Embed Size (px)
Citation preview
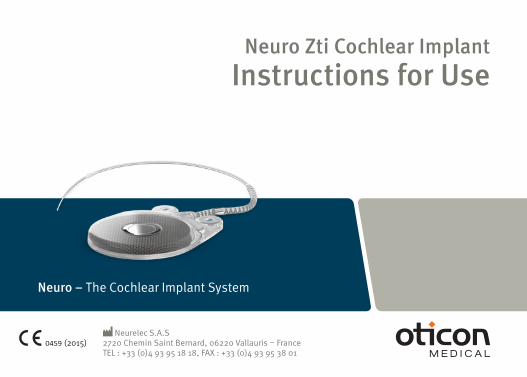
Neuro Zti Cochlear ImplantInstructions for Use
Neurelec S.A.S 2720 Chemin Saint Bernard, 06220 Vallauris – FranceTEL : +33 (0)4 93 95 18 18, FAX : +33 (0)4 93 95 38 01
0459 (2015)
Neuro – The Cochlear Implant System
2
Table of content
Opening the Neuro Zti blister pack ..................................................................................4Neuro Zti Cochlear Implant – Instructions for use ............................................................ 51. Description of the Neuro Zti cochlear implant.............................................................. 52. Package: symbols and meanings ................................................................................ 73. Neuro Zti pack content ...............................................................................................84. Indications .................................................................................................................95. Contraindications .......................................................................................................96. Undesirable side effects ........................................................................................... 107. Warnings ..............................................................................................................128. Additional warnings specific to medical intervention/therapies ................................ 149. Surgical instructions .................................................................................................1710. Explantation ............................................................................................................20
3
11. MRI medical exam ..............................................................................................22A. MRI exam with implanted magnet in place (1,5 Tesla) .............................................24B. MRI exam with magnet removal (3 Tesla) ................................................................ 25C. Dummy removal and magnet replacement intervention......................................... 30D. Magnet replacement ..............................................................................................30
12. General technical specifications of the Neuro Zti cochlear implant ............................ 3113. Neuro ZtiCLA – Specifications and characteristics of the electrode-array ..................... 3414. Neuro ZtiEVO – Specifications and characteristics of the electrode-array ...................... 35Warranty Certificate ......................................................................................................36
4
Oticon Medical Neurelec S.A.S
2720 Chemin Saint-Bernard
06224 Vallauris Cedex - France
Tel. +33(0)4 93 95 18 18 Fax +33 (0)4 93 95 38 01Email: [email protected]
Oticon Medical Neurelec S.A.S
2720 Chemin Saint-Bernard
06224 Vallauris Cedex - France
Tel. +33(0)4 93 95 18 18 Fax +33 (0)4 93 95 38 01Email: [email protected]
M80311 - version A
Oticon Medical Neurelec S.A.S
2720 Chemin Saint-Bernard
06224 Vallauris Cedex - France
Tel. +33(0)4 93 95 18 18 Fax +33 (0)4 93 95 38 01Email: [email protected]
M80311 - version A
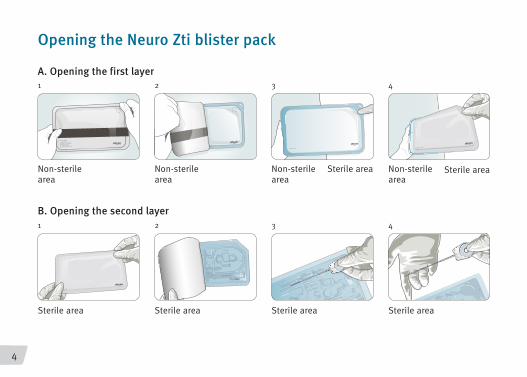
Opening the Neuro Zti blister pack
1
A. Opening the first layer2 3 4
Non-sterile area
M80311 - version A
B. Opening the second layer1 2 3 4
Non-sterile area
Non-sterile area
Non-sterile area
Sterile area Sterile area Sterile area Sterile area
Sterile area Sterile area
5
Neuro Zti cochlear implant – Instructions for use
1. Description of the Neuro Zti cochlear implantNeuro Zti is a multi-channel cochlear implant. The device consists of a receiver/stimulator, fixation system, removable magnet, and a twenty contact electrode array. The receiver/stimulator is designed to be surgically implanted and secured to the temporal bone behind the auricle of the ear. The electrode array is designed to be placed into the scala-tympani of the cochlea. The receiver/stimulator is powered and controlled via an inductively coupled link to an external sound processor. Only Neuro Zti compatible processors will work with the Neuro Zti cochlear implant.

6
The Oticon Medical cochlear implant range includes:Neuro ZtiCLA Version (Ref: M80184)CLA stands for Classic.
Neuro ZtiEVO Version (Ref: M80185)
Identification of the implantThroughout this instruction for use, versions of the Neuro Zti cochlear implant are mentioned only when required.
Implant receiver marking:• Trademark of the manufacturer (Oticon Medical)• Type of implant (model): the Neuro Zti CLASSIC or EVO implant version• Serial number (SN): NZAxxxxx: (NZA) Neuro Zti CLASSIC version + (xxxxx) incremental number
NZBxxxxx: (NZB) Neuro Zti EVO version + (xxxxx) incremental number• Bottom: to specify the skull facing part of the implant receiverMagnet marking: • Trademark of the manufacturer (Oticon Medical)• Serial Number (SN): Axxxxxx (xxxxxx: incremental number)
AXXXXXX
UpBottom
7
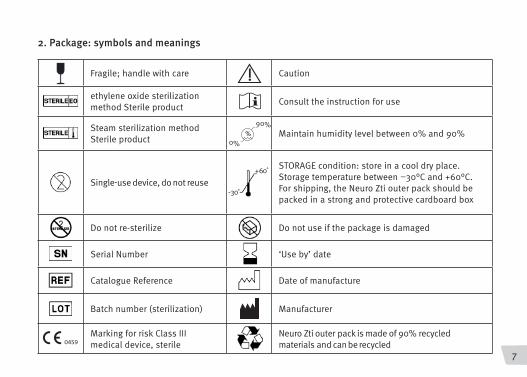
2. Package: symbols and meanings
Fragile; handle with care Caution
ethylene oxide sterilization method Sterile product Consult the instruction for use
Steam sterilization methodSterile product
90%
0%Maintain humidity level between 0% and 90%
Single-use device, do not reuse+60
-30
STORAGE condition: store in a cool dry place. Storage temperature between –30°C and +60°C.For shipping, the Neuro Zti outer pack should be packed in a strong and protective cardboard box
Do not re-sterilize Do not use if the package is damaged
Serial Number ‘Use by’ date
Catalogue Reference Date of manufacture
Batch number (sterilization) Manufacturer
0459Marking for risk Class III medical device, sterile
Neuro Zti outer pack is made of 90% recycled materials and can be recycled
8
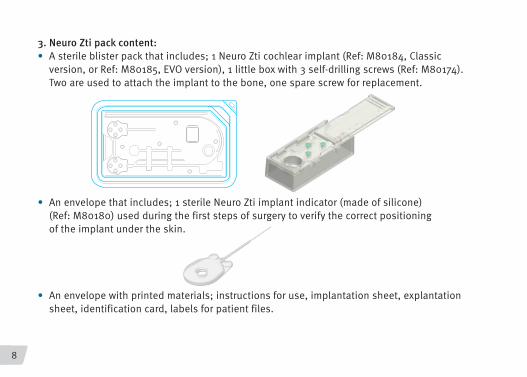
3. Neuro Zti pack content:• A sterile blister pack that includes; 1 Neuro Zti cochlear implant (Ref: M80184, Classic
version, or Ref: M80185, EVO version), 1 little box with 3 self-drilling screws (Ref: M80174). Two are used to attach the implant to the bone, one spare screw for replacement.
• An envelope that includes; 1 sterile Neuro Zti implant indicator (made of silicone) (Ref: M80180) used during the first steps of surgery to verify the correct positioning of the implant under the skin.
• An envelope with printed materials; instructions for use, implantation sheet, explantation sheet, identification card, labels for patient files.
9
4. Indications The Neuro Zti cochlear implant is designed for adults and children of all ages who have severe to profound unilateral or bilateral perceptive hearing loss, with a limited benefit from appropriately fitted hearing aids.
5. Contraindications The Neuro Zti cochlear implant is not indicated in patients with perceptive hearing loss accompa-nied by major cochlear lesions (example: major cochlear malformation, fracture of the petrous pyramid, significant ossification of the cochlea, absence of cochlea development), auditory nerve lesions (example: axonal neuropathy, tumor near or on the auditory nerve such as an acoustic neuroma, complete destruction of both auditory nerves), severe anomaly of the auditory path-ways, existing middle ear infection or any middle ear disorder that would preclude the possibility of accessing the cochlea, or contact allergy(s) to implant materials (silicone, platinum iridium, titanium). Healthcare professional can perform allergy tests on patient before implantation.
10
6. Undesirable side effects Patients who meet the indications for implantation will be informed about typical risks associated with surgery (effects from general anesthesia, infections, etc.), which are independent of the pro-duct itself. However, there is also a risk that the patient’s body may reject the implant or a part of the implant. This risk has been reduced by using biocompatible materials for the design.Complications associated with the cochlear implant surgery (temporary or permanent facial paraly-sis, risk of meningitis, changes in taste, dizziness, tinnitus, etc.) are rare, but should be carefully considered. It is important to inform every prospective implant candidate about these potential risks. Specific information should be given to the patient regarding the symptoms and the initial signs of meningitis. According to current recommendations, pneumococcal vaccination is also strongly recommended.Once the implant is in place, the risk of revision surgery or explantation still exists, which would require another surgery. Explantation may occur in the following cases:• Device failure (example: head trauma, inherent to the device) • Medical or surgical complication (example: wound or flap problems)• Electrodes extrusion, magnet extrusion, removable magnet extrusion• Electrodes migration, device displacement, removable magnet displacement
11
All of these risks have been evaluated, and the materials and design of the implant have been chosen to minimize these risks (improving implant quality to reduce internal failures, screw fixation to prevent device displacement).Finally, the loss of residual hearing associated with the electrodes insertion and long term effects of electrical stimulation in humans are unknown. These effects may include cochlear ossification or degeneration of the nerve fibers, and may require replacement of the implant, or lead to a reduced response to stimulation.
12
7. Warnings • This device should only be implanted by surgeons with adequate experience and training in
cochlear implantation.
• The implant is packaged in a sterile blister pack/ the sterilization must be preserved throughout the different steps of surgery.
• The warranty of the device does not cover any misuse on Neuro Zti cochlear implant before or during surgery. Care must be taken when handling the implant.
• The Neuro Zti cochlear implant should be handled by holding the electronic housing or main body of the device and not by the electrode-array. Lifting or holding the Neuro Zti by the elec-trode array may result in damage to the array.
• Use Oticon Medical surgical instruments to perform a cochlear implantation with a Neuro Zti implant (refer to the Neuro Zti Surgical Tool Instructions for Use).
• Caution: Implantable device parts should not be reused if they have been previously implanted in another patient.
13
• Information to provide to the patient: – The patient should be informed of the benefits of a cochlear implant, but also of its possible
undesirable side effects (see UNDESIRABLE SIDE EFFECTS). – The supplied identification card must be fully completed. – Inform the patient that they must present the identification card prior to any medical
examination or treatment. – Advise the patient to carefully read the user instructions for use supplied with his/her
external processor, in particular the section relating to the warnings for use. – The Neuro Zti implant has a removal magnet. Please advise the patient not to position a
magnet on the head in the area of the implant receiver to avoid migration of the magnet.
• In case of failure or malfunction of the cochlear implant system, the patient should contact his/her implantation centre.
– Patients are strongly advised against practicing contact sports (rugby, boxing, American football, etc.) since such activities could result in an impact force that may damage the implanted components.
– Scuba diving: Recreational scuba diving is not recommended at depths below 20m. Excess pressure may damage the implant. Moreover, it is strongly discouraged to engage in profes-sional deep-sea diving activities. The implant is not guaranteed against repeated high pres-sure stresses.
– Access to restricted areas: Patients should consult a physician before entering restricted areas (MRI exam room, walk-through metal detectors, 3D scanning booths, etc.).
14
8. Additional warnings specific to medical interventions/therapies
High-voltage electrical field: • Electrotherapy: Electrotherapy may send currents of varying strengths. The use of high-voltage
electrotherapy techniques is prohibited due to the risk of damage to the implant system. How-ever, low-voltage electrotherapy may be considered only if the electrodes are not placed in areas near the head or neck.
• Electroconvulsive therapy: Do not use electroconvulsive therapy, it can cause tissue damage in the cochlea or permanently damage the implant.
• Defibrillation: Sending several thousand volt electrical shocks through the body is not advised in a patient wearing a cochlear implant. Electrical shocks can cause tissue damage in the coch-lea or permanently damage the implant. In a life-threatening situation, only the medical team is in a position to make a decision..
• Diathermy: Medical diathermy using ultrasound cannot be considered on area of the head and neck but on other parts of the body. High currents induced through the electrode array can cause cochlear tissue damage or permanent damage to the implant.
• Neurostimulation: Do not use neurostimulation directly over the cochlear implant. High currents induced into the electrode array can cause cochlea tissue damage or permanent damage to the implant. Diagnostic tests or treatments using ultrasound: The implant should not be exposed to thera-

15
peutic levels of ultrasonic energy. The device may inadvertently concentrate the ultrasonic field and be damaged.
• Ionizing radiation: Ionizing therapy may be used over the implant up to 112 Grays.
• Electrosurgery: Do not use monopolar electrosurgical instruments on the head or neck, it may induce currents and could cause damage to cochlear tissues or permanent damage to the implant. As soon as a cochlear implant is removed from its packaging in the operating room, any monopolar surgical systems should be turned off to avoid any damage to the implant. Bipolar electrosurgical instruments may be used on the head and neck of patients; however, they must not be in direct contact with the implant and not too near.
16
Non-ionizing electromagnetic radiation:• MRI (Magnetic Resonance Imaging): Neuro Zti implant system contains a removable magnet.
An MRI exam or a strong magnetic field applied near the implant may cause damage to the implant and/or the patient if the magnet is left in place. To perform an MRI exam, please follow recommendations as described in the section “MRI Medical exam” included in this instruction for use.
17
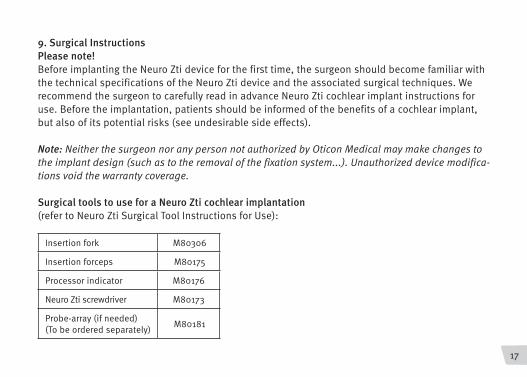
9. Surgical InstructionsPlease note! Before implanting the Neuro Zti device for the first time, the surgeon should become familiar with the technical specifications of the Neuro Zti device and the associated surgical techniques. We recommend the surgeon to carefully read in advance Neuro Zti cochlear implant instructions for use. Before the implantation, patients should be informed of the benefits of a cochlear implant, but also of its potential risks (see undesirable side effects).
Note: Neither the surgeon nor any person not authorized by Oticon Medical may make changes to the implant design (such as to the removal of the fixation system...). Unauthorized device modifica-tions void the warranty coverage.
Surgical tools to use for a Neuro Zti cochlear implantation (refer to Neuro Zti Surgical Tool Instructions for Use):
Insertion fork M80306
Insertion forceps M80175
Processor indicator M80176
Neuro Zti screwdriver M80173
Probe-array (if needed)(To be ordered separately) M80181
18
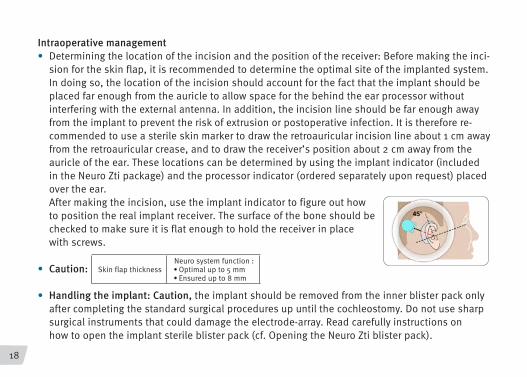
Intraoperative management• Determining the location of the incision and the position of the receiver: Before making the inci-
sion for the skin flap, it is recommended to determine the optimal site of the implanted system. In doing so, the location of the incision should account for the fact that the implant should be placed far enough from the auricle to allow space for the behind the ear processor without interfering with the external antenna. In addition, the incision line should be far enough away from the implant to prevent the risk of extrusion or postoperative infection. It is therefore re-commended to use a sterile skin marker to draw the retroauricular incision line about 1 cm away from the retroauricular crease, and to draw the receiver’s position about 2 cm away from the auricle of the ear. These locations can be determined by using the implant indicator (included in the Neuro Zti package) and the processor indicator (ordered separately upon request) placed over the ear. After making the incision, use the implant indicator to figure out how to position the real implant receiver. The surface of the bone should be checked to make sure it is flat enough to hold the receiver in place with screws.
• Caution:
• Handling the implant: Caution, the implant should be removed from the inner blister pack only after completing the standard surgical procedures up until the cochleostomy. Do not use sharp surgical instruments that could damage the electrode-array. Read carefully instructions on how to open the implant sterile blister pack (cf. Opening the Neuro Zti blister pack).
Skin flap thicknessNeuro system function :• Optimal up to 5 mm• Ensured up to 8 mm
19
We recommend opening the inner sterile blister pack only at the time when it is needed. Before implanting, make sure the implant is not damaged. Avoid touching and/or bending the electrode-array. Orientation of the implant: The engraved skull facing side of the Neuro Zti implant mentioning Bottom should be placed facing the skull and should not be visible. The titanium plate contains important information that identifies the implant (cf. Identification of the implant). Before attaching the implant receiver to the bone, the ground electrode that is situated on the implant toroid must remain on the mastoid where it must lie very flat.
• Fixation of the implant: No milling of the bone is needed for the implant bed as the Neuro Zti has a flat skull facing side and a 2 screw fixation system. Simply slide the receiver under the temporal muscle and position it as decided. The Neuro Zti implant receiver must be attached with the supplied screws to prevent any possible displacement, migration, which could create stress and possibly damage the electrode array. It is always recommended to secure it in place with two self-tapping screws provided in the packaging.
Follow the steps below to remove the screws from the sterile box:• Insert the screwdriver (M80173) that can be ordered separately into the screw using
a firm axial pressure.• Slowly withdraw the screw from the box.• The screw is now attached to the screwdriver and can be used.
20
• Position the first screw into one of the fixation system’s titanium inserts. It is recommended to hold the screwdriver vertical to the implant axis for fixation. Tighten the screw. Check that it is secure, then repeat the same procedure for the second screw.
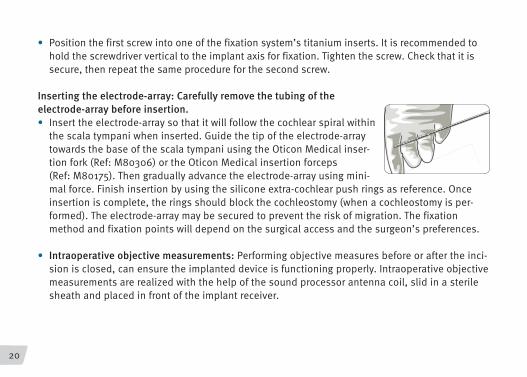
Inserting the electrode-array: Carefully remove the tubing of the electrode-array before insertion. • Insert the electrode-array so that it will follow the cochlear spiral within
the scala tympani when inserted. Guide the tip of the electrode-array towards the base of the scala tympani using the Oticon Medical inser-tion fork (Ref: M80306) or the Oticon Medical insertion forceps (Ref: M80175). Then gradually advance the electrode-array using mini-mal force. Finish insertion by using the silicone extra-cochlear push rings as reference. Once insertion is complete, the rings should block the cochleostomy (when a cochleostomy is per-formed). The electrode-array may be secured to prevent the risk of migration. The fixation method and fixation points will depend on the surgical access and the surgeon’s preferences.
• Intraoperative objective measurements: Performing objective measures before or after the inci-sion is closed, can ensure the implanted device is functioning properly. Intraoperative objective measurements are realized with the help of the sound processor antenna coil, slid in a sterile sheath and placed in front of the implant receiver.
21
10. Explantation If malfunction of the Neuro Zti cochlear implant is suspected, the system must be examined with the help of Oticon Medical clinical support. If malfunction of the implant is confirmed and the medical team decides to explant, it is important to contact Oticon Medical, to request an explan-tation kit (Ref: M80183) so that the explanted system may be sent back, thereby making it possi-ble to examine it. Measures should be taken when explanting as the implant shall remain intact for further examinations. Other reasons for explanting may be the result of medical complications. The same procedures before the explantation must be followed.
• If additional clarification is needed with respect to the described performances please contact Oticon Medical customer service or local distributor: [email protected].
• If information is incomplete or ambiguous or should you have any question or concern about the information provided, please contact the manufacturer mentioned in this document or Oticon Medical local distributor.
22
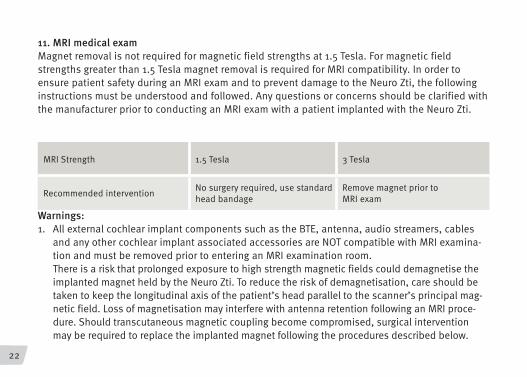
11. MRI medical examMagnet removal is not required for magnetic field strengths at 1.5 Tesla. For magnetic field strengths greater than 1.5 Tesla magnet removal is required for MRI compatibility. In order to ensure patient safety during an MRI exam and to prevent damage to the Neuro Zti, the following instructions must be understood and followed. Any questions or concerns should be clarified with the manufacturer prior to conducting an MRI exam with a patient implanted with the Neuro Zti.
Warnings:1. All external cochlear implant components such as the BTE, antenna, audio streamers, cables
and any other cochlear implant associated accessories are NOT compatible with MRI examina-tion and must be removed prior to entering an MRI examination room. There is a risk that prolonged exposure to high strength magnetic fields could demagnetise the implanted magnet held by the Neuro Zti. To reduce the risk of demagnetisation, care should be taken to keep the longitudinal axis of the patient’s head parallel to the scanner’s principal mag-netic field. Loss of magnetisation may interfere with antenna retention following an MRI proce-dure. Should transcutaneous magnetic coupling become compromised, surgical intervention may be required to replace the implanted magnet following the procedures described below.
MRI Strength 1.5 Tesla 3 Tesla
Recommended intervention No surgery required, use standard head bandage
Remove magnet prior to MRI exam
23
2. If the region of medical interest is likely to fall within the projected artefact produced by the Neuro Zti, the magnet may be removed prior to an MRI exam for MRI strengths at 1.5 Tesla to minimize artefacts.
3. It is possible that the medical region of interest may be obscured by artefacts produced by the Neuro Zti even with the implanted magnet removed.
4. It is possible that the patient may experience auditory sensations such as crackling, beeping and/or a humming sound during an MRI exam. The patient should be advised of this possi- bility and that it does not indicate device malfunction or damage.
5. If the patient is a bilateral Neuro Zti recipient, the same procedures outlined in this document must also be followed for the contralateral implant.
6. Head first: Technicians must slide the Neuro Zti recipient head first in the MRI machine independent of the anatomical region to be scanned. Caution: Entering feet first is contraindicated.
7. Note: To perform an MRI exam, the radiologist should fill out an exam form that can be found at www.oticonmedical.com. The form must be sent back for approval to the manufacturer that is mentioned on the cover before performing the MRI exam.
24
A. MRI exam with implanted magnet in place (at 1.5 Tesla) recommended guidelines for radiologists.1. The patient must have been implanted with a cochlear implant at least 6 months prior to
the MRI examination. 2. All external parts or cochlear implant system accessories should be removed.3. The patient must have a compression bandage applied to the head to secure the implant
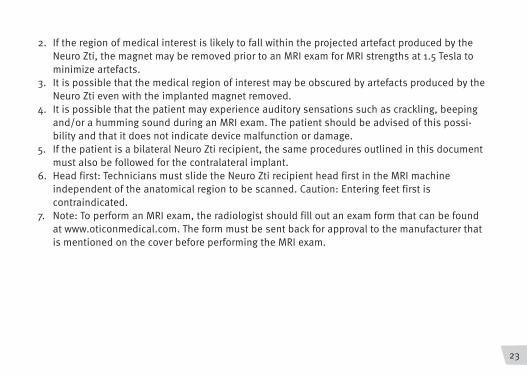
position.4. For all MRI examinations requiring the head of the patient to be placed in the centre of the
tunnel, the position of the patient must be conformed to the ‘usual position’ (figure below). It is imperative that this position applies at least 30 cm before the beginning of the tunnel. Note: When carrying out an MRI exam with a Neuro Zti cochlear implant, do not use the Head Coil Array.
‘Usual Position’ with nose up
BO
25
B. MRI exam with magnet removal (3 Tesla) Magnet removal or replacement is a surgical procedure and must take place following standard surgical practice to ensure sterility.
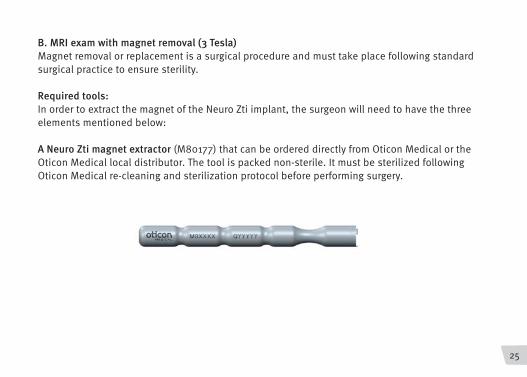
Required tools:In order to extract the magnet of the Neuro Zti implant, the surgeon will need to have the three elements mentioned below:
A Neuro Zti magnet extractor (M80177) that can be ordered directly from Oticon Medical or the Oticon Medical local distributor. The tool is packed non-sterile. It must be sterilized following Oticon Medical re-cleaning and sterilization protocol before performing surgery.

26
A Neuro Zti dummy magnet (M80178). The dummy magnet is packed sterile. It shall be ordered directly from Oticon Medical or Oticon Medical local distributor and before performing a magnet extraction. The dummy magnet is an empty titanium casing that does not hold any magnet in order to avoid any harm caused by strong electromag-netic field. The dummy magnet must be put in place after extracting the implant magnet in order to avoid the fibrosis to form into the implant. Note: The cochlear implant recipient should be informed the proces-sor antenna can no longer be kept in place on the head if no external magnet system or headband is used.
A Neuro Zti magnet (M80179) for replacement. The magnet is packed sterile. It shall be ordered from Oticon Medical or Oticon Medical local distributor before performing any medical exam that requires a magnet extraction.
DUMMY
27
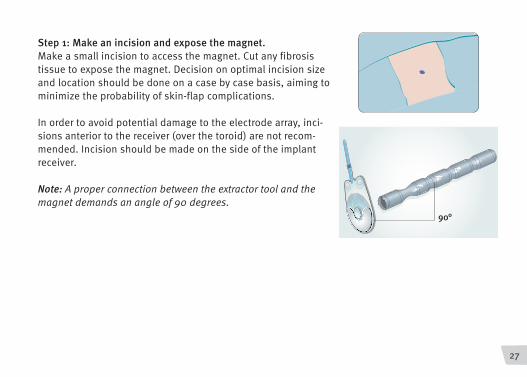
Step 1: Make an incision and expose the magnet. Make a small incision to access the magnet. Cut any fibrosis tissue to expose the magnet. Decision on optimal incision size and location should be done on a case by case basis, aiming to minimize the probability of skin-flap complications.
In order to avoid potential damage to the electrode array, inci-sions anterior to the receiver (over the toroid) are not recom-mended. Incision should be made on the side of the implant receiver.
Note: A proper connection between the extractor tool and the magnet demands an angle of 90 degrees.
90°
28
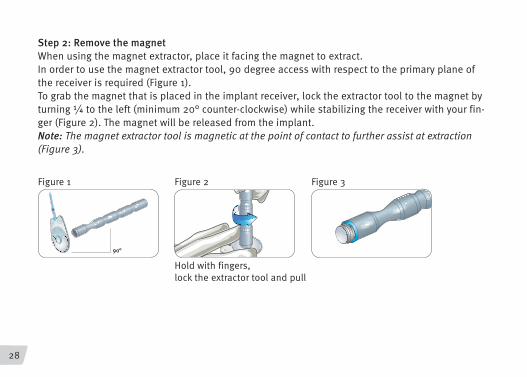
Step 2: Remove the magnetWhen using the magnet extractor, place it facing the magnet to extract. In order to use the magnet extractor tool, 90 degree access with respect to the primary plane of the receiver is required (Figure 1).To grab the magnet that is placed in the implant receiver, lock the extractor tool to the magnet by turning ¼ to the left (minimum 20° counter-clockwise) while stabilizing the receiver with your fin-ger (Figure 2). The magnet will be released from the implant.Note: The magnet extractor tool is magnetic at the point of contact to further assist at extraction (Figure 3).
Hold with fingers, lock the extractor tool and pull
Figure 2Figure 1 Figure 3
90°
29
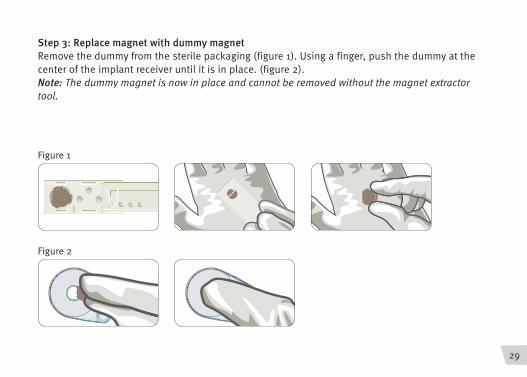
Step 3: Replace magnet with dummy magnetRemove the dummy from the sterile packaging (figure 1). Using a finger, push the dummy at the center of the implant receiver until it is in place. (figure 2).Note: The dummy magnet is now in place and cannot be removed without the magnet extractor tool.
Figure 1
Figure 2
30
Step 4: Close incision according to best surgical practiceNote: Wait until incision is healed prior to wearing the external sound processor.
C. Dummy removal and magnet replacement intervention Follow same procedures as in “B. MRI with magnet removal (3 Tesla)”.
D. Magnet replacement To remove the magnet, follow procedure of “B. MRI Exam with magnet removal (3 Tesla)”. Instead of replacing the magnet with a dummy magnet (M80178); place a new magnet (M80179) instead. This procedure would be indicated also if a patient’s magnet was demagnetised following repeated MRI at 1.5T or an accidental MRI at 3T that demagnetised a magnet.
31
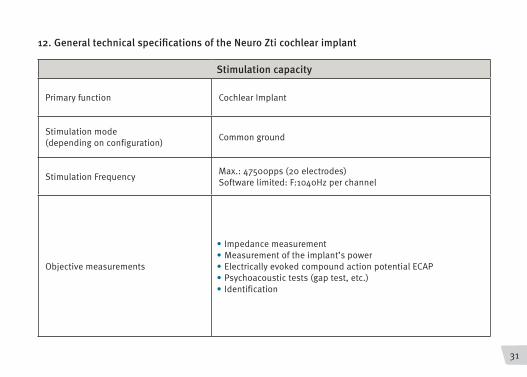
12. General technical specifications of the Neuro Zti cochlear implant
Stimulation capacity
Primary function Cochlear Implant
Stimulation mode (depending on configuration) Common ground
Stimulation Frequency Max.: 47500pps (20 electrodes)Software limited: F:1040Hz per channel
Objective measurements
• Impedance measurement• Measurement of the implant’s power• Electrically evoked compound action potential ECAP• Psychoacoustic tests (gap test, etc.)• Identification
32
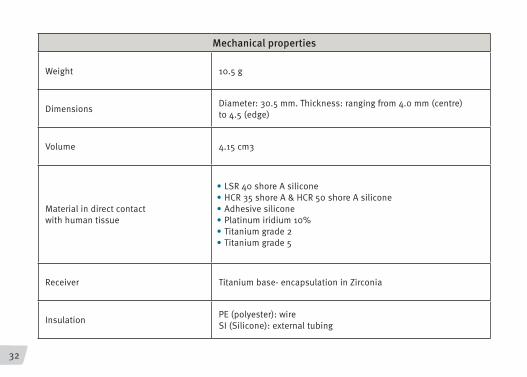
Mechanical properties
Weight 10.5 g
Dimensions Diameter: 30.5 mm. Thickness: ranging from 4.0 mm (centre) to 4.5 (edge)
Volume 4.15 cm3
Material in direct contact with human tissue
• LSR 40 shore A silicone• HCR 35 shore A & HCR 50 shore A silicone• Adhesive silicone• Platinum iridium 10%• Titanium grade 2• Titanium grade 5
Receiver Titanium base- encapsulation in Zirconia
Insulation PE (polyester): wireSI (Silicone): external tubing
33
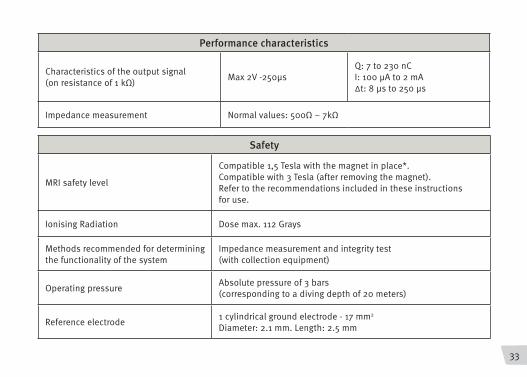
Performance characteristics
Characteristics of the output signal (on resistance of 1 kΩ) Max 2V -250µs
Q: 7 to 230 nCI: 100 µA to 2 mA∆t: 8 µs to 250 µs
Impedance measurement Normal values: 500Ω – 7kΩ
Safety
MRI safety level
Compatible 1,5 Tesla with the magnet in place*. Compatible with 3 Tesla (after removing the magnet). Refer to the recommendations included in these instructions for use.
Ionising Radiation Dose max. 112 Grays
Methods recommended for determining the functionality of the system
Impedance measurement and integrity test (with collection equipment)
Operating pressure Absolute pressure of 3 bars (corresponding to a diving depth of 20 meters)
Reference electrode 1 cylindrical ground electrode - 17 mm2
Diameter: 2.1 mm. Length: 2.5 mm
34
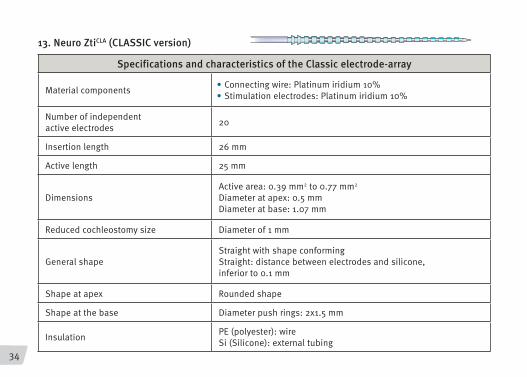
13. Neuro ZtiCLA (CLASSIC version)
Specifications and characteristics of the Classic electrode-array
Material components • Connecting wire: Platinum iridium 10%• Stimulation electrodes: Platinum iridium 10%
Number of independent active electrodes 20
Insertion length 26 mm
Active length 25 mm
Dimensions Active area: 0.39 mm2 to 0.77 mm2
Diameter at apex: 0.5 mmDiameter at base: 1.07 mm
Reduced cochleostomy size Diameter of 1 mm
General shapeStraight with shape conformingStraight: distance between electrodes and silicone, inferior to 0.1 mm
Shape at apex Rounded shape
Shape at the base Diameter push rings: 2x1.5 mm
Insulation PE (polyester): wireSi (Silicone): external tubing
35
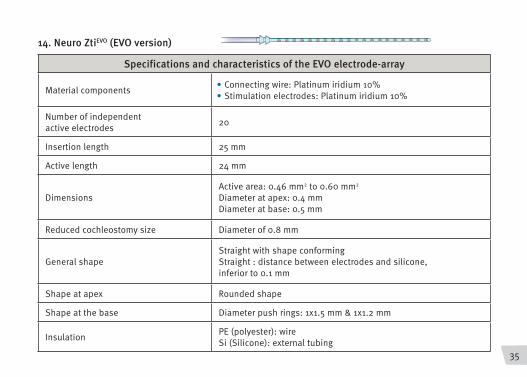
14. Neuro ZtiEVO (EVO version)
Specifications and characteristics of the EVO electrode-array
Material components • Connecting wire: Platinum iridium 10%• Stimulation electrodes: Platinum iridium 10%
Number of independent active electrodes 20
Insertion length 25 mm
Active length 24 mm
Dimensions Active area: 0.46 mm2 to 0.60 mm2
Diameter at apex: 0.4 mmDiameter at base: 0.5 mm
Reduced cochleostomy size Diameter of 0.8 mm
General shapeStraight with shape conformingStraight : distance between electrodes and silicone, inferior to 0.1 mm
Shape at apex Rounded shape
Shape at the base Diameter push rings: 1x1.5 mm & 1x1.2 mm
Insulation PE (polyester): wireSi (Silicone): external tubing
36
Warranty certificate
1. Warranty periodThe implant is guaranteed for 10 years from the date in which the receiver was implanted, as noted on the implantation registration sheet. Note that the implantation registration sheet must be signed by the surgeon and returned to Oticon Medical within 15 days after the surgery.
2. Warranty terms and conditionsa. The implant is warranted to be free from defects in design or workmanship, subject to the war-
ranty period defined in paragraph 1. The warranty shall not apply in the following cases. Oticon Medical shall not be held liable: – In the event of an explantation due to medical problems (e.g. infection, electrode misplace-ment, contraindication, etc.). The warranty shall also not apply in the event of displacement if the implant body has not been attached using the screws (Cf. Neuro Zti Surgical Instructions). – When the implant has not been implanted before the implant-by-date indicated on the pro-tective packaging (and on the sterile pack). – In the event of alteration or voluntary or accidental mishandling, such as impact, exposing the implant to temperatures above 60°C or below -30°C, etc. (Cf.Package: Symbols and Meanings) – if implant is used although the sterile packaging has been damaged. The product is sterile and cannot be resterilized. Do not use if sterile packaging is damaged. Do not remove the implant from sterile packaging until required.
37
b. The warranty consists of an outright exchange of the defective implant for an equivalent or a more recent generation device.
c. Only explanted patients may receive the new implant under the terms of this warranty. d. Oticon Medical shall be notified when a malfunction has been observed prior to any
explantation.e. The explanted implant must be returned to Oticon Medical for an expert assessment within
15 days in the explantation kit obtained through Oticon Medical, along with the completed medical device report and explantation registration sheet detailing the circumstances of the extraction.
f. Any implant that is explanted shall be technically examined to confirm that the new implant is under warranty.
g. Failure to comply with any of these clauses voids the warranty.h. Exchanging an implant under the warranty shall not serve to extend the warranty period of the
new implant, nor the replacement of the magnet by a new one. i. No compensation for damages will be payable regardless of the length of time or loss of use by
the explanted patient. j. Any dispute shall be subject to the exclusive jurisdiction of the courts of Nice, France.
Last Review of the instructions for use: 2015-06
M80
318
- ver
sion
D
Oticon Medical Neurelec S.A.S
2720 Chemin Saint Bernard06220 Vallauris – France
TEL : +33 (0)4 93 95 18 18 FAX : +33 (0)4 93 95 38 [email protected]
www.oticonmedical.com