Embed Size (px)
Citation preview
Northling Blanket
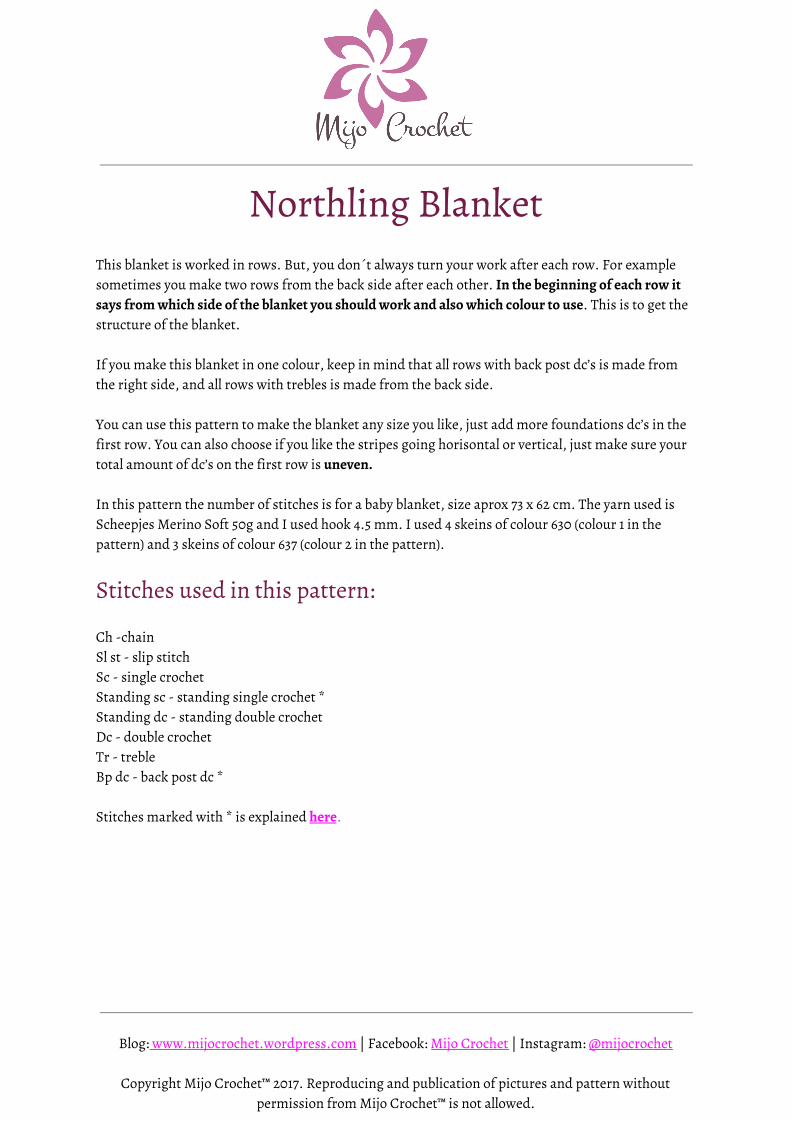
This blanket is worked in rows. But, you don´t always turn your work after each row. For example sometimes you make two rows from the back side after each other. In the beginning of each row it says from which side of the blanket you should work and also which colour to use. This is to get the structure of the blanket. If you make this blanket in one colour, keep in mind that all rows with back post dc’s is made from the right side, and all rows with trebles is made from the back side. You can use this pattern to make the blanket any size you like, just add more foundations dc’s in the first row. You can also choose if you like the stripes going horisontal or vertical, just make sure your total amount of dc’s on the first row is uneven. In this pattern the number of stitches is for a baby blanket, size aprox 73 x 62 cm. The yarn used is Scheepjes Merino Soft 50g and I used hook 4.5 mm. I used 4 skeins of colour 630 (colour 1 in the pattern) and 3 skeins of colour 637 (colour 2 in the pattern).
Stitches used in this pattern: Ch -chain Sl st - slip stitch Sc - single crochet Standing sc - standing single crochet * Standing dc - standing double crochet Dc - double crochet Tr - treble Bp dc - back post dc * Stitches marked with * is explained here.
Blog: www.mijocrochet.wordpress.com | Facebook: Mijo Crochet | Instagram: @mijocrochet
Copyright Mijo Crochet™ 2017. Reproducing and publication of pictures and pattern without permission from Mijo Crochet™ is not allowed.
Pattern: After each row number is the colour number specified. R 1 (1) Make 87 foundation dc. Or make 89 ch, 1 dc in 4:th ch from the hook and in every ch until end of row (=87 dc where the first dc is made of 2 ch) The total amount of stitches will be the same through the whole pattern. R 2 (1) Turn your work. 2 ch (=1:st dc), 1 bp dc in every dc until end of row. Cut yarn! [87 dc] This is from now on the right side of your work. Mark it with a piece of yarn or a marker if you like. R 3 (2) Turn and work from the back side. Standing sc in 1:st dc. (tr in next dc, sc in next dc) repeat until end of row. Cut yarn! [43 small bobbles on the right side and 44 sc] R 4 (1) Continue to work from the back side. Standing dc in 1:st sc. 1 dc in every stitch until end of row. [87 dc]
Blog: www.mijocrochet.wordpress.com | Facebook: Mijo Crochet | Instagram: @mijocrochet
Copyright Mijo Crochet™ 2017. Reproducing and publication of pictures and pattern without permission from Mijo Crochet™ is not allowed.
R 5 (1) Turn and work from the right side. 2 ch (=1:st dc), 1 bp dc in every dc until end of row. [87 dc] R 6 (1) Turn and work from the back side. 1 ch (does not count). 1 sc in 1:st dc. (1 ch, skip 1 dc, 1 sc in next dc) until end of row. Cut yarn! [43 1-ch-spaces and 44 sc] R 7 (2) Turn and work from the right side. Standing sc in 1:st sc, 1 sc in next 1-ch-space. (1 ch, skip 1 sc, 1 sc in next 1-chain-space) until last 1-ch-space. 1 sc in last sc. Cut yarn! [42 1-ch-spaces and 45 sc] R 8 (1) Continue to work from the right side. Standing sc in 1:st sc. (1 ch, skip 1 sc, 1 sc in next 1-ch-space) repeat until end of row. [43 1-ch-spaces and 44 sc] R 9 (1) Turn and work from the back side. 2 ch (=1:st dc). 1 dc in every sc and 1 dc in every 1-ch-space until end of row. [87 dc] R 10 (1) Turn and work from the right side. 2 ch (=1:st dc), 1 bp dc in every dc until end of row. [87 dc] R 11 (1) Turn and work from the back side. 1 ch (does not count). 1 sc in 1:st dc. (1 ch, skip 1 dc, 1 sc in next dc) until end of row. Cut yarn! [43 1-ch-spaces and 44 sc]
Blog: www.mijocrochet.wordpress.com | Facebook: Mijo Crochet | Instagram: @mijocrochet
Copyright Mijo Crochet™ 2017. Reproducing and publication of pictures and pattern without permission from Mijo Crochet™ is not allowed.
R 12 (2) Turn and work from the right side. Standing sc in 1:st sc, 1 sc in next 1-ch-space. (1 ch, skip 1 sc, 1 sc in next 1-ch-space) until last 1-ch-space. 1 sc in last sc. [42 1-ch-spaces and 45 sc] R 13 (2) Turn and work from the back side. 2 ch (=1:st dc). 1 dc in each sc and 1 dc in each 1-ch-space until end of row. [87 dc] R 14 (2) Turn and work from the right side. 2 ch (=1:st dc). 1 bp dc in every dc until end of row. Cut yarn! [87 dc] R 15 (1) Turn and work from the back side. Standing sc in 1:st dc. (Tr in next dc, sc in next dc) repeat until end of row. Cut yarn! [43 small bobbles on the right side and 44 sc] R 16 (2) Continue to work from the back side. Standing dc in 1:st sc. 1 dc in each tr and each sc until end of row. [87 dc] R 17 (2) Turn and work from the right side. 2 ch (=1:st dc), 1 bp dc in each dc until end of row. [87 dc] R 18 (2) Turn and work from the back side. 1 ch (does not count). 1 sc in 1:st dc. (1 ch, skip 1 dc, 1 sc in next dc) until end of row. Cut yarn! [43 1-ch-spaces and 44 sc]
Blog: www.mijocrochet.wordpress.com | Facebook: Mijo Crochet | Instagram: @mijocrochet
Copyright Mijo Crochet™ 2017. Reproducing and publication of pictures and pattern without permission from Mijo Crochet™ is not allowed.
R 19 (1) Turn and work from the right side. Standing sc in 1:st sc, 1 sc in next 1-ch-space. (1 ch, skip 1 sc, 1 sc in next 1-ch-space) until the last 1-ch-space. 1 sc in last sc. [42 1-ch-spaces and 45 sc] R 20 (1) Turn and work from the back side. 2 ch (=1:st dc). 1 dc in each sc and 1 dc in each 1-ch-space until end of row. [87 dc] R 21 (1) Turn and work from the right side. 2 ch (=1:st dc), 1 bp dc in each dc until end of row. [87 dc] R 22 (1) Turn and work from the back side. 1 ch (does not count). 1 sc in 1:st dc. (1 ch, skip 1 dc, 1 sc in next dc) repeat until end of row. Cut yarn! [43 1-ch-spaces and 44 sc] R 23 (2) Turn and work from the right side. Standing sc in 1:st sc, 1 sc in next 1-ch-space. ( 1 ch, skip 1 sc, 1 sc in next 1-ch-space) repeat until last 1-ch-space. 1 sc in last sc. Cut yarn! [42 1-ch-spaces and 45 sc] R 24 (1) Continue to work from the right side. Standing sc in 1:st sc. (1 ch, skip 1 sc, 1 sc in next 1-ch-space) until end of row. [43 1-ch-spaces and 44 sc] R 25 (1) Turn and work from the back side. 2 ch (=1:st dc). 1 dc in each sc and 1 dc in each 1-ch-space until end of row. [87 dc]
Blog: www.mijocrochet.wordpress.com | Facebook: Mijo Crochet | Instagram: @mijocrochet
Copyright Mijo Crochet™ 2017. Reproducing and publication of pictures and pattern without permission from Mijo Crochet™ is not allowed.
R 26 (1) Turn and work from the right side. 2 ch (=1:st dc), 1 bp dc in each dc until end of row. Cut yarn! [87 dc] R 27 (2) Turn and work from the back side. Standing sc in 1:st dc. (Tr in next dc, sc in next dc) repeat until end of row. Cut yarn! [43 small bobbles on the right side and 44 fsc] R 28 (1) Continue to work from the back side. Standing dc in 1:st sc. 1 dc in each tr and 1 dc in each sc until end of row. [87 dc] R 29 (1) Turn and work from the right side. 2 ch (=1:st dc), 1 bp dc in each dc until end of row. [87 dc] Repeat r 6-29 two more times. If you make a bigger blanket or wish another size you repeat r 6-29 as many time you like before making the border.
The border: R 1 (2) Work from the right side. You will now make a row with sc around the blanket. It’s important that the number of sc of each side is uneven. On the short sides you make 1 sc in each dc (=87 sc) and on the long sides you make 1 sc in each row that begins with a sc and 3 sc evenly over 2 rows that starts with a dc. Make 2 ch in every corner. Start with a sl st in the 1:st dc of any short side, make 1 ch and continue with sc as written above. End with a sl st in 1:st ch. [87 dc/short side and 97 sc/long side]
Blog: www.mijocrochet.wordpress.com | Facebook: Mijo Crochet | Instagram: @mijocrochet
Copyright Mijo Crochet™ 2017. Reproducing and publication of pictures and pattern without permission from Mijo Crochet™ is not allowed.
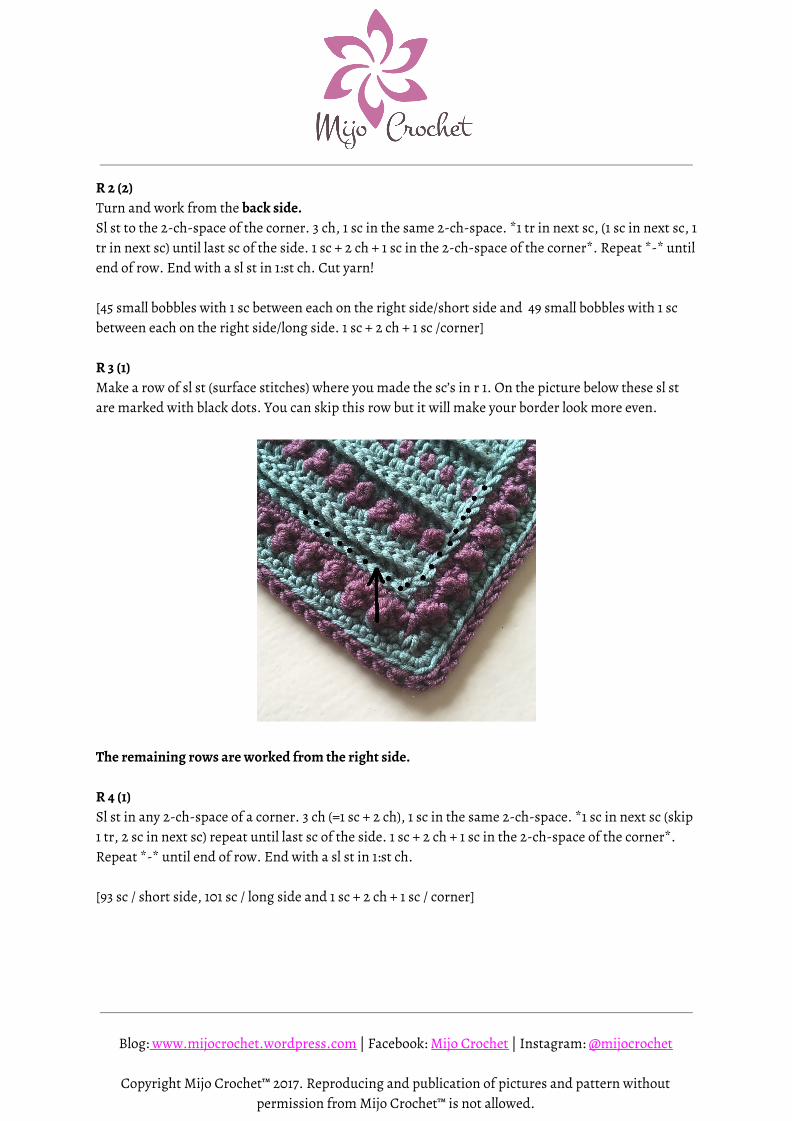
R 2 (2) Turn and work from the back side. Sl st to the 2-ch-space of the corner. 3 ch, 1 sc in the same 2-ch-space. *1 tr in next sc, (1 sc in next sc, 1 tr in next sc) until last sc of the side. 1 sc + 2 ch + 1 sc in the 2-ch-space of the corner*. Repeat *-* until end of row. End with a sl st in 1:st ch. Cut yarn! [45 small bobbles with 1 sc between each on the right side/short side and 49 small bobbles with 1 sc between each on the right side/long side. 1 sc + 2 ch + 1 sc /corner] R 3 (1) Make a row of sl st (surface stitches) where you made the sc’s in r 1. On the picture below these sl st are marked with black dots. You can skip this row but it will make your border look more even.
The remaining rows are worked from the right side. R 4 (1) Sl st in any 2-ch-space of a corner. 3 ch (=1 sc + 2 ch), 1 sc in the same 2-ch-space. *1 sc in next sc (skip 1 tr, 2 sc in next sc) repeat until last sc of the side. 1 sc + 2 ch + 1 sc in the 2-ch-space of the corner*. Repeat *-* until end of row. End with a sl st in 1:st ch. [93 sc / short side, 101 sc / long side and 1 sc + 2 ch + 1 sc / corner]
Blog: www.mijocrochet.wordpress.com | Facebook: Mijo Crochet | Instagram: @mijocrochet
Copyright Mijo Crochet™ 2017. Reproducing and publication of pictures and pattern without permission from Mijo Crochet™ is not allowed.
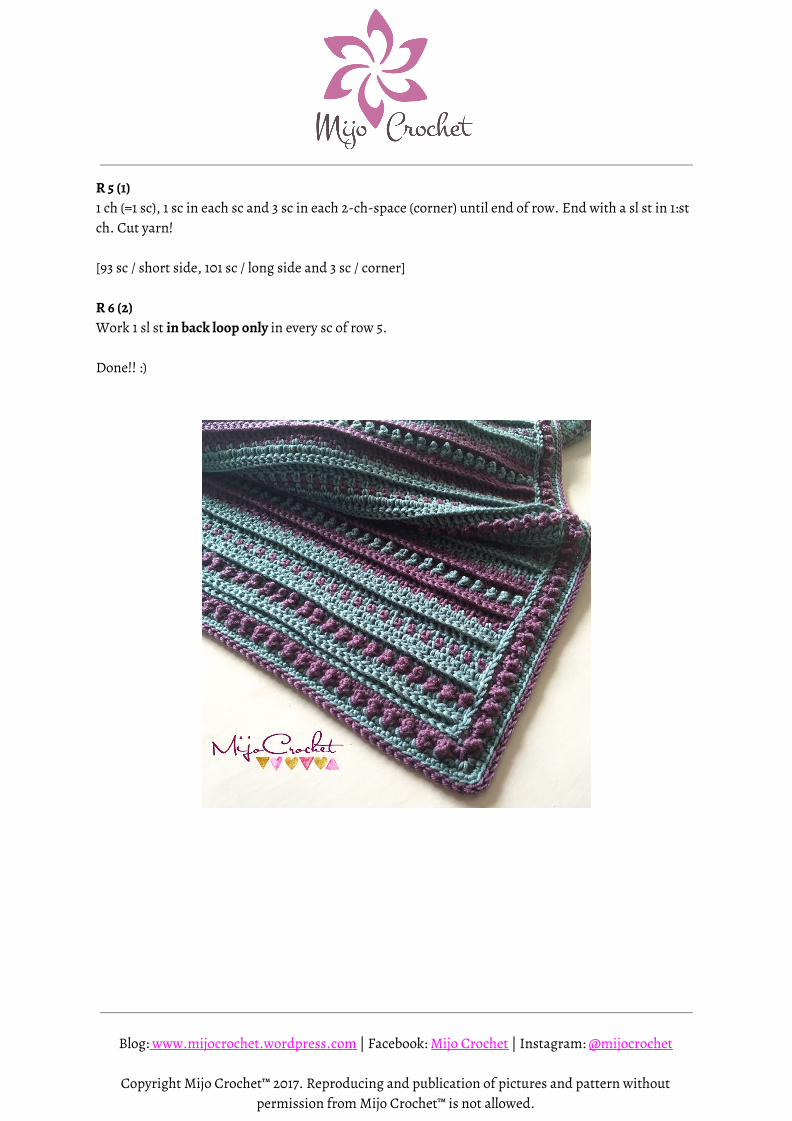
R 5 (1) 1 ch (=1 sc), 1 sc in each sc and 3 sc in each 2-ch-space (corner) until end of row. End with a sl st in 1:st ch. Cut yarn! [93 sc / short side, 101 sc / long side and 3 sc / corner] R 6 (2) Work 1 sl st in back loop only in every sc of row 5. Done!! :)
Blog: www.mijocrochet.wordpress.com | Facebook: Mijo Crochet | Instagram: @mijocrochet
Copyright Mijo Crochet™ 2017. Reproducing and publication of pictures and pattern without permission from Mijo Crochet™ is not allowed.


![VERTICAL HERRINGBONE CROCHET BLANKET ......VERTICAL HERRINGBONE CROCHET BLANKET | CROCHET Rep last 2 rows for pat until work from beg measures approx 52" [132 cm], ending on 4th row](https://img.pdfslide.net/doc/110x75/5e39a95ffe0db85fca427b51/vertical-herringbone-crochet-blanket-vertical-herringbone-crochet-blanket.jpg)