Embed Size (px)
Citation preview
Numicon Interactive Whiteboard SoftwareUser Guide
2 Numicon Interactive Whiteboard Software
User Guide
© Oxford University Press 2017
Contents
3 Getting Started4 Calibrating Your Interactive Whiteboard4 Aspect Ratio (Interactive Whiteboard Screen Size)5 Workspaces Menu5 Resources Panel6 Group Select/Select All 7 Move Mode Controls (Rotate, Flip, Undo, Delete
and Fullscreen)8 Draw Mode (Annotation Tools)9 Teacher Controls (Workspaces, Display, Delete All, Save,
Help, Exit and Scrolling)10 Display11 Saving to My Numicon Files13 Workspaces13 Blank14 Baseboards15 Pan Balance16 Number Rod Track16 Number Lines18 100 Square19 Calculation Boxes
19 Place Value Frames20 Multiplication Grids20 Sorting Rings (Venn Diagrams)21 Carroll Diagrams21 Part-Whole and Number Trios23 Resources23 Numicon Shapes23 Number Rods23 Base-ten Apparatus24 Pegs24 Counters24 Number Rod Trays24 Keypad25 Spinners26 Numeral Cards 26 Subtraction Covers26 Money27 Shapes28 Pictures28 Numicon Shapes (Grey)
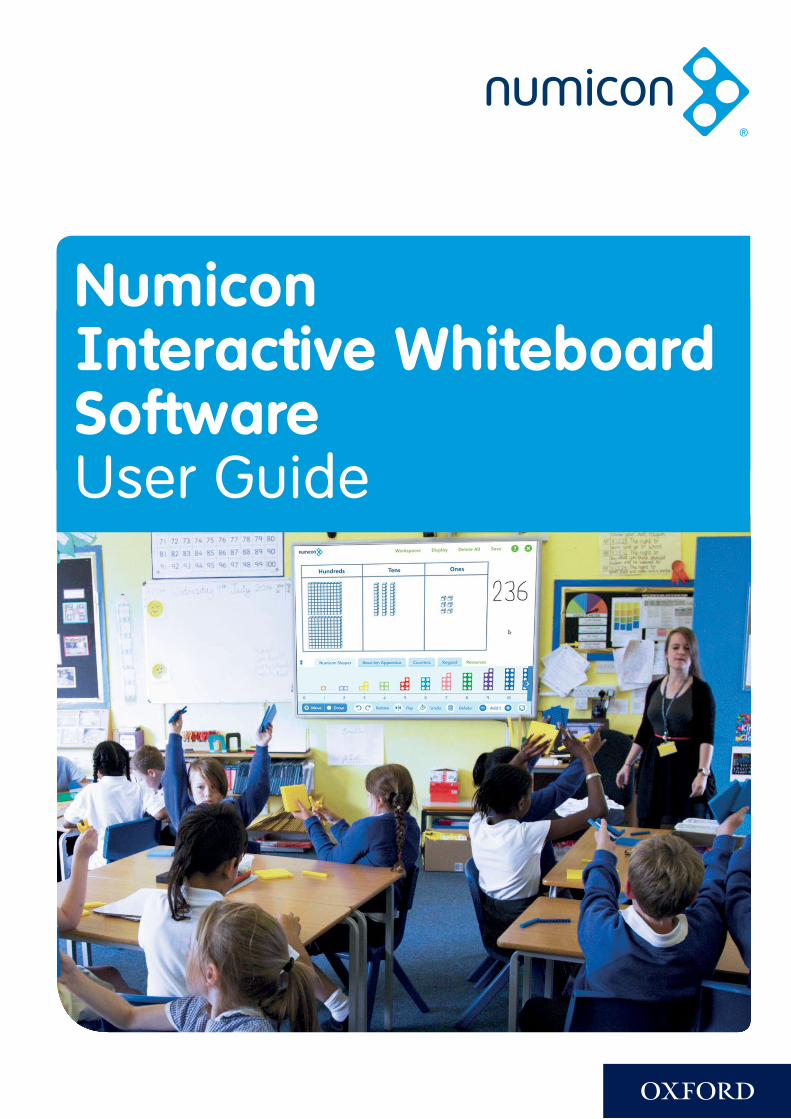
Numicon Interactive Whiteboard Software is a flexible tool for teaching with a wide range of manipulatives and imagery. It supports a Concrete Pictorial Abstract approach to teaching and learning mathematics at any stage.
The software is designed for use in whole-class or group sessions rather than for children to interact with alone. It can be used to support the activities from any of the Numicon teaching materials (see www.numicon.com) or any other teaching with manipulatives. It is intended to aid discussion and visualization of the physical resources used in the classroom and not as a replacement for those physical resources.
The resources featured in the software are designed to match their physical counterparts as far as is practical. Physical versions of the majority of the items in the resources panel are available from www.numicon.com, along with a range of Numicon teaching and learning materials that can be used either as a full maths programme or alongside other resources to enrich your teaching.
The software can be accessed via Numicon Online on www.oxfordowl.co.uk. Aside from Numicon Interactive Whiteboard Software, Numicon Online also contains a wealth of other digital resources to support teaching and learning with Numicon, from Firm Foundations all the way through to Numicon 6. This includes teacher support videos, editable planning, assessment and tracking resources, curriculum matching charts and photocopy masters.
3 Numicon Interactive Whiteboard Software
User Guide
© Oxford University Press 2017
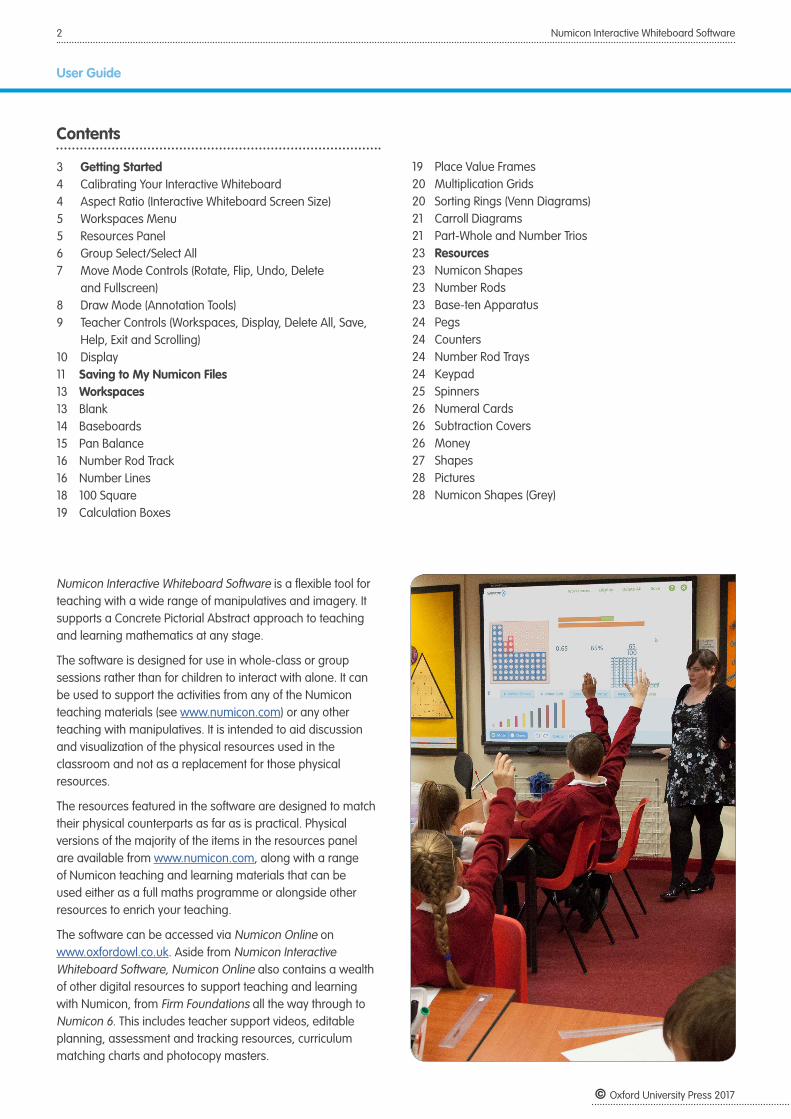
Getting StartedStep 1: Calibrate your interactive whiteboardIt is essential that you calibrate your interactive whiteboard before every use of the software. This is to ensure the best possible user experience and accuracy when using the various resources and workspaces. If your whiteboard is not calibrated, the resources and workspaces may not respond with precision.
Step 2: Set the aspect ratioYou will be asked to select the screen size of the interactive whiteboard you intend to use to deliver your lesson (either regular 4:3 or widescreen 16:9). This is so that the software is presented to make the best use of space for your whiteboard. The software will work regardless of which aspect ratio you select. Click here for further detail.
Step 3: Open a workspaceTo access the workspaces menu, tap Workspaces at the top of the screen area. All the available workspaces will be listed in this area. The software opens in a blank workspace by default.
Step 4: Add resources to work withThe resources panel is available across the bottom of the screen area. From here, all your resources such as the Numicon Shapes, number rods, pictures and spinners can be accessed. Click or drag a resource from the resources panel to add it to a workspace.
Step 5: Label and annotate your workA keypad is available in the resources panel and can be used for typing text, numerals, symbols or fractions. You can also select the Draw mode to annotate your workspace using the pen, highlighter or line tool. Select Move mode to return to the full workspace functionality.
Step 6: Save your work for laterWhether you wish to prepare on a laptop in advance of a lesson or save your work from a lesson for another day, you can have up to 50 saved files and return to them at a later date. The Save button is located at the top right of the screen area.
For help, please see the User Guide
or contact the support team on:
Email: [email protected]
Phone: +44 (0) 1536 452960
For browser and system requirements, please go to:
https://www.oxfordowl.co.uk/pages/q-which-browsers-work-with-oxford-owl
Supporting maths teaching with inspirational resources, advice and professional development
4 Numicon Interactive Whiteboard Software
User Guide
© Oxford University Press 2017
Calibrating Your Interactive Whiteboard
It is essential that you calibrate your interactive whiteboard before every use of Numicon Interactive Whiteboard Software. This is to ensure the best possible user experience and accuracy when using the various resources and workspaces.
For help with calibration, please find the user instructions for your interactive whiteboard. For example:
Prometheanhttps://support.prometheanworld.com/
Smarthttps://home.smarttech.com/
Aspect Ratio
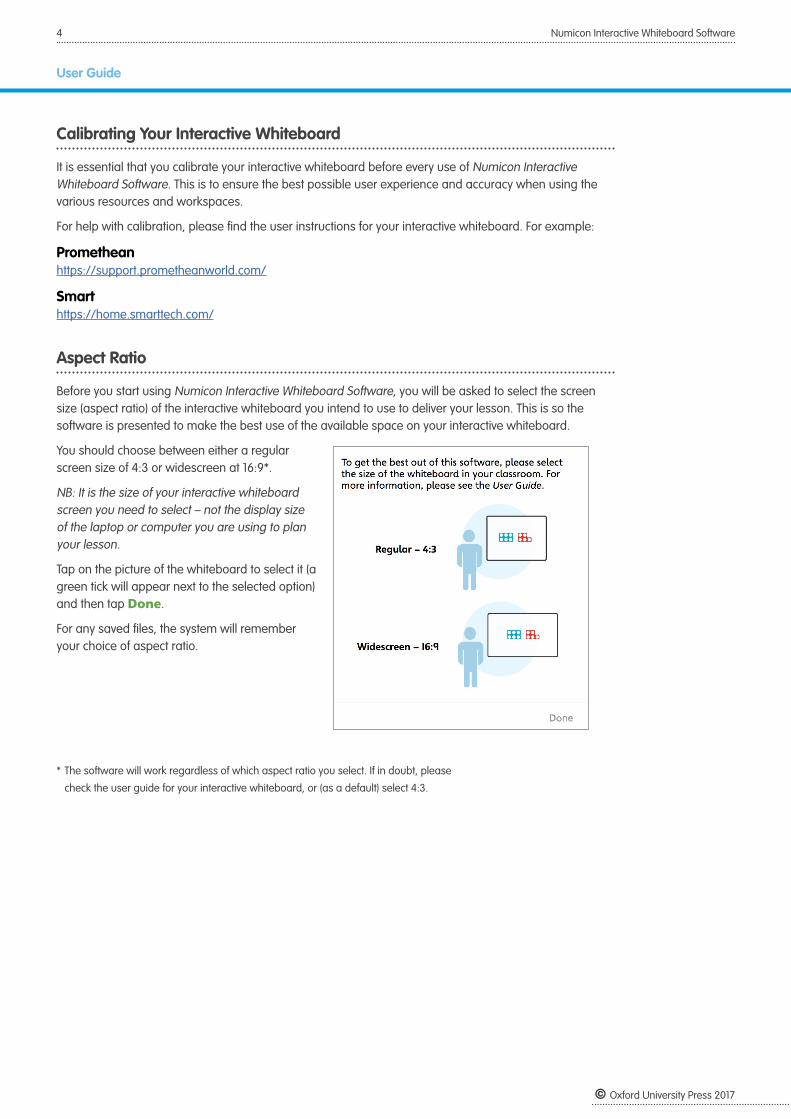
Before you start using Numicon Interactive Whiteboard Software, you will be asked to select the screen size (aspect ratio) of the interactive whiteboard you intend to use to deliver your lesson. This is so the software is presented to make the best use of the available space on your interactive whiteboard.
You should choose between either a regular screen size of 4:3 or widescreen at 16:9*.
NB: It is the size of your interactive whiteboard screen you need to select – not the display size of the laptop or computer you are using to plan your lesson.
Tap on the picture of the whiteboard to select it (a green tick will appear next to the selected option) and then tap Done.
For any saved files, the system will remember your choice of aspect ratio.
* The software will work regardless of which aspect ratio you select. If in doubt, please
check the user guide for your interactive whiteboard, or (as a default) select 4:3.
5 Numicon Interactive Whiteboard Software
User Guide
© Oxford University Press 2017
Workspaces MenuFor a full list of workspaces, see page 13.
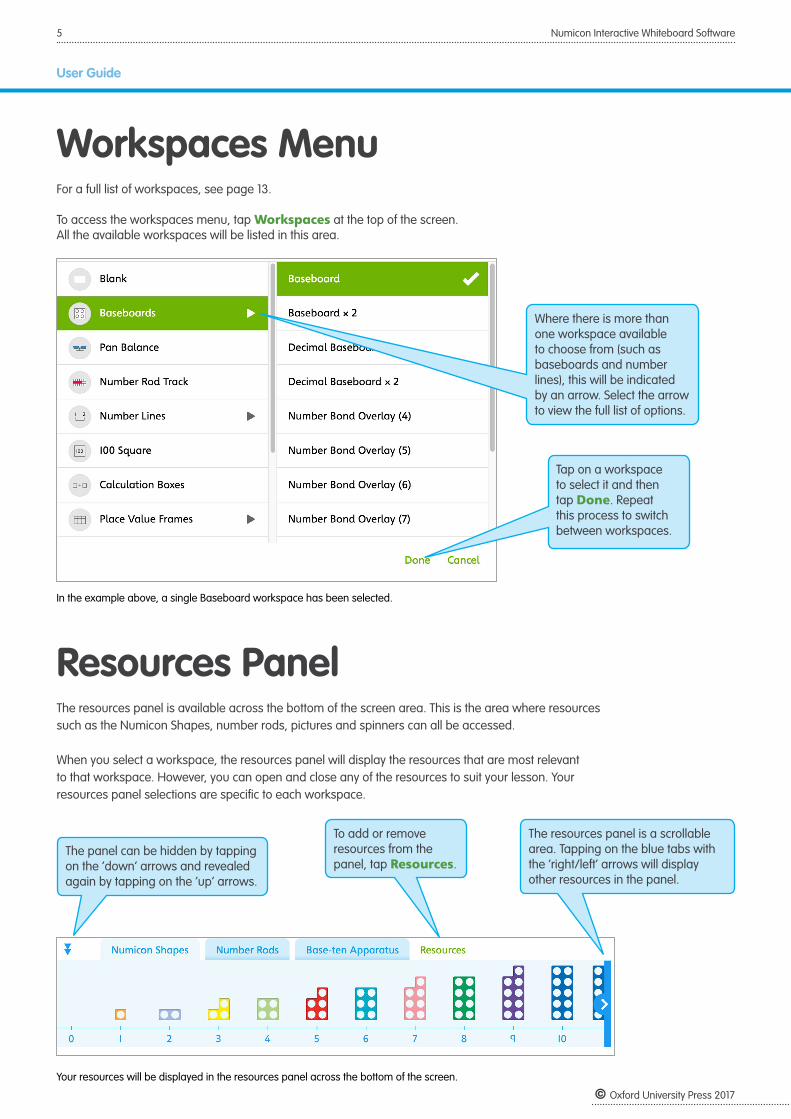
To access the workspaces menu, tap Workspaces at the top of the screen. All the available workspaces will be listed in this area.
In the example above, a single Baseboard workspace has been selected.
Resources PanelThe resources panel is available across the bottom of the screen area. This is the area where resources such as the Numicon Shapes, number rods, pictures and spinners can all be accessed.
When you select a workspace, the resources panel will display the resources that are most relevant to that workspace. However, you can open and close any of the resources to suit your lesson. Your resources panel selections are specific to each workspace.
Your resources will be displayed in the resources panel across the bottom of the screen.
Where there is more than one workspace available to choose from (such as baseboards and number lines), this will be indicated by an arrow. Select the arrow to view the full list of options.
Tap on a workspace to select it and then tap Done. Repeat this process to switch between workspaces.
The panel can be hidden by tapping on the ‘down’ arrows and revealed again by tapping on the ‘up’ arrows.
The resources panel is a scrollable area. Tapping on the blue tabs with the ‘right/left’ arrows will display other resources in the panel.
To add or remove resources from the panel, tap Resources.
6 Numicon Interactive Whiteboard Software
User Guide
© Oxford University Press 2017
To add a resource, tap on it (a resource will be highlighted green with a tick when selected) and then tap Done. To remove a resource, tap on it to deselect it. Then tap Done. You always have to have at least one resource selected.
There are two different ways to select resources and move them onto your workspace area:
1) Dragging resources into a workspaceYou can drag resources from the resources panel and drop them into the workspace. You can then reposition them as you choose.
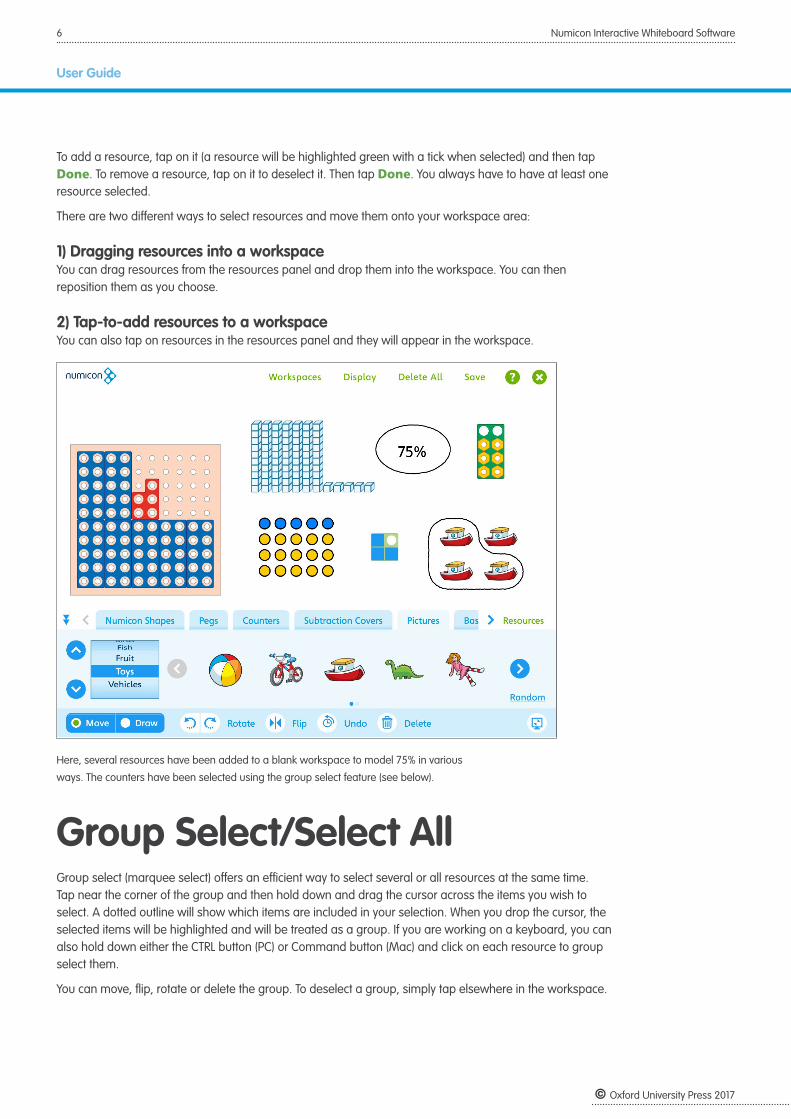
2) Tap-to-add resources to a workspaceYou can also tap on resources in the resources panel and they will appear in the workspace.
Here, several resources have been added to a blank workspace to model 75% in various
ways. The counters have been selected using the group select feature (see below).
Group Select/Select AllGroup select (marquee select) offers an efficient way to select several or all resources at the same time. Tap near the corner of the group and then hold down and drag the cursor across the items you wish to select. A dotted outline will show which items are included in your selection. When you drop the cursor, the selected items will be highlighted and will be treated as a group. If you are working on a keyboard, you can also hold down either the CTRL button (PC) or Command button (Mac) and click on each resource to group select them.
You can move, flip, rotate or delete the group. To deselect a group, simply tap elsewhere in the workspace.
7 Numicon Interactive Whiteboard Software
User Guide
© Oxford University Press 2017
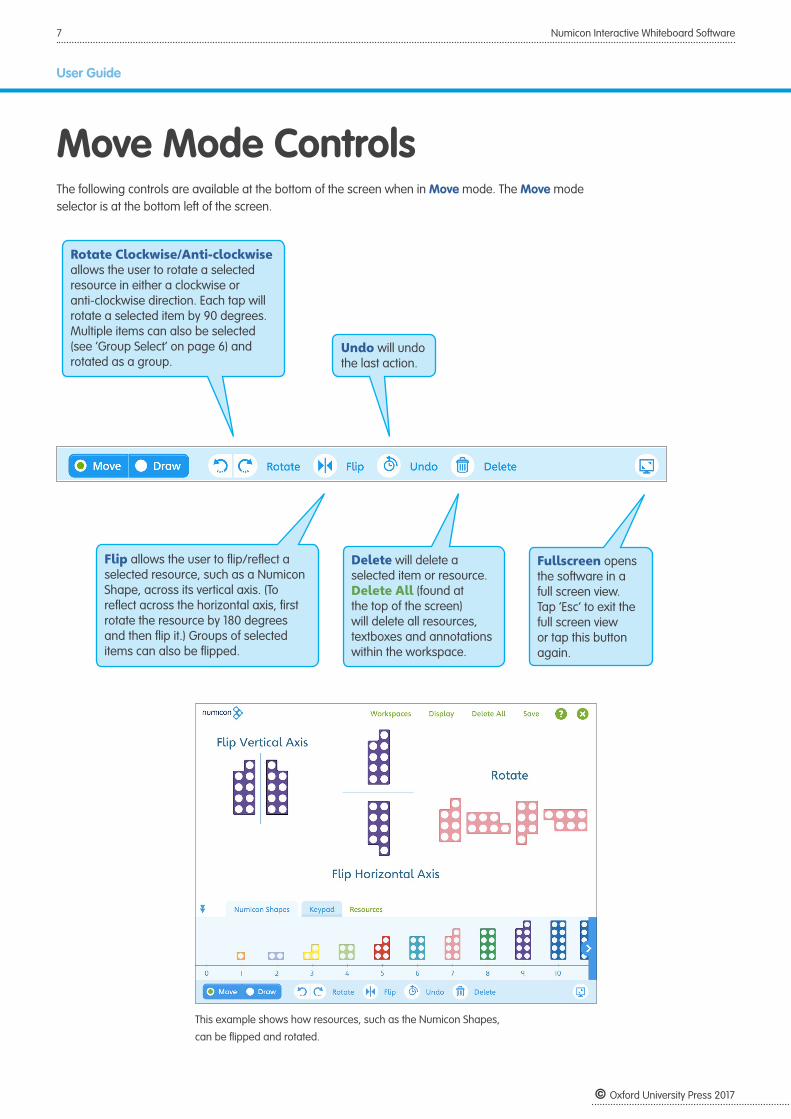
Move Mode Controls The following controls are available at the bottom of the screen when in Move mode. The Move mode selector is at the bottom left of the screen.
Rotate Clockwise/Anti-clockwise allows the user to rotate a selected resource in either a clockwise or anti-clockwise direction. Each tap will rotate a selected item by 90 degrees. Multiple items can also be selected (see ‘Group Select’ on page 6) and rotated as a group.
Flip allows the user to flip/reflect a selected resource, such as a Numicon Shape, across its vertical axis. (To reflect across the horizontal axis, first rotate the resource by 180 degrees and then flip it.) Groups of selected items can also be flipped.
Delete will delete a selected item or resource. Delete All (found at the top of the screen) will delete all resources, textboxes and annotations within the workspace.
Fullscreen opens the software in a full screen view. Tap ‘Esc’ to exit the full screen view or tap this button again.
Undo will undo the last action.
This example shows how resources, such as the Numicon Shapes,
can be flipped and rotated.
8 Numicon Interactive Whiteboard Software
User Guide
© Oxford University Press 2017
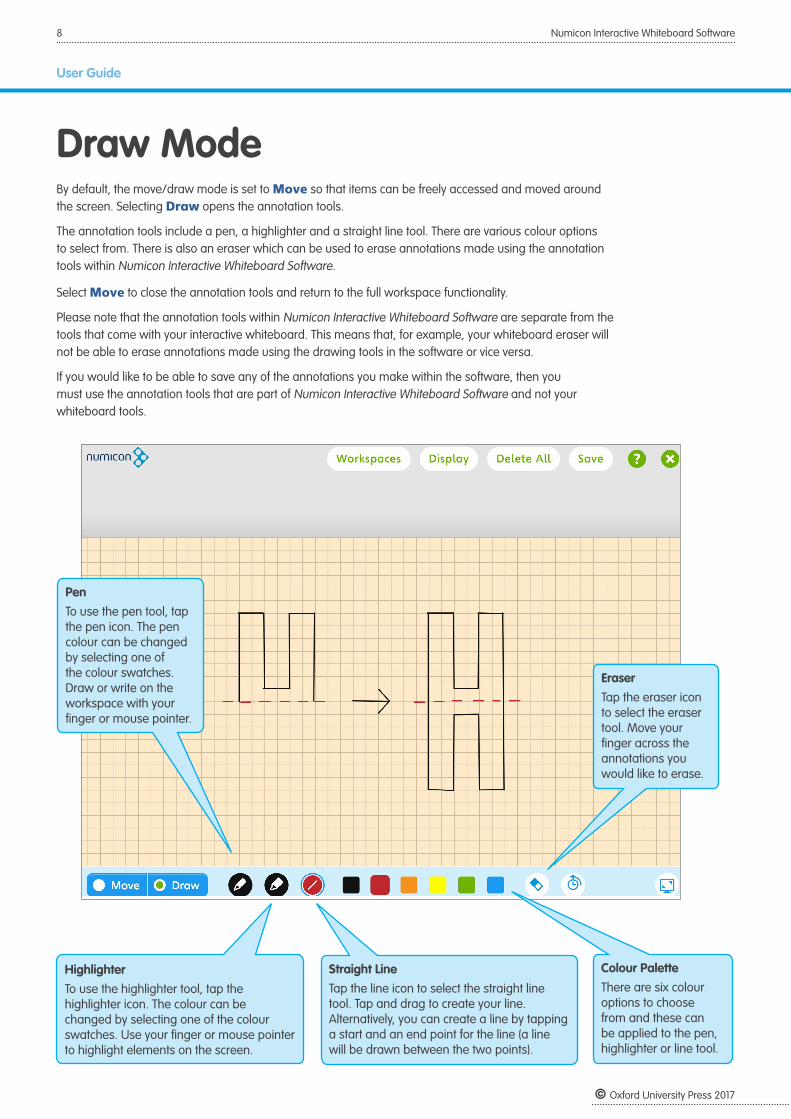
Draw Mode By default, the move/draw mode is set to Move so that items can be freely accessed and moved around the screen. Selecting Draw opens the annotation tools.
The annotation tools include a pen, a highlighter and a straight line tool. There are various colour options to select from. There is also an eraser which can be used to erase annotations made using the annotation tools within Numicon Interactive Whiteboard Software.
Select Move to close the annotation tools and return to the full workspace functionality.
Please note that the annotation tools within Numicon Interactive Whiteboard Software are separate from the tools that come with your interactive whiteboard. This means that, for example, your whiteboard eraser will not be able to erase annotations made using the drawing tools in the software or vice versa.
If you would like to be able to save any of the annotations you make within the software, then you must use the annotation tools that are part of Numicon Interactive Whiteboard Software and not your whiteboard tools.
Straight Line Tap the line icon to select the straight line tool. Tap and drag to create your line. Alternatively, you can create a line by tapping a start and an end point for the line (a line will be drawn between the two points).
Highlighter To use the highlighter tool, tap the highlighter icon. The colour can be changed by selecting one of the colour swatches. Use your finger or mouse pointer to highlight elements on the screen.
Pen To use the pen tool, tap the pen icon. The pen colour can be changed by selecting one of the colour swatches. Draw or write on the workspace with your finger or mouse pointer.
Eraser Tap the eraser icon to select the eraser tool. Move your finger across the annotations you would like to erase.
Colour Palette There are six colour options to choose from and these can be applied to the pen, highlighter or line tool.
9 Numicon Interactive Whiteboard Software
User Guide
© Oxford University Press 2017
Teacher Controls
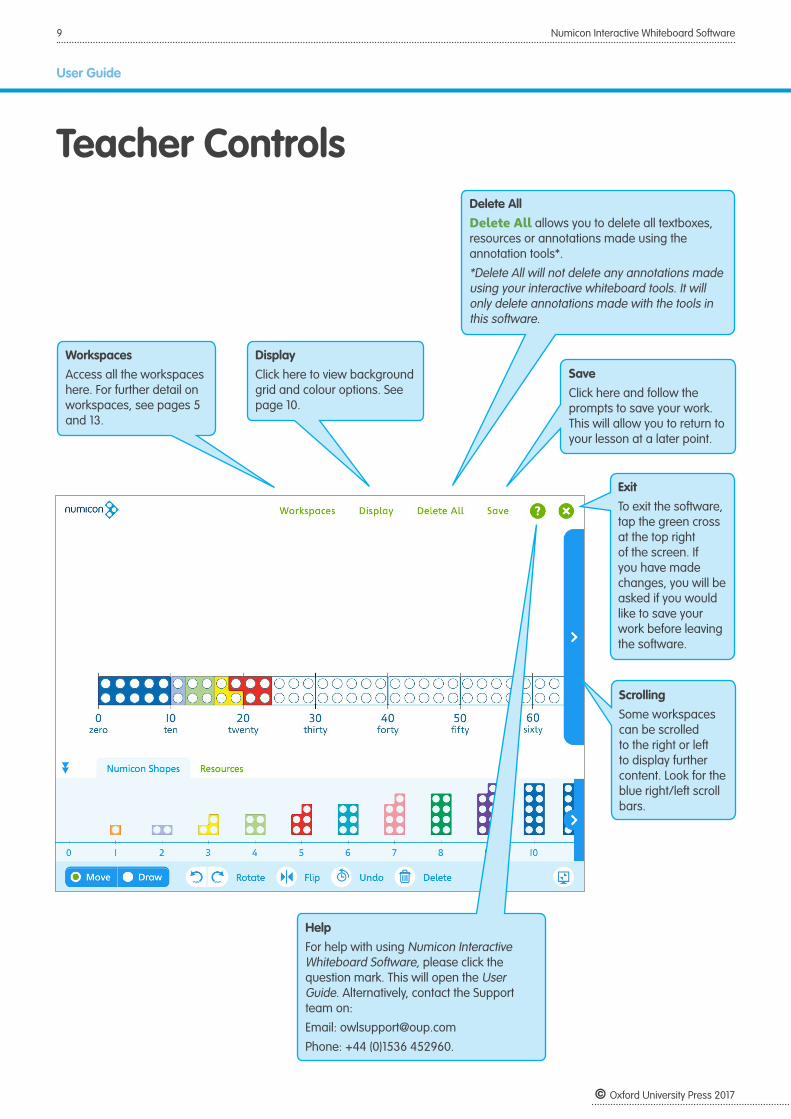
ExitTo exit the software, tap the green cross at the top right of the screen. If you have made changes, you will be asked if you would like to save your work before leaving the software.
Save Click here and follow the prompts to save your work. This will allow you to return to your lesson at a later point.
ScrollingSome workspaces can be scrolled to the right or left to display further content. Look for the blue right/left scroll bars.
Help For help with using Numicon Interactive Whiteboard Software, please click the question mark. This will open the User Guide. Alternatively, contact the Support team on:
Email: [email protected]
Phone: +44 (0)1536 452960.
Delete All Delete All allows you to delete all textboxes, resources or annotations made using the annotation tools*.
*Delete All will not delete any annotations made using your interactive whiteboard tools. It will only delete annotations made with the tools in this software.
Workspaces Access all the workspaces here. For further detail on workspaces, see pages 5 and 13.
Display Click here to view background grid and colour options. See page 10.
10 Numicon Interactive Whiteboard Software
User Guide
© Oxford University Press 2017
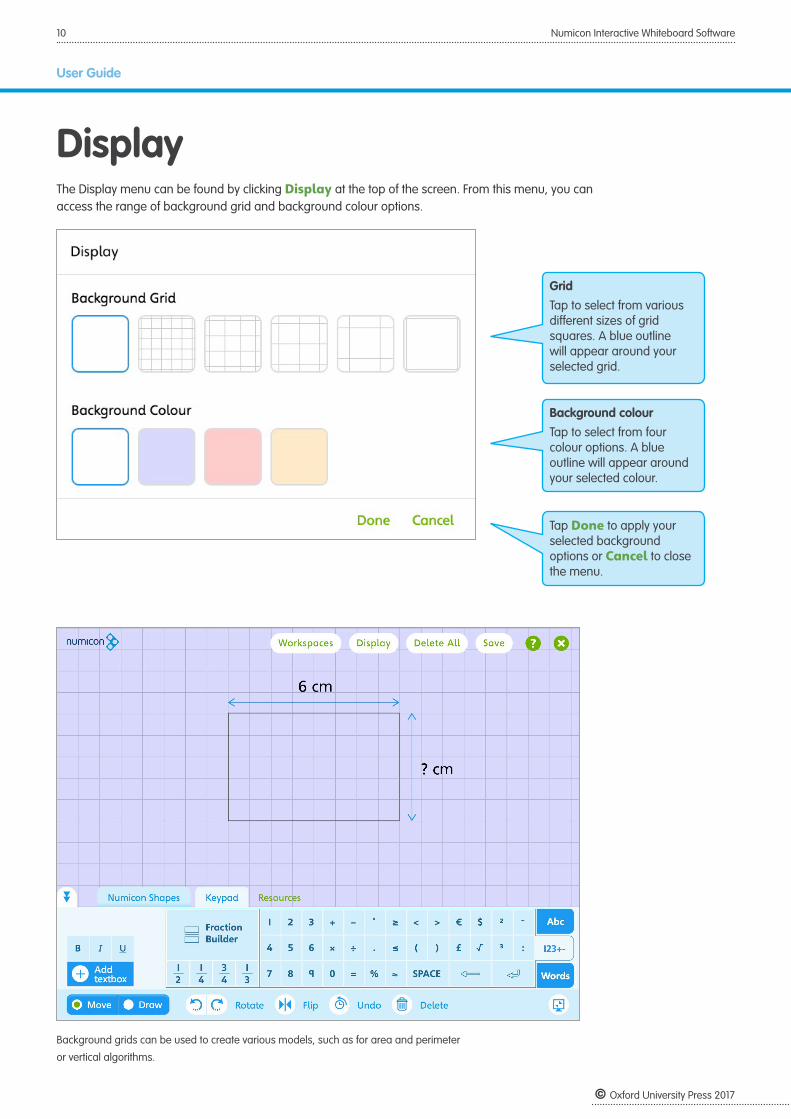
Display The Display menu can be found by clicking Display at the top of the screen. From this menu, you can access the range of background grid and background colour options.
Background grids can be used to create various models, such as for area and perimeter
or vertical algorithms.
Grid Tap to select from various different sizes of grid squares. A blue outline will appear around your selected grid.
Background colour Tap to select from four colour options. A blue outline will appear around your selected colour.
Tap Done to apply your selected background options or Cancel to close the menu.
11 Numicon Interactive Whiteboard Software
User Guide
© Oxford University Press 2017
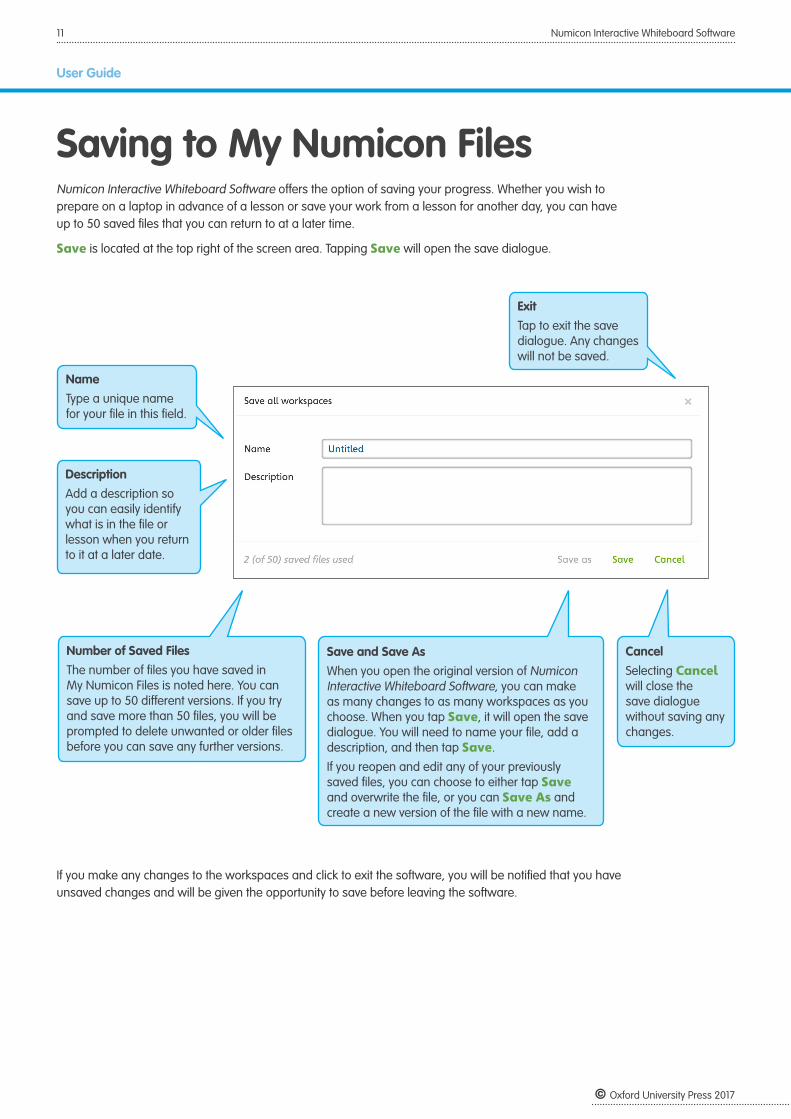
Saving to My Numicon FilesNumicon Interactive Whiteboard Software offers the option of saving your progress. Whether you wish to prepare on a laptop in advance of a lesson or save your work from a lesson for another day, you can have up to 50 saved files that you can return to at a later time.
Save is located at the top right of the screen area. Tapping Save will open the save dialogue.
If you make any changes to the workspaces and click to exit the software, you will be notified that you have unsaved changes and will be given the opportunity to save before leaving the software.
Save and Save As When you open the original version of Numicon Interactive Whiteboard Software, you can make as many changes to as many workspaces as you choose. When you tap Save, it will open the save dialogue. You will need to name your file, add a description, and then tap Save.
If you reopen and edit any of your previously saved files, you can choose to either tap Save and overwrite the file, or you can Save As and create a new version of the file with a new name.
Number of Saved Files The number of files you have saved in My Numicon Files is noted here. You can save up to 50 different versions. If you try and save more than 50 files, you will be prompted to delete unwanted or older files before you can save any further versions.
Description Add a description so you can easily identify what is in the file or lesson when you return to it at a later date.
Name Type a unique name for your file in this field.
Cancel Selecting Cancel will close the save dialogue without saving any changes.
Exit Tap to exit the save dialogue. Any changes will not be saved.
12 Numicon Interactive Whiteboard Software
User Guide
© Oxford University Press 2017
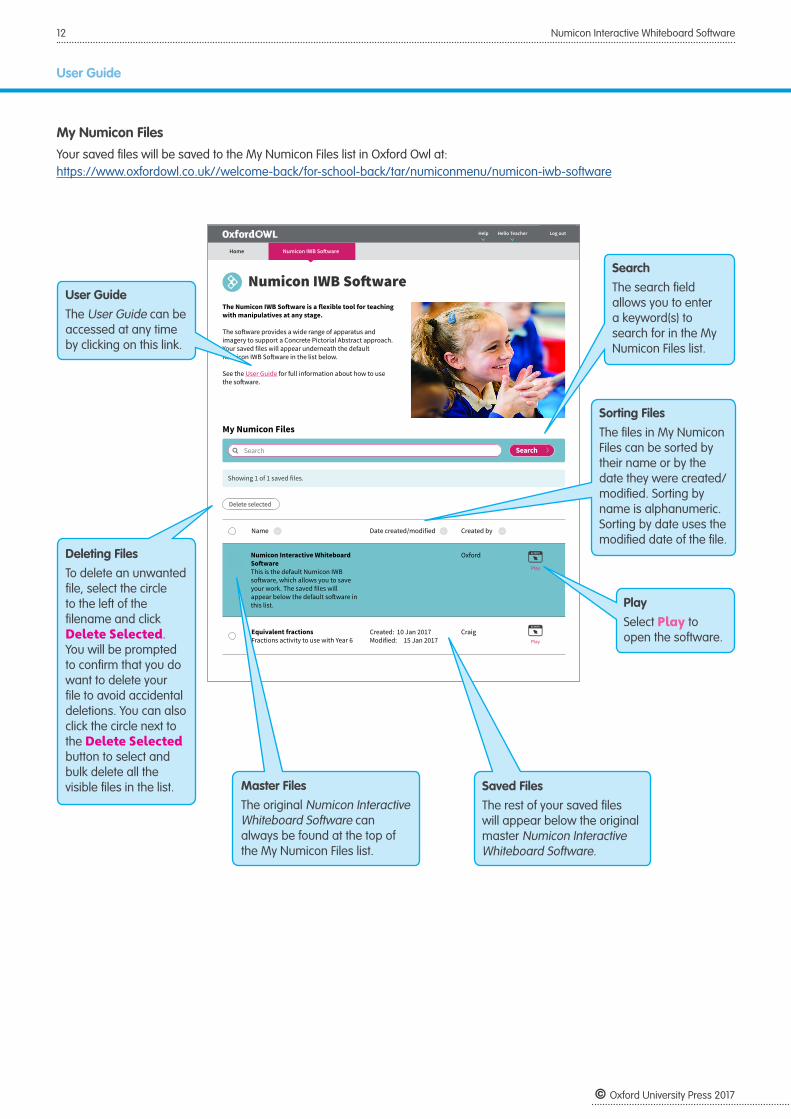
My Numicon FilesYour saved files will be saved to the My Numicon Files list in Oxford Owl at: https://www.oxfordowl.co.uk//welcome-back/for-school-back/tar/numiconmenu/numicon-iwb-software
Log outHello TeacherHelp
Numicon IWB So�wareThe Numicon IWB So�ware is a flexible tool for teaching with manipulatives at any stage.
The so�ware provides a wide range of apparatus and imagery to support a Concrete Pictorial Abstract approach.Your saved files will appear underneath the default Numicon IWB So�ware in the list below.
See the User Guide for full information about how to use the so�ware.
Name Date created/modified Created by
My Numicon Files
Oxford
CraigEquivalent fractionsFractions activity to use with Year 6
Search Search
Play
ACTIVITY
Play
ACTIVITY
Showing 1 of 1 saved files.
Delete selected
Created: 10 Jan 2017Modified: 15 Jan 2017
Numicon Interactive Whiteboard So�wareThis is the default Numicon IWB so�ware, which allows you to save your work. The saved files will appear below the default so�ware in this list.
Home Numicon IWB So�ware
Master Files The original Numicon Interactive Whiteboard Software can always be found at the top of the My Numicon Files list.
Saved Files The rest of your saved files will appear below the original master Numicon Interactive Whiteboard Software.
Deleting Files To delete an unwanted file, select the circle to the left of the filename and click Delete Selected. You will be prompted to confirm that you do want to delete your file to avoid accidental deletions. You can also click the circle next to the Delete Selected button to select and bulk delete all the visible files in the list.
User Guide The User Guide can be accessed at any time by clicking on this link.
Play Select Play to open the software.
Sorting Files The files in My Numicon Files can be sorted by their name or by the date they were created/modified. Sorting by name is alphanumeric. Sorting by date uses the modified date of the file.
Search The search field allows you to enter a keyword(s) to search for in the My Numicon Files list.
13 Numicon Interactive Whiteboard Software
User Guide
© Oxford University Press 2017
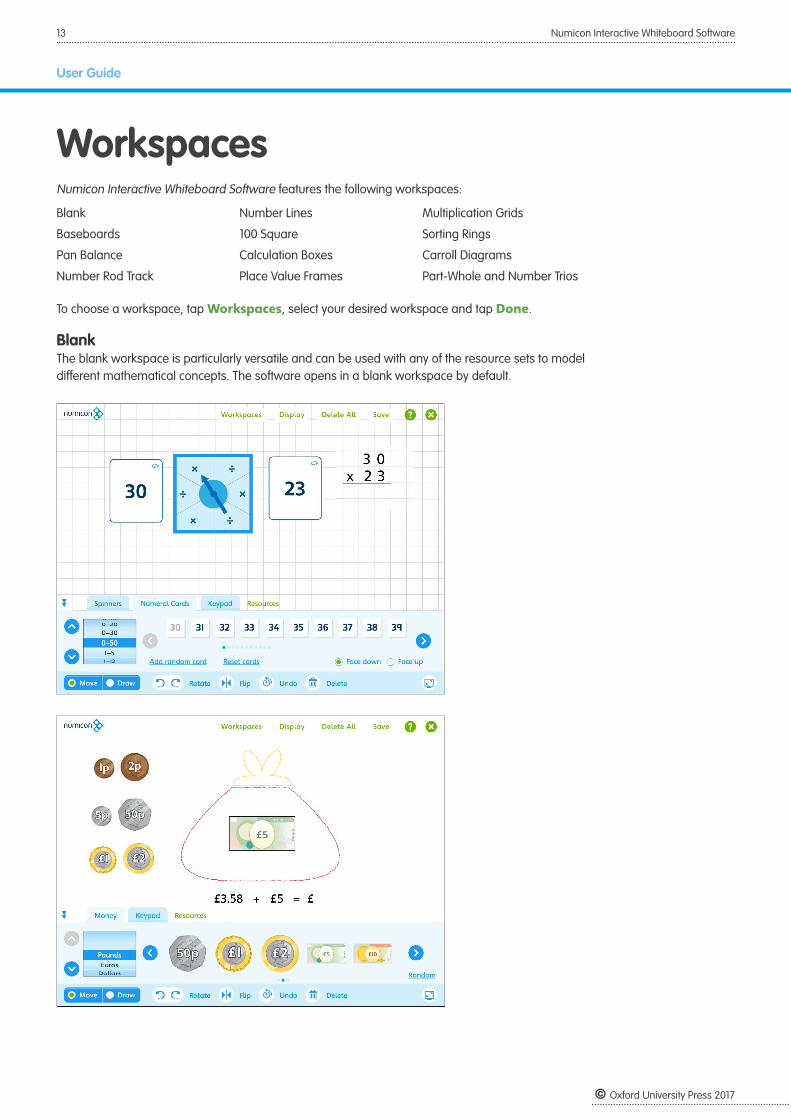
WorkspacesNumicon Interactive Whiteboard Software features the following workspaces:
Blank
Baseboards
Pan Balance
Number Rod Track
Number Lines
100 Square
Calculation Boxes
Place Value Frames
Multiplication Grids
Sorting Rings
Carroll Diagrams
Part-Whole and Number Trios
To choose a workspace, tap Workspaces, select your desired workspace and tap Done.
BlankThe blank workspace is particularly versatile and can be used with any of the resource sets to model different mathematical concepts. The software opens in a blank workspace by default.
14 Numicon Interactive Whiteboard Software
User Guide
© Oxford University Press 2017
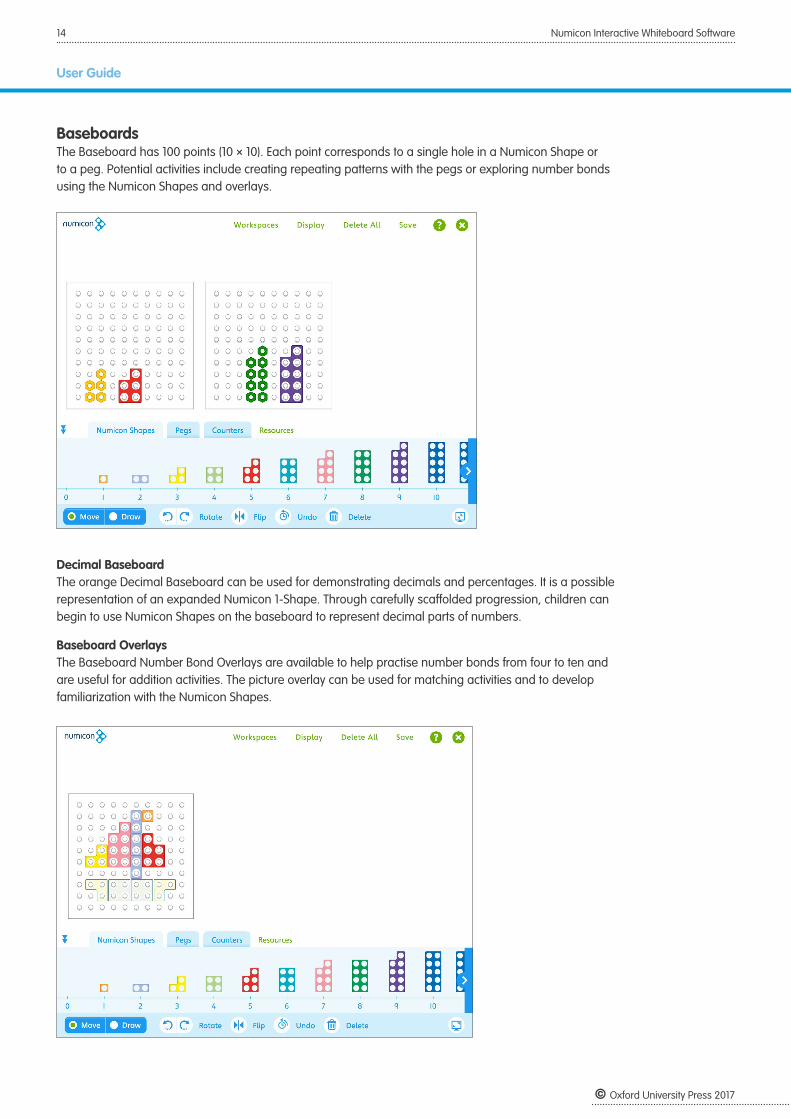
BaseboardsThe Baseboard has 100 points (10 × 10). Each point corresponds to a single hole in a Numicon Shape or to a peg. Potential activities include creating repeating patterns with the pegs or exploring number bonds using the Numicon Shapes and overlays.
Decimal BaseboardThe orange Decimal Baseboard can be used for demonstrating decimals and percentages. It is a possible representation of an expanded Numicon 1-Shape. Through carefully scaffolded progression, children can begin to use Numicon Shapes on the baseboard to represent decimal parts of numbers.
Baseboard OverlaysThe Baseboard Number Bond Overlays are available to help practise number bonds from four to ten and are useful for addition activities. The picture overlay can be used for matching activities and to develop familiarization with the Numicon Shapes.
15 Numicon Interactive Whiteboard Software
User Guide
© Oxford University Press 2017
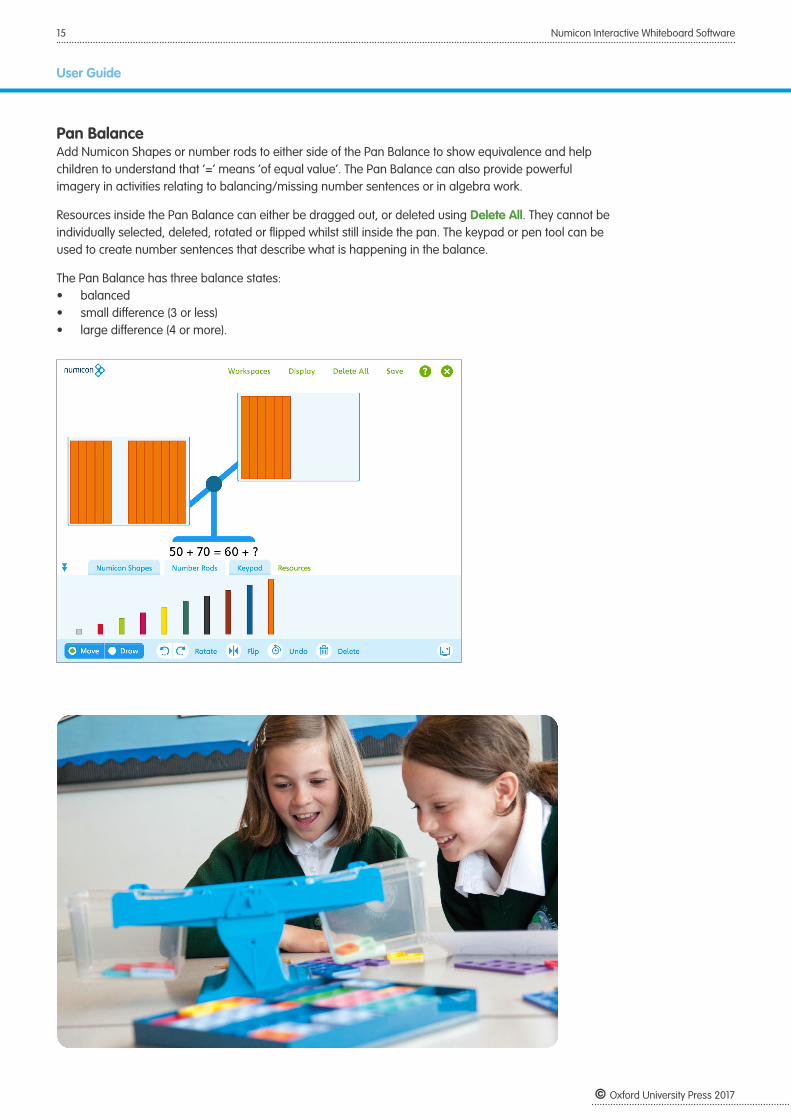
Pan BalanceAdd Numicon Shapes or number rods to either side of the Pan Balance to show equivalence and help children to understand that ‘=’ means ‘of equal value’. The Pan Balance can also provide powerful imagery in activities relating to balancing/missing number sentences or in algebra work.
Resources inside the Pan Balance can either be dragged out, or deleted using Delete All. They cannot be individually selected, deleted, rotated or flipped whilst still inside the pan. The keypad or pen tool can be used to create number sentences that describe what is happening in the balance.
The Pan Balance has three balance states: • balanced• small difference (3 or less)• large difference (4 or more).
16 Numicon Interactive Whiteboard Software
User Guide
© Oxford University Press 2017
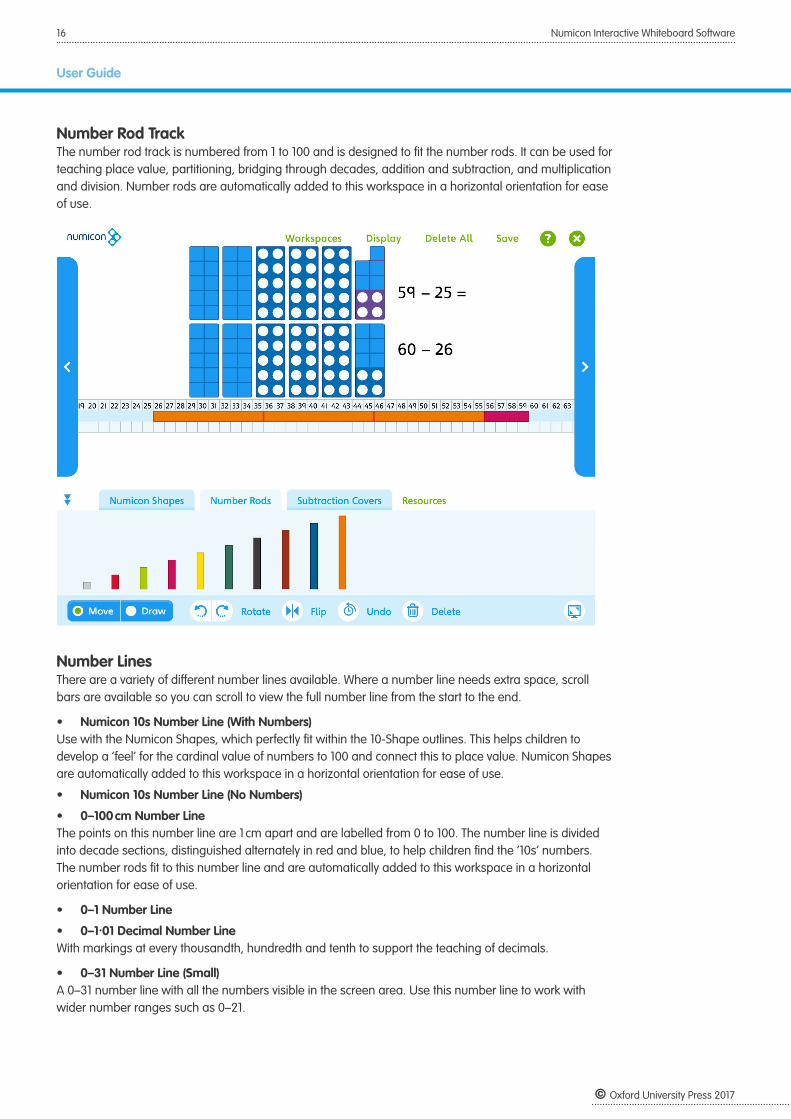
Number Rod TrackThe number rod track is numbered from 1 to 100 and is designed to fit the number rods. It can be used for teaching place value, partitioning, bridging through decades, addition and subtraction, and multiplication and division. Number rods are automatically added to this workspace in a horizontal orientation for ease of use.
Number LinesThere are a variety of different number lines available. Where a number line needs extra space, scroll bars are available so you can scroll to view the full number line from the start to the end.
• Numicon 10s Number Line (With Numbers)Use with the Numicon Shapes, which perfectly fit within the 10-Shape outlines. This helps children to develop a ‘feel’ for the cardinal value of numbers to 100 and connect this to place value. Numicon Shapes are automatically added to this workspace in a horizontal orientation for ease of use.
• Numicon 10s Number Line (No Numbers)
• 0–100 cm Number LineThe points on this number line are 1 cm apart and are labelled from 0 to 100. The number line is divided into decade sections, distinguished alternately in red and blue, to help children find the ‘10s’ numbers. The number rods fit to this number line and are automatically added to this workspace in a horizontal orientation for ease of use.
• 0–1 Number Line
• 0–1.01 Decimal Number LineWith markings at every thousandth, hundredth and tenth to support the teaching of decimals.
• 0–31 Number Line (Small)A 0–31 number line with all the numbers visible in the screen area. Use this number line to work with wider number ranges such as 0–21.
17 Numicon Interactive Whiteboard Software
User Guide
© Oxford University Press 2017
• 0–31 Number Line (Large)A 0–31 number line that has been ‘zoomed in’ so that only around 12 numbers are visible in the screen area. Use this number line to work with smaller number ranges such as 5–10.
• Numicon 0–41 Number Rod Number Line
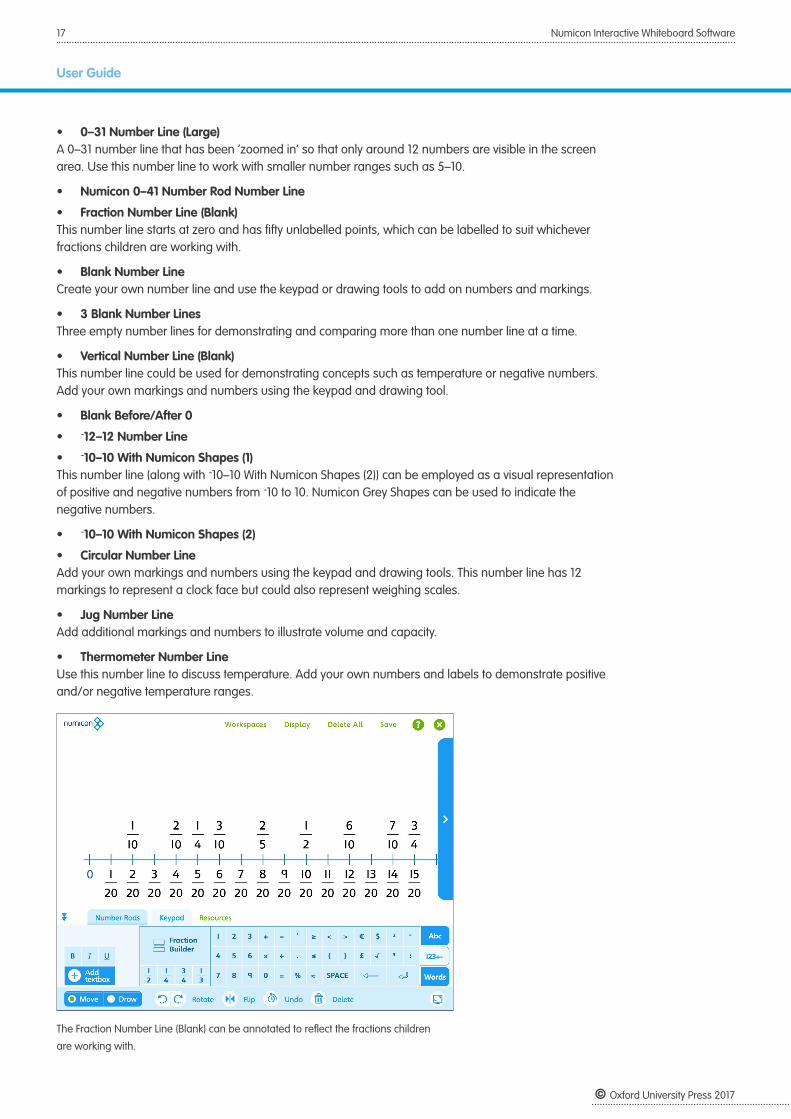
• Fraction Number Line (Blank) This number line starts at zero and has fifty unlabelled points, which can be labelled to suit whichever fractions children are working with.
• Blank Number LineCreate your own number line and use the keypad or drawing tools to add on numbers and markings.
• 3 Blank Number LinesThree empty number lines for demonstrating and comparing more than one number line at a time.
• Vertical Number Line (Blank) This number line could be used for demonstrating concepts such as temperature or negative numbers. Add your own markings and numbers using the keypad and drawing tool.
• Blank Before/After 0
• -12–12 Number Line
• -10–10 With Numicon Shapes (1)This number line (along with -10–10 With Numicon Shapes (2)) can be employed as a visual representation of positive and negative numbers from -10 to 10. Numicon Grey Shapes can be used to indicate the negative numbers.
• -10–10 With Numicon Shapes (2)
• Circular Number LineAdd your own markings and numbers using the keypad and drawing tools. This number line has 12 markings to represent a clock face but could also represent weighing scales.
• Jug Number LineAdd additional markings and numbers to illustrate volume and capacity.
• Thermometer Number Line Use this number line to discuss temperature. Add your own numbers and labels to demonstrate positive and/or negative temperature ranges.
The Fraction Number Line (Blank) can be annotated to reflect the fractions children
are working with.
18 Numicon Interactive Whiteboard Software
User Guide
© Oxford University Press 2017
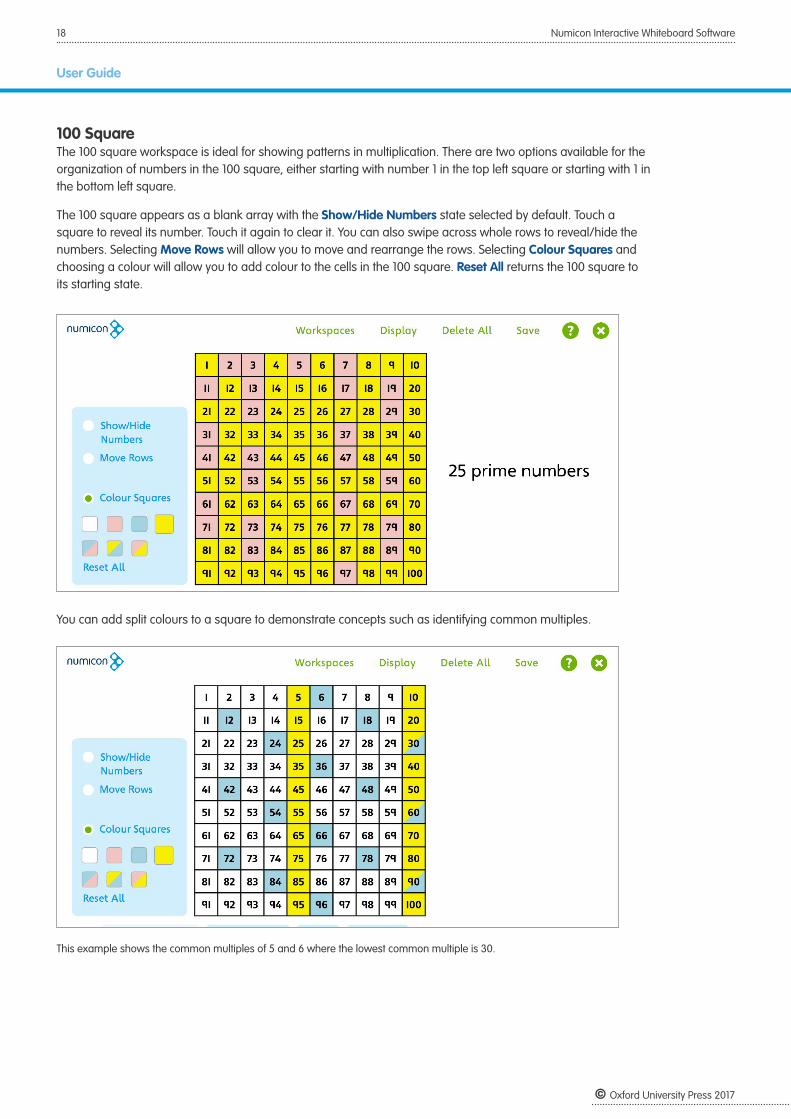
100 SquareThe 100 square workspace is ideal for showing patterns in multiplication. There are two options available for the organization of numbers in the 100 square, either starting with number 1 in the top left square or starting with 1 in the bottom left square.
The 100 square appears as a blank array with the Show/Hide Numbers state selected by default. Touch a square to reveal its number. Touch it again to clear it. You can also swipe across whole rows to reveal/hide the numbers. Selecting Move Rows will allow you to move and rearrange the rows. Selecting Colour Squares and choosing a colour will allow you to add colour to the cells in the 100 square. Reset All returns the 100 square to its starting state.
You can add split colours to a square to demonstrate concepts such as identifying common multiples.
This example shows the common multiples of 5 and 6 where the lowest common multiple is 30.
19 Numicon Interactive Whiteboard Software
User Guide
© Oxford University Press 2017
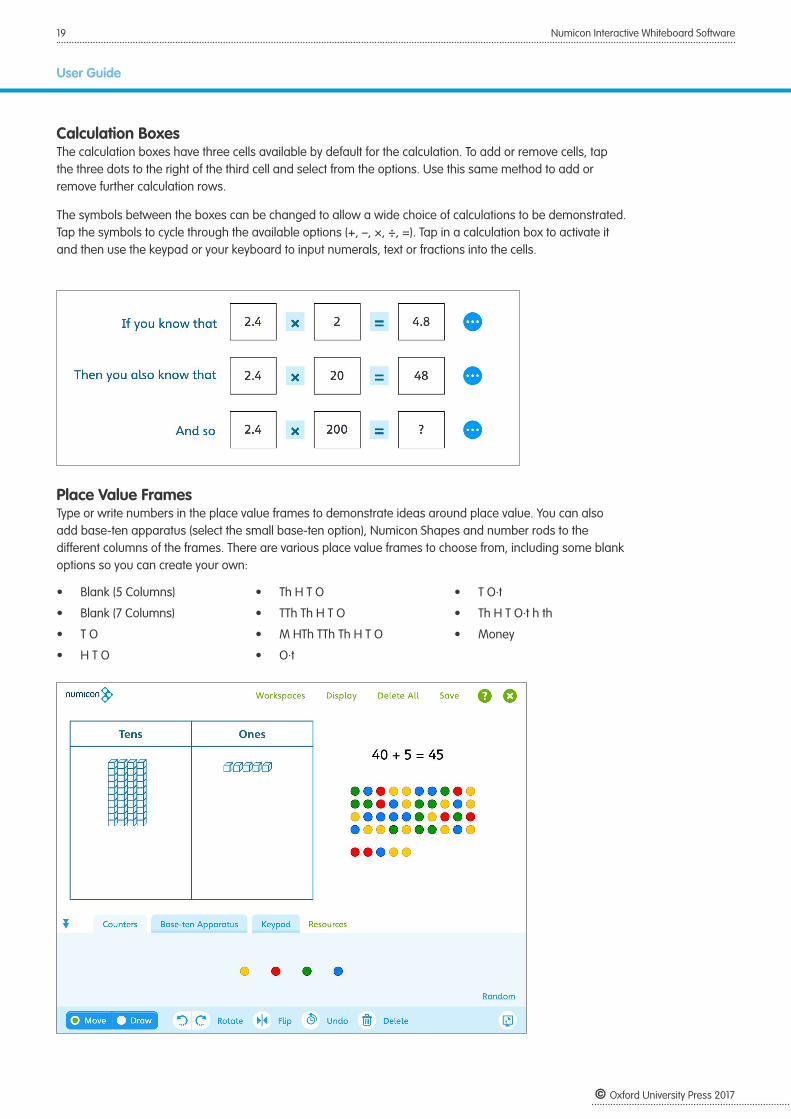
Calculation BoxesThe calculation boxes have three cells available by default for the calculation. To add or remove cells, tap the three dots to the right of the third cell and select from the options. Use this same method to add or remove further calculation rows.
The symbols between the boxes can be changed to allow a wide choice of calculations to be demonstrated. Tap the symbols to cycle through the available options (+, –, ×, ÷, =). Tap in a calculation box to activate it and then use the keypad or your keyboard to input numerals, text or fractions into the cells.
Place Value FramesType or write numbers in the place value frames to demonstrate ideas around place value. You can also add base-ten apparatus (select the small base-ten option), Numicon Shapes and number rods to the different columns of the frames. There are various place value frames to choose from, including some blank options so you can create your own:
• Blank (5 Columns)
• Blank (7 Columns)
• T O
• H T O
• Th H T O
• TTh Th H T O
• M HTh TTh Th H T O
• O·t
• T O·t
• Th H T O·t h th
• Money
20 Numicon Interactive Whiteboard Software
User Guide
© Oxford University Press 2017
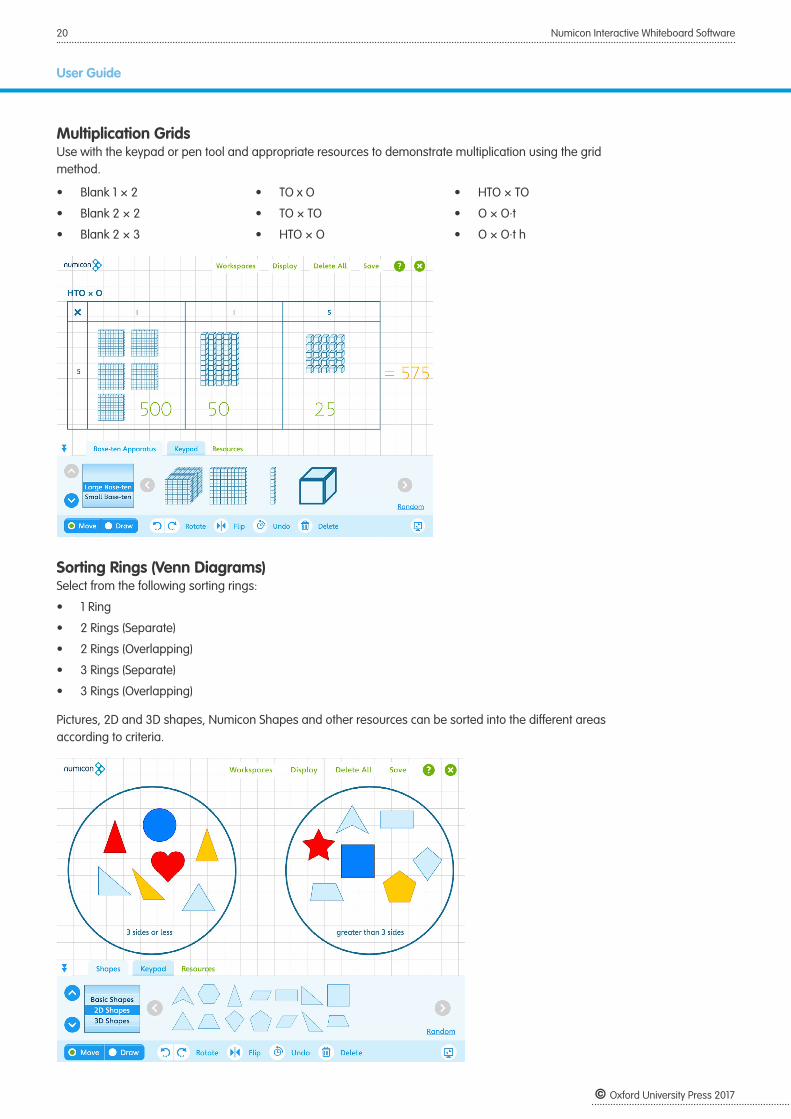
Multiplication Grids Use with the keypad or pen tool and appropriate resources to demonstrate multiplication using the grid method.
• Blank 1 × 2
• Blank 2 × 2
• Blank 2 × 3
• TO x O
• TO × TO
• HTO × O
• HTO × TO
• O × O·t
• O × O·t h
Sorting Rings (Venn Diagrams)Select from the following sorting rings:
• 1 Ring
• 2 Rings (Separate)
• 2 Rings (Overlapping)
• 3 Rings (Separate)
• 3 Rings (Overlapping)
Pictures, 2D and 3D shapes, Numicon Shapes and other resources can be sorted into the different areas according to criteria.
21 Numicon Interactive Whiteboard Software
User Guide
© Oxford University Press 2017
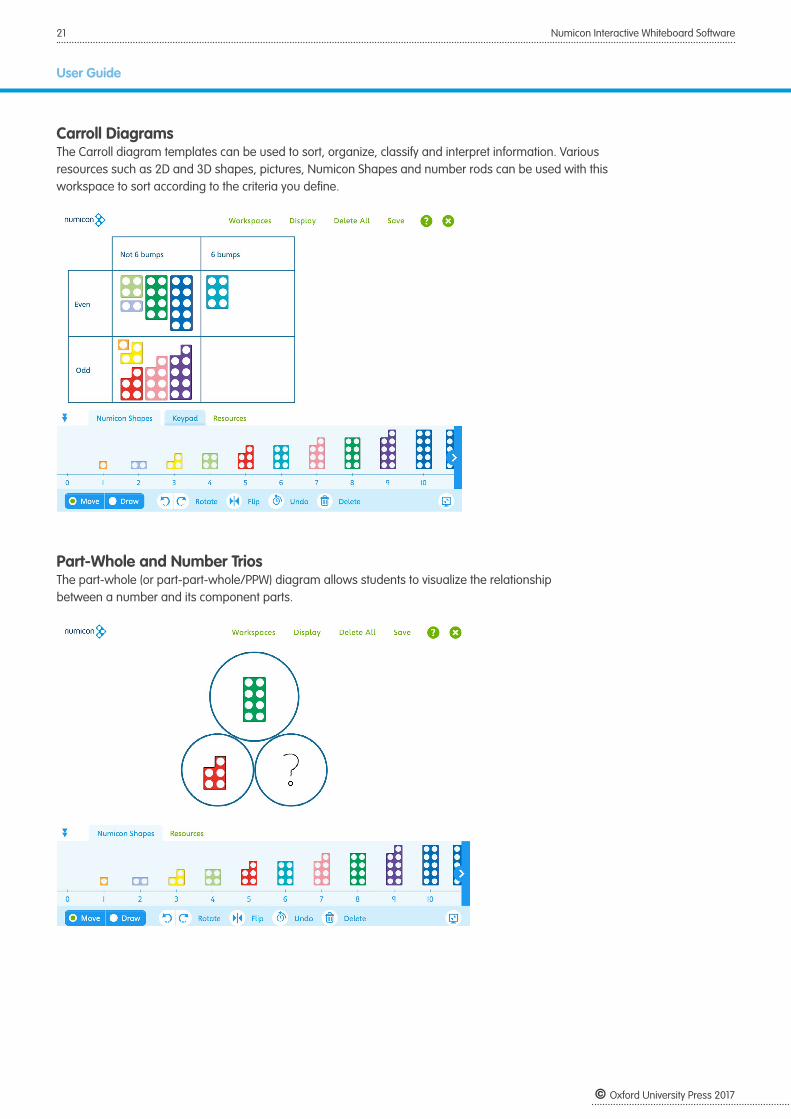
Carroll Diagrams The Carroll diagram templates can be used to sort, organize, classify and interpret information. Various resources such as 2D and 3D shapes, pictures, Numicon Shapes and number rods can be used with this workspace to sort according to the criteria you define.
Part-Whole and Number TriosThe part-whole (or part-part-whole/PPW) diagram allows students to visualize the relationship between a number and its component parts.
22 Numicon Interactive Whiteboard Software
User Guide
© Oxford University Press 2017
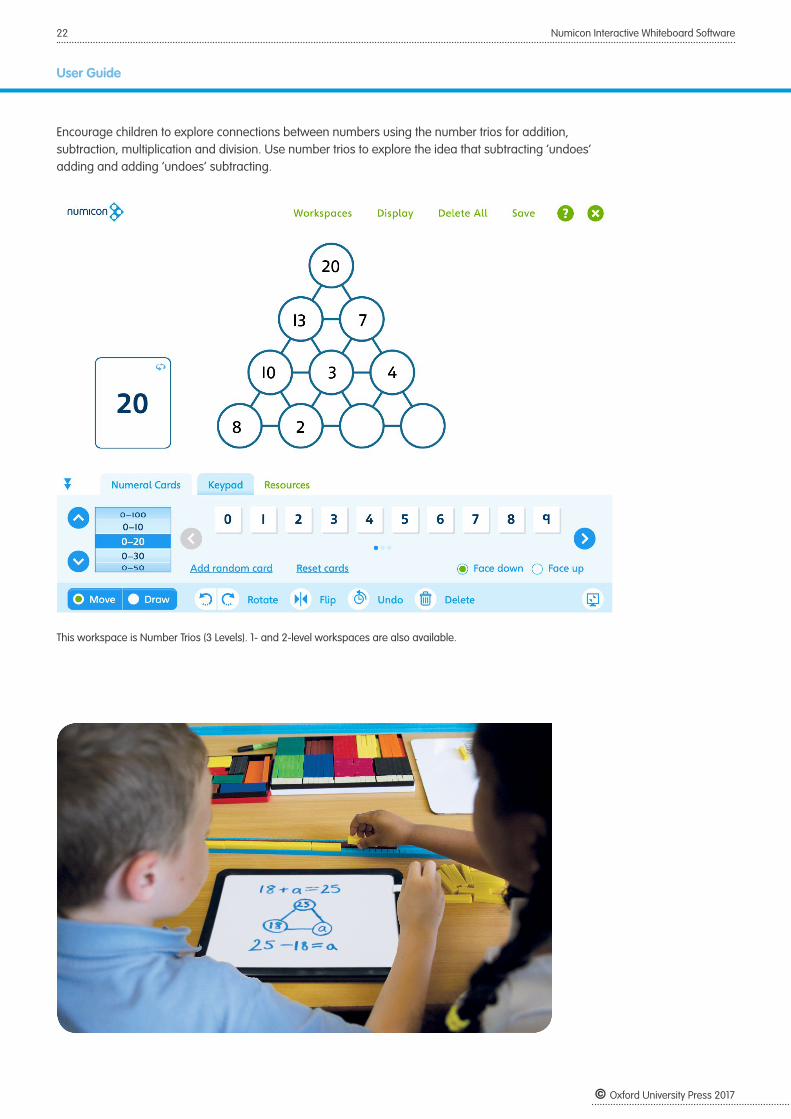
Encourage children to explore connections between numbers using the number trios for addition, subtraction, multiplication and division. Use number trios to explore the idea that subtracting ‘undoes’ adding and adding ‘undoes’ subtracting.
This workspace is Number Trios (3 Levels). 1- and 2-level workspaces are also available.
23 Numicon Interactive Whiteboard Software
User Guide
© Oxford University Press 2017
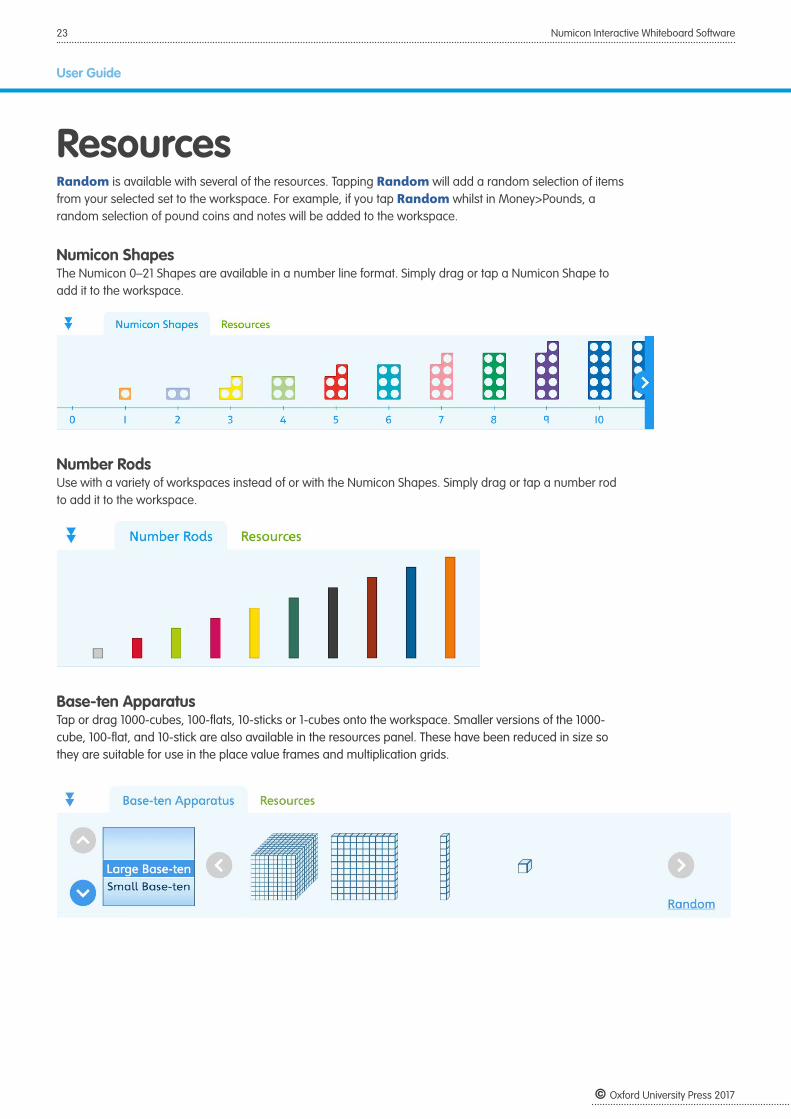
ResourcesRandom is available with several of the resources. Tapping Random will add a random selection of items from your selected set to the workspace. For example, if you tap Random whilst in Money>Pounds, a random selection of pound coins and notes will be added to the workspace.
Numicon Shapes The Numicon 0–21 Shapes are available in a number line format. Simply drag or tap a Numicon Shape to add it to the workspace.
Number Rods Use with a variety of workspaces instead of or with the Numicon Shapes. Simply drag or tap a number rod to add it to the workspace.
Base-ten Apparatus Tap or drag 1000-cubes, 100-flats, 10-sticks or 1-cubes onto the workspace. Smaller versions of the 1000-cube, 100-flat, and 10-stick are also available in the resources panel. These have been reduced in size so they are suitable for use in the place value frames and multiplication grids.
24 Numicon Interactive Whiteboard Software
User Guide
© Oxford University Press 2017
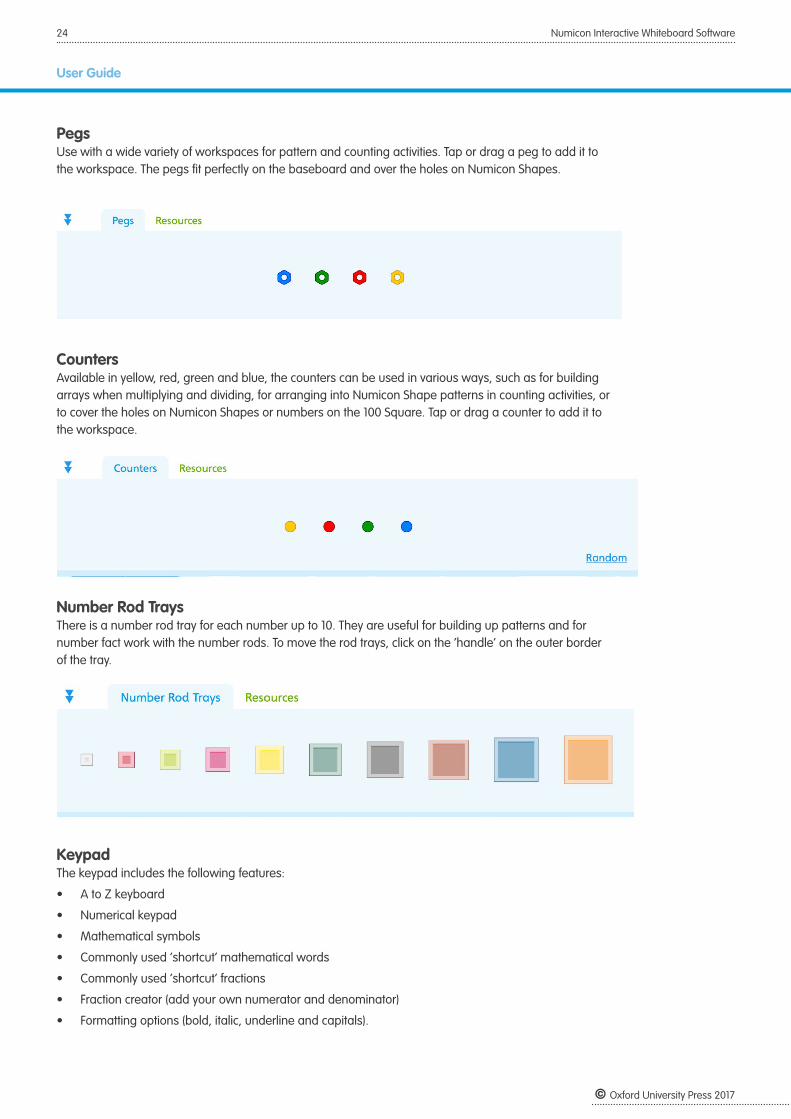
Pegs Use with a wide variety of workspaces for pattern and counting activities. Tap or drag a peg to add it to the workspace. The pegs fit perfectly on the baseboard and over the holes on Numicon Shapes.
CountersAvailable in yellow, red, green and blue, the counters can be used in various ways, such as for building arrays when multiplying and dividing, for arranging into Numicon Shape patterns in counting activities, or to cover the holes on Numicon Shapes or numbers on the 100 Square. Tap or drag a counter to add it to the workspace.
Number Rod TraysThere is a number rod tray for each number up to 10. They are useful for building up patterns and for number fact work with the number rods. To move the rod trays, click on the ‘handle’ on the outer border of the tray.
Keypad The keypad includes the following features:
• A to Z keyboard
• Numerical keypad
• Mathematical symbols
• Commonly used ‘shortcut’ mathematical words
• Commonly used ‘shortcut’ fractions
• Fraction creator (add your own numerator and denominator)
• Formatting options (bold, italic, underline and capitals).
25 Numicon Interactive Whiteboard Software
User Guide
© Oxford University Press 2017
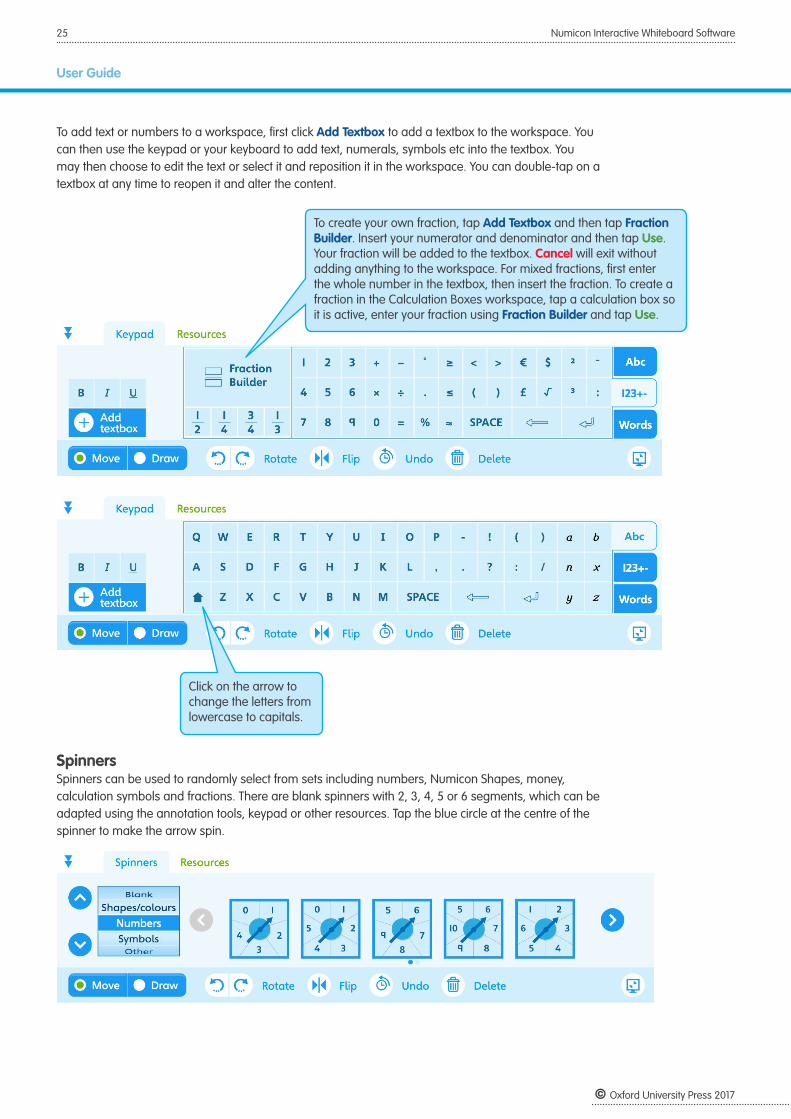
To add text or numbers to a workspace, first click Add Textbox to add a textbox to the workspace. You can then use the keypad or your keyboard to add text, numerals, symbols etc into the textbox. You may then choose to edit the text or select it and reposition it in the workspace. You can double-tap on a textbox at any time to reopen it and alter the content.
Spinners Spinners can be used to randomly select from sets including numbers, Numicon Shapes, money, calculation symbols and fractions. There are blank spinners with 2, 3, 4, 5 or 6 segments, which can be adapted using the annotation tools, keypad or other resources. Tap the blue circle at the centre of the spinner to make the arrow spin.
Click on the arrow to change the letters from lowercase to capitals.
To create your own fraction, tap Add Textbox and then tap Fraction Builder. Insert your numerator and denominator and then tap Use. Your fraction will be added to the textbox. Cancel will exit without adding anything to the workspace. For mixed fractions, first enter the whole number in the textbox, then insert the fraction. To create a fraction in the Calculation Boxes workspace, tap a calculation box so it is active, enter your fraction using Fraction Builder and tap Use.
26 Numicon Interactive Whiteboard Software
User Guide
© Oxford University Press 2017
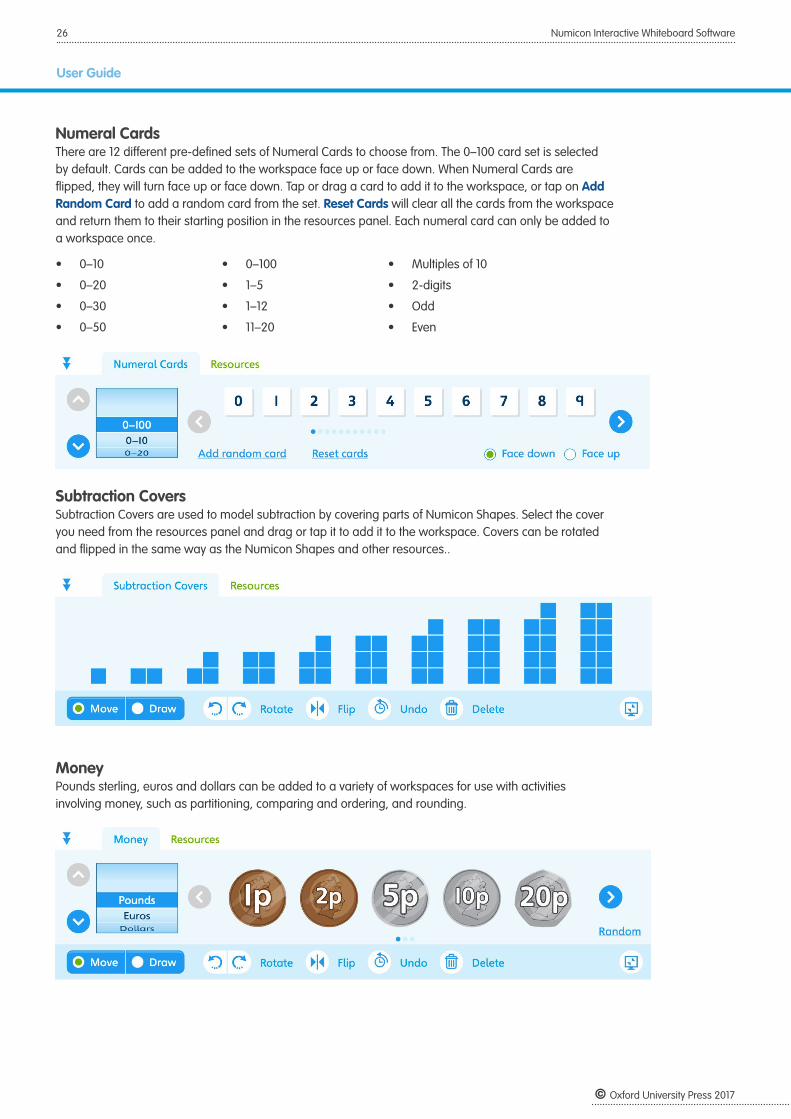
Numeral CardsThere are 12 different pre-defined sets of Numeral Cards to choose from. The 0–100 card set is selected by default. Cards can be added to the workspace face up or face down. When Numeral Cards are flipped, they will turn face up or face down. Tap or drag a card to add it to the workspace, or tap on Add Random Card to add a random card from the set. Reset Cards will clear all the cards from the workspace and return them to their starting position in the resources panel. Each numeral card can only be added to a workspace once.
• 0–10
• 0–20
• 0–30
• 0–50
• 0–100
• 1–5
• 1–12
• 11–20
• Multiples of 10
• 2-digits
• Odd
• Even
Subtraction Covers Subtraction Covers are used to model subtraction by covering parts of Numicon Shapes. Select the cover you need from the resources panel and drag or tap it to add it to the workspace. Covers can be rotated and flipped in the same way as the Numicon Shapes and other resources..
MoneyPounds sterling, euros and dollars can be added to a variety of workspaces for use with activities involving money, such as partitioning, comparing and ordering, and rounding.
27 Numicon Interactive Whiteboard Software
User Guide
© Oxford University Press 2017
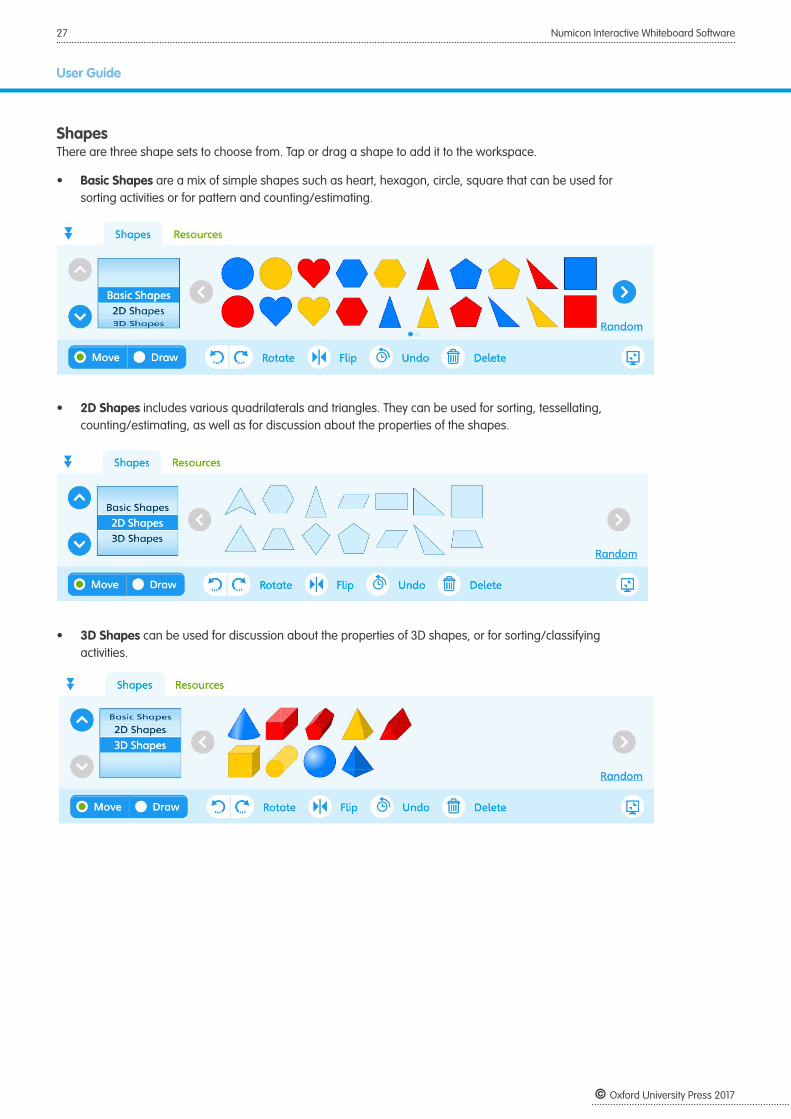
ShapesThere are three shape sets to choose from. Tap or drag a shape to add it to the workspace.
• Basic Shapes are a mix of simple shapes such as heart, hexagon, circle, square that can be used for sorting activities or for pattern and counting/estimating.
• 2D Shapes includes various quadrilaterals and triangles. They can be used for sorting, tessellating, counting/estimating, as well as for discussion about the properties of the shapes.
• 3D Shapes can be used for discussion about the properties of 3D shapes, or for sorting/classifying activities.
28 Numicon Interactive Whiteboard Software
User Guide
© Oxford University Press 2017
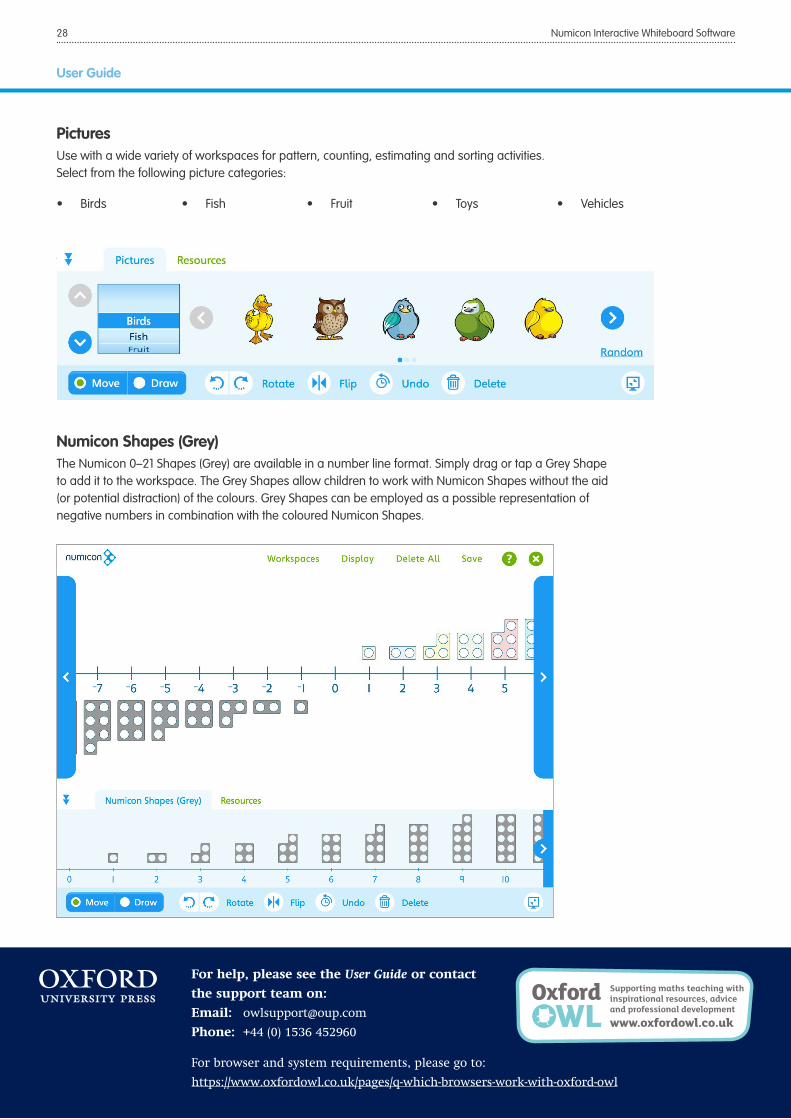
PicturesUse with a wide variety of workspaces for pattern, counting, estimating and sorting activities. Select from the following picture categories:
• Birds • Fish • Fruit • Toys • Vehicles
Tap or drag a picture to add it to the workspace.
Numicon Shapes (Grey) The Numicon 0–21 Shapes (Grey) are available in a number line format. Simply drag or tap a Grey Shape to add it to the workspace. The Grey Shapes allow children to work with Numicon Shapes without the aid (or potential distraction) of the colours. Grey Shapes can be employed as a possible representation of negative numbers in combination with the coloured Numicon Shapes.
For help, please see the User Guide or contact
the support team on:
Email: [email protected]
Phone: +44 (0) 1536 452960
For browser and system requirements, please go to:
https://www.oxfordowl.co.uk/pages/q-which-browsers-work-with-oxford-owl
3 Supporting maths teaching with inspirational resources, advice and professional development