Embed Size (px)
Citation preview
NVIDIA Graphics Card and Driver Installation Guide
(Windows NT 4.0 and Windows 2000)
Revision 2.1
March 1, 2001
NVIDIA Corporation NVIDIA Graphics Card & Driver Installation Guide
Published by NVIDIA Corporation 3535 Monroe Street Santa Clara, CA 95051 Copyright © 2001 NVIDIA Corporation. All rights reserved. This software may not, in whole or in part, be copied through any means, mechanical, electromechanical, or otherwise, without the express permission of NVIDIA Corporation. Information furnished is believed to be accurate and reliable. However, NVIDIA assumes no responsibility for the consequences of use of such information nor for any infringement of patents or other rights of third parties, which may result from its use. No License is granted by implication or otherwise under any patent or patent rights of NVIDIA Corporation. Specifications mentioned in the software are subject to change without notice. NVIDIA Corporation products are not authorized for use as critical components in life support devices or systems without express written approval of NVIDIA Corporation. NVIDIA, the NVIDIA logo, GeForce, GeForce2, GeForce2 Pro, GeForce2 Ultra, GeForce2 Go, GeForce2 MX, GeForce2 GTS, GeForce 256, Quadro2, NVIDIA Quadro2, Quadro2 Pro, Quadro2 MXR, Quadro, NVIDIA Quadro, Vanta, NVIDIA Vanta, TNT2, NVIDIA TNT2, TNT, NVIDIA TNT, RIVA, NVIDIA RIVA, NVIDIA RIVA 128ZX, and NVIDIA RIVA 128 are registered trademarks or trademarks of NVIDIA Corporation in the United States and/or other countries. Intel and Pentium are registered trademarks of Intel. Microsoft, Windows, Windows NT, Direct3D, DirectDraw, and DirectX are registered trademarks of Microsoft Corporation. Other company and product names may be trademarks or registered trademarks of the respective owners with which they are associated.

TABLE OF CONTENTS
1 ABOUT THIS DOCUMENT ..................................................................................................................................4
2 SYSTEM REQUIREMENTS .................................................................................................................................4 2.1 HARDWARE ........................................................................................................................................................4 2.2 SOFTWARE..........................................................................................................................................................5
2.2.1 NVIDIA Driver Software............................................................................................................................5 2.3 BEFORE YOU BEGIN ...........................................................................................................................................5
2.3.1 Safety Information......................................................................................................................................5 2.3.2 Removing an Existing Graphics Card........................................................................................................5
2.3.2.1 Removing an Existing Graphics Card: Windows NT 4.0 ......................................................................5 2.3.2.2 Removing an Existing Graphics Card: Windows 2000..........................................................................6 2.3.2.3 Administrator Access .............................................................................................................................6
3 INSTALLING THE NVIDIA GRAPHICS CARD ...............................................................................................7 3.1 INSTALLING THE HARDWARE..............................................................................................................................7 3.2 INSTALLING THE SOFTWARE (NVIDIA DRIVERS) ..............................................................................................7
3.2.1 Installing NVIDIA Drivers: Windows NT 4.0 ............................................................................................7 3.2.2 Installing NVIDIA Drivers: Windows 2000 (Standard Method) ..............................................................12 3.2.3 Installing NVIDIA Drivers: Windows 2000 (Alternate Method)..............................................................14
4 VIEWING PROPERTIES OF THE NVIDIA GRAPHICS CARD...................................................................18 4.1 VIEWING PROPERTIES OF THE NVIDIA GRAPHICS CARD: WINDOWS NT 4.0 ..................................................18 4.2 VIEWING PROPERTIES OF THE NVIDIA GRAPHICS CARD: WINDOWS 2000......................................................20
5 UNINSTALLING NVIDIA DRIVERS ................................................................................................................24 5.1 UNINSTALLING NVIDIA DRIVERS: WINDOWS NT 4.0.....................................................................................24 5.2 UNINSTALLING NVIDIA DRIVERS: WINDOWS 2000 ........................................................................................25
NVIDIA Corporation NVIDIA Graphics Card & Driver Installation Guide
1 About this Document This Installation Guide is designed to help you install and configure your new NVIDIA graphics card and associated drivers (software) on an IBM computer compatible system running either Microsoft Windows NT 4.0 or Windows 2000.
Links appear in blue underline. • Names of windows and dialog boxes appear in italics. •
NOTE: For example purposes, the NVIDA GeForce2 MX card and the current version of the NVIDIA driver files are
referenced throughout this document; your NVIDIA graphics card and the version number of your NVIDIA driver files may vary. (See System Requirements below for a list of NVIDIA graphics cards.)
2 System Requirements
2.1 Hardware You need the following hardware:
• •
•
•
•
•
Intel Pentium II 233 MHz or compatible CPU with Monitor Accelerated Graphics Port (AGP) 1.0/2.0 Compliant Motherboard NOTE: Some systems have integrated graphics functionality on the motherboard. Contact your motherboard
manufacturer to find out how to disable your on-board graphics. NVIDIA Graphics Card You must have one of the following NVIDIA graphics cards ready to install: GeForce2 Ultra GeForce2 Pro GeForce2 GTS GeForce2 MX GeForce 256
GeForce2 Go Quadro Quadro2 MXR Quadro2 Pro TNT2 Ultra
TNT2 Pro TNT2 TNT2 M64 Vanta Vanta LT
TNT
Additional Tools Have the following tools ready during installation:
A Phillips tip and/or a flat-bladed screwdriver to remove and reinstall the computer cover screws and card mounting screws. (See your computer manual for specific requirements.) An antistatic wrist strap (recommended but not required.)
4
NVIDIA Corporation NVIDIA Graphics Card & Driver Installation Guide
2.2 Software This guide explains installation of an NVIDIA graphics card and driver software on the following operating systems:
Windows 2000 • •
•
Windows NT 4.0 (Service Pack 4 or higher)
2.2.1 NVIDIA Driver Software
• Be sure to have on hand the NVIDIA Driver Installation software (files), which is supplied on CD-ROM or disk.
• The installation instructions assume that you have a Windows folder named Disk 1, which contains all the required NVIDIA Driver Installation files.
2.3 Before You Begin
2.3.1 Safety Information WARNING: Electric Shock is possible. The power supply in your computer contains high voltage. Do not remove
cables or open the computer while the power is on. Turn off the power and wait at least 10 seconds before removing cables or opening the unit.
CAUTION: Watch Out For Static Electricity! Although the NVIDIA graphics card is reasonably protected against static electricity, we recommend that you do not take the card out of the static-protective bag until you are grounded. You can ground yourself by using an antistatic wrist strap.
2.3.2 Removing an Existing Graphics Card If you are replacing an existing graphics card in your computer with the NVIDIA graphics card, it is recommended that you set your display driver to Standard VGA before shutting down your computer. To set your display driver to Standard VGA and remove an existing graphics card, click the appropriate section for your Windows operating system:
Removing an Existing Graphics Card: Windows NT 4.0 on this page Removing an Existing Graphics Card: Windows 2000 on page 6
•
2.3.2.1 Removing an Existing Graphics Card: Windows NT 4.0 1. From the active Windows NT 4.0 desktop, click Start > Settings > Control Panel to display the Control Panel. 2. Double-click the Add/Remove Programs icon to display the Add/Remove Programs Properties window. Any
driver program that is installed on your computer is listed here. 3. Click on the driver(s) you want to remove to highlight them. 4. Click Add/Remove and follow the prompts to complete removing the existing drivers. 5. Click OK when asked to restart the computer. 6. Important: Once the computer is in the process of starting up, turn off the power switch to completely shut down
the computer. For safety, be sure to:
Shut down your computer, making sure that the power is off. •
•
•
Unplug your computer.
Disconnect the monitor. 7. Remove the cover from the computer and locate the graphics card.
5
NVIDIA Corporation NVIDIA Graphics Card & Driver Installation Guide
8. Remove the retaining screw associated with the graphics card. 9. Remove the existing graphics card. 10. Go to Installing the NVIDIA Graphics Card on page 7.
2.3.2.2 Removing an Existing Graphics Card: Windows 2000 1. From your Windows 2000 desktop, right click on the desktop and select Properties, then click the Settings tab. 2. Click the Advanced button and then the Adapter tab. 3. Click the Properties button and then the Driver tab. 4. Click the Uninstall button and click OK. 5. Important: Click No each time you are asked to restart the computer and continue to click OK until the Display
Properties window is closed. 6. Click Start > Shut Down to open the Shutdown window. 7. Be sure that the Shutdown option is selected and then click OK. 8. For safety, be sure to:
Shut down your computer, making sure that the power is off. •
•
•
Unplug your computer.
Disconnect the monitor. 9. Remove the cover from the computer and locate the graphics card. 10. Remove the retaining screw associated with the graphics card. 11. Remove the existing graphics card. 12. Go to Installing the NVIDIA Graphics Card on page 7.
2.3.2.3 Administrator Access
Under Windows NT 4.0 and Windows 2000, you must have appropriate Administrator login access rights on the computer where you will install the NVIDIA driver files.
6
NVIDIA Corporation NVIDIA Graphics Card & Driver Installation Guide
3 Installing the NVIDIA Graphics Card
3.1 Installing the Hardware Your NVIDIA graphics card comes in an AGP version. To install the NVIDIA graphics card, follow these steps:
Obtain the NVIDIA graphics card that you want to install. If you followed the procedures in the previous section to remove an existing graphics card from your computer, continue to Step 5. If you did not have to remove an existing graphics card from your computer, be sure to:
Shut down your computer, making sure the power is off. Unplug your computer. Disconnect the monitor.
1. Remove the cover from the computer and locate the AGP slot (the darker connector around the middle of the computer’s motherboard).
2. Remove the bracket plate screw that is associated with the AGP slot in the back of the computer. 3. Be sure to wear the anti-static wrist straps before you handle the NVIDIA graphics card. 4. Position the card directly above the AGP slot. The card is designed to fit the connector in only one way. 5. Carefully press the card evenly and snugly into the AGP connector. Do not use force. Be sure that the metal
contacts on the bottom of the NVIDIA graphics card are securely seated in the AGP slot. 6. Once the card has been installed properly in its slot, use the bracket screw (you previously removed in step 2) to
secure it to the computer. 7. Connect the VGA monitor cable to the 15-pin connector on your NVIDIA graphics card.
If you have an NVIDIA dual-display card (for example, a GeForce2 MX card), it may contain additional connector pins for a DFP or TV. You can connect a DFP or TV to the appropriate connector at this time. NOTE: Once you have completed the NVIDIA driver installation, you can enable a DFP or TV as a secondary
display device when you configure the driver features. For further information, refer to your latest release of the NVIDIA Drivers for Windows: Features & Enhancements document.
8. Secure your computer cover, plug in the computer, and turn it on. 9. To install the NVIDIA drivers, click the appropriate section for your Windows operating system.
• Installing NVIDIA Drivers: Windows NT 4.0 on this page • Installing NVIDIA Drivers: Windows 2000 (Standard Method) on page 12 • Installing NVIDIA Drivers: Windows 2000 (Alternate Method) on page 14
3.2 Installing the Software (NVIDIA Drivers)
3.2.1 Installing NVIDIA Drivers: Windows NT 4.0 Before you begin to install the NVIDIA drivers on your Windows NT 4.0 system, follow these steps:
1. Be sure that you have completed the steps in Installing the Hardware on this page to install your NVIDIA graphics card on your computer that is running Windows NT 4.0.
2. Have on hand the NVIDIA Driver Installation files for your NVIDIA graphics card. 3. Important: Be sure you have Administrator login access to the computer on which you will install the NVIDIA
driver files.
7
NVIDIA Corporation NVIDIA Graphics Card & Driver Installation Guide
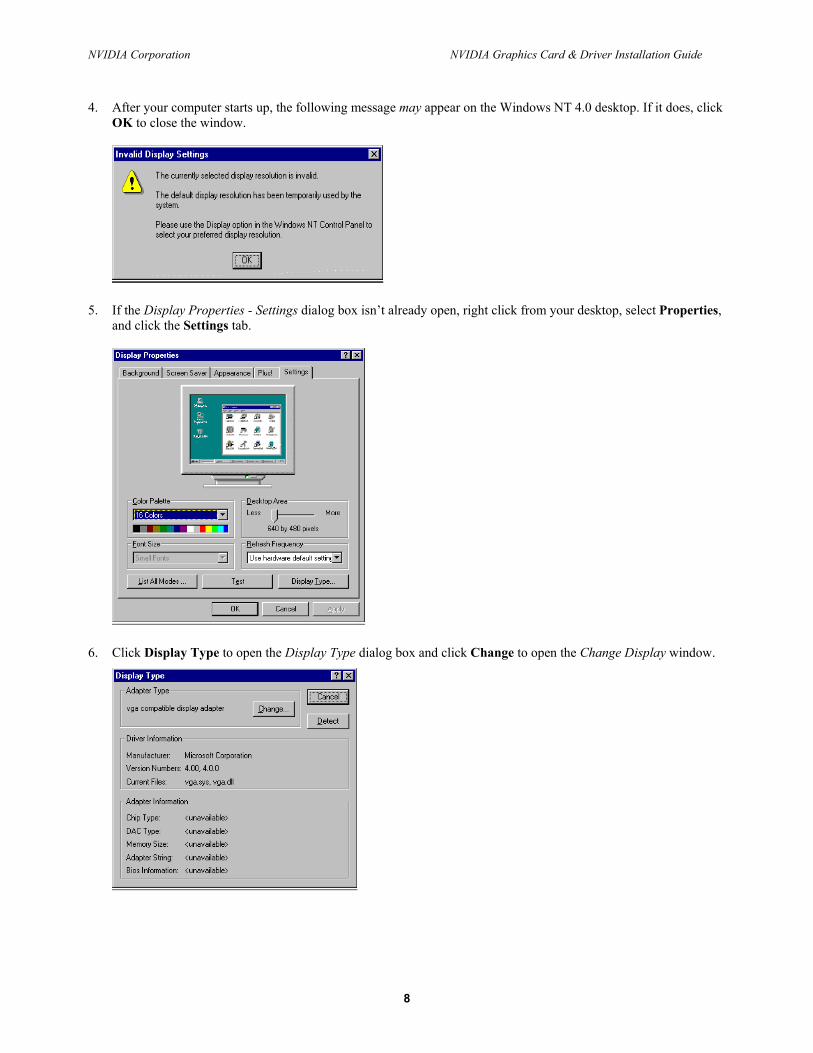
4. After your computer starts up, the following message may appear on the Windows NT 4.0 desktop. If it does, click OK to close the window.
5. If the Display Properties - Settings dialog box isn’t already open, right click from your desktop, select Properties, and click the Settings tab.
6. Click Display Type to open the Display Type dialog box and click Change to open the Change Display window.
8
NVIDIA Corporation NVIDIA Graphics Card & Driver Installation Guide
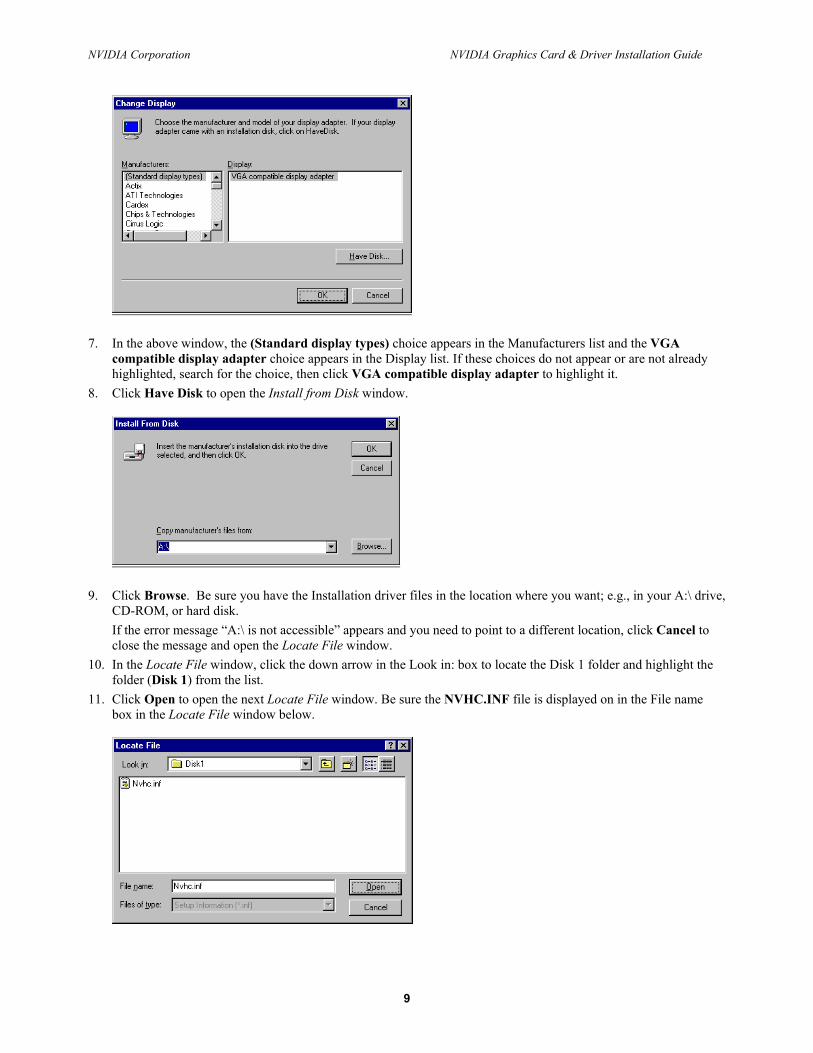
7. In the above window, the (Standard display types) choice appears in the Manufacturers list and the VGA compatible display adapter choice appears in the Display list. If these choices do not appear or are not already highlighted, search for the choice, then click VGA compatible display adapter to highlight it.
8. Click Have Disk to open the Install from Disk window.
9. Click Browse. Be sure you have the Installation driver files in the location where you want; e.g., in your A:\ drive, CD-ROM, or hard disk. If the error message “A:\ is not accessible” appears and you need to point to a different location, click Cancel to close the message and open the Locate File window.
10. In the Locate File window, click the down arrow in the Look in: box to locate the Disk 1 folder and highlight the folder (Disk 1) from the list.
11. Click Open to open the next Locate File window. Be sure the NVHC.INF file is displayed on in the File name box in the Locate File window below.
9
NVIDIA Corporation NVIDIA Graphics Card & Driver Installation Guide
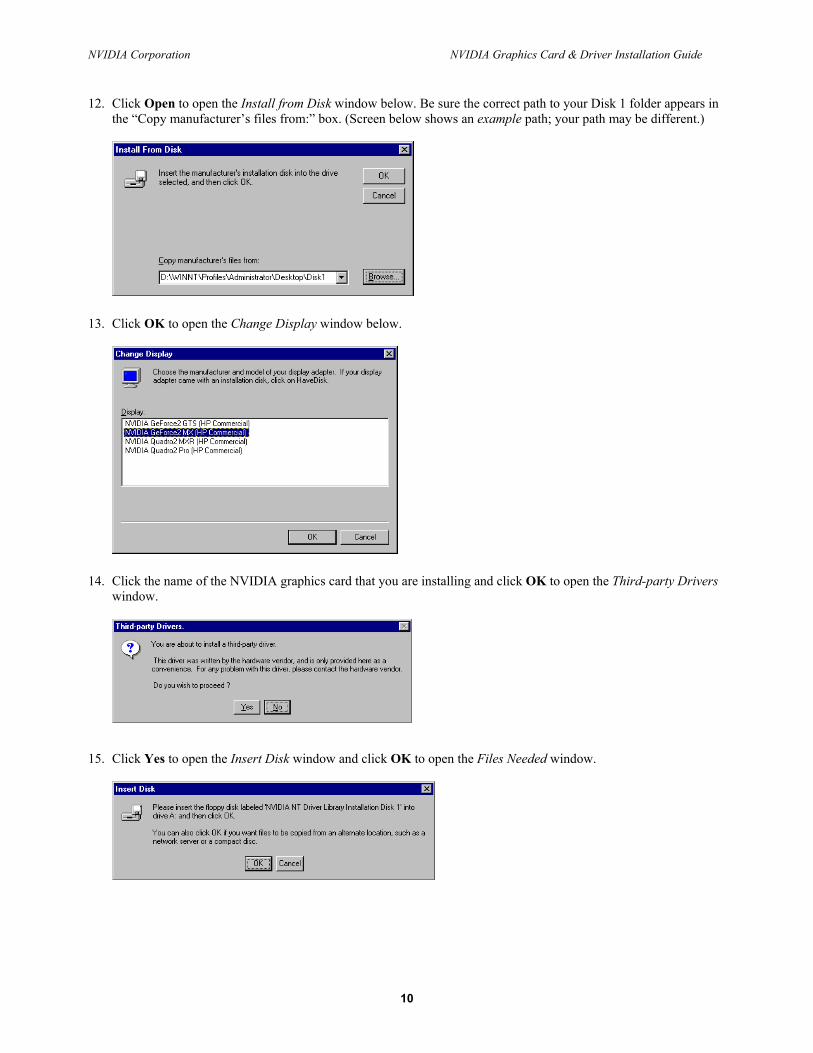
12. Click Open to open the Install from Disk window below. Be sure the correct path to your Disk 1 folder appears in the “Copy manufacturer’s files from:” box. (Screen below shows an example path; your path may be different.)
13. Click OK to open the Change Display window below.
14. Click the name of the NVIDIA graphics card that you are installing and click OK to open the Third-party Drivers
window.
15. Click Yes to open the Insert Disk window and click OK to open the Files Needed window.
10
NVIDIA Corporation NVIDIA Graphics Card & Driver Installation Guide
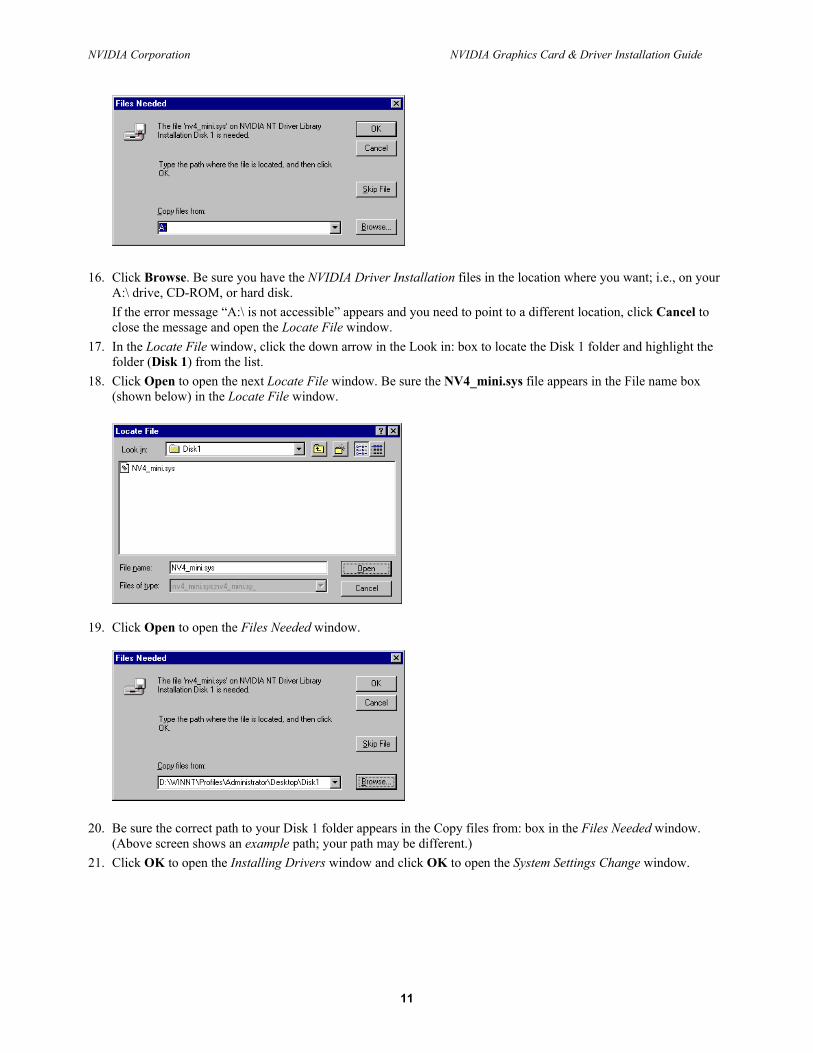
16. Click Browse. Be sure you have the NVIDIA Driver Installation files in the location where you want; i.e., on your
A:\ drive, CD-ROM, or hard disk. If the error message “A:\ is not accessible” appears and you need to point to a different location, click Cancel to close the message and open the Locate File window.
17. In the Locate File window, click the down arrow in the Look in: box to locate the Disk 1 folder and highlight the folder (Disk 1) from the list.
18. Click Open to open the next Locate File window. Be sure the NV4_mini.sys file appears in the File name box (shown below) in the Locate File window.
19. Click Open to open the Files Needed window.
20. Be sure the correct path to your Disk 1 folder appears in the Copy files from: box in the Files Needed window.
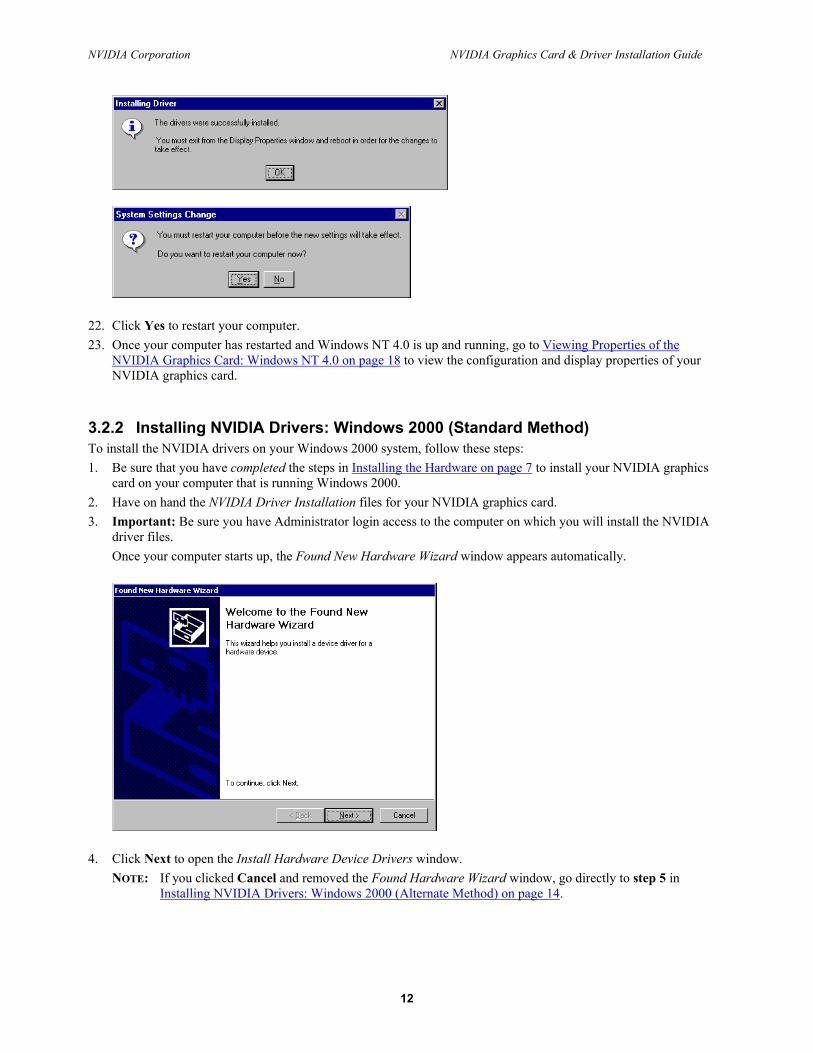
(Above screen shows an example path; your path may be different.) 21. Click OK to open the Installing Drivers window and click OK to open the System Settings Change window.
11
NVIDIA Corporation NVIDIA Graphics Card & Driver Installation Guide
22. Click Yes to restart your computer. 23. Once your computer has restarted and Windows NT 4.0 is up and running, go to Viewing Properties of the
NVIDIA Graphics Card: Windows NT 4.0 on page 18 to view the configuration and display properties of your NVIDIA graphics card.
3.2.2 Installing NVIDIA Drivers: Windows 2000 (Standard Method) To install the NVIDIA drivers on your Windows 2000 system, follow these steps: 1. Be sure that you have completed the steps in Installing the Hardware on page 7 to install your NVIDIA graphics
card on your computer that is running Windows 2000. 2. Have on hand the NVIDIA Driver Installation files for your NVIDIA graphics card. 3. Important: Be sure you have Administrator login access to the computer on which you will install the NVIDIA
driver files. Once your computer starts up, the Found New Hardware Wizard window appears automatically.
4. Click Next to open the Install Hardware Device Drivers window.
NOTE: If you clicked Cancel and removed the Found Hardware Wizard window, go directly to step 5 in Installing NVIDIA Drivers: Windows 2000 (Alternate Method) on page 14.
12
NVIDIA Corporation NVIDIA Graphics Card & Driver Installation Guide
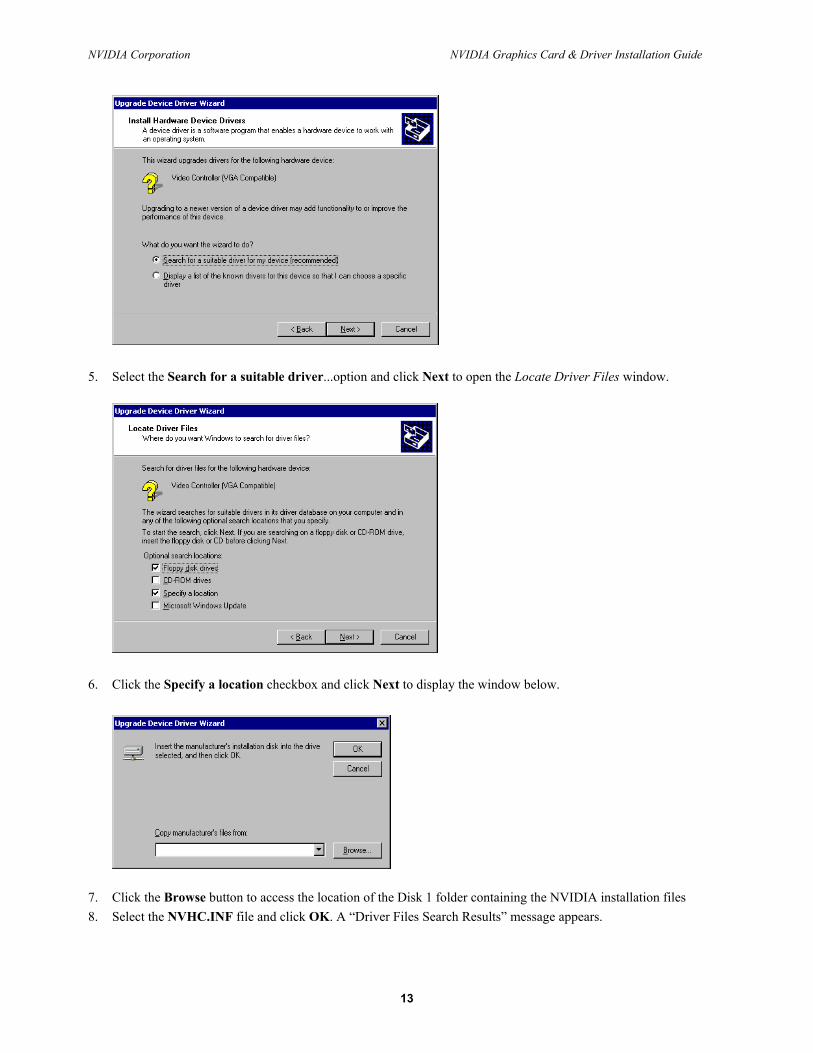
5. Select the Search for a suitable driver...option and click Next to open the Locate Driver Files window.
6. Click the Specify a location checkbox and click Next to display the window below.
7. Click the Browse button to access the location of the Disk 1 folder containing the NVIDIA installation files 8. Select the NVHC.INF file and click OK. A “Driver Files Search Results” message appears.
13
NVIDIA Corporation NVIDIA Graphics Card & Driver Installation Guide
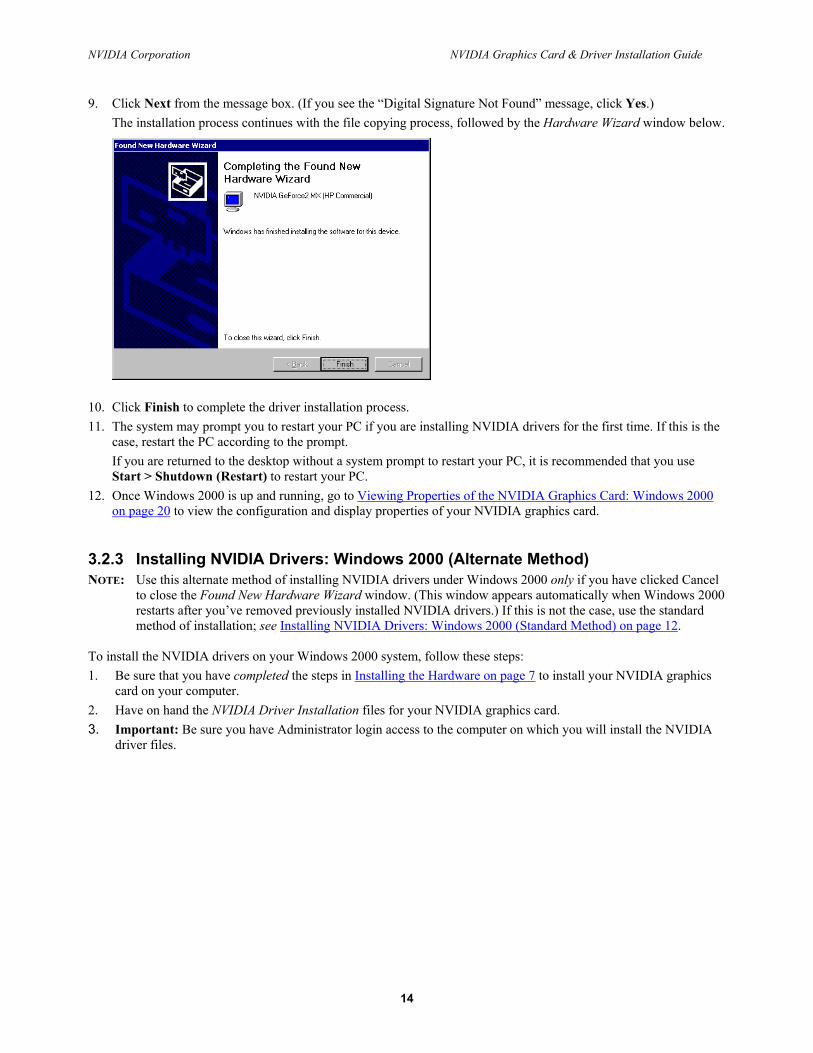
9. Click Next from the message box. (If you see the “Digital Signature Not Found” message, click Yes.) The installation process continues with the file copying process, followed by the Hardware Wizard window below.
10. Click Finish to complete the driver installation process. 11. The system may prompt you to restart your PC if you are installing NVIDIA drivers for the first time. If this is the
case, restart the PC according to the prompt. If you are returned to the desktop without a system prompt to restart your PC, it is recommended that you use Start > Shutdown (Restart) to restart your PC.
12. Once Windows 2000 is up and running, go to Viewing Properties of the NVIDIA Graphics Card: Windows 2000 on page 20 to view the configuration and display properties of your NVIDIA graphics card.
3.2.3 Installing NVIDIA Drivers: Windows 2000 (Alternate Method) NOTE: Use this alternate method of installing NVIDIA drivers under Windows 2000 only if you have clicked Cancel
to close the Found New Hardware Wizard window. (This window appears automatically when Windows 2000 restarts after you’ve removed previously installed NVIDIA drivers.) If this is not the case, use the standard method of installation; see Installing NVIDIA Drivers: Windows 2000 (Standard Method) on page 12.
To install the NVIDIA drivers on your Windows 2000 system, follow these steps: 1. Be sure that you have completed the steps in Installing the Hardware on page 7 to install your NVIDIA graphics
card on your computer. 2. Have on hand the NVIDIA Driver Installation files for your NVIDIA graphics card. 3. Important: Be sure you have Administrator login access to the computer on which you will install the NVIDIA
driver files.
14
NVIDIA Corporation NVIDIA Graphics Card & Driver Installation Guide
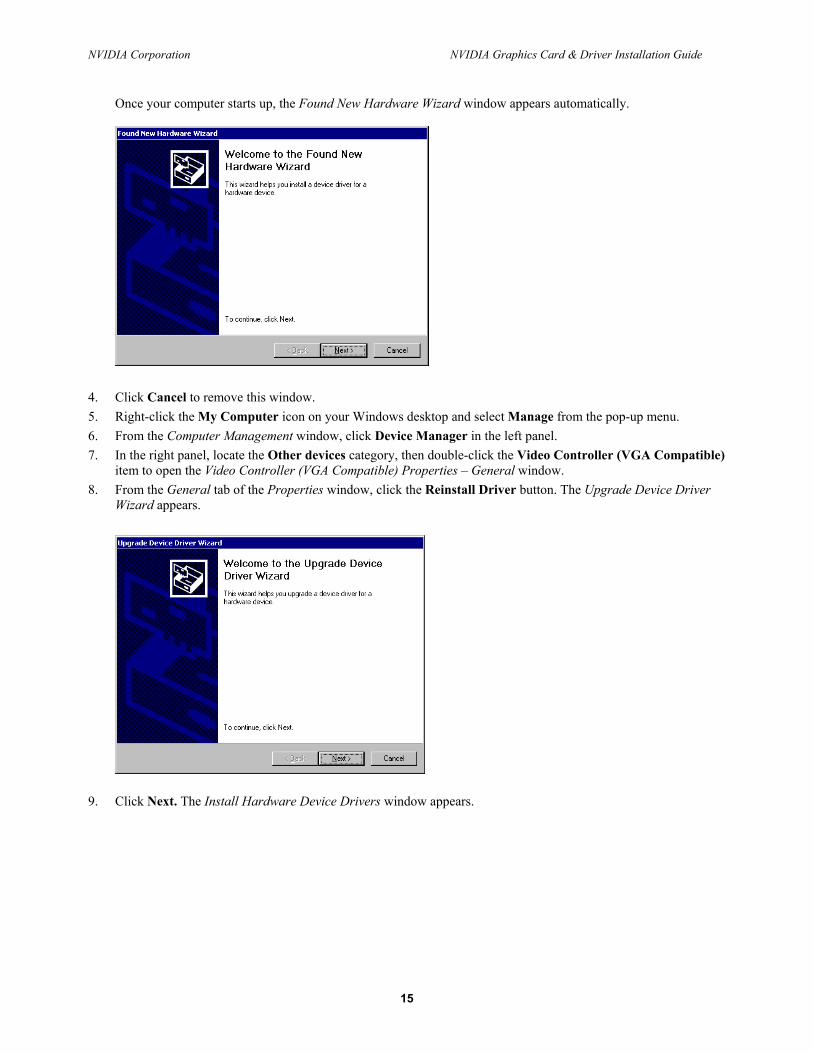
Once your computer starts up, the Found New Hardware Wizard window appears automatically.
4. Click Cancel to remove this window. 5. Right-click the My Computer icon on your Windows desktop and select Manage from the pop-up menu. 6. From the Computer Management window, click Device Manager in the left panel. 7. In the right panel, locate the Other devices category, then double-click the Video Controller (VGA Compatible)
item to open the Video Controller (VGA Compatible) Properties – General window. 8. From the General tab of the Properties window, click the Reinstall Driver button. The Upgrade Device Driver
Wizard appears.
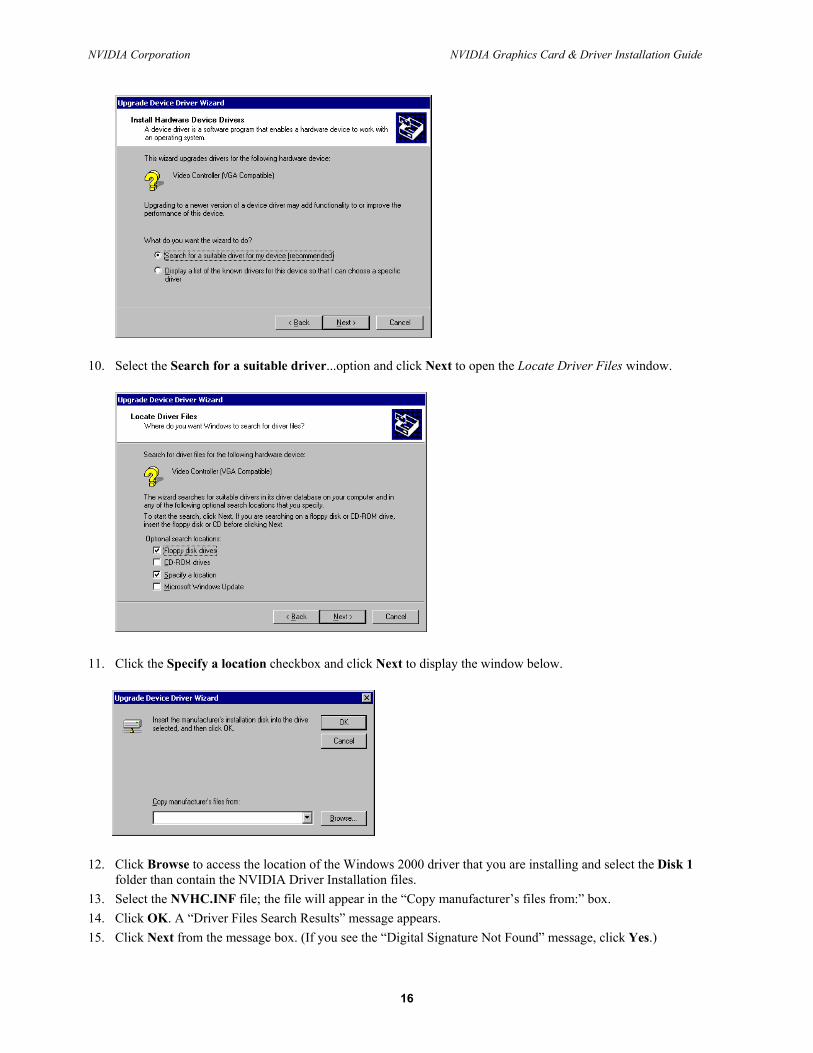
9. Click Next. The Install Hardware Device Drivers window appears.
15
NVIDIA Corporation NVIDIA Graphics Card & Driver Installation Guide
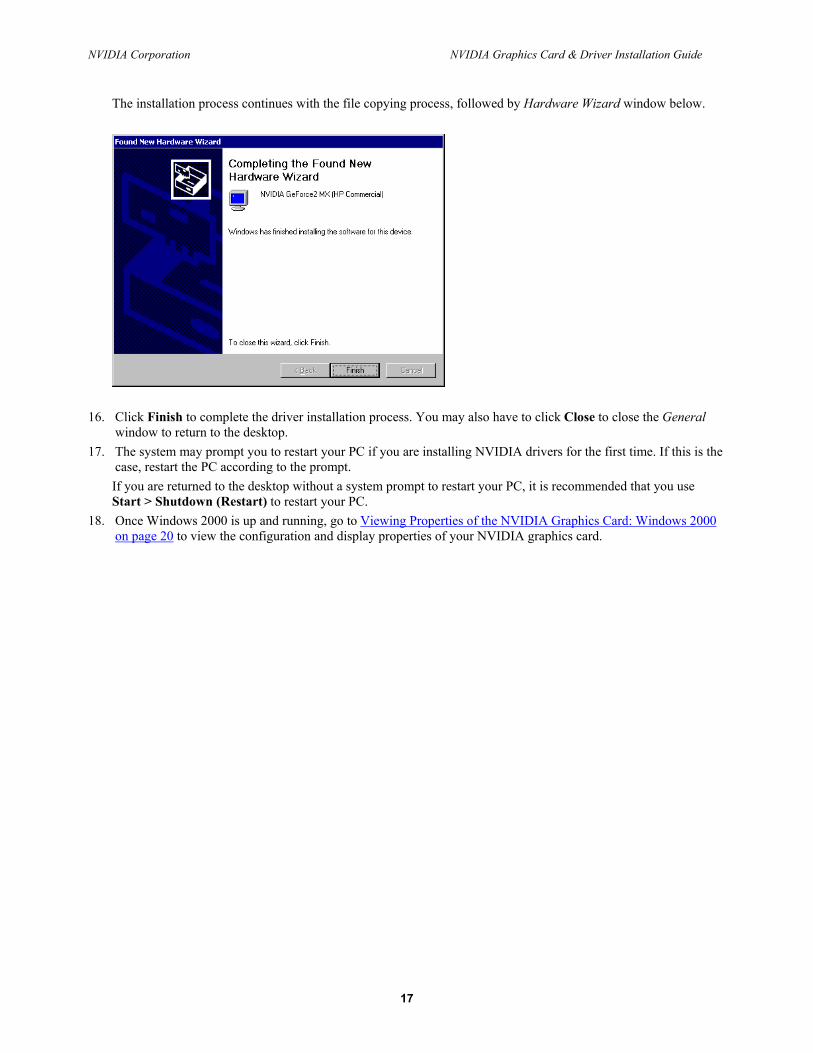
10. Select the Search for a suitable driver...option and click Next to open the Locate Driver Files window.
11. Click the Specify a location checkbox and click Next to display the window below.
12. Click Browse to access the location of the Windows 2000 driver that you are installing and select the Disk 1 folder than contain the NVIDIA Driver Installation files.
13. Select the NVHC.INF file; the file will appear in the “Copy manufacturer’s files from:” box. 14. Click OK. A “Driver Files Search Results” message appears. 15. Click Next from the message box. (If you see the “Digital Signature Not Found” message, click Yes.)
16
NVIDIA Corporation NVIDIA Graphics Card & Driver Installation Guide
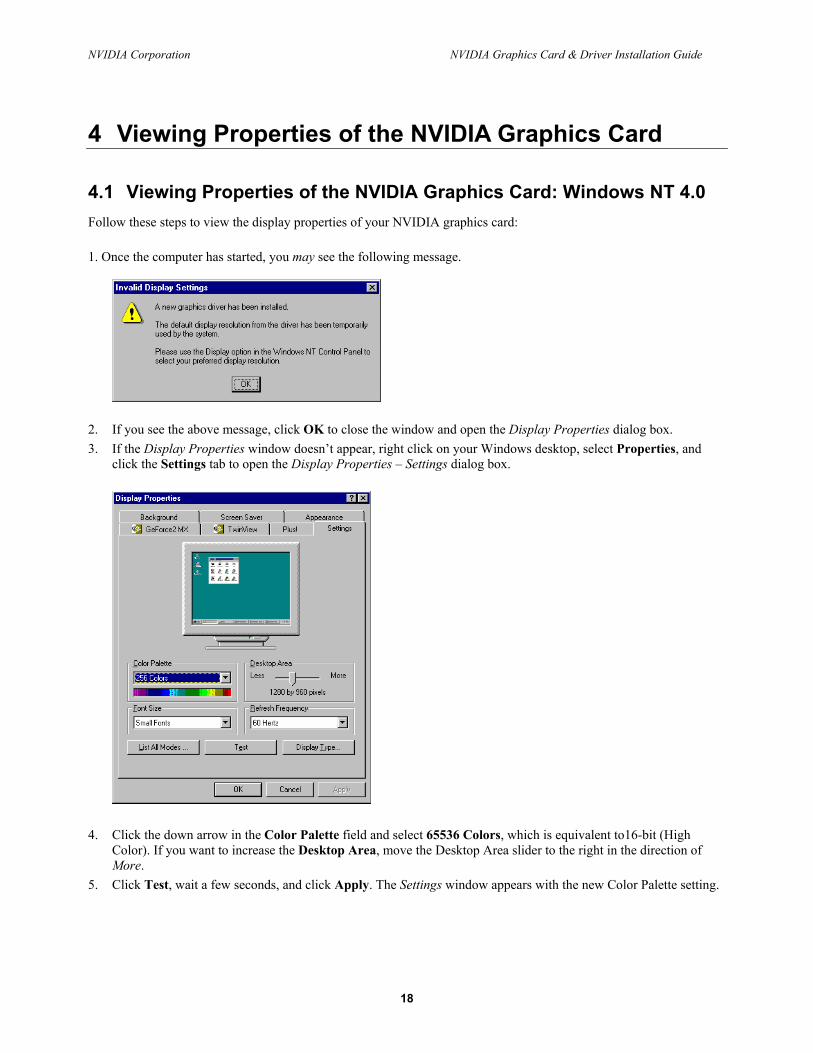
The installation process continues with the file copying process, followed by Hardware Wizard window below.
16. Click Finish to complete the driver installation process. You may also have to click Close to close the General window to return to the desktop.
17. The system may prompt you to restart your PC if you are installing NVIDIA drivers for the first time. If this is the case, restart the PC according to the prompt. If you are returned to the desktop without a system prompt to restart your PC, it is recommended that you use Start > Shutdown (Restart) to restart your PC.
18. Once Windows 2000 is up and running, go to Viewing Properties of the NVIDIA Graphics Card: Windows 2000 on page 20 to view the configuration and display properties of your NVIDIA graphics card.
17
NVIDIA Corporation NVIDIA Graphics Card & Driver Installation Guide
4 Viewing Properties of the NVIDIA Graphics Card
4.1 Viewing Properties of the NVIDIA Graphics Card: Windows NT 4.0 Follow these steps to view the display properties of your NVIDIA graphics card: 1. Once the computer has started, you may see the following message.
2. If you see the above message, click OK to close the window and open the Display Properties dialog box. 3. If the Display Properties window doesn’t appear, right click on your Windows desktop, select Properties, and
click the Settings tab to open the Display Properties – Settings dialog box.
4. Click the down arrow in the Color Palette field and select 65536 Colors, which is equivalent to16-bit (High
Color). If you want to increase the Desktop Area, move the Desktop Area slider to the right in the direction of More.
5. Click Test, wait a few seconds, and click Apply. The Settings window appears with the new Color Palette setting.
18
NVIDIA Corporation NVIDIA Graphics Card & Driver Installation Guide
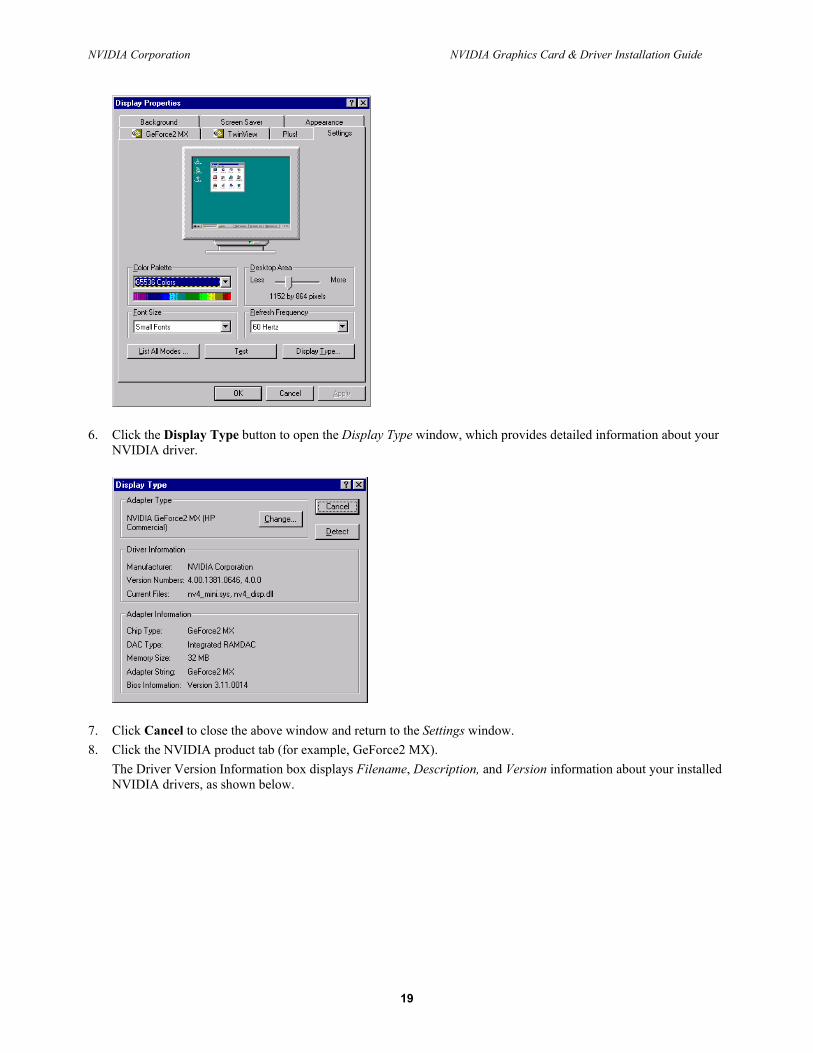
6. Click the Display Type button to open the Display Type window, which provides detailed information about your
NVIDIA driver.
7. Click Cancel to close the above window and return to the Settings window. 8. Click the NVIDIA product tab (for example, GeForce2 MX).
The Driver Version Information box displays Filename, Description, and Version information about your installed NVIDIA drivers, as shown below.
19
NVIDIA Corporation NVIDIA Graphics Card & Driver Installation Guide
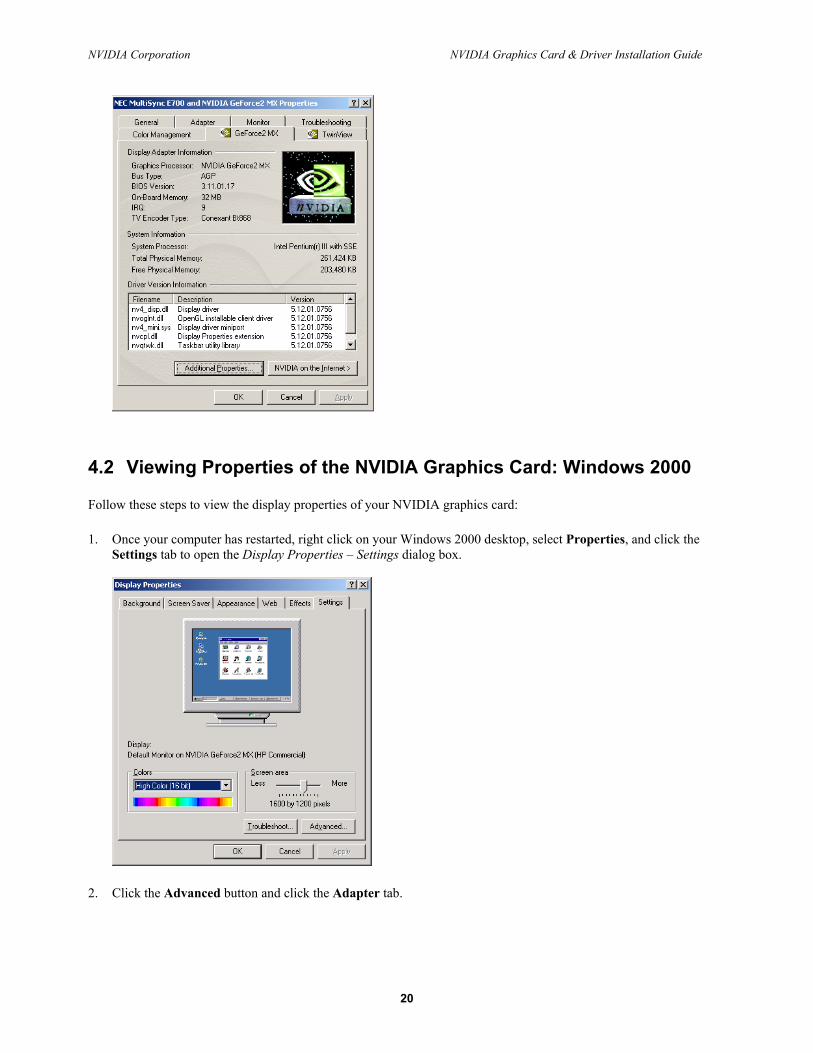
4.2 Viewing Properties of the NVIDIA Graphics Card: Windows 2000 Follow these steps to view the display properties of your NVIDIA graphics card: 1. Once your computer has restarted, right click on your Windows 2000 desktop, select Properties, and click the
Settings tab to open the Display Properties – Settings dialog box.
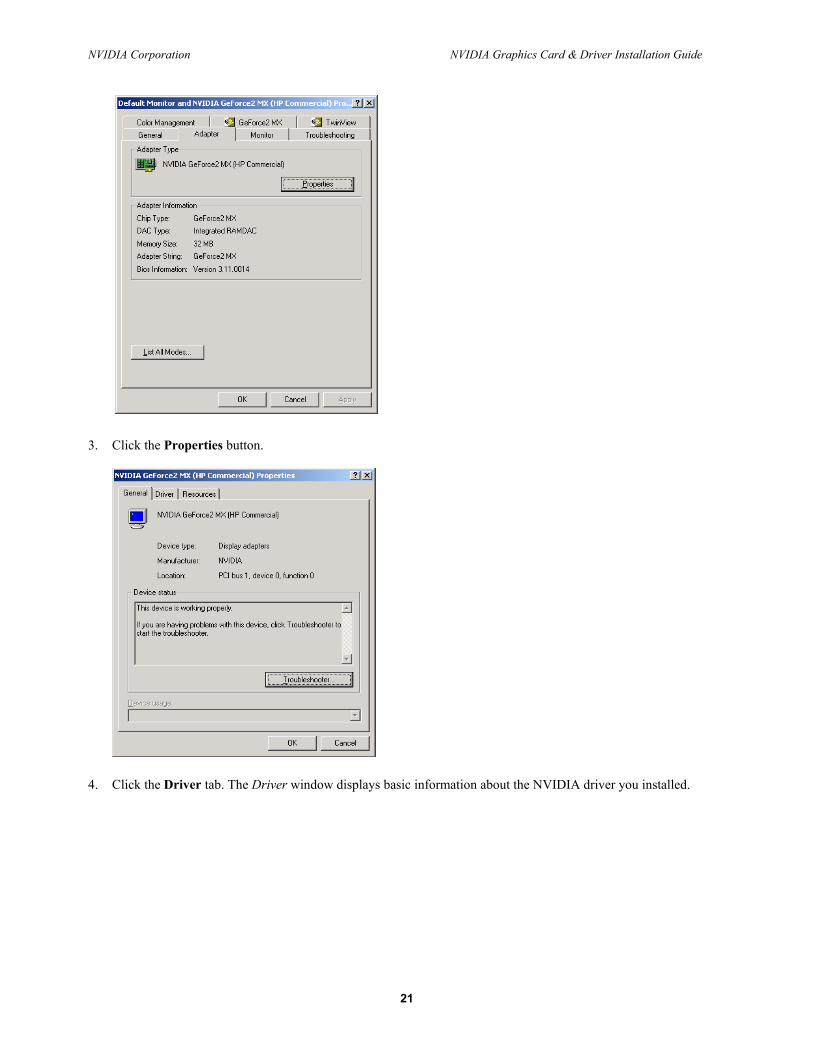
2. Click the Advanced button and click the Adapter tab.
20
NVIDIA Corporation NVIDIA Graphics Card & Driver Installation Guide
3. Click the Properties button.
4. Click the Driver tab. The Driver window displays basic information about the NVIDIA driver you installed.
21

NVIDIA Corporation NVIDIA Graphics Card & Driver Installation Guide
5. Click the Driver Details button to open the Driver File Details window, which lists the NVIDIA driver files installed on your computer
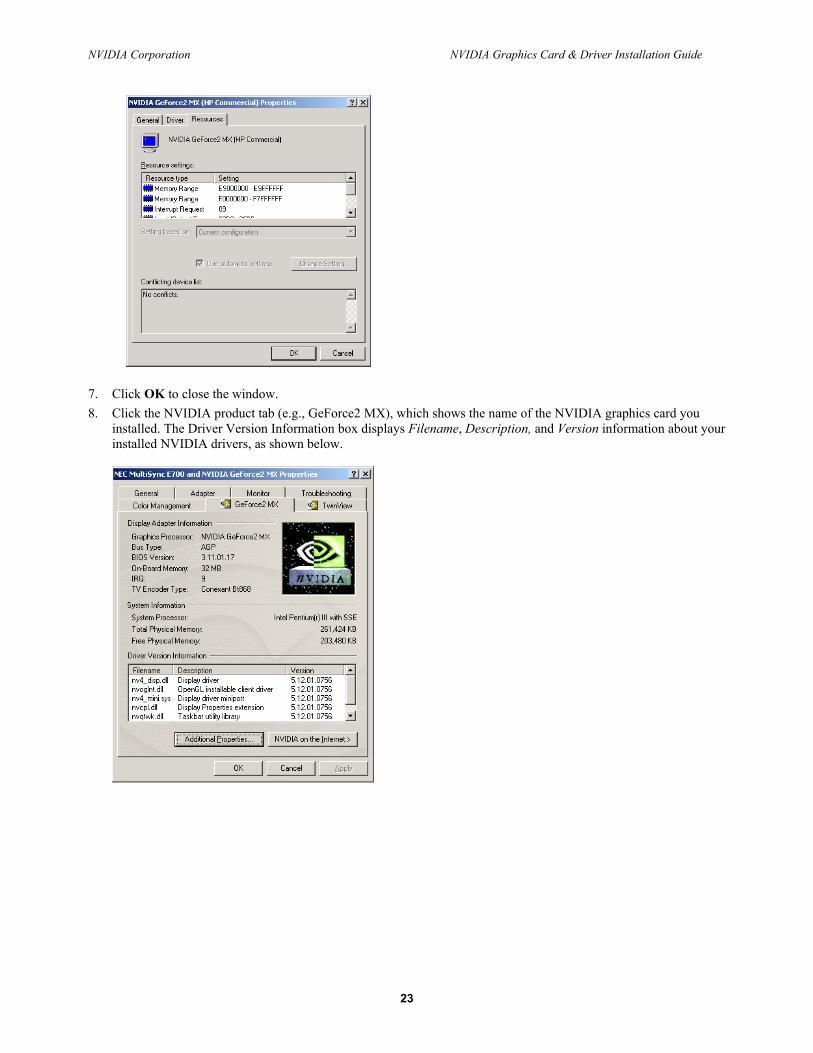
6. Click OK to return to the Driver window and click the Resources tab. The Resources window displays the
resource settings of your NVIDIA graphics card. Use the scroll bar to see the complete list of settings.
22
NVIDIA Corporation NVIDIA Graphics Card & Driver Installation Guide
7. Click OK to close the window. 8. Click the NVIDIA product tab (e.g., GeForce2 MX), which shows the name of the NVIDIA graphics card you
installed. The Driver Version Information box displays Filename, Description, and Version information about your installed NVIDIA drivers, as shown below.
23
NVIDIA Corporation NVIDIA Graphics Card & Driver Installation Guide
5 Uninstalling NVIDIA Drivers
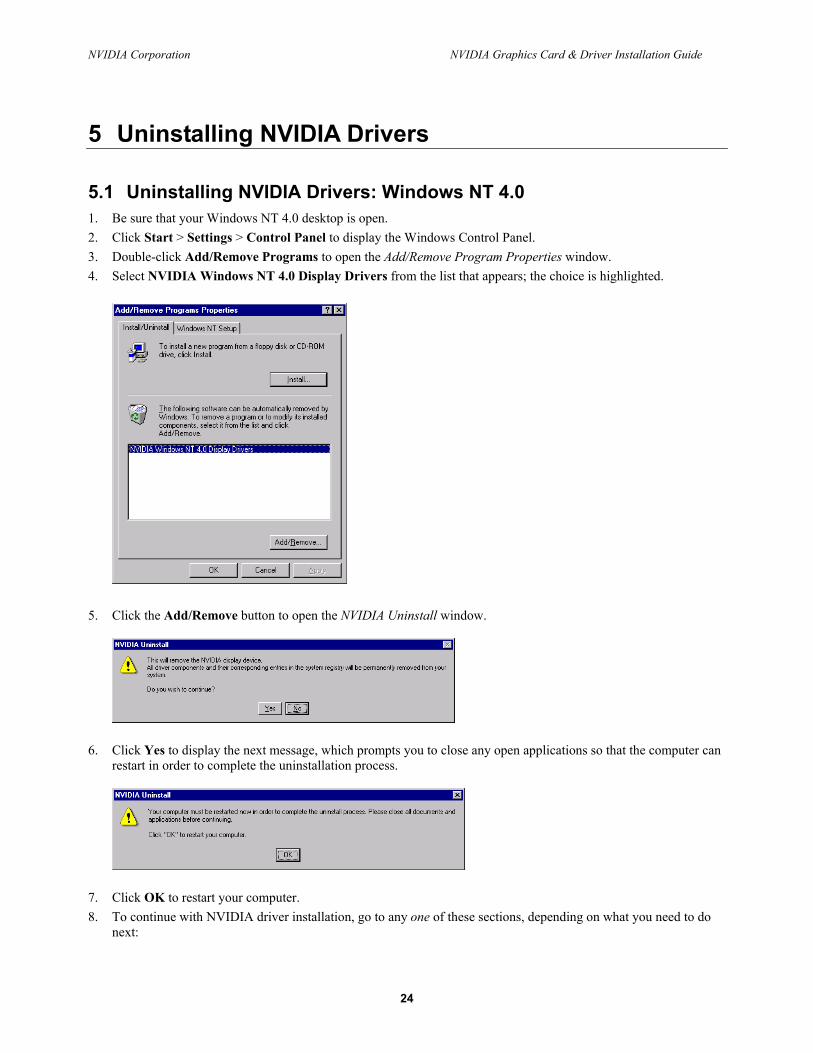
5.1 Uninstalling NVIDIA Drivers: Windows NT 4.0 1. Be sure that your Windows NT 4.0 desktop is open. 2. Click Start > Settings > Control Panel to display the Windows Control Panel. 3. Double-click Add/Remove Programs to open the Add/Remove Program Properties window. 4. Select NVIDIA Windows NT 4.0 Display Drivers from the list that appears; the choice is highlighted.
5. Click the Add/Remove button to open the NVIDIA Uninstall window.
6. Click Yes to display the next message, which prompts you to close any open applications so that the computer can
restart in order to complete the uninstallation process.
7. Click OK to restart your computer. 8. To continue with NVIDIA driver installation, go to any one of these sections, depending on what you need to do
next:
24
NVIDIA Corporation NVIDIA Graphics Card & Driver Installation Guide
25
• Removing an Existing Graphics Card on page 5
Installing the Hardware on page 7 •
Installing the Software (NVIDIA Drivers) on page 7 •
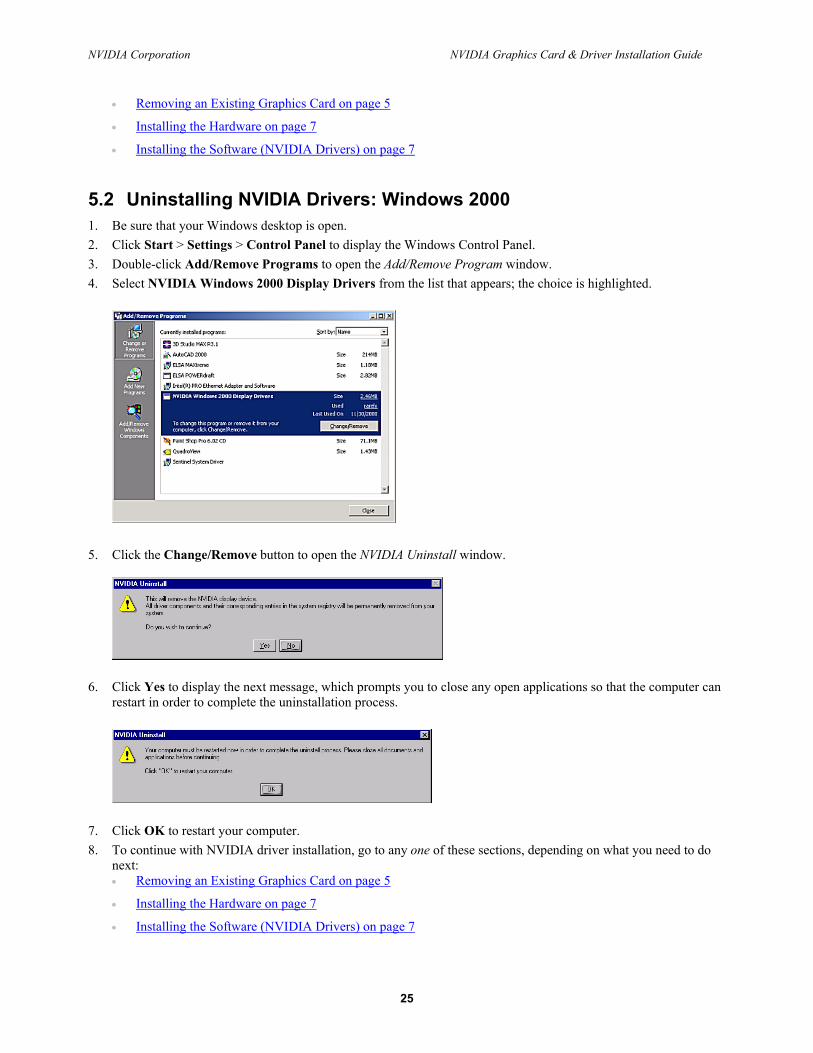
5.2 Uninstalling NVIDIA Drivers: Windows 2000 1. Be sure that your Windows desktop is open. 2. Click Start > Settings > Control Panel to display the Windows Control Panel. 3. Double-click Add/Remove Programs to open the Add/Remove Program window. 4. Select NVIDIA Windows 2000 Display Drivers from the list that appears; the choice is highlighted.
5. Click the Change/Remove button to open the NVIDIA Uninstall window.
6. Click Yes to display the next message, which prompts you to close any open applications so that the computer can
restart in order to complete the uninstallation process.
7. Click OK to restart your computer. 8. To continue with NVIDIA driver installation, go to any one of these sections, depending on what you need to do
next: Removing an Existing Graphics Card on page 5 •
Installing the Hardware on page 7 •
Installing the Software (NVIDIA Drivers) on page 7 •