Embed Size (px)
DESCRIPTION
Hands on system administration for OAS on Windows
Citation preview

© 2012 Onsystex Inc.
OASYS Administrationfor Windows 64 BitPlatforms
Onsystex 2012All Rights Reserved
Note:
This document may contain Confidential Privileged
information and is intended only for the recipient(s).
Receipt of this document by any person other than the
intended recipient does not constitute permission to
examine, copy, or distribute this document thereto and
doing so is strictly prohibited.
If you receive this document in error, please notify the
sender immediately, by either electronic mail message or
telephone. We kindly request that no copies be made of the
original electronic document.
OASIS AdministrationMicrosoft Windows 64 bit Platforms
Introduction
by Onsystex Inc.
Welcome to OASYS, the most advanced, high performance transactional business application server built toleverage the best capabilities of MultiValue and Relational technologies.
If you are look ing to create, extend or migrate multiuser business applications to the cloud in a SAAS model,OASYS is the right product for you.
OASYS offers a sophisticated and robust core environment ideal to create and host business rules that canbe accessed natively or through any of the built in multipurpose data provider connectors to interface with web,client/server and/or terminal based applications that utilize multi-discipline software technlogy including Javaand .NET
For ultimate flexibility, application data can be stored, accessed and managed on OASYS' hybridmultidimensional data store which supports relational databases including Oracle, SQL Server, Postgres, DB2,MySQL. As a result applications can seamlessly integrate with external data sources mak ing a reality theability to "write once and deploy anywhere" software applications.
Thank you for using our products.
This document is property of Onsystex, Inc and should not be copied, altered or reproduced without theexpress written authorization of Onsystex, Inc.
Please note that all references to vendors and their respective third party products in this document are inmost cases protected by trademarks, patents and/or copyrights. Any references made on this document weresolely used for illustration purposes.
The content of this document is subject to change without notice.
For more information about this document or to learn more about the family of Onsystex products, pleasecontact Onsystex directly or visit us at www.onsystex.com.
All rights reserved. No parts of this work may be reproduced in any form or by any means - graphic, electronic, ormechanical, including photocopying, recording, taping, or information storage and retrieval systems - without thewritten permission of the publisher.
Products that are referred to in this document may be either trademarks and/or registered trademarks of therespective owners. The publisher and the author make no claim to these trademarks.
While every precaution has been taken in the preparation of this document, the publisher and the author assume noresponsibility for errors or omissions, or for damages resulting from the use of information contained in thisdocument or from the use of programs and source code that may accompany it. In no event shall the publisher andthe author be liable for any loss of profit or any other commercial damage caused or alleged to have been causeddirectly or indirectly by this document.
OASYS Administration for Windows 64 BitPlatforms© 2012 Onsystex Inc.
PublisherSpecial thanks to:
All the team members of Onsystex and Beta customers whocontributed to this document.
Managing Editor
Technical Editors
Cover Designer
Onsystex Publications
Onsystex Marketing
Onsystex Technical Support Team
Onsystex Engineering
Onsystex - Euphoria .NET
Production
Onsystex Marketing
Team Coordinator
Onsystex Technical Publications
OASYS Administration for Windows 64 Bit Platforms4
© 2012 Onsystex Inc.
Table of Contents
1 Introduction 10
................................................................................................................................... 101 About This Manual
.......................................................................................................................................................... 10Audience
.......................................................................................................................................................... 10About the Product
.......................................................................................................................................................... 10Unsupported Commands
.......................................................................................................................................................... 11Reserved Characters
.......................................................................................................................................................... 11Case Sensitivity
.......................................................................................................................................................... 12Symbolic Links
.......................................................................................................................................................... 12Phantom Command
.......................................................................................................................................................... 12Dynamic Files
.......................................................................................................................................................... 12Deleting Files
.......................................................................................................................................................... 13PCPERFORM Command
.......................................................................................................................................................... 13Shell Command Differences
.......................................................................................................................................................... 13Use of Semicolon
................................................................................................................................... 142 Notes About Terminal Devices and Tape Drives
.......................................................................................................................................................... 14Terminal Devices
.......................................................................................................................................................... 14Tape Devices
................................................................................................................................... 153 Printing in OAS for Windows Platforms
2 Managing and Using the OASTelnet Service 17
................................................................................................................................... 171 Introduction
.......................................................................................................................................................... 17Requirements for the OASTelnet Service
................................................................................................................................... 172 Overview of Features
.......................................................................................................................................................... 17Configurability
.......................................................................................................................................................... 18Direct Access to OAS
.......................................................................................................................................................... 18Security
.......................................................................................................................................................... 18Secure Sockets Layer
.......................................................................................................................................................... 18Terminal Emulation
................................................................................................................................... 183 Configuring the OASTelnet Service
.......................................................................................................................................................... 19Service Options
.......................................................................................................................................................... 21User Profiles
.......................................................................................................................................................... 23Customizing User Profiles
.......................................................................................................................................................... 24Generated Profiles
................................................................................................................................... 254 Starting, Stopping and Pausing OASTelnet
.......................................................................................................................................................... 26Controlling OASTelnet from OAS Admin
.......................................................................................................................................................... 26Controlling OASTelnet from the Control Panel
3 OAS and Services 28
................................................................................................................................... 281 What Is a Service?
................................................................................................................................... 282 Principal OAS Services
.......................................................................................................................................................... 28Basic Object Manager (oas_objmanager)
.......................................................................................................................................................... 29Shared Memory Manager (oas_shmanager)
.......................................................................................................................................................... 29Clean Up (oas_cleaner)
5Contents
5
© 2012 Onsystex Inc.
................................................................................................................................... 293 Monitoring OAS Services
.......................................................................................................................................................... 30Log Files
4 OAS and Memory 32
................................................................................................................................... 321 Windows Platforms and Shared Memory
................................................................................................................................... 322 OAS and Shared Memory
.......................................................................................................................................................... 32oas_shmanager and Shared Memory
.......................................................................................................................................................... 33oas_objmanager and Shared Memory
.......................................................................................................................................................... 33Self-Created Segments
5 Configuring Your OAS System 35
................................................................................................................................... 351 Configuration Procedure
.......................................................................................................................................................... 351. Identify Disk Requirements
.......................................................................................................................................................... 352. Identify Memory Requirements
.......................................................................................................................................................... 353. Verify Version Compatibilities
.......................................................................................................................................................... 364. Check/Reset System-Level Parameters
.......................................................................................................................................................... 365. Check/Reset OAS Configuration Parameters
.......................................................................................................................................................... 366. Define Peripherals w ithin OAS
.......................................................................................................................................................... 367. Create OAS Accounts
.......................................................................................................................................................... 378. Add Windows Users
.......................................................................................................................................................... 379. Set Environment Variables
.......................................................................................................................................................... 3810. Review OAS Security
.......................................................................................................................................................... 3911. Convert Data Files
.......................................................................................................................................................... 3912. Review Backup Procedures
6 Starting and Stopping OASIS 41
................................................................................................................................... 411 Normal Operation
.......................................................................................................................................................... 41OAS Log Files
.......................................................................................................................................................... 42Starting & Stopping OASIS
................................................................................................................................... 422 Additional Commands
.......................................................................................................................................................... 42Stopping a User Process with deleteuser
7 Managing OAS Accounts 45
................................................................................................................................... 451 What Is an OASIS Account?
................................................................................................................................... 452 Creating an OAS Account
................................................................................................................................... 473 Deleting an Oasis Account
8 Managing OAS Security 50
................................................................................................................................... 501 Customizing Permissions
................................................................................................................................... 512 Customizing a VOC File
.......................................................................................................................................................... 51Removing Entries
................................................................................................................................... 533 Customizing OASIS Behavior
................................................................................................................................... 534 Remote Items
................................................................................................................................... 545 The SETFILE Command
................................................................................................................................... 546 LOGIN and LOGOUT Paragraphs
................................................................................................................................... 567 Field-Level Security for OASQuery
.......................................................................................................................................................... 56Points to Remember about Field-Level Security
OASYS Administration for Windows 64 Bit Platforms6
© 2012 Onsystex Inc.
.......................................................................................................................................................... 56The QUERY.PRIVILEGE File
.......................................................................................................................................................... 58OASQuery Processing
.......................................................................................................................................................... 58Turning on Field-Level Security
9 Managing OAS Files 61
................................................................................................................................... 611 OAS Hashed Files
................................................................................................................................... 612 Static Hashed Files
................................................................................................................................... 623 Dynamic Hashed Files
.......................................................................................................................................................... 62Dynamic Files and Overflow
.......................................................................................................................................................... 64When Dynamic Files Are Created
.......................................................................................................................................................... 64Tips and Constraints for Creating a Dynamic File
.......................................................................................................................................................... 65Dynamic Files and Disk Space
................................................................................................................................... 694 Sequentially Hashed Files
.......................................................................................................................................................... 69The dat001 File
.......................................................................................................................................................... 69The over001 File
.......................................................................................................................................................... 70The gmekey File
................................................................................................................................... 715 DIR-Type Files
................................................................................................................................... 716 Multilevel Directory Files
................................................................................................................................... 727 Index Files and Index Log Files
.......................................................................................................................................................... 73Index-Related Files for a Static Hashed File
.......................................................................................................................................................... 73Index-Related Files for a Dynamic Hashed File
................................................................................................................................... 748 File-Handling Commands
................................................................................................................................... 759 File Corruption
.......................................................................................................................................................... 75What Causes File Corruption?
.......................................................................................................................................................... 76Preventing File Corruption
................................................................................................................................... 7610 OAS Detection Tools
.......................................................................................................................................................... 76oas_analyzetbls
.......................................................................................................................................................... 79oas_analyzetbls_ndx
.......................................................................................................................................................... 81oas_validatetbls
................................................................................................................................... 8211 OAS Recovery Tools
.......................................................................................................................................................... 82oas_dumpgroup
.......................................................................................................................................................... 83oas_fixgroup
.......................................................................................................................................................... 84oas_fixtbls
................................................................................................................................... 8612 Detection and Repair Examples
................................................................................................................................... 8813 How to Use oas_analyzetbls
................................................................................................................................... 8914 Error Messages
.......................................................................................................................................................... 89File Access Messages
.......................................................................................................................................................... 89Block Usage Messages
.......................................................................................................................................................... 90Group Header Messages
.......................................................................................................................................................... 90Header Key Messages
.......................................................................................................................................................... 90Other Header Messages
.......................................................................................................................................................... 91Free Block Messages
.......................................................................................................................................................... 91Long Record Messages
.......................................................................................................................................................... 92Dynamic File Messages
10 Managing OAS Locks 94
................................................................................................................................... 941 The OASIS Global Lock Manager
.......................................................................................................................................................... 94How OASIS Global Locking Works
7Contents
7
© 2012 Onsystex Inc.
................................................................................................................................... 952 Locking in OasBasic
.......................................................................................................................................................... 95How Locks Work
.......................................................................................................................................................... 95Locking Commands
................................................................................................................................... 963 Resource Locks
................................................................................................................................... 974 Listing Locks
.......................................................................................................................................................... 97LIST.READU
.......................................................................................................................................................... 98LIST.LOCKS
.......................................................................................................................................................... 98LIST.QUEUE
.......................................................................................................................................................... 99Parameters
.......................................................................................................................................................... 99LIST.QUEUE Display
................................................................................................................................... 1025 Commands for Clearing Locks
.......................................................................................................................................................... 102SUPERCLEAR.LOCKS Command
.......................................................................................................................................................... 102SUPERRELEASE Command
................................................................................................................................... 1036 Procedure for Clearing Locks
11 Managing OAS Users 106
................................................................................................................................... 1061 Adding Users
.......................................................................................................................................................... 106User Groups
.......................................................................................................................................................... 106Home Directories
.......................................................................................................................................................... 107Logon Scripts
................................................................................................................................... 1082 Monitoring User Processes
.......................................................................................................................................................... 108OAS Commands
................................................................................................................................... 1093 Stopping User Processes
.......................................................................................................................................................... 109Using TIMEOUT
12 Managing Printers in OAS 112
................................................................................................................................... 1121 Configuring and Troubleshooting a Printer 14-3
.......................................................................................................................................................... 112Physical Configuration
.......................................................................................................................................................... 112Troubleshooting
.......................................................................................................................................................... 115Definition in OAS
.......................................................................................................................................................... 115Default Printers
................................................................................................................................... 1152 Spooling From OAS
.......................................................................................................................................................... 115The Spooling Process
.......................................................................................................................................................... 115OAS for Windows Platforms Specifics
.......................................................................................................................................................... 116Creating a Local Printer
................................................................................................................................... 1213 Creating a Form
................................................................................................................................... 1234 Defining a Printer Unit in OAS
.......................................................................................................................................................... 126Examples
.......................................................................................................................................................... 128Printing to the _HOLD_ File
.......................................................................................................................................................... 129Selecting a Spooler Mode
.......................................................................................................................................................... 131Redefining the Default OAS Print Unit
.......................................................................................................................................................... 131Submitting Concurrent Print Jobs
................................................................................................................................... 1315 OAS Printing Commands
13 Managing Cataloged Programs 134
................................................................................................................................... 1341 OasBasic Source and Compiled Programs
.......................................................................................................................................................... 134OasBasic Compiled Programs
................................................................................................................................... 1342 Cataloging OasBasic Programs
OASYS Administration for Windows 64 Bit Platforms8
© 2012 Onsystex Inc.
.......................................................................................................................................................... 135Direct Cataloging
.......................................................................................................................................................... 135Local Cataloging
.......................................................................................................................................................... 135Global Cataloging
................................................................................................................................... 1363 Managing Global Catalogs
.......................................................................................................................................................... 136Contents of a Global Catalog
.......................................................................................................................................................... 138Verifying a Program Version
.......................................................................................................................................................... 139Activating Newly Cataloged Programs and Subroutines
................................................................................................................................... 1414 Listing Programs in Use
................................................................................................................................... 1425 Creating an Alternate Global Catalog Space
.......................................................................................................................................................... 142Files and Directories Created by newhome
.......................................................................................................................................................... 144Procedure for Creating an Alternate Global Catalog Space
14 Managing and Using Tape Devices 147
................................................................................................................................... 1471 OAS Tape Handling Commands
.......................................................................................................................................................... 148SETTAPE
................................................................................................................................... 1482 Steps for Tape Device Use
15 Monitoring and Tuning OAS 152
................................................................................................................................... 1521 Monitoring Your Windows System
................................................................................................................................... 1522 OAS Performance Factors
.......................................................................................................................................................... 152Database Design Considerations
.......................................................................................................................................................... 152Using Alternate Key Indexes
.......................................................................................................................................................... 152Sizing Static Hashed Files
.......................................................................................................................................................... 153Sizing Dynamic Hashed Files
.......................................................................................................................................................... 153OasBasic Coding Tips
................................................................................................................................... 1543 OasBasic Profiling
16 Appendix A OAS Configuration Parameters 158
17 Appendix B Environment Variables for OAS 165
Index 0
Part
1
OASYS Administration for Windows 64 Bit Platforms10
© 2012 Onsystex Inc.
1 Introduction
This introduction provides an overview of the information in this manual and describes the conventions it uses.
1.1 About This Manual
The purpose of this manual is to collect, in a single book, as much information as possible about activitiesneeded to administer an OASYS installation on Windows platforms. This manual repeats some informationpresented elsewhere in the OASYS documentation set. Certain command descriptions and examples have beenamplified or modified in this manual to increase their usefulness to system administrators as opposed to endusers.
1.1.1 Audience
Administering OASYS on Windows Platforms is intended for users whose responsibilities may include thefollowing:
Tasks performed at the Windows operating system level Modifying file permissions Adding users Creating directories Starting and stopping OASYS Backing up OASYS
Tasks performed within OASYS
Creating and managing OASYS accounts Optimizing OASYS configuration settings Customizing security Managing files Monitoring and accessing files, peripherals, and system resources
1.1.2 About the Product
OASYS for Windows Platforms includes most of the features present in OASYS for Linux. Please read all thefeatures carefully as some many not supported on OASYS for Windows Platforms
1.1.3 Unsupported Commands
The following OASYS linux commands are not supported on OASYS for Windows platforms:
oas_pickload oas_start oas_stop oasinstall
Introduction 11
© 2012 Onsystex Inc.
1.1.4 Reserved Characters
OASYS for Windows platforms does not allow the use of the following characters in a file or directory name:
“ (double quotation mark) | (pipe sign) * (asterisk) / (slash) : (colon) < (less than sign) > (greater than sign) ? (question mark) \ (backslash)
You may use the reserved characters in a file specification. For instance, C:\Onsystex\oas61\PDPSAMPLE\ORDERHISTORY is an acceptable file specification. The reserved characters : and \ are used asdelimiters in the file specification. However, they may not be used within the name of a file or directory. TES:T orORDER\HISTORY are unacceptable.
1.1.5 Case Sensitivity
Windows platforms do not distinguish between uppercase and lowercase, except in a user’s password, which iscase sensitive. OASYS is case sensitive.
File Names On Windows platforms, you cannot have two files whose names are identical except for case. For example, if yourapplication creates files such as “aatemp” and “AATEMP”, you must modify the application since Windowsplatforms will not allow both to exist.
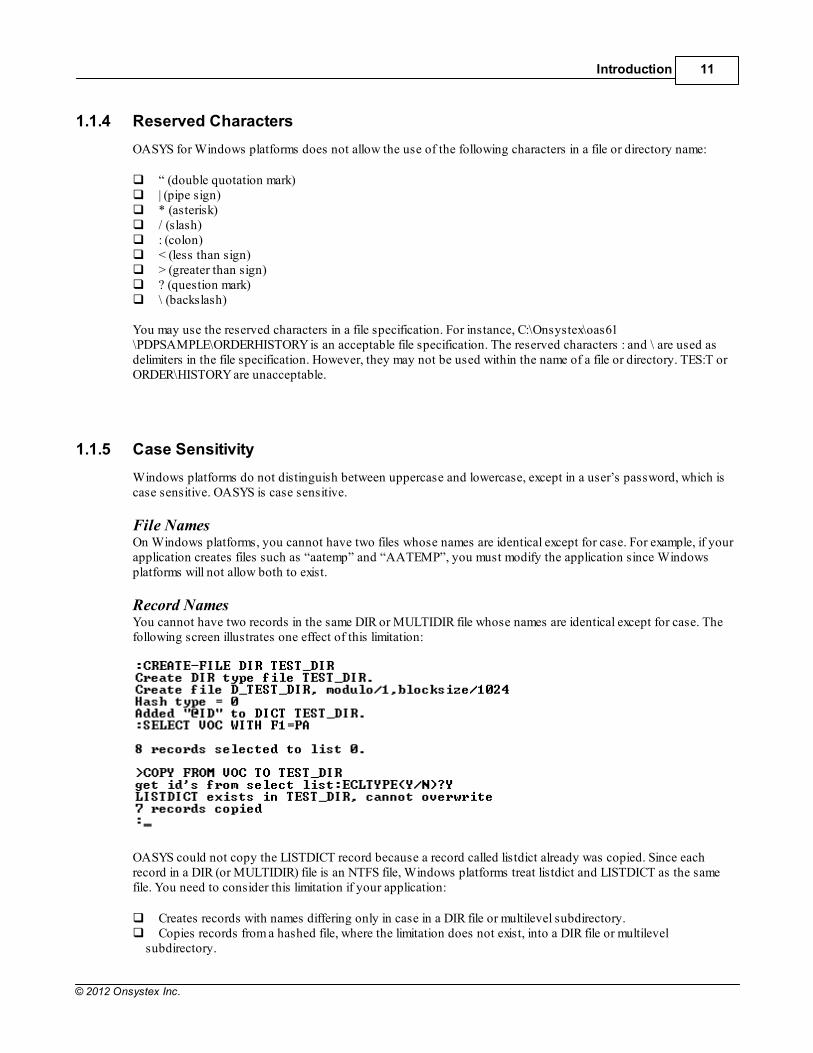
Record Names You cannot have two records in the same DIR or MULTIDIR file whose names are identical except for case. Thefollowing screen illustrates one effect of this limitation:
OASYS could not copy the LISTDICT record because a record called listdict already was copied. Since eachrecord in a DIR (or MULTIDIR) file is an NTFS file, Windows platforms treat listdict and LISTDICT as the samefile. You need to consider this limitation if your application:
Creates records with names differing only in case in a DIR file or multilevel subdirectory. Copies records from a hashed file, where the limitation does not exist, into a DIR file or multilevel
subdirectory.
OASYS Administration for Windows 64 Bit Platforms12
© 2012 Onsystex Inc.
Index Files and Index Log Files On OASYS for Linux, the index file and the index log file for a static hashed file are named X_filename and x_filename, respectively. On OASYS for Windows platforms, the index file and index log file for a static hashed fileare named X_FILENAME and L_FILENAME, respectively.
Warning: The Windows operating system does not distinguish between X_filename and x_filename. If you copyan index file and an index log file to your Windows machine, Windows platforms may overwrite the first oneyou copied with the second, and you could lose information. When you are migrating your application,consider removing the index log files for your static files, or renaming them to the Windows platformsconvention, before physically moving them to the Windows machine.
savedlists File By default, a OASYS account on Linux contains a SAVEDLISTS file for saving SELECT lists, and a savedlists filefor storing temporary information for BY.EXP sorts.
At the operating system level, the file named savedlists on OASYS for Linux is called the SAVEDLISTSL file onOASYS for Windows platforms. However, the VOC file contains an entry for savedlists pointing the correct file,so you should not have to modify your application. You must change the name of the savedlists file in anyOASYS account you are moving from Linux to Windows platforms.
Note: Query verbs invoked in lower case will be treated in mode 'U'.
1.1.6 Symbolic Links
Windows platforms, unlike Linux, do not support symbolic links. If your application has identified files by usingsymbolic links at the operating system level, you must restructure your OASYS accounts to eliminate them. Youcan use environment variables in VOC pointers, or set new pointers with SETFILE, just as you can in OASYS forLinux.
1.1.7 Phantom Command
On OASYS for Windows platforms, the PHANTOM command behaves differently, depending from where youexecute it.
If you execute PHANTOM from a OASYS session at the console, then end the OASYS session, thephantom job completes.
If you execute PHANTOM from a telnet session, the phantom job continues until it completes. Thisbehavior matches the behavior of PHANTOM on Linux.
1.1.8 Dynamic Files
The dynamic file implementation on OASYS for Windows platforms differs slightly from the implementation onOASYS for Linux. On OASYS for Windows platforms, the “parts” of a large dynamic file must remain in the samepartition where the file was created. Because of this, the “part table” is not relevant to OASYS for Windowsplatforms. The size of each part file is limited by the configuration parameter OAS_MaxPartitionLength in OASHOME\include\oasconfig.
1.1.9 Deleting Files
Windows platforms do not allow a process to delete a file if any other process has that file open. This operatingsystem limitation significantly affects the behavior of the ECL DELETE.FILE command. To minimize the impact ofthis restriction, DELETE.FILE only removes the DICT portion and VOC entry for a file if it has successfullyremoved the DATA portion of the file. However, the operating system restriction still results in the followingbehaviors in OASYS:
Introduction 13
© 2012 Onsystex Inc.
If one process executes DELETE.FILE filename, and another process has the DATA portion of filename open,or both the DICT and the DATA portions of filename open, the DELETE.FILE fails with an error, and nocomponent of the file is deleted. If one process executes DELETE.FILE filename, and another process has only the DICT portion of filenameopen, the DELETE.FILE removes only the data portion of the file, leaving the VOC entry and the DICT portionintact, and displaying an error.
In OASYS on Linux, DELETE.FILE would succeed in both cases. If your appli-cation depends on the Linux-stylebehavior, you need to rework the application.
1.1.10 PCPERFORM Command
The OASBasic PCPERFORM command allows users to execute an operating system command from within aOASBasic program. In OASYS for Windows platforms, only MS-DOS commands can be executed withPCPERFORM.
In some cases (for instance, the echo command) there are MS-DOS commands named like the Linux versions(although their behavior may differ somewhat). In other cases (for instance, who, ls, ps) you must identifyreplacements. Refer to your Windows platform and Linux documentation for information about system-levelcommands.
1.1.11 Shell Command Differences
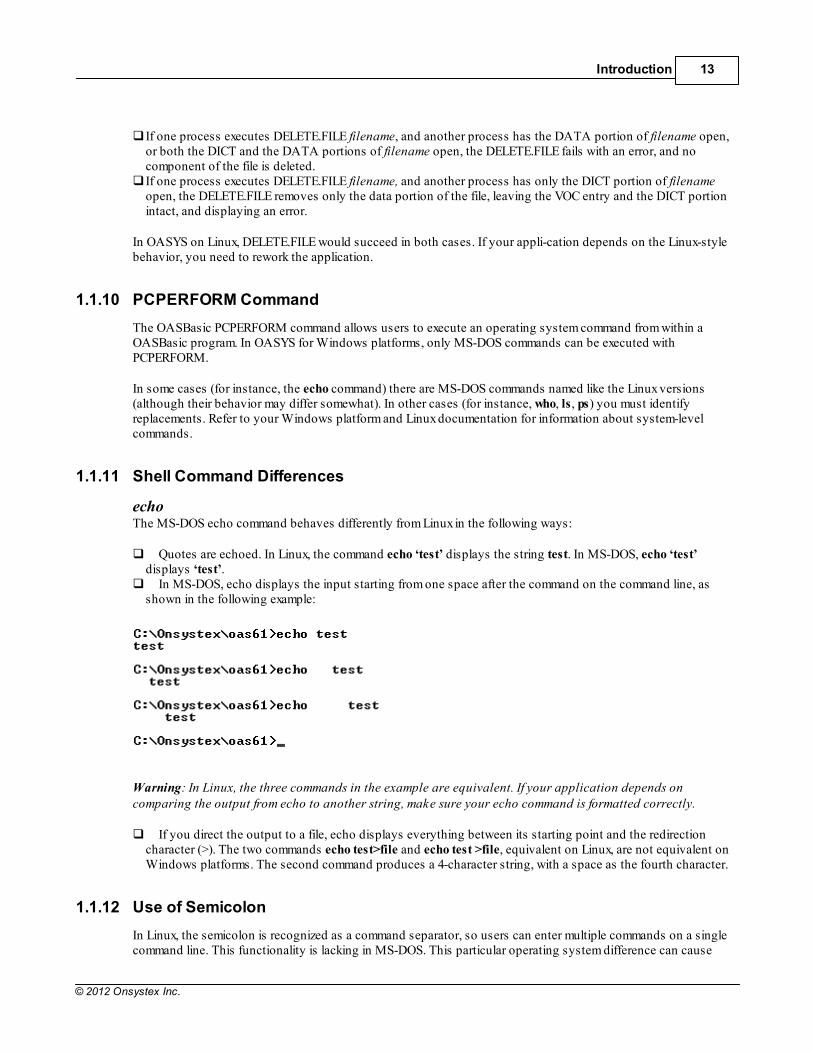
echo The MS-DOS echo command behaves differently from Linux in the following ways:
Quotes are echoed. In Linux, the command echo ‘test’ displays the string test. In MS-DOS, echo ‘test’displays ‘test’.
In MS-DOS, echo displays the input starting from one space after the command on the command line, asshown in the following example:
Warning: In Linux, the three commands in the example are equivalent. If your application depends oncomparing the output from echo to another string, make sure your echo command is formatted correctly.
If you direct the output to a file, echo displays everything between its starting point and the redirectioncharacter (>). The two commands echo test>file and echo test >file, equivalent on Linux, are not equivalent onWindows platforms. The second command produces a 4-character string, with a space as the fourth character.
1.1.12 Use of Semicolon
In Linux, the semicolon is recognized as a command separator, so users can enter multiple commands on a singlecommand line. This functionality is lacking in MS-DOS. This particular operating system difference can cause

OASYS Administration for Windows 64 Bit Platforms14
© 2012 Onsystex Inc.
unexpected results.
On Linux, the command line entry would echo the string abc to the file named file, then attempt to execute the dircommand.
1.2 Notes About Terminal Devices and Tape Drives
This sections discusses terminal and tape devices.
1.2.1 Terminal Devices
OASYS for Windows Platforms records and displays a “tty” for a OASYS process. The tty is formed byappending the OASNO (from LISTUSER) to the string “pts/”.
This tty can be used with the !portnumber option in the ECL MESSAGE command, to send a message to aspecific terminal or window. A number of ECL commands (LISTUSER, MYSELF, WHO, and STATUS) display thetty number for each OASYS session.
1.2.2 Tape Devices
When you use OASYS tape commands (for instance, SETTAPE), you must use the Universal NamingConvention (UNC) format for device identifiers. UNC names are in the form \\server\device. The followingexample shows the SETTAPE, T.ATT, and T.STATUS commands on OASYS for Windows Platforms:
The device identifier \\.\TAPE0 indicates the current server (.), device TAPE0.
You can identify a disk file as a tape device by entering a path and file name (not in UNC format) on theSETTAPE command line. If you do not use UNC format, OASYS checks for a path and file that matches yourentry. If the file exists, OASYS writes to the file as a “tape device”. Otherwise, SETTAPE fails with an errormessage.OASYS stores tape definition information in a file called OASHOME\sysprog\tapeinfo. This is a text file,which you can view with any text editor.
You must log in as a member of the Administrators group to define a tape device with the SETTAPE command.
Introduction 15
© 2012 Onsystex Inc.
1.3 Printing in OAS for Windows Platforms
Windows platforms allow users to print to printers (which are simply drivers that control print devices). A printermay control a network print device or a local print device. Microsoft applications, through their own print menus,allow users to incorporate printing options (like font selections, orientation, duplex mode, and so forth) withintheir application. Linux spoolers, on the other hand, allow users to select many of these options outside of theirapplication, on the command line of the spooler.
The Windows spooler allows users to write data, including device-specific escape sequences, to a print device(RAW mode), or to incorporate pre-defined printing options (WINDOW) mode. Within a OASYS session, theSETPTR command identifies a print unit with a default spooler mode of RAW.
If the output from your application contains escape sequences for formatting, you do not need to specifyprinting options when you define a print unit with SETPTR. If you are not using escape sequences, you canspecify printer options in a quoted string on the SETPTR command line. OASYS then passes that information tothe Windows spooler.
Part
2
Managing and Using the OASTelnet Service 17
© 2012 Onsystex Inc.
2 Managing and Using the OASTelnet Service
The OASYS Telnet Service (OAS Telnet) enables multiple users to log on to a single Windows platform to runOASYS. With the OASYS Telnet Service installed and started, your Windows platform exports a logon prompt toits network so that network users can log on and run OASYS.
For SSL connectivity Onsystex SSL Telnet Server is available as an add-on product.
2.1 Introduction
The OASYS Telnet Service is a service that exports a logon prompt to a network. Users can log on through thelogon prompt, and multiple users can work on the system at the same time. OAS Telnet creates an alternateconsole window when a user runs programs other than OASYS in that window, just as they would run in aconsole window.
When a user opens a OASYS session through OAS Telnet, OASYS writes screen output directly to a socket.Using the socket is more efficient than writing screen output to the alternate console window.
When a user “shells out” from OASYS to execute a non-OASYS process (for instance, !DIR), OASYS directsoutput to the alternate console window. This allows programs that write to “standard output” to function withoutmodification under OAS Telnet.
2.1.1 Requirements for the OASTelnet Service
This sections describes the requirements for the using the OAS Telnet service.
Operating System Your system must be running a 64 bit Microsoft Windows operating system.
Disk Space OAS Telnet uses less than one megabyte of disk space. During the installation process, OASYS installs the filesfor OAS Telnet in the Telnet subdirectory in your \oas61\bin folder.
Memory The OASYS Telnet service and configuration screens take less than one megabyte of system memory to run. Youneed somewhat less than 1 MB of memory for every Telnet user logged into your system, over and above thememory required for the application.
Telnet Client You must have a Telnet client running on your Windows system. The OAS Telnet Service interacts with theexisting Telnet client.
2.2 Overview of Features
This section describes the features of the OAS Telnet Service.
2.2.1 Configurability
local Administrators group to configure the OAS Telnet Service.
You can perform the following tasks to configure the OAS Telnet Service:
OASYS Administration for Windows 64 Bit Platforms18
© 2012 Onsystex Inc.
Establish a default configuration for all users who access your system through OAS Telnet. Create individual user profiles that establish session characteristics for each user. Create a combination of custom profiles and a default configuration. Set parameters, including the number of concurrent OAS Telnet sessions and the number of logon attempts toallow each user. Make tuning changes that may affect performance for users logging in via OAS Telnet to execute MS-DOScommands.
2.2.2 Direct Access to OAS
You can configure the OASYS Telnet Service so that users never see the Windows command prompt. Users canlog directly on to OASYS, or on to a custom application.
2.2.3 Security
Users cannot log on through the Telnet Service unless:
They have a valid logon on the Windows workstation or domain. They belong to a local group that has the user privileges Access this computer from network and Log on
locally assigned.
These constraints mean that users logged on through Telnet have only the permissions already associated withtheir Windows system account, just as if they had logged on from the console.
2.2.4 Secure Sockets Layer
For Secure Sockets Layer (SSL) connectivity , use the Onsystex SSL Telnet Server product.
2.2.5 Terminal Emulation
The OASYS Telnet Service provides any terminal emulation supported by OASYS. OASYS uses the oastermcapfile to validate terminal settings. The oastermcap file, located in the OASHOME\include directory, containsdefinitions for terminals supported within OASYS. By default, the oastermCAP file contains definitions for thefollowing terminals:
VT100, VT200, VT300, VT400, VT420 WYSE60 ADDS-VP IN 9400 IN 9400B
You can add terminal definitions to oastermcap, or modify the definitions, if you desire.
2.3 Configuring the OASTelnet Service
Note: You need to log in to the Administrator account or log on as a member of the local Administrators groupto configure the OAS Telnet Service.
Managing and Using the OASTelnet Service 19
© 2012 Onsystex Inc.
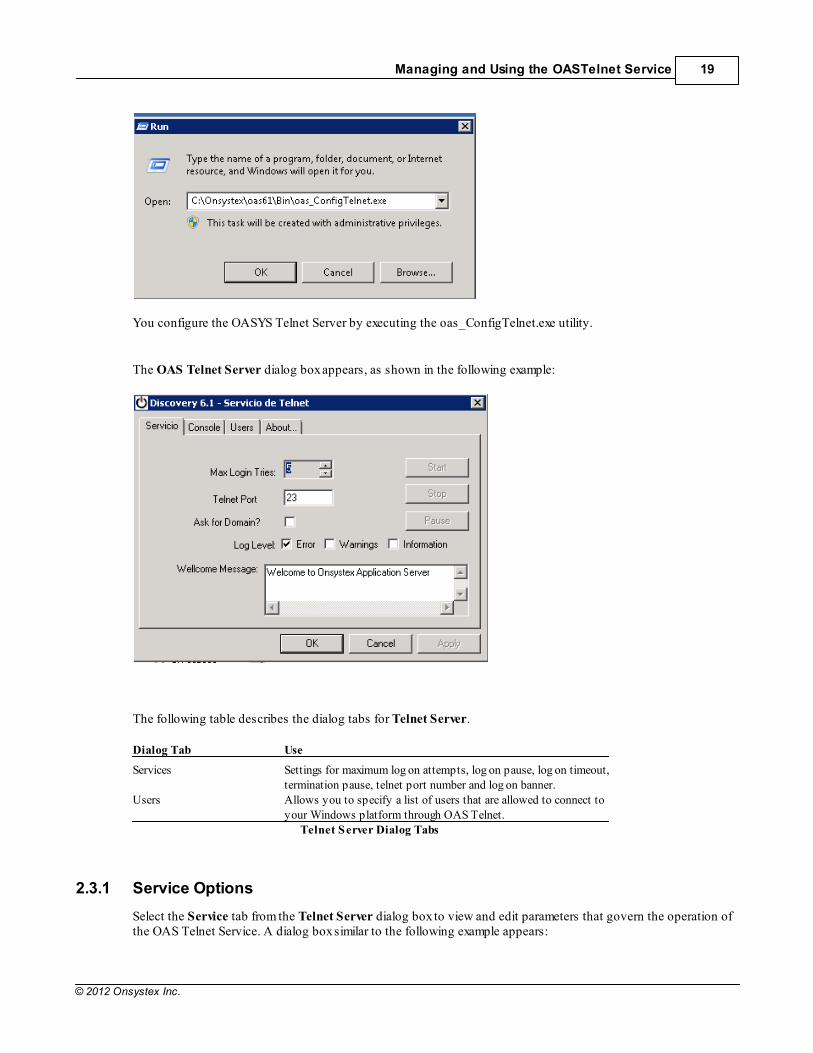
You configure the OASYS Telnet Server by executing the oas_ConfigTelnet.exe utility.
The OAS Telnet Server dialog box appears, as shown in the following example:
The following table describes the dialog tabs for Telnet Server.
Dialog Tab Use
Services Settings for maximum log on attempts, log on pause, log on timeout,termination pause, telnet port number and log on banner.
Users Allows you to specify a list of users that are allowed to connect toyour Windows platform through OAS Telnet.
Telnet Server Dialog Tabs
2.3.1 Service Options
Select the Service tab from the Telnet Server dialog box to view and edit parameters that govern the operation ofthe OAS Telnet Service. A dialog box similar to the following example appears:
OASYS Administration for Windows 64 Bit Platforms20
© 2012 Onsystex Inc.
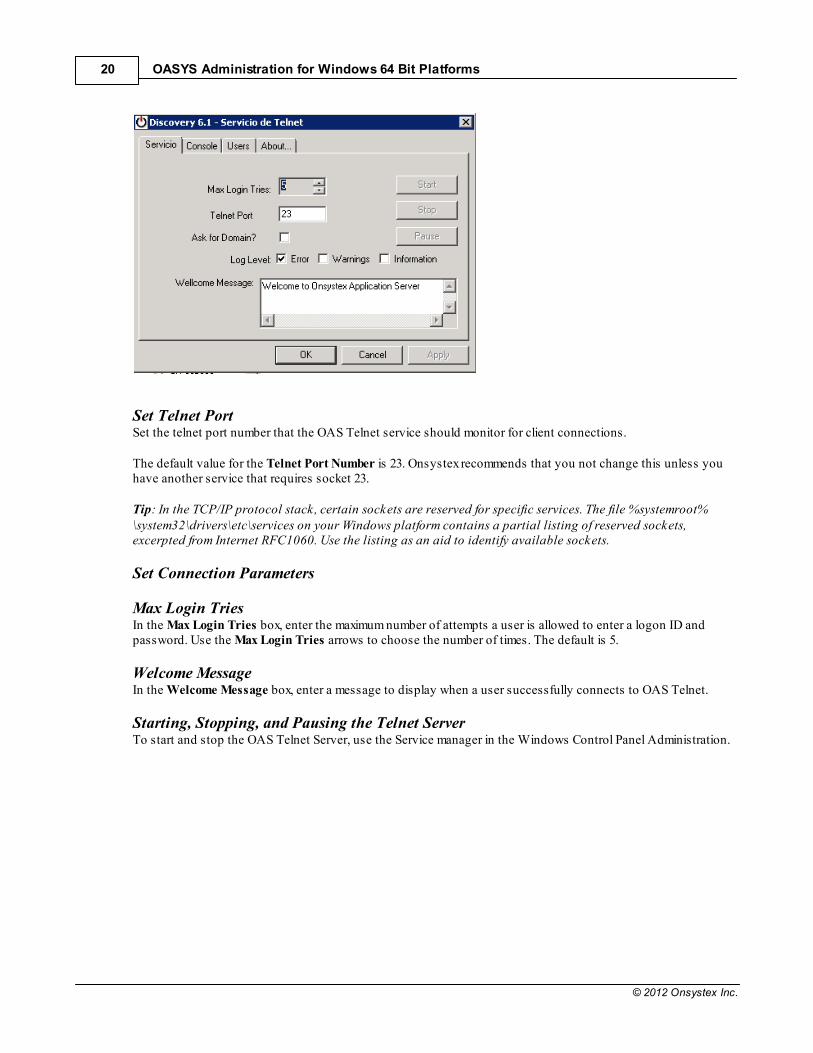
Set Telnet Port Set the telnet port number that the OAS Telnet service should monitor for client connections.
The default value for the Telnet Port Number is 23. Onsystex recommends that you not change this unless youhave another service that requires socket 23.
Tip: In the TCP/IP protocol stack, certain sockets are reserved for specific services. The file %systemroot%\system32\drivers\etc\services on your Windows platform contains a partial listing of reserved sockets,excerpted from Internet RFC1060. Use the listing as an aid to identify available sockets.
Set Connection Parameters
Max Login TriesIn the Max Login Tries box, enter the maximum number of attempts a user is allowed to enter a logon ID andpassword. Use the Max Login Tries arrows to choose the number of times. The default is 5.
Welcome Message In the Welcome Message box, enter a message to display when a user successfully connects to OAS Telnet.
Starting, Stopping, and Pausing the Telnet Server To start and stop the OAS Telnet Server, use the Service manager in the Windows Control Panel Administration.
Managing and Using the OASTelnet Service 21
© 2012 Onsystex Inc.
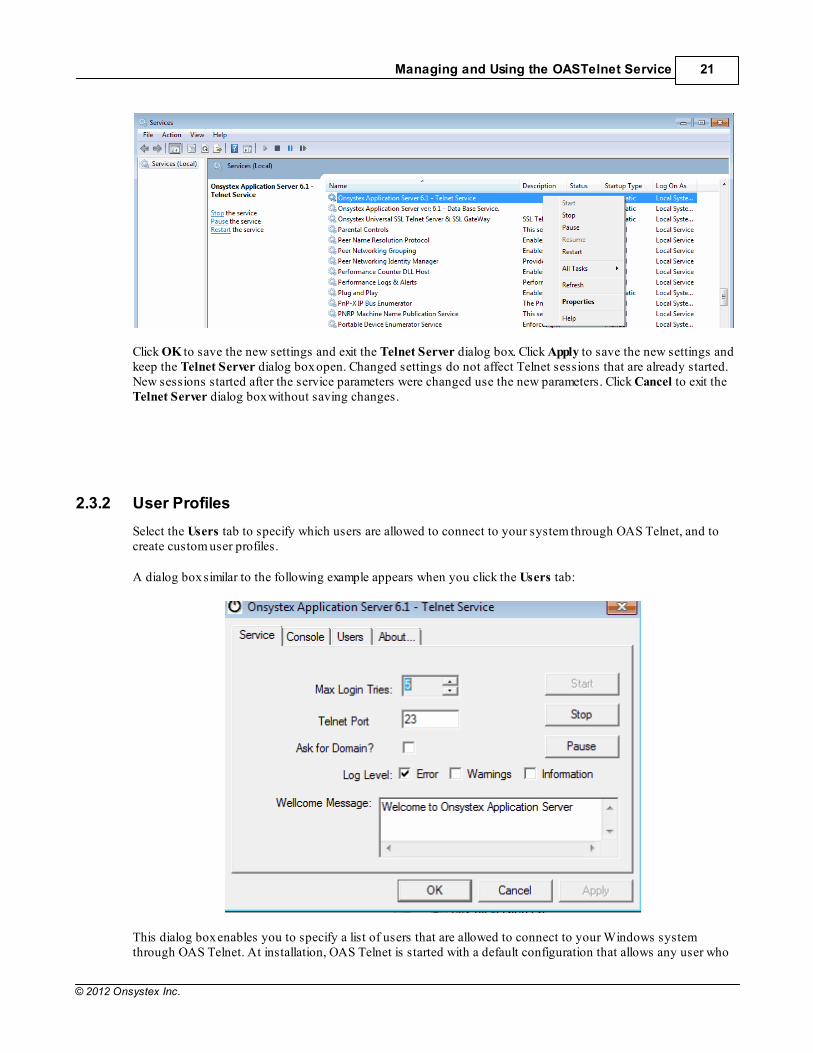
Click OK to save the new settings and exit the Telnet Server dialog box. Click Apply to save the new settings andkeep the Telnet Server dialog box open. Changed settings do not affect Telnet sessions that are already started.New sessions started after the service parameters were changed use the new parameters. Click Cancel to exit theTelnet Server dialog box without saving changes.
2.3.2 User Profiles
Select the Users tab to specify which users are allowed to connect to your system through OAS Telnet, and tocreate custom user profiles.
A dialog box similar to the following example appears when you click the Users tab:
This dialog box enables you to specify a list of users that are allowed to connect to your Windows systemthrough OAS Telnet. At installation, OAS Telnet is started with a default configuration that allows any user who
OASYS Administration for Windows 64 Bit Platforms22
© 2012 Onsystex Inc.
can access your Windows system from the network to access the system through OAS Telnet as well. Thisdefault behavior is acceptable in many instances. However, administrators may wish to grant only certain usersTelnet access, or to create individual user profiles. The Users dialog box allows this flexibility.
Warning: If you remove the Default profile, no user can log on through OAS Telnet unless you have created aspecific profile for the user.
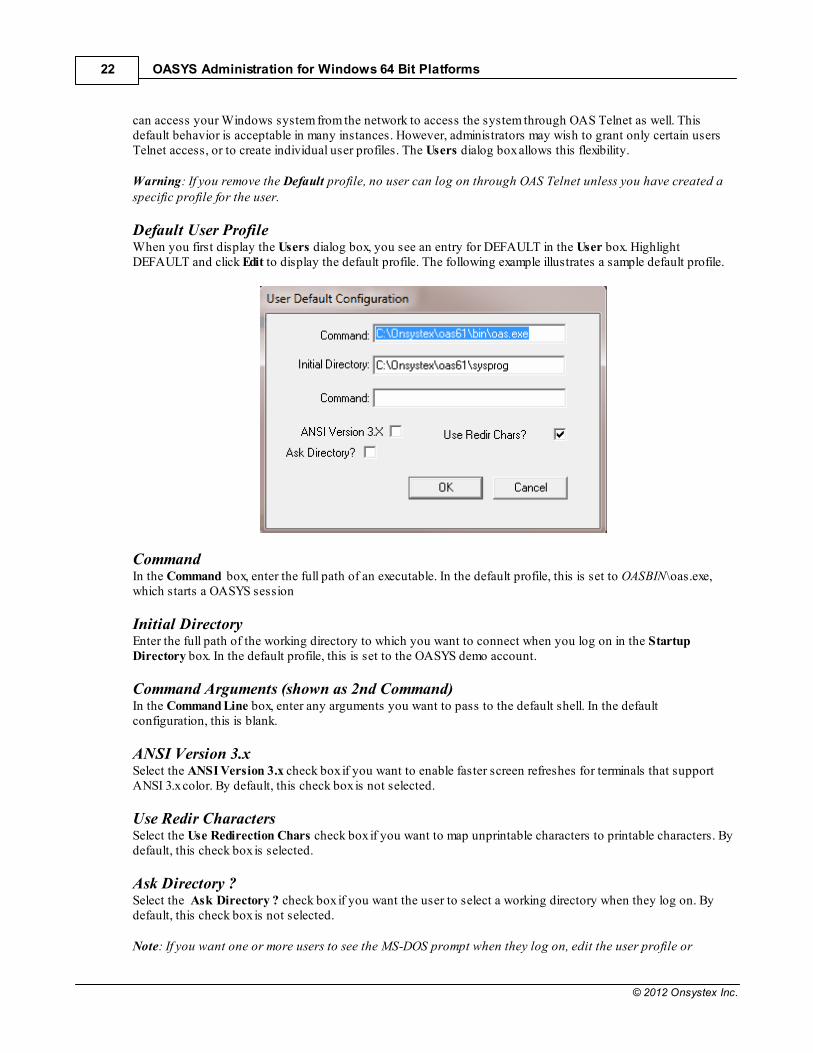
Default User Profile When you first display the Users dialog box, you see an entry for DEFAULT in the User box. HighlightDEFAULT and click Edit to display the default profile. The following example illustrates a sample default profile.
Command In the Command box, enter the full path of an executable. In the default profile, this is set to OASBIN\oas.exe,which starts a OASYS session
Initial Directory Enter the full path of the working directory to which you want to connect when you log on in the StartupDirectory box. In the default profile, this is set to the OASYS demo account.
Command Arguments (shown as 2nd Command) In the Command Line box, enter any arguments you want to pass to the default shell. In the defaultconfiguration, this is blank.
ANSI Version 3.xSelect the ANSI Version 3.x check box if you want to enable faster screen refreshes for terminals that supportANSI 3.x color. By default, this check box is not selected.
Use Redir Characters Select the Use Redirection Chars check box if you want to map unprintable characters to printable characters. Bydefault, this check box is selected.
Ask Directory ?Select the Ask Directory ? check box if you want the user to select a working directory when they log on. Bydefault, this check box is not selected.
Note: If you want one or more users to see the MS-DOS prompt when they log on, edit the user profile or
Managing and Using the OASTelnet Service 23
© 2012 Onsystex Inc.
profiles so that the default shell is %systemroot%\system32\cmd.exe.
Click OK to return to the Telnet Server dialog box, or click Cancel to exit without saving changes.
2.3.3 Customizing User Profiles
Complete the following steps to create a customized profile for a user.
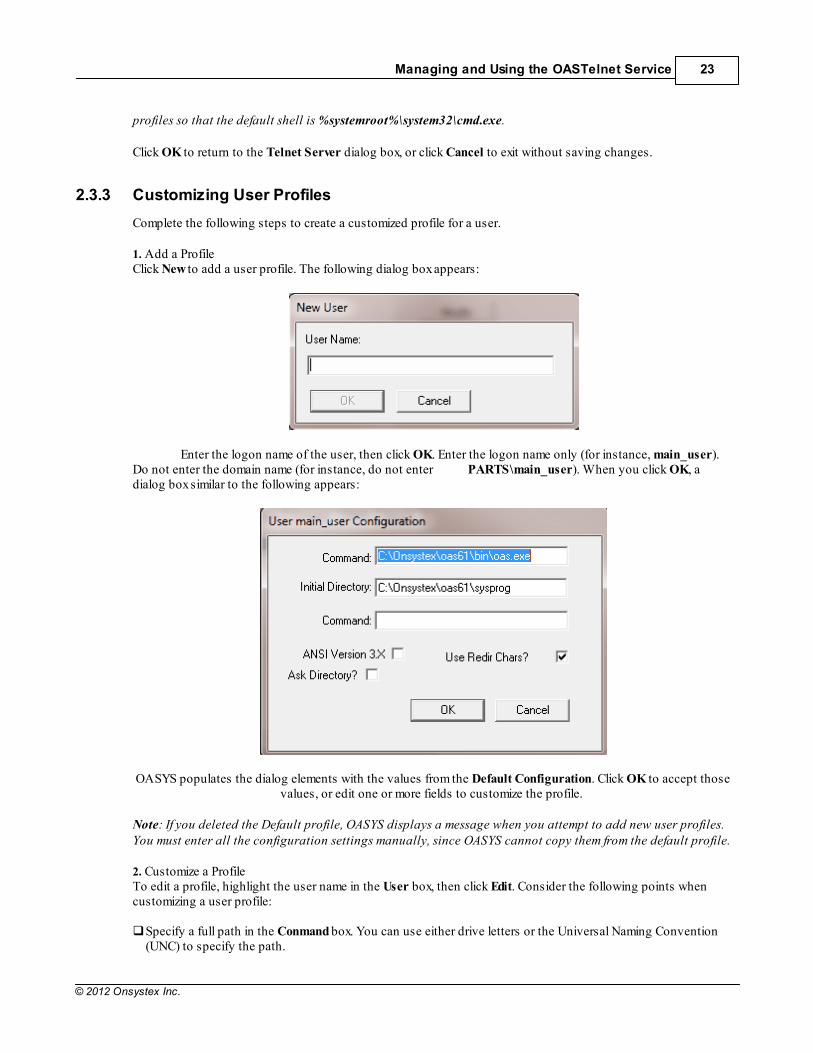
1. Add a ProfileClick New to add a user profile. The following dialog box appears:
Enter the logon name of the user, then click OK. Enter the logon name only (for instance, main_user).Do not enter the domain name (for instance, do not enter PARTS\main_user). When you click OK, adialog box similar to the following appears:
OASYS populates the dialog elements with the values from the Default Configuration. Click OK to accept thosevalues, or edit one or more fields to customize the profile.
Note: If you deleted the Default profile, OASYS displays a message when you attempt to add new user profiles.You must enter all the configuration settings manually, since OASYS cannot copy them from the default profile.
2. Customize a Profile To edit a profile, highlight the user name in the User box, then click Edit. Consider the following points whencustomizing a user profile:
Specify a full path in the Conmand box. You can use either drive letters or the Universal Naming Convention(UNC) to specify the path.
OASYS Administration for Windows 64 Bit Platforms24
© 2012 Onsystex Inc.
By specifying the Initial Directory, you can direct different users to different startup directories, even if theyare using the same default shell. You can allow users to choose their directory when they log on by selecting the Ask Directory ? check box. If you do not know whether a particular terminal supports Version 3 Color, select the ANSI Version 3.x checkbox. Test the terminal; if screen colors are not displayed correctly, modify the user profile to clear the ANSIVersion 3.x check box.
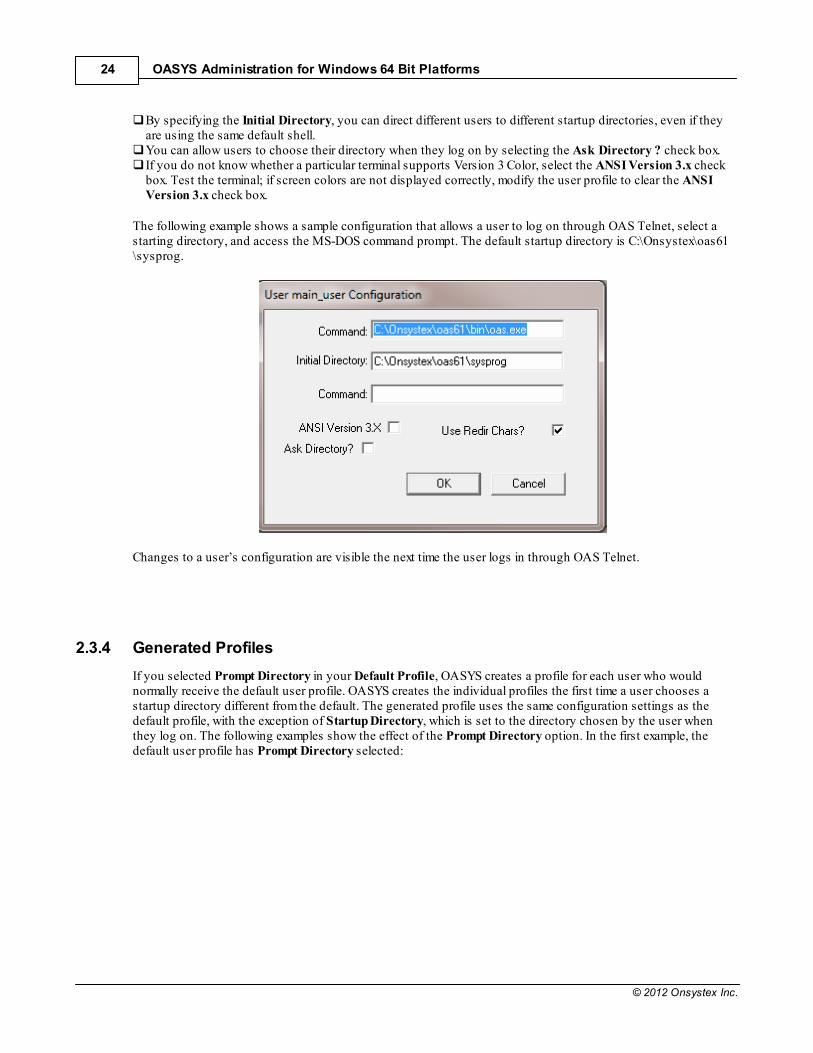
The following example shows a sample configuration that allows a user to log on through OAS Telnet, select astarting directory, and access the MS-DOS command prompt. The default startup directory is C:\Onsystex\oas61\sysprog.
Changes to a user’s configuration are visible the next time the user logs in through OAS Telnet.
2.3.4 Generated Profiles
If you selected Prompt Directory in your Default Profile, OASYS creates a profile for each user who wouldnormally receive the default user profile. OASYS creates the individual profiles the first time a user chooses astartup directory different from the default. The generated profile uses the same configuration settings as thedefault profile, with the exception of Startup Directory, which is set to the directory chosen by the user whenthey log on. The following examples show the effect of the Prompt Directory option. In the first example, thedefault user profile has Prompt Directory selected:
Managing and Using the OASTelnet Service 25
© 2012 Onsystex Inc.
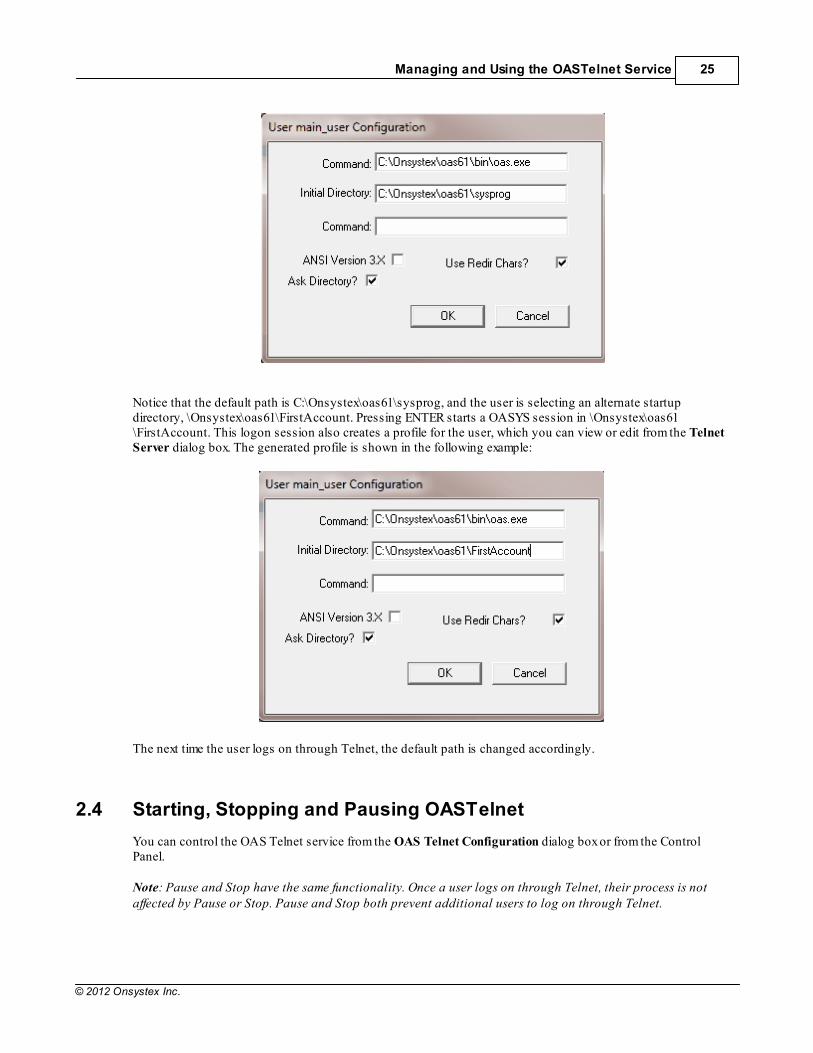
Notice that the default path is C:\Onsystex\oas61\sysprog, and the user is selecting an alternate startupdirectory, \Onsystex\oas61\FirstAccount. Pressing ENTER starts a OASYS session in \Onsystex\oas61\FirstAccount. This logon session also creates a profile for the user, which you can view or edit from the TelnetServer dialog box. The generated profile is shown in the following example:
The next time the user logs on through Telnet, the default path is changed accordingly.
2.4 Starting, Stopping and Pausing OASTelnet
You can control the OAS Telnet service from the OAS Telnet Configuration dialog box or from the ControlPanel.
Note: Pause and Stop have the same functionality. Once a user logs on through Telnet, their process is notaffected by Pause or Stop. Pause and Stop both prevent additional users to log on through Telnet.
OASYS Administration for Windows 64 Bit Platforms26
© 2012 Onsystex Inc.
2.4.1 Controlling OASTelnet from OAS Admin
You can start, stop, or pause the OAS Telnet Server Service from the Service tab in the Telnet Server dialogbox.
Click Stop to stop the OAS Telnet Service. Users already logged on can continue to work, but no additionalusers can log on through OAS Telnet until you Start the service. Click Start to start the OAS Telnet service (if it is stopped) or continue the service (if it is paused). Click Pause to pause the OAS Telnet service. Users already logged on can continue to work, but no additionalusers can log on through OAS Telnet until you Start the service.
2.4.2 Controlling OASTelnet from the Control Panel
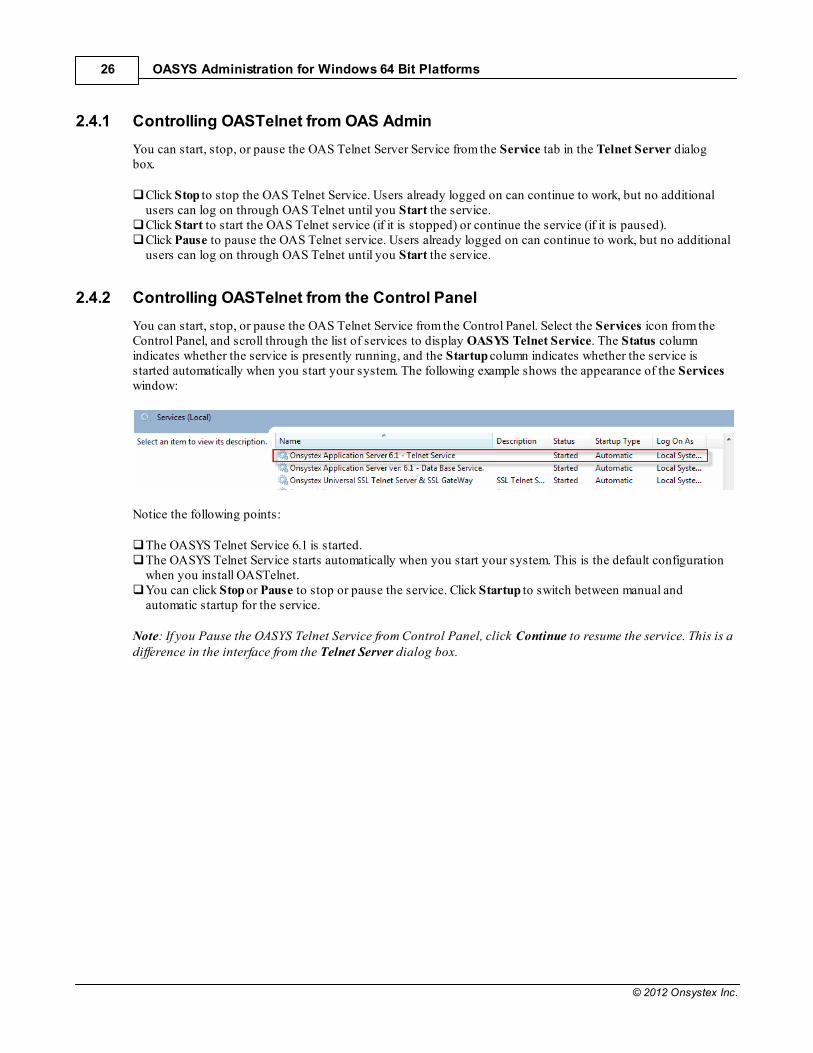
You can start, stop, or pause the OAS Telnet Service from the Control Panel. Select the Services icon from theControl Panel, and scroll through the list of services to display OASYS Telnet Service. The Status columnindicates whether the service is presently running, and the Startup column indicates whether the service isstarted automatically when you start your system. The following example shows the appearance of the Serviceswindow:
Notice the following points:
The OASYS Telnet Service 6.1 is started. The OASYS Telnet Service starts automatically when you start your system. This is the default configurationwhen you install OASTelnet. You can click Stop or Pause to stop or pause the service. Click Startup to switch between manual andautomatic startup for the service.
Note: If you Pause the OASYS Telnet Service from Control Panel, click Continue to resume the service. This is adifference in the interface from the Telnet Server dialog box.

Part
3
OASYS Administration for Windows 64 Bit Platforms28
© 2012 Onsystex Inc.
3 OAS and Services
This chapter explains what services are, and describes services specific to OASYS.
3.1 What Is a Service?
A service is a background process that performs a specific task or set of tasks. Services wait in the backgrounduntil they receive a request for their specific function. A number of standard Windows services run to controlsystem processes, schedule commands, handle print requests, and to perform other similar functions. Consultyour host operating system documentation for detailed information about the services that run on your system.
3.2 Principal OAS Services
OASYS Database services control your OASYS environment. When a user starts a OASYS session, the user’sprocess, called a oas, communicates with the services. The oas process runs with the permissions valid for theuser, preventing inappropriate file access by the OASYS services.
Lock tracking- oas_shmanager records all OASBasic locks and semaphore locks, identifying which OASYSuser holds each. Process cleanup- At periodic intervals, the oas_cleaner service checks to see if terminated process flags havebeen set. If oas_cleaner detects a terminated process flag, it deletes the associated process from internaltables, removes any requests from the queue, and removes any messages sent to the terminated process. Ifoas_cleaner receives a message from a process, it checks to see if the message was sent from a terminatedprocess. If so, it throws away the message.
3.2.1 Basic Object Manager (oas_objmanager)
The Basic Object Manager, manages shared memory used by globally cataloged OASBasic programs. OASYSstarts oas_objmanager when you execute oas_start and stops it when you execute oas_stop. The functions ofoas_objmanager include:
Loading and tracking globally cataloged programs- oas_objmanager loads globally cataloged programsinto shared memory as needed, and keeps track of the programs loaded and the number of processes executingeach one. When a user executes a globally cataloged program, oas_objmanager checks in shared memory, thentakes the following actions:
If the program is already loaded, oas_objmanager increments the counter for the number of users executingit, and tells the oas process which segment to attach to execute the program. If the program has not been loaded, oas_objmanager loads the program into shared memory and starts acounter for it.
Periodically, oas_objmanager checks shared memory and removes loaded programs that are no longer inuse.
Controlling shared memory- The oas_objmanager daemon can attach up to 20 shared memory segments.The maximum size of each segment for oas_objmanager is determined by the OASYS configuration
parameter OAS_MaxCatalogBytes. oas_objmanager attaches segments as it needs to load globally catalogedprograms, and releases memory back to the operating system when it is no longer needed.
Process cleanup- At periodic intervals, the oas_objmanager process checks the oas_cleaner service to seeif terminated process flags have been set. If oas_objmanager detects a terminated process flag, it removes allmessages sent for the process. If the terminated process is the only process using a program in sharedmemory, it removes the program from shared memory. oas_objmanager uses the process ID to determine if amessage it receives is from a terminated process. If so, oas_objmanager discards the message.
OAS and Services 29
© 2012 Onsystex Inc.
3.2.2 Shared Memory Manager (oas_shmanager)
The shared memory manager, oas_shmanager, builds and manages structures and tables within shared memory.OASYS starts oas_shmanager when you start the OASYS Database Service, and stops it when you stop theOASYS Database Service. OASYS processes (OAS processes) communicate with oas_shmanager to request andreturn shared memory. The OASYS processes request shared memory from oas_shmanager for the followingtasks:
License control- The oas_shmanager process tracks the number of users for which a site is licensed, andprevents more than that number of users from logging on to OASYS. oas_shmanager also displays warningmessages when a license is about to expire. User process tracking- When a user logs on to OASYS, oas_shmanager assigns an internal tracking numberto the user’s process and records information about the process in tables within OASYS. Buffering program variables. Storing query records and intermediate results. Storing select lists. Storing expression buffers. Managing a current modulo table for dynamic files.Process cleanup- At periodic intervals, the oas_shmanager process checks the oas_cleaner service to see ifterminated process flags have been set. If oas_shmanager detects a terminated process flag, it checks all ipcIDs. If one of the ipc IDs is invalid, oas_shmanager exits, bringing down OASYS. oas_shmanager also checksall process groups to see if the services terminated abnormally. If so, oas_shmanager removes all self-createdshared memory pieces and reclaims all global pages occupied by the terminated group. oas_shmanager alsocorrects any inconsistencies that may have occured if an update was terminated.
The Onsystex Application Server Service starts oas_shmanager, which creates a control table (CTL) in sharedmemory. The CTL tracks all information about the shared memory segments that oas_shmanager manages. Thesize of the CTL is related to the number of users on the system and to a series of configuration parameters.
3.2.3 Clean Up (oas_cleaner)
The clean up process, oas_cleaner, detects terminated user processes at check time intervals. If oas_cleanerdetects a terminated process, internal flags are set. The oas_shmanager and oas_objmanager servicesperiodically check to see if oas_cleaner has set internal flags. If these services detect flags, each service performsthe necessary clean up and resets its own flag to zero.
The oas_cleaner service performs clean up that is not handled by oas_shmanager or oas_objmanager. When theoas_shmanager and oas_objmanager services have reset their flags to zero, the oas_cleaner service resets its flagto zero, makes the user process ID available, and frees the local control table.
3.3 Monitoring OAS Services
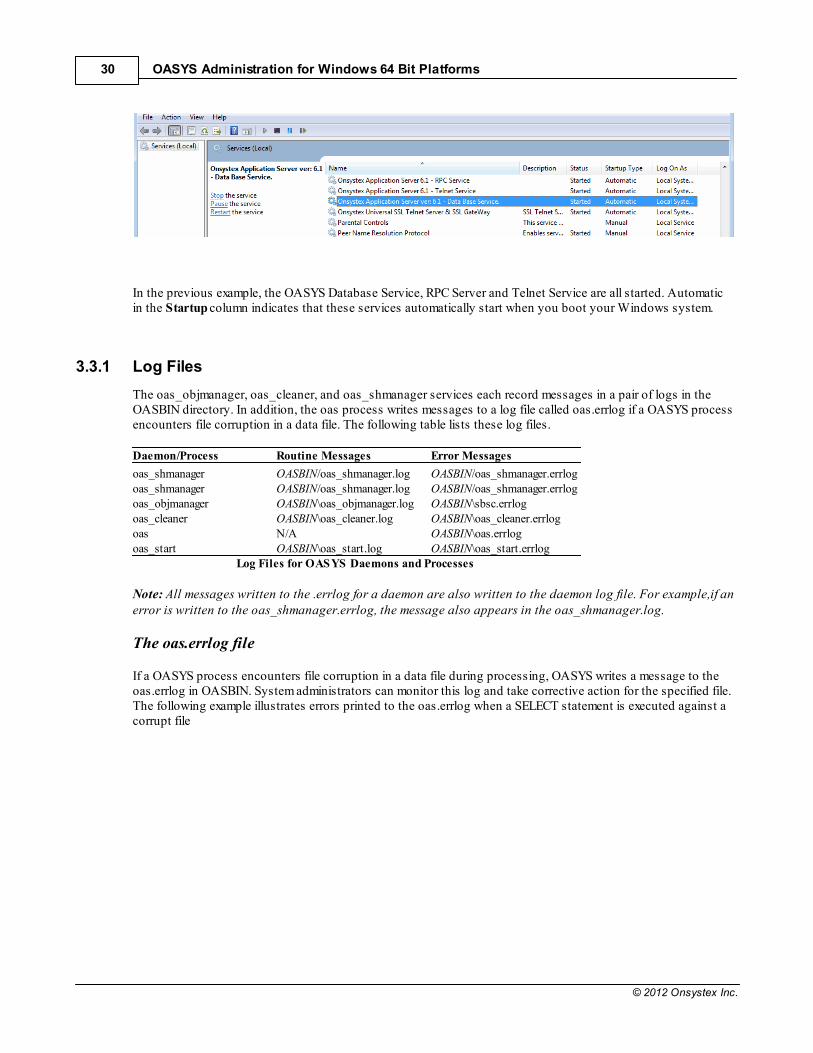
To monitor OASYS services, click the Start menu, point to Settings, click Control Panel, and then double-clickServices. A window similar to the following appears:
OASYS Administration for Windows 64 Bit Platforms30
© 2012 Onsystex Inc.
In the previous example, the OASYS Database Service, RPC Server and Telnet Service are all started. Automaticin the Startup column indicates that these services automatically start when you boot your Windows system.
3.3.1 Log Files
The oas_objmanager, oas_cleaner, and oas_shmanager services each record messages in a pair of logs in theOASBIN directory. In addition, the oas process writes messages to a log file called oas.errlog if a OASYS processencounters file corruption in a data file. The following table lists these log files.
Daemon/Process Routine Messages Error Messages
oas_shmanager OASBIN/oas_shmanager.log OASBIN/oas_shmanager.errlog oas_shmanager OASBIN/oas_shmanager.log OASBIN/oas_shmanager.errlog oas_objmanager OASBIN\oas_objmanager.log OASBIN\sbsc.errlog oas_cleaner OASBIN\oas_cleaner.log OASBIN\oas_cleaner.errlog oas N/A OASBIN\oas.errlog oas_start OASBIN\oas_start.log OASBIN\oas_start.errlog
Log Files for OASYS Daemons and Processes
Note: All messages written to the .errlog for a daemon are also written to the daemon log file. For example,if anerror is written to the oas_shmanager.errlog, the message also appears in the oas_shmanager.log.
The oas.errlog file
If a OASYS process encounters file corruption in a data file during processing, OASYS writes a message to theoas.errlog in OASBIN. System administrators can monitor this log and take corrective action for the specified file.The following example illustrates errors printed to the oas.errlog when a SELECT statement is executed against acorrupt file

Part
4
OASYS Administration for Windows 64 Bit Platforms32
© 2012 Onsystex Inc.
4 OAS and Memory
This chapter describes how to configure, attach, and release shared memory.
4.1 Windows Platforms and Shared Memory
Shared memory is a region of memory that more than one process can access. Shared memory resides on aWindows system outside the address space of any process. It is partitioned into segments.
As a process requires memory, the process attaches a segment to its own address space. Processes use system-level calls to create, attach, and release shared memory segments.
4.2 OAS and Shared Memory
OASYS interacts with shared memory by using system-level calls, OASYS services, and OASYS configurationparameters to build its own structures in shared memory.
OASYS defines shared memory segments that can be attached by OASYS processes. The oas_objmanager(Basic Object Manager) service creates shared memory structures for storing active globally cataloged OASBasicprograms.
The oas_shmanager (shared memory manager) service creates shared memory structures for internal tablesrequired by OASYS processes. OASYS processes request memory for:
Buffering OASBasic variables Storing intermediate results Storing a current modulo table for dynamic files
4.2.1 oas_shmanager and Shared Memory
The shared memory manager (oas_shmanager) creates shared memory segments as needed. The size andcharacteristics of segments oas_shmanager or the OASYS Database Service create are determined by OASYSconfiguration parameters. Whenever OASYS starts, it reads the oasconfig file located in OASHOME\include andstores these values in shared memory. oas_shmanager subdivides each of its segments into global pages, andsubdivides each global page into local pages.
oas_shmanager also creates and maintains internal tables that track the use of the structures it creates. Theseinternal tables, stored in shared memory structures, allow oas_shmanager to protect shared memory pagesagainst accidental overwriting, and to optimize the efficiency of memory use by releasing unneeded sharedmemory pages back to the operating system.
Displaying Parameter Settings Use the OASYS system-level command oas_showmem -h to display the current settings for configurationparameters related to shared memory.
Note: See “Appendix A OASYS Configuration Parameters,” for further information about these parameters.
OAS and Memory 33
© 2012 Onsystex Inc.
4.2.2 oas_objmanager and Shared Memory
oas_objmanager creates structures in shared memory as needed for storing active globally cataloged OASBasicprograms. The limits for structures created by oas_objmanager are different from those for oas_shmanager.
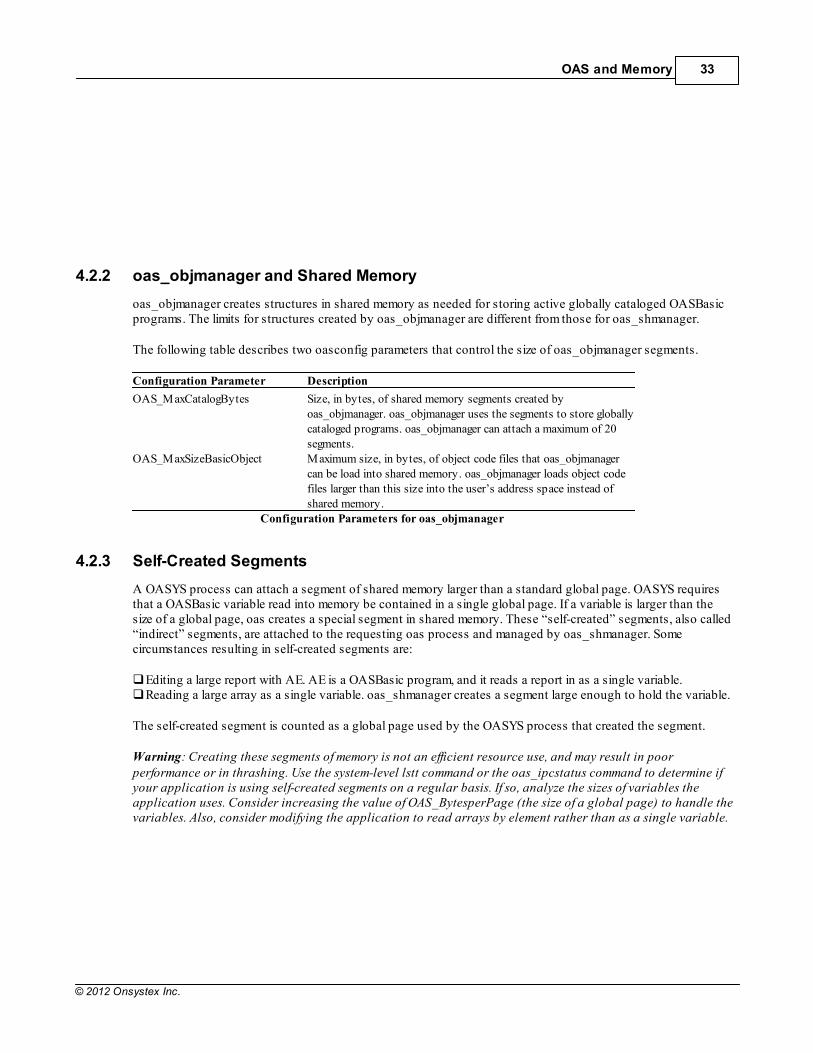
The following table describes two oasconfig parameters that control the size of oas_objmanager segments.
Configuration Parameter Description
OAS_MaxCatalogBytes Size, in bytes, of shared memory segments created byoas_objmanager. oas_objmanager uses the segments to store globallycataloged programs. oas_objmanager can attach a maximum of 20segments.
OAS_MaxSizeBasicObject Maximum size, in bytes, of object code files that oas_objmanagercan be load into shared memory. oas_objmanager loads object codefiles larger than this size into the user’s address space instead ofshared memory.
Configuration Parameters for oas_objmanager
4.2.3 Self-Created Segments
A OASYS process can attach a segment of shared memory larger than a standard global page. OASYS requiresthat a OASBasic variable read into memory be contained in a single global page. If a variable is larger than thesize of a global page, oas creates a special segment in shared memory. These “self-created” segments, also called“indirect” segments, are attached to the requesting oas process and managed by oas_shmanager. Somecircumstances resulting in self-created segments are:
Editing a large report with AE. AE is a OASBasic program, and it reads a report in as a single variable. Reading a large array as a single variable. oas_shmanager creates a segment large enough to hold the variable.
The self-created segment is counted as a global page used by the OASYS process that created the segment.
Warning: Creating these segments of memory is not an efficient resource use, and may result in poorperformance or in thrashing. Use the system-level lstt command or the oas_ipcstatus command to determine ifyour application is using self-created segments on a regular basis. If so, analyze the sizes of variables theapplication uses. Consider increasing the value of OAS_BytesperPage (the size of a global page) to handle thevariables. Also, consider modifying the application to read arrays by element rather than as a single variable.

Part
5
Configuring Your OAS System 35
© 2012 Onsystex Inc.
5 Configuring Your OAS System
This chapter outlines configuration considerations that may be appropriate when you first implement OASYS orwhen you make major changes to your system. Major changes include adding or reconfiguring hardware,installing a new software application, or upgrading or relicensing OASYS.
This chapter does not present detailed information, but outlines the considerations and refers you to sources ofadditional information.
5.1 Configuration Procedure
If you are installing or upgrading OASYS, see Installing and Licensing OASYS Products for estimates for initialdisk and memory needs for your system. These estimates should be sufficient to allow you to install and startOASYS with a minimal configuration.
5.1.1 1. Identify Disk Requirements
The initial estimates in Installing and Licensing OASYS Products should allow you to install and run OASYS.However, we recommend that you evaluate your system, including your operating system, your hardwareconfiguration, and your application, to develop accurate disk space requirements. Onsystex offers the followingsuggestions.
Disk Requirements- Use the largest expected size for your data files to estimate how much disk space youneed. In certain applications, such as financial applications, the number of records varies in a predictable wayover time. Your system must have enough disk space to handle the maximum number of records withoutdifficulty.
Disk I/O- For best results, configure your disk system so that access is balanced across all devices. Onsystexsuggests the following:
\TEMP directory- Locate your \TEMP directory on a different physical drive from your data for improvedperformance.
OASYS accounts- If your application uses more than one OASYS account, locate the account directorieson separate drives to distribute load.
5.1.2 2. Identify Memory Requirements
The initial estimates in Installing and Licensing OASYS Products should allow you to install and run OASYSwith a minimal configuration. However, memory requirements can be platform dependent as well as applicationdependent. Estimate the memory required for the following components of your application:
The memory segments controlled by oas_shmanager The memory segments controlled by oas_shmanager The memory segments for oas_objmanager
See Chapter 6, “OASYS and Memory,” for information about estimating memory needs.
5.1.3 3. Verify Version Compatibilities
If you are considering major upgrades to your hardware or to your operating system, consult your Onsystexaccount representative early in your planning process to determine if your current OASYS version is supported
OASYS Administration for Windows 64 Bit Platforms36
© 2012 Onsystex Inc.
by the hardware or software you are considering.
5.1.4 4. Check/Reset System-Level Parameters
Depending on your version of Windows, you may or may not be able to modify system-level parameters directly.You may need to adjust the following categories of parameters when you first implement OASYS:
Memory- Review parameters that limit the number of shared memory segments system-wide, the maximum andminimum size of a segment, and the maximum number of segments per process. See Chapter 6, “OASYS andMemory,” for additional information. Files and Users- Review parameters that define the maximum number of open files and file locks supportedsystem-wide, the maximum number of files per user process, and the maximum number of user processes thesystem can support at one time. ipc Facilities- Review parameters that define the number and size of message queues, the number ofsemaphore sets and semaphores, and the number of semaphore undo structures your system supports.
5.1.5 5. Check/Reset OAS Configuration Parameters
The OASYS oasconfig file, located in OASHOME\include, contains a set of parameters that are given defaultvalues when you install OASYS. When you start a OASYS session, OASYS sets environment variables for eachvalue in the oasconfig file.
Note: The oasconfig file is always located in OASHOME\include. Do not move the directory to anotherlocation, or OASYS will not run.
The oasconfig file enables you to define values for each parameter that applies to your OASYS environment. Youcan adjust most oasconfig parameters for your environment, but some should not be changed. Refer to“Appendix A OASYS Configuration Parameters,” for detailed information about each oasconfig parameter.
You must log in as Administrator to modify oasconfig parameters.
5.1.6 6. Define Peripherals within OAS
You must define tape devices, printers, and line devices within OASYS before you can access them from OASYS.Before defining a device within OASYS, make sure that it is properly installed and functioning in your Windowsenvironment. Refer to your operating system documentation for information about setting up peripherals on yoursystem.
Use the ECL SETTAPE, SETLINE, and SETPTR commands to define your peripherals to OASYS. See Chapter 14,“Managing Printers in OASYS,” and Chapter 16, “Managing and Using Tape Devices,” for additionalinformation.
5.1.7 7. Create OAS Accounts
When you implement OASYS, you may need to create one or more OASYS accounts for your application. AOASYS account is a directory that contains a OASYS VOC file and its dictionary.
The VOC file identifies commands, paragraphs, and all data files that are used in the OASYS account. The datafiles may be in the same directory as the VOC file, or the VOC file may contain pointers to data files in other filesystems.
Your system may have a single OASYS account or several, depending on your application.
Configuring Your OAS System 37
© 2012 Onsystex Inc.
Note: A Windows account (logon ID, password) is not the same as a OASYS account. Every OASYS user shouldhave a separate Windows account (logon ID and password), but many users can access the same OASYSaccount.
Use the Windows platform mkdir command and the OASYS system-level oas_newacct command to createOASYS accounts. See your host operating system documentation for information about the mkdir command,and see Chapter 9, “Managing OASYS Accounts,” for information about the oas_newacct command.
5.1.8 8. Add Windows Users
Accessing OASYS requires each user to have a logon ID and password on your Windows system.
Onsystex recommends you create a separate Windows account for each OASYS user.
See your host operating system documentation for detailed information on creating Windows accounts. SeeChapter 10, “Managing OASYS Security,” for OASYS-specific information.
5.1.9 9. Set Environment Variables
You do not have to set the OASHOME and OASBIN environment variables on Windows platforms, unless your OASHOME and OASBIN directories differ from those defined in the Registry. A user wishing to access OASYSusing a different OASHOME and OASBIN than those defined in the Registry must have two environmentvariables set: OASHOME and OASBIN. The settings you assign for these variables depend on whether youperformed a basic or an advanced OASYS installation.
See Installing and Licensing OASYS Products for information about installation types.
OASHOME- This variable identifies the path of the OASYS “home” directory. The home directory containssubdirectories OASYS needs for processing. OASBIN- This variable identifies the path for the directory that contains OASYS executables. By default,OASBIN is a subdirectory under OASHOME.
Setting OASHOME and OASBIN You can add commands to set these environment variables to each user’s profile, if the user is accessing OASYSwith a different OASHOME or OASBIN than defined in the Registry. Use the following commands to set thesevariables: set OASHOME \directory-name set OASBIN \directory-name set PATH \directory-name
You can also set environment variables from the System window. From the Start menu, click Control Panel, andthen double-click System. Click the Advanced tab, then click Environment Variables. A dialog box similar to thefollowing example appears:
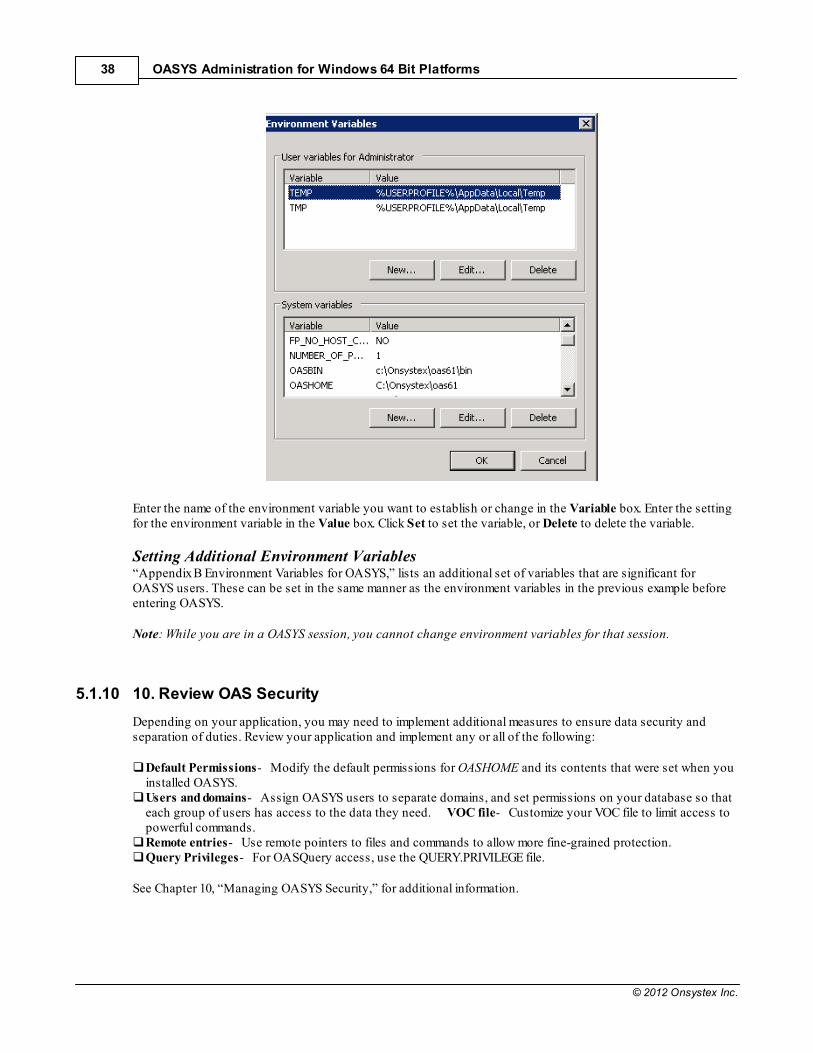
OASYS Administration for Windows 64 Bit Platforms38
© 2012 Onsystex Inc.
Enter the name of the environment variable you want to establish or change in the Variable box. Enter the settingfor the environment variable in the Value box. Click Set to set the variable, or Delete to delete the variable.
Setting Additional Environment Variables “Appendix B Environment Variables for OASYS,” lists an additional set of variables that are significant forOASYS users. These can be set in the same manner as the environment variables in the previous example beforeentering OASYS.
Note: While you are in a OASYS session, you cannot change environment variables for that session.
5.1.10 10. Review OAS Security
Depending on your application, you may need to implement additional measures to ensure data security andseparation of duties. Review your application and implement any or all of the following:
Default Permissions- Modify the default permissions for OASHOME and its contents that were set when youinstalled OASYS. Users and domains- Assign OASYS users to separate domains, and set permissions on your database so thateach group of users has access to the data they need. VOC file- Customize your VOC file to limit access topowerful commands. Remote entries- Use remote pointers to files and commands to allow more fine-grained protection. Query Privileges- For OASQuery access, use the QUERY.PRIVILEGE file.
See Chapter 10, “Managing OASYS Security,” for additional information.
Configuring Your OAS System 39
© 2012 Onsystex Inc.
5.1.11 11. Convert Data Files
Depending upon the nature of your system change, you may need to perform some conversion of OASYShashed files. Consider the following:
RDBMS Integration- OASIS provides seamless integration with RDBMS Tables providing the samefunctionality support as if these were hashed native files. If you are migrating your hashed data files tonormalized storage forms or need to integtrate with external RDBMS data sources, please refer to the "OASYSRDBMS Integration Guide" for additional information.File characteristics- OASIS also offers you the capability to convert files from static to dynamic, change filecharacteristics such as block size and modulo, change hashing algorithm for a static file, and change file formatbetween high-byte and low-byte formats. See Chapter 11, “Managing OASYS Files,” and the OASYSCommands Reference for additional information.
5.1.12 12. Review Backup Procedures
Special considerations are needed to back up OASYS accounts. Make sure your backup procedures have thefollowing capabilities:
Subdirectories- Your backup procedure should be able to back up at least three levels of subdirectories. Thisis required to support OASYS MULTIDIR and MULTIFILE files. Backing up selected files - Your backup procedure should allow you to input a list of files to back up. This isrequired to support full backups of OASYS accounts. Simply backing up the directory that contains the VOCfile may be insufficient, since data files are not necessarily located in the same directory as the VOC file. TheECL SETFILE command creates VOC entries with pointers to files in other locations. However, backup utilitiesmay not follow these SETFILE pointers. To create a complete backup of an account, you need to make sureyou back up and verify each physical file associated with the account.

Part
6
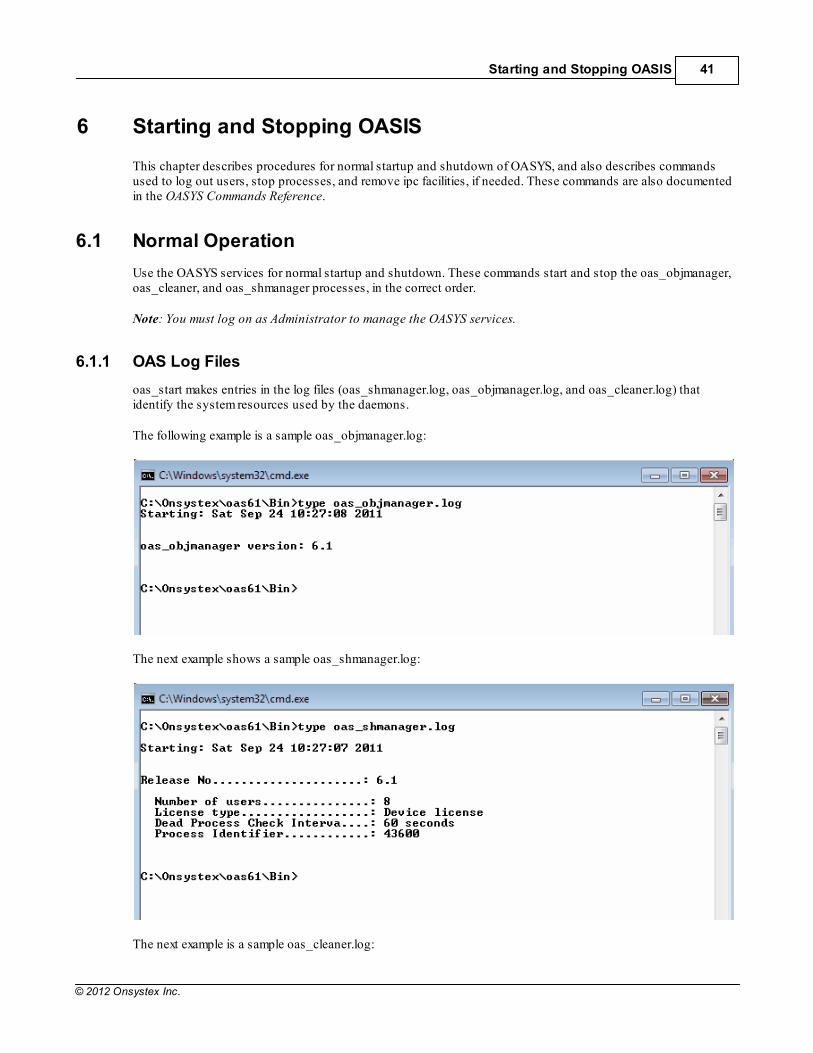
Starting and Stopping OASIS 41
© 2012 Onsystex Inc.
6 Starting and Stopping OASIS
This chapter describes procedures for normal startup and shutdown of OASYS, and also describes commandsused to log out users, stop processes, and remove ipc facilities, if needed. These commands are also documentedin the OASYS Commands Reference.
6.1 Normal Operation
Use the OASYS services for normal startup and shutdown. These commands start and stop the oas_objmanager,oas_cleaner, and oas_shmanager processes, in the correct order.
Note: You must log on as Administrator to manage the OASYS services.
6.1.1 OAS Log Files
oas_start makes entries in the log files (oas_shmanager.log, oas_objmanager.log, and oas_cleaner.log) thatidentify the system resources used by the daemons.
The following example is a sample oas_objmanager.log:
The next example shows a sample oas_shmanager.log:
The next example is a sample oas_cleaner.log:
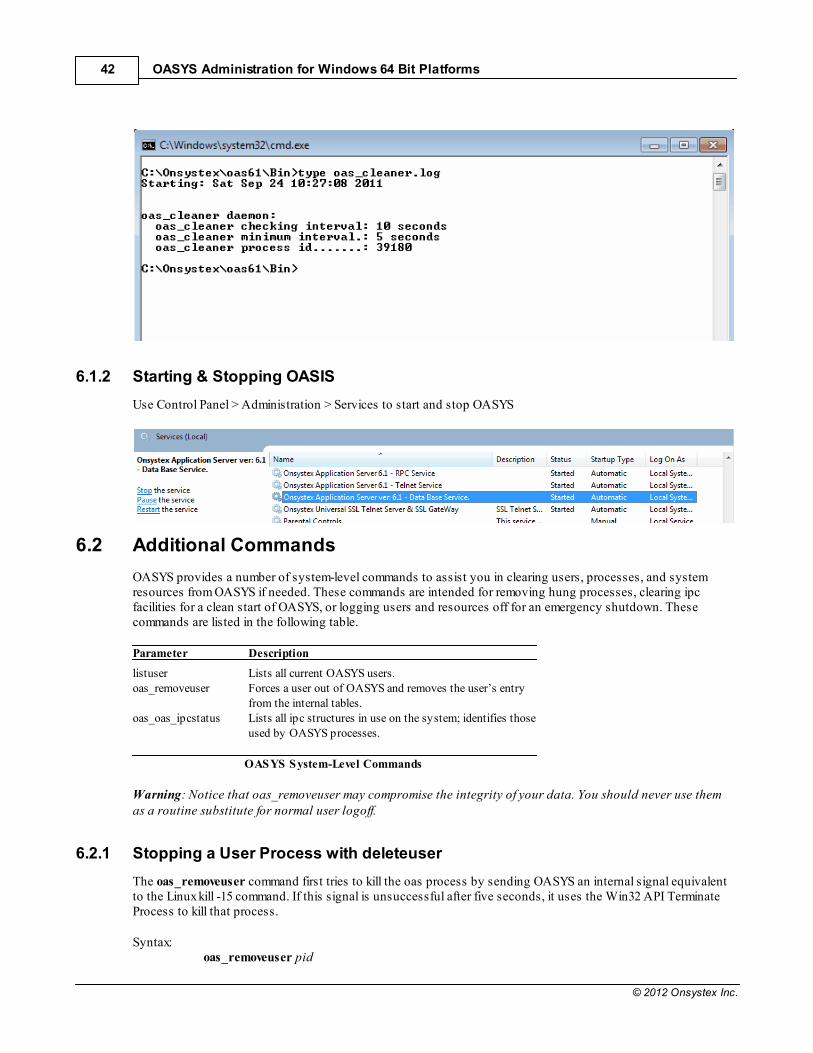
OASYS Administration for Windows 64 Bit Platforms42
© 2012 Onsystex Inc.
6.1.2 Starting & Stopping OASIS
Use Control Panel > Administration > Services to start and stop OASYS
6.2 Additional Commands
OASYS provides a number of system-level commands to assist you in clearing users, processes, and systemresources from OASYS if needed. These commands are intended for removing hung processes, clearing ipcfacilities for a clean start of OASYS, or logging users and resources off for an emergency shutdown. Thesecommands are listed in the following table.
Parameter Description
listuser Lists all current OASYS users. oas_removeuser Forces a user out of OASYS and removes the user’s entry
from the internal tables. oas_oas_ipcstatus Lists all ipc structures in use on the system; identifies those
used by OASYS processes.
OASYS System-Level Commands
Warning: Notice that oas_removeuser may compromise the integrity of your data. You should never use themas a routine substitute for normal user logoff.
6.2.1 Stopping a User Process with deleteuser
The oas_removeuser command first tries to kill the oas process by sending OASYS an internal signal equivalentto the Linux kill -15 command. If this signal is unsuccessful after five seconds, it uses the Win32 API TerminateProcess to kill that process.
Syntax:oas_removeuser pid
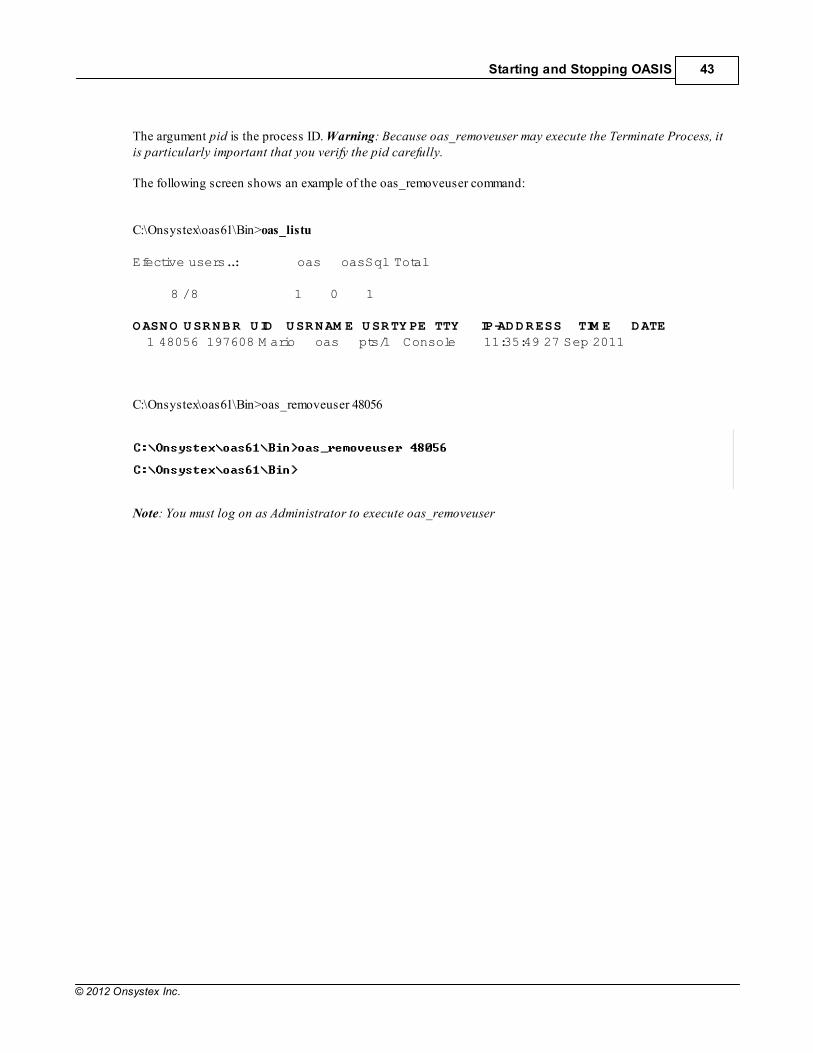
Starting and Stopping OASIS 43
© 2012 Onsystex Inc.
The argument pid is the process ID. Warning: Because oas_removeuser may execute the Terminate Process, itis particularly important that you verify the pid carefully.
The following screen shows an example of the oas_removeuser command:
C:\Onsystex\oas61\Bin>oas_listu
Efective users..: oas oasSql Total
8 / 8 1 0 1
OASNO USRNBR UID USRNAM E USRTYPE TTY IP-ADDRESS TIM E DATE 1 48056 197608 M ario oas pts/1 Console 11:35:49 27 Sep 2011
C:\Onsystex\oas61\Bin>oas_removeuser 48056
Note: You must log on as Administrator to execute oas_removeuser
Part
7
Managing OAS Accounts 45
© 2012 Onsystex Inc.
7 Managing OAS Accounts
This chapter describes OASYS accounts and describes procedures used to create, save, and clear the accounts.
7.1 What Is an OASIS Account?
A OASYS account is a directory that contains a default set of OASYS files, including a VOC file and itsdictionary.
Note: The system-level oas_newacct command creates the default files OASYS requires for an account.
The VOC file identifies commands, paragraphs, and all data files that are used in the OASYS account. The datafiles may be in the same directory as the VOC file, or the VOC file may contain pointers to data files in otherdirectories. Your system may have a single OASYS account, or several, depending on your application.
Note: A Windows account typically means a logon ID, its associated password, and its default directory. Thereis no direct relationship between OASYS accounts and Windows accounts (logon IDs). Many Windows usersmay access any OASYS account. A Windows user’s default directory does not have to be (and usually is not) aOASYS account.
7.2 Creating an OAS Account
There are three steps required to create a OASYS account:
1. Use the MS-DOS mkdir command to create the directory that will house the account. The name of the OASYSaccount directory can be in uppercase, lowercase, or mixed uppercase and lowercase. 2. Make the new directory your working directory. You can change to the directory with the MS-DOS cdcommand. 3. Use the OASYS oas_oas_newacct command to create the VOC and other OASYS-specific files in the directory.
Note: You do not need to log on as Administrator to create a OASYS account. However, you must have Changeaccess in the account directory.
The following three screens illustrate how to create a OASYS account. In the examples, the new account is namesACCOUNT, and is located in the OASYS directory:
The first window shows creating the account directory:
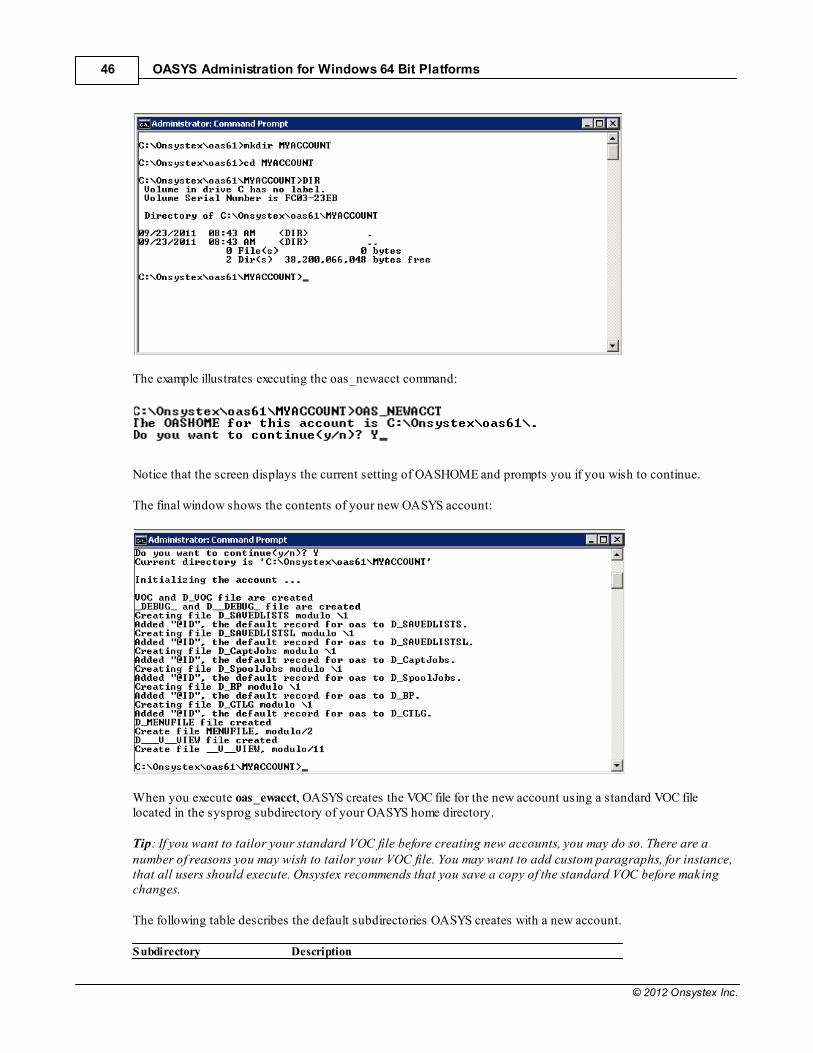
OASYS Administration for Windows 64 Bit Platforms46
© 2012 Onsystex Inc.
The example illustrates executing the oas_newacct command:
Notice that the screen displays the current setting of OASHOME and prompts you if you wish to continue.
The final window shows the contents of your new OASYS account:
When you execute oas_ewacct, OASYS creates the VOC file for the new account using a standard VOC filelocated in the sysprog subdirectory of your OASYS home directory.
Tip: If you want to tailor your standard VOC file before creating new accounts, you may do so. There are anumber of reasons you may wish to tailor your VOC file. You may want to add custom paragraphs, for instance,that all users should execute. Onsystex recommends that you save a copy of the standard VOC before makingchanges.
The following table describes the default subdirectories OASYS creates with a new account.
Subdirectory Description

Managing OAS Accounts 47
© 2012 Onsystex Inc.
BP Used to store OASBasic source and object code. CTLG Used to store locally cataloged OASBasic programs. SAVEDLISTS Used to store SELECT lists. SAVEDLISTSL Used to store temporary information for BY.EXP sorts. OASYS
automatically creates and deletes the contents of this subdirectory. _SpoolJobs_ Used to store print files.
Subdirectories in a OASYS Account
Subdirectory Description _CaptJobs_ Used to store output from background processes (created by the
OASYS ECL PHANTOM command) and captured terminal I/O(created by the OASYS ECL COMO command).
Subdirectories in a OASYS Account (continued)
OASYS creates the subdirectories empty and populates them as the account is used.
The next table describes the OASYS hashed files that OASYS creates are created in a new account.
File Description
MENUFILE Stores user-generated menu definitions. VOC VOC (vocabulary) file, containing references for ECL commands,
sentences, paragraphs, and file names. privilege Used to store OASYS SQL access privileges. D_BP Dictionary for the BP file, which holds OASBasic programs. D_CTLG Dictionary for CTLG. D_MENUFILE Dictionary for MENUFILE. D_SAVEDLISTS Dictionary for SAVEDLISTS. D_VOC Dictionary for VOC. D__SpoolJobs_ Dictionary for SpoolJobs. D__CaptJobs Dictionary for CaptJobs
Hashed Files in a OASYS Account
File Description
D_SAVEDLISTSL Dictionary for savedlists. Hashed Files in a OASYS Account (continued)
Note: See Developing OASBasic Applications and Using OASYS RDBMS Integraton for information aboutOASBasic and OASYS RDBMS integration
7.3 Deleting an Oasis Account
There is no OASYS command or utility that allows you to delete an entire account. If you need to delete anaccount, complete the following steps:
1. Analyze the database and identify which files you want to delete. Take care not to delete shared files that otherOASYS accounts still need. 2. Create and verify a full backup of at least the account you are going to delete. 3. Consider strategy. If the account is self-contained (that is, within one file system), you can use the MS-DOSrmdir /s command to delete the account directory. If the account has file pointers to other file systems, you maywish to use the ECL DELETE.FILE command to delete the files before removing the account directory. Use theECL MAX.USER command to prevent inadvertent access to the OASYS account.
OASYS Administration for Windows 64 Bit Platforms48
© 2012 Onsystex Inc.
Warning: Be careful with rmdir /s. This command removes all files and subdirectories below the directory youspecify. If you have nested accounts (that is, a OASYS account within a OASYS account) and you remove anaccount directory with rmdir /s, you could remove more than one account.

Part
8
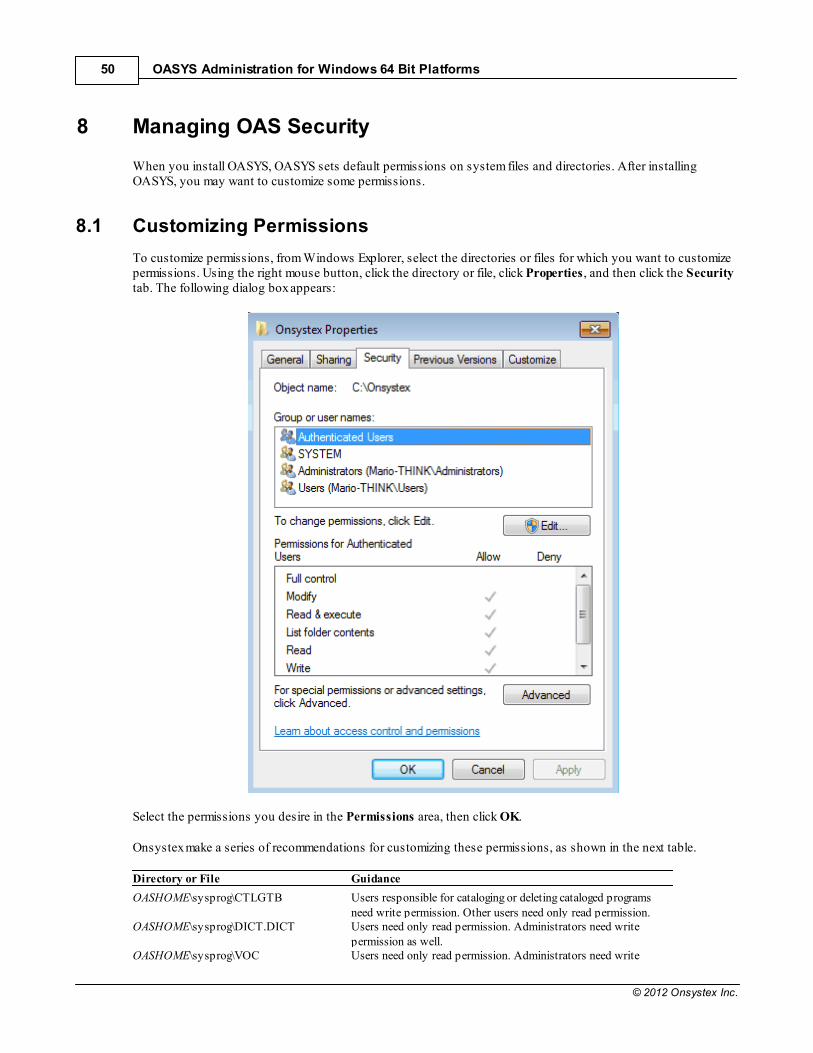
OASYS Administration for Windows 64 Bit Platforms50
© 2012 Onsystex Inc.
8 Managing OAS Security
When you install OASYS, OASYS sets default permissions on system files and directories. After installingOASYS, you may want to customize some permissions.
8.1 Customizing Permissions
To customize permissions, from Windows Explorer, select the directories or files for which you want to customizepermissions. Using the right mouse button, click the directory or file, click Properties, and then click the Securitytab. The following dialog box appears:
Select the permissions you desire in the Permissions area, then click OK.
Onsystex make a series of recommendations for customizing these permissions, as shown in the next table.
Directory or File Guidance
OASHOME\sysprog\CTLGTB Users responsible for cataloging or deleting cataloged programsneed write permission. Other users need only read permission.
OASHOME\sysprog\DICT.DICT Users need only read permission. Administrators need writepermission as well.
OASHOME\sysprog\VOC Users need only read permission. Administrators need write
Managing OAS Security 51
© 2012 Onsystex Inc.
permission as well. OASHOME\sysprog\CTLG Users, including programmers, need execute permission to this
global catalog directory. In general, do not allow users to add ordelete subdirectories to CTLG.
OASHOME\sysprog\CTLG\n and directoriesand files within these subdirectories
CTLG contains a subdirectory for each letter of the alphabet andone for symbols. Users need execute permission to thesedirectories and read access to the files in them. Programmers mayneed Change permissions to the subdirectories and files so they cancatalog or delete cataloged programs.
OASHOME\demo Use this directory for training and experimentation. Use anypermissions settings that suit your situation.
OASHOME\sysprog\AE_BP All users with access to AE (the line editor) need read and writepermissions.
Guidelines for Permissions for OASYS System Files
When you create a OASYS account, Onsystex suggests the following guidelines for setting permissions for thedirectory, subdirectories, and files in the account:
Direct Description
The account directory Only users who need to create files in the directory should have writepermission.
BP Users need read and execute permissions so they can run OASBasic programsthat are not globally cataloged. Programmers need write permission.
CTLG Users need read and execute permissions so they can run locally catalogedprograms. Programmers and administrators need write permission so they canlocally catalog and delete locally cataloged programs.
SAVEDLISTS Users need read and write permissions. SpoolJobs Users need read and write permissions. CaptJobs Users need read and write permissions. VOC (This refers to the account VOC file, not the master VOC file in OASHOME
\sysprog.) Users must have read and write access to enter their accounts unlessyou have set the VOC_READONLY environment variable. See Using OASYS formore information about the VOC file. Suggested Permissions for a OASYS Account
8.2 Customizing a VOC File
This section describes ways to customize your VOC file.
8.2.1 Removing Entries
Depending on your application, you may wish to prevent users from executing certain ECL commands. If youremove the entries corresponding to these commands from a VOC file in an account, users logged on to thataccount will not be able to execute them.
When a user enters an ECL command, OASYS searches the VOC file in the current account. If there is nocorresponding entry, OASYS displays an error message instead of executing the command.
The following example shows the results of deleting a VOC entry:
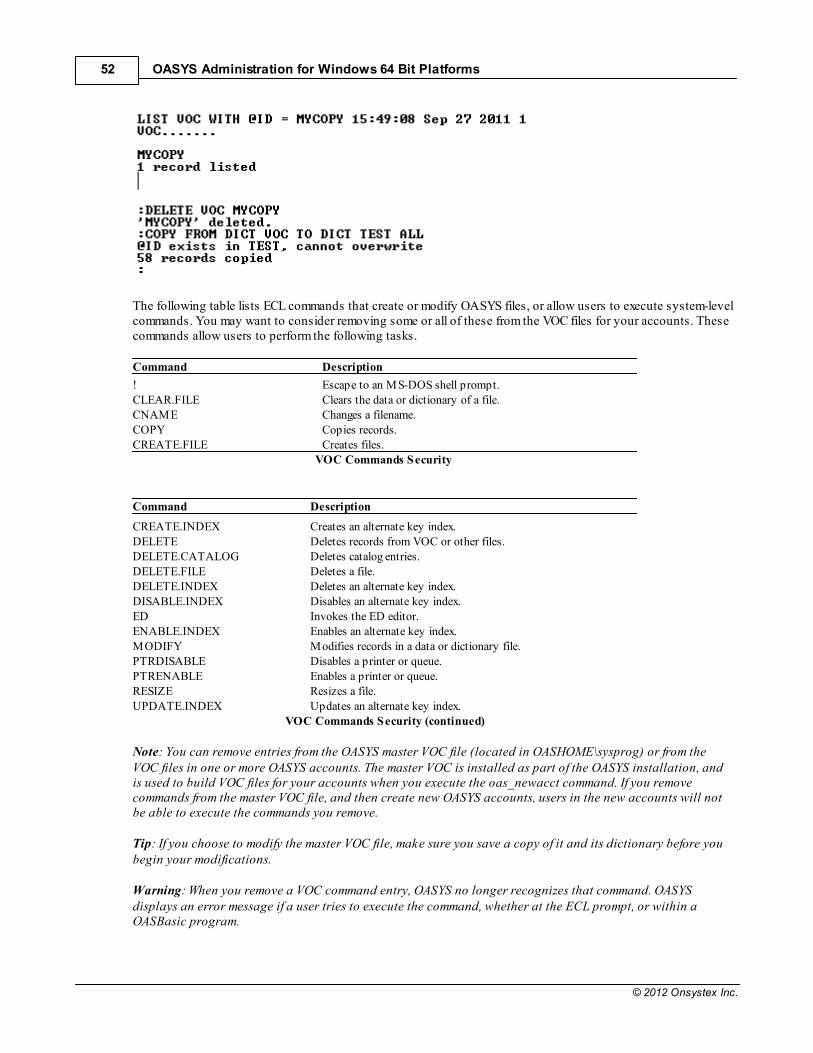
OASYS Administration for Windows 64 Bit Platforms52
© 2012 Onsystex Inc.
The following table lists ECL commands that create or modify OASYS files, or allow users to execute system-levelcommands. You may want to consider removing some or all of these from the VOC files for your accounts. Thesecommands allow users to perform the following tasks.
Command Description
! Escape to an MS-DOS shell prompt. CLEAR.FILE Clears the data or dictionary of a file. CNAME Changes a filename. COPY Copies records. CREATE.FILE Creates files.
VOC Commands Security
Command Description
CREATE.INDEX Creates an alternate key index. DELETE Deletes records from VOC or other files. DELETE.CATALOG Deletes catalog entries. DELETE.FILE Deletes a file. DELETE.INDEX Deletes an alternate key index. DISABLE.INDEX Disables an alternate key index. ED Invokes the ED editor. ENABLE.INDEX Enables an alternate key index. MODIFY Modifies records in a data or dictionary file. PTRDISABLE Disables a printer or queue. PTRENABLE Enables a printer or queue. RESIZE Resizes a file. UPDATE.INDEX Updates an alternate key index.
VOC Commands Security (continued)
Note: You can remove entries from the OASYS master VOC file (located in OASHOME\sysprog) or from theVOC files in one or more OASYS accounts. The master VOC is installed as part of the OASYS installation, andis used to build VOC files for your accounts when you execute the oas_newacct command. If you removecommands from the master VOC file, and then create new OASYS accounts, users in the new accounts will notbe able to execute the commands you remove.
Tip: If you choose to modify the master VOC file, make sure you save a copy of it and its dictionary before youbegin your modifications.
Warning: When you remove a VOC command entry, OASYS no longer recognizes that command. OASYSdisplays an error message if a user tries to execute the command, whether at the ECL prompt, or within aOASBasic program.
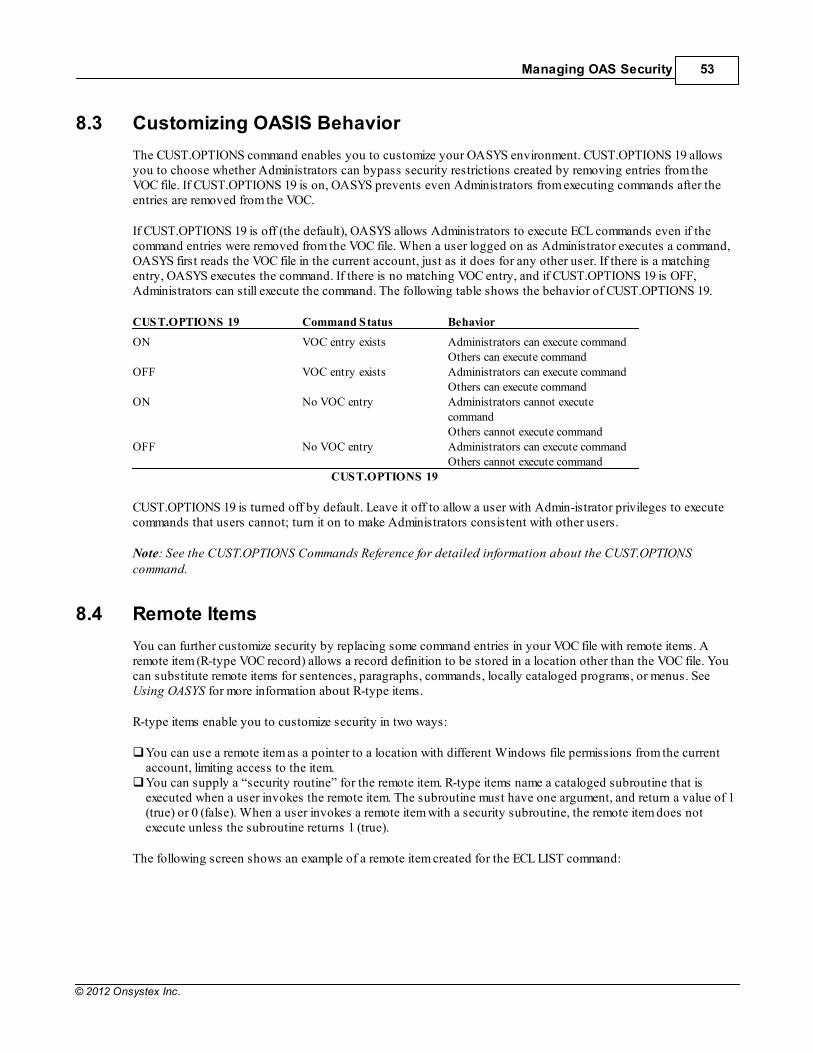
Managing OAS Security 53
© 2012 Onsystex Inc.
8.3 Customizing OASIS Behavior
The CUST.OPTIONS command enables you to customize your OASYS environment. CUST.OPTIONS 19 allowsyou to choose whether Administrators can bypass security restrictions created by removing entries from theVOC file. If CUST.OPTIONS 19 is on, OASYS prevents even Administrators from executing commands after theentries are removed from the VOC.
If CUST.OPTIONS 19 is off (the default), OASYS allows Administrators to execute ECL commands even if thecommand entries were removed from the VOC file. When a user logged on as Administrator executes a command,OASYS first reads the VOC file in the current account, just as it does for any other user. If there is a matchingentry, OASYS executes the command. If there is no matching VOC entry, and if CUST.OPTIONS 19 is OFF,Administrators can still execute the command. The following table shows the behavior of CUST.OPTIONS 19.
CUST.OPTIONS 19 Command Status Behavior
ON VOC entry exists Administrators can execute commandOthers can execute command
OFF VOC entry exists Administrators can execute commandOthers can execute command
ON No VOC entry Administrators cannot executecommand Others cannot execute command
OFF No VOC entry Administrators can execute commandOthers cannot execute command
CUST.OPTIONS 19
CUST.OPTIONS 19 is turned off by default. Leave it off to allow a user with Admin-istrator privileges to executecommands that users cannot; turn it on to make Administrators consistent with other users.
Note: See the CUST.OPTIONS Commands Reference for detailed information about the CUST.OPTIONScommand.
8.4 Remote Items
You can further customize security by replacing some command entries in your VOC file with remote items. Aremote item (R-type VOC record) allows a record definition to be stored in a location other than the VOC file. Youcan substitute remote items for sentences, paragraphs, commands, locally cataloged programs, or menus. See Using OASYS for more information about R-type items.
R-type items enable you to customize security in two ways:
You can use a remote item as a pointer to a location with different Windows file permissions from the currentaccount, limiting access to the item. You can supply a “security routine” for the remote item. R-type items name a cataloged subroutine that isexecuted when a user invokes the remote item. The subroutine must have one argument, and return a value of 1(true) or 0 (false). When a user invokes a remote item with a security subroutine, the remote item does notexecute unless the subroutine returns 1 (true).
The following screen shows an example of a remote item created for the ECL LIST command:
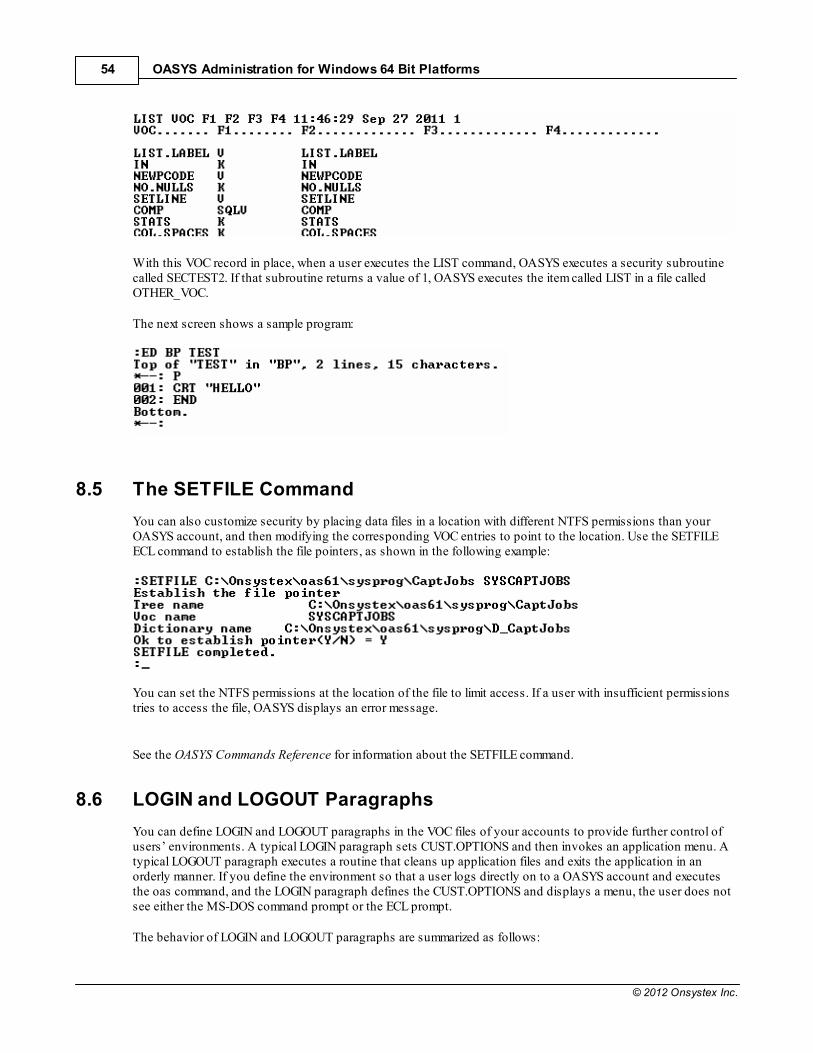
OASYS Administration for Windows 64 Bit Platforms54
© 2012 Onsystex Inc.
With this VOC record in place, when a user executes the LIST command, OASYS executes a security subroutinecalled SECTEST2. If that subroutine returns a value of 1, OASYS executes the item called LIST in a file calledOTHER_VOC.
The next screen shows a sample program:
8.5 The SETFILE Command
You can also customize security by placing data files in a location with different NTFS permissions than yourOASYS account, and then modifying the corresponding VOC entries to point to the location. Use the SETFILEECL command to establish the file pointers, as shown in the following example:
You can set the NTFS permissions at the location of the file to limit access. If a user with insufficient permissionstries to access the file, OASYS displays an error message.
See the OASYS Commands Reference for information about the SETFILE command.
8.6 LOGIN and LOGOUT Paragraphs
You can define LOGIN and LOGOUT paragraphs in the VOC files of your accounts to provide further control ofusers’ environments. A typical LOGIN paragraph sets CUST.OPTIONS and then invokes an application menu. Atypical LOGOUT paragraph executes a routine that cleans up application files and exits the application in anorderly manner. If you define the environment so that a user logs directly on to a OASYS account and executesthe oas command, and the LOGIN paragraph defines the CUST.OPTIONS and displays a menu, the user does notsee either the MS-DOS command prompt or the ECL prompt.
The behavior of LOGIN and LOGOUT paragraphs are summarized as follows:
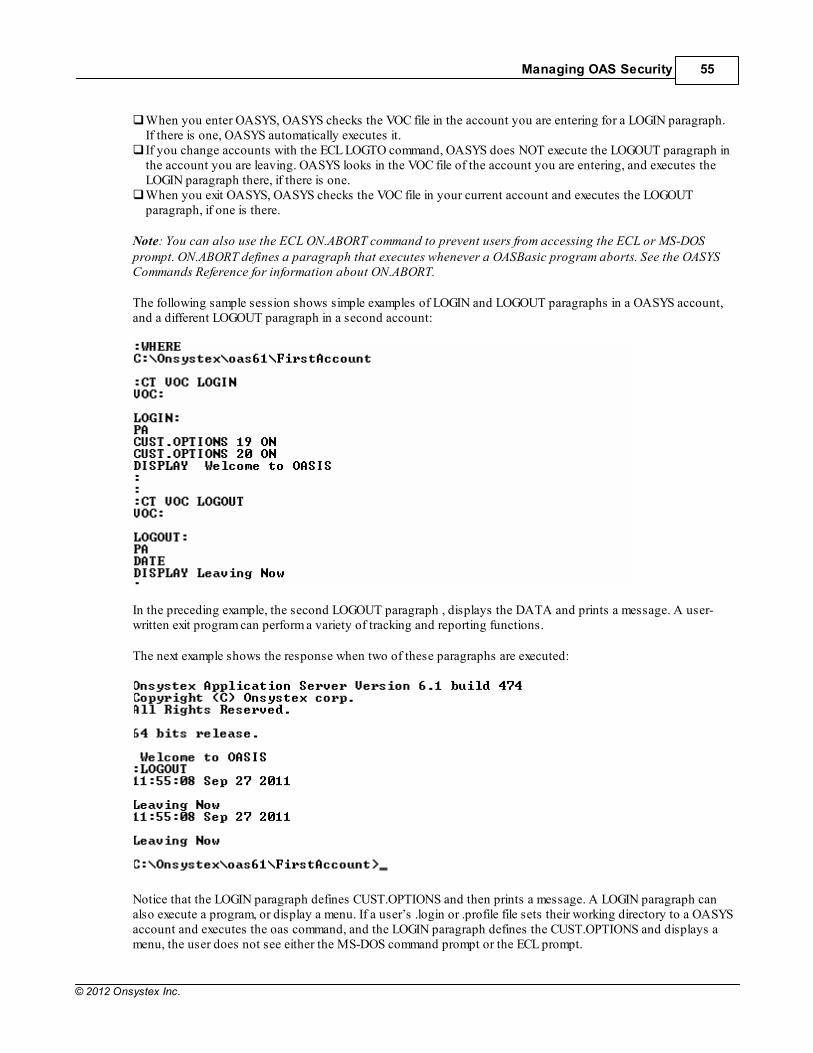
Managing OAS Security 55
© 2012 Onsystex Inc.
When you enter OASYS, OASYS checks the VOC file in the account you are entering for a LOGIN paragraph.If there is one, OASYS automatically executes it. If you change accounts with the ECL LOGTO command, OASYS does NOT execute the LOGOUT paragraph inthe account you are leaving. OASYS looks in the VOC file of the account you are entering, and executes theLOGIN paragraph there, if there is one. When you exit OASYS, OASYS checks the VOC file in your current account and executes the LOGOUTparagraph, if one is there.
Note: You can also use the ECL ON.ABORT command to prevent users from accessing the ECL or MS-DOSprompt. ON.ABORT defines a paragraph that executes whenever a OASBasic program aborts. See the OASYSCommands Reference for information about ON.ABORT.
The following sample session shows simple examples of LOGIN and LOGOUT paragraphs in a OASYS account,and a different LOGOUT paragraph in a second account:
In the preceding example, the second LOGOUT paragraph , displays the DATA and prints a message. A user-written exit program can perform a variety of tracking and reporting functions.
The next example shows the response when two of these paragraphs are executed:
Notice that the LOGIN paragraph defines CUST.OPTIONS and then prints a message. A LOGIN paragraph canalso execute a program, or display a menu. If a user’s .login or .profile file sets their working directory to a OASYSaccount and executes the oas command, and the LOGIN paragraph defines the CUST.OPTIONS and displays amenu, the user does not see either the MS-DOS command prompt or the ECL prompt.

OASYS Administration for Windows 64 Bit Platforms56
© 2012 Onsystex Inc.
Notice also that logging out of OASYS after the LOGTO command executes the LOGOUT paragraph of thecurrent account only.
Note: If CUST.OPTIONS 20, U_IGNLGN_LGTO, is on, users logged on as an Admin-istrator can access anaccount through the LOGTO command without executing the LOGIN paragraph. If a user logged on as anAdministrator accesses the account directly, OASYS executes the LOGIN paragraph regardless of the setting ofCUST.OPTIONS 20.
8.7 Field-Level Security for OASQuery
OASYS includes functionality to determine OASQuery access on a attribute-by-attribute basis.
System administrators can set privileges for OASQuery access at the file or attribute level for a single user or forall users in a domain by creating a QUERY.PRIVILEGE table in a specified format and adding records to thattable.
You can also set a default for your system, defining all files as OPEN or SECURE. In an OPEN system, the abilityto access a file or a field with OASQuery is a function of system-level file permissions, other OASYS securityimplementations, and privi-leges granted using the QUERY.PRIVILEGE table. In a SECURE system, unlessprivileges are granted in the QUERY.PRIVILEGE table, users cannot access files through OASQuery, regardlessof system-level permissions or other implementations.
8.7.1 Points to Remember about Field-Level Security
Remember the following points about field-level security:
Implementing and maintaining field-level security is a completely manual process. You must create andpopulate the QUERY.PRIVILEGE file manually. ECL commands, such as CREATE.FILE, DELETE.FILE, and CNAME, do not update the QUERY.PRIVILEGEtable. ECL commands are not affected by OASQuery security. The OASQuery MODIFY command is not affected by the OASQuery security feature. The security is imposedwhen a user attempts to SELECT. A default of OPEN or SECURE affects all OASYS accounts that share the same OASHOME. You cannot definesome accounts as OPEN and some as SECURE. Privileges granted on a file are not automatically applied to its dictionary. Therefore, if a user has ALL accessto the INVENTORY file and its dictionary, you must consider D_INVENTORY as well. If the system default isOPEN, the user can access D_INVENTORY. Otherwise, if you want the user to access D_INVENTORY, youneed a QUERY.PRIVILEGE record for D_INVENTORY as well.
8.7.2 The QUERY.PRIVILEGE File
OASQuery security depends on the existence of the QUERY.PRIVILEGE file, which must be located in OASHOME\sysprog. If this file does not exist, OASQuery functions as it has previously, with no field-levelsecurity.
Warning: If you create the QUERY.PRIVILEGE file, but do not populate the file with any records, OASYS doesnot allow any user to access any files on the system through OASQuery.
When you install OASYS, the OASQuery security is not implemented, and there is no QUERY.PRIVILEGE file. Ifyou wish to turn this feature on, you must create QUERY.PRIVILEGE and D_QUERY.PRIVILEGE manually.
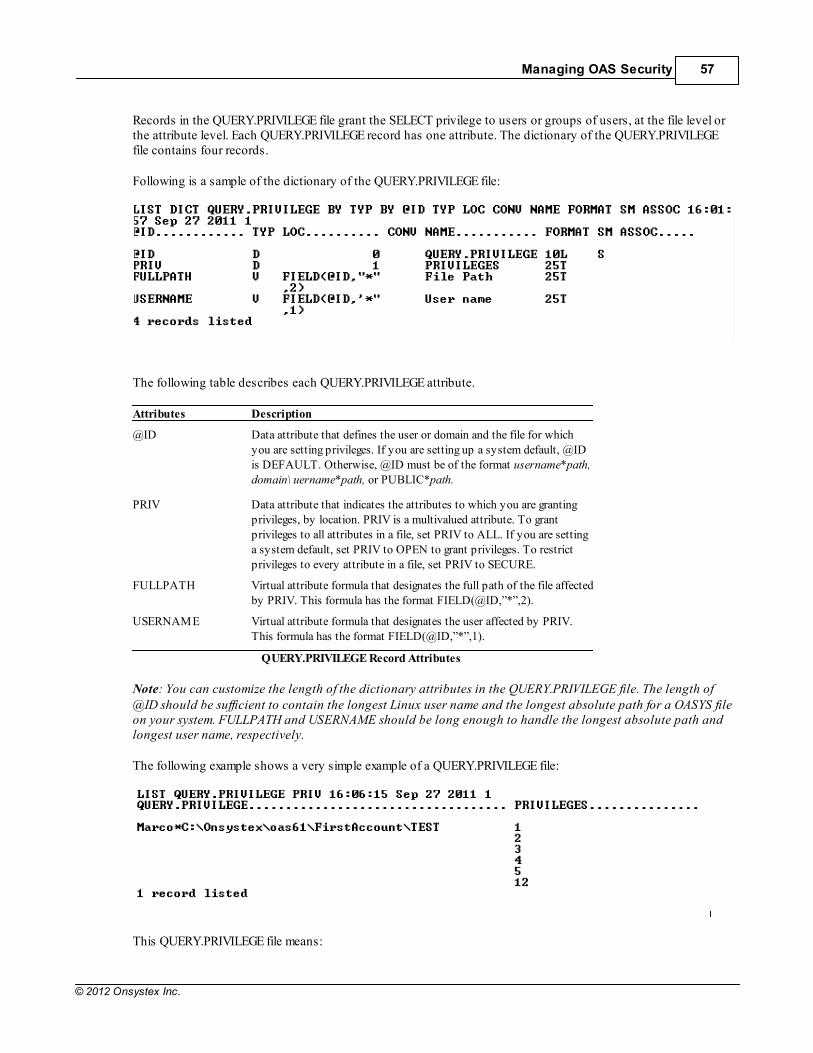
Managing OAS Security 57
© 2012 Onsystex Inc.
Records in the QUERY.PRIVILEGE file grant the SELECT privilege to users or groups of users, at the file level orthe attribute level. Each QUERY.PRIVILEGE record has one attribute. The dictionary of the QUERY.PRIVILEGEfile contains four records.
Following is a sample of the dictionary of the QUERY.PRIVILEGE file:
The following table describes each QUERY.PRIVILEGE attribute.
Attributes Description
@ID Data attribute that defines the user or domain and the file for whichyou are setting privileges. If you are setting up a system default, @IDis DEFAULT. Otherwise, @ID must be of the format username*path,domain\ uername*path, or PUBLIC*path.
PRIV Data attribute that indicates the attributes to which you are grantingprivileges, by location. PRIV is a multivalued attribute. To grantprivileges to all attributes in a file, set PRIV to ALL. If you are settinga system default, set PRIV to OPEN to grant privileges. To restrictprivileges to every attribute in a file, set PRIV to SECURE.
FULLPATH Virtual attribute formula that designates the full path of the file affectedby PRIV. This formula has the format FIELD(@ID,”*”,2).
USERNAME Virtual attribute formula that designates the user affected by PRIV.This formula has the format FIELD(@ID,”*”,1).
QUERY.PRIVILEGE Record Attributes
Note: You can customize the length of the dictionary attributes in the QUERY.PRIVILEGE file. The length of@ID should be sufficient to contain the longest Linux user name and the longest absolute path for a OASYS fileon your system. FULLPATH and USERNAME should be long enough to handle the longest absolute path andlongest user name, respectively.
The following example shows a very simple example of a QUERY.PRIVILEGE file:
This QUERY.PRIVILEGE file means:
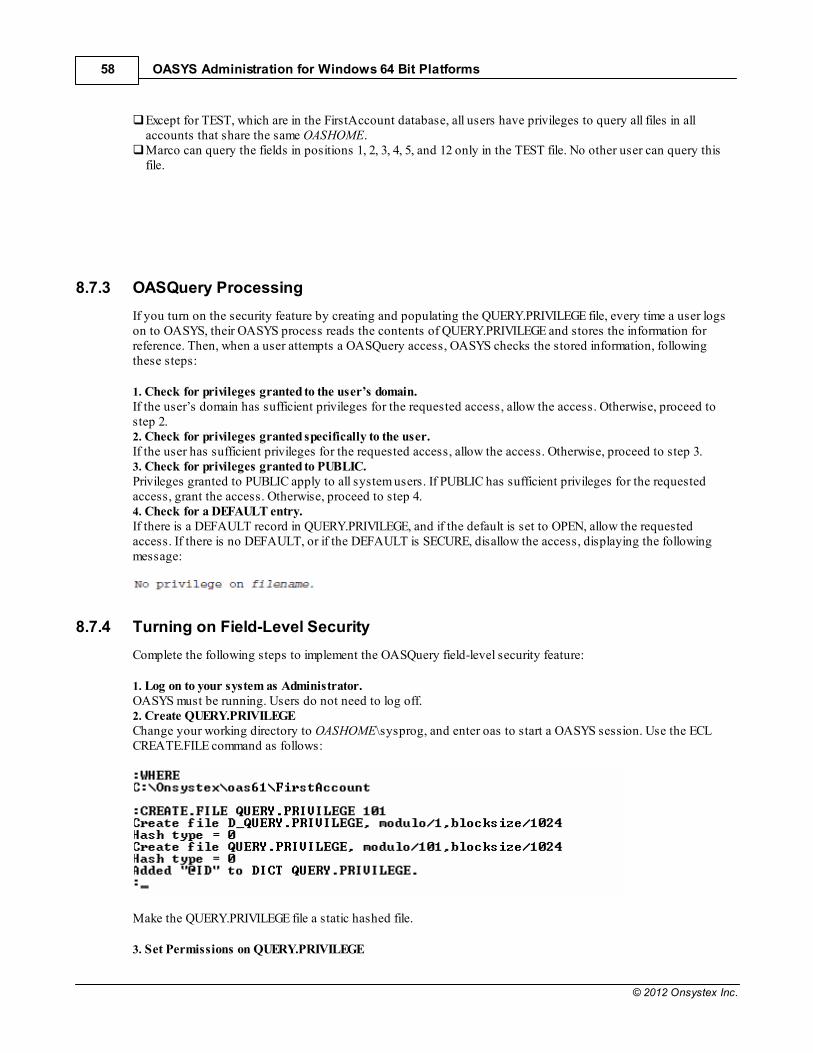
OASYS Administration for Windows 64 Bit Platforms58
© 2012 Onsystex Inc.
Except for TEST, which are in the FirstAccount database, all users have privileges to query all files in allaccounts that share the same OASHOME. Marco can query the fields in positions 1, 2, 3, 4, 5, and 12 only in the TEST file. No other user can query thisfile.
8.7.3 OASQuery Processing
If you turn on the security feature by creating and populating the QUERY.PRIVILEGE file, every time a user logson to OASYS, their OASYS process reads the contents of QUERY.PRIVILEGE and stores the information forreference. Then, when a user attempts a OASQuery access, OASYS checks the stored information, followingthese steps:
1. Check for privileges granted to the user’s domain.If the user’s domain has sufficient privileges for the requested access, allow the access. Otherwise, proceed tostep 2.2. Check for privileges granted specifically to the user.If the user has sufficient privileges for the requested access, allow the access. Otherwise, proceed to step 3.3. Check for privileges granted to PUBLIC.Privileges granted to PUBLIC apply to all system users. If PUBLIC has sufficient privileges for the requestedaccess, grant the access. Otherwise, proceed to step 4. 4. Check for a DEFAULT entry.If there is a DEFAULT record in QUERY.PRIVILEGE, and if the default is set to OPEN, allow the requestedaccess. If there is no DEFAULT, or if the DEFAULT is SECURE, disallow the access, displaying the followingmessage:
8.7.4 Turning on Field-Level Security
Complete the following steps to implement the OASQuery field-level security feature:
1. Log on to your system as Administrator.OASYS must be running. Users do not need to log off.2. Create QUERY.PRIVILEGE Change your working directory to OASHOME\sysprog, and enter oas to start a OASYS session. Use the ECLCREATE.FILE command as follows:
Make the QUERY.PRIVILEGE file a static hashed file.
3. Set Permissions on QUERY.PRIVILEGE
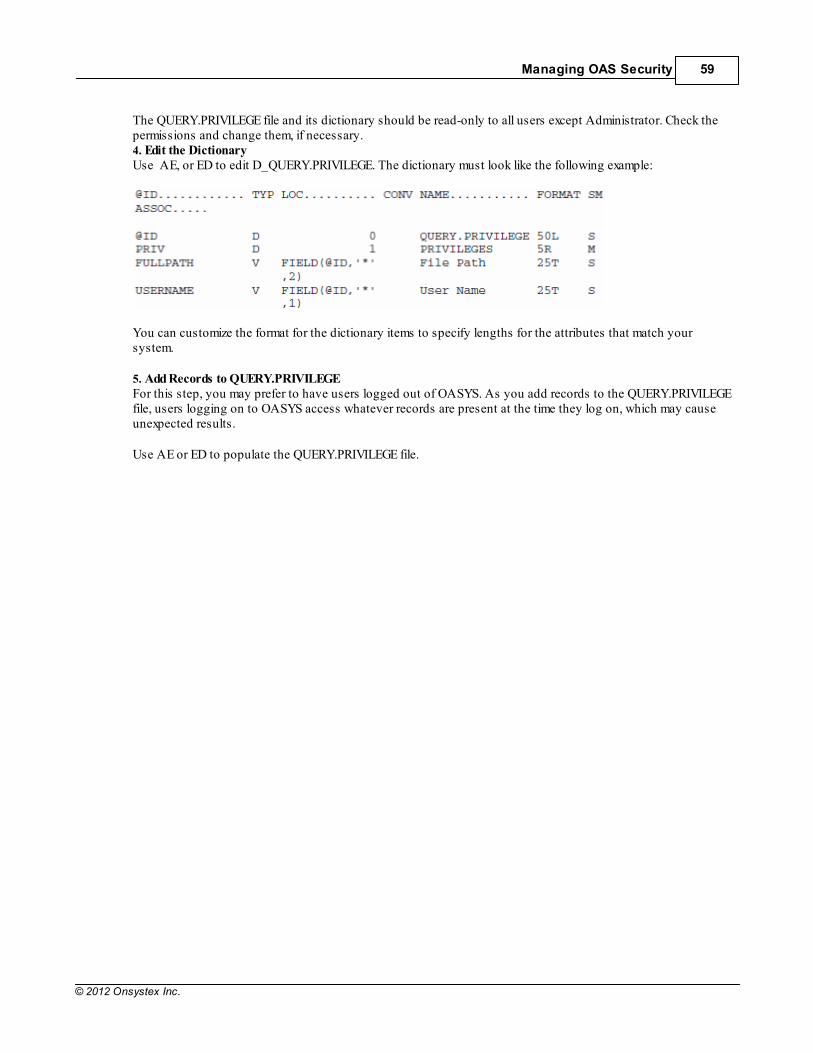
Managing OAS Security 59
© 2012 Onsystex Inc.
The QUERY.PRIVILEGE file and its dictionary should be read-only to all users except Administrator. Check thepermissions and change them, if necessary. 4. Edit the Dictionary Use AE, or ED to edit D_QUERY.PRIVILEGE. The dictionary must look like the following example:
You can customize the format for the dictionary items to specify lengths for the attributes that match yoursystem.
5. Add Records to QUERY.PRIVILEGE For this step, you may prefer to have users logged out of OASYS. As you add records to the QUERY.PRIVILEGEfile, users logging on to OASYS access whatever records are present at the time they log on, which may causeunexpected results.
Use AE or ED to populate the QUERY.PRIVILEGE file.

Part
9
Managing OAS Files 61
© 2012 Onsystex Inc.
9 Managing OAS Files
OASYS stores your data in hashed files of several different types. OASYS also supplies other types of files tosupport your database, including index files, program files, and directory files. This chapter describes the typesof OASYS hashed files and explains the commands you can use to manage them.
9.1 OAS Hashed Files
Hashed files are binary files that cannot be viewed at the operating system level or read by text editors external toOASYS. Each OASYS hashed file consists of a file header and one or more groups of data. Each data groupcontains the following structure:
A fixed-length group header A pointer array Record IDs Data
A record key is assigned to a group in the file according to a hashing algorithm. Then the precise location of thedata is stored in the header of that group. The goal of hashing is to make searching for data more efficient byeliminating the need to search an entire file for a record. In a hashed file, OASYS searches only the group wherethe primary key of the record was assigned. OASYS supports two proprietary hashing algorithms (hash type 0and hash type 1). The hash type determines the data group that contains each record.
The most efficient hashing algorithm for a file is the one that provides the best distri-bution of keys across thegroups in the file. If the distribution is uneven, heavily loaded groups are accessed more frequently, whichresults in inefficient disk space use and increased contention for those groups. The default hash type for bothstatic and dynamic files is 0. You can specify hash type 1 when you create a file, and you can switch betweenhash types with the memresize command.
9.2 Static Hashed Files
OASYS creates static hashed files with a specified block size multiplier and a specified modulo (number of datagroups). OASYS stores the block size and modulo in the header of the file.
Groups in static hashed files can overflow in two ways, as shown in the following table.
Overflow Type Description
Level 1 overflow The amount of space required for the data in the group is larger thanthe amount of space available. This happens if the length of a datarecord is too long for the block size, or if the number of records in thegroup grows so large that not all of the data fits. OASYS appendsoverflow blocks to the original file, and stores the data portions ofrecords in overflow. The pointers and keys remain in the primarydata file; accessing a record can require two reads, one to determinethe address and the second to read the data in overflow.
Level 2 overflow The amount of space required for pointers and keys is larger than thetotal size of the group. This happens if too many records are hashedto the group. OASYS creates overflow blocks which contain bothdata and keys. Record access can require multiple reads to determinethe location and find the data.
Level 1 and Level 2 Overflow
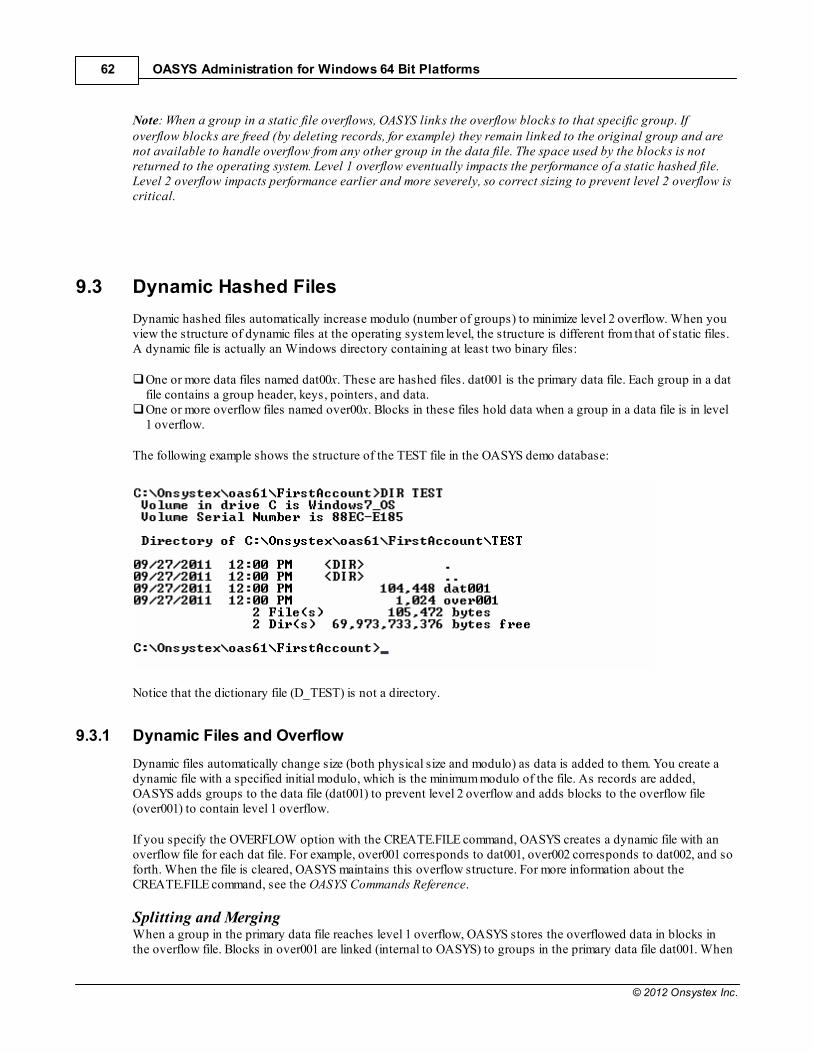
OASYS Administration for Windows 64 Bit Platforms62
© 2012 Onsystex Inc.
Note: When a group in a static file overflows, OASYS links the overflow blocks to that specific group. Ifoverflow blocks are freed (by deleting records, for example) they remain linked to the original group and arenot available to handle overflow from any other group in the data file. The space used by the blocks is notreturned to the operating system. Level 1 overflow eventually impacts the performance of a static hashed file.Level 2 overflow impacts performance earlier and more severely, so correct sizing to prevent level 2 overflow iscritical.
9.3 Dynamic Hashed Files
Dynamic hashed files automatically increase modulo (number of groups) to minimize level 2 overflow. When youview the structure of dynamic files at the operating system level, the structure is different from that of static files.A dynamic file is actually an Windows directory containing at least two binary files:
One or more data files named dat00x. These are hashed files. dat001 is the primary data file. Each group in a datfile contains a group header, keys, pointers, and data. One or more overflow files named over00x. Blocks in these files hold data when a group in a data file is in level1 overflow.
The following example shows the structure of the TEST file in the OASYS demo database:
Notice that the dictionary file (D_TEST) is not a directory.
9.3.1 Dynamic Files and Overflow
Dynamic files automatically change size (both physical size and modulo) as data is added to them. You create adynamic file with a specified initial modulo, which is the minimum modulo of the file. As records are added,OASYS adds groups to the data file (dat001) to prevent level 2 overflow and adds blocks to the overflow file(over001) to contain level 1 overflow.
If you specify the OVERFLOW option with the CREATE.FILE command, OASYS creates a dynamic file with anoverflow file for each dat file. For example, over001 corresponds to dat001, over002 corresponds to dat002, and soforth. When the file is cleared, OASYS maintains this overflow structure. For more information about theCREATE.FILE command, see the OASYS Commands Reference.
Splitting and Merging When a group in the primary data file reaches level 1 overflow, OASYS stores the overflowed data in blocks inthe overflow file. Blocks in over001 are linked (internal to OASYS) to groups in the primary data file dat001. When
Managing OAS Files 63
© 2012 Onsystex Inc.
the overflow file runs out of blocks, OASYS adds blocks to it. To prevent level 2 overflow, OASYS splits groups(increasing the modulo of the primary file) whenever the load factor of an existing group reaches a level called thesplitting threshold (or SPLIT.LOAD). The splitting process is transparent to the user. When a group splits,OASYS adds the additional group to the primary data file, increasing its modulo and physical size.
As records are removed from a dynamic file, groups that had been split can merge back together if all thefollowing conditions are true:
The current modulo of the file is greater than the minimum modulo of the file. The combined load factor of the two groups is less than a value called merging threshold (or MERGE.LOAD). One of the two groups is the last group in the file.
OASYS provides two different split/merge types for dynamic files, KEYONLY and KEYDATA. You can set thesplit/merge type when you create a dynamic file, and you can change an existing split/merge type for a file withthe CONFIGURE.FILE command or the memresize command. Use FILE.STAT, ANALYZE.FILE, or GROUP.STATto display the split/merge type for a file.
KEYONLY Type The KEYONLY split/merge type is the default for OASYS dynamic files. For KEYONLY dynamic files, the loadfactor of a group is the percentage of the group space that is filled with keys and pointers. By default, thesplitting threshold for a group in a KEYONLY dynamic file is 60%, meaning that the group can split into twowhen the space occupied by keys and pointers reaches 60% of the size of the group. By default, the mergingthreshold for a KEYONLY dynamic file is 40%, meaning that if the total load in a pair of groups that resulted froma split is under 40% of the size of a single group, the pair are eligible to merge. You can change the splittingthreshold for a single KEYONLY file with the CONFIGURE.FILE or memresize commands, and you can change thedefaults for all files by changing the OAS_SplitLoadand OAS_MergeLoadparameters in the OASYSconfiguration file (\OASHOME\include\oasconfig).
KEYDATA Type The KEYDATA split/merge type is also available for OASYS dynamic files. For KEYDATA dynamic files, theload factor of a group is the percentage of the group space that is filled with keys, pointers, and data. By default,the splitting threshold for a group in a KEYDATA dynamic file is 95 percent, meaning that the group can splitinto two when the space occupied by keys, pointers, and data reaches 95 percent of the size of the group. Bydefault the merging threshold for a KEYDATA dynamic file is 40 percent, meaning that if the total load in a pair ofgroups that resulted from a split is under 40 percent of the size of a single group, the pair are eligible to merge.You can change the splitting threshold for a single KEYDATA file with the CONFIGURE.FILE or memresizecommands, and you can change the defaults for all files by changing the KEYDATA_OAS_SplitLoadandKEYDATA_OAS_MergeLoadparameters in the OASYS configuration file (\OASHOME\include\oasconfig).
Selecting a Split/Merge Type Use the KEYONLY split/merge type for files whose records differ widely in length (standard deviation fromaverage is large). When record lengths vary widely, the KEYONLY split/merge type makes more efficient use ofdisk space. Use the oas_analyzetbls or FILE.STAT command to determine the record length and standarddeviation from average for an existing file.
Use KEYDATA for files whose record length is consistent and in which the length of the data portion of eachrecord is large with respect to the record ID. For files with these characteristics, the KEYDATA split/merge typeprovides a better distribution of records and less overflow than KEYONLY.
Dynamic Files and Hash Type For both static and dynamic files, the default hash type was is 0. This hash type provides a more evendistribution of keys in groups in dynamic files. If key distribution in a file is uneven, you should consider tuningthe modulo, block size, and split/merge type of the file. If none of these methods is effective, you should considerswitching the hash type to 1.
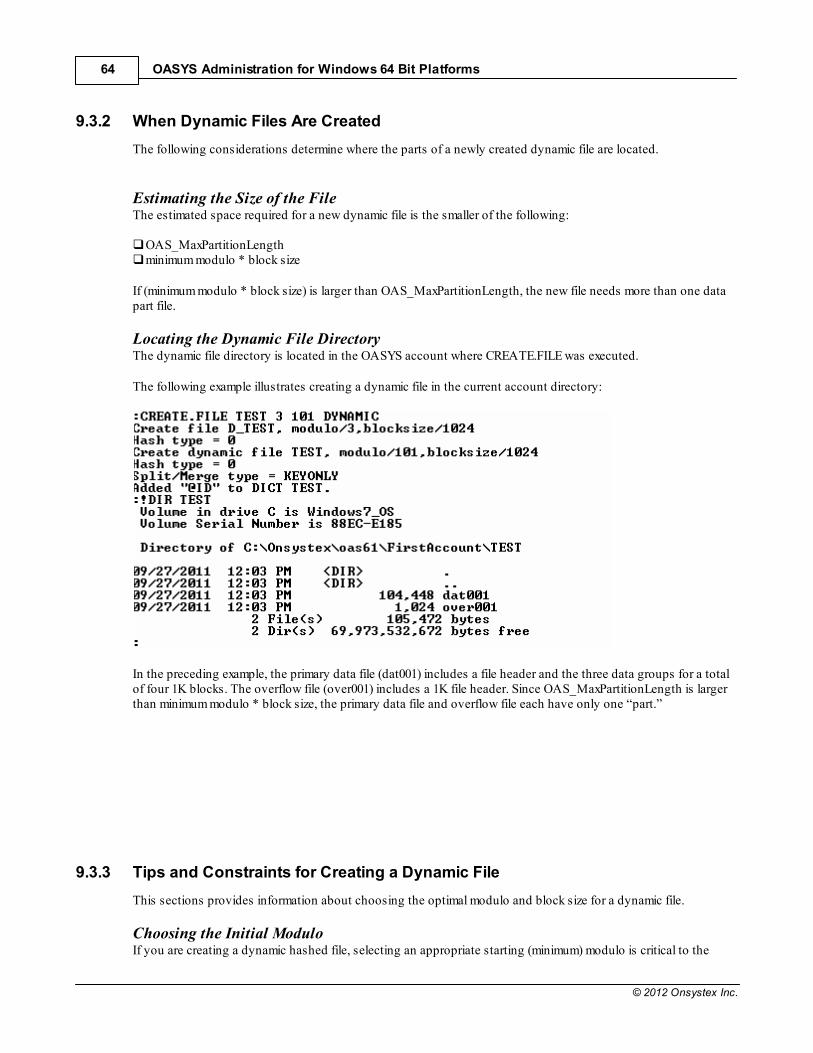
OASYS Administration for Windows 64 Bit Platforms64
© 2012 Onsystex Inc.
9.3.2 When Dynamic Files Are Created
The following considerations determine where the parts of a newly created dynamic file are located.
Estimating the Size of the File The estimated space required for a new dynamic file is the smaller of the following:
OAS_MaxPartitionLength minimum modulo * block size
If (minimum modulo * block size) is larger than OAS_MaxPartitionLength, the new file needs more than one datapart file.
Locating the Dynamic File Directory The dynamic file directory is located in the OASYS account where CREATE.FILE was executed.
The following example illustrates creating a dynamic file in the current account directory:
In the preceding example, the primary data file (dat001) includes a file header and the three data groups for a totalof four 1K blocks. The overflow file (over001) includes a 1K file header. Since OAS_MaxPartitionLength is largerthan minimum modulo * block size, the primary data file and overflow file each have only one “part.”
9.3.3 Tips and Constraints for Creating a Dynamic File
This sections provides information about choosing the optimal modulo and block size for a dynamic file.
Choosing the Initial Modulo If you are creating a dynamic hashed file, selecting an appropriate starting (minimum) modulo is critical to the
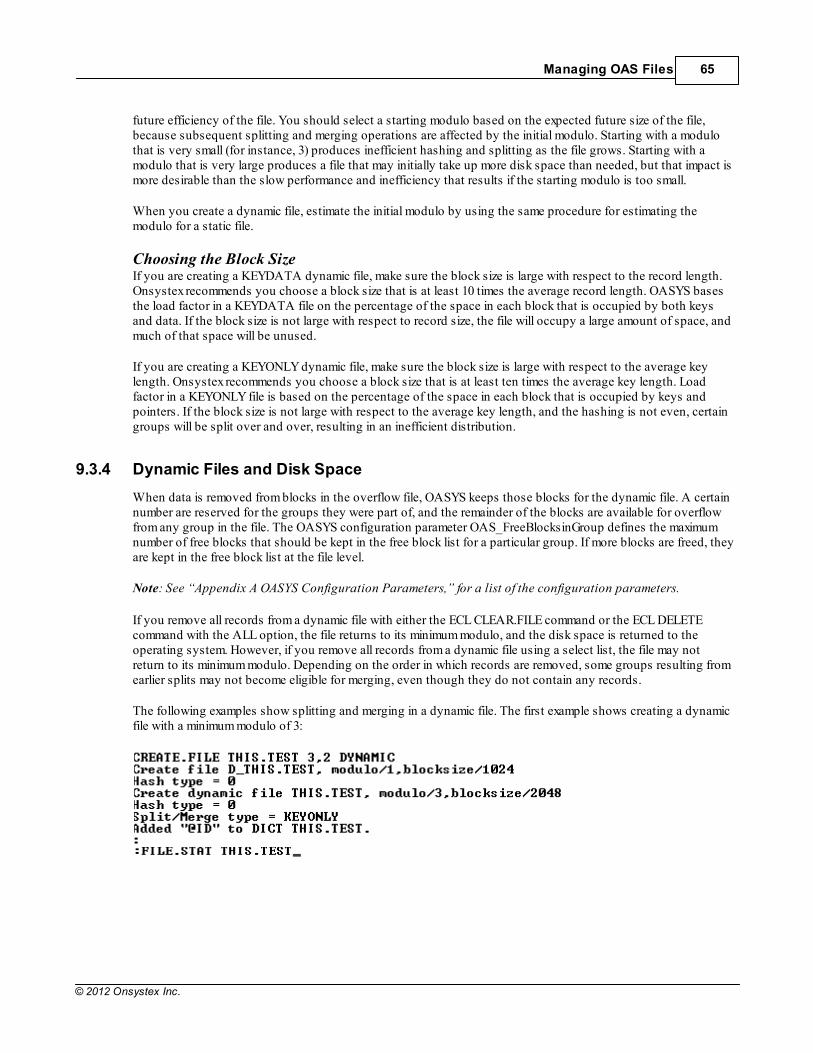
Managing OAS Files 65
© 2012 Onsystex Inc.
future efficiency of the file. You should select a starting modulo based on the expected future size of the file,because subsequent splitting and merging operations are affected by the initial modulo. Starting with a modulothat is very small (for instance, 3) produces inefficient hashing and splitting as the file grows. Starting with amodulo that is very large produces a file that may initially take up more disk space than needed, but that impact ismore desirable than the slow performance and inefficiency that results if the starting modulo is too small.
When you create a dynamic file, estimate the initial modulo by using the same procedure for estimating themodulo for a static file.
Choosing the Block Size If you are creating a KEYDATA dynamic file, make sure the block size is large with respect to the record length.Onsystex recommends you choose a block size that is at least 10 times the average record length. OASYS basesthe load factor in a KEYDATA file on the percentage of the space in each block that is occupied by both keysand data. If the block size is not large with respect to record size, the file will occupy a large amount of space, andmuch of that space will be unused.
If you are creating a KEYONLY dynamic file, make sure the block size is large with respect to the average keylength. Onsystex recommends you choose a block size that is at least ten times the average key length. Loadfactor in a KEYONLY file is based on the percentage of the space in each block that is occupied by keys andpointers. If the block size is not large with respect to the average key length, and the hashing is not even, certaingroups will be split over and over, resulting in an inefficient distribution.
9.3.4 Dynamic Files and Disk Space
When data is removed from blocks in the overflow file, OASYS keeps those blocks for the dynamic file. A certainnumber are reserved for the groups they were part of, and the remainder of the blocks are available for overflowfrom any group in the file. The OASYS configuration parameter OAS_FreeBlocksinGroup defines the maximumnumber of free blocks that should be kept in the free block list for a particular group. If more blocks are freed, theyare kept in the free block list at the file level.
Note: See “Appendix A OASYS Configuration Parameters,” for a list of the configuration parameters.
If you remove all records from a dynamic file with either the ECL CLEAR.FILE command or the ECL DELETEcommand with the ALL option, the file returns to its minimum modulo, and the disk space is returned to theoperating system. However, if you remove all records from a dynamic file using a select list, the file may notreturn to its minimum modulo. Depending on the order in which records are removed, some groups resulting fromearlier splits may not become eligible for merging, even though they do not contain any records.
The following examples show splitting and merging in a dynamic file. The first example shows creating a dynamicfile with a minimum modulo of 3:
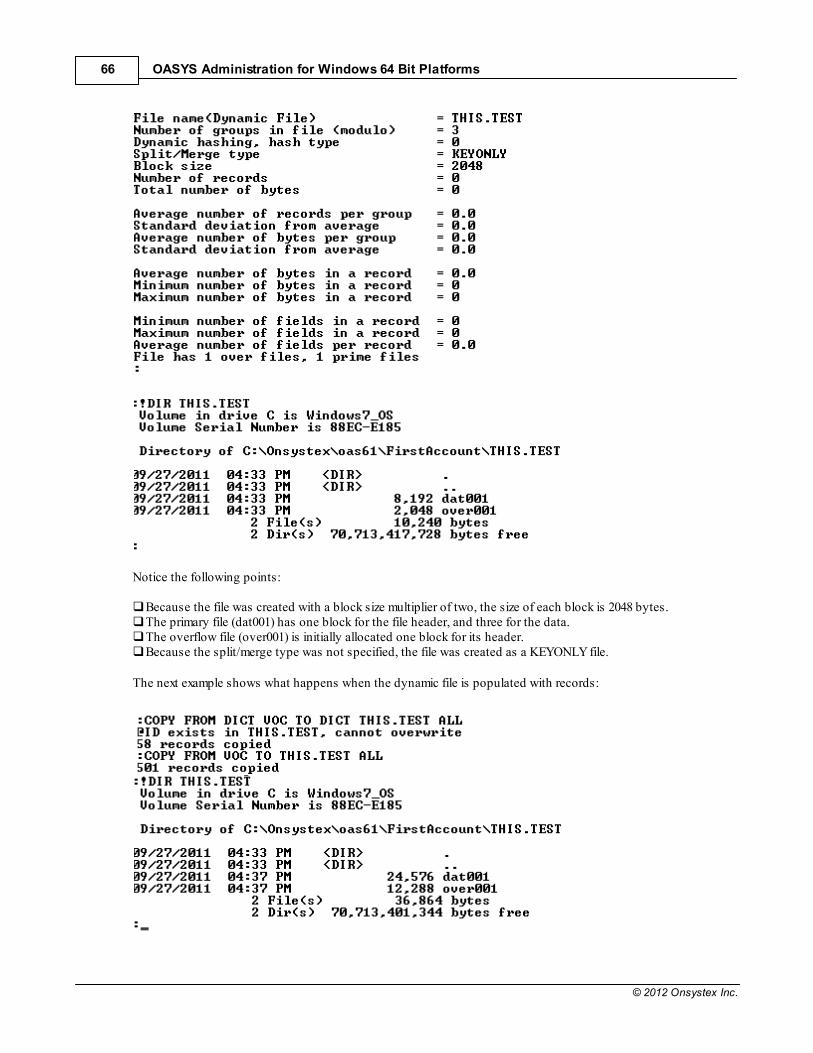
OASYS Administration for Windows 64 Bit Platforms66
© 2012 Onsystex Inc.
Notice the following points:
Because the file was created with a block size multiplier of two, the size of each block is 2048 bytes. The primary file (dat001) has one block for the file header, and three for the data. The overflow file (over001) is initially allocated one block for its header. Because the split/merge type was not specified, the file was created as a KEYONLY file.
The next example shows what happens when the dynamic file is populated with records:
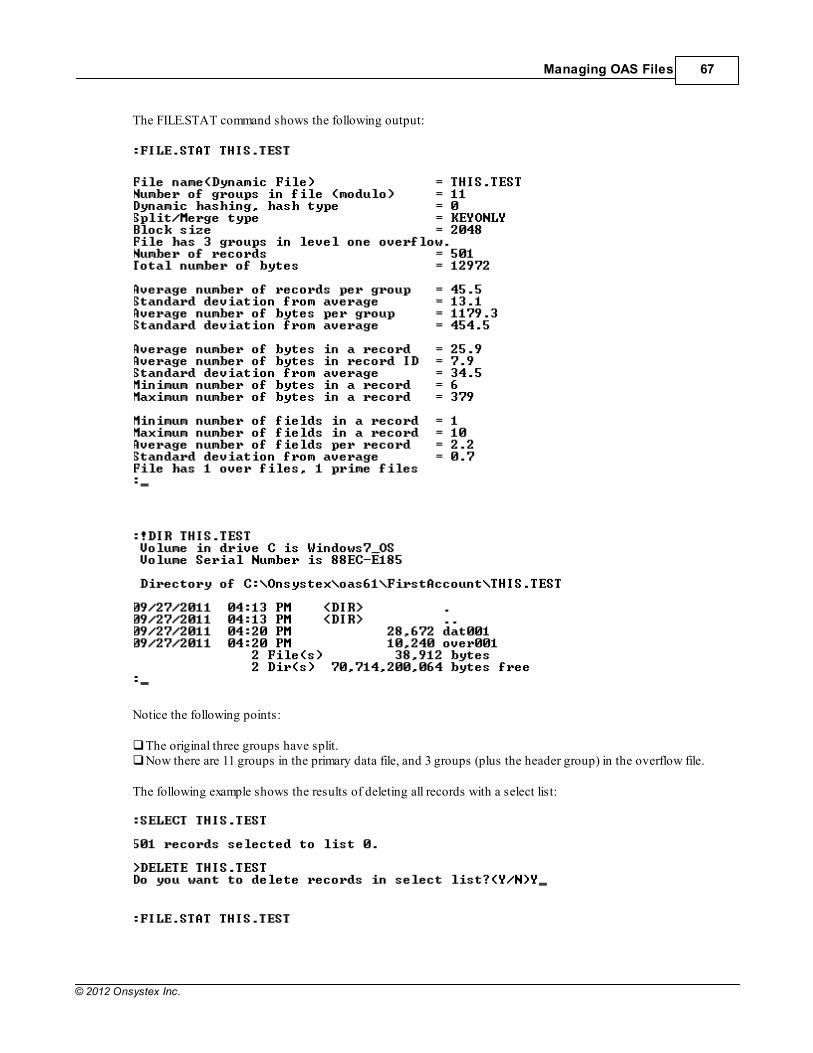
Managing OAS Files 67
© 2012 Onsystex Inc.
The FILE.STAT command shows the following output:
Notice the following points:
The original three groups have split. Now there are 11 groups in the primary data file, and 3 groups (plus the header group) in the overflow file.
The following example shows the results of deleting all records with a select list:
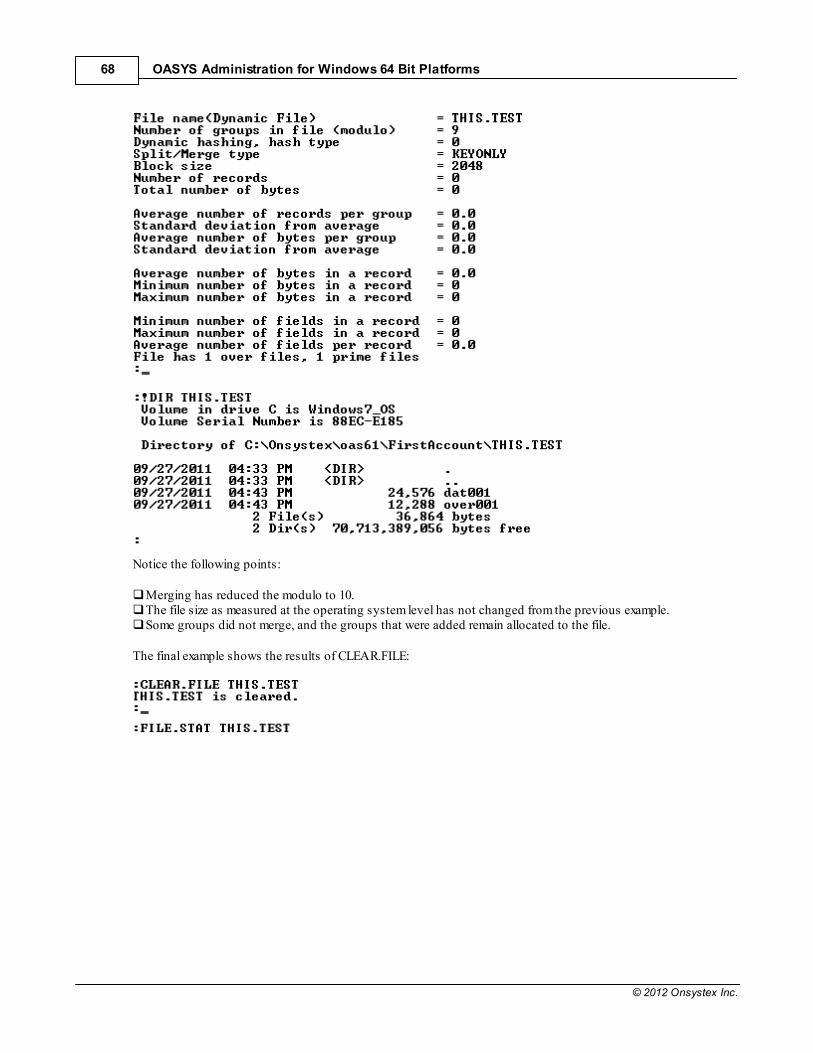
OASYS Administration for Windows 64 Bit Platforms68
© 2012 Onsystex Inc.
Notice the following points:
Merging has reduced the modulo to 10. The file size as measured at the operating system level has not changed from the previous example. Some groups did not merge, and the groups that were added remain allocated to the file.
The final example shows the results of CLEAR.FILE:
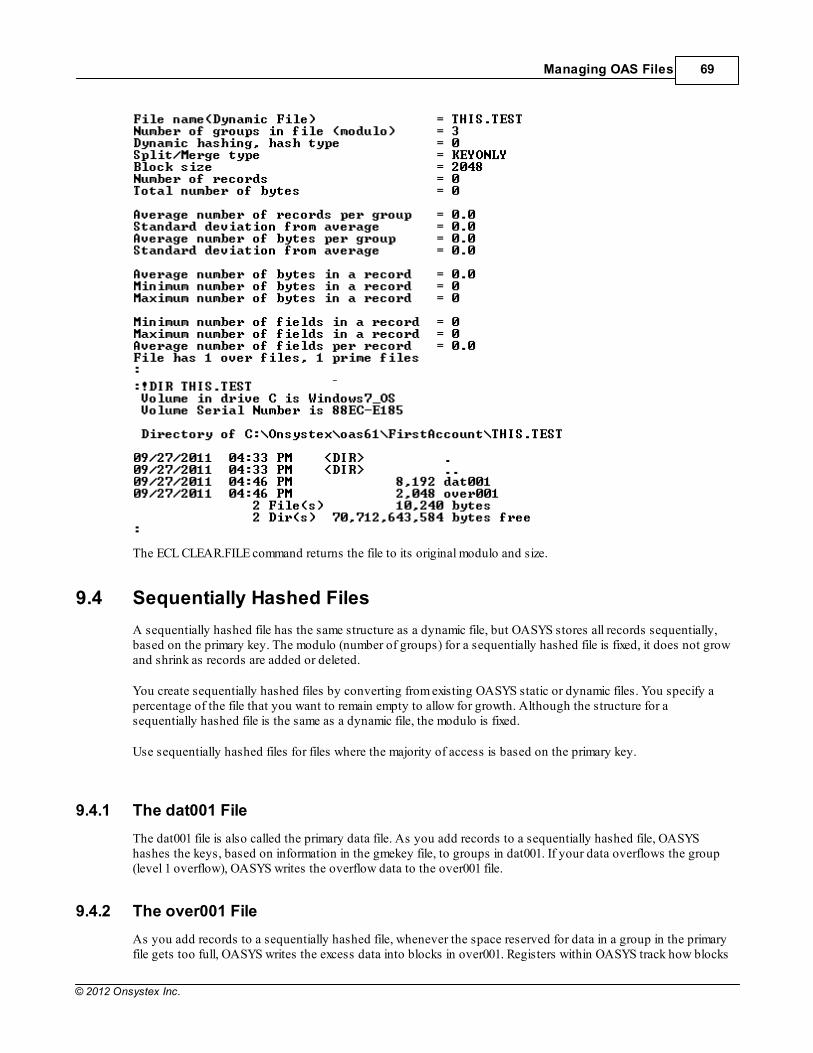
Managing OAS Files 69
© 2012 Onsystex Inc.
The ECL CLEAR.FILE command returns the file to its original modulo and size.
9.4 Sequentially Hashed Files
A sequentially hashed file has the same structure as a dynamic file, but OASYS stores all records sequentially,based on the primary key. The modulo (number of groups) for a sequentially hashed file is fixed, it does not growand shrink as records are added or deleted.
You create sequentially hashed files by converting from existing OASYS static or dynamic files. You specify apercentage of the file that you want to remain empty to allow for growth. Although the structure for asequentially hashed file is the same as a dynamic file, the modulo is fixed.
Use sequentially hashed files for files where the majority of access is based on the primary key.
9.4.1 The dat001 File
The dat001 file is also called the primary data file. As you add records to a sequentially hashed file, OASYShashes the keys, based on information in the gmekey file, to groups in dat001. If your data overflows the group(level 1 overflow), OASYS writes the overflow data to the over001 file.
9.4.2 The over001 File
As you add records to a sequentially hashed file, whenever the space reserved for data in a group in the primaryfile gets too full, OASYS writes the excess data into blocks in over001. Registers within OASYS track how blocks
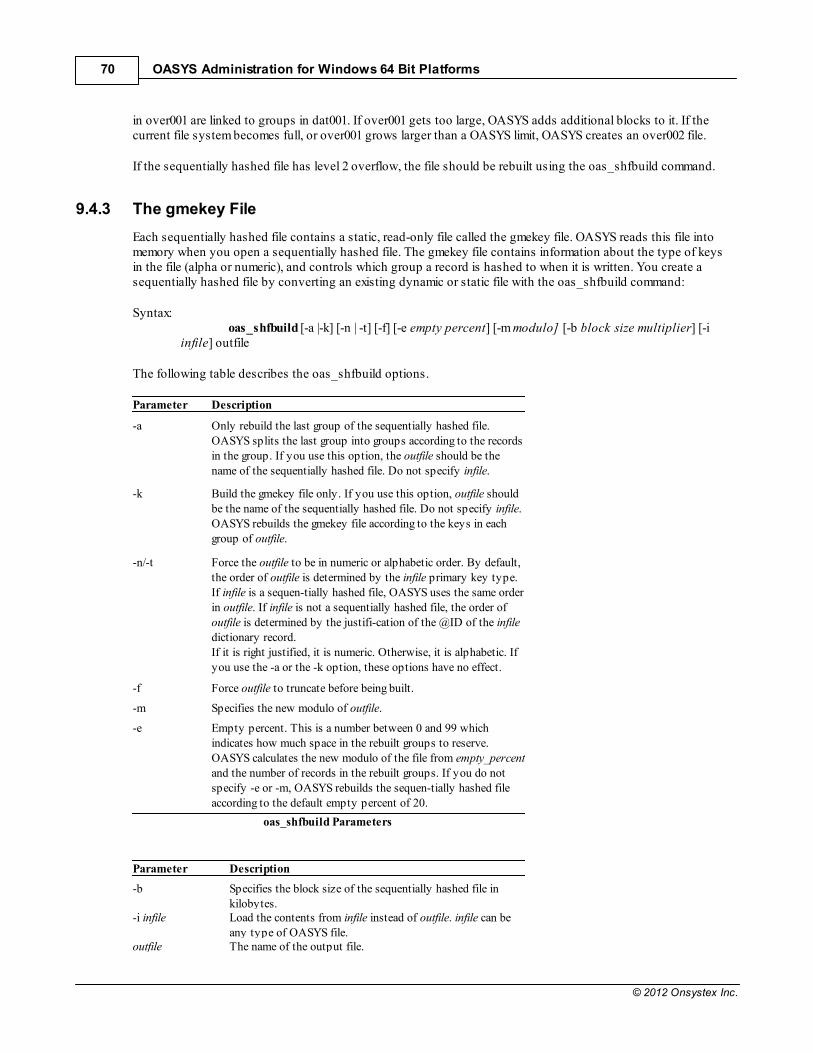
OASYS Administration for Windows 64 Bit Platforms70
© 2012 Onsystex Inc.
in over001 are linked to groups in dat001. If over001 gets too large, OASYS adds additional blocks to it. If thecurrent file system becomes full, or over001 grows larger than a OASYS limit, OASYS creates an over002 file.
If the sequentially hashed file has level 2 overflow, the file should be rebuilt using the oas_shfbuild command.
9.4.3 The gmekey File
Each sequentially hashed file contains a static, read-only file called the gmekey file. OASYS reads this file intomemory when you open a sequentially hashed file. The gmekey file contains information about the type of keysin the file (alpha or numeric), and controls which group a record is hashed to when it is written. You create asequentially hashed file by converting an existing dynamic or static file with the oas_shfbuild command:
Syntax:oas_shfbuild [-a |-k] [-n | -t] [-f] [-e empty percent] [-m modulo] [-b block size multiplier] [-i
infile] outfile
The following table describes the oas_shfbuild options.
Parameter Description
-a Only rebuild the last group of the sequentially hashed file.OASYS splits the last group into groups according to the recordsin the group. If you use this option, the outfile should be thename of the sequentially hashed file. Do not specify infile.
-k Build the gmekey file only. If you use this option, outfile shouldbe the name of the sequentially hashed file. Do not specify infile.OASYS rebuilds the gmekey file according to the keys in eachgroup of outfile.
-n/-t Force the outfile to be in numeric or alphabetic order. By default,the order of outfile is determined by the infile primary key type.If infile is a sequen-tially hashed file, OASYS uses the same orderin outfile. If infile is not a sequentially hashed file, the order ofoutfile is determined by the justifi-cation of the @ID of the infiledictionary record. If it is right justified, it is numeric. Otherwise, it is alphabetic. Ifyou use the -a or the -k option, these options have no effect.
-f Force outfile to truncate before being built.
-m Specifies the new modulo of outfile.
-e Empty percent. This is a number between 0 and 99 whichindicates how much space in the rebuilt groups to reserve.OASYS calculates the new modulo of the file from empty_percentand the number of records in the rebuilt groups. If you do notspecify -e or -m, OASYS rebuilds the sequen-tially hashed fileaccording to the default empty percent of 20.
oas_shfbuild Parameters
Parameter Description
-b Specifies the block size of the sequentially hashed file inkilobytes.
-i infile Load the contents from infile instead of outfile. infile can beany type of OASYS file.
outfile The name of the output file.

Managing OAS Files 71
© 2012 Onsystex Inc.
oas_shfbuild Parameters (continued)
To convert an existing file, execute the oas_shfbuild command from the system level prompt, as shown in thefollowing example:
After converting a file to a sequentially hashed file, you must manually enter a file pointer in the VOC file in orderto access the sequentially hashed file, as shown in the following example:
9.5 DIR-Type Files
A OASYS DIR-type file is an NTFS directory that contains NTFS text or data files. Each NTFS text or data file is aOASYS record. The BP file, a OASYS file that stores OASBasic source files and compiled programs, is a DIR-typefile. The following example shows the structure of a sample DIR file:
In the example, MYTEST is a directory file.
9.6 Multilevel Directory Files
A OASYS multilevel directory (LD) file is a NTFS directory. The NTFS directory contains one or more NTFSsubdirectories (OASYS DIR type files). All of the DIR files share the same dictionary. To access a record, youmust specify both the multilevel directory file and the DIR file where the record resides. The following exampleshows some characteristics of a multilevel directory file:
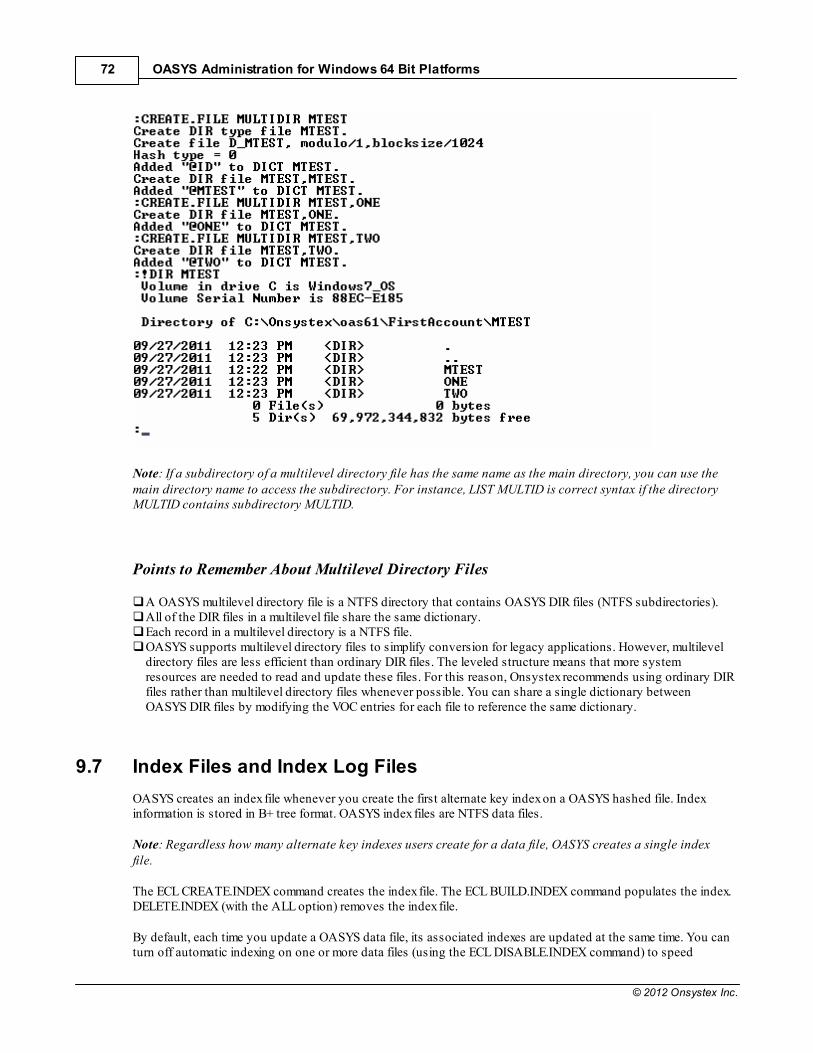
OASYS Administration for Windows 64 Bit Platforms72
© 2012 Onsystex Inc.
Note: If a subdirectory of a multilevel directory file has the same name as the main directory, you can use themain directory name to access the subdirectory. For instance, LIST MULTID is correct syntax if the directoryMULTID contains subdirectory MULTID.
Points to Remember About Multilevel Directory Files
A OASYS multilevel directory file is a NTFS directory that contains OASYS DIR files (NTFS subdirectories). All of the DIR files in a multilevel file share the same dictionary. Each record in a multilevel directory is a NTFS file.OASYS supports multilevel directory files to simplify conversion for legacy applications. However, multileveldirectory files are less efficient than ordinary DIR files. The leveled structure means that more systemresources are needed to read and update these files. For this reason, Onsystex recommends using ordinary DIRfiles rather than multilevel directory files whenever possible. You can share a single dictionary betweenOASYS DIR files by modifying the VOC entries for each file to reference the same dictionary.
9.7 Index Files and Index Log Files
OASYS creates an index file whenever you create the first alternate key index on a OASYS hashed file. Indexinformation is stored in B+ tree format. OASYS index files are NTFS data files.
Note: Regardless how many alternate key indexes users create for a data file, OASYS creates a single indexfile.
The ECL CREATE.INDEX command creates the index file. The ECL BUILD.INDEX command populates the index.DELETE.INDEX (with the ALL option) removes the index file.
By default, each time you update a OASYS data file, its associated indexes are updated at the same time. You canturn off automatic indexing on one or more data files (using the ECL DISABLE.INDEX command) to speed

Managing OAS Files 73
© 2012 Onsystex Inc.
performance during periods of heavy activity on your system. If you turn off automatic indexing, OASYS storesall index updates in an index log file. The ECL UPDATE.INDEX command applies updates from index logs toindexes in batch mode, and the ECL ENABLE.INDEX command turns automatic updating back on. The ENABLE.INDEX command also creates an index log file if one is not already there. DELETE.INDEX (with the ALL option)removes the index log file.
See the OASYS Commands Reference for additional information about index handling commands.
9.7.1 Index-Related Files for a Static Hashed File
For a static hashed file, OASYS creates both the index file and the index log file in the account directory with thedata file. The following example shows a sample account where a static file named MYSTATIC has been indexed:
X_MYSTATICFILE is the index file for the data file MYSTATICFILE.
9.7.2 Index-Related Files for a Dynamic Hashed File
For a dynamic hashed file, OASYS creates both the index file and the index log file in the dynamic file directoryitself. The following example shows the structure of the TEST file in the demo database after an index is createdon the file:
Notice that the index and index log files are located in the dynamic file directory rather than in the account. Thefile idx001 is the index file, and xlog001 is the index log file.
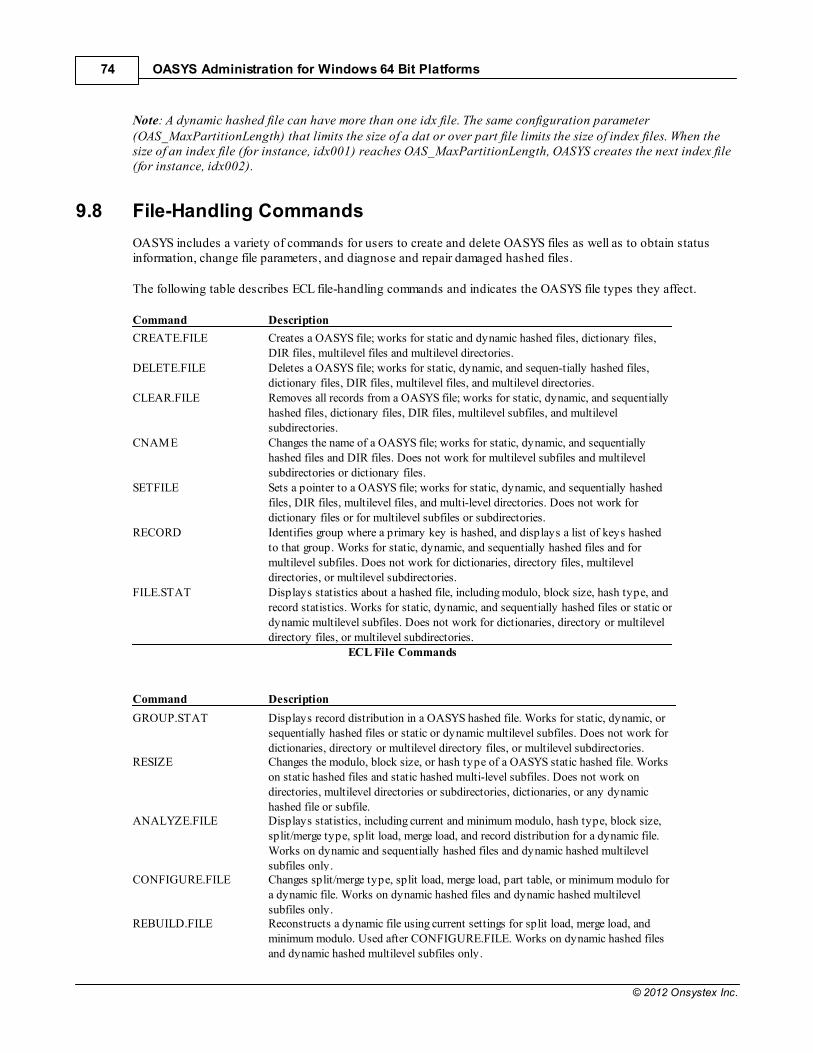
OASYS Administration for Windows 64 Bit Platforms74
© 2012 Onsystex Inc.
Note: A dynamic hashed file can have more than one idx file. The same configuration parameter(OAS_MaxPartitionLength) that limits the size of a dat or over part file limits the size of index files. When thesize of an index file (for instance, idx001) reaches OAS_MaxPartitionLength, OASYS creates the next index file(for instance, idx002).
9.8 File-Handling Commands
OASYS includes a variety of commands for users to create and delete OASYS files as well as to obtain statusinformation, change file parameters, and diagnose and repair damaged hashed files.
The following table describes ECL file-handling commands and indicates the OASYS file types they affect.
Command Description
CREATE.FILE Creates a OASYS file; works for static and dynamic hashed files, dictionary files,DIR files, multilevel files and multilevel directories.
DELETE.FILE Deletes a OASYS file; works for static, dynamic, and sequen-tially hashed files,dictionary files, DIR files, multilevel files, and multilevel directories.
CLEAR.FILE Removes all records from a OASYS file; works for static, dynamic, and sequentiallyhashed files, dictionary files, DIR files, multilevel subfiles, and multilevelsubdirectories.
CNAME Changes the name of a OASYS file; works for static, dynamic, and sequentiallyhashed files and DIR files. Does not work for multilevel subfiles and multilevelsubdirectories or dictionary files.
SETFILE Sets a pointer to a OASYS file; works for static, dynamic, and sequentially hashedfiles, DIR files, multilevel files, and multi-level directories. Does not work fordictionary files or for multilevel subfiles or subdirectories.
RECORD Identifies group where a primary key is hashed, and displays a list of keys hashedto that group. Works for static, dynamic, and sequentially hashed files and formultilevel subfiles. Does not work for dictionaries, directory files, multileveldirectories, or multilevel subdirectories.
FILE.STAT Displays statistics about a hashed file, including modulo, block size, hash type, andrecord statistics. Works for static, dynamic, and sequentially hashed files or static ordynamic multilevel subfiles. Does not work for dictionaries, directory or multileveldirectory files, or multilevel subdirectories.
ECL File Commands
Command Description
GROUP.STAT Displays record distribution in a OASYS hashed file. Works for static, dynamic, orsequentially hashed files or static or dynamic multilevel subfiles. Does not work fordictionaries, directory or multilevel directory files, or multilevel subdirectories.
RESIZE Changes the modulo, block size, or hash type of a OASYS static hashed file. Workson static hashed files and static hashed multi-level subfiles. Does not work ondirectories, multilevel directories or subdirectories, dictionaries, or any dynamichashed file or subfile.
ANALYZE.FILE Displays statistics, including current and minimum modulo, hash type, block size,split/merge type, split load, merge load, and record distribution for a dynamic file.Works on dynamic and sequentially hashed files and dynamic hashed multilevelsubfiles only.
CONFIGURE.FILE Changes split/merge type, split load, merge load, part table, or minimum modulo fora dynamic file. Works on dynamic hashed files and dynamic hashed multilevelsubfiles only.
REBUILD.FILE Reconstructs a dynamic file using current settings for split load, merge load, andminimum modulo. Used after CONFIGURE.FILE. Works on dynamic hashed filesand dynamic hashed multilevel subfiles only.
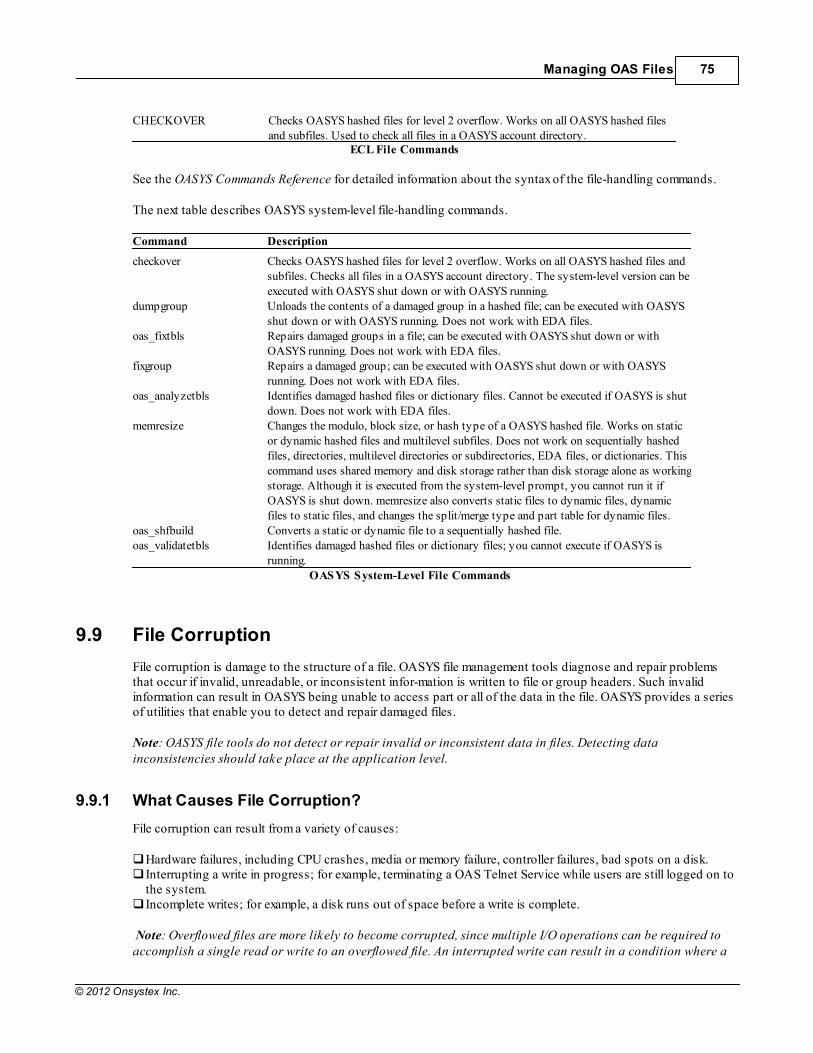
Managing OAS Files 75
© 2012 Onsystex Inc.
CHECKOVER Checks OASYS hashed files for level 2 overflow. Works on all OASYS hashed filesand subfiles. Used to check all files in a OASYS account directory.
ECL File Commands
See the OASYS Commands Reference for detailed information about the syntax of the file-handling commands.
The next table describes OASYS system-level file-handling commands.
Command Description
checkover Checks OASYS hashed files for level 2 overflow. Works on all OASYS hashed files andsubfiles. Checks all files in a OASYS account directory. The system-level version can beexecuted with OASYS shut down or with OASYS running.
dumpgroup Unloads the contents of a damaged group in a hashed file; can be executed with OASYSshut down or with OASYS running. Does not work with EDA files.
oas_fixtbls Repairs damaged groups in a file; can be executed with OASYS shut down or withOASYS running. Does not work with EDA files.
fixgroup Repairs a damaged group; can be executed with OASYS shut down or with OASYSrunning. Does not work with EDA files.
oas_analyzetbls Identifies damaged hashed files or dictionary files. Cannot be executed if OASYS is shutdown. Does not work with EDA files.
memresize Changes the modulo, block size, or hash type of a OASYS hashed file. Works on staticor dynamic hashed files and multilevel subfiles. Does not work on sequentially hashedfiles, directories, multilevel directories or subdirectories, EDA files, or dictionaries. Thiscommand uses shared memory and disk storage rather than disk storage alone as workingstorage. Although it is executed from the system-level prompt, you cannot run it ifOASYS is shut down. memresize also converts static files to dynamic files, dynamicfiles to static files, and changes the split/merge type and part table for dynamic files.
oas_shfbuild Converts a static or dynamic file to a sequentially hashed file. oas_validatetbls Identifies damaged hashed files or dictionary files; you cannot execute if OASYS is
running. OASYS System-Level File Commands
9.9 File Corruption
File corruption is damage to the structure of a file. OASYS file management tools diagnose and repair problemsthat occur if invalid, unreadable, or inconsistent infor-mation is written to file or group headers. Such invalidinformation can result in OASYS being unable to access part or all of the data in the file. OASYS provides a seriesof utilities that enable you to detect and repair damaged files.
Note: OASYS file tools do not detect or repair invalid or inconsistent data in files. Detecting datainconsistencies should take place at the application level.
9.9.1 What Causes File Corruption?
File corruption can result from a variety of causes:
Hardware failures, including CPU crashes, media or memory failure, controller failures, bad spots on a disk. Interrupting a write in progress; for example, terminating a OAS Telnet Service while users are still logged on tothe system. Incomplete writes; for example, a disk runs out of space before a write is complete.
Note: Overflowed files are more likely to become corrupted, since multiple I/O operations can be required toaccomplish a single read or write to an overflowed file. An interrupted write can result in a condition where a

OASYS Administration for Windows 64 Bit Platforms76
© 2012 Onsystex Inc.
primary data block and corresponding overflow blocks are out of synch. The increased chance of corruption isparticularly significant for files in level 2 overflow.
9.9.2 Preventing File Corruption
You can reduce the possibility of file corruption by sizing your files to minimize overflow. Level 1 overflow canleave incomplete records in a file, although all the IDs are available. Level 2 overflow can cause more severe dataproblems because IDs and data can be lost. Onsystex strongly recommends you monitor and minimize level 2overflow. Using dynamic files versus static files minimizes level 2 overflow, which provides some protection.However, using dynamic files greatly increases level 1 overflow, making the risk of file corruption greater thanthat for static files.
Certain OASYS commands carry a direct risk of file corruption, as shown in the following table.
Command Risk Factor
oas_removeuser This OASYS command first tries to gracefully terminate a process.If unsuccessful, oas_removeuser forces the process to terminate.
OASYS Commands that can corrupt a file
There are other operations that can corrupt OASYS files; the following list contains some examples:
Stopping the OASYS Telnet Service (OAS Telnet) while users are logged on to the system. Attempting to view/edit a OASYS file with an MS-DOS text, octal, or binary editor can damage the file whetheror not OASYS is running. In many cases, the file damage is irreversible. Backing up and restoring a OASYS file while users are accessing the file during backup may damage therestored file. Any OASYS file can be damaged in this way, but the risk is particularly great for dynamic files.
Note: The file being backed up is not damaged. Danger is only to the file being restored.
9.10 OAS Detection Tools
OASYS supplies the following tools for detecting damaged files:
oas_analyzetbls - Use the oas_analyzetbls command to detect file damage when OASYS is running. oas_validatetbls - Use the oas_validatetbls command to detect file damage when OASYS is not running.
9.10.1 oas_analyzetbls
Syntax:oas_analyzetbls [file1, file2,...][-options]
Note: You may supply oas_analyzetbls with the name of a single OASYS file or a series of file names separated
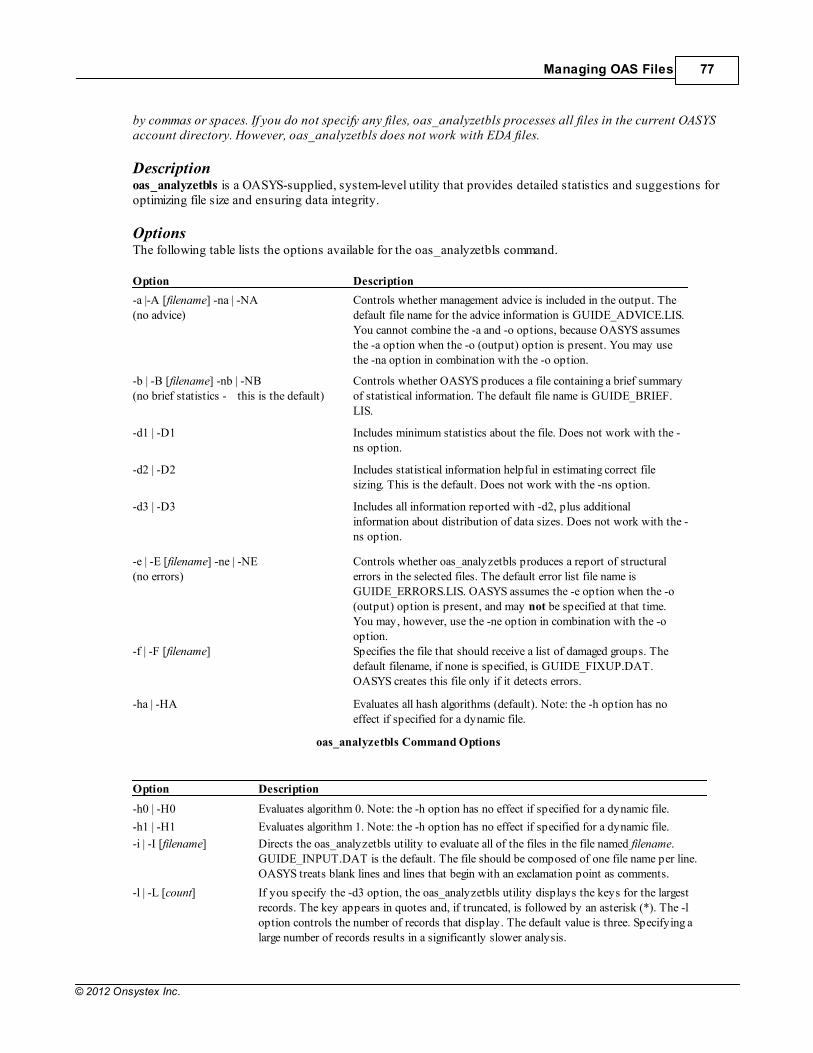
Managing OAS Files 77
© 2012 Onsystex Inc.
by commas or spaces. If you do not specify any files, oas_analyzetbls processes all files in the current OASYSaccount directory. However, oas_analyzetbls does not work with EDA files.
Description oas_analyzetbls is a OASYS-supplied, system-level utility that provides detailed statistics and suggestions foroptimizing file size and ensuring data integrity.
Options The following table lists the options available for the oas_analyzetbls command.
Option Description
-a |-A [filename] -na | -NA (no advice)
Controls whether management advice is included in the output. Thedefault file name for the advice information is GUIDE_ADVICE.LIS.You cannot combine the -a and -o options, because OASYS assumesthe -a option when the -o (output) option is present. You may usethe -na option in combination with the -o option.
-b | -B [filename] -nb | -NB (no brief statistics - this is the default)
Controls whether OASYS produces a file containing a brief summaryof statistical information. The default file name is GUIDE_BRIEF.LIS.
-d1 | -D1 Includes minimum statistics about the file. Does not work with the -ns option.
-d2 | -D2 Includes statistical information helpful in estimating correct filesizing. This is the default. Does not work with the -ns option.
-d3 | -D3 Includes all information reported with -d2, plus additionalinformation about distribution of data sizes. Does not work with the -ns option.
-e | -E [filename] -ne | -NE (no errors)
Controls whether oas_analyzetbls produces a report of structuralerrors in the selected files. The default error list file name isGUIDE_ERRORS.LIS. OASYS assumes the -e option when the -o(output) option is present, and may not be specified at that time.You may, however, use the -ne option in combination with the -ooption.
-f | -F [filename] Specifies the file that should receive a list of damaged groups. Thedefault filename, if none is specified, is GUIDE_FIXUP.DAT.OASYS creates this file only if it detects errors.
-ha | -HA Evaluates all hash algorithms (default). Note: the -h option has noeffect if specified for a dynamic file.
oas_analyzetbls Command Options
Option Description
-h0 | -H0 Evaluates algorithm 0. Note: the -h option has no effect if specified for a dynamic file.
-h1 | -H1 Evaluates algorithm 1. Note: the -h option has no effect if specified for a dynamic file.
-i | -I [filename] Directs the oas_analyzetbls utility to evaluate all of the files in the file named filename.GUIDE_INPUT.DAT is the default. The file should be composed of one file name per line.OASYS treats blank lines and lines that begin with an exclamation point as comments.
-l | -L [count] If you specify the -d3 option, the oas_analyzetbls utility displays the keys for the largestrecords. The key appears in quotes and, if truncated, is followed by an asterisk (*). The -loption controls the number of records that display. The default value is three. Specifying alarge number of records results in a significantly slower analysis.
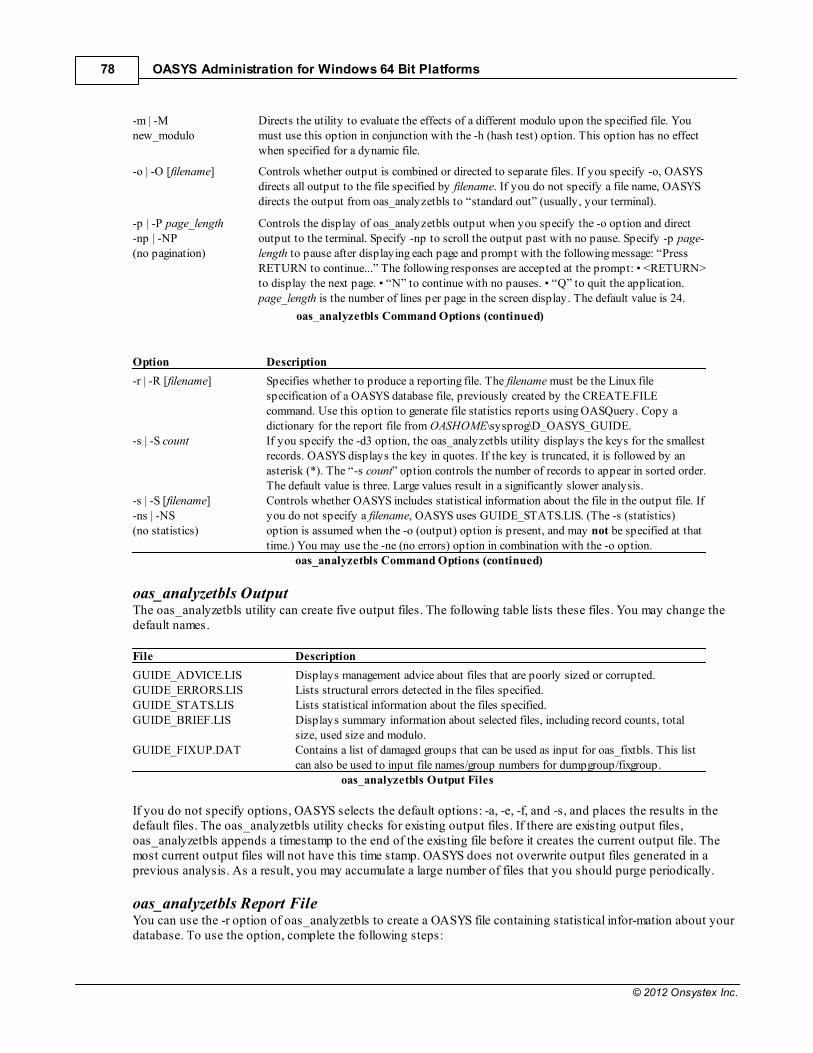
OASYS Administration for Windows 64 Bit Platforms78
© 2012 Onsystex Inc.
-m | -M new_modulo
Directs the utility to evaluate the effects of a different modulo upon the specified file. Youmust use this option in conjunction with the -h (hash test) option. This option has no effectwhen specified for a dynamic file.
-o | -O [filename] Controls whether output is combined or directed to separate files. If you specify -o, OASYSdirects all output to the file specified by filename. If you do not specify a file name, OASYSdirects the output from oas_analyzetbls to “standard out” (usually, your terminal).
-p | -P page_length -np | -NP (no pagination)
Controls the display of oas_analyzetbls output when you specify the -o option and directoutput to the terminal. Specify -np to scroll the output past with no pause. Specify -p page-length to pause after displaying each page and prompt with the following message: “PressRETURN to continue...” The following responses are accepted at the prompt: • <RETURN>to display the next page. • “N” to continue with no pauses. • “Q” to quit the application. page_length is the number of lines per page in the screen display. The default value is 24.
oas_analyzetbls Command Options (continued)
Option Description
-r | -R [filename] Specifies whether to produce a reporting file. The filename must be the Linux filespecification of a OASYS database file, previously created by the CREATE.FILEcommand. Use this option to generate file statistics reports using OASQuery. Copy adictionary for the report file from OASHOME\sysprog\D_OASYS_GUIDE.
-s | -S count If you specify the -d3 option, the oas_analyzetbls utility displays the keys for the smallestrecords. OASYS displays the key in quotes. If the key is truncated, it is followed by anasterisk (*). The “-s count” option controls the number of records to appear in sorted order.The default value is three. Large values result in a significantly slower analysis.
-s | -S [filename] -ns | -NS (no statistics)
Controls whether OASYS includes statistical information about the file in the output file. Ifyou do not specify a filename, OASYS uses GUIDE_STATS.LIS. (The -s (statistics)option is assumed when the -o (output) option is present, and may not be specified at thattime.) You may use the -ne (no errors) option in combination with the -o option.
oas_analyzetbls Command Options (continued)
oas_analyzetbls Output The oas_analyzetbls utility can create five output files. The following table lists these files. You may change thedefault names.
File Description
GUIDE_ADVICE.LIS Displays management advice about files that are poorly sized or corrupted. GUIDE_ERRORS.LIS Lists structural errors detected in the files specified. GUIDE_STATS.LIS Lists statistical information about the files specified. GUIDE_BRIEF.LIS Displays summary information about selected files, including record counts, total
size, used size and modulo. GUIDE_FIXUP.DAT Contains a list of damaged groups that can be used as input for oas_fixtbls. This list
can also be used to input file names/group numbers for dumpgroup/fixgroup. oas_analyzetbls Output Files
If you do not specify options, OASYS selects the default options: -a, -e, -f, and -s, and places the results in thedefault files. The oas_analyzetbls utility checks for existing output files. If there are existing output files,oas_analyzetbls appends a timestamp to the end of the existing file before it creates the current output file. Themost current output files will not have this time stamp. OASYS does not overwrite output files generated in aprevious analysis. As a result, you may accumulate a large number of files that you should purge periodically.
oas_analyzetbls Report File You can use the -r option of oas_analyzetbls to create a OASYS file containing statistical infor-mation about yourdatabase. To use the option, complete the following steps:
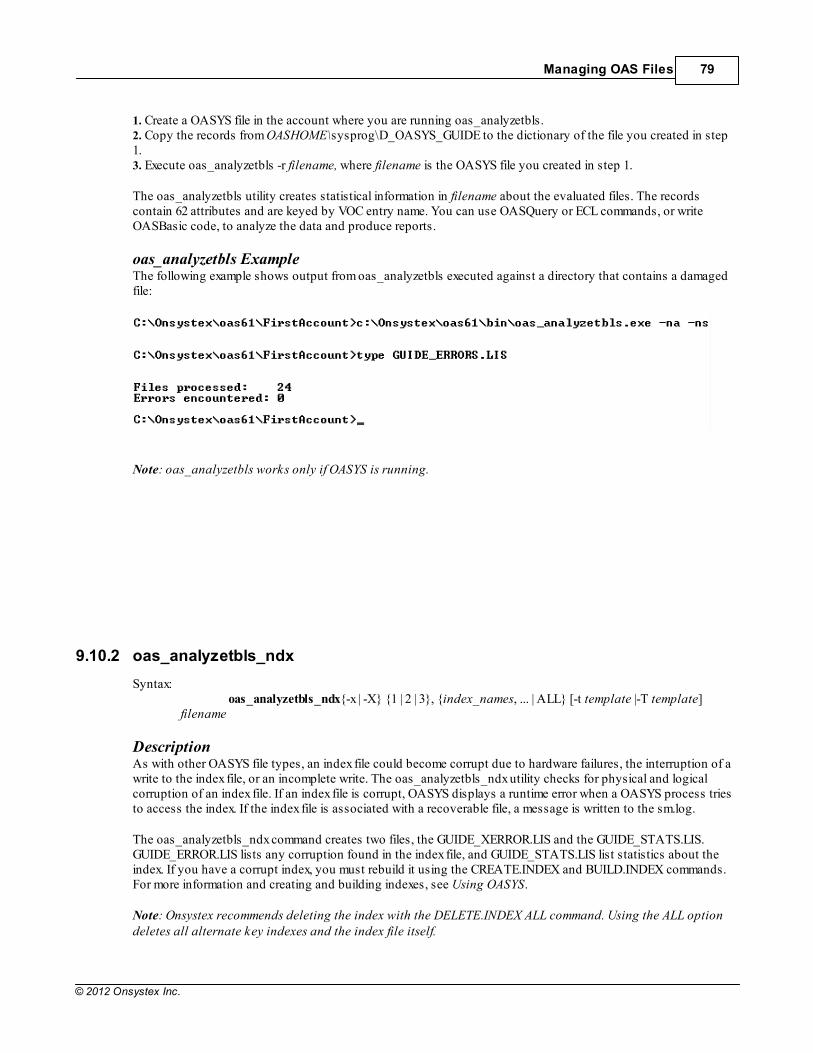
Managing OAS Files 79
© 2012 Onsystex Inc.
1. Create a OASYS file in the account where you are running oas_analyzetbls. 2. Copy the records from OASHOME\sysprog\D_OASYS_GUIDE to the dictionary of the file you created in step1. 3. Execute oas_analyzetbls -r filename, where filename is the OASYS file you created in step 1.
The oas_analyzetbls utility creates statistical information in filename about the evaluated files. The recordscontain 62 attributes and are keyed by VOC entry name. You can use OASQuery or ECL commands, or writeOASBasic code, to analyze the data and produce reports.
oas_analyzetbls Example The following example shows output from oas_analyzetbls executed against a directory that contains a damagedfile:
Note: oas_analyzetbls works only if OASYS is running.
9.10.2 oas_analyzetbls_ndx
Syntax:oas_analyzetbls_ndx{-x | -X} {1 | 2 | 3}, {index_names, ... | ALL} [-t template |-T template]
filename
Description As with other OASYS file types, an index file could become corrupt due to hardware failures, the interruption of awrite to the index file, or an incomplete write. The oas_analyzetbls_ndx utility checks for physical and logicalcorruption of an index file. If an index file is corrupt, OASYS displays a runtime error when a OASYS process triesto access the index. If the index file is associated with a recoverable file, a message is written to the sm.log.
The oas_analyzetbls_ndx command creates two files, the GUIDE_XERROR.LIS and the GUIDE_STATS.LIS.GUIDE_ERROR.LIS lists any corruption found in the index file, and GUIDE_STATS.LIS list statistics about theindex. If you have a corrupt index, you must rebuild it using the CREATE.INDEX and BUILD.INDEX commands.For more information and creating and building indexes, see Using OASYS.
Note: Onsystex recommends deleting the index with the DELETE.INDEX ALL command. Using the ALL optiondeletes all alternate key indexes and the index file itself.
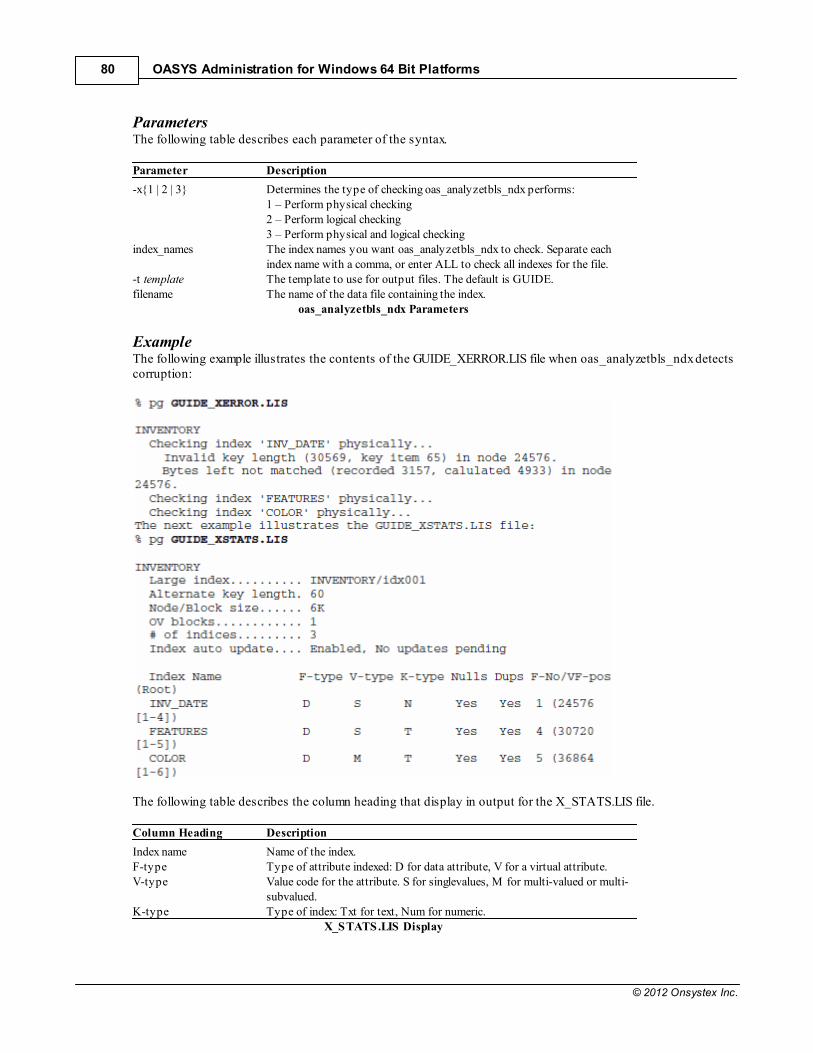
OASYS Administration for Windows 64 Bit Platforms80
© 2012 Onsystex Inc.
Parameters The following table describes each parameter of the syntax.
Parameter Description
-x{1 | 2 | 3} Determines the type of checking oas_analyzetbls_ndx performs: 1 – Perform physical checking 2 – Perform logical checking 3 – Perform physical and logical checking
index_names The index names you want oas_analyzetbls_ndx to check. Separate eachindex name with a comma, or enter ALL to check all indexes for the file.
-t template The template to use for output files. The default is GUIDE. filename The name of the data file containing the index.
oas_analyzetbls_ndx Parameters
Example The following example illustrates the contents of the GUIDE_XERROR.LIS file when oas_analyzetbls_ndx detectscorruption:
The following table describes the column heading that display in output for the X_STATS.LIS file.
Column Heading Description
Index name Name of the index. F-type Type of attribute indexed: D for data attribute, V for a virtual attribute. V-type Value code for the attribute. S for singlevalues, M for multi-valued or multi-
subvalued. K-type Type of index: Txt for text, Num for numeric.
X_STATS.LIS Display
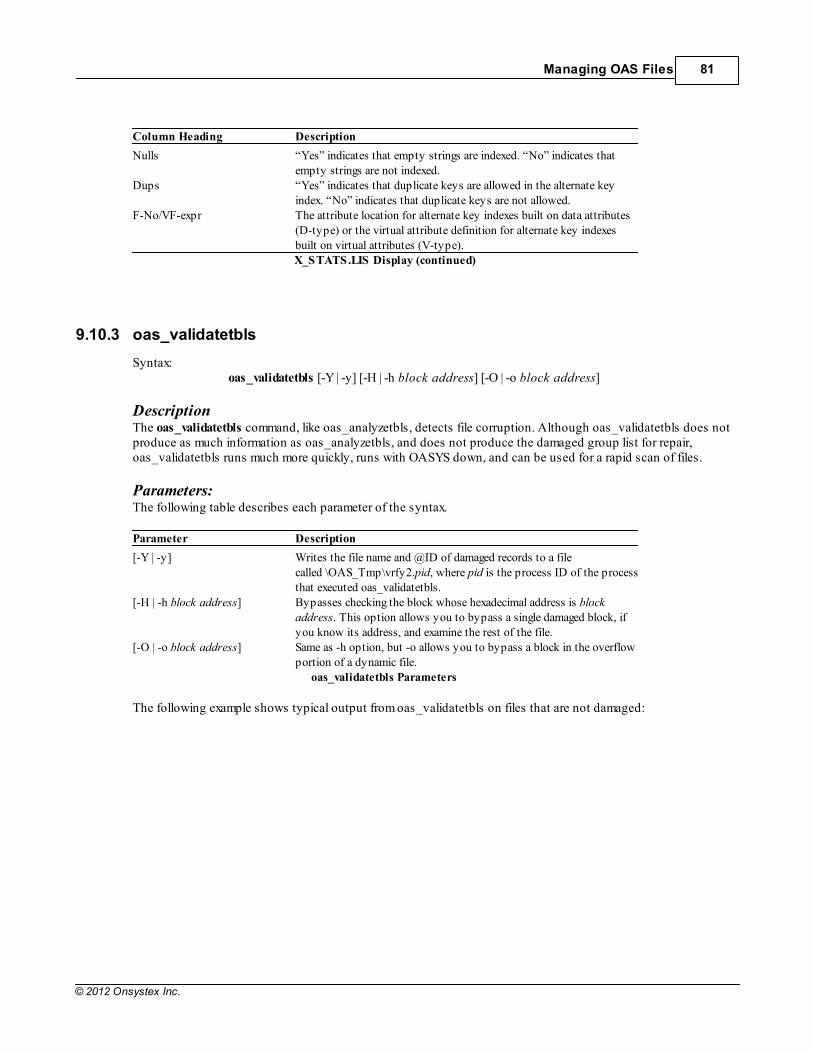
Managing OAS Files 81
© 2012 Onsystex Inc.
Column Heading Description
Nulls “Yes” indicates that empty strings are indexed. “No” indicates thatempty strings are not indexed.
Dups “Yes” indicates that duplicate keys are allowed in the alternate keyindex. “No” indicates that duplicate keys are not allowed.
F-No/VF-expr The attribute location for alternate key indexes built on data attributes(D-type) or the virtual attribute definition for alternate key indexesbuilt on virtual attributes (V-type). X_STATS.LIS Display (continued)
9.10.3 oas_validatetbls
Syntax: oas_validatetbls [-Y | -y] [-H | -h block address] [-O | -o block address]
Description The oas_validatetbls command, like oas_analyzetbls, detects file corruption. Although oas_validatetbls does notproduce as much information as oas_analyzetbls, and does not produce the damaged group list for repair,oas_validatetbls runs much more quickly, runs with OASYS down, and can be used for a rapid scan of files.
Parameters: The following table describes each parameter of the syntax.
Parameter Description
[-Y | -y] Writes the file name and @ID of damaged records to a filecalled \OAS_Tmp\vrfy2.pid, where pid is the process ID of the processthat executed oas_validatetbls.
[-H | -h block address] Bypasses checking the block whose hexadecimal address is blockaddress. This option allows you to bypass a single damaged block, ifyou know its address, and examine the rest of the file.
[-O | -o block address] Same as -h option, but -o allows you to bypass a block in the overflowportion of a dynamic file.
oas_validatetbls Parameters
The following example shows typical output from oas_validatetbls on files that are not damaged:
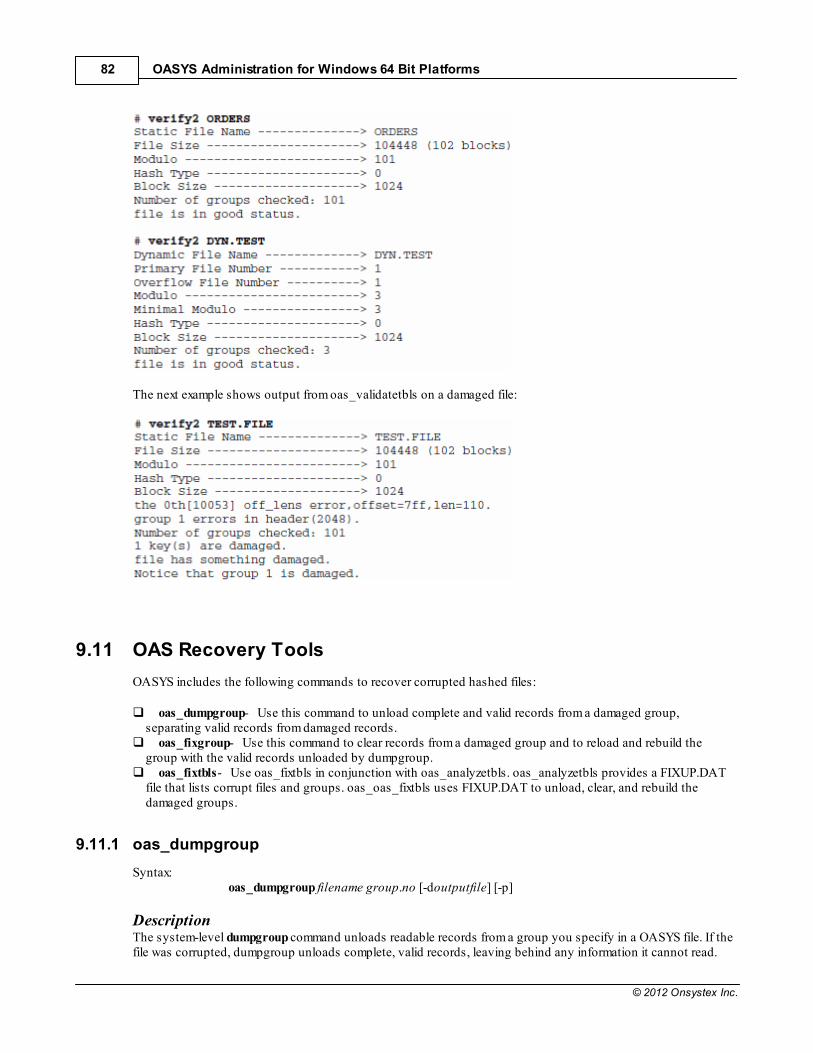
OASYS Administration for Windows 64 Bit Platforms82
© 2012 Onsystex Inc.
The next example shows output from oas_validatetbls on a damaged file:
9.11 OAS Recovery Tools
OASYS includes the following commands to recover corrupted hashed files:
oas_dumpgroup- Use this command to unload complete and valid records from a damaged group,separating valid records from damaged records.
oas_fixgroup- Use this command to clear records from a damaged group and to reload and rebuild thegroup with the valid records unloaded by dumpgroup.
oas_fixtbls- Use oas_fixtbls in conjunction with oas_analyzetbls. oas_analyzetbls provides a FIXUP.DATfile that lists corrupt files and groups. oas_oas_fixtbls uses FIXUP.DAT to unload, clear, and rebuild thedamaged groups.
9.11.1 oas_dumpgroup
Syntax: oas_dumpgroup filename group.no [-doutputfile] [-p]
Description The system-level dumpgroup command unloads readable records from a group you specify in a OASYS file. If thefile was corrupted, dumpgroup unloads complete, valid records, leaving behind any information it cannot read.
Managing OAS Files 83
© 2012 Onsystex Inc.
Parameters The following table describes each parameter of the syntax.
Parameter Description
filename Specifies the name of the file containing groups to be dumped.
group.no Specifies the number of the group to dump. The output fromeither oas_analyzetbls or oas_validatetbls identifies groups thatare damaged. Use this infor-mation to select groups to process.
[-doutputfile] Specifies the name of a file that contains the readable recordsfrom the dumped group, in an uneditable form. If you do notspecify the -d parameter with an outputfile, the output prints toscreen. To load outputfile back into the file, use fixgroup. Note:No space is allowed between -d and outputfile.
[-p] Converts nonprinting field markers to printable characters ineditable output file. This option is only valid if -d is used.
Parameters of dumpgroup Command
If you execute oas_dumpgroup without specifying an output file, the output simply displays on the screen. Youwill not be able to use that output to verify records or repair the damaged group. If you do specify an output file,OASYS places the records in uneditable form, suitable for reloading, into the output file. OASYS also creates adirectory within your current account for each dumped group. The directory is named FILE_GROUP, where FILEand GROUP are the file name and group number you specify on the command line. This directory contains anASCII file for each record, so that you can check them for consistency before reloading the damaged file.
Warning: When you use the -d option, make sure you name your output file with a name that does not alreadyexist in your account name. If you specify a duplicate name, the preexisting file may be overwritten.
9.11.2 oas_fixgroup
Syntax:oas_fixgroup filename group.no [-iinputfile] [-k]
The system level oas_fixgroup command reloads a hashed file group based on a file created by the dumpgroupcommand.
The following table describes each parameter of the syntax.
Parameter Description
filename Specifies the name of the file to repair.
group.no Indicates the identifying number of the damaged group.
[-iinputfile] Specifies the name of the file created by dumpgroup. If you donot specify an input file argument, fixgroup simply clears thespecified group, without reloading it. Note: No space is allowedbetween -i and inputfile.
[-k] Allows fixgroup to reload the damaged records from inputfilewithout zeroing the group first. This option may be useful if thegroup was updated since dumpgroup was executed. However,for best results, do not allow access to a file while it is beingrepaired, and clear the damaged groups rather than using the -k

OASYS Administration for Windows 64 Bit Platforms84
© 2012 Onsystex Inc.
option. fixgroup Parameters
Warning: If you execute oas_fixgroup without an input file argument, OASYS clears the damaged group. Besure that you have saved the readable records with oas_dumpgroup before clearing the group. If you clear thedamaged group and you have not saved the readable records, the data in that group is lost. The syntax forclearing a group without reloading it is:
OASYS displays a warning message before clearing the group, as shown in the following example
9.11.3 oas_fixtbls
Syntax:
oas_fixtbls {-t | {-dfilename | -k | -p | -f}} [-mfilename] [-wdirectory] [-ifilename | filename group.no]
The system-level oas_fixtbls command repairs damaged groups in OASYS files by clearing the group andoptionally restoring readable records to the group. Use oas_fixtbls in conjunction with the oas_analyzetblsutility. Do not let users access files while oas_fixtbls is running because you could lose records.
The following table describes each parameter of the oas_fixtbls syntax.
Parameter Description
{-t} Direct all output to the terminal only. Each readable record is describedin a new line that includes the record key and the record length. Allattributes in the record appear on separate lines, each line indented bytwo spaces. Special and nonprintable characters are translated asfollows: Attribute Mark - New line Value Mark - “ } ” SubvalueMark - “ | ” Text Mark - “ { ” Non-printables - “ . ” The -t and -dparameters are mutually exclusive and cannot be used together.
{-dfilename} A file specification is required. For static files, dumps the readablerecords to this file in uneditable format. For dynamic files, OASYScreates this file, but dumps the actual records to a file in \temp. With the-d option, OASYS also writes the records, in readable format, to adirectory in your current OASYS account. This directory contains anASCII file for each readable record in the group. The records are in aformat suitable for editing. To repair any file, you need both the -d and -f options.
{-k} If you specify the -k option with the -d option, OASYS does not clearthe damaged groups. This has the effect of dumping the readable recordsfor examination, but leaving the file corrupt. If you specify the -d and -foption along with the -k option, OASYS repairs the file and returns thereadable records to the group. Any unreadable records that OASYS didnot dump remain in the file as well.
{-p} If you specify the -p option with the -d option, OASYS trans-lates allnon-printing characters and characters with special meaning to OASYS.This translation applies to the editable ASCII files created by the -doption. If you do not specify the - p option, only attribute marks aretranslated.
Managing OAS Files 85
© 2012 Onsystex Inc.
oas_fixtbls Command Parameters
Parameter Description
{-f} If you specify the -f option with the -d option, OASYS clears thedamaged group and restores the records that were dumped back into thegroup, creating a fixed file with all readable data restored. You mustspecify the -d option with the -f option.
[-mfilename] OASYS writes all error messages and statistics to the file you specify,instead of the terminal.
[-wdirectory] OASYS creates the work files that are generated in the directory youspecify.
{-ifilename} OASYS uses this file as the source of the names of damaged files andgroups to be repaired. If you do not use this option or the {filenamegroup.no} option, OASYS uses the GUIDE_FIXUP.DAT file under thecurrent directory. This option is mutually exclusive with {filenamegroup.no}.
{filename group.no} The file name and group number that contains the corruption. If you donot use this option or the {-ifilename} option, OASYS uses theGUIDE_FIXUP.DAT file under the current directory. This option ismutually exclusive with the {-ifilename} option
oas_fixtbls Command Parameters (continued)
How oas_fixtbls Works with Static Files When you run oas_fixtbls with the -t option on a static file, OASYS displays the readable records from the fileand group to the terminal. OASYS does not clear or repair the group. You can supply the names of damaged filesand groups from the command line or from an input file. The default input file is GUIDE_FIXUP.DAT.
When you run oas_fixtbls with -dfilename on a static file, OASYS creates:
An NTFS directory or directories for the files and groups being repaired. If only one group in a file isdamaged, the directory is named FILE_GROUP, where FILE is the damaged file (from GUIDE_FIXUP.DAT oroas_validatetbls) and GROUP is the damaged group. If several groups in a file are damaged, OASYS creates adirectory named FILE_dir.
Each FILE_GROUP directory contains an ASCII file for every readable record in the damaged group.Each file name is the key for the corresponding OASYS record. These records are in a format suitable forediting. Each FILE_dir contains a subdirectory for each damaged group in FILE. The name of each subdirectory isthe group number of the damaged group. Each subdirectory contains an ASCII file for every readablerecord in the damaged group. Each file name is the key for the corresponding OASYS record. These recordsare in a format suitable for editing.
A file, with the name you specify on the command line, that contains the records oas_fixtbls could read, inuneditable format. This file is used to reload the records into the damaged groups after the groups are cleared.
Note: If you specify the -p option, oas_fixtbls translates nonprinting characters in the records when it createsthe “editable” files. Otherwise, OASYS translates only attribute marks to new lines.
When you run oas_fixtbls with the -d and -f options on a static file, OASYS reloads the records into the damagedgroups, taking them from the file you specify on the command line. Unless you specify the -k option, oas_fixtblsclears the groups, removing all contents, before reloading the data. If you specify the -k option, OASYS adds the

OASYS Administration for Windows 64 Bit Platforms86
© 2012 Onsystex Inc.
records back, but does not clear any data from the group.
Note: It is possible to run oas_fixtbls in two steps, one to dump the records for review and the second to repairthe file. To dump the records only, run oas_fixtbls with the -d option, but without the -f option. Unless youspecify the -k option, running oas_fixtbls with the -dfilename deletes the readable data from the specifiedgroups when it creates output. To repair the file, run oas_fixtbls with both -d and -f options.
How oas_fixtbls Works with Dynamic Files When you execute oas_fixtbls with the -d option on a dynamic file, OASYS creates the following:
An NTFS directory located in \temp for each file-group combination being repaired. The directories are namedFILE_GROUP where FILE is a damaged file (from GUIDE_FIXUP.DAT or oas_validatetbls) and GROUP is adamaged group. If several groups in a file are damaged, OASYS creates a directory for each damaged group. Each FILE_GROUP directory contains an ASCII file for every readable record in the damaged group. Eachrecord’s name is the key for the corre-sponding OASYS record. These records are in a format suitable forediting. A file containing the records oas_fixtbls could read, in uneditable format suitable for reloading into the groupafter it has been cleared. This file is located in \temp (or in the directory identified by the OAS_Tmpenvironment variable) and is named ud_dp_pid, where pid is the process ID of the process that executedoas_fixtbls.
Note: If you specify the -p option, oas_fixtbls translates nonprinting characters in the records when it createsthe editable files. Otherwise, OASYS translates only attribute marks to new lines.
When you run oas_fixtbls with the -d and -f options on a dynamic file, OASYS reads the file you specify with the-d option on the command line and also reads the uneditable file of dumped records. OASYS then reloads therecords from that file into the damaged groups. Unless you specify the -k option, oas_fixtbls clears the groups,removing all contents, before reloading the data. Otherwise, OASYS adds the records back, but does not clearany data from the group.
Note: You can run oas_fixtbls in two steps, one to dump the records for review and the second to repair the file.To dump the records for review, run oas_fixtbls with the -d option, but without the -f option. (You do not needto use -k for dynamic files. For dynamic files, running oas_fixtbls with -dfilename and not -f does not delete thereadable data from the specified groups when it creates output.) To repair the file, run oas_fixtbls with boththe -d and -f options. If you specify the same file name with -d in both the review and repair steps, OASYS willprompt whether or not to clear the damaged groups.
9.12 Detection and Repair Examples
The following example shows typical output from running oas_analyzetbls against a damaged file:
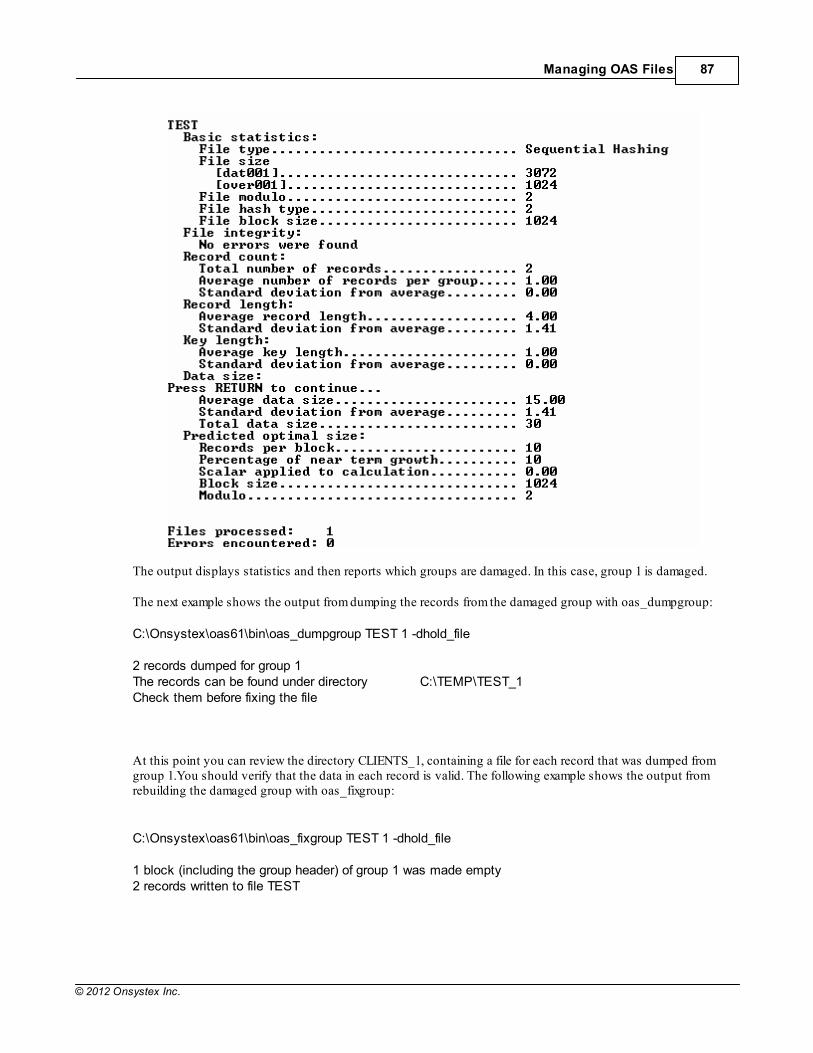
Managing OAS Files 87
© 2012 Onsystex Inc.
The output displays statistics and then reports which groups are damaged. In this case, group 1 is damaged.
The next example shows the output from dumping the records from the damaged group with oas_dumpgroup:
C:\Onsystex\oas61\bin\oas_dumpgroup TEST 1 -dhold_file
2 records dumped for group 1The records can be found under directory C:\TEMP\TEST_1Check them before fixing the file
At this point you can review the directory CLIENTS_1, containing a file for each record that was dumped fromgroup 1.You should verify that the data in each record is valid. The following example shows the output fromrebuilding the damaged group with oas_fixgroup:
C:\Onsystex\oas61\bin\oas_fixgroup TEST 1 -dhold_file
1 block (including the group header) of group 1 was made empty2 records written to file TEST
OASYS Administration for Windows 64 Bit Platforms88
© 2012 Onsystex Inc.
9.13 How to Use oas_analyzetbls
The steps listed below provide guidelines for effectively using the oas_analyzetbls utility.
1. Monitor File Integrity with oas_analyzetbls You should execute oas_analyzetbls against your database at regular intervals, as well as when you have had asystem crash. You can set up shell scripts to run oas_analyzetbls at specified intervals on specified lists of files,or you can simply execute the oas_analyzetbls command in each OASYS account. You can executeoas_analyzetbls against static hashed files at any time, and schedule oas_analyzetbls to run on dynamic files at atime when the system is idle or only lightly loaded.
Note: The oas_analyzetbls utility requires exclusive access to process any dynamic file. There are twoconsiderations: first, if you run oas_analyzetbls against such files while the system is under heavy load,oas_analyzetbls may be unable to process the majority of your files. Second, if oas_analyzetbls is able to gainexclusive access to a file, OASYS blocks other access to that file until oas_analyzetbls completes.
2. Check Error Output (GUIDE_ERRORS.LIS) Use the following information to determine what action to take, depending on the error output.
No Errors If there are no errors, proceed to step 5.
Partially Allocated Block Messages Partially allocated block messages are not false error reports; they indicate an out-ofsynch condition in a dynamicfile, but they do not mean that the file must be fixed immediately. Users can continue to access the file; this willnot cause damage. Complete the repair at a convenient time using the procedure in step 3. Partially allocatedblock messages look like:
Other oas_analyzetbls Error Messages oas_analyzetbls produces many messages besides the one discussed above. If you see error messagespertaining only to static files, or if you see other error messages pertaining to dynamic files, proceed to step 3.
3. Repair Damaged FilesComplete the following steps:
1. Back up the damaged file(s)- If time and space permit, Onsystex strongly recommends you back up (or simplymake a copy of) the damaged files before proceeding. In the event of a system failure during the repair process,you will be able to restore from the backup copies and repeat the procedures rather than attempting to recover apartially-completed repair. DO NOT ALLOW USERS TO ACCESS YOUR FILES WHILE YOU ARE BACKINGTHEM UP! 2. Repair the damaged groups- After oas_analyzetbls completes, you can execute either oas_fixtbls or
Managing OAS Files 89
© 2012 Onsystex Inc.
dumpgroup/fixgroup to repair the damaged groups. In either case, the process overview is: dump the readablerecords from a damaged group, clear the group, and then reload all readable records back into the group.Tip: Onsystex recommends that you not use the -k option with oas_fixtbls or with fixgroup. The -k option letsyou reload the readable records without clearing the group. However, you may encounter additional errors ifyou do not clear the group. Use oas_fixtbls or fixgroup without -k; this procedure automatically clears thegroup before reloading the readable records.Be sure no users are accessing your files before repairing damaged groups. The dumpgroup command does not obtain exclusive access, andoas_fixtbls/fixgroup only lock the file when the records are being written back to a group. Concurrent access tothe file could make corruption worse. 3. Verify the repair- Rerun oas_analyzetbls after the repair is complete to verify that the errors are fixed. If theyare not, or if additional groups are damaged, repeat the previous step.
4. Back Up the Repaired Files Back up any files you have just completed repairing.
5. Continue Processing If you shut OASYS down to repair files, start it again before allowing users to log in.
9.14 Error Messages
This section lists error messages users may see and provides information about the meaning of them. Some of themessages are generated by the oas_analyzetbls command and others are generated by the oas_validatetblscommand.
9.14.1 File Access Messages
File access messages are similar to the following example:
All of these messages indicate that oas_analyzetbls or oas_validatetbls did not process the file because it wasunable to obtain an exclusive lock on the file.
Note: These messages display only at the terminal. They are not logged in any file.
9.14.2 Block Usage Messages
Block usage messages are similar to the following example:
These indicate that a block is found to be referenced by more than one link, which should not occur. Thesemessages indicate damage.
A block has been found that is not in the global free chain and is not used by any group. This error can bereported when oas_analyzetbls or oas_validatetbls encounters a corrupt block, and is therefore unable to check
OASYS Administration for Windows 64 Bit Platforms90
© 2012 Onsystex Inc.
blocks linked through the corrupted one.
9.14.3 Group Header Messages
Group header messages are similar to the following example:
These messages indicate damage.
9.14.4 Header Key Messages
Header key messages are similar to the following example:
These errors indicate that key area size or number of keys have been corrupted in a group header.
9.14.5 Other Header Messages
There are a number of other header messages, as shown in the following examples:
The group number recorded in the block header does not match the group being checked.
The offset (link to next disk block) is not a multiple of the block size, or, for a dynamic file, the offset does notindicate an overflow file offset.
A data position in a group header is damaged.
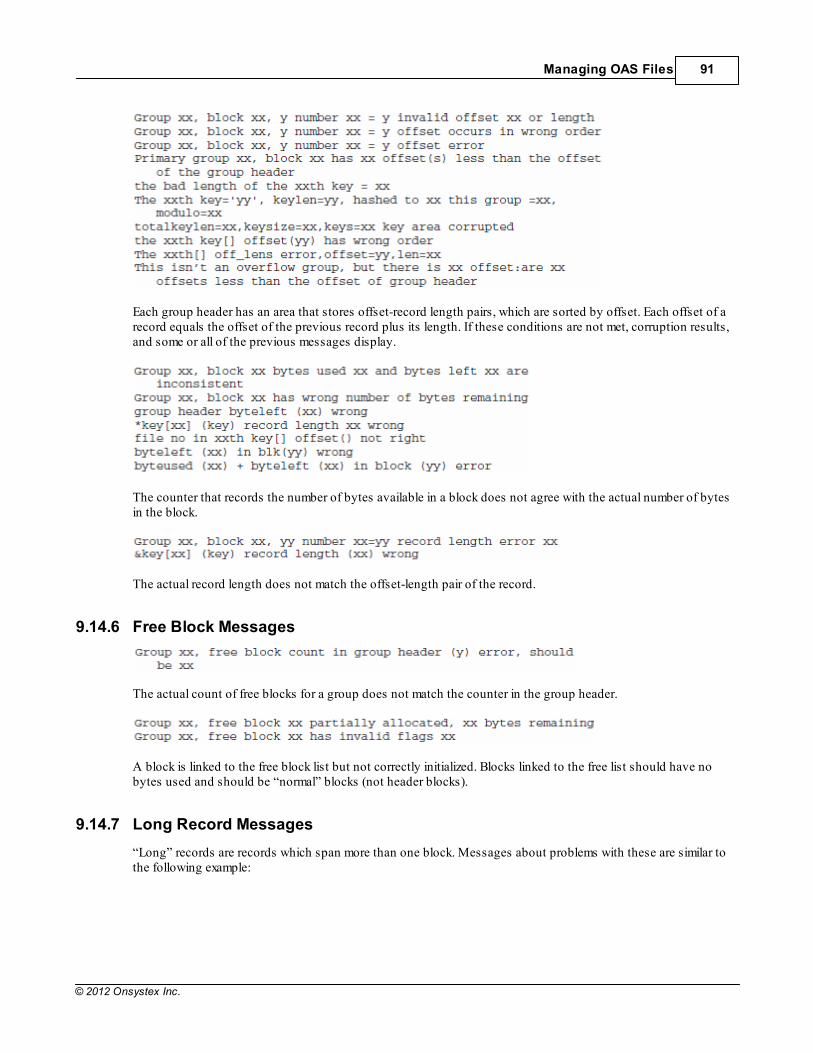
Managing OAS Files 91
© 2012 Onsystex Inc.
Each group header has an area that stores offset-record length pairs, which are sorted by offset. Each offset of arecord equals the offset of the previous record plus its length. If these conditions are not met, corruption results,and some or all of the previous messages display.
The counter that records the number of bytes available in a block does not agree with the actual number of bytesin the block.
The actual record length does not match the offset-length pair of the record.
9.14.6 Free Block Messages
The actual count of free blocks for a group does not match the counter in the group header.
A block is linked to the free block list but not correctly initialized. Blocks linked to the free list should have nobytes used and should be “normal” blocks (not header blocks).
9.14.7 Long Record Messages
“Long” records are records which span more than one block. Messages about problems with these are similar tothe following example:
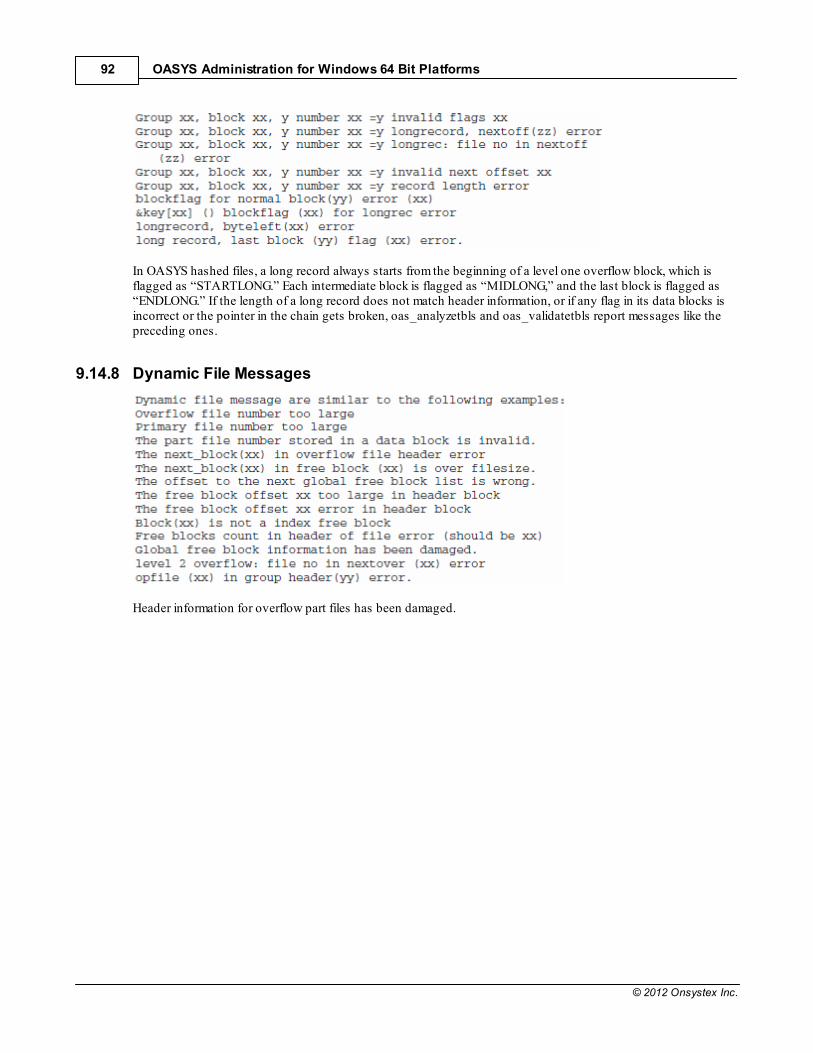
OASYS Administration for Windows 64 Bit Platforms92
© 2012 Onsystex Inc.
In OASYS hashed files, a long record always starts from the beginning of a level one overflow block, which isflagged as “STARTLONG.” Each intermediate block is flagged as “MIDLONG,” and the last block is flagged as“ENDLONG.” If the length of a long record does not match header information, or if any flag in its data blocks isincorrect or the pointer in the chain gets broken, oas_analyzetbls and oas_validatetbls report messages like thepreceding ones.
9.14.8 Dynamic File Messages
Header information for overflow part files has been damaged.

Part
10
OASYS Administration for Windows 64 Bit Platforms94
© 2012 Onsystex Inc.
10 Managing OAS Locks
This chapter outlines file, record, and system resource locking within OASYS, describes tools for listing locksand listing the contents of the wait queue, and describes procedures for releasing locks that remain set when aprocess exits OASYS.
10.1 The OASIS Global Lock Manager
The Global Lock Manager (OASYS Locking) is an internal software module that is linked into each oas process tomanage logical record locks.
10.1.1 How OASIS Global Locking Works
OASYS manages local lock tables for each oas process and a shared global lock table in shared memory, whichcan be accessed by multiple oas processes. The lock tables are hashed tables containing linked lists, whichcontain lock nodes. When a oas process locks a record, OASYS writes the file name, record ID, and lock mode toboth the local lock table and the global lock table. When a oas process requests a lock, OASYS first searches thatlocal lock table for the oas to see if that process is holding the lock, then the global lock table to see if anotheroas process is holding the lock.
OASYS Locking oasconfig Parameters There are four oasconfig parameters which control the size of the shared lock table and the memory OASYSallocates for each memory request.
OAS_NoGlobalSlotsThis parameter defines the number of hash buckets system-wide, used to hold the lock names in shared memory.This setting directly affects performance. Normally, the default value of this parameter should not be changed.However, if you notice significant degradation in performance, or your application intensively accesses specificfiles, you should increase this parameter. The value should be the closest prime number to OAS_MaxUsers * 3.
OAS_NoLocalSlotsThis parameter determines the number of hash buckets for the local lock table, and is highly applicationdependent. If the application requires a large number of locks in one transaction (more than 20), this settingshould be increased from the default of 23. The setting should be the closest prime number to the maximumnumber of locks per transaction.
OAS_NoBlockingNode This parameter defines the number of lock nodes allocated for each memory request, and is highly applicationdependent. If your application requires a large number of locks in one transaction, this setting should beincreased to the maximum number of locks per transaction * 2.
OAS_BytesperNode This parameter specifies the segment size for each shared memory segment required for OASYS Locking. Themaximum number of segments is 16. Large application environments require a larger size. The default value is 10.
OAS_BytesperNode must be greater than 4096 and less than OAS_MaxShmSize. The formula for determiningOAS_MaxShmSize is OAS_MaxUsers * maximum number of locks per transaction * 512. OAS_MaxShmSizeshould be a multiple of 4096.
Managing OAS Locks 95
© 2012 Onsystex Inc.
10.2 Locking in OasBasic
A series of OASBasic commands enable users to set read-only locks and exclusive locks on OASYS files andtheir contents.
10.2.1 How Locks Work
OASBasic locks are advisory rather than physical, meaning that they inform other users of a file or record that thefile or record is in use, rather than explicitly preventing access. You can set exclusive locks or shared (read-only)locks.
Exclusive Locks (U Type) Exclusive (U) locks are respected by all lock-checking commands except those that write and delete. Exclusivelocks are set by “U” commands, for instance READU, MATREADU, and RECORDLOCKU.
Shared Locks (L Type) Shared, or read-only, locks can be shared by more than one user. These locks are set by “L” commands, forinstance READL, MATREADL, RECORDLOCKL. A record locked with an L lock can be accessed for reading byanother “L” command, but cannot be accessed by “U” commands.
Writing and Deleting WRITE and DELETE commands execute regardless of lock status. WRITEU, WRITEVU, MATWRITEU, andDELETEU retain locks set by previous commands. To prevent multiple updates to records, all WRITE andDELETE commands should be preceded by a lock-setting command like READU.
10.2.2 Locking Commands
The following table lists OASBasic commands for setting and releasing locks.
Command Description
FILELOCK Locks the data or dictionary portion of a OASYS file against access by commandsthat check locks.
FILEUNLOCK Unlocks a file previously locked with the FILELOCK command.
MATREADL Assigns the values found in successive attributes of a record to correspondingelements of a matrix and sets a read-only lock on the record.
MATREADU Assigns the values found in successive attributes of a record to correspondingelements of a matrix and sets an exclusive lock on the record.
MATWRITE Writes successive elements of a matrix to the corresponding attributes of a recordand releases locks previously set on the record.
MATWRITEU Writes successive elements of a matrix to the corresponding attributes of a recordwithout releasing locks previously set on the record.
READBCKL Retrieves one record from a B+ tree based alternate key index and places a read-only lock on the record. Each subsequent READBCKU retrieves the previousrecord in the index.
READBCKU Retrieves one record from a B+ tree based alternate key index and places anexclusive lock on the record. Each subsequent READBCKU retrieves the previousrecord in the index.
READFWDL Retrieves one record from a B+ tree based alternate key index and places a read-only lock on the record. Each subsequent READBCKU retrieves the next record inthe index.
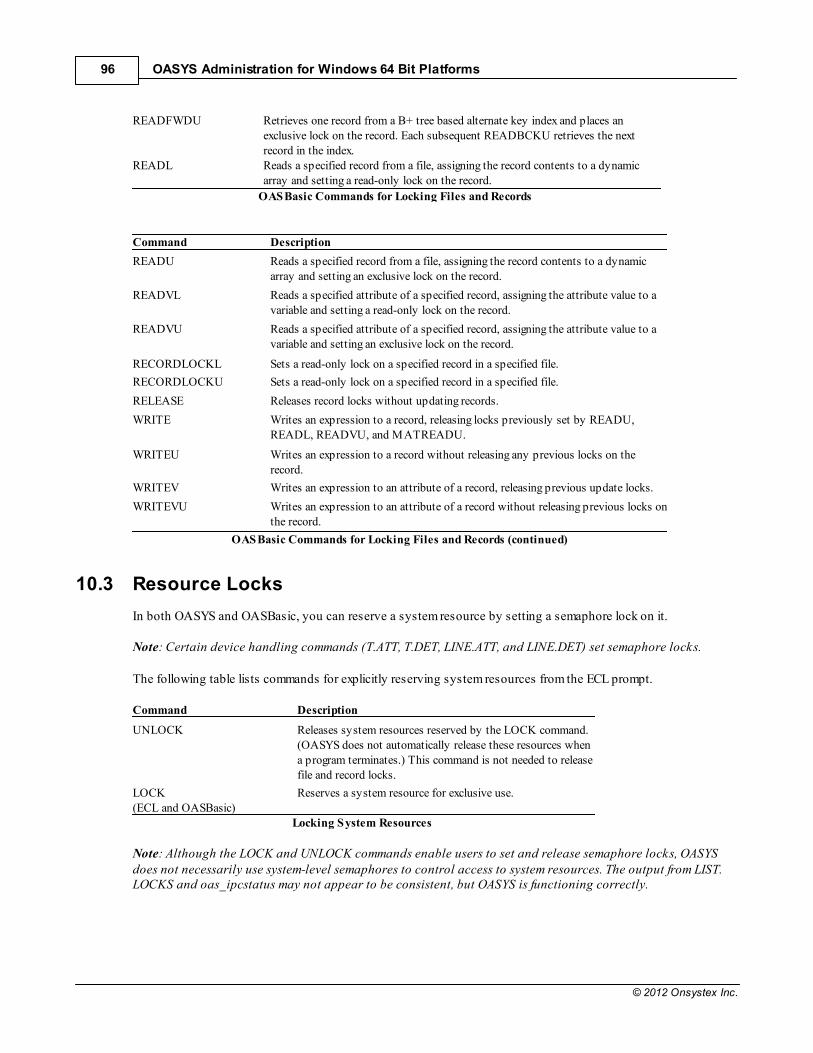
OASYS Administration for Windows 64 Bit Platforms96
© 2012 Onsystex Inc.
READFWDU Retrieves one record from a B+ tree based alternate key index and places anexclusive lock on the record. Each subsequent READBCKU retrieves the nextrecord in the index.
READL Reads a specified record from a file, assigning the record contents to a dynamicarray and setting a read-only lock on the record.
OASBasic Commands for Locking Files and Records
Command Description
READU Reads a specified record from a file, assigning the record contents to a dynamicarray and setting an exclusive lock on the record.
READVL Reads a specified attribute of a specified record, assigning the attribute value to avariable and setting a read-only lock on the record.
READVU Reads a specified attribute of a specified record, assigning the attribute value to avariable and setting an exclusive lock on the record.
RECORDLOCKL Sets a read-only lock on a specified record in a specified file.
RECORDLOCKU Sets a read-only lock on a specified record in a specified file.
RELEASE Releases record locks without updating records.
WRITE Writes an expression to a record, releasing locks previously set by READU,READL, READVU, and MATREADU.
WRITEU Writes an expression to a record without releasing any previous locks on therecord.
WRITEV Writes an expression to an attribute of a record, releasing previous update locks.
WRITEVU Writes an expression to an attribute of a record without releasing previous locks onthe record.
OASBasic Commands for Locking Files and Records (continued)
10.3 Resource Locks
In both OASYS and OASBasic, you can reserve a system resource by setting a semaphore lock on it.
Note: Certain device handling commands (T.ATT, T.DET, LINE.ATT, and LINE.DET) set semaphore locks.
The following table lists commands for explicitly reserving system resources from the ECL prompt.
Command Description
UNLOCK Releases system resources reserved by the LOCK command.(OASYS does not automatically release these resources whena program terminates.) This command is not needed to releasefile and record locks.
LOCK (ECL and OASBasic)
Reserves a system resource for exclusive use.
Locking System Resources
Note: Although the LOCK and UNLOCK commands enable users to set and release semaphore locks, OASYSdoes not necessarily use system-level semaphores to control access to system resources. The output from LIST.LOCKS and oas_ipcstatus may not appear to be consistent, but OASYS is functioning correctly.
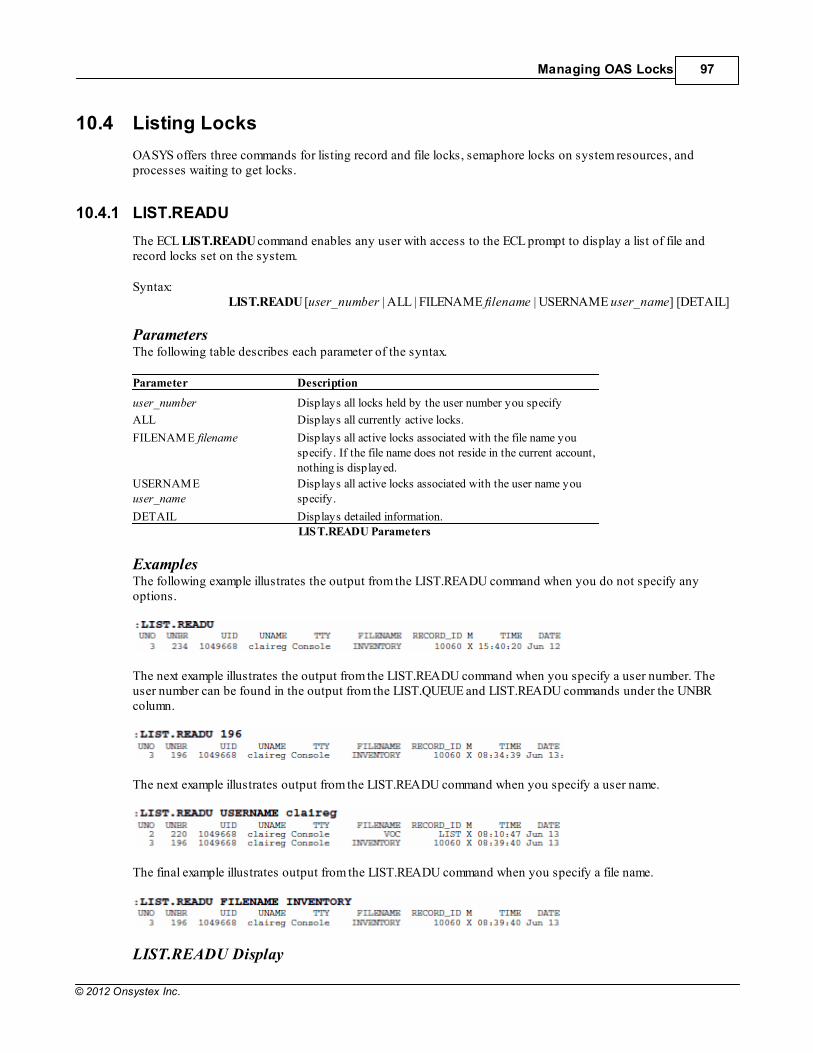
Managing OAS Locks 97
© 2012 Onsystex Inc.
10.4 Listing Locks
OASYS offers three commands for listing record and file locks, semaphore locks on system resources, andprocesses waiting to get locks.
10.4.1 LIST.READU
The ECL LIST.READU command enables any user with access to the ECL prompt to display a list of file andrecord locks set on the system.
Syntax:LIST.READU [user_number | ALL | FILENAME filename | USERNAME user_name] [DETAIL]
Parameters The following table describes each parameter of the syntax.
Parameter Description
user_number Displays all locks held by the user number you specify
ALL Displays all currently active locks.
FILENAME filename Displays all active locks associated with the file name youspecify. If the file name does not reside in the current account,nothing is displayed.
USERNAME user_name
Displays all active locks associated with the user name youspecify.
DETAIL Displays detailed information. LIST.READU Parameters
Examples The following example illustrates the output from the LIST.READU command when you do not specify anyoptions.
The next example illustrates the output from the LIST.READU command when you specify a user number. Theuser number can be found in the output from the LIST.QUEUE and LIST.READU commands under the UNBRcolumn.
The next example illustrates output from the LIST.READU command when you specify a user name.
The final example illustrates output from the LIST.READU command when you specify a file name.
LIST.READU Display
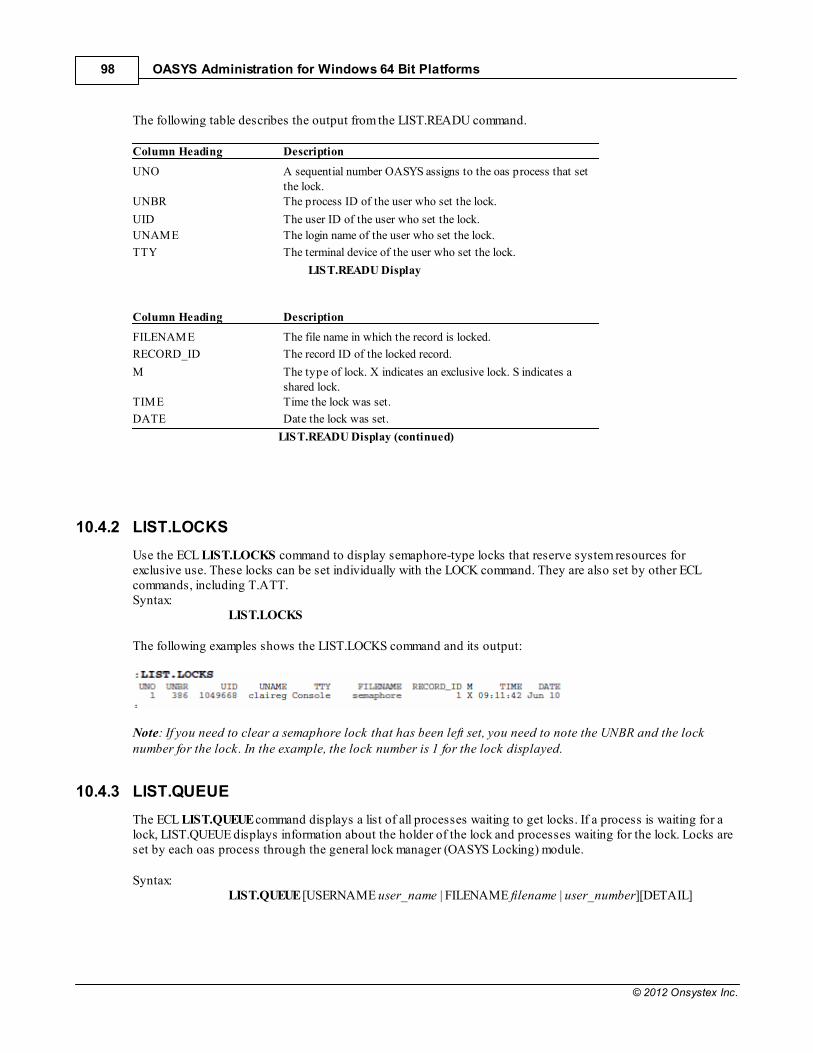
OASYS Administration for Windows 64 Bit Platforms98
© 2012 Onsystex Inc.
The following table describes the output from the LIST.READU command.
Column Heading Description
UNO A sequential number OASYS assigns to the oas process that setthe lock.
UNBR The process ID of the user who set the lock.
UID The user ID of the user who set the lock.
UNAME The login name of the user who set the lock.
TTY The terminal device of the user who set the lock.
LIST.READU Display
Column Heading Description
FILENAME The file name in which the record is locked.
RECORD_ID The record ID of the locked record.
M The type of lock. X indicates an exclusive lock. S indicates ashared lock.
TIME Time the lock was set.
DATE Date the lock was set.
LIST.READU Display (continued)
10.4.2 LIST.LOCKS
Use the ECL LIST.LOCKS command to display semaphore-type locks that reserve system resources forexclusive use. These locks can be set individually with the LOCK command. They are also set by other ECLcommands, including T.ATT. Syntax:
LIST.LOCKS
The following examples shows the LIST.LOCKS command and its output:
Note: If you need to clear a semaphore lock that has been left set, you need to note the UNBR and the locknumber for the lock. In the example, the lock number is 1 for the lock displayed.
10.4.3 LIST.QUEUE
The ECL LIST.QUEUE command displays a list of all processes waiting to get locks. If a process is waiting for alock, LIST.QUEUE displays information about the holder of the lock and processes waiting for the lock. Locks areset by each oas process through the general lock manager (OASYS Locking) module.
Syntax: LIST.QUEUE [USERNAME user_name | FILENAME filename | user_number][DETAIL]
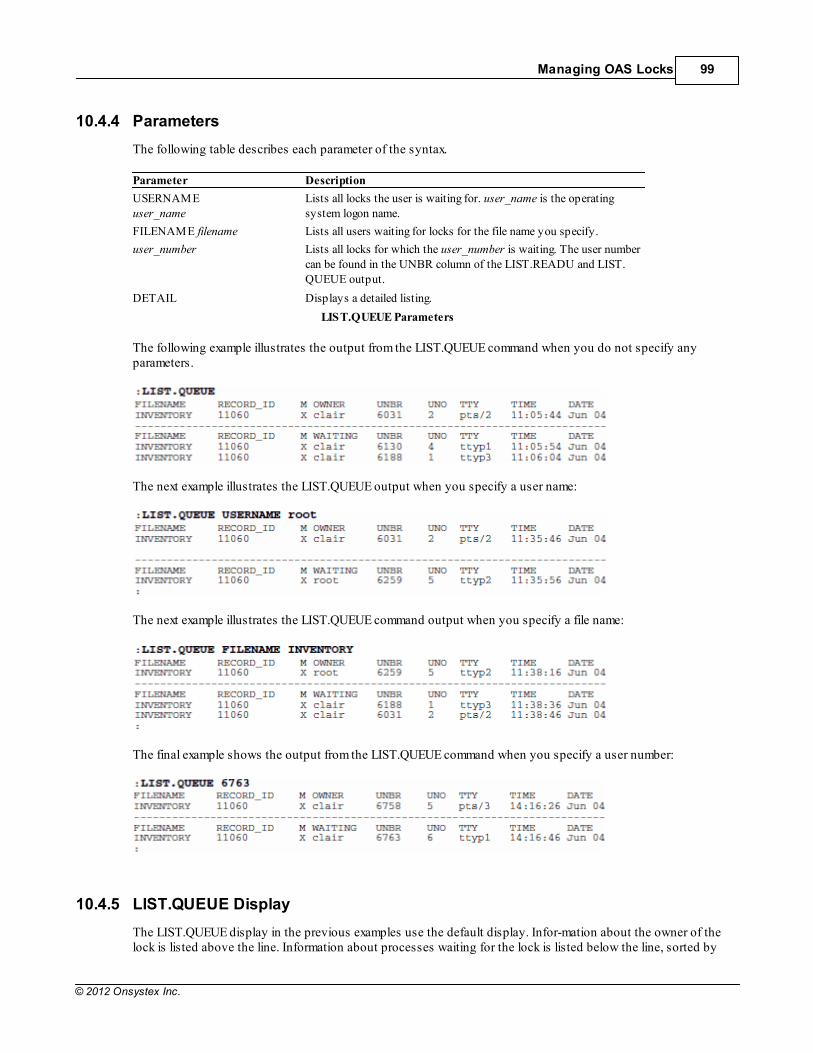
Managing OAS Locks 99
© 2012 Onsystex Inc.
10.4.4 Parameters
The following table describes each parameter of the syntax.
Parameter Description
USERNAME user_name
Lists all locks the user is waiting for. user_name is the operatingsystem logon name.
FILENAME filename Lists all users waiting for locks for the file name you specify.
user_number Lists all locks for which the user_number is waiting. The user numbercan be found in the UNBR column of the LIST.READU and LIST.QUEUE output.
DETAIL Displays a detailed listing.
LIST.QUEUE Parameters
The following example illustrates the output from the LIST.QUEUE command when you do not specify anyparameters.
The next example illustrates the LIST.QUEUE output when you specify a user name:
The next example illustrates the LIST.QUEUE command output when you specify a file name:
The final example shows the output from the LIST.QUEUE command when you specify a user number:
10.4.5 LIST.QUEUE Display
The LIST.QUEUE display in the previous examples use the default display. Infor-mation about the owner of thelock is listed above the line. Information about processes waiting for the lock is listed below the line, sorted by
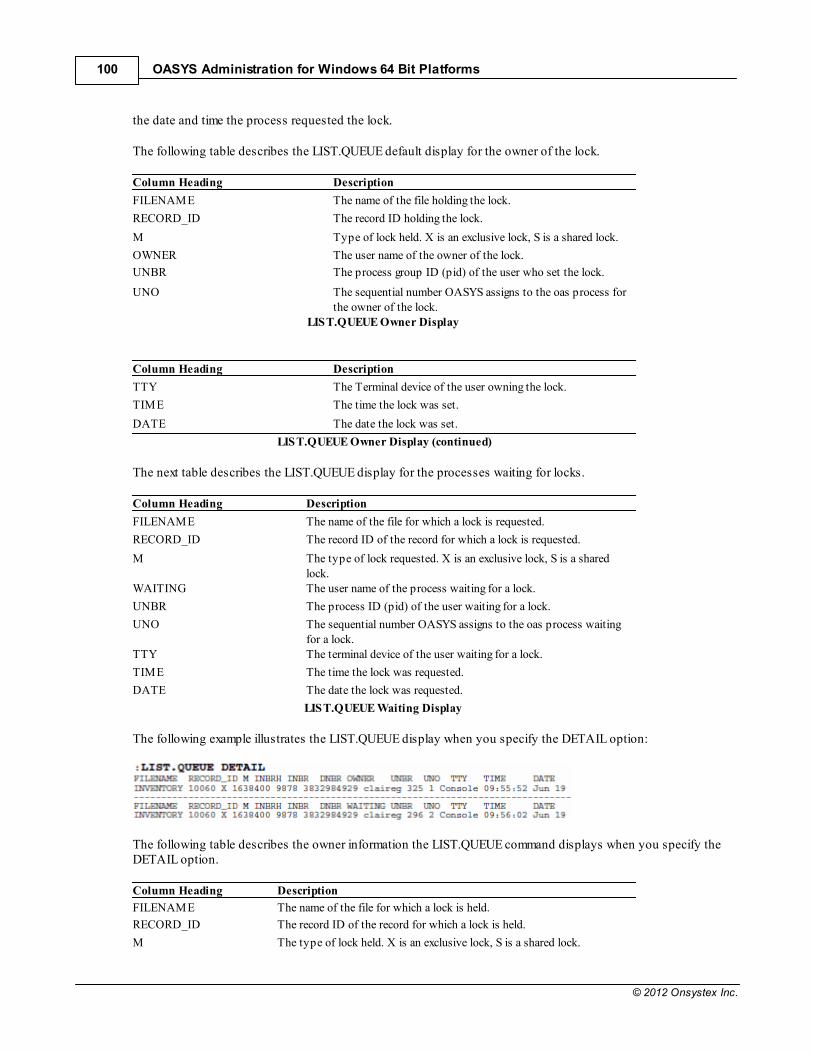
OASYS Administration for Windows 64 Bit Platforms100
© 2012 Onsystex Inc.
the date and time the process requested the lock.
The following table describes the LIST.QUEUE default display for the owner of the lock.
Column Heading Description
FILENAME The name of the file holding the lock.
RECORD_ID The record ID holding the lock.
M Type of lock held. X is an exclusive lock, S is a shared lock.
OWNER The user name of the owner of the lock.
UNBR The process group ID (pid) of the user who set the lock.
UNO The sequential number OASYS assigns to the oas process forthe owner of the lock.
LIST.QUEUE Owner Display
Column Heading Description
TTY The Terminal device of the user owning the lock.
TIME The time the lock was set.
DATE The date the lock was set.
LIST.QUEUE Owner Display (continued)
The next table describes the LIST.QUEUE display for the processes waiting for locks.
Column Heading Description
FILENAME The name of the file for which a lock is requested.
RECORD_ID The record ID of the record for which a lock is requested.
M The type of lock requested. X is an exclusive lock, S is a sharedlock.
WAITING The user name of the process waiting for a lock.
UNBR The process ID (pid) of the user waiting for a lock.
UNO The sequential number OASYS assigns to the oas process waitingfor a lock.
TTY The terminal device of the user waiting for a lock.
TIME The time the lock was requested.
DATE The date the lock was requested.
LIST.QUEUE Waiting Display
The following example illustrates the LIST.QUEUE display when you specify the DETAIL option:
The following table describes the owner information the LIST.QUEUE command displays when you specify theDETAIL option.
Column Heading Description
FILENAME The name of the file for which a lock is held.
RECORD_ID The record ID of the record for which a lock is held.
M The type of lock held. X is an exclusive lock, S is a shared lock.

Managing OAS Locks 101
© 2012 Onsystex Inc.
INBRH The high integer of the inode of the file holding the lock.
INBR The low integer of the inode of the file holding the lock.
DNBR Used in conjunction with the INBR to define the file holding the lock atthe operating system level.
OWNER The user name of the process holding the lock.
UNBR The process ID (pid) of the user holding a lock.
UNO The sequential number OASYS assigns to the oas process holding a lock.
TTY The terminal device of the user holding a lock.
TIME The time the lock was set.
DATE The date the lock was set.
LIST.QUEUE Detail Display
The following table describes the waiting information the LIST.QUEUE command displays then you specify theDETAIL option.
Column Heading Description
FILENAME The name of the file for which a lock is requested.
RECORD_ID The record ID of the record for which a lock is requested.
M The type of lock held. X is an exclusive lock, S is a shared lock.
INBRH The high integer of the inode of the file holding the lock.
INBR The inode of the file for which a lock is requested.
LIST.QUEUE Detail Display
Column Heading Description
DNBR Used in conjunction with the INBR to define the file for which alock is requested at the operating system level.
WAITING The user name of the process requesting a lock.
UNBR The process ID (pid) of the user requesting a lock.
UNO The sequential number OASYS assigns to the oas processrequesting a lock.
TTY The terminal device of the user requesting a lock.
TIME The time the lock was requested.
DATE The date the lock was requested.
LIST.QUEUE Detail Display (continued)
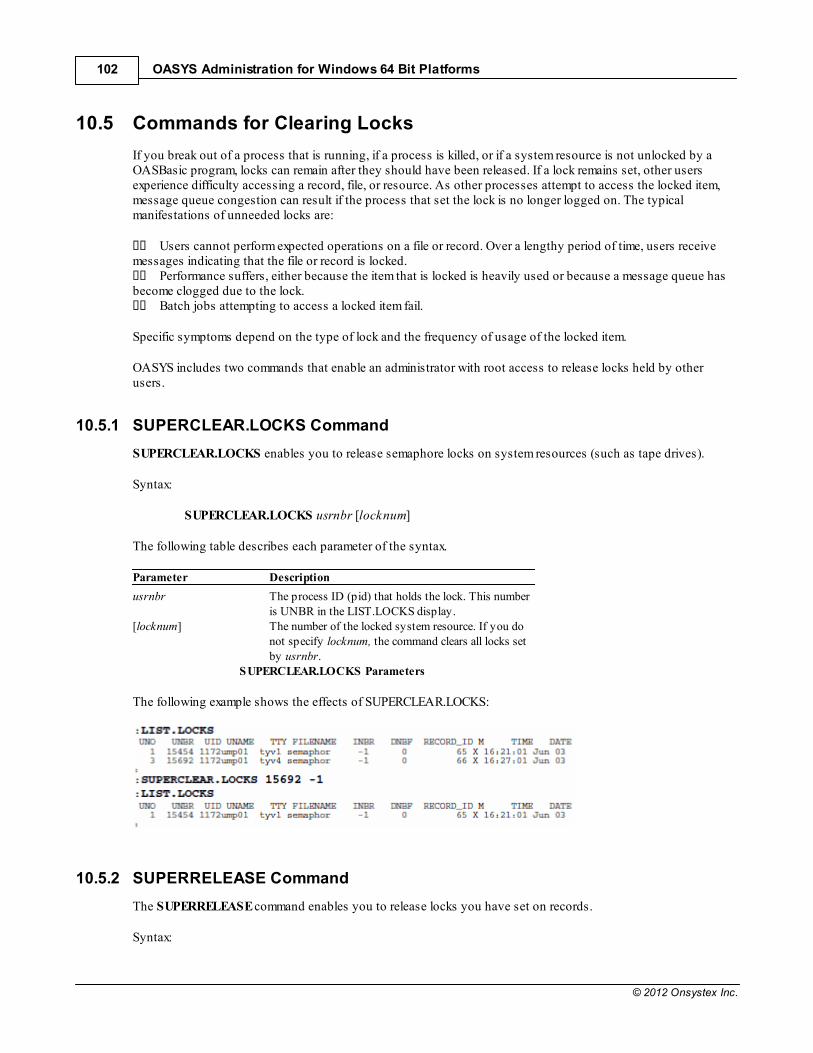
OASYS Administration for Windows 64 Bit Platforms102
© 2012 Onsystex Inc.
10.5 Commands for Clearing Locks
If you break out of a process that is running, if a process is killed, or if a system resource is not unlocked by aOASBasic program, locks can remain after they should have been released. If a lock remains set, other usersexperience difficulty accessing a record, file, or resource. As other processes attempt to access the locked item,message queue congestion can result if the process that set the lock is no longer logged on. The typicalmanifestations of unneeded locks are:
Users cannot perform expected operations on a file or record. Over a lengthy period of time, users receivemessages indicating that the file or record is locked.
Performance suffers, either because the item that is locked is heavily used or because a message queue hasbecome clogged due to the lock.
Batch jobs attempting to access a locked item fail.
Specific symptoms depend on the type of lock and the frequency of usage of the locked item.
OASYS includes two commands that enable an administrator with root access to release locks held by otherusers.
10.5.1 SUPERCLEAR.LOCKS Command
SUPERCLEAR.LOCKS enables you to release semaphore locks on system resources (such as tape drives).
Syntax:
SUPERCLEAR.LOCKS usrnbr [locknum]
The following table describes each parameter of the syntax.
Parameter Description
usrnbr The process ID (pid) that holds the lock. This numberis UNBR in the LIST.LOCKS display.
[locknum] The number of the locked system resource. If you donot specify locknum, the command clears all locks setby usrnbr.
SUPERCLEAR.LOCKS Parameters
The following example shows the effects of SUPERCLEAR.LOCKS:
10.5.2 SUPERRELEASE Command
The SUPERRELEASE command enables you to release locks you have set on records.
Syntax:

Managing OAS Locks 103
© 2012 Onsystex Inc.
SUPERRELEASE usrnbr [inbr devnum] [record.id]
The following table describes each parameter of the syntax.
Parameter Description
usrnbr The process ID that holds the lock. This number isUNBR in the LIST.READU display.
[inbr devnum] The inode number and device number for the file thathas the lock set. These numbers are INBRH, INBR andDNBR in the LIST.READU display.
[record.id] The identifier for the record to clear. This number isRECORD ID in the LIST.READU display.
SUPERRELEASE Parameters
Note: If you execute SUPERRELEASE and specify only usrnbr, you release all record locks held by the processID corresponding to usrnbr.
The following example shows the effect of SUPERRELEASE:
10.6 Procedure for Clearing Locks
Complete the following steps to identify and clear unneeded locks.
1. Check for Unneeded Locks Use the OASYS LIST.READU and LIST.LOCKS commands to display the locks currently set on the system. UseLIST.QUEUE to identify locks for which processes are waiting. Note locks that meet the following criteria:
They are set on files or records that users cannot currently access. They have been set for a long period of time (shown by the time and date on the list). They were set by users who are not currently on the system.
2. Note Information for Clearing For record locks, note UNBR, INBRH, INBR, DNBR, RECORD NO. For semaphore locks, note UNBR and locknumber. To clear record locks, proceed to step 3. To clear semaphore locks, proceed to step 4.
3. Release Record Locks Log on as an Administrator and use the OASYS SUPERRELEASE command to clear record locks. If possible,specify only a UNBR to clear all the locks belonging to a process ID. If you have semaphore locks to clear,proceed to step 4. Otherwise, proceed to step 5.
Warning: Some situations that retain locks can also cause file corruption (for example, a oas process isinadvertently killed). Consider checking the file with oas_analyzetbls to make certain it has not beencorrupted.
OASYS Administration for Windows 64 Bit Platforms104
© 2012 Onsystex Inc.
4. Clear Semaphore Locks Log on as an Administrator and clear semaphore locks with the SUPERCLEAR.LOCKS command.

Part
11
OASYS Administration for Windows 64 Bit Platforms106
© 2012 Onsystex Inc.
11 Managing OAS Users
This chapter outlines considerations for adding OASYS users to your Windows system, and describes how touse OASYS commands to view user processes for troubleshooting, to remove user processes when needed, andto start and stop OASYS.
11.1 Adding Users
To access OASYS on your system, each user needs a valid Windows account, including an MS-DOS logon IDand password. In Pick® systems, where each logon account must be a Pick® account, shared logon IDs andpasswords are common. In contrast, OASYS allows multiple relationships between user logon IDs and OASYSaccounts. A user may have access to more than one OASYS account, and many users can access a singleOASYS account using separate logon IDs. Therefore, Onsystex strongly recommends you set up a separateWindows account for each user. Onsystex recommends separate logon IDs for the following reasons:
It is easier to identify processes and locks belonging to an individual user, which facilitatestroubleshooting.
Using separate logon IDs allows you to define your users’ responsibilities for protecting their passwordsand your data.
11.1.1 User Groups
When you add a user account to your Windows system, you can assign the user to one or more user groups. Incontrast to Linux, Windows platforms allows a user to belong to many groups simultaneously, and allows accessto objects based on all groups to which the user is assigned.
When you install OASYS on your Windows system, the installation procedure sets permissions on the OASYSdirectory structure. OASYS grants permissions to three categories of users, Administrators, members of theOASYS group, and all other users. After you install OASYS, you must assign your OASYS users to the OASYSgroup.
Note: Use User Accounts to create user accounts. Use Computer Management add users to groups, and assignUser Rights. From the Start menu, click Control Panel then double-click User Accounts. Refer to your Windowsdocumentation for further information.
11.1.2 Home Directories
On Windows platforms, you can define a home directory for each logon ID. This directory is the user’s workingdirectory when they log on. You are not required to define a home directory. If you wish, you can define the samehome directory for a group of users, or create a separate one for each user. The home directory does not need tobe a OASYS account.
To define a home directory for a user, from the Start menu, double-click Adminis-trative Tools, and then double-click Computer Management. Double-click Users, double-click the user for which you are defining a homedirectory, and then click the Profile tab. The following dialog box appears:
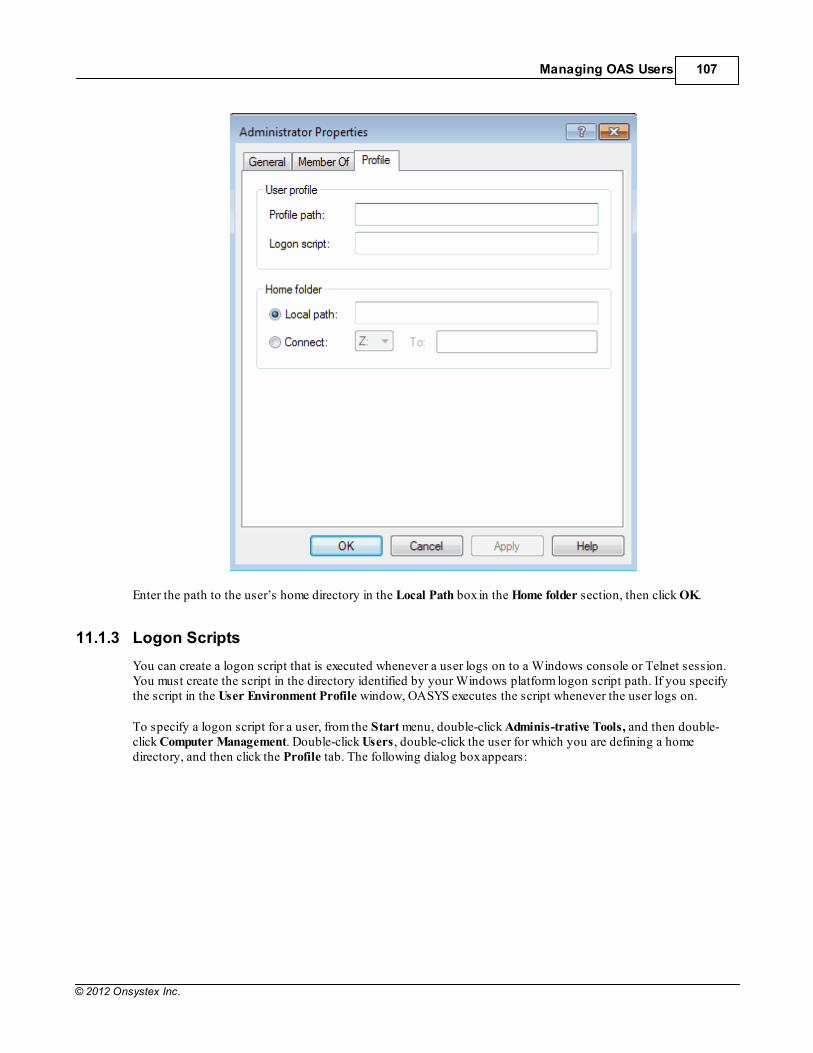
Managing OAS Users 107
© 2012 Onsystex Inc.
Enter the path to the user’s home directory in the Local Path box in the Home folder section, then click OK.
11.1.3 Logon Scripts
You can create a logon script that is executed whenever a user logs on to a Windows console or Telnet session.You must create the script in the directory identified by your Windows platform logon script path. If you specifythe script in the User Environment Profile window, OASYS executes the script whenever the user logs on.
To specify a logon script for a user, from the Start menu, double-click Adminis-trative Tools, and then double-click Computer Management. Double-click Users, double-click the user for which you are defining a homedirectory, and then click the Profile tab. The following dialog box appears:
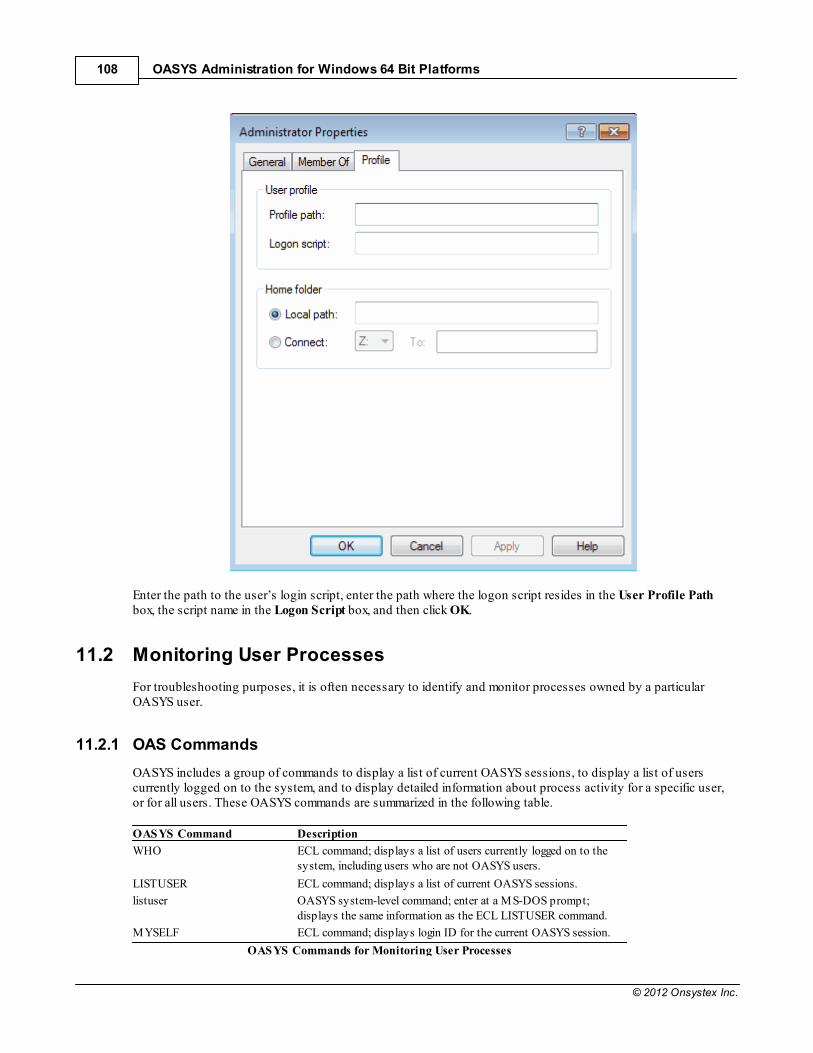
OASYS Administration for Windows 64 Bit Platforms108
© 2012 Onsystex Inc.
Enter the path to the user’s login script, enter the path where the logon script resides in the User Profile Pathbox, the script name in the Logon Script box, and then click OK.
11.2 Monitoring User Processes
For troubleshooting purposes, it is often necessary to identify and monitor processes owned by a particularOASYS user.
11.2.1 OAS Commands
OASYS includes a group of commands to display a list of current OASYS sessions, to display a list of userscurrently logged on to the system, and to display detailed information about process activity for a specific user,or for all users. These OASYS commands are summarized in the following table.
OASYS Command Description
WHO ECL command; displays a list of users currently logged on to thesystem, including users who are not OASYS users.
LISTUSER ECL command; displays a list of current OASYS sessions.
listuser OASYS system-level command; enter at a MS-DOS prompt;displays the same information as the ECL LISTUSER command.
MYSELF ECL command; displays login ID for the current OASYS session.
OASYS Commands for Monitoring User Processes
Managing OAS Users 109
© 2012 Onsystex Inc.
Note: You do not need to log on as an Administrator to execute these commands.
The following example shows the system response to the WHO, LISTUSER, and listuser commands.
:W HO
M ario Console 13:11:42 27 Sep 2011M ario Console 13:13:05 27 Sep 2011
:LISTUSER
Effective users..: oas oasSql Total
8 / 8 2 0 2
OASNO USRNBR UID USRNAM E USRTYPE TTY IP-ADDRESS TIM E DATE 1 50512 197608 M arco oas pts/1 Console 13:11:42 27 Sep 2011
2 55168 197608 M arco oas pts/2 Console 13:13:05 27 Sep 2011
Notice that the output of the WHO command includes the user name but not the process ID. Also, output fromthe LISTUSER command includes a series of identifications: OASNO (OASYS user number), USRNBR (the pid),UID (the user’s uid number), and USRNAME. Displaying further information about a OASYS process typicallyrequires the pid (USRNBR).
11.3 Stopping User Processes
OASYS includes commands that enable you to stop a user’s oas process if the process is hung, or if you need tostop OASYS while a user is still logged on. These commands are summarized in the following table.
OASYS Command Description
oas_removeuser First attempts to gracefully exit and allow a write in progress tocomplete. If the command is not successful in five seconds, force logsout a user, which may interrupt a write in progress, potentially causingfile corruption.
OASYS Commands for Removing User Processes
You can log yourself out using the stopoas command, but you must log on as an Administrator to log out otherusers using stopoas. You must log on as an Administrator to execute oas_removeuser.
Warning: Both of these commands can disrupt the consistency of your database, and oas_removeuser can alsocorrupt data. Do not use these commands should as a substitute for normal user logout.
11.3.1 Using TIMEOUT
You can execute the ECL TIMEOUT command at the ECL prompt, in a LOGIN paragraph, or in a OASBasicprogram. TIMEOUT forces the current oas process to log out after a specified number of seconds. If you includeTIMEOUT in the LOGIN paragraphs for your OASYS accounts, you can provide some improved security forterminals left idle.
OASYS Administration for Windows 64 Bit Platforms110
© 2012 Onsystex Inc.
Note: Be careful with TIMEOUT. Because this command can cause a OASBasic program to terminate at anINPUT statement rather than concluding normally, using TIMEOUT can cause inconsistent data in yourdatabase.

Part
12
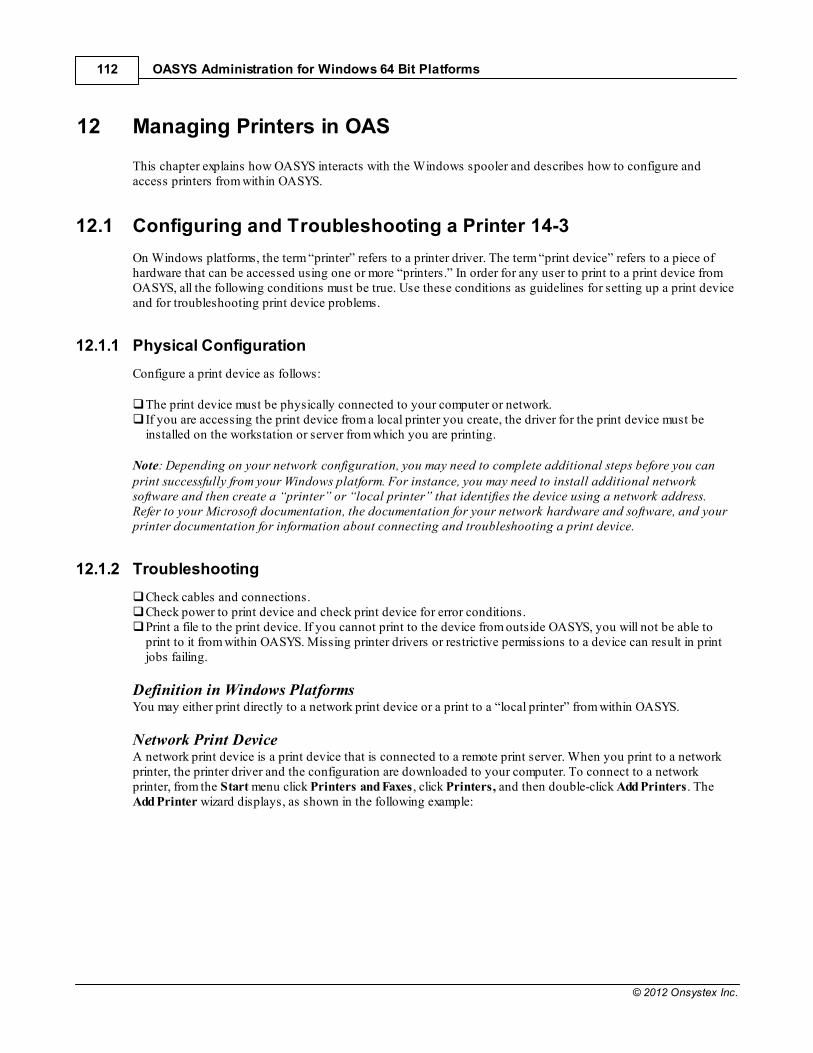
OASYS Administration for Windows 64 Bit Platforms112
© 2012 Onsystex Inc.
12 Managing Printers in OAS
This chapter explains how OASYS interacts with the Windows spooler and describes how to configure andaccess printers from within OASYS.
12.1 Configuring and Troubleshooting a Printer 14-3
On Windows platforms, the term “printer” refers to a printer driver. The term “print device” refers to a piece ofhardware that can be accessed using one or more “printers.” In order for any user to print to a print device fromOASYS, all the following conditions must be true. Use these conditions as guidelines for setting up a print deviceand for troubleshooting print device problems.
12.1.1 Physical Configuration
Configure a print device as follows:
The print device must be physically connected to your computer or network. If you are accessing the print device from a local printer you create, the driver for the print device must beinstalled on the workstation or server from which you are printing.
Note: Depending on your network configuration, you may need to complete additional steps before you canprint successfully from your Windows platform. For instance, you may need to install additional networksoftware and then create a “printer” or “local printer” that identifies the device using a network address.Refer to your Microsoft documentation, the documentation for your network hardware and software, and yourprinter documentation for information about connecting and troubleshooting a print device.
12.1.2 Troubleshooting
Check cables and connections. Check power to print device and check print device for error conditions. Print a file to the print device. If you cannot print to the device from outside OASYS, you will not be able toprint to it from within OASYS. Missing printer drivers or restrictive permissions to a device can result in printjobs failing.
Definition in Windows Platforms You may either print directly to a network print device or a print to a “local printer” from within OASYS.
Network Print Device A network print device is a print device that is connected to a remote print server. When you print to a networkprinter, the printer driver and the configuration are downloaded to your computer. To connect to a networkprinter, from the Start menu click Printers and Faxes, click Printers, and then double-click Add Printers. TheAdd Printer wizard displays, as shown in the following example:
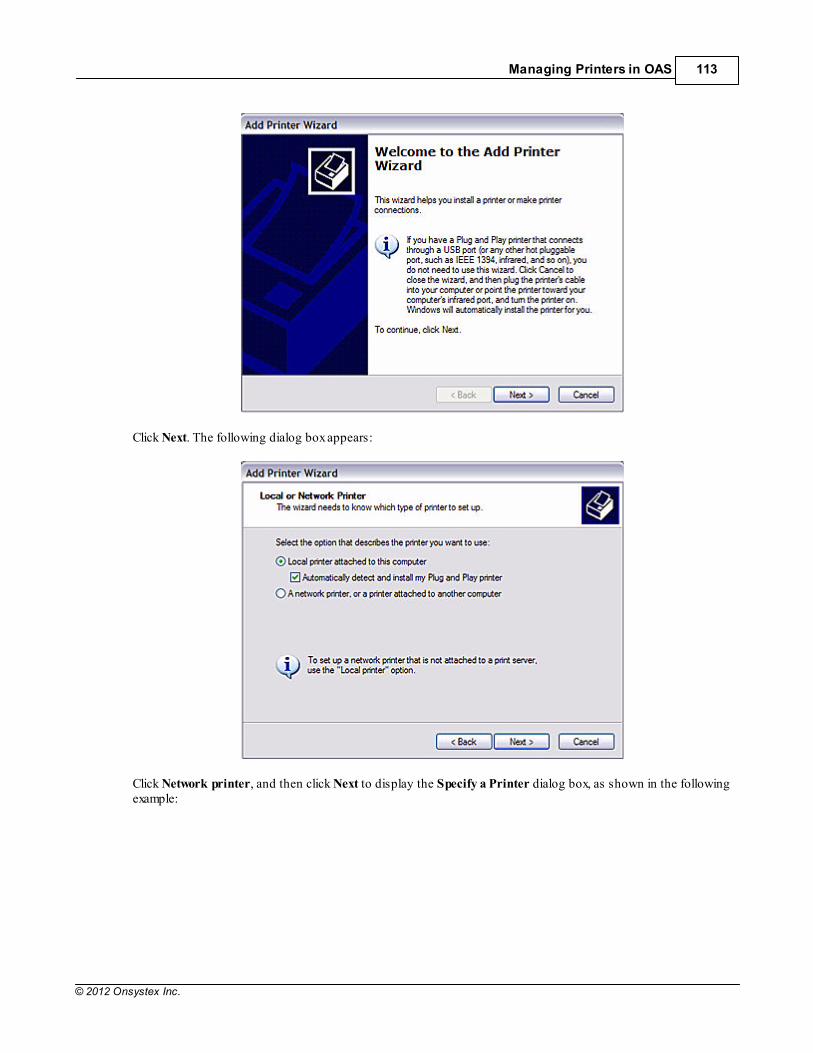
Managing Printers in OAS 113
© 2012 Onsystex Inc.
Click Next. The following dialog box appears:
Click Network printer, and then click Next to display the Specify a Printer dialog box, as shown in the followingexample:
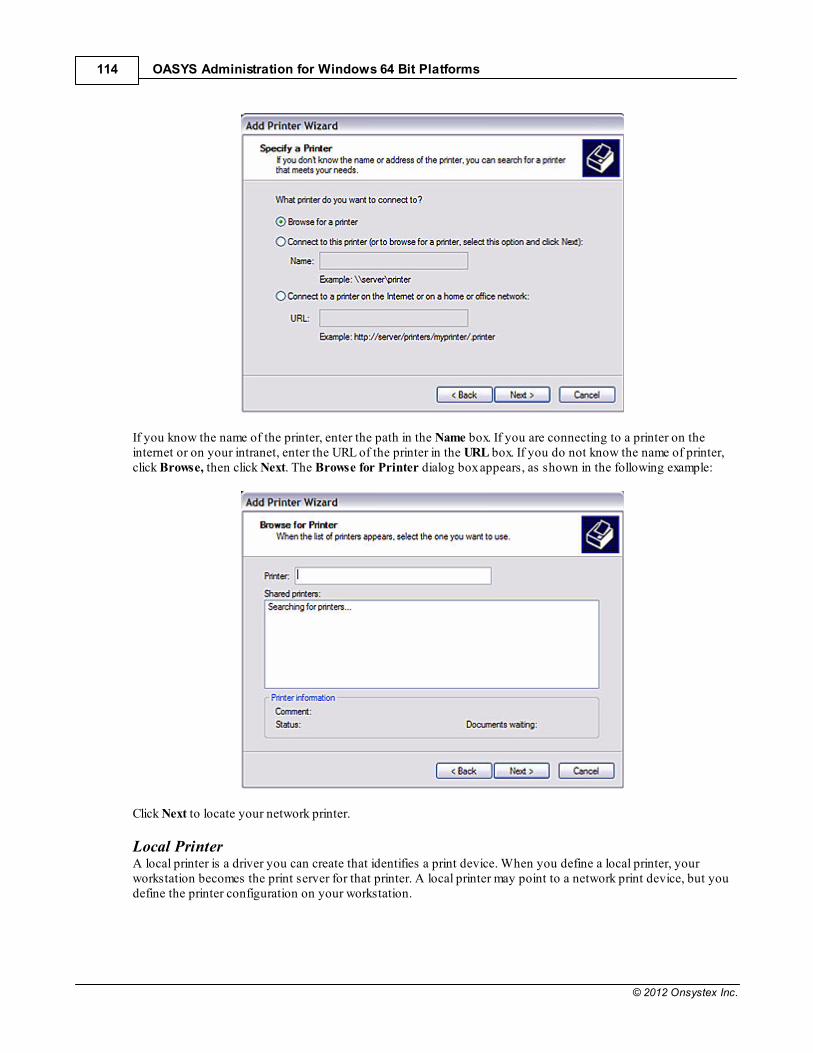
OASYS Administration for Windows 64 Bit Platforms114
© 2012 Onsystex Inc.
If you know the name of the printer, enter the path in the Name box. If you are connecting to a printer on theinternet or on your intranet, enter the URL of the printer in the URL box. If you do not know the name of printer,click Browse, then click Next. The Browse for Printer dialog box appears, as shown in the following example:
Click Next to locate your network printer.
Local Printer A local printer is a driver you can create that identifies a print device. When you define a local printer, yourworkstation becomes the print server for that printer. A local printer may point to a network print device, but youdefine the printer configuration on your workstation.
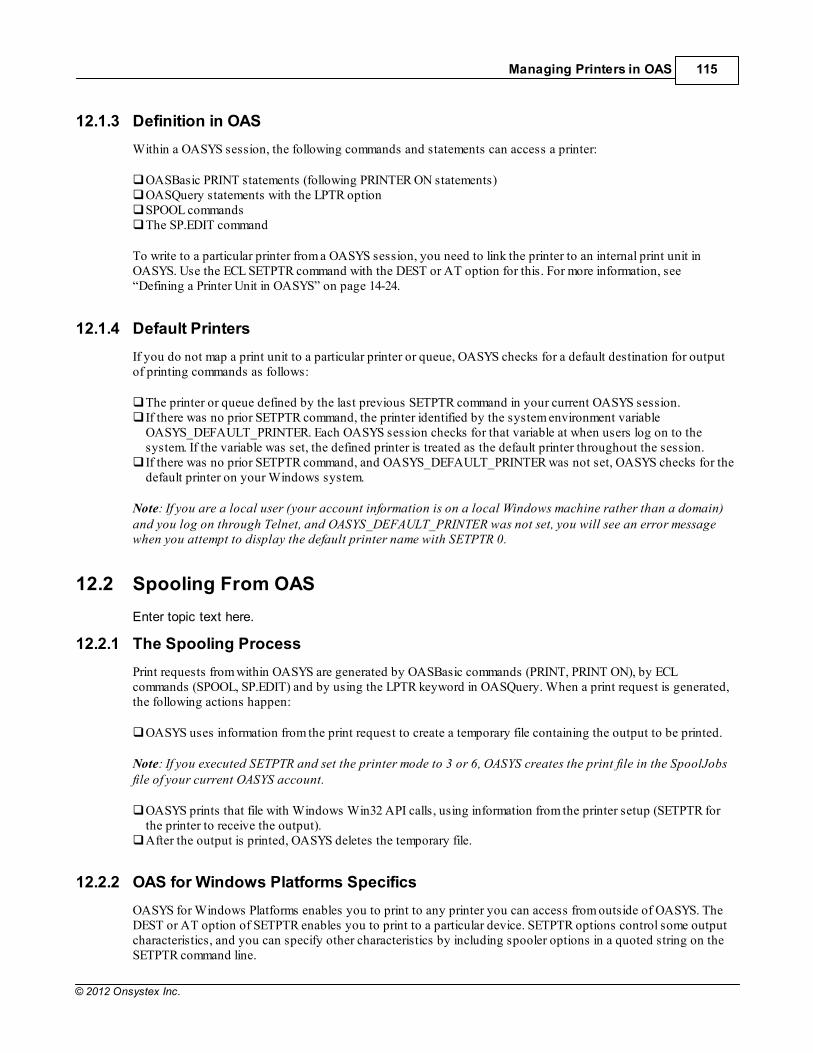
Managing Printers in OAS 115
© 2012 Onsystex Inc.
12.1.3 Definition in OAS
Within a OASYS session, the following commands and statements can access a printer:
OASBasic PRINT statements (following PRINTER ON statements)OASQuery statements with the LPTR option SPOOL commands The SP.EDIT command
To write to a particular printer from a OASYS session, you need to link the printer to an internal print unit inOASYS. Use the ECL SETPTR command with the DEST or AT option for this. For more information, see“Defining a Printer Unit in OASYS” on page 14-24.
12.1.4 Default Printers
If you do not map a print unit to a particular printer or queue, OASYS checks for a default destination for outputof printing commands as follows:
The printer or queue defined by the last previous SETPTR command in your current OASYS session. If there was no prior SETPTR command, the printer identified by the system environment variableOASYS_DEFAULT_PRINTER. Each OASYS session checks for that variable at when users log on to thesystem. If the variable was set, the defined printer is treated as the default printer throughout the session. If there was no prior SETPTR command, and OASYS_DEFAULT_PRINTER was not set, OASYS checks for thedefault printer on your Windows system.
Note: If you are a local user (your account information is on a local Windows machine rather than a domain)and you log on through Telnet, and OASYS_DEFAULT_PRINTER was not set, you will see an error messagewhen you attempt to display the default printer name with SETPTR 0.
12.2 Spooling From OAS
Enter topic text here.
12.2.1 The Spooling Process
Print requests from within OASYS are generated by OASBasic commands (PRINT, PRINT ON), by ECLcommands (SPOOL, SP.EDIT) and by using the LPTR keyword in OASQuery. When a print request is generated,the following actions happen:
OASYS uses information from the print request to create a temporary file containing the output to be printed.
Note: If you executed SETPTR and set the printer mode to 3 or 6, OASYS creates the print file in the SpoolJobsfile of your current OASYS account.
OASYS prints that file with Windows Win32 API calls, using information from the printer setup (SETPTR forthe printer to receive the output). After the output is printed, OASYS deletes the temporary file.
12.2.2 OAS for Windows Platforms Specifics
OASYS for Windows Platforms enables you to print to any printer you can access from outside of OASYS. TheDEST or AT option of SETPTR enables you to print to a particular device. SETPTR options control some outputcharacteristics, and you can specify other characteristics by including spooler options in a quoted string on theSETPTR command line.
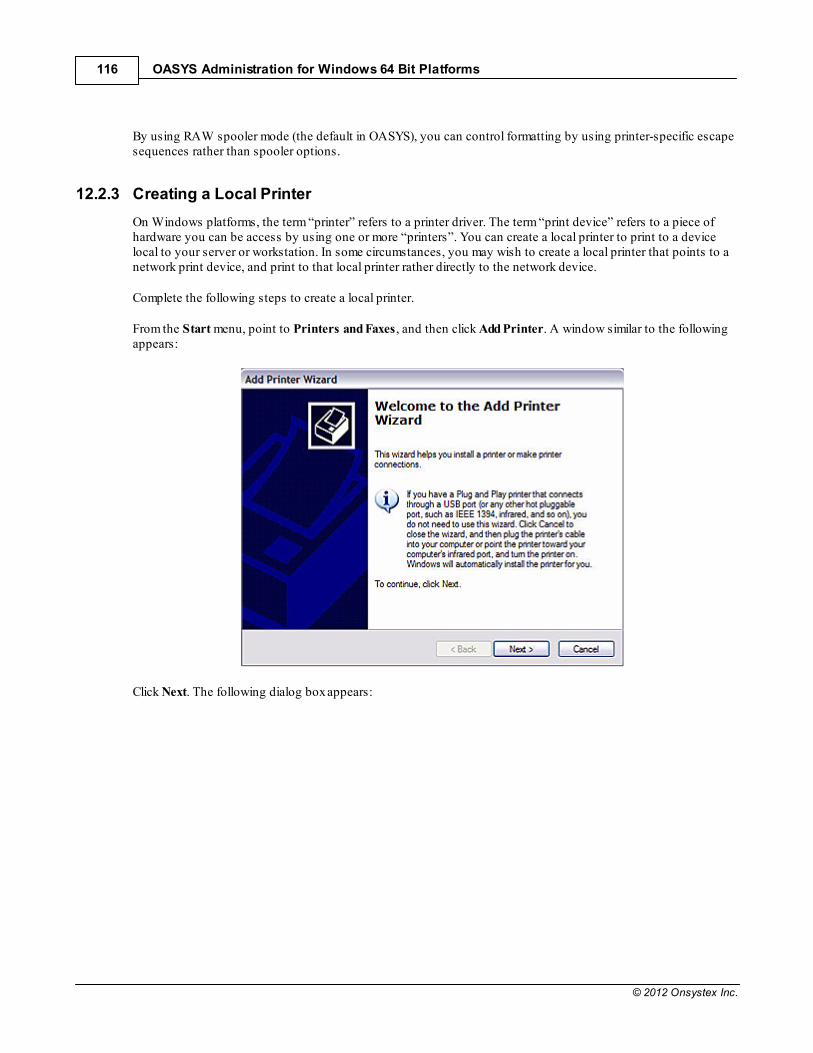
OASYS Administration for Windows 64 Bit Platforms116
© 2012 Onsystex Inc.
By using RAW spooler mode (the default in OASYS), you can control formatting by using printer-specific escapesequences rather than spooler options.
12.2.3 Creating a Local Printer
On Windows platforms, the term “printer” refers to a printer driver. The term “print device” refers to a piece ofhardware you can be access by using one or more “printers”. You can create a local printer to print to a devicelocal to your server or workstation. In some circumstances, you may wish to create a local printer that points to anetwork print device, and print to that local printer rather directly to the network device.
Complete the following steps to create a local printer.
From the Start menu, point to Printers and Faxes, and then click Add Printer. A window similar to the followingappears:
Click Next. The following dialog box appears:
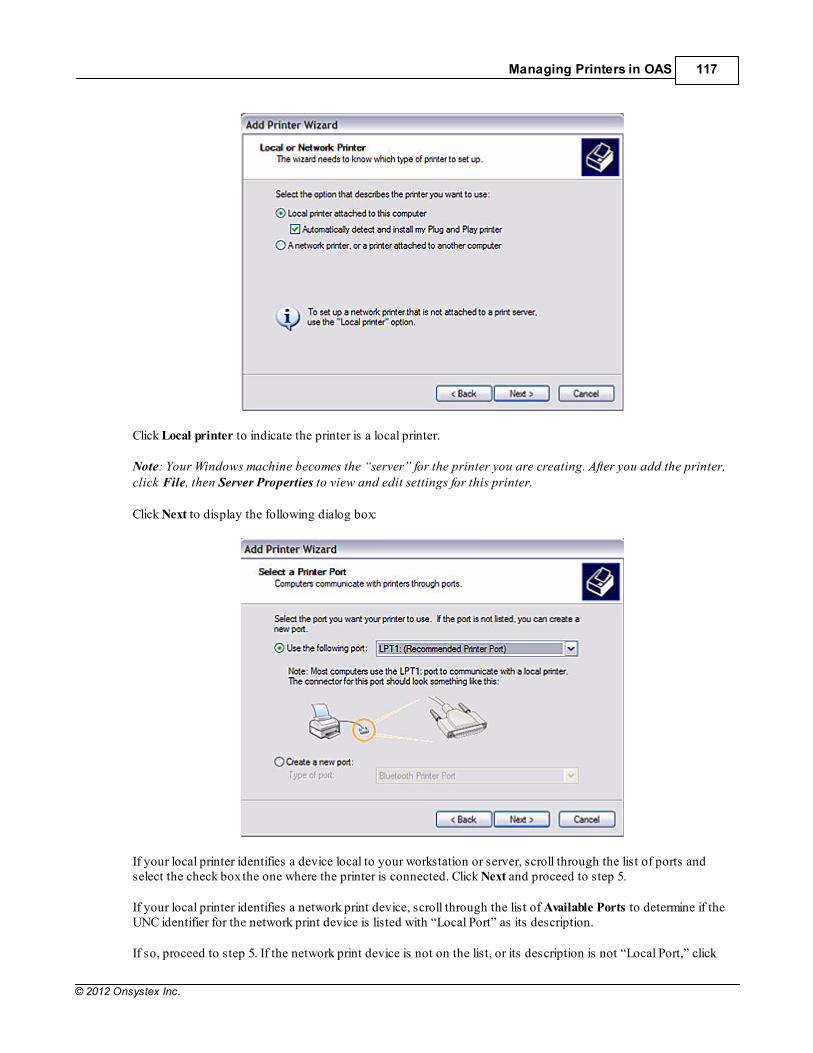
Managing Printers in OAS 117
© 2012 Onsystex Inc.
Click Local printer to indicate the printer is a local printer.
Note: Your Windows machine becomes the “server” for the printer you are creating. After you add the printer,click File, then Server Properties to view and edit settings for this printer.
Click Next to display the following dialog box:
If your local printer identifies a device local to your workstation or server, scroll through the list of ports andselect the check box the one where the printer is connected. Click Next and proceed to step 5.
If your local printer identifies a network print device, scroll through the list of Available Ports to determine if theUNC identifier for the network print device is listed with “Local Port” as its description.
If so, proceed to step 5. If the network print device is not on the list, or its description is not “Local Port,” click
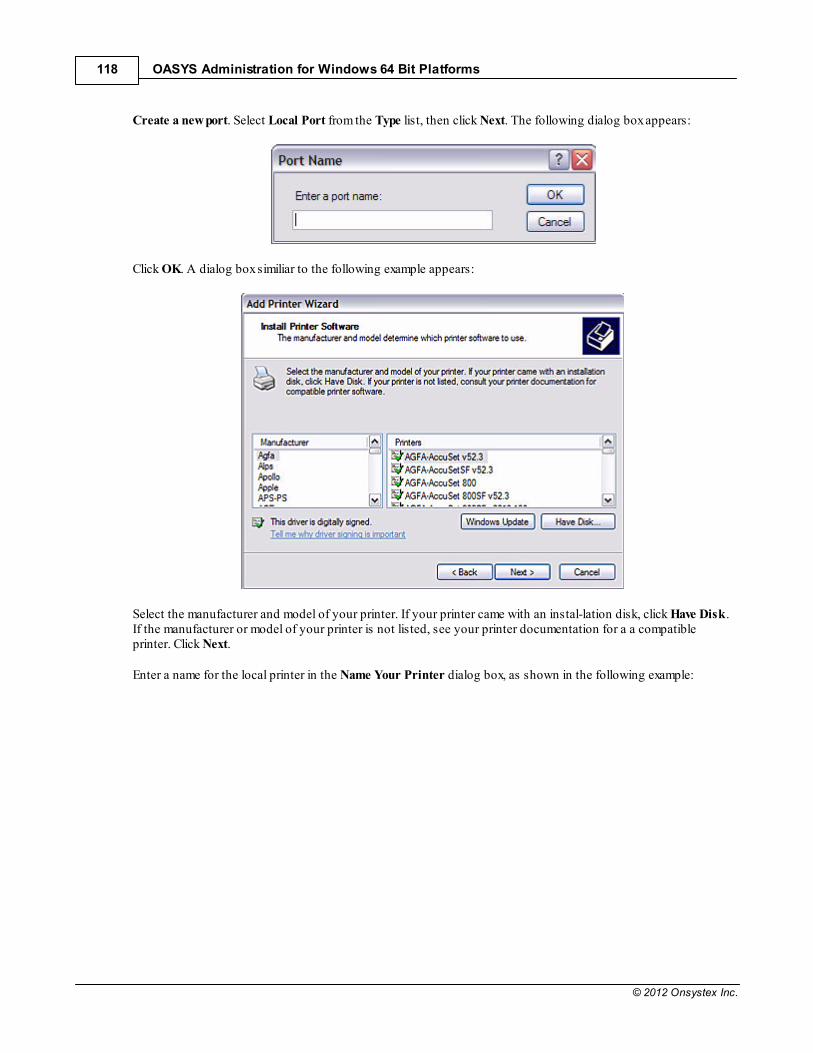
OASYS Administration for Windows 64 Bit Platforms118
© 2012 Onsystex Inc.
Create a new port. Select Local Port from the Type list, then click Next. The following dialog box appears:
Click OK. A dialog box similiar to the following example appears:
Select the manufacturer and model of your printer. If your printer came with an instal-lation disk, click Have Disk.If the manufacturer or model of your printer is not listed, see your printer documentation for a a compatibleprinter. Click Next.
Enter a name for the local printer in the Name Your Printer dialog box, as shown in the following example:

Managing Printers in OAS 119
© 2012 Onsystex Inc.
Warning: Do not use spaces in the printer name. Although Windows platforms allow spaces in the name (forinstance, “LASER PRINTER”), the OASYS SETPTR command does not support names that contain spaces. Ifyou use a name containing spaces with the DEST or AT options of SETPTR, the command fails.
You can share your printer with other users on the network. In the following dialog box, enter a name for theshared printer, or select Do not share this printer.
Note: You may share a local printer if you wish. However, sharing a local printer offers no advantage inOASYS. OASYS only recognizes local printers created on the same Windows system where you are runningOASYS. Also, OASYS does not use the share name to recognize a printer. Rather, OASYS uses the printer nameyou entered previously.
When you click Next after defining Sharing properties, a dialog box similar to the following appears:
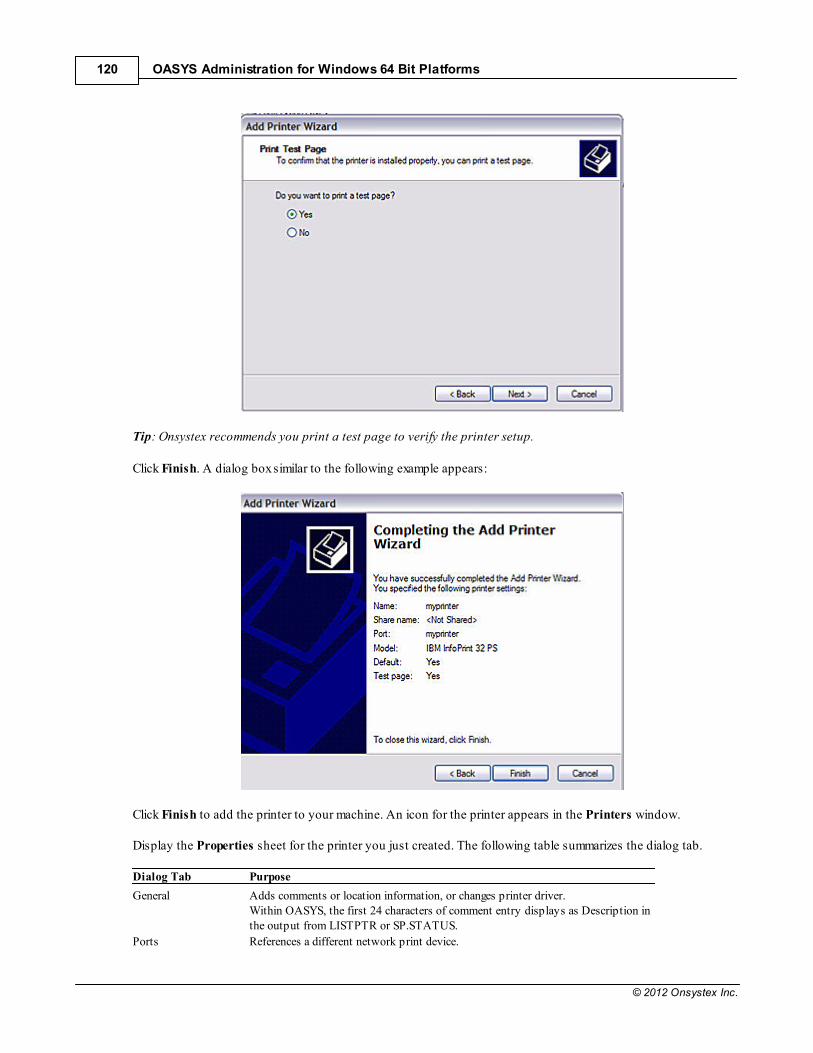
OASYS Administration for Windows 64 Bit Platforms120
© 2012 Onsystex Inc.
Tip: Onsystex recommends you print a test page to verify the printer setup.
Click Finish. A dialog box similar to the following example appears:
Click Finish to add the printer to your machine. An icon for the printer appears in the Printers window.
Display the Properties sheet for the printer you just created. The following table summarizes the dialog tab.
Dialog Tab Purpose
General Adds comments or location information, or changes printer driver. Within OASYS, the first 24 characters of comment entry displays as Description inthe output from LISTPTR or SP.STATUS.
Ports References a different network print device.
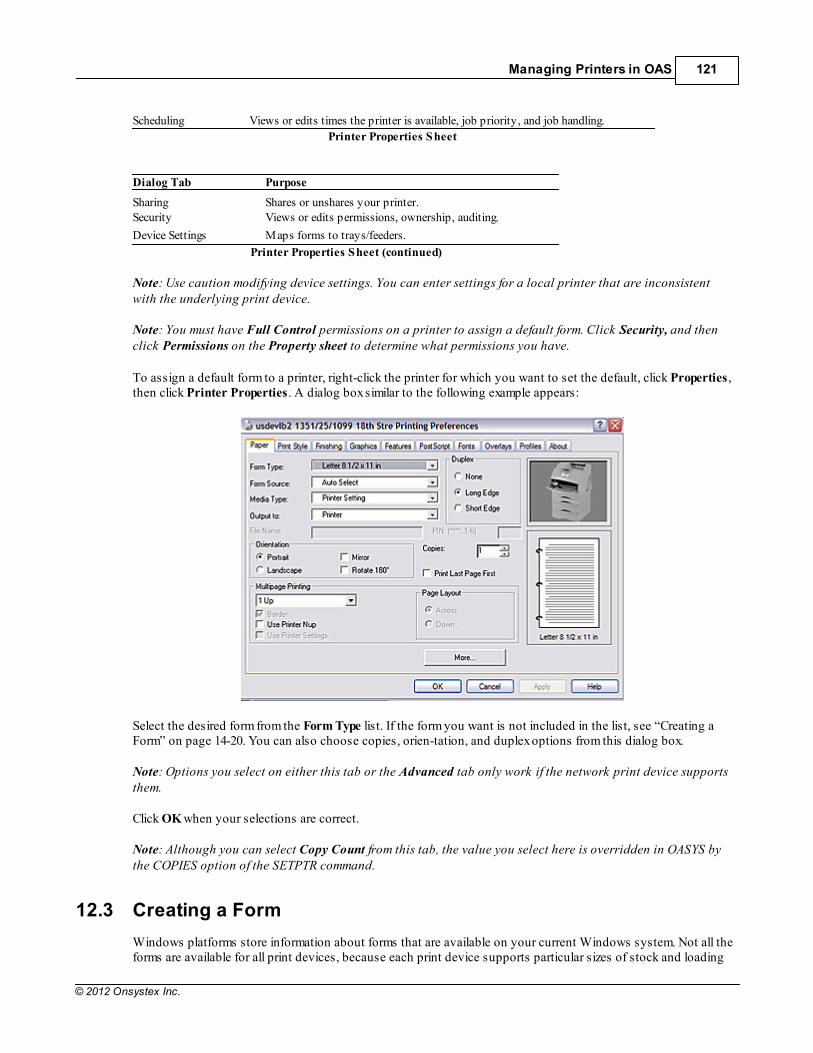
Managing Printers in OAS 121
© 2012 Onsystex Inc.
Scheduling Views or edits times the printer is available, job priority, and job handling.
Printer Properties Sheet
Dialog Tab Purpose
Sharing Shares or unshares your printer. Security Views or edits permissions, ownership, auditing.
Device Settings Maps forms to trays/feeders.
Printer Properties Sheet (continued)
Note: Use caution modifying device settings. You can enter settings for a local printer that are inconsistentwith the underlying print device.
Note: You must have Full Control permissions on a printer to assign a default form. Click Security, and thenclick Permissions on the Property sheet to determine what permissions you have.
To assign a default form to a printer, right-click the printer for which you want to set the default, click Properties,then click Printer Properties. A dialog box similar to the following example appears:
Select the desired form from the Form Type list. If the form you want is not included in the list, see “Creating aForm” on page 14-20. You can also choose copies, orien-tation, and duplex options from this dialog box.
Note: Options you select on either this tab or the Advanced tab only work if the network print device supportsthem.
Click OK when your selections are correct.
Note: Although you can select Copy Count from this tab, the value you select here is overridden in OASYS bythe COPIES option of the SETPTR command.
12.3 Creating a Form
Windows platforms store information about forms that are available on your current Windows system. Not all theforms are available for all print devices, because each print device supports particular sizes of stock and loading
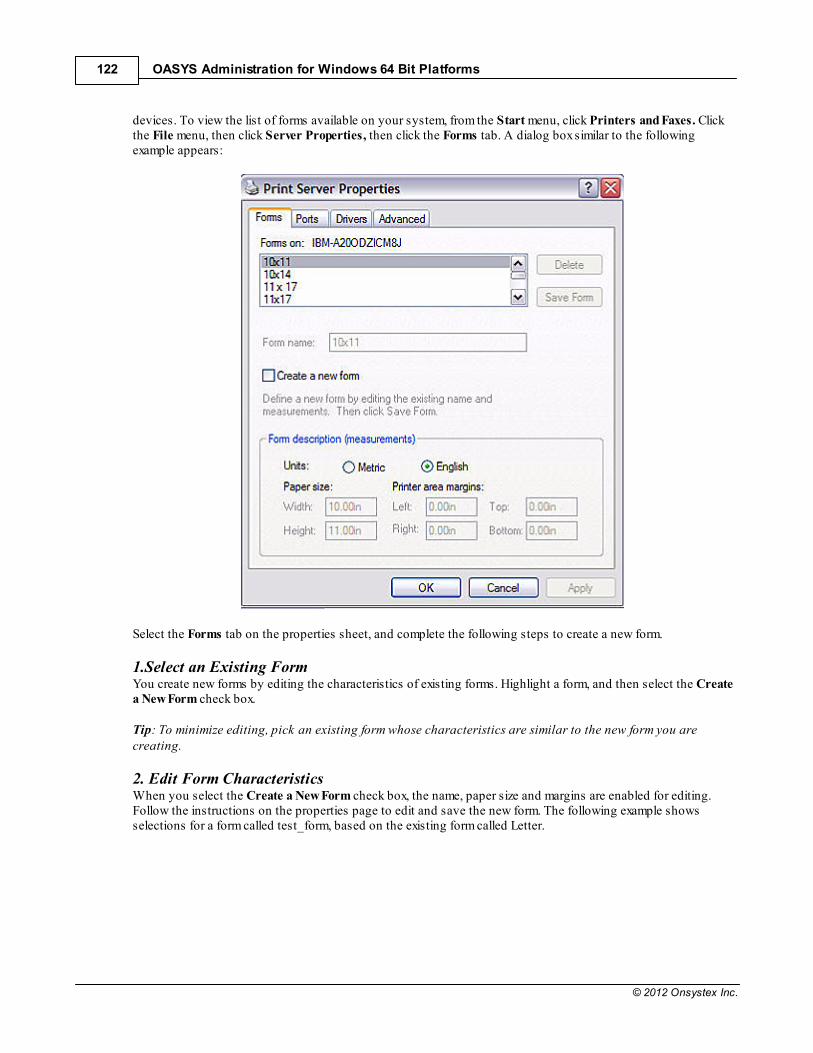
OASYS Administration for Windows 64 Bit Platforms122
© 2012 Onsystex Inc.
devices. To view the list of forms available on your system, from the Start menu, click Printers and Faxes. Clickthe File menu, then click Server Properties, then click the Forms tab. A dialog box similar to the followingexample appears:
Select the Forms tab on the properties sheet, and complete the following steps to create a new form.
1.Select an Existing Form You create new forms by editing the characteristics of existing forms. Highlight a form, and then select the Createa New Form check box.
Tip: To minimize editing, pick an existing form whose characteristics are similar to the new form you arecreating.
2. Edit Form Characteristics When you select the Create a New Form check box, the name, paper size and margins are enabled for editing.Follow the instructions on the properties page to edit and save the new form. The following example showsselections for a form called test_form, based on the existing form called Letter.

Managing Printers in OAS 123
© 2012 Onsystex Inc.
Note: Although you can create forms of varying sizes, you cannot select a particular form for use on aparticular printer unless the print device can support that size of stock. Refer to your Windows documentationand the documentation for your print device for information about constraints.
The new form now displays in the form list.
Click OK to exit the Forms tab.
12.4 Defining a Printer Unit in OAS
Use the ECL SETPTR command to define printer units within OASYS. This command maps Windows printers tological unit numbers within a OASYS session.
Syntax:SETPTR unit [width,length,topmargin,bottommargin] [,mode] [,options] [,“spooler_options
”]
With SETPTR, you can define up to 31 logical printer units in a single OASYS session. Throughout OASYS, youcan define up to 255, but only 31 can be defined in a single user session.
The following table lists each parameter of the syntax.
Parameter Description
unit Logical printer unit number that is internal to OASYS. You can map this to a Windowsprinter with the DEST or AT option. Must range from 0 through 254; default is 0.
OASYS Administration for Windows 64 Bit Platforms124
© 2012 Onsystex Inc.
[width] The number of characters per line; must be from 0 to 1024; default is 132.
[length] The number of lines per page; must be from 1 to 32,767 lines; default is 60.
[topmargin] The number of lines to leave blank at the top of each page; must be from 0 to 25; defaultis 3.
[bottommargin] The number of lines to leave blank at the bottom of each page; must be from 0 to 25;default is 3.
[mode] Allows you additional flexibility to direct output; default is 1; see separate table.
[options] Report formatting and printer control options. For more infor-mation, see “SETPTROptions.”
[“spooler_options”] Options that are valid with the Windows spooler. See separate table for list of supportedoptions. Supply these options in a quoted string.
SETPTR Parameters
Note: Users familiar with Pick® conventions should be aware that printer unit numbers set with SETPTR arenot the same as Pick® printer numbers. SETPTR allows you to define logical printer units, which may be, butare not necessarily, linked to specific printers. OASYS printer unit numbers are used with the PRINT ONstatement in OASBasic to allow multiple concurrent jobs. Pick® printers (forms) are specified with the DESToption of SP.ASSIGN.
The next table describes modes for the SETPTR command.
Mode Description
1 Directs output to a line printer only.
2 Must be used with DEVICE option; directs output to the serial device specified bythe DEVICE option.
3 Directs output to a SpoolJobs file only.
6 Directs output to both a SpoolJobs file and a printer.
9 Directs output to a line printer; suppresses display of the SpoolJobs entry name.
SETPTR Modes
The next table describes options for the SETPTR command.
Option Description
BANNER [string] Modifies the default banner line (which is the Windows user ID). Depends onMODE setting; also modifies SpoolJobs entry name.
BANNER UNIQUE [string]
Modifies the default banner line, and automatically uses attribute 1 (NEXT.HOLD)in the dictionary for the SpoolJobs file to create unique entry names for jobs sent toSpoolJobs.
BRIEF Directs OASYS NOT to prompt for verification upon execution of SETPTR.
COPIES n Prints n copies of the print job. Does not work with mode 3.
DEFER [time] Delays printing until the specified time. Specify the time in HH:MM format. Doesnot work with mode 3.
DEST unit (or AT unit) Directs output to a specific printer or queue. The unit may be either a local printeror a network printer.
SETPTR Options
Option Description
DEVICE name Used with mode 2 only. Directs output to the Windows device (for instance, aCOM port) identified by name.
EJECT Ejects a blank page at the end of each print job.
Managing Printers in OAS 125
© 2012 Onsystex Inc.
NOEJECT Suppresses the form feed at the end of each print job.
LNUM Prints line numbers in the left margin of each print job.
NFMT or NOFMT Suspends all OASYS print formatting.
NHEAD or NOHEAD Suppresses the banner for each print job. OPEN Opens a print file, and directs output to this file until the file is closed by the SP.
CLOSE command.
SETPTR Options (continued)
The next table describes spooler options you can specify in a quoted string.
Option Description
Orientation Paper orientation; must be PORTRAIT or LANDSCAPE. Defaults to the setting inthe Default Document Properties sheet for the printer.
PaperSource Default paper source; must match an available paper source listed on the DeviceSettings tab of the printer’s Properties Sheet.
Duplex Must be NONE, HORIZONTAL, or VERTICAL; default is NONE.If the print device does not support duplex printing, this option is ignored. Jobsprint single-sided and no error message displays.
Form Form to use (for instance, Letter). Must match an available paper size listed on the Device Settings tab of the printer’s Properties Sheet.
SETPTR Spooler Options
Option Description
Mode RAW or WINDOW. Default is RAW, meaning that printer-specific escapesequences are required for all formatting. Specifying formatting options (Form, Font, FontSize, Orien-tation, FontStyle,DefaultSource, or Duplex) in a quoted string automatically switches Mode toWINDOW.
Prefix stevPrinter-specific escape sequence, specified as the literal ASCII characters. Validin RAW mode only. For example, “PREFIX = \002”
Font Font name, for instance “Courier New”. The OASYS spooler creates a “logical font” using the values you provide for Font,FontSize, and FontStyle. Windows platforms attempt to find an appropriate font touse from the ones installed on your computer.
FontSize Font size in points (for instance, 8, 9, 10, 11). The OASYS spooler creates a “logical font” using the values you provide for Font,FontSize, and FontStyle. Windows platforms attempt to find an appropriate font touse from the ones installed on your computer.
FontStyle Must be Regular, Italic, Bold, Underline, or StrikeOut. Default is Regular. The OASYS spooler creates a “logical font” using the values you provide for Font,FontSize, and FontStyle. Windows platforms attempt to find an appropriate font touse from the ones installed on your computer.
LeftMargin Left margin of the page, in inches. For example, “LeftMargin = 1.0”
RightMargin Right margin of the page, in inches. For example, “RightMargin = 0.75”
TopMargin Top margin of the page, in inches. TopMargin is measured beginning at the value ofthe SETPTR topmargin option (default is 3 lines). If topmargin is 3 lines (thedefault) and TopMargin = 1, the first printed line is one inch below the third line onthe page.
SETPTR Spooler Options (continued)
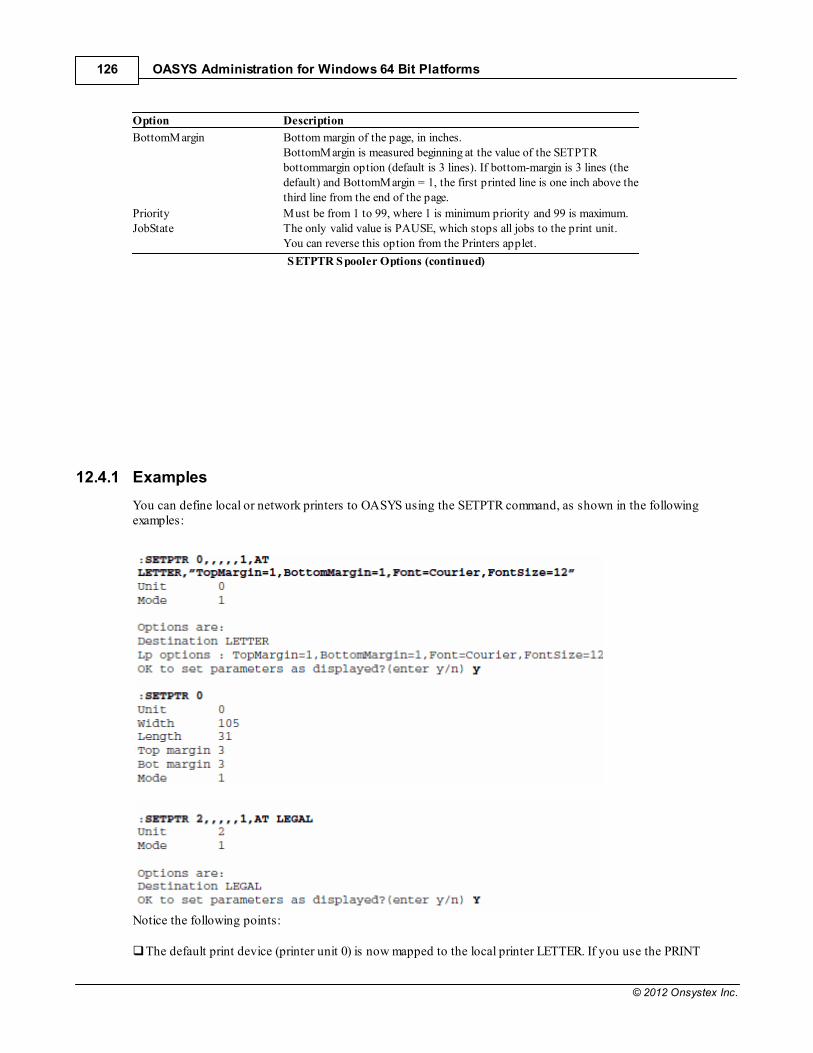
OASYS Administration for Windows 64 Bit Platforms126
© 2012 Onsystex Inc.
Option Description
BottomMargin Bottom margin of the page, in inches. BottomMargin is measured beginning at the value of the SETPTRbottommargin option (default is 3 lines). If bottom-margin is 3 lines (thedefault) and BottomMargin = 1, the first printed line is one inch above thethird line from the end of the page.
Priority Must be from 1 to 99, where 1 is minimum priority and 99 is maximum. JobState The only valid value is PAUSE, which stops all jobs to the print unit.
You can reverse this option from the Printers applet.
SETPTR Spooler Options (continued)
12.4.1 Examples
You can define local or network printers to OASYS using the SETPTR command, as shown in the followingexamples:
Notice the following points:
The default print device (printer unit 0) is now mapped to the local printer LETTER. If you use the PRINT
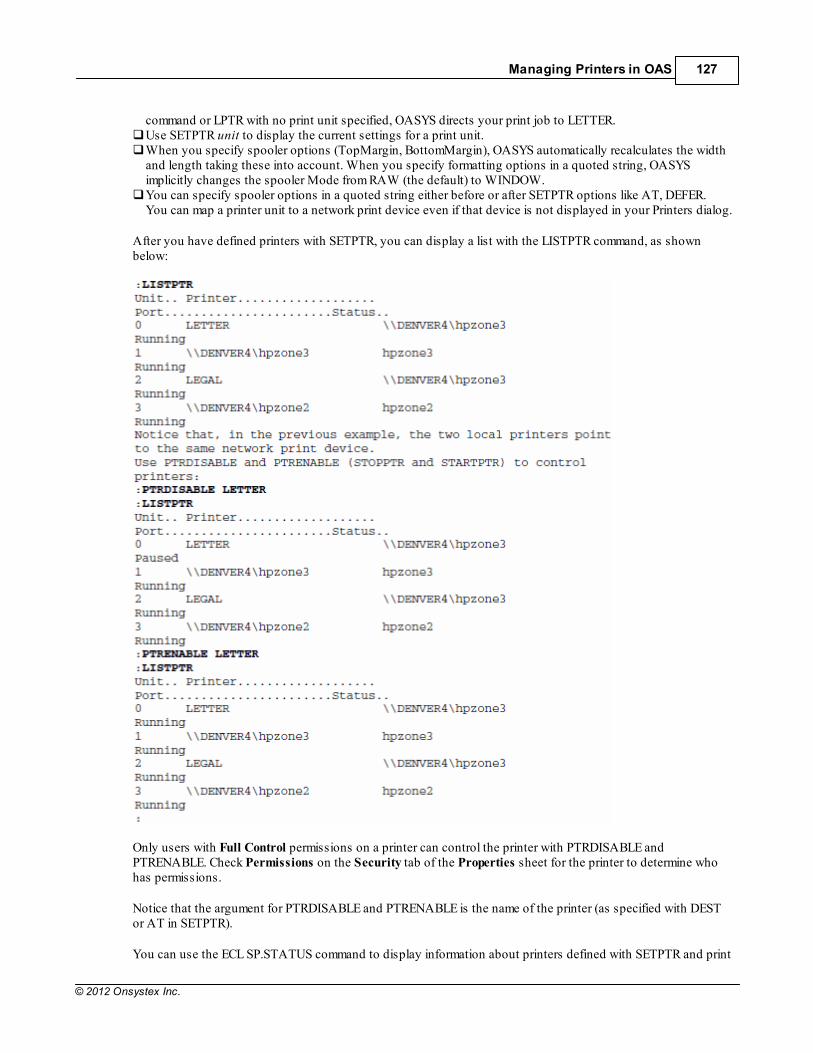
Managing Printers in OAS 127
© 2012 Onsystex Inc.
command or LPTR with no print unit specified, OASYS directs your print job to LETTER. Use SETPTR unit to display the current settings for a print unit. When you specify spooler options (TopMargin, BottomMargin), OASYS automatically recalculates the widthand length taking these into account. When you specify formatting options in a quoted string, OASYSimplicitly changes the spooler Mode from RAW (the default) to WINDOW. You can specify spooler options in a quoted string either before or after SETPTR options like AT, DEFER. You can map a printer unit to a network print device even if that device is not displayed in your Printers dialog.
After you have defined printers with SETPTR, you can display a list with the LISTPTR command, as shownbelow:
Only users with Full Control permissions on a printer can control the printer with PTRDISABLE andPTRENABLE. Check Permissions on the Security tab of the Properties sheet for the printer to determine whohas permissions.
Notice that the argument for PTRDISABLE and PTRENABLE is the name of the printer (as specified with DESTor AT in SETPTR).
You can use the ECL SP.STATUS command to display information about printers defined with SETPTR and print
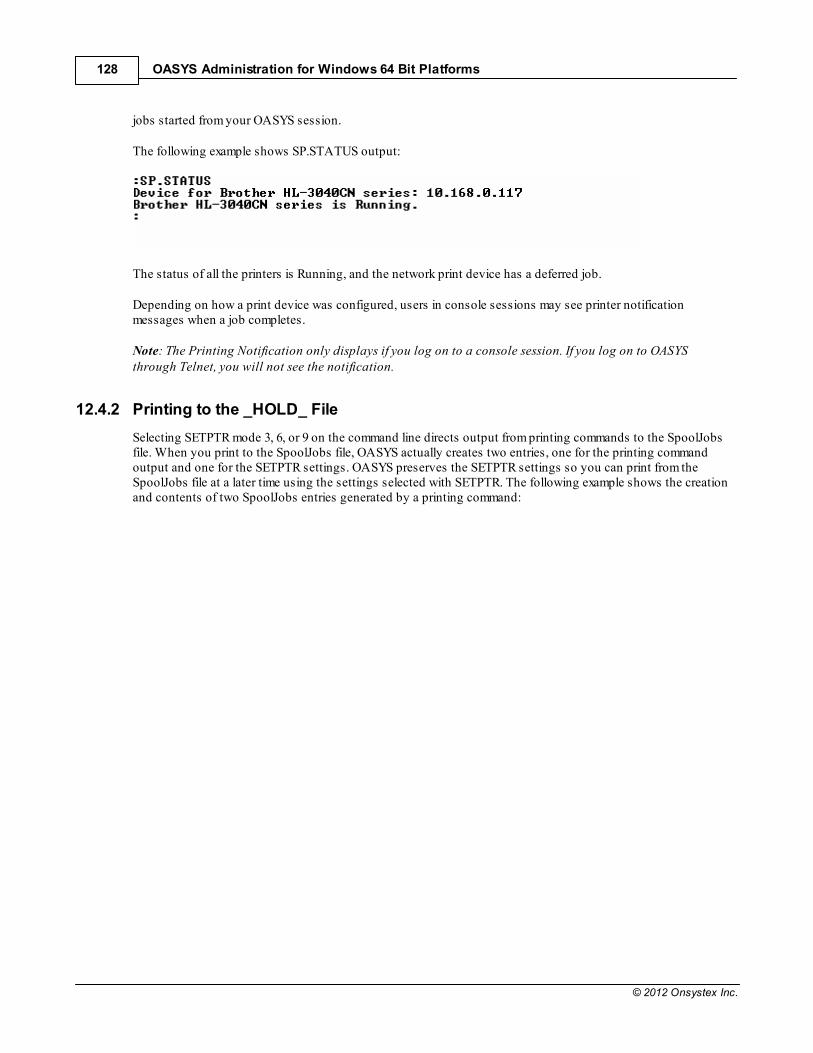
OASYS Administration for Windows 64 Bit Platforms128
© 2012 Onsystex Inc.
jobs started from your OASYS session.
The following example shows SP.STATUS output:
The status of all the printers is Running, and the network print device has a deferred job.
Depending on how a print device was configured, users in console sessions may see printer notificationmessages when a job completes.
Note: The Printing Notification only displays if you log on to a console session. If you log on to OASYSthrough Telnet, you will not see the notification.
12.4.2 Printing to the _HOLD_ File
Selecting SETPTR mode 3, 6, or 9 on the command line directs output from printing commands to the SpoolJobsfile. When you print to the SpoolJobs file, OASYS actually creates two entries, one for the printing commandoutput and one for the SETPTR settings. OASYS preserves the SETPTR settings so you can print from theSpoolJobs file at a later time using the settings selected with SETPTR. The following example shows the creationand contents of two SpoolJobs entries generated by a printing command:
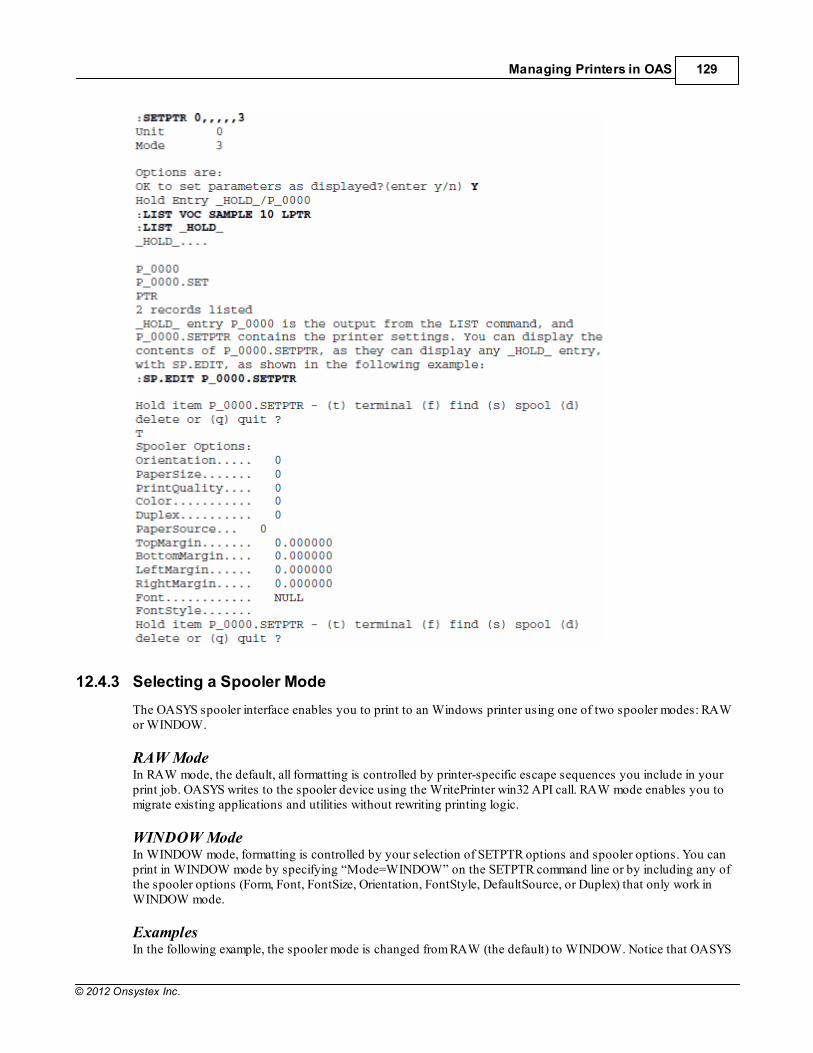
Managing Printers in OAS 129
© 2012 Onsystex Inc.
12.4.3 Selecting a Spooler Mode
The OASYS spooler interface enables you to print to an Windows printer using one of two spooler modes: RAWor WINDOW.
RAW Mode In RAW mode, the default, all formatting is controlled by printer-specific escape sequences you include in yourprint job. OASYS writes to the spooler device using the WritePrinter win32 API call. RAW mode enables you tomigrate existing applications and utilities without rewriting printing logic.
WINDOW Mode In WINDOW mode, formatting is controlled by your selection of SETPTR options and spooler options. You canprint in WINDOW mode by specifying “Mode=WINDOW” on the SETPTR command line or by including any ofthe spooler options (Form, Font, FontSize, Orientation, FontStyle, DefaultSource, or Duplex) that only work inWINDOW mode.
Examples In the following example, the spooler mode is changed from RAW (the default) to WINDOW. Notice that OASYS
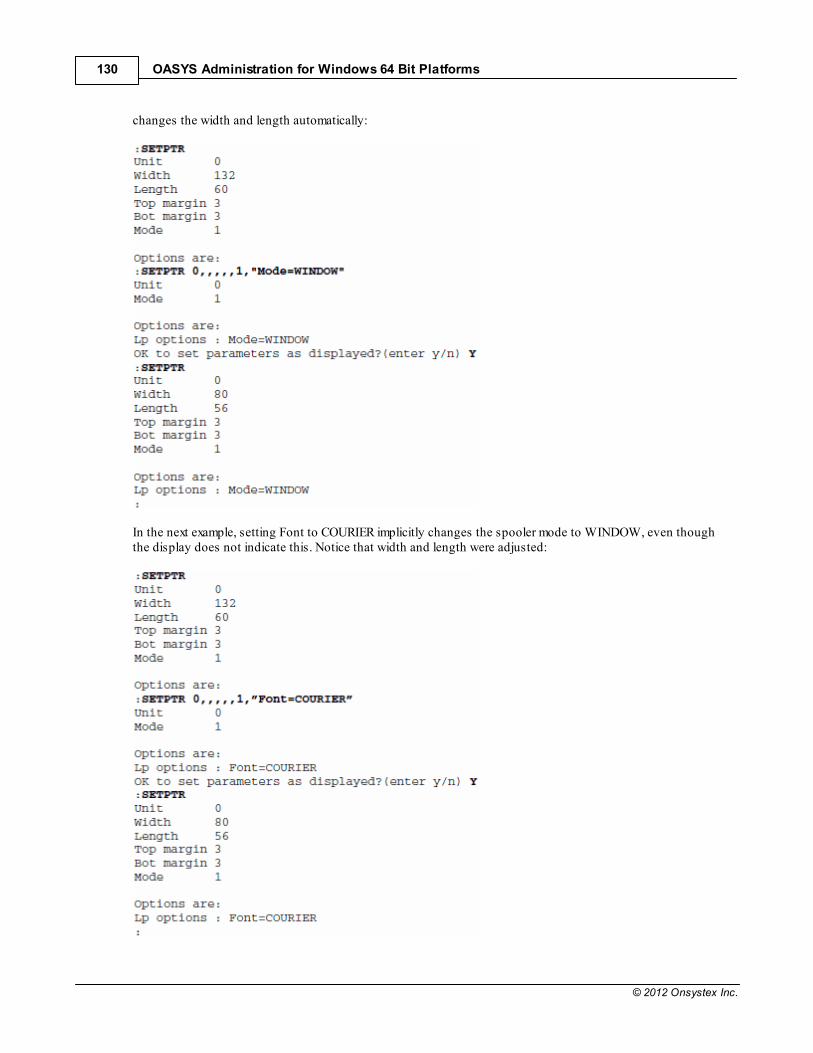
OASYS Administration for Windows 64 Bit Platforms130
© 2012 Onsystex Inc.
changes the width and length automatically:
In the next example, setting Font to COURIER implicitly changes the spooler mode to WINDOW, even thoughthe display does not indicate this. Notice that width and length were adjusted:
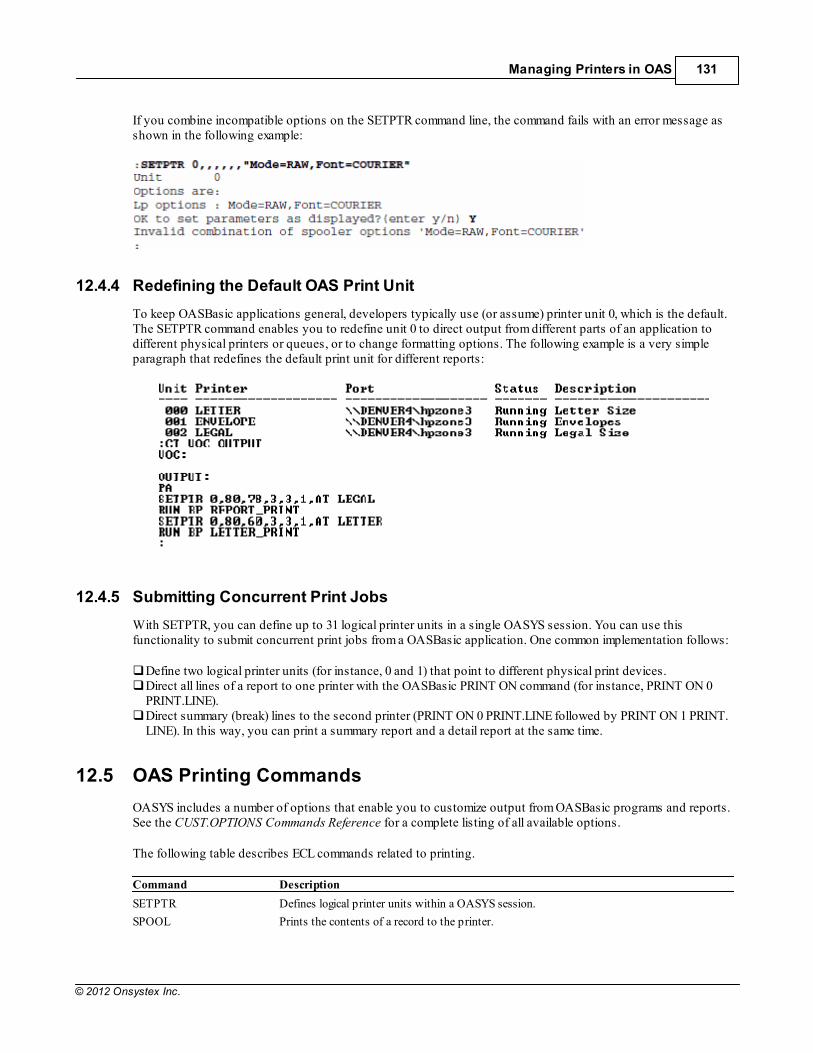
Managing Printers in OAS 131
© 2012 Onsystex Inc.
If you combine incompatible options on the SETPTR command line, the command fails with an error message asshown in the following example:
12.4.4 Redefining the Default OAS Print Unit
To keep OASBasic applications general, developers typically use (or assume) printer unit 0, which is the default.The SETPTR command enables you to redefine unit 0 to direct output from different parts of an application todifferent physical printers or queues, or to change formatting options. The following example is a very simpleparagraph that redefines the default print unit for different reports:
12.4.5 Submitting Concurrent Print Jobs
With SETPTR, you can define up to 31 logical printer units in a single OASYS session. You can use thisfunctionality to submit concurrent print jobs from a OASBasic application. One common implementation follows:
Define two logical printer units (for instance, 0 and 1) that point to different physical print devices. Direct all lines of a report to one printer with the OASBasic PRINT ON command (for instance, PRINT ON 0PRINT.LINE). Direct summary (break) lines to the second printer (PRINT ON 0 PRINT.LINE followed by PRINT ON 1 PRINT.LINE). In this way, you can print a summary report and a detail report at the same time.
12.5 OAS Printing Commands
OASYS includes a number of options that enable you to customize output from OASBasic programs and reports.See the CUST.OPTIONS Commands Reference for a complete listing of all available options.
The following table describes ECL commands related to printing.
Command Description
SETPTR Defines logical printer units within a OASYS session.
SPOOL Prints the contents of a record to the printer.
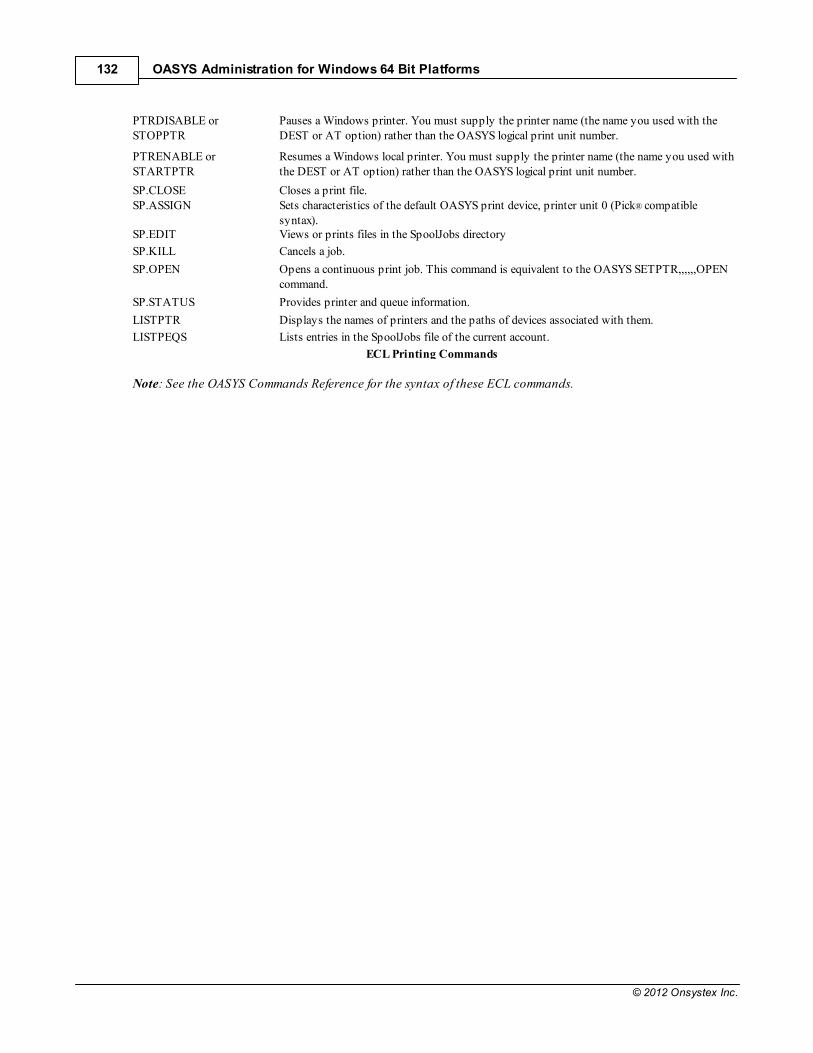
OASYS Administration for Windows 64 Bit Platforms132
© 2012 Onsystex Inc.
PTRDISABLE or STOPPTR
Pauses a Windows printer. You must supply the printer name (the name you used with theDEST or AT option) rather than the OASYS logical print unit number.
PTRENABLE or STARTPTR
Resumes a Windows local printer. You must supply the printer name (the name you used withthe DEST or AT option) rather than the OASYS logical print unit number.
SP.CLOSE Closes a print file. SP.ASSIGN Sets characteristics of the default OASYS print device, printer unit 0 (Pick® compatible
syntax). SP.EDIT Views or prints files in the SpoolJobs directory
SP.KILL Cancels a job.
SP.OPEN Opens a continuous print job. This command is equivalent to the OASYS SETPTR,,,,,,OPENcommand.
SP.STATUS Provides printer and queue information.
LISTPTR Displays the names of printers and the paths of devices associated with them.
LISTPEQS Lists entries in the SpoolJobs file of the current account.
ECL Printing Commands
Note: See the OASYS Commands Reference for the syntax of these ECL commands.

Part
13
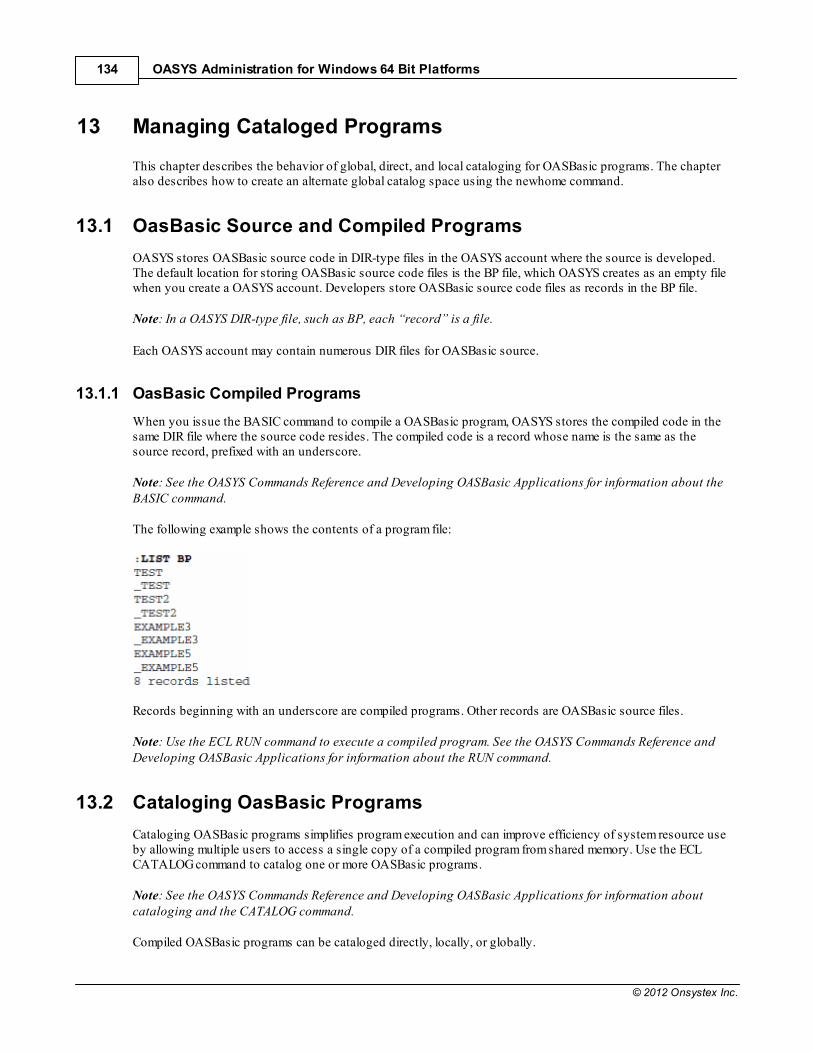
OASYS Administration for Windows 64 Bit Platforms134
© 2012 Onsystex Inc.
13 Managing Cataloged Programs
This chapter describes the behavior of global, direct, and local cataloging for OASBasic programs. The chapteralso describes how to create an alternate global catalog space using the newhome command.
13.1 OasBasic Source and Compiled Programs
OASYS stores OASBasic source code in DIR-type files in the OASYS account where the source is developed.The default location for storing OASBasic source code files is the BP file, which OASYS creates as an empty filewhen you create a OASYS account. Developers store OASBasic source code files as records in the BP file.
Note: In a OASYS DIR-type file, such as BP, each “record” is a file.
Each OASYS account may contain numerous DIR files for OASBasic source.
13.1.1 OasBasic Compiled Programs
When you issue the BASIC command to compile a OASBasic program, OASYS stores the compiled code in thesame DIR file where the source code resides. The compiled code is a record whose name is the same as thesource record, prefixed with an underscore.
Note: See the OASYS Commands Reference and Developing OASBasic Applications for information about theBASIC command.
The following example shows the contents of a program file:
Records beginning with an underscore are compiled programs. Other records are OASBasic source files.
Note: Use the ECL RUN command to execute a compiled program. See the OASYS Commands Reference andDeveloping OASBasic Applications for information about the RUN command.
13.2 Cataloging OasBasic Programs
Cataloging OASBasic programs simplifies program execution and can improve efficiency of system resource useby allowing multiple users to access a single copy of a compiled program from shared memory. Use the ECLCATALOG command to catalog one or more OASBasic programs.
Note: See the OASYS Commands Reference and Developing OASBasic Applications for information aboutcataloging and the CATALOG command.
Compiled OASBasic programs can be cataloged directly, locally, or globally.
Managing Cataloged Programs 135
© 2012 Onsystex Inc.
13.2.1 Direct Cataloging
Points to remember about direct cataloging are:
Compiled code is located in the program file in the OASYS account where the program was compiled andcataloged. The VOC file in the account contains a pointer to the compiled code in the program file. Users in the sameaccount can execute the program by entering the program name at the ECL prompt. Because users accessthe compiled code in the program file, developers do not need to recatalog the code if they recompile. When you execute a directly cataloged program, OASYS loads a copy of the program into your address space.
13.2.2 Local Cataloging
Points to remember about local cataloging are:
Compiled code is located in the CTLG directory in the OASYS account where the program was cataloged, aswell as in the program file. CTLG is a DIR-type OASYS file, and each record is a compiled OASBasic program. The VOC file in the account contains a pointer to the compiled program in the CTLG. Users in the sameaccount can execute the program by entering the program name at the ECL prompt. Developers must recatalog a program after recompiling to place a new copy of the compiled code into theCTLG. When you execute a locally cataloged program, OASYS loads a copy of the program into your address space.
13.2.3 Global Cataloging
Points to remember about global cataloging are:
If you execute the CATALOG command without specifying local or direct cataloging, your program is globallycataloged. Compiled code is located in a systemwide global catalog. The default global catalog is OASHOME\sysprog\CTLG. Developers must recatalog a program after recompiling it to place a new copy of the compiled code into theglobal catalog.
Note: A OASYS installation can have more than one global catalog space. The environment variableOASHOME determines which global catalog space a particular OASYS session accesses. See “Creating anAlternate Global Catalog Space” on page 15-15 for more information about creating multiple global catalogspaces.
A systemwide global catalog is a DIR-type file, with 26 subdirectories named a through z. Compiled code islocated in the subdirectory corre-sponding to the first letter of the program name. Compiled programs that beginwith nonalphabetic characters are stored in a subdirectory named X. The cataloged program name can be thesame as the source and object, or you can specify a different name when you execute CATALOG.
Tip: Consider your program naming conventions if you are using global cataloging. Since OASYS places thecompiled code in subdirectories according to name, you may have an unbalanced situation if a large numberof your program names begin with the same letter (for instance, a general ledger application where all the filesbegin with “gl”).
A globally cataloged program is available to users in all OASYS accounts.
When you execute a globally cataloged program, the shared basic code server (oas_objmanager) checksto see if a copy already exists in the shared memory it controls.
If so, oas_objmanager notifies the oas process which shared memory segment to attach to access thatcopy.
OASYS Administration for Windows 64 Bit Platforms136
© 2012 Onsystex Inc.
If not, oas_objmanager loads a copy into one of its shared memory segments for you to execute.
Any object file located in the OASHOME\sysprog\CTLG file system is handled by oas_objmanager, regardlessof how the program is accessed. The oas_objmanager process can manage up to 20 shared memory segments for globally cataloged programs.OASYS determines the size of each segment by the OAS_MaxCatalogBytes parameter in the OASYSconfiguration file (\OASHOME\include\oasconfig). The default value for OAS_MaxCatalogBytes is 1,048,576bytes (1 MB), which is set when you install OASYS. You will encounter runtime errors if this size isinsufficient. You can increase the segment size as long as you do not exceed the configuration parameterOAS_MaxShmSize.
Tip: See “Appendix A OASYS Configuration Parameters” for more information about OAS_MaxCatalogBytesand OAS_MaxShmSize.
13.3 Managing Global Catalogs
OASYS provides a group of files and commands that manage global catalogs. These files and commandsaccomplish the following:
Identify the contents of a global catalog space Verify consistency between OASBasic source and a globally cataloged program Activate newly cataloged programs and subroutines Display use of globally cataloged programs
13.3.1 Contents of a Global Catalog
OASYS maintains two files that store contents of a global catalog. The global catalog table, called CTLGTB, is adynamically maintained file that shows the current contents of the global catalog. You can list the catalog tablefrom a OASYS account, as shown in the following example:
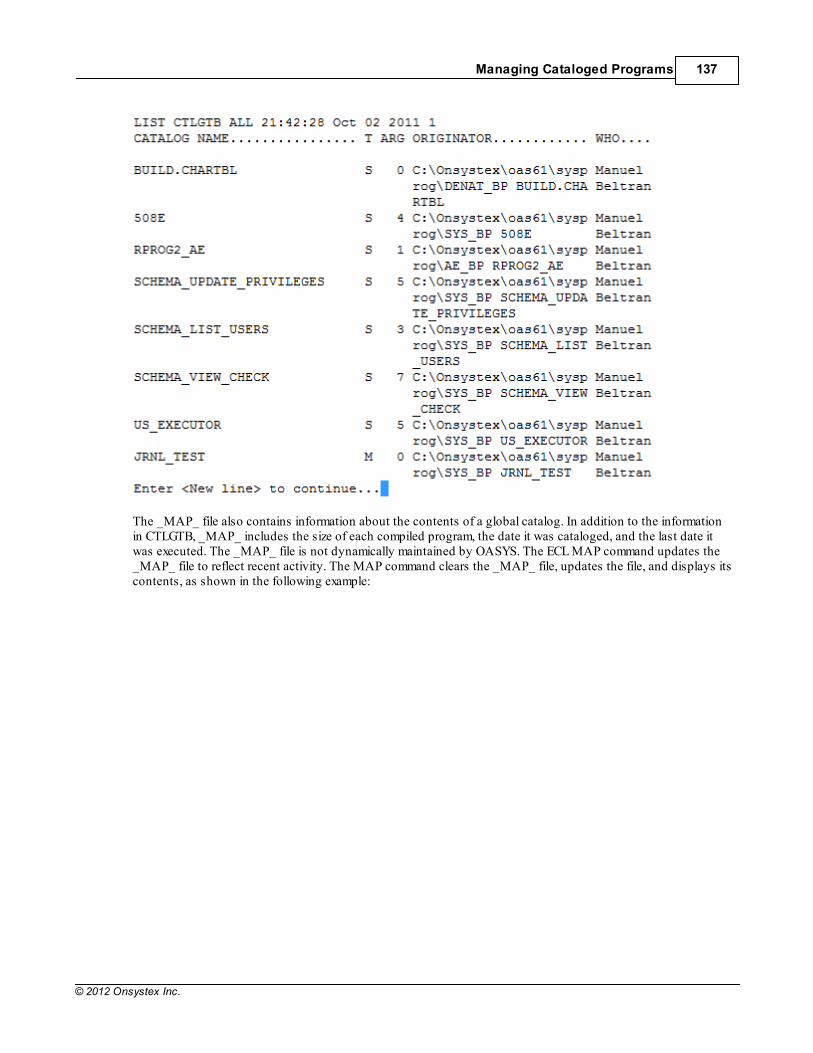
Managing Cataloged Programs 137
© 2012 Onsystex Inc.
The _MAP_ file also contains information about the contents of a global catalog. In addition to the informationin CTLGTB, _MAP_ includes the size of each compiled program, the date it was cataloged, and the last date itwas executed. The _MAP_ file is not dynamically maintained by OASYS. The ECL MAP command updates the_MAP_ file to reflect recent activity. The MAP command clears the _MAP_ file, updates the file, and displays itscontents, as shown in the following example:
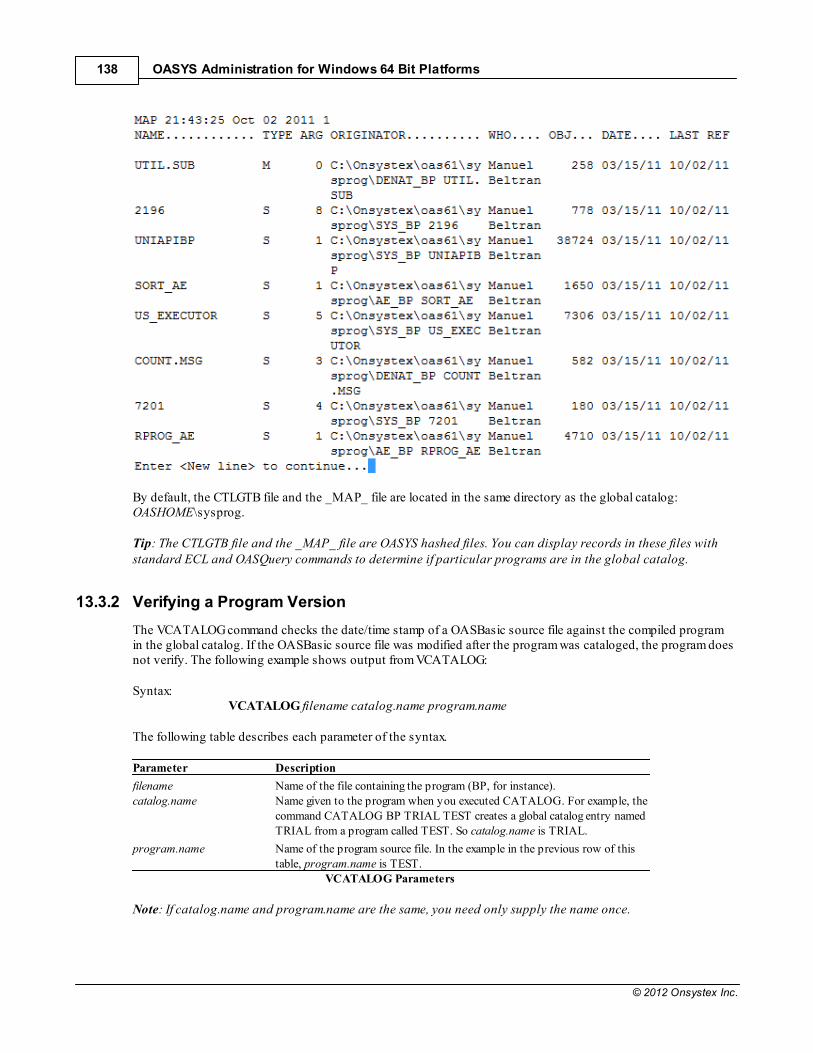
OASYS Administration for Windows 64 Bit Platforms138
© 2012 Onsystex Inc.
By default, the CTLGTB file and the _MAP_ file are located in the same directory as the global catalog: OASHOME\sysprog.
Tip: The CTLGTB file and the _MAP_ file are OASYS hashed files. You can display records in these files withstandard ECL and OASQuery commands to determine if particular programs are in the global catalog.
13.3.2 Verifying a Program Version
The VCATALOG command checks the date/time stamp of a OASBasic source file against the compiled programin the global catalog. If the OASBasic source file was modified after the program was cataloged, the program doesnot verify. The following example shows output from VCATALOG:
Syntax: VCATALOG filename catalog.name program.name
The following table describes each parameter of the syntax.
Parameter Description
filename Name of the file containing the program (BP, for instance). catalog.name Name given to the program when you executed CATALOG. For example, the
command CATALOG BP TRIAL TEST creates a global catalog entry namedTRIAL from a program called TEST. So catalog.name is TRIAL.
program.name Name of the program source file. In the example in the previous row of thistable, program.name is TEST.
VCATALOG Parameters
Note: If catalog.name and program.name are the same, you need only supply the name once.
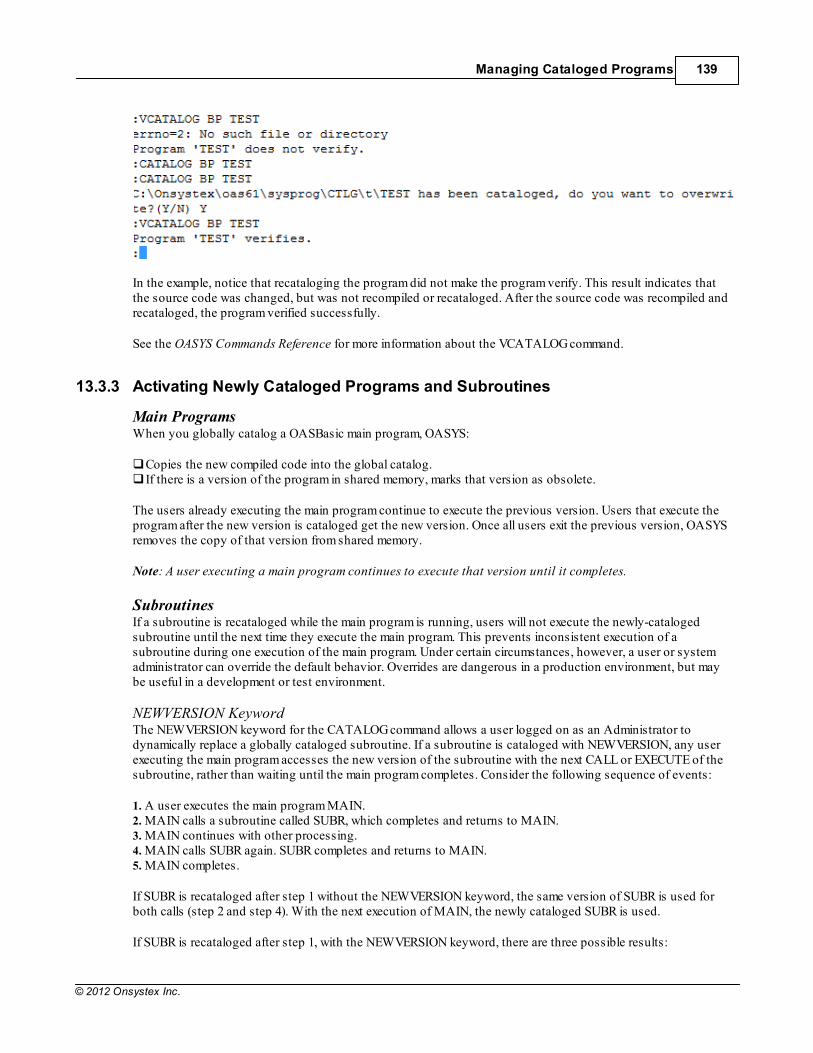
Managing Cataloged Programs 139
© 2012 Onsystex Inc.
In the example, notice that recataloging the program did not make the program verify. This result indicates thatthe source code was changed, but was not recompiled or recataloged. After the source code was recompiled andrecataloged, the program verified successfully.
See the OASYS Commands Reference for more information about the VCATALOG command.
13.3.3 Activating Newly Cataloged Programs and Subroutines
Main Programs When you globally catalog a OASBasic main program, OASYS:
Copies the new compiled code into the global catalog. If there is a version of the program in shared memory, marks that version as obsolete.
The users already executing the main program continue to execute the previous version. Users that execute theprogram after the new version is cataloged get the new version. Once all users exit the previous version, OASYSremoves the copy of that version from shared memory.
Note: A user executing a main program continues to execute that version until it completes.
Subroutines If a subroutine is recataloged while the main program is running, users will not execute the newly-catalogedsubroutine until the next time they execute the main program. This prevents inconsistent execution of asubroutine during one execution of the main program. Under certain circumstances, however, a user or systemadministrator can override the default behavior. Overrides are dangerous in a production environment, but maybe useful in a development or test environment.
NEWVERSION Keyword The NEWVERSION keyword for the CATALOG command allows a user logged on as an Administrator todynamically replace a globally cataloged subroutine. If a subroutine is cataloged with NEWVERSION, any userexecuting the main program accesses the new version of the subroutine with the next CALL or EXECUTE of thesubroutine, rather than waiting until the main program completes. Consider the following sequence of events:
1. A user executes the main program MAIN. 2. MAIN calls a subroutine called SUBR, which completes and returns to MAIN. 3. MAIN continues with other processing.4. MAIN calls SUBR again. SUBR completes and returns to MAIN. 5. MAIN completes.
If SUBR is recataloged after step 1 without the NEWVERSION keyword, the same version of SUBR is used forboth calls (step 2 and step 4). With the next execution of MAIN, the newly cataloged SUBR is used.
If SUBR is recataloged after step 1, with the NEWVERSION keyword, there are three possible results:

OASYS Administration for Windows 64 Bit Platforms140
© 2012 Onsystex Inc.
CATALOG happens after step 1 but before step 2. In this case, the newly cataloged SUBR gets accessed inboth step 2 and step 4. CATALOG happens after step 2, but before step 4. In this case, the prior version of SUBR gets accessed instep 2, and the newly cataloged version gets accessed in step 4. CATALOG happens after step 4. In this case, the prior version gets accessed in both step 2 and step 4. Withthe next execution of MAIN, the newly cataloged SUBR is accessed.
Warning: Using the NEWVERSION keyword to CATALOG a subroutine can produce inconsistent results forusers who are currently executing the main program. For example, the number of arguments could change.
The following sample CATALOG command shows the syntax including the NEWVERSION keyword:
newversion System-Level CommandThe OASYS system-level command newversion allows a user logged on as an Administrator to dynamicallyreplace a cataloged subroutine (just as the NEWVERSION keyword does) but limits the behavior to a selecteduser or users.
Syntax: newversion path userno...
The following table describes each parameter of the syntax.
Parameter Description
path Absolute path of the cataloged subroutine.
userno... Process ID (pid) for a user who should access the new subroutinedynam-ically. You can specify more than one userno; separate thenumbers with spaces.
newversion Parameters
The following screen shows an example of the newversion command:
In the example, the newly cataloged subroutine is dynamically available to cgustafs, the owner of user number2664. If cgustafs is executing a main program that calls a subroutine, the next call to the subroutine accesses thenewly cataloged version. For all users other than cgustafs, the default behavior remains in effect. The newlycataloged subroutine is activated with the next execution of the main program, not the next subroutine call. Noticethat, in the example, the subroutine is globally cataloged; this command works with locally or directly cataloged
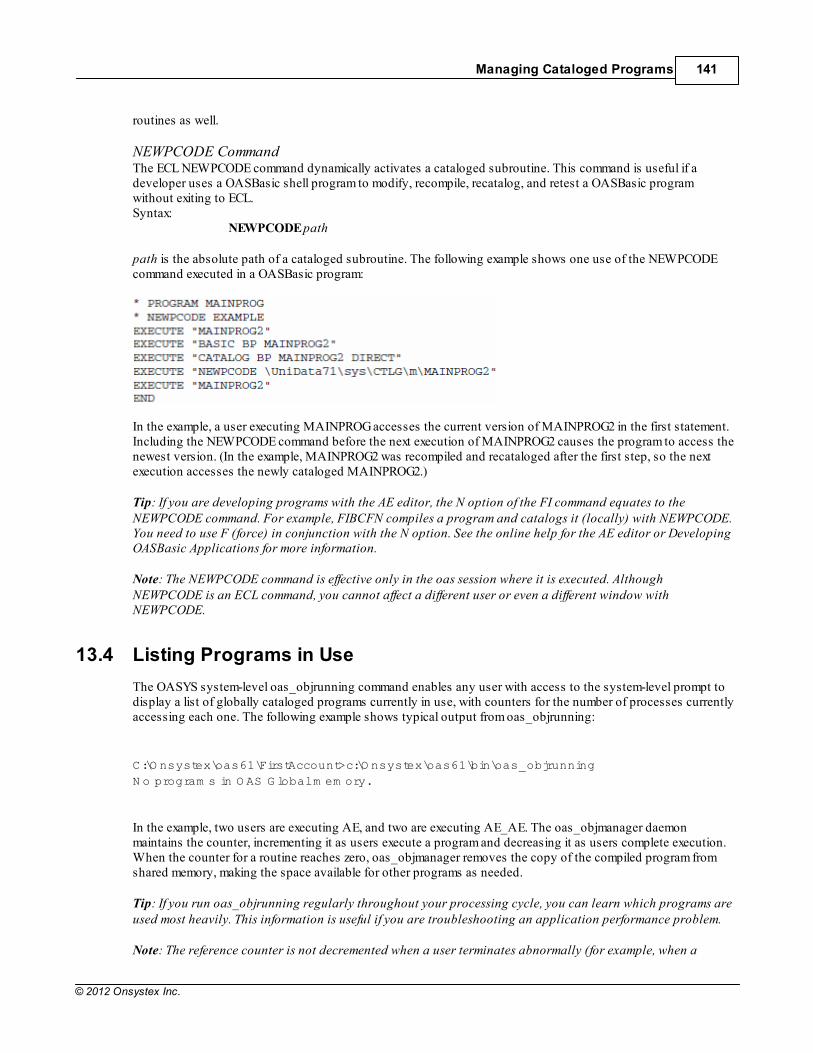
Managing Cataloged Programs 141
© 2012 Onsystex Inc.
routines as well.
NEWPCODE CommandThe ECL NEWPCODE command dynamically activates a cataloged subroutine. This command is useful if adeveloper uses a OASBasic shell program to modify, recompile, recatalog, and retest a OASBasic programwithout exiting to ECL.Syntax:
NEWPCODE path
path is the absolute path of a cataloged subroutine. The following example shows one use of the NEWPCODEcommand executed in a OASBasic program:
In the example, a user executing MAINPROG accesses the current version of MAINPROG2 in the first statement.Including the NEWPCODE command before the next execution of MAINPROG2 causes the program to access thenewest version. (In the example, MAINPROG2 was recompiled and recataloged after the first step, so the nextexecution accesses the newly cataloged MAINPROG2.)
Tip: If you are developing programs with the AE editor, the N option of the FI command equates to theNEWPCODE command. For example, FIBCFN compiles a program and catalogs it (locally) with NEWPCODE.You need to use F (force) in conjunction with the N option. See the online help for the AE editor or DevelopingOASBasic Applications for more information.
Note: The NEWPCODE command is effective only in the oas session where it is executed. AlthoughNEWPCODE is an ECL command, you cannot affect a different user or even a different window withNEWPCODE.
13.4 Listing Programs in Use
The OASYS system-level oas_objrunning command enables any user with access to the system-level prompt todisplay a list of globally cataloged programs currently in use, with counters for the number of processes currentlyaccessing each one. The following example shows typical output from oas_objrunning:
C:\O nsystex\oas61\FirstAccount>c:\O nsystex\oas61\bin\oas_objrunning
N o program s in O AS G lobal m em ory.
In the example, two users are executing AE, and two are executing AE_AE. The oas_objmanager daemonmaintains the counter, incrementing it as users execute a program and decreasing it as users complete execution.When the counter for a routine reaches zero, oas_objmanager removes the copy of the compiled program fromshared memory, making the space available for other programs as needed.
Tip: If you run oas_objrunning regularly throughout your processing cycle, you can learn which programs areused most heavily. This information is useful if you are troubleshooting an application performance problem.
Note: The reference counter is not decremented when a user terminates abnormally (for example, when a
OASYS Administration for Windows 64 Bit Platforms142
© 2012 Onsystex Inc.
process is killed). Because of this, the count may be inaccu-rately high, causing excess memory to remain held.Stopping and restarting OASYS resets the counter and releases memory.
13.5 Creating an Alternate Global Catalog Space
The system-level newhome command creates a new OASYS account containing an alternate global catalog spacefor use in development and testing.
13.5.1 Files and Directories Created by newhome
OASYS creates or overlays the directory indicated by path. This directory contains only the subdirectorysysprog, which contains the following files and directories:
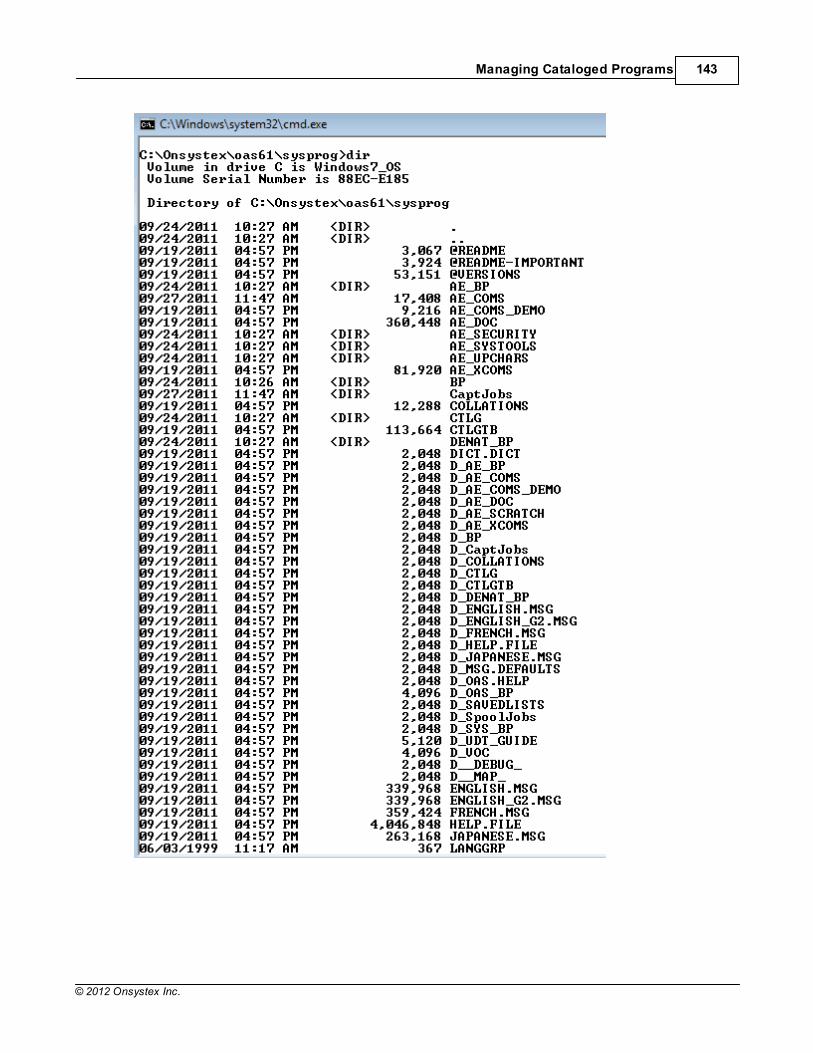
Managing Cataloged Programs 143
© 2012 Onsystex Inc.
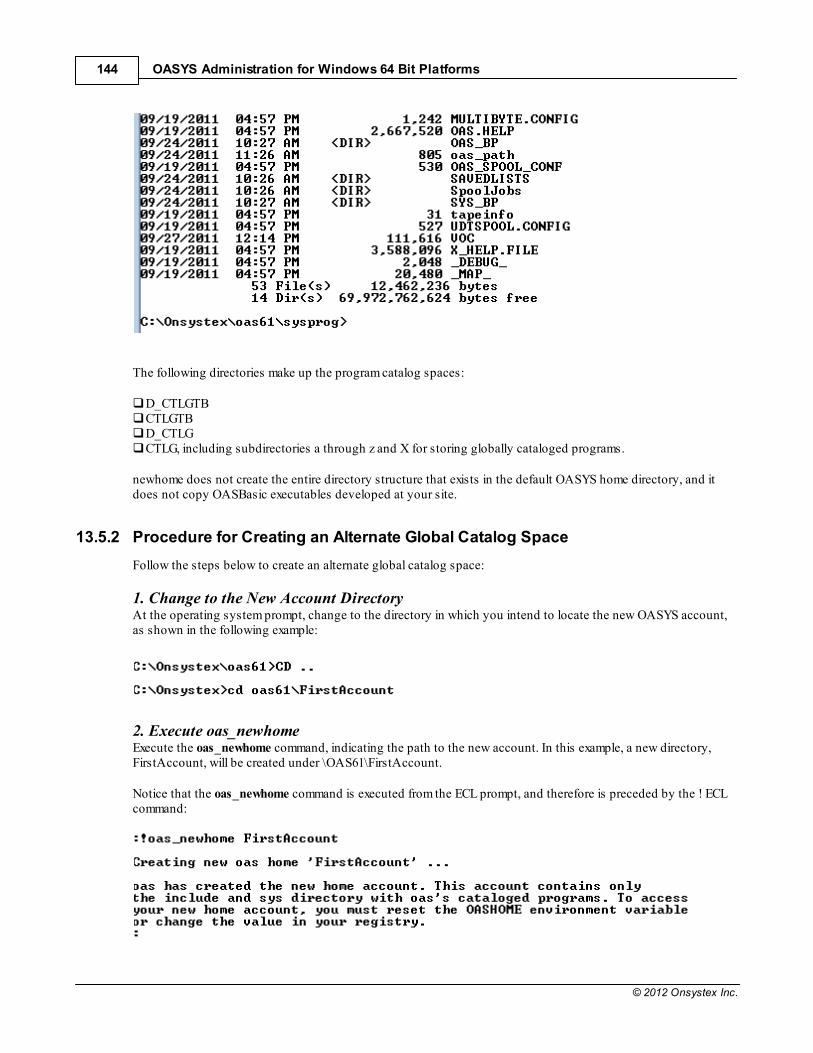
OASYS Administration for Windows 64 Bit Platforms144
© 2012 Onsystex Inc.
The following directories make up the program catalog spaces:
D_CTLGTB CTLGTB D_CTLG CTLG, including subdirectories a through z and X for storing globally cataloged programs.
newhome does not create the entire directory structure that exists in the default OASYS home directory, and itdoes not copy OASBasic executables developed at your site.
13.5.2 Procedure for Creating an Alternate Global Catalog Space
Follow the steps below to create an alternate global catalog space:
1. Change to the New Account Directory At the operating system prompt, change to the directory in which you intend to locate the new OASYS account,as shown in the following example:
2. Execute oas_newhome Execute the oas_newhome command, indicating the path to the new account. In this example, a new directory,FirstAccount, will be created under \OAS61\FirstAccount.
Notice that the oas_newhome command is executed from the ECL prompt, and therefore is preceded by the ! ECLcommand:
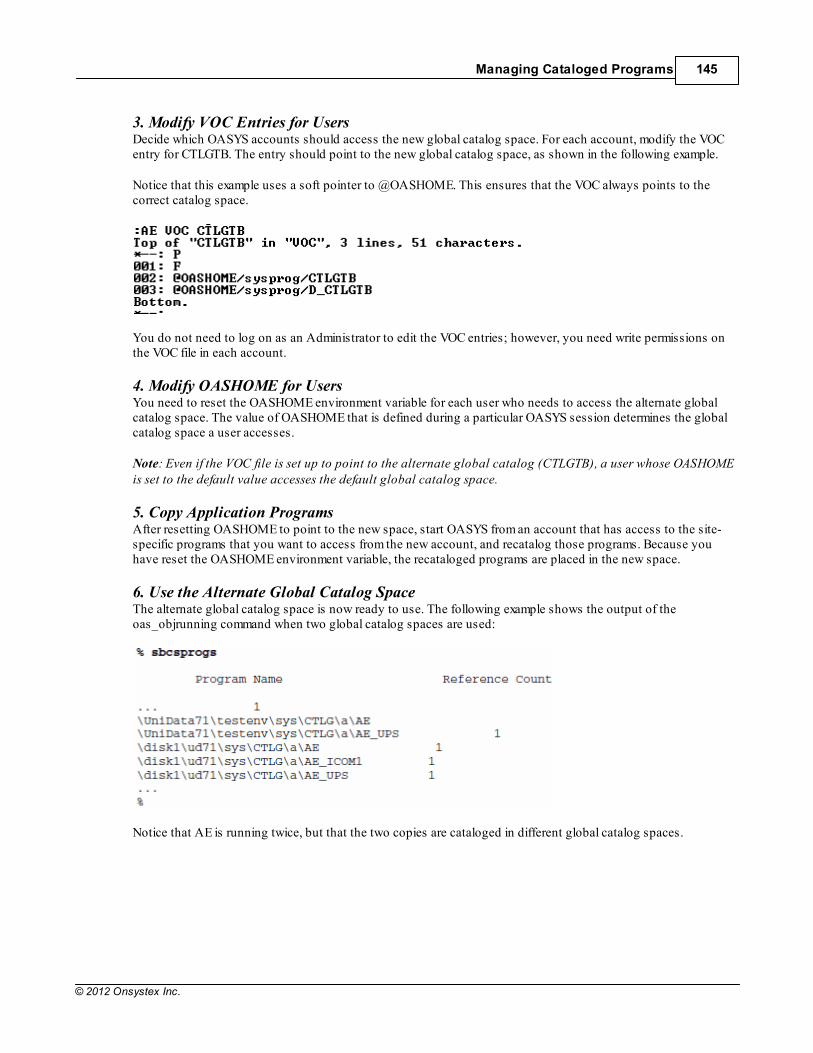
Managing Cataloged Programs 145
© 2012 Onsystex Inc.
3. Modify VOC Entries for Users Decide which OASYS accounts should access the new global catalog space. For each account, modify the VOCentry for CTLGTB. The entry should point to the new global catalog space, as shown in the following example.
Notice that this example uses a soft pointer to @OASHOME. This ensures that the VOC always points to thecorrect catalog space.
You do not need to log on as an Administrator to edit the VOC entries; however, you need write permissions onthe VOC file in each account.
4. Modify OASHOME for Users You need to reset the OASHOME environment variable for each user who needs to access the alternate globalcatalog space. The value of OASHOME that is defined during a particular OASYS session determines the globalcatalog space a user accesses.
Note: Even if the VOC file is set up to point to the alternate global catalog (CTLGTB), a user whose OASHOMEis set to the default value accesses the default global catalog space.
5. Copy Application Programs After resetting OASHOME to point to the new space, start OASYS from an account that has access to the site-specific programs that you want to access from the new account, and recatalog those programs. Because youhave reset the OASHOME environment variable, the recataloged programs are placed in the new space.
6. Use the Alternate Global Catalog Space The alternate global catalog space is now ready to use. The following example shows the output of theoas_objrunning command when two global catalog spaces are used:
Notice that AE is running twice, but that the two copies are cataloged in different global catalog spaces.

Part
14
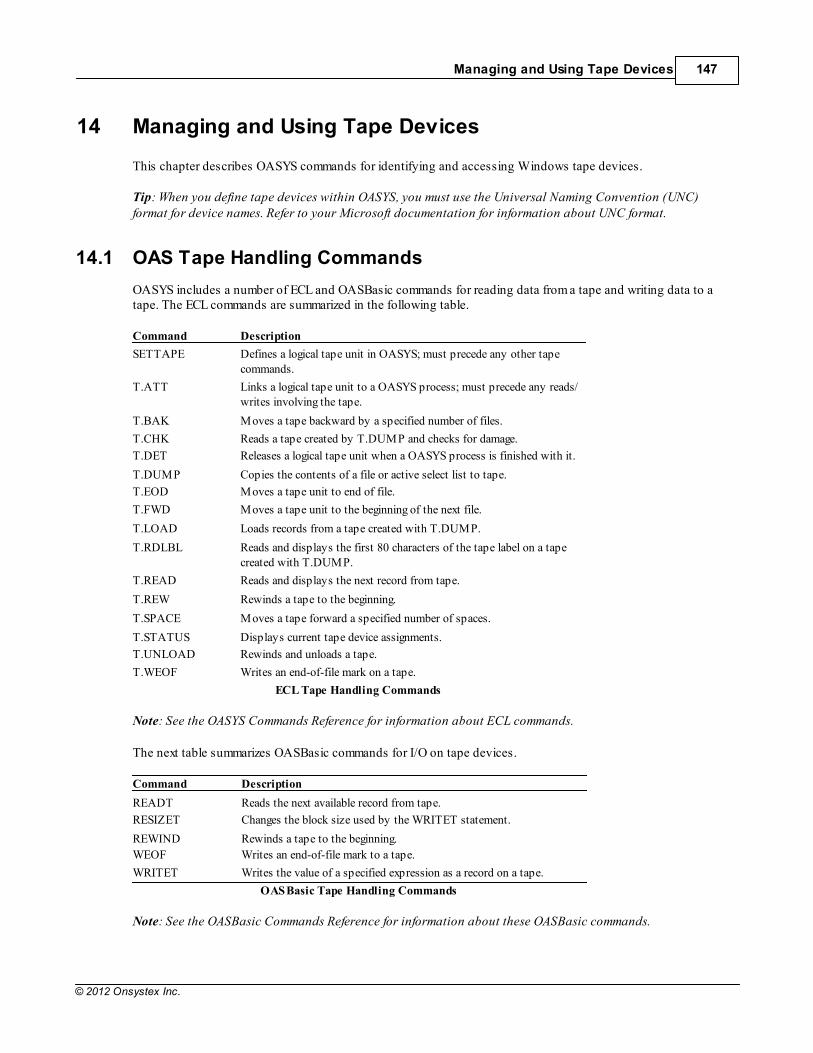
Managing and Using Tape Devices 147
© 2012 Onsystex Inc.
14 Managing and Using Tape Devices
This chapter describes OASYS commands for identifying and accessing Windows tape devices.
Tip: When you define tape devices within OASYS, you must use the Universal Naming Convention (UNC)format for device names. Refer to your Microsoft documentation for information about UNC format.
14.1 OAS Tape Handling Commands
OASYS includes a number of ECL and OASBasic commands for reading data from a tape and writing data to atape. The ECL commands are summarized in the following table.
Command Description
SETTAPE Defines a logical tape unit in OASYS; must precede any other tapecommands.
T.ATT Links a logical tape unit to a OASYS process; must precede any reads/writes involving the tape.
T.BAK Moves a tape backward by a specified number of files.
T.CHK Reads a tape created by T.DUMP and checks for damage.
T.DET Releases a logical tape unit when a OASYS process is finished with it.
T.DUMP Copies the contents of a file or active select list to tape.
T.EOD Moves a tape unit to end of file.
T.FWD Moves a tape unit to the beginning of the next file.
T.LOAD Loads records from a tape created with T.DUMP.
T.RDLBL Reads and displays the first 80 characters of the tape label on a tapecreated with T.DUMP.
T.READ Reads and displays the next record from tape.
T.REW Rewinds a tape to the beginning.
T.SPACE Moves a tape forward a specified number of spaces.
T.STATUS Displays current tape device assignments.
T.UNLOAD Rewinds and unloads a tape.
T.WEOF Writes an end-of-file mark on a tape.
ECL Tape Handling Commands
Note: See the OASYS Commands Reference for information about ECL commands.
The next table summarizes OASBasic commands for I/O on tape devices.
Command Description
READT Reads the next available record from tape.
RESIZET Changes the block size used by the WRITET statement.
REWIND Rewinds a tape to the beginning.
WEOF Writes an end-of-file mark to a tape.
WRITET Writes the value of a specified expression as a record on a tape.
OASBasic Tape Handling Commands
Note: See the OASBasic Commands Reference for information about these OASBasic commands.
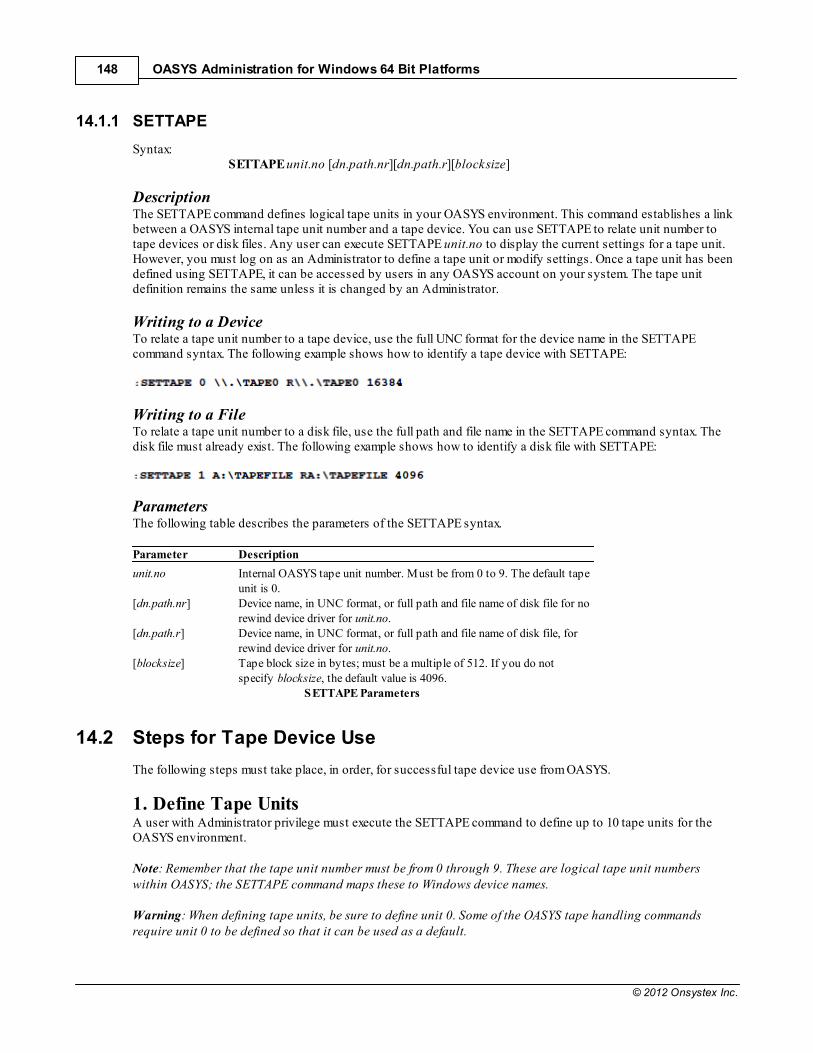
OASYS Administration for Windows 64 Bit Platforms148
© 2012 Onsystex Inc.
14.1.1 SETTAPE
Syntax: SETTAPE unit.no [dn.path.nr][dn.path.r][blocksize]
Description The SETTAPE command defines logical tape units in your OASYS environment. This command establishes a linkbetween a OASYS internal tape unit number and a tape device. You can use SETTAPE to relate unit number totape devices or disk files. Any user can execute SETTAPE unit.no to display the current settings for a tape unit.However, you must log on as an Administrator to define a tape unit or modify settings. Once a tape unit has beendefined using SETTAPE, it can be accessed by users in any OASYS account on your system. The tape unitdefinition remains the same unless it is changed by an Administrator.
Writing to a Device To relate a tape unit number to a tape device, use the full UNC format for the device name in the SETTAPEcommand syntax. The following example shows how to identify a tape device with SETTAPE:
Writing to a File To relate a tape unit number to a disk file, use the full path and file name in the SETTAPE command syntax. Thedisk file must already exist. The following example shows how to identify a disk file with SETTAPE:
Parameters The following table describes the parameters of the SETTAPE syntax.
Parameter Description
unit.no Internal OASYS tape unit number. Must be from 0 to 9. The default tapeunit is 0.
[dn.path.nr] Device name, in UNC format, or full path and file name of disk file for norewind device driver for unit.no.
[dn.path.r] Device name, in UNC format, or full path and file name of disk file, forrewind device driver for unit.no.
[blocksize] Tape block size in bytes; must be a multiple of 512. If you do notspecify blocksize, the default value is 4096.
SETTAPE Parameters
14.2 Steps for Tape Device Use
The following steps must take place, in order, for successful tape device use from OASYS.
1. Define Tape Units A user with Administrator privilege must execute the SETTAPE command to define up to 10 tape units for theOASYS environment.
Note: Remember that the tape unit number must be from 0 through 9. These are logical tape unit numberswithin OASYS; the SETTAPE command maps these to Windows device names.
Warning: When defining tape units, be sure to define unit 0. Some of the OASYS tape handling commandsrequire unit 0 to be defined so that it can be used as a default.
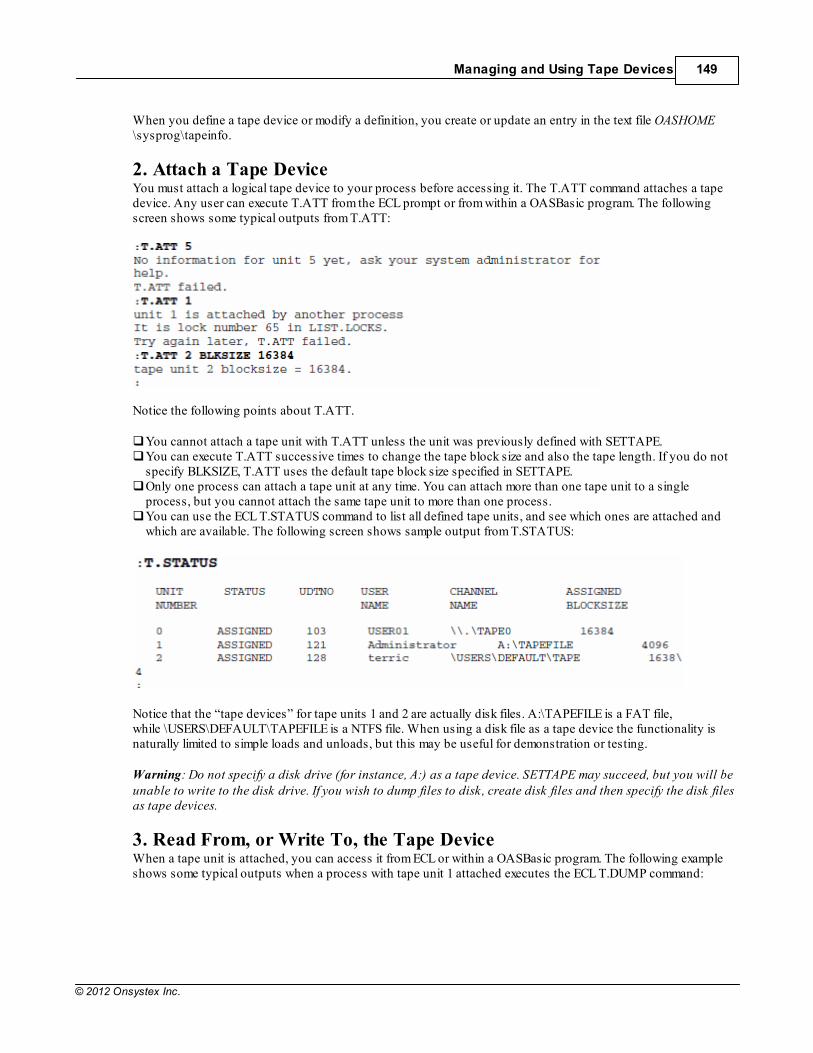
Managing and Using Tape Devices 149
© 2012 Onsystex Inc.
When you define a tape device or modify a definition, you create or update an entry in the text file OASHOME\sysprog\tapeinfo.
2. Attach a Tape Device You must attach a logical tape device to your process before accessing it. The T.ATT command attaches a tapedevice. Any user can execute T.ATT from the ECL prompt or from within a OASBasic program. The followingscreen shows some typical outputs from T.ATT:
Notice the following points about T.ATT.
You cannot attach a tape unit with T.ATT unless the unit was previously defined with SETTAPE. You can execute T.ATT successive times to change the tape block size and also the tape length. If you do notspecify BLKSIZE, T.ATT uses the default tape block size specified in SETTAPE. Only one process can attach a tape unit at any time. You can attach more than one tape unit to a singleprocess, but you cannot attach the same tape unit to more than one process. You can use the ECL T.STATUS command to list all defined tape units, and see which ones are attached andwhich are available. The following screen shows sample output from T.STATUS:
Notice that the “tape devices” for tape units 1 and 2 are actually disk files. A:\TAPEFILE is a FAT file,while \USERS\DEFAULT\TAPEFILE is a NTFS file. When using a disk file as a tape device the functionality isnaturally limited to simple loads and unloads, but this may be useful for demonstration or testing.
Warning: Do not specify a disk drive (for instance, A:) as a tape device. SETTAPE may succeed, but you will beunable to write to the disk drive. If you wish to dump files to disk, create disk files and then specify the disk filesas tape devices.
3. Read From, or Write To, the Tape Device When a tape unit is attached, you can access it from ECL or within a OASBasic program. The following exampleshows some typical outputs when a process with tape unit 1 attached executes the ECL T.DUMP command:
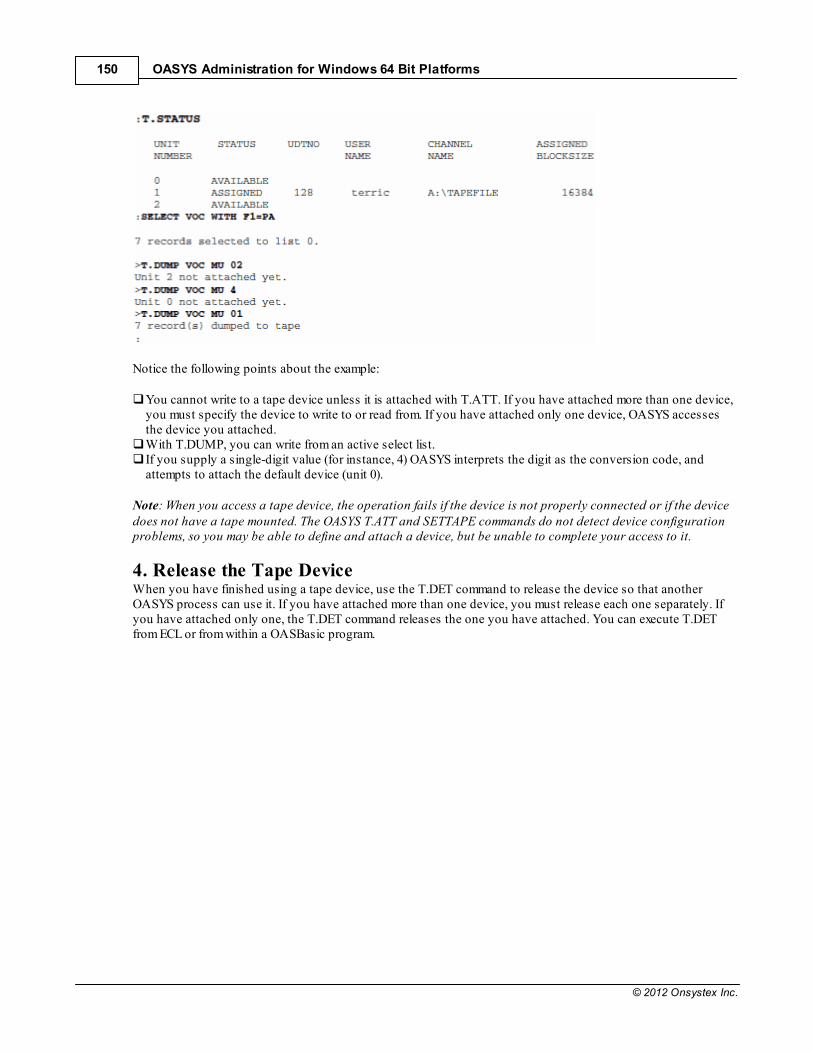
OASYS Administration for Windows 64 Bit Platforms150
© 2012 Onsystex Inc.
Notice the following points about the example:
You cannot write to a tape device unless it is attached with T.ATT. If you have attached more than one device,you must specify the device to write to or read from. If you have attached only one device, OASYS accessesthe device you attached. With T.DUMP, you can write from an active select list. If you supply a single-digit value (for instance, 4) OASYS interprets the digit as the conversion code, andattempts to attach the default device (unit 0).
Note: When you access a tape device, the operation fails if the device is not properly connected or if the devicedoes not have a tape mounted. The OASYS T.ATT and SETTAPE commands do not detect device configurationproblems, so you may be able to define and attach a device, but be unable to complete your access to it.
4. Release the Tape Device When you have finished using a tape device, use the T.DET command to release the device so that anotherOASYS process can use it. If you have attached more than one device, you must release each one separately. Ifyou have attached only one, the T.DET command releases the one you have attached. You can execute T.DETfrom ECL or from within a OASBasic program.

Part
15
OASYS Administration for Windows 64 Bit Platforms152
© 2012 Onsystex Inc.
15 Monitoring and Tuning OAS
This chapter outlines considerations that can affect OASYS performance on your Windows platform anddescribes OASYS-specific procedures for monitoring performance.
15.1 Monitoring Your Windows System
The Performance Monitor provides great flexibility for monitoring the behavior of your Windows system. Fromthe Start menu, click Control Panel, then double-click Administrative Tools, and then click Performance.
Note: A description of the Microsoft Performance Monitor is outside the scope of OASYS documentation. Referto your operating system documentation for information about how to use the Performance Monitor.
Onsystex recommends you monitor your system performance regularly to develop baseline expectationsthroughout your processing cycle. The performance history of your system provides information you can use toimplement new procedures (such as scheduling certain jobs to run off-hours or purchasing more resources), aswell as to identify problems quickly to minimize downtime.
Tip: You can select an individual oas session and monitor detailed information about its use of systemresources, in addition to monitoring OASYS as a whole.
15.2 OAS Performance Factors
Within OASYS applications, the major performance factors are: database design, file sizing, and program codingefficiency.
15.2.1 Database Design Considerations
Structure your database so records do not exceed a size limit of 4K bytes. When possible, avoid long, multivalued, variable-length records. Locate the most frequently accessed attributes near the beginning of a record. As far as possible, keep key lengths numeric and small in length.
15.2.2 Using Alternate Key Indexes
Using alternate key indexes speeds query access in a hashed file, but can slow down updates. Consider thisfactor when creating indexes. The more indexes created for a file, the longer an update takes. Index overflowsoccur when the maximum length value is too small for the fields being indexed.
Index overflows can degrade performance for query as well as update access. The solution for index overflows isto delete all the indexes for a file and rebuild them with a longer maximum length value.
Tip: Use the OASYS LIST.INDEX tool to identify index overflow problems. Consider running LIST.INDEXperiodically. See Using OASYS for information about alternate key indexes.
15.2.3 Sizing Static Hashed Files
Performance loss results if OASYS hashed files are allowed to overflow. Level 2 overflow, which occurs whenprimary keys outgrow a block, has a particularly serious performance impact. Level 1 overflow, which occurswhen data overflows a block, eventually affects performance as well.
Monitoring and Tuning OAS 153
© 2012 Onsystex Inc.
For information about file sizing commands, see the OASYS Commands Reference.
15.2.4 Sizing Dynamic Hashed Files
Dynamic hashed files differ from static hashed files in that they split and merge with respect to a minimummodulo. Splitting prevents level 2 overflow conditions, because a group splits whenever the percentage occupiedby keys exceeds a preset value. Merging supports efficient access to the file, because maintaining the file at a lowmodulo makes searches faster. For information about dynamic file sizing commands, see the OASYS CommandsReference.
15.2.5 OasBasic Coding Tips
The efficiency of your OASBasic application has a significant impact on OASYS performance. Use the followingguidelines when designing and coding.
Use Modular Programming Use inserts and include files consistently. Open frequently-used files to COMMON to reduce physical fileopens.
Use Efficient Commands Use the EQUATE command where possible. Use CASE statements instead of IF, THEN, ELSE structure whenever possible. Avoid nested IF, THEN, ELSE. Use OASYS @variables. Minimize new assignment of variables. Eliminate GOTO statements. Use GOSUB instead of external CALLs when appropriate; use CALL when multiple programs access the samecode. When using CALLs:
Avoid opening files; pass through COMMON or an argument list. Minimize local variables in subroutines. Use inserts, COMMON, and argument lists whenever possible.
Use A += B instead of A = A + B. Use LOOP and REMOVE when extracting data sequentially from a string.Avoid unnecessary shell commands; minimize PERFORM, EXECUTE, and MDPERFORM statements. Use CALL or CHAIN to run another OASBasic program. Avoid repeated ITYPE( ) function calls. Minimize use of EXECUTE “SELECT.....” by:
Using OASBasic SETINDEX, READFWD, READBCK. Using the OASBasic SELECT command.
Use Dynamic Arrays and Matrices Appropriately Use dynamic arrays when you are accessing small strings and variables. Use matrices if you are handling a large number of attributes and multi-valued strings.
Use the Correct READ in Each Situation Use READ when you are accessing small records, and the data you want is near the beginning of each record. Use READV if your intention is to get only one attribute. Use MATREAD when:
You are handling records with a large number of attributes, and you want to access more than oneattribute. You are handling large multivalued lists.
OASYS Administration for Windows 64 Bit Platforms154
© 2012 Onsystex Inc.
Manage Locks Carefully Use the LOCKED clause with a loop. Remember to release locks promptly.
15.3 OasBasic Profiling
OASYS allows users to generate execution profiles that track call counts and execution times for OASBasicprograms, internal subroutines, and program calls. You can use these profiles to identify sections of yourOASBasic application that are called most frequently, and then focus optimization efforts in those areas.Complete the following steps to create OASBasic execution profiles.
1. Compile the Programs with -G Compile OASBasic programs with the -G option to include information about internal subroutines in the profilereports.
2. Execute the Programs with -G To profile a OASBasic program, run the program with the -G option. See Developing OASBasic Applications forinformation about compiling and running programs.
3. Review the Profile Output OASYS stores profile output in the NTFS directory where the OASBasic program was executed. Output files arecalled profile.pid and profile.elapse.pid where pid is the process ID (USRNBR in LISTUSER output) of the user’sOASYS process.
The following example shows a portion of a profile report for a sample OASBasic program:
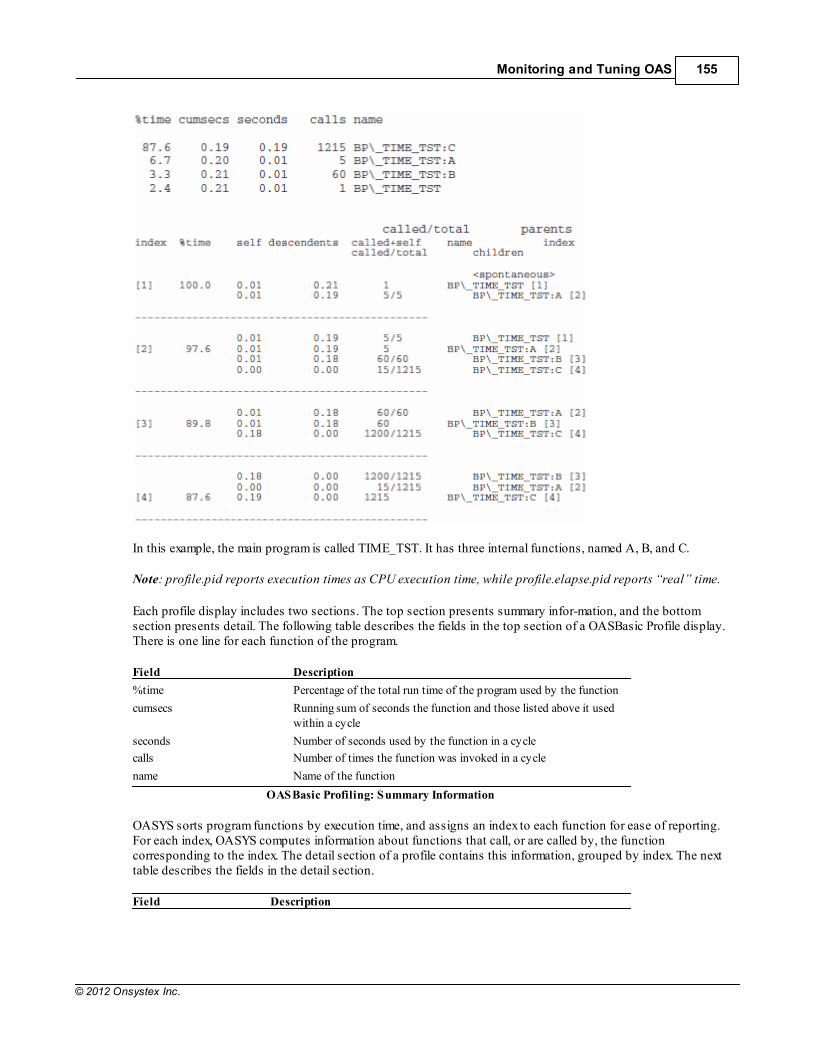
Monitoring and Tuning OAS 155
© 2012 Onsystex Inc.
In this example, the main program is called TIME_TST. It has three internal functions, named A, B, and C.
Note: profile.pid reports execution times as CPU execution time, while profile.elapse.pid reports “real” time.
Each profile display includes two sections. The top section presents summary infor-mation, and the bottomsection presents detail. The following table describes the fields in the top section of a OASBasic Profile display.There is one line for each function of the program.
Field Description
%time Percentage of the total run time of the program used by the function
cumsecs Running sum of seconds the function and those listed above it usedwithin a cycle
seconds Number of seconds used by the function in a cycle
calls Number of times the function was invoked in a cycle
name Name of the function
OASBasic Profiling: Summary Information
OASYS sorts program functions by execution time, and assigns an index to each function for ease of reporting.For each index, OASYS computes information about functions that call, or are called by, the functioncorresponding to the index. The detail section of a profile contains this information, grouped by index. The nexttable describes the fields in the detail section.
Field Description
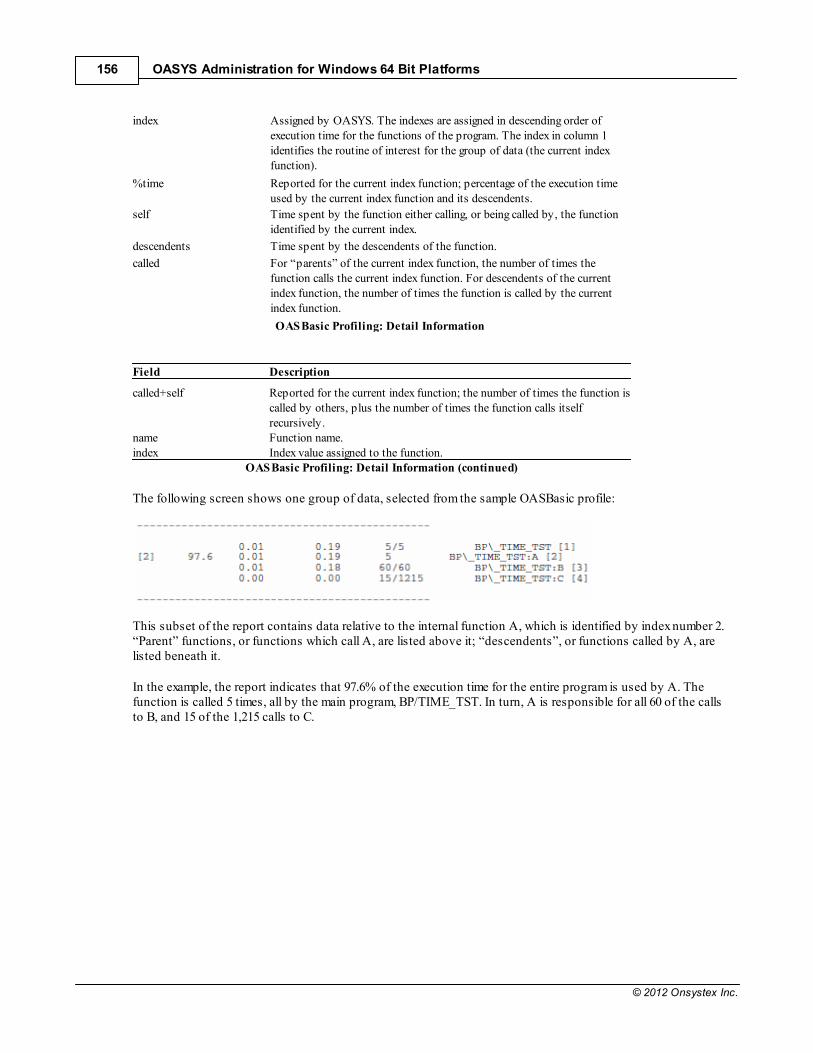
OASYS Administration for Windows 64 Bit Platforms156
© 2012 Onsystex Inc.
index Assigned by OASYS. The indexes are assigned in descending order ofexecution time for the functions of the program. The index in column 1identifies the routine of interest for the group of data (the current indexfunction).
%time Reported for the current index function; percentage of the execution timeused by the current index function and its descendents.
self Time spent by the function either calling, or being called by, the functionidentified by the current index.
descendents Time spent by the descendents of the function.
called For “parents” of the current index function, the number of times thefunction calls the current index function. For descendents of the currentindex function, the number of times the function is called by the currentindex function.
OASBasic Profiling: Detail Information
Field Description
called+self Reported for the current index function; the number of times the function iscalled by others, plus the number of times the function calls itselfrecursively.
name Function name. index Index value assigned to the function.
OASBasic Profiling: Detail Information (continued)
The following screen shows one group of data, selected from the sample OASBasic profile:
This subset of the report contains data relative to the internal function A, which is identified by index number 2.“Parent” functions, or functions which call A, are listed above it; “descendents”, or functions called by A, arelisted beneath it.
In the example, the report indicates that 97.6% of the execution time for the entire program is used by A. Thefunction is called 5 times, all by the main program, BP/TIME_TST. In turn, A is responsible for all 60 of the callsto B, and 15 of the 1,215 calls to C.

Part
16
OASYS Administration for Windows 64 Bit Platforms158
© 2012 Onsystex Inc.
16 Appendix A OAS Configuration Parameters
This appendix lists the names and descriptions for all OASYS configuration param-eters as of Release 7.1. SeeChapter 7, “Configuring Your OASYS System,” for more information about modifying your oasconfig file.
The following tables describe the configuration parameters that are placed in the oasconfig file located in \OASHOME\include at the time of installation. They are system-dependent and should not be changed.
Parameter Description
OAS_BlockingSequence The locking sequence of processes in the system. This parameter should not be changed. OAS_BlockingStrategy Type of P/V operations used for the Recoverable File System (RFS) only. Determined at
installation; platform dependent. Do not change unless instructed by Onsystex. oasconfig File Parameters that should not be changed
The following parameters may be changed to suit your environment.
Parameter Description
OAS_MaxTables Number of physical files that can be opened at the operating system level at one time ina OASYS session. This limit is for both oas and tm processes; the name of thecorresponding kernel parameter varies among OS versions.
OAS_MaxUsers Limit for number of OASYS user processes (such as oas and PHANTOM) that can runat the same time.
OAS_Console Switch for turning on and off messaging to your console. Must be greater than zero formessages to display at console.
OAS_Tmp Path of a directory for storing intermediate work files. Default is \OASYS\ud61\temp.
OAS_NULL Specifies a character to print to represent the null value. The ASCII character thatrepresents the null value is nonprinting.
OAS_TestandSet Used with OASYS Physical Lock Manager. If a Linux platform supports test-n-setinstruction, OAS_BlockingStrategy is set to 3 and OAS_TestandSet is set to 0. If aLinux platform does not support test-n-set instruction, OAS_BlockingStrategy is set to2 and OAS_TestandSet is set to 1. Do not change this parameter unless instructed to doso by Onsystex.
OAS_WaitMilliseconds If OAS_TestandSet is set to 0, the length of time (in milli-seconds) that a process waitsto access a shared memory address held by another process. This parameter has no effectif OAS_TestandSet is set to 1. Do not change unless instructed to do so by Onsystex.
OAS_NullFlag Toggles null value handling on and off. If 0, null value handling is off. Must be greaterthan 0 for null value handling to be in effect.
OAS_MaxSystemFiles Maximum number of Linux file systems allowed. If you have more than 200 Linux filesystems, increase to your number of file systems.
oasconfig File Parameters that may be changed
Parameter Description
OAS_NoGlobalSlots The number of hash buckets systemwide, used to hold the lock names in sharedmemory. This setting directly affects performance. Normally, the default value ofthis parameter should not be changed. However, if you notice significantdegradation in performance, or your appli-cation intensively accesses specific files,you can increase this parameter. The default value is the closest prime number toOAS_MaxUsers * 3.
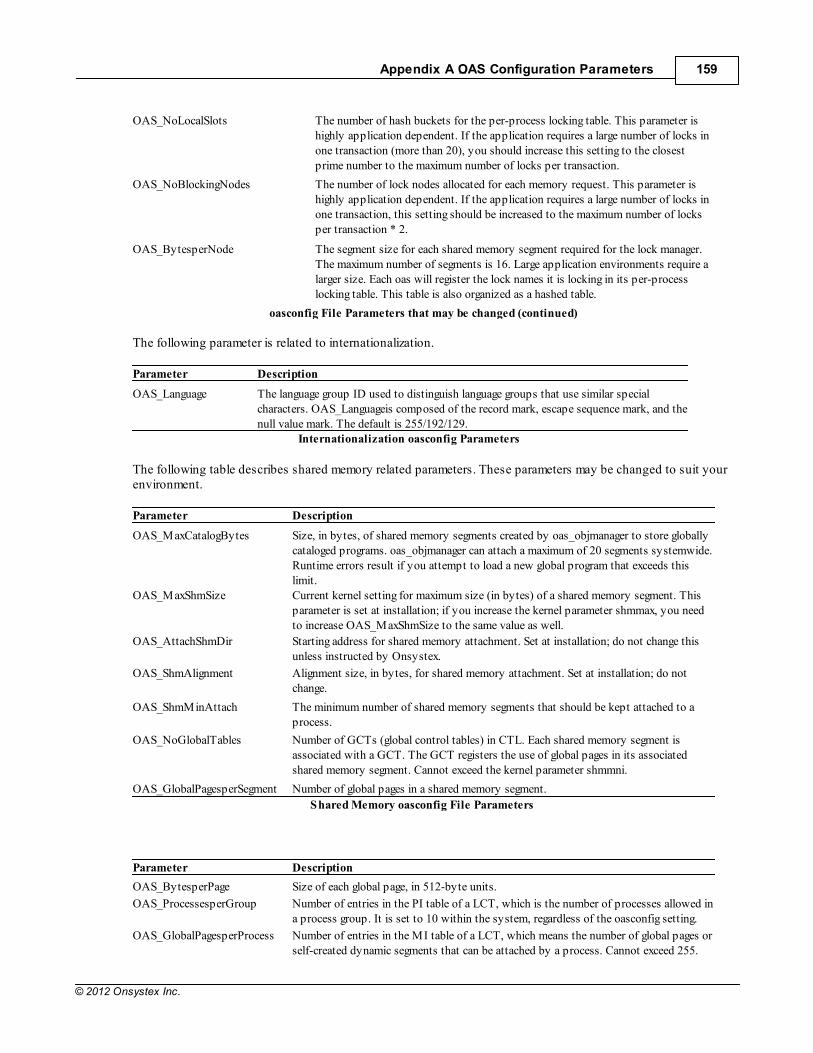
Appendix A OAS Configuration Parameters 159
© 2012 Onsystex Inc.
OAS_NoLocalSlots The number of hash buckets for the per-process locking table. This parameter ishighly application dependent. If the application requires a large number of locks inone transaction (more than 20), you should increase this setting to the closestprime number to the maximum number of locks per transaction.
OAS_NoBlockingNodes The number of lock nodes allocated for each memory request. This parameter ishighly application dependent. If the application requires a large number of locks inone transaction, this setting should be increased to the maximum number of locksper transaction * 2.
OAS_BytesperNode The segment size for each shared memory segment required for the lock manager.The maximum number of segments is 16. Large application environments require alarger size. Each oas will register the lock names it is locking in its per-processlocking table. This table is also organized as a hashed table.
oasconfig File Parameters that may be changed (continued)
The following parameter is related to internationalization.
Parameter Description
OAS_Language The language group ID used to distinguish language groups that use similar specialcharacters. OAS_Languageis composed of the record mark, escape sequence mark, and thenull value mark. The default is 255/192/129.
Internationalization oasconfig Parameters
The following table describes shared memory related parameters. These parameters may be changed to suit yourenvironment.
Parameter Description
OAS_MaxCatalogBytes Size, in bytes, of shared memory segments created by oas_objmanager to store globallycataloged programs. oas_objmanager can attach a maximum of 20 segments systemwide.Runtime errors result if you attempt to load a new global program that exceeds thislimit.
OAS_MaxShmSize Current kernel setting for maximum size (in bytes) of a shared memory segment. Thisparameter is set at installation; if you increase the kernel parameter shmmax, you needto increase OAS_MaxShmSize to the same value as well.
OAS_AttachShmDir Starting address for shared memory attachment. Set at installation; do not change thisunless instructed by Onsystex.
OAS_ShmAlignment Alignment size, in bytes, for shared memory attachment. Set at installation; do notchange.
OAS_ShmMinAttach The minimum number of shared memory segments that should be kept attached to aprocess.
OAS_NoGlobalTables Number of GCTs (global control tables) in CTL. Each shared memory segment isassociated with a GCT. The GCT registers the use of global pages in its associatedshared memory segment. Cannot exceed the kernel parameter shmmni.
OAS_GlobalPagesperSegment Number of global pages in a shared memory segment.
Shared Memory oasconfig File Parameters
Parameter Description
OAS_BytesperPage Size of each global page, in 512-byte units.
OAS_ProcessesperGroup Number of entries in the PI table of a LCT, which is the number of processes allowed ina process group. It is set to 10 within the system, regardless of the oasconfig setting.
OAS_GlobalPagesperProcess Number of entries in the MI table of a LCT, which means the number of global pages orself-created dynamic segments that can be attached by a process. Cannot exceed 255.
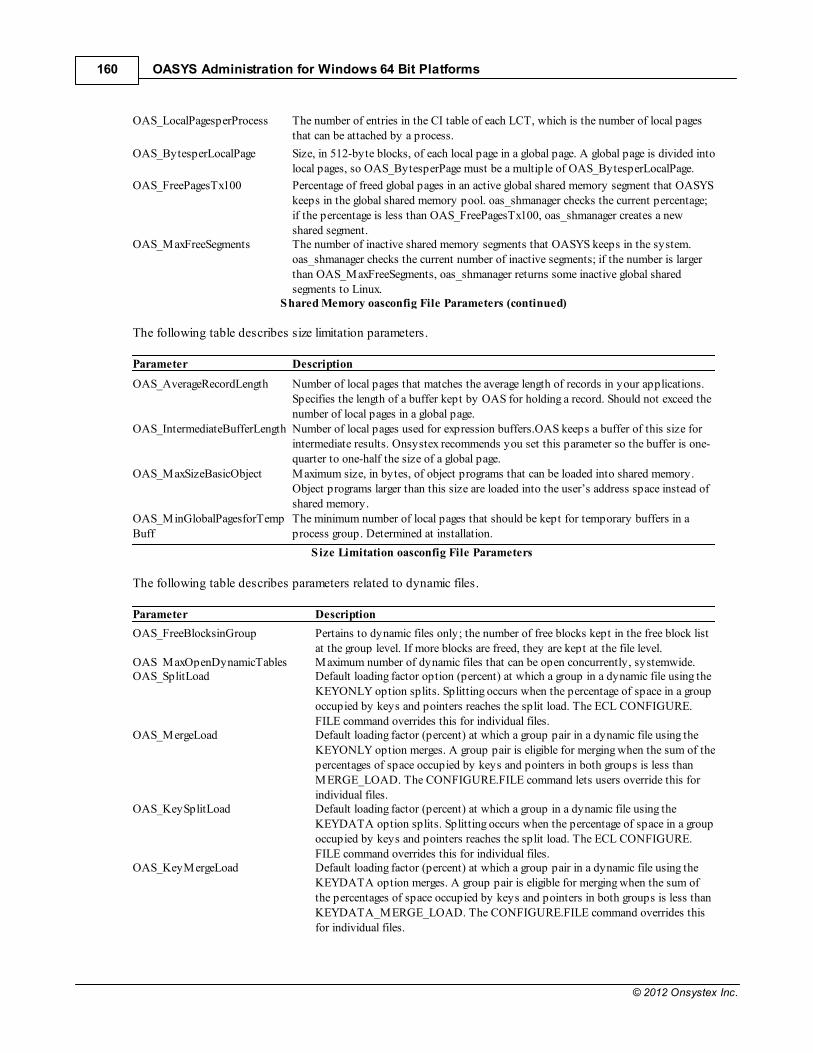
OASYS Administration for Windows 64 Bit Platforms160
© 2012 Onsystex Inc.
OAS_LocalPagesperProcess The number of entries in the CI table of each LCT, which is the number of local pagesthat can be attached by a process.
OAS_BytesperLocalPage Size, in 512-byte blocks, of each local page in a global page. A global page is divided intolocal pages, so OAS_BytesperPage must be a multiple of OAS_BytesperLocalPage.
OAS_FreePagesTx100 Percentage of freed global pages in an active global shared memory segment that OASYSkeeps in the global shared memory pool. oas_shmanager checks the current percentage;if the percentage is less than OAS_FreePagesTx100, oas_shmanager creates a newshared segment.
OAS_MaxFreeSegments The number of inactive shared memory segments that OASYS keeps in the system.oas_shmanager checks the current number of inactive segments; if the number is largerthan OAS_MaxFreeSegments, oas_shmanager returns some inactive global sharedsegments to Linux.
Shared Memory oasconfig File Parameters (continued)
The following table describes size limitation parameters.
Parameter Description
OAS_AverageRecordLength Number of local pages that matches the average length of records in your applications.Specifies the length of a buffer kept by OAS for holding a record. Should not exceed thenumber of local pages in a global page.
OAS_IntermediateBufferLength Number of local pages used for expression buffers.OAS keeps a buffer of this size forintermediate results. Onsystex recommends you set this parameter so the buffer is one-quarter to one-half the size of a global page.
OAS_MaxSizeBasicObject Maximum size, in bytes, of object programs that can be loaded into shared memory.Object programs larger than this size are loaded into the user’s address space instead ofshared memory.
OAS_MinGlobalPagesforTempBuff
The minimum number of local pages that should be kept for temporary buffers in aprocess group. Determined at installation.
Size Limitation oasconfig File Parameters
The following table describes parameters related to dynamic files.
Parameter Description
OAS_FreeBlocksinGroup Pertains to dynamic files only; the number of free blocks kept in the free block listat the group level. If more blocks are freed, they are kept at the file level.
OAS_MaxOpenDynamicTables Maximum number of dynamic files that can be open concurrently, systemwide. OAS_SplitLoad Default loading factor option (percent) at which a group in a dynamic file using the
KEYONLY option splits. Splitting occurs when the percentage of space in a groupoccupied by keys and pointers reaches the split load. The ECL CONFIGURE.FILE command overrides this for individual files.
OAS_MergeLoad Default loading factor (percent) at which a group pair in a dynamic file using theKEYONLY option merges. A group pair is eligible for merging when the sum of thepercentages of space occupied by keys and pointers in both groups is less thanMERGE_LOAD. The CONFIGURE.FILE command lets users override this forindividual files.
OAS_KeySplitLoad Default loading factor (percent) at which a group in a dynamic file using theKEYDATA option splits. Splitting occurs when the percentage of space in a groupoccupied by keys and pointers reaches the split load. The ECL CONFIGURE.FILE command overrides this for individual files.
OAS_KeyMergeLoad Default loading factor (percent) at which a group pair in a dynamic file using theKEYDATA option merges. A group pair is eligible for merging when the sum ofthe percentages of space occupied by keys and pointers in both groups is less thanKEYDATA_MERGE_LOAD. The CONFIGURE.FILE command overrides thisfor individual files.

Appendix A OAS Configuration Parameters 161
© 2012 Onsystex Inc.
OAS_MaxPartitionLength Upper size limit, in bytes, of each partition file (dat00x) of a dynamic file. When apart file reaches this size, OASYS does not add further blocks to it, but createsanother part file using the part table. The default value is 1073741824 bytes (1GB). Must be greater than 32768 bytes (32 KB) and less than 2147467264 bytes(2 GB-16KB).
OAS_PathPartitionTable Path of a Linux text file that directs OASYS where to create dynamic file part files.
Dynamic File oasconfig File Parameters
The following parameters are for Telnet
Parameter Description
OAS_WaitBlockingTime Used by the Telnet server to specify the maximum time to wait for a lock.
OAS_WaitforInput Used by the OAS ts executable to specify the maximum number of seconds to waitfor input from client about device information. If the information is not provided,OASYS starts without the device information.
Telnet oasconfig File Parameters
The following table describes parameters related to Journaling.
Parameter Description
OAS_MaxJournalProcesses Maximum number of journal processes per journal path.
OAS_MaxTablesperJournalProcess Maximum number of journal files allowed per journal process.
Journaling oasconfig File Parameters
The following table describes OASBasic file-related parameters.
Parameter Description
OAS_MaxOpenTables Maximum number of hashed files that can be opened by OASBasic OPENstatements, per oas process. Includes RFS and non-RFS, static, dynamic, andsequentially hashed files; each dynamic file counts as one file.
OAS_MaxSequentialTables Maximum number of sequential files that can be opened at one time by OASBasicOPENSEQ statements, per oas process.
OAS_MaxSystemTables Maximum number of Linux sequential files that can be opened at one time byOASBasic OSOPEN statements, per oas process.
OAS_MaxDynamicFileParts Maximum number of nonrecoverable dynamic part files (dat00x, over00x) aOASYS process can open with OASBasic OPEN statements or ECL commands.Each dynamic file has at least two part files.
OASBasic File-Related oasconfig File Parameters
The following table describes parameters related to OASBasic.
Parameter Description
OAS_MaxLevelExecuteCapturing Number of levels allowed for nested OASBasic EXECUTE WITH CAPTURINGor MDPERFORM WITH CAPTURING clauses. Individual users can set anenvironment variable that overrides the configuration parameter.
OAS_MaxLevelExecuteReturning Number of levels allowed for nested OASBasic EXECUTE WITH RETURNINGor MDPERFORM WITH RETURNING clauses. Individual users can set anenvironment variable that overrides the configuration parameter.
OAS_CompressVariablePolicy Used to oas_analyzetbls BASIC memory compactor to do compaction for BASICstrings.
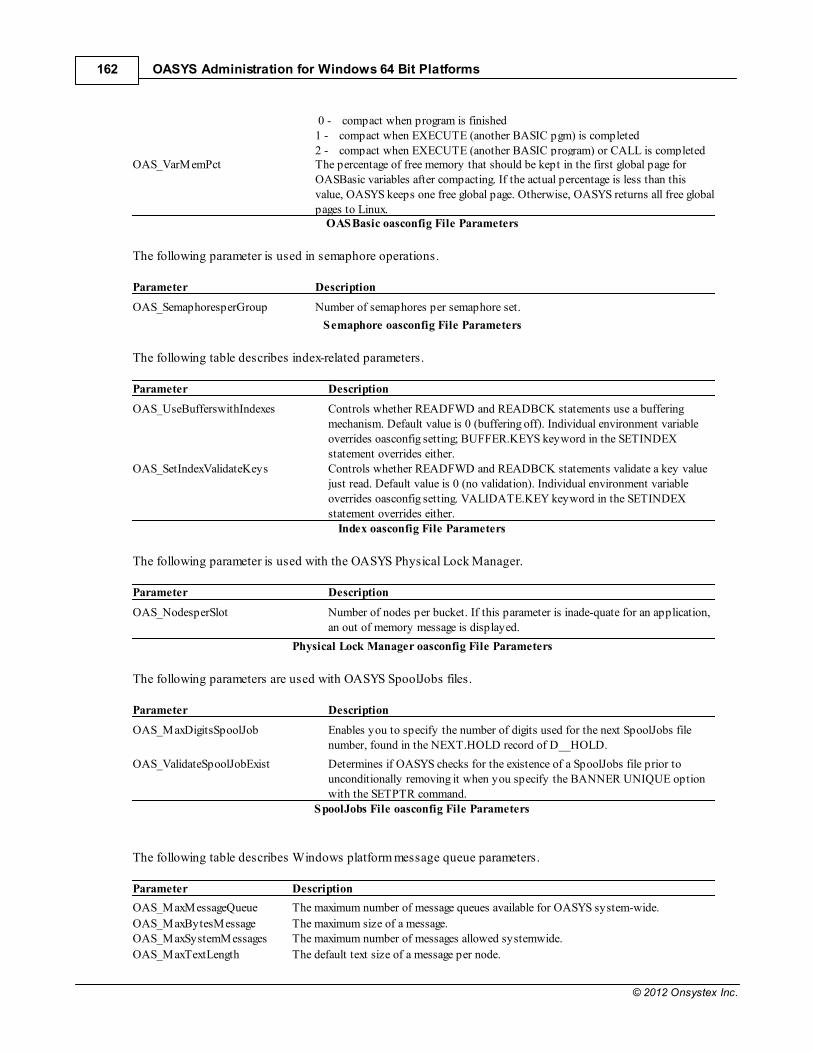
OASYS Administration for Windows 64 Bit Platforms162
© 2012 Onsystex Inc.
0 - compact when program is finished 1 - compact when EXECUTE (another BASIC pgm) is completed 2 - compact when EXECUTE (another BASIC program) or CALL is completed
OAS_VarMemPct The percentage of free memory that should be kept in the first global page forOASBasic variables after compacting. If the actual percentage is less than thisvalue, OASYS keeps one free global page. Otherwise, OASYS returns all free globalpages to Linux.
OASBasic oasconfig File Parameters
The following parameter is used in semaphore operations.
Parameter Description
OAS_SemaphoresperGroup Number of semaphores per semaphore set.
Semaphore oasconfig File Parameters
The following table describes index-related parameters.
Parameter Description
OAS_UseBufferswithIndexes Controls whether READFWD and READBCK statements use a bufferingmechanism. Default value is 0 (buffering off). Individual environment variableoverrides oasconfig setting; BUFFER.KEYS keyword in the SETINDEXstatement overrides either.
OAS_SetIndexValidateKeys Controls whether READFWD and READBCK statements validate a key valuejust read. Default value is 0 (no validation). Individual environment variableoverrides oasconfig setting. VALIDATE.KEY keyword in the SETINDEXstatement overrides either.
Index oasconfig File Parameters
The following parameter is used with the OASYS Physical Lock Manager.
Parameter Description
OAS_NodesperSlot Number of nodes per bucket. If this parameter is inade-quate for an application,an out of memory message is displayed.
Physical Lock Manager oasconfig File Parameters
The following parameters are used with OASYS SpoolJobs files.
Parameter Description
OAS_MaxDigitsSpoolJob Enables you to specify the number of digits used for the next SpoolJobs filenumber, found in the NEXT.HOLD record of D__HOLD.
OAS_ValidateSpoolJobExist Determines if OASYS checks for the existence of a SpoolJobs file prior tounconditionally removing it when you specify the BANNER UNIQUE optionwith the SETPTR command.
SpoolJobs File oasconfig File Parameters
The following table describes Windows platform message queue parameters.
Parameter Description
OAS_MaxMessageQueue The maximum number of message queues available for OASYS system-wide.
OAS_MaxBytesMessage The maximum size of a message. OAS_MaxSystemMessages The maximum number of messages allowed systemwide.
OAS_MaxTextLength The default text size of a message per node.
Appendix A OAS Configuration Parameters 163
© 2012 Onsystex Inc.
Windows Platform Message Queue oasconfig Parameters
Part
17
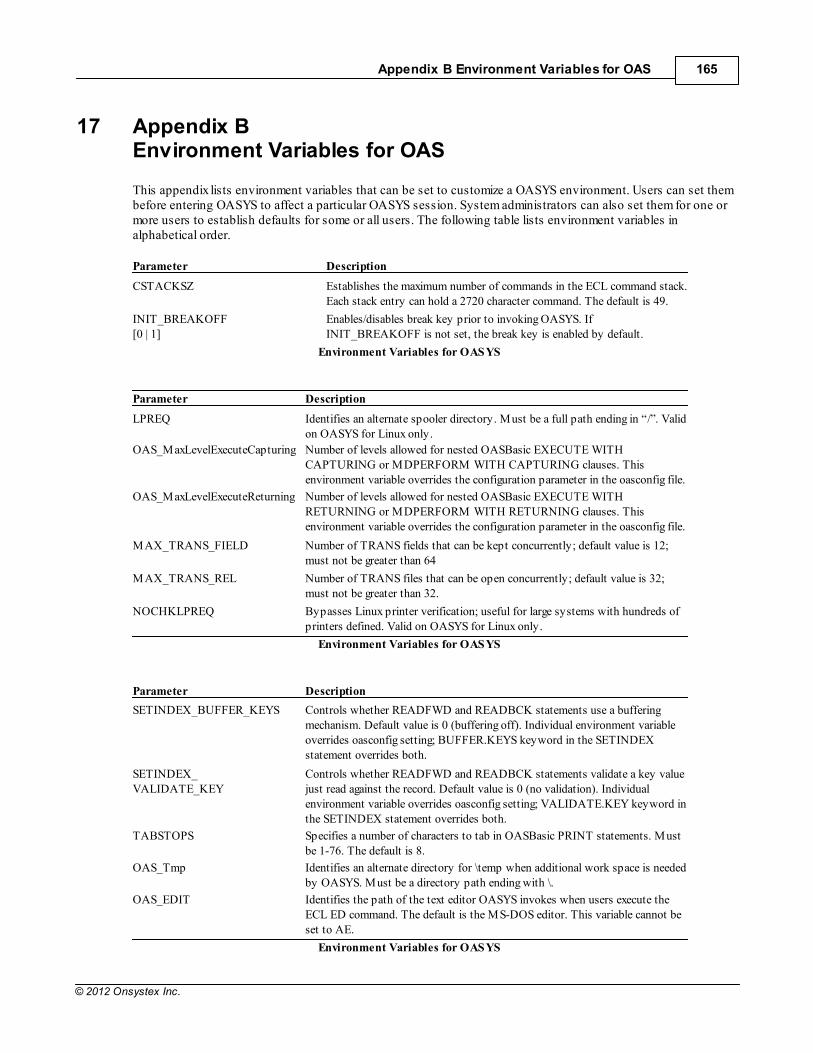
Appendix B Environment Variables for OAS 165
© 2012 Onsystex Inc.
17 Appendix B Environment Variables for OAS
This appendix lists environment variables that can be set to customize a OASYS environment. Users can set thembefore entering OASYS to affect a particular OASYS session. System administrators can also set them for one ormore users to establish defaults for some or all users. The following table lists environment variables inalphabetical order.
Parameter Description
CSTACKSZ Establishes the maximum number of commands in the ECL command stack.Each stack entry can hold a 2720 character command. The default is 49.
INIT_BREAKOFF [0 | 1]
Enables/disables break key prior to invoking OASYS. IfINIT_BREAKOFF is not set, the break key is enabled by default.
Environment Variables for OASYS
Parameter Description
LPREQ Identifies an alternate spooler directory. Must be a full path ending in “/”. Validon OASYS for Linux only.
OAS_MaxLevelExecuteCapturing Number of levels allowed for nested OASBasic EXECUTE WITHCAPTURING or MDPERFORM WITH CAPTURING clauses. Thisenvironment variable overrides the configuration parameter in the oasconfig file.
OAS_MaxLevelExecuteReturning Number of levels allowed for nested OASBasic EXECUTE WITHRETURNING or MDPERFORM WITH RETURNING clauses. Thisenvironment variable overrides the configuration parameter in the oasconfig file.
MAX_TRANS_FIELD Number of TRANS fields that can be kept concurrently; default value is 12;must not be greater than 64
MAX_TRANS_REL Number of TRANS files that can be open concurrently; default value is 32;must not be greater than 32.
NOCHKLPREQ Bypasses Linux printer verification; useful for large systems with hundreds ofprinters defined. Valid on OASYS for Linux only.
Environment Variables for OASYS
Parameter Description
SETINDEX_BUFFER_KEYS Controls whether READFWD and READBCK statements use a bufferingmechanism. Default value is 0 (buffering off). Individual environment variableoverrides oasconfig setting; BUFFER.KEYS keyword in the SETINDEXstatement overrides both.
SETINDEX_ VALIDATE_KEY
Controls whether READFWD and READBCK statements validate a key valuejust read against the record. Default value is 0 (no validation). Individualenvironment variable overrides oasconfig setting; VALIDATE.KEY keyword inthe SETINDEX statement overrides both.
TABSTOPS Specifies a number of characters to tab in OASBasic PRINT statements. Mustbe 1-76. The default is 8.
OAS_Tmp Identifies an alternate directory for \temp when additional work space is neededby OASYS. Must be a directory path ending with \.
OAS_EDIT Identifies the path of the text editor OASYS invokes when users execute theECL ED command. The default is the MS-DOS editor. This variable cannot beset to AE.
Environment Variables for OASYS
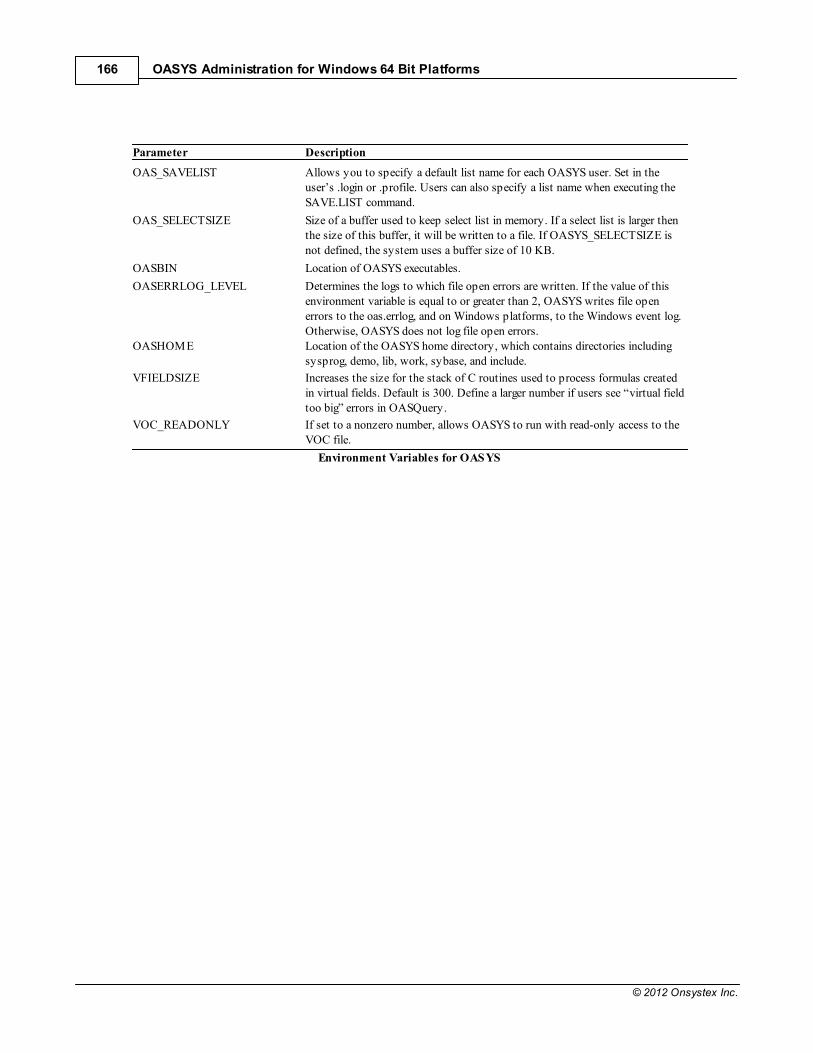
OASYS Administration for Windows 64 Bit Platforms166
© 2012 Onsystex Inc.
Parameter Description
OAS_SAVELIST Allows you to specify a default list name for each OASYS user. Set in theuser’s .login or .profile. Users can also specify a list name when executing theSAVE.LIST command.
OAS_SELECTSIZE Size of a buffer used to keep select list in memory. If a select list is larger thenthe size of this buffer, it will be written to a file. If OASYS_SELECTSIZE isnot defined, the system uses a buffer size of 10 KB.
OASBIN Location of OASYS executables.
OASERRLOG_LEVEL Determines the logs to which file open errors are written. If the value of thisenvironment variable is equal to or greater than 2, OASYS writes file openerrors to the oas.errlog, and on Windows platforms, to the Windows event log.Otherwise, OASYS does not log file open errors.
OASHOME Location of the OASYS home directory, which contains directories includingsysprog, demo, lib, work, sybase, and include.
VFIELDSIZE Increases the size for the stack of C routines used to process formulas createdin virtual fields. Default is 300. Define a larger number if users see “virtual fieldtoo big” errors in OASQuery.
VOC_READONLY If set to a nonzero number, allows OASYS to run with read-only access to theVOC file.
Environment Variables for OASYS