Embed Size (px)
Citation preview
Office 2007
Word
Word processing your CV
July 2008

Word Processing a CV (250708) ©De Montfort University, IT Training 2008 i
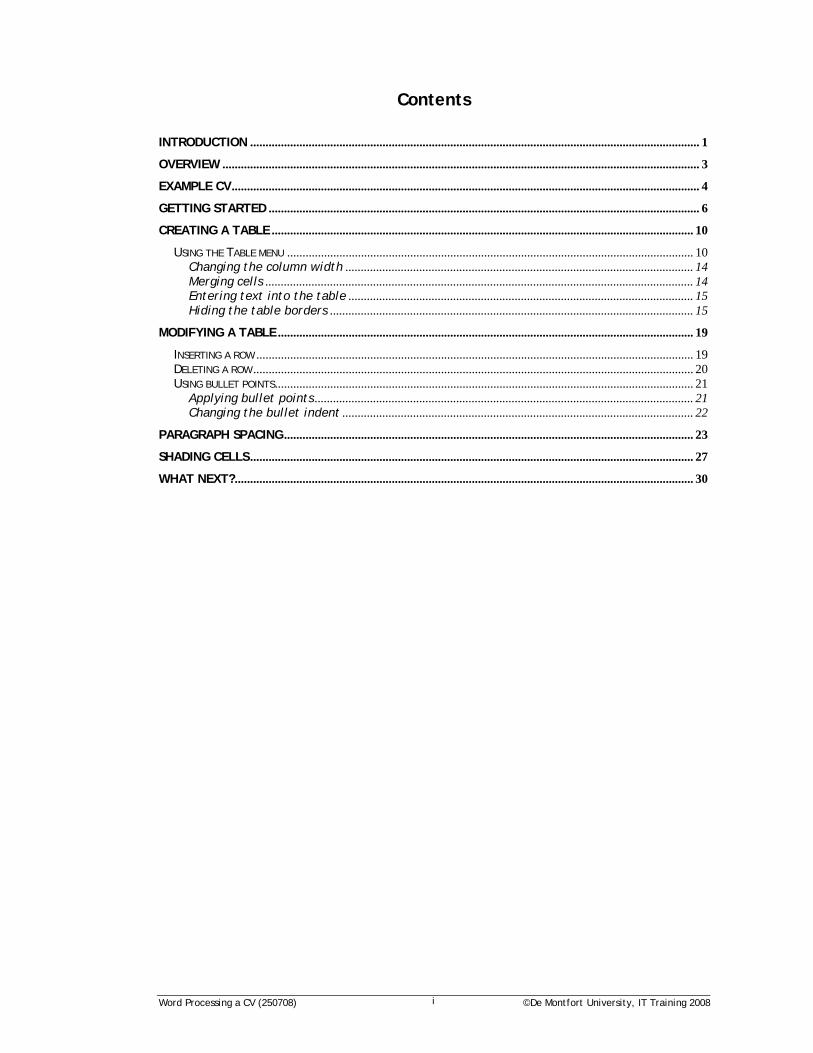
Contents
INTRODUCTION .................................................................................................................................................. 1 OVERVIEW ........................................................................................................................................................... 3 EXAMPLE CV ........................................................................................................................................................ 4 GETTING STARTED ............................................................................................................................................ 6 CREATING A TABLE ......................................................................................................................................... 10
USING THE TABLE MENU .................................................................................................................................... 10 Changing the column width ................................................................................................................. 14 Merging cells ........................................................................................................................................... 14 Entering text into the table ................................................................................................................ 15 Hiding the table borders ...................................................................................................................... 15
MODIFYING A TABLE ....................................................................................................................................... 19 INSERTING A ROW .............................................................................................................................................. 19 DELETING A ROW ............................................................................................................................................... 20 USING BULLET POINTS ........................................................................................................................................ 21
Applying bullet points ........................................................................................................................... 21 Changing the bullet indent .................................................................................................................. 22
PARAGRAPH SPACING ..................................................................................................................................... 23 SHADING CELLS ................................................................................................................................................ 27 WHAT NEXT? ..................................................................................................................................................... 30

Word Processing a CV (250708) ©De Montfort University, IT Training 2008 1
This short course is aimed at those who already know the basics of word processing and would like some help in producing a curriculum vitae (CV). There are different types of CV, for example a chronological CV for use when your work has been continuous and your experience highlights your steady career development, and the position you are seeking follows on logically from your most recent job. Examples of different types of CV can be seen in the booklet, Making Successful Applications. This is produced by Careers DMU and can be downloaded from their web site. During this training session you will produce a targeted CV. These are written when you have a particular job in mind. Student Services run an Ask service which is open from Monday to Friday from 9am, the last appointment is 4.45pm. This is run on a drop-in basis and there will be a careers advisor available to provide guidance on what information you should include in your CV with the opportunity to have your completed CV checked to ensure you have incorporated all the required information. There is no need to book one of these 15 minute appointments; you will be seen on a first come served basis. To take advantage of the Ask service, go to Student Services on the ground floor of Gateway House. Check the Careers pages on the DMU web site for more information:
http://www.dmu.ac.uk/study/student_services/careers/ Knowledge assumed experience of using a computer, for example keyboard
familiarity experience of using Windows basic experience of using Microsoft Word Areas covered creating a Word document creating a table formatting text in a table
INTRODUCTION
Word Processing a CV (250708) ©De Montfort University, IT Training 2008 2
Document signposts Instructions for you to type Bold text
Shortcuts
Reminders
Exercises
Notes
Word Processing a CV (250708) ©De Montfort University, IT Training 2008 3
Word 2007 is a very powerful word processing package and there are many features that you may not currently use to their full potential. Our aim is that, by the end of this training session, you will be confident in using tables to format text and should be able to produce a CV easily. IMPORTANT TO REMEMBER The format that you will use to produce a CV is only one of many that are acceptable. Before spending time on a CV consider the type of job you are applying for. For example, for work involving a design element, a more creative style of CV may be more appropriate, whereas a more formal style may be best for a position as an accountant. As time for this training session is limited you will create only the last two tables of the CV shown on page 4. You will also learn how to modify the tables and format text so that points are emphasised.
OVERVIEW
Word Processing a CV (250708) ©De Montfort University, IT Training 2008 4
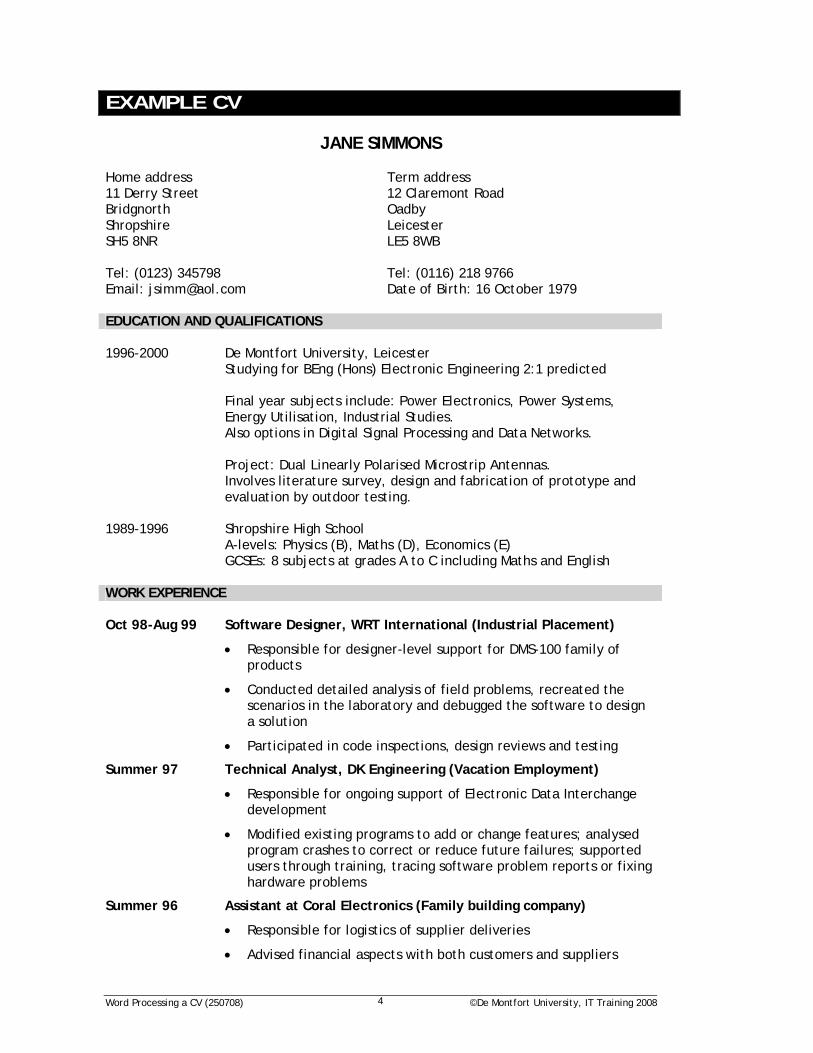
JANE SIMMONS
Home address Term address 11 Derry Street 12 Claremont Road Bridgnorth Oadby Shropshire Leicester SH5 8NR LE5 8WB Tel: (0123) 345798 Tel: (0116) 218 9766 Email: [email protected] Date of Birth: 16 October 1979 EDUCATION AND QUALIFICATIONS 1996-2000 De Montfort University, Leicester Studying for BEng (Hons) Electronic Engineering 2:1 predicted Final year subjects include: Power Electronics, Power Systems,
Energy Utilisation, Industrial Studies. Also options in Digital Signal Processing and Data Networks.
Project: Dual Linearly Polarised Microstrip Antennas.
Involves literature survey, design and fabrication of prototype and evaluation by outdoor testing.
1989-1996 Shropshire High School
A-levels: Physics (B), Maths (D), Economics (E) GCSEs: 8 subjects at grades A to C including Maths and English
WORK EXPERIENCE Oct 98-Aug 99 Software Designer, WRT International (Industrial Placement)
• Responsible for designer-level support for DMS-100 family of products
• Conducted detailed analysis of field problems, recreated the scenarios in the laboratory and debugged the software to design a solution
• Participated in code inspections, design reviews and testing
Summer 97 Technical Analyst, DK Engineering (Vacation Employment)
• Responsible for ongoing support of Electronic Data Interchange development
• Modified existing programs to add or change features; analysed program crashes to correct or reduce future failures; supported users through training, tracing software problem reports or fixing hardware problems
Summer 96 Assistant at Coral Electronics (Family building company)
• Responsible for logistics of supplier deliveries
• Advised financial aspects with both customers and suppliers
EXAMPLE CV

Word Processing a CV (250708) ©De Montfort University, IT Training 2008 5
TECHNICAL SKILLS Programming: C, C++, Java, Visual Basic, Assembler,
Fortran Operating Systems: UNIX, DOS, VAX/VMS, Win 3.1, Win NT,
Novell Software Packages: Excel, Word, Lotus 123 Methodologies: SSADM$, UML, Object Orientated
Analysis and Design, Prince 2 Other: AutoCAD, Oracle PROFESSIONAL ACTIVITIES • Student member of the IEEE and Institute of Measurement and
Control • Reached Regional Final of Engineering Society National Student
Design Competition in March 1999 EXTRA-CURRICULAR ACTIVITIES • Secretary of the University Women’s Rugby Club, involves
organising meetings, scheduling matches and compiling match reports
• Treasurer of Engineering Society Committee, responsible for fund-raising and budgeting
• Member of the British Association of Ski Instructors, which involves training/coaching, risk analysis and equipment repair
ADDITIONAL SKILLS • Full clean driving licence • Conversational French REFERENCES Dr S Squires Mr C Bannister School of Engineering and Manufacture Technical Director Queens Building WRT International De Montfort University The Gateway
London Road Leicester
Leicester LE1 9BH LE2 6BN
Word Processing a CV (250708) ©De Montfort University, IT Training 2008 6
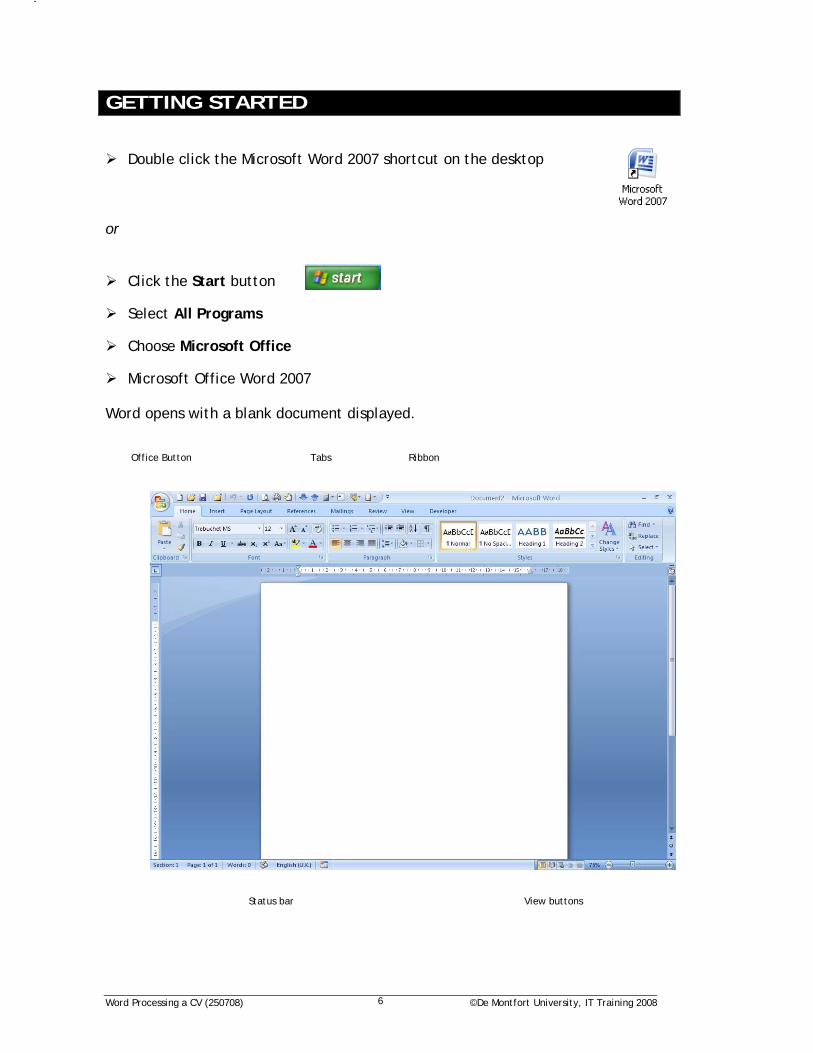
Double click the Microsoft Word 2007 shortcut on the desktop or
Click the Start button
Select All Programs
Choose Microsoft Office
Microsoft Office Word 2007 Word opens with a blank document displayed.
GETTING STARTED
Office Button Tabs Ribbon
View buttons Status bar
Word Processing a CV (250708) ©De Montfort University, IT Training 2008 7
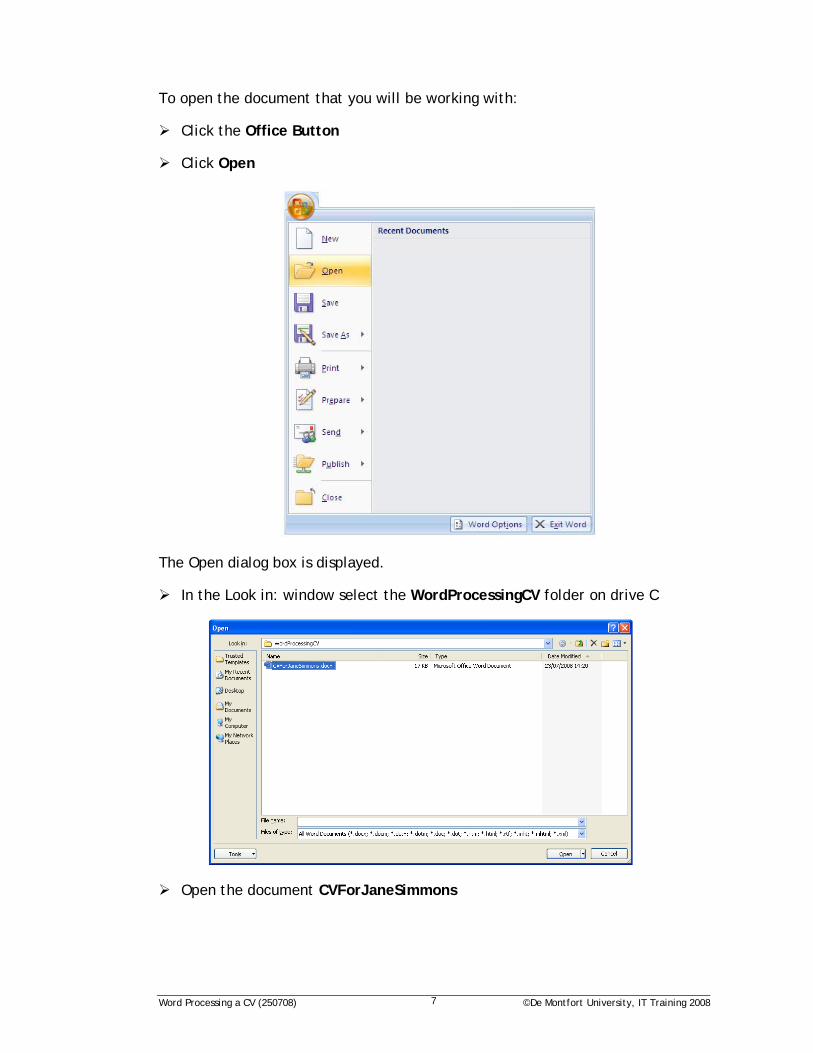
To open the document that you will be working with:
Click the Office Button
Click Open
The Open dialog box is displayed.
In the Look in: window select the WordProcessingCV folder on drive C
Open the document CVForJaneSimmons
Word Processing a CV (250708) ©De Montfort University, IT Training 2008 8
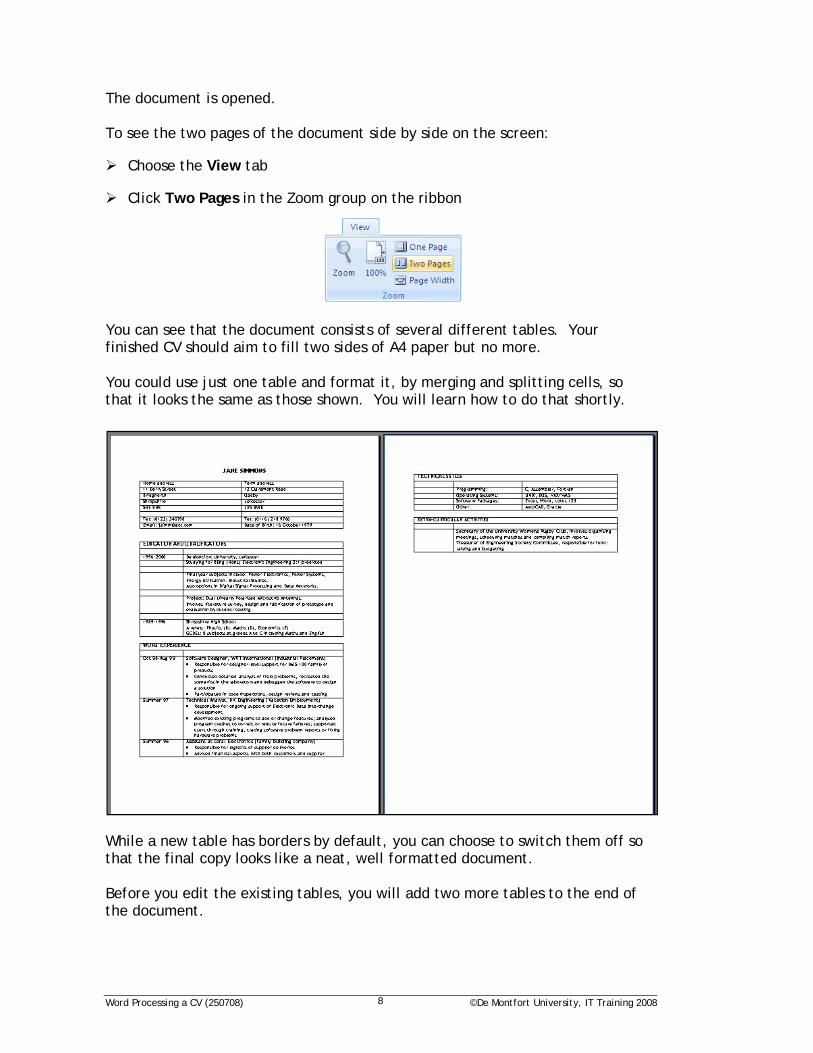
The document is opened. To see the two pages of the document side by side on the screen:
Choose the View tab
Click Two Pages in the Zoom group on the ribbon
You can see that the document consists of several different tables. Your finished CV should aim to fill two sides of A4 paper but no more. You could use just one table and format it, by merging and splitting cells, so that it looks the same as those shown. You will learn how to do that shortly.
While a new table has borders by default, you can choose to switch them off so that the final copy looks like a neat, well formatted document. Before you edit the existing tables, you will add two more tables to the end of the document.

Word Processing a CV (250708) ©De Montfort University, IT Training 2008 9
All tables are created in the same way and modified to suit the contents. By the end of this training session you will be confident that you could have started the document from scratch and produced all the tables it contains.
Click the One Page button in the Zoom group on the ribbon
Enlarge the image by clicking the 100% button in the View group on the ribbon
Word Processing a CV (250708) ©De Montfort University, IT Training 2008 10
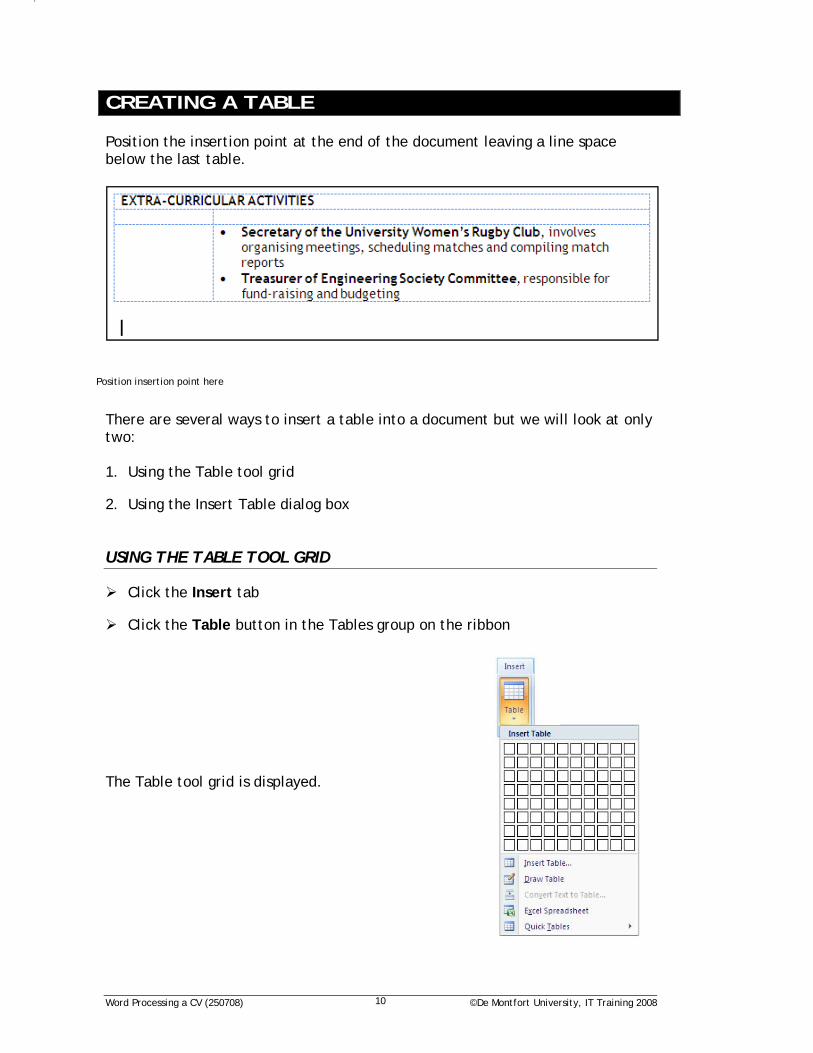
Position the insertion point at the end of the document leaving a line space below the last table.
There are several ways to insert a table into a document but we will look at only two: 1. Using the Table tool grid
2. Using the Insert Table dialog box USING THE TABLE TOOL GRID
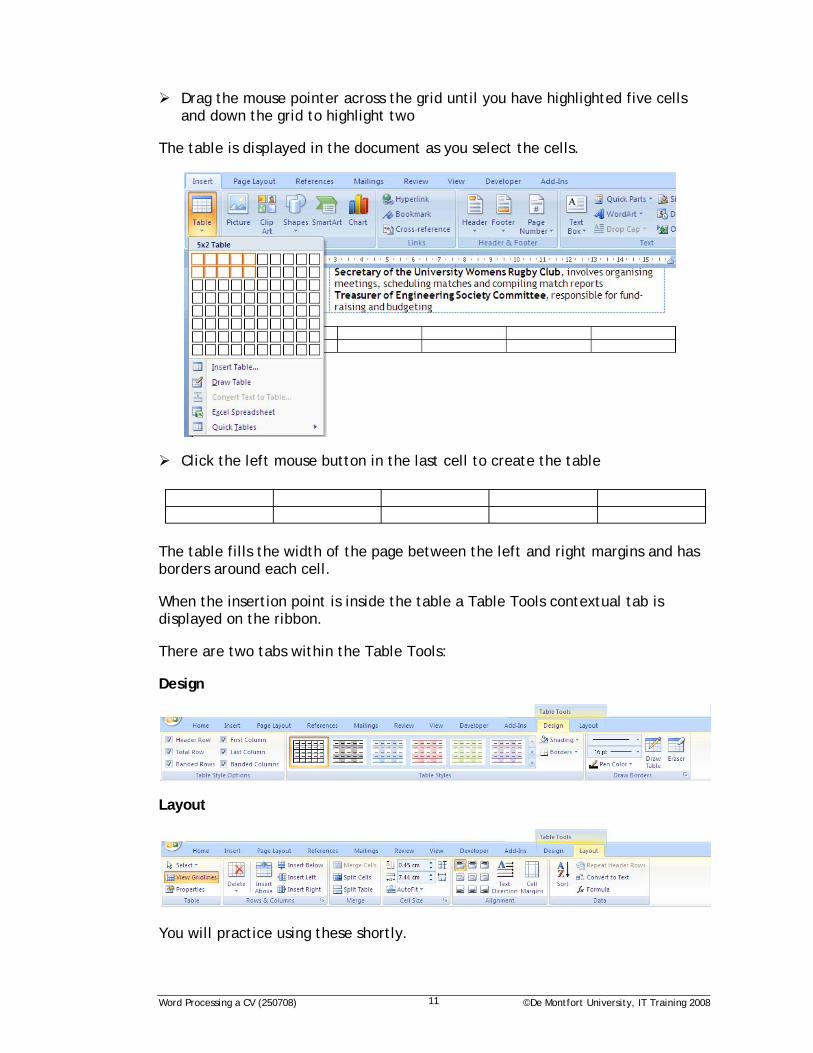
Click the Insert tab
Click the Table button in the Tables group on the ribbon The Table tool grid is displayed.
CREATING A TABLE
Position insertion point here
Word Processing a CV (250708) ©De Montfort University, IT Training 2008 11
Drag the mouse pointer across the grid until you have highlighted five cells and down the grid to highlight two
The table is displayed in the document as you select the cells.
Click the left mouse button in the last cell to create the table
The table fills the width of the page between the left and right margins and has borders around each cell.
When the insertion point is inside the table a Table Tools contextual tab is displayed on the ribbon.
There are two tabs within the Table Tools:
Design
Layout
You will practice using these shortly.
Word Processing a CV (250708) ©De Montfort University, IT Training 2008 12
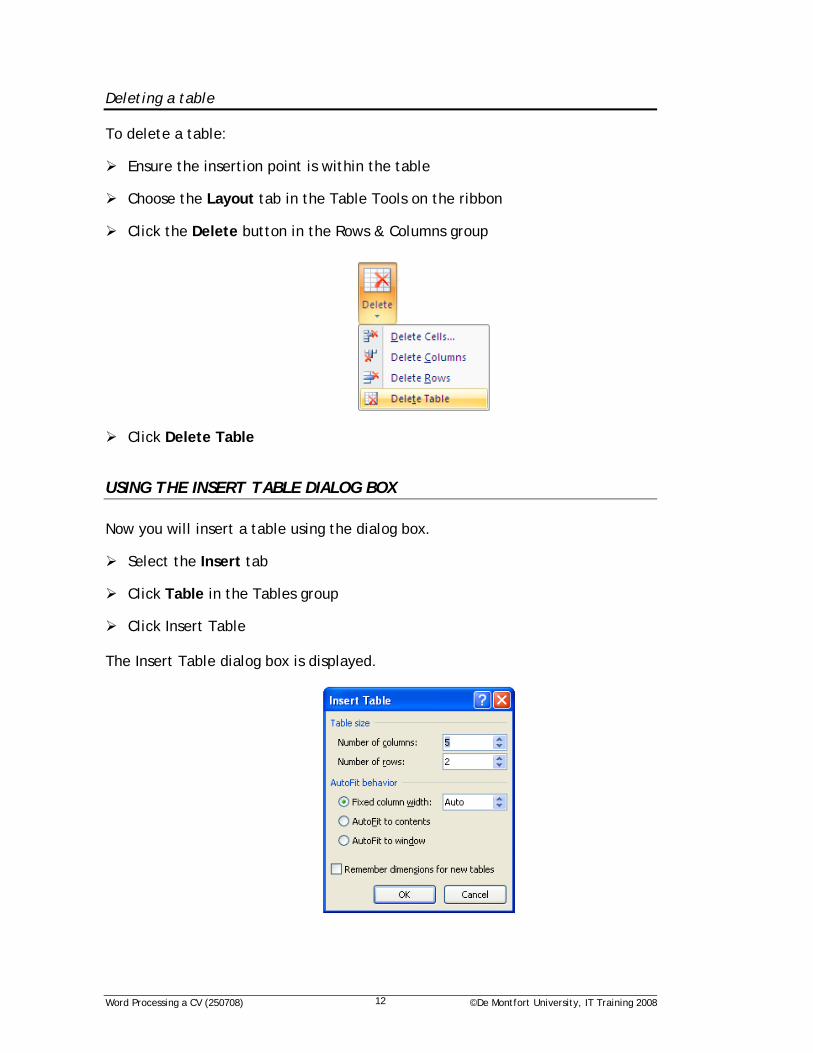
Deleting a table
To delete a table:
Ensure the insertion point is within the table
Choose the Layout tab in the Table Tools on the ribbon
Click the Delete button in the Rows & Columns group
Click Delete Table
USING THE INSERT TABLE DIALOG BOX Now you will insert a table using the dialog box.
Select the Insert tab
Click Table in the Tables group
Click Insert Table The Insert Table dialog box is displayed.
Word Processing a CV (250708) ©De Montfort University, IT Training 2008 13
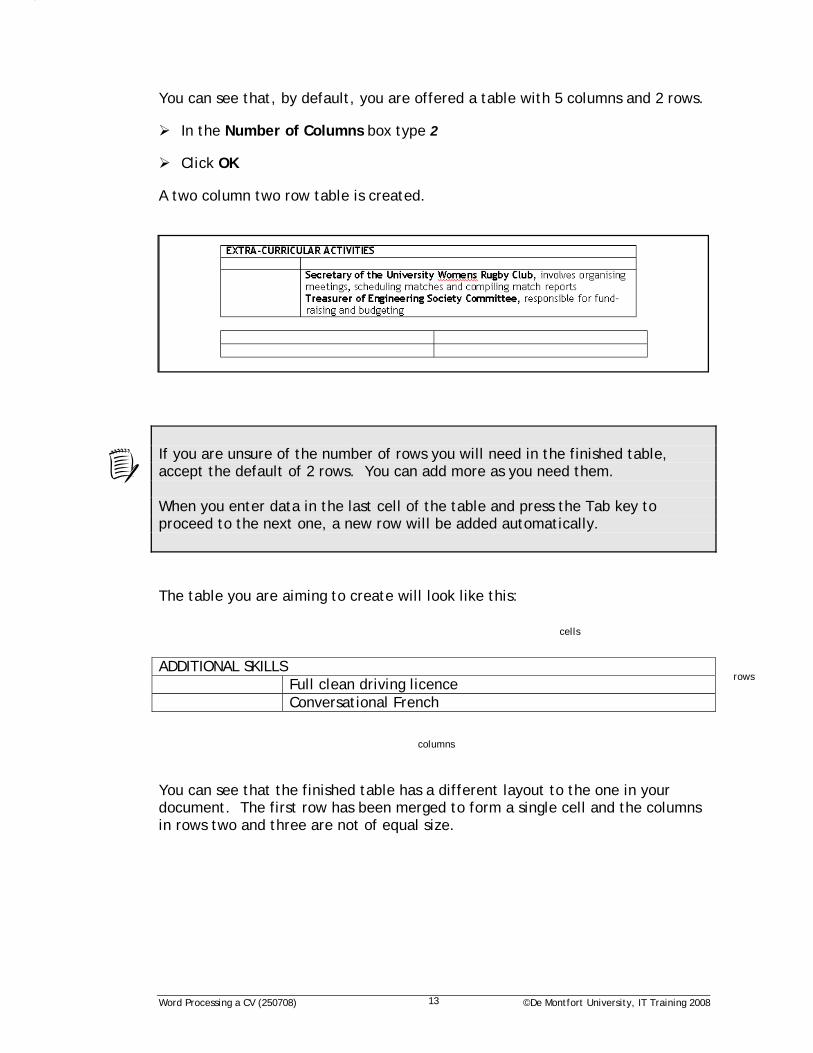
You can see that, by default, you are offered a table with 5 columns and 2 rows.
In the Number of Columns box type 2
Click OK
A two column two row table is created.
If you are unsure of the number of rows you will need in the finished table, accept the default of 2 rows. You can add more as you need them. When you enter data in the last cell of the table and press the Tab key to proceed to the next one, a new row will be added automatically. The table you are aiming to create will look like this: ADDITIONAL SKILLS Full clean driving licence Conversational French You can see that the finished table has a different layout to the one in your document. The first row has been merged to form a single cell and the columns in rows two and three are not of equal size.
columns
cells
rows
Word Processing a CV (250708) ©De Montfort University, IT Training 2008 14
Changing the column width
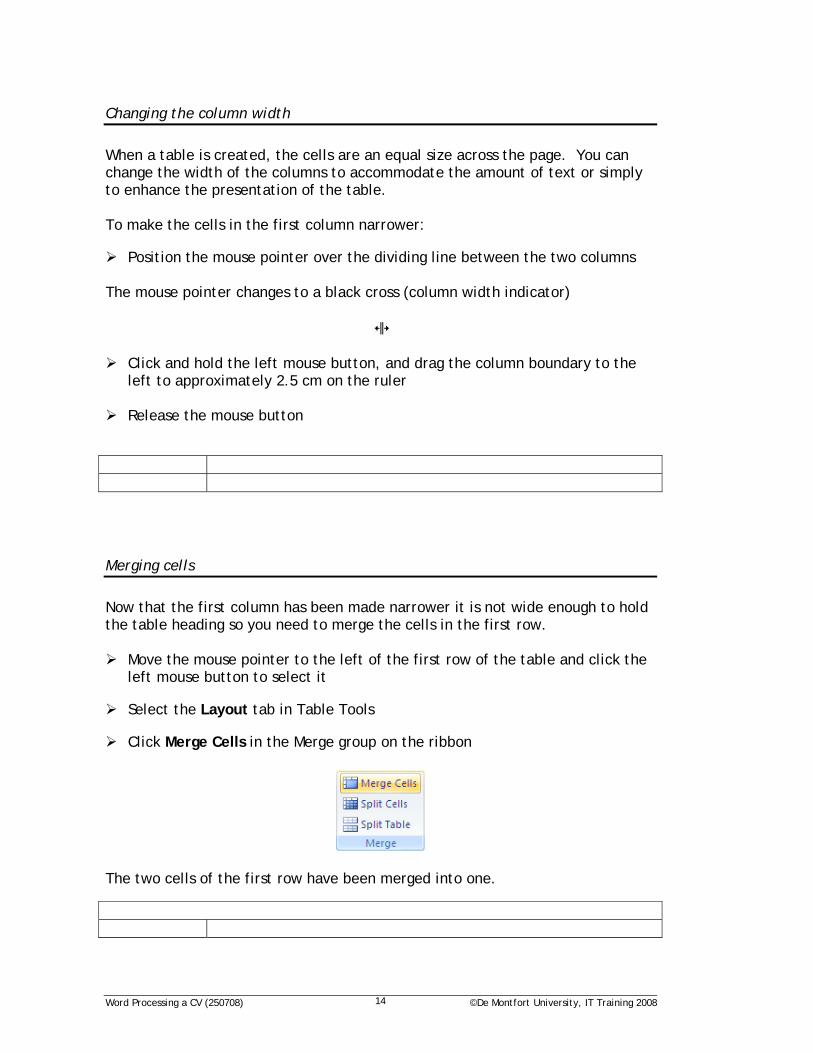
When a table is created, the cells are an equal size across the page. You can change the width of the columns to accommodate the amount of text or simply to enhance the presentation of the table. To make the cells in the first column narrower:
Position the mouse pointer over the dividing line between the two columns The mouse pointer changes to a black cross (column width indicator)
Click and hold the left mouse button, and drag the column boundary to the left to approximately 2.5 cm on the ruler
Release the mouse button
Merging cells
Now that the first column has been made narrower it is not wide enough to hold the table heading so you need to merge the cells in the first row.
Move the mouse pointer to the left of the first row of the table and click the left mouse button to select it
Select the Layout tab in Table Tools
Click Merge Cells in the Merge group on the ribbon
The two cells of the first row have been merged into one.

Word Processing a CV (250708) ©De Montfort University, IT Training 2008 15
Entering text into the table
Position the insertion point in the first cell
Type ADDITIONAL SKILLS To embolden the heading:
Select the Home tab
Click the Bold button in the Font group on the ribbon
Position the insertion point in the second cell of the second row
Type Full clean driving licence
Press the Tab key once
A new row is added to the table.
Press Tab again
Type Conversational French
Hiding the table borders
The cells of the table are being used as place holders for the text and it is not intended that you will see the borders around the cells when the document is printed. So you need to hide the borders.
ADDITIONAL SKILLS
ADDITIONAL SKILLS Full clean driving licence
ADDITIONAL SKILLS Full clean driving licence Conversational French
Word Processing a CV (250708) ©De Montfort University, IT Training 2008 16
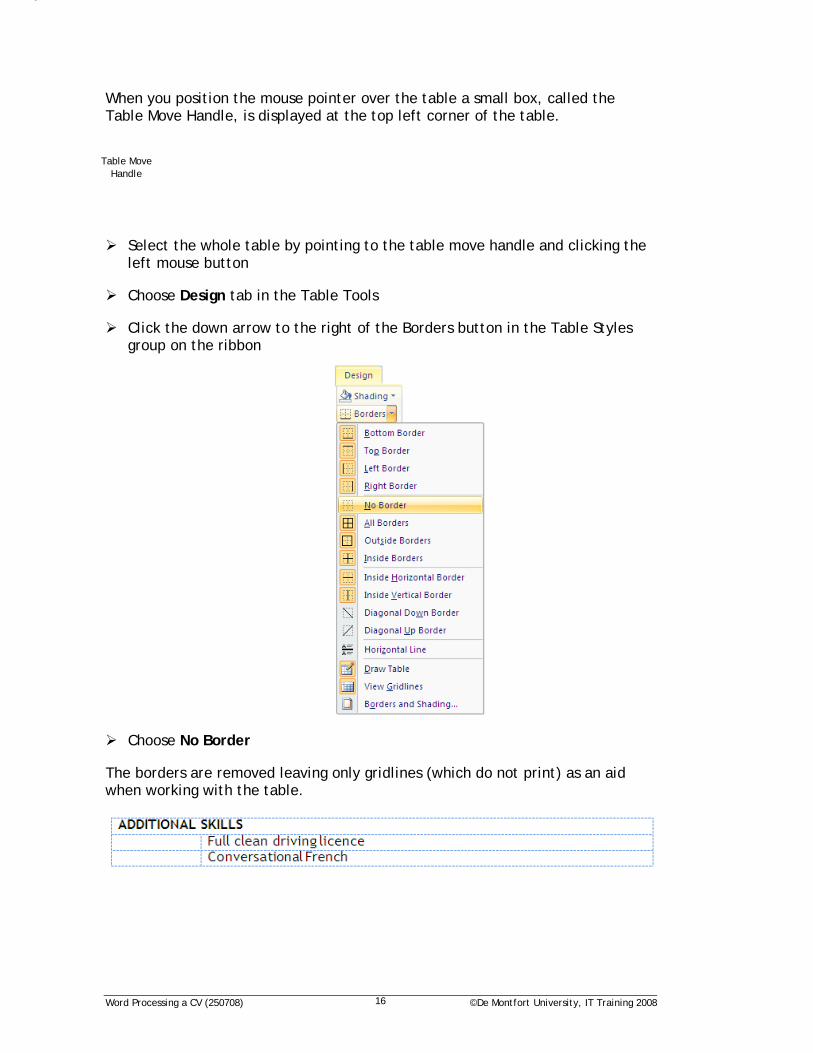
When you position the mouse pointer over the table a small box, called the Table Move Handle, is displayed at the top left corner of the table.
Select the whole table by pointing to the table move handle and clicking the left mouse button
Choose Design tab in the Table Tools
Click the down arrow to the right of the Borders button in the Table Styles group on the ribbon
Choose No Border
The borders are removed leaving only gridlines (which do not print) as an aid when working with the table.
Table Move Handle
Click
Word Processing a CV (250708) ©De Montfort University, IT Training 2008 17
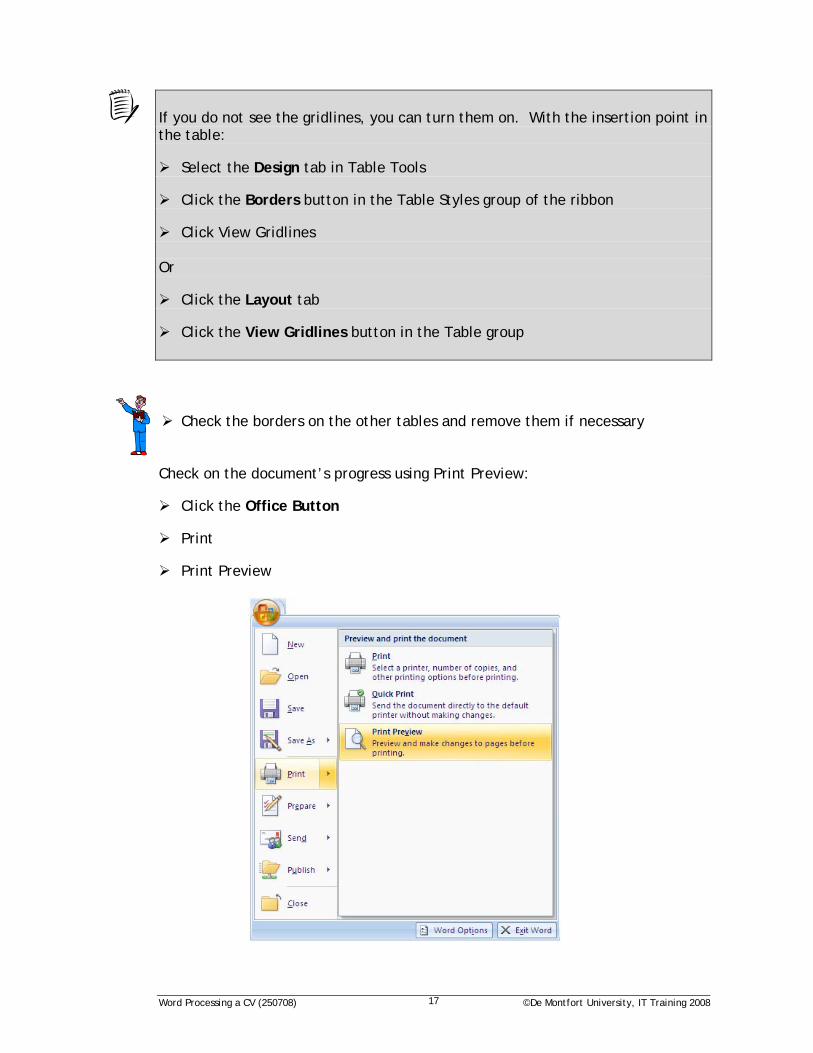
If you do not see the gridlines, you can turn them on. With the insertion point in the table:
Select the Design tab in Table Tools
Click the Borders button in the Table Styles group of the ribbon
Click View Gridlines Or
Click the Layout tab
Click the View Gridlines button in the Table group
Check the borders on the other tables and remove them if necessary Check on the document’s progress using Print Preview:
Click the Office Button
Print Preview
Word Processing a CV (250708) ©De Montfort University, IT Training 2008 18
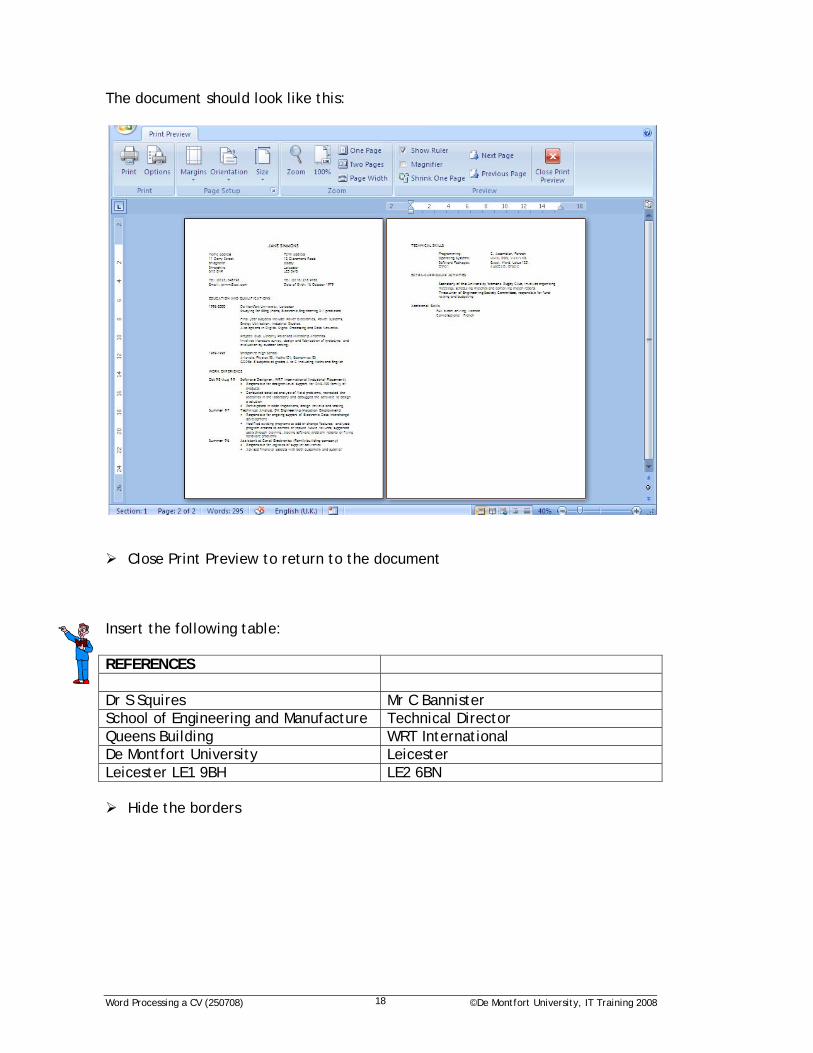
The document should look like this:
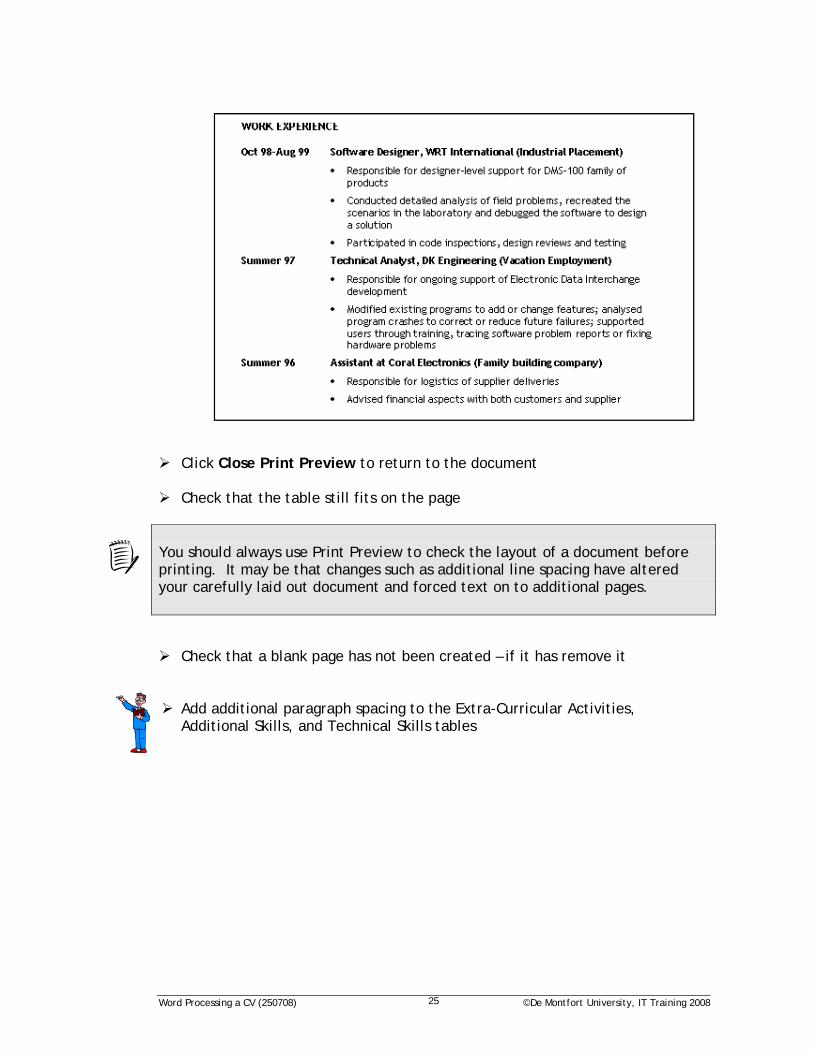
Close Print Preview to return to the document Insert the following table: REFERENCES Dr S Squires Mr C Bannister School of Engineering and Manufacture Technical Director Queens Building WRT International De Montfort University Leicester Leicester LE1 9BH LE2 6BN
Hide the borders
Word Processing a CV (250708) ©De Montfort University, IT Training 2008 19
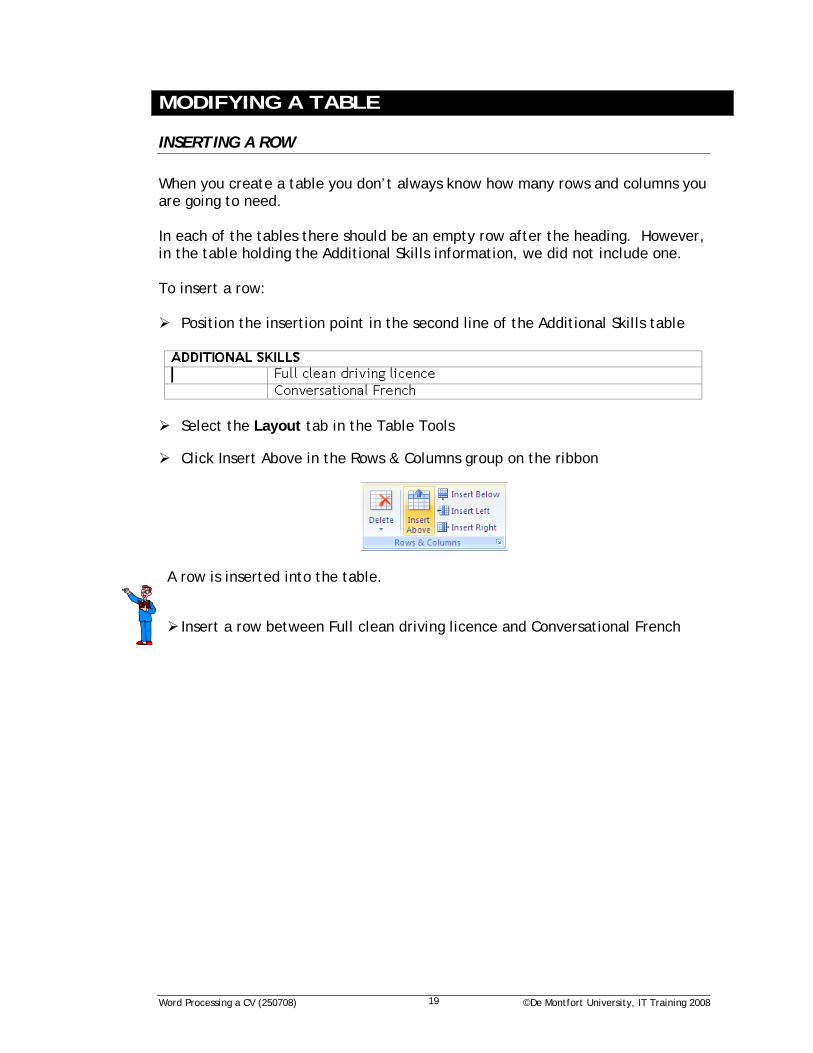
INSERTING A ROW When you create a table you don’t always know how many rows and columns you are going to need. In each of the tables there should be an empty row after the heading. However, in the table holding the Additional Skills information, we did not include one. To insert a row:
Position the insertion point in the second line of the Additional Skills table
Select the Layout tab in the Table Tools
Click Insert Above in the Rows & Columns group on the ribbon
A row is inserted into the table.
Insert a row between Full clean driving licence and Conversational French
MODIFYING A TABLE
Word Processing a CV (250708) ©De Montfort University, IT Training 2008 20
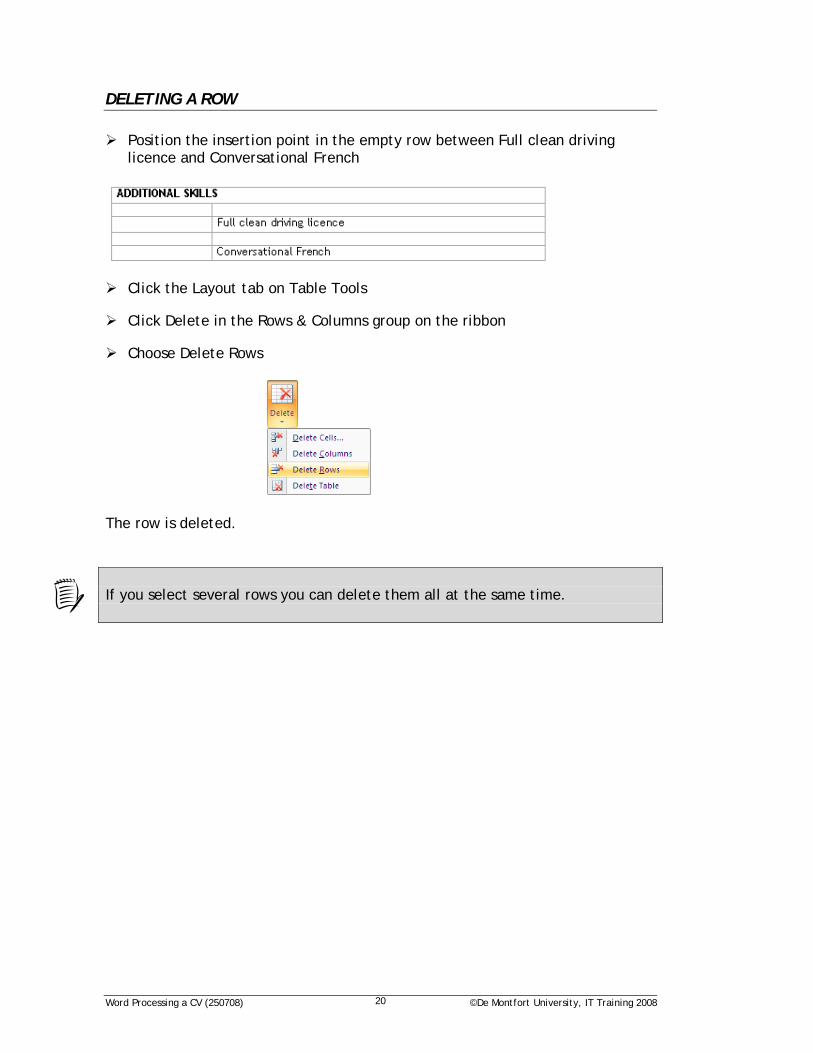
DELETING A ROW
Position the insertion point in the empty row between Full clean driving licence and Conversational French
Click the Layout tab on Table Tools
Click Delete in the Rows & Columns group on the ribbon
Choose Delete Rows
The row is deleted. If you select several rows you can delete them all at the same time.
Word Processing a CV (250708) ©De Montfort University, IT Training 2008 21
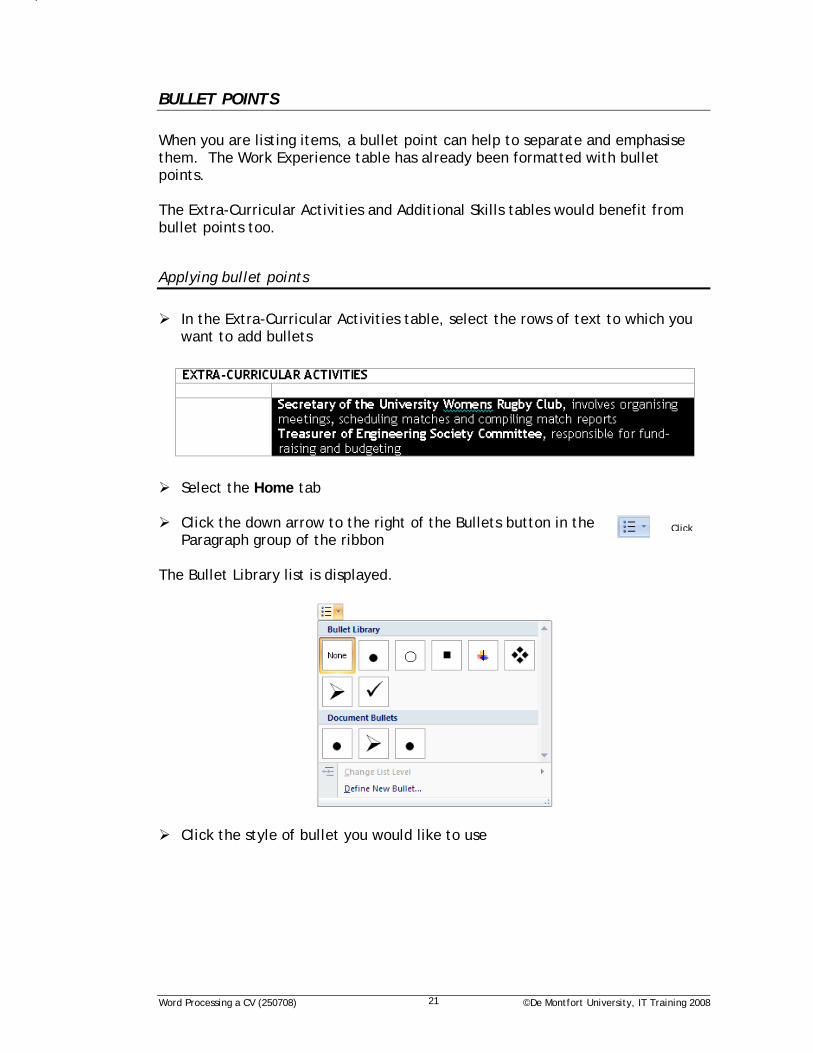
BULLET POINTS When you are listing items, a bullet point can help to separate and emphasise them. The Work Experience table has already been formatted with bullet points. The Extra-Curricular Activities and Additional Skills tables would benefit from bullet points too.
Applying bullet points
In the Extra-Curricular Activities table, select the rows of text to which you
want to add bullets
Select the Home tab
Click the down arrow to the right of the Bullets button in the Paragraph group of the ribbon
The Bullet Library list is displayed.
Click the style of bullet you would like to use
Click
Word Processing a CV (250708) ©De Montfort University, IT Training 2008 22
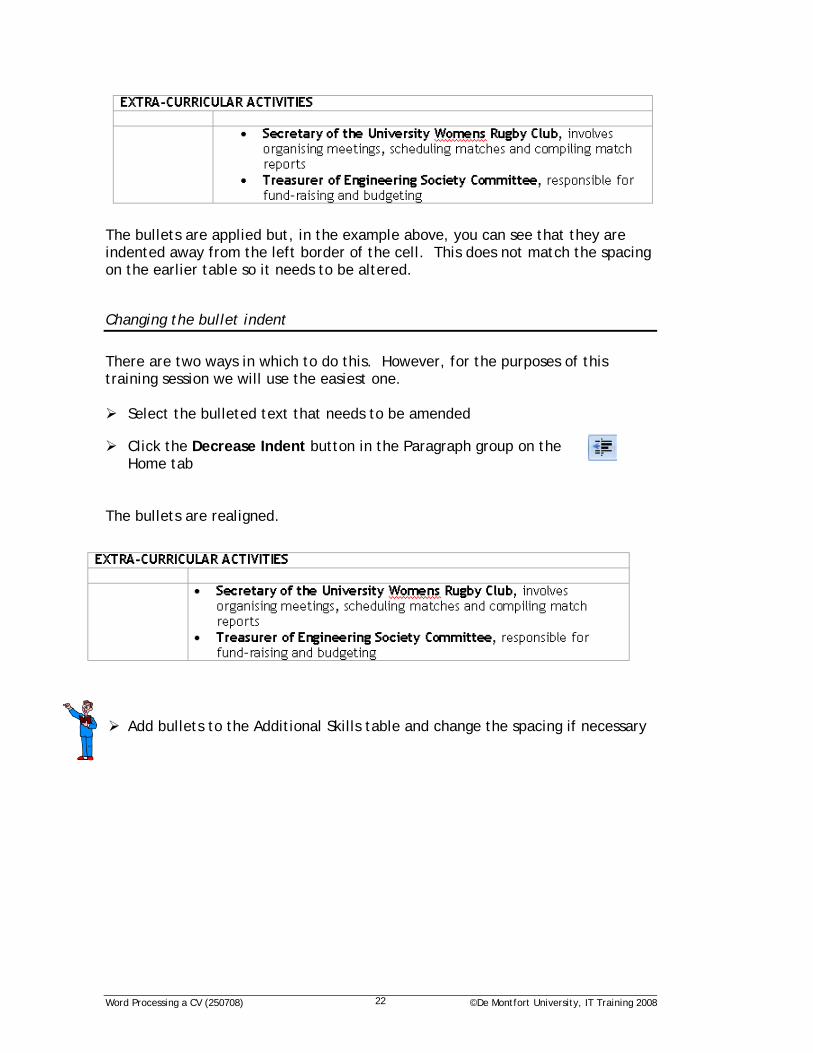
The bullets are applied but, in the example above, you can see that they are indented away from the left border of the cell. This does not match the spacing on the earlier table so it needs to be altered.
Changing the bullet indent
There are two ways in which to do this. However, for the purposes of this training session we will use the easiest one.
Select the bulleted text that needs to be amended
Click the Decrease Indent button in the Paragraph group on the Home tab
The bullets are realigned.
Add bullets to the Additional Skills table and change the spacing if necessary
Word Processing a CV (250708) ©De Montfort University, IT Training 2008 23
As already stated you should aim to keep your CV fairly short, typically two sides of A4 paper. The CV that you are working on is only one and a half sides so there is room to format the text to include space between the points so that they are a little easier to read. The text in the Education and Qualifications table has been separated by including an empty row in the table. However, the text with bullet points is cramped and can be spaced a little more without exceeding the maximum length of the document. Rather than adding extra line spaces to the text, you will use paragraph spacing. This method is ideal when you are working with bullets as you don’t add unwanted bullets on the blank lines.
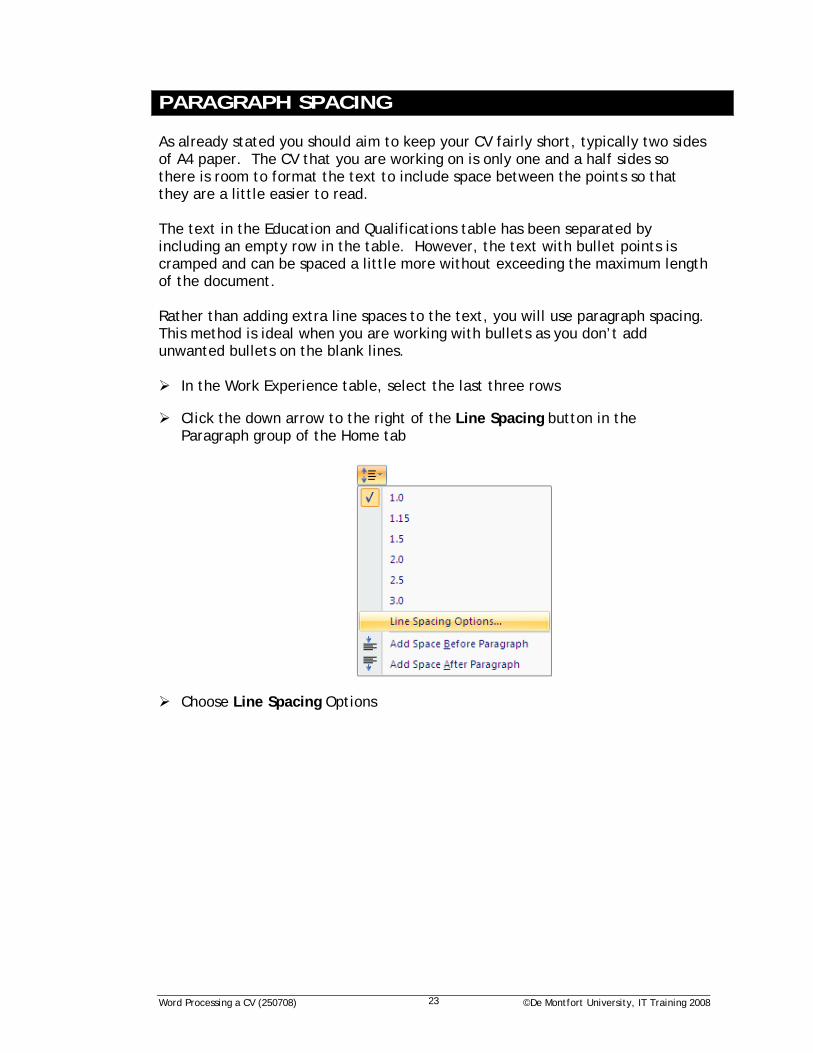
In the Work Experience table, select the last three rows
Click the down arrow to the right of the Line Spacing button in the Paragraph group of the Home tab
Choose Line Spacing Options
PARAGRAPH SPACING
Word Processing a CV (250708) ©De Montfort University, IT Training 2008 24
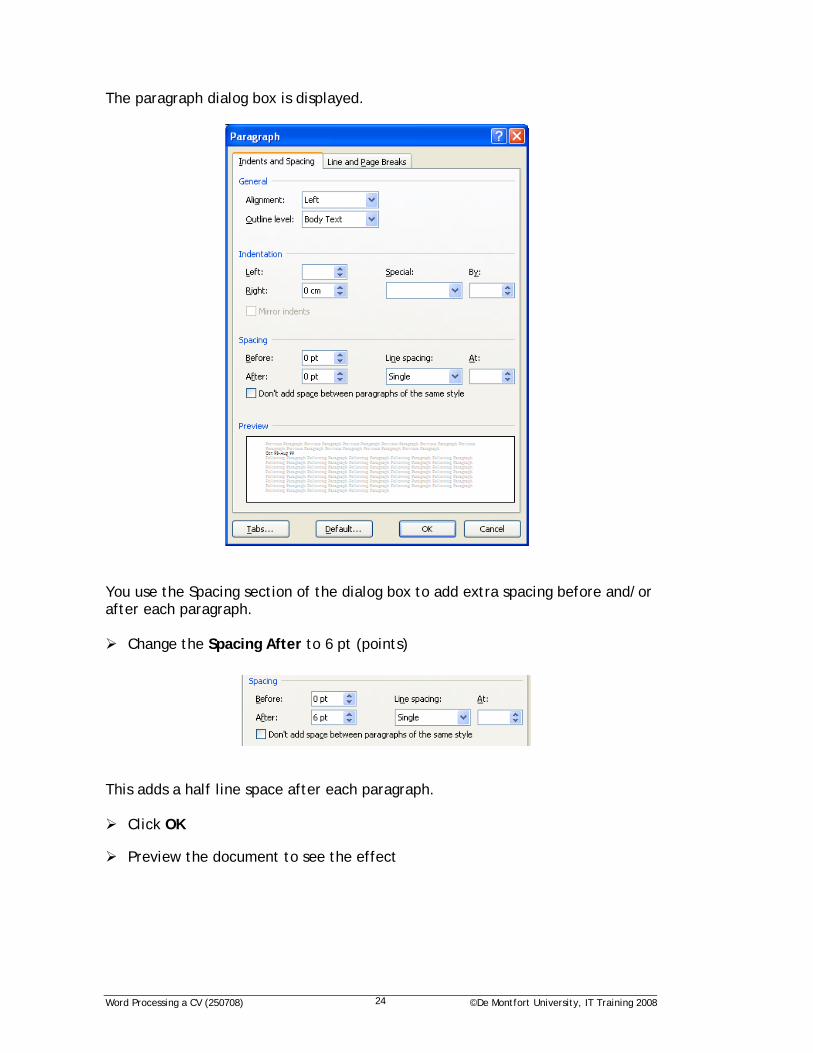
The paragraph dialog box is displayed.
You use the Spacing section of the dialog box to add extra spacing before and/or after each paragraph.
Change the Spacing After to 6 pt (points)
This adds a half line space after each paragraph.
Click OK
Preview the document to see the effect
Word Processing a CV (250708) ©De Montfort University, IT Training 2008 25
Click Close Print Preview to return to the document
Check that the table still fits on the page You should always use Print Preview to check the layout of a document before printing. It may be that changes such as additional line spacing have altered your carefully laid out document and forced text on to additional pages.
Check that a blank page has not been created – if it has remove it
Add additional paragraph spacing to the Extra-Curricular Activities, Additional Skills, and Technical Skills tables
Word Processing a CV (250708) ©De Montfort University, IT Training 2008 26
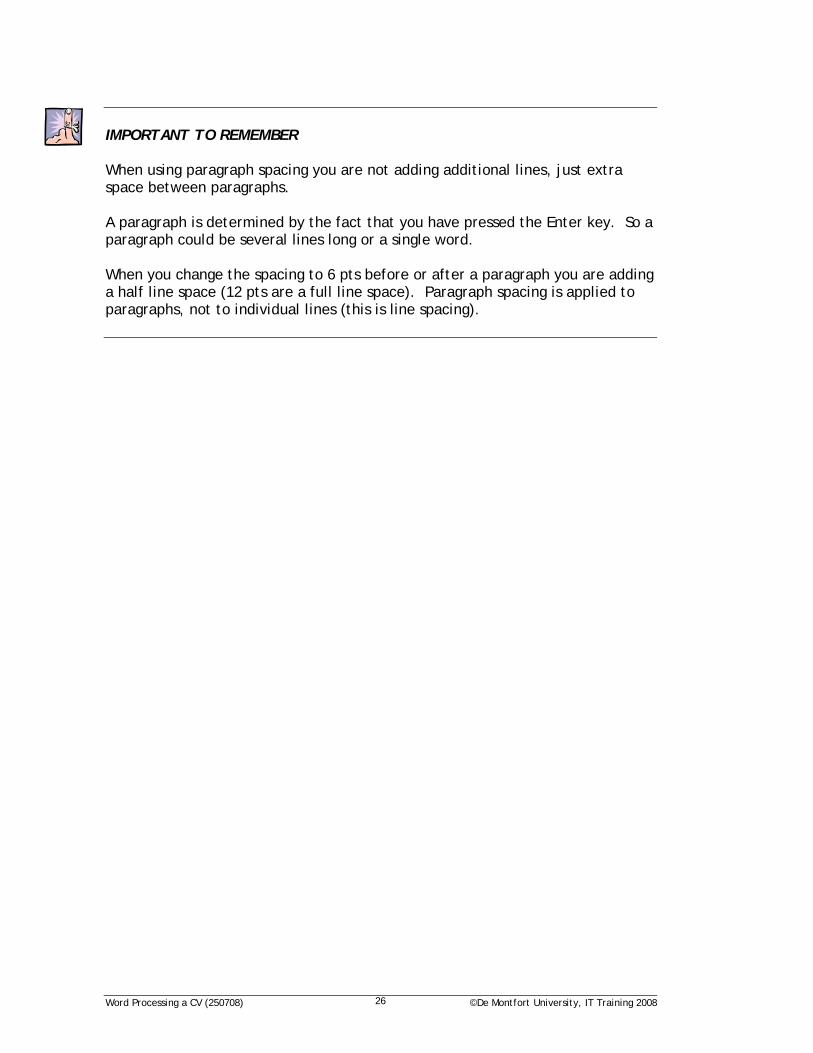
IMPORTANT TO REMEMBER When using paragraph spacing you are not adding additional lines, just extra space between paragraphs. A paragraph is determined by the fact that you have pressed the Enter key. So a paragraph could be several lines long or a single word. When you change the spacing to 6 pts before or after a paragraph you are adding a half line space (12 pts are a full line space). Paragraph spacing is applied to paragraphs, not to individual lines (this is line spacing).
Word Processing a CV (250708) ©De Montfort University, IT Training 2008 27
Depending on the format of your CV you may want to add shading or colour to the cells containing the table headings. However, do remember that this should be subtle rather than a bold statement.
Position the insertion point in the heading of the Education and Qualifications table
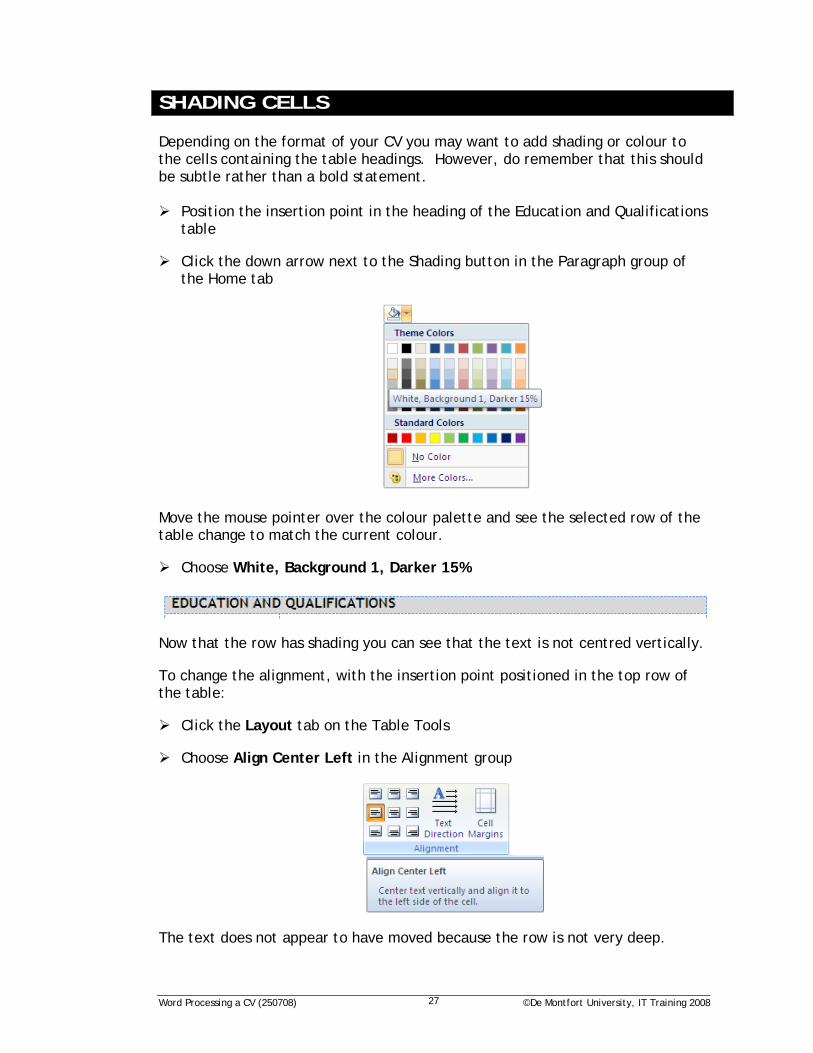
Click the down arrow next to the Shading button in the Paragraph group of the Home tab
Move the mouse pointer over the colour palette and see the selected row of the table change to match the current colour.
Choose White, Background 1, Darker 15%
Now that the row has shading you can see that the text is not centred vertically.
To change the alignment, with the insertion point positioned in the top row of the table:
Click the Layout tab on the Table Tools
Choose Align Center Left in the Alignment group
The text does not appear to have moved because the row is not very deep.
SHADING CELLS
Word Processing a CV (250708) ©De Montfort University, IT Training 2008 28
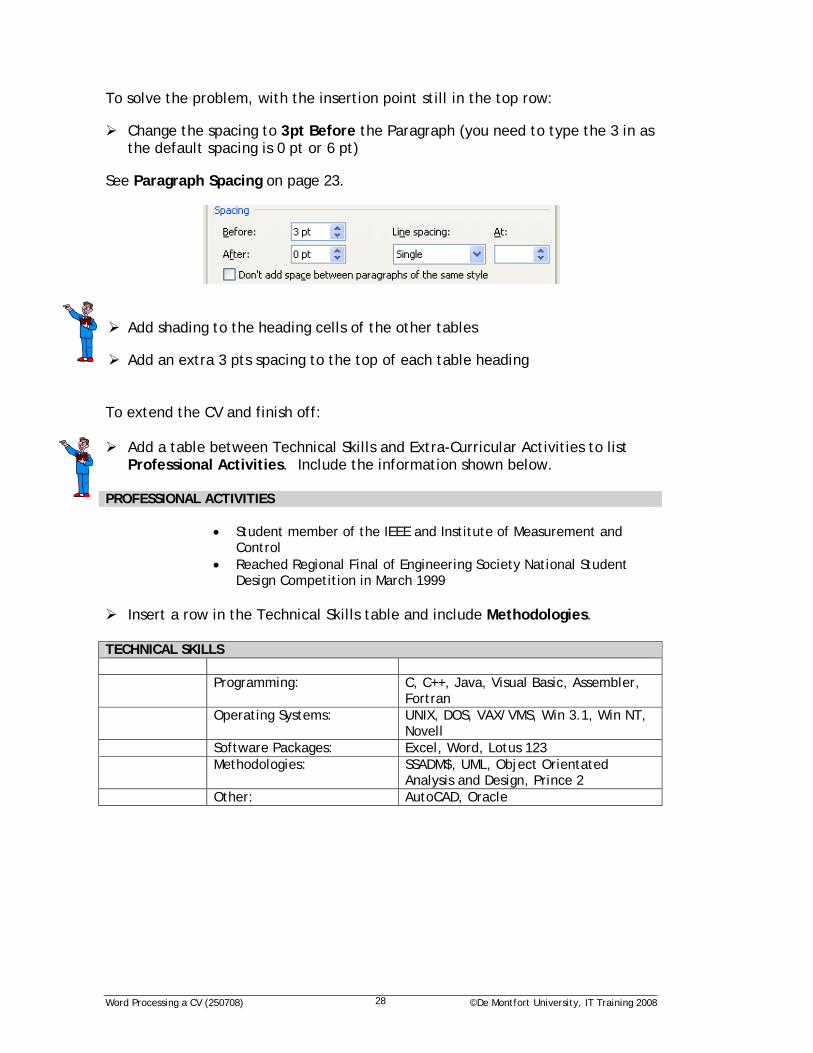
To solve the problem, with the insertion point still in the top row:
Change the spacing to 3pt Before the Paragraph (you need to type the 3 in as the default spacing is 0 pt or 6 pt)
See Paragraph Spacing on page 23.
Add shading to the heading cells of the other tables
Add an extra 3 pts spacing to the top of each table heading To extend the CV and finish off:
Add a table between Technical Skills and Extra-Curricular Activities to list Professional Activities. Include the information shown below.
PROFESSIONAL ACTIVITIES • Student member of the IEEE and Institute of Measurement and
Control • Reached Regional Final of Engineering Society National Student
Design Competition in March 1999
Insert a row in the Technical Skills table and include Methodologies. TECHNICAL SKILLS Programming: C, C++, Java, Visual Basic, Assembler,
Fortran Operating Systems: UNIX, DOS, VAX/VMS, Win 3.1, Win NT,
Novell Software Packages: Excel, Word, Lotus 123 Methodologies: SSADM$, UML, Object Orientated
Analysis and Design, Prince 2 Other: AutoCAD, Oracle
Word Processing a CV (250708) ©De Montfort University, IT Training 2008 29
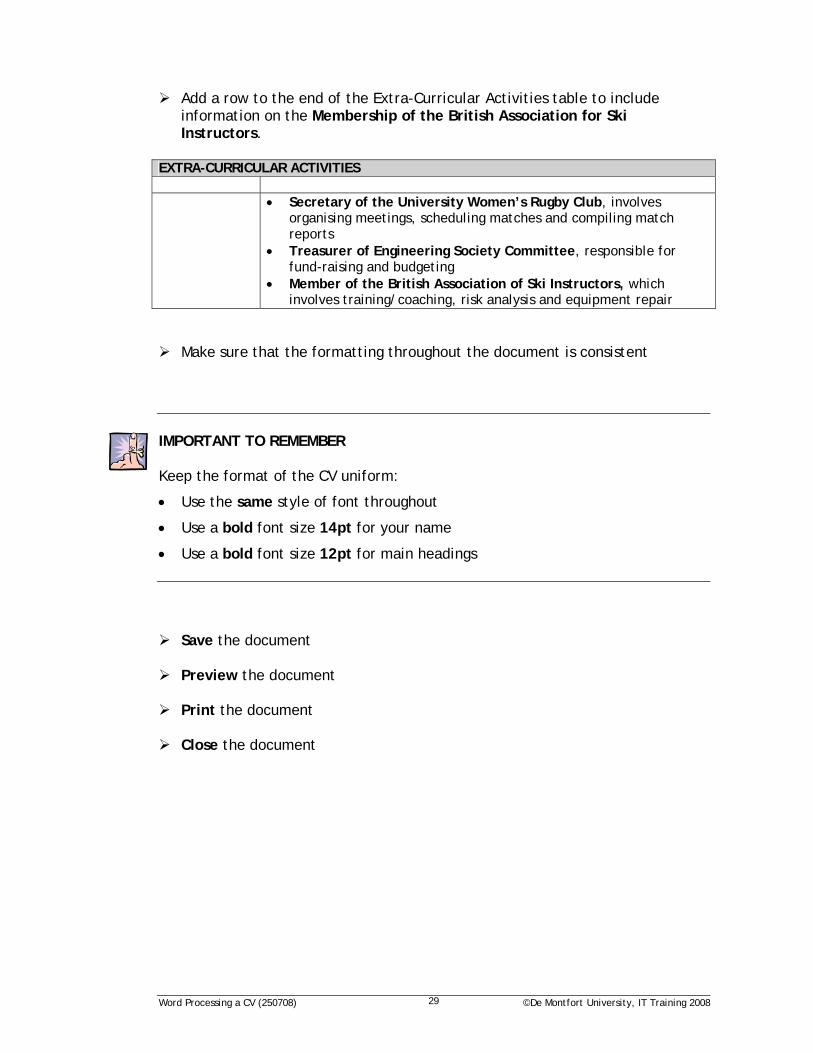
Add a row to the end of the Extra-Curricular Activities table to include information on the Membership of the British Association for Ski Instructors.
EXTRA-CURRICULAR ACTIVITIES • Secretary of the University Women’s Rugby Club, involves
organising meetings, scheduling matches and compiling match reports
• Treasurer of Engineering Society Committee, responsible for fund-raising and budgeting
• Member of the British Association of Ski Instructors, which involves training/coaching, risk analysis and equipment repair
Make sure that the formatting throughout the document is consistent IMPORTANT TO REMEMBER Keep the format of the CV uniform:
• Use the same style of font throughout
• Use a bold font size 14pt for your name
• Use a bold font size 12pt for main headings
Save the document
Preview the document
Print the document
Close the document
Word Processing a CV (250708) ©De Montfort University, IT Training 2008 30
1. Before you begin to create you own CV:
Gather the information that you will include
Contact Careers DMU in Gateway House to get advice on what to include and which style of CV you should use
2. Produce your CV:
Word process your CV using this document as a guide
3. If necessary get it checked:
Contact Careers DMU
Edit the CV if required - and don’t forget to include a single side cover letter with your CV when you send it to a prospective employer
WHAT NEXT?