Embed Size (px)
Citation preview
1 | P a g e
OpenEdge Credit Card Module
User Manual
How to access the Credit Card module
Unless you have decided to continue using the old Credit Card module (Fortis or VeriFone) during a transition
period (the time to finish processing active contract payments), the button allowing you to access it at the Front
Desk screen will no longer be there:
You access the Credit Card module by clicking on the C Credit Card Module button located in the menu bar of
the Platinum’s Front Desk screen beside the EHR button:
Credit Card module menu
Payment Schedule To add, terminate and manage payment
schedule, consult statistics on
processed/unprocessed contract payments and
get the scheduled/processed payments list.
Credit Card on File To add/remove credit cards to the patient
account, select a default credit card for recurring
and regular payments, and set a credit card
expiration reminder date.
Sale/Refund To make a regular credit card payment or a
refund. Product purchased can be added with
the payment.
Void To void one or multiple selected credit card
payment transactions that have been processed
today. Next days, you must cancel with a
Refund.
Process Recurring
payments
To process recurring payments on or after the
scheduled payment date.
Reports To generate reports for the new and old Credit
Card module.
Exit To quit the Credit Card module.
The blue buttons are related to the patient selected at the Front Desk and the green buttons to the clinic.
IMPORTANT
You can’t use TRX and OpenEdge at the same time. TRX
must be disabled in order to use OpenEdge.
2 | P a g e
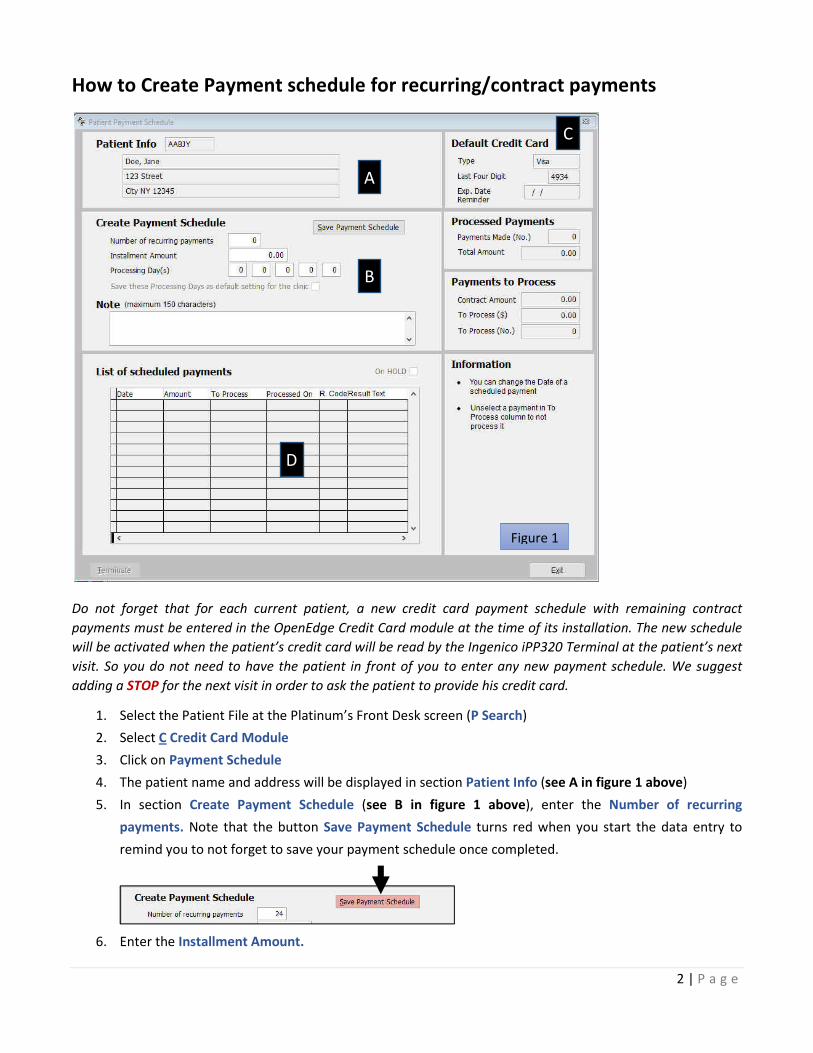
How to Create Payment schedule for recurring/contract payments
Do not forget that for each current patient, a new credit card payment schedule with remaining contract
payments must be entered in the OpenEdge Credit Card module at the time of its installation. The new schedule
will be activated when the patient’s credit card will be read by the Ingenico iPP320 Terminal at the patient’s next
visit. So you do not need to have the patient in front of you to enter any new payment schedule. We suggest
adding a STOP for the next visit in order to ask the patient to provide his credit card.
1. Select the Patient File at the Platinum’s Front Desk screen (P Search)
2. Select C Credit Card Module
3. Click on Payment Schedule
4. The patient name and address will be displayed in section Patient Info (see A in figure 1 above)
5. In section Create Payment Schedule (see B in figure 1 above), enter the Number of recurring
payments. Note that the button Save Payment Schedule turns red when you start the data entry to
remind you to not forget to save your payment schedule once completed.
6. Enter the Installment Amount.
Figure 1
D
A
B
C
3 | P a g e
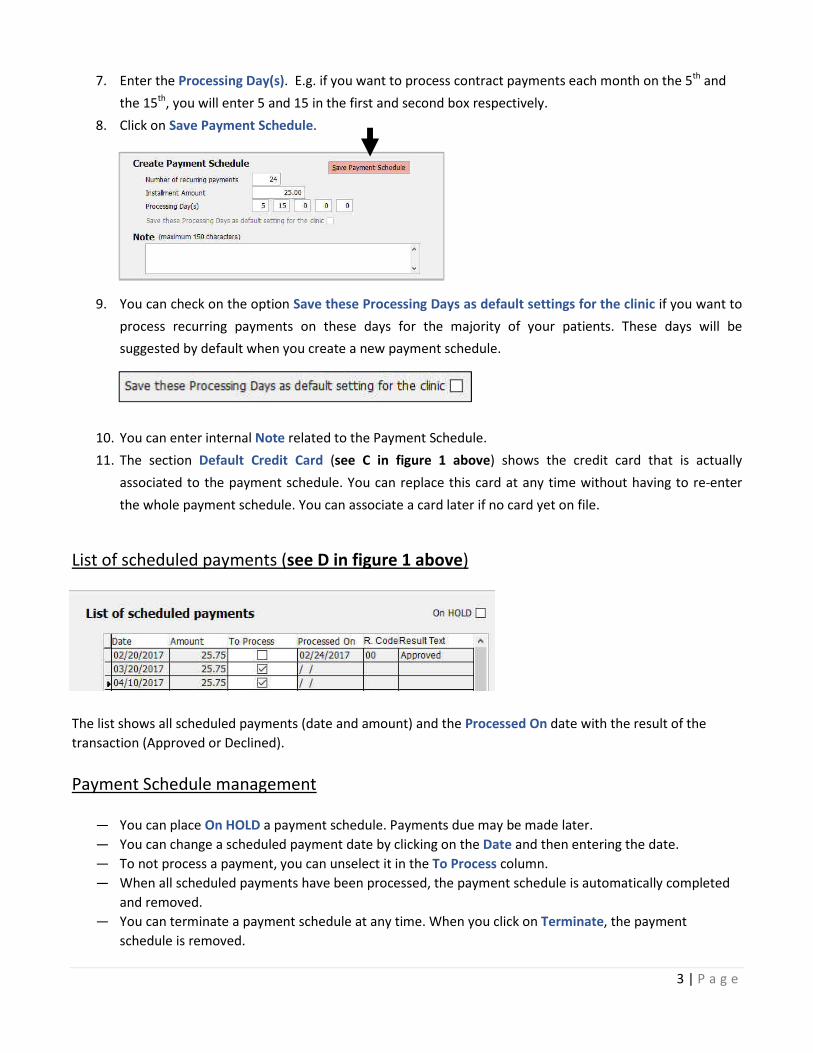
7. Enter the Processing Day(s). E.g. if you want to process contract payments each month on the 5th
and
the 15th
, you will enter 5 and 15 in the first and second box respectively.
8. Click on Save Payment Schedule.
9. You can check on the option Save these Processing Days as default settings for the clinic if you want to
process recurring payments on these days for the majority of your patients. These days will be
suggested by default when you create a new payment schedule.
10. You can enter internal Note related to the Payment Schedule.
11. The section Default Credit Card (see C in figure 1 above) shows the credit card that is actually
associated to the payment schedule. You can replace this card at any time without having to re-enter
the whole payment schedule. You can associate a card later if no card yet on file.
List of scheduled payments (see D in figure 1 above)
The list shows all scheduled payments (date and amount) and the Processed On date with the result of the
transaction (Approved or Declined).
Payment Schedule management
— You can place On HOLD a payment schedule. Payments due may be made later.
— You can change a scheduled payment date by clicking on the Date and then entering the date.
— To not process a payment, you can unselect it in the To Process column.
— When all scheduled payments have been processed, the payment schedule is automatically completed
and removed.
— You can terminate a payment schedule at any time. When you click on Terminate, the payment
schedule is removed.
4 | P a g e
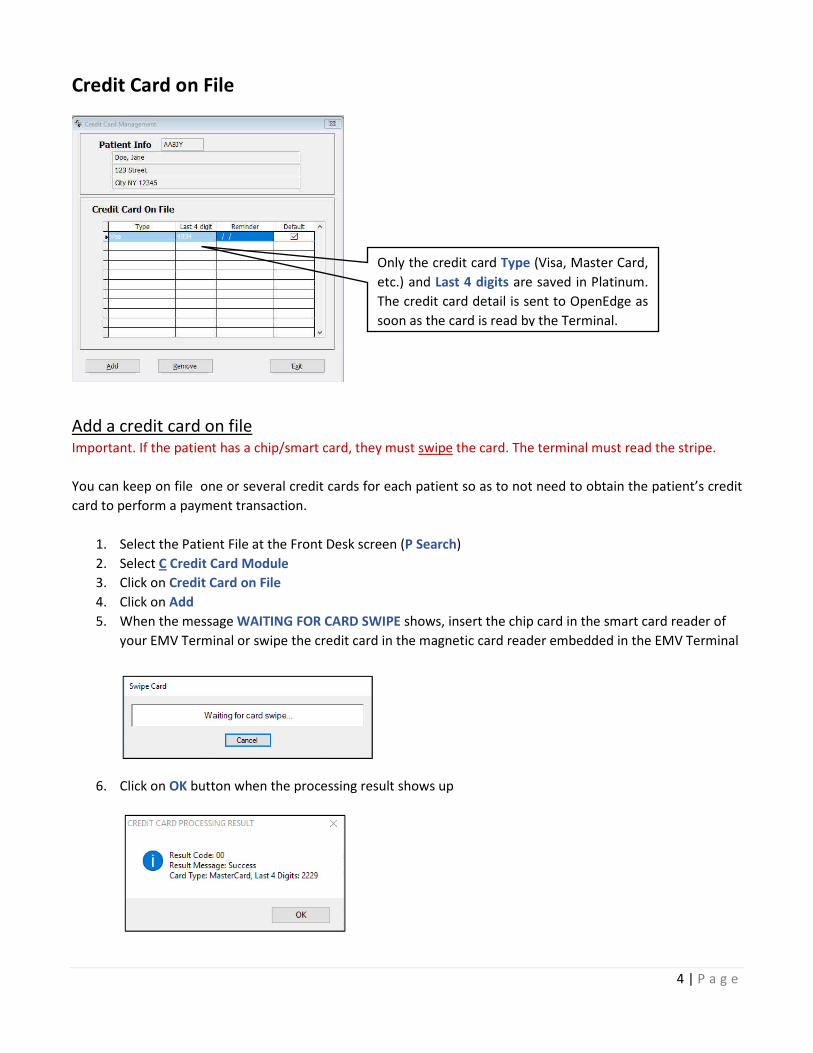
Credit Card on File
Add a credit card on file Important. If the patient has a chip/smart card, they must swipe the card. The terminal must read the stripe.
You can keep on file one or several credit cards for each patient so as to not need to obtain the patient’s credit
card to perform a payment transaction.
1. Select the Patient File at the Front Desk screen (P Search)
2. Select C Credit Card Module
3. Click on Credit Card on File
4. Click on Add
5. When the message WAITING FOR CARD SWIPE shows, insert the chip card in the smart card reader of
your EMV Terminal or swipe the credit card in the magnetic card reader embedded in the EMV Terminal
6. Click on OK button when the processing result shows up
Only the credit card Type (Visa, Master Card,
etc.) and Last 4 digits are saved in Platinum.
The credit card detail is sent to OpenEdge as
soon as the card is read by the Terminal.
5 | P a g e
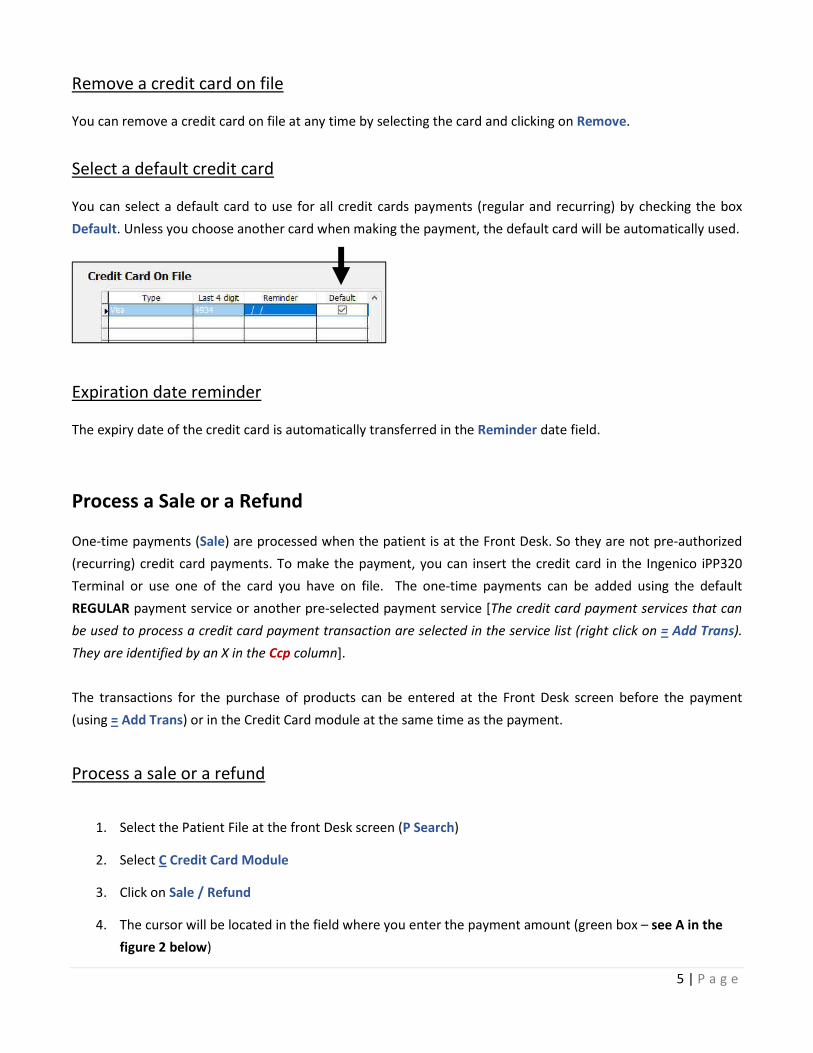
Remove a credit card on file
You can remove a credit card on file at any time by selecting the card and clicking on Remove.
Select a default credit card
You can select a default card to use for all credit cards payments (regular and recurring) by checking the box
Default. Unless you choose another card when making the payment, the default card will be automatically used.
Expiration date reminder
The expiry date of the credit card is automatically transferred in the Reminder date field.
Process a Sale or a Refund
One-time payments (Sale) are processed when the patient is at the Front Desk. So they are not pre-authorized
(recurring) credit card payments. To make the payment, you can insert the credit card in the Ingenico iPP320
Terminal or use one of the card you have on file. The one-time payments can be added using the default
REGULAR payment service or another pre-selected payment service [The credit card payment services that can
be used to process a credit card payment transaction are selected in the service list (right click on = Add Trans).
They are identified by an X in the Ccp column].
The transactions for the purchase of products can be entered at the Front Desk screen before the payment
(using = Add Trans) or in the Credit Card module at the same time as the payment.
Process a sale or a refund
1. Select the Patient File at the front Desk screen (P Search)
2. Select C Credit Card Module
3. Click on Sale / Refund
4. The cursor will be located in the field where you enter the payment amount (green box – see A in the
figure 2 below)
6 | P a g e
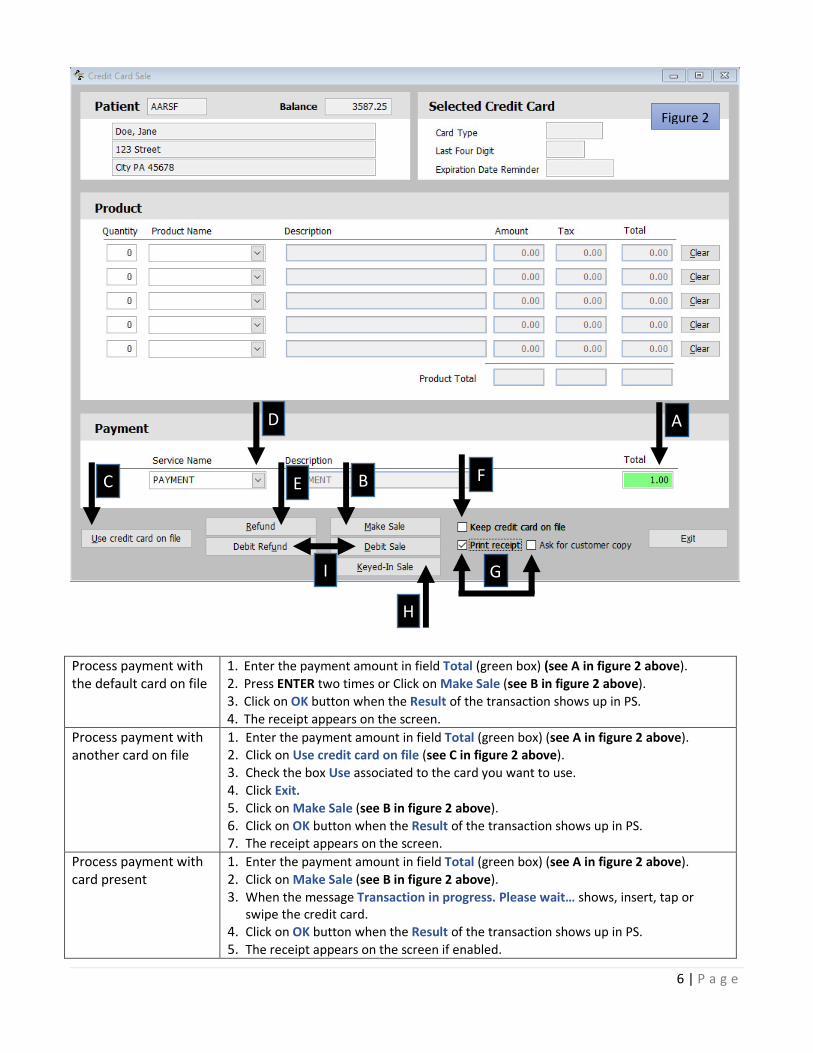
Process payment with
the default card on file
1. Enter the payment amount in field Total (green box) (see A in figure 2 above).
2. Press ENTER two times or Click on Make Sale (see B in figure 2 above).
3. Click on OK button when the Result of the transaction shows up in PS.
4. The receipt appears on the screen.
Process payment with
another card on file
1. Enter the payment amount in field Total (green box) (see A in figure 2 above).
2. Click on Use credit card on file (see C in figure 2 above).
3. Check the box Use associated to the card you want to use.
4. Click Exit.
5. Click on Make Sale (see B in figure 2 above).
6. Click on OK button when the Result of the transaction shows up in PS.
7. The receipt appears on the screen.
Process payment with
card present
1. Enter the payment amount in field Total (green box) (see A in figure 2 above).
2. Click on Make Sale (see B in figure 2 above).
3. When the message Transaction in progress. Please wait… shows, insert, tap or
swipe the credit card.
4. Click on OK button when the Result of the transaction shows up in PS.
5. The receipt appears on the screen if enabled.
Figure 2
A
B C
D
E F
G
H
I
7 | P a g e
Keyed-In the Sale You can keyed-in the card number so not to use the terminal. See below procedure.
Process payment with
a debit card
1. Enter the payment amount in field Total (green box) (see A in figure 2 above).
2. Click on Make Sale (see I in figure 2 above).
3. When the message Transaction in progress. Please wait… shows, tap or swipe the
credit card.
4. Keyed-in the PIN on the Terminal keypad when requested on the Terminal console.
5. Press the green button on the Terminal keypad to accept.
6. Click on OK button when the Result of the transaction shows up in PS.
7. The receipt appears on the screen if enabled.
Change payment
service
Use the drop down arrow of the Service Name box to select another service (see D in
figure 2 above).
Do a refund on credit
card
Proceed in the same way as for a payment but click on Refund instead of Make Sale
(see E in figure 2 above). Do not enter negative amount in Total.
Do a refund on debit
card
Proceed in the same way as for a payment but click on Debit Refund instead of Make
Sale (see I in figure 2 above). Do not enter negative amount in Total.
Keep credit card on file If the patient presents you with a new card and you want to keep it on file, check Keep
credit card on file (see F in figure 2 above) before clicking on Make Sale.
Print receipt Platinum can generate merchant and customer receipts. When the options are selected
(see G in figure 2 above), they remain selected for all patients. See section Sale receipt.
Payment Results
Credit card payment transaction can be approved or declined:
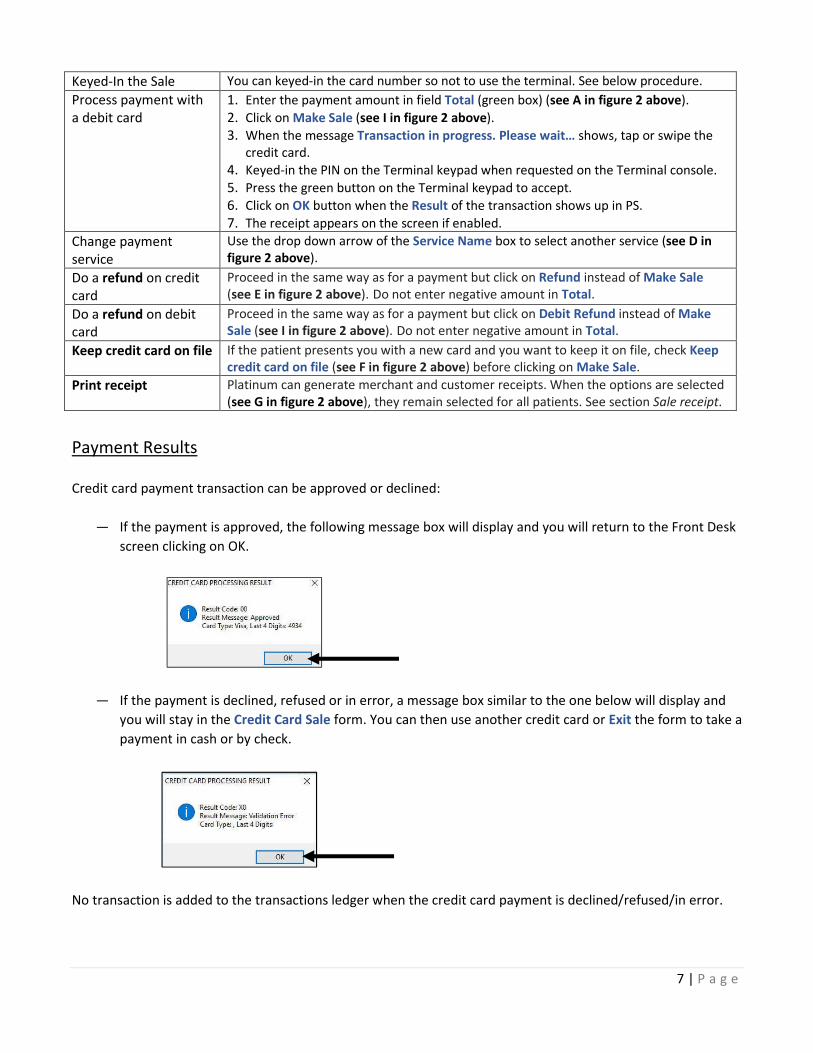
— If the payment is approved, the following message box will display and you will return to the Front Desk
screen clicking on OK.
— If the payment is declined, refused or in error, a message box similar to the one below will display and
you will stay in the Credit Card Sale form. You can then use another credit card or Exit the form to take a
payment in cash or by check.
No transaction is added to the transactions ledger when the credit card payment is declined/refused/in error.
8 | P a g e
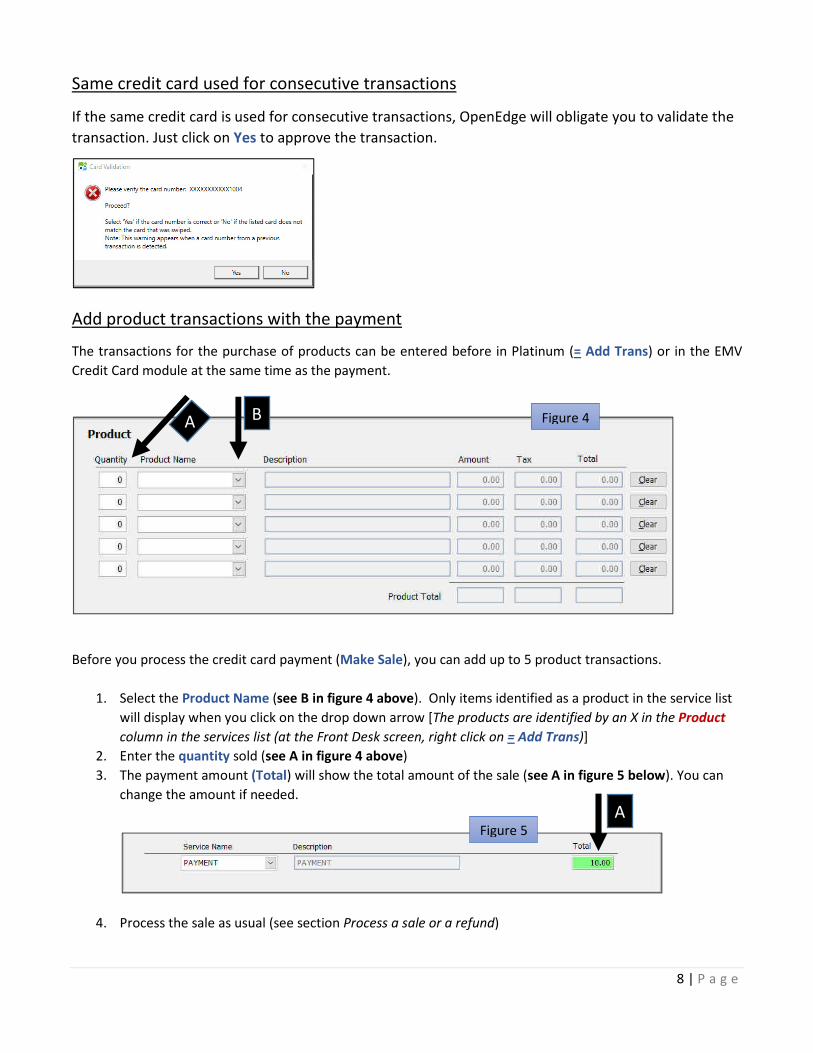
Same credit card used for consecutive transactions
If the same credit card is used for consecutive transactions, OpenEdge will obligate you to validate the
transaction. Just click on Yes to approve the transaction.
Add product transactions with the payment
The transactions for the purchase of products can be entered before in Platinum (= Add Trans) or in the EMV
Credit Card module at the same time as the payment.
Before you process the credit card payment (Make Sale), you can add up to 5 product transactions.
1. Select the Product Name (see B in figure 4 above). Only items identified as a product in the service list
will display when you click on the drop down arrow [The products are identified by an X in the Product
column in the services list (at the Front Desk screen, right click on = Add Trans)]
2. Enter the quantity sold (see A in figure 4 above)
3. The payment amount (Total) will show the total amount of the sale (see A in figure 5 below). You can
change the amount if needed.
4. Process the sale as usual (see section Process a sale or a refund)
B A
A Figure 5
Figure 4
9 | P a g e
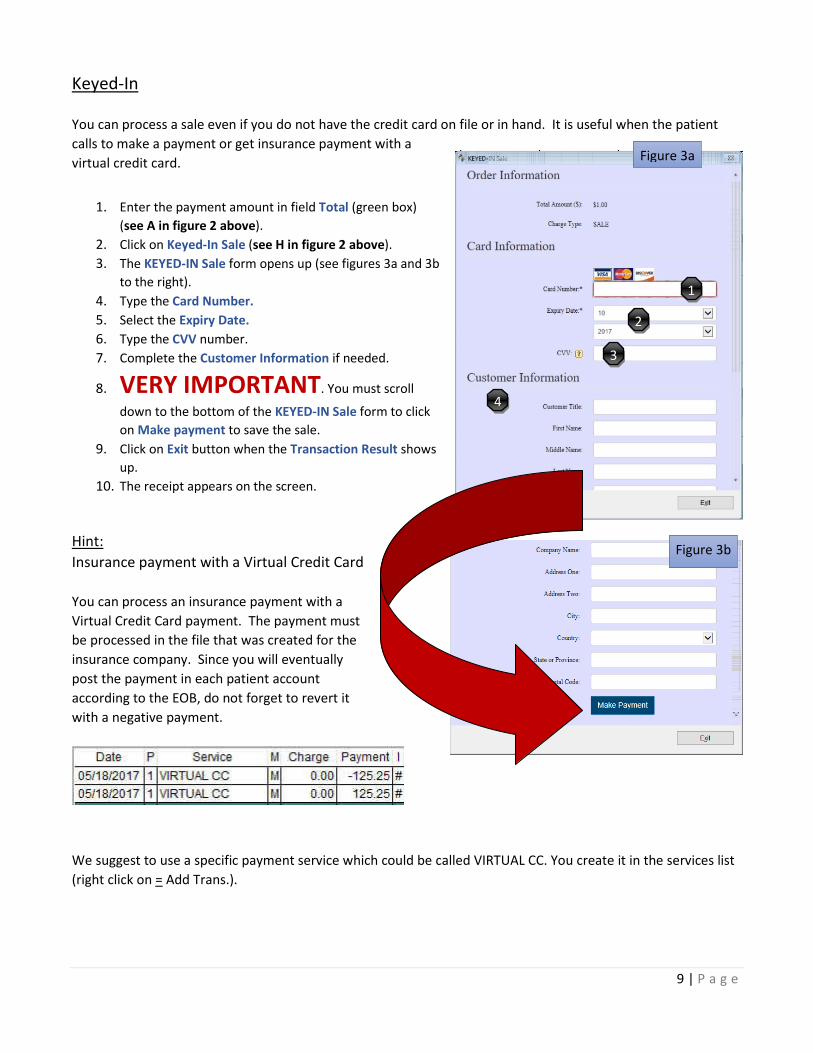
Keyed-In
You can process a sale even if you do not have the credit card on file or in hand. It is useful when the patient
calls to make a payment or get insurance payment with a
virtual credit card.
1. Enter the payment amount in field Total (green box)
(see A in figure 2 above).
2. Click on Keyed-In Sale (see H in figure 2 above).
3. The KEYED-IN Sale form opens up (see figures 3a and 3b
to the right).
4. Type the Card Number.
5. Select the Expiry Date.
6. Type the CVV number.
7. Complete the Customer Information if needed.
8. VERY IMPORTANT. You must scroll
down to the bottom of the KEYED-IN Sale form to click
on Make payment to save the sale.
9. Click on Exit button when the Transaction Result shows
up.
10. The receipt appears on the screen.
Hint:
Insurance payment with a Virtual Credit Card
You can process an insurance payment with a
Virtual Credit Card payment. The payment must
be processed in the file that was created for the
insurance company. Since you will eventually
post the payment in each patient account
according to the EOB, do not forget to revert it
with a negative payment.
We suggest to use a specific payment service which could be called VIRTUAL CC. You create it in the services list
(right click on = Add Trans.).
Figure 3a
Figure 3b
1
2
3
4

10 | P a g e
Add product transactions with the payment
The transactions for the purchase of products can be entered before in Platinum (= Add Trans) or in the EMV
Credit Card module at the same time as the payment.
Before you process the credit card payment (Make Sale), you can add up to 5 product transactions.
5. Select the Product Name (see B in figure 4 above). Only items identified as a product in the service list
will display when you click on the drop down arrow [The products are identified by an X in the Product
column in the services list (at the Front Desk screen, right click on = Add Trans)]
6. Enter the quantity sold (see A in figure 4 above)
7. The payment amount (Total) will show the total amount of the sale (see A in figure 5 below). You can
change the amount if needed.
8. Process the sale as usual (see section Process a sale or a refund)
B A
A Figure 5
Figure 4

11 | P a g e
Void credit card payments
You can void one or multiple credit card payment transactions that have been processed today. Debit
transactions cannot be voided. If you need to reimburse the patient, you need to do a Refund Debit. See I in
figure 2 above.
1. Tick the Select box of each payment you want to void (see A in figure 6 above)
2. Click on Void Payments (see B in figure 6 above)
3. Click on YES to confirm that you want to void the payment
4. Click OK when the Voiding Transaction result message box is displayed
5. Click Exit (see C in figure 6 above)
6. A negative transaction will be added in the transactions ledger to cancel the initial transaction
A
B C
Figure 6
12 | P a g e
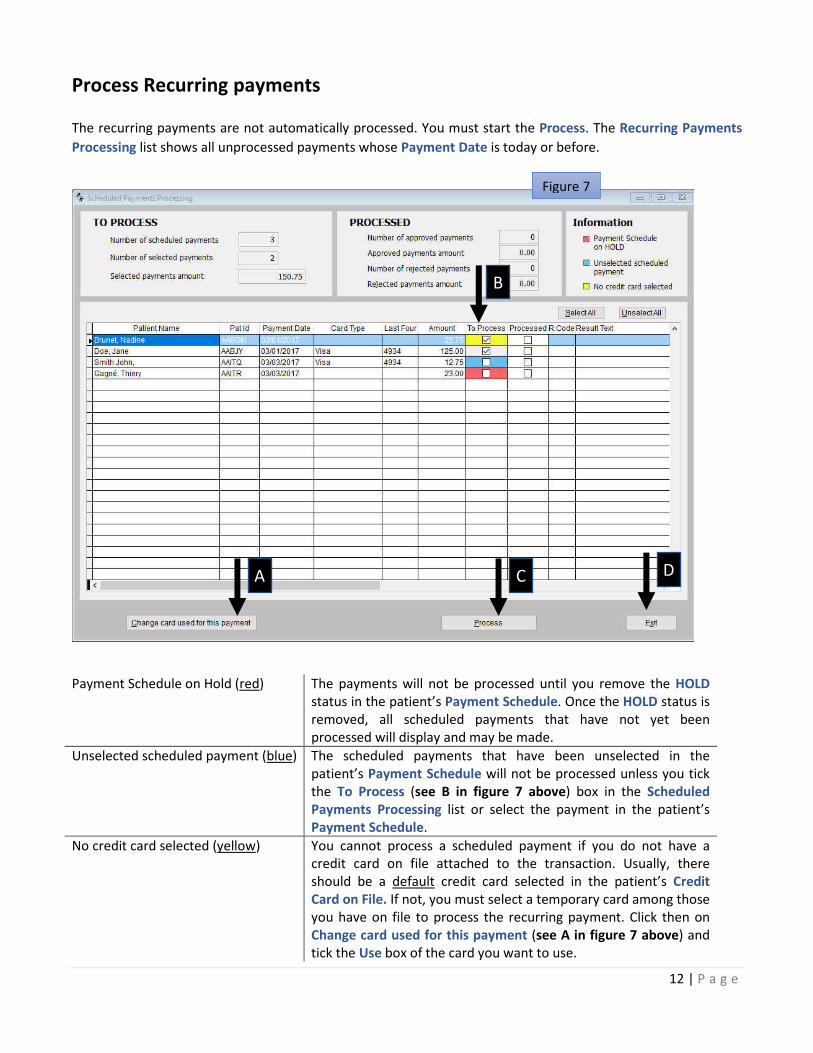
Process Recurring payments
The recurring payments are not automatically processed. You must start the Process. The Recurring Payments
Processing list shows all unprocessed payments whose Payment Date is today or before.
Payment Schedule on Hold (red) The payments will not be processed until you remove the HOLD
status in the patient’s Payment Schedule. Once the HOLD status is
removed, all scheduled payments that have not yet been
processed will display and may be made.
Unselected scheduled payment (blue) The scheduled payments that have been unselected in the
patient’s Payment Schedule will not be processed unless you tick
the To Process (see B in figure 7 above) box in the Scheduled
Payments Processing list or select the payment in the patient’s
Payment Schedule.
No credit card selected (yellow) You cannot process a scheduled payment if you do not have a
credit card on file attached to the transaction. Usually, there
should be a default credit card selected in the patient’s Credit
Card on File. If not, you must select a temporary card among those
you have on file to process the recurring payment. Click then on
Change card used for this payment (see A in figure 7 above) and
tick the Use box of the card you want to use.
Figure 7
A
B
C D
13 | P a g e
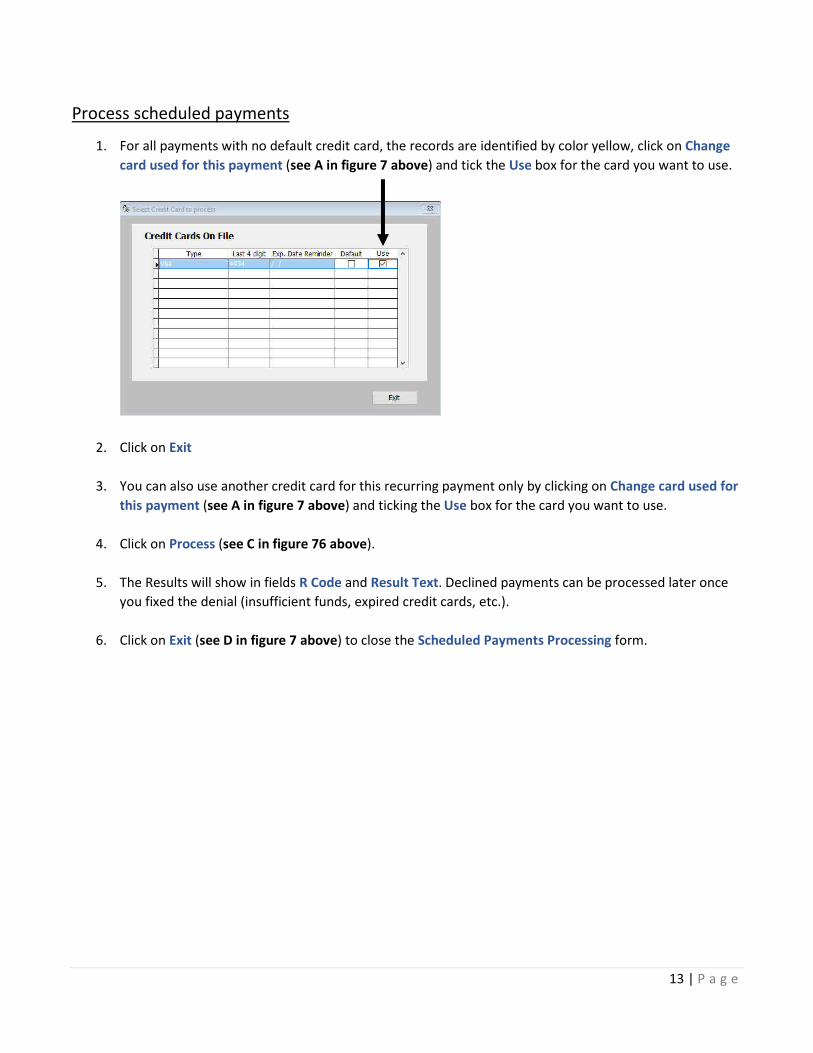
Process scheduled payments
1. For all payments with no default credit card, the records are identified by color yellow, click on Change
card used for this payment (see A in figure 7 above) and tick the Use box for the card you want to use.
2. Click on Exit
3. You can also use another credit card for this recurring payment only by clicking on Change card used for
this payment (see A in figure 7 above) and ticking the Use box for the card you want to use.
4. Click on Process (see C in figure 76 above).
5. The Results will show in fields R Code and Result Text. Declined payments can be processed later once
you fixed the denial (insufficient funds, expired credit cards, etc.).
6. Click on Exit (see D in figure 7 above) to close the Scheduled Payments Processing form.

14 | P a g e
Reports
Transactions Report All credit card payments processed during the selected date range.
The transactions can be grouped by patient or by date.
Processed Scheduled Payments List All recurring credit card payments processed during the selected
date range (including the declined transactions).
Expired Credit Cards for Scheduled
Payments
All credit card with a reminder for an expiration date during the
selected date range.
Payment Schedule Overview Payment Schedule overview with the contract status (ACTIVE,
TERMINATED, COMPLETED or ON HOLD), number of installments,
amount of the installment and total processed. You can filter on
the contract status.
Projected Payments Report All recurring payments to be processed during the date range. The
transactions can be grouped by patient or by date.
Transactions Receipt Transactions receipt for the patient. It shows all processed credit
card payments during the selected date range.
Scheduled Payment Receipt Contract receipt for the patient. It shows the payment schedule
detail, the processed and unprocessed recurring payments.
The transaction receipt that is printed after each regular payment will now be printed from the EMV Terminal.
The transactions processed in the old (VeriFone)
and the new Credit Card module (OpenEdge and
TRX) can’t be merged on same reports. The
button REPORTS from Previous Credit Card
Module will let you generate the reports for
transactions processed in the old Credit Card
module. It must be enabled by Platinum.
The transactions processed under TRX and
OpenEdge are merged on the reports because
they have been processed under the same
platform.
There is no report generated by Platinum for
Fortis.
15 | P a g e
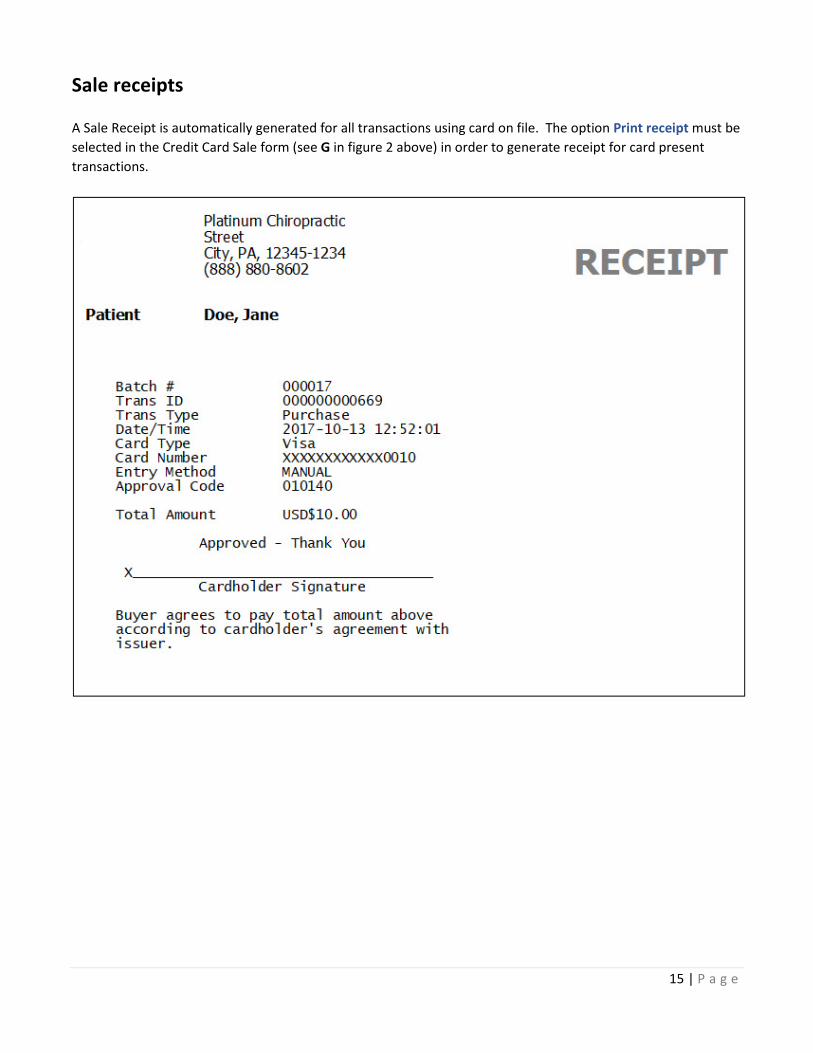
Sale receipts
A Sale Receipt is automatically generated for all transactions using card on file. The option Print receipt must be
selected in the Credit Card Sale form (see G in figure 2 above) in order to generate receipt for card present
transactions.


![CREDIT CARD AUTHORIZATION - LA Film Rentals · 2019-03-11 · CREDIT CARD AUTHORIZATION CUSTOMER INFO PHOTO ID CREDIT CARD CREDIT CARD INFO BILLING ADDRESS PICKUP CONSENT [ ] HAVE](https://img.pdfslide.net/doc/110x75/5f05b4857e708231d4144a44/credit-card-authorization-la-film-rentals-2019-03-11-credit-card-authorization.jpg)