Embed Size (px)
Citation preview
Oracle FLEXCUBE Direct
Banking User Manual Core
Release 12.0.2.0.0
Part No. E50108-01
September 2013
Oracle FLEXCUBE Direct Banking 12.0.2.0.0 Core
Core User Manual September 2013 Oracle Financial Services Software Limited Oracle Park Off Western Express Highway Goregaon (East) Mumbai, Maharashtra 400 063 India Worldwide Inquiries: Phone: +91 22 6718 3000 Fax:+91 22 6718 3001 www.oracle.com/financialservices/
Copyright © 2008, 2013, Oracle and/or its affiliates. All rights reserved. Oracle and Java are registered trademarks of Oracle and/or its affiliates. Other names may be trademarks of their respective owners. U.S. GOVERNMENT END USERS: Oracle programs, including any operating system, integrated software, any programs installed on the hardware, and/or documentation, delivered to U.S. Government end users are “commercial computer software” pursuant to the applicable Federal Acquisition Regulation and agency-specific supplemental regulations. As such, use, duplication, disclosure, modification, and adaptation of the programs, including any operating system, integrated software, any programs installed on the hardware, and/or documentation, shall be subject to license terms and license restrictions applicable to the programs. No other rights are granted to the U.S. Government. This software or hardware is developed for general use in a variety of information management applications. It is not developed or intended for use in any inherently dangerous applications, including applications that may create a risk of personal injury. If you use this software or hardware in dangerous applications, then you shall be responsible to take all appropriate failsafe, backup, redundancy, and other measures to ensure its safe use. Oracle Corporation and its affiliates disclaim any liability for any damages caused by use of this software or hardware in dangerous applications. This software and related documentation are provided under a license agreement containing restrictions on use and disclosure and are protected by intellectual property laws. Except as expressly permitted in your license agreement or allowed by law, you may not use, copy, reproduce, translate, broadcast, modify, license, transmit, distribute, exhibit, perform, publish or display any part, in any form, or by any means. Reverse engineering, disassembly, or decompilation of this software, unless required by law for interoperability, is prohibited. The information contained herein is subject to change without notice and is not warranted to be error-free. If you find any errors, please report them to us in writing. This software or hardware and documentation may provide access to or information on content, products and services from third parties. Oracle Corporation and its affiliates are not responsible for and expressly disclaim all warranties of any kind with respect to third-party content, products, and services. Oracle Corporation and its affiliates will not be responsible for any loss, costs, or damages incurred due to your access to or use of third-party content, products, or services.
Oracle FLEXCUBE Direct Banking 12.0.2.0.0 Core
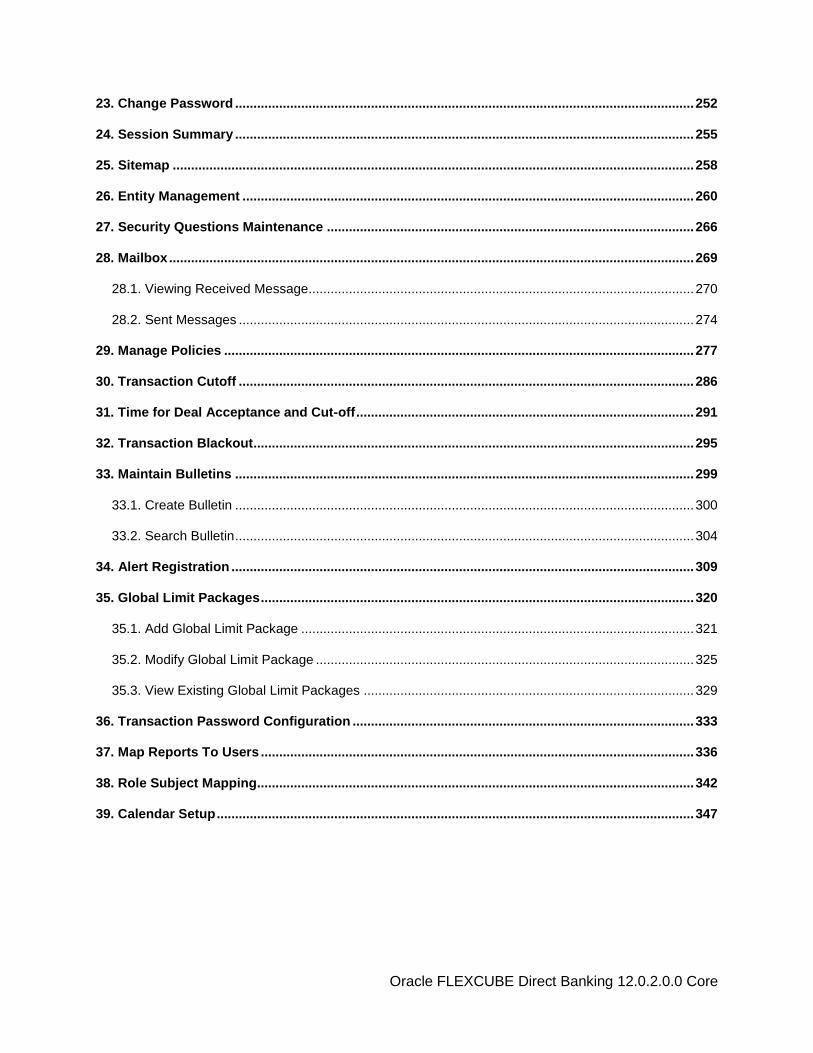
Contents
1. Preface ..................................................................................................................................................... 6
2. Transaction Host Integration Matrix ..................................................................................................... 8
3. Introduction ........................................................................................................................................... 11
4. Login ....................................................................................................................................................... 12
5. Logout .................................................................................................................................................... 16
6. Transaction Activities ........................................................................................................................... 18
6.1. Initiated Transactions ....................................................................................................................... 19
6.2. Transactions to Authorize ................................................................................................................ 24
6.3. View Transactions ........................................................................................................................... 30
6.4. Request Processing ......................................................................................................................... 34
6.5. Transactions Status Change ........................................................................................................... 38
7. Role Maintenance .................................................................................................................................. 41
7.1. Create Role ...................................................................................................................................... 43
7.2. Modify Role ...................................................................................................................................... 48
7.3. Delete Role ...................................................................................................................................... 53
7.4. View Role ......................................................................................................................................... 56
8. Account Opening .................................................................................................................................. 60
8.1. View and Update Applications ......................................................................................................... 61
8.2. New Application ............................................................................................................................... 65
8.3. Update File Status ........................................................................................................................... 67
9. User Management ................................................................................................................................. 69
9.1. Create User (Bank Adminstration User) .......................................................................................... 70
9.2. Create User(Business user creation) .............................................................................................. 78
9.3. Multi Entity Access (Business User) ................................................................................................ 88
9.4. Modify User(Bank Administrator) ..................................................................................................... 99
Oracle FLEXCUBE Direct Banking 12.0.2.0.0 Core
9.5. Modify User(Business User) .......................................................................................................... 110
9.6. Delete User .................................................................................................................................... 124
9.7. Revoke User .................................................................................................................................. 130
9.8. Activate User ................................................................................................................................. 135
9.9. Deactivate User ............................................................................................................................. 140
9.10. Lock User ..................................................................................................................................... 145
9.11. Unlock User ................................................................................................................................. 150
9.12. Reset Password ........................................................................................................................... 155
9.13. View User..................................................................................................................................... 161
9.14. Print Welcome Letter, Passwords ............................................................................................... 168
9.15. Terminate User Session .............................................................................................................. 173
10. Customer Management .................................................................................................................... 177
10.1. Customer Profile .......................................................................................................................... 178
10.1.1. Search Customer Profile ...................................................................................................... 178
10.1.2. Customer Profile Initiate ....................................................................................................... 182
10.2. View Customer Transactions ....................................................................................................... 188
11. Account Mapping Setup ................................................................................................................... 193
12. Maintain User List ............................................................................................................................. 208
13. Manage Rules .................................................................................................................................... 211
14. Manage Timers .................................................................................................................................. 219
15. Manage Application Messages ........................................................................................................ 223
16. Workflow Configuration ................................................................................................................... 226
17. Configuration Properties .................................................................................................................. 234
18. View Audit Log .................................................................................................................................. 236
19. View System Log ............................................................................................................................... 240
20. Host Interface Log ............................................................................................................................. 244
21. User Loggin ....................................................................................................................................... 247
22. Preferences ........................................................................................................................................ 250
Oracle FLEXCUBE Direct Banking 12.0.2.0.0 Core
23. Change Password ............................................................................................................................. 252
24. Session Summary ............................................................................................................................. 255
25. Sitemap .............................................................................................................................................. 258
26. Entity Management ........................................................................................................................... 260
27. Security Questions Maintenance .................................................................................................... 266
28. Mailbox ............................................................................................................................................... 269
28.1. Viewing Received Message......................................................................................................... 270
28.2. Sent Messages ............................................................................................................................ 274
29. Manage Policies ................................................................................................................................ 277
30. Transaction Cutoff ............................................................................................................................ 286
31. Time for Deal Acceptance and Cut-off ............................................................................................ 291
32. Transaction Blackout ........................................................................................................................ 295
33. Maintain Bulletins ............................................................................................................................. 299
33.1. Create Bulletin ............................................................................................................................. 300
33.2. Search Bulletin ............................................................................................................................. 304
34. Alert Registration .............................................................................................................................. 309
35. Global Limit Packages ...................................................................................................................... 320
35.1. Add Global Limit Package ........................................................................................................... 321
35.2. Modify Global Limit Package ....................................................................................................... 325
35.3. View Existing Global Limit Packages .......................................................................................... 329
36. Transaction Password Configuration ............................................................................................. 333
37. Map Reports To Users ...................................................................................................................... 336
38. Role Subject Mapping ....................................................................................................................... 342
39. Calendar Setup .................................................................................................................................. 347
Core User Manual
Oracle FLEXCUBE Direct Banking 12.0.2.0.0 Core
1. Preface
1.1. Intended Audience
This document is intended for the following audience:
Customers
Partners
1.2. Documentation Accessibility
For information about Oracle's commitment to accessibility, visit the Oracle Accessibility Program
website at http://www.oracle.com/pls/topic/lookup?ctx=acc&id=docacc.
1.3. Access to OFSS Support
https://flexsupp.oracle.com/
1.4. Structure
This manual is organized into the following categories:
Preface gives information on the intended audience. It also describes the overall structure of the User Manual
Transaction Host Integration Matrix provides information on host integration requirements for the transactions covered in the User Manual.
Introduction provides brief information on the overall functionality covered in the User Manual
Chapters post Introduction are dedicated to individual transactions and its details, covered in the User Manual
Core User Manual
Oracle FLEXCUBE Direct Banking 12.0.2.0.0 Core
1.5. Related Information Sources
For more information on Oracle FLEXCUBE Direct Banking Release 12.0.2.0.0, refer to the following documents:
Oracle FLEXCUBE Direct Banking Licensing Guide
Oracle FLEXCUBE Direct Banking Installation Manuals
Transaction Host Integration Matrix
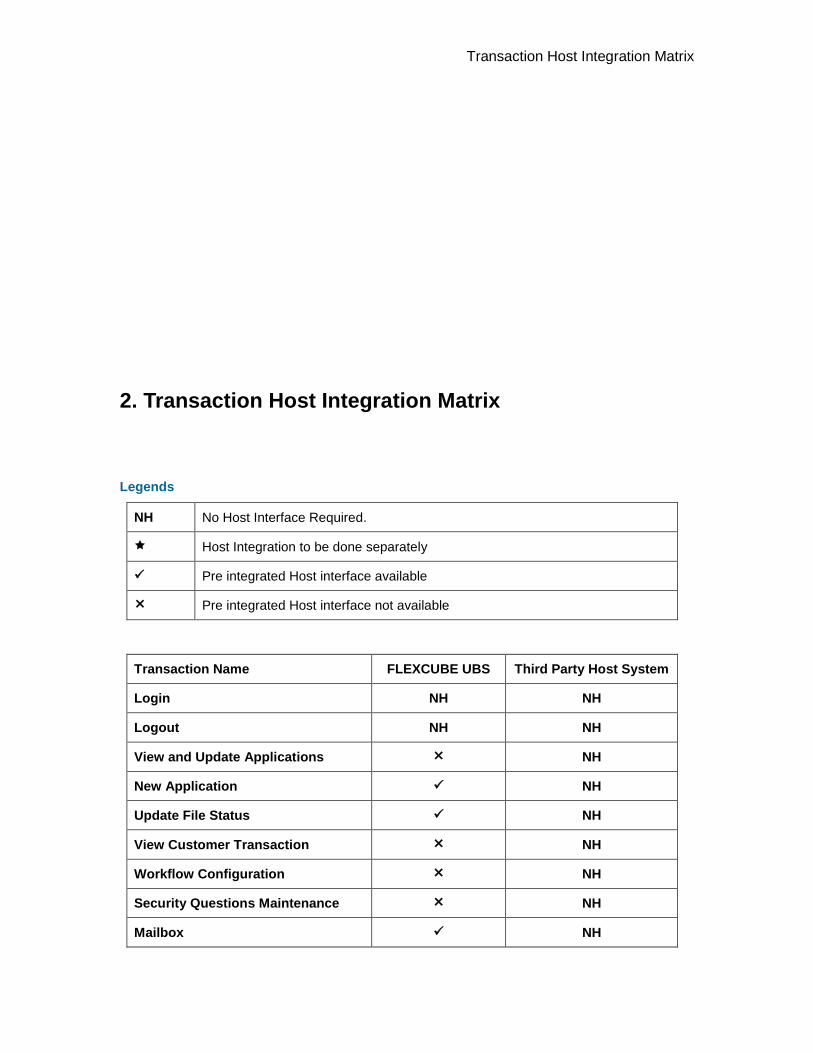
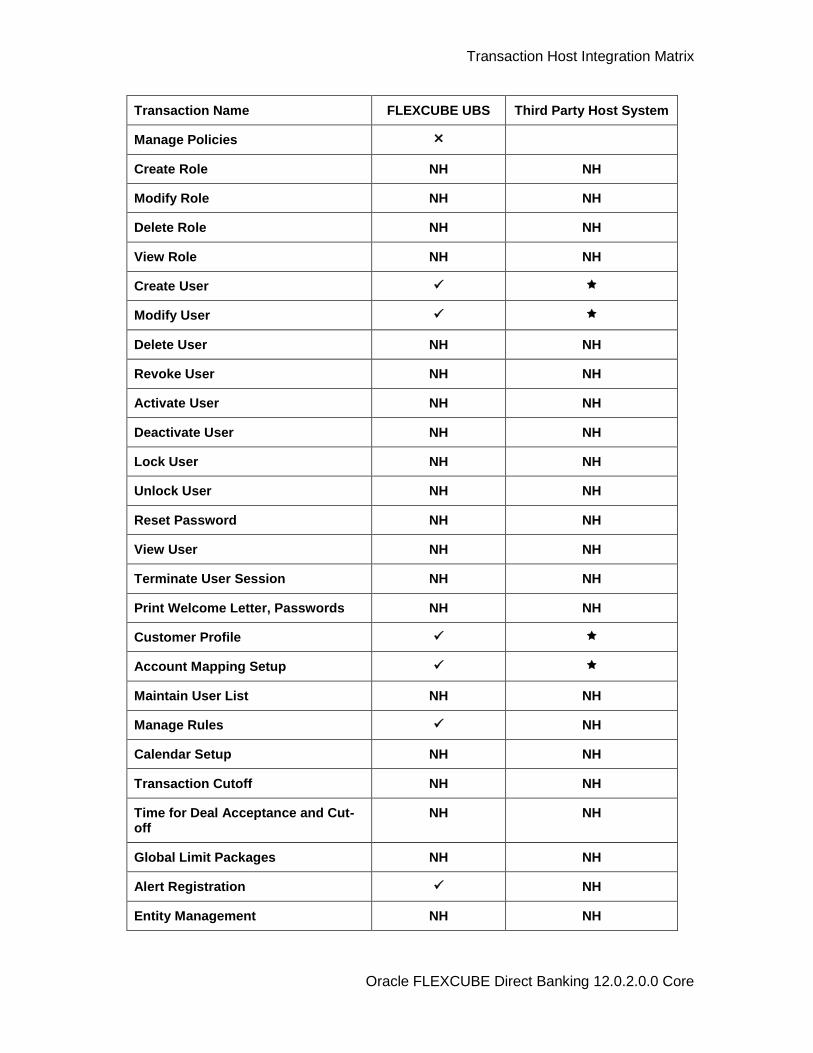
2. Transaction Host Integration Matrix
Legends
NH No Host Interface Required.
Host Integration to be done separately
Pre integrated Host interface available
Pre integrated Host interface not available
Transaction Name FLEXCUBE UBS Third Party Host System
Login NH NH
Logout NH NH
View and Update Applications NH
New Application NH
Update File Status NH
View Customer Transaction NH
Workflow Configuration NH
Security Questions Maintenance NH
Mailbox NH
Transaction Host Integration Matrix
Oracle FLEXCUBE Direct Banking 12.0.2.0.0 Core
Transaction Name FLEXCUBE UBS Third Party Host System
Manage Policies
Create Role NH NH
Modify Role NH NH
Delete Role NH NH
View Role NH NH
Create User
Modify User
Delete User NH NH
Revoke User NH NH
Activate User NH NH
Deactivate User NH NH
Lock User NH NH
Unlock User NH NH
Reset Password NH NH
View User NH NH
Terminate User Session NH NH
Print Welcome Letter, Passwords NH NH
Customer Profile
Account Mapping Setup
Maintain User List NH NH
Manage Rules NH
Calendar Setup NH NH
Transaction Cutoff NH NH
Time for Deal Acceptance and Cut-off
NH NH
Global Limit Packages NH NH
Alert Registration NH
Entity Management NH NH
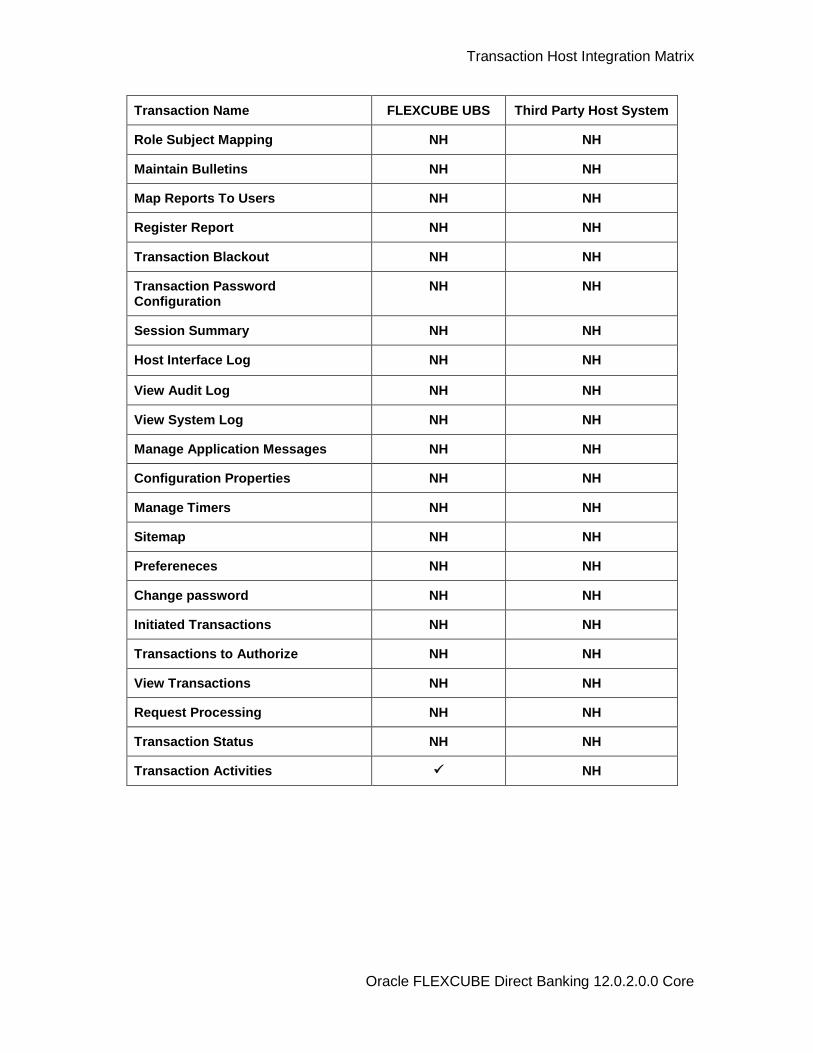
Transaction Host Integration Matrix
Oracle FLEXCUBE Direct Banking 12.0.2.0.0 Core
Transaction Name FLEXCUBE UBS Third Party Host System
Role Subject Mapping NH NH
Maintain Bulletins NH NH
Map Reports To Users NH NH
Register Report NH NH
Transaction Blackout NH NH
Transaction Password Configuration
NH NH
Session Summary NH NH
Host Interface Log NH NH
View Audit Log NH NH
View System Log NH NH
Manage Application Messages NH NH
Configuration Properties NH NH
Manage Timers NH NH
Sitemap NH NH
Prefereneces NH NH
Change password NH NH
Initiated Transactions NH NH
Transactions to Authorize NH NH
View Transactions NH NH
Request Processing NH NH
Transaction Status NH NH
Transaction Activities NH
Introduction
Oracle FLEXCUBE Direct Banking 12.0.2.0.0 Core
3. Introduction
The Core Module allows the Bank administrator to carry out various transactions required so as to carry out the day to day transactions by you. The core module of FLEXCUBE Direct Banking is used by the administrator to carry out the basic maintenance activity for smooth follow of transactions done by the Customers of the Bank.
A few of the transactions included in the Core module are User management, Role Maintenance, Customer Management, Cut off maintenance, Account mapping, Limits maintenance, Limits maintenance, etc.
Each transaction is explained in detail in the following manual for better understanding and smooth functioning of the application.
Login
Oracle FLEXCUBE Direct Banking 12.0.2.0.0 Core
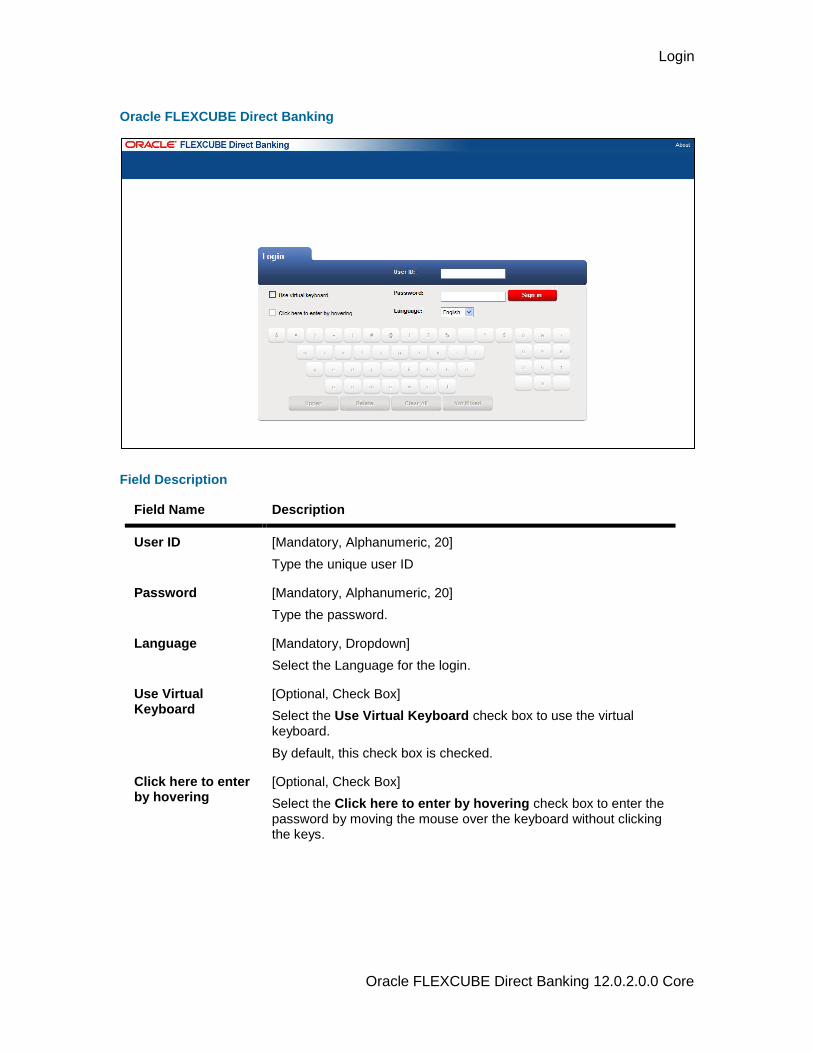
4. Login
This option allows you to log in to the ORACLE FCDB Administration application. By default, the security keyboard option is checked. This enables you to access the interface through a virtual keyboard appearing on the screen by either clicking or hovering on the keys. Alternatively, you can clear the security keyboard option and can use the keyboard.
To log in to Oracle FLEXCUBE Direct Banking
1. Enter the appropriate URL of the application provided in the address bar
2. The system displays the main page of the Oracle FLEXCUBE Direct Banking
application
Login
Oracle FLEXCUBE Direct Banking 12.0.2.0.0 Core
Oracle FLEXCUBE Direct Banking
Field Description
Field Name Description
User ID [Mandatory, Alphanumeric, 20]
Type the unique user ID
Password [Mandatory, Alphanumeric, 20]
Type the password.
Language [Mandatory, Dropdown]
Select the Language for the login.
Use Virtual Keyboard
[Optional, Check Box]
Select the Use Virtual Keyboard check box to use the virtual keyboard.
By default, this check box is checked.
Click here to enter by hovering
[Optional, Check Box]
Select the Click here to enter by hovering check box to enter the password by moving the mouse over the keyboard without clicking the keys.
Login
Oracle FLEXCUBE Direct Banking 12.0.2.0.0 Core
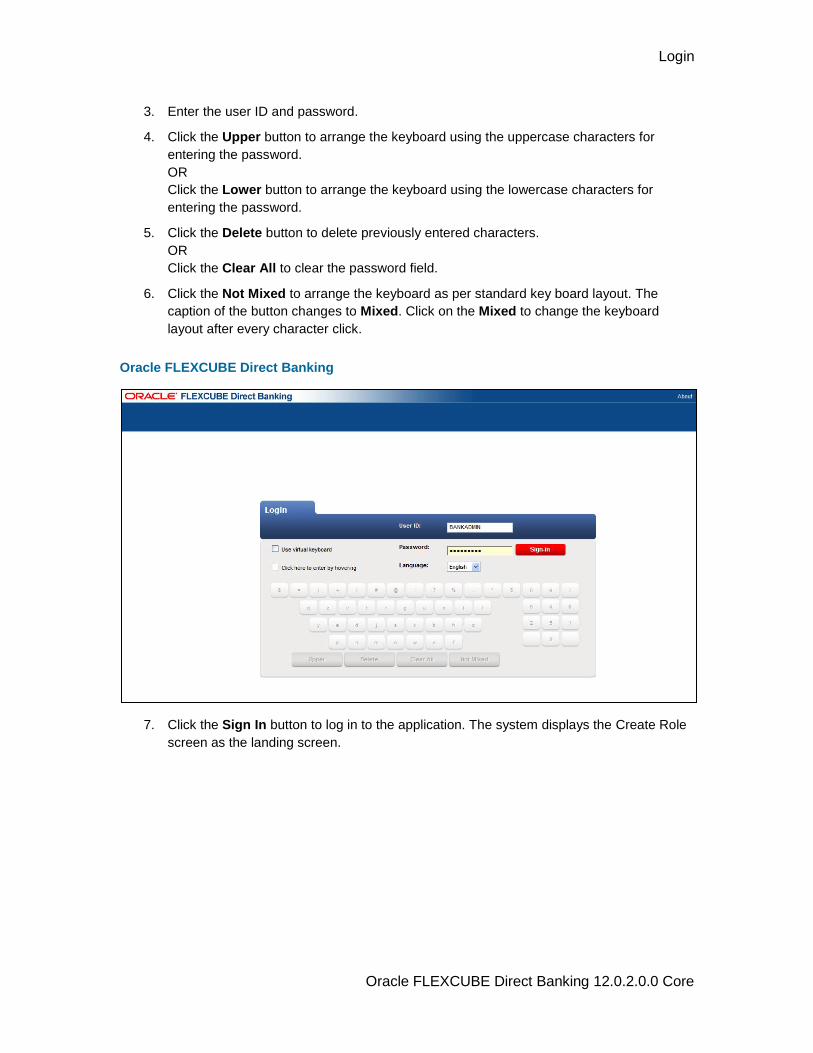
3. Enter the user ID and password.
4. Click the Upper button to arrange the keyboard using the uppercase characters for
entering the password.
OR
Click the Lower button to arrange the keyboard using the lowercase characters for
entering the password.
5. Click the Delete button to delete previously entered characters.
OR
Click the Clear All to clear the password field.
6. Click the Not Mixed to arrange the keyboard as per standard key board layout. The
caption of the button changes to Mixed. Click on the Mixed to change the keyboard
layout after every character click.
Oracle FLEXCUBE Direct Banking
7. Click the Sign In button to log in to the application. The system displays the Create Role
screen as the landing screen.
Login
Oracle FLEXCUBE Direct Banking 12.0.2.0.0 Core
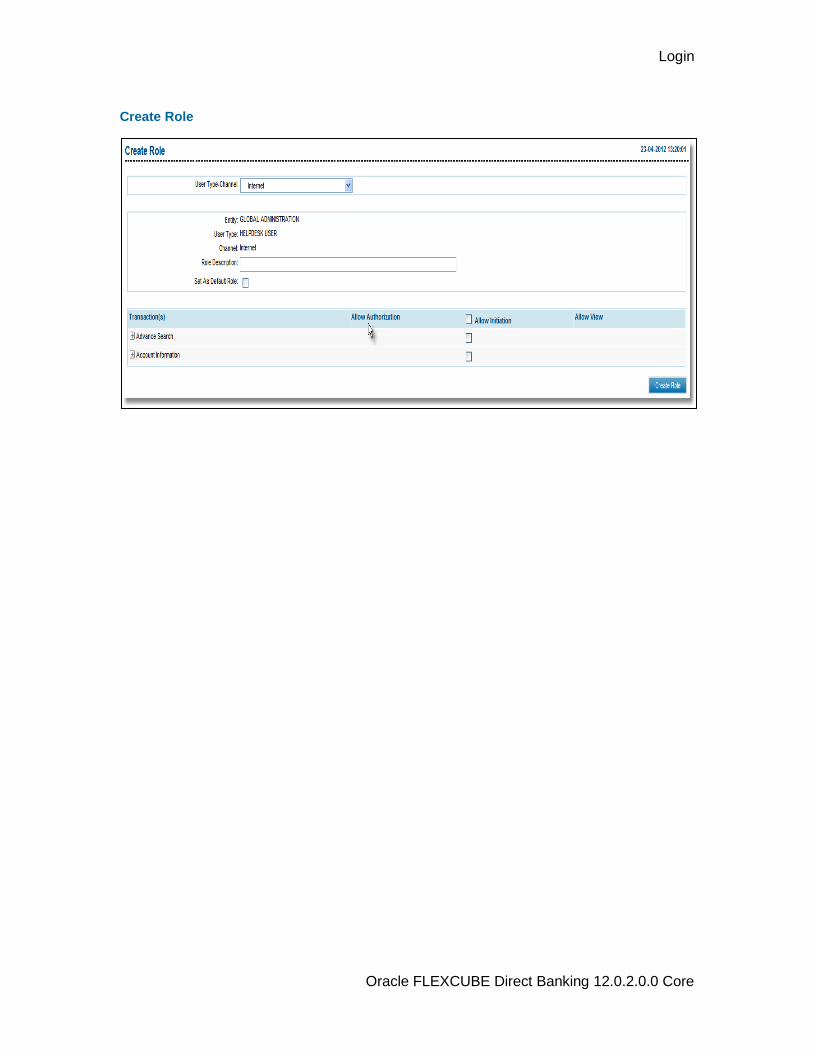
Create Role
Logout
5. Logout
This option allows you to log out of the ORACLE FCDB application.
To log out of the Oracle FLEXCUBE Direct Banking
1. Log in to the Oracle FLEXCUBE Direct Banking application
2. Navigate Default Transaction > Logout. The system displays FLEXCUBE Internet Banking -
Log off screen.
Logout
Oracle FLEXCUBE Direct Banking 12.0.2.0.0 Core
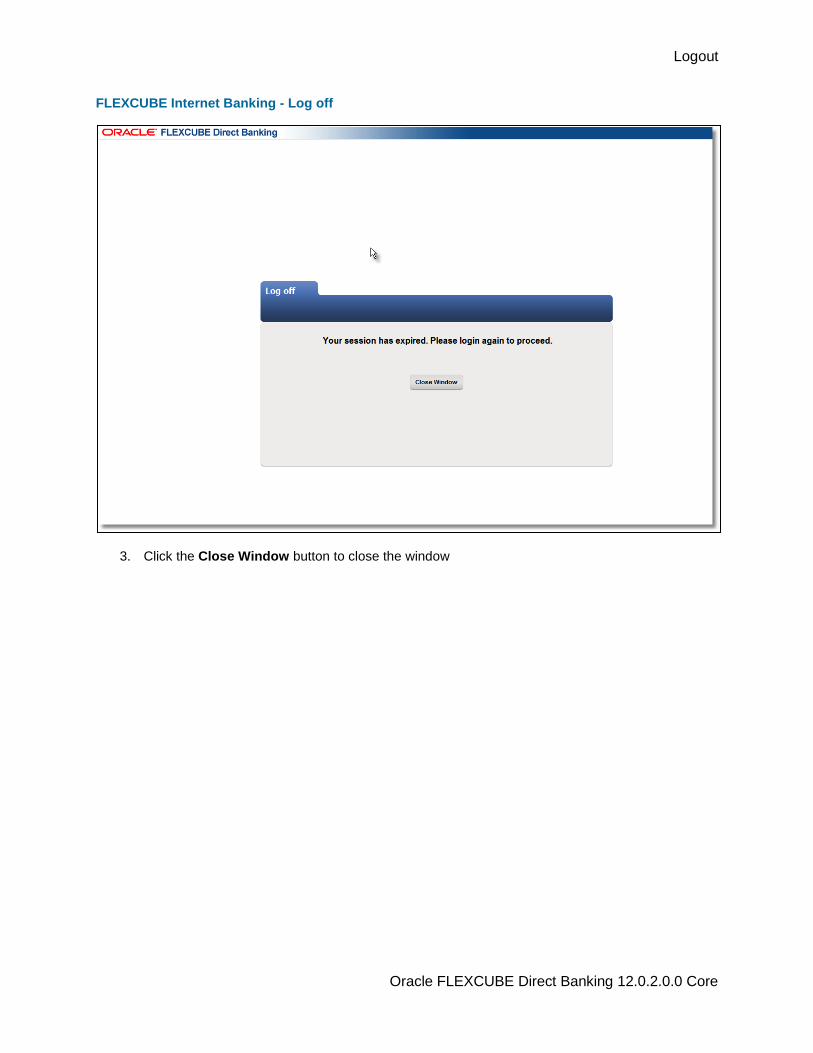
FLEXCUBE Internet Banking - Log off
3. Click the Close Window button to close the window
Transaction Activities
Oracle FLEXCUBE Direct Banking 12.0.2.0.0 Core
6. Transaction Activities
Transaction Activities
Oracle FLEXCUBE Direct Banking 12.0.2.0.0 Core
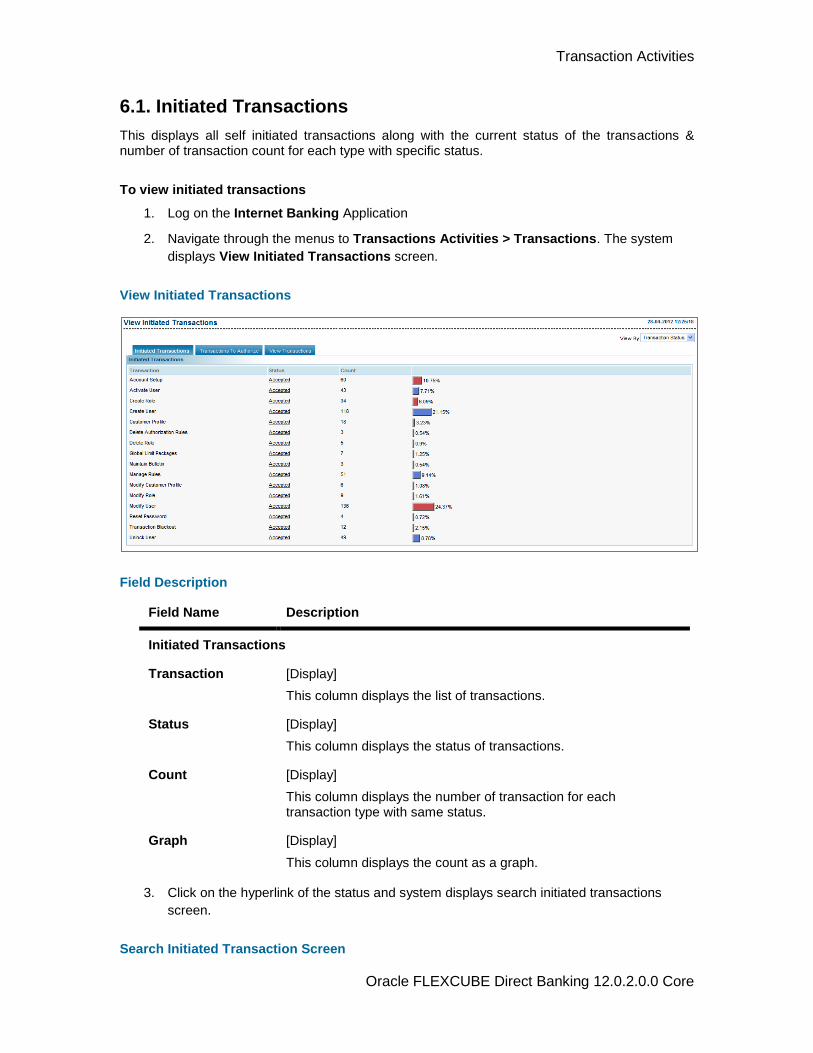
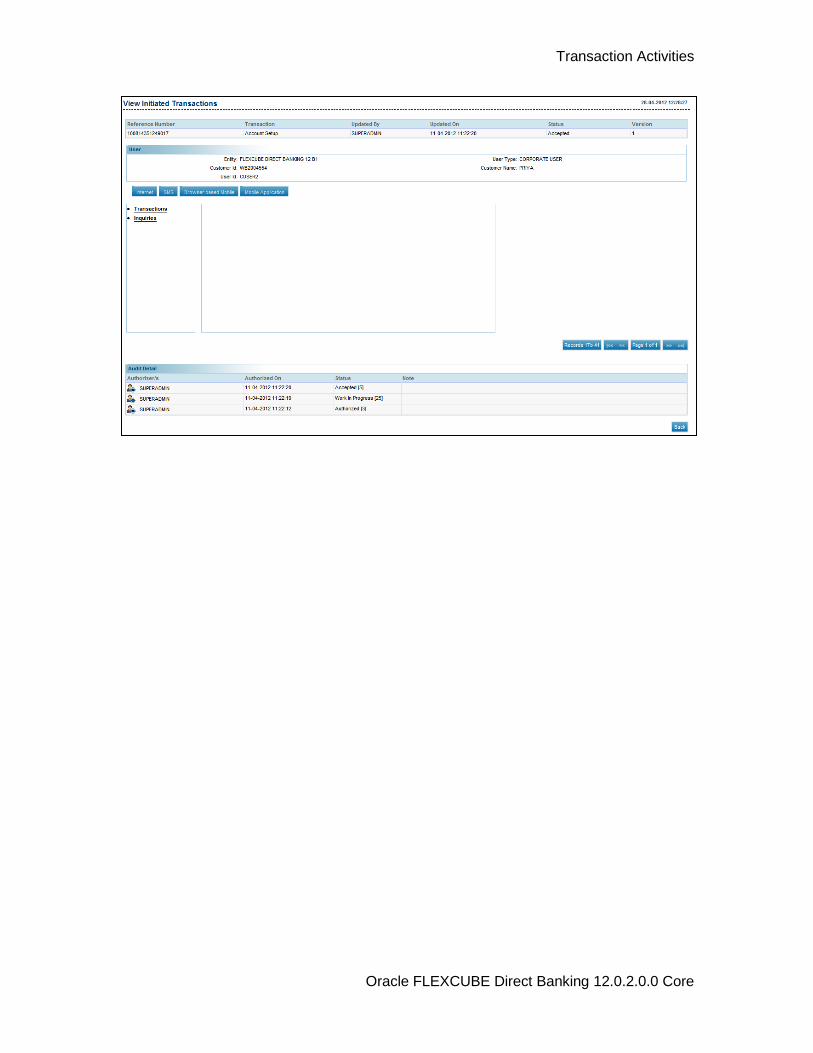
6.1. Initiated Transactions
This displays all self initiated transactions along with the current status of the transactions & number of transaction count for each type with specific status.
To view initiated transactions
1. Log on the Internet Banking Application
2. Navigate through the menus to Transactions Activities > Transactions. The system
displays View Initiated Transactions screen.
View Initiated Transactions
Field Description
3. Click on the hyperlink of the status and system displays search initiated transactions
screen.
Search Initiated Transaction Screen
Field Name Description
Initiated Transactions
Transaction [Display]
This column displays the list of transactions.
Status [Display]
This column displays the status of transactions.
Count [Display]
This column displays the number of transaction for each transaction type with same status.
Graph [Display]
This column displays the count as a graph.
Transaction Activities
Oracle FLEXCUBE Direct Banking 12.0.2.0.0 Core
Transaction Activities
Oracle FLEXCUBE Direct Banking 12.0.2.0.0 Core
Field Description
Field Name Description
Search By
EBanking Reference Number
[Radio Button, Input]
Select the radio button and enter the ebanking reference number of the transaction.
Other Search Criteria
[Radio Button]
Select the radio button search by other search criteria.
Transaction [Dropdown]
Select the transaction from the list.
User reference number
[Optional, Alphanumeric]
Type the user reference number as a search criteria.
Status [Dropdown]
Select the status from the list.
Period [Dropdown]
Select the period in which the transaction was initiated.
Values:
Last 1 Day
Last 6 Months
Last n Transactions
Custom Date
From Date [Date picker]
Enter the date from to search by date range.
From Date will be enabled and mandatory if Custom Date is selected in the Transaction Period dropdown.
To Date [Date picker]
Enter the To Date to search by date range.
To Date will be enabled and mandatory if Custom Date is selected in the Transaction Period dropdown.
Search Results
EBanking Reference Number
[Display]
This column displays the ebanking reference number of the transaction.
Transaction [Display]
This column display selected the transaction.
Transaction Activities
Oracle FLEXCUBE Direct Banking 12.0.2.0.0 Core
Field Name Description
Status [Display]
This column displays the status of the transaction.
Created By [Display]
This column displays the creator of the transaction.
Created on [Display]
This column displays the date and time on which the transaction was updated..
Updated By [Display]
This column displays the user ID of last user who has updated the transaction.
Updated On [Display]
This column displays the date and time on which the transaction is updated.
Version [Display]
This column displays the version of transaction.
(Version gets incremented if a rejected transaction gets modified by initiator).
State Bit [Display]
This column displays state bit.
4. The additional search criteria fields and the additional search result fields are available as
per the transaction selected.
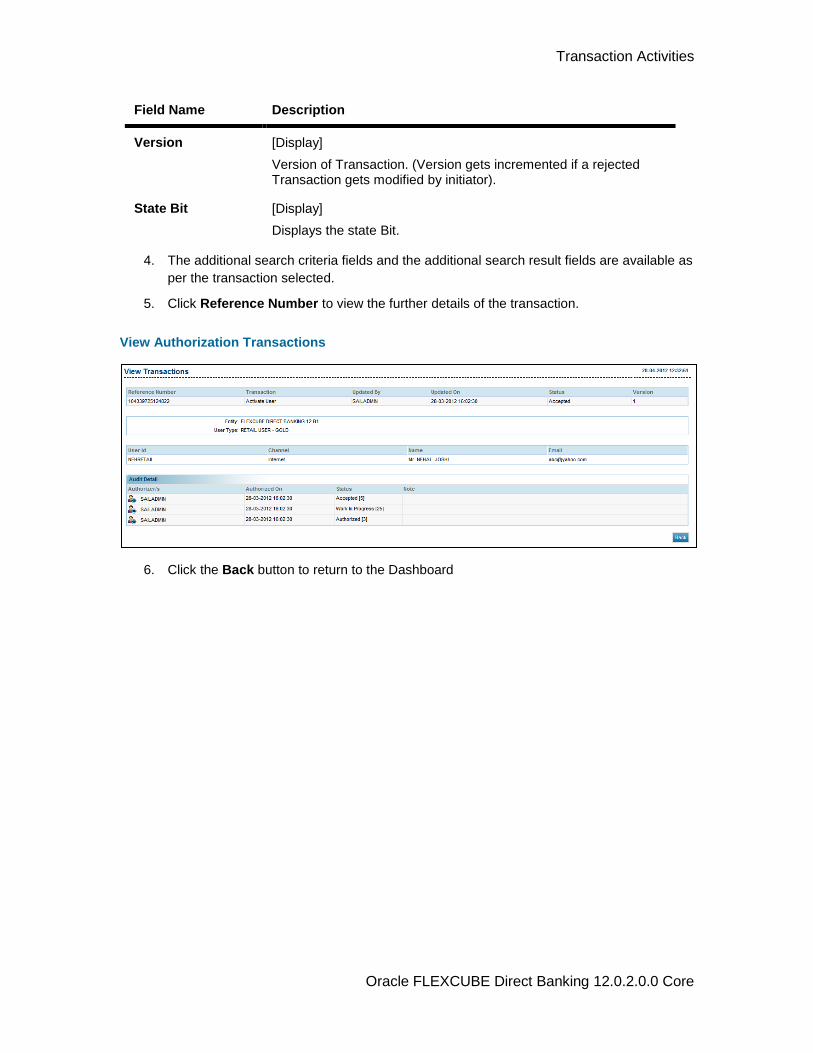
5. Click hyper linked Reference Number to view the further details of the transaction.
View Initiated Transactions
Transaction Activities
Oracle FLEXCUBE Direct Banking 12.0.2.0.0 Core
Transaction Activities
Oracle FLEXCUBE Direct Banking 12.0.2.0.0 Core
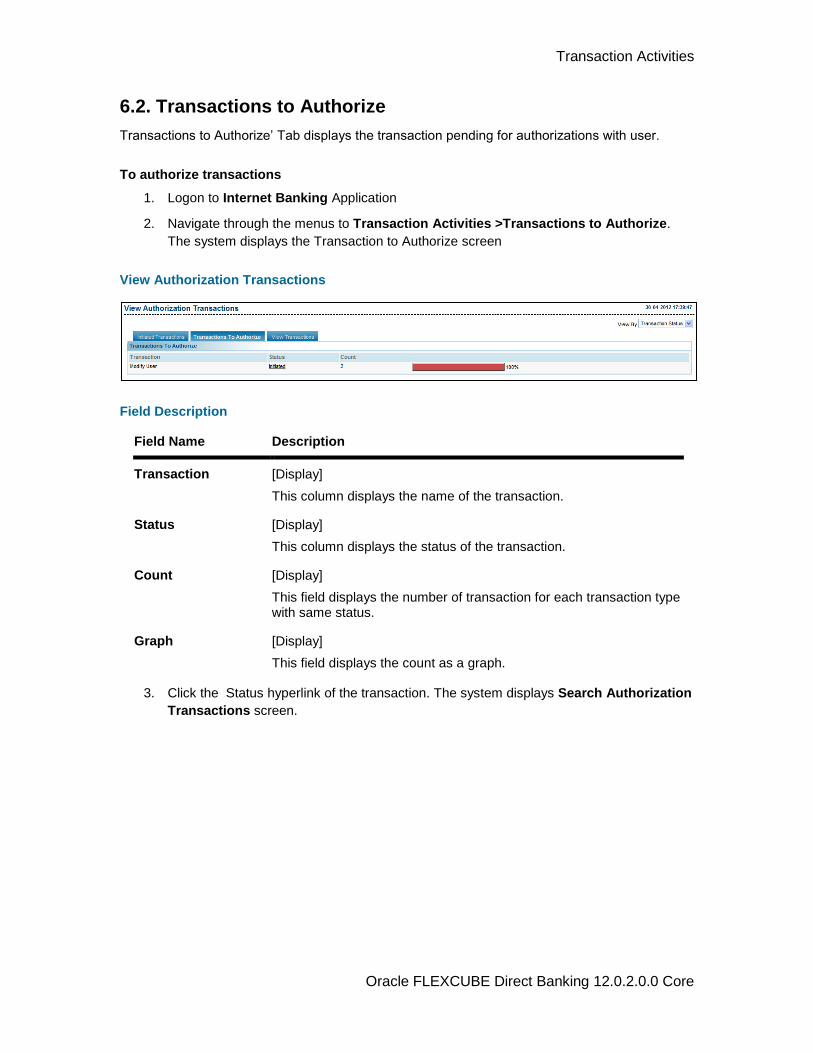
6.2. Transactions to Authorize
Transactions to Authorize’ Tab displays the transaction pending for authorizations with user.
To authorize transactions
1. Logon to Internet Banking Application
2. Navigate through the menus to Transaction Activities >Transactions to Authorize.
The system displays the Transaction to Authorize screen
View Authorization Transactions
Field Description
Field Name Description
Transaction [Display]
This column displays the name of the transaction.
Status [Display]
This column displays the status of the transaction.
Count [Display]
This field displays the number of transaction for each transaction type with same status.
Graph [Display]
This field displays the count as a graph.
3. Click the Status hyperlink of the transaction. The system displays Search Authorization
Transactions screen.
Transaction Activities
Oracle FLEXCUBE Direct Banking 12.0.2.0.0 Core
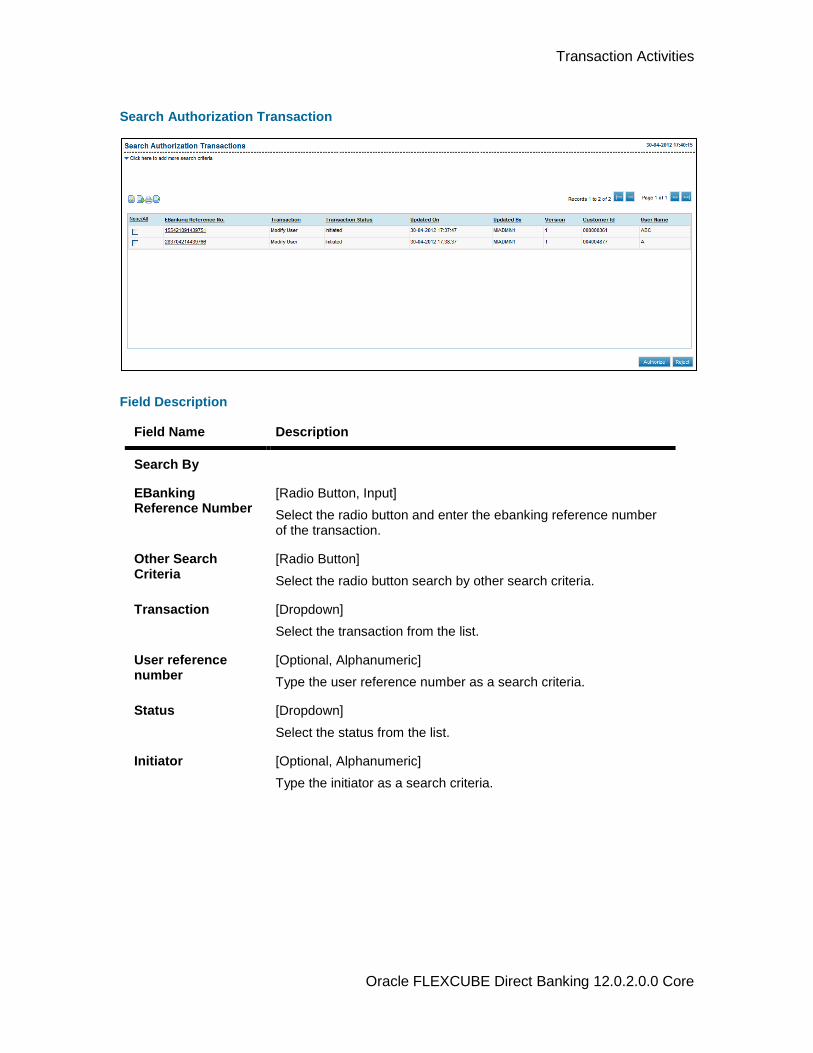
Search Authorization Transaction
Field Description
Field Name Description
Search By
EBanking Reference Number
[Radio Button, Input]
Select the radio button and enter the ebanking reference number of the transaction.
Other Search Criteria
[Radio Button]
Select the radio button search by other search criteria.
Transaction [Dropdown]
Select the transaction from the list.
User reference number
[Optional, Alphanumeric]
Type the user reference number as a search criteria.
Status [Dropdown]
Select the status from the list.
Initiator [Optional, Alphanumeric]
Type the initiator as a search criteria.
Transaction Activities
Oracle FLEXCUBE Direct Banking 12.0.2.0.0 Core
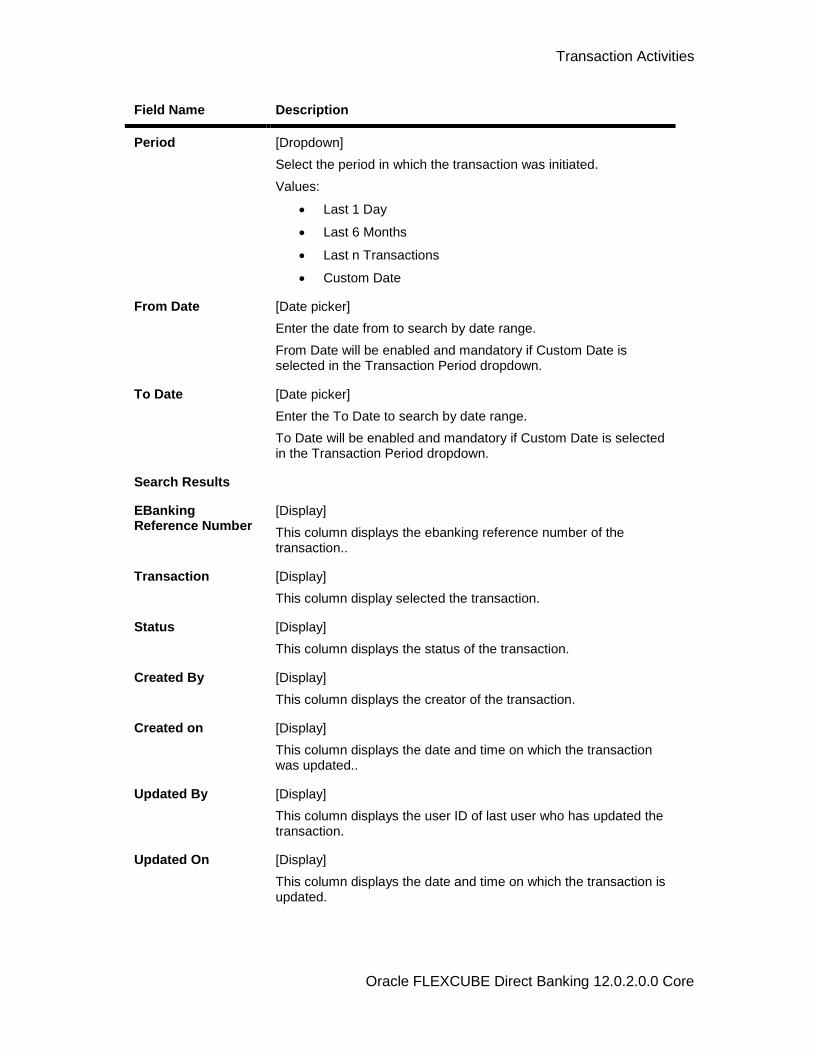
Field Name Description
Period [Dropdown]
Select the period in which the transaction was initiated.
Values:
Last 1 Day
Last 6 Months
Last n Transactions
Custom Date
From Date [Date picker]
Enter the date from to search by date range.
From Date will be enabled and mandatory if Custom Date is selected in the Transaction Period dropdown.
To Date [Date picker]
Enter the To Date to search by date range.
To Date will be enabled and mandatory if Custom Date is selected in the Transaction Period dropdown.
Search Results
EBanking Reference Number
[Display]
This column displays the ebanking reference number of the transaction..
Transaction [Display]
This column display selected the transaction.
Status [Display]
This column displays the status of the transaction.
Created By [Display]
This column displays the creator of the transaction.
Created on [Display]
This column displays the date and time on which the transaction was updated..
Updated By [Display]
This column displays the user ID of last user who has updated the transaction.
Updated On [Display]
This column displays the date and time on which the transaction is updated.
Transaction Activities
Oracle FLEXCUBE Direct Banking 12.0.2.0.0 Core
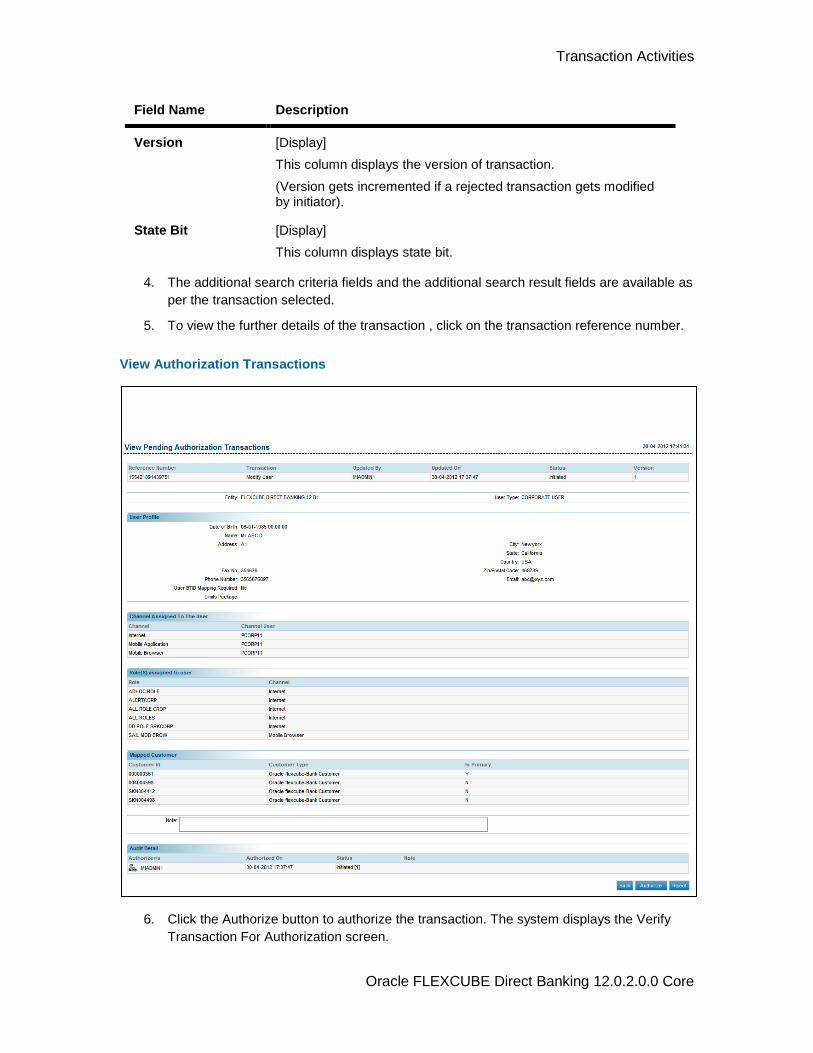
Field Name Description
Version [Display]
This column displays the version of transaction.
(Version gets incremented if a rejected transaction gets modified by initiator).
State Bit [Display]
This column displays state bit.
4. The additional search criteria fields and the additional search result fields are available as
per the transaction selected.
5. To view the further details of the transaction , click on the transaction reference number.
View Authorization Transactions
6. Click the Authorize button to authorize the transaction. The system displays the Verify
Transaction For Authorization screen.
Transaction Activities
Oracle FLEXCUBE Direct Banking 12.0.2.0.0 Core
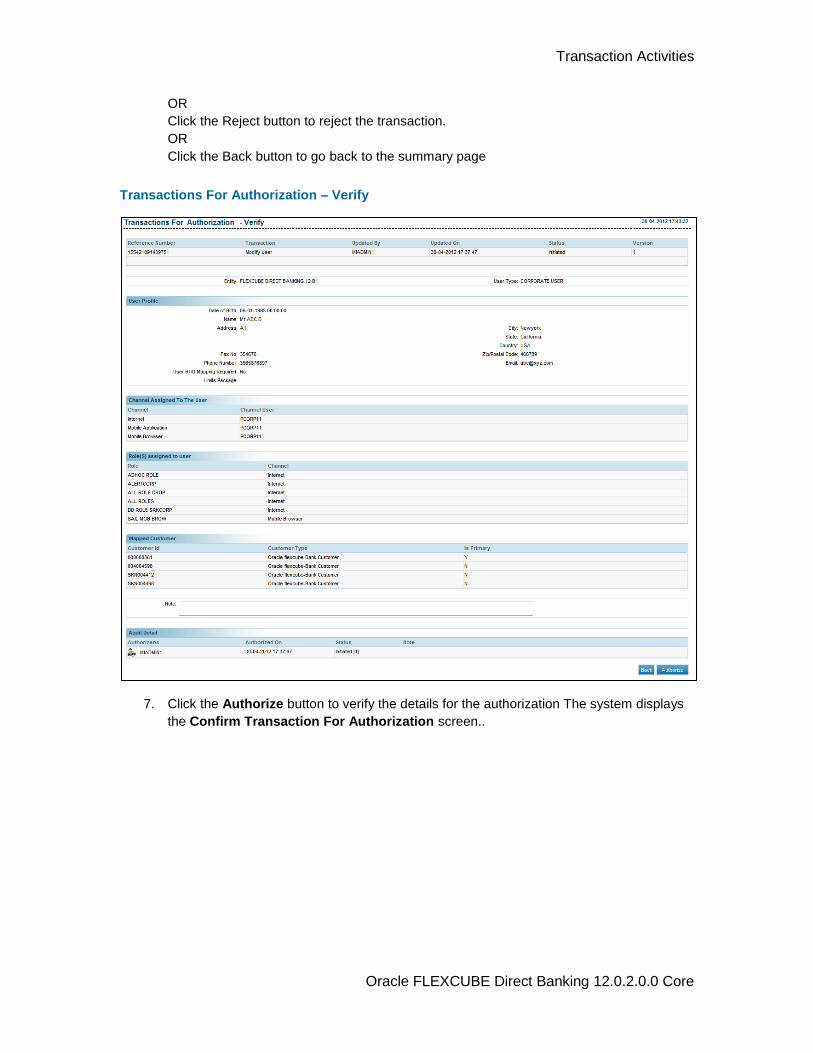
OR
Click the Reject button to reject the transaction.
OR
Click the Back button to go back to the summary page
Transactions For Authorization – Verify
7. Click the Authorize button to verify the details for the authorization The system displays
the Confirm Transaction For Authorization screen..
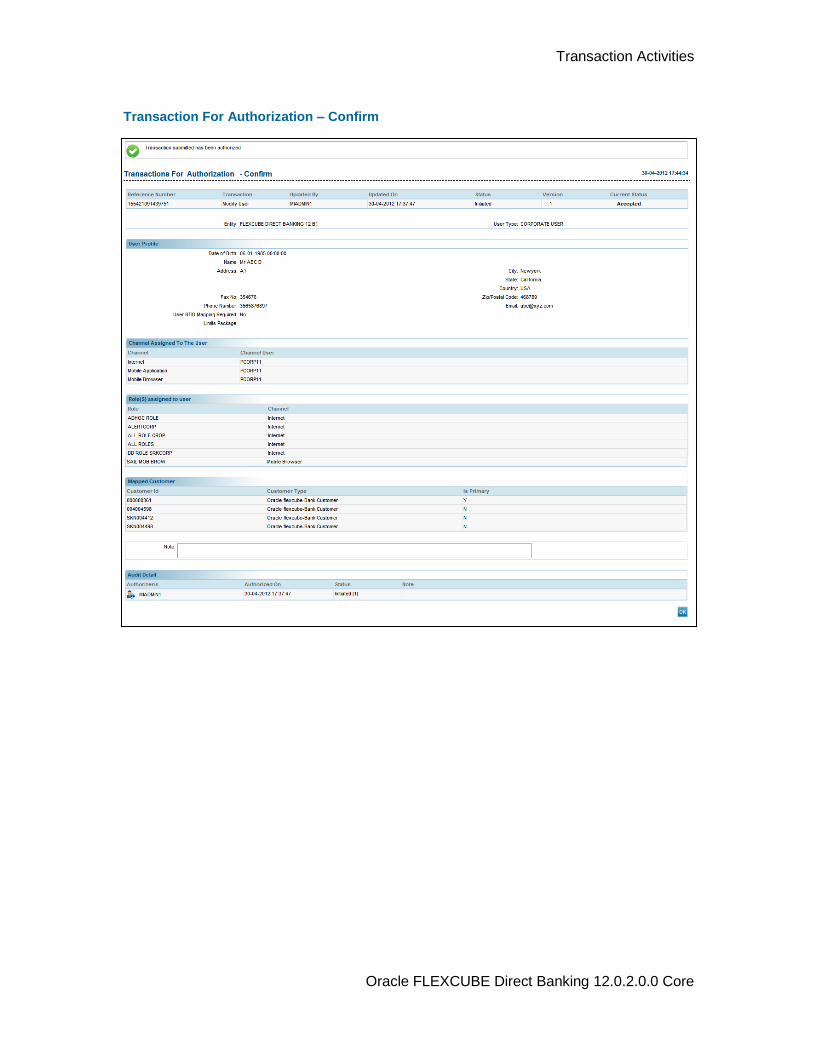
Transaction Activities
Oracle FLEXCUBE Direct Banking 12.0.2.0.0 Core
Transaction For Authorization – Confirm
Transaction Activities
Oracle FLEXCUBE Direct Banking 12.0.2.0.0 Core
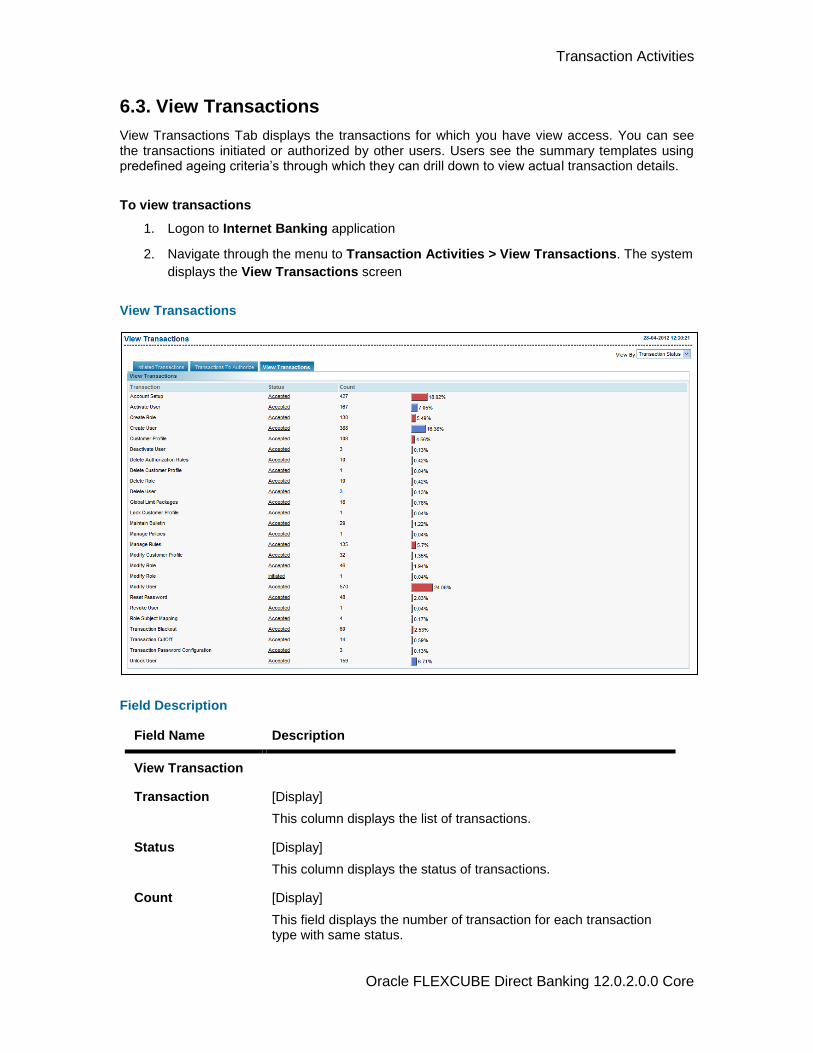
6.3. View Transactions
View Transactions Tab displays the transactions for which you have view access. You can see the transactions initiated or authorized by other users. Users see the summary templates using predefined ageing criteria’s through which they can drill down to view actual transaction details.
To view transactions
1. Logon to Internet Banking application
2. Navigate through the menu to Transaction Activities > View Transactions. The system
displays the View Transactions screen
View Transactions
Field Description
Field Name Description
View Transaction
Transaction [Display]
This column displays the list of transactions.
Status [Display]
This column displays the status of transactions.
Count [Display]
This field displays the number of transaction for each transaction type with same status.
Transaction Activities
Oracle FLEXCUBE Direct Banking 12.0.2.0.0 Core
Field Name Description
Graph [Display]
This field displays the count as a graph.
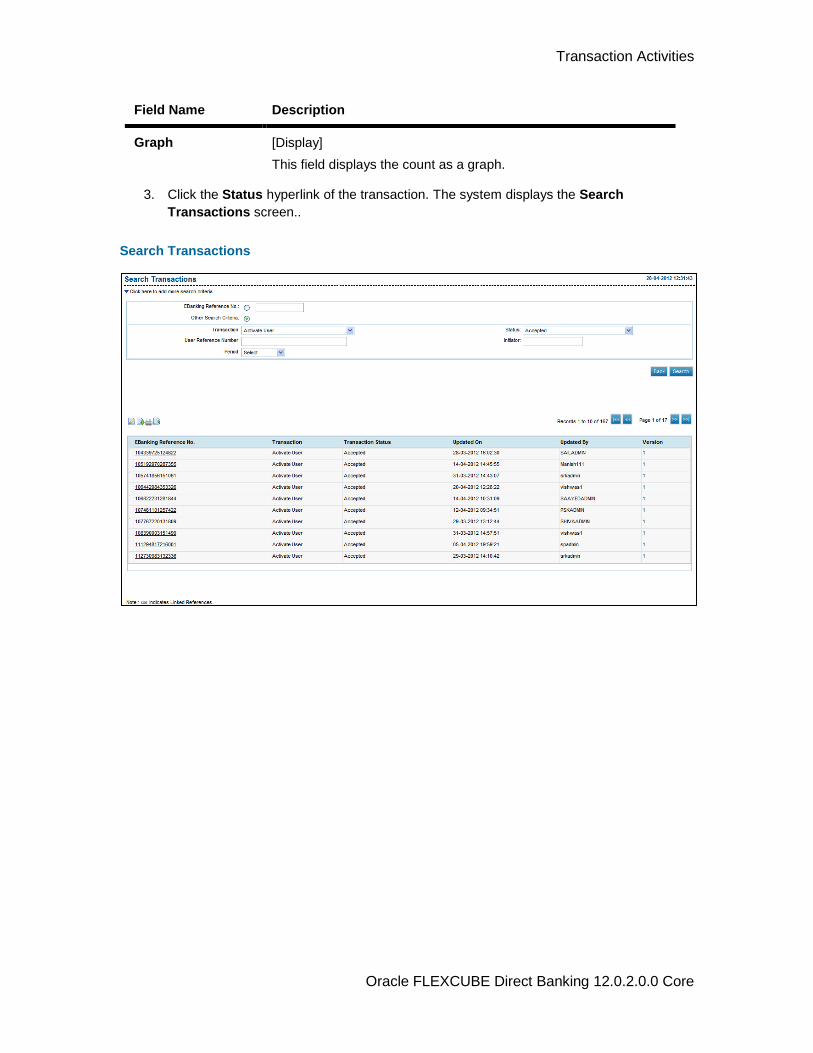
3. Click the Status hyperlink of the transaction. The system displays the Search
Transactions screen..
Search Transactions
Transaction Activities
Oracle FLEXCUBE Direct Banking 12.0.2.0.0 Core
Field Description
Field Name Description
Search By
EBanking Reference Number
[Radio Button, Input]
Select the radio button and enter the ebanking reference number of the transaction.
Other Search Criteria
The following fields are displayed if other search criteria is selected
Transaction [Mandatory, Drop-down]
Select the transaction from the drop down menu.
Status [ Optional , Drop-down]
Select the status from the drop down menu
User Reference Number
[Optional, Alphanumeric, 20]
User Reference Number of the transaction.
Period [Optional, Drop-down]
Click the button besides period and select the period from drop down menu .
From Date, To Date
[Conditional, Date, Pick-list] Enter Transaction Initiation Date Range
Search Result Click Search and the results are displayed
Reference Number [Display]
Displays the transaction reference number
Transaction [Display]
Displays the transaction.
Created By [Display]
User ID of last user who has created the transaction.
Created on [Display]
User ID of last user who has created the transaction.
Updated By [Display]
User ID of last user who has updated the transaction.
Updated On [Display]
Date & Time at which transaction was updated.
Status [Display]
Current status of the Transaction.
Transaction Activities
Oracle FLEXCUBE Direct Banking 12.0.2.0.0 Core
Field Name Description
Version [Display]
Version of Transaction. (Version gets incremented if a rejected Transaction gets modified by initiator).
State Bit [Display]
Displays the state Bit.
4. The additional search criteria fields and the additional search result fields are available as
per the transaction selected.
5. Click Reference Number to view the further details of the transaction.
View Authorization Transactions
6. Click the Back button to return to the Dashboard
Transaction Activities
Oracle FLEXCUBE Direct Banking 12.0.2.0.0 Core
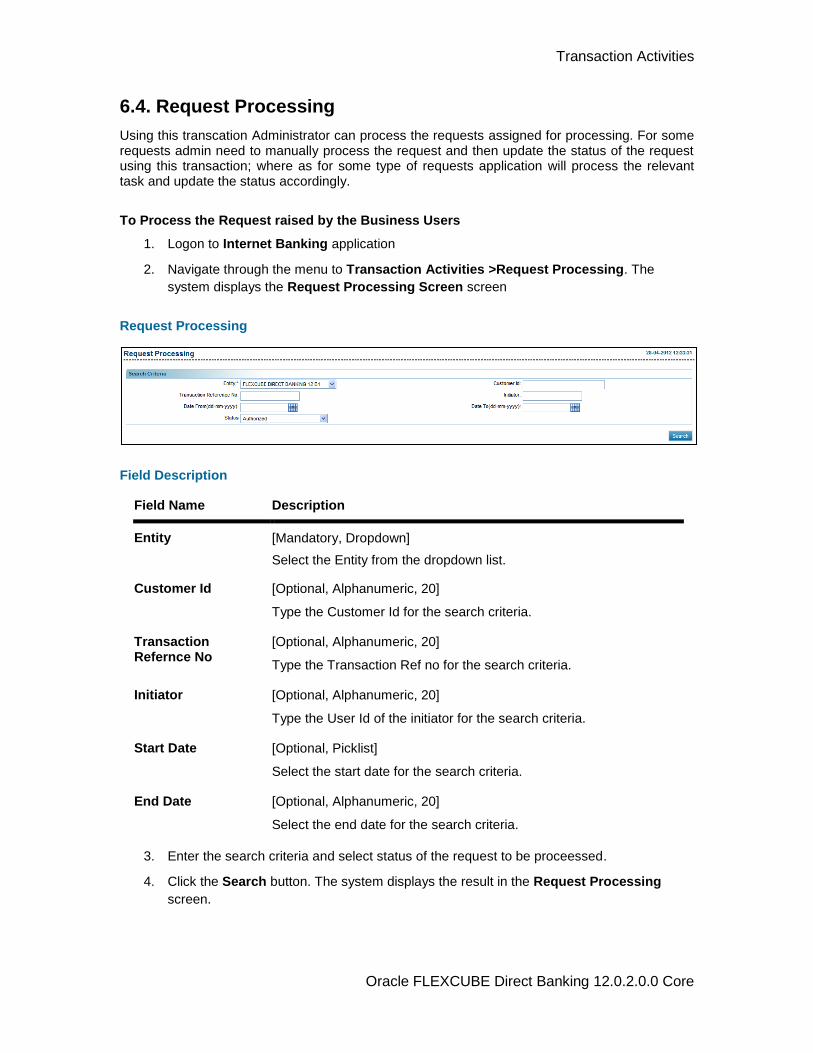
6.4. Request Processing
Using this transcation Administrator can process the requests assigned for processing. For some requests admin need to manually process the request and then update the status of the request using this transaction; where as for some type of requests application will process the relevant task and update the status accordingly.
To Process the Request raised by the Business Users
1. Logon to Internet Banking application
2. Navigate through the menu to Transaction Activities >Request Processing. The
system displays the Request Processing Screen screen
Request Processing
Field Description
Field Name Description
Entity [Mandatory, Dropdown]
Select the Entity from the dropdown list.
Customer Id [Optional, Alphanumeric, 20]
Type the Customer Id for the search criteria.
Transaction Refernce No
[Optional, Alphanumeric, 20]
Type the Transaction Ref no for the search criteria.
Initiator [Optional, Alphanumeric, 20]
Type the User Id of the initiator for the search criteria.
Start Date [Optional, Picklist]
Select the start date for the search criteria.
End Date [Optional, Alphanumeric, 20]
Select the end date for the search criteria.
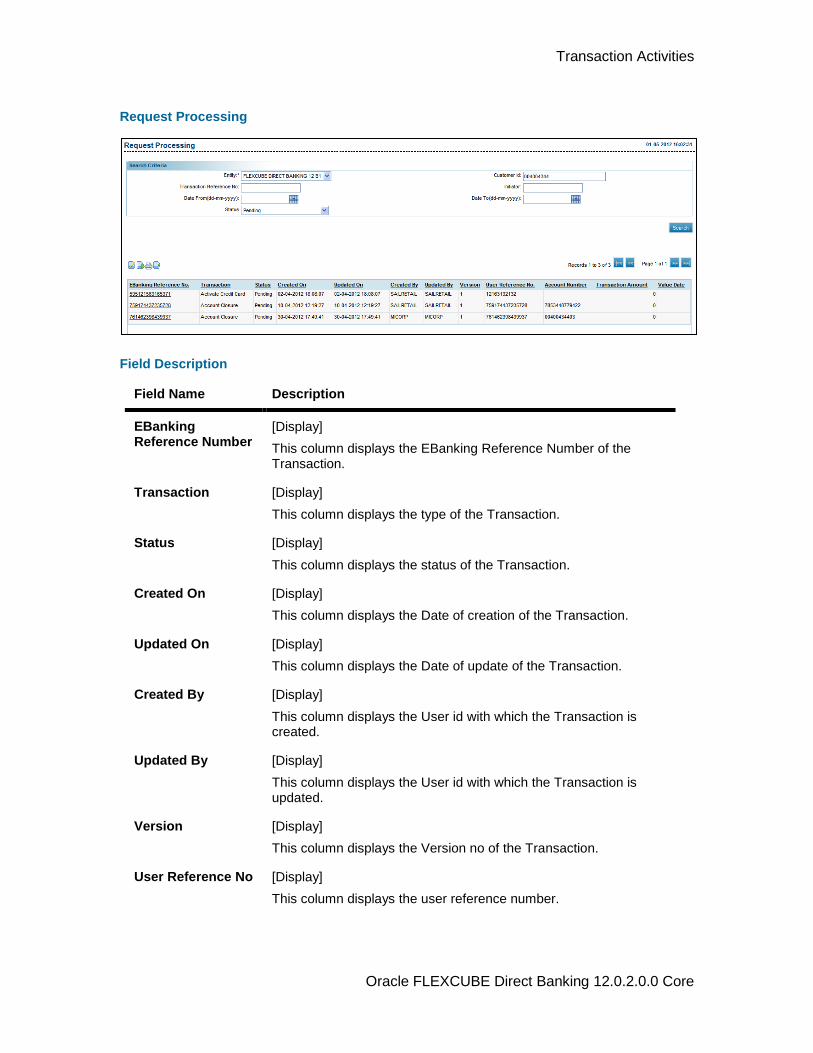
3. Enter the search criteria and select status of the request to be proceessed.
4. Click the Search button. The system displays the result in the Request Processing
screen.
Transaction Activities
Oracle FLEXCUBE Direct Banking 12.0.2.0.0 Core
Request Processing
Field Description
Field Name Description
EBanking Reference Number
[Display]
This column displays the EBanking Reference Number of the Transaction.
Transaction [Display]
This column displays the type of the Transaction.
Status [Display]
This column displays the status of the Transaction.
Created On [Display]
This column displays the Date of creation of the Transaction.
Updated On [Display]
This column displays the Date of update of the Transaction.
Created By [Display]
This column displays the User id with which the Transaction is created.
Updated By [Display]
This column displays the User id with which the Transaction is updated.
Version [Display]
This column displays the Version no of the Transaction.
User Reference No [Display]
This column displays the user reference number.
Transaction Activities
Oracle FLEXCUBE Direct Banking 12.0.2.0.0 Core
Field Name Description
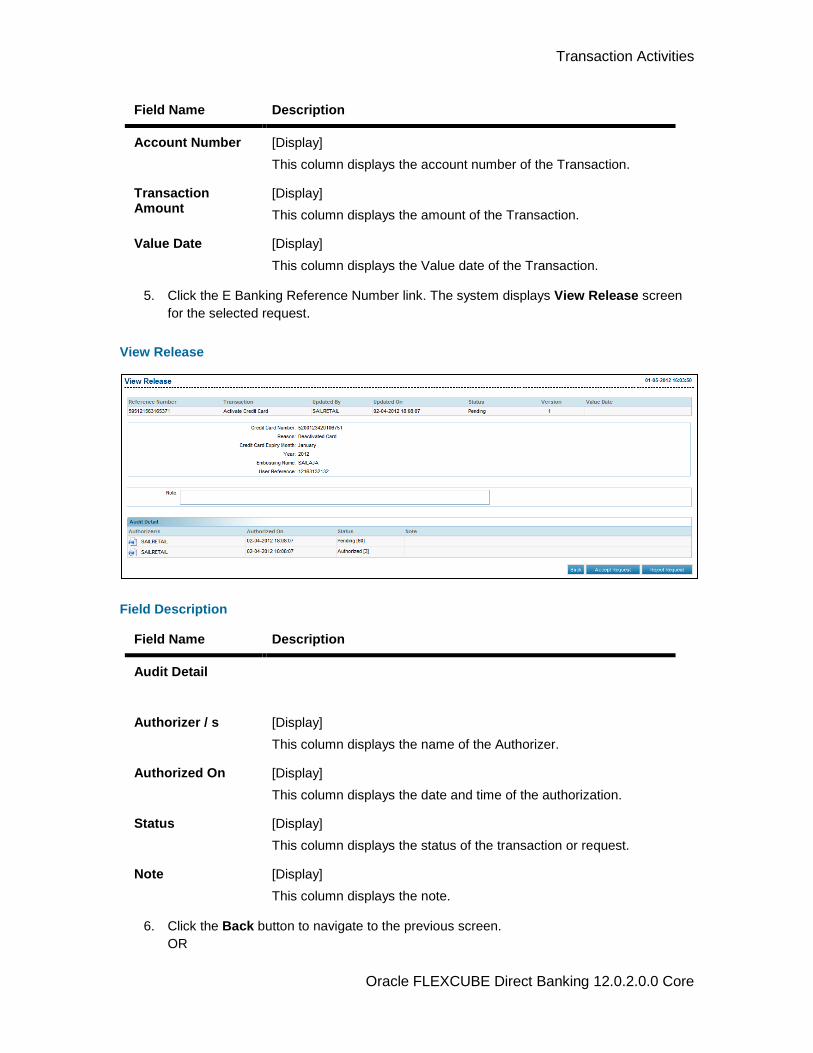
Account Number [Display]
This column displays the account number of the Transaction.
Transaction Amount
[Display]
This column displays the amount of the Transaction.
Value Date [Display]
This column displays the Value date of the Transaction.
5. Click the E Banking Reference Number link. The system displays View Release screen
for the selected request.
View Release
Field Description
Field Name Description
Audit Detail
Authorizer / s [Display]
This column displays the name of the Authorizer.
Authorized On [Display]
This column displays the date and time of the authorization.
Status [Display]
This column displays the status of the transaction or request.
Note [Display]
This column displays the note.
6. Click the Back button to navigate to the previous screen.
OR
Transaction Activities
Oracle FLEXCUBE Direct Banking 12.0.2.0.0 Core
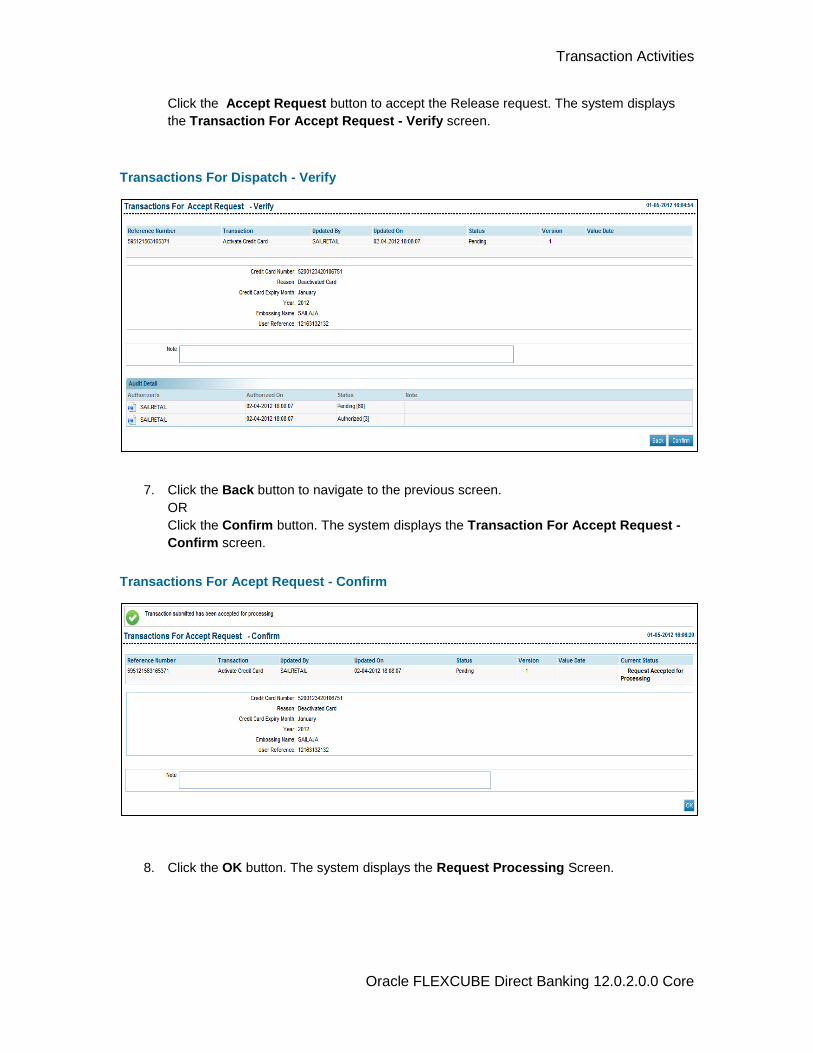
Click the Accept Request button to accept the Release request. The system displays
the Transaction For Accept Request - Verify screen.
Transactions For Dispatch - Verify
7. Click the Back button to navigate to the previous screen.
OR
Click the Confirm button. The system displays the Transaction For Accept Request -
Confirm screen.
Transactions For Acept Request - Confirm
8. Click the OK button. The system displays the Request Processing Screen.
Transaction Activities
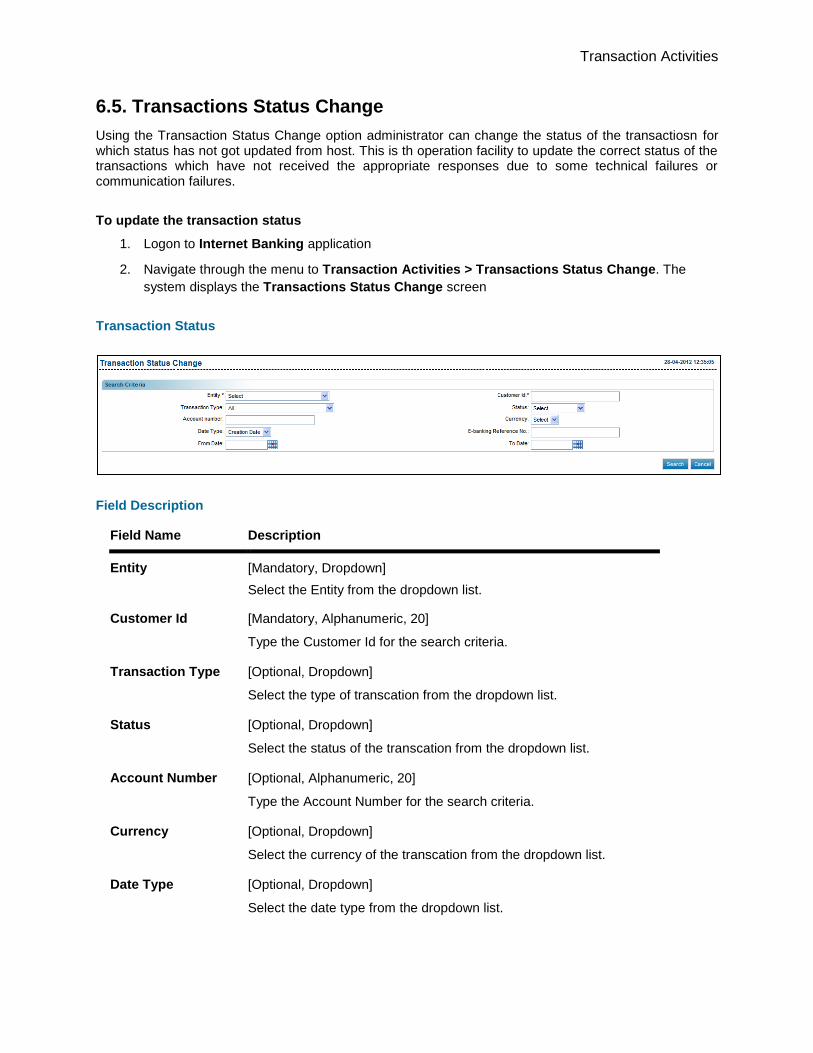
6.5. Transactions Status Change
Using the Transaction Status Change option administrator can change the status of the transactiosn for which status has not got updated from host. This is th operation facility to update the correct status of the transactions which have not received the appropriate responses due to some technical failures or communication failures.
To update the transaction status
1. Logon to Internet Banking application
2. Navigate through the menu to Transaction Activities > Transactions Status Change. The
system displays the Transactions Status Change screen
Transaction Status
Field Description
Field Name Description
Entity [Mandatory, Dropdown]
Select the Entity from the dropdown list.
Customer Id [Mandatory, Alphanumeric, 20]
Type the Customer Id for the search criteria.
Transaction Type [Optional, Dropdown]
Select the type of transcation from the dropdown list.
Status [Optional, Dropdown]
Select the status of the transcation from the dropdown list.
Account Number [Optional, Alphanumeric, 20]
Type the Account Number for the search criteria.
Currency [Optional, Dropdown]
Select the currency of the transcation from the dropdown list.
Date Type [Optional, Dropdown]
Select the date type from the dropdown list.
Transaction Activities
Oracle FLEXCUBE Direct Banking 12.0.2.0.0 Core
Field Name Description
Ebanking Reference number
[Optional, Alphanumeric, 20]
Type the Ebanking Reference number for the search criteria.
From Date [Optional, Pick list]
Select the from datefor the search criteria from the date picklist.
To Date [Optional, Pick list]
Select the to date for the search criteria from the date picklist.
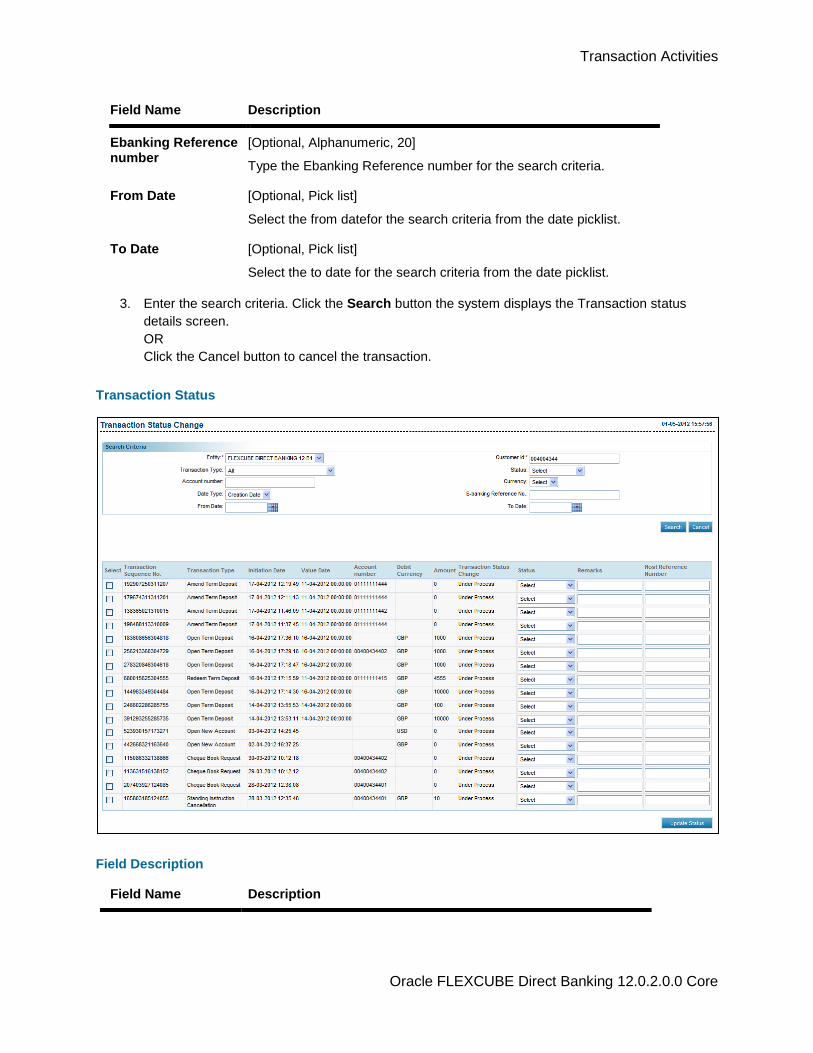
3. Enter the search criteria. Click the Search button the system displays the Transaction status
details screen.
OR
Click the Cancel button to cancel the transaction.
Transaction Status
Field Description
Field Name Description
Transaction Activities
Oracle FLEXCUBE Direct Banking 12.0.2.0.0 Core
Field Name Description
Transaction sequence number
[Display]
This column displays the Transcation Sequence number of the transaction.
Transaction type [Display]
This column displays the type of the transaction.
Initiation date [Display]
This column displays the initiation date of the transaction.
Value date [Display]
This column displays the valuedate of the transaction.
Account number [Display]
This column displays the account number for the transaction.
Debit currency [Display]
This column displays the debit currency of the transaction.
Transaction status [Display]
This column displays the transaction status of the transaction.
Status [Optional, Dropdown]
Select the new status for the transaction.
Remarks [Optional, Alphanumeric]
Type the remarks for status change if any..
Amount [Display]
This column displays the amount of the transaction.
Host reference Number
[Optional, Alphanumeric]
Type the Host reference number for the transaction.
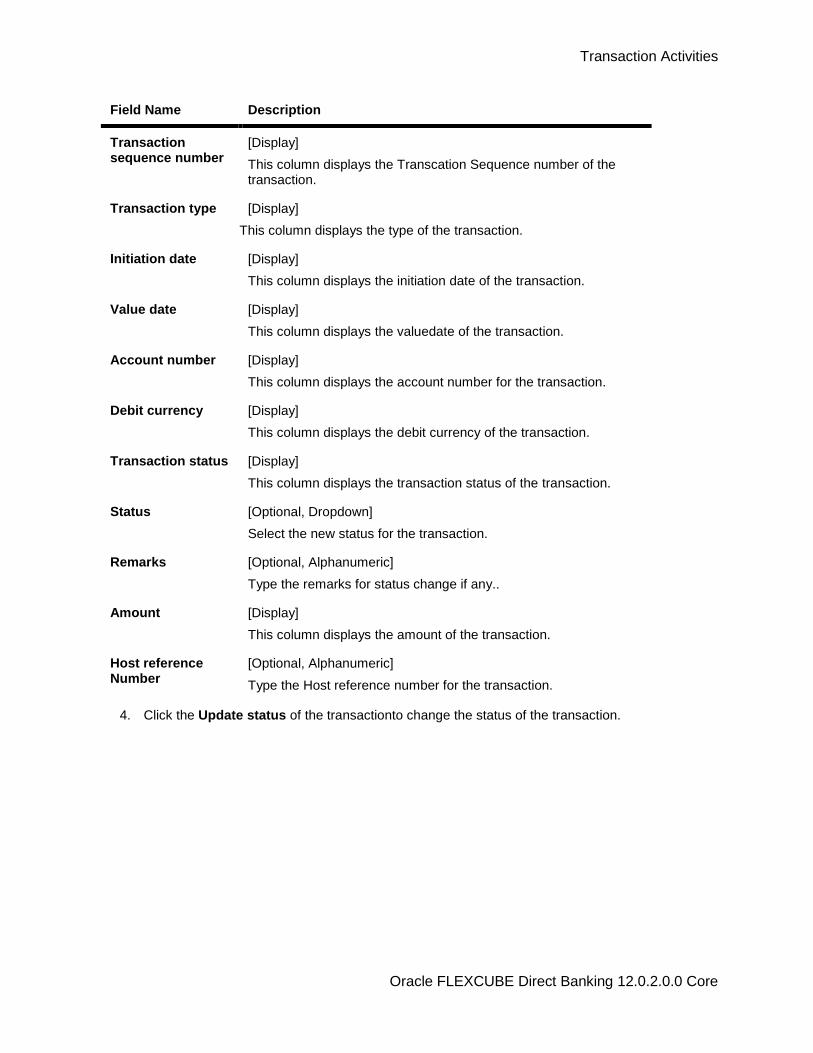
4. Click the Update status of the transactionto change the status of the transaction.
Role Maintenance
Oracle FLEXCUBE Direct Banking 12.0.2.0.0 Core
7. Role Maintenance
Role maintenance is the process by which the Administrator regulates the access and privileges of users over the transactions. Role is a group of transactions with specified access privileges. Each role is associated with a user type and entity. The list of transactions available for each user type that can be included in the role will be defined as part of the day 0 setup. A transaction can be part of multiple roles.
Roles can be of three types.
Normal Roles
A role which is not marked as a Default is a normal role and this can be assigned to the users by the bank administrator.
Default Roles
A role can be defined as a default role for a user type. In this case such a role will automatically be mapped to every user belonging to that user type. Default roles cannot be assigned by the administrator to a specific user.
The transaction in a role can be given three kinds of privileges namely ‘Initiation’, ‘Authorization’ and ‘View’
Initiate
Initiation privilege for a transaction allows user to initiate the associated transaction. When initiate privilege is granted, the user is able to see and access the transaction in the menu item.
Note: In case of inquiry transactions Initiate privilege allows user to initiate (Invoke) the inquiry transaction.
Authorize
Role Maintenance
Oracle FLEXCUBE Direct Banking 12.0.2.0.0 Core
Authorization privilege for a transaction allows the user to authorize associated transaction. When authorize privilege is granted, the user is able to authorize the transaction and it will be available to the user under ‘Dashboard’ – ‘Transactions to Authorize’ tab. (This will also depend on the authorization rules set and account access matrix).
Note: In case of inquiry transactions this privilege cannot be set.
View
View privilege for a transaction allows the user to view all the records and their status of associated transaction. When view privilege is granted, the user is able to view the transaction and will be available to the user under ‘Dashboard’ – ‘View Transactions’ tab.
When a role is modified, the changes in the role get reflected to the users associated. A role can be modified even when users associated with role are logged in. Changes in role will be effected in the subsequent login session for such users. While modifying the role, role type cannot be changed, e.g. default role cannot be change to a normal role.
Deletion of Normal roles can be done only if no user is associated with that role. Default roles can be deleted any time. User can be created without mapping any role to you. In such case user will able to access only default functions assigned to that user type & channel as per the day 0 parameter.
All the transactions pertaining to each module will be clubbed together under each User Type & channel. If access is to be provided to the entire module, then the user needs to check the boxes next to the module name. This will automatically check all the boxes for all the transaction under that module, or can explore the module to select specific transaction/s.
Role Maintenance
Oracle FLEXCUBE Direct Banking 12.0.2.0.0 Core
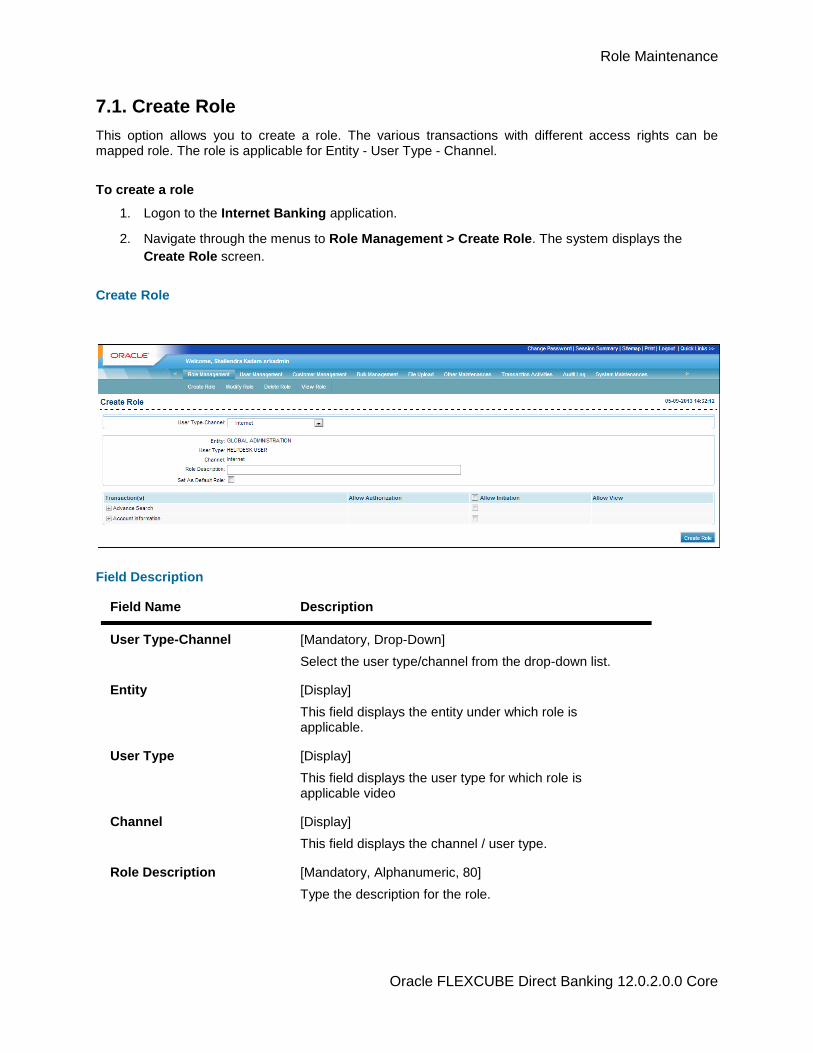
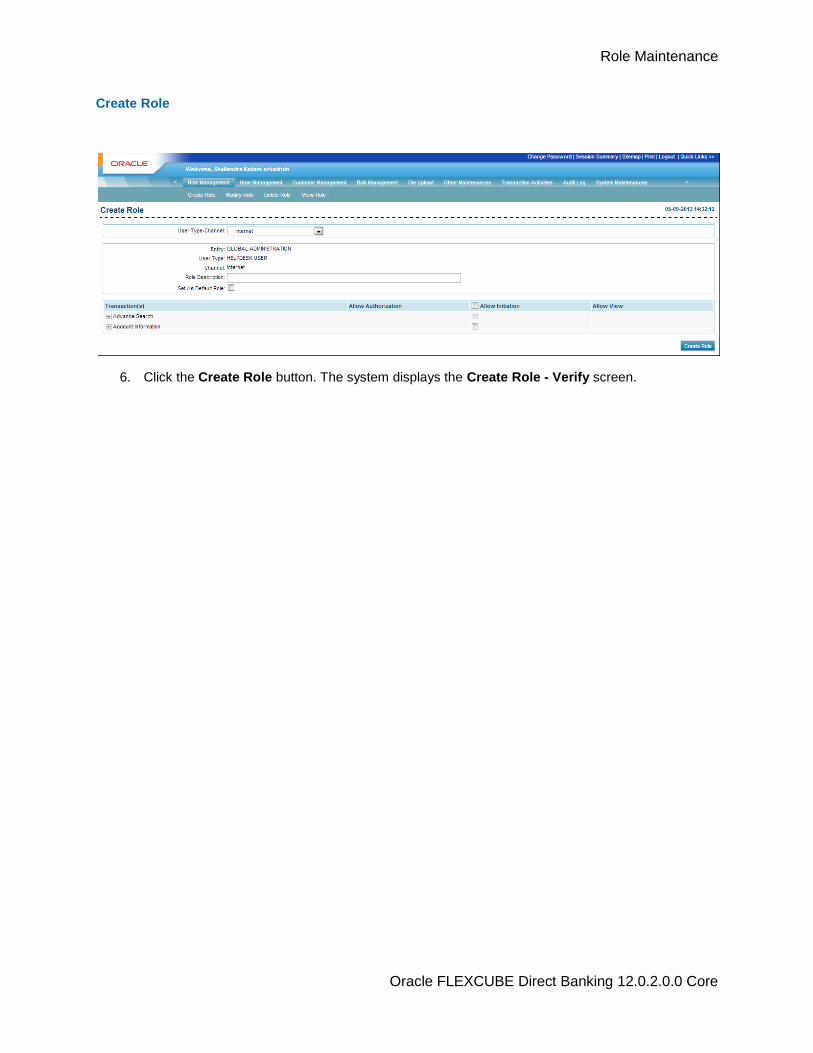
7.1. Create Role
This option allows you to create a role. The various transactions with different access rights can be mapped role. The role is applicable for Entity - User Type - Channel.
To create a role
1. Logon to the Internet Banking application.
2. Navigate through the menus to Role Management > Create Role. The system displays the
Create Role screen.
Create Role
Field Description
Field Name Description
User Type-Channel [Mandatory, Drop-Down]
Select the user type/channel from the drop-down list.
Entity [Display]
This field displays the entity under which role is applicable.
User Type [Display]
This field displays the user type for which role is applicable video
Channel [Display]
This field displays the channel / user type.
Role Description [Mandatory, Alphanumeric, 80]
Type the description for the role.
Role Maintenance
Oracle FLEXCUBE Direct Banking 12.0.2.0.0 Core
Field Name Description
Set As Default Role [Optional, Check Box]
Select the Set As Default Role check box to set the role as default.
Column Name Description
Allow Initiation [Optional, Check Box]
Select the Allow Initiation check box adjacent to the listed transactions To map the role to initiate the selected transaction.
Allow Authorization [Optional, Check Box]
Select the Allow Authorization check box adjacent to the listed transactions.
This enables you mapped to this role to authorize the selected transactions.
Allow View [Optional, Check Box]
Select the Allow View check box adjacent to the listed transaction.
This enables you mapped to this role to view the selected transactions.
3. Enter the role description.
4. Select the Default Role check box if role is to be created as a default role.
5. Select the transactions and the transaction privileges.
Role Maintenance
Oracle FLEXCUBE Direct Banking 12.0.2.0.0 Core
Create Role
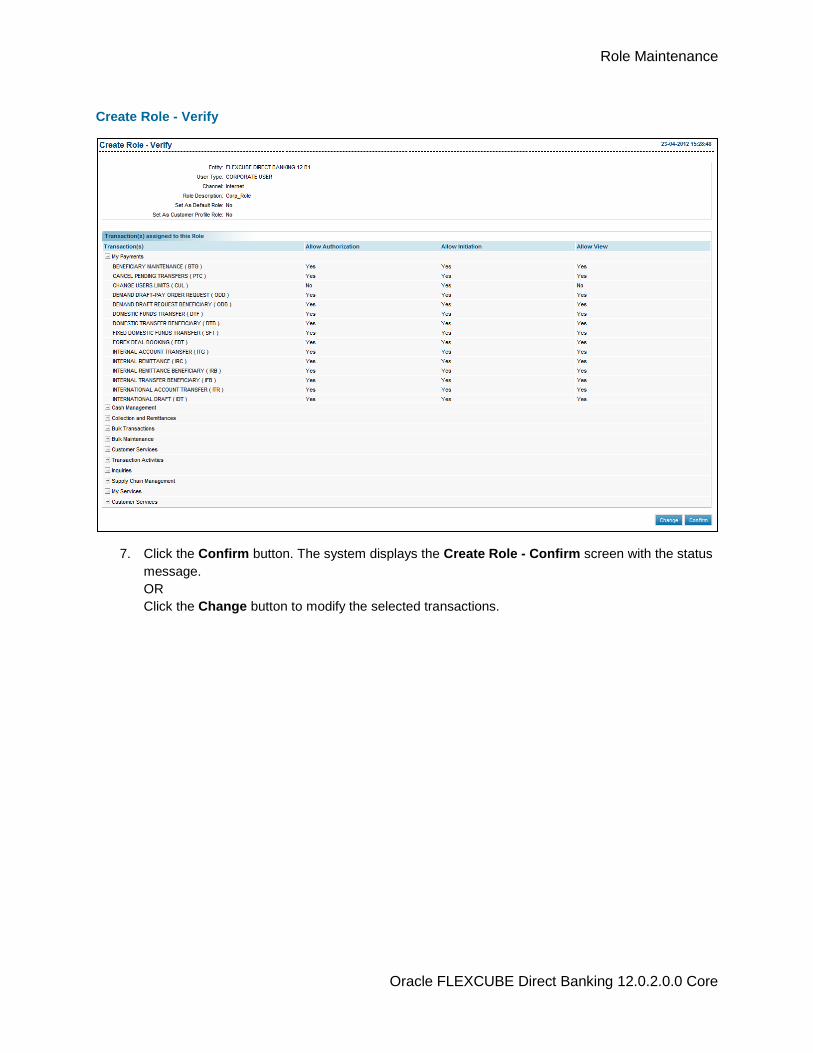
6. Click the Create Role button. The system displays the Create Role - Verify screen.
Role Maintenance
Oracle FLEXCUBE Direct Banking 12.0.2.0.0 Core
Create Role - Verify
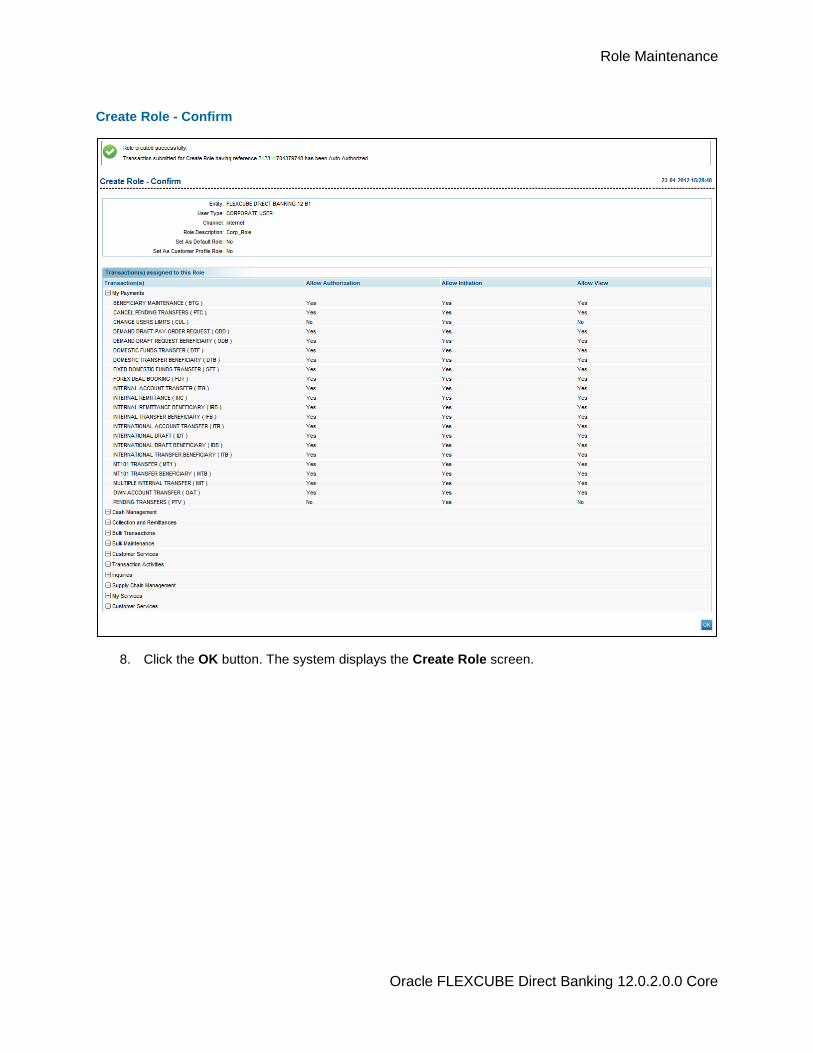
7. Click the Confirm button. The system displays the Create Role - Confirm screen with the status
message.
OR
Click the Change button to modify the selected transactions.
Role Maintenance
Oracle FLEXCUBE Direct Banking 12.0.2.0.0 Core
Create Role - Confirm
8. Click the OK button. The system displays the Create Role screen.
Role Maintenance
Oracle FLEXCUBE Direct Banking 12.0.2.0.0 Core
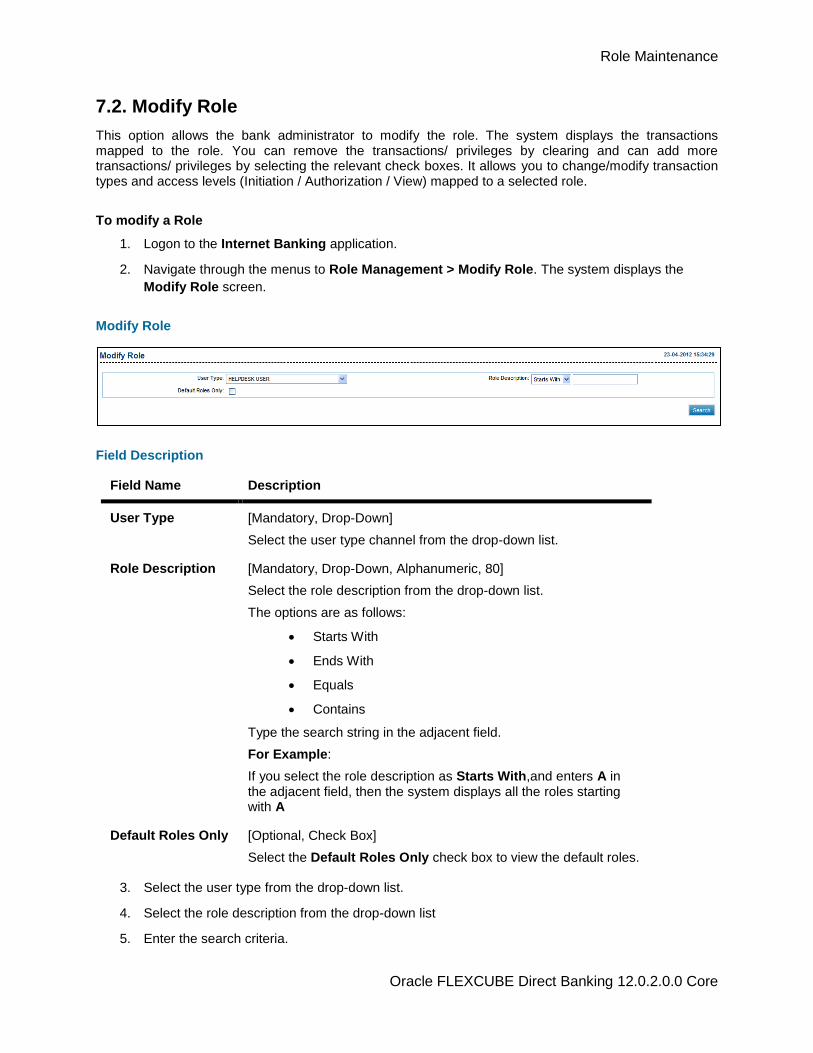
7.2. Modify Role
This option allows the bank administrator to modify the role. The system displays the transactions mapped to the role. You can remove the transactions/ privileges by clearing and can add more transactions/ privileges by selecting the relevant check boxes. It allows you to change/modify transaction types and access levels (Initiation / Authorization / View) mapped to a selected role.
To modify a Role
1. Logon to the Internet Banking application.
2. Navigate through the menus to Role Management > Modify Role. The system displays the
Modify Role screen.
Modify Role
Field Description
Field Name Description
User Type [Mandatory, Drop-Down]
Select the user type channel from the drop-down list.
Role Description [Mandatory, Drop-Down, Alphanumeric, 80]
Select the role description from the drop-down list.
The options are as follows:
Starts With
Ends With
Equals
Contains
Type the search string in the adjacent field.
For Example:
If you select the role description as Starts With,and enters A in the adjacent field, then the system displays all the roles starting with A
Default Roles Only [Optional, Check Box]
Select the Default Roles Only check box to view the default roles.
3. Select the user type from the drop-down list.
4. Select the role description from the drop-down list
5. Enter the search criteria.
Role Maintenance
Oracle FLEXCUBE Direct Banking 12.0.2.0.0 Core
6. Click the Search button. The system displays the Modify Role screen with the search results.
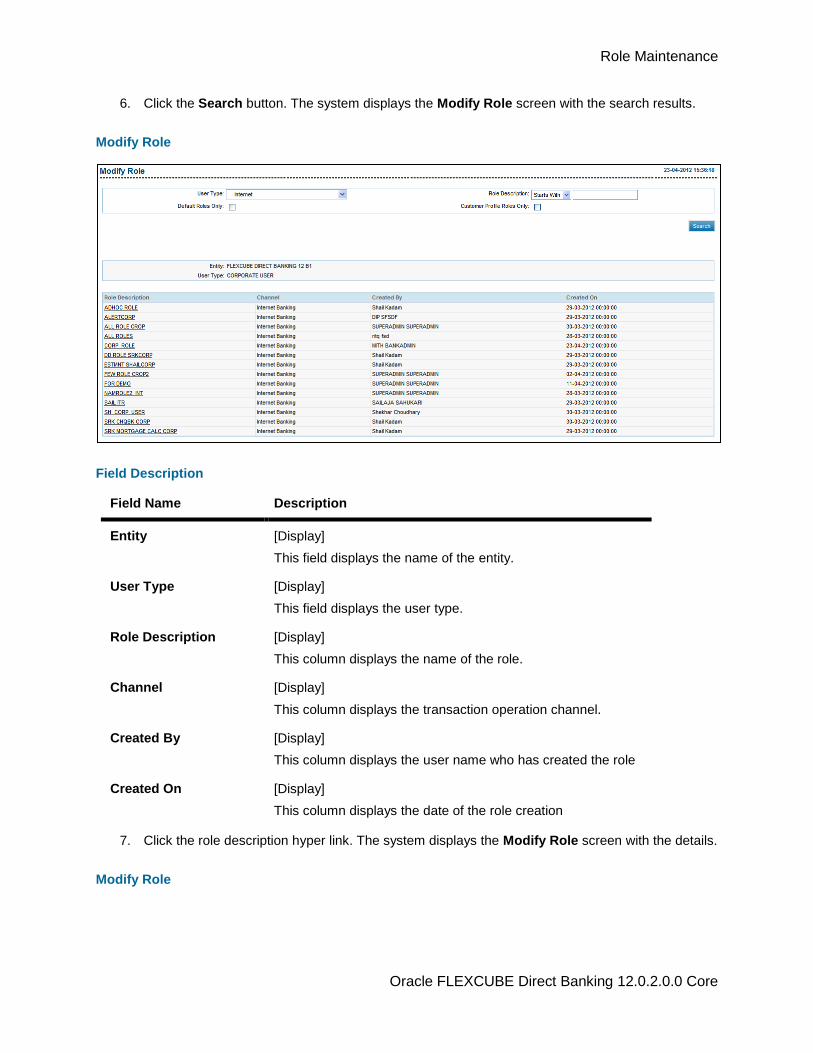
Modify Role
Field Description
Field Name Description
Entity [Display]
This field displays the name of the entity.
User Type [Display]
This field displays the user type.
Role Description [Display]
This column displays the name of the role.
Channel [Display]
This column displays the transaction operation channel.
Created By [Display]
This column displays the user name who has created the role
Created On [Display]
This column displays the date of the role creation
7. Click the role description hyper link. The system displays the Modify Role screen with the details.
Modify Role
Role Maintenance
Oracle FLEXCUBE Direct Banking 12.0.2.0.0 Core
8. Click the Modify button. The system displays the Modify Role - Verify screen.
OR
Click the Change button to select another role.
Role Maintenance
Oracle FLEXCUBE Direct Banking 12.0.2.0.0 Core
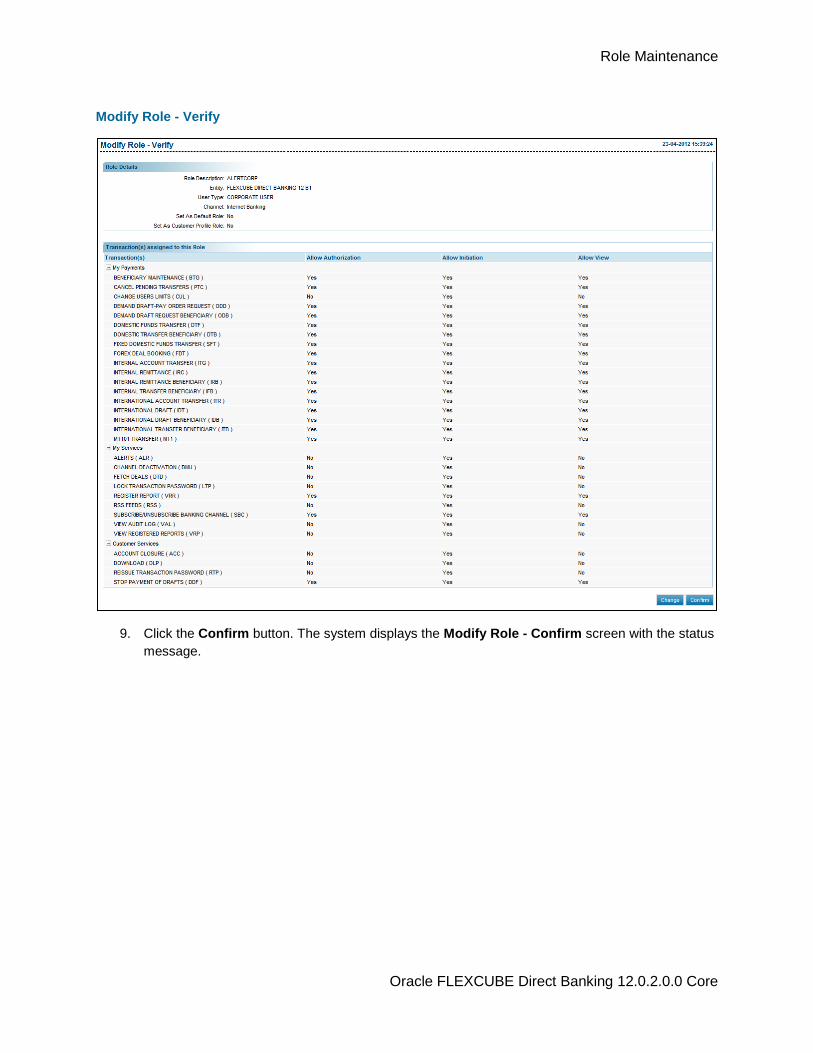
Modify Role - Verify
9. Click the Confirm button. The system displays the Modify Role - Confirm screen with the status
message.
Role Maintenance
Oracle FLEXCUBE Direct Banking 12.0.2.0.0 Core
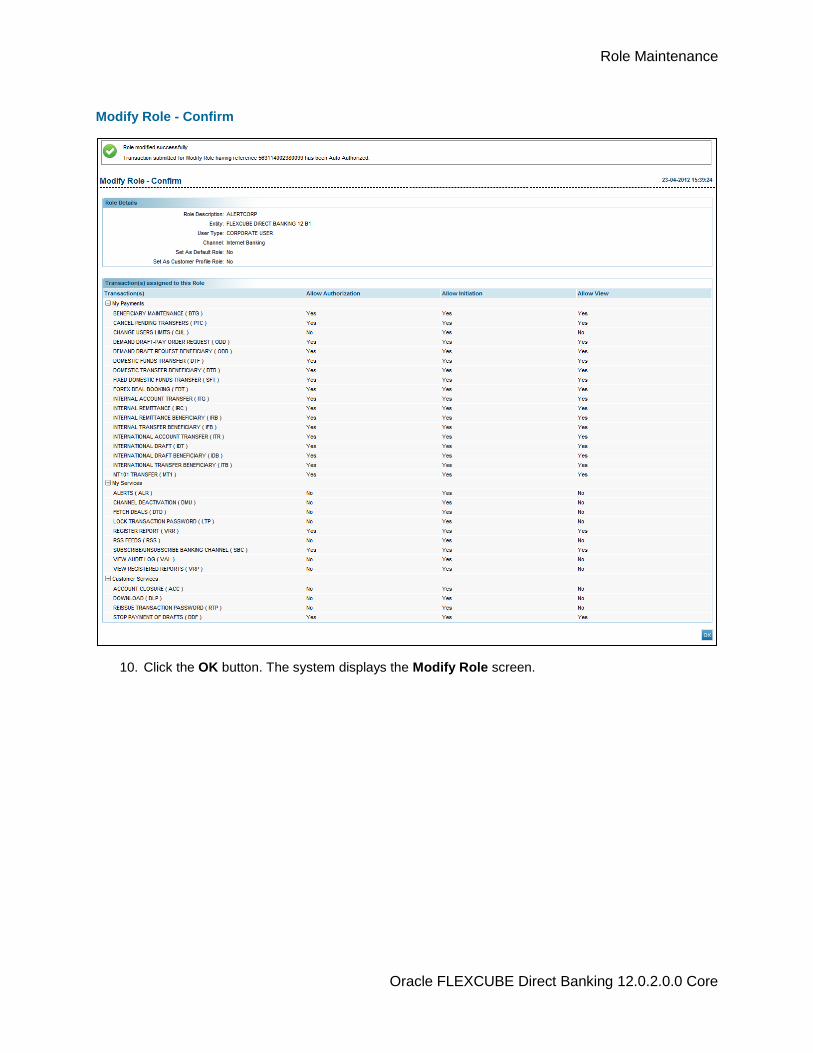
Modify Role - Confirm
10. Click the OK button. The system displays the Modify Role screen.
Role Maintenance
Oracle FLEXCUBE Direct Banking 12.0.2.0.0 Core
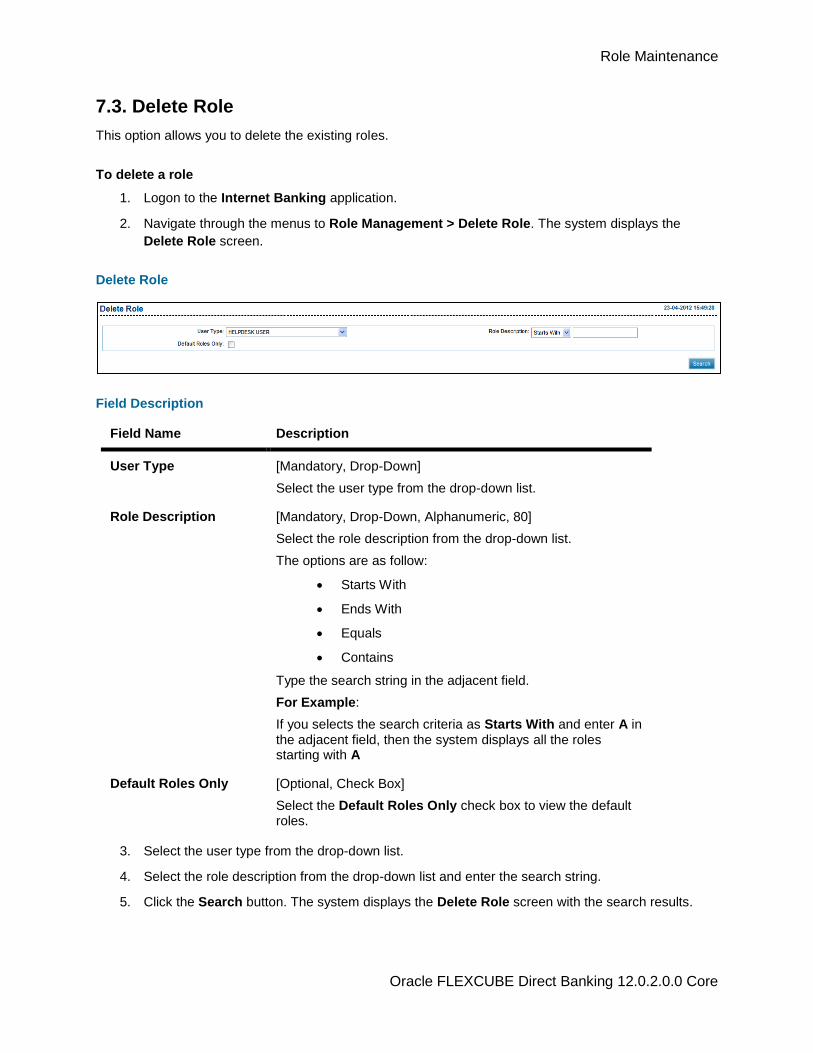
7.3. Delete Role
This option allows you to delete the existing roles.
To delete a role
1. Logon to the Internet Banking application.
2. Navigate through the menus to Role Management > Delete Role. The system displays the
Delete Role screen.
Delete Role
Field Description
Field Name Description
User Type [Mandatory, Drop-Down]
Select the user type from the drop-down list.
Role Description [Mandatory, Drop-Down, Alphanumeric, 80]
Select the role description from the drop-down list.
The options are as follow:
Starts With
Ends With
Equals
Contains
Type the search string in the adjacent field.
For Example:
If you selects the search criteria as Starts With and enter A in the adjacent field, then the system displays all the roles starting with A
Default Roles Only [Optional, Check Box]
Select the Default Roles Only check box to view the default roles.
3. Select the user type from the drop-down list.
4. Select the role description from the drop-down list and enter the search string.
5. Click the Search button. The system displays the Delete Role screen with the search results.

Role Maintenance
Oracle FLEXCUBE Direct Banking 12.0.2.0.0 Core
Delete Role
Field Description
Column Name Description
Entity [Display]
This field displays the name of the entity.
User Type [Display]
This field displays the user type.
Role Description [Mandatory, Check Box]
Select the Role Description check box to delete the role. It displays the roles pertaining to the search criteria.
Channel [Display]
This column displays the transaction operation channel related to the role.
Created By [Display]
This column displays the User Name who created the Role
Created On [Display]
This column displays the Date of the Role Creation
6. Select the role to be deleted.
Role Maintenance
Oracle FLEXCUBE Direct Banking 12.0.2.0.0 Core
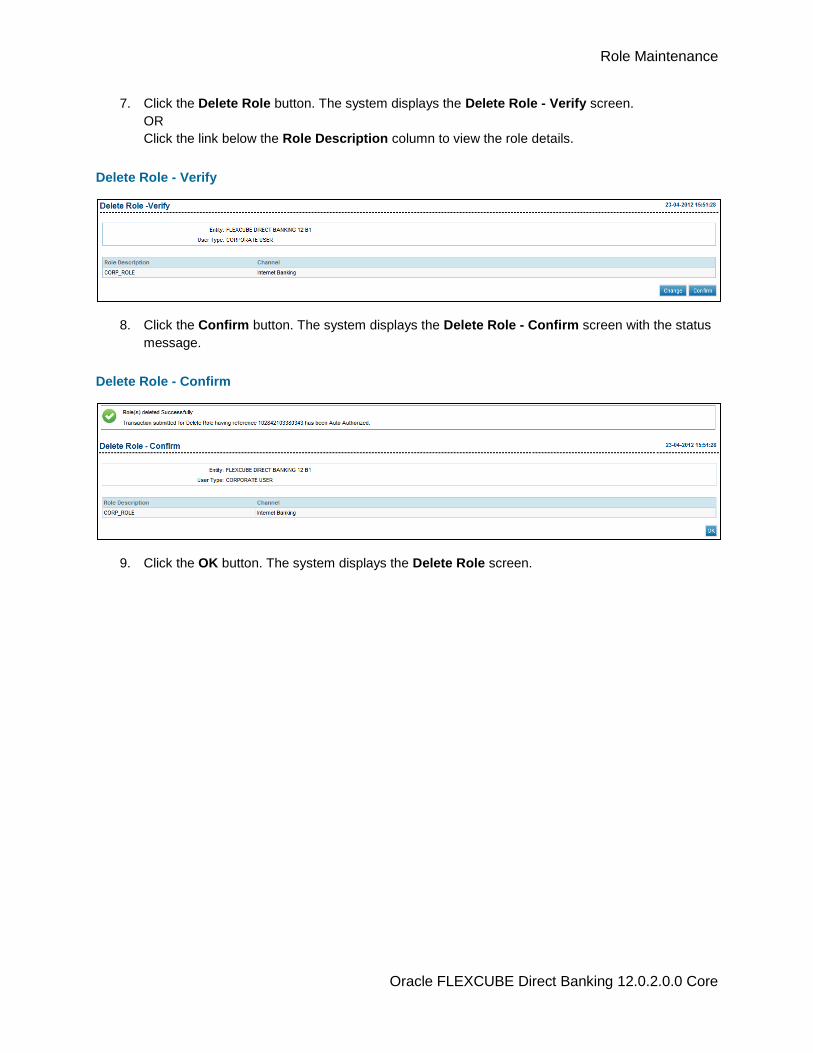
7. Click the Delete Role button. The system displays the Delete Role - Verify screen.
OR
Click the link below the Role Description column to view the role details.
Delete Role - Verify
8. Click the Confirm button. The system displays the Delete Role - Confirm screen with the status
message.
Delete Role - Confirm
9. Click the OK button. The system displays the Delete Role screen.
Role Maintenance
Oracle FLEXCUBE Direct Banking 12.0.2.0.0 Core
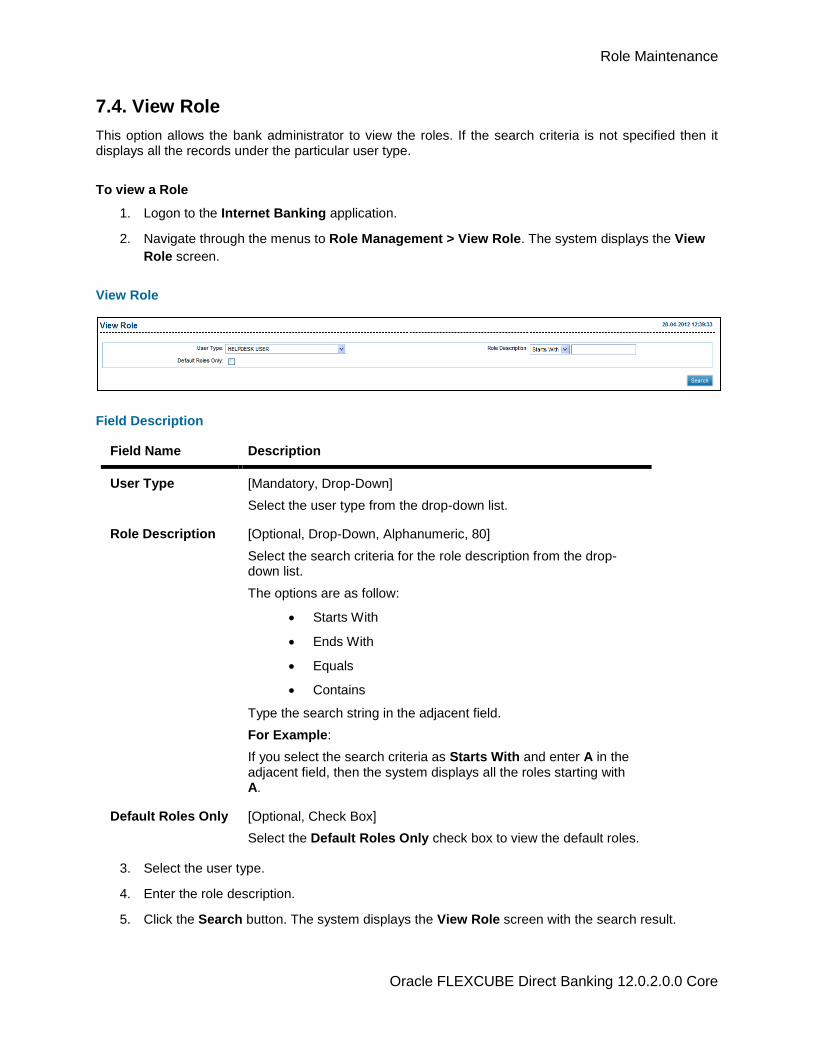
7.4. View Role
This option allows the bank administrator to view the roles. If the search criteria is not specified then it displays all the records under the particular user type.
To view a Role
1. Logon to the Internet Banking application.
2. Navigate through the menus to Role Management > View Role. The system displays the View
Role screen.
View Role
Field Description
Field Name Description
User Type [Mandatory, Drop-Down]
Select the user type from the drop-down list.
Role Description [Optional, Drop-Down, Alphanumeric, 80]
Select the search criteria for the role description from the drop-down list.
The options are as follow:
Starts With
Ends With
Equals
Contains
Type the search string in the adjacent field.
For Example:
If you select the search criteria as Starts With and enter A in the adjacent field, then the system displays all the roles starting with A.
Default Roles Only [Optional, Check Box]
Select the Default Roles Only check box to view the default roles.
3. Select the user type.
4. Enter the role description.
5. Click the Search button. The system displays the View Role screen with the search result.
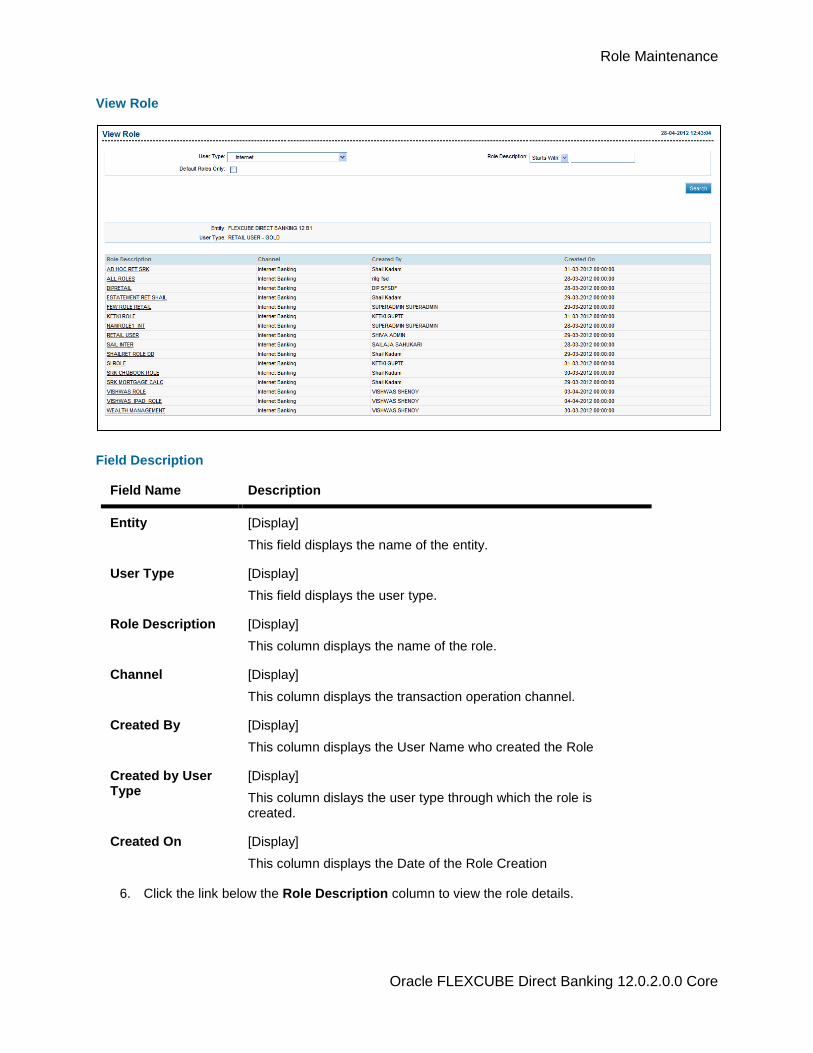
Role Maintenance
Oracle FLEXCUBE Direct Banking 12.0.2.0.0 Core
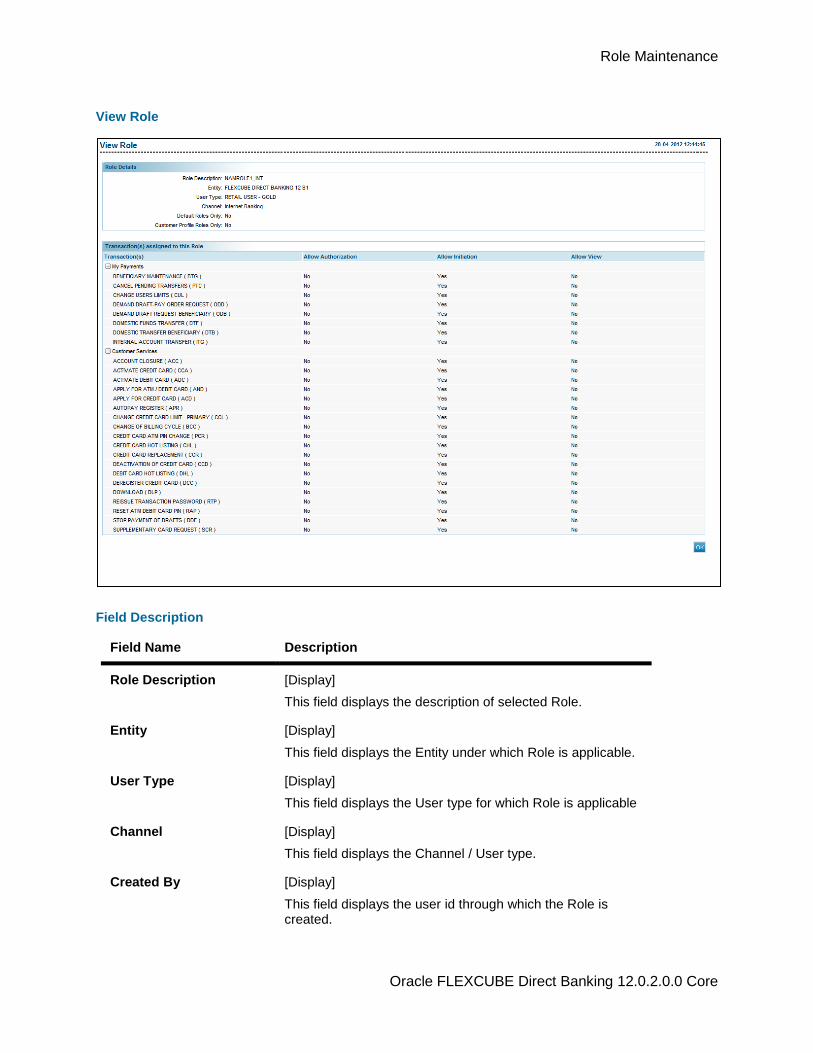
View Role
Field Description
Field Name Description
Entity [Display]
This field displays the name of the entity.
User Type [Display]
This field displays the user type.
Role Description [Display]
This column displays the name of the role.
Channel [Display]
This column displays the transaction operation channel.
Created By [Display]
This column displays the User Name who created the Role
Created by User Type
[Display]
This column dislays the user type through which the role is created.
Created On [Display]
This column displays the Date of the Role Creation
6. Click the link below the Role Description column to view the role details.
Role Maintenance
Oracle FLEXCUBE Direct Banking 12.0.2.0.0 Core
View Role
Field Description
Field Name Description
Role Description [Display]
This field displays the description of selected Role.
Entity [Display]
This field displays the Entity under which Role is applicable.
User Type [Display]
This field displays the User type for which Role is applicable
Channel [Display]
This field displays the Channel / User type.
Created By [Display]
This field displays the user id through which the Role is created.
Role Maintenance
Oracle FLEXCUBE Direct Banking 12.0.2.0.0 Core
Field Name Description
Created By user type [Display]
This field displays the user type through which the Role is created.
Default Role only [Display]
This field displays whether the Role is marked as Default Role
Created by Customer id [Display]
This field displays the customer id through which the Role is created.
This field will be displayed only if the Role is created by a corporate user with administrative transactions.
Column Name Description
Transaction Name [Display]
This column displays the transaction mapped to the selected User
Allow Initiation [Display]
This column displays whether Initiation/ Invoke access is allowed for the respective transaction
Allow Authorization [Display]
This column displays whether Authorization access is allowed for the respective transaction
Allow View [Display]
This column displays whether View access is allowed for the respective transaction
7. Click the OK Button to go back to the View Role Search Screen.
Account Opening
Oracle FLEXCUBE Direct Banking 12.0.2.0.0 Core
8. Account Opening
Bank administrator can help in completion of the new account request on behalf of the prospect. You can view and download online account opening requests and leads. Administrator can also manually modify status update.
Account Opening
Oracle FLEXCUBE Direct Banking 12.0.2.0.0 Core
8.1. View and Update Applications
This transaction enables you to view the list of applications and leads.
To View and Update Application
1. Logon to the Internet Banking application.
2. Navigate through the menus to Account Opening > View and Update Applications.
The system displays the Search Application Form screen.
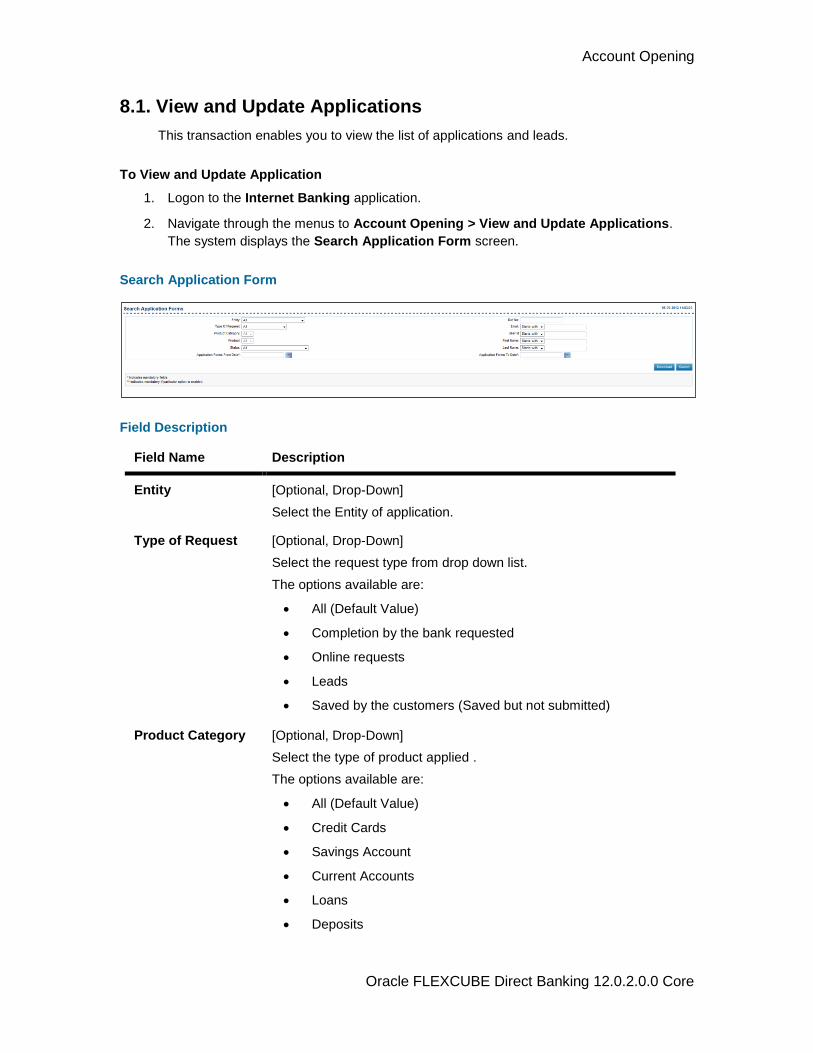
Search Application Form
Field Description
Field Name Description
Entity [Optional, Drop-Down]
Select the Entity of application.
Type of Request [Optional, Drop-Down]
Select the request type from drop down list.
The options available are:
All (Default Value)
Completion by the bank requested
Online requests
Leads
Saved by the customers (Saved but not submitted)
Product Category [Optional, Drop-Down]
Select the type of product applied .
The options available are:
All (Default Value)
Credit Cards
Savings Account
Current Accounts
Loans
Deposits
Account Opening
Oracle FLEXCUBE Direct Banking 12.0.2.0.0 Core
Field Name Description
Product [Optional, Drop-Down]
Select the type of products available under the selected product category.
Status [Optional, Drop-Down]
Select the current Status of the application
Ref No. [Optional,Input,20]
Enter to search by reference number.
Email [Optional,Input,100]
Enter to search by email address.
User Id [Optional,Input,35
Enter to search by user id.
First Name [Optional,Input,35]
Enter the first name of the applicant.
Last Name [Optional,Input,35]
Enter the last name of the applicant.
Application Forms From Date
[Mandatory,Date picker]
Select date to specify the date range
Application Form To Date
[Mandatory,Date picker]
Select date to specify the date range.
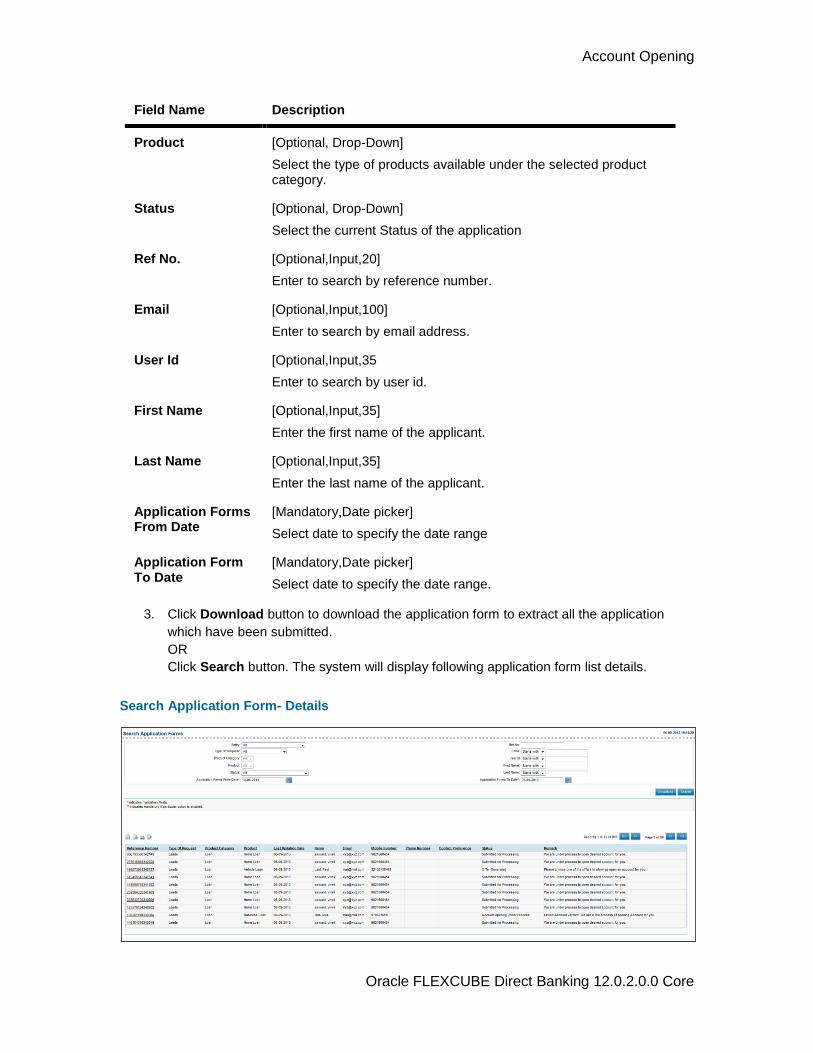
3. Click Download button to download the application form to extract all the application
which have been submitted.
OR
Click Search button. The system will display following application form list details.
Search Application Form- Details
Account Opening
Oracle FLEXCUBE Direct Banking 12.0.2.0.0 Core
Field Description
Field Name Description
Reference Number [Display]
This field displays the transaction reference number.
Type of Request [Display]
This field displays the type of request for origination
Product Category [Display]
This field displays the product category
Product [Display]
This field displays the product name
Date [Display]
This field displays date of last activity on the application
Name [Display]
This field displays the name of the applicant.
E-mail Address [Display]
This field displays email address of the applicant
Mobile Number [Display]
This field displays mobile number of the applicant
Phone Number [Display]
This field displays phone number of the applicant
Contact Preference
[Display]
This field displays email and phone number of the applicant
Status [Display]
This field displays the current status of the application
Remarks [Display]
This field displays the latest remarks available for the application.
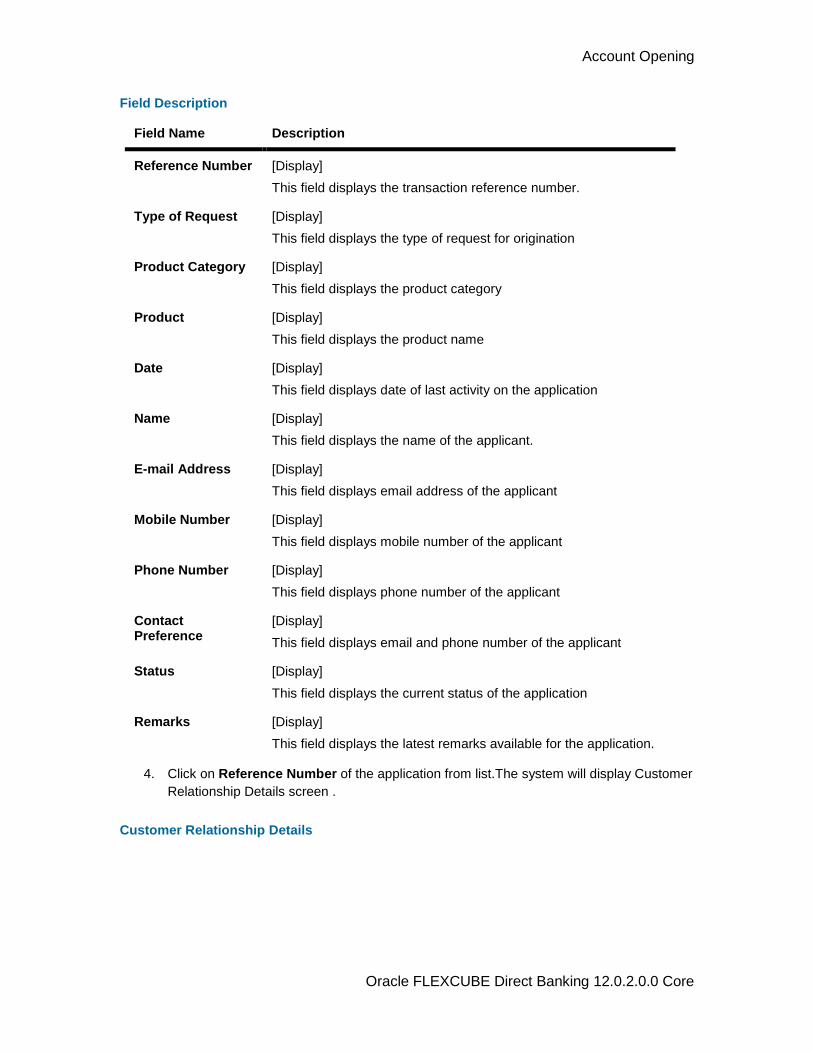
4. Click on Reference Number of the application from list.The system will display Customer
Relationship Details screen .
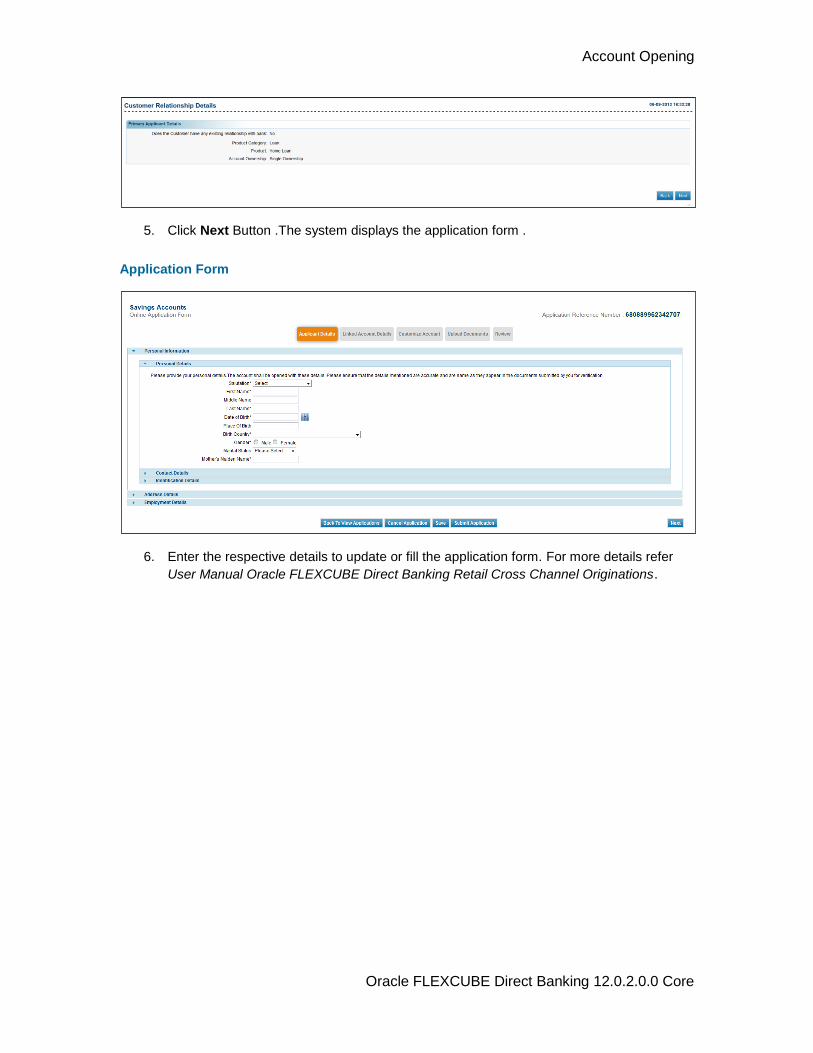
Customer Relationship Details
Account Opening
Oracle FLEXCUBE Direct Banking 12.0.2.0.0 Core
5. Click Next Button .The system displays the application form .
Application Form
6. Enter the respective details to update or fill the application form. For more details refer
User Manual Oracle FLEXCUBE Direct Banking Retail Cross Channel Originations.
Account Opening
Oracle FLEXCUBE Direct Banking 12.0.2.0.0 Core
8.2. New Application
Bank administrator can fill and subit the application form for opening the account.
To view New Application Form
1. Logon to the Internet Banking application.
2. Navigate through the menus to Account Opening > New Application. The system
displays the New Application screen.
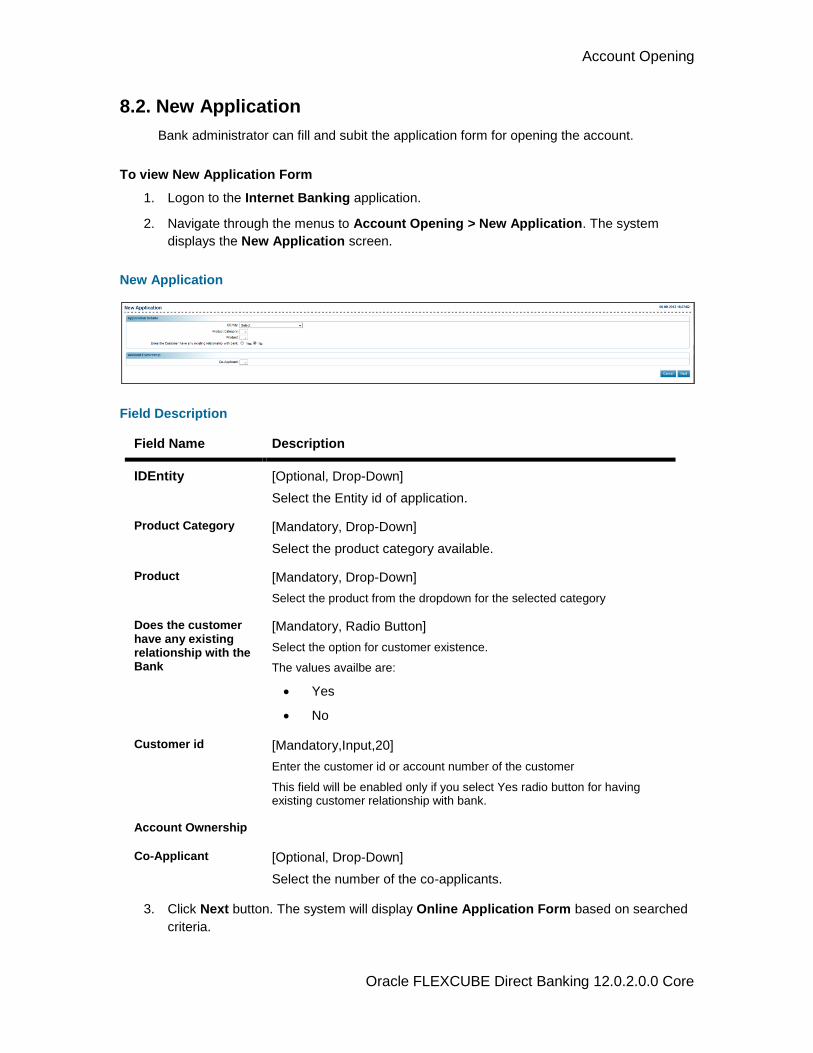
New Application
Field Description
Field Name Description
IDEntity [Optional, Drop-Down]
Select the Entity id of application.
Product Category [Mandatory, Drop-Down]
Select the product category available.
Product [Mandatory, Drop-Down]
Select the product from the dropdown for the selected category
Does the customer have any existing relationship with the Bank
[Mandatory, Radio Button]
Select the option for customer existence.
The values availbe are:
Yes
No
Customer id [Mandatory,Input,20]
Enter the customer id or account number of the customer
This field will be enabled only if you select Yes radio button for having existing customer relationship with bank.
Account Ownership
Co-Applicant [Optional, Drop-Down]
Select the number of the co-applicants.
3. Click Next button. The system will display Online Application Form based on searched
criteria.

Account Opening
Oracle FLEXCUBE Direct Banking 12.0.2.0.0 Core
4. Enter respective details in the application form.For more details refer User Manual Oracle
FLEXCUBE Direct Banking Retail Cross Channel Originations.
5. Click Submit Application.
Account Opening
Oracle FLEXCUBE Direct Banking 12.0.2.0.0 Core
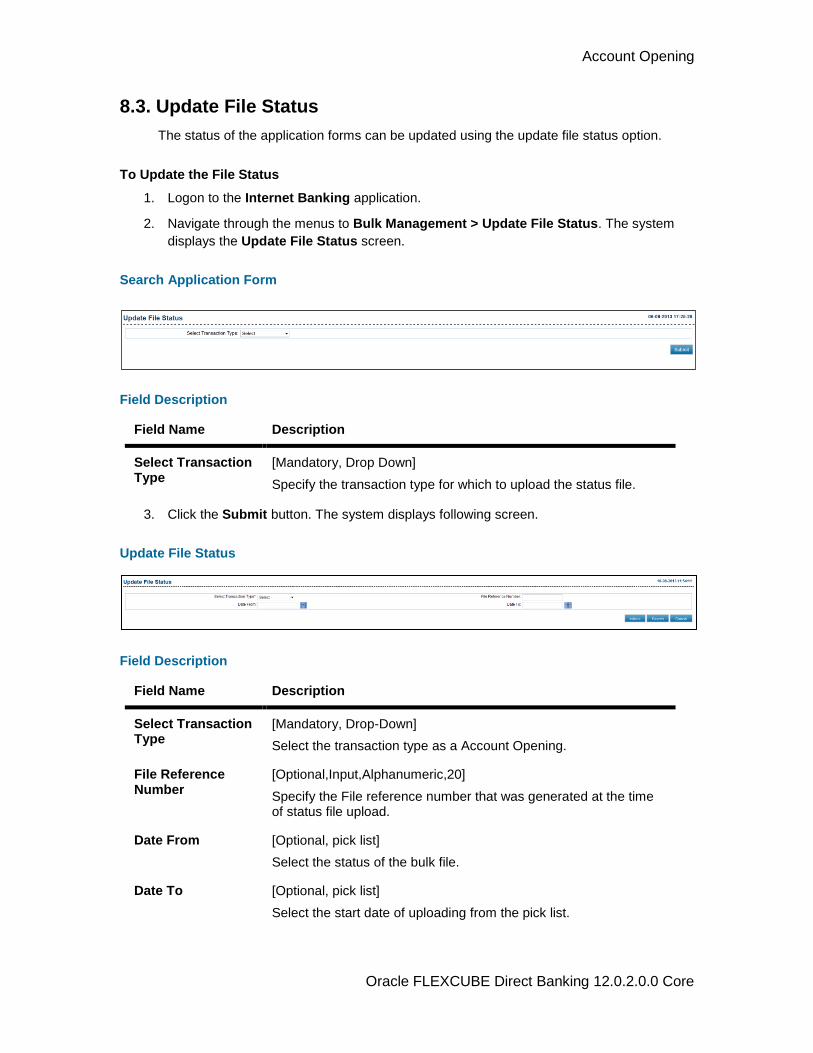
8.3. Update File Status
The status of the application forms can be updated using the update file status option.
To Update the File Status
1. Logon to the Internet Banking application.
2. Navigate through the menus to Bulk Management > Update File Status. The system
displays the Update File Status screen.
Search Application Form
Field Description
Field Name Description
Select Transaction Type
[Mandatory, Drop Down]
Specify the transaction type for which to upload the status file.
3. Click the Submit button. The system displays following screen.
Update File Status
Field Description
Field Name Description
Select Transaction Type
[Mandatory, Drop-Down]
Select the transaction type as a Account Opening.
File Reference Number
[Optional,Input,Alphanumeric,20]
Specify the File reference number that was generated at the time of status file upload.
Date From [Optional, pick list]
Select the status of the bulk file.
Date To [Optional, pick list]
Select the start date of uploading from the pick list.
Account Opening
Oracle FLEXCUBE Direct Banking 12.0.2.0.0 Core
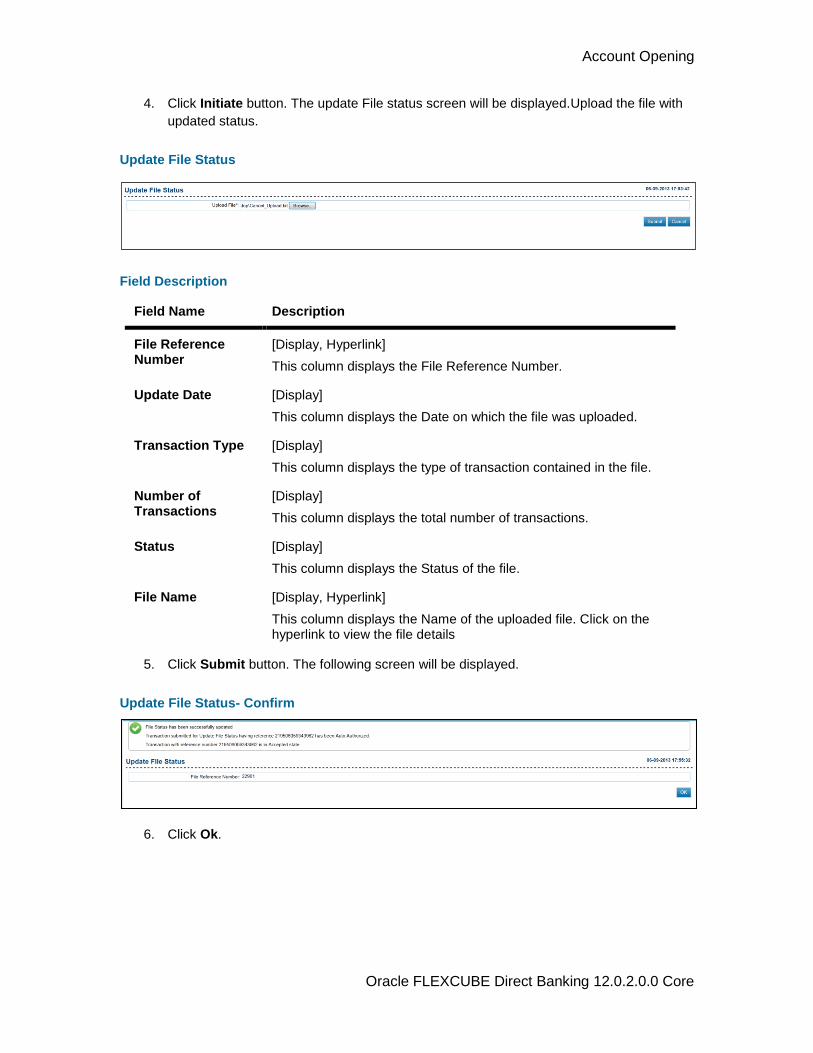
4. Click Initiate button. The update File status screen will be displayed.Upload the file with
updated status.
Update File Status
Field Description
Field Name Description
File Reference Number
[Display, Hyperlink]
This column displays the File Reference Number.
Update Date [Display]
This column displays the Date on which the file was uploaded.
Transaction Type [Display]
This column displays the type of transaction contained in the file.
Number of Transactions
[Display]
This column displays the total number of transactions.
Status [Display]
This column displays the Status of the file.
File Name [Display, Hyperlink]
This column displays the Name of the uploaded file. Click on the hyperlink to view the file details
5. Click Submit button. The following screen will be displayed.
Update File Status- Confirm
6. Click Ok.
User Management
Oracle FLEXCUBE Direct Banking 12.0.2.0.0 Core
9. User Management
User Management
Oracle FLEXCUBE Direct Banking 12.0.2.0.0 Core
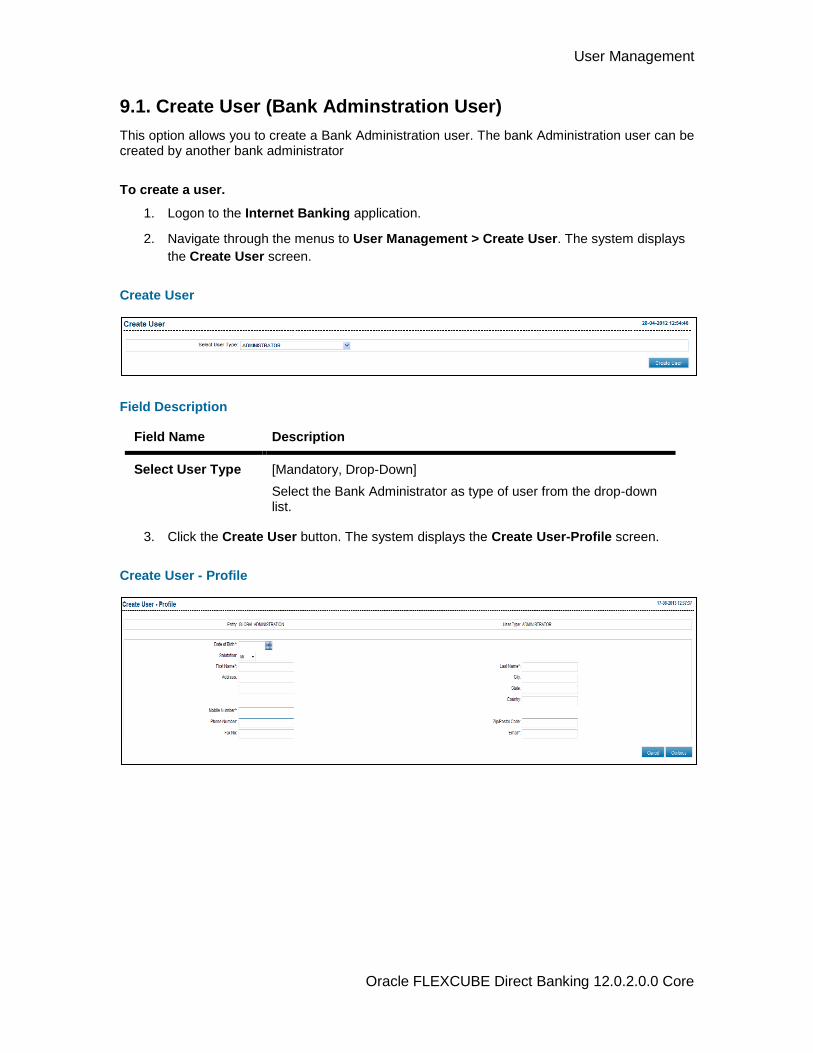
9.1. Create User (Bank Adminstration User)
This option allows you to create a Bank Administration user. The bank Administration user can be created by another bank administrator
To create a user.
1. Logon to the Internet Banking application.
2. Navigate through the menus to User Management > Create User. The system displays
the Create User screen.
Create User
Field Description
Field Name Description
Select User Type [Mandatory, Drop-Down]
Select the Bank Administrator as type of user from the drop-down list.
3. Click the Create User button. The system displays the Create User-Profile screen.
Create User - Profile
User Management
Oracle FLEXCUBE Direct Banking 12.0.2.0.0 Core
Field Description
Field Name Description
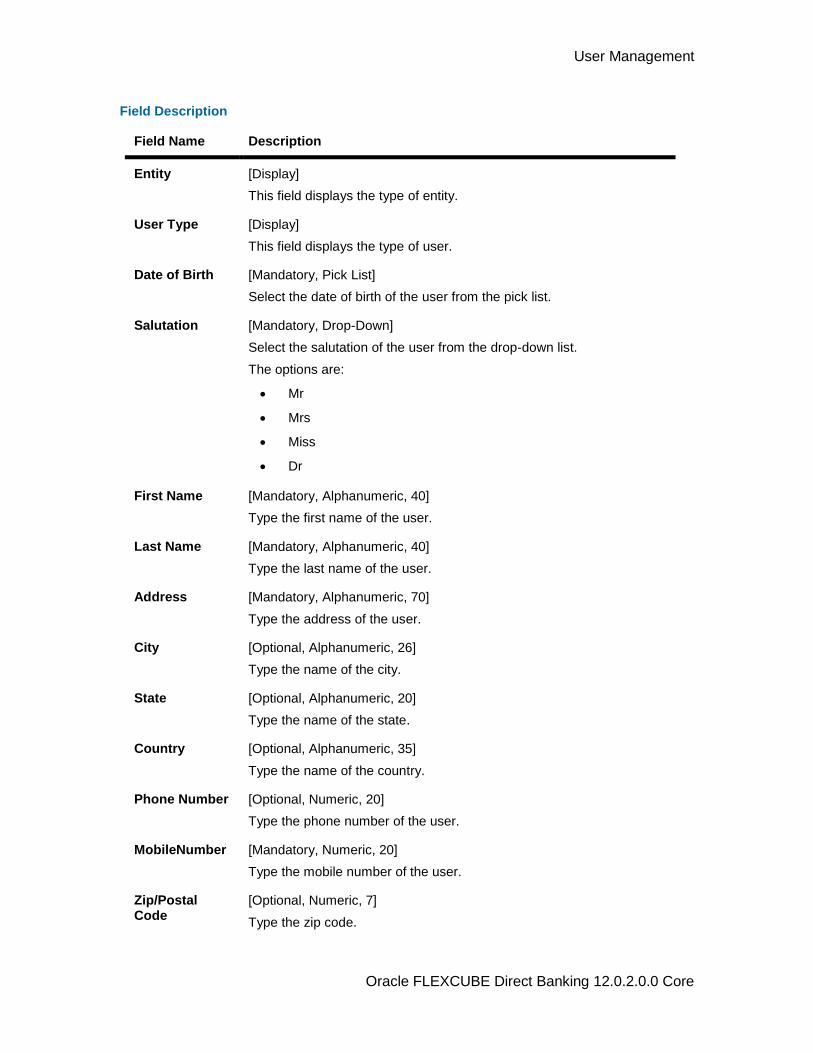
Entity [Display]
This field displays the type of entity.
User Type [Display]
This field displays the type of user.
Date of Birth [Mandatory, Pick List]
Select the date of birth of the user from the pick list.
Salutation [Mandatory, Drop-Down]
Select the salutation of the user from the drop-down list.
The options are:
Mr
Mrs
Miss
Dr
First Name [Mandatory, Alphanumeric, 40]
Type the first name of the user.
Last Name [Mandatory, Alphanumeric, 40]
Type the last name of the user.
Address [Mandatory, Alphanumeric, 70]
Type the address of the user.
City [Optional, Alphanumeric, 26]
Type the name of the city.
State [Optional, Alphanumeric, 20]
Type the name of the state.
Country [Optional, Alphanumeric, 35]
Type the name of the country.
Phone Number [Optional, Numeric, 20]
Type the phone number of the user.
MobileNumber [Mandatory, Numeric, 20]
Type the mobile number of the user.
Zip/Postal Code
[Optional, Numeric, 7]
Type the zip code.
User Management
Oracle FLEXCUBE Direct Banking 12.0.2.0.0 Core
Field Name Description
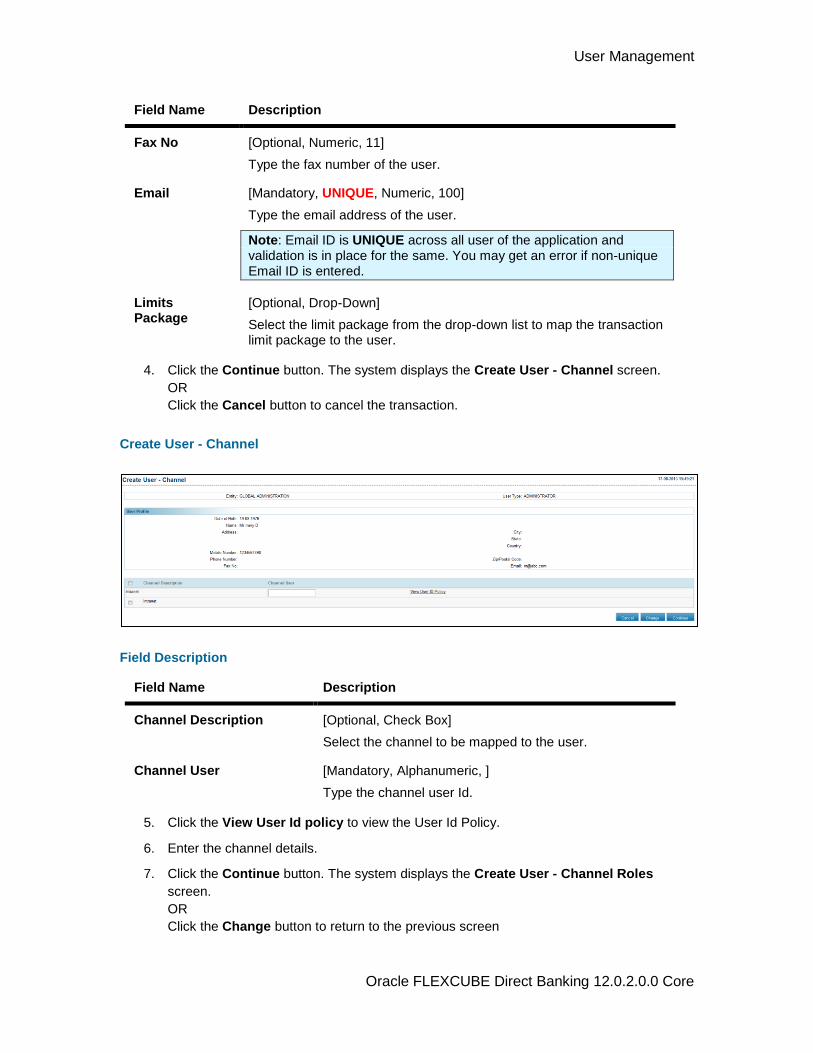
Fax No [Optional, Numeric, 11]
Type the fax number of the user.
Email [Mandatory, UNIQUE, Numeric, 100]
Type the email address of the user.
Note: Email ID is UNIQUE across all user of the application and validation is in place for the same. You may get an error if non-unique Email ID is entered.
Limits Package
[Optional, Drop-Down]
Select the limit package from the drop-down list to map the transaction limit package to the user.
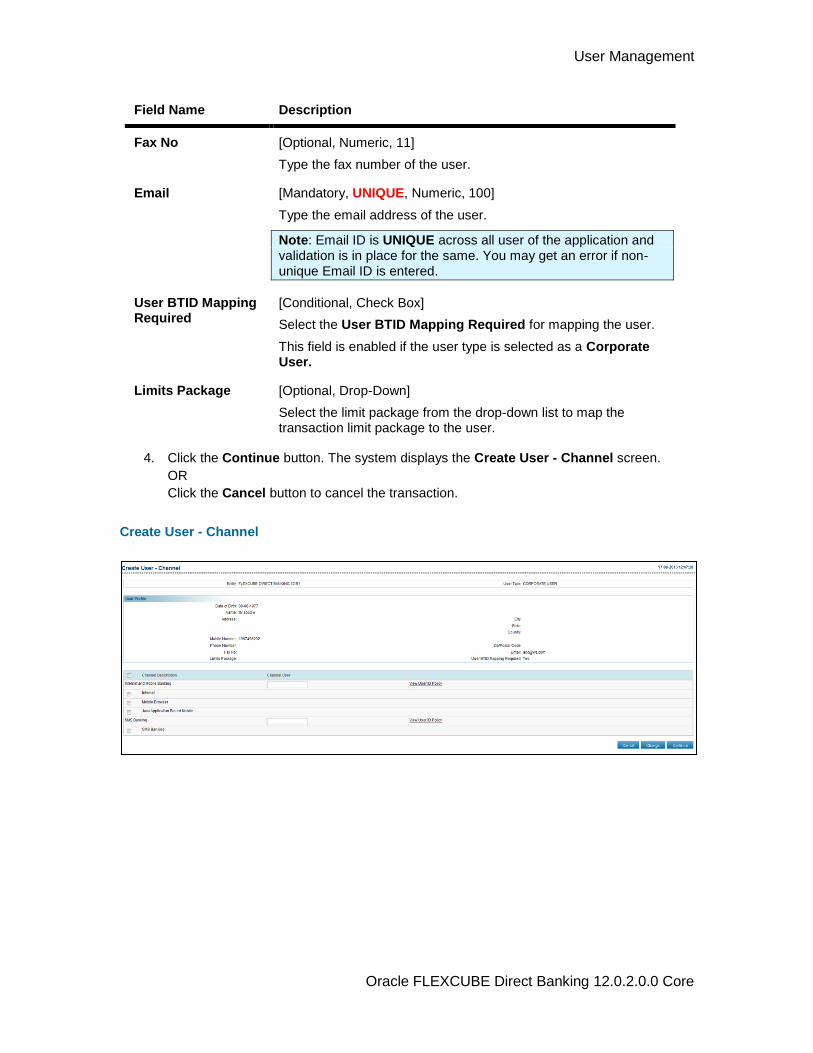
4. Click the Continue button. The system displays the Create User - Channel screen.
OR
Click the Cancel button to cancel the transaction.
Create User - Channel
Field Description
Field Name Description
Channel Description [Optional, Check Box]
Select the channel to be mapped to the user.
Channel User [Mandatory, Alphanumeric, ]
Type the channel user Id.
5. Click the View User Id policy to view the User Id Policy.
6. Enter the channel details.
7. Click the Continue button. The system displays the Create User - Channel Roles
screen.
OR
Click the Change button to return to the previous screen
User Management
Oracle FLEXCUBE Direct Banking 12.0.2.0.0 Core
OR
Click the Cancel button to cancel the transaction.
User Management
Oracle FLEXCUBE Direct Banking 12.0.2.0.0 Core
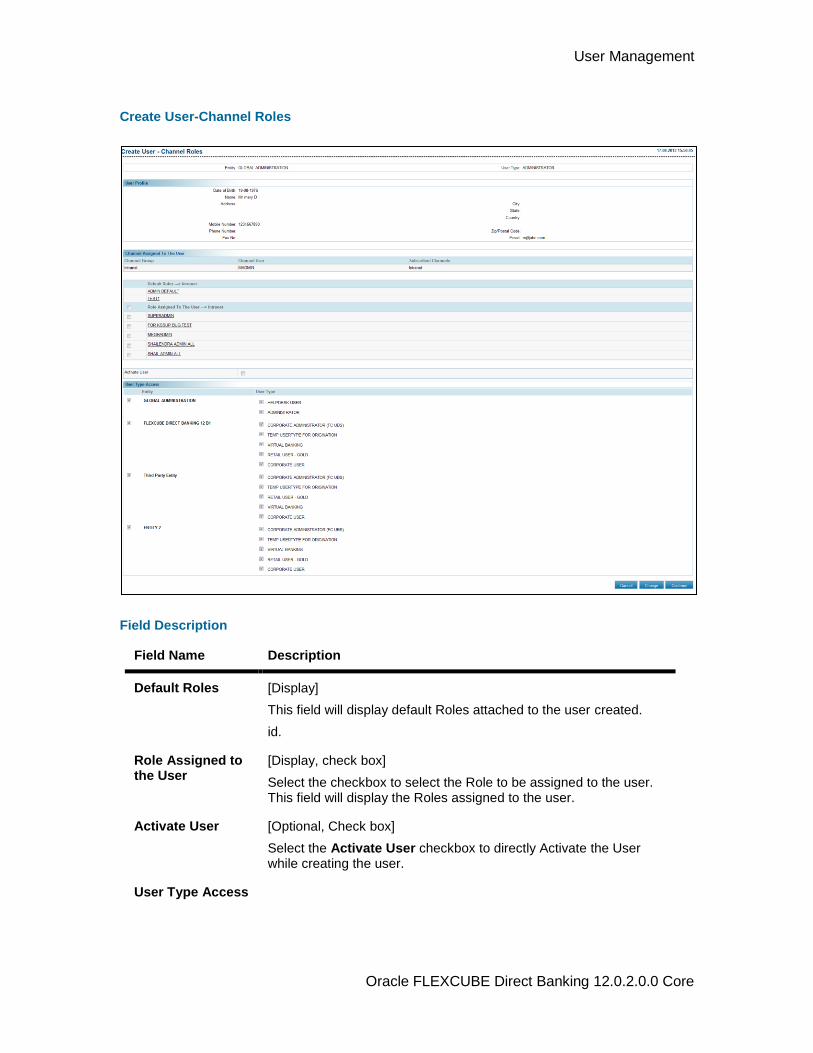
Create User-Channel Roles
Field Description
Field Name Description
Default Roles [Display]
This field will display default Roles attached to the user created.
id.
Role Assigned to the User
[Display, check box]
Select the checkbox to select the Role to be assigned to the user. This field will display the Roles assigned to the user.
Activate User [Optional, Check box]
Select the Activate User checkbox to directly Activate the User while creating the user.
User Type Access
User Management
Oracle FLEXCUBE Direct Banking 12.0.2.0.0 Core
Field Name Description
Entity [Optional, Check box]
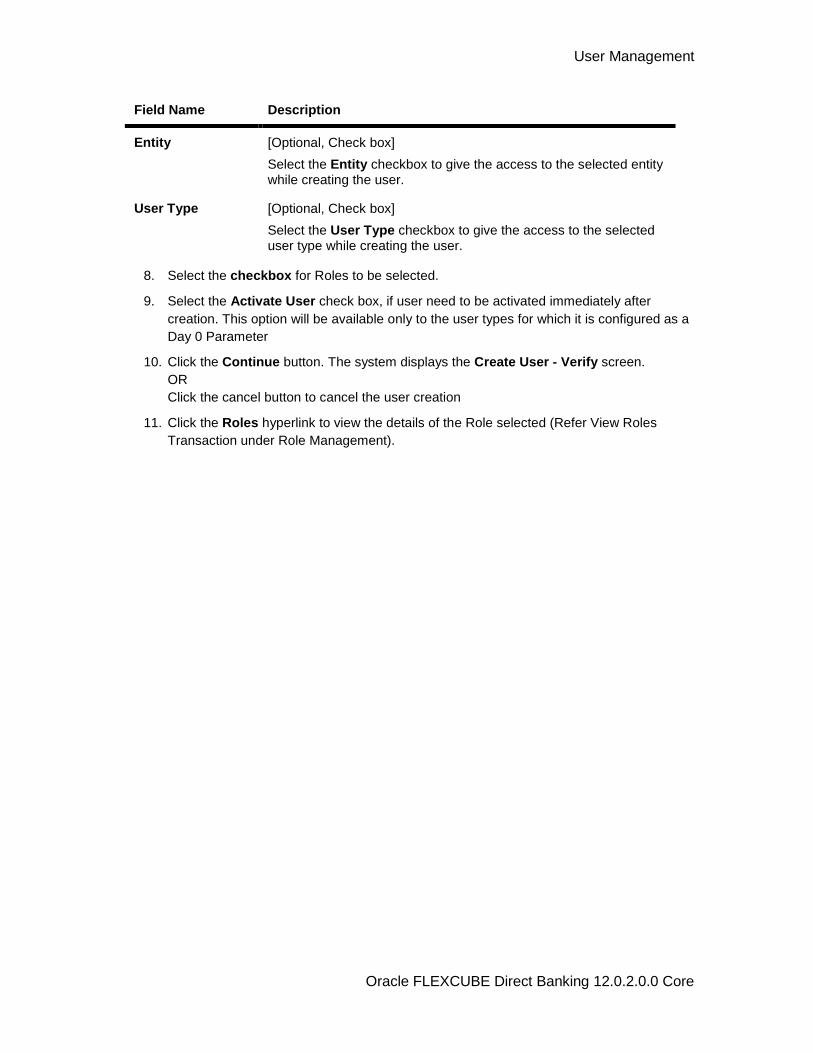
Select the Entity checkbox to give the access to the selected entity while creating the user.
User Type [Optional, Check box]
Select the User Type checkbox to give the access to the selected user type while creating the user.
8. Select the checkbox for Roles to be selected.
9. Select the Activate User check box, if user need to be activated immediately after
creation. This option will be available only to the user types for which it is configured as a
Day 0 Parameter
10. Click the Continue button. The system displays the Create User - Verify screen.
OR
Click the cancel button to cancel the user creation
11. Click the Roles hyperlink to view the details of the Role selected (Refer View Roles
Transaction under Role Management).

User Management
Oracle FLEXCUBE Direct Banking 12.0.2.0.0 Core
Create User - Verify
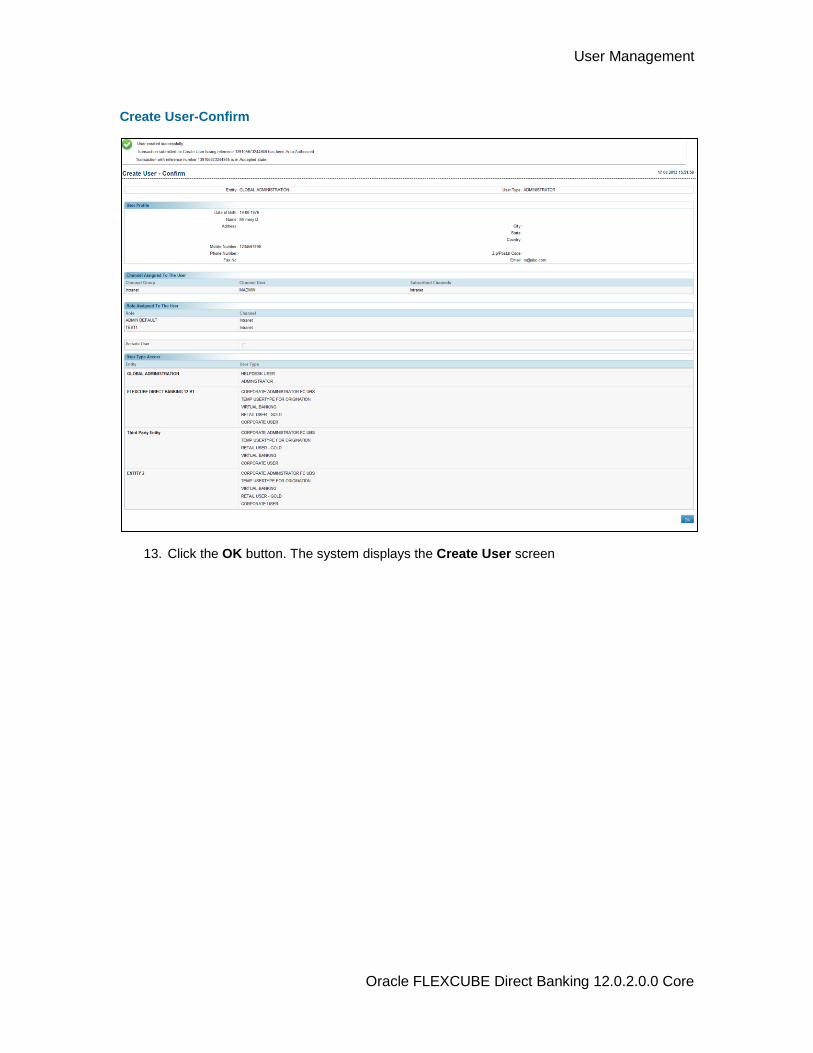
12. Click the Confirm button. The system displays the Create User- Confirm screen with
the status message.
OR
Click the Change User Profile button to change the user profile.
OR;
Click the Change User Channel button to change the user channel.
OR
Click the Change User Role button to change the user role.
OR
Click the Cancel button to cancel the transaction.
User Management
Oracle FLEXCUBE Direct Banking 12.0.2.0.0 Core
Create User-Confirm
13. Click the OK button. The system displays the Create User screen
User Management
Oracle FLEXCUBE Direct Banking 12.0.2.0.0 Core
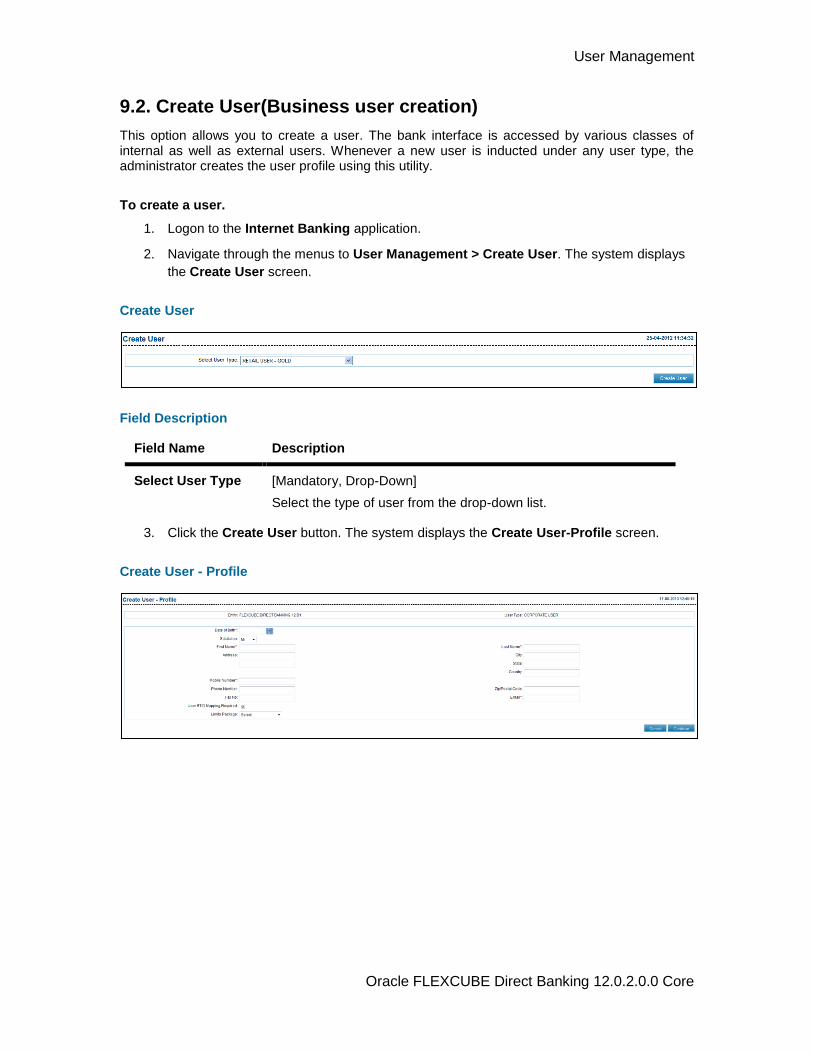
9.2. Create User(Business user creation)
This option allows you to create a user. The bank interface is accessed by various classes of internal as well as external users. Whenever a new user is inducted under any user type, the administrator creates the user profile using this utility.
To create a user.
1. Logon to the Internet Banking application.
2. Navigate through the menus to User Management > Create User. The system displays
the Create User screen.
Create User
Field Description
Field Name Description
Select User Type [Mandatory, Drop-Down]
Select the type of user from the drop-down list.
3. Click the Create User button. The system displays the Create User-Profile screen.
Create User - Profile
User Management
Oracle FLEXCUBE Direct Banking 12.0.2.0.0 Core
Field Description
Field Name Description
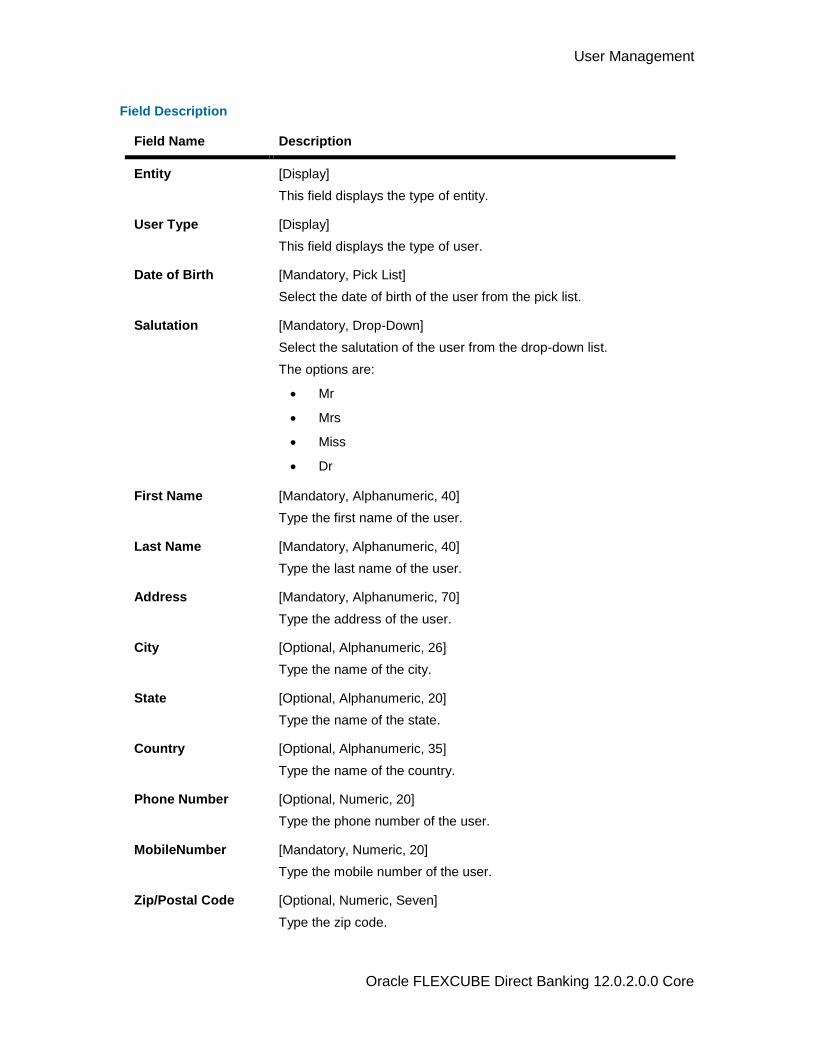
Entity [Display]
This field displays the type of entity.
User Type [Display]
This field displays the type of user.
Date of Birth [Mandatory, Pick List]
Select the date of birth of the user from the pick list.
Salutation [Mandatory, Drop-Down]
Select the salutation of the user from the drop-down list.
The options are:
Mr
Mrs
Miss
Dr
First Name [Mandatory, Alphanumeric, 40]
Type the first name of the user.
Last Name [Mandatory, Alphanumeric, 40]
Type the last name of the user.
Address [Mandatory, Alphanumeric, 70]
Type the address of the user.
City [Optional, Alphanumeric, 26]
Type the name of the city.
State [Optional, Alphanumeric, 20]
Type the name of the state.
Country [Optional, Alphanumeric, 35]
Type the name of the country.
Phone Number [Optional, Numeric, 20]
Type the phone number of the user.
MobileNumber [Mandatory, Numeric, 20]
Type the mobile number of the user.
Zip/Postal Code [Optional, Numeric, Seven]
Type the zip code.
User Management
Oracle FLEXCUBE Direct Banking 12.0.2.0.0 Core
Field Name Description
Fax No [Optional, Numeric, 11]
Type the fax number of the user.
Email [Mandatory, UNIQUE, Numeric, 100]
Type the email address of the user.
Note: Email ID is UNIQUE across all user of the application and validation is in place for the same. You may get an error if non-unique Email ID is entered.
User BTID Mapping Required
[Conditional, Check Box]
Select the User BTID Mapping Required for mapping the user.
This field is enabled if the user type is selected as a Corporate User.
Limits Package [Optional, Drop-Down]
Select the limit package from the drop-down list to map the transaction limit package to the user.
4. Click the Continue button. The system displays the Create User - Channel screen.
OR
Click the Cancel button to cancel the transaction.
Create User - Channel
User Management
Oracle FLEXCUBE Direct Banking 12.0.2.0.0 Core
Field Description
Field Name Description
Channel Description
[Optional, Check Box]
Select the channel to be mapped to the user.
Note: Internet & Mobile Banking is a single group. So Channel User will be same across all the sub-channels under this group, provided their checkboxes are checked. In above screen, if all the checkboxes for sub-channels Internet, Mobile Browser & Mobile Application are checked, then same channels user will be applicable to all these channels under Internet and Mobile Banking group.
Channels displayed will be configured as day 0 for selected entity and user type. Logical grouping can be maintained at day 0 and the groups will be displayed in channel selection screen.
Channel User
[Mandatory, Alphanumeric, ]
Type the channel user Id.
Note: The administrator can assign channel access to individual channels of a group but will have to define a single user id for all the channels that are part of a group.
5. Click the View User Id policy to view the User Id Policy.
6. Enter the channel details.
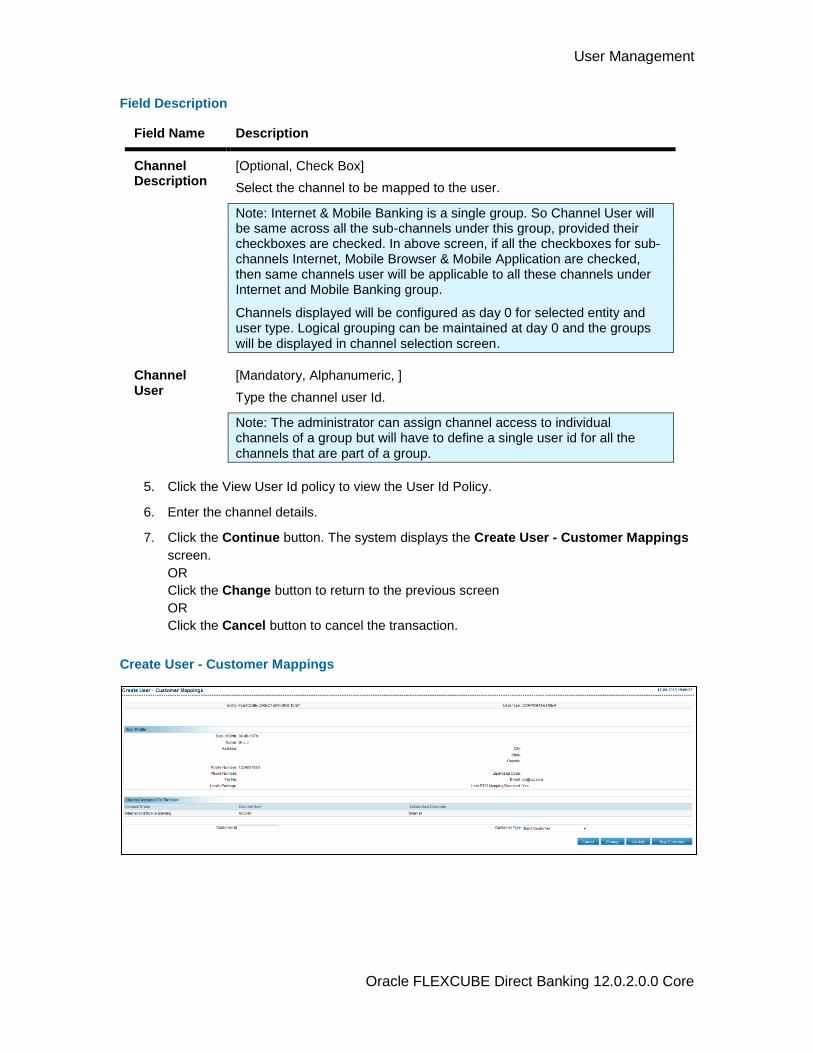
7. Click the Continue button. The system displays the Create User - Customer Mappings
screen.
OR
Click the Change button to return to the previous screen
OR
Click the Cancel button to cancel the transaction.
Create User - Customer Mappings
User Management
Oracle FLEXCUBE Direct Banking 12.0.2.0.0 Core
Field Description
Field Name Description
Customer id [Mandatory, Alphanumeric, 20]
Type the Customer Id to be mapped to the user.
Customer Type [Mandatory, Dropdown]
Select the Type of customer from the dropdown list.
8. Click the Validate button. The system displays the Validate Customer screen.
OR
Click the Map Customer to Map the customer directly
Or
Click the Cancel button to cancel the User creation
OR
Click the Change button to return to the previous screen for modification.
User Management
Oracle FLEXCUBE Direct Banking 12.0.2.0.0 Core
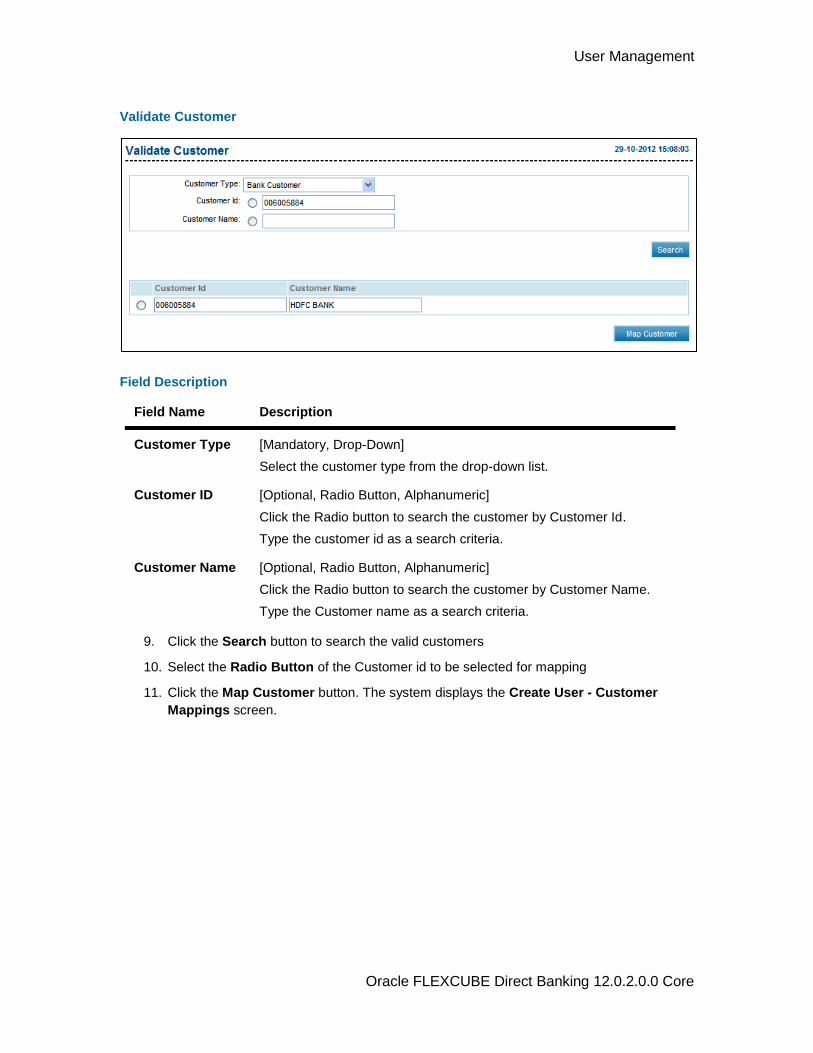
Validate Customer
Field Description
Field Name Description
Customer Type [Mandatory, Drop-Down]
Select the customer type from the drop-down list.
Customer ID [Optional, Radio Button, Alphanumeric]
Click the Radio button to search the customer by Customer Id.
Type the customer id as a search criteria.
Customer Name [Optional, Radio Button, Alphanumeric]
Click the Radio button to search the customer by Customer Name.
Type the Customer name as a search criteria.
9. Click the Search button to search the valid customers
10. Select the Radio Button of the Customer id to be selected for mapping
11. Click the Map Customer button. The system displays the Create User - Customer
Mappings screen.
User Management
Oracle FLEXCUBE Direct Banking 12.0.2.0.0 Core
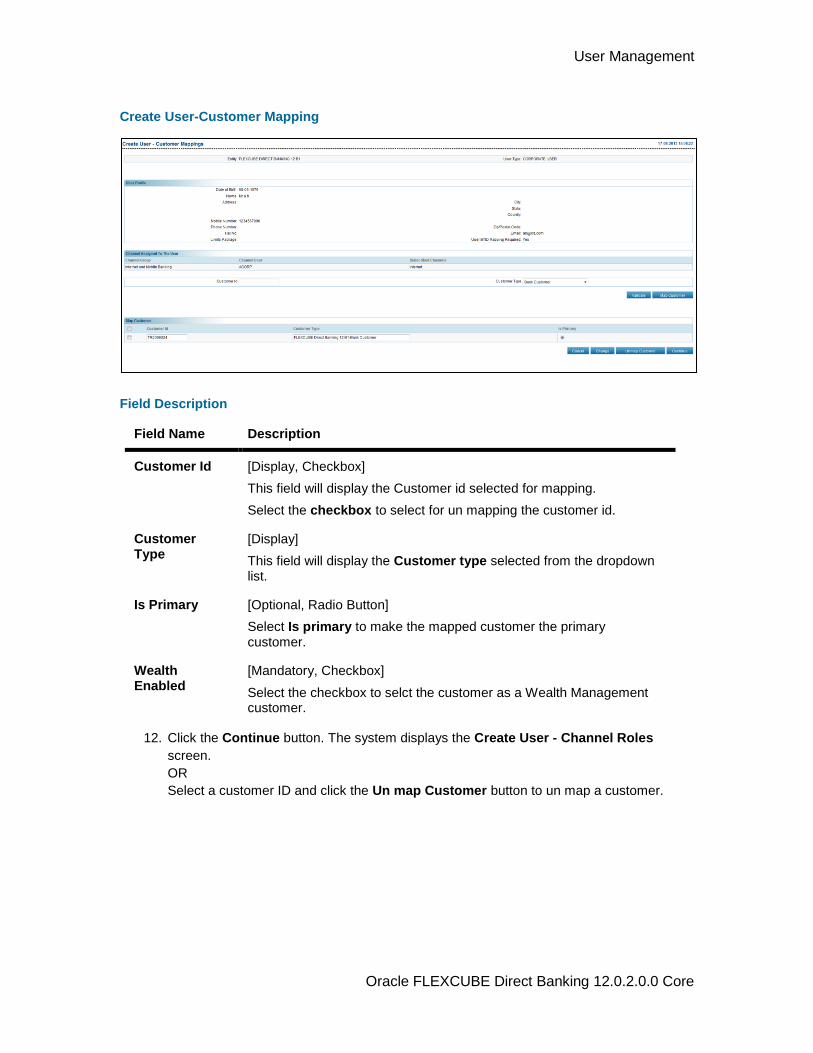
Create User-Customer Mapping
Field Description
Field Name Description
Customer Id [Display, Checkbox]
This field will display the Customer id selected for mapping.
Select the checkbox to select for un mapping the customer id.
Customer Type
[Display]
This field will display the Customer type selected from the dropdown list.
Is Primary [Optional, Radio Button]
Select Is primary to make the mapped customer the primary customer.
Wealth Enabled
[Mandatory, Checkbox]
Select the checkbox to selct the customer as a Wealth Management customer.
12. Click the Continue button. The system displays the Create User - Channel Roles
screen.
OR
Select a customer ID and click the Un map Customer button to un map a customer.
User Management
Oracle FLEXCUBE Direct Banking 12.0.2.0.0 Core
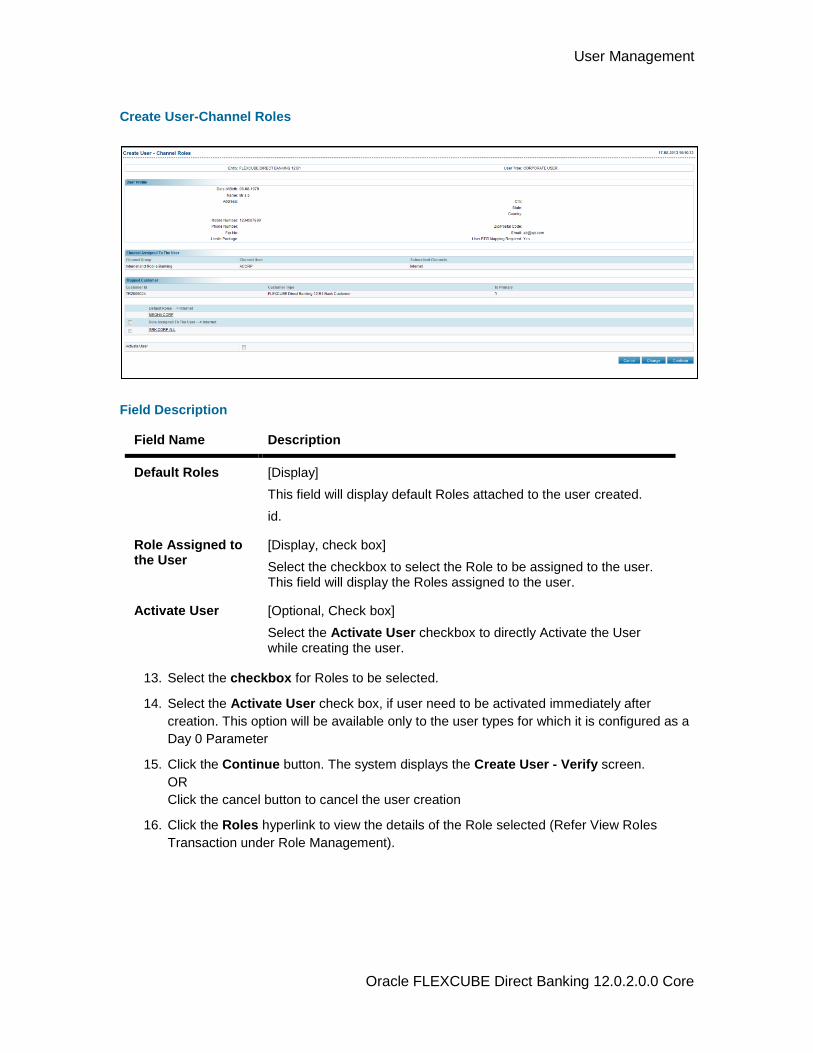
Create User-Channel Roles
Field Description
Field Name Description
Default Roles [Display]
This field will display default Roles attached to the user created.
id.
Role Assigned to the User
[Display, check box]
Select the checkbox to select the Role to be assigned to the user. This field will display the Roles assigned to the user.
Activate User [Optional, Check box]
Select the Activate User checkbox to directly Activate the User while creating the user.
13. Select the checkbox for Roles to be selected.
14. Select the Activate User check box, if user need to be activated immediately after
creation. This option will be available only to the user types for which it is configured as a
Day 0 Parameter
15. Click the Continue button. The system displays the Create User - Verify screen.
OR
Click the cancel button to cancel the user creation
16. Click the Roles hyperlink to view the details of the Role selected (Refer View Roles
Transaction under Role Management).
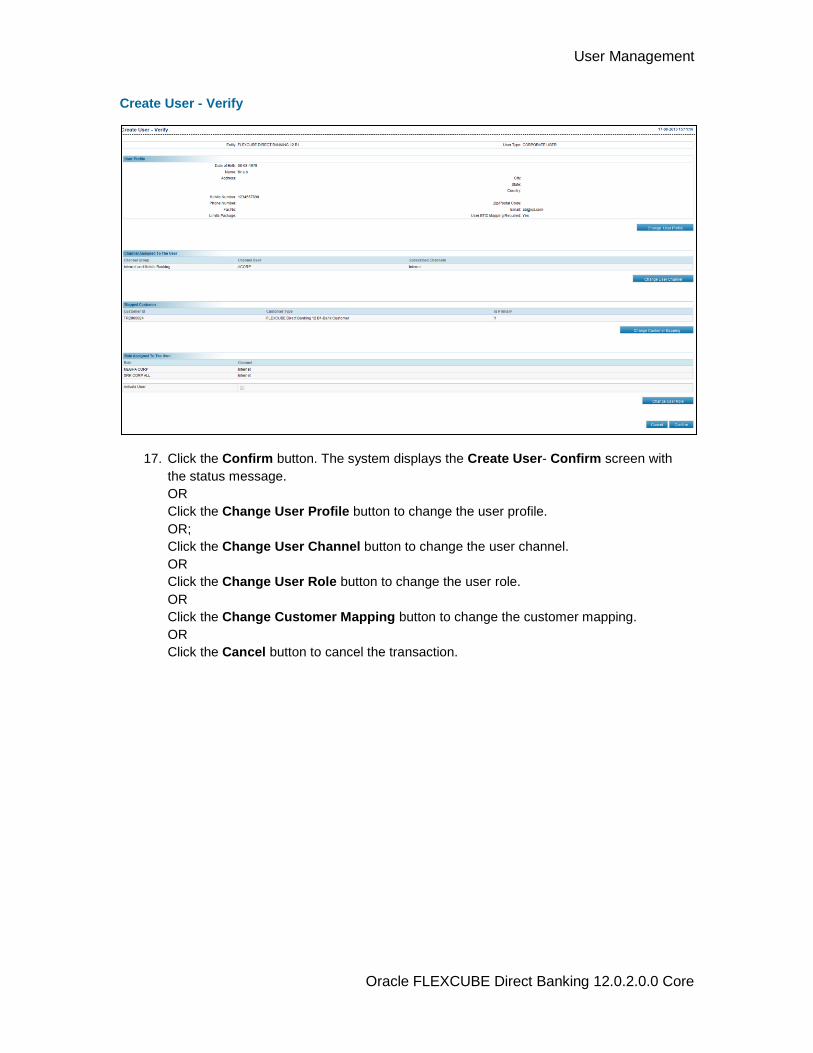
User Management
Oracle FLEXCUBE Direct Banking 12.0.2.0.0 Core
Create User - Verify
17. Click the Confirm button. The system displays the Create User- Confirm screen with
the status message.
OR
Click the Change User Profile button to change the user profile.
OR;
Click the Change User Channel button to change the user channel.
OR
Click the Change User Role button to change the user role.
OR
Click the Change Customer Mapping button to change the customer mapping.
OR
Click the Cancel button to cancel the transaction.
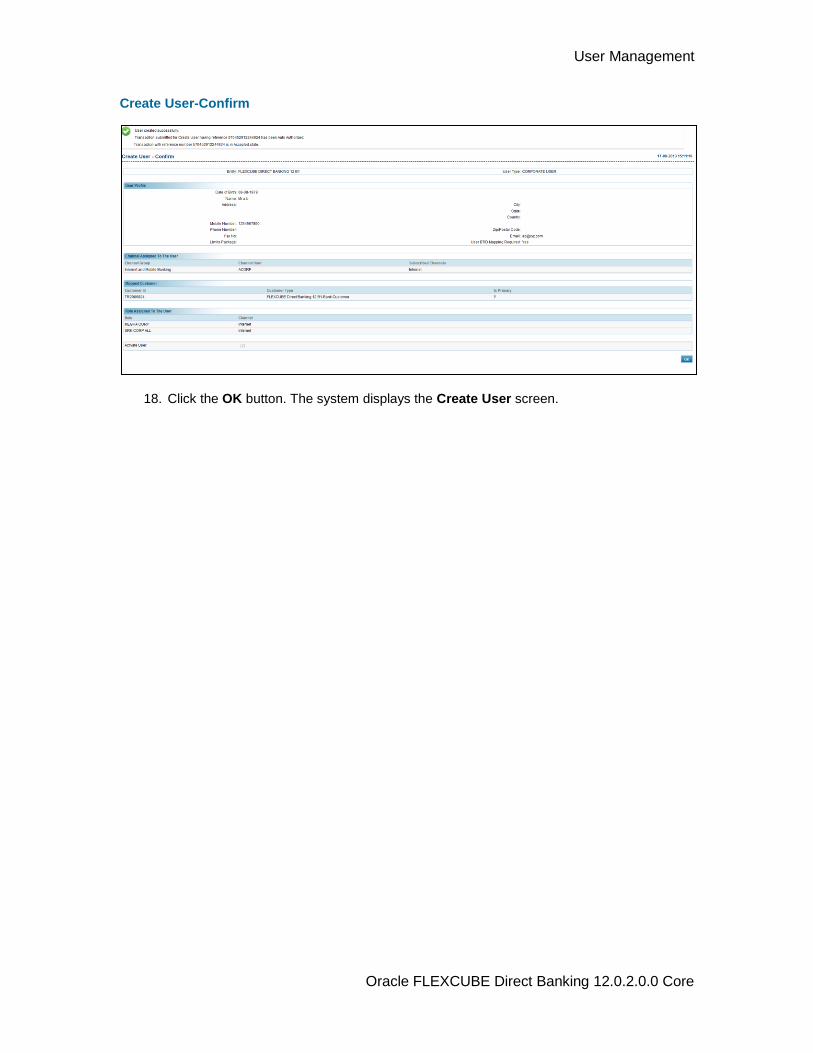
User Management
Oracle FLEXCUBE Direct Banking 12.0.2.0.0 Core
Create User-Confirm
18. Click the OK button. The system displays the Create User screen.
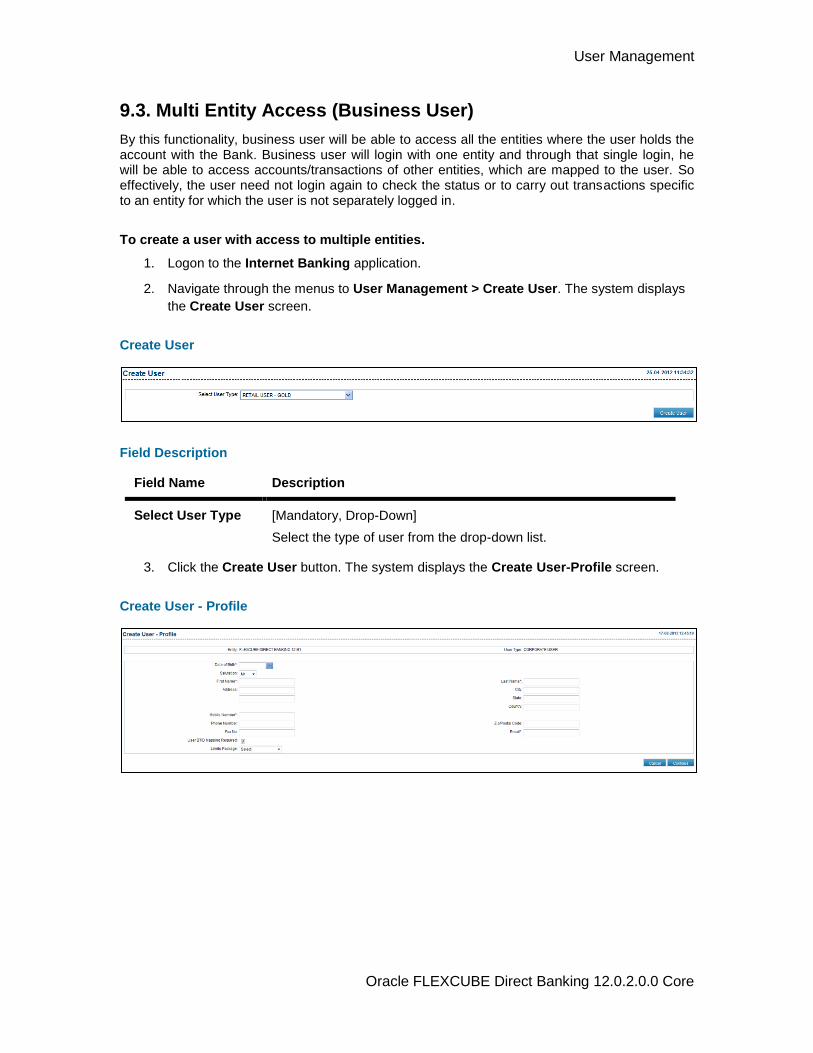
User Management
Oracle FLEXCUBE Direct Banking 12.0.2.0.0 Core
9.3. Multi Entity Access (Business User)
By this functionality, business user will be able to access all the entities where the user holds the account with the Bank. Business user will login with one entity and through that single login, he will be able to access accounts/transactions of other entities, which are mapped to the user. So effectively, the user need not login again to check the status or to carry out transactions specific to an entity for which the user is not separately logged in.
To create a user with access to multiple entities.
1. Logon to the Internet Banking application.
2. Navigate through the menus to User Management > Create User. The system displays
the Create User screen.
Create User
Field Description
Field Name Description
Select User Type [Mandatory, Drop-Down]
Select the type of user from the drop-down list.
3. Click the Create User button. The system displays the Create User-Profile screen.
Create User - Profile

User Management
Oracle FLEXCUBE Direct Banking 12.0.2.0.0 Core
Field Description
Field Name Description
Entity [Display]
This field displays the type of entity.
User Type [Display]
This field displays the type of user.
Date of Birth [Mandatory, Pick List]
Select the date of birth of the user from the pick list.
Salutation [Mandatory, Drop-Down]
Select the salutation of the user from the drop-down list.
The options are:
Mr
Mrs
Miss
Dr
First Name [Mandatory, Alphanumeric, 40]
Type the first name of the user.
Last Name [Mandatory, Alphanumeric, 40]
Type the last name of the user.
Address [Mandatory, Alphanumeric, 70]
Type the address of the user.
City [Optional, Alphanumeric, 26]
Type the name of the city.
State [Optional, Alphanumeric, 20]
Type the name of the state.
Country [Optional, Alphanumeric, 35]
Type the name of the country.
MobileNumber [Mandatory, Numeric, 20]
Type the mobile number of the user.
Phone Number [Optional, Numeric, 11]
Type the phone number of the user.
Zip/Postal Code [Optional, Numeric, Seven]
Type the zip code.
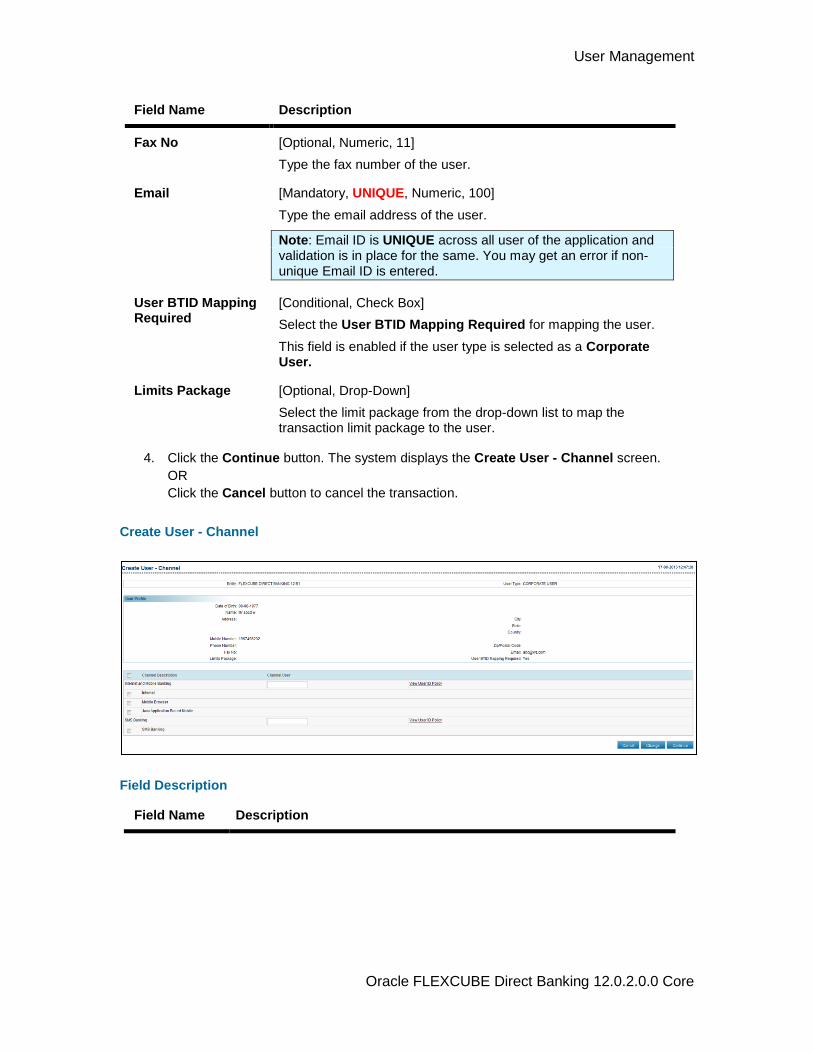
User Management
Oracle FLEXCUBE Direct Banking 12.0.2.0.0 Core
Field Name Description
Fax No [Optional, Numeric, 11]
Type the fax number of the user.
Email [Mandatory, UNIQUE, Numeric, 100]
Type the email address of the user.
Note: Email ID is UNIQUE across all user of the application and validation is in place for the same. You may get an error if non-unique Email ID is entered.
User BTID Mapping Required
[Conditional, Check Box]
Select the User BTID Mapping Required for mapping the user.
This field is enabled if the user type is selected as a Corporate User.
Limits Package [Optional, Drop-Down]
Select the limit package from the drop-down list to map the transaction limit package to the user.
4. Click the Continue button. The system displays the Create User - Channel screen.
OR
Click the Cancel button to cancel the transaction.
Create User - Channel
Field Description
Field Name Description
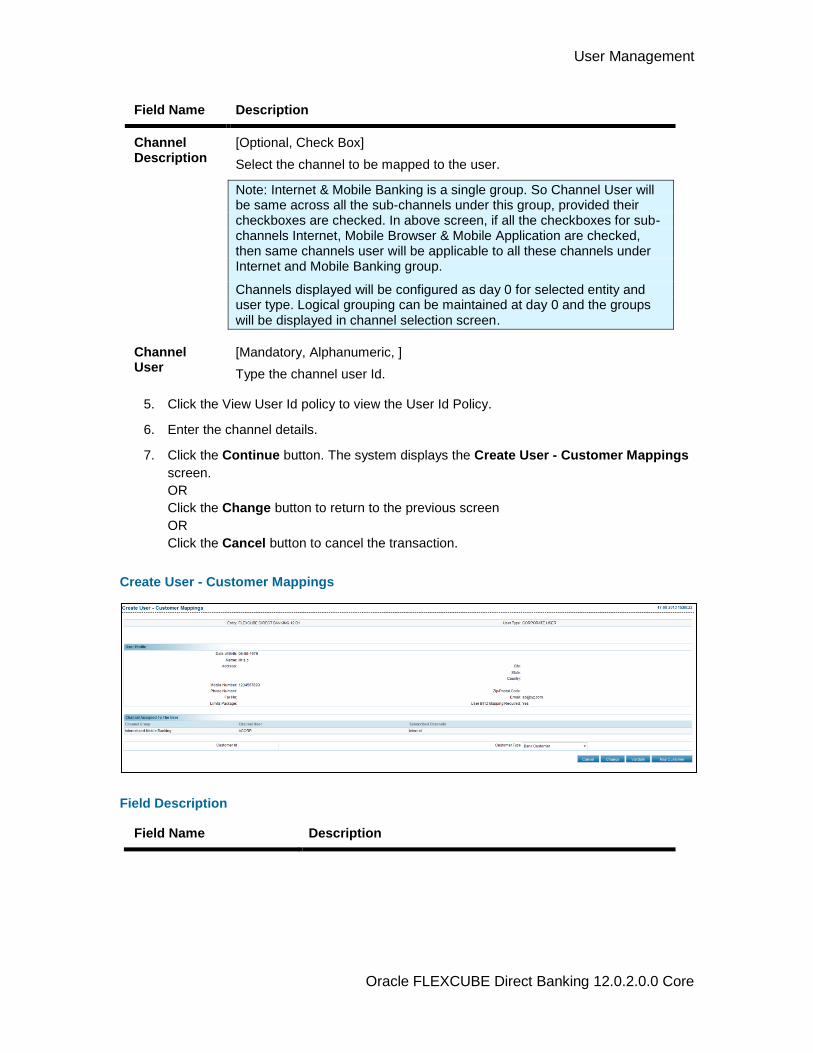
User Management
Oracle FLEXCUBE Direct Banking 12.0.2.0.0 Core
Field Name Description
Channel Description
[Optional, Check Box]
Select the channel to be mapped to the user.
Note: Internet & Mobile Banking is a single group. So Channel User will be same across all the sub-channels under this group, provided their checkboxes are checked. In above screen, if all the checkboxes for sub-channels Internet, Mobile Browser & Mobile Application are checked, then same channels user will be applicable to all these channels under Internet and Mobile Banking group.
Channels displayed will be configured as day 0 for selected entity and user type. Logical grouping can be maintained at day 0 and the groups will be displayed in channel selection screen.
Channel User
[Mandatory, Alphanumeric, ]
Type the channel user Id.
5. Click the View User Id policy to view the User Id Policy.
6. Enter the channel details.
7. Click the Continue button. The system displays the Create User - Customer Mappings
screen.
OR
Click the Change button to return to the previous screen
OR
Click the Cancel button to cancel the transaction.
Create User - Customer Mappings
Field Description
Field Name Description
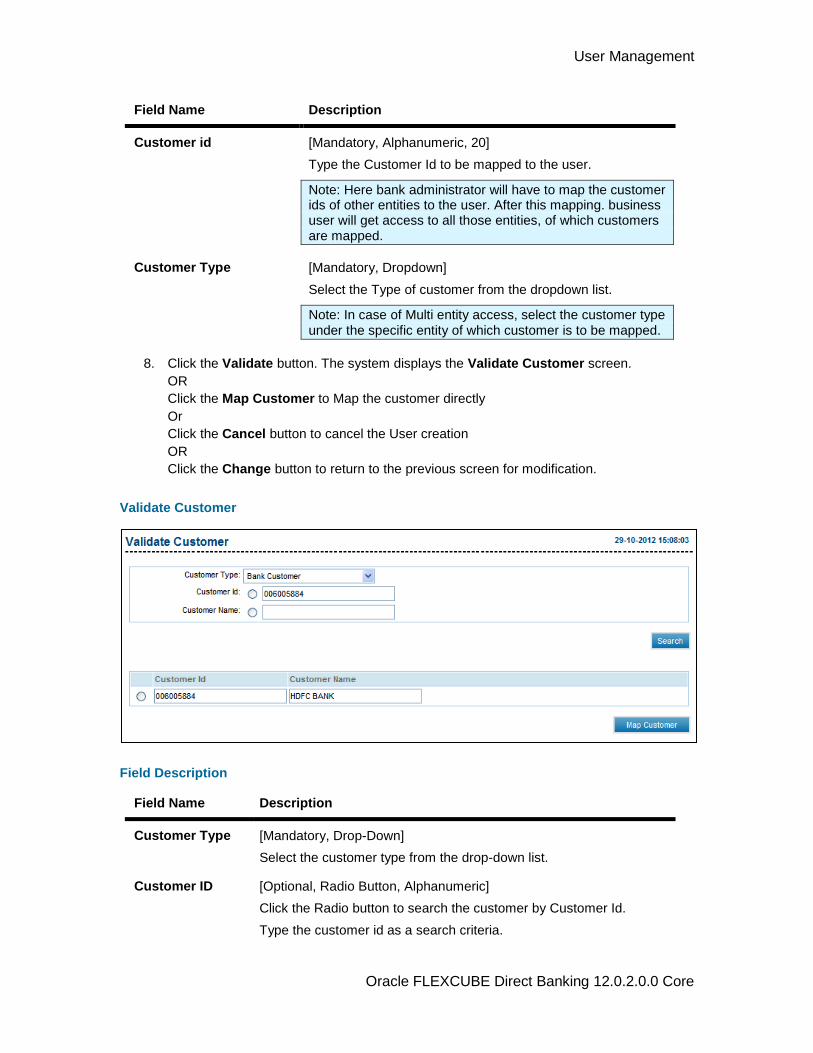
User Management
Oracle FLEXCUBE Direct Banking 12.0.2.0.0 Core
Field Name Description
Customer id [Mandatory, Alphanumeric, 20]
Type the Customer Id to be mapped to the user.
Note: Here bank administrator will have to map the customer ids of other entities to the user. After this mapping. business user will get access to all those entities, of which customers are mapped.
Customer Type [Mandatory, Dropdown]
Select the Type of customer from the dropdown list.
Note: In case of Multi entity access, select the customer type under the specific entity of which customer is to be mapped.
8. Click the Validate button. The system displays the Validate Customer screen.
OR
Click the Map Customer to Map the customer directly
Or
Click the Cancel button to cancel the User creation
OR
Click the Change button to return to the previous screen for modification.
Validate Customer
Field Description
Field Name Description
Customer Type [Mandatory, Drop-Down]
Select the customer type from the drop-down list.
Customer ID [Optional, Radio Button, Alphanumeric]
Click the Radio button to search the customer by Customer Id.
Type the customer id as a search criteria.
User Management
Oracle FLEXCUBE Direct Banking 12.0.2.0.0 Core
Field Name Description
Customer Name [Optional, Radio Button, Alphanumeric]
Click the Radio button to search the customer by Customer Name.
Type the Customer name as a search criteria.
9. Click the Search button to search the valid customers
10. Select the Radio Button of the Customer id to be selected for mapping
11. Click the Map Customer button. The system displays the Create User - Customer
Mappings screen.
Note: As shown highlighted in below screen, 3 customer ids of different entities are mapped to the user. This enables user to have access to all these 3 entities.

User Management
Oracle FLEXCUBE Direct Banking 12.0.2.0.0 Core
Create User-Customer Mapping
Note: Business user will be able to access transactions/accounts of other mapped entities. These transactions will depend on the entity specific customer ids as well as entity specific roles mapped to the user
Field Description
Field Name Description
Customer Id [Display, Checkbox]
This field will display the Customer id selected for mapping.
Select the checkbox to select for un mapping the customer id.
Customer Type
[Display]
This field will display the Customer type selected from the dropdown list.
Is Primary [Optional, Radio Button]
Select Is primary to make the mapped customer the primary customer.
Wealth Enabled
[Mandatory, Checkbox]
Select the checkbox to selct the customer as a Wealth Management customer.
12. Click the Continue button. The system displays the Create User - Channel Roles
screen.
OR
Select a customer ID and click the Un map Customer button to un map a customer.
User Management
Oracle FLEXCUBE Direct Banking 12.0.2.0.0 Core
Create User-Channel Roles
User Management
Oracle FLEXCUBE Direct Banking 12.0.2.0.0 Core
Field Description
Field Name Description
Default Roles [Display]
This field will display default Roles attached to the user created.
id.
Role Assigned to the User
[Display, check box]
Select the checkbox to select the Role to be assigned to the user. This field will display the Roles assigned to the user.
Activate User [Optional, Check box]
Select the Activate User checkbox to directly Activate the User while creating the user.
13. Select the checkbox for Roles to be selected.
14. Select the Activate User check box, if user need to be activated immediately after
creation. This option will be available only to the user types for which it is configured as a
Day 0 Parameter
15. Click the Continue button. The system displays the Create User - Verify screen.
OR
Click the cancel button to cancel the user creation
16. Click the Roles hyperlink to view the details of the Role selected (Refer View Roles
Transaction under Role Management).
User Management
Oracle FLEXCUBE Direct Banking 12.0.2.0.0 Core
Create User - Verify
17. Click the Confirm button. The system displays the Create User- Confirm screen with
the status message.
OR
Click the Change User Profile button to change the user profile.
OR;
Click the Change User Channel button to change the user channel.
OR
Click the Change User Role button to change the user role.
OR
Click the Change Customer Mapping button to change the customer mapping.
OR
Click the Cancel button to cancel the transaction.
Create User-Confirm
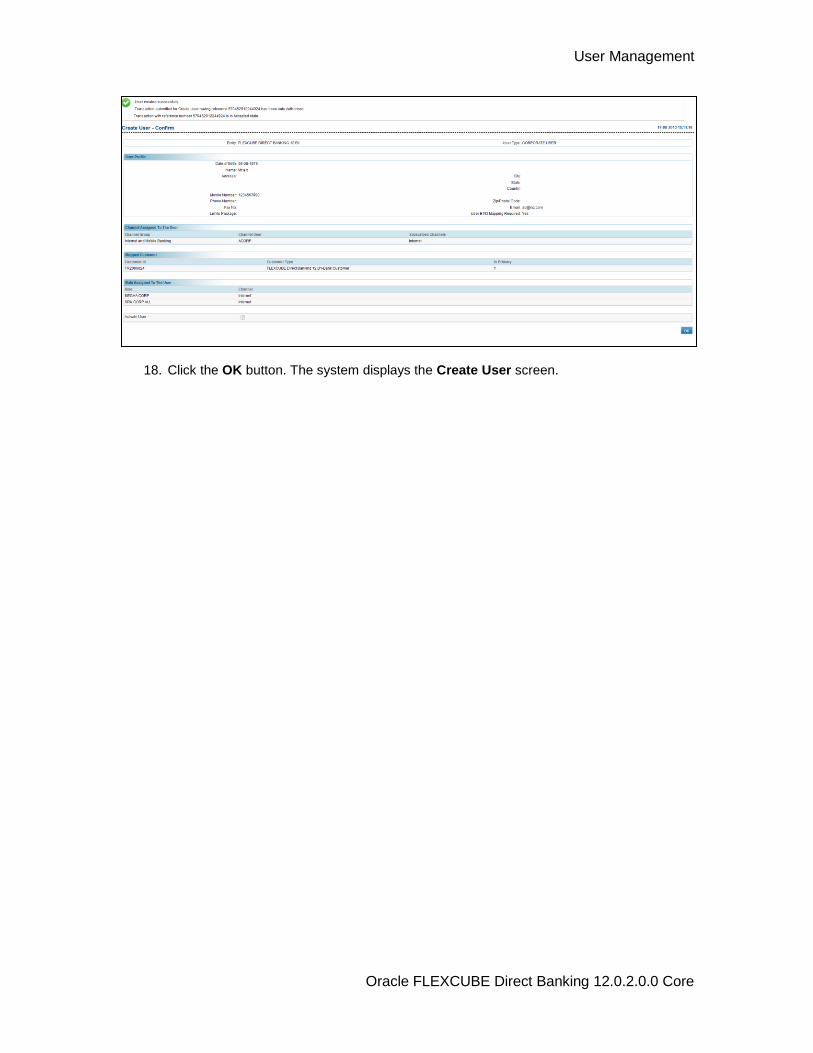
User Management
Oracle FLEXCUBE Direct Banking 12.0.2.0.0 Core
18. Click the OK button. The system displays the Create User screen.
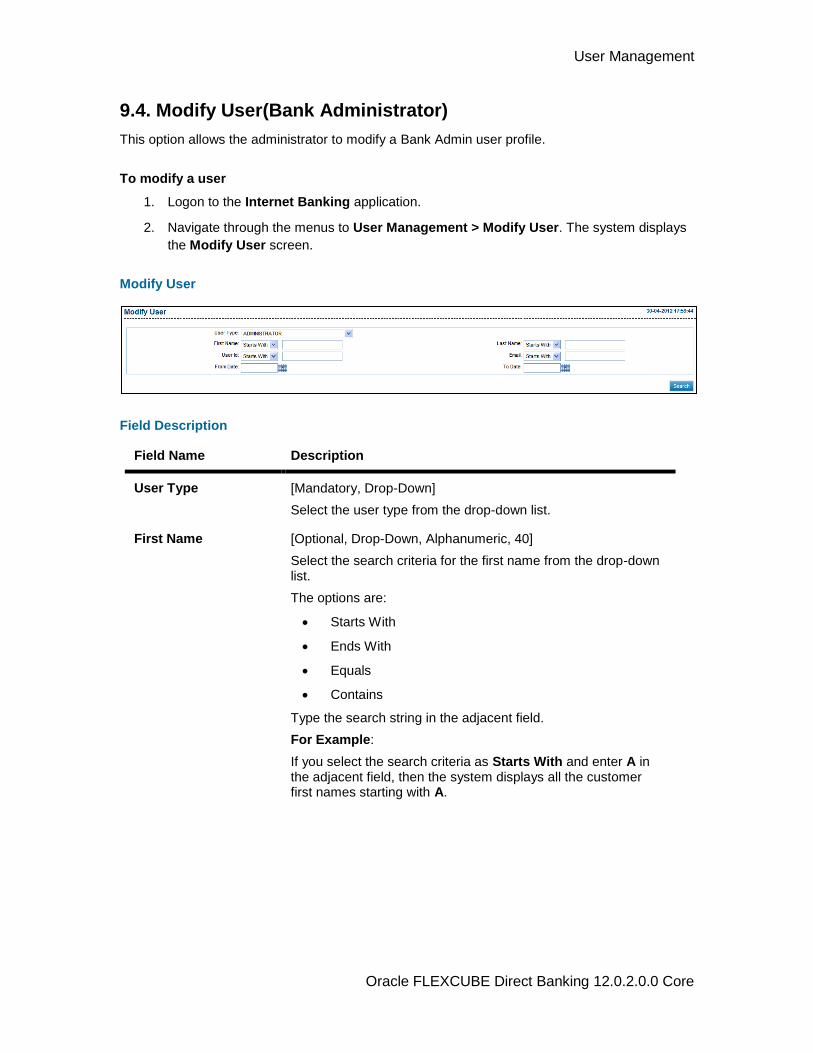
User Management
Oracle FLEXCUBE Direct Banking 12.0.2.0.0 Core
9.4. Modify User(Bank Administrator)
This option allows the administrator to modify a Bank Admin user profile.
To modify a user
1. Logon to the Internet Banking application.
2. Navigate through the menus to User Management > Modify User. The system displays
the Modify User screen.
Modify User
Field Description
Field Name Description
User Type [Mandatory, Drop-Down]
Select the user type from the drop-down list.
First Name [Optional, Drop-Down, Alphanumeric, 40]
Select the search criteria for the first name from the drop-down list.
The options are:
Starts With
Ends With
Equals
Contains
Type the search string in the adjacent field.
For Example:
If you select the search criteria as Starts With and enter A in the adjacent field, then the system displays all the customer first names starting with A.
User Management
Oracle FLEXCUBE Direct Banking 12.0.2.0.0 Core
Field Name Description
Last Name [Optional, Drop-Down, Alphanumeric, 40]
Select the search criteria for the last name from the drop-down list.
The options are:
Starts With
Ends With
Equals
Contains
Type the search string in the adjacent field.
For Example:
If you select the search criteria as Starts With and enter E in the adjacent field, then the system displays all the customer last names starting with E.
User Id [Optional, Drop-Down, Alphanumeric, 20]
Select the search criteria for the user ID from the drop-down list.
The options are:
Starts With
Ends With
Equals
Contains
Type the search string in the adjacent field.
For Example:
If you select the search criteria as Starts With and enter 1 in the adjacent field, then the system displays all the user ID's starting with 1.
User Management
Oracle FLEXCUBE Direct Banking 12.0.2.0.0 Core
Field Name Description
Email [Optional, UNIQUE, Drop-Down, Alphanumeric, 100]
Select the search criteria for the email ID from the drop-down list.
The options are:
Starts With
Ends With
Equals
Contains
Type the search string in the adjacent field.
For Example:
If you select the search criteria as Starts With and enter L in the adjacent field, then the system displays all the email ID's starting with L.
Note: Email ID is UNIQUE across all user of the application and validation is in place for the same. You may get an error if non-unique Email ID is entered.
From Date [Optional, Pick List]
Select the start date from the pick list.
The date should not greater than the process date.
To Date [Optional, Pick List]
Select the end date from the pick list.
The date should be greater than the from date.
Customer ID [Conditional, Drop-down, Alphanumeric, 18]
Select the search criteria for the customer ID from the drop-down.
The options are:
Start With
Ends With
Equals
Contains
Type the search string in the adjacent field.
This field is enabled if the Corporate User option is selected from the User Type drop-down list.
For Example:
If you select the search criteria as Starts With and enter L in the adjacent field, then the system displays all the customer ID's starting with L.
3. Select the user type.

User Management
Oracle FLEXCUBE Direct Banking 12.0.2.0.0 Core
4. Enter the search criteria.
5. Click the Search button. The system displays the Modify User screen with the search
result.
Modify User
Field Description
Field Name Description
User Id [Display]
This column displays the user ID.
Name [Display]
This column displays the name of the user.
Email [Display, UNIQUE]
This column displays the email address of the user.
Note: Email ID is UNIQUE across all user of the application and validation is in place for the same. You may get an error if non-unique Email ID is entered.
Channel [Display]
This column displays the banking channel through which the user performs the transactions.
6. Click the User ID. The system displays the Modify User - Profile screen.
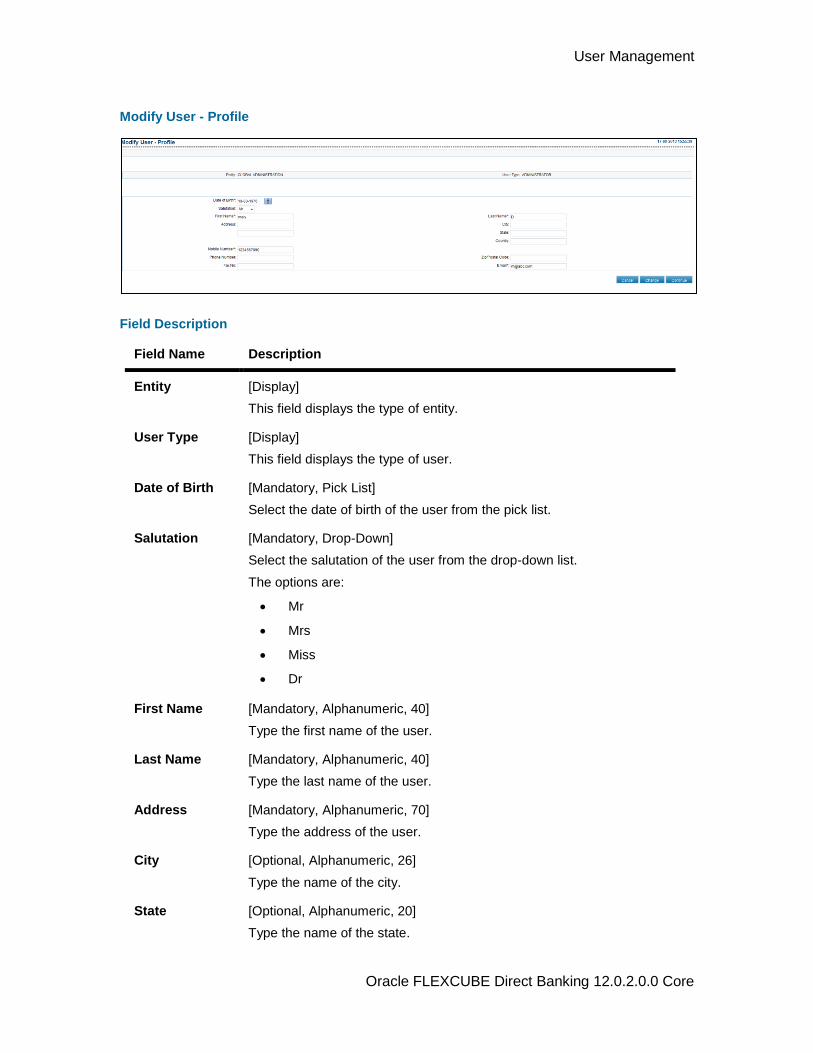
User Management
Oracle FLEXCUBE Direct Banking 12.0.2.0.0 Core
Modify User - Profile
Field Description
Field Name Description
Entity [Display]
This field displays the type of entity.
User Type [Display]
This field displays the type of user.
Date of Birth [Mandatory, Pick List]
Select the date of birth of the user from the pick list.
Salutation [Mandatory, Drop-Down]
Select the salutation of the user from the drop-down list.
The options are:
Mr
Mrs
Miss
Dr
First Name [Mandatory, Alphanumeric, 40]
Type the first name of the user.
Last Name [Mandatory, Alphanumeric, 40]
Type the last name of the user.
Address [Mandatory, Alphanumeric, 70]
Type the address of the user.
City [Optional, Alphanumeric, 26]
Type the name of the city.
State [Optional, Alphanumeric, 20]
Type the name of the state.
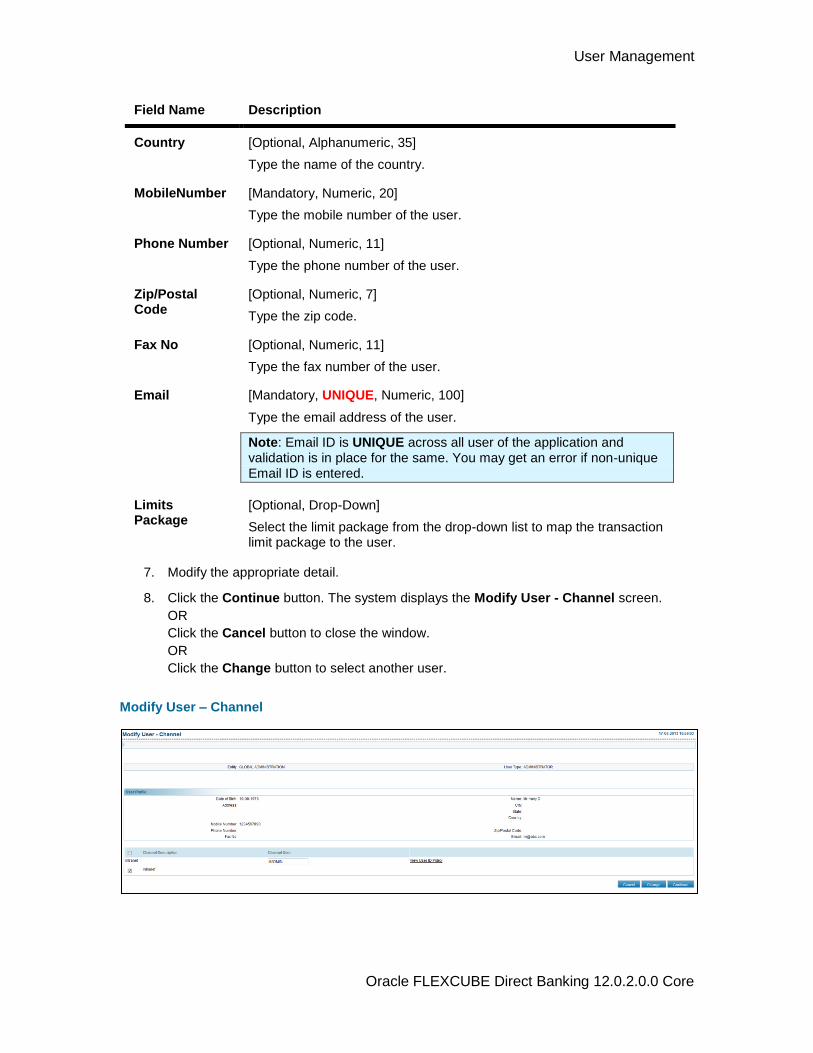
User Management
Oracle FLEXCUBE Direct Banking 12.0.2.0.0 Core
Field Name Description
Country [Optional, Alphanumeric, 35]
Type the name of the country.
MobileNumber [Mandatory, Numeric, 20]
Type the mobile number of the user.
Phone Number [Optional, Numeric, 11]
Type the phone number of the user.
Zip/Postal Code
[Optional, Numeric, 7]
Type the zip code.
Fax No [Optional, Numeric, 11]
Type the fax number of the user.
Email [Mandatory, UNIQUE, Numeric, 100]
Type the email address of the user.
Note: Email ID is UNIQUE across all user of the application and validation is in place for the same. You may get an error if non-unique Email ID is entered.
Limits Package
[Optional, Drop-Down]
Select the limit package from the drop-down list to map the transaction limit package to the user.
7. Modify the appropriate detail.
8. Click the Continue button. The system displays the Modify User - Channel screen.
OR
Click the Cancel button to close the window.
OR
Click the Change button to select another user.
Modify User – Channel
User Management
Oracle FLEXCUBE Direct Banking 12.0.2.0.0 Core
Field Description
Field Name Description
Channel Description [Optional, Check Box]
Select the channel to be mapped to the user.
Channel User [Mandatory, Alphanumeric]
Type the channel user Id.
9. Select the channel to be assigned to the user.
10. Click the Continue button. The system displays the Modify User - Channel Roles
screen.
OR
Click the Change button to return to the previous screen to make changes.
OR
Click the Cancel button to cancel the transcation.

User Management
Oracle FLEXCUBE Direct Banking 12.0.2.0.0 Core
Modify User - Channel Roles
Field Description
Field Name Description
Channel Assigned To The User
[Display]
This field will display default Roles attached to the user created.
id.
Role Assigned to the User
[Display, check box]
Select the checkbox to select the Role to be assigned to the user. This field will display the Roles assigned to the user.
Activate User [Optional, Check box]
Select the Activate User checkbox to directly Activate the User while creating the user.
User Type Access
Entity [Optional, Check box]
Select the Entity checkbox to give the access to the selected entity while creating the user.
User Management
Oracle FLEXCUBE Direct Banking 12.0.2.0.0 Core
Field Name Description
User Type [Optional, Check box]
Select the User Type checkbox to give the access to the selected user type while creating the user.
11. Click the Continue button. The system displays the Modify User - Verify screen.
OR
Click the Cancel button to cancel the transaction.
OR
Click the Change button to select another user.
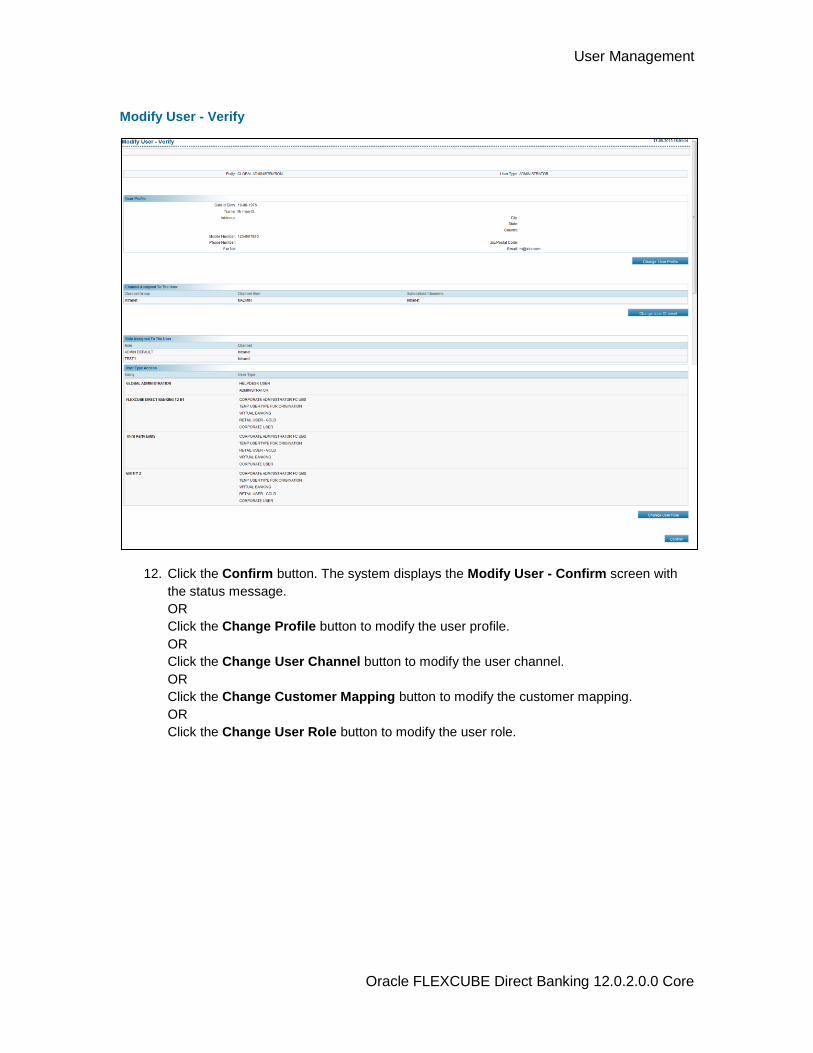
User Management
Oracle FLEXCUBE Direct Banking 12.0.2.0.0 Core
Modify User - Verify
12. Click the Confirm button. The system displays the Modify User - Confirm screen with
the status message.
OR
Click the Change Profile button to modify the user profile.
OR
Click the Change User Channel button to modify the user channel.
OR
Click the Change Customer Mapping button to modify the customer mapping.
OR
Click the Change User Role button to modify the user role.

User Management
Oracle FLEXCUBE Direct Banking 12.0.2.0.0 Core
Modify User - Confirm
13. Click the OK button. The system displays the Modify User screen with the status
message.
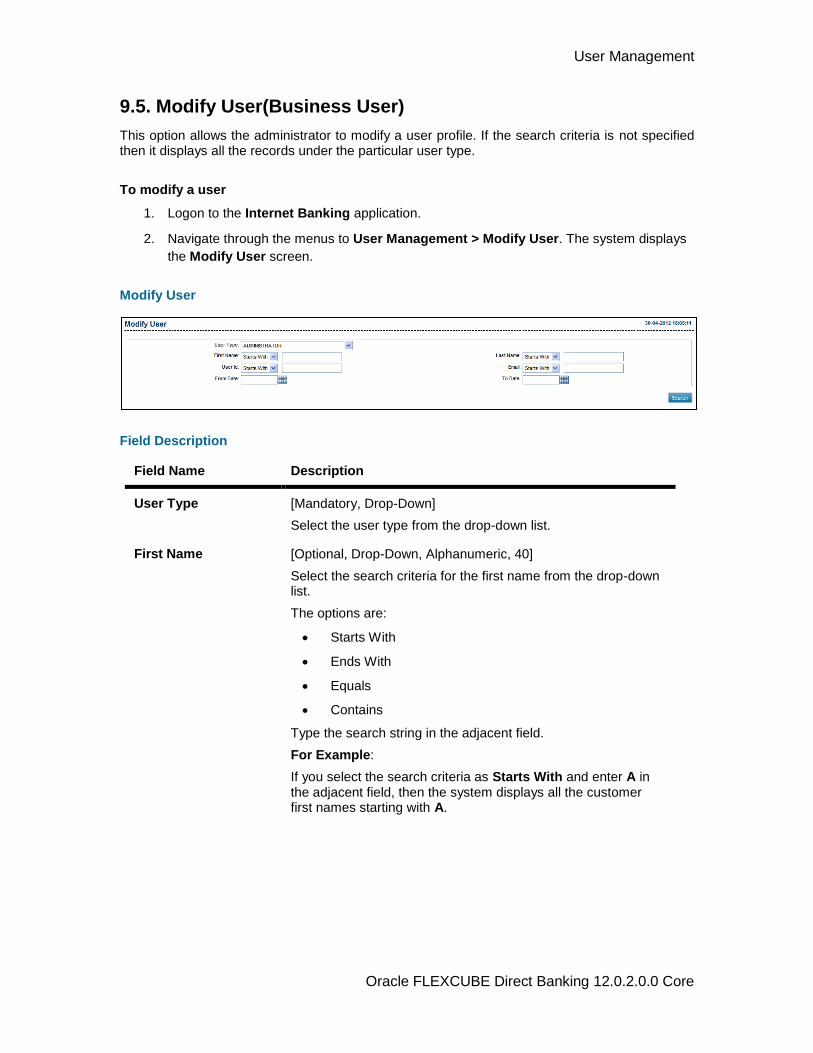
User Management
Oracle FLEXCUBE Direct Banking 12.0.2.0.0 Core
9.5. Modify User(Business User)
This option allows the administrator to modify a user profile. If the search criteria is not specified then it displays all the records under the particular user type.
To modify a user
1. Logon to the Internet Banking application.
2. Navigate through the menus to User Management > Modify User. The system displays
the Modify User screen.
Modify User
Field Description
Field Name Description
User Type [Mandatory, Drop-Down]
Select the user type from the drop-down list.
First Name [Optional, Drop-Down, Alphanumeric, 40]
Select the search criteria for the first name from the drop-down list.
The options are:
Starts With
Ends With
Equals
Contains
Type the search string in the adjacent field.
For Example:
If you select the search criteria as Starts With and enter A in the adjacent field, then the system displays all the customer first names starting with A.

User Management
Oracle FLEXCUBE Direct Banking 12.0.2.0.0 Core
Field Name Description
Last Name [Optional, Drop-Down, Alphanumeric, 40]
Select the search criteria for the last name from the drop-down list.
The options are:
Starts With
Ends With
Equals
Contains
Type the search string in the adjacent field.
For Example:
If you select the search criteria as Starts With and enter E in the adjacent field, then the system displays all the customer last names starting with E.
User Id [Optional, Drop-Down, Alphanumeric, 20]
Select the search criteria for the user ID from the drop-down list.
The options are:
Starts With
Ends With
Equals
Contains
Type the search string in the adjacent field.
For Example:
If you select the search criteria as Starts With and enter 1 in the adjacent field, then the system displays all the user ID's starting with 1.
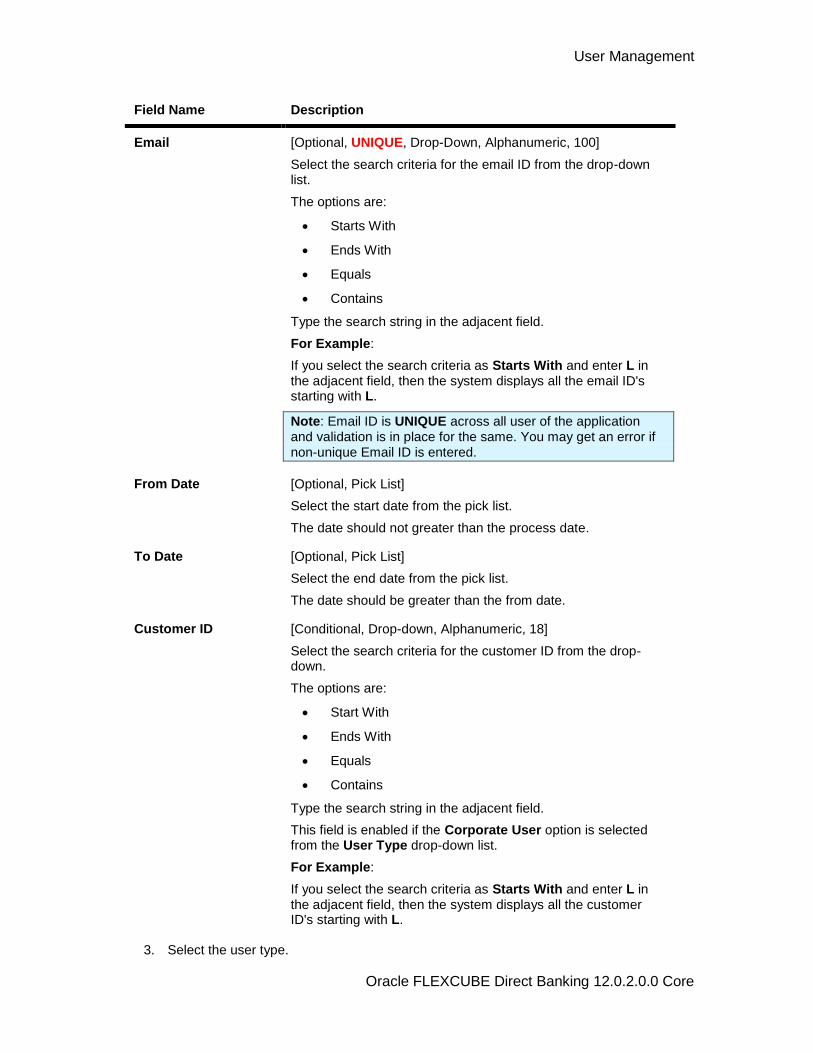
User Management
Oracle FLEXCUBE Direct Banking 12.0.2.0.0 Core
Field Name Description
Email [Optional, UNIQUE, Drop-Down, Alphanumeric, 100]
Select the search criteria for the email ID from the drop-down list.
The options are:
Starts With
Ends With
Equals
Contains
Type the search string in the adjacent field.
For Example:
If you select the search criteria as Starts With and enter L in the adjacent field, then the system displays all the email ID's starting with L.
Note: Email ID is UNIQUE across all user of the application and validation is in place for the same. You may get an error if non-unique Email ID is entered.
From Date [Optional, Pick List]
Select the start date from the pick list.
The date should not greater than the process date.
To Date [Optional, Pick List]
Select the end date from the pick list.
The date should be greater than the from date.
Customer ID [Conditional, Drop-down, Alphanumeric, 18]
Select the search criteria for the customer ID from the drop-down.
The options are:
Start With
Ends With
Equals
Contains
Type the search string in the adjacent field.
This field is enabled if the Corporate User option is selected from the User Type drop-down list.
For Example:
If you select the search criteria as Starts With and enter L in the adjacent field, then the system displays all the customer ID's starting with L.
3. Select the user type.
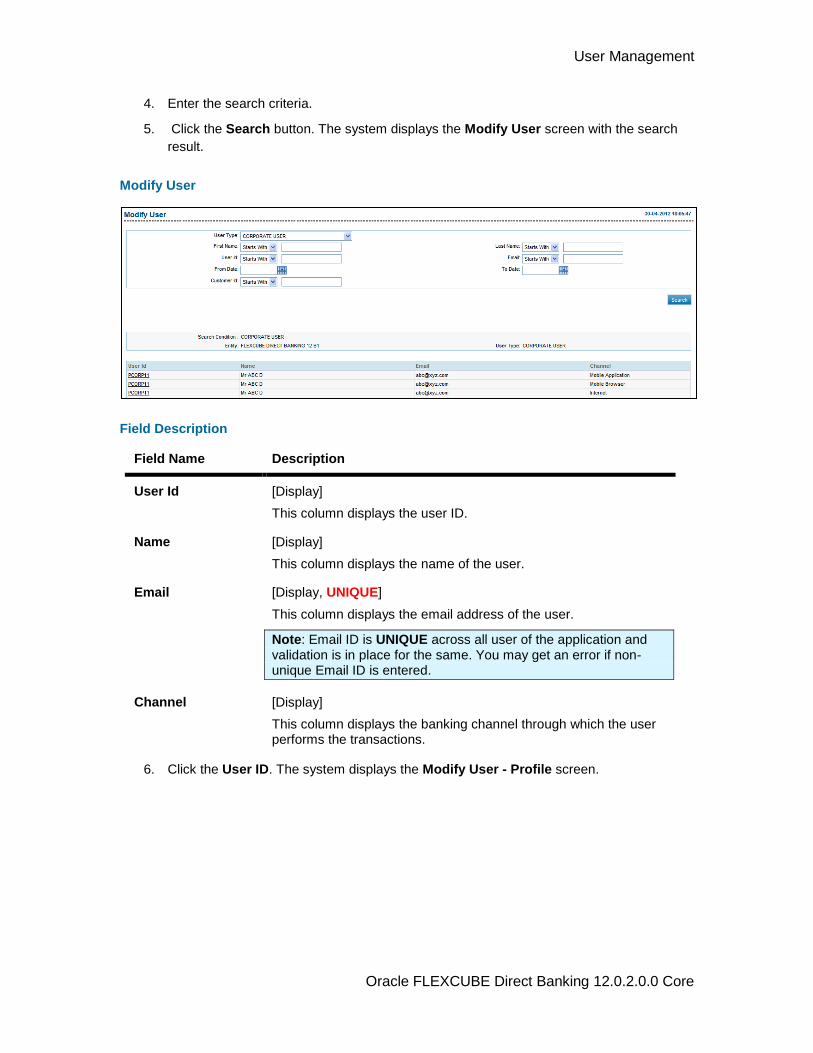
User Management
Oracle FLEXCUBE Direct Banking 12.0.2.0.0 Core
4. Enter the search criteria.
5. Click the Search button. The system displays the Modify User screen with the search
result.
Modify User
Field Description
Field Name Description
User Id [Display]
This column displays the user ID.
Name [Display]
This column displays the name of the user.
Email [Display, UNIQUE]
This column displays the email address of the user.
Note: Email ID is UNIQUE across all user of the application and validation is in place for the same. You may get an error if non-unique Email ID is entered.
Channel [Display]
This column displays the banking channel through which the user performs the transactions.
6. Click the User ID. The system displays the Modify User - Profile screen.
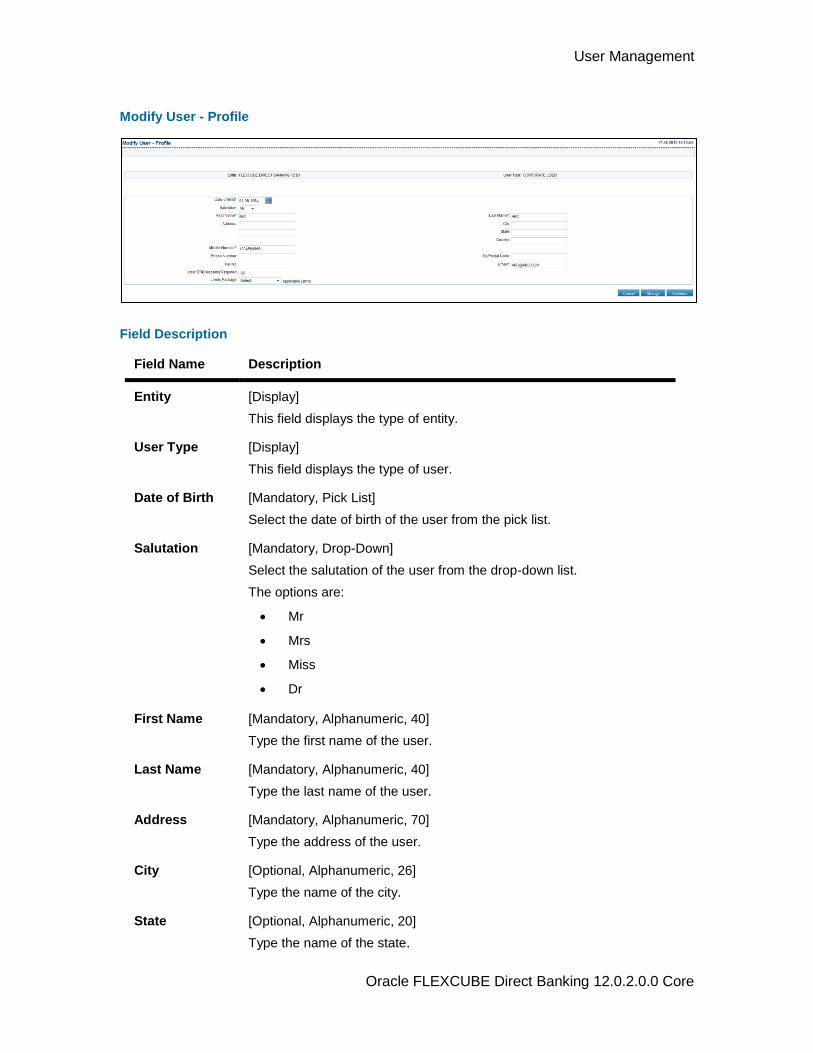
User Management
Oracle FLEXCUBE Direct Banking 12.0.2.0.0 Core
Modify User - Profile
Field Description
Field Name Description
Entity [Display]
This field displays the type of entity.
User Type [Display]
This field displays the type of user.
Date of Birth [Mandatory, Pick List]
Select the date of birth of the user from the pick list.
Salutation [Mandatory, Drop-Down]
Select the salutation of the user from the drop-down list.
The options are:
Mr
Mrs
Miss
Dr
First Name [Mandatory, Alphanumeric, 40]
Type the first name of the user.
Last Name [Mandatory, Alphanumeric, 40]
Type the last name of the user.
Address [Mandatory, Alphanumeric, 70]
Type the address of the user.
City [Optional, Alphanumeric, 26]
Type the name of the city.
State [Optional, Alphanumeric, 20]
Type the name of the state.
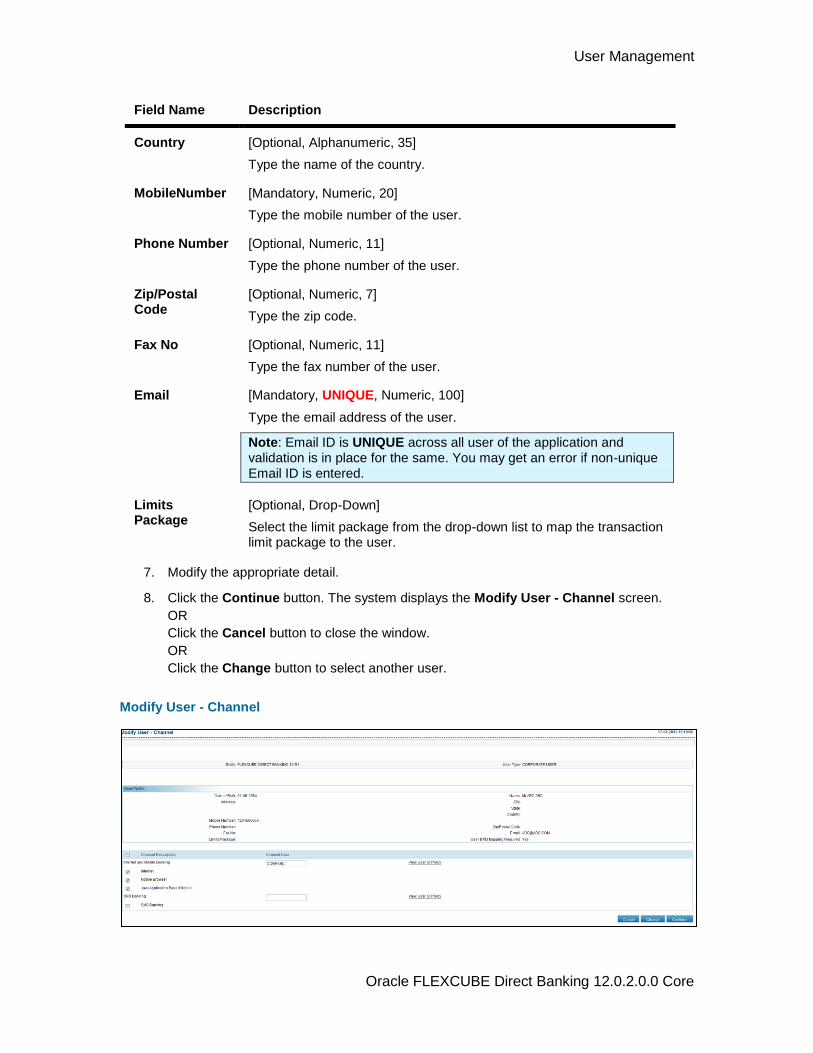
User Management
Oracle FLEXCUBE Direct Banking 12.0.2.0.0 Core
Field Name Description
Country [Optional, Alphanumeric, 35]
Type the name of the country.
MobileNumber [Mandatory, Numeric, 20]
Type the mobile number of the user.
Phone Number [Optional, Numeric, 11]
Type the phone number of the user.
Zip/Postal Code
[Optional, Numeric, 7]
Type the zip code.
Fax No [Optional, Numeric, 11]
Type the fax number of the user.
Email [Mandatory, UNIQUE, Numeric, 100]
Type the email address of the user.
Note: Email ID is UNIQUE across all user of the application and validation is in place for the same. You may get an error if non-unique Email ID is entered.
Limits Package
[Optional, Drop-Down]
Select the limit package from the drop-down list to map the transaction limit package to the user.
7. Modify the appropriate detail.
8. Click the Continue button. The system displays the Modify User - Channel screen.
OR
Click the Cancel button to close the window.
OR
Click the Change button to select another user.
Modify User - Channel

User Management
Oracle FLEXCUBE Direct Banking 12.0.2.0.0 Core
Field Description
Field Name Description
Channel Description [Optional, Check Box]
Select the channel to be mapped to the user.
Channel User [Mandatory, Alphanumeric]
Type the channel user Id.
9. Select the channel to be assigned to the user.
Click the Continue button. The system displays the Modify User - Customer Mappings
screen.
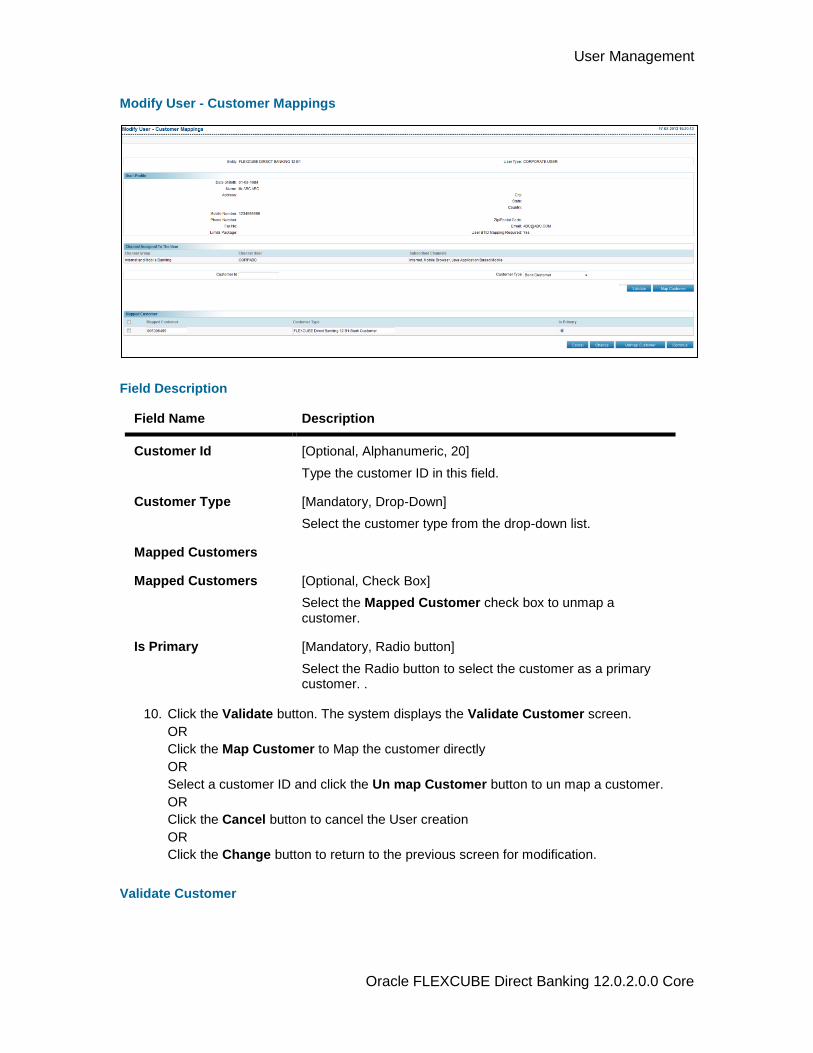
User Management
Oracle FLEXCUBE Direct Banking 12.0.2.0.0 Core
Modify User - Customer Mappings
Field Description
Field Name Description
Customer Id [Optional, Alphanumeric, 20]
Type the customer ID in this field.
Customer Type [Mandatory, Drop-Down]
Select the customer type from the drop-down list.
Mapped Customers
Mapped Customers [Optional, Check Box]
Select the Mapped Customer check box to unmap a customer.
Is Primary [Mandatory, Radio button]
Select the Radio button to select the customer as a primary customer. .
10. Click the Validate button. The system displays the Validate Customer screen.
OR
Click the Map Customer to Map the customer directly
OR
Select a customer ID and click the Un map Customer button to un map a customer.
OR
Click the Cancel button to cancel the User creation
OR
Click the Change button to return to the previous screen for modification.
Validate Customer
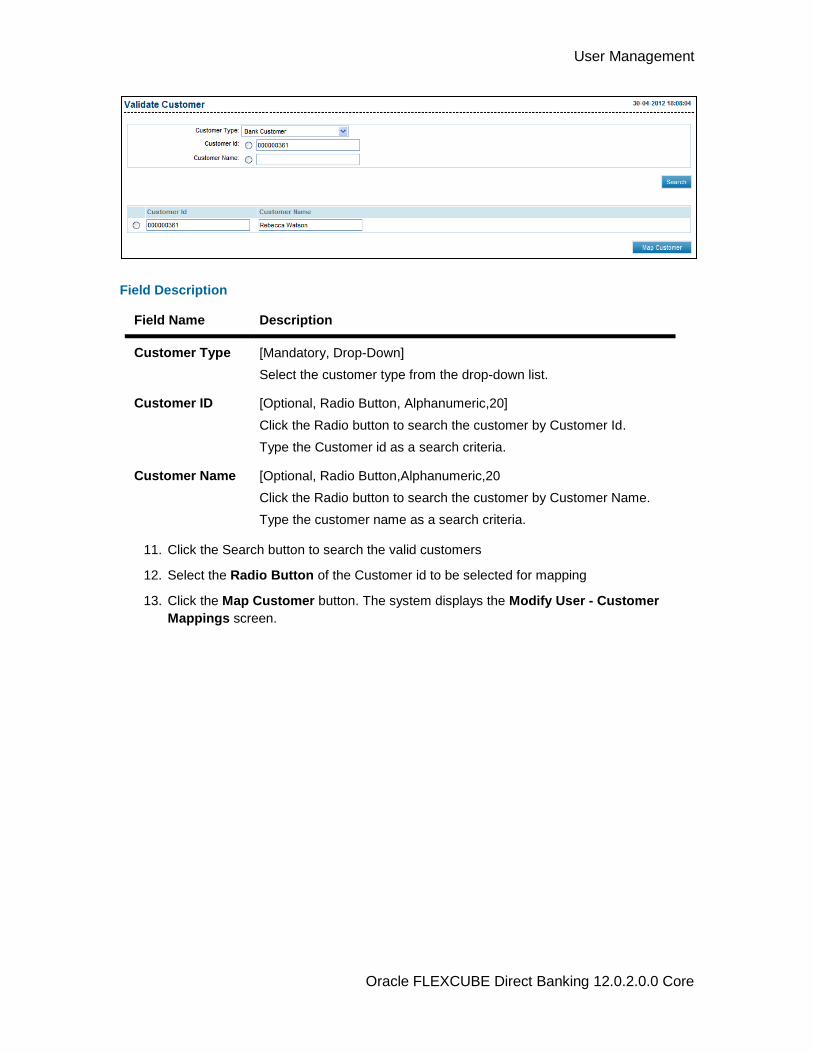
User Management
Oracle FLEXCUBE Direct Banking 12.0.2.0.0 Core
Field Description
Field Name Description
Customer Type [Mandatory, Drop-Down]
Select the customer type from the drop-down list.
Customer ID [Optional, Radio Button, Alphanumeric,20]
Click the Radio button to search the customer by Customer Id.
Type the Customer id as a search criteria.
Customer Name [Optional, Radio Button,Alphanumeric,20
Click the Radio button to search the customer by Customer Name.
Type the customer name as a search criteria.
11. Click the Search button to search the valid customers
12. Select the Radio Button of the Customer id to be selected for mapping
13. Click the Map Customer button. The system displays the Modify User - Customer
Mappings screen.
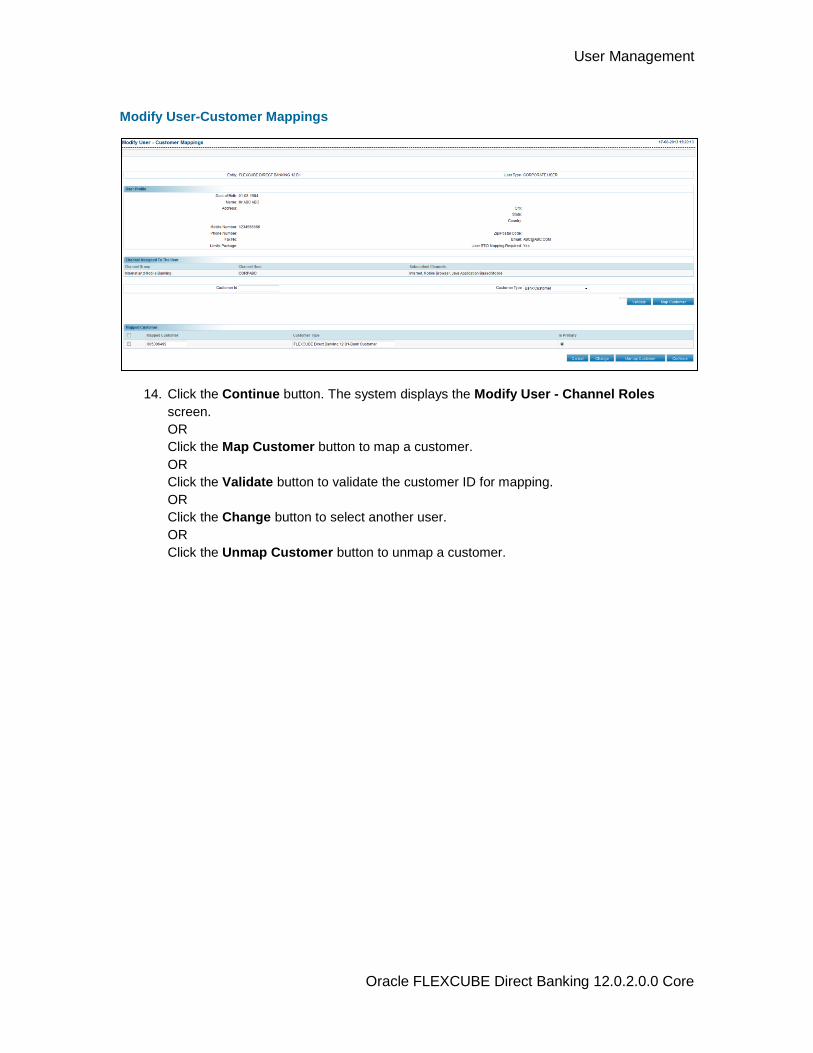
User Management
Oracle FLEXCUBE Direct Banking 12.0.2.0.0 Core
Modify User-Customer Mappings
14. Click the Continue button. The system displays the Modify User - Channel Roles
screen.
OR
Click the Map Customer button to map a customer.
OR
Click the Validate button to validate the customer ID for mapping.
OR
Click the Change button to select another user.
OR
Click the Unmap Customer button to unmap a customer.
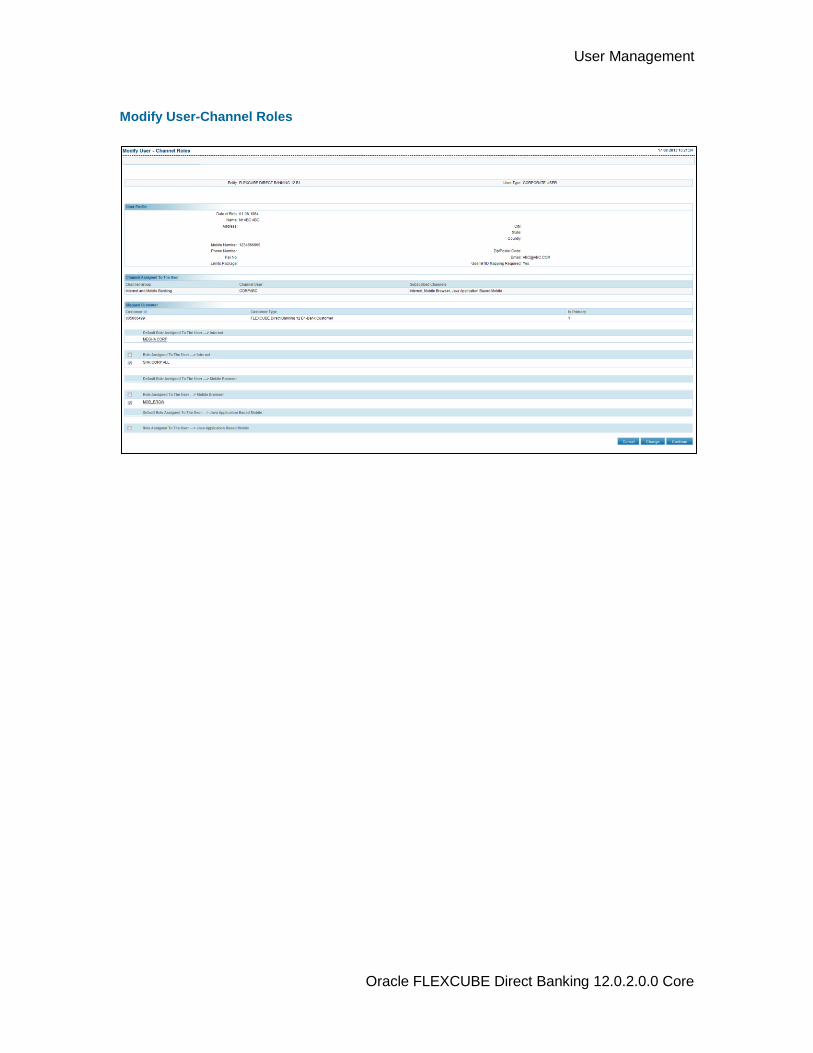
User Management
Oracle FLEXCUBE Direct Banking 12.0.2.0.0 Core
Modify User-Channel Roles
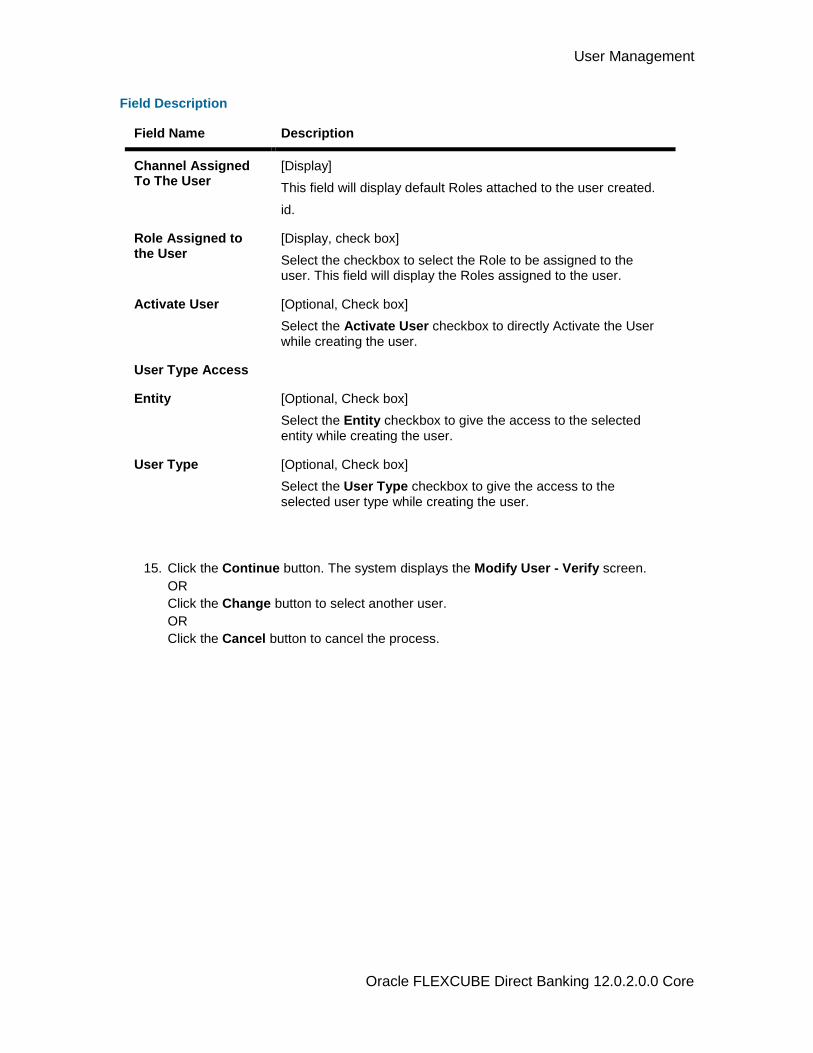
User Management
Oracle FLEXCUBE Direct Banking 12.0.2.0.0 Core
Field Description
Field Name Description
Channel Assigned To The User
[Display]
This field will display default Roles attached to the user created.
id.
Role Assigned to the User
[Display, check box]
Select the checkbox to select the Role to be assigned to the user. This field will display the Roles assigned to the user.
Activate User [Optional, Check box]
Select the Activate User checkbox to directly Activate the User while creating the user.
User Type Access
Entity [Optional, Check box]
Select the Entity checkbox to give the access to the selected entity while creating the user.
User Type [Optional, Check box]
Select the User Type checkbox to give the access to the selected user type while creating the user.
15. Click the Continue button. The system displays the Modify User - Verify screen.
OR
Click the Change button to select another user.
OR
Click the Cancel button to cancel the process.
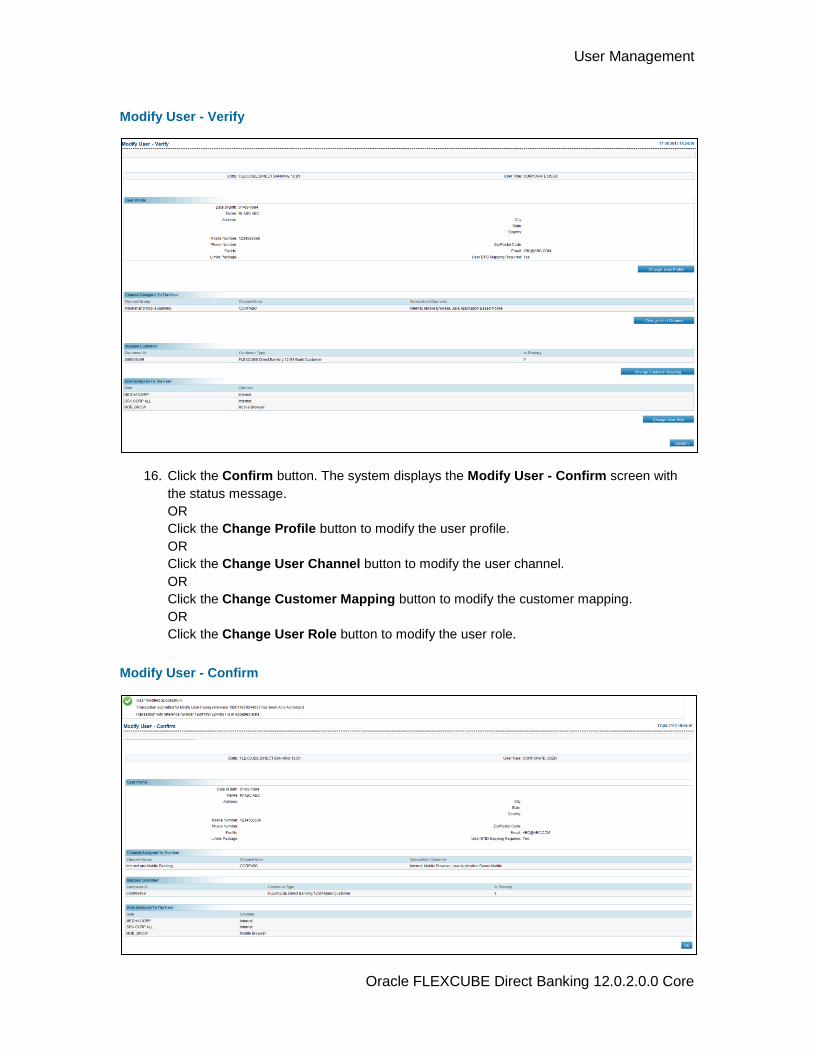
User Management
Oracle FLEXCUBE Direct Banking 12.0.2.0.0 Core
Modify User - Verify
16. Click the Confirm button. The system displays the Modify User - Confirm screen with
the status message.
OR
Click the Change Profile button to modify the user profile.
OR
Click the Change User Channel button to modify the user channel.
OR
Click the Change Customer Mapping button to modify the customer mapping.
OR
Click the Change User Role button to modify the user role.
Modify User - Confirm
User Management
Oracle FLEXCUBE Direct Banking 12.0.2.0.0 Core
17. Click the OK button. The system displays the Modify User screen with the status
message.
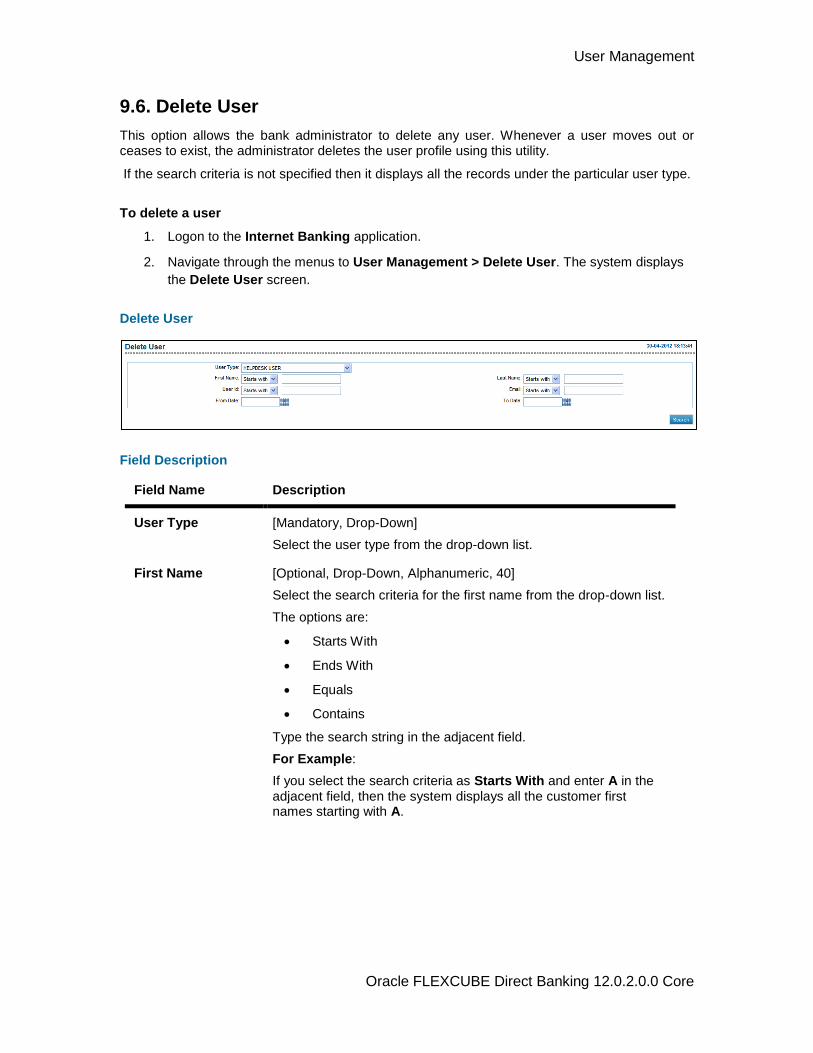
User Management
Oracle FLEXCUBE Direct Banking 12.0.2.0.0 Core
9.6. Delete User
This option allows the bank administrator to delete any user. Whenever a user moves out or ceases to exist, the administrator deletes the user profile using this utility.
If the search criteria is not specified then it displays all the records under the particular user type.
To delete a user
1. Logon to the Internet Banking application.
2. Navigate through the menus to User Management > Delete User. The system displays
the Delete User screen.
Delete User
Field Description
Field Name Description
User Type [Mandatory, Drop-Down]
Select the user type from the drop-down list.
First Name [Optional, Drop-Down, Alphanumeric, 40]
Select the search criteria for the first name from the drop-down list.
The options are:
Starts With
Ends With
Equals
Contains
Type the search string in the adjacent field.
For Example:
If you select the search criteria as Starts With and enter A in the adjacent field, then the system displays all the customer first names starting with A.

User Management
Oracle FLEXCUBE Direct Banking 12.0.2.0.0 Core
Field Name Description
Last Name [Optional, Drop-Down, Alphanumeric, 40]
Select the search criteria for the last name from the drop-down list.
The options are:
Starts With
Ends With
Equals
Contains
Type the search string in the adjacent field.
For Example:
If you select the search criteria as Starts With and enter E in the adjacent field, then the system displays all the customer last names starting with E.
User Id [Optional, Drop-Down, Alphanumeric, 20]
Select the search criteria for the user ID from the drop-down list.
The options are:
Starts With
Ends With
Equals
Contains
Type the search string in the adjacent field.
For Example:
If you select the search criteria as Starts With and enter 1 in the adjacent field, then the system displays all the user ID's starting with 1.
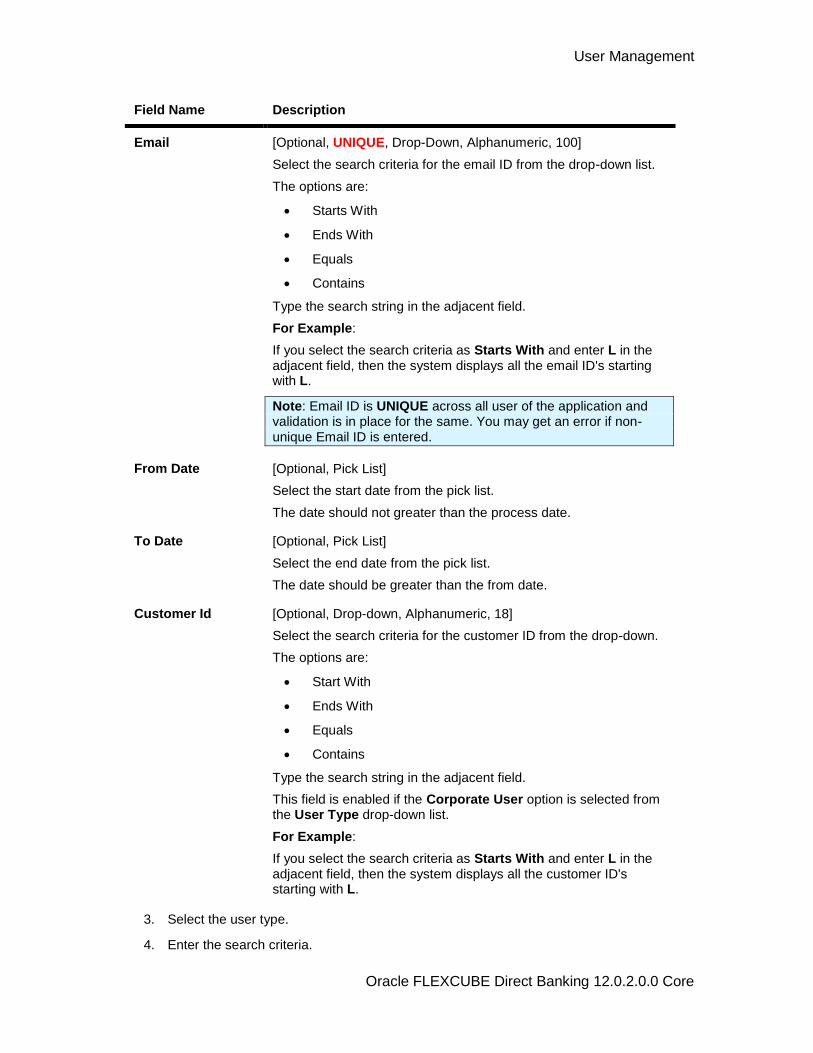
User Management
Oracle FLEXCUBE Direct Banking 12.0.2.0.0 Core
Field Name Description
Email [Optional, UNIQUE, Drop-Down, Alphanumeric, 100]
Select the search criteria for the email ID from the drop-down list.
The options are:
Starts With
Ends With
Equals
Contains
Type the search string in the adjacent field.
For Example:
If you select the search criteria as Starts With and enter L in the adjacent field, then the system displays all the email ID's starting with L.
Note: Email ID is UNIQUE across all user of the application and validation is in place for the same. You may get an error if non-unique Email ID is entered.
From Date [Optional, Pick List]
Select the start date from the pick list.
The date should not greater than the process date.
To Date [Optional, Pick List]
Select the end date from the pick list.
The date should be greater than the from date.
Customer Id [Optional, Drop-down, Alphanumeric, 18]
Select the search criteria for the customer ID from the drop-down.
The options are:
Start With
Ends With
Equals
Contains
Type the search string in the adjacent field.
This field is enabled if the Corporate User option is selected from the User Type drop-down list.
For Example:
If you select the search criteria as Starts With and enter L in the adjacent field, then the system displays all the customer ID's starting with L.
3. Select the user type.
4. Enter the search criteria.
User Management
Oracle FLEXCUBE Direct Banking 12.0.2.0.0 Core
5. Click the Search button. The system displays the Delete User screen with the search
result.
6. Select the check box adjacent to the User Id to delete the user.
OR
Click the User Id to view the user profile.
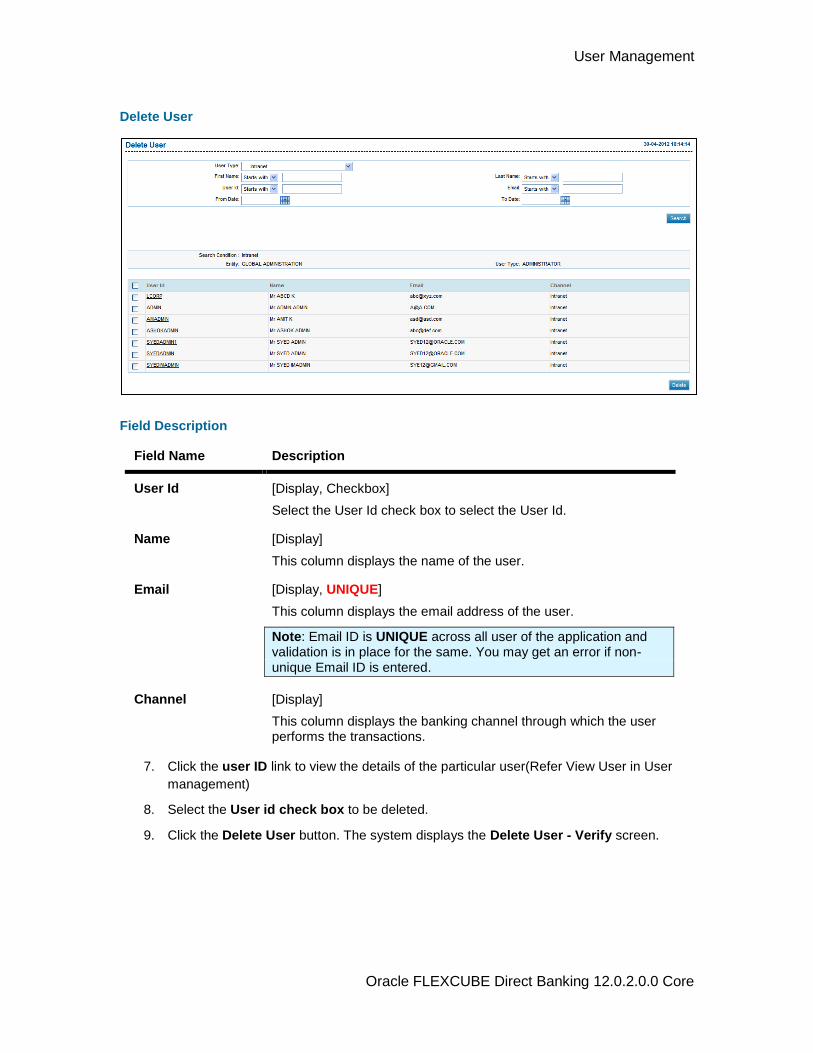
User Management
Oracle FLEXCUBE Direct Banking 12.0.2.0.0 Core
Delete User
Field Description
Field Name Description
User Id [Display, Checkbox]
Select the User Id check box to select the User Id.
Name [Display]
This column displays the name of the user.
Email [Display, UNIQUE]
This column displays the email address of the user.
Note: Email ID is UNIQUE across all user of the application and validation is in place for the same. You may get an error if non-unique Email ID is entered.
Channel [Display]
This column displays the banking channel through which the user performs the transactions.
7. Click the user ID link to view the details of the particular user(Refer View User in User
management)
8. Select the User id check box to be deleted.
9. Click the Delete User button. The system displays the Delete User - Verify screen.
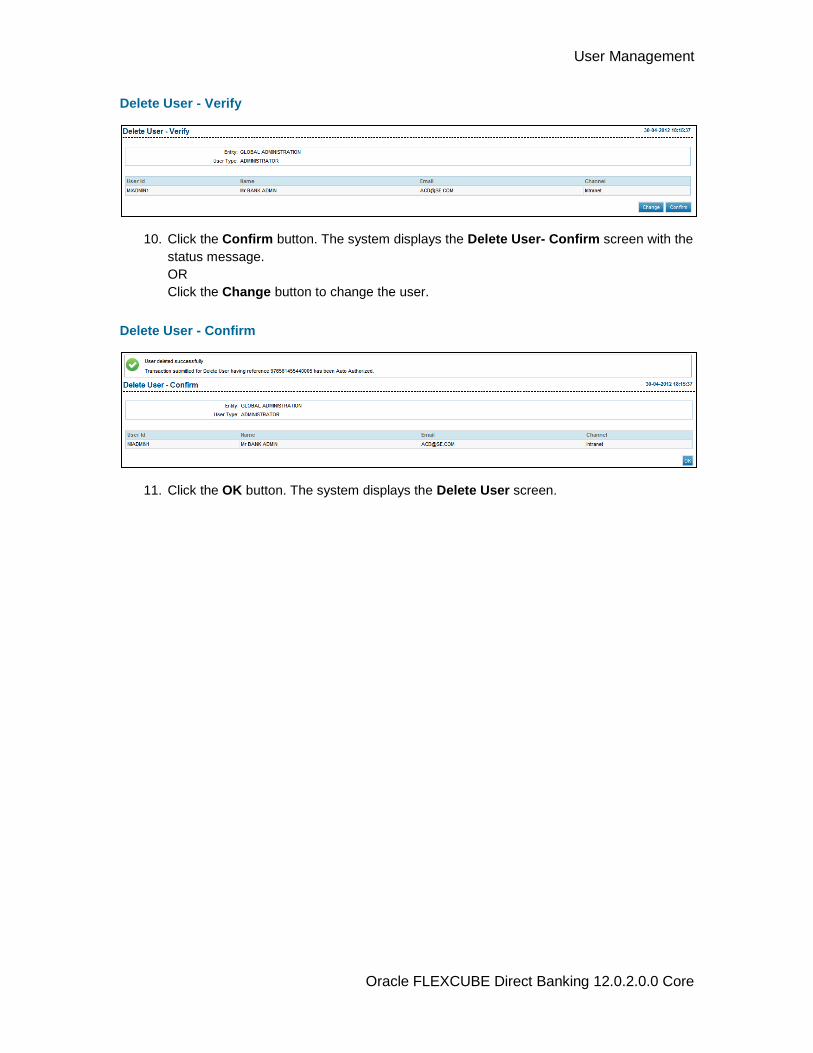
User Management
Oracle FLEXCUBE Direct Banking 12.0.2.0.0 Core
Delete User - Verify
10. Click the Confirm button. The system displays the Delete User- Confirm screen with the
status message.
OR
Click the Change button to change the user.
Delete User - Confirm
11. Click the OK button. The system displays the Delete User screen.
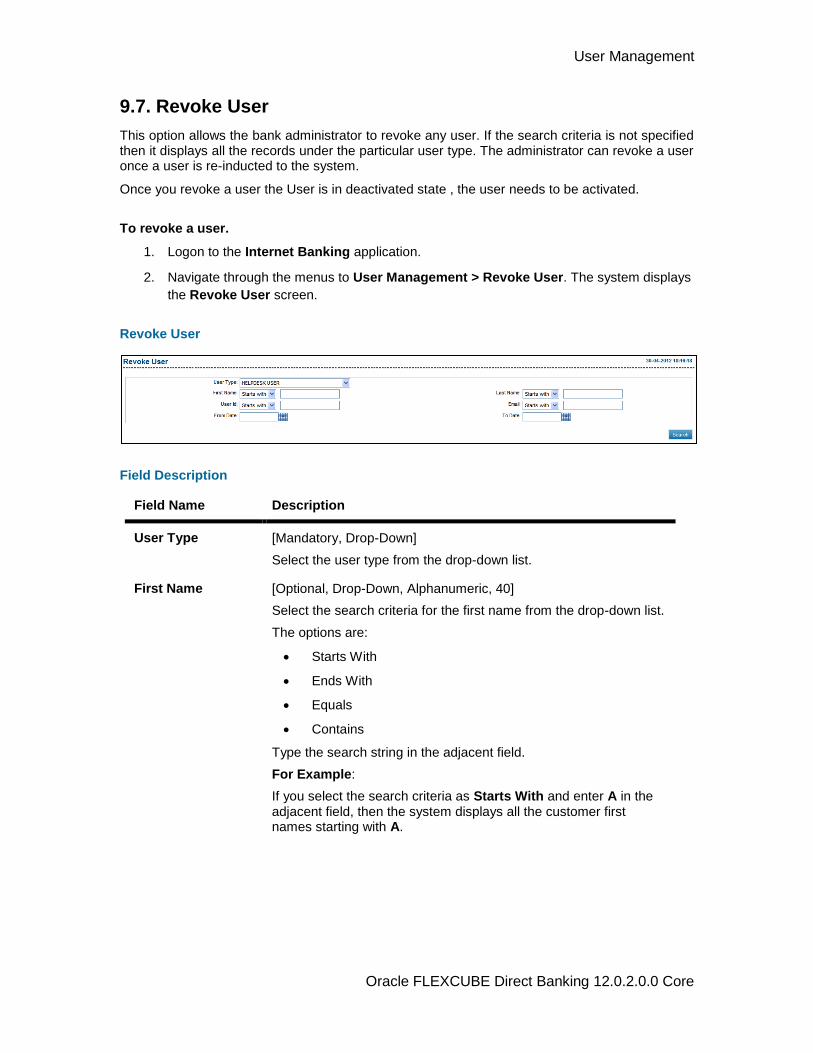
User Management
Oracle FLEXCUBE Direct Banking 12.0.2.0.0 Core
9.7. Revoke User
This option allows the bank administrator to revoke any user. If the search criteria is not specified then it displays all the records under the particular user type. The administrator can revoke a user once a user is re-inducted to the system.
Once you revoke a user the User is in deactivated state , the user needs to be activated.
To revoke a user.
1. Logon to the Internet Banking application.
2. Navigate through the menus to User Management > Revoke User. The system displays
the Revoke User screen.
Revoke User
Field Description
Field Name Description
User Type [Mandatory, Drop-Down]
Select the user type from the drop-down list.
First Name [Optional, Drop-Down, Alphanumeric, 40]
Select the search criteria for the first name from the drop-down list.
The options are:
Starts With
Ends With
Equals
Contains
Type the search string in the adjacent field.
For Example:
If you select the search criteria as Starts With and enter A in the adjacent field, then the system displays all the customer first names starting with A.

User Management
Oracle FLEXCUBE Direct Banking 12.0.2.0.0 Core
Field Name Description
Last Name [Optional, Drop-Down, Alphanumeric, 40]
Select the search criteria for the last name from the drop-down list.
The options are:
Starts With
Ends With
Equals
Contains
Type the search string in the adjacent field.
For Example:
If you select the search criteria as Starts With and enter E in the adjacent field, then the system displays all the customer last names starting with E.
User Id [Optional, Drop-Down, Alphanumeric, 20]
Select the search criteria for the user ID from the drop-down list.
The options are:
Starts With
Ends With
Equals
Contains
Type the search string in the adjacent field.
For Example:
If you select the search criteria as Starts With and enter 1 in the adjacent field, then the system displays all the user ID's starting with 1.
User Management
Oracle FLEXCUBE Direct Banking 12.0.2.0.0 Core
Field Name Description
Email [Optional, UNIQUE, Drop-Down, Alphanumeric, 100]
Select the search criteria for the email ID from the drop-down list.
The options are:
Starts With
Ends With
Equals
Contains
Type the search string in the adjacent field.
For Example:
If you select the search criteria as Starts With and enter L in the adjacent field, then the system displays all the email ID's starting with L.
Note: Email ID is UNIQUE across all user of the application and validation is in place for the same. You may get an error if non-unique Email ID is entered.
From Date [Optional, Pick List]
Select the start date from the pick list.
The date should not greater than the process date.
To Date [Optional, Pick List]
Select the end date from the pick list.
The date should be greater than the from date.
3. Select the user type.
4. Enter the search criteria.
5. Click the Search button. The system displays the Revoke User screen with the search
result.
6. Select the check box adjacent to the User Id to revoke the user.
OR
Click the User Id to view the user profile.
Revoke User
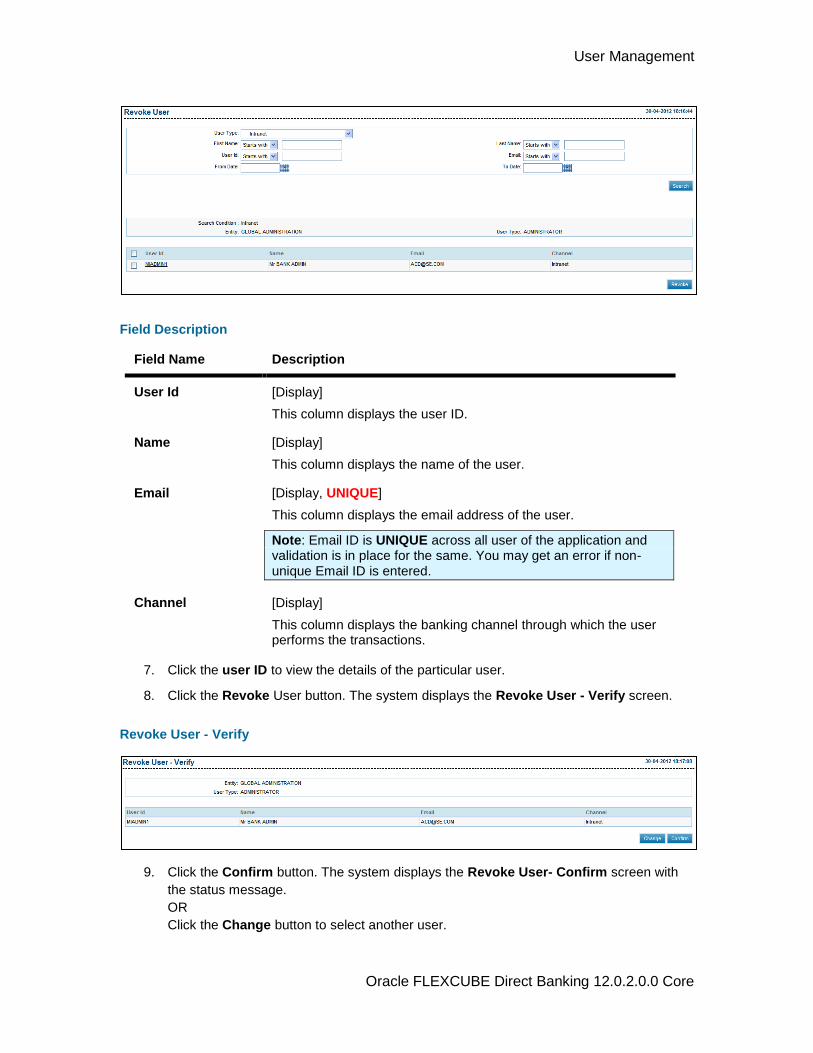
User Management
Oracle FLEXCUBE Direct Banking 12.0.2.0.0 Core
Field Description
Field Name Description
User Id [Display]
This column displays the user ID.
Name [Display]
This column displays the name of the user.
Email [Display, UNIQUE]
This column displays the email address of the user.
Note: Email ID is UNIQUE across all user of the application and validation is in place for the same. You may get an error if non-unique Email ID is entered.
Channel [Display]
This column displays the banking channel through which the user performs the transactions.
7. Click the user ID to view the details of the particular user.
8. Click the Revoke User button. The system displays the Revoke User - Verify screen.
Revoke User - Verify
9. Click the Confirm button. The system displays the Revoke User- Confirm screen with
the status message.
OR
Click the Change button to select another user.
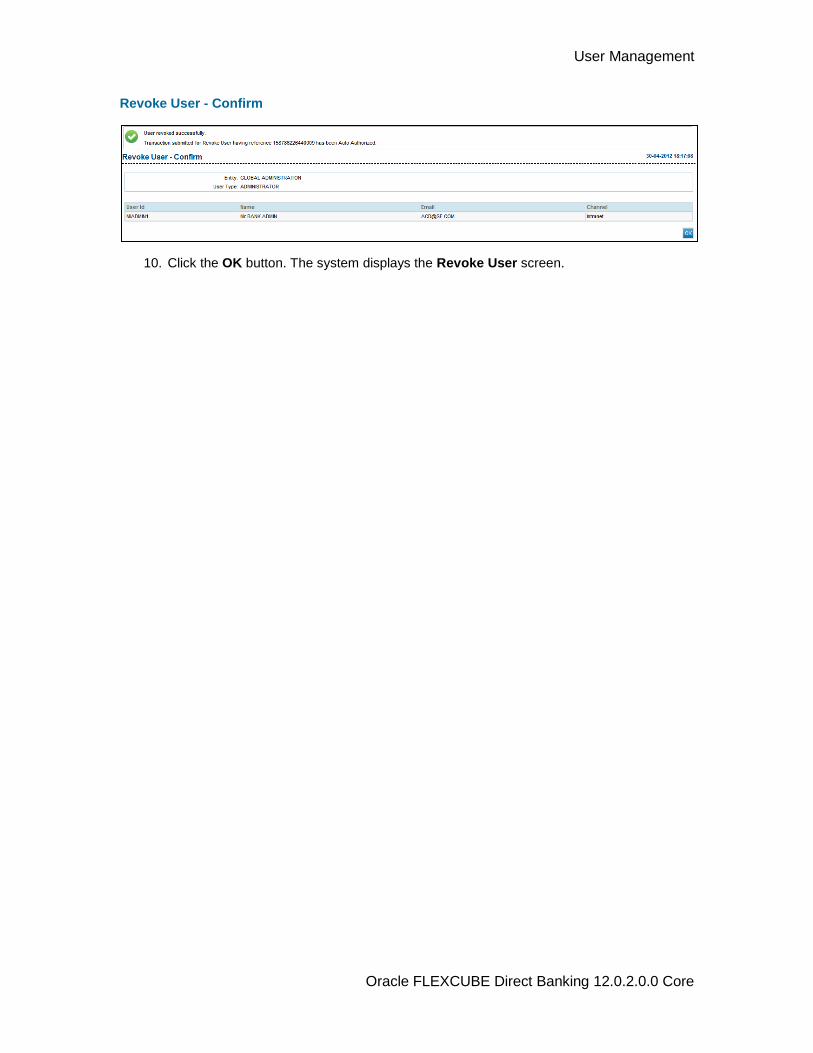
User Management
Oracle FLEXCUBE Direct Banking 12.0.2.0.0 Core
Revoke User - Confirm
10. Click the OK button. The system displays the Revoke User screen.
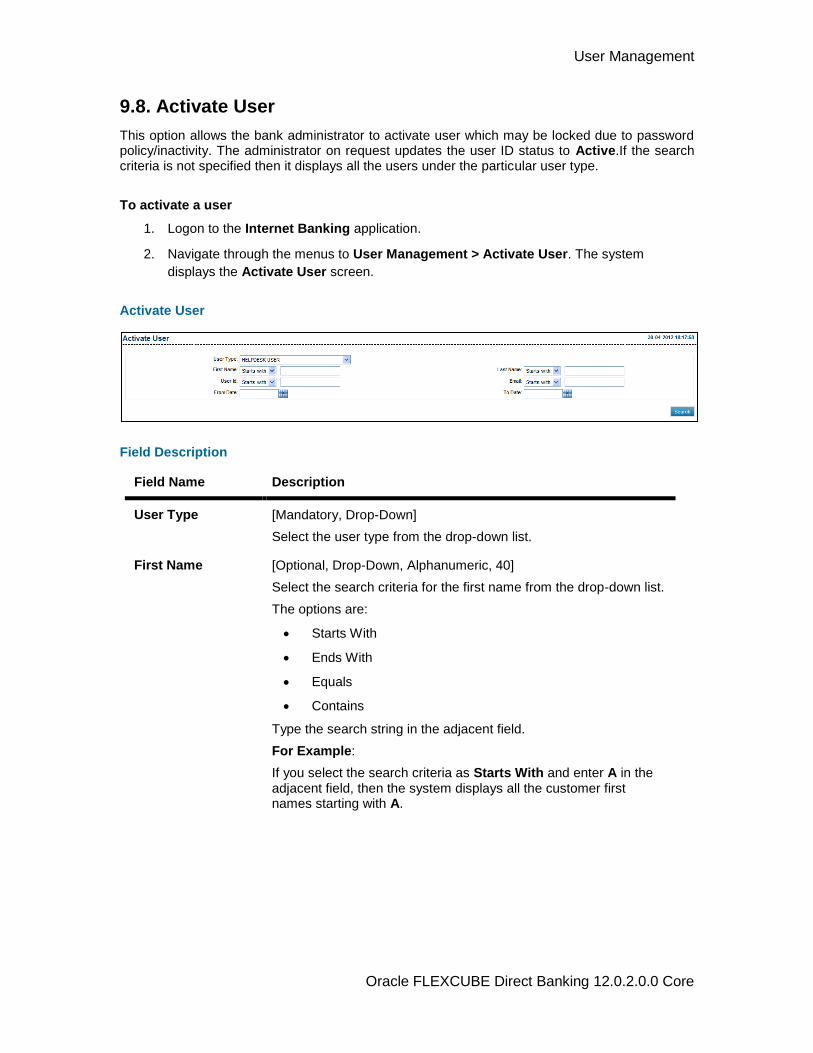
User Management
Oracle FLEXCUBE Direct Banking 12.0.2.0.0 Core
9.8. Activate User
This option allows the bank administrator to activate user which may be locked due to password policy/inactivity. The administrator on request updates the user ID status to Active.If the search criteria is not specified then it displays all the users under the particular user type.
To activate a user
1. Logon to the Internet Banking application.
2. Navigate through the menus to User Management > Activate User. The system
displays the Activate User screen.
Activate User
Field Description
Field Name Description
User Type [Mandatory, Drop-Down]
Select the user type from the drop-down list.
First Name [Optional, Drop-Down, Alphanumeric, 40]
Select the search criteria for the first name from the drop-down list.
The options are:
Starts With
Ends With
Equals
Contains
Type the search string in the adjacent field.
For Example:
If you select the search criteria as Starts With and enter A in the adjacent field, then the system displays all the customer first names starting with A.

User Management
Oracle FLEXCUBE Direct Banking 12.0.2.0.0 Core
Field Name Description
Last Name [Optional, Drop-Down, Alphanumeric, 40]
Select the search criteria for the last name from the drop-down list.
The options are:
Starts With
Ends With
Equals
Contains
Type the search string in the adjacent field.
For Example:
If you select the search criteria as Starts With and enter E in the adjacent field, then the system displays all the customer last names starting with E.
User Id [Optional, Drop-Down, Alphanumeric, 20]
Select the search criteria for the user ID from the drop-down list.
The options are:
Starts With
Ends With
Equals
Contains
Type the search string in the adjacent field.
For Example:
If you select the search criteria as Starts With and enters 1 in the adjacent field, then the system displays all the user ID's starting with 1.

User Management
Oracle FLEXCUBE Direct Banking 12.0.2.0.0 Core
Field Name Description
Email [Optional, UNIQUE, Drop-Down, Alphanumeric, 100]
Select the search criteria for the email ID from the drop-down list.
The options are:
Starts With
Ends With
Equals
Contains
Type the search string in the adjacent field.
For Example:
If you select the search criteria as Starts With and enter L in the adjacent field, then the system displays all the email ID's starting with L.
Note: Email ID is UNIQUE across all user of the application and validation is in place for the same. You may get an error if non-unique Email ID is entered.
From Date [Optional, Pick List]
Select the start date from the pick list.
The date should not greater than the process date.
To Date [Optional, Pick List]
Select the end date from the pick list.
The date should be greater than the from date.
3. Select the user type.
4. Enter the search criteria.
5. Click the Search button. The system displays the Activate User screen with the search
result.
6. Select the check box adjacent to the User ID's to activate the user.
OR
Click the User Id to view the user profile.
Activate User
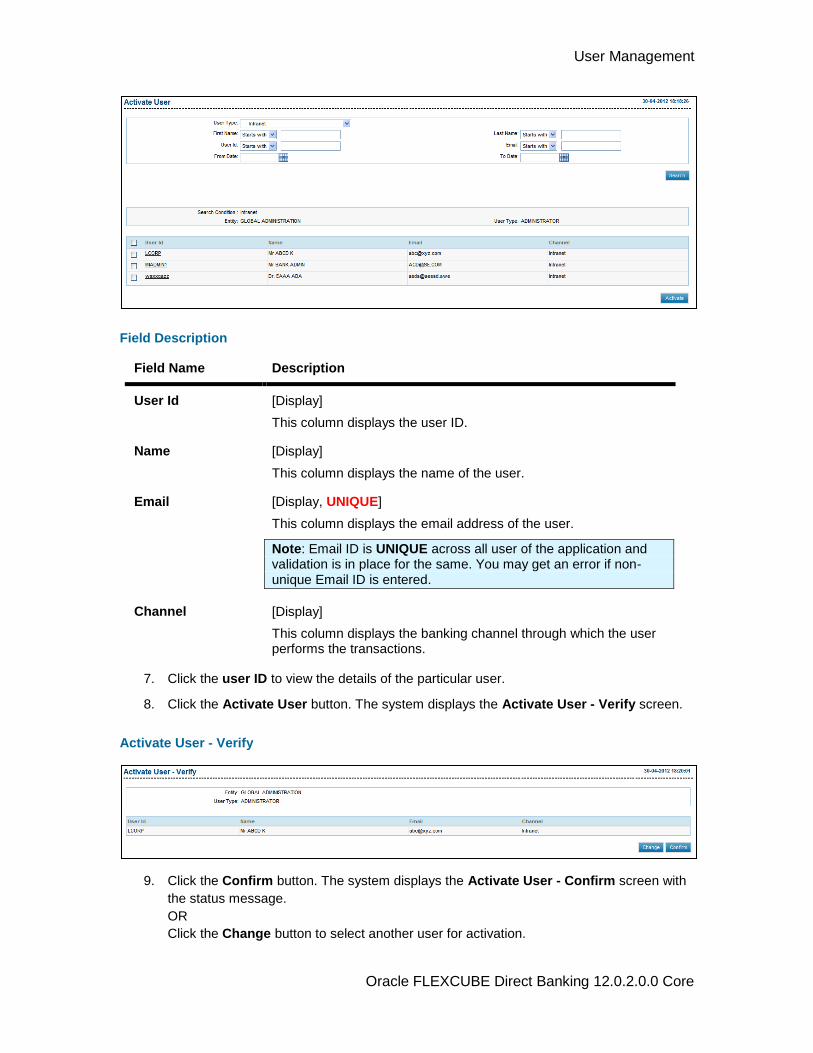
User Management
Oracle FLEXCUBE Direct Banking 12.0.2.0.0 Core
Field Description
Field Name Description
User Id [Display]
This column displays the user ID.
Name [Display]
This column displays the name of the user.
Email [Display, UNIQUE]
This column displays the email address of the user.
Note: Email ID is UNIQUE across all user of the application and validation is in place for the same. You may get an error if non-unique Email ID is entered.
Channel [Display]
This column displays the banking channel through which the user performs the transactions.
7. Click the user ID to view the details of the particular user.
8. Click the Activate User button. The system displays the Activate User - Verify screen.
Activate User - Verify
9. Click the Confirm button. The system displays the Activate User - Confirm screen with
the status message.
OR
Click the Change button to select another user for activation.
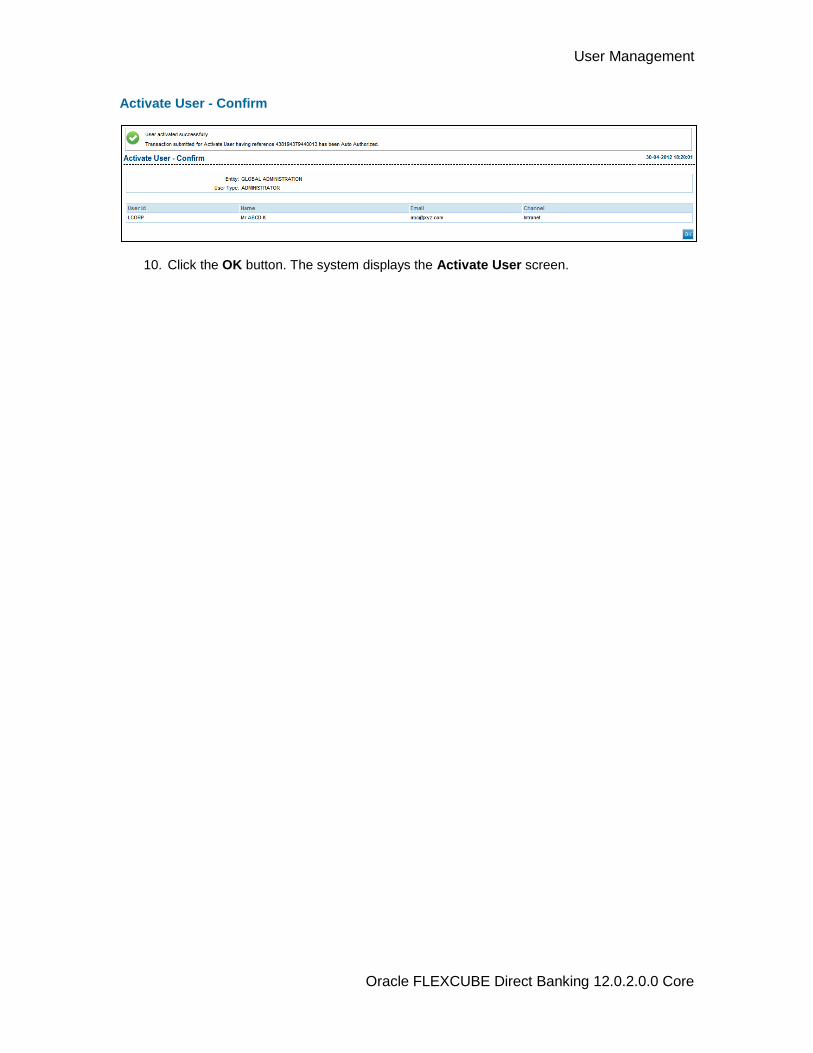
User Management
Oracle FLEXCUBE Direct Banking 12.0.2.0.0 Core
Activate User - Confirm
10. Click the OK button. The system displays the Activate User screen.
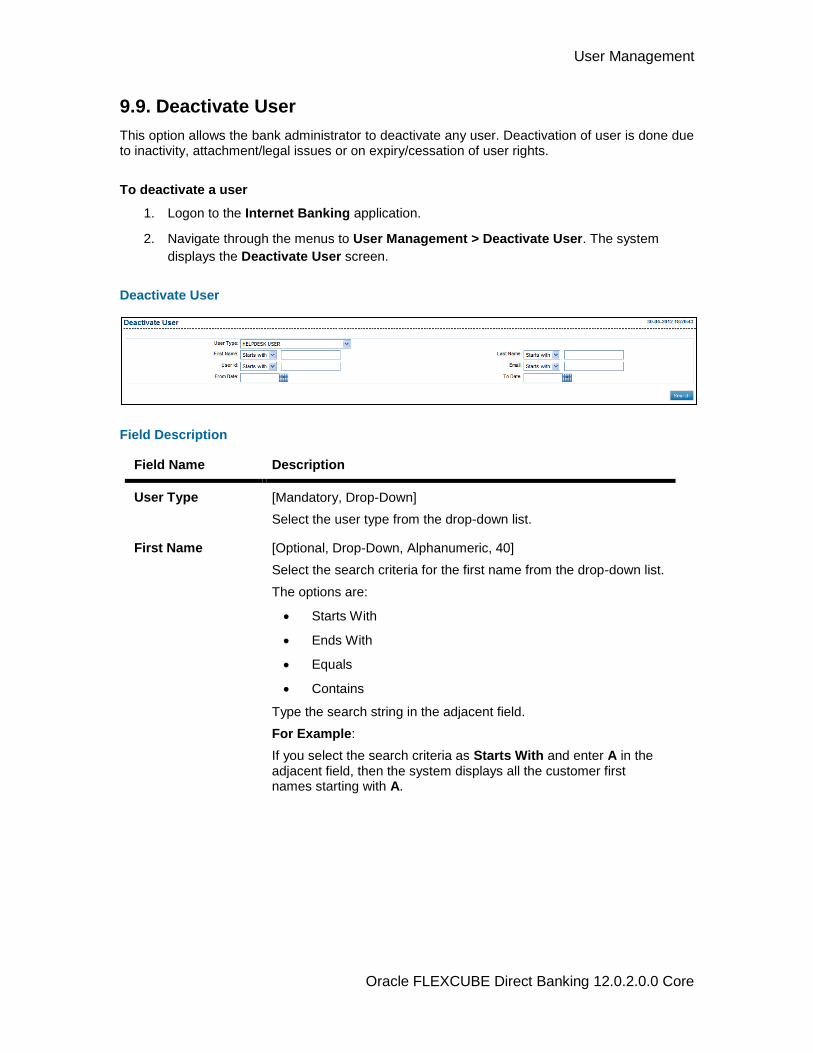
User Management
Oracle FLEXCUBE Direct Banking 12.0.2.0.0 Core
9.9. Deactivate User
This option allows the bank administrator to deactivate any user. Deactivation of user is done due to inactivity, attachment/legal issues or on expiry/cessation of user rights.
To deactivate a user
1. Logon to the Internet Banking application.
2. Navigate through the menus to User Management > Deactivate User. The system
displays the Deactivate User screen.
Deactivate User
Field Description
Field Name Description
User Type [Mandatory, Drop-Down]
Select the user type from the drop-down list.
First Name [Optional, Drop-Down, Alphanumeric, 40]
Select the search criteria for the first name from the drop-down list.
The options are:
Starts With
Ends With
Equals
Contains
Type the search string in the adjacent field.
For Example:
If you select the search criteria as Starts With and enter A in the adjacent field, then the system displays all the customer first names starting with A.

User Management
Oracle FLEXCUBE Direct Banking 12.0.2.0.0 Core
Field Name Description
Last Name [Optional, Drop-Down, Alphanumeric, 40]
Select the search criteria for the last name from the drop-down list.
The options are:
Starts With
Ends With
Equals
Contains
Type the search string in the adjacent field.
For Example:
If you select the search criteria as Starts With and enter E in the adjacent field, then the system displays all the customer last names starting with E.
User Id [Optional, Drop-Down, Alphanumeric, 20]
Select the search criteria for the user ID from the drop-down list.
The options are:
Starts With
Ends With
Equals
Contains
Type the search string in the adjacent field.
For Example:
If you select the search criteria as Starts With and enter 1 in the adjacent field, then the system displays all the user ID's starting with 1.
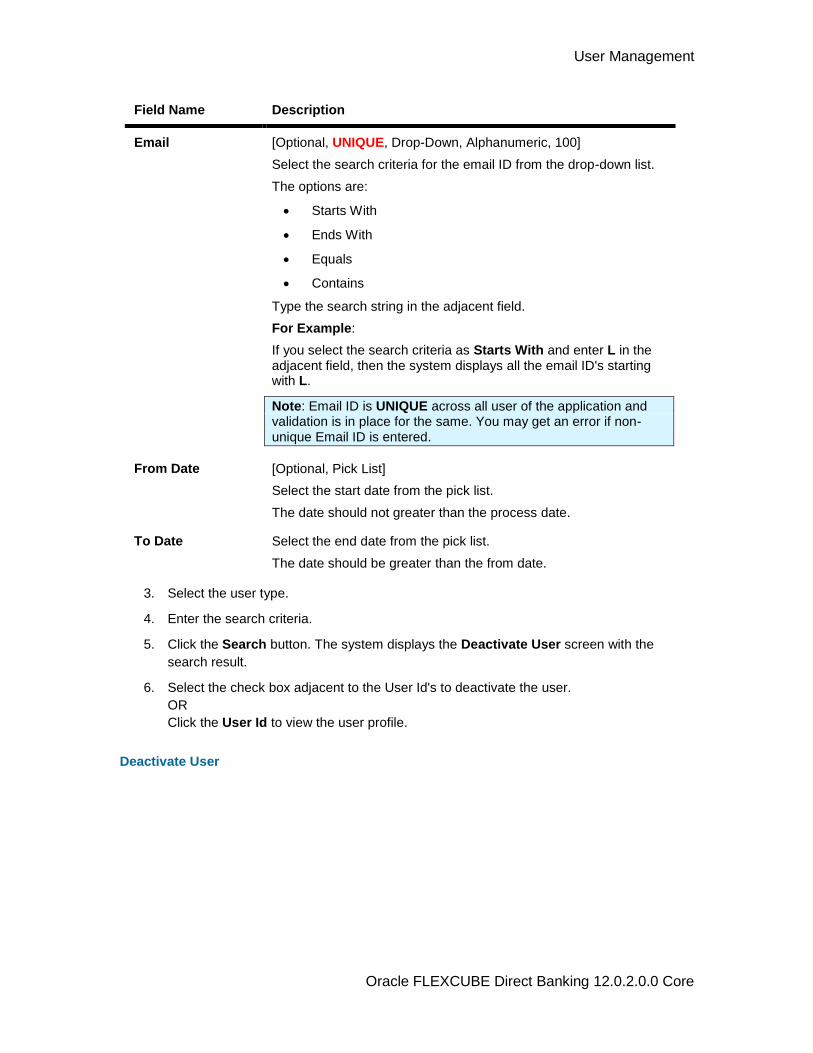
User Management
Oracle FLEXCUBE Direct Banking 12.0.2.0.0 Core
Field Name Description
Email [Optional, UNIQUE, Drop-Down, Alphanumeric, 100]
Select the search criteria for the email ID from the drop-down list.
The options are:
Starts With
Ends With
Equals
Contains
Type the search string in the adjacent field.
For Example:
If you select the search criteria as Starts With and enter L in the adjacent field, then the system displays all the email ID's starting with L.
Note: Email ID is UNIQUE across all user of the application and validation is in place for the same. You may get an error if non-unique Email ID is entered.
From Date [Optional, Pick List]
Select the start date from the pick list.
The date should not greater than the process date.
To Date Select the end date from the pick list.
The date should be greater than the from date.
3. Select the user type.
4. Enter the search criteria.
5. Click the Search button. The system displays the Deactivate User screen with the
search result.
6. Select the check box adjacent to the User Id's to deactivate the user.
OR
Click the User Id to view the user profile.
Deactivate User
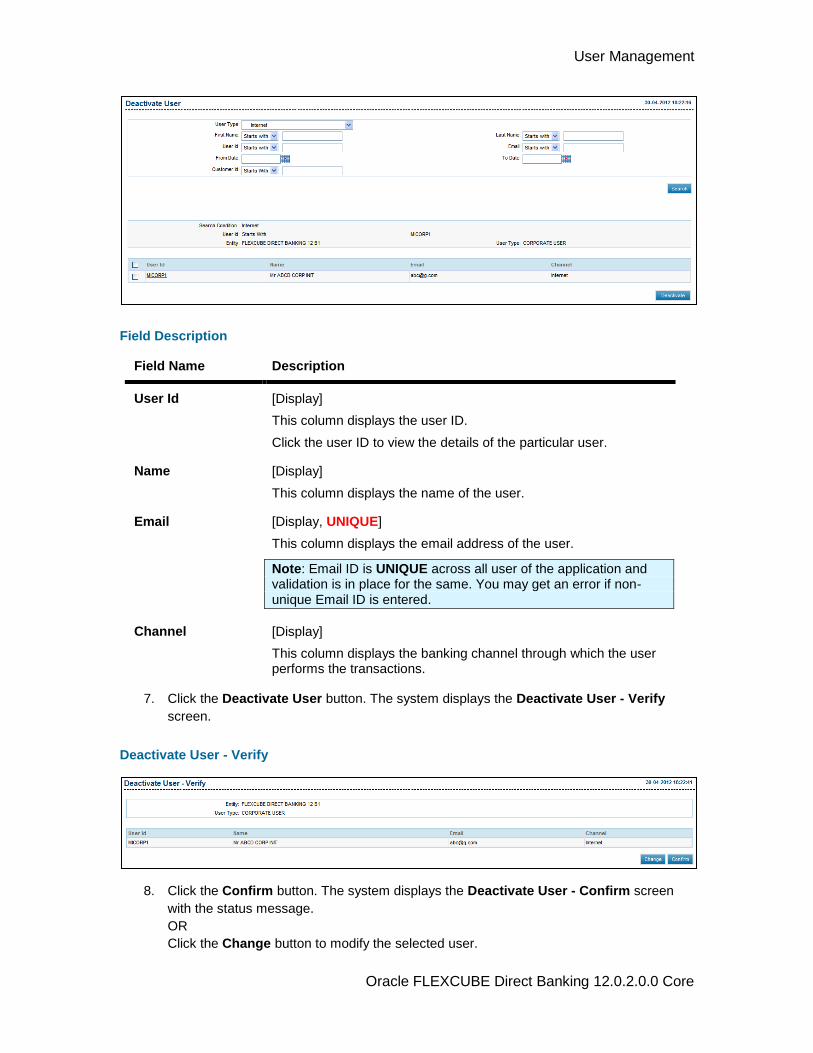
User Management
Oracle FLEXCUBE Direct Banking 12.0.2.0.0 Core
Field Description
Field Name Description
User Id [Display]
This column displays the user ID.
Click the user ID to view the details of the particular user.
Name [Display]
This column displays the name of the user.
Email [Display, UNIQUE]
This column displays the email address of the user.
Note: Email ID is UNIQUE across all user of the application and validation is in place for the same. You may get an error if non-unique Email ID is entered.
Channel [Display]
This column displays the banking channel through which the user performs the transactions.
7. Click the Deactivate User button. The system displays the Deactivate User - Verify
screen.
Deactivate User - Verify
8. Click the Confirm button. The system displays the Deactivate User - Confirm screen
with the status message.
OR
Click the Change button to modify the selected user.
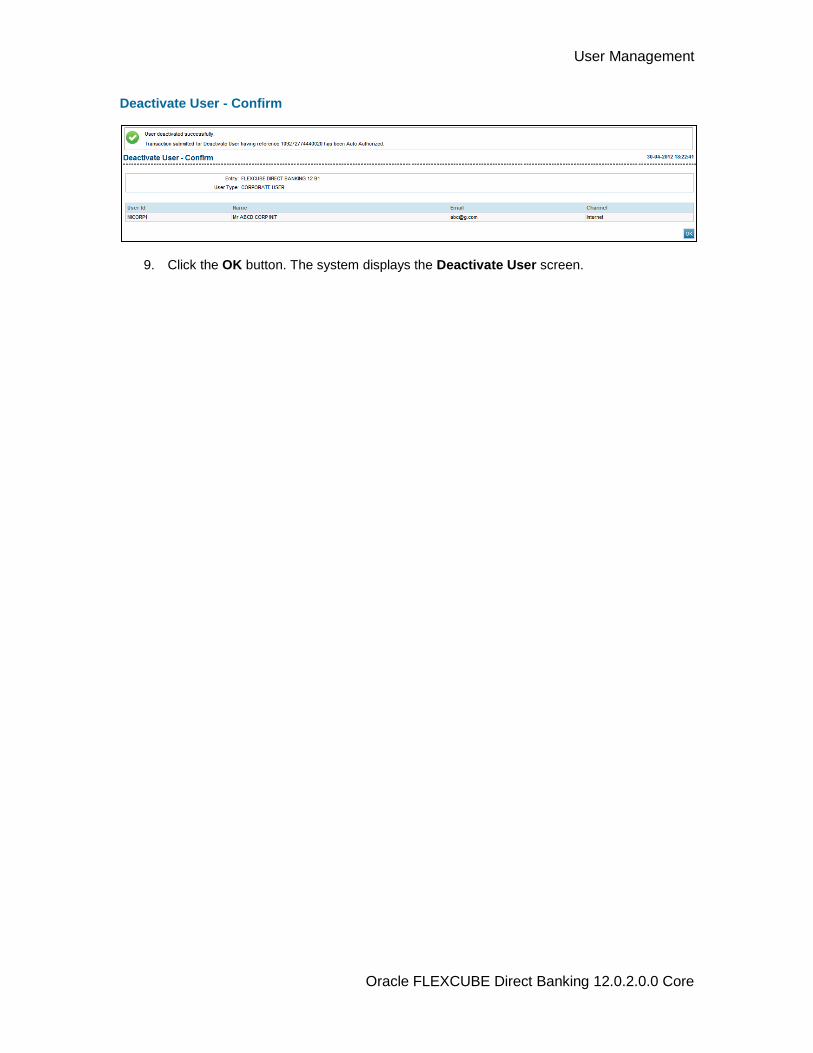
User Management
Oracle FLEXCUBE Direct Banking 12.0.2.0.0 Core
Deactivate User - Confirm
9. Click the OK button. The system displays the Deactivate User screen.
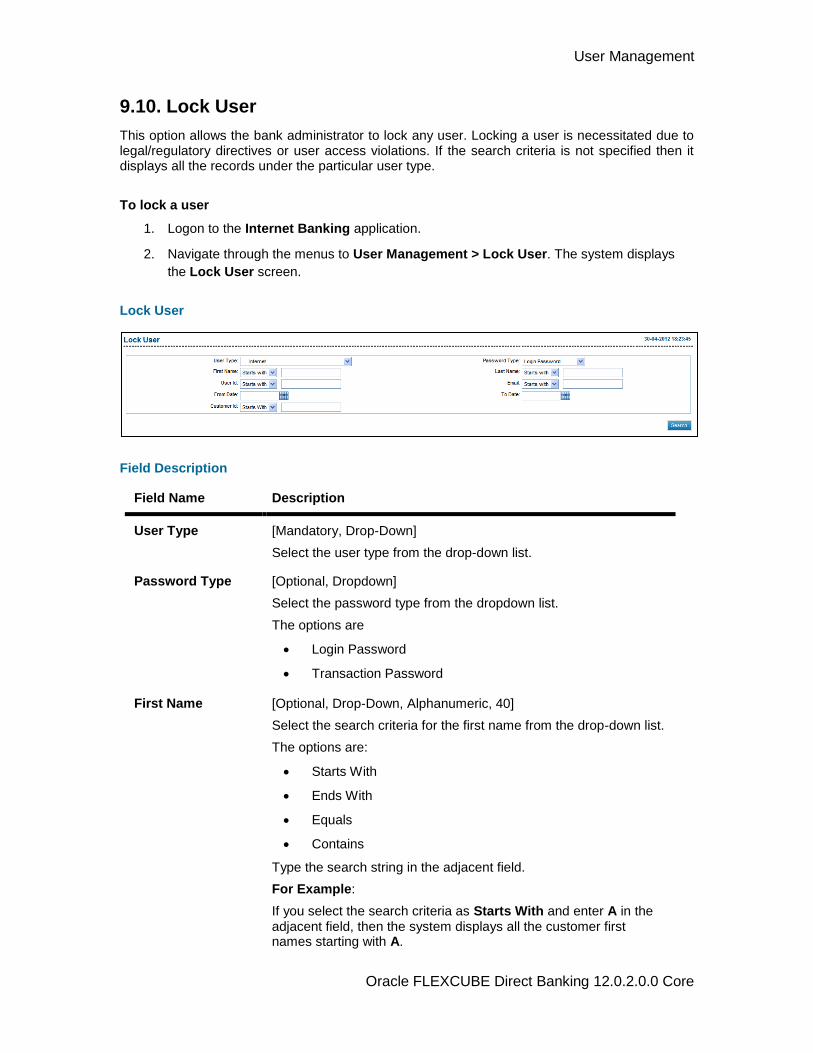
User Management
Oracle FLEXCUBE Direct Banking 12.0.2.0.0 Core
9.10. Lock User
This option allows the bank administrator to lock any user. Locking a user is necessitated due to legal/regulatory directives or user access violations. If the search criteria is not specified then it displays all the records under the particular user type.
To lock a user
1. Logon to the Internet Banking application.
2. Navigate through the menus to User Management > Lock User. The system displays
the Lock User screen.
Lock User
Field Description
Field Name Description
User Type [Mandatory, Drop-Down]
Select the user type from the drop-down list.
Password Type [Optional, Dropdown]
Select the password type from the dropdown list.
The options are
Login Password
Transaction Password
First Name [Optional, Drop-Down, Alphanumeric, 40]
Select the search criteria for the first name from the drop-down list.
The options are:
Starts With
Ends With
Equals
Contains
Type the search string in the adjacent field.
For Example:
If you select the search criteria as Starts With and enter A in the adjacent field, then the system displays all the customer first names starting with A.

User Management
Oracle FLEXCUBE Direct Banking 12.0.2.0.0 Core
Field Name Description
Last Name [Optional, Drop-Down, Alphanumeric, 40]
Select the search criteria for the last name from the drop-down list.
The options are:
Starts With
Ends With
Equals
Contains
Type the search string in the adjacent field.
For Example:
If you select the search criteria as Starts With and enter E in the adjacent field, then the system displays all the customer last names starting with E.
User Id [Optional, Drop-Down, Alphanumeric, 20]
Select the search criteria for the user ID from the drop-down list.
The options are:
Starts With
Ends With
Equals
Contains
Type the search string in the adjacent field.
For Example:
If you select the search criteria as Starts With and enter 1 in the adjacent field, then the system displays all the user ID's starting with 1.
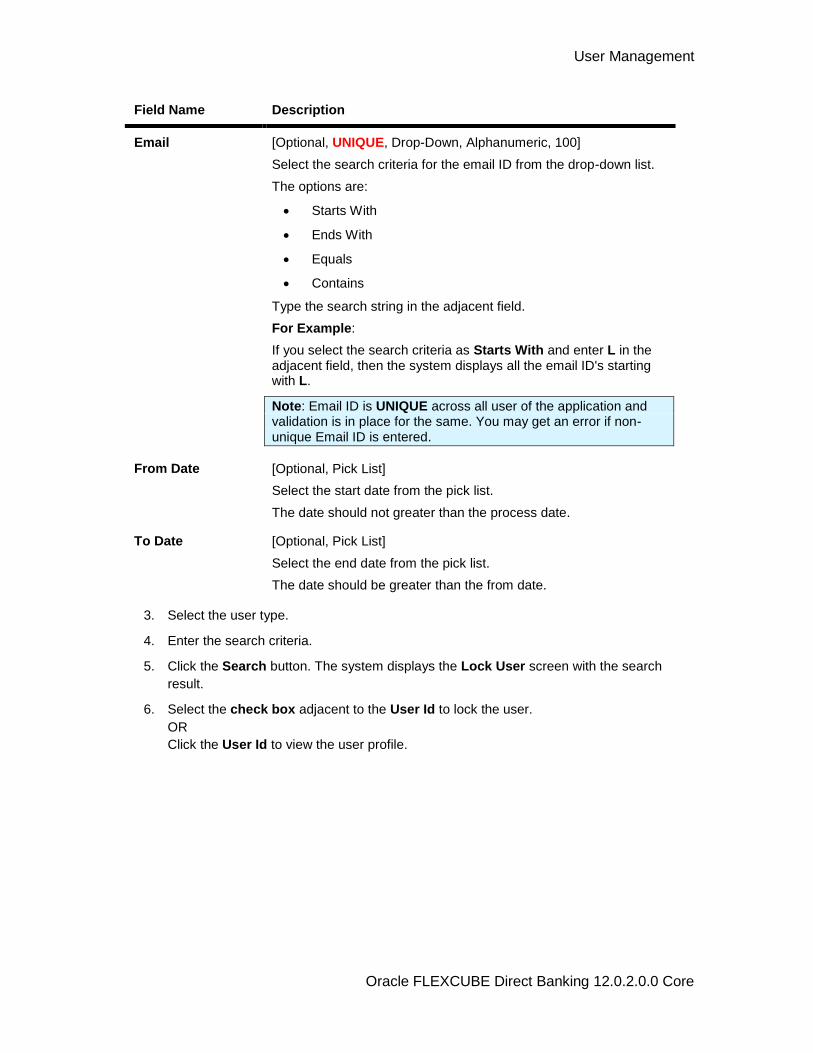
User Management
Oracle FLEXCUBE Direct Banking 12.0.2.0.0 Core
Field Name Description
Email [Optional, UNIQUE, Drop-Down, Alphanumeric, 100]
Select the search criteria for the email ID from the drop-down list.
The options are:
Starts With
Ends With
Equals
Contains
Type the search string in the adjacent field.
For Example:
If you select the search criteria as Starts With and enter L in the adjacent field, then the system displays all the email ID's starting with L.
Note: Email ID is UNIQUE across all user of the application and validation is in place for the same. You may get an error if non-unique Email ID is entered.
From Date [Optional, Pick List]
Select the start date from the pick list.
The date should not greater than the process date.
To Date [Optional, Pick List]
Select the end date from the pick list.
The date should be greater than the from date.
3. Select the user type.
4. Enter the search criteria.
5. Click the Search button. The system displays the Lock User screen with the search
result.
6. Select the check box adjacent to the User Id to lock the user.
OR
Click the User Id to view the user profile.
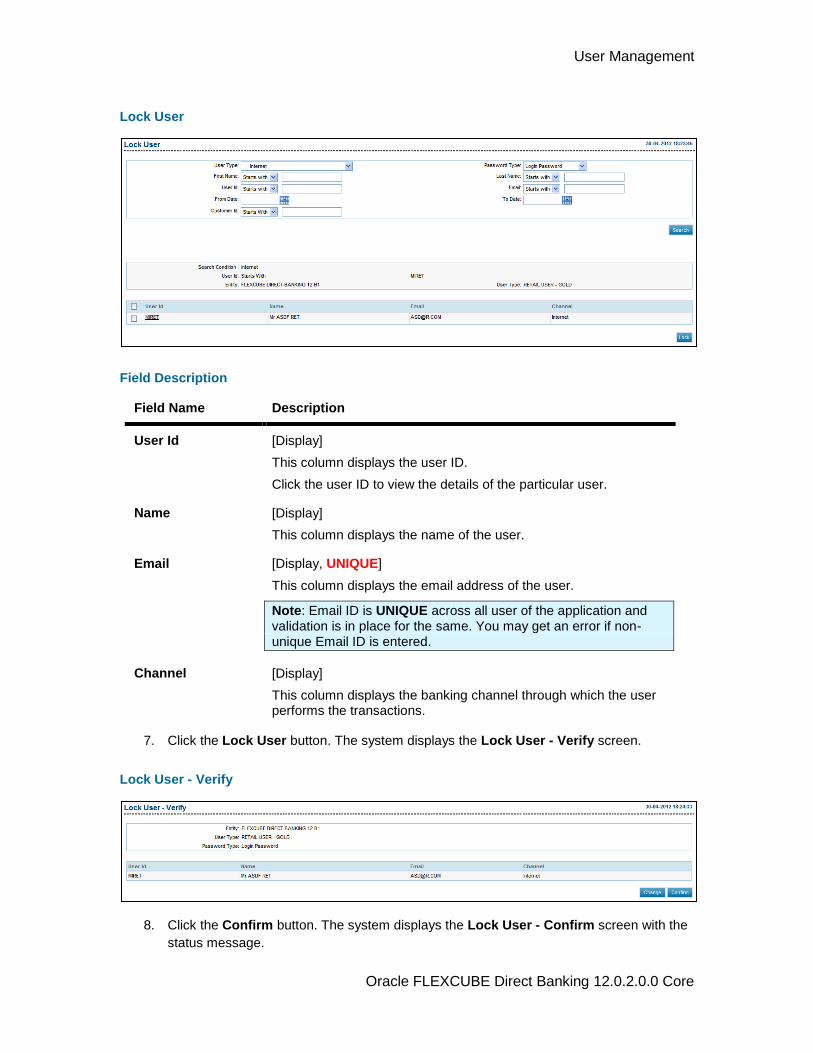
User Management
Oracle FLEXCUBE Direct Banking 12.0.2.0.0 Core
Lock User
Field Description
Field Name Description
User Id [Display]
This column displays the user ID.
Click the user ID to view the details of the particular user.
Name [Display]
This column displays the name of the user.
Email [Display, UNIQUE]
This column displays the email address of the user.
Note: Email ID is UNIQUE across all user of the application and validation is in place for the same. You may get an error if non-unique Email ID is entered.
Channel [Display]
This column displays the banking channel through which the user performs the transactions.
7. Click the Lock User button. The system displays the Lock User - Verify screen.
Lock User - Verify
8. Click the Confirm button. The system displays the Lock User - Confirm screen with the
status message.
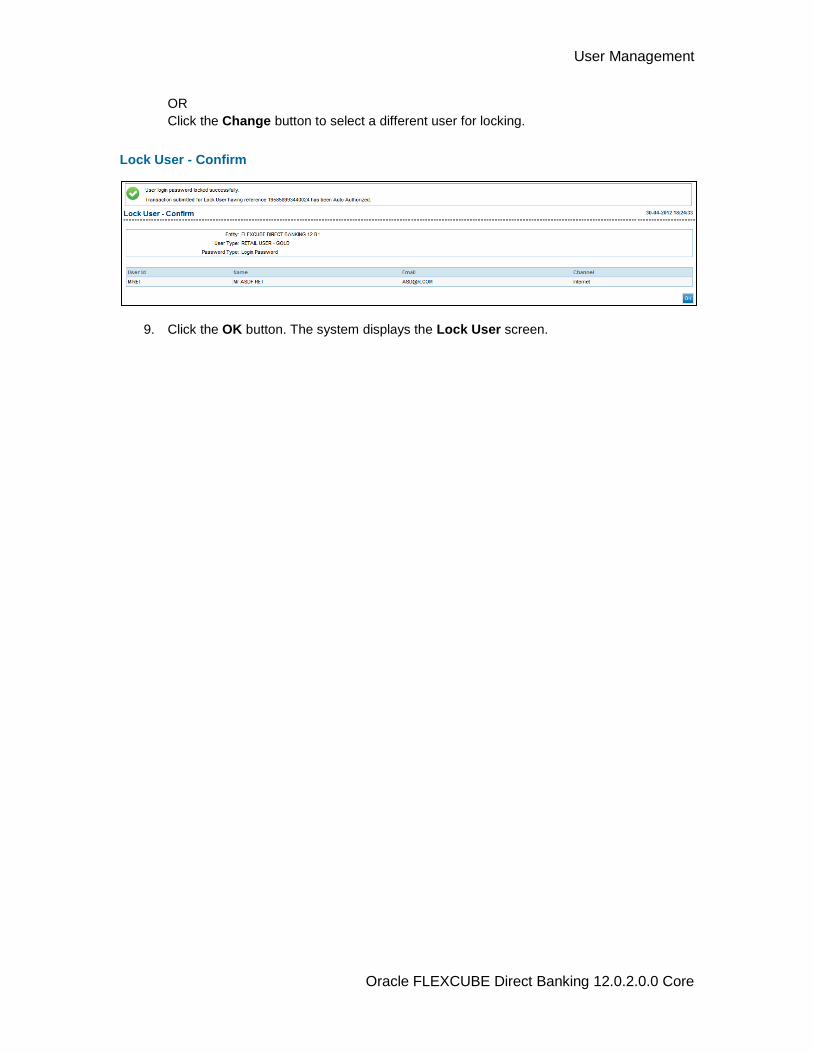
User Management
Oracle FLEXCUBE Direct Banking 12.0.2.0.0 Core
OR
Click the Change button to select a different user for locking.
Lock User - Confirm
9. Click the OK button. The system displays the Lock User screen.
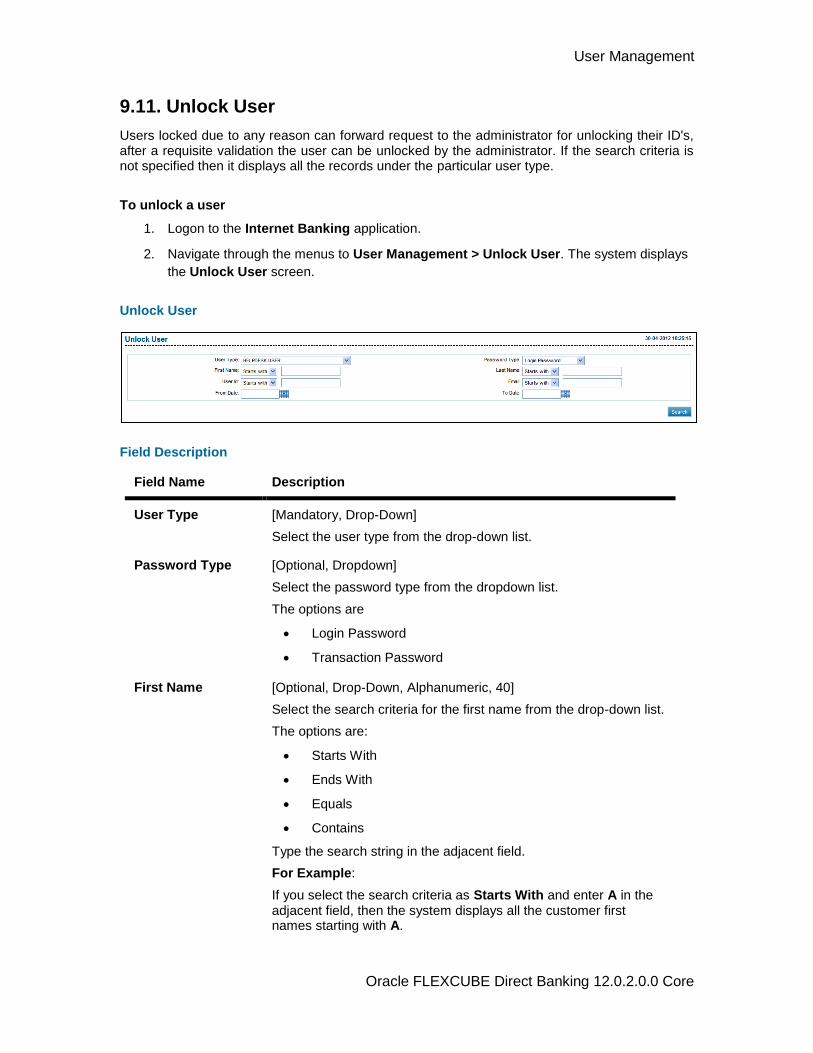
User Management
Oracle FLEXCUBE Direct Banking 12.0.2.0.0 Core
9.11. Unlock User
Users locked due to any reason can forward request to the administrator for unlocking their ID's, after a requisite validation the user can be unlocked by the administrator. If the search criteria is not specified then it displays all the records under the particular user type.
To unlock a user
1. Logon to the Internet Banking application.
2. Navigate through the menus to User Management > Unlock User. The system displays
the Unlock User screen.
Unlock User
Field Description
Field Name Description
User Type [Mandatory, Drop-Down]
Select the user type from the drop-down list.
Password Type [Optional, Dropdown]
Select the password type from the dropdown list.
The options are
Login Password
Transaction Password
First Name [Optional, Drop-Down, Alphanumeric, 40]
Select the search criteria for the first name from the drop-down list.
The options are:
Starts With
Ends With
Equals
Contains
Type the search string in the adjacent field.
For Example:
If you select the search criteria as Starts With and enter A in the adjacent field, then the system displays all the customer first names starting with A.
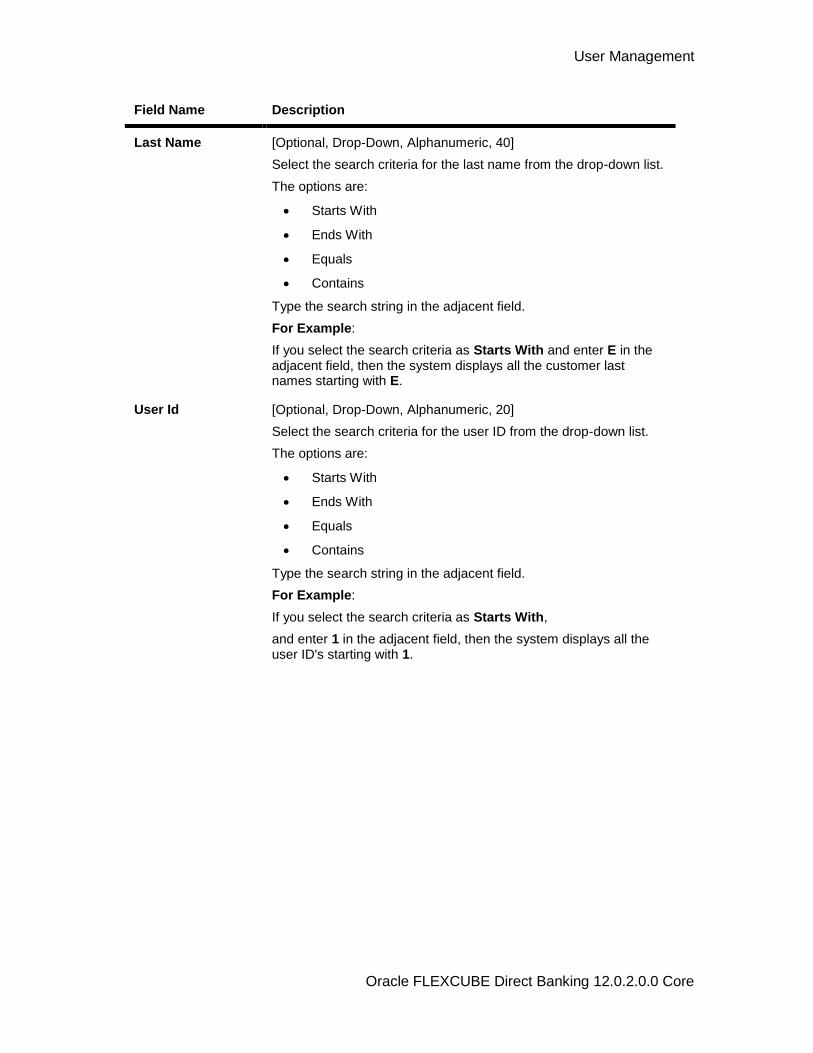
User Management
Oracle FLEXCUBE Direct Banking 12.0.2.0.0 Core
Field Name Description
Last Name [Optional, Drop-Down, Alphanumeric, 40]
Select the search criteria for the last name from the drop-down list.
The options are:
Starts With
Ends With
Equals
Contains
Type the search string in the adjacent field.
For Example:
If you select the search criteria as Starts With and enter E in the adjacent field, then the system displays all the customer last names starting with E.
User Id [Optional, Drop-Down, Alphanumeric, 20]
Select the search criteria for the user ID from the drop-down list.
The options are:
Starts With
Ends With
Equals
Contains
Type the search string in the adjacent field.
For Example:
If you select the search criteria as Starts With,
and enter 1 in the adjacent field, then the system displays all the user ID's starting with 1.

User Management
Oracle FLEXCUBE Direct Banking 12.0.2.0.0 Core
Field Name Description
Email [Optional, UNIQUE, Drop-Down, Alphanumeric, 100]
Select the search criteria for the email ID from the drop-down list.
The options are:
Starts With
Ends With
Equals
Contains
Type the search string in the adjacent field.
For Example:
If you select the search criteria as Starts With and enter L in the adjacent field, then the system displays all the email ID's starting with L.
Note: Email ID is UNIQUE across all user of the application and validation is in place for the same. You may get an error if non-unique Email ID is entered.
From Date [Optional, Pick List]
Select the start date from the pick list.
The date should not greater than the process date.
To Date [Optional, Pick List]
Select the end date from the pick list.
The date should be greater than the from date.
3. Select the user type.
4. Enter the search criteria.
5. Click the Search button. The system displays the Unlock User screen with the search
result.
6. Select the check box to adjacent to the User Id to unlock the user.
OR
Click the User Id to view user profile.
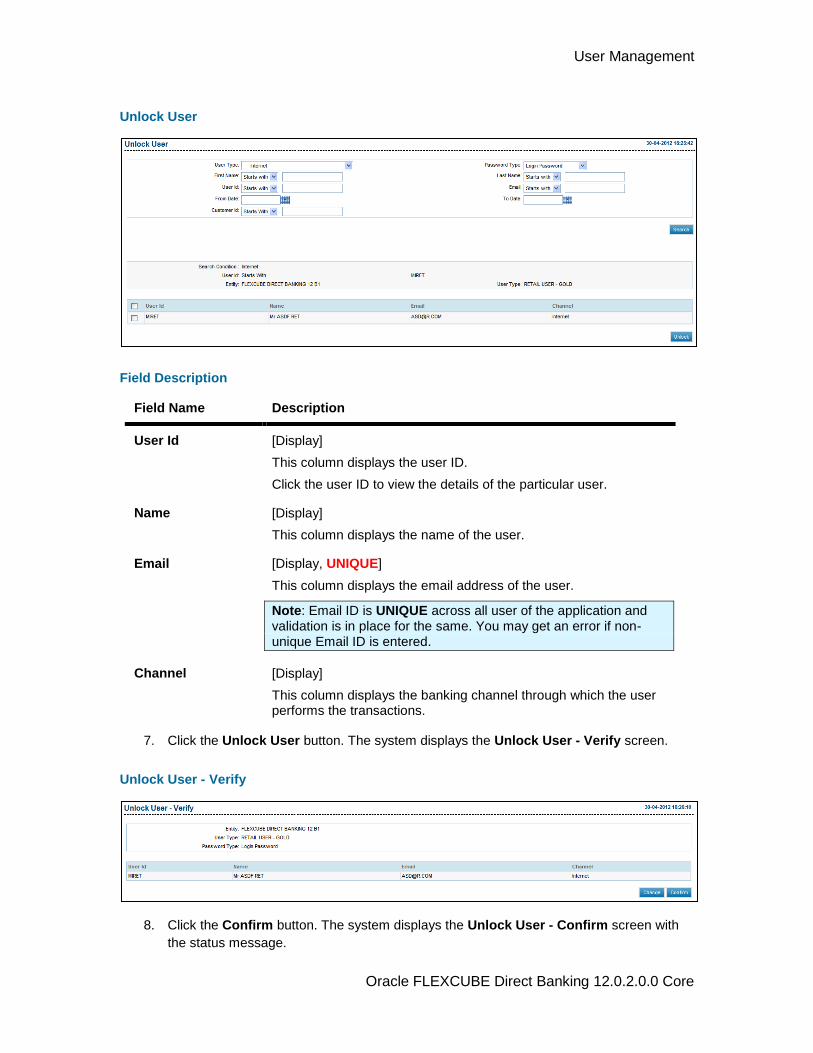
User Management
Oracle FLEXCUBE Direct Banking 12.0.2.0.0 Core
Unlock User
Field Description
Field Name Description
User Id [Display]
This column displays the user ID.
Click the user ID to view the details of the particular user.
Name [Display]
This column displays the name of the user.
Email [Display, UNIQUE]
This column displays the email address of the user.
Note: Email ID is UNIQUE across all user of the application and validation is in place for the same. You may get an error if non-unique Email ID is entered.
Channel [Display]
This column displays the banking channel through which the user performs the transactions.
7. Click the Unlock User button. The system displays the Unlock User - Verify screen.
Unlock User - Verify
8. Click the Confirm button. The system displays the Unlock User - Confirm screen with
the status message.
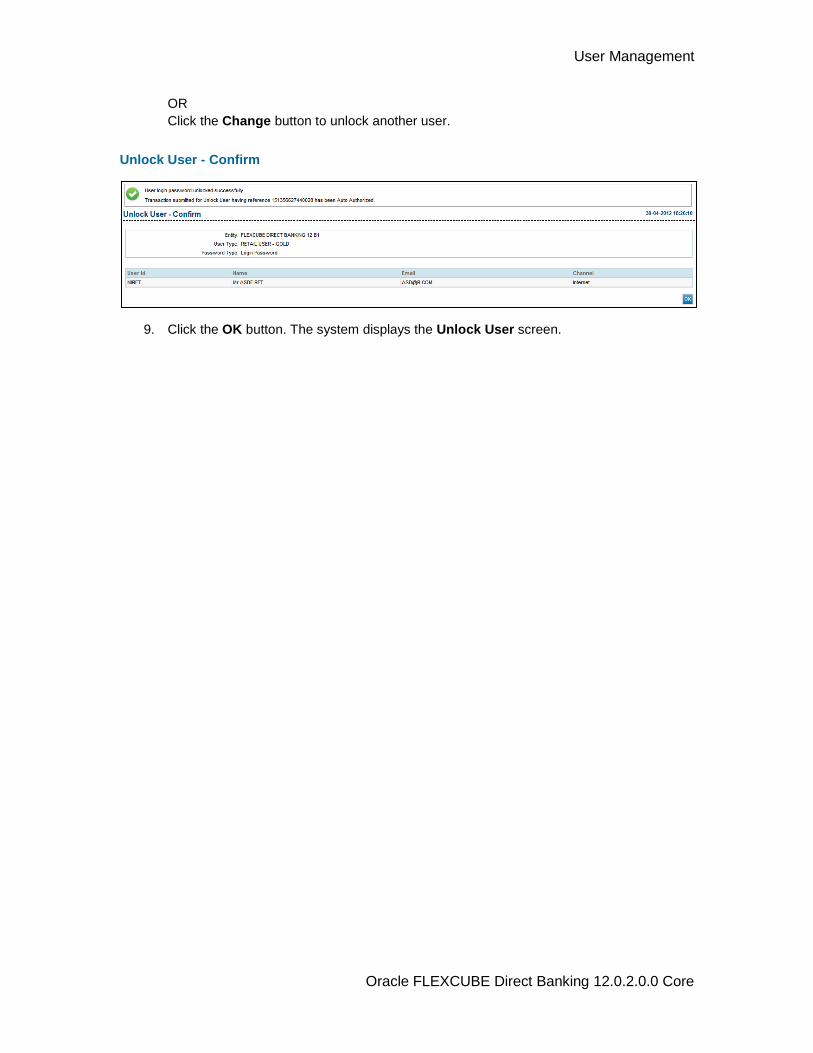
User Management
Oracle FLEXCUBE Direct Banking 12.0.2.0.0 Core
OR
Click the Change button to unlock another user.
Unlock User - Confirm
9. Click the OK button. The system displays the Unlock User screen.
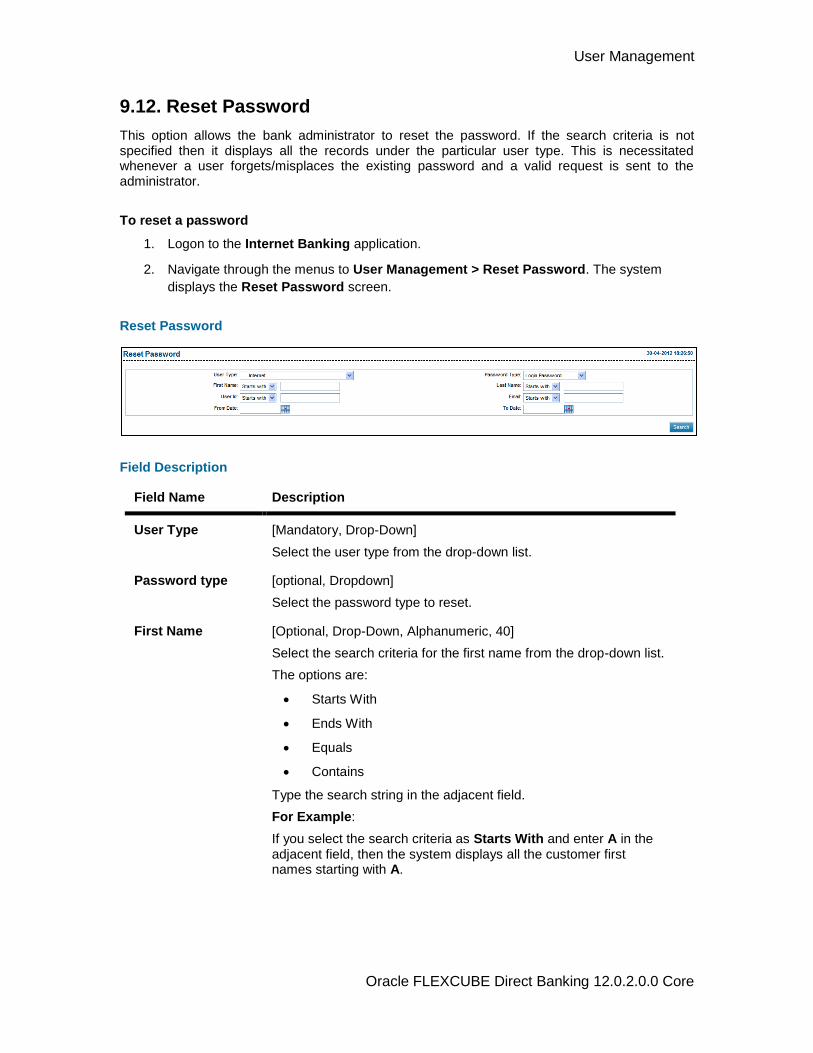
User Management
Oracle FLEXCUBE Direct Banking 12.0.2.0.0 Core
9.12. Reset Password
This option allows the bank administrator to reset the password. If the search criteria is not specified then it displays all the records under the particular user type. This is necessitated whenever a user forgets/misplaces the existing password and a valid request is sent to the administrator.
To reset a password
1. Logon to the Internet Banking application.
2. Navigate through the menus to User Management > Reset Password. The system
displays the Reset Password screen.
Reset Password
Field Description
Field Name Description
User Type [Mandatory, Drop-Down]
Select the user type from the drop-down list.
Password type [optional, Dropdown]
Select the password type to reset.
First Name [Optional, Drop-Down, Alphanumeric, 40]
Select the search criteria for the first name from the drop-down list.
The options are:
Starts With
Ends With
Equals
Contains
Type the search string in the adjacent field.
For Example:
If you select the search criteria as Starts With and enter A in the adjacent field, then the system displays all the customer first names starting with A.

User Management
Oracle FLEXCUBE Direct Banking 12.0.2.0.0 Core
Field Name Description
Last Name [Optional, Drop-Down, Alphanumeric, 40]
Select the search criteria for the last name from the drop-down list.
The options are:
Starts With
Ends With
Equals
Contains
Type the search string in the adjacent field.
For Example:
If you select the search criteria as Starts With and enter E in the adjacent field, then the system displays all the customer last names starting with E.
User Id [Optional, Drop-Down, Alphanumeric, 20]
Select the search criteria for the user ID from the drop-down list.
The options are:
Starts With
Ends With
Equals
Contains
Type the search string in the adjacent field.
For Example:
If you select the search criteria as Starts With and enter 1 in the adjacent field, then the system displays all the user ID's starting with 1.
User Management
Oracle FLEXCUBE Direct Banking 12.0.2.0.0 Core
Field Name Description
Email [Optional, UNIQUE, Drop-Down, Alphanumeric, 100]
Select the search criteria for the email ID from the drop-down list.
The options are:
Starts With
Ends With
Equals
Contains
Type the search string in the adjacent field.
For Example:
If you select the search criteria as Starts With and enter L in the adjacent field, then the system displays all the email ID's starting with L.
Note: Email ID is UNIQUE across all user of the application and validation is in place for the same. You may get an error if non-unique Email ID is entered.
Customer Id [Optional, Drop-Down, Alphanumeric, 40]
Select the search criteria for the first name from the drop-down list.
The options are:
Starts With
Ends With
Equals
Contains
Type the search string in the adjacent field.
For Example:
If you select the search criteria as Starts With and enter A in the adjacent field, then the system displays all the customer id starting with A.
From Date [Optional, Pick List]
Select the start date from the pick list.
The date should not greater than the process date.
To Date [Optional, Pick List]
Select the end date from the pick list.
The date should be greater than the from date.
3. Select the user type.
4. Enter the search criteria.
User Management
Oracle FLEXCUBE Direct Banking 12.0.2.0.0 Core
5. Click the Search button. The system displays the Reset Password screen with the
search result.
6. Select the check box adjacent to the User Id to reset the password.
OR
Click the User Id to view the user profile.
7. Select the password policy from the Select Password Policy drop-down list.
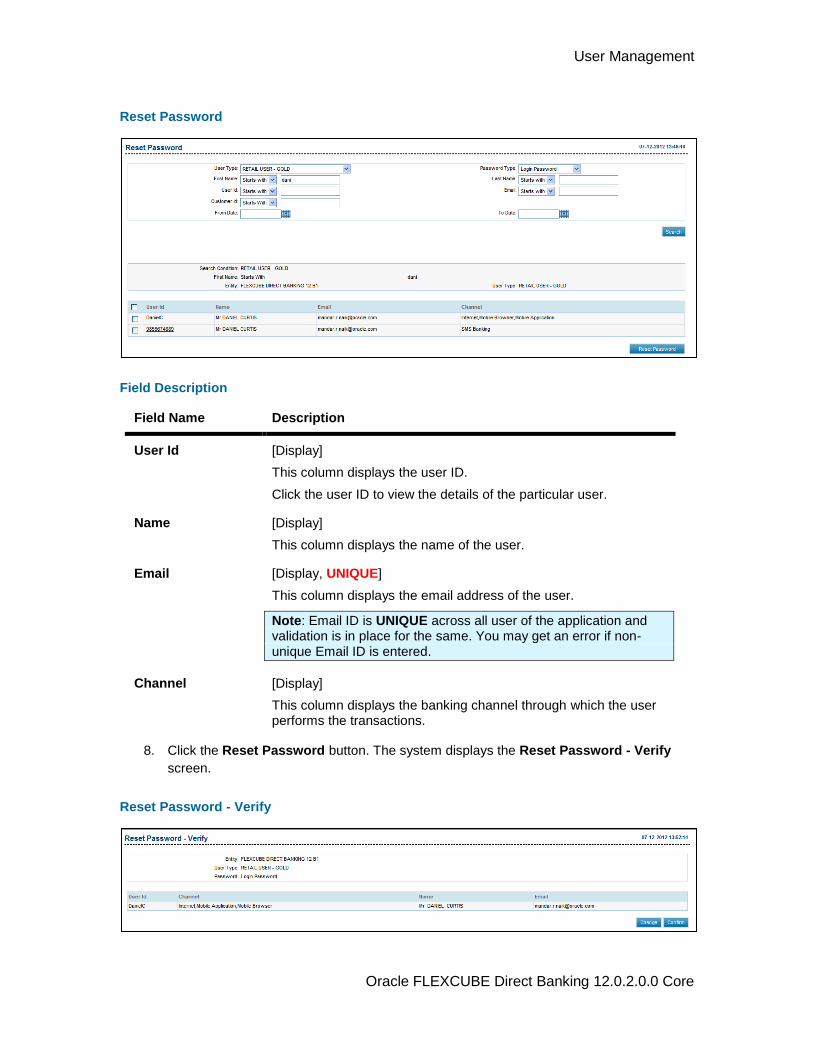
User Management
Oracle FLEXCUBE Direct Banking 12.0.2.0.0 Core
Reset Password
Field Description
Field Name Description
User Id [Display]
This column displays the user ID.
Click the user ID to view the details of the particular user.
Name [Display]
This column displays the name of the user.
Email [Display, UNIQUE]
This column displays the email address of the user.
Note: Email ID is UNIQUE across all user of the application and validation is in place for the same. You may get an error if non-unique Email ID is entered.
Channel [Display]
This column displays the banking channel through which the user performs the transactions.
8. Click the Reset Password button. The system displays the Reset Password - Verify
screen.
Reset Password - Verify

User Management
Oracle FLEXCUBE Direct Banking 12.0.2.0.0 Core
9. Click the Confirm button. The system displays the Reset Password- Confirm screen
with the status message.
OR
Click the Change button to navigate to previous screen.
Reset Password - Confirm
10. Click the OK button. The system displays the Reset Password screen.
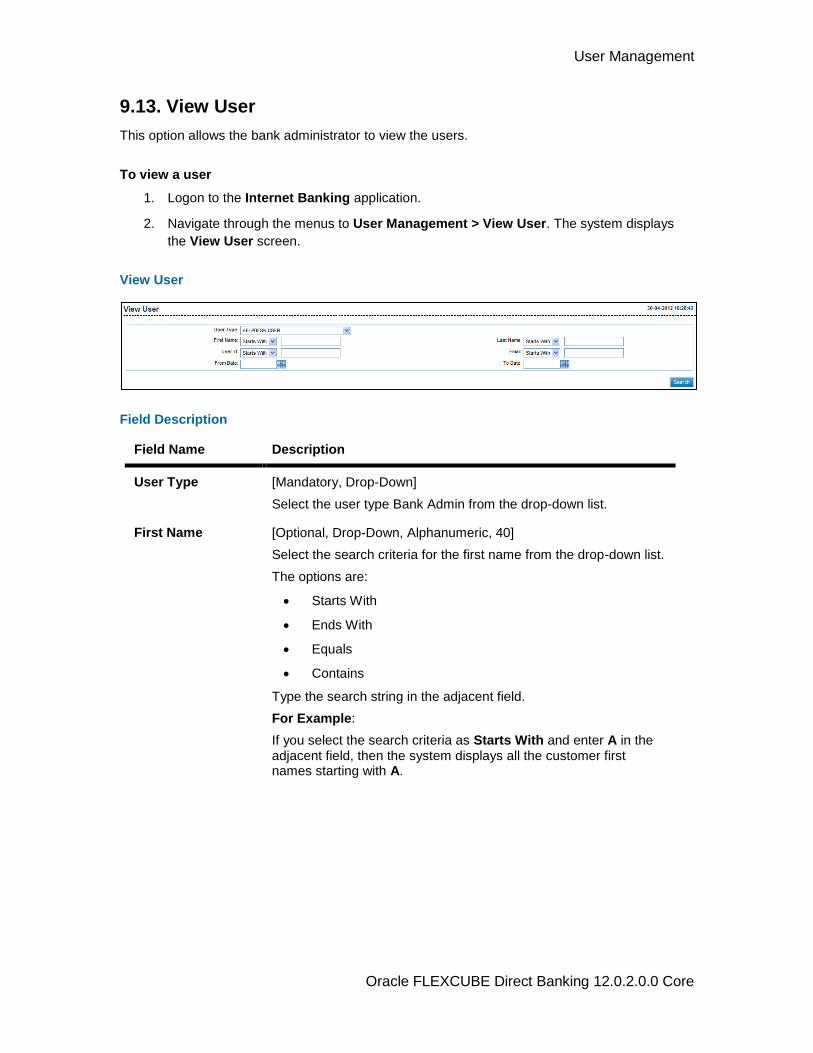
User Management
Oracle FLEXCUBE Direct Banking 12.0.2.0.0 Core
9.13. View User
This option allows the bank administrator to view the users.
To view a user
1. Logon to the Internet Banking application.
2. Navigate through the menus to User Management > View User. The system displays
the View User screen.
View User
Field Description
Field Name Description
User Type [Mandatory, Drop-Down]
Select the user type Bank Admin from the drop-down list.
First Name [Optional, Drop-Down, Alphanumeric, 40]
Select the search criteria for the first name from the drop-down list.
The options are:
Starts With
Ends With
Equals
Contains
Type the search string in the adjacent field.
For Example:
If you select the search criteria as Starts With and enter A in the adjacent field, then the system displays all the customer first names starting with A.

User Management
Oracle FLEXCUBE Direct Banking 12.0.2.0.0 Core
Field Name Description
Last Name [Optional, Drop-Down, Alphanumeric, 40]
Select the search criteria for the last name from the drop-down list.
The options are:
Starts With
Ends With
Equals
Contains
Type the search string in the adjacent field.
For Example:
If you select the search criteria as Starts With and enter E in the adjacent field, then the system displays all the customer last names starting with E.
User Id [Optional, Drop-Down, Alphanumeric, 20]
Select the search criteria for the user ID from the drop-down list.
The options are:
Starts With
Ends With
Equals
Contains
Type the search string in the adjacent field.
For Example:
If you select the search criteria as Starts With and enter 1 in the adjacent field, then the system displays all the user ID's starting with 1.
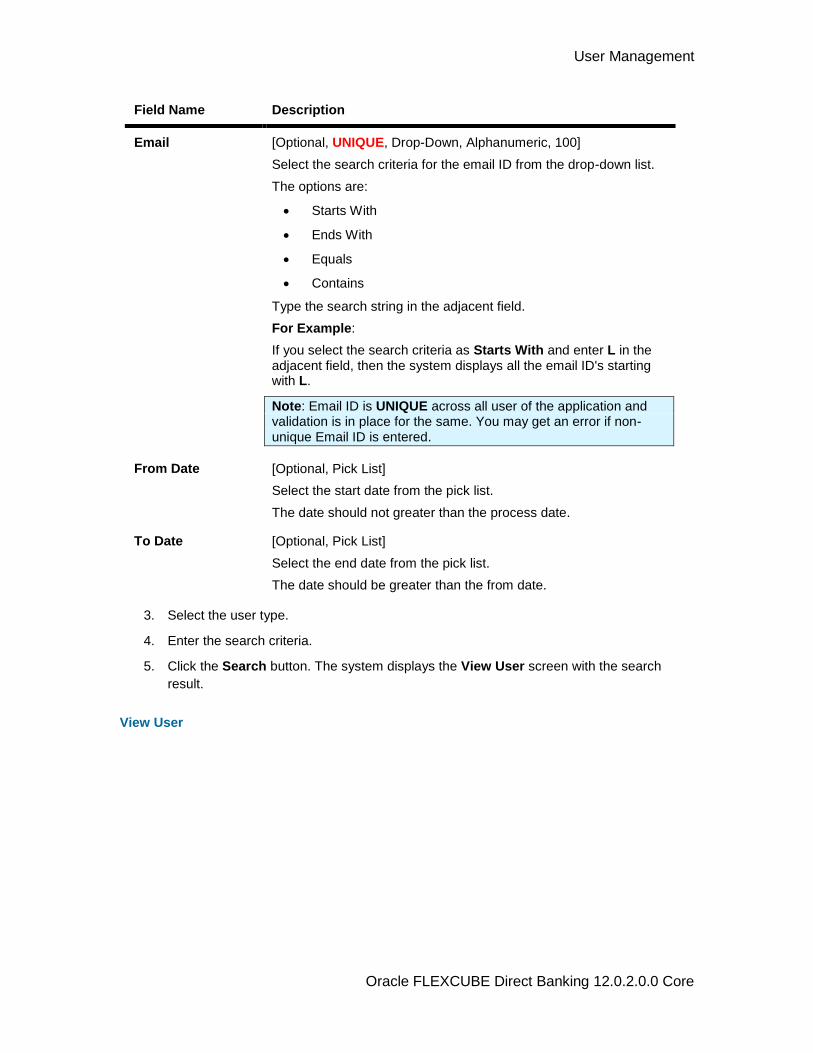
User Management
Oracle FLEXCUBE Direct Banking 12.0.2.0.0 Core
Field Name Description
Email [Optional, UNIQUE, Drop-Down, Alphanumeric, 100]
Select the search criteria for the email ID from the drop-down list.
The options are:
Starts With
Ends With
Equals
Contains
Type the search string in the adjacent field.
For Example:
If you select the search criteria as Starts With and enter L in the adjacent field, then the system displays all the email ID's starting with L.
Note: Email ID is UNIQUE across all user of the application and validation is in place for the same. You may get an error if non-unique Email ID is entered.
From Date [Optional, Pick List]
Select the start date from the pick list.
The date should not greater than the process date.
To Date [Optional, Pick List]
Select the end date from the pick list.
The date should be greater than the from date.
3. Select the user type.
4. Enter the search criteria.
5. Click the Search button. The system displays the View User screen with the search
result.
View User
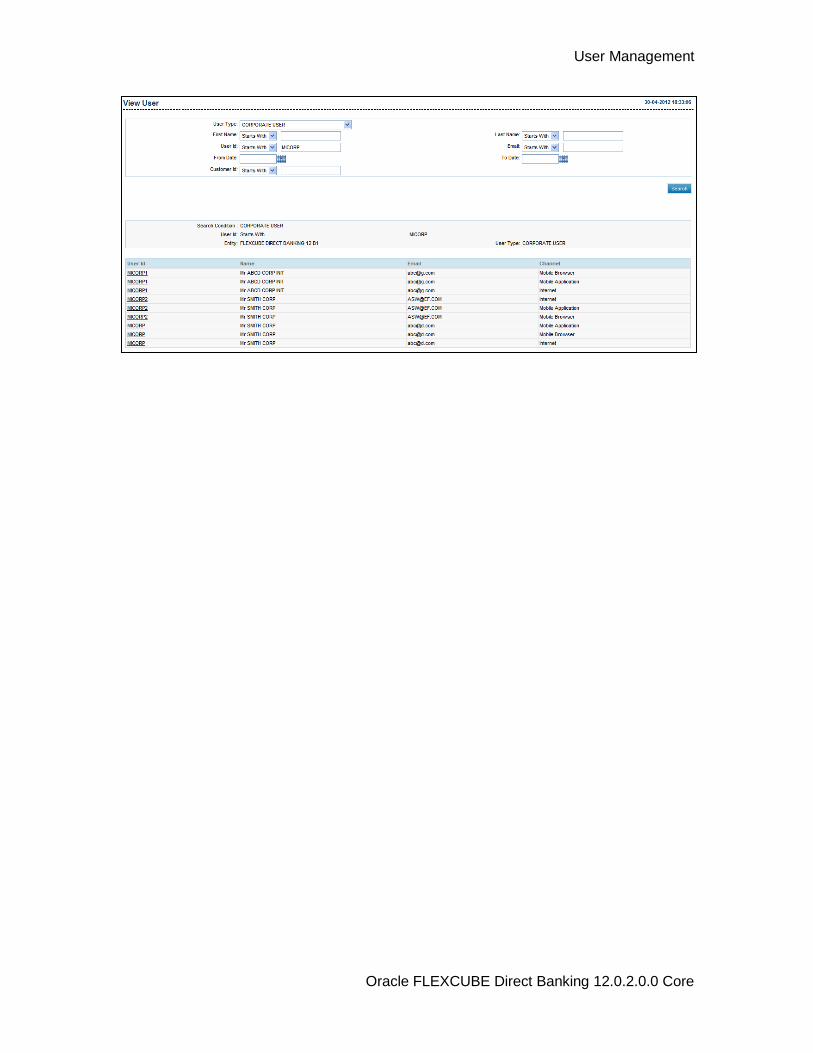
User Management
Oracle FLEXCUBE Direct Banking 12.0.2.0.0 Core
User Management
Oracle FLEXCUBE Direct Banking 12.0.2.0.0 Core
Field Description
Field Name Description
Search Condition [Display]
This field displays the search condition for Type of user..
Entity [Display]
This field displays the name of the Entity..
User Type [Display]
This field displays the user ID.
User ID [Display]
This column displays the user ID.
Name [Display]
This column displays the name of the user.
Email [Display, UNIQUE]
This column displays the email ID of the user.
Note: Email ID is UNIQUE across all user of the application and validation is in place for the same. You may get an error if non-unique Email ID is entered.
Channel [Display]
This column displays the transaction operation channel.
6. Click the link below the User Id column to view the user details.
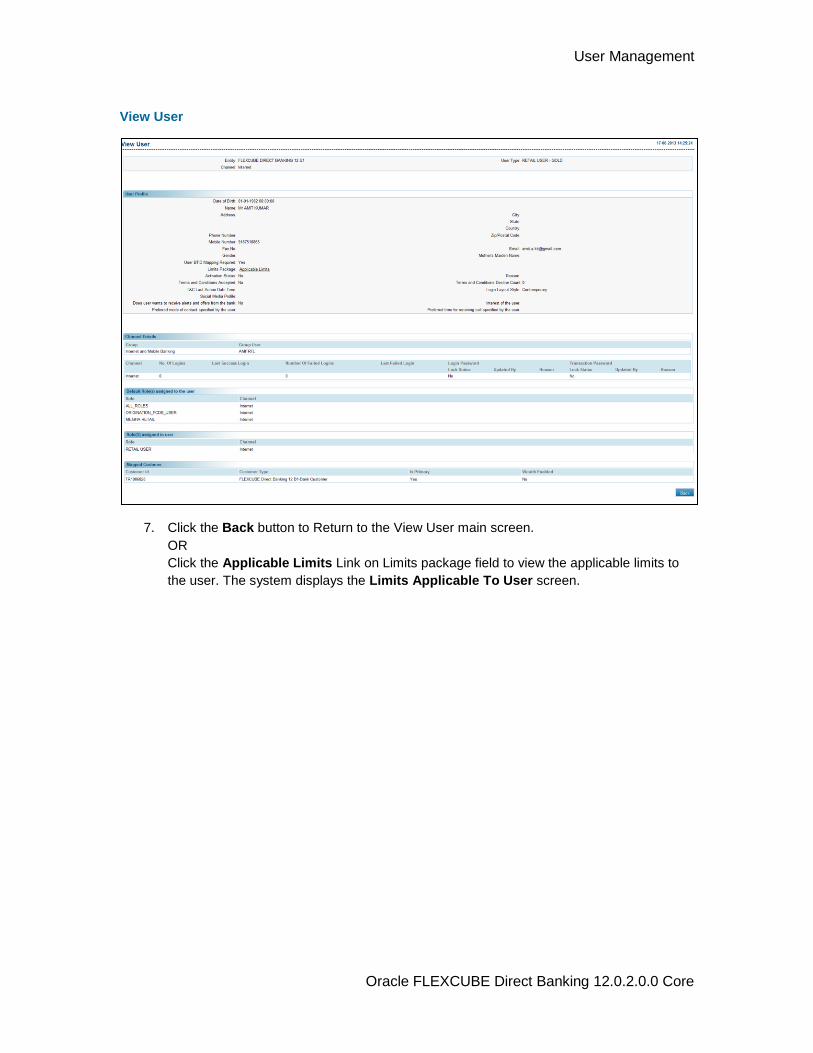
User Management
Oracle FLEXCUBE Direct Banking 12.0.2.0.0 Core
View User
7. Click the Back button to Return to the View User main screen.
OR
Click the Applicable Limits Link on Limits package field to view the applicable limits to
the user. The system displays the Limits Applicable To User screen.
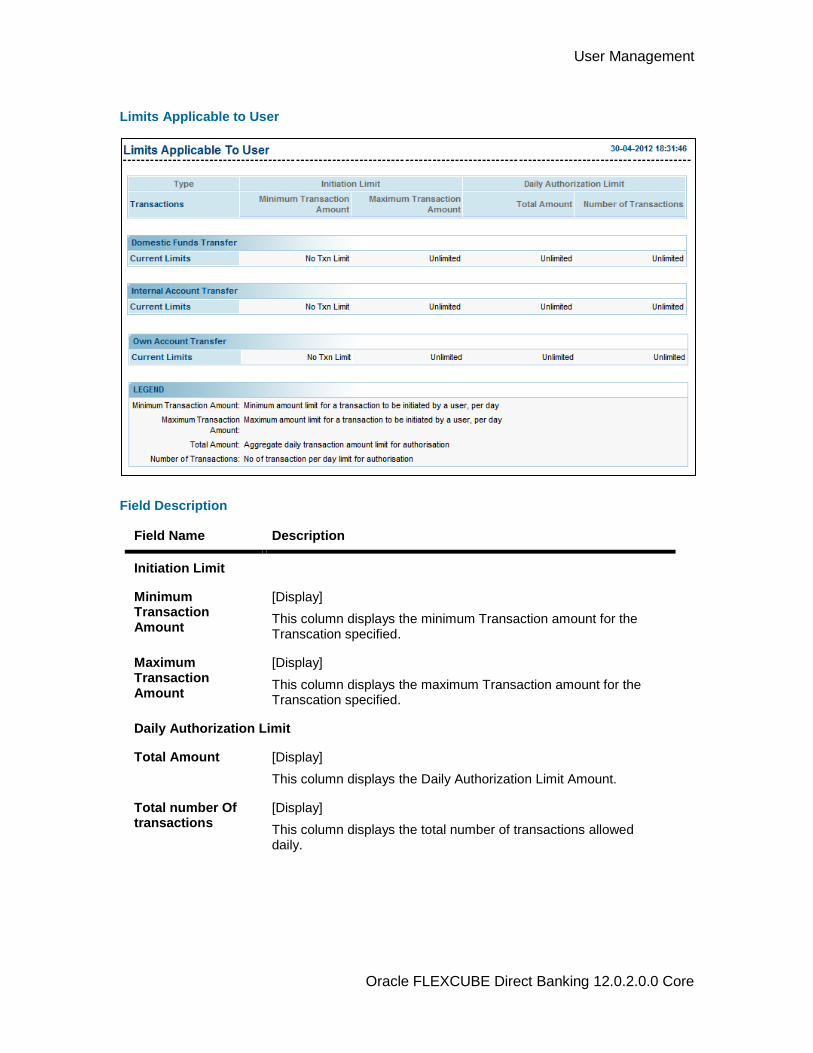
User Management
Oracle FLEXCUBE Direct Banking 12.0.2.0.0 Core
Limits Applicable to User
Field Description
Field Name Description
Initiation Limit
Minimum Transaction Amount
[Display]
This column displays the minimum Transaction amount for the Transcation specified.
Maximum Transaction Amount
[Display]
This column displays the maximum Transaction amount for the Transcation specified.
Daily Authorization Limit
Total Amount [Display]
This column displays the Daily Authorization Limit Amount.
Total number Of transactions
[Display]
This column displays the total number of transactions allowed daily.
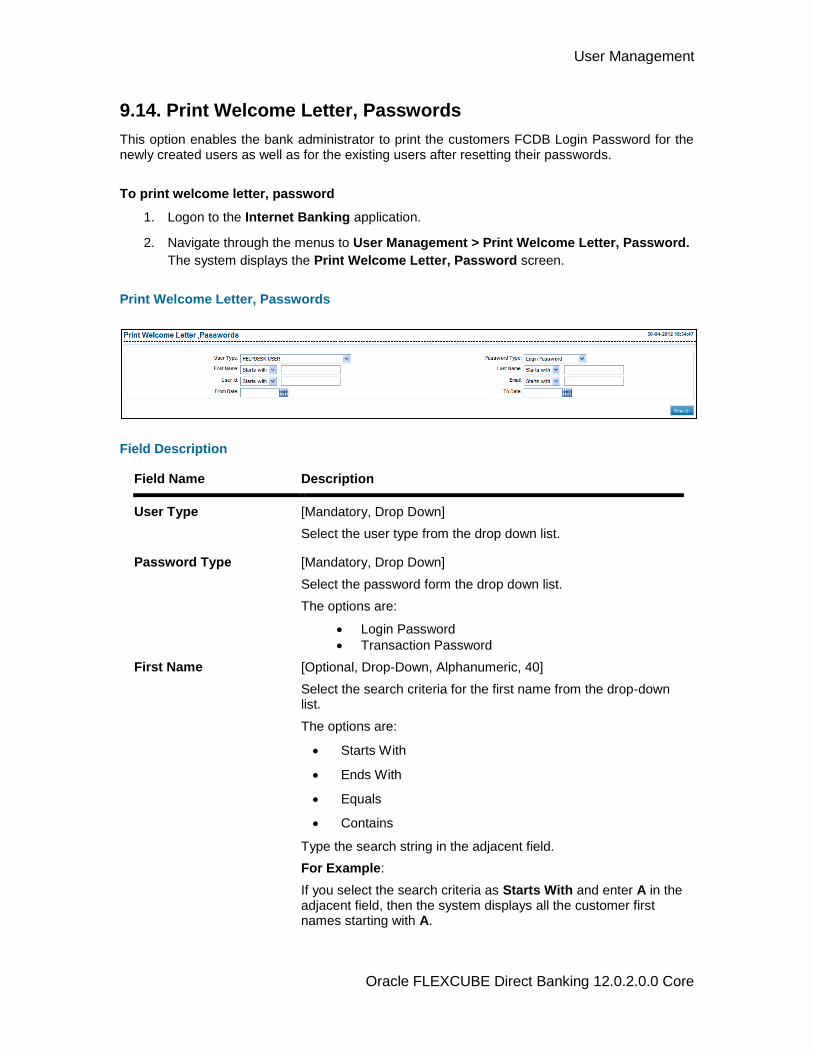
User Management
Oracle FLEXCUBE Direct Banking 12.0.2.0.0 Core
9.14. Print Welcome Letter, Passwords
This option enables the bank administrator to print the customers FCDB Login Password for the newly created users as well as for the existing users after resetting their passwords.
To print welcome letter, password
1. Logon to the Internet Banking application.
2. Navigate through the menus to User Management > Print Welcome Letter, Password.
The system displays the Print Welcome Letter, Password screen.
Print Welcome Letter, Passwords
Field Description
Field Name Description
User Type [Mandatory, Drop Down]
Select the user type from the drop down list.
Password Type [Mandatory, Drop Down]
Select the password form the drop down list.
The options are:
Login Password
Transaction Password
First Name [Optional, Drop-Down, Alphanumeric, 40]
Select the search criteria for the first name from the drop-down list.
The options are:
Starts With
Ends With
Equals
Contains
Type the search string in the adjacent field.
For Example:
If you select the search criteria as Starts With and enter A in the adjacent field, then the system displays all the customer first names starting with A.
User Management
Oracle FLEXCUBE Direct Banking 12.0.2.0.0 Core
Field Name Description
Last Name [Optional, Drop-Down, Alphanumeric, 40]
Select the search criteria for the last name from the drop-down list.
The options are:
Starts With
Ends With
Equals
Contains
Type the search string in the adjacent field.
For Example:
If you select the search criteria as Starts With and enter E in the adjacent field, then the system displays all the customer last names starting with E.
User Id [Optional, Drop-Down, Alphanumeric, 20]
Select the search criteria for the user ID from the drop-down list.
The options are:
Starts With
Ends With
Equals
Contains
Type the search string in the adjacent field.
For Example:
If you select the search criteria as Starts With and enter 1 in the adjacent field, then the system displays all the user ID's starting with 1.
From Date [Optional, Pick List]
Select the start date from the pick list.
To Date [Optional, Pick List]
Select the end date from he pick list.
User Management
Oracle FLEXCUBE Direct Banking 12.0.2.0.0 Core
Field Name Description
Customer ID [Optional, Drop-Down, Alphanumeric, 40]
Select the search criteria for the Customer id from the drop-down list.
The options are:
Starts With
Ends With
Equals
Contains
Type the search string in the adjacent field.
For Example:
If you select the search criteria as Starts With and enter A in the adjacent field, then the system displays all the customer id starting with A.
Email [Optional, UNIQUE, Drop-Down, Alphanumeric, 100]
Select the search criteria for the email ID from the drop-down list.
The options are:
Starts With
Ends With
Equals
Contains
Type the search string in the adjacent field.
For Example:
If you select the search criteria as Starts With and enter L in the adjacent field, then the system displays all the email ID's starting with L.
3. Note: Email ID is UNIQUE across all user of the application and validation is in place for
the same. You may get an error if non-unique Email ID is entered.Enter the search
criteria and click the Search button. The following screen is displayed.
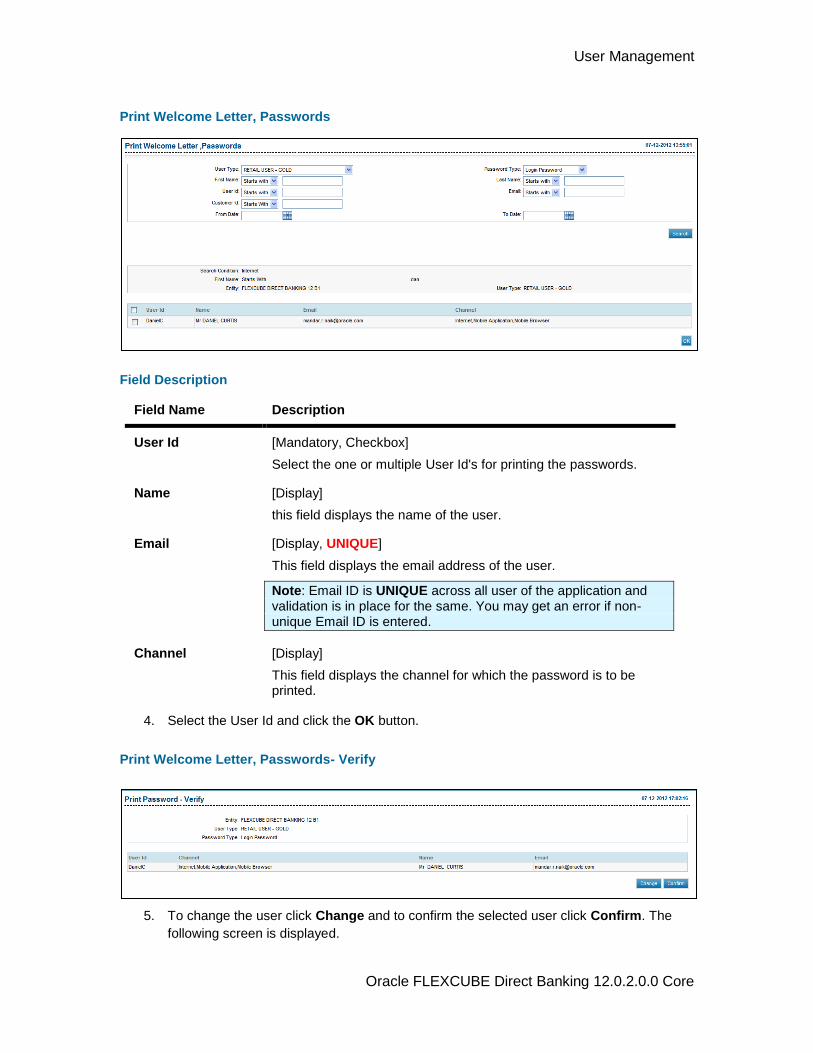
User Management
Oracle FLEXCUBE Direct Banking 12.0.2.0.0 Core
Print Welcome Letter, Passwords
Field Description
Field Name Description
User Id [Mandatory, Checkbox]
Select the one or multiple User Id's for printing the passwords.
Name [Display]
this field displays the name of the user.
Email [Display, UNIQUE]
This field displays the email address of the user.
Note: Email ID is UNIQUE across all user of the application and validation is in place for the same. You may get an error if non-unique Email ID is entered.
Channel [Display]
This field displays the channel for which the password is to be printed.
4. Select the User Id and click the OK button.
Print Welcome Letter, Passwords- Verify
5. To change the user click Change and to confirm the selected user click Confirm. The
following screen is displayed.
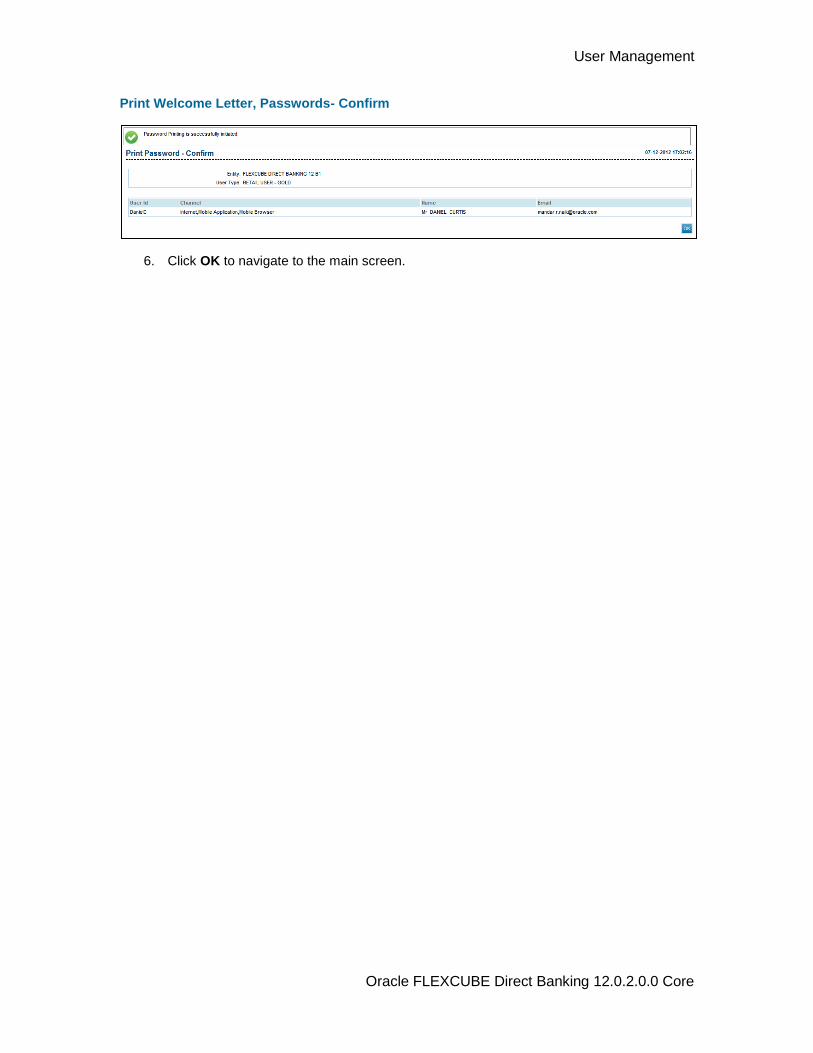
User Management
Oracle FLEXCUBE Direct Banking 12.0.2.0.0 Core
Print Welcome Letter, Passwords- Confirm
6. Click OK to navigate to the main screen.
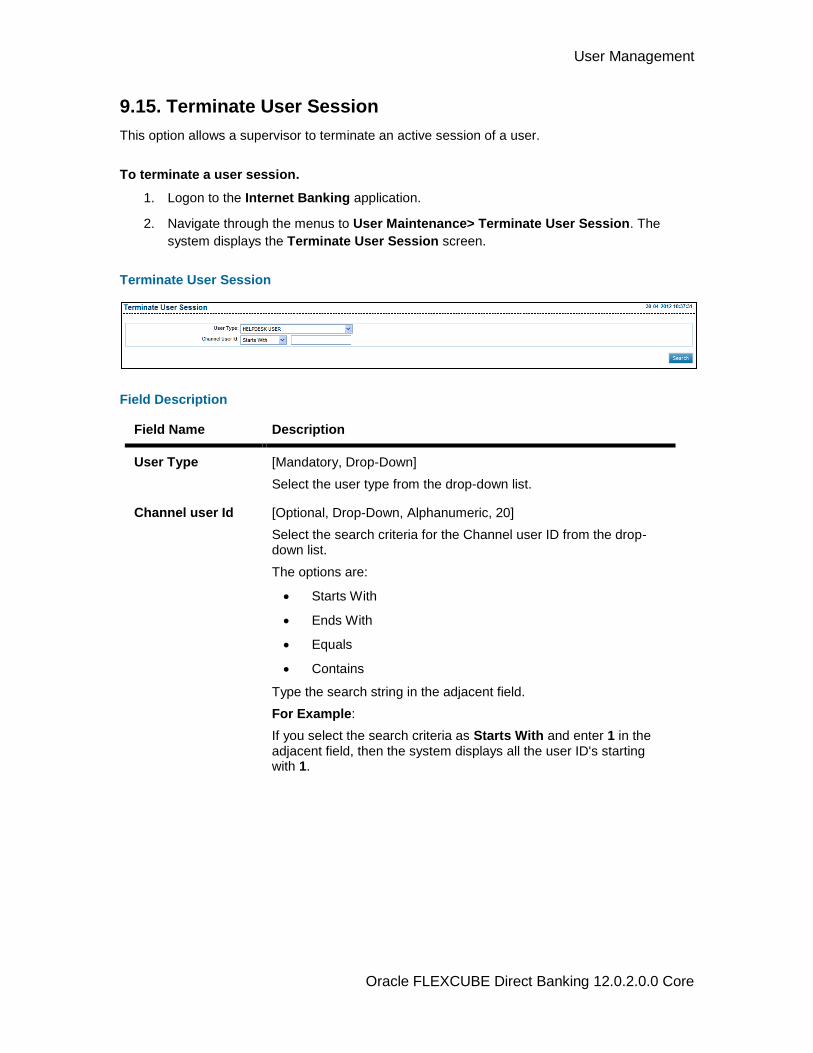
User Management
Oracle FLEXCUBE Direct Banking 12.0.2.0.0 Core
9.15. Terminate User Session
This option allows a supervisor to terminate an active session of a user.
To terminate a user session.
1. Logon to the Internet Banking application.
2. Navigate through the menus to User Maintenance> Terminate User Session. The
system displays the Terminate User Session screen.
Terminate User Session
Field Description
Field Name Description
User Type [Mandatory, Drop-Down]
Select the user type from the drop-down list.
Channel user Id [Optional, Drop-Down, Alphanumeric, 20]
Select the search criteria for the Channel user ID from the drop-down list.
The options are:
Starts With
Ends With
Equals
Contains
Type the search string in the adjacent field.
For Example:
If you select the search criteria as Starts With and enter 1 in the adjacent field, then the system displays all the user ID's starting with 1.
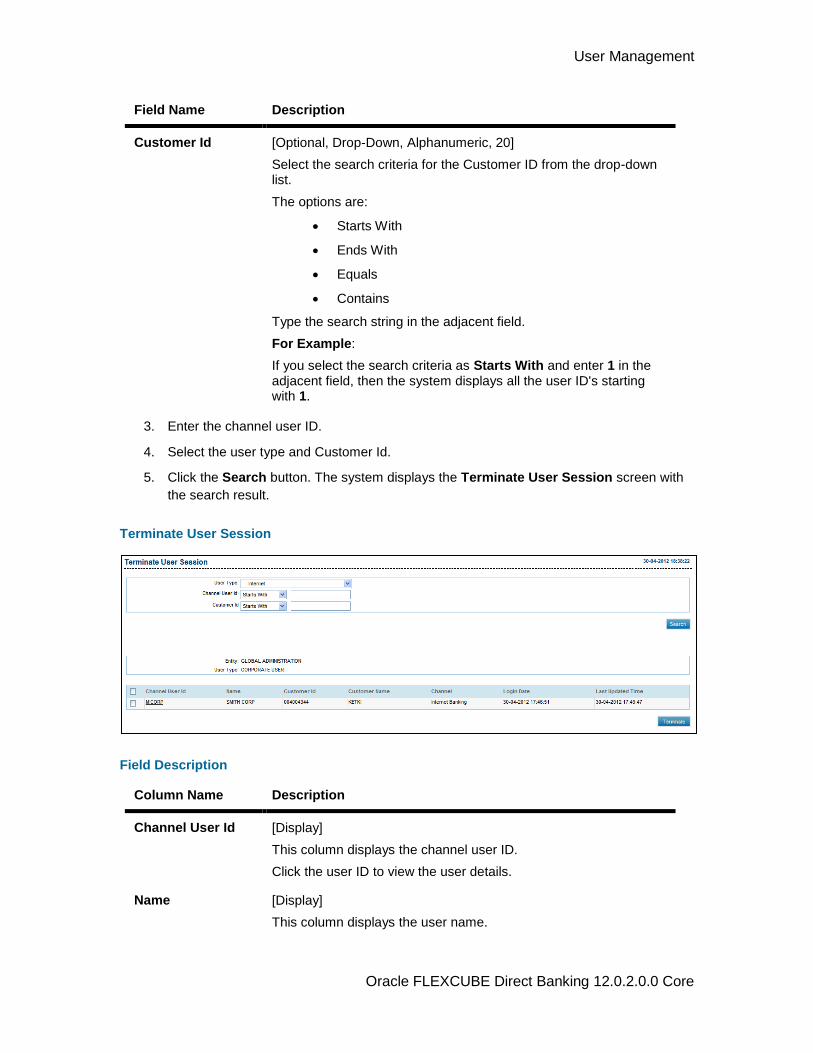
User Management
Oracle FLEXCUBE Direct Banking 12.0.2.0.0 Core
Field Name Description
Customer Id [Optional, Drop-Down, Alphanumeric, 20]
Select the search criteria for the Customer ID from the drop-down list.
The options are:
Starts With
Ends With
Equals
Contains
Type the search string in the adjacent field.
For Example:
If you select the search criteria as Starts With and enter 1 in the adjacent field, then the system displays all the user ID's starting with 1.
3. Enter the channel user ID.
4. Select the user type and Customer Id.
5. Click the Search button. The system displays the Terminate User Session screen with
the search result.
Terminate User Session
Field Description
Column Name Description
Channel User Id [Display]
This column displays the channel user ID.
Click the user ID to view the user details.
Name [Display]
This column displays the user name.

User Management
Oracle FLEXCUBE Direct Banking 12.0.2.0.0 Core
Column Name Description
Customer ID [Display]
This column displays the Customer Id of the User.
Customer Name [Display]
This column displays the Customer name of the user.
Channel [Display]
This column displays the channel through which the user is performing the transaction.
User Type [Display]
This column displays the user type.
Login Date [Display]
This column displays the login date and time.
Last Updated Time [Display]
This column displays the last updated date and time of the user session.
6. Select the checkbox of the Channel user Id to be terminated.
7. Click the Terminate button. The system displays the Verify Terminate User Session
screen with the log details.
Terminate User Session - Verify
8. Click the Terminate button. The system displays the Confirm Terminate User Session
screen.
OR
Click the Back button to navigate to the previous screen.

User Management
Oracle FLEXCUBE Direct Banking 12.0.2.0.0 Core
Confirm Terminate User Session
9. Click the OK button. The system displays the Terminate User Session screen.
Customer Management
Oracle FLEXCUBE Direct Banking 12.0.2.0.0 Core
10. Customer Management
This transaction is used for setting up customer level information and parameters for accessing different transactions from the Internet Application. Customer profile is at the customer ID level, The customer profile can be initiated and modified by Bank Administrator, and corporate administrator can only modify the customer profile.
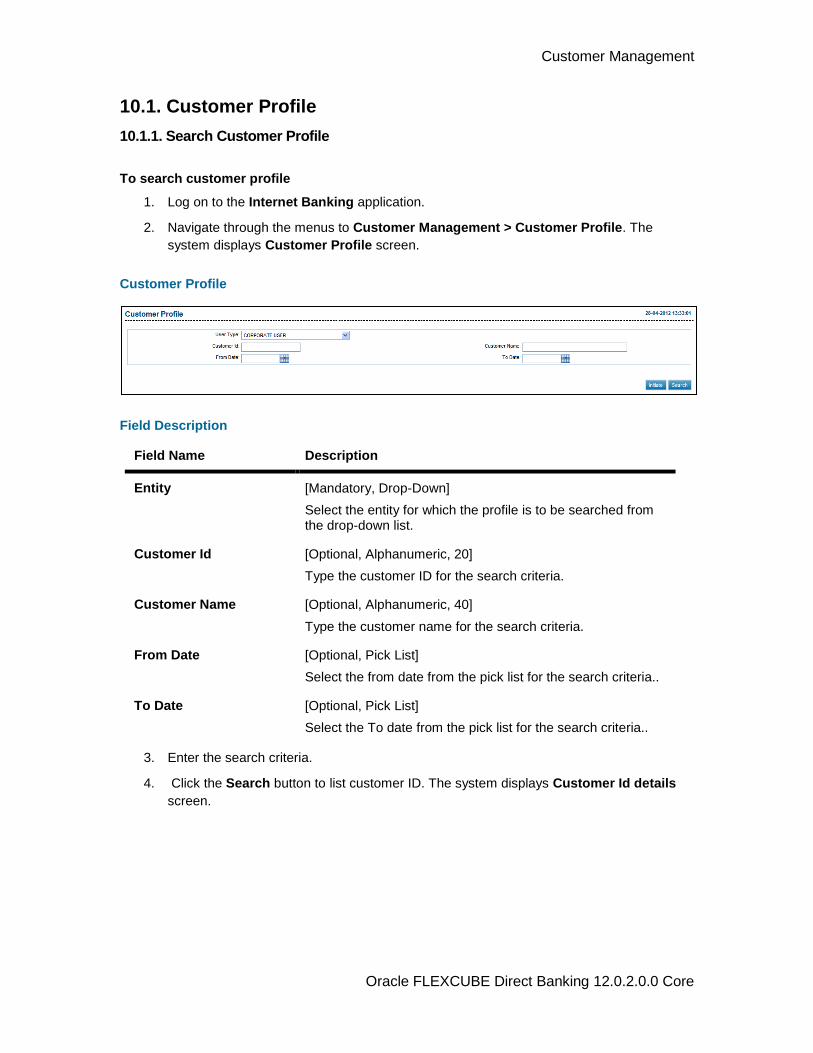
Customer Management
Oracle FLEXCUBE Direct Banking 12.0.2.0.0 Core
10.1. Customer Profile
10.1.1. Search Customer Profile
To search customer profile
1. Log on to the Internet Banking application.
2. Navigate through the menus to Customer Management > Customer Profile. The
system displays Customer Profile screen.
Customer Profile
Field Description
Field Name Description
Entity [Mandatory, Drop-Down]
Select the entity for which the profile is to be searched from the drop-down list.
Customer Id [Optional, Alphanumeric, 20]
Type the customer ID for the search criteria.
Customer Name [Optional, Alphanumeric, 40]
Type the customer name for the search criteria.
From Date [Optional, Pick List]
Select the from date from the pick list for the search criteria..
To Date [Optional, Pick List]
Select the To date from the pick list for the search criteria..
3. Enter the search criteria.
4. Click the Search button to list customer ID. The system displays Customer Id details
screen.
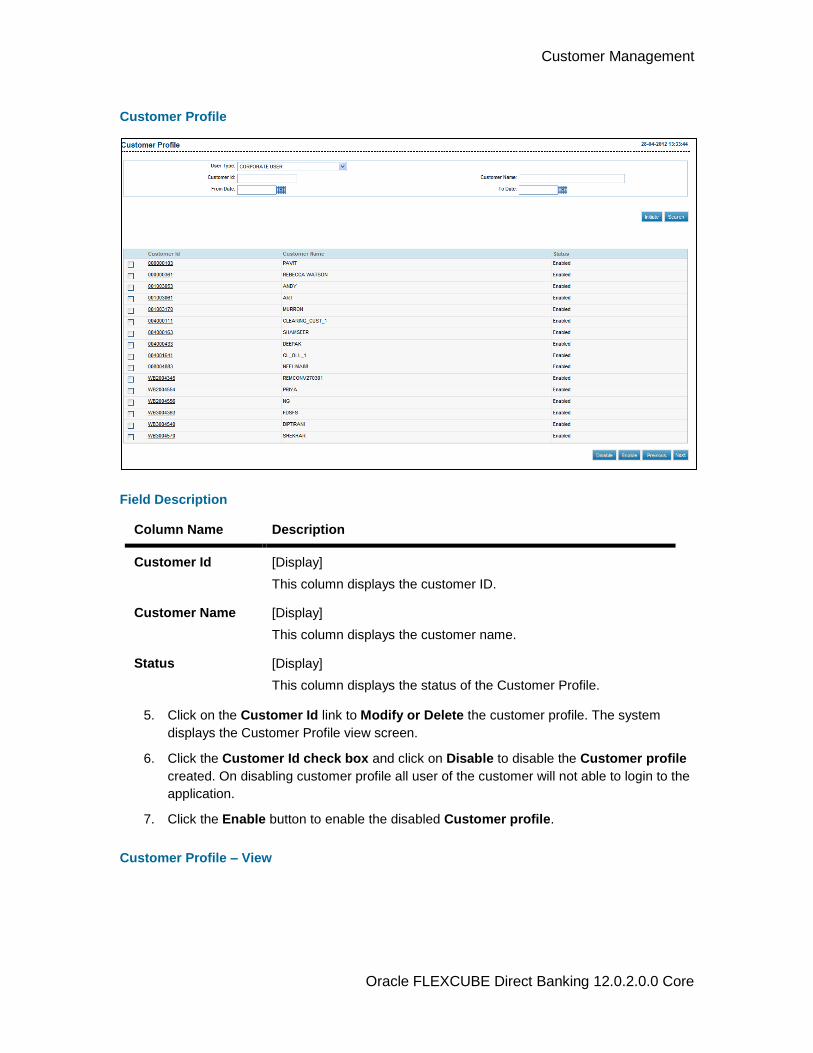
Customer Management
Oracle FLEXCUBE Direct Banking 12.0.2.0.0 Core
Customer Profile
Field Description
Column Name Description
Customer Id [Display]
This column displays the customer ID.
Customer Name [Display]
This column displays the customer name.
Status [Display]
This column displays the status of the Customer Profile.
5. Click on the Customer Id link to Modify or Delete the customer profile. The system
displays the Customer Profile view screen.
6. Click the Customer Id check box and click on Disable to disable the Customer profile
created. On disabling customer profile all user of the customer will not able to login to the
application.
7. Click the Enable button to enable the disabled Customer profile.
Customer Profile – View
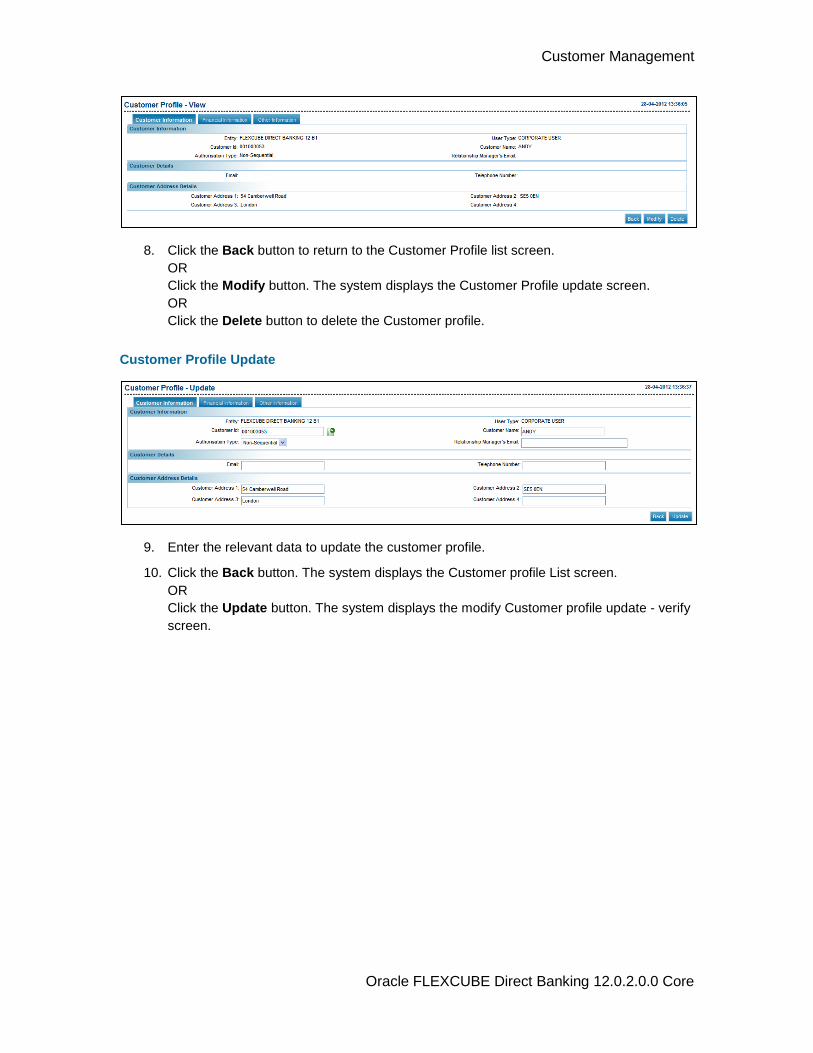
Customer Management
Oracle FLEXCUBE Direct Banking 12.0.2.0.0 Core
8. Click the Back button to return to the Customer Profile list screen.
OR
Click the Modify button. The system displays the Customer Profile update screen.
OR
Click the Delete button to delete the Customer profile.
Customer Profile Update
9. Enter the relevant data to update the customer profile.
10. Click the Back button. The system displays the Customer profile List screen.
OR
Click the Update button. The system displays the modify Customer profile update - verify
screen.
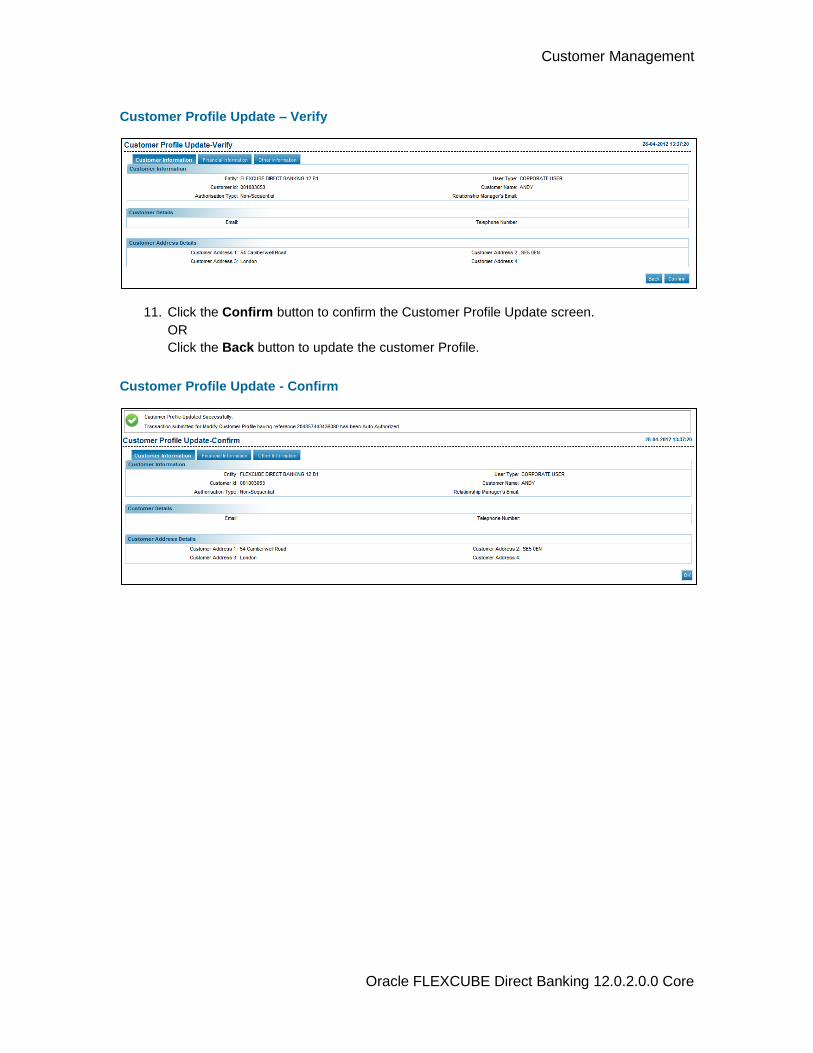
Customer Management
Oracle FLEXCUBE Direct Banking 12.0.2.0.0 Core
Customer Profile Update – Verify
11. Click the Confirm button to confirm the Customer Profile Update screen.
OR
Click the Back button to update the customer Profile.
Customer Profile Update - Confirm
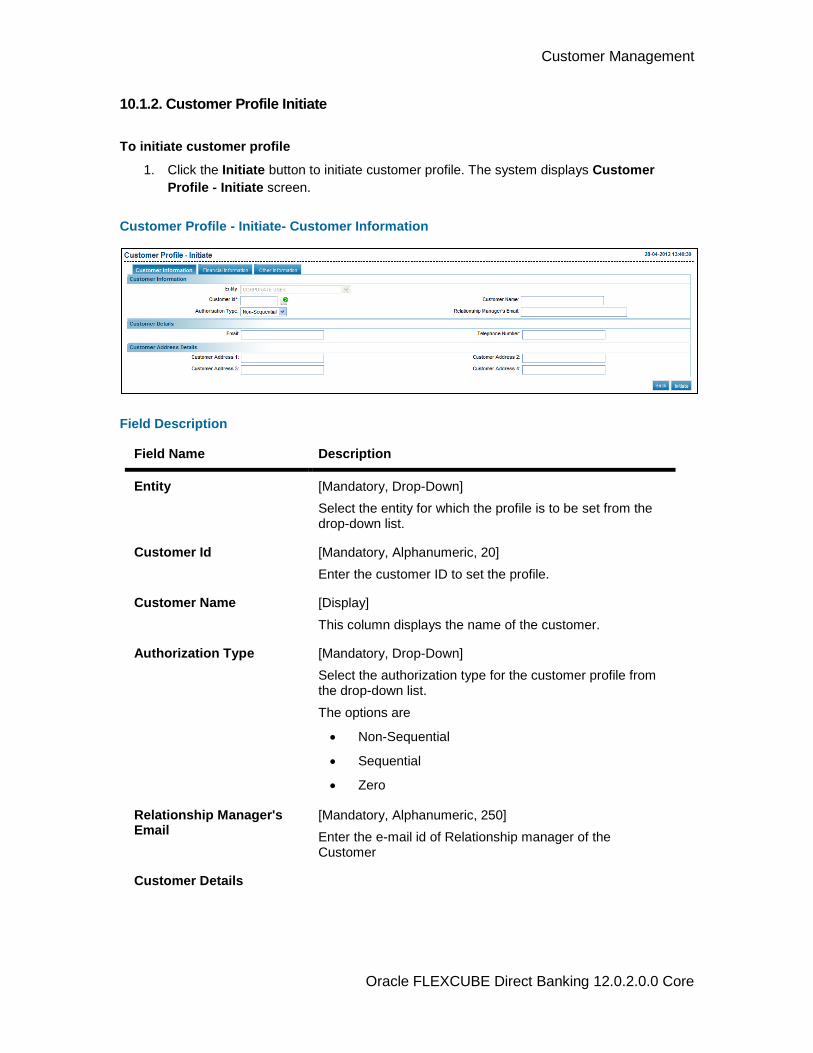
Customer Management
Oracle FLEXCUBE Direct Banking 12.0.2.0.0 Core
10.1.2. Customer Profile Initiate
To initiate customer profile
1. Click the Initiate button to initiate customer profile. The system displays Customer
Profile - Initiate screen.
Customer Profile - Initiate- Customer Information
Field Description
Field Name Description
Entity [Mandatory, Drop-Down]
Select the entity for which the profile is to be set from the drop-down list.
Customer Id [Mandatory, Alphanumeric, 20]
Enter the customer ID to set the profile.
Customer Name [Display]
This column displays the name of the customer.
Authorization Type [Mandatory, Drop-Down]
Select the authorization type for the customer profile from the drop-down list.
The options are
Non-Sequential
Sequential
Zero
Relationship Manager's Email
[Mandatory, Alphanumeric, 250]
Enter the e-mail id of Relationship manager of the Customer
Customer Details
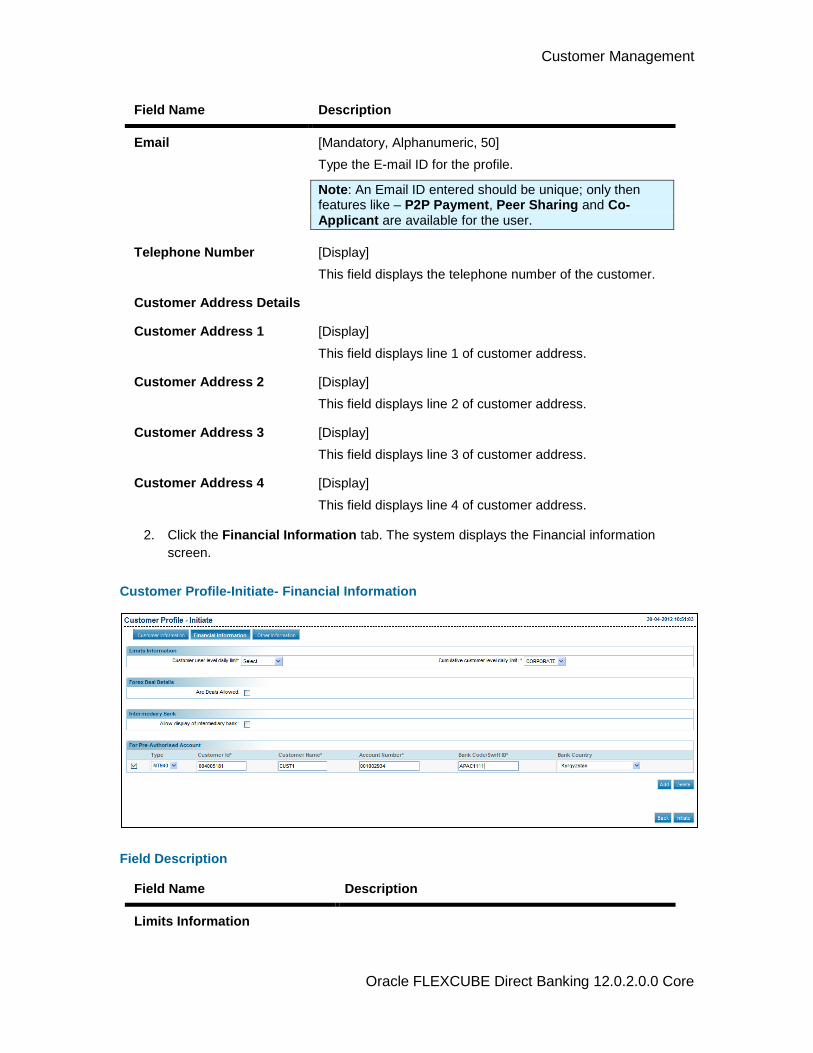
Customer Management
Oracle FLEXCUBE Direct Banking 12.0.2.0.0 Core
Field Name Description
Email [Mandatory, Alphanumeric, 50]
Type the E-mail ID for the profile.
Note: An Email ID entered should be unique; only then features like – P2P Payment, Peer Sharing and Co-Applicant are available for the user.
Telephone Number [Display]
This field displays the telephone number of the customer.
Customer Address Details
Customer Address 1 [Display]
This field displays line 1 of customer address.
Customer Address 2 [Display]
This field displays line 2 of customer address.
Customer Address 3 [Display]
This field displays line 3 of customer address.
Customer Address 4 [Display]
This field displays line 4 of customer address.
2. Click the Financial Information tab. The system displays the Financial information
screen.
Customer Profile-Initiate- Financial Information
Field Description
Field Name Description
Limits Information
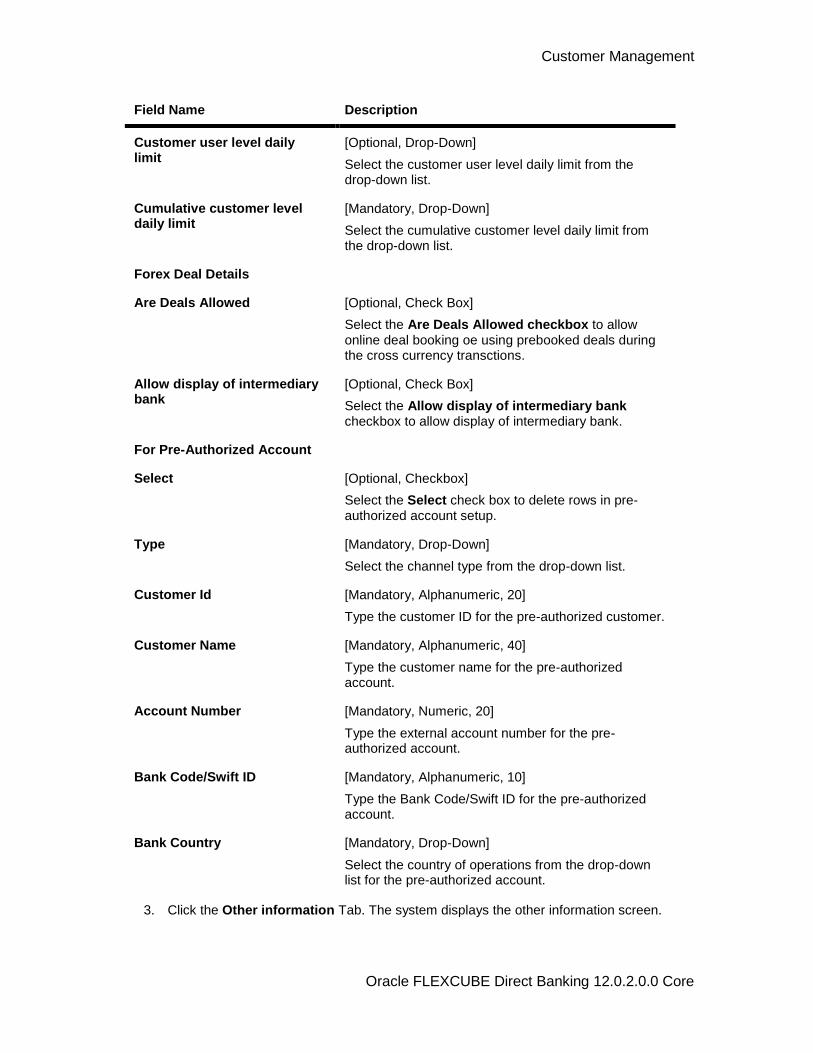
Customer Management
Oracle FLEXCUBE Direct Banking 12.0.2.0.0 Core
Field Name Description
Customer user level daily limit
[Optional, Drop-Down]
Select the customer user level daily limit from the drop-down list.
Cumulative customer level daily limit
[Mandatory, Drop-Down]
Select the cumulative customer level daily limit from the drop-down list.
Forex Deal Details
Are Deals Allowed [Optional, Check Box]
Select the Are Deals Allowed checkbox to allow online deal booking oe using prebooked deals during the cross currency transctions.
Allow display of intermediary bank
[Optional, Check Box]
Select the Allow display of intermediary bank checkbox to allow display of intermediary bank.
For Pre-Authorized Account
Select [Optional, Checkbox]
Select the Select check box to delete rows in pre-authorized account setup.
Type [Mandatory, Drop-Down]
Select the channel type from the drop-down list.
Customer Id [Mandatory, Alphanumeric, 20]
Type the customer ID for the pre-authorized customer.
Customer Name [Mandatory, Alphanumeric, 40]
Type the customer name for the pre-authorized account.
Account Number [Mandatory, Numeric, 20]
Type the external account number for the pre-authorized account.
Bank Code/Swift ID [Mandatory, Alphanumeric, 10]
Type the Bank Code/Swift ID for the pre-authorized account.
Bank Country [Mandatory, Drop-Down]
Select the country of operations from the drop-down list for the pre-authorized account.
3. Click the Other information Tab. The system displays the other information screen.
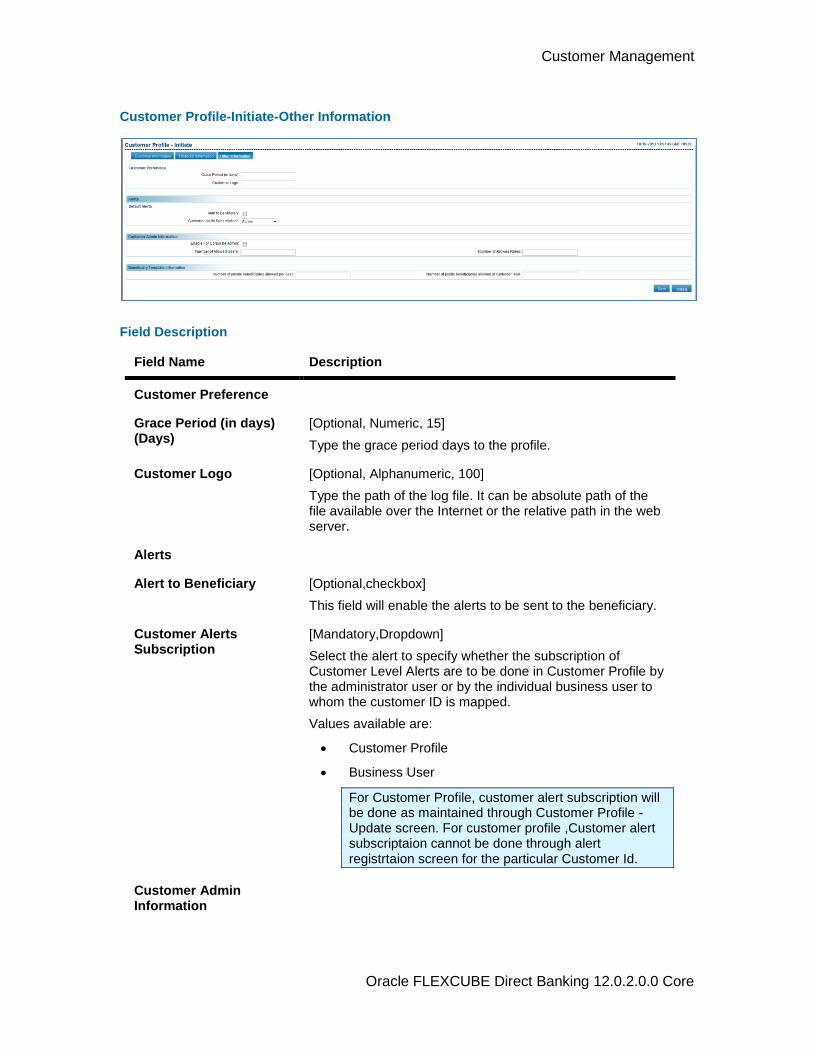
Customer Management
Oracle FLEXCUBE Direct Banking 12.0.2.0.0 Core
Customer Profile-Initiate-Other Information
Field Description
Field Name Description
Customer Preference
Grace Period (in days) (Days)
[Optional, Numeric, 15]
Type the grace period days to the profile.
Customer Logo [Optional, Alphanumeric, 100]
Type the path of the log file. It can be absolute path of the file available over the Internet or the relative path in the web server.
Alerts
Alert to Beneficiary [Optional,checkbox]
This field will enable the alerts to be sent to the beneficiary.
Customer Alerts Subscription
[Mandatory,Dropdown]
Select the alert to specify whether the subscription of Customer Level Alerts are to be done in Customer Profile by the administrator user or by the individual business user to whom the customer ID is mapped.
Values available are:
Customer Profile
Business User
For Customer Profile, customer alert subscription will be done as maintained through Customer Profile - Update screen. For customer profile ,Customer alert subscriptaion cannot be done through alert registrtaion screen for the particular Customer Id.
Customer Admin Information
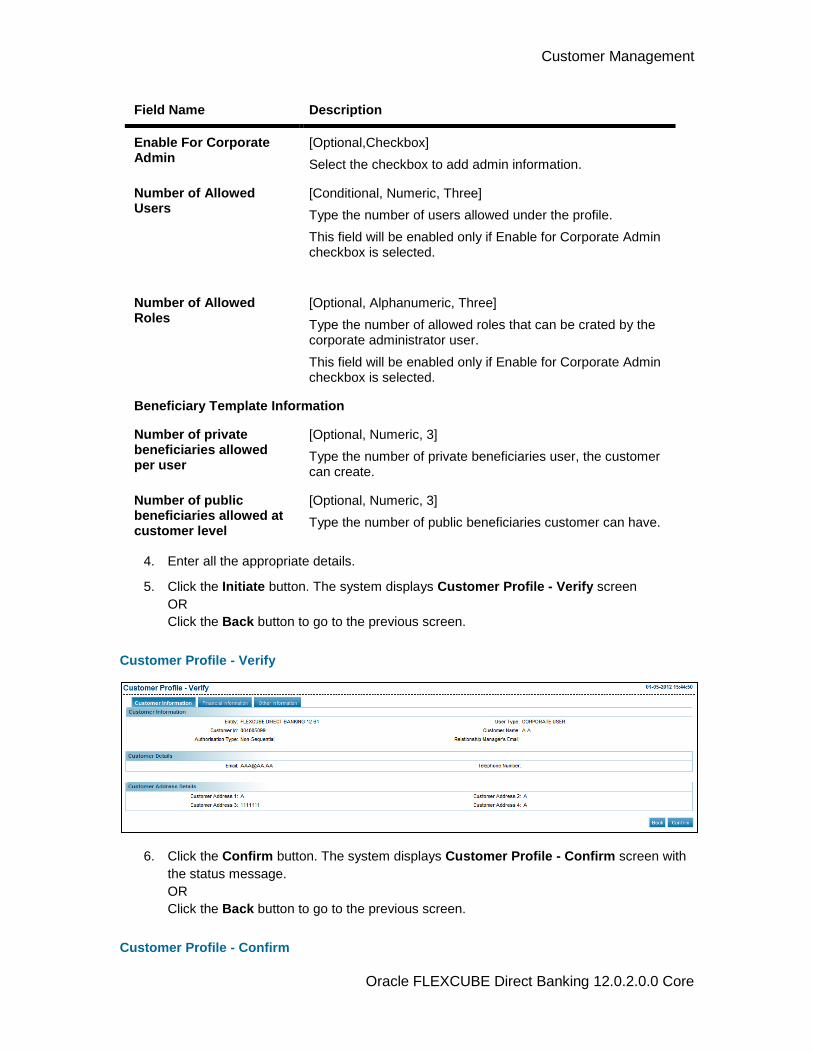
Customer Management
Oracle FLEXCUBE Direct Banking 12.0.2.0.0 Core
Field Name Description
Enable For Corporate Admin
[Optional,Checkbox]
Select the checkbox to add admin information.
Number of Allowed Users
[Conditional, Numeric, Three]
Type the number of users allowed under the profile.
This field will be enabled only if Enable for Corporate Admin checkbox is selected.
Number of Allowed Roles
[Optional, Alphanumeric, Three]
Type the number of allowed roles that can be crated by the corporate administrator user.
This field will be enabled only if Enable for Corporate Admin checkbox is selected.
Beneficiary Template Information
Number of private beneficiaries allowed per user
[Optional, Numeric, 3]
Type the number of private beneficiaries user, the customer can create.
Number of public beneficiaries allowed at customer level
[Optional, Numeric, 3]
Type the number of public beneficiaries customer can have.
4. Enter all the appropriate details.
5. Click the Initiate button. The system displays Customer Profile - Verify screen
OR
Click the Back button to go to the previous screen.
Customer Profile - Verify
6. Click the Confirm button. The system displays Customer Profile - Confirm screen with
the status message.
OR
Click the Back button to go to the previous screen.
Customer Profile - Confirm
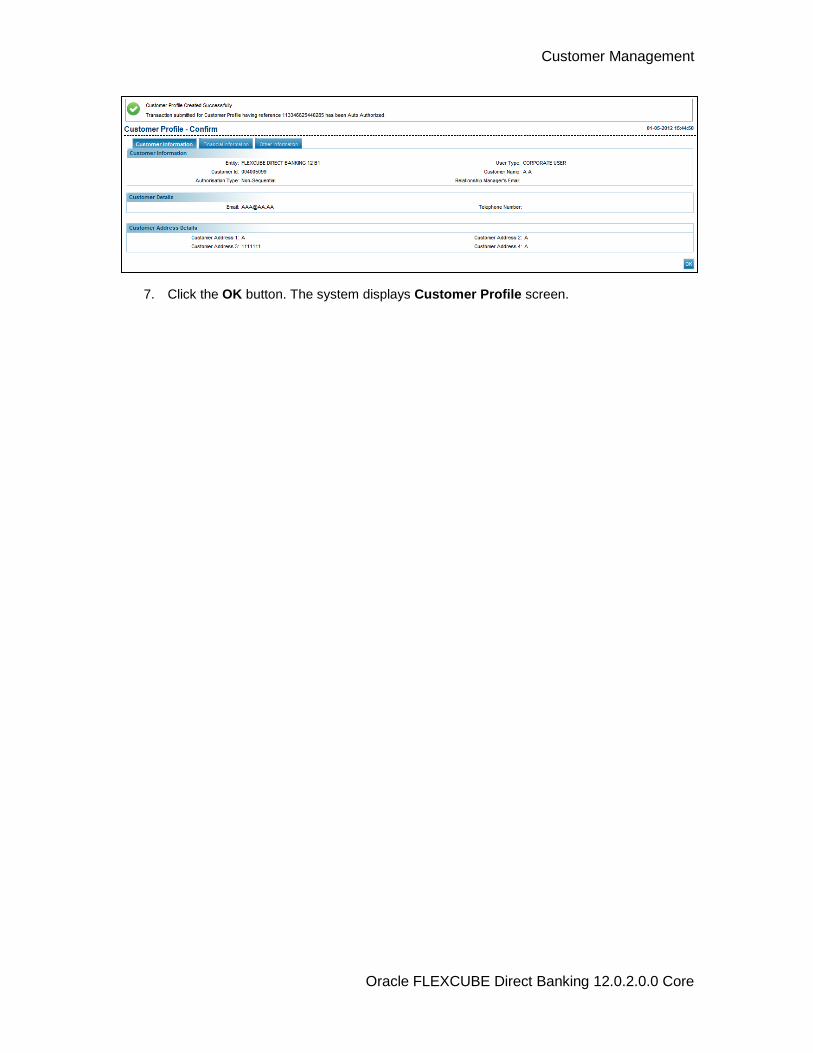
Customer Management
Oracle FLEXCUBE Direct Banking 12.0.2.0.0 Core
7. Click the OK button. The system displays Customer Profile screen.
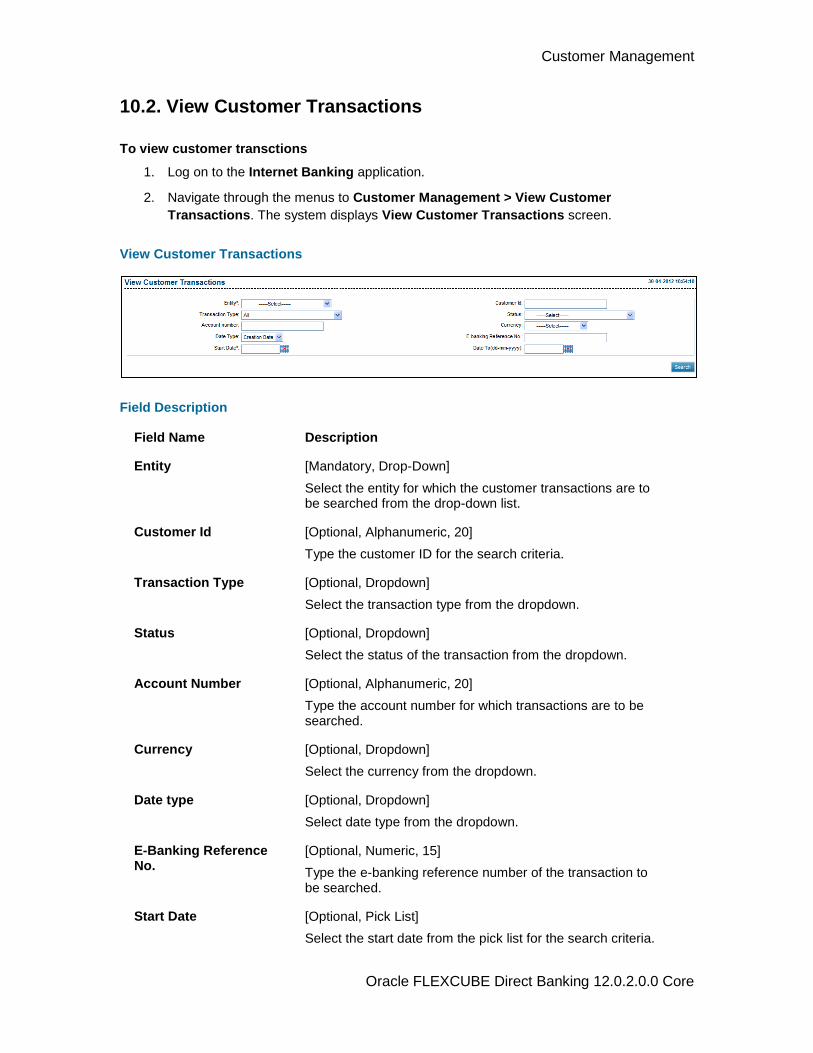
Customer Management
Oracle FLEXCUBE Direct Banking 12.0.2.0.0 Core
10.2. View Customer Transactions
To view customer transctions
1. Log on to the Internet Banking application.
2. Navigate through the menus to Customer Management > View Customer
Transactions. The system displays View Customer Transactions screen.
View Customer Transactions
Field Description
Field Name Description
Entity [Mandatory, Drop-Down]
Select the entity for which the customer transactions are to be searched from the drop-down list.
Customer Id [Optional, Alphanumeric, 20]
Type the customer ID for the search criteria.
Transaction Type [Optional, Dropdown]
Select the transaction type from the dropdown.
Status [Optional, Dropdown]
Select the status of the transaction from the dropdown.
Account Number [Optional, Alphanumeric, 20]
Type the account number for which transactions are to be searched.
Currency [Optional, Dropdown]
Select the currency from the dropdown.
Date type [Optional, Dropdown]
Select date type from the dropdown.
E-Banking Reference No.
[Optional, Numeric, 15]
Type the e-banking reference number of the transaction to be searched.
Start Date [Optional, Pick List]
Select the start date from the pick list for the search criteria.
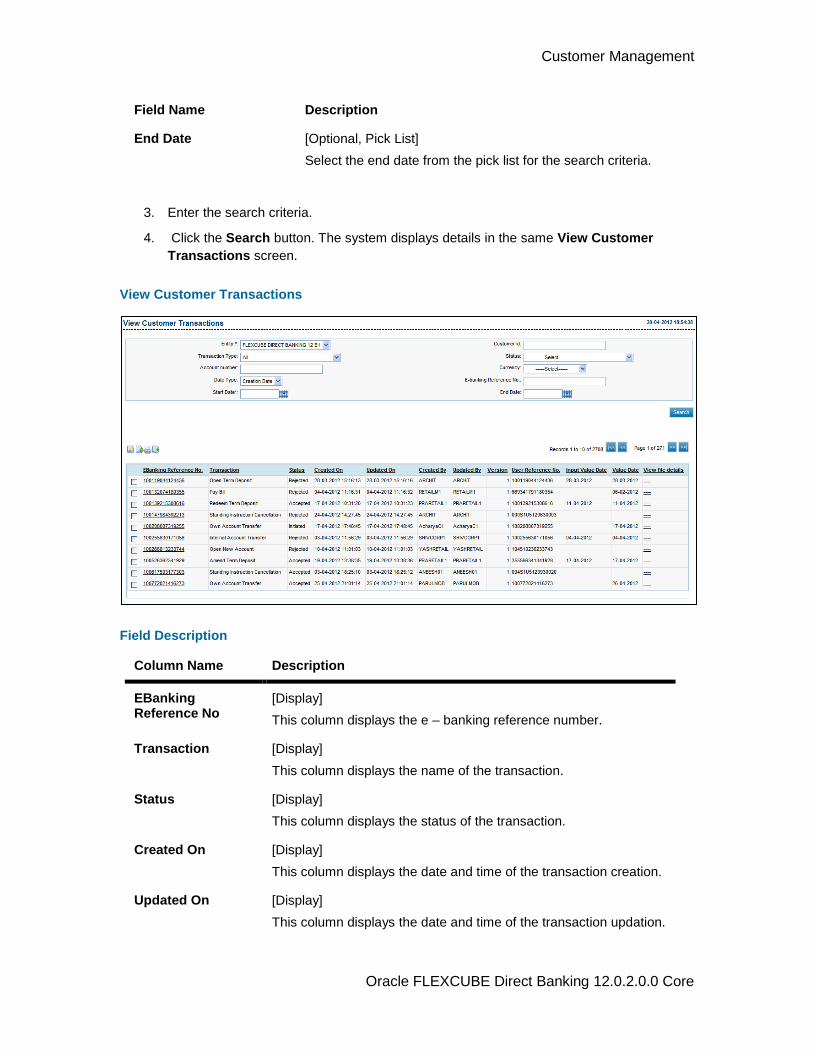
Customer Management
Oracle FLEXCUBE Direct Banking 12.0.2.0.0 Core
Field Name Description
End Date [Optional, Pick List]
Select the end date from the pick list for the search criteria.
3. Enter the search criteria.
4. Click the Search button. The system displays details in the same View Customer
Transactions screen.
View Customer Transactions
Field Description
Column Name Description
EBanking Reference No
[Display]
This column displays the e – banking reference number.
Transaction [Display]
This column displays the name of the transaction.
Status [Display]
This column displays the status of the transaction.
Created On [Display]
This column displays the date and time of the transaction creation.
Updated On [Display]
This column displays the date and time of the transaction updation.

Customer Management
Oracle FLEXCUBE Direct Banking 12.0.2.0.0 Core
Column Name Description
Created By [Display]
This column displays the name of the user who has created the transaction.
Updated By [Display]
This column displays the name of the user who has updated the transaction.
Version [Display]
This column displays the version of the transaction.
User Reference Number
[Display]
This column displays the user reference number.
Input Value Date [Display]
This column displays the value date entered by the user.
Value Date [Display]
This column displays the value date as per the bank.
View file Details [Display]
This column displays thefile details.
5. Click on the E-Banking Reference No hyperlink. The system displays the View
Transactions screen.
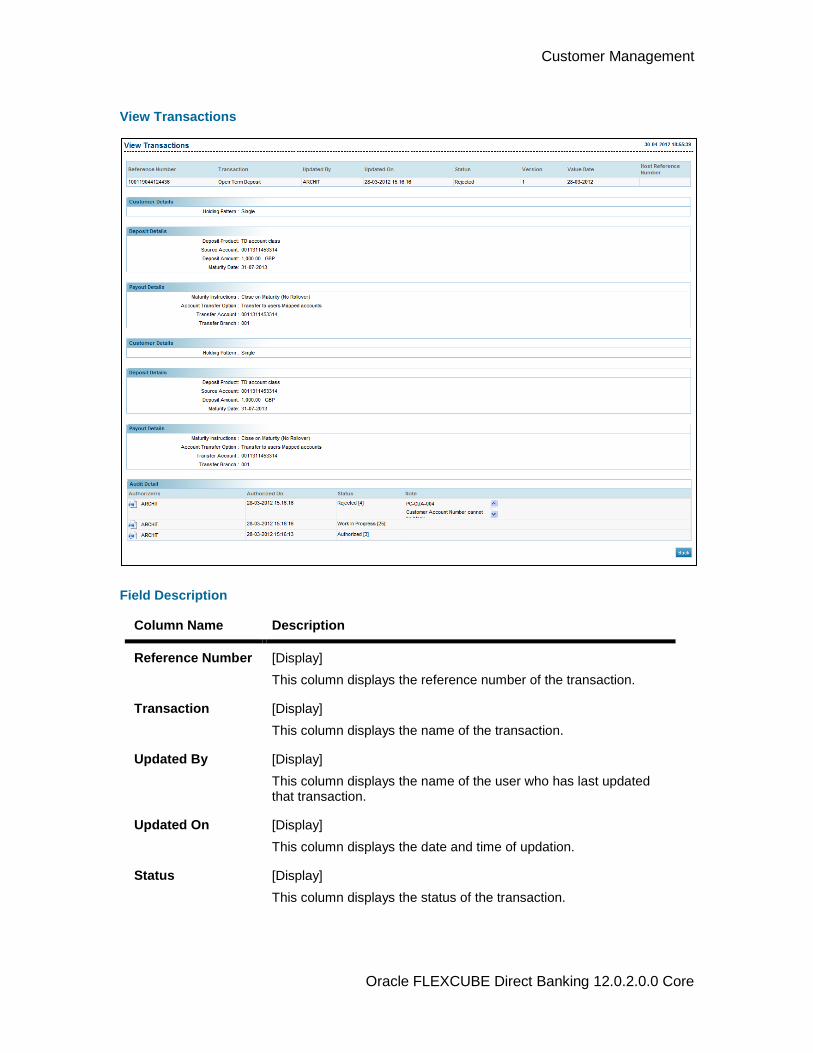
Customer Management
Oracle FLEXCUBE Direct Banking 12.0.2.0.0 Core
View Transactions
Field Description
Column Name Description
Reference Number [Display]
This column displays the reference number of the transaction.
Transaction [Display]
This column displays the name of the transaction.
Updated By [Display]
This column displays the name of the user who has last updated that transaction.
Updated On [Display]
This column displays the date and time of updation.
Status [Display]
This column displays the status of the transaction.
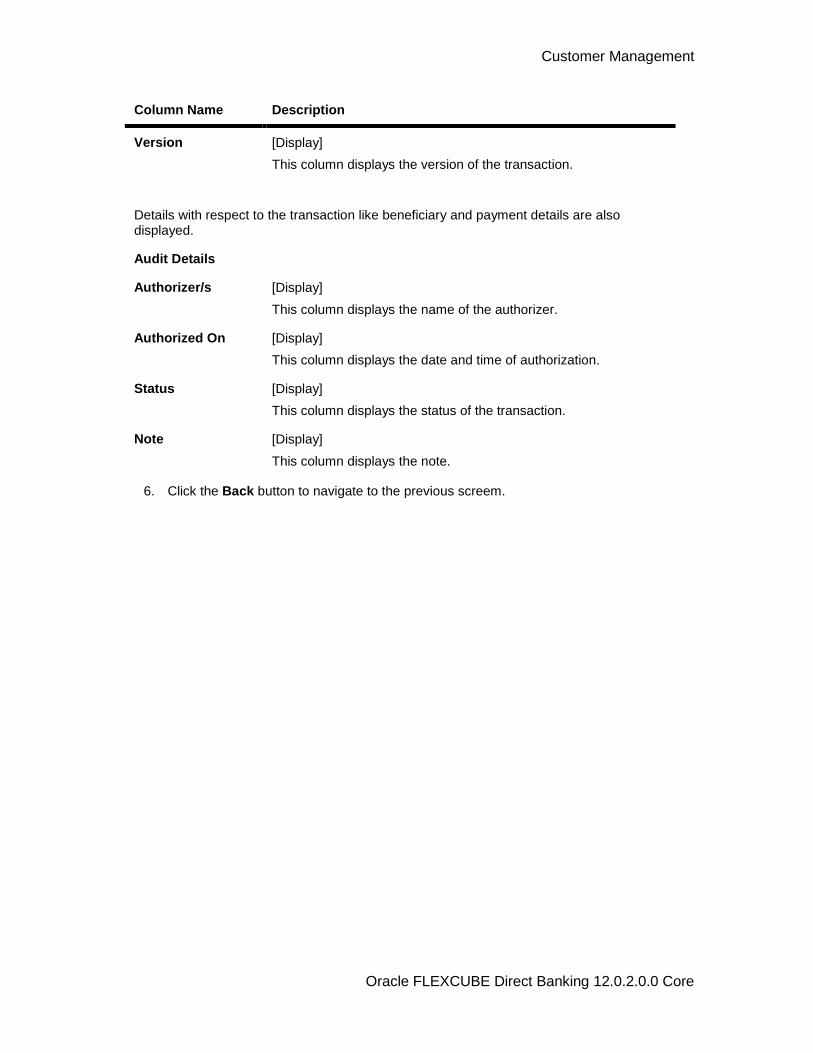
Customer Management
Oracle FLEXCUBE Direct Banking 12.0.2.0.0 Core
Column Name Description
Version [Display]
This column displays the version of the transaction.
Details with respect to the transaction like beneficiary and payment details are also displayed.
Audit Details
Authorizer/s [Display]
This column displays the name of the authorizer.
Authorized On [Display]
This column displays the date and time of authorization.
Status [Display]
This column displays the status of the transaction.
Note [Display]
This column displays the note.
6. Click the Back button to navigate to the previous screem.
Account Mapping Setup
Oracle FLEXCUBE Direct Banking 12.0.2.0.0 Core
11. Account Mapping Setup
The Account Mapping Setup is done to define the account access for a customer ID or customer through different channels available in the setup.
Two types of access rights can be defined for an account:
Inquiry
Transaction
Access can be defined for individual channels available in the set up or for all channels. Account access also can be defined for each transaction available in the system.
This transaction merges the functionality of authorised account setup and group account setup into a single transaction for maintaining the consistency and simplicity. Administrator can select the level at which he/she wants to define the account mapping. Different levels available for selection are as follows:
Customer ID
Linked Customer ID
Business User .
Depending on mapping level selected, related search criteria is displayed to the user.
To setup an account.
1. Logon to the Internet Banking application.
2. Navigate through the menus to Customer Management > Account Setup. The system
displays the Account Mapping Setup screen.
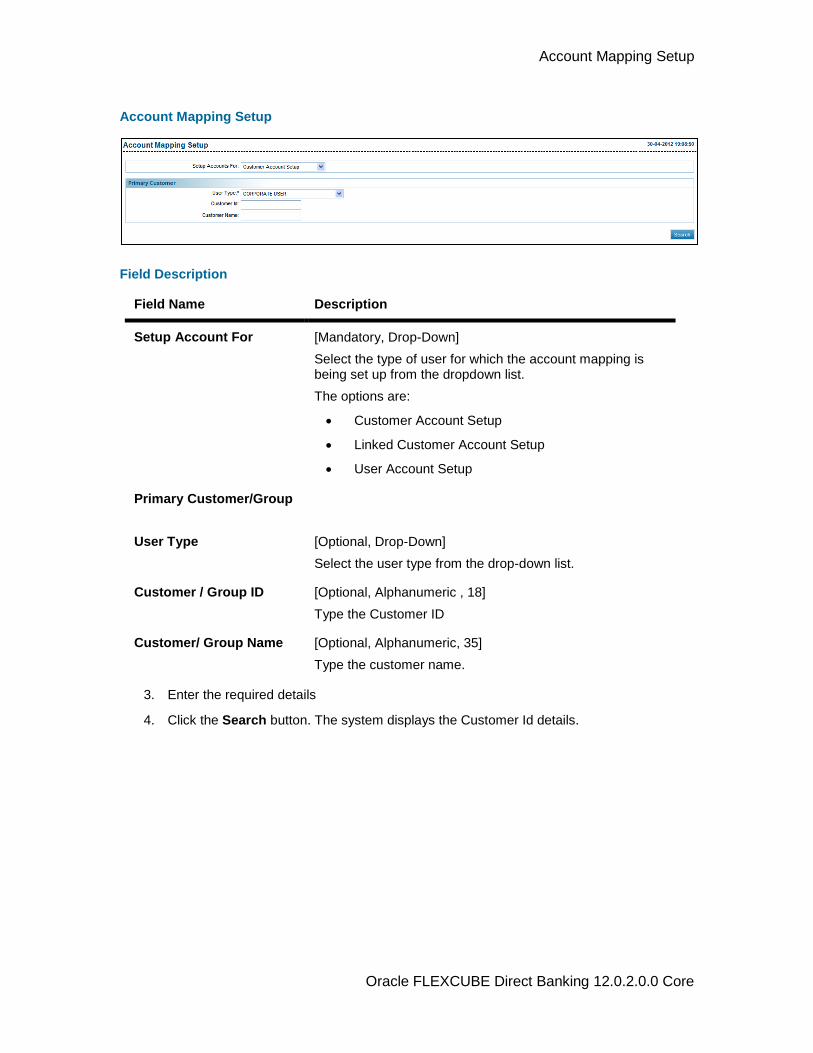
Account Mapping Setup
Oracle FLEXCUBE Direct Banking 12.0.2.0.0 Core
Account Mapping Setup
Field Description
Field Name Description
Setup Account For [Mandatory, Drop-Down]
Select the type of user for which the account mapping is being set up from the dropdown list.
The options are:
Customer Account Setup
Linked Customer Account Setup
User Account Setup
Primary Customer/Group
User Type [Optional, Drop-Down]
Select the user type from the drop-down list.
Customer / Group ID [Optional, Alphanumeric , 18]
Type the Customer ID
Customer/ Group Name [Optional, Alphanumeric, 35]
Type the customer name.
3. Enter the required details
4. Click the Search button. The system displays the Customer Id details.
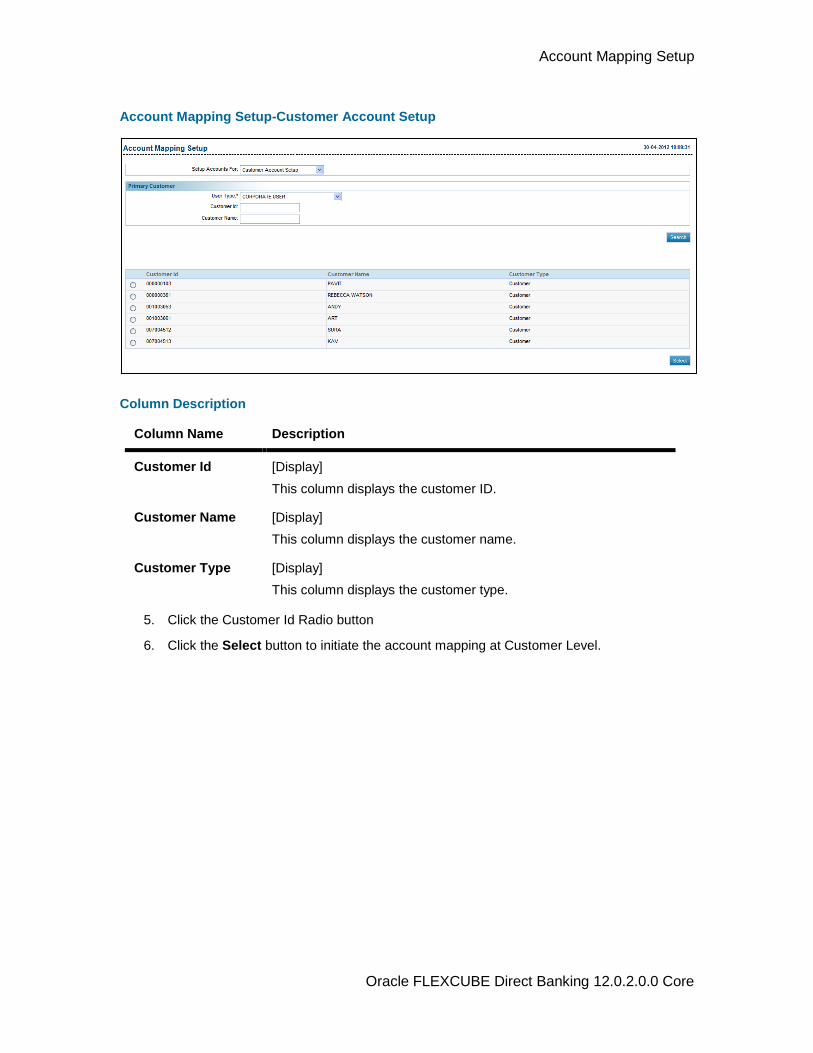
Account Mapping Setup
Oracle FLEXCUBE Direct Banking 12.0.2.0.0 Core
Account Mapping Setup-Customer Account Setup
Column Description
Column Name Description
Customer Id [Display]
This column displays the customer ID.
Customer Name [Display]
This column displays the customer name.
Customer Type [Display]
This column displays the customer type.
5. Click the Customer Id Radio button
6. Click the Select button to initiate the account mapping at Customer Level.
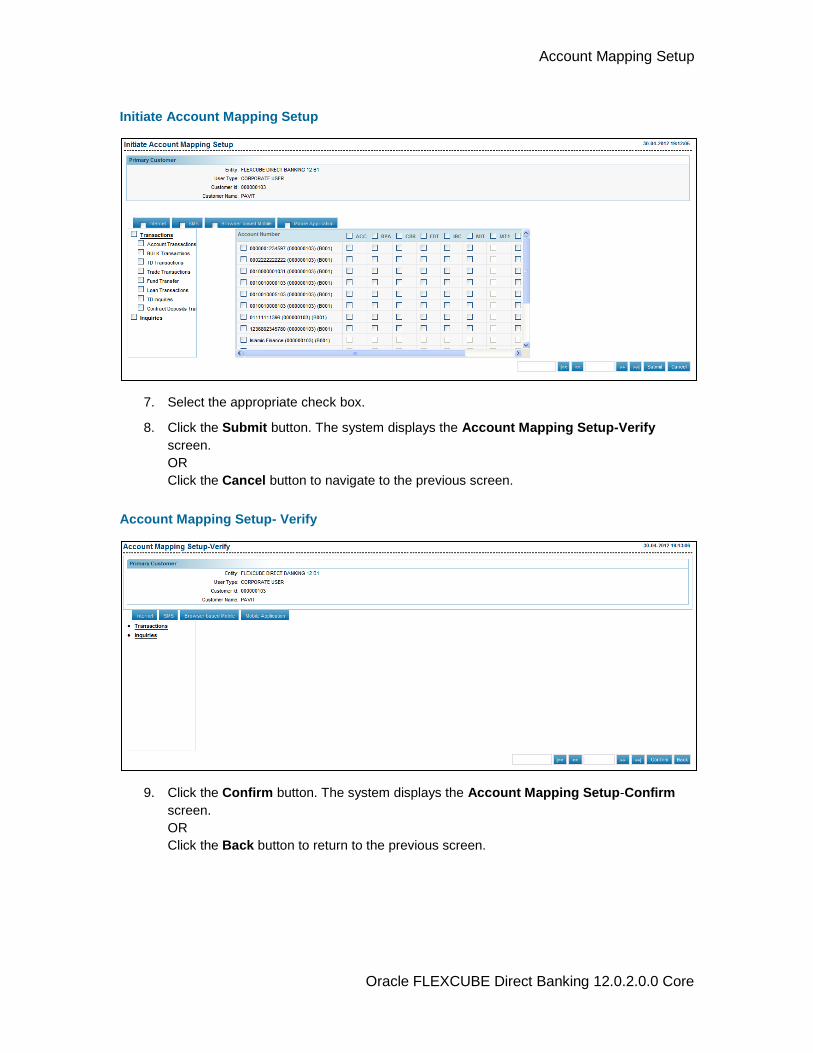
Account Mapping Setup
Oracle FLEXCUBE Direct Banking 12.0.2.0.0 Core
Initiate Account Mapping Setup
7. Select the appropriate check box.
8. Click the Submit button. The system displays the Account Mapping Setup-Verify
screen.
OR
Click the Cancel button to navigate to the previous screen.
Account Mapping Setup- Verify
9. Click the Confirm button. The system displays the Account Mapping Setup-Confirm
screen.
OR
Click the Back button to return to the previous screen.
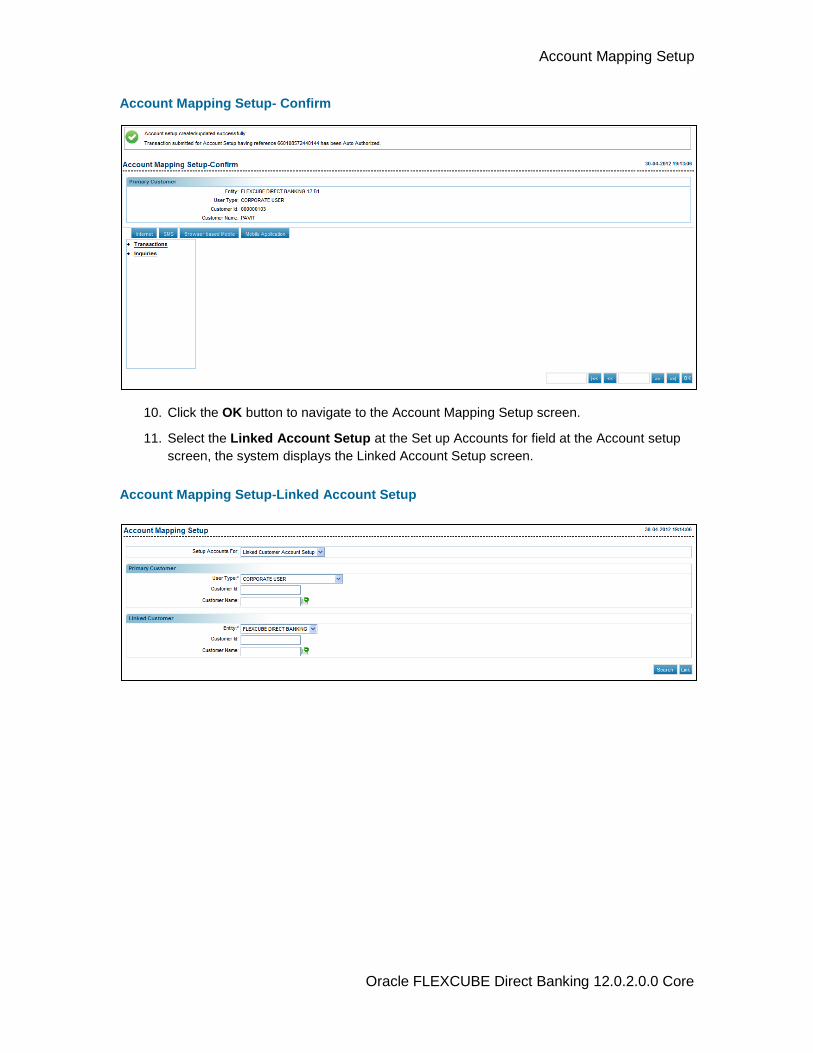
Account Mapping Setup
Oracle FLEXCUBE Direct Banking 12.0.2.0.0 Core
Account Mapping Setup- Confirm
10. Click the OK button to navigate to the Account Mapping Setup screen.
11. Select the Linked Account Setup at the Set up Accounts for field at the Account setup
screen, the system displays the Linked Account Setup screen.
Account Mapping Setup-Linked Account Setup
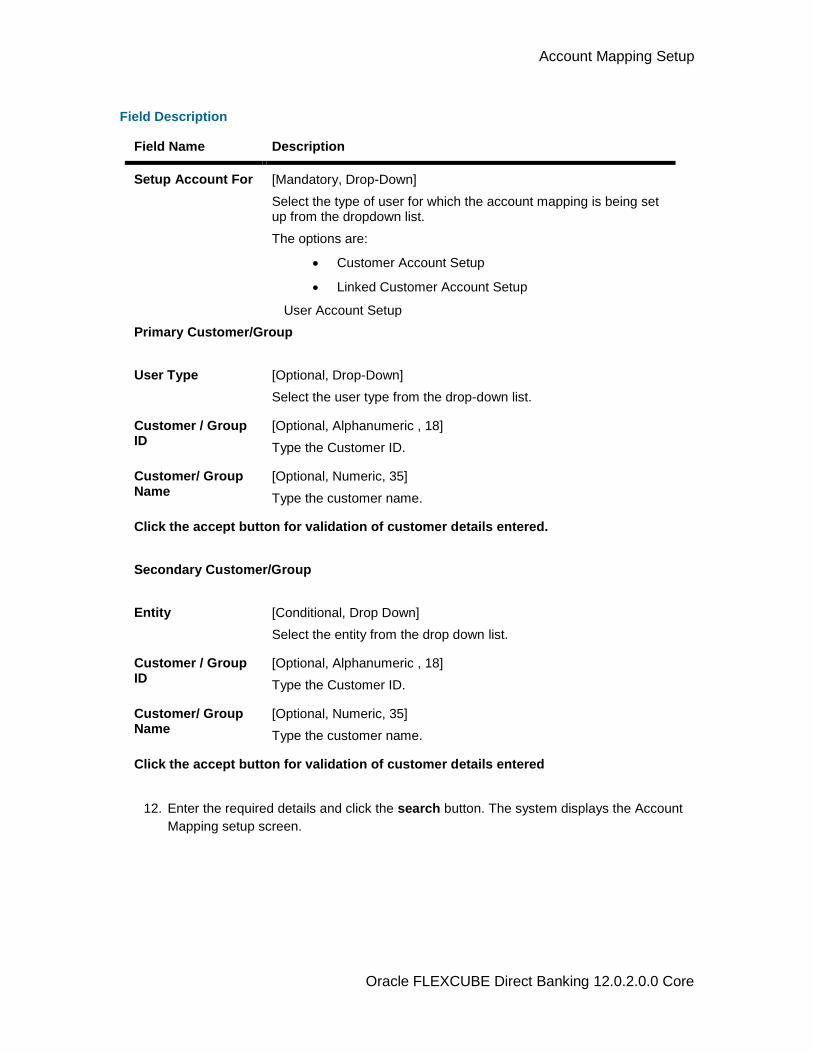
Account Mapping Setup
Oracle FLEXCUBE Direct Banking 12.0.2.0.0 Core
Field Description
Field Name Description
Setup Account For [Mandatory, Drop-Down]
Select the type of user for which the account mapping is being set up from the dropdown list.
The options are:
Customer Account Setup
Linked Customer Account Setup
User Account Setup
Primary Customer/Group
User Type [Optional, Drop-Down]
Select the user type from the drop-down list.
Customer / Group ID
[Optional, Alphanumeric , 18]
Type the Customer ID.
Customer/ Group Name
[Optional, Numeric, 35]
Type the customer name.
Click the accept button for validation of customer details entered.
Secondary Customer/Group
Entity [Conditional, Drop Down]
Select the entity from the drop down list.
Customer / Group ID
[Optional, Alphanumeric , 18]
Type the Customer ID.
Customer/ Group Name
[Optional, Numeric, 35]
Type the customer name.
Click the accept button for validation of customer details entered
12. Enter the required details and click the search button. The system displays the Account
Mapping setup screen.
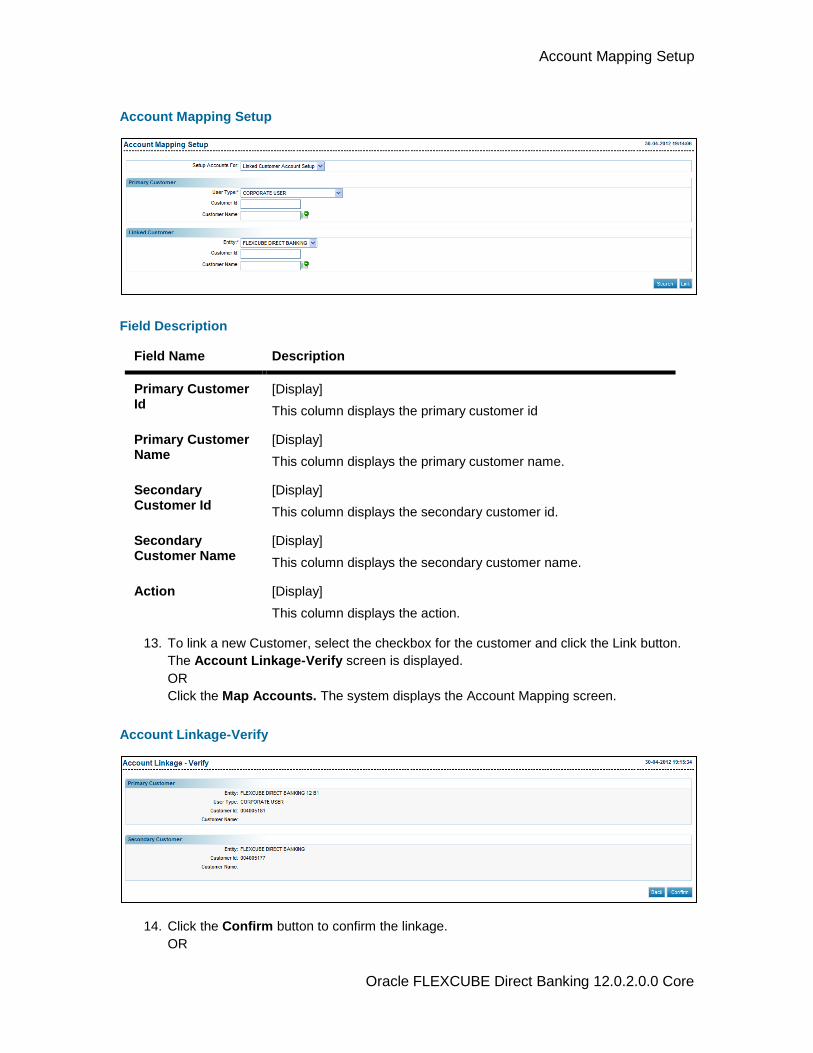
Account Mapping Setup
Oracle FLEXCUBE Direct Banking 12.0.2.0.0 Core
Account Mapping Setup
Field Description
Field Name Description
Primary Customer Id
[Display]
This column displays the primary customer id
Primary Customer Name
[Display]
This column displays the primary customer name.
Secondary Customer Id
[Display]
This column displays the secondary customer id.
Secondary Customer Name
[Display]
This column displays the secondary customer name.
Action [Display]
This column displays the action.
13. To link a new Customer, select the checkbox for the customer and click the Link button.
The Account Linkage-Verify screen is displayed.
OR
Click the Map Accounts. The system displays the Account Mapping screen.
Account Linkage-Verify
14. Click the Confirm button to confirm the linkage.
OR
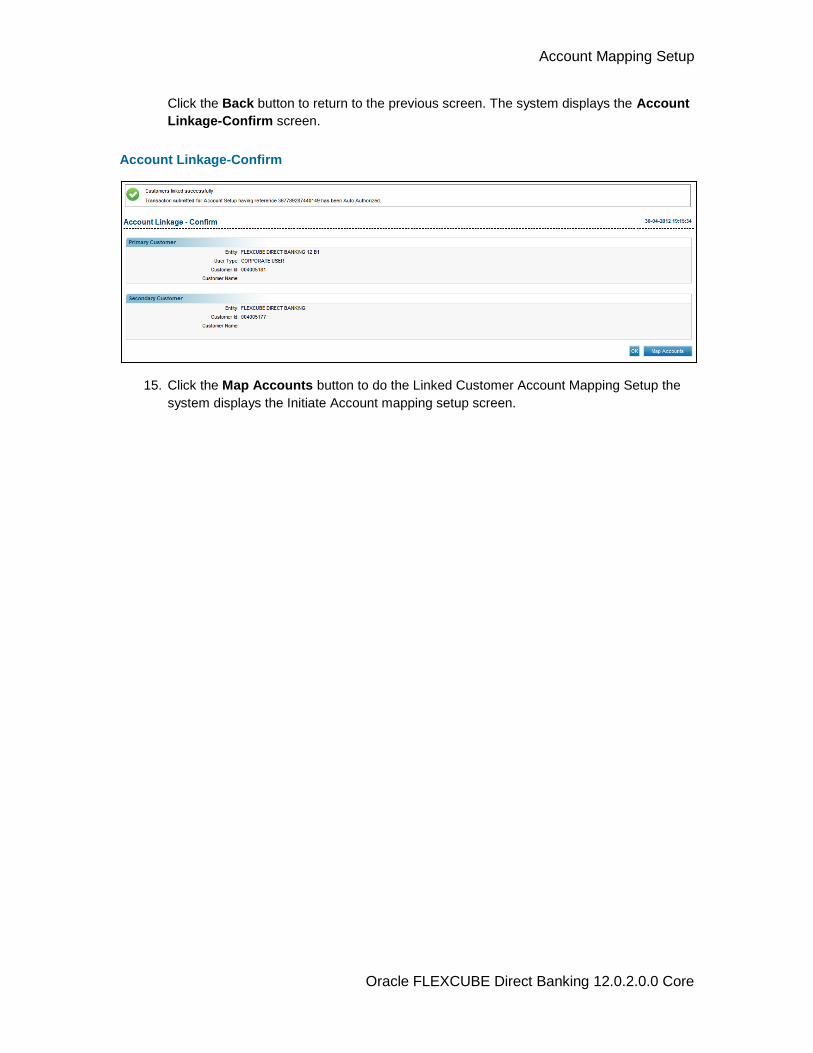
Account Mapping Setup
Oracle FLEXCUBE Direct Banking 12.0.2.0.0 Core
Click the Back button to return to the previous screen. The system displays the Account
Linkage-Confirm screen.
Account Linkage-Confirm
15. Click the Map Accounts button to do the Linked Customer Account Mapping Setup the
system displays the Initiate Account mapping setup screen.
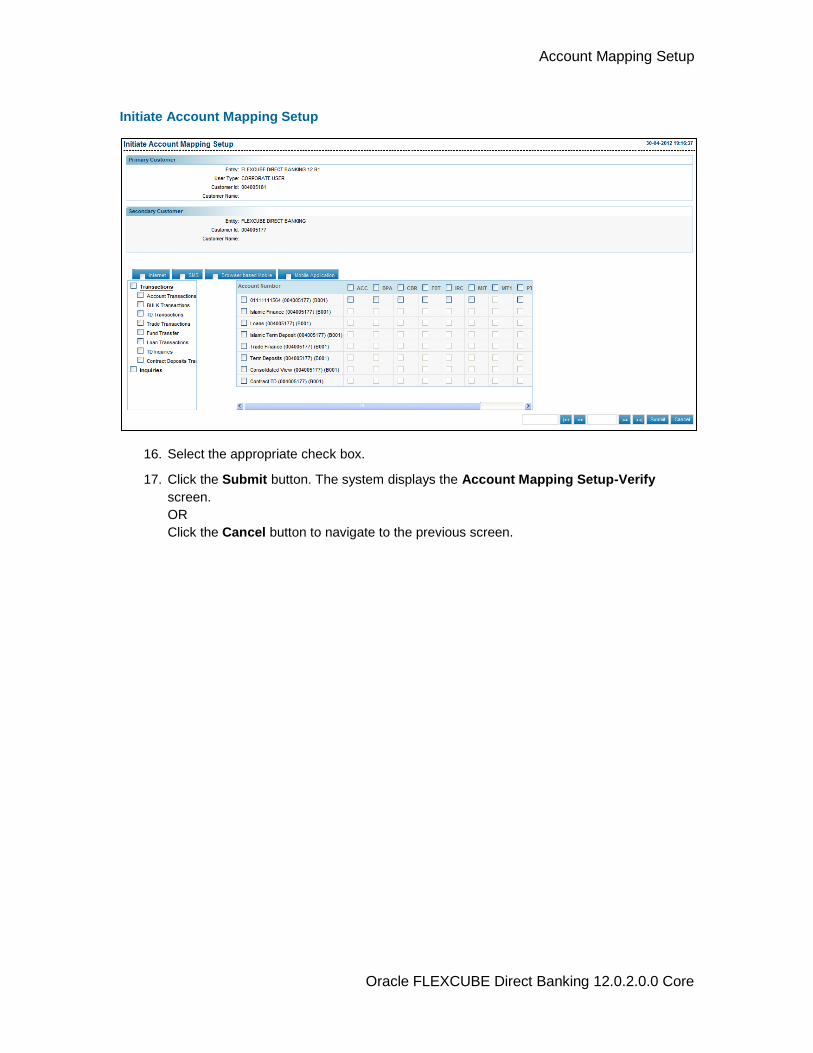
Account Mapping Setup
Oracle FLEXCUBE Direct Banking 12.0.2.0.0 Core
Initiate Account Mapping Setup
16. Select the appropriate check box.
17. Click the Submit button. The system displays the Account Mapping Setup-Verify
screen.
OR
Click the Cancel button to navigate to the previous screen.
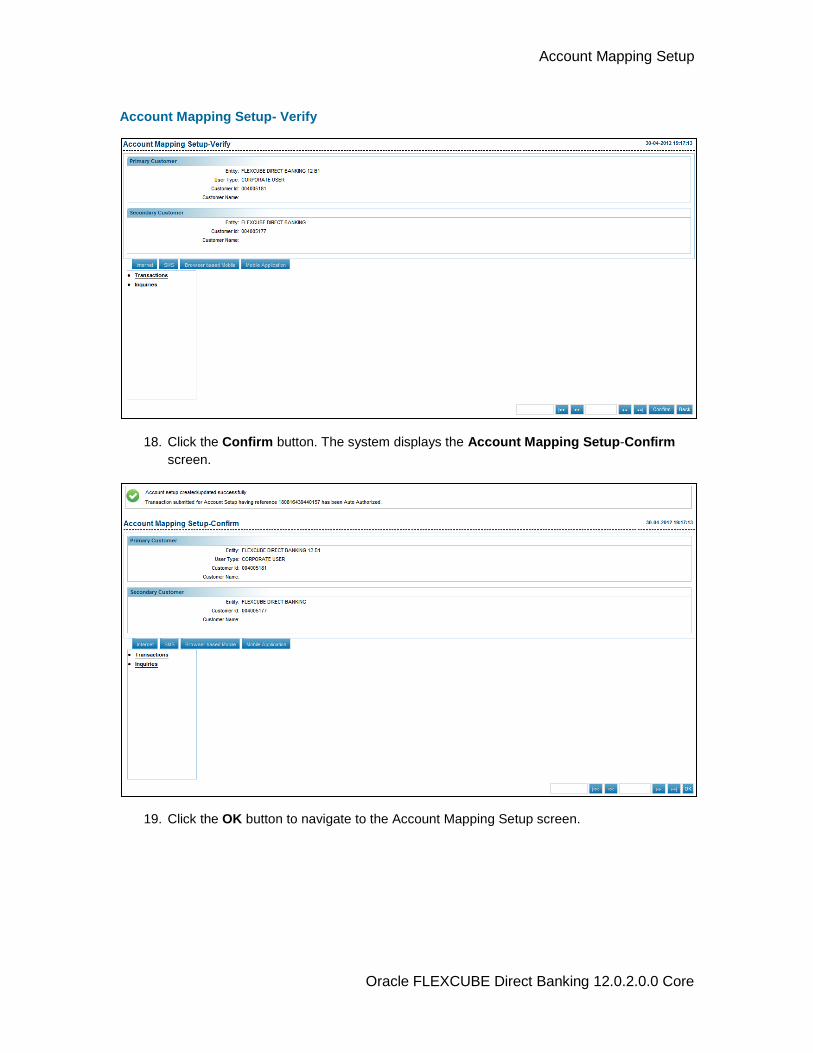
Account Mapping Setup
Oracle FLEXCUBE Direct Banking 12.0.2.0.0 Core
Account Mapping Setup- Verify
18. Click the Confirm button. The system displays the Account Mapping Setup-Confirm
screen.
19. Click the OK button to navigate to the Account Mapping Setup screen.
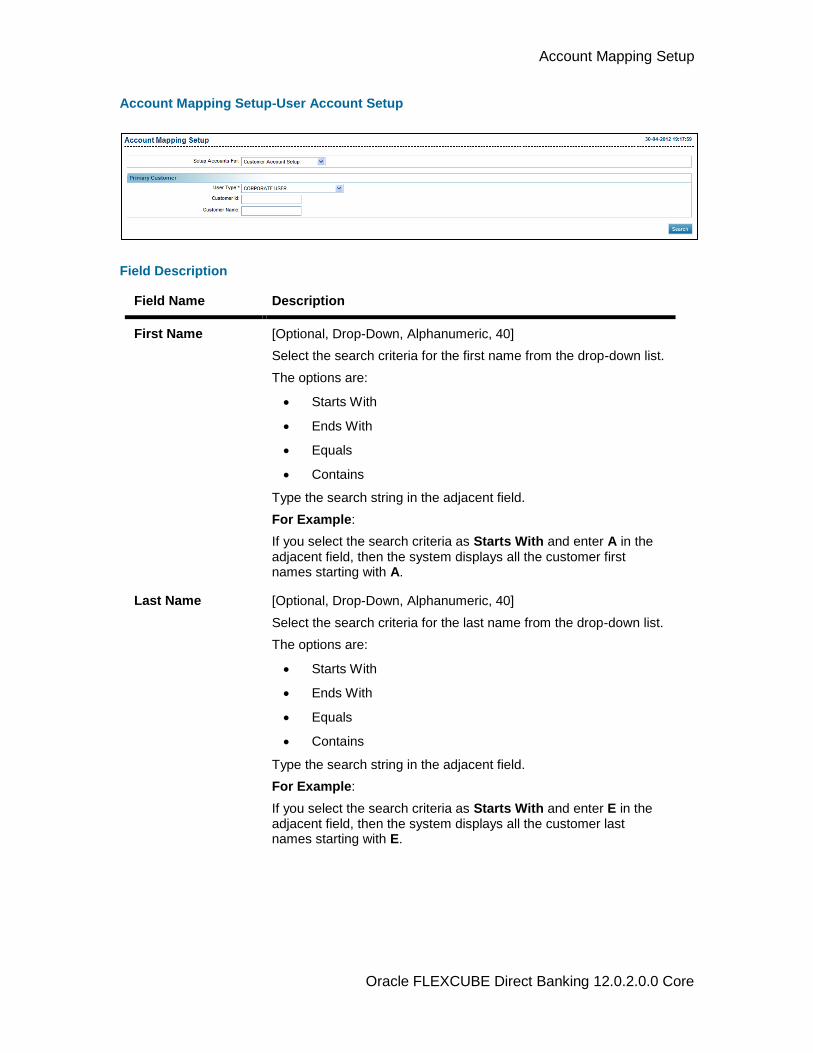
Account Mapping Setup
Oracle FLEXCUBE Direct Banking 12.0.2.0.0 Core
Account Mapping Setup-User Account Setup
Field Description
Field Name Description
First Name [Optional, Drop-Down, Alphanumeric, 40]
Select the search criteria for the first name from the drop-down list.
The options are:
Starts With
Ends With
Equals
Contains
Type the search string in the adjacent field.
For Example:
If you select the search criteria as Starts With and enter A in the adjacent field, then the system displays all the customer first names starting with A.
Last Name [Optional, Drop-Down, Alphanumeric, 40]
Select the search criteria for the last name from the drop-down list.
The options are:
Starts With
Ends With
Equals
Contains
Type the search string in the adjacent field.
For Example:
If you select the search criteria as Starts With and enter E in the adjacent field, then the system displays all the customer last names starting with E.
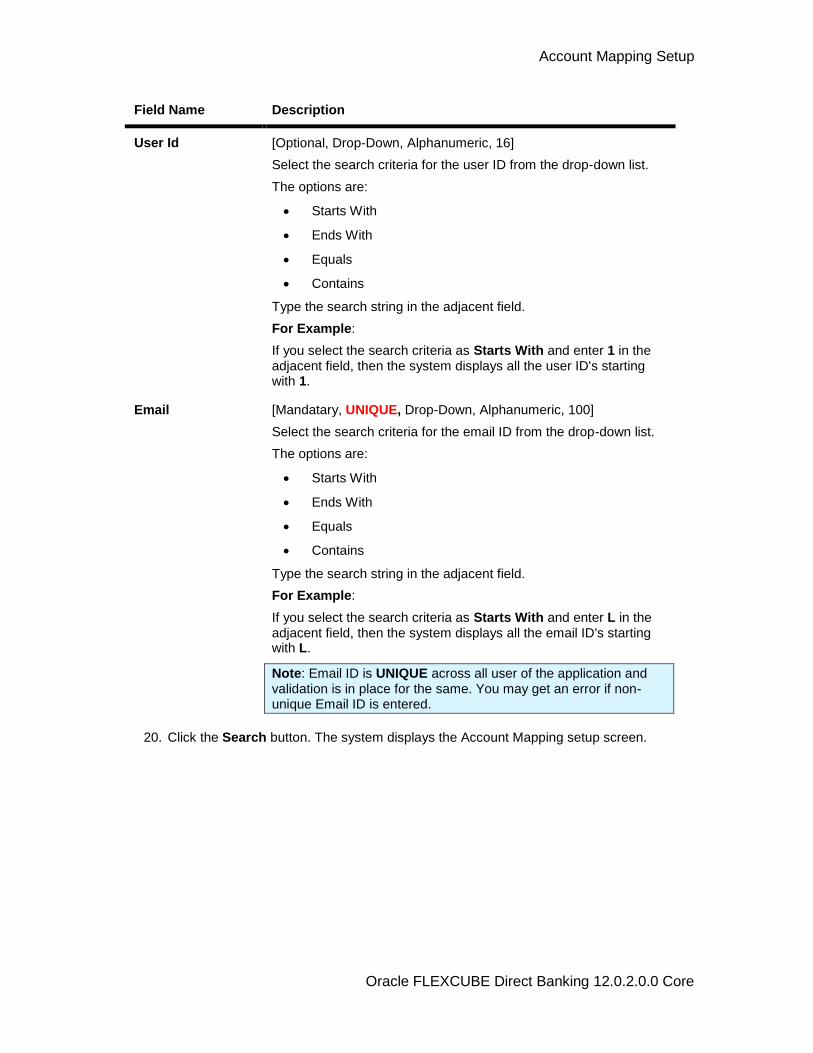
Account Mapping Setup
Oracle FLEXCUBE Direct Banking 12.0.2.0.0 Core
Field Name Description
User Id [Optional, Drop-Down, Alphanumeric, 16]
Select the search criteria for the user ID from the drop-down list.
The options are:
Starts With
Ends With
Equals
Contains
Type the search string in the adjacent field.
For Example:
If you select the search criteria as Starts With and enter 1 in the adjacent field, then the system displays all the user ID's starting with 1.
Email [Mandatary, UNIQUE, Drop-Down, Alphanumeric, 100]
Select the search criteria for the email ID from the drop-down list.
The options are:
Starts With
Ends With
Equals
Contains
Type the search string in the adjacent field.
For Example:
If you select the search criteria as Starts With and enter L in the adjacent field, then the system displays all the email ID's starting with L.
Note: Email ID is UNIQUE across all user of the application and validation is in place for the same. You may get an error if non-unique Email ID is entered.
20. Click the Search button. The system displays the Account Mapping setup screen.
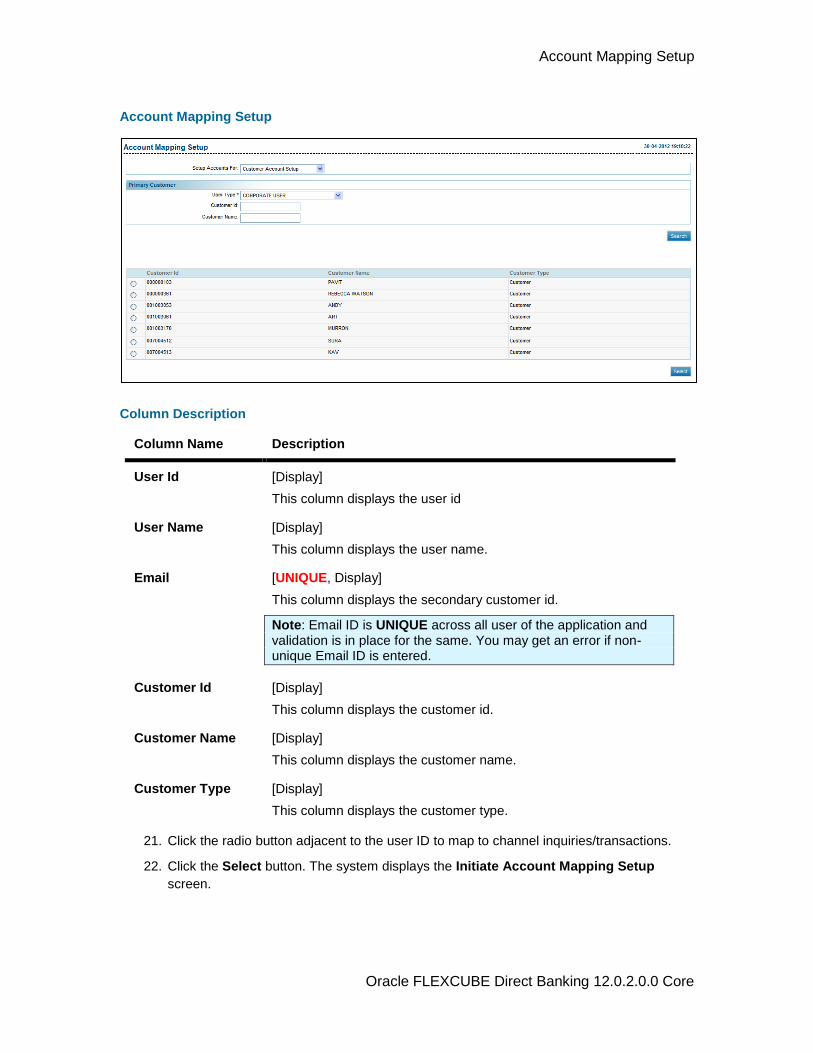
Account Mapping Setup
Oracle FLEXCUBE Direct Banking 12.0.2.0.0 Core
Account Mapping Setup
Column Description
Column Name Description
User Id [Display]
This column displays the user id
User Name [Display]
This column displays the user name.
Email [UNIQUE, Display]
This column displays the secondary customer id.
Note: Email ID is UNIQUE across all user of the application and validation is in place for the same. You may get an error if non-unique Email ID is entered.
Customer Id [Display]
This column displays the customer id.
Customer Name [Display]
This column displays the customer name.
Customer Type [Display]
This column displays the customer type.
21. Click the radio button adjacent to the user ID to map to channel inquiries/transactions.
22. Click the Select button. The system displays the Initiate Account Mapping Setup
screen.
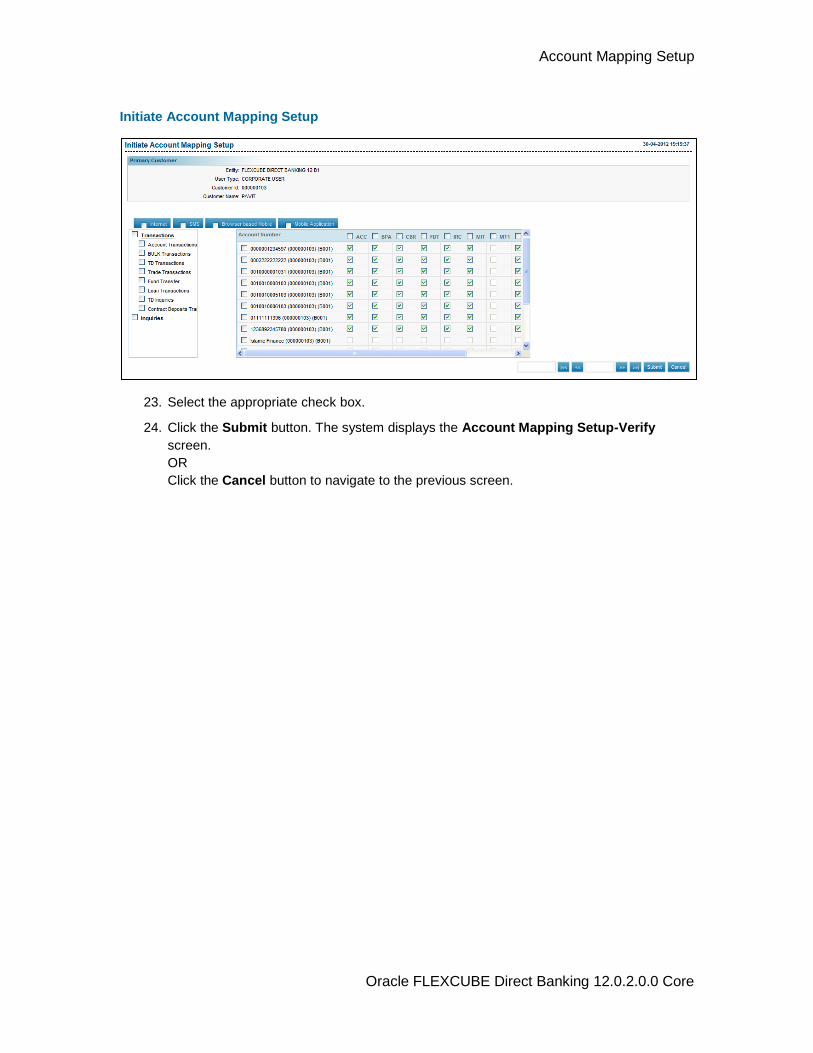
Account Mapping Setup
Oracle FLEXCUBE Direct Banking 12.0.2.0.0 Core
Initiate Account Mapping Setup
23. Select the appropriate check box.
24. Click the Submit button. The system displays the Account Mapping Setup-Verify
screen.
OR
Click the Cancel button to navigate to the previous screen.
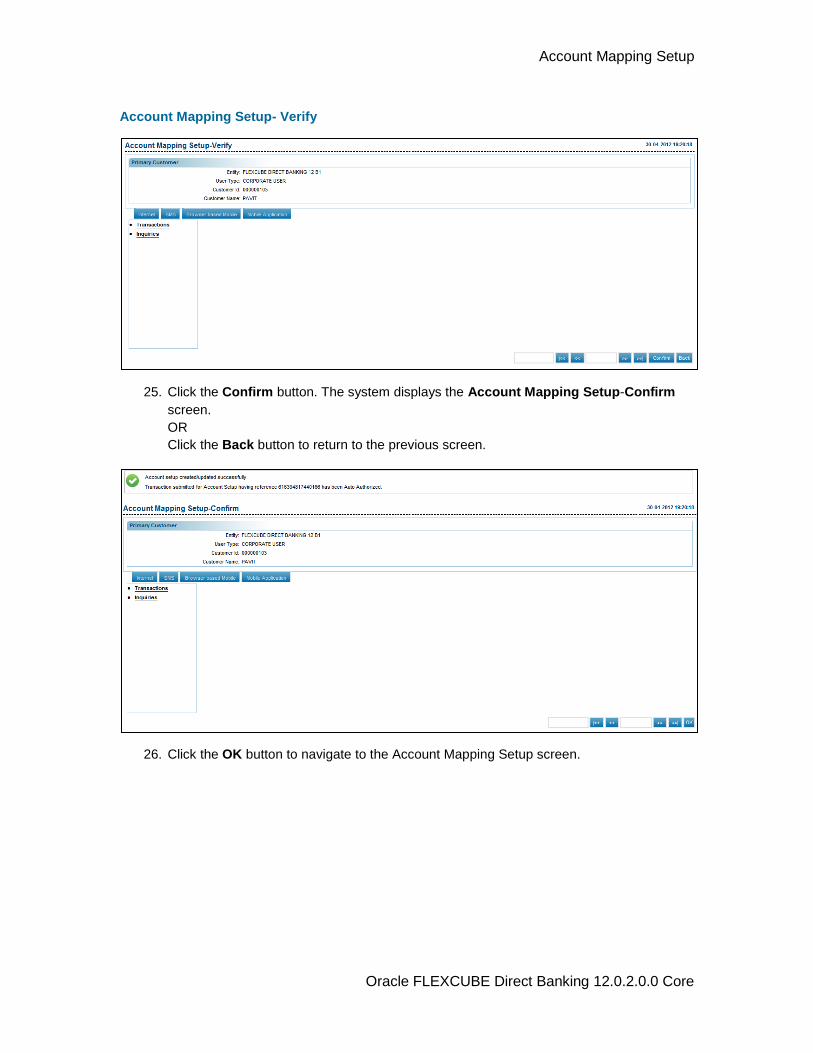
Account Mapping Setup
Oracle FLEXCUBE Direct Banking 12.0.2.0.0 Core
Account Mapping Setup- Verify
25. Click the Confirm button. The system displays the Account Mapping Setup-Confirm
screen.
OR
Click the Back button to return to the previous screen.
26. Click the OK button to navigate to the Account Mapping Setup screen.
Maintain User List
Oracle FLEXCUBE Direct Banking 12.0.2.0.0 Core
12. Maintain User List
This option allows the administrator to maintain user list. This user list is created to keep the users of a similar designation together for the purpose of Authorization activity. Users which come under one User list cannot be a part of any other list but the users which come under one list can be an authorizer as a single authorizer.
To maintain a user list.
1. Logon to the Internet Banking application.
2. Navigate through the menus to Authorisation Maintenance > Maintain User List. The
system displays the Maintain User List screen.
Maintain User List
Field Description
Field Name Description
User Type [Mandatory, Drop-Down]
Select the user type from the drop-down list.
3. Select the user type.
4. Click the Fetch User button. The system displays the Maintain User List screen with the
search result.
Maintain User List
Oracle FLEXCUBE Direct Banking 12.0.2.0.0 Core
Maintain User List
Field Description
Field Name Description
Existing List [Optional, Radio Button, Drop-Down]
Select the Existing List radio button to add the user to the existing list.
Select the list name from the drop-down list.
New List [Optional, Radio Button, Alphanumeric, 15]
Select the New List radio button to enter the name of the new list.
Type the name of the new list in the adjacent field.
This field is enabled if the radio button is selected.
Unassigned Users [Display]
This field displays the unassigned users.
Assigned Users [Display]
This field displays the assigned users.
5. Select the user and click the > button. The user id displayed in the Assigned Users field.
OR
Select the user and click the < button. The user id displayed in the Unassigned Users
field.
OR
Click the >> button to view all the users in the Assigned Users field.
OR
Click the << button to clear all the users from the Assigned Users field.
6. Click the Save button. The system displays the Maintain User List - Verify screen.
OR
Click the Cancel button. The system displays the Maintain User List screen.
Maintain User List
Oracle FLEXCUBE Direct Banking 12.0.2.0.0 Core
Maintain User List - Verify
7. Click the Confirm button. The system displays the Maintain User List - Confirm screen
with the status message.
OR
Click the Back button to navigate to the previous screen.
Maintain User List - Confirm
8. Click the OK button. The system displays the Maintain User List screen.
Manage Rules
Oracle FLEXCUBE Direct Banking 12.0.2.0.0 Core
13. Manage Rules
This option allows the administrator to manage the rules.
There are four types of authorization rules:
Non – Sequential: This authorization mandate doesn’t follow any authorization sequence.
Sequential: Under sequential authorization mandate, the authorization can be done only by sequence.
To manage a rule
1. Logon to the Internet Banking application.
2. Navigate through the menus to Authorisation Maintenance > Manage Rule. The
system displays the Manage Rules screen.
Manage Rules
Field Description
Field Name Description
User Type [Mandatory, Drop-Down]
Select the user type from the drop-down list.
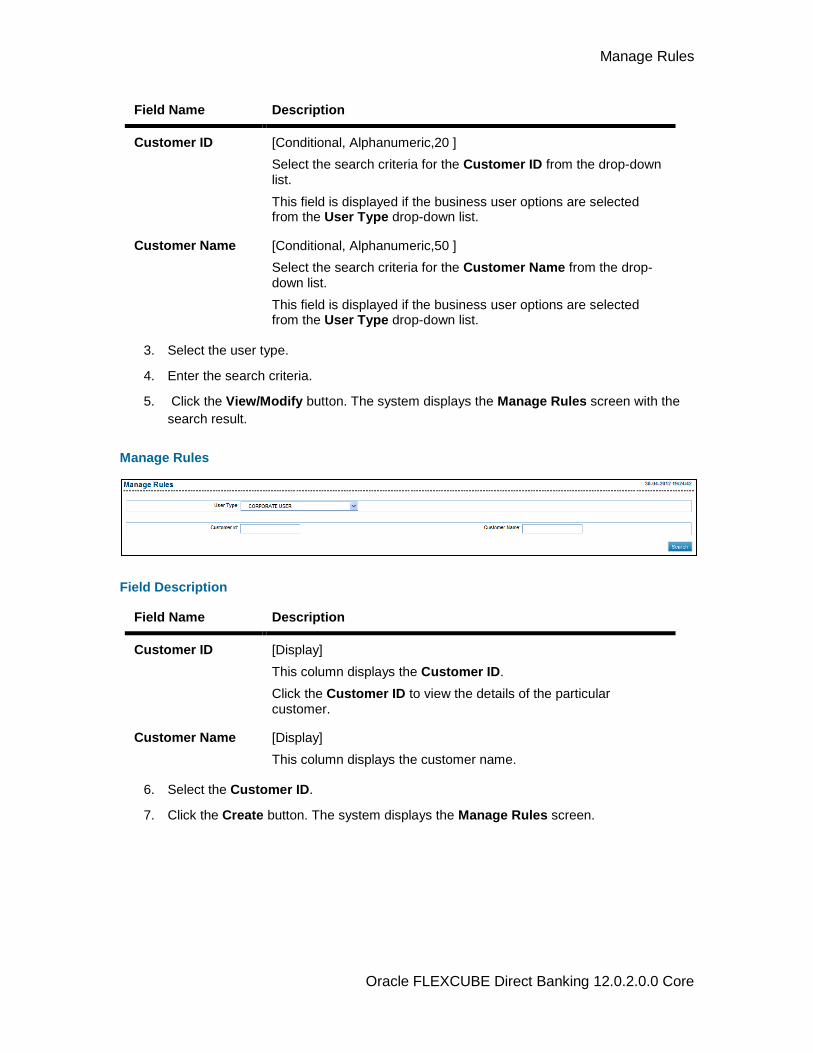
Manage Rules
Oracle FLEXCUBE Direct Banking 12.0.2.0.0 Core
Field Name Description
Customer ID [Conditional, Alphanumeric,20 ]
Select the search criteria for the Customer ID from the drop-down list.
This field is displayed if the business user options are selected from the User Type drop-down list.
Customer Name [Conditional, Alphanumeric,50 ]
Select the search criteria for the Customer Name from the drop-down list.
This field is displayed if the business user options are selected from the User Type drop-down list.
3. Select the user type.
4. Enter the search criteria.
5. Click the View/Modify button. The system displays the Manage Rules screen with the
search result.
Manage Rules
Field Description
Field Name Description
Customer ID [Display]
This column displays the Customer ID.
Click the Customer ID to view the details of the particular customer.
Customer Name [Display]
This column displays the customer name.
6. Select the Customer ID.
7. Click the Create button. The system displays the Manage Rules screen.
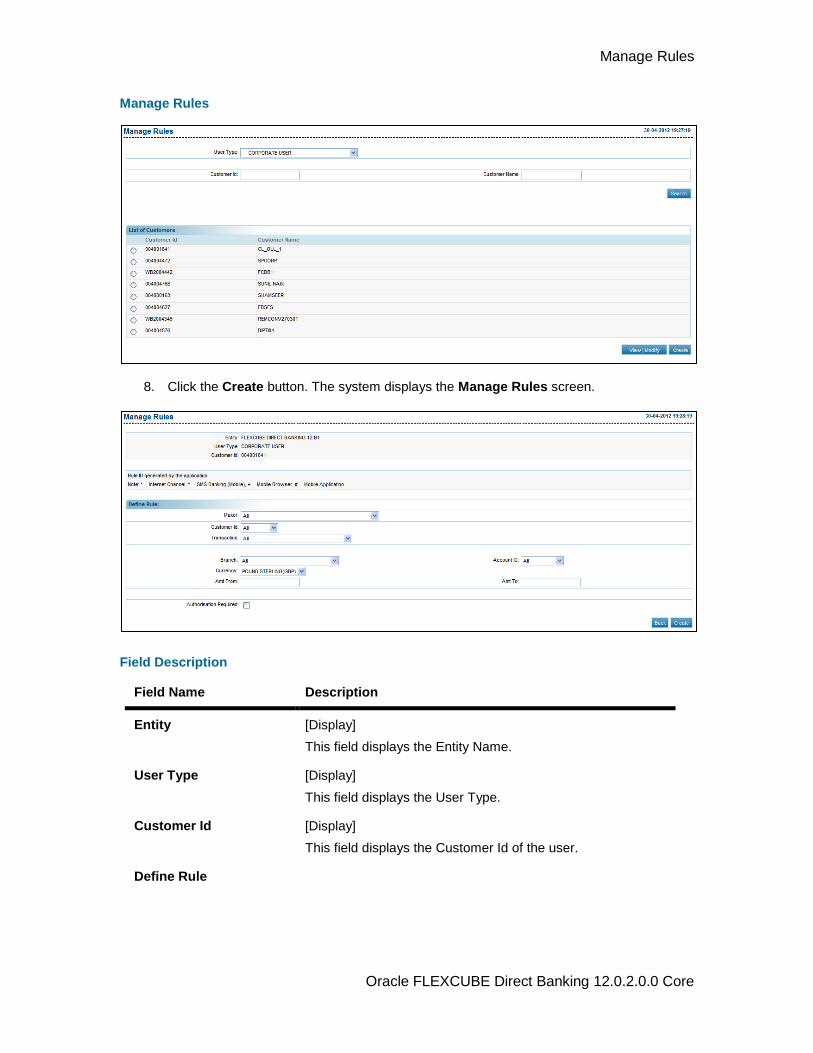
Manage Rules
Oracle FLEXCUBE Direct Banking 12.0.2.0.0 Core
Manage Rules
8. Click the Create button. The system displays the Manage Rules screen.
Field Description
Field Name Description
Entity [Display]
This field displays the Entity Name.
User Type [Display]
This field displays the User Type.
Customer Id [Display]
This field displays the Customer Id of the user.
Define Rule
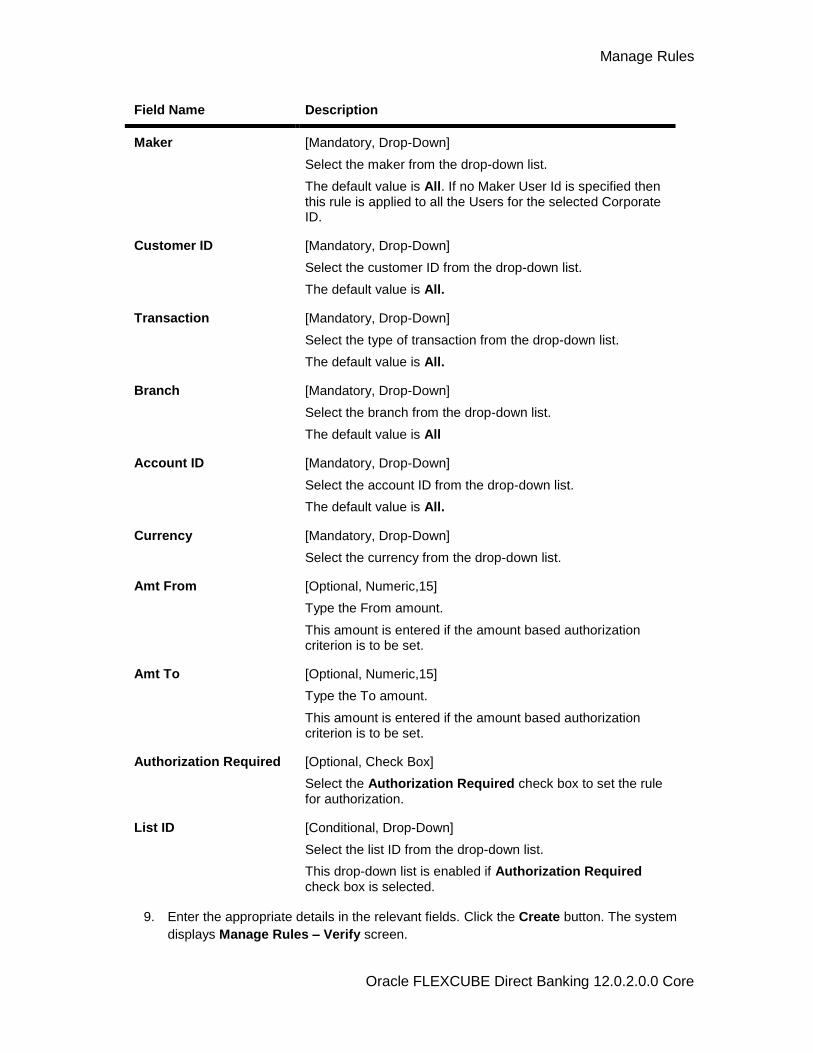
Manage Rules
Oracle FLEXCUBE Direct Banking 12.0.2.0.0 Core
Field Name Description
Maker [Mandatory, Drop-Down]
Select the maker from the drop-down list.
The default value is All. If no Maker User Id is specified then this rule is applied to all the Users for the selected Corporate ID.
Customer ID [Mandatory, Drop-Down]
Select the customer ID from the drop-down list.
The default value is All.
Transaction [Mandatory, Drop-Down]
Select the type of transaction from the drop-down list.
The default value is All.
Branch [Mandatory, Drop-Down]
Select the branch from the drop-down list.
The default value is All
Account ID [Mandatory, Drop-Down]
Select the account ID from the drop-down list.
The default value is All.
Currency [Mandatory, Drop-Down]
Select the currency from the drop-down list.
Amt From [Optional, Numeric,15]
Type the From amount.
This amount is entered if the amount based authorization criterion is to be set.
Amt To [Optional, Numeric,15]
Type the To amount.
This amount is entered if the amount based authorization criterion is to be set.
Authorization Required [Optional, Check Box]
Select the Authorization Required check box to set the rule for authorization.
List ID [Conditional, Drop-Down]
Select the list ID from the drop-down list.
This drop-down list is enabled if Authorization Required check box is selected.
9. Enter the appropriate details in the relevant fields. Click the Create button. The system
displays Manage Rules – Verify screen.
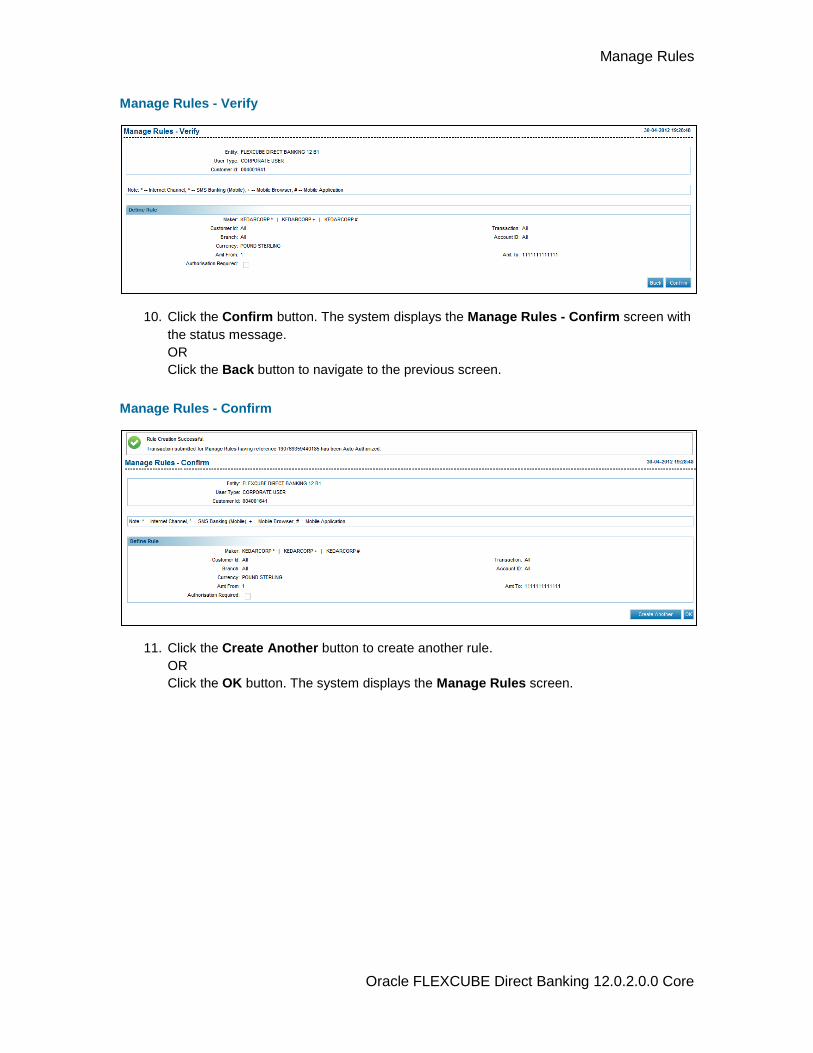
Manage Rules
Oracle FLEXCUBE Direct Banking 12.0.2.0.0 Core
Manage Rules - Verify
10. Click the Confirm button. The system displays the Manage Rules - Confirm screen with
the status message.
OR
Click the Back button to navigate to the previous screen.
Manage Rules - Confirm
11. Click the Create Another button to create another rule.
OR
Click the OK button. The system displays the Manage Rules screen.
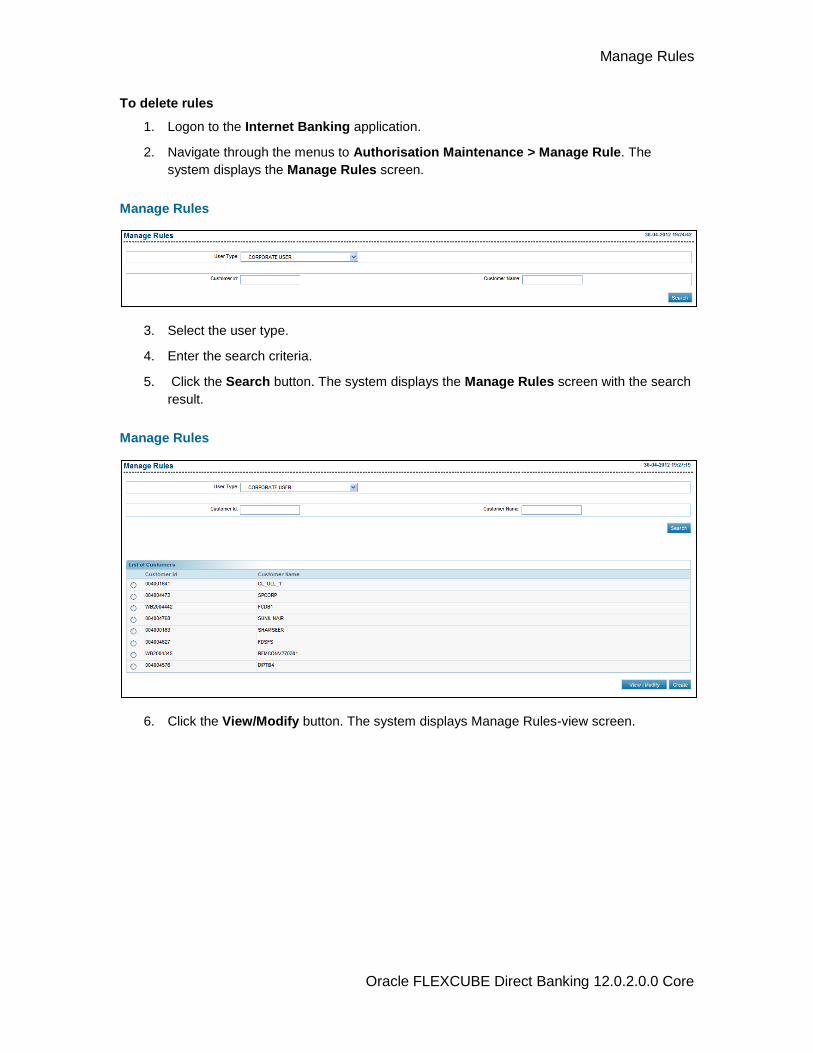
Manage Rules
Oracle FLEXCUBE Direct Banking 12.0.2.0.0 Core
To delete rules
1. Logon to the Internet Banking application.
2. Navigate through the menus to Authorisation Maintenance > Manage Rule. The
system displays the Manage Rules screen.
Manage Rules
3. Select the user type.
4. Enter the search criteria.
5. Click the Search button. The system displays the Manage Rules screen with the search
result.
Manage Rules
6. Click the View/Modify button. The system displays Manage Rules-view screen.
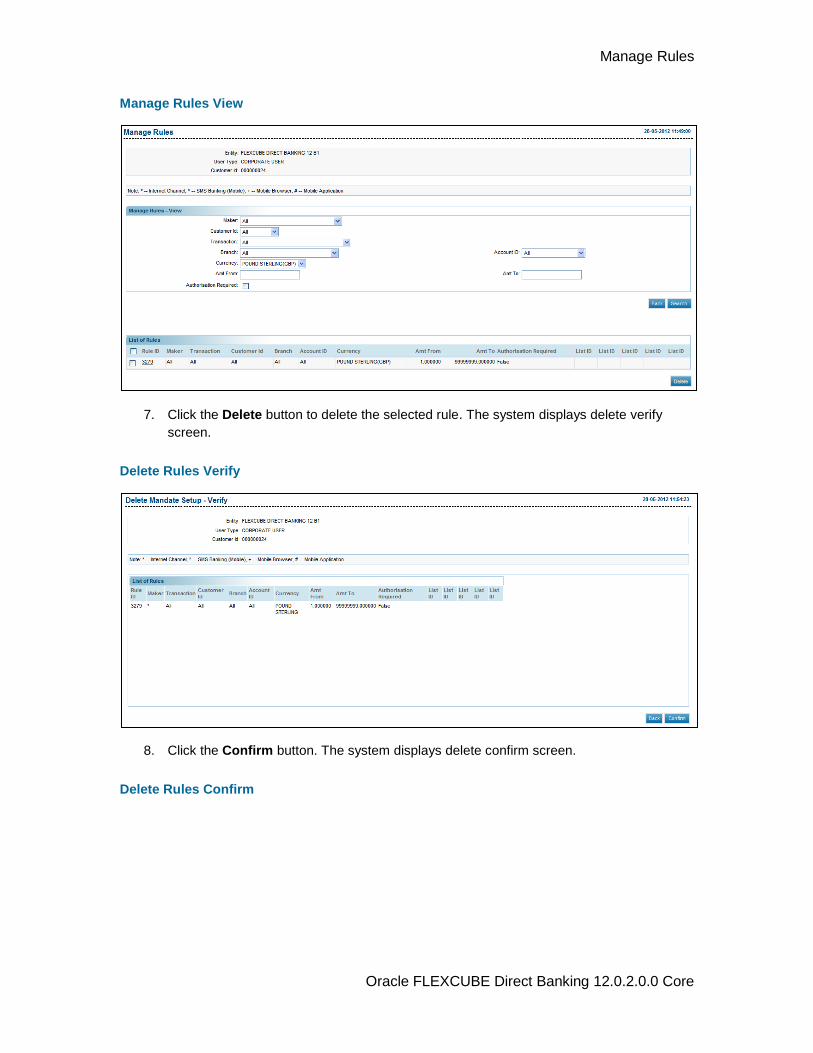
Manage Rules
Oracle FLEXCUBE Direct Banking 12.0.2.0.0 Core
Manage Rules View
7. Click the Delete button to delete the selected rule. The system displays delete verify
screen.
Delete Rules Verify
8. Click the Confirm button. The system displays delete confirm screen.
Delete Rules Confirm
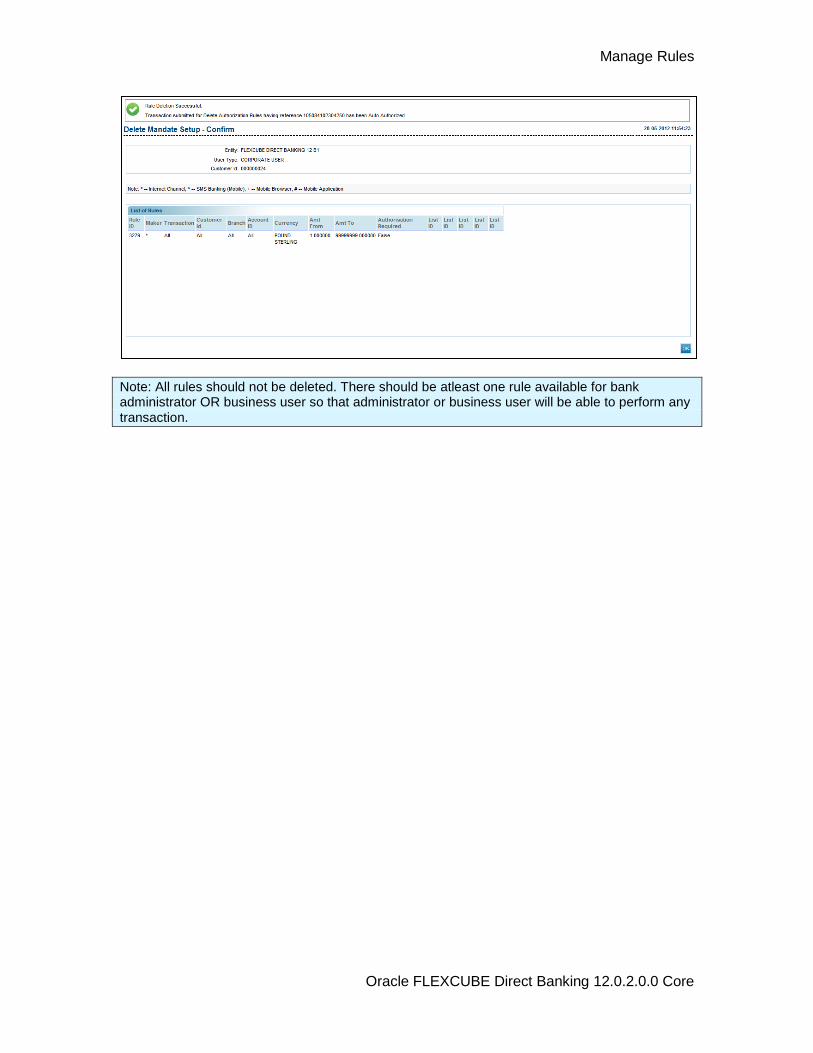
Manage Rules
Oracle FLEXCUBE Direct Banking 12.0.2.0.0 Core
Note: All rules should not be deleted. There should be atleast one rule available for bank administrator OR business user so that administrator or business user will be able to perform any transaction.
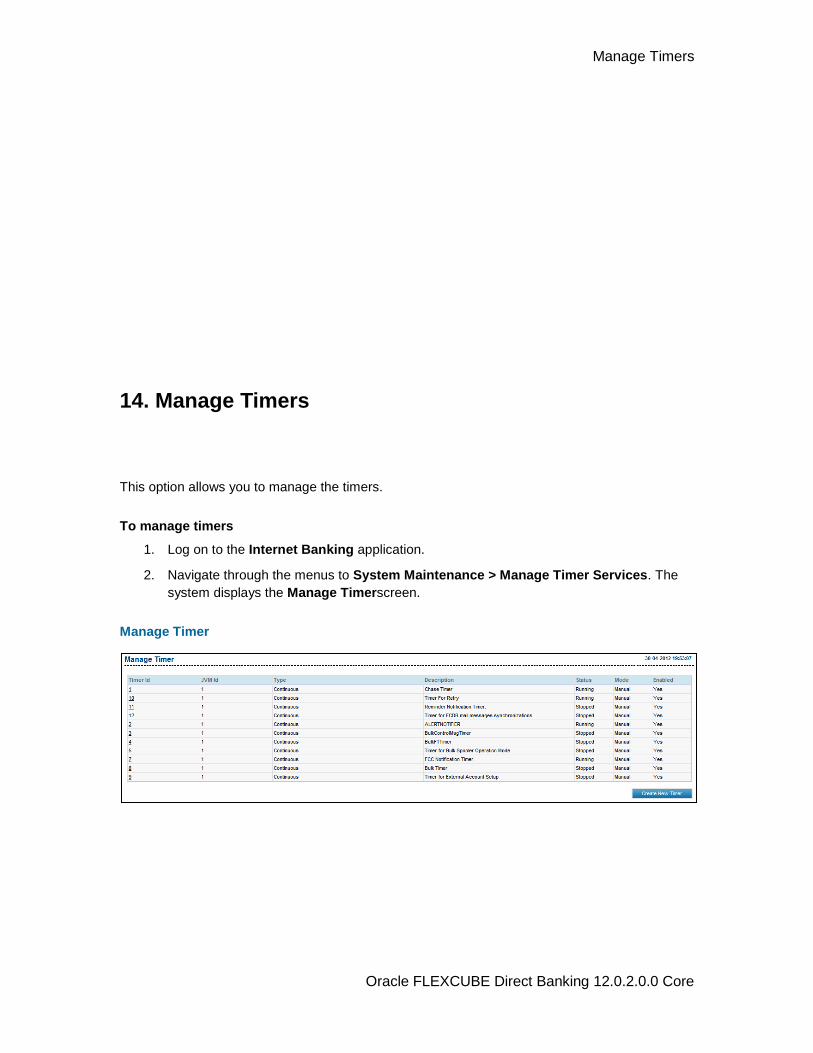
Manage Timers
Oracle FLEXCUBE Direct Banking 12.0.2.0.0 Core
14. Manage Timers
This option allows you to manage the timers.
To manage timers
1. Log on to the Internet Banking application.
2. Navigate through the menus to System Maintenance > Manage Timer Services. The
system displays the Manage Timerscreen.
Manage Timer
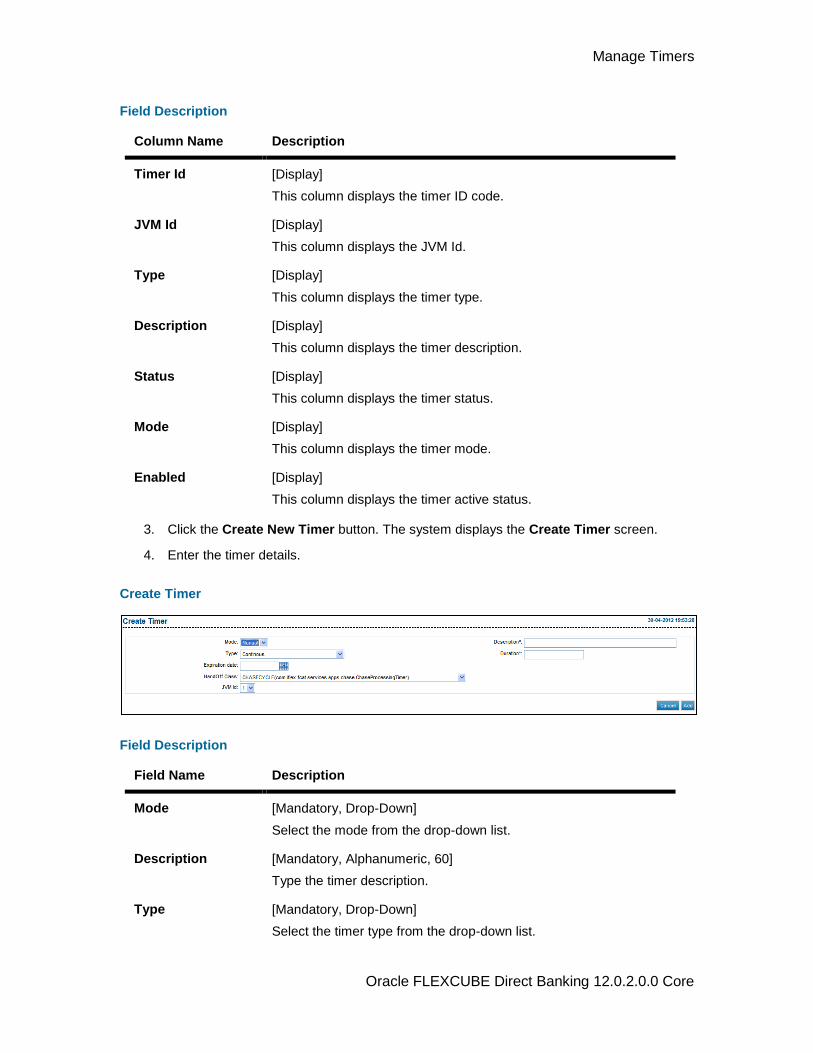
Manage Timers
Oracle FLEXCUBE Direct Banking 12.0.2.0.0 Core
Field Description
Column Name Description
Timer Id [Display]
This column displays the timer ID code.
JVM Id [Display]
This column displays the JVM Id.
Type [Display]
This column displays the timer type.
Description [Display]
This column displays the timer description.
Status [Display]
This column displays the timer status.
Mode [Display]
This column displays the timer mode.
Enabled [Display]
This column displays the timer active status.
3. Click the Create New Timer button. The system displays the Create Timer screen.
4. Enter the timer details.
Create Timer
Field Description
Field Name Description
Mode [Mandatory, Drop-Down]
Select the mode from the drop-down list.
Description [Mandatory, Alphanumeric, 60]
Type the timer description.
Type [Mandatory, Drop-Down]
Select the timer type from the drop-down list.
Manage Timers
Oracle FLEXCUBE Direct Banking 12.0.2.0.0 Core
Field Name Description
Duration [Conditional, Numeric, 20]
Type the timer duration in this field.
This field is enabled only if Continuous or Continuous starts at specific date and time option is selected in the Type drop-down list.
Expiration Date [Conditional, Pick List]
Select the date and time from the pick list.
This field is enabled only if One time at specific date and time or Continuous starts at specific date and time option is selected in the Type drop-down list.
Hand Off Class [Mandatory, Drop-Down]
Select the hand off class from the drop-down list.
JVM Id [Mandatory, Drop-Down]
Select the JVM ID from the drop-down list.
5. Click the Add button. The system displays the Create Timer - Verify screen.
Create Timer - Verify
6. Click the Confirm button. The system displays the Create Timer - Verify screen with the
status message.
OR
Click the Back button to navigate to the previous screen.
Manage Timers
Oracle FLEXCUBE Direct Banking 12.0.2.0.0 Core
Create Timer - Confirm
7. Click the Back To Main Page button. The system displays the Manage Timer screen.
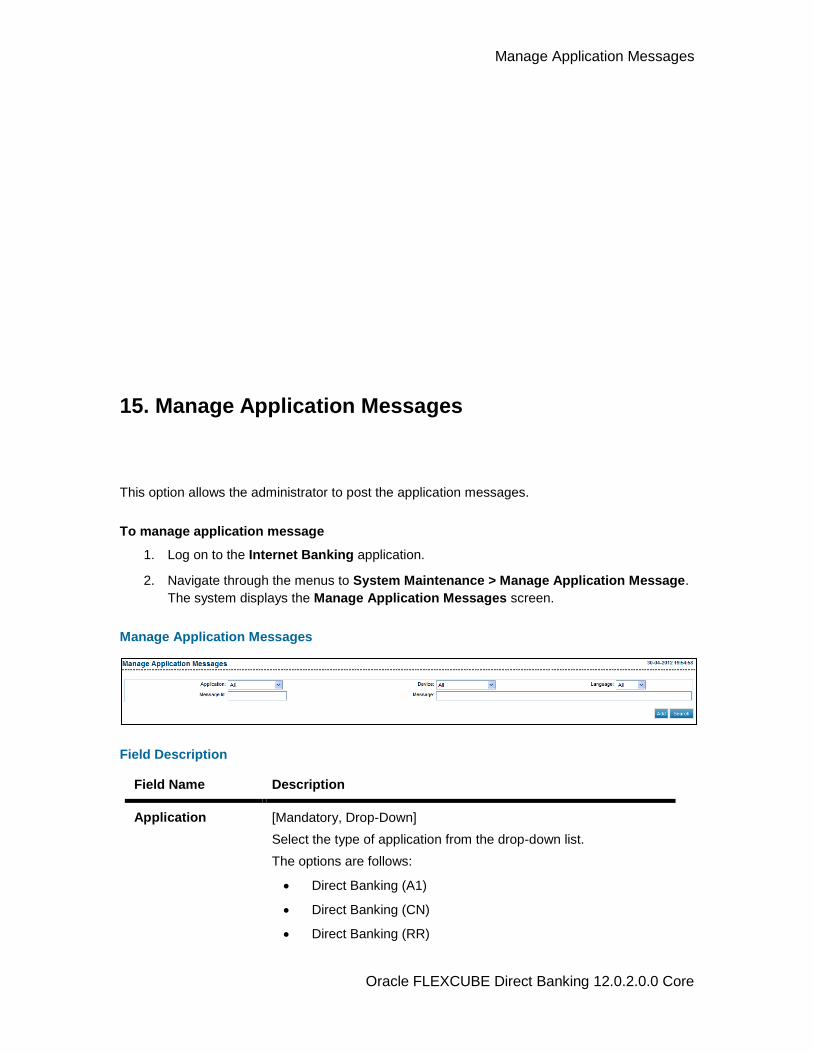
Manage Application Messages
Oracle FLEXCUBE Direct Banking 12.0.2.0.0 Core
15. Manage Application Messages
This option allows the administrator to post the application messages.
To manage application message
1. Log on to the Internet Banking application.
2. Navigate through the menus to System Maintenance > Manage Application Message.
The system displays the Manage Application Messages screen.
Manage Application Messages
Field Description
Field Name Description
Application [Mandatory, Drop-Down]
Select the type of application from the drop-down list.
The options are follows:
Direct Banking (A1)
Direct Banking (CN)
Direct Banking (RR)
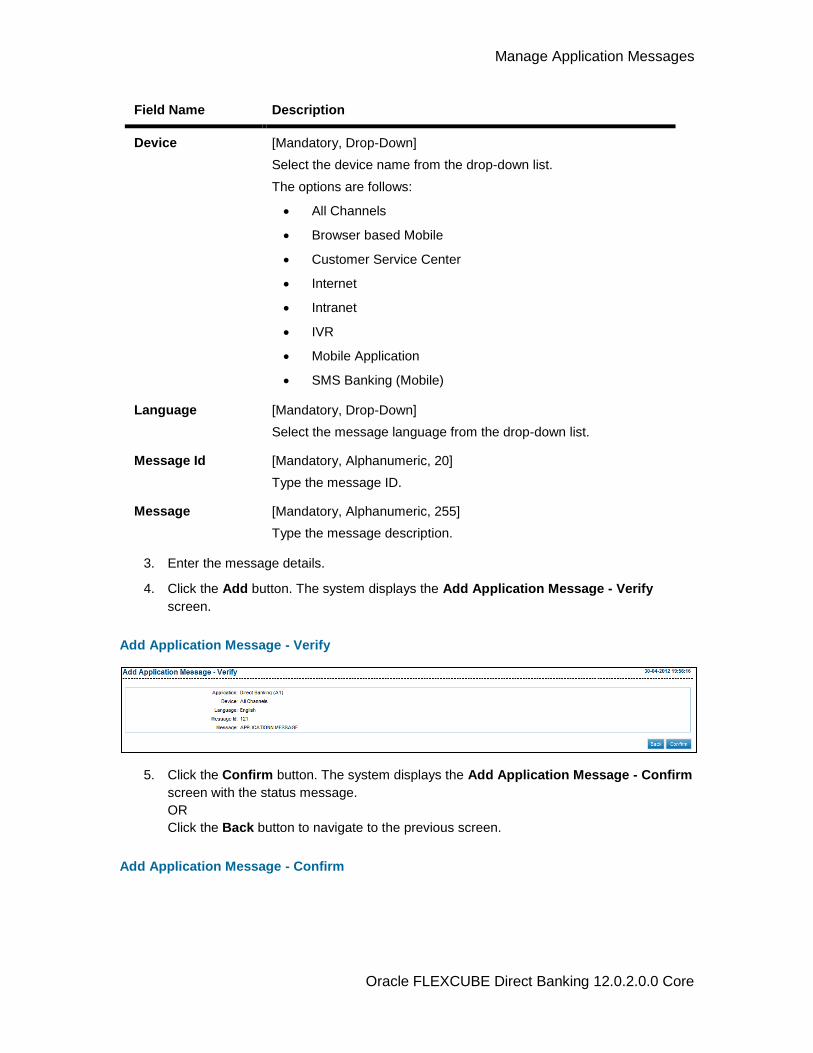
Manage Application Messages
Oracle FLEXCUBE Direct Banking 12.0.2.0.0 Core
Field Name Description
Device [Mandatory, Drop-Down]
Select the device name from the drop-down list.
The options are follows:
All Channels
Browser based Mobile
Customer Service Center
Internet
Intranet
IVR
Mobile Application
SMS Banking (Mobile)
Language [Mandatory, Drop-Down]
Select the message language from the drop-down list.
Message Id [Mandatory, Alphanumeric, 20]
Type the message ID.
Message [Mandatory, Alphanumeric, 255]
Type the message description.
3. Enter the message details.
4. Click the Add button. The system displays the Add Application Message - Verify
screen.
Add Application Message - Verify
5. Click the Confirm button. The system displays the Add Application Message - Confirm
screen with the status message.
OR
Click the Back button to navigate to the previous screen.
Add Application Message - Confirm
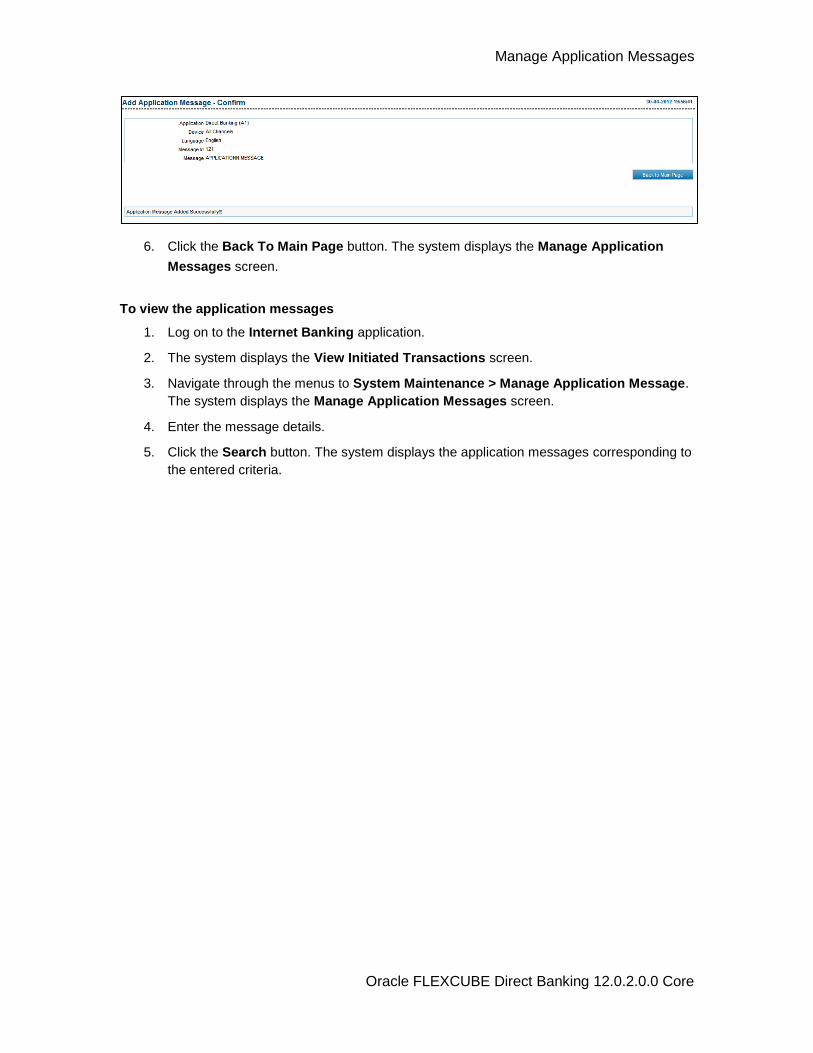
Manage Application Messages
Oracle FLEXCUBE Direct Banking 12.0.2.0.0 Core
6. Click the Back To Main Page button. The system displays the Manage Application
Messages screen. 0.
To view the application messages
1. Log on to the Internet Banking application.
2. The system displays the View Initiated Transactions screen.
3. Navigate through the menus to System Maintenance > Manage Application Message.
The system displays the Manage Application Messages screen.
4. Enter the message details.
5. Click the Search button. The system displays the application messages corresponding to
the entered criteria.
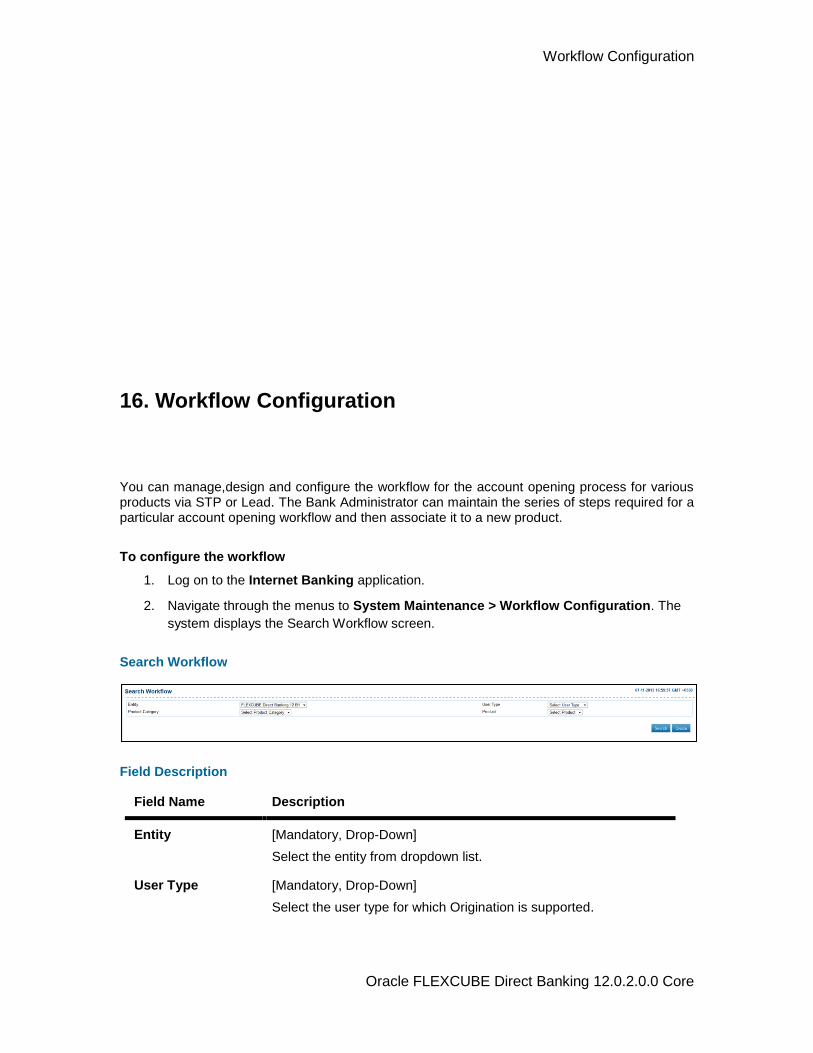
Workflow Configuration
Oracle FLEXCUBE Direct Banking 12.0.2.0.0 Core
16. Workflow Configuration
You can manage,design and configure the workflow for the account opening process for various products via STP or Lead. The Bank Administrator can maintain the series of steps required for a particular account opening workflow and then associate it to a new product.
To configure the workflow
1. Log on to the Internet Banking application.
2. Navigate through the menus to System Maintenance > Workflow Configuration. The
system displays the Search Workflow screen.
Search Workflow
Field Description
Field Name Description
Entity [Mandatory, Drop-Down]
Select the entity from dropdown list.
User Type [Mandatory, Drop-Down]
Select the user type for which Origination is supported.
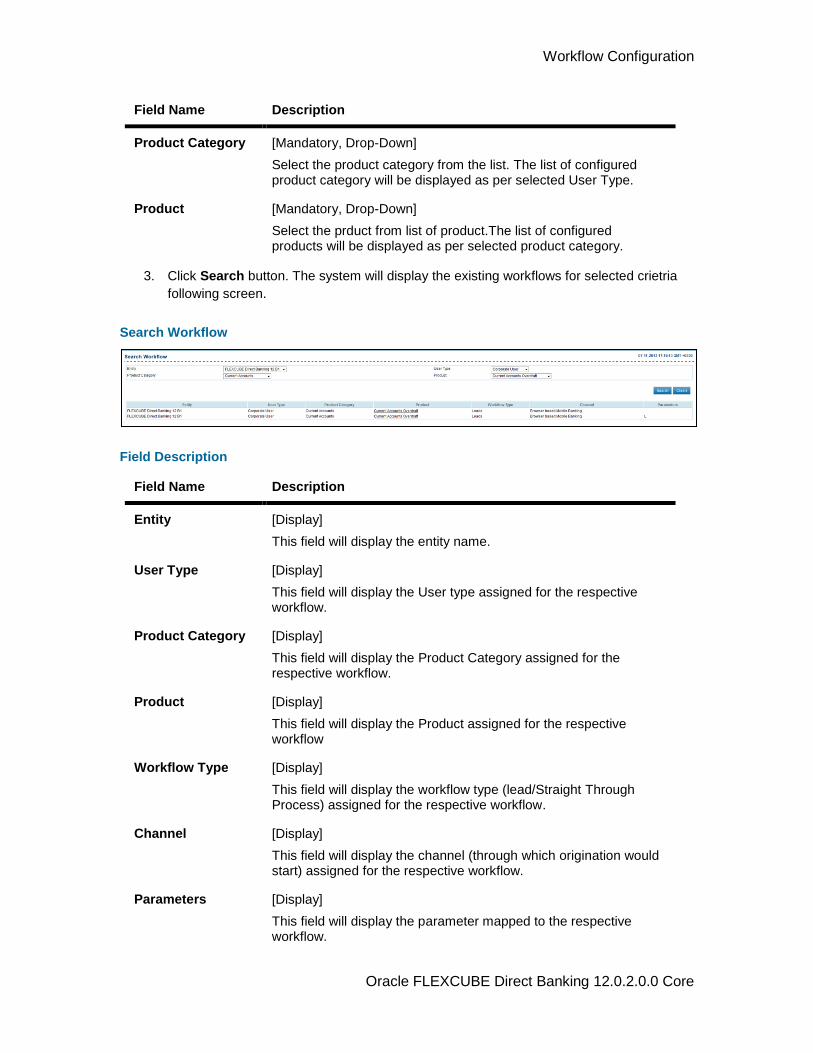
Workflow Configuration
Oracle FLEXCUBE Direct Banking 12.0.2.0.0 Core
Field Name Description
Product Category [Mandatory, Drop-Down]
Select the product category from the list. The list of configured product category will be displayed as per selected User Type.
Product [Mandatory, Drop-Down]
Select the prduct from list of product.The list of configured products will be displayed as per selected product category.
3. Click Search button. The system will display the existing workflows for selected crietria
following screen.
Search Workflow
Field Description
Field Name Description
Entity [Display]
This field will display the entity name.
User Type [Display]
This field will display the User type assigned for the respective workflow.
Product Category [Display]
This field will display the Product Category assigned for the respective workflow.
Product [Display]
This field will display the Product assigned for the respective workflow
Workflow Type [Display]
This field will display the workflow type (lead/Straight Through Process) assigned for the respective workflow.
Channel [Display]
This field will display the channel (through which origination would start) assigned for the respective workflow.
Parameters [Display]
This field will display the parameter mapped to the respective workflow.
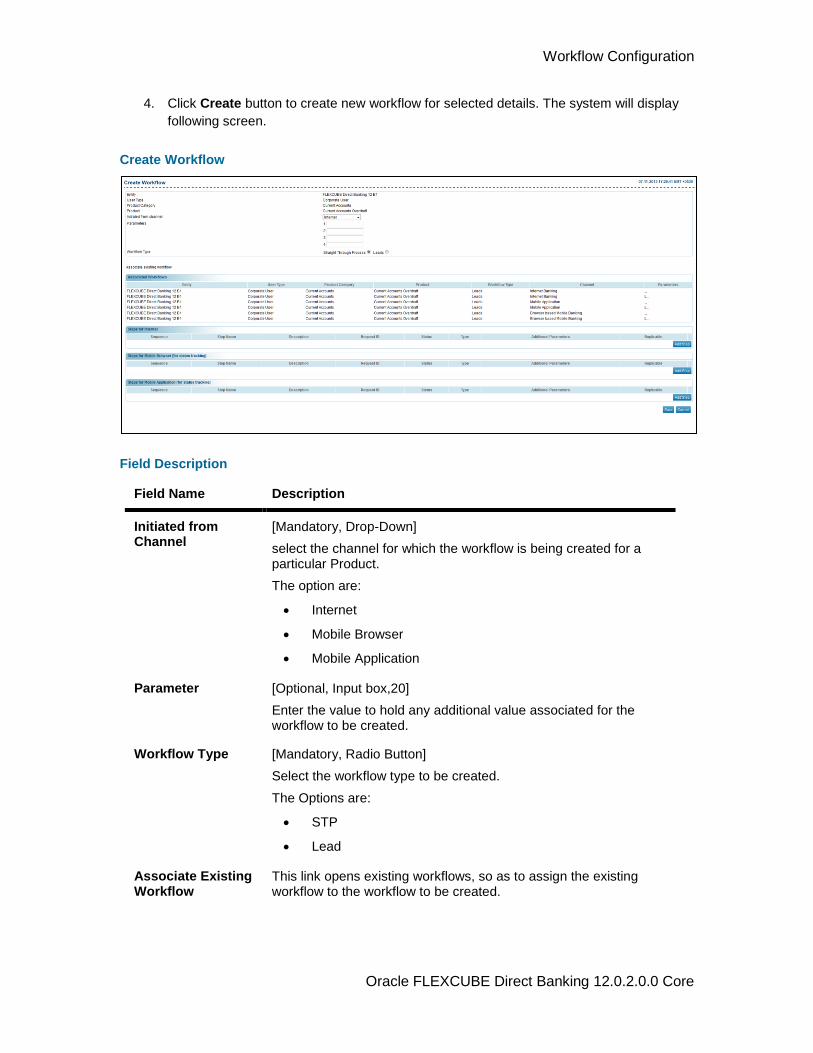
Workflow Configuration
Oracle FLEXCUBE Direct Banking 12.0.2.0.0 Core
4. Click Create button to create new workflow for selected details. The system will display
following screen.
Create Workflow
Field Description
Field Name Description
Initiated from Channel
[Mandatory, Drop-Down]
select the channel for which the workflow is being created for a particular Product.
The option are:
Internet
Mobile Browser
Mobile Application
Parameter [Optional, Input box,20]
Enter the value to hold any additional value associated for the workflow to be created.
Workflow Type [Mandatory, Radio Button]
Select the workflow type to be created.
The Options are:
STP
Lead
Associate Existing Workflow
This link opens existing workflows, so as to assign the existing workflow to the workflow to be created.
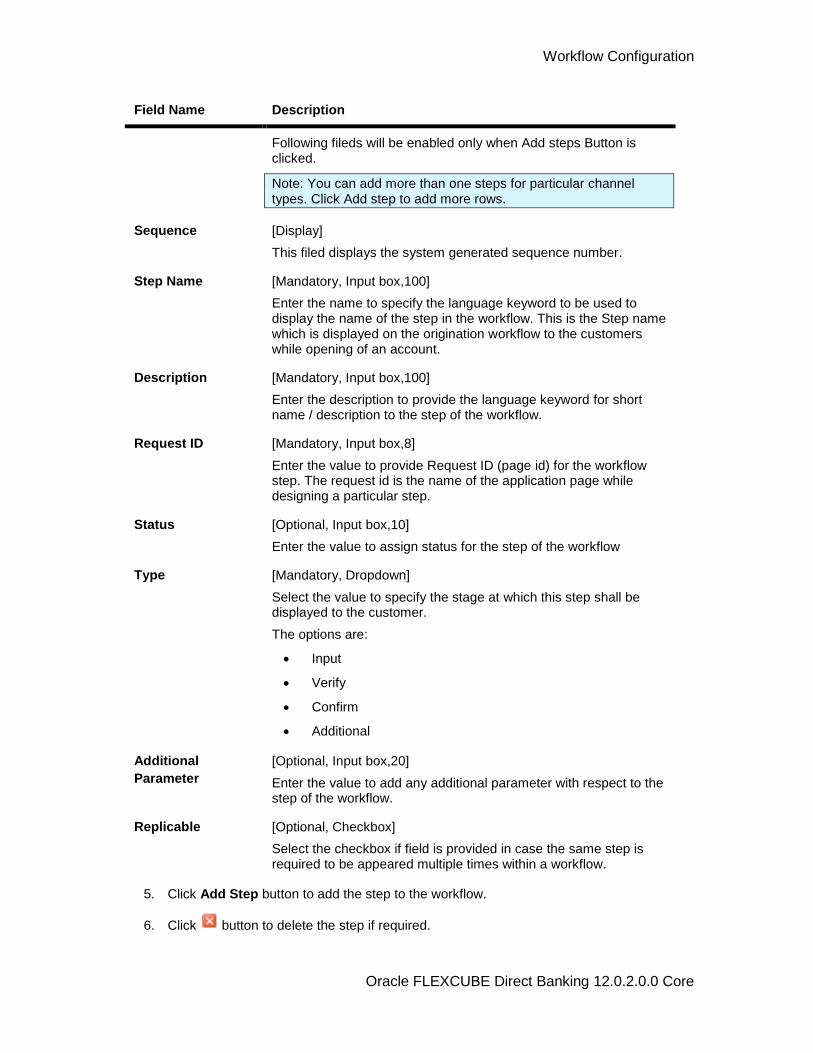
Workflow Configuration
Oracle FLEXCUBE Direct Banking 12.0.2.0.0 Core
Field Name Description
Following fileds will be enabled only when Add steps Button is clicked.
Note: You can add more than one steps for particular channel types. Click Add step to add more rows.
Sequence [Display]
This filed displays the system generated sequence number.
Step Name [Mandatory, Input box,100]
Enter the name to specify the language keyword to be used to display the name of the step in the workflow. This is the Step name which is displayed on the origination workflow to the customers while opening of an account.
Description [Mandatory, Input box,100]
Enter the description to provide the language keyword for short name / description to the step of the workflow.
Request ID [Mandatory, Input box,8]
Enter the value to provide Request ID (page id) for the workflow step. The request id is the name of the application page while designing a particular step.
Status [Optional, Input box,10]
Enter the value to assign status for the step of the workflow
Type [Mandatory, Dropdown]
Select the value to specify the stage at which this step shall be displayed to the customer.
The options are:
Input
Verify
Confirm
Additional
Additional
Parameter
[Optional, Input box,20]
Enter the value to add any additional parameter with respect to the step of the workflow.
Replicable [Optional, Checkbox]
Select the checkbox if field is provided in case the same step is required to be appeared multiple times within a workflow.
5. Click Add Step button to add the step to the workflow.
6. Click button to delete the step if required.
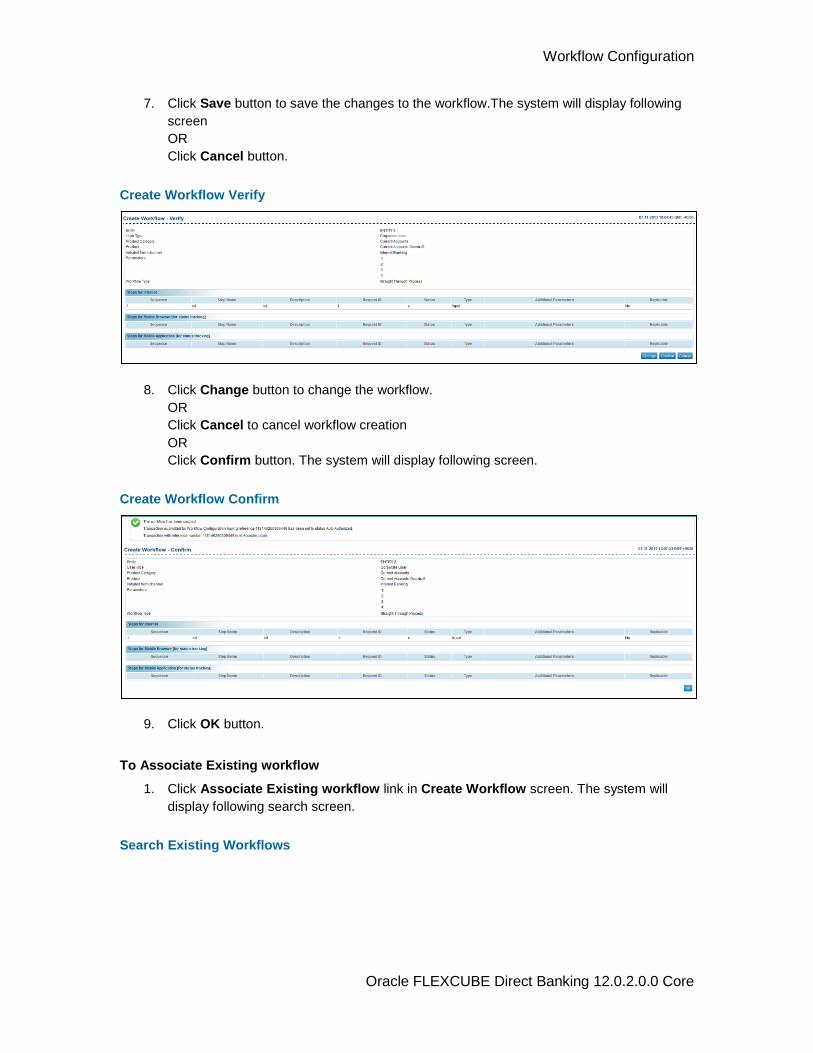
Workflow Configuration
Oracle FLEXCUBE Direct Banking 12.0.2.0.0 Core
7. Click Save button to save the changes to the workflow.The system will display following
screen
OR
Click Cancel button.
Create Workflow Verify
8. Click Change button to change the workflow.
OR
Click Cancel to cancel workflow creation
OR
Click Confirm button. The system will display following screen.
Create Workflow Confirm
9. Click OK button.
To Associate Existing workflow
1. Click Associate Existing workflow link in Create Workflow screen. The system will
display following search screen.
Search Existing Workflows
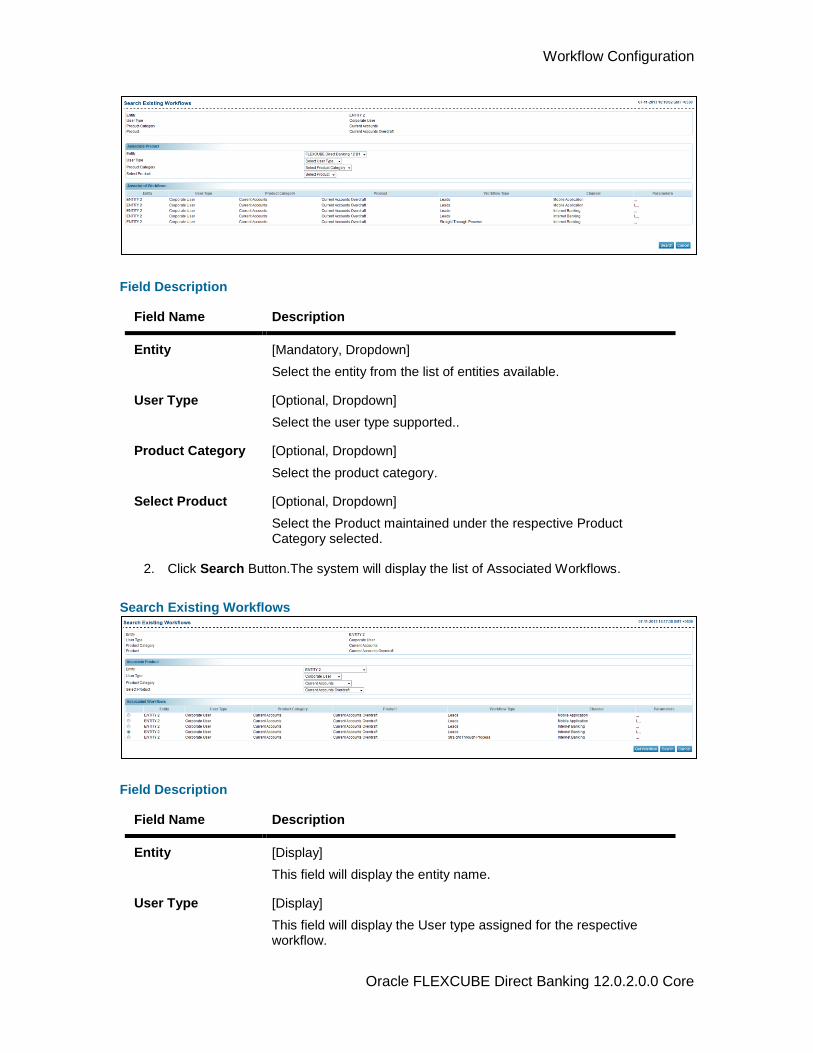
Workflow Configuration
Oracle FLEXCUBE Direct Banking 12.0.2.0.0 Core
Field Description
Field Name Description
Entity [Mandatory, Dropdown]
Select the entity from the list of entities available.
User Type [Optional, Dropdown]
Select the user type supported..
Product Category [Optional, Dropdown]
Select the product category.
Select Product [Optional, Dropdown]
Select the Product maintained under the respective Product Category selected.
2. Click Search Button.The system will display the list of Associated Workflows.
Search Existing Workflows
Field Description
Field Name Description
Entity [Display]
This field will display the entity name.
User Type [Display]
This field will display the User type assigned for the respective workflow.
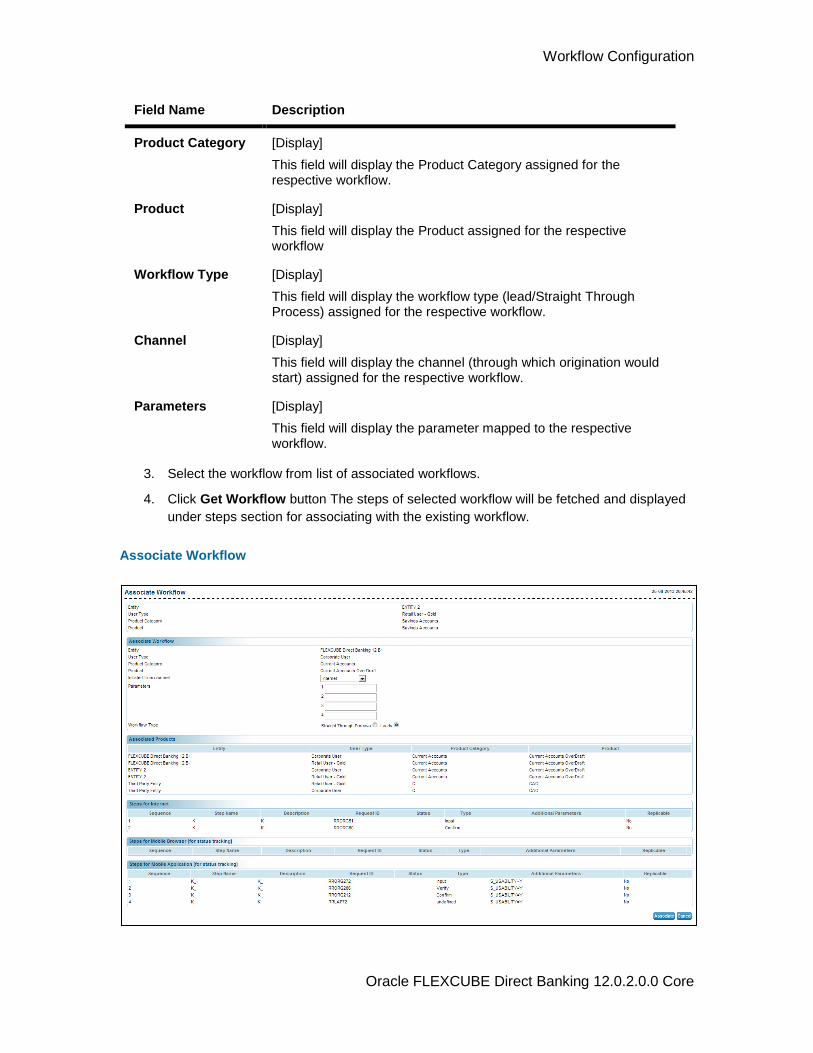
Workflow Configuration
Oracle FLEXCUBE Direct Banking 12.0.2.0.0 Core
Field Name Description
Product Category [Display]
This field will display the Product Category assigned for the respective workflow.
Product [Display]
This field will display the Product assigned for the respective workflow
Workflow Type [Display]
This field will display the workflow type (lead/Straight Through Process) assigned for the respective workflow.
Channel [Display]
This field will display the channel (through which origination would start) assigned for the respective workflow.
Parameters [Display]
This field will display the parameter mapped to the respective workflow.
3. Select the workflow from list of associated workflows.
4. Click Get Workflow button The steps of selected workflow will be fetched and displayed
under steps section for associating with the existing workflow.
Associate Workflow
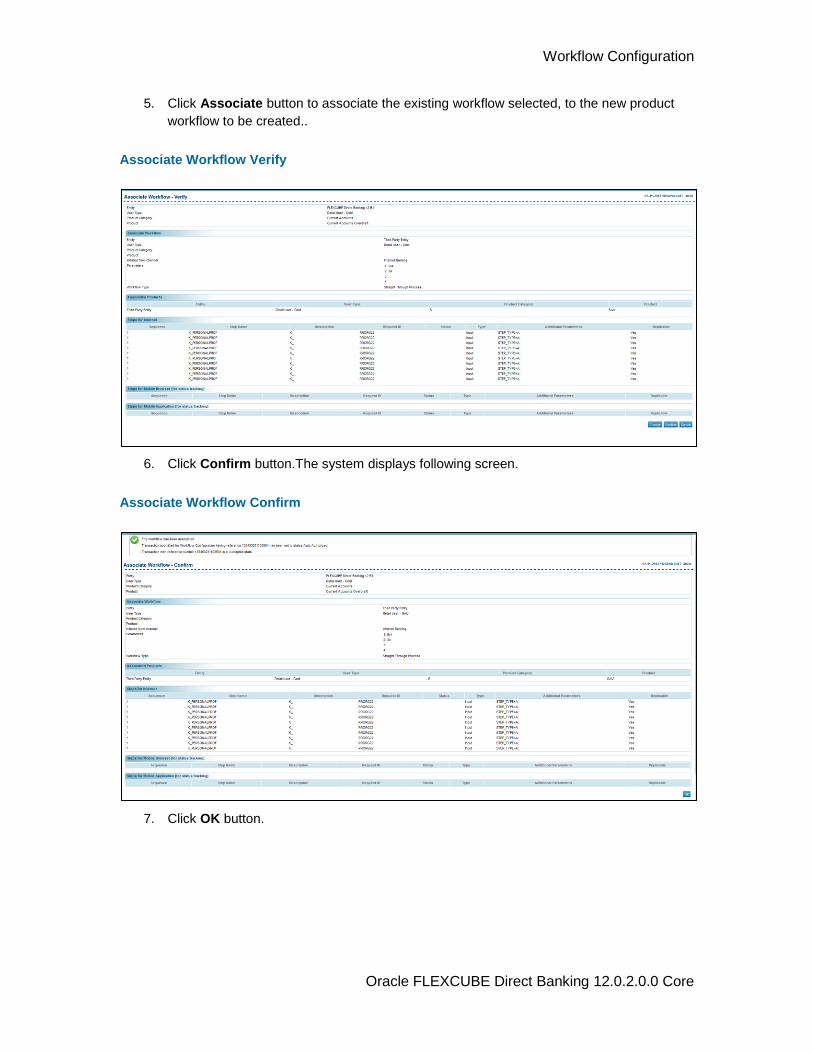
Workflow Configuration
Oracle FLEXCUBE Direct Banking 12.0.2.0.0 Core
5. Click Associate button to associate the existing workflow selected, to the new product
workflow to be created..
Associate Workflow Verify
6. Click Confirm button.The system displays following screen.
Associate Workflow Confirm
7. Click OK button.
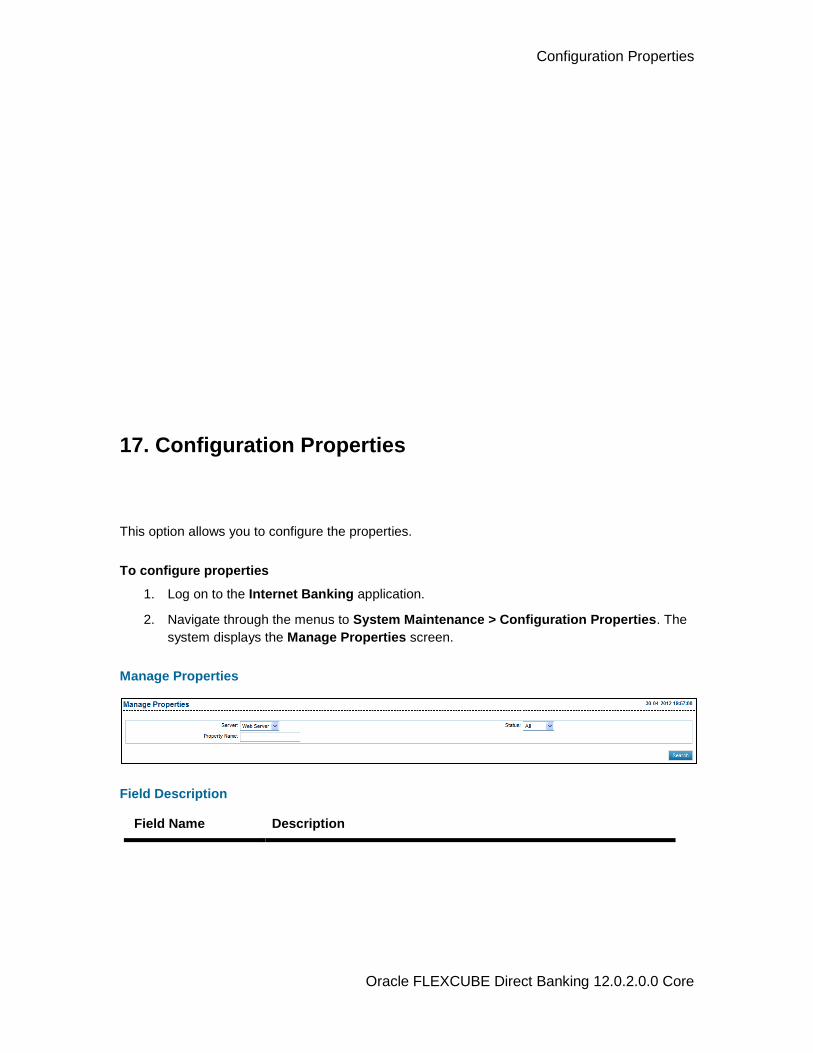
Configuration Properties
Oracle FLEXCUBE Direct Banking 12.0.2.0.0 Core
17. Configuration Properties
This option allows you to configure the properties.
To configure properties
1. Log on to the Internet Banking application.
2. Navigate through the menus to System Maintenance > Configuration Properties. The
system displays the Manage Properties screen.
Manage Properties
Field Description
Field Name Description
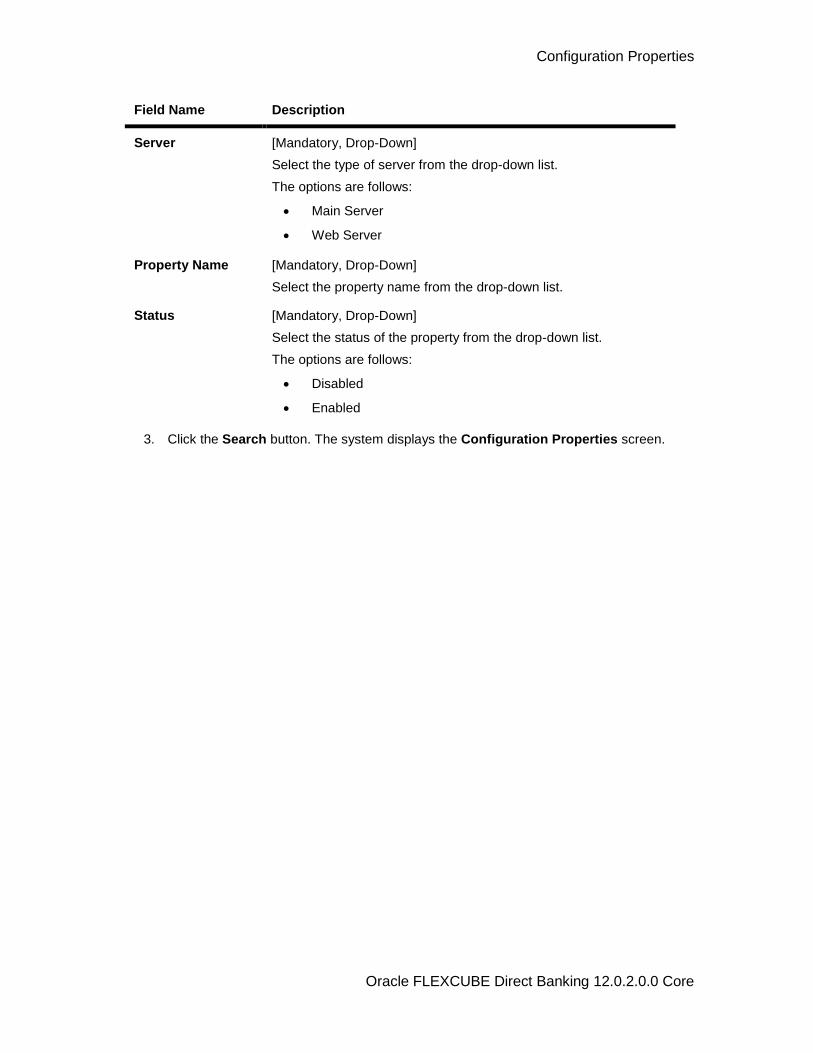
Configuration Properties
Oracle FLEXCUBE Direct Banking 12.0.2.0.0 Core
Field Name Description
Server [Mandatory, Drop-Down]
Select the type of server from the drop-down list.
The options are follows:
Main Server
Web Server
Property Name [Mandatory, Drop-Down]
Select the property name from the drop-down list.
Status [Mandatory, Drop-Down]
Select the status of the property from the drop-down list.
The options are follows:
Disabled
Enabled
3. Click the Search button. The system displays the Configuration Properties screen.
View Audit Log
Oracle FLEXCUBE Direct Banking 12.0.2.0.0 Core
18. View Audit Log
This option allows to facilitate access control and supervision, an audit trail can be maintained for any task / transaction accessed by the user. A log is then recorded and can be accessed by the bank at any future date.
To view audit log.
1. Logon to the Internet Banking application.
2. Navigate through the menus to Customer Services > View Audit Log. The system
displays the View Audit Log screen.
View Audit Log
View Audit Log
Oracle FLEXCUBE Direct Banking 12.0.2.0.0 Core
Field Description
Field Name Description
User Type [Mandatory, Drop-Down]
Select the user type from the drop-down list.
Transaction [Optional, Drop-Down]
Select the transaction from the drop-down list.
From Date [Optional, Pick List]
Select the start date of the search criteria from the drop down list
System User Id [Optional, Pick List]
Select the start date of the search criteria from the drop down list
To Date [Optional, Pick List]
Select the end date of the search criteria from the drop down list
Status [Mandatory, Drop-Down]
Select the status of the transaction from the drop-down list.
The options are:
All
Failure
Session Failure
Success
User Id [Optional, Pick List]
Select the end date of the search criteria from the drop down list
Customer Id [Conditional, Pick List]
Select the search criteria for the customer id from the drop down list
This field is displayed only if the Retail User or Corporate User options are selected from the User Type drop-down list.
.
3. Select the user type.
4. Enter the search criteria.
5. Click the Search button. The system displays the View Audit Log screen with the search
result.
View Audit Log
Oracle FLEXCUBE Direct Banking 12.0.2.0.0 Core
View Audit Log
Field Description
Column Name Description
Transaction Name [Display]
This column displays the transaction name.
Channel User Id [Display]
This column displays the channel user ID.
Channel [Display]
This column displays the banking channel through which the user performs the transactions.
Status [Display]
This column displays the status of the user session.
Transaction Date [Display]
This column displays the date and time of the transaction.
6. Click the link on the items listed in the Transaction Name column to view the audit log in
detail. This screen displays the audit log as per the selected criteria.
View Audit Log
Oracle FLEXCUBE Direct Banking 12.0.2.0.0 Core
View Audit Log
7. Click the Back button to navigate to the previous screen.
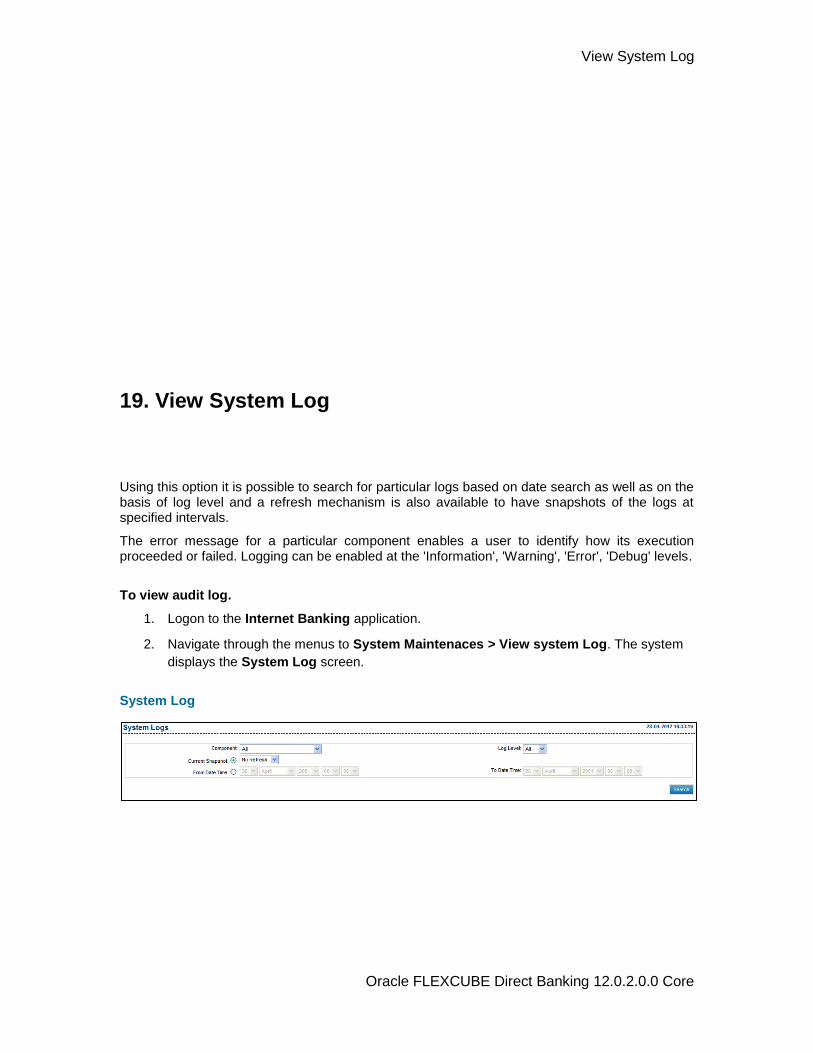
View System Log
Oracle FLEXCUBE Direct Banking 12.0.2.0.0 Core
19. View System Log
Using this option it is possible to search for particular logs based on date search as well as on the basis of log level and a refresh mechanism is also available to have snapshots of the logs at specified intervals.
The error message for a particular component enables a user to identify how its execution proceeded or failed. Logging can be enabled at the 'Information', 'Warning', 'Error', 'Debug' levels.
To view audit log.
1. Logon to the Internet Banking application.
2. Navigate through the menus to System Maintenaces > View system Log. The system
displays the System Log screen.
System Log
View System Log
Oracle FLEXCUBE Direct Banking 12.0.2.0.0 Core
Field Description
Field Name Description
Component [Mandatory, Drop-Down]
Select the component from the drop-down list.
Log level [Mandatory, Drop-Down]
Select the log level from the drop-down list.
Current snapshot [Optional, Radio button, Drop-Down]
Select the radio button for the enable the drop-down list.
Select the current snapshot from the drop-down list.
The drop-down list will be enabled if the Current Snapshot radio button is selected.
From Date Time [Optional, Radio Button, Drop-Down]
Select the radio button for the enable the drop-down list.
Select the start date and time of the search criteria from the drop down list.
The drop-down list will be enabled if the From Date Time radio button is selected.
To Date time [Optional,Radio Button, Drop-Down]
Select the radio button for the enable the drop-down list.
Select the end date and time of the search criteria from the drop down list.
The drop-down list will be enabled if the To Date Time radio button is selected
3. Enter the search criteria.
4. Click the Search button. The system displays the View System Log screen with the
search result.
View System Log
Oracle FLEXCUBE Direct Banking 12.0.2.0.0 Core
System Log
View System Log
Oracle FLEXCUBE Direct Banking 12.0.2.0.0 Core
Field Description
Column Name Description
ID [Display]
This column displays the Id.
Date [Display]
This column displays the date of the log.
Component [Display]
This column displays the component of the log.
Method [Display]
This column displays the method of the log..
Log Level [Display]
This column displays the level of the log.
MsgId [Display]
This column displays the message id of the log.
Message [Display]
This column displays the message of the log.
5. Click the Previous or the Next button to navigate to the next or the previous screen.

Oracle FLEXCUBE Direct Banking 12.0.2.0.0 Core
20. Host Interface Log
The table host audit log is used to hold the audited information about the interaction between the two systems.
To view host interface log.
1. Logon to the Internet Banking application.
2. Navigate through the menus to System Maintenaces > Host interface log. The system
displays the View Host Audit Log screen.
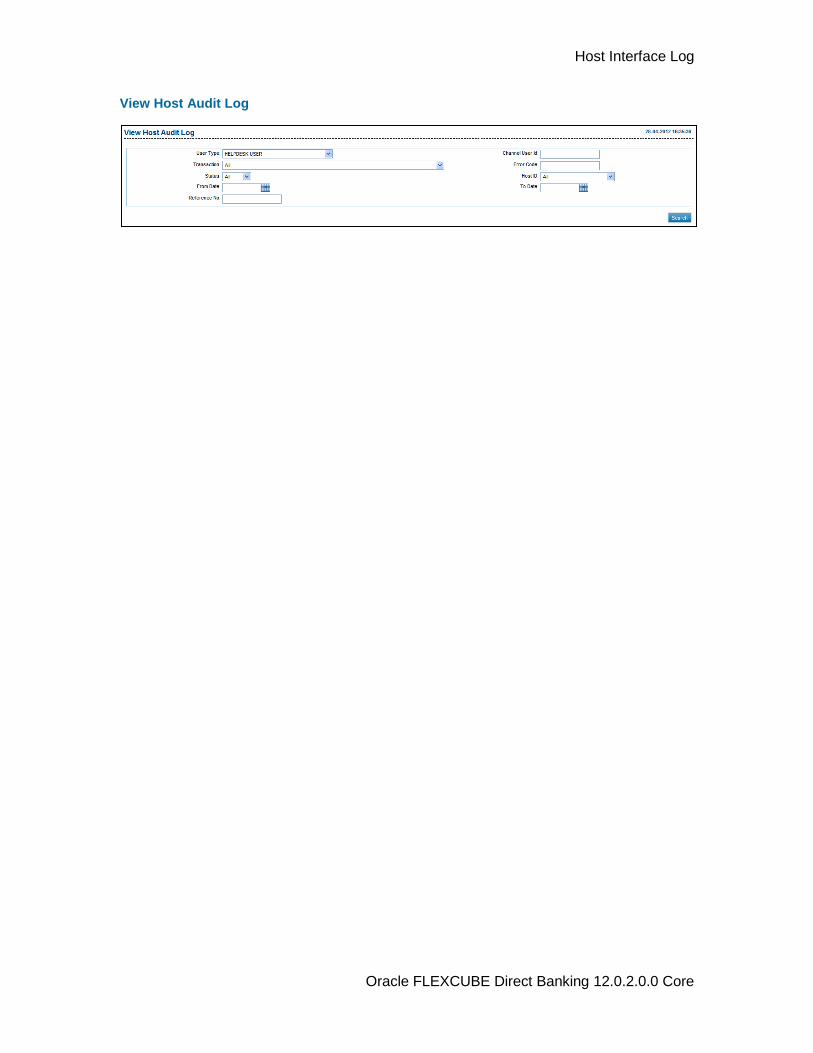
Host Interface Log
Oracle FLEXCUBE Direct Banking 12.0.2.0.0 Core
View Host Audit Log
Host Interface Log
Oracle FLEXCUBE Direct Banking 12.0.2.0.0 Core
Field Description
Field Name Description
User Type [Mandatory, Drop-Down]
Select the user type from the drop-down list.
Channel user Id [Mandatory, Alphanumeric, 20]
Type the channel user id.
Transaction [Mandatory, Drop-Down]
Select the transactions from the drop-down list.
Error Code [Mandatory, Alphanumeric, 20]
Type the error code.
Status [Optional, Drop-Down]
Select the status from the drop-down list.
Host Id [Optional, Drop-Down]
Select the host id from the drop-down list.
From Date [Optional, Pick List]
Select the form date from the pick list for the search criteria.
To Date [Optional, PickList]
Select the to date from the pick list for the search criteria.
Reference No [Optional, Alphanumeric, 20]
Type the reference number.
3. Enter the search criteria.
4. Click the Search button. The system displays the Host Audit Logs screen with the
search result.
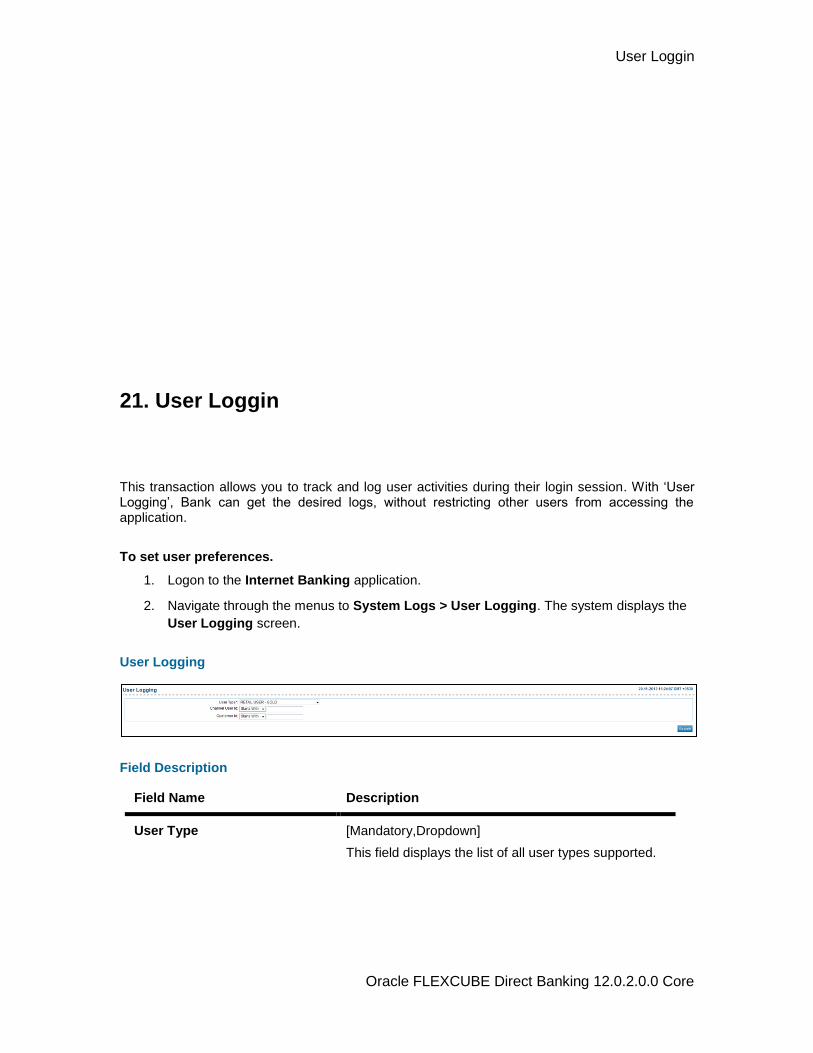
User Loggin
Oracle FLEXCUBE Direct Banking 12.0.2.0.0 Core
21. User Loggin
This transaction allows you to track and log user activities during their login session. With ‘User Logging’, Bank can get the desired logs, without restricting other users from accessing the application.
To set user preferences.
1. Logon to the Internet Banking application.
2. Navigate through the menus to System Logs > User Logging. The system displays the
User Logging screen.
User Logging
Field Description
Field Name Description
User Type [Mandatory,Dropdown]
This field displays the list of all user types supported.
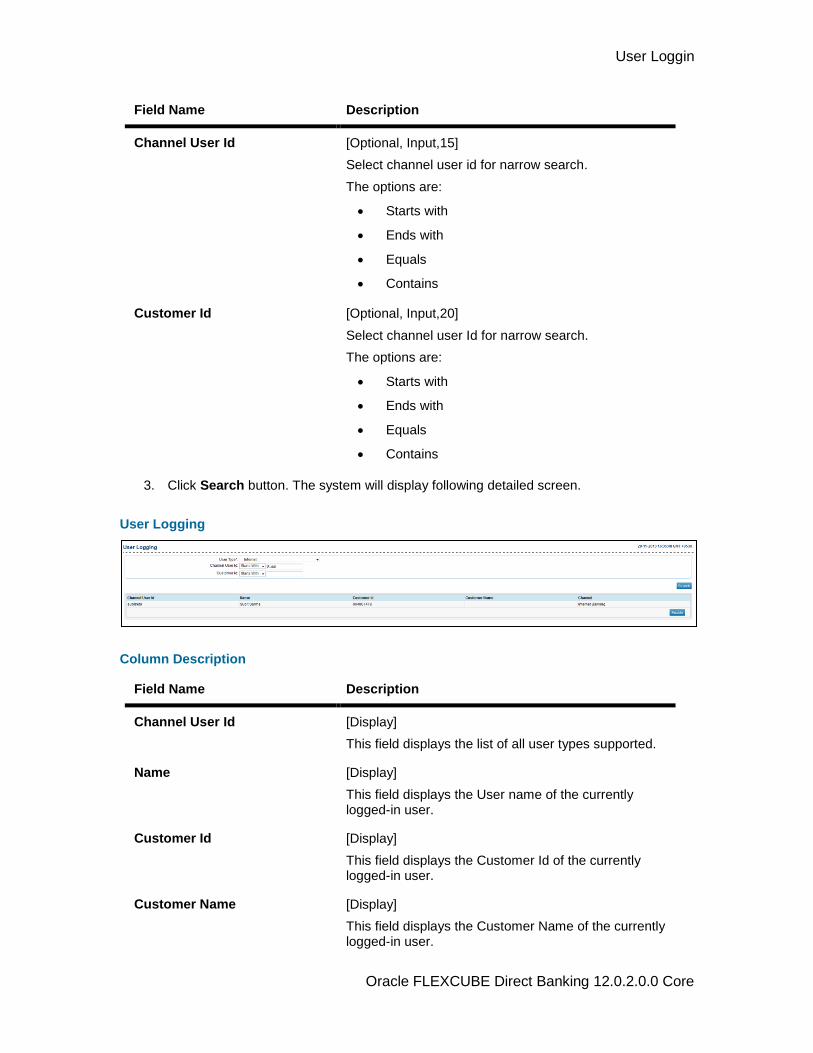
User Loggin
Oracle FLEXCUBE Direct Banking 12.0.2.0.0 Core
Field Name Description
Channel User Id [Optional, Input,15]
Select channel user id for narrow search.
The options are:
Starts with
Ends with
Equals
Contains
Customer Id [Optional, Input,20]
Select channel user Id for narrow search.
The options are:
Starts with
Ends with
Equals
Contains
3. Click Search button. The system will display following detailed screen.
User Logging
Column Description
Field Name Description
Channel User Id [Display]
This field displays the list of all user types supported.
Name [Display]
This field displays the User name of the currently logged-in user.
Customer Id [Display]
This field displays the Customer Id of the currently logged-in user.
Customer Name [Display]
This field displays the Customer Name of the currently logged-in user.
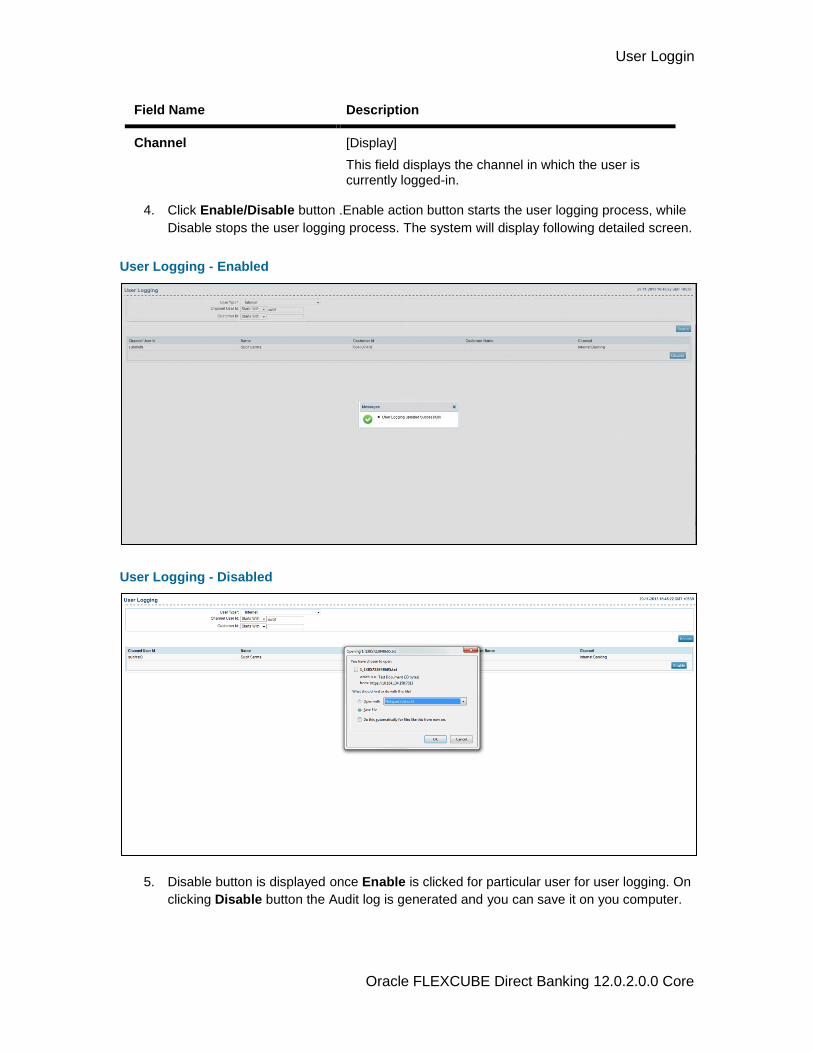
User Loggin
Oracle FLEXCUBE Direct Banking 12.0.2.0.0 Core
Field Name Description
Channel [Display]
This field displays the channel in which the user is currently logged-in.
4. Click Enable/Disable button .Enable action button starts the user logging process, while
Disable stops the user logging process. The system will display following detailed screen.
User Logging - Enabled
User Logging - Disabled
5. Disable button is displayed once Enable is clicked for particular user for user logging. On
clicking Disable button the Audit log is generated and you can save it on you computer.
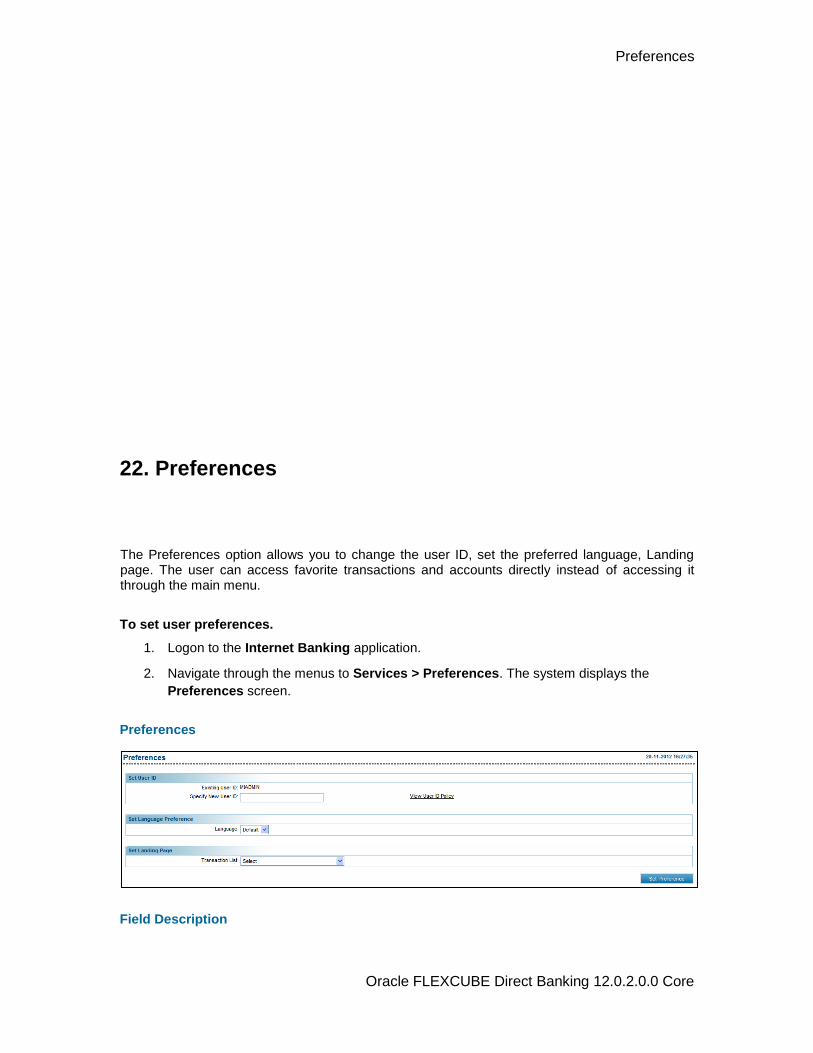
Preferences
Oracle FLEXCUBE Direct Banking 12.0.2.0.0 Core
22. Preferences
The Preferences option allows you to change the user ID, set the preferred language, Landing page. The user can access favorite transactions and accounts directly instead of accessing it through the main menu.
To set user preferences.
1. Logon to the Internet Banking application.
2. Navigate through the menus to Services > Preferences. The system displays the
Preferences screen.
Preferences
Field Description
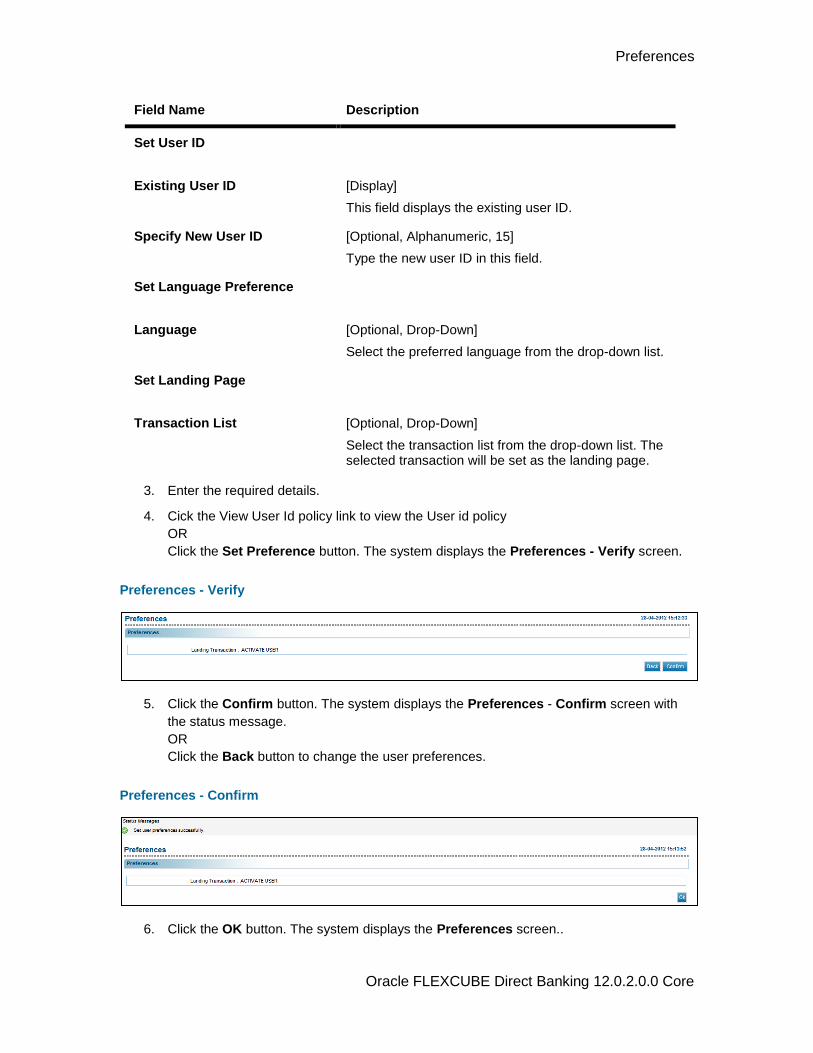
Preferences
Oracle FLEXCUBE Direct Banking 12.0.2.0.0 Core
Field Name Description
Set User ID
Existing User ID [Display]
This field displays the existing user ID.
Specify New User ID [Optional, Alphanumeric, 15]
Type the new user ID in this field.
Set Language Preference
Language [Optional, Drop-Down]
Select the preferred language from the drop-down list.
Set Landing Page
Transaction List [Optional, Drop-Down]
Select the transaction list from the drop-down list. The selected transaction will be set as the landing page.
3. Enter the required details.
4. Cick the View User Id policy link to view the User id policy
OR
Click the Set Preference button. The system displays the Preferences - Verify screen.
Preferences - Verify
5. Click the Confirm button. The system displays the Preferences - Confirm screen with
the status message.
OR
Click the Back button to change the user preferences.
Preferences - Confirm
6. Click the OK button. The system displays the Preferences screen..
Change Password
Oracle FLEXCUBE Direct Banking 12.0.2.0.0 Core
23. Change Password
This option allows you to change the login or transaction password
To change the password
1. Logon to the Internet Banking application.
2. Navigate Default Transaction > Change Password.The system displays the Change
Password screen.
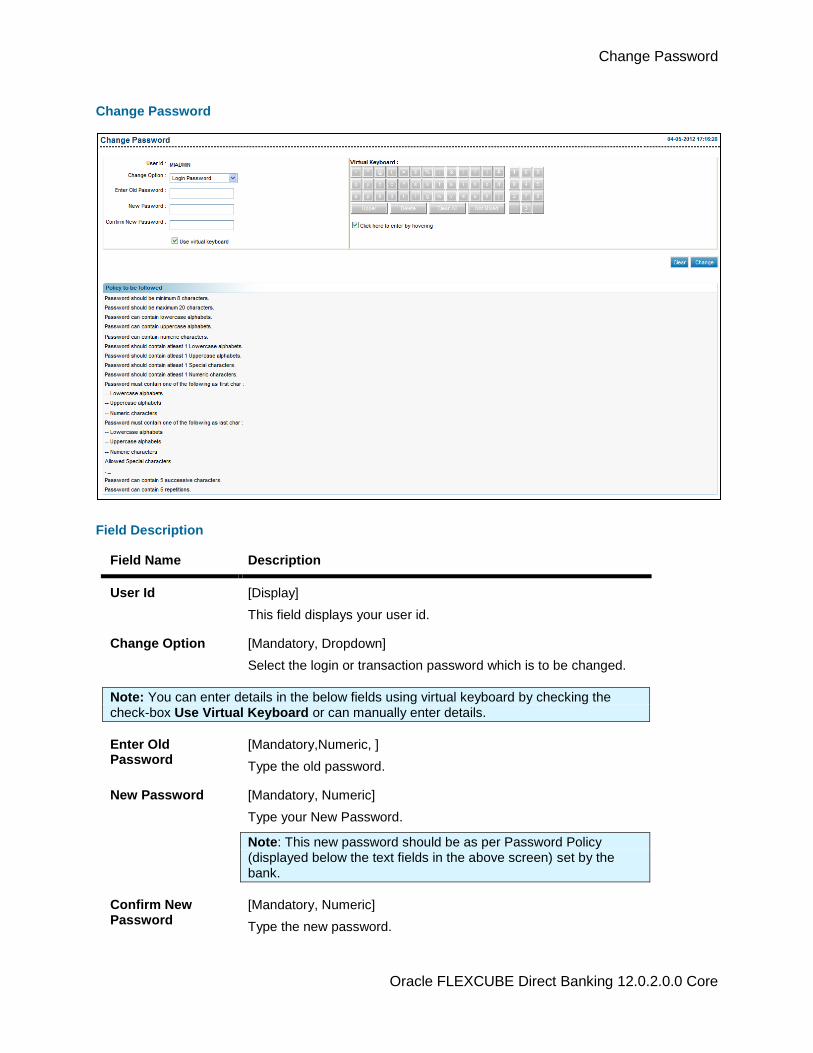
Change Password
Oracle FLEXCUBE Direct Banking 12.0.2.0.0 Core
Change Password
Field Description
Field Name Description
User Id [Display]
This field displays your user id.
Change Option [Mandatory, Dropdown]
Select the login or transaction password which is to be changed.
Note: You can enter details in the below fields using virtual keyboard by checking the check-box Use Virtual Keyboard or can manually enter details.
Enter Old Password
[Mandatory,Numeric, ]
Type the old password.
New Password [Mandatory, Numeric]
Type your New Password.
Note: This new password should be as per Password Policy (displayed below the text fields in the above screen) set by the bank.
Confirm New Password
[Mandatory, Numeric]
Type the new password.
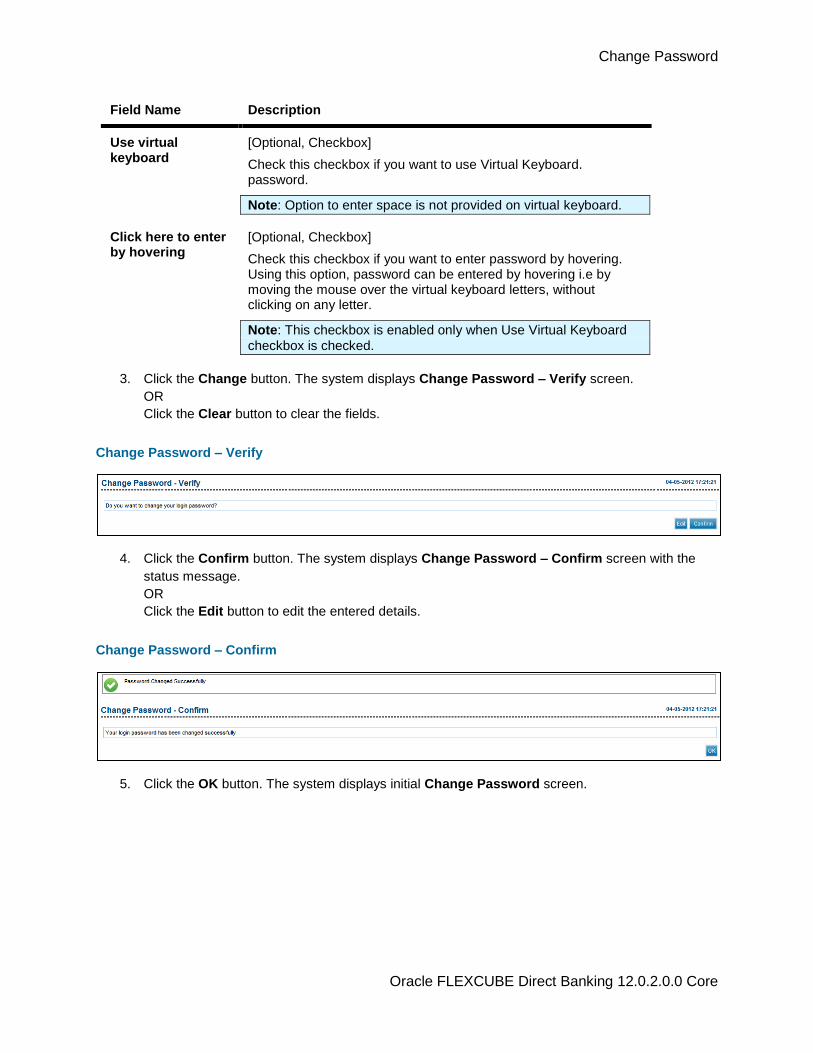
Change Password
Oracle FLEXCUBE Direct Banking 12.0.2.0.0 Core
Field Name Description
Use virtual keyboard
[Optional, Checkbox]
Check this checkbox if you want to use Virtual Keyboard. password.
Note: Option to enter space is not provided on virtual keyboard.
Click here to enter by hovering
[Optional, Checkbox]
Check this checkbox if you want to enter password by hovering. Using this option, password can be entered by hovering i.e by moving the mouse over the virtual keyboard letters, without clicking on any letter.
Note: This checkbox is enabled only when Use Virtual Keyboard
checkbox is checked.
3. Click the Change button. The system displays Change Password – Verify screen.
OR
Click the Clear button to clear the fields.
Change Password – Verify
4. Click the Confirm button. The system displays Change Password – Confirm screen with the
status message.
OR
Click the Edit button to edit the entered details.
Change Password – Confirm
5. Click the OK button. The system displays initial Change Password screen.
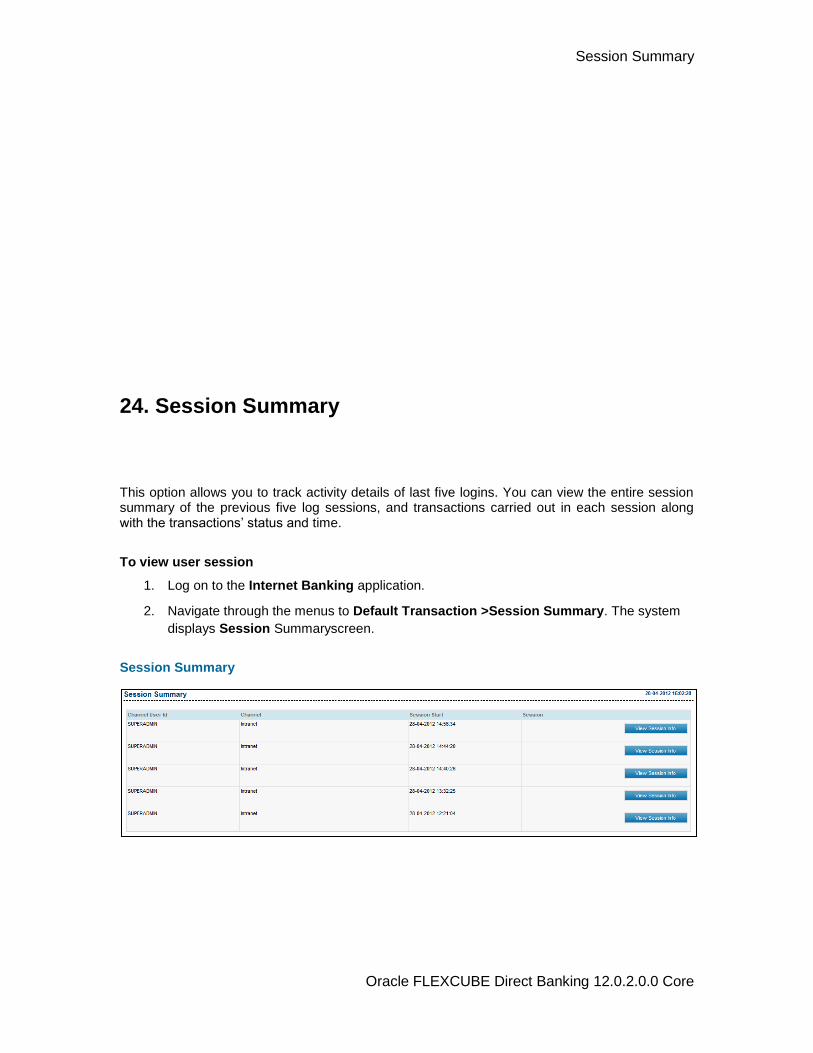
Session Summary
Oracle FLEXCUBE Direct Banking 12.0.2.0.0 Core
24. Session Summary
This option allows you to track activity details of last five logins. You can view the entire session summary of the previous five log sessions, and transactions carried out in each session along with the transactions’ status and time.
To view user session
1. Log on to the Internet Banking application.
2. Navigate through the menus to Default Transaction >Session Summary. The system
displays Session Summaryscreen.
Session Summary
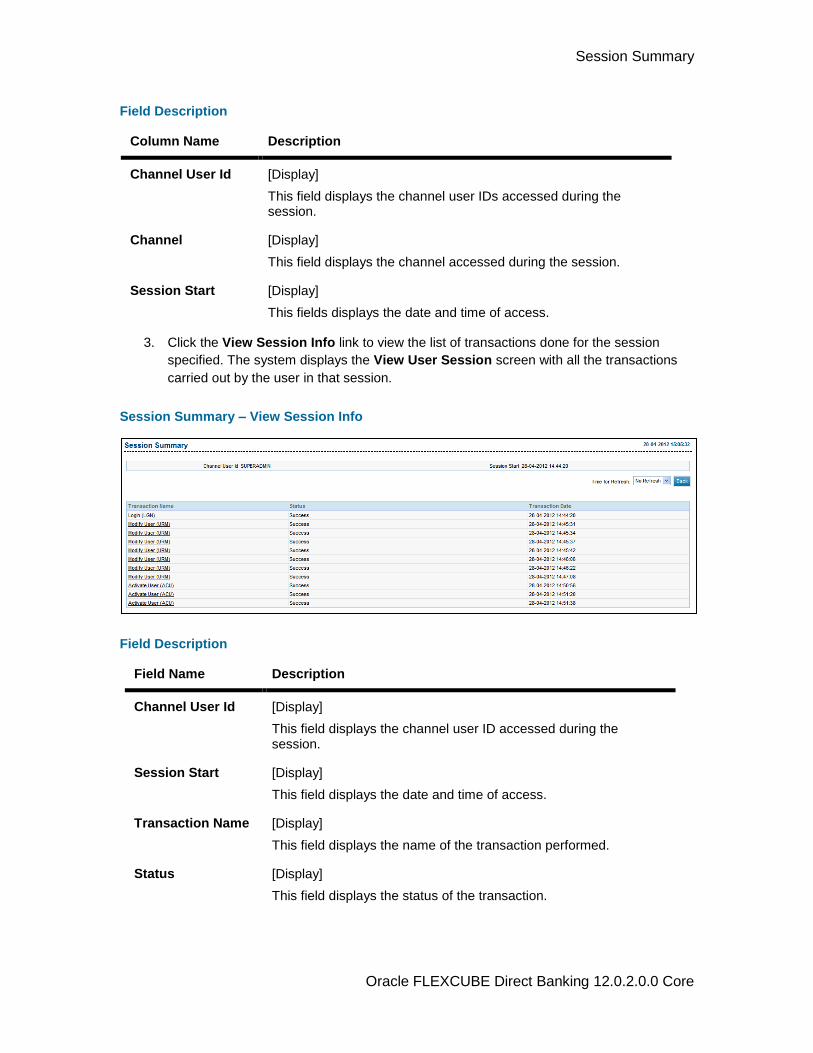
Session Summary
Oracle FLEXCUBE Direct Banking 12.0.2.0.0 Core
Field Description
3. Click the View Session Info link to view the list of transactions done for the session
specified. The system displays the View User Session screen with all the transactions
carried out by the user in that session.
Session Summary – View Session Info
Field Description
Field Name Description
Channel User Id [Display]
This field displays the channel user ID accessed during the session.
Session Start [Display]
This field displays the date and time of access.
Transaction Name [Display]
This field displays the name of the transaction performed.
Status [Display]
This field displays the status of the transaction.
Column Name Description
Channel User Id [Display]
This field displays the channel user IDs accessed during the session.
Channel [Display]
This field displays the channel accessed during the session.
Session Start [Display]
This fields displays the date and time of access.
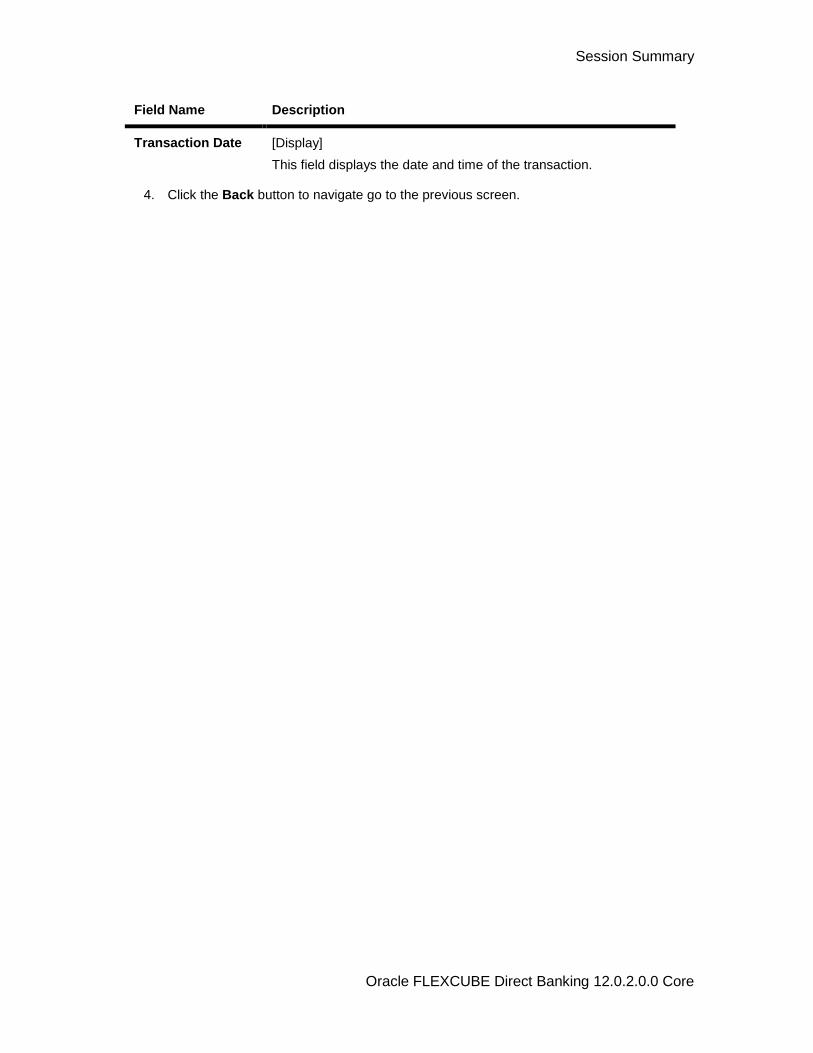
Session Summary
Oracle FLEXCUBE Direct Banking 12.0.2.0.0 Core
Field Name Description
Transaction Date [Display]
This field displays the date and time of the transaction.
4. Click the Back button to navigate go to the previous screen.
Sitemap
Oracle FLEXCUBE Direct Banking 12.0.2.0.0 Core
25. Sitemap
Using this option you can view the list of transactions that can be performed using direct banking.
To view the sitemap
1. Logon to the Internet Banking application.
2. Navigate through Default Transaction > Sitemap. The system displays the list of
transactions.
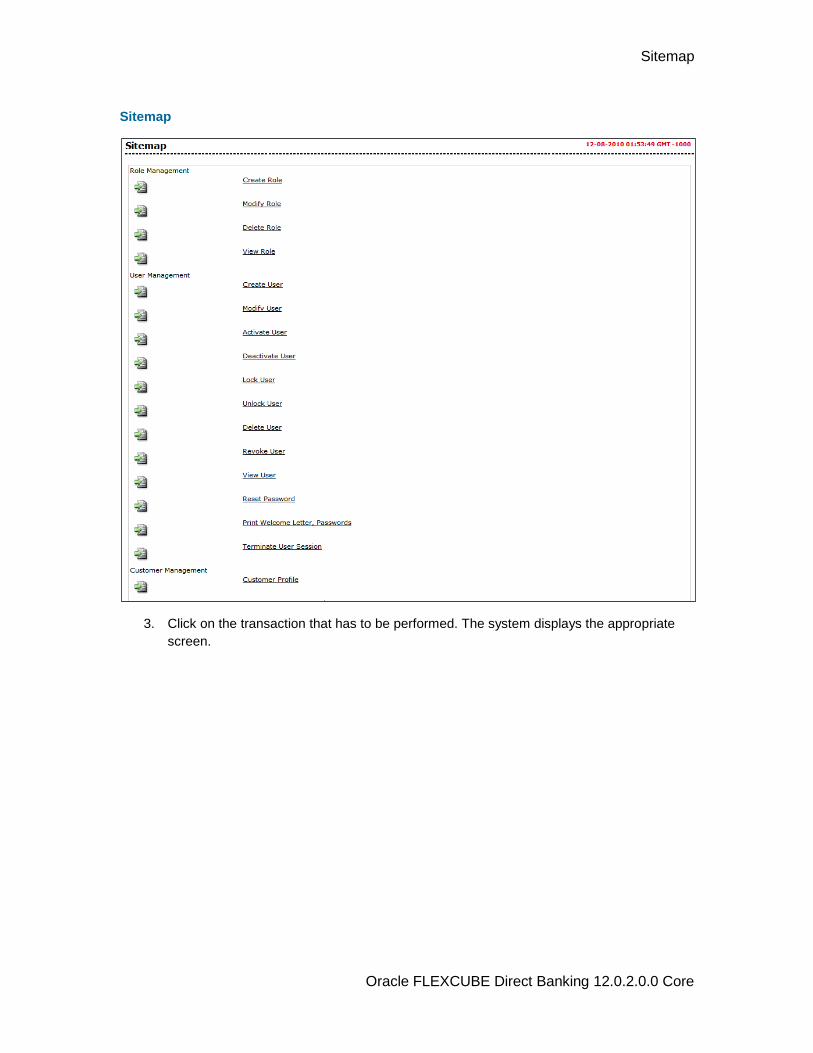
Sitemap
Oracle FLEXCUBE Direct Banking 12.0.2.0.0 Core
Sitemap
3. Click on the transaction that has to be performed. The system displays the appropriate
screen.
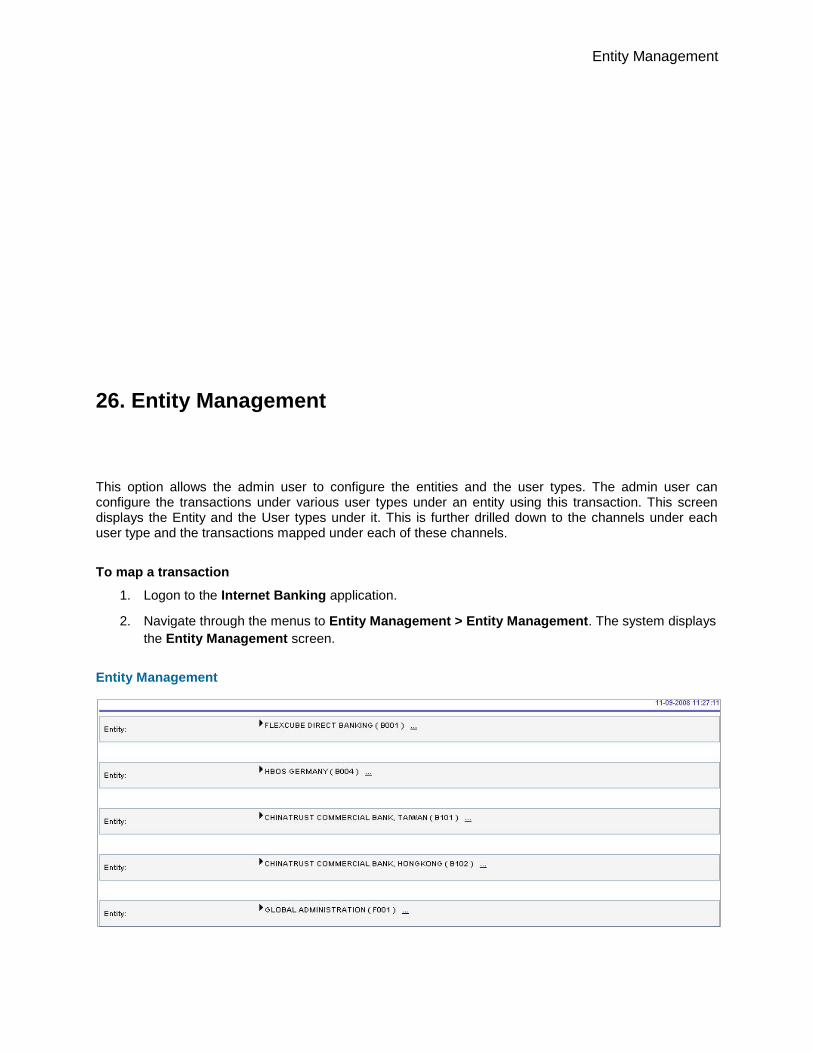
Entity Management
26. Entity Management
This option allows the admin user to configure the entities and the user types. The admin user can configure the transactions under various user types under an entity using this transaction. This screen displays the Entity and the User types under it. This is further drilled down to the channels under each user type and the transactions mapped under each of these channels.
To map a transaction
1. Logon to the Internet Banking application.
2. Navigate through the menus to Entity Management > Entity Management. The system displays
the Entity Management screen.
Entity Management
Entity Management
Oracle FLEXCUBE Direct Banking 12.0.2.0.0 Core
Field Description
Field Name Description
Entity [Display]
This field displays the list of entities to be configured.
Click the entity name to view the transactions for that particular entity.
3. Click the entity name. The system displays the detail list of transactions configured under that
particular entity.
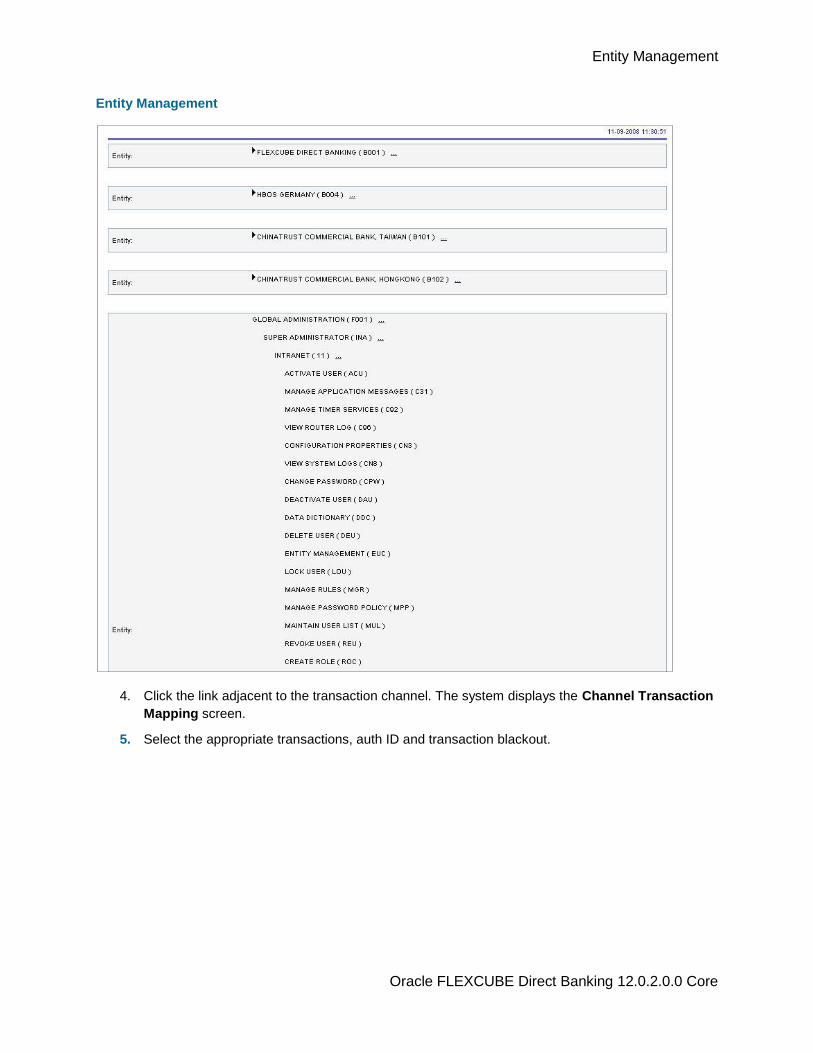
Entity Management
Oracle FLEXCUBE Direct Banking 12.0.2.0.0 Core
Entity Management
4. Click the link adjacent to the transaction channel. The system displays the Channel Transaction
Mapping screen.
5. Select the appropriate transactions, auth ID and transaction blackout.
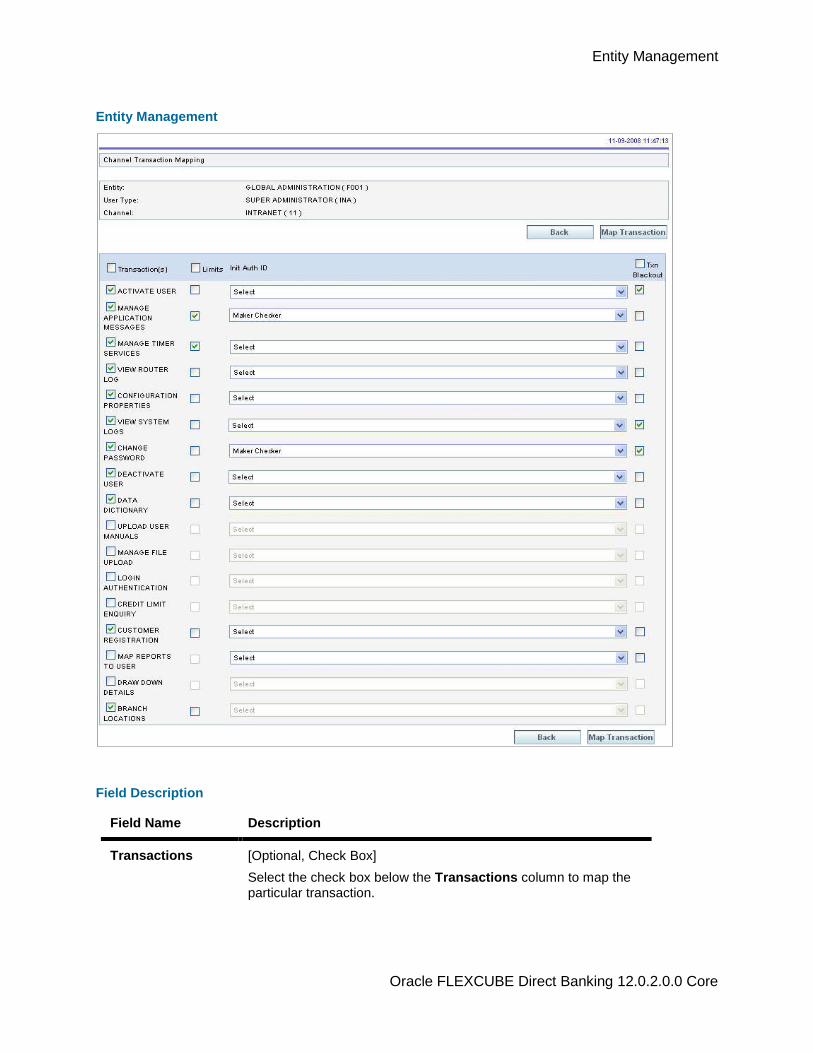
Entity Management
Oracle FLEXCUBE Direct Banking 12.0.2.0.0 Core
Entity Management
Field Description
Field Name Description
Transactions [Optional, Check Box]
Select the check box below the Transactions column to map the particular transaction.
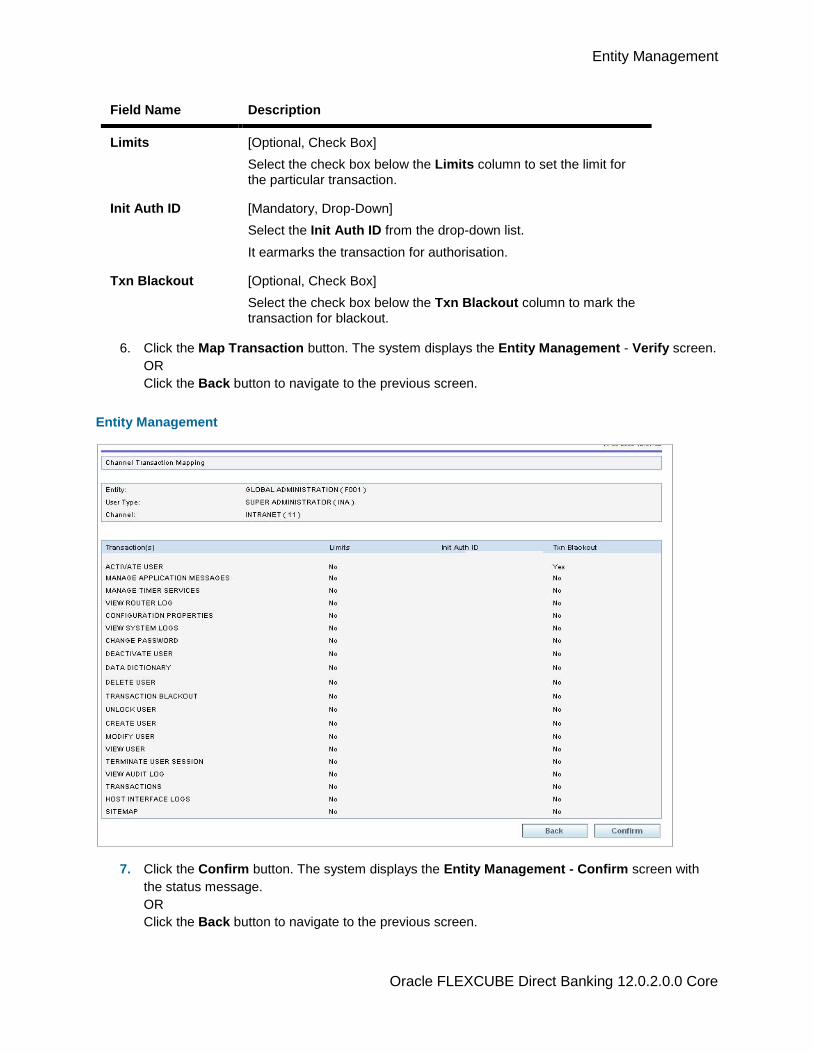
Entity Management
Oracle FLEXCUBE Direct Banking 12.0.2.0.0 Core
Field Name Description
Limits [Optional, Check Box]
Select the check box below the Limits column to set the limit for the particular transaction.
Init Auth ID [Mandatory, Drop-Down]
Select the Init Auth ID from the drop-down list.
It earmarks the transaction for authorisation.
Txn Blackout [Optional, Check Box]
Select the check box below the Txn Blackout column to mark the transaction for blackout.
6. Click the Map Transaction button. The system displays the Entity Management - Verify screen.
OR
Click the Back button to navigate to the previous screen.
Entity Management
7. Click the Confirm button. The system displays the Entity Management - Confirm screen with
the status message.
OR
Click the Back button to navigate to the previous screen.
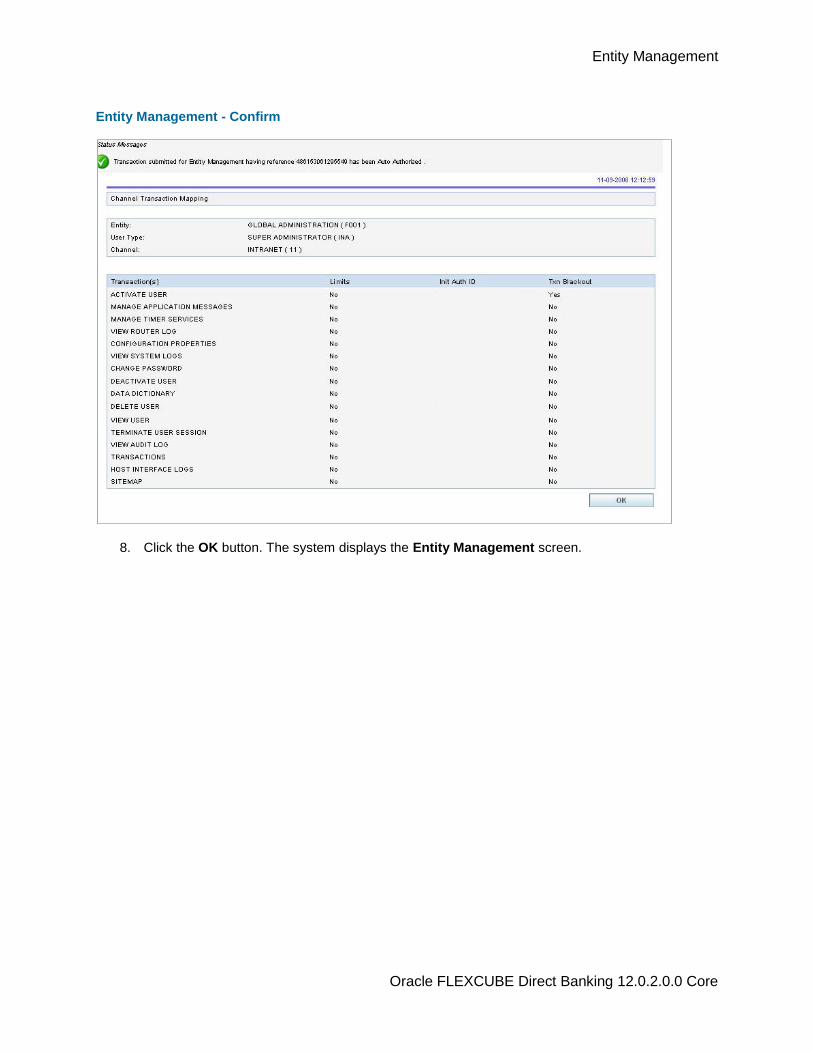
Entity Management
Oracle FLEXCUBE Direct Banking 12.0.2.0.0 Core
Entity Management - Confirm
8. Click the OK button. The system displays the Entity Management screen.
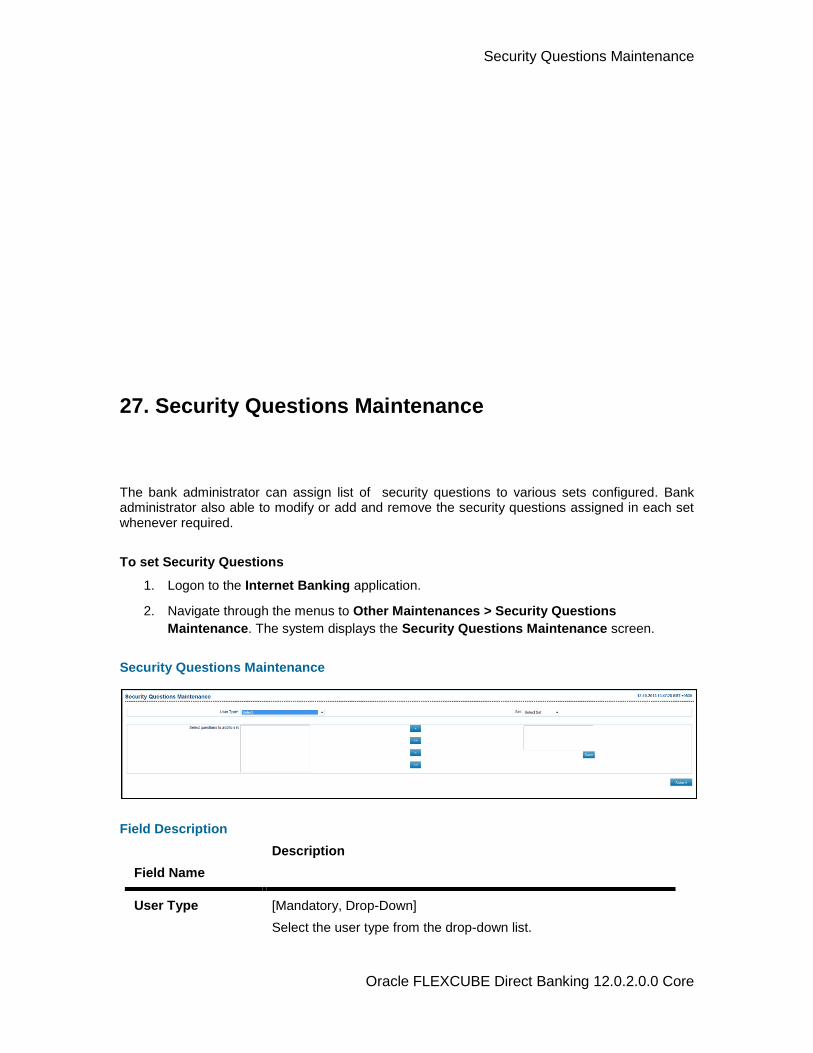
Security Questions Maintenance
Oracle FLEXCUBE Direct Banking 12.0.2.0.0 Core
27. Security Questions Maintenance
The bank administrator can assign list of security questions to various sets configured. Bank administrator also able to modify or add and remove the security questions assigned in each set whenever required.
To set Security Questions
1. Logon to the Internet Banking application.
2. Navigate through the menus to Other Maintenances > Security Questions
Maintenance. The system displays the Security Questions Maintenance screen.
Security Questions Maintenance
Field Description
Field Name
Description
User Type [Mandatory, Drop-Down]
Select the user type from the drop-down list.
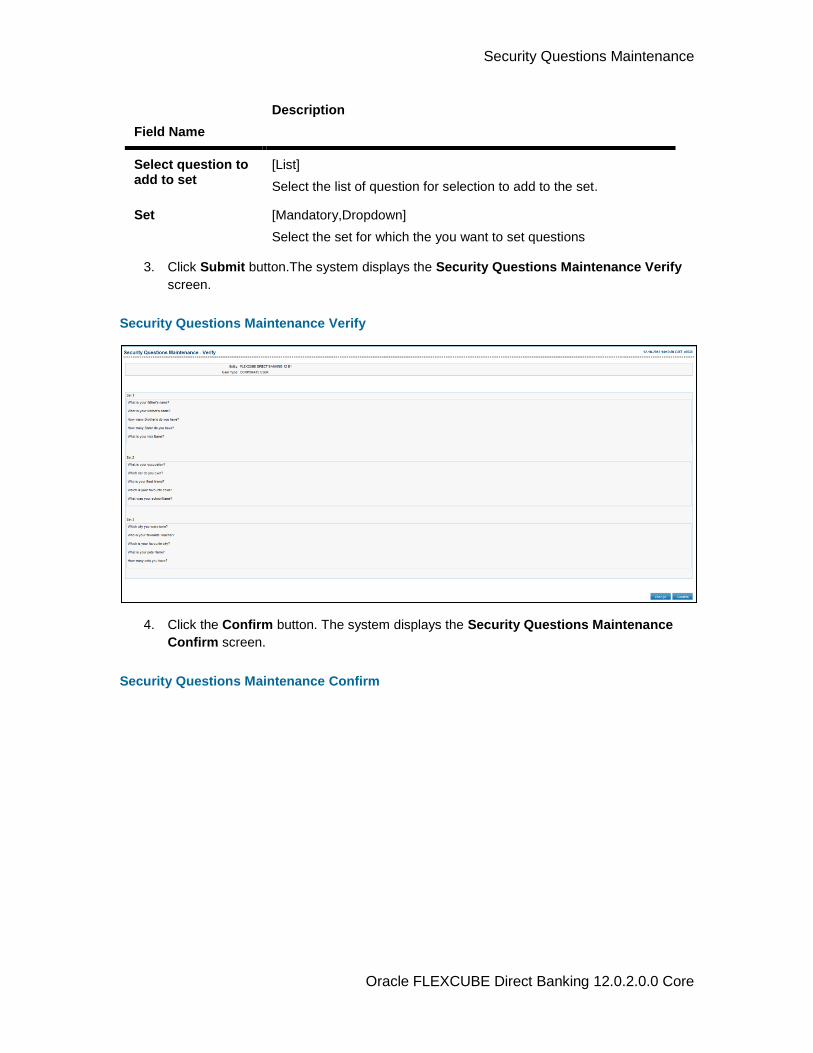
Security Questions Maintenance
Oracle FLEXCUBE Direct Banking 12.0.2.0.0 Core
Field Name
Description
Select question to add to set
[List]
Select the list of question for selection to add to the set.
Set [Mandatory,Dropdown]
Select the set for which the you want to set questions
3. Click Submit button.The system displays the Security Questions Maintenance Verify
screen.
Security Questions Maintenance Verify
4. Click the Confirm button. The system displays the Security Questions Maintenance
Confirm screen.
Security Questions Maintenance Confirm
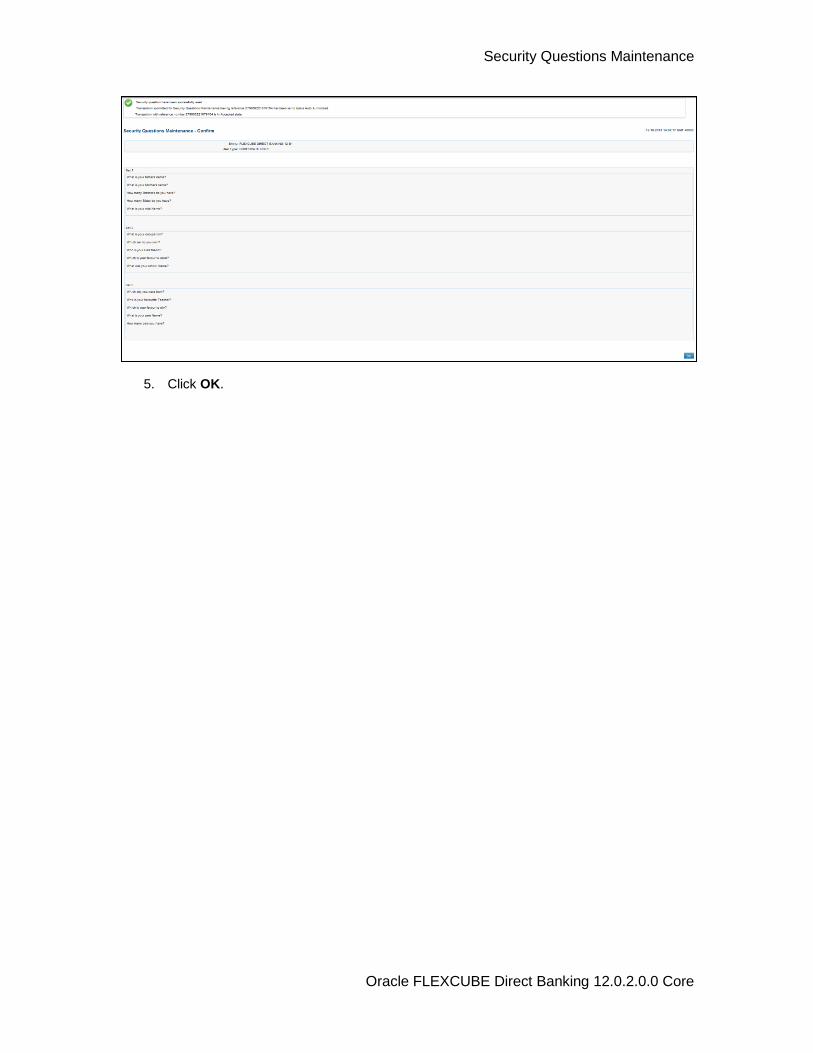
Security Questions Maintenance
Oracle FLEXCUBE Direct Banking 12.0.2.0.0 Core
5. Click OK.
Mailbox
Oracle FLEXCUBE Direct Banking 12.0.2.0.0 Core
28. Mailbox
The Mailbox option is an integrated communication system within the internet banking system for you to communicate with the customers and vice versa. It allows you to view all the notifications, alert messages and general messages sent by the customers; allows you to send messages to the customers.
Like popular e-mail clients that you may have used, the Mailbox offers an Inbox - where you can view messages and notifications sent to you, a Send Message facility using which you can send messages to the customer and a Sent folder, which allows you to view all the sent items.
Mail Box functionality is subdivided into the following sub-sections:
Viewing received messages (Inbox)
Viewing sent messages (Sent Messages)

Mailbox
Oracle FLEXCUBE Direct Banking 12.0.2.0.0 Core
28.1. Viewing Received Message
The Inbox folder stores all the bulletin messages sent to you. You can view the individual messages by clicking on the sender's name. The following procedure explains the steps to access Inbox and view a message stored within it.
To view received messages
6. Navigate through the menus to Service > Mailbox. The system displays the Messages
screen.
Mailbox
7. Click the Inbox tab. The system displays following screen.
Mailbox Inbox
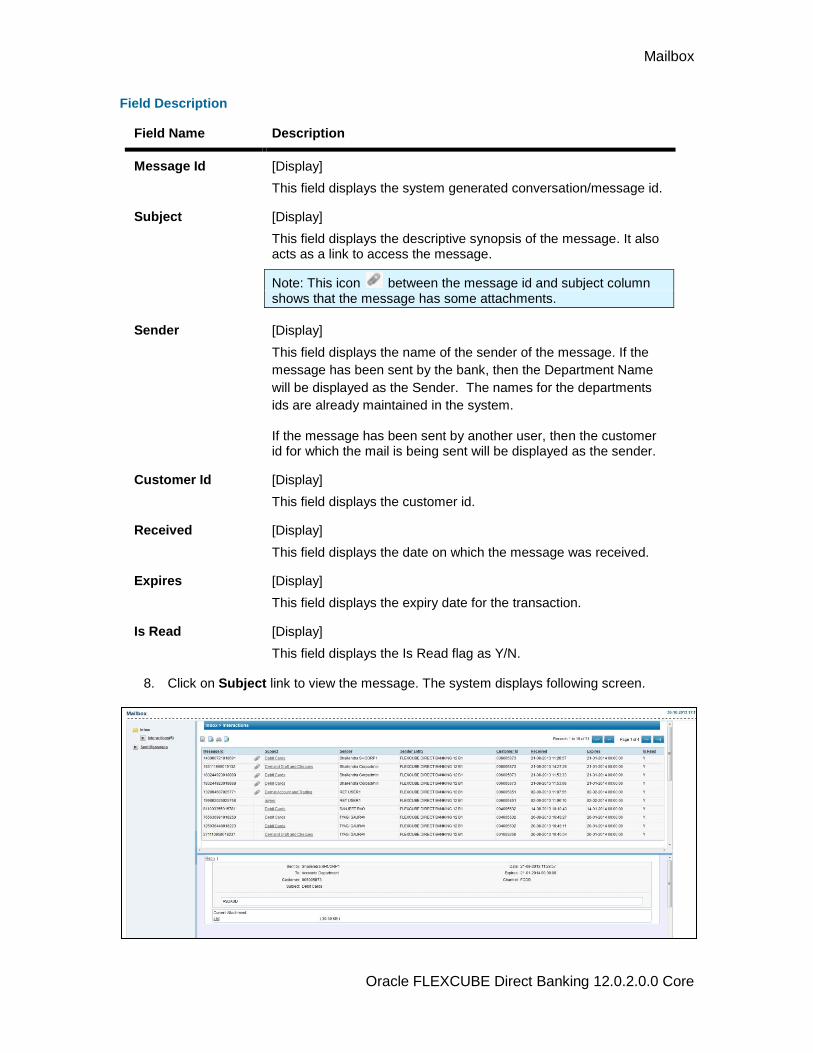
Mailbox
Oracle FLEXCUBE Direct Banking 12.0.2.0.0 Core
Field Description
Field Name Description
Message Id [Display]
This field displays the system generated conversation/message id.
Subject [Display]
This field displays the descriptive synopsis of the message. It also acts as a link to access the message.
Note: This icon between the message id and subject column shows that the message has some attachments.
Sender [Display]
This field displays the name of the sender of the message. If the
message has been sent by the bank, then the Department Name
will be displayed as the Sender. The names for the departments
ids are already maintained in the system.
If the message has been sent by another user, then the customer id for which the mail is being sent will be displayed as the sender.
Customer Id [Display]
This field displays the customer id.
Received [Display]
This field displays the date on which the message was received.
Expires [Display]
This field displays the expiry date for the transaction.
Is Read [Display]
This field displays the Is Read flag as Y/N.
8. Click on Subject link to view the message. The system displays following screen.
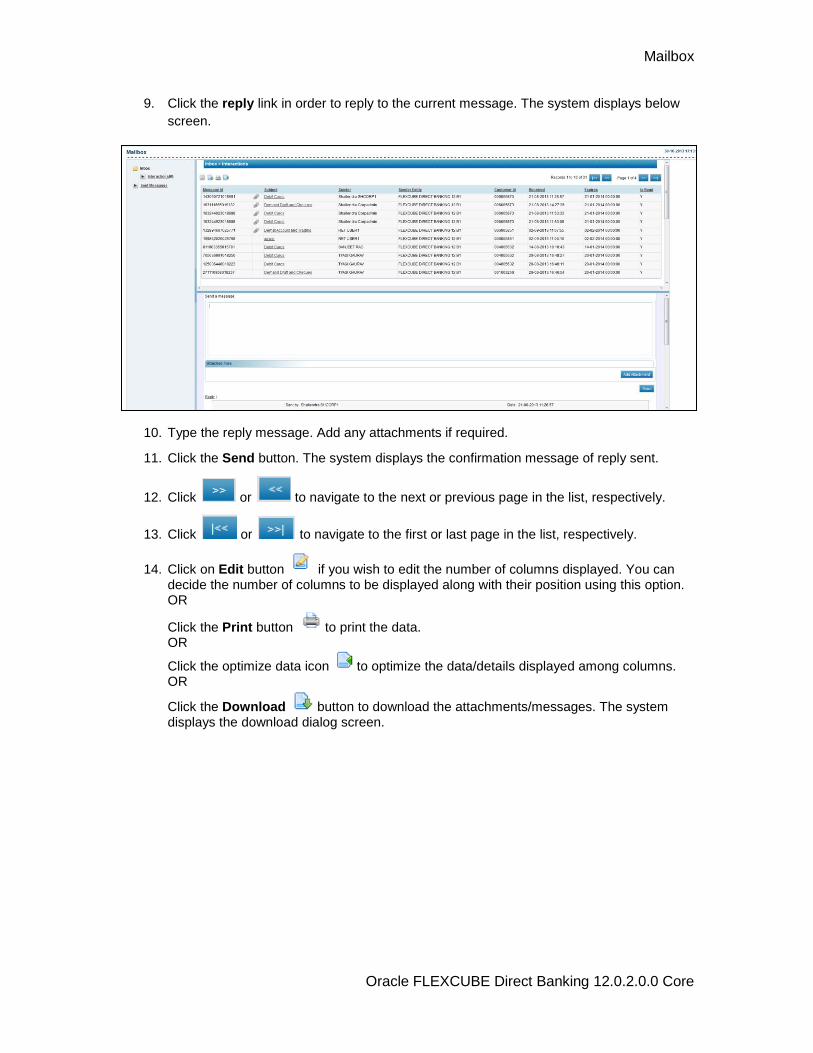
Mailbox
Oracle FLEXCUBE Direct Banking 12.0.2.0.0 Core
9. Click the reply link in order to reply to the current message. The system displays below
screen.
10. Type the reply message. Add any attachments if required.
11. Click the Send button. The system displays the confirmation message of reply sent.
12. Click or to navigate to the next or previous page in the list, respectively.
13. Click or to navigate to the first or last page in the list, respectively.
14. Click on Edit button if you wish to edit the number of columns displayed. You can decide the number of columns to be displayed along with their position using this option. OR
Click the Print button to print the data. OR
Click the optimize data icon to optimize the data/details displayed among columns. OR
Click the Download button to download the attachments/messages. The system displays the download dialog screen.
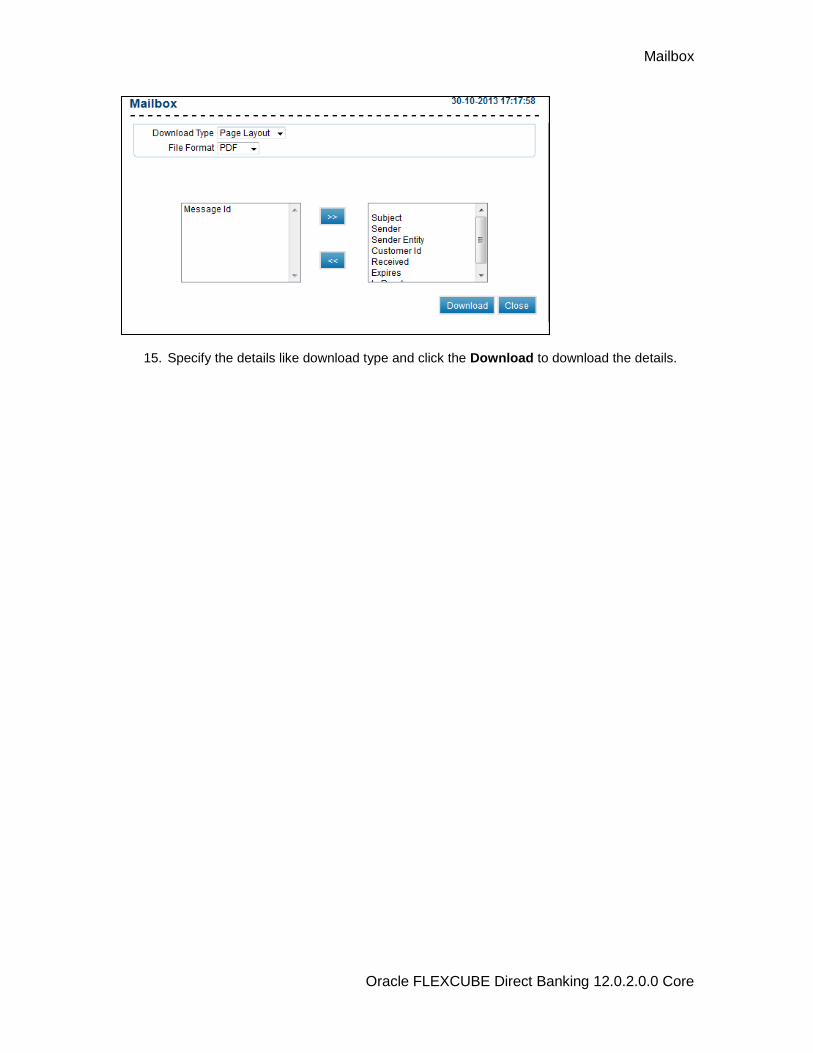
Mailbox
Oracle FLEXCUBE Direct Banking 12.0.2.0.0 Core
15. Specify the details like download type and click the Download to download the details.
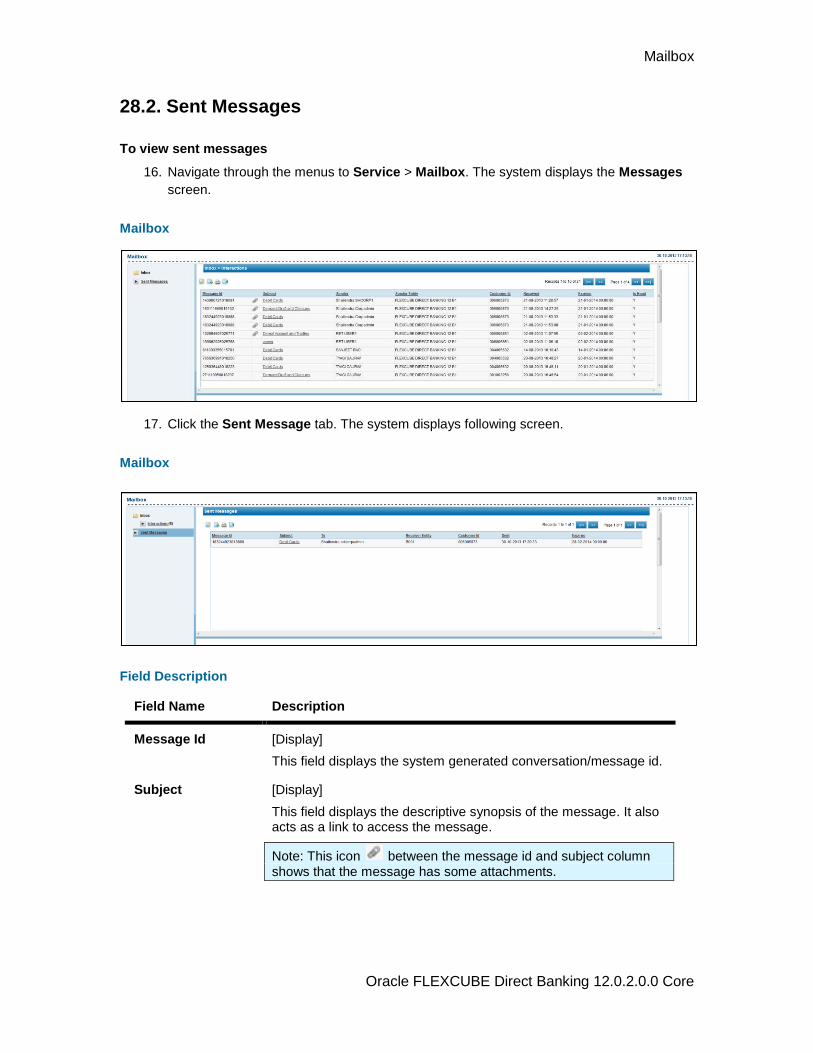
Mailbox
Oracle FLEXCUBE Direct Banking 12.0.2.0.0 Core
28.2. Sent Messages
To view sent messages
16. Navigate through the menus to Service > Mailbox. The system displays the Messages
screen.
Mailbox
17. Click the Sent Message tab. The system displays following screen.
Mailbox
Field Description
Field Name Description
Message Id [Display]
This field displays the system generated conversation/message id.
Subject [Display]
This field displays the descriptive synopsis of the message. It also acts as a link to access the message.
Note: This icon between the message id and subject column shows that the message has some attachments.
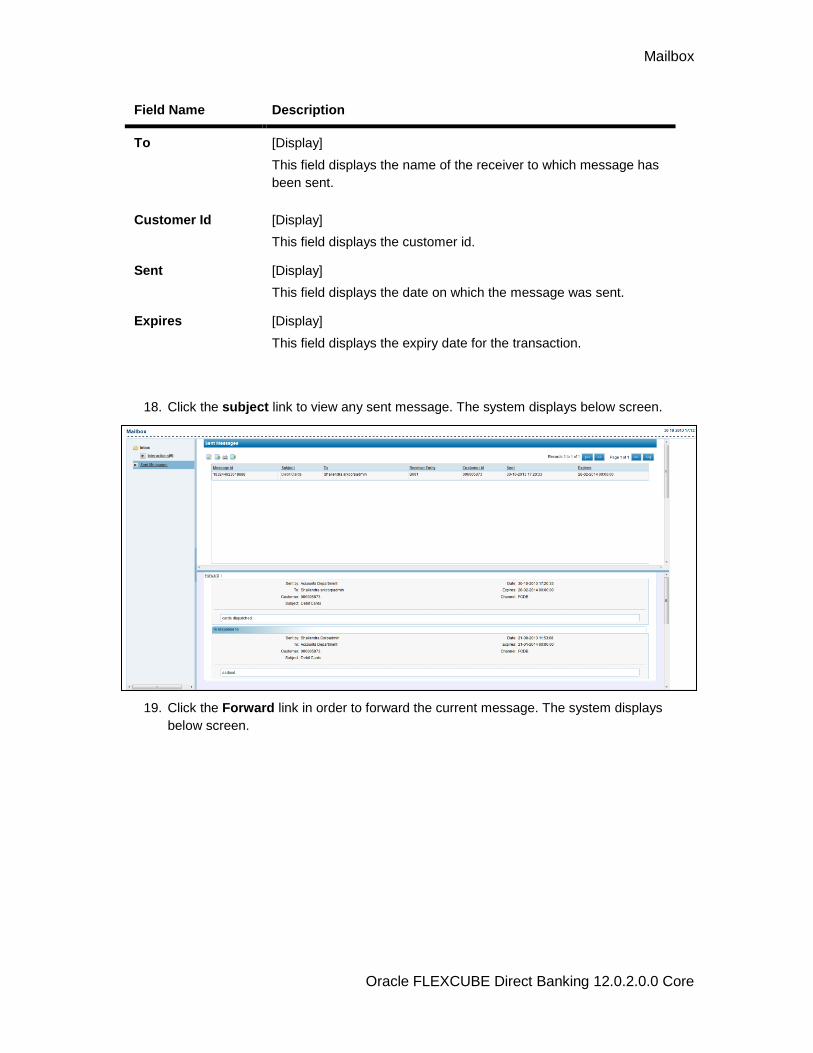
Mailbox
Oracle FLEXCUBE Direct Banking 12.0.2.0.0 Core
Field Name Description
To [Display]
This field displays the name of the receiver to which message has
been sent.
Customer Id [Display]
This field displays the customer id.
Sent [Display]
This field displays the date on which the message was sent.
Expires [Display]
This field displays the expiry date for the transaction.
18. Click the subject link to view any sent message. The system displays below screen.
19. Click the Forward link in order to forward the current message. The system displays
below screen.
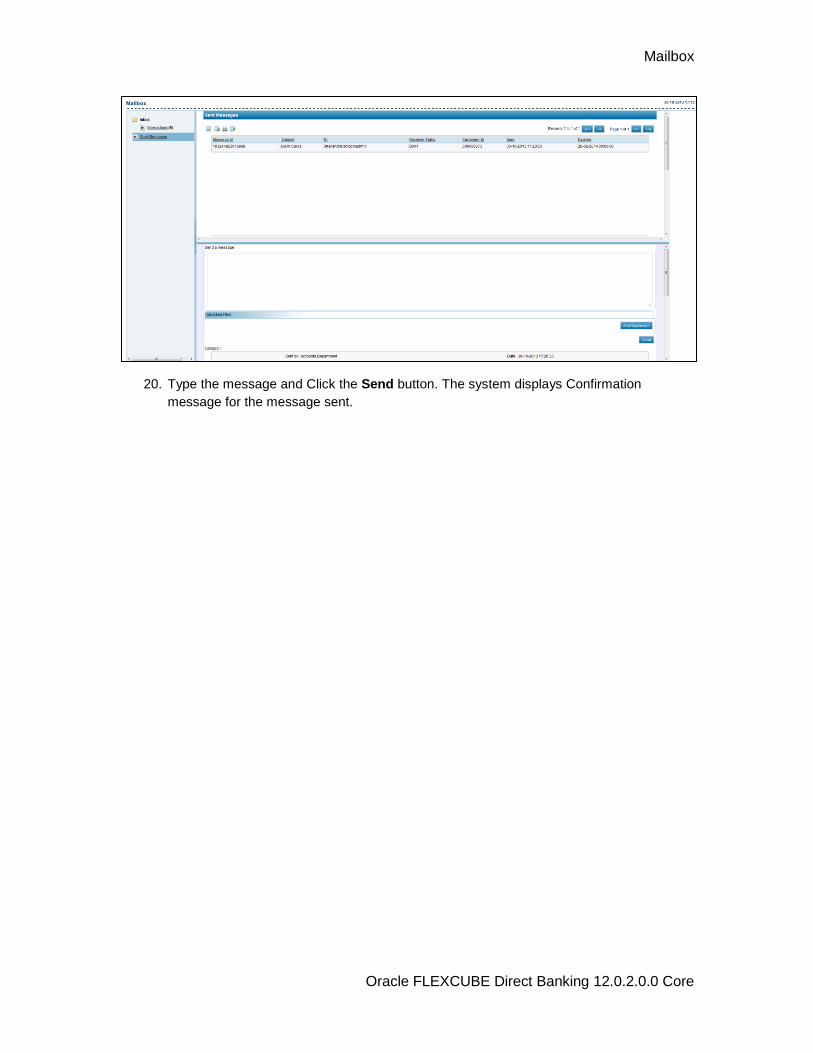
Mailbox
Oracle FLEXCUBE Direct Banking 12.0.2.0.0 Core
20. Type the message and Click the Send button. The system displays Confirmation
message for the message sent.
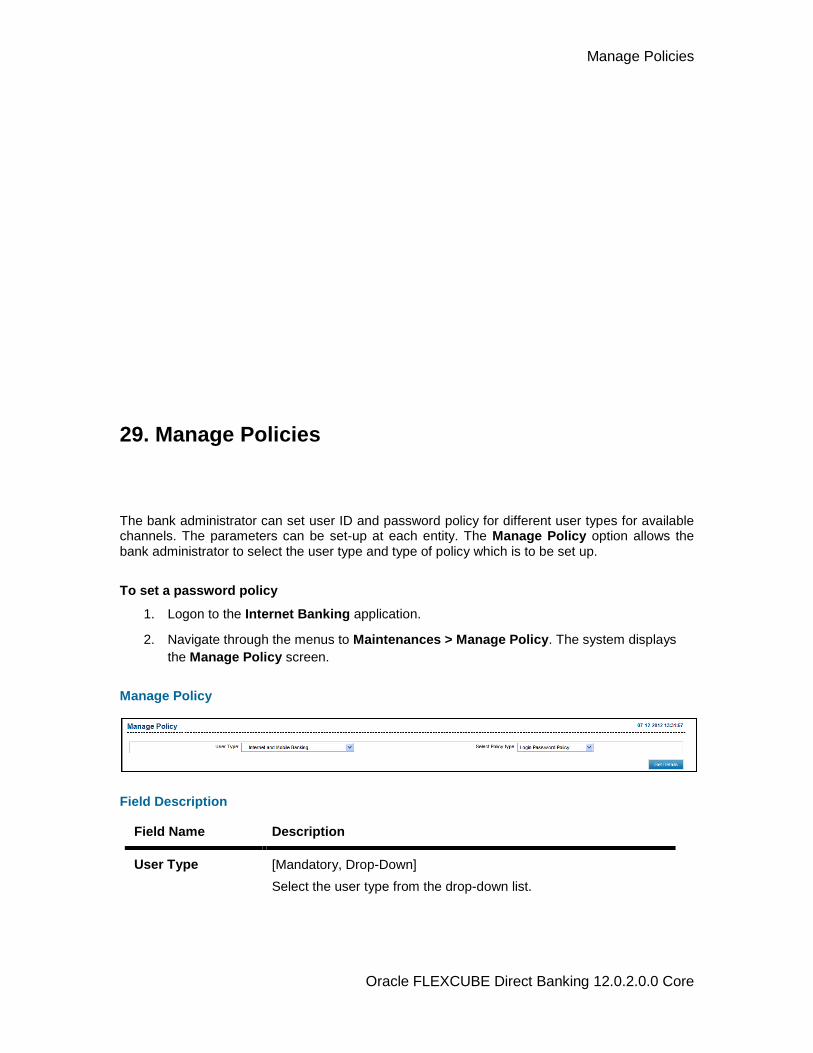
Manage Policies
Oracle FLEXCUBE Direct Banking 12.0.2.0.0 Core
29. Manage Policies
The bank administrator can set user ID and password policy for different user types for available channels. The parameters can be set-up at each entity. The Manage Policy option allows the bank administrator to select the user type and type of policy which is to be set up.
To set a password policy
1. Logon to the Internet Banking application.
2. Navigate through the menus to Maintenances > Manage Policy. The system displays
the Manage Policy screen.
Manage Policy
Field Description
Field Name Description
User Type [Mandatory, Drop-Down]
Select the user type from the drop-down list.
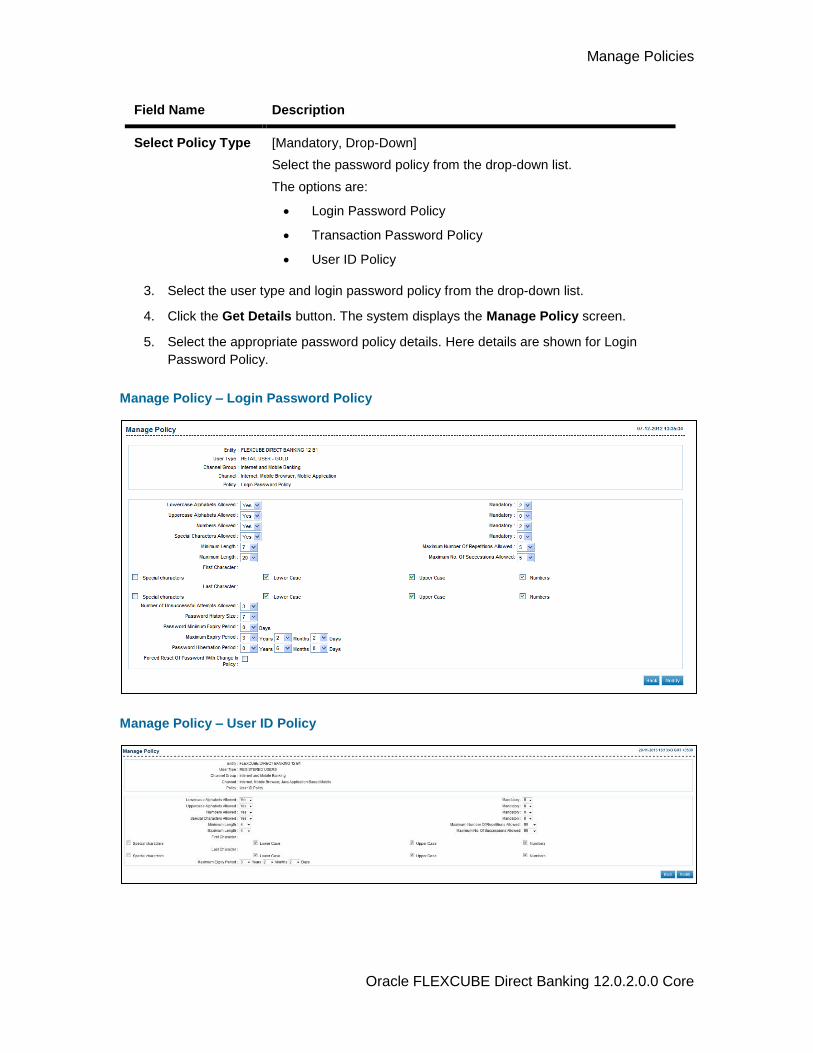
Manage Policies
Oracle FLEXCUBE Direct Banking 12.0.2.0.0 Core
Field Name Description
Select Policy Type [Mandatory, Drop-Down]
Select the password policy from the drop-down list.
The options are:
Login Password Policy
Transaction Password Policy
User ID Policy
3. Select the user type and login password policy from the drop-down list.
4. Click the Get Details button. The system displays the Manage Policy screen.
5. Select the appropriate password policy details. Here details are shown for Login
Password Policy.
Manage Policy – Login Password Policy
Manage Policy – User ID Policy
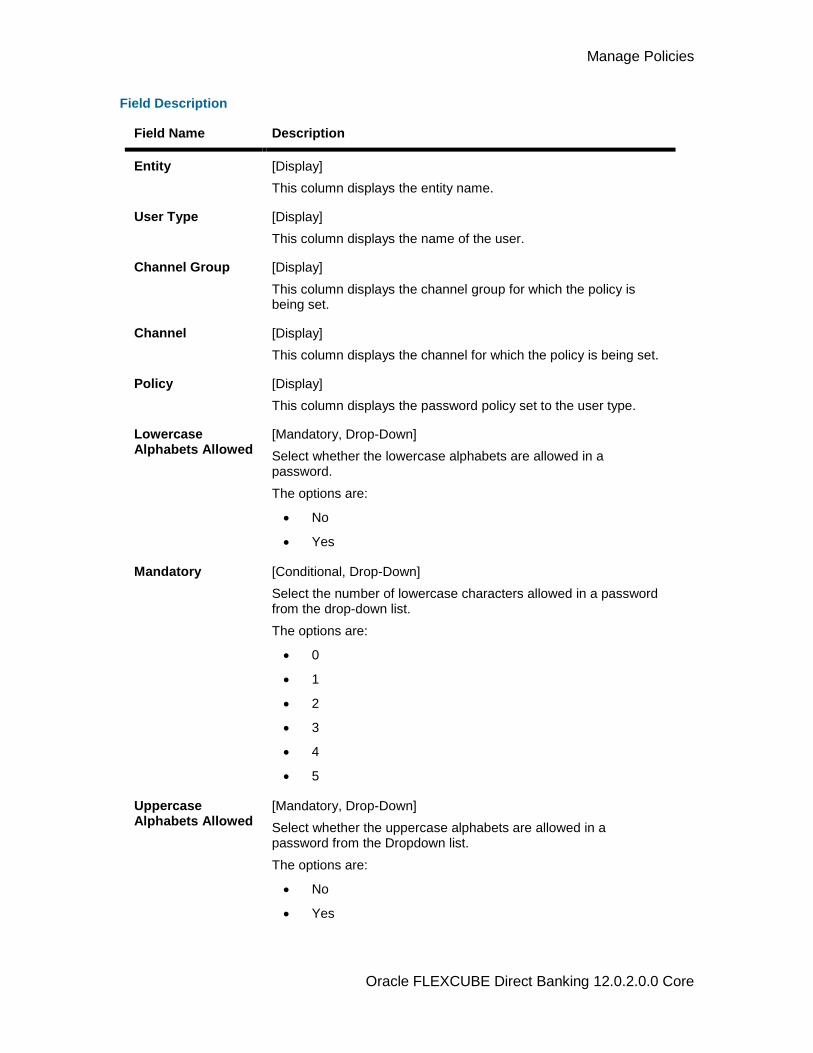
Manage Policies
Oracle FLEXCUBE Direct Banking 12.0.2.0.0 Core
Field Description
Field Name Description
Entity [Display]
This column displays the entity name.
User Type [Display]
This column displays the name of the user.
Channel Group [Display]
This column displays the channel group for which the policy is being set.
Channel [Display]
This column displays the channel for which the policy is being set.
Policy [Display]
This column displays the password policy set to the user type.
Lowercase Alphabets Allowed
[Mandatory, Drop-Down]
Select whether the lowercase alphabets are allowed in a password.
The options are:
No
Yes
Mandatory [Conditional, Drop-Down]
Select the number of lowercase characters allowed in a password from the drop-down list.
The options are:
0
1
2
3
4
5
Uppercase Alphabets Allowed
[Mandatory, Drop-Down]
Select whether the uppercase alphabets are allowed in a password from the Dropdown list.
The options are:
No
Yes
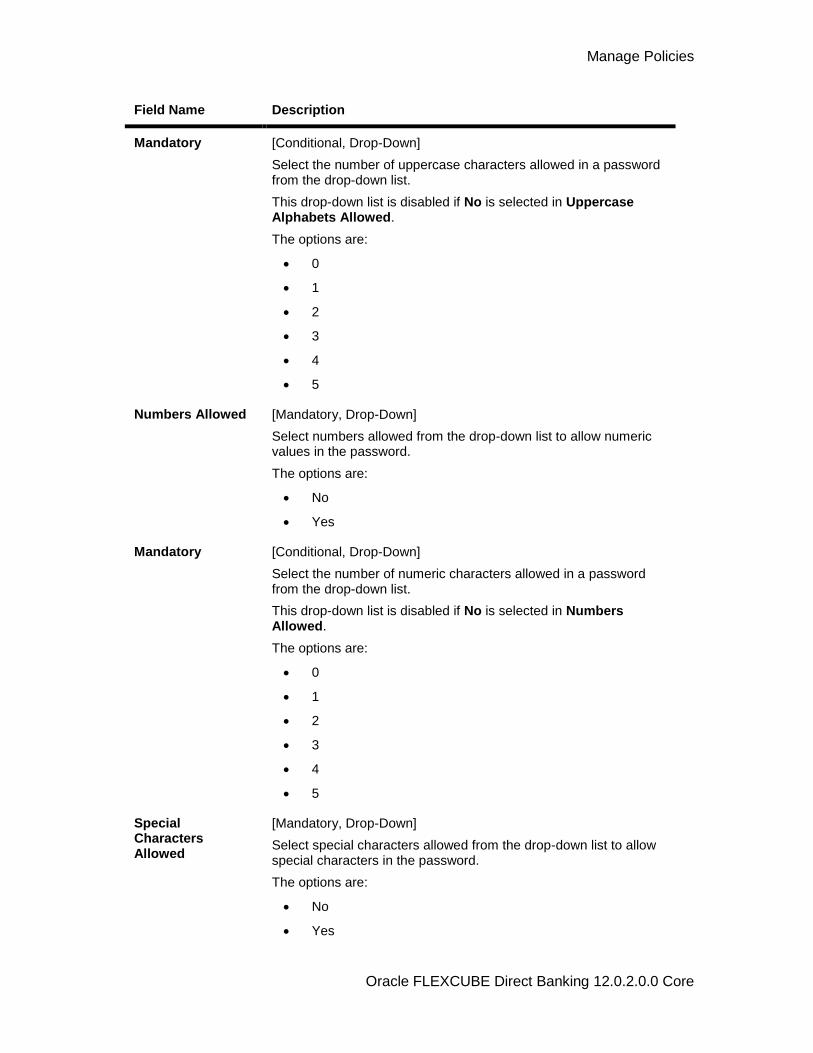
Manage Policies
Oracle FLEXCUBE Direct Banking 12.0.2.0.0 Core
Field Name Description
Mandatory [Conditional, Drop-Down]
Select the number of uppercase characters allowed in a password from the drop-down list.
This drop-down list is disabled if No is selected in Uppercase Alphabets Allowed.
The options are:
0
1
2
3
4
5
Numbers Allowed [Mandatory, Drop-Down]
Select numbers allowed from the drop-down list to allow numeric values in the password.
The options are:
No
Yes
Mandatory [Conditional, Drop-Down]
Select the number of numeric characters allowed in a password from the drop-down list.
This drop-down list is disabled if No is selected in Numbers Allowed.
The options are:
0
1
2
3
4
5
Special Characters Allowed
[Mandatory, Drop-Down]
Select special characters allowed from the drop-down list to allow special characters in the password.
The options are:
No
Yes

Manage Policies
Oracle FLEXCUBE Direct Banking 12.0.2.0.0 Core
Field Name Description
Mandatory [Conditional, Drop-Down]
Select the number of special characters allowed in a password from the drop-down list.
This drop-down list is disabled if No is selected in Numbers Allowed.
Minimum Length [Mandatory, Drop-Down]
Select the minimum password length from the drop-down list.
The options are:
4
5
6
7
8
9
10
Maximum No.Of Repetitions Allowed
[Mandatory, Drop-Down]
Select the maximum number of repetitions allowed from the drop-down list.
The options are:
[0-20]
Maximum Length [Mandatory, Drop-Down]
Select the maximum password length from the drop-down list.
Maximum No. Of
Successions Allowed
[Mandatory, Drop-Down]
Select the number of successful attempts allowed to enter a password from the drop-down list.
Manage Policies
Oracle FLEXCUBE Direct Banking 12.0.2.0.0 Core
Field Name Description
First Character In Password
[Mandatory, Check Box]
Select the check box to select the first character of the password.
The options are:
Special character: If this check box is selected then user can enter special characters as first character of the password.
Lower Case: If this check box is selected then user can enter first character in lower case.
Upper Case: If this check box is selected then user can enter first character in upper case.
Numbers: If this check box is selected then user can enter first character as numeric
Last Character In Password
[Mandatory, Check Box]
Select the check box to select the last character of the password.
The options are:
Special character: If this check box is selected then user can enter special characters as last character of the password
Lower Case: If this check box is selected then user can enter last character in lower case
Upper Case: If this check box is selected then user can enter last character in upper case
Numbers: If this check box is selected then user can enter last character as numeric.
Number of Unsuccessful Attempts Allowed
[Mandatory, Drop-Down]
Select the number of unsuccessful attempts allowed from the drop-down list.
The account will be locked after the specified number of attempts.
Note : This field will be enabled only for password policy
Password History Size
[Mandatory, Drop-Down]
Select the password history from the drop-down list.
System retains a log of old passwords which can not be repeated.
Note : This field will be enabled only for password policy
Password Minimum Expiry Period
[Mandatory, Drop-Down]
Select the password minimum expiry period from the drop-down list.
Note : This field will be enabled only for password policy
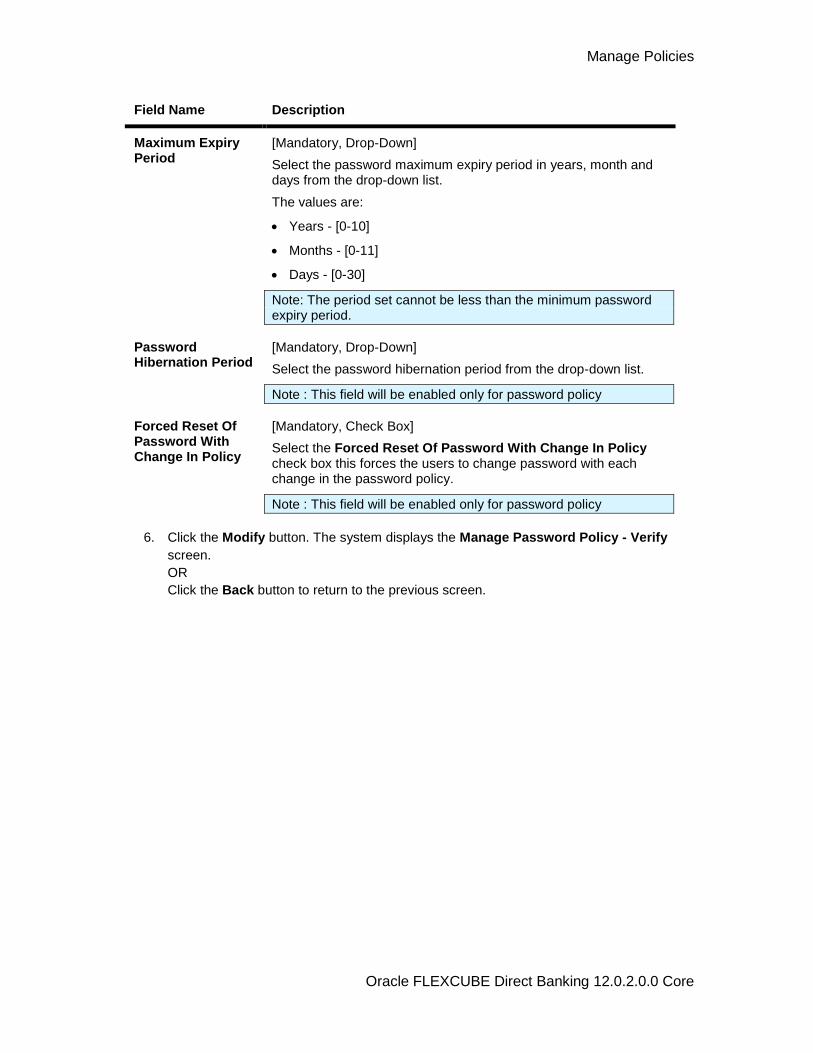
Manage Policies
Oracle FLEXCUBE Direct Banking 12.0.2.0.0 Core
Field Name Description
Maximum Expiry Period
[Mandatory, Drop-Down]
Select the password maximum expiry period in years, month and days from the drop-down list.
The values are:
Years - [0-10]
Months - [0-11]
Days - [0-30]
Note: The period set cannot be less than the minimum password expiry period.
Password Hibernation Period
[Mandatory, Drop-Down]
Select the password hibernation period from the drop-down list.
Note : This field will be enabled only for password policy
Forced Reset Of Password With Change In Policy
[Mandatory, Check Box]
Select the Forced Reset Of Password With Change In Policy check box this forces the users to change password with each change in the password policy.
Note : This field will be enabled only for password policy
6. Click the Modify button. The system displays the Manage Password Policy - Verify
screen.
OR
Click the Back button to return to the previous screen.
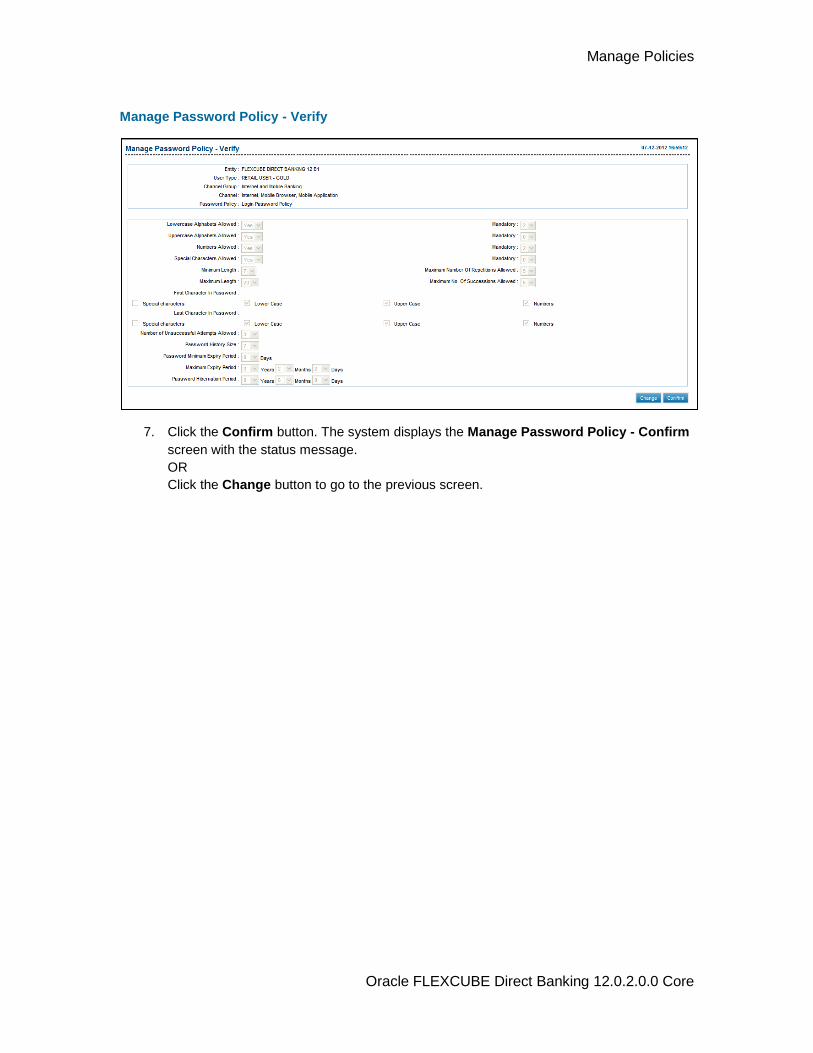
Manage Policies
Oracle FLEXCUBE Direct Banking 12.0.2.0.0 Core
Manage Password Policy - Verify
7. Click the Confirm button. The system displays the Manage Password Policy - Confirm
screen with the status message.
OR
Click the Change button to go to the previous screen.
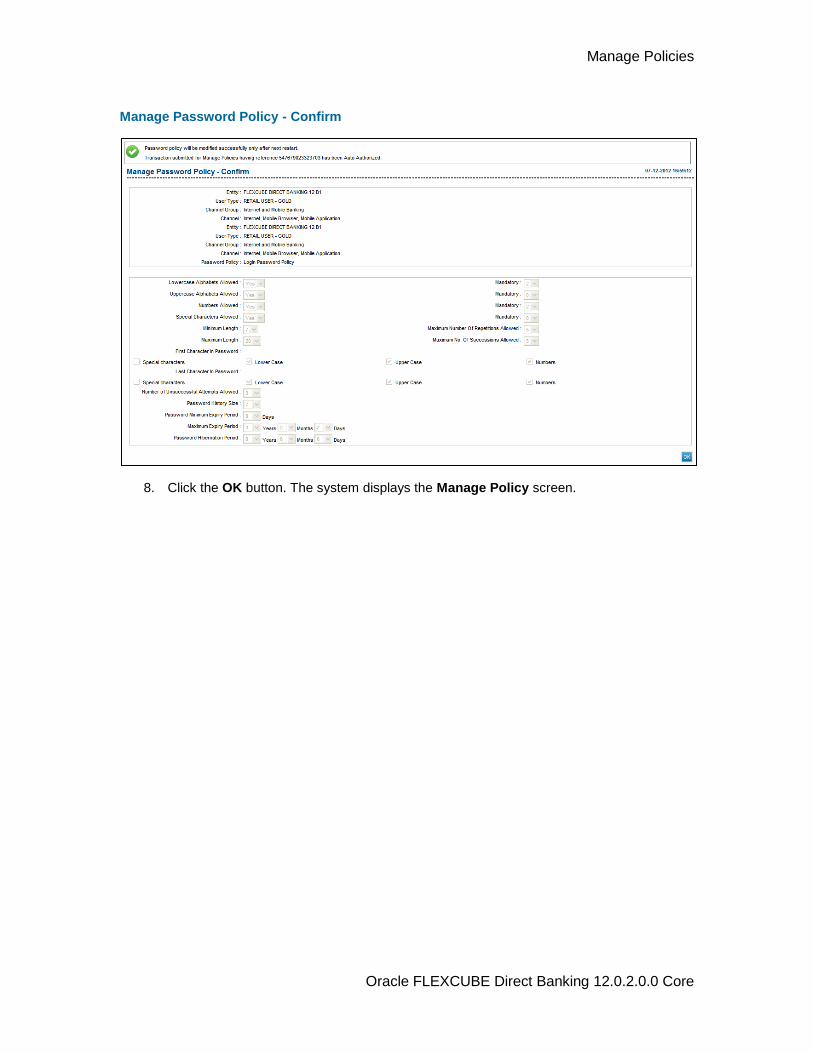
Manage Policies
Oracle FLEXCUBE Direct Banking 12.0.2.0.0 Core
Manage Password Policy - Confirm
8. Click the OK button. The system displays the Manage Policy screen.
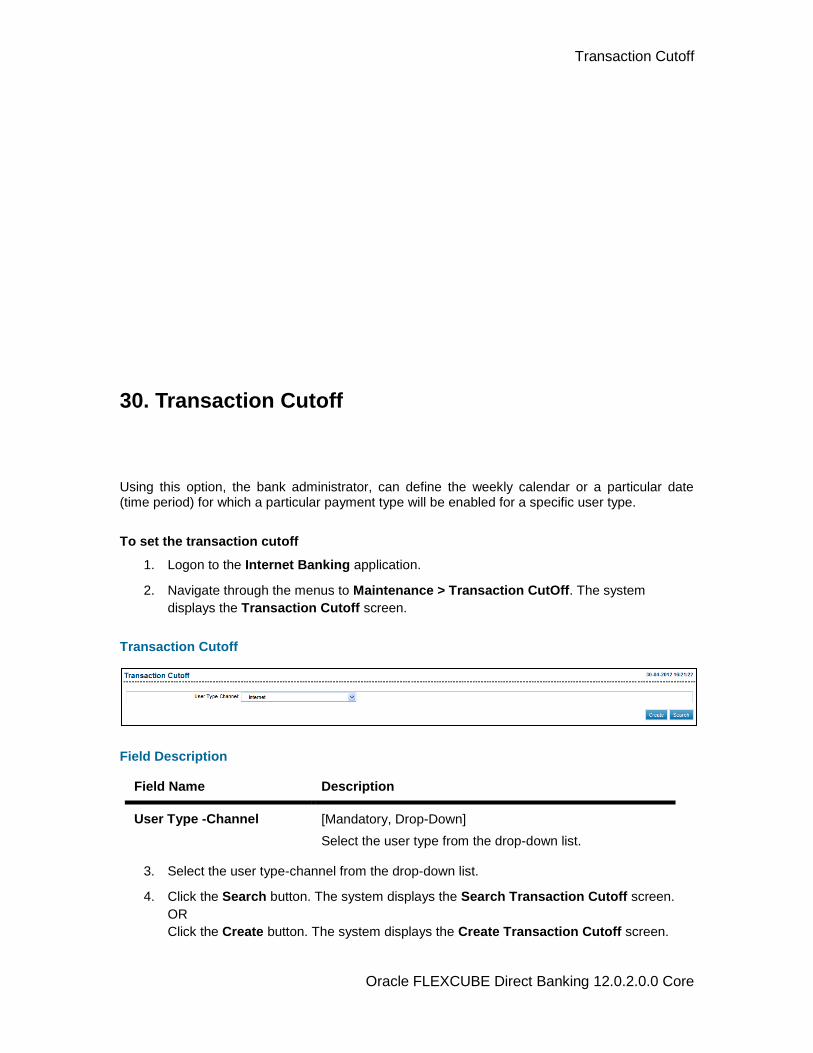
Transaction Cutoff
Oracle FLEXCUBE Direct Banking 12.0.2.0.0 Core
30. Transaction Cutoff
Using this option, the bank administrator, can define the weekly calendar or a particular date (time period) for which a particular payment type will be enabled for a specific user type.
To set the transaction cutoff
1. Logon to the Internet Banking application.
2. Navigate through the menus to Maintenance > Transaction CutOff. The system
displays the Transaction Cutoff screen.
Transaction Cutoff
Field Description
Field Name Description
User Type -Channel [Mandatory, Drop-Down]
Select the user type from the drop-down list.
3. Select the user type-channel from the drop-down list.
4. Click the Search button. The system displays the Search Transaction Cutoff screen.
OR
Click the Create button. The system displays the Create Transaction Cutoff screen.
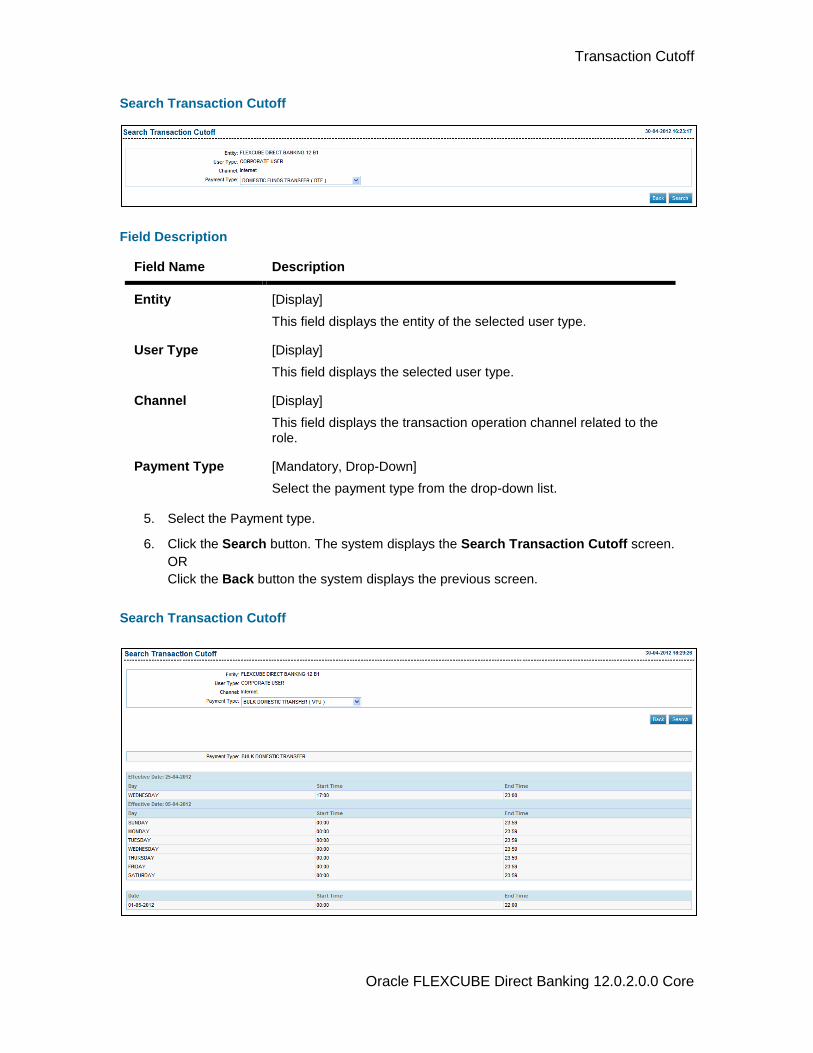
Transaction Cutoff
Oracle FLEXCUBE Direct Banking 12.0.2.0.0 Core
Search Transaction Cutoff
Field Description
Field Name Description
Entity [Display]
This field displays the entity of the selected user type.
User Type [Display]
This field displays the selected user type.
Channel [Display]
This field displays the transaction operation channel related to the role.
Payment Type [Mandatory, Drop-Down]
Select the payment type from the drop-down list.
5. Select the Payment type.
6. Click the Search button. The system displays the Search Transaction Cutoff screen.
OR
Click the Back button the system displays the previous screen.
Search Transaction Cutoff
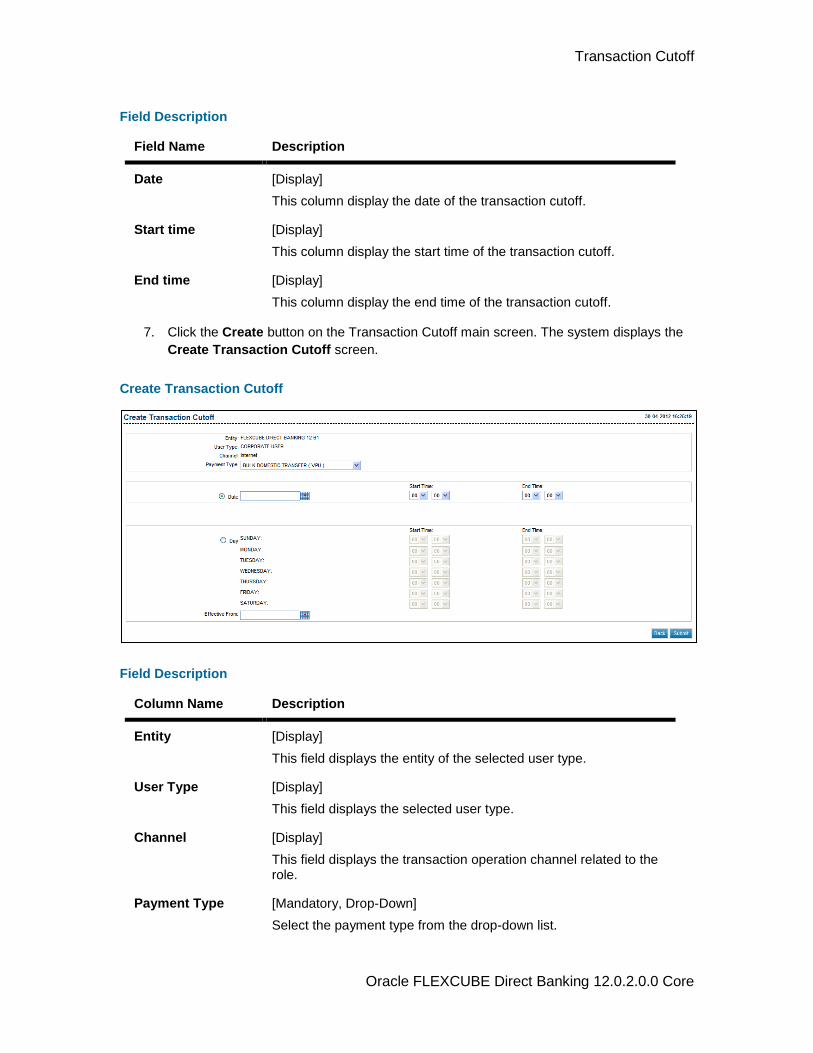
Transaction Cutoff
Oracle FLEXCUBE Direct Banking 12.0.2.0.0 Core
Field Description
Field Name Description
Date [Display]
This column display the date of the transaction cutoff.
Start time [Display]
This column display the start time of the transaction cutoff.
End time [Display]
This column display the end time of the transaction cutoff.
7. Click the Create button on the Transaction Cutoff main screen. The system displays the
Create Transaction Cutoff screen.
Create Transaction Cutoff
Field Description
Column Name Description
Entity [Display]
This field displays the entity of the selected user type.
User Type [Display]
This field displays the selected user type.
Channel [Display]
This field displays the transaction operation channel related to the role.
Payment Type [Mandatory, Drop-Down]
Select the payment type from the drop-down list.
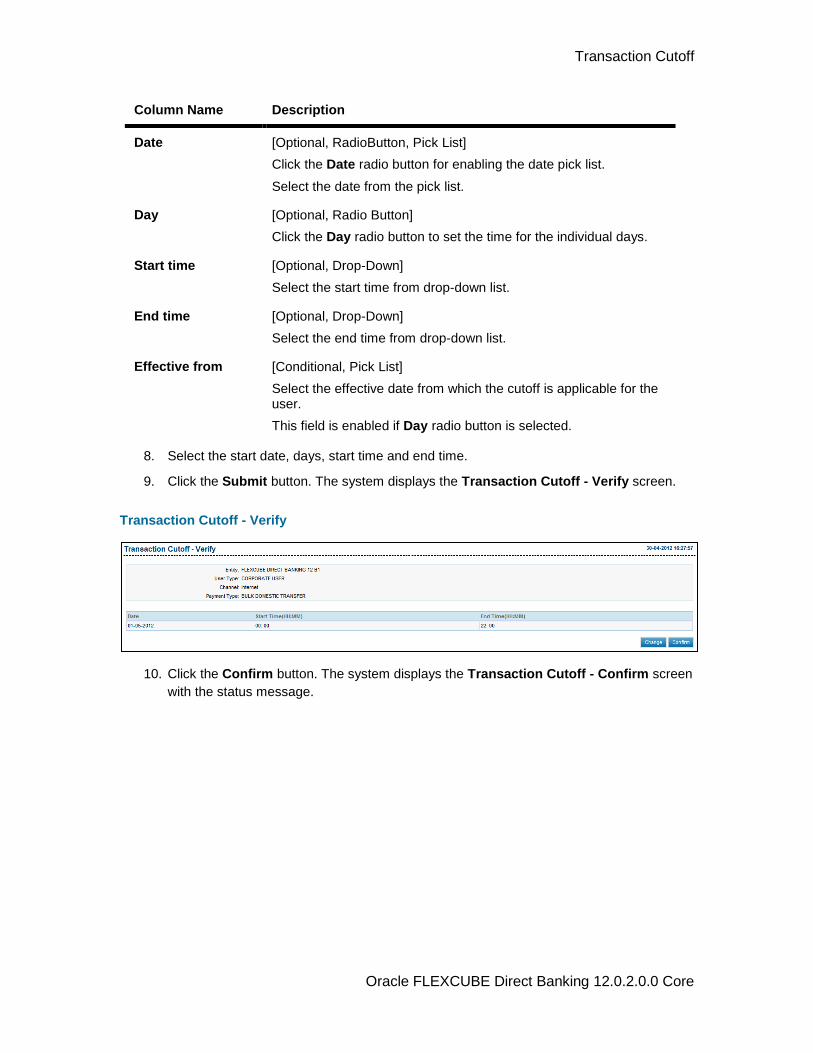
Transaction Cutoff
Oracle FLEXCUBE Direct Banking 12.0.2.0.0 Core
Column Name Description
Date [Optional, RadioButton, Pick List]
Click the Date radio button for enabling the date pick list.
Select the date from the pick list.
Day [Optional, Radio Button]
Click the Day radio button to set the time for the individual days.
Start time [Optional, Drop-Down]
Select the start time from drop-down list.
End time [Optional, Drop-Down]
Select the end time from drop-down list.
Effective from [Conditional, Pick List]
Select the effective date from which the cutoff is applicable for the user.
This field is enabled if Day radio button is selected.
8. Select the start date, days, start time and end time.
9. Click the Submit button. The system displays the Transaction Cutoff - Verify screen.
Transaction Cutoff - Verify
10. Click the Confirm button. The system displays the Transaction Cutoff - Confirm screen
with the status message.
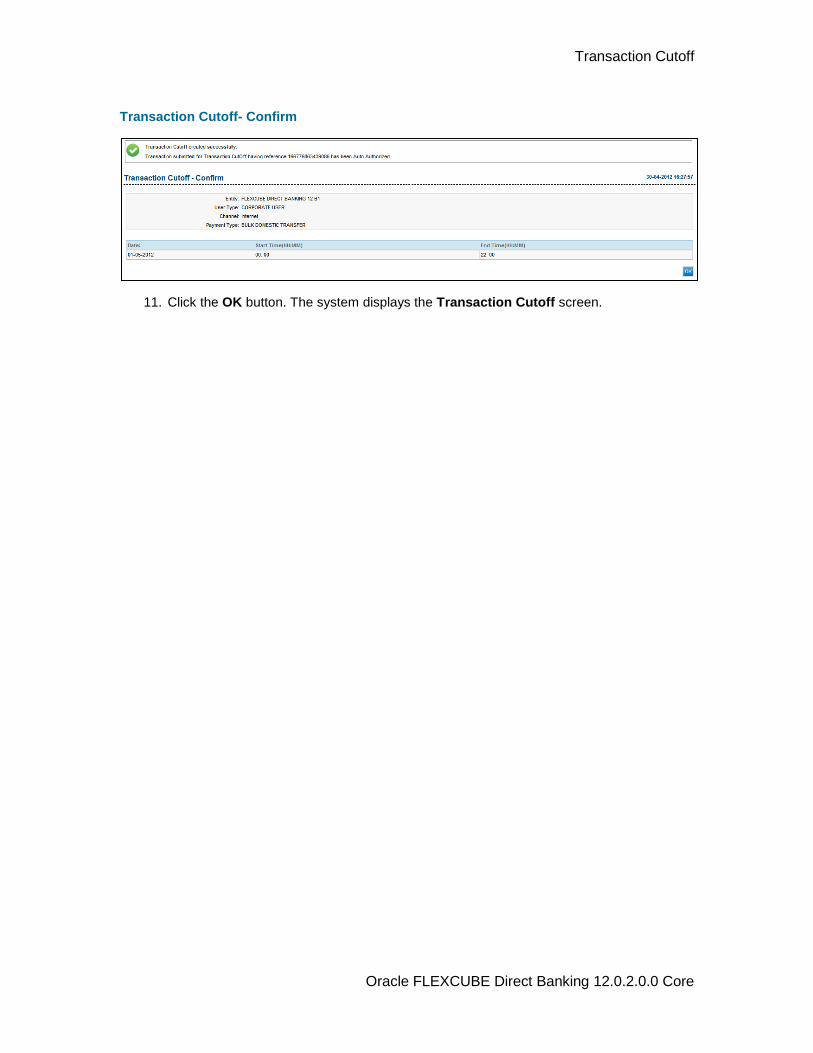
Transaction Cutoff
Oracle FLEXCUBE Direct Banking 12.0.2.0.0 Core
Transaction Cutoff- Confirm
11. Click the OK button. The system displays the Transaction Cutoff screen.
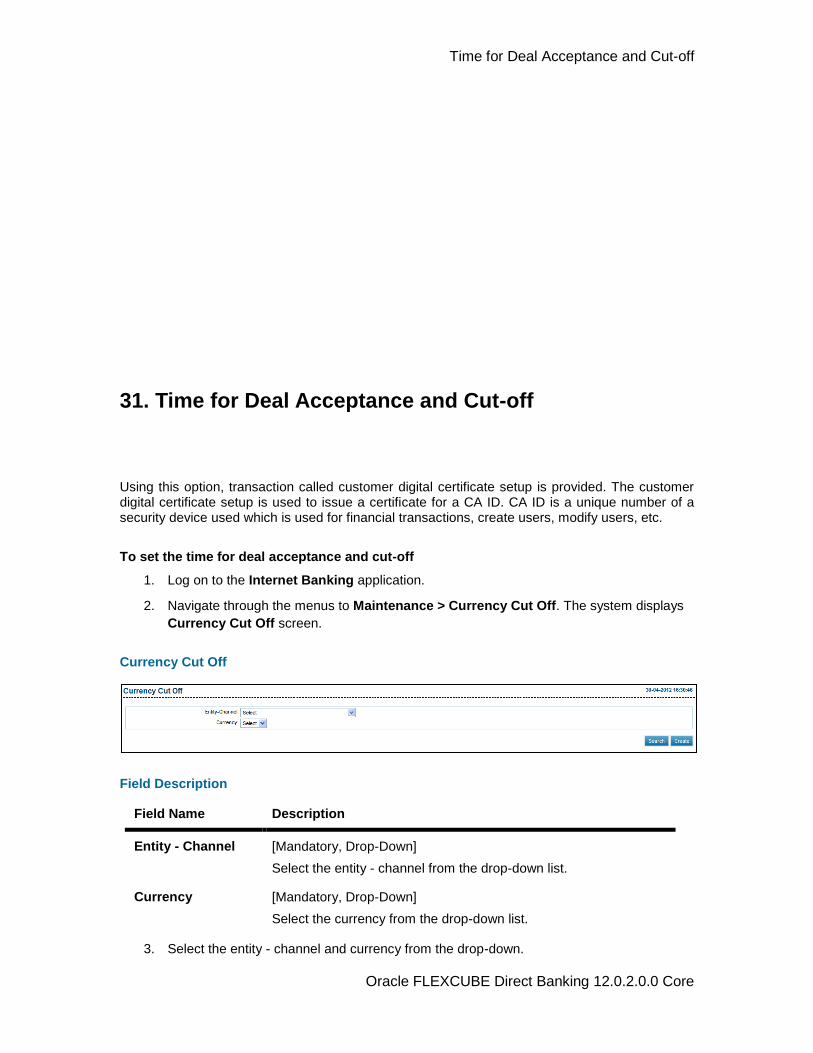
Time for Deal Acceptance and Cut-off
Oracle FLEXCUBE Direct Banking 12.0.2.0.0 Core
31. Time for Deal Acceptance and Cut-off
Using this option, transaction called customer digital certificate setup is provided. The customer digital certificate setup is used to issue a certificate for a CA ID. CA ID is a unique number of a security device used which is used for financial transactions, create users, modify users, etc.
To set the time for deal acceptance and cut-off
1. Log on to the Internet Banking application.
2. Navigate through the menus to Maintenance > Currency Cut Off. The system displays
Currency Cut Off screen.
Currency Cut Off
Field Description
Field Name Description
Entity - Channel [Mandatory, Drop-Down]
Select the entity - channel from the drop-down list.
Currency [Mandatory, Drop-Down]
Select the currency from the drop-down list.
3. Select the entity - channel and currency from the drop-down.
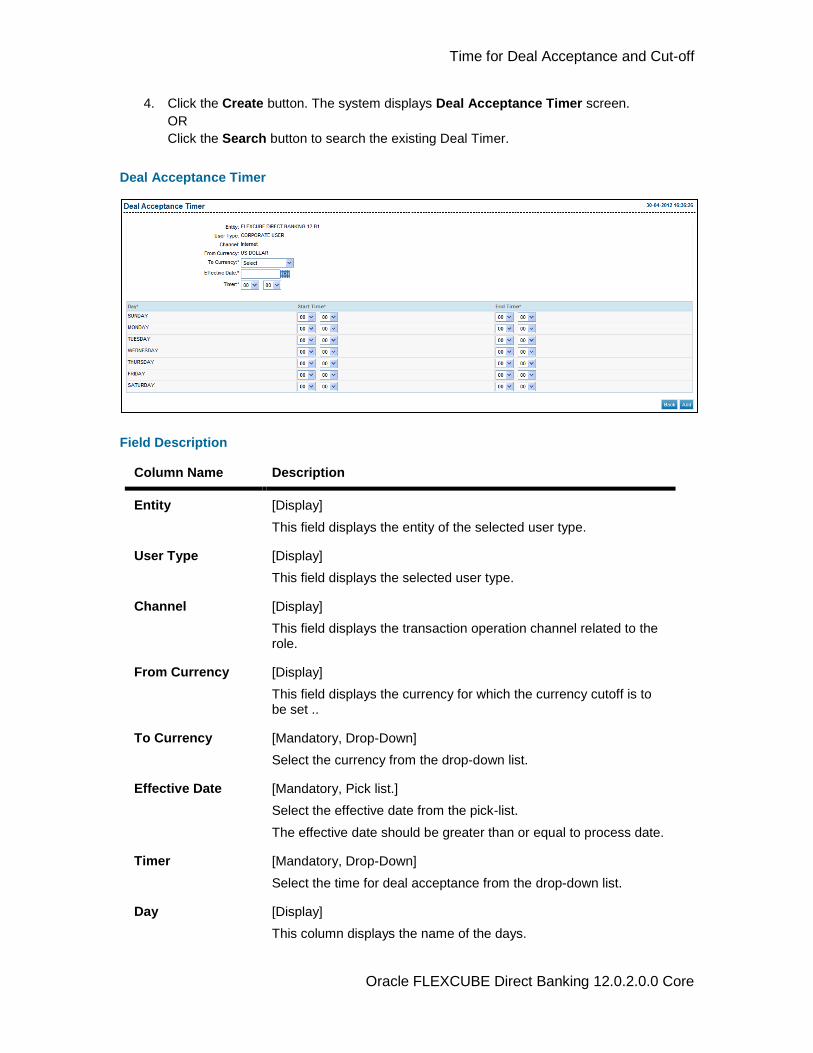
Time for Deal Acceptance and Cut-off
Oracle FLEXCUBE Direct Banking 12.0.2.0.0 Core
4. Click the Create button. The system displays Deal Acceptance Timer screen.
OR
Click the Search button to search the existing Deal Timer.
Deal Acceptance Timer
Field Description
Column Name Description
Entity [Display]
This field displays the entity of the selected user type.
User Type [Display]
This field displays the selected user type.
Channel [Display]
This field displays the transaction operation channel related to the role.
From Currency [Display]
This field displays the currency for which the currency cutoff is to be set ..
To Currency [Mandatory, Drop-Down]
Select the currency from the drop-down list.
Effective Date [Mandatory, Pick list.]
Select the effective date from the pick-list.
The effective date should be greater than or equal to process date.
Timer [Mandatory, Drop-Down]
Select the time for deal acceptance from the drop-down list.
Day [Display]
This column displays the name of the days.
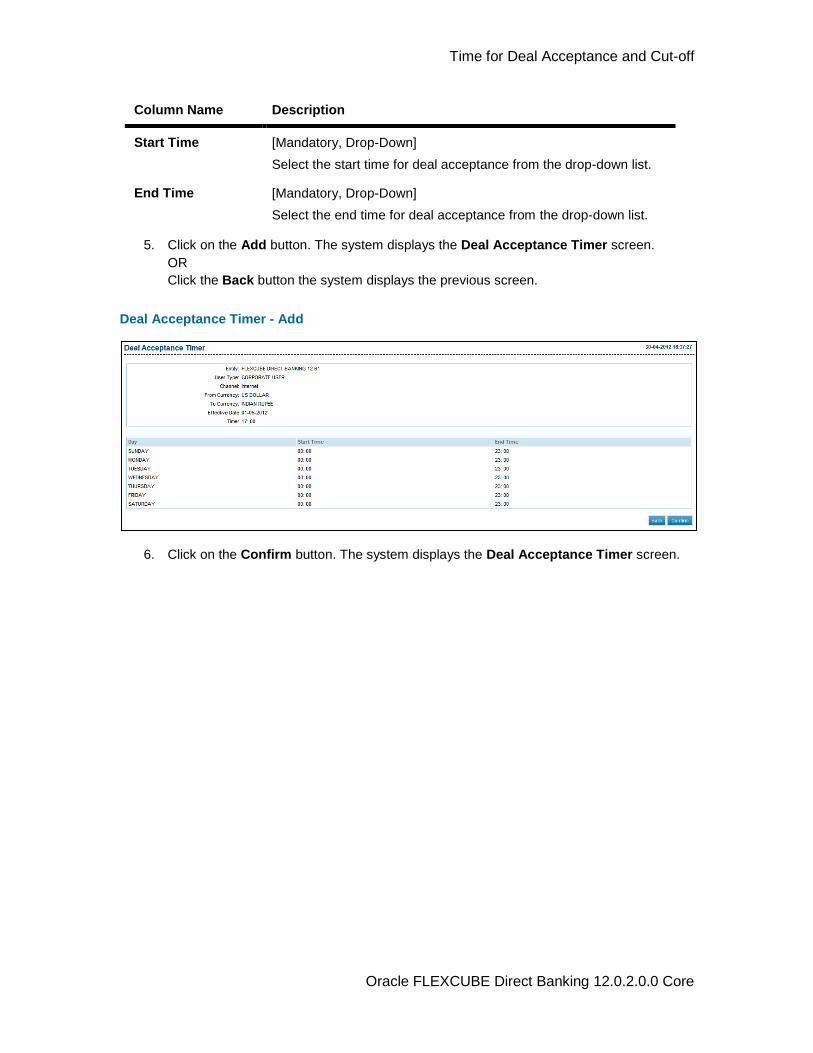
Time for Deal Acceptance and Cut-off
Oracle FLEXCUBE Direct Banking 12.0.2.0.0 Core
Column Name Description
Start Time [Mandatory, Drop-Down]
Select the start time for deal acceptance from the drop-down list.
End Time [Mandatory, Drop-Down]
Select the end time for deal acceptance from the drop-down list.
5. Click on the Add button. The system displays the Deal Acceptance Timer screen.
OR
Click the Back button the system displays the previous screen.
Deal Acceptance Timer - Add
6. Click on the Confirm button. The system displays the Deal Acceptance Timer screen.
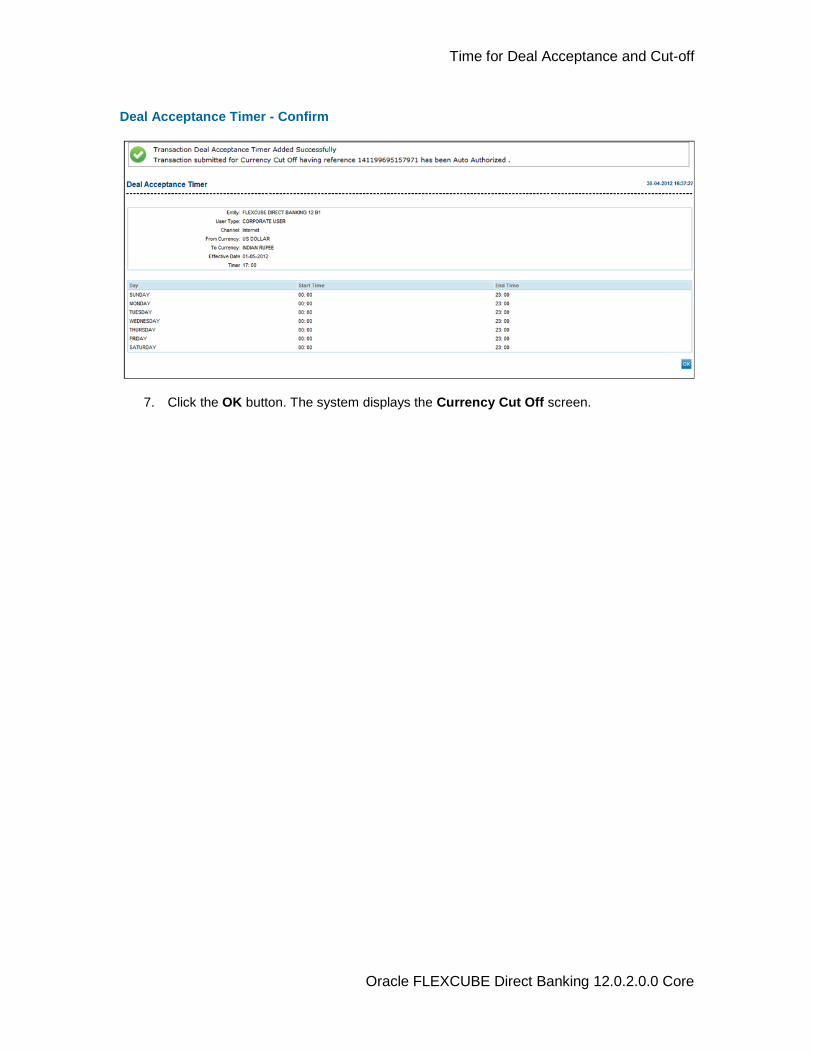
Time for Deal Acceptance and Cut-off
Oracle FLEXCUBE Direct Banking 12.0.2.0.0 Core
Deal Acceptance Timer - Confirm
7. Click the OK button. The system displays the Currency Cut Off screen.
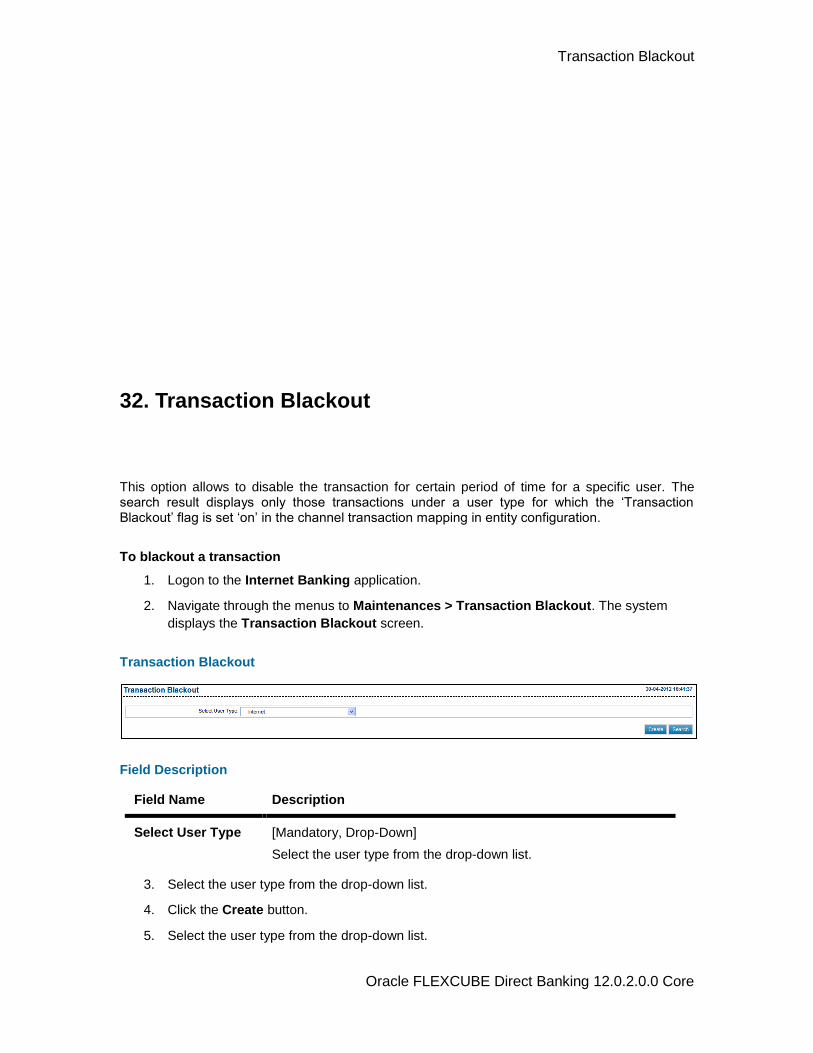
Transaction Blackout
Oracle FLEXCUBE Direct Banking 12.0.2.0.0 Core
32. Transaction Blackout
This option allows to disable the transaction for certain period of time for a specific user. The search result displays only those transactions under a user type for which the ‘Transaction Blackout’ flag is set ‘on’ in the channel transaction mapping in entity configuration.
To blackout a transaction
1. Logon to the Internet Banking application.
2. Navigate through the menus to Maintenances > Transaction Blackout. The system
displays the Transaction Blackout screen.
Transaction Blackout
Field Description
Field Name Description
Select User Type [Mandatory, Drop-Down]
Select the user type from the drop-down list.
3. Select the user type from the drop-down list.
4. Click the Create button.
5. Select the user type from the drop-down list.
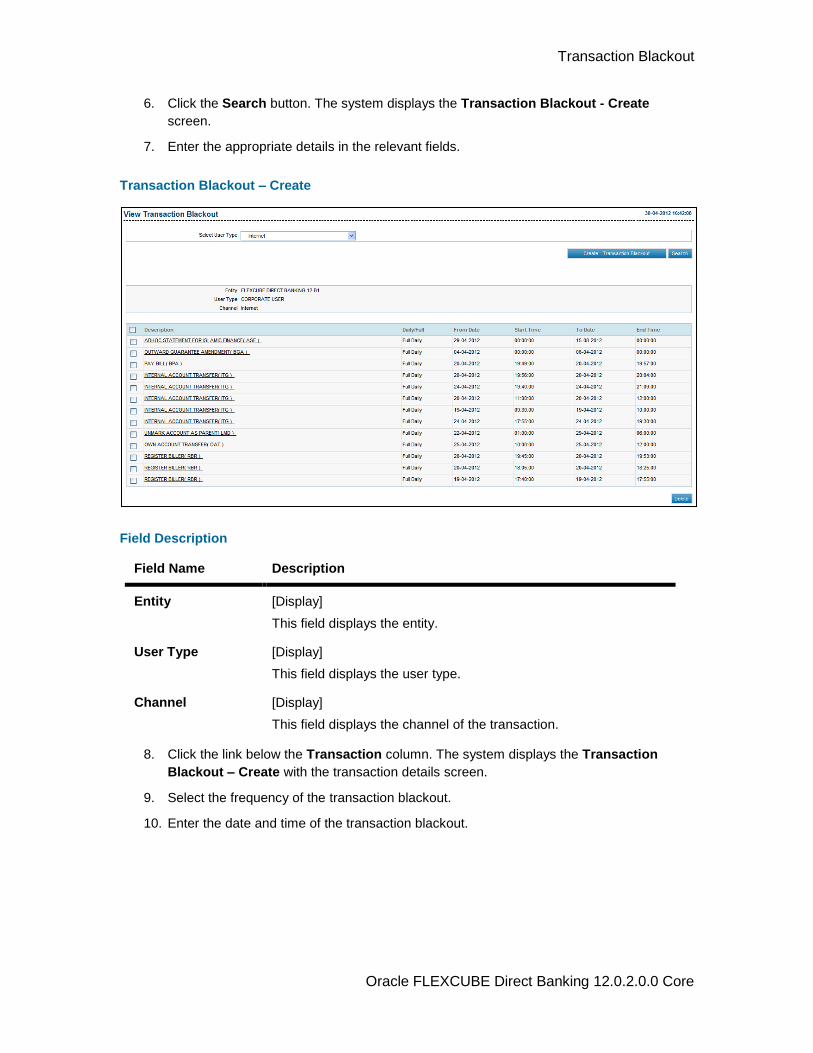
Transaction Blackout
Oracle FLEXCUBE Direct Banking 12.0.2.0.0 Core
6. Click the Search button. The system displays the Transaction Blackout - Create
screen.
7. Enter the appropriate details in the relevant fields.
Transaction Blackout – Create
Field Description
Field Name Description
Entity [Display]
This field displays the entity.
User Type [Display]
This field displays the user type.
Channel [Display]
This field displays the channel of the transaction.
8. Click the link below the Transaction column. The system displays the Transaction
Blackout – Create with the transaction details screen.
9. Select the frequency of the transaction blackout.
10. Enter the date and time of the transaction blackout.
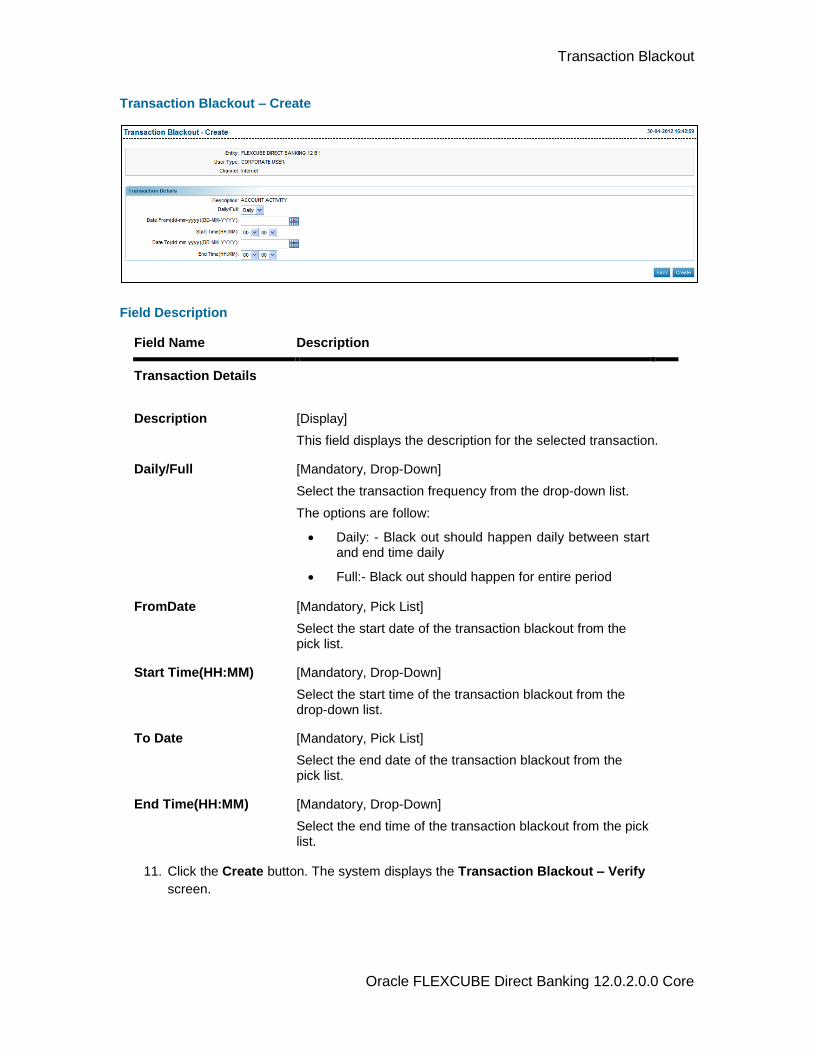
Transaction Blackout
Oracle FLEXCUBE Direct Banking 12.0.2.0.0 Core
Transaction Blackout – Create
Field Description
Field Name Description
Transaction Details
Description [Display]
This field displays the description for the selected transaction.
Daily/Full [Mandatory, Drop-Down]
Select the transaction frequency from the drop-down list.
The options are follow:
Daily: - Black out should happen daily between start and end time daily
Full:- Black out should happen for entire period
FromDate [Mandatory, Pick List]
Select the start date of the transaction blackout from the pick list.
Start Time(HH:MM) [Mandatory, Drop-Down]
Select the start time of the transaction blackout from the drop-down list.
To Date [Mandatory, Pick List]
Select the end date of the transaction blackout from the pick list.
End Time(HH:MM) [Mandatory, Drop-Down]
Select the end time of the transaction blackout from the pick list.
11. Click the Create button. The system displays the Transaction Blackout – Verify
screen.
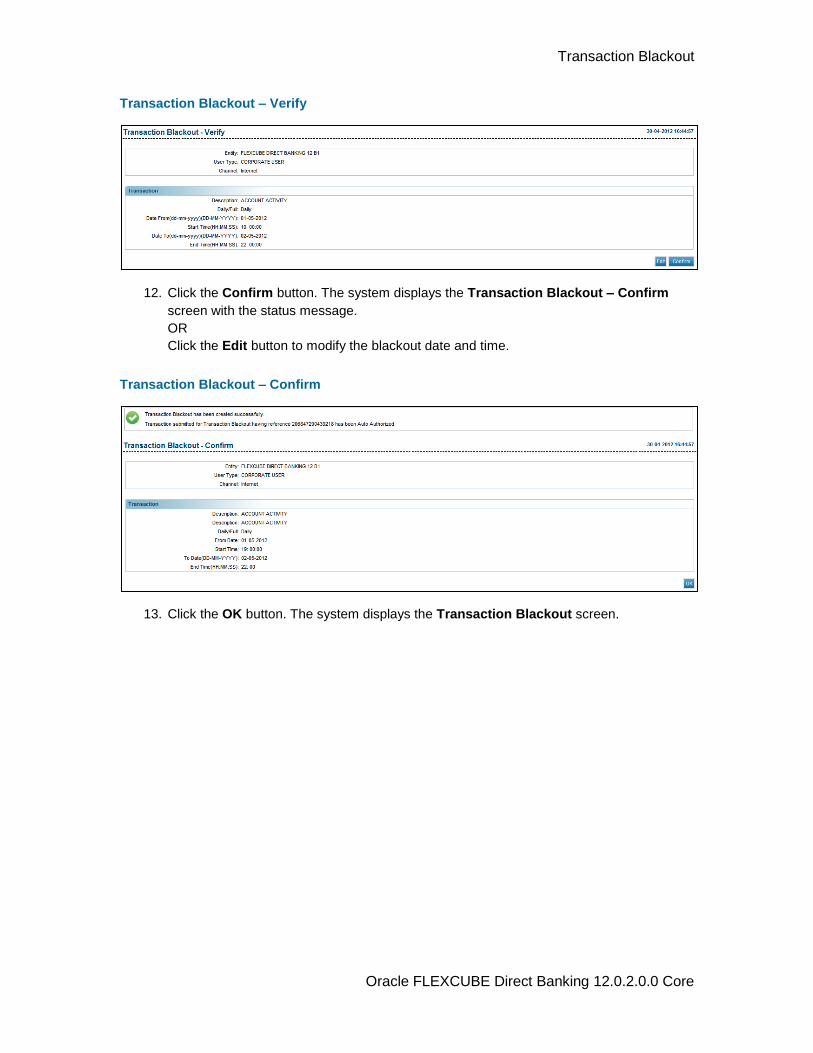
Transaction Blackout
Oracle FLEXCUBE Direct Banking 12.0.2.0.0 Core
Transaction Blackout – Verify
12. Click the Confirm button. The system displays the Transaction Blackout – Confirm
screen with the status message.
OR
Click the Edit button to modify the blackout date and time.
Transaction Blackout – Confirm
13. Click the OK button. The system displays the Transaction Blackout screen.
Maintain Bulletins
Oracle FLEXCUBE Direct Banking 12.0.2.0.0 Core
33. Maintain Bulletins
This option allows the bank admin to create and search bulletins which are broadcasted throughout the Internet Application. This function does not require “Maker-Checker” for creating bulletins. The customer can access the inbox to read the received bulletins.
Maintain Bulletins
Oracle FLEXCUBE Direct Banking 12.0.2.0.0 Core
33.1. Create Bulletin
To create a bulletin
1. Log on to the Internet Banking application.
2. Navigate through the menus to Customer Service > Maintain Bulletins. The system
displays Search Bulletins screen.
Search Bulletin
Field Description
Field Name Description
Entity [Mandatory, Drop-Down]
Select the entity for which the bulletin is to be searched.
Date Created From [Optional, Pick List]
Select the date from the pick list.
The system will search the bulletins which were created from this date onwards.
Date Created To [Optional, Pick List]
Select the date from the pick list.
The system will search the bulletins which were created until this date.
Active From Date [Optional, Pick List]
Select the date from the pick list.
The system will search the bulletins which were active from this date onwards.
Active To Date [Optional, Pick List]
Select the date from the pick list.
The system will search the bulletins which were active until this date.
3. Click the Add button. The system displays Create New Bulletin screen.
OR
Click the Search button. The system displays the existing bulletins.
Maintain Bulletins
Oracle FLEXCUBE Direct Banking 12.0.2.0.0 Core
Create New Bulletin
Field Description
Field Name Description
Language [Mandatory, Drop-Down]
Select the language in which the bulletin is to be created.
Entity [Mandatory, Drop-Down]
Select the entity for which the bulletin is to be set.
Active From [Mandatory, Pick List]
Select the date from which the bulletin is to be displayed
Active Upto [Mandatory, Pick List]
Select the date up to which the bulletin is to be displayed
Subject [Mandatory, Alphanumeric, 80]
Type the subject of the bulletin in short.
Message*+ [Mandatory, Alphanumeric, 1000]
Type the message to be displayed in the bulletin
Click the Browse button to upload a file.
If the file is uploaded to the message, the text entered gets erased.
User/Customer Specific
[Optional, Checkbox]
Select User/Customer Specific checkbox in order to make the bulletin display specific to a user/customer.
Send To [Conditional, Drop Down]
Select the user specific or customer specific from the drop-down list.
This field is enabled if the User/Customer Specific checkbox is selected.
Maintain Bulletins
Oracle FLEXCUBE Direct Banking 12.0.2.0.0 Core
Field Name Description
User/Customer List
[Conditional, Alphanumeric, 20]
Type the bank user list to which this bulletin is to be displayed.
Click the Browse button to upload a file with the list of users/customers.
This field is enabled if the User/Customer Specific checkbox is selected.
Attach File [Conditional, Pick List]
Click the Browse button to attach a file to the bulletin. It's an attachment to the bulletin message received in inbox.
This field is enabled if the User/Customer Specific checkbox is selected.
4. Select the language and entity.
5. Enter active period, subject and message of the bulletin, and type of bulletin.
6. Click the Create Bulletin button. The system displays Verify Bulletin Creation screen
OR
Click the Reset bulletin to go to the previous screen.
Verify Bulletin Creation
7. Click the Confirm button. The system displays the Confirm Bulletin Creation screen
with the status message.
OR
Click the Change button to go to the previous screen.
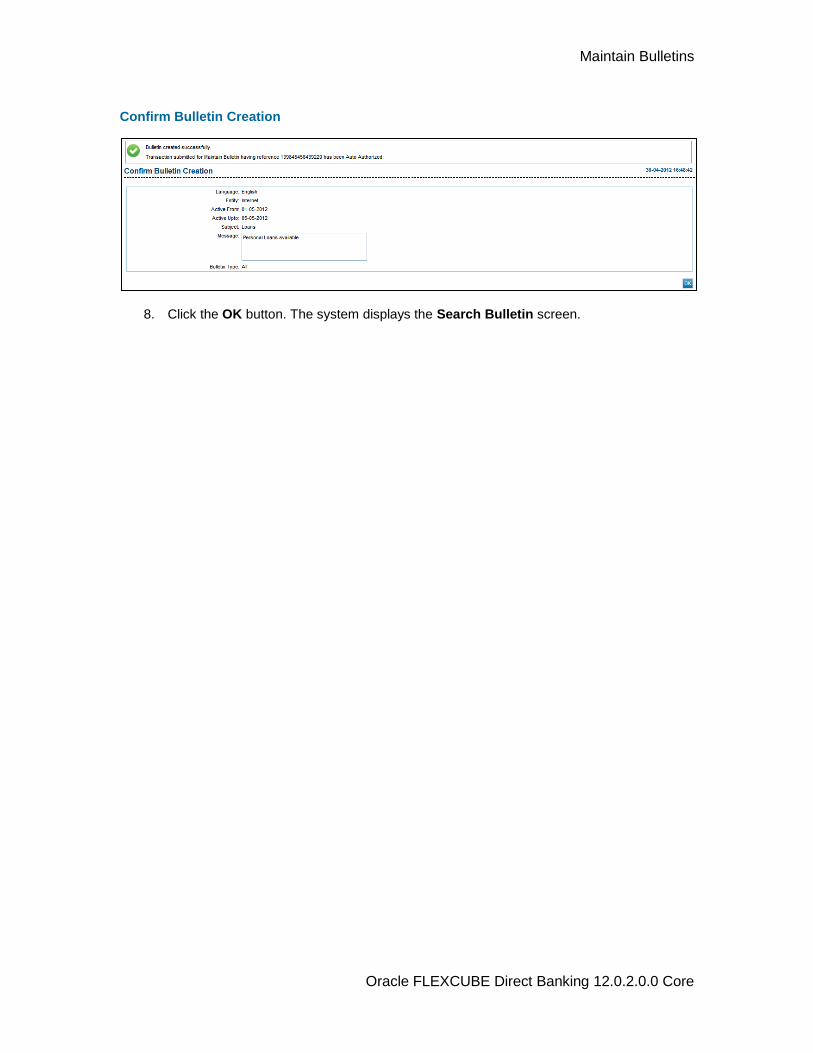
Maintain Bulletins
Oracle FLEXCUBE Direct Banking 12.0.2.0.0 Core
Confirm Bulletin Creation
8. Click the OK button. The system displays the Search Bulletin screen.
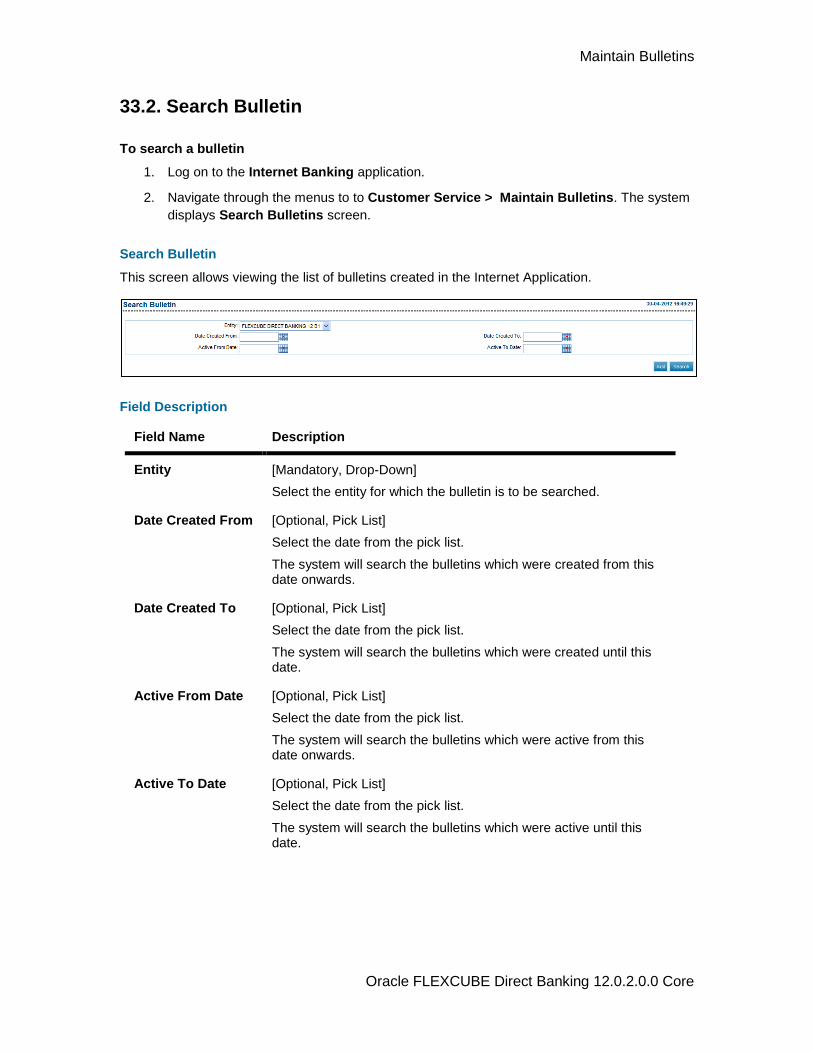
Maintain Bulletins
Oracle FLEXCUBE Direct Banking 12.0.2.0.0 Core
33.2. Search Bulletin
To search a bulletin
1. Log on to the Internet Banking application.
2. Navigate through the menus to to Customer Service > Maintain Bulletins. The system
displays Search Bulletins screen.
Search Bulletin
This screen allows viewing the list of bulletins created in the Internet Application.
Field Description
Field Name Description
Entity [Mandatory, Drop-Down]
Select the entity for which the bulletin is to be searched.
Date Created From [Optional, Pick List]
Select the date from the pick list.
The system will search the bulletins which were created from this date onwards.
Date Created To [Optional, Pick List]
Select the date from the pick list.
The system will search the bulletins which were created until this date.
Active From Date [Optional, Pick List]
Select the date from the pick list.
The system will search the bulletins which were active from this date onwards.
Active To Date [Optional, Pick List]
Select the date from the pick list.
The system will search the bulletins which were active until this date.
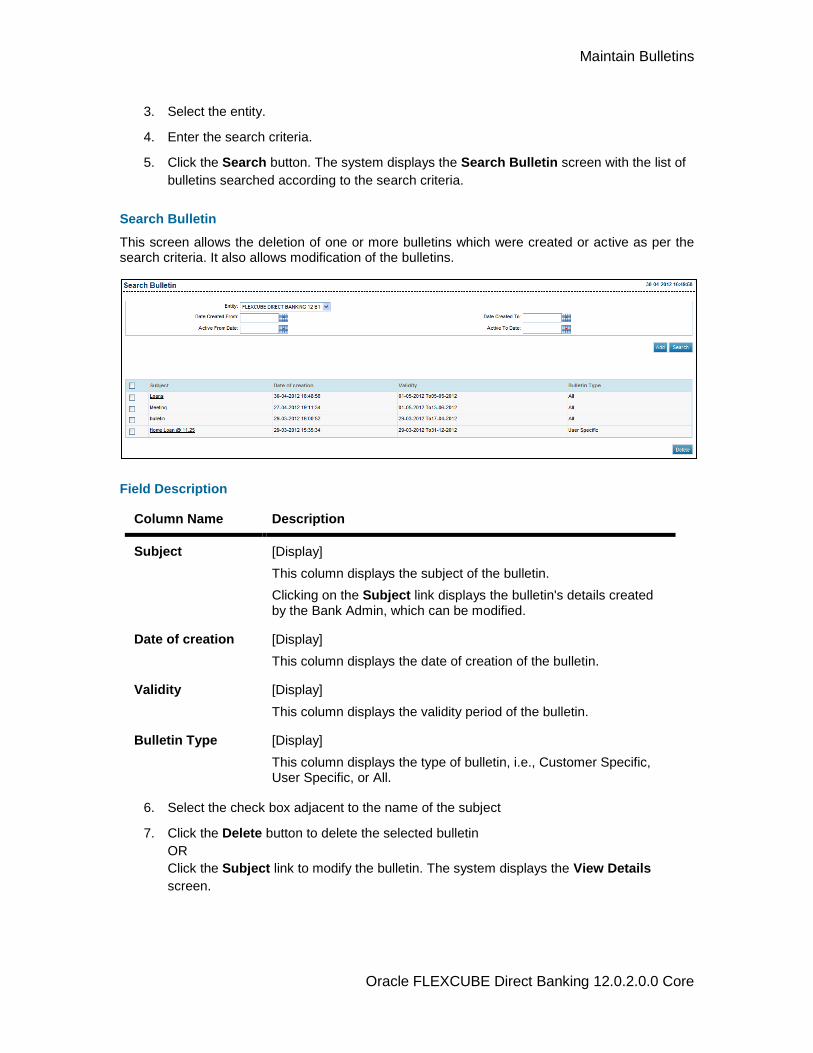
Maintain Bulletins
Oracle FLEXCUBE Direct Banking 12.0.2.0.0 Core
3. Select the entity.
4. Enter the search criteria.
5. Click the Search button. The system displays the Search Bulletin screen with the list of
bulletins searched according to the search criteria.
Search Bulletin
This screen allows the deletion of one or more bulletins which were created or active as per the search criteria. It also allows modification of the bulletins.
Field Description
Column Name Description
Subject [Display]
This column displays the subject of the bulletin.
Clicking on the Subject link displays the bulletin's details created by the Bank Admin, which can be modified.
Date of creation [Display]
This column displays the date of creation of the bulletin.
Validity [Display]
This column displays the validity period of the bulletin.
Bulletin Type [Display]
This column displays the type of bulletin, i.e., Customer Specific, User Specific, or All.
6. Select the check box adjacent to the name of the subject
7. Click the Delete button to delete the selected bulletin
OR
Click the Subject link to modify the bulletin. The system displays the View Details
screen.
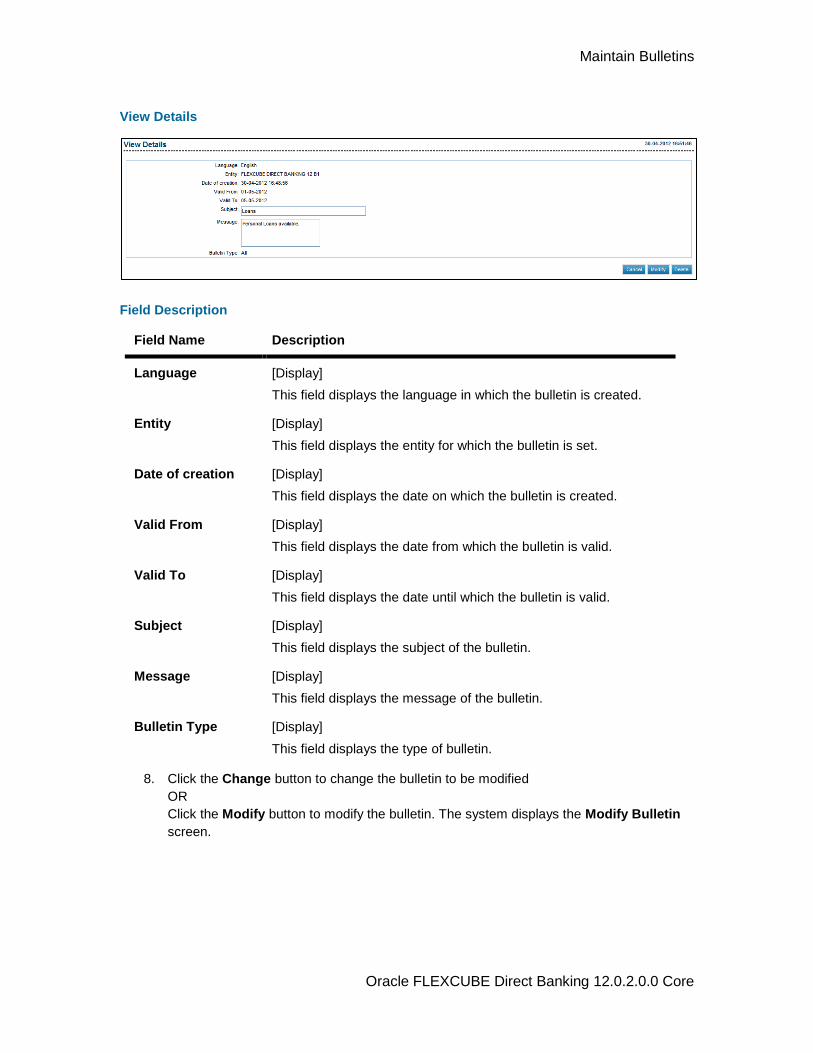
Maintain Bulletins
Oracle FLEXCUBE Direct Banking 12.0.2.0.0 Core
View Details
Field Description
Field Name Description
Language [Display]
This field displays the language in which the bulletin is created.
Entity [Display]
This field displays the entity for which the bulletin is set.
Date of creation [Display]
This field displays the date on which the bulletin is created.
Valid From [Display]
This field displays the date from which the bulletin is valid.
Valid To [Display]
This field displays the date until which the bulletin is valid.
Subject [Display]
This field displays the subject of the bulletin.
Message [Display]
This field displays the message of the bulletin.
Bulletin Type [Display]
This field displays the type of bulletin.
8. Click the Change button to change the bulletin to be modified
OR
Click the Modify button to modify the bulletin. The system displays the Modify Bulletin
screen.
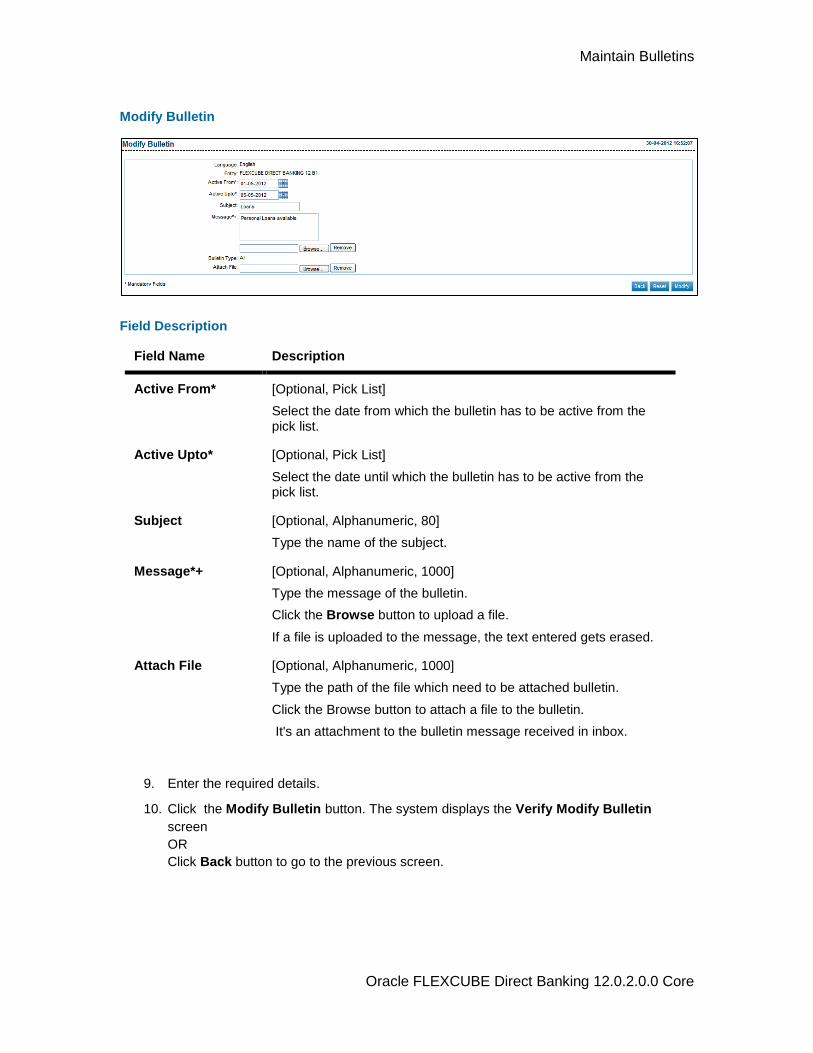
Maintain Bulletins
Oracle FLEXCUBE Direct Banking 12.0.2.0.0 Core
Modify Bulletin
Field Description
Field Name Description
Active From* [Optional, Pick List]
Select the date from which the bulletin has to be active from the pick list.
Active Upto* [Optional, Pick List]
Select the date until which the bulletin has to be active from the pick list.
Subject [Optional, Alphanumeric, 80]
Type the name of the subject.
Message*+ [Optional, Alphanumeric, 1000]
Type the message of the bulletin.
Click the Browse button to upload a file.
If a file is uploaded to the message, the text entered gets erased.
Attach File [Optional, Alphanumeric, 1000]
Type the path of the file which need to be attached bulletin.
Click the Browse button to attach a file to the bulletin.
It's an attachment to the bulletin message received in inbox.
9. Enter the required details.
10. Click the Modify Bulletin button. The system displays the Verify Modify Bulletin
screen
OR
Click Back button to go to the previous screen.
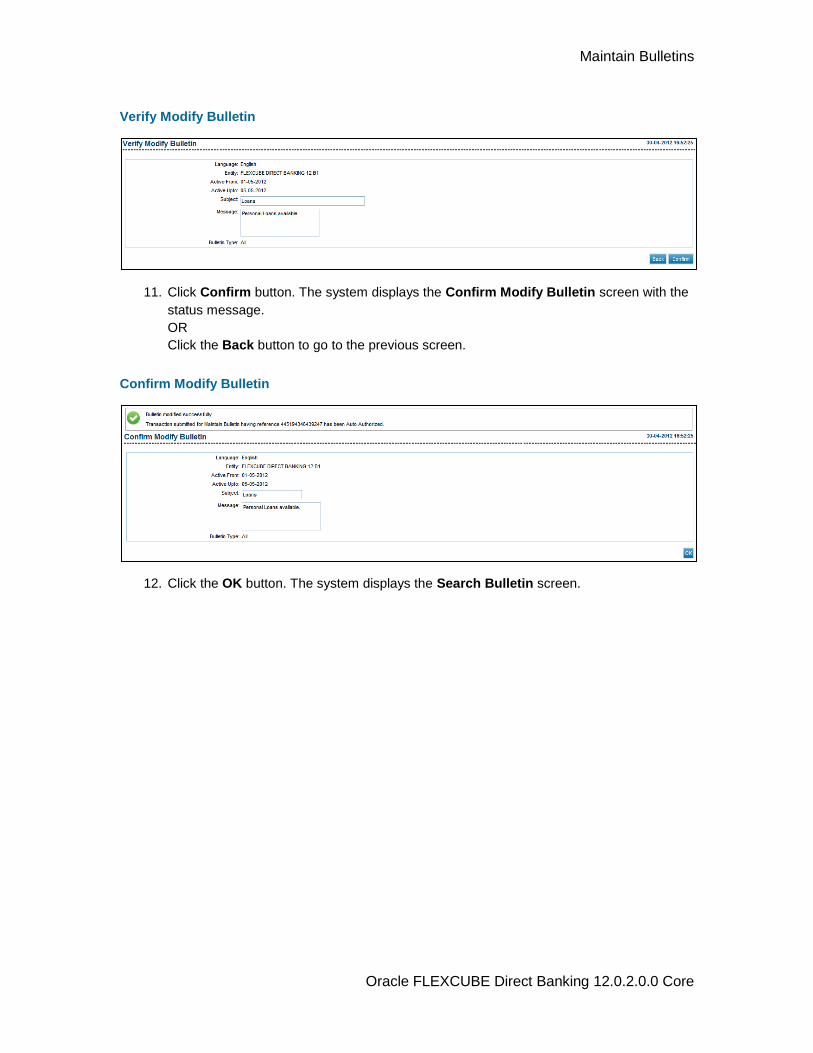
Maintain Bulletins
Oracle FLEXCUBE Direct Banking 12.0.2.0.0 Core
Verify Modify Bulletin
11. Click Confirm button. The system displays the Confirm Modify Bulletin screen with the
status message.
OR
Click the Back button to go to the previous screen.
Confirm Modify Bulletin
12. Click the OK button. The system displays the Search Bulletin screen.
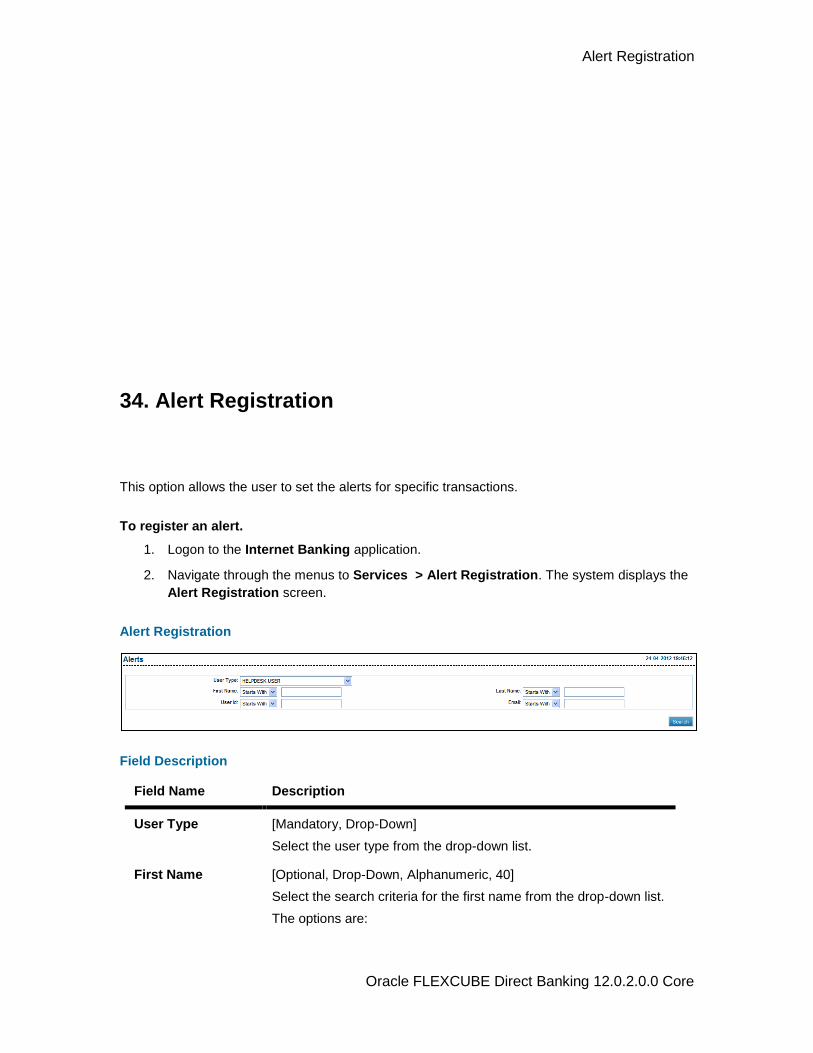
Alert Registration
Oracle FLEXCUBE Direct Banking 12.0.2.0.0 Core
34. Alert Registration
This option allows the user to set the alerts for specific transactions.
To register an alert.
1. Logon to the Internet Banking application.
2. Navigate through the menus to Services > Alert Registration. The system displays the
Alert Registration screen.
Alert Registration
Field Description
Field Name Description
User Type [Mandatory, Drop-Down]
Select the user type from the drop-down list.
First Name [Optional, Drop-Down, Alphanumeric, 40]
Select the search criteria for the first name from the drop-down list.
The options are:
Alert Registration
Oracle FLEXCUBE Direct Banking 12.0.2.0.0 Core
Field Name Description
Starts With
Ends With
Equals
Contains
Type the search string in the adjacent field.
For Example:
If you select the search criteria as Starts With and enter A in the adjacent field, then the system displays all the customer first names starting with A.
Last Name [Optional, Drop-Down, Alphanumeric, 40]
Select the search criteria for the last name from the drop-down list.
The options are:
Starts With
Ends With
Equals
Contains
Type the search string in the adjacent field.
For Example:
If you select the search criteria as Starts With and enter E in the adjacent field, then the system displays all the customer last names starting with E.
User Id [Optional, Drop-Down, Alphanumeric, 18]
Select the search criteria for the user ID from the drop-down list.
The options are:
Starts With
Ends With
Equals
Contains
Type the search string in the adjacent field.
For Example:
If you select the search criteria as Starts With and enter 1 in the adjacent field, then the system displays all the user ID's starting with 1.
Email [Optional, UNIQUE, Drop-Down, Alphanumeric, 18]
Select the search criteria for the email ID from the drop-down list.
The options are:
Starts With
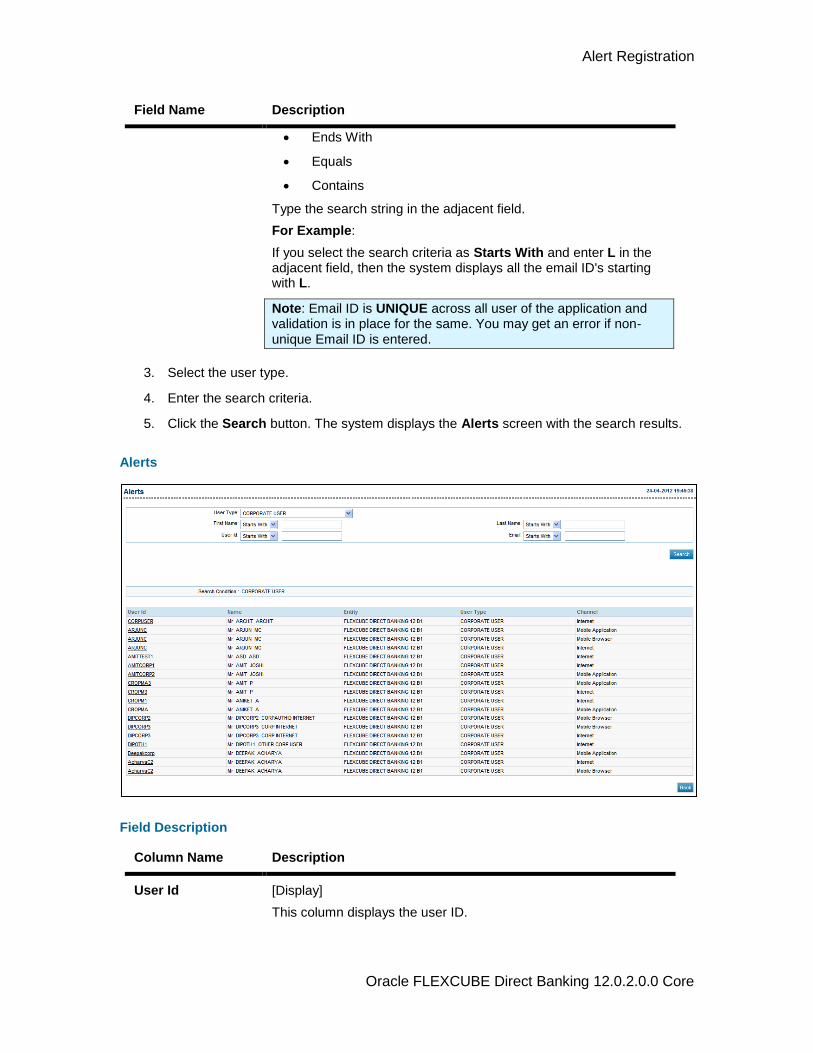
Alert Registration
Oracle FLEXCUBE Direct Banking 12.0.2.0.0 Core
Field Name Description
Ends With
Equals
Contains
Type the search string in the adjacent field.
For Example:
If you select the search criteria as Starts With and enter L in the adjacent field, then the system displays all the email ID's starting with L.
Note: Email ID is UNIQUE across all user of the application and validation is in place for the same. You may get an error if non-unique Email ID is entered.
3. Select the user type.
4. Enter the search criteria.
5. Click the Search button. The system displays the Alerts screen with the search results.
Alerts
Field Description
Column Name Description
User Id [Display]
This column displays the user ID.
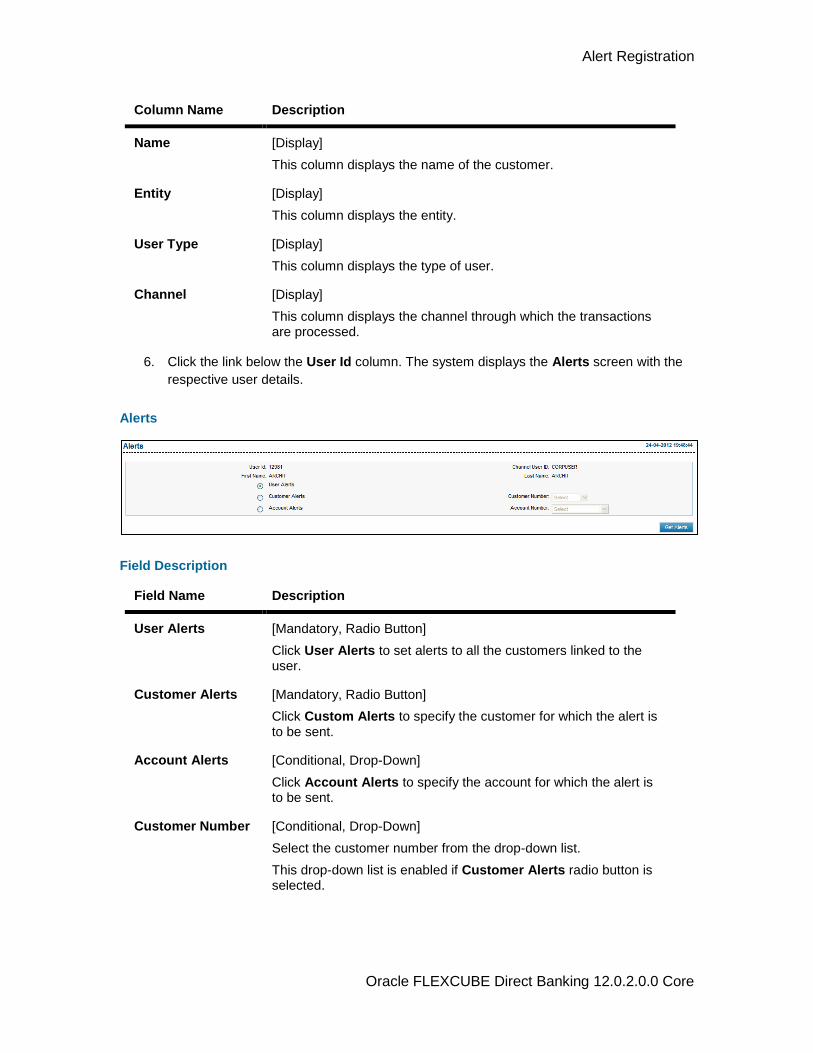
Alert Registration
Oracle FLEXCUBE Direct Banking 12.0.2.0.0 Core
Column Name Description
Name [Display]
This column displays the name of the customer.
Entity [Display]
This column displays the entity.
User Type [Display]
This column displays the type of user.
Channel [Display]
This column displays the channel through which the transactions are processed.
6. Click the link below the User Id column. The system displays the Alerts screen with the
respective user details.
Alerts
Field Description
Field Name Description
User Alerts [Mandatory, Radio Button]
Click User Alerts to set alerts to all the customers linked to the user.
Customer Alerts [Mandatory, Radio Button]
Click Custom Alerts to specify the customer for which the alert is to be sent.
Account Alerts [Conditional, Drop-Down]
Click Account Alerts to specify the account for which the alert is to be sent.
Customer Number [Conditional, Drop-Down]
Select the customer number from the drop-down list.
This drop-down list is enabled if Customer Alerts radio button is selected.
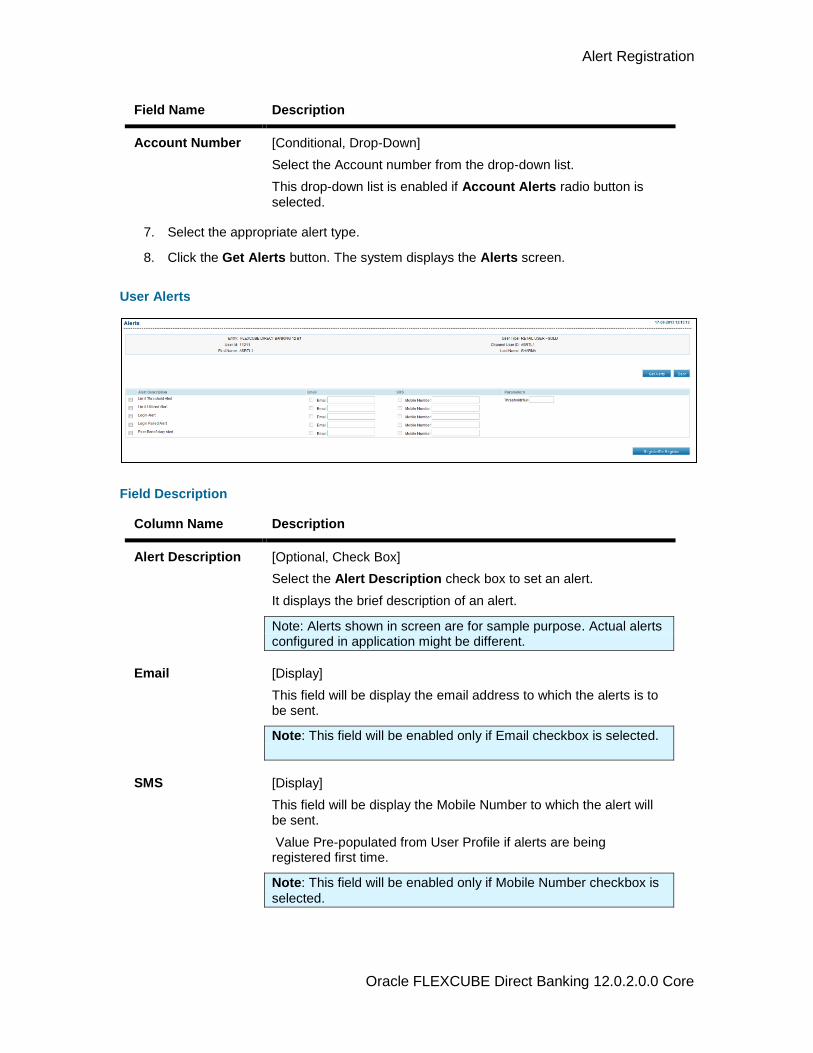
Alert Registration
Oracle FLEXCUBE Direct Banking 12.0.2.0.0 Core
Field Name Description
Account Number [Conditional, Drop-Down]
Select the Account number from the drop-down list.
This drop-down list is enabled if Account Alerts radio button is selected.
7. Select the appropriate alert type.
8. Click the Get Alerts button. The system displays the Alerts screen.
User Alerts
Field Description
Column Name Description
Alert Description [Optional, Check Box]
Select the Alert Description check box to set an alert.
It displays the brief description of an alert.
Note: Alerts shown in screen are for sample purpose. Actual alerts configured in application might be different.
Email [Display]
This field will be display the email address to which the alerts is to be sent.
Note: This field will be enabled only if Email checkbox is selected.
SMS [Display]
This field will be display the Mobile Number to which the alert will be sent.
Value Pre-populated from User Profile if alerts are being registered first time.
Note: This field will be enabled only if Mobile Number checkbox is
selected.
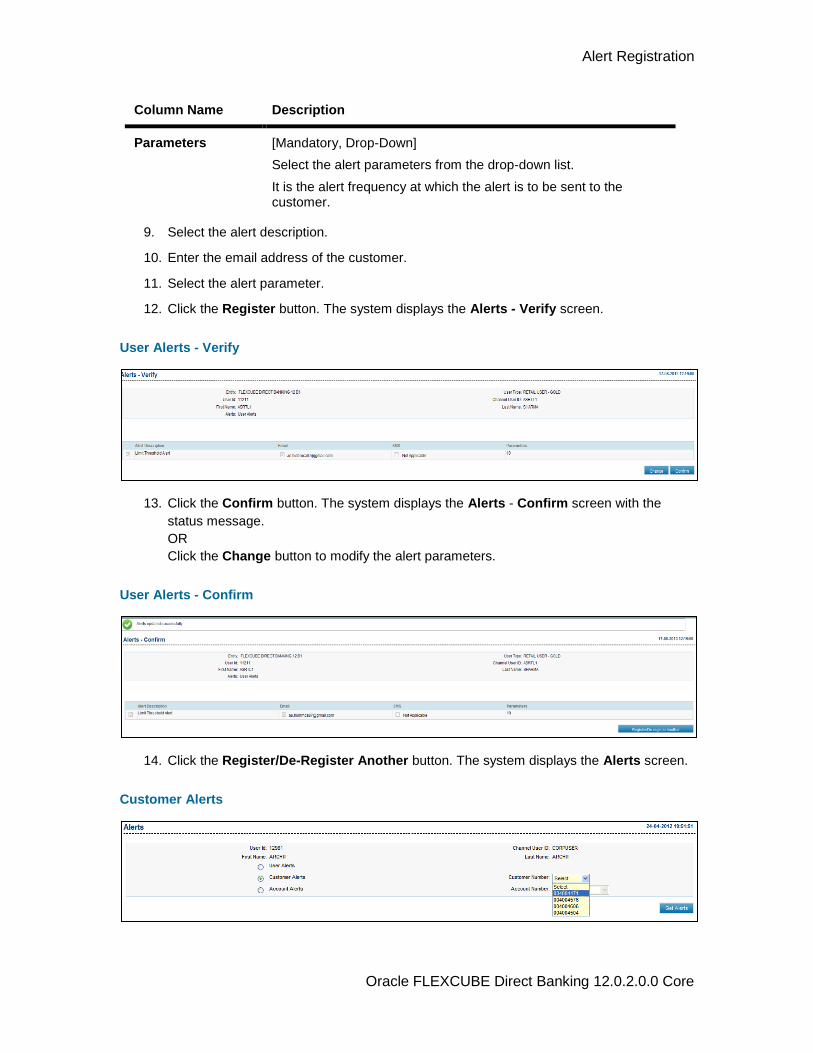
Alert Registration
Oracle FLEXCUBE Direct Banking 12.0.2.0.0 Core
Column Name Description
Parameters [Mandatory, Drop-Down]
Select the alert parameters from the drop-down list.
It is the alert frequency at which the alert is to be sent to the customer.
9. Select the alert description.
10. Enter the email address of the customer.
11. Select the alert parameter.
12. Click the Register button. The system displays the Alerts - Verify screen.
User Alerts - Verify
13. Click the Confirm button. The system displays the Alerts - Confirm screen with the
status message.
OR
Click the Change button to modify the alert parameters.
User Alerts - Confirm
14. Click the Register/De-Register Another button. The system displays the Alerts screen.
Customer Alerts
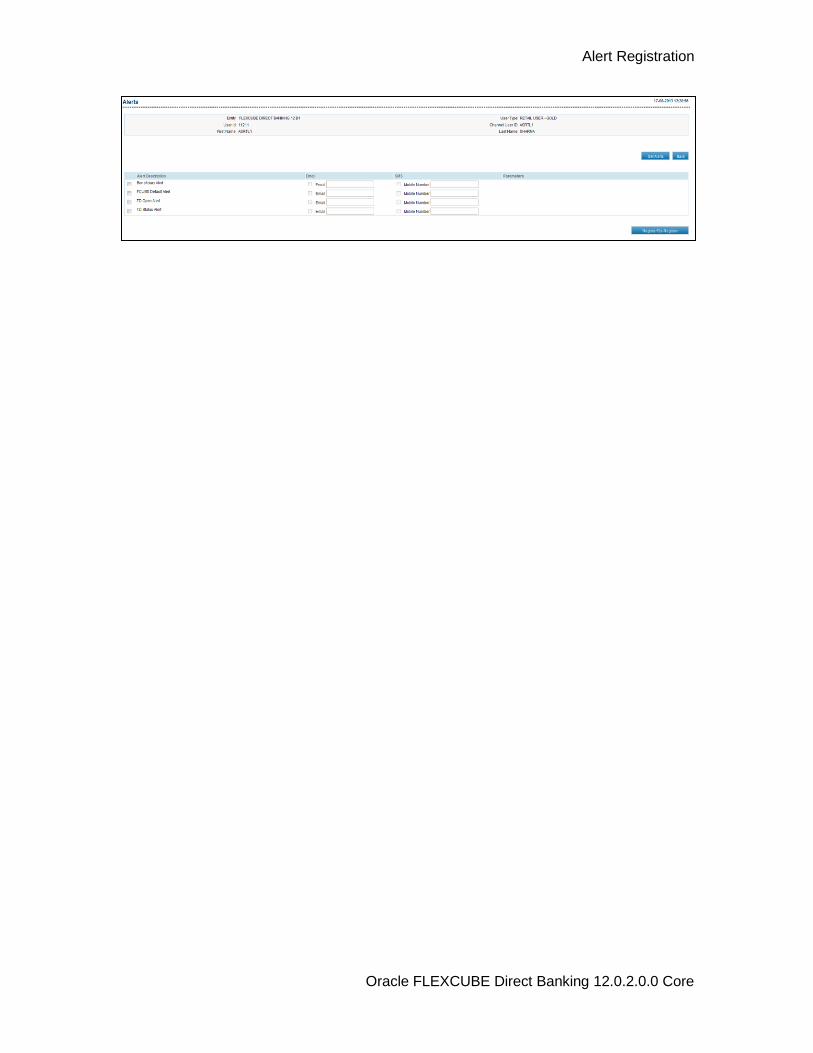
Alert Registration
Oracle FLEXCUBE Direct Banking 12.0.2.0.0 Core
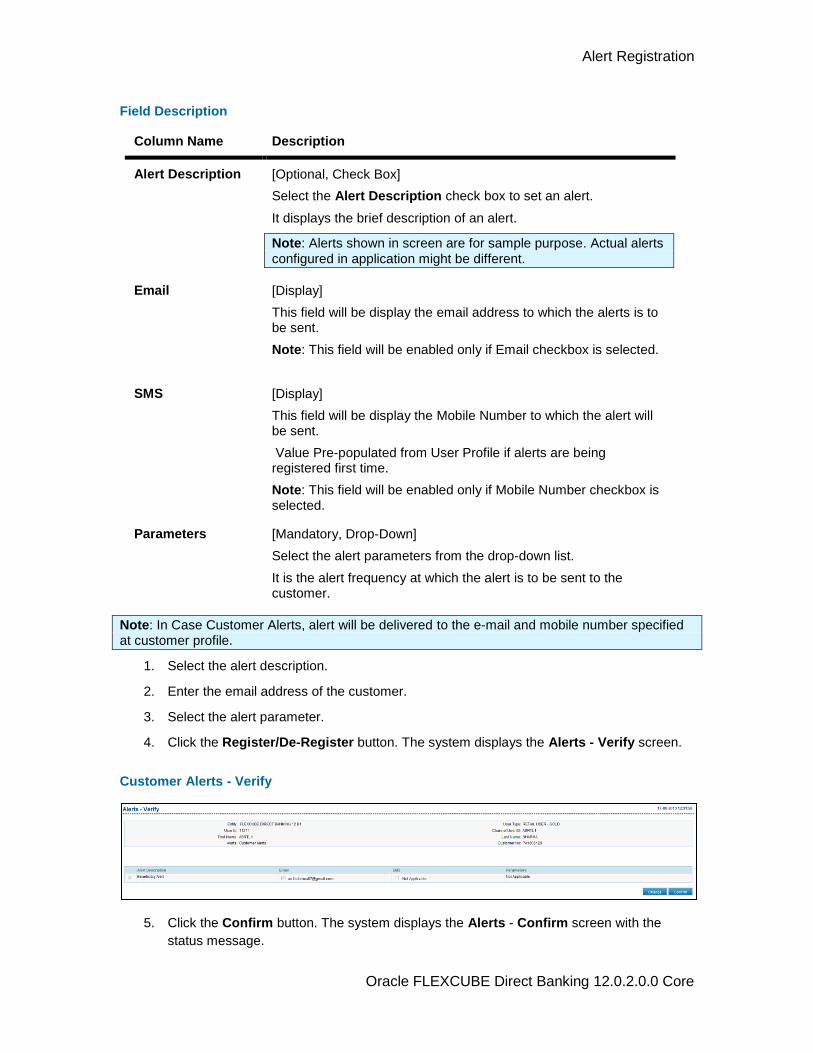
Alert Registration
Oracle FLEXCUBE Direct Banking 12.0.2.0.0 Core
Field Description
Column Name Description
Alert Description [Optional, Check Box]
Select the Alert Description check box to set an alert.
It displays the brief description of an alert.
Note: Alerts shown in screen are for sample purpose. Actual alerts
configured in application might be different.
Email [Display]
This field will be display the email address to which the alerts is to be sent.
Note: This field will be enabled only if Email checkbox is selected.
SMS [Display]
This field will be display the Mobile Number to which the alert will be sent.
Value Pre-populated from User Profile if alerts are being registered first time.
Note: This field will be enabled only if Mobile Number checkbox is selected.
Parameters [Mandatory, Drop-Down]
Select the alert parameters from the drop-down list.
It is the alert frequency at which the alert is to be sent to the customer.
Note: In Case Customer Alerts, alert will be delivered to the e-mail and mobile number specified at customer profile.
1. Select the alert description.
2. Enter the email address of the customer.
3. Select the alert parameter.
4. Click the Register/De-Register button. The system displays the Alerts - Verify screen.
Customer Alerts - Verify
5. Click the Confirm button. The system displays the Alerts - Confirm screen with the
status message.
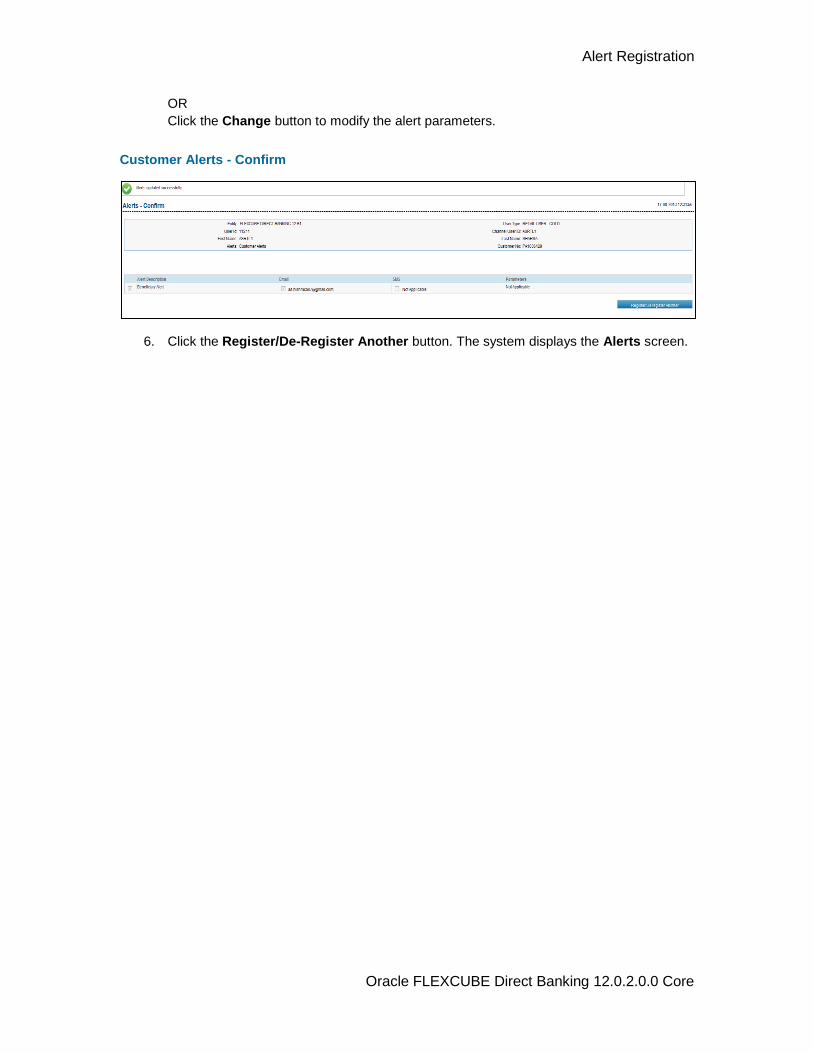
Alert Registration
Oracle FLEXCUBE Direct Banking 12.0.2.0.0 Core
OR
Click the Change button to modify the alert parameters.
Customer Alerts - Confirm
6. Click the Register/De-Register Another button. The system displays the Alerts screen.
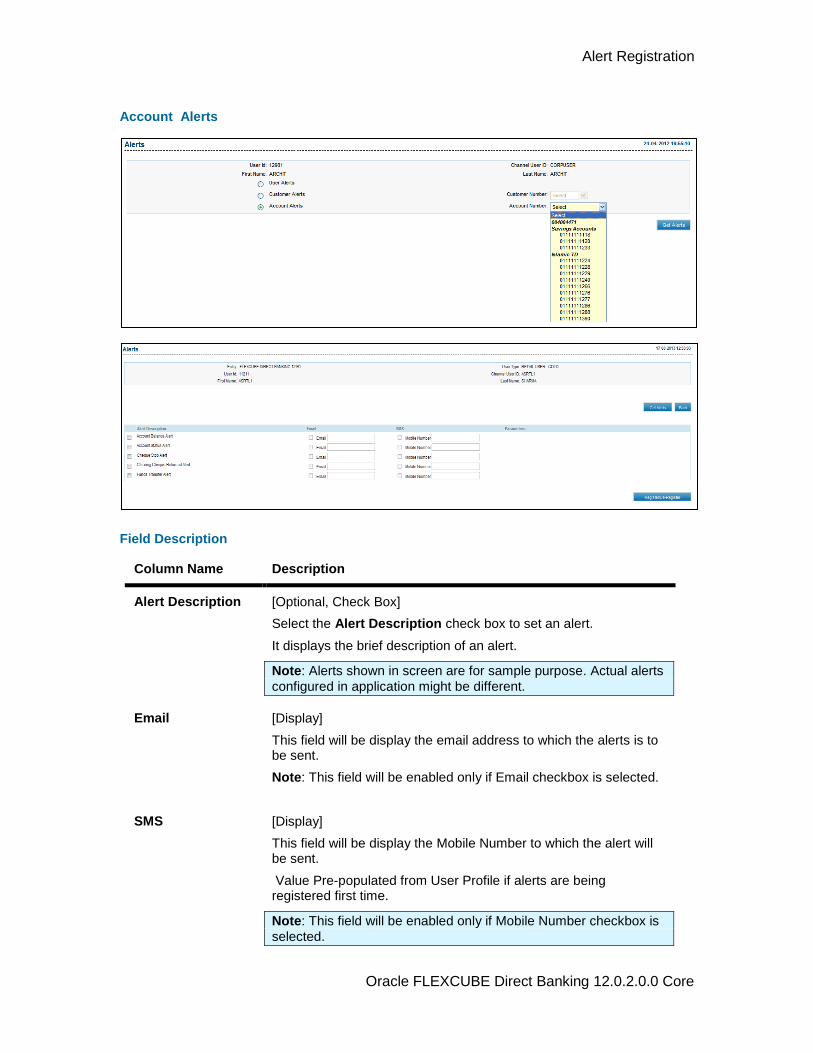
Alert Registration
Oracle FLEXCUBE Direct Banking 12.0.2.0.0 Core
Account Alerts
Field Description
Column Name Description
Alert Description [Optional, Check Box]
Select the Alert Description check box to set an alert.
It displays the brief description of an alert.
Note: Alerts shown in screen are for sample purpose. Actual alerts
configured in application might be different.
Email [Display]
This field will be display the email address to which the alerts is to be sent.
Note: This field will be enabled only if Email checkbox is selected.
SMS [Display]
This field will be display the Mobile Number to which the alert will be sent.
Value Pre-populated from User Profile if alerts are being registered first time.
Note: This field will be enabled only if Mobile Number checkbox is
selected.

Alert Registration
Oracle FLEXCUBE Direct Banking 12.0.2.0.0 Core
Column Name Description
Parameters [Mandatory, Drop-Down]
Select the alert parameters from the drop-down list.
It is the alert frequency at which the alert is to be sent to the customer.
1. Select the alert description.
2. Enter the email address of the customer.
3. Select the alert parameter.
4. Click the Register/De-Register button. The system displays the Alerts - Verify screen.
Account Alerts - Verify
5. Click the Confirm button. The system displays the Alerts - Confirm screen with the
status message.
OR
Click the Change button to modify the alert parameters.
Account Alerts - Confirm
6. Click the Register Another button. The system displays the Alerts screen.

Global Limit Packages
Oracle FLEXCUBE Direct Banking 12.0.2.0.0 Core
35. Global Limit Packages

Global Limit Packages
Oracle FLEXCUBE Direct Banking 12.0.2.0.0 Core
35.1. Add Global Limit Package
This option allows you to add a new global limit package.
To add a global limit package
1. Log on to the Internet Banking application.
2. Navigate through the menus to Maintenances > Global Limit Packages. The system
displays the Global Limit Packages screen
Global Limit Packages
3. Click Add. The system displays the Global Limit Package screen.
OR
Click the Search button, the system displays the already created packages.
Global Limit Packages
4. Click the Add button the system displays the Global Limit Package Add screen.
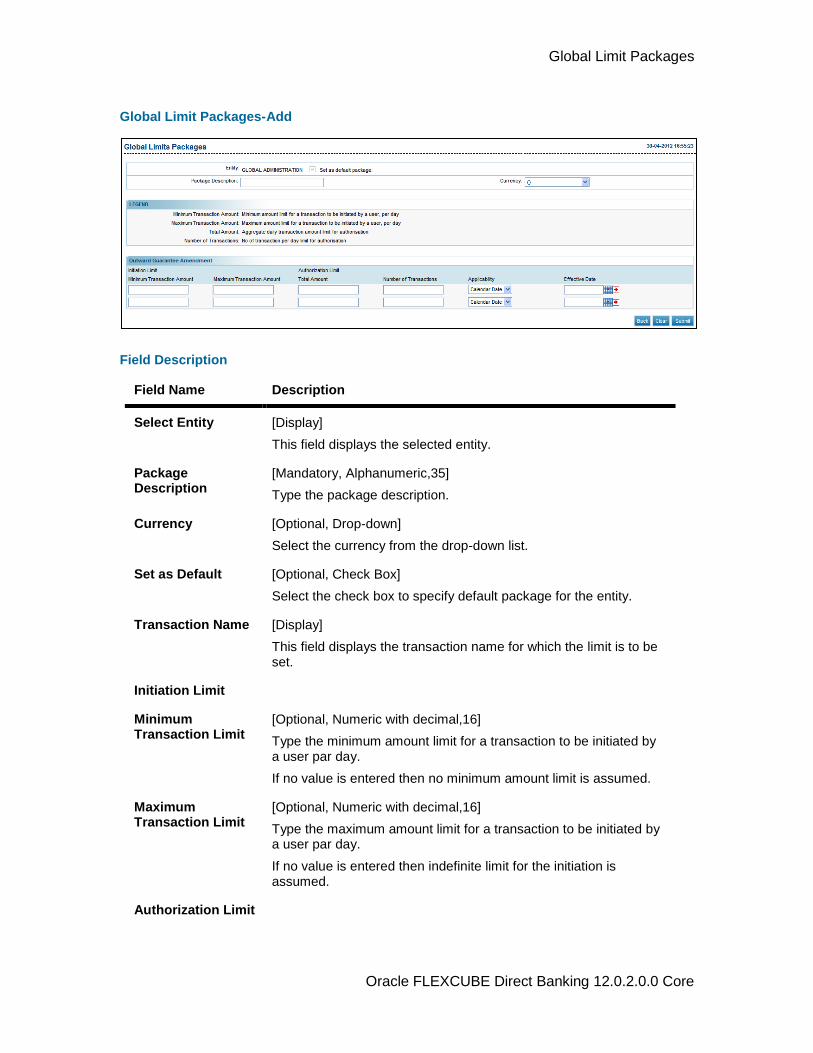
Global Limit Packages
Oracle FLEXCUBE Direct Banking 12.0.2.0.0 Core
Global Limit Packages-Add
Field Description
Field Name Description
Select Entity [Display]
This field displays the selected entity.
Package Description
[Mandatory, Alphanumeric,35]
Type the package description.
Currency [Optional, Drop-down]
Select the currency from the drop-down list.
Set as Default [Optional, Check Box]
Select the check box to specify default package for the entity.
Transaction Name [Display]
This field displays the transaction name for which the limit is to be set.
Initiation Limit
Minimum Transaction Limit
[Optional, Numeric with decimal,16]
Type the minimum amount limit for a transaction to be initiated by a user par day.
If no value is entered then no minimum amount limit is assumed.
Maximum Transaction Limit
[Optional, Numeric with decimal,16]
Type the maximum amount limit for a transaction to be initiated by a user par day.
If no value is entered then indefinite limit for the initiation is assumed.
Authorization Limit
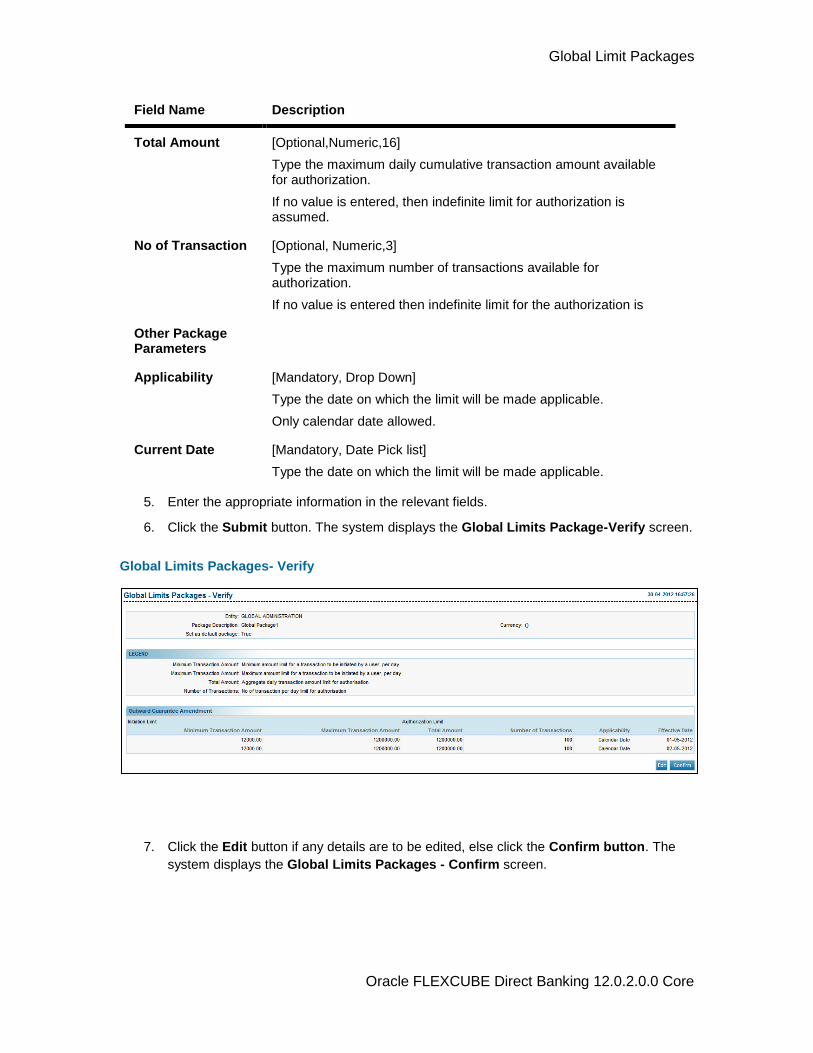
Global Limit Packages
Oracle FLEXCUBE Direct Banking 12.0.2.0.0 Core
Field Name Description
Total Amount [Optional,Numeric,16]
Type the maximum daily cumulative transaction amount available for authorization.
If no value is entered, then indefinite limit for authorization is assumed.
No of Transaction [Optional, Numeric,3]
Type the maximum number of transactions available for authorization.
If no value is entered then indefinite limit for the authorization is
Other Package Parameters
Applicability [Mandatory, Drop Down]
Type the date on which the limit will be made applicable.
Only calendar date allowed.
Current Date [Mandatory, Date Pick list]
Type the date on which the limit will be made applicable.
5. Enter the appropriate information in the relevant fields.
6. Click the Submit button. The system displays the Global Limits Package-Verify screen.
Global Limits Packages- Verify
7. Click the Edit button if any details are to be edited, else click the Confirm button. The
system displays the Global Limits Packages - Confirm screen.
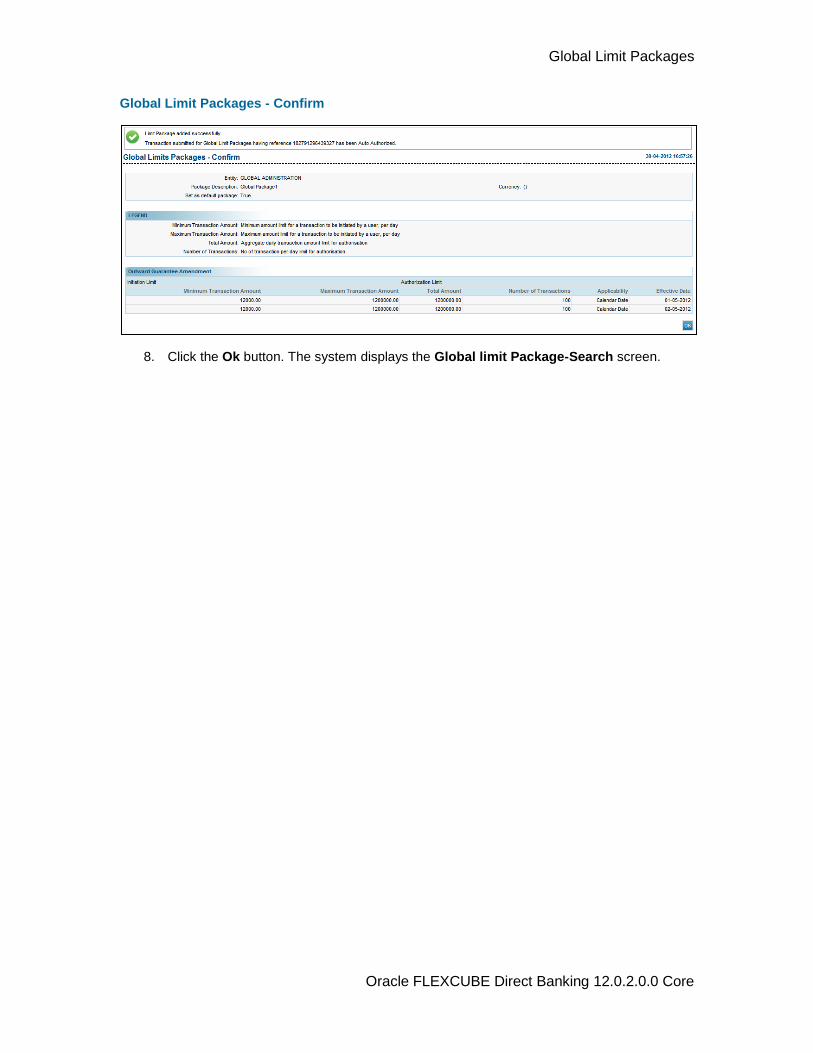
Global Limit Packages
Oracle FLEXCUBE Direct Banking 12.0.2.0.0 Core
Global Limit Packages - Confirm
8. Click the Ok button. The system displays the Global limit Package-Search screen.
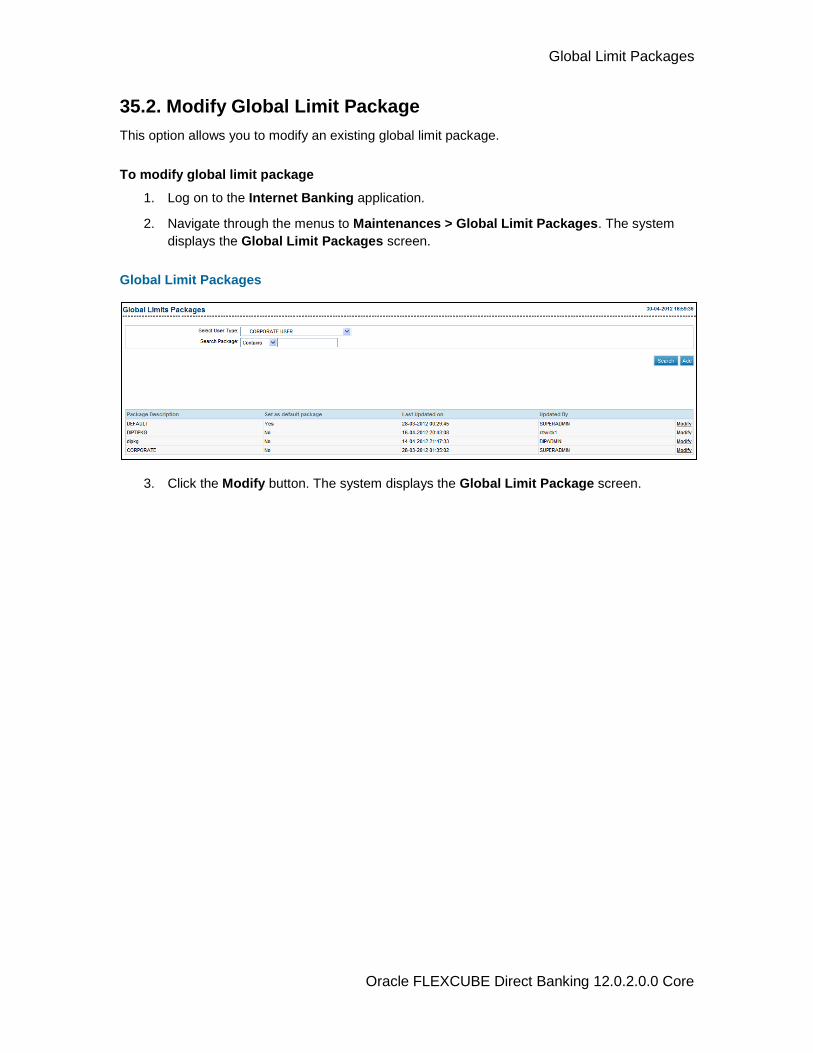
Global Limit Packages
Oracle FLEXCUBE Direct Banking 12.0.2.0.0 Core
35.2. Modify Global Limit Package
This option allows you to modify an existing global limit package.
To modify global limit package
1. Log on to the Internet Banking application.
2. Navigate through the menus to Maintenances > Global Limit Packages. The system
displays the Global Limit Packages screen.
Global Limit Packages
3. Click the Modify button. The system displays the Global Limit Package screen.
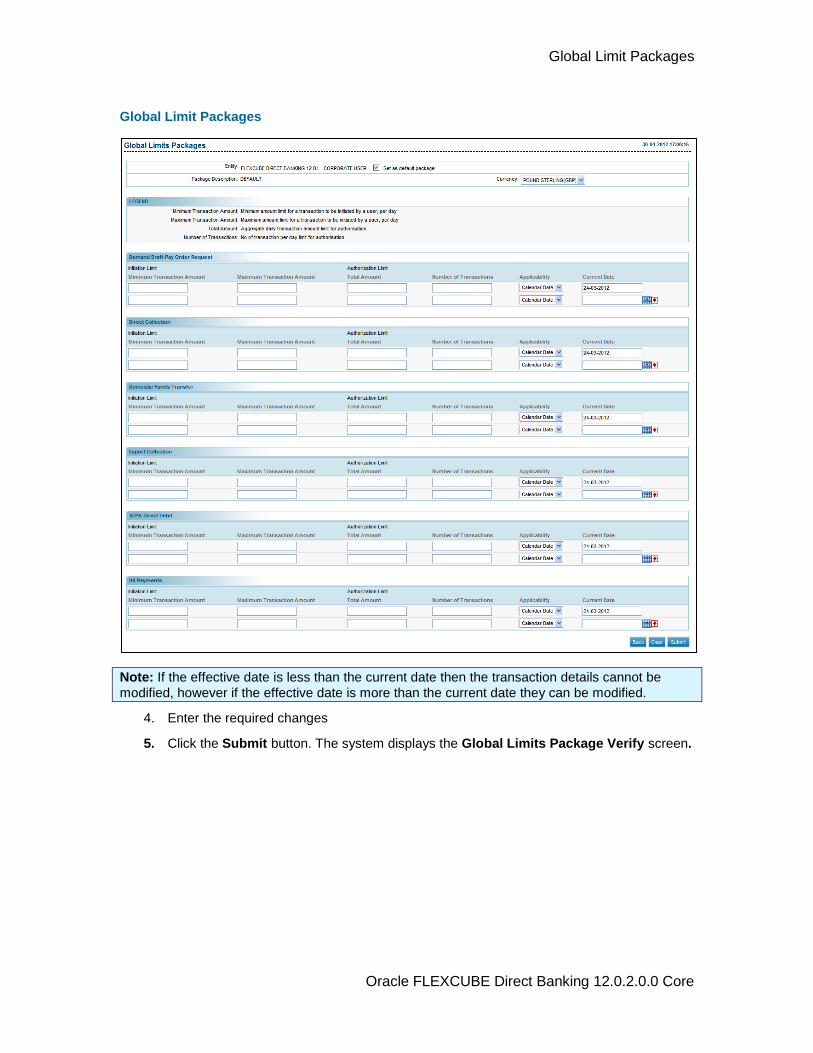
Global Limit Packages
Oracle FLEXCUBE Direct Banking 12.0.2.0.0 Core
Global Limit Packages
Note: If the effective date is less than the current date then the transaction details cannot be
modified, however if the effective date is more than the current date they can be modified.
4. Enter the required changes
5. Click the Submit button. The system displays the Global Limits Package Verify screen.
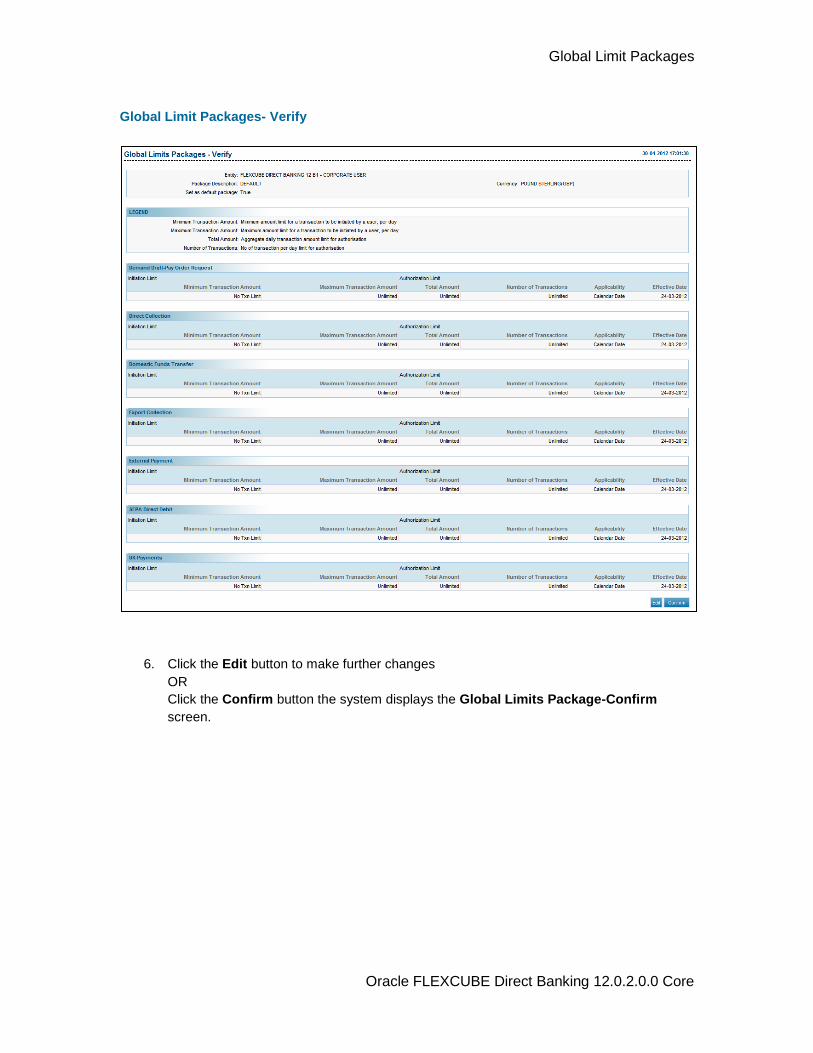
Global Limit Packages
Oracle FLEXCUBE Direct Banking 12.0.2.0.0 Core
Global Limit Packages- Verify
6. Click the Edit button to make further changes
OR
Click the Confirm button the system displays the Global Limits Package-Confirm
screen.
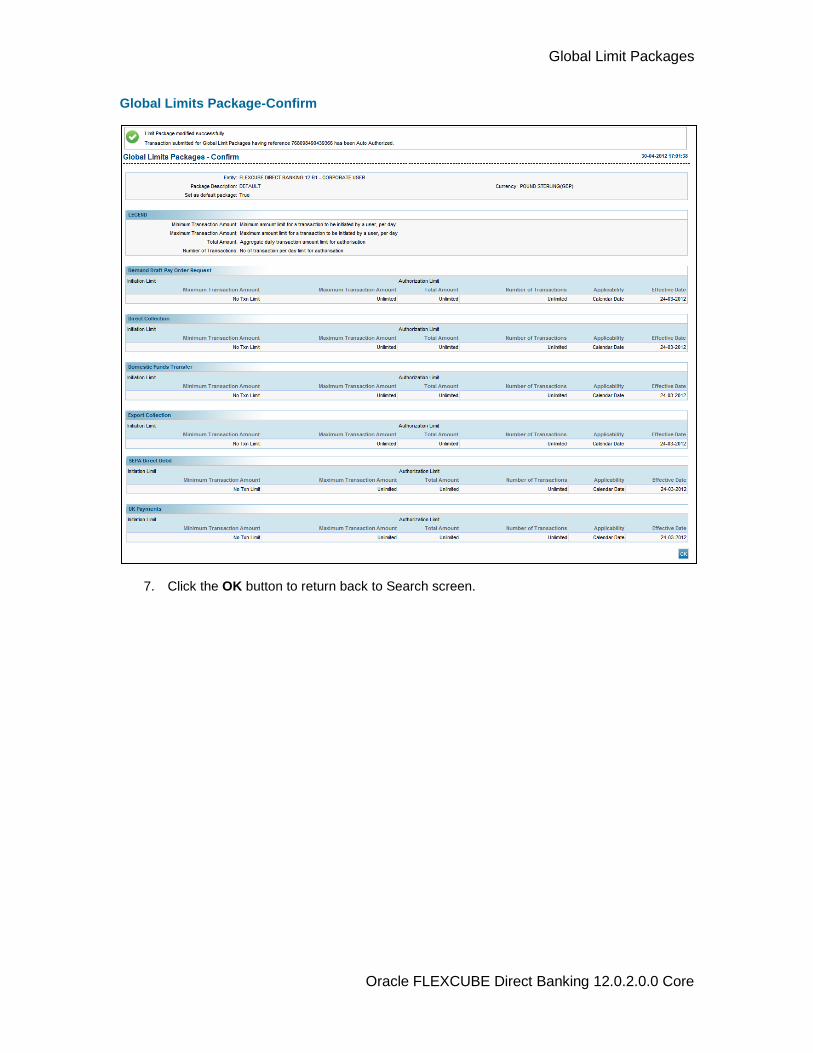
Global Limit Packages
Oracle FLEXCUBE Direct Banking 12.0.2.0.0 Core
Global Limits Package-Confirm
7. Click the OK button to return back to Search screen.
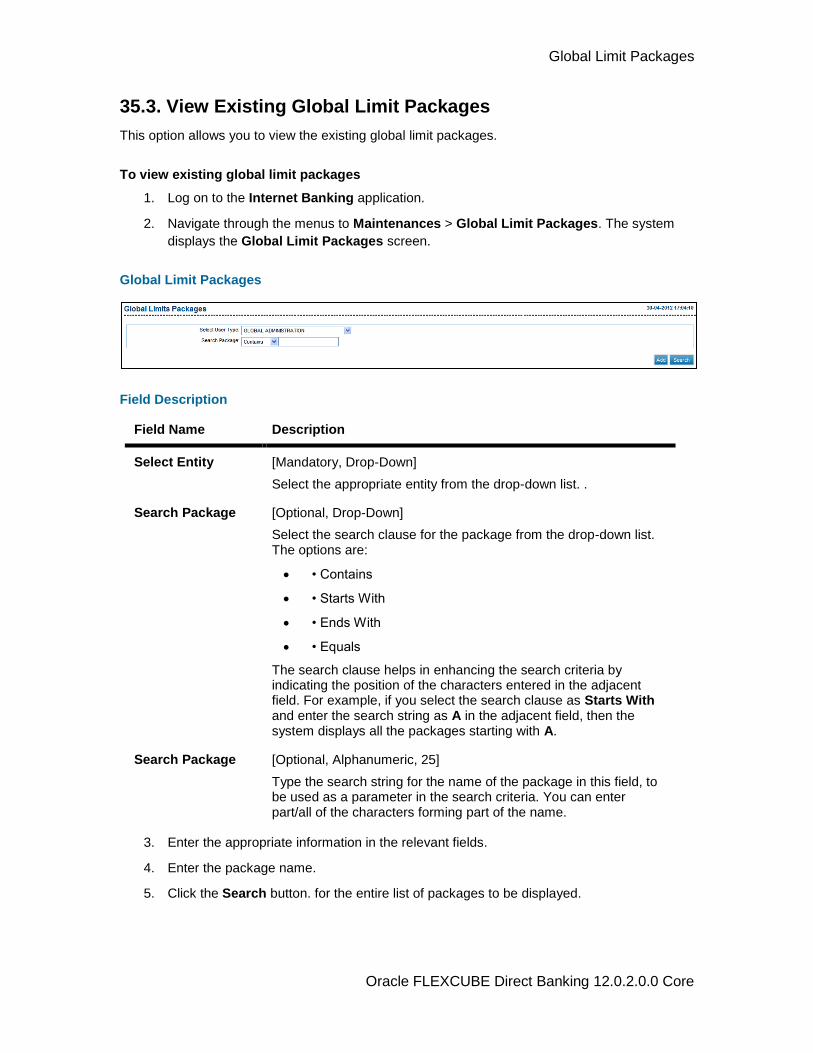
Global Limit Packages
Oracle FLEXCUBE Direct Banking 12.0.2.0.0 Core
35.3. View Existing Global Limit Packages
This option allows you to view the existing global limit packages.
To view existing global limit packages
1. Log on to the Internet Banking application.
2. Navigate through the menus to Maintenances > Global Limit Packages. The system
displays the Global Limit Packages screen.
Global Limit Packages
Field Description
Field Name Description
Select Entity [Mandatory, Drop-Down]
Select the appropriate entity from the drop-down list. .
Search Package [Optional, Drop-Down]
Select the search clause for the package from the drop-down list. The options are:
• Contains
• Starts With
• Ends With
• Equals
The search clause helps in enhancing the search criteria by indicating the position of the characters entered in the adjacent field. For example, if you select the search clause as Starts With and enter the search string as A in the adjacent field, then the system displays all the packages starting with A.
Search Package [Optional, Alphanumeric, 25]
Type the search string for the name of the package in this field, to be used as a parameter in the search criteria. You can enter part/all of the characters forming part of the name.
3. Enter the appropriate information in the relevant fields.
4. Enter the package name.
5. Click the Search button. for the entire list of packages to be displayed.
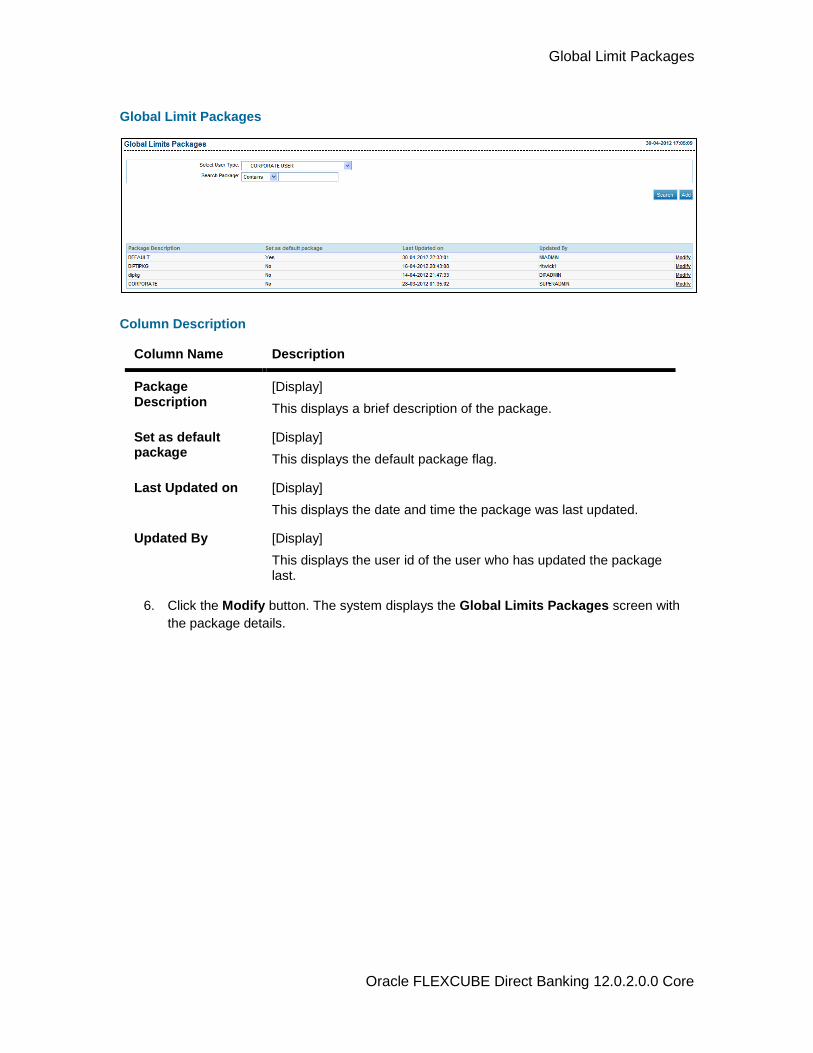
Global Limit Packages
Oracle FLEXCUBE Direct Banking 12.0.2.0.0 Core
Global Limit Packages
Column Description
Column Name Description
Package Description
[Display]
This displays a brief description of the package.
Set as default package
[Display]
This displays the default package flag.
Last Updated on [Display]
This displays the date and time the package was last updated.
Updated By [Display]
This displays the user id of the user who has updated the package last.
6. Click the Modify button. The system displays the Global Limits Packages screen with
the package details.
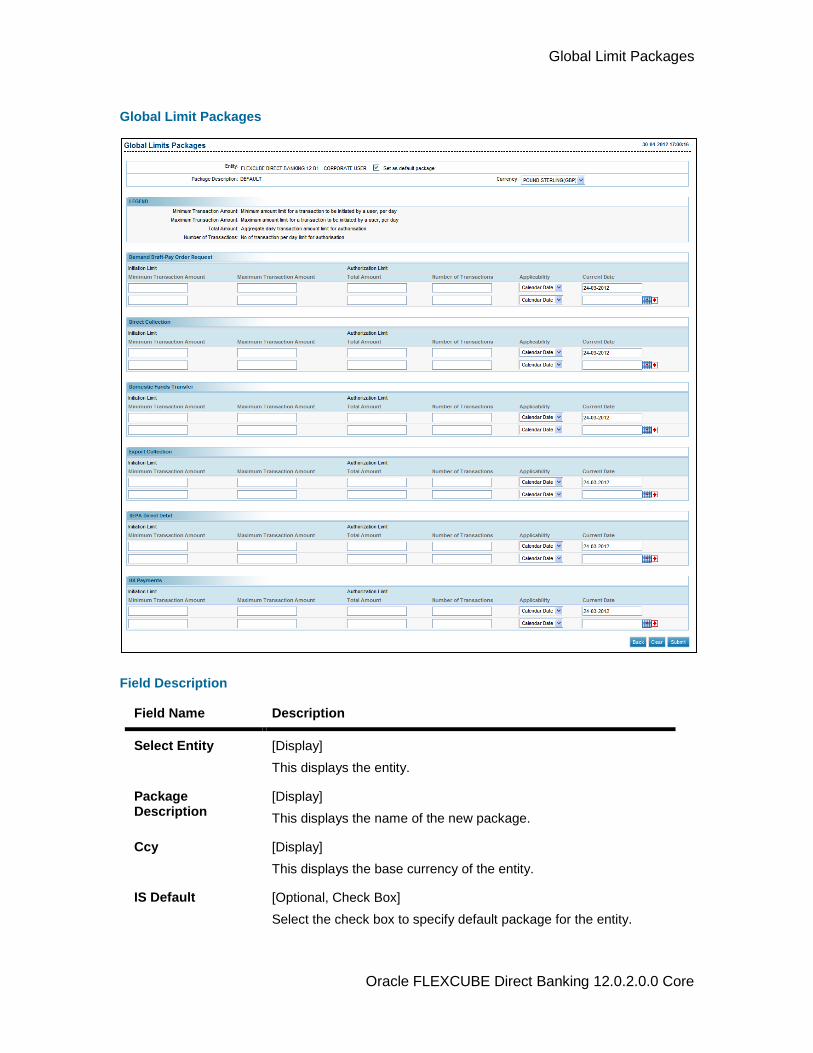
Global Limit Packages
Oracle FLEXCUBE Direct Banking 12.0.2.0.0 Core
Global Limit Packages
Field Description
Field Name Description
Select Entity [Display]
This displays the entity.
Package Description
[Display]
This displays the name of the new package.
Ccy [Display]
This displays the base currency of the entity.
IS Default [Optional, Check Box]
Select the check box to specify default package for the entity.

Global Limit Packages
Oracle FLEXCUBE Direct Banking 12.0.2.0.0 Core
Field Name Description
Transaction Name [Display]
This displays the transaction name for which the limit is to be set.
Initiation Limit
MinTxnLimit [Display]
This displays the minimum amount limit for a transaction to be initiated by a user par day. If no value is entered then no minimum amount limit is assumed.
TxnLimit [Display]
This displays the maximum amount limit for a transaction to be initiated by a user par day.
If no value is entered then indefinite limit for the initiation is assumed.
Authorization Limit
DayTxnLimit [Display]
This displays the maximum daily cumulative transaction amount available for authorization.
If no value is entered, then indefinite limit for authorization is assumed.
NoOfTxn [Display]
This displays the maximum number of transactions available for authorization.
If no value is entered then indefinite limit for the authorization is
Other Package Parameters
Applicability [Display]
This displays the date on which the limit will be made applicable.
Only calendar date allowed.
Effective Date [Display]
This displays the date on which the limit will be made applicable.
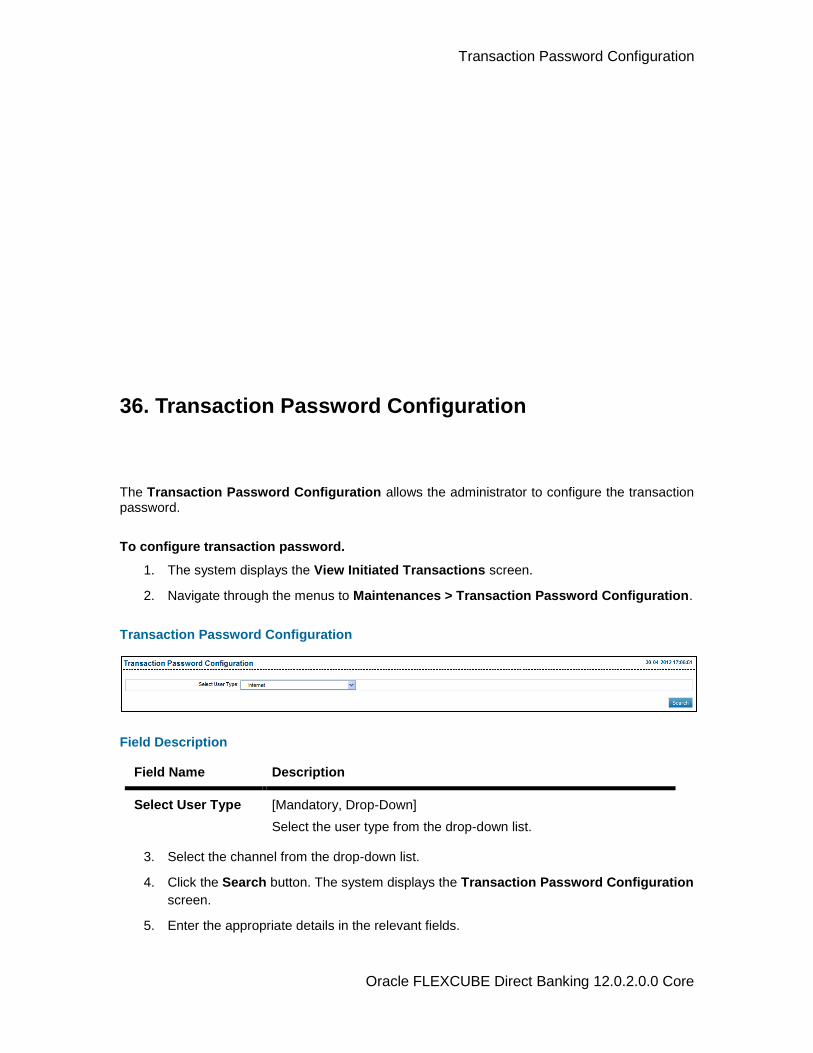
Transaction Password Configuration
Oracle FLEXCUBE Direct Banking 12.0.2.0.0 Core
36. Transaction Password Configuration
The Transaction Password Configuration allows the administrator to configure the transaction password.
To configure transaction password.
1. The system displays the View Initiated Transactions screen.
2. Navigate through the menus to Maintenances > Transaction Password Configuration.
Transaction Password Configuration
Field Description
Field Name Description
Select User Type [Mandatory, Drop-Down]
Select the user type from the drop-down list.
3. Select the channel from the drop-down list.
4. Click the Search button. The system displays the Transaction Password Configuration
screen.
5. Enter the appropriate details in the relevant fields.
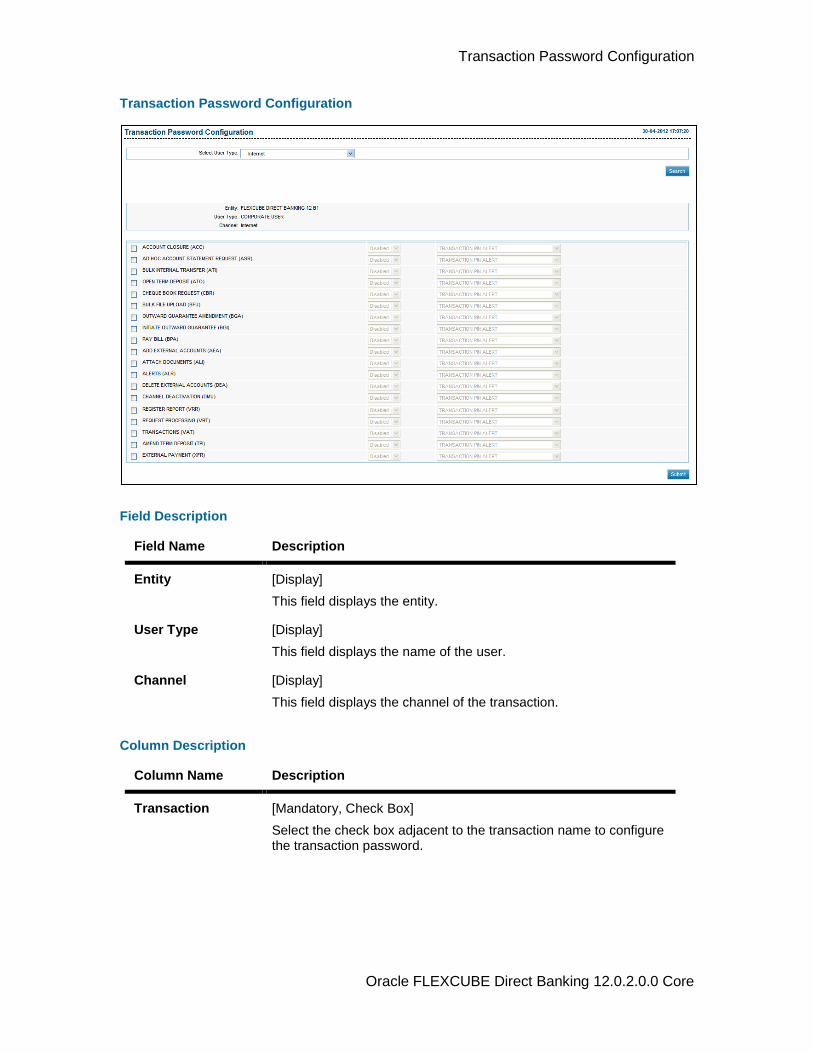
Transaction Password Configuration
Oracle FLEXCUBE Direct Banking 12.0.2.0.0 Core
Transaction Password Configuration
Field Description
Field Name Description
Entity [Display]
This field displays the entity.
User Type [Display]
This field displays the name of the user.
Channel [Display]
This field displays the channel of the transaction.
Column Description
Column Name Description
Transaction [Mandatory, Check Box]
Select the check box adjacent to the transaction name to configure the transaction password.
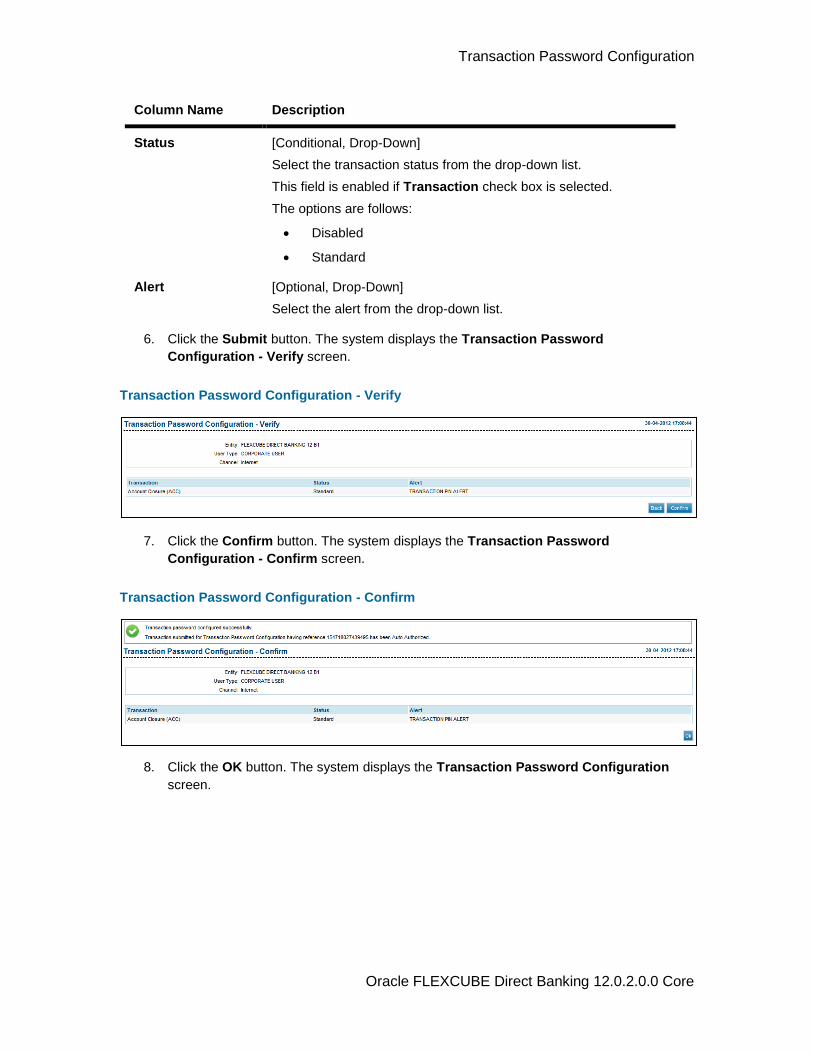
Transaction Password Configuration
Oracle FLEXCUBE Direct Banking 12.0.2.0.0 Core
Column Name Description
Status [Conditional, Drop-Down]
Select the transaction status from the drop-down list.
This field is enabled if Transaction check box is selected.
The options are follows:
Disabled
Standard
Alert [Optional, Drop-Down]
Select the alert from the drop-down list.
6. Click the Submit button. The system displays the Transaction Password
Configuration - Verify screen.
Transaction Password Configuration - Verify
7. Click the Confirm button. The system displays the Transaction Password
Configuration - Confirm screen.
Transaction Password Configuration - Confirm
8. Click the OK button. The system displays the Transaction Password Configuration
screen.
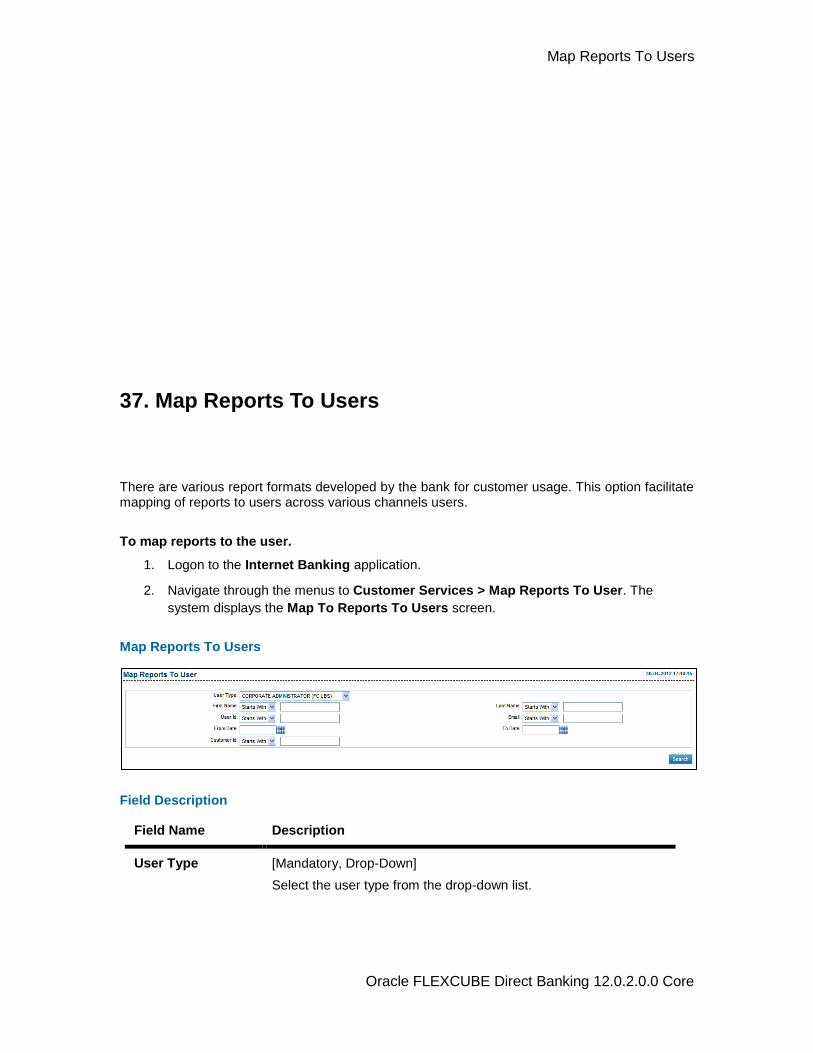
Map Reports To Users
Oracle FLEXCUBE Direct Banking 12.0.2.0.0 Core
37. Map Reports To Users
There are various report formats developed by the bank for customer usage. This option facilitate mapping of reports to users across various channels users.
To map reports to the user.
1. Logon to the Internet Banking application.
2. Navigate through the menus to Customer Services > Map Reports To User. The
system displays the Map To Reports To Users screen.
Map Reports To Users
Field Description
Field Name Description
User Type [Mandatory, Drop-Down]
Select the user type from the drop-down list.
Map Reports To Users
Oracle FLEXCUBE Direct Banking 12.0.2.0.0 Core
Field Name Description
First Name [Optional, Drop-Down, Alphanumeric, 40]
Select the search criteria for the first name from the drop-down list.
The options are:
Starts With
Ends With
Equals
Contains
Type the search string in the adjacent field.
For Example:
If you select the search criteria as Starts With and enter A in the adjacent field, then the system displays all the customer first names starting with A.
Last Name [Optional, Drop-Down, Alphanumeric, 40]
Select the search criteria for the last name from the drop-down list.
The options are:
Starts With
Ends With
Equals
Contains
Type the search string in the adjacent field.
For Example:
If you select the search criteria as Starts With and enter E in the adjacent field, then the system displays all the customer last names starting with E.
User Id [Optional, Drop-Down, Alphanumeric, 18]
Select the search criteria for the user ID from the drop-down list.
The options are:
Starts With
Ends With
Equals
Contains
Type the search string in the adjacent field.
For Example:
If you select the search criteria as Starts With and enter 1 in the adjacent field, then the system displays all the user ID's starting with 1.
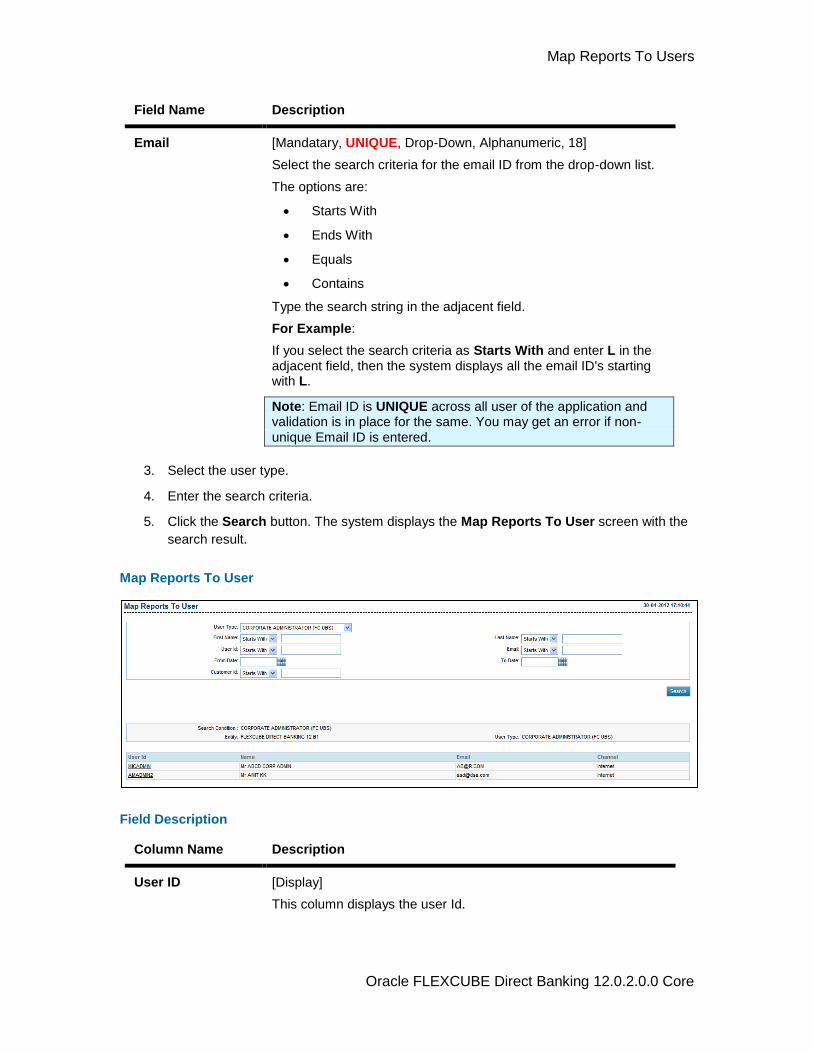
Map Reports To Users
Oracle FLEXCUBE Direct Banking 12.0.2.0.0 Core
Field Name Description
Email [Mandatary, UNIQUE, Drop-Down, Alphanumeric, 18]
Select the search criteria for the email ID from the drop-down list.
The options are:
Starts With
Ends With
Equals
Contains
Type the search string in the adjacent field.
For Example:
If you select the search criteria as Starts With and enter L in the adjacent field, then the system displays all the email ID's starting with L.
Note: Email ID is UNIQUE across all user of the application and validation is in place for the same. You may get an error if non-unique Email ID is entered.
3. Select the user type.
4. Enter the search criteria.
5. Click the Search button. The system displays the Map Reports To User screen with the
search result.
Map Reports To User
Field Description
Column Name Description
User ID [Display]
This column displays the user Id.
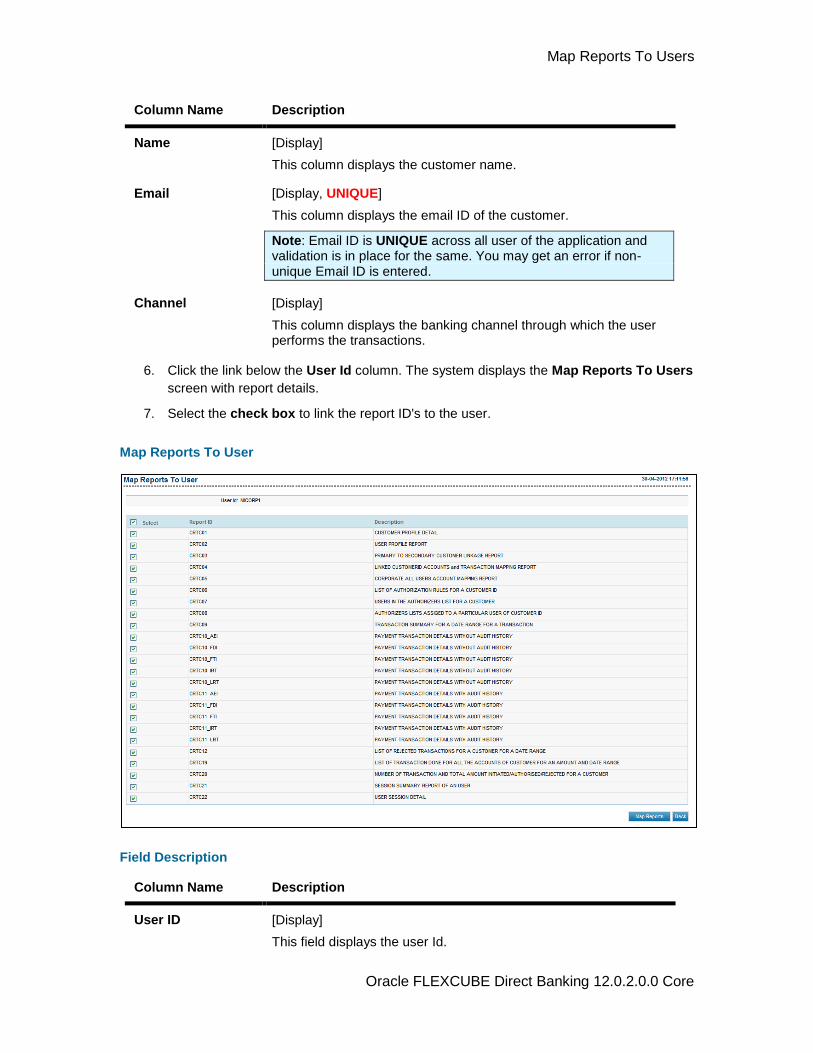
Map Reports To Users
Oracle FLEXCUBE Direct Banking 12.0.2.0.0 Core
Column Name Description
Name [Display]
This column displays the customer name.
Email [Display, UNIQUE]
This column displays the email ID of the customer.
Note: Email ID is UNIQUE across all user of the application and validation is in place for the same. You may get an error if non-unique Email ID is entered.
Channel [Display]
This column displays the banking channel through which the user performs the transactions.
6. Click the link below the User Id column. The system displays the Map Reports To Users
screen with report details.
7. Select the check box to link the report ID's to the user.
Map Reports To User
Field Description
Column Name Description
User ID [Display]
This field displays the user Id.
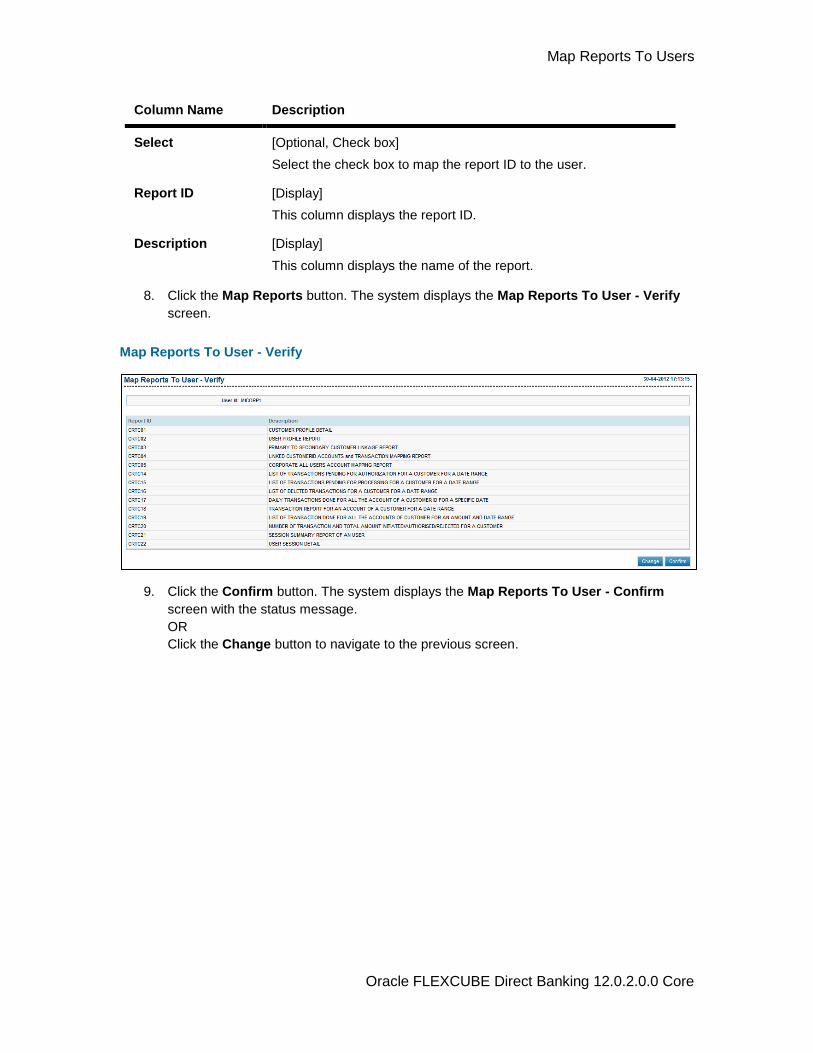
Map Reports To Users
Oracle FLEXCUBE Direct Banking 12.0.2.0.0 Core
Column Name Description
Select [Optional, Check box]
Select the check box to map the report ID to the user.
Report ID [Display]
This column displays the report ID.
Description [Display]
This column displays the name of the report.
8. Click the Map Reports button. The system displays the Map Reports To User - Verify
screen.
Map Reports To User - Verify
9. Click the Confirm button. The system displays the Map Reports To User - Confirm
screen with the status message.
OR
Click the Change button to navigate to the previous screen.
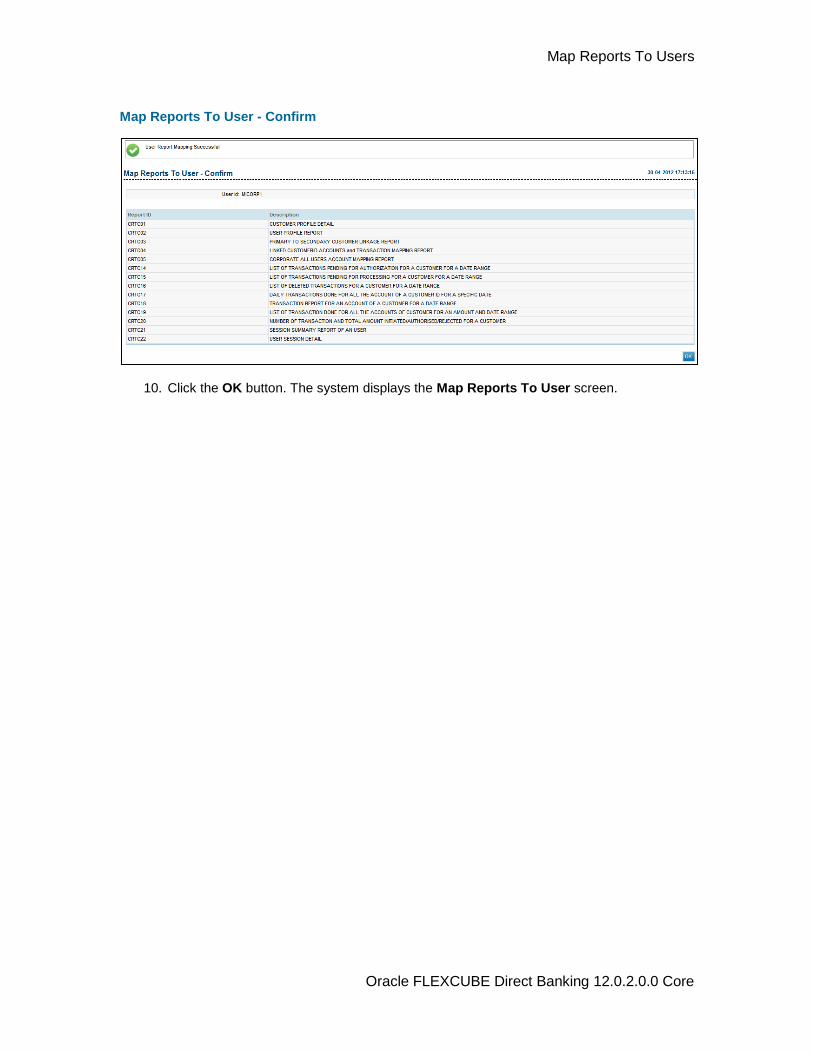
Map Reports To Users
Oracle FLEXCUBE Direct Banking 12.0.2.0.0 Core
Map Reports To User - Confirm
10. Click the OK button. The system displays the Map Reports To User screen.
Oracle FLEXCUBE Direct Banking 12.0.2.0.0 Core
38. Role Subject Mapping
Using the Role Subject mapping you can assign the subjects to a Role which shall be assigned to the user through the roles assigned. Using this transactions the Mails pertaining to the subject will directly go to the administrator which has been assigned the particular role which has been mapped with the Subject.
To register an alert.
1. Logon to the Internet Banking application.
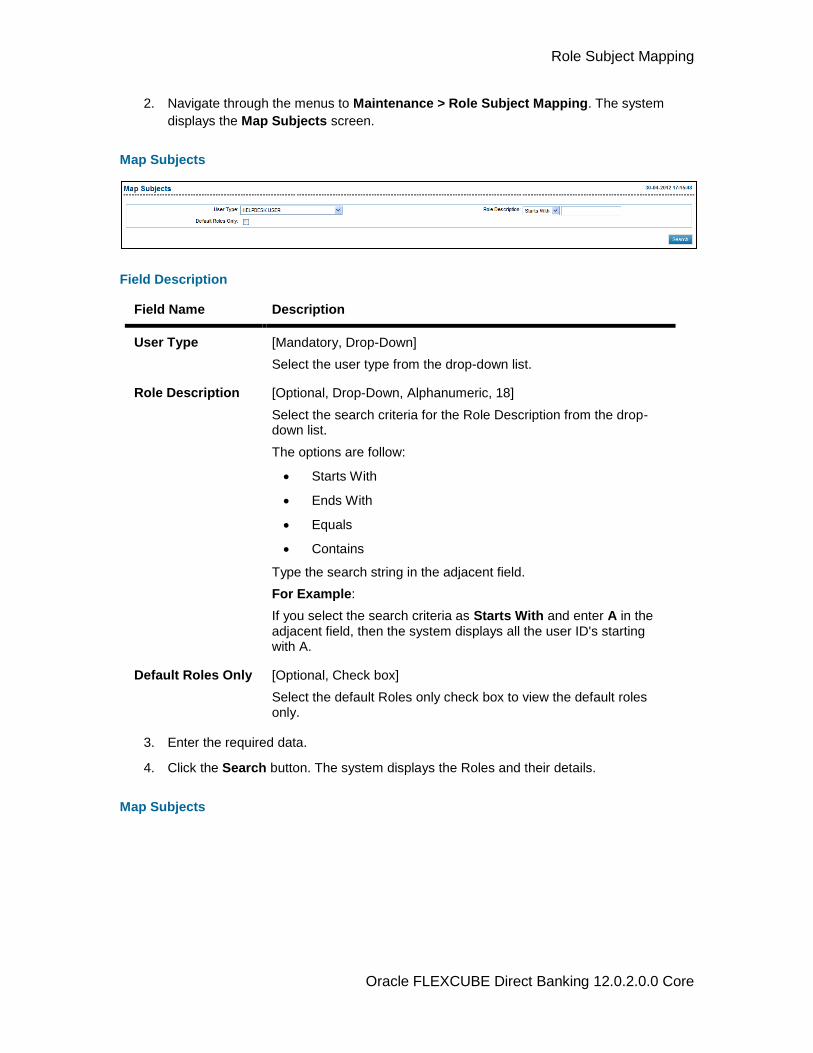
Role Subject Mapping
Oracle FLEXCUBE Direct Banking 12.0.2.0.0 Core
2. Navigate through the menus to Maintenance > Role Subject Mapping. The system
displays the Map Subjects screen.
Map Subjects
Field Description
Field Name Description
User Type [Mandatory, Drop-Down]
Select the user type from the drop-down list.
Role Description [Optional, Drop-Down, Alphanumeric, 18]
Select the search criteria for the Role Description from the drop-down list.
The options are follow:
Starts With
Ends With
Equals
Contains
Type the search string in the adjacent field.
For Example:
If you select the search criteria as Starts With and enter A in the adjacent field, then the system displays all the user ID's starting with A.
Default Roles Only [Optional, Check box]
Select the default Roles only check box to view the default roles only.
3. Enter the required data.
4. Click the Search button. The system displays the Roles and their details.
Map Subjects
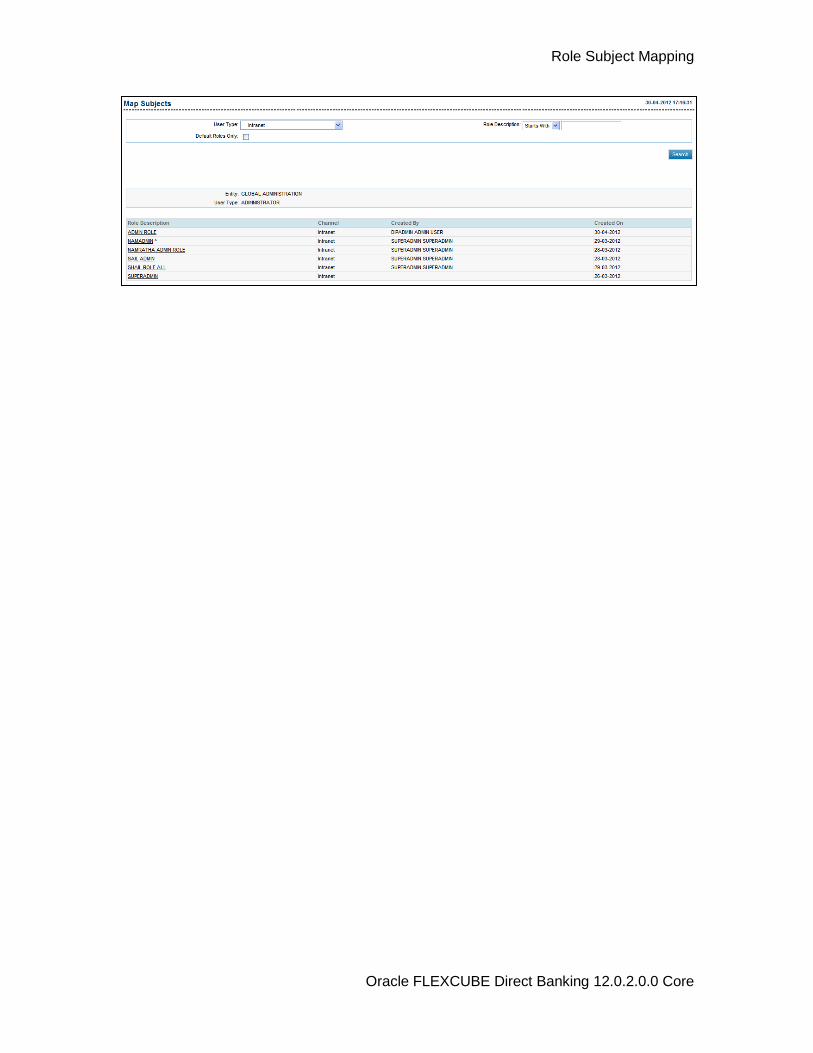
Role Subject Mapping
Oracle FLEXCUBE Direct Banking 12.0.2.0.0 Core

Role Subject Mapping
Oracle FLEXCUBE Direct Banking 12.0.2.0.0 Core
Field Description
Column Name Description
Entity [Display]
This column displays entity name.
User Type [Display]
This field displays the type of user.
Role Description [Display]
This column displays the roles assigned.
Channel [Display]
This column displays the channel through which the transactions are processed.
Created by [Display]
This column displays the name of the user through which the role was created
Created on [Display]
This column displays the date on which the role was created.
5. Click on the Role Description hyperlink. The system displays the Role Subject Mapping
screen.
Map Subjects
6. Select the Subjects checkbox in order to map the subject to the role.
7. Click the Change button to return to the previous screen and change the details
OR
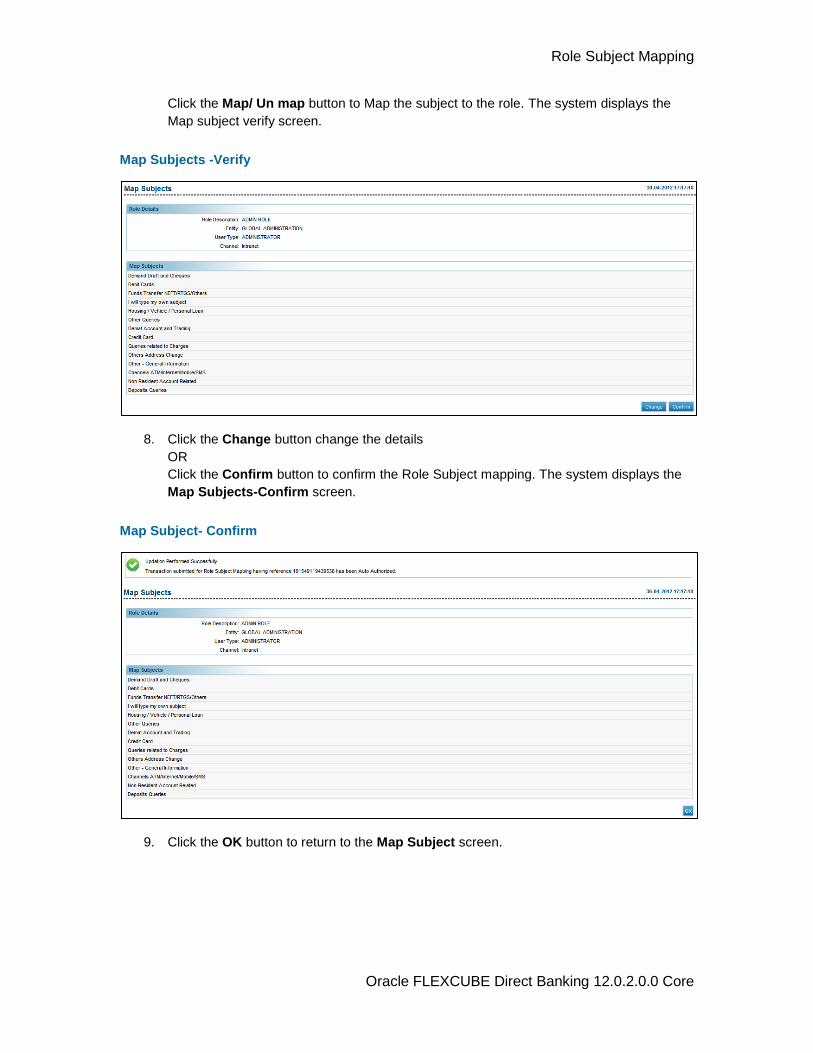
Role Subject Mapping
Oracle FLEXCUBE Direct Banking 12.0.2.0.0 Core
Click the Map/ Un map button to Map the subject to the role. The system displays the
Map subject verify screen.
Map Subjects -Verify
8. Click the Change button change the details
OR
Click the Confirm button to confirm the Role Subject mapping. The system displays the
Map Subjects-Confirm screen.
Map Subject- Confirm
9. Click the OK button to return to the Map Subject screen.
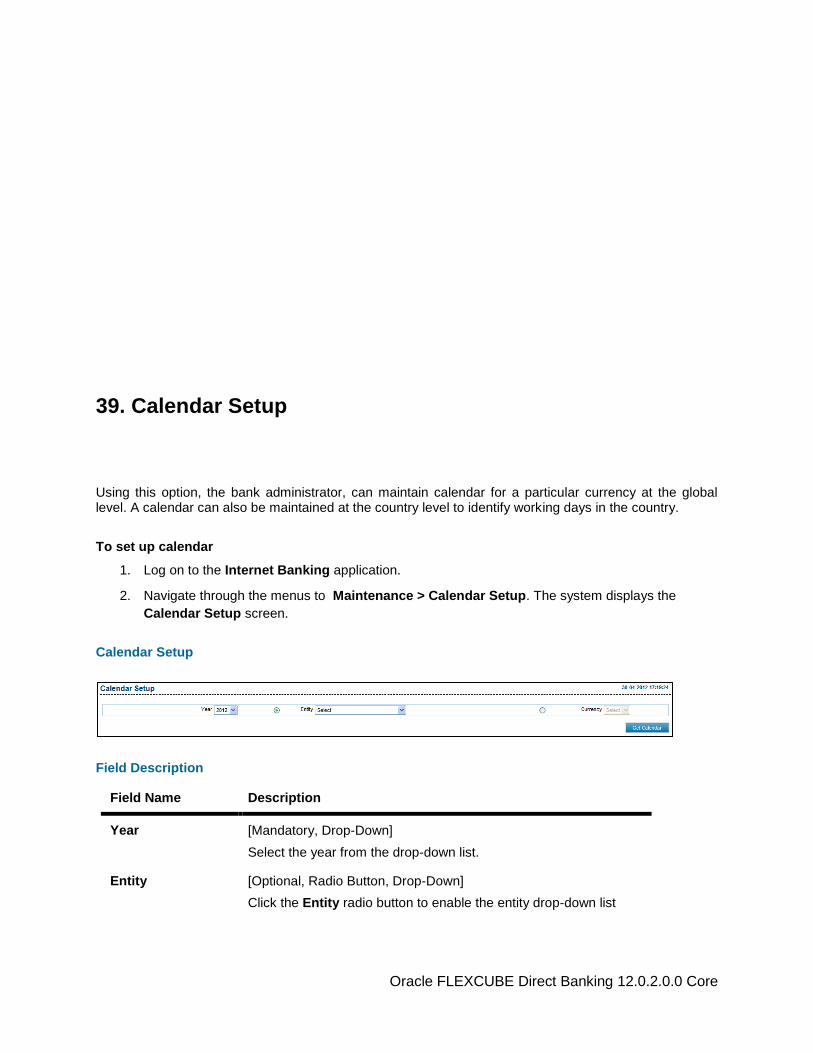
Oracle FLEXCUBE Direct Banking 12.0.2.0.0 Core
39. Calendar Setup
Using this option, the bank administrator, can maintain calendar for a particular currency at the global level. A calendar can also be maintained at the country level to identify working days in the country.
To set up calendar
1. Log on to the Internet Banking application.
2. Navigate through the menus to Maintenance > Calendar Setup. The system displays the
Calendar Setup screen.
Calendar Setup
Field Description
Field Name Description
Year [Mandatory, Drop-Down]
Select the year from the drop-down list.
Entity [Optional, Radio Button, Drop-Down]
Click the Entity radio button to enable the entity drop-down list
Oracle FLEXCUBE Direct Banking 12.0.2.0.0 Core
Field Name Description
Currency [Optional, Radio Button, Drop-Down]
Click the Currency radio button to enable the drop-down list.
Select the currency for which calendar is to be maintained from the drop-down list
3. Select the year, entity and first day of week from the drop-down list.
4. Select the appropriate check box to select the weekly off.
5. Click the Get Calendar button. The system displays the Calendar Setup screen.
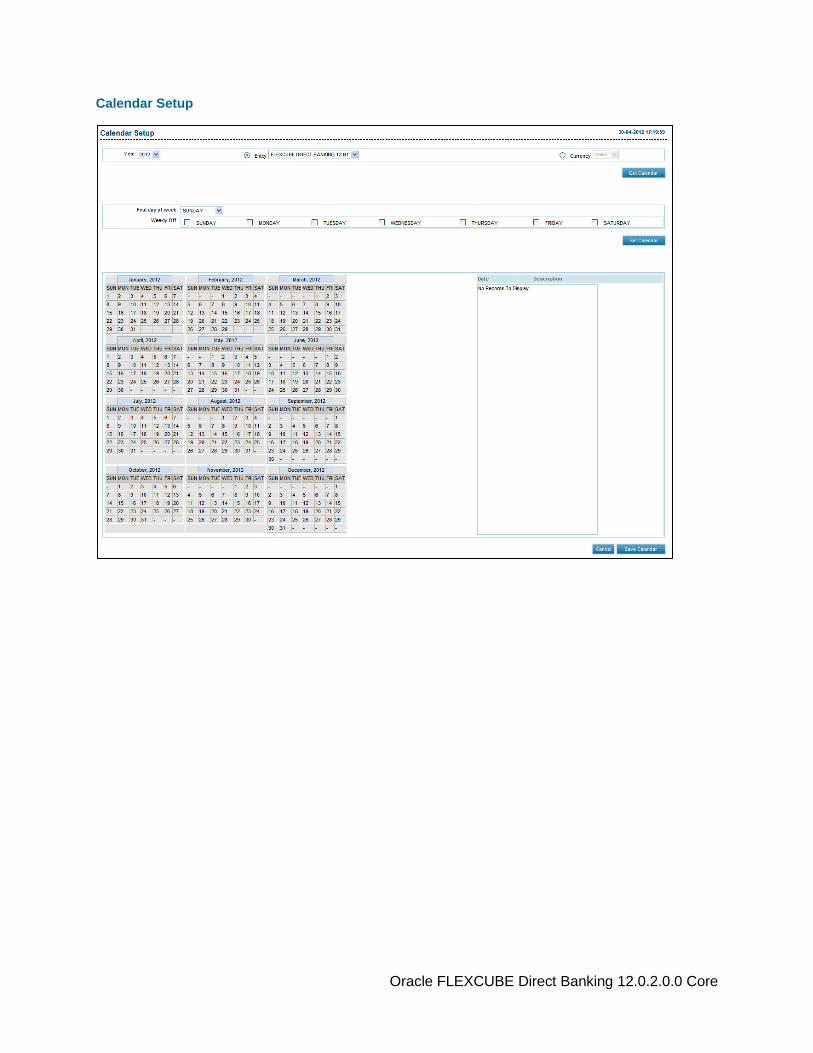
Oracle FLEXCUBE Direct Banking 12.0.2.0.0 Core
Calendar Setup
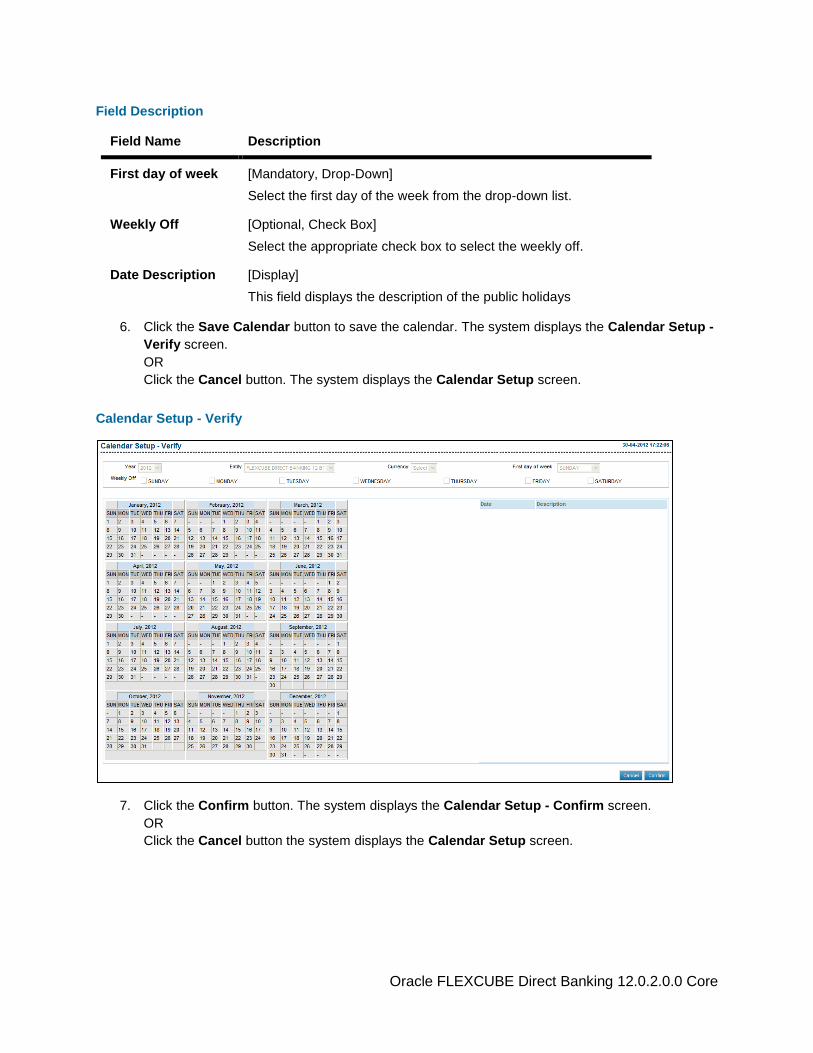
Oracle FLEXCUBE Direct Banking 12.0.2.0.0 Core
Field Description
Field Name Description
First day of week [Mandatory, Drop-Down]
Select the first day of the week from the drop-down list.
Weekly Off [Optional, Check Box]
Select the appropriate check box to select the weekly off.
Date Description [Display]
This field displays the description of the public holidays
6. Click the Save Calendar button to save the calendar. The system displays the Calendar Setup -
Verify screen.
OR
Click the Cancel button. The system displays the Calendar Setup screen.
Calendar Setup - Verify
7. Click the Confirm button. The system displays the Calendar Setup - Confirm screen.
OR
Click the Cancel button the system displays the Calendar Setup screen.
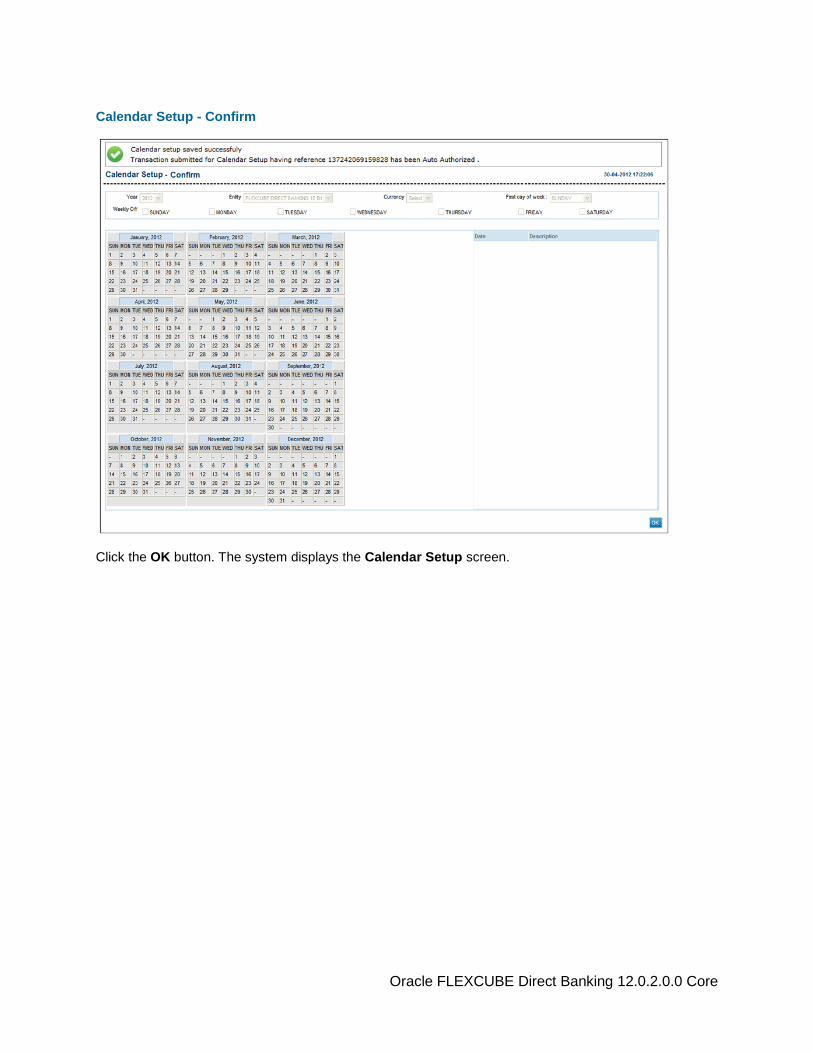
Oracle FLEXCUBE Direct Banking 12.0.2.0.0 Core
Calendar Setup - Confirm
Click the OK button. The system displays the Calendar Setup screen.
![Musharaka Creation Oracle FLEXCUBE Universal Banking ... · Oracle FLEXCUBE Universal Banking . Release 12.0.1.0.0 [December] [2012] Oracle Part Number E51465-01. ... The process](https://img.pdfslide.net/doc/110x75/5f64234c21bb256cb427994c/musharaka-creation-oracle-flexcube-universal-banking-oracle-flexcube-universal.jpg)

![Derivatives Oracle FLEXCUBE Universal Banking Release … · Derivatives . Oracle FLEXCUBE Universal Banking . Release 11.3.83.02.0 [April] [2014] Oracle Part Number E53607-01](https://img.pdfslide.net/doc/110x75/5caf936b88c993474d8be9ae/derivatives-oracle-flexcube-universal-banking-release-derivatives-oracle-flexcube.jpg)


![Fixed Assets Oracle FLEXCUBE Universal Banking · Fixed Assets Oracle FLEXCUBE Universal Banking Release 12.0 [May] [2012] Oracle Part Number E51527-01](https://img.pdfslide.net/doc/110x75/5abf56107f8b9a8e3f8e2404/fixed-assets-oracle-flexcube-universal-banking-assets-oracle-flexcube-universal.jpg)
![Reference Guide Oracle FLEXCUBE Universal Banking · Reference Guide . Oracle FLEXCUBE Universal Banking . Release 12.0 [May] [2012] Oracle Part Number E51527-01](https://img.pdfslide.net/doc/110x75/5ac8c8d87f8b9aa3298c68ed/reference-guide-oracle-flexcube-universal-banking-guide-oracle-flexcube-universal.jpg)


![UCM Server Setup Oracle FLEXCUBE Universal Banking …...UCM Server Setup Oracle FLEXCUBE Universal Banking Release 12.2.0.0.0 [May] [2016]](https://img.pdfslide.net/doc/110x75/5f5188e390d52d0087493ac2/ucm-server-setup-oracle-flexcube-universal-banking-ucm-server-setup-oracle-flexcube.jpg)
![Funds Transfer Oracle FLEXCUBE Universal Banking · Funds Transfer Oracle FLEXCUBE Universal Banking Release 11.3.0 [May] [2011] Oracle Part Number E51511-01](https://img.pdfslide.net/doc/110x75/5ec09e646d8a4515990e5577/funds-transfer-oracle-flexcube-universal-banking-funds-transfer-oracle-flexcube.jpg)

![Oracle FLEXCUBE Universal Banking - FLEXCUBE Core … · 1-1 Oracle FLEXCUBE Universal Banking - FLEXCUBE Core Integration Oracle FLEXCUBE Universal Banking Release 11.5.0.0.0 [July]](https://img.pdfslide.net/doc/110x75/5b0dd0227f8b9a8b038e4323/oracle-flexcube-universal-banking-flexcube-core-oracle-flexcube-universal-banking.jpg)


![Foreign Exchange Oracle FLEXCUBE Universal Banking Release … · 2013. 12. 18. · Foreign Exchange Oracle FLEXCUBE Universal Banking Release 12.0.1.0.0 [December] [2012] Oracle](https://img.pdfslide.net/doc/110x75/60fb2bcdf1a4074fc379256f/foreign-exchange-oracle-flexcube-universal-banking-release-2013-12-18-foreign.jpg)
![Mudarabah Creation Oracle FLEXCUBE Universal Banking ... · Mudarabah Creation Oracle FLEXCUBE Universal Banking Release 11.3.0 [May] [2011] Oracle Part Number E51511-01](https://img.pdfslide.net/doc/110x75/5d09b99b88c99339638b954b/mudarabah-creation-oracle-flexcube-universal-banking-mudarabah-creation.jpg)
![Oracle FLEXCUBE Process Flow Guide Oracle FLEXCUBE Universal Banking ... · Oracle FLEXCUBE Process Flow Guide Oracle FLEXCUBE Universal Banking Release 12.4.0.0.0 [May] [2017] 1-1](https://img.pdfslide.net/doc/110x75/5bb9760609d3f2d4678b7cf2/oracle-flexcube-process-flow-guide-oracle-flexcube-universal-banking-oracle.jpg)


![Foreign Exchange Oracle FLEXCUBE Universal Banking · Foreign Exchange Oracle FLEXCUBE Universal Banking Release 11.3.0 [May] [2011] Oracle Part Number E51536-01](https://img.pdfslide.net/doc/110x75/5fcba915f138ce09c40acab8/foreign-exchange-oracle-flexcube-universal-banking-foreign-exchange-oracle-flexcube.jpg)