Embed Size (px)
Citation preview
Outline Salvadori After-School: Skyscrapers
Sample Vocabulary
built environment – everything that is
designed and built around us (i.e. houses,
bridges, roads, parks, hospitals, schools,
churches, etc.)
skyscraper – a contextually tall building
that rises well above the other structures
around it and changes the skyline
skyline – the outline of buildings against
the sky; the artificial horizon that a city's
overall structure creates. Skylines serve
as a kind of fingerprint of a city, as no two
skylines are alike
technology – the use of scientific
discoveries for practical purposes, with
the intention of making people’s lives
easier and better
proportional – the relation of one part to
another or to the whole
scale – an indication of the relationship
between the distances on a map )or
diagram/model) and the corresponding
actual distances
modular – made up of standard units
which are built off-site and then
assembled together to create a larger
structure
façade – the face or front of a building
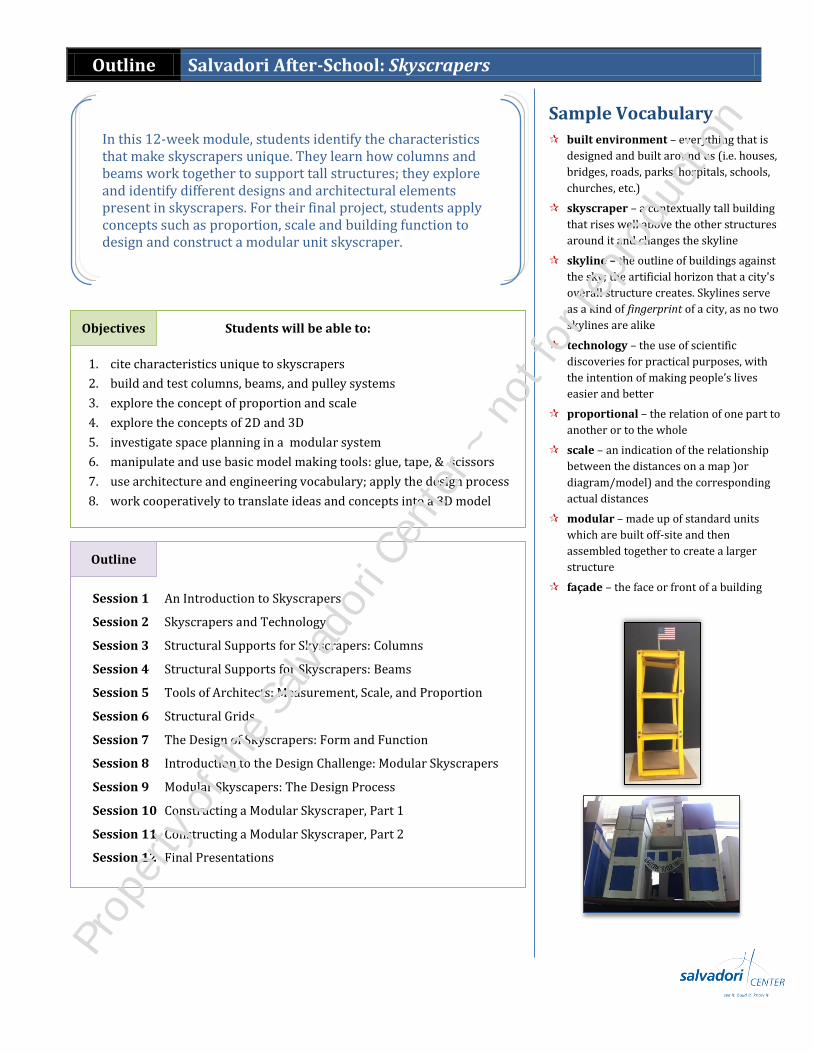
In this 12-week module, students identify the characteristics that make skyscrapers unique. They learn how columns and beams work together to support tall structures; they explore and identify different designs and architectural elements present in skyscrapers. For their final project, students apply concepts such as proportion, scale and building function to design and construct a modular unit skyscraper.
Students will be able to:
1. cite characteristics unique to skyscrapers
2. build and test columns, beams, and pulley systems
3. explore the concept of proportion and scale
4. explore the concepts of 2D and 3D
5. investigate space planning in a modular system
6. manipulate and use basic model making tools: glue, tape, & scissors
7. use architecture and engineering vocabulary; apply the design process
8. work cooperatively to translate ideas and concepts into a 3D model
Objectives
Session 1 An Introduction to Skyscrapers
Session 2 Skyscrapers and Technology
Session 3 Structural Supports for Skyscrapers: Columns
Session 4 Structural Supports for Skyscrapers: Beams
Session 5 Tools of Architects: Measurement, Scale, and Proportion
Session 6 Structural Grids
Session 7 The Design of Skyscrapers: Form and Function
Session 8 Introduction to the Design Challenge: Modular Skyscrapers
Session 9 Modular Skyscapers: The Design Process
Session 10 Constructing a Modular Skyscraper, Part 1
Session 11 Constructing a Modular Skyscraper, Part 2
Session 12 Final Presentations
Outline
Prop
erty
of t
he S
alva
dori
Cent
er ~
not
for r
epro
duct
ion
Salvadori After-School
© 2012 Salvadori Center
with support from the National Science Foundation
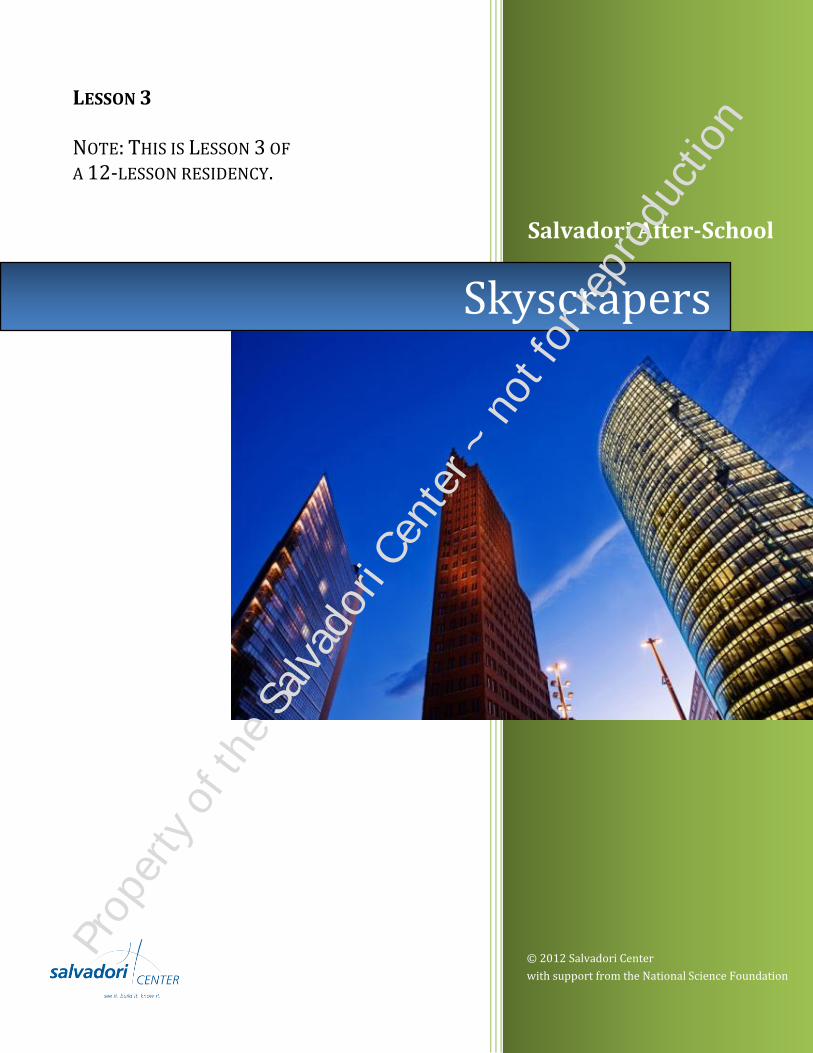
Skyscrapers
LESSON 3 NOTE: THIS IS LESSON 3 OF
A 12-LESSON RESIDENCY.
Prop
erty
of t
he S
alva
dori
Cent
er ~
not
for r
epro
duct
ion
Session 3 Structural Supports for Skyscrapers
`
Lesson Prep
Post charts/pictures:
1. Salvadori Student Agreement
2. Measuring Force with a Spring Scale
3. Movable Pulley diagram poster
4. Fixed Pulley diagram poster
5. Structural Grid poster
6. Column Quest poster
Prepare sample columns (one of each shape)
Materials
stickers, pencils, student activity books
chart paper, colored pencils
dry eraser and dry erase markers
pulley pictures
Movable Pulley materials (per group)
one pulley wheel
one piece of string (30”) – looped
at one end
one wooden dowel (12”)
one 8-oz weight
metal ring (through hole in weight)
spring scale
Extension: a longer piece of string (36”)
and another pulley
Column Quest materials (per group)
one 10×10 cardboard base
4 copies of one template shape per
group, on 20lb paper of different colors:
triangle, square, circle. Use pentagon if
there are four groups.
sixteen 1” pieces of tape
Column Quest testing materials
one 10×10 cardboard base
one plastic box
weights (about 5 lbs)
other objects for additional weight
food scale
Vocabulary
Newton
movable pulley
mechanical advantage
structural grid
beam
column
load
live load
dead load
efficiency
Lesson Theme
Students will understand how buildings are supported by a structural grid, and how a column’s shape affects its load-bearing capacity.
Students will be able to:
1. build and test a movable pulley system
2. compare the advantages of using a fixed pulley versus a movable pulley
3. label the components that make up a skyscraper’s structural grid
4. predict and test the relative load-bearing capacities of three different shapes of columns: triangular, square, and circular
5. draw conclusions based on evidence and prior knowledge
Objectives
Re-Cap Activity: Movable Pulley
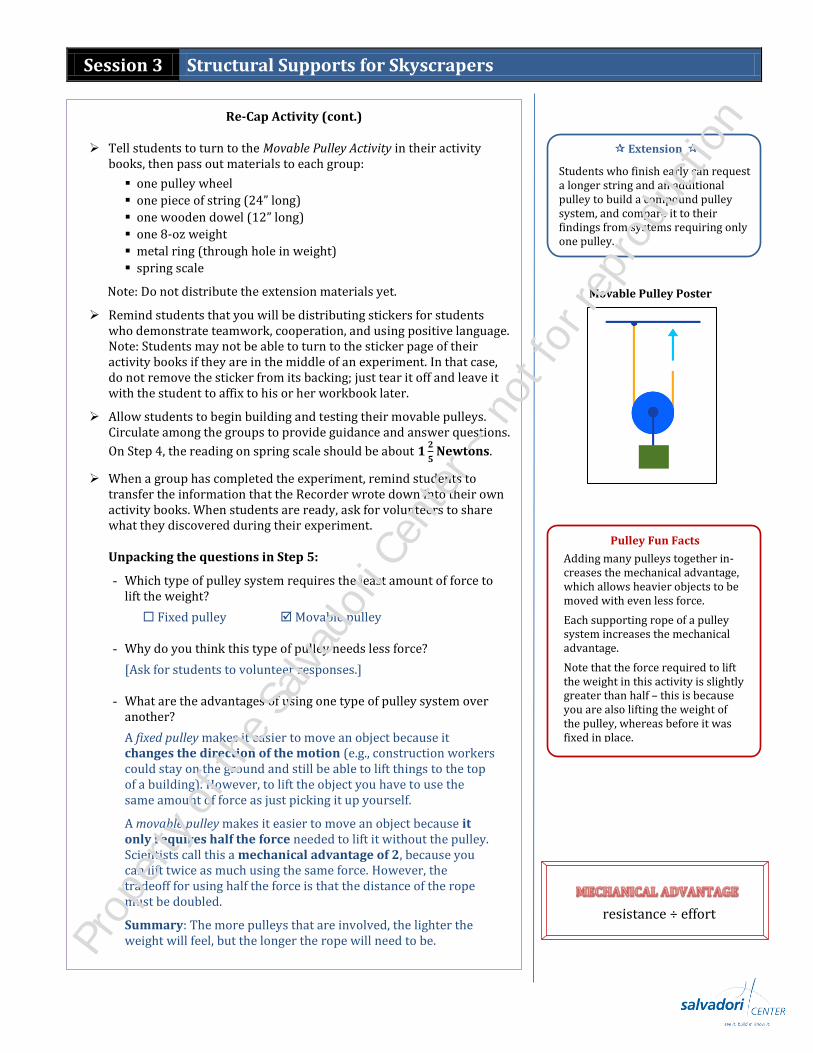
Remind students that in last week’s session, they built a fixed pulley system to demonstrate how technology innovations like elevators helped with the construction of the first modern skyscrapers. Today they will be building another kind of pulley system: a movable pulley.
Tell students to turn to the Fixed Pulley Activity in their activity books (the activity they completed last week). Ask students about their predictions on Step 5 – based on their measurements with a fixed pulley and the picture of the movable pulley, who thinks a movable pulley will make the weight feel lighter? heavier? about the same? Use the Spring Scale poster to indicate where students’ predictions fall.
Have students work in small groups of 3 or 4. One option is to have students switch off between holding the pulley, testing it, and recording their findings.
Another option is to assign roles within the group. Instructors who choose this option should record the following on chart paper so that students can make an informed decision about who will do each role within their group.
- Supporter: holds up and stabilizes the dowel
- Pulley Coordinator: arranges the pulley components
- Recorder: documents the findings from the experiment
For groups of 4 students, there can be more than one “supporter.”
Remind students that scientists repeat tests and use the same procedure every time in order to reduce human error and to make it possible for other scientists to verify the procedure themselves.
30 min.
Prop
erty
of t
he S
alva
dori
Cent
er ~
not
for r
epro
duct
ion
Session 3 Structural Supports for Skyscrapers
student
Extension
Students who finish early can request a longer string and an additional pulley to build a compound pulley system, and compare it to their findings from systems requiring only one pulley.
Movable Pulley Poster
Pulley Fun Facts
Adding many pulleys together in-creases the mechanical advantage, which allows heavier objects to be moved with even less force.
Each supporting rope of a pulley system increases the mechanical advantage.
Note that the force required to lift the weight in this activity is slightly greater than half – this is because you are also lifting the weight of the pulley, whereas before it was fixed in place.
Re-Cap Activity (cont.)
Tell students to turn to the Movable Pulley Activity in their activity books, then pass out materials to each group:
one pulley wheel
one piece of string (24” long)
one wooden dowel (12” long)
one 8-oz weight
metal ring (through hole in weight)
spring scale
Note: Do not distribute the extension materials yet.
Remind students that you will be distributing stickers for students who demonstrate teamwork, cooperation, and using positive language. Note: Students may not be able to turn to the sticker page of their activity books if they are in the middle of an experiment. In that case, do not remove the sticker from its backing; just tear it off and leave it with the student to affix to his or her workbook later.
Allow students to begin building and testing their movable pulleys. Circulate among the groups to provide guidance and answer questions.
On Step 4, the reading on spring scale should be about 𝟏𝟐
𝟓 Newtons.
When a group has completed the experiment, remind students to transfer the information that the Recorder wrote down into their own activity books. When students are ready, ask for volunteers to share what they discovered during their experiment.
Unpacking the questions in Step 5:
- Which type of pulley system requires the least amount of force to lift the weight?
Fixed pulley Movable pulley
- Why do you think this type of pulley needs less force?
[Ask for students to volunteer responses.]
- What are the advantages of using one type of pulley system over another?
A fixed pulley makes it easier to move an object because it changes the direction of the motion (e.g., construction workers could stay on the ground and still be able to lift things to the top of a building). However, to lift the object you have to use the same amount of force as just picking it up yourself.
A movable pulley makes it easier to move an object because it only requires half the force needed to lift it without the pulley. Scientists call this a mechanical advantage of 2, because you can lift twice as much using the same force. However, the tradeoff for using half the force is that the distance of the rope must be doubled.
Summary: The more pulleys that are involved, the lighter the weight will feel, but the longer the rope will need to be.
resistance ÷ effort
Prop
erty
of t
he S
alva
dori
Cent
er ~
not
for r
epro
duct
ion
Session 3 Structural Supports for Skyscrapers
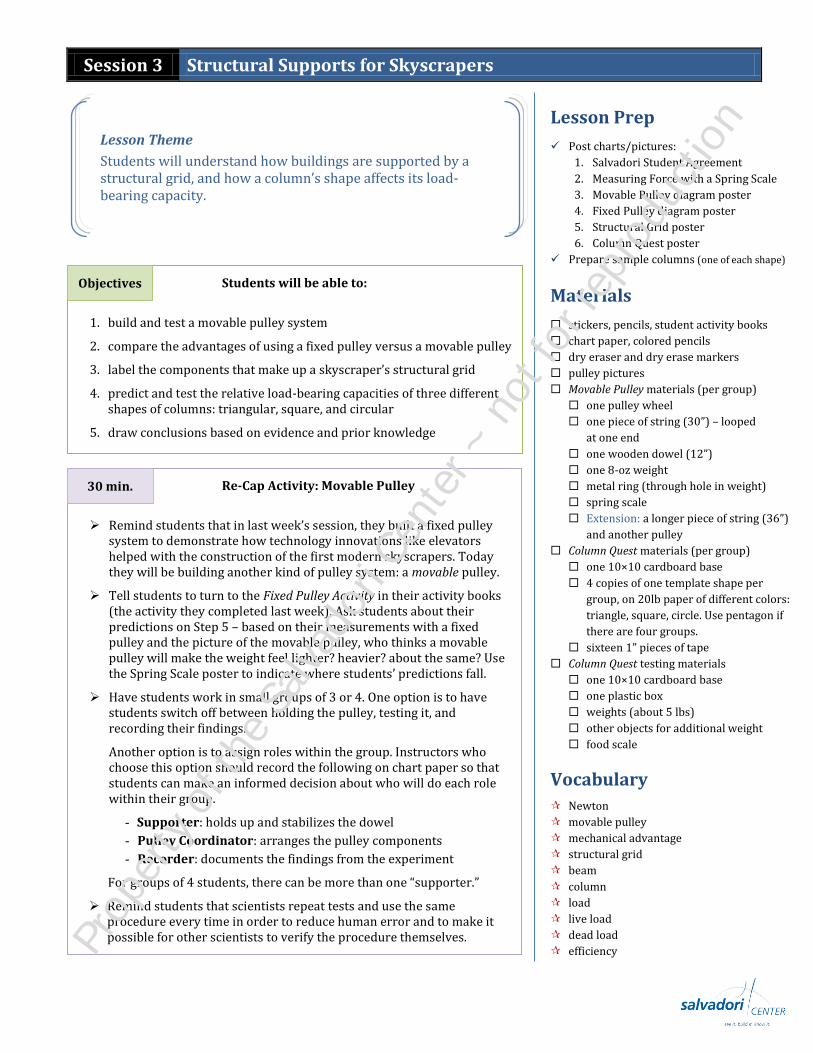
Primary Activity Introduction: Structural Grid
Ask students what the purpose of a person’s skeleton is. [Possible responses: it keeps us from falling, helps us to stand up, makes us stronger, etc.]
Our skeleton is our structure – if we didn’t have a skeleton, we would just collapse or flop around. Just like humans have a skeleton, a skyscraper has a structural grid that supports the building and keeps it standing.
Draw students’ attention to the Structural Grid poster at the front of the room and have them turn to that page in their activity books.
A structural grid is a system of columns and beams that are connected to each other, as well as other components that are necessary for the stability of the structure. This allows a skyscraper to carry the loads (or weights) of all the materials used to build it, as well as the objects and people that will go inside it. We are going to label the different parts of the structural grid, and then do an activity where we test them out!
Distribute colored pencils to each group. For this activity, students will need two different colors (one for columns and one for beams).
A beam is a horizontal, rigid structural member designed to carry and transfer loads. Which direction do I mean when I say horizontal – does that go up and down or side to side? Do you see horizontal components on this diagram?
Use a dry erase marker of one color to label and shade in a beam on the poster (see picture inset); have students do the same labeling and shading in their activity books. Then have students continue shading in all of the other beams on the grid.
A column is a vertical, rigid, upright structural member designed to carry loads. So if horizontal goes side to side, then which way does vertical go? Who can come up to the diagram and shade in a column for me? Remember – we’re going to use a different color to shade the columns.
Have students switch to a different colored pencil to label and shade all of the columns.
Walk around to check students’ work, then have students get into their working groups (3-4 students) for the Column Quest activity.
10 min.
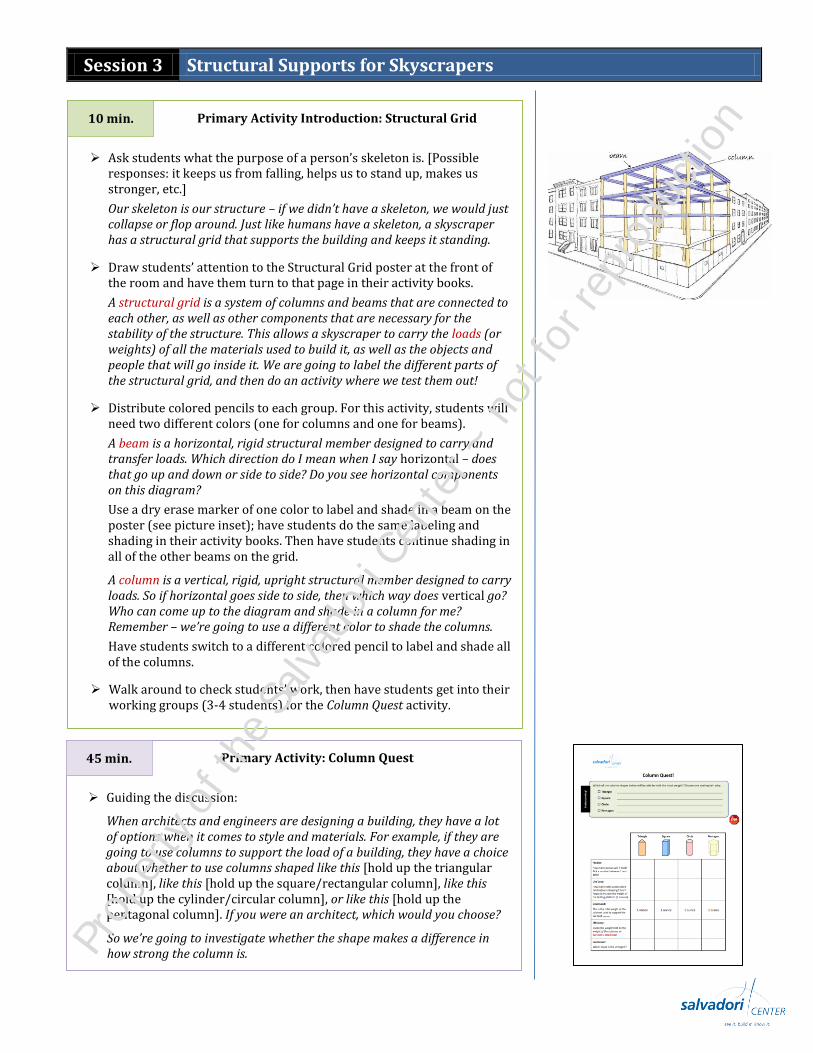
Primary Activity: Column Quest
Guiding the discussion:
When architects and engineers are designing a building, they have a lot of options when it comes to style and materials. For example, if they are going to use columns to support the load of a building, they have a choice about whether to use columns shaped like this [hold up the triangular column], like this [hold up the square/rectangular column], like this [hold up the cylinder/circular column], or like this [hold up the pentagonal column]. If you were an architect, which would you choose?
So we’re going to investigate whether the shape makes a difference in how strong the column is.
45 min.
Prop
erty
of t
he S
alva
dori
Cent
er ~
not
for r
epro
duct
ion
Session 3 Structural Supports for Skyscrapers
Primary Activity (cont.)
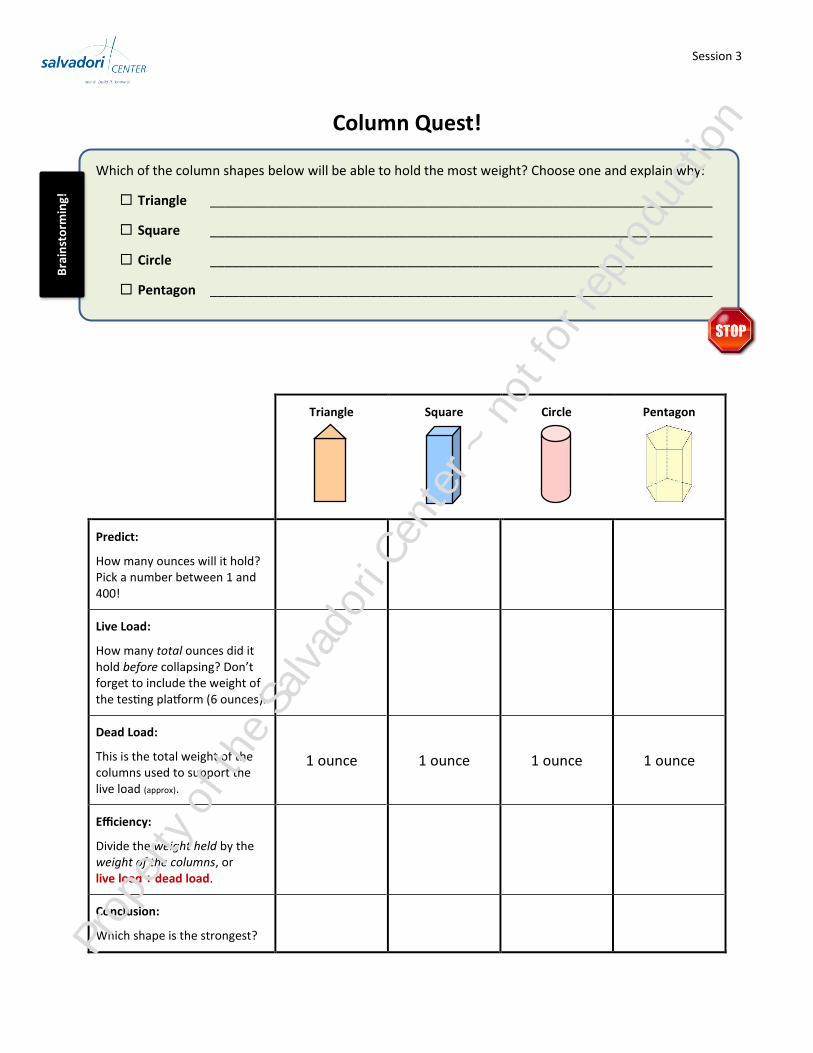
Have students open their activity books to Column Quest! and complete the top section, in which they make a prediction about which column shape will hold the most weight. While students are writing their responses, begin distributing materials. Each group gets:
- 4 identical sheets of one type of column (e.g., triangle) - one 10×10 cardboard base - sixteen 1” pieces of tape (3 per column, 4 more to tape columns to
base)
Encourage students to share their brainstorming responses.
Instruct students to begin folding their templates along each of the lines, and then tape together into the shape of a column. Leave the pre-assembled columns out at the front of the room so students can use those as examples of the final product.
Remind students to build their columns very carefully, and not to handle them too much before testing their strength. This puts stress on the material and may make the column weaker than it would have been otherwise.
As each group finishes assembling their columns, have them tape each column to a corner of the cardboard base. Students can then go back to their activity books and make a prediction about the amount of weight each type of column will hold. [Tip: Pass around a few weights so that students can get a sense for how heavy they feel.]
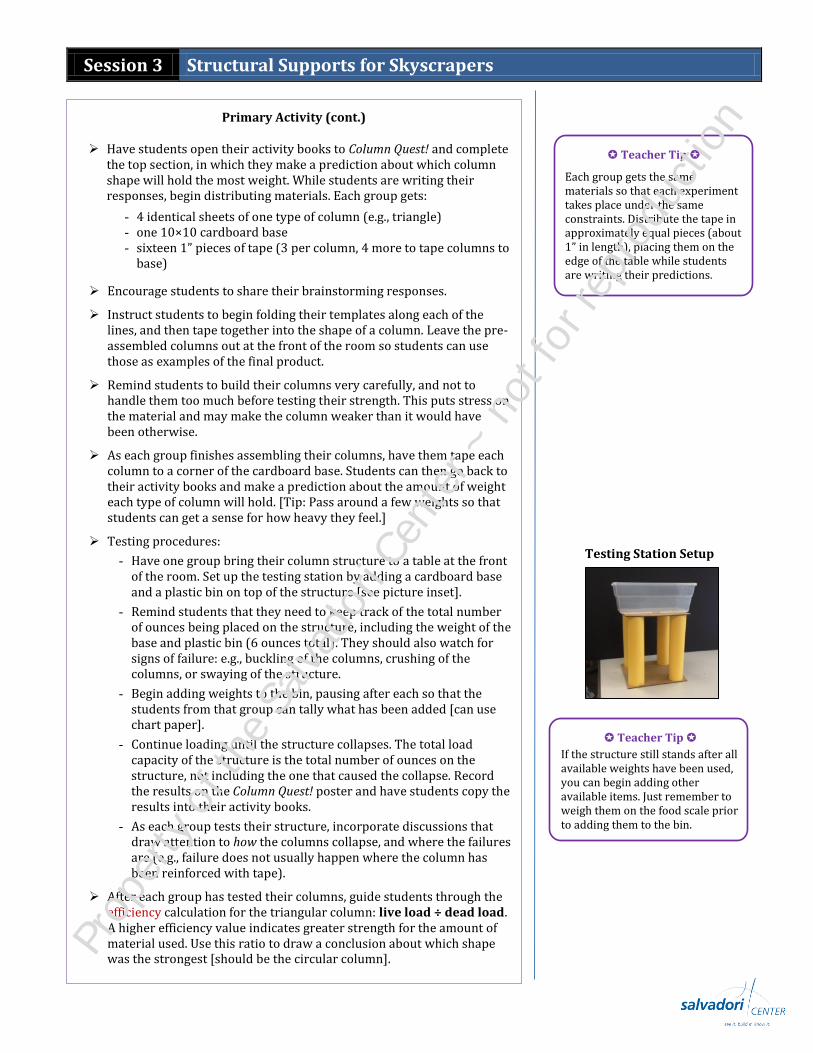
Testing procedures:
- Have one group bring their column structure to a table at the front of the room. Set up the testing station by adding a cardboard base and a plastic bin on top of the structure [see picture inset].
- Remind students that they need to keep track of the total number of ounces being placed on the structure, including the weight of the base and plastic bin (6 ounces total). They should also watch for signs of failure: e.g., buckling of the columns, crushing of the columns, or swaying of the structure.
- Begin adding weights to the bin, pausing after each so that the students from that group can tally what has been added [can use chart paper].
- Continue loading until the structure collapses. The total load capacity of the structure is the total number of ounces on the structure, not including the one that caused the collapse. Record the results on the Column Quest! poster and have students copy the results into their activity books.
- As each group tests their structure, incorporate discussions that draw attention to how the columns collapse, and where the failures are (e.g., failure does not usually happen where the column has been reinforced with tape).
After each group has tested their columns, guide students through the efficiency calculation for the triangular column: live load ÷ dead load. A higher efficiency value indicates greater strength for the amount of material used. Use this ratio to draw a conclusion about which shape was the strongest [should be the circular column].
Testing Station Setup
Teacher Tip
If the structure still stands after all available weights have been used, you can begin adding other available items. Just remember to weigh them on the food scale prior to adding them to the bin.
Teacher Tip
Each group gets the same materials so that each experiment takes place under the same constraints. Distribute the tape in approximately equal pieces (about 1” in length), placing them on the edge of the table while students are writing their predictions.
Prop
erty
of t
he S
alva
dori
Cent
er ~
not
for r
epro
duct
ion
Session 3 Structural Supports for Skyscrapers
Wrap-Up
Ask students what they think would happen if they were to test columns with different heights? What if I gave you a taller circle column – would that be able to hold more weight, or less? What about a shorter column? We’ll find out next week!
5 min.
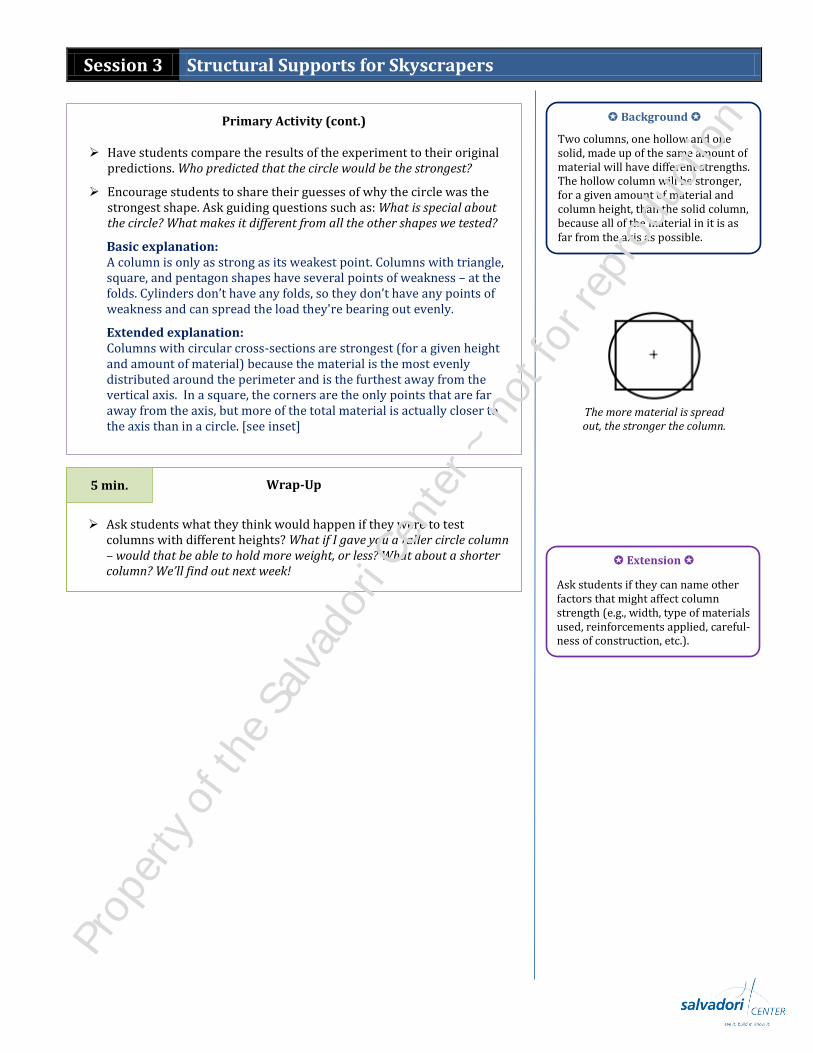
Background
Two columns, one hollow and one solid, made up of the same amount of material will have different strengths. The hollow column will be stronger, for a given amount of material and column height, than the solid column, because all of the material in it is as far from the axis as possible.
Ask students if they can name other factors that might affect column strength (e.g., width, type of materials used, reinforcements applied, careful-ness of construction, etc.).
Extension
The more material is spread out, the stronger the column.
Primary Activity (cont.)
Have students compare the results of the experiment to their original predictions. Who predicted that the circle would be the strongest?
Encourage students to share their guesses of why the circle was the strongest shape. Ask guiding questions such as: What is special about the circle? What makes it different from all the other shapes we tested?
Basic explanation: A column is only as strong as its weakest point. Columns with triangle, square, and pentagon shapes have several points of weakness – at the folds. Cylinders don’t have any folds, so they don’t have any points of weakness and can spread the load they're bearing out evenly.
Extended explanation: Columns with circular cross-sections are strongest (for a given height and amount of material) because the material is the most evenly distributed around the perimeter and is the furthest away from the vertical axis. In a square, the corners are the only points that are far away from the axis, but more of the total material is actually closer to the axis than in a circle. [see inset]
Prop
erty
of t
he S
alva
dori
Cent
er ~
not
for r
epro
duct
ion
Session 3 Vocabulary
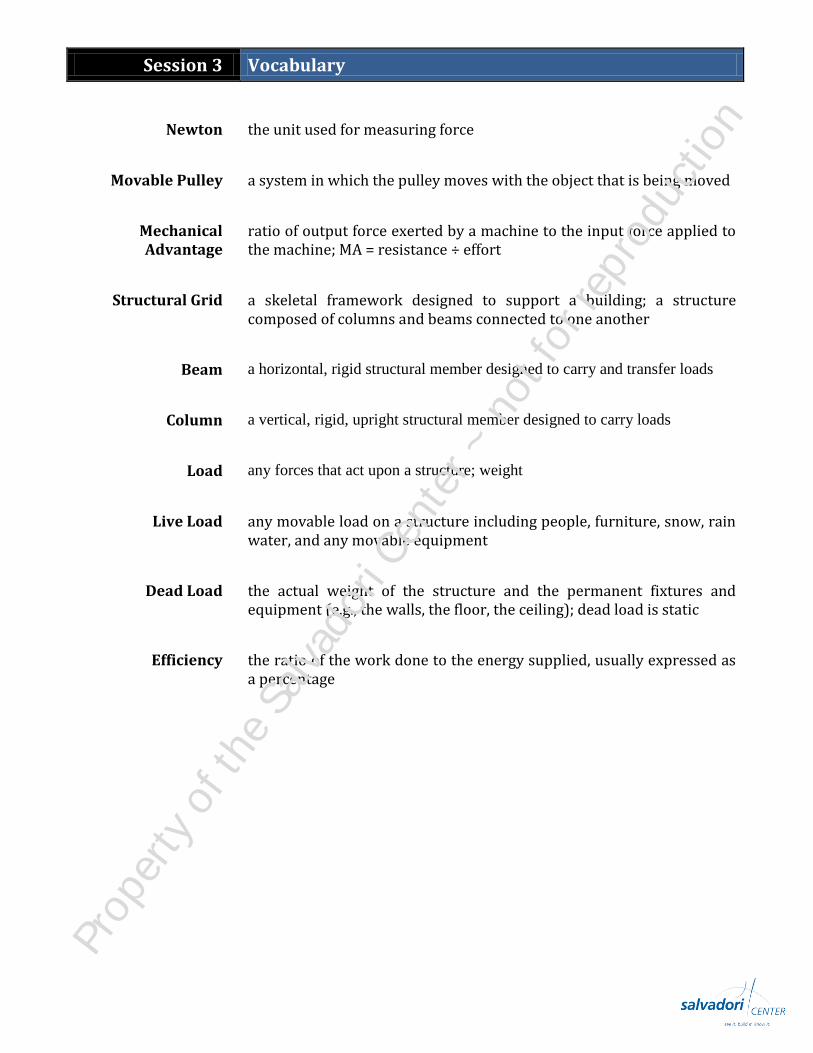
Newton the unit used for measuring force
Movable Pulley a system in which the pulley moves with the object that is being moved
Mechanical Advantage
ratio of output force exerted by a machine to the input force applied to the machine; MA = resistance ÷ effort
Structural Grid a skeletal framework designed to support a building; a structure composed of columns and beams connected to one another
Beam a horizontal, rigid structural member designed to carry and transfer loads
Column a vertical, rigid, upright structural member designed to carry loads
Load any forces that act upon a structure; weight
Live Load any movable load on a structure including people, furniture, snow, rain water, and any movable equipment
Dead Load the actual weight of the structure and the permanent fixtures and equipment (e.g., the walls, the floor, the ceiling); dead load is static
Efficiency the ratio of the work done to the energy supplied, usually expressed as a percentage
Prop
erty
of t
he S
alva
dori
Cent
er ~
not
for r
epro
duct
ion
Session 3 Standards Addressed
New York State: Math, Science, and Technology Standards Standard 1 Analysis, Inquiry, and Design
Students will use mathematical analysis, scientific inquiry, and engineering design, as appropriate, to pose questions, seek answers, and develop solutions.
MATHEMATICAL ANALYSIS: Key Idea 3 Critical thinking skills are used in the solution of mathematical problems.
Use appropriate scientific tools, such as metric rulers, spring scale, pan balance, graph paper, thermometers [Fahrenheit and Celsius], graduated cylinder to solve problems about the natural world.
SCIENTIFIC INQUIRY: Key Idea 2 Beyond the use of reasoning and consensus, scientific inquiry involves the testing of proposed
explanations involving the use of conventional techniques and procedures and usually requiring considerable ingenuity.
Carry out their plans for exploring phenomena through direct observation and through the use of simple instruments that permit measurement of quantities, such as length, mass, volume, temperature, and time.
SCIENTIFIC INQUIRY: Key Idea 3 The observations made while testing proposed explanations, when analyzed using conven-
tional and invented methods, provide new insights into phenomena.
Interpret the organized data to answer the research question or hypothesis and to gain insight into the problem.
Standard 7 Interdisciplinary Problem Solving Students will apply the knowledge and thinking skills of mathematics, science, and technology to address real-life problems and make informed decisions.
CONNECTIONS: Key Idea 1
The knowledge and skills of mathematics, science, and technology are used together to make informed decisions and solve problems, especially those relating to issues of science/technology/society, consumer decision making, design, and inquiry into phenomenon.
Observe phenomena and evaluate them scientifically and mathematically by conducting a fair test of the effect of variables and using mathematical knowledge and technological tools to collect, analyze, and present data and conclusions.
Prop
erty
of t
he S
alva
dori
Cent
er ~
not
for r
epro
duct
ion
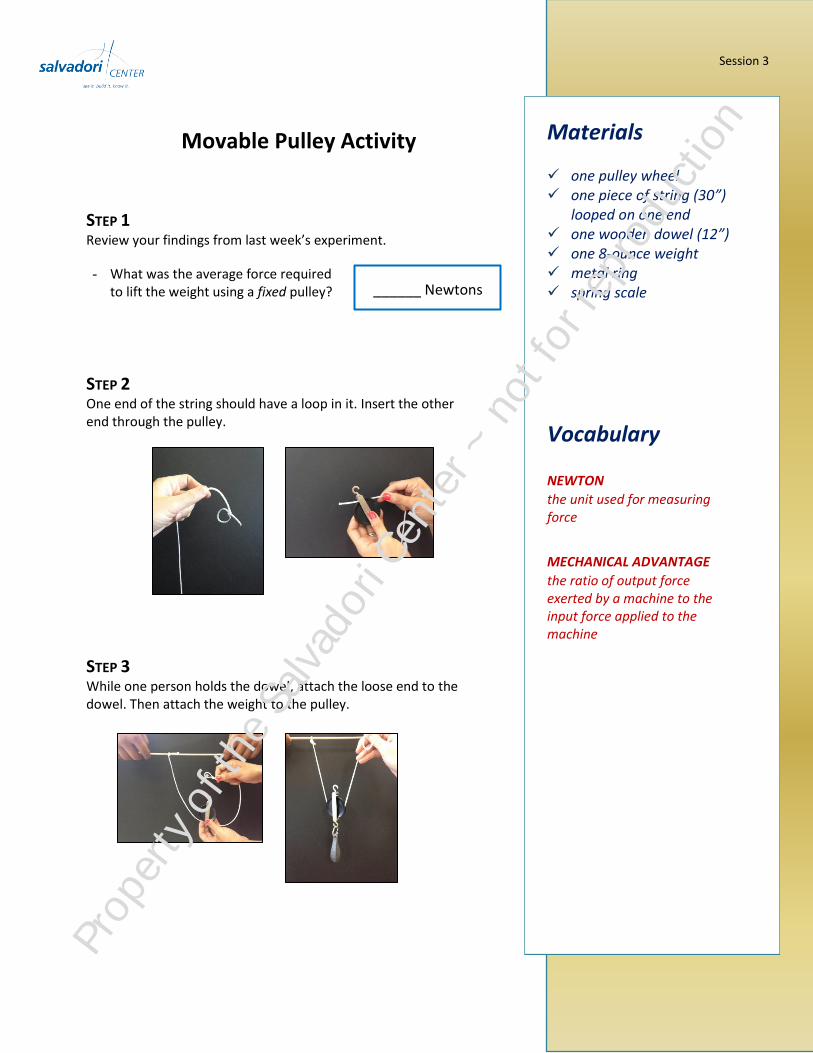
Movable Pulley Activity
STEP 1 Review your findings from last week’s experiment.
- What was the average force required to lift the weight using a fixed pulley?
STEP 2 One end of the string should have a loop in it. Insert the other end through the pulley.
STEP 3 While one person holds the dowel, attach the loose end to the dowel. Then attach the weight to the pulley.
Materials one pulley wheel one piece of string (30”)
looped on one end one wooden dowel (12”) one 8-ounce weight metal ring spring scale
Vocabulary
NEWTON the unit used for measuring force
MECHANICAL ADVANTAGE the ratio of output force exerted by a machine to the input force applied to the machine
______ Newtons
Session 3
Prop
erty
of t
he S
alva
dori
Cent
er ~
not
for r
epro
duct
ion
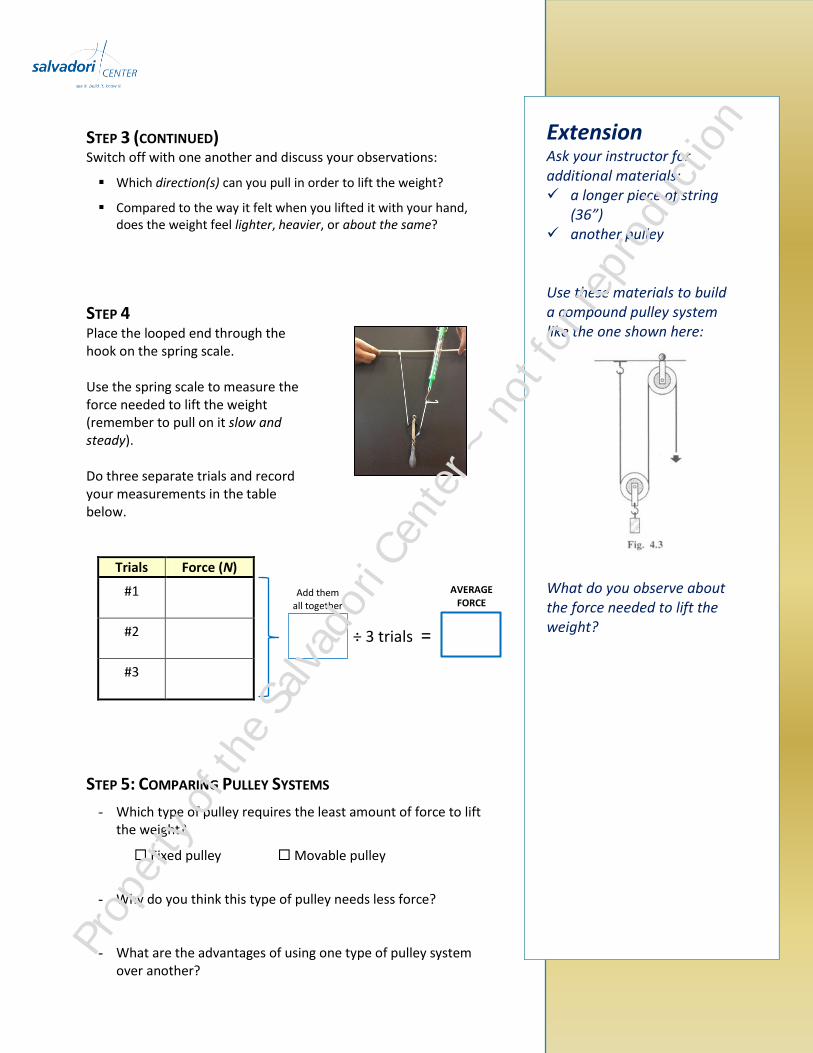
STEP 3 (CONTINUED) Switch off with one another and discuss your observations:
Which direction(s) can you pull in order to lift the weight?
Compared to the way it felt when you lifted it with your hand, does the weight feel lighter, heavier, or about the same?
STEP 4 Place the looped end through the hook on the spring scale. Use the spring scale to measure the force needed to lift the weight (remember to pull on it slow and steady). Do three separate trials and record your measurements in the table below.
Trials Force (N)
#1
#2
#3
STEP 5: COMPARING PULLEY SYSTEMS
- Which type of pulley requires the least amount of force to lift the weight?
Fixed pulley Movable pulley
- Why do you think this type of pulley needs less force?
- What are the advantages of using one type of pulley system over another?
Extension Ask your instructor for additional materials: a longer piece of string
(36”) another pulley Use these materials to build a compound pulley system like the one shown here:
What do you observe about the force needed to lift the weight?
Add them all together
÷ 3 trials =
AVERAGE FORCE
Prop
erty
of t
he S
alva
dori
Cent
er ~
not
for r
epro
duct
ion
Session 3
Column Quest!
Which of the column shapes below will be able to hold the most weight? Choose one and explain why:
Triangle _____________________________________________________________________
Square _____________________________________________________________________
Circle _____________________________________________________________________
Pentagon _____________________________________________________________________
Triangle
Square
Circle
Pentagon
Predict:
How many ounces will it hold? Pick a number between 1 and 400!
Live Load:
How many total ounces did it hold before collapsing? Don’t forget to include the weight of the testing platform (6 ounces).
Dead Load:
This is the total weight of the columns used to support the live load (approx).
1 ounce 1 ounce 1 ounce 1 ounce
Efficiency:
Divide the weight held by the weight of the columns, or live load ÷ dead load.
Conclusion:
Which shape is the strongest?
Bra
inst
orm
ing!
Prop
erty
of t
he S
alva
dori
Cent
er ~
not
for r
epro
duct
ion