Embed Size (px)
Citation preview
United States Army Special Operations Command (USASOC)
Special Operations Forces Information Technology Enterprise Contracts (SITEC)
OUTLOOK WEB ACCESS (OWA) AND
SSL VPN HOME USERS MANUAL
Prepared by: SITEC – USASOC
E2929 Desert Storm Drive Ft. Bragg, North Carolina 28310
Prepared for: USASOC G-6
03 July 2013
Document Number: MD101228B-TS1591F
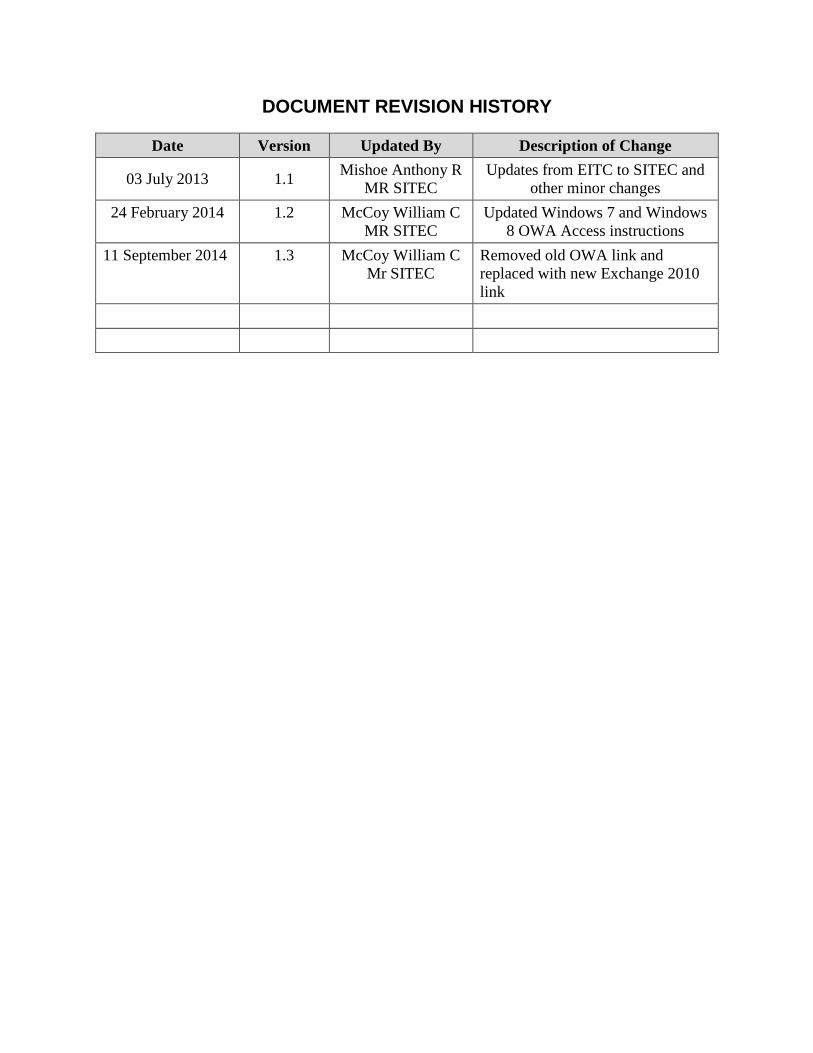
DOCUMENT REVISION HISTORY
Date Version Updated By Description of Change
03 July 2013 1.1 Mishoe Anthony R MR SITEC
Updates from EITC to SITEC and other minor changes
24 February 2014 1.2 McCoy William C MR SITEC
Updated Windows 7 and Windows 8 OWA Access instructions
11 September 2014 1.3 McCoy William C Mr SITEC
Removed old OWA link and replaced with new Exchange 2010 link
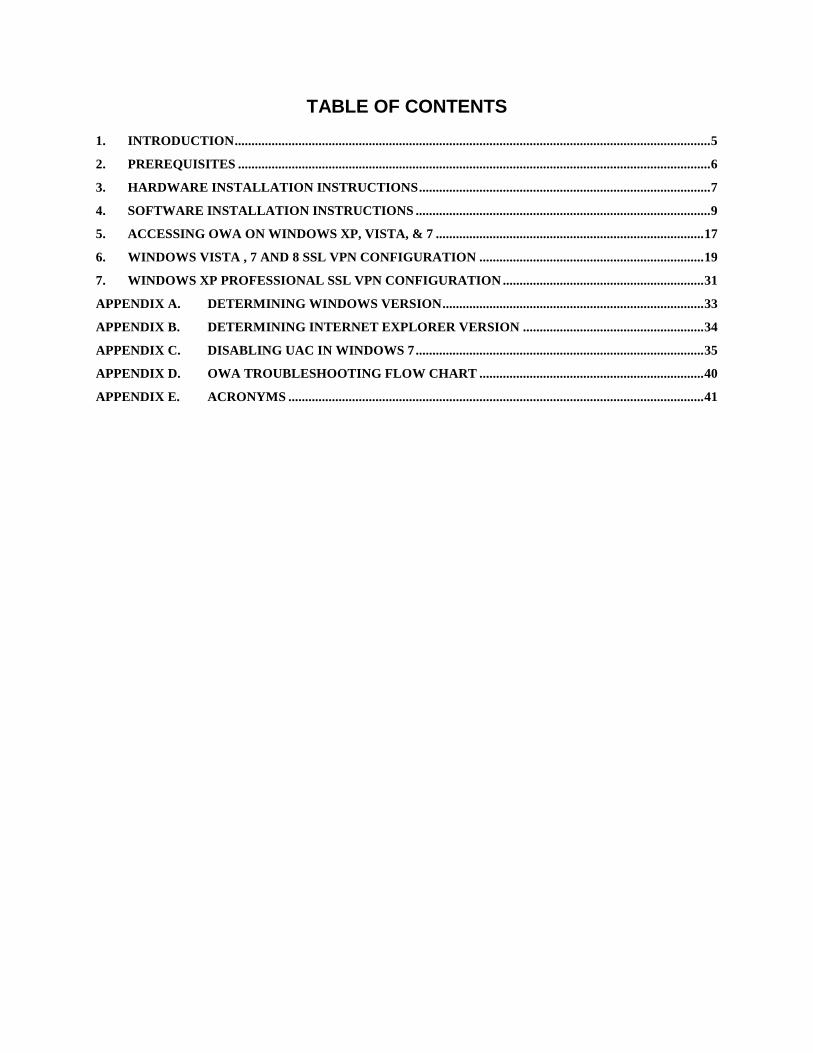
TABLE OF CONTENTS 1. INTRODUCTION .............................................................................................................................................. 5
2. PREREQUISITES ............................................................................................................................................. 6
3. HARDWARE INSTALLATION INSTRUCTIONS ....................................................................................... 7
4. SOFTWARE INSTALLATION INSTRUCTIONS ........................................................................................ 9 5. ACCESSING OWA ON WINDOWS XP, VISTA, & 7 ................................................................................ 17
6. WINDOWS VISTA , 7 AND 8 SSL VPN CONFIGURATION ................................................................... 19
7. WINDOWS XP PROFESSIONAL SSL VPN CONFIGURATION ............................................................ 31
APPENDIX A. DETERMINING WINDOWS VERSION .............................................................................. 33
APPENDIX B. DETERMINING INTERNET EXPLORER VERSION ...................................................... 34
APPENDIX C. DISABLING UAC IN WINDOWS 7 ...................................................................................... 35 APPENDIX D. OWA TROUBLESHOOTING FLOW CHART ................................................................... 40
APPENDIX E. ACRONYMS ............................................................................................................................ 41
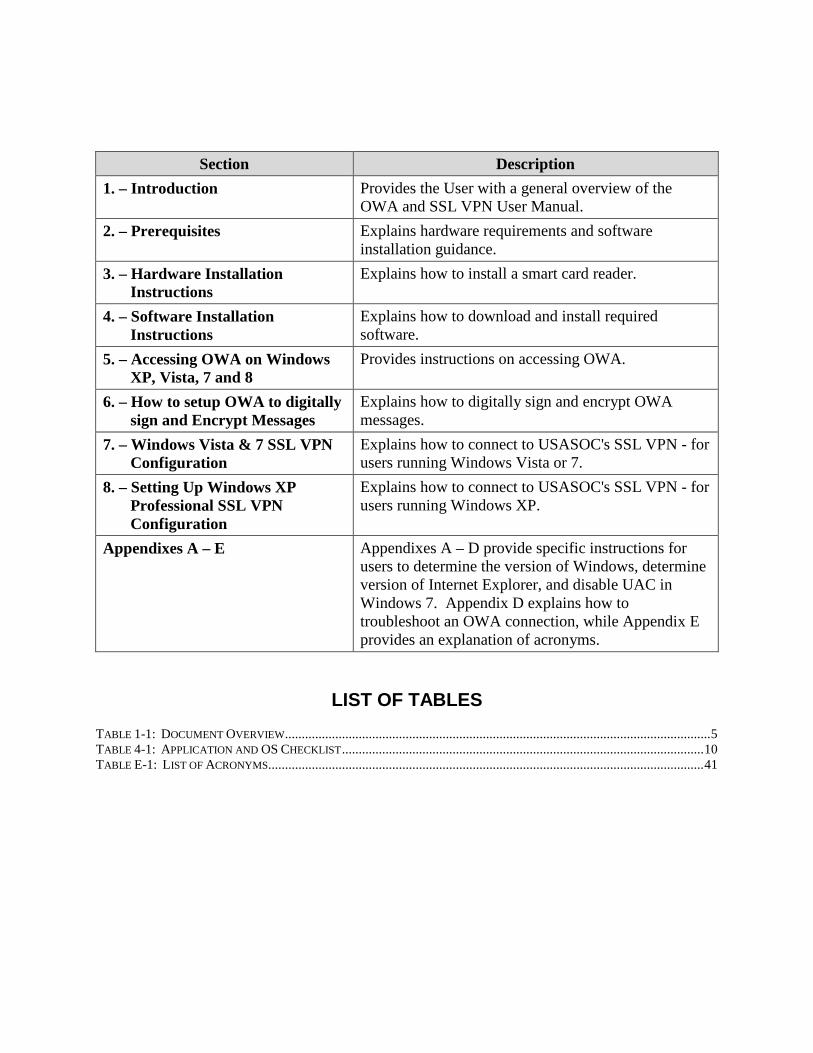
Section Description
1. – Introduction Provides the User with a general overview of the OWA and SSL VPN User Manual.
2. – Prerequisites Explains hardware requirements and software installation guidance.
3. – Hardware Installation Instructions
Explains how to install a smart card reader.
4. – Software Installation Instructions
Explains how to download and install required software.
5. – Accessing OWA on Windows XP, Vista, 7 and 8
Provides instructions on accessing OWA.
6. – How to setup OWA to digitally sign and Encrypt Messages
Explains how to digitally sign and encrypt OWA messages.
7. – Windows Vista & 7 SSL VPN Configuration
Explains how to connect to USASOC's SSL VPN - for users running Windows Vista or 7.
8. – Setting Up Windows XP Professional SSL VPN Configuration
Explains how to connect to USASOC's SSL VPN - for users running Windows XP.
Appendixes A – E Appendixes A – D provide specific instructions for users to determine the version of Windows, determine version of Internet Explorer, and disable UAC in Windows 7. Appendix D explains how to troubleshoot an OWA connection, while Appendix E provides an explanation of acronyms.
LIST OF TABLES
TABLE 1-1: DOCUMENT OVERVIEW ............................................................................................................................... 5 TABLE 4-1: APPLICATION AND OS CHECKLIST ............................................................................................................ 10 TABLE E-1: LIST OF ACRONYMS .................................................................................................................................. 41
1. INTRODUCTION
The United States Army Special Operations Command (USASOC) Outlook Web Access and Secure Socket Layer (SSL) Virtual Private Network (VPN) Home Users' Manual provides instructions for installation and configuration of software and hardware necessary for accessing OWA and the USASOC NIPR Network via SSL VPN. See Table 1-1 for an overview of document sections. This User Manual will serve:
• To guide users through the installation and configuration of all software and hardware required to access USASOC Outlook Web Access (OWA) Non-Secure Internet Protocol Router Network (NIPRNet) e-mail on a personal computer (PC) running a Windows operating system (OS).
• To guide users through the installation and configuration of all software and hardware
required to access USASOC's NIPR Secure Socket Layer (SSL) Virtual Private Network (VPN) on a PC running Windows version XP, Vista, or 7 operating system.
NOTE
Windows XP, Vista, 7, 8 or higher is required for SSL VPN to allow Remote Desktop Protocol (RDP). Linux or Apple Operating Systems have not been tested. If you will be installing software, you should know your Army Knowledge Online (AKO) username and password before you get started.
• To provide instructions for users to access OWA and the SSL VPN.
DISCLAIMER
Other than this document, the USASOC G6 will not provide customer service support for the installation or use of any personal use software or hardware. This includes, but is not limited to, the software covered in this installation guide. This guide is provided to USASOC users for the purpose of accessing OWA or SSL VPN using their personal computers and a government-provided or personally-owned smart card reader. Support and additional information can be acquired through AKO - https://www.us.army.mil/suite/page/241504 or at the commercial website - http://militarycac.com/.
Table 1-1: Document Overview
2. PREREQUISITES
You will need to know your AKO Username and Password (https://www.us.army.mil) in order to download required root certificates during the software installation process. You should also have the following two pieces of essential hardware:
• A computer with Windows XP, Vista, or 7 (Professional or higher for SSL VPN). See Appendix A to determine which Operating System (OS) you are running.
• A USB smart card reader. Some laptops have a built-in smart card reader. If you are using a desktop, you will be required to provide a smart card reader. Smart card readers are available in a variety of shapes and sizes. SCM Microsystems SCR-3310 model works very well on Windows 7, Vista, and XP. Readers can be ordered from various online retailers like the ones listed below. On the respected sites, do a search for 'smart card reader'.
o http://www.cdw.com
o http://www.amazon.com
o http://www.buy.com
3. HARDWARE INSTALLATION INSTRUCTIONS
3.1. Smart Card Reader In most cases your smart card reader will install automatically with the Windows New Hardware Wizard or without user intervention.
3.1.1. Install Smart Card Reader Driver 3.1.1.1. Plug in your smart card reader into an available USB port on your computer.
3.1.1.2. If the drivers do not install automatically, follow the driver installation procedures for the smart card reader purchased.
3.1.2. Determine if Smart Card Reader Driver Installed Properly Directions for determining if your smart card reader driver was installed properly can be found below according to the type of operating system you are running on your PC.
Windows XP 3.1.2.1. Open the Control Panel by clicking the Start button then clicking Settings and
selecting Control Panel
3.1.2.2. Select 'System' to open System Properties (Figure 3-1)
3.1.2.3. Click on 'Device Manager' (Figure 3-2)
3.1.2.4. Expand the 'Smart card readers' menu (click the +)
3.1.2.5. If your smart card reader is not listed, you will need to download the correct driver for the hardware you purchased
Windows Vista or Windows 7 3.1.2.1. Open the Control Panel by clicking the Start button, then clicking Control Panel
3.1.2.2. Select 'System and Security' 3.1.2.3. Click on 'Device Manager'' under the “System” heading
3.1.2.4. Expand the 'Smart card readers' menu
3.1.2.5. If your smart card reader is not listed, you will need to download the correct driver for the hardware you purchased
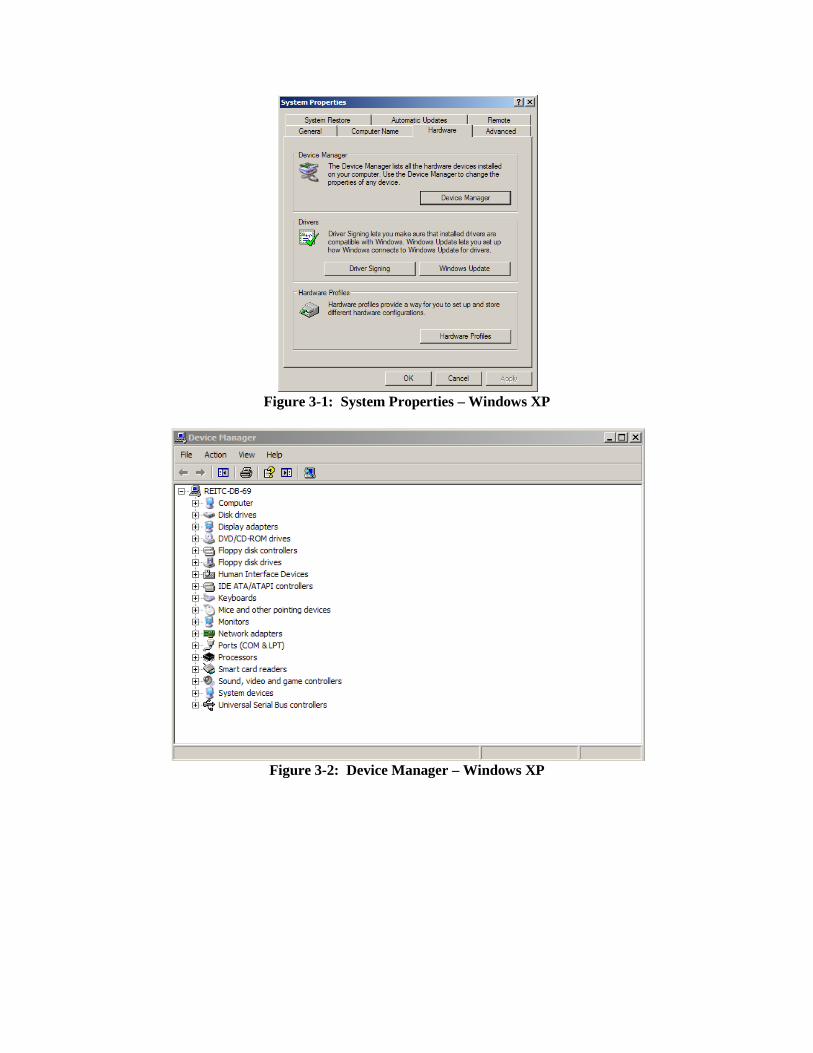
Figure 3-1: System Properties – Windows XP
Figure 3-2: Device Manager – Windows XP
4. SOFTWARE INSTALLATION INSTRUCTIONS
4.1. Software Required for OWA and SSL VPN To access OWA; In addition to installing Smart Card Reader drivers, (See Section 3.1), you may also be required to install the following software:
• DoD Install Root 3.13A certificates
• ActivClient 6.v To access the SSL VPN; you must ensure that the following required software is installed on your computer:
• Internet Explorer (Version 7 or higher)
• Java (Version 6 or higher)
• DoD InstallRoot 3.13A certificates
• ActivClient 6.x
WARNING If you have a PIV II compliant CAC (back shows: "GEMAL TO DLGX4 144" or "Oberthur ID One 128 v5.5 Dual" at the top above the magnetic strip) and you are running Windows 7, you may be able to use your CAC without installing ActivClient. More details are found at http://militarycac.com/activclient.htm. If you have Windows XP (64-bit) be aware that the 64-bit ActivClient 6.2 version doesn't seem to work. You will need the 64-bit ActivClient 6.1
Table 4-1 provides an Applications and OS checklist. Directions for determining what software is installed on your computer can be found below according to the type of OS:
4.2. Determine Software Currently Installed On Your System
4.2.1. Identify Software Currently Installed Windows XP 4.2.1.1. Open the Control Panel by clicking the Start button then clicking Settings and
selecting Control Panel.
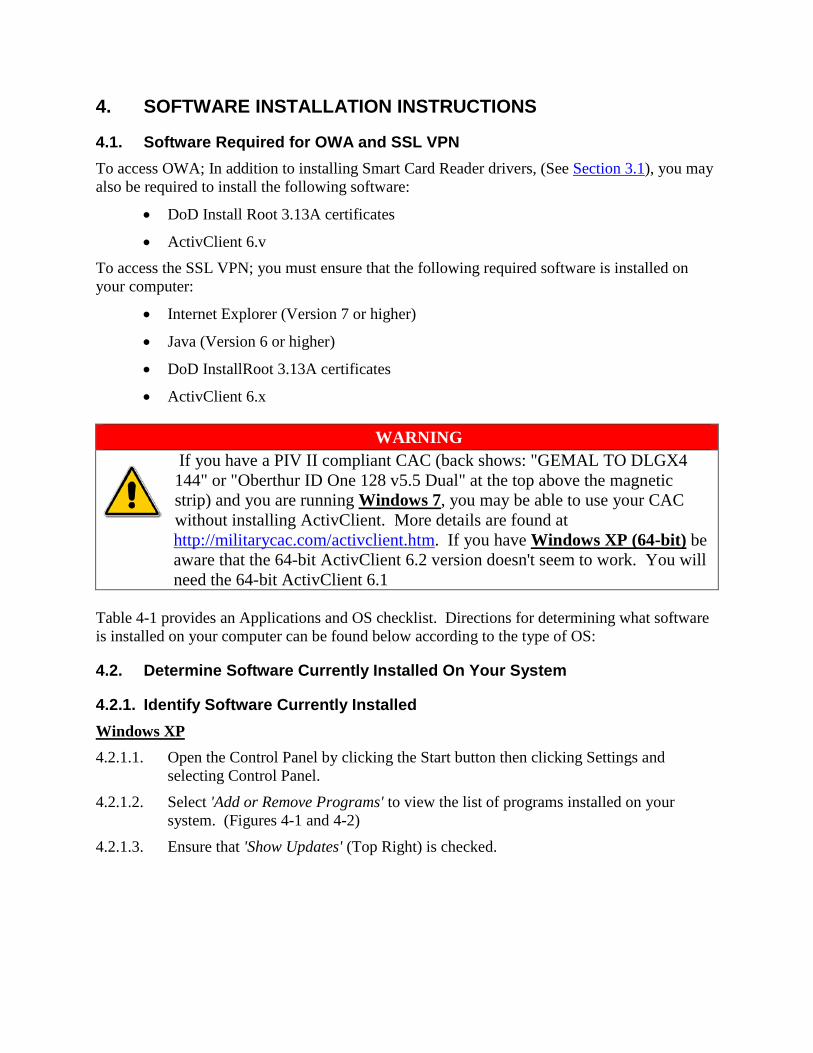
4.2.1.2. Select 'Add or Remove Programs' to view the list of programs installed on your system. (Figures 4-1 and 4-2)
4.2.1.3. Ensure that 'Show Updates' (Top Right) is checked.
Windows Vista Windows 7 and Windows 8 4.2.1.1. Open the Control Panel by clicking the Start button then clicking Control Panel.
4.2.1.2. Select 'Programs' to view the list of programs installed on your system.
4.2.1.3. Select 'Uninstall a program' and ‘View installed updates’ to view the list of programs installed on your system.
Table 4-1: Application and OS Checklist Required Applications and
OS Installed? (Yes or No)
Which Version? How to determine
if Application is installed Internet Explorer (7, 8,9,10,11) Appendix B
Java (Version 6 or higher) Section 4.1 DoD InstallRoot 3.13A Section 4.1 ActivClient 6.x Section 4.1 Windows OS (XP, Vista, 7, 8) 32bit or 64 bit
Appendix A
If you don't have the required software, Sections 4.2 through 4.5 provide an explanation of how to obtain and install applications you may need.
Figure 4-1: Control Panel: Add or Remove Programs - Windows XP

Figure 4-2: Installed Programs -Windows XP
4.3. Install Internet Explorer (Version 7 or higher) You should use Internet Explorer as the pages are designed to work best with that browser. Firefox, Chrome, Opera, Safari and others might work but may have issues properly rendering certain sites - or may not work at all.
IE can be downloaded for free at http://www.microsoft.com/windows/internet-explorer/default.aspx
4.4. Install Java 6 Java6 can be downloaded for free at http://www.java.com/en/download.
4.5. Install DoD InstallRoot 3.13A
4.5.1. Login to AKO 4.5.1.1. In order for the below links to work properly, you must be logged into your AKO
account. Otherwise they will take you to the main AKO website page.
4.5.1.2. Open a new tab on your browser then cut and paste the following link into the address bar on the new tab of your browser: https://www.us.army.mil/suite/doc/21291629
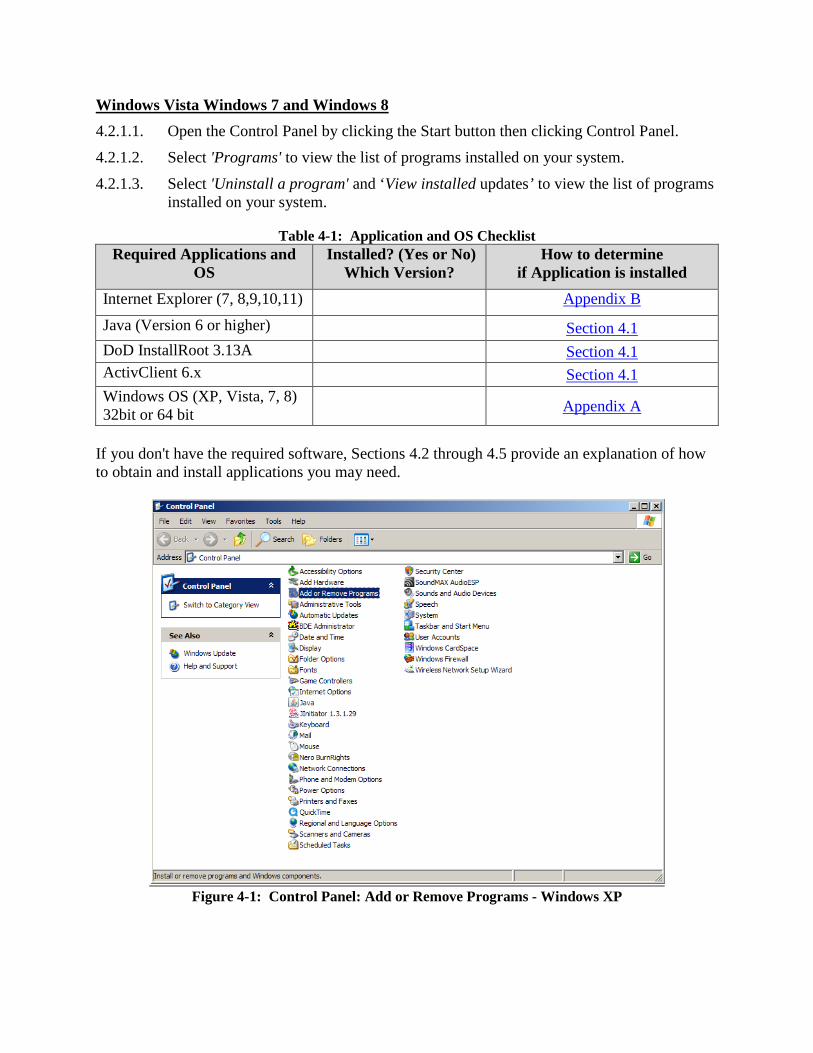
4.5.1.3. A 'File Download' window will pop up, click 'Run' to start the installation
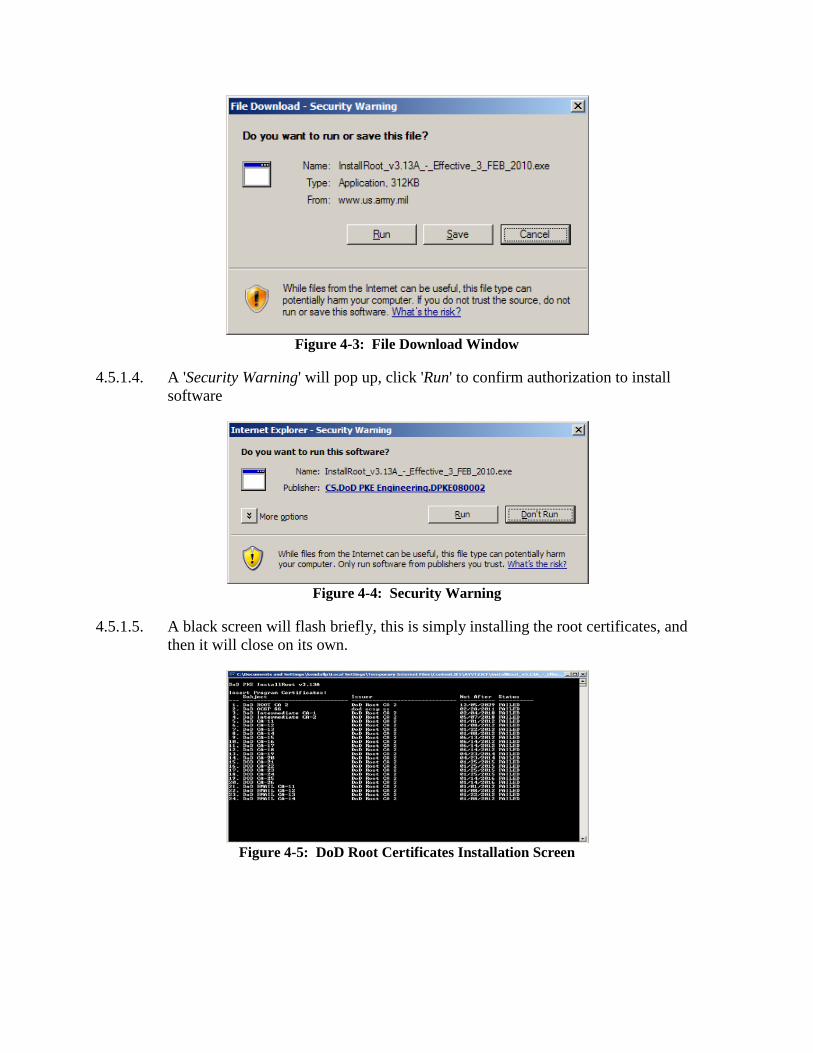
Figure 4-3: File Download Window
4.5.1.4. A 'Security Warning' will pop up, click 'Run' to confirm authorization to install software
Figure 4-4: Security Warning
4.5.1.5. A black screen will flash briefly, this is simply installing the root certificates, and then it will close on its own.
Figure 4-5: DoD Root Certificates Installation Screen
4.6. Install ActivClient 6.x The version of ActivClient that you should install will be dependent upon the OS you are running. Before beginning the ActivClient Install see Warning in section 4.1.
4.6.1. Download ActivClient 6.x 4.6.1.1. While still logged into AKO, open a new tab on your browser then cut and paste the
following link into the address bar on the new tab of your browser: https://www.us.army.mil/suite/folder/7757881
Figure 4-6: AKO ActivClient Installation Files Page
4.6.1.2. Click on the text 'ActivClient' to display the different versions available
NOTE: this will take a few seconds after you click once, be patient
Figure 4-7: AKO ActivClient Files (different versions) Page
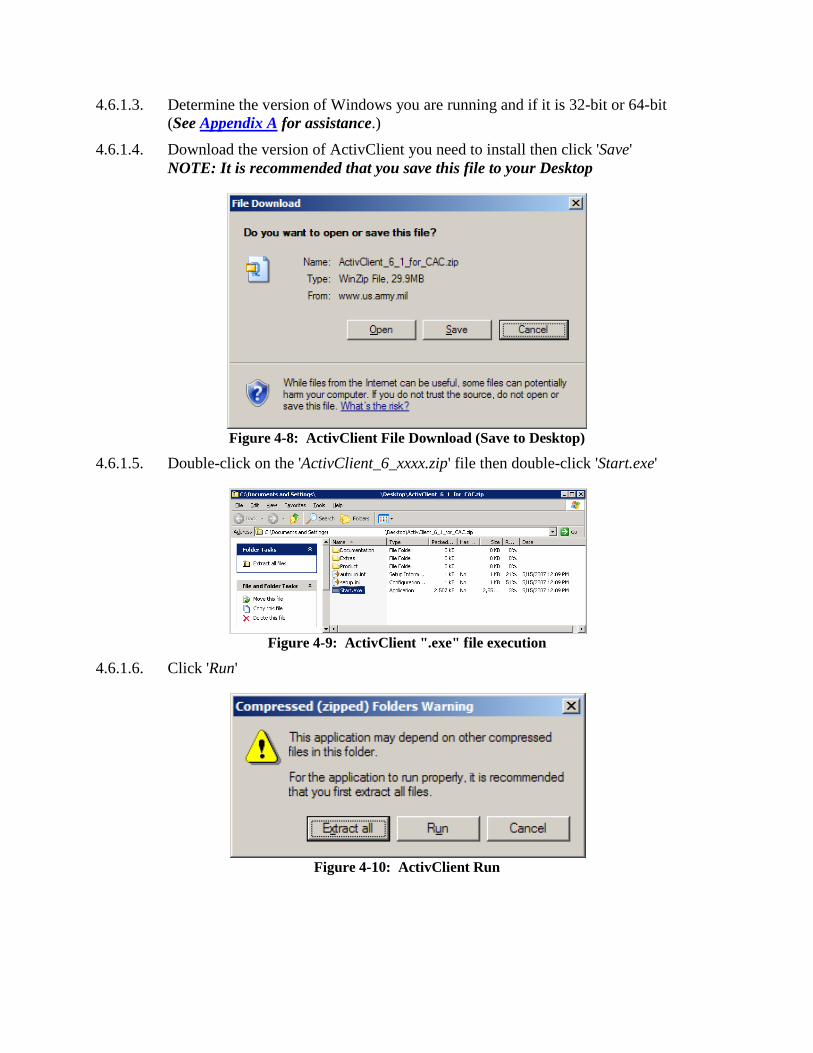
4.6.1.3. Determine the version of Windows you are running and if it is 32-bit or 64-bit (See Appendix A for assistance.)
4.6.1.4. Download the version of ActivClient you need to install then click 'Save' NOTE: It is recommended that you save this file to your Desktop
Figure 4-8: ActivClient File Download (Save to Desktop)
4.6.1.5. Double-click on the 'ActivClient_6_xxxx.zip' file then double-click 'Start.exe'
Figure 4-9: ActivClient ".exe" file execution
4.6.1.6. Click 'Run'
Figure 4-10: ActivClient Run
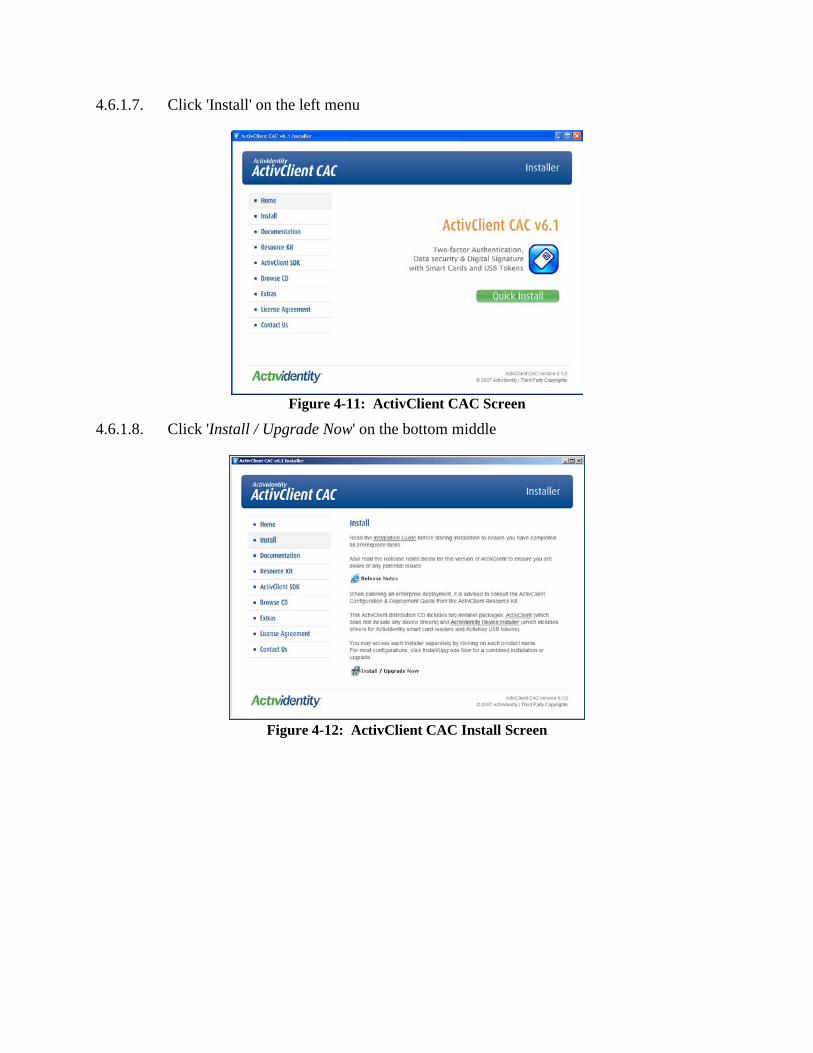
4.6.1.7. Click 'Install' on the left menu
Figure 4-11: ActivClient CAC Screen
4.6.1.8. Click 'Install / Upgrade Now' on the bottom middle
Figure 4-12: ActivClient CAC Install Screen
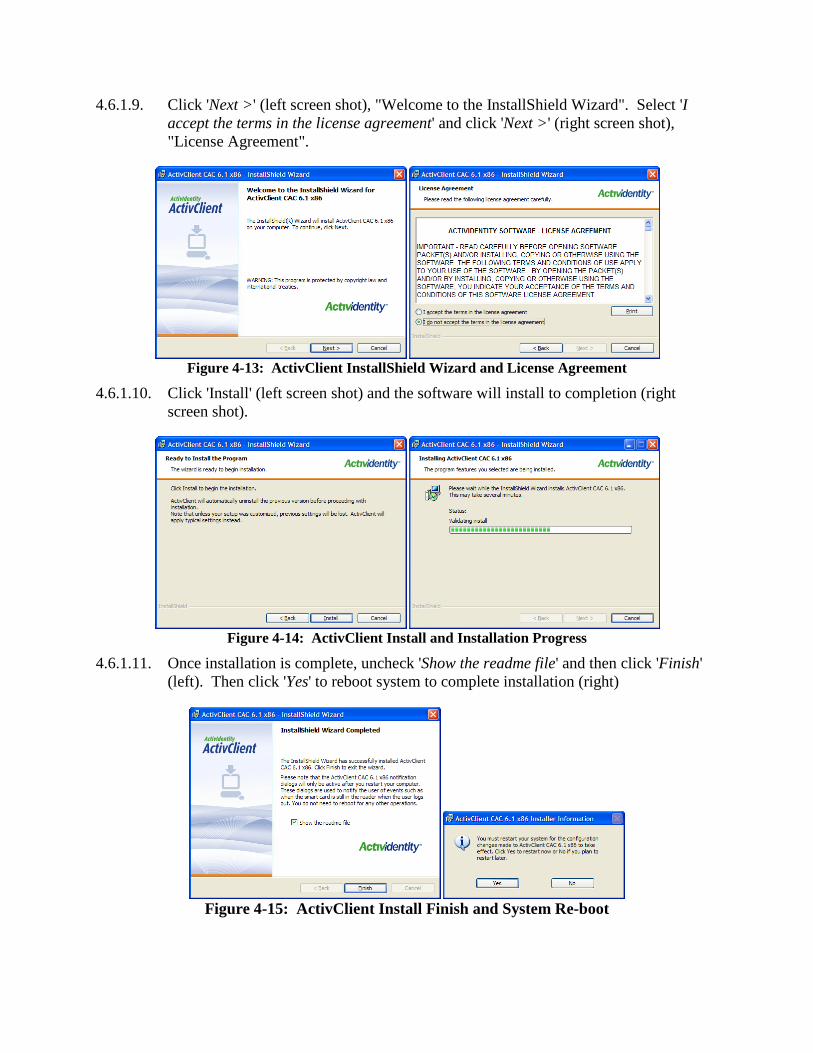
4.6.1.9. Click 'Next >' (left screen shot), "Welcome to the InstallShield Wizard". Select 'I accept the terms in the license agreement' and click 'Next >' (right screen shot), "License Agreement".
Figure 4-13: ActivClient InstallShield Wizard and License Agreement
4.6.1.10. Click 'Install' (left screen shot) and the software will install to completion (right screen shot).
Figure 4-14: ActivClient Install and Installation Progress
4.6.1.11. Once installation is complete, uncheck 'Show the readme file' and then click 'Finish' (left). Then click 'Yes' to reboot system to complete installation (right)
Figure 4-15: ActivClient Install Finish and System Re-boot
5. ACCESSING OWA ON WINDOWS XP, VISTA, 7 & 8
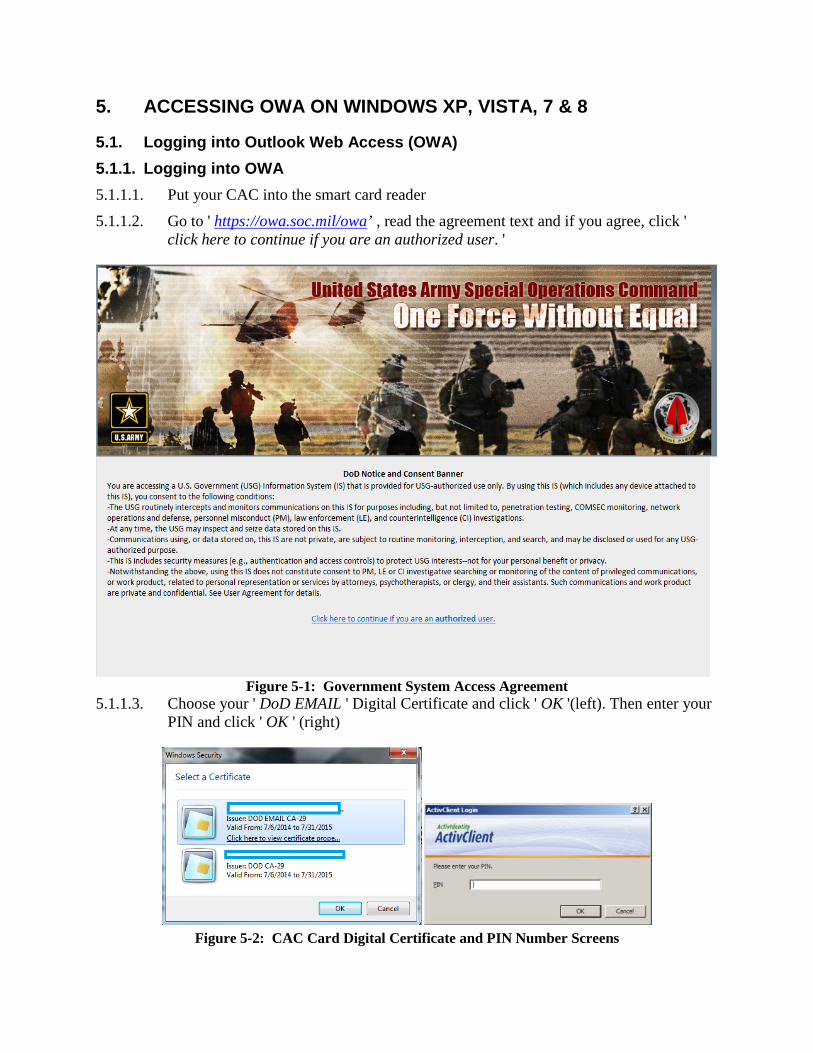
5.1. Logging into Outlook Web Access (OWA) 5.1.1. Logging into OWA 5.1.1.1. Put your CAC into the smart card reader
5.1.1.2. Go to ' https://owa.soc.mil/owa’ , read the agreement text and if you agree, click ' click here to continue if you are an authorized user. '
Figure 5-1: Government System Access Agreement
5.1.1.3. Choose your ' DoD EMAIL ' Digital Certificate and click ' OK '(left). Then enter your PIN and click ' OK ' (right)
Figure 5-2: CAC Card Digital Certificate and PIN Number Screens
5.2. Troubleshooting OWA To assist users who may experience problems accessing OWA, Appendix D offers a troubleshooting diagram.
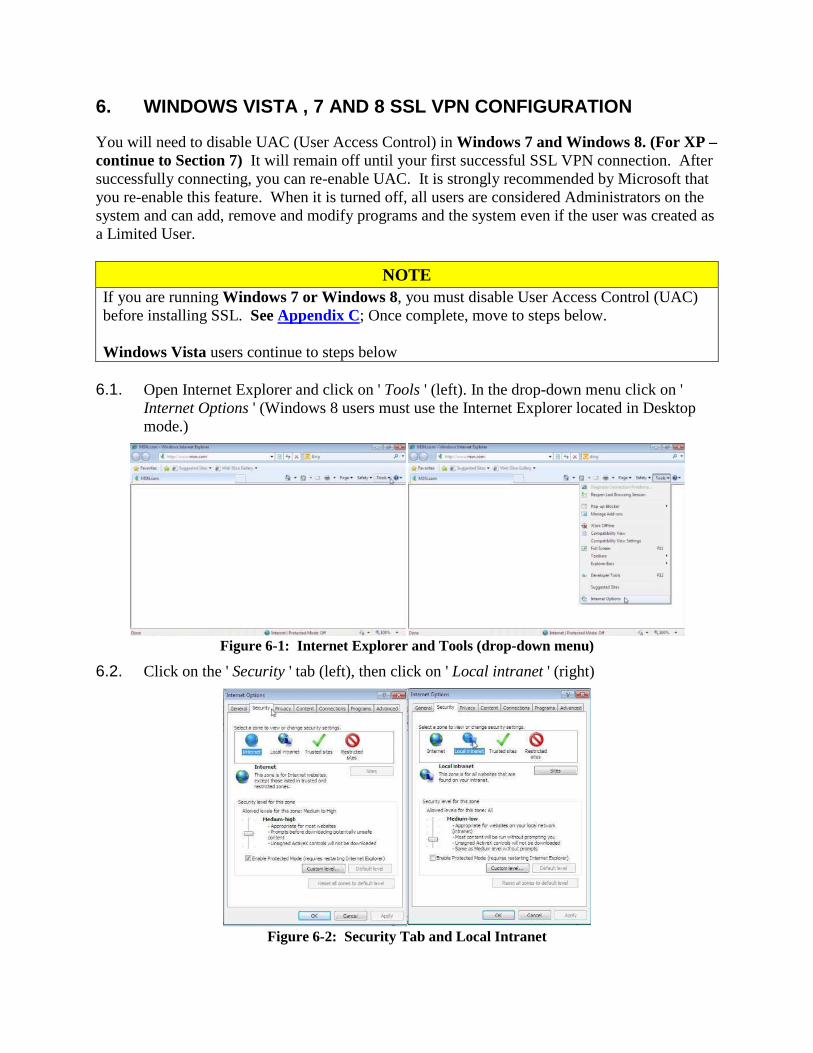
6. WINDOWS VISTA , 7 AND 8 SSL VPN CONFIGURATION
You will need to disable UAC (User Access Control) in Windows 7 and Windows 8. (For XP – continue to Section 7) It will remain off until your first successful SSL VPN connection. After successfully connecting, you can re-enable UAC. It is strongly recommended by Microsoft that you re-enable this feature. When it is turned off, all users are considered Administrators on the system and can add, remove and modify programs and the system even if the user was created as a Limited User.
NOTE If you are running Windows 7 or Windows 8, you must disable User Access Control (UAC) before installing SSL. See Appendix C; Once complete, move to steps below. Windows Vista users continue to steps below
6.1. Open Internet Explorer and click on ' Tools ' (left). In the drop-down menu click on '
Internet Options ' (Windows 8 users must use the Internet Explorer located in Desktop mode.)
Figure 6-1: Internet Explorer and Tools (drop-down menu)
6.2. Click on the ' Security ' tab (left), then click on ' Local intranet ' (right)
Figure 6-2: Security Tab and Local Intranet
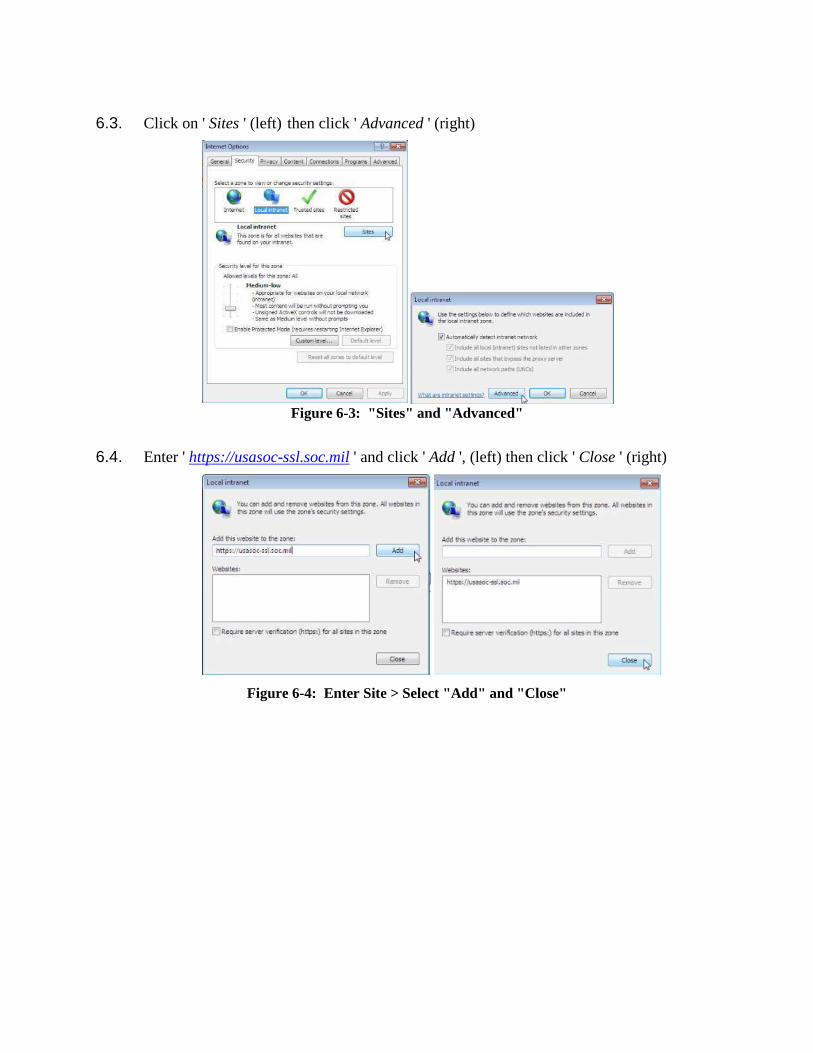
6.3. Click on ' Sites ' (left) then click ' Advanced ' (right)
Figure 6-3: "Sites" and "Advanced"
6.4. Enter ' https://usasoc-ssl.soc.mil ' and click ' Add ', (left) then click ' Close ' (right)
Figure 6-4: Enter Site > Select "Add" and "Close"
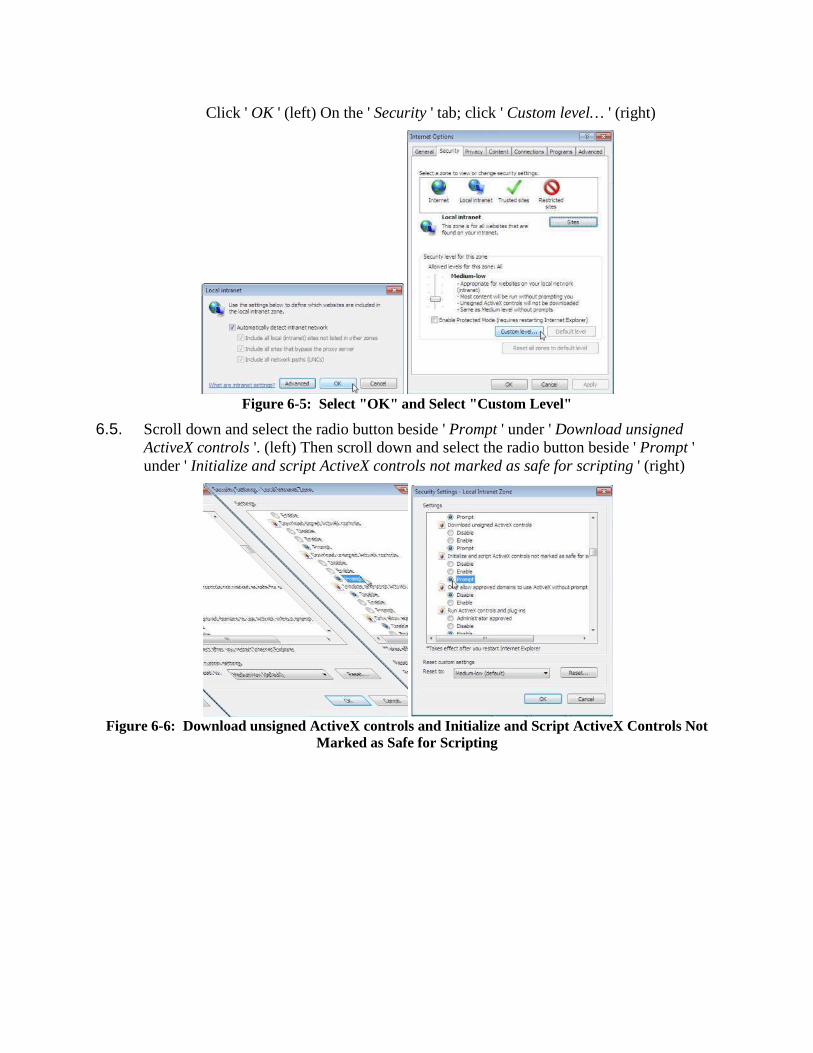
Click ' OK ' (left) On the ' Security ' tab; click ' Custom level… ' (right)
Figure 6-5: Select "OK" and Select "Custom Level"
6.5. Scroll down and select the radio button beside ' Prompt ' under ' Download unsigned ActiveX controls '. (left) Then scroll down and select the radio button beside ' Prompt ' under ' Initialize and script ActiveX controls not marked as safe for scripting ' (right)
Figure 6-6: Download unsigned ActiveX controls and Initialize and Script ActiveX Controls Not
Marked as Safe for Scripting
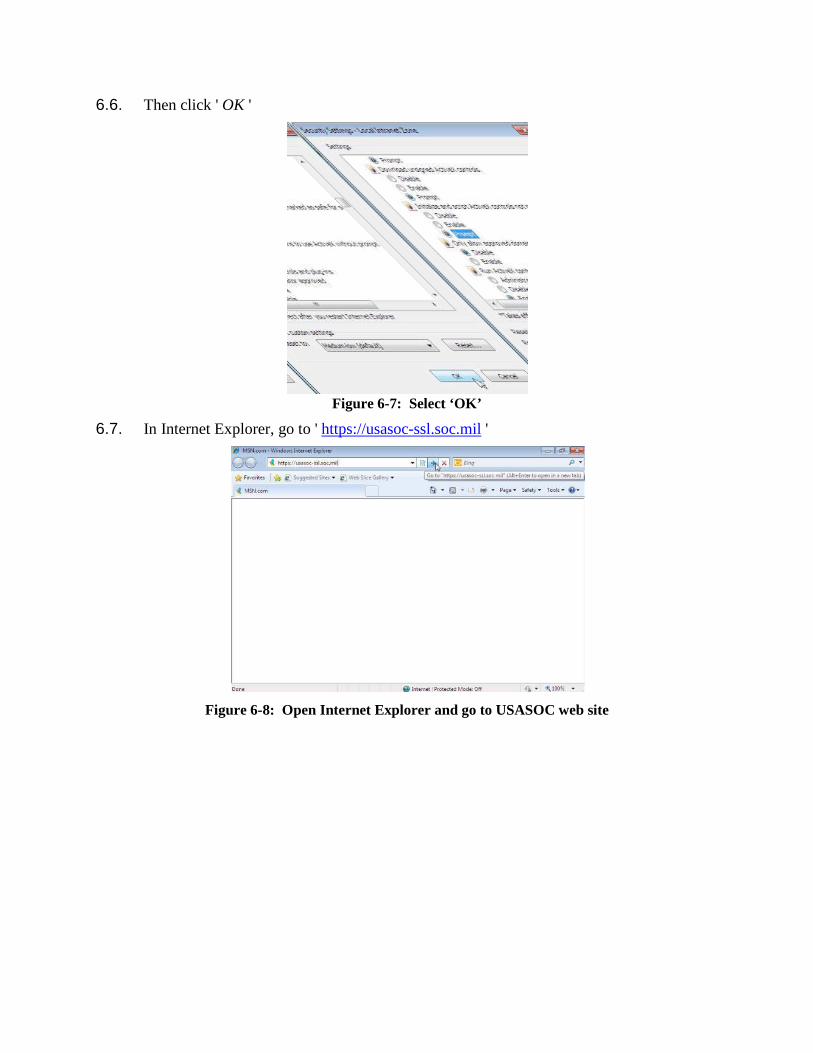
6.6. Then click ' OK '
Figure 6-7: Select ‘OK’
6.7. In Internet Explorer, go to ' https://usasoc-ssl.soc.mil '
Figure 6-8: Open Internet Explorer and go to USASOC web site
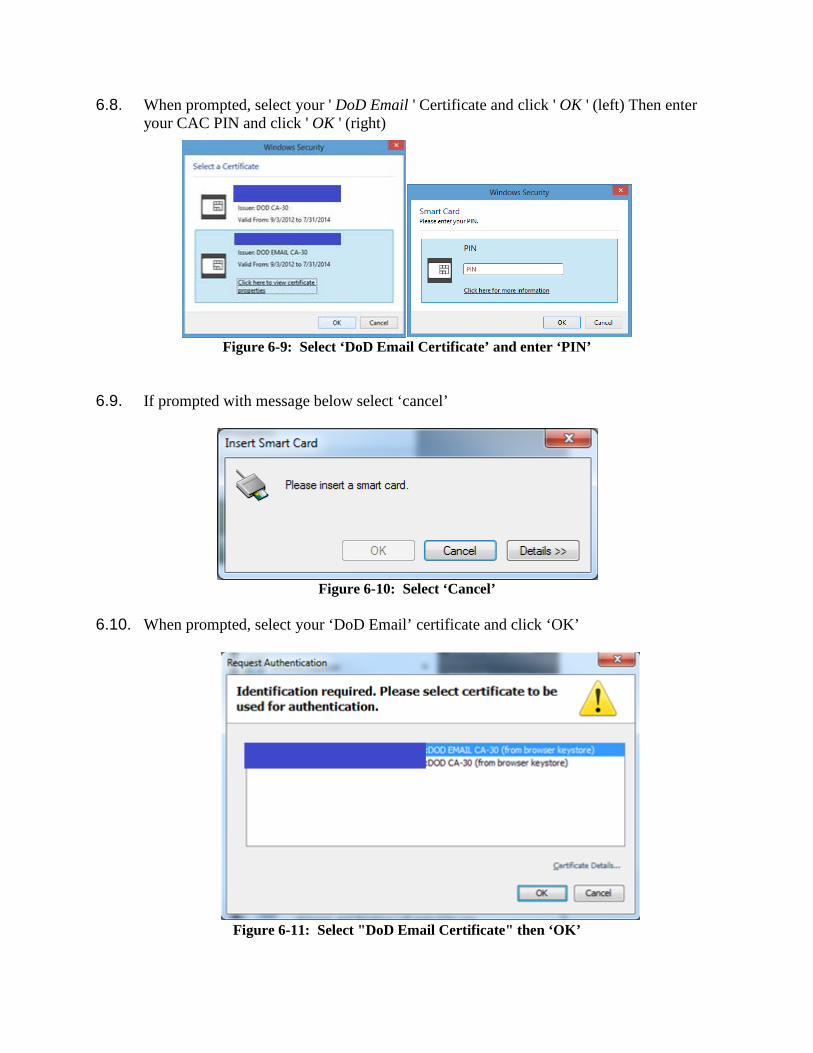
6.8. When prompted, select your ' DoD Email ' Certificate and click ' OK ' (left) Then enter your CAC PIN and click ' OK ' (right)
Figure 6-9: Select ‘DoD Email Certificate’ and enter ‘PIN’
6.9. If prompted with message below select ‘cancel’
Figure 6-10: Select ‘Cancel’
6.10. When prompted, select your ‘DoD Email’ certificate and click ‘OK’
Figure 6-11: Select "DoD Email Certificate" then ‘OK’
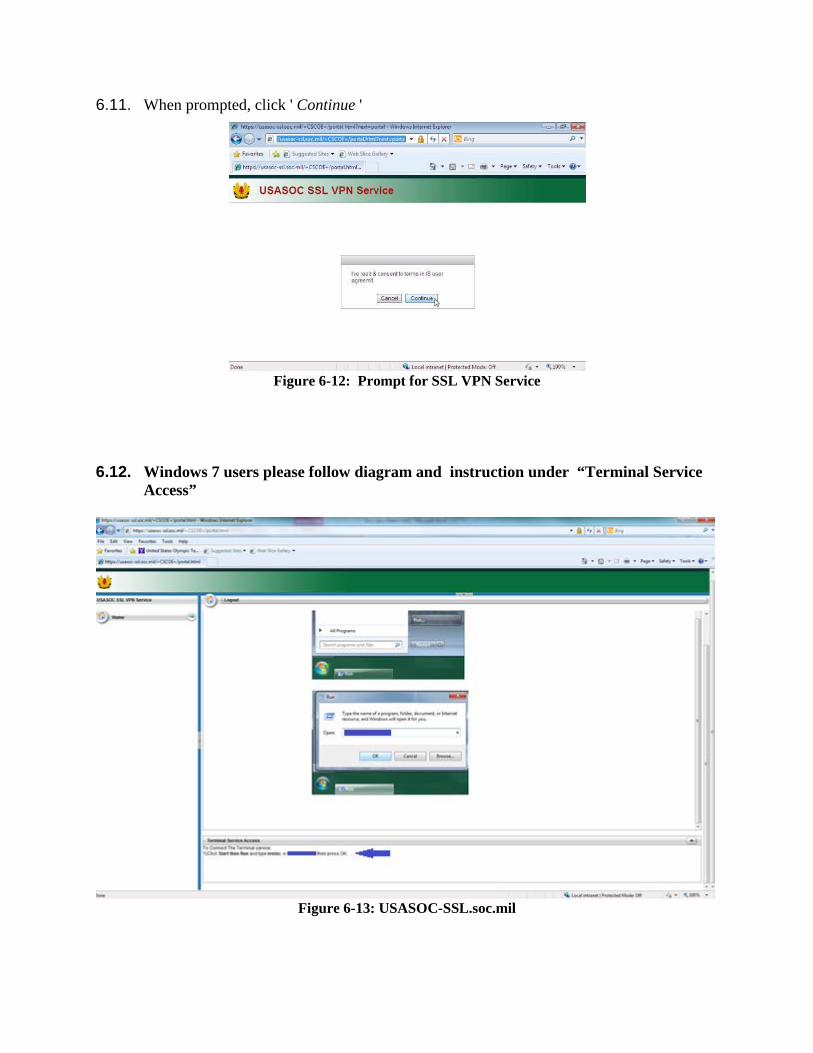
6.11. When prompted, click ' Continue '
Figure 6-12: Prompt for SSL VPN Service
6.12. Windows 7 users please follow diagram and instruction under “Terminal Service
Access”
Figure 6-13: USASOC-SSL.soc.mil
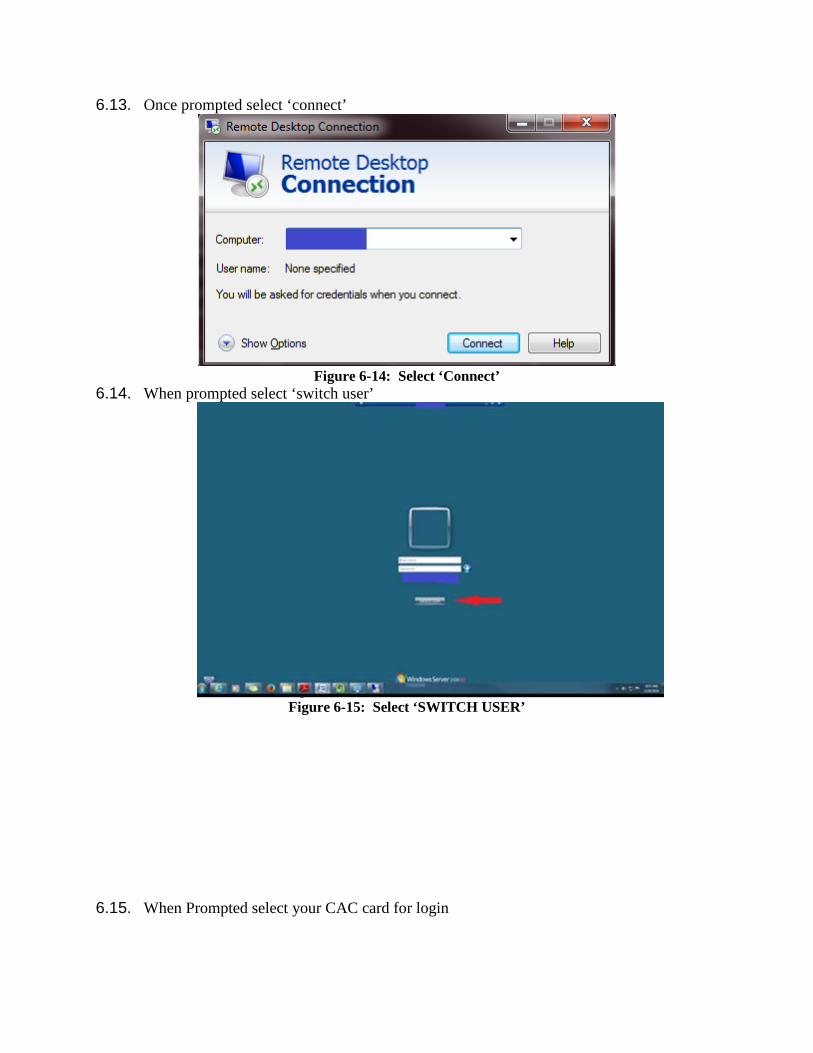
6.13. Once prompted select ‘connect’
Figure 6-14: Select ‘Connect’
6.14. When prompted select ‘switch user’
Figure 6-15: Select ‘SWITCH USER’
6.15. When Prompted select your CAC card for login
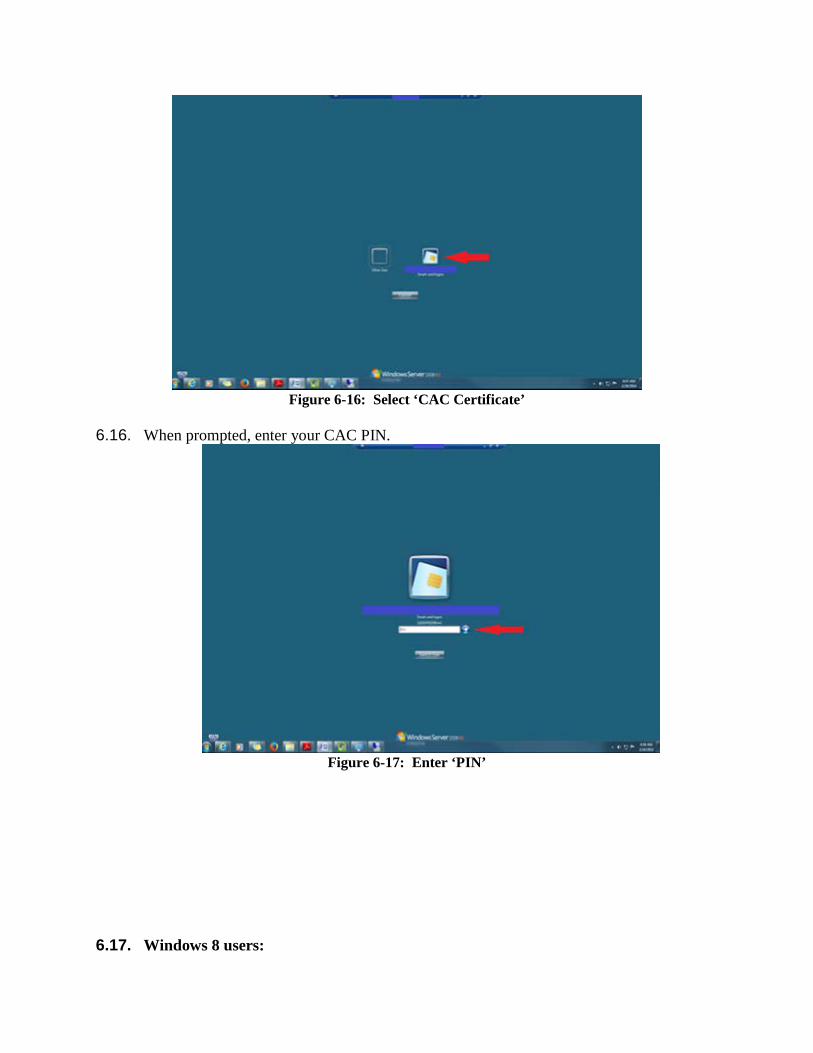
Figure 6-16: Select ‘CAC Certificate’
6.16. When prompted, enter your CAC PIN.
Figure 6-17: Enter ‘PIN’
6.17. Windows 8 users:
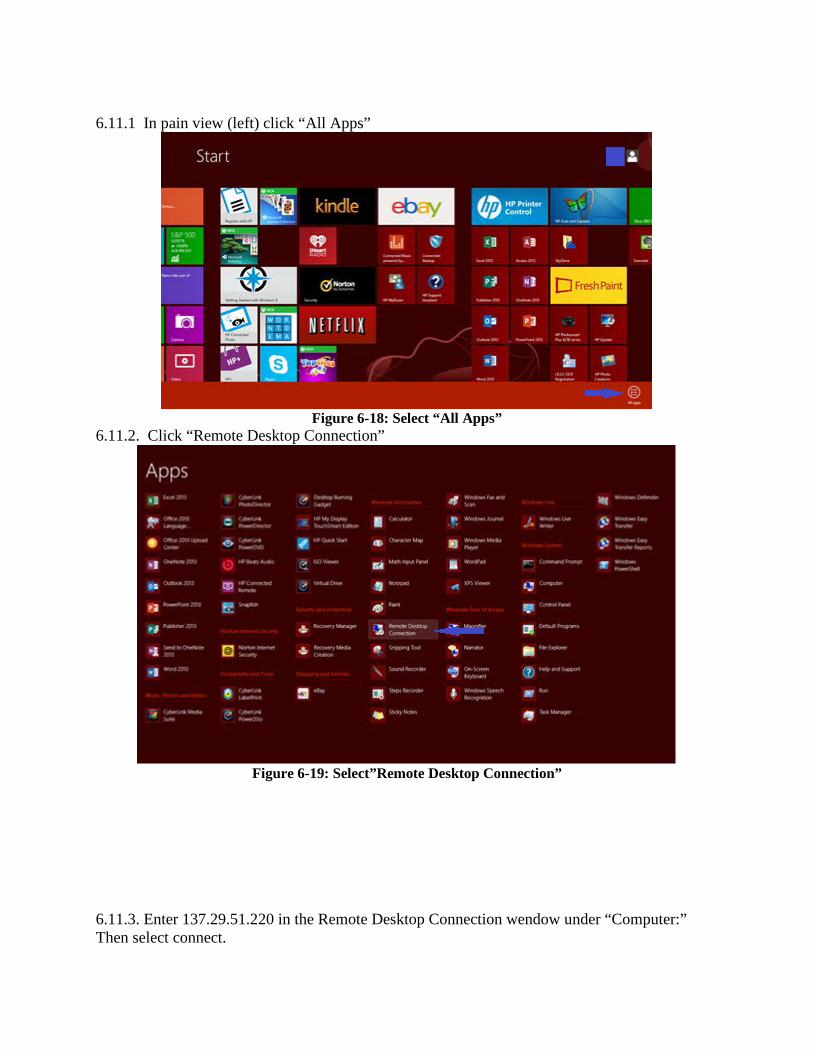
6.11.1 In pain view (left) click “All Apps”
Figure 6-18: Select “All Apps”
6.11.2. Click “Remote Desktop Connection”
Figure 6-19: Select”Remote Desktop Connection”
6.11.3. Enter 137.29.51.220 in the Remote Desktop Connection wendow under “Computer:” Then select connect.
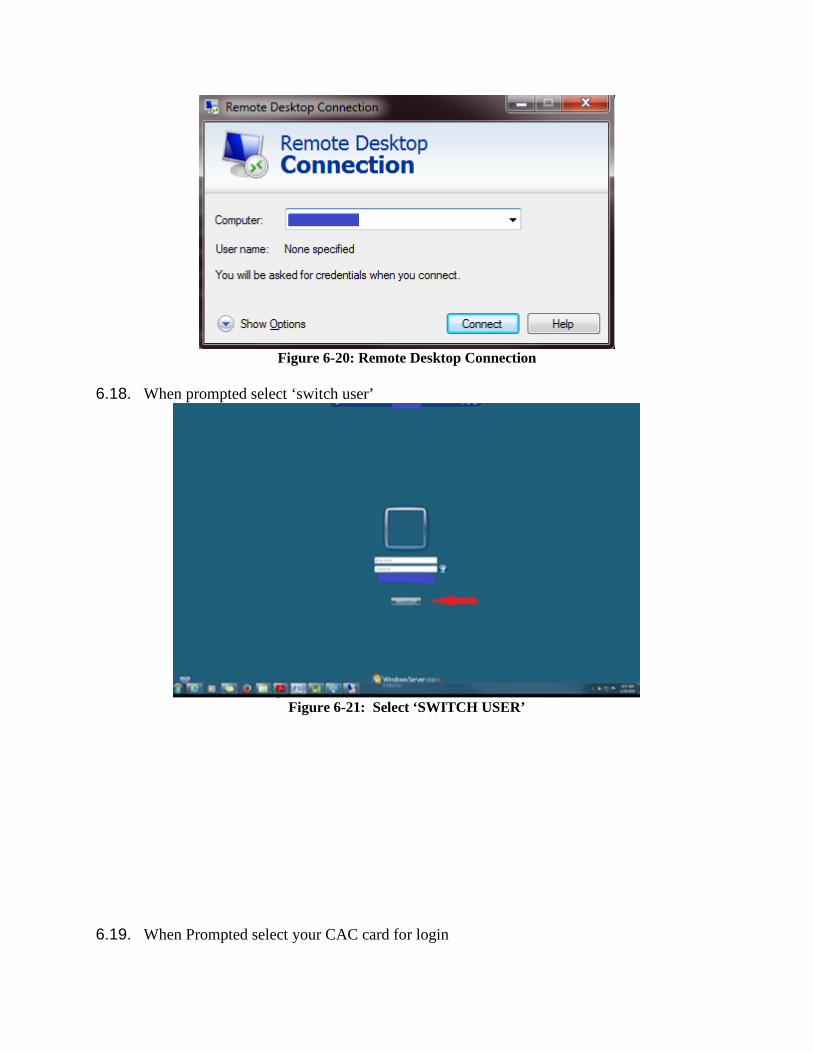
Figure 6-20: Remote Desktop Connection
6.18. When prompted select ‘switch user’
Figure 6-21: Select ‘SWITCH USER’
6.19. When Prompted select your CAC card for login
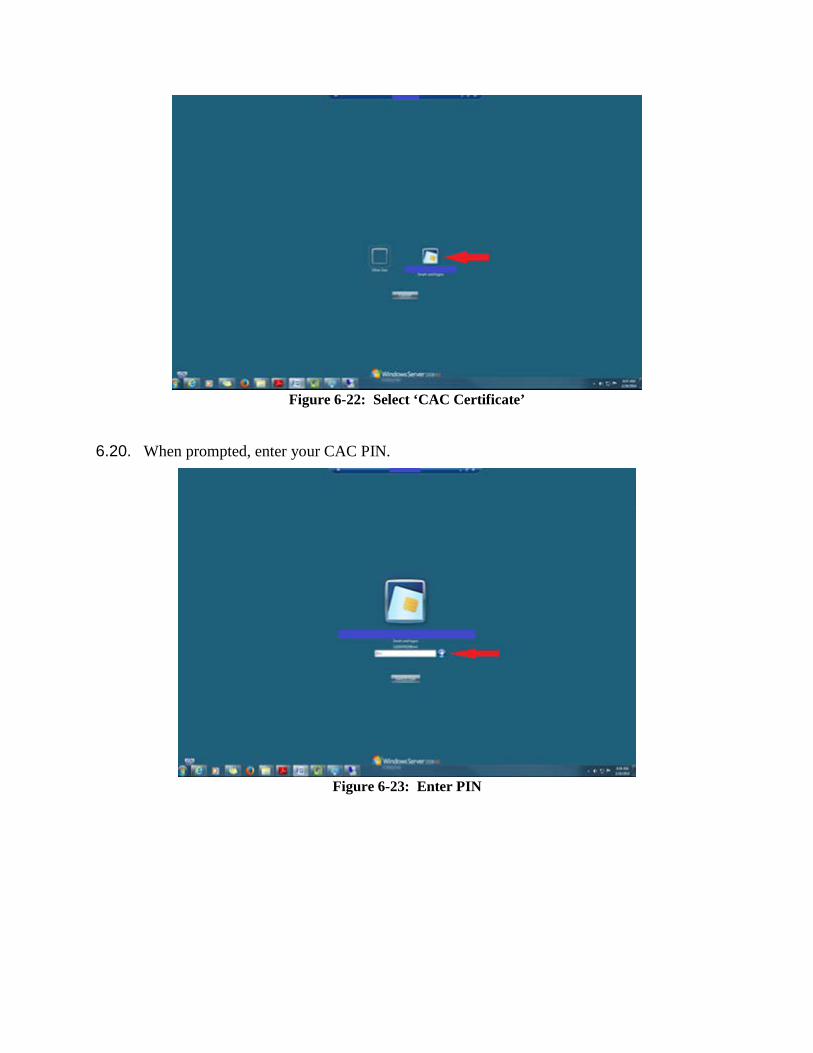
Figure 6-22: Select ‘CAC Certificate’
6.20. When prompted, enter your CAC PIN.
Figure 6-23: Enter PIN
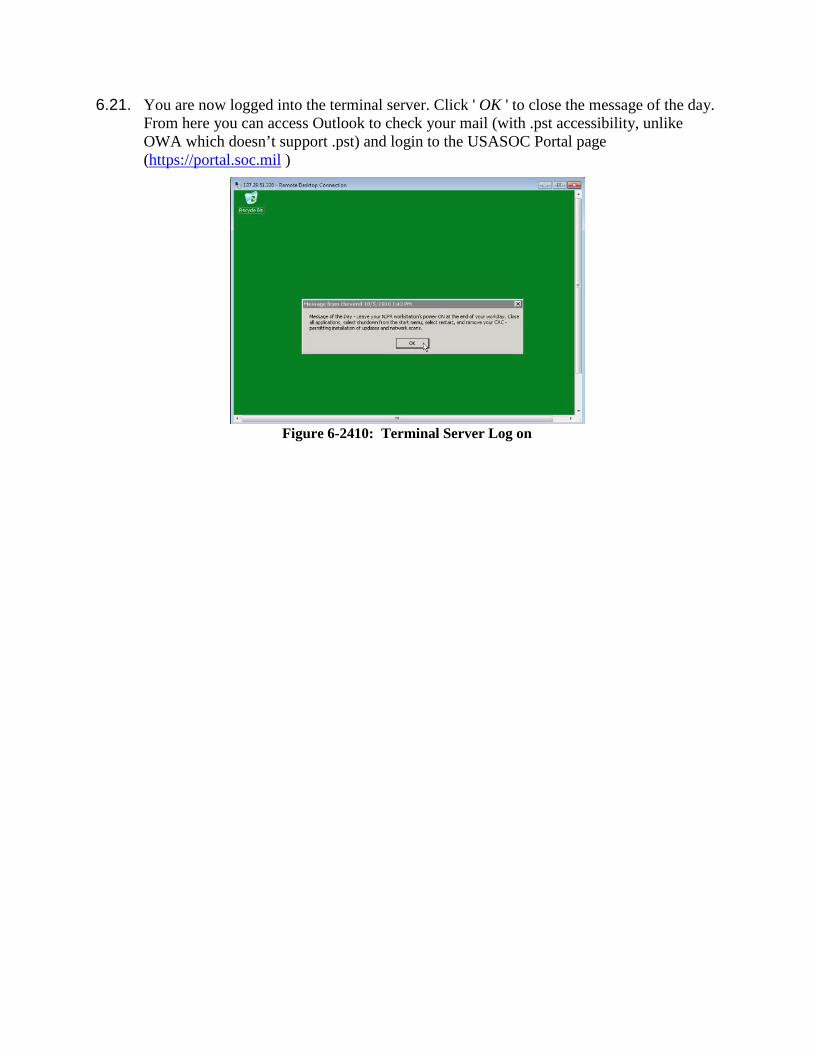
6.21. You are now logged into the terminal server. Click ' OK ' to close the message of the day. From here you can access Outlook to check your mail (with .pst accessibility, unlike OWA which doesn’t support .pst) and login to the USASOC Portal page (https://portal.soc.mil )
Figure 6-2410: Terminal Server Log on
7. WINDOWS XP PROFESSIONAL SSL VPN CONFIGURATION
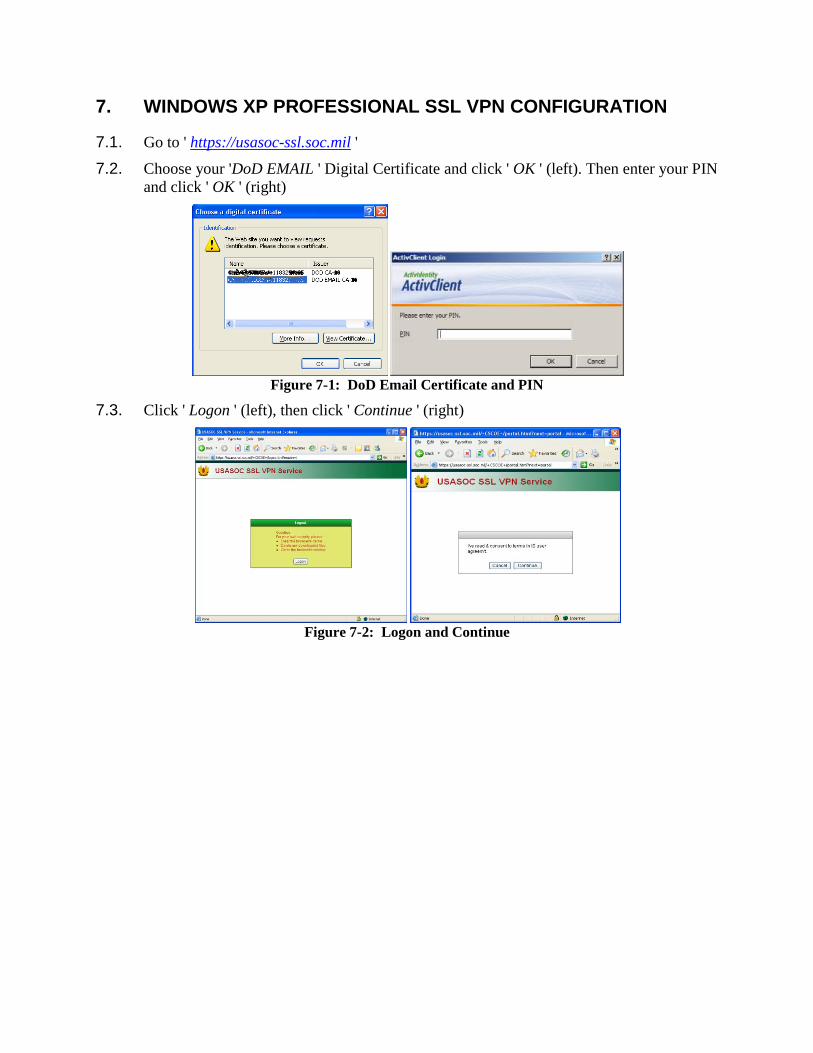
7.1. Go to ' https://usasoc-ssl.soc.mil '
7.2. Choose your 'DoD EMAIL ' Digital Certificate and click ' OK ' (left). Then enter your PIN and click ' OK ' (right)
Figure 7-1: DoD Email Certificate and PIN
7.3. Click ' Logon ' (left), then click ' Continue ' (right)
Figure 7-2: Logon and Continue
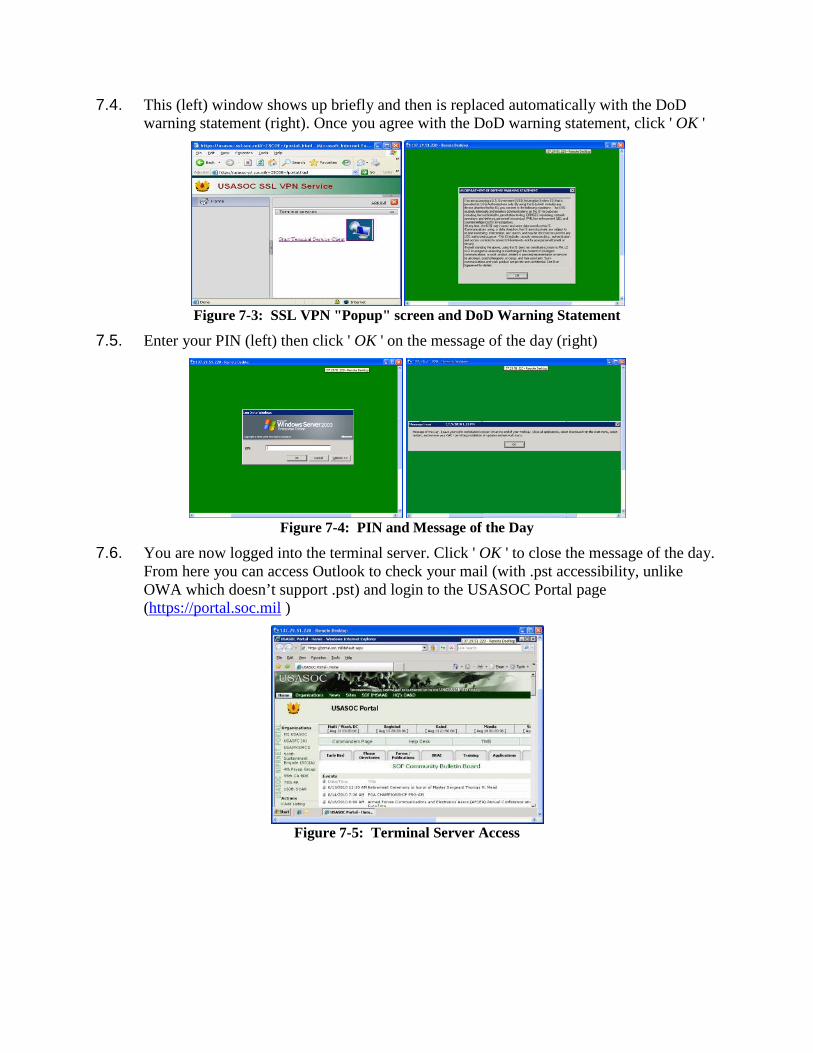
7.4. This (left) window shows up briefly and then is replaced automatically with the DoD warning statement (right). Once you agree with the DoD warning statement, click ' OK '
Figure 7-3: SSL VPN "Popup" screen and DoD Warning Statement
7.5. Enter your PIN (left) then click ' OK ' on the message of the day (right)
Figure 7-4: PIN and Message of the Day
7.6. You are now logged into the terminal server. Click ' OK ' to close the message of the day. From here you can access Outlook to check your mail (with .pst accessibility, unlike OWA which doesn’t support .pst) and login to the USASOC Portal page (https://portal.soc.mil )
Figure 7-5: Terminal Server Access
APPENDIX A. DETERMINING WINDOWS VERSION
Microsoft has two pages for determining the version of Windows you are currently running. The links to those pages are listed below.
• http://support.microsoft.com/kb/310104 - determines what version of Windows you are running such as XP, Vista or 7
• http://support.microsoft.com/kb/827218 - assists in resolving if you are running 32-bit or 64-bit versions of Windows software
If you are unsure which version you have, here is how to find out:
• Vista & 7: Right click Computer, Properties. Look under the System section, System Type: it will show either 32-bit or 64-bit Operating System.
• XP: Right click My Computer, Properties. If it doesn't show 64-bit, you have a 32-bit Operating System.
APPENDIX B. DETERMINING INTERNET EXPLORER VERSION
To determine the version of Internet Explorer you are running on your PC: • Open Internet Explorer by clicking the Start button , and then clicking Internet
Explorer. Press ALT+H and then click About Internet Explorer.
OR:
• Open Web Page, select Help from top menu, and then select About Internet Explorer.
APPENDIX C. DISABLING UAC IN WINDOWS 7
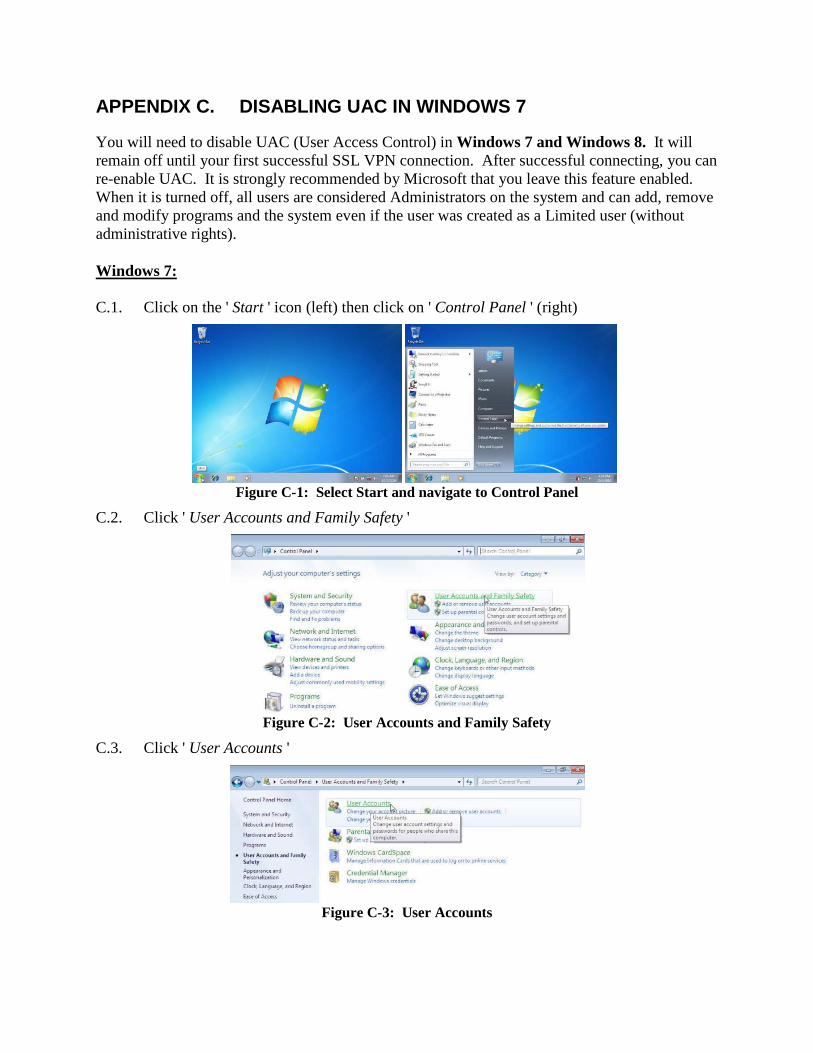
You will need to disable UAC (User Access Control) in Windows 7 and Windows 8. It will remain off until your first successful SSL VPN connection. After successful connecting, you can re-enable UAC. It is strongly recommended by Microsoft that you leave this feature enabled. When it is turned off, all users are considered Administrators on the system and can add, remove and modify programs and the system even if the user was created as a Limited user (without administrative rights). Windows 7: C.1. Click on the ' Start ' icon (left) then click on ' Control Panel ' (right)
Figure C-1: Select Start and navigate to Control Panel
C.2. Click ' User Accounts and Family Safety '
Figure C-2: User Accounts and Family Safety
C.3. Click ' User Accounts '
Figure C-3: User Accounts
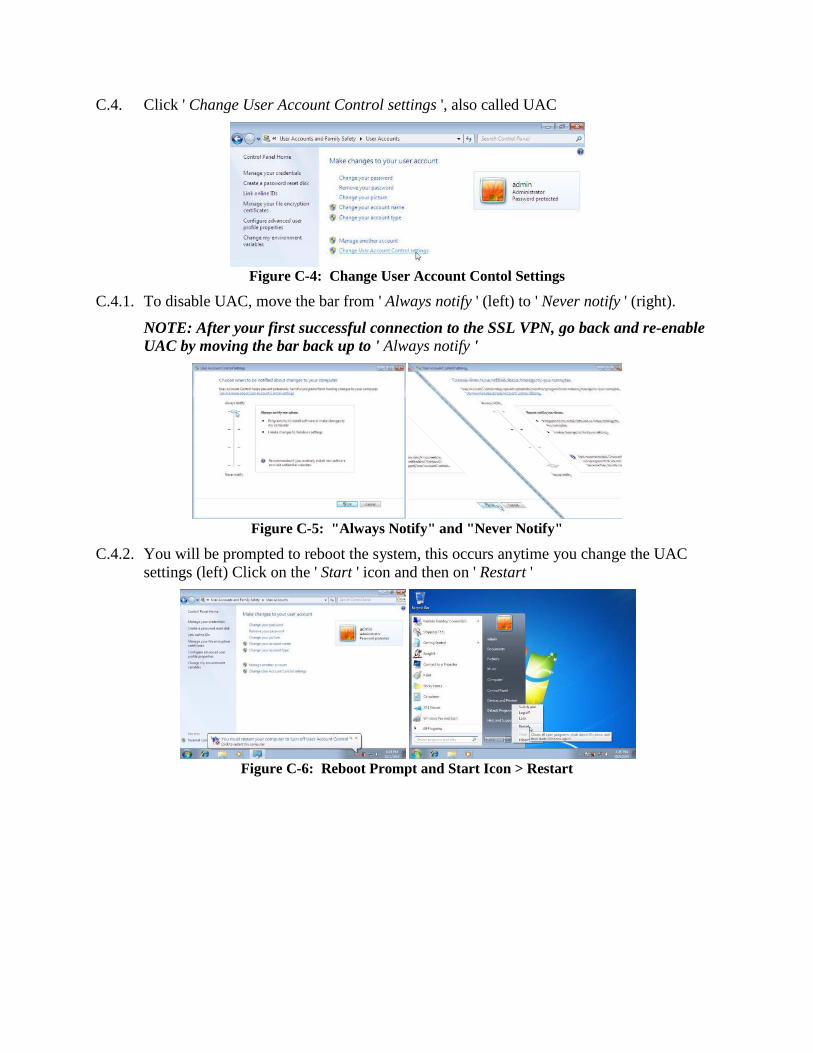
C.4. Click ' Change User Account Control settings ', also called UAC
Figure C-4: Change User Account Contol Settings
C.4.1. To disable UAC, move the bar from ' Always notify ' (left) to ' Never notify ' (right).
NOTE: After your first successful connection to the SSL VPN, go back and re-enable UAC by moving the bar back up to ' Always notify '
Figure C-5: "Always Notify" and "Never Notify"
C.4.2. You will be prompted to reboot the system, this occurs anytime you change the UAC settings (left) Click on the ' Start ' icon and then on ' Restart '
Figure C-6: Reboot Prompt and Start Icon > Restart
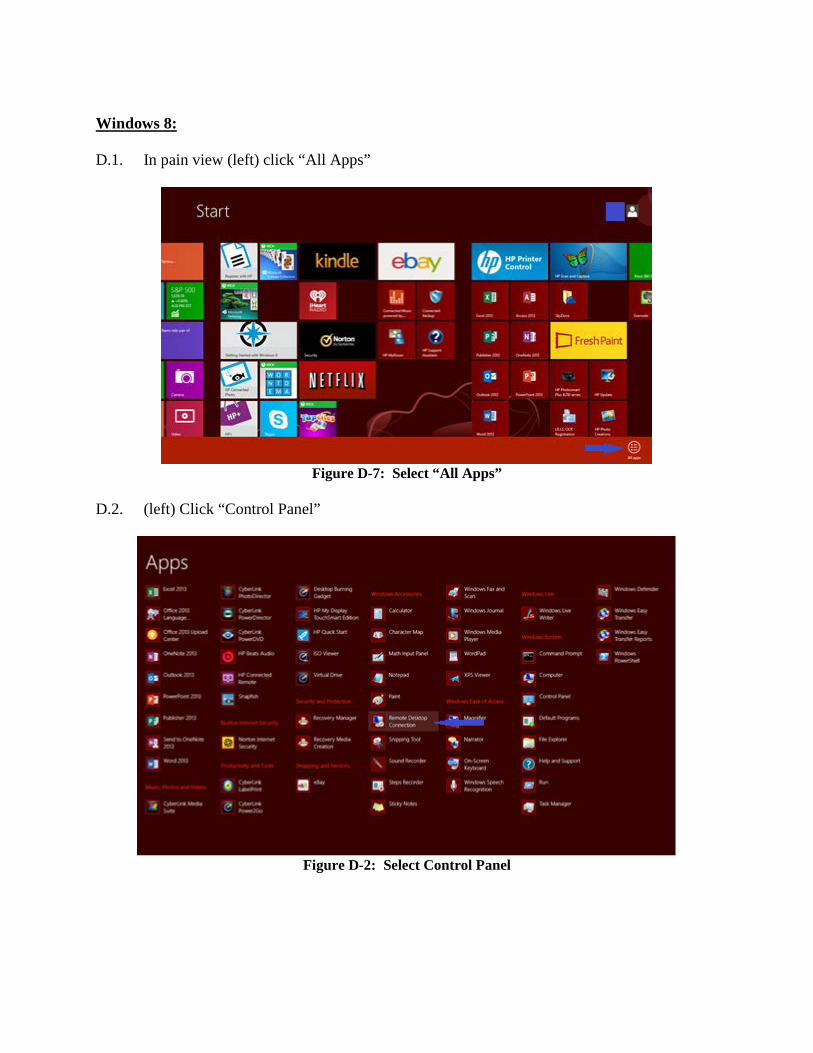
Windows 8: D.1. In pain view (left) click “All Apps”
Figure D-7: Select “All Apps”
D.2. (left) Click “Control Panel”
Figure D-2: Select Control Panel
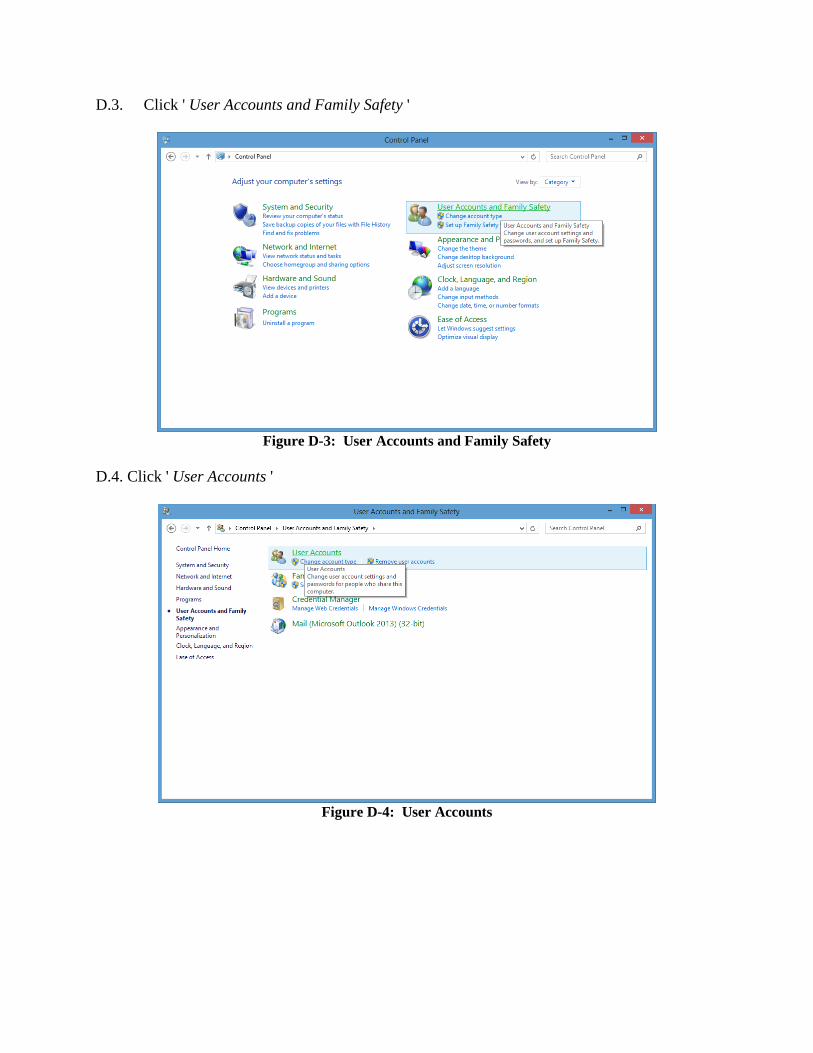
D.3. Click ' User Accounts and Family Safety '
Figure D-3: User Accounts and Family Safety
D.4. Click ' User Accounts '
Figure D-4: User Accounts
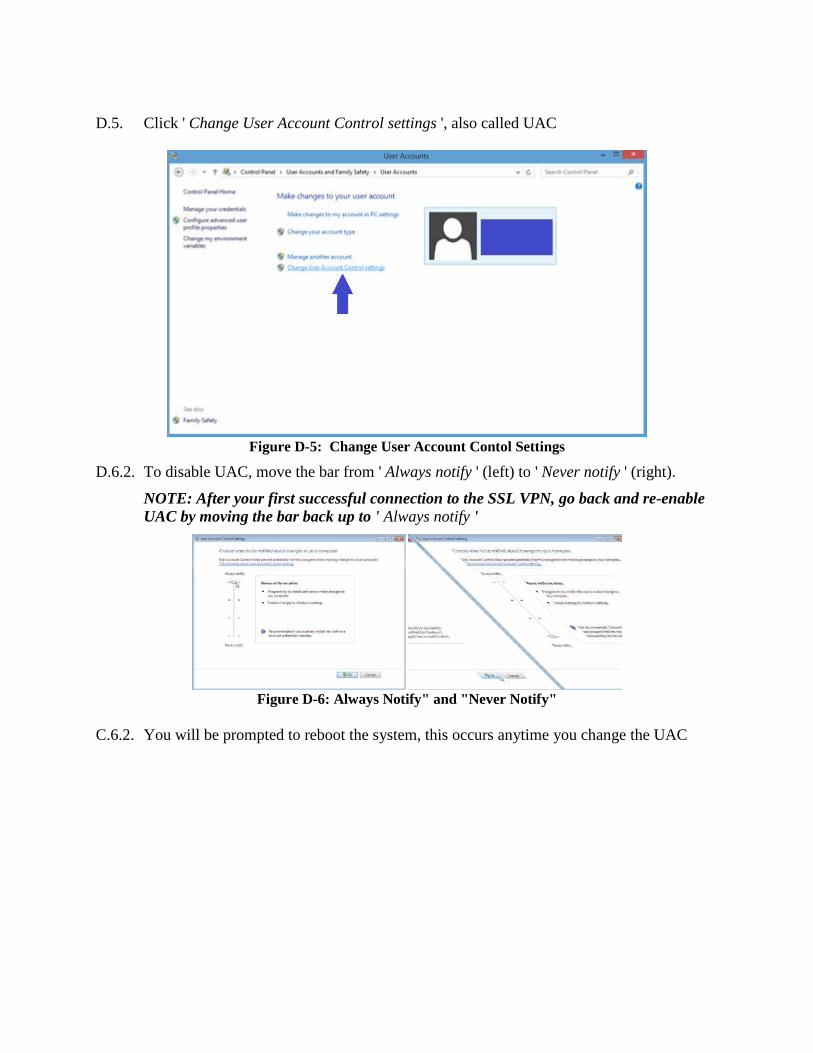
D.5. Click ' Change User Account Control settings ', also called UAC
Figure D-5: Change User Account Contol Settings
D.6.2. To disable UAC, move the bar from ' Always notify ' (left) to ' Never notify ' (right).
NOTE: After your first successful connection to the SSL VPN, go back and re-enable UAC by moving the bar back up to ' Always notify '
Figure D-6: Always Notify" and "Never Notify"
C.6.2. You will be prompted to reboot the system, this occurs anytime you change the UAC
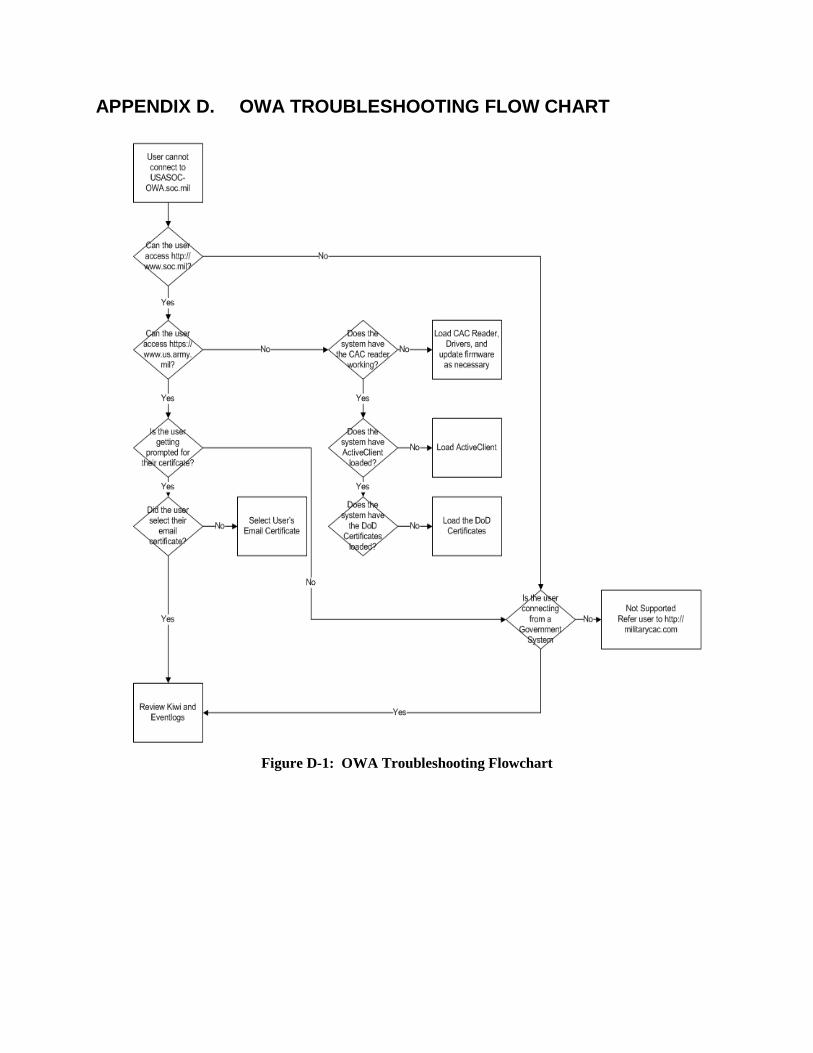
APPENDIX D. OWA TROUBLESHOOTING FLOW CHART
Figure D-1: OWA Troubleshooting Flowchart
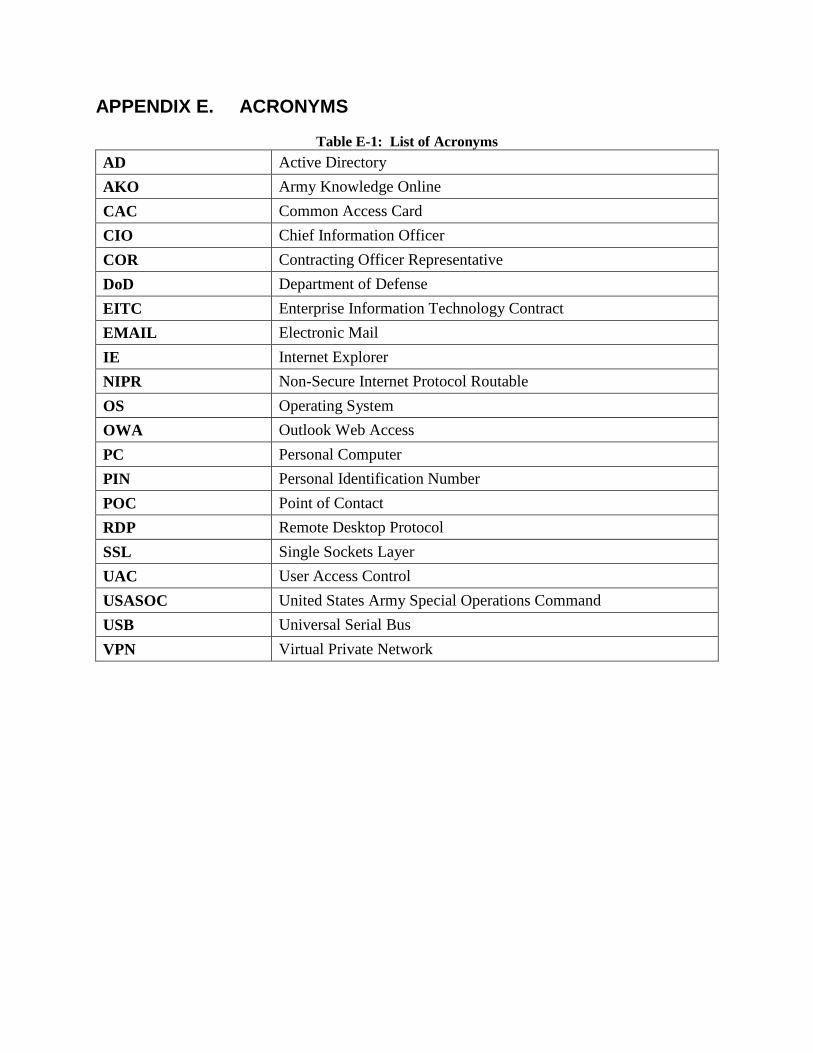
APPENDIX E. ACRONYMS
Table E-1: List of Acronyms AD Active Directory AKO Army Knowledge Online CAC Common Access Card CIO Chief Information Officer COR Contracting Officer Representative DoD Department of Defense EITC Enterprise Information Technology Contract EMAIL Electronic Mail IE Internet Explorer NIPR Non-Secure Internet Protocol Routable OS Operating System OWA Outlook Web Access PC Personal Computer PIN Personal Identification Number POC Point of Contact RDP Remote Desktop Protocol SSL Single Sockets Layer UAC User Access Control USASOC United States Army Special Operations Command USB Universal Serial Bus VPN Virtual Private Network