Embed Size (px)
Citation preview
ICT Service Desk 03000 415555 [email protected] Version 1.0 Page 1 of 48
Remote Working Services
OWA (Outlook Web Access) - User Guide
Kent County Council
ICT Service Desk 03000 415555 [email protected] Version 1.0 Page 2 of 48
Contents 1 Connecting to your KCC mailbox ................................................................................................................ 4
1.1 Requirements ...................................................................................................................................... 4
1.2 Remote Working Tokens ..................................................................................................................... 4
1.3 Logging on to OWA ............................................................................................................................. 5
2 How to use OWA ...................................................................................................................................... 10
2.1 New Message .................................................................................................................................... 10
2.1.1 Opening a New Message ........................................................................................................... 10
2.1.2 Adding intended recipients ........................................................................................................ 12
2.1.3 Adding email attachments ......................................................................................................... 14
2.1.4 Sending the message ................................................................................................................. 14
2.2 Reply/Forward ................................................................................................................................... 15
2.3 Calendars ........................................................................................................................................... 16
2.3.1 Access Calendars ........................................................................................................................ 16
2.3.2 Add shared calendar .................................................................................................................. 17
2.4 Contacts (People) .............................................................................................................................. 22
2.4.1 Accessing Contacts ..................................................................................................................... 22
2.4.2 Find a Contact ............................................................................................................................ 22
2.4.3 Add a Contact ............................................................................................................................. 24
2.5 Managing email attachments (OneDrive) ......................................................................................... 25
2.5.1 Opening attachments ................................................................................................................ 25
2.5.2 Accessing the OneDrive ............................................................................................................. 27
2.5.3 Adding email attachments ......................................................................................................... 29
2.6 Accessing Shared Mailbox ................................................................................................................. 33
2.6.1 Adding a Shared Mailbox as an Additional Folder ..................................................................... 33
2.6.2 Removing a Shared Mailbox from the Folder List ..................................................................... 35
2.6.3 Opening a Shared Mailbox directly ............................................................................................ 36
2.7 Mailbox Settings ................................................................................................................................ 38
2.7.1 Display Settings .......................................................................................................................... 39
2.7.2 Automatic Replies (Out of office) .............................................................................................. 40
2.7.3 Email Signatures ......................................................................................................................... 41
2.7.4 Accessing/Adding Rules ............................................................................................................. 42
ICT Service Desk 03000 415555 [email protected] Version 1.0 Page 3 of 48
2.8 Changing Theme ................................................................................................................................ 46
2.9 Signing Out ........................................................................................................................................ 47
3 Troubleshooting ....................................................................................................................................... 48
3.1 Remote Working Token Unlock and PIN Reset ................................................................................. 48
3.2 If all else fails ..................................................................................................................................... 48
ICT Service Desk 03000 415555 [email protected] Version 1.0 Page 4 of 48
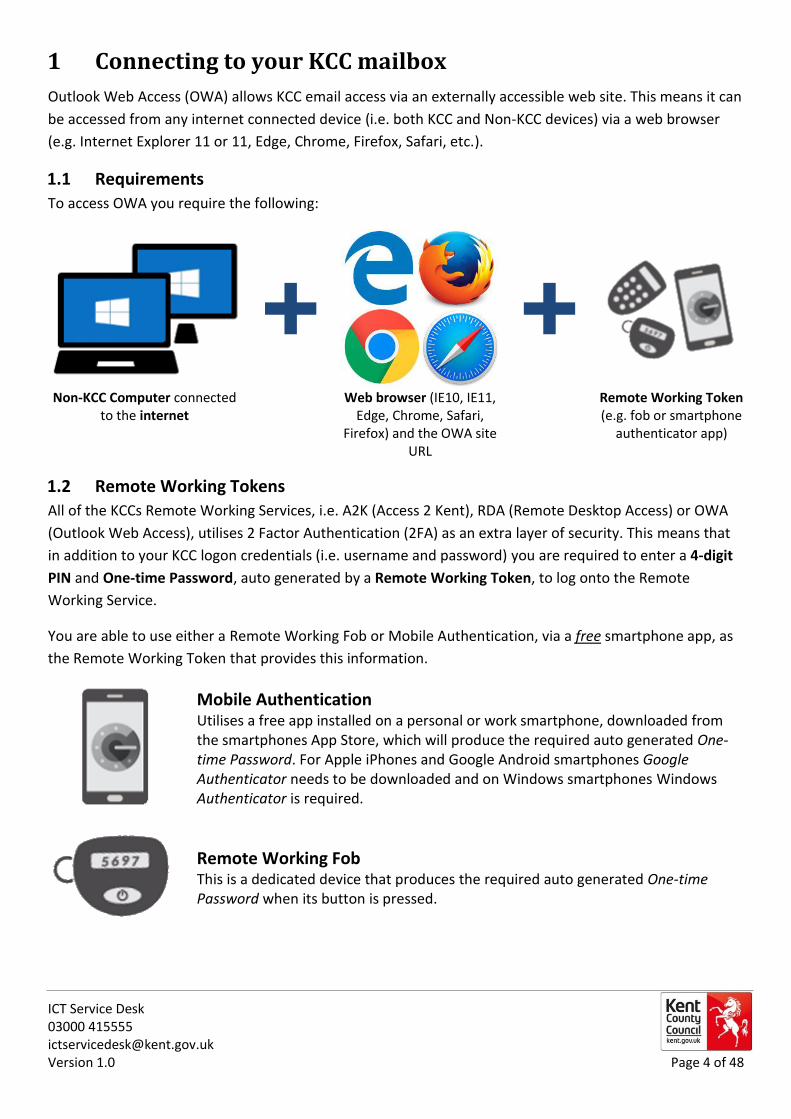
1 Connecting to your KCC mailbox
Outlook Web Access (OWA) allows KCC email access via an externally accessible web site. This means it can
be accessed from any internet connected device (i.e. both KCC and Non-KCC devices) via a web browser
(e.g. Internet Explorer 11 or 11, Edge, Chrome, Firefox, Safari, etc.).
1.1 Requirements
To access OWA you require the following:
Non-KCC Computer connected to the internet
Web browser (IE10, IE11, Edge, Chrome, Safari,
Firefox) and the OWA site URL
Remote Working Token (e.g. fob or smartphone
authenticator app)
1.2 Remote Working Tokens
All of the KCCs Remote Working Services, i.e. A2K (Access 2 Kent), RDA (Remote Desktop Access) or OWA
(Outlook Web Access), utilises 2 Factor Authentication (2FA) as an extra layer of security. This means that
in addition to your KCC logon credentials (i.e. username and password) you are required to enter a 4-digit
PIN and One-time Password, auto generated by a Remote Working Token, to log onto the Remote
Working Service.
You are able to use either a Remote Working Fob or Mobile Authentication, via a free smartphone app, as
the Remote Working Token that provides this information.
Mobile Authentication Utilises a free app installed on a personal or work smartphone, downloaded from the smartphones App Store, which will produce the required auto generated One-time Password. For Apple iPhones and Google Android smartphones Google Authenticator needs to be downloaded and on Windows smartphones Windows Authenticator is required.
Remote Working Fob This is a dedicated device that produces the required auto generated One-time Password when its button is pressed.
ICT Service Desk 03000 415555 [email protected] Version 1.0 Page 5 of 48
1.3 Logging on to OWA
Below are steps highlighting how to log onto OWA.
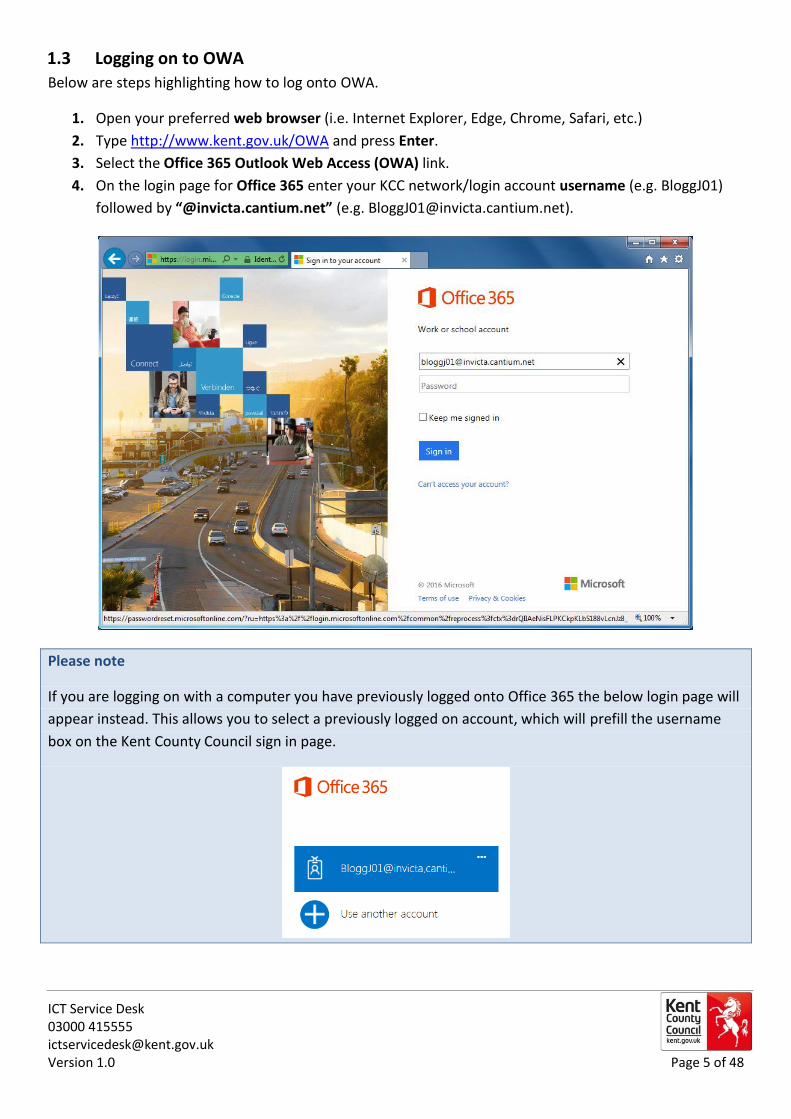
1. Open your preferred web browser (i.e. Internet Explorer, Edge, Chrome, Safari, etc.)
2. Type http://www.kent.gov.uk/OWA and press Enter.
3. Select the Office 365 Outlook Web Access (OWA) link. 4. On the login page for Office 365 enter your KCC network/login account username (e.g. BloggJ01)
followed by “@invicta.cantium.net” (e.g. [email protected]).
Please note
If you are logging on with a computer you have previously logged onto Office 365 the below login page will
appear instead. This allows you to select a previously logged on account, which will prefill the username
box on the Kent County Council sign in page.
ICT Service Desk 03000 415555 [email protected] Version 1.0 Page 6 of 48
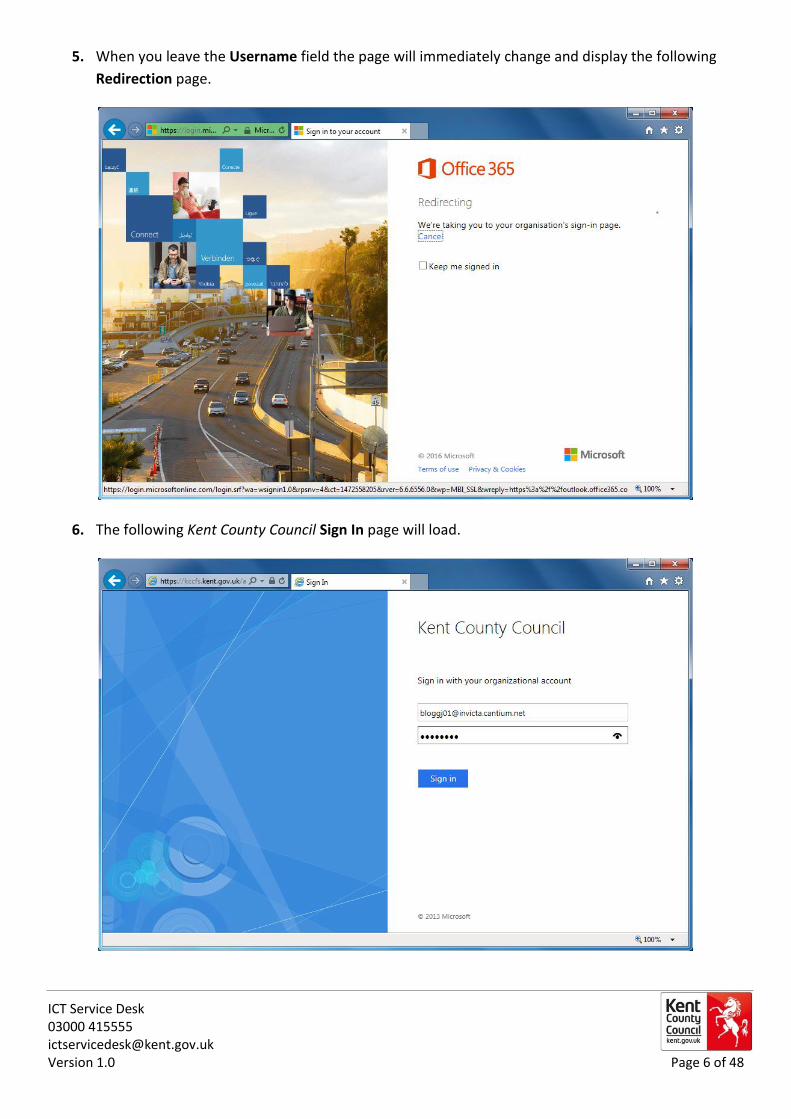
5. When you leave the Username field the page will immediately change and display the following
Redirection page.
6. The following Kent County Council Sign In page will load.
ICT Service Desk 03000 415555 [email protected] Version 1.0 Page 7 of 48
7. Please enter the following information:
Your KCC network/login account username (e.g. BloggJ01) followed by “@invicta.cantium.net”
(e.g. [email protected]).
Your KCC network/login account password.
8. Select Sign in.
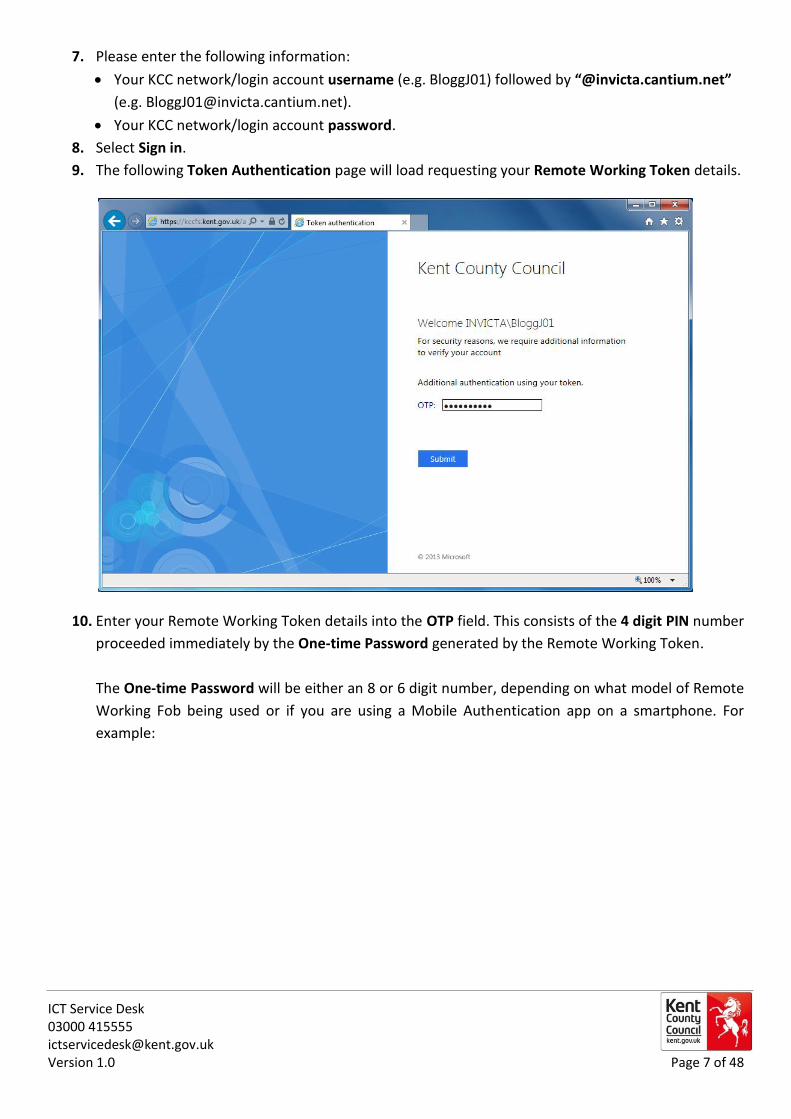
9. The following Token Authentication page will load requesting your Remote Working Token details.
10. Enter your Remote Working Token details into the OTP field. This consists of the 4 digit PIN number
proceeded immediately by the One-time Password generated by the Remote Working Token.
The One-time Password will be either an 8 or 6 digit number, depending on what model of Remote
Working Fob being used or if you are using a Mobile Authentication app on a smartphone. For
example:
ICT Service Desk 03000 415555 [email protected] Version 1.0 Page 8 of 48
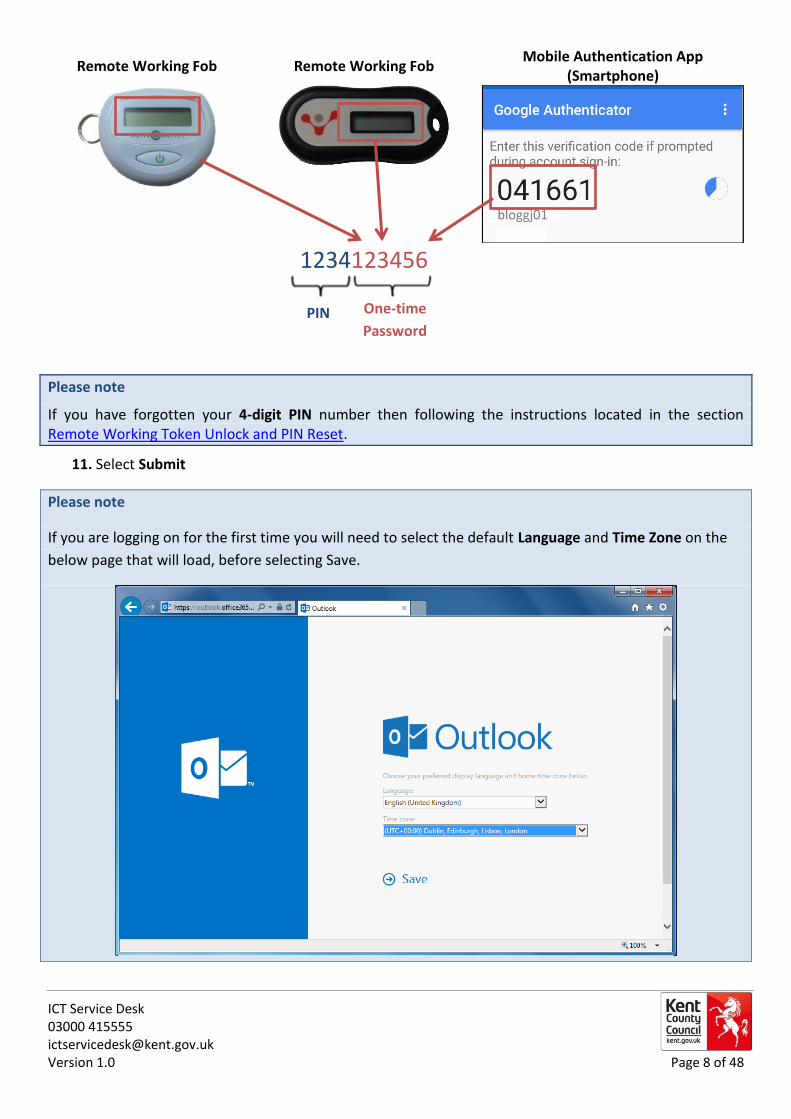
Remote Working Fob Remote Working Fob Mobile Authentication App
(Smartphone)
1234123456
Please note
If you have forgotten your 4-digit PIN number then following the instructions located in the section Remote Working Token Unlock and PIN Reset.
11. Select Submit
Please note
If you are logging on for the first time you will need to select the default Language and Time Zone on the
below page that will load, before selecting Save.
One-time
Password PIN
ICT Service Desk 03000 415555 [email protected] Version 1.0 Page 9 of 48
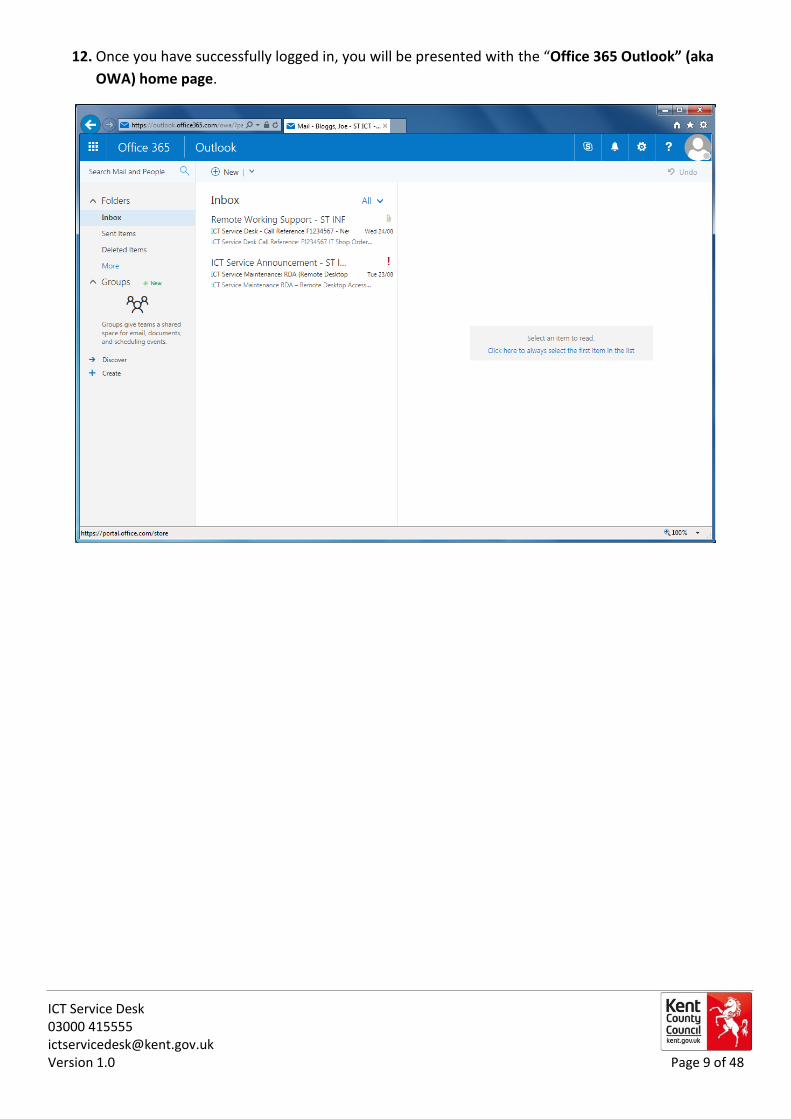
12. Once you have successfully logged in, you will be presented with the “Office 365 Outlook” (aka
OWA) home page.
ICT Service Desk 03000 415555 [email protected] Version 1.0 Page 10 of 48
2 How to use OWA
This section covers briefly how to access important mailbox functions and perform some common actions.
2.1 New Message
2.1.1 Opening a New Message
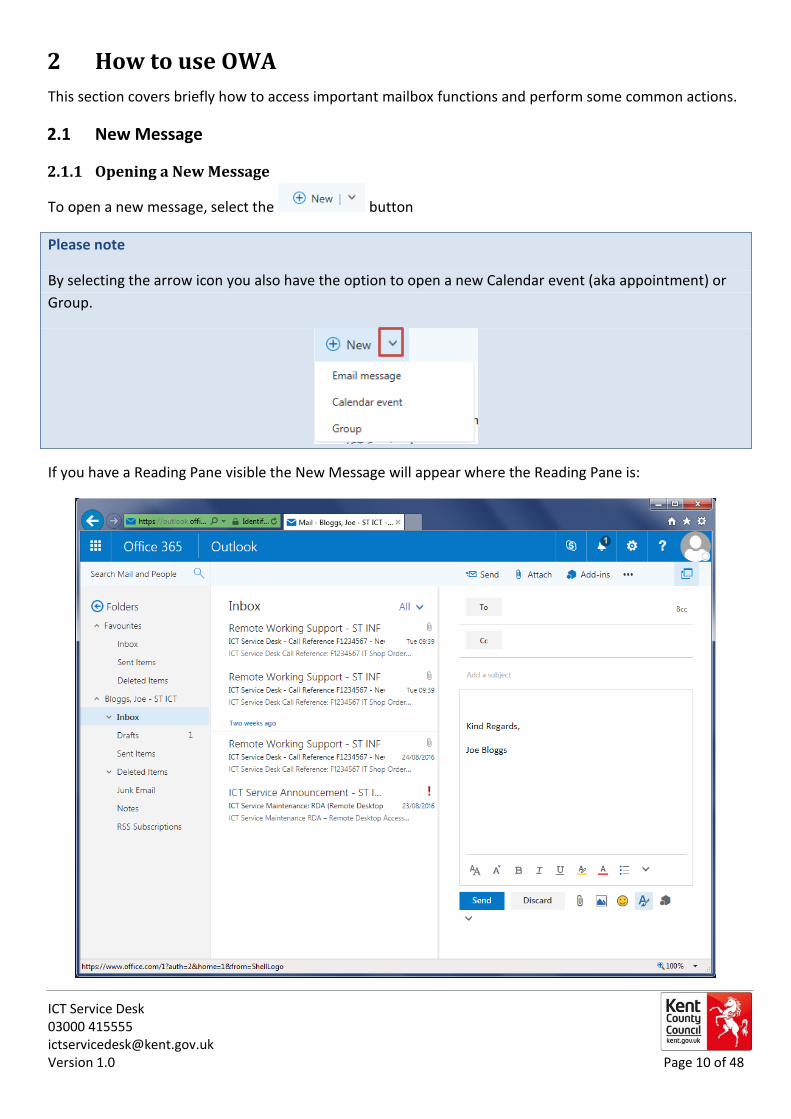
To open a new message, select the button
Please note
By selecting the arrow icon you also have the option to open a new Calendar event (aka appointment) or
Group.
If you have a Reading Pane visible the New Message will appear where the Reading Pane is:
ICT Service Desk 03000 415555 [email protected] Version 1.0 Page 11 of 48
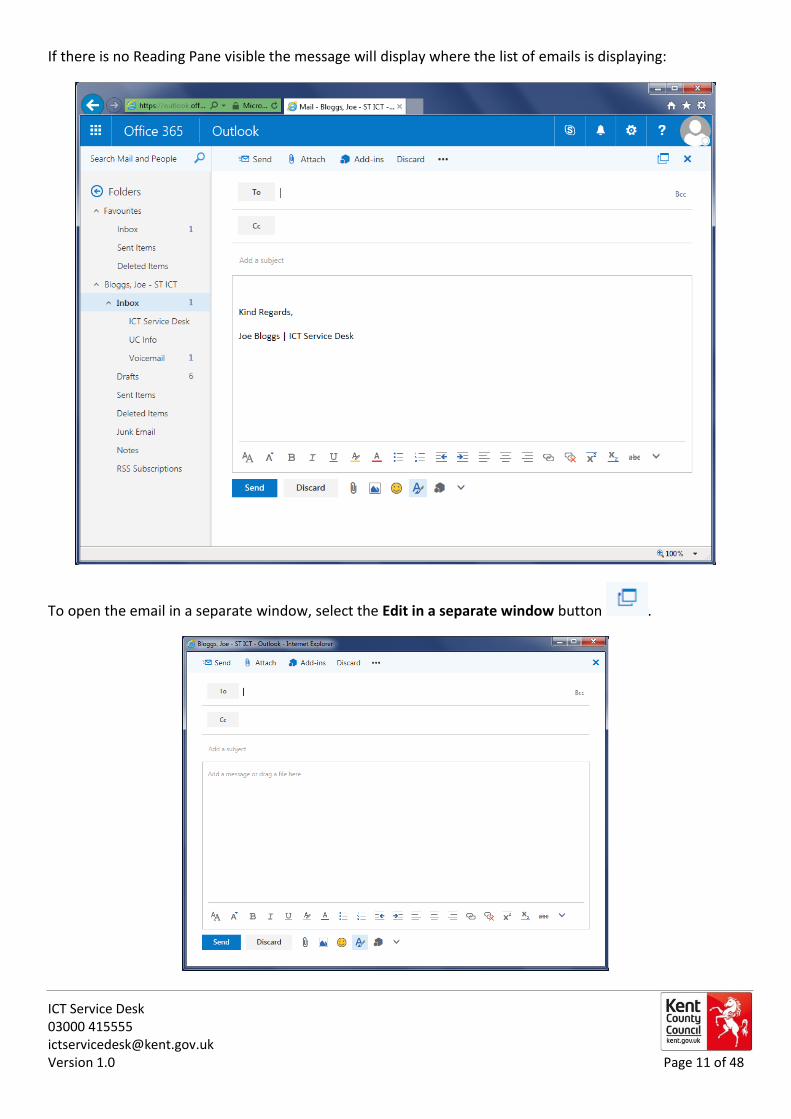
If there is no Reading Pane visible the message will display where the list of emails is displaying:
To open the email in a separate window, select the Edit in a separate window button .
ICT Service Desk 03000 415555 [email protected] Version 1.0 Page 12 of 48
2.1.2 Adding intended recipients
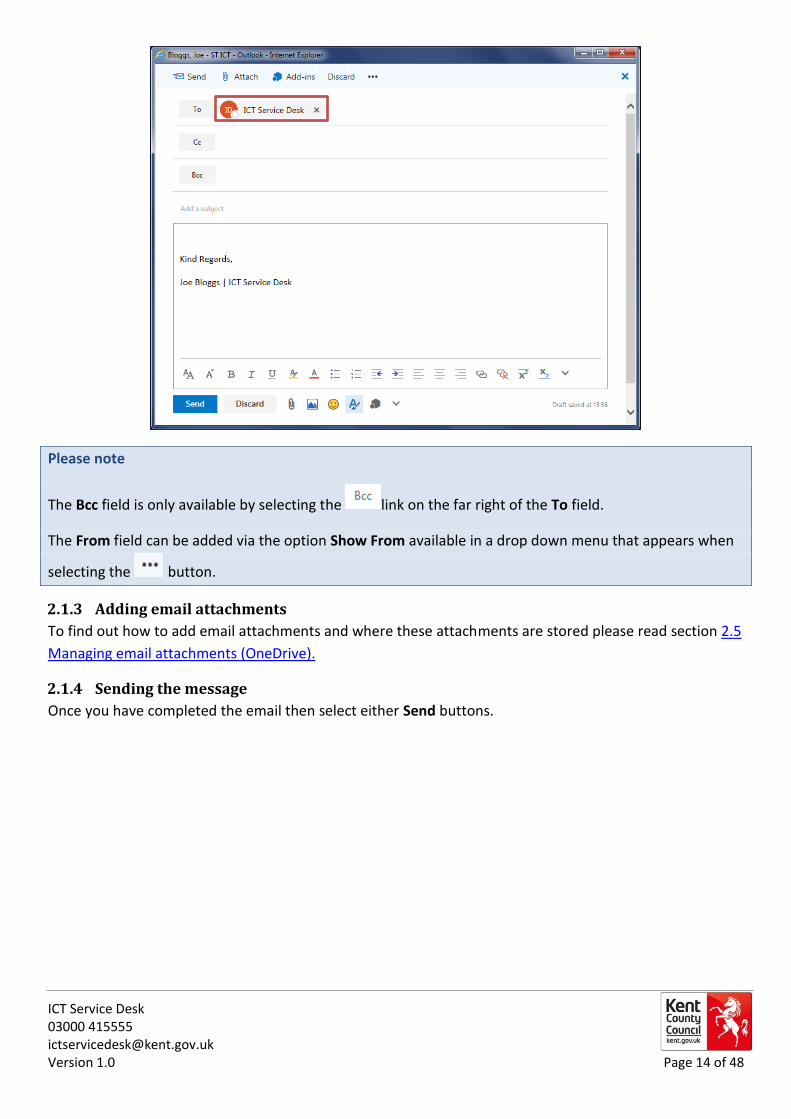
To add a contact to the To, Cc, Bcc or From fields you can either:
Please note
The Bcc field is only available by selecting the link on the far right of the To field.
The From field can be added via the option Show From available in a drop down menu that appears when
selecting the button.
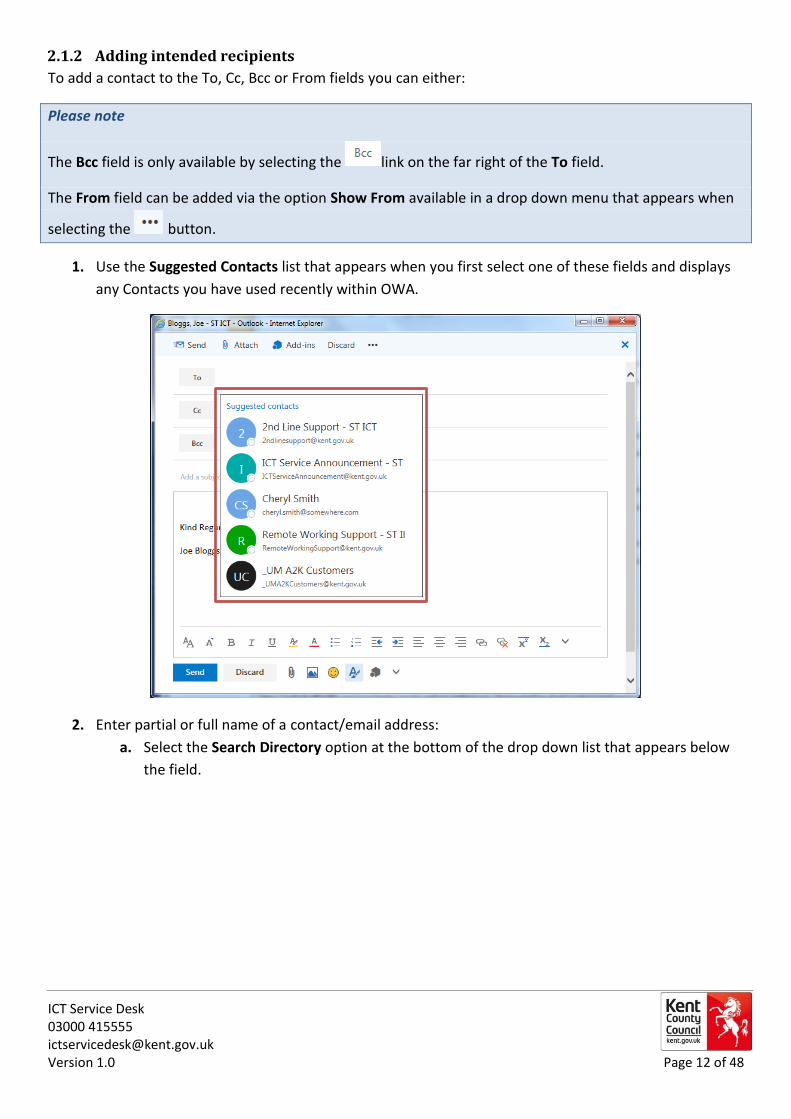
1. Use the Suggested Contacts list that appears when you first select one of these fields and displays
any Contacts you have used recently within OWA.
2. Enter partial or full name of a contact/email address:
a. Select the Search Directory option at the bottom of the drop down list that appears below
the field.
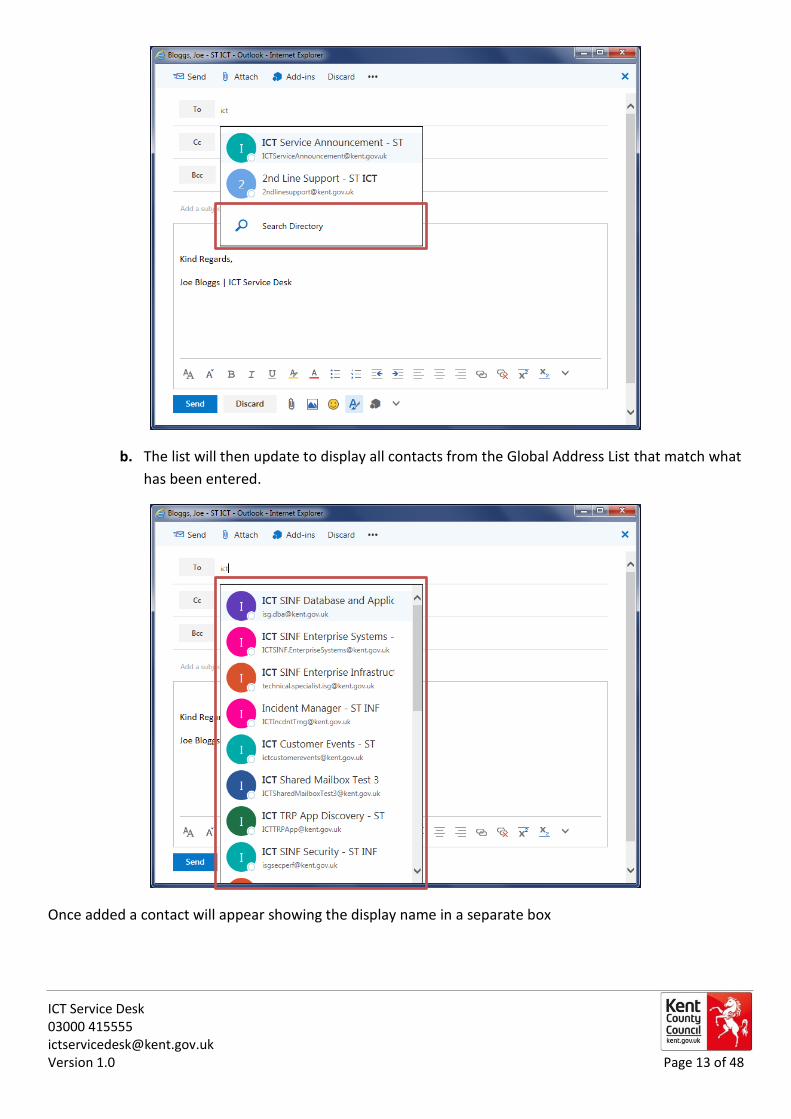
ICT Service Desk 03000 415555 [email protected] Version 1.0 Page 13 of 48
b. The list will then update to display all contacts from the Global Address List that match what
has been entered.
Once added a contact will appear showing the display name in a separate box
ICT Service Desk 03000 415555 [email protected] Version 1.0 Page 14 of 48
Please note
The Bcc field is only available by selecting the link on the far right of the To field.
The From field can be added via the option Show From available in a drop down menu that appears when
selecting the button.
2.1.3 Adding email attachments
To find out how to add email attachments and where these attachments are stored please read section 2.5
Managing email attachments (OneDrive).
2.1.4 Sending the message
Once you have completed the email then select either Send buttons.
ICT Service Desk 03000 415555 [email protected] Version 1.0 Page 15 of 48
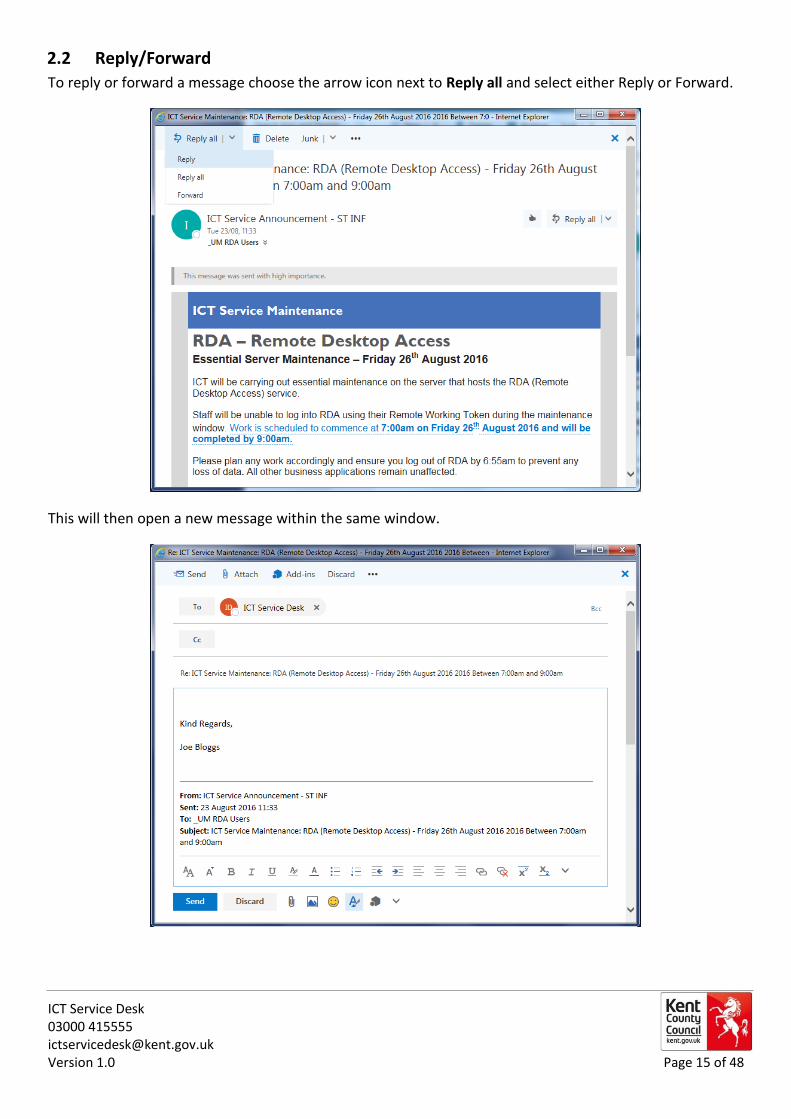
2.2 Reply/Forward
To reply or forward a message choose the arrow icon next to Reply all and select either Reply or Forward.
This will then open a new message within the same window.
ICT Service Desk 03000 415555 [email protected] Version 1.0 Page 16 of 48
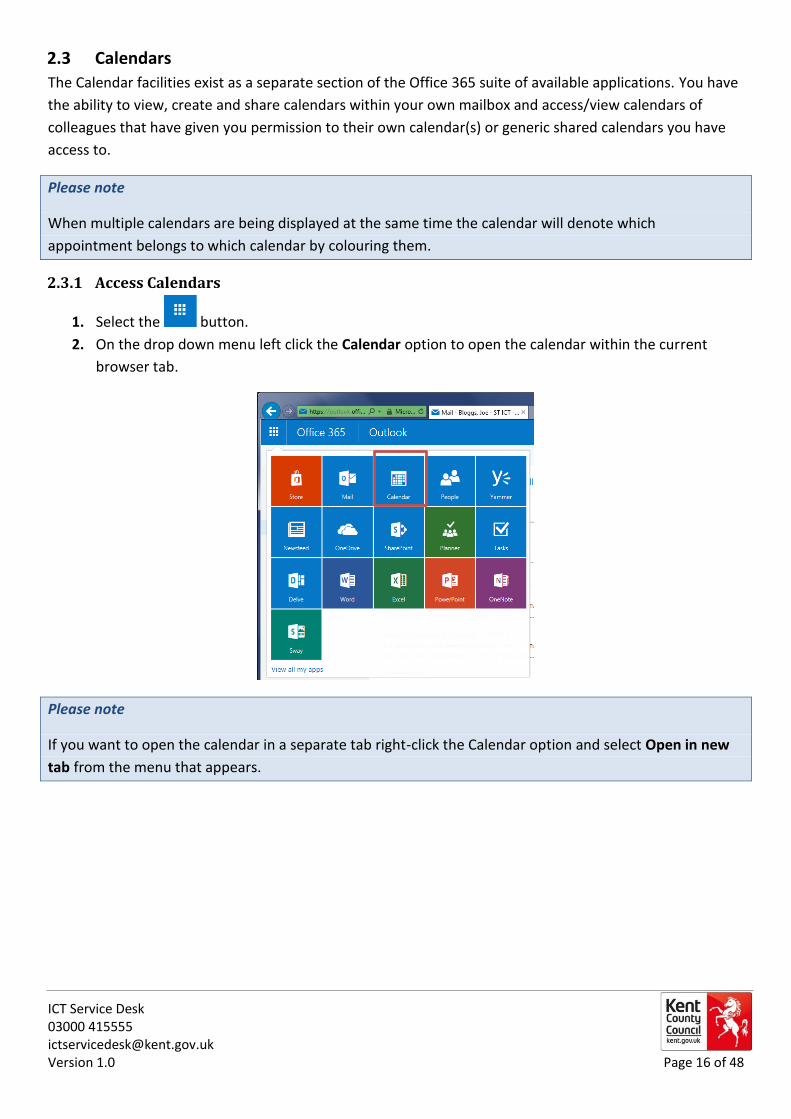
2.3 Calendars
The Calendar facilities exist as a separate section of the Office 365 suite of available applications. You have
the ability to view, create and share calendars within your own mailbox and access/view calendars of
colleagues that have given you permission to their own calendar(s) or generic shared calendars you have
access to.
Please note
When multiple calendars are being displayed at the same time the calendar will denote which
appointment belongs to which calendar by colouring them.
2.3.1 Access Calendars
1. Select the button.
2. On the drop down menu left click the Calendar option to open the calendar within the current
browser tab.
Please note
If you want to open the calendar in a separate tab right-click the Calendar option and select Open in new
tab from the menu that appears.
ICT Service Desk 03000 415555 [email protected] Version 1.0 Page 17 of 48
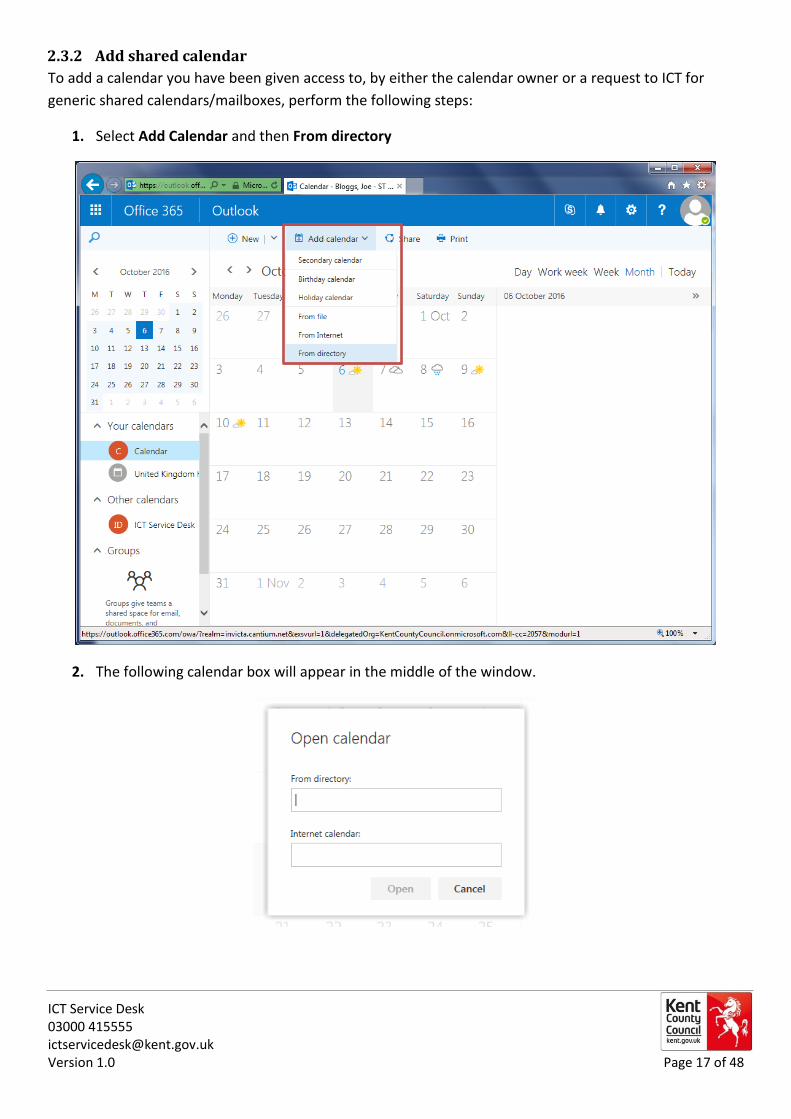
2.3.2 Add shared calendar
To add a calendar you have been given access to, by either the calendar owner or a request to ICT for
generic shared calendars/mailboxes, perform the following steps:
1. Select Add Calendar and then From directory
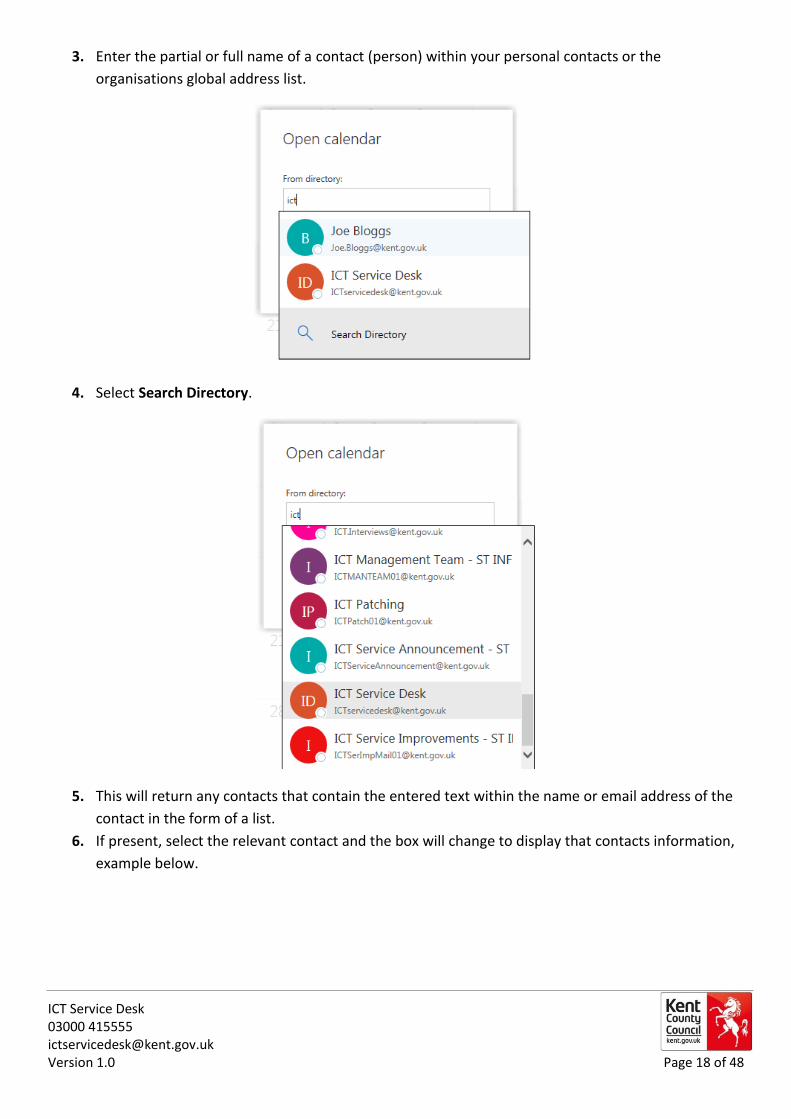
2. The following calendar box will appear in the middle of the window.
ICT Service Desk 03000 415555 [email protected] Version 1.0 Page 18 of 48
3. Enter the partial or full name of a contact (person) within your personal contacts or the
organisations global address list.
4. Select Search Directory.
5. This will return any contacts that contain the entered text within the name or email address of the
contact in the form of a list.
6. If present, select the relevant contact and the box will change to display that contacts information,
example below.
ICT Service Desk 03000 415555 [email protected] Version 1.0 Page 19 of 48
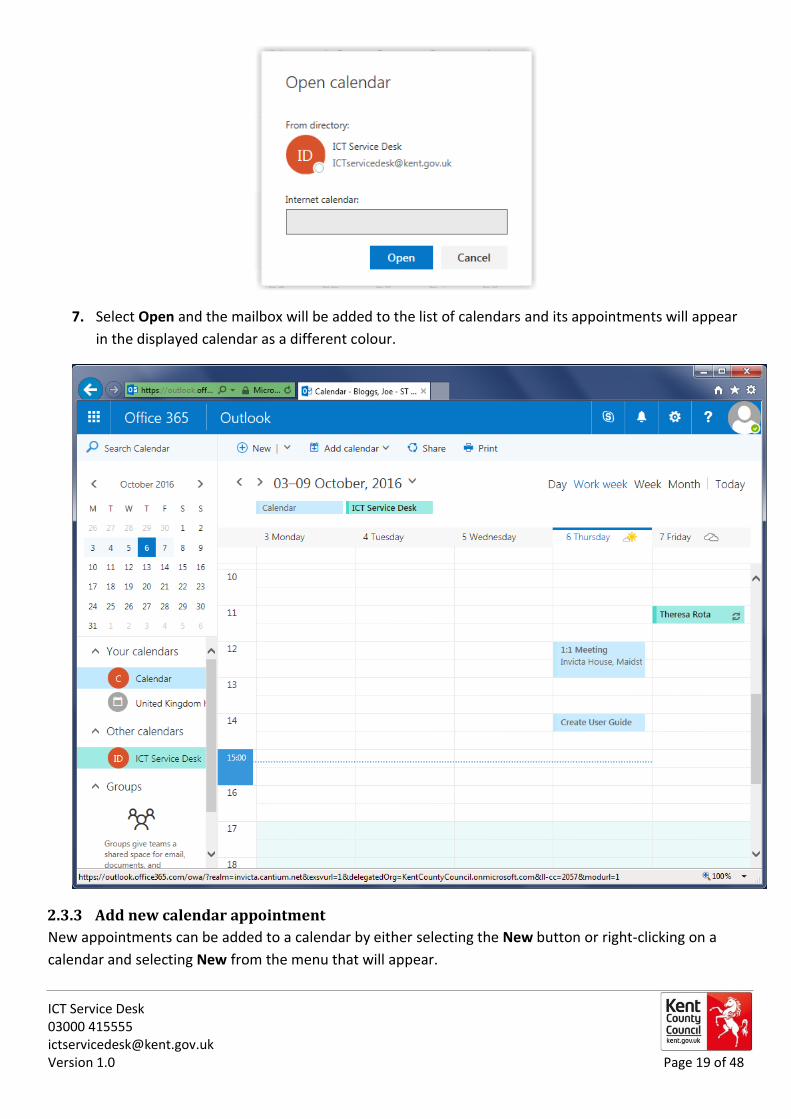
7. Select Open and the mailbox will be added to the list of calendars and its appointments will appear
in the displayed calendar as a different colour.
2.3.3 Add new calendar appointment
New appointments can be added to a calendar by either selecting the New button or right-clicking on a
calendar and selecting New from the menu that will appear.
ICT Service Desk 03000 415555 [email protected] Version 1.0 Page 20 of 48
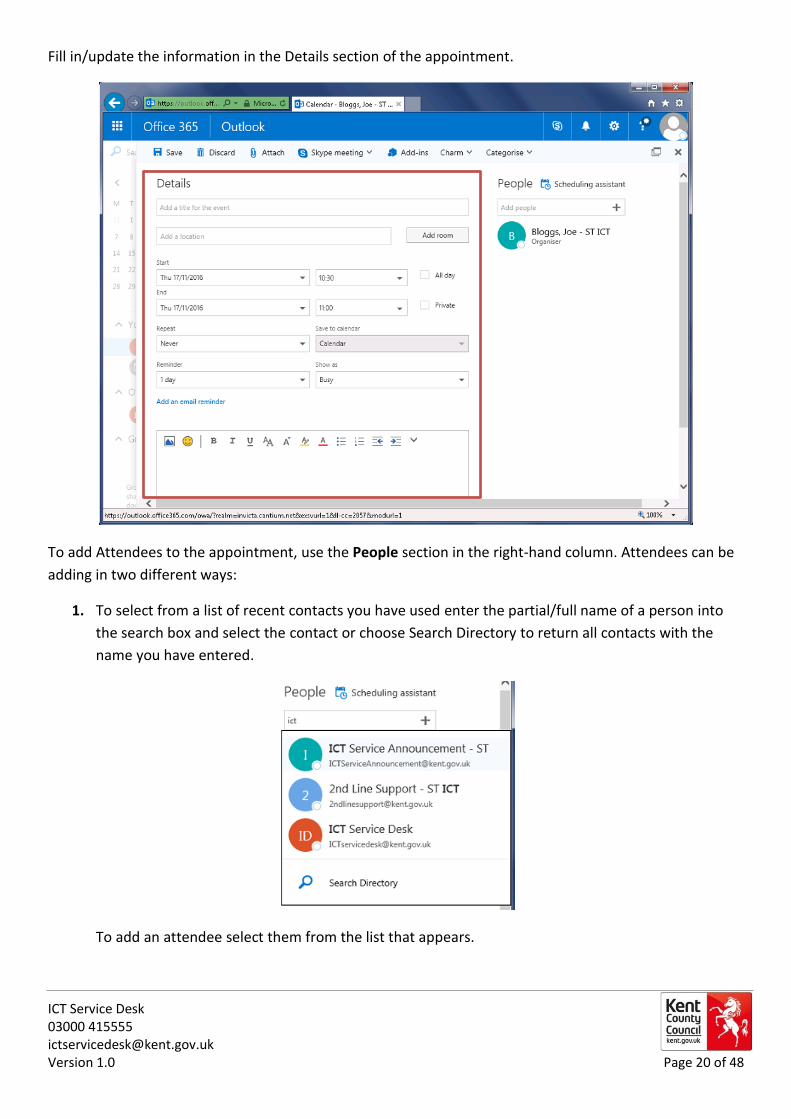
Fill in/update the information in the Details section of the appointment.
To add Attendees to the appointment, use the People section in the right-hand column. Attendees can be
adding in two different ways:
1. To select from a list of recent contacts you have used enter the partial/full name of a person into
the search box and select the contact or choose Search Directory to return all contacts with the
name you have entered.
To add an attendee select them from the list that appears.
ICT Service Desk 03000 415555 [email protected] Version 1.0 Page 21 of 48
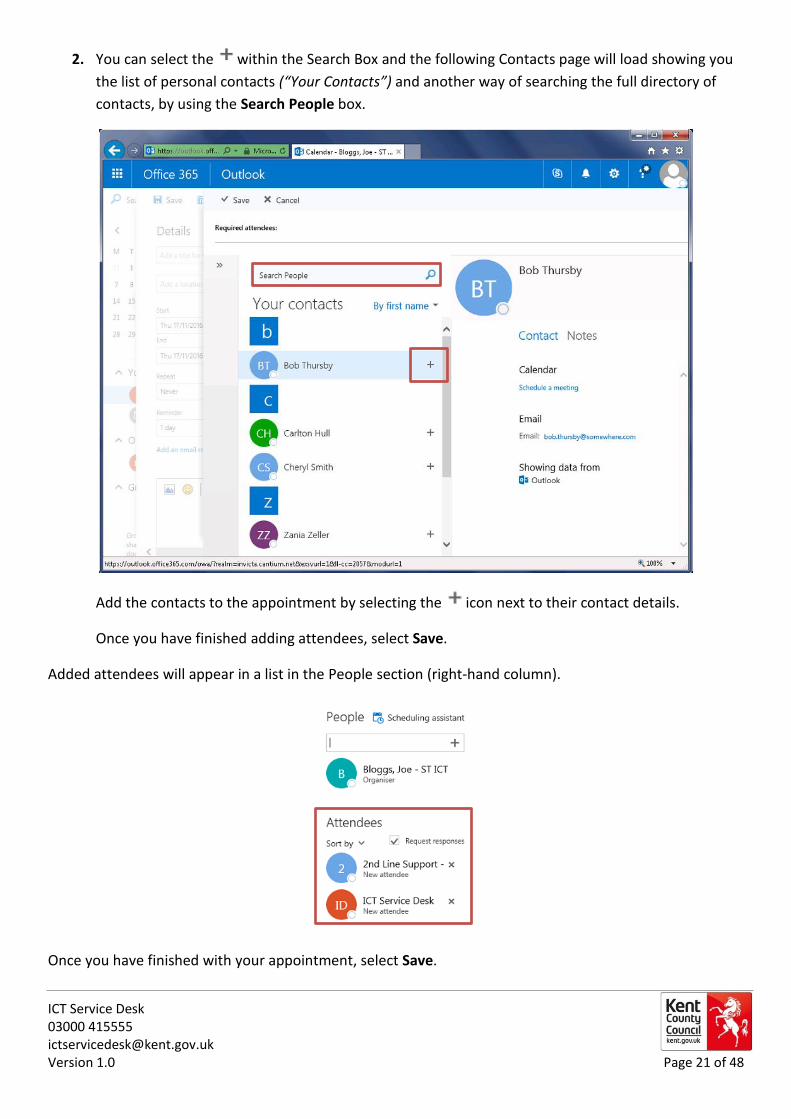
2. You can select the within the Search Box and the following Contacts page will load showing you
the list of personal contacts (“Your Contacts”) and another way of searching the full directory of
contacts, by using the Search People box.
Add the contacts to the appointment by selecting the icon next to their contact details.
Once you have finished adding attendees, select Save.
Added attendees will appear in a list in the People section (right-hand column).
Once you have finished with your appointment, select Save.
ICT Service Desk 03000 415555 [email protected] Version 1.0 Page 22 of 48
2.4 Contacts (People)
Office 365 now refers to Contacts as People. As with the Calendar, “People” is access as a separate facility
within OWA. This section briefly describes how to access personal and the organisations contacts lists.
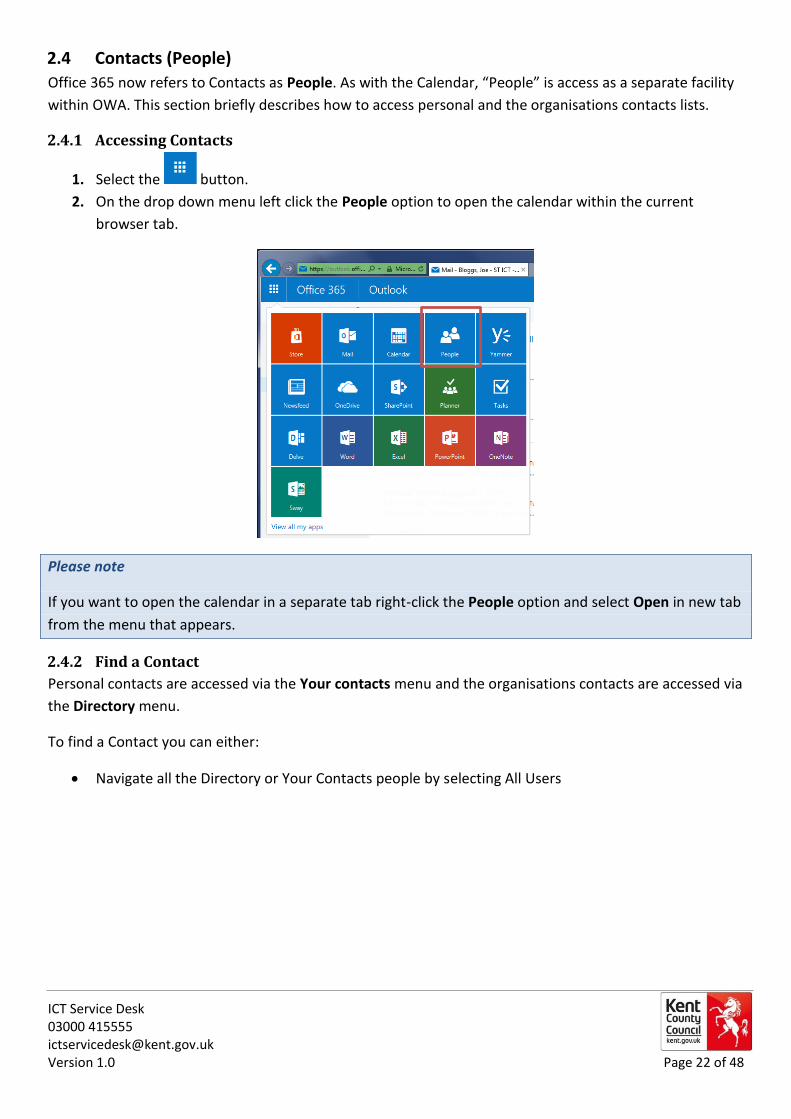
2.4.1 Accessing Contacts
1. Select the button.
2. On the drop down menu left click the People option to open the calendar within the current
browser tab.
Please note
If you want to open the calendar in a separate tab right-click the People option and select Open in new tab
from the menu that appears.
2.4.2 Find a Contact
Personal contacts are accessed via the Your contacts menu and the organisations contacts are accessed via
the Directory menu.
To find a Contact you can either:
Navigate all the Directory or Your Contacts people by selecting All Users

ICT Service Desk 03000 415555 [email protected] Version 1.0 Page 23 of 48
Enter the partial/full name of a person in the Search People field.
ICT Service Desk 03000 415555 [email protected] Version 1.0 Page 24 of 48
2.4.3 Add a Contact
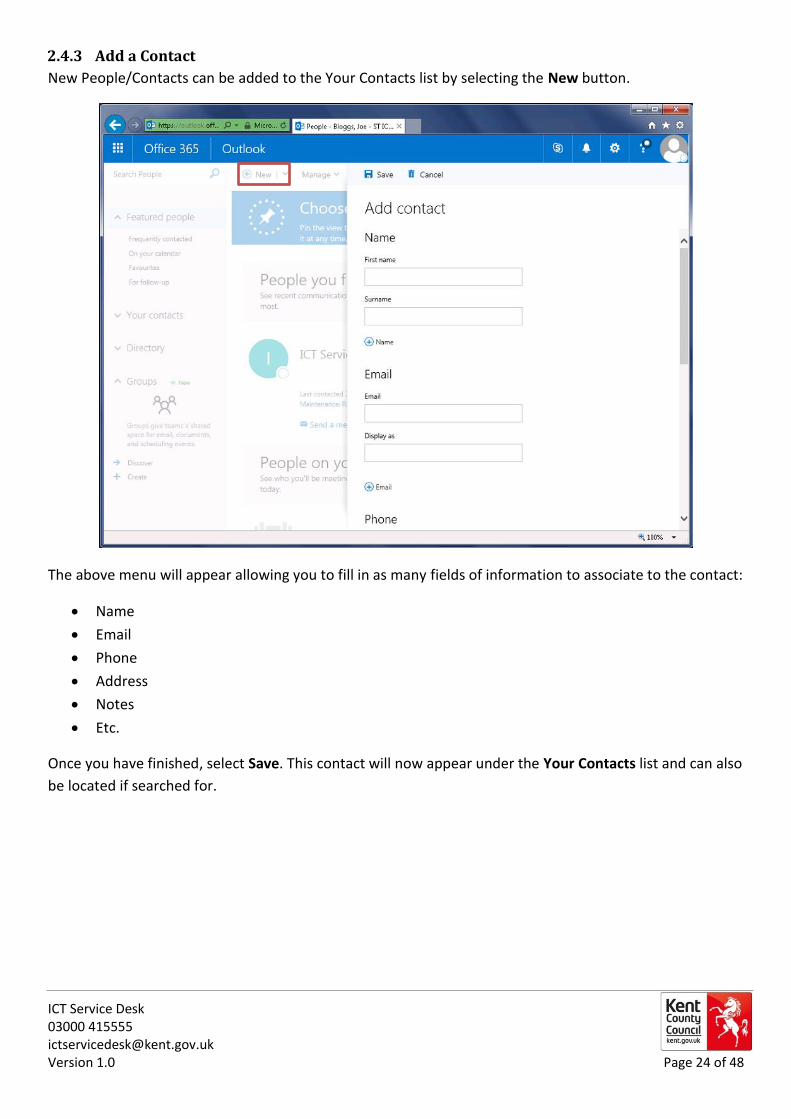
New People/Contacts can be added to the Your Contacts list by selecting the New button.
The above menu will appear allowing you to fill in as many fields of information to associate to the contact:
Name
Phone
Address
Notes
Etc.
Once you have finished, select Save. This contact will now appear under the Your Contacts list and can also
be located if searched for.
ICT Service Desk 03000 415555 [email protected] Version 1.0 Page 25 of 48
2.5 Managing email attachments (OneDrive)
OWA provides access to a file hosting service called OneDrive, e.g. it is a network file share based in the
Cloud. OneDrive will be the default location for saving and attaching files from/to emails whilst using OWA.
Being a web hosted service the OneDrive is available to access on both work and personal (via OWA)
devices.
2.5.1 Opening attachments
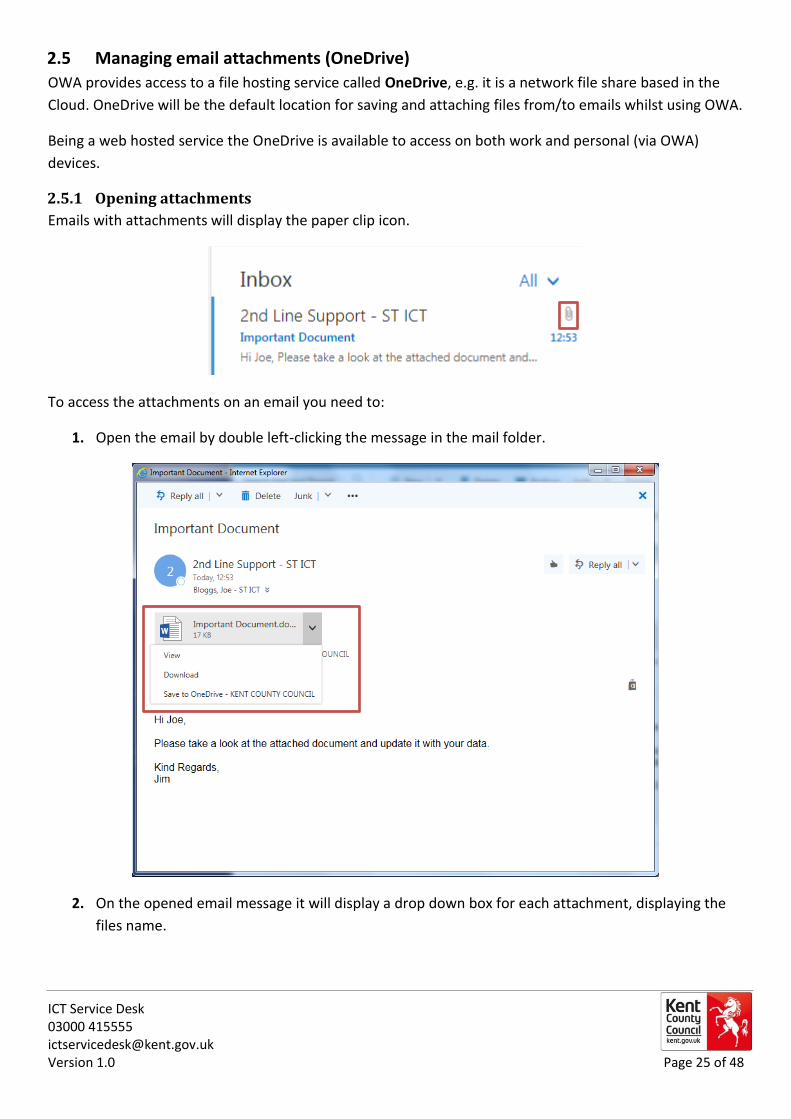
Emails with attachments will display the paper clip icon.
To access the attachments on an email you need to:
1. Open the email by double left-clicking the message in the mail folder.
2. On the opened email message it will display a drop down box for each attachment, displaying the
files name.
ICT Service Desk 03000 415555 [email protected] Version 1.0 Page 26 of 48
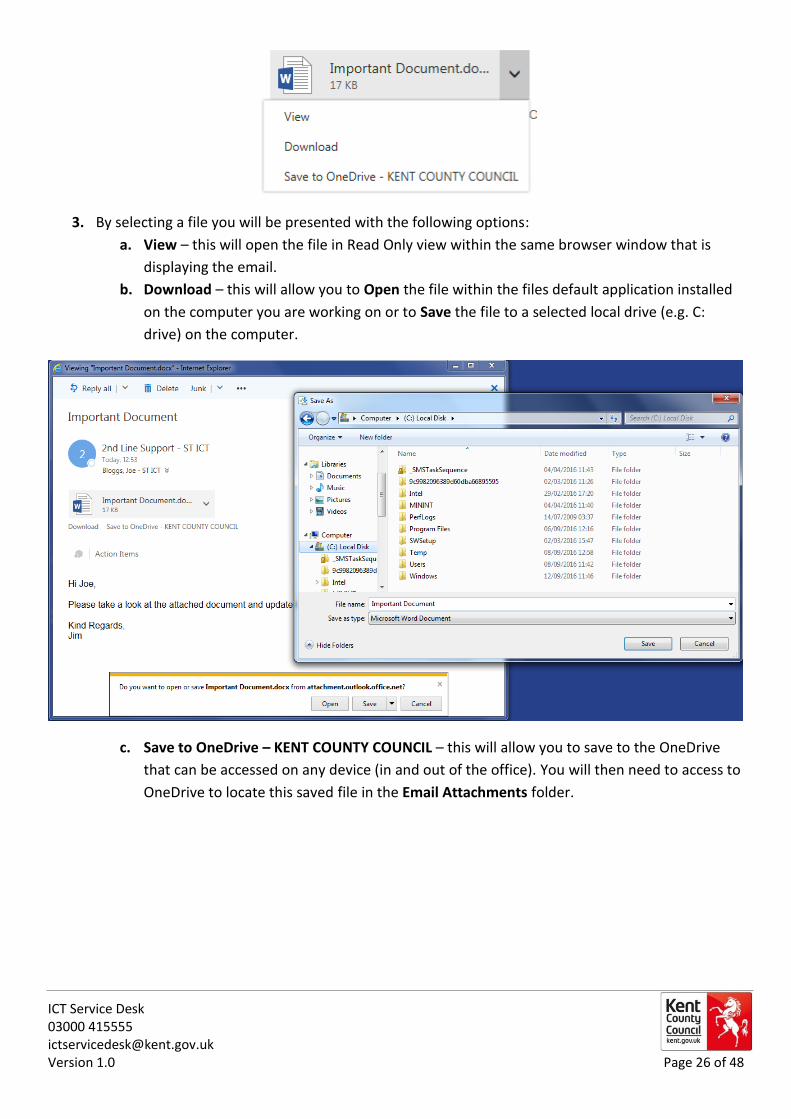
3. By selecting a file you will be presented with the following options:
a. View – this will open the file in Read Only view within the same browser window that is
displaying the email.
b. Download – this will allow you to Open the file within the files default application installed
on the computer you are working on or to Save the file to a selected local drive (e.g. C:
drive) on the computer.
c. Save to OneDrive – KENT COUNTY COUNCIL – this will allow you to save to the OneDrive
that can be accessed on any device (in and out of the office). You will then need to access to
OneDrive to locate this saved file in the Email Attachments folder.
ICT Service Desk 03000 415555 [email protected] Version 1.0 Page 27 of 48
2.5.2 Accessing the OneDrive
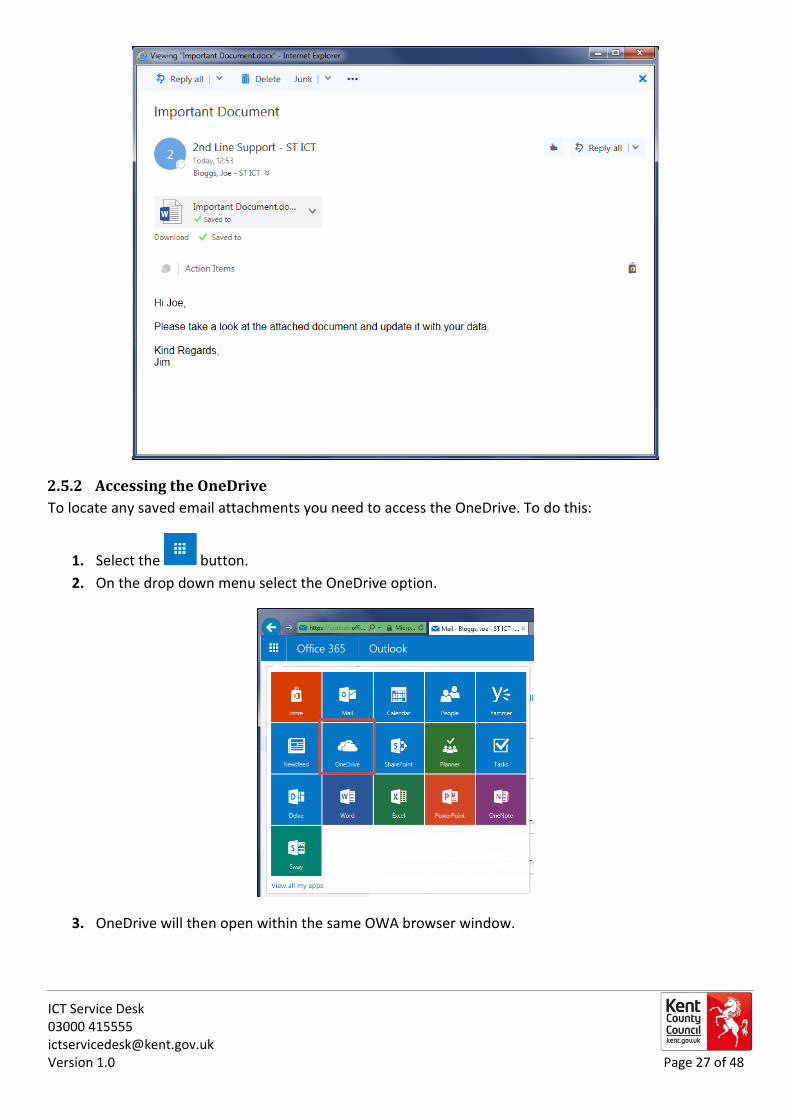
To locate any saved email attachments you need to access the OneDrive. To do this:
1. Select the button.
2. On the drop down menu select the OneDrive option.
3. OneDrive will then open within the same OWA browser window.
ICT Service Desk 03000 415555 [email protected] Version 1.0 Page 28 of 48
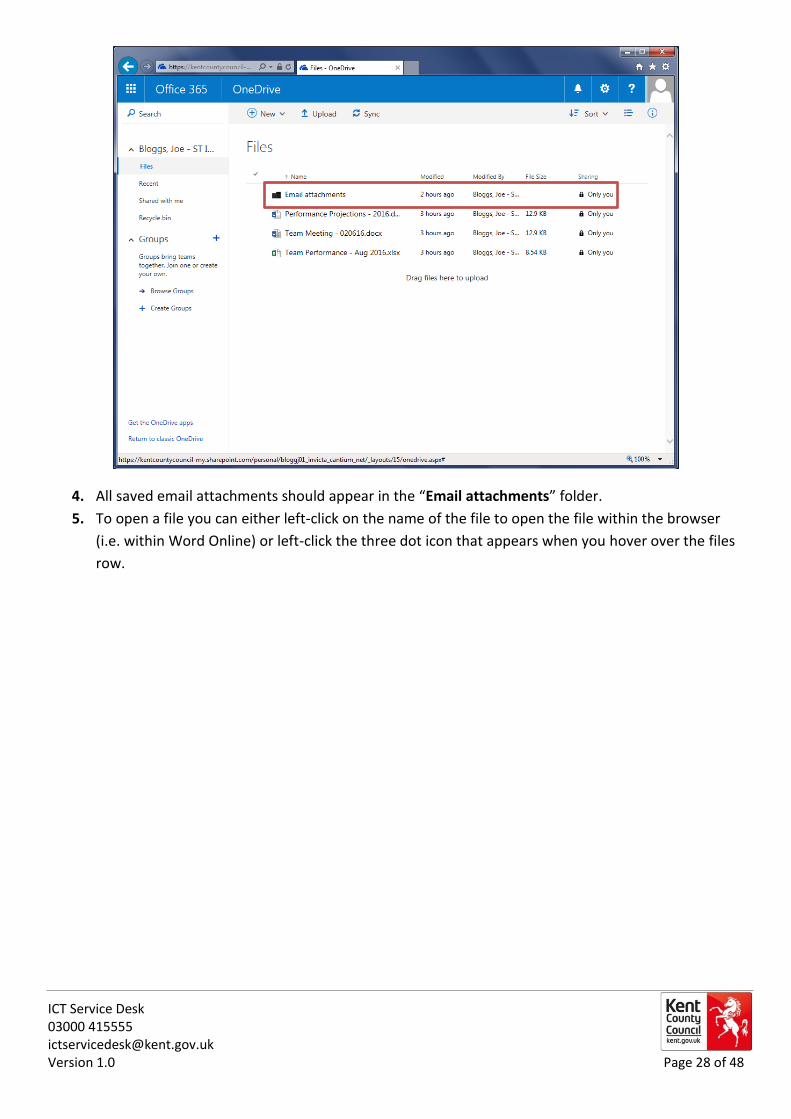
4. All saved email attachments should appear in the “Email attachments” folder.
5. To open a file you can either left-click on the name of the file to open the file within the browser
(i.e. within Word Online) or left-click the three dot icon that appears when you hover over the files
row.
ICT Service Desk 03000 415555 [email protected] Version 1.0 Page 29 of 48
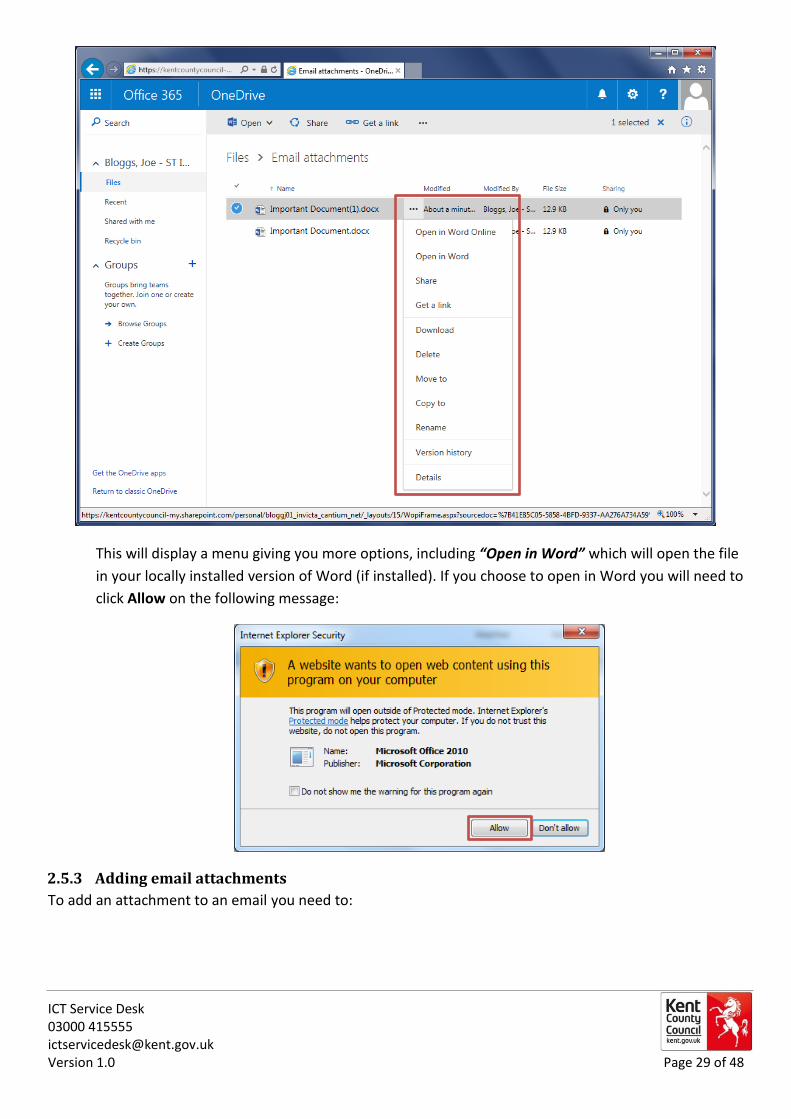
This will display a menu giving you more options, including “Open in Word” which will open the file
in your locally installed version of Word (if installed). If you choose to open in Word you will need to
click Allow on the following message:
2.5.3 Adding email attachments
To add an attachment to an email you need to:
ICT Service Desk 03000 415555 [email protected] Version 1.0 Page 30 of 48
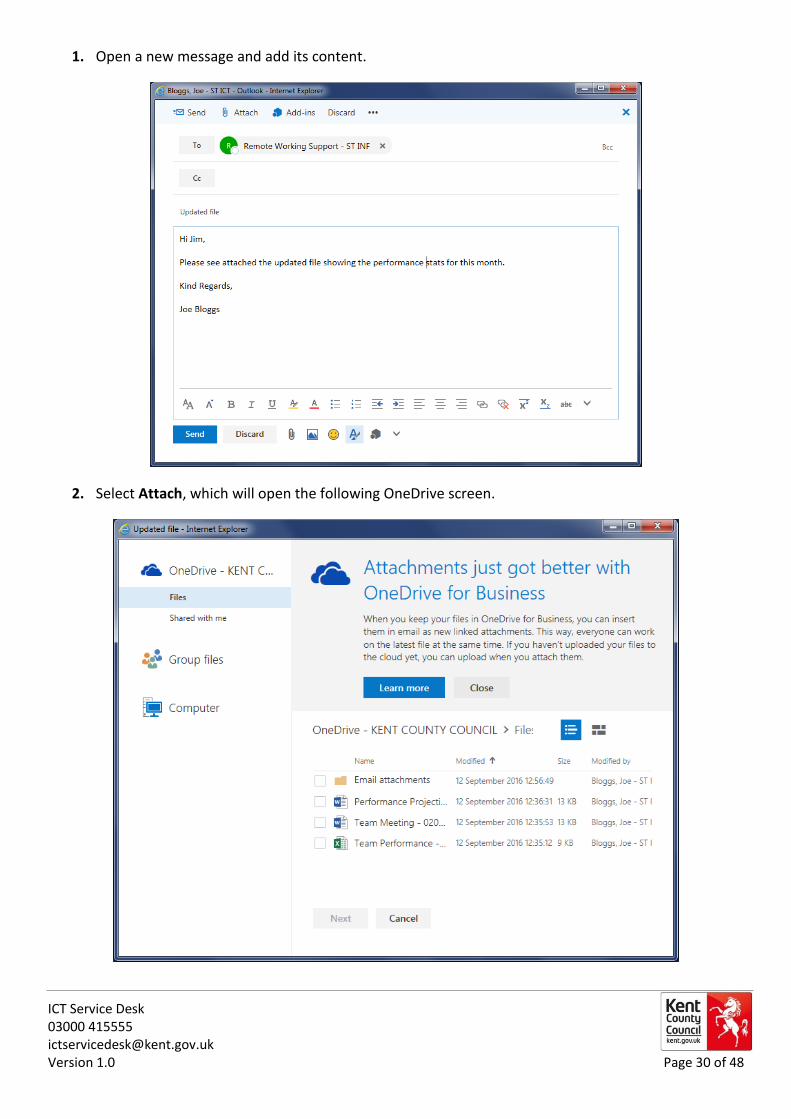
1. Open a new message and add its content.
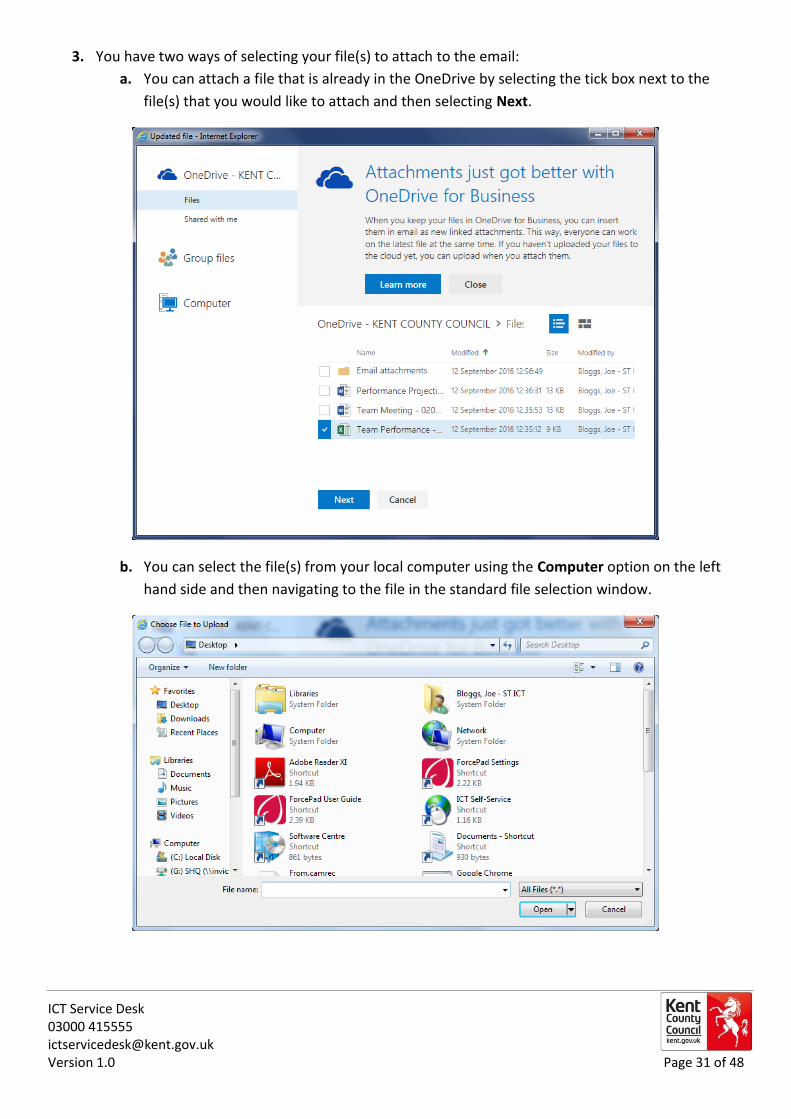
2. Select Attach, which will open the following OneDrive screen.
ICT Service Desk 03000 415555 [email protected] Version 1.0 Page 31 of 48
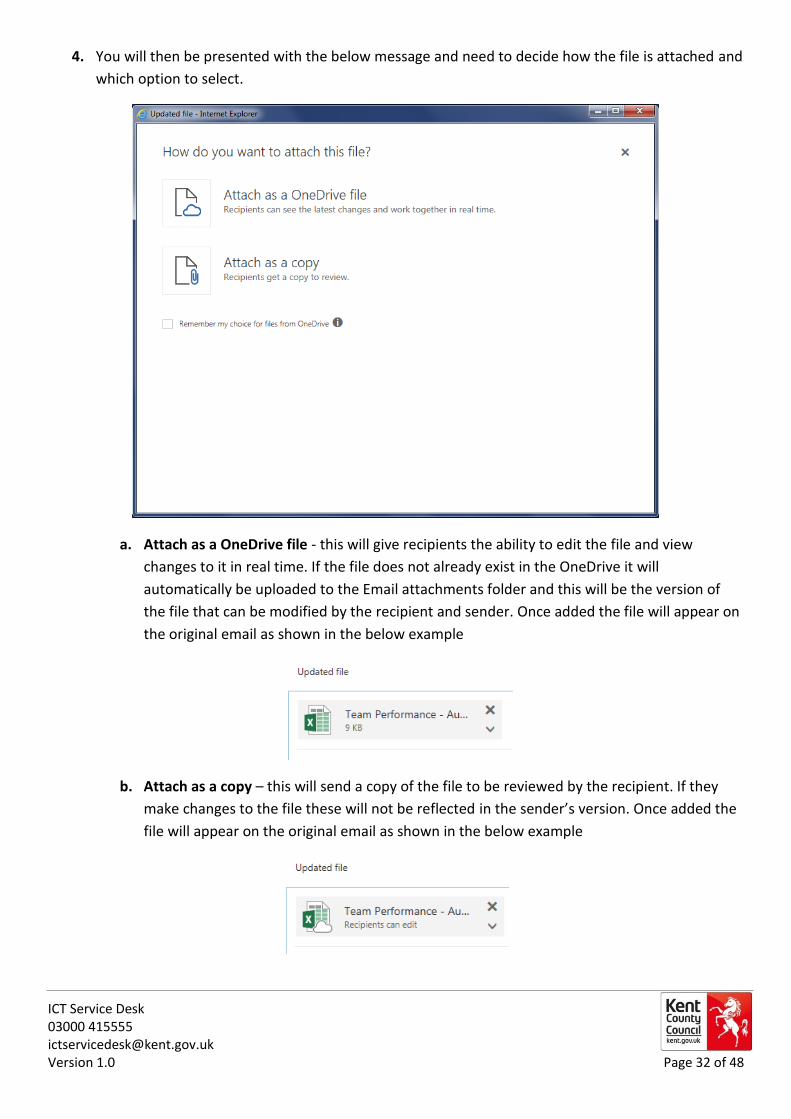
3. You have two ways of selecting your file(s) to attach to the email:
a. You can attach a file that is already in the OneDrive by selecting the tick box next to the
file(s) that you would like to attach and then selecting Next.
b. You can select the file(s) from your local computer using the Computer option on the left
hand side and then navigating to the file in the standard file selection window.
ICT Service Desk 03000 415555 [email protected] Version 1.0 Page 32 of 48
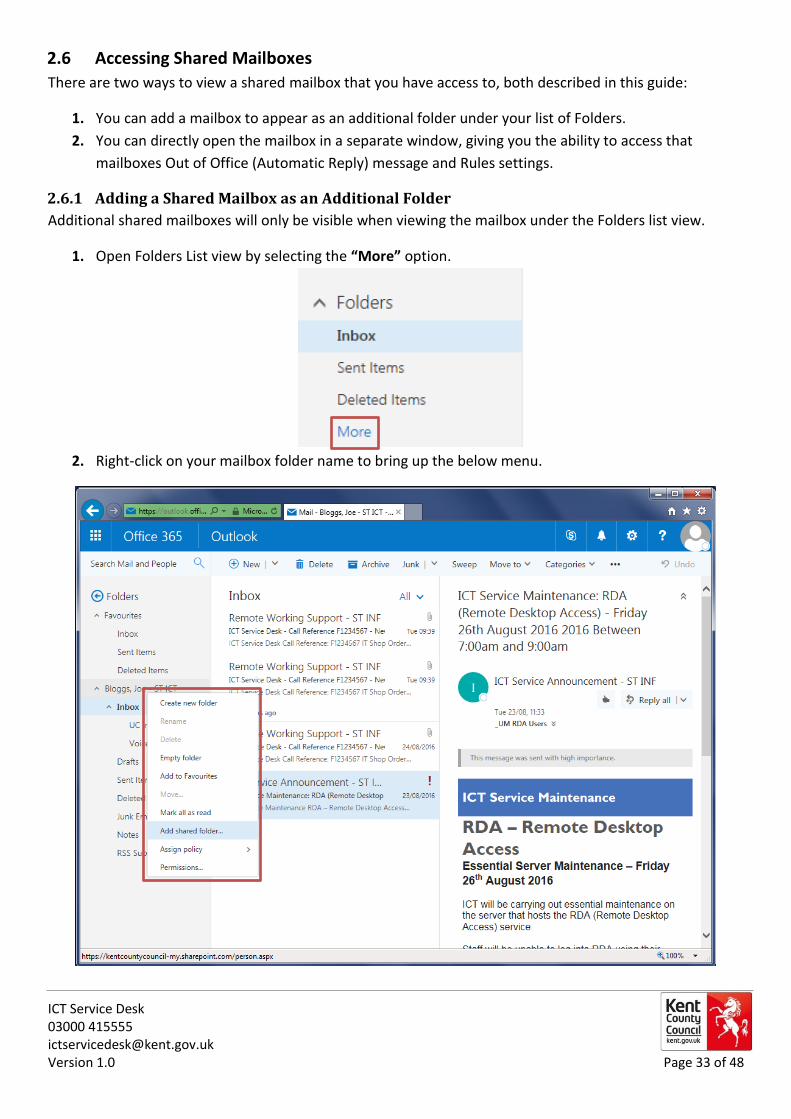
4. You will then be presented with the below message and need to decide how the file is attached and
which option to select.
a. Attach as a OneDrive file - this will give recipients the ability to edit the file and view
changes to it in real time. If the file does not already exist in the OneDrive it will
automatically be uploaded to the Email attachments folder and this will be the version of
the file that can be modified by the recipient and sender. Once added the file will appear on
the original email as shown in the below example
b. Attach as a copy – this will send a copy of the file to be reviewed by the recipient. If they
make changes to the file these will not be reflected in the sender’s version. Once added the
file will appear on the original email as shown in the below example
ICT Service Desk 03000 415555 [email protected] Version 1.0 Page 33 of 48
2.6 Accessing Shared Mailboxes
There are two ways to view a shared mailbox that you have access to, both described in this guide:
1. You can add a mailbox to appear as an additional folder under your list of Folders.
2. You can directly open the mailbox in a separate window, giving you the ability to access that
mailboxes Out of Office (Automatic Reply) message and Rules settings.
2.6.1 Adding a Shared Mailbox as an Additional Folder
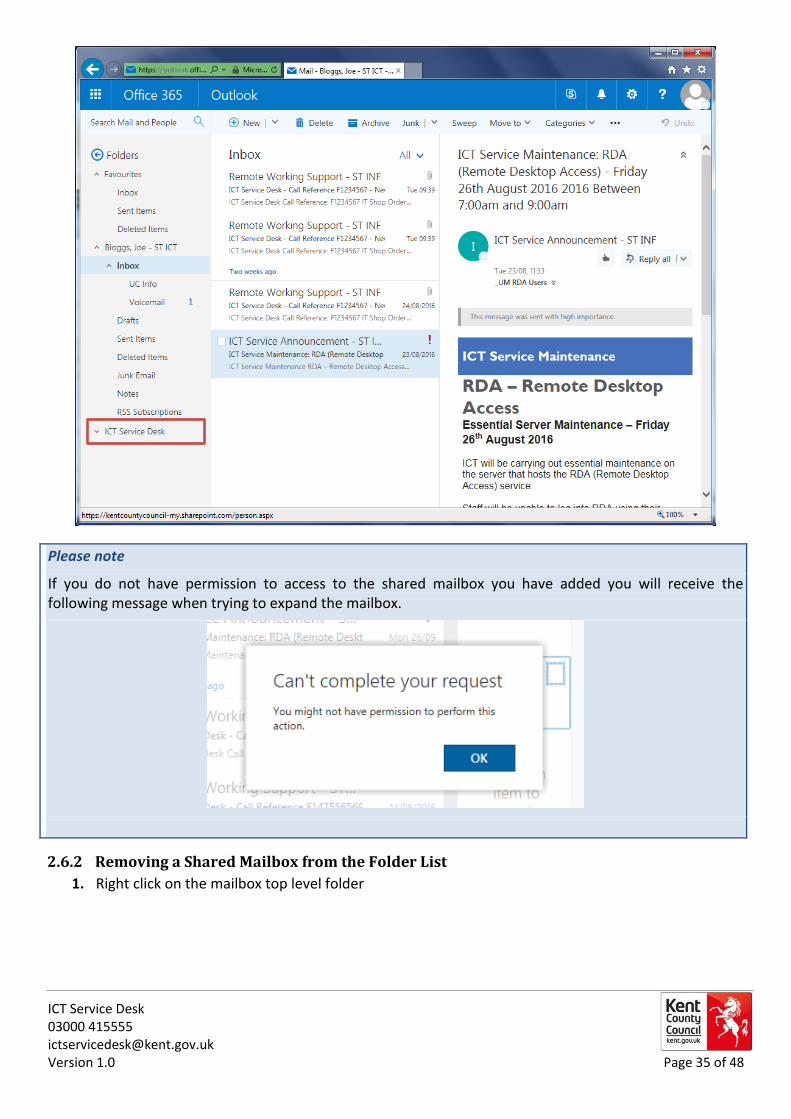
Additional shared mailboxes will only be visible when viewing the mailbox under the Folders list view.
1. Open Folders List view by selecting the “More” option.
2. Right-click on your mailbox folder name to bring up the below menu.
ICT Service Desk 03000 415555 [email protected] Version 1.0 Page 34 of 48
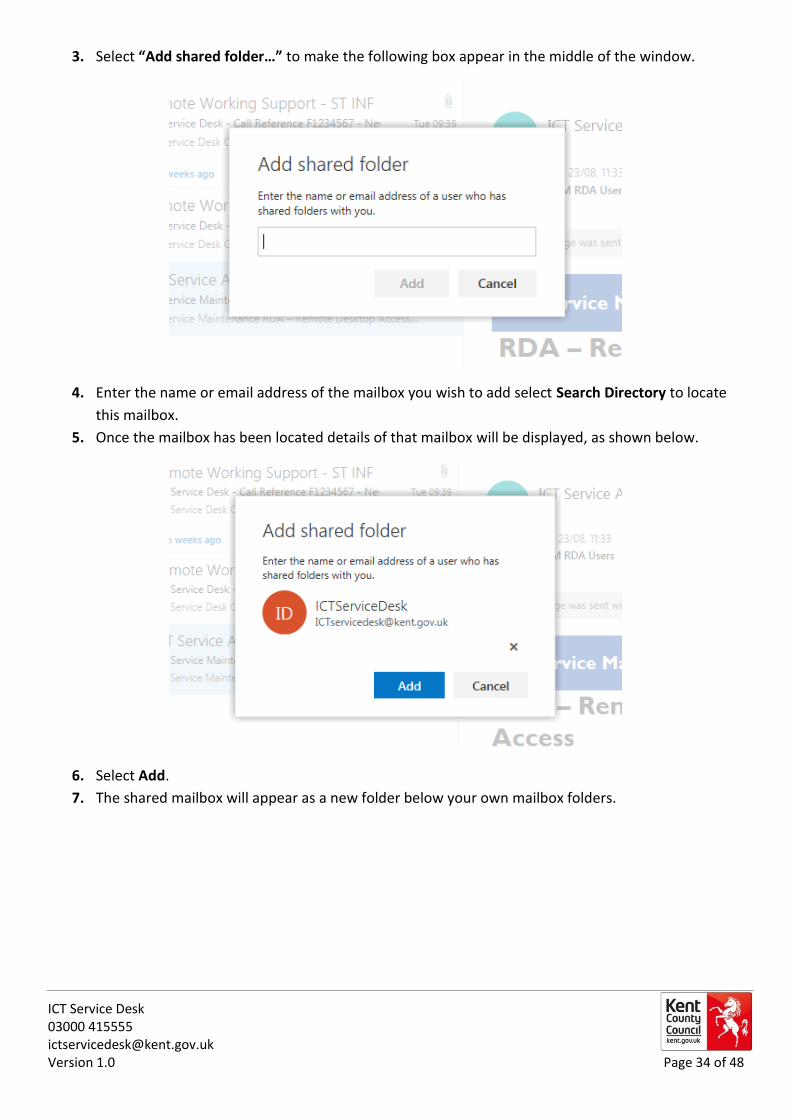
3. Select “Add shared folder…” to make the following box appear in the middle of the window.
4. Enter the name or email address of the mailbox you wish to add select Search Directory to locate
this mailbox.
5. Once the mailbox has been located details of that mailbox will be displayed, as shown below.
6. Select Add.
7. The shared mailbox will appear as a new folder below your own mailbox folders.
ICT Service Desk 03000 415555 [email protected] Version 1.0 Page 35 of 48
Please note
If you do not have permission to access to the shared mailbox you have added you will receive the following message when trying to expand the mailbox.
2.6.2 Removing a Shared Mailbox from the Folder List
1. Right click on the mailbox top level folder
ICT Service Desk 03000 415555 [email protected] Version 1.0 Page 36 of 48
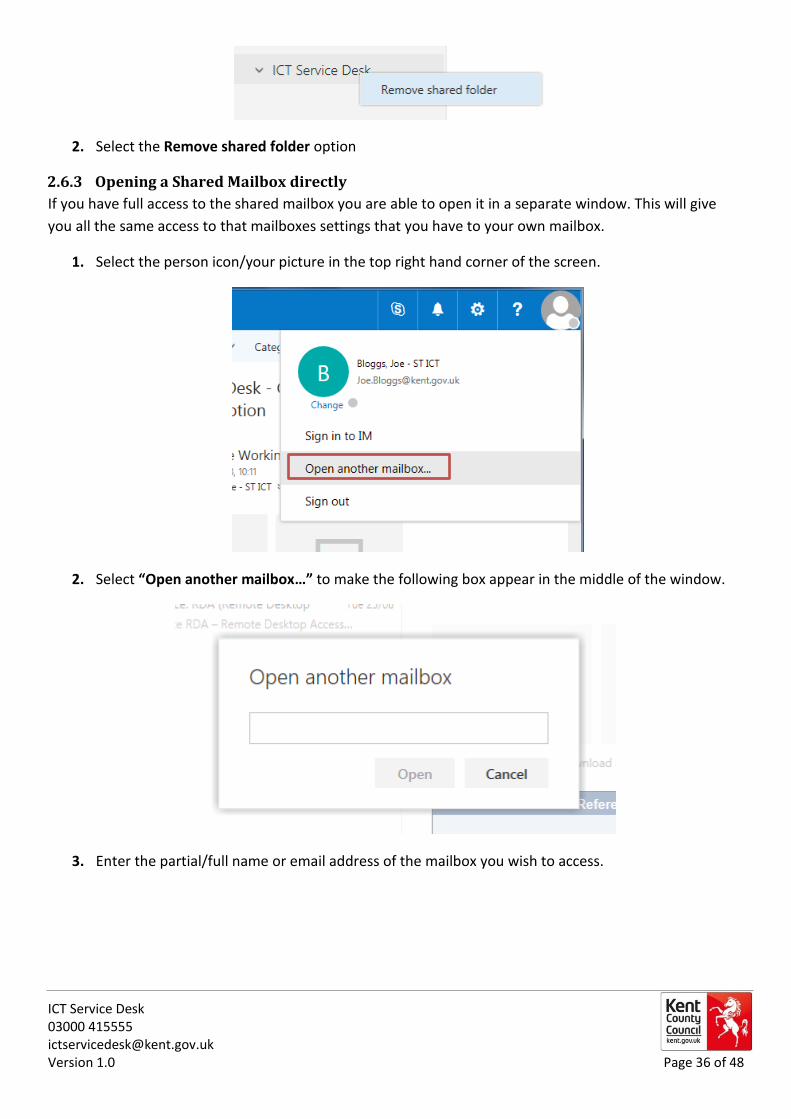
2. Select the Remove shared folder option
2.6.3 Opening a Shared Mailbox directly
If you have full access to the shared mailbox you are able to open it in a separate window. This will give
you all the same access to that mailboxes settings that you have to your own mailbox.
1. Select the person icon/your picture in the top right hand corner of the screen.
2. Select “Open another mailbox…” to make the following box appear in the middle of the window.
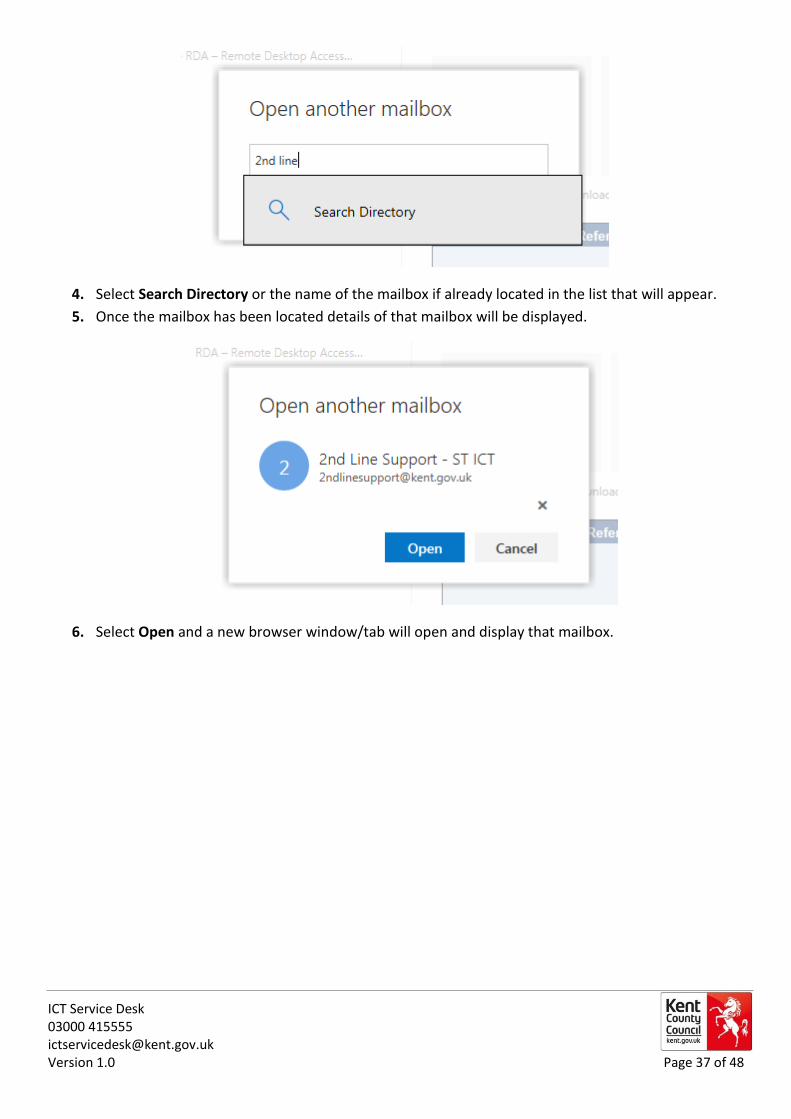
3. Enter the partial/full name or email address of the mailbox you wish to access.
ICT Service Desk 03000 415555 [email protected] Version 1.0 Page 37 of 48
4. Select Search Directory or the name of the mailbox if already located in the list that will appear.
5. Once the mailbox has been located details of that mailbox will be displayed.
6. Select Open and a new browser window/tab will open and display that mailbox.
ICT Service Desk 03000 415555 [email protected] Version 1.0 Page 38 of 48
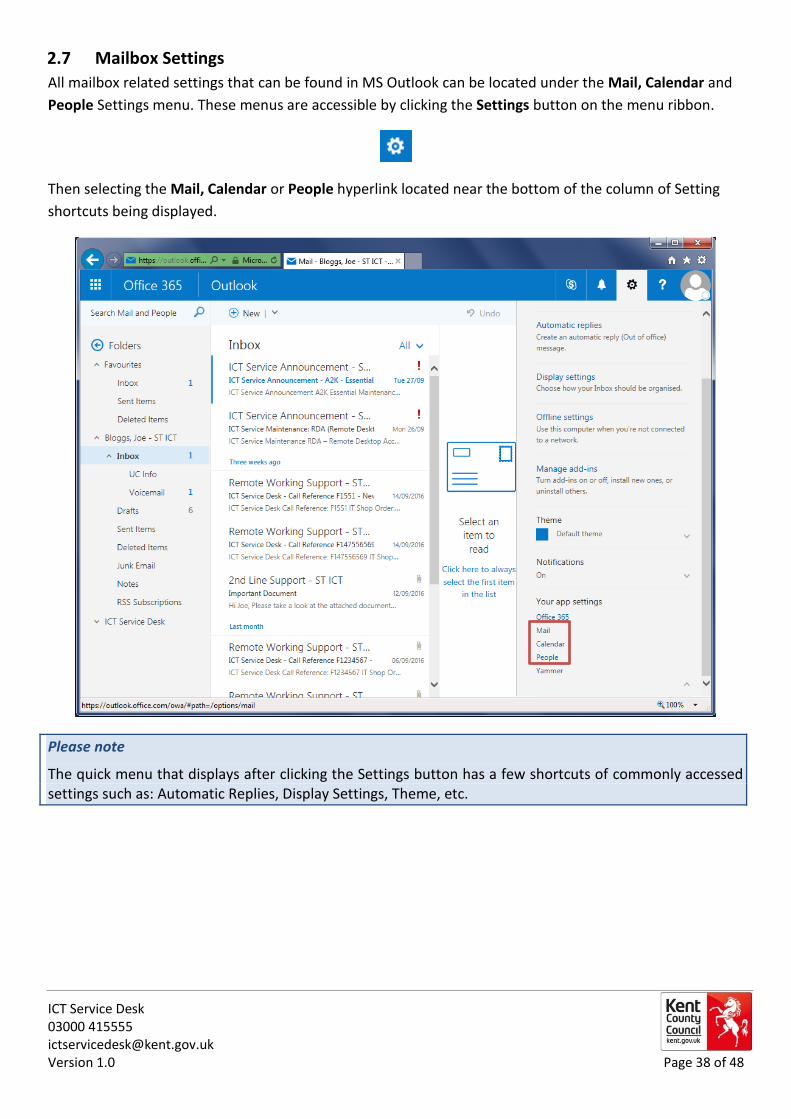
2.7 Mailbox Settings
All mailbox related settings that can be found in MS Outlook can be located under the Mail, Calendar and
People Settings menu. These menus are accessible by clicking the Settings button on the menu ribbon.
Then selecting the Mail, Calendar or People hyperlink located near the bottom of the column of Setting
shortcuts being displayed.
Please note
The quick menu that displays after clicking the Settings button has a few shortcuts of commonly accessed settings such as: Automatic Replies, Display Settings, Theme, etc.
ICT Service Desk 03000 415555 [email protected] Version 1.0 Page 39 of 48
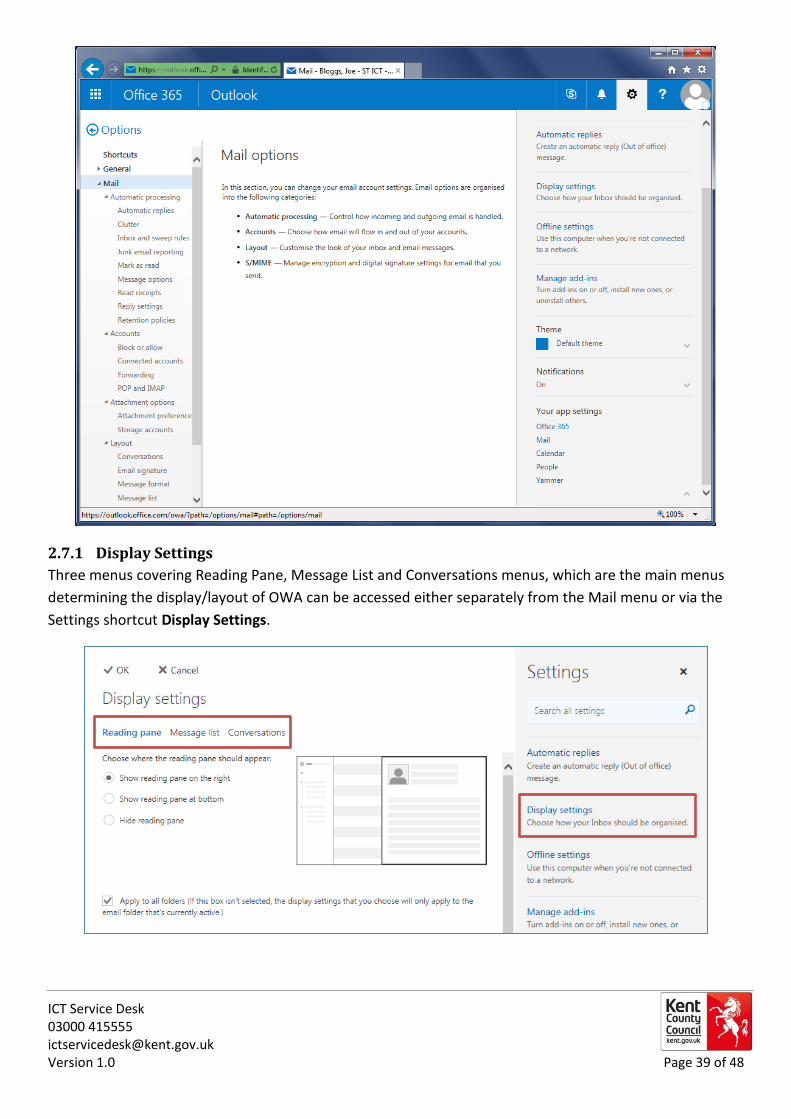
2.7.1 Display Settings
Three menus covering Reading Pane, Message List and Conversations menus, which are the main menus
determining the display/layout of OWA can be accessed either separately from the Mail menu or via the
Settings shortcut Display Settings.
ICT Service Desk 03000 415555 [email protected] Version 1.0 Page 40 of 48
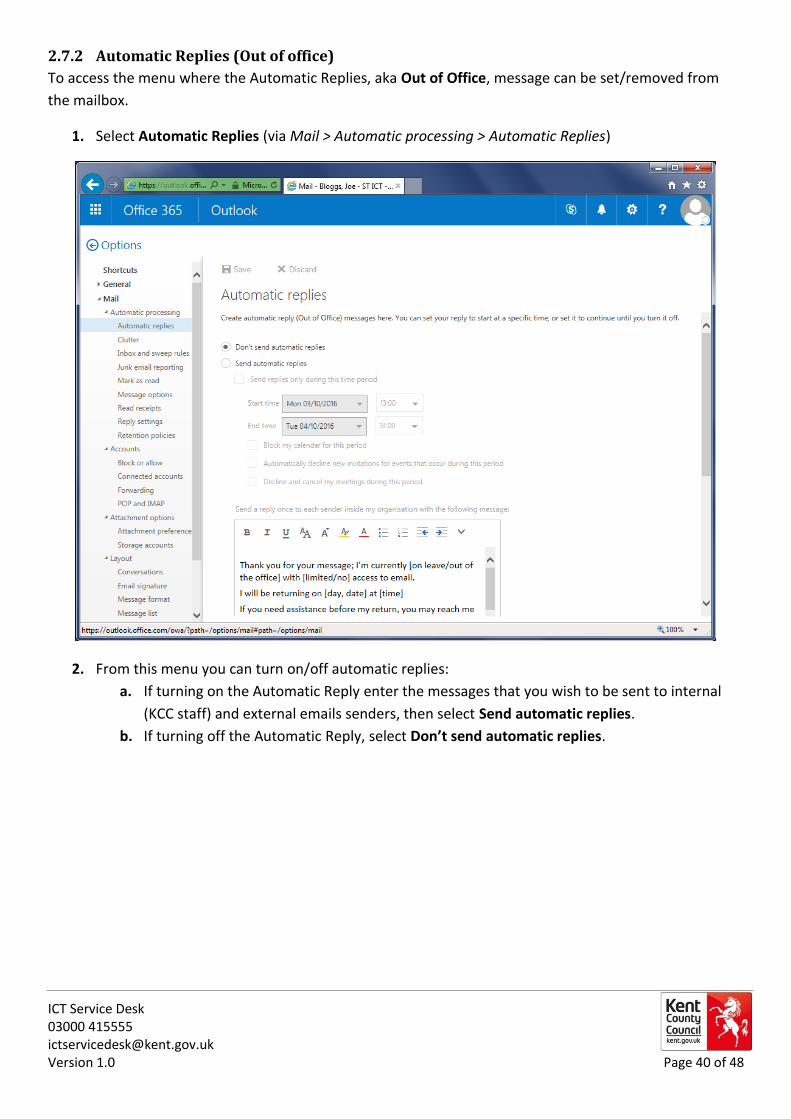
2.7.2 Automatic Replies (Out of office)
To access the menu where the Automatic Replies, aka Out of Office, message can be set/removed from
the mailbox.
1. Select Automatic Replies (via Mail > Automatic processing > Automatic Replies)
2. From this menu you can turn on/off automatic replies:
a. If turning on the Automatic Reply enter the messages that you wish to be sent to internal
(KCC staff) and external emails senders, then select Send automatic replies.
b. If turning off the Automatic Reply, select Don’t send automatic replies.
ICT Service Desk 03000 415555 [email protected] Version 1.0 Page 41 of 48
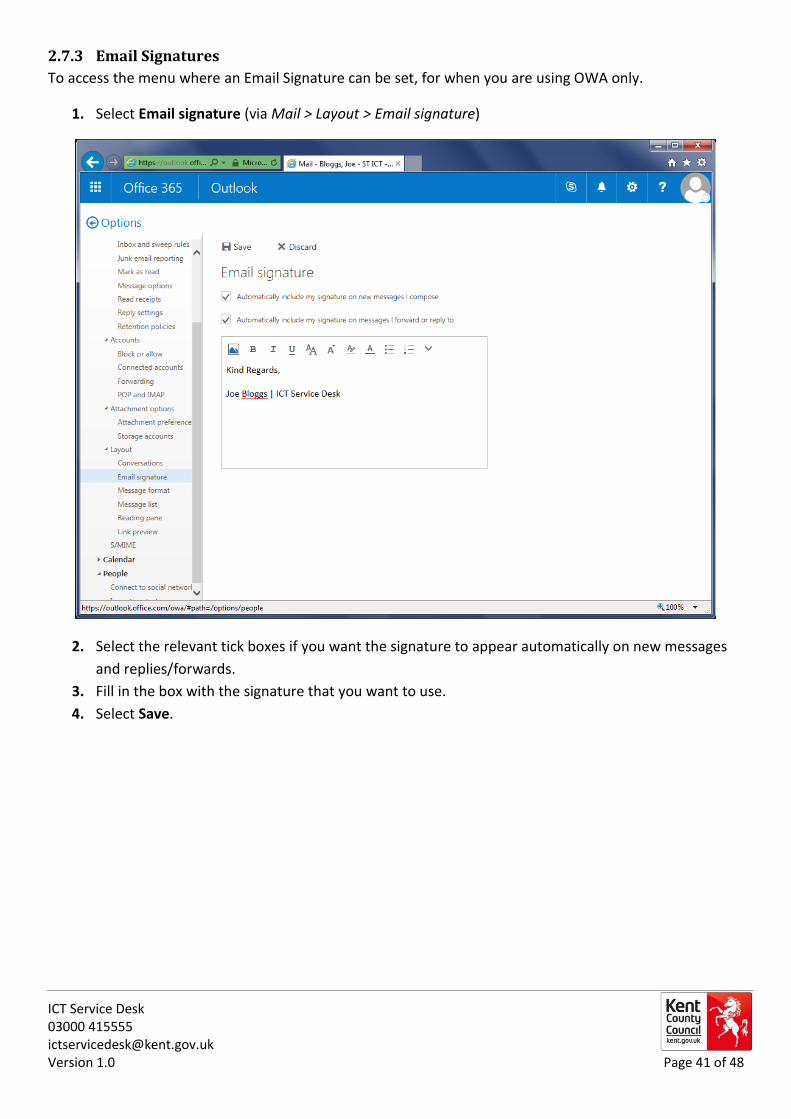
2.7.3 Email Signatures
To access the menu where an Email Signature can be set, for when you are using OWA only.
1. Select Email signature (via Mail > Layout > Email signature)
2. Select the relevant tick boxes if you want the signature to appear automatically on new messages
and replies/forwards.
3. Fill in the box with the signature that you want to use.
4. Select Save.
ICT Service Desk 03000 415555 [email protected] Version 1.0 Page 42 of 48
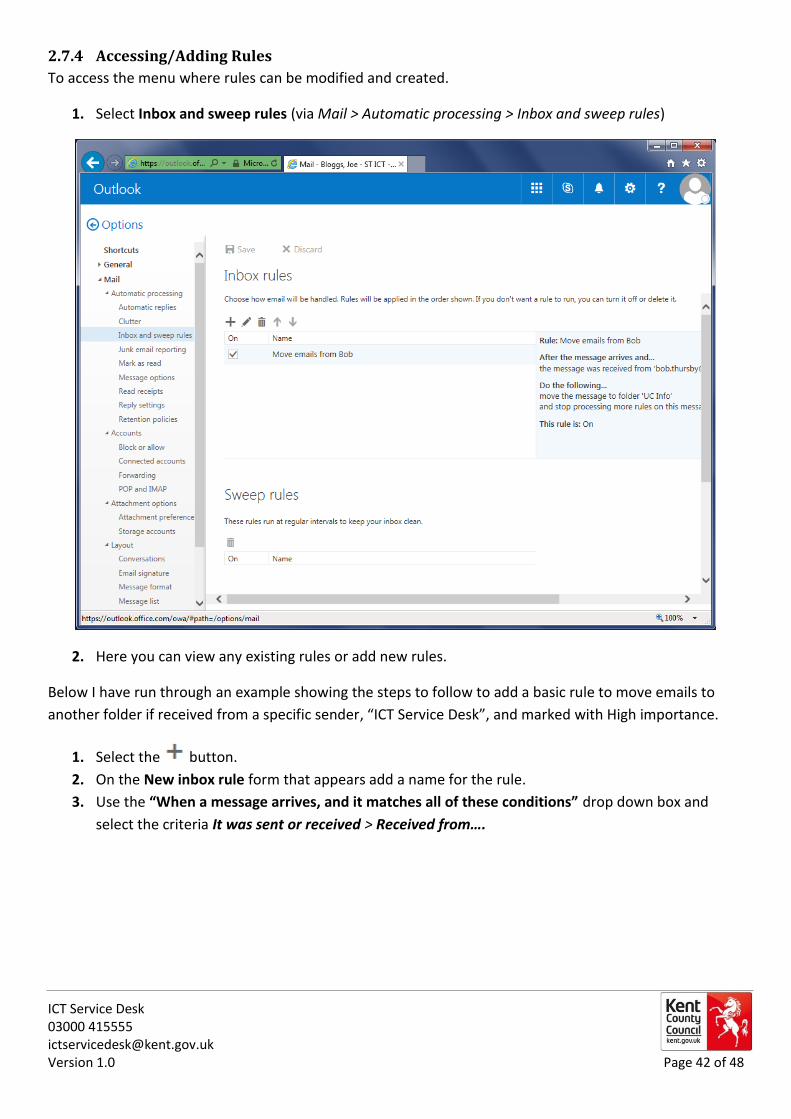
2.7.4 Accessing/Adding Rules
To access the menu where rules can be modified and created.
1. Select Inbox and sweep rules (via Mail > Automatic processing > Inbox and sweep rules)
2. Here you can view any existing rules or add new rules.
Below I have run through an example showing the steps to follow to add a basic rule to move emails to
another folder if received from a specific sender, “ICT Service Desk”, and marked with High importance.
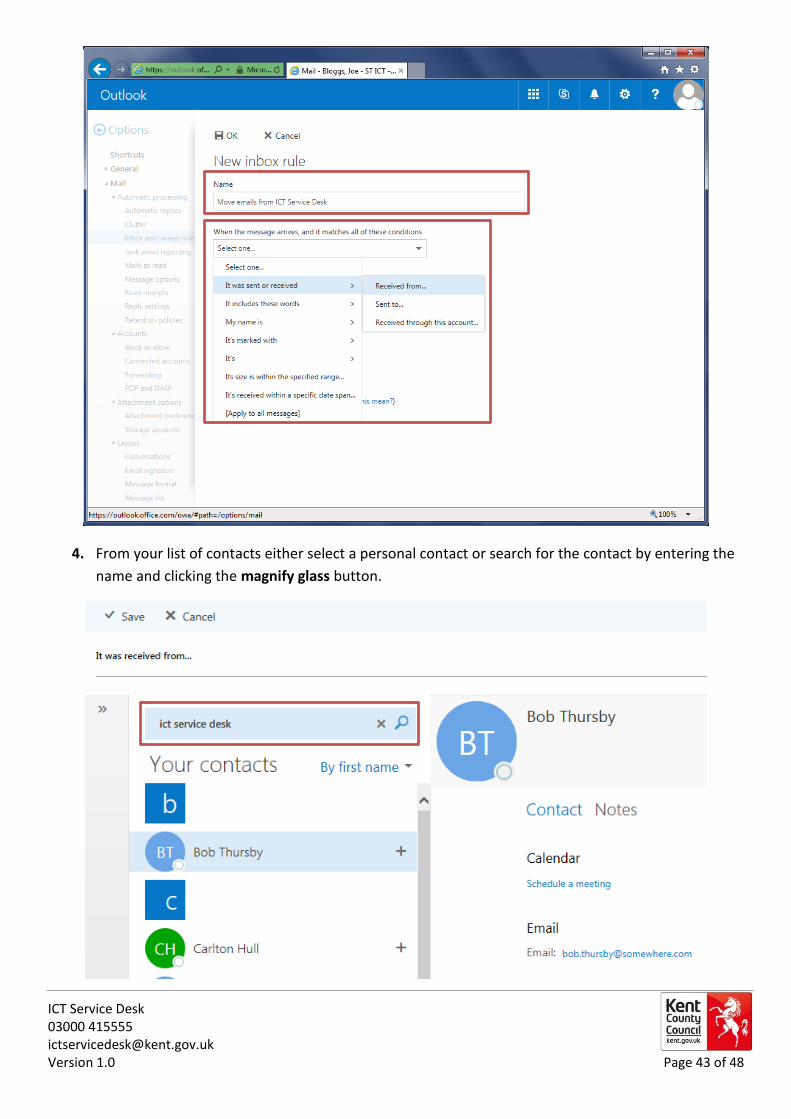
1. Select the button.
2. On the New inbox rule form that appears add a name for the rule.
3. Use the “When a message arrives, and it matches all of these conditions” drop down box and
select the criteria It was sent or received > Received from….
ICT Service Desk 03000 415555 [email protected] Version 1.0 Page 43 of 48
4. From your list of contacts either select a personal contact or search for the contact by entering the
name and clicking the magnify glass button.
ICT Service Desk 03000 415555 [email protected] Version 1.0 Page 44 of 48
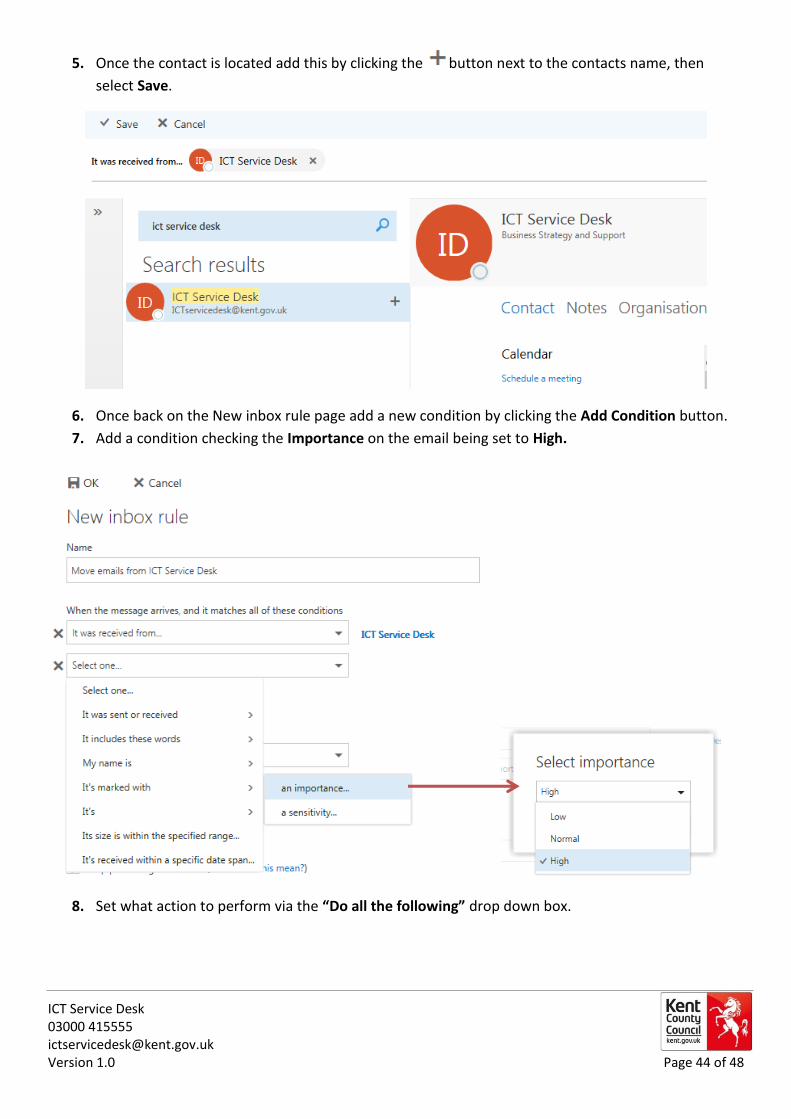
5. Once the contact is located add this by clicking the button next to the contacts name, then
select Save.
6. Once back on the New inbox rule page add a new condition by clicking the Add Condition button.
7. Add a condition checking the Importance on the email being set to High.
8. Set what action to perform via the “Do all the following” drop down box.
ICT Service Desk 03000 415555 [email protected] Version 1.0 Page 45 of 48
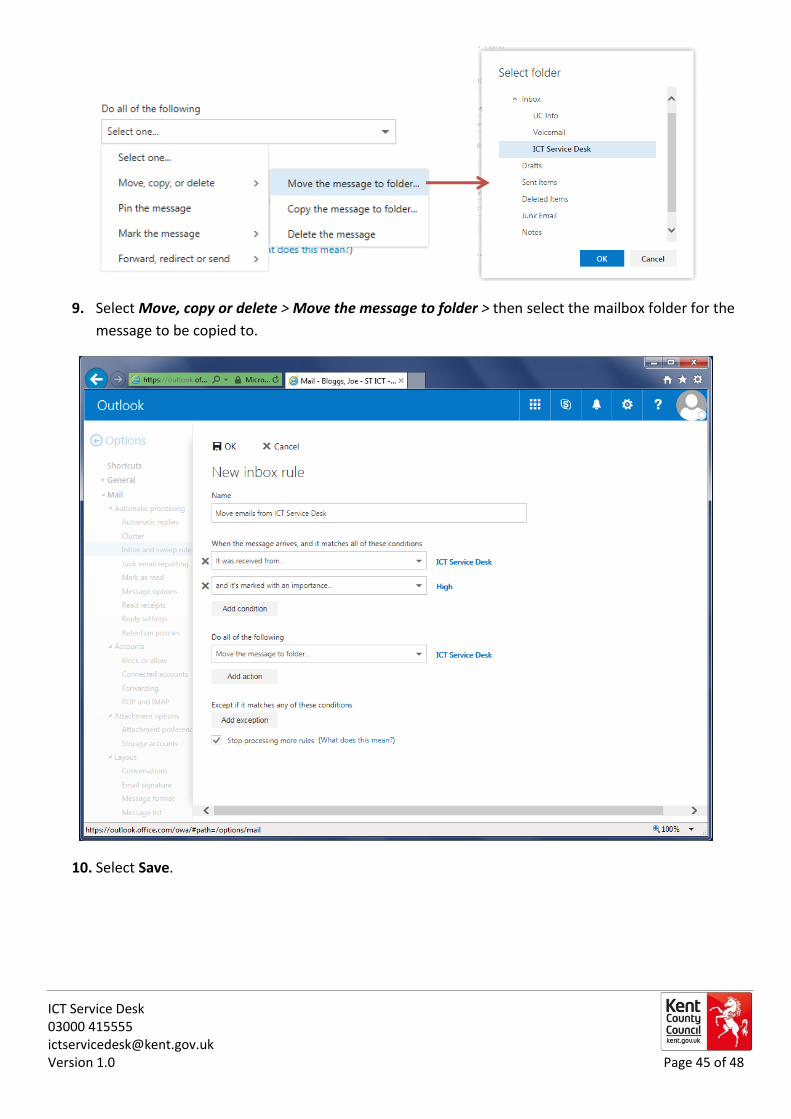
9. Select Move, copy or delete > Move the message to folder > then select the mailbox folder for the
message to be copied to.
10. Select Save.
ICT Service Desk 03000 415555 [email protected] Version 1.0 Page 46 of 48
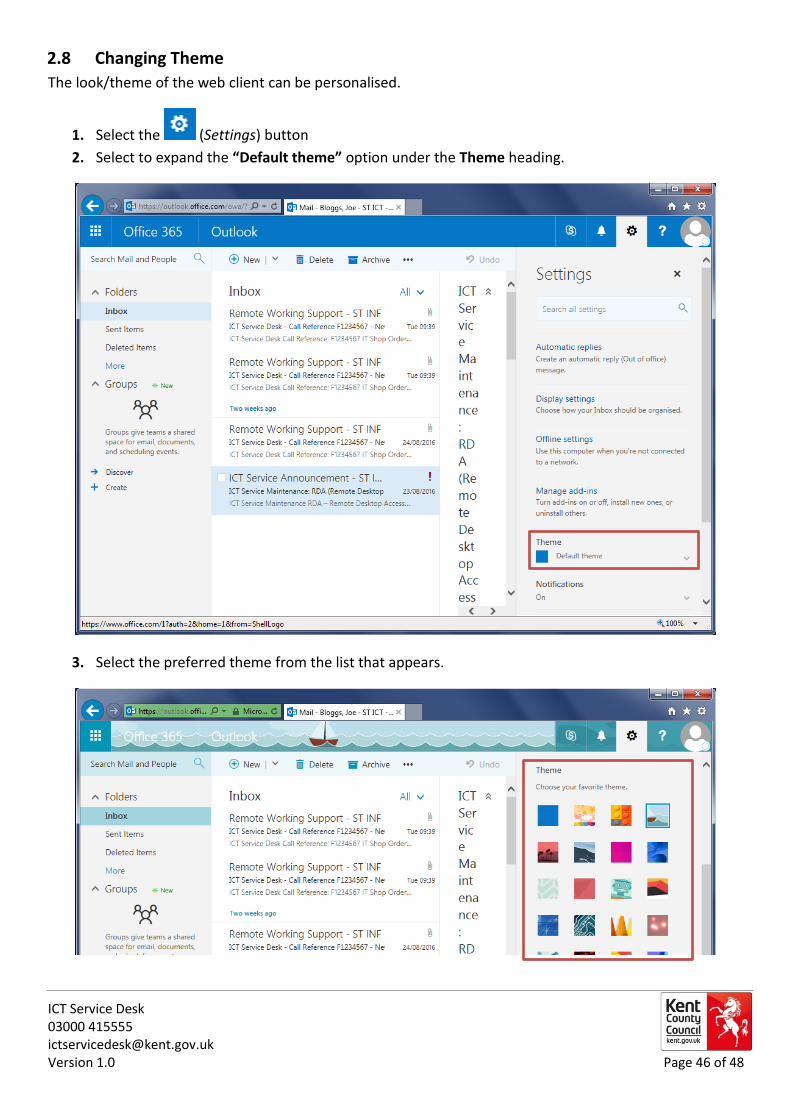
2.8 Changing Theme
The look/theme of the web client can be personalised.
1. Select the (Settings) button
2. Select to expand the “Default theme” option under the Theme heading.
3. Select the preferred theme from the list that appears.
ICT Service Desk 03000 415555 [email protected] Version 1.0 Page 47 of 48
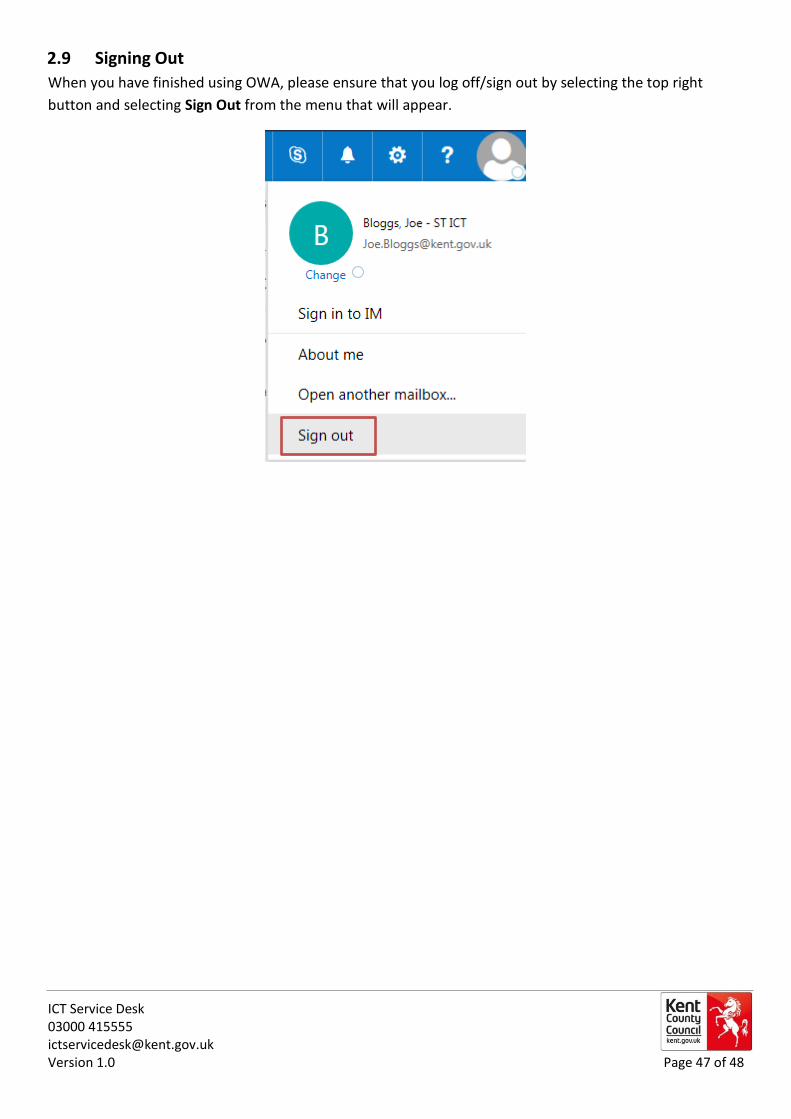
2.9 Signing Out
When you have finished using OWA, please ensure that you log off/sign out by selecting the top right
button and selecting Sign Out from the menu that will appear.
ICT Service Desk 03000 415555 [email protected] Version 1.0 Page 48 of 48
3 Troubleshooting
This section highlights some scenarios you may come across during your use of OWA.
3.1 Remote Working Token Unlock and PIN Reset
Remote Working Tokens can be unlocked and their PIN Reset by accessing the Remote Working Token Self
Service Portal. The site is only accessible from a KCC device that is connected to the KCC network, i.e. a
device in the office or a successful connection to A2K or RDA.
Please note
For full details please read the Remote Working Token Activation – User Guide located on ICT’s Knet page.
If you are not connected to the KCC network you can contact the ICT Service Desk and request the Remote
Working Token be unlocked or the PIN reset.
3.2 If all else fails
You can contact the ICT Service Desk on (03000) 415555. We are available Monday to Friday from 8am
until 5:30pm. If the problem is not urgent, you can e-mail us on ICT Service Desk