Embed Size (px)
Citation preview
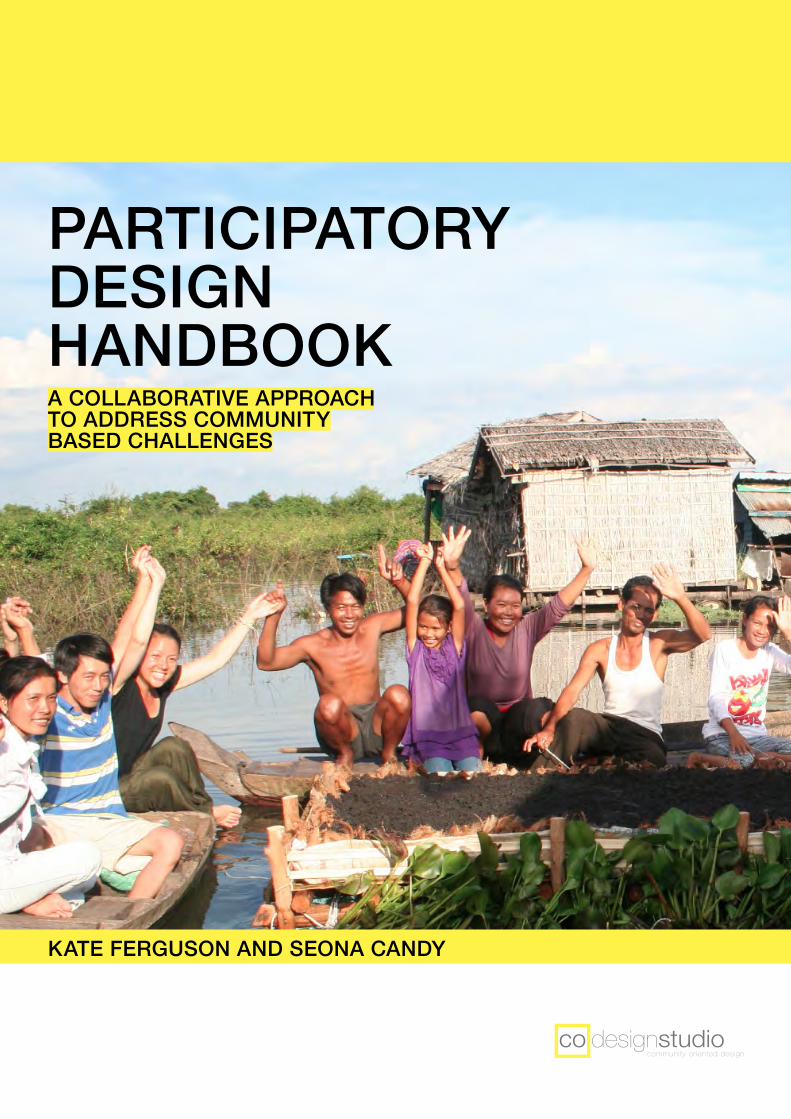
PARTICIPATORY DESIGN HANDBOOKA COLLABORATIVE APPROACH TO ADDRESS COMMUNITY BASED CHALLENGES
KATE FERGUSON AND SEONA CANDY
ii /// Participatory design handbook
PARTICIPATORY DESIGN HANDBOOKKATE FERGUSON AND SEONA CANDY
Handbook Design and GraphicsDavid HeymannLucy Rogers [email protected]
Project PartnersThe project on which this Handbook is based was a partnership between CoDesign Studio, Agile Development Group, and Rural Friends for Community Development.
CoDesign Studio is a non-profit social enterprise that works with communities, professionals and service providers to build social inclusion through neighbourhood improvement projects. www.codesignstudio.com.au
Agile Development Group is a business with experience in grassroots community development, international development, international business, social enterprise development and corporate social responsibility. www.agiledg.comRural Friends for Community Development is a non-government organisation who work with 13 villages in Pursat Province, Cambodia. Their programs focus on health, environment, food security and governance.
AcknowledgementsThe project on which this Handbook is based would not have been possible without the efforts of many people and organisations.Thank you to Agile Development Group and Rural Friends for Community Development for their vision, commitment, project management and facilitation skills. Thank you to the volunteers from CoDesign Studio and Small World for their time, enthusiasm, thoughtfulness and professional skills.Thank you to our secondary partners Small World and the Food Security Network for facilitating different aspects of the project. Thank you to Live and Learn Environmental, and Taber Hand for sharing ideas for appropriate design in Cambodia.Most importantly, thank you to the families from Au Akol and Kampong Khneas for their participation, patience, commitment and for making the project their own.
©Kate Ferguson and Seona Candy, 2014. This document is made available under a Creative Commons Attribution ShareAlike CC-BY-SA 4.0 International licence. You may share the material in any format and adapt the material for any purpose, however you must give appropriate credit, indicate if changes were made, and share the material under the same Creative Commons licence.
CorrespondenceFor further information on the project or handbook, please contact [email protected]
CONTENTSPARTICIPATORY DESIGN HANDBOOK IIINTRODUCTION VHOW TO USE THIS HANDBOOK 2PRINCIPLES OF PARTICIPATORY DESIGN 4PLANNING & RELATIONSHIPS 9BACKGROUND RESEARCH 10PARTNERING 13STAKEHOLDER ANALYSIS 16COMMUNICATION PLAN 18PROJECT PLANNING 22RISK ANALYSIS 24SELECTING PARTICIPANTS 26EXPECTATIONS 28SKILLS TRAINING 29GETTING TO KNOW EACH OTHER 30KNOWLEDGE EXCHANGE 32DESIGN 35WHAT IS DESIGN? 36THE PERFECT GARDEN 37DESIGN BRIEF 38PRECEDENTS 40MATERIALS 42FACILITATION 46CONSTRUCTION PROCESS 48MONITORING & EVALUATION (M&E) 53COLLECTING BASELINE DATA 54REFLECTION SESSIONS 56IDENTIFYING OUTCOMES AND INDICATORS 58DESIGN PRESENTATION 61LOGBOOKS 62INTERVIEWS 64CONTACT US 65
Introduction
vi /// Participatory design handbook
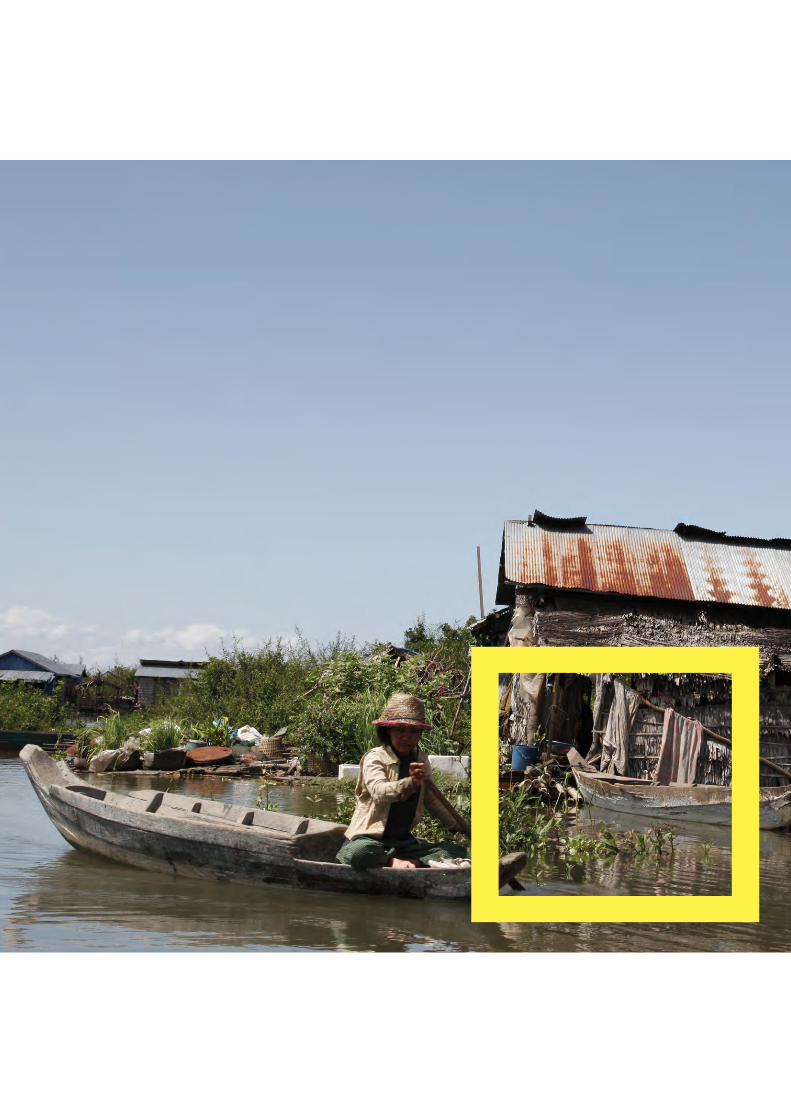
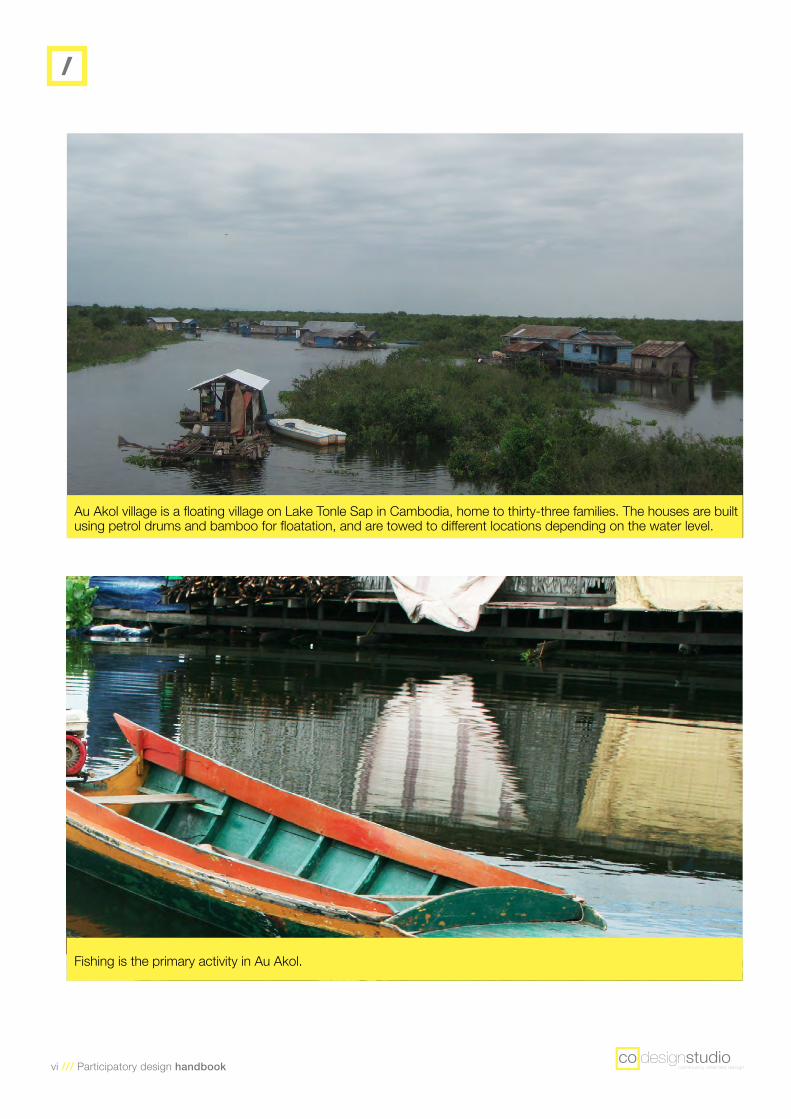
Au Akol village is a floating village on Lake Tonle Sap in Cambodia, home to thirty-three families. The houses are built using petrol drums and bamboo for floatation, and are towed to different locations depending on the water level.
Fishing is the primary activity in Au Akol.
Participatory design handbook /// 1
WHY DESIGN?Design is about addressing challenges. Design is about imagining how things could be better in the future. It can be driven by wanting to solve a problem or take advantage of an opportunity. Design is a way of thinking that can make sense of complex situations and propose innovative changes. Design process is useful for creating or improving: products (such as floating gardens), spaces (such as buildings or landscapes), systems (such as transport, waste, food production) or services (healthcare, education, disability support) to name a few. This handbook was developed from the process undertaken in a product-design process, but we hope the process has wide application in other areas.
WHY PARTICIPATION?Participation in design process can lead to a more effective design outcome, because the knowledge and needs of the user are integrated throughout the process. This helps to avoid misinterpretation or misunderstandings between designer and user. When participants invest their time in a project, they are more likely to continue caring about the project after it finishes: this can result in them taking initiative on maintenance and improvements. Participation can also lead to social outcomes such as empowerment, skills development, and increased confidence.
WHO CAN BENEFIT FROM THIS HANDBOOK?This handbook is intended to help anyone who wants to initiate or work on a community development project. The handbook was developed out of a participatory design project, but the activities in the ‘Planning and Relationships’ and the ‘Monitoring and Evaluation’ sections can be used on any type of community project, not just design projects. For the following groups the handbook offers these specific benefits:
+ Design professionals and students: resources to help you initiate and run a community project, and an explanation of when and how participatory process can help you achieve positive outcomes. Some of the methods are also useful for conventional design projects;
+ Non-government and community organisations: explanation of how design can help you achieve community impact, and resources to put this into practice;
+ Governments: explanation of processes that can help you develop innovative programs and projects for the people you serve.
We believe participatory design is a powerful process that can improve people’s lives and help communities to function better. It is an evolving field and we hope you use this document as a starting point. Please adapt it to suit your needs, test activities, come up with new ideas and constantly improve it. We would love to hear from you about your experiences and suggestions for improvement.
2 /// Participatory design handbook
HOW TO USE THIS HANDBOOK
1. READ THE INTRODUCTORY SECTIONS
‘Design’ and ‘Principles of Participatory Design’ give background on what participatory design is, why it is useful, and how it can work in a community development context.
‘Case Study – Floating Villages’ explains the context of a project undertaken on Lake Tonle Sap in Cambodia, in which participatory design was used. Throughout the Activities section you will find information about that activity in the context of the case study project, to help put it in perspective.
2. WORK THROUGH THE ACTIVITIES AS YOU UNDERTAKE YOUR OWN PROJECT.
The activities are suggestions. You may feel that some are not relevant to your project, or that you need to adapt them. Please go ahead and change them or make up your own activities.
The activities are split into three sections. These sections relate to types of activities rather than phases of the project’s timeline.
+ Planning and Relationships: Activities to help you define and plan your project, and build relationships with relevant stakeholders
+ Design: Activities related to defining a design challenge and facilitating activities with local communities + Monitoring and Evaluation: Activities related to defining project goals, tracking progress and measuring success.
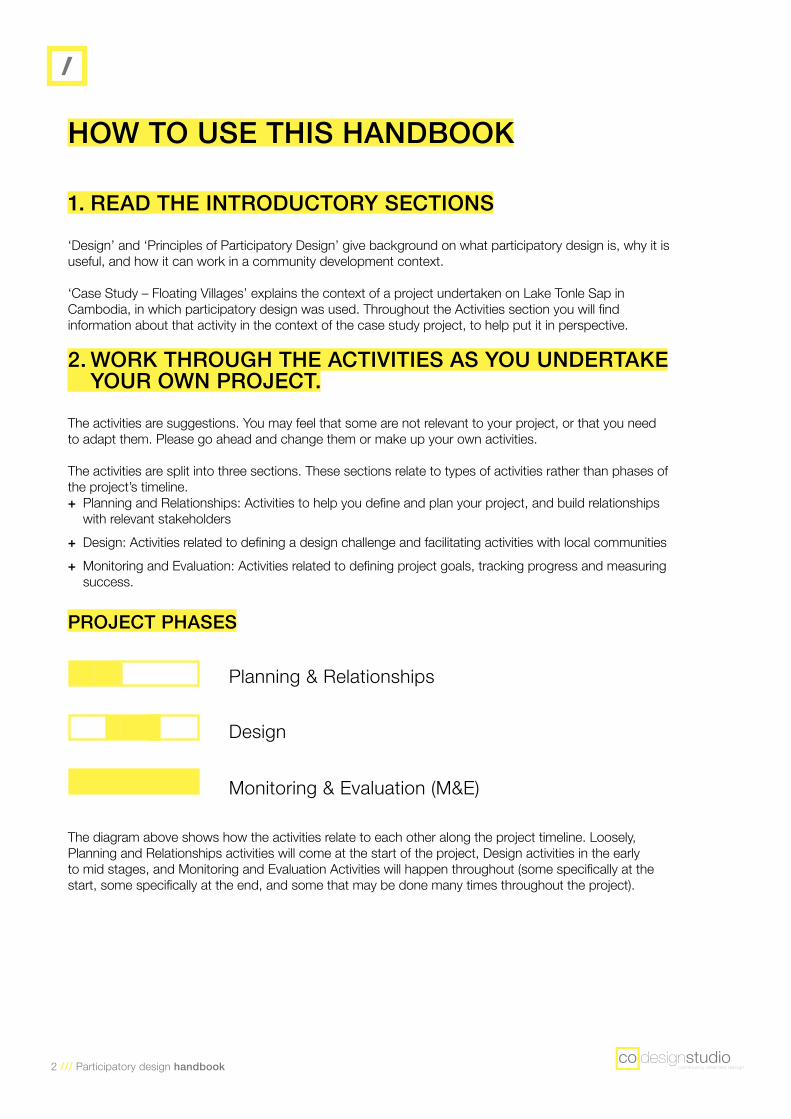
PROJECT PHASES
Planning & Relationships
Design
Monitoring & Evaluation (M&E)
The diagram above shows how the activities relate to each other along the project timeline. Loosely, Planning and Relationships activities will come at the start of the project, Design activities in the early to mid stages, and Monitoring and Evaluation Activities will happen throughout (some specifically at the start, some specifically at the end, and some that may be done many times throughout the project).
Participatory design handbook /// 3
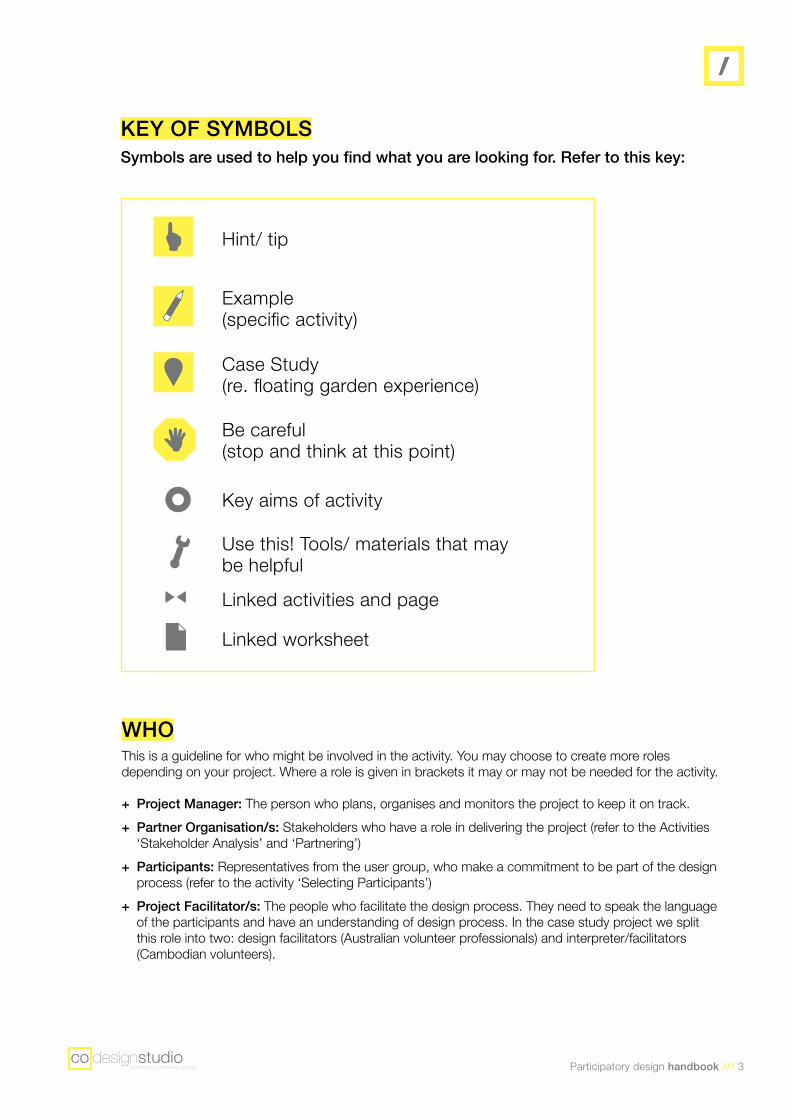
Hint/ tip
Example (specific activity)
Case Study (re. floating garden experience)
Be careful (stop and think at this point)
Key aims of activity
Linked activities and page
Linked worksheet
Use this! Tools/ materials that may be helpful
KEY OF SYMBOLS Symbols are used to help you find what you are looking for. Refer to this key:
WHOThis is a guideline for who might be involved in the activity. You may choose to create more roles depending on your project. Where a role is given in brackets it may or may not be needed for the activity.
+ Project Manager: The person who plans, organises and monitors the project to keep it on track. + Partner Organisation/s: Stakeholders who have a role in delivering the project (refer to the Activities ‘Stakeholder Analysis’ and ‘Partnering’)
+ Participants: Representatives from the user group, who make a commitment to be part of the design process (refer to the activity ‘Selecting Participants’)
+ Project Facilitator/s: The people who facilitate the design process. They need to speak the language of the participants and have an understanding of design process. In the case study project we split this role into two: design facilitators (Australian volunteer professionals) and interpreter/facilitators (Cambodian volunteers).
4 /// Participatory design handbook
PRINCIPLES OF PARTICIPATORY DESIGNParticipatory Design, also known as co-design, is an approach that centres around the idea that people who are affected by a decision, event or product should have an opportunity to influence it. Working with users in their own environment is not always easy and the participatory design process can be complex, messy and slow moving. Ultimately though, including users in all stages of the design process increases their ownership of the end product and the probability of a usable design in the long term. Along with the development of an appropriate design, an equally important outcome in participatory design is the empowerment of the users to express their needs and ideas, and gain skills which enable them to address future design challenges without the need for external design professionals.
When differences in culture and/or life experiences exist between professional designers and the users of a product, user involvement becomes a key success factor. Communities are experts in their own local environment and needs, and no matter how experienced the designers are, what they perceive as being the best solution will inevitably be based on their own world view. High levels of user participation mean designers do not interpret collected data from their own cultural vantage point in isolation from the users. This helps to avoid misinterpretation. Recognition of the users as experts is also empowering, leading to better development effectiveness.
The main guiding principles for participatory design include:
+ Allowing designers to work directly with users in their own environment to understand actions and technologies in actual settings;
+ Enabling users, professional designers, and other stakeholders to participate equally so design ideas arise in collaboration with participants from different backgrounds, and decision-making is democratic;
+ Valuing all kinds of knowledge, regardless of whether it has been gained through professional training or lived experience.
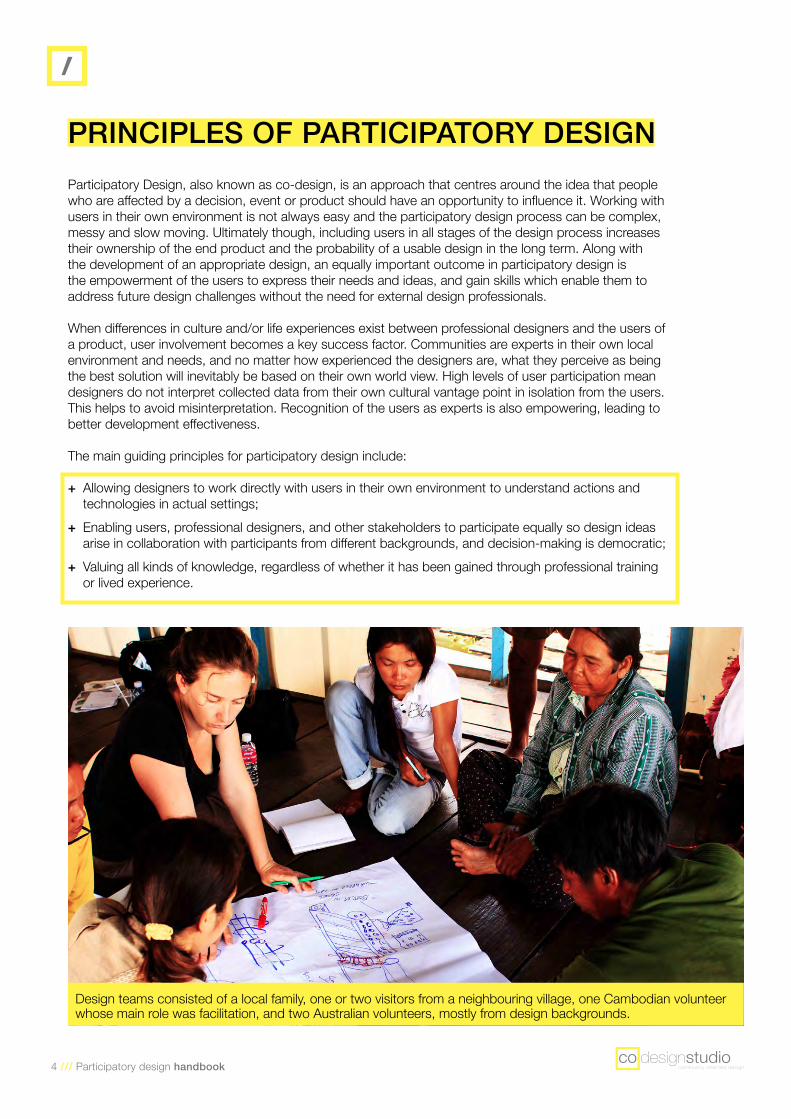
Design teams consisted of a local family, one or two visitors from a neighbouring village, one Cambodian volunteer whose main role was facilitation, and two Australian volunteers, mostly from design backgrounds.
Participatory design handbook /// 5
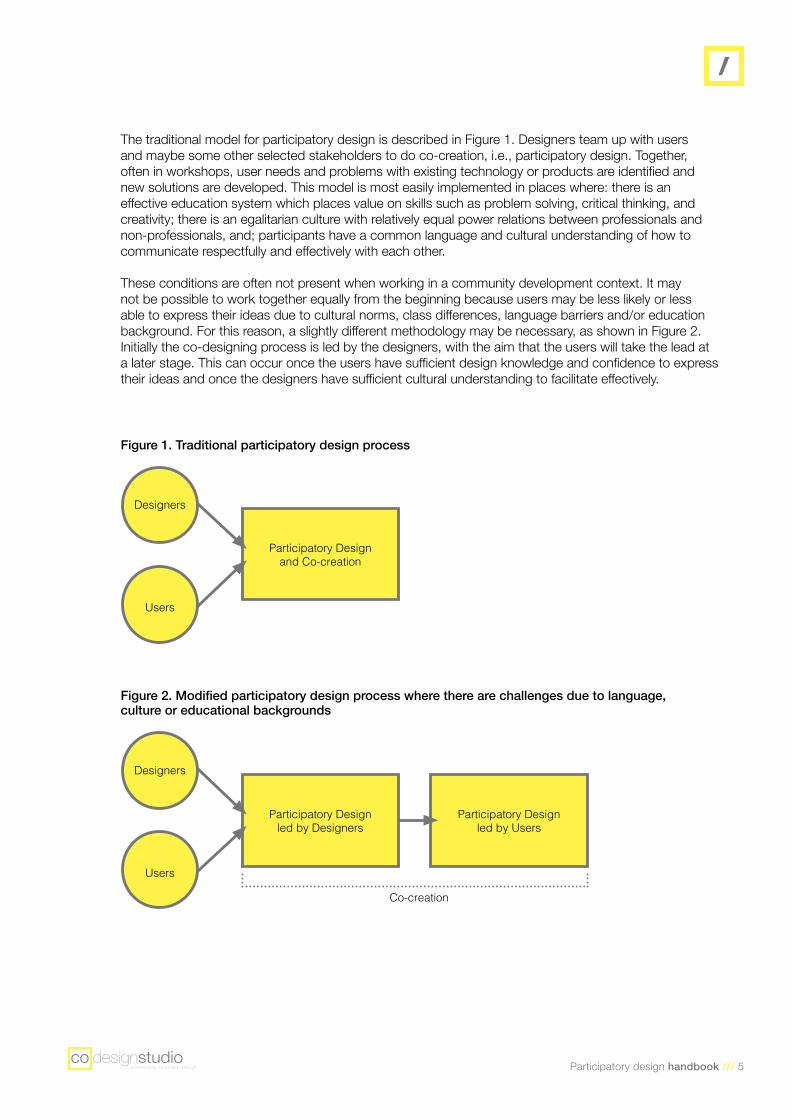
The traditional model for participatory design is described in Figure 1. Designers team up with users and maybe some other selected stakeholders to do co-creation, i.e., participatory design. Together, often in workshops, user needs and problems with existing technology or products are identified and new solutions are developed. This model is most easily implemented in places where: there is an effective education system which places value on skills such as problem solving, critical thinking, and creativity; there is an egalitarian culture with relatively equal power relations between professionals and non-professionals, and; participants have a common language and cultural understanding of how to communicate respectfully and effectively with each other.
These conditions are often not present when working in a community development context. It may not be possible to work together equally from the beginning because users may be less likely or less able to express their ideas due to cultural norms, class differences, language barriers and/or education background. For this reason, a slightly different methodology may be necessary, as shown in Figure 2. Initially the co-designing process is led by the designers, with the aim that the users will take the lead at a later stage. This can occur once the users have sufficient design knowledge and confidence to express their ideas and once the designers have sufficient cultural understanding to facilitate effectively.
Participatory Design and Co-creation
Designers
Designers
Users
Users
Participatory Design led by Designers
Participatory Design led by Users
Co-creation
Figure 1. Traditional participatory design process
Figure 2. Modified participatory design process where there are challenges due to language, culture or educational backgrounds
6 /// Participatory design handbook
ROLE OF THE DESIGNER – FACILITATORIn the participatory design process, the role of the designer is often as a facilitator of the process in addition to a contributor of ideas. These roles can be separated where resources are available.
To empower participants, facilitators must put great effort into seeking and understanding participants’ opinions, and ensure all participants are given real opportunities for influencing the product or services being designed. A common challenge occurs when professional designers and users disagree. In this case it is important for all participants to discuss why they hold their opinion: delving deeper into the issue allows participants to learn from each other, and this understanding can inform the best solution. The facilitator also needs to be flexible to alter their approach to suit the dynamics of the group. This requires knowledge of a suite of approaches and activities to foster participation and also regular monitoring and evaluation throughout the design process.
In the role of contributor, a designer must be able to communicate their suggestions and the reasons behind them in ways that are appropriate for other participants to understand. They must also be a listener and team member, treating other participants with respect and working toward a collaborative solution.
IMPORTANCE OF TOOLS / ACTIVITIESPutting participation into practice often relies on activities (also called ‘tools’) to help non-designers to articulate their needs and ideas. The different types of activities are defined as:
+ Making tools - tools and techniques for making tangible things (collages, maps, models and mock-ups made by non-designer participants)
+ Telling tools – tools and techniques that support verbally oriented activities such as talking and explaining (diaries, logs and the use of cards for organizing ideas).
+ Enacting tools – tools and techniques to facilitate acting and playing (role playing, improvisation, use of props and puppets)
Each participatory design process will generally require a different combination of activities depending on the context, and the specific capabilities and cultural norms of participants. This handbook details a selection of activities, but there are many others you can access online, or you can make up your own.
FURTHER READINGParticipatory design is an emerging field. You can explore it further in:
+ “The Placemaker’s Guide to Building Community”. This book by Nabeel Hamdi discusses the history and themes of community development in an international context.
+ An internet search for ‘public interest design’. This is a broad category that involves much more than participatory design, but may still be relevant.
BE CAREFULIt is a mistake for a designer to think that their technical knowledge means they know the best solution. Sometimes designers believe their role is to guide participants toward this ‘best’ outcome (from their own point of view), however this mindset is damaging because it does not value the knowledge that other participants bring. It is true that designers will have knowledge that the participants have not been exposed to, but the reverse is also true: participants have knowledge that the designers do not. There may be many underlying reasons for participants to express certain preferences, and the job of a facilitator is to bring these reasons to light.
Participatory design handbook /// 7
CASE STUDY – FLOATING VILLAGES
Much of the information presented in this handbook comes from lessons learned during a participatory design project to develop floating vegetable gardens for low-income communities living on Lake Tonle Sap in Cambodia. The project was a collaboration between local villagers in Au Akol and Kampong Kneas, CoDesign Studio, Agile Development Group and Rural Friends for Community Development (RFCD).
LOCATIONAu Akol and Kampong Kneas are floating settlements in Pursat province, approximately four hours drive from the capital Phnom Penh. Both are only accessible by boat from Kampong Luong, the nearest land settlement on the edge of Lake Tonle Sap.
HISTORYThe floating villages were established followed the political upheaval in the late 1970s, primarily to take advantage of the abundant fishing opportunities by people who had no access to land for agriculture. Fishing remains the main source of income for most inhabitants, although this is at risk due to declining fish stocks from overfishing and poor eco-system management.
VILLAGE LIFELiving conditions are basic, with each house-boat having no more than two rooms made of wood or thatch and kept afloat with bamboo poles and petrol drums. Cooking is done on a wood fire and sanitation is poor. Fluctuating seasonal water levels on the lake mean that the villagers need to move their floating houses up to eight times per year. To ensure a good fishing catch, it is necessary to remain some distance from the edge of the lake, making it difficult to access markets and fresh fruit and vegetables.
PAST PROJECTSIn 2009 an international non-government organization, donated 100 bamboo poles each to some families to build floating platforms for gardens. Bamboo is an effective material for both structure and floatation, but it is also very expensive and only lasts for a few years before becoming water-logged. Although villagers were enthusiastic about growing their own vegetables, they couldn’t afford to replace the bamboo once it began to break down. Bamboo was also a useful material for house construction, and in some cases the poles from the floating gardens were re-purposed when houses were damaged during storms.
PARTICIPATORY DESIGN PROJECT OUTLINEA participatory design process was initiated with the aim to develop floating garden designs that were affordable and could be maintained by local people. The main project stages included scoping, prototyping and evaluation. The scoping trip took place in July 2012, and involved village meetings and creative consultation activities. The prototyping field trip followed in November 2012, and involved nine design facilitators from Australia, four Cambodian volunteers, four families from Au Akol and five visiting residents of Kampong Khneas. The group was split into four teams and each developed a garden prototype for a budget of US$30. The final evaluation trip took place in August 2013.

Planning & Relationships
10 /// Participatory design handbook
Who? + Project Manager + Partner Organisation/s + (Participants) + (Project Facilitator/s)
Aims: + Set the background + Helps you to define a design problem
+ Enables you to learn from other people’s experiences
What you need: + Computer + Camera + Notebook + Large paper + Crayons + Sticky-notes.
Linked Activities: + Various
Worksheet: N/A
BACKGROUND RESEARCH METHOD 1. Brainstorm all the questions you have in relation to the project;2. Decide on a method of research (for example an internet search,
a questionnaire, asking an expert for advice, setting up a physical experiment, visiting a case study site, asking people to draw a map etc);
3. Assign people to research different things, and set a deadline and format for sharing the research with the team.
HINT/TIPS + Consider creative, participatory research techniques. If you need information in a village, a group activity such as mapping the village may be more engaging than a meeting or survey.
+ Although you may start with an intensive research period at the beginning of your project, you will likely be researching throughout.
CASE STUDYHere are some of the questions we asked during our Scoping Trip and initial research phase:
+ How do aquaponic and hydroponic systems work? (internet search)
+ What is the climate like? (internet search, asking partner organisation)
+ What types of materials are commonly available and how much do they cost? (asking partner organisation)
+ Are there common fabrication methods in the area or local industries? (internet search, asking partner organisation)
+ What are the village dynamics? (asking villagers to create a map of the village, informal conversation)
+ What do people do with their time, and how busy are they? (asking people to draw pictures of the things they do regularly, following up with questions about when and how long it takes)
+ What are the biggest issues in the village (village meetings, informal conversation)
Participatory design handbook /// 11
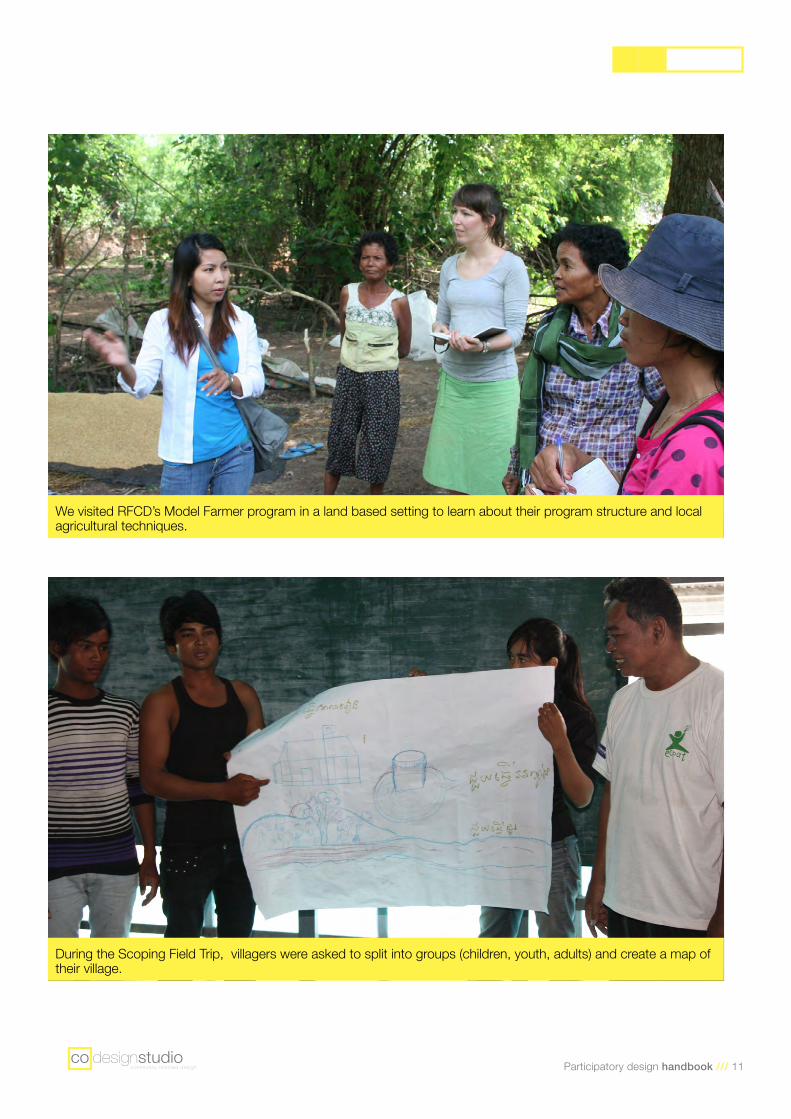
We visited RFCD’s Model Farmer program in a land based setting to learn about their program structure and local agricultural techniques.
During the Scoping Field Trip, villagers were asked to split into groups (children, youth, adults) and create a map of their village.
12 /// Participatory design handbook
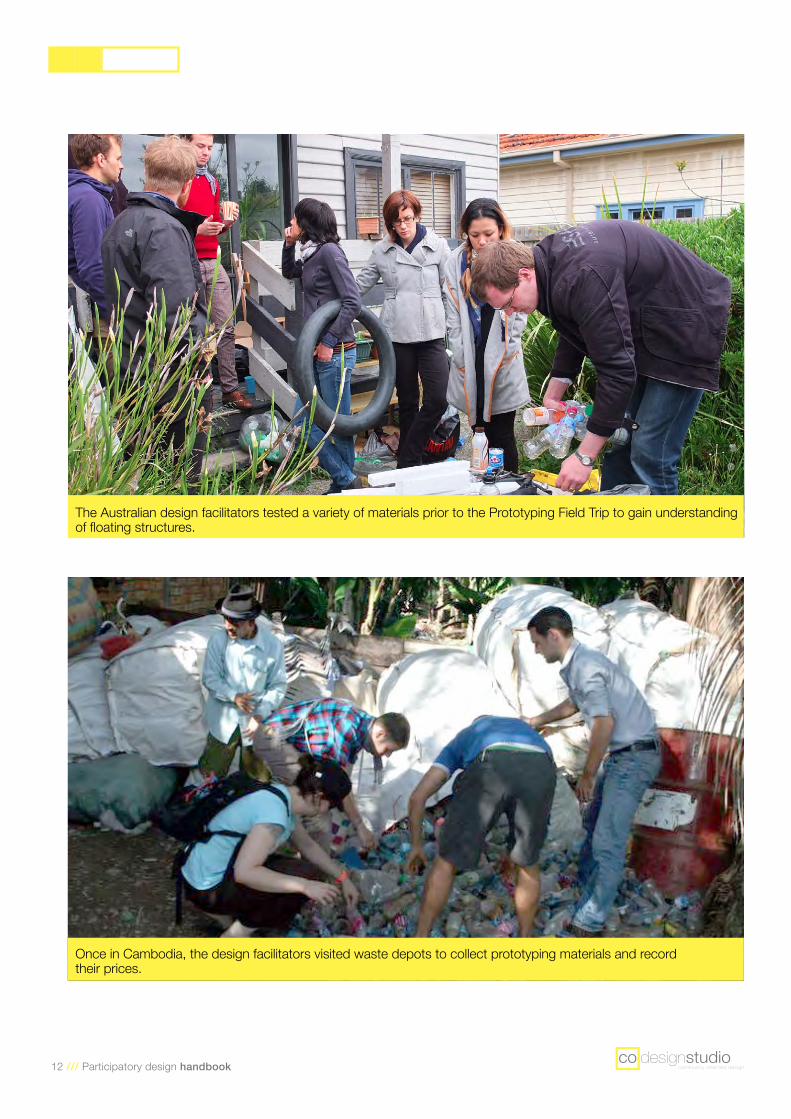
The Australian design facilitators tested a variety of materials prior to the Prototyping Field Trip to gain understanding of floating structures.
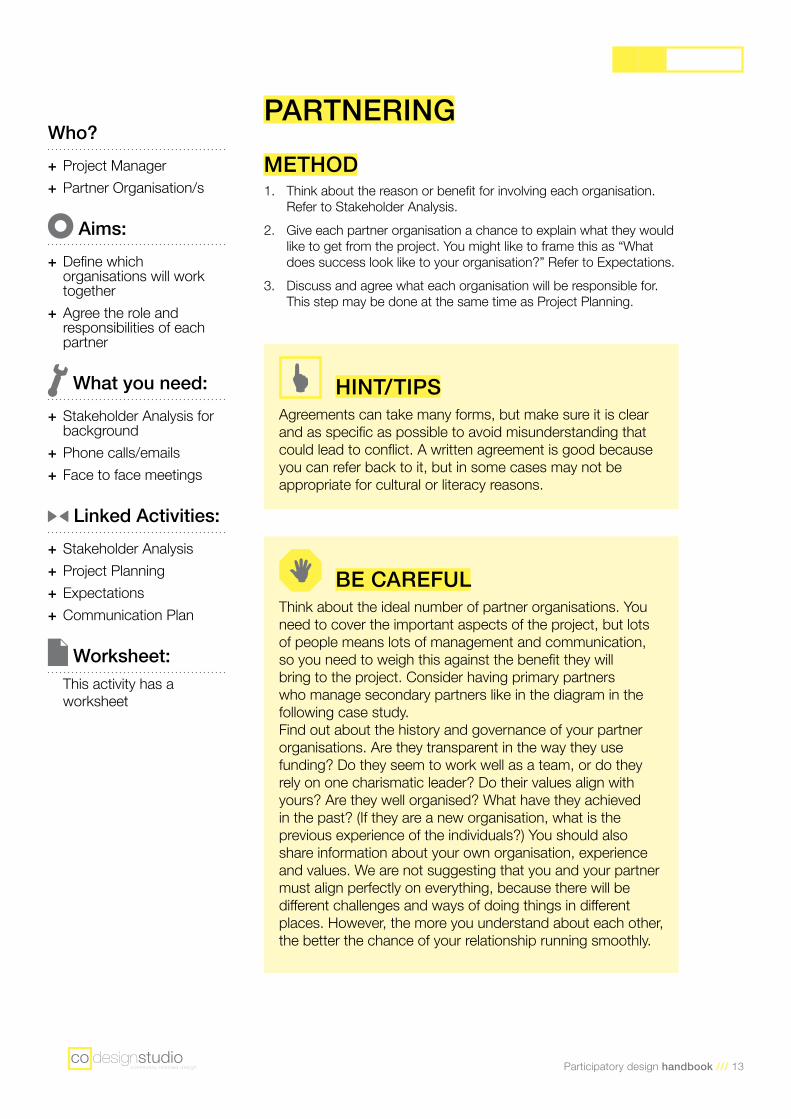
Once in Cambodia, the design facilitators visited waste depots to collect prototyping materials and record their prices.
Participatory design handbook /// 13
Who? + Project Manager + Partner Organisation/s
Aims: + Define which organisations will work together
+ Agree the role and responsibilities of each partner
What you need: + Stakeholder Analysis for background
+ Phone calls/emails + Face to face meetings
Linked Activities: + Stakeholder Analysis + Project Planning + Expectations + Communication Plan
Worksheet: This activity has a worksheet
PARTNERING METHOD 1. Think about the reason or benefit for involving each organisation.
Refer to Stakeholder Analysis.2. Give each partner organisation a chance to explain what they would
like to get from the project. You might like to frame this as “What does success look like to your organisation?” Refer to Expectations.
3. Discuss and agree what each organisation will be responsible for. This step may be done at the same time as Project Planning.
HINT/TIPSAgreements can take many forms, but make sure it is clear and as specific as possible to avoid misunderstanding that could lead to conflict. A written agreement is good because you can refer back to it, but in some cases may not be appropriate for cultural or literacy reasons.
BE CAREFULThink about the ideal number of partner organisations. You need to cover the important aspects of the project, but lots of people means lots of management and communication, so you need to weigh this against the benefit they will bring to the project. Consider having primary partners who manage secondary partners like in the diagram in the following case study.Find out about the history and governance of your partner organisations. Are they transparent in the way they use funding? Do they seem to work well as a team, or do they rely on one charismatic leader? Do their values align with yours? Are they well organised? What have they achieved in the past? (If they are a new organisation, what is the previous experience of the individuals?) You should also share information about your own organisation, experience and values. We are not suggesting that you and your partner must align perfectly on everything, because there will be different challenges and ways of doing things in different places. However, the more you understand about each other, the better the chance of your relationship running smoothly.
14 /// Participatory design handbook
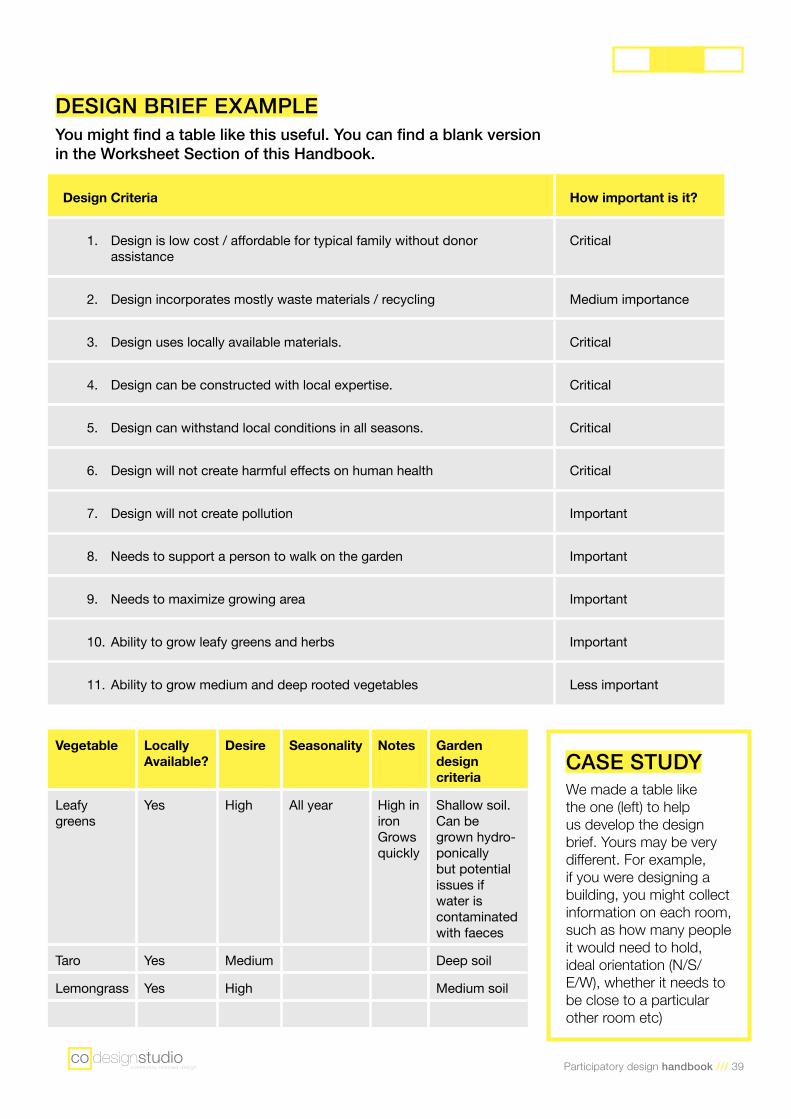
PARTNERING EXAMPLEYou might find a table like this useful. You can find a blank version in the Worksheet Section of this Handbook.
Partner Benefits of involving them
Success / Expectations
Responsibilities (examples)
Eg. RFCD Local knowledge; Authority to deliver programs in this village; On the ground support for the project
Successful outcome for community; Development of new skills; Ability to seek funding for new programs
Selecting participant families; Supporting participants to fill out monitoring logbooks;
Eg. Agile Development
Development professionals; History of delivering development projects for aid organisations in this village; Strong facilitation skills; Proficient in English and Khmer; Existing positive relationship with RFCD and villagers;
Successful outcome for community; Business income; Learn new skills in design; Build business reputation; Potential to get further funding for future projects;
Managing Agile and RFCD’s budget; Facilitating RFCD’s involvement; Facilitating involvement of other local NGOs Producing a cost benefit analysis; Facilitating overall process of village field trips and meetings; etc
Eg. CoDesign Studio
Multi-disciplinary design expertise
Successful outcome for community; Build business reputation; Learn new skills in international development
Managing overall budget; Technical research into appropriate materials and design considerations; Producing participatory design activities; Working in teams with village families to develop prototypes;
Participatory design handbook /// 15
Food Security Network
Live and Learn
CoDesign Studio
Small World
RFCD
Agile Development
Group
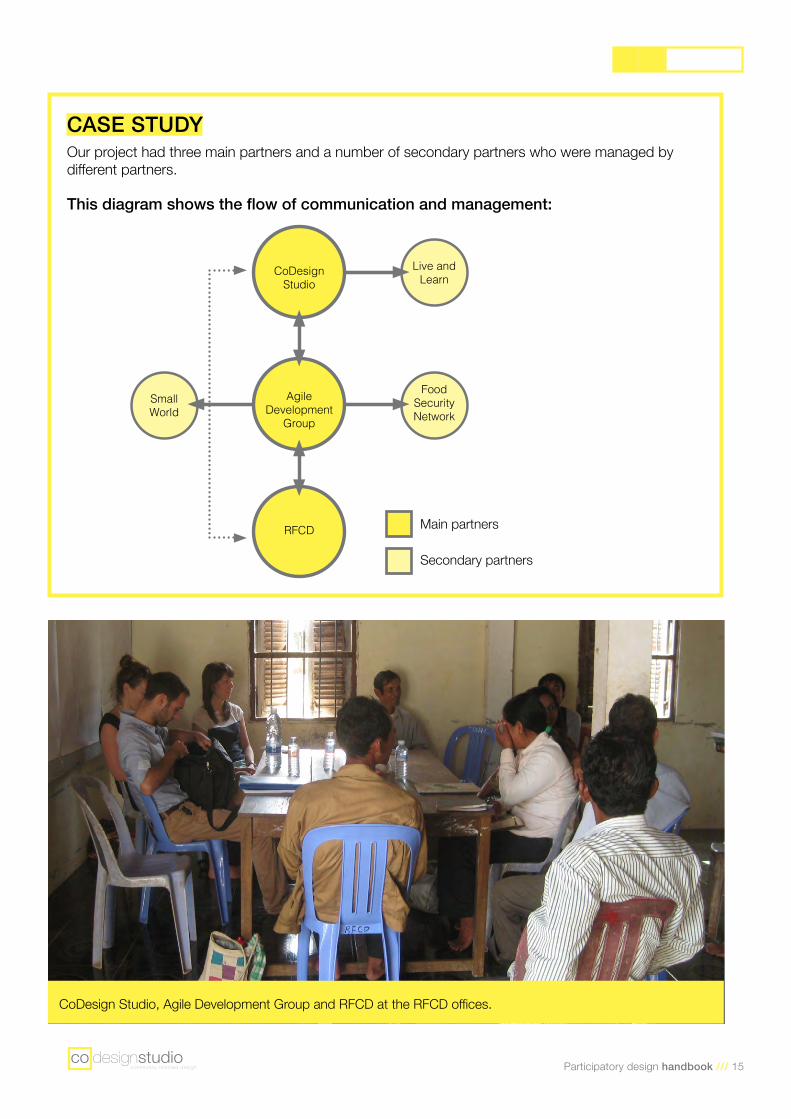
CASE STUDYOur project had three main partners and a number of secondary partners who were managed by different partners.
This diagram shows the flow of communication and management:
CoDesign Studio, Agile Development Group and RFCD at the RFCD offices.
Main partners
Secondary partners
16 /// Participatory design handbook
Who? + Project Manager + Partner Organisation/s
Aims: + Understand who (both organisations and people) has, or could have, an interest in your project.
+ Decide how to involve them.
What you need: + Worksheet
Linked Activities: + Background Research + Project Planning + Partnering + Communications Plan + Risk Management Plan
Worksheet: This activity has a worksheet
STAKEHOLDER ANALYSIS METHOD 1. List the organisations or people who have (or could have) an interest
in the project. Examples include: + Each partner organisation + Relevant authorities (such as a Fisheries Department, local government)
+ Aligned organisations (for example other organisations working in the same geographical area, or researching a similar topic)
+ Participating families/individuals (you may like to break this down into gender and/or age groups)
+ Other people in the host village or neighbouring villages + Financial donor + Potential future funding bodies
2. What are the needs and expectations of each stakeholder? What will success ‘look like’ for them?
3. What assets do they have which could help the project to be successful? For example: knowledge, networks, time, experience, funding, technical skills.
4. Are there any risks associated with this stakeholder? If so, transfer these to your Risk Management Plan.
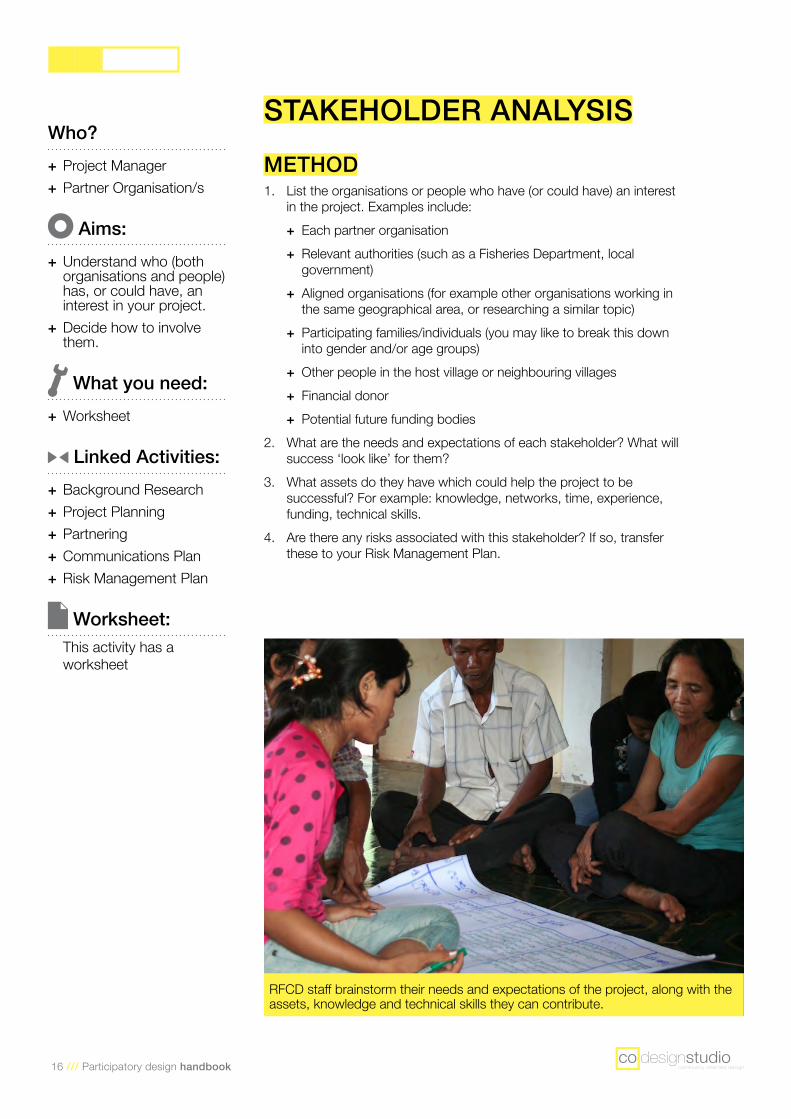
RFCD staff brainstorm their needs and expectations of the project, along with the assets, knowledge and technical skills they can contribute.

Participatory design handbook /// 17
STAKEHOLDER ANALYSIS EXAMPLEYou might find a table like this useful. You can find a blank version in the Worksheet Section of this Handbook.
Stakeholder What are their needs and expectations?
What assets do they have that can be leveraged?
Are there any risks?
Eg. Donor Project on time, on budget, achieving impact. Professional behaviour. High quality reporting
MoneyInfluence
May withdraw funding if requirements are not met
Eg Village families They will end up with something of value in recognition of their time spent (ie knowledge, a garden)
Local knowledge, time, enthusiasm,
May not have enough time available for quality participation
Eg International volunteers
Experience, personal and professional growth
Professional expertise, time, enthusiasm
Issues with cross-cultural communication;Skill level;Taking jobs away from local people
BE CAREFULIt’s important to have the necessary permissions for your project, but you may not need to involve the authorities if a partner already has the appropriate permissions to do the work you plan to do. In some places, involving officials may result in delays, fees or bribes.
18 /// Participatory design handbook
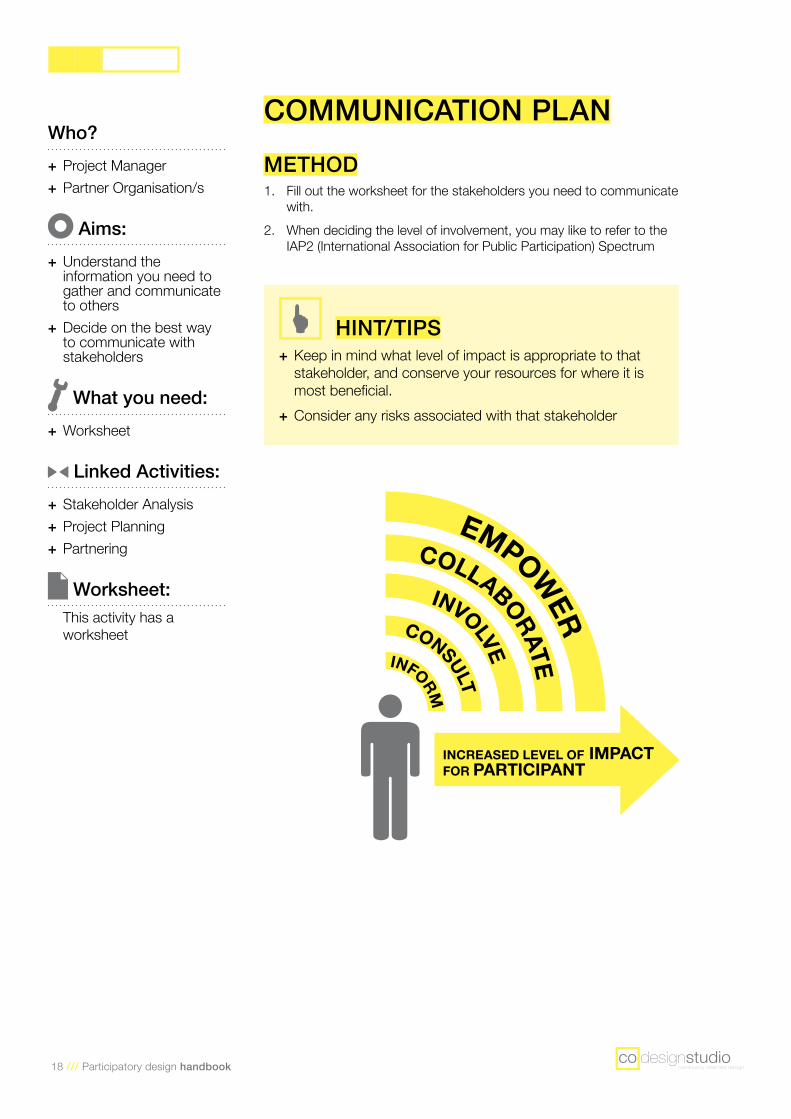
INFORM
CONSULT
INVOLVE
COLLABORATE
EMPOWER
INCREASED LEVEL OF FOR PARTICIPANT
IMPACT
Who? + Project Manager + Partner Organisation/s
Aims: + Understand the information you need to gather and communicate to others
+ Decide on the best way to communicate with stakeholders
What you need: + Worksheet
Linked Activities: + Stakeholder Analysis + Project Planning + Partnering
Worksheet: This activity has a worksheet
COMMUNICATION PLAN METHOD 1. Fill out the worksheet for the stakeholders you need to communicate
with.2. When deciding the level of involvement, you may like to refer to the
IAP2 (International Association for Public Participation) Spectrum
HINT/TIPS + Keep in mind what level of impact is appropriate to that stakeholder, and conserve your resources for where it is most beneficial.
+ Consider any risks associated with that stakeholder
Participatory design handbook /// 19
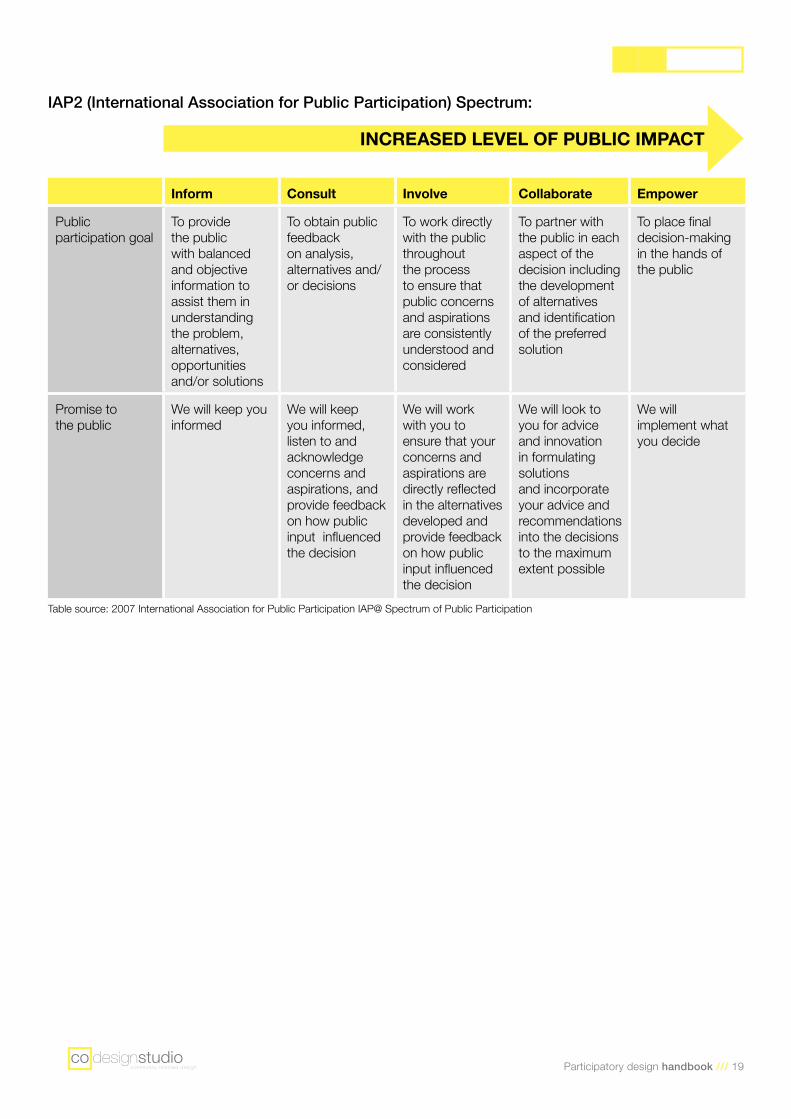
IAP2 (International Association for Public Participation) Spectrum:
Table source: 2007 International Association for Public Participation IAP@ Spectrum of Public Participation
Inform Consult Involve Collaborate Empower
Public participation goal
To provide the public with balanced and objective information to assist them in understanding the problem, alternatives, opportunities and/or solutions
To obtain public feedback on analysis, alternatives and/or decisions
To work directly with the public throughout the process to ensure that public concerns and aspirations are consistently understood and considered
To partner with the public in each aspect of the decision including the development of alternatives and identification of the preferred solution
To place final decision-making in the hands of the public
Promise to the public
We will keep you informed
We will keep you informed, listen to and acknowledge concerns and aspirations, and provide feedback on how public input influenced the decision
We will work with you to ensure that your concerns and aspirations are directly reflected in the alternatives developed and provide feedback on how public input influenced the decision
We will look to you for advice and innovation in formulating solutions and incorporate your advice and recommendations into the decisions to the maximum extent possible
We will implement what you decide
INCREASED LEVEL OF PUBLIC IMPACT
20 /// Participatory design handbook
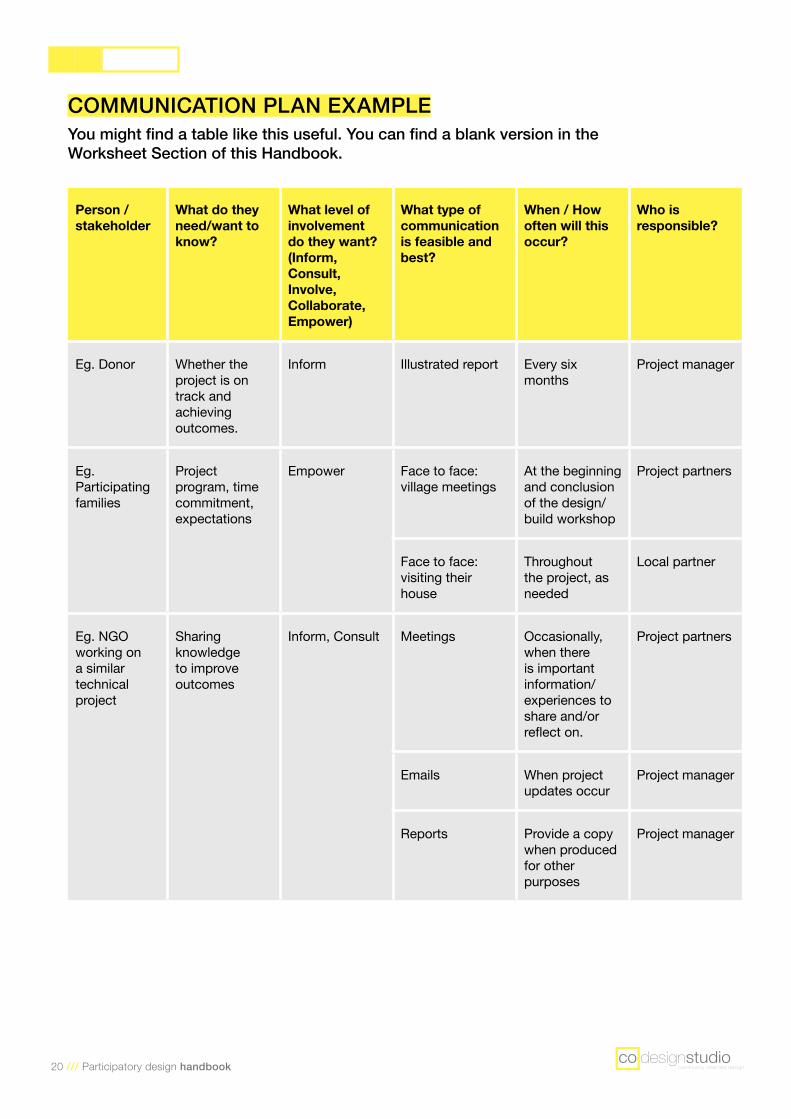
COMMUNICATION PLAN EXAMPLEYou might find a table like this useful. You can find a blank version in the Worksheet Section of this Handbook.
Person / stakeholder
What do they need/want to know?
What level of involvement do they want? (Inform, Consult, Involve, Collaborate, Empower)
What type of communication is feasible and best?
When / How often will this occur?
Who is responsible?
Eg. Donor Whether the project is on track and achieving outcomes.
Inform Illustrated report Every six months
Project manager
Eg. Participating families
Project program, time commitment, expectations
Empower Face to face: village meetings
At the beginning and conclusion of the design/build workshop
Project partners
Face to face: visiting their house
Throughout the project, as needed
Local partner
Eg. NGO working on a similar technical project
Sharing knowledge to improve outcomes
Inform, Consult Meetings Occasionally, when there is important information/experiences to share and/or reflect on.
Project partners
Emails When project updates occur
Project manager
Reports Provide a copy when produced for other purposes
Project manager
Participatory design handbook /// 21
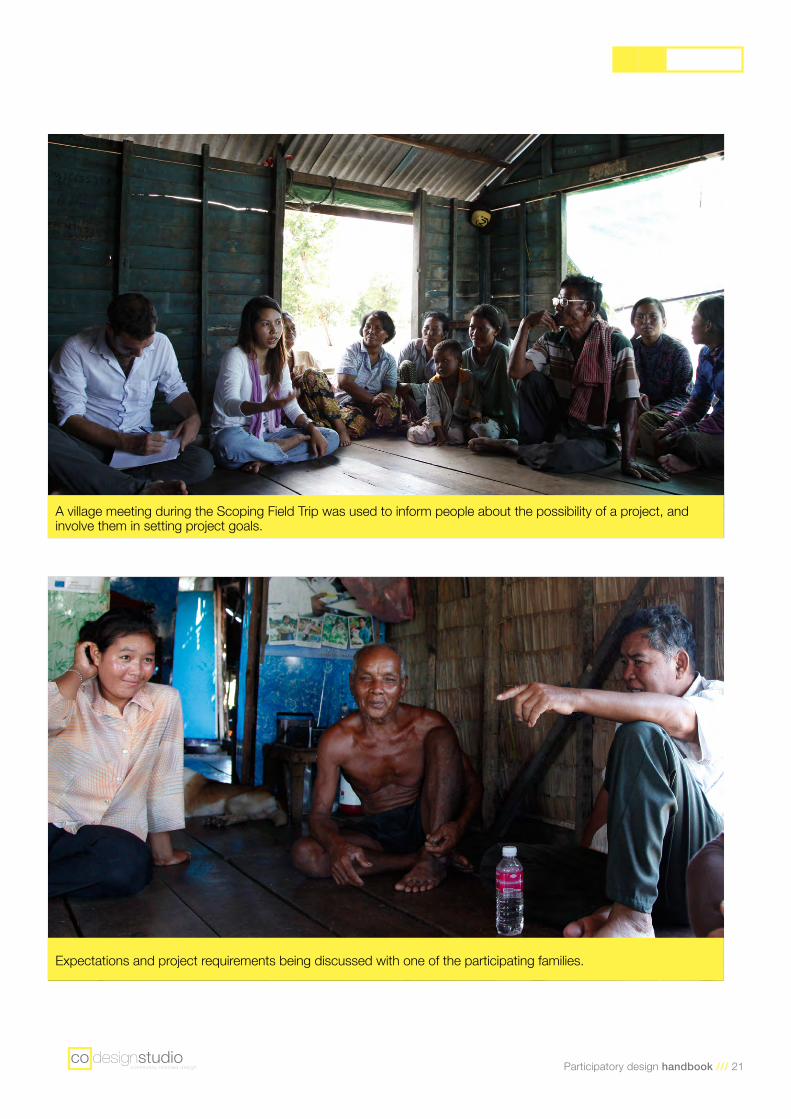
A village meeting during the Scoping Field Trip was used to inform people about the possibility of a project, and involve them in setting project goals.
Expectations and project requirements being discussed with one of the participating families.
22 /// Participatory design handbook
Who? + Project Manager + Partner Organisation/s + Project Facilitator/s + Participants
Aims: + Plan the activities you need in order to achieve your goals.
+ Plan activities and outputs to maximise the benefit for the time/money invested.
+ Develop a timeline + Allocate resources and budgets
What you need: + Worksheet
Linked Activities: + Stakeholder Analysis + Partnering + Communication Plan + Expectations + Outcomes and Indicators + Selecting Participants
Worksheet: This activity has a worksheet
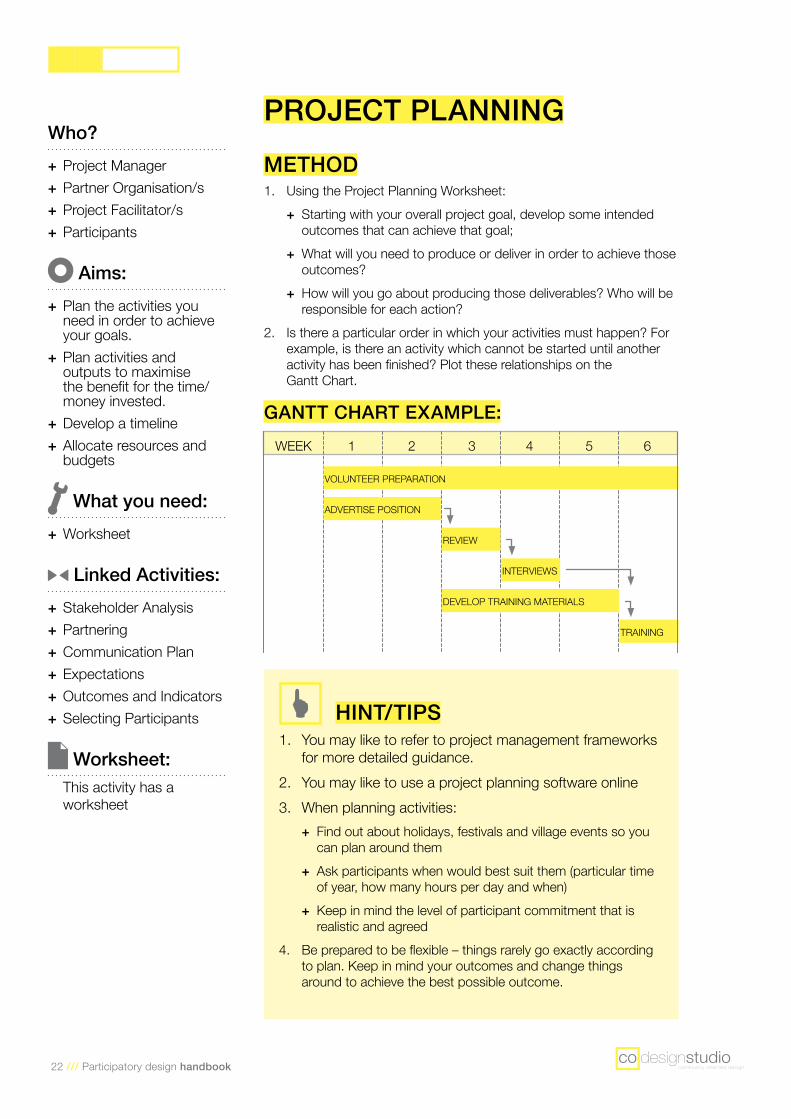
PROJECT PLANNING METHOD 1. Using the Project Planning Worksheet:
+ Starting with your overall project goal, develop some intended outcomes that can achieve that goal;
+ What will you need to produce or deliver in order to achieve those outcomes?
+ How will you go about producing those deliverables? Who will be responsible for each action?
2. Is there a particular order in which your activities must happen? For example, is there an activity which cannot be started until another activity has been finished? Plot these relationships on the Gantt Chart.
GANTT CHART EXAMPLE:
HINT/TIPS1. You may like to refer to project management frameworks
for more detailed guidance. 2. You may like to use a project planning software online 3. When planning activities:
+ Find out about holidays, festivals and village events so you can plan around them
+ Ask participants when would best suit them (particular time of year, how many hours per day and when)
+ Keep in mind the level of participant commitment that is realistic and agreed
4. Be prepared to be flexible – things rarely go exactly according to plan. Keep in mind your outcomes and change things around to achieve the best possible outcome.
WEEK 1 2 3 4 5 6
VOLUNTEER PREPARATION
ADVERTISE POSITION
REVIEW
INTERVIEWS
DEVELOP TRAINING MATERIALS
TRAINING

Participatory design handbook /// 23
PROJECT PLANNING EXAMPLEYou might find a table like this useful. You can find a blank version in the Worksheet Section of this Handbook.
Outcomes Outputs / Deliverables Actions By who By when Budget (hours or cost)
Improved nutrition and food sovereignty
Nutritional training Engage training provider
Arrange dates for training
Publicise to participants
Gardens Research nutritious diet
Research popular foods in the village
Research requirements for growing these vegetables (soil depth etc)
Effective participatory design process
Participatory Design Workshop
Arrange logistics for workshop (dates, flights etc)
Select participants
Invite participants and create participation agreement
Design activities
Produce activities
Produce detailed program for workshop
Source materials for construction
Run workshop
Training/briefing for Design Facilitators
Develop pre-departure training for design facilitators (or engage trainer)
Run training
M&E framework Develop M&E Plan
Evaluation Field Trip Arrange logistics for workshop (dates, flights etc)
Design activities / questionnaires
Run Field Trip
Increased knowledge of design and agriculture
Innovative design outcome
Gender
Economic benefits
24 /// Participatory design handbook
Who? + Project Manager + Partner Organisation/s + (Project Facilitator/s) + (Participants)
Aims: + Identify project risks + Plan to mitigate risks (what can you do that makes the risk less likely)
+ Plan for a response if the risk occurs
What you need: + Worksheet
Linked Activities: + Background Research + Partnering + Stakeholder Analysis + Communication Plan + Project Planning + Selecting Participants
Worksheet: This activity has a worksheet
RISK ANALYSIS METHOD 1. Use the Worksheet to write down any risks for the project. These
may come from other activities in this handbook (such as your Stakeholder Analysis) and will also include other risks. You may want to sort the Risk Analysis Worksheet into separate sections for related risks, to make it easier to read;
2. For each of your risks, make a judgement about how likely it is (Extremely High, High, Medium, Low, Negligible). You may need to do some research or talk to your partners to determine this;
3. For each of your risks, write the level of the consequence (Extreme, High, Medium, Low, Negligible)
4. Give each risk a rating (Extreme, High, Medium, Low), using the table on the next page.
5. For any risks rated High or Extreme, think about mitigation (how you can prevent it from occurring), and contingency (what is your plan if it does occur)
6. Integrate your mitigation and contingency measures into your project plan

Participatory design handbook /// 25
RISK ANALYSIS EXAMPLEYou might find a table like this useful. You can find a blank version in the Worksheet Section of this Handbook.
Risk Likelihood Consequences Rating Mitigation Contingency
Eg. Someone hurts themselves during construction
Medium Medium High Safety training for participants;Design facilitators to be responsible for keeping an eye on safety during construction
+ Bring a First Aid Kit and ensure everyone is informed of it’s location;
+ Ensure there are two qualified First Aiders on the project team;
+ Ensure international volunteers have comprehensive travel insurance;
+ Collate information about nearby hospitals and keep in first aid kit.
Eg. Cross cultural conflict
Medium Medium High Pre-departure training;
Agree conflict resolution process with partners
Regular, supportive reflection sessions.
+ Regular, supportive reflection sessions;
+ Mediation; + If unresolvable, visitors will leave the village.
Risk Analysis Matrix
Economic/environmental consequences
Likelihood Negligible Low Medium High Extreme
Extremely high H H E E E
High M H H E E
Medium L M H E E
Low L L M H E
Negligible L L M H H
26 /// Participatory design handbook
Who? + Project Manager + Partner Organisation/s + Participants
Aims: + Find and recruit participants who are appropriate to the aims of the project
+ Agree with them what their participation will consist of, and what they can expect to receive in return
What you need: + Agreement form (if applicable)
Linked Activities: + Expectations + Getting To Know Each Other
+ Identifying Outcomes and Indicators
Worksheet: N/A
SELECTING PARTICIPANTS METHOD 1. Think about the following questions when selecting participants:
+ What will they get out of the project? + Is it appropriate to pay participants for their time? + What is their level of capacity? + Are they likely to have enough time available? + Will they bring useful knowledge and skills required to the team?
2. Communicate clearly with them: + what the project is + what the anticipated benefits are + how the project is intended to run (in general)
3. Discuss with them what their availability and commitment would be.4. Have some sort of agreement in place. It may not be appropriate for
this to be written, but make sure any discussions are summarised at the end and people have the opportunity to clarify anything they are unsure about.
HINT/TIPSThink about what your project is aiming to achieve, and who is best suited to participate. An experimental/pilot project (which may be seen as high risk by participants) may be more suitable to people who have shown initiative in the past, but it’s important to think about how it will be carried forward. For example, it may be more difficult to involve the poorest members of a village because their lives are already under stress and they may not have time available, but it’s important to be careful that excluding them does not reinforce powerlessness amongst the poorest families. On the other hand, a wealthier family is not necessarily a better participant because if they are already comfortable they may not see value in trying something new. There are no right answers!
Participatory design handbook /// 27
BE CAREFUL + Be wary of imposing your expectations without an open discussion. If you give people a ‘take it or leave it’ scenario (such as “we need you to work from X date to Y date”) they might say yes, even if it’s not possible, because they fear missing out. If the discussion is more flexible (such as “we are thinking of holding the project from X date to Y date, what do you think?) it gives them a chance to raise concerns (such as pre-existing commitments) which you may be able to work around. They may also have suggestions that can help improve the project;
+ Sometimes, people may tell you what they think you want to hear. This could be politeness, or they might think that you (a powerful donor) will leave if you don’t get what you want., they may tell you what they think you want to hear. Try to foster a culture of open, honest communication. It may help to explain the importance of being realistic to the project’s success. If there are people who already have a good relationship with the participants, such as a local NGO, it may be best for them to conduct this discussion;
+ Be careful if someone is speaking for somebody else (for example a chief speaking on behalf of villagers, or one family member speaking on behalf of another). If you are expecting something of someone, verify with them directly.
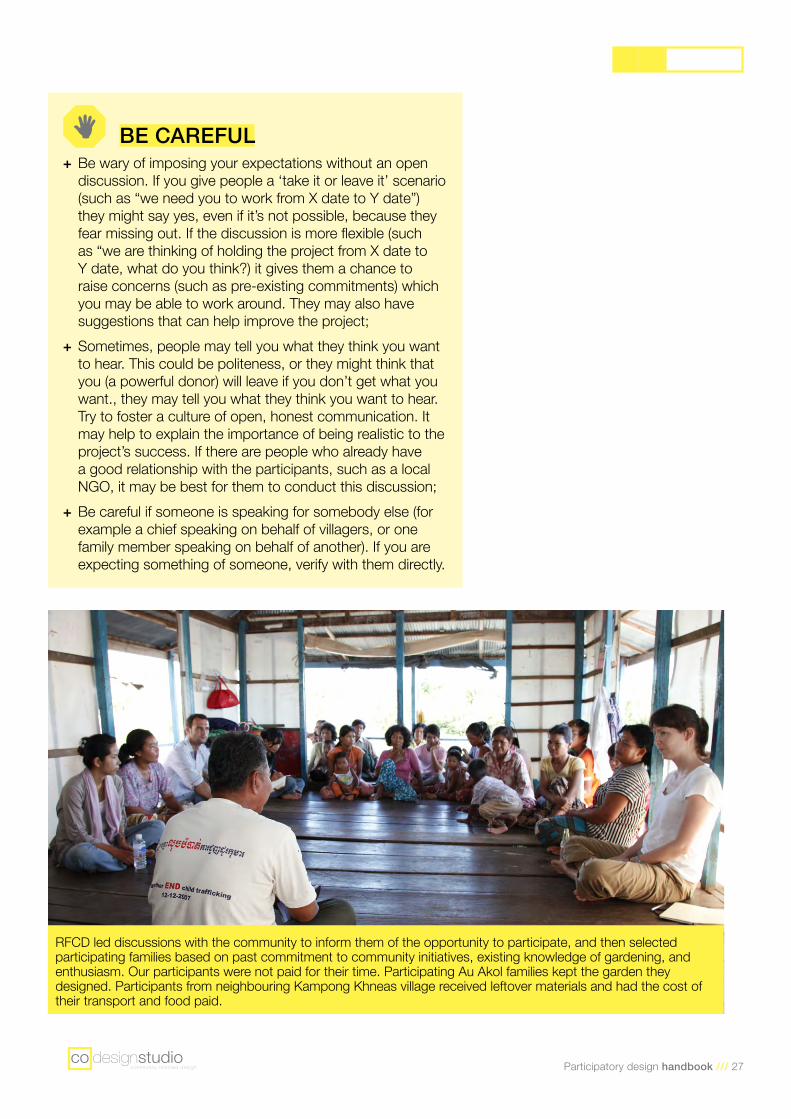
RFCD led discussions with the community to inform them of the opportunity to participate, and then selected participating families based on past commitment to community initiatives, existing knowledge of gardening, and enthusiasm. Our participants were not paid for their time. Participating Au Akol families kept the garden they designed. Participants from neighbouring Kampong Khneas village received leftover materials and had the cost of their transport and food paid.
28 /// Participatory design handbook
Who? + Project Manager + Partner Organisation/s + Project Facilitator/s + Participants
Aims: + Understand people’s hopes for the project
+ Identify and manage unrealistic expectations
What you need: + Large paper + Crayons
Linked Activities: + Selecting Participants + Partnering + Project Planning + Getting to Know Each Other
Worksheet: N/A
EXPECTATIONS METHOD 1. Ask participants to discuss or write down what they expect the
project will be like and what they hope to gain from it;2. Discuss whether all the expectations are reasonable and can be
achieved. + It may be possible to change things to meet expectations; + It may be necessary to accept that some expectations cannot be met. Where this is the case, discuss the reasons for this so all participants understand;
+ There may be conflicting expectations, and it is important to agree on the priorities.
HINT/TIPS + Encourage people to be open and honest. + Some people may not even be aware of the expectations they have. Ask probing questions to open up discussion.
CASE STUDYIn our project, village members initially saw us as a donor group who would give money and materials. They hoped that we would provide bamboo, a valuable material which had been used for floating gardens in the past. We explained that the purpose of the project was to find a low-cost solution that families could afford without donor assistance, however it took several days and conversations to reinforce this and manage the villagers’ expectations around bamboo.
One family had an unstated expectation that our team were there to provide them with a ready-made solution, whereas our expectation was that each family would participate on an equal level with the design facilitators, and that the project aims were to test a variety of ideas in order to learn and improve. Misaligned expectations led to little participation from the family, and the resulting design was abandoned.
Participatory design handbook /// 29
Who? + Project Manager + Participants
Aims: + Identify any new skills that are needed to meet project goals
+ Plan for training to be delivered
What you need: Project Plan
Linked Activities: + Identifying Outcomes and Indicators
+ Project Planning + Stakeholder Analysis + Expectations
Worksheet: N/A
SKILLS TRAININGMETHOD
+ Use your Project Plan, Outcomes, and conversations with participants (for example during Participant Selection and Expectations activities) to identify any skills gaps/shortages that could prevent your project from being successful.
+ Develop a plan to deliver that training. This could involve developing the training yourself if you have the experience to do so, or engaging another organisation to deliver it.
CASE STUDYIn our scoping phase, villagers identified that they had problems such as insects with the plants they were already growing. They did not know much about agriculture, because their families had lived on water for more than a generation. A Cambodian organisation called the Food Security Network was engaged to deliver training in organic pesticides and fertilisers.
30 /// Participatory design handbook
Who? + Project Manager + Partner Organisation/s + Add Project Facilitator/s + Participants
Aims: + Build positive relationships
+ Build trust + Build awareness of cultural differences
What you need: N/A
Linked Activities: + Knowledge Exchange
Worksheet: N/A
GETTING TO KNOWEACH OTHER METHOD 1. Think about activities you could do to build positive relationships and
trust. Think about activities that would be appropriate to the group with regard to:
+ Amount of time available + If there are assumptions that need to be challenged;
2. Source any materials you need to run the activities.
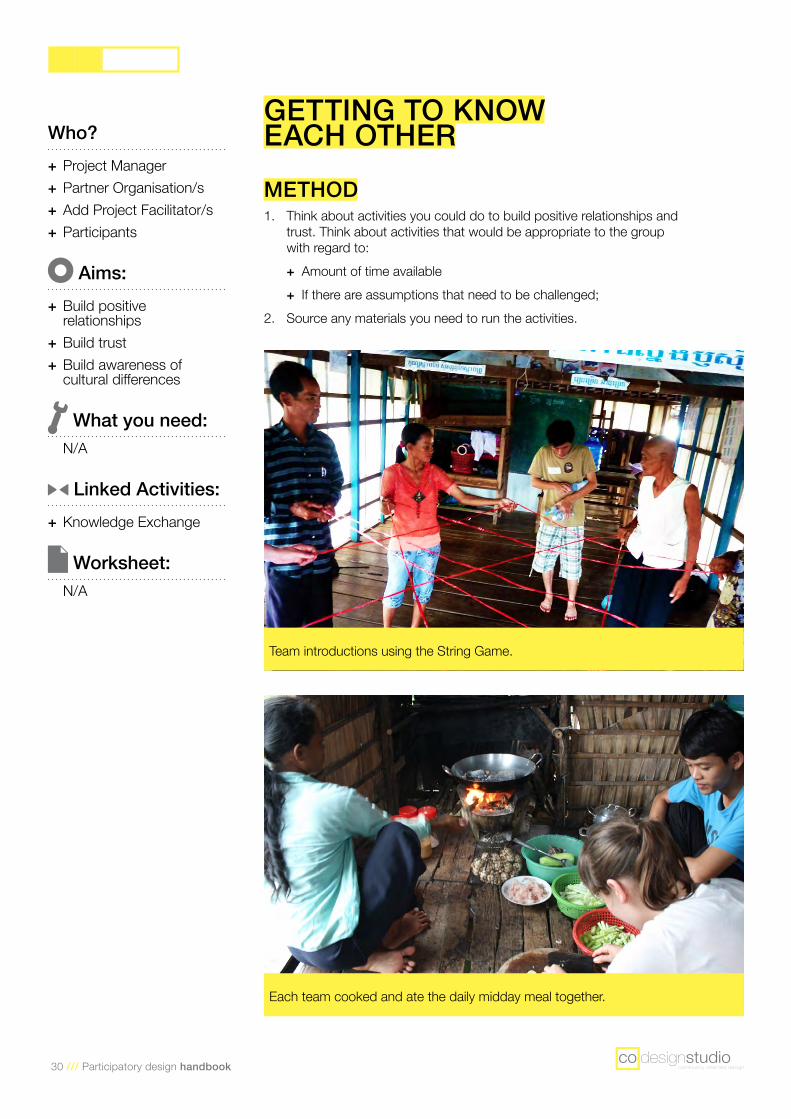
Each team cooked and ate the daily midday meal together.
Team introductions using the String Game.
Participatory design handbook /// 31
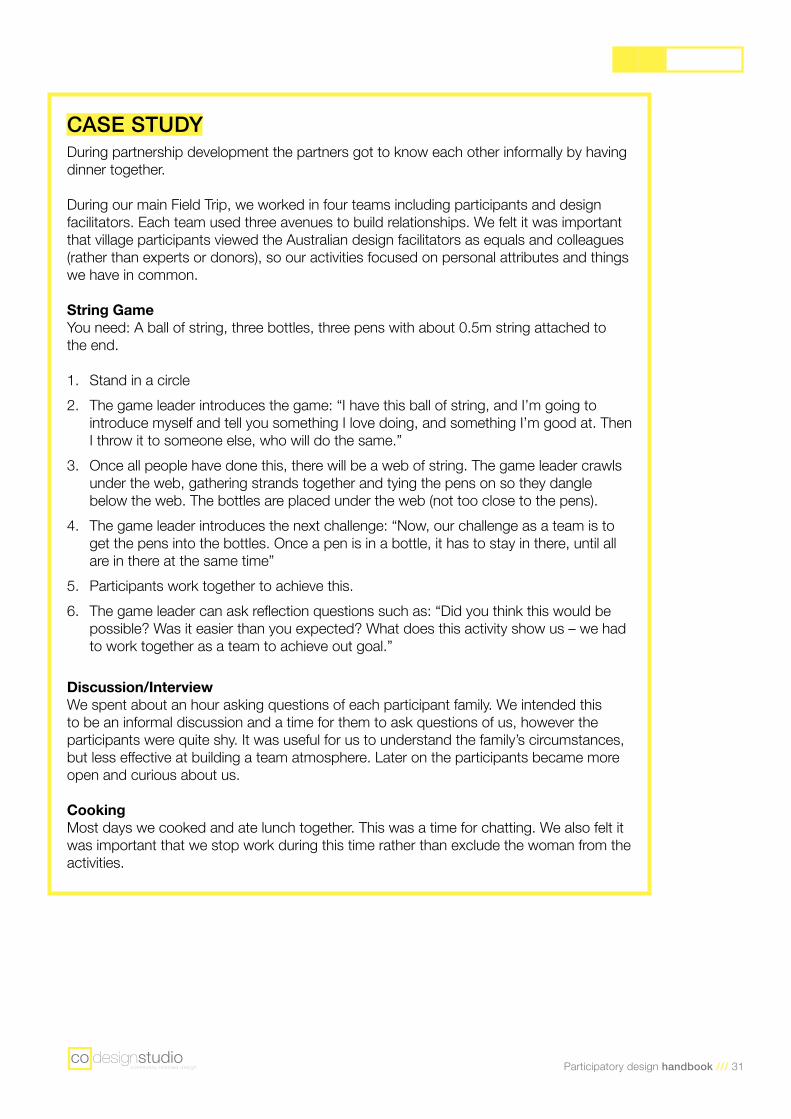
CASE STUDYDuring partnership development the partners got to know each other informally by having dinner together.
During our main Field Trip, we worked in four teams including participants and design facilitators. Each team used three avenues to build relationships. We felt it was important that village participants viewed the Australian design facilitators as equals and colleagues (rather than experts or donors), so our activities focused on personal attributes and things we have in common.
String GameYou need: A ball of string, three bottles, three pens with about 0.5m string attached to the end.
1. Stand in a circle2. The game leader introduces the game: “I have this ball of string, and I’m going to
introduce myself and tell you something I love doing, and something I’m good at. Then I throw it to someone else, who will do the same.”
3. Once all people have done this, there will be a web of string. The game leader crawls under the web, gathering strands together and tying the pens on so they dangle below the web. The bottles are placed under the web (not too close to the pens).
4. The game leader introduces the next challenge: “Now, our challenge as a team is to get the pens into the bottles. Once a pen is in a bottle, it has to stay in there, until all are in there at the same time”
5. Participants work together to achieve this.6. The game leader can ask reflection questions such as: “Did you think this would be
possible? Was it easier than you expected? What does this activity show us – we had to work together as a team to achieve out goal.”
Discussion/InterviewWe spent about an hour asking questions of each participant family. We intended this to be an informal discussion and a time for them to ask questions of us, however the participants were quite shy. It was useful for us to understand the family’s circumstances, but less effective at building a team atmosphere. Later on the participants became more open and curious about us.
CookingMost days we cooked and ate lunch together. This was a time for chatting. We also felt it was important that we stop work during this time rather than exclude the woman from the activities.
32 /// Participatory design handbook
Who? + Project Facilitator/s + Participants
Aims: Many of the activities in the design chapter incorporate knowledge exchange, however it may be useful to include non-project related knowledge sharing, in order to:
+ Learn more about the local context
+ Show appreciation for local knowledge
+ Build the confidence of participants to value and contribute their knowledge
+ Encourage a culture of teamwork
What you need: N/A
Linked Activities: Getting to Know Each Other
Worksheet: N/A
KNOWLEDGE EXCHANGEMETHOD
+ Think of activities in which the participants can demonstrate their expertise.
+ Ask participants if there is something they would be willing to teach the project facilitators
+ Think about the amount of time that should be dedicated to this activity. If the aims can be achieved with short activities, that will leave more time for the rest of the project’s activities
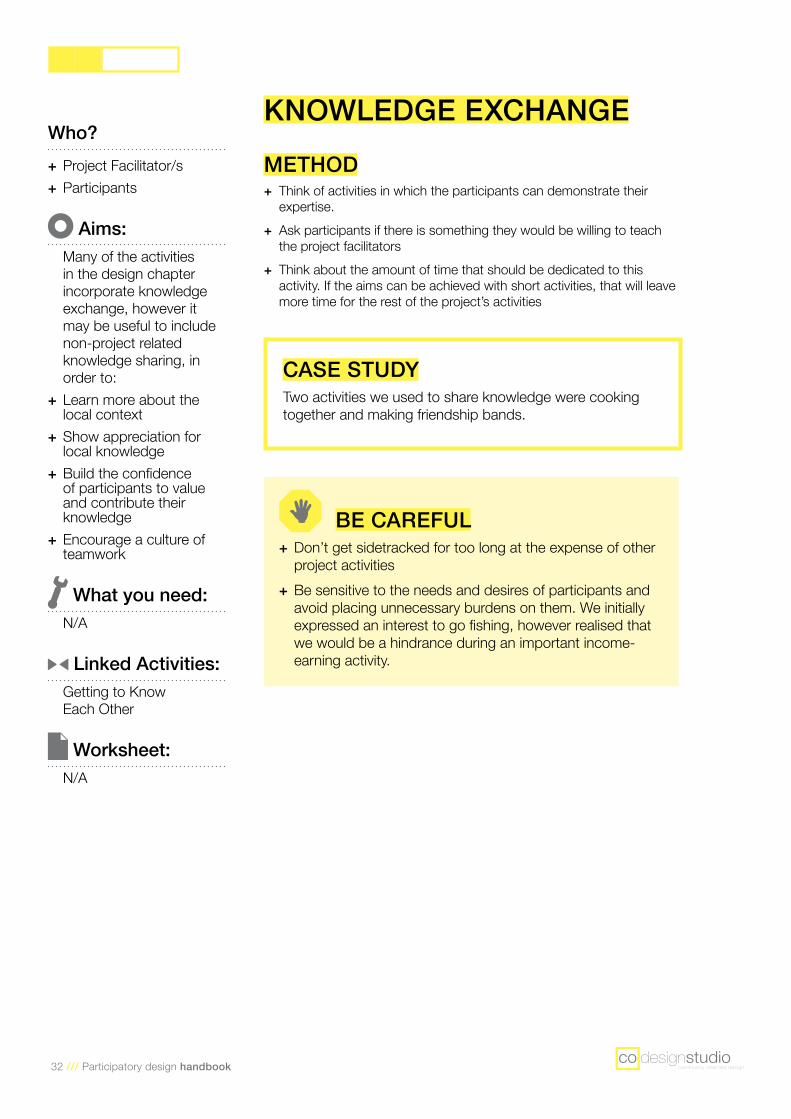
CASE STUDYTwo activities we used to share knowledge were cooking together and making friendship bands.
BE CAREFUL + Don’t get sidetracked for too long at the expense of other project activities
+ Be sensitive to the needs and desires of participants and avoid placing unnecessary burdens on them. We initially expressed an interest to go fishing, however realised that we would be a hindrance during an important income-earning activity.
Participatory design handbook /// 33
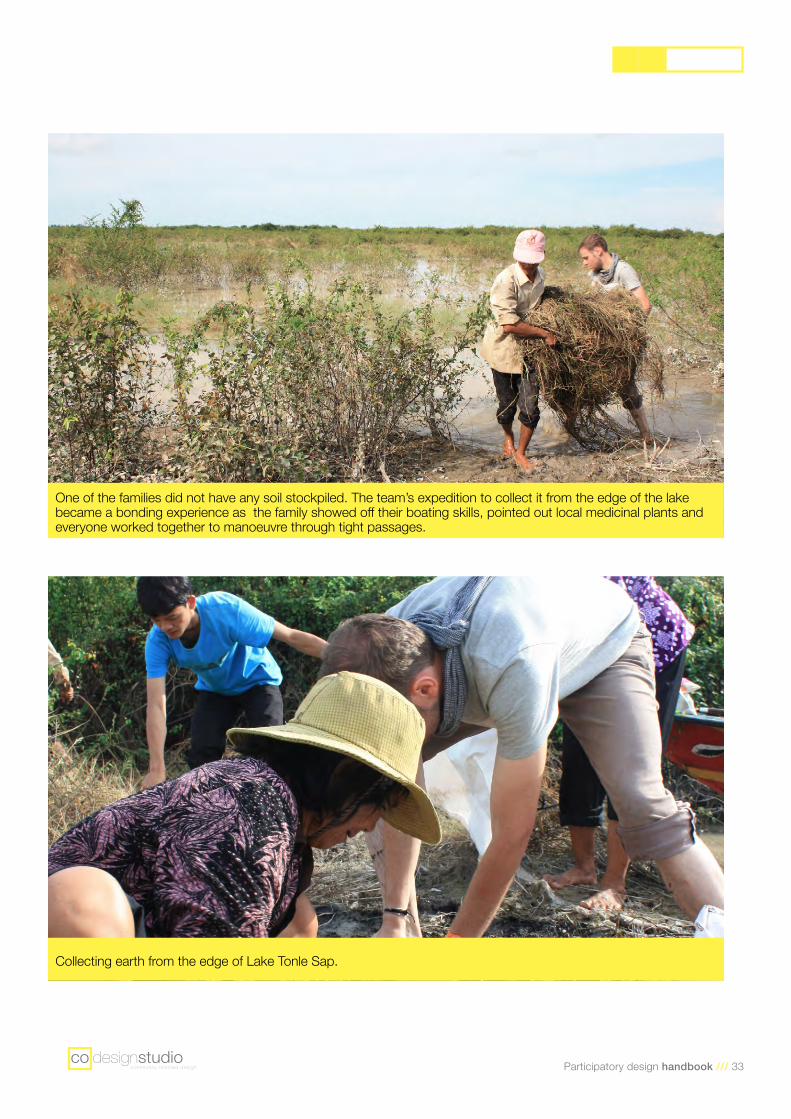
One of the families did not have any soil stockpiled. The team’s expedition to collect it from the edge of the lake became a bonding experience as the family showed off their boating skills, pointed out local medicinal plants and everyone worked together to manoeuvre through tight passages.
Collecting earth from the edge of Lake Tonle Sap.
Design
36 /// Participatory design handbook
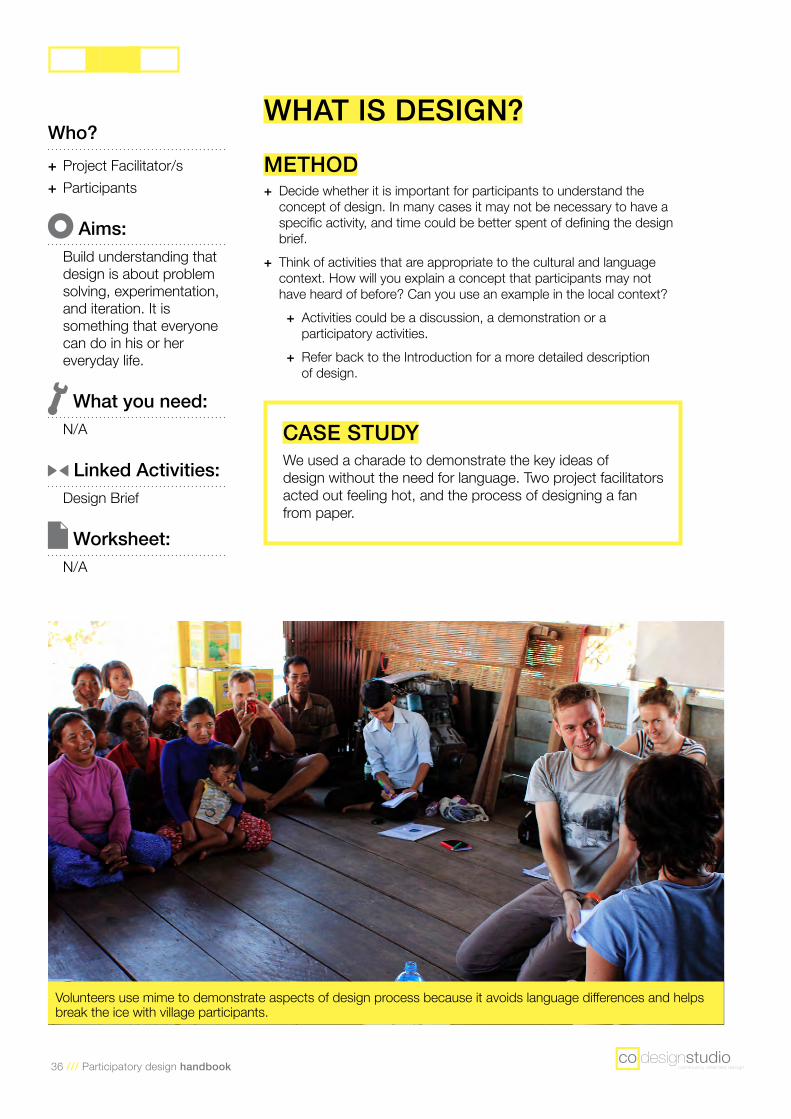
Volunteers use mime to demonstrate aspects of design process because it avoids language differences and helps break the ice with village participants.
Who? + Project Facilitator/s + Participants
Aims: Build understanding that design is about problem solving, experimentation, and iteration. It is something that everyone can do in his or her everyday life.
What you need: N/A
Linked Activities: Design Brief
Worksheet: N/A
WHAT IS DESIGN? METHOD
+ Decide whether it is important for participants to understand the concept of design. In many cases it may not be necessary to have a specific activity, and time could be better spent of defining the design brief.
+ Think of activities that are appropriate to the cultural and language context. How will you explain a concept that participants may not have heard of before? Can you use an example in the local context?
+ Activities could be a discussion, a demonstration or a participatory activities.
+ Refer back to the Introduction for a more detailed description of design.
CASE STUDYWe used a charade to demonstrate the key ideas of design without the need for language. Two project facilitators acted out feeling hot, and the process of designing a fan from paper.
Participatory design handbook /// 37
Who? + Project Facilitator/s + Participants
Aims: + Determine the existing level of design thinking (refer to Collecting Baseline Data)
+ Develop a design brief (a set of criteria that the design must meet)
What you need: + Large paper + Crayons
Linked Activities: + Collecting Baseline Data
+ Design Brief + Expectations
Worksheet: N/A
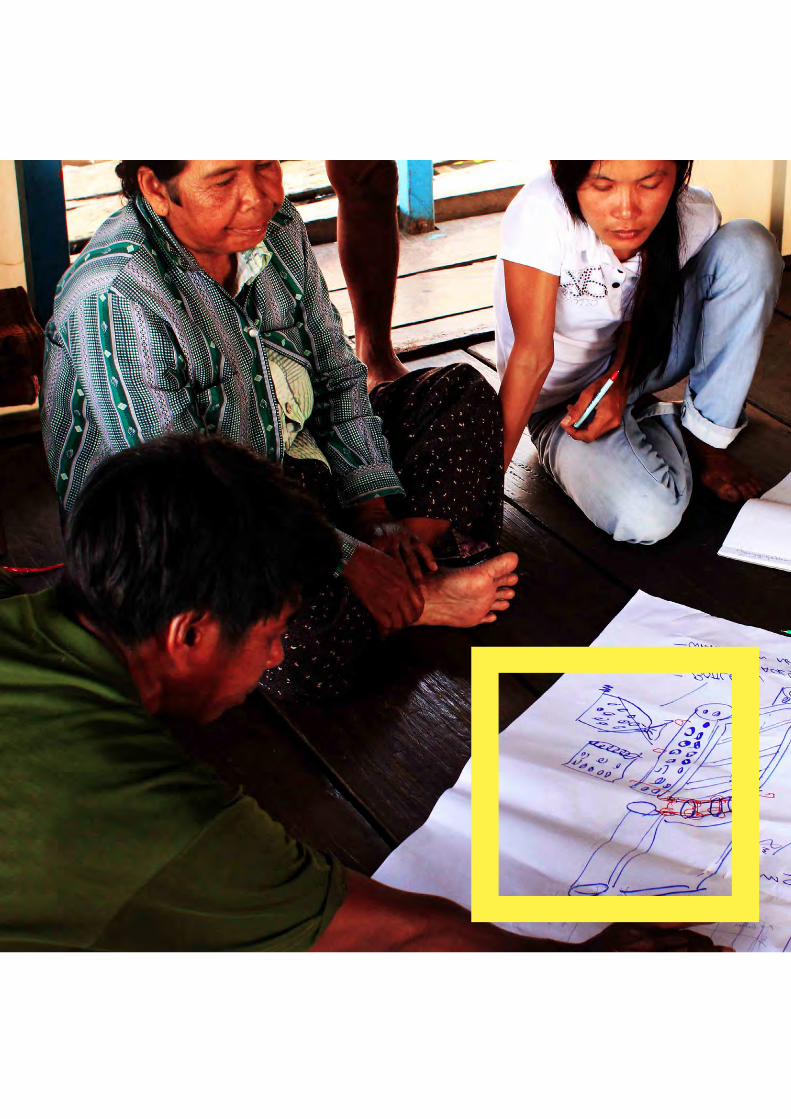
THE PERFECT GARDENMETHOD
+ Ask participants to draw their idea of a perfect garden (or whatever your project aims to design). If some people are not comfortable drawing, help them to participate in other ways. Another participant may act as scribe for the whole team. If this person doesn’t seem to be listening to others, a design facilitator could act as scribe for those who are not comfortable drawing.
+ If you are using this activity to collect baseline data, make sure you keep a record of what the participants come up with by themselves. For example you could take a photo of the page.
+ Use prompting questions for things that have not been considered, for example:
+ What plants do you want to grow? What soil depth is necessary? (Transfer this information to the Design Brief Worksheet)
+ Is it important that it can support a person walking on it, or could it be accessed by boat?
+ How will you deter pests such as rats? + What materials have you used and why? (Keep these in mind to discuss during the Materials activity)
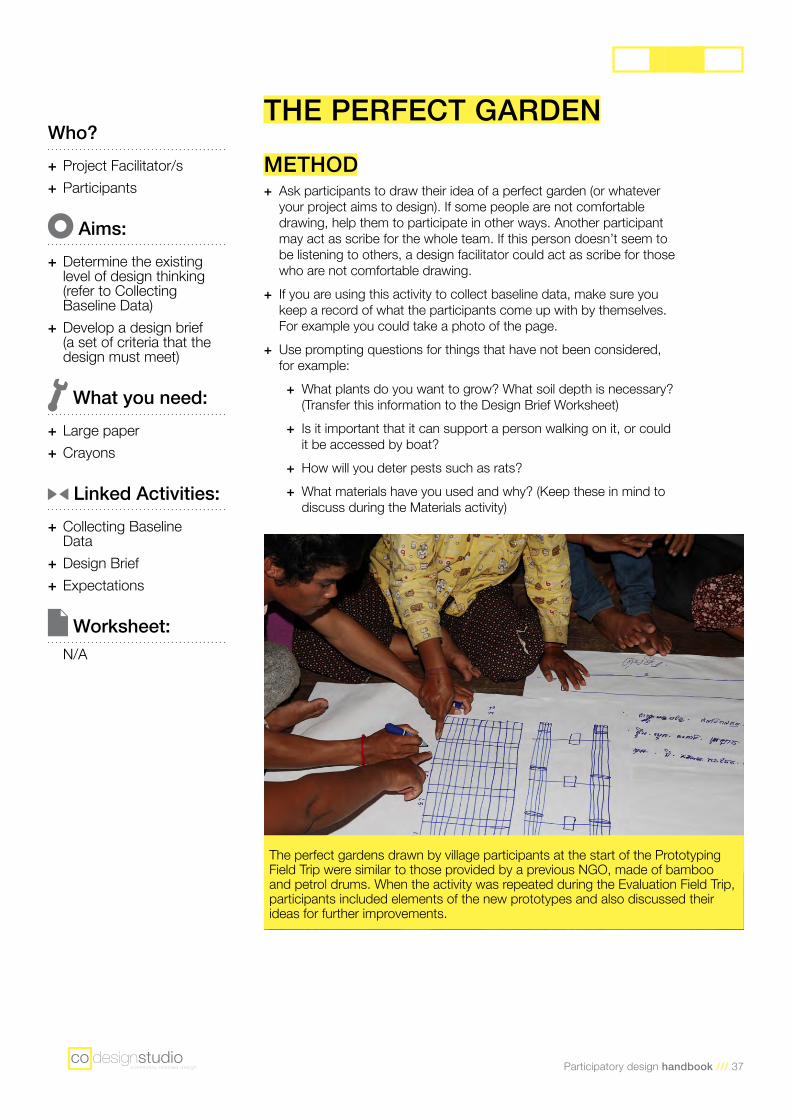
The perfect gardens drawn by village participants at the start of the Prototyping Field Trip were similar to those provided by a previous NGO, made of bamboo and petrol drums. When the activity was repeated during the Evaluation Field Trip, participants included elements of the new prototypes and also discussed their ideas for further improvements.
38 /// Participatory design handbook
Who? + Project Manager + Partner Organisation/s + Project Facilitator/s + Participants
Aims: + Decide on the criteria for your design
+ Prioritise the importance of different criteria
+ Define ‘success’ with participants
What you need: + Large paper + Crayons
Linked Activities: + Materials + What is Design?
Worksheet: This activity has a worksheet
DESIGN BRIEFMETHOD 1. List the critieria that will make your design successful;2. Discuss potential conflicts between criteria, and develop priorities;3. You will probably do these steps more than once. The donor or
project manager may have criteria that are non-negotiable, so it is useful to think about how these will be presented to the village participants. It is important to involve village participants for several reasons:
+ The design brief is closely linked to the goals of the project, and it is important for participants to understand why these criteria exist (refer to case study below);
+ Villagers may have expectations that are incompatible with some design criteria
+ Villagers will have additional criteria to add, particularly around how the garden will be used.
4. Discuss and refine the design brief with the participants. When discussing the kinds of vegetables they want to grow, you may like to make a table to record information about crops from other sources in the same document.
CASE STUDYFollowing a scoping trip which included meetings with villagers, CoDesign developed a design brief (refer to Criteria 1-7 below). During the prototyping field trip, each team discussed these criteria with participants, and added additional criteria specific to each family (see 8-11 below). A cost of $30 per garden was determined as affordable, through discussion with participants during the scoping trip. Initially participants pressured us to build high-cost gardens. We explained that the low-cost criteria was important because it would reduce reliance on a donor. We used their current condition as an example. There were some high cost gardens that were provided by a donor three years ago, which were now disintegrating. Nobody could afford to build their own garden for that price, and the donor had not provided more funding, so the gardens would soon disappear. If our group also gave them high cost gardens, they would soon be in the same position as now. The reason for our project was to find out if gardens could be made more cheaply so they could be accessible to everyone. This is the reason we needed their help to test a variety of options, to try to discover a better way of doing things.
Participatory design handbook /// 39
Design Criteria How important is it?
1. Design is low cost / affordable for typical family without donor assistance
Critical
2. Design incorporates mostly waste materials / recycling Medium importance
3. Design uses locally available materials. Critical
4. Design can be constructed with local expertise. Critical
5. Design can withstand local conditions in all seasons. Critical
6. Design will not create harmful effects on human health Critical
7. Design will not create pollution Important
8. Needs to support a person to walk on the garden Important
9. Needs to maximize growing area Important
10. Ability to grow leafy greens and herbs Important
11. Ability to grow medium and deep rooted vegetables Less important
Vegetable Locally Available?
Desire Seasonality Notes Garden design criteria
Leafy greens
Yes High All year High in ironGrows quickly
Shallow soil. Can be grown hydro-ponically but potential issues if water is contaminated with faeces
Taro Yes Medium Deep soil
Lemongrass Yes High Medium soil
DESIGN BRIEF EXAMPLEYou might find a table like this useful. You can find a blank version in the Worksheet Section of this Handbook.
CASE STUDYWe made a table like the one (left) to help us develop the design brief. Yours may be very different. For example, if you were designing a building, you might collect information on each room, such as how many people it would need to hold, ideal orientation (N/S/E/W), whether it needs to be close to a particular other room etc)
40 /// Participatory design handbook
Who?Project Facilitator/s
Aims: + Learn from successes and failures in other places
+ Demonstrate to participants that alternatives exist
+ Provide design inspiration
What you need: + Computer (with internet) + A place to collate all the precedents
+ Presentation materials (ie file of precedents including images) to take to the project site
Linked Activities: + Background Research + Design brief + Materials
Worksheet: N/A
PRECEDENTSMETHOD
+ Research how other groups have tackled a similar design problem. This could include Google searching, reading journals related to the topic, or getting in contact with organisations who do similar work;
+ Start big (e.g. a global scale) and filter your research to more specifically suit your project.
+ Think about how the precedent relates to your project. What are the differences in context, and how could this affect your design?
+ Create a booklet or file of examples. Ensure you have pictures, preferably photographs. You might also like to have technical drawings, or write some notes about the design.
+ Use this file with your village participants. Discussion points for each example could include:
+ Do they think it could work in their village? Why/why not? + What is good about the design? What is bad? + How could it be improved for the local context? + What materials have been used? Are those things available here? If not, is there something we could substitute?
HINT/TIPS + Consider splitting up into small working groups to research various precedents. Meet regularly to discuss what you are learning
+ Consider an online storage place for all the information. This way, each group can learn and add to each other’s work over the investigation period whilst not being in the same place. It is important that everyone in your working group is comfortable with using this method of communication before you start! Examples of free/cheap online collaboration tools are Google Drive, Dropbox, Wiki etc.
+ Consider how you will put your research together to create a useful tool for in the field:
+ Consider the quality of images, are the clear and legible to a foreign audience
+ Do they give a realistic or confusing impression of what can be achieved?
Participatory design handbook /// 41
CASE STUDYRunning the precedents handbook exercise in a village (Also refer to the precedents handbook example in the worksheet section)
We created a small pictorial handbook of floating garden examples found around the world that during our initial design phase we the families, we showed to present how other places develop floating gardens.
Pros: + The handbook worked well in developing enthusiasm for the project
+ It also assisted in increasing awareness of possible alternatives
Cons: + The location of Au Akol (entirely surrounded by water) meant that a number of the examples we had in the handbook were not at all possible at the project site. Perhaps this raised unrealistic expectations for what was achievable
BE CAREFULIf you are using the precedent handbook in the field, make sure that it is clear to participants that these are ‘examples only.’ They may/ may not work in the given environment, but will help to engage and foster design thinking.
42 /// Participatory design handbook
Who? + Project Facilitator/s + Participants
Aims: Determine which materials are appropriate for your context
What you need: + Background Research + Precedents + Budget
Linked Activities: + Background Research + Precedents
Worksheet: This activity has a worksheet
MATERIALSMETHOD
+ Find out what is currently being used for similar purposes. What are the benefits and drawbacks?
+ Try and find out as much as possible about what materials are available for use. Think about:
+ Can it be sourced locally? If not, how would people access it? + How much does it cost? + What are the potential environmental impacts? (for example reducing or creating waste)
+ For natural materials (such as cane): + Is it indigenous to the area, or a weed? + What is the growing cycle? + How abundant is it? + Can it be sustainably collected? + Can people collect it themselves, or is it a product for purchase? + What is involved in growing and/or collecting it?
+ It may be helpful to produce a materials analysis like the one on the following page.
+ Test your materials through small experiments. For example, how many bottles does it take to float 1kg of waterlogged soil? What happens if you leave coconut husks in water for a month?
+ Use the flashcard activity with families to start discussion materials are best for the project outcome (see Example flash card activity)
+ Obtain materials in order to construct prototypes on site.
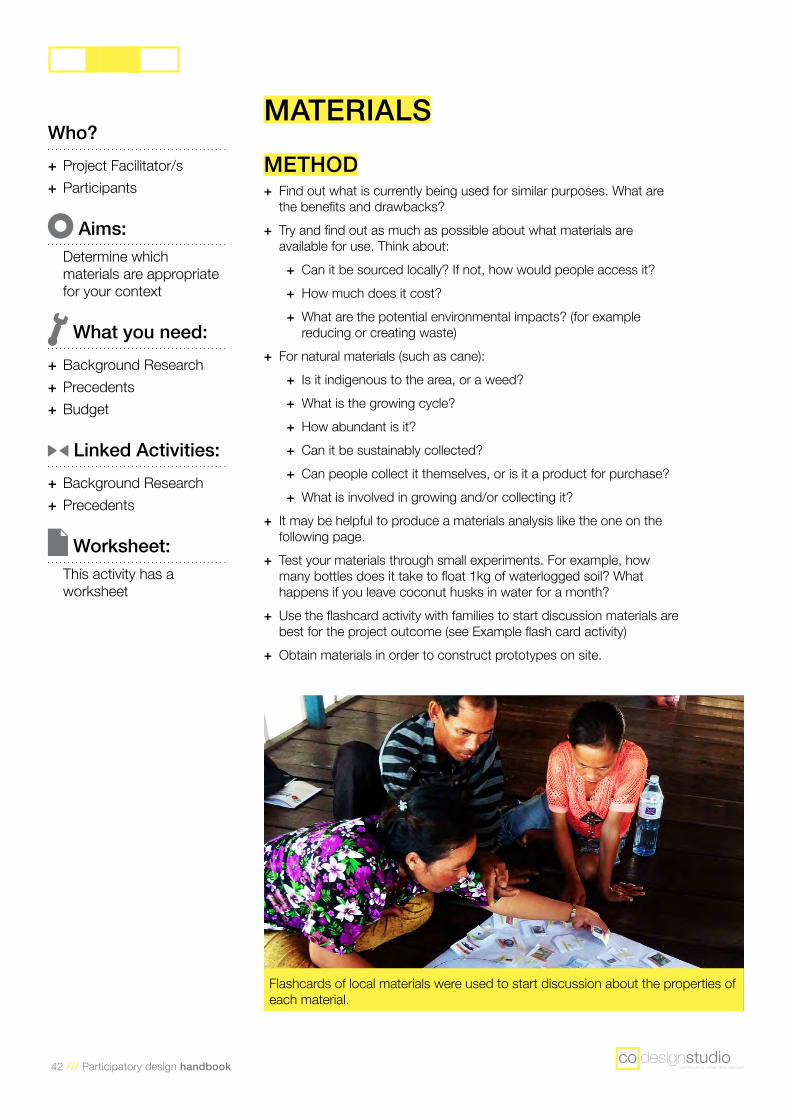
Flashcards of local materials were used to start discussion about the properties of each material.
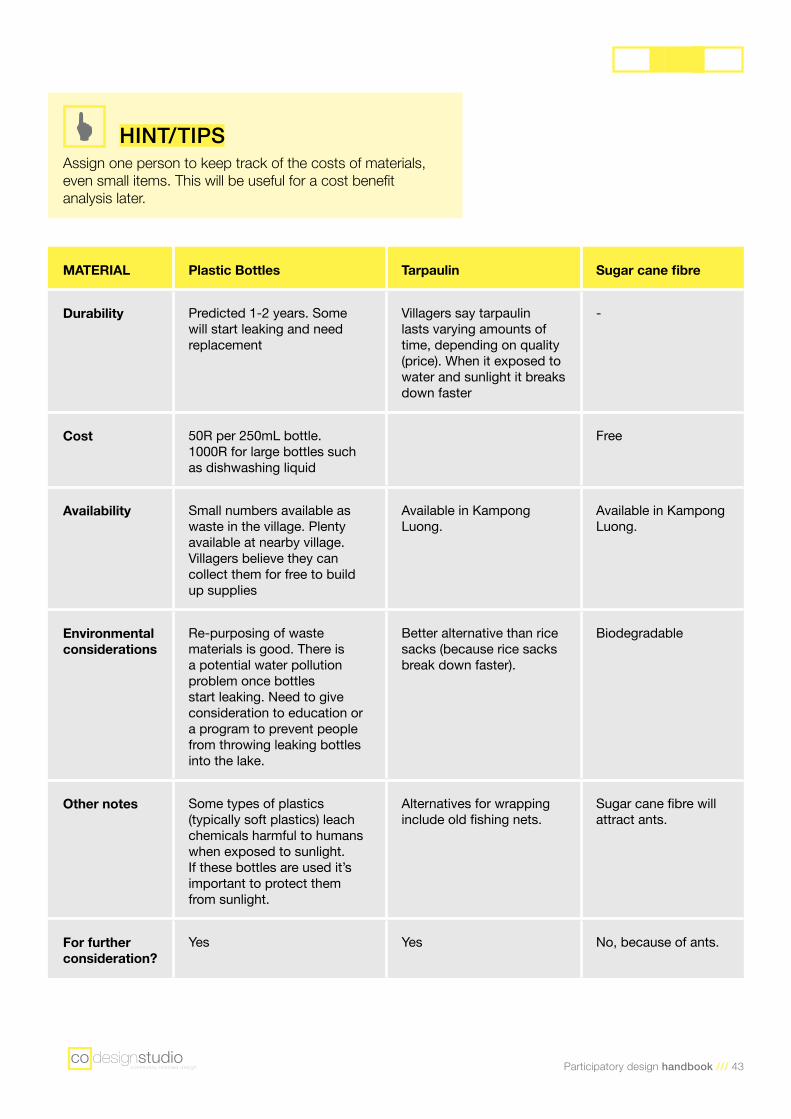
Participatory design handbook /// 43
HINT/TIPSAssign one person to keep track of the costs of materials, even small items. This will be useful for a cost benefit analysis later.
MATERIAL Plastic Bottles Tarpaulin Sugar cane fibre
Durability Predicted 1-2 years. Some will start leaking and need replacement
Villagers say tarpaulin lasts varying amounts of time, depending on quality (price). When it exposed to water and sunlight it breaks down faster
-
Cost 50R per 250mL bottle.1000R for large bottles such as dishwashing liquid
Free
Availability Small numbers available as waste in the village. Plenty available at nearby village. Villagers believe they can collect them for free to build up supplies
Available in Kampong Luong.
Available in Kampong Luong.
Environmental considerations
Re-purposing of waste materials is good. There is a potential water pollution problem once bottles start leaking. Need to give consideration to education or a program to prevent people from throwing leaking bottles into the lake.
Better alternative than rice sacks (because rice sacks break down faster).
Biodegradable
Other notes Some types of plastics (typically soft plastics) leach chemicals harmful to humans when exposed to sunlight. If these bottles are used it’s important to protect them from sunlight.
Alternatives for wrapping include old fishing nets.
Sugar cane fibre will attract ants.
For further consideration?
Yes Yes No, because of ants.
44 /// Participatory design handbook
EXAMPLE ACTIVITY: FLASHCARDSWhat you need:
+ Flash cards, including blank cards (example on the following page)
+ Worksheet. (You can change the criteria to suit your project)
+ Samples of the actual materials can be useful
Steps:1. Cut out your flash cards and lay them on a large piece of
paper with a circle drawn on it.2. Ask participants to sort the flash cards using the criteria.
For example “Put things that are ‘useful’ inside the circle”, or “Put things that are ‘locally available’ inside the circle” etc.
3. Allow participants time to discuss the materials. This discussion will provide useful information that they might not otherwise think to tell you.
4. Ask participants if they have suggestions for other materials. Have blank flash cards ready for this.
5. Ask participants if they have suggestions for other criteria. Be prepared to expand your Worksheet.
6. Evaluate the materials value in order to come up with a list of ‘best use’ materials to build your prototype.
CASE STUDYInitially, villagers were sceptical of our suggestion to consider plastic bottles for floatation, because they thought they would blow away too easily. They began to consider these as a viable material after seeing precedents and discussing the criteria. The criteria helped them to understand that plastic bottles have many positive attributes (they are durable, very cheap, locally available etc).
Participatory design handbook /// 45
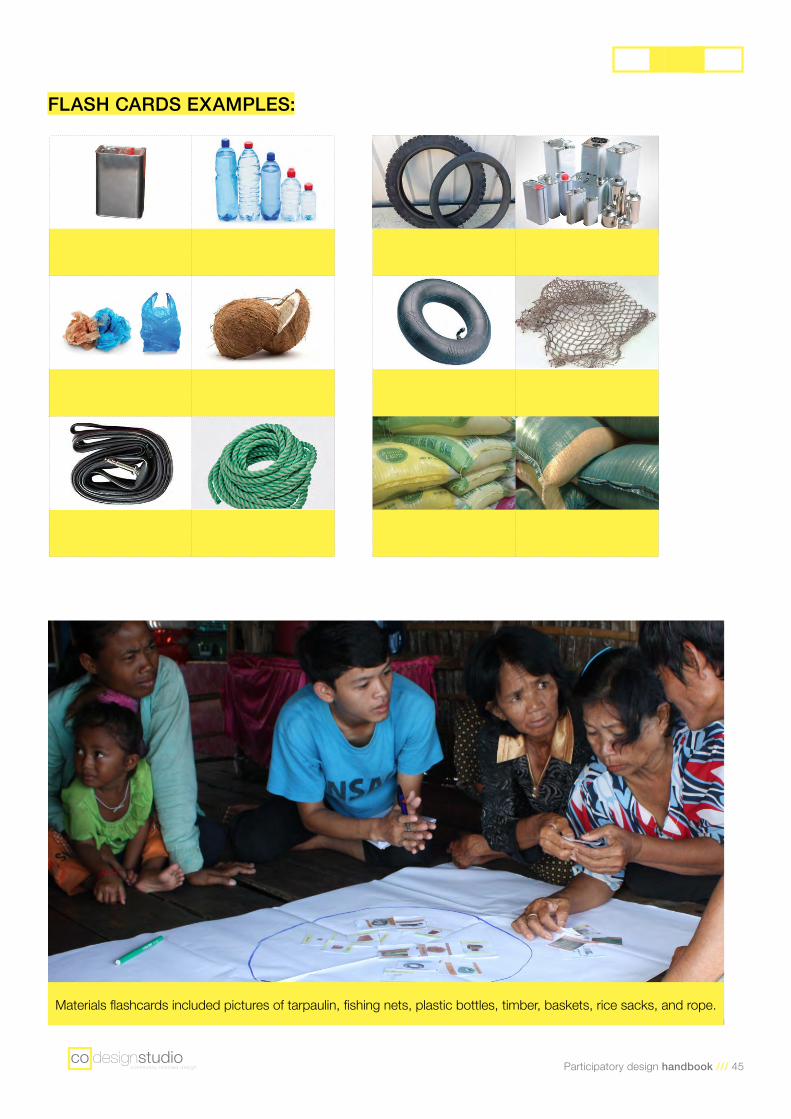
Materials flashcards included pictures of tarpaulin, fishing nets, plastic bottles, timber, baskets, rice sacks, and rope.
FLASH CARDS EXAMPLES:
46 /// Participatory design handbook
Who? + Project Manager + Partner Organisation/s + Project Facilitator/s
Aims: + To ensure design facilitators understand the approach, goals and values of the project
+ To plan facilitation techniques
What you need: N/A
Linked Activities: + Various
Worksheet: N/A
FACILITATIONMETHOD
+ Identify what facilitation skills are needed. In our project we had designers to facilitate the design process, but they they were from a different language and cultural background than the participants. For this reason we were assisted by Cambodian volunteers as interpreter-facilitators.
+ Facilitation preparation: + Have a discussion with the facilitators about the project goals, values and approach.
+ Provide training in cross-cultural communication if your facilitators are unfamiliar with the cultural context of the project
+ Think about potential facilitation problems that might arise, and how you might respond. For example, what will you do if one person in the group is being dominant? What will you do if people seem to be losing interest?
+ Plan your activities. You may like to use some from this workbook, but you can also make your own. Think about what is appropriate: in literate communities you could use activities that involve writing or drawing. In non-literate communities some people may be comfortable drawing, but some may prefer model-making or prototyping.
+ During facilitation: + Be prepared to be flexible: modify the pace and/or work times to suit participants;
+ Be prepared to be creative: if one activity is not working, you can make up something new to achieve the same goal;
+ Ensure you have time for regular reflection. An evening meeting may be a good way for facilitators to share their experiences and learnings from the day and plan for the next day.
+ Ensure facilitators are supported. An evening meeting provides space for facilitators to raise challenges and discuss solutions.
Participatory design handbook /// 47
CASE STUDYOur goals for the Prototyping Field Trip were:
+ Produce four completed test gardens + Run an effective participatory design process by focusing on empowering participants
+ Effectively involve women in the design process, and they are likely to be the most active gardeners
Facilitation techniques to meet these goals included: + Make participants comfortable to voice their opinions through friendship-building, genuine listening and reacting positively to their participation;
+ Build a culture of teamwork where all voices are heard and considered;
+ Allow the process to be led by participants and responsive to their needs (ie respecting times when they need to do other activities);
+ Monitor the speed of the process in order to ensure the garden construction is completed. We identified that this could cause a potential conflict with the other goals, given we could not extend the workshop.
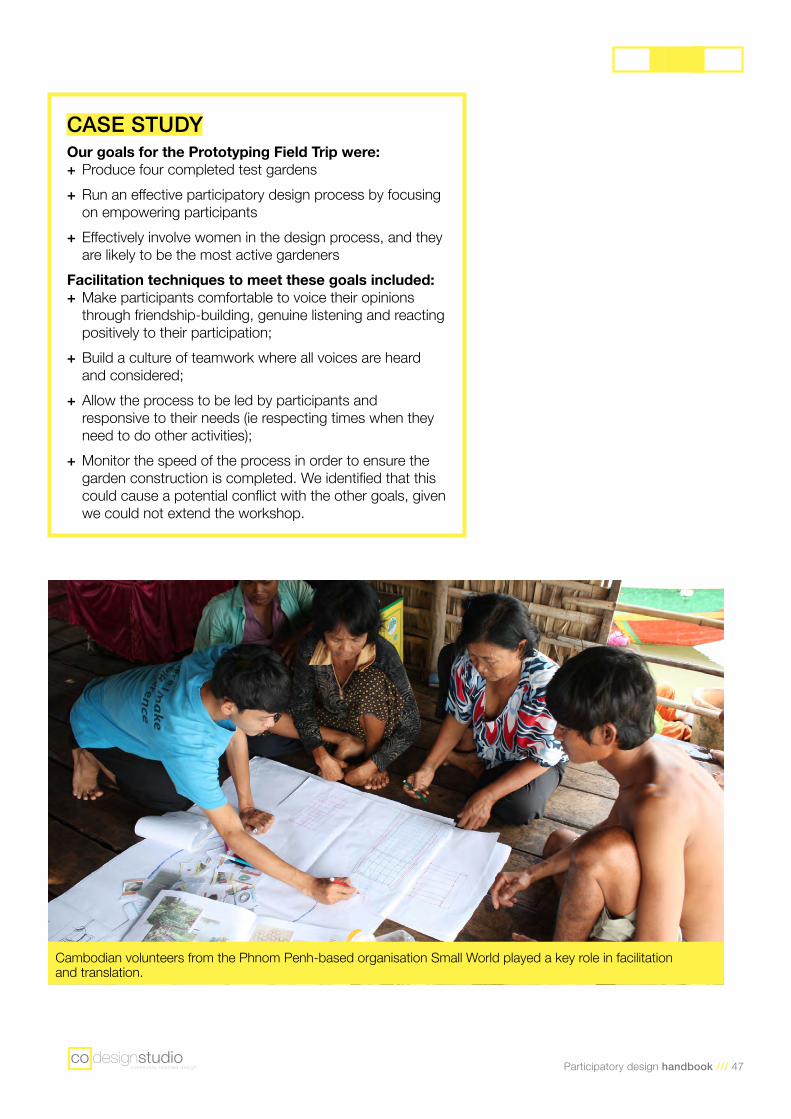
Cambodian volunteers from the Phnom Penh-based organisation Small World played a key role in facilitation and translation.
48 /// Participatory design handbook
Who? + Participants + Project Facilitator/s
Aims: Test and decide on construction process.
What you need: + Large paper + Crayons + Samples of materials + Locally available tools + Model-making materials (for example straws could represent timber, string could represent rope etc)
Linked Activities: + Materials + Precedents + Design brief
Worksheet: N/A
CONSTRUCTION PROCESSMETHOD
+ Discuss construction techniques that are familiar to the family: + What tools do they have? + What are things they have made themselves? For example you could talk about how their house was made.
+ What are the skills and abilities of each person? For example, who uses tools? Who is good at weaving? Who is good at using knives?
+ Develop ideas for how to construct your garden. You could do this as a whole group, or split into pairs, or do it individually. Things to think about include:
+ What will give it strength? + What will provide floatation? + What will make it stable? + Does it need rigidity or flexibility? Rigid joints may provide strength, but flexibility may help to avoid capsizing when there are waves;
+ What sort of impacts or pressures is it likely to be subject to? For example:
+ How will waves act on it during a storm? + Is it likely to get bumped? + Do people need to be able to walk on it?
+ Use drawings or small scale models to help you discuss options. Drawing is a fast technique, but model-making may be easier for people to visualise, especially if participants are hesitant about drawing;
+ Make full scale tests of parts of the design. For example, if you need to join two pieces of timber together, you could use nails or rope binding: test both options on small/scrap pieces of timber to see which is strongest, and weigh these techniques against other factors such as cost and durability.
+ Once you have decided on how you will construct your garden, plan for it. You might set up different areas for different tasks.
+ Discuss and agree safety precautions.

Participatory design handbook /// 49
Once packed, the bags are sewn together and wrapped in damaged fishing nets to keep the bottle-bricks firmly together.
In prototype 1, small water bottles are tied into groups of four, before packing the into rice sacks.
50 /// Participatory design handbook
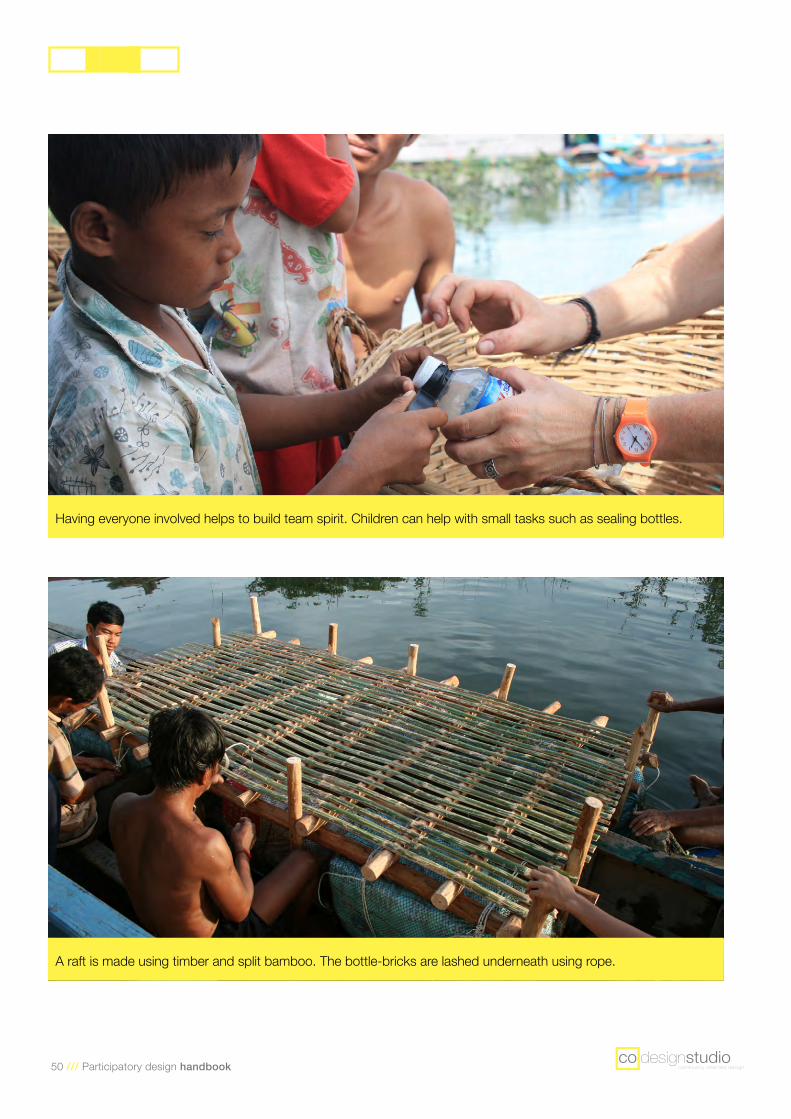
Having everyone involved helps to build team spirit. Children can help with small tasks such as sealing bottles.
A raft is made using timber and split bamboo. The bottle-bricks are lashed underneath using rope.
Participatory design handbook /// 51
HINT/TIPS + If you are cutting timber or bamboo, calculate what lengths you will need and measure them off to use long lengths efficiently. It may be best to cut one piece at a time: if you accidentally calculated wrongly and the piece is too long or too short, you have only wasted one piece, not the whole lot!
+ Try to involve all types of participants in construction. If men are present they may take on the heavier tasks, but others can still contribute to ideas. Children or elderly people can get involved in easier tasks such as testing bottles for leaks. When everyone in contributing, it demonstrates that everyone has skills to offer, and helps build a fun team spirit.
BE CAREFUL + It is far more likely that participants will know how best to construct in their own environment. Ensure that your role is helping and facilitating the building process, not dictating it.
+ It can be easy to get chaotic during construction, due to high levels of enthusiasm. Allowing participants to do the construction is empowering, and can leave facilitators free to keep an eye on safety and coordination.
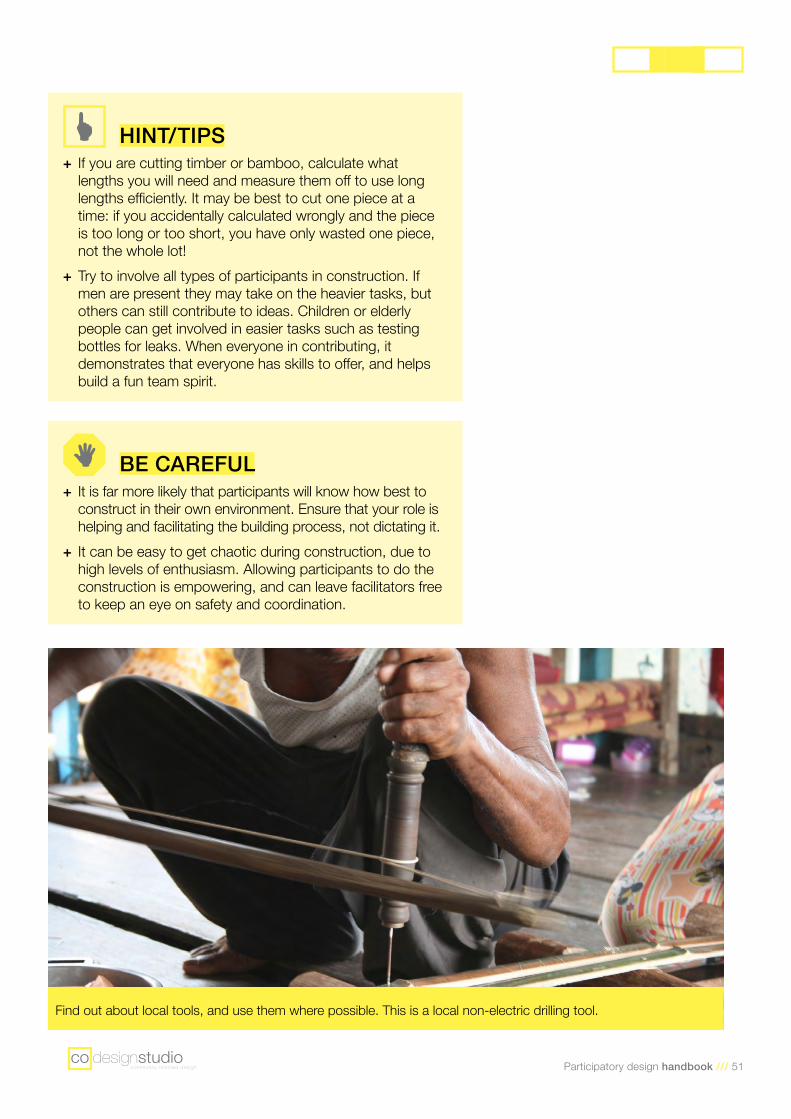
Find out about local tools, and use them where possible. This is a local non-electric drilling tool.
Monitoring & Evaluation (M&E)
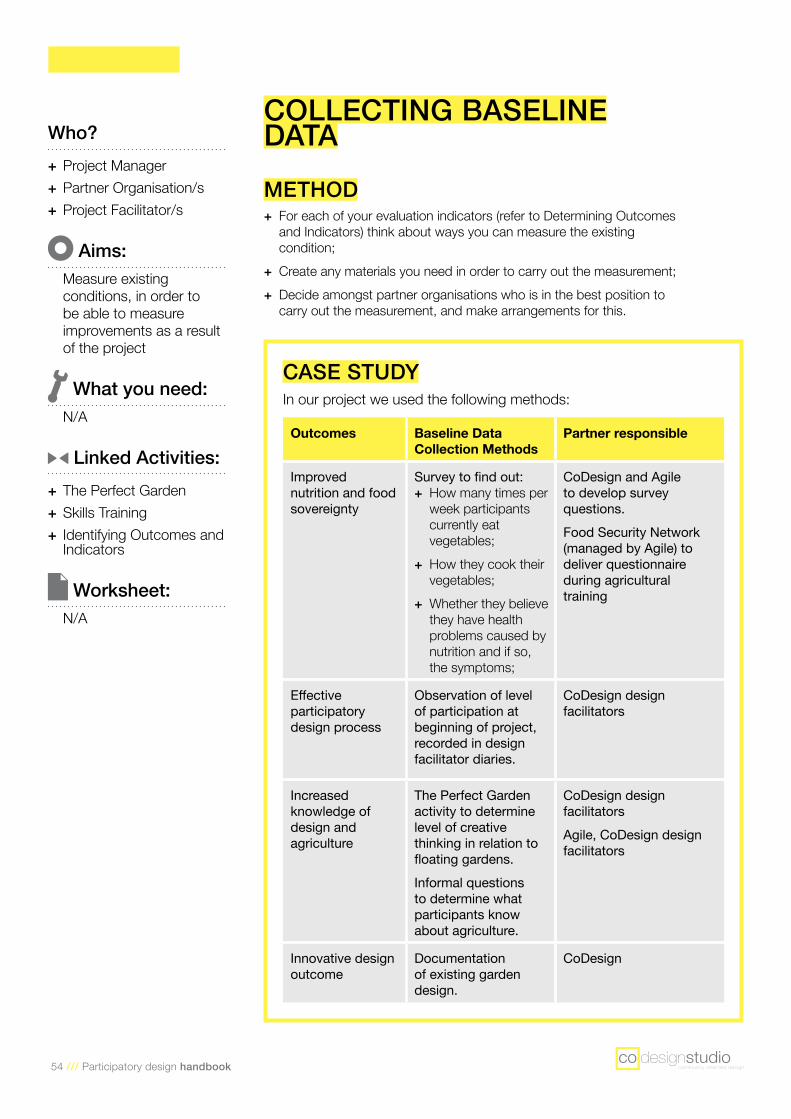
54 /// Participatory design handbook
Who? + Project Manager + Partner Organisation/s + Project Facilitator/s
Aims: Measure existing conditions, in order to be able to measure improvements as a result of the project
What you need: N/A
Linked Activities: + The Perfect Garden + Skills Training + Identifying Outcomes and Indicators
Worksheet: N/A
COLLECTING BASELINEDATAMETHOD
+ For each of your evaluation indicators (refer to Determining Outcomes and Indicators) think about ways you can measure the existing condition;
+ Create any materials you need in order to carry out the measurement; + Decide amongst partner organisations who is in the best position to carry out the measurement, and make arrangements for this.
CASE STUDYIn our project we used the following methods:
Outcomes Baseline Data Collection Methods
Partner responsible
Improved nutrition and food sovereignty
Survey to find out: + How many times per week participants currently eat vegetables;
+ How they cook their vegetables;
+ Whether they believe they have health problems caused by nutrition and if so, the symptoms;
CoDesign and Agile to develop survey questions. Food Security Network (managed by Agile) to deliver questionnaire during agricultural training
Effective participatory design process
Observation of level of participation at beginning of project, recorded in design facilitator diaries.
CoDesign design facilitators
Increased knowledge of design and agriculture
The Perfect Garden activity to determine level of creative thinking in relation to floating gardens.Informal questions to determine what participants know about agriculture.
CoDesign design facilitatorsAgile, CoDesign design facilitators
Innovative design outcome
Documentation of existing garden design.
CoDesign
Participatory design handbook /// 55
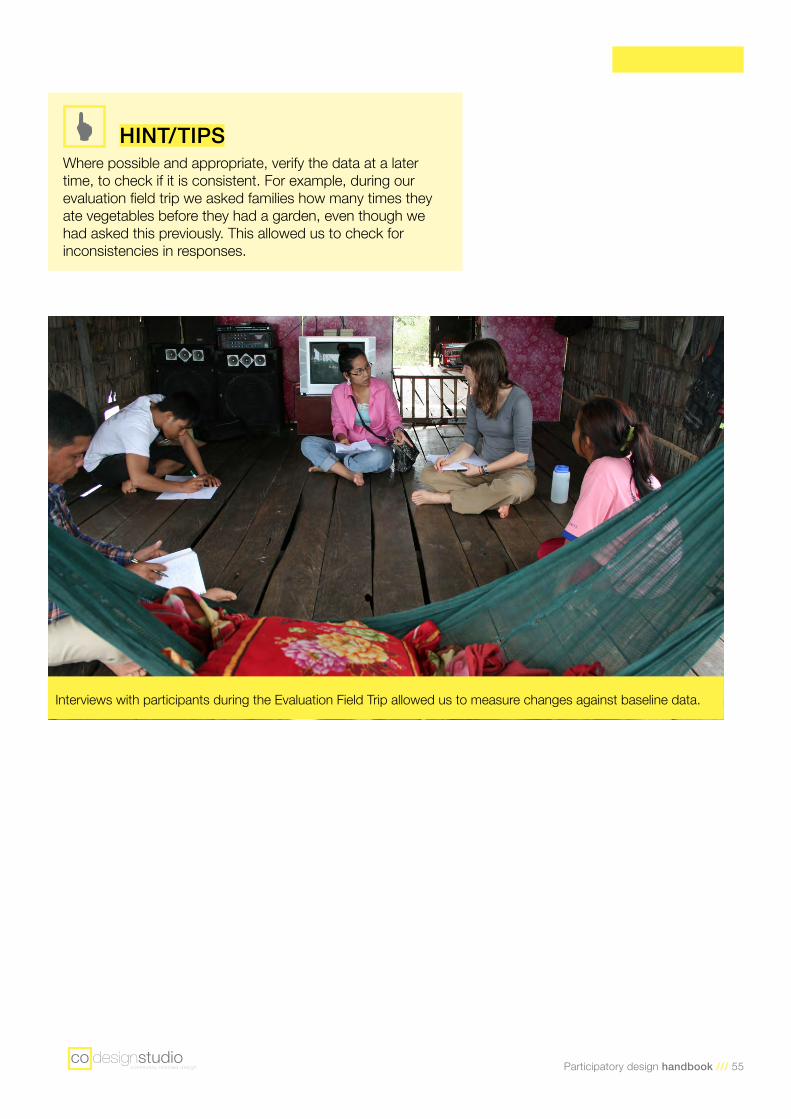
HINT/TIPSWhere possible and appropriate, verify the data at a later time, to check if it is consistent. For example, during our evaluation field trip we asked families how many times they ate vegetables before they had a garden, even though we had asked this previously. This allowed us to check for inconsistencies in responses.
Interviews with participants during the Evaluation Field Trip allowed us to measure changes against baseline data.
56 /// Participatory design handbook
Who? + Project Manager + Partner Organisation/s + Project Facilitator/s + Participants
Aims: + Learn throughout the project;
+ Support any team members who are facing difficulties;
+ Assess progress toward goals;
+ Develop any actions that need to take place in order to solve challenges
+ Build a culture of sharing and learning
What you need: 1-2 hours
Linked Activities: + Partnering + Project Planning + Expectations + Design Facilitation + Identifying Outcomes and Indicators
+ Evaluation
Worksheet: N/A
REFLECTION SESSIONSMETHOD
+ Read the aims of this activity, and decide what kinds of reflection sessions will be useful, who will be involved, and when they should be held. Add these to your Project Plan.
+ Make a safe, comfortable space. Think about how the room is configured For example, sitting in a circle allows everyone to see each other.
+ Explain the reason for the reflection + Depending on the group, allow people to introduce themselves + Encourage sharing by all attendees. You could do this formally, by going around the circle, or informally, by being aware of who is contributing less, and thinking of appropriate ways to increase their involvement.
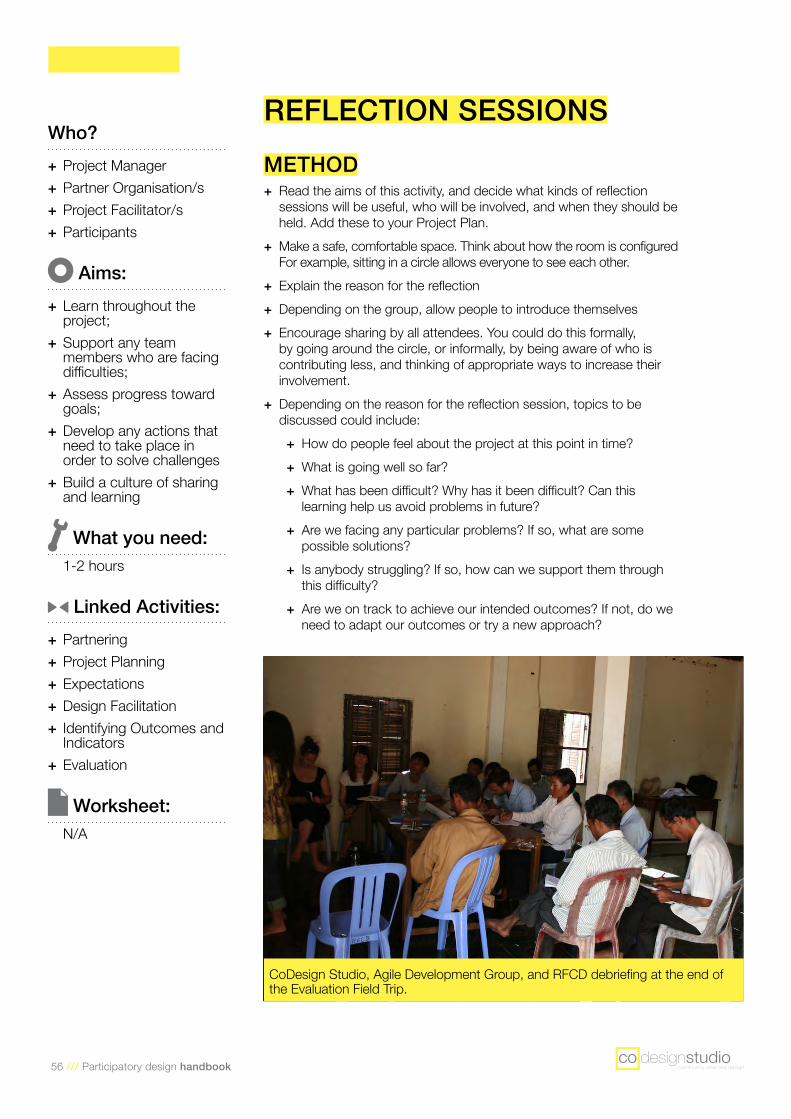
+ Depending on the reason for the reflection session, topics to be discussed could include:
+ How do people feel about the project at this point in time? + What is going well so far? + What has been difficult? Why has it been difficult? Can this learning help us avoid problems in future?
+ Are we facing any particular problems? If so, what are some possible solutions?
+ Is anybody struggling? If so, how can we support them through this difficulty?
+ Are we on track to achieve our intended outcomes? If not, do we need to adapt our outcomes or try a new approach?
CoDesign Studio, Agile Development Group, and RFCD debriefing at the end of the Evaluation Field Trip.
Participatory design handbook /// 57
HINT/TIPS + Translation. This is important if there is no common language that all participants are comfortable speaking. You need to allow extra time for the session, as the time for interpretation needs to be included. Be aware of the skill level of the translator; it may be worthwhile to have another local speaker take notes in the language being spoken, so you can verify responses at a later time. When speaking, avoid jargon that may be hard to translate.
+ Recognition. Always remember to thank people for their attendance. Think about whether it is appropriate to pay for people’s time or provide a gift. Refer to any agreements already in place. For example, it may be appropriate to pay an agreed hourly rate to the staff of a partner organisation. Accessibility. How will people get there, and who will pay for their transport? Is wheelchair accessibility necessary?
+ Inclusive participation. How will you make sure people feel comfortable to share their ideas? If it is a large group you might break into small groups for discussion. It may be worthwhile to have separate groups for men, women, children and youth if you think they may have differing viewpoints, or if you think they will contribute differently depending on who they are working with.
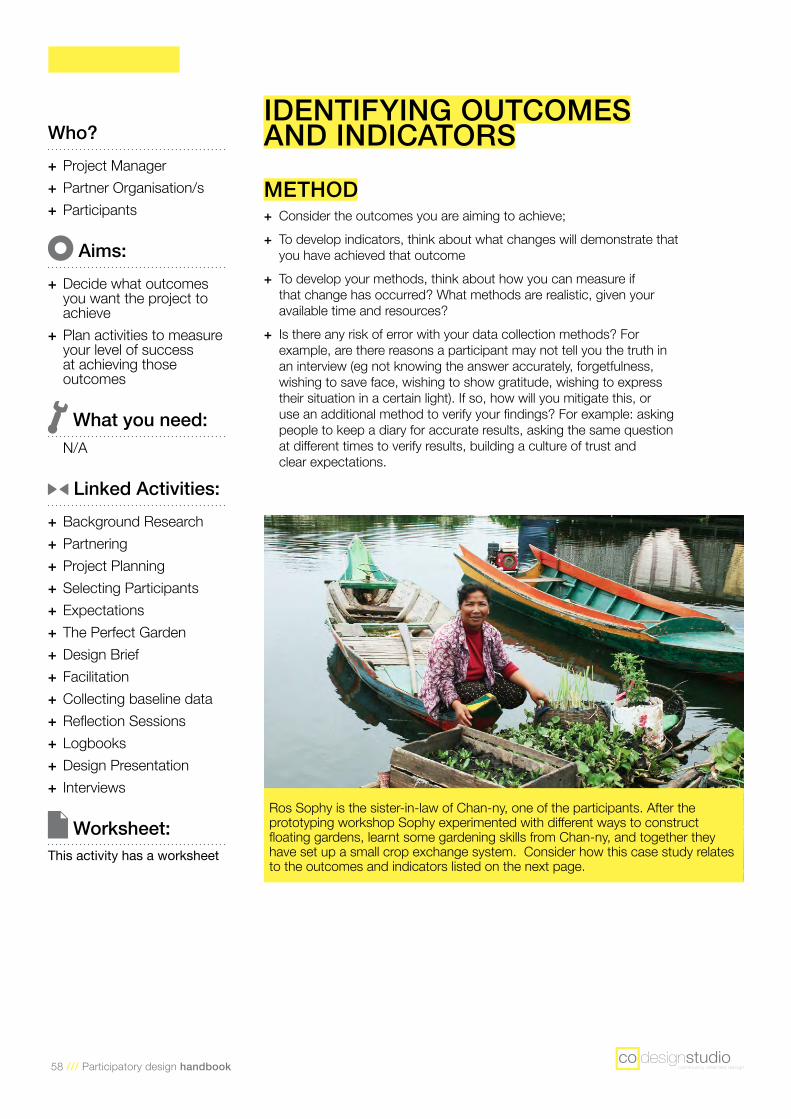
58 /// Participatory design handbook
Who? + Project Manager + Partner Organisation/s + Participants
Aims: + Decide what outcomes you want the project to achieve
+ Plan activities to measure your level of success at achieving those outcomes
What you need: N/A
Linked Activities: + Background Research + Partnering + Project Planning + Selecting Participants + Expectations + The Perfect Garden + Design Brief + Facilitation + Collecting baseline data + Reflection Sessions + Logbooks + Design Presentation + Interviews
Worksheet: This activity has a worksheet
IDENTIFYING OUTCOMESAND INDICATORSMETHOD
+ Consider the outcomes you are aiming to achieve; + To develop indicators, think about what changes will demonstrate that you have achieved that outcome
+ To develop your methods, think about how you can measure if that change has occurred? What methods are realistic, given your available time and resources?
+ Is there any risk of error with your data collection methods? For example, are there reasons a participant may not tell you the truth in an interview (eg not knowing the answer accurately, forgetfulness, wishing to save face, wishing to show gratitude, wishing to express their situation in a certain light). If so, how will you mitigate this, or use an additional method to verify your findings? For example: asking people to keep a diary for accurate results, asking the same question at different times to verify results, building a culture of trust and clear expectations.
Ros Sophy is the sister-in-law of Chan-ny, one of the participants. After the prototyping workshop Sophy experimented with different ways to construct floating gardens, learnt some gardening skills from Chan-ny, and together they have set up a small crop exchange system. Consider how this case study relates to the outcomes and indicators listed on the next page.
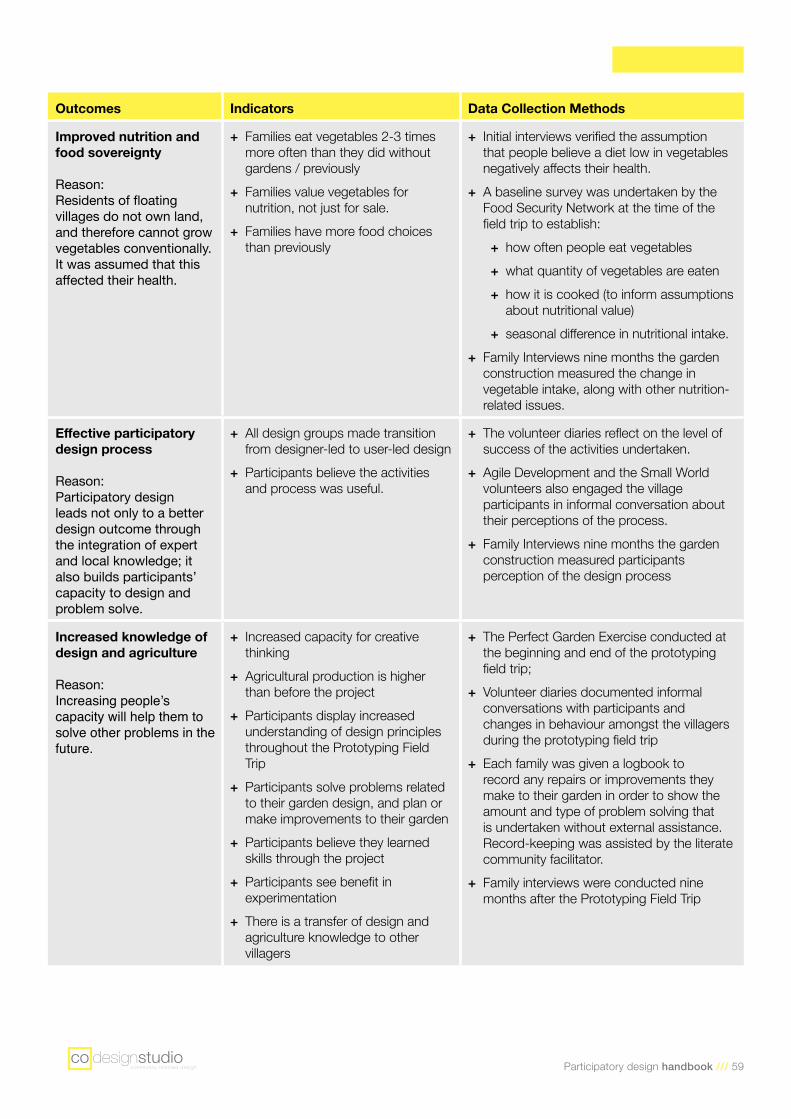
Participatory design handbook /// 59
Outcomes Indicators Data Collection Methods
Improved nutrition and food sovereignty
Reason:Residents of floating villages do not own land, and therefore cannot grow vegetables conventionally. It was assumed that this affected their health.
+ Families eat vegetables 2-3 times more often than they did without gardens / previously
+ Families value vegetables for nutrition, not just for sale.
+ Families have more food choices than previously
+ Initial interviews verified the assumption that people believe a diet low in vegetables negatively affects their health.
+ A baseline survey was undertaken by the Food Security Network at the time of the field trip to establish:
+ how often people eat vegetables + what quantity of vegetables are eaten + how it is cooked (to inform assumptions about nutritional value)
+ seasonal difference in nutritional intake. + Family Interviews nine months the garden construction measured the change in vegetable intake, along with other nutrition-related issues.
Effective participatory design process
Reason:Participatory design leads not only to a better design outcome through the integration of expert and local knowledge; it also builds participants’ capacity to design and problem solve.
+ All design groups made transition from designer-led to user-led design
+ Participants believe the activities and process was useful.
+ The volunteer diaries reflect on the level of success of the activities undertaken.
+ Agile Development and the Small World volunteers also engaged the village participants in informal conversation about their perceptions of the process.
+ Family Interviews nine months the garden construction measured participants perception of the design process
Increased knowledge of design and agriculture
Reason:Increasing people’s capacity will help them to solve other problems in the future.
+ Increased capacity for creative thinking
+ Agricultural production is higher than before the project
+ Participants display increased understanding of design principles throughout the Prototyping Field Trip
+ Participants solve problems related to their garden design, and plan or make improvements to their garden
+ Participants believe they learned skills through the project
+ Participants see benefit in experimentation
+ There is a transfer of design and agriculture knowledge to other villagers
+ The Perfect Garden Exercise conducted at the beginning and end of the prototyping field trip;
+ Volunteer diaries documented informal conversations with participants and changes in behaviour amongst the villagers during the prototyping field trip
+ Each family was given a logbook to record any repairs or improvements they make to their garden in order to show the amount and type of problem solving that is undertaken without external assistance. Record-keeping was assisted by the literate community facilitator.
+ Family interviews were conducted nine months after the Prototyping Field Trip
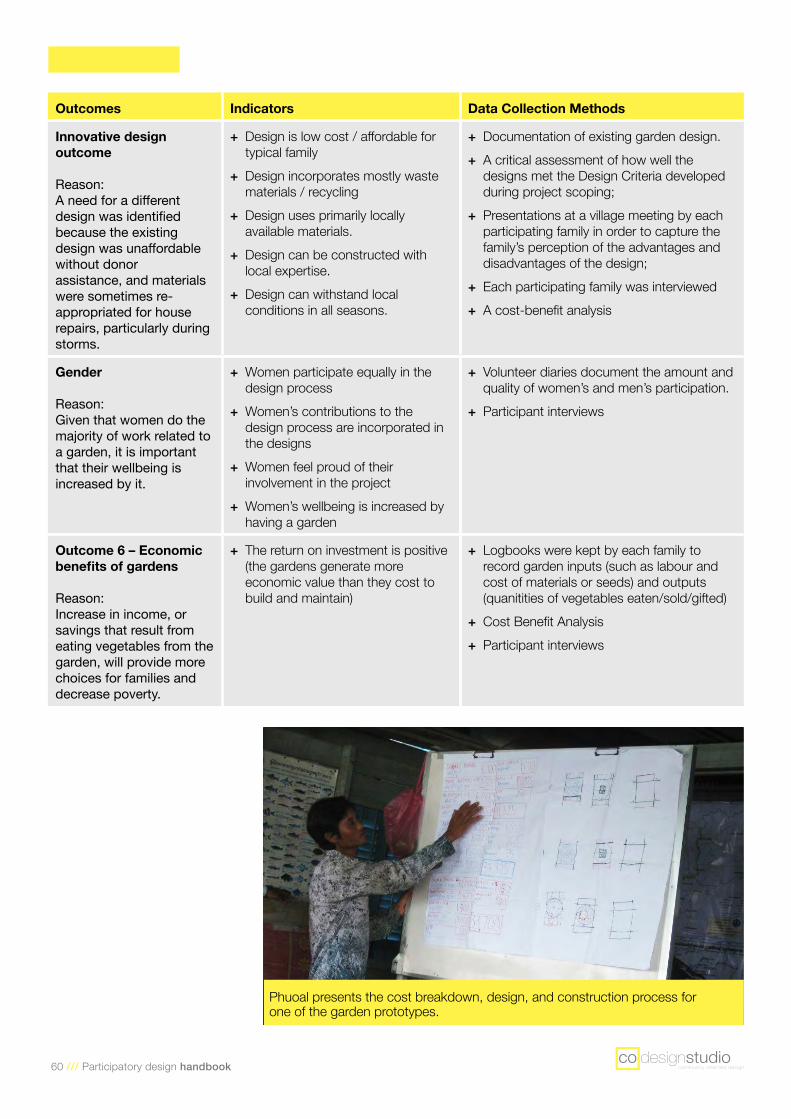
60 /// Participatory design handbook
Outcomes Indicators Data Collection Methods
Innovative design outcome
Reason:A need for a different design was identified because the existing design was unaffordable without donor assistance, and materials were sometimes re-appropriated for house repairs, particularly during storms.
+ Design is low cost / affordable for typical family
+ Design incorporates mostly waste materials / recycling
+ Design uses primarily locally available materials.
+ Design can be constructed with local expertise.
+ Design can withstand local conditions in all seasons.
+ Documentation of existing garden design. + A critical assessment of how well the designs met the Design Criteria developed during project scoping;
+ Presentations at a village meeting by each participating family in order to capture the family’s perception of the advantages and disadvantages of the design;
+ Each participating family was interviewed + A cost-benefit analysis
Gender
Reason:Given that women do the majority of work related to a garden, it is important that their wellbeing is increased by it.
+ Women participate equally in the design process
+ Women’s contributions to the design process are incorporated in the designs
+ Women feel proud of their involvement in the project
+ Women’s wellbeing is increased by having a garden
+ Volunteer diaries document the amount and quality of women’s and men’s participation.
+ Participant interviews
Outcome 6 – Economic benefits of gardens
Reason:Increase in income, or savings that result from eating vegetables from the garden, will provide more choices for families and decrease poverty.
+ The return on investment is positive (the gardens generate more economic value than they cost to build and maintain)
+ Logbooks were kept by each family to record garden inputs (such as labour and cost of materials or seeds) and outputs (quanitities of vegetables eaten/sold/gifted)
+ Cost Benefit Analysis + Participant interviews
Phuoal presents the cost breakdown, design, and construction process for one of the garden prototypes.
Participatory design handbook /// 61
Who? + Project Manager + Participants
Aims: + Allow participants to share knowledge
+ Reflect on achievements + Measure increase in understanding of design process amongst participants
What you need: + Large paper + Crayons
Linked Activities: + Identifying Outcomes and Indicators
Worksheet: N/A
DESIGN PRESENTATIONMETHOD 1. Ask each participant team to prepare a presentation of their design.
You may like to set some topics that the presentation should cover. This can be done collaboratively by asking participants what they would like to learn from other teams. The presentation could include props to explain the design, such as drawings, photographs, a table of costs, or the actual prototype.
2. Each team presents their design to the rest of the participants, or to a public village meeting.
3. If you are using this activity as an evaluation tool, record each presentation for later analysis. For example if one of your intended outcomes is increased understanding of design process, you could listen for comments about experimentation, ideas for improvements, and balancing of cost vs other factors.
CASE STUDYEach of the teams described the construction process, listed the materials needed with their costs and a total cost for the garden, and described what they saw as a the strengths and weaknesses of their design. For example, one team described that the strengths of their design were its durability (using a strong timber frame with cane baskets that could be easily replaced) and scalability (each basket unit cost a low investment of $10, and more could be built as funds were available). They noted the main weakness was that the growable area was less than other designs.
BE CAREFULEnsure that participants understand that the purpose of the presentation is to share knowledge, and encourage honesty. In our project one family presented a very positive review of their garden, however it became apparent later that they had been positive because they believed it would upset the donor if they were critical.
62 /// Participatory design handbook
Who? + Project Manager + Partner Organisation/s + Project Facilitator/s + Participants
Aims: + To collect information about how the prototypes are used, and what the costs and benefits are over time.
What you need: N/A
Linked Activities: + Identifying Outcomes and Indicators
+ Selecting Participants + Project Planning
Worksheet: This activity has a worksheet
LOGBOOKSMETHOD
+ Use the Logbook Worksheet or create your own logbook; + Think about how the logbook will be completed:
+ Are the participants literate? + If not, who will assist them to fill out the logbook and how will this occur? (eg through weekly meetings, a group session) Is it appropriate to pay this person for their time?
+ Distribute the logbook to participants explaining the purpose and how the data will be used, what is required of them, and how they can get help if they need it.
+ Ensure that once the data has been collected and analysed, the analysis is made accessible to participants.
HINT/TIPSIt will take some time and effort for participants to fill out the logbook. They will be much more likely to do this diligently if they feel it is important. You might like to ask them to identify how the data will benefit them (by helping them to plan for expenditure, by helping them predict how long it will take them to start making a profit on their garden etc). You could also discuss how their work is important research that can benefit other communities and reduce poverty around the country.

Participatory design handbook /// 63
Date Maintenance activity
Expense Quantity Duration Reason
09/04/13 Eg. Creating an extra sack of bottles to increase floatation
5000R 20 x 2L water bottles
0:30 The garden was too low in the water when more soil was added
Date Agricultural activity
Expense Qty Income (if sold)
Saving (if eaten)
Notes
09/04/13 Eg. Buy spinach seeds
1000R
Eg. Spray insecticide to kill pests
2000R
Eg Pick spinach
200gm 1000R
Eg Pick spinach
300gm 2000R
Eg Pick spinach
200gm Gift to neighbour - 1000R
64 /// Participatory design handbook
Who? + Project Manager + Partner Organisation/s + Project Facilitator/s + Participants
Aims: + Collect data + Build relationships
What you need: + Paper + Pens
Linked Activities: + Background Research + Selecting Participants + Expectations + Collecting baseline data + Identifying Outcomes and Indicators
Worksheet: This activity has a worksheet
INTERVIEWSMETHOD
+ Determine what style of interview is appropriate. A structured interview, like a survey, is good for getting a large amount of consistent data from a lot of participants, quickly. A less structured interview is useful for exploring concepts and values deeply;
+ Decide on what data you need to collect. This may come from your Outcomes and Indicators Worksheet. If there are lots of topics to explore, you could develop the questions in small teams;
+ Develop an interview guide. You need to balance data collection with developing a relationship where you are a trusted listener. For an in-depth interview, you might like to follow the following stages:
+ Open with specific, easy questions to build confidence (such as: “Who is in your family / who lives here?”, “Who does what in the household?”, “What is your day like usually?”;
+ Ask broad questions, such as aspirations for the future; + Probe deeply on topics of particular interest to your project. There are various techniques to do this, such as presenting the participant with a scenario, and asking how they would respond;
+ Assign clear roles for the interviewing team. For example one interviewer, one note taker, one photographer. You may like to introduce each person to the participant and explain what they will be doing. Always ask permission before photographing. For individual interviews, have no more than three people on the interview team, so the participant doesn’t become overwhelmed;
+ Think about potential problems you could encounter, and how you might solve them. For example, if other family members are hanging around and you want the interview to be private, someone from the interviewing team could take the others aside and engage them in an activity.
HINT/TIPSYou might like to test your interview guide in a role-play situation. This will help you work out the best way for questions to flow. If you feel it is taking too long you can shorten the interview guide.
CONTACT USWe hope you have found this handbook useful. We would love to hear about your experiences using it, and any feedback for improvement. For further information about the Floating Gardens project a report is available. Please contact [email protected]
WORKSHEET SECTIONYou may like to use the following list of worksheets as a checklist while you complete them. Please change them or make new ones to suit your project.
+ If you are completing a worksheet as a group activity, you can make your own on large sheets of paper.
+ If you have a computer, you can use the digital .xls file provided with this handbook. If you don’t already have the .xls file, you can download it from kateferguson.org/portfolio/participatory-design-handbook
WORKSHEETS + Partnering + Stakeholder Analysis + Communication Plan + Project Plan + Gantt Chart + Risk Analysis + Materials + Outcomes and Indicators + Logbook