Embed Size (px)
Citation preview
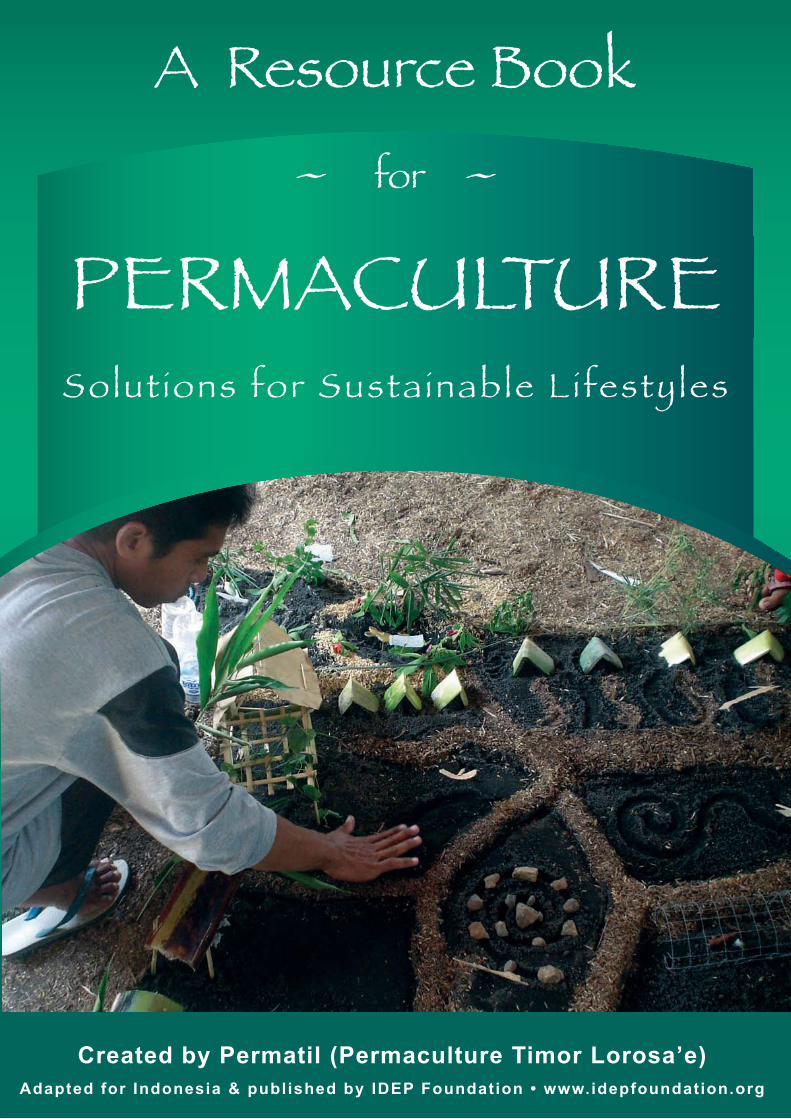
A Resource Book
~ for ~
PERMACULTURE Solut ions for Sustainable Lifestyles
Created by Permatil (Permaculture Timor Lorosa’e)Adapted for Indonesia & published by IDEP Foundation • www.idepfoundation.org
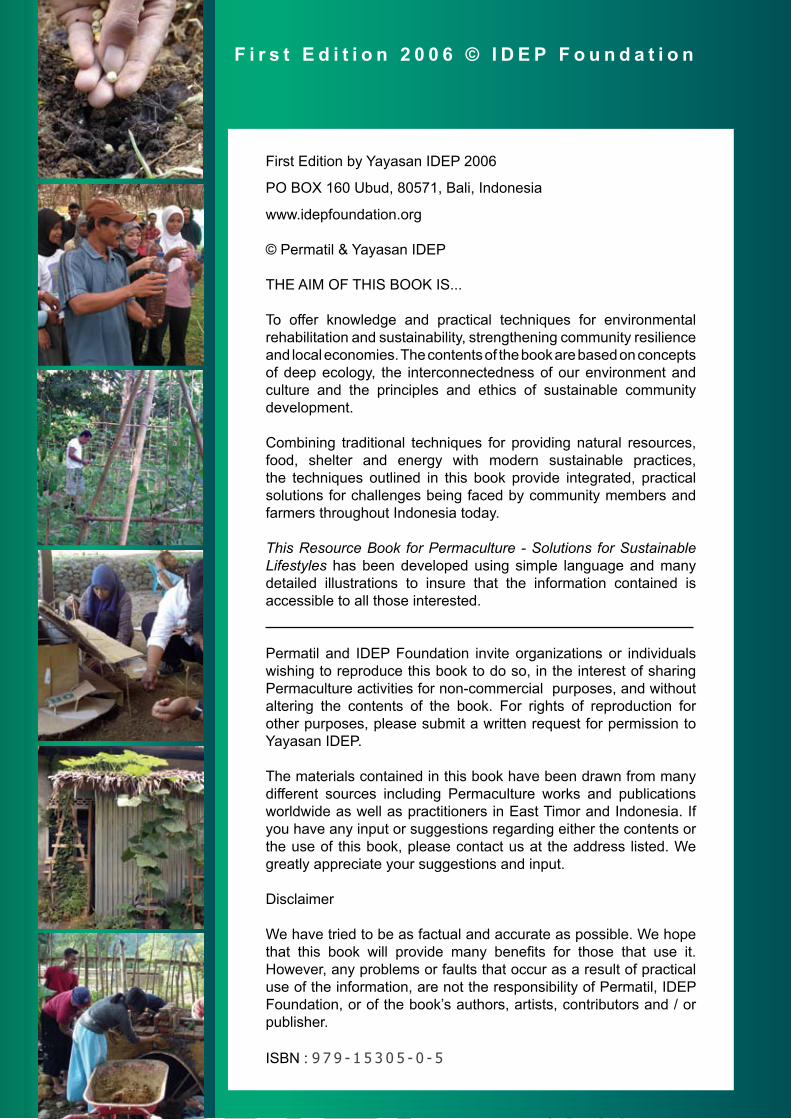
First Edition by Yayasan IDEP 2006
PO BOX 160 Ubud, 80571, Bali, Indonesia
www.idepfoundation.org
© Permatil & Yayasan IDEP
ThE aIm OF ThIs BOOk Is...
To offer knowledge and practical techniques for environmental rehabilitation and sustainability, strengthening community resilience and local economies. The contents of the book are based on concepts of deep ecology, the interconnectedness of our environment and culture and the principles and ethics of sustainable community development.
Combining traditional techniques for providing natural resources, food, shelter and energy with modern sustainable practices, the techniques outlined in this book provide integrated, practical solutions for challenges being faced by community members and farmers throughout Indonesia today.
This Resource Book for Permaculture - Solutions for Sustainable Lifestyles has been developed using simple language and many detailed illustrations to insure that the information contained is accessible to all those interested.
Permatil and IDEP Foundation invite organizations or individuals wishing to reproduce this book to do so, in the interest of sharing Permaculture activities for non-commercial purposes, and without altering the contents of the book. For rights of reproduction for other purposes, please submit a written request for permission to Yayasan IDEP.
The materials contained in this book have been drawn from many different sources including Permaculture works and publications worldwide as well as practitioners in East Timor and Indonesia. If you have any input or suggestions regarding either the contents or the use of this book, please contact us at the address listed. We greatly appreciate your suggestions and input.
Disclaimer
We have tried to be as factual and accurate as possible. We hope that this book will provide many benefits for those that use it. however, any problems or faults that occur as a result of practical use of the information, are not the responsibility of Permatil, IDEP Foundation, or of the book’s authors, artists, contributors and / or publisher.
IsBN : 9 7 9 - 1 5 3 0 5 - 0 - 5
F i r s t E d i t i o n 2 0 0 6 © I D E P F o u n d a t i o n
Supported by:
Created by Permatil (Permaculture Timor Lorosa’e)
A d a p t e d f o r I n d o n e s i a & P u b l i s h e d b y I D E P F o u n d a t i o n
A Resource Book
~ for ~
PERMACULTURE Solut ions for Sustainable Lifestyles
Written by
Lachlan McKenzie with Ego Lemos
Contributing Writers
Sasha Earle, Deirdre Nagle, Rob Swain, Julianne Hartmann, Steve Cran,
Robi Supriyanto
Information Contributors
Permatil, IDEP Foundation, Chris Walsh, USC East Timor, Wayne Gum, Xisto
Martins, Trish Morrow, Permatil’s permaculture project participants and part-
ners, Yudi Suanda, Lachlan McKenzie, Lakota Moira, Made Chakra, Dessy
Haryanti, Nita Noor, Sherry Kasman Entus, Purnawan Budisetia, Misbahhu-
din, Gede Sugiarta, Made Suyasa, I Gusti Raka Panji Tisna, Roberto Huta-
barat, Petra Schneider, Courtney Stephen, Kadek Lisa, Dewi Surtikanti
Illustrators
Arte Moris Art School, Simao “Mong” Cardosso Periera, Gibrael “Aziby”
Dias Soares Carocho, Edson Arintes Da Costa Carminha, Grinaldo Gilma-
rodep Fernandes, Jose “Osme” Fortunato Gonzalves, Jose “Tony” de Jesus
Amaral, Leo Marcal, Ozorio “Azo” Jeronimo, Kathryn “Cipi” Morgan, Lach-
lan McKenzie, Robi Supriyanto & the Spiritual Junkies
Editors and Translators
Lachlan McKenzie, Ego Lemos, Anastasia Guise, Sasha Earle, Julianne Hart-
mann, Rob Swain, Robi Supriyanto, Lakota Moira, Putu Widyastuti Rudolf
Desktop Publishing and Graphic Design
Petra Schneider, Lachlan McKenzie, Lakota Moira, Courtney Stephen,
Dewi Surtikanti, Saturnino de Maia, Asatu
Publisher
IDEP Foundation - w w w . i d e p f o u n d a t i o n . o r g
Permaculture can be seen
as a sustainable philosophy
and lifestyle which integrates
different components, like ecological knowledge
(interconnected natural processes which happen
in nature); peoples ability to design production
systems like agriculture and animal husbandry;
using appropriate and environment friendly
technology; and awareness to work together
with the local culture and environment.
In general Permaculture can be
defined as permanent-
agriculture, which means
achieving sustainable
agriculture and
animal husbandry
through protecting
or improving the
natural environment,
and permanent-culture,
which means preserving,
supporting and working with
the local culture and environment.
Permaculture, which is based on the ethics
of caring for the land, the people and the future,
is very beneficial in helping us to understand
and create an integration of harmony between
people and nature.
However, the reality is that through fulfilling our
needs and wants, we have already caused great
damage to the environment, including creating
conditions which are threatening even to
ourselves. For example pollution and damaged
habitats, which has in part been caused by
monoculture farming and animal husbandry
systems which use dangerous chemicals during
production. There is also genetic engineering
experiments which have many risks and
challenge the laws of nature.
IDEP (Indonesian Development of Education and
Permaculture) as a foundation working towards
education and Permaculture development in
Indonesia also feels responsible for all of these
problems and feels obligated to improve these
conditions, and little by little to reverse this
confused paradigm of building concepts and
production systems which are exploitative and
oriented for only short term benefits.
As a manifestation of this feeling of responsibility,
we are grateful that IDEP has
succeeded in publishing this
Permaculture Resource
Book which has been
adapted from Permatil
( P e r m a c u l t u r e
Timor Lorosa’e)
for Indonesia. We
hope this book will
be beneficial, and
will inspire, interest and
initiate action through all
layers of Indonesian communities,
both for people living in villages and in
urban cities, to adopt and adapt Permaculture
principles and practices which are outlined in
this resource book.
Our wellbeing and the wellbeing of future
generations are dependent on our ability to make
conscious choices and actions for improving the
environmental and social problems which we
have created.
Board of Govenors
IDEP Foundation
Fo r w a r d

vi Pe r m a c u l t u r e , S o l u t i o n s f o r S u s t a i n a b l e L i f e s t y l e s
N o t e s . . .
Pe
rma
cu
ltu
re R
eso
urc
e B
oo
k -
TA
BL
E O
F C
ON
TE
NT
S
TA B L E O F C O N T E N T S

i i Pe r m a c u l t u r e , S o l u t i o n s f o r S u s t a i n a b l e L i f e s t y l e s
N o t e s . . .
Ta b l e o f C o n t e n t s i i i
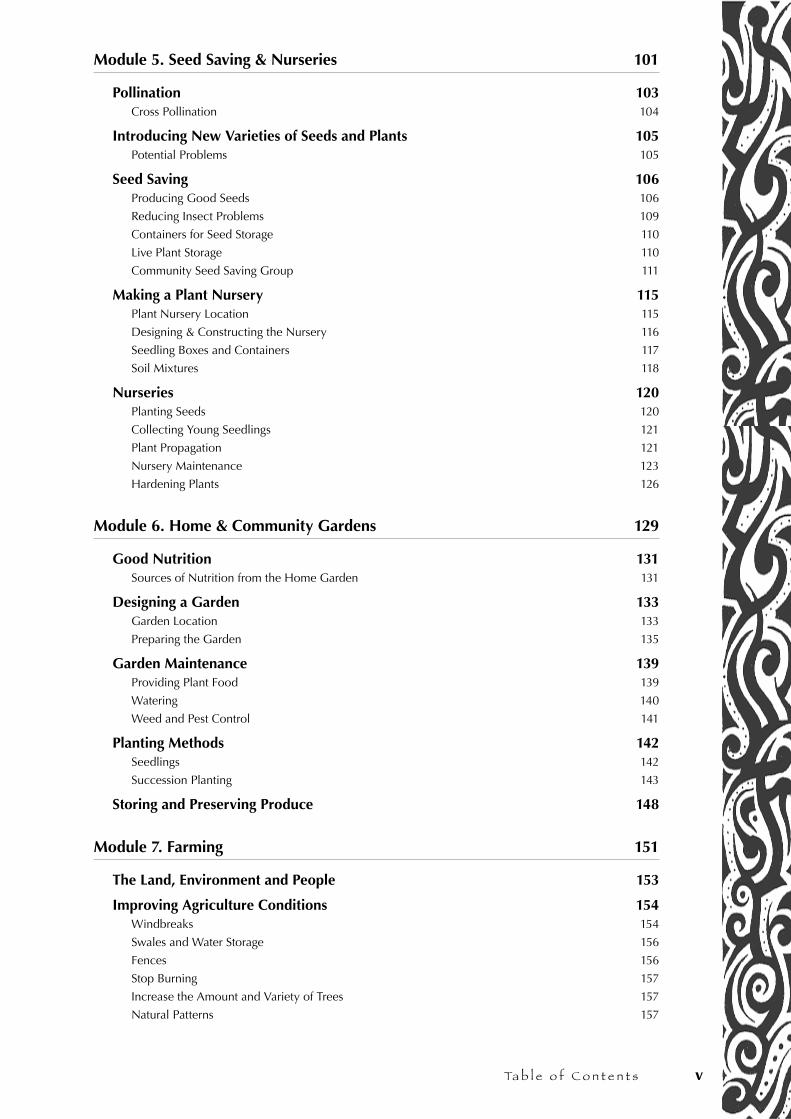
Module 1. What is Permaculture? 1
Permaculture can be defined as: 3
Ethics of Permaculture 4
Principles of Permaculture 6
Beauty 8
Module 2. Natural Patterns & Permaculture Design 11
Patterns 13Increasing Productivity 15
Methods of Design 17
Approaches to Design 181. Maps 18
2. Element Analysis 21
3. Zones 23
4. Sectors 30
5. Observation and Data Collection 33
Module 3. Houses, Water & Waste Management 37
How to Create a Healthy House 401. House Location 40
2. Ways to Reduce Risks 41
3. Compatibility with Climate 41
4. Good Health and Disease Prevention 42
5. A House That is Easy to Clean 42
7. Reducing Water and Energy Use 45
8. A Long Lasting House 45
Building a House 46Start with a Plan 46
Building Materials 47
Ideas for House Improvement 49Ventilation 49
Insulation 49
Natural Lighting 50
Making a House Last Longer 51
Bamboo (For more information on how to choose, cure and store bamboo, see the section ‘Bamboo’ in
Module 8 - Forests, Tree Crops & Bamboo). 51
Insect Screens 52
Outside Improvements 52Pergola / Shade Structure 52
Trees and Windbreaks 52
Gardens 52
Ponds 53
Kitchens 53
Washing Area 56
Washrooms 57
Compost Toilet Systems 60
Table of Contents

iv Pe r m a c u l t u r e , S o l u t i o n s f o r S u s t a i n a b l e L i f e s t y l e s
Water Supply and Storage 62Collecting Water 62
Water Storage 63
Keeping Water Clean 64Cleaning Drinking Water 64
Reducing Mosquito Problems 66
Community Buildings and Land 67National Plans 67
Module 4. Healthy Soil 69
About Soil 71
What is Healthy Living Soil? 72The Importance of Worms in the Soil 72
Benefits of Healthy Living Soil 73
Different Types of Soil 75Improving Soil Quality 75
Soil pH 77pH Chart 77
Identification of Soil pH 77
Solutions for Balancing Soil pH 78
Nutrient Cycles 80Nutrient Deficiencies 81
Organic Soil Improvement Strategies 82
Natural Nutrient Sources 82
EM (Effective Microorganisms) 84How to Multiply EM 84
How to Use EM 84
How to Make Liquid Fertilizer 85
Using Liquid Fertilizer 87
Compost 88Making Quick Compost Heaps 88
Making Slow Compost Heaps 89
How to Use Compost 89
Making Compost Baskets and Trenches 90
Compost Pits 91
Direct Composting 91
Diluted Urine 92
Earthworm Farms 92How to Make an Earthworm Farm 92
Mulch 93What is Mulch? 93
Benefits of Using Mulch 93
How to Use Mulch 94
Legumes 95Types of Legume Plants 95
Techniques for Using Annual Legumes 96
Techniques for Using Perennial Legumes 97
Fertile Soil 98
Non-organic Fertilizers 99
Ta b l e o f C o n t e n t s v
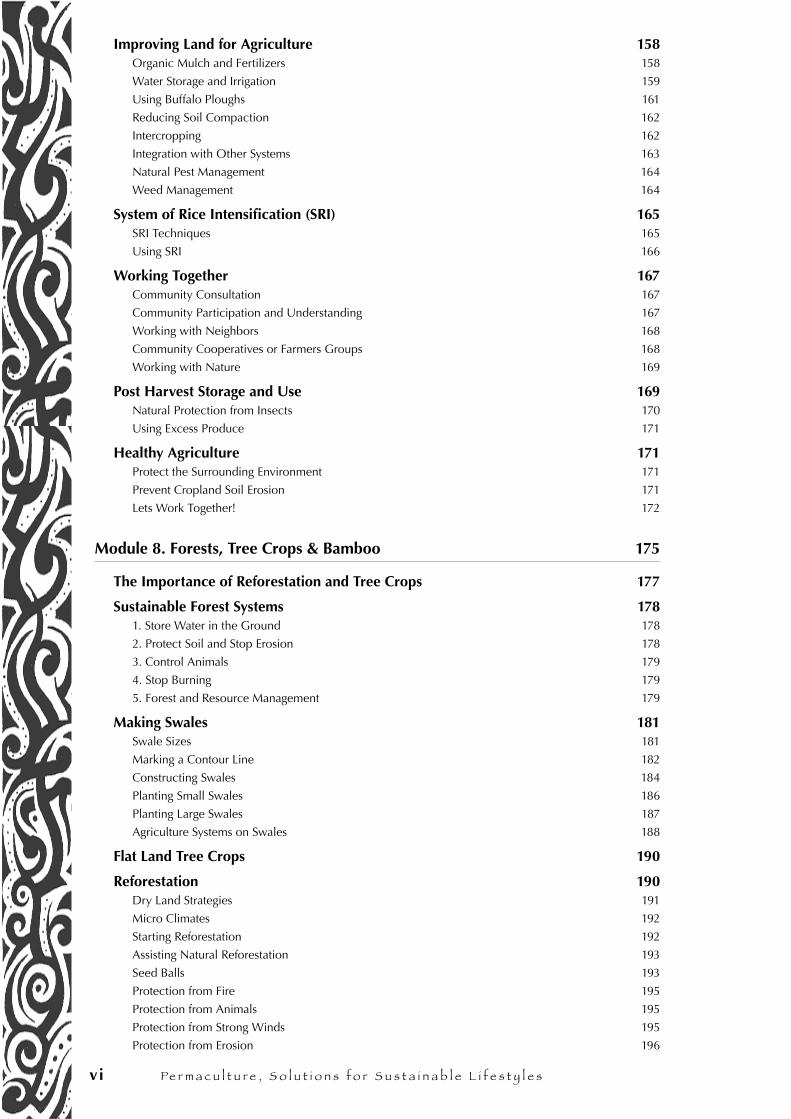
Module 5. Seed Saving & Nurseries 101
Pollination 103Cross Pollination 104
Introducing New Varieties of Seeds and Plants 105Potential Problems 105
Seed Saving 106Producing Good Seeds 106
Reducing Insect Problems 109
Containers for Seed Storage 110
Live Plant Storage 110
Community Seed Saving Group 111
Making a Plant Nursery 115Plant Nursery Location 115
Designing & Constructing the Nursery 116
Seedling Boxes and Containers 117
Soil Mixtures 118
Nurseries 120Planting Seeds 120
Collecting Young Seedlings 121
Plant Propagation 121
Nursery Maintenance 123
Hardening Plants 126
Module 6. Home & Community Gardens 129
Good Nutrition 131Sources of Nutrition from the Home Garden 131
Designing a Garden 133Garden Location 133
Preparing the Garden 135
Garden Maintenance 139Providing Plant Food 139
Watering 140
Weed and Pest Control 141
Planting Methods 142Seedlings 142
Succession Planting 143
Storing and Preserving Produce 148
Module 7. Farming 151
The Land, Environment and People 153
Improving Agriculture Conditions 154Windbreaks 154
Swales and Water Storage 156
Fences 156
Stop Burning 157
Increase the Amount and Variety of Trees 157
Natural Patterns 157
vi Pe r m a c u l t u r e , S o l u t i o n s f o r S u s t a i n a b l e L i f e s t y l e s
Improving Land for Agriculture 158Organic Mulch and Fertilizers 158
Water Storage and Irrigation 159
Using Buffalo Ploughs 161
Reducing Soil Compaction 162
Intercropping 162
Integration with Other Systems 163
Natural Pest Management 164
Weed Management 164
System of Rice Intensification (SRI) 165SRI Techniques 165
Using SRI 166
Working Together 167Community Consultation 167
Community Participation and Understanding 167
Working with Neighbors 168
Community Cooperatives or Farmers Groups 168
Working with Nature 169
Post Harvest Storage and Use 169Natural Protection from Insects 170
Using Excess Produce 171
Healthy Agriculture 171Protect the Surrounding Environment 171
Prevent Cropland Soil Erosion 171
Lets Work Together! 172
Module 8. Forests, Tree Crops & Bamboo 175
The Importance of Reforestation and Tree Crops 177
Sustainable Forest Systems 1781. Store Water in the Ground 178
2. Protect Soil and Stop Erosion 178
3. Control Animals 179
4. Stop Burning 179
5. Forest and Resource Management 179
Making Swales 181Swale Sizes 181
Marking a Contour Line 182
Constructing Swales 184
Planting Small Swales 186
Planting Large Swales 187
Agriculture Systems on Swales 188
Flat Land Tree Crops 190
Reforestation 190Dry Land Strategies 191
Micro Climates 192
Starting Reforestation 192
Assisting Natural Reforestation 193
Seed Balls 193
Protection from Fire 195
Protection from Animals 195
Protection from Strong Winds 195
Protection from Erosion 196
Ta b l e o f C o n t e n t s vii
Planting Trees 196Planting Fruit Trees 196
Planting Reforestation Trees 197
Tree Maintenance 198Watering 198
Fertilizer 198
Mulching Trees 200
Tree Pruning 201
Bamboo 203Bamboo Propagation 203
Growing High Quality Bamboo 205
Clump Management 206
Bamboo Plantations 207
Using Bamboo 211
Module 9. Integrated Pest Management 215
The Importance of Healthy Soil 218
Encouraging Natural Pest Predators 218
Healthy Environment 219
Using Non-hybrid Seeds 220
Good Crop Management 220Companion Planting 221
Preventing Pest Attacks 222Plant Diseases and Fungus 222
Examples of Pest Prevention 223
Pest Traps 224Examples of Pest Traps 224
Using Animals for Pest Control 225
Natural Pesticides 226How to Use Natural Pesticides 226
Natural Fungicides 230Biological Control 232
Module 10. Animal Systems 235
Chickens 238Chicken Needs 238
Chicken Products 242
Ducks 243Duck Needs 244
Duck Products 245
Integrating Ducks with Other Systems 245
Pigs 247Pig Needs 247
Pig Products 249
Goats 249Goat Health 251
Goat Products 252

vii i Pe r m a c u l t u r e , S o l u t i o n s f o r S u s t a i n a b l e L i f e s t y l e s
Cows 252Cow Needs 253
Cow Products 255
Buffalo 256Buffalo Needs 256
Buffalo Products 257
Integrating Buffalo with Other Systems 258
Leather 258
Pigeons 260
Bees 260
Horses 261
Dogs 261
Working Together with Communities 261Health 261
Community Animal Breeding 262
Community Animal Grazing Land 262
Community Animal Yards and Houses 263
Protecting Land, Rivers and Springs 263
Drying and Storing Meat 264
Animal Rights 265
Module 11. Aquaculture 267
Why is Aquaculture Important? 269
Step by Step Aquaculture Systems 270Location 270
Sunlight 271
Size 271
Depth 271
Shape 272
Construction 272
Pond Water 274
Fish Production 275
Making a Fishpond 275Preparing the Fishpond 275
Providing Shade 276
Water Plants and Small Water Animals 276
Providing Homes for Fish 277
Plants Around the Pond Edge 277
Add the Fish 278
Types of Fish 280Carp 280
Tilapia 280
Catfish 281
Gurami 281
Mujair 281
Freshwater Prawns 281
Eels 282
Breeding Fish 282
Water Plant Production 282
Fish Food 283Extra Feed 284

Ta b l e o f C o n t e n t s ix
Fish Diseases and Pests 285Diseases 285Pests 286
Oxygen 286
Cleaning the Pond 287
Potential Problems 287Pollution 287Over Feeding 288Mosquitoes 288
Other Types of Fishponds 288Wet Season Fishponds 288Saltwater Fishponds 288
Integrating Fish with Other Systems 289Fish with Chickens 289Fish with Pigs 290Fish and Rice Paddy Systems (Mina Padi) 290Growing Vegetables During the Dry Season 291Fish with Swales 291Chinampas 292
Drying and Storing Fish 293
Module 12. Appropriate Technology 295
Clay Ovens and Stoves 298Clay Stoves 298Clay Ovens 298Charcoal Brick Cooking Fuel 299Drum Ovens 300Sawdust Stoves 300Tin Metal Stoves 302Gas Stoves 302Solar Cookers 302
Solar Driers 303Plastic Solar Driers 303
Natural Coolers 304Clay Pots 304
Electricity 305Hydro-electric Systems 305
Biogas Systems 305
Solar Systems 307
Wind Systems 307
Oil Fuel 308Coconut Oil for Diesel Machines 308
Water Pumps 308Ram Pumps 308
Foot Pumps and Treadle Pumps 309
Solar Power Water Pumps 309
Windmills 309
Elevated Water Storage 309
Other Simple Tools 310Pedal Powered Grinders 310Oil Press 310
Using the Internet 310

x Pe r m a c u l t u r e , S o l u t i o n s f o r S u s t a i n a b l e L i f e s t y l e s
Module 13. Cooperatives & Enterprise Development 313
Why Form a Cooperative? 315Cooperatives provide many benefits for the whole community, including: 315
Illustrating a Cooperative 316
Creating Ideas 317Product Value Adding 318
Ecotourism 318
The Importance of Management 319A Vision Statement 319
An Ethical Structure 319
A Management System 319
Setting Wages, Prices and Profit Structures 320
A Bookkeeping System 320
GLOSSARY 323
Pe
rma
cu
ltu
re R
eso
urc
e B
oo
k M
od
ule
1.
Wh
at
is P
erm
ac
ult
ure
?
M O D U L E N o 1 .
What is Permaculture?

� Pe r m a c u l t u r e , S o l u t i o n s f o r S u s t a i n a b l e L i f e s t y l e s
N o t e s . . .
M o d u l e 1 : W h a t i s Pe r m a c u l t u r e ? �
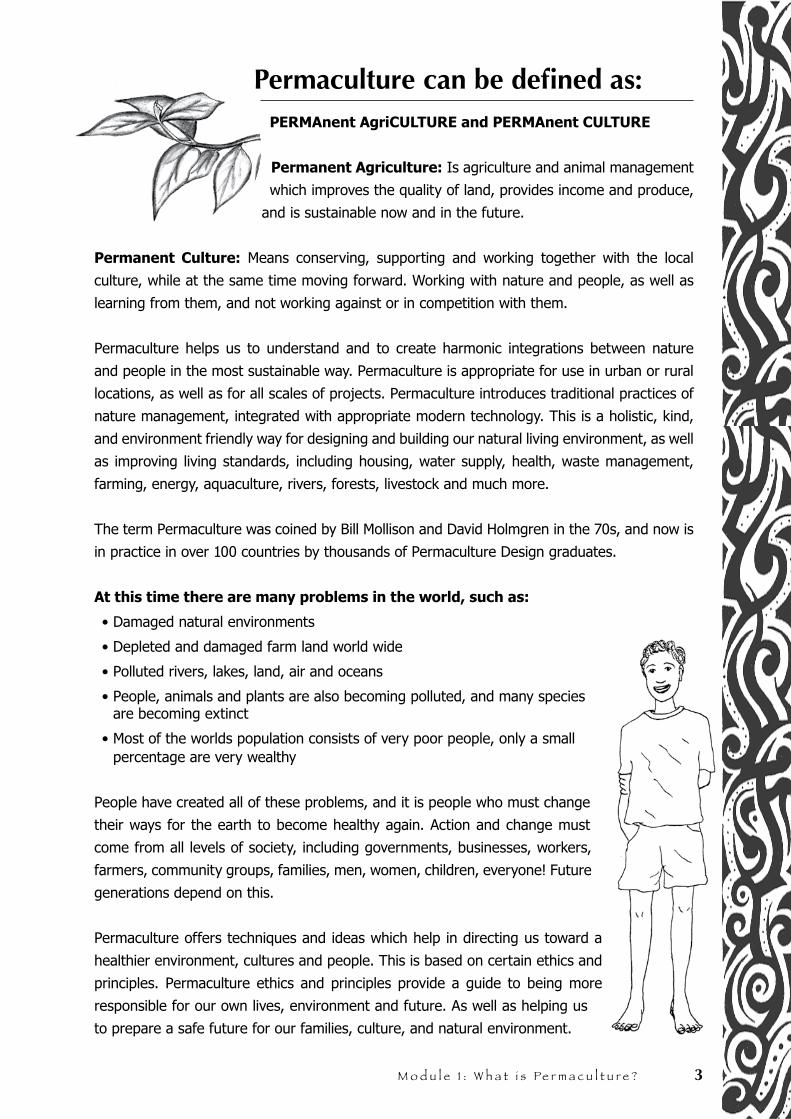
Permaculture can be defined as:PERMAnent AgriCULTURE and PERMAnent CULTURE
Permanent Agriculture: Is agriculture and animal management
which improves the quality of land, provides income and produce,
and is sustainable now and in the future.
Permanent Culture: Means conserving, supporting and working together with the local
culture, while at the same time moving forward. Working with nature and people, as well as
learning from them, and not working against or in competition with them.
Permaculture helps us to understand and to create harmonic integrations between nature
and people in the most sustainable way. Permaculture is appropriate for use in urban or rural
locations, as well as for all scales of projects. Permaculture introduces traditional practices of
nature management, integrated with appropriate modern technology. This is a holistic, kind,
and environment friendly way for designing and building our natural living environment, as well
as improving living standards, including housing, water supply, health, waste management,
farming, energy, aquaculture, rivers, forests, livestock and much more.
The term Permaculture was coined by Bill Mollison and David Holmgren in the 70s, and now is
in practice in over 100 countries by thousands of Permaculture Design graduates.
At this time there are many problems in the world, such as:
• Damaged natural environments
• Depleted and damaged farm land world wide
• Polluted rivers, lakes, land, air and oceans
• People, animals and plants are also becoming polluted, and many species are becoming extinct
• Most of the worlds population consists of very poor people, only a small percentage are very wealthy
People have created all of these problems, and it is people who must change
their ways for the earth to become healthy again. Action and change must
come from all levels of society, including governments, businesses, workers,
farmers, community groups, families, men, women, children, everyone! Future
generations depend on this.
Permaculture offers techniques and ideas which help in directing us toward a
healthier environment, cultures and people. This is based on certain ethics and
principles. Permaculture ethics and principles provide a guide to being more
responsible for our own lives, environment and future. As well as helping us
to prepare a safe future for our families, culture, and natural environment.
� Pe r m a c u l t u r e , S o l u t i o n s f o r S u s t a i n a b l e L i f e s t y l e s
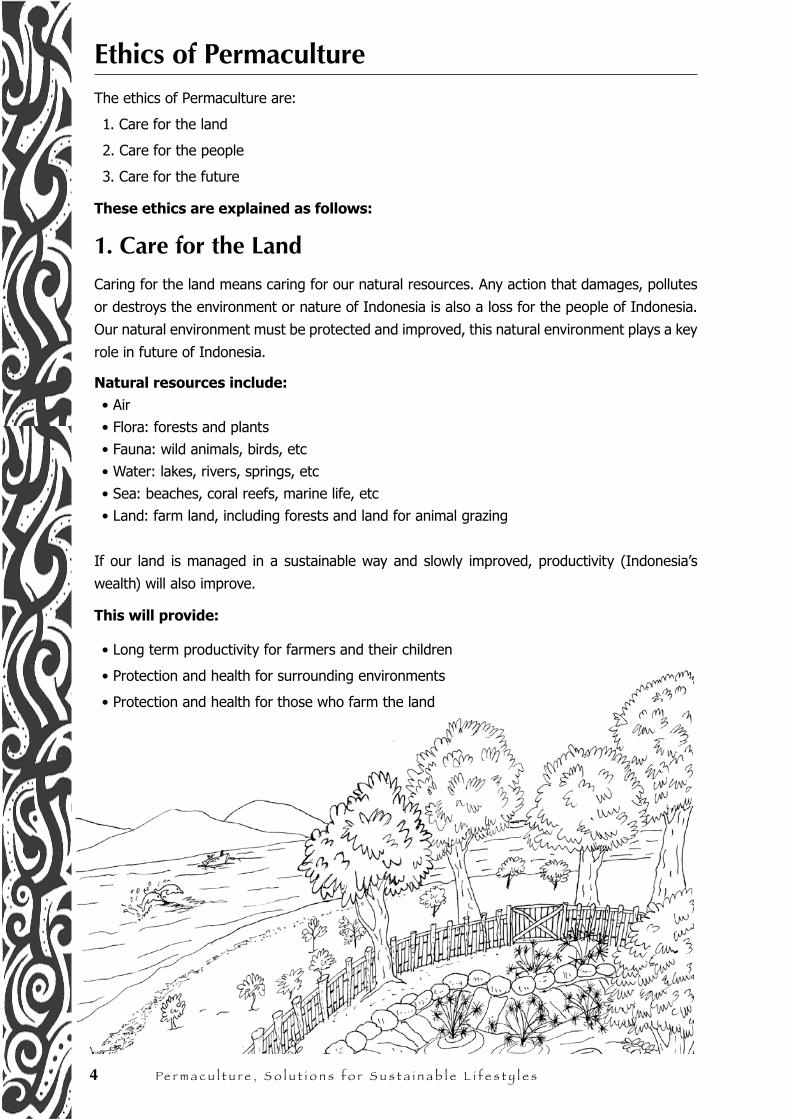
Ethics of PermacultureThe ethics of Permaculture are:
1. Care for the land
2. Care for the people
3. Care for the future
These ethics are explained as follows:
1. Care for the Land
Caring for the land means caring for our natural resources. Any action that damages, pollutes
or destroys the environment or nature of Indonesia is also a loss for the people of Indonesia.
Our natural environment must be protected and improved, this natural environment plays a key
role in future of Indonesia.
Natural resources include:
• Air
• Flora: forests and plants
• Fauna: wild animals, birds, etc
• Water: lakes, rivers, springs, etc
• Sea: beaches, coral reefs, marine life, etc
• Land: farm land, including forests and land for animal grazing
If our land is managed in a sustainable way and slowly improved, productivity (Indonesia’s
wealth) will also improve.
This will provide:
• Long term productivity for farmers and their children
• Protection and health for surrounding environments
• Protection and health for those who farm the land
M o d u l e 1 : W h a t i s Pe r m a c u l t u r e ? �
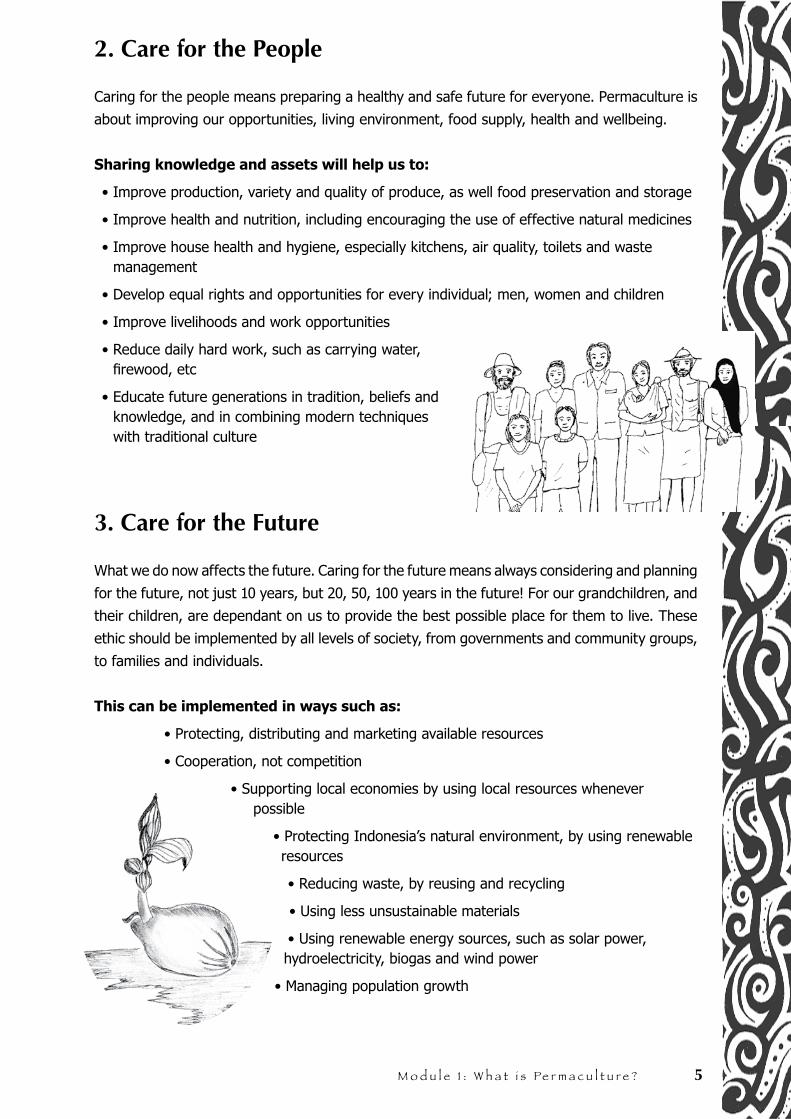
2. Care for the People
Caring for the people means preparing a healthy and safe future for everyone. Permaculture is
about improving our opportunities, living environment, food supply, health and wellbeing.
Sharing knowledge and assets will help us to:
• Improve production, variety and quality of produce, as well food preservation and storage
• Improve health and nutrition, including encouraging the use of effective natural medicines
• Improve house health and hygiene, especially kitchens, air quality, toilets and waste management
• Develop equal rights and opportunities for every individual; men, women and children
• Improve livelihoods and work opportunities
• Reduce daily hard work, such as carrying water, firewood, etc
• Educate future generations in tradition, beliefs and knowledge, and in combining modern techniques with traditional culture
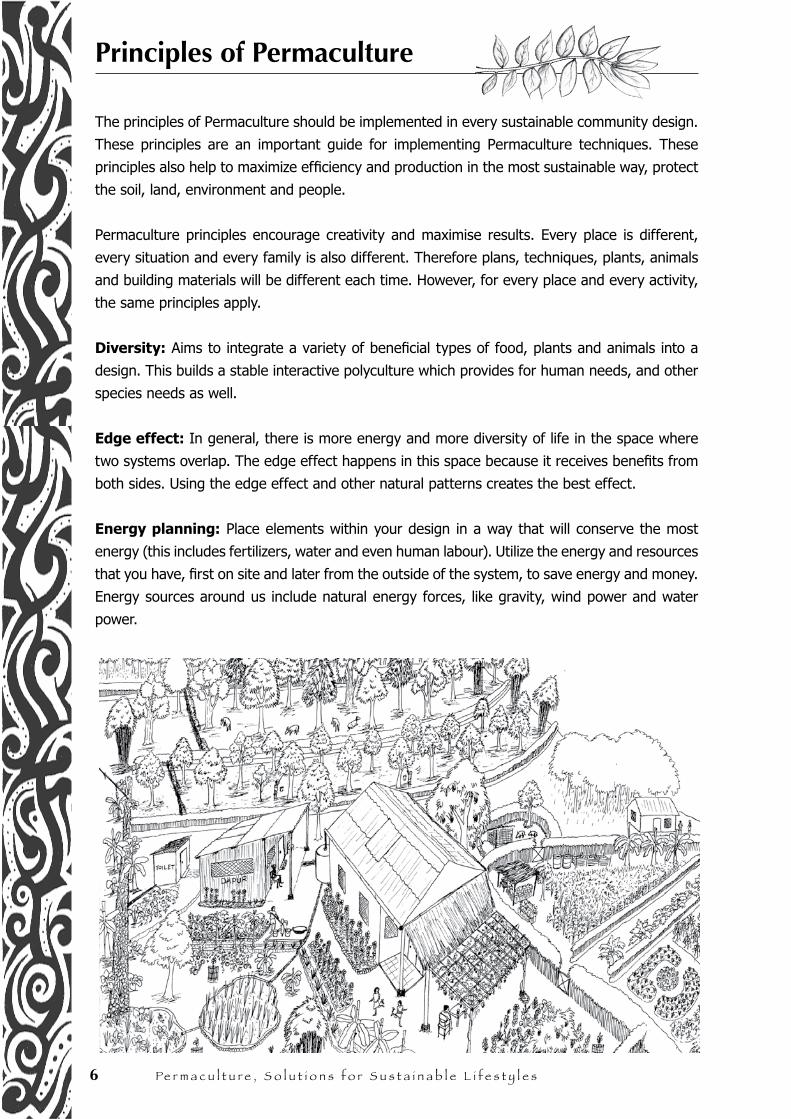
3. Care for the Future
What we do now affects the future. Caring for the future means always considering and planning
for the future, not just 10 years, but 20, 50, 100 years in the future! For our grandchildren, and
their children, are dependant on us to provide the best possible place for them to live. These
ethic should be implemented by all levels of society, from governments and community groups,
to families and individuals.
This can be implemented in ways such as:
• Protecting, distributing and marketing available resources
• Cooperation, not competition
• Supporting local economies by using local resources whenever possible
• Protecting Indonesia’s natural environment, by using renewable resources
• Reducing waste, by reusing and recycling
• Using less unsustainable materials
• Using renewable energy sources, such as solar power, hydroelectricity, biogas and wind power
• Managing population growth
� Pe r m a c u l t u r e , S o l u t i o n s f o r S u s t a i n a b l e L i f e s t y l e s
Principles of Permaculture
The principles of Permaculture should be implemented in every sustainable community design.
These principles are an important guide for implementing Permaculture techniques. These
principles also help to maximize efficiency and production in the most sustainable way, protect
the soil, land, environment and people.
Permaculture principles encourage creativity and maximise results. Every place is different,
every situation and every family is also different. Therefore plans, techniques, plants, animals
and building materials will be different each time. However, for every place and every activity,
the same principles apply.
Diversity: Aims to integrate a variety of beneficial types of food, plants and animals into a
design. This builds a stable interactive polyculture which provides for human needs, and other
species needs as well.
Edge effect: In general, there is more energy and more diversity of life in the space where
two systems overlap. The edge effect happens in this space because it receives benefits from
both sides. Using the edge effect and other natural patterns creates the best effect.
Energy planning: Place elements within your design in a way that will conserve the most
energy (this includes fertilizers, water and even human labour). Utilize the energy and resources
that you have, first on site and later from the outside of the system, to save energy and money.
Energy sources around us include natural energy forces, like gravity, wind power and water
power.
M o d u l e 1 : W h a t i s Pe r m a c u l t u r e ? �
Energy cycling: In a natural system there is no waste or pollution. The output from one
natural process becomes the resource for another process. Recycle and reuse resources as
much as possible and as many times as possible.
Scale: Create human scale systems. Choose simple, appropriate technologies for use in
designs. Create systems that are manageable, start small and take achievable steps towards
and ideal goal.
Biological resources: Use natural methods and processes to achieve all tasks. Find materials
in nature (plants, animals, bacteria) which support the system design and conserve the need
for energy from outside the system.
Multiple elements: Support each vital and essential function in more than one way, so
that if one element fails, it will not stop other elements in the process from functioning. Also,
recognize that there is almost always more than one way to manage any process.
Multiple functions: Most things can be used in a variety of ways and for a variety of functions.
One main rule in Permaculture is to try to design at least three uses for every element in a
system. This will save space, time and money.
Natural succession: Work with nature and natural processes. Anticipate future developments
through research and observation whenever necessary.
Relative location: Place every element of your design in relationships so that they can receive
benefits from each other. For example, store tools near to the place where they will be used.
Personal responsibility: Our actions affect our own lives, our families’ lives, our friends’
lives and anyone else who has direct or indirect contact with us. Any constructive sustainable
actions that we do will create benefits for many. The same is true of destructive actions, their
affects will be felt far and wide.
� Pe r m a c u l t u r e , S o l u t i o n s f o r S u s t a i n a b l e L i f e s t y l e s
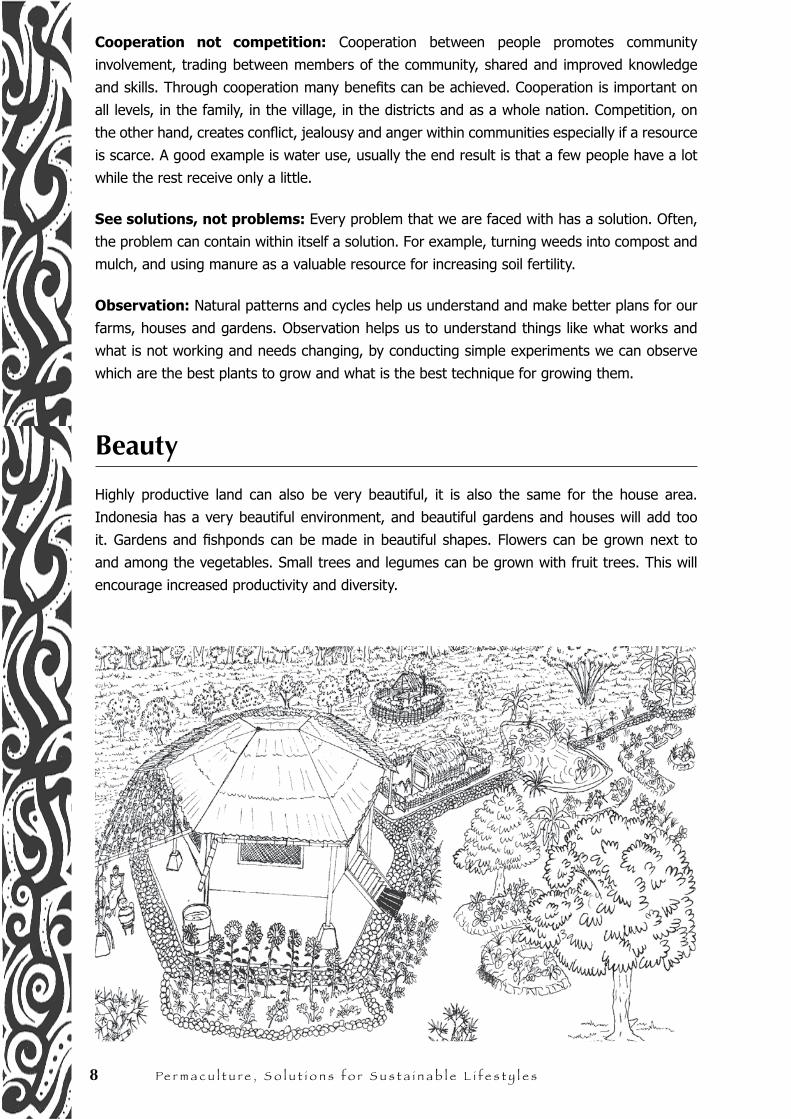
Cooperation not competition: Cooperation between people promotes community
involvement, trading between members of the community, shared and improved knowledge
and skills. Through cooperation many benefits can be achieved. Cooperation is important on
all levels, in the family, in the village, in the districts and as a whole nation. Competition, on
the other hand, creates conflict, jealousy and anger within communities especially if a resource
is scarce. A good example is water use, usually the end result is that a few people have a lot
while the rest receive only a little.
See solutions, not problems: Every problem that we are faced with has a solution. Often,
the problem can contain within itself a solution. For example, turning weeds into compost and
mulch, and using manure as a valuable resource for increasing soil fertility.
Observation: Natural patterns and cycles help us understand and make better plans for our
farms, houses and gardens. Observation helps us to understand things like what works and
what is not working and needs changing, by conducting simple experiments we can observe
which are the best plants to grow and what is the best technique for growing them.
Beauty
Highly productive land can also be very beautiful, it is also the same for the house area.
Indonesia has a very beautiful environment, and beautiful gardens and houses will add too
it. Gardens and fishponds can be made in beautiful shapes. Flowers can be grown next to
and among the vegetables. Small trees and legumes can be grown with fruit trees. This will
encourage increased productivity and diversity.

M o d u l e 1 : W h a t i s Pe r m a c u l t u r e ? �
N o t e s . . .

10 Pe r m a c u l t u r e , S o l u t i o n s f o r S u s t a i n a b l e L i f e s t y l e s
N o t e s . . .
Perm
acul
ture
Res
ourc
e B
ook
Mod
ule
2. N
atur
al P
atte
rns
& P
erm
acul
ture
Des
ign
M o d u l e N o 2 .
Natural Patterns &Permaculture design

12 Pe r m a c u l t u r e , S o l u t i o n s f o r S u s t a i n a b l e l i f e s t y l e s
N o t e s . . .
M o d u l e 2 : N a t u r a l Pa t t e r n s & Pe r m a c u l t u r e d e s i g n 13
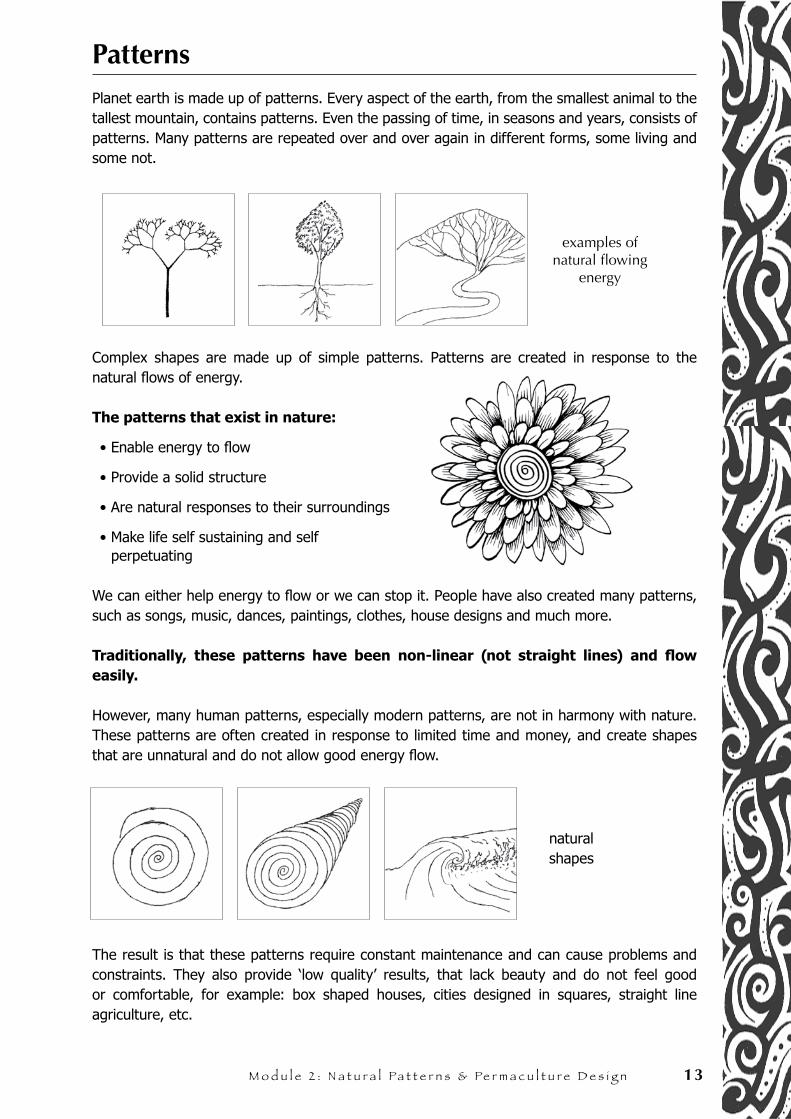
PatternsPlanet earth is made up of patterns. Every aspect of the earth, from the smallest animal to the tallest mountain, contains patterns. Even the passing of time, in seasons and years, consists of patterns. Many patterns are repeated over and over again in different forms, some living and some not.
Complex shapes are made up of simple patterns. Patterns are created in response to the natural flows of energy. The patterns that exist in nature:
• Enable energy to flow
• Provide a solid structure
• Are natural responses to their surroundings
• Make life self sustaining and self perpetuating
We can either help energy to flow or we can stop it. People have also created many patterns, such as songs, music, dances, paintings, clothes, house designs and much more.
Traditionally, these patterns have been non-linear (not straight lines) and flow easily.
However, many human patterns, especially modern patterns, are not in harmony with nature. These patterns are often created in response to limited time and money, and create shapes that are unnatural and do not allow good energy flow.
The result is that these patterns require constant maintenance and can cause problems and constraints. They also provide ‘low quality’ results, that lack beauty and do not feel good or comfortable, for example: box shaped houses, cities designed in squares, straight line agriculture, etc.
examples of natural flowing
energy
natural shapes
14 Pe r m a c u l t u r e , S o l u t i o n s f o r S u s t a i n a b l e l i f e s t y l e s
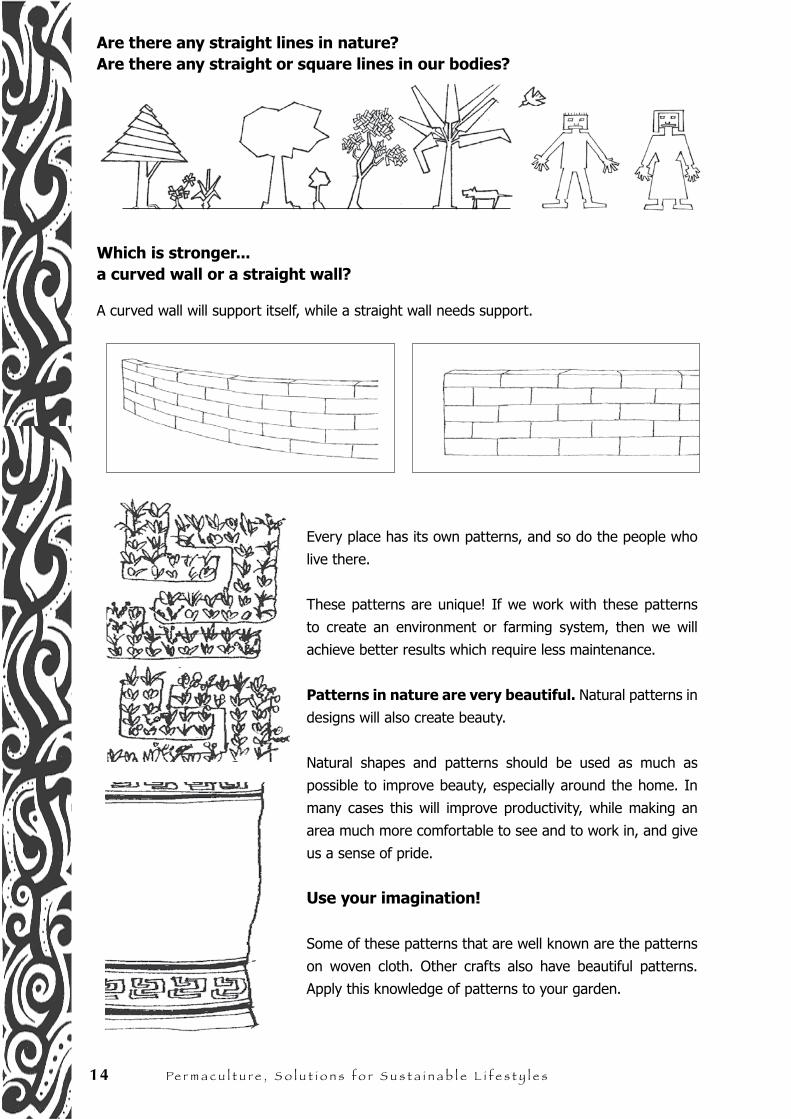
Are there any straight lines in nature?Are there any straight or square lines in our bodies?
Which is stronger... a curved wall or a straight wall?
A curved wall will support itself, while a straight wall needs support.
Every place has its own patterns, and so do the people who
live there.
These patterns are unique! If we work with these patterns
to create an environment or farming system, then we will
achieve better results which require less maintenance.
Patterns in nature are very beautiful. Natural patterns in
designs will also create beauty.
Natural shapes and patterns should be used as much as
possible to improve beauty, especially around the home. In
many cases this will improve productivity, while making an
area much more comfortable to see and to work in, and give
us a sense of pride.
Use your imagination!
Some of these patterns that are well known are the patterns
on woven cloth. Other crafts also have beautiful patterns.
Apply this knowledge of patterns to your garden.
M o d u l e 2 : N a t u r a l Pa t t e r n s & Pe r m a c u l t u r e d e s i g n 15
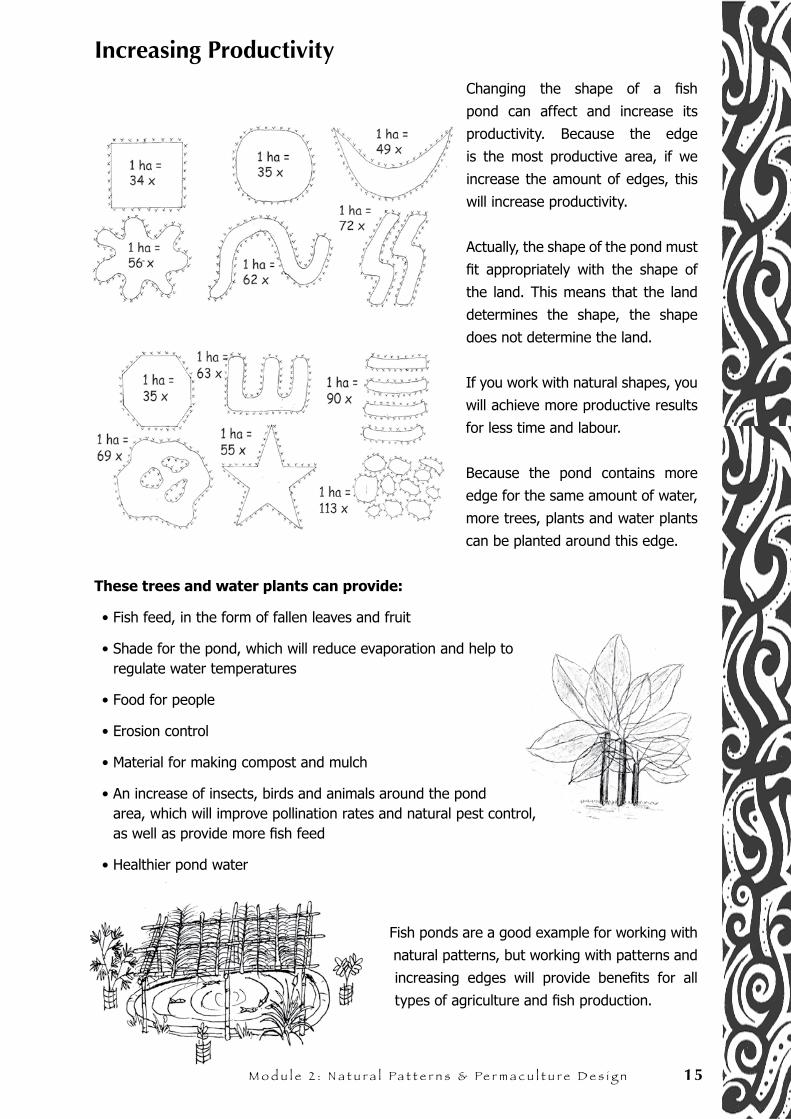
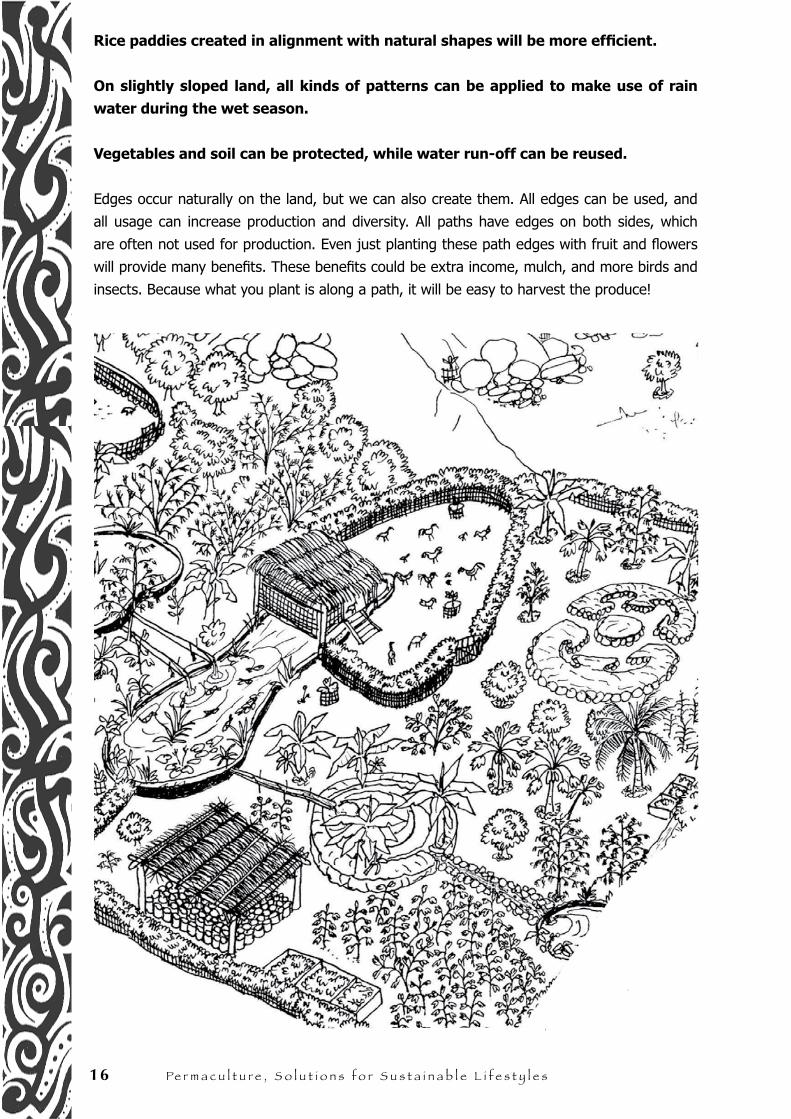
Increasing Productivity
Changing the shape of a fish
pond can affect and increase its
productivity. Because the edge
is the most productive area, if we
increase the amount of edges, this
will increase productivity.
Actually, the shape of the pond must
fit appropriately with the shape of
the land. This means that the land
determines the shape, the shape
does not determine the land.
If you work with natural shapes, you
will achieve more productive results
for less time and labour.
Because the pond contains more
edge for the same amount of water,
more trees, plants and water plants
can be planted around this edge.
These trees and water plants can provide:
• Fish feed, in the form of fallen leaves and fruit
• Shade for the pond, which will reduce evaporation and help to regulate water temperatures
• Food for people
• Erosion control
• Material for making compost and mulch
• An increase of insects, birds and animals around the pond area, which will improve pollination rates and natural pest control, as well as provide more fish feed
• Healthier pond water
Fish ponds are a good example for working with
natural patterns, but working with patterns and
increasing edges will provide benefits for all
types of agriculture and fish production.
16 Pe r m a c u l t u r e , S o l u t i o n s f o r S u s t a i n a b l e l i f e s t y l e s
Rice paddies created in alignment with natural shapes will be more efficient.
On slightly sloped land, all kinds of patterns can be applied to make use of rain
water during the wet season.
Vegetables and soil can be protected, while water run-off can be reused.
Edges occur naturally on the land, but we can also create them. All edges can be used, and
all usage can increase production and diversity. All paths have edges on both sides, which
are often not used for production. Even just planting these path edges with fruit and flowers
will provide many benefits. These benefits could be extra income, mulch, and more birds and
insects. Because what you plant is along a path, it will be easy to harvest the produce!

M o d u l e 2 : N a t u r a l Pa t t e r n s & Pe r m a c u l t u r e d e s i g n 17
Methods of Design
This section will cover some ideas and methods used in planning long term designs for
agriculture land, animal management, houses and other projects.
“Where will the element go?”
“How can it be placed to provide maximum benefits for the system?”
In designing any system, Permaculture combines a series of techniques and strategies.
Techniques are how you do something. Strategies are how and when you do these things.
Design is about making a pattern from different elements and working with the land to create
a system.
Creating a long term design is very important because:
• It helps to plan for the future
• It helps you to see what are priorities for developing a successful farm or project
• It enables you to see how to integrate different parts of a system to save resources and labour, while increasing productivity
• It allows you to plan how to use waste from one section as a resource for another section
• It reduces long term labour needs and helps you to achieve maximum benefits from your work
• It speeds up the development of a farm or project, by using the appropriate technique at the right time
• You can make plans for extreme weather conditions, like a storm, drought or flood. This is very important! There are many techniques in this guidebook to help you prepare for these extreme conditions
A plan provides you with a frame. Like a house, the framework is
necessary before you begin to build the rest of the house, and good
framework will create a strong and long lasting house.
A plan will bring more order, but can still have flexibility. Plans can change as
circumstances change. If you have successes or failures, adjust your plans
accordingly.
18 Pe r m a c u l t u r e , S o l u t i o n s f o r S u s t a i n a b l e l i f e s t y l e s
Approaches to Design
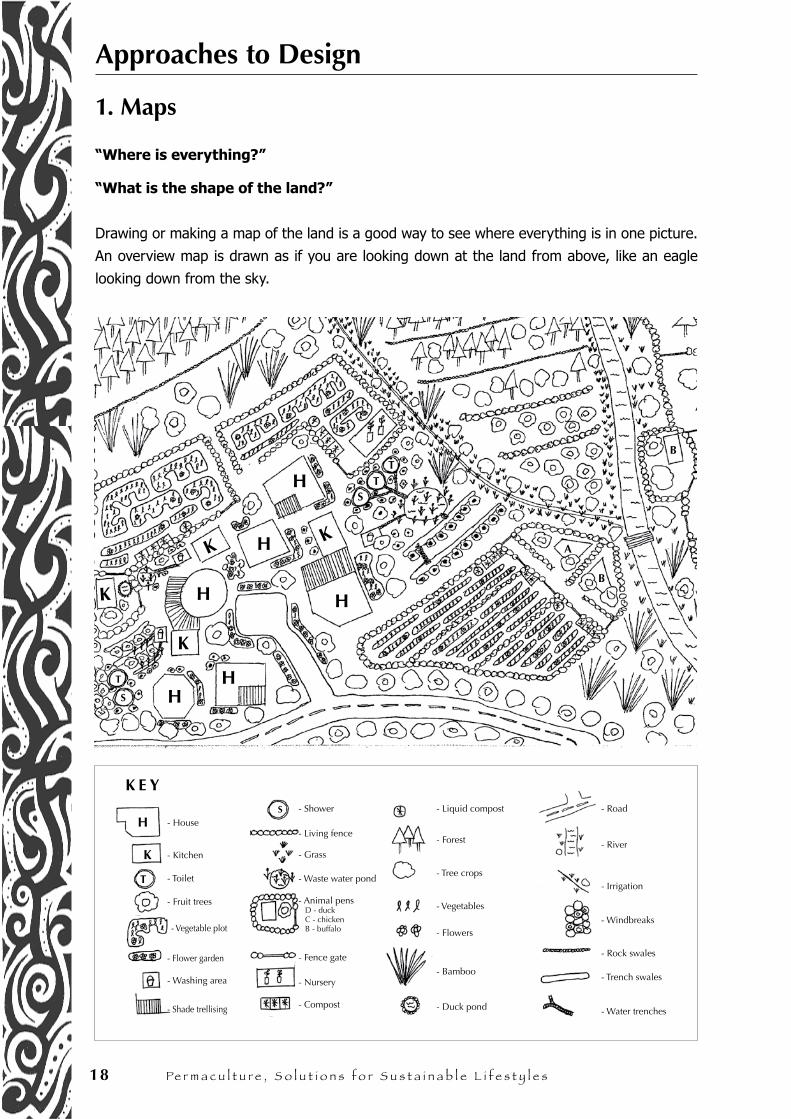
1. Maps
“Where is everything?”
“What is the shape of the land?”
Drawing or making a map of the land is a good way to see where everything is in one picture.
An overview map is drawn as if you are looking down at the land from above, like an eagle
looking down from the sky.
H
K
K
H
H
H
H
H
KK
TT
S
A
S
T
B
B
H
K
S- House
- Kitchen
- Toilet
- Fruit trees
- Vegetable plot
- Flower garden
- Washing area
- Shade trellising
- Shower
- Living fence
- Grass
- Waste water pond
- Animal pens D - duck C - chicken B - buffalo
- Fence gate
- Nursery
- Compost
- Liquid compost
- Forest
- Tree crops
- Vegetables
- Flowers
- Bamboo
- Duck pond
- Road
- River
- Irrigation
- Windbreaks
- Rock swales
- Trench swales
- Water trenches
K E Y
M o d u l e 2 : N a t u r a l Pa t t e r n s & Pe r m a c u l t u r e d e s i g n 19
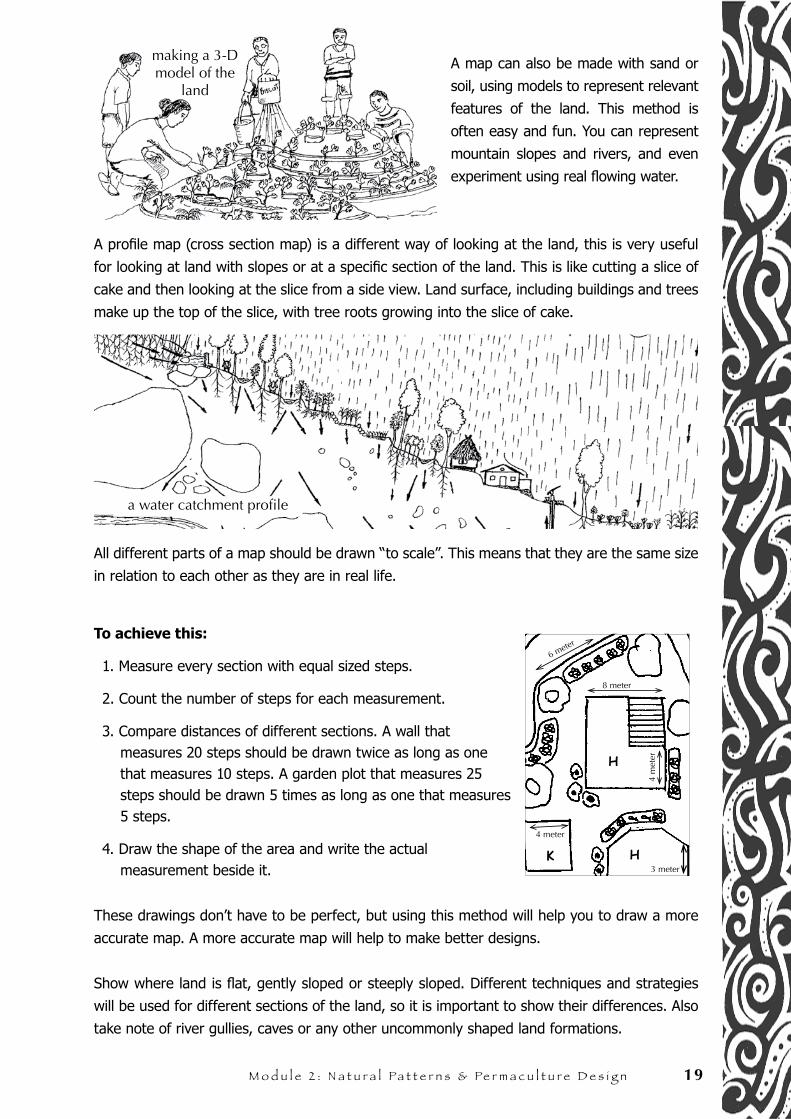
A map can also be made with sand or
soil, using models to represent relevant
features of the land. This method is
often easy and fun. You can represent
mountain slopes and rivers, and even
experiment using real flowing water.
A profile map (cross section map) is a different way of looking at the land, this is very useful
for looking at land with slopes or at a specific section of the land. This is like cutting a slice of
cake and then looking at the slice from a side view. Land surface, including buildings and trees
make up the top of the slice, with tree roots growing into the slice of cake.
All different parts of a map should be drawn “to scale”. This means that they are the same size
in relation to each other as they are in real life.
To achieve this:
1. Measure every section with equal sized steps.
2. Count the number of steps for each measurement.
3. Compare distances of different sections. A wall that measures 20 steps should be drawn twice as long as one that measures 10 steps. A garden plot that measures 25 steps should be drawn 5 times as long as one that measures 5 steps.
4. Draw the shape of the area and write the actual measurement beside it.
These drawings don’t have to be perfect, but using this method will help you to draw a more
accurate map. A more accurate map will help to make better designs.
Show where land is flat, gently sloped or steeply sloped. Different techniques and strategies
will be used for different sections of the land, so it is important to show their differences. Also
take note of river gullies, caves or any other uncommonly shaped land formations.
making a 3-D model of the
land
a water catchment profile
4 meter
3 meter
8 meter
6 meter
H
4 m
eter
K H
20 Pe r m a c u l t u r e , S o l u t i o n s f o r S u s t a i n a b l e l i f e s t y l e s
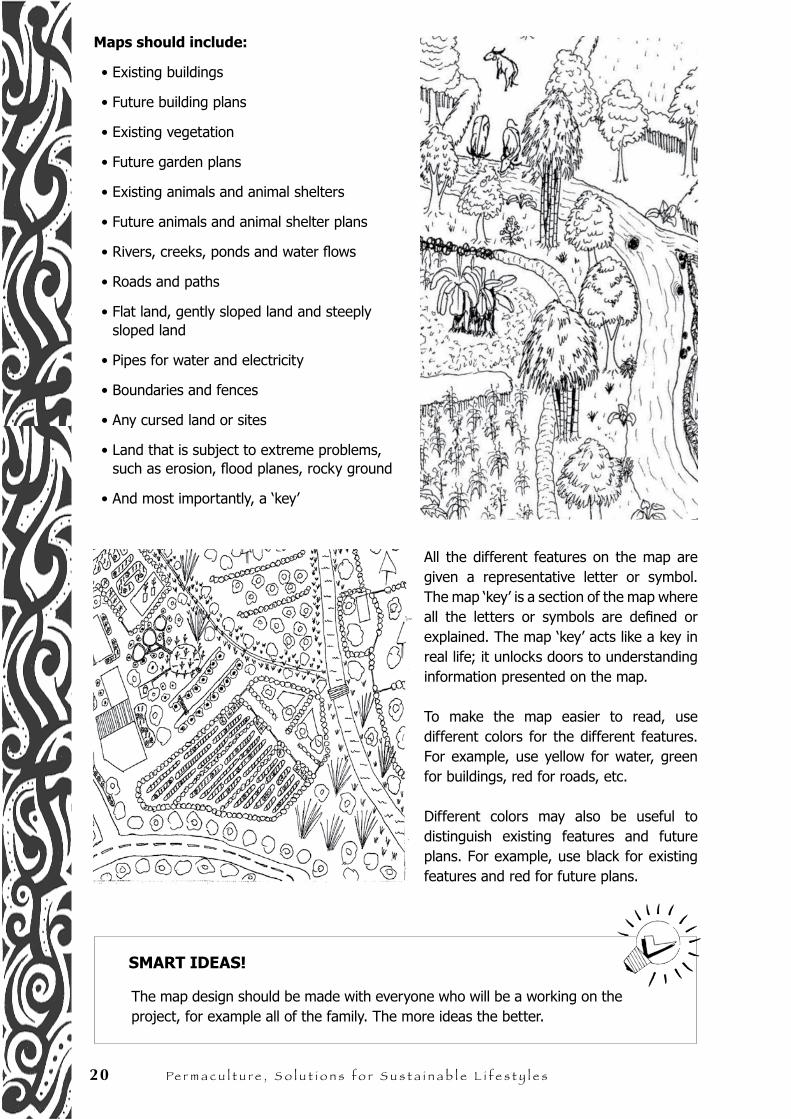
Maps should include:
• Existing buildings
• Future building plans
• Existing vegetation
• Future garden plans
• Existing animals and animal shelters
• Future animals and animal shelter plans
• Rivers, creeks, ponds and water flows
• Roads and paths
• Flat land, gently sloped land and steeply sloped land
• Pipes for water and electricity
• Boundaries and fences
• Any cursed land or sites
• Land that is subject to extreme problems, such as erosion, flood planes, rocky ground
• And most importantly, a ‘key’
All the different features on the map are given a representative letter or symbol. The map ‘key’ is a section of the map where all the letters or symbols are defined or explained. The map ‘key’ acts like a key in real life; it unlocks doors to understanding information presented on the map.
To make the map easier to read, use different colors for the different features. For example, use yellow for water, green for buildings, red for roads, etc.
Different colors may also be useful to distinguish existing features and future plans. For example, use black for existing features and red for future plans.
SMART IDEAS!
The map design should be made with everyone who will be a working on the project, for example all of the family. The more ideas the better.
M o d u l e 2 : N a t u r a l Pa t t e r n s & Pe r m a c u l t u r e d e s i g n 21
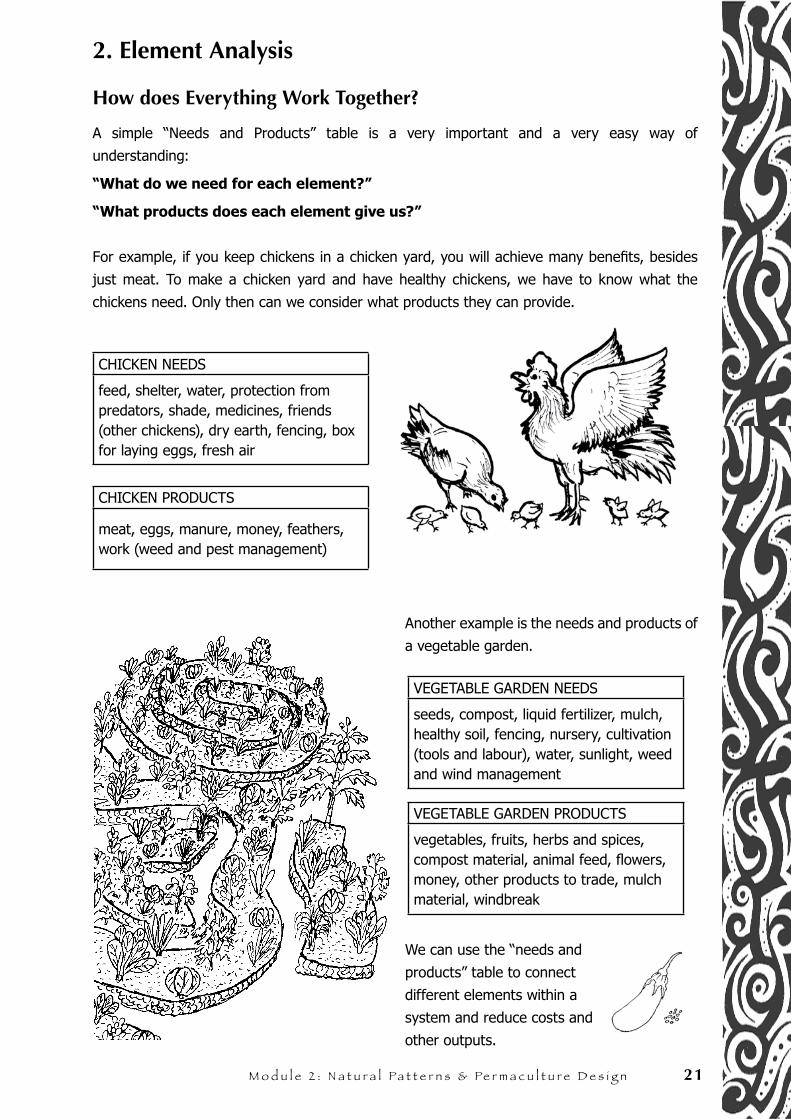
2. Element Analysis
How does Everything Work Together?
A simple “Needs and Products” table is a very important and a very easy way of
understanding:
“What do we need for each element?”
“What products does each element give us?”
For example, if you keep chickens in a chicken yard, you will achieve many benefits, besides
just meat. To make a chicken yard and have healthy chickens, we have to know what the
chickens need. Only then can we consider what products they can provide.
CHICKEN NEEDS
feed, shelter, water, protection from predators, shade, medicines, friends (other chickens), dry earth, fencing, box for laying eggs, fresh air
CHICKEN PRODUCTS
meat, eggs, manure, money, feathers, work (weed and pest management)
Another example is the needs and products of
a vegetable garden.
VEGETABLE GARDEN NEEDS
seeds, compost, liquid fertilizer, mulch, healthy soil, fencing, nursery, cultivation (tools and labour), water, sunlight, weed and wind management
VEGETABLE GARDEN PRODUCTS
vegetables, fruits, herbs and spices, compost material, animal feed, flowers, money, other products to trade, mulch material, windbreak
We can use the “needs and
products” table to connect
different elements within a
system and reduce costs and
other outputs.
22 Pe r m a c u l t u r e , S o l u t i o n s f o r S u s t a i n a b l e l i f e s t y l e s
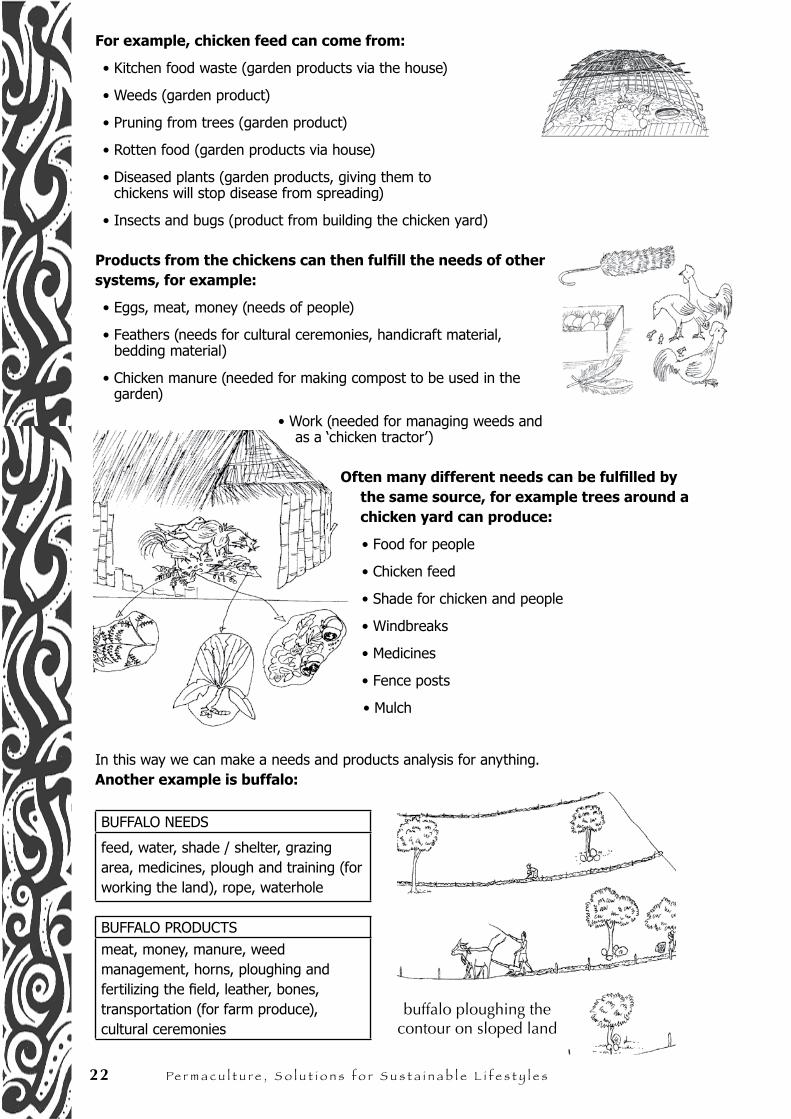
For example, chicken feed can come from:
• Kitchen food waste (garden products via the house)
• Weeds (garden product)
• Pruning from trees (garden product)
• Rotten food (garden products via house)
• Diseased plants (garden products, giving them to chickens will stop disease from spreading)
• Insects and bugs (product from building the chicken yard)
Products from the chickens can then fulfill the needs of other systems, for example:
• Eggs, meat, money (needs of people)
• Feathers (needs for cultural ceremonies, handicraft material, bedding material)
• Chicken manure (needed for making compost to be used in the garden)
• Work (needed for managing weeds and as a ‘chicken tractor’)
Often many different needs can be fulfilled by the same source, for example trees around a chicken yard can produce:
• Food for people
• Chicken feed
• Shade for chicken and people
• Windbreaks
• Medicines
• Fence posts
• Mulch
In this way we can make a needs and products analysis for anything.Another example is buffalo:
BUFFALO NEEDS
feed, water, shade / shelter, grazing area, medicines, plough and training (for working the land), rope, waterhole
BUFFALO PRODUCTSmeat, money, manure, weed management, horns, ploughing and fertilizing the field, leather, bones, transportation (for farm produce), cultural ceremonies
buffalo ploughing the contour on sloped land
M o d u l e 2 : N a t u r a l Pa t t e r n s & Pe r m a c u l t u r e d e s i g n 23
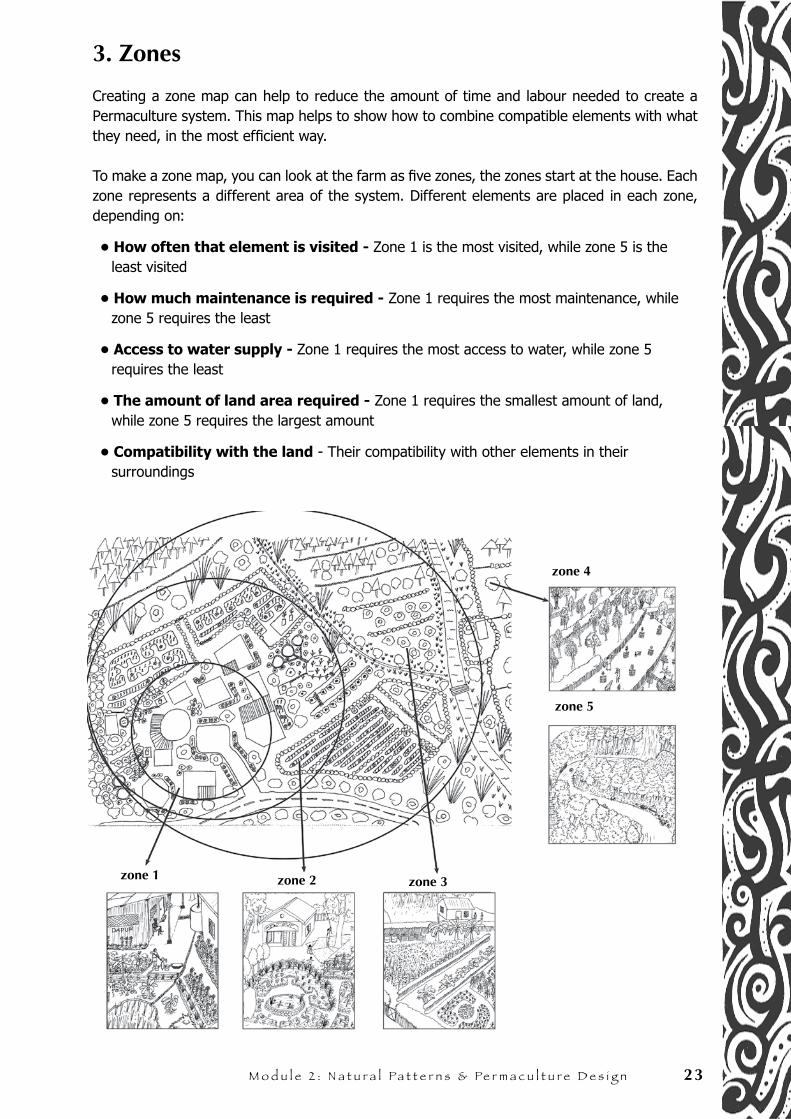
3. Zones
Creating a zone map can help to reduce the amount of time and labour needed to create a Permaculture system. This map helps to show how to combine compatible elements with what they need, in the most efficient way.
To make a zone map, you can look at the farm as five zones, the zones start at the house. Each zone represents a different area of the system. Different elements are placed in each zone, depending on:
• How often that element is visited - Zone 1 is the most visited, while zone 5 is the least visited
• How much maintenance is required - Zone 1 requires the most maintenance, while zone 5 requires the least
• Access to water supply - Zone 1 requires the most access to water, while zone 5 requires the least
• The amount of land area required - Zone 1 requires the smallest amount of land, while zone 5 requires the largest amount
• Compatibility with the land - Their compatibility with other elements in their surroundings
zone 4
zone 5
zone 1 zone 2 zone 3
24 Pe r m a c u l t u r e , S o l u t i o n s f o r S u s t a i n a b l e l i f e s t y l e s
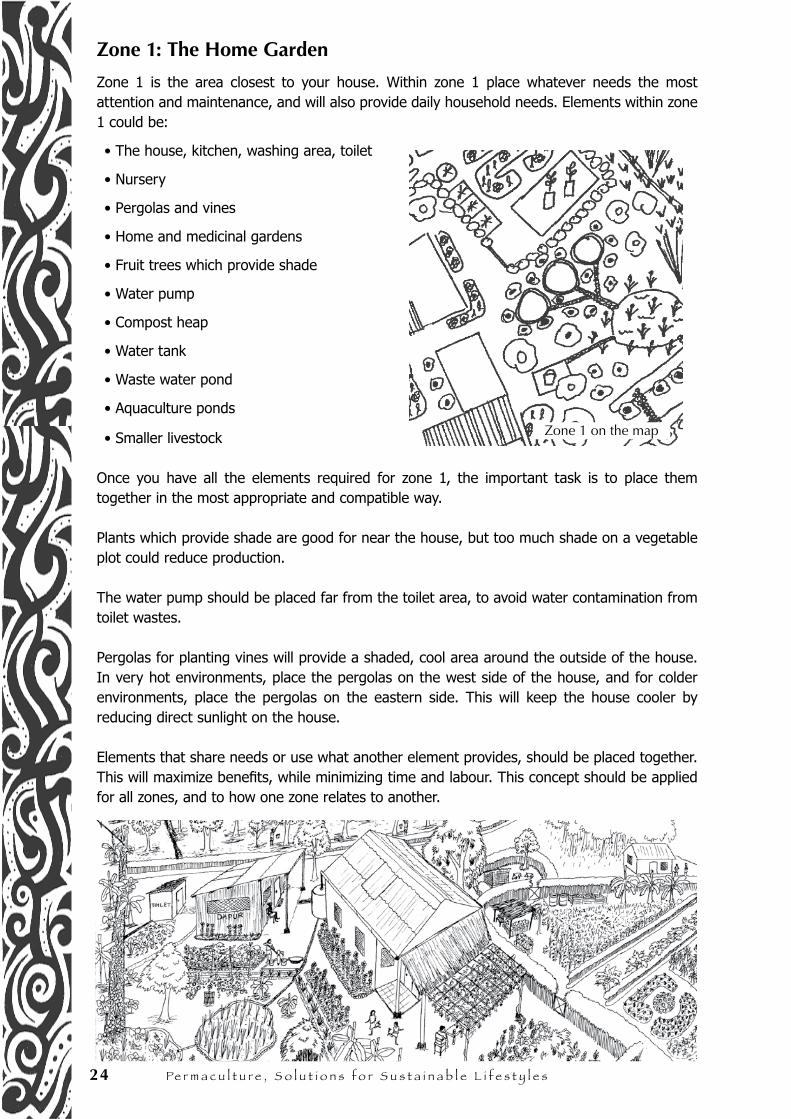
Zone 1: The Home Garden
Zone 1 is the area closest to your house. Within zone 1 place whatever needs the most attention and maintenance, and will also provide daily household needs. Elements within zone 1 could be:
• The house, kitchen, washing area, toilet
• Nursery
• Pergolas and vines
• Home and medicinal gardens
• Fruit trees which provide shade
• Water pump
• Compost heap
• Water tank
• Waste water pond
• Aquaculture ponds
• Smaller livestock
Once you have all the elements required for zone 1, the important task is to place them together in the most appropriate and compatible way.
Plants which provide shade are good for near the house, but too much shade on a vegetable plot could reduce production.
The water pump should be placed far from the toilet area, to avoid water contamination from toilet wastes.
Pergolas for planting vines will provide a shaded, cool area around the outside of the house. In very hot environments, place the pergolas on the west side of the house, and for colder environments, place the pergolas on the eastern side. This will keep the house cooler by reducing direct sunlight on the house.
Elements that share needs or use what another element provides, should be placed together. This will maximize benefits, while minimizing time and labour. This concept should be applied for all zones, and to how one zone relates to another.
Zone 1 on the map
M o d u l e 2 : N a t u r a l Pa t t e r n s & Pe r m a c u l t u r e d e s i g n 25
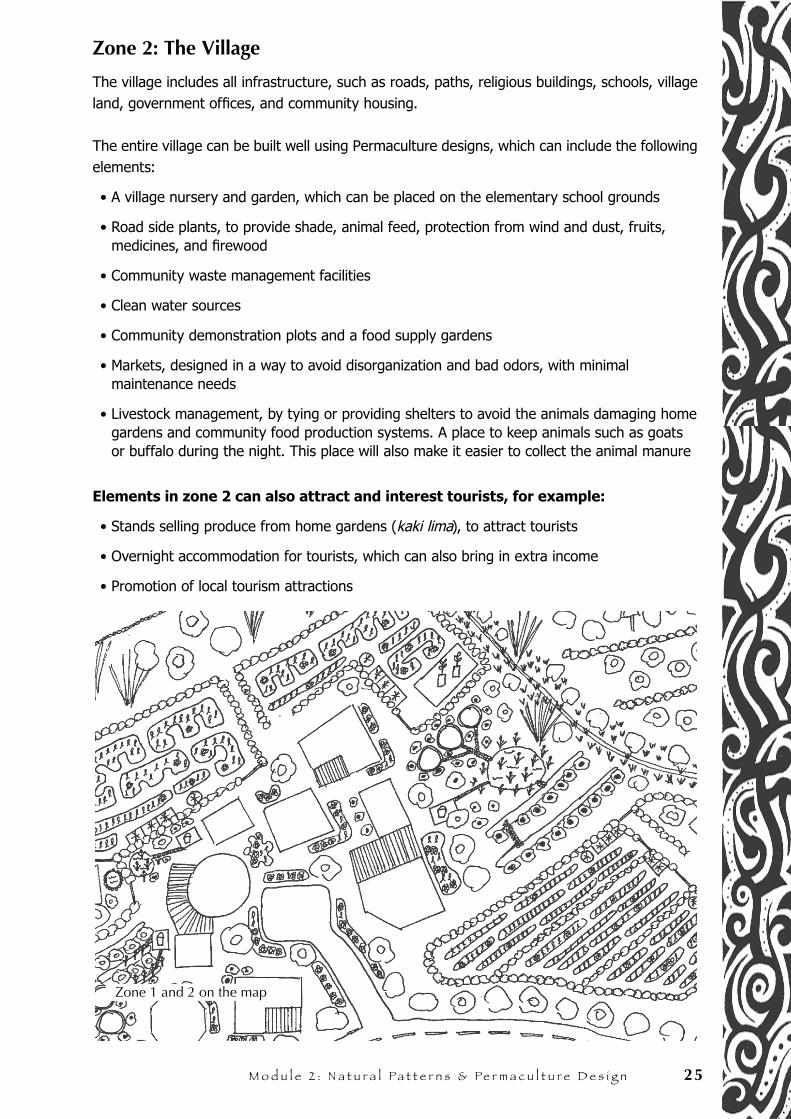
Zone 2: The Village
The village includes all infrastructure, such as roads, paths, religious buildings, schools, village land, government offices, and community housing.
The entire village can be built well using Permaculture designs, which can include the following elements:
• A village nursery and garden, which can be placed on the elementary school grounds
• Road side plants, to provide shade, animal feed, protection from wind and dust, fruits, medicines, and firewood
• Community waste management facilities
• Clean water sources
• Community demonstration plots and a food supply gardens
• Markets, designed in a way to avoid disorganization and bad odors, with minimal maintenance needs
• Livestock management, by tying or providing shelters to avoid the animals damaging home gardens and community food production systems. A place to keep animals such as goats or buffalo during the night. This place will also make it easier to collect the animal manure
Elements in zone 2 can also attract and interest tourists, for example:
• Stands selling produce from home gardens (kaki lima), to attract tourists
• Overnight accommodation for tourists, which can also bring in extra income
• Promotion of local tourism attractions
Zone 1 and 2 on the map
26 Pe r m a c u l t u r e , S o l u t i o n s f o r S u s t a i n a b l e l i f e s t y l e s
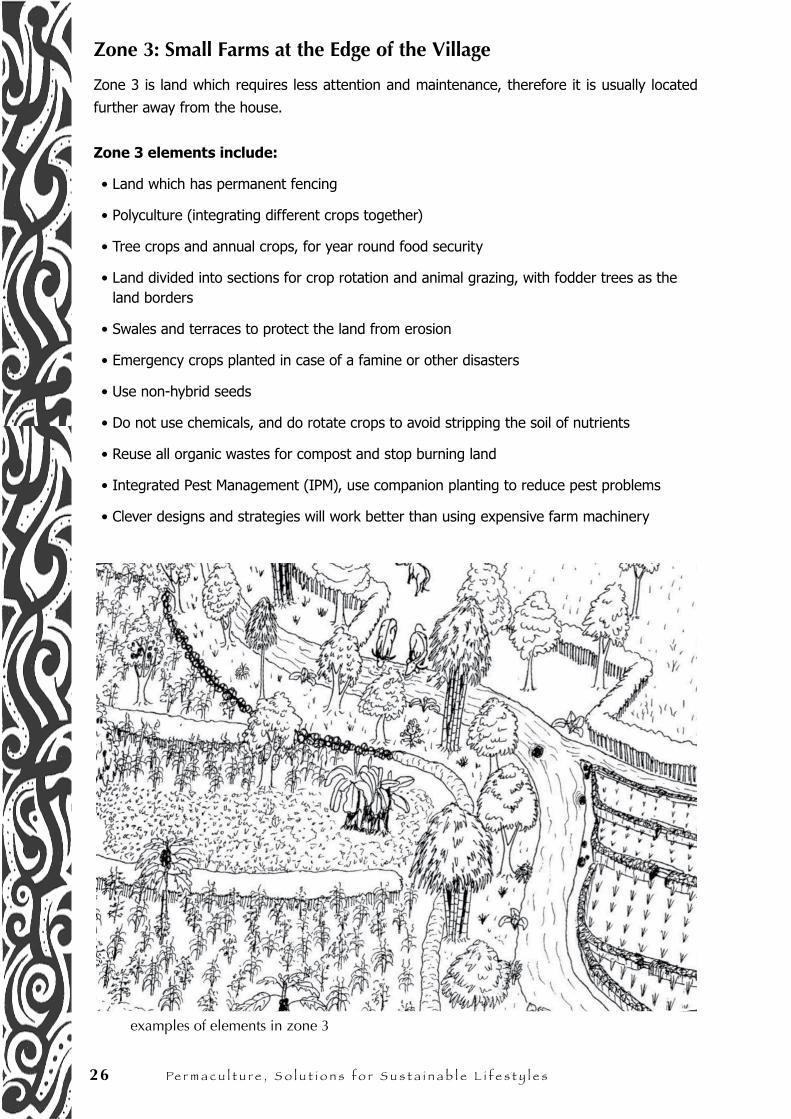
Zone 3: Small Farms at the Edge of the Village
Zone 3 is land which requires less attention and maintenance, therefore it is usually located
further away from the house.
Zone 3 elements include:
• Land which has permanent fencing
• Polyculture (integrating different crops together)
• Tree crops and annual crops, for year round food security
• Land divided into sections for crop rotation and animal grazing, with fodder trees as the land borders
• Swales and terraces to protect the land from erosion
• Emergency crops planted in case of a famine or other disasters
• Use non-hybrid seeds
• Do not use chemicals, and do rotate crops to avoid stripping the soil of nutrients
• Reuse all organic wastes for compost and stop burning land
• Integrated Pest Management (IPM), use companion planting to reduce pest problems
• Clever designs and strategies will work better than using expensive farm machinery
examples of elements in zone 3
M o d u l e 2 : N a t u r a l Pa t t e r n s & Pe r m a c u l t u r e d e s i g n 27
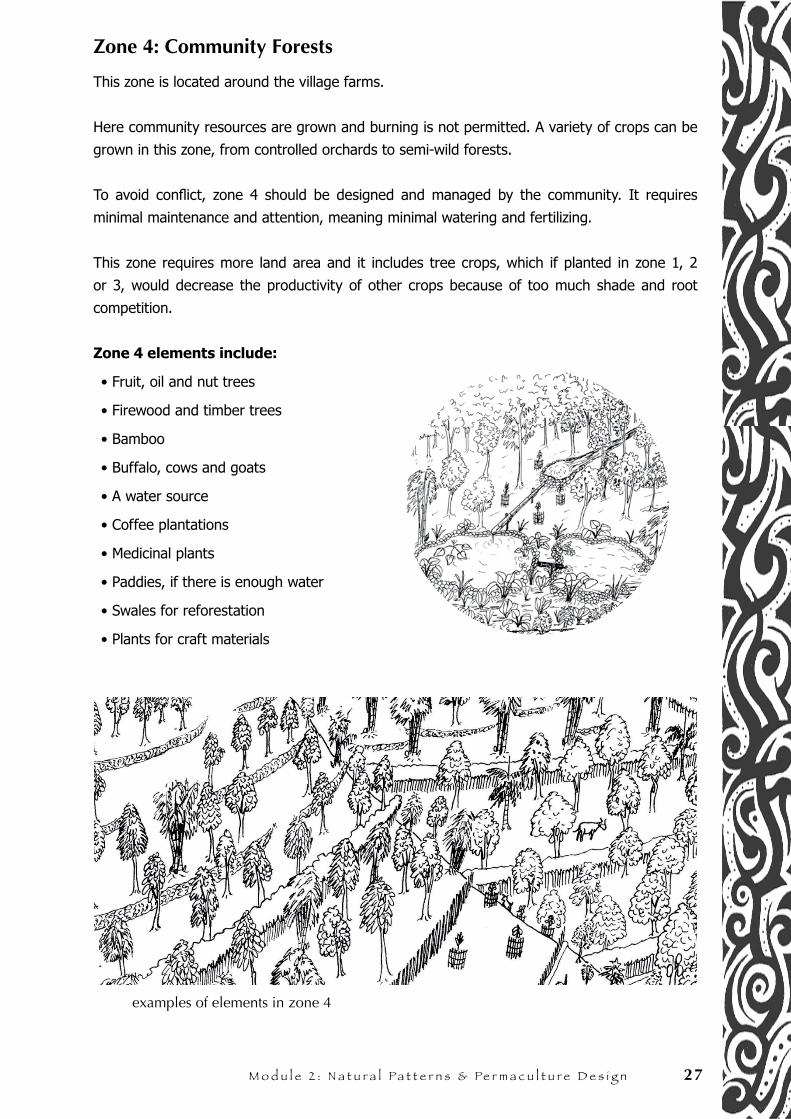
Zone 4: Community Forests
This zone is located around the village farms.
Here community resources are grown and burning is not permitted. A variety of crops can be
grown in this zone, from controlled orchards to semi-wild forests.
To avoid conflict, zone 4 should be designed and managed by the community. It requires
minimal maintenance and attention, meaning minimal watering and fertilizing.
This zone requires more land area and it includes tree crops, which if planted in zone 1, 2
or 3, would decrease the productivity of other crops because of too much shade and root
competition.
Zone 4 elements include:
• Fruit, oil and nut trees
• Firewood and timber trees
• Bamboo
• Buffalo, cows and goats
• A water source
• Coffee plantations
• Medicinal plants
• Paddies, if there is enough water
• Swales for reforestation
• Plants for craft materials
examples of elements in zone 4
28 Pe r m a c u l t u r e , S o l u t i o n s f o r S u s t a i n a b l e l i f e s t y l e s
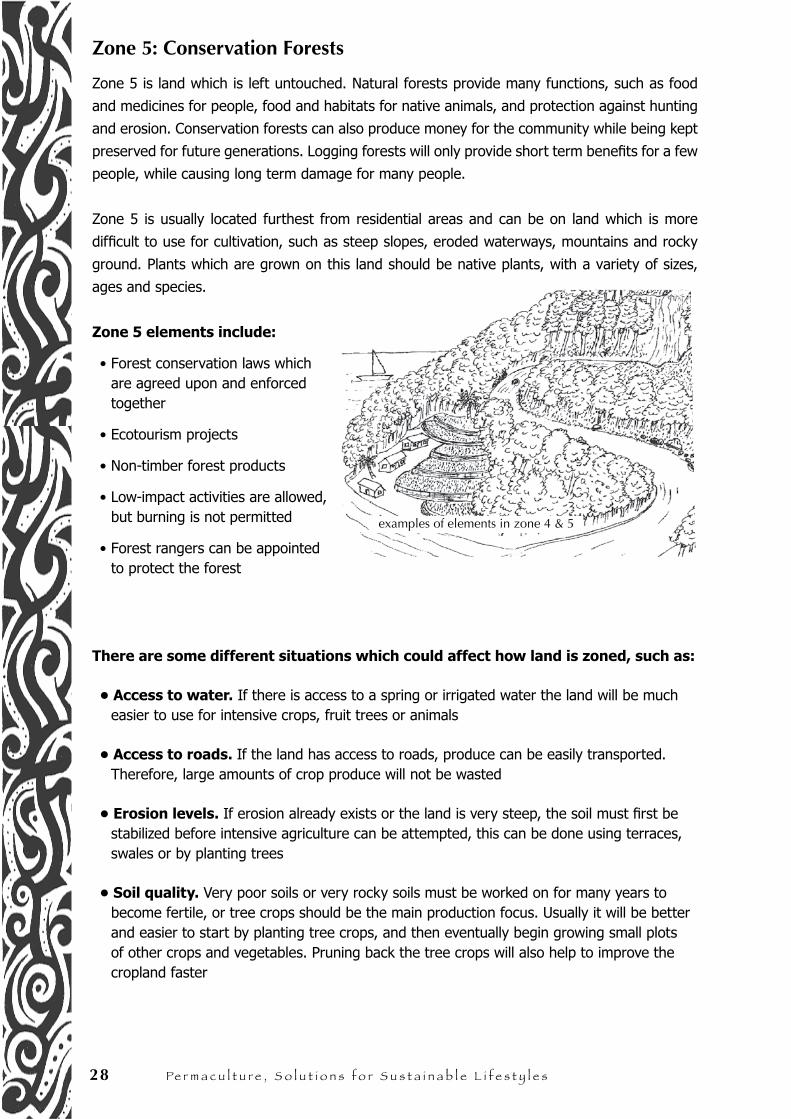
examples of elements in zone 4 & 5
Zone 5: Conservation Forests
Zone 5 is land which is left untouched. Natural forests provide many functions, such as food
and medicines for people, food and habitats for native animals, and protection against hunting
and erosion. Conservation forests can also produce money for the community while being kept
preserved for future generations. Logging forests will only provide short term benefits for a few
people, while causing long term damage for many people.
Zone 5 is usually located furthest from residential areas and can be on land which is more
difficult to use for cultivation, such as steep slopes, eroded waterways, mountains and rocky
ground. Plants which are grown on this land should be native plants, with a variety of sizes,
ages and species.
Zone 5 elements include:
• Forest conservation laws which are agreed upon and enforced together
• Ecotourism projects
• Non-timber forest products
• Low-impact activities are allowed, but burning is not permitted
• Forest rangers can be appointed to protect the forest
There are some different situations which could affect how land is zoned, such as:
• Access to water. If there is access to a spring or irrigated water the land will be much easier to use for intensive crops, fruit trees or animals
• Access to roads. If the land has access to roads, produce can be easily transported. Therefore, large amounts of crop produce will not be wasted
• Erosion levels. If erosion already exists or the land is very steep, the soil must first be stabilized before intensive agriculture can be attempted, this can be done using terraces, swales or by planting trees
• Soil quality. Very poor soils or very rocky soils must be worked on for many years to become fertile, or tree crops should be the main production focus. Usually it will be better and easier to start by planting tree crops, and then eventually begin growing small plots of other crops and vegetables. Pruning back the tree crops will also help to improve the cropland faster
M o d u l e 2 : N a t u r a l Pa t t e r n s & Pe r m a c u l t u r e d e s i g n 29
SMART IDEAS!
• Some elements could be located in more than one zone, like corn, citrus and pigs. This will depend on:
a. The type, quality and size of the land
b. The techniques and strategies used
c. Which crops are for selling and which are for the family to eat
c. The possibility of integration with other elements
• Making pathways is very important because they can connect zones in efficient ways. The pathways will provide location points for liquid compost, animal pens and water access. All pathways can bordered or fenced with production crops. These path borders can be small garden plots, flowers, herbs, vines or smaller fruit trees. This will increase the use of nonproductive land and make the farm more beautiful!
• The zones can also be implemented on a community or village level. This idea can save time, costs and labour. If different farms are working together, the production process will be more efficient, resources can be continuously reused and everyone will benefit
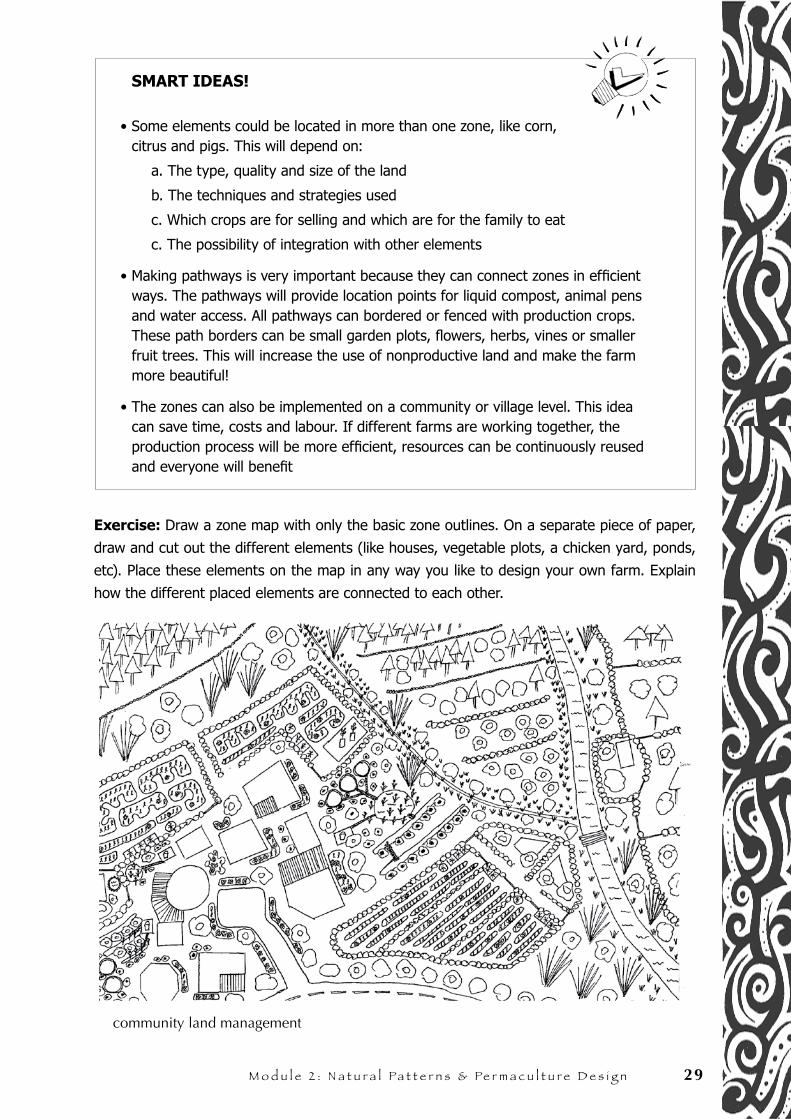
Exercise: Draw a zone map with only the basic zone outlines. On a separate piece of paper,
draw and cut out the different elements (like houses, vegetable plots, a chicken yard, ponds,
etc). Place these elements on the map in any way you like to design your own farm. Explain
how the different placed elements are connected to each other.
community land management
30 Pe r m a c u l t u r e , S o l u t i o n s f o r S u s t a i n a b l e l i f e s t y l e s
4. Sectors
Sectors look at the natural factors that affect the land and the production levels of the land.
These natural factors are sun, wind, water flow and flooding potential, fire, slopes, soil types
and sacred lands. Sector planning is done to channel these natural factors into or out of a
system.
The knowledge gained from understanding the effects of these natural factors leads to planning
that will:
• Help to maximise yields
• Reduce mistakes made, for example, planting crops or trees which will get washed away with the next heavy rains or floods
• Make the farm more resilient and capable of facing disasters and extreme conditions, like fires, flooding or erosion
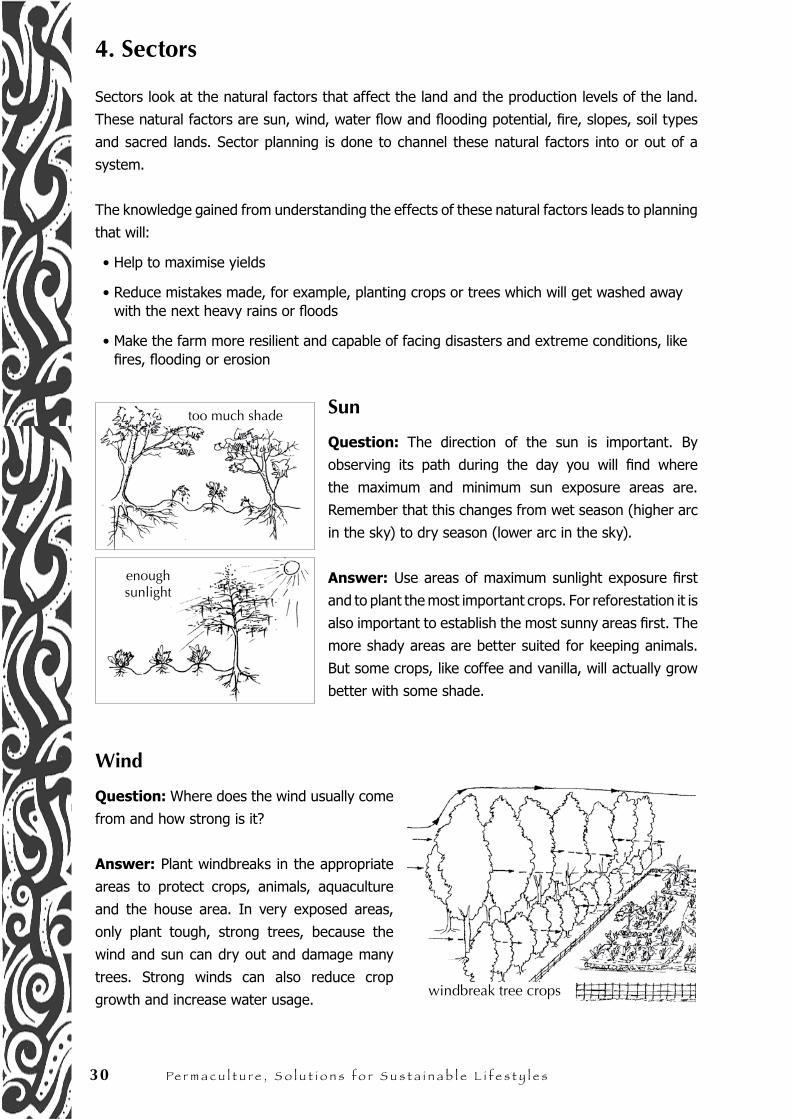
Sun
Question: The direction of the sun is important. By
observing its path during the day you will find where
the maximum and minimum sun exposure areas are.
Remember that this changes from wet season (higher arc
in the sky) to dry season (lower arc in the sky).
Answer: Use areas of maximum sunlight exposure first
and to plant the most important crops. For reforestation it is
also important to establish the most sunny areas first. The
more shady areas are better suited for keeping animals.
But some crops, like coffee and vanilla, will actually grow
better with some shade.
Wind
Question: Where does the wind usually come
from and how strong is it?
Answer: Plant windbreaks in the appropriate
areas to protect crops, animals, aquaculture
and the house area. In very exposed areas,
only plant tough, strong trees, because the
wind and sun can dry out and damage many
trees. Strong winds can also reduce crop
growth and increase water usage.windbreak tree crops
too much shade
enough sunlight
M o d u l e 2 : N a t u r a l Pa t t e r n s & Pe r m a c u l t u r e d e s i g n 31
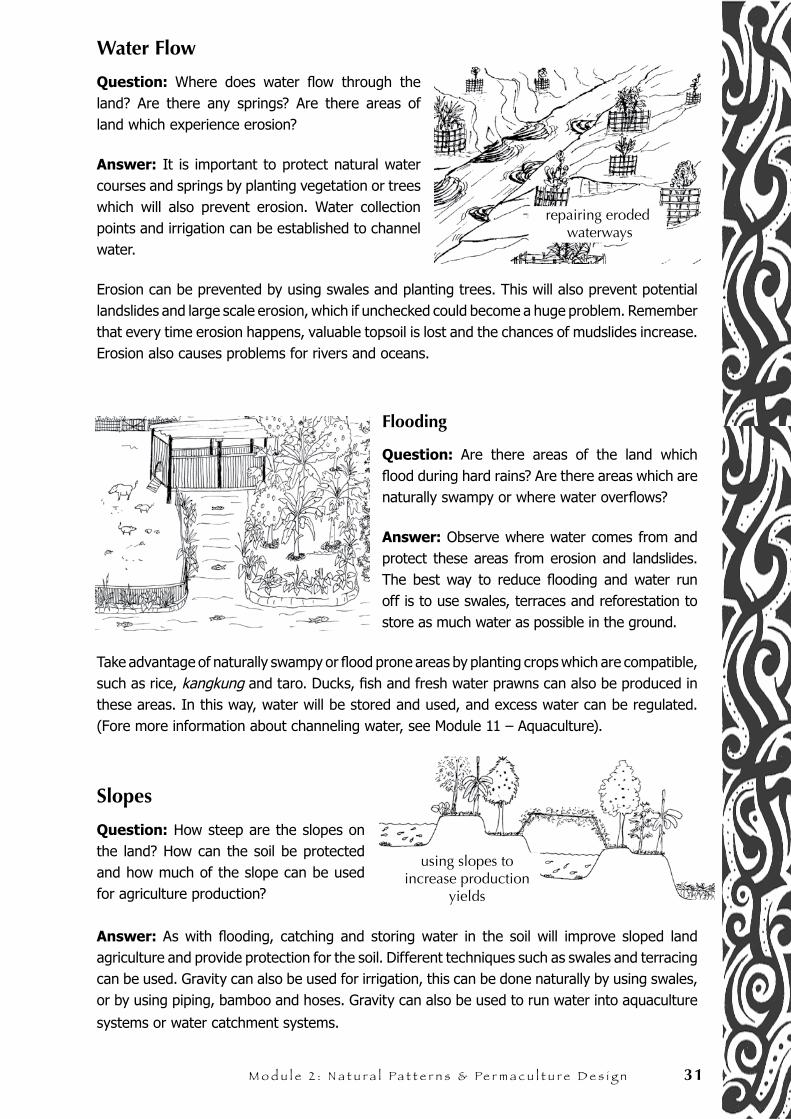
Water Flow
Question: Where does water flow through the land? Are there any springs? Are there areas of land which experience erosion?
Answer: It is important to protect natural water courses and springs by planting vegetation or trees which will also prevent erosion. Water collection points and irrigation can be established to channel water.
Erosion can be prevented by using swales and planting trees. This will also prevent potential landslides and large scale erosion, which if unchecked could become a huge problem. Remember that every time erosion happens, valuable topsoil is lost and the chances of mudslides increase. Erosion also causes problems for rivers and oceans.
Flooding
Question: Are there areas of the land which flood during hard rains? Are there areas which are naturally swampy or where water overflows?
Answer: Observe where water comes from and protect these areas from erosion and landslides. The best way to reduce flooding and water run off is to use swales, terraces and reforestation to store as much water as possible in the ground.
Take advantage of naturally swampy or flood prone areas by planting crops which are compatible, such as rice, kangkung and taro. Ducks, fish and fresh water prawns can also be produced in these areas. In this way, water will be stored and used, and excess water can be regulated. (Fore more information about channeling water, see Module 11 – Aquaculture).
Slopes
Question: How steep are the slopes on the land? How can the soil be protected and how much of the slope can be used for agriculture production?
Answer: As with flooding, catching and storing water in the soil will improve sloped land agriculture and provide protection for the soil. Different techniques such as swales and terracing can be used. Gravity can also be used for irrigation, this can be done naturally by using swales, or by using piping, bamboo and hoses. Gravity can also be used to run water into aquaculture
systems or water catchment systems.
using slopes to increase production
yields
repairing eroded waterways
32 Pe r m a c u l t u r e , S o l u t i o n s f o r S u s t a i n a b l e l i f e s t y l e s
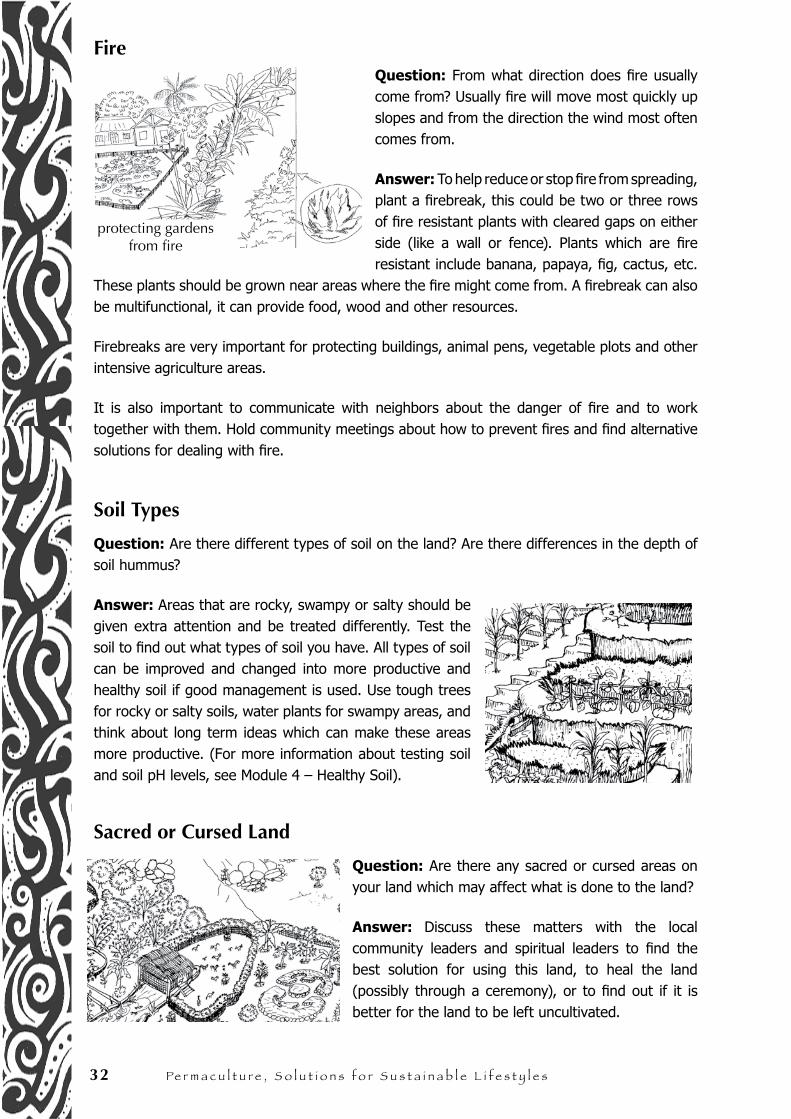
FireQuestion: From what direction does fire usually come from? Usually fire will move most quickly up slopes and from the direction the wind most often comes from.
Answer: To help reduce or stop fire from spreading, plant a firebreak, this could be two or three rows of fire resistant plants with cleared gaps on either side (like a wall or fence). Plants which are fire resistant include banana, papaya, fig, cactus, etc.
These plants should be grown near areas where the fire might come from. A firebreak can also be multifunctional, it can provide food, wood and other resources.
Firebreaks are very important for protecting buildings, animal pens, vegetable plots and other intensive agriculture areas.
It is also important to communicate with neighbors about the danger of fire and to work together with them. Hold community meetings about how to prevent fires and find alternative solutions for dealing with fire.
Soil Types
Question: Are there different types of soil on the land? Are there differences in the depth of soil hummus?
Answer: Areas that are rocky, swampy or salty should be given extra attention and be treated differently. Test the soil to find out what types of soil you have. All types of soil can be improved and changed into more productive and healthy soil if good management is used. Use tough trees for rocky or salty soils, water plants for swampy areas, and think about long term ideas which can make these areas more productive. (For more information about testing soil and soil pH levels, see Module 4 – Healthy Soil).
Sacred or Cursed Land
Question: Are there any sacred or cursed areas on your land which may affect what is done to the land?
Answer: Discuss these matters with the local community leaders and spiritual leaders to find the best solution for using this land, to heal the land (possibly through a ceremony), or to find out if it is better for the land to be left uncultivated.
protecting gardens from fire
M o d u l e 2 : N a t u r a l Pa t t e r n s & Pe r m a c u l t u r e d e s i g n 33
5. Observation and Data Collection
Observation is very important and should be the first step taken when planning agriculture
projects for your land. Through observation we can see how natural elements affect the land.
For example, the same variety of tree will grow differently in one area compared to in another
area. Is this because of the amount of water available, different soil depths, wind exposure,
sunlight exposure or another factor entirely? Observation can show us and help us to make
better plans.
Nature gives signs that we can look for, such as:
• Plants with fleshy or fuzzy leaves will grow better where there is more water available
• If there are often strong winds, all tall trees will grow leaning to the opposite direction, and plants will grow smaller and stunted
• Yellowing of leaves and new growth, early maturing and smaller fruit and flowers are all signs of nitrogen deficiencies in the soil. (For more information about nitrogen in the soil, see Module 4 – Healthy Soil)
If you observe and work with nature, you will save time, labour and expense.
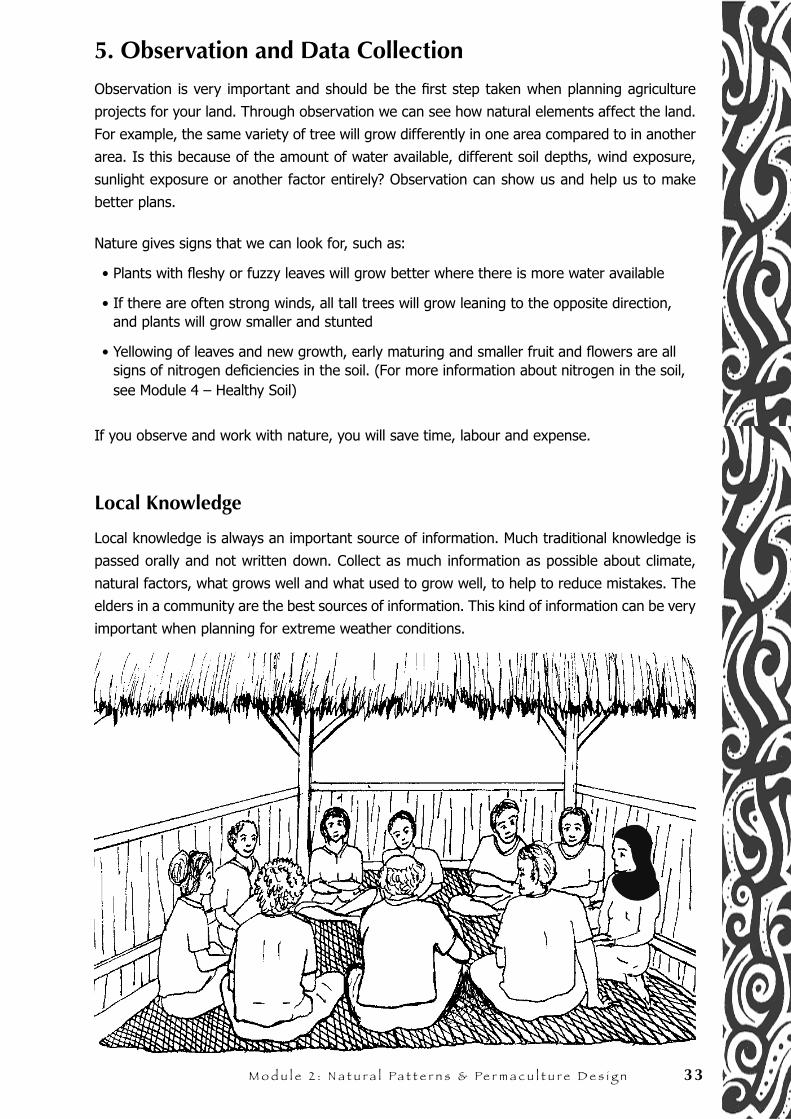
Local Knowledge
Local knowledge is always an important source of information. Much traditional knowledge is
passed orally and not written down. Collect as much information as possible about climate,
natural factors, what grows well and what used to grow well, to help to reduce mistakes. The
elders in a community are the best sources of information. This kind of information can be very
important when planning for extreme weather conditions.
34 Pe r m a c u l t u r e , S o l u t i o n s f o r S u s t a i n a b l e l i f e s t y l e s
The Local Government
Government agriculture workers can help to provide some information and support. Information about government projects, weather patterns, seeds and plants, techniques, and what support is available, will all help. Creating a farmer’s group will help to make the best use of any information and support available.
Other sources of information include NGOs (Non Governmental Organizations), schools, radios, books, universities and the internet.
Create a farmer’s group, community group or seed saving group as a resource base. Other support groups, such as women’s groups, are also very important. Representatives from each group can work together with representatives from larger groups, this will maximize the benefits of any information or support. In this way, all community members will receive benefits in the most sustainable way.
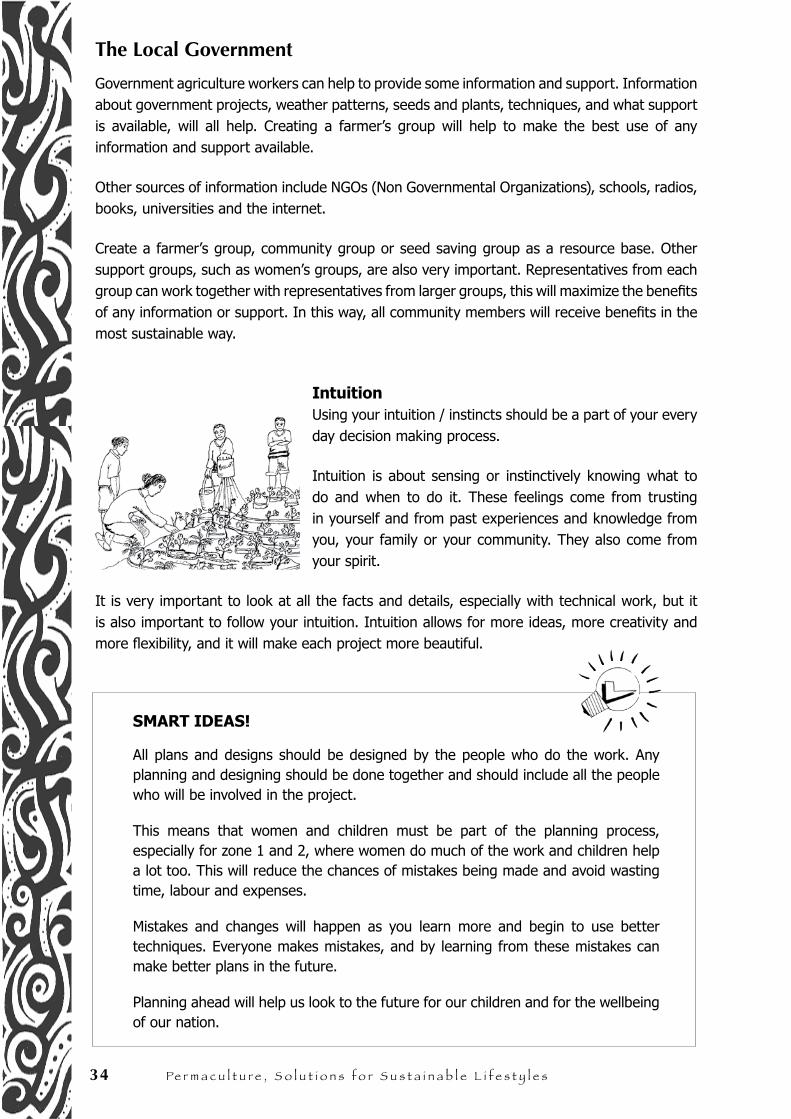
IntuitionUsing your intuition / instincts should be a part of your every day decision making process.
Intuition is about sensing or instinctively knowing what to do and when to do it. These feelings come from trusting in yourself and from past experiences and knowledge from you, your family or your community. They also come from your spirit.
It is very important to look at all the facts and details, especially with technical work, but it is also important to follow your intuition. Intuition allows for more ideas, more creativity and more flexibility, and it will make each project more beautiful.
SMART IDEAS!
All plans and designs should be designed by the people who do the work. Any planning and designing should be done together and should include all the people who will be involved in the project.
This means that women and children must be part of the planning process, especially for zone 1 and 2, where women do much of the work and children help a lot too. This will reduce the chances of mistakes being made and avoid wasting time, labour and expenses.
Mistakes and changes will happen as you learn more and begin to use better techniques. Everyone makes mistakes, and by learning from these mistakes can make better plans in the future.
Planning ahead will help us look to the future for our children and for the wellbeing of our nation.

M o d u l e 2 : N a t u r a l Pa t t e r n s & Pe r m a c u l t u r e d e s i g n 35
N o t e s . . .

36 Pe r m a c u l t u r e , S o l u t i o n s f o r S u s t a i n a b l e l i f e s t y l e s
N o t e s . . .
Per
mac
ult
ure
Res
ou
rce
Bo
ok
Mo
du
le 3
. H
ou
ses,
Wat
er &
Was
te M
anag
emen
t
M o d u l e N o 3 .
Houses, Water & Waste Management

38 Pe r m a c u l t u r e , S o l u t i o n s f o r S u s t a i n a b l e l i f e s t y l e s
N o t e s . . .
M o d u l e 3 : H o u s e s , W a t e r & W a s t e M a n a g e m e n t 39
Everything is connected to everything else. This principle is very important to remember when
creating sustainable agriculture systems. You can work with this principle for future benefits,
or ignore it for future detriment. This principle is also applicable for the home and living area,
including the kitchen, washing area and toilet.
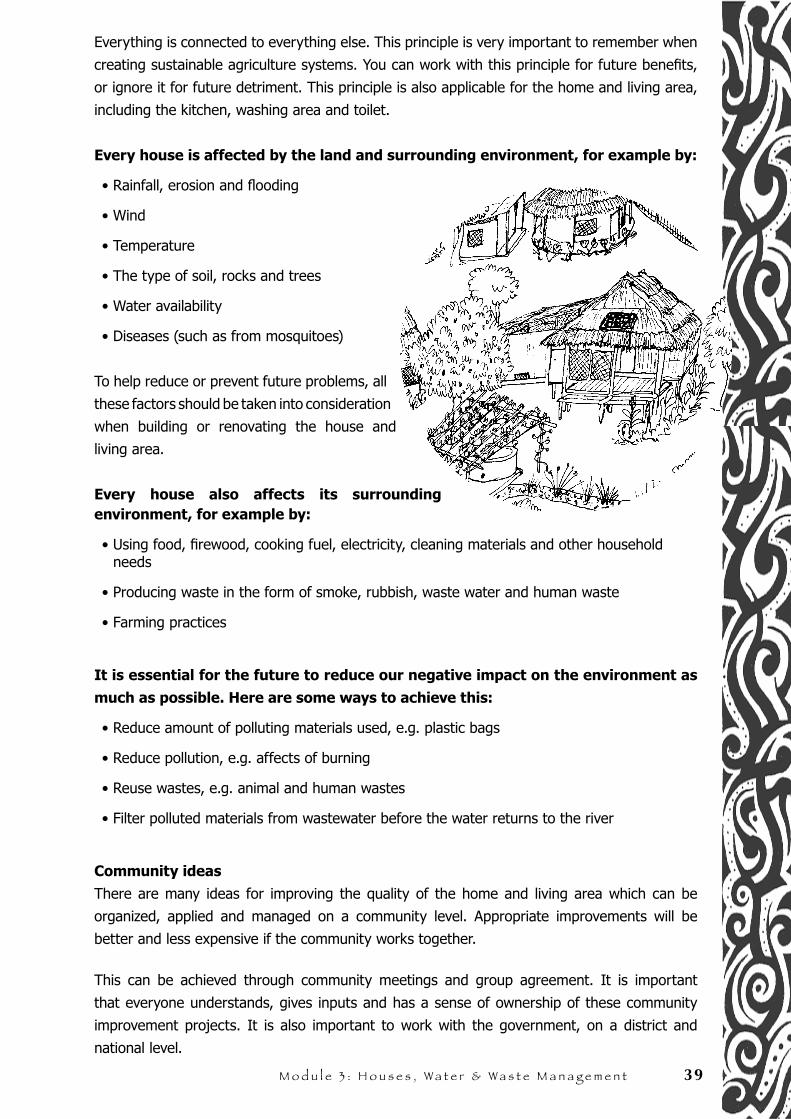
Every house is affected by the land and surrounding environment, for example by:
• Rainfall, erosion and flooding
• Wind
• Temperature
• The type of soil, rocks and trees
• Water availability
• Diseases (such as from mosquitoes)
To help reduce or prevent future problems, all
these factors should be taken into consideration
when building or renovating the house and
living area.
Every house also affects its surrounding environment, for example by:
• Using food, firewood, cooking fuel, electricity, cleaning materials and other household needs
• Producing waste in the form of smoke, rubbish, waste water and human waste
• Farming practices
It is essential for the future to reduce our negative impact on the environment as
much as possible. Here are some ways to achieve this:
• Reduce amount of polluting materials used, e.g. plastic bags
• Reduce pollution, e.g. affects of burning
• Reuse wastes, e.g. animal and human wastes
• Filter polluted materials from wastewater before the water returns to the river
Community ideas
There are many ideas for improving the quality of the home and living area which can be
organized, applied and managed on a community level. Appropriate improvements will be
better and less expensive if the community works together.
This can be achieved through community meetings and group agreement. It is important
that everyone understands, gives inputs and has a sense of ownership of these community
improvement projects. It is also important to work with the government, on a district and
national level.
40 Pe r m a c u l t u r e , S o l u t i o n s f o r S u s t a i n a b l e l i f e s t y l e s
This module will explain:
1. How to create a house or living area that is comfortable, healthy and functional, while minimizing resources and costs, e.g. using windbreaks, improving water supply, natural light and ventilation
2. How to clean and dispose of waste, and if possible even turn waste into something useful, e.g. compost
3. How to maximize use of natural resources and make them last longer, e.g. buildings of stone or clay, treating bamboo, and much more
4. Ideas for improving the house and living area, on a family, community and national level
How to Create a Healthy House
A healthy house is practical, long lasting, and makes life easier and better, while reducing costs. It is important to have a house you can be proud of, that looks beautiful on the inside as well as the outside. These considerations can all be combined.
Making your house better does not necessarily have to cost more money. In fact, there are many ways to improve a house and living quality which will also provide extra resources for your garden and livestock, such as fertilizer for fruit trees, water for vegetable plots, and animal fodder.
When you build a house or improve an existing house, it is important to take into consideration the following factors:
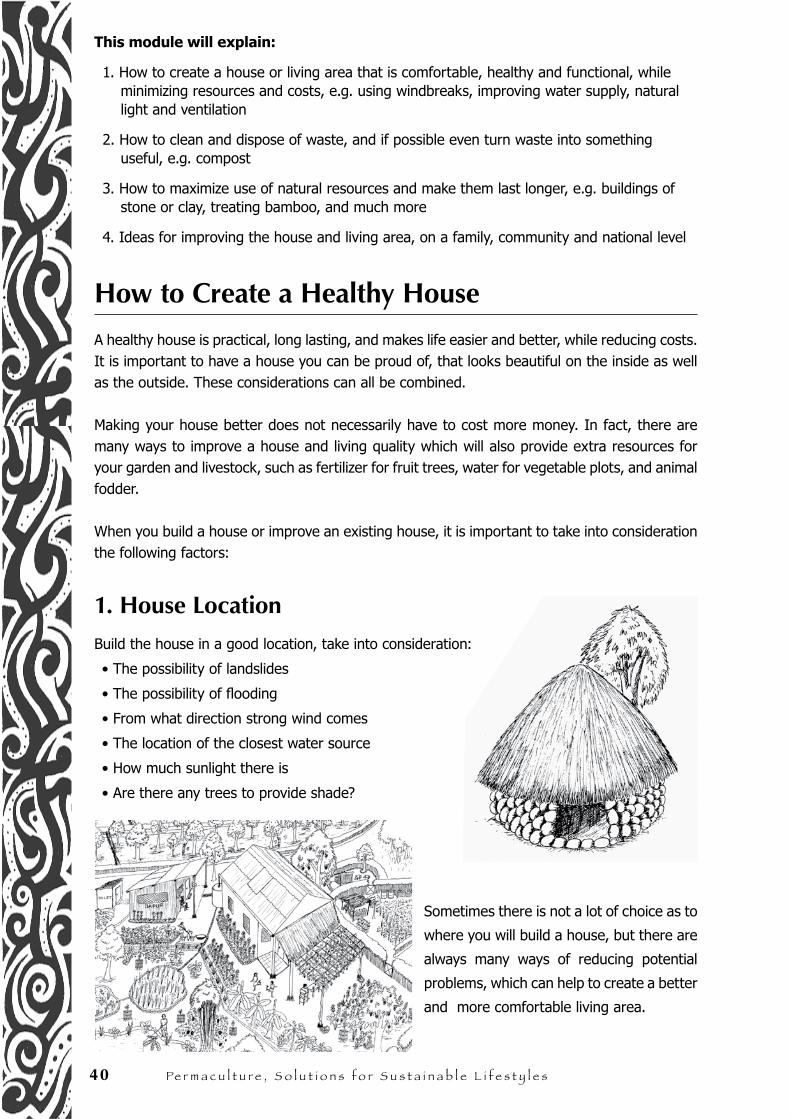
1. House Location
Build the house in a good location, take into consideration:
• The possibility of landslides
• The possibility of flooding
• From what direction strong wind comes
• The location of the closest water source
• How much sunlight there is
• Are there any trees to provide shade?
Sometimes there is not a lot of choice as to
where you will build a house, but there are
always many ways of reducing potential
problems, which can help to create a better
and more comfortable living area.
M o d u l e 3 : H o u s e s , W a t e r & W a s t e M a n a g e m e n t 41
2. Ways to Reduce RisksThere are some things that can be done to reduce risks, such as:
• Stop erosion and reduce the risk of landslides. Above the house, swales can be built to catch water and soil. For this situation, direct the water slowly to one side, away from the house. This water can then be stored and reused for ponds below the house, compost pits or vegetable gardens. It is also important to plant strong trees right away to protect the soil and water
• Reduce the risk of flooding. Reforesting mountains and river banks is the best long term solution to reduce the risk of flooding. But sometimes flooding will still naturally occur
• Reduce the risk of fire. Fire will travel quickly uphill with the help of wind. If there is a high risk of fires, use firebreaks and other ways to stop fire on the path it could take
• Reduce the risk of house damage from strong winds. If possible, don’t build on top of hills, and plant many trees to create windbreaks
Community idea: Preventing disasters Preventing disasters is an issue for every family, community and nation. Rivers and river banks must be protected to reduce the risk of flooding. Planting trees, bamboo and grasses along the river bank will help reduce the risk of flooding and erosion. Reforesting community land will
help reduce the risk of landslides.
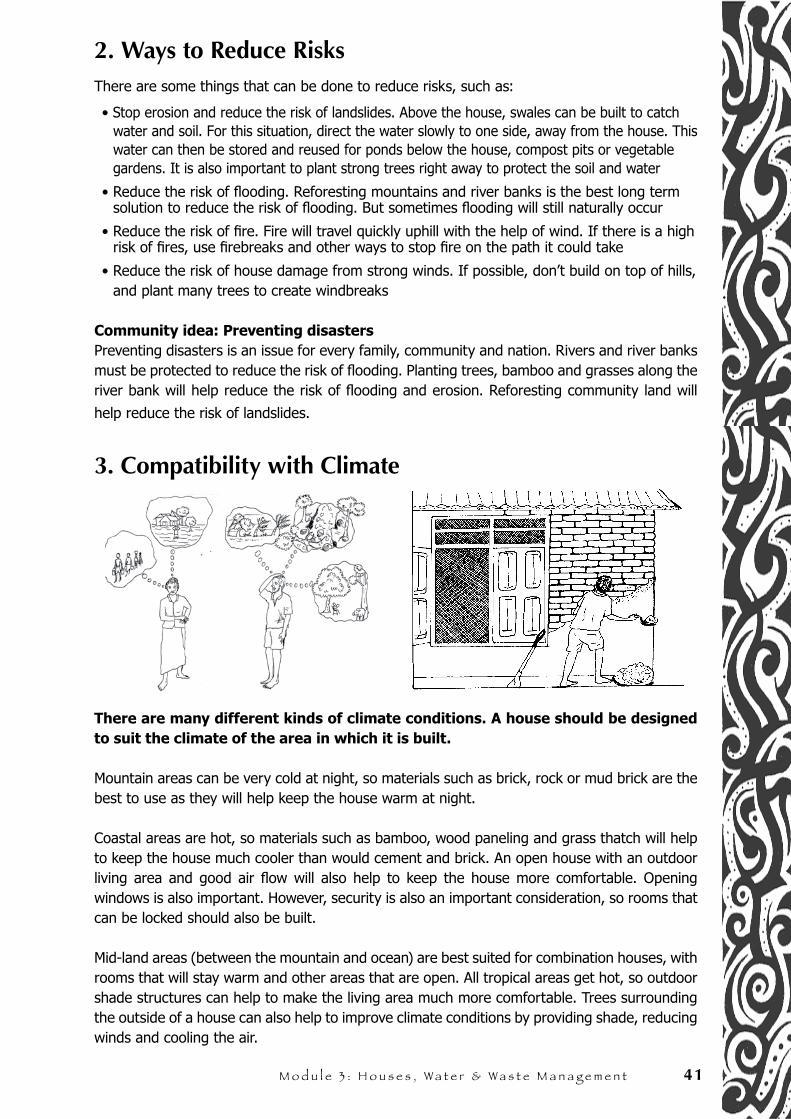
3. Compatibility with Climate
There are many different kinds of climate conditions. A house should be designed to suit the climate of the area in which it is built.
Mountain areas can be very cold at night, so materials such as brick, rock or mud brick are the best to use as they will help keep the house warm at night.
Coastal areas are hot, so materials such as bamboo, wood paneling and grass thatch will help to keep the house much cooler than would cement and brick. An open house with an outdoor living area and good air flow will also help to keep the house more comfortable. Opening windows is also important. However, security is also an important consideration, so rooms that can be locked should also be built.
Mid-land areas (between the mountain and ocean) are best suited for combination houses, with rooms that will stay warm and other areas that are open. All tropical areas get hot, so outdoor shade structures can help to make the living area much more comfortable. Trees surrounding the outside of a house can also help to improve climate conditions by providing shade, reducing winds and cooling the air.
42 Pe r m a c u l t u r e , S o l u t i o n s f o r S u s t a i n a b l e l i f e s t y l e s
4. Good Health and Disease Prevention
Much disease and illness can be prevented or the affects can be reduced by well designed and
well built houses. This is especially true for the kitchen area.
PROBLEMS SOLUTIONS
Smoke causes chest and breathing problems, which can cause TB (Tuberculosis)
• Well ventilated kitchens
• Use smoke chimneys (pipes)
• Minimizing use of smoke producing stoves / ovens
• Don’t use firewood
Mosquitoes cause malaria, dengue fever and many other diseases. They breed in still water
• Don’t let water lay in puddles / pools
• Cover all tanks and water containers
• Place mosquito netting on house windows
• Use mosquito netting when sleeping
Disease can spread because of an uncleanly / unsanitary washing area
• A well built washing area is one that can easily be kept clean
• Use drainage systems that quickly drain wash water• A simple filter system to clean washing water
Disease can spread because of dirty, open toilets
• Use compost toilets and build toilets which prevent animals or insects from touching or eating human waste
• Use toilets instead of rivers
• Applying good toilet hygiene
Mice, dogs, cats, cockroaches, flies, etc can spread disease, especially if they eat food or manure
• Protect all food in containers to prevent disease contamination
• Prevent animals from entering the kitchen
• Build a house that is easy to clean
• Wash hands before eating
Mould and damp walls can cause chest infection and breathing problems
• Dry floors and living area
• A roof that is not damaged or leaky
• Keep rain away from the walls
• A well ventilated house
Burning rubbish produces smoke, which can cause health problems
• Recycle rubbish, as much as possible
• Only burn rubbish in a specific area far from the house and children
5. A House That is Easy to Clean
A house that is easy to clean will reduce problems
and improve health.
A cement or stone floor will be easier to clean.
Walkways made from small or large stones can
be built between the kitchen, house, washing
area and toilet to prevent spreading mud and dirt,
which will also reduce the spread of disease.
M o d u l e 3 : H o u s e s , W a t e r & W a s t e M a n a g e m e n t 43
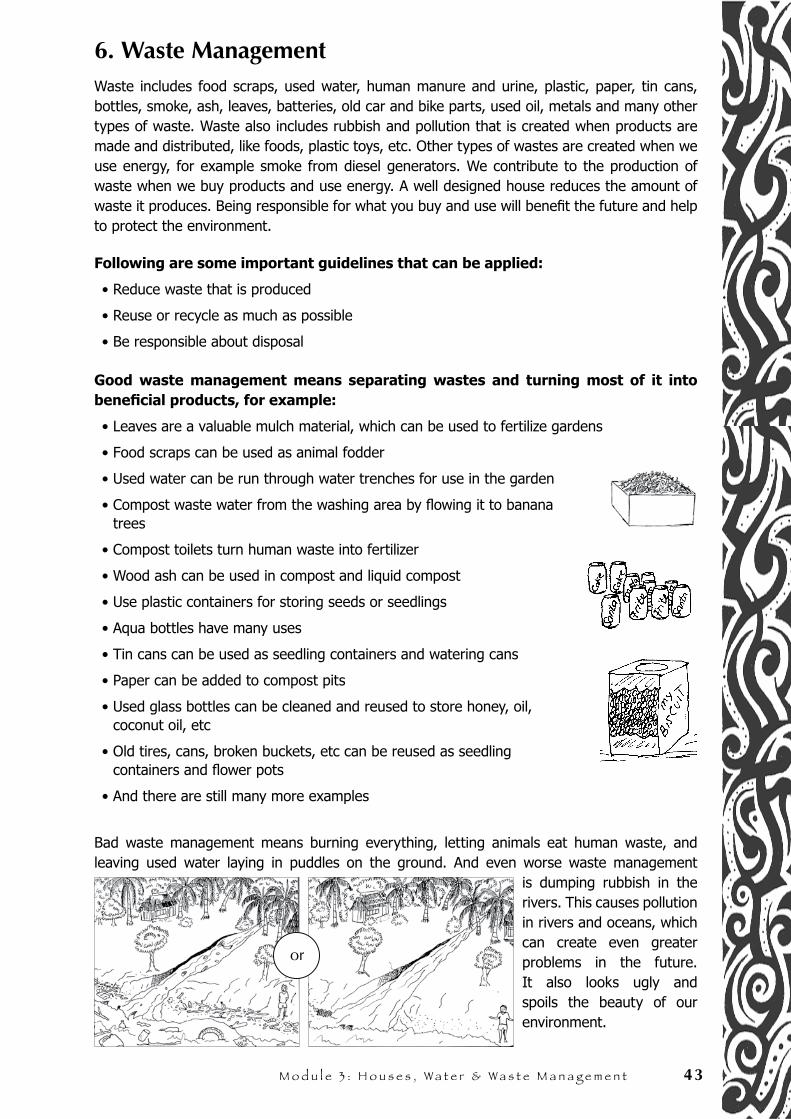
6. Waste ManagementWaste includes food scraps, used water, human manure and urine, plastic, paper, tin cans, bottles, smoke, ash, leaves, batteries, old car and bike parts, used oil, metals and many other types of waste. Waste also includes rubbish and pollution that is created when products are made and distributed, like foods, plastic toys, etc. Other types of wastes are created when we use energy, for example smoke from diesel generators. We contribute to the production of waste when we buy products and use energy. A well designed house reduces the amount of waste it produces. Being responsible for what you buy and use will benefit the future and help to protect the environment.
Following are some important guidelines that can be applied:
• Reduce waste that is produced
• Reuse or recycle as much as possible
• Be responsible about disposal
Good waste management means separating wastes and turning most of it into beneficial products, for example:
• Leaves are a valuable mulch material, which can be used to fertilize gardens
• Food scraps can be used as animal fodder
• Used water can be run through water trenches for use in the garden
• Compost waste water from the washing area by flowing it to banana trees
• Compost toilets turn human waste into fertilizer
• Wood ash can be used in compost and liquid compost
• Use plastic containers for storing seeds or seedlings
• Aqua bottles have many uses
• Tin cans can be used as seedling containers and watering cans
• Paper can be added to compost pits
• Used glass bottles can be cleaned and reused to store honey, oil, coconut oil, etc
• Old tires, cans, broken buckets, etc can be reused as seedling containers and flower pots
• And there are still many more examples
Bad waste management means burning everything, letting animals eat human waste, and leaving used water laying in puddles on the ground. And even worse waste management
is dumping rubbish in the rivers. This causes pollution in rivers and oceans, which can create even greater problems in the future. It also looks ugly and spoils the beauty of our environment.
or
44 Pe r m a c u l t u r e , S o l u t i o n s f o r S u s t a i n a b l e l i f e s t y l e s
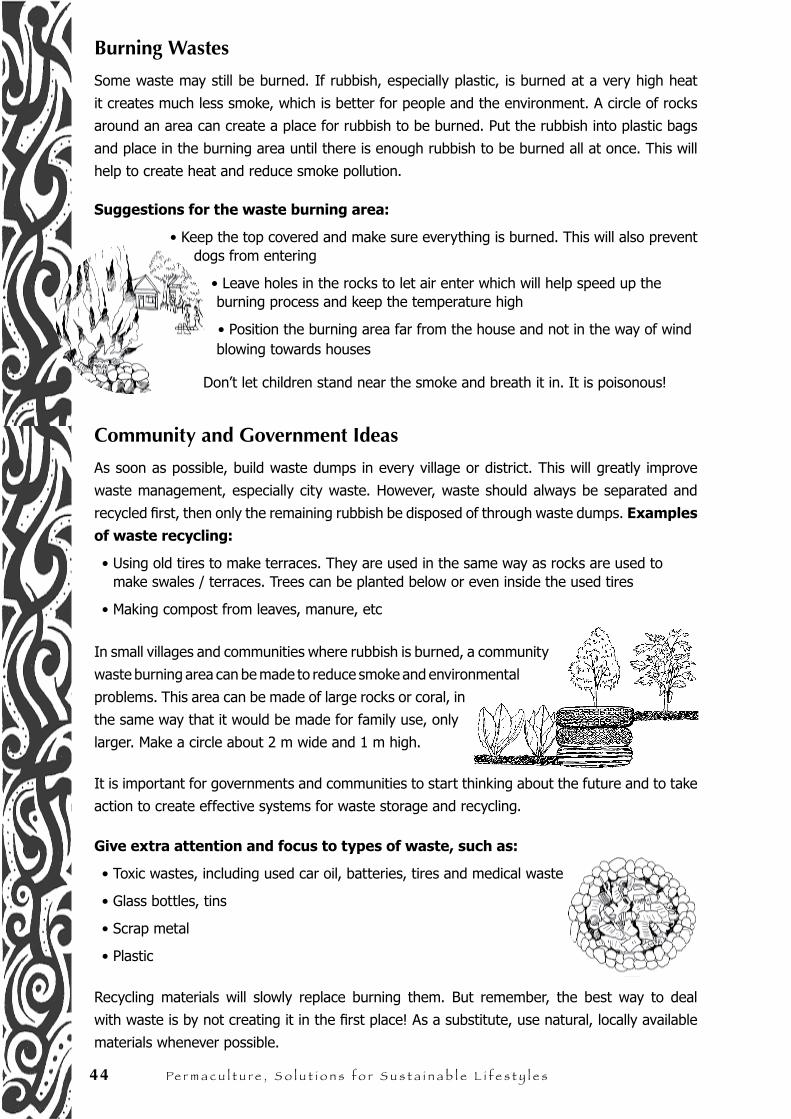
Burning Wastes
Some waste may still be burned. If rubbish, especially plastic, is burned at a very high heat
it creates much less smoke, which is better for people and the environment. A circle of rocks
around an area can create a place for rubbish to be burned. Put the rubbish into plastic bags
and place in the burning area until there is enough rubbish to be burned all at once. This will
help to create heat and reduce smoke pollution.
Suggestions for the waste burning area:
• Keep the top covered and make sure everything is burned. This will also prevent dogs from entering
• Leave holes in the rocks to let air enter which will help speed up the burning process and keep the temperature high
• Position the burning area far from the house and not in the way of wind blowing towards houses
Don’t let children stand near the smoke and breath it in. It is poisonous!
Community and Government Ideas
As soon as possible, build waste dumps in every village or district. This will greatly improve
waste management, especially city waste. However, waste should always be separated and
recycled first, then only the remaining rubbish be disposed of through waste dumps. Examples
of waste recycling:
• Using old tires to make terraces. They are used in the same way as rocks are used to make swales / terraces. Trees can be planted below or even inside the used tires
• Making compost from leaves, manure, etc
In small villages and communities where rubbish is burned, a community
waste burning area can be made to reduce smoke and environmental
problems. This area can be made of large rocks or coral, in
the same way that it would be made for family use, only
larger. Make a circle about 2 m wide and 1 m high.
It is important for governments and communities to start thinking about the future and to take
action to create effective systems for waste storage and recycling. Give extra attention and focus to types of waste, such as:
• Toxic wastes, including used car oil, batteries, tires and medical waste
• Glass bottles, tins
• Scrap metal
• Plastic
Recycling materials will slowly replace burning them. But remember, the best way to deal
with waste is by not creating it in the first place! As a substitute, use natural, locally available
materials whenever possible.
M o d u l e 3 : H o u s e s , W a t e r & W a s t e M a n a g e m e n t 45
7. Reducing Water and Energy Use
Water is a precious resource that often takes hard work to collect. This module offers many
ideas for collecting and storing water, but first it is most important to reduce water usage. Even
in cities and villages that have piped water, it is very important to only use what is needed, to
ensure there will be enough water for use in the future.
Water saving ideas for in the home:
• Always turn off taps after use
• Make a compost toilet, it only uses small amounts of water
• Reuse all kitchen and washing water for watering gardens
• Use buckets and sinks for washing, and don’t leave the water continuously flowing while washing
Energy is the fuel needed for a house. Wood, kerosene, electricity, generators, gas,
petrol, oil and even candles all provide energy.
The price of oil and petrol is expensive and will only become more expensive, as supplies won’t
last forever. It is very important that people all over the world reduce energy use and change
to using renewable energy. Some types of renewable energy are solar panels, micro-hydro
generators, biogas generators and wind generators. (For more information about energy, see
Module 12 - Appropriate Technology).
It is also important to use stoves and ovens that use only a small amount of firewood or none,
or that use gas. Trees are being used very quickly, and are being cut down much faster than
they are growing back. This is already a big problem for the environment, and it will only get
worse unless changes are made. There are places in the world now where people have to walk
all day just to collect firewood. Is this the future we hope for?
8. A Long Lasting House
Wood, bamboo, plywood and grass thatch are all natural materials that are comfortable and
fairly inexpensive. However, they often only last four years, five years, or sometimes less,
after which they need to be replaced. By choosing and treating the right material, especially
bamboo, it will last a few years longer. Reducing rotting by keeping the ground dry will also
help to increase the amount of time materials last.
Stone or clay will last much longer than cement blocks.
By covering the surface of stone, cement blocks, clay
blocks and other building material with a render they
will last much longer. Clay, sand, cement, cow manure,
lime and water are examples of materials used in other
countries. It is also common to cement block walls.
Read further to learn more about these techniques.
46 Pe r m a c u l t u r e , S o l u t i o n s f o r S u s t a i n a b l e l i f e s t y l e s
Building a House
Start with a PlanInclude the whole family in the designing process so that all of their needs can be addressed.
Women often spend a lot of time around the house and therefore will have many ideas about
how needs can be met and how to deal with issues of health and cleanliness. This could include
materials to use and ideas for making the home more beautiful. If these needs are met it will
save time and labour, while improving the lifestyle of the whole family. For example, planting
grape vines and passion fruit will provide shade and a cool area outside the house, as well as
produce fruit for the family.
House Designs
Every region has its own designs for local traditional houses. These houses reflect the climate
and available materials, as well as the taste of the people who live there. Brick houses generally
are based on Portuguese designs, and more recently Indonesian designs. Sometimes the
materials used are not suitable for climate conditions, especially for houses built in coastal
areas. It is very important to choose building materials that suit the local climate. A houses
shape and size will have impacts on its temperature, comfort, strength, durability and its
resistance to disasters.
SMART IDEAS!
• A curved wall is stronger than a straight one, and more beautiful too!
• A house can be built with indoor and outdoor living areas
• Combine traditional house designs with modern house designs
• The position of the rooms is very important. A room that faces the afternoon sun will be the hottest room during the night. For example, a room that faces the afternoon sun is very appropriate for colder areas, but not appropriate for coastal areas
• A veranda or shade structure can be built at the west side of the house (where the sun sets) to help keep the house cooler during the night
• Building a house on stilts / poles will improve ventilation and reduce the risk of flooding
• A wide roof will reduce the amount of direct sunlight reaching the walls. This will help to cool down a house built in a hot area
• In areas with strong winds, a four sided roof is better than a two sided one for preventing wind damage. This is because the wind blows over the top instead of underneath, which can sometimes even blow off the roof!
Be creative and decorative!
Future development and changes can also be planned, for example: If now you only build a
small house because of limited materials or money, plan which rooms you would like to add on
in the future.
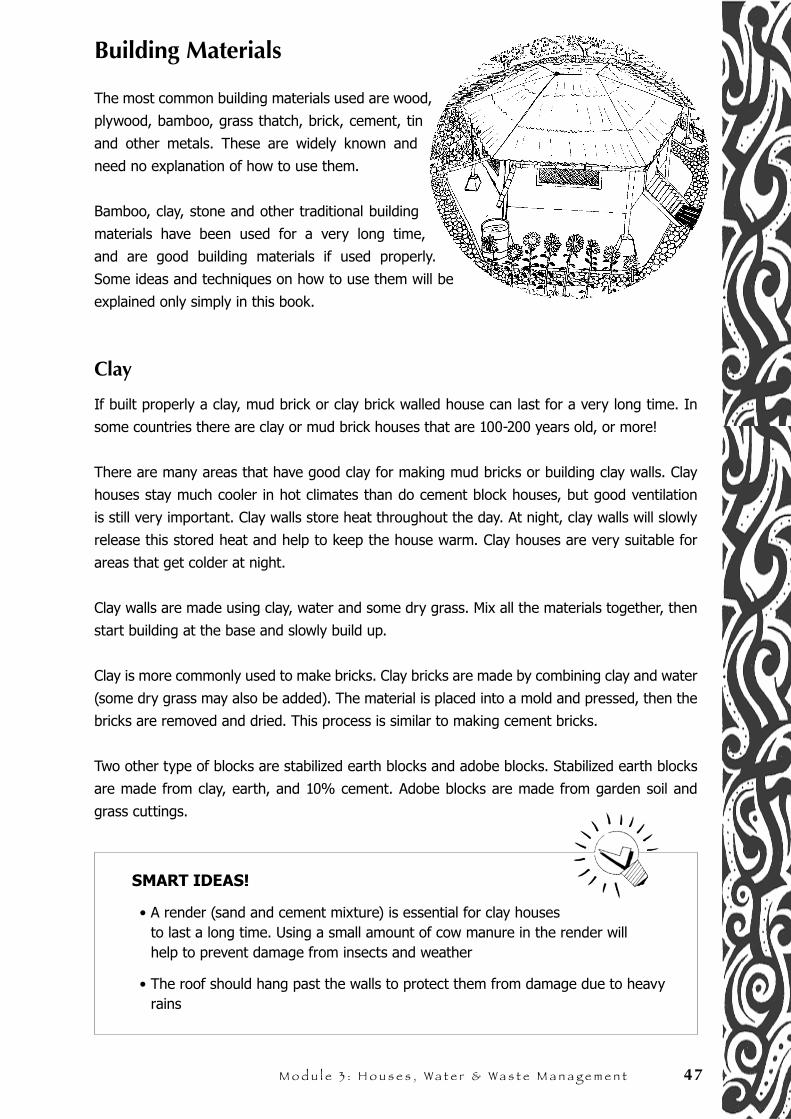
M o d u l e 3 : H o u s e s , W a t e r & W a s t e M a n a g e m e n t 47
Building Materials
The most common building materials used are wood,
plywood, bamboo, grass thatch, brick, cement, tin
and other metals. These are widely known and
need no explanation of how to use them.
Bamboo, clay, stone and other traditional building
materials have been used for a very long time,
and are good building materials if used properly.
Some ideas and techniques on how to use them will be
explained only simply in this book.
Clay
If built properly a clay, mud brick or clay brick walled house can last for a very long time. In
some countries there are clay or mud brick houses that are 100-200 years old, or more!
There are many areas that have good clay for making mud bricks or building clay walls. Clay
houses stay much cooler in hot climates than do cement block houses, but good ventilation
is still very important. Clay walls store heat throughout the day. At night, clay walls will slowly
release this stored heat and help to keep the house warm. Clay houses are very suitable for
areas that get colder at night.
Clay walls are made using clay, water and some dry grass. Mix all the materials together, then
start building at the base and slowly build up.
Clay is more commonly used to make bricks. Clay bricks are made by combining clay and water
(some dry grass may also be added). The material is placed into a mold and pressed, then the
bricks are removed and dried. This process is similar to making cement bricks.
Two other type of blocks are stabilized earth blocks and adobe blocks. Stabilized earth blocks
are made from clay, earth, and 10% cement. Adobe blocks are made from garden soil and
grass cuttings.
SMART IDEAS!
• A render (sand and cement mixture) is essential for clay houses to last a long time. Using a small amount of cow manure in the render will help to prevent damage from insects and weather
• The roof should hang past the walls to protect them from damage due to heavy rains
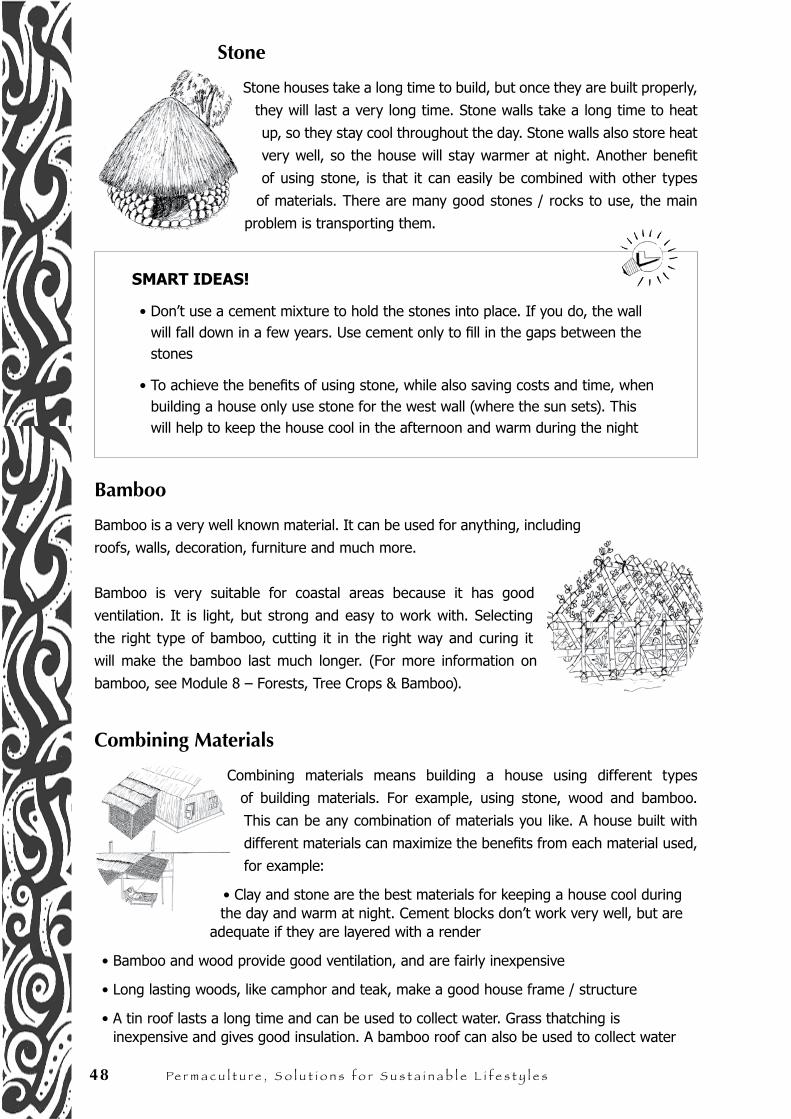
48 Pe r m a c u l t u r e , S o l u t i o n s f o r S u s t a i n a b l e l i f e s t y l e s
Stone
Stone houses take a long time to build, but once they are built properly,
they will last a very long time. Stone walls take a long time to heat
up, so they stay cool throughout the day. Stone walls also store heat
very well, so the house will stay warmer at night. Another benefit
of using stone, is that it can easily be combined with other types
of materials. There are many good stones / rocks to use, the main
problem is transporting them.
SMART IDEAS!
• Don’t use a cement mixture to hold the stones into place. If you do, the wall will fall down in a few years. Use cement only to fill in the gaps between the stones
• To achieve the benefits of using stone, while also saving costs and time, when building a house only use stone for the west wall (where the sun sets). This will help to keep the house cool in the afternoon and warm during the night
Bamboo
Bamboo is a very well known material. It can be used for anything, including
roofs, walls, decoration, furniture and much more.
Bamboo is very suitable for coastal areas because it has good
ventilation. It is light, but strong and easy to work with. Selecting
the right type of bamboo, cutting it in the right way and curing it
will make the bamboo last much longer. (For more information on
bamboo, see Module 8 – Forests, Tree Crops & Bamboo).
Combining Materials
Combining materials means building a house using different types
of building materials. For example, using stone, wood and bamboo.
This can be any combination of materials you like. A house built with
different materials can maximize the benefits from each material used,
for example:
• Clay and stone are the best materials for keeping a house cool during the day and warm at night. Cement blocks don’t work very well, but are
adequate if they are layered with a render
• Bamboo and wood provide good ventilation, and are fairly inexpensive
• Long lasting woods, like camphor and teak, make a good house frame / structure
• A tin roof lasts a long time and can be used to collect water. Grass thatching is inexpensive and gives good insulation. A bamboo roof can also be used to collect water
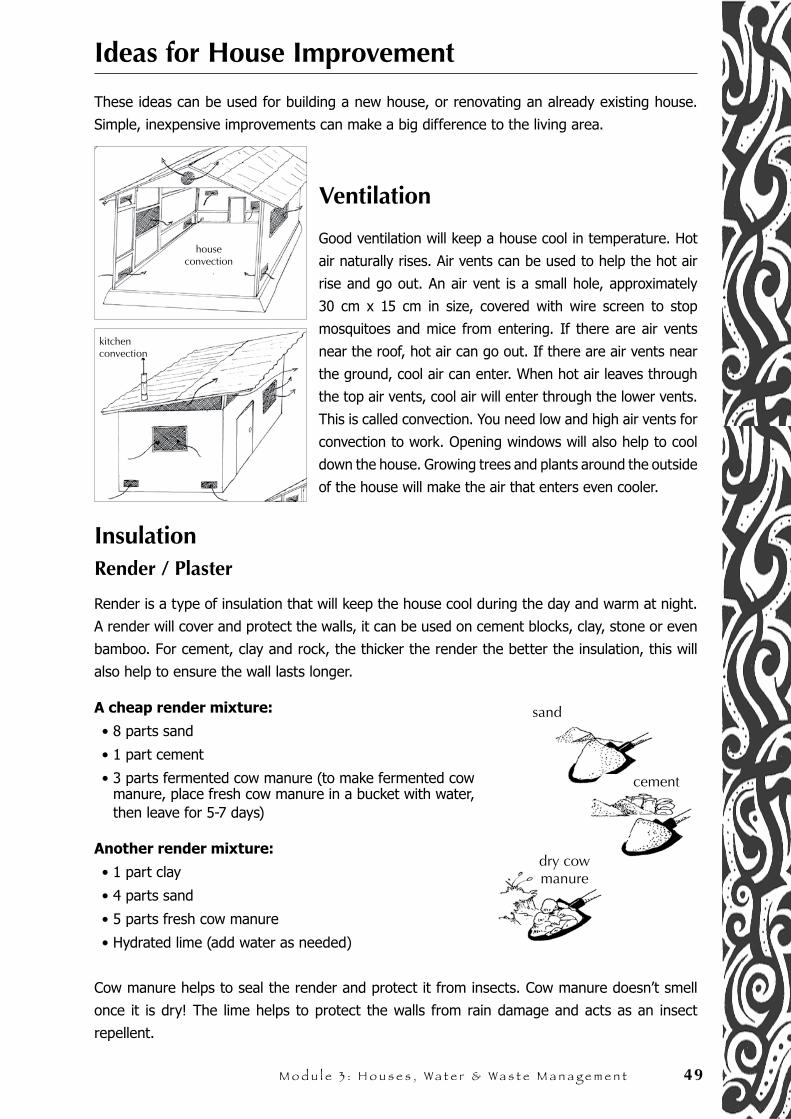
M o d u l e 3 : H o u s e s , W a t e r & W a s t e M a n a g e m e n t 49
Ideas for House Improvement
These ideas can be used for building a new house, or renovating an already existing house.
Simple, inexpensive improvements can make a big difference to the living area.
Ventilation
Good ventilation will keep a house cool in temperature. Hot
air naturally rises. Air vents can be used to help the hot air
rise and go out. An air vent is a small hole, approximately
30 cm x 15 cm in size, covered with wire screen to stop
mosquitoes and mice from entering. If there are air vents
near the roof, hot air can go out. If there are air vents near
the ground, cool air can enter. When hot air leaves through
the top air vents, cool air will enter through the lower vents.
This is called convection. You need low and high air vents for
convection to work. Opening windows will also help to cool
down the house. Growing trees and plants around the outside
of the house will make the air that enters even cooler.
InsulationRender / Plaster
Render is a type of insulation that will keep the house cool during the day and warm at night.
A render will cover and protect the walls, it can be used on cement blocks, clay, stone or even
bamboo. For cement, clay and rock, the thicker the render the better the insulation, this will
also help to ensure the wall lasts longer.
A cheap render mixture:
• 8 parts sand
• 1 part cement
• 3 parts fermented cow manure (to make fermented cow manure, place fresh cow manure in a bucket with water, then leave for 5-7 days)
Another render mixture:
• 1 part clay
• 4 parts sand
• 5 parts fresh cow manure
• Hydrated lime (add water as needed)
Cow manure helps to seal the render and protect it from insects. Cow manure doesn’t smell
once it is dry! The lime helps to protect the walls from rain damage and acts as an insect
repellent.
kitchenconvection
houseconvection
sand
cement
dry cow manure
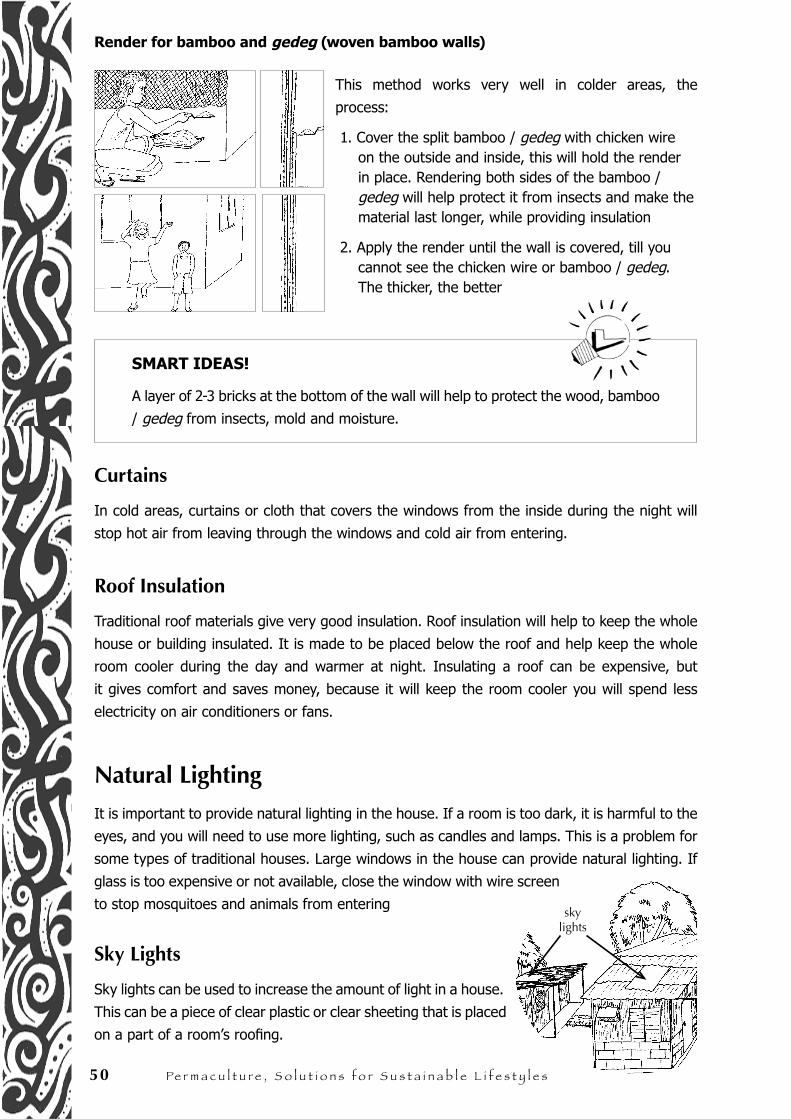
50 Pe r m a c u l t u r e , S o l u t i o n s f o r S u s t a i n a b l e l i f e s t y l e s
Render for bamboo and gedeg (woven bamboo walls)
This method works very well in colder areas, the
process:
1. Cover the split bamboo / gedeg with chicken wire on the outside and inside, this will hold the render in place. Rendering both sides of the bamboo / gedeg will help protect it from insects and make the material last longer, while providing insulation
2. Apply the render until the wall is covered, till you cannot see the chicken wire or bamboo / gedeg. The thicker, the better
SMART IDEAS!
A layer of 2-3 bricks at the bottom of the wall will help to protect the wood, bamboo
/ gedeg from insects, mold and moisture.
Curtains
In cold areas, curtains or cloth that covers the windows from the inside during the night will
stop hot air from leaving through the windows and cold air from entering.
Roof Insulation
Traditional roof materials give very good insulation. Roof insulation will help to keep the whole
house or building insulated. It is made to be placed below the roof and help keep the whole
room cooler during the day and warmer at night. Insulating a roof can be expensive, but
it gives comfort and saves money, because it will keep the room cooler you will spend less
electricity on air conditioners or fans.
Natural Lighting
It is important to provide natural lighting in the house. If a room is too dark, it is harmful to the
eyes, and you will need to use more lighting, such as candles and lamps. This is a problem for
some types of traditional houses. Large windows in the house can provide natural lighting. If
glass is too expensive or not available, close the window with wire screen
to stop mosquitoes and animals from entering
Sky Lights
Sky lights can be used to increase the amount of light in a house.
This can be a piece of clear plastic or clear sheeting that is placed
on a part of a room’s roofing.
skylights
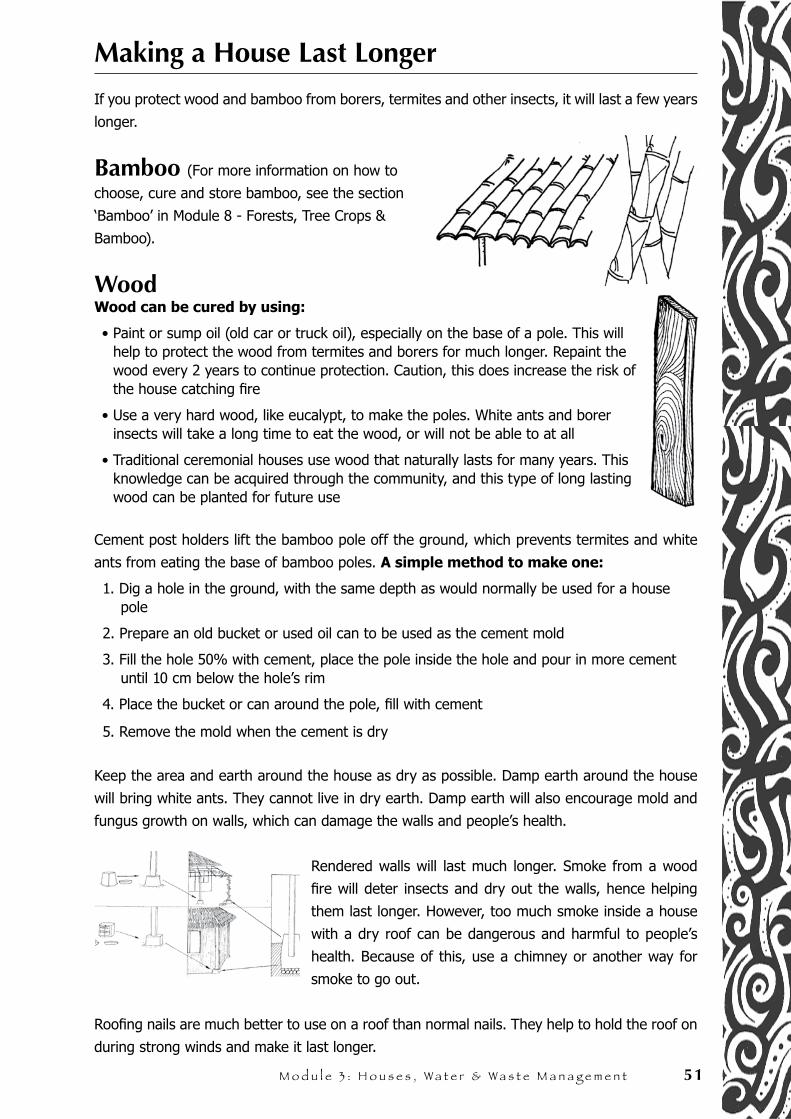
M o d u l e 3 : H o u s e s , W a t e r & W a s t e M a n a g e m e n t 51
Making a House Last Longer
If you protect wood and bamboo from borers, termites and other insects, it will last a few years
longer.
Bamboo (For more information on how to
choose, cure and store bamboo, see the section
‘Bamboo’ in Module 8 - Forests, Tree Crops &
Bamboo).
Wood Wood can be cured by using:
• Paint or sump oil (old car or truck oil), especially on the base of a pole. This will help to protect the wood from termites and borers for much longer. Repaint the wood every 2 years to continue protection. Caution, this does increase the risk of the house catching fire
• Use a very hard wood, like eucalypt, to make the poles. White ants and borer insects will take a long time to eat the wood, or will not be able to at all
• Traditional ceremonial houses use wood that naturally lasts for many years. This knowledge can be acquired through the community, and this type of long lasting wood can be planted for future use
Cement post holders lift the bamboo pole off the ground, which prevents termites and white
ants from eating the base of bamboo poles. A simple method to make one:
1. Dig a hole in the ground, with the same depth as would normally be used for a house pole
2. Prepare an old bucket or used oil can to be used as the cement mold
3. Fill the hole 50% with cement, place the pole inside the hole and pour in more cement until 10 cm below the hole’s rim
4. Place the bucket or can around the pole, fill with cement
5. Remove the mold when the cement is dry
Keep the area and earth around the house as dry as possible. Damp earth around the house
will bring white ants. They cannot live in dry earth. Damp earth will also encourage mold and
fungus growth on walls, which can damage the walls and people’s health.
Rendered walls will last much longer. Smoke from a wood
fire will deter insects and dry out the walls, hence helping
them last longer. However, too much smoke inside a house
with a dry roof can be dangerous and harmful to people’s
health. Because of this, use a chimney or another way for
smoke to go out.
Roofing nails are much better to use on a roof than normal nails. They help to hold the roof on
during strong winds and make it last longer.
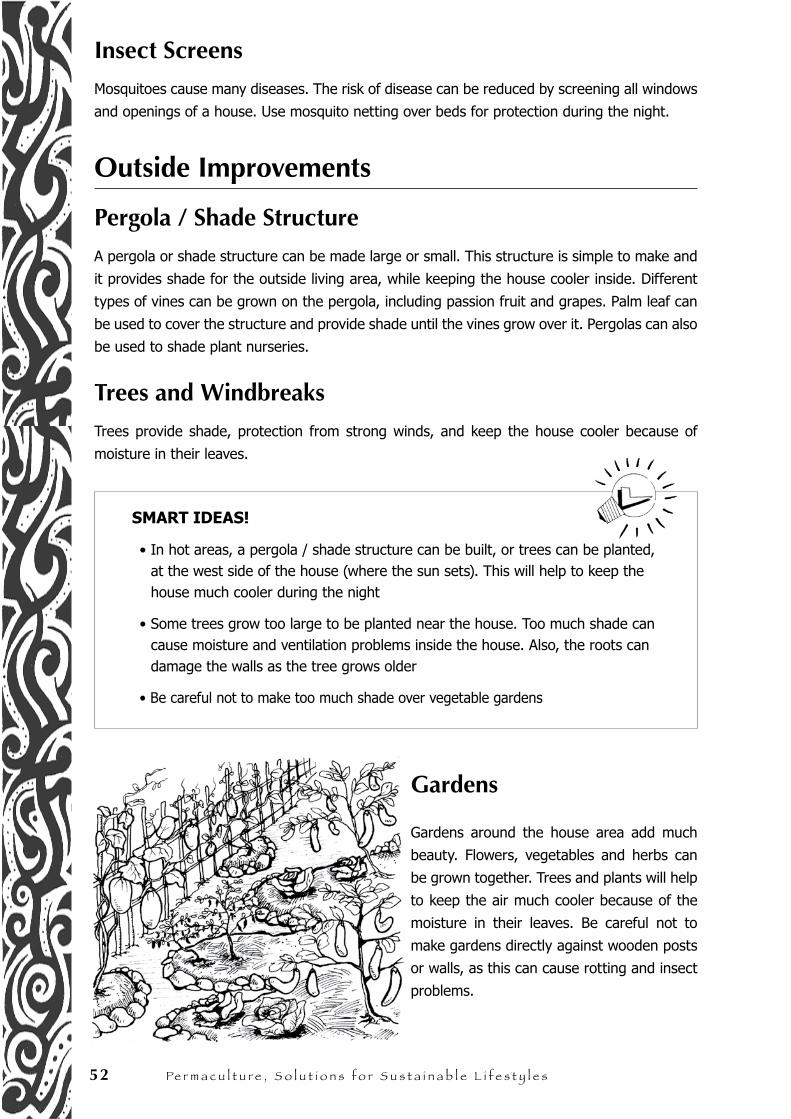
52 Pe r m a c u l t u r e , S o l u t i o n s f o r S u s t a i n a b l e l i f e s t y l e s
Insect Screens
Mosquitoes cause many diseases. The risk of disease can be reduced by screening all windows
and openings of a house. Use mosquito netting over beds for protection during the night.
Outside Improvements
Pergola / Shade Structure
A pergola or shade structure can be made large or small. This structure is simple to make and
it provides shade for the outside living area, while keeping the house cooler inside. Different
types of vines can be grown on the pergola, including passion fruit and grapes. Palm leaf can
be used to cover the structure and provide shade until the vines grow over it. Pergolas can also
be used to shade plant nurseries.
Trees and Windbreaks
Trees provide shade, protection from strong winds, and keep the house cooler because of
moisture in their leaves.
SMART IDEAS!
• In hot areas, a pergola / shade structure can be built, or trees can be planted, at the west side of the house (where the sun sets). This will help to keep the house much cooler during the night
• Some trees grow too large to be planted near the house. Too much shade can cause moisture and ventilation problems inside the house. Also, the roots can damage the walls as the tree grows older
• Be careful not to make too much shade over vegetable gardens
Gardens
Gardens around the house area add much
beauty. Flowers, vegetables and herbs can
be grown together. Trees and plants will help
to keep the air much cooler because of the
moisture in their leaves. Be careful not to
make gardens directly against wooden posts
or walls, as this can cause rotting and insect
problems.
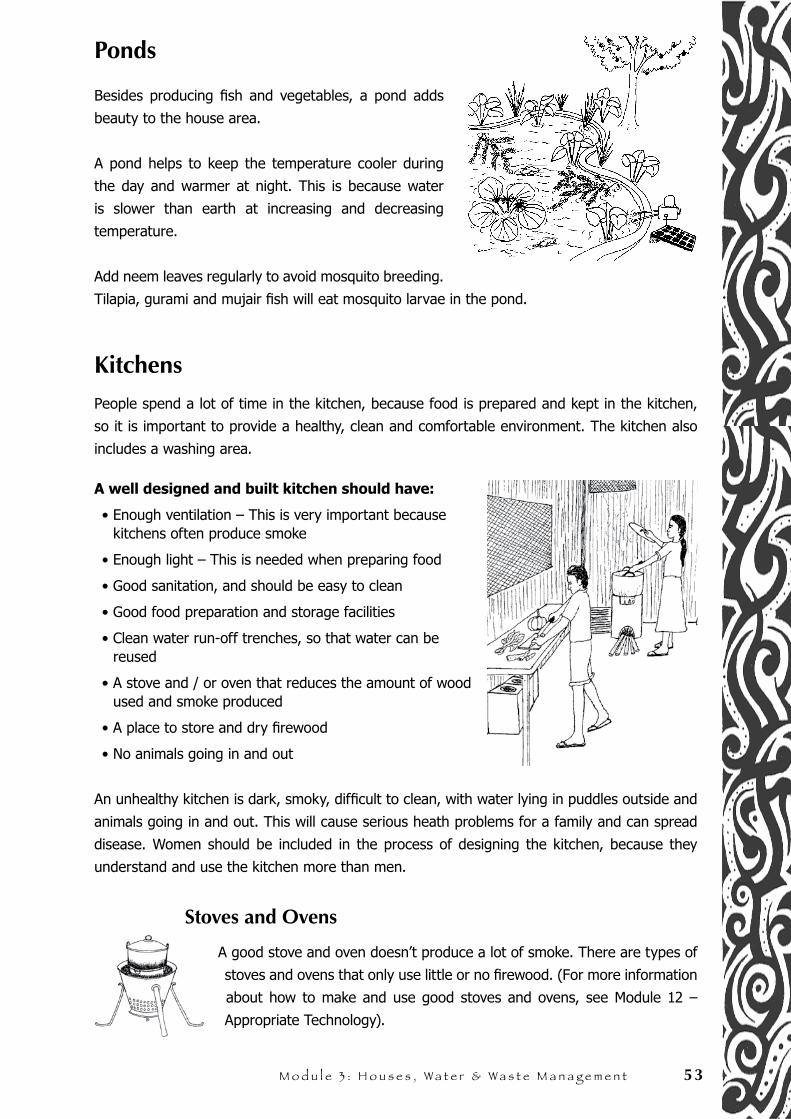
M o d u l e 3 : H o u s e s , W a t e r & W a s t e M a n a g e m e n t 53
Ponds
Besides producing fish and vegetables, a pond adds
beauty to the house area.
A pond helps to keep the temperature cooler during
the day and warmer at night. This is because water
is slower than earth at increasing and decreasing
temperature.
Add neem leaves regularly to avoid mosquito breeding.
Tilapia, gurami and mujair fish will eat mosquito larvae in the pond.
Kitchens
People spend a lot of time in the kitchen, because food is prepared and kept in the kitchen,
so it is important to provide a healthy, clean and comfortable environment. The kitchen also
includes a washing area.
A well designed and built kitchen should have:
• Enough ventilation – This is very important because kitchens often produce smoke
• Enough light – This is needed when preparing food
• Good sanitation, and should be easy to clean
• Good food preparation and storage facilities
• Clean water run-off trenches, so that water can be reused
• A stove and / or oven that reduces the amount of wood used and smoke produced
• A place to store and dry firewood
• No animals going in and out
An unhealthy kitchen is dark, smoky, difficult to clean, with water lying in puddles outside and
animals going in and out. This will cause serious heath problems for a family and can spread
disease. Women should be included in the process of designing the kitchen, because they
understand and use the kitchen more than men.
Stoves and Ovens
A good stove and oven doesn’t produce a lot of smoke. There are types of
stoves and ovens that only use little or no firewood. (For more information
about how to make and use good stoves and ovens, see Module 12 –
Appropriate Technology).
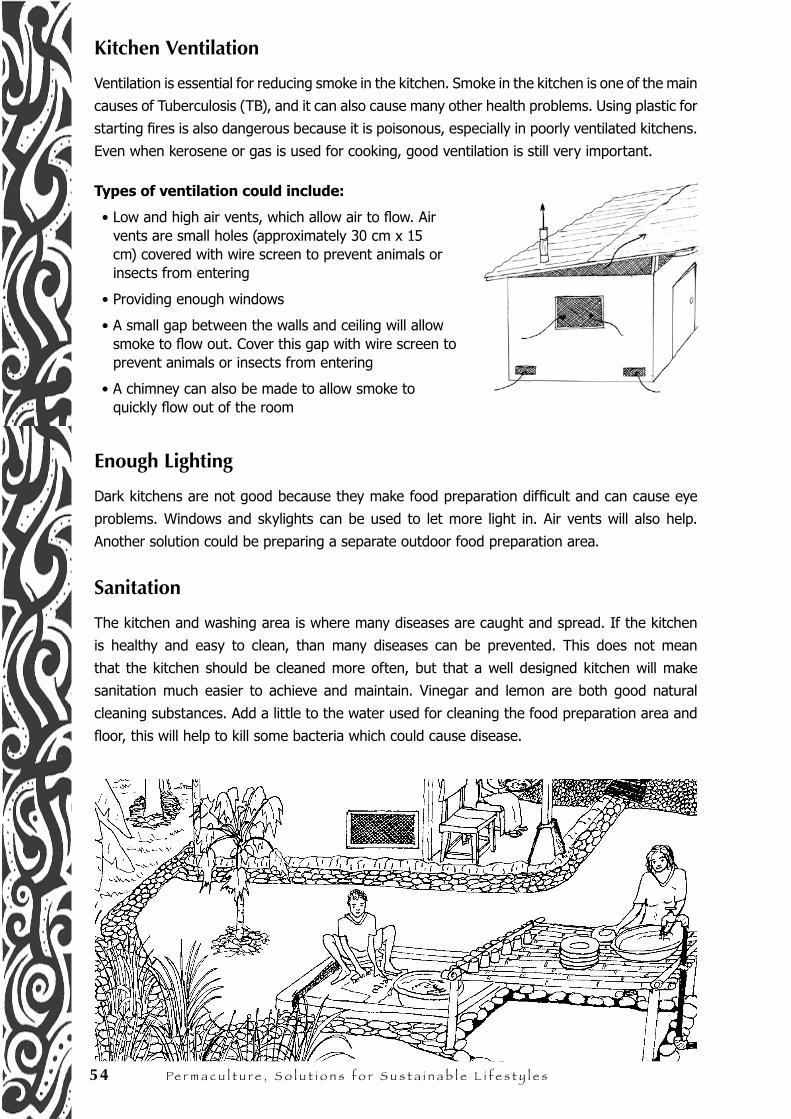
54 Pe r m a c u l t u r e , S o l u t i o n s f o r S u s t a i n a b l e l i f e s t y l e s
Kitchen Ventilation
Ventilation is essential for reducing smoke in the kitchen. Smoke in the kitchen is one of the main
causes of Tuberculosis (TB), and it can also cause many other health problems. Using plastic for
starting fires is also dangerous because it is poisonous, especially in poorly ventilated kitchens.
Even when kerosene or gas is used for cooking, good ventilation is still very important.
Types of ventilation could include:
• Low and high air vents, which allow air to flow. Air vents are small holes (approximately 30 cm x 15 cm) covered with wire screen to prevent animals or insects from entering
• Providing enough windows
• A small gap between the walls and ceiling will allow smoke to flow out. Cover this gap with wire screen to prevent animals or insects from entering
• A chimney can also be made to allow smoke to quickly flow out of the room
Enough Lighting
Dark kitchens are not good because they make food preparation difficult and can cause eye
problems. Windows and skylights can be used to let more light in. Air vents will also help.
Another solution could be preparing a separate outdoor food preparation area.
Sanitation
The kitchen and washing area is where many diseases are caught and spread. If the kitchen
is healthy and easy to clean, than many diseases can be prevented. This does not mean
that the kitchen should be cleaned more often, but that a well designed kitchen will make
sanitation much easier to achieve and maintain. Vinegar and lemon are both good natural
cleaning substances. Add a little to the water used for cleaning the food preparation area and
floor, this will help to kill some bacteria which could cause disease.
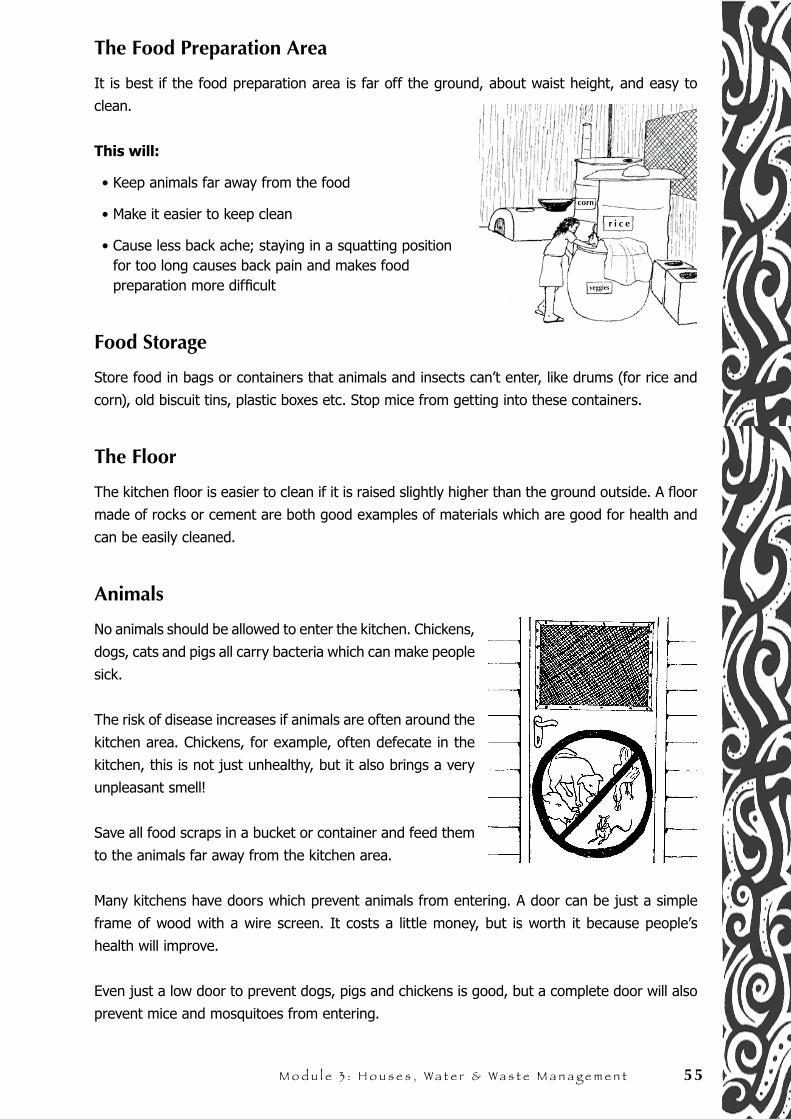
M o d u l e 3 : H o u s e s , W a t e r & W a s t e M a n a g e m e n t 55
The Food Preparation Area
It is best if the food preparation area is far off the ground, about waist height, and easy to
clean.
This will:
• Keep animals far away from the food
• Make it easier to keep clean
• Cause less back ache; staying in a squatting position for too long causes back pain and makes food preparation more difficult
Food Storage
Store food in bags or containers that animals and insects can’t enter, like drums (for rice and
corn), old biscuit tins, plastic boxes etc. Stop mice from getting into these containers.
The Floor
The kitchen floor is easier to clean if it is raised slightly higher than the ground outside. A floor
made of rocks or cement are both good examples of materials which are good for health and
can be easily cleaned.
Animals
No animals should be allowed to enter the kitchen. Chickens,
dogs, cats and pigs all carry bacteria which can make people
sick.
The risk of disease increases if animals are often around the
kitchen area. Chickens, for example, often defecate in the
kitchen, this is not just unhealthy, but it also brings a very
unpleasant smell!
Save all food scraps in a bucket or container and feed them
to the animals far away from the kitchen area.
Many kitchens have doors which prevent animals from entering. A door can be just a simple
frame of wood with a wire screen. It costs a little money, but is worth it because people’s
health will improve.
Even just a low door to prevent dogs, pigs and chickens is good, but a complete door will also
prevent mice and mosquitoes from entering.
corn
r i c e
veggies
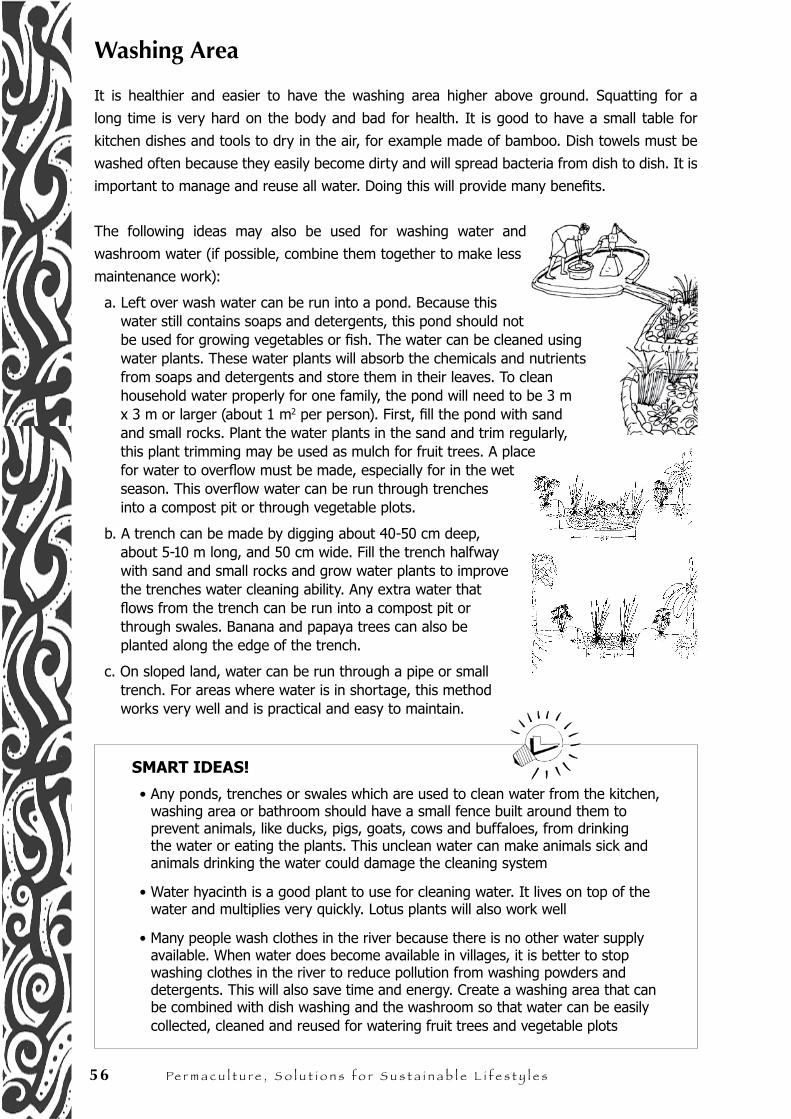
56 Pe r m a c u l t u r e , S o l u t i o n s f o r S u s t a i n a b l e l i f e s t y l e s
Washing Area
It is healthier and easier to have the washing area higher above ground. Squatting for a
long time is very hard on the body and bad for health. It is good to have a small table for
kitchen dishes and tools to dry in the air, for example made of bamboo. Dish towels must be
washed often because they easily become dirty and will spread bacteria from dish to dish. It is
important to manage and reuse all water. Doing this will provide many benefits.
The following ideas may also be used for washing water and
washroom water (if possible, combine them together to make less
maintenance work):
a. Left over wash water can be run into a pond. Because this water still contains soaps and detergents, this pond should not be used for growing vegetables or fish. The water can be cleaned using water plants. These water plants will absorb the chemicals and nutrients from soaps and detergents and store them in their leaves. To clean household water properly for one family, the pond will need to be 3 m x 3 m or larger (about 1 m2 per person). First, fill the pond with sand and small rocks. Plant the water plants in the sand and trim regularly, this plant trimming may be used as mulch for fruit trees. A place for water to overflow must be made, especially for in the wet season. This overflow water can be run through trenches into a compost pit or through vegetable plots.
b. A trench can be made by digging about 40-50 cm deep, about 5-10 m long, and 50 cm wide. Fill the trench halfway with sand and small rocks and grow water plants to improve the trenches water cleaning ability. Any extra water that flows from the trench can be run into a compost pit or through swales. Banana and papaya trees can also be planted along the edge of the trench.
c. On sloped land, water can be run through a pipe or small trench. For areas where water is in shortage, this method works very well and is practical and easy to maintain.
SMART IDEAS!
• Any ponds, trenches or swales which are used to clean water from the kitchen, washing area or bathroom should have a small fence built around them to prevent animals, like ducks, pigs, goats, cows and buffaloes, from drinking the water or eating the plants. This unclean water can make animals sick and animals drinking the water could damage the cleaning system
• Water hyacinth is a good plant to use for cleaning water. It lives on top of the water and multiplies very quickly. Lotus plants will also work well
• Many people wash clothes in the river because there is no other water supply available. When water does become available in villages, it is better to stop washing clothes in the river to reduce pollution from washing powders and detergents. This will also save time and energy. Create a washing area that can be combined with dish washing and the washroom so that water can be easily collected, cleaned and reused for watering fruit trees and vegetable plots

M o d u l e 3 : H o u s e s , W a t e r & W a s t e M a n a g e m e n t 57
Washrooms
There are many different ways to make a washroom, from simple
compost showers to washrooms made of rock, clay or cement blocks.
Choose building materials that are most easily accessible to you.
The most important thing is to reuse the left over water!
Compost Showers
Compost showers are made by digging a hole about 2 m wide and 1 m deep. This is a
inexpensive and simple way to directly reuse water.
There are 2 methods of making a compost shower:
Method 1
To allow water to easily be filtered into the
earth, fill the hole with:
• A 10 cm layer of palm fiber, this should also cover the sides of the hole
• Add rocks / coral / stone until almost full
• Add gravel to fill in the gaps, and a top layer of gravel about 5-10 cm thick
Method 2
Fill the hole half way with coffee or rice husk.
This will soak up the water. Then, make a
floor with eucalyptus poles and cover with
woven bamboo panels. This method will rot
within 1 or 2 years, so the floor will have to
be made over again.
Build a simple structure surrounding
the shower to give privacy and to
provide a trellis for vines to grow. All
the water will be stored in the ground
to be reused by trees and plants. Plant
banana trees, pumpkins, gourds, luffa,
watermelon, papaya trees, pineapples,
chillies, tomatoes, passion fruit and
other plants around the edge of the
shower, these plants will absorb and
reuse the water coming from the shower.
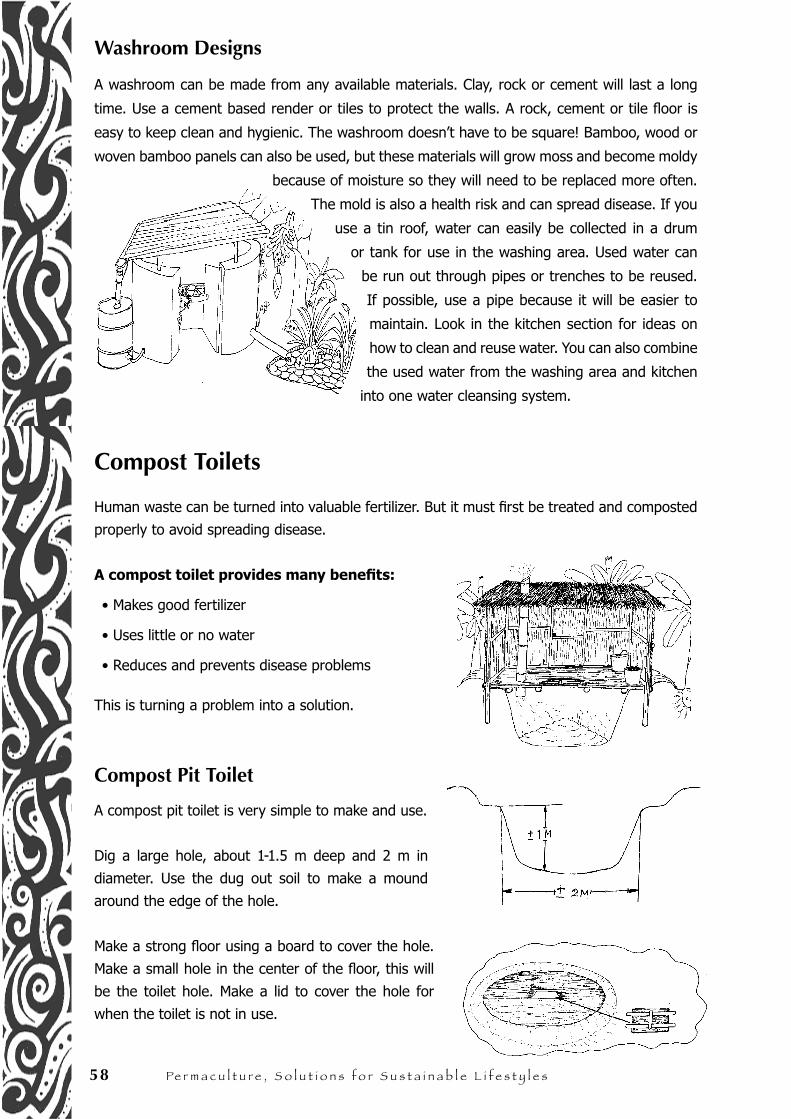
58 Pe r m a c u l t u r e , S o l u t i o n s f o r S u s t a i n a b l e l i f e s t y l e s
Washroom Designs
A washroom can be made from any available materials. Clay, rock or cement will last a long
time. Use a cement based render or tiles to protect the walls. A rock, cement or tile floor is
easy to keep clean and hygienic. The washroom doesn’t have to be square! Bamboo, wood or
woven bamboo panels can also be used, but these materials will grow moss and become moldy
because of moisture so they will need to be replaced more often.
The mold is also a health risk and can spread disease. If you
use a tin roof, water can easily be collected in a drum
or tank for use in the washing area. Used water can
be run out through pipes or trenches to be reused.
If possible, use a pipe because it will be easier to
maintain. Look in the kitchen section for ideas on
how to clean and reuse water. You can also combine
the used water from the washing area and kitchen
into one water cleansing system.
Compost Toilets
Human waste can be turned into valuable fertilizer. But it must first be treated and composted
properly to avoid spreading disease.
A compost toilet provides many benefits:
• Makes good fertilizer
• Uses little or no water
• Reduces and prevents disease problems
This is turning a problem into a solution.
Compost Pit Toilet
A compost pit toilet is very simple to make and use.
Dig a large hole, about 1-1.5 m deep and 2 m in
diameter. Use the dug out soil to make a mound
around the edge of the hole.
Make a strong floor using a board to cover the hole.
Make a small hole in the center of the floor, this will
be the toilet hole. Make a lid to cover the hole for
when the toilet is not in use.
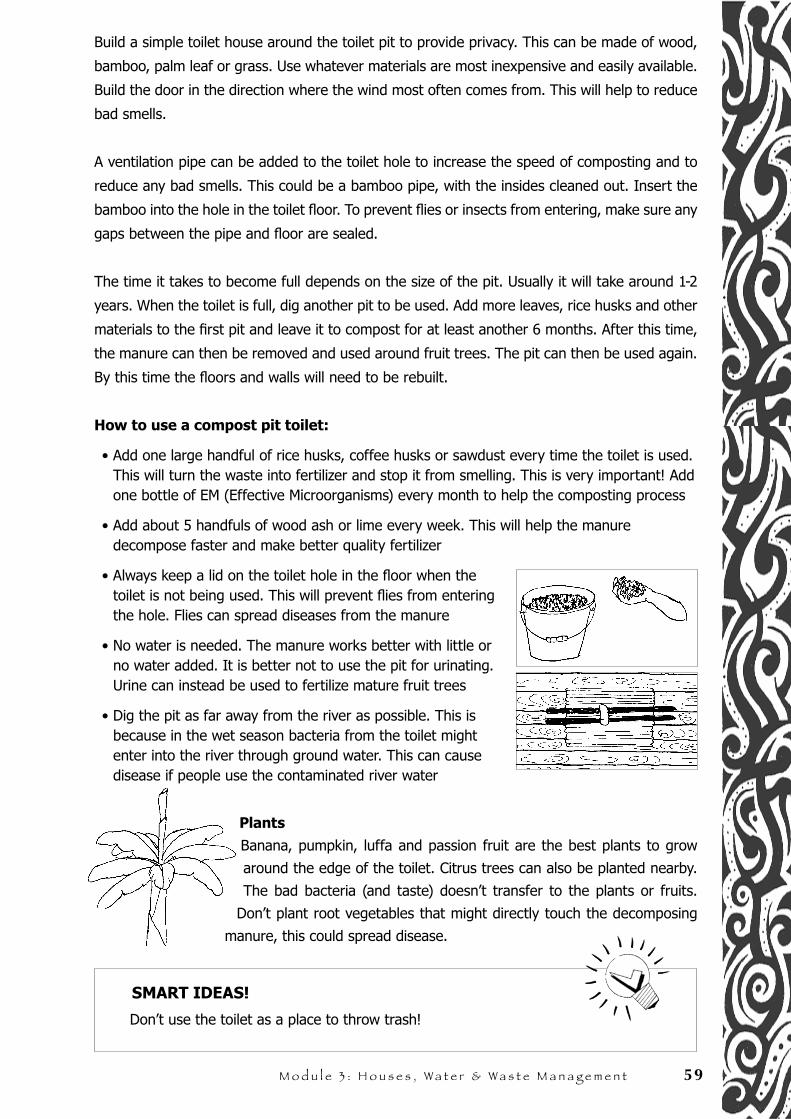
M o d u l e 3 : H o u s e s , W a t e r & W a s t e M a n a g e m e n t 59
Build a simple toilet house around the toilet pit to provide privacy. This can be made of wood,
bamboo, palm leaf or grass. Use whatever materials are most inexpensive and easily available.
Build the door in the direction where the wind most often comes from. This will help to reduce
bad smells.
A ventilation pipe can be added to the toilet hole to increase the speed of composting and to
reduce any bad smells. This could be a bamboo pipe, with the insides cleaned out. Insert the
bamboo into the hole in the toilet floor. To prevent flies or insects from entering, make sure any
gaps between the pipe and floor are sealed.
The time it takes to become full depends on the size of the pit. Usually it will take around 1-2
years. When the toilet is full, dig another pit to be used. Add more leaves, rice husks and other
materials to the first pit and leave it to compost for at least another 6 months. After this time,
the manure can then be removed and used around fruit trees. The pit can then be used again.
By this time the floors and walls will need to be rebuilt.
How to use a compost pit toilet:
• Add one large handful of rice husks, coffee husks or sawdust every time the toilet is used. This will turn the waste into fertilizer and stop it from smelling. This is very important! Add one bottle of EM (Effective Microorganisms) every month to help the composting process
• Add about 5 handfuls of wood ash or lime every week. This will help the manure decompose faster and make better quality fertilizer
• Always keep a lid on the toilet hole in the floor when the toilet is not being used. This will prevent flies from entering the hole. Flies can spread diseases from the manure
• No water is needed. The manure works better with little or no water added. It is better not to use the pit for urinating. Urine can instead be used to fertilize mature fruit trees
• Dig the pit as far away from the river as possible. This is because in the wet season bacteria from the toilet might enter into the river through ground water. This can cause disease if people use the contaminated river water
Plants
Banana, pumpkin, luffa and passion fruit are the best plants to grow
around the edge of the toilet. Citrus trees can also be planted nearby.
The bad bacteria (and taste) doesn’t transfer to the plants or fruits.
Don’t plant root vegetables that might directly touch the decomposing
manure, this could spread disease.
SMART IDEAS!
Don’t use the toilet as a place to throw trash!
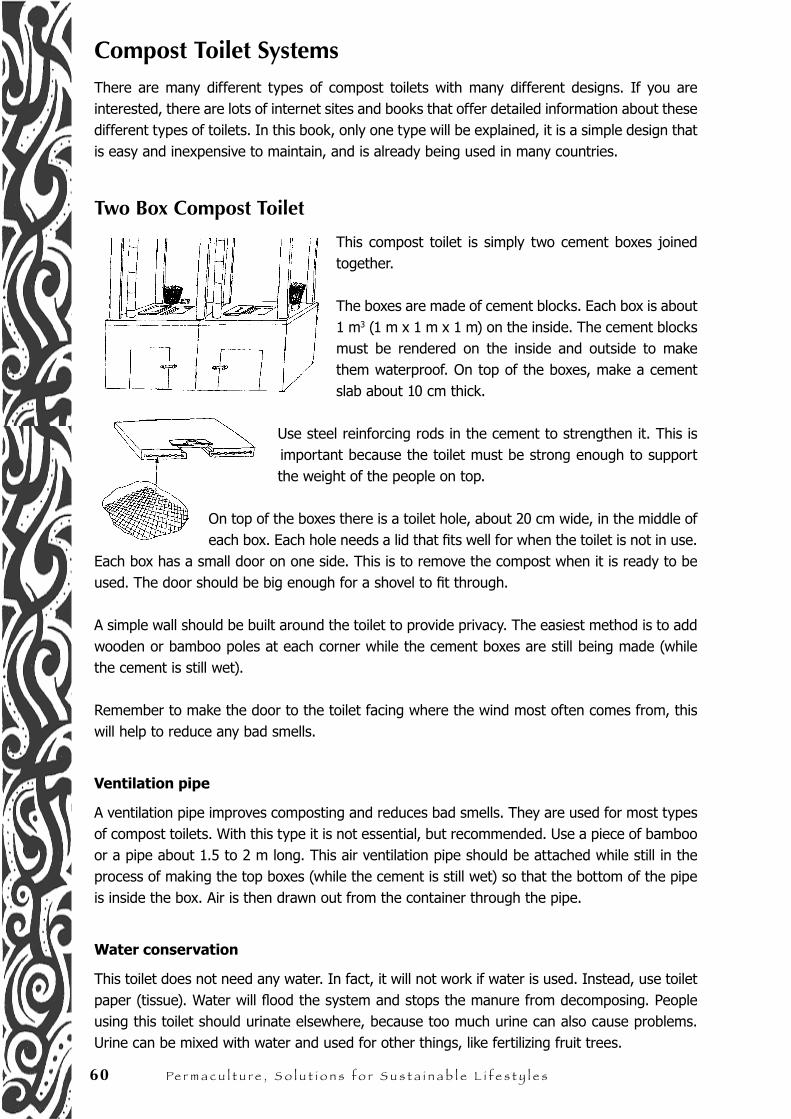
60 Pe r m a c u l t u r e , S o l u t i o n s f o r S u s t a i n a b l e l i f e s t y l e s
Compost Toilet SystemsThere are many different types of compost toilets with many different designs. If you are interested, there are lots of internet sites and books that offer detailed information about these different types of toilets. In this book, only one type will be explained, it is a simple design that is easy and inexpensive to maintain, and is already being used in many countries.
Two Box Compost Toilet
This compost toilet is simply two cement boxes joined together.
The boxes are made of cement blocks. Each box is about 1 m3 (1 m x 1 m x 1 m) on the inside. The cement blocks must be rendered on the inside and outside to make them waterproof. On top of the boxes, make a cement slab about 10 cm thick.
Use steel reinforcing rods in the cement to strengthen it. This is important because the toilet must be strong enough to support the weight of the people on top.
On top of the boxes there is a toilet hole, about 20 cm wide, in the middle of each box. Each hole needs a lid that fits well for when the toilet is not in use.
Each box has a small door on one side. This is to remove the compost when it is ready to be used. The door should be big enough for a shovel to fit through.
A simple wall should be built around the toilet to provide privacy. The easiest method is to add wooden or bamboo poles at each corner while the cement boxes are still being made (while the cement is still wet).
Remember to make the door to the toilet facing where the wind most often comes from, this will help to reduce any bad smells.
Ventilation pipe
A ventilation pipe improves composting and reduces bad smells. They are used for most types of compost toilets. With this type it is not essential, but recommended. Use a piece of bamboo or a pipe about 1.5 to 2 m long. This air ventilation pipe should be attached while still in the process of making the top boxes (while the cement is still wet) so that the bottom of the pipe is inside the box. Air is then drawn out from the container through the pipe.
Water conservation
This toilet does not need any water. In fact, it will not work if water is used. Instead, use toilet paper (tissue). Water will flood the system and stops the manure from decomposing. People using this toilet should urinate elsewhere, because too much urine can also cause problems. Urine can be mixed with water and used for other things, like fertilizing fruit trees.
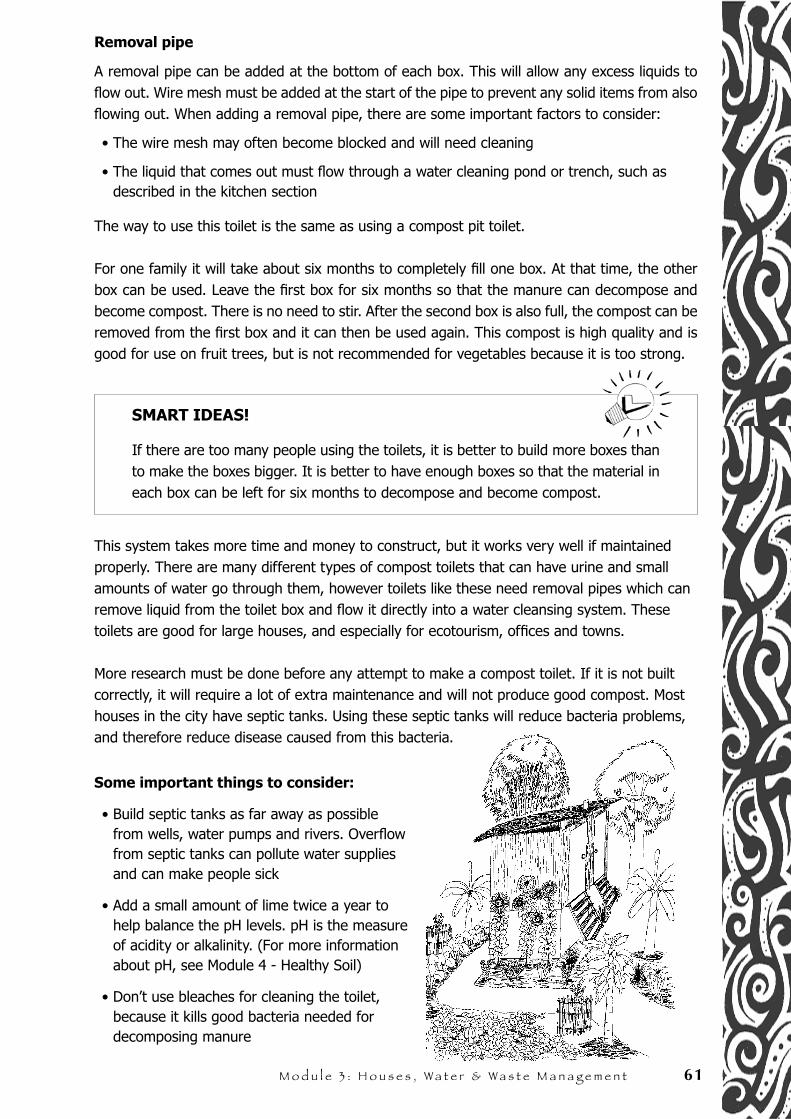
M o d u l e 3 : H o u s e s , W a t e r & W a s t e M a n a g e m e n t 61
Removal pipe
A removal pipe can be added at the bottom of each box. This will allow any excess liquids to flow out. Wire mesh must be added at the start of the pipe to prevent any solid items from also flowing out. When adding a removal pipe, there are some important factors to consider:
• The wire mesh may often become blocked and will need cleaning
• The liquid that comes out must flow through a water cleaning pond or trench, such as described in the kitchen section
The way to use this toilet is the same as using a compost pit toilet.
For one family it will take about six months to completely fill one box. At that time, the other box can be used. Leave the first box for six months so that the manure can decompose and become compost. There is no need to stir. After the second box is also full, the compost can be removed from the first box and it can then be used again. This compost is high quality and is good for use on fruit trees, but is not recommended for vegetables because it is too strong.
SMART IDEAS!
If there are too many people using the toilets, it is better to build more boxes than to make the boxes bigger. It is better to have enough boxes so that the material in each box can be left for six months to decompose and become compost.
This system takes more time and money to construct, but it works very well if maintained properly. There are many different types of compost toilets that can have urine and small amounts of water go through them, however toilets like these need removal pipes which can remove liquid from the toilet box and flow it directly into a water cleansing system. These toilets are good for large houses, and especially for ecotourism, offices and towns.
More research must be done before any attempt to make a compost toilet. If it is not built correctly, it will require a lot of extra maintenance and will not produce good compost. Most houses in the city have septic tanks. Using these septic tanks will reduce bacteria problems, and therefore reduce disease caused from this bacteria.
Some important things to consider:
• Build septic tanks as far away as possible from wells, water pumps and rivers. Overflow from septic tanks can pollute water supplies and can make people sick
• Add a small amount of lime twice a year to help balance the pH levels. pH is the measure of acidity or alkalinity. (For more information about pH, see Module 4 - Healthy Soil)
• Don’t use bleaches for cleaning the toilet, because it kills good bacteria needed for decomposing manure
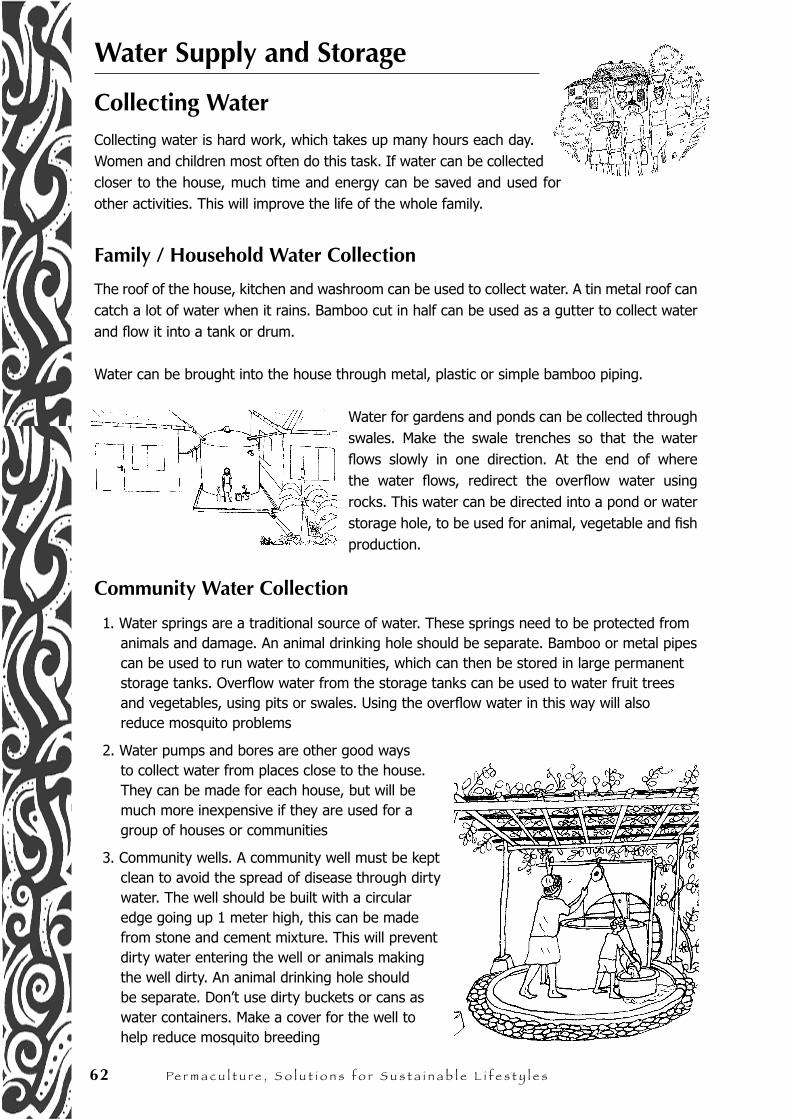
62 Pe r m a c u l t u r e , S o l u t i o n s f o r S u s t a i n a b l e l i f e s t y l e s
Water Supply and Storage
Collecting WaterCollecting water is hard work, which takes up many hours each day. Women and children most often do this task. If water can be collected closer to the house, much time and energy can be saved and used for other activities. This will improve the life of the whole family.
Family / Household Water Collection
The roof of the house, kitchen and washroom can be used to collect water. A tin metal roof can catch a lot of water when it rains. Bamboo cut in half can be used as a gutter to collect water and flow it into a tank or drum.
Water can be brought into the house through metal, plastic or simple bamboo piping.
Water for gardens and ponds can be collected through swales. Make the swale trenches so that the water flows slowly in one direction. At the end of where the water flows, redirect the overflow water using rocks. This water can be directed into a pond or water storage hole, to be used for animal, vegetable and fish production.
Community Water Collection
1. Water springs are a traditional source of water. These springs need to be protected from animals and damage. An animal drinking hole should be separate. Bamboo or metal pipes can be used to run water to communities, which can then be stored in large permanent storage tanks. Overflow water from the storage tanks can be used to water fruit trees and vegetables, using pits or swales. Using the overflow water in this way will also reduce mosquito problems
2. Water pumps and bores are other good ways to collect water from places close to the house. They can be made for each house, but will be much more inexpensive if they are used for a group of houses or communities
3. Community wells. A community well must be kept clean to avoid the spread of disease through dirty water. The well should be built with a circular edge going up 1 meter high, this can be made from stone and cement mixture. This will prevent dirty water entering the well or animals making the well dirty. An animal drinking hole should be separate. Don’t use dirty buckets or cans as water containers. Make a cover for the well to help reduce mosquito breeding
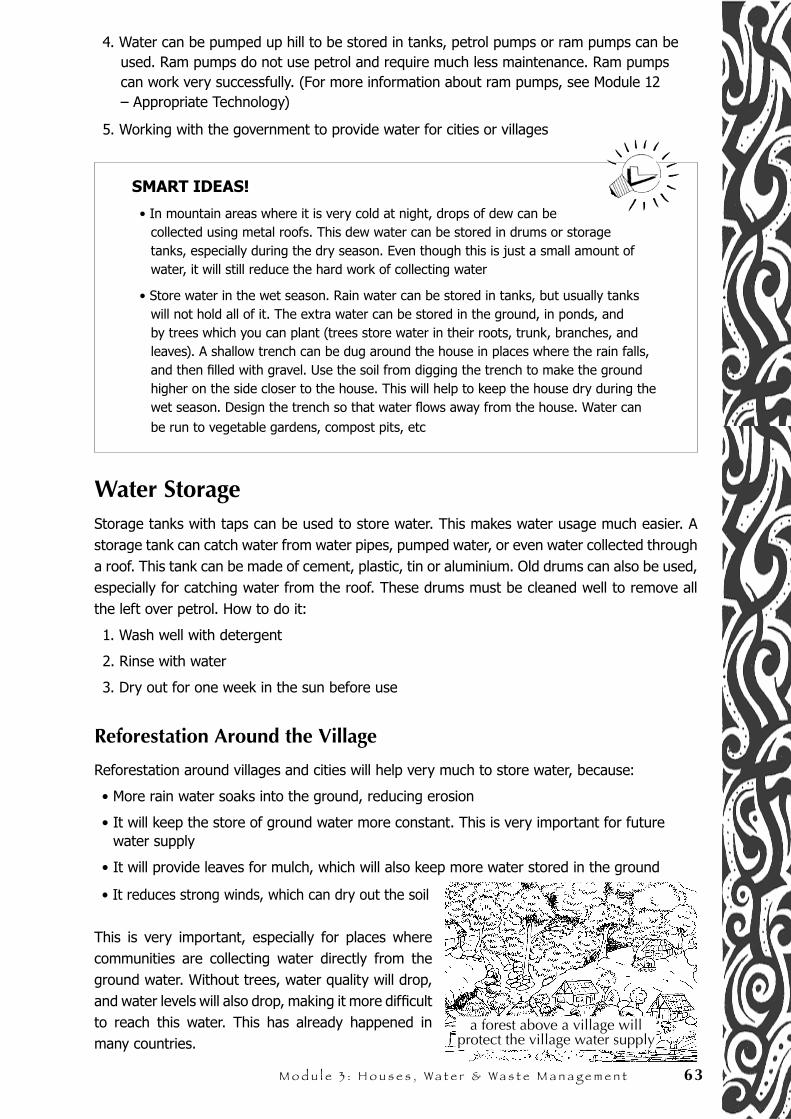
M o d u l e 3 : H o u s e s , W a t e r & W a s t e M a n a g e m e n t 63
4. Water can be pumped up hill to be stored in tanks, petrol pumps or ram pumps can be used. Ram pumps do not use petrol and require much less maintenance. Ram pumps can work very successfully. (For more information about ram pumps, see Module 12 – Appropriate Technology)
5. Working with the government to provide water for cities or villages
SMART IDEAS!
• In mountain areas where it is very cold at night, drops of dew can be collected using metal roofs. This dew water can be stored in drums or storage tanks, especially during the dry season. Even though this is just a small amount of water, it will still reduce the hard work of collecting water
• Store water in the wet season. Rain water can be stored in tanks, but usually tanks will not hold all of it. The extra water can be stored in the ground, in ponds, and by trees which you can plant (trees store water in their roots, trunk, branches, and leaves). A shallow trench can be dug around the house in places where the rain falls, and then filled with gravel. Use the soil from digging the trench to make the ground higher on the side closer to the house. This will help to keep the house dry during the wet season. Design the trench so that water flows away from the house. Water can be run to vegetable gardens, compost pits, etc
Water StorageStorage tanks with taps can be used to store water. This makes water usage much easier. A storage tank can catch water from water pipes, pumped water, or even water collected through a roof. This tank can be made of cement, plastic, tin or aluminium. Old drums can also be used, especially for catching water from the roof. These drums must be cleaned well to remove all the left over petrol. How to do it:
1. Wash well with detergent
2. Rinse with water
3. Dry out for one week in the sun before use
Reforestation Around the Village
Reforestation around villages and cities will help very much to store water, because:
• More rain water soaks into the ground, reducing erosion
• It will keep the store of ground water more constant. This is very important for future water supply
• It will provide leaves for mulch, which will also keep more water stored in the ground
• It reduces strong winds, which can dry out the soil
This is very important, especially for places where communities are collecting water directly from the ground water. Without trees, water quality will drop, and water levels will also drop, making it more difficult to reach this water. This has already happened in many countries.
a forest above a village will protect the village water supply
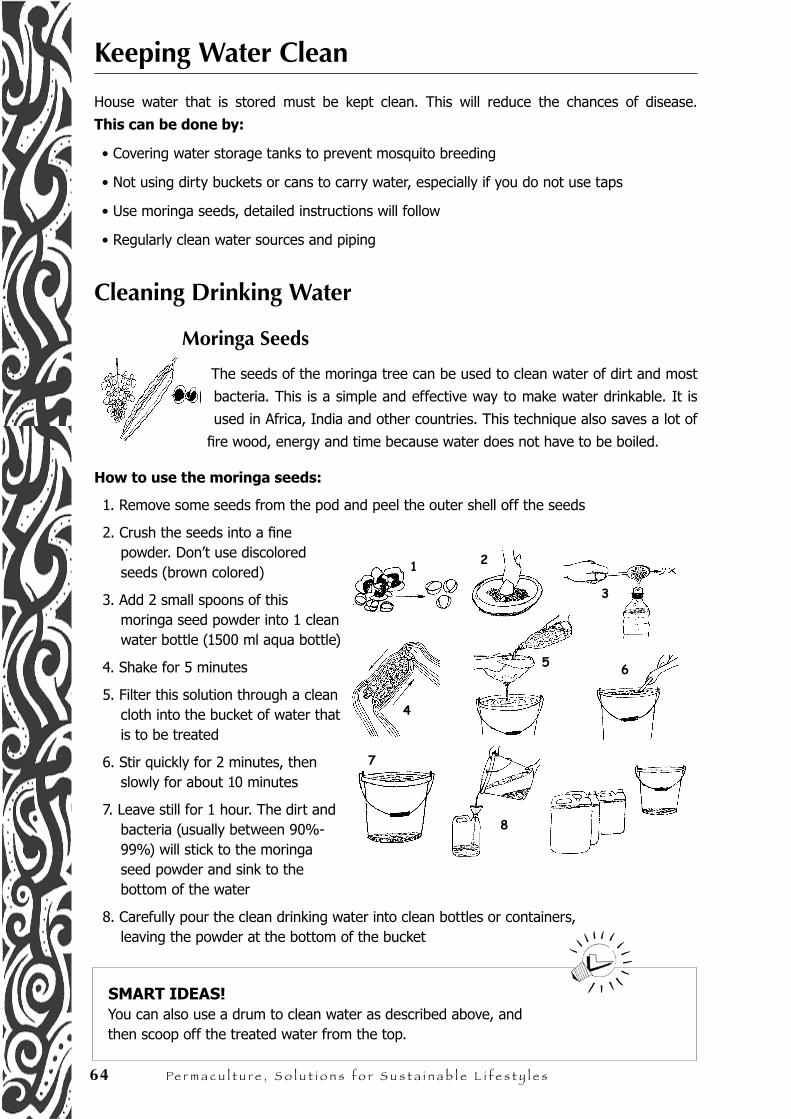
64 Pe r m a c u l t u r e , S o l u t i o n s f o r S u s t a i n a b l e l i f e s t y l e s
Keeping Water Clean
House water that is stored must be kept clean. This will reduce the chances of disease.
This can be done by:
• Covering water storage tanks to prevent mosquito breeding
• Not using dirty buckets or cans to carry water, especially if you do not use taps
• Use moringa seeds, detailed instructions will follow
• Regularly clean water sources and piping
Cleaning Drinking Water
Moringa Seeds
The seeds of the moringa tree can be used to clean water of dirt and most
bacteria. This is a simple and effective way to make water drinkable. It is
used in Africa, India and other countries. This technique also saves a lot of
fire wood, energy and time because water does not have to be boiled.
How to use the moringa seeds:
1. Remove some seeds from the pod and peel the outer shell off the seeds
2. Crush the seeds into a fine powder. Don’t use discolored seeds (brown colored)
3. Add 2 small spoons of this moringa seed powder into 1 clean water bottle (1500 ml aqua bottle)
4. Shake for 5 minutes
5. Filter this solution through a clean cloth into the bucket of water that is to be treated
6. Stir quickly for 2 minutes, then slowly for about 10 minutes
7. Leave still for 1 hour. The dirt and bacteria (usually between 90%-99%) will stick to the moringa seed powder and sink to the bottom of the water
8. Carefully pour the clean drinking water into clean bottles or containers, leaving the powder at the bottom of the bucket
SMART IDEAS! You can also use a drum to clean water as described above, and then scoop off the treated water from the top.
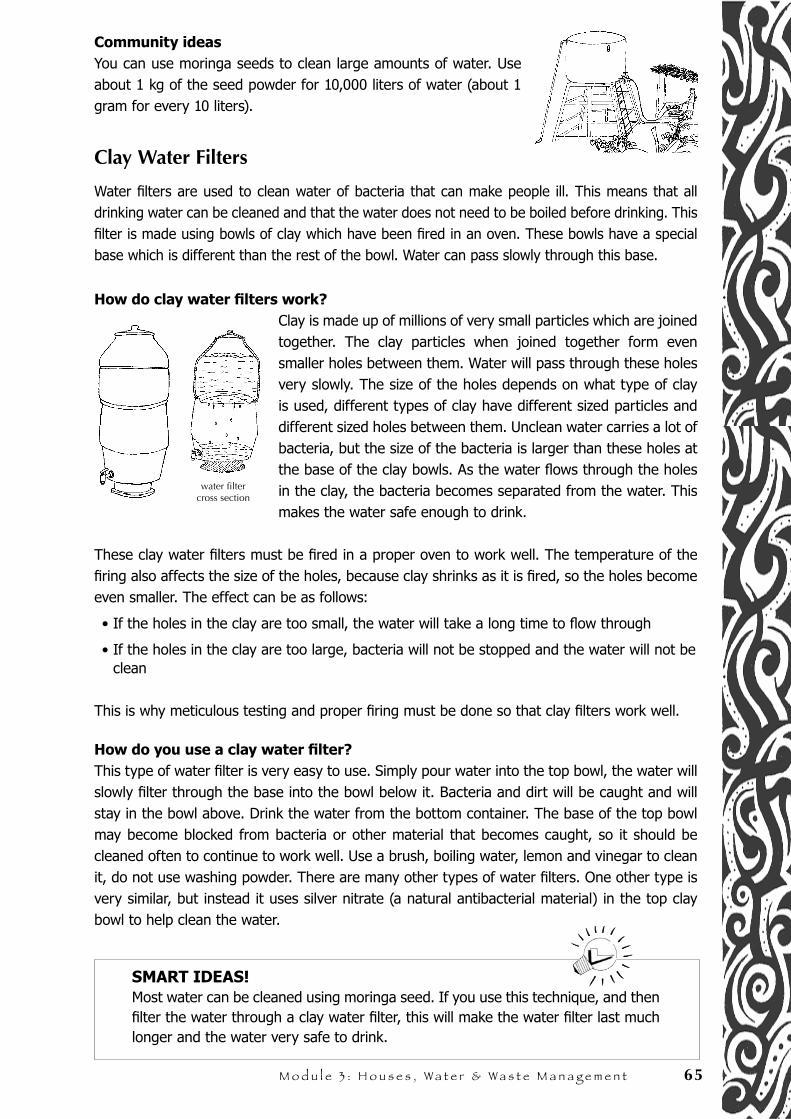
M o d u l e 3 : H o u s e s , W a t e r & W a s t e M a n a g e m e n t 65
Community ideasYou can use moringa seeds to clean large amounts of water. Use about 1 kg of the seed powder for 10,000 liters of water (about 1 gram for every 10 liters).
Clay Water Filters
Water filters are used to clean water of bacteria that can make people ill. This means that all drinking water can be cleaned and that the water does not need to be boiled before drinking. This filter is made using bowls of clay which have been fired in an oven. These bowls have a special base which is different than the rest of the bowl. Water can pass slowly through this base.
How do clay water filters work?Clay is made up of millions of very small particles which are joined together. The clay particles when joined together form even smaller holes between them. Water will pass through these holes very slowly. The size of the holes depends on what type of clay is used, different types of clay have different sized particles and different sized holes between them. Unclean water carries a lot of bacteria, but the size of the bacteria is larger than these holes at the base of the clay bowls. As the water flows through the holes in the clay, the bacteria becomes separated from the water. This makes the water safe enough to drink.
These clay water filters must be fired in a proper oven to work well. The temperature of the firing also affects the size of the holes, because clay shrinks as it is fired, so the holes become even smaller. The effect can be as follows:
• If the holes in the clay are too small, the water will take a long time to flow through
• If the holes in the clay are too large, bacteria will not be stopped and the water will not be clean
This is why meticulous testing and proper firing must be done so that clay filters work well.
How do you use a clay water filter?This type of water filter is very easy to use. Simply pour water into the top bowl, the water will slowly filter through the base into the bowl below it. Bacteria and dirt will be caught and will stay in the bowl above. Drink the water from the bottom container. The base of the top bowl may become blocked from bacteria or other material that becomes caught, so it should be cleaned often to continue to work well. Use a brush, boiling water, lemon and vinegar to clean it, do not use washing powder. There are many other types of water filters. One other type is very similar, but instead it uses silver nitrate (a natural antibacterial material) in the top clay bowl to help clean the water.
SMART IDEAS!Most water can be cleaned using moringa seed. If you use this technique, and then filter the water through a clay water filter, this will make the water filter last much longer and the water very safe to drink.
water filter cross section
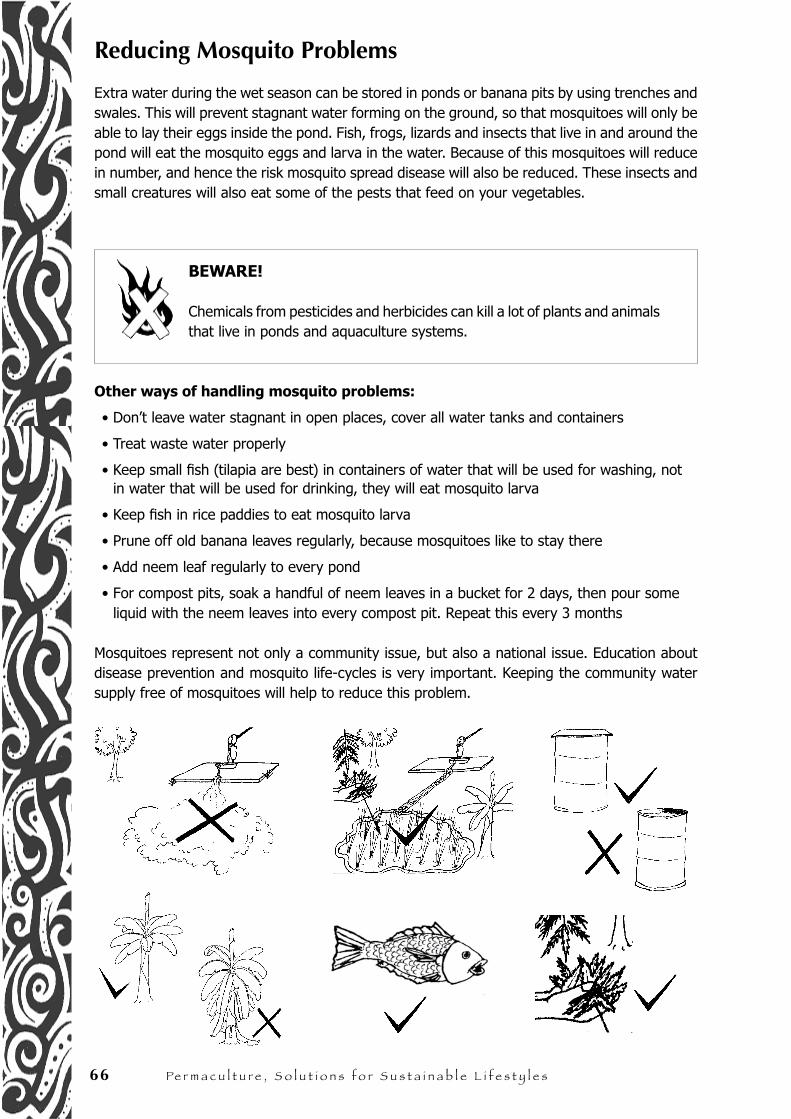
66 Pe r m a c u l t u r e , S o l u t i o n s f o r S u s t a i n a b l e l i f e s t y l e s
Reducing Mosquito Problems
Extra water during the wet season can be stored in ponds or banana pits by using trenches and swales. This will prevent stagnant water forming on the ground, so that mosquitoes will only be able to lay their eggs inside the pond. Fish, frogs, lizards and insects that live in and around the pond will eat the mosquito eggs and larva in the water. Because of this mosquitoes will reduce in number, and hence the risk mosquito spread disease will also be reduced. These insects and small creatures will also eat some of the pests that feed on your vegetables.
BEWARE!
Chemicals from pesticides and herbicides can kill a lot of plants and animals that live in ponds and aquaculture systems.
Other ways of handling mosquito problems:
• Don’t leave water stagnant in open places, cover all water tanks and containers
• Treat waste water properly
• Keep small fish (tilapia are best) in containers of water that will be used for washing, not in water that will be used for drinking, they will eat mosquito larva
• Keep fish in rice paddies to eat mosquito larva
• Prune off old banana leaves regularly, because mosquitoes like to stay there
• Add neem leaf regularly to every pond
• For compost pits, soak a handful of neem leaves in a bucket for 2 days, then pour some liquid with the neem leaves into every compost pit. Repeat this every 3 months
Mosquitoes represent not only a community issue, but also a national issue. Education about disease prevention and mosquito life-cycles is very important. Keeping the community water supply free of mosquitoes will help to reduce this problem.
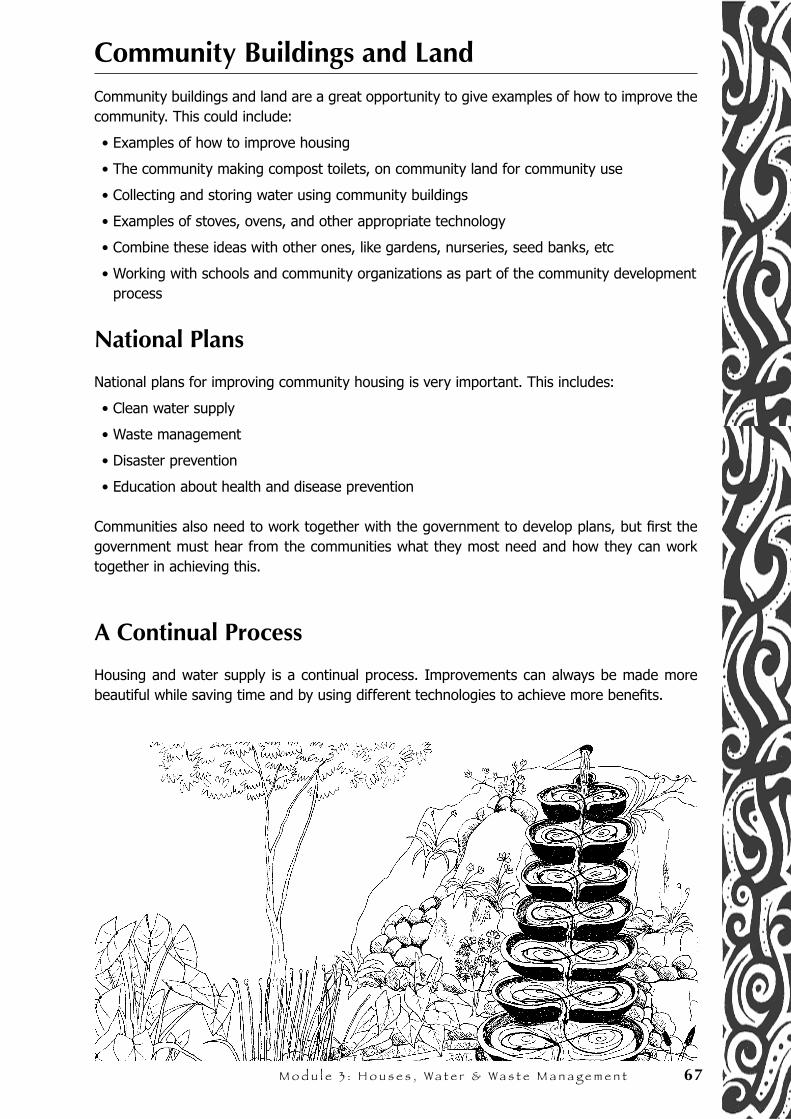
M o d u l e 3 : H o u s e s , W a t e r & W a s t e M a n a g e m e n t 67
Community Buildings and LandCommunity buildings and land are a great opportunity to give examples of how to improve the community. This could include:
• Examples of how to improve housing
• The community making compost toilets, on community land for community use
• Collecting and storing water using community buildings
• Examples of stoves, ovens, and other appropriate technology
• Combine these ideas with other ones, like gardens, nurseries, seed banks, etc
• Working with schools and community organizations as part of the community development process
National Plans
National plans for improving community housing is very important. This includes:
• Clean water supply
• Waste management
• Disaster prevention
• Education about health and disease prevention
Communities also need to work together with the government to develop plans, but first the government must hear from the communities what they most need and how they can work together in achieving this.
A Continual Process
Housing and water supply is a continual process. Improvements can always be made more beautiful while saving time and by using different technologies to achieve more benefits.

68 Pe r m a c u l t u r e , S o l u t i o n s f o r S u s t a i n a b l e l i f e s t y l e s
N o t e s . . .
Pe
rma
cu
ltu
re R
eso
urc
e B
oo
k M
od
ule
4.
He
alt
hy
So
il
M O D U L E N o 4.
Healthy Soil

70 Pe r m a c u l t u r e , S o l u t i o n s f o r S u s t a i n a b l e L i f e s t y l e s
N o t e s . . .
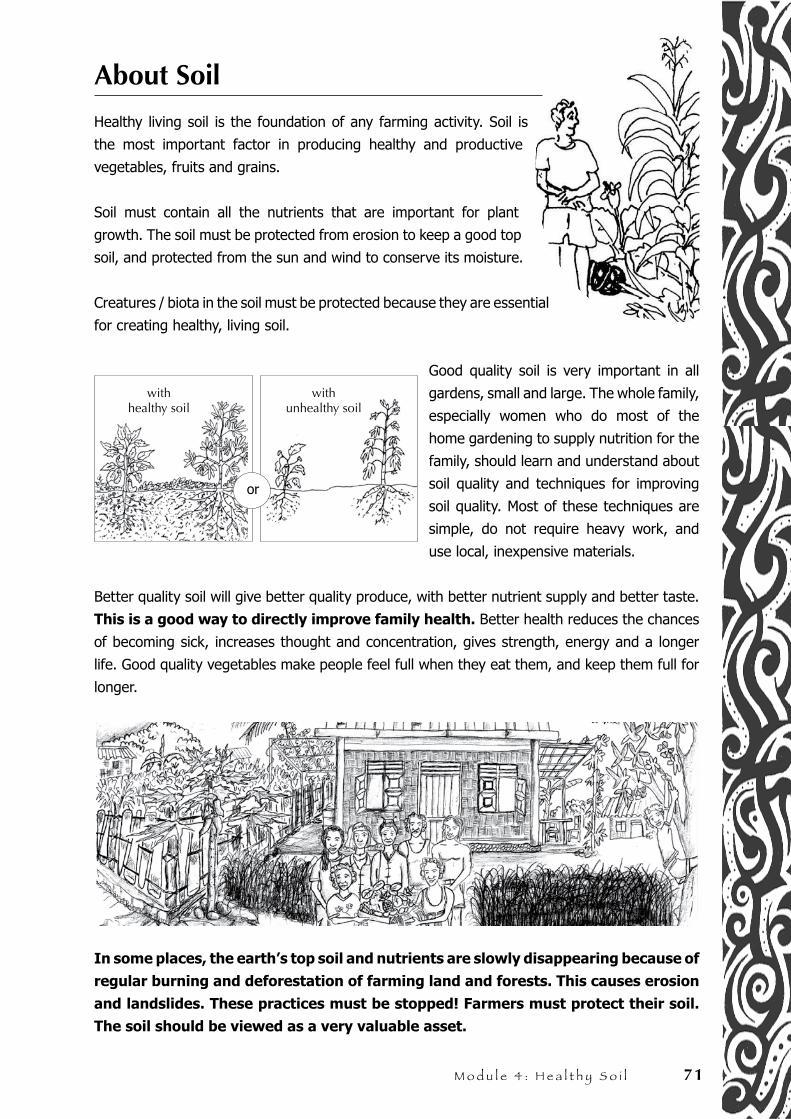
M o d u l e 4 : H e a l t h y S o i l 71
About Soil
Healthy living soil is the foundation of any farming activity. Soil is
the most important factor in producing healthy and productive
vegetables, fruits and grains.
Soil must contain all the nutrients that are important for plant
growth. The soil must be protected from erosion to keep a good top
soil, and protected from the sun and wind to conserve its moisture.
Creatures / biota in the soil must be protected because they are essential
for creating healthy, living soil.
Good quality soil is very important in all
gardens, small and large. The whole family,
especially women who do most of the
home gardening to supply nutrition for the
family, should learn and understand about
soil quality and techniques for improving
soil quality. Most of these techniques are
simple, do not require heavy work, and
use local, inexpensive materials.
Better quality soil will give better quality produce, with better nutrient supply and better taste.
This is a good way to directly improve family health. Better health reduces the chances
of becoming sick, increases thought and concentration, gives strength, energy and a longer
life. Good quality vegetables make people feel full when they eat them, and keep them full for
longer.
In some places, the earth’s top soil and nutrients are slowly disappearing because of
regular burning and deforestation of farming land and forests. This causes erosion
and landslides. These practices must be stopped! Farmers must protect their soil.
The soil should be viewed as a very valuable asset.
with healthy soil
with unhealthy soil
or
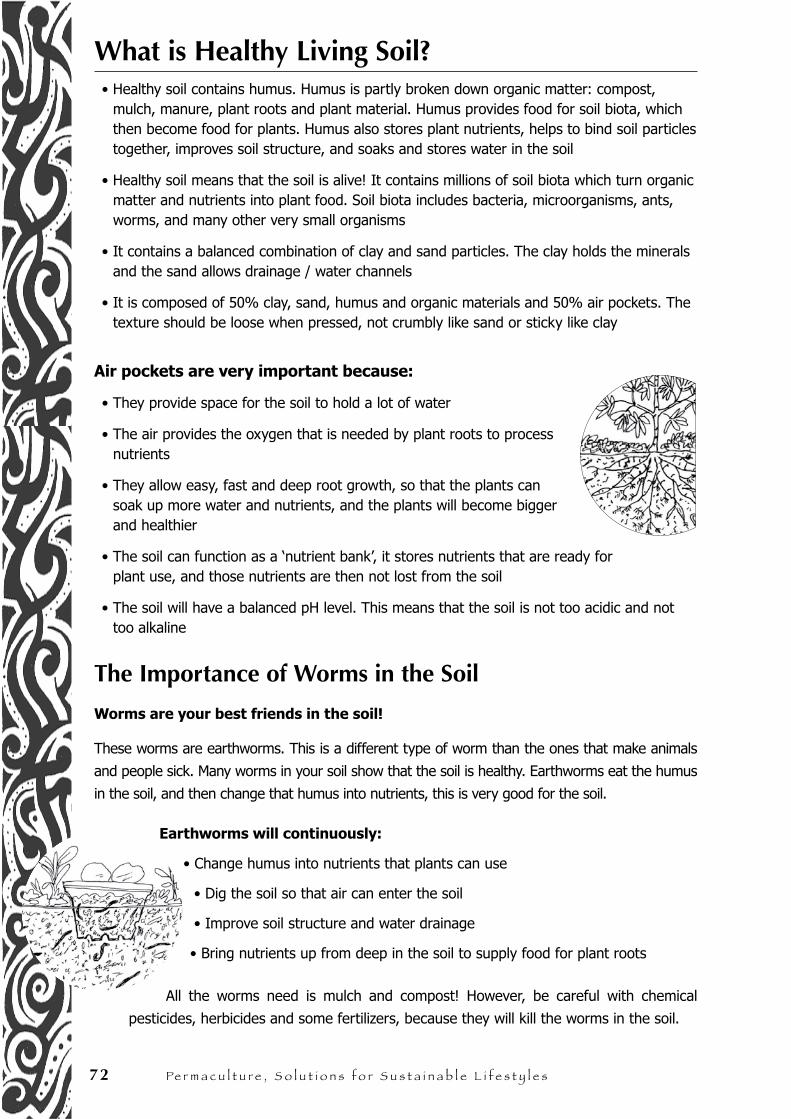
72 Pe r m a c u l t u r e , S o l u t i o n s f o r S u s t a i n a b l e L i f e s t y l e s
What is Healthy Living Soil?• Healthy soil contains humus. Humus is partly broken down organic matter: compost,
mulch, manure, plant roots and plant material. Humus provides food for soil biota, which then become food for plants. Humus also stores plant nutrients, helps to bind soil particles together, improves soil structure, and soaks and stores water in the soil
• Healthy soil means that the soil is alive! It contains millions of soil biota which turn organic matter and nutrients into plant food. Soil biota includes bacteria, microorganisms, ants, worms, and many other very small organisms
• It contains a balanced combination of clay and sand particles. The clay holds the minerals and the sand allows drainage / water channels
• It is composed of 50% clay, sand, humus and organic materials and 50% air pockets. The texture should be loose when pressed, not crumbly like sand or sticky like clay
Air pockets are very important because:
• They provide space for the soil to hold a lot of water
• The air provides the oxygen that is needed by plant roots to process nutrients
• They allow easy, fast and deep root growth, so that the plants can soak up more water and nutrients, and the plants will become bigger and healthier
• The soil can function as a ‘nutrient bank’, it stores nutrients that are ready for plant use, and those nutrients are then not lost from the soil
• The soil will have a balanced pH level. This means that the soil is not too acidic and not too alkaline
The Importance of Worms in the Soil
Worms are your best friends in the soil!
These worms are earthworms. This is a different type of worm than the ones that make animals
and people sick. Many worms in your soil show that the soil is healthy. Earthworms eat the humus
in the soil, and then change that humus into nutrients, this is very good for the soil.
Earthworms will continuously:
• Change humus into nutrients that plants can use
• Dig the soil so that air can enter the soil
• Improve soil structure and water drainage
• Bring nutrients up from deep in the soil to supply food for plant roots
All the worms need is mulch and compost! However, be careful with chemical
pesticides, herbicides and some fertilizers, because they will kill the worms in the soil.
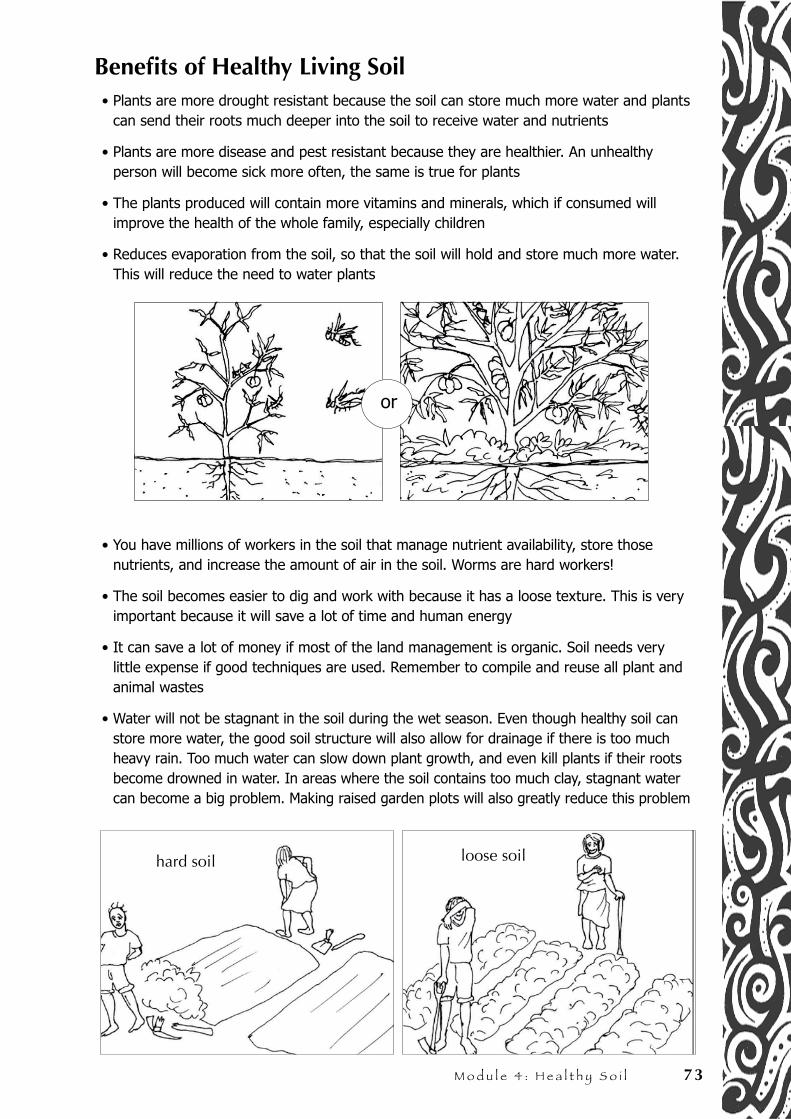
M o d u l e 4 : H e a l t h y S o i l 73
Benefits of Healthy Living Soil• Plants are more drought resistant because the soil can store much more water and plants
can send their roots much deeper into the soil to receive water and nutrients
• Plants are more disease and pest resistant because they are healthier. An unhealthy person will become sick more often, the same is true for plants
• The plants produced will contain more vitamins and minerals, which if consumed will improve the health of the whole family, especially children
• Reduces evaporation from the soil, so that the soil will hold and store much more water. This will reduce the need to water plants
• You have millions of workers in the soil that manage nutrient availability, store those nutrients, and increase the amount of air in the soil. Worms are hard workers!
• The soil becomes easier to dig and work with because it has a loose texture. This is very important because it will save a lot of time and human energy
• It can save a lot of money if most of the land management is organic. Soil needs very little expense if good techniques are used. Remember to compile and reuse all plant and animal wastes
• Water will not be stagnant in the soil during the wet season. Even though healthy soil can store more water, the good soil structure will also allow for drainage if there is too much heavy rain. Too much water can slow down plant growth, and even kill plants if their roots become drowned in water. In areas where the soil contains too much clay, stagnant water can become a big problem. Making raised garden plots will also greatly reduce this problem
or
hard soil loose soil
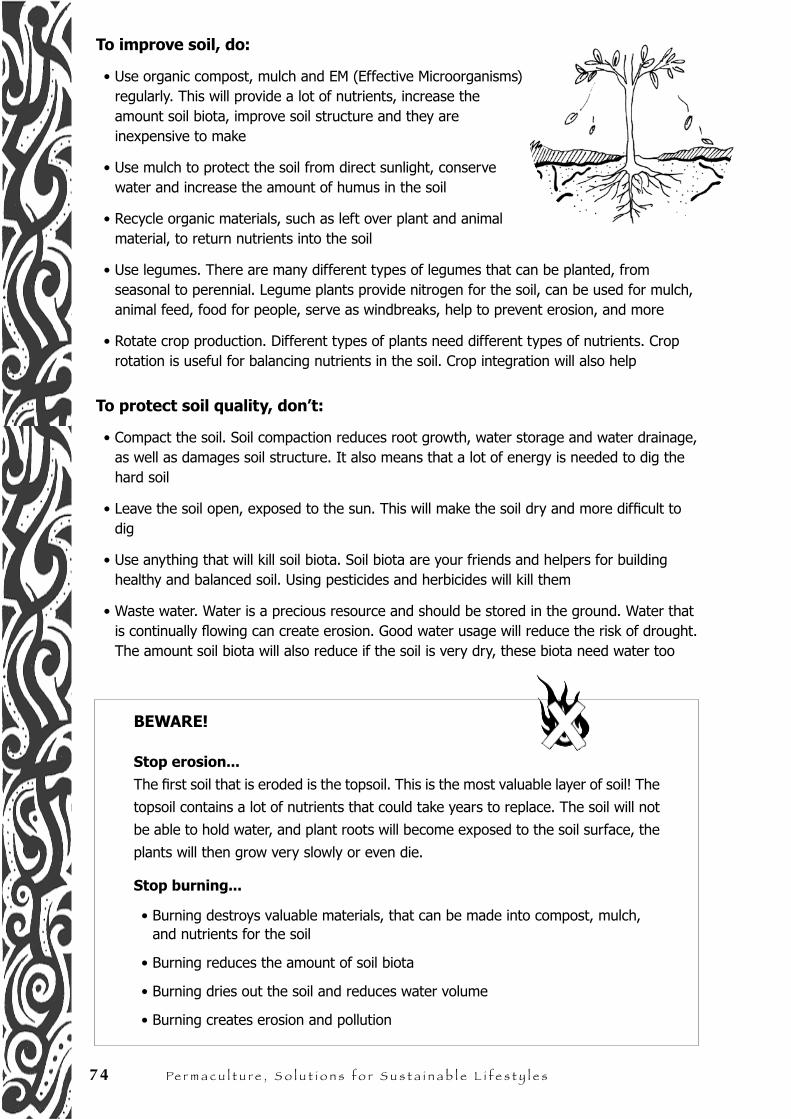
74 Pe r m a c u l t u r e , S o l u t i o n s f o r S u s t a i n a b l e L i f e s t y l e s
To improve soil, do:
• Use organic compost, mulch and EM (Effective Microorganisms) regularly. This will provide a lot of nutrients, increase the amount soil biota, improve soil structure and they are inexpensive to make
• Use mulch to protect the soil from direct sunlight, conserve water and increase the amount of humus in the soil
• Recycle organic materials, such as left over plant and animal material, to return nutrients into the soil
• Use legumes. There are many different types of legumes that can be planted, from seasonal to perennial. Legume plants provide nitrogen for the soil, can be used for mulch, animal feed, food for people, serve as windbreaks, help to prevent erosion, and more
• Rotate crop production. Different types of plants need different types of nutrients. Crop rotation is useful for balancing nutrients in the soil. Crop integration will also help
To protect soil quality, don’t:
• Compact the soil. Soil compaction reduces root growth, water storage and water drainage, as well as damages soil structure. It also means that a lot of energy is needed to dig the hard soil
• Leave the soil open, exposed to the sun. This will make the soil dry and more difficult to dig
• Use anything that will kill soil biota. Soil biota are your friends and helpers for building healthy and balanced soil. Using pesticides and herbicides will kill them
• Waste water. Water is a precious resource and should be stored in the ground. Water that is continually flowing can create erosion. Good water usage will reduce the risk of drought. The amount soil biota will also reduce if the soil is very dry, these biota need water too
BEWARE!
Stop erosion...
The first soil that is eroded is the topsoil. This is the most valuable layer of soil! The
topsoil contains a lot of nutrients that could take years to replace. The soil will not
be able to hold water, and plant roots will become exposed to the soil surface, the
plants will then grow very slowly or even die.
Stop burning...
• Burning destroys valuable materials, that can be made into compost, mulch, and nutrients for the soil
• Burning reduces the amount of soil biota
• Burning dries out the soil and reduces water volume
• Burning creates erosion and pollution
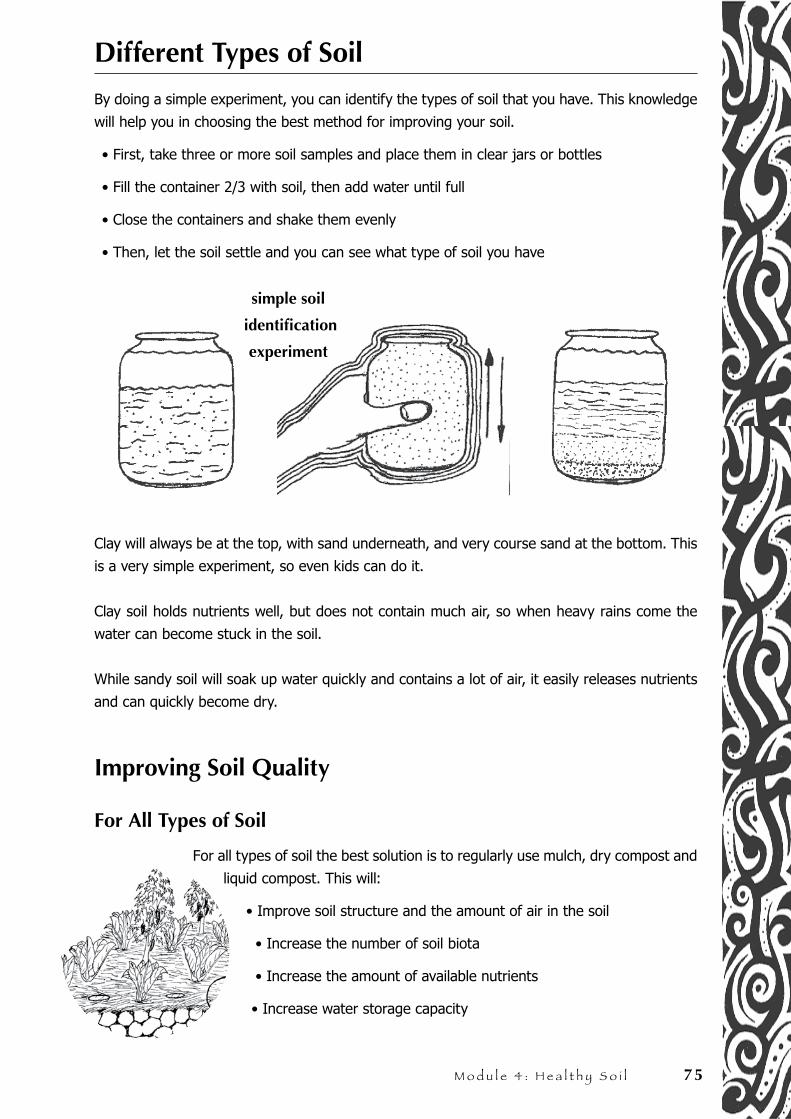
M o d u l e 4 : H e a l t h y S o i l 75
Different Types of Soil
By doing a simple experiment, you can identify the types of soil that you have. This knowledge
will help you in choosing the best method for improving your soil.
• First, take three or more soil samples and place them in clear jars or bottles
• Fill the container 2/3 with soil, then add water until full
• Close the containers and shake them evenly
• Then, let the soil settle and you can see what type of soil you have
Clay will always be at the top, with sand underneath, and very course sand at the bottom. This
is a very simple experiment, so even kids can do it.
Clay soil holds nutrients well, but does not contain much air, so when heavy rains come the
water can become stuck in the soil.
While sandy soil will soak up water quickly and contains a lot of air, it easily releases nutrients
and can quickly become dry.
Improving Soil Quality
For All Types of Soil
For all types of soil the best solution is to regularly use mulch, dry compost and
liquid compost. This will:
• Improve soil structure and the amount of air in the soil
• Increase the number of soil biota
• Increase the amount of available nutrients
• Increase water storage capacity
simple soil
identification
experiment
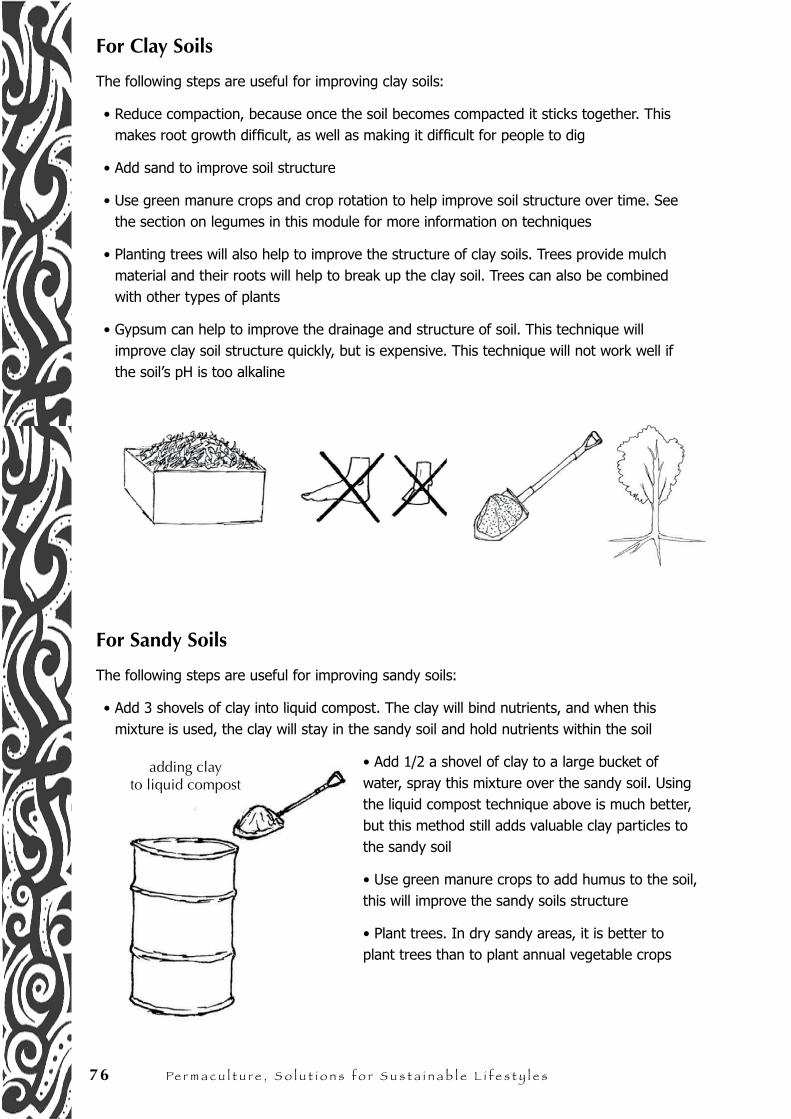
76 Pe r m a c u l t u r e , S o l u t i o n s f o r S u s t a i n a b l e L i f e s t y l e s
For Clay Soils
The following steps are useful for improving clay soils:
• Reduce compaction, because once the soil becomes compacted it sticks together. This makes root growth difficult, as well as making it difficult for people to dig
• Add sand to improve soil structure
• Use green manure crops and crop rotation to help improve soil structure over time. See the section on legumes in this module for more information on techniques
• Planting trees will also help to improve the structure of clay soils. Trees provide mulch material and their roots will help to break up the clay soil. Trees can also be combined with other types of plants
• Gypsum can help to improve the drainage and structure of soil. This technique will improve clay soil structure quickly, but is expensive. This technique will not work well if the soil’s pH is too alkaline
For Sandy Soils
The following steps are useful for improving sandy soils:
• Add 3 shovels of clay into liquid compost. The clay will bind nutrients, and when this mixture is used, the clay will stay in the sandy soil and hold nutrients within the soil
• Add 1/2 a shovel of clay to a large bucket of water, spray this mixture over the sandy soil. Using the liquid compost technique above is much better, but this method still adds valuable clay particles to the sandy soil
• Use green manure crops to add humus to the soil, this will improve the sandy soils structure
• Plant trees. In dry sandy areas, it is better to plant trees than to plant annual vegetable crops
adding clayto liquid compost
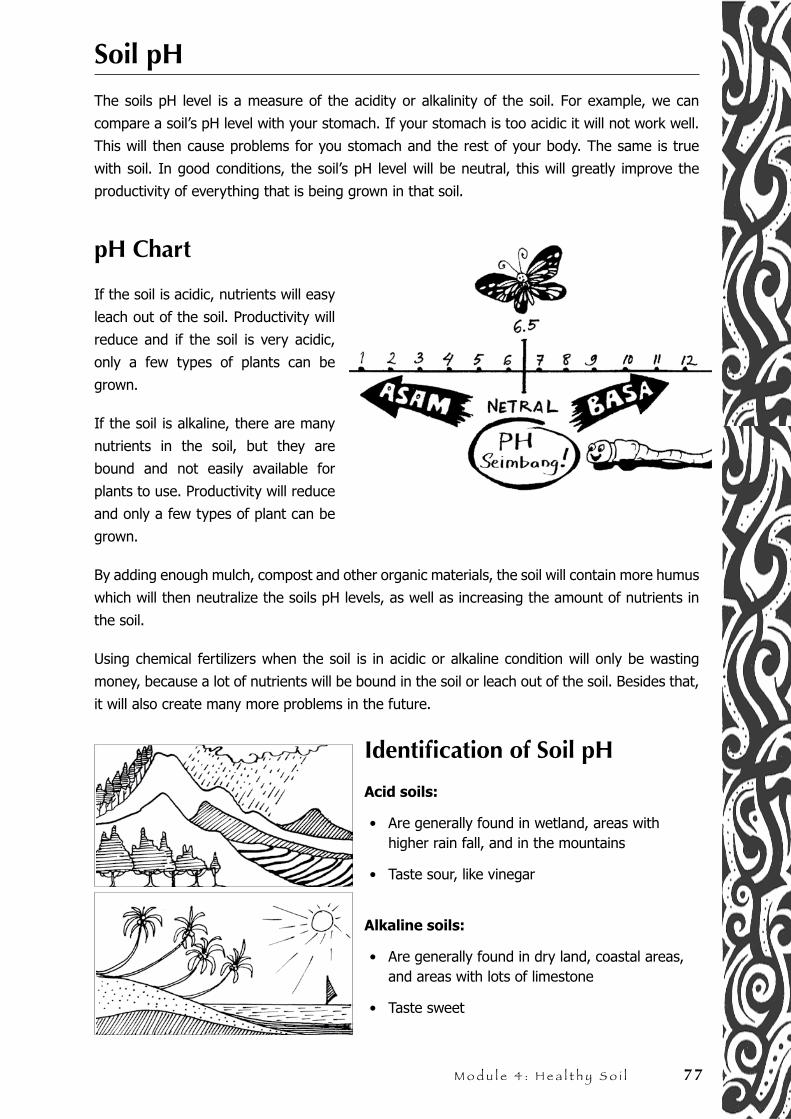
M o d u l e 4 : H e a l t h y S o i l 77
Soil pH
The soils pH level is a measure of the acidity or alkalinity of the soil. For example, we can
compare a soil’s pH level with your stomach. If your stomach is too acidic it will not work well.
This will then cause problems for you stomach and the rest of your body. The same is true
with soil. In good conditions, the soil’s pH level will be neutral, this will greatly improve the
productivity of everything that is being grown in that soil.
pH Chart
If the soil is acidic, nutrients will easy
leach out of the soil. Productivity will
reduce and if the soil is very acidic,
only a few types of plants can be
grown.
If the soil is alkaline, there are many
nutrients in the soil, but they are
bound and not easily available for
plants to use. Productivity will reduce
and only a few types of plant can be
grown.
By adding enough mulch, compost and other organic materials, the soil will contain more humus
which will then neutralize the soils pH levels, as well as increasing the amount of nutrients in
the soil.
Using chemical fertilizers when the soil is in acidic or alkaline condition will only be wasting
money, because a lot of nutrients will be bound in the soil or leach out of the soil. Besides that,
it will also create many more problems in the future.
Identification of Soil pH
Acid soils:
Are generally found in wetland, areas with higher rain fall, and in the mountains
Taste sour, like vinegar
Alkaline soils:
Are generally found in dry land, coastal areas, and areas with lots of limestone
Taste sweet
•
•
•
•

78 Pe r m a c u l t u r e , S o l u t i o n s f o r S u s t a i n a b l e L i f e s t y l e s
Testing Soil pH
Soil pH can be accurately identified using a pH tester. A pH tester shows a series of numbers,
ranging from 1 to 12. Number 1 shows that the soil is most acidic, and number 12 shows
that the soil is most alkaline. The ideal soil condition will have a pH of 6.5 or neutral; in this
condition, the soil is neither acidic nor alkaline.
There are a few types of pH testers. Some agriculture workers and NGOs may have this type
of tester. However, by identifying landforms (for example, swamps), rocks, and common tree
types, you can identify the soil pH without needing this equipment.
Solutions for Balancing Soil pH
The best solution for acidic or alkaline soils is to increase the amount of humus in the soil. This
can be done by regularly using mulch, compost, liquid fertilizer and other organic materials.
Increasing the humus content in the soil will make the soil pH neutral, allowing more nutrients
to stay in the soil and be available for plant use.
Other Solutions for Acidic Soils
• Ash from wood fires (there must be no plastic content in the ash) can be spread over soil that is acidic. Don’t use more than 1 kg for every 30 square meters each year. Don’t burn grass and plant materials to make the ash; grass and plant materials are also very important for balancing soil pH
• For acidic soil in small areas, crushed seashells will provide lime to help balance soil pH
• For larger areas, dolomite can be used. Lime can also be used, but dolomite is better because it contains magnesium, and is safer for plant roots. These materials are expensive, and should only be used after the soil pH has been tested
spreading dolomite on acidic soil
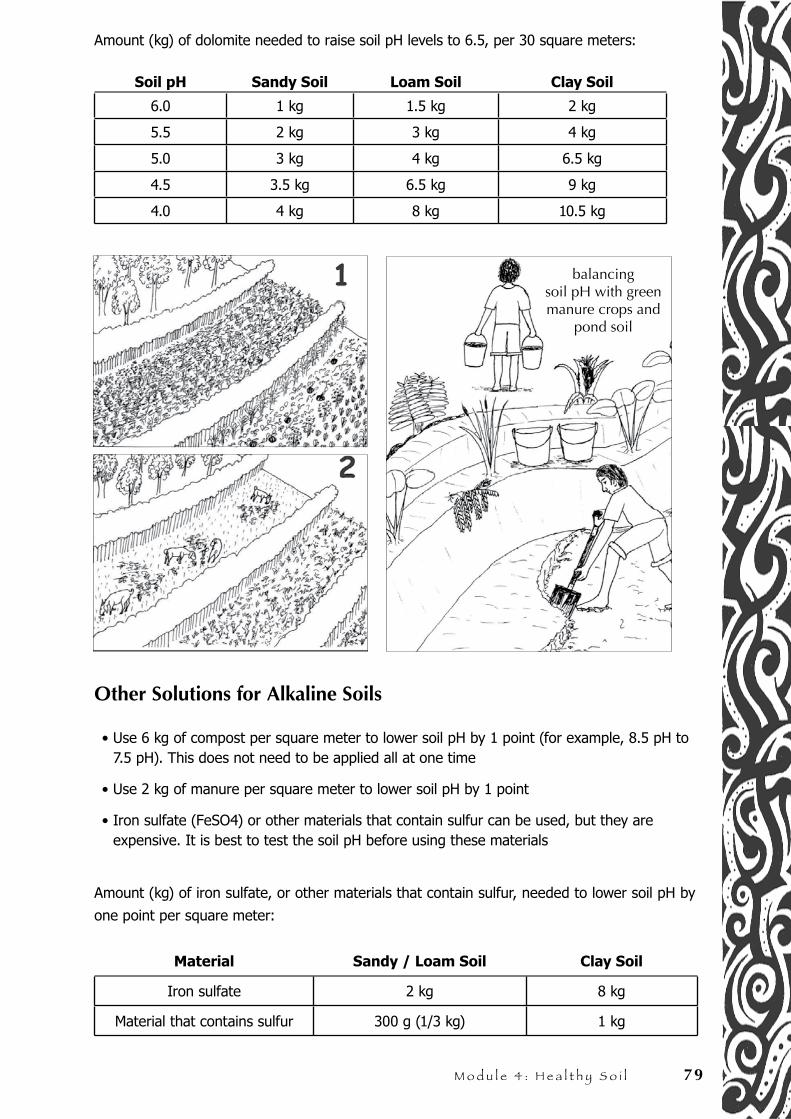
M o d u l e 4 : H e a l t h y S o i l 79
Amount (kg) of dolomite needed to raise soil pH levels to 6.5, per 30 square meters:
Soil pH Sandy Soil Loam Soil Clay Soil
6.0 1 kg 1.5 kg 2 kg
5.5 2 kg 3 kg 4 kg
5.0 3 kg 4 kg 6.5 kg
4.5 3.5 kg 6.5 kg 9 kg
4.0 4 kg 8 kg 10.5 kg
Other Solutions for Alkaline Soils
• Use 6 kg of compost per square meter to lower soil pH by 1 point (for example, 8.5 pH to 7.5 pH). This does not need to be applied all at one time
• Use 2 kg of manure per square meter to lower soil pH by 1 point
• Iron sulfate (FeSO4) or other materials that contain sulfur can be used, but they are expensive. It is best to test the soil pH before using these materials
Amount (kg) of iron sulfate, or other materials that contain sulfur, needed to lower soil pH by
one point per square meter:
Material Sandy / Loam Soil Clay Soil
Iron sulfate 2 kg 8 kg
Material that contains sulfur 300 g (1/3 kg) 1 kg
balancing soil pH with green manure crops and
pond soil
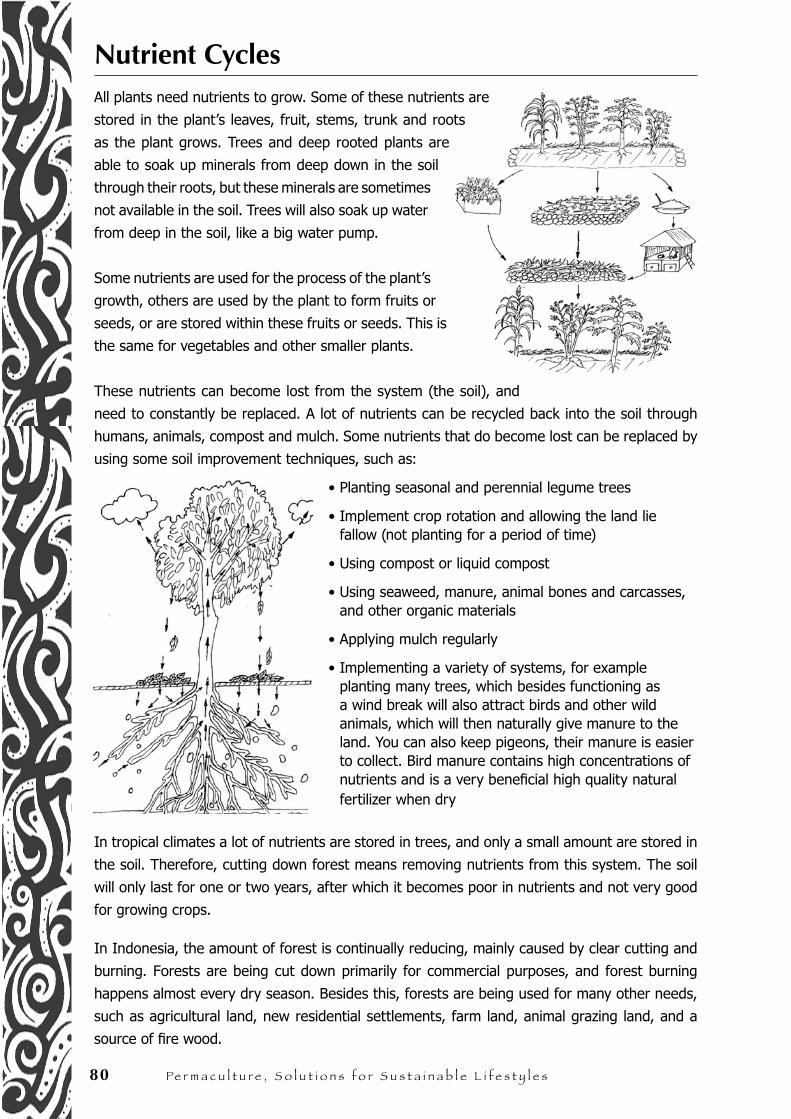
80 Pe r m a c u l t u r e , S o l u t i o n s f o r S u s t a i n a b l e L i f e s t y l e s
Nutrient CyclesAll plants need nutrients to grow. Some of these nutrients are
stored in the plant’s leaves, fruit, stems, trunk and roots
as the plant grows. Trees and deep rooted plants are
able to soak up minerals from deep down in the soil
through their roots, but these minerals are sometimes
not available in the soil. Trees will also soak up water
from deep in the soil, like a big water pump.
Some nutrients are used for the process of the plant’s
growth, others are used by the plant to form fruits or
seeds, or are stored within these fruits or seeds. This is
the same for vegetables and other smaller plants.
These nutrients can become lost from the system (the soil), and
need to constantly be replaced. A lot of nutrients can be recycled back into the soil through
humans, animals, compost and mulch. Some nutrients that do become lost can be replaced by
using some soil improvement techniques, such as:
Planting seasonal and perennial legume trees
Implement crop rotation and allowing the land lie fallow (not planting for a period of time)
Using compost or liquid compost
Using seaweed, manure, animal bones and carcasses, and other organic materials
Applying mulch regularly
Implementing a variety of systems, for example planting many trees, which besides functioning as a wind break will also attract birds and other wild animals, which will then naturally give manure to the land. You can also keep pigeons, their manure is easier to collect. Bird manure contains high concentrations of nutrients and is a very beneficial high quality natural fertilizer when dry
In tropical climates a lot of nutrients are stored in trees, and only a small amount are stored in
the soil. Therefore, cutting down forest means removing nutrients from this system. The soil
will only last for one or two years, after which it becomes poor in nutrients and not very good
for growing crops.
In Indonesia, the amount of forest is continually reducing, mainly caused by clear cutting and
burning. Forests are being cut down primarily for commercial purposes, and forest burning
happens almost every dry season. Besides this, forests are being used for many other needs,
such as agricultural land, new residential settlements, farm land, animal grazing land, and a
source of fire wood.
•
•
•
•
•
•

M o d u l e 4 : H e a l t h y S o i l 81
Burning land is a very serious problem, because it reduces soil fertility and removes valuable
nutrients from the soil. Each time the land, leaves, grass and other plant materials are burned,
nutrients which are stored in plants become lost. This occurs both on agricultural land as well
as animal grazing land. After burning, the ash does provide a small amount of potassium and
minerals, but the nutrients that have been removed are much more than what is contained in
this ash. To get potassium, using ash just from kitchen cooking fires is enough.
Remember, the more nutrients that are recycled back into the system, the less
outside inputs are needed!
Nutrient Deficiencies
In some places, a lot of soil is nutrient deficient. Some areas are very deficient, and others only
lack one or two types of nutrients. Just like people, plants also need a range of vitamins and
minerals to grow well. If nutrients are not available, plants will be smaller, and more susceptible
to drought, pests and disease. Plants show specific signs when they are missing a nutrients,
for example:
Missing nutrient Plant Characteristics
Nitrogen• All leaves and new growths are yellow and pale
• Early maturing, fruit and flower size is smaller
Potassium
• Leaves are small and darker in color
• Older leaves are blue / purple with yellow edges
• Plant growth is slow
Phosphorus• Fruit size is small and poorly colored
• Burnt leaf edges and yellowing of older leaves
Magnesium
• Yellowing leaf edges, yellow spots but the leaf veins stay green
• Often there are brown spots on the leaves
• Old leaves drop of faster
Sulphur • All leaves have a dull color
Calcium• New leaves and shoots grow and develop poorly
• Unusual fruit growth
Micro nutrients • Symptoms vary
If plants are sick or not producing well, it is not enough to just add a basic fertilizer. In fact,
this approach can even cause more problems. It is better to first try and identify the problem,
and then to figure out what the exact deficiency is. In this way, problem solving will be more
effective and inexpensive.

82 Pe r m a c u l t u r e , S o l u t i o n s f o r S u s t a i n a b l e L i f e s t y l e s
Organic Soil Improvement Strategies
If land is under cultivation, then nutrients are being used and must be replaced. To improve
the nutrient condition, it is not enough to just replace the missing nutrients, but also with time
there should be soil texture improvement so that the soil can store more nutrients and water.
Natural organic fertilizers can be
used regularly and can be applied
before, during and after planting.
The nutrients that are not used
will be stored in the soil to be used
later. Both for short term and long
term, organic fertilizers will help to
improve the soil’s condition.
It is always better to compost manures before using them as fertilizers. If the manure is fresh,
especially bird manure, it can burn plants, especially small plants and young vegetables.
The nutrients are also not yet available for the plant to use. This is the same as humans trying
to eat rice, corn or meat before it is cooked! Composting organic materials will concentrate the
nutrients, making them easily available for the plant to use.
There are many different composting methods, some of which will be explained later on. Over
time, by experimenting, you will find out what works best for your land, climate and needs. This
could be new techniques, traditional techniques, or a combination of both.
Natural Nutrient Sources
Almost all nutrient deficiencies can be handled by using
compost, liquid compost, and mulch. This is the best and
most balanced method.
Sometimes, a specific nutrient or nutrients are not
available in the soil or plants, because of erosion,
deforestation or poor soil.
This nutrient needs to be reintroduced into the soil, and
for best results, added again once or twice a year. This new
nutrient should be recycled within the system as much as possible
to reduce the need for more outside inputs.
COMPOST
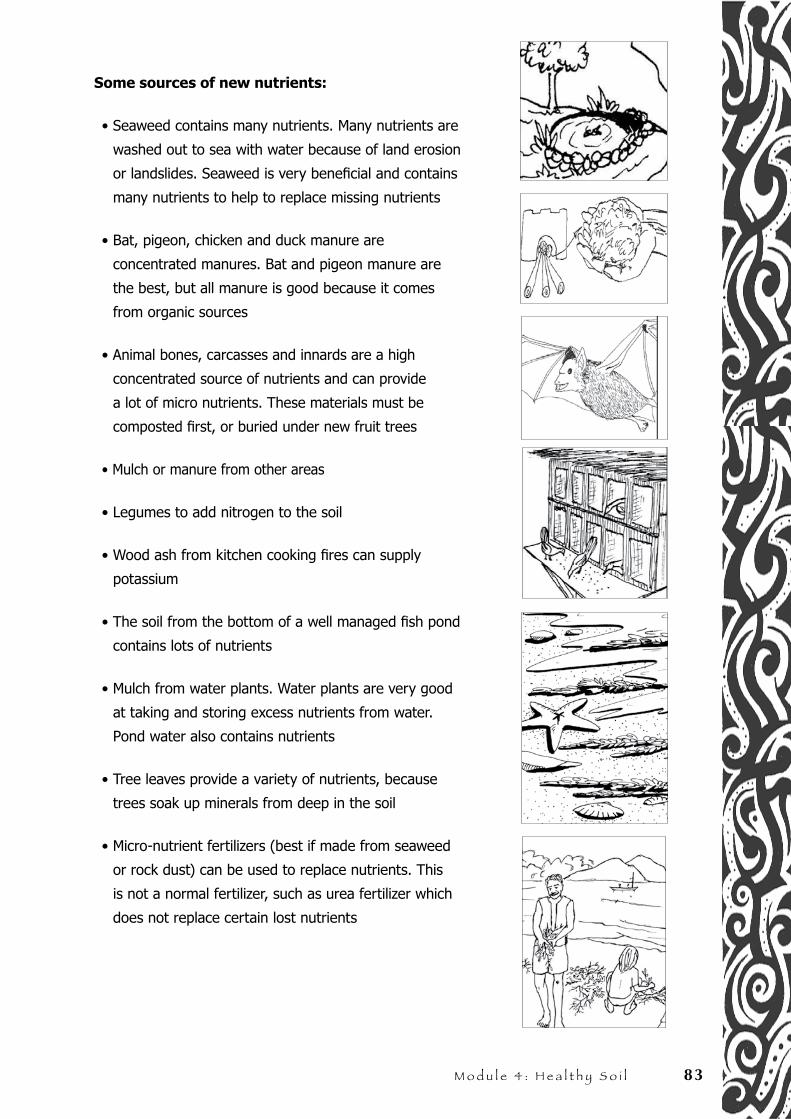
M o d u l e 4 : H e a l t h y S o i l 83
Some sources of new nutrients:
• Seaweed contains many nutrients. Many nutrients are
washed out to sea with water because of land erosion
or landslides. Seaweed is very beneficial and contains
many nutrients to help to replace missing nutrients
• Bat, pigeon, chicken and duck manure are
concentrated manures. Bat and pigeon manure are
the best, but all manure is good because it comes
from organic sources
• Animal bones, carcasses and innards are a high
concentrated source of nutrients and can provide
a lot of micro nutrients. These materials must be
composted first, or buried under new fruit trees
• Mulch or manure from other areas
• Legumes to add nitrogen to the soil
• Wood ash from kitchen cooking fires can supply
potassium
• The soil from the bottom of a well managed fish pond
contains lots of nutrients
• Mulch from water plants. Water plants are very good
at taking and storing excess nutrients from water.
Pond water also contains nutrients
• Tree leaves provide a variety of nutrients, because
trees soak up minerals from deep in the soil
• Micro-nutrient fertilizers (best if made from seaweed
or rock dust) can be used to replace nutrients. This
is not a normal fertilizer, such as urea fertilizer which
does not replace certain lost nutrients
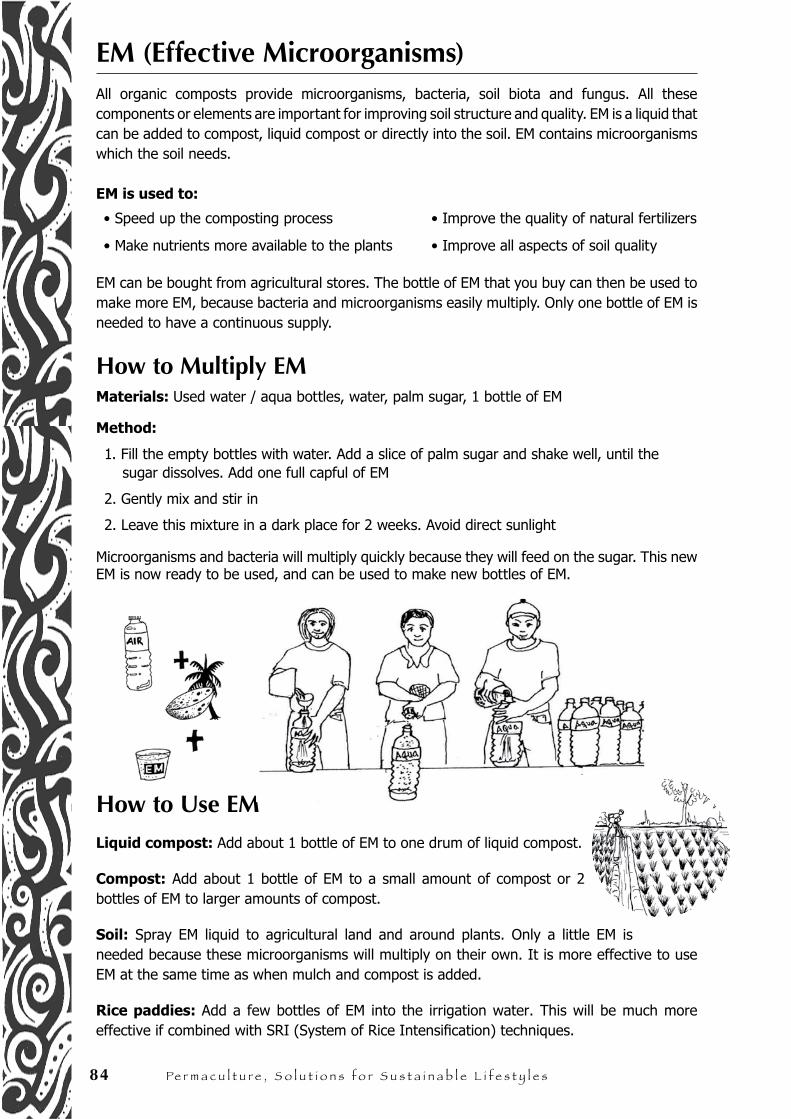
84 Pe r m a c u l t u r e , S o l u t i o n s f o r S u s t a i n a b l e L i f e s t y l e s
EM (Effective Microorganisms)All organic composts provide microorganisms, bacteria, soil biota and fungus. All these components or elements are important for improving soil structure and quality. EM is a liquid that can be added to compost, liquid compost or directly into the soil. EM contains microorganisms which the soil needs.
EM is used to:
• Speed up the composting process • Improve the quality of natural fertilizers
• Make nutrients more available to the plants • Improve all aspects of soil quality
EM can be bought from agricultural stores. The bottle of EM that you buy can then be used to make more EM, because bacteria and microorganisms easily multiply. Only one bottle of EM is needed to have a continuous supply.
How to Multiply EMMaterials: Used water / aqua bottles, water, palm sugar, 1 bottle of EM
Method:
1. Fill the empty bottles with water. Add a slice of palm sugar and shake well, until the sugar dissolves. Add one full capful of EM
2. Gently mix and stir in
2. Leave this mixture in a dark place for 2 weeks. Avoid direct sunlight
Microorganisms and bacteria will multiply quickly because they will feed on the sugar. This new EM is now ready to be used, and can be used to make new bottles of EM.
How to Use EM
Liquid compost: Add about 1 bottle of EM to one drum of liquid compost.
Compost: Add about 1 bottle of EM to a small amount of compost or 2 bottles of EM to larger amounts of compost.
Soil: Spray EM liquid to agricultural land and around plants. Only a little EM is needed because these microorganisms will multiply on their own. It is more effective to use EM at the same time as when mulch and compost is added.
Rice paddies: Add a few bottles of EM into the irrigation water. This will be much more effective if combined with SRI (System of Rice Intensification) techniques.
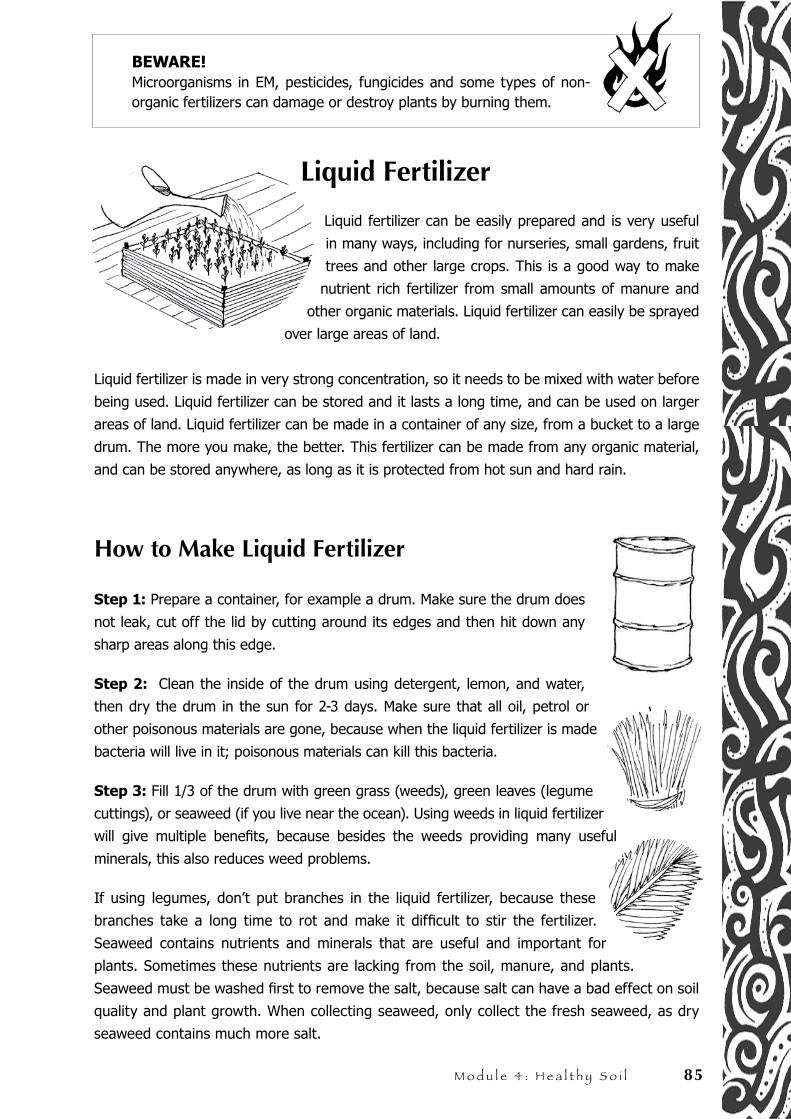
M o d u l e 4 : H e a l t h y S o i l 85
BEWARE! Microorganisms in EM, pesticides, fungicides and some types of non-organic fertilizers can damage or destroy plants by burning them.
Liquid Fertilizer
Liquid fertilizer can be easily prepared and is very useful
in many ways, including for nurseries, small gardens, fruit
trees and other large crops. This is a good way to make
nutrient rich fertilizer from small amounts of manure and
other organic materials. Liquid fertilizer can easily be sprayed
over large areas of land.
Liquid fertilizer is made in very strong concentration, so it needs to be mixed with water before
being used. Liquid fertilizer can be stored and it lasts a long time, and can be used on larger
areas of land. Liquid fertilizer can be made in a container of any size, from a bucket to a large
drum. The more you make, the better. This fertilizer can be made from any organic material,
and can be stored anywhere, as long as it is protected from hot sun and hard rain.
How to Make Liquid Fertilizer
Step 1: Prepare a container, for example a drum. Make sure the drum does
not leak, cut off the lid by cutting around its edges and then hit down any
sharp areas along this edge.
Step 2: Clean the inside of the drum using detergent, lemon, and water,
then dry the drum in the sun for 2-3 days. Make sure that all oil, petrol or
other poisonous materials are gone, because when the liquid fertilizer is made
bacteria will live in it; poisonous materials can kill this bacteria.
Step 3: Fill 1/3 of the drum with green grass (weeds), green leaves (legume
cuttings), or seaweed (if you live near the ocean). Using weeds in liquid fertilizer
will give multiple benefits, because besides the weeds providing many useful
minerals, this also reduces weed problems.
If using legumes, don’t put branches in the liquid fertilizer, because these
branches take a long time to rot and make it difficult to stir the fertilizer.
Seaweed contains nutrients and minerals that are useful and important for
plants. Sometimes these nutrients are lacking from the soil, manure, and plants.
Seaweed must be washed first to remove the salt, because salt can have a bad effect on soil
quality and plant growth. When collecting seaweed, only collect the fresh seaweed, as dry
seaweed contains much more salt.
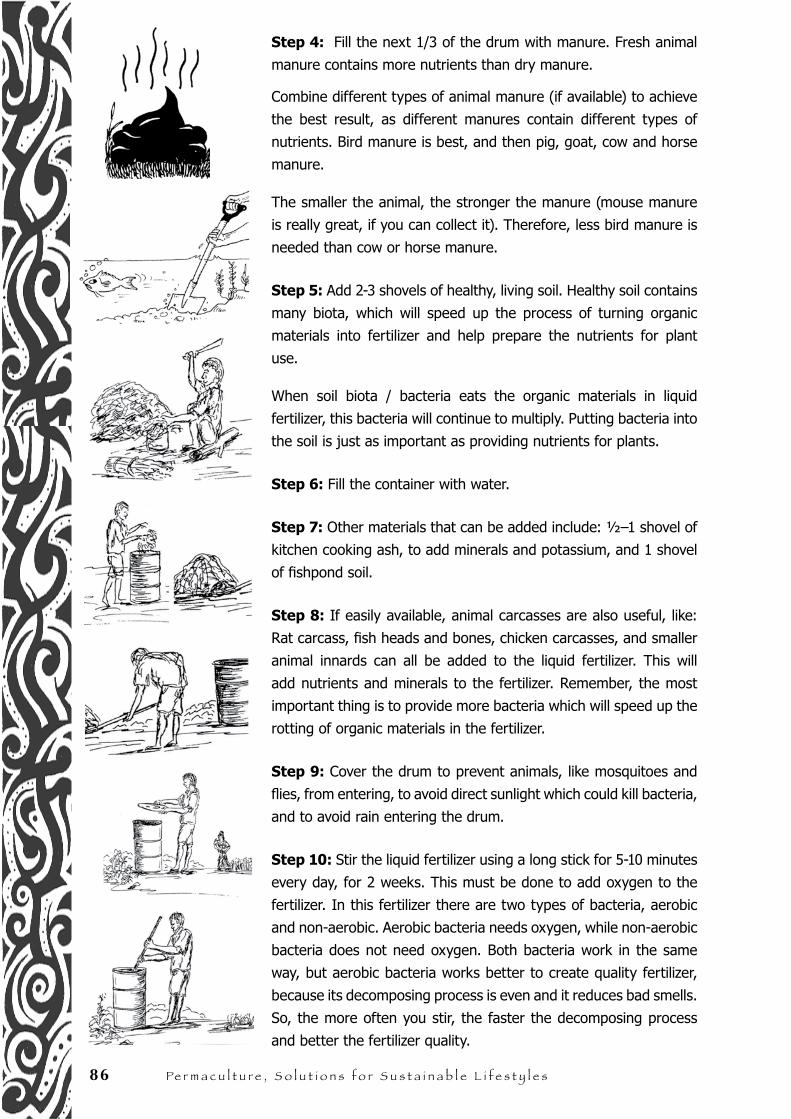
86 Pe r m a c u l t u r e , S o l u t i o n s f o r S u s t a i n a b l e L i f e s t y l e s
Step 4: Fill the next 1/3 of the drum with manure. Fresh animal
manure contains more nutrients than dry manure.
Combine different types of animal manure (if available) to achieve
the best result, as different manures contain different types of
nutrients. Bird manure is best, and then pig, goat, cow and horse
manure.
The smaller the animal, the stronger the manure (mouse manure
is really great, if you can collect it). Therefore, less bird manure is
needed than cow or horse manure.
Step 5: Add 2-3 shovels of healthy, living soil. Healthy soil contains
many biota, which will speed up the process of turning organic
materials into fertilizer and help prepare the nutrients for plant
use.
When soil biota / bacteria eats the organic materials in liquid
fertilizer, this bacteria will continue to multiply. Putting bacteria into
the soil is just as important as providing nutrients for plants.
Step 6: Fill the container with water.
Step 7: Other materials that can be added include: ½–1 shovel of
kitchen cooking ash, to add minerals and potassium, and 1 shovel
of fishpond soil.
Step 8: If easily available, animal carcasses are also useful, like:
Rat carcass, fish heads and bones, chicken carcasses, and smaller
animal innards can all be added to the liquid fertilizer. This will
add nutrients and minerals to the fertilizer. Remember, the most
important thing is to provide more bacteria which will speed up the
rotting of organic materials in the fertilizer.
Step 9: Cover the drum to prevent animals, like mosquitoes and
flies, from entering, to avoid direct sunlight which could kill bacteria,
and to avoid rain entering the drum.
Step 10: Stir the liquid fertilizer using a long stick for 5-10 minutes
every day, for 2 weeks. This must be done to add oxygen to the
fertilizer. In this fertilizer there are two types of bacteria, aerobic
and non-aerobic. Aerobic bacteria needs oxygen, while non-aerobic
bacteria does not need oxygen. Both bacteria work in the same
way, but aerobic bacteria works better to create quality fertilizer,
because its decomposing process is even and it reduces bad smells.
So, the more often you stir, the faster the decomposing process
and better the fertilizer quality.
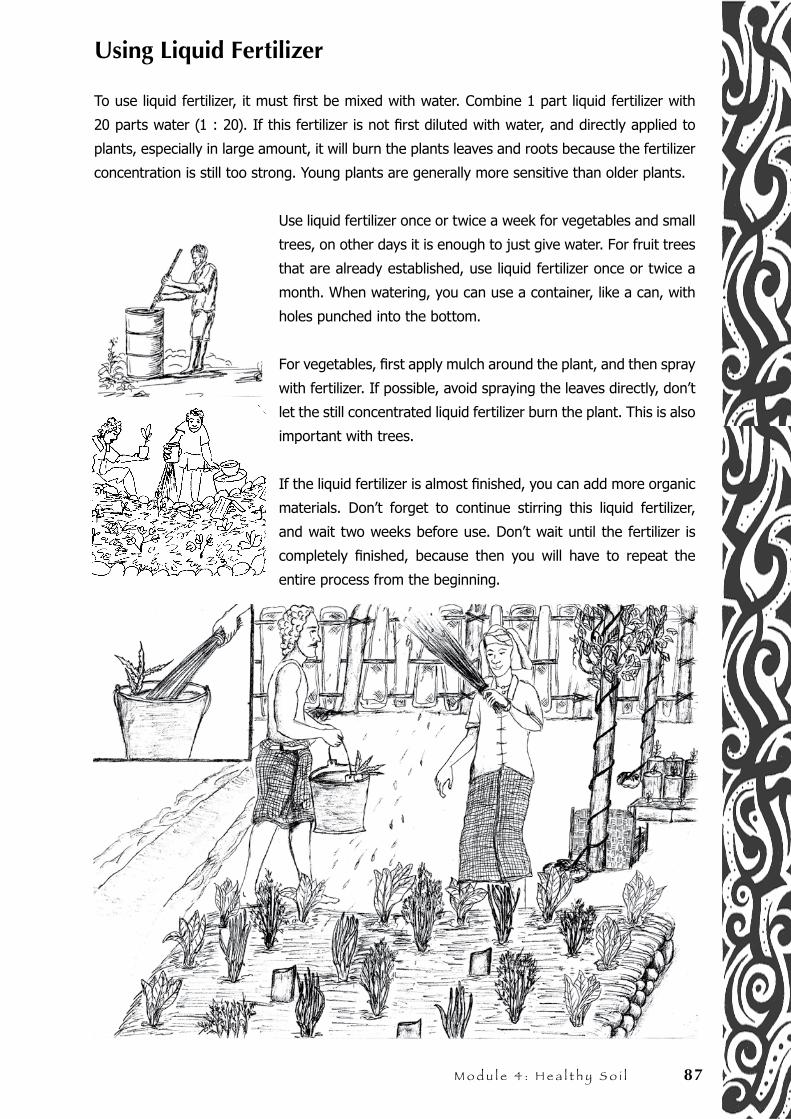
M o d u l e 4 : H e a l t h y S o i l 87
Using Liquid Fertilizer
To use liquid fertilizer, it must first be mixed with water. Combine 1 part liquid fertilizer with
20 parts water (1 : 20). If this fertilizer is not first diluted with water, and directly applied to
plants, especially in large amount, it will burn the plants leaves and roots because the fertilizer
concentration is still too strong. Young plants are generally more sensitive than older plants.
Use liquid fertilizer once or twice a week for vegetables and small
trees, on other days it is enough to just give water. For fruit trees
that are already established, use liquid fertilizer once or twice a
month. When watering, you can use a container, like a can, with
holes punched into the bottom.
For vegetables, first apply mulch around the plant, and then spray
with fertilizer. If possible, avoid spraying the leaves directly, don’t
let the still concentrated liquid fertilizer burn the plant. This is also
important with trees.
If the liquid fertilizer is almost finished, you can add more organic
materials. Don’t forget to continue stirring this liquid fertilizer,
and wait two weeks before use. Don’t wait until the fertilizer is
completely finished, because then you will have to repeat the
entire process from the beginning.
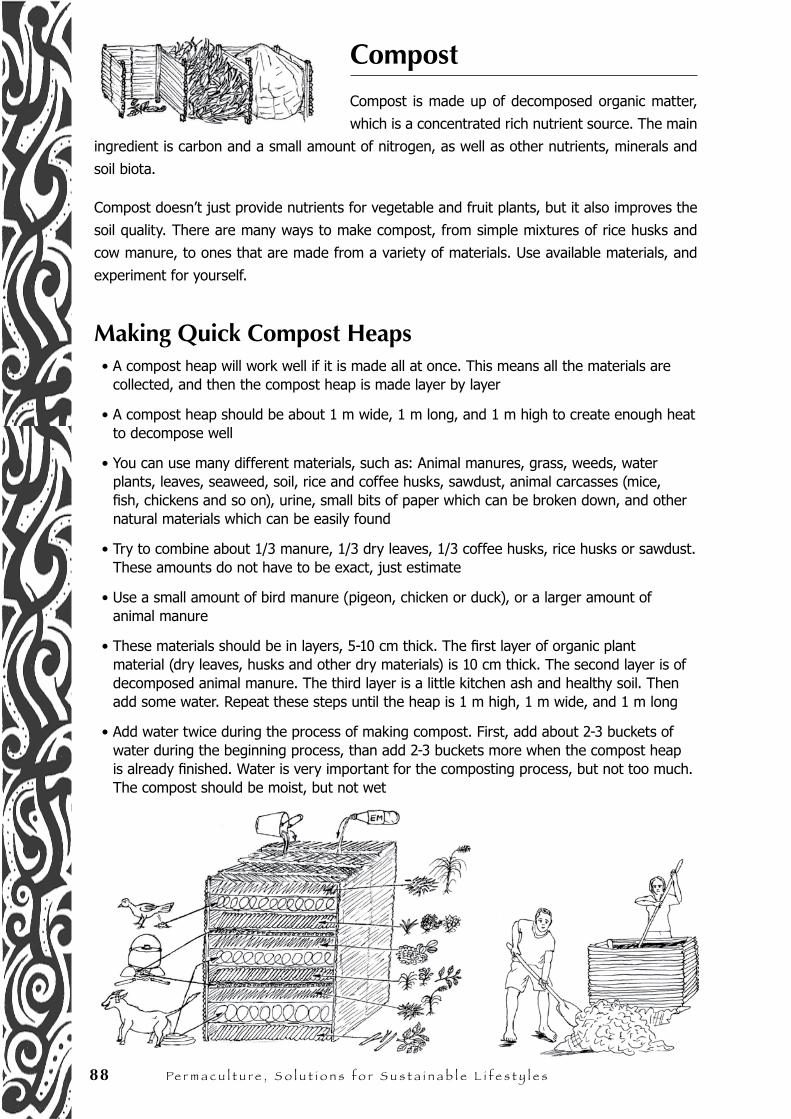
88 Pe r m a c u l t u r e , S o l u t i o n s f o r S u s t a i n a b l e L i f e s t y l e s
Compost
Compost is made up of decomposed organic matter,
which is a concentrated rich nutrient source. The main
ingredient is carbon and a small amount of nitrogen, as well as other nutrients, minerals and
soil biota.
Compost doesn’t just provide nutrients for vegetable and fruit plants, but it also improves the
soil quality. There are many ways to make compost, from simple mixtures of rice husks and
cow manure, to ones that are made from a variety of materials. Use available materials, and
experiment for yourself.
Making Quick Compost Heaps• A compost heap will work well if it is made all at once. This means all the materials are
collected, and then the compost heap is made layer by layer
• A compost heap should be about 1 m wide, 1 m long, and 1 m high to create enough heat to decompose well
• You can use many different materials, such as: Animal manures, grass, weeds, water plants, leaves, seaweed, soil, rice and coffee husks, sawdust, animal carcasses (mice, fish, chickens and so on), urine, small bits of paper which can be broken down, and other natural materials which can be easily found
• Try to combine about 1/3 manure, 1/3 dry leaves, 1/3 coffee husks, rice husks or sawdust. These amounts do not have to be exact, just estimate
• Use a small amount of bird manure (pigeon, chicken or duck), or a larger amount of animal manure
• These materials should be in layers, 5-10 cm thick. The first layer of organic plant material (dry leaves, husks and other dry materials) is 10 cm thick. The second layer is of decomposed animal manure. The third layer is a little kitchen ash and healthy soil. Then add some water. Repeat these steps until the heap is 1 m high, 1 m wide, and 1 m long
• Add water twice during the process of making compost. First, add about 2-3 buckets of water during the beginning process, than add 2-3 buckets more when the compost heap is already finished. Water is very important for the composting process, but not too much. The compost should be moist, but not wet
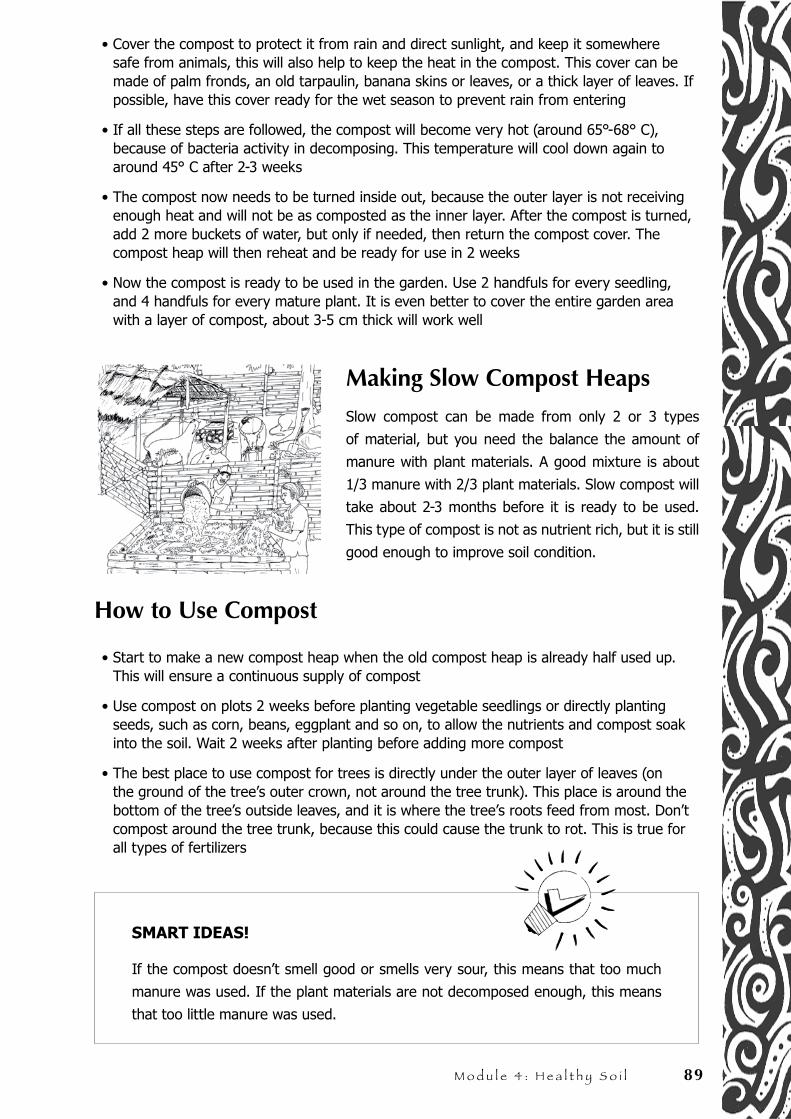
M o d u l e 4 : H e a l t h y S o i l 89
• Cover the compost to protect it from rain and direct sunlight, and keep it somewhere safe from animals, this will also help to keep the heat in the compost. This cover can be made of palm fronds, an old tarpaulin, banana skins or leaves, or a thick layer of leaves. If possible, have this cover ready for the wet season to prevent rain from entering
• If all these steps are followed, the compost will become very hot (around 65°-68° C), because of bacteria activity in decomposing. This temperature will cool down again to around 45° C after 2-3 weeks
• The compost now needs to be turned inside out, because the outer layer is not receiving enough heat and will not be as composted as the inner layer. After the compost is turned, add 2 more buckets of water, but only if needed, then return the compost cover. The compost heap will then reheat and be ready for use in 2 weeks
• Now the compost is ready to be used in the garden. Use 2 handfuls for every seedling, and 4 handfuls for every mature plant. It is even better to cover the entire garden area with a layer of compost, about 3-5 cm thick will work well
Making Slow Compost Heaps
Slow compost can be made from only 2 or 3 types
of material, but you need the balance the amount of
manure with plant materials. A good mixture is about
1/3 manure with 2/3 plant materials. Slow compost will
take about 2-3 months before it is ready to be used.
This type of compost is not as nutrient rich, but it is still
good enough to improve soil condition.
How to Use Compost
• Start to make a new compost heap when the old compost heap is already half used up. This will ensure a continuous supply of compost
• Use compost on plots 2 weeks before planting vegetable seedlings or directly planting seeds, such as corn, beans, eggplant and so on, to allow the nutrients and compost soak into the soil. Wait 2 weeks after planting before adding more compost
• The best place to use compost for trees is directly under the outer layer of leaves (on the ground of the tree’s outer crown, not around the tree trunk). This place is around the bottom of the tree’s outside leaves, and it is where the tree’s roots feed from most. Don’t compost around the tree trunk, because this could cause the trunk to rot. This is true for all types of fertilizers
SMART IDEAS!
If the compost doesn’t smell good or smells very sour, this means that too much
manure was used. If the plant materials are not decomposed enough, this means
that too little manure was used.
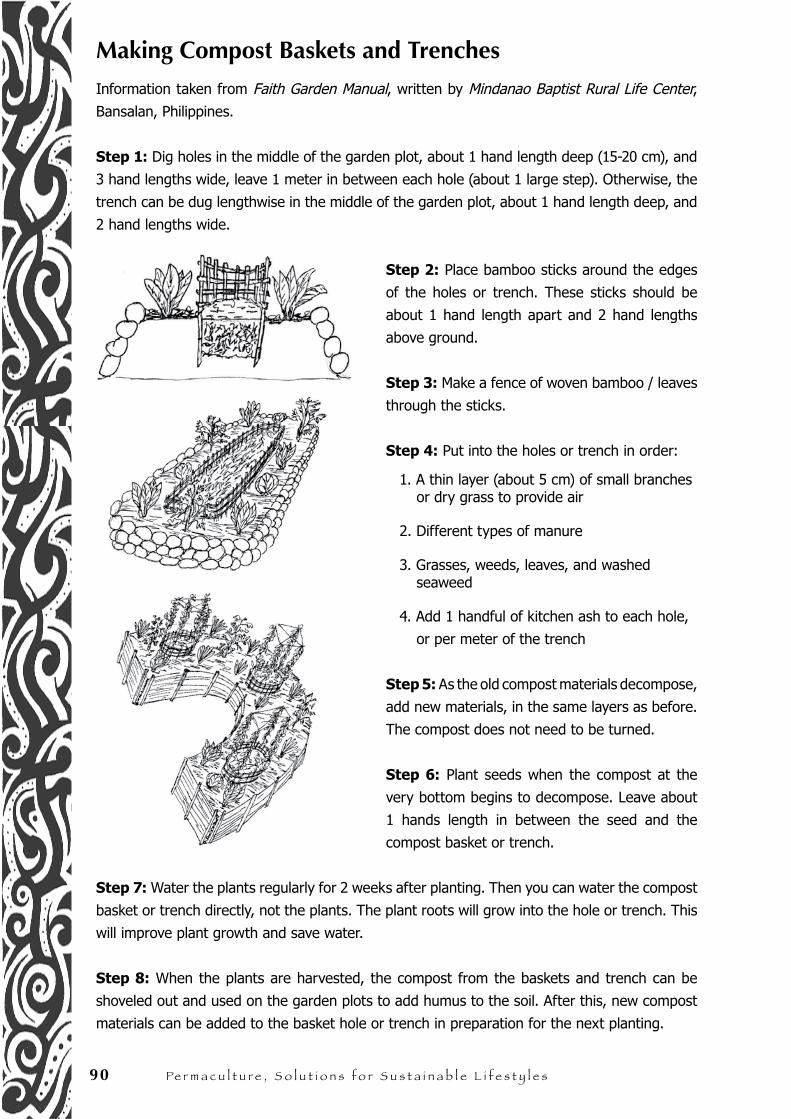
90 Pe r m a c u l t u r e , S o l u t i o n s f o r S u s t a i n a b l e L i f e s t y l e s
Making Compost Baskets and Trenches
Information taken from Faith Garden Manual, written by Mindanao Baptist Rural Life Center, Bansalan, Philippines.
Step 1: Dig holes in the middle of the garden plot, about 1 hand length deep (15-20 cm), and
3 hand lengths wide, leave 1 meter in between each hole (about 1 large step). Otherwise, the
trench can be dug lengthwise in the middle of the garden plot, about 1 hand length deep, and
2 hand lengths wide.
Step 2: Place bamboo sticks around the edges
of the holes or trench. These sticks should be
about 1 hand length apart and 2 hand lengths
above ground.
Step 3: Make a fence of woven bamboo / leaves
through the sticks.
Step 4: Put into the holes or trench in order:
1. A thin layer (about 5 cm) of small branches or dry grass to provide air
2. Different types of manure
3. Grasses, weeds, leaves, and washed seaweed
4. Add 1 handful of kitchen ash to each hole,
or per meter of the trench
Step 5: As the old compost materials decompose,
add new materials, in the same layers as before.
The compost does not need to be turned.
Step 6: Plant seeds when the compost at the
very bottom begins to decompose. Leave about
1 hands length in between the seed and the
compost basket or trench.
Step 7: Water the plants regularly for 2 weeks after planting. Then you can water the compost
basket or trench directly, not the plants. The plant roots will grow into the hole or trench. This
will improve plant growth and save water.
Step 8: When the plants are harvested, the compost from the baskets and trench can be
shoveled out and used on the garden plots to add humus to the soil. After this, new compost
materials can be added to the basket hole or trench in preparation for the next planting.
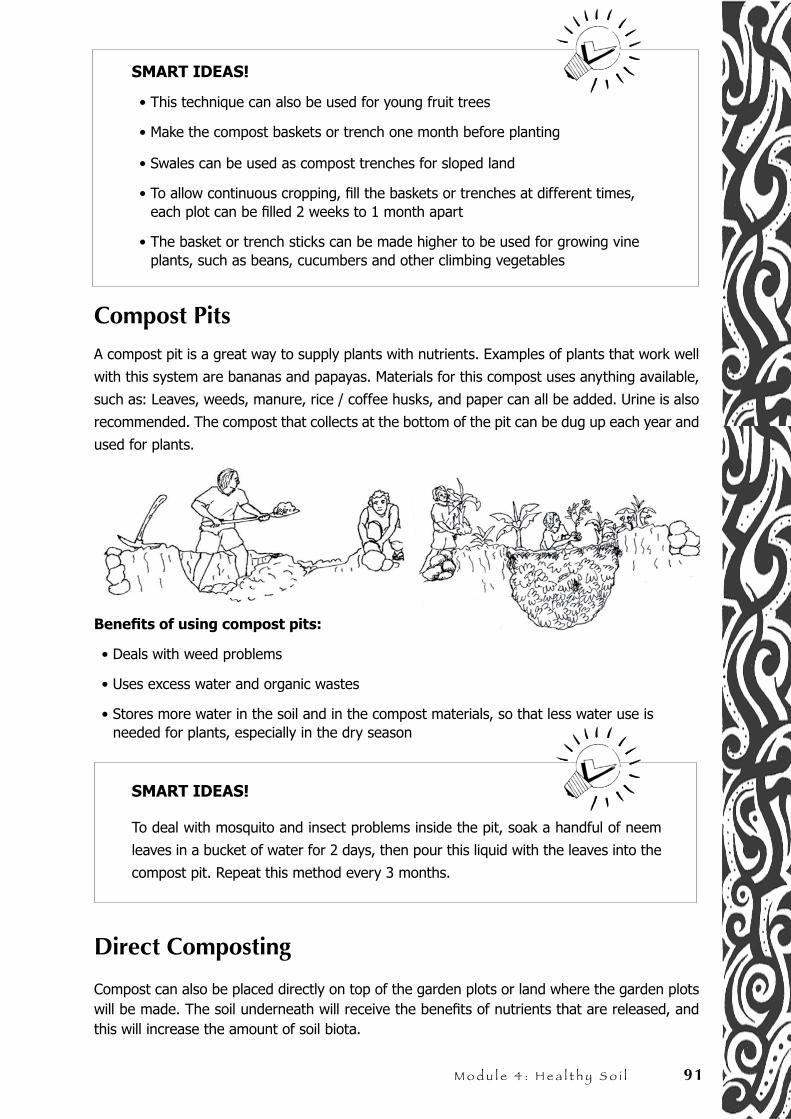
M o d u l e 4 : H e a l t h y S o i l 91
SMART IDEAS!
• This technique can also be used for young fruit trees
• Make the compost baskets or trench one month before planting
• Swales can be used as compost trenches for sloped land
• To allow continuous cropping, fill the baskets or trenches at different times, each plot can be filled 2 weeks to 1 month apart
• The basket or trench sticks can be made higher to be used for growing vine plants, such as beans, cucumbers and other climbing vegetables
Compost Pits
A compost pit is a great way to supply plants with nutrients. Examples of plants that work well
with this system are bananas and papayas. Materials for this compost uses anything available,
such as: Leaves, weeds, manure, rice / coffee husks, and paper can all be added. Urine is also
recommended. The compost that collects at the bottom of the pit can be dug up each year and
used for plants.
Benefits of using compost pits:
• Deals with weed problems
• Uses excess water and organic wastes
• Stores more water in the soil and in the compost materials, so that less water use is needed for plants, especially in the dry season
SMART IDEAS!
To deal with mosquito and insect problems inside the pit, soak a handful of neem
leaves in a bucket of water for 2 days, then pour this liquid with the leaves into the
compost pit. Repeat this method every 3 months.
Direct Composting
Compost can also be placed directly on top of the garden plots or land where the garden plots will be made. The soil underneath will receive the benefits of nutrients that are released, and this will increase the amount of soil biota.
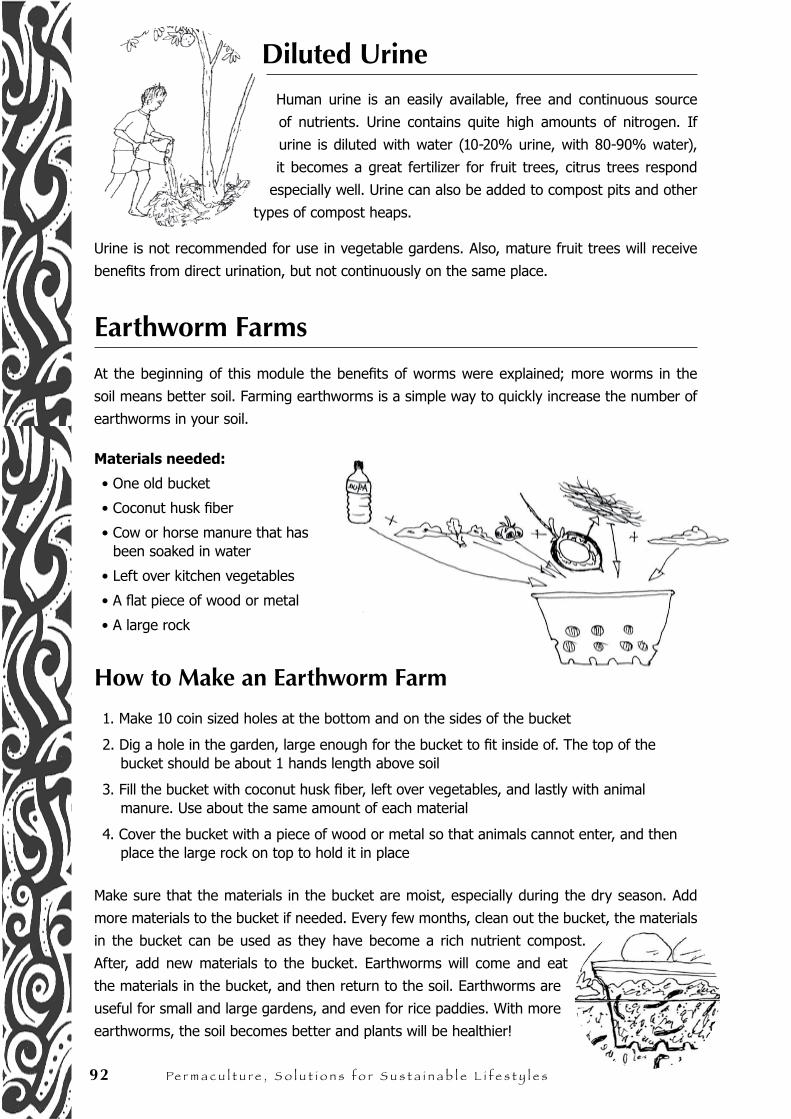
92 Pe r m a c u l t u r e , S o l u t i o n s f o r S u s t a i n a b l e L i f e s t y l e s
Diluted UrineHuman urine is an easily available, free and continuous source
of nutrients. Urine contains quite high amounts of nitrogen. If
urine is diluted with water (10-20% urine, with 80-90% water),
it becomes a great fertilizer for fruit trees, citrus trees respond
especially well. Urine can also be added to compost pits and other
types of compost heaps.
Urine is not recommended for use in vegetable gardens. Also, mature fruit trees will receive
benefits from direct urination, but not continuously on the same place.
Earthworm Farms
At the beginning of this module the benefits of worms were explained; more worms in the
soil means better soil. Farming earthworms is a simple way to quickly increase the number of
earthworms in your soil. Materials needed:
• One old bucket
• Coconut husk fiber
• Cow or horse manure that has been soaked in water
• Left over kitchen vegetables
• A flat piece of wood or metal
• A large rock
How to Make an Earthworm Farm
1. Make 10 coin sized holes at the bottom and on the sides of the bucket
2. Dig a hole in the garden, large enough for the bucket to fit inside of. The top of the bucket should be about 1 hands length above soil
3. Fill the bucket with coconut husk fiber, left over vegetables, and lastly with animal manure. Use about the same amount of each material
4. Cover the bucket with a piece of wood or metal so that animals cannot enter, and then place the large rock on top to hold it in place
Make sure that the materials in the bucket are moist, especially during the dry season. Add
more materials to the bucket if needed. Every few months, clean out the bucket, the materials
in the bucket can be used as they have become a rich nutrient compost.
After, add new materials to the bucket. Earthworms will come and eat
the materials in the bucket, and then return to the soil. Earthworms are
useful for small and large gardens, and even for rice paddies. With more
earthworms, the soil becomes better and plants will be healthier!
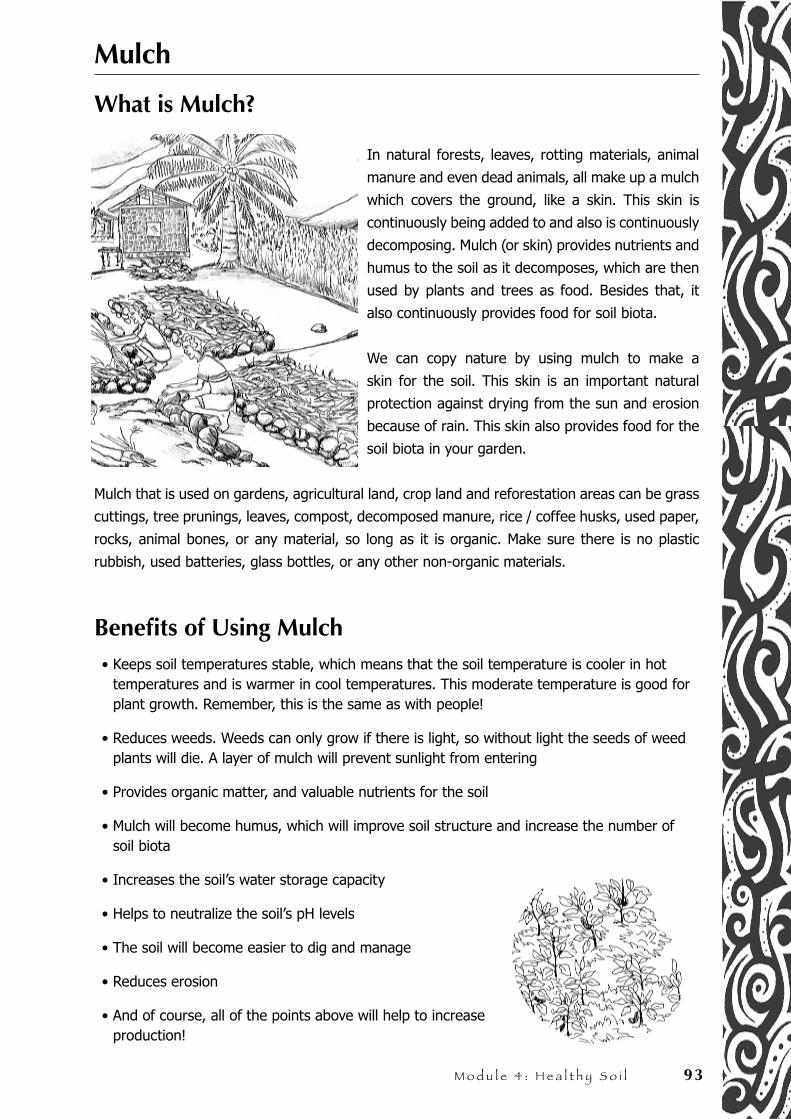
M o d u l e 4 : H e a l t h y S o i l 93
Mulch
What is Mulch?
In natural forests, leaves, rotting materials, animal
manure and even dead animals, all make up a mulch
which covers the ground, like a skin. This skin is
continuously being added to and also is continuously
decomposing. Mulch (or skin) provides nutrients and
humus to the soil as it decomposes, which are then
used by plants and trees as food. Besides that, it
also continuously provides food for soil biota.
We can copy nature by using mulch to make a
skin for the soil. This skin is an important natural
protection against drying from the sun and erosion
because of rain. This skin also provides food for the
soil biota in your garden.
Mulch that is used on gardens, agricultural land, crop land and reforestation areas can be grass
cuttings, tree prunings, leaves, compost, decomposed manure, rice / coffee husks, used paper,
rocks, animal bones, or any material, so long as it is organic. Make sure there is no plastic
rubbish, used batteries, glass bottles, or any other non-organic materials.
Benefits of Using Mulch• Keeps soil temperatures stable, which means that the soil temperature is cooler in hot
temperatures and is warmer in cool temperatures. This moderate temperature is good for plant growth. Remember, this is the same as with people!
• Reduces weeds. Weeds can only grow if there is light, so without light the seeds of weed plants will die. A layer of mulch will prevent sunlight from entering
• Provides organic matter, and valuable nutrients for the soil
• Mulch will become humus, which will improve soil structure and increase the number of soil biota
• Increases the soil’s water storage capacity
• Helps to neutralize the soil’s pH levels
• The soil will become easier to dig and manage
• Reduces erosion
• And of course, all of the points above will help to increase production!
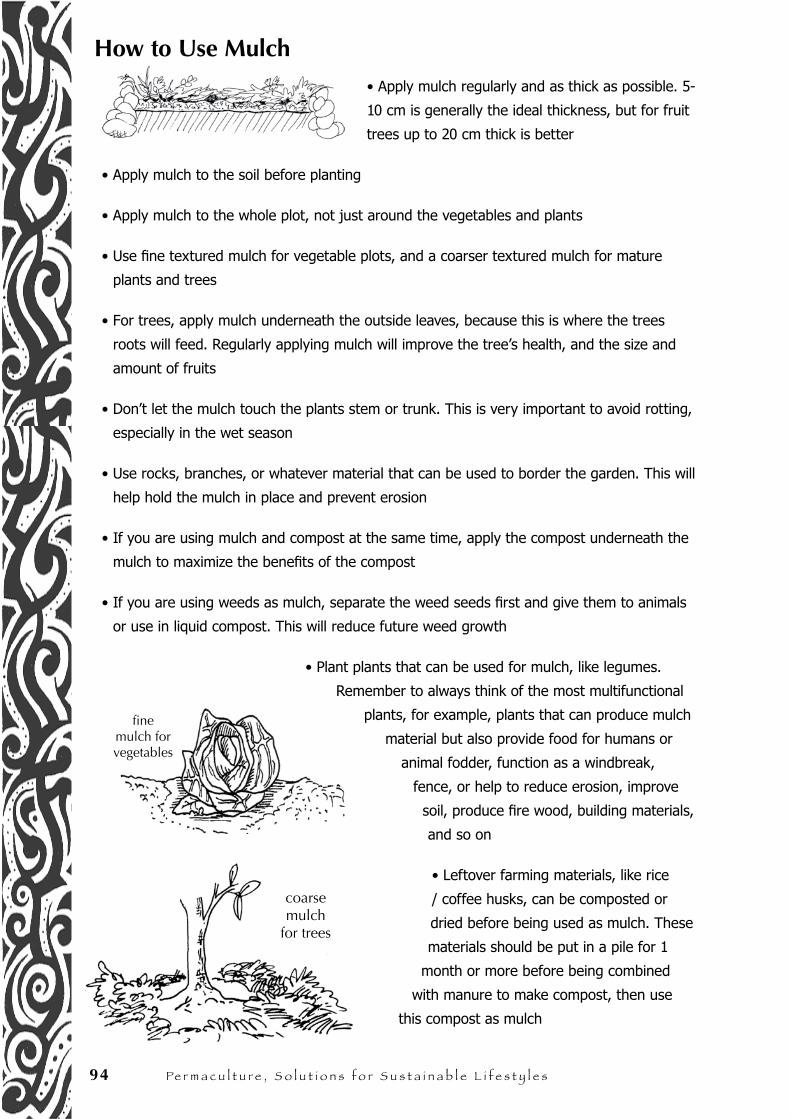
94 Pe r m a c u l t u r e , S o l u t i o n s f o r S u s t a i n a b l e L i f e s t y l e s
How to Use Mulch• Apply mulch regularly and as thick as possible. 5-
10 cm is generally the ideal thickness, but for fruit
trees up to 20 cm thick is better
• Apply mulch to the soil before planting
• Apply mulch to the whole plot, not just around the vegetables and plants
• Use fine textured mulch for vegetable plots, and a coarser textured mulch for mature
plants and trees
• For trees, apply mulch underneath the outside leaves, because this is where the trees
roots will feed. Regularly applying mulch will improve the tree’s health, and the size and
amount of fruits
• Don’t let the mulch touch the plants stem or trunk. This is very important to avoid rotting,
especially in the wet season
• Use rocks, branches, or whatever material that can be used to border the garden. This will
help hold the mulch in place and prevent erosion
• If you are using mulch and compost at the same time, apply the compost underneath the
mulch to maximize the benefits of the compost
• If you are using weeds as mulch, separate the weed seeds first and give them to animals
or use in liquid compost. This will reduce future weed growth
• Plant plants that can be used for mulch, like legumes.
Remember to always think of the most multifunctional
plants, for example, plants that can produce mulch
material but also provide food for humans or
animal fodder, function as a windbreak,
fence, or help to reduce erosion, improve
soil, produce fire wood, building materials,
and so on
• Leftover farming materials, like rice
/ coffee husks, can be composted or
dried before being used as mulch. These
materials should be put in a pile for 1
month or more before being combined
with manure to make compost, then use
this compost as mulch
coarse mulch
for trees
fine mulch for vegetables
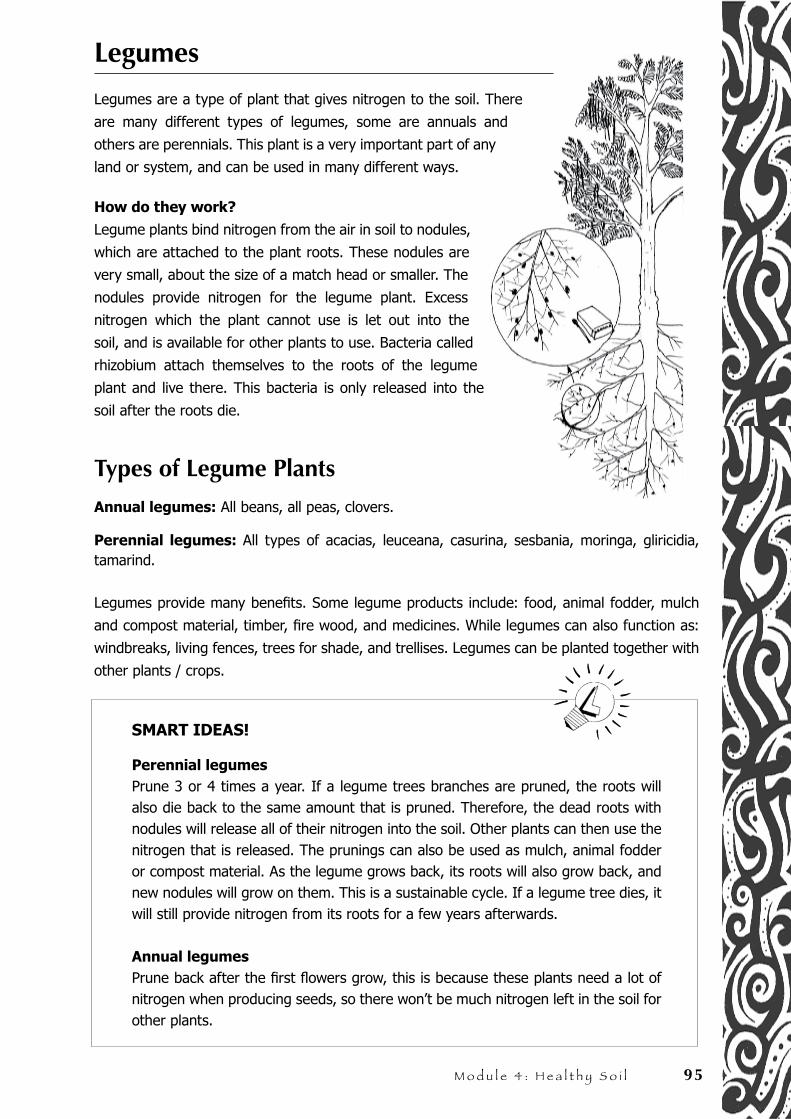
M o d u l e 4 : H e a l t h y S o i l 95
Legumes
Legumes are a type of plant that gives nitrogen to the soil. There
are many different types of legumes, some are annuals and
others are perennials. This plant is a very important part of any
land or system, and can be used in many different ways.
How do they work?
Legume plants bind nitrogen from the air in soil to nodules,
which are attached to the plant roots. These nodules are
very small, about the size of a match head or smaller. The
nodules provide nitrogen for the legume plant. Excess
nitrogen which the plant cannot use is let out into the
soil, and is available for other plants to use. Bacteria called
rhizobium attach themselves to the roots of the legume
plant and live there. This bacteria is only released into the
soil after the roots die.
Types of Legume Plants
Annual legumes: All beans, all peas, clovers.
Perennial legumes: All types of acacias, leuceana, casurina, sesbania, moringa, gliricidia, tamarind.
Legumes provide many benefits. Some legume products include: food, animal fodder, mulch
and compost material, timber, fire wood, and medicines. While legumes can also function as:
windbreaks, living fences, trees for shade, and trellises. Legumes can be planted together with
other plants / crops.
SMART IDEAS!
Perennial legumesPrune 3 or 4 times a year. If a legume trees branches are pruned, the roots will also die back to the same amount that is pruned. Therefore, the dead roots with nodules will release all of their nitrogen into the soil. Other plants can then use the nitrogen that is released. The prunings can also be used as mulch, animal fodder or compost material. As the legume grows back, its roots will also grow back, and new nodules will grow on them. This is a sustainable cycle. If a legume tree dies, it will still provide nitrogen from its roots for a few years afterwards.
Annual legumesPrune back after the first flowers grow, this is because these plants need a lot of nitrogen when producing seeds, so there won’t be much nitrogen left in the soil for other plants.
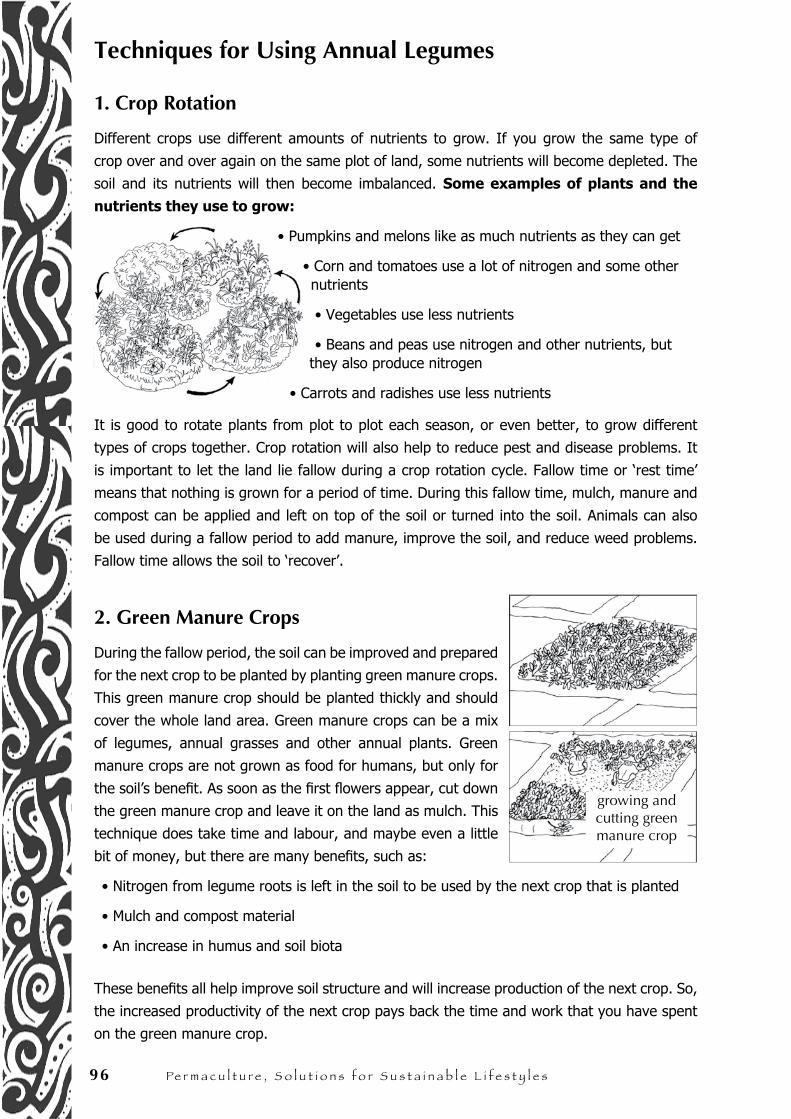
96 Pe r m a c u l t u r e , S o l u t i o n s f o r S u s t a i n a b l e L i f e s t y l e s
Techniques for Using Annual Legumes
1. Crop Rotation
Different crops use different amounts of nutrients to grow. If you grow the same type of
crop over and over again on the same plot of land, some nutrients will become depleted. The
soil and its nutrients will then become imbalanced. Some examples of plants and the
nutrients they use to grow:
• Pumpkins and melons like as much nutrients as they can get
• Corn and tomatoes use a lot of nitrogen and some other nutrients
• Vegetables use less nutrients
• Beans and peas use nitrogen and other nutrients, but they also produce nitrogen
• Carrots and radishes use less nutrients
It is good to rotate plants from plot to plot each season, or even better, to grow different
types of crops together. Crop rotation will also help to reduce pest and disease problems. It
is important to let the land lie fallow during a crop rotation cycle. Fallow time or ‘rest time’
means that nothing is grown for a period of time. During this fallow time, mulch, manure and
compost can be applied and left on top of the soil or turned into the soil. Animals can also
be used during a fallow period to add manure, improve the soil, and reduce weed problems.
Fallow time allows the soil to ‘recover’.
2. Green Manure Crops
During the fallow period, the soil can be improved and prepared
for the next crop to be planted by planting green manure crops.
This green manure crop should be planted thickly and should
cover the whole land area. Green manure crops can be a mix
of legumes, annual grasses and other annual plants. Green
manure crops are not grown as food for humans, but only for
the soil’s benefit. As soon as the first flowers appear, cut down
the green manure crop and leave it on the land as mulch. This
technique does take time and labour, and maybe even a little
bit of money, but there are many benefits, such as:
• Nitrogen from legume roots is left in the soil to be used by the next crop that is planted
• Mulch and compost material
• An increase in humus and soil biota
These benefits all help improve soil structure and will increase production of the next crop. So,
the increased productivity of the next crop pays back the time and work that you have spent
on the green manure crop.
growing and cutting green manure crop
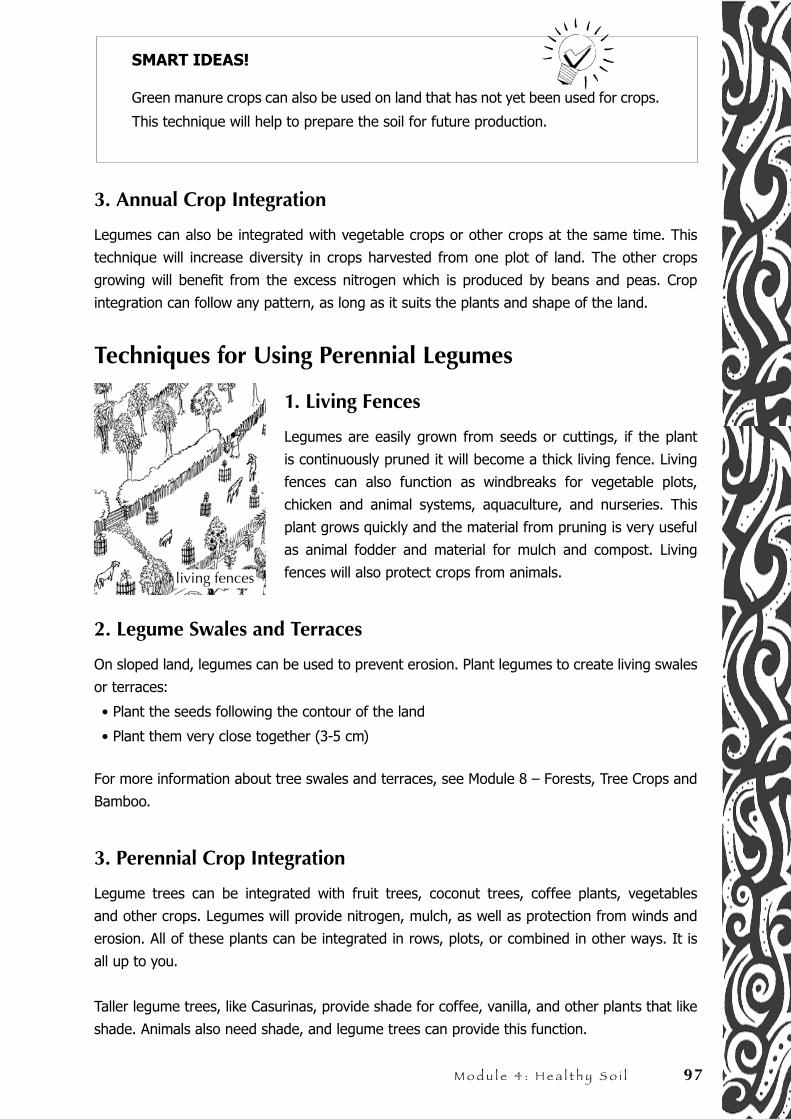
M o d u l e 4 : H e a l t h y S o i l 97
SMART IDEAS!
Green manure crops can also be used on land that has not yet been used for crops.
This technique will help to prepare the soil for future production.
3. Annual Crop Integration
Legumes can also be integrated with vegetable crops or other crops at the same time. This
technique will increase diversity in crops harvested from one plot of land. The other crops
growing will benefit from the excess nitrogen which is produced by beans and peas. Crop
integration can follow any pattern, as long as it suits the plants and shape of the land.
Techniques for Using Perennial Legumes
1. Living Fences
Legumes are easily grown from seeds or cuttings, if the plant
is continuously pruned it will become a thick living fence. Living
fences can also function as windbreaks for vegetable plots,
chicken and animal systems, aquaculture, and nurseries. This
plant grows quickly and the material from pruning is very useful
as animal fodder and material for mulch and compost. Living
fences will also protect crops from animals.
2. Legume Swales and Terraces
On sloped land, legumes can be used to prevent erosion. Plant legumes to create living swales
or terraces:
• Plant the seeds following the contour of the land
• Plant them very close together (3-5 cm)
For more information about tree swales and terraces, see Module 8 – Forests, Tree Crops and
Bamboo.
3. Perennial Crop Integration
Legume trees can be integrated with fruit trees, coconut trees, coffee plants, vegetables
and other crops. Legumes will provide nitrogen, mulch, as well as protection from winds and
erosion. All of these plants can be integrated in rows, plots, or combined in other ways. It is
all up to you.
Taller legume trees, like Casurinas, provide shade for coffee, vanilla, and other plants that like
shade. Animals also need shade, and legume trees can provide this function.
living fences
98 Pe r m a c u l t u r e , S o l u t i o n s f o r S u s t a i n a b l e L i f e s t y l e s
4. Pioneer Trees
Pioneer trees are trees that are planted
first in a system. They are used to
prevent erosion, provide protection for
future crops, improve the soil and provide
mulch. Pioneer trees often grow in hard
soil conditions. Because of this, use
trees that don’t need a lot of water, and
are most endurable in hard conditions.
Legume trees can be pioneer trees,
because they:
• Easily grow from seeds or cuttings
• Grow quickly
• Provide nitrogen for other crops
SMART IDEAS!
• Almost all types of legume trees have short life spans. Use short life legume trees as pioneer trees, and longer life legume trees for windbreaks, shade and living fences
• Plant many more legume trees as pioneer trees, and then after a year or two, cut down the weaker or smaller trees to be used as mulch and to provide space for new trees
• If legume trees are planted on sloped land, when their nitrogen is released into the soil, it will slowly move down to lower areas, so lower areas will receive enough nutrient supply
• Remember, legumes are multifunctional. They provide many benefits. Use as many of these benefits as possible
Fertile Soil
If we have fertile, healthy soil, this will be a strong
foundation for continually producing productive
sustainable crops, whether for a small home
garden or a large agricultural farm. If the soil is
well managed in a healthy farm system, the soil
will become more fertile over time and continually
produce healthy food and crops.
M o d u l e 4 : H e a l t h y S o i l 99
Non-organic Fertilizers
In the last few decades, the use of non-organic fertilizers has increased dramatically all over the
world. In Indonesia, the practice of using non-organic fertilizer is supported by a government
program to increase farming produce. So, almost all Village Cooperations (KUDs) and some
farming stores sell non-organic fertilizers directly to farmers. However, besides the high prices of
non-organic fertilizers, even if used correctly by farmers, they only provide short term benefits,
which will not last in the long run.
The information above is only the writers opinion, and an attempt to analyze and suggest
to farmers that if we do use chemical materials or non-organic fertilizers, we should truly
understand the negative effects of the materials on our environment. Farmers in Indonesia
often have difficulty accessing information about these topics, in part because there are not a
lot of field workers that really understand such topics.
Once we damage the land, it will take a long time for the land to recover to its normal condition,
when of course food production for community needs must still be met. If non-organic fertilizers
are being used, water irrigation must be good enough to supply even more water for crops,
because non-organic fertilizers stimulate plants to soak up more nutrients and water from the
soil than what they normally need for growth. Non-organic fertilizers are similar to stimulating
medicines.
If the practice of using non-organic fertilizers continues, in time the nutrients in the soil will be
used up, the amount of acidity in soils will increase, bacteria / microorganisms in the soil will
die, soil structure will deteriorate, and in the end farmers and the soil will be dependant on non-
organic fertilizers indefinitely. Also, many non-organic fertilizers do not provide all the nutrients
and minerals the plants need to grow.
Even in highly developed countries, where there is good access to information, many problems are
still experienced due to use of non-organic materials, let alone in still developing countries.
Some serious problems that can happen are health problems (sometimes skin, lungs, and even
cancer), and problems to do with soil, such as too many nutrients in the soil. If there are too
many nutrients in the soil:
• Nutrient ‘lock up’ will occur, which means that there are nutrients stored in the soil, but they are not available to plants for use
• Excess nutrients will be wasted, especially nitrogen, and washed away by water into wells, ponds, rivers and oceans. This also causes problems for water quality, which can effect fish and water plants, animals, humans and all living things in the surrounding environment
Another thing to consider, besides the negative impacts on the environment and ourselves, is
that non-organic fertilizers are expensive, while it is not definite that a farmer’s produce will sell
to the market. This can make it difficult for farmer to pay back the money or loan they have
used to buy non-organic fertilizers.

100 Pe r m a c u l t u r e , S o l u t i o n s f o r S u s t a i n a b l e L i f e s t y l e s
N o t e s . . .
Pe
rma
cu
ltu
re R
eso
urc
e B
oo
k M
od
ule
5.
Se
ed
Sav
ing
& N
urs
eri
es
M o d u l e N o 5 .
Seed Saving
& Nurseries

102 Pe r m a c u l t u r e , S o l u t i o n s f o r S u s t a i n a b l e l i f e s t y l e s
N o t e s . . .
M o d u l e 5 : S e e d S a v i n g & N u r s e r i e s 103
Saving and using local seeds is one of the most important methods
for strengthening agriculture and increasing plant diversity.
Why? Because:
• It is inexpensive and easy to do, anyone can collect and save seeds
• It will increase the amount and range of foods that can be grown
• Seeds are valuable, they can be exchanged with other seeds or sold through a community seed bank
• Plant quality will naturally improve from year to year
Local seeds are adapted to local conditions. As these seeds grow in the local climate and soils,
they become stronger. For example, if someone from Indonesia goes to live in England, it will
take a long time for him / her to adapt to the cold climate, the people, language and culture.
It is the same with seeds and plants. The plants which grow healthiest and strongest are the
plants that can become the seed source.
Pollination
Pollination is a process a plant uses to produce fruits and seeds.
During pollination, the pollen from the male part of a plant fertilizes
the female part of a plant. This pollination process usually happens in
a plants flower. Once the female part of plant is pollinated, the plant
will produce fruit and / or seed. Different pollination techniques are
used by different types of plants, for example:
1. Beans, lettuce, tomato, cabbage and chilli are all plants which
have male and female parts inside the same flower
2. Pumpkin, melon, cucumber and corn are plants which have male
and female parts separate, on the same plant. These plants
need insects, wind, or human hands to fertilize
3. Papaya and salak are plants which have separate male and
female plants, these plants need more than one plant to fertilize
SMART IDEAS!
The more insects there are in the garden, the more pollination will happen. Flowers, food, plant diversity and ponds will attract insects to your garden.
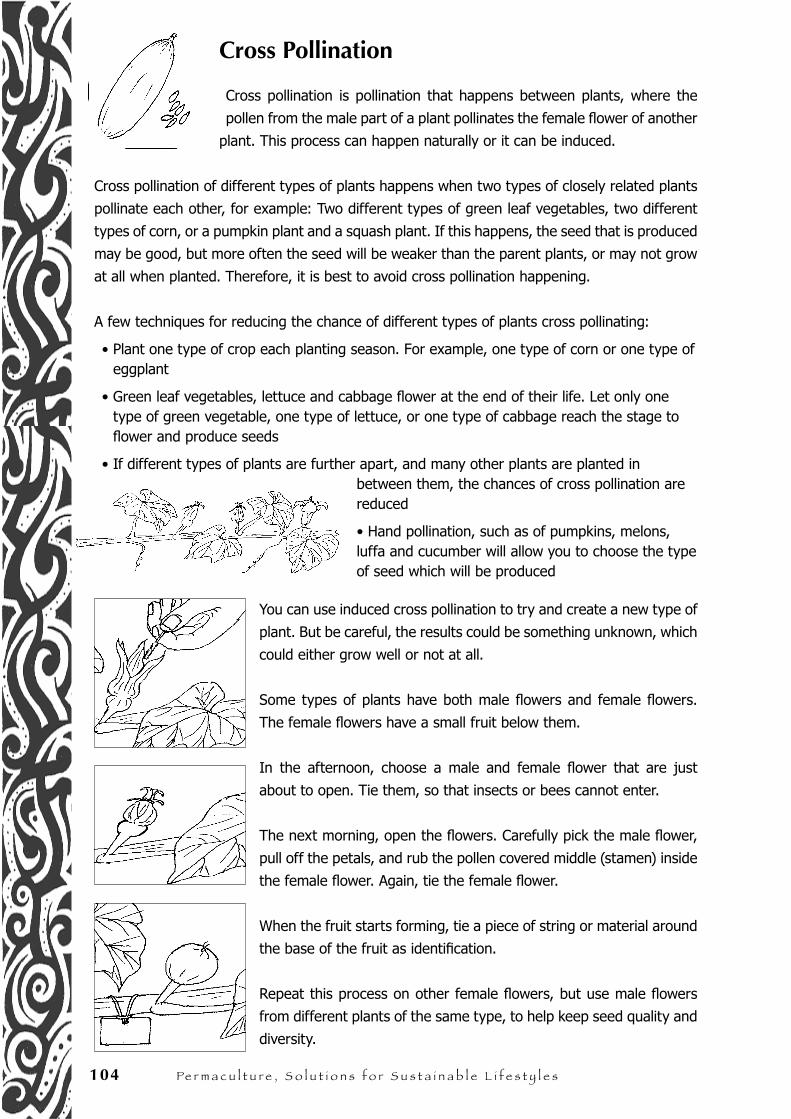
104 Pe r m a c u l t u r e , S o l u t i o n s f o r S u s t a i n a b l e l i f e s t y l e s
Cross Pollination
Cross pollination is pollination that happens between plants, where the
pollen from the male part of a plant pollinates the female flower of another
plant. This process can happen naturally or it can be induced.
Cross pollination of different types of plants happens when two types of closely related plants
pollinate each other, for example: Two different types of green leaf vegetables, two different
types of corn, or a pumpkin plant and a squash plant. If this happens, the seed that is produced
may be good, but more often the seed will be weaker than the parent plants, or may not grow
at all when planted. Therefore, it is best to avoid cross pollination happening.
A few techniques for reducing the chance of different types of plants cross pollinating:
• Plant one type of crop each planting season. For example, one type of corn or one type of eggplant
• Green leaf vegetables, lettuce and cabbage flower at the end of their life. Let only one type of green vegetable, one type of lettuce, or one type of cabbage reach the stage to flower and produce seeds
• If different types of plants are further apart, and many other plants are planted in between them, the chances of cross pollination are reduced
• Hand pollination, such as of pumpkins, melons, luffa and cucumber will allow you to choose the type of seed which will be produced
You can use induced cross pollination to try and create a new type of
plant. But be careful, the results could be something unknown, which
could either grow well or not at all.
Some types of plants have both male flowers and female flowers.
The female flowers have a small fruit below them.
In the afternoon, choose a male and female flower that are just
about to open. Tie them, so that insects or bees cannot enter.
The next morning, open the flowers. Carefully pick the male flower,
pull off the petals, and rub the pollen covered middle (stamen) inside
the female flower. Again, tie the female flower.
When the fruit starts forming, tie a piece of string or material around
the base of the fruit as identification.
Repeat this process on other female flowers, but use male flowers
from different plants of the same type, to help keep seed quality and
diversity.

M o d u l e 5 : S e e d S a v i n g & N u r s e r i e s 105
Introducing New Varieties of Seeds and Plants
New varieties of plants can be grown to add diversity of plants. Sometimes introducing new
types of plants, grains, fruits and vegetables can increase crop yields. Don’t forget to label
every new type, so that it can be easily identified.
If a new type of seed or plant is introduced:
• Always use non-hybrid varieties of seed. Non-hybrid seeds can be saved and planted again each year, but hybrid seeds must be bought every planting season. Hybrid seeds are produced from two or more varieties of plants. Hybrid plants do not produce seeds that can be replanted. If they do produce seeds, the seeds will not be the same type of plant and the quality of the next crop will be poorer
• Plant test crops first to find out if plants grow well and produce well. A simple test is to plant 3 small plots of the new type of vegetable in the garden, each plot should be 3 m x 1 m. Each test plot should be in a different location, but grown using the same techniques. If the plants grow well, they can be planted in larger plots next time. This will help increase crop variety, but will still save a lot of time, work and money if the crop does not grow well
BEWARE!
Be careful to not introduce new pests or diseases:
• From one area to another. Check the seeds for insects or insect eggs. Remove seed pods and any plant materials. Wash the seeds until clean and dry. Cover the seeds with wood ash to avoid insect problems. A small amount of dried neem leaf, crushed and mixed in with the seeds, will help to kill insects and their eggs
• From overseas. A countries government should give more attention to the quarantine department. The regulations should be followed to ensure that new diseases and pests do not enter
Potential Problems
New plants that are introduced are at risk of becoming a problem in the future, for example if the
plant spreads quickly and becomes a weed which could disrupt the local environment. This can
happen with any type of plant, even plants that are very productive can become a problem.
Research the following about any new plant before it is introduced:
• What is its growing habit?
• Does it spread naturally? For example, do animals spread the seeds?
• Has the plant caused problems in other places?
• Does the plant suffer from diseases which could spread to new areas?
This is very important for protecting our environment and resources for the future.
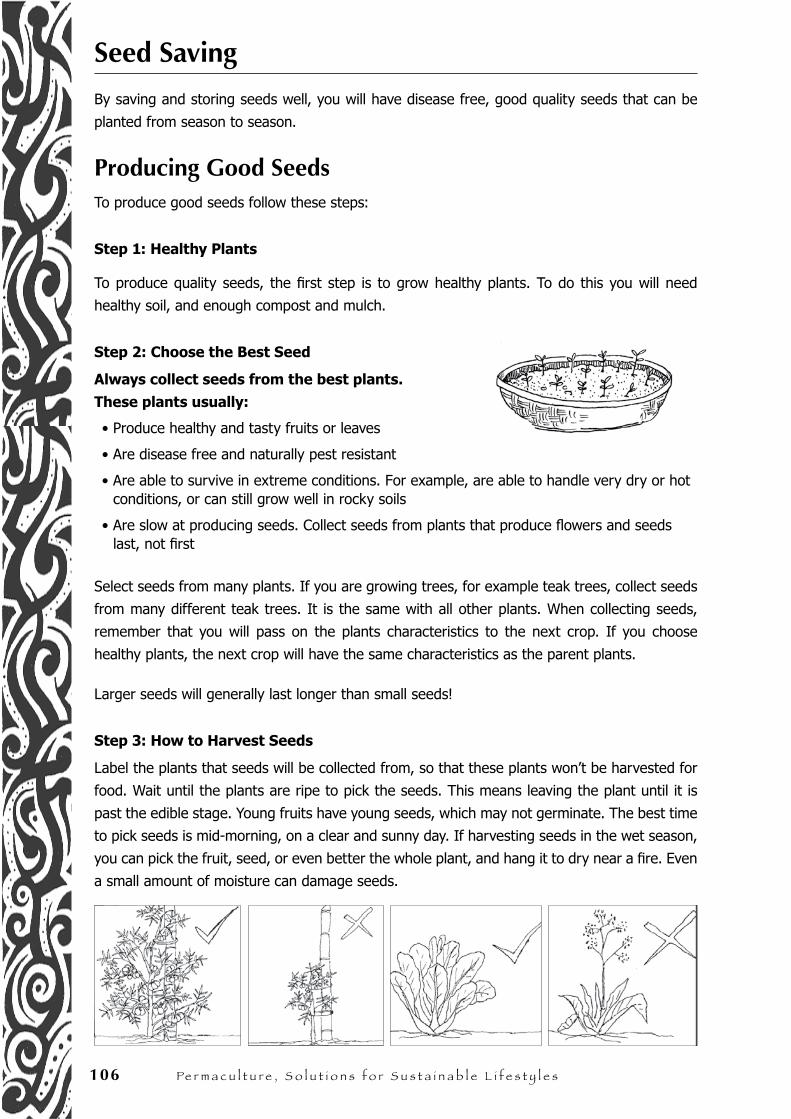
106 Pe r m a c u l t u r e , S o l u t i o n s f o r S u s t a i n a b l e l i f e s t y l e s
Seed Saving
By saving and storing seeds well, you will have disease free, good quality seeds that can be
planted from season to season.
Producing Good SeedsTo produce good seeds follow these steps:
Step 1: Healthy Plants
To produce quality seeds, the first step is to grow healthy plants. To do this you will need
healthy soil, and enough compost and mulch.
Step 2: Choose the Best Seed
Always collect seeds from the best plants.
These plants usually:
• Produce healthy and tasty fruits or leaves
• Are disease free and naturally pest resistant
• Are able to survive in extreme conditions. For example, are able to handle very dry or hot conditions, or can still grow well in rocky soils
• Are slow at producing seeds. Collect seeds from plants that produce flowers and seeds last, not first
Select seeds from many plants. If you are growing trees, for example teak trees, collect seeds
from many different teak trees. It is the same with all other plants. When collecting seeds,
remember that you will pass on the plants characteristics to the next crop. If you choose
healthy plants, the next crop will have the same characteristics as the parent plants.
Larger seeds will generally last longer than small seeds!
Step 3: How to Harvest Seeds
Label the plants that seeds will be collected from, so that these plants won’t be harvested for
food. Wait until the plants are ripe to pick the seeds. This means leaving the plant until it is
past the edible stage. Young fruits have young seeds, which may not germinate. The best time
to pick seeds is mid-morning, on a clear and sunny day. If harvesting seeds in the wet season,
you can pick the fruit, seed, or even better the whole plant, and hang it to dry near a fire. Even
a small amount of moisture can damage seeds.
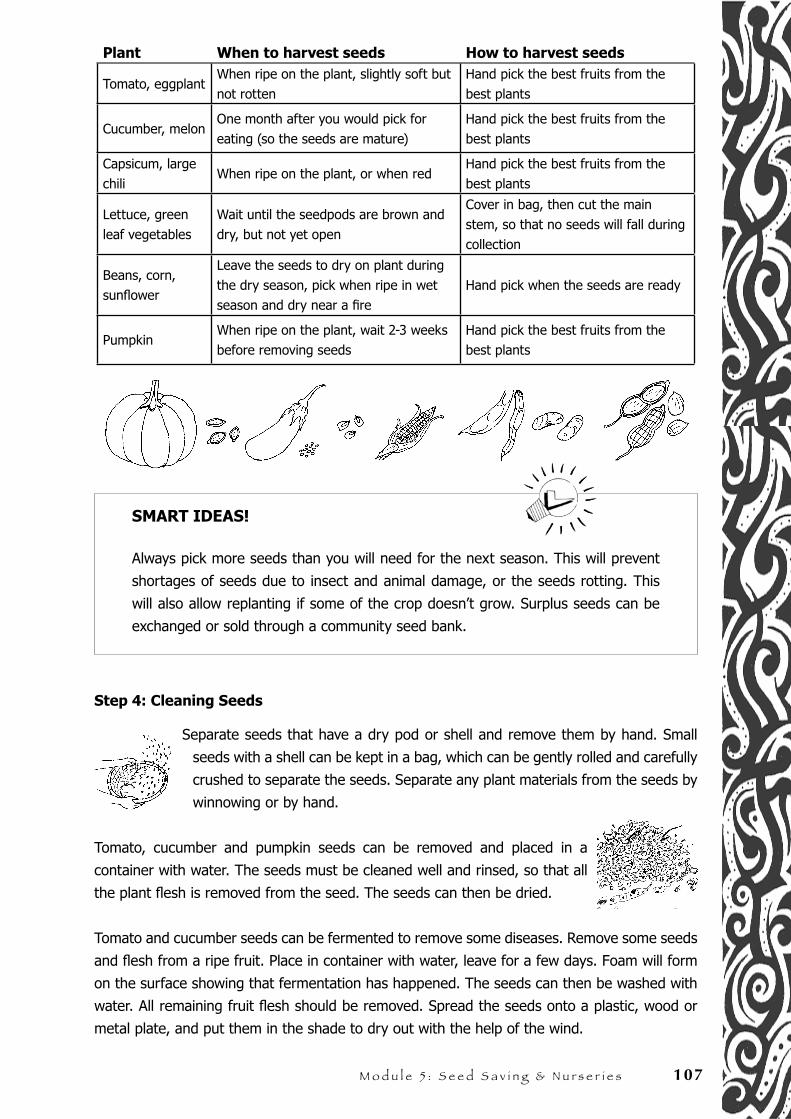
M o d u l e 5 : S e e d S a v i n g & N u r s e r i e s 107
Plant When to harvest seeds How to harvest seeds
Tomato, eggplantWhen ripe on the plant, slightly soft but not rotten
Hand pick the best fruits from the best plants
Cucumber, melonOne month after you would pick for eating (so the seeds are mature)
Hand pick the best fruits from the best plants
Capsicum, large chili
When ripe on the plant, or when redHand pick the best fruits from the best plants
Lettuce, green leaf vegetables
Wait until the seedpods are brown and dry, but not yet open
Cover in bag, then cut the main stem, so that no seeds will fall during collection
Beans, corn, sunflower
Leave the seeds to dry on plant during the dry season, pick when ripe in wet season and dry near a fire
Hand pick when the seeds are ready
PumpkinWhen ripe on the plant, wait 2-3 weeks before removing seeds
Hand pick the best fruits from the best plants
SMART IDEAS!
Always pick more seeds than you will need for the next season. This will prevent
shortages of seeds due to insect and animal damage, or the seeds rotting. This
will also allow replanting if some of the crop doesn’t grow. Surplus seeds can be
exchanged or sold through a community seed bank.
Step 4: Cleaning Seeds
Separate seeds that have a dry pod or shell and remove them by hand. Small
seeds with a shell can be kept in a bag, which can be gently rolled and carefully
crushed to separate the seeds. Separate any plant materials from the seeds by
winnowing or by hand.
Tomato, cucumber and pumpkin seeds can be removed and placed in a
container with water. The seeds must be cleaned well and rinsed, so that all
the plant flesh is removed from the seed. The seeds can then be dried.
Tomato and cucumber seeds can be fermented to remove some diseases. Remove some seeds
and flesh from a ripe fruit. Place in container with water, leave for a few days. Foam will form
on the surface showing that fermentation has happened. The seeds can then be washed with
water. All remaining fruit flesh should be removed. Spread the seeds onto a plastic, wood or
metal plate, and put them in the shade to dry out with the help of the wind.
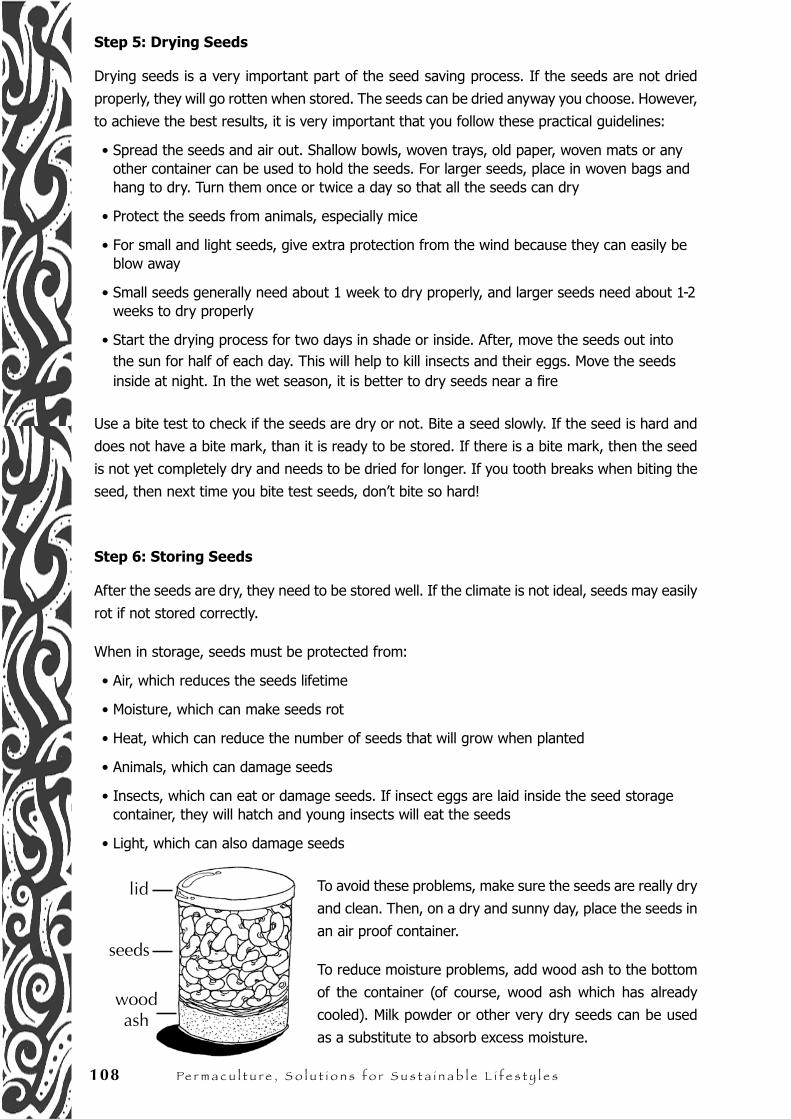
108 Pe r m a c u l t u r e , S o l u t i o n s f o r S u s t a i n a b l e l i f e s t y l e s
Step 5: Drying Seeds
Drying seeds is a very important part of the seed saving process. If the seeds are not dried
properly, they will go rotten when stored. The seeds can be dried anyway you choose. However,
to achieve the best results, it is very important that you follow these practical guidelines:
• Spread the seeds and air out. Shallow bowls, woven trays, old paper, woven mats or any other container can be used to hold the seeds. For larger seeds, place in woven bags and hang to dry. Turn them once or twice a day so that all the seeds can dry
• Protect the seeds from animals, especially mice
• For small and light seeds, give extra protection from the wind because they can easily be blow away
• Small seeds generally need about 1 week to dry properly, and larger seeds need about 1-2 weeks to dry properly
• Start the drying process for two days in shade or inside. After, move the seeds out into the sun for half of each day. This will help to kill insects and their eggs. Move the seeds inside at night. In the wet season, it is better to dry seeds near a fire
Use a bite test to check if the seeds are dry or not. Bite a seed slowly. If the seed is hard and
does not have a bite mark, than it is ready to be stored. If there is a bite mark, then the seed
is not yet completely dry and needs to be dried for longer. If you tooth breaks when biting the
seed, then next time you bite test seeds, don’t bite so hard!
Step 6: Storing Seeds
After the seeds are dry, they need to be stored well. If the climate is not ideal, seeds may easily
rot if not stored correctly.
When in storage, seeds must be protected from:
• Air, which reduces the seeds lifetime
• Moisture, which can make seeds rot
• Heat, which can reduce the number of seeds that will grow when planted
• Animals, which can damage seeds
• Insects, which can eat or damage seeds. If insect eggs are laid inside the seed storage container, they will hatch and young insects will eat the seeds
• Light, which can also damage seeds
To avoid these problems, make sure the seeds are really dry
and clean. Then, on a dry and sunny day, place the seeds in
an air proof container.
To reduce moisture problems, add wood ash to the bottom
of the container (of course, wood ash which has already
cooled). Milk powder or other very dry seeds can be used
as a substitute to absorb excess moisture.
lid
seeds
wood ash
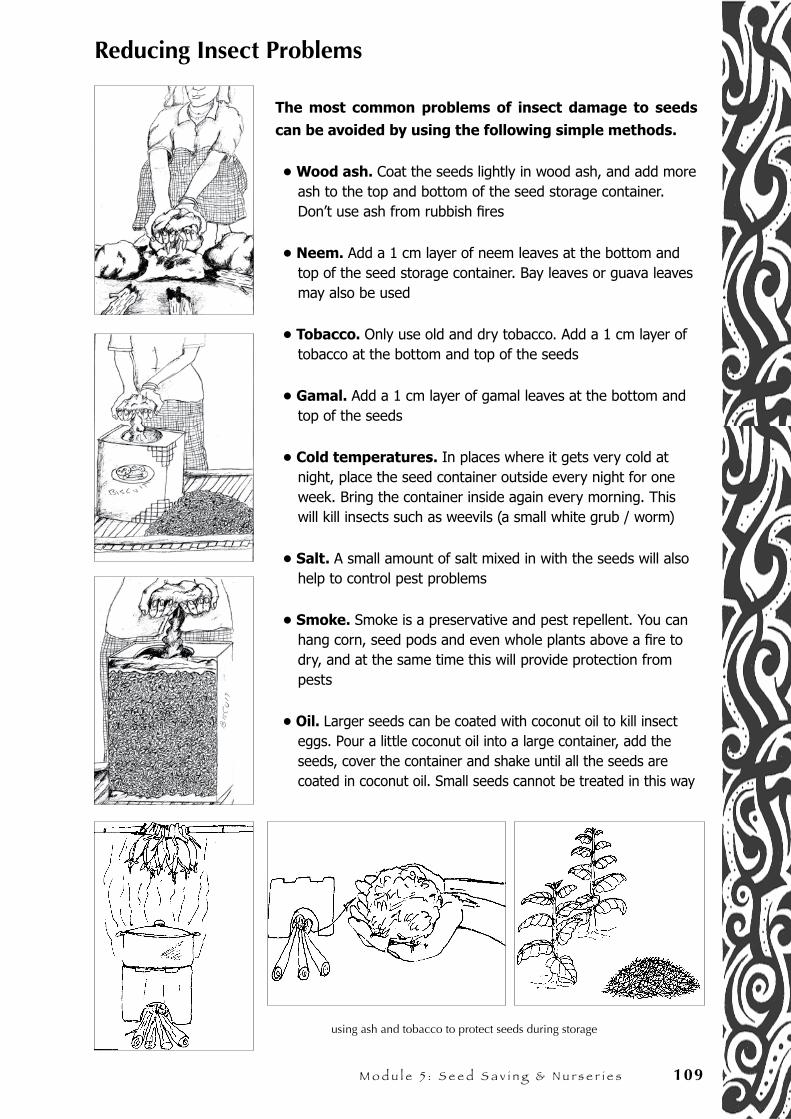
M o d u l e 5 : S e e d S a v i n g & N u r s e r i e s 109
Reducing Insect Problems
The most common problems of insect damage to seeds
can be avoided by using the following simple methods.
• Wood ash. Coat the seeds lightly in wood ash, and add more ash to the top and bottom of the seed storage container. Don’t use ash from rubbish fires
• Neem. Add a 1 cm layer of neem leaves at the bottom and top of the seed storage container. Bay leaves or guava leaves may also be used
• Tobacco. Only use old and dry tobacco. Add a 1 cm layer of tobacco at the bottom and top of the seeds
• Gamal. Add a 1 cm layer of gamal leaves at the bottom and top of the seeds
• Cold temperatures. In places where it gets very cold at night, place the seed container outside every night for one week. Bring the container inside again every morning. This will kill insects such as weevils (a small white grub / worm)
• Salt. A small amount of salt mixed in with the seeds will also help to control pest problems
• Smoke. Smoke is a preservative and pest repellent. You can hang corn, seed pods and even whole plants above a fire to dry, and at the same time this will provide protection from pests
• Oil. Larger seeds can be coated with coconut oil to kill insect eggs. Pour a little coconut oil into a large container, add the seeds, cover the container and shake until all the seeds are coated in coconut oil. Small seeds cannot be treated in this way
using ash and tobacco to protect seeds during storage
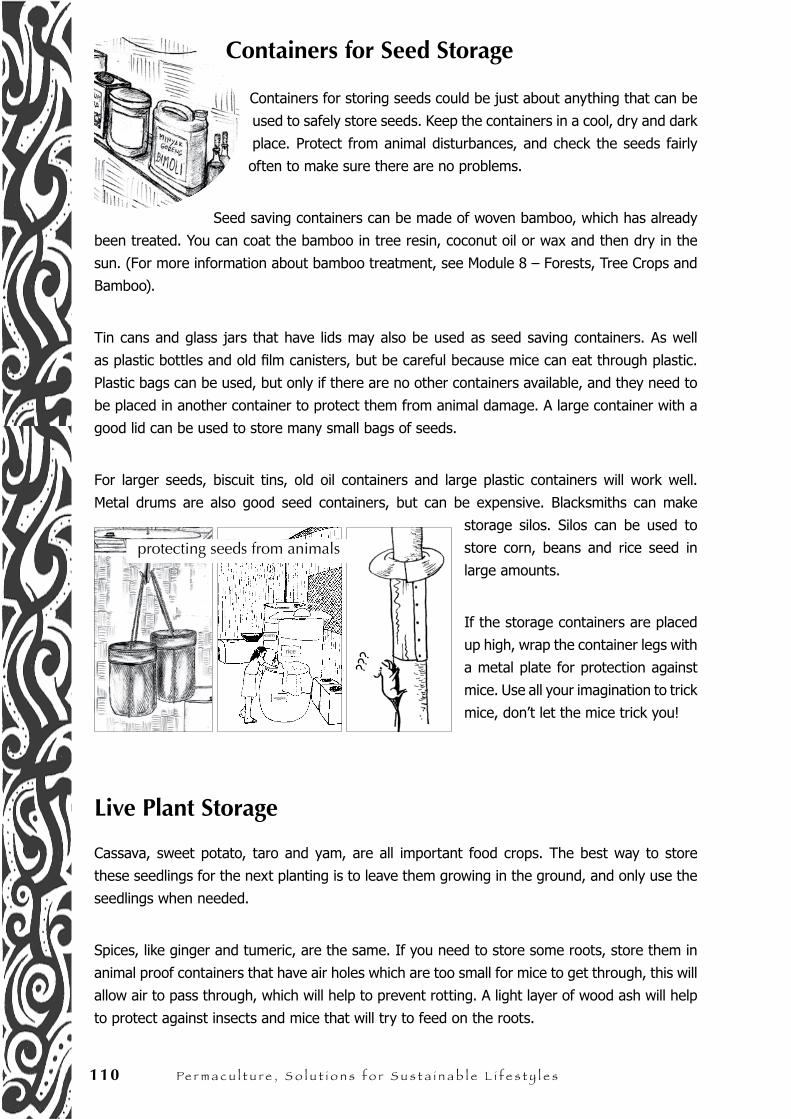
110 Pe r m a c u l t u r e , S o l u t i o n s f o r S u s t a i n a b l e l i f e s t y l e s
Containers for Seed Storage
Containers for storing seeds could be just about anything that can be
used to safely store seeds. Keep the containers in a cool, dry and dark
place. Protect from animal disturbances, and check the seeds fairly
often to make sure there are no problems.
Seed saving containers can be made of woven bamboo, which has already
been treated. You can coat the bamboo in tree resin, coconut oil or wax and then dry in the
sun. (For more information about bamboo treatment, see Module 8 – Forests, Tree Crops and
Bamboo).
Tin cans and glass jars that have lids may also be used as seed saving containers. As well
as plastic bottles and old film canisters, but be careful because mice can eat through plastic.
Plastic bags can be used, but only if there are no other containers available, and they need to
be placed in another container to protect them from animal damage. A large container with a
good lid can be used to store many small bags of seeds.
For larger seeds, biscuit tins, old oil containers and large plastic containers will work well.
Metal drums are also good seed containers, but can be expensive. Blacksmiths can make
storage silos. Silos can be used to
store corn, beans and rice seed in
large amounts.
If the storage containers are placed
up high, wrap the container legs with
a metal plate for protection against
mice. Use all your imagination to trick
mice, don’t let the mice trick you!
Live Plant Storage
Cassava, sweet potato, taro and yam, are all important food crops. The best way to store
these seedlings for the next planting is to leave them growing in the ground, and only use the
seedlings when needed.
Spices, like ginger and tumeric, are the same. If you need to store some roots, store them in
animal proof containers that have air holes which are too small for mice to get through, this will
allow air to pass through, which will help to prevent rotting. A light layer of wood ash will help
to protect against insects and mice that will try to feed on the roots.
???
protecting seeds from animals
veggies
rice
corn
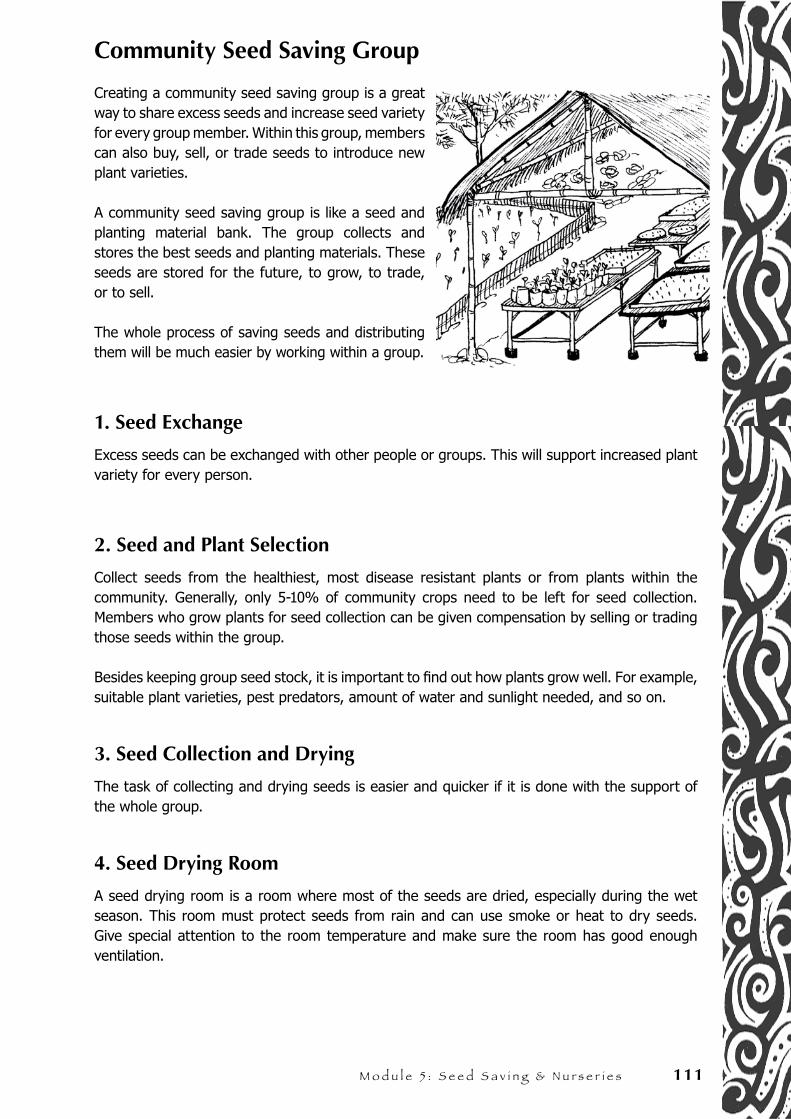
M o d u l e 5 : S e e d S a v i n g & N u r s e r i e s 111
Community Seed Saving Group
Creating a community seed saving group is a great way to share excess seeds and increase seed variety for every group member. Within this group, members can also buy, sell, or trade seeds to introduce new plant varieties.
A community seed saving group is like a seed and planting material bank. The group collects and stores the best seeds and planting materials. These seeds are stored for the future, to grow, to trade, or to sell.
The whole process of saving seeds and distributing them will be much easier by working within a group.
1. Seed Exchange
Excess seeds can be exchanged with other people or groups. This will support increased plant variety for every person.
2. Seed and Plant Selection
Collect seeds from the healthiest, most disease resistant plants or from plants within the community. Generally, only 5-10% of community crops need to be left for seed collection. Members who grow plants for seed collection can be given compensation by selling or trading those seeds within the group.
Besides keeping group seed stock, it is important to find out how plants grow well. For example, suitable plant varieties, pest predators, amount of water and sunlight needed, and so on.
3. Seed Collection and Drying
The task of collecting and drying seeds is easier and quicker if it is done with the support of the whole group.
4. Seed Drying Room
A seed drying room is a room where most of the seeds are dried, especially during the wet season. This room must protect seeds from rain and can use smoke or heat to dry seeds. Give special attention to the room temperature and make sure the room has good enough ventilation.

112 Pe r m a c u l t u r e , S o l u t i o n s f o r S u s t a i n a b l e l i f e s t y l e s
5. Seed Storage
A large community room or an agreed place can be
used to store seed. Compiling containers for large
amounts of seed is much easier and less expensive if
done through a community group.
Permanent seed containers or silos can be ordered
or made, and can be used to fulfil the needs of the
whole group.
6. Seed Supply
All seeds that are saved by the group should be used wisely.
The seeds should be distributed evenly among the group members so that every member has
enough seed for their own land. Every member that who receives seeds must give something
in return to the group. This could be seed products, labour, manure, compost, land, storage
containers, and so on.
If there is excess seed, some can be kept in case of seed shortages during the next season. If
possible, always save enough seed for one more crop season.
7. Seed Garden
A community seed garden can be made specifically for
producing seeds. This garden will provide high quality seeds,
because the seeds are taken from the best plants, and it will
make it easier to reduce chances of cross pollination.
8. Seed and Planting Material List
A list will help group members know what materials the group has available. What is available
could be seeds, plants, and planting materials. This list also provides information for people
outside of the group who are interested in buying or trading. Other benefits of having this list
include:
• It helps to identify the best place to grow each type of plant
• To identify the differences in types of plants
• It can be combined with other plant lists to form a district or national plant list
• It helps to assess what the community can produce and what needs to be introduced
• It helps to keep local plant varieties in the ownership of the community
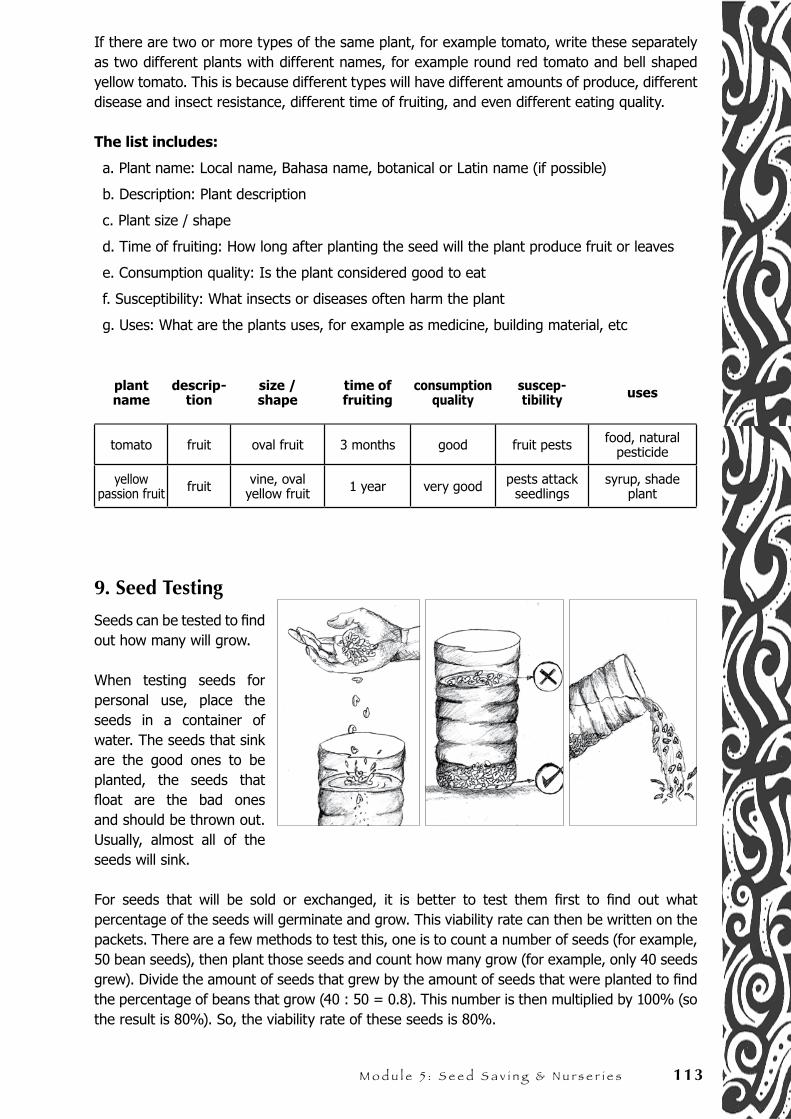
M o d u l e 5 : S e e d S a v i n g & N u r s e r i e s 113
If there are two or more types of the same plant, for example tomato, write these separately as two different plants with different names, for example round red tomato and bell shaped yellow tomato. This is because different types will have different amounts of produce, different disease and insect resistance, different time of fruiting, and even different eating quality.
The list includes:
a. Plant name: Local name, Bahasa name, botanical or Latin name (if possible)
b. Description: Plant description
c. Plant size / shape
d. Time of fruiting: How long after planting the seed will the plant produce fruit or leaves
e. Consumption quality: Is the plant considered good to eat
f. Susceptibility: What insects or diseases often harm the plant
g. Uses: What are the plants uses, for example as medicine, building material, etc
plant name
descrip-tion
size / shape
time offruiting
consumptionquality
suscep- tibility uses
tomato fruit oval fruit 3 months good fruit pests food, natural pesticide
yellow passion fruit fruit vine, oval
yellow fruit 1 year very good pests attack seedlings
syrup, shade plant
9. Seed Testing
Seeds can be tested to find out how many will grow.
When testing seeds for personal use, place the seeds in a container of water. The seeds that sink are the good ones to be planted, the seeds that float are the bad ones and should be thrown out. Usually, almost all of the seeds will sink.
For seeds that will be sold or exchanged, it is better to test them first to find out what percentage of the seeds will germinate and grow. This viability rate can then be written on the packets. There are a few methods to test this, one is to count a number of seeds (for example, 50 bean seeds), then plant those seeds and count how many grow (for example, only 40 seeds grew). Divide the amount of seeds that grew by the amount of seeds that were planted to find the percentage of beans that grow (40 : 50 = 0.8). This number is then multiplied by 100% (so the result is 80%). So, the viability rate of these seeds is 80%.
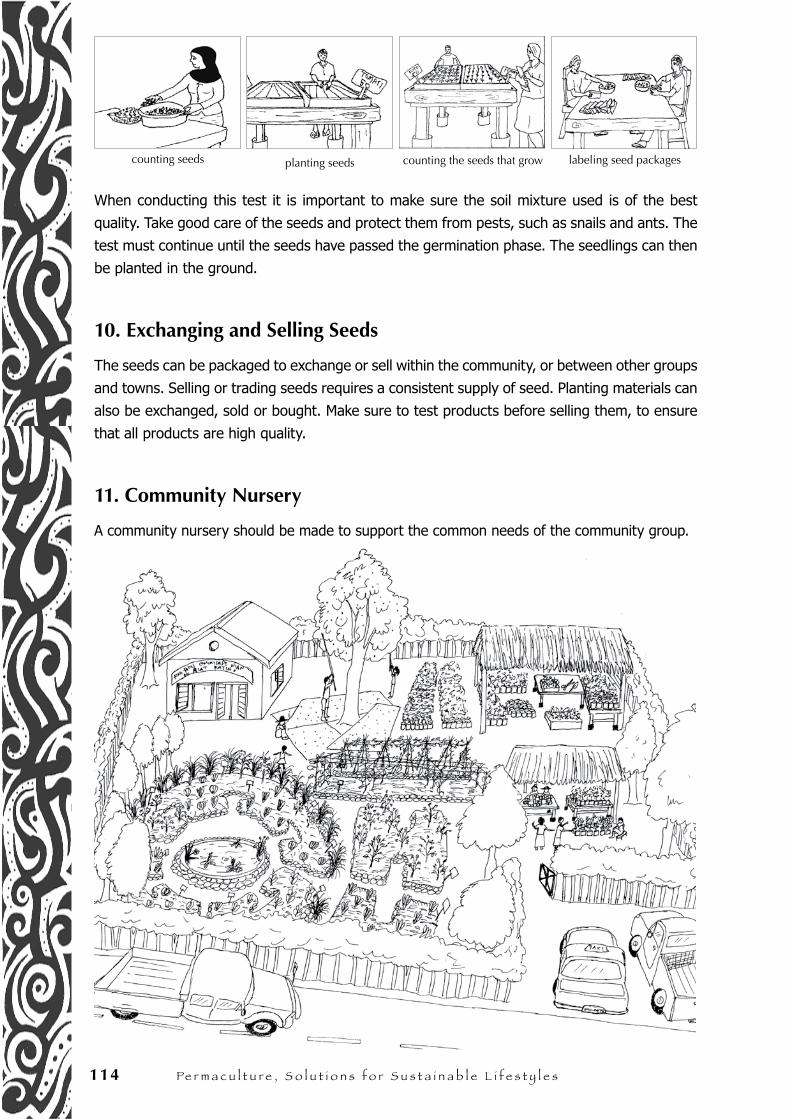
114 Pe r m a c u l t u r e , S o l u t i o n s f o r S u s t a i n a b l e l i f e s t y l e s
When conducting this test it is important to make sure the soil mixture used is of the best
quality. Take good care of the seeds and protect them from pests, such as snails and ants. The
test must continue until the seeds have passed the germination phase. The seedlings can then
be planted in the ground.
10. Exchanging and Selling Seeds
The seeds can be packaged to exchange or sell within the community, or between other groups
and towns. Selling or trading seeds requires a consistent supply of seed. Planting materials can
also be exchanged, sold or bought. Make sure to test products before selling them, to ensure
that all products are high quality.
11. Community Nursery
A community nursery should be made to support the common needs of the community group.
counting seeds labeling seed packagescounting the seeds that growplanting seeds
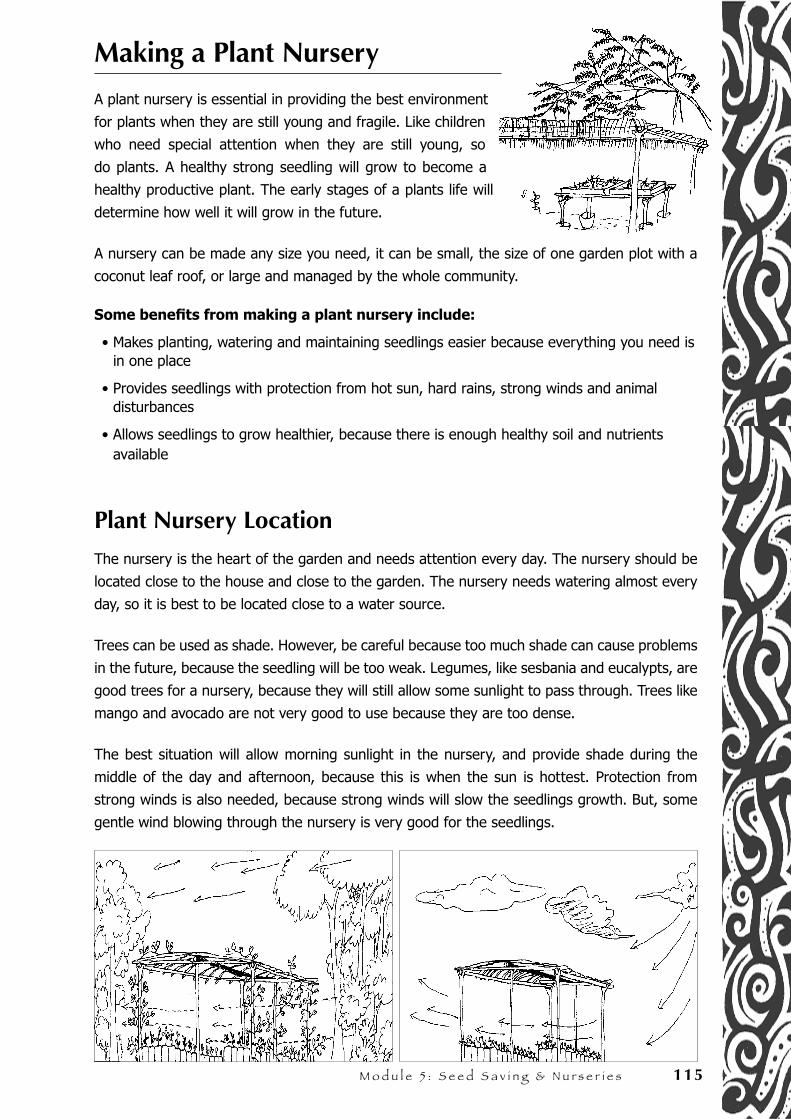
M o d u l e 5 : S e e d S a v i n g & N u r s e r i e s 115
Making a Plant Nursery
A plant nursery is essential in providing the best environment
for plants when they are still young and fragile. Like children
who need special attention when they are still young, so
do plants. A healthy strong seedling will grow to become a
healthy productive plant. The early stages of a plants life will
determine how well it will grow in the future.
A nursery can be made any size you need, it can be small, the size of one garden plot with a
coconut leaf roof, or large and managed by the whole community.
Some benefits from making a plant nursery include:
• Makes planting, watering and maintaining seedlings easier because everything you need is in one place
• Provides seedlings with protection from hot sun, hard rains, strong winds and animal disturbances
• Allows seedlings to grow healthier, because there is enough healthy soil and nutrients available
Plant Nursery Location
The nursery is the heart of the garden and needs attention every day. The nursery should be
located close to the house and close to the garden. The nursery needs watering almost every
day, so it is best to be located close to a water source.
Trees can be used as shade. However, be careful because too much shade can cause problems
in the future, because the seedling will be too weak. Legumes, like sesbania and eucalypts, are
good trees for a nursery, because they will still allow some sunlight to pass through. Trees like
mango and avocado are not very good to use because they are too dense.
The best situation will allow morning sunlight in the nursery, and provide shade during the
middle of the day and afternoon, because this is when the sun is hottest. Protection from
strong winds is also needed, because strong winds will slow the seedlings growth. But, some
gentle wind blowing through the nursery is very good for the seedlings.
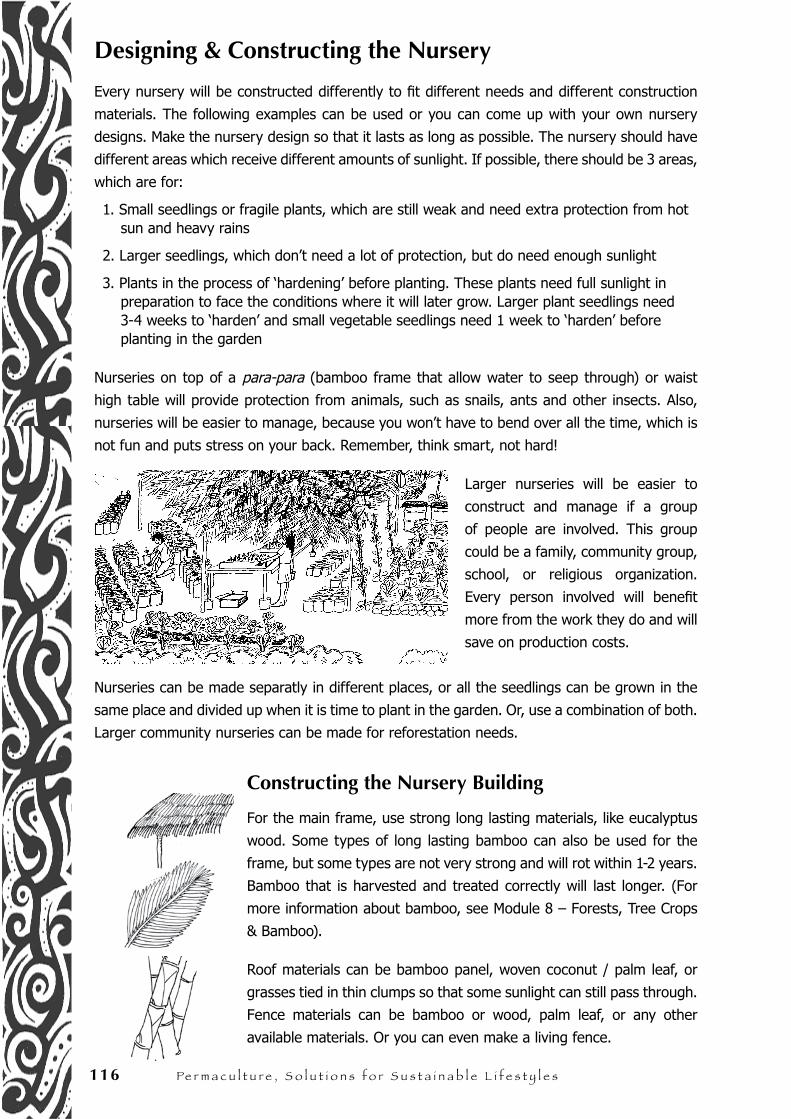
116 Pe r m a c u l t u r e , S o l u t i o n s f o r S u s t a i n a b l e l i f e s t y l e s
Designing & Constructing the Nursery
Every nursery will be constructed differently to fit different needs and different construction
materials. The following examples can be used or you can come up with your own nursery
designs. Make the nursery design so that it lasts as long as possible. The nursery should have
different areas which receive different amounts of sunlight. If possible, there should be 3 areas,
which are for:
1. Small seedlings or fragile plants, which are still weak and need extra protection from hot sun and heavy rains
2. Larger seedlings, which don’t need a lot of protection, but do need enough sunlight
3. Plants in the process of ‘hardening’ before planting. These plants need full sunlight in preparation to face the conditions where it will later grow. Larger plant seedlings need 3-4 weeks to ‘harden’ and small vegetable seedlings need 1 week to ‘harden’ before planting in the garden
Nurseries on top of a para-para (bamboo frame that allow water to seep through) or waist
high table will provide protection from animals, such as snails, ants and other insects. Also,
nurseries will be easier to manage, because you won’t have to bend over all the time, which is
not fun and puts stress on your back. Remember, think smart, not hard!
Larger nurseries will be easier to
construct and manage if a group
of people are involved. This group
could be a family, community group,
school, or religious organization.
Every person involved will benefit
more from the work they do and will
save on production costs.
Nurseries can be made separatly in different places, or all the seedlings can be grown in the
same place and divided up when it is time to plant in the garden. Or, use a combination of both.
Larger community nurseries can be made for reforestation needs.
Constructing the Nursery Building
For the main frame, use strong long lasting materials, like eucalyptus
wood. Some types of long lasting bamboo can also be used for the
frame, but some types are not very strong and will rot within 1-2 years.
Bamboo that is harvested and treated correctly will last longer. (For
more information about bamboo, see Module 8 – Forests, Tree Crops
& Bamboo).
Roof materials can be bamboo panel, woven coconut / palm leaf, or
grasses tied in thin clumps so that some sunlight can still pass through.
Fence materials can be bamboo or wood, palm leaf, or any other
available materials. Or you can even make a living fence.

M o d u l e 5 : S e e d S a v i n g & N u r s e r i e s 117
SMART IDEAS!
In the mountains, seedling will grow better if they are raised off the ground, about
waist high is best. This is because at night it becomes very cold. Cold temperatures
can damage and even kill seedlings. Some other ways to deal with cold temperature
are by planting some trees near the nursery or covering the ground with a layer of
mulch made from coffee / rice husks, about 10-15 cm is good. However, a layer of
husk mulch could promote fungus growth in areas with warmer temperature.
Seedling Boxes and Containers
Seedling containers are easy to
make and are good for growing
many varieties of vegetable and tree
seedlings. These containers need to be
made deep enough for roots to grow long,
not grow around in circles. Tree seedlings can be
transferred to the containers when they are about 1 month old
(about the time when four leaves have grown). Height and drainage
is very important. Choose the size of container that fits your
needs and the materials available. These containers are generally
made of wood or bamboo. If using bamboo, the outside of the
bamboo should be facing up to provide better water drainage.
Many different containers can be used as seedling containers. All
seedling containers should have drain holes at the bottom.
Seedling containers can be made from:
• Cans, baskets, used drink / food containers, and other used materials
• Coconut husks
• Bamboo
• Banana leaves, must be 1 finger width at the base to be able to hold water
• Banana trunk / bark
• Woven leaves
• Poly bags are the easiest containers for nurseries with lots of trees. They do cost money, but save a lot of time and energy
making containers from banana trunks
making containers from banana leaf
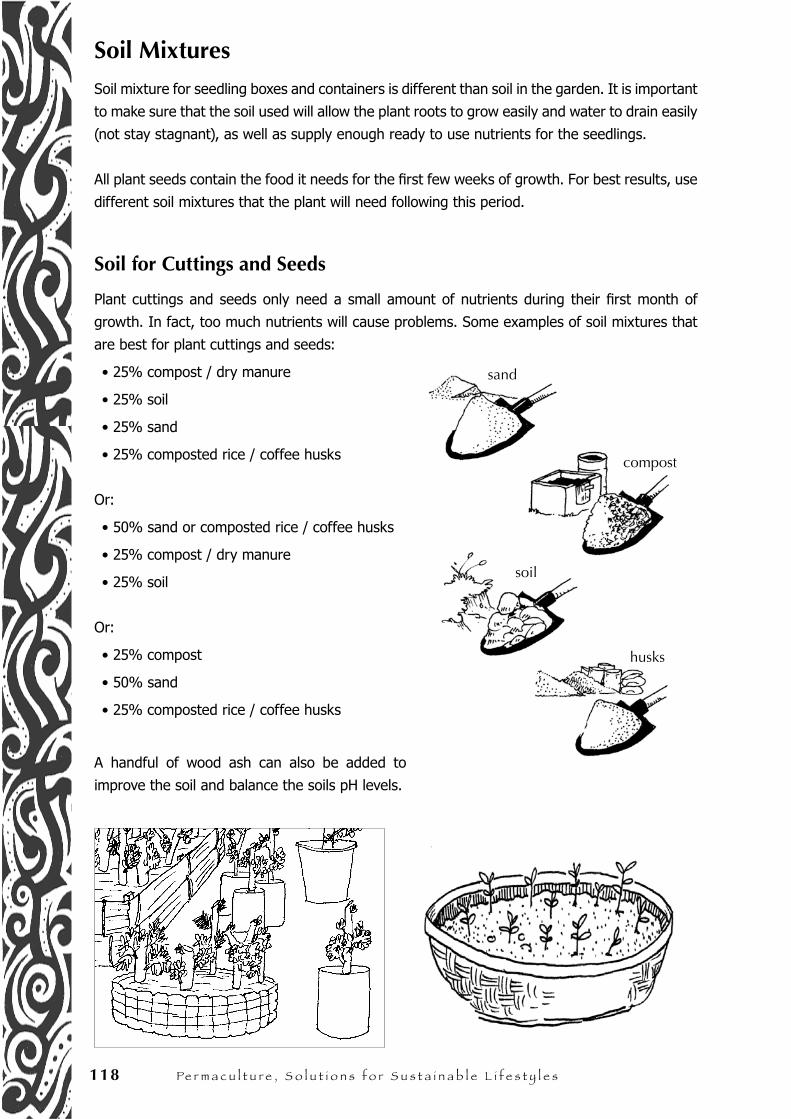
118 Pe r m a c u l t u r e , S o l u t i o n s f o r S u s t a i n a b l e l i f e s t y l e s
Soil Mixtures
Soil mixture for seedling boxes and containers is different than soil in the garden. It is important
to make sure that the soil used will allow the plant roots to grow easily and water to drain easily
(not stay stagnant), as well as supply enough ready to use nutrients for the seedlings.
All plant seeds contain the food it needs for the first few weeks of growth. For best results, use
different soil mixtures that the plant will need following this period.
Soil for Cuttings and Seeds
Plant cuttings and seeds only need a small amount of nutrients during their first month of
growth. In fact, too much nutrients will cause problems. Some examples of soil mixtures that
are best for plant cuttings and seeds:
• 25% compost / dry manure
• 25% soil
• 25% sand
• 25% composted rice / coffee husks
Or:
• 50% sand or composted rice / coffee husks
• 25% compost / dry manure
• 25% soil
Or:
• 25% compost
• 50% sand
• 25% composted rice / coffee husks
A handful of wood ash can also be added to
improve the soil and balance the soils pH levels.
compost
sand
soil
husks
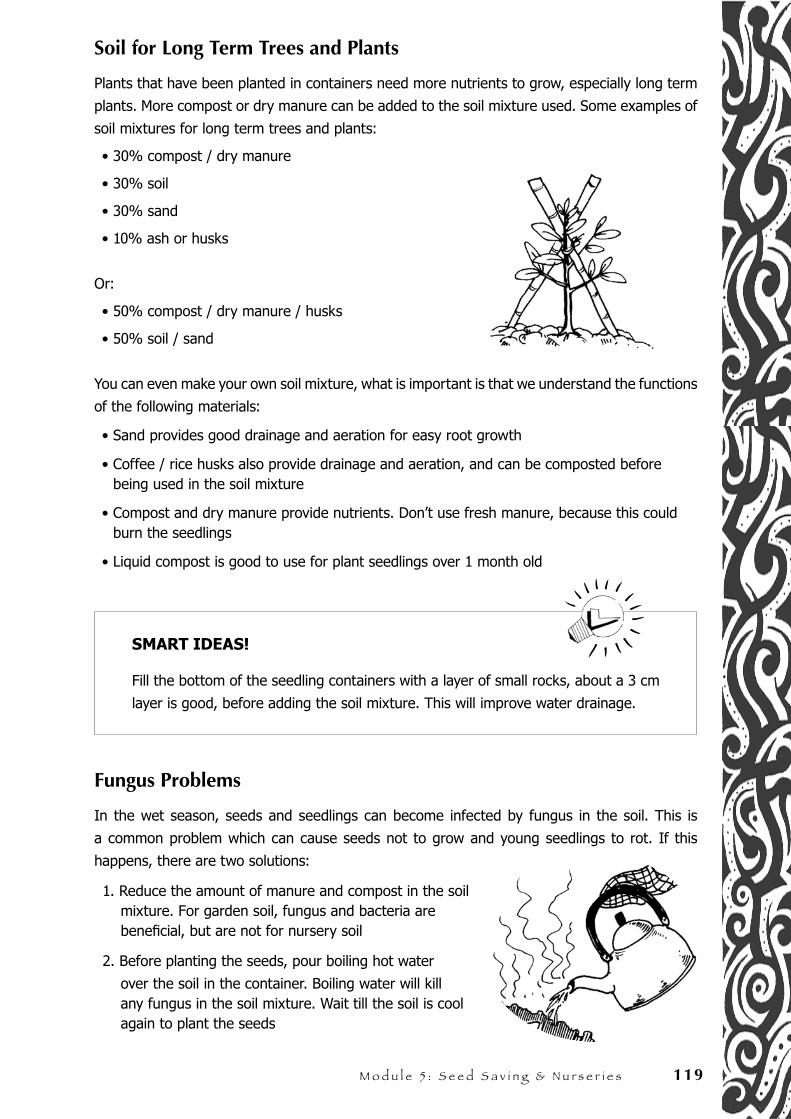
M o d u l e 5 : S e e d S a v i n g & N u r s e r i e s 119
Soil for Long Term Trees and Plants
Plants that have been planted in containers need more nutrients to grow, especially long term
plants. More compost or dry manure can be added to the soil mixture used. Some examples of
soil mixtures for long term trees and plants:
• 30% compost / dry manure
• 30% soil
• 30% sand
• 10% ash or husks
Or:
• 50% compost / dry manure / husks
• 50% soil / sand
You can even make your own soil mixture, what is important is that we understand the functions
of the following materials:
• Sand provides good drainage and aeration for easy root growth
• Coffee / rice husks also provide drainage and aeration, and can be composted before being used in the soil mixture
• Compost and dry manure provide nutrients. Don’t use fresh manure, because this could burn the seedlings
• Liquid compost is good to use for plant seedlings over 1 month old
SMART IDEAS!
Fill the bottom of the seedling containers with a layer of small rocks, about a 3 cm
layer is good, before adding the soil mixture. This will improve water drainage.
Fungus Problems
In the wet season, seeds and seedlings can become infected by fungus in the soil. This is
a common problem which can cause seeds not to grow and young seedlings to rot. If this
happens, there are two solutions:
1. Reduce the amount of manure and compost in the soil mixture. For garden soil, fungus and bacteria are beneficial, but are not for nursery soil
2. Before planting the seeds, pour boiling hot water
over the soil in the container. Boiling water will kill any fungus in the soil mixture. Wait till the soil is cool again to plant the seeds
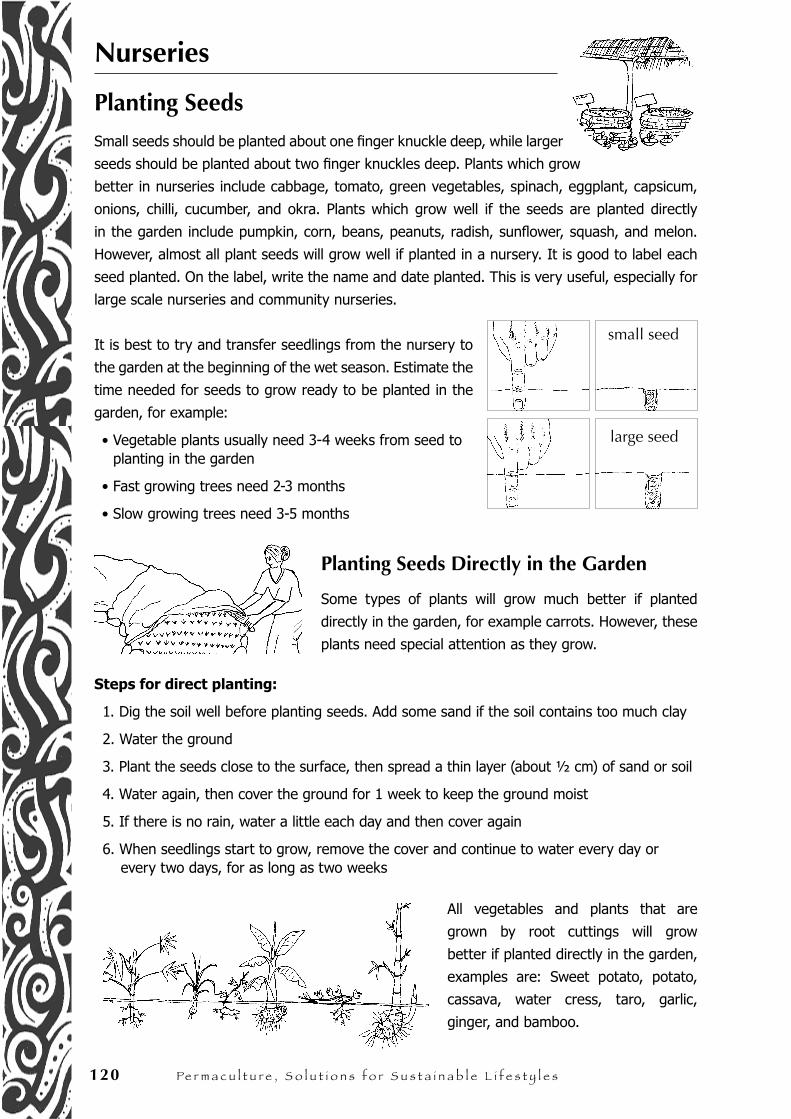
120 Pe r m a c u l t u r e , S o l u t i o n s f o r S u s t a i n a b l e l i f e s t y l e s
Nurseries
Planting Seeds
Small seeds should be planted about one finger knuckle deep, while larger
seeds should be planted about two finger knuckles deep. Plants which grow
better in nurseries include cabbage, tomato, green vegetables, spinach, eggplant, capsicum,
onions, chilli, cucumber, and okra. Plants which grow well if the seeds are planted directly
in the garden include pumpkin, corn, beans, peanuts, radish, sunflower, squash, and melon.
However, almost all plant seeds will grow well if planted in a nursery. It is good to label each
seed planted. On the label, write the name and date planted. This is very useful, especially for
large scale nurseries and community nurseries.
It is best to try and transfer seedlings from the nursery to
the garden at the beginning of the wet season. Estimate the
time needed for seeds to grow ready to be planted in the
garden, for example:
• Vegetable plants usually need 3-4 weeks from seed to planting in the garden
• Fast growing trees need 2-3 months
• Slow growing trees need 3-5 months
Planting Seeds Directly in the Garden
Some types of plants will grow much better if planted
directly in the garden, for example carrots. However, these
plants need special attention as they grow.
Steps for direct planting:
1. Dig the soil well before planting seeds. Add some sand if the soil contains too much clay
2. Water the ground
3. Plant the seeds close to the surface, then spread a thin layer (about ½ cm) of sand or soil
4. Water again, then cover the ground for 1 week to keep the ground moist
5. If there is no rain, water a little each day and then cover again
6. When seedlings start to grow, remove the cover and continue to water every day or every two days, for as long as two weeks
All vegetables and plants that are
grown by root cuttings will grow
better if planted directly in the garden,
examples are: Sweet potato, potato,
cassava, water cress, taro, garlic,
ginger, and bamboo.
large seed
small seed
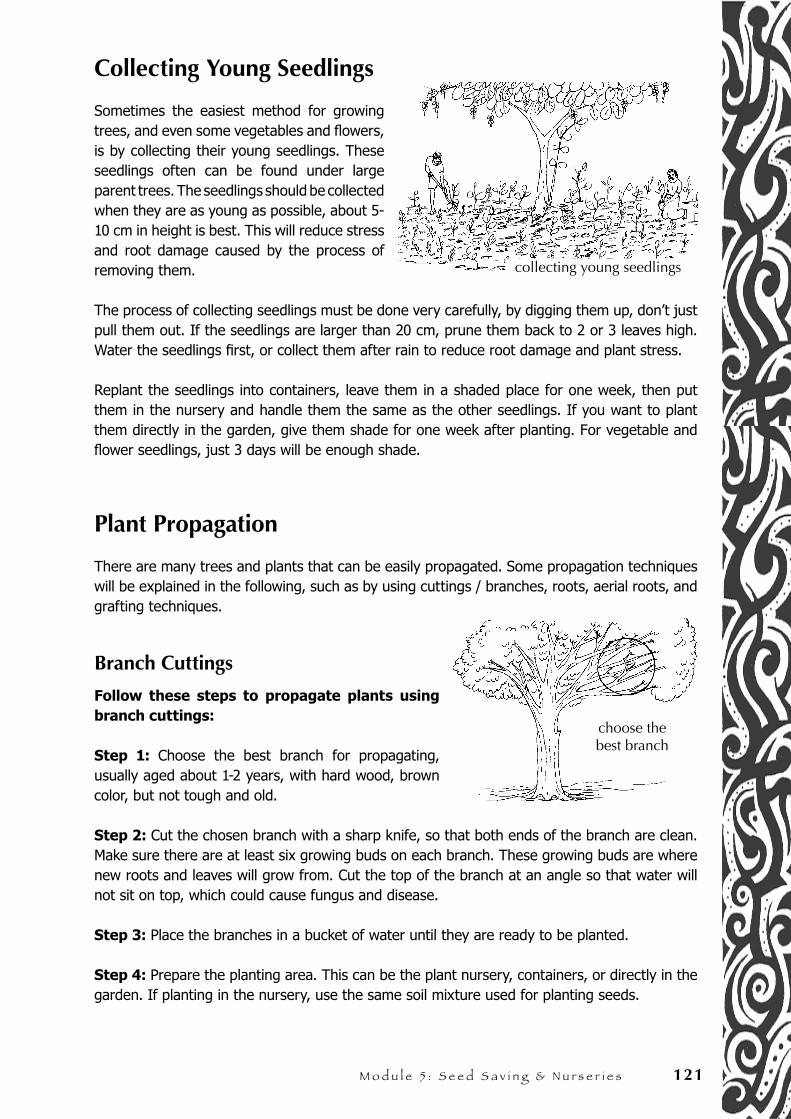
M o d u l e 5 : S e e d S a v i n g & N u r s e r i e s 121
Collecting Young Seedlings
Sometimes the easiest method for growing trees, and even some vegetables and flowers, is by collecting their young seedlings. These seedlings often can be found under large parent trees. The seedlings should be collected when they are as young as possible, about 5-10 cm in height is best. This will reduce stress and root damage caused by the process of removing them.
The process of collecting seedlings must be done very carefully, by digging them up, don’t just pull them out. If the seedlings are larger than 20 cm, prune them back to 2 or 3 leaves high. Water the seedlings first, or collect them after rain to reduce root damage and plant stress.
Replant the seedlings into containers, leave them in a shaded place for one week, then put them in the nursery and handle them the same as the other seedlings. If you want to plant them directly in the garden, give them shade for one week after planting. For vegetable and flower seedlings, just 3 days will be enough shade.
Plant Propagation
There are many trees and plants that can be easily propagated. Some propagation techniques will be explained in the following, such as by using cuttings / branches, roots, aerial roots, and grafting techniques.
Branch Cuttings
Follow these steps to propagate plants using branch cuttings:
Step 1: Choose the best branch for propagating, usually aged about 1-2 years, with hard wood, brown color, but not tough and old.
Step 2: Cut the chosen branch with a sharp knife, so that both ends of the branch are clean. Make sure there are at least six growing buds on each branch. These growing buds are where new roots and leaves will grow from. Cut the top of the branch at an angle so that water will not sit on top, which could cause fungus and disease.
Step 3: Place the branches in a bucket of water until they are ready to be planted.
Step 4: Prepare the planting area. This can be the plant nursery, containers, or directly in the garden. If planting in the nursery, use the same soil mixture used for planting seeds.
choose the best branch
collecting young seedlings

122 Pe r m a c u l t u r e , S o l u t i o n s f o r S u s t a i n a b l e l i f e s t y l e s
Step 5: When planting, make sure that the growing buds face upwards. Also make sure that there are 3 growing buds below soil and 3 above soil.
Step 6: Water every day until new leaves grow. Then, water only twice a week. If planting directly in the garden, water every day if there is no rain and provide shade until new leaves grow.
Root Cuttings
Follow these steps to propagate plants using root cuttings:
Step 1: Water the plant before cutting its roots
Step 2: Dig the soil, first from the side under the plant, then straight down through the plant to cut and separate the section of root that will be removed.
Step 3: Remove the section, be very careful not to damage the roots.
Step 4: Carefully replant the plant root into the ground or in a container, and water well.
Marcotting / Aerial Roots
Propagating plants by creating areal roots is a commonly used practice. This method is good
to use and quick; it creates new plants that if planted from seed / seedlings could take 2 or 3
years to grow as large as the aerial root plant. The steps are:
Step 1: Choose a strong, productive and disease and pest resistant plant to make the marcott. This is very important, because the new plant that will grow will have the same characteristics as its parent plant.
Step 2: Choose a healthy branch, positioned in the shade. Peel off the outside layer of bark, about 10 cm (middle finger length) of the branch.
Step 3: Cover the part of the peeled branch with healthy soil and wrap it in plastic. Tie both ends of the wrapping, and if needed the center as well. The soil inside the wrapping should stay cool, so if needed use two layers of plastic.
Step 4: Make sure the soil stays moist, and check it regularly. Leave for 3 months.
Step 5: After 3 months, there will be a lot of roots growing. At this time, the branch is ready to be cut. Cut it below the marcott, it is best to use a saw to avoid damaging these roots.
Step 6: Carefully, remove the wrapping. Put the roots in water until it is time for planting. Remove about 1/3 of the branches and leaves. Plant into a pot and place in a shady place until new growth starts. When this new plant is established, move it into a place that receives enough sunlight. When the tree becomes strong and hard it is ready to be planted in the garden.
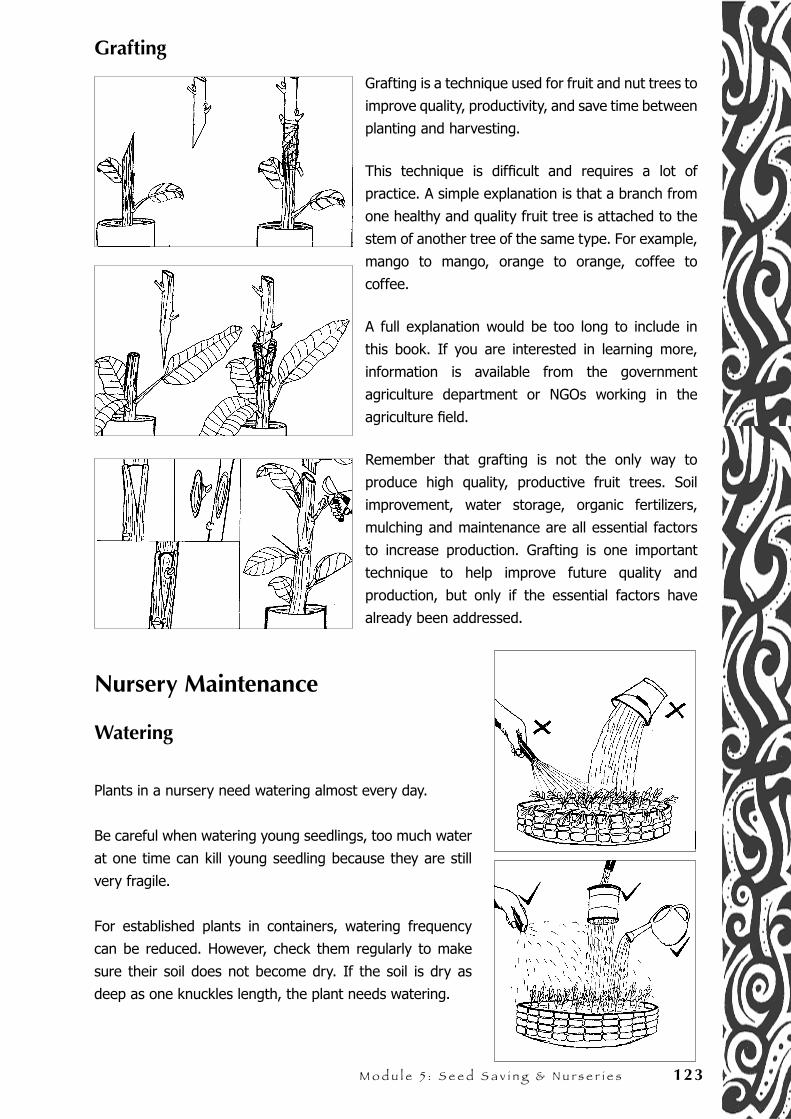
M o d u l e 5 : S e e d S a v i n g & N u r s e r i e s 123
Grafting
Grafting is a technique used for fruit and nut trees to
improve quality, productivity, and save time between
planting and harvesting.
This technique is difficult and requires a lot of
practice. A simple explanation is that a branch from
one healthy and quality fruit tree is attached to the
stem of another tree of the same type. For example,
mango to mango, orange to orange, coffee to
coffee.
A full explanation would be too long to include in
this book. If you are interested in learning more,
information is available from the government
agriculture department or NGOs working in the
agriculture field.
Remember that grafting is not the only way to
produce high quality, productive fruit trees. Soil
improvement, water storage, organic fertilizers,
mulching and maintenance are all essential factors
to increase production. Grafting is one important
technique to help improve future quality and
production, but only if the essential factors have
already been addressed.
Nursery Maintenance
Watering
Plants in a nursery need watering almost every day.
Be careful when watering young seedlings, too much water
at one time can kill young seedling because they are still
very fragile.
For established plants in containers, watering frequency
can be reduced. However, check them regularly to make
sure their soil does not become dry. If the soil is dry as
deep as one knuckles length, the plant needs watering.
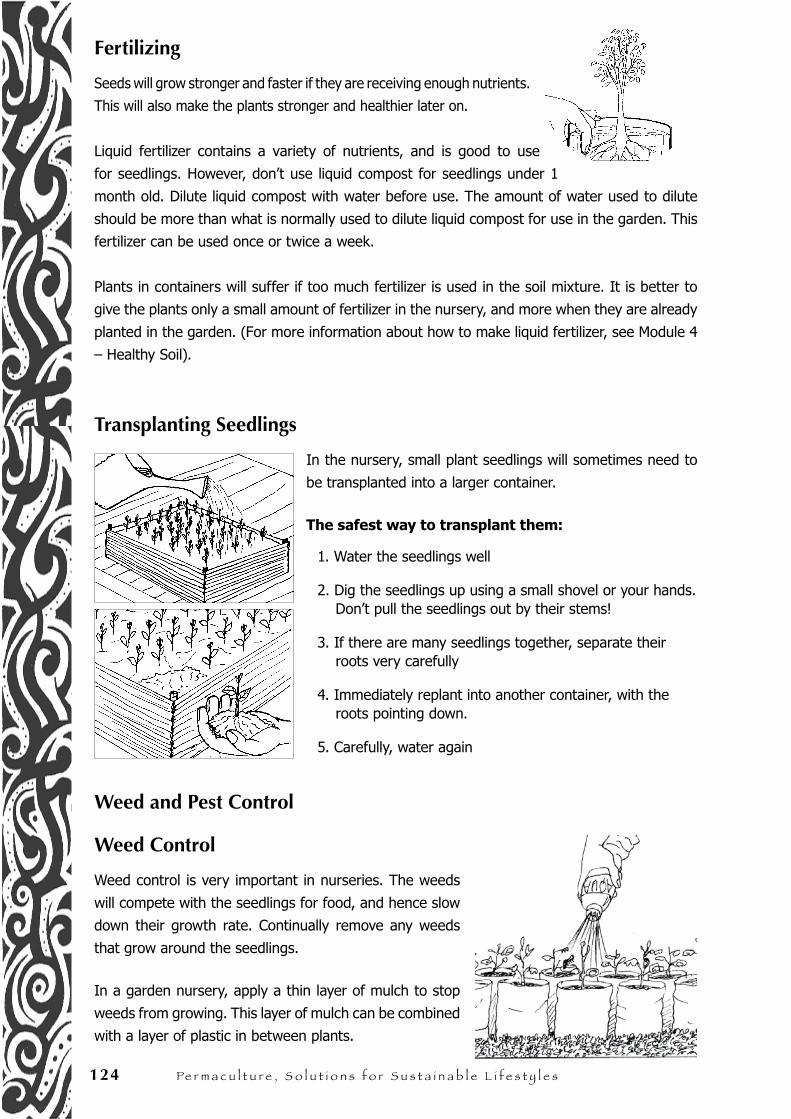
124 Pe r m a c u l t u r e , S o l u t i o n s f o r S u s t a i n a b l e l i f e s t y l e s
Fertilizing
Seeds will grow stronger and faster if they are receiving enough nutrients.
This will also make the plants stronger and healthier later on.
Liquid fertilizer contains a variety of nutrients, and is good to use
for seedlings. However, don’t use liquid compost for seedlings under 1
month old. Dilute liquid compost with water before use. The amount of water used to dilute
should be more than what is normally used to dilute liquid compost for use in the garden. This
fertilizer can be used once or twice a week.
Plants in containers will suffer if too much fertilizer is used in the soil mixture. It is better to
give the plants only a small amount of fertilizer in the nursery, and more when they are already
planted in the garden. (For more information about how to make liquid fertilizer, see Module 4
– Healthy Soil).
Transplanting Seedlings
In the nursery, small plant seedlings will sometimes need to
be transplanted into a larger container.
The safest way to transplant them:
1. Water the seedlings well
2. Dig the seedlings up using a small shovel or your hands. Don’t pull the seedlings out by their stems!
3. If there are many seedlings together, separate their roots very carefully
4. Immediately replant into another container, with the roots pointing down.
5. Carefully, water again
Weed and Pest Control
Weed Control
Weed control is very important in nurseries. The weeds
will compete with the seedlings for food, and hence slow
down their growth rate. Continually remove any weeds
that grow around the seedlings.
In a garden nursery, apply a thin layer of mulch to stop
weeds from growing. This layer of mulch can be combined
with a layer of plastic in between plants.
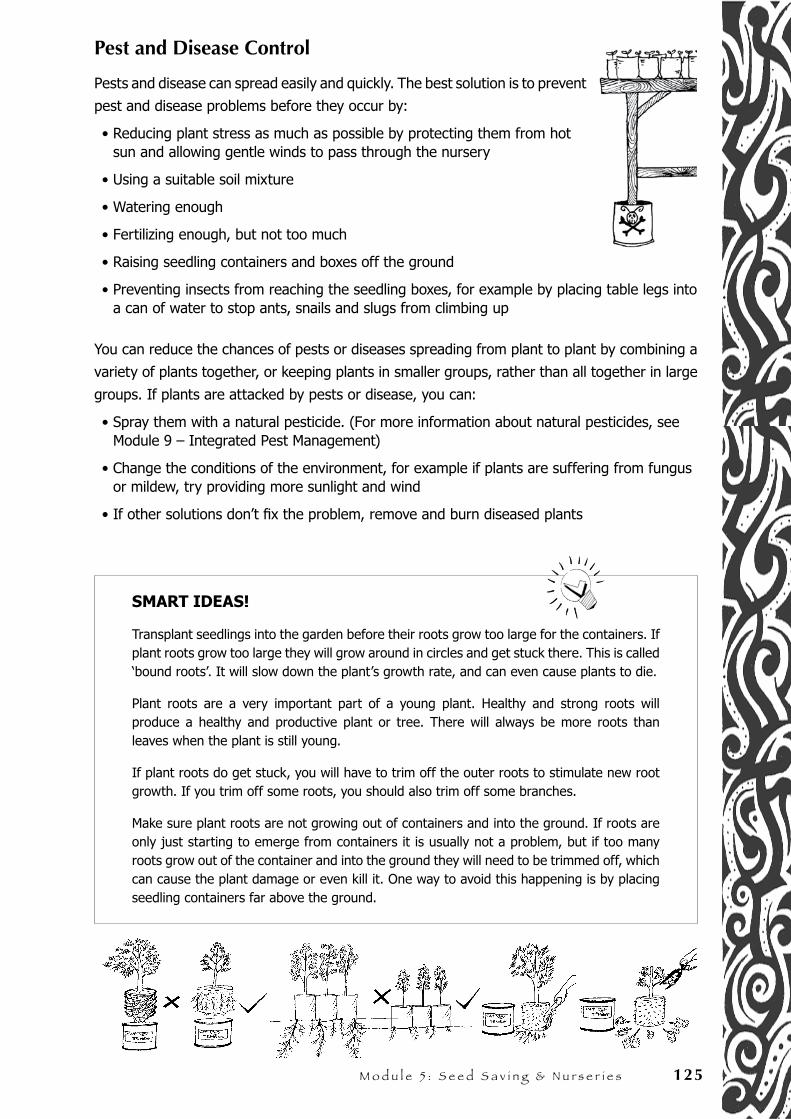
M o d u l e 5 : S e e d S a v i n g & N u r s e r i e s 125
Pest and Disease Control
Pests and disease can spread easily and quickly. The best solution is to prevent
pest and disease problems before they occur by:
• Reducing plant stress as much as possible by protecting them from hot sun and allowing gentle winds to pass through the nursery
• Using a suitable soil mixture
• Watering enough
• Fertilizing enough, but not too much
• Raising seedling containers and boxes off the ground
• Preventing insects from reaching the seedling boxes, for example by placing table legs into a can of water to stop ants, snails and slugs from climbing up
You can reduce the chances of pests or diseases spreading from plant to plant by combining a
variety of plants together, or keeping plants in smaller groups, rather than all together in large
groups. If plants are attacked by pests or disease, you can:
• Spray them with a natural pesticide. (For more information about natural pesticides, see Module 9 – Integrated Pest Management)
• Change the conditions of the environment, for example if plants are suffering from fungus or mildew, try providing more sunlight and wind
• If other solutions don’t fix the problem, remove and burn diseased plants
SMART IDEAS!
Transplant seedlings into the garden before their roots grow too large for the containers. If plant roots grow too large they will grow around in circles and get stuck there. This is called ‘bound roots’. It will slow down the plant’s growth rate, and can even cause plants to die.
Plant roots are a very important part of a young plant. Healthy and strong roots will produce a healthy and productive plant or tree. There will always be more roots than leaves when the plant is still young.
If plant roots do get stuck, you will have to trim off the outer roots to stimulate new root growth. If you trim off some roots, you should also trim off some branches.
Make sure plant roots are not growing out of containers and into the ground. If roots are only just starting to emerge from containers it is usually not a problem, but if too many roots grow out of the container and into the ground they will need to be trimmed off, which can cause the plant damage or even kill it. One way to avoid this happening is by placing seedling containers far above the ground.
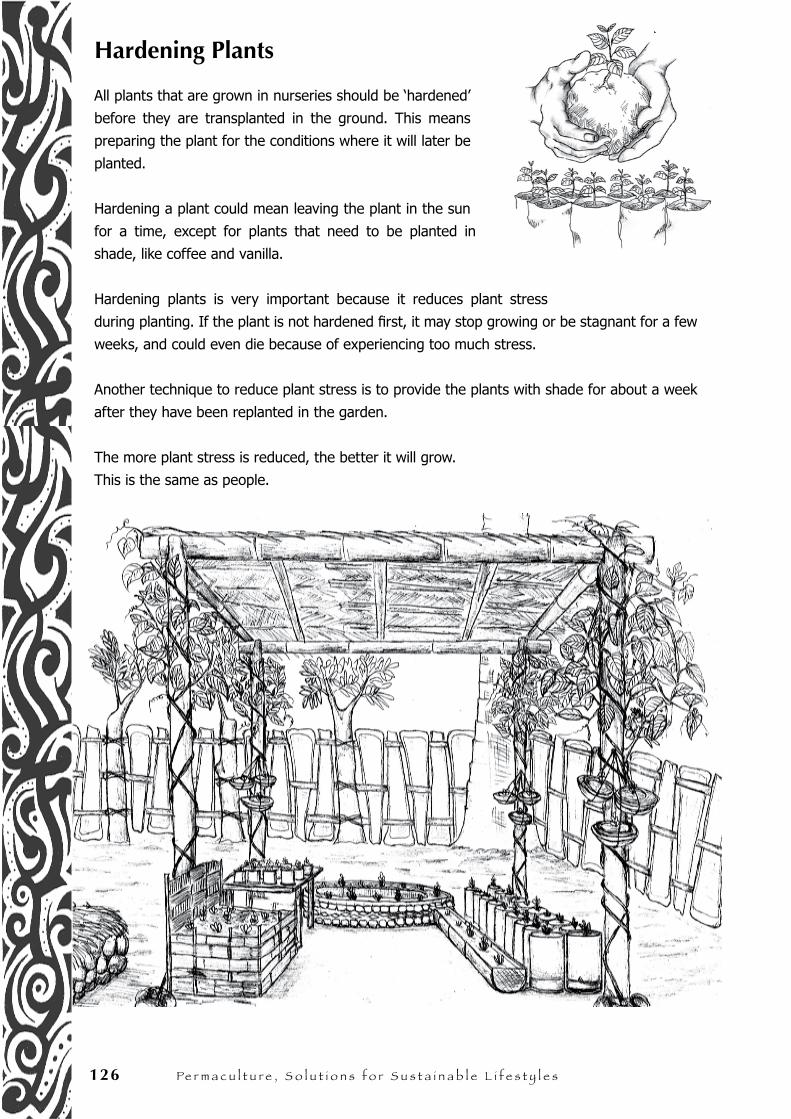
126 Pe r m a c u l t u r e , S o l u t i o n s f o r S u s t a i n a b l e l i f e s t y l e s
Hardening Plants
All plants that are grown in nurseries should be ‘hardened’
before they are transplanted in the ground. This means
preparing the plant for the conditions where it will later be
planted.
Hardening a plant could mean leaving the plant in the sun
for a time, except for plants that need to be planted in
shade, like coffee and vanilla.
Hardening plants is very important because it reduces plant stress
during planting. If the plant is not hardened first, it may stop growing or be stagnant for a few
weeks, and could even die because of experiencing too much stress.
Another technique to reduce plant stress is to provide the plants with shade for about a week
after they have been replanted in the garden.
The more plant stress is reduced, the better it will grow.
This is the same as people.
Modul 5 - Penyimpanan Benih dan Pembibitan
MODUL5
PenyimpananBenih & Pembibitan

M o d u l e 5 : S e e d S a v i n g & N u r s e r i e s 127
N o t e s . . .

128 Pe r m a c u l t u r e , S o l u t i o n s f o r S u s t a i n a b l e l i f e s t y l e s
N o t e s . . .
Pe
rma
cu
ltu
re R
eso
urc
e B
oo
k M
od
ule
6.
Hom
e &
Com
mun
ity
Gar
dens
M o d u l e N o 6 .
Home & Community Gardens

130 Pe r m a c u l t u r e , S o l u t i o n s f o r S u s t a i n a b l e l i f e s t y l e s
N o t e s . . .
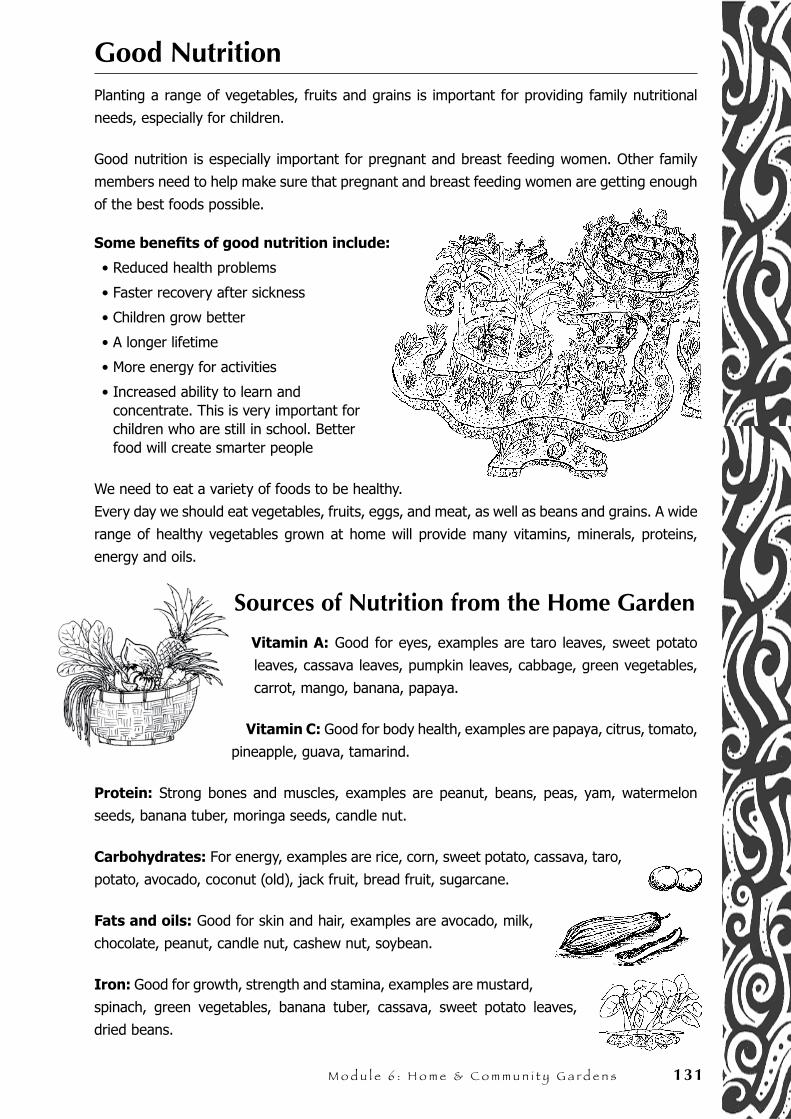
M o d u l e 6 : H o m e & C o m m u n i t y G a r d e n s 131
Good NutritionPlanting a range of vegetables, fruits and grains is important for providing family nutritional
needs, especially for children.
Good nutrition is especially important for pregnant and breast feeding women. Other family
members need to help make sure that pregnant and breast feeding women are getting enough
of the best foods possible.
Some benefits of good nutrition include:
• Reduced health problems
• Faster recovery after sickness
• Children grow better
• A longer lifetime
• More energy for activities
• Increased ability to learn and concentrate. This is very important for children who are still in school. Better food will create smarter people
We need to eat a variety of foods to be healthy.
Every day we should eat vegetables, fruits, eggs, and meat, as well as beans and grains. A wide
range of healthy vegetables grown at home will provide many vitamins, minerals, proteins,
energy and oils.
Sources of Nutrition from the Home Garden
Vitamin A: Good for eyes, examples are taro leaves, sweet potato
leaves, cassava leaves, pumpkin leaves, cabbage, green vegetables,
carrot, mango, banana, papaya.
Vitamin C: Good for body health, examples are papaya, citrus, tomato,
pineapple, guava, tamarind.
Protein: Strong bones and muscles, examples are peanut, beans, peas, yam, watermelon
seeds, banana tuber, moringa seeds, candle nut.
Carbohydrates: For energy, examples are rice, corn, sweet potato, cassava, taro,
potato, avocado, coconut (old), jack fruit, bread fruit, sugarcane.
Fats and oils: Good for skin and hair, examples are avocado, milk,
chocolate, peanut, candle nut, cashew nut, soybean.
Iron: Good for growth, strength and stamina, examples are mustard,
spinach, green vegetables, banana tuber, cassava, sweet potato leaves,
dried beans.
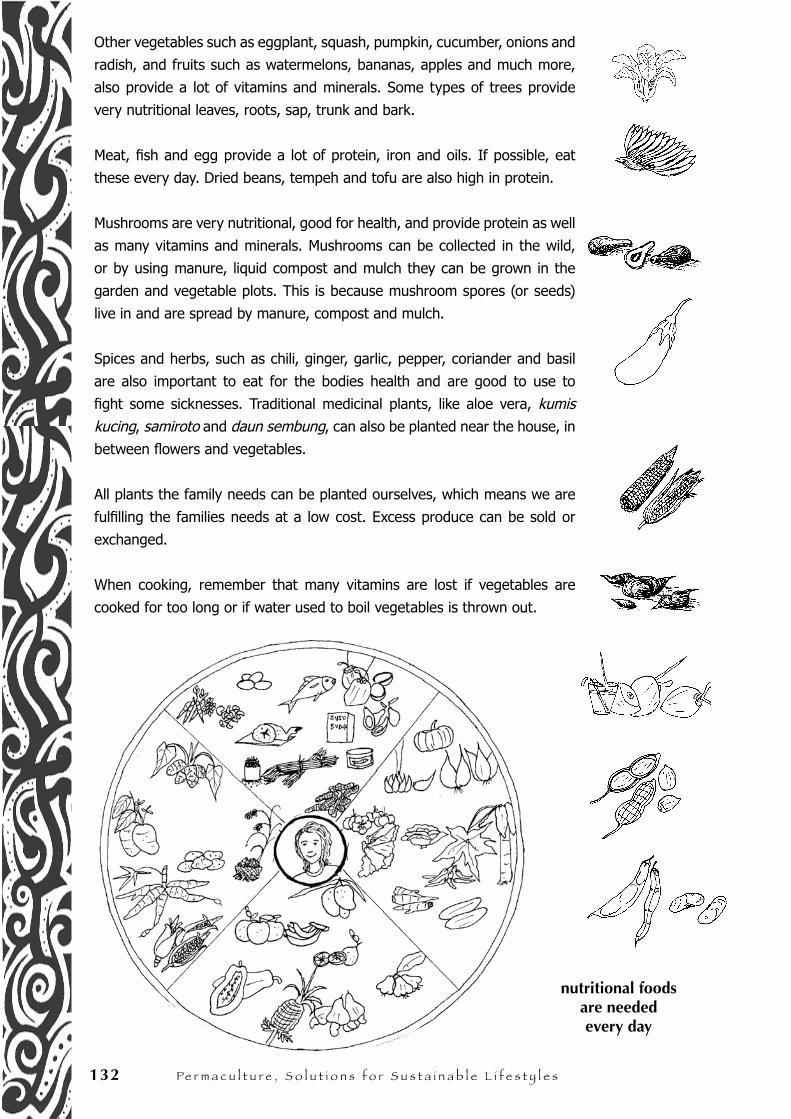
132 Pe r m a c u l t u r e , S o l u t i o n s f o r S u s t a i n a b l e l i f e s t y l e s
Other vegetables such as eggplant, squash, pumpkin, cucumber, onions and
radish, and fruits such as watermelons, bananas, apples and much more,
also provide a lot of vitamins and minerals. Some types of trees provide
very nutritional leaves, roots, sap, trunk and bark.
Meat, fish and egg provide a lot of protein, iron and oils. If possible, eat
these every day. Dried beans, tempeh and tofu are also high in protein.
Mushrooms are very nutritional, good for health, and provide protein as well
as many vitamins and minerals. Mushrooms can be collected in the wild,
or by using manure, liquid compost and mulch they can be grown in the
garden and vegetable plots. This is because mushroom spores (or seeds)
live in and are spread by manure, compost and mulch.
Spices and herbs, such as chili, ginger, garlic, pepper, coriander and basil
are also important to eat for the bodies health and are good to use to
fight some sicknesses. Traditional medicinal plants, like aloe vera, kumis kucing, samiroto and daun sembung, can also be planted near the house, in
between flowers and vegetables.
All plants the family needs can be planted ourselves, which means we are
fulfilling the families needs at a low cost. Excess produce can be sold or
exchanged.
When cooking, remember that many vitamins are lost if vegetables are
cooked for too long or if water used to boil vegetables is thrown out.
nutritional foods are needed every day
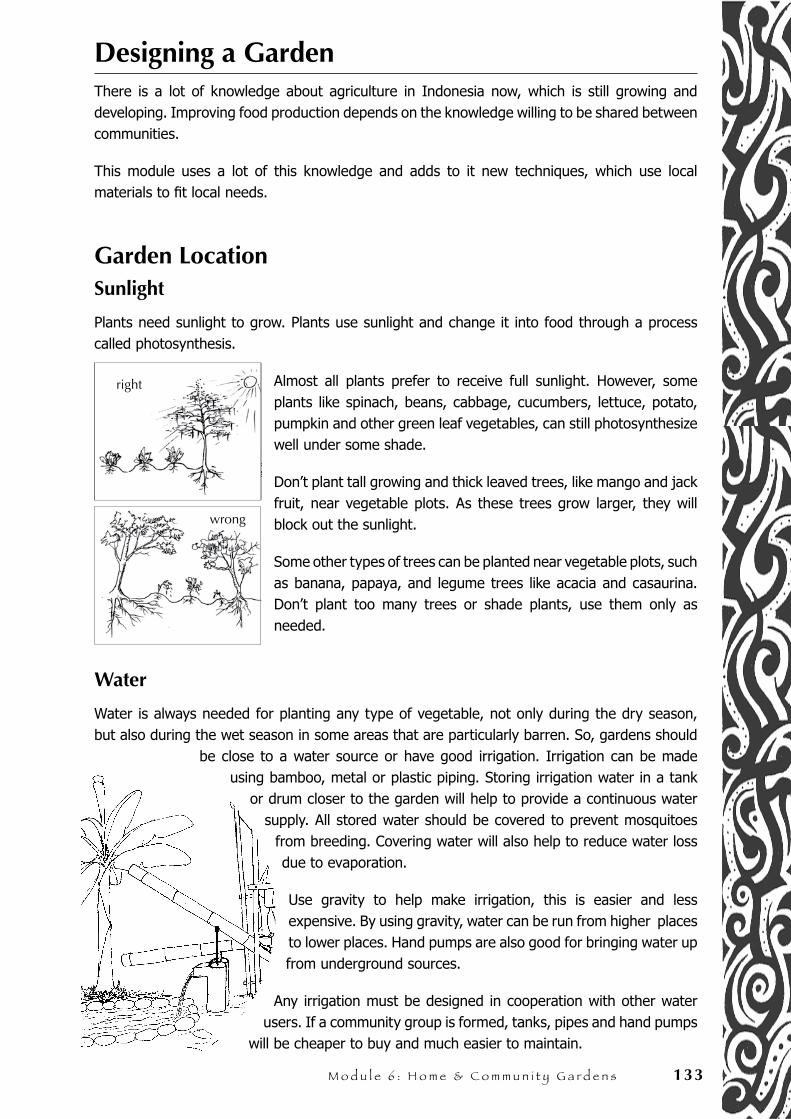
M o d u l e 6 : H o m e & C o m m u n i t y G a r d e n s 133
Designing a GardenThere is a lot of knowledge about agriculture in Indonesia now, which is still growing and developing. Improving food production depends on the knowledge willing to be shared between communities.
This module uses a lot of this knowledge and adds to it new techniques, which use local materials to fit local needs.
Garden LocationSunlight
Plants need sunlight to grow. Plants use sunlight and change it into food through a process called photosynthesis.
Almost all plants prefer to receive full sunlight. However, some plants like spinach, beans, cabbage, cucumbers, lettuce, potato, pumpkin and other green leaf vegetables, can still photosynthesize well under some shade.
Don’t plant tall growing and thick leaved trees, like mango and jack fruit, near vegetable plots. As these trees grow larger, they will block out the sunlight.
Some other types of trees can be planted near vegetable plots, such as banana, papaya, and legume trees like acacia and casaurina. Don’t plant too many trees or shade plants, use them only as needed.
Water
Water is always needed for planting any type of vegetable, not only during the dry season, but also during the wet season in some areas that are particularly barren. So, gardens should
be close to a water source or have good irrigation. Irrigation can be made using bamboo, metal or plastic piping. Storing irrigation water in a tank
or drum closer to the garden will help to provide a continuous water supply. All stored water should be covered to prevent mosquitoes
from breeding. Covering water will also help to reduce water loss due to evaporation.
Use gravity to help make irrigation, this is easier and less expensive. By using gravity, water can be run from higher places to lower places. Hand pumps are also good for bringing water up from underground sources.
Any irrigation must be designed in cooperation with other water users. If a community group is formed, tanks, pipes and hand pumps
will be cheaper to buy and much easier to maintain.
right
wrong
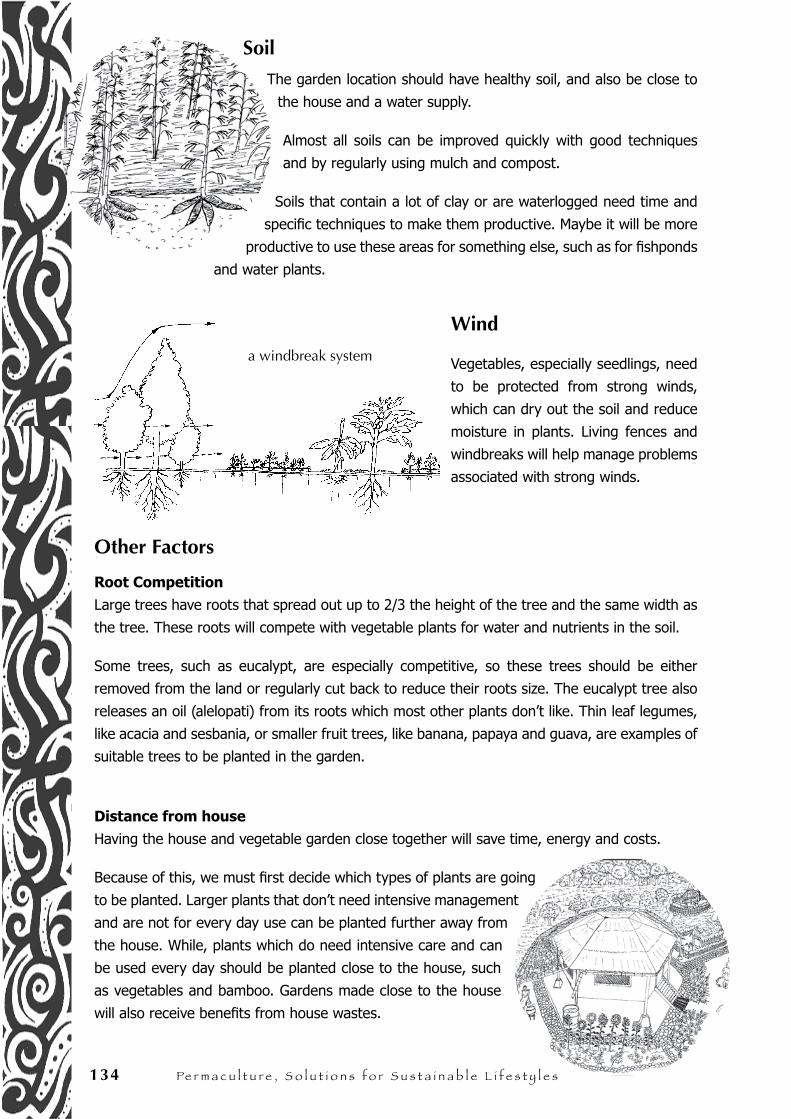
134 Pe r m a c u l t u r e , S o l u t i o n s f o r S u s t a i n a b l e l i f e s t y l e s
Soil
The garden location should have healthy soil, and also be close to
the house and a water supply.
Almost all soils can be improved quickly with good techniques
and by regularly using mulch and compost.
Soils that contain a lot of clay or are waterlogged need time and
specific techniques to make them productive. Maybe it will be more
productive to use these areas for something else, such as for fishponds
and water plants.
Wind
Vegetables, especially seedlings, need
to be protected from strong winds,
which can dry out the soil and reduce
moisture in plants. Living fences and
windbreaks will help manage problems
associated with strong winds.
Other Factors
Root Competition
Large trees have roots that spread out up to 2/3 the height of the tree and the same width as
the tree. These roots will compete with vegetable plants for water and nutrients in the soil.
Some trees, such as eucalypt, are especially competitive, so these trees should be either
removed from the land or regularly cut back to reduce their roots size. The eucalypt tree also
releases an oil (alelopati) from its roots which most other plants don’t like. Thin leaf legumes,
like acacia and sesbania, or smaller fruit trees, like banana, papaya and guava, are examples of
suitable trees to be planted in the garden.
Distance from house
Having the house and vegetable garden close together will save time, energy and costs.
Because of this, we must first decide which types of plants are going
to be planted. Larger plants that don’t need intensive management
and are not for every day use can be planted further away from
the house. While, plants which do need intensive care and can
be used every day should be planted close to the house, such
as vegetables and bamboo. Gardens made close to the house
will also receive benefits from house wastes.
a windbreak system
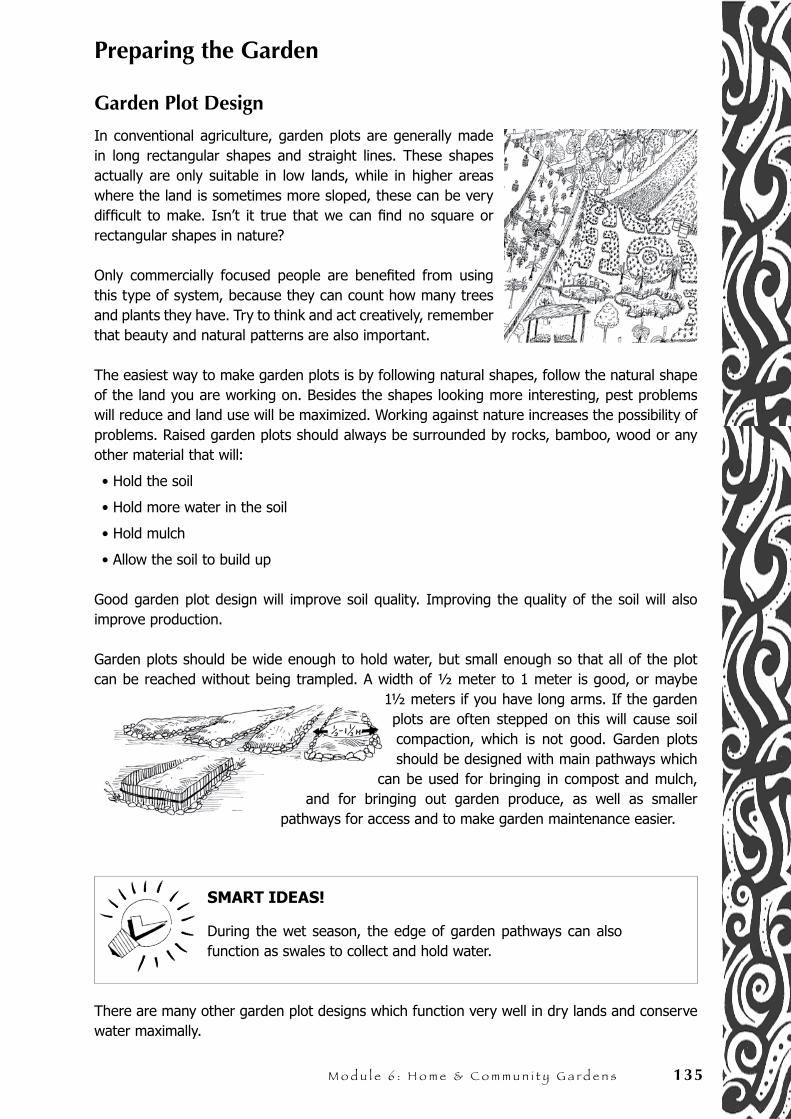
M o d u l e 6 : H o m e & C o m m u n i t y G a r d e n s 135
Preparing the Garden
Garden Plot Design
In conventional agriculture, garden plots are generally made in long rectangular shapes and straight lines. These shapes actually are only suitable in low lands, while in higher areas where the land is sometimes more sloped, these can be very difficult to make. Isn’t it true that we can find no square or rectangular shapes in nature?
Only commercially focused people are benefited from using this type of system, because they can count how many trees and plants they have. Try to think and act creatively, remember that beauty and natural patterns are also important.
The easiest way to make garden plots is by following natural shapes, follow the natural shape of the land you are working on. Besides the shapes looking more interesting, pest problems will reduce and land use will be maximized. Working against nature increases the possibility of problems. Raised garden plots should always be surrounded by rocks, bamboo, wood or any other material that will:
• Hold the soil
• Hold more water in the soil
• Hold mulch
• Allow the soil to build up
Good garden plot design will improve soil quality. Improving the quality of the soil will also improve production.
Garden plots should be wide enough to hold water, but small enough so that all of the plot can be reached without being trampled. A width of ½ meter to 1 meter is good, or maybe
1½ meters if you have long arms. If the garden plots are often stepped on this will cause soil compaction, which is not good. Garden plots should be designed with main pathways which
can be used for bringing in compost and mulch, and for bringing out garden produce, as well as smaller
pathways for access and to make garden maintenance easier.
SMART IDEAS!
During the wet season, the edge of garden pathways can also function as swales to collect and hold water.
There are many other garden plot designs which function very well in dry lands and conserve water maximally.
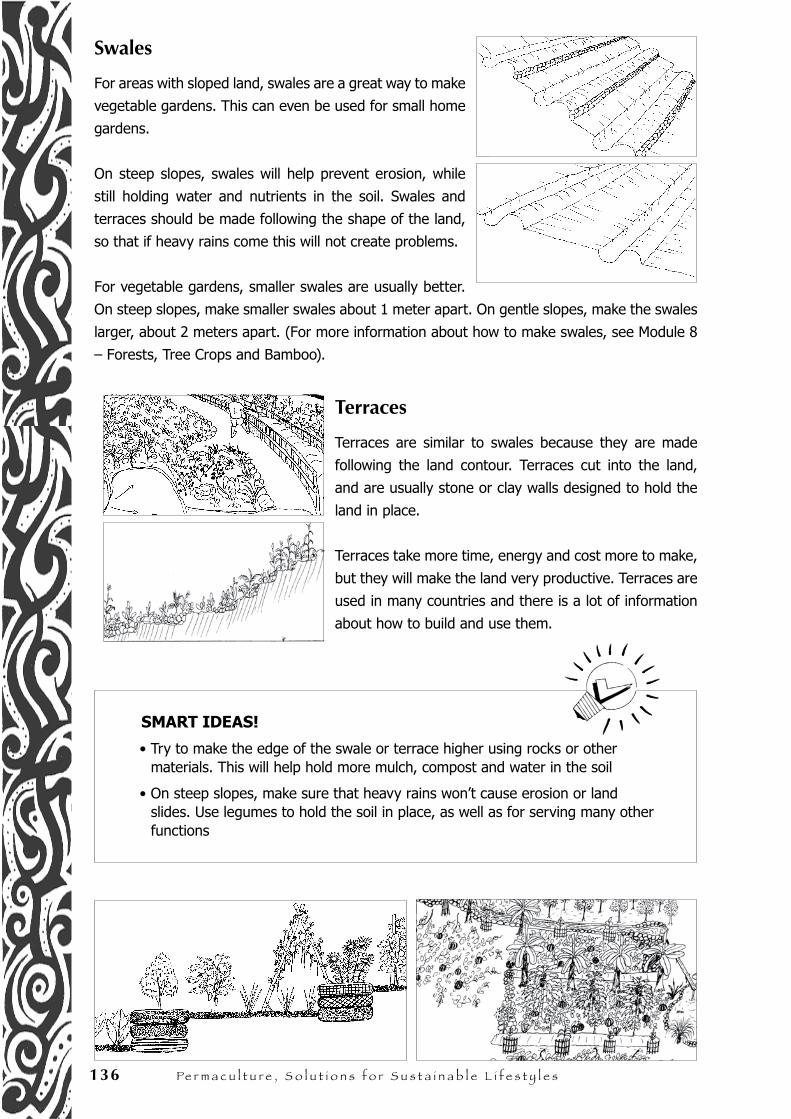
136 Pe r m a c u l t u r e , S o l u t i o n s f o r S u s t a i n a b l e l i f e s t y l e s
Swales
For areas with sloped land, swales are a great way to make
vegetable gardens. This can even be used for small home
gardens.
On steep slopes, swales will help prevent erosion, while
still holding water and nutrients in the soil. Swales and
terraces should be made following the shape of the land,
so that if heavy rains come this will not create problems.
For vegetable gardens, smaller swales are usually better.
On steep slopes, make smaller swales about 1 meter apart. On gentle slopes, make the swales
larger, about 2 meters apart. (For more information about how to make swales, see Module 8
– Forests, Tree Crops and Bamboo).
Terraces
Terraces are similar to swales because they are made
following the land contour. Terraces cut into the land,
and are usually stone or clay walls designed to hold the
land in place.
Terraces take more time, energy and cost more to make,
but they will make the land very productive. Terraces are
used in many countries and there is a lot of information
about how to build and use them.
SMART IDEAS!
• Try to make the edge of the swale or terrace higher using rocks or other materials. This will help hold more mulch, compost and water in the soil
• On steep slopes, make sure that heavy rains won’t cause erosion or land slides. Use legumes to hold the soil in place, as well as for serving many other functions
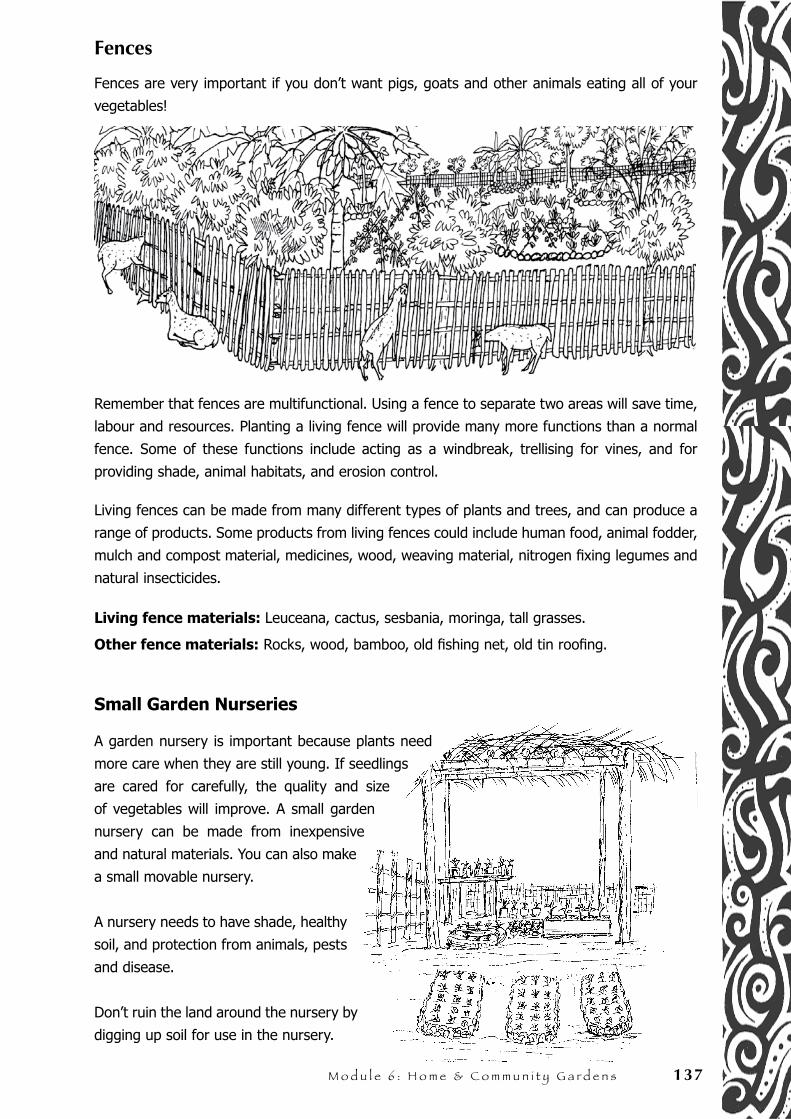
M o d u l e 6 : H o m e & C o m m u n i t y G a r d e n s 137
Fences
Fences are very important if you don’t want pigs, goats and other animals eating all of your
vegetables!
Remember that fences are multifunctional. Using a fence to separate two areas will save time,
labour and resources. Planting a living fence will provide many more functions than a normal
fence. Some of these functions include acting as a windbreak, trellising for vines, and for
providing shade, animal habitats, and erosion control.
Living fences can be made from many different types of plants and trees, and can produce a
range of products. Some products from living fences could include human food, animal fodder,
mulch and compost material, medicines, wood, weaving material, nitrogen fixing legumes and
natural insecticides.
Living fence materials: Leuceana, cactus, sesbania, moringa, tall grasses.
Other fence materials: Rocks, wood, bamboo, old fishing net, old tin roofing.
Small Garden Nurseries
A garden nursery is important because plants need
more care when they are still young. If seedlings
are cared for carefully, the quality and size
of vegetables will improve. A small garden
nursery can be made from inexpensive
and natural materials. You can also make
a small movable nursery.
A nursery needs to have shade, healthy
soil, and protection from animals, pests
and disease.
Don’t ruin the land around the nursery by
digging up soil for use in the nursery.
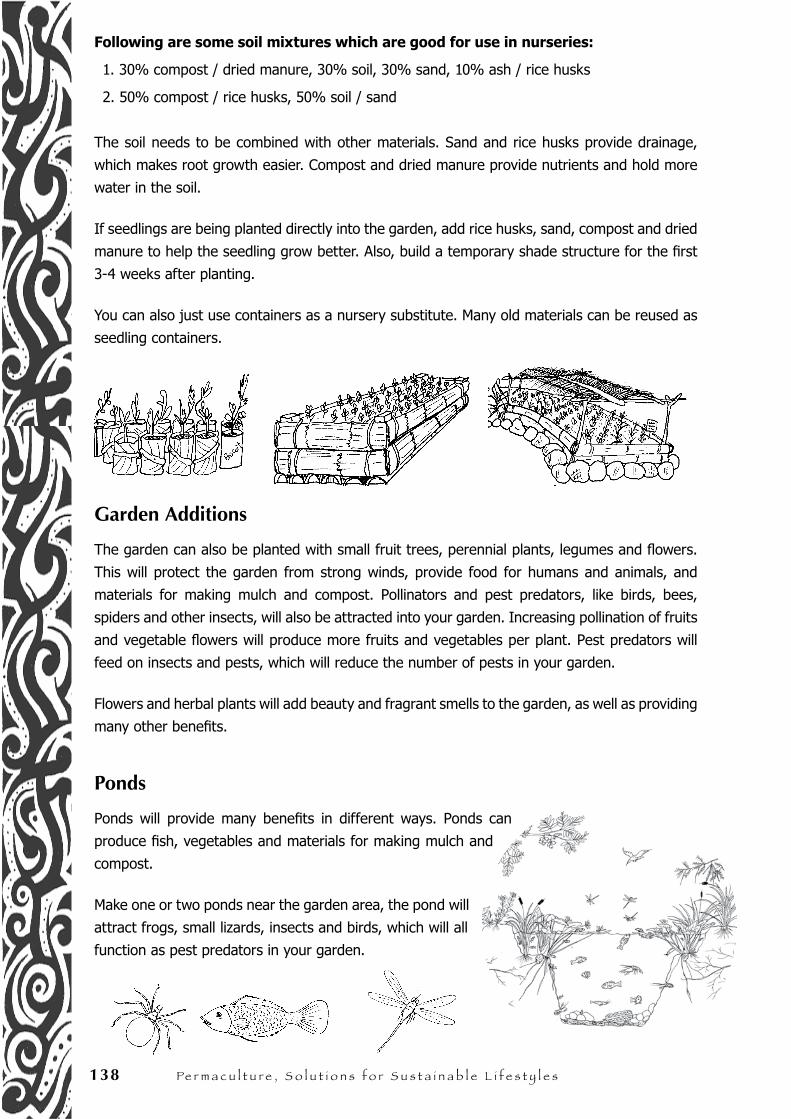
138 Pe r m a c u l t u r e , S o l u t i o n s f o r S u s t a i n a b l e l i f e s t y l e s
Following are some soil mixtures which are good for use in nurseries:
1. 30% compost / dried manure, 30% soil, 30% sand, 10% ash / rice husks
2. 50% compost / rice husks, 50% soil / sand
The soil needs to be combined with other materials. Sand and rice husks provide drainage,
which makes root growth easier. Compost and dried manure provide nutrients and hold more
water in the soil.
If seedlings are being planted directly into the garden, add rice husks, sand, compost and dried
manure to help the seedling grow better. Also, build a temporary shade structure for the first
3-4 weeks after planting.
You can also just use containers as a nursery substitute. Many old materials can be reused as
seedling containers.
Garden Additions
The garden can also be planted with small fruit trees, perennial plants, legumes and flowers.
This will protect the garden from strong winds, provide food for humans and animals, and
materials for making mulch and compost. Pollinators and pest predators, like birds, bees,
spiders and other insects, will also be attracted into your garden. Increasing pollination of fruits
and vegetable flowers will produce more fruits and vegetables per plant. Pest predators will
feed on insects and pests, which will reduce the number of pests in your garden.
Flowers and herbal plants will add beauty and fragrant smells to the garden, as well as providing
many other benefits.
Ponds
Ponds will provide many benefits in different ways. Ponds can
produce fish, vegetables and materials for making mulch and
compost.
Make one or two ponds near the garden area, the pond will
attract frogs, small lizards, insects and birds, which will all
function as pest predators in your garden.
M o d u l e 6 : H o m e & C o m m u n i t y G a r d e n s 139
SMART IDEAS!
• Excess water in the wet season can be stored in ponds to prevent water laying stagnant on the ground
• To manage the problem of mosquitoes laying eggs in ponds, add a handful of neem leaves to the pond once every three months. Neem leaves will help stop mosquitoes from breeding, but won’t harm other pond creatures. Frogs, lizards and fish, especially tilapia fish, will feed on mosquito eggs and larvae
BEWARE!
Chemicals from pesticides and herbicides can kill many plants and animals living in your pond.
Garden Maintenance
Providing Plant Food
Garden plots should be covered with compost at least 2 weeks before planting. Compost can be lightly turned into the soil if nothing has been planted, or just leave the compost laying on top of the soil. Add more compost 1 or 2 weeks after planting. Make sure adding compost does not disturb the plant roots. After composting, add a thick layer of mulch on top.
Liquid compost can be used on garden plots every 1 or 2 weeks, but make sure to dilute with water before use. There are many different ways to fertilize the garden. It is up to you to decide which method works best for your situation. Use EM (Effective Micro-organisms) with other soil improvement techniques to increase results.
All of these techniques will improve soil quality, structure and nutrient content so that there is enough food available for plants to use.
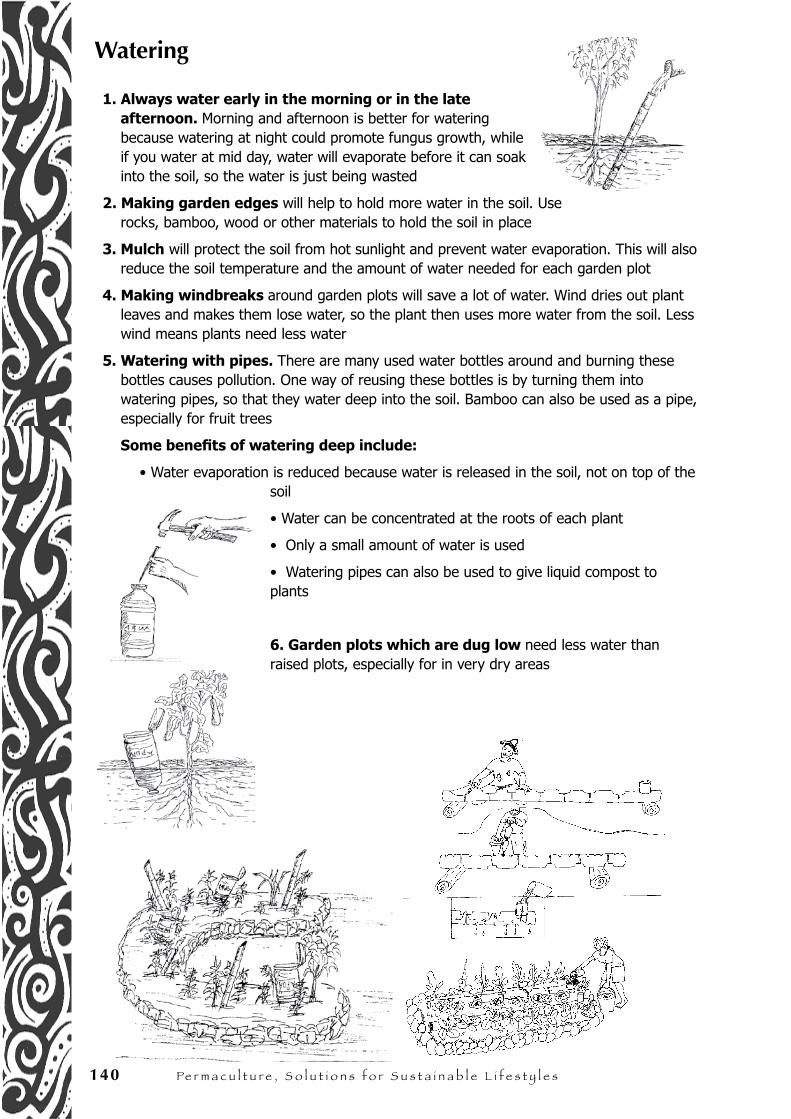
140 Pe r m a c u l t u r e , S o l u t i o n s f o r S u s t a i n a b l e l i f e s t y l e s
Watering
1. Always water early in the morning or in the late afternoon. Morning and afternoon is better for watering because watering at night could promote fungus growth, while if you water at mid day, water will evaporate before it can soak into the soil, so the water is just being wasted
2. Making garden edges will help to hold more water in the soil. Use rocks, bamboo, wood or other materials to hold the soil in place
3. Mulch will protect the soil from hot sunlight and prevent water evaporation. This will also reduce the soil temperature and the amount of water needed for each garden plot
4. Making windbreaks around garden plots will save a lot of water. Wind dries out plant leaves and makes them lose water, so the plant then uses more water from the soil. Less wind means plants need less water
5. Watering with pipes. There are many used water bottles around and burning these bottles causes pollution. One way of reusing these bottles is by turning them into watering pipes, so that they water deep into the soil. Bamboo can also be used as a pipe, especially for fruit trees
Some benefits of watering deep include:
• Water evaporation is reduced because water is released in the soil, not on top of the soil
• Water can be concentrated at the roots of each plant
• Only a small amount of water is used
• Watering pipes can also be used to give liquid compost to plants
6. Garden plots which are dug low need less water than raised plots, especially for in very dry areas
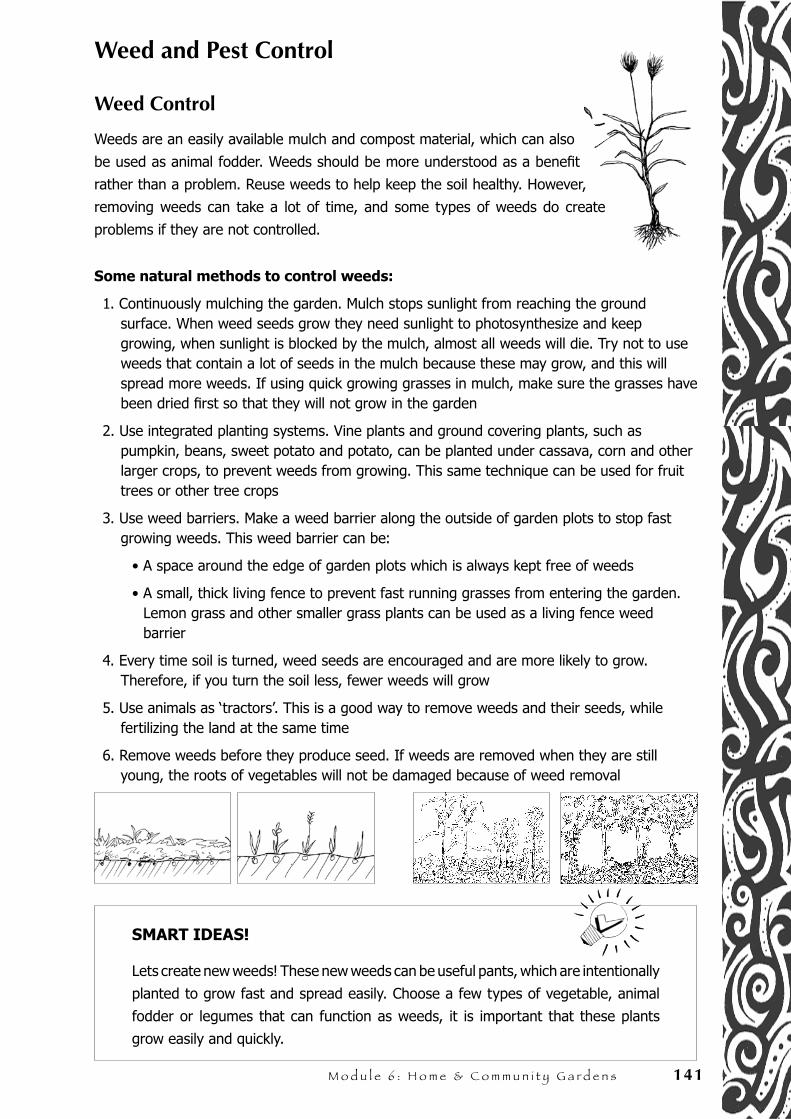
M o d u l e 6 : H o m e & C o m m u n i t y G a r d e n s 141
Weed and Pest Control
Weed Control
Weeds are an easily available mulch and compost material, which can also
be used as animal fodder. Weeds should be more understood as a benefit
rather than a problem. Reuse weeds to help keep the soil healthy. However,
removing weeds can take a lot of time, and some types of weeds do create
problems if they are not controlled.
Some natural methods to control weeds:
1. Continuously mulching the garden. Mulch stops sunlight from reaching the ground surface. When weed seeds grow they need sunlight to photosynthesize and keep growing, when sunlight is blocked by the mulch, almost all weeds will die. Try not to use weeds that contain a lot of seeds in the mulch because these may grow, and this will spread more weeds. If using quick growing grasses in mulch, make sure the grasses have been dried first so that they will not grow in the garden
2. Use integrated planting systems. Vine plants and ground covering plants, such as pumpkin, beans, sweet potato and potato, can be planted under cassava, corn and other larger crops, to prevent weeds from growing. This same technique can be used for fruit trees or other tree crops
3. Use weed barriers. Make a weed barrier along the outside of garden plots to stop fast growing weeds. This weed barrier can be:
• A space around the edge of garden plots which is always kept free of weeds
• A small, thick living fence to prevent fast running grasses from entering the garden. Lemon grass and other smaller grass plants can be used as a living fence weed barrier
4. Every time soil is turned, weed seeds are encouraged and are more likely to grow. Therefore, if you turn the soil less, fewer weeds will grow
5. Use animals as ‘tractors’. This is a good way to remove weeds and their seeds, while fertilizing the land at the same time
6. Remove weeds before they produce seed. If weeds are removed when they are still young, the roots of vegetables will not be damaged because of weed removal
SMART IDEAS!
Lets create new weeds! These new weeds can be useful pants, which are intentionally
planted to grow fast and spread easily. Choose a few types of vegetable, animal
fodder or legumes that can function as weeds, it is important that these plants
grow easily and quickly.
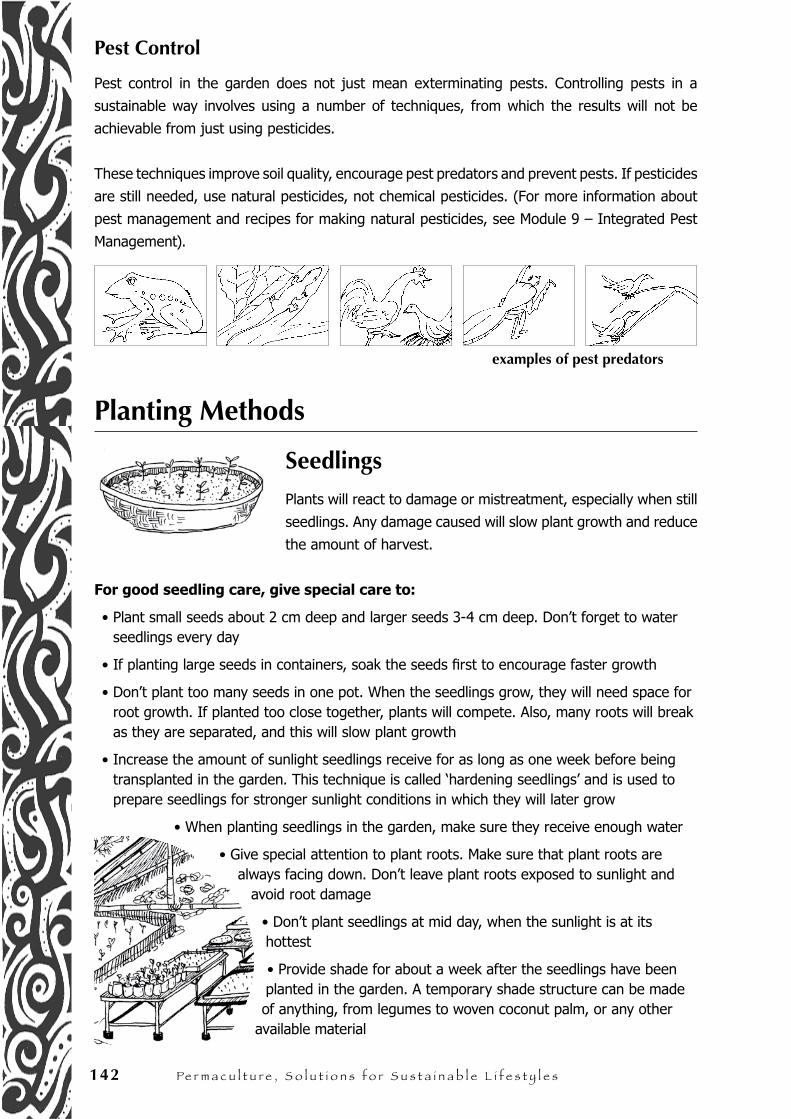
142 Pe r m a c u l t u r e , S o l u t i o n s f o r S u s t a i n a b l e l i f e s t y l e s
Pest Control
Pest control in the garden does not just mean exterminating pests. Controlling pests in a
sustainable way involves using a number of techniques, from which the results will not be
achievable from just using pesticides.
These techniques improve soil quality, encourage pest predators and prevent pests. If pesticides
are still needed, use natural pesticides, not chemical pesticides. (For more information about
pest management and recipes for making natural pesticides, see Module 9 – Integrated Pest
Management).
Planting Methods
Seedlings
Plants will react to damage or mistreatment, especially when still
seedlings. Any damage caused will slow plant growth and reduce
the amount of harvest.
For good seedling care, give special care to:
• Plant small seeds about 2 cm deep and larger seeds 3-4 cm deep. Don’t forget to water seedlings every day
• If planting large seeds in containers, soak the seeds first to encourage faster growth
• Don’t plant too many seeds in one pot. When the seedlings grow, they will need space for root growth. If planted too close together, plants will compete. Also, many roots will break as they are separated, and this will slow plant growth
• Increase the amount of sunlight seedlings receive for as long as one week before being transplanted in the garden. This technique is called ‘hardening seedlings’ and is used to prepare seedlings for stronger sunlight conditions in which they will later grow
• When planting seedlings in the garden, make sure they receive enough water
• Give special attention to plant roots. Make sure that plant roots are always facing down. Don’t leave plant roots exposed to sunlight and
avoid root damage
• Don’t plant seedlings at mid day, when the sunlight is at its hottest
• Provide shade for about a week after the seedlings have been planted in the garden. A temporary shade structure can be made of anything, from legumes to woven coconut palm, or any other
available material
examples of pest predators
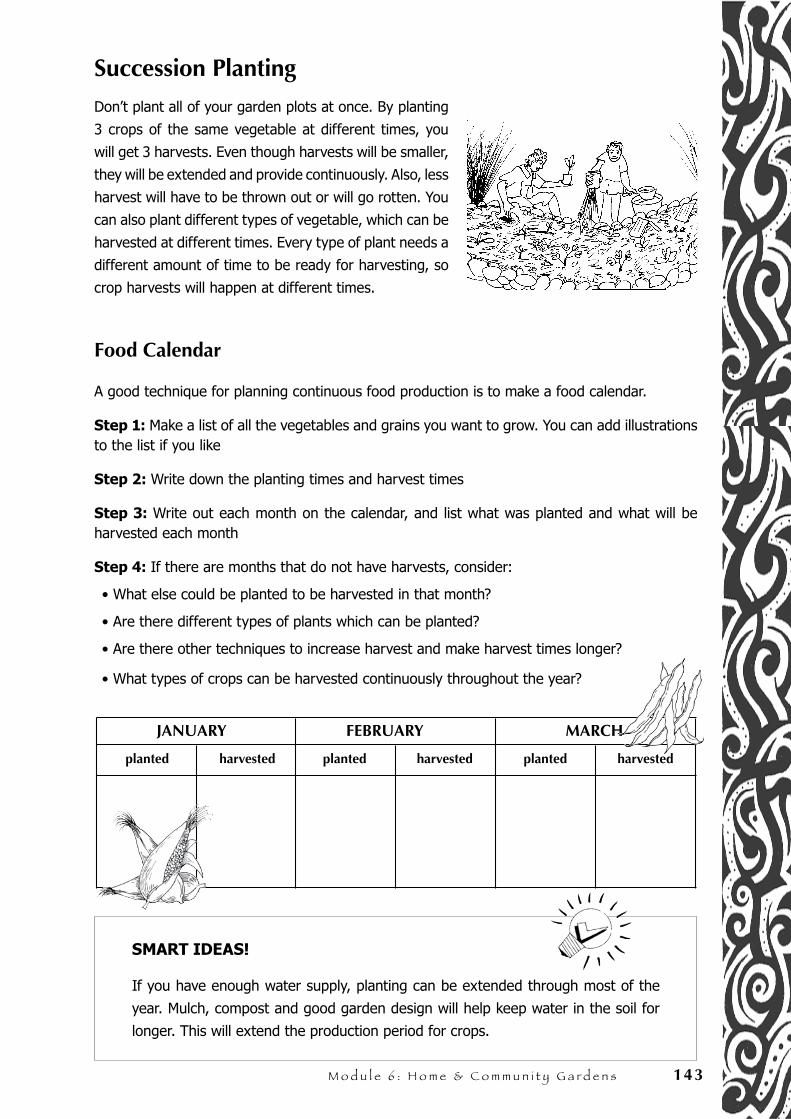
M o d u l e 6 : H o m e & C o m m u n i t y G a r d e n s 143
yg ditanam yg dipanen yg ditanam yg dipanen yg ditanam yg dipanen
JANUARI FEBRUARI MARETJANUARY FEBRUARY MARCH
planted harvested planted harvested planted harvested
Succession Planting
Don’t plant all of your garden plots at once. By planting
3 crops of the same vegetable at different times, you
will get 3 harvests. Even though harvests will be smaller,
they will be extended and provide continuously. Also, less
harvest will have to be thrown out or will go rotten. You
can also plant different types of vegetable, which can be
harvested at different times. Every type of plant needs a
different amount of time to be ready for harvesting, so
crop harvests will happen at different times.
Food Calendar
A good technique for planning continuous food production is to make a food calendar.
Step 1: Make a list of all the vegetables and grains you want to grow. You can add illustrations to the list if you like
Step 2: Write down the planting times and harvest times
Step 3: Write out each month on the calendar, and list what was planted and what will be harvested each month
Step 4: If there are months that do not have harvests, consider:
• What else could be planted to be harvested in that month?
• Are there different types of plants which can be planted?
• Are there other techniques to increase harvest and make harvest times longer?
• What types of crops can be harvested continuously throughout the year?
SMART IDEAS!
If you have enough water supply, planting can be extended through most of the
year. Mulch, compost and good garden design will help keep water in the soil for
longer. This will extend the production period for crops.
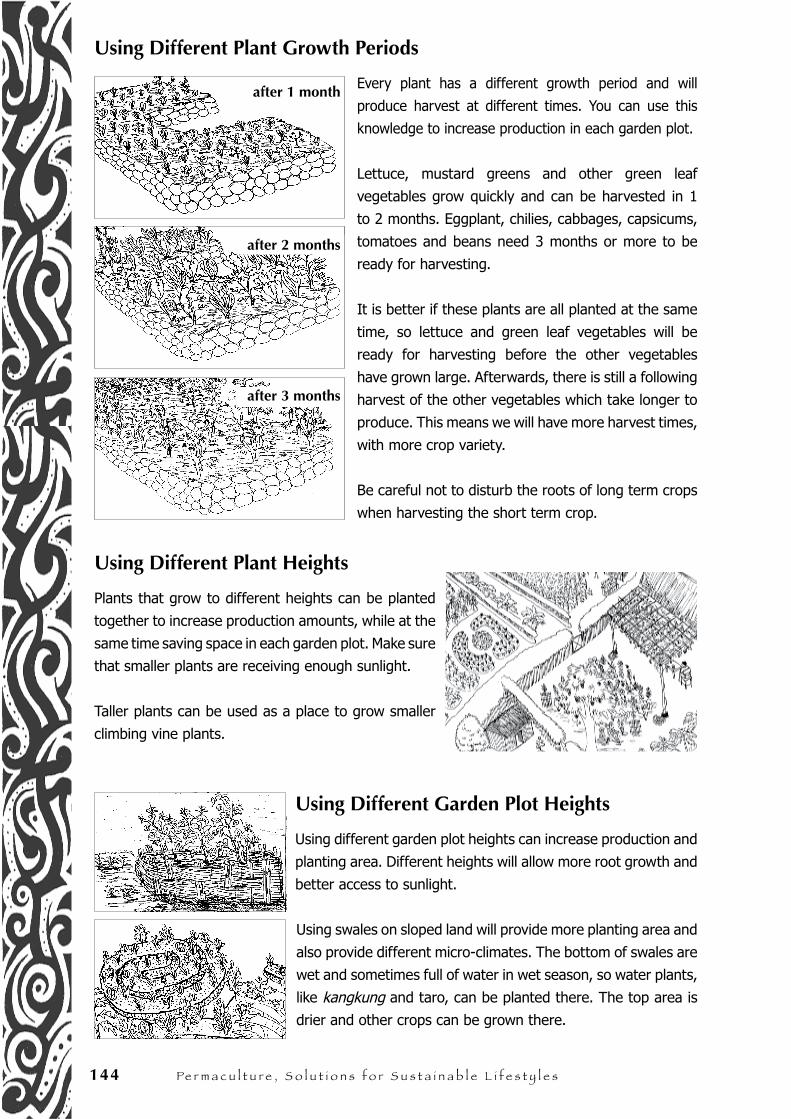
144 Pe r m a c u l t u r e , S o l u t i o n s f o r S u s t a i n a b l e l i f e s t y l e s
Using Different Plant Growth Periods
Every plant has a different growth period and will
produce harvest at different times. You can use this
knowledge to increase production in each garden plot.
Lettuce, mustard greens and other green leaf
vegetables grow quickly and can be harvested in 1
to 2 months. Eggplant, chilies, cabbages, capsicums,
tomatoes and beans need 3 months or more to be
ready for harvesting.
It is better if these plants are all planted at the same
time, so lettuce and green leaf vegetables will be
ready for harvesting before the other vegetables
have grown large. Afterwards, there is still a following
harvest of the other vegetables which take longer to
produce. This means we will have more harvest times,
with more crop variety.
Be careful not to disturb the roots of long term crops
when harvesting the short term crop.
Using Different Plant Heights
Plants that grow to different heights can be planted
together to increase production amounts, while at the
same time saving space in each garden plot. Make sure
that smaller plants are receiving enough sunlight.
Taller plants can be used as a place to grow smaller
climbing vine plants.
Using Different Garden Plot Heights
Using different garden plot heights can increase production and
planting area. Different heights will allow more root growth and
better access to sunlight.
Using swales on sloped land will provide more planting area and
also provide different micro-climates. The bottom of swales are
wet and sometimes full of water in wet season, so water plants,
like kangkung and taro, can be planted there. The top area is
drier and other crops can be grown there.
after 1 month
after 2 months
after 3 months
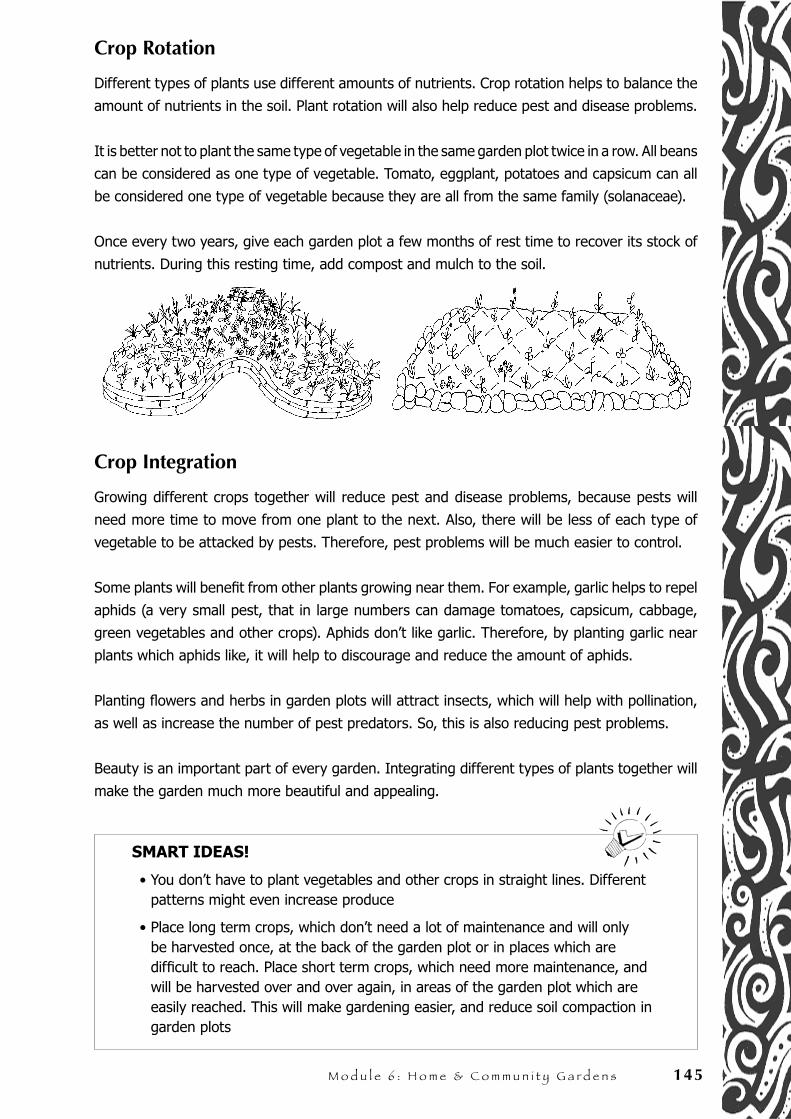
M o d u l e 6 : H o m e & C o m m u n i t y G a r d e n s 145
Crop Rotation
Different types of plants use different amounts of nutrients. Crop rotation helps to balance the
amount of nutrients in the soil. Plant rotation will also help reduce pest and disease problems.
It is better not to plant the same type of vegetable in the same garden plot twice in a row. All beans
can be considered as one type of vegetable. Tomato, eggplant, potatoes and capsicum can all
be considered one type of vegetable because they are all from the same family (solanaceae).
Once every two years, give each garden plot a few months of rest time to recover its stock of
nutrients. During this resting time, add compost and mulch to the soil.
Crop Integration
Growing different crops together will reduce pest and disease problems, because pests will
need more time to move from one plant to the next. Also, there will be less of each type of
vegetable to be attacked by pests. Therefore, pest problems will be much easier to control.
Some plants will benefit from other plants growing near them. For example, garlic helps to repel
aphids (a very small pest, that in large numbers can damage tomatoes, capsicum, cabbage,
green vegetables and other crops). Aphids don’t like garlic. Therefore, by planting garlic near
plants which aphids like, it will help to discourage and reduce the amount of aphids.
Planting flowers and herbs in garden plots will attract insects, which will help with pollination,
as well as increase the number of pest predators. So, this is also reducing pest problems.
Beauty is an important part of every garden. Integrating different types of plants together will
make the garden much more beautiful and appealing.
SMART IDEAS!
• You don’t have to plant vegetables and other crops in straight lines. Different patterns might even increase produce
• Place long term crops, which don’t need a lot of maintenance and will only be harvested once, at the back of the garden plot or in places which are difficult to reach. Place short term crops, which need more maintenance, and will be harvested over and over again, in areas of the garden plot which are easily reached. This will make gardening easier, and reduce soil compaction in garden plots
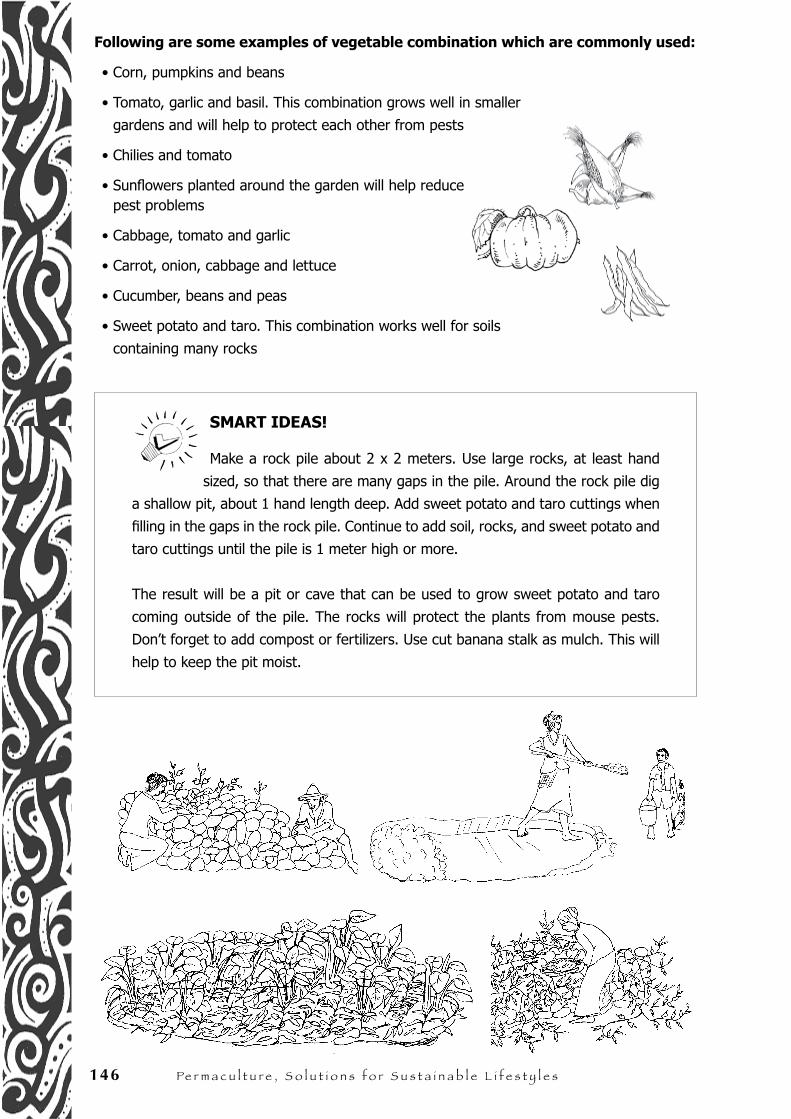
146 Pe r m a c u l t u r e , S o l u t i o n s f o r S u s t a i n a b l e l i f e s t y l e s
Following are some examples of vegetable combination which are commonly used:
• Corn, pumpkins and beans
• Tomato, garlic and basil. This combination grows well in smaller
gardens and will help to protect each other from pests
• Chilies and tomato
• Sunflowers planted around the garden will help reduce pest problems
• Cabbage, tomato and garlic
• Carrot, onion, cabbage and lettuce
• Cucumber, beans and peas
• Sweet potato and taro. This combination works well for soils
containing many rocks
SMART IDEAS!
Make a rock pile about 2 x 2 meters. Use large rocks, at least hand
sized, so that there are many gaps in the pile. Around the rock pile dig
a shallow pit, about 1 hand length deep. Add sweet potato and taro cuttings when
filling in the gaps in the rock pile. Continue to add soil, rocks, and sweet potato and
taro cuttings until the pile is 1 meter high or more.
The result will be a pit or cave that can be used to grow sweet potato and taro
coming outside of the pile. The rocks will protect the plants from mouse pests.
Don’t forget to add compost or fertilizers. Use cut banana stalk as mulch. This will
help to keep the pit moist.
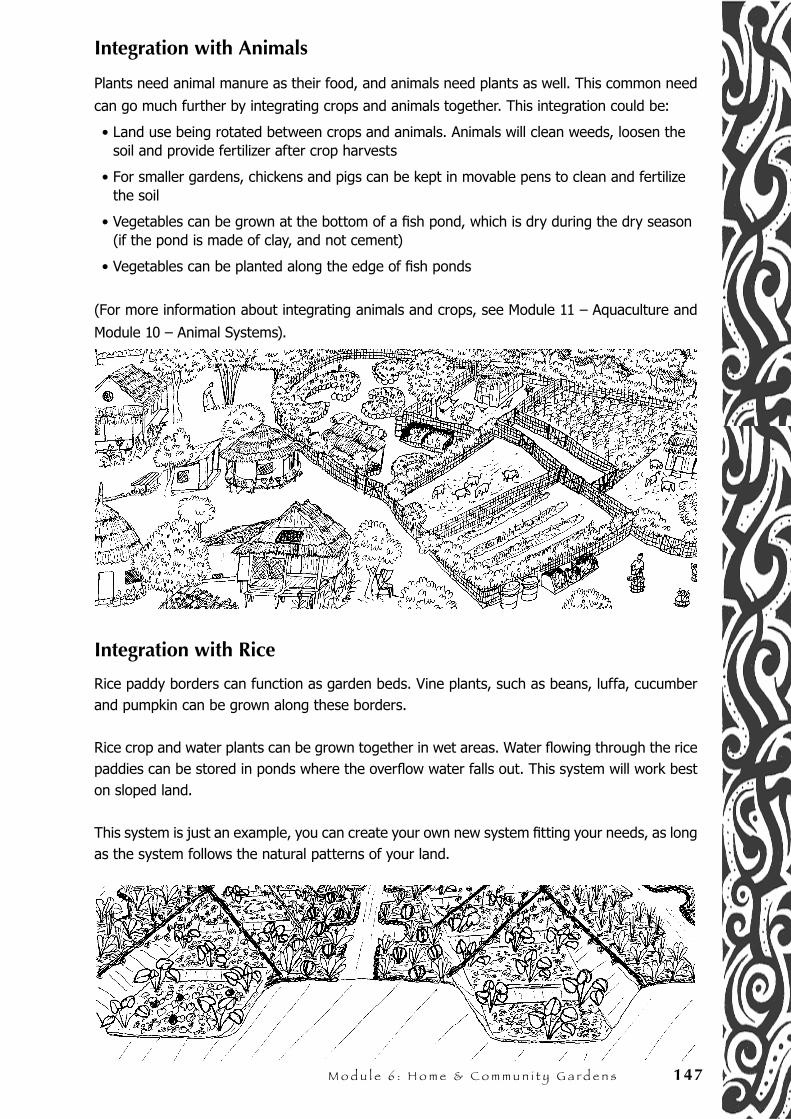
M o d u l e 6 : H o m e & C o m m u n i t y G a r d e n s 147
Integration with Animals
Plants need animal manure as their food, and animals need plants as well. This common need
can go much further by integrating crops and animals together. This integration could be:
• Land use being rotated between crops and animals. Animals will clean weeds, loosen the soil and provide fertilizer after crop harvests
• For smaller gardens, chickens and pigs can be kept in movable pens to clean and fertilize the soil
• Vegetables can be grown at the bottom of a fish pond, which is dry during the dry season (if the pond is made of clay, and not cement)
• Vegetables can be planted along the edge of fish ponds
(For more information about integrating animals and crops, see Module 11 – Aquaculture and
Module 10 – Animal Systems).
Integration with Rice
Rice paddy borders can function as garden beds. Vine plants, such as beans, luffa, cucumber and pumpkin can be grown along these borders.
Rice crop and water plants can be grown together in wet areas. Water flowing through the rice paddies can be stored in ponds where the overflow water falls out. This system will work best on sloped land.
This system is just an example, you can create your own new system fitting your needs, as long as the system follows the natural patterns of your land.
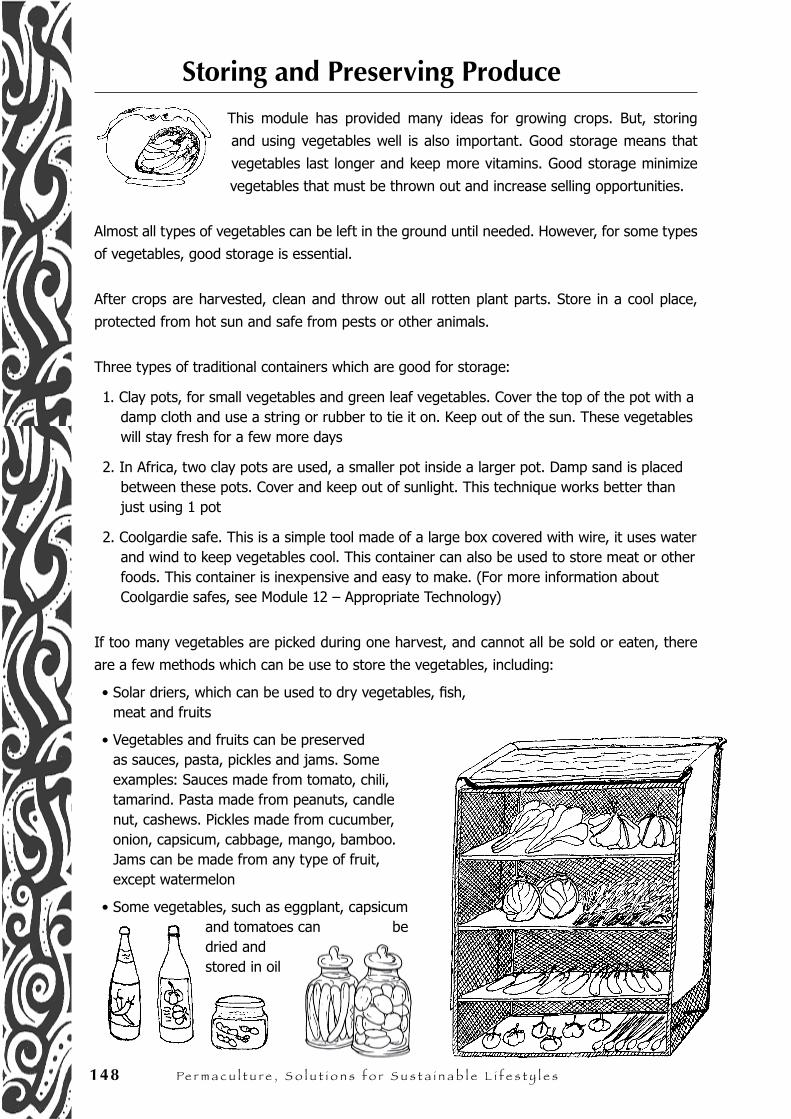
148 Pe r m a c u l t u r e , S o l u t i o n s f o r S u s t a i n a b l e l i f e s t y l e s
Storing and Preserving Produce
This module has provided many ideas for growing crops. But, storing
and using vegetables well is also important. Good storage means that
vegetables last longer and keep more vitamins. Good storage minimize
vegetables that must be thrown out and increase selling opportunities.
Almost all types of vegetables can be left in the ground until needed. However, for some types
of vegetables, good storage is essential.
After crops are harvested, clean and throw out all rotten plant parts. Store in a cool place,
protected from hot sun and safe from pests or other animals.
Three types of traditional containers which are good for storage:
1. Clay pots, for small vegetables and green leaf vegetables. Cover the top of the pot with a damp cloth and use a string or rubber to tie it on. Keep out of the sun. These vegetables will stay fresh for a few more days
2. In Africa, two clay pots are used, a smaller pot inside a larger pot. Damp sand is placed between these pots. Cover and keep out of sunlight. This technique works better than just using 1 pot
2. Coolgardie safe. This is a simple tool made of a large box covered with wire, it uses water and wind to keep vegetables cool. This container can also be used to store meat or other foods. This container is inexpensive and easy to make. (For more information about Coolgardie safes, see Module 12 – Appropriate Technology)
If too many vegetables are picked during one harvest, and cannot all be sold or eaten, there
are a few methods which can be use to store the vegetables, including:
• Solar driers, which can be used to dry vegetables, fish, meat and fruits
• Vegetables and fruits can be preserved as sauces, pasta, pickles and jams. Some examples: Sauces made from tomato, chili, tamarind. Pasta made from peanuts, candle nut, cashews. Pickles made from cucumber, onion, capsicum, cabbage, mango, bamboo. Jams can be made from any type of fruit, except watermelon
• Some vegetables, such as eggplant, capsicum and tomatoes can be dried and stored in oil

M o d u l e 6 : H o m e & C o m m u n i t y G a r d e n s 149
N o t e s . . .

150 Pe r m a c u l t u r e , S o l u t i o n s f o r S u s t a i n a b l e l i f e s t y l e s
N o t e s . . .
Pe
rma
cu
ltu
re R
eso
urc
e B
oo
k M
od
ule
7.
Fa
rmin
g
M o d u l e N o 7.
Farming

152 Pe r m a c u l t u r e , S o l u t i o n s f o r S u s t a i n a b l e l i f e s t y l e s
N o t e s . . .

M o d u l e 7 : F a r m i n g 153
This module is about farming crops to eat, trade or sell.
Some important things to do are:
• Use agriculture land optimally, maximize production using minimal expenses in the most sustainable ways
• Form a community cooperative and farmers group which can work together; share resources, expenses, techniques and knowledge
• Improve techniques for storing, marketing and distributing produce
Working together in the community should be the main focus. These ideas can be implemented
for any agricultural development, from small kitchen gardens to large community
agriculture farms, on small areas of land or vast areas of land, on flat land or sloped
land.
Our farmers already have a lot of knowledge and traditions related to agriculture.
Therefore, this module only offers some additional knowledge and techniques
to help support more sustainable agriculture.
The Land, Environment and People
Agriculture is a part of the land and environment around
it. Wherever agriculture is practiced it will affect and
be affected by the land, environment and people.
Agriculture is affected by:
• Climate: Sun, rain, wind
• Surrounding land and land use
• Surrounding vegetation and animal life
• Water supply and quality
• Soil type and quality
• Erosion and landslides
• Distance from houses and towns
• Resources available to farmers and workers, such as: Seed, tools, fertilizers, harvesting equipment and so on
• Transportation and marketing of produce
If there is already an understanding about what affects us, we can choose to use simple techniques and solutions to maximize production.
Some solutions could be:
• Using terraces and swales to protect the soil, stop burning and prevent landslides
• Using natural fertilizers and pesticides, instead of using chemical fertilizers and pesticides because chemical materials create pollution and other problems
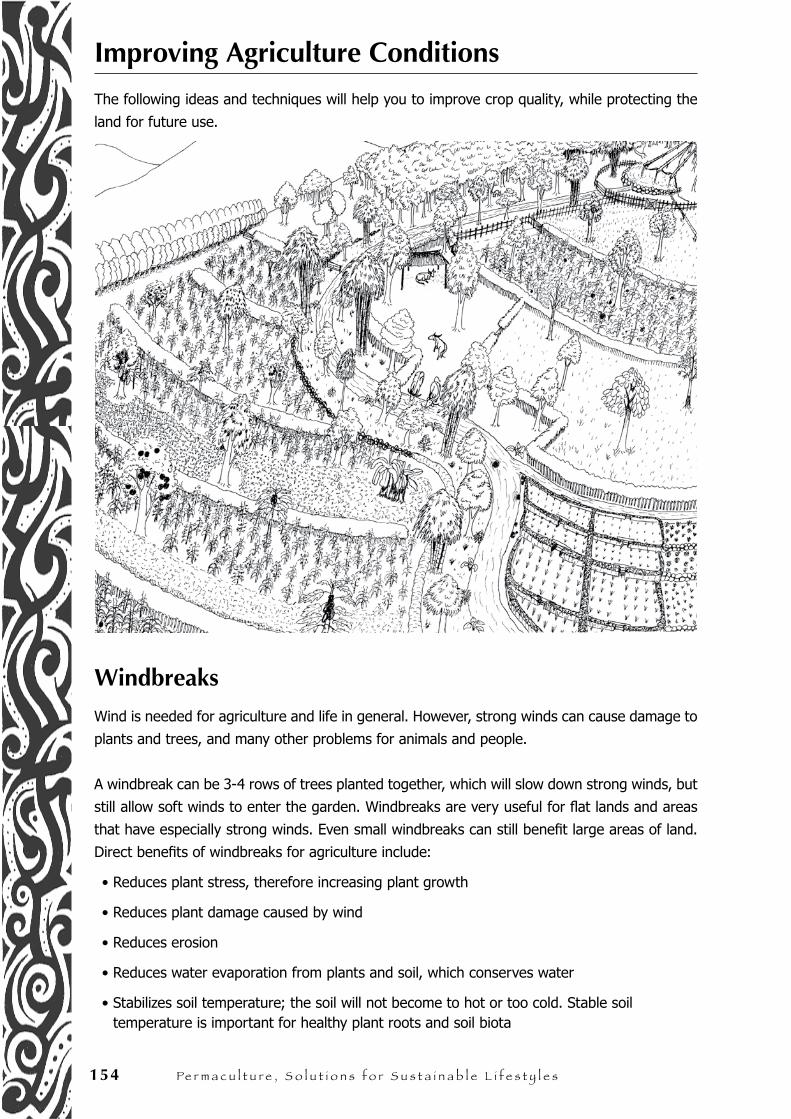
154 Pe r m a c u l t u r e , S o l u t i o n s f o r S u s t a i n a b l e l i f e s t y l e s
Improving Agriculture Conditions
The following ideas and techniques will help you to improve crop quality, while protecting the
land for future use.
Windbreaks
Wind is needed for agriculture and life in general. However, strong winds can cause damage to
plants and trees, and many other problems for animals and people.
A windbreak can be 3-4 rows of trees planted together, which will slow down strong winds, but
still allow soft winds to enter the garden. Windbreaks are very useful for flat lands and areas
that have especially strong winds. Even small windbreaks can still benefit large areas of land.
Direct benefits of windbreaks for agriculture include:
• Reduces plant stress, therefore increasing plant growth
• Reduces plant damage caused by wind
• Reduces erosion
• Reduces water evaporation from plants and soil, which conserves water
• Stabilizes soil temperature; the soil will not become to hot or too cold. Stable soil temperature is important for healthy plant roots and soil biota
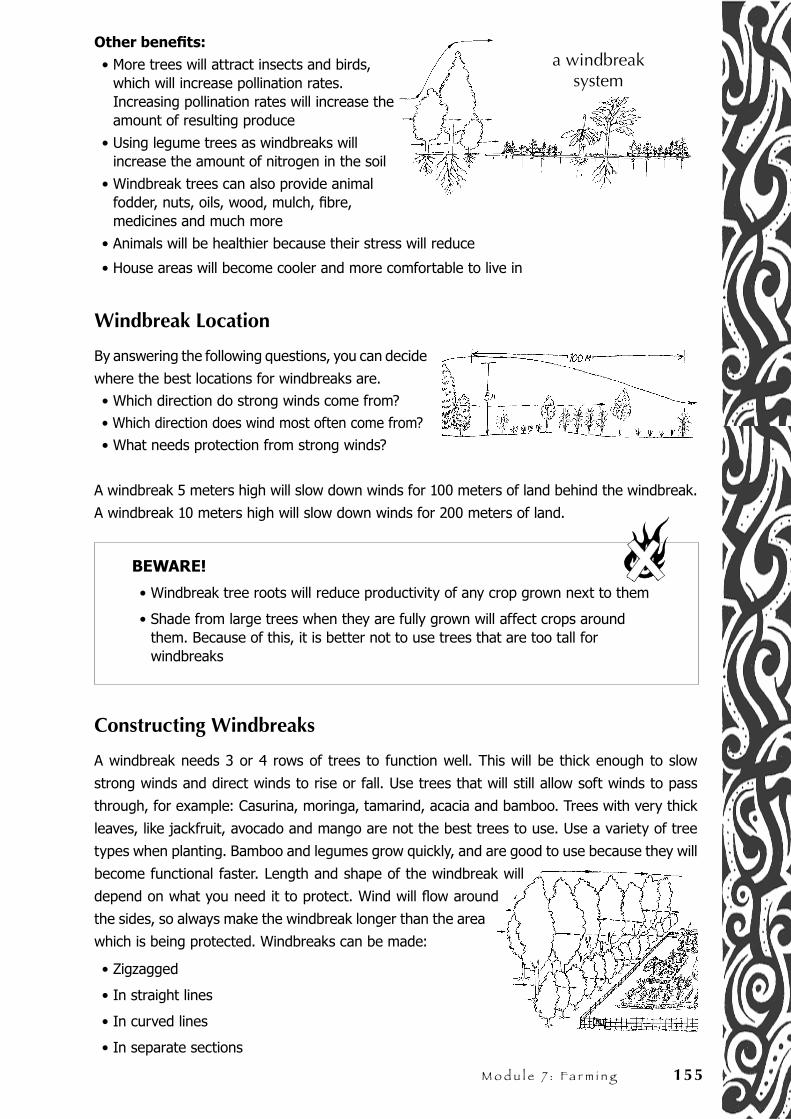
M o d u l e 7 : F a r m i n g 155
Other benefits:
• More trees will attract insects and birds, which will increase pollination rates. Increasing pollination rates will increase the amount of resulting produce
• Using legume trees as windbreaks will increase the amount of nitrogen in the soil
• Windbreak trees can also provide animal fodder, nuts, oils, wood, mulch, fibre, medicines and much more
• Animals will be healthier because their stress will reduce
• House areas will become cooler and more comfortable to live in
Windbreak Location
By answering the following questions, you can decide
where the best locations for windbreaks are.
• Which direction do strong winds come from?
• Which direction does wind most often come from?
• What needs protection from strong winds?
A windbreak 5 meters high will slow down winds for 100 meters of land behind the windbreak.
A windbreak 10 meters high will slow down winds for 200 meters of land.
BEWARE!
• Windbreak tree roots will reduce productivity of any crop grown next to them
• Shade from large trees when they are fully grown will affect crops around them. Because of this, it is better not to use trees that are too tall for windbreaks
Constructing Windbreaks
A windbreak needs 3 or 4 rows of trees to function well. This will be thick enough to slow
strong winds and direct winds to rise or fall. Use trees that will still allow soft winds to pass
through, for example: Casurina, moringa, tamarind, acacia and bamboo. Trees with very thick
leaves, like jackfruit, avocado and mango are not the best trees to use. Use a variety of tree
types when planting. Bamboo and legumes grow quickly, and are good to use because they will
become functional faster. Length and shape of the windbreak will
depend on what you need it to protect. Wind will flow around
the sides, so always make the windbreak longer than the area
which is being protected. Windbreaks can be made:
• Zigzagged
• In straight lines
• In curved lines
• In separate sections
a windbreak system
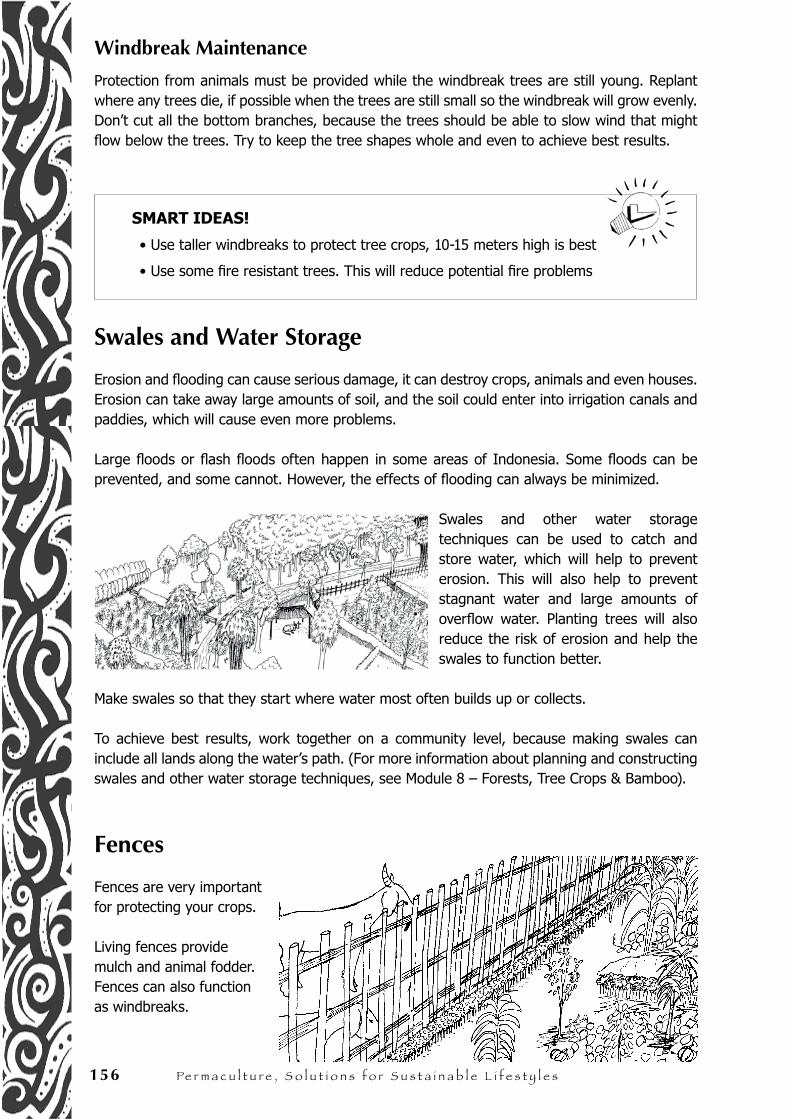
156 Pe r m a c u l t u r e , S o l u t i o n s f o r S u s t a i n a b l e l i f e s t y l e s
Windbreak Maintenance
Protection from animals must be provided while the windbreak trees are still young. Replant where any trees die, if possible when the trees are still small so the windbreak will grow evenly. Don’t cut all the bottom branches, because the trees should be able to slow wind that might flow below the trees. Try to keep the tree shapes whole and even to achieve best results.
SMART IDEAS!
• Use taller windbreaks to protect tree crops, 10-15 meters high is best
• Use some fire resistant trees. This will reduce potential fire problems
Swales and Water Storage
Erosion and flooding can cause serious damage, it can destroy crops, animals and even houses. Erosion can take away large amounts of soil, and the soil could enter into irrigation canals and paddies, which will cause even more problems.
Large floods or flash floods often happen in some areas of Indonesia. Some floods can be prevented, and some cannot. However, the effects of flooding can always be minimized.
Swales and other water storage techniques can be used to catch and store water, which will help to prevent erosion. This will also help to prevent stagnant water and large amounts of overflow water. Planting trees will also reduce the risk of erosion and help the swales to function better.
Make swales so that they start where water most often builds up or collects.
To achieve best results, work together on a community level, because making swales can include all lands along the water’s path. (For more information about planning and constructing swales and other water storage techniques, see Module 8 – Forests, Tree Crops & Bamboo).
Fences
Fences are very important for protecting your crops.
Living fences provide mulch and animal fodder. Fences can also function as windbreaks.
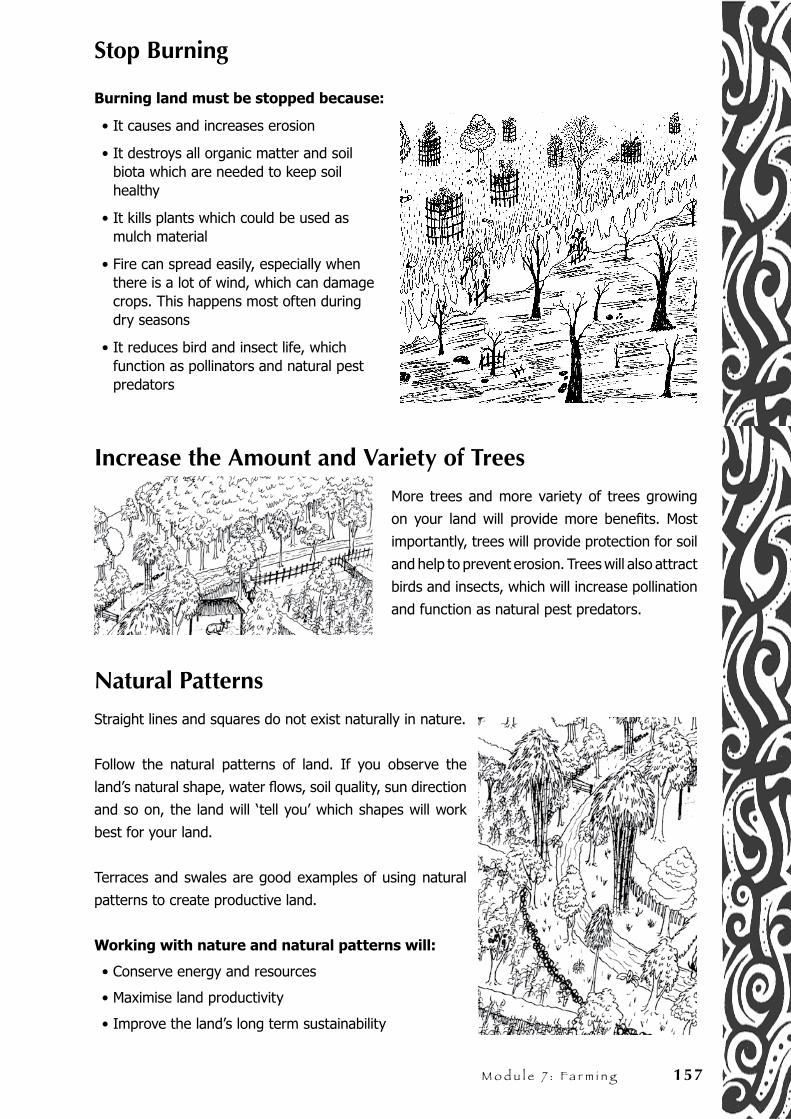
M o d u l e 7 : F a r m i n g 157
Stop Burning
Burning land must be stopped because:
• It causes and increases erosion
• It destroys all organic matter and soil biota which are needed to keep soil healthy
• It kills plants which could be used as mulch material
• Fire can spread easily, especially when there is a lot of wind, which can damage crops. This happens most often during dry seasons
• It reduces bird and insect life, which function as pollinators and natural pest predators
Increase the Amount and Variety of Trees
More trees and more variety of trees growing
on your land will provide more benefits. Most
importantly, trees will provide protection for soil
and help to prevent erosion. Trees will also attract
birds and insects, which will increase pollination
and function as natural pest predators.
Natural Patterns
Straight lines and squares do not exist naturally in nature.
Follow the natural patterns of land. If you observe the
land’s natural shape, water flows, soil quality, sun direction
and so on, the land will ‘tell you’ which shapes will work
best for your land.
Terraces and swales are good examples of using natural
patterns to create productive land.
Working with nature and natural patterns will:
• Conserve energy and resources
• Maximise land productivity
• Improve the land’s long term sustainability
158 Pe r m a c u l t u r e , S o l u t i o n s f o r S u s t a i n a b l e l i f e s t y l e s
Improving Land for AgricultureHealthy, living soil is the basis for good agriculture. Agriculture practices should give extra focus to soil improvement from year after year.
Organic Mulch and FertilizersThere are many ways to provide natural fertilizers for your land.
Mulch
Use plant waste and leaves as mulch material. Some legume trees, such as leuceana, acacia, sesbania and moringa, can be planted between cropland to provide mulch. Besides providing nutrients to the soil, mulch will also improve soil because it provides organic materials and food for soil biota. By using mulch, water will stay in the soil for much longer and erosion levels will decrease. To achieve best results, mulch must be used regularly. (For more information about mulch, see Module 4 – Healthy Soil).
Liquid Fertilizer
Liquid fertilizer is a good natural fertilizer because it is a concentrated compost. This fertilizer is very strong and must be diluted before being used. It can be used in many ways, it can be applied directly to the land or into irrigation water. To achieve best results, use liquid fertilizer before planting, during crop growth and after harvest. (For more information about how to make and use liquid fertilizer, see Module 4 – Healthy Soil).
EM (Effective Microorganisms)
EM is a liquid which will increase the number of microorganisms in the soil, this will improve soil quality and increase crop production. EM is good to use for agriculture because:
• It can be easily used on large areas of land
• It can be combined with any type of organic fertilizer, including liquid compost and mulch
• Microorganisms in EM will naturally and quickly multiply in the soil
(For more information about how to make and use EM, see Module 4 – Healthy Soil).
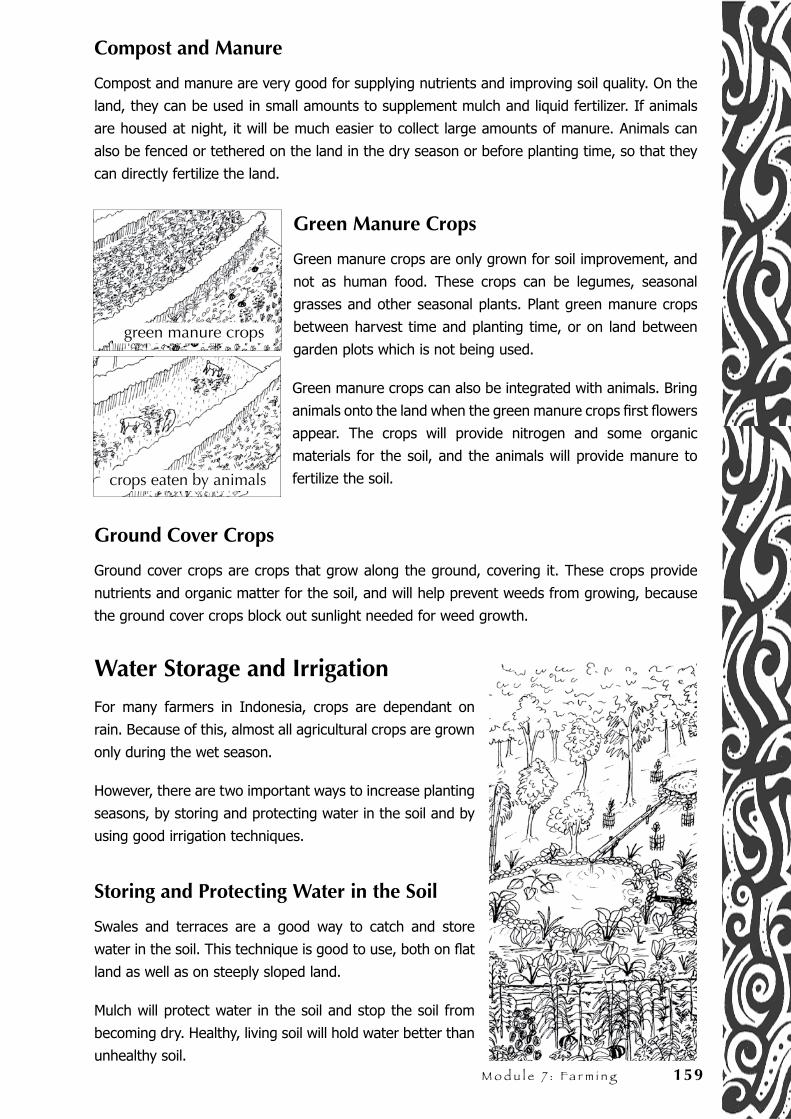
M o d u l e 7 : F a r m i n g 159
Compost and Manure
Compost and manure are very good for supplying nutrients and improving soil quality. On the
land, they can be used in small amounts to supplement mulch and liquid fertilizer. If animals
are housed at night, it will be much easier to collect large amounts of manure. Animals can
also be fenced or tethered on the land in the dry season or before planting time, so that they
can directly fertilize the land.
Green Manure Crops
Green manure crops are only grown for soil improvement, and
not as human food. These crops can be legumes, seasonal
grasses and other seasonal plants. Plant green manure crops
between harvest time and planting time, or on land between
garden plots which is not being used.
Green manure crops can also be integrated with animals. Bring
animals onto the land when the green manure crops first flowers
appear. The crops will provide nitrogen and some organic
materials for the soil, and the animals will provide manure to
fertilize the soil.
Ground Cover Crops
Ground cover crops are crops that grow along the ground, covering it. These crops provide
nutrients and organic matter for the soil, and will help prevent weeds from growing, because
the ground cover crops block out sunlight needed for weed growth.
Water Storage and Irrigation
For many farmers in Indonesia, crops are dependant on
rain. Because of this, almost all agricultural crops are grown
only during the wet season.
However, there are two important ways to increase planting
seasons, by storing and protecting water in the soil and by
using good irrigation techniques.
Storing and Protecting Water in the Soil
Swales and terraces are a good way to catch and store
water in the soil. This technique is good to use, both on flat
land as well as on steeply sloped land.
Mulch will protect water in the soil and stop the soil from
becoming dry. Healthy, living soil will hold water better than
unhealthy soil.
green manure crops
crops eaten by animals
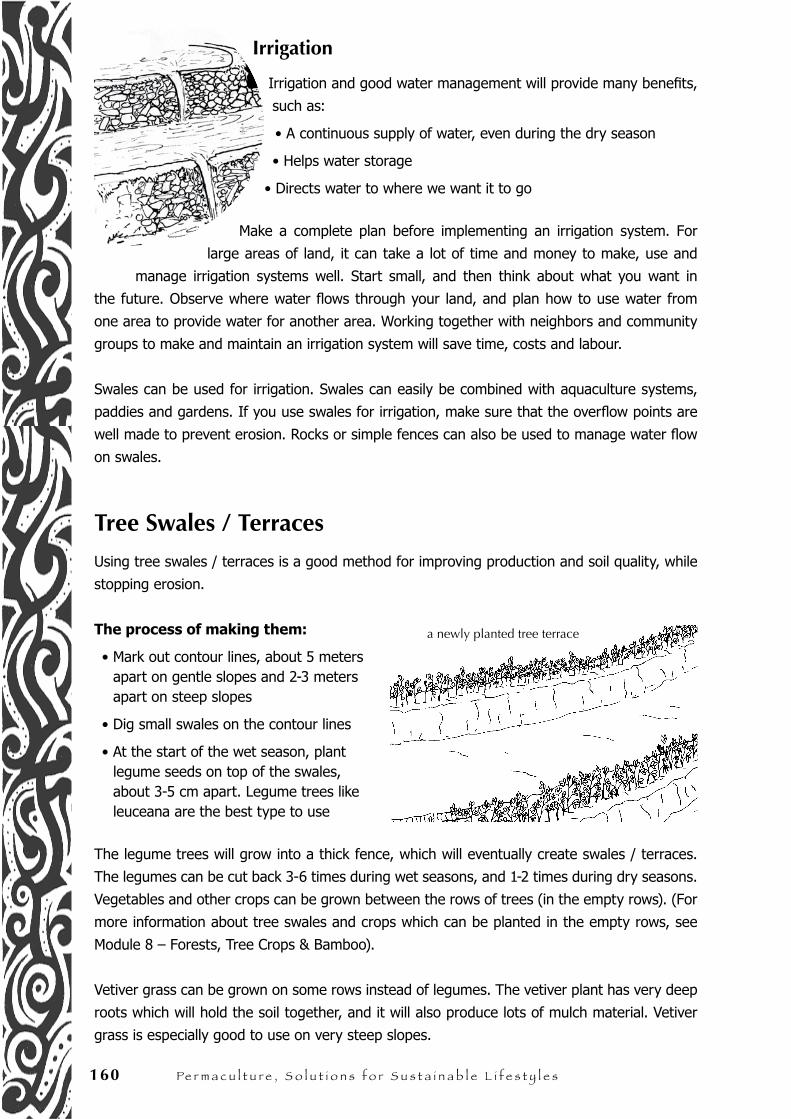
160 Pe r m a c u l t u r e , S o l u t i o n s f o r S u s t a i n a b l e l i f e s t y l e s
Irrigation
Irrigation and good water management will provide many benefits,
such as:
• A continuous supply of water, even during the dry season
• Helps water storage
• Directs water to where we want it to go
Make a complete plan before implementing an irrigation system. For
large areas of land, it can take a lot of time and money to make, use and
manage irrigation systems well. Start small, and then think about what you want in
the future. Observe where water flows through your land, and plan how to use water from
one area to provide water for another area. Working together with neighbors and community
groups to make and maintain an irrigation system will save time, costs and labour.
Swales can be used for irrigation. Swales can easily be combined with aquaculture systems,
paddies and gardens. If you use swales for irrigation, make sure that the overflow points are
well made to prevent erosion. Rocks or simple fences can also be used to manage water flow
on swales.
Tree Swales / Terraces
Using tree swales / terraces is a good method for improving production and soil quality, while
stopping erosion.
The process of making them:
• Mark out contour lines, about 5 meters apart on gentle slopes and 2-3 meters apart on steep slopes
• Dig small swales on the contour lines
• At the start of the wet season, plant legume seeds on top of the swales, about 3-5 cm apart. Legume trees like leuceana are the best type to use
The legume trees will grow into a thick fence, which will eventually create swales / terraces.
The legumes can be cut back 3-6 times during wet seasons, and 1-2 times during dry seasons.
Vegetables and other crops can be grown between the rows of trees (in the empty rows). (For
more information about tree swales and crops which can be planted in the empty rows, see
Module 8 – Forests, Tree Crops & Bamboo).
Vetiver grass can be grown on some rows instead of legumes. The vetiver plant has very deep
roots which will hold the soil together, and it will also produce lots of mulch material. Vetiver
grass is especially good to use on very steep slopes.
a newly planted tree terrace
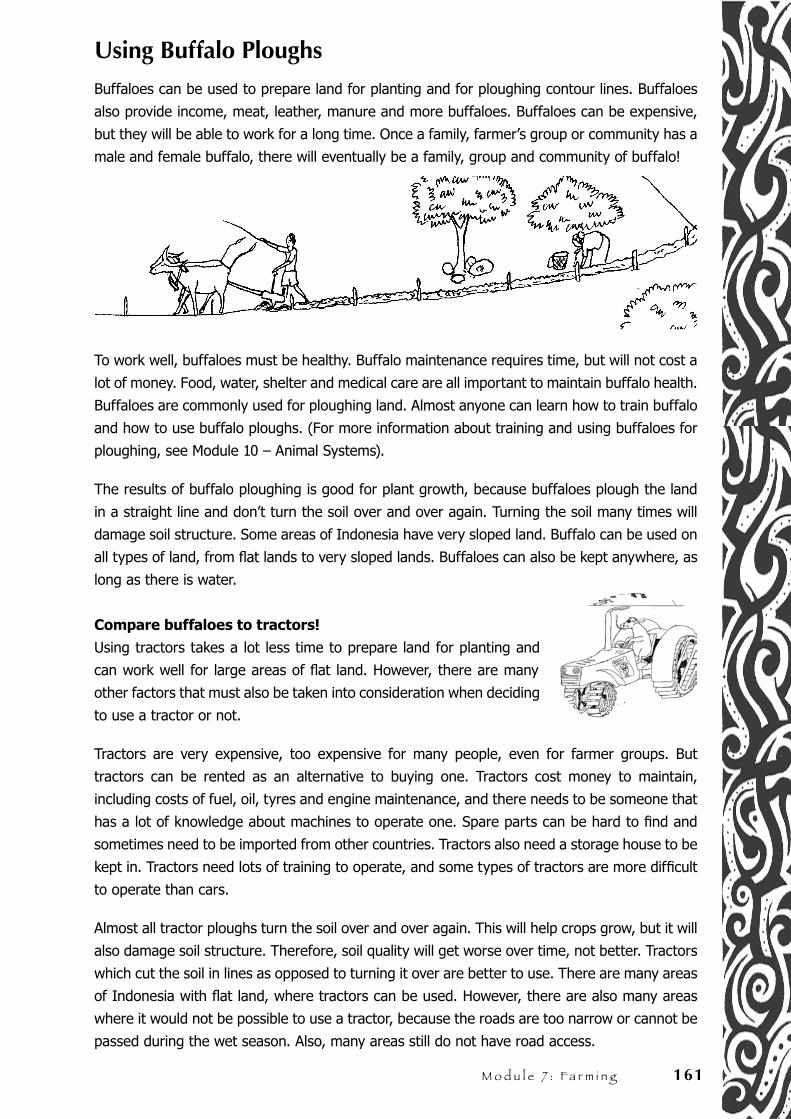
M o d u l e 7 : F a r m i n g 161
Using Buffalo Ploughs
Buffaloes can be used to prepare land for planting and for ploughing contour lines. Buffaloes
also provide income, meat, leather, manure and more buffaloes. Buffaloes can be expensive,
but they will be able to work for a long time. Once a family, farmer’s group or community has a
male and female buffalo, there will eventually be a family, group and community of buffalo!
To work well, buffaloes must be healthy. Buffalo maintenance requires time, but will not cost a
lot of money. Food, water, shelter and medical care are all important to maintain buffalo health.
Buffaloes are commonly used for ploughing land. Almost anyone can learn how to train buffalo
and how to use buffalo ploughs. (For more information about training and using buffaloes for
ploughing, see Module 10 – Animal Systems).
The results of buffalo ploughing is good for plant growth, because buffaloes plough the land
in a straight line and don’t turn the soil over and over again. Turning the soil many times will
damage soil structure. Some areas of Indonesia have very sloped land. Buffalo can be used on
all types of land, from flat lands to very sloped lands. Buffaloes can also be kept anywhere, as
long as there is water.
Compare buffaloes to tractors!
Using tractors takes a lot less time to prepare land for planting and
can work well for large areas of flat land. However, there are many
other factors that must also be taken into consideration when deciding
to use a tractor or not.
Tractors are very expensive, too expensive for many people, even for farmer groups. But
tractors can be rented as an alternative to buying one. Tractors cost money to maintain,
including costs of fuel, oil, tyres and engine maintenance, and there needs to be someone that
has a lot of knowledge about machines to operate one. Spare parts can be hard to find and
sometimes need to be imported from other countries. Tractors also need a storage house to be
kept in. Tractors need lots of training to operate, and some types of tractors are more difficult
to operate than cars.
Almost all tractor ploughs turn the soil over and over again. This will help crops grow, but it will
also damage soil structure. Therefore, soil quality will get worse over time, not better. Tractors
which cut the soil in lines as opposed to turning it over are better to use. There are many areas
of Indonesia with flat land, where tractors can be used. However, there are also many areas
where it would not be possible to use a tractor, because the roads are too narrow or cannot be
passed during the wet season. Also, many areas still do not have road access.
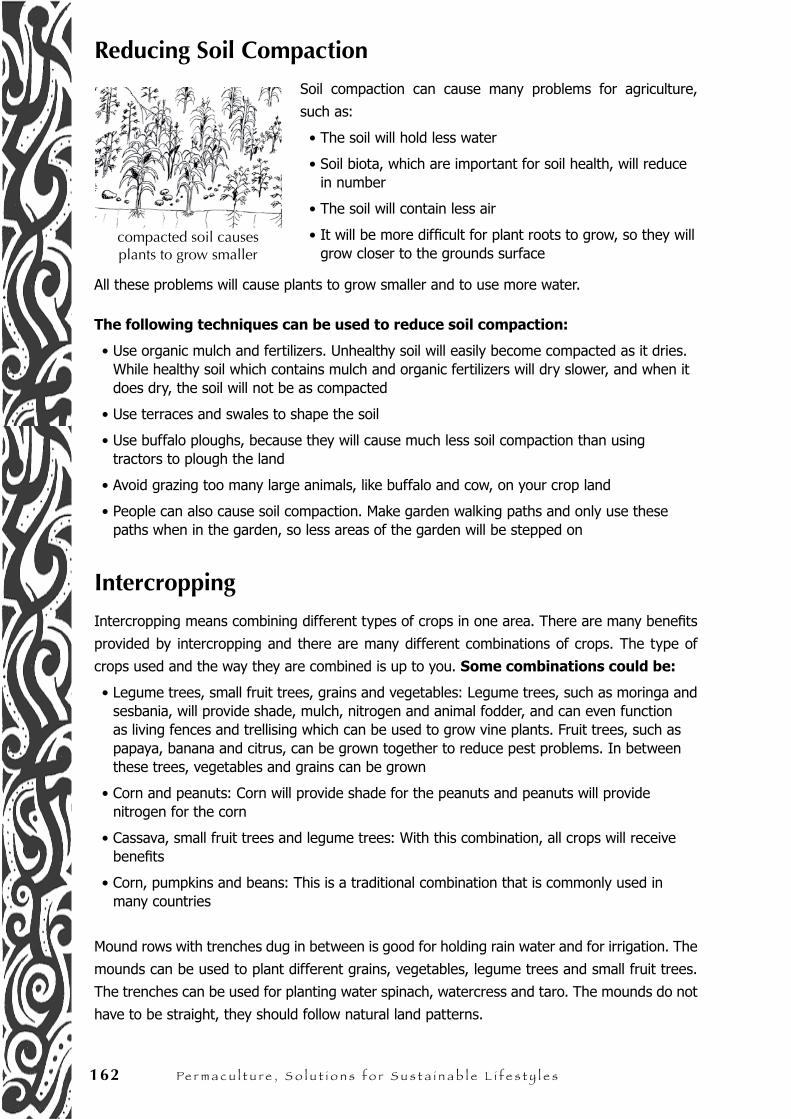
162 Pe r m a c u l t u r e , S o l u t i o n s f o r S u s t a i n a b l e l i f e s t y l e s
Reducing Soil Compaction
Soil compaction can cause many problems for agriculture,
such as:
• The soil will hold less water
• Soil biota, which are important for soil health, will reduce in number
• The soil will contain less air
• It will be more difficult for plant roots to grow, so they will grow closer to the grounds surface
All these problems will cause plants to grow smaller and to use more water.
The following techniques can be used to reduce soil compaction:
• Use organic mulch and fertilizers. Unhealthy soil will easily become compacted as it dries. While healthy soil which contains mulch and organic fertilizers will dry slower, and when it does dry, the soil will not be as compacted
• Use terraces and swales to shape the soil
• Use buffalo ploughs, because they will cause much less soil compaction than using tractors to plough the land
• Avoid grazing too many large animals, like buffalo and cow, on your crop land
• People can also cause soil compaction. Make garden walking paths and only use these paths when in the garden, so less areas of the garden will be stepped on
Intercropping
Intercropping means combining different types of crops in one area. There are many benefits
provided by intercropping and there are many different combinations of crops. The type of
crops used and the way they are combined is up to you. Some combinations could be:
• Legume trees, small fruit trees, grains and vegetables: Legume trees, such as moringa and sesbania, will provide shade, mulch, nitrogen and animal fodder, and can even function as living fences and trellising which can be used to grow vine plants. Fruit trees, such as papaya, banana and citrus, can be grown together to reduce pest problems. In between these trees, vegetables and grains can be grown
• Corn and peanuts: Corn will provide shade for the peanuts and peanuts will provide nitrogen for the corn
• Cassava, small fruit trees and legume trees: With this combination, all crops will receive benefits
• Corn, pumpkins and beans: This is a traditional combination that is commonly used in many countries
Mound rows with trenches dug in between is good for holding rain water and for irrigation. The
mounds can be used to plant different grains, vegetables, legume trees and small fruit trees.
The trenches can be used for planting water spinach, watercress and taro. The mounds do not
have to be straight, they should follow natural land patterns.
compacted soil causes plants to grow smaller
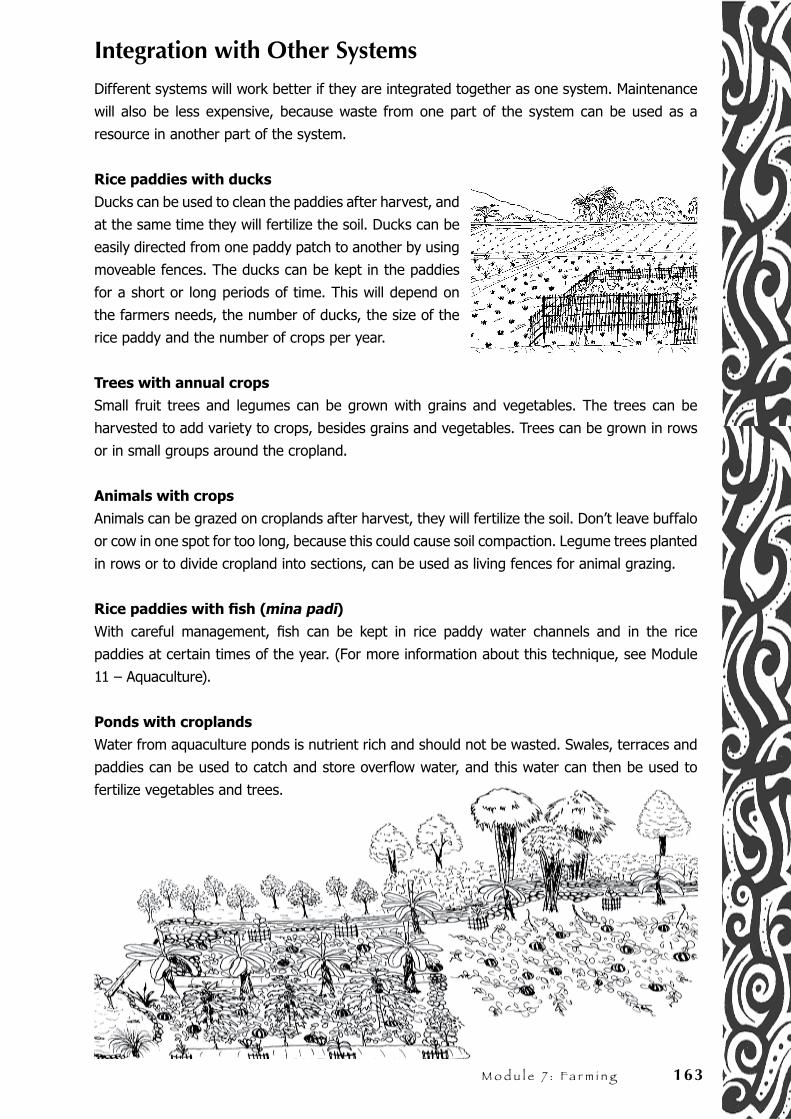
M o d u l e 7 : F a r m i n g 163
Integration with Other Systems
Different systems will work better if they are integrated together as one system. Maintenance
will also be less expensive, because waste from one part of the system can be used as a
resource in another part of the system.
Rice paddies with ducks
Ducks can be used to clean the paddies after harvest, and
at the same time they will fertilize the soil. Ducks can be
easily directed from one paddy patch to another by using
moveable fences. The ducks can be kept in the paddies
for a short or long periods of time. This will depend on
the farmers needs, the number of ducks, the size of the
rice paddy and the number of crops per year.
Trees with annual crops
Small fruit trees and legumes can be grown with grains and vegetables. The trees can be
harvested to add variety to crops, besides grains and vegetables. Trees can be grown in rows
or in small groups around the cropland.
Animals with crops
Animals can be grazed on croplands after harvest, they will fertilize the soil. Don’t leave buffalo
or cow in one spot for too long, because this could cause soil compaction. Legume trees planted
in rows or to divide cropland into sections, can be used as living fences for animal grazing.
Rice paddies with fish (mina padi)
With careful management, fish can be kept in rice paddy water channels and in the rice
paddies at certain times of the year. (For more information about this technique, see Module
11 – Aquaculture).
Ponds with croplands
Water from aquaculture ponds is nutrient rich and should not be wasted. Swales, terraces and
paddies can be used to catch and store overflow water, and this water can then be used to
fertilize vegetables and trees.
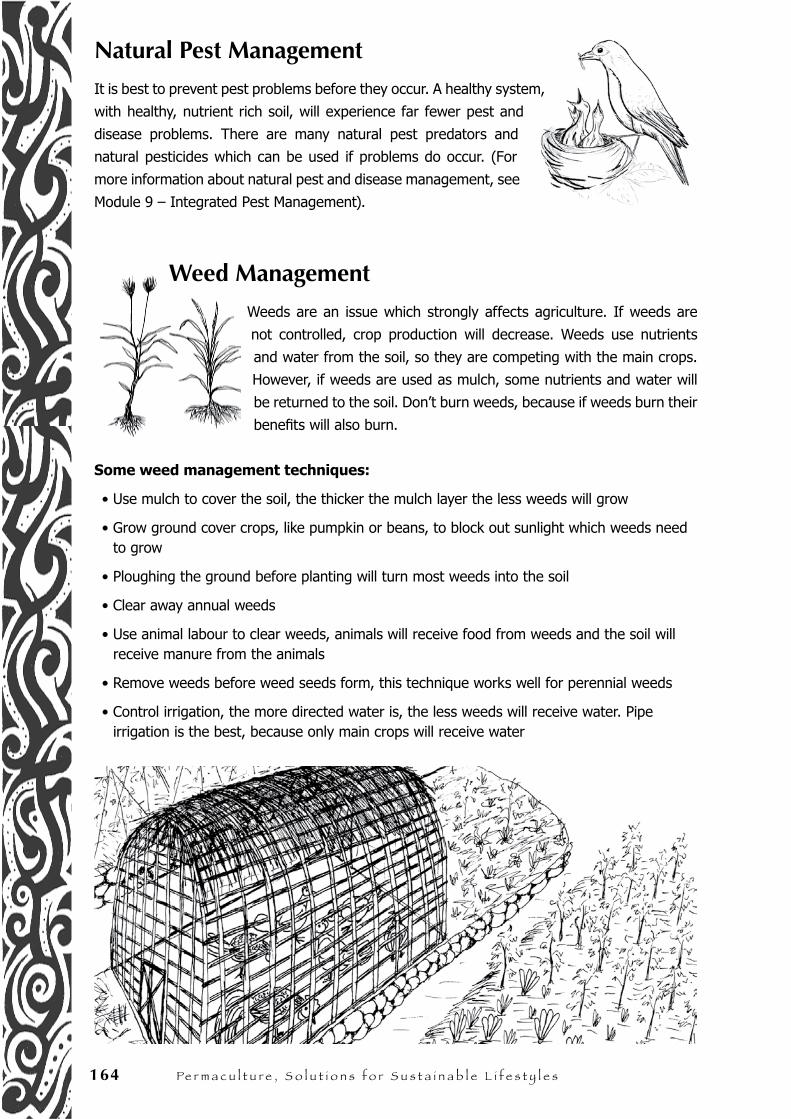
164 Pe r m a c u l t u r e , S o l u t i o n s f o r S u s t a i n a b l e l i f e s t y l e s
Natural Pest Management
It is best to prevent pest problems before they occur. A healthy system,
with healthy, nutrient rich soil, will experience far fewer pest and
disease problems. There are many natural pest predators and
natural pesticides which can be used if problems do occur. (For
more information about natural pest and disease management, see
Module 9 – Integrated Pest Management).
Weed Management
Weeds are an issue which strongly affects agriculture. If weeds are
not controlled, crop production will decrease. Weeds use nutrients
and water from the soil, so they are competing with the main crops.
However, if weeds are used as mulch, some nutrients and water will
be returned to the soil. Don’t burn weeds, because if weeds burn their
benefits will also burn.
Some weed management techniques:
• Use mulch to cover the soil, the thicker the mulch layer the less weeds will grow
• Grow ground cover crops, like pumpkin or beans, to block out sunlight which weeds need to grow
• Ploughing the ground before planting will turn most weeds into the soil
• Clear away annual weeds
• Use animal labour to clear weeds, animals will receive food from weeds and the soil will receive manure from the animals
• Remove weeds before weed seeds form, this technique works well for perennial weeds
• Control irrigation, the more directed water is, the less weeds will receive water. Pipe irrigation is the best, because only main crops will receive water
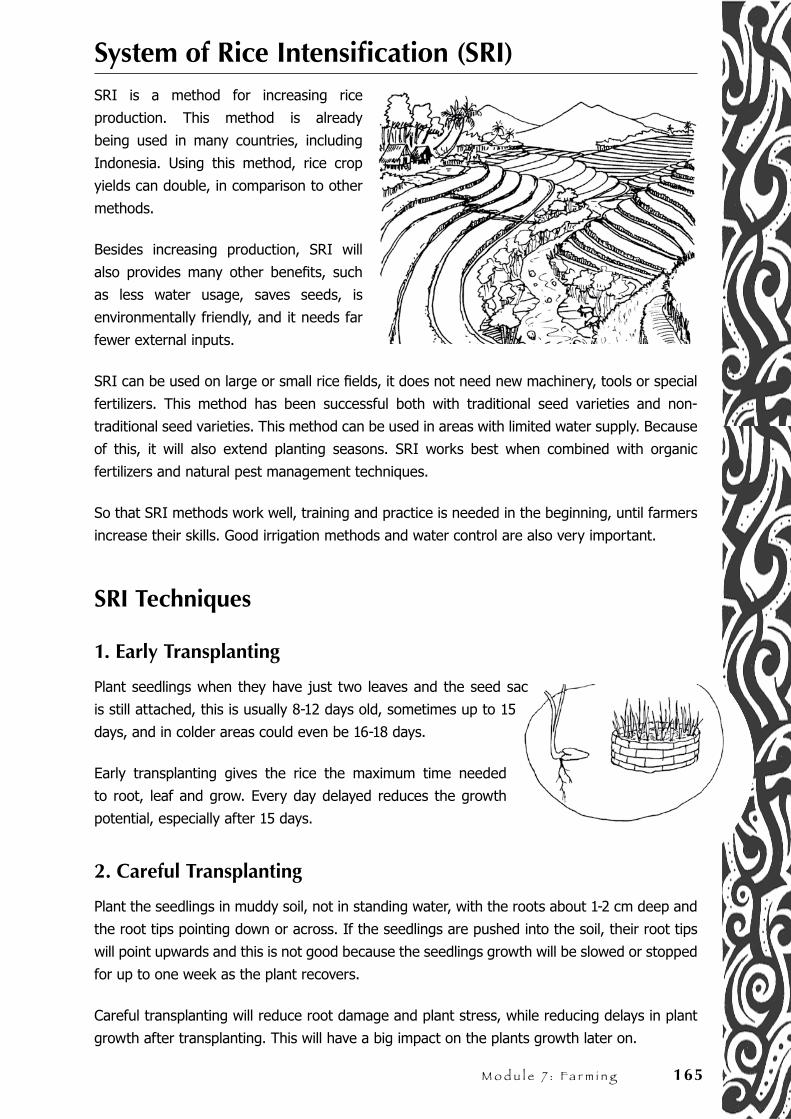
M o d u l e 7 : F a r m i n g 165
System of Rice Intensification (SRI)SRI is a method for increasing rice
production. This method is already
being used in many countries, including
Indonesia. Using this method, rice crop
yields can double, in comparison to other
methods.
Besides increasing production, SRI will
also provides many other benefits, such
as less water usage, saves seeds, is
environmentally friendly, and it needs far
fewer external inputs.
SRI can be used on large or small rice fields, it does not need new machinery, tools or special
fertilizers. This method has been successful both with traditional seed varieties and non-
traditional seed varieties. This method can be used in areas with limited water supply. Because
of this, it will also extend planting seasons. SRI works best when combined with organic
fertilizers and natural pest management techniques.
So that SRI methods work well, training and practice is needed in the beginning, until farmers
increase their skills. Good irrigation methods and water control are also very important.
SRI Techniques
1. Early Transplanting
Plant seedlings when they have just two leaves and the seed sac
is still attached, this is usually 8-12 days old, sometimes up to 15
days, and in colder areas could even be 16-18 days.
Early transplanting gives the rice the maximum time needed
to root, leaf and grow. Every day delayed reduces the growth
potential, especially after 15 days.
2. Careful Transplanting
Plant the seedlings in muddy soil, not in standing water, with the roots about 1-2 cm deep and
the root tips pointing down or across. If the seedlings are pushed into the soil, their root tips
will point upwards and this is not good because the seedlings growth will be slowed or stopped
for up to one week as the plant recovers.
Careful transplanting will reduce root damage and plant stress, while reducing delays in plant
growth after transplanting. This will have a big impact on the plants growth later on.
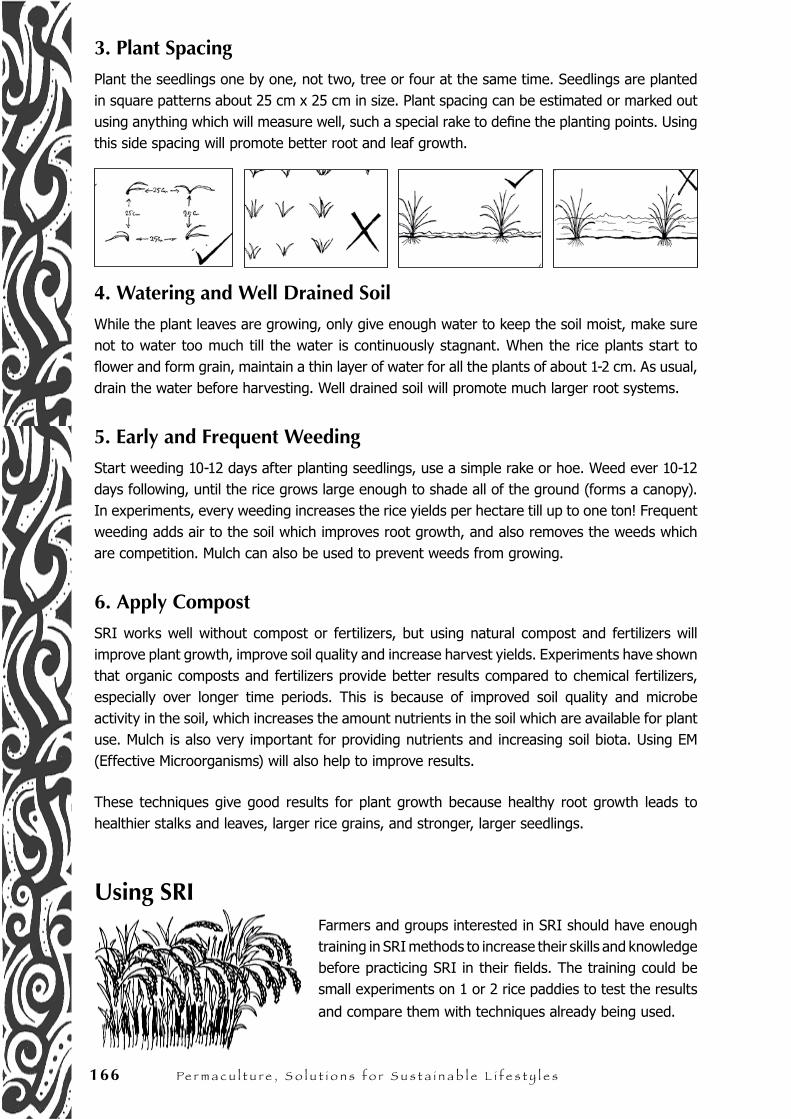
166 Pe r m a c u l t u r e , S o l u t i o n s f o r S u s t a i n a b l e l i f e s t y l e s
3. Plant Spacing
Plant the seedlings one by one, not two, tree or four at the same time. Seedlings are planted in square patterns about 25 cm x 25 cm in size. Plant spacing can be estimated or marked out using anything which will measure well, such a special rake to define the planting points. Using this side spacing will promote better root and leaf growth.
4. Watering and Well Drained Soil
While the plant leaves are growing, only give enough water to keep the soil moist, make sure not to water too much till the water is continuously stagnant. When the rice plants start to flower and form grain, maintain a thin layer of water for all the plants of about 1-2 cm. As usual, drain the water before harvesting. Well drained soil will promote much larger root systems.
5. Early and Frequent Weeding
Start weeding 10-12 days after planting seedlings, use a simple rake or hoe. Weed ever 10-12 days following, until the rice grows large enough to shade all of the ground (forms a canopy). In experiments, every weeding increases the rice yields per hectare till up to one ton! Frequent weeding adds air to the soil which improves root growth, and also removes the weeds which are competition. Mulch can also be used to prevent weeds from growing.
6. Apply Compost
SRI works well without compost or fertilizers, but using natural compost and fertilizers will improve plant growth, improve soil quality and increase harvest yields. Experiments have shown that organic composts and fertilizers provide better results compared to chemical fertilizers, especially over longer time periods. This is because of improved soil quality and microbe activity in the soil, which increases the amount nutrients in the soil which are available for plant use. Mulch is also very important for providing nutrients and increasing soil biota. Using EM (Effective Microorganisms) will also help to improve results.
These techniques give good results for plant growth because healthy root growth leads to healthier stalks and leaves, larger rice grains, and stronger, larger seedlings.
Using SRIFarmers and groups interested in SRI should have enough training in SRI methods to increase their skills and knowledge before practicing SRI in their fields. The training could be small experiments on 1 or 2 rice paddies to test the results
and compare them with techniques already being used.
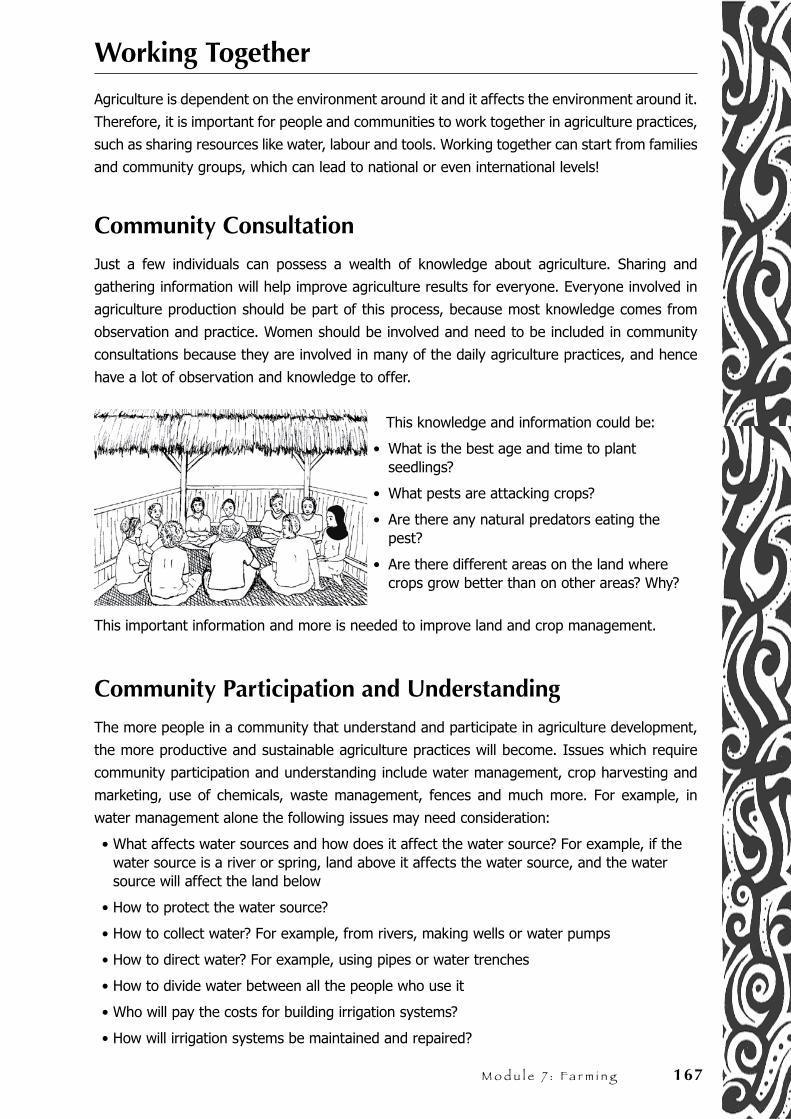
M o d u l e 7 : F a r m i n g 167
Working Together
Agriculture is dependent on the environment around it and it affects the environment around it.
Therefore, it is important for people and communities to work together in agriculture practices,
such as sharing resources like water, labour and tools. Working together can start from families
and community groups, which can lead to national or even international levels!
Community Consultation
Just a few individuals can possess a wealth of knowledge about agriculture. Sharing and
gathering information will help improve agriculture results for everyone. Everyone involved in
agriculture production should be part of this process, because most knowledge comes from
observation and practice. Women should be involved and need to be included in community
consultations because they are involved in many of the daily agriculture practices, and hence
have a lot of observation and knowledge to offer.
This knowledge and information could be:
What is the best age and time to plant seedlings?
What pests are attacking crops?
Are there any natural predators eating the pest?
Are there different areas on the land where crops grow better than on other areas? Why?
This important information and more is needed to improve land and crop management.
Community Participation and Understanding
The more people in a community that understand and participate in agriculture development,
the more productive and sustainable agriculture practices will become. Issues which require
community participation and understanding include water management, crop harvesting and
marketing, use of chemicals, waste management, fences and much more. For example, in
water management alone the following issues may need consideration:
• What affects water sources and how does it affect the water source? For example, if the water source is a river or spring, land above it affects the water source, and the water source will affect the land below
• How to protect the water source?
• How to collect water? For example, from rivers, making wells or water pumps
• How to direct water? For example, using pipes or water trenches
• How to divide water between all the people who use it
• Who will pay the costs for building irrigation systems?
• How will irrigation systems be maintained and repaired?
•
•
•
•
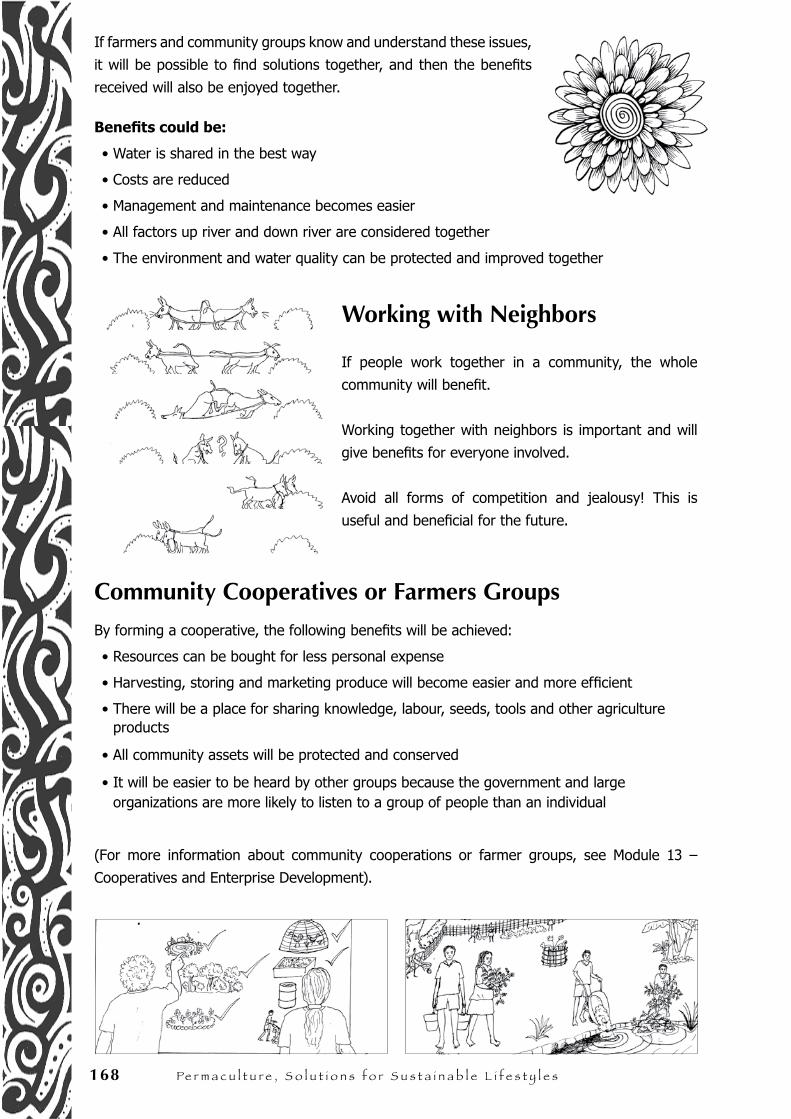
168 Pe r m a c u l t u r e , S o l u t i o n s f o r S u s t a i n a b l e l i f e s t y l e s
If farmers and community groups know and understand these issues,
it will be possible to find solutions together, and then the benefits
received will also be enjoyed together.
Benefits could be:
• Water is shared in the best way
• Costs are reduced
• Management and maintenance becomes easier
• All factors up river and down river are considered together
• The environment and water quality can be protected and improved together
Working with Neighbors
If people work together in a community, the whole
community will benefit.
Working together with neighbors is important and will
give benefits for everyone involved.
Avoid all forms of competition and jealousy! This is
useful and beneficial for the future.
Community Cooperatives or Farmers Groups
By forming a cooperative, the following benefits will be achieved:
• Resources can be bought for less personal expense
• Harvesting, storing and marketing produce will become easier and more efficient
• There will be a place for sharing knowledge, labour, seeds, tools and other agriculture products
• All community assets will be protected and conserved
• It will be easier to be heard by other groups because the government and large organizations are more likely to listen to a group of people than an individual
(For more information about community cooperations or farmer groups, see Module 13 –
Cooperatives and Enterprise Development).
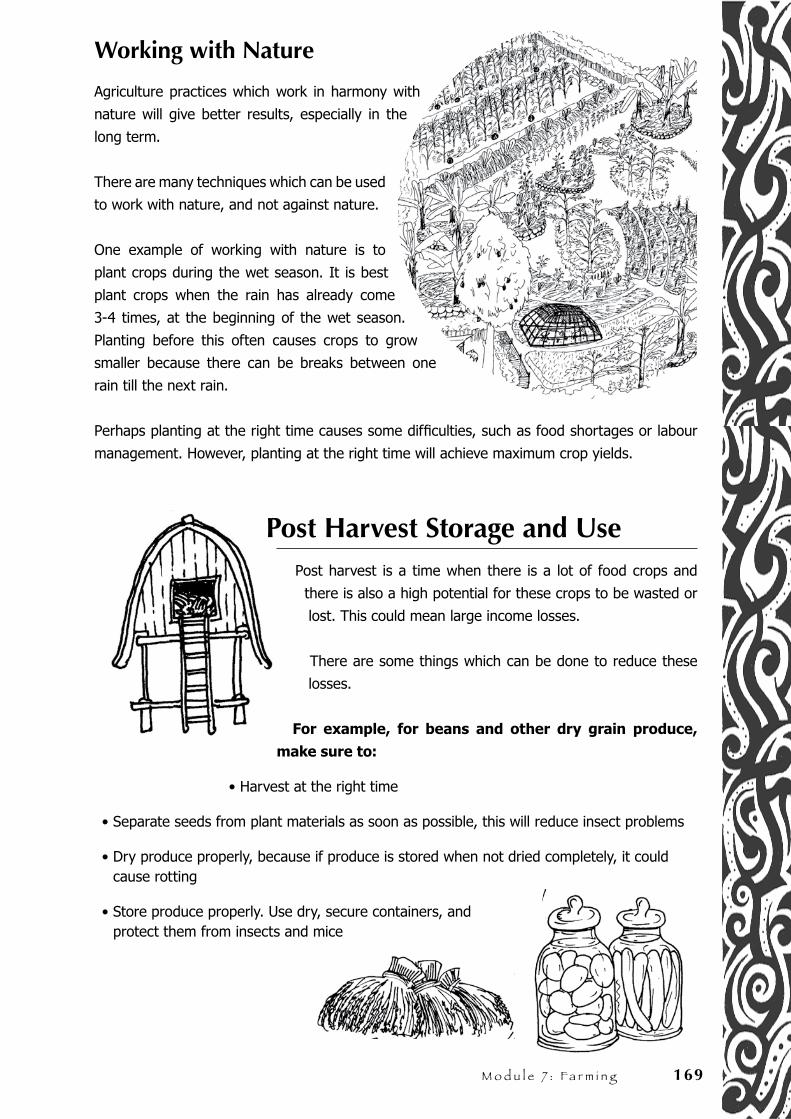
M o d u l e 7 : F a r m i n g 169
Working with Nature
Agriculture practices which work in harmony with
nature will give better results, especially in the
long term.
There are many techniques which can be used
to work with nature, and not against nature.
One example of working with nature is to
plant crops during the wet season. It is best
plant crops when the rain has already come
3-4 times, at the beginning of the wet season.
Planting before this often causes crops to grow
smaller because there can be breaks between one
rain till the next rain.
Perhaps planting at the right time causes some difficulties, such as food shortages or labour
management. However, planting at the right time will achieve maximum crop yields.
Post Harvest Storage and UsePost harvest is a time when there is a lot of food crops and
there is also a high potential for these crops to be wasted or
lost. This could mean large income losses.
There are some things which can be done to reduce these
losses.
For example, for beans and other dry grain produce,
make sure to:
• Harvest at the right time
• Separate seeds from plant materials as soon as possible, this will reduce insect problems
• Dry produce properly, because if produce is stored when not dried completely, it could cause rotting
• Store produce properly. Use dry, secure containers, and protect them from insects and mice
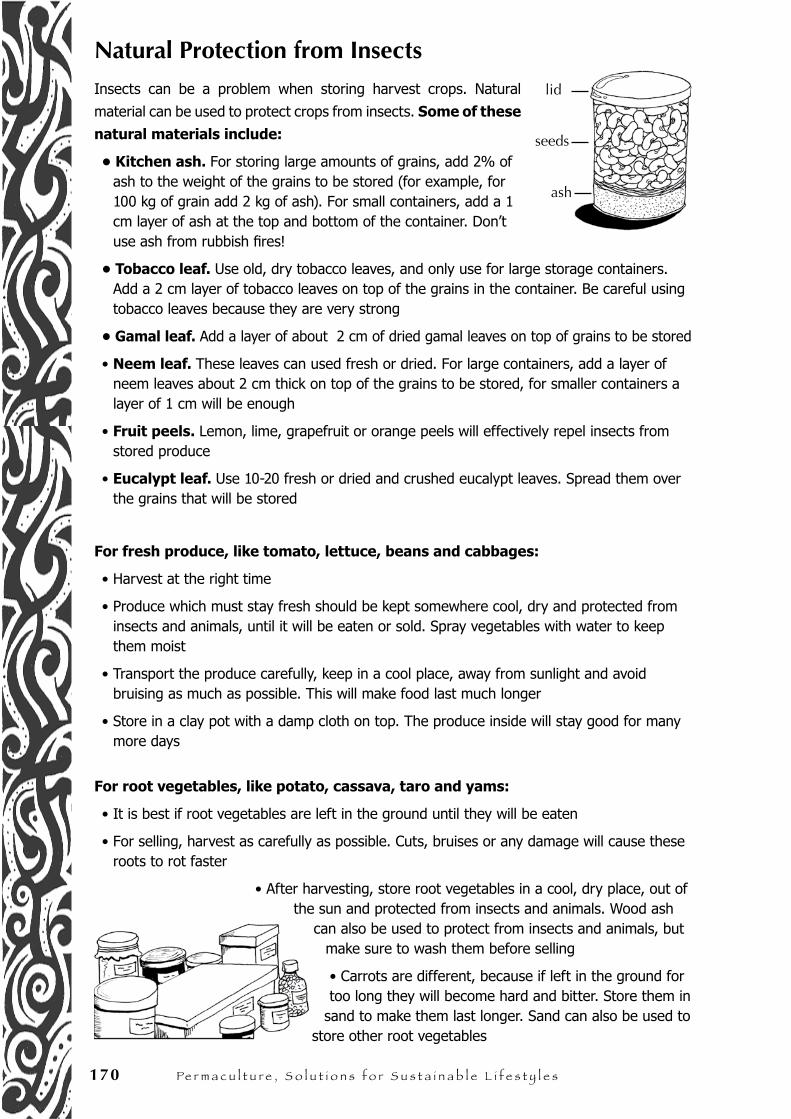
170 Pe r m a c u l t u r e , S o l u t i o n s f o r S u s t a i n a b l e l i f e s t y l e s
Natural Protection from Insects
Insects can be a problem when storing harvest crops. Natural
material can be used to protect crops from insects. Some of these
natural materials include:
• Kitchen ash. For storing large amounts of grains, add 2% of ash to the weight of the grains to be stored (for example, for 100 kg of grain add 2 kg of ash). For small containers, add a 1 cm layer of ash at the top and bottom of the container. Don’t use ash from rubbish fires!
• Tobacco leaf. Use old, dry tobacco leaves, and only use for large storage containers. Add a 2 cm layer of tobacco leaves on top of the grains in the container. Be careful using tobacco leaves because they are very strong
• Gamal leaf. Add a layer of about 2 cm of dried gamal leaves on top of grains to be stored
• Neem leaf. These leaves can used fresh or dried. For large containers, add a layer of neem leaves about 2 cm thick on top of the grains to be stored, for smaller containers a layer of 1 cm will be enough
• Fruit peels. Lemon, lime, grapefruit or orange peels will effectively repel insects from stored produce
• Eucalypt leaf. Use 10-20 fresh or dried and crushed eucalypt leaves. Spread them over the grains that will be stored
For fresh produce, like tomato, lettuce, beans and cabbages:
• Harvest at the right time
• Produce which must stay fresh should be kept somewhere cool, dry and protected from insects and animals, until it will be eaten or sold. Spray vegetables with water to keep them moist
• Transport the produce carefully, keep in a cool place, away from sunlight and avoid bruising as much as possible. This will make food last much longer
• Store in a clay pot with a damp cloth on top. The produce inside will stay good for many more days
For root vegetables, like potato, cassava, taro and yams:
• It is best if root vegetables are left in the ground until they will be eaten
• For selling, harvest as carefully as possible. Cuts, bruises or any damage will cause these roots to rot faster
• After harvesting, store root vegetables in a cool, dry place, out of the sun and protected from insects and animals. Wood ash
can also be used to protect from insects and animals, but make sure to wash them before selling
• Carrots are different, because if left in the ground for too long they will become hard and bitter. Store them in
sand to make them last longer. Sand can also be used to store other root vegetables
lid
seeds
ash
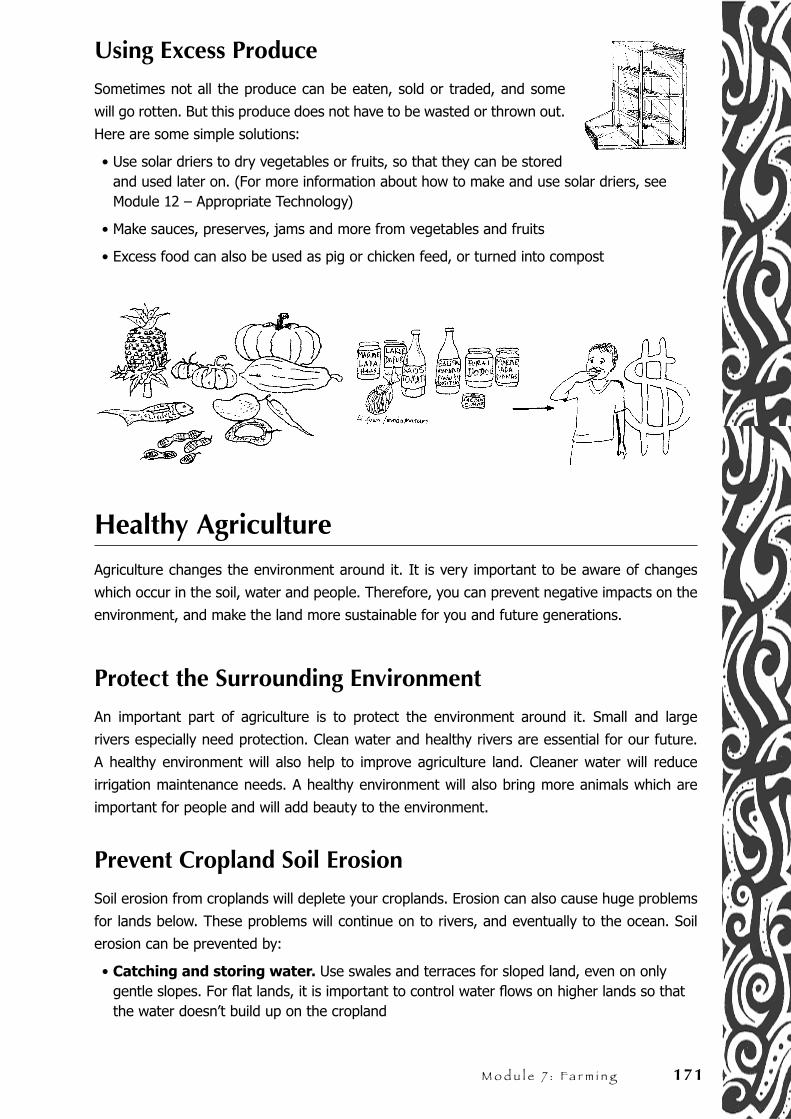
M o d u l e 7 : F a r m i n g 171
Using Excess Produce
Sometimes not all the produce can be eaten, sold or traded, and some
will go rotten. But this produce does not have to be wasted or thrown out.
Here are some simple solutions:
• Use solar driers to dry vegetables or fruits, so that they can be stored and used later on. (For more information about how to make and use solar driers, see Module 12 – Appropriate Technology)
• Make sauces, preserves, jams and more from vegetables and fruits
• Excess food can also be used as pig or chicken feed, or turned into compost
Healthy AgricultureAgriculture changes the environment around it. It is very important to be aware of changes
which occur in the soil, water and people. Therefore, you can prevent negative impacts on the
environment, and make the land more sustainable for you and future generations.
Protect the Surrounding Environment
An important part of agriculture is to protect the environment around it. Small and large
rivers especially need protection. Clean water and healthy rivers are essential for our future.
A healthy environment will also help to improve agriculture land. Cleaner water will reduce
irrigation maintenance needs. A healthy environment will also bring more animals which are
important for people and will add beauty to the environment.
Prevent Cropland Soil Erosion
Soil erosion from croplands will deplete your croplands. Erosion can also cause huge problems
for lands below. These problems will continue on to rivers, and eventually to the ocean. Soil
erosion can be prevented by:
• Catching and storing water. Use swales and terraces for sloped land, even on only gentle slopes. For flat lands, it is important to control water flows on higher lands so that the water doesn’t build up on the cropland
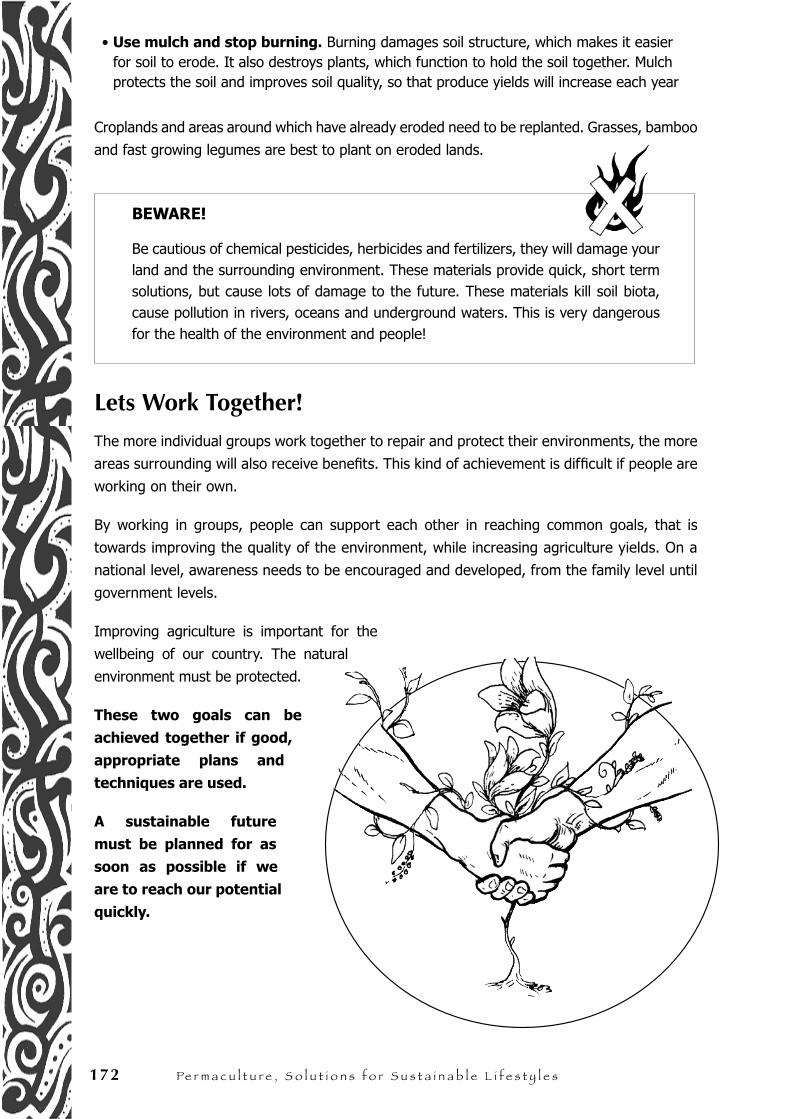
172 Pe r m a c u l t u r e , S o l u t i o n s f o r S u s t a i n a b l e l i f e s t y l e s
• Use mulch and stop burning. Burning damages soil structure, which makes it easier for soil to erode. It also destroys plants, which function to hold the soil together. Mulch protects the soil and improves soil quality, so that produce yields will increase each year
Croplands and areas around which have already eroded need to be replanted. Grasses, bamboo
and fast growing legumes are best to plant on eroded lands.
BEWARE!
Be cautious of chemical pesticides, herbicides and fertilizers, they will damage your land and the surrounding environment. These materials provide quick, short term solutions, but cause lots of damage to the future. These materials kill soil biota, cause pollution in rivers, oceans and underground waters. This is very dangerous for the health of the environment and people!
Lets Work Together!
The more individual groups work together to repair and protect their environments, the more
areas surrounding will also receive benefits. This kind of achievement is difficult if people are
working on their own.
By working in groups, people can support each other in reaching common goals, that is
towards improving the quality of the environment, while increasing agriculture yields. On a
national level, awareness needs to be encouraged and developed, from the family level until
government levels.
Improving agriculture is important for the
wellbeing of our country. The natural
environment must be protected.
These two goals can be
achieved together if good,
appropriate plans and
techniques are used.
A sustainable future
must be planned for as
soon as possible if we
are to reach our potential
quickly.

M o d u l e 7 : F a r m i n g 173
N o t e s . . .

174 Pe r m a c u l t u r e , S o l u t i o n s f o r S u s t a i n a b l e l i f e s t y l e s
N o t e s . . .
Pe
rma
cu
ltu
re R
eso
urc
e B
oo
k M
od
ule
8.
Fo
rest
s, T
ree
Cro
ps
& B
am
bo
o
M o d u l e N o 8 .
Forests, Tree Crops & Bamboo

176 Pe r m a c u l t u r e , S o l u t i o n s f o r S u s t a i n a b l e l i f e s t y l e s
N o t e s . . .
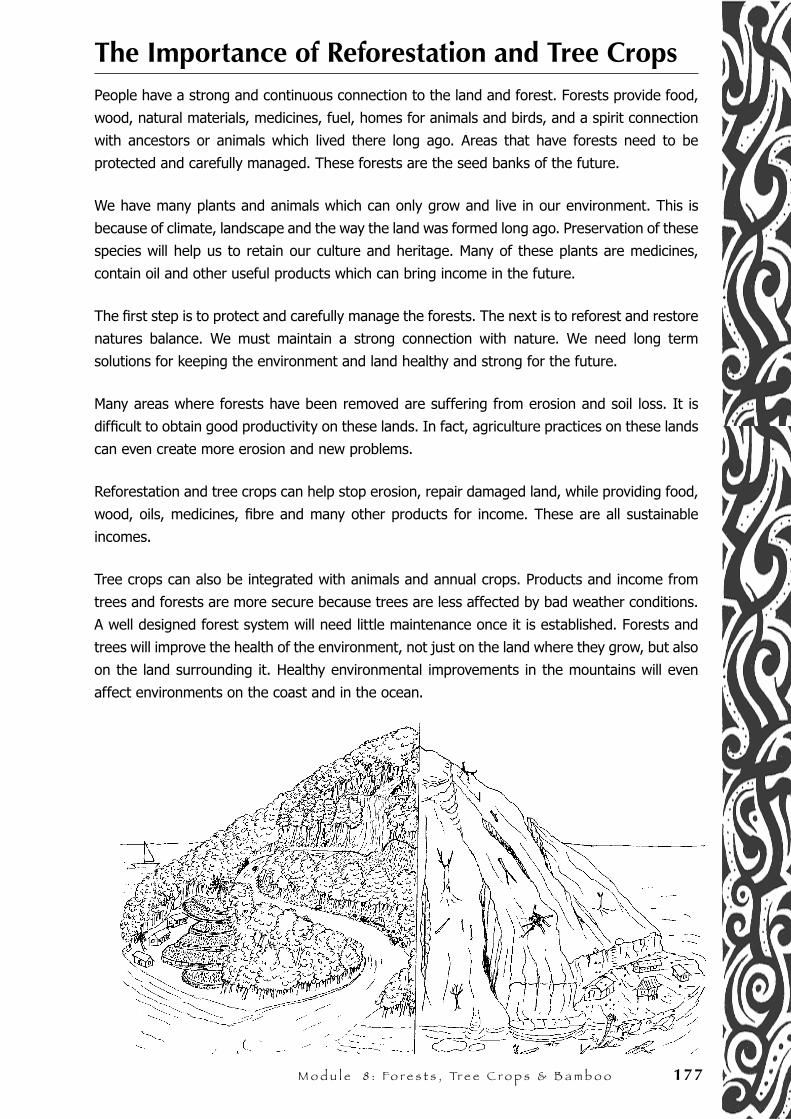
M o d u l e 8 : Fo r e s t s , Tr e e C r o p s & B a m b o o 177
The Importance of Reforestation and Tree CropsPeople have a strong and continuous connection to the land and forest. Forests provide food,
wood, natural materials, medicines, fuel, homes for animals and birds, and a spirit connection
with ancestors or animals which lived there long ago. Areas that have forests need to be
protected and carefully managed. These forests are the seed banks of the future.
We have many plants and animals which can only grow and live in our environment. This is
because of climate, landscape and the way the land was formed long ago. Preservation of these
species will help us to retain our culture and heritage. Many of these plants are medicines,
contain oil and other useful products which can bring income in the future.
The first step is to protect and carefully manage the forests. The next is to reforest and restore
natures balance. We must maintain a strong connection with nature. We need long term
solutions for keeping the environment and land healthy and strong for the future.
Many areas where forests have been removed are suffering from erosion and soil loss. It is
difficult to obtain good productivity on these lands. In fact, agriculture practices on these lands
can even create more erosion and new problems.
Reforestation and tree crops can help stop erosion, repair damaged land, while providing food,
wood, oils, medicines, fibre and many other products for income. These are all sustainable
incomes.
Tree crops can also be integrated with animals and annual crops. Products and income from
trees and forests are more secure because trees are less affected by bad weather conditions.
A well designed forest system will need little maintenance once it is established. Forests and
trees will improve the health of the environment, not just on the land where they grow, but also
on the land surrounding it. Healthy environmental improvements in the mountains will even
affect environments on the coast and in the ocean.
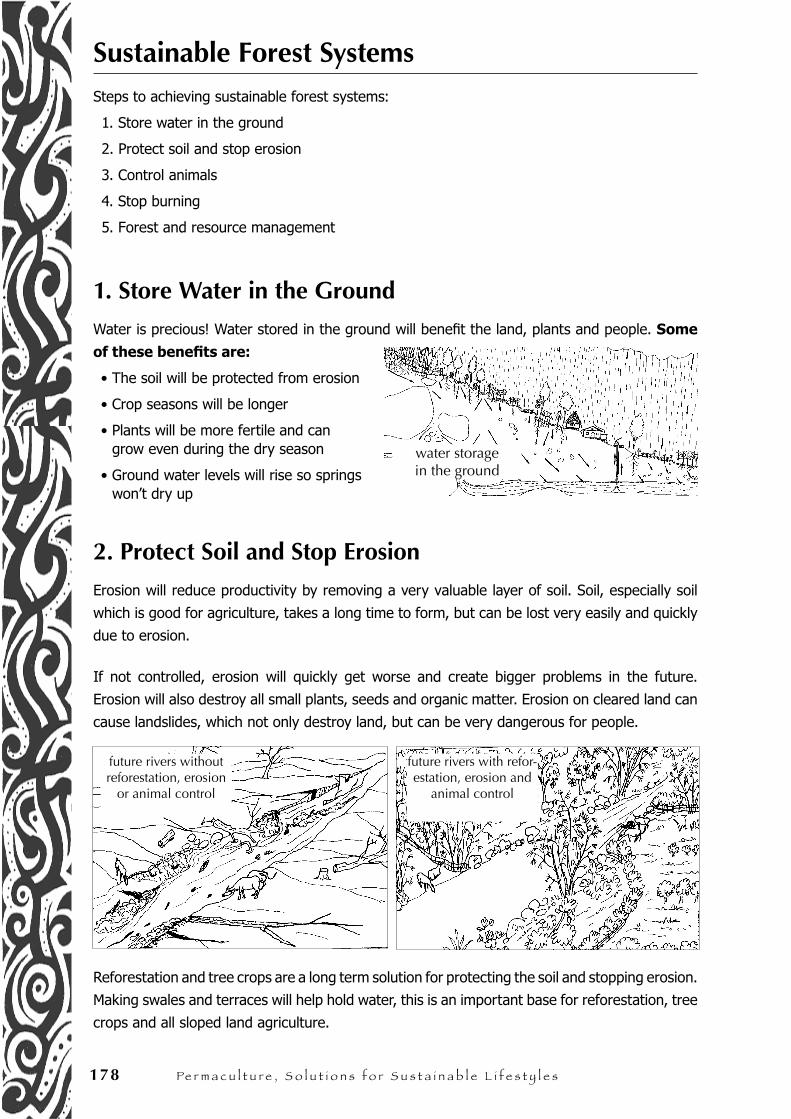
178 Pe r m a c u l t u r e , S o l u t i o n s f o r S u s t a i n a b l e l i f e s t y l e s
Sustainable Forest SystemsSteps to achieving sustainable forest systems:
1. Store water in the ground
2. Protect soil and stop erosion
3. Control animals
4. Stop burning
5. Forest and resource management
1. Store Water in the Ground
Water is precious! Water stored in the ground will benefit the land, plants and people. Some
of these benefits are:
• The soil will be protected from erosion
• Crop seasons will be longer
• Plants will be more fertile and can grow even during the dry season
• Ground water levels will rise so springs won’t dry up
2. Protect Soil and Stop Erosion
Erosion will reduce productivity by removing a very valuable layer of soil. Soil, especially soil
which is good for agriculture, takes a long time to form, but can be lost very easily and quickly
due to erosion.
If not controlled, erosion will quickly get worse and create bigger problems in the future.
Erosion will also destroy all small plants, seeds and organic matter. Erosion on cleared land can
cause landslides, which not only destroy land, but can be very dangerous for people.
Reforestation and tree crops are a long term solution for protecting the soil and stopping erosion.
Making swales and terraces will help hold water, this is an important base for reforestation, tree
crops and all sloped land agriculture.
water storage in the ground
future rivers with refor-estation, erosion and
animal control
future rivers without reforestation, erosion
or animal control
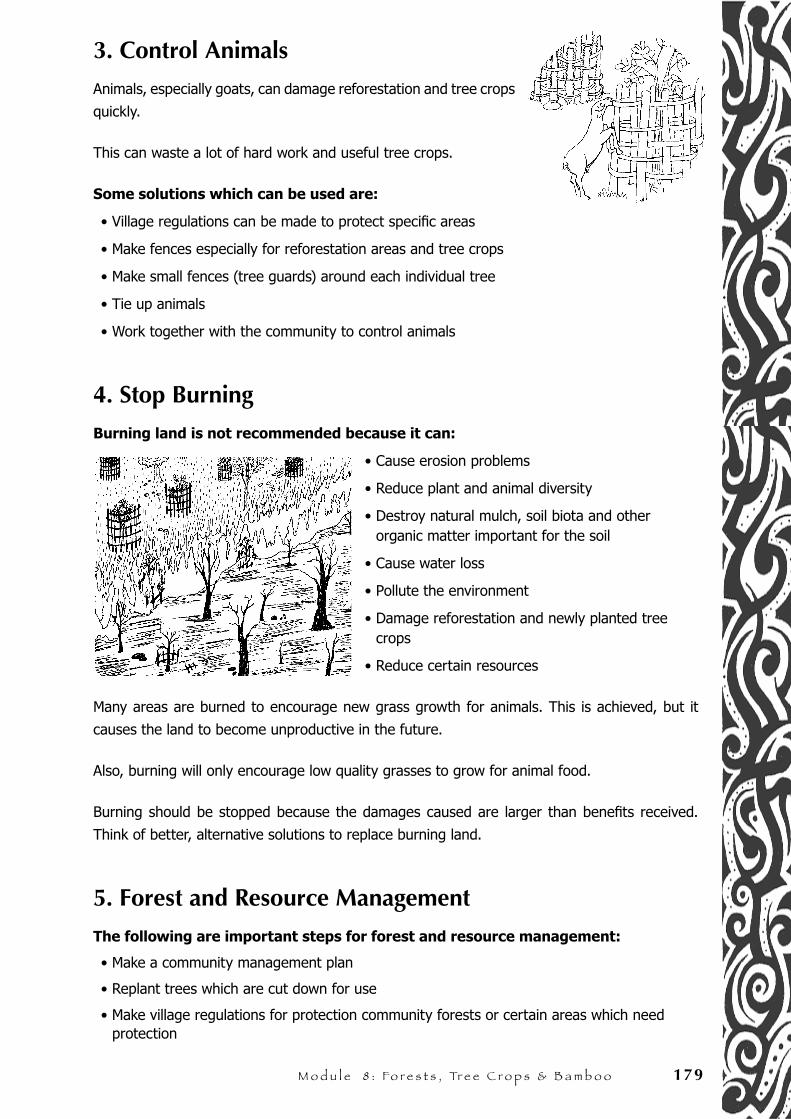
M o d u l e 8 : Fo r e s t s , Tr e e C r o p s & B a m b o o 179
3. Control Animals
Animals, especially goats, can damage reforestation and tree crops
quickly.
This can waste a lot of hard work and useful tree crops.
Some solutions which can be used are:
• Village regulations can be made to protect specific areas
• Make fences especially for reforestation areas and tree crops
• Make small fences (tree guards) around each individual tree
• Tie up animals
• Work together with the community to control animals
4. Stop Burning
Burning land is not recommended because it can:
• Cause erosion problems
• Reduce plant and animal diversity
• Destroy natural mulch, soil biota and other organic matter important for the soil
• Cause water loss
• Pollute the environment
• Damage reforestation and newly planted tree crops
• Reduce certain resources
Many areas are burned to encourage new grass growth for animals. This is achieved, but it
causes the land to become unproductive in the future.
Also, burning will only encourage low quality grasses to grow for animal food.
Burning should be stopped because the damages caused are larger than benefits received.
Think of better, alternative solutions to replace burning land.
5. Forest and Resource Management
The following are important steps for forest and resource management:
• Make a community management plan
• Replant trees which are cut down for use
• Make village regulations for protection community forests or certain areas which need protection
180 Pe r m a c u l t u r e , S o l u t i o n s f o r S u s t a i n a b l e l i f e s t y l e s
A community management plan is a plan for the future.
A community management plan should:
• Plan what can be harvested and whom can harvest it
• Control income from harvests, including how much income should return to the community to be used for forest management
• Develop a working relationship with the government
• Protect community land from other groups interested in ownership, for example from commercial enterprises
• Use forest resources wisely. Beneficial forest resources include seeds, medicines, oils, bamboo products, honey and much more
Smaller community groups, like women’s groups and youth groups, can compile information and
important guidelines regarding land and forest management. This information can be passed
on and discussed at community meetings, so that knowledge and ideas can be included in
community management plans.
Collecting firewood can cause huge losses to now existing trees. Collecting
firewood is also hard work, which takes up a lot of time. Finding alternatives
to firewood is important, because by reducing the use of firewood a lot of time
and energy will be saved, while protecting the forest. Take into consideration
changes such as:
• Planting trees around the house which can be used as firewood, this could even be living fences
• Using stoves and ovens which use less firewood or none at all, like charcoal stoves
BEWARE!
International companies are looking to our forests to make money for themselves.
This could be from harvesting forest resources or clear cutting for commercial
purposes, such as for farming land or other reasons. Short term jobs and small
amounts of money will never be able to replace the wealth and value contained in
forests. Commercial companies will always take most of the money and benefits,
this is how they work. This is already happening in many countries all over the world
and it is causing huge problems and destruction.
Any plantations should be separate from the forest area and forests should never be
replaced by plantations. Our beautiful forests and environment can be an important
asset in the future, such as for ecotourism, which can provide many more jobs and
local income than logging and plantations can. This is also more sustainable for the
future.
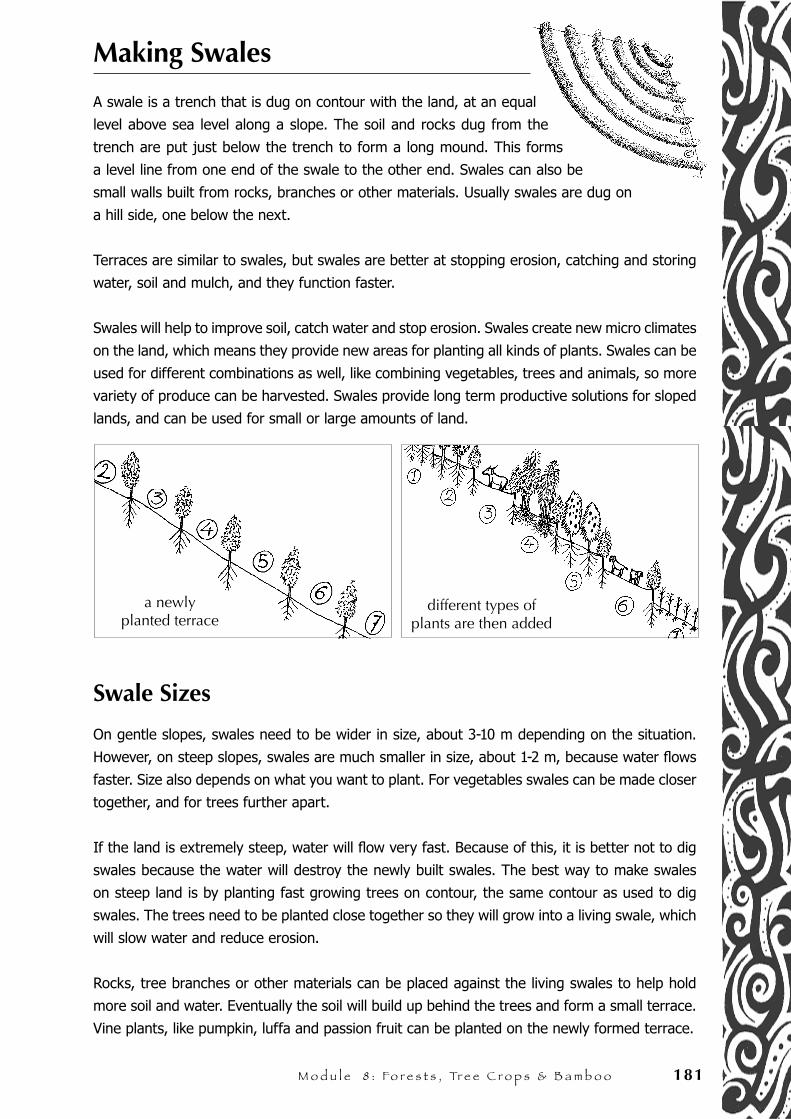
M o d u l e 8 : Fo r e s t s , Tr e e C r o p s & B a m b o o 181
Making Swales
A swale is a trench that is dug on contour with the land, at an equal
level above sea level along a slope. The soil and rocks dug from the
trench are put just below the trench to form a long mound. This forms
a level line from one end of the swale to the other end. Swales can also be
small walls built from rocks, branches or other materials. Usually swales are dug on
a hill side, one below the next.
Terraces are similar to swales, but swales are better at stopping erosion, catching and storing
water, soil and mulch, and they function faster.
Swales will help to improve soil, catch water and stop erosion. Swales create new micro climates
on the land, which means they provide new areas for planting all kinds of plants. Swales can be
used for different combinations as well, like combining vegetables, trees and animals, so more
variety of produce can be harvested. Swales provide long term productive solutions for sloped
lands, and can be used for small or large amounts of land.
Swale Sizes
On gentle slopes, swales need to be wider in size, about 3-10 m depending on the situation.
However, on steep slopes, swales are much smaller in size, about 1-2 m, because water flows
faster. Size also depends on what you want to plant. For vegetables swales can be made closer
together, and for trees further apart.
If the land is extremely steep, water will flow very fast. Because of this, it is better not to dig
swales because the water will destroy the newly built swales. The best way to make swales
on steep land is by planting fast growing trees on contour, the same contour as used to dig
swales. The trees need to be planted close together so they will grow into a living swale, which
will slow water and reduce erosion.
Rocks, tree branches or other materials can be placed against the living swales to help hold
more soil and water. Eventually the soil will build up behind the trees and form a small terrace.
Vine plants, like pumpkin, luffa and passion fruit can be planted on the newly formed terrace.
different types of plants are then added
a newly planted terrace
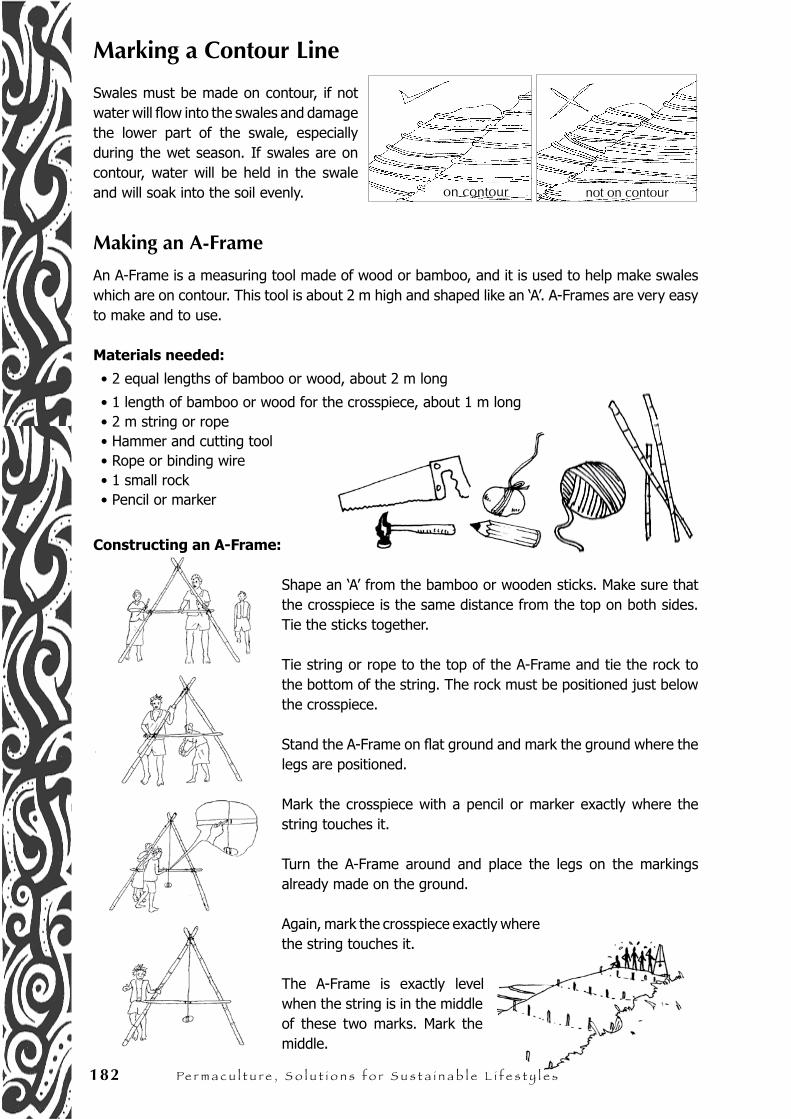
182 Pe r m a c u l t u r e , S o l u t i o n s f o r S u s t a i n a b l e l i f e s t y l e s
Marking a Contour Line
Swales must be made on contour, if not water will flow into the swales and damage the lower part of the swale, especially during the wet season. If swales are on contour, water will be held in the swale and will soak into the soil evenly.
Making an A-Frame
An A-Frame is a measuring tool made of wood or bamboo, and it is used to help make swales which are on contour. This tool is about 2 m high and shaped like an ‘A’. A-Frames are very easy to make and to use.
Materials needed:
• 2 equal lengths of bamboo or wood, about 2 m long
• 1 length of bamboo or wood for the crosspiece, about 1 m long• 2 m string or rope • Hammer and cutting tool• Rope or binding wire• 1 small rock• Pencil or marker
Constructing an A-Frame:
Shape an ‘A’ from the bamboo or wooden sticks. Make sure that the crosspiece is the same distance from the top on both sides. Tie the sticks together.
Tie string or rope to the top of the A-Frame and tie the rock to the bottom of the string. The rock must be positioned just below the crosspiece.
Stand the A-Frame on flat ground and mark the ground where the legs are positioned.
Mark the crosspiece with a pencil or marker exactly where the string touches it.
Turn the A-Frame around and place the legs on the markings already made on the ground.
Again, mark the crosspiece exactly where the string touches it.
The A-Frame is exactly level when the string is in the middle of these two marks. Mark the middle.
on contour not on contour
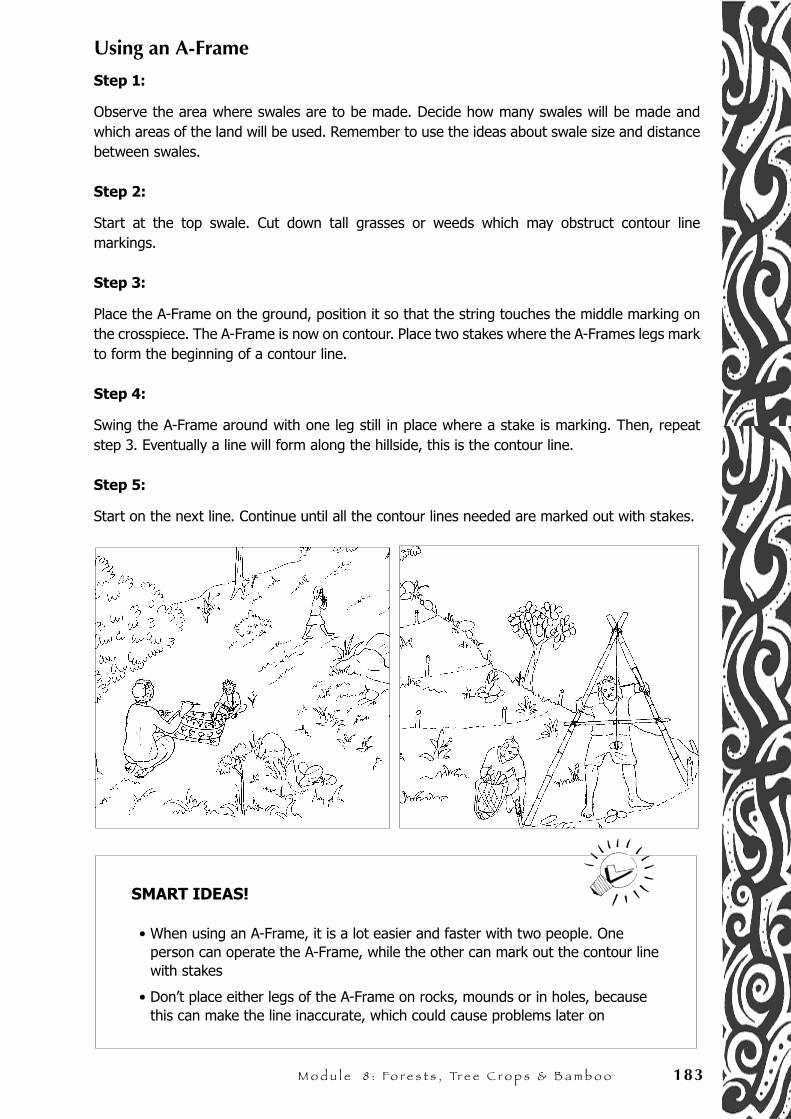
M o d u l e 8 : Fo r e s t s , Tr e e C r o p s & B a m b o o 183
Using an A-Frame
Step 1:
Observe the area where swales are to be made. Decide how many swales will be made and which areas of the land will be used. Remember to use the ideas about swale size and distance between swales.
Step 2:
Start at the top swale. Cut down tall grasses or weeds which may obstruct contour line markings.
Step 3:
Place the A-Frame on the ground, position it so that the string touches the middle marking on the crosspiece. The A-Frame is now on contour. Place two stakes where the A-Frames legs mark to form the beginning of a contour line.
Step 4:
Swing the A-Frame around with one leg still in place where a stake is marking. Then, repeat step 3. Eventually a line will form along the hillside, this is the contour line.
Step 5:
Start on the next line. Continue until all the contour lines needed are marked out with stakes.
SMART IDEAS!
• When using an A-Frame, it is a lot easier and faster with two people. One person can operate the A-Frame, while the other can mark out the contour line with stakes
• Don’t place either legs of the A-Frame on rocks, mounds or in holes, because this can make the line inaccurate, which could cause problems later on
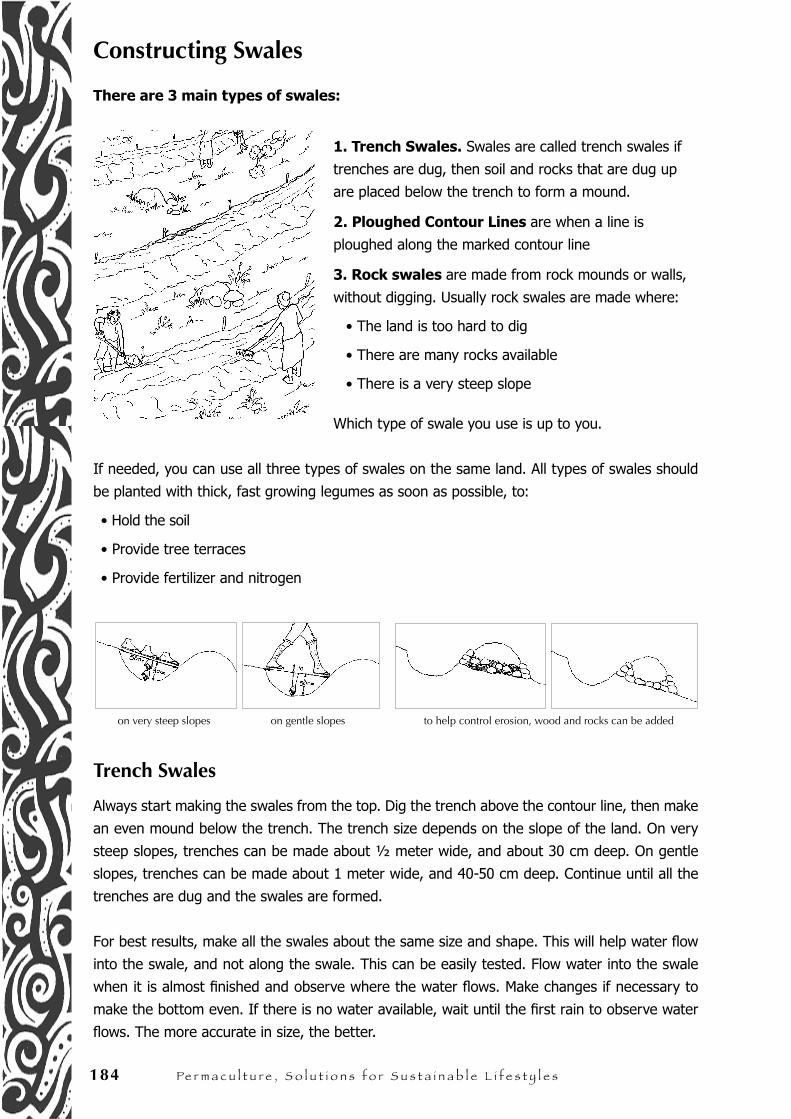
184 Pe r m a c u l t u r e , S o l u t i o n s f o r S u s t a i n a b l e l i f e s t y l e s
Constructing Swales
There are 3 main types of swales:
1. Trench Swales. Swales are called trench swales if
trenches are dug, then soil and rocks that are dug up
are placed below the trench to form a mound.
2. Ploughed Contour Lines are when a line is
ploughed along the marked contour line
3. Rock swales are made from rock mounds or walls,
without digging. Usually rock swales are made where:
• The land is too hard to dig
• There are many rocks available
• There is a very steep slope
Which type of swale you use is up to you.
If needed, you can use all three types of swales on the same land. All types of swales should
be planted with thick, fast growing legumes as soon as possible, to:
• Hold the soil
• Provide tree terraces
• Provide fertilizer and nitrogen
Trench Swales
Always start making the swales from the top. Dig the trench above the contour line, then make
an even mound below the trench. The trench size depends on the slope of the land. On very
steep slopes, trenches can be made about ½ meter wide, and about 30 cm deep. On gentle
slopes, trenches can be made about 1 meter wide, and 40-50 cm deep. Continue until all the
trenches are dug and the swales are formed.
For best results, make all the swales about the same size and shape. This will help water flow
into the swale, and not along the swale. This can be easily tested. Flow water into the swale
when it is almost finished and observe where the water flows. Make changes if necessary to
make the bottom even. If there is no water available, wait until the first rain to observe water
flows. The more accurate in size, the better.
on very steep slopes on gentle slopes to help control erosion, wood and rocks can be added
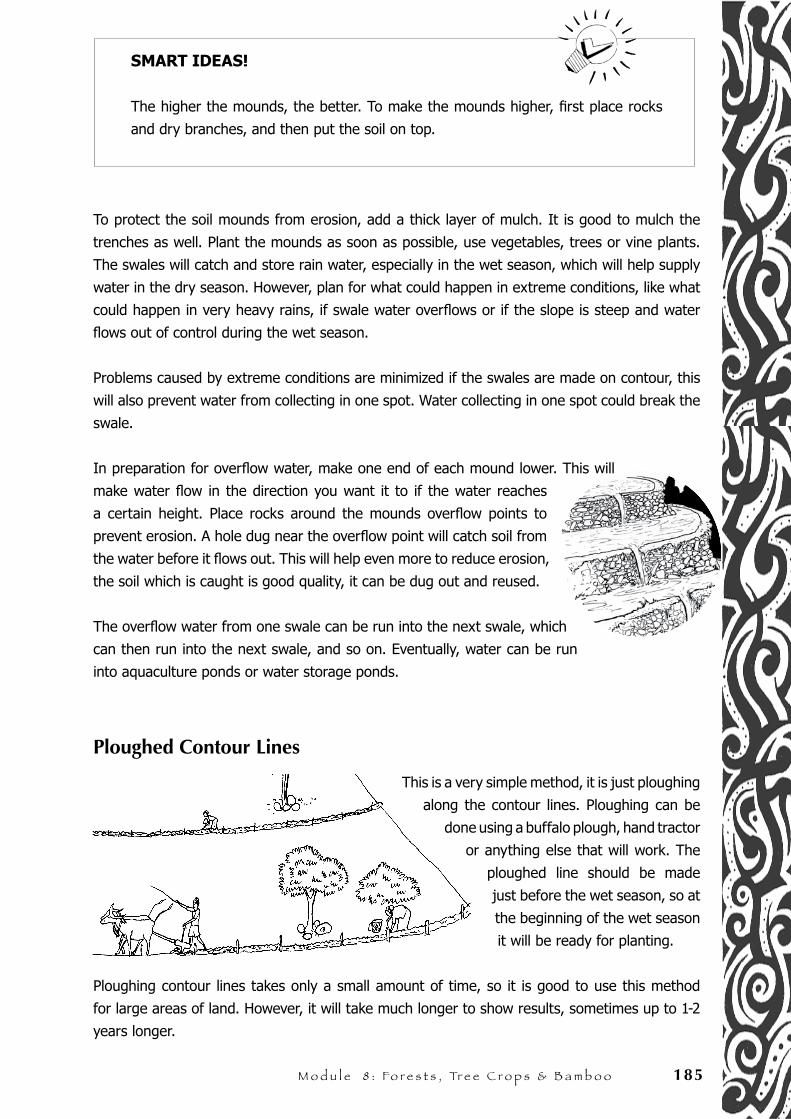
M o d u l e 8 : Fo r e s t s , Tr e e C r o p s & B a m b o o 185
SMART IDEAS!
The higher the mounds, the better. To make the mounds higher, first place rocks
and dry branches, and then put the soil on top.
To protect the soil mounds from erosion, add a thick layer of mulch. It is good to mulch the
trenches as well. Plant the mounds as soon as possible, use vegetables, trees or vine plants.
The swales will catch and store rain water, especially in the wet season, which will help supply
water in the dry season. However, plan for what could happen in extreme conditions, like what
could happen in very heavy rains, if swale water overflows or if the slope is steep and water
flows out of control during the wet season.
Problems caused by extreme conditions are minimized if the swales are made on contour, this
will also prevent water from collecting in one spot. Water collecting in one spot could break the
swale.
In preparation for overflow water, make one end of each mound lower. This will
make water flow in the direction you want it to if the water reaches
a certain height. Place rocks around the mounds overflow points to
prevent erosion. A hole dug near the overflow point will catch soil from
the water before it flows out. This will help even more to reduce erosion,
the soil which is caught is good quality, it can be dug out and reused.
The overflow water from one swale can be run into the next swale, which
can then run into the next swale, and so on. Eventually, water can be run
into aquaculture ponds or water storage ponds.
Ploughed Contour Lines
This is a very simple method, it is just ploughing
along the contour lines. Ploughing can be
done using a buffalo plough, hand tractor
or anything else that will work. The
ploughed line should be made
just before the wet season, so at
the beginning of the wet season
it will be ready for planting.
Ploughing contour lines takes only a small amount of time, so it is good to use this method
for large areas of land. However, it will take much longer to show results, sometimes up to 1-2
years longer.
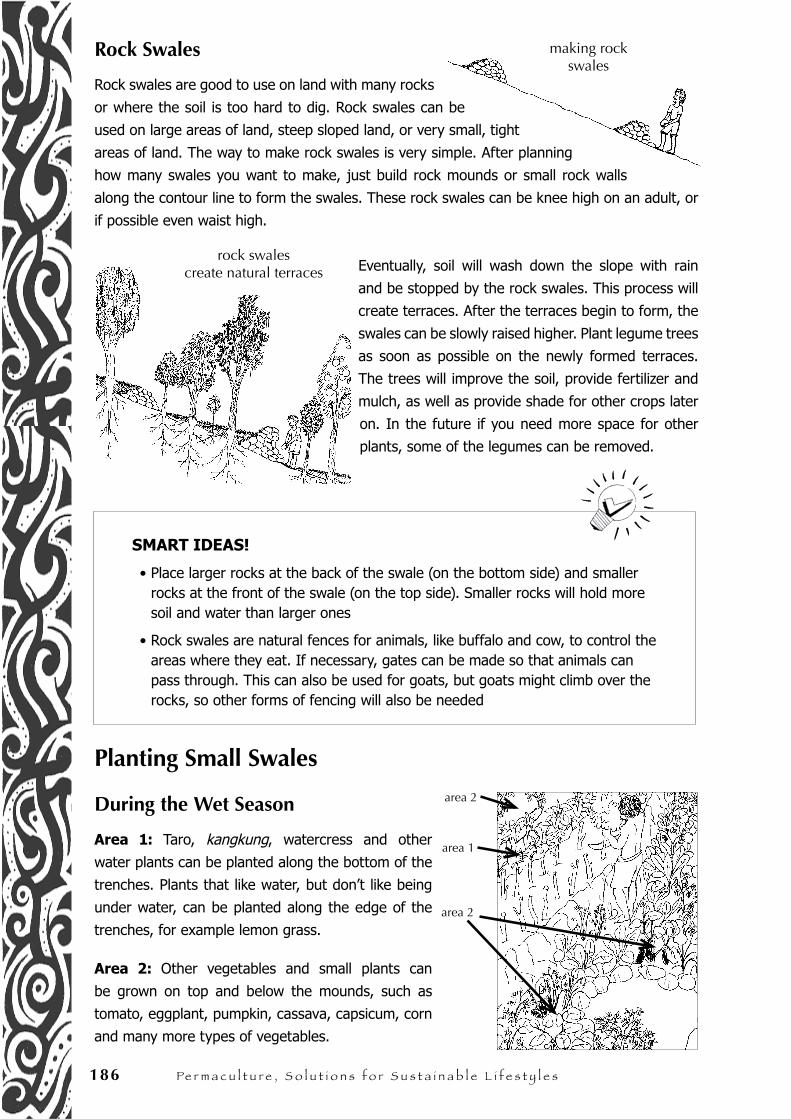
186 Pe r m a c u l t u r e , S o l u t i o n s f o r S u s t a i n a b l e l i f e s t y l e s
Rock Swales
Rock swales are good to use on land with many rocks
or where the soil is too hard to dig. Rock swales can be
used on large areas of land, steep sloped land, or very small, tight
areas of land. The way to make rock swales is very simple. After planning
how many swales you want to make, just build rock mounds or small rock walls
along the contour line to form the swales. These rock swales can be knee high on an adult, or
if possible even waist high.
Eventually, soil will wash down the slope with rain
and be stopped by the rock swales. This process will
create terraces. After the terraces begin to form, the
swales can be slowly raised higher. Plant legume trees
as soon as possible on the newly formed terraces.
The trees will improve the soil, provide fertilizer and
mulch, as well as provide shade for other crops later
on. In the future if you need more space for other
plants, some of the legumes can be removed.
SMART IDEAS!
• Place larger rocks at the back of the swale (on the bottom side) and smaller rocks at the front of the swale (on the top side). Smaller rocks will hold more soil and water than larger ones
• Rock swales are natural fences for animals, like buffalo and cow, to control the areas where they eat. If necessary, gates can be made so that animals can pass through. This can also be used for goats, but goats might climb over the rocks, so other forms of fencing will also be needed
Planting Small Swales
During the Wet Season
Area 1: Taro, kangkung, watercress and other
water plants can be planted along the bottom of the
trenches. Plants that like water, but don’t like being
under water, can be planted along the edge of the
trenches, for example lemon grass.
Area 2: Other vegetables and small plants can
be grown on top and below the mounds, such as
tomato, eggplant, pumpkin, cassava, capsicum, corn
and many more types of vegetables.
rock swales create natural terraces
area 2
area 2
area 1
making rock swales
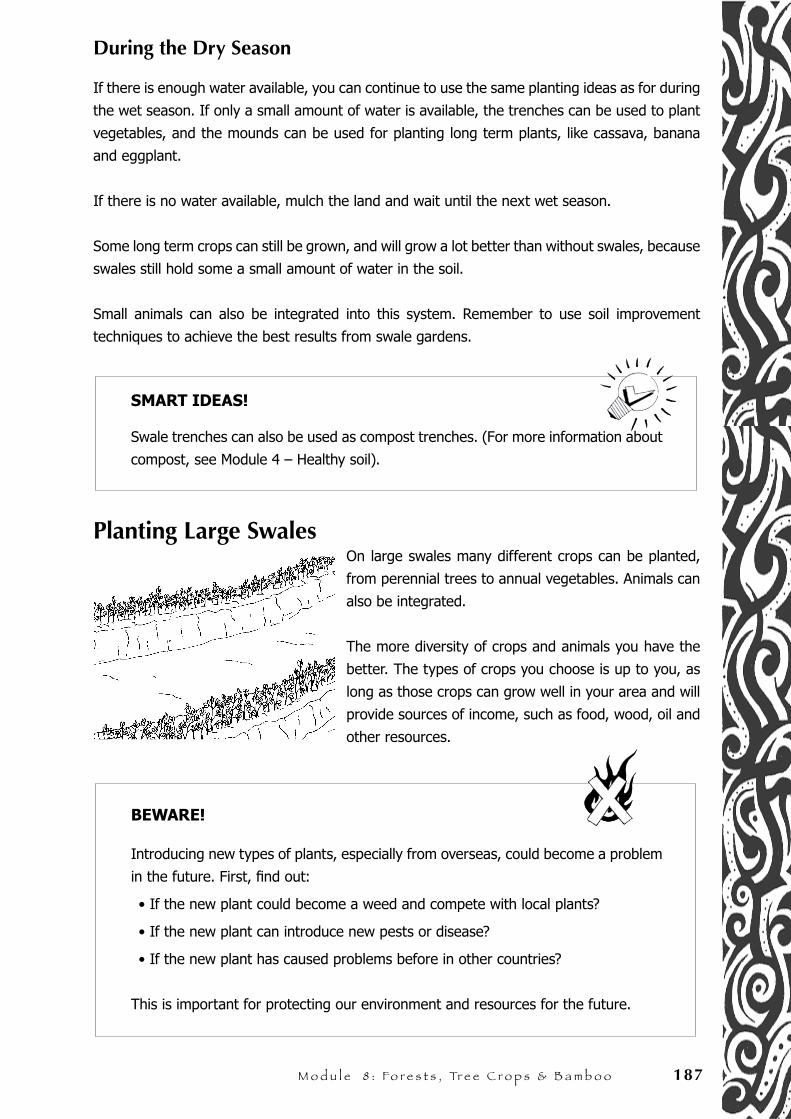
M o d u l e 8 : Fo r e s t s , Tr e e C r o p s & B a m b o o 187
During the Dry Season
If there is enough water available, you can continue to use the same planting ideas as for during
the wet season. If only a small amount of water is available, the trenches can be used to plant
vegetables, and the mounds can be used for planting long term plants, like cassava, banana
and eggplant.
If there is no water available, mulch the land and wait until the next wet season.
Some long term crops can still be grown, and will grow a lot better than without swales, because
swales still hold some a small amount of water in the soil.
Small animals can also be integrated into this system. Remember to use soil improvement
techniques to achieve the best results from swale gardens.
SMART IDEAS!
Swale trenches can also be used as compost trenches. (For more information about
compost, see Module 4 – Healthy soil).
Planting Large SwalesOn large swales many different crops can be planted,
from perennial trees to annual vegetables. Animals can
also be integrated.
The more diversity of crops and animals you have the
better. The types of crops you choose is up to you, as
long as those crops can grow well in your area and will
provide sources of income, such as food, wood, oil and
other resources.
BEWARE!
Introducing new types of plants, especially from overseas, could become a problem
in the future. First, find out:
• If the new plant could become a weed and compete with local plants?
• If the new plant can introduce new pests or disease?
• If the new plant has caused problems before in other countries?
This is important for protecting our environment and resources for the future.

188 Pe r m a c u l t u r e , S o l u t i o n s f o r S u s t a i n a b l e l i f e s t y l e s
Agriculture Systems on Swales
At the start of the wet season, plant legumes along the swale mounds or along the ploughed
contour lines. Plant the legumes close together, about 3-5 cm apart. Leucaena and moringa are
both good legumes to use. These legumes have many functions, they will:
• Hold the soil together and eventually form a fence which can be continuously pruned for many years. The pruning can be used as mulch and fertilizer, and as the legumes are pruned they will release nitrogen into the soil
• Act as a windbreak, which will help to protect crops when they are still young
• Eventually form natural terraces on the land
In between the legume rows, there is wide rows or ‘alleys’ which can be used for planting many
different types of crops or even for grazing animals. Not all of the land must be used straight
away, it is better to utilize the land gradually as needed.
Managing Planting Times
Managing planting times is a technique which can increase crop yields by working with crops
of different sizes, different growth rates and different life spans. Following is an example
of managing crop planting times:
• Year 1: Plant legume trees, like leuceana and moring. Leave space for fruit trees. Legume trees will grow quickly and can later be cut back to provide more space for other trees
• Year 1 and 2: Plant fruit trees, like apples, mango and citrus, between the legume trees. When planting, think about how large the tree will be in 10-20 years ahead and leave enough room for trees to grow to their full size. The legume trees will provide some shade for the fruit trees when they are still young. When the fruit trees grow larger, the legumes can be cut back to provide more space. Eventually, the fruit trees will take over the legume trees. Animals can also be integrated into this system
• Year 1-5: There will be space between the fruit trees for about 5 years. The space can be used to grow vegetables like corn, pumpkin, beans, sweet potato, capsicum, taro, cassava, papaya, banana, pineapple and root plants, like ginger. To allow sunlight in, prune back legumes which grow too thick, the prunings can be used as mulch material
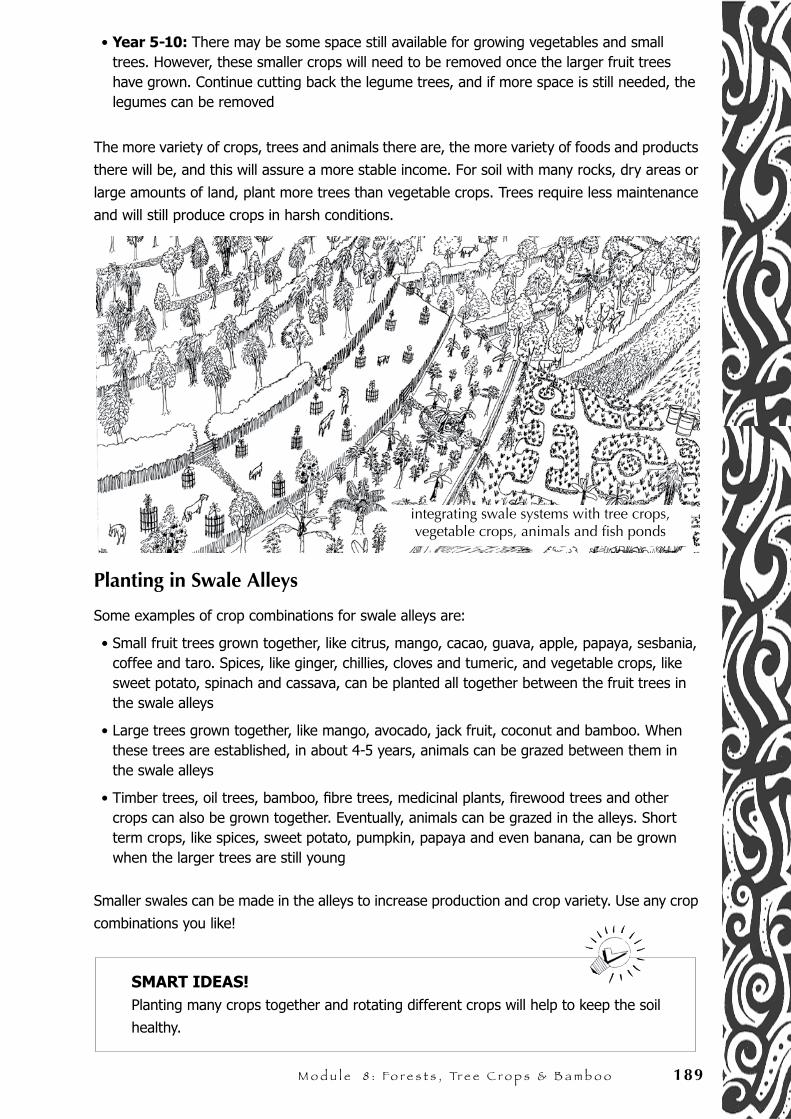
M o d u l e 8 : Fo r e s t s , Tr e e C r o p s & B a m b o o 189
• Year 5-10: There may be some space still available for growing vegetables and small trees. However, these smaller crops will need to be removed once the larger fruit trees have grown. Continue cutting back the legume trees, and if more space is still needed, the legumes can be removed
The more variety of crops, trees and animals there are, the more variety of foods and products
there will be, and this will assure a more stable income. For soil with many rocks, dry areas or
large amounts of land, plant more trees than vegetable crops. Trees require less maintenance
and will still produce crops in harsh conditions.
Planting in Swale Alleys
Some examples of crop combinations for swale alleys are:
• Small fruit trees grown together, like citrus, mango, cacao, guava, apple, papaya, sesbania, coffee and taro. Spices, like ginger, chillies, cloves and tumeric, and vegetable crops, like sweet potato, spinach and cassava, can be planted all together between the fruit trees in the swale alleys
• Large trees grown together, like mango, avocado, jack fruit, coconut and bamboo. When these trees are established, in about 4-5 years, animals can be grazed between them in the swale alleys
• Timber trees, oil trees, bamboo, fibre trees, medicinal plants, firewood trees and other crops can also be grown together. Eventually, animals can be grazed in the alleys. Short term crops, like spices, sweet potato, pumpkin, papaya and even banana, can be grown when the larger trees are still young
Smaller swales can be made in the alleys to increase production and crop variety. Use any crop
combinations you like!
SMART IDEAS!Planting many crops together and rotating different crops will help to keep the soil
healthy.
integrating swale systems with tree crops, vegetable crops, animals and fish ponds

190 Pe r m a c u l t u r e , S o l u t i o n s f o r S u s t a i n a b l e l i f e s t y l e s
Flat Land Tree CropsFlat land is generally used for grains, vegetables and paddies, but tree crops can be combined
in many ways. Tree crops will increase production and crop variety. Tree crops need less
maintenance, and will still produce in the dry season. Small trees, like citrus, banana, papaya,
clove and pigeon peas can be planted with grains and vegetables. The trees will provide shade
for smaller annual crops. They will also act as a barrier and make it harder for pest insects to
pass from one plant to the next. Also plant legumes, they will provide many benefits.
Another benefit from planting trees with crops and vegetables, is that the smaller crops can be
harvested first, while waiting for the large trees to grow and produce.
SMART IDEAS!
Flat land agriculture will be improved if water is collected and stored in the ground,
this includes rain water and water that flows down from the mountains. Continue
using trenches and compost pits to collect water.
ReforestationReforestation areas are areas where the natural forest is
restored.
Reforestation is a less intensive system, and will provide less produce
than agriculture.
However, this system is very important for preserving the environment and stopping erosion,
and it will provide many essential products, such as bamboo, oils, fibre, timber, honey and
medicines.
2 years 5 years 10 years
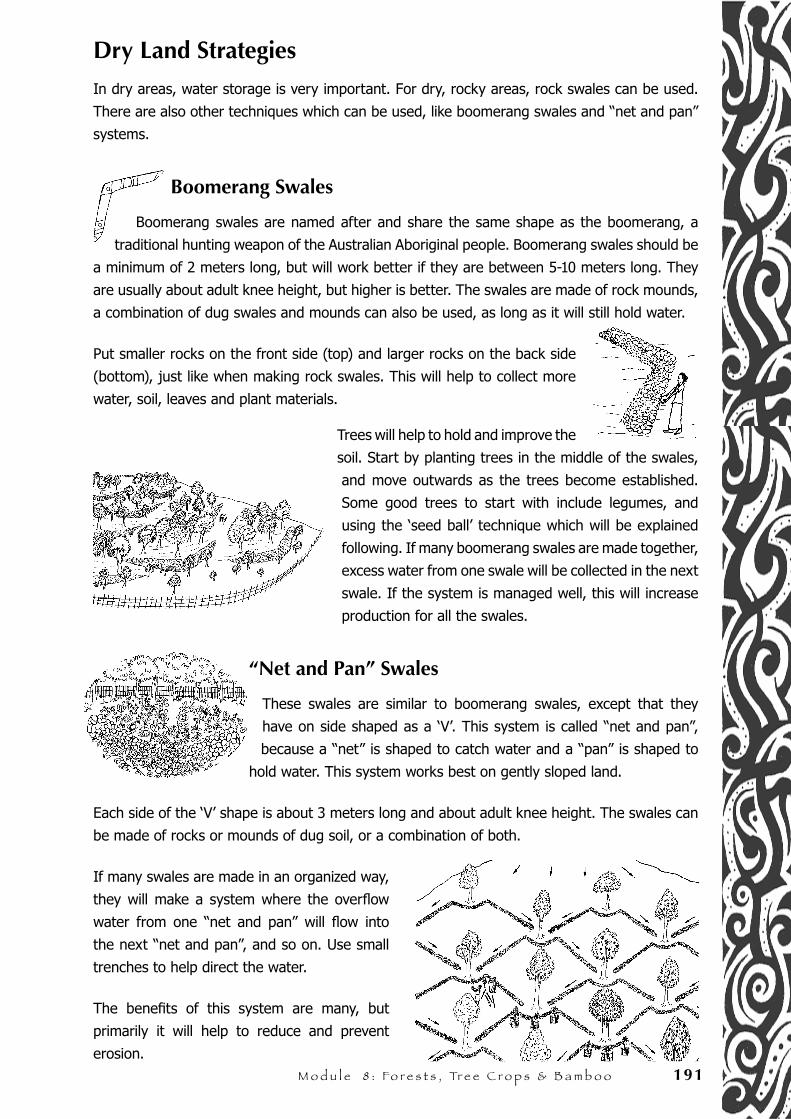
M o d u l e 8 : Fo r e s t s , Tr e e C r o p s & B a m b o o 191
Dry Land Strategies
In dry areas, water storage is very important. For dry, rocky areas, rock swales can be used.
There are also other techniques which can be used, like boomerang swales and “net and pan”
systems.
Boomerang Swales
Boomerang swales are named after and share the same shape as the boomerang, a
traditional hunting weapon of the Australian Aboriginal people. Boomerang swales should be
a minimum of 2 meters long, but will work better if they are between 5-10 meters long. They
are usually about adult knee height, but higher is better. The swales are made of rock mounds,
a combination of dug swales and mounds can also be used, as long as it will still hold water.
Put smaller rocks on the front side (top) and larger rocks on the back side
(bottom), just like when making rock swales. This will help to collect more
water, soil, leaves and plant materials.
Trees will help to hold and improve the
soil. Start by planting trees in the middle of the swales,
and move outwards as the trees become established.
Some good trees to start with include legumes, and
using the ‘seed ball’ technique which will be explained
following. If many boomerang swales are made together,
excess water from one swale will be collected in the next
swale. If the system is managed well, this will increase
production for all the swales.
“Net and Pan” Swales
These swales are similar to boomerang swales, except that they
have on side shaped as a ‘V’. This system is called “net and pan”,
because a “net” is shaped to catch water and a “pan” is shaped to
hold water. This system works best on gently sloped land.
Each side of the ‘V’ shape is about 3 meters long and about adult knee height. The swales can
be made of rocks or mounds of dug soil, or a combination of both.
If many swales are made in an organized way,
they will make a system where the overflow
water from one “net and pan” will flow into
the next “net and pan”, and so on. Use small
trenches to help direct the water.
The benefits of this system are many, but
primarily it will help to reduce and prevent
erosion.
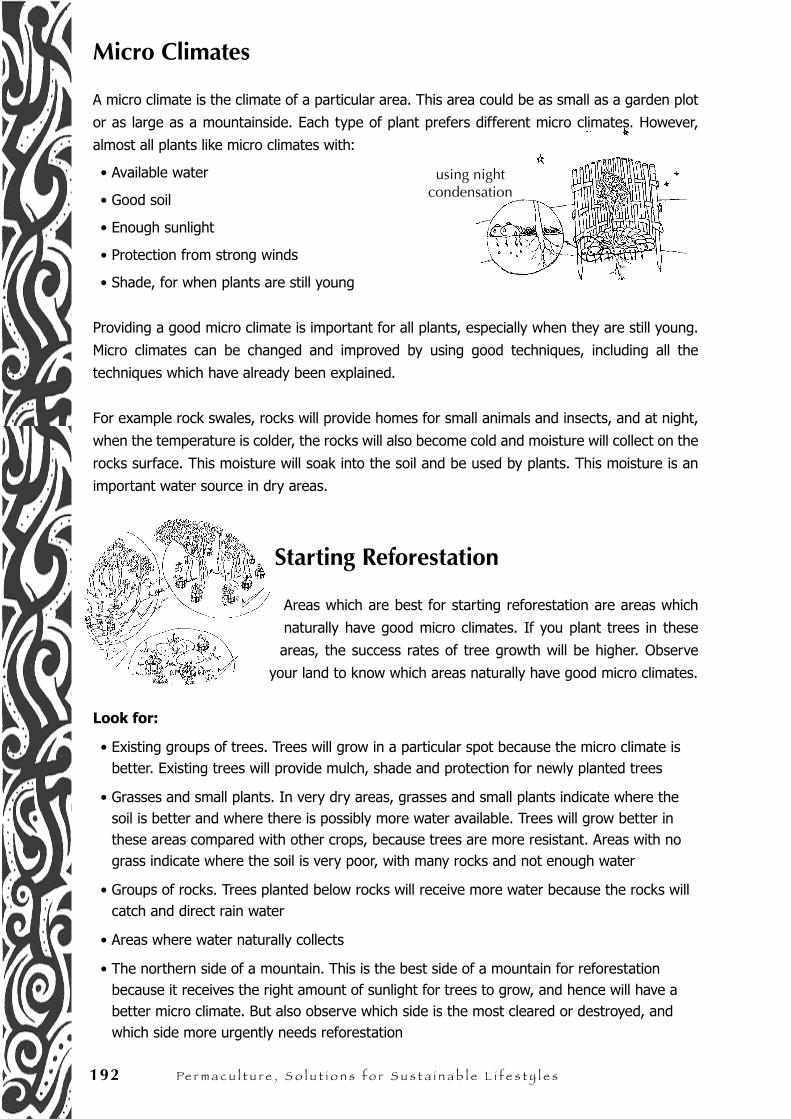
192 Pe r m a c u l t u r e , S o l u t i o n s f o r S u s t a i n a b l e l i f e s t y l e s
Micro Climates
A micro climate is the climate of a particular area. This area could be as small as a garden plot
or as large as a mountainside. Each type of plant prefers different micro climates. However,
almost all plants like micro climates with:
• Available water
• Good soil
• Enough sunlight
• Protection from strong winds
• Shade, for when plants are still young
Providing a good micro climate is important for all plants, especially when they are still young.
Micro climates can be changed and improved by using good techniques, including all the
techniques which have already been explained.
For example rock swales, rocks will provide homes for small animals and insects, and at night,
when the temperature is colder, the rocks will also become cold and moisture will collect on the
rocks surface. This moisture will soak into the soil and be used by plants. This moisture is an
important water source in dry areas.
Starting Reforestation
Areas which are best for starting reforestation are areas which
naturally have good micro climates. If you plant trees in these
areas, the success rates of tree growth will be higher. Observe
your land to know which areas naturally have good micro climates.
Look for:
• Existing groups of trees. Trees will grow in a particular spot because the micro climate is better. Existing trees will provide mulch, shade and protection for newly planted trees
• Grasses and small plants. In very dry areas, grasses and small plants indicate where the soil is better and where there is possibly more water available. Trees will grow better in these areas compared with other crops, because trees are more resistant. Areas with no grass indicate where the soil is very poor, with many rocks and not enough water
• Groups of rocks. Trees planted below rocks will receive more water because the rocks will catch and direct rain water
• Areas where water naturally collects
• The northern side of a mountain. This is the best side of a mountain for reforestation because it receives the right amount of sunlight for trees to grow, and hence will have a better micro climate. But also observe which side is the most cleared or destroyed, and which side more urgently needs reforestation
using night condensation
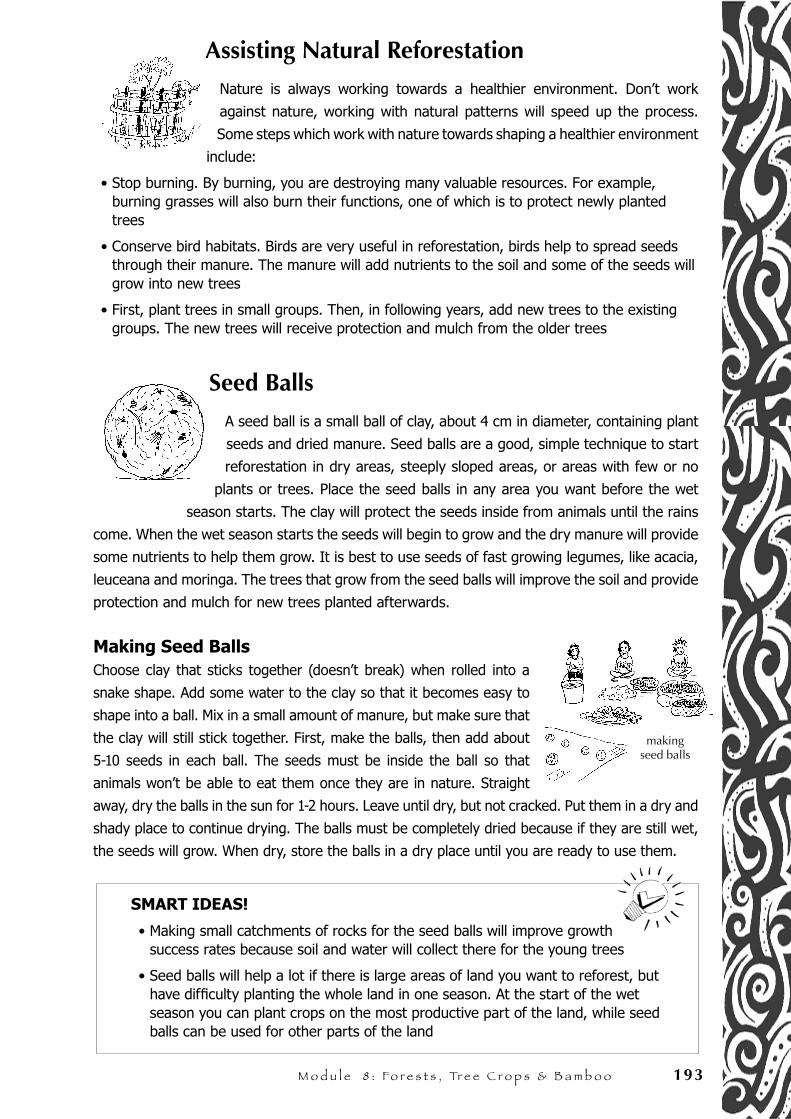
M o d u l e 8 : Fo r e s t s , Tr e e C r o p s & B a m b o o 193
Assisting Natural Reforestation
Nature is always working towards a healthier environment. Don’t work
against nature, working with natural patterns will speed up the process.
Some steps which work with nature towards shaping a healthier environment
include:
• Stop burning. By burning, you are destroying many valuable resources. For example, burning grasses will also burn their functions, one of which is to protect newly planted trees
• Conserve bird habitats. Birds are very useful in reforestation, birds help to spread seeds through their manure. The manure will add nutrients to the soil and some of the seeds will grow into new trees
• First, plant trees in small groups. Then, in following years, add new trees to the existing groups. The new trees will receive protection and mulch from the older trees
Seed Balls
A seed ball is a small ball of clay, about 4 cm in diameter, containing plant
seeds and dried manure. Seed balls are a good, simple technique to start
reforestation in dry areas, steeply sloped areas, or areas with few or no
plants or trees. Place the seed balls in any area you want before the wet
season starts. The clay will protect the seeds inside from animals until the rains
come. When the wet season starts the seeds will begin to grow and the dry manure will provide
some nutrients to help them grow. It is best to use seeds of fast growing legumes, like acacia,
leuceana and moringa. The trees that grow from the seed balls will improve the soil and provide
protection and mulch for new trees planted afterwards.
Making Seed BallsChoose clay that sticks together (doesn’t break) when rolled into a
snake shape. Add some water to the clay so that it becomes easy to
shape into a ball. Mix in a small amount of manure, but make sure that
the clay will still stick together. First, make the balls, then add about
5-10 seeds in each ball. The seeds must be inside the ball so that
animals won’t be able to eat them once they are in nature. Straight
away, dry the balls in the sun for 1-2 hours. Leave until dry, but not cracked. Put them in a dry and
shady place to continue drying. The balls must be completely dried because if they are still wet,
the seeds will grow. When dry, store the balls in a dry place until you are ready to use them.
SMART IDEAS!
• Making small catchments of rocks for the seed balls will improve growth success rates because soil and water will collect there for the young trees
• Seed balls will help a lot if there is large areas of land you want to reforest, but have difficulty planting the whole land in one season. At the start of the wet season you can plant crops on the most productive part of the land, while seed balls can be used for other parts of the land
making seed balls
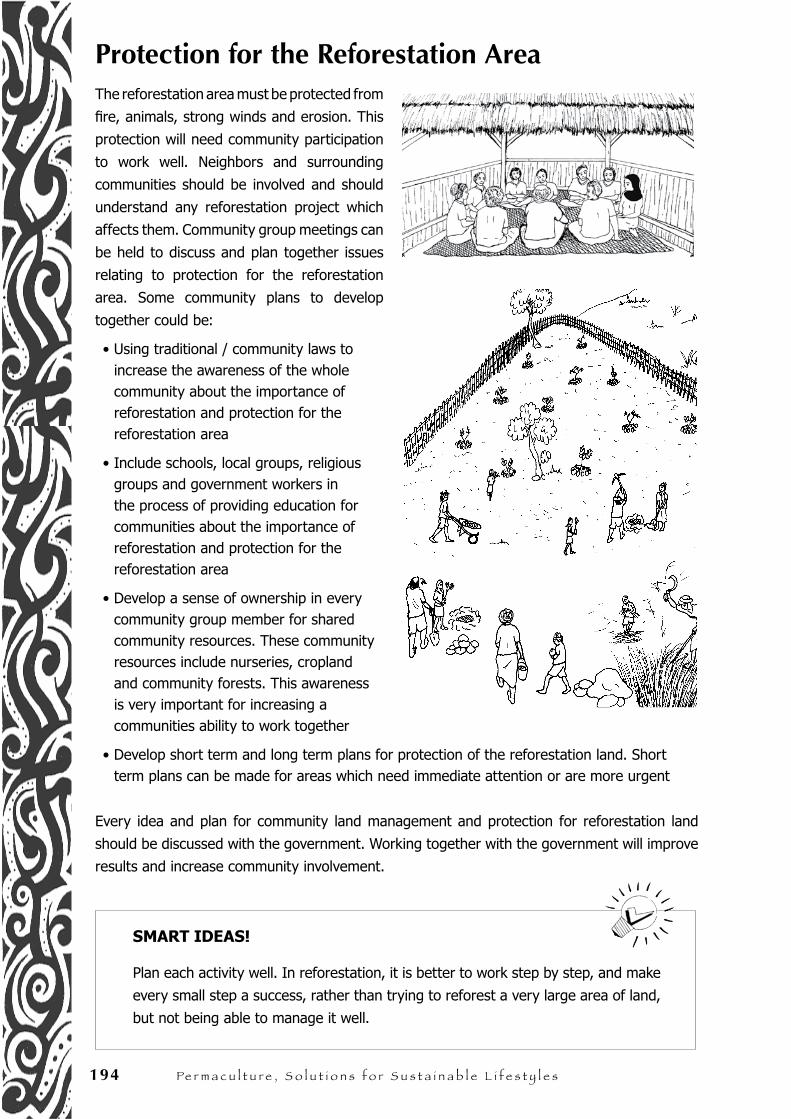
194 Pe r m a c u l t u r e , S o l u t i o n s f o r S u s t a i n a b l e l i f e s t y l e s
Protection for the Reforestation AreaThe reforestation area must be protected from
fire, animals, strong winds and erosion. This
protection will need community participation
to work well. Neighbors and surrounding
communities should be involved and should
understand any reforestation project which
affects them. Community group meetings can
be held to discuss and plan together issues
relating to protection for the reforestation
area. Some community plans to develop
together could be:
• Using traditional / community laws to increase the awareness of the whole community about the importance of reforestation and protection for the reforestation area
• Include schools, local groups, religious groups and government workers in the process of providing education for communities about the importance of reforestation and protection for the reforestation area
• Develop a sense of ownership in every community group member for shared community resources. These community resources include nurseries, cropland and community forests. This awareness is very important for increasing a communities ability to work together
• Develop short term and long term plans for protection of the reforestation land. Short term plans can be made for areas which need immediate attention or are more urgent
Every idea and plan for community land management and protection for reforestation land
should be discussed with the government. Working together with the government will improve
results and increase community involvement.
SMART IDEAS!
Plan each activity well. In reforestation, it is better to work step by step, and make
every small step a success, rather than trying to reforest a very large area of land,
but not being able to manage it well.
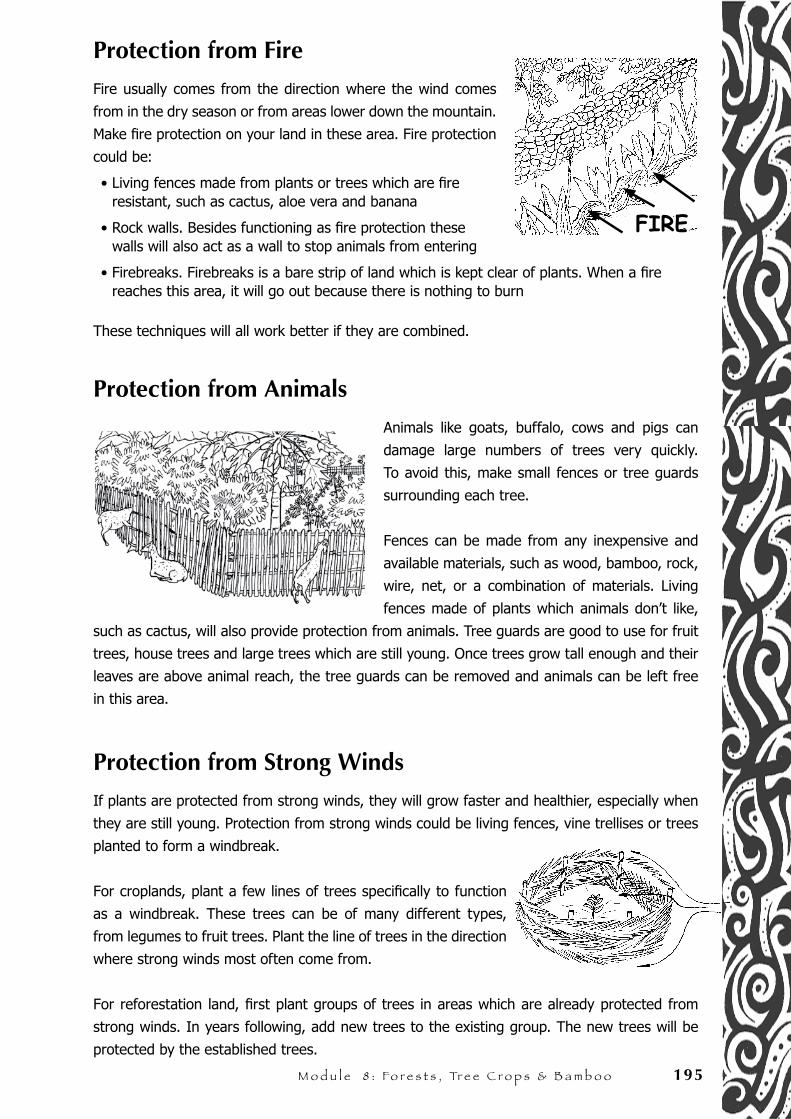
M o d u l e 8 : Fo r e s t s , Tr e e C r o p s & B a m b o o 195
Protection from Fire
Fire usually comes from the direction where the wind comes
from in the dry season or from areas lower down the mountain.
Make fire protection on your land in these area. Fire protection
could be:
• Living fences made from plants or trees which are fire resistant, such as cactus, aloe vera and banana
• Rock walls. Besides functioning as fire protection these walls will also act as a wall to stop animals from entering
• Firebreaks. Firebreaks is a bare strip of land which is kept clear of plants. When a fire reaches this area, it will go out because there is nothing to burn
These techniques will all work better if they are combined.
Protection from Animals
Animals like goats, buffalo, cows and pigs can
damage large numbers of trees very quickly.
To avoid this, make small fences or tree guards
surrounding each tree.
Fences can be made from any inexpensive and
available materials, such as wood, bamboo, rock,
wire, net, or a combination of materials. Living
fences made of plants which animals don’t like,
such as cactus, will also provide protection from animals. Tree guards are good to use for fruit
trees, house trees and large trees which are still young. Once trees grow tall enough and their
leaves are above animal reach, the tree guards can be removed and animals can be left free
in this area.
Protection from Strong Winds
If plants are protected from strong winds, they will grow faster and healthier, especially when
they are still young. Protection from strong winds could be living fences, vine trellises or trees
planted to form a windbreak.
For croplands, plant a few lines of trees specifically to function
as a windbreak. These trees can be of many different types,
from legumes to fruit trees. Plant the line of trees in the direction
where strong winds most often come from.
For reforestation land, first plant groups of trees in areas which are already protected from
strong winds. In years following, add new trees to the existing group. The new trees will be
protected by the established trees.
FIRE
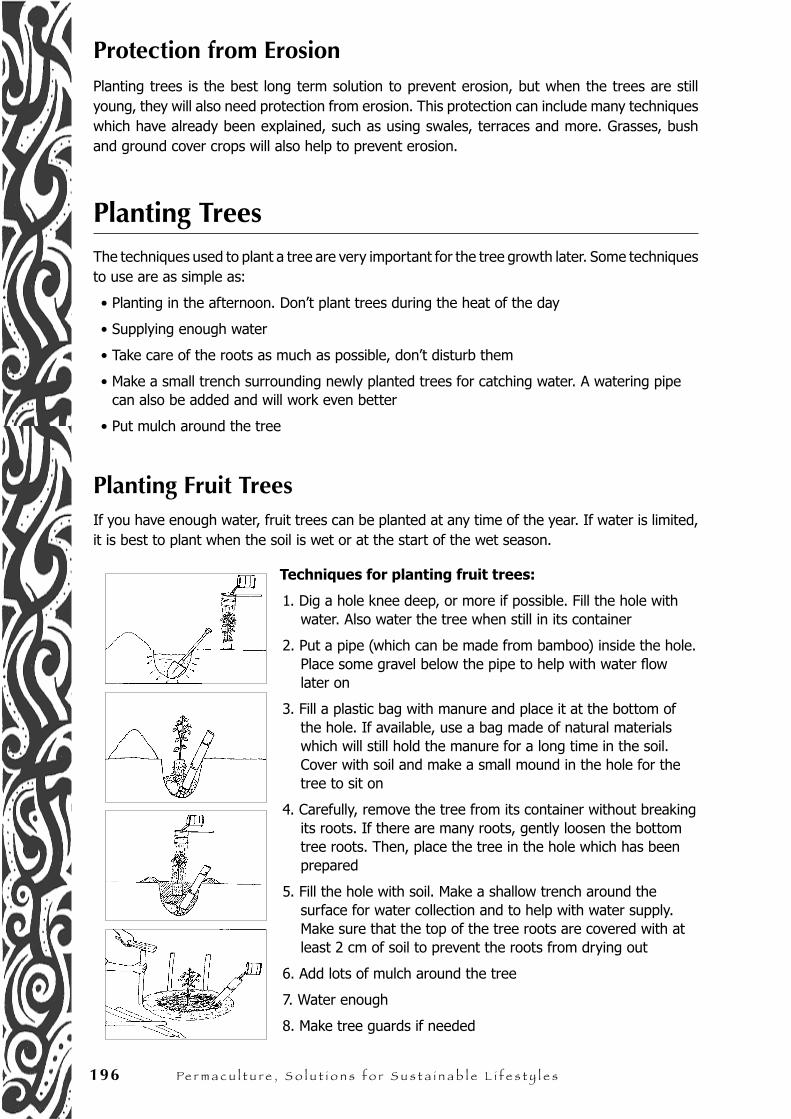
196 Pe r m a c u l t u r e , S o l u t i o n s f o r S u s t a i n a b l e l i f e s t y l e s
Protection from ErosionPlanting trees is the best long term solution to prevent erosion, but when the trees are still young, they will also need protection from erosion. This protection can include many techniques which have already been explained, such as using swales, terraces and more. Grasses, bush and ground cover crops will also help to prevent erosion.
Planting TreesThe techniques used to plant a tree are very important for the tree growth later. Some techniques to use are as simple as:
• Planting in the afternoon. Don’t plant trees during the heat of the day
• Supplying enough water
• Take care of the roots as much as possible, don’t disturb them
• Make a small trench surrounding newly planted trees for catching water. A watering pipe can also be added and will work even better
• Put mulch around the tree
Planting Fruit TreesIf you have enough water, fruit trees can be planted at any time of the year. If water is limited, it is best to plant when the soil is wet or at the start of the wet season.
Techniques for planting fruit trees:
1. Dig a hole knee deep, or more if possible. Fill the hole with water. Also water the tree when still in its container
2. Put a pipe (which can be made from bamboo) inside the hole. Place some gravel below the pipe to help with water flow later on
3. Fill a plastic bag with manure and place it at the bottom of the hole. If available, use a bag made of natural materials which will still hold the manure for a long time in the soil. Cover with soil and make a small mound in the hole for the tree to sit on
4. Carefully, remove the tree from its container without breaking its roots. If there are many roots, gently loosen the bottom tree roots. Then, place the tree in the hole which has been prepared
5. Fill the hole with soil. Make a shallow trench around the surface for water collection and to help with water supply. Make sure that the top of the tree roots are covered with at least 2 cm of soil to prevent the roots from drying out
6. Add lots of mulch around the tree
7. Water enough
8. Make tree guards if needed
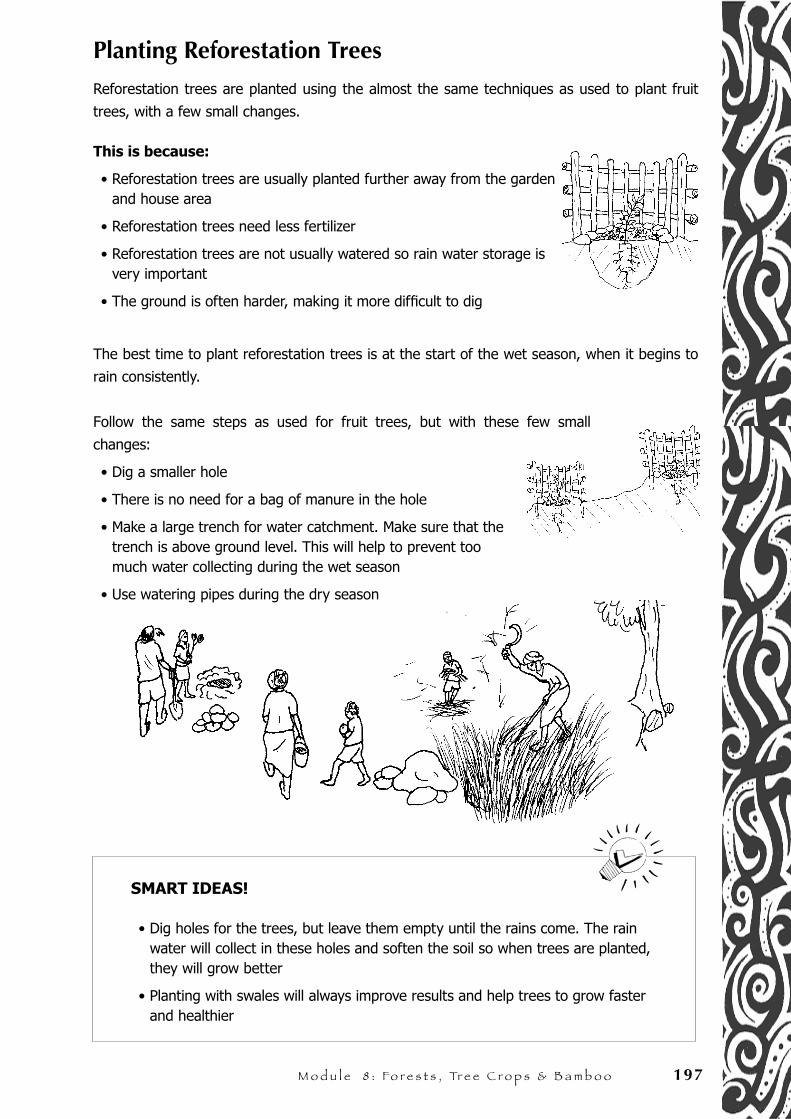
M o d u l e 8 : Fo r e s t s , Tr e e C r o p s & B a m b o o 197
Planting Reforestation Trees
Reforestation trees are planted using the almost the same techniques as used to plant fruit
trees, with a few small changes.
This is because:
• Reforestation trees are usually planted further away from the garden and house area
• Reforestation trees need less fertilizer
• Reforestation trees are not usually watered so rain water storage is very important
• The ground is often harder, making it more difficult to dig
The best time to plant reforestation trees is at the start of the wet season, when it begins to
rain consistently.
Follow the same steps as used for fruit trees, but with these few small
changes:
• Dig a smaller hole
• There is no need for a bag of manure in the hole
• Make a large trench for water catchment. Make sure that the trench is above ground level. This will help to prevent too much water collecting during the wet season
• Use watering pipes during the dry season
SMART IDEAS!
• Dig holes for the trees, but leave them empty until the rains come. The rain water will collect in these holes and soften the soil so when trees are planted, they will grow better
• Planting with swales will always improve results and help trees to grow faster and healthier
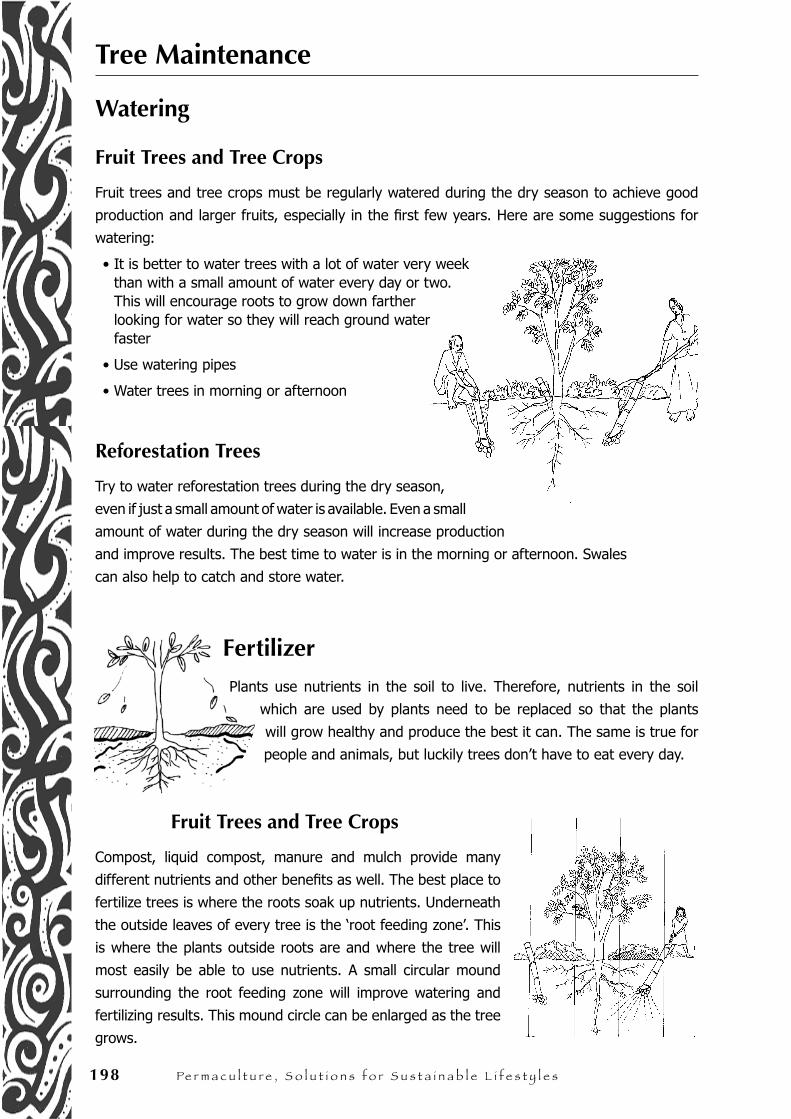
198 Pe r m a c u l t u r e , S o l u t i o n s f o r S u s t a i n a b l e l i f e s t y l e s
Tree Maintenance
Watering
Fruit Trees and Tree Crops
Fruit trees and tree crops must be regularly watered during the dry season to achieve good
production and larger fruits, especially in the first few years. Here are some suggestions for
watering:
• It is better to water trees with a lot of water very week than with a small amount of water every day or two. This will encourage roots to grow down farther looking for water so they will reach ground water faster
• Use watering pipes
• Water trees in morning or afternoon
Reforestation Trees
Try to water reforestation trees during the dry season,
even if just a small amount of water is available. Even a small
amount of water during the dry season will increase production
and improve results. The best time to water is in the morning or afternoon. Swales
can also help to catch and store water.
Fertilizer
Plants use nutrients in the soil to live. Therefore, nutrients in the soil
which are used by plants need to be replaced so that the plants
will grow healthy and produce the best it can. The same is true for
people and animals, but luckily trees don’t have to eat every day.
Fruit Trees and Tree Crops
Compost, liquid compost, manure and mulch provide many
different nutrients and other benefits as well. The best place to
fertilize trees is where the roots soak up nutrients. Underneath
the outside leaves of every tree is the ‘root feeding zone’. This
is where the plants outside roots are and where the tree will
most easily be able to use nutrients. A small circular mound
surrounding the root feeding zone will improve watering and
fertilizing results. This mound circle can be enlarged as the tree
grows.
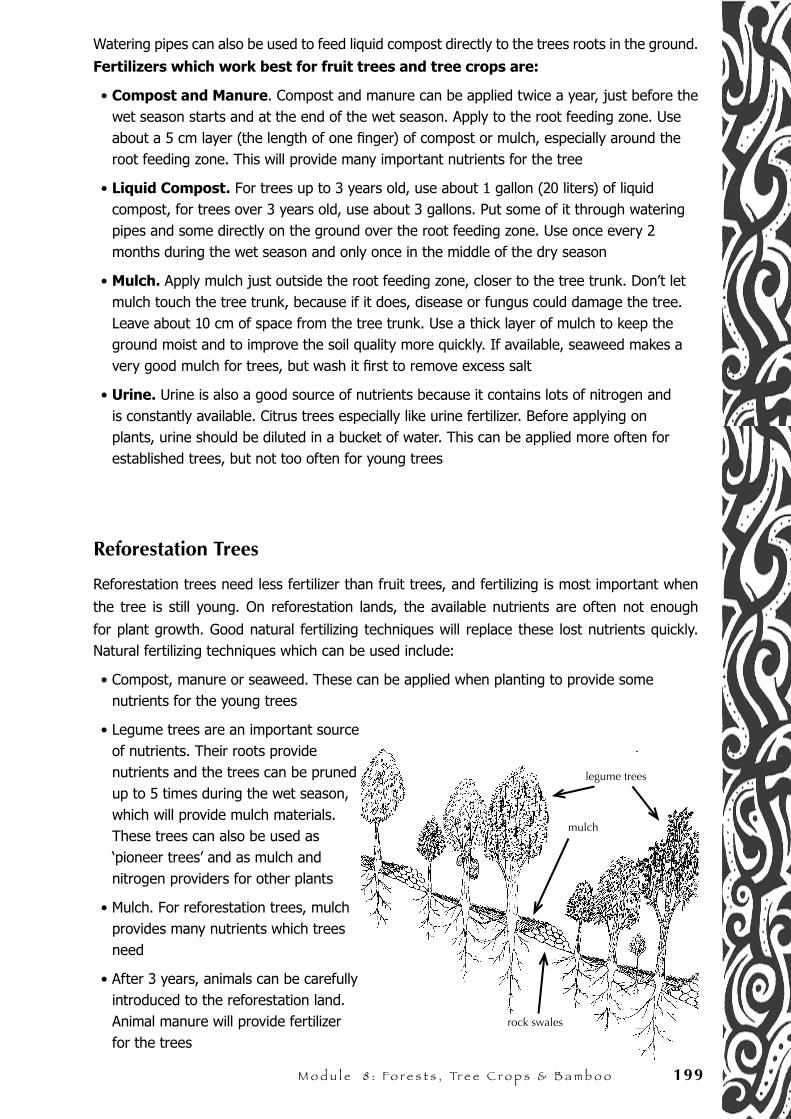
M o d u l e 8 : Fo r e s t s , Tr e e C r o p s & B a m b o o 199
Watering pipes can also be used to feed liquid compost directly to the trees roots in the ground.
Fertilizers which work best for fruit trees and tree crops are:
• Compost and Manure. Compost and manure can be applied twice a year, just before the wet season starts and at the end of the wet season. Apply to the root feeding zone. Use about a 5 cm layer (the length of one finger) of compost or mulch, especially around the root feeding zone. This will provide many important nutrients for the tree
• Liquid Compost. For trees up to 3 years old, use about 1 gallon (20 liters) of liquid compost, for trees over 3 years old, use about 3 gallons. Put some of it through watering pipes and some directly on the ground over the root feeding zone. Use once every 2 months during the wet season and only once in the middle of the dry season
• Mulch. Apply mulch just outside the root feeding zone, closer to the tree trunk. Don’t let mulch touch the tree trunk, because if it does, disease or fungus could damage the tree. Leave about 10 cm of space from the tree trunk. Use a thick layer of mulch to keep the ground moist and to improve the soil quality more quickly. If available, seaweed makes a very good mulch for trees, but wash it first to remove excess salt
• Urine. Urine is also a good source of nutrients because it contains lots of nitrogen and is constantly available. Citrus trees especially like urine fertilizer. Before applying on plants, urine should be diluted in a bucket of water. This can be applied more often for established trees, but not too often for young trees
Reforestation Trees
Reforestation trees need less fertilizer than fruit trees, and fertilizing is most important when
the tree is still young. On reforestation lands, the available nutrients are often not enough
for plant growth. Good natural fertilizing techniques will replace these lost nutrients quickly. Natural fertilizing techniques which can be used include:
• Compost, manure or seaweed. These can be applied when planting to provide some nutrients for the young trees
• Legume trees are an important source of nutrients. Their roots provide nutrients and the trees can be pruned up to 5 times during the wet season, which will provide mulch materials. These trees can also be used as ‘pioneer trees’ and as mulch and nitrogen providers for other plants
• Mulch. For reforestation trees, mulch provides many nutrients which trees need
• After 3 years, animals can be carefully introduced to the reforestation land. Animal manure will provide fertilizer for the trees
legume trees
mulch
rock swales
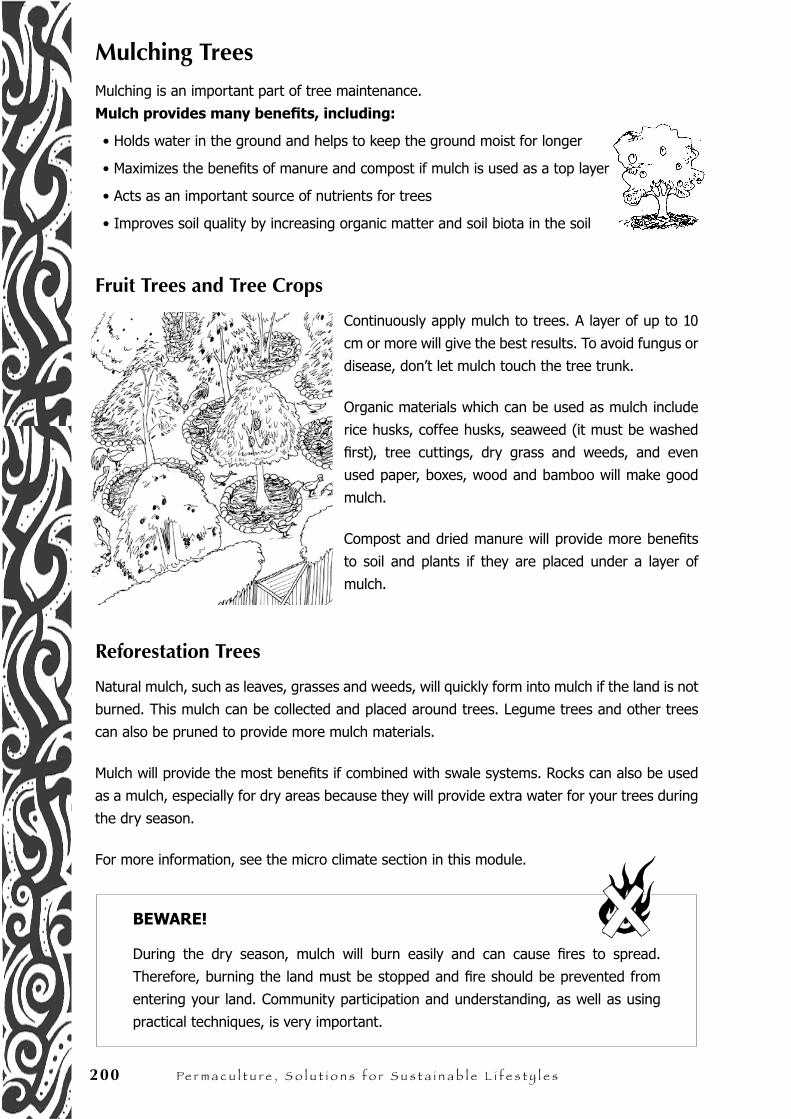
200 Pe r m a c u l t u r e , S o l u t i o n s f o r S u s t a i n a b l e l i f e s t y l e s
Mulching Trees
Mulching is an important part of tree maintenance.
Mulch provides many benefits, including:
• Holds water in the ground and helps to keep the ground moist for longer
• Maximizes the benefits of manure and compost if mulch is used as a top layer
• Acts as an important source of nutrients for trees
• Improves soil quality by increasing organic matter and soil biota in the soil
Fruit Trees and Tree Crops
Continuously apply mulch to trees. A layer of up to 10
cm or more will give the best results. To avoid fungus or
disease, don’t let mulch touch the tree trunk.
Organic materials which can be used as mulch include
rice husks, coffee husks, seaweed (it must be washed
first), tree cuttings, dry grass and weeds, and even
used paper, boxes, wood and bamboo will make good
mulch.
Compost and dried manure will provide more benefits
to soil and plants if they are placed under a layer of
mulch.
Reforestation Trees
Natural mulch, such as leaves, grasses and weeds, will quickly form into mulch if the land is not
burned. This mulch can be collected and placed around trees. Legume trees and other trees
can also be pruned to provide more mulch materials.
Mulch will provide the most benefits if combined with swale systems. Rocks can also be used
as a mulch, especially for dry areas because they will provide extra water for your trees during
the dry season.
For more information, see the micro climate section in this module.
BEWARE!
During the dry season, mulch will burn easily and can cause fires to spread.
Therefore, burning the land must be stopped and fire should be prevented from
entering your land. Community participation and understanding, as well as using
practical techniques, is very important.
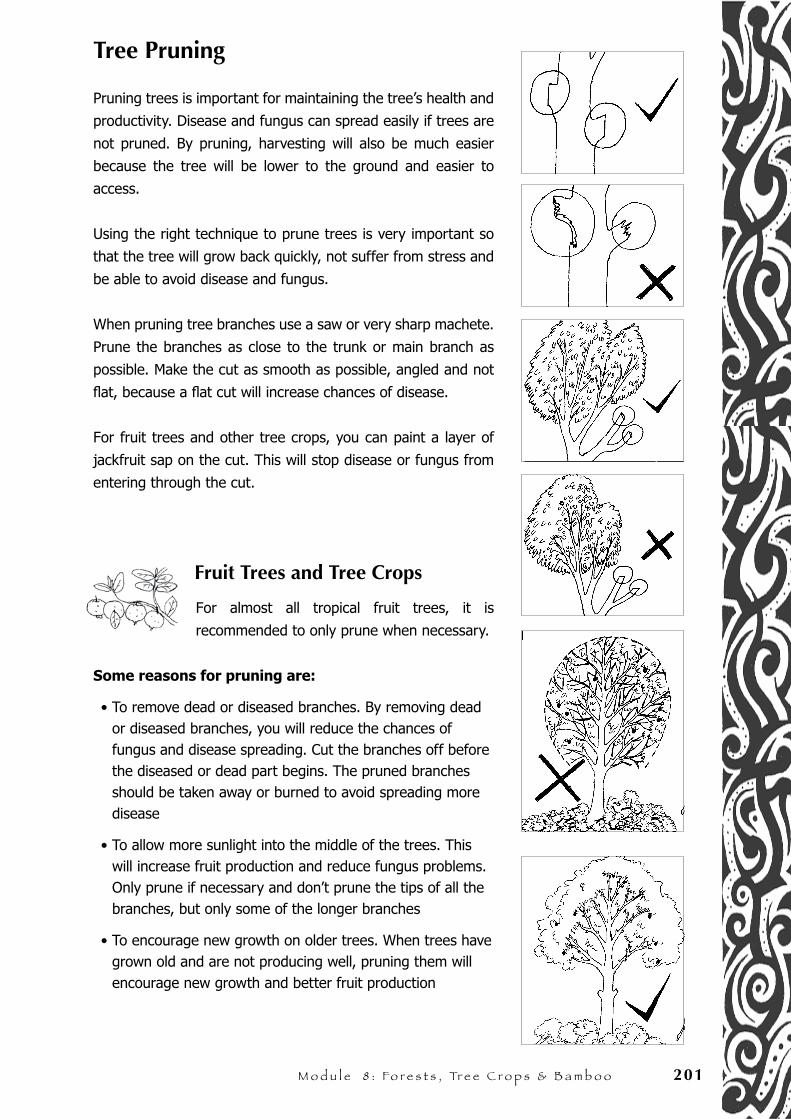
M o d u l e 8 : Fo r e s t s , Tr e e C r o p s & B a m b o o 201
Tree Pruning
Pruning trees is important for maintaining the tree’s health and
productivity. Disease and fungus can spread easily if trees are
not pruned. By pruning, harvesting will also be much easier
because the tree will be lower to the ground and easier to
access.
Using the right technique to prune trees is very important so
that the tree will grow back quickly, not suffer from stress and
be able to avoid disease and fungus.
When pruning tree branches use a saw or very sharp machete.
Prune the branches as close to the trunk or main branch as
possible. Make the cut as smooth as possible, angled and not
flat, because a flat cut will increase chances of disease.
For fruit trees and other tree crops, you can paint a layer of
jackfruit sap on the cut. This will stop disease or fungus from
entering through the cut.
Fruit Trees and Tree Crops
For almost all tropical fruit trees, it is
recommended to only prune when necessary.
Some reasons for pruning are:
• To remove dead or diseased branches. By removing dead or diseased branches, you will reduce the chances of fungus and disease spreading. Cut the branches off before the diseased or dead part begins. The pruned branches should be taken away or burned to avoid spreading more disease
• To allow more sunlight into the middle of the trees. This will increase fruit production and reduce fungus problems. Only prune if necessary and don’t prune the tips of all the branches, but only some of the longer branches
• To encourage new growth on older trees. When trees have grown old and are not producing well, pruning them will encourage new growth and better fruit production
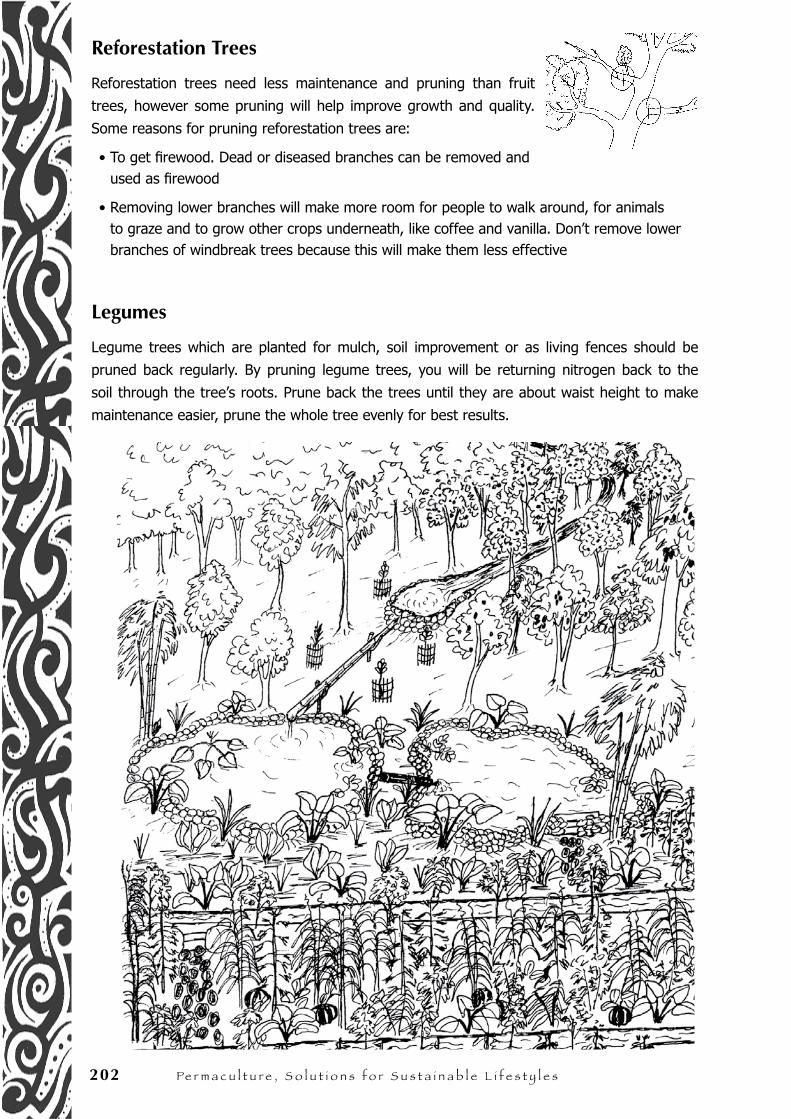
202 Pe r m a c u l t u r e , S o l u t i o n s f o r S u s t a i n a b l e l i f e s t y l e s
Reforestation Trees
Reforestation trees need less maintenance and pruning than fruit
trees, however some pruning will help improve growth and quality.
Some reasons for pruning reforestation trees are:
• To get firewood. Dead or diseased branches can be removed and used as firewood
• Removing lower branches will make more room for people to walk around, for animals to graze and to grow other crops underneath, like coffee and vanilla. Don’t remove lower branches of windbreak trees because this will make them less effective
Legumes
Legume trees which are planted for mulch, soil improvement or as living fences should be
pruned back regularly. By pruning legume trees, you will be returning nitrogen back to the
soil through the tree’s roots. Prune back the trees until they are about waist height to make
maintenance easier, prune the whole tree evenly for best results.
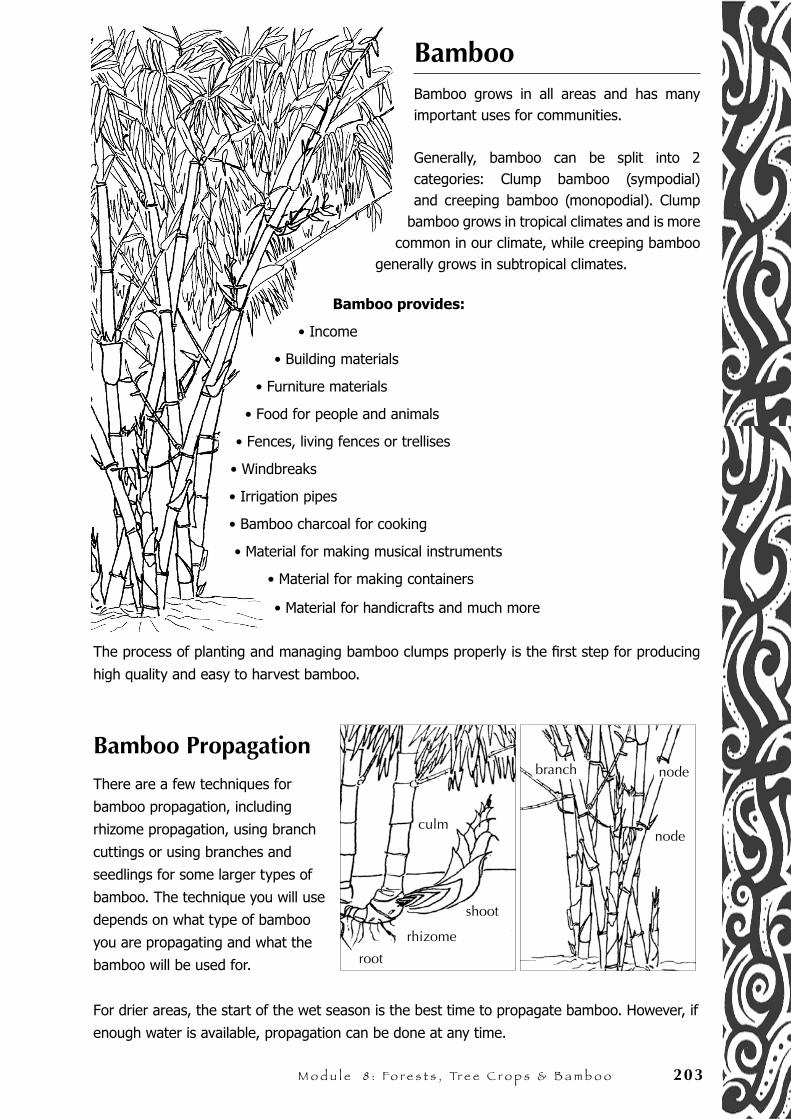
M o d u l e 8 : Fo r e s t s , Tr e e C r o p s & B a m b o o 203
BambooBamboo grows in all areas and has many important uses for communities.
Generally, bamboo can be split into 2 categories: Clump bamboo (sympodial) and creeping bamboo (monopodial). Clump
bamboo grows in tropical climates and is more common in our climate, while creeping bamboo
generally grows in subtropical climates.
Bamboo provides:
• Income
• Building materials
• Furniture materials
• Food for people and animals
• Fences, living fences or trellises
• Windbreaks
• Irrigation pipes
• Bamboo charcoal for cooking
• Material for making musical instruments
• Material for making containers
• Material for handicrafts and much more
The process of planting and managing bamboo clumps properly is the first step for producing
high quality and easy to harvest bamboo.
Bamboo Propagation
There are a few techniques for
bamboo propagation, including
rhizome propagation, using branch
cuttings or using branches and
seedlings for some larger types of
bamboo. The technique you will use
depends on what type of bamboo
you are propagating and what the
bamboo will be used for.
For drier areas, the start of the wet season is the best time to propagate bamboo. However, if
enough water is available, propagation can be done at any time.
shoot
rhizome
root
branch node
nodeculm
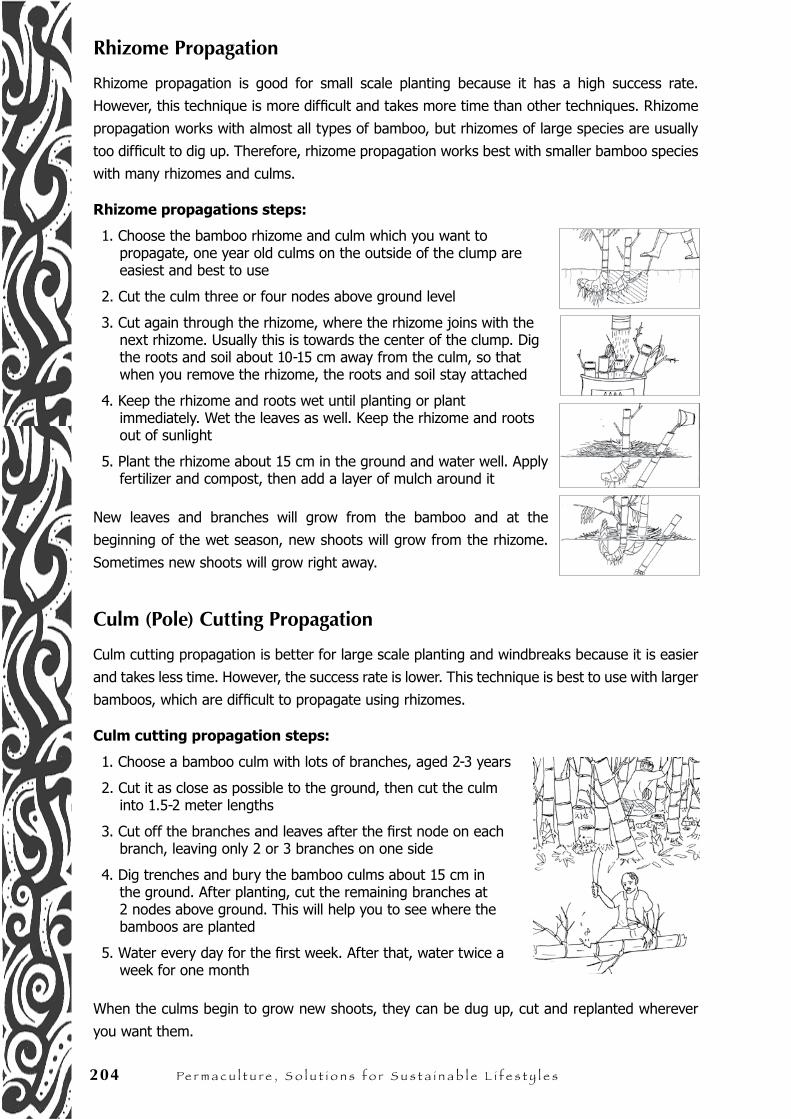
204 Pe r m a c u l t u r e , S o l u t i o n s f o r S u s t a i n a b l e l i f e s t y l e s
Rhizome Propagation
Rhizome propagation is good for small scale planting because it has a high success rate.
However, this technique is more difficult and takes more time than other techniques. Rhizome
propagation works with almost all types of bamboo, but rhizomes of large species are usually
too difficult to dig up. Therefore, rhizome propagation works best with smaller bamboo species
with many rhizomes and culms.
Rhizome propagations steps:
1. Choose the bamboo rhizome and culm which you want to propagate, one year old culms on the outside of the clump are easiest and best to use
2. Cut the culm three or four nodes above ground level
3. Cut again through the rhizome, where the rhizome joins with the next rhizome. Usually this is towards the center of the clump. Dig the roots and soil about 10-15 cm away from the culm, so that when you remove the rhizome, the roots and soil stay attached
4. Keep the rhizome and roots wet until planting or plant immediately. Wet the leaves as well. Keep the rhizome and roots out of sunlight
5. Plant the rhizome about 15 cm in the ground and water well. Apply fertilizer and compost, then add a layer of mulch around it
New leaves and branches will grow from the bamboo and at the
beginning of the wet season, new shoots will grow from the rhizome.
Sometimes new shoots will grow right away.
Culm (Pole) Cutting Propagation
Culm cutting propagation is better for large scale planting and windbreaks because it is easier
and takes less time. However, the success rate is lower. This technique is best to use with larger
bamboos, which are difficult to propagate using rhizomes.
Culm cutting propagation steps:
1. Choose a bamboo culm with lots of branches, aged 2-3 years
2. Cut it as close as possible to the ground, then cut the culm into 1.5-2 meter lengths
3. Cut off the branches and leaves after the first node on each branch, leaving only 2 or 3 branches on one side
4. Dig trenches and bury the bamboo culms about 15 cm in the ground. After planting, cut the remaining branches at 2 nodes above ground. This will help you to see where the bamboos are planted
5. Water every day for the first week. After that, water twice a week for one month
When the culms begin to grow new shoots, they can be dug up, cut and replanted wherever
you want them.
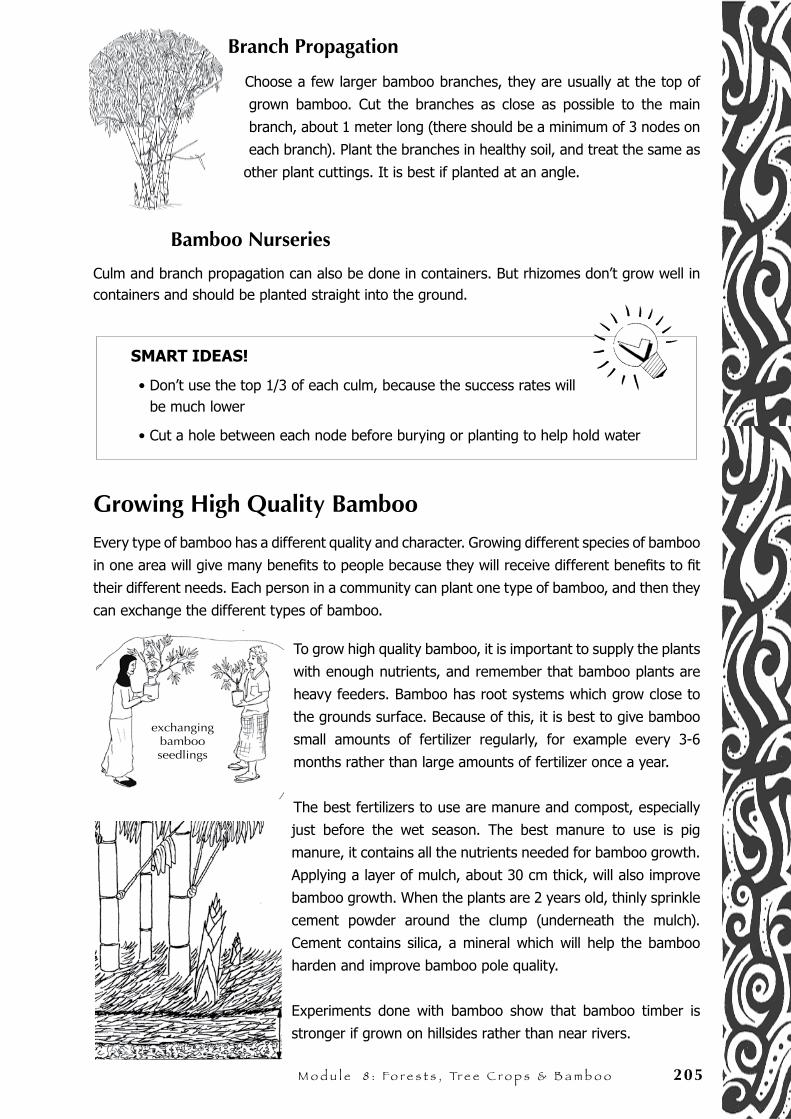
M o d u l e 8 : Fo r e s t s , Tr e e C r o p s & B a m b o o 205
Branch Propagation
Choose a few larger bamboo branches, they are usually at the top of
grown bamboo. Cut the branches as close as possible to the main
branch, about 1 meter long (there should be a minimum of 3 nodes on
each branch). Plant the branches in healthy soil, and treat the same as
other plant cuttings. It is best if planted at an angle.
Bamboo Nurseries
Culm and branch propagation can also be done in containers. But rhizomes don’t grow well in containers and should be planted straight into the ground.
SMART IDEAS!
• Don’t use the top 1/3 of each culm, because the success rates will be much lower
• Cut a hole between each node before burying or planting to help hold water
Growing High Quality Bamboo
Every type of bamboo has a different quality and character. Growing different species of bamboo
in one area will give many benefits to people because they will receive different benefits to fit
their different needs. Each person in a community can plant one type of bamboo, and then they
can exchange the different types of bamboo.
To grow high quality bamboo, it is important to supply the plants
with enough nutrients, and remember that bamboo plants are
heavy feeders. Bamboo has root systems which grow close to
the grounds surface. Because of this, it is best to give bamboo
small amounts of fertilizer regularly, for example every 3-6
months rather than large amounts of fertilizer once a year.
The best fertilizers to use are manure and compost, especially
just before the wet season. The best manure to use is pig
manure, it contains all the nutrients needed for bamboo growth.
Applying a layer of mulch, about 30 cm thick, will also improve
bamboo growth. When the plants are 2 years old, thinly sprinkle
cement powder around the clump (underneath the mulch).
Cement contains silica, a mineral which will help the bamboo
harden and improve bamboo pole quality.
Experiments done with bamboo show that bamboo timber is
stronger if grown on hillsides rather than near rivers.
exchanging bamboo seedlings
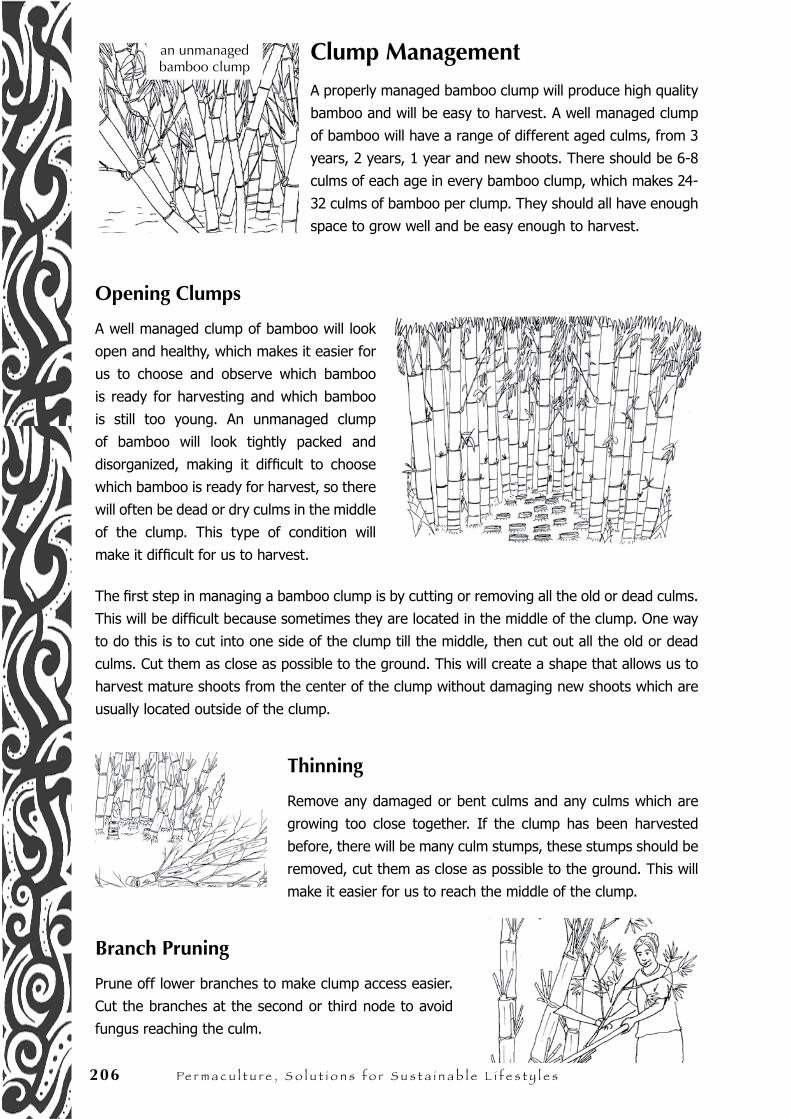
206 Pe r m a c u l t u r e , S o l u t i o n s f o r S u s t a i n a b l e l i f e s t y l e s
Clump Management
A properly managed bamboo clump will produce high quality
bamboo and will be easy to harvest. A well managed clump
of bamboo will have a range of different aged culms, from 3
years, 2 years, 1 year and new shoots. There should be 6-8
culms of each age in every bamboo clump, which makes 24-
32 culms of bamboo per clump. They should all have enough
space to grow well and be easy enough to harvest.
Opening Clumps
A well managed clump of bamboo will look
open and healthy, which makes it easier for
us to choose and observe which bamboo
is ready for harvesting and which bamboo
is still too young. An unmanaged clump
of bamboo will look tightly packed and
disorganized, making it difficult to choose
which bamboo is ready for harvest, so there
will often be dead or dry culms in the middle
of the clump. This type of condition will
make it difficult for us to harvest.
The first step in managing a bamboo clump is by cutting or removing all the old or dead culms.
This will be difficult because sometimes they are located in the middle of the clump. One way
to do this is to cut into one side of the clump till the middle, then cut out all the old or dead
culms. Cut them as close as possible to the ground. This will create a shape that allows us to
harvest mature shoots from the center of the clump without damaging new shoots which are
usually located outside of the clump.
Thinning
Remove any damaged or bent culms and any culms which are
growing too close together. If the clump has been harvested
before, there will be many culm stumps, these stumps should be
removed, cut them as close as possible to the ground. This will
make it easier for us to reach the middle of the clump.
Branch Pruning
Prune off lower branches to make clump access easier.
Cut the branches at the second or third node to avoid
fungus reaching the culm.
an unmanaged bamboo clump
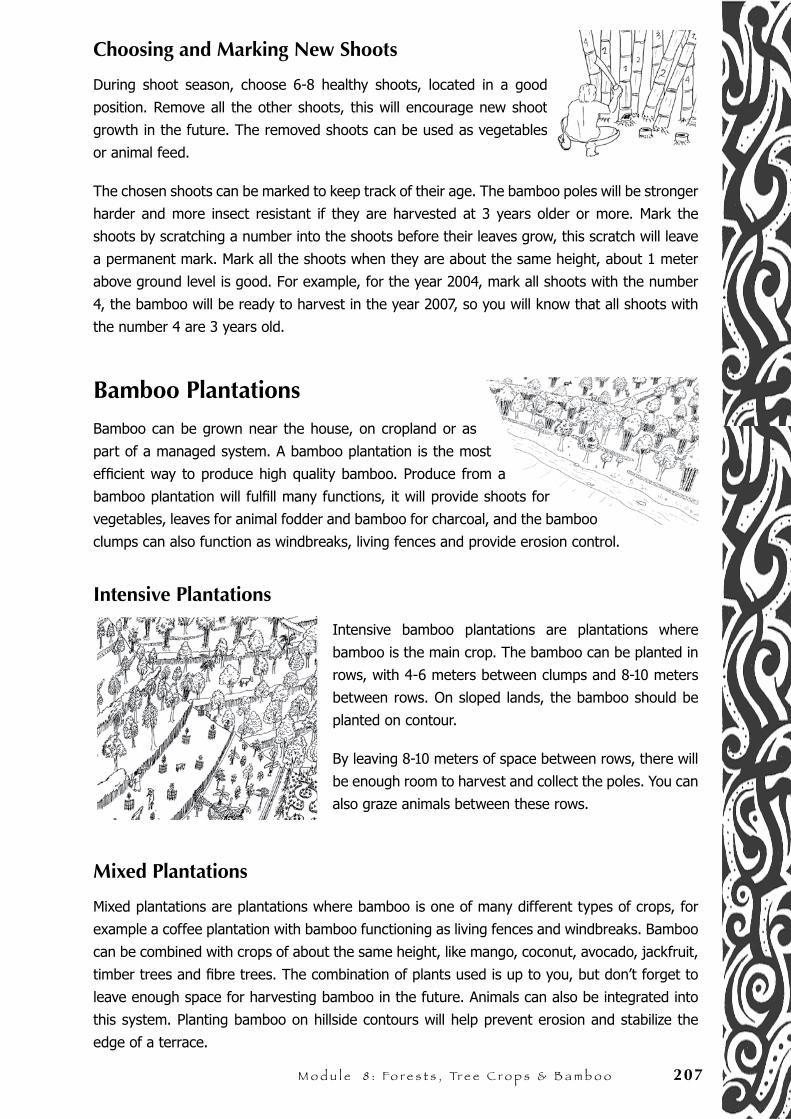
M o d u l e 8 : Fo r e s t s , Tr e e C r o p s & B a m b o o 207
Choosing and Marking New Shoots
During shoot season, choose 6-8 healthy shoots, located in a good
position. Remove all the other shoots, this will encourage new shoot
growth in the future. The removed shoots can be used as vegetables
or animal feed.
The chosen shoots can be marked to keep track of their age. The bamboo poles will be stronger
harder and more insect resistant if they are harvested at 3 years older or more. Mark the
shoots by scratching a number into the shoots before their leaves grow, this scratch will leave
a permanent mark. Mark all the shoots when they are about the same height, about 1 meter
above ground level is good. For example, for the year 2004, mark all shoots with the number
4, the bamboo will be ready to harvest in the year 2007, so you will know that all shoots with
the number 4 are 3 years old.
Bamboo Plantations
Bamboo can be grown near the house, on cropland or as
part of a managed system. A bamboo plantation is the most
efficient way to produce high quality bamboo. Produce from a
bamboo plantation will fulfill many functions, it will provide shoots for
vegetables, leaves for animal fodder and bamboo for charcoal, and the bamboo
clumps can also function as windbreaks, living fences and provide erosion control.
Intensive Plantations
Intensive bamboo plantations are plantations where
bamboo is the main crop. The bamboo can be planted in
rows, with 4-6 meters between clumps and 8-10 meters
between rows. On sloped lands, the bamboo should be
planted on contour.
By leaving 8-10 meters of space between rows, there will
be enough room to harvest and collect the poles. You can
also graze animals between these rows.
Mixed Plantations
Mixed plantations are plantations where bamboo is one of many different types of crops, for
example a coffee plantation with bamboo functioning as living fences and windbreaks. Bamboo
can be combined with crops of about the same height, like mango, coconut, avocado, jackfruit,
timber trees and fibre trees. The combination of plants used is up to you, but don’t forget to
leave enough space for harvesting bamboo in the future. Animals can also be integrated into
this system. Planting bamboo on hillside contours will help prevent erosion and stabilize the
edge of a terrace.
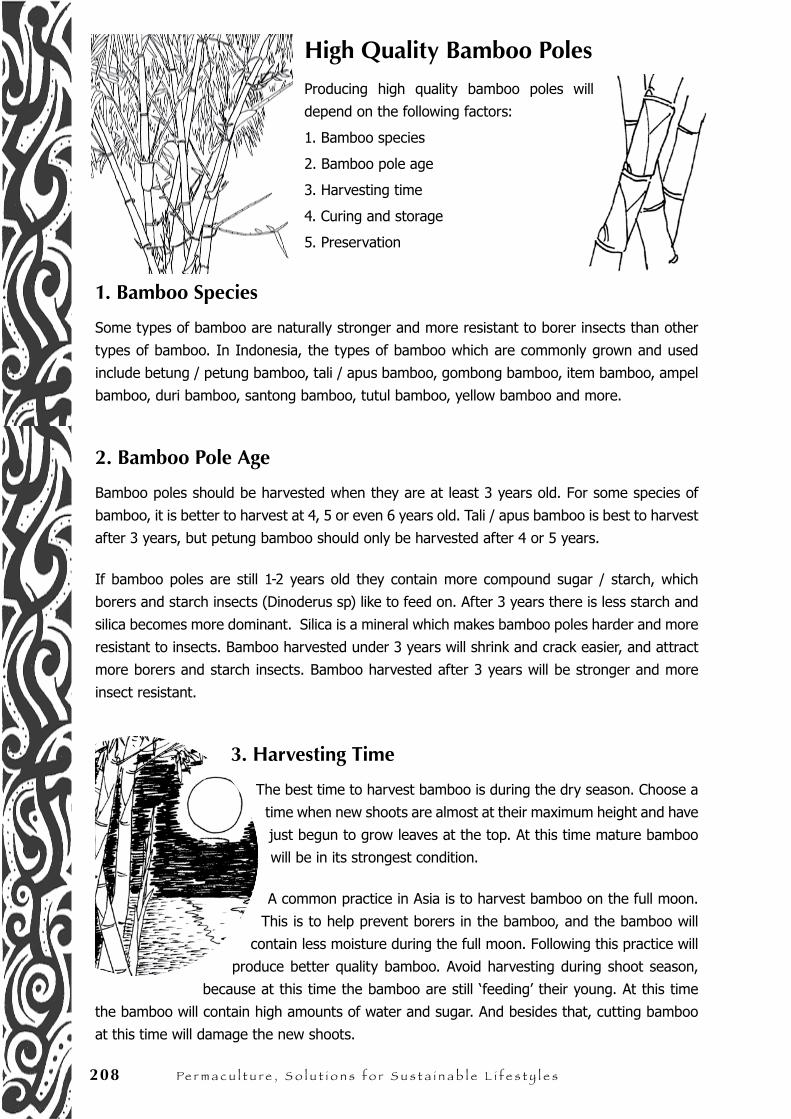
208 Pe r m a c u l t u r e , S o l u t i o n s f o r S u s t a i n a b l e l i f e s t y l e s
High Quality Bamboo Poles
Producing high quality bamboo poles will
depend on the following factors:
1. Bamboo species
2. Bamboo pole age
3. Harvesting time
4. Curing and storage
5. Preservation
1. Bamboo Species
Some types of bamboo are naturally stronger and more resistant to borer insects than other
types of bamboo. In Indonesia, the types of bamboo which are commonly grown and used
include betung / petung bamboo, tali / apus bamboo, gombong bamboo, item bamboo, ampel
bamboo, duri bamboo, santong bamboo, tutul bamboo, yellow bamboo and more.
2. Bamboo Pole Age
Bamboo poles should be harvested when they are at least 3 years old. For some species of
bamboo, it is better to harvest at 4, 5 or even 6 years old. Tali / apus bamboo is best to harvest
after 3 years, but petung bamboo should only be harvested after 4 or 5 years.
If bamboo poles are still 1-2 years old they contain more compound sugar / starch, which
borers and starch insects (Dinoderus sp) like to feed on. After 3 years there is less starch and
silica becomes more dominant. Silica is a mineral which makes bamboo poles harder and more
resistant to insects. Bamboo harvested under 3 years will shrink and crack easier, and attract
more borers and starch insects. Bamboo harvested after 3 years will be stronger and more
insect resistant.
3. Harvesting Time
The best time to harvest bamboo is during the dry season. Choose a
time when new shoots are almost at their maximum height and have
just begun to grow leaves at the top. At this time mature bamboo
will be in its strongest condition.
A common practice in Asia is to harvest bamboo on the full moon.
This is to help prevent borers in the bamboo, and the bamboo will
contain less moisture during the full moon. Following this practice will
produce better quality bamboo. Avoid harvesting during shoot season,
because at this time the bamboo are still ‘feeding’ their young. At this time
the bamboo will contain high amounts of water and sugar. And besides that, cutting bamboo
at this time will damage the new shoots.
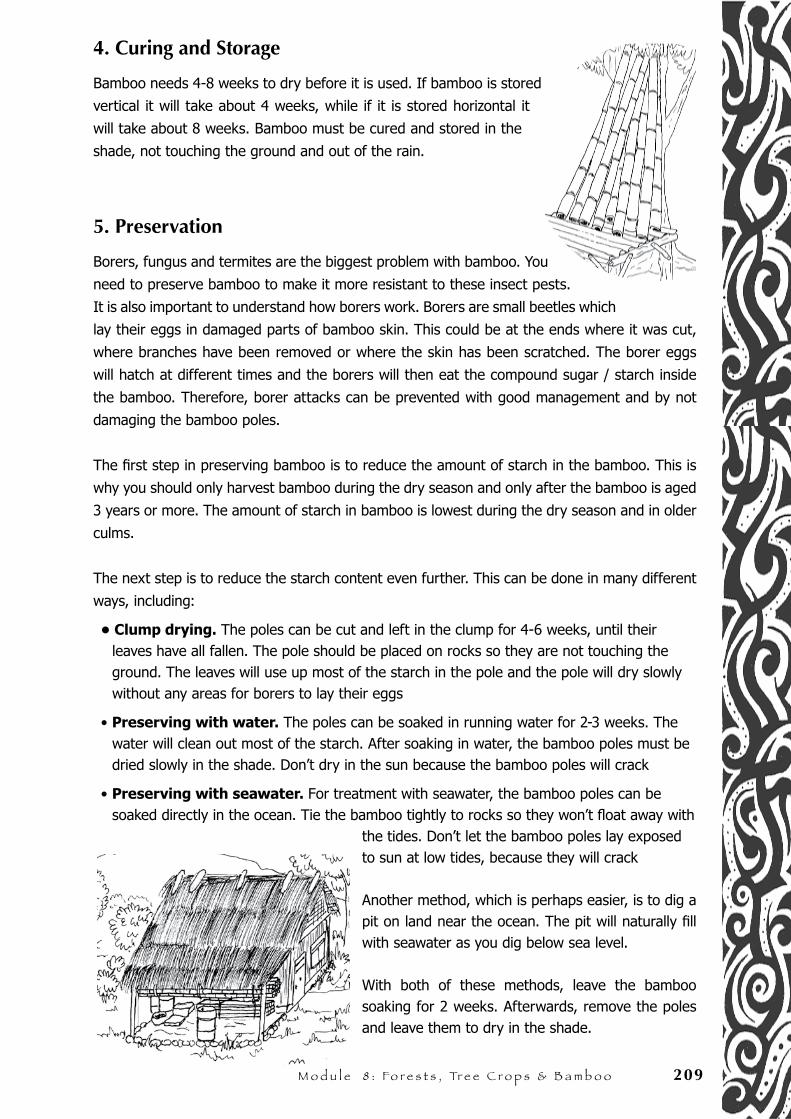
M o d u l e 8 : Fo r e s t s , Tr e e C r o p s & B a m b o o 209
4. Curing and Storage
Bamboo needs 4-8 weeks to dry before it is used. If bamboo is stored
vertical it will take about 4 weeks, while if it is stored horizontal it
will take about 8 weeks. Bamboo must be cured and stored in the
shade, not touching the ground and out of the rain.
5. Preservation
Borers, fungus and termites are the biggest problem with bamboo. You
need to preserve bamboo to make it more resistant to these insect pests.
It is also important to understand how borers work. Borers are small beetles which
lay their eggs in damaged parts of bamboo skin. This could be at the ends where it was cut,
where branches have been removed or where the skin has been scratched. The borer eggs
will hatch at different times and the borers will then eat the compound sugar / starch inside
the bamboo. Therefore, borer attacks can be prevented with good management and by not
damaging the bamboo poles.
The first step in preserving bamboo is to reduce the amount of starch in the bamboo. This is
why you should only harvest bamboo during the dry season and only after the bamboo is aged
3 years or more. The amount of starch in bamboo is lowest during the dry season and in older
culms.
The next step is to reduce the starch content even further. This can be done in many different
ways, including:
• Clump drying. The poles can be cut and left in the clump for 4-6 weeks, until their leaves have all fallen. The pole should be placed on rocks so they are not touching the ground. The leaves will use up most of the starch in the pole and the pole will dry slowly without any areas for borers to lay their eggs
• Preserving with water. The poles can be soaked in running water for 2-3 weeks. The water will clean out most of the starch. After soaking in water, the bamboo poles must be dried slowly in the shade. Don’t dry in the sun because the bamboo poles will crack
• Preserving with seawater. For treatment with seawater, the bamboo poles can be soaked directly in the ocean. Tie the bamboo tightly to rocks so they won’t float away with
the tides. Don’t let the bamboo poles lay exposed to sun at low tides, because they will crack
Another method, which is perhaps easier, is to dig a pit on land near the ocean. The pit will naturally fill with seawater as you dig below sea level.
With both of these methods, leave the bamboo soaking for 2 weeks. Afterwards, remove the poles and leave them to dry in the shade.
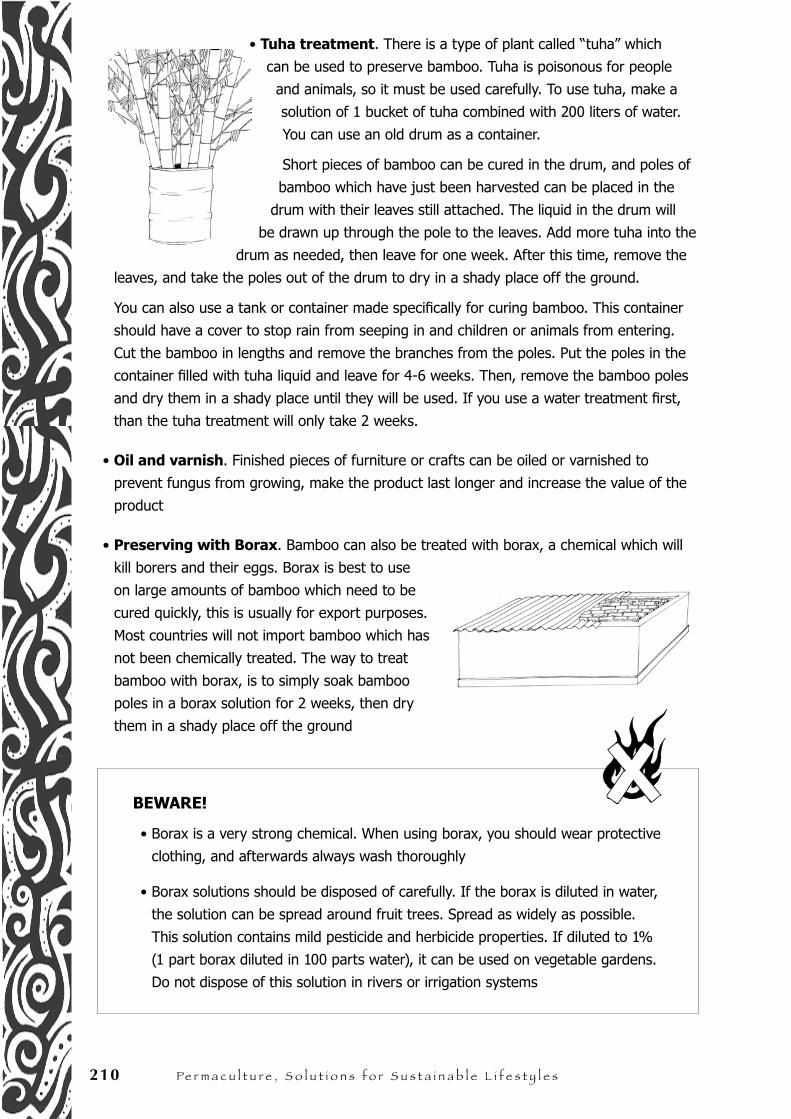
210 Pe r m a c u l t u r e , S o l u t i o n s f o r S u s t a i n a b l e l i f e s t y l e s
• Tuha treatment. There is a type of plant called “tuha” which
can be used to preserve bamboo. Tuha is poisonous for people
and animals, so it must be used carefully. To use tuha, make a
solution of 1 bucket of tuha combined with 200 liters of water.
You can use an old drum as a container.
Short pieces of bamboo can be cured in the drum, and poles of
bamboo which have just been harvested can be placed in the
drum with their leaves still attached. The liquid in the drum will
be drawn up through the pole to the leaves. Add more tuha into the
drum as needed, then leave for one week. After this time, remove the
leaves, and take the poles out of the drum to dry in a shady place off the ground.
You can also use a tank or container made specifically for curing bamboo. This container
should have a cover to stop rain from seeping in and children or animals from entering.
Cut the bamboo in lengths and remove the branches from the poles. Put the poles in the
container filled with tuha liquid and leave for 4-6 weeks. Then, remove the bamboo poles
and dry them in a shady place until they will be used. If you use a water treatment first,
than the tuha treatment will only take 2 weeks.
• Oil and varnish. Finished pieces of furniture or crafts can be oiled or varnished to
prevent fungus from growing, make the product last longer and increase the value of the
product
• Preserving with Borax. Bamboo can also be treated with borax, a chemical which will
kill borers and their eggs. Borax is best to use
on large amounts of bamboo which need to be
cured quickly, this is usually for export purposes.
Most countries will not import bamboo which has
not been chemically treated. The way to treat
bamboo with borax, is to simply soak bamboo
poles in a borax solution for 2 weeks, then dry
them in a shady place off the ground
BEWARE!
• Borax is a very strong chemical. When using borax, you should wear protective
clothing, and afterwards always wash thoroughly
• Borax solutions should be disposed of carefully. If the borax is diluted in water,
the solution can be spread around fruit trees. Spread as widely as possible.
This solution contains mild pesticide and herbicide properties. If diluted to 1%
(1 part borax diluted in 100 parts water), it can be used on vegetable gardens.
Do not dispose of this solution in rivers or irrigation systems
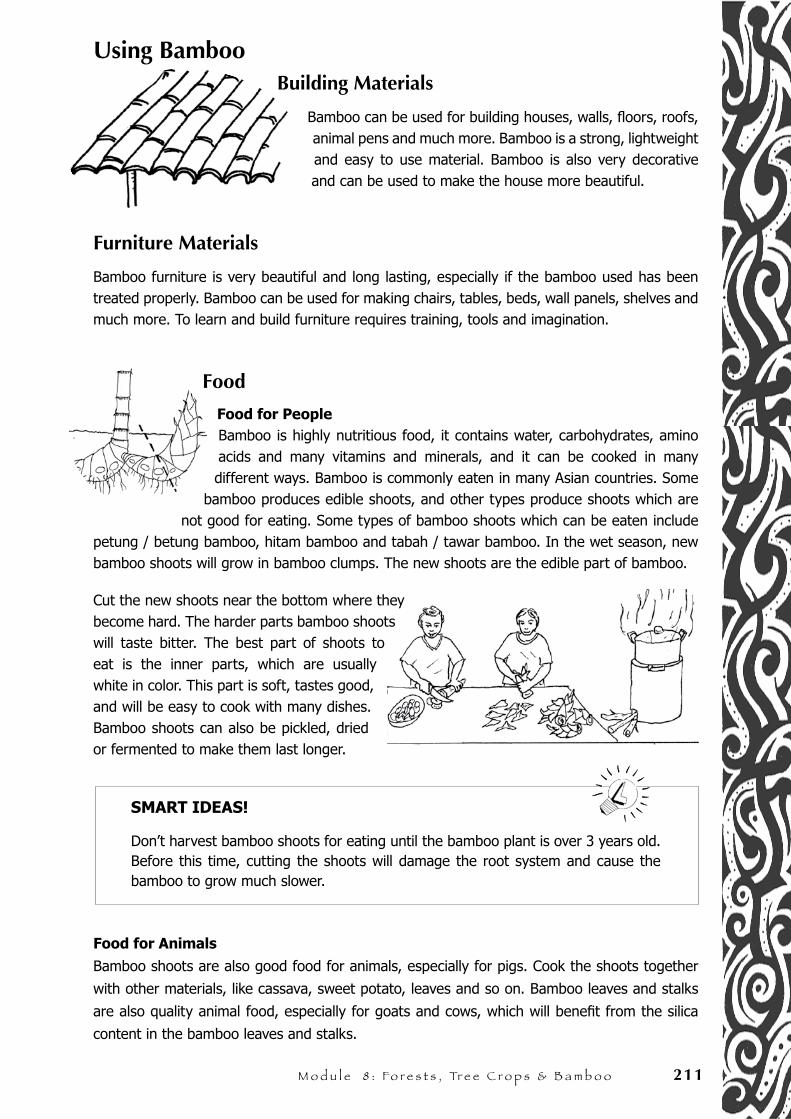
M o d u l e 8 : Fo r e s t s , Tr e e C r o p s & B a m b o o 211
Using BambooBuilding Materials
Bamboo can be used for building houses, walls, floors, roofs, animal pens and much more. Bamboo is a strong, lightweight and easy to use material. Bamboo is also very decorative and can be used to make the house more beautiful.
Furniture Materials
Bamboo furniture is very beautiful and long lasting, especially if the bamboo used has been treated properly. Bamboo can be used for making chairs, tables, beds, wall panels, shelves and much more. To learn and build furniture requires training, tools and imagination.
Food
Food for PeopleBamboo is highly nutritious food, it contains water, carbohydrates, amino acids and many vitamins and minerals, and it can be cooked in many different ways. Bamboo is commonly eaten in many Asian countries. Some
bamboo produces edible shoots, and other types produce shoots which are not good for eating. Some types of bamboo shoots which can be eaten include
petung / betung bamboo, hitam bamboo and tabah / tawar bamboo. In the wet season, new bamboo shoots will grow in bamboo clumps. The new shoots are the edible part of bamboo.
Cut the new shoots near the bottom where they become hard. The harder parts bamboo shoots will taste bitter. The best part of shoots to eat is the inner parts, which are usually white in color. This part is soft, tastes good, and will be easy to cook with many dishes. Bamboo shoots can also be pickled, dried or fermented to make them last longer.
SMART IDEAS!
Don’t harvest bamboo shoots for eating until the bamboo plant is over 3 years old. Before this time, cutting the shoots will damage the root system and cause the bamboo to grow much slower.
Food for Animals
Bamboo shoots are also good food for animals, especially for pigs. Cook the shoots together
with other materials, like cassava, sweet potato, leaves and so on. Bamboo leaves and stalks
are also quality animal food, especially for goats and cows, which will benefit from the silica
content in the bamboo leaves and stalks.
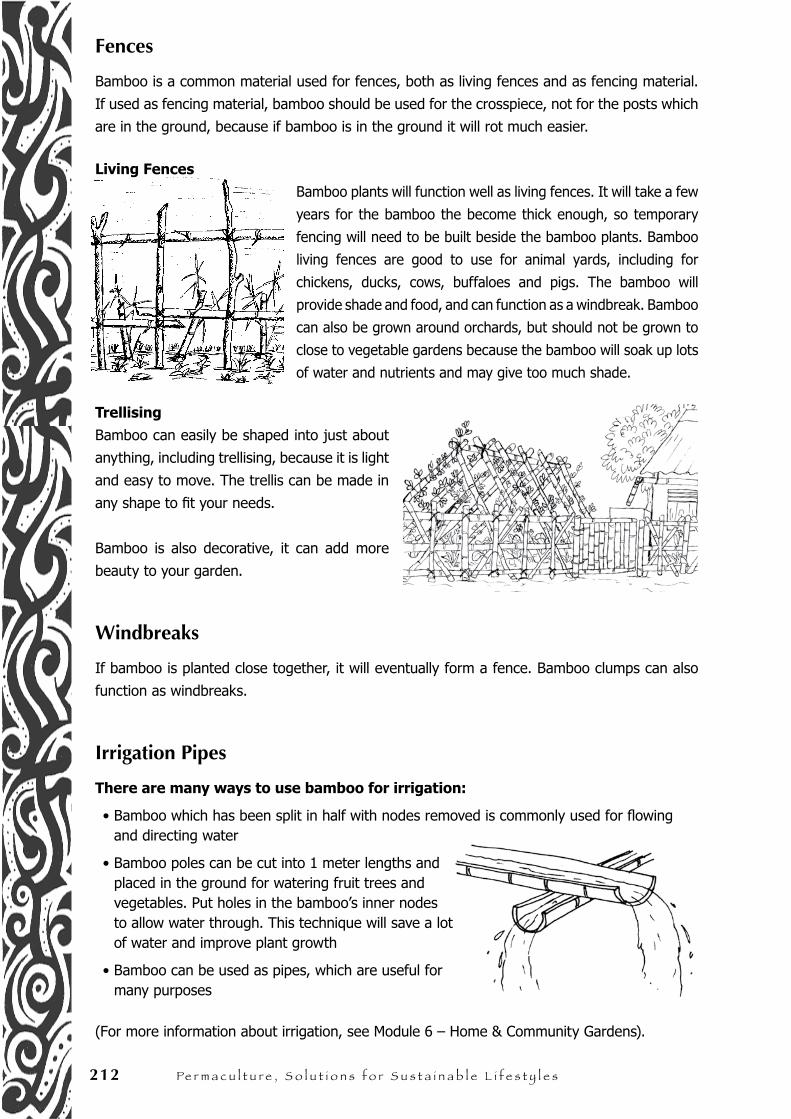
212 Pe r m a c u l t u r e , S o l u t i o n s f o r S u s t a i n a b l e l i f e s t y l e s
Fences
Bamboo is a common material used for fences, both as living fences and as fencing material.
If used as fencing material, bamboo should be used for the crosspiece, not for the posts which
are in the ground, because if bamboo is in the ground it will rot much easier.
Living Fences
Bamboo plants will function well as living fences. It will take a few
years for the bamboo the become thick enough, so temporary
fencing will need to be built beside the bamboo plants. Bamboo
living fences are good to use for animal yards, including for
chickens, ducks, cows, buffaloes and pigs. The bamboo will
provide shade and food, and can function as a windbreak. Bamboo
can also be grown around orchards, but should not be grown to
close to vegetable gardens because the bamboo will soak up lots
of water and nutrients and may give too much shade.
Trellising
Bamboo can easily be shaped into just about
anything, including trellising, because it is light
and easy to move. The trellis can be made in
any shape to fit your needs.
Bamboo is also decorative, it can add more
beauty to your garden.
Windbreaks
If bamboo is planted close together, it will eventually form a fence. Bamboo clumps can also
function as windbreaks.
Irrigation Pipes
There are many ways to use bamboo for irrigation:
• Bamboo which has been split in half with nodes removed is commonly used for flowing and directing water
• Bamboo poles can be cut into 1 meter lengths and placed in the ground for watering fruit trees and vegetables. Put holes in the bamboo’s inner nodes to allow water through. This technique will save a lot of water and improve plant growth
• Bamboo can be used as pipes, which are useful for many purposes
(For more information about irrigation, see Module 6 – Home & Community Gardens).
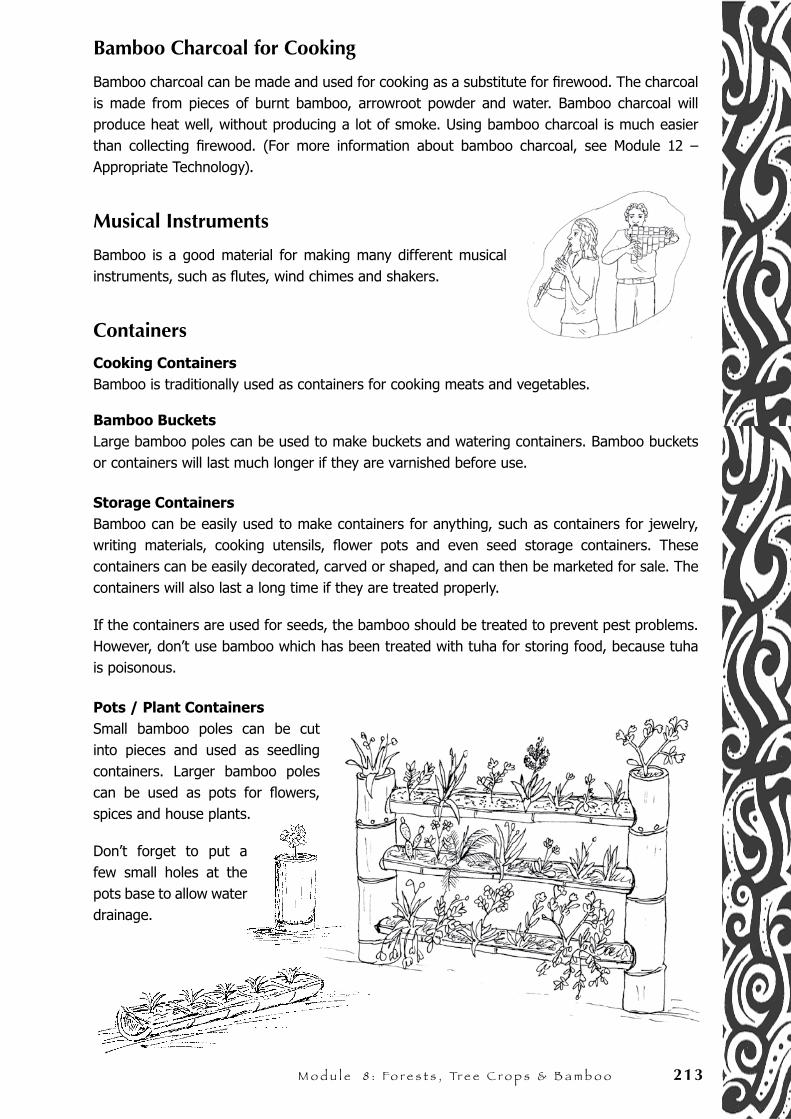
M o d u l e 8 : Fo r e s t s , Tr e e C r o p s & B a m b o o 213
Bamboo Charcoal for Cooking
Bamboo charcoal can be made and used for cooking as a substitute for firewood. The charcoal is made from pieces of burnt bamboo, arrowroot powder and water. Bamboo charcoal will produce heat well, without producing a lot of smoke. Using bamboo charcoal is much easier than collecting firewood. (For more information about bamboo charcoal, see Module 12 – Appropriate Technology).
Musical Instruments
Bamboo is a good material for making many different musical instruments, such as flutes, wind chimes and shakers.
Containers
Cooking ContainersBamboo is traditionally used as containers for cooking meats and vegetables.
Bamboo BucketsLarge bamboo poles can be used to make buckets and watering containers. Bamboo buckets or containers will last much longer if they are varnished before use.
Storage ContainersBamboo can be easily used to make containers for anything, such as containers for jewelry, writing materials, cooking utensils, flower pots and even seed storage containers. These containers can be easily decorated, carved or shaped, and can then be marketed for sale. The containers will also last a long time if they are treated properly.
If the containers are used for seeds, the bamboo should be treated to prevent pest problems. However, don’t use bamboo which has been treated with tuha for storing food, because tuha is poisonous.
Pots / Plant ContainersSmall bamboo poles can be cut into pieces and used as seedling containers. Larger bamboo poles can be used as pots for flowers, spices and house plants.
Don’t forget to put a few small holes at the pots base to allow water drainage.

214 Pe r m a c u l t u r e , S o l u t i o n s f o r S u s t a i n a b l e l i f e s t y l e s
N o t e s . . .
Pe
rma
cu
ltu
re R
eso
urc
e B
oo
k M
od
ule
9.
Inte
gra
ted
Pe
st M
an
ag
em
en
t
M o d u l e N o 9.
IntegratedPest Management

216 Pe r m a c u l t u r e , S o l u t i o n s f o r S u s t a i n a b l e l i f e s t y l e s
N o t e s . . .
M o d u l e 9 : I n t e g r a t e d Pe s t M a n a g e m e n t 217
Pest problems occur because a system is not in balance.
Most commonly pest problems occur because of:
• Fires, floods and land clearing
• Using large areas of land for only one type of crop
• Introducing pests from one area into another area
• Destruction or removal of a pest predator, usually caused by pesticide use or by damage to pest predator habitats
To manage pest problems, long term solutions should be used with an aim to return the balance of nature. Long term solutions can sometimes take many years, so short term solutions are also needed, such as using natural pesticides. Many different natural techniques for pest management are combined together in Integrated Pest Management (IPM). The main goal of IPM is to avoid pest problems from happening and if pest problems do happen, to manage them by using natural, environment friendly techniques.
Every part of the environment is connected to every other part, including people. What happens to one part of a system will affect every other part of the system. This philosophy is the foundation behind every IPM technique.
Observe how different parts of a system work and how they affect other parts of the same system. Parts of a system include soil, insects, plants and trees, birds, animals, water, people and technology. If different parts of a system can be integrated to work together it will bring many benefits, including:
• Less resource usage and less expenses because the land will maintain itself and the resources used will mainly be local available resources
• Soil, crop and environmental improvements, not gradual destruction
• Increase in crop resistance to pests, disease and extreme weather
• Increased overall productivity of the land
• Improved health for people
This module will explain IPM techniques which can be used for all scales of agriculture, from small scale home gardens and market gardens, to large scale agriculture, such as rice production, fruit trees and all combined systems.
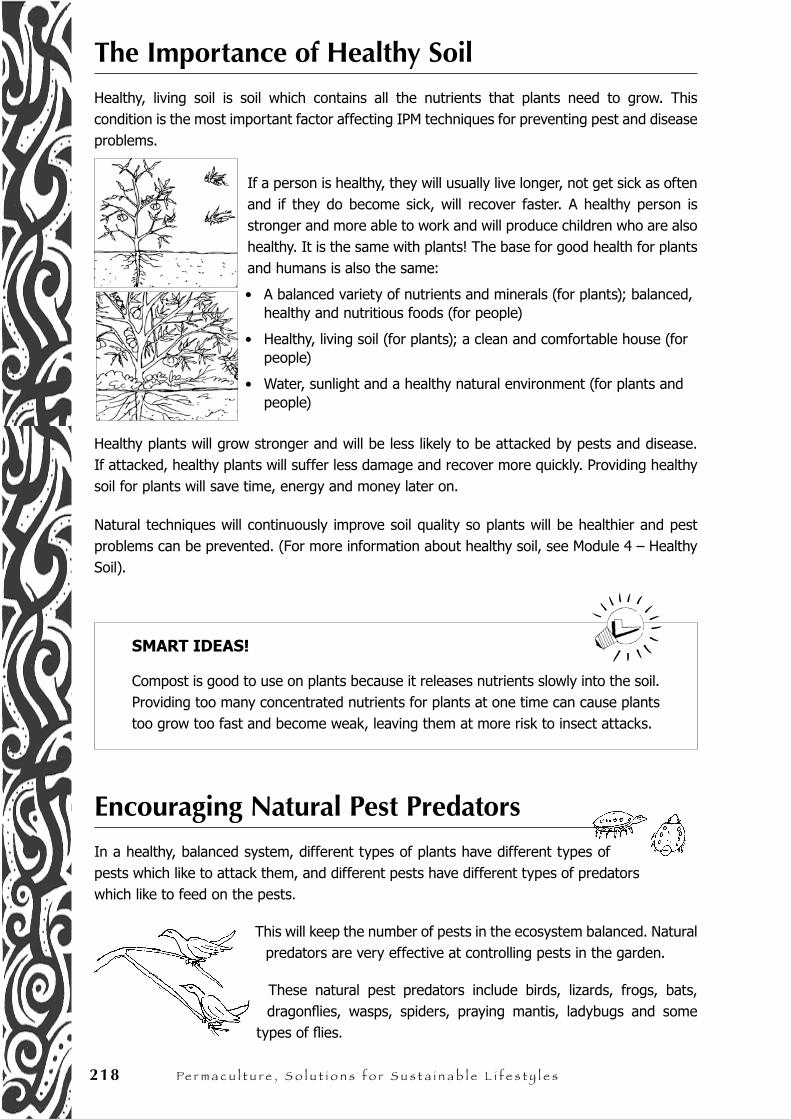
218 Pe r m a c u l t u r e , S o l u t i o n s f o r S u s t a i n a b l e l i f e s t y l e s
The Importance of Healthy SoilHealthy, living soil is soil which contains all the nutrients that plants need to grow. This condition is the most important factor affecting IPM techniques for preventing pest and disease problems.
If a person is healthy, they will usually live longer, not get sick as often and if they do become sick, will recover faster. A healthy person is stronger and more able to work and will produce children who are also healthy. It is the same with plants! The base for good health for plants and humans is also the same:
A balanced variety of nutrients and minerals (for plants); balanced, healthy and nutritious foods (for people)
Healthy, living soil (for plants); a clean and comfortable house (for people)
Water, sunlight and a healthy natural environment (for plants and people)
Healthy plants will grow stronger and will be less likely to be attacked by pests and disease. If attacked, healthy plants will suffer less damage and recover more quickly. Providing healthy soil for plants will save time, energy and money later on.
Natural techniques will continuously improve soil quality so plants will be healthier and pest problems can be prevented. (For more information about healthy soil, see Module 4 – Healthy Soil).
SMART IDEAS!
Compost is good to use on plants because it releases nutrients slowly into the soil. Providing too many concentrated nutrients for plants at one time can cause plants too grow too fast and become weak, leaving them at more risk to insect attacks.
Encouraging Natural Pest PredatorsIn a healthy, balanced system, different types of plants have different types of pests which like to attack them, and different pests have different types of predators which like to feed on the pests.
This will keep the number of pests in the ecosystem balanced. Natural predators are very effective at controlling pests in the garden.
These natural pest predators include birds, lizards, frogs, bats, dragonflies, wasps, spiders, praying mantis, ladybugs and some
types of flies.
•
•
•
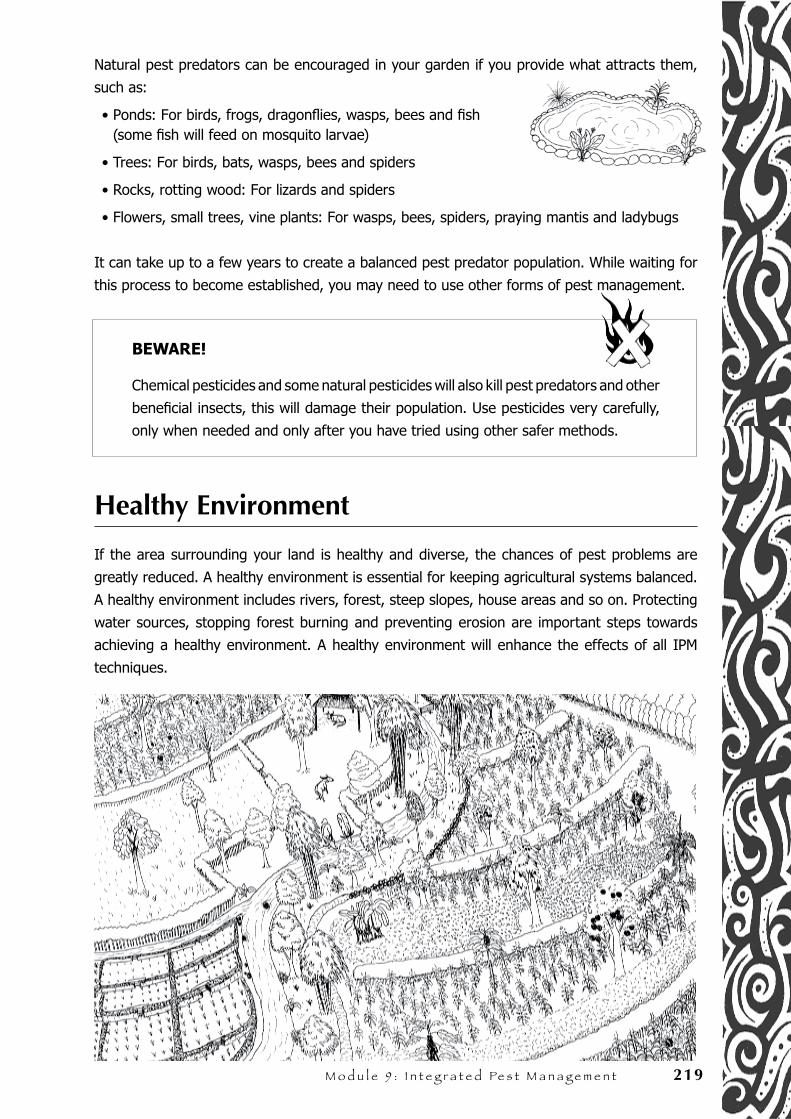
M o d u l e 9 : I n t e g r a t e d Pe s t M a n a g e m e n t 219
Natural pest predators can be encouraged in your garden if you provide what attracts them,
such as:
• Ponds: For birds, frogs, dragonflies, wasps, bees and fish (some fish will feed on mosquito larvae)
• Trees: For birds, bats, wasps, bees and spiders
• Rocks, rotting wood: For lizards and spiders
• Flowers, small trees, vine plants: For wasps, bees, spiders, praying mantis and ladybugs
It can take up to a few years to create a balanced pest predator population. While waiting for
this process to become established, you may need to use other forms of pest management.
BEWARE!
Chemical pesticides and some natural pesticides will also kill pest predators and other
beneficial insects, this will damage their population. Use pesticides very carefully,
only when needed and only after you have tried using other safer methods.
Healthy Environment
If the area surrounding your land is healthy and diverse, the chances of pest problems are
greatly reduced. A healthy environment is essential for keeping agricultural systems balanced.
A healthy environment includes rivers, forest, steep slopes, house areas and so on. Protecting
water sources, stopping forest burning and preventing erosion are important steps towards
achieving a healthy environment. A healthy environment will enhance the effects of all IPM
techniques.
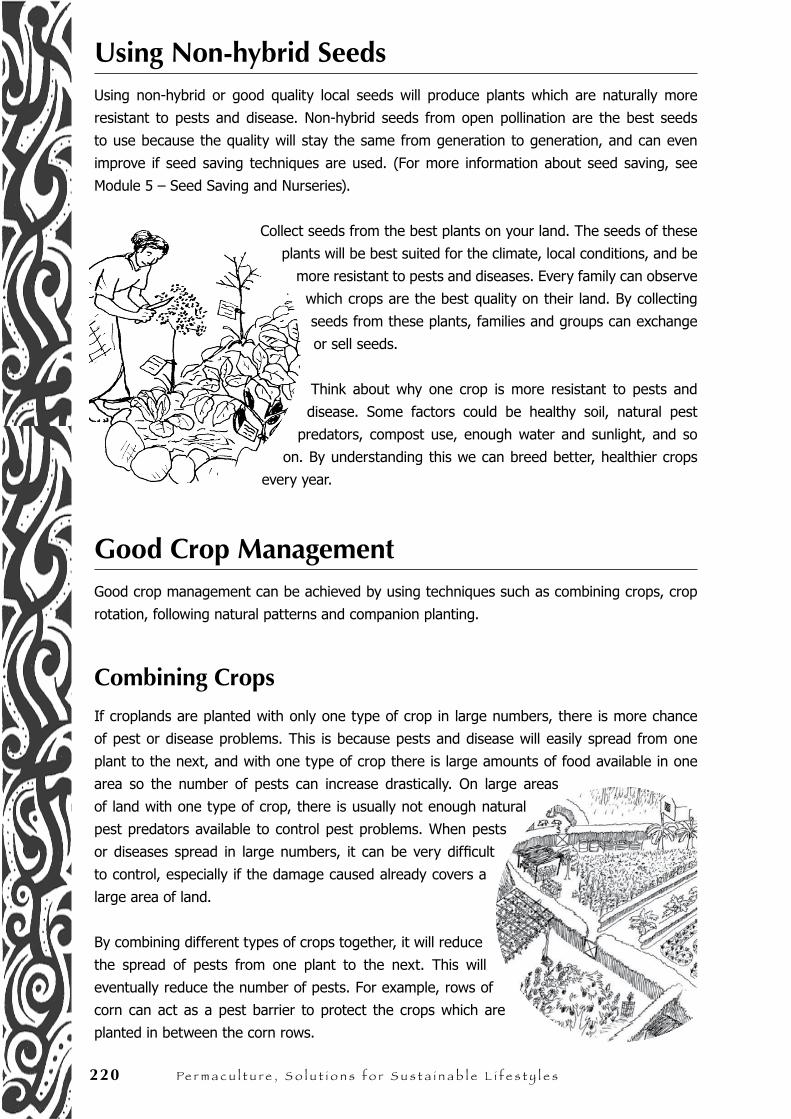
220 Pe r m a c u l t u r e , S o l u t i o n s f o r S u s t a i n a b l e l i f e s t y l e s
Using Non-hybrid SeedsUsing non-hybrid or good quality local seeds will produce plants which are naturally more
resistant to pests and disease. Non-hybrid seeds from open pollination are the best seeds
to use because the quality will stay the same from generation to generation, and can even
improve if seed saving techniques are used. (For more information about seed saving, see
Module 5 – Seed Saving and Nurseries).
Collect seeds from the best plants on your land. The seeds of these
plants will be best suited for the climate, local conditions, and be
more resistant to pests and diseases. Every family can observe
which crops are the best quality on their land. By collecting
seeds from these plants, families and groups can exchange
or sell seeds.
Think about why one crop is more resistant to pests and
disease. Some factors could be healthy soil, natural pest
predators, compost use, enough water and sunlight, and so
on. By understanding this we can breed better, healthier crops
every year.
Good Crop ManagementGood crop management can be achieved by using techniques such as combining crops, crop
rotation, following natural patterns and companion planting.
Combining Crops
If croplands are planted with only one type of crop in large numbers, there is more chance
of pest or disease problems. This is because pests and disease will easily spread from one
plant to the next, and with one type of crop there is large amounts of food available in one
area so the number of pests can increase drastically. On large areas
of land with one type of crop, there is usually not enough natural
pest predators available to control pest problems. When pests
or diseases spread in large numbers, it can be very difficult
to control, especially if the damage caused already covers a
large area of land.
By combining different types of crops together, it will reduce
the spread of pests from one plant to the next. This will
eventually reduce the number of pests. For example, rows of
corn can act as a pest barrier to protect the crops which are
planted in between the corn rows.
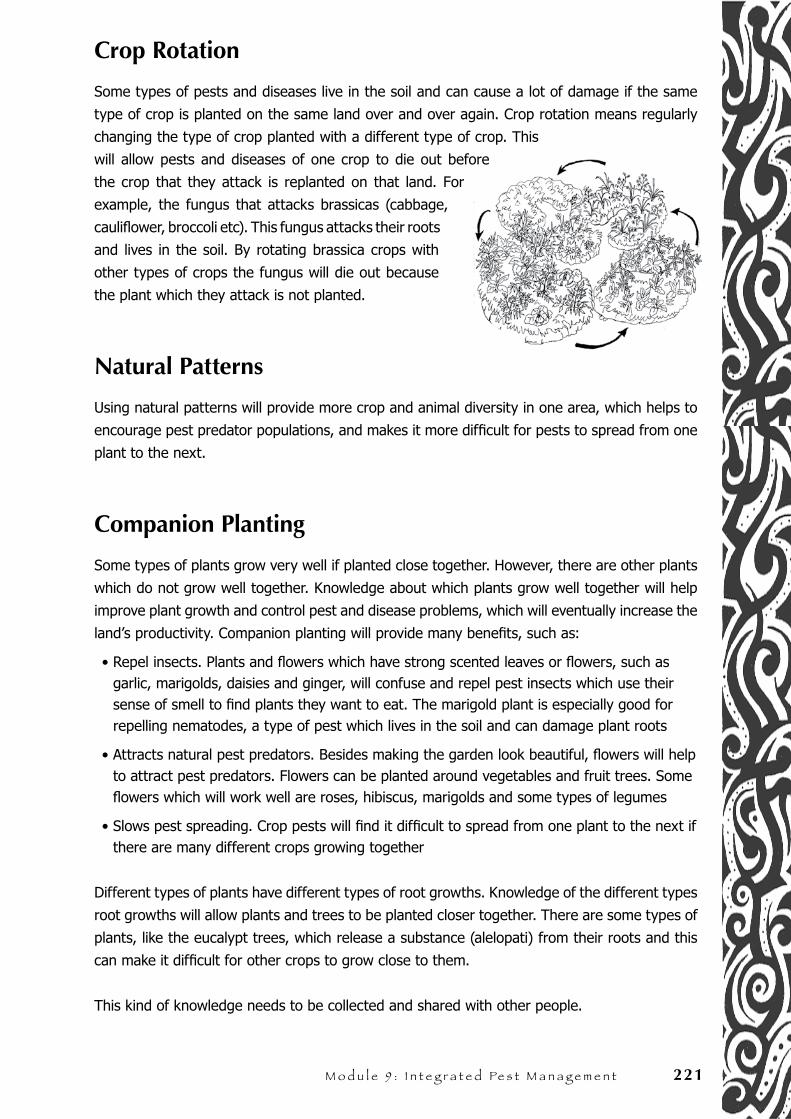
M o d u l e 9 : I n t e g r a t e d Pe s t M a n a g e m e n t 221
Crop Rotation
Some types of pests and diseases live in the soil and can cause a lot of damage if the same
type of crop is planted on the same land over and over again. Crop rotation means regularly
changing the type of crop planted with a different type of crop. This
will allow pests and diseases of one crop to die out before
the crop that they attack is replanted on that land. For
example, the fungus that attacks brassicas (cabbage,
cauliflower, broccoli etc). This fungus attacks their roots
and lives in the soil. By rotating brassica crops with
other types of crops the fungus will die out because
the plant which they attack is not planted.
Natural Patterns
Using natural patterns will provide more crop and animal diversity in one area, which helps to
encourage pest predator populations, and makes it more difficult for pests to spread from one
plant to the next.
Companion Planting
Some types of plants grow very well if planted close together. However, there are other plants
which do not grow well together. Knowledge about which plants grow well together will help
improve plant growth and control pest and disease problems, which will eventually increase the
land’s productivity. Companion planting will provide many benefits, such as:
• Repel insects. Plants and flowers which have strong scented leaves or flowers, such as garlic, marigolds, daisies and ginger, will confuse and repel pest insects which use their sense of smell to find plants they want to eat. The marigold plant is especially good for repelling nematodes, a type of pest which lives in the soil and can damage plant roots
• Attracts natural pest predators. Besides making the garden look beautiful, flowers will help to attract pest predators. Flowers can be planted around vegetables and fruit trees. Some flowers which will work well are roses, hibiscus, marigolds and some types of legumes
• Slows pest spreading. Crop pests will find it difficult to spread from one plant to the next if there are many different crops growing together
Different types of plants have different types of root growths. Knowledge of the different types
root growths will allow plants and trees to be planted closer together. There are some types of
plants, like the eucalypt trees, which release a substance (alelopati) from their roots and this
can make it difficult for other crops to grow close to them.
This kind of knowledge needs to be collected and shared with other people.

222 Pe r m a c u l t u r e , S o l u t i o n s f o r S u s t a i n a b l e l i f e s t y l e s
Preventing Pest Attacks
Observation will prevent many pest problems before they arise.
When observing, consider:
• Are the plants that are growing healthy?
• Are there pests attacking the plants?
• Where do the pests come from?
• What type of pests are they, insects or other creatures?
• What are the predators of this type of pest?
• What will attract predators?
The earlier we know about pest and disease problems, the easier managing the problems will
be. Observe the stages of a pest’s lifetime, for example the fruit fly: Eggs, worm, grub, adult.
Identifying pests or diseases is very important. If you do not know, discuss it with other groups
or NGOs which may be able to help.
Each type of plant has a specific type of pest which will attack it. A pest which attacks one
type of plant will not necessarily attack a different type of plant growing nearby. Knowledge
about which pests will attack which plants can be used to prevent problems, through using
techniques such as crop rotation, companion planting and combining crops.
Use different methods and sprays to control different types of pests. Using a specific pest
control spray for a certain type of pest is better than using sprays which kill all types of insects.
Observation will help you to choose which type of spray is best to use.
Observation of pest problems and methods of pest control can happen every day while working
in the garden. Children can learn about good insects and insects which become pests, and
about how to control pest problems. Removing pests by hand is sometimes the most effective
method of pest control, especially for home gardens. Insect pests can be collected and fed to
chickens and ducks, or killed in a bucket of water. Snails can be cooked as pig or chicken feed.
And in some countries, people even eat them!
Pest insects also like to eat weeds. Through observation you can find out which types of weeds
attract pests away from your crops. Afterwards, these weeds now filled with pests, can be used
as animal feed or turned into compost.
Plant Diseases and Fungus
Trees infected with fungus can be helped by pruning back some branches to let in more sun
and wind. Fungus needs moisture to grow, but the sun and wind will help to keep the tree dry.
Always remove dead tree branches to reduce chances of fungus and disease. Observe carefully
if there are crops or trees infected with fungus, remove the parts which are already infected to
reduce chances of the disease spreading.
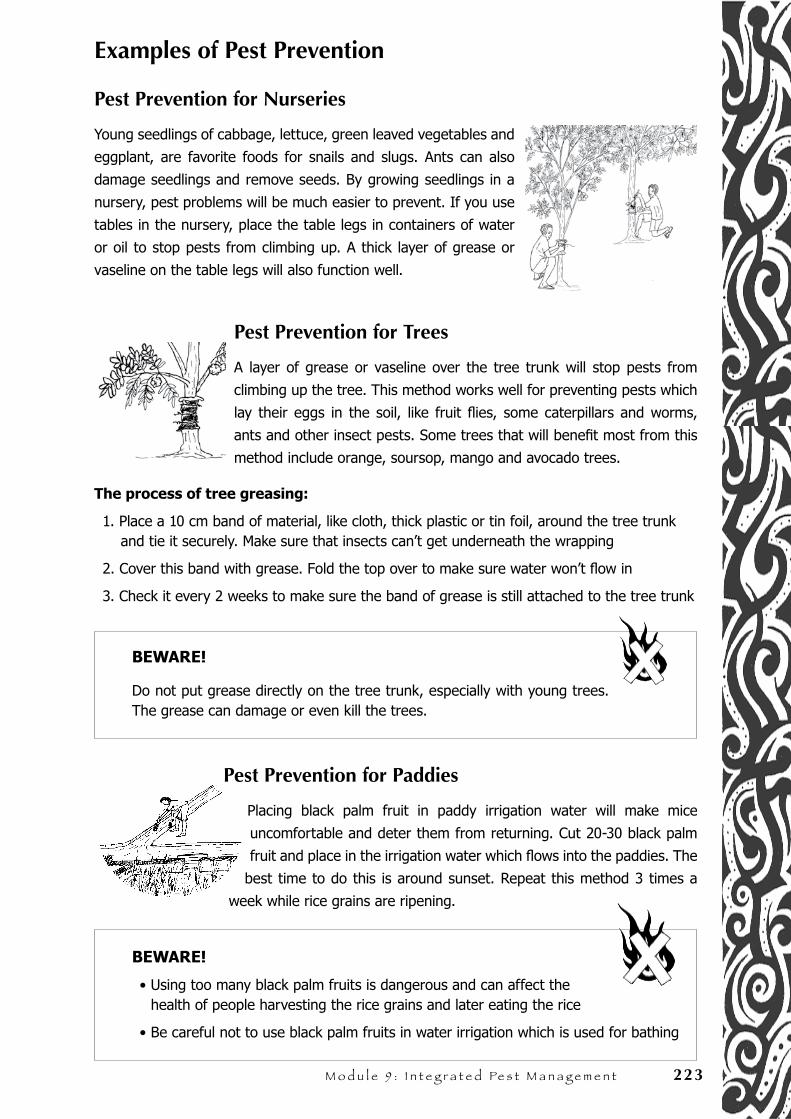
M o d u l e 9 : I n t e g r a t e d Pe s t M a n a g e m e n t 223
Examples of Pest Prevention
Pest Prevention for Nurseries
Young seedlings of cabbage, lettuce, green leaved vegetables and
eggplant, are favorite foods for snails and slugs. Ants can also
damage seedlings and remove seeds. By growing seedlings in a
nursery, pest problems will be much easier to prevent. If you use
tables in the nursery, place the table legs in containers of water
or oil to stop pests from climbing up. A thick layer of grease or
vaseline on the table legs will also function well.
Pest Prevention for Trees
A layer of grease or vaseline over the tree trunk will stop pests from
climbing up the tree. This method works well for preventing pests which
lay their eggs in the soil, like fruit flies, some caterpillars and worms,
ants and other insect pests. Some trees that will benefit most from this
method include orange, soursop, mango and avocado trees.
The process of tree greasing:
1. Place a 10 cm band of material, like cloth, thick plastic or tin foil, around the tree trunk and tie it securely. Make sure that insects can’t get underneath the wrapping
2. Cover this band with grease. Fold the top over to make sure water won’t flow in
3. Check it every 2 weeks to make sure the band of grease is still attached to the tree trunk
BEWARE!
Do not put grease directly on the tree trunk, especially with young trees. The grease can damage or even kill the trees.
Pest Prevention for Paddies
Placing black palm fruit in paddy irrigation water will make mice
uncomfortable and deter them from returning. Cut 20-30 black palm
fruit and place in the irrigation water which flows into the paddies. The
best time to do this is around sunset. Repeat this method 3 times a
week while rice grains are ripening.
BEWARE!
• Using too many black palm fruits is dangerous and can affect the health of people harvesting the rice grains and later eating the rice
• Be careful not to use black palm fruits in water irrigation which is used for bathing
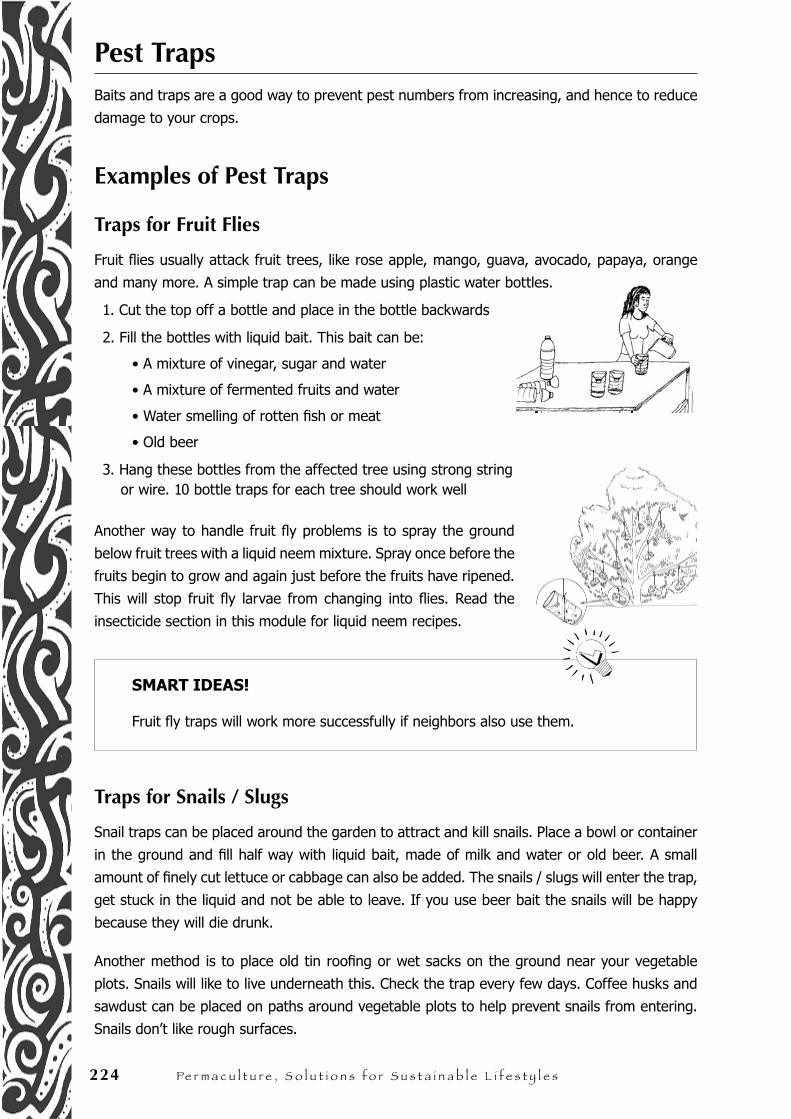
224 Pe r m a c u l t u r e , S o l u t i o n s f o r S u s t a i n a b l e l i f e s t y l e s
Pest Traps Baits and traps are a good way to prevent pest numbers from increasing, and hence to reduce
damage to your crops.
Examples of Pest Traps
Traps for Fruit Flies
Fruit flies usually attack fruit trees, like rose apple, mango, guava, avocado, papaya, orange
and many more. A simple trap can be made using plastic water bottles.
1. Cut the top off a bottle and place in the bottle backwards
2. Fill the bottles with liquid bait. This bait can be:
• A mixture of vinegar, sugar and water
• A mixture of fermented fruits and water
• Water smelling of rotten fish or meat
• Old beer
3. Hang these bottles from the affected tree using strong string or wire. 10 bottle traps for each tree should work well
Another way to handle fruit fly problems is to spray the ground
below fruit trees with a liquid neem mixture. Spray once before the
fruits begin to grow and again just before the fruits have ripened.
This will stop fruit fly larvae from changing into flies. Read the
insecticide section in this module for liquid neem recipes.
SMART IDEAS!
Fruit fly traps will work more successfully if neighbors also use them.
Traps for Snails / Slugs
Snail traps can be placed around the garden to attract and kill snails. Place a bowl or container
in the ground and fill half way with liquid bait, made of milk and water or old beer. A small
amount of finely cut lettuce or cabbage can also be added. The snails / slugs will enter the trap,
get stuck in the liquid and not be able to leave. If you use beer bait the snails will be happy
because they will die drunk.
Another method is to place old tin roofing or wet sacks on the ground near your vegetable
plots. Snails will like to live underneath this. Check the trap every few days. Coffee husks and
sawdust can be placed on paths around vegetable plots to help prevent snails from entering.
Snails don’t like rough surfaces.
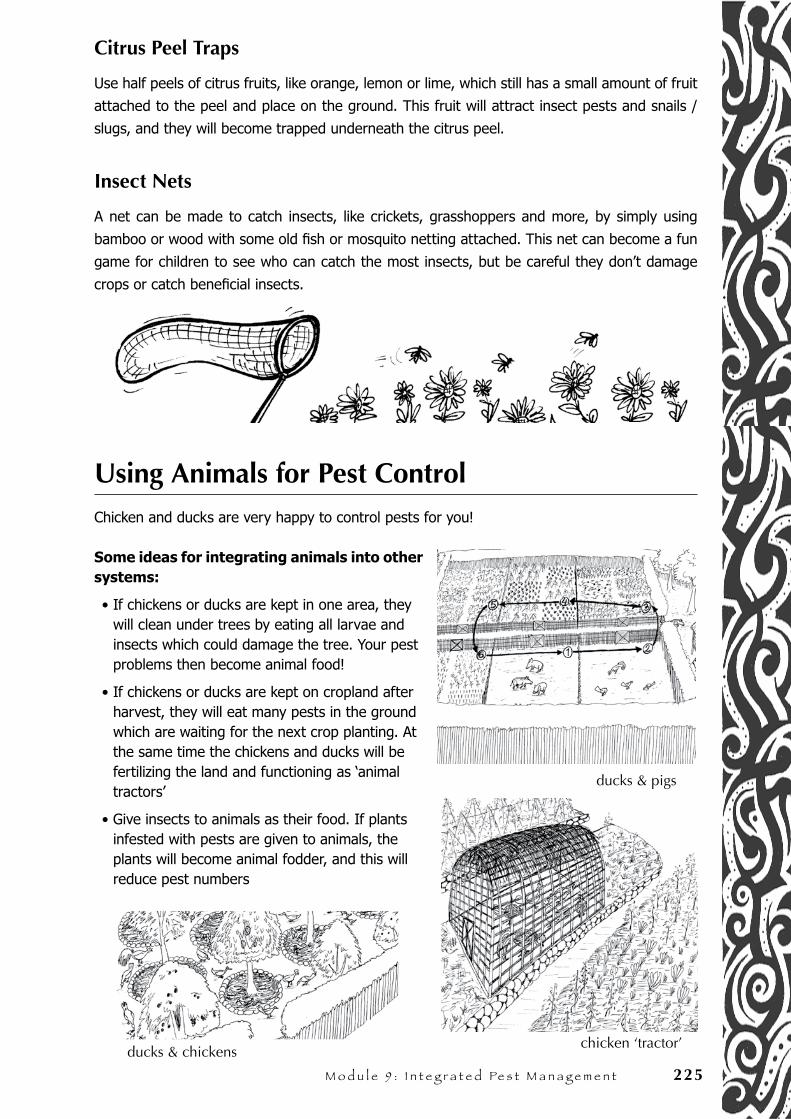
M o d u l e 9 : I n t e g r a t e d Pe s t M a n a g e m e n t 225
Citrus Peel Traps
Use half peels of citrus fruits, like orange, lemon or lime, which still has a small amount of fruit
attached to the peel and place on the ground. This fruit will attract insect pests and snails /
slugs, and they will become trapped underneath the citrus peel.
Insect Nets
A net can be made to catch insects, like crickets, grasshoppers and more, by simply using
bamboo or wood with some old fish or mosquito netting attached. This net can become a fun
game for children to see who can catch the most insects, but be careful they don’t damage
crops or catch beneficial insects.
Using Animals for Pest ControlChicken and ducks are very happy to control pests for you!
Some ideas for integrating animals into other systems:
• If chickens or ducks are kept in one area, they will clean under trees by eating all larvae and insects which could damage the tree. Your pest problems then become animal food!
• If chickens or ducks are kept on cropland after harvest, they will eat many pests in the ground which are waiting for the next crop planting. At the same time the chickens and ducks will be fertilizing the land and functioning as ‘animal tractors’
• Give insects to animals as their food. If plants infested with pests are given to animals, the plants will become animal fodder, and this will reduce pest numbers
ducks & chickenschicken ‘tractor’
ducks & pigs
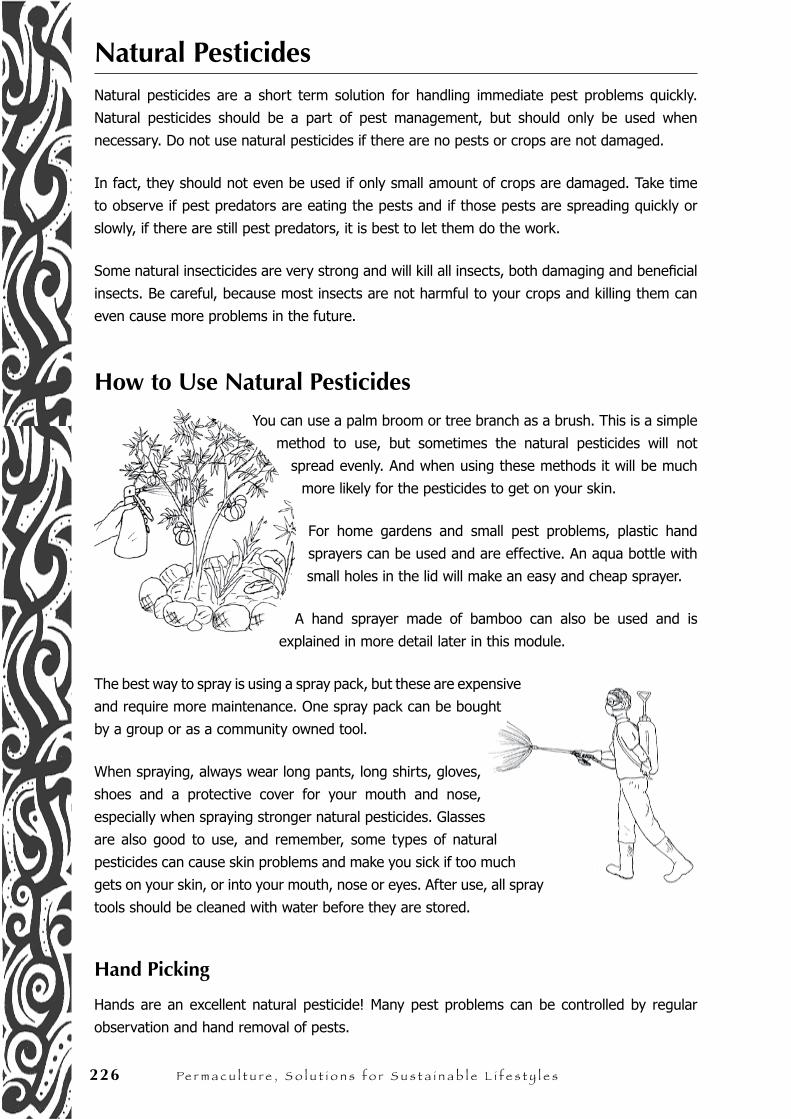
226 Pe r m a c u l t u r e , S o l u t i o n s f o r S u s t a i n a b l e l i f e s t y l e s
Natural PesticidesNatural pesticides are a short term solution for handling immediate pest problems quickly.
Natural pesticides should be a part of pest management, but should only be used when
necessary. Do not use natural pesticides if there are no pests or crops are not damaged.
In fact, they should not even be used if only small amount of crops are damaged. Take time
to observe if pest predators are eating the pests and if those pests are spreading quickly or
slowly, if there are still pest predators, it is best to let them do the work.
Some natural insecticides are very strong and will kill all insects, both damaging and beneficial
insects. Be careful, because most insects are not harmful to your crops and killing them can
even cause more problems in the future.
How to Use Natural Pesticides
You can use a palm broom or tree branch as a brush. This is a simple
method to use, but sometimes the natural pesticides will not
spread evenly. And when using these methods it will be much
more likely for the pesticides to get on your skin.
For home gardens and small pest problems, plastic hand
sprayers can be used and are effective. An aqua bottle with
small holes in the lid will make an easy and cheap sprayer.
A hand sprayer made of bamboo can also be used and is
explained in more detail later in this module.
The best way to spray is using a spray pack, but these are expensive
and require more maintenance. One spray pack can be bought
by a group or as a community owned tool.
When spraying, always wear long pants, long shirts, gloves,
shoes and a protective cover for your mouth and nose,
especially when spraying stronger natural pesticides. Glasses
are also good to use, and remember, some types of natural
pesticides can cause skin problems and make you sick if too much
gets on your skin, or into your mouth, nose or eyes. After use, all spray
tools should be cleaned with water before they are stored.
Hand Picking
Hands are an excellent natural pesticide! Many pest problems can be controlled by regular
observation and hand removal of pests.
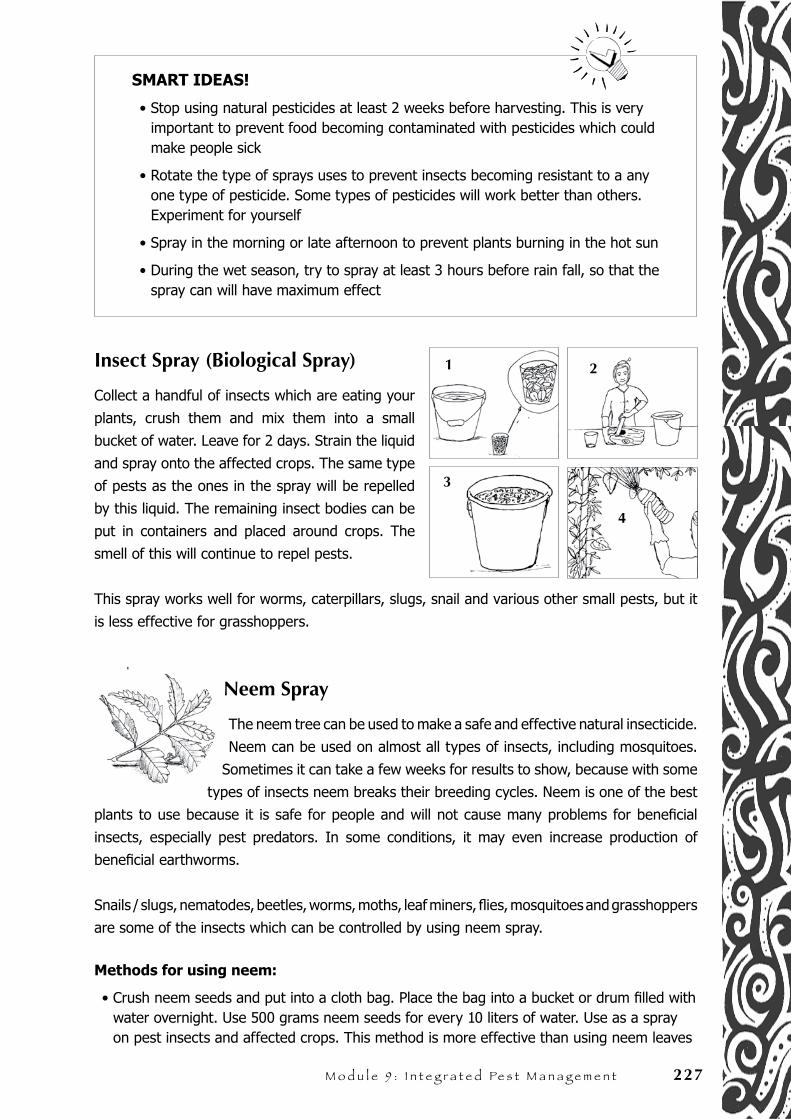
M o d u l e 9 : I n t e g r a t e d Pe s t M a n a g e m e n t 227
SMART IDEAS!
• Stop using natural pesticides at least 2 weeks before harvesting. This is very important to prevent food becoming contaminated with pesticides which could make people sick
• Rotate the type of sprays uses to prevent insects becoming resistant to a any one type of pesticide. Some types of pesticides will work better than others. Experiment for yourself
• Spray in the morning or late afternoon to prevent plants burning in the hot sun
• During the wet season, try to spray at least 3 hours before rain fall, so that the spray can will have maximum effect
Insect Spray (Biological Spray)
Collect a handful of insects which are eating your
plants, crush them and mix them into a small
bucket of water. Leave for 2 days. Strain the liquid
and spray onto the affected crops. The same type
of pests as the ones in the spray will be repelled
by this liquid. The remaining insect bodies can be
put in containers and placed around crops. The
smell of this will continue to repel pests.
This spray works well for worms, caterpillars, slugs, snail and various other small pests, but it
is less effective for grasshoppers.
Neem Spray
The neem tree can be used to make a safe and effective natural insecticide.
Neem can be used on almost all types of insects, including mosquitoes.
Sometimes it can take a few weeks for results to show, because with some
types of insects neem breaks their breeding cycles. Neem is one of the best
plants to use because it is safe for people and will not cause many problems for beneficial
insects, especially pest predators. In some conditions, it may even increase production of
beneficial earthworms.
Snails / slugs, nematodes, beetles, worms, moths, leaf miners, flies, mosquitoes and grasshoppers
are some of the insects which can be controlled by using neem spray.
Methods for using neem:
• Crush neem seeds and put into a cloth bag. Place the bag into a bucket or drum filled with water overnight. Use 500 grams neem seeds for every 10 liters of water. Use as a spray on pest insects and affected crops. This method is more effective than using neem leaves
1 2
3
4
228 Pe r m a c u l t u r e , S o l u t i o n s f o r S u s t a i n a b l e l i f e s t y l e s
• Collect a large handful of fresh neem leaves, crush into small bits and place in a bucket of water. Leave for 2 days, then remove the leaves and use the liquid as a spray
• Dry a large handful of neem leaves, crush them and place in a bucket of water. Leave for 2 days, strain and then use the liquid as a spray
• Neem spray can also be made by soaking crushed neem seeds in alcohol or making oil from the neem seeds using an oil press. These methods are more expensive but produce a much stronger product
Garlic and Chili Spray
Combine 3 bulbs of peeled garlic with a large handful of chilies and boil
in a pot of water. Add ¼ block of soap, stir evenly and leave for one day.
Strain and use 2 cups of this liquid each time you spray.
Garlic is an insecticide, fungicide and pest repellent. Chili is also an insecticide and insect
repellent. The soap will help the spray stick to plants and pests. Use this liquid for aphids,
worms, caterpillars and moths.
SMART IDEAS!
• Garlic and chili plants will naturally repel many insects. Plant them around fruit trees and vegetable plots to help reduce insect problems
• Garlic and chili can also be used separately as sprays
Papaya Spray
Collect 1 kg of papaya leaves (about 1 large plastic bag), crush into small bits and mix into 1
liter of water, then leave for 1 hour. Strain and add 4 more liters of water and 1 large spoonful
of soap. Spray onto insect pests. This papaya spray can be used on aphids, termites, bugs
and caterpillars. For termites, crush young unripe papaya fruit and collect the juice. Spray this
directly onto termites and damaged wood.
Ginger Juice Spray
Grate one handful of ginger and put into a bucket of water. Leave for one day, then spray on
damaged plants to control larvae of worms and caterpillars.
Taro Leaf Spray
Taro leaves contain lysollic acid. When insect eat this, it feels something like eating broken glass!
To make this spray, simply crush 10 taro leaves and place in 3 liters of water (½ bucket), stir
well. Spread onto plants using a palm broom. Make sure every plant is covered well with this
liquid so they will equally receive protection against insects.
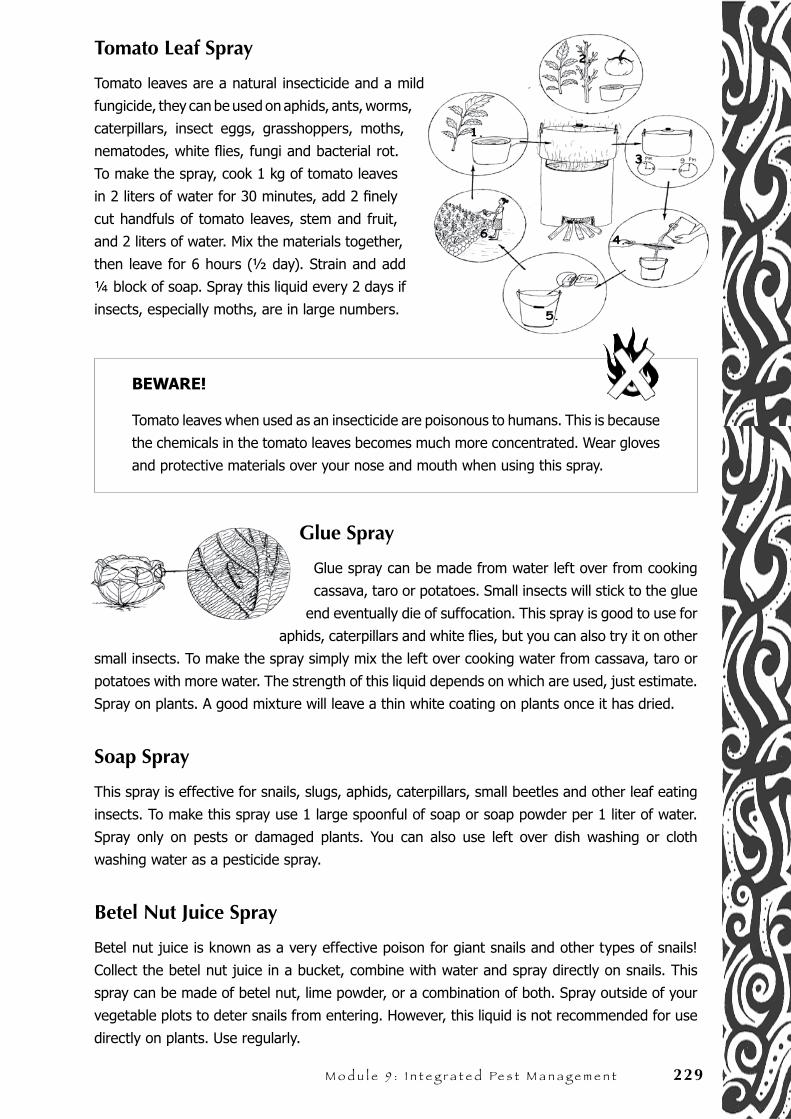
M o d u l e 9 : I n t e g r a t e d Pe s t M a n a g e m e n t 229
Tomato Leaf Spray
Tomato leaves are a natural insecticide and a mild
fungicide, they can be used on aphids, ants, worms,
caterpillars, insect eggs, grasshoppers, moths,
nematodes, white flies, fungi and bacterial rot.
To make the spray, cook 1 kg of tomato leaves
in 2 liters of water for 30 minutes, add 2 finely
cut handfuls of tomato leaves, stem and fruit,
and 2 liters of water. Mix the materials together,
then leave for 6 hours (½ day). Strain and add
¼ block of soap. Spray this liquid every 2 days if
insects, especially moths, are in large numbers.
BEWARE!
Tomato leaves when used as an insecticide are poisonous to humans. This is because
the chemicals in the tomato leaves becomes much more concentrated. Wear gloves
and protective materials over your nose and mouth when using this spray.
Glue Spray
Glue spray can be made from water left over from cooking
cassava, taro or potatoes. Small insects will stick to the glue
end eventually die of suffocation. This spray is good to use for
aphids, caterpillars and white flies, but you can also try it on other
small insects. To make the spray simply mix the left over cooking water from cassava, taro or
potatoes with more water. The strength of this liquid depends on which are used, just estimate.
Spray on plants. A good mixture will leave a thin white coating on plants once it has dried.
Soap Spray
This spray is effective for snails, slugs, aphids, caterpillars, small beetles and other leaf eating
insects. To make this spray use 1 large spoonful of soap or soap powder per 1 liter of water.
Spray only on pests or damaged plants. You can also use left over dish washing or cloth
washing water as a pesticide spray.
Betel Nut Juice Spray
Betel nut juice is known as a very effective poison for giant snails and other types of snails!
Collect the betel nut juice in a bucket, combine with water and spray directly on snails. This
spray can be made of betel nut, lime powder, or a combination of both. Spray outside of your
vegetable plots to deter snails from entering. However, this liquid is not recommended for use
directly on plants. Use regularly.

230 Pe r m a c u l t u r e , S o l u t i o n s f o r S u s t a i n a b l e l i f e s t y l e s
Tobacco Leaf Spray
Tobacco leaf spray should only be used as a last option. Wear protective
clothing and protective material for hands and face when making and using
tobacco spray. Tobacco leaves are very poisonous and can kill beneficial
insects as well.
Tobacco spray can be used for most pest insects. To make the spray soak 1 kg (1 plastic bag)
of crushed tobacco leaves in 15 liters of water for 1 day and 1 night. Add two large spoonfuls
of liquid or block soap and stir well. Strain and use the liquid as a spray. You can also dry the
leaves and crush them into a powder. The powder can be used for aphids, slugs, caterpillars
and leaf curl virus. Do not use this spray on tomato plants, potato, eggplant, chilli plants or
roses.
Ants cause problems through their digging and removing seeds. They can never be removed
completely, but their effects can be reduced. For root damage, try using biological, chili, garlic,
tomato or tobacco sprays.
Natural FungicidesFungus is an organism that lives and grows on the surface of plants, animals, wood, people
and even cement and non-living surfaces. Fungus lives best in damp and moist conditions. This
can cause problems for plants by covering plant surfaces, which causes rotting and prevents
normal growth. The best way to control fungus on plants is by providing them with enough
wind, sunlight and air flow. Fungus growth is encouraged by dark and damp conditions, and
rotting materials.
For trees, remove all dead wood and prune the tree to allow more
wind and sunlight through. Only prune as much as is needed.
For vegetables, remove old and dead leaves and provide
trellises for climbing plants, like peas, beans and tomatoes.
Very badly diseased plants should be removed and burned.
Don’t let mulch touch tree trunks or vegetable stems.
Neem Spray
You can use neem as a natural fungicide. Make liquid from neem seeds in the same way as
used for natural pesticides, then spray this on mildew and rust mildew. This may also work for
other fungus, but more research is still being conducted. Experiment for yourself.
Seaweed Tea Spray
Collect some fresh seaweed, rinse with water to remove the salt, then place
in a bucket of water. Leave for 2 weeks, then spray on fungus infected
plants.
pruning back dead branches
M o d u l e 9 : I n t e g r a t e d Pe s t M a n a g e m e n t 231
Diluted Urine Spray
Combine 1 part human urine to 4 parts water. Spray on plants or trees damaged from fungus, like vine mildew, powdery mildew, and other types of similar fungus.
Milk Powder Spray
Combine 1 liter fresh milk or powdered milk with 10 liters of water. Spray every 10 days on vegetables or trees that are suffering from fungus, mildew or mosaic virus.
Sweet Potato Leaf Spray
Cut and soak 3 large handfuls of sweet potato leaf in 1 bucket of water. Leave for 1 day, then use as a spray for fungus, especially for rice fungus diseases.
Garlic Spray
Dry garlic and crush into a powder. Combine one large spoon of garlic powder with 1 liter of water and use as a spray for fungus attacking tomato and bean plants.
Papaya Spray
Papaya spray can be used on insects, but can also be used as a mild fungicide for coffee rust, powdery mildew and brown spots on rice leaves.
Evaluating ResultsThe results of using natural pesticides and fungicides should be continuously observed. Observe how much the pesticides are working and if the treatment needs to be repeated. If pest problems have not stopped, you have a few choices, such as:
• Repeating the spray treatment
• Trying a stronger combination
• Trying a different pesticide
• Combining natural pesticide materials (combine different kinds of materials together)
Making Simple Sprayers
This information is taken from Liklik Buk, a development book compiled by Lik Lik Buk information center, Papua New Guinea.
Materials:
• A bamboo pole of adult arm length with nodes 3-4 cm wide
• A wooden rod, about 1 meter long, longer than the bamboo it will fit into. It is best to use a hard wood
• Nails for making holes, a hammer, a saw
• A strip of cloth, about 1 meter long and 10 cm wide
• A small length of wire or strong string
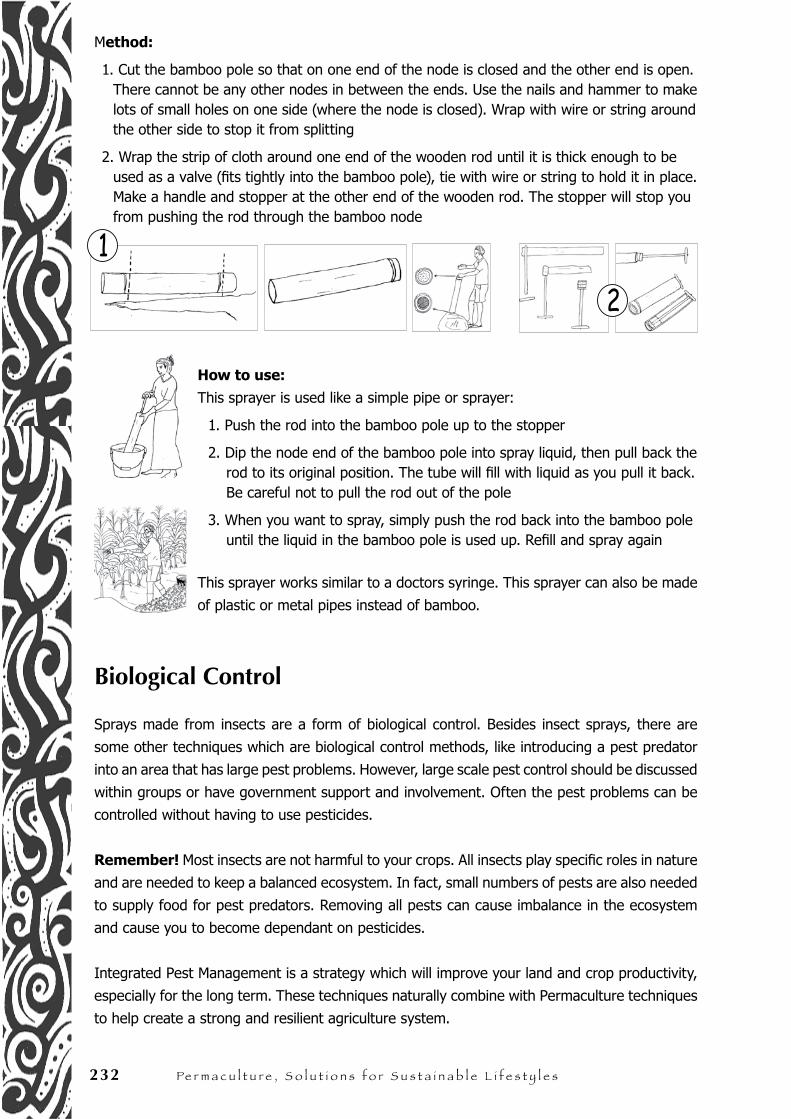
232 Pe r m a c u l t u r e , S o l u t i o n s f o r S u s t a i n a b l e l i f e s t y l e s
Method:
1. Cut the bamboo pole so that on one end of the node is closed and the other end is open. There cannot be any other nodes in between the ends. Use the nails and hammer to make lots of small holes on one side (where the node is closed). Wrap with wire or string around the other side to stop it from splitting
2. Wrap the strip of cloth around one end of the wooden rod until it is thick enough to be used as a valve (fits tightly into the bamboo pole), tie with wire or string to hold it in place. Make a handle and stopper at the other end of the wooden rod. The stopper will stop you from pushing the rod through the bamboo node
How to use:
This sprayer is used like a simple pipe or sprayer:
1. Push the rod into the bamboo pole up to the stopper
2. Dip the node end of the bamboo pole into spray liquid, then pull back the rod to its original position. The tube will fill with liquid as you pull it back. Be careful not to pull the rod out of the pole
3. When you want to spray, simply push the rod back into the bamboo pole until the liquid in the bamboo pole is used up. Refill and spray again
This sprayer works similar to a doctors syringe. This sprayer can also be made
of plastic or metal pipes instead of bamboo.
Biological Control
Sprays made from insects are a form of biological control. Besides insect sprays, there are
some other techniques which are biological control methods, like introducing a pest predator
into an area that has large pest problems. However, large scale pest control should be discussed
within groups or have government support and involvement. Often the pest problems can be
controlled without having to use pesticides.
Remember! Most insects are not harmful to your crops. All insects play specific roles in nature
and are needed to keep a balanced ecosystem. In fact, small numbers of pests are also needed
to supply food for pest predators. Removing all pests can cause imbalance in the ecosystem
and cause you to become dependant on pesticides.
Integrated Pest Management is a strategy which will improve your land and crop productivity,
especially for the long term. These techniques naturally combine with Permaculture techniques
to help create a strong and resilient agriculture system.
2
1

M o d u l e 9 : I n t e g r a t e d Pe s t M a n a g e m e n t 233
N o t e s . . .

234 Pe r m a c u l t u r e , S o l u t i o n s f o r S u s t a i n a b l e l i f e s t y l e s
N o t e s . . .
Pe
rma
cu
ltu
re R
eso
urc
e B
oo
k M
od
ule
10
. A
nim
al
Sy
ste
ms
M o d u l e N o 1 0 .
Animal Systems

236 Pe r m a c u l t u r e , S o l u t i o n s f o r S u s t a i n a b l e l i f e s t y l e s
N o t e s . . .
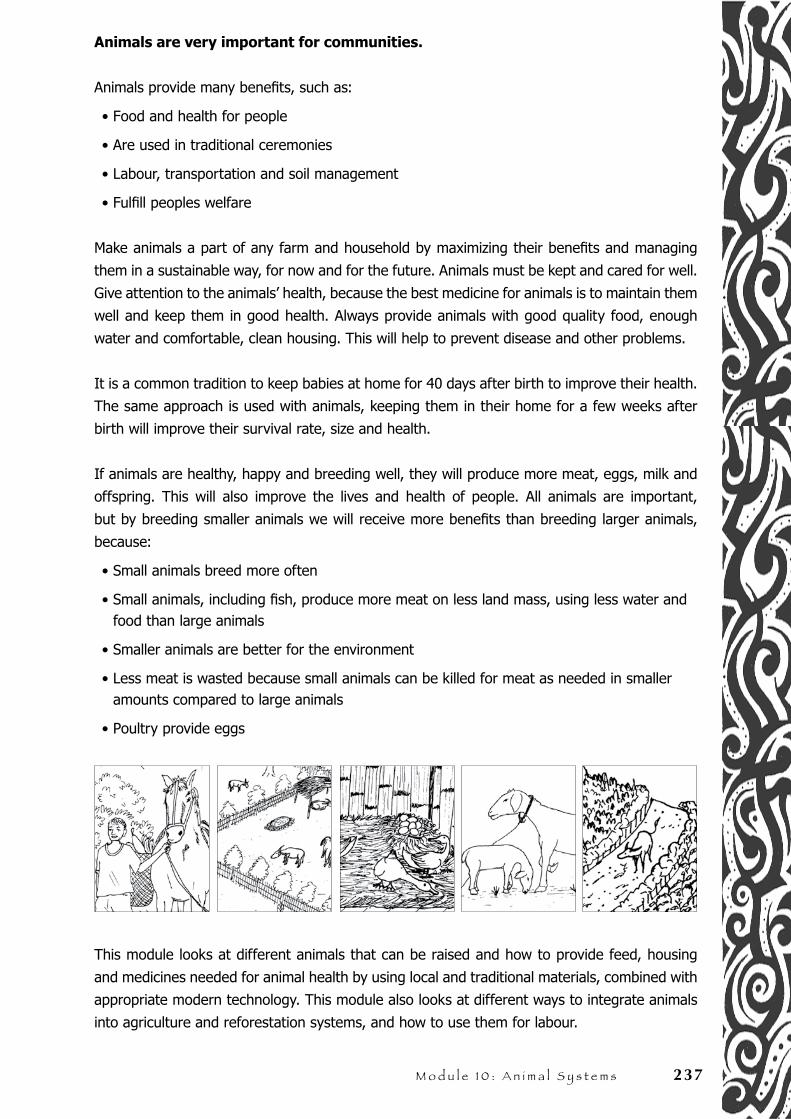
M o d u l e 1 0 : A n i m a l S y s t e m s 237
Animals are very important for communities.
Animals provide many benefits, such as:
• Food and health for people
• Are used in traditional ceremonies
• Labour, transportation and soil management
• Fulfill peoples welfare
Make animals a part of any farm and household by maximizing their benefits and managing
them in a sustainable way, for now and for the future. Animals must be kept and cared for well.
Give attention to the animals’ health, because the best medicine for animals is to maintain them
well and keep them in good health. Always provide animals with good quality food, enough
water and comfortable, clean housing. This will help to prevent disease and other problems.
It is a common tradition to keep babies at home for 40 days after birth to improve their health.
The same approach is used with animals, keeping them in their home for a few weeks after
birth will improve their survival rate, size and health.
If animals are healthy, happy and breeding well, they will produce more meat, eggs, milk and
offspring. This will also improve the lives and health of people. All animals are important,
but by breeding smaller animals we will receive more benefits than breeding larger animals,
because:
• Small animals breed more often
• Small animals, including fish, produce more meat on less land mass, using less water and food than large animals
• Smaller animals are better for the environment
• Less meat is wasted because small animals can be killed for meat as needed in smaller amounts compared to large animals
• Poultry provide eggs
This module looks at different animals that can be raised and how to provide feed, housing
and medicines needed for animal health by using local and traditional materials, combined with
appropriate modern technology. This module also looks at different ways to integrate animals
into agriculture and reforestation systems, and how to use them for labour.
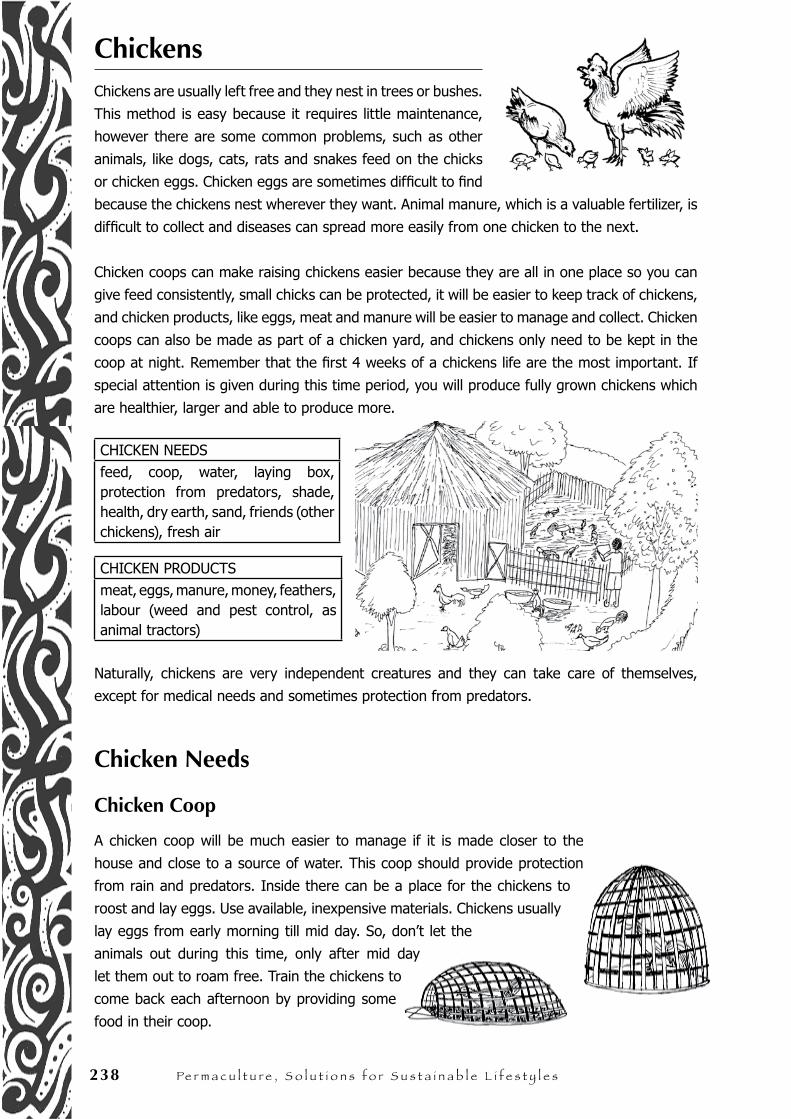
238 Pe r m a c u l t u r e , S o l u t i o n s f o r S u s t a i n a b l e l i f e s t y l e s
ChickensChickens are usually left free and they nest in trees or bushes.
This method is easy because it requires little maintenance,
however there are some common problems, such as other
animals, like dogs, cats, rats and snakes feed on the chicks
or chicken eggs. Chicken eggs are sometimes difficult to find
because the chickens nest wherever they want. Animal manure, which is a valuable fertilizer, is
difficult to collect and diseases can spread more easily from one chicken to the next.
Chicken coops can make raising chickens easier because they are all in one place so you can
give feed consistently, small chicks can be protected, it will be easier to keep track of chickens,
and chicken products, like eggs, meat and manure will be easier to manage and collect. Chicken
coops can also be made as part of a chicken yard, and chickens only need to be kept in the
coop at night. Remember that the first 4 weeks of a chickens life are the most important. If
special attention is given during this time period, you will produce fully grown chickens which
are healthier, larger and able to produce more.
CHICKEN NEEDSfeed, coop, water, laying box, protection from predators, shade, health, dry earth, sand, friends (other chickens), fresh air
CHICKEN PRODUCTSmeat, eggs, manure, money, feathers, labour (weed and pest control, as animal tractors)
Naturally, chickens are very independent creatures and they can take care of themselves,
except for medical needs and sometimes protection from predators.
Chicken Needs
Chicken Coop
A chicken coop will be much easier to manage if it is made closer to the
house and close to a source of water. This coop should provide protection
from rain and predators. Inside there can be a place for the chickens to
roost and lay eggs. Use available, inexpensive materials. Chickens usually
lay eggs from early morning till mid day. So, don’t let the
animals out during this time, only after mid day
let them out to roam free. Train the chickens to
come back each afternoon by providing some
food in their coop.
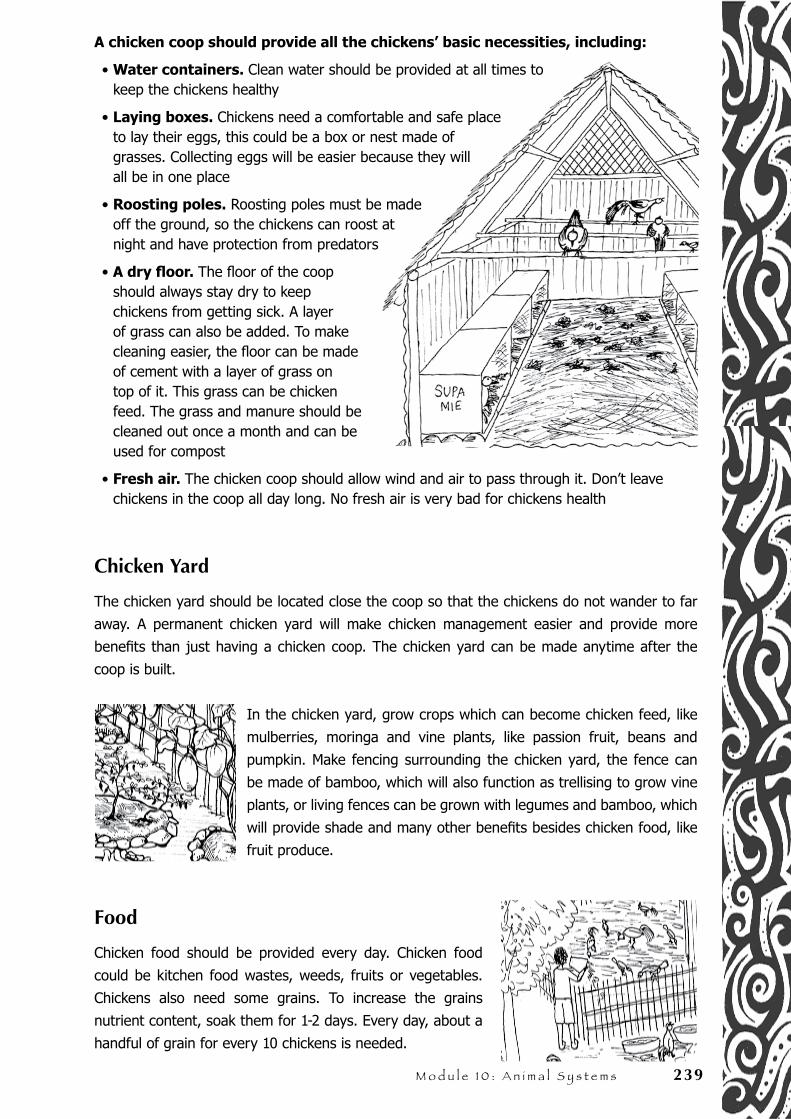
M o d u l e 1 0 : A n i m a l S y s t e m s 239
A chicken coop should provide all the chickens’ basic necessities, including:
• Water containers. Clean water should be provided at all times to keep the chickens healthy
• Laying boxes. Chickens need a comfortable and safe place to lay their eggs, this could be a box or nest made of grasses. Collecting eggs will be easier because they will all be in one place
• Roosting poles. Roosting poles must be made off the ground, so the chickens can roost at night and have protection from predators
• A dry floor. The floor of the coop should always stay dry to keep chickens from getting sick. A layer of grass can also be added. To make cleaning easier, the floor can be made of cement with a layer of grass on top of it. This grass can be chicken feed. The grass and manure should be cleaned out once a month and can be used for compost
• Fresh air. The chicken coop should allow wind and air to pass through it. Don’t leave chickens in the coop all day long. No fresh air is very bad for chickens health
Chicken Yard
The chicken yard should be located close the coop so that the chickens do not wander to far
away. A permanent chicken yard will make chicken management easier and provide more
benefits than just having a chicken coop. The chicken yard can be made anytime after the
coop is built.
In the chicken yard, grow crops which can become chicken feed, like
mulberries, moringa and vine plants, like passion fruit, beans and
pumpkin. Make fencing surrounding the chicken yard, the fence can
be made of bamboo, which will also function as trellising to grow vine
plants, or living fences can be grown with legumes and bamboo, which
will provide shade and many other benefits besides chicken food, like
fruit produce.
Food
Chicken food should be provided every day. Chicken food
could be kitchen food wastes, weeds, fruits or vegetables.
Chickens also need some grains. To increase the grains
nutrient content, soak them for 1-2 days. Every day, about a
handful of grain for every 10 chickens is needed.
240 Pe r m a c u l t u r e , S o l u t i o n s f o r S u s t a i n a b l e l i f e s t y l e s
Chickens scratch the ground searching for insects and worms. Good scratching ground can
easily be provided by covering an area of ground with a layer of plant husks, grasses or weeds,
which will then encourage insects to live under it. Just let the chickens happily hunt for insects
under this layer, eventually this layer will decompose and there will a lot of chicken manure
collected there.
These materials are a very high quality compost fertilizer. A place for
making compost can be made close to the chicken coop.
You can also breed termites for chicken food. To do
this, dig a hole in the ground somewhere in the
chicken yard and put rotting wood inside the hole,
close the hole and leave for one month. Then,
uncover the hole, pull out the termite filled wood
and let the chickens feast! The ground around the
hole will become high in nutrients and the leftover
remains make a great fertilizer.
Shade
Chickens need shade. Remember, chicken ancestors come from the forest
and they need shade to stay healthy!
A Fence
A fence is needed to keep the chickens in one area. Living fences will
provide shade, food for chickens and people, a place for growing vine
plants, windbreak and many other benefits. The fence needs to be made
high enough to prevent chickens from flying out.
Friends
Chickens live in flocks or families. Too little or too many chickens in a small space is not good.
If chickens are kept free, they will naturally decide their flock size. If you keep the chickens in
coops, you must decide the flock size for them.
The ideal number is 1 rooster for every 10-15 hens. When the young chicks begin to grow into
roosters or hens, the roosters can be separated for eating later on.
Clipping Wings
To prevent chickens from flying and escaping over the fence, you
can clip off the tips of one of their wing’s feathers. The feathers to
cut are the long feathers on the outermost part of the wing. This
will keep the chickens unbalanced and prevent them from flying.
Repeat this once every 6 months.

M o d u l e 1 0 : A n i m a l S y s t e m s 241
Health
Chickens are generally independent, healthy and capable of caring for themselves. To prevent
chickens from becoming sick, keep the coop dry and clean it regularly. Separate sick chickens
from the flock until they recover to prevent diseases from spreading.
Dry Soil
Chickens will dig holes in dry soil and spread the soil through their
feathers to clean their bodies from lice. This is very important for the
chicken’s health. If chickens are free in nature, they will search for dry
soil themselves. If chickens are in a yard, you must provide the dry soil
for them, especially during the wet season.
Put some neem leaves in the holes. The neem leaves are a natural pesticide which will help to
reduce lice on the chickens, but will not affect the chickens health.
For problems with worms, there are two natural remedies, using papaya seeds or mulberry
leaves. Chickens like eating these, especially young papaya seeds. Feed it to them regularly to
prevent worm problems. Chickens also like eating chili and garlic, which well help them to fight
off some minor sicknesses. Crushed eggshells and sand are also good for chickens. Chickens
will naturally eat this if it is mixed in with their other food. It will help their digestion and help
them to produce eggs with stronger shells.
Vaccination
One disease which kills a lot of chickens in many countries is called Newcastle’s Disease (ND).
It spreads very quickly and easily can occur every year, usually at the end of the dry season.
The only effective way to control this is by vaccination. The vaccination must be given when
the chickens are still young, and for best results it should be given to all the chickens in a
community.
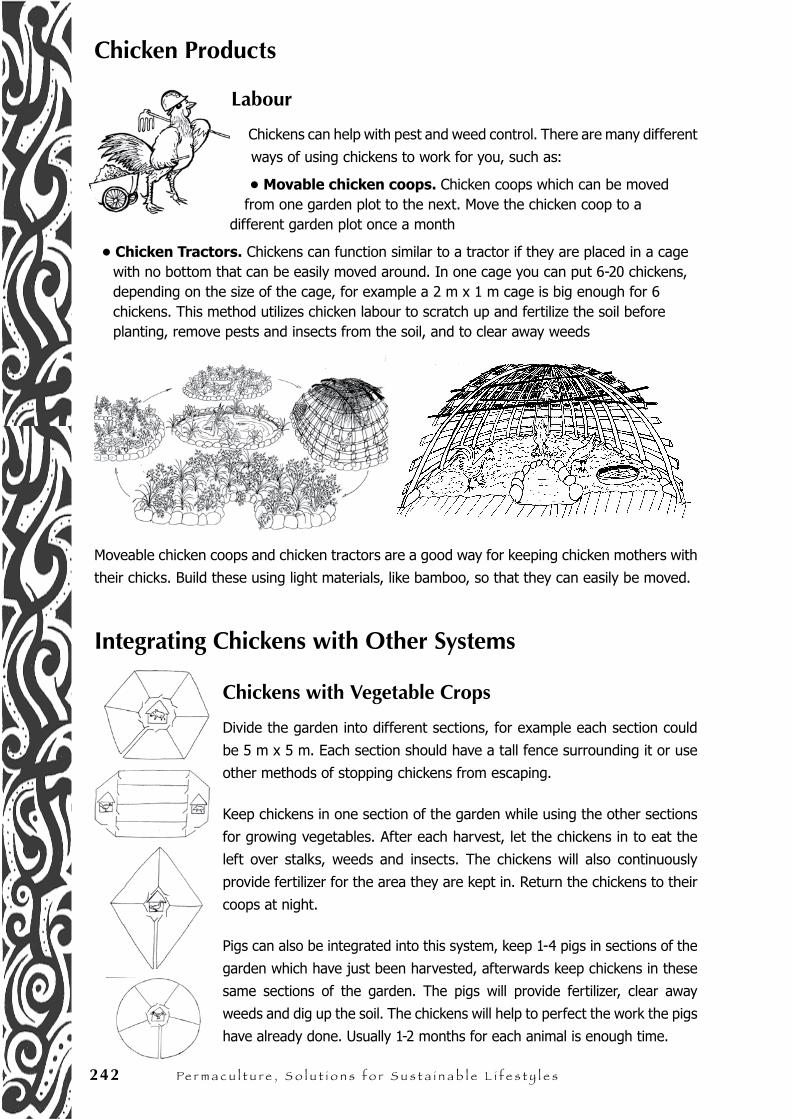
242 Pe r m a c u l t u r e , S o l u t i o n s f o r S u s t a i n a b l e l i f e s t y l e s
Chicken Products
Labour
Chickens can help with pest and weed control. There are many different
ways of using chickens to work for you, such as:
• Movable chicken coops. Chicken coops which can be moved from one garden plot to the next. Move the chicken coop to a
different garden plot once a month
• Chicken Tractors. Chickens can function similar to a tractor if they are placed in a cage with no bottom that can be easily moved around. In one cage you can put 6-20 chickens, depending on the size of the cage, for example a 2 m x 1 m cage is big enough for 6 chickens. This method utilizes chicken labour to scratch up and fertilize the soil before planting, remove pests and insects from the soil, and to clear away weeds
Moveable chicken coops and chicken tractors are a good way for keeping chicken mothers with
their chicks. Build these using light materials, like bamboo, so that they can easily be moved.
Integrating Chickens with Other Systems
Chickens with Vegetable Crops
Divide the garden into different sections, for example each section could
be 5 m x 5 m. Each section should have a tall fence surrounding it or use
other methods of stopping chickens from escaping.
Keep chickens in one section of the garden while using the other sections
for growing vegetables. After each harvest, let the chickens in to eat the
left over stalks, weeds and insects. The chickens will also continuously
provide fertilizer for the area they are kept in. Return the chickens to their
coops at night.
Pigs can also be integrated into this system, keep 1-4 pigs in sections of the
garden which have just been harvested, afterwards keep chickens in these
same sections of the garden. The pigs will provide fertilizer, clear away
weeds and dig up the soil. The chickens will help to perfect the work the pigs
have already done. Usually 1-2 months for each animal is enough time.
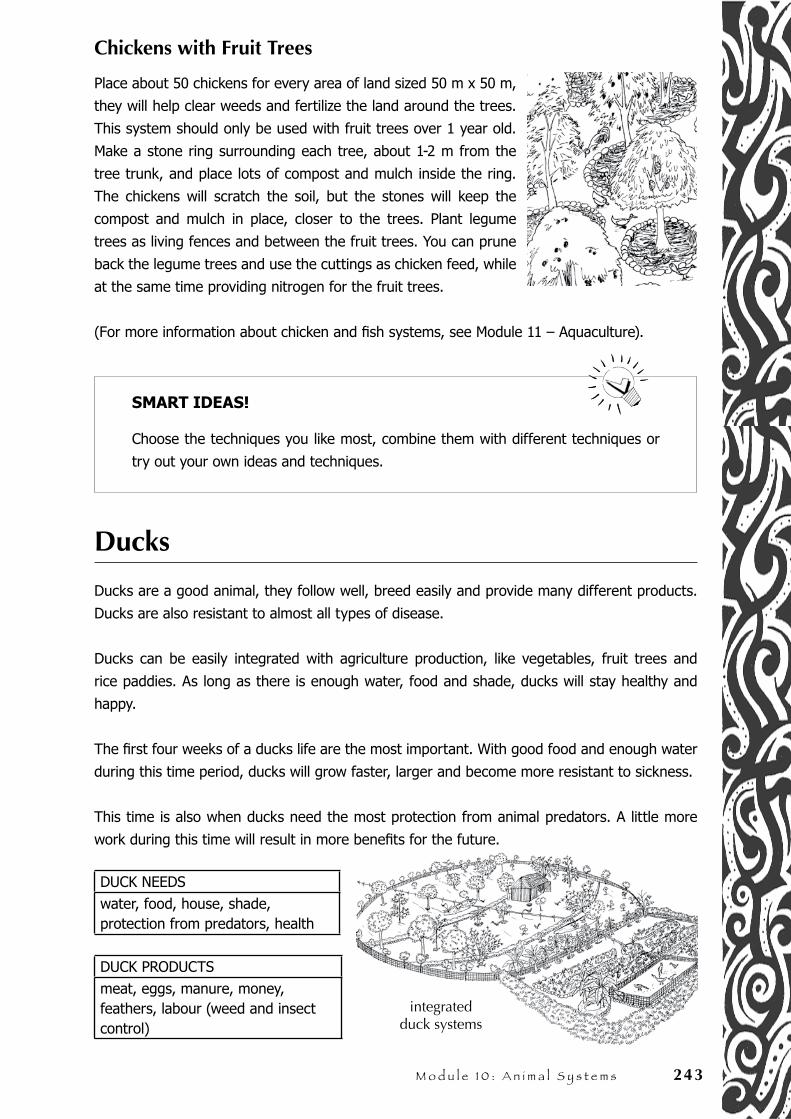
M o d u l e 1 0 : A n i m a l S y s t e m s 243
Chickens with Fruit Trees
Place about 50 chickens for every area of land sized 50 m x 50 m,
they will help clear weeds and fertilize the land around the trees.
This system should only be used with fruit trees over 1 year old.
Make a stone ring surrounding each tree, about 1-2 m from the
tree trunk, and place lots of compost and mulch inside the ring.
The chickens will scratch the soil, but the stones will keep the
compost and mulch in place, closer to the trees. Plant legume
trees as living fences and between the fruit trees. You can prune
back the legume trees and use the cuttings as chicken feed, while
at the same time providing nitrogen for the fruit trees.
(For more information about chicken and fish systems, see Module 11 – Aquaculture).
SMART IDEAS!
Choose the techniques you like most, combine them with different techniques or
try out your own ideas and techniques.
Ducks
Ducks are a good animal, they follow well, breed easily and provide many different products.
Ducks are also resistant to almost all types of disease.
Ducks can be easily integrated with agriculture production, like vegetables, fruit trees and
rice paddies. As long as there is enough water, food and shade, ducks will stay healthy and
happy.
The first four weeks of a ducks life are the most important. With good food and enough water
during this time period, ducks will grow faster, larger and become more resistant to sickness.
This time is also when ducks need the most protection from animal predators. A little more
work during this time will result in more benefits for the future.
DUCK NEEDSwater, food, house, shade, protection from predators, health
DUCK PRODUCTSmeat, eggs, manure, money, feathers, labour (weed and insect control)
integrated duck systems
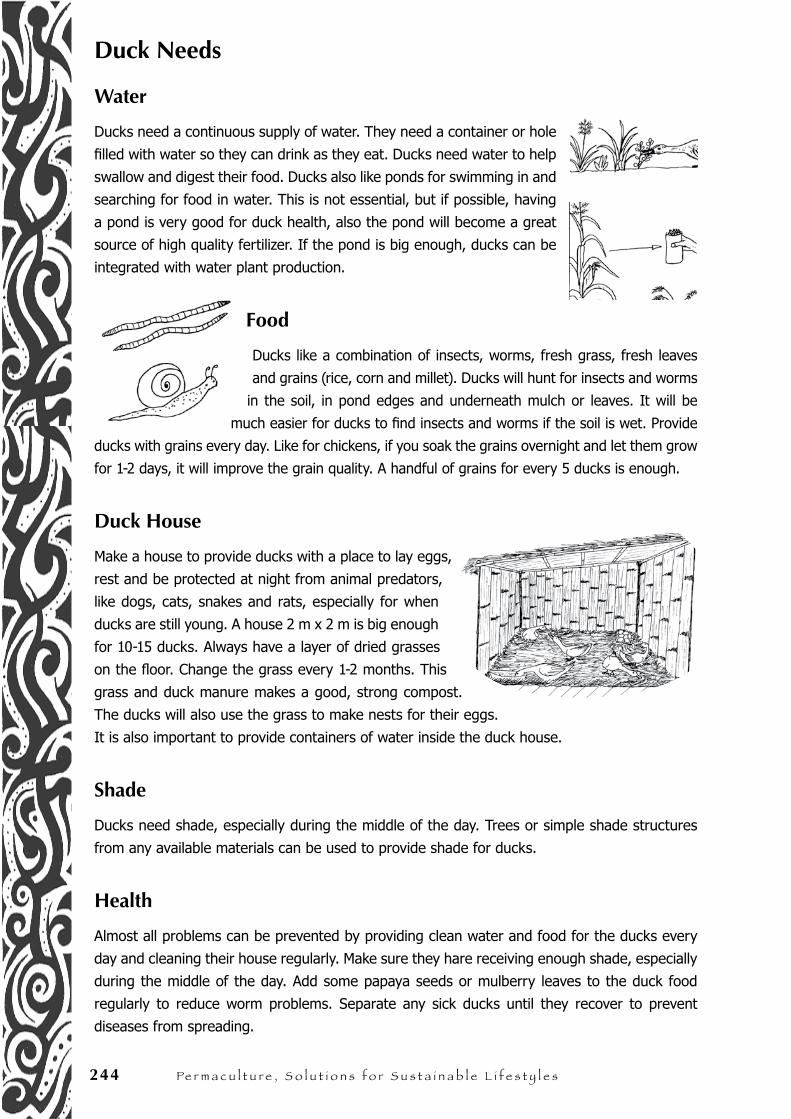
244 Pe r m a c u l t u r e , S o l u t i o n s f o r S u s t a i n a b l e l i f e s t y l e s
Duck Needs
Water
Ducks need a continuous supply of water. They need a container or hole
filled with water so they can drink as they eat. Ducks need water to help
swallow and digest their food. Ducks also like ponds for swimming in and
searching for food in water. This is not essential, but if possible, having
a pond is very good for duck health, also the pond will become a great
source of high quality fertilizer. If the pond is big enough, ducks can be
integrated with water plant production.
Food
Ducks like a combination of insects, worms, fresh grass, fresh leaves
and grains (rice, corn and millet). Ducks will hunt for insects and worms
in the soil, in pond edges and underneath mulch or leaves. It will be
much easier for ducks to find insects and worms if the soil is wet. Provide
ducks with grains every day. Like for chickens, if you soak the grains overnight and let them grow
for 1-2 days, it will improve the grain quality. A handful of grains for every 5 ducks is enough.
Duck House
Make a house to provide ducks with a place to lay eggs,
rest and be protected at night from animal predators,
like dogs, cats, snakes and rats, especially for when
ducks are still young. A house 2 m x 2 m is big enough
for 10-15 ducks. Always have a layer of dried grasses
on the floor. Change the grass every 1-2 months. This
grass and duck manure makes a good, strong compost.
The ducks will also use the grass to make nests for their eggs.
It is also important to provide containers of water inside the duck house.
Shade
Ducks need shade, especially during the middle of the day. Trees or simple shade structures
from any available materials can be used to provide shade for ducks.
Health
Almost all problems can be prevented by providing clean water and food for the ducks every
day and cleaning their house regularly. Make sure they hare receiving enough shade, especially
during the middle of the day. Add some papaya seeds or mulberry leaves to the duck food
regularly to reduce worm problems. Separate any sick ducks until they recover to prevent
diseases from spreading.
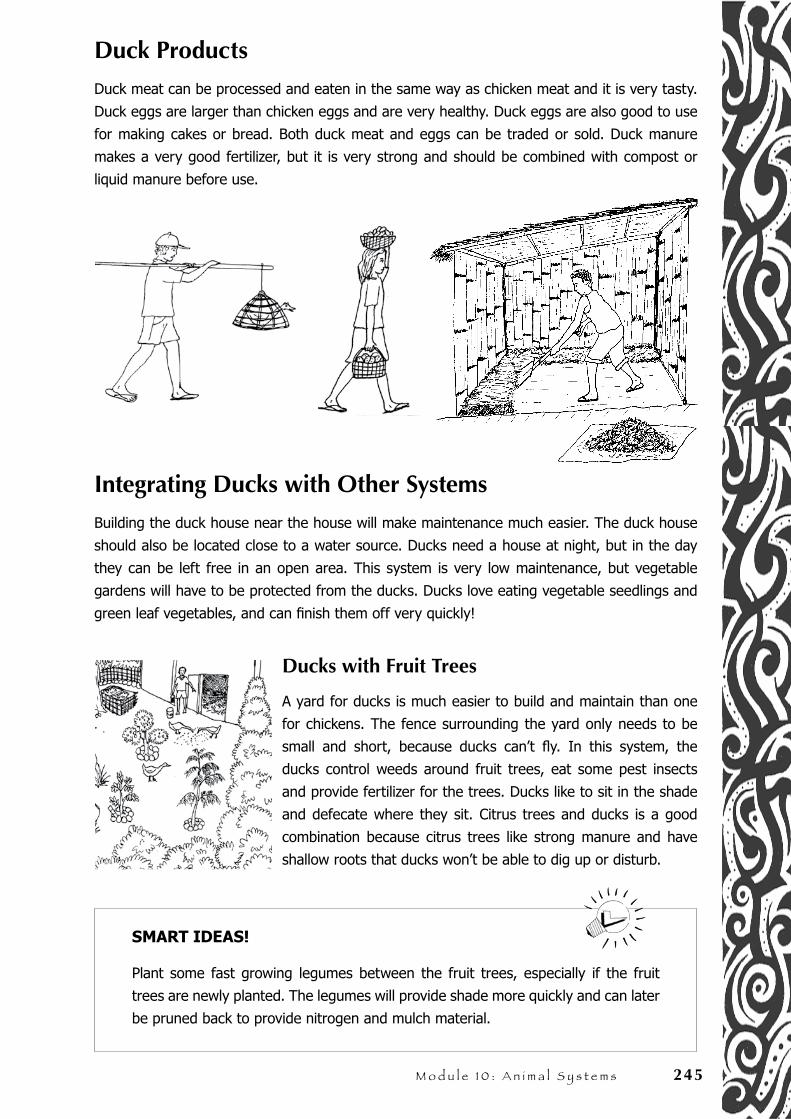
M o d u l e 1 0 : A n i m a l S y s t e m s 245
Duck Products
Duck meat can be processed and eaten in the same way as chicken meat and it is very tasty.
Duck eggs are larger than chicken eggs and are very healthy. Duck eggs are also good to use
for making cakes or bread. Both duck meat and eggs can be traded or sold. Duck manure
makes a very good fertilizer, but it is very strong and should be combined with compost or
liquid manure before use.
Integrating Ducks with Other Systems
Building the duck house near the house will make maintenance much easier. The duck house
should also be located close to a water source. Ducks need a house at night, but in the day
they can be left free in an open area. This system is very low maintenance, but vegetable
gardens will have to be protected from the ducks. Ducks love eating vegetable seedlings and
green leaf vegetables, and can finish them off very quickly!
Ducks with Fruit Trees
A yard for ducks is much easier to build and maintain than one
for chickens. The fence surrounding the yard only needs to be
small and short, because ducks can’t fly. In this system, the
ducks control weeds around fruit trees, eat some pest insects
and provide fertilizer for the trees. Ducks like to sit in the shade
and defecate where they sit. Citrus trees and ducks is a good
combination because citrus trees like strong manure and have
shallow roots that ducks won’t be able to dig up or disturb.
SMART IDEAS!
Plant some fast growing legumes between the fruit trees, especially if the fruit
trees are newly planted. The legumes will provide shade more quickly and can later
be pruned back to provide nitrogen and mulch material.

246 Pe r m a c u l t u r e , S o l u t i o n s f o r S u s t a i n a b l e l i f e s t y l e s
Ducks with Rice Paddies
Ducks can be used to eat weeds and provide
fertilizer for rice paddies after harvest. Use a
small moveable fence to keep the ducks on the
part of the paddy you want them on. It is best to
move them back to the duck house every night
so they are protected from predators and to
make collecting eggs easier.
Ducks with Vegetable Gardens
The best time to integrate ducks into this system
is just after harvest. The ducks will eat weeds
and insects, while providing fertilizing the soil for
the next planting season.
Remember to always provide some shade for the
middle of the day. Give extra attention to parts
of the garden where vegetables are still growing,
because the ducks could eat them all!
(For information about integrating ducks with
fish, see Module 11 – Aquaculture).
Ducks with Irrigation Water
Having a pond is very good for ducks. The pond
water will be full of nutrients and can be used for
making compost and liquid fertilizer.
This system will provide some nutrients to the
irrigation waters which will later be used by
plants. In the wet season, if water from the duck
pond overflows, you can use swales or other
water catchments below the pond to catch the
water.
This water is very high in nutrients, and will
fertilize your vegetables and trees.
BEWARE!
Waste water from kitchens or bathrooms should not be used directly for duck ponds because it contains soaps and detergents, which can make the ducks sick.
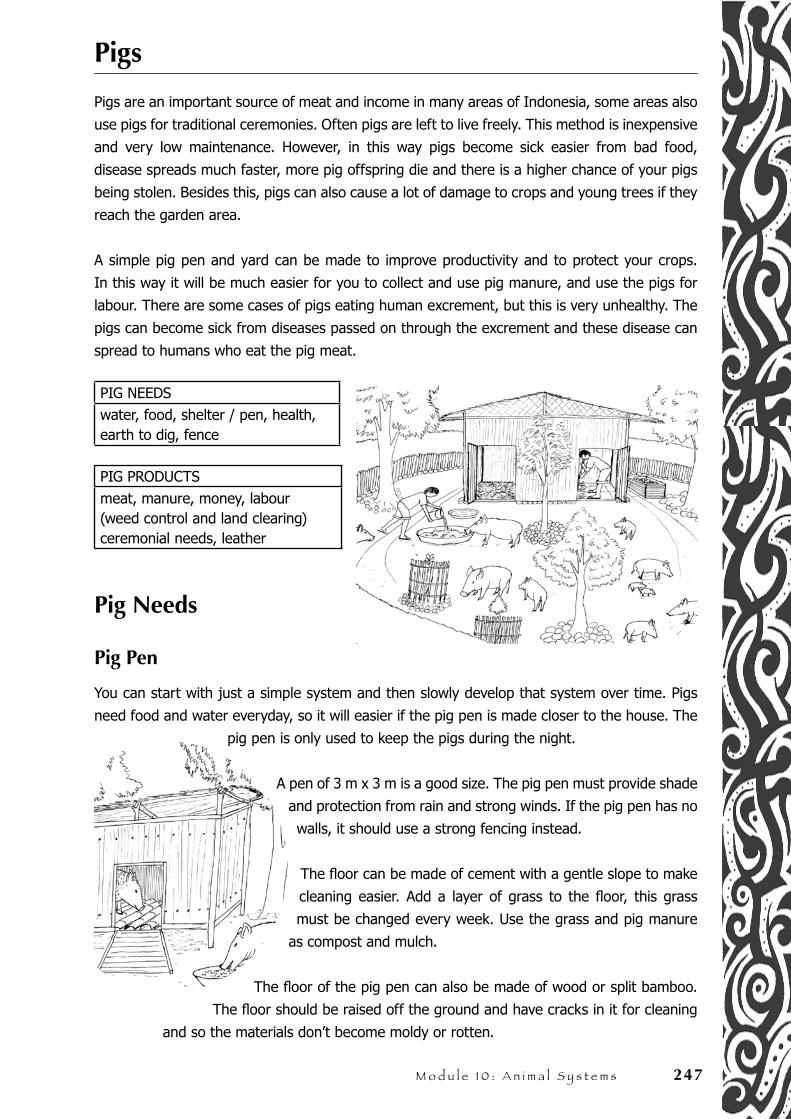
M o d u l e 1 0 : A n i m a l S y s t e m s 247
Pigs
Pigs are an important source of meat and income in many areas of Indonesia, some areas also
use pigs for traditional ceremonies. Often pigs are left to live freely. This method is inexpensive
and very low maintenance. However, in this way pigs become sick easier from bad food,
disease spreads much faster, more pig offspring die and there is a higher chance of your pigs
being stolen. Besides this, pigs can also cause a lot of damage to crops and young trees if they
reach the garden area.
A simple pig pen and yard can be made to improve productivity and to protect your crops.
In this way it will be much easier for you to collect and use pig manure, and use the pigs for
labour. There are some cases of pigs eating human excrement, but this is very unhealthy. The
pigs can become sick from diseases passed on through the excrement and these disease can
spread to humans who eat the pig meat.
PIG NEEDSwater, food, shelter / pen, health, earth to dig, fence
PIG PRODUCTSmeat, manure, money, labour (weed control and land clearing) ceremonial needs, leather
Pig Needs
Pig Pen
You can start with just a simple system and then slowly develop that system over time. Pigs
need food and water everyday, so it will easier if the pig pen is made closer to the house. The
pig pen is only used to keep the pigs during the night.
A pen of 3 m x 3 m is a good size. The pig pen must provide shade
and protection from rain and strong winds. If the pig pen has no
walls, it should use a strong fencing instead.
The floor can be made of cement with a gentle slope to make
cleaning easier. Add a layer of grass to the floor, this grass
must be changed every week. Use the grass and pig manure
as compost and mulch.
The floor of the pig pen can also be made of wood or split bamboo.
The floor should be raised off the ground and have cracks in it for cleaning
and so the materials don’t become moldy or rotten.
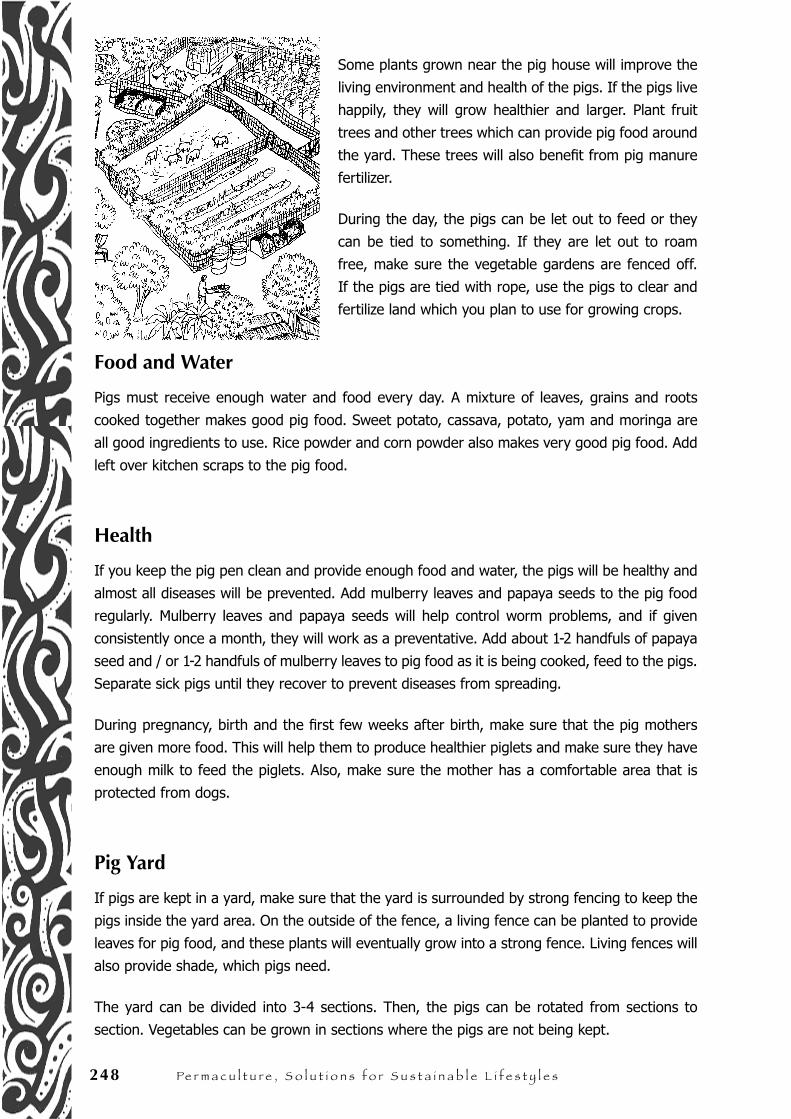
248 Pe r m a c u l t u r e , S o l u t i o n s f o r S u s t a i n a b l e l i f e s t y l e s
Some plants grown near the pig house will improve the
living environment and health of the pigs. If the pigs live
happily, they will grow healthier and larger. Plant fruit
trees and other trees which can provide pig food around
the yard. These trees will also benefit from pig manure
fertilizer.
During the day, the pigs can be let out to feed or they
can be tied to something. If they are let out to roam
free, make sure the vegetable gardens are fenced off.
If the pigs are tied with rope, use the pigs to clear and
fertilize land which you plan to use for growing crops.
Food and Water
Pigs must receive enough water and food every day. A mixture of leaves, grains and roots
cooked together makes good pig food. Sweet potato, cassava, potato, yam and moringa are
all good ingredients to use. Rice powder and corn powder also makes very good pig food. Add
left over kitchen scraps to the pig food.
Health
If you keep the pig pen clean and provide enough food and water, the pigs will be healthy and
almost all diseases will be prevented. Add mulberry leaves and papaya seeds to the pig food
regularly. Mulberry leaves and papaya seeds will help control worm problems, and if given
consistently once a month, they will work as a preventative. Add about 1-2 handfuls of papaya
seed and / or 1-2 handfuls of mulberry leaves to pig food as it is being cooked, feed to the pigs.
Separate sick pigs until they recover to prevent diseases from spreading.
During pregnancy, birth and the first few weeks after birth, make sure that the pig mothers
are given more food. This will help them to produce healthier piglets and make sure they have
enough milk to feed the piglets. Also, make sure the mother has a comfortable area that is
protected from dogs.
Pig Yard
If pigs are kept in a yard, make sure that the yard is surrounded by strong fencing to keep the
pigs inside the yard area. On the outside of the fence, a living fence can be planted to provide
leaves for pig food, and these plants will eventually grow into a strong fence. Living fences will
also provide shade, which pigs need.
The yard can be divided into 3-4 sections. Then, the pigs can be rotated from sections to
section. Vegetables can be grown in sections where the pigs are not being kept.
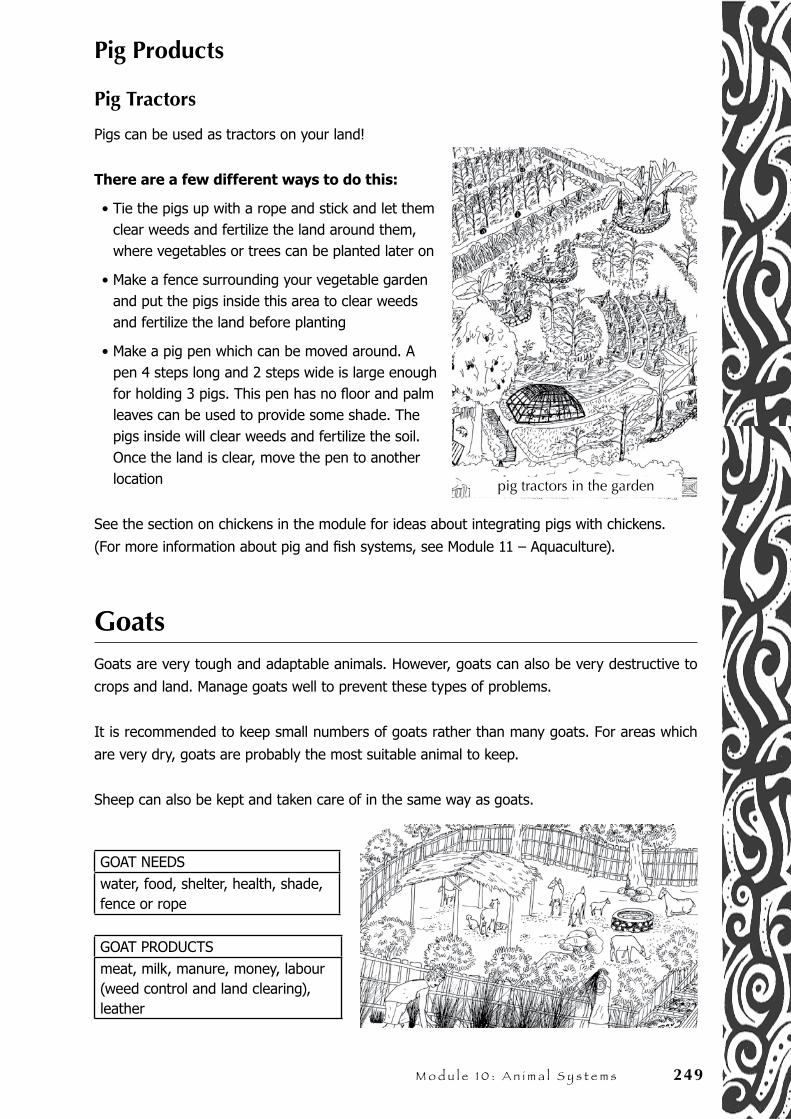
M o d u l e 1 0 : A n i m a l S y s t e m s 249
Pig Products
Pig Tractors
Pigs can be used as tractors on your land!
There are a few different ways to do this:
• Tie the pigs up with a rope and stick and let them clear weeds and fertilize the land around them, where vegetables or trees can be planted later on
• Make a fence surrounding your vegetable garden and put the pigs inside this area to clear weeds and fertilize the land before planting
• Make a pig pen which can be moved around. A pen 4 steps long and 2 steps wide is large enough for holding 3 pigs. This pen has no floor and palm leaves can be used to provide some shade. The pigs inside will clear weeds and fertilize the soil. Once the land is clear, move the pen to another location
See the section on chickens in the module for ideas about integrating pigs with chickens.
(For more information about pig and fish systems, see Module 11 – Aquaculture).
GoatsGoats are very tough and adaptable animals. However, goats can also be very destructive to
crops and land. Manage goats well to prevent these types of problems.
It is recommended to keep small numbers of goats rather than many goats. For areas which
are very dry, goats are probably the most suitable animal to keep.
Sheep can also be kept and taken care of in the same way as goats.
GOAT NEEDSwater, food, shelter, health, shade, fence or rope
GOAT PRODUCTSmeat, milk, manure, money, labour (weed control and land clearing), leather
pig tractors in the garden
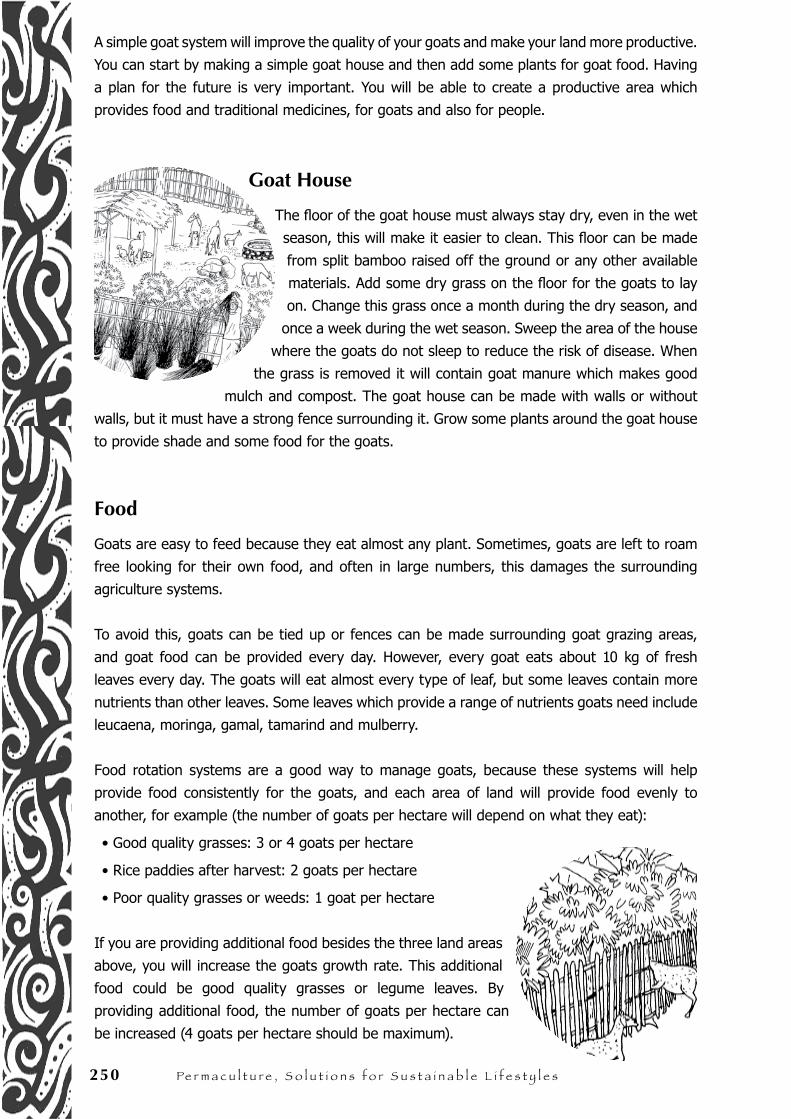
250 Pe r m a c u l t u r e , S o l u t i o n s f o r S u s t a i n a b l e l i f e s t y l e s
A simple goat system will improve the quality of your goats and make your land more productive.
You can start by making a simple goat house and then add some plants for goat food. Having
a plan for the future is very important. You will be able to create a productive area which
provides food and traditional medicines, for goats and also for people.
Goat House
The floor of the goat house must always stay dry, even in the wet
season, this will make it easier to clean. This floor can be made
from split bamboo raised off the ground or any other available
materials. Add some dry grass on the floor for the goats to lay
on. Change this grass once a month during the dry season, and
once a week during the wet season. Sweep the area of the house
where the goats do not sleep to reduce the risk of disease. When
the grass is removed it will contain goat manure which makes good
mulch and compost. The goat house can be made with walls or without
walls, but it must have a strong fence surrounding it. Grow some plants around the goat house
to provide shade and some food for the goats.
Food
Goats are easy to feed because they eat almost any plant. Sometimes, goats are left to roam
free looking for their own food, and often in large numbers, this damages the surrounding
agriculture systems.
To avoid this, goats can be tied up or fences can be made surrounding goat grazing areas,
and goat food can be provided every day. However, every goat eats about 10 kg of fresh
leaves every day. The goats will eat almost every type of leaf, but some leaves contain more
nutrients than other leaves. Some leaves which provide a range of nutrients goats need include
leucaena, moringa, gamal, tamarind and mulberry.
Food rotation systems are a good way to manage goats, because these systems will help
provide food consistently for the goats, and each area of land will provide food evenly to
another, for example (the number of goats per hectare will depend on what they eat):
• Good quality grasses: 3 or 4 goats per hectare
• Rice paddies after harvest: 2 goats per hectare
• Poor quality grasses or weeds: 1 goat per hectare
If you are providing additional food besides the three land areas
above, you will increase the goats growth rate. This additional
food could be good quality grasses or legume leaves. By
providing additional food, the number of goats per hectare can
be increased (4 goats per hectare should be maximum).

M o d u l e 1 0 : A n i m a l S y s t e m s 251
SMART IDEAS!
Collect and spread seeds of legumes, ground cover crops, clovers and other small
plants. This will improve the soil and provide quality goat food.
Goat Health
Sea salt is very important for goat health. If you put a small
container of salt in their house, the goats will naturally lick it
when they want it. Add papaya seeds and mulberry leaves to goat
food to control worm problems. Take care of mothers and
newborn goats in a house or yard which has protection
from rains and strong winds. This will help
increase young goat survival rates
and reduce chances of the mother
or the newborn kids getting sick.
One of the main diseases which affects goats is called Coccidia. This is a type of worm which
goats usually carry without problems, but if the goats’ living conditions are unhealthy or the
weather is bad, this disease can kill them. Usually this disease affects goats at the end of the
wet season, when the winds are strongest.
The best cure for this disease is prevention. This can be done by:
• Not grazing too many goats on one area of land
• Cleaning the goat house regularly during the wet season, once every day or two. Wet goat manure increases the risk of disease
• Put some dry grass in the goat house and burn it. This will kill worms which live in the soil, but be careful not to burn down the whole goat house! Do this 1-2 times during the wet season
• Clean out water containers so that there is no goat manure in them
• Protect goats from strong winds (protection in the goat house)
• Separate sick goats until they recover to prevent diseases from spreading
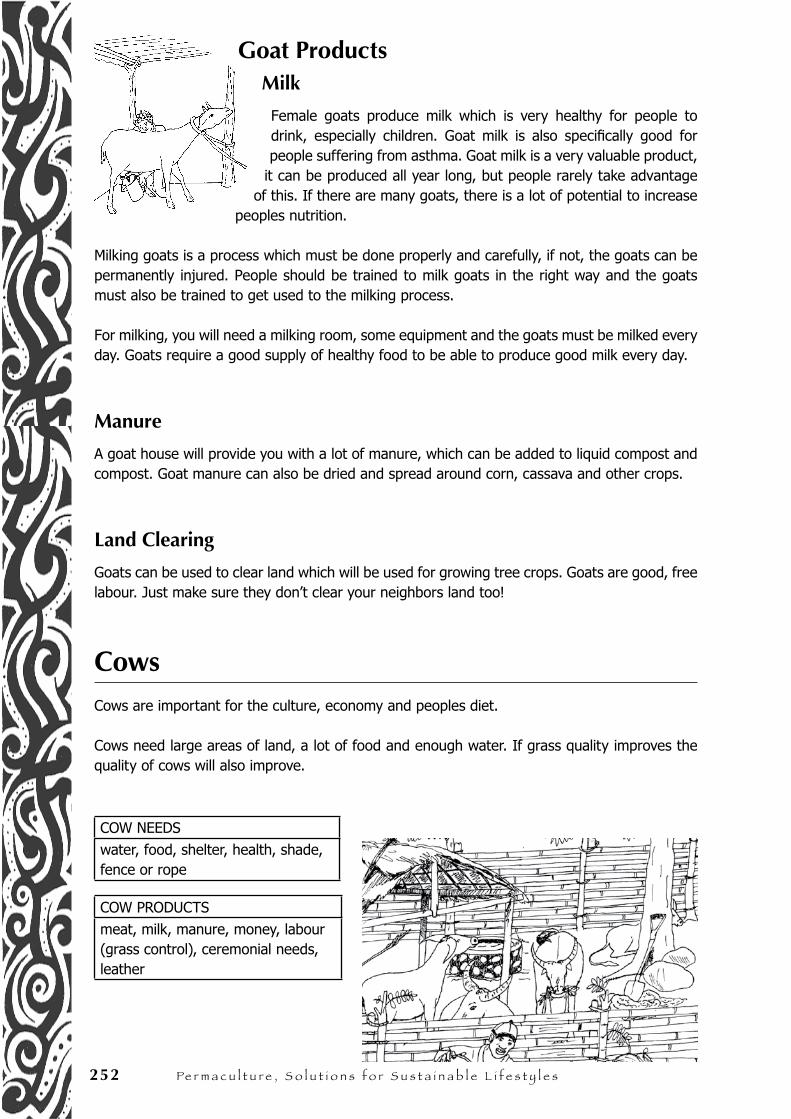
252 Pe r m a c u l t u r e , S o l u t i o n s f o r S u s t a i n a b l e l i f e s t y l e s
Goat ProductsMilk
Female goats produce milk which is very healthy for people to drink, especially children. Goat milk is also specifically good for people suffering from asthma. Goat milk is a very valuable product,
it can be produced all year long, but people rarely take advantage of this. If there are many goats, there is a lot of potential to increase
peoples nutrition.
Milking goats is a process which must be done properly and carefully, if not, the goats can be permanently injured. People should be trained to milk goats in the right way and the goats must also be trained to get used to the milking process.
For milking, you will need a milking room, some equipment and the goats must be milked every day. Goats require a good supply of healthy food to be able to produce good milk every day.
Manure
A goat house will provide you with a lot of manure, which can be added to liquid compost and compost. Goat manure can also be dried and spread around corn, cassava and other crops.
Land Clearing
Goats can be used to clear land which will be used for growing tree crops. Goats are good, free labour. Just make sure they don’t clear your neighbors land too!
CowsCows are important for the culture, economy and peoples diet.
Cows need large areas of land, a lot of food and enough water. If grass quality improves the quality of cows will also improve.
COW NEEDSwater, food, shelter, health, shade, fence or rope
COW PRODUCTSmeat, milk, manure, money, labour (grass control), ceremonial needs, leather
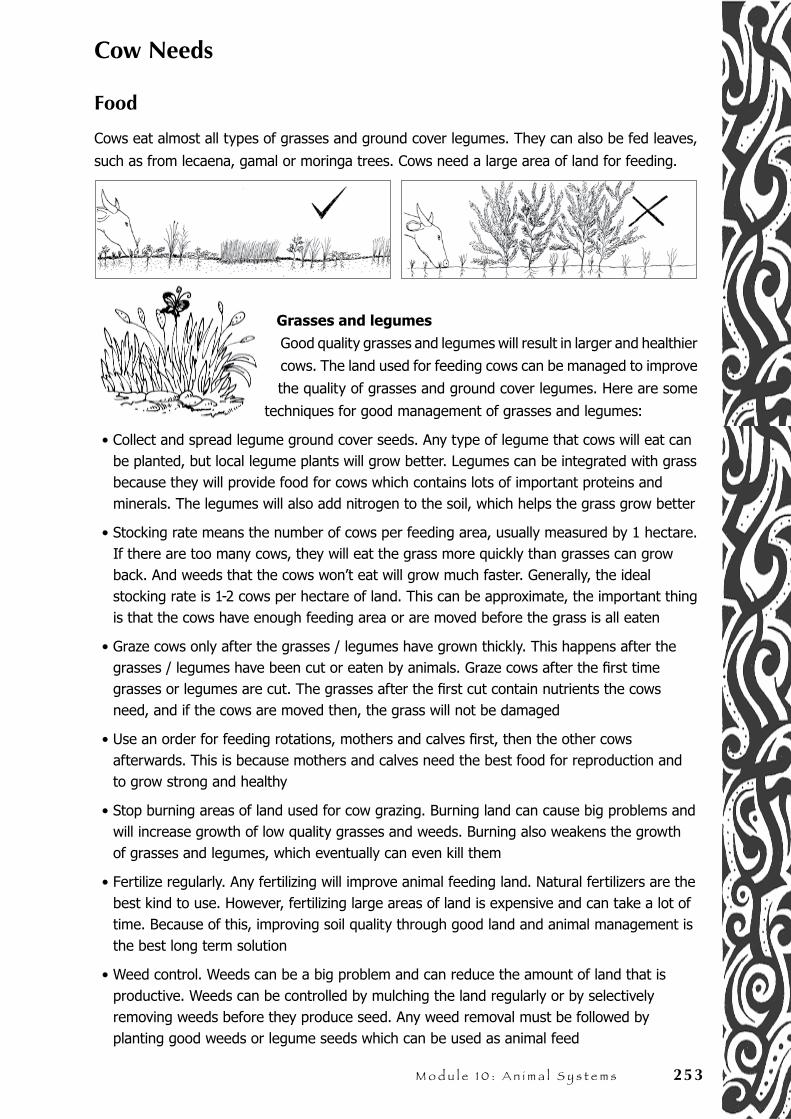
M o d u l e 1 0 : A n i m a l S y s t e m s 253
Cow Needs
Food
Cows eat almost all types of grasses and ground cover legumes. They can also be fed leaves,
such as from lecaena, gamal or moringa trees. Cows need a large area of land for feeding.
Grasses and legumes
Good quality grasses and legumes will result in larger and healthier
cows. The land used for feeding cows can be managed to improve
the quality of grasses and ground cover legumes. Here are some
techniques for good management of grasses and legumes:
• Collect and spread legume ground cover seeds. Any type of legume that cows will eat can be planted, but local legume plants will grow better. Legumes can be integrated with grass because they will provide food for cows which contains lots of important proteins and minerals. The legumes will also add nitrogen to the soil, which helps the grass grow better
• Stocking rate means the number of cows per feeding area, usually measured by 1 hectare. If there are too many cows, they will eat the grass more quickly than grasses can grow back. And weeds that the cows won’t eat will grow much faster. Generally, the ideal stocking rate is 1-2 cows per hectare of land. This can be approximate, the important thing is that the cows have enough feeding area or are moved before the grass is all eaten
• Graze cows only after the grasses / legumes have grown thickly. This happens after the grasses / legumes have been cut or eaten by animals. Graze cows after the first time grasses or legumes are cut. The grasses after the first cut contain nutrients the cows need, and if the cows are moved then, the grass will not be damaged
• Use an order for feeding rotations, mothers and calves first, then the other cows afterwards. This is because mothers and calves need the best food for reproduction and to grow strong and healthy
• Stop burning areas of land used for cow grazing. Burning land can cause big problems and will increase growth of low quality grasses and weeds. Burning also weakens the growth of grasses and legumes, which eventually can even kill them
• Fertilize regularly. Any fertilizing will improve animal feeding land. Natural fertilizers are the best kind to use. However, fertilizing large areas of land is expensive and can take a lot of time. Because of this, improving soil quality through good land and animal management is the best long term solution
• Weed control. Weeds can be a big problem and can reduce the amount of land that is productive. Weeds can be controlled by mulching the land regularly or by selectively removing weeds before they produce seed. Any weed removal must be followed by planting good weeds or legume seeds which can be used as animal feed
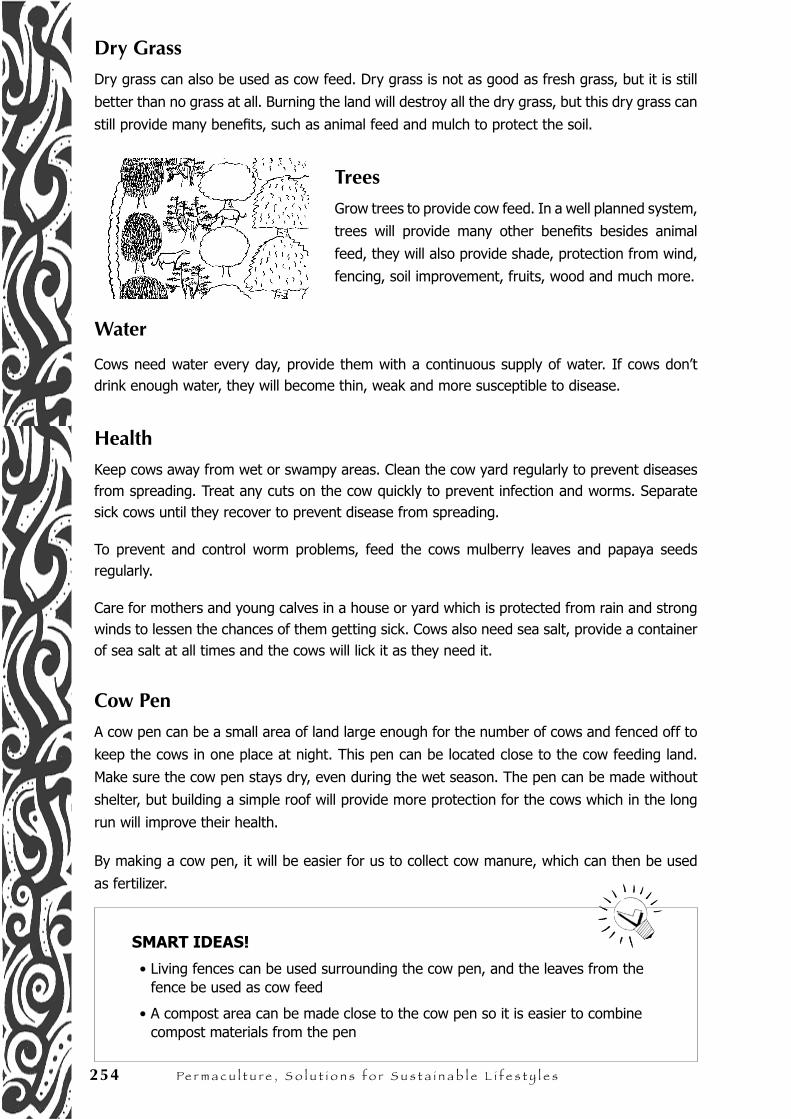
254 Pe r m a c u l t u r e , S o l u t i o n s f o r S u s t a i n a b l e l i f e s t y l e s
Dry Grass
Dry grass can also be used as cow feed. Dry grass is not as good as fresh grass, but it is still
better than no grass at all. Burning the land will destroy all the dry grass, but this dry grass can
still provide many benefits, such as animal feed and mulch to protect the soil.
Trees
Grow trees to provide cow feed. In a well planned system,
trees will provide many other benefits besides animal
feed, they will also provide shade, protection from wind,
fencing, soil improvement, fruits, wood and much more.
Water
Cows need water every day, provide them with a continuous supply of water. If cows don’t drink enough water, they will become thin, weak and more susceptible to disease.
Health
Keep cows away from wet or swampy areas. Clean the cow yard regularly to prevent diseases from spreading. Treat any cuts on the cow quickly to prevent infection and worms. Separate sick cows until they recover to prevent disease from spreading.
To prevent and control worm problems, feed the cows mulberry leaves and papaya seeds regularly.
Care for mothers and young calves in a house or yard which is protected from rain and strong winds to lessen the chances of them getting sick. Cows also need sea salt, provide a container of sea salt at all times and the cows will lick it as they need it.
Cow Pen
A cow pen can be a small area of land large enough for the number of cows and fenced off to
keep the cows in one place at night. This pen can be located close to the cow feeding land.
Make sure the cow pen stays dry, even during the wet season. The pen can be made without
shelter, but building a simple roof will provide more protection for the cows which in the long
run will improve their health.
By making a cow pen, it will be easier for us to collect cow manure, which can then be used
as fertilizer.
SMART IDEAS!
• Living fences can be used surrounding the cow pen, and the leaves from the fence be used as cow feed
• A compost area can be made close to the cow pen so it is easier to combine compost materials from the pen
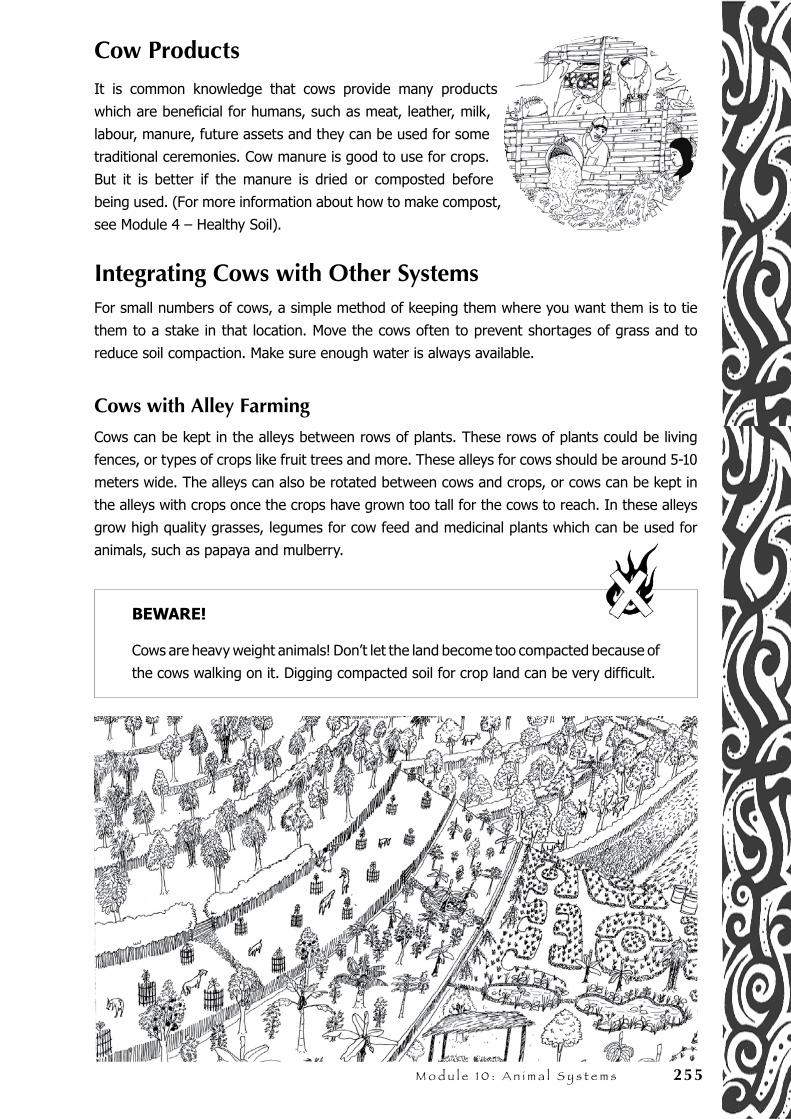
M o d u l e 1 0 : A n i m a l S y s t e m s 255
Cow Products
It is common knowledge that cows provide many products
which are beneficial for humans, such as meat, leather, milk,
labour, manure, future assets and they can be used for some
traditional ceremonies. Cow manure is good to use for crops.
But it is better if the manure is dried or composted before
being used. (For more information about how to make compost,
see Module 4 – Healthy Soil).
Integrating Cows with Other SystemsFor small numbers of cows, a simple method of keeping them where you want them is to tie
them to a stake in that location. Move the cows often to prevent shortages of grass and to
reduce soil compaction. Make sure enough water is always available.
Cows with Alley Farming
Cows can be kept in the alleys between rows of plants. These rows of plants could be living
fences, or types of crops like fruit trees and more. These alleys for cows should be around 5-10
meters wide. The alleys can also be rotated between cows and crops, or cows can be kept in
the alleys with crops once the crops have grown too tall for the cows to reach. In these alleys
grow high quality grasses, legumes for cow feed and medicinal plants which can be used for
animals, such as papaya and mulberry.
BEWARE!
Cows are heavy weight animals! Don’t let the land become too compacted because of
the cows walking on it. Digging compacted soil for crop land can be very difficult.
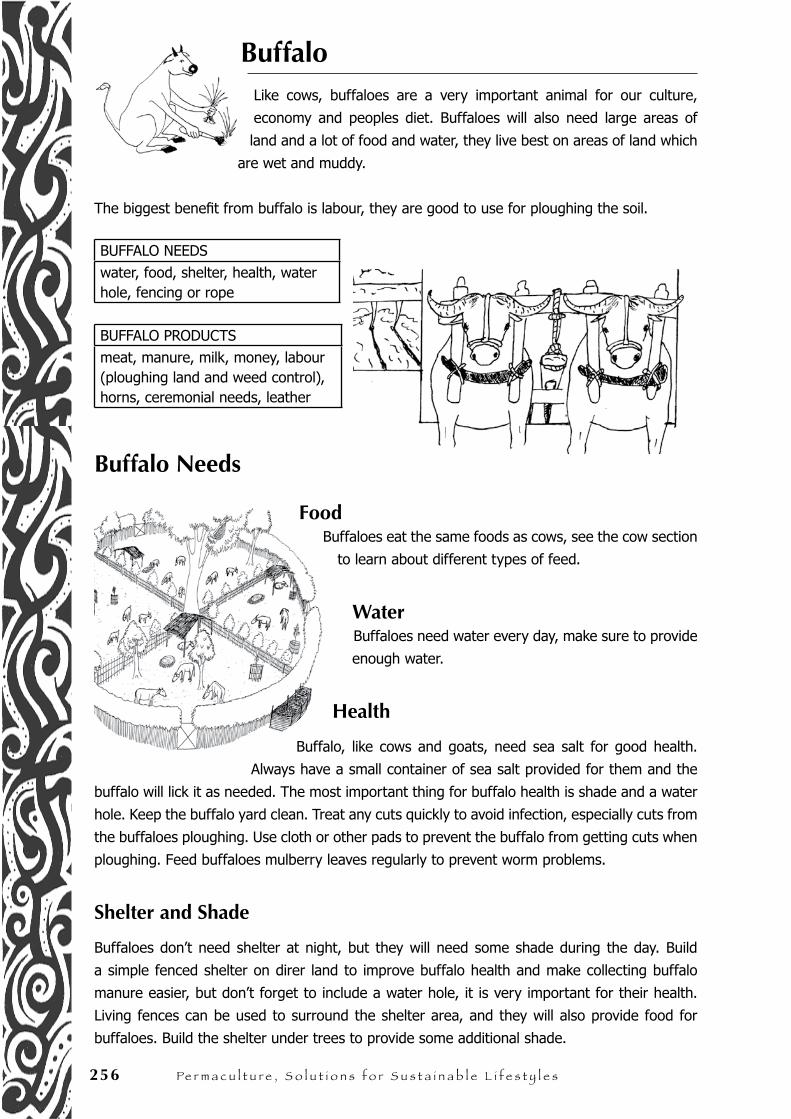
256 Pe r m a c u l t u r e , S o l u t i o n s f o r S u s t a i n a b l e l i f e s t y l e s
Buffalo Like cows, buffaloes are a very important animal for our culture,
economy and peoples diet. Buffaloes will also need large areas of
land and a lot of food and water, they live best on areas of land which
are wet and muddy.
The biggest benefit from buffalo is labour, they are good to use for ploughing the soil.
BUFFALO NEEDSwater, food, shelter, health, water hole, fencing or rope
BUFFALO PRODUCTSmeat, manure, milk, money, labour (ploughing land and weed control), horns, ceremonial needs, leather
Buffalo Needs
FoodBuffaloes eat the same foods as cows, see the cow section
to learn about different types of feed.
WaterBuffaloes need water every day, make sure to provide
enough water.
Health
Buffalo, like cows and goats, need sea salt for good health.
Always have a small container of sea salt provided for them and the
buffalo will lick it as needed. The most important thing for buffalo health is shade and a water
hole. Keep the buffalo yard clean. Treat any cuts quickly to avoid infection, especially cuts from
the buffaloes ploughing. Use cloth or other pads to prevent the buffalo from getting cuts when
ploughing. Feed buffaloes mulberry leaves regularly to prevent worm problems.
Shelter and Shade
Buffaloes don’t need shelter at night, but they will need some shade during the day. Build
a simple fenced shelter on direr land to improve buffalo health and make collecting buffalo
manure easier, but don’t forget to include a water hole, it is very important for their health.
Living fences can be used to surround the shelter area, and they will also provide food for
buffaloes. Build the shelter under trees to provide some additional shade.
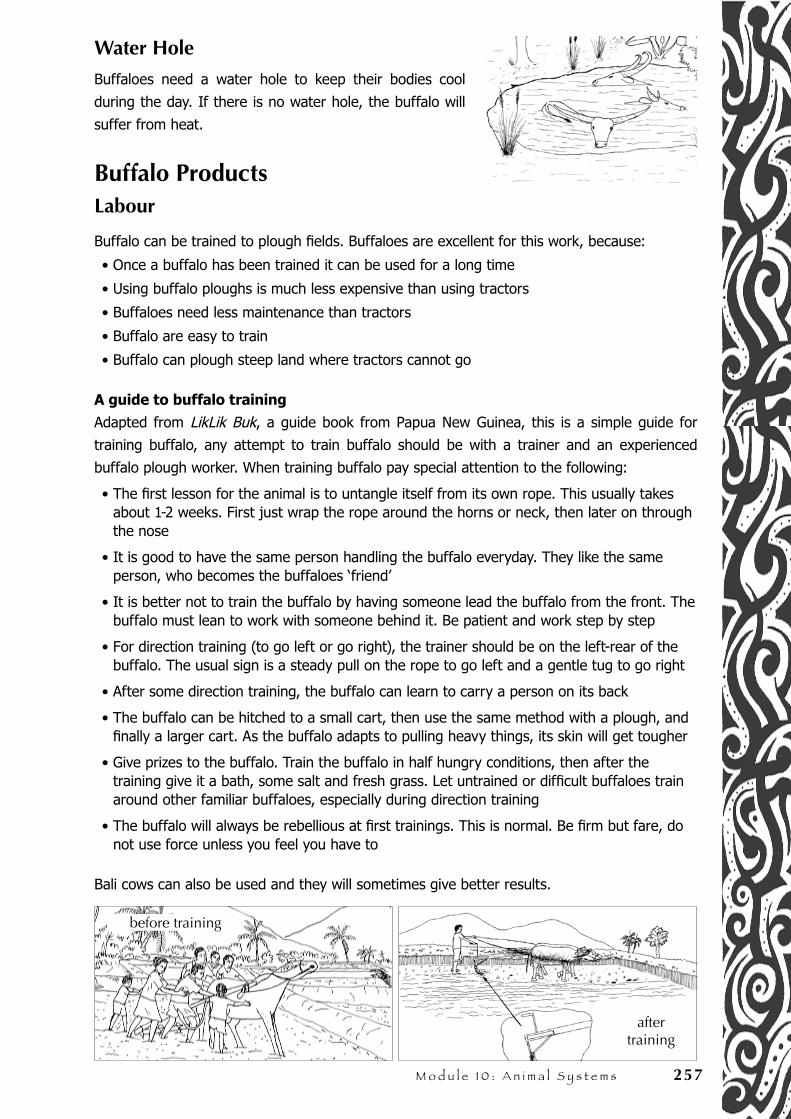
M o d u l e 1 0 : A n i m a l S y s t e m s 257
Water Hole
Buffaloes need a water hole to keep their bodies cool
during the day. If there is no water hole, the buffalo will
suffer from heat.
Buffalo ProductsLabour
Buffalo can be trained to plough fields. Buffaloes are excellent for this work, because:
• Once a buffalo has been trained it can be used for a long time
• Using buffalo ploughs is much less expensive than using tractors
• Buffaloes need less maintenance than tractors
• Buffalo are easy to train
• Buffalo can plough steep land where tractors cannot go
A guide to buffalo training
Adapted from LikLik Buk, a guide book from Papua New Guinea, this is a simple guide for
training buffalo, any attempt to train buffalo should be with a trainer and an experienced
buffalo plough worker. When training buffalo pay special attention to the following:
• The first lesson for the animal is to untangle itself from its own rope. This usually takes about 1-2 weeks. First just wrap the rope around the horns or neck, then later on through the nose
• It is good to have the same person handling the buffalo everyday. They like the same person, who becomes the buffaloes ‘friend’
• It is better not to train the buffalo by having someone lead the buffalo from the front. The buffalo must lean to work with someone behind it. Be patient and work step by step
• For direction training (to go left or go right), the trainer should be on the left-rear of the buffalo. The usual sign is a steady pull on the rope to go left and a gentle tug to go right
• After some direction training, the buffalo can learn to carry a person on its back
• The buffalo can be hitched to a small cart, then use the same method with a plough, and finally a larger cart. As the buffalo adapts to pulling heavy things, its skin will get tougher
• Give prizes to the buffalo. Train the buffalo in half hungry conditions, then after the training give it a bath, some salt and fresh grass. Let untrained or difficult buffaloes train around other familiar buffaloes, especially during direction training
• The buffalo will always be rebellious at first trainings. This is normal. Be firm but fare, do not use force unless you feel you have to
Bali cows can also be used and they will sometimes give better results.
before training
after training
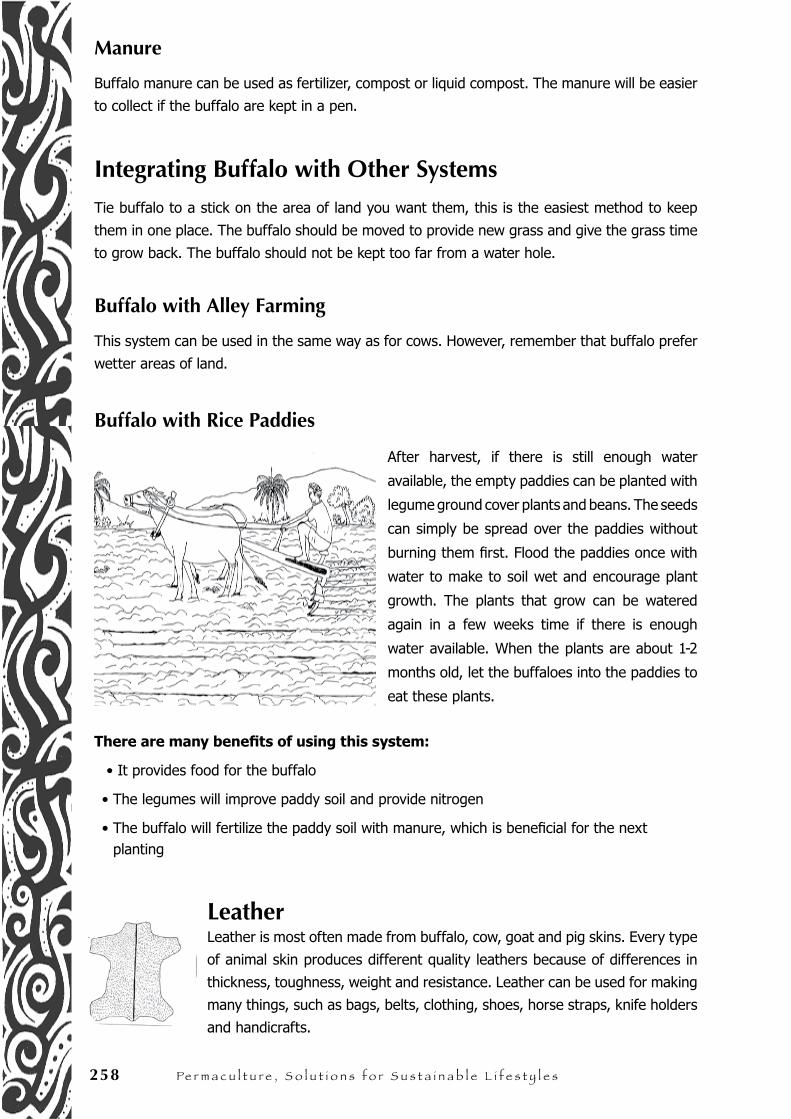
258 Pe r m a c u l t u r e , S o l u t i o n s f o r S u s t a i n a b l e l i f e s t y l e s
Manure
Buffalo manure can be used as fertilizer, compost or liquid compost. The manure will be easier
to collect if the buffalo are kept in a pen.
Integrating Buffalo with Other Systems
Tie buffalo to a stick on the area of land you want them, this is the easiest method to keep
them in one place. The buffalo should be moved to provide new grass and give the grass time
to grow back. The buffalo should not be kept too far from a water hole.
Buffalo with Alley Farming
This system can be used in the same way as for cows. However, remember that buffalo prefer
wetter areas of land.
Buffalo with Rice Paddies
After harvest, if there is still enough water
available, the empty paddies can be planted with
legume ground cover plants and beans. The seeds
can simply be spread over the paddies without
burning them first. Flood the paddies once with
water to make to soil wet and encourage plant
growth. The plants that grow can be watered
again in a few weeks time if there is enough
water available. When the plants are about 1-2
months old, let the buffaloes into the paddies to
eat these plants.
There are many benefits of using this system:
• It provides food for the buffalo
• The legumes will improve paddy soil and provide nitrogen
• The buffalo will fertilize the paddy soil with manure, which is beneficial for the next planting
LeatherLeather is most often made from buffalo, cow, goat and pig skins. Every type
of animal skin produces different quality leathers because of differences in
thickness, toughness, weight and resistance. Leather can be used for making
many things, such as bags, belts, clothing, shoes, horse straps, knife holders
and handicrafts.
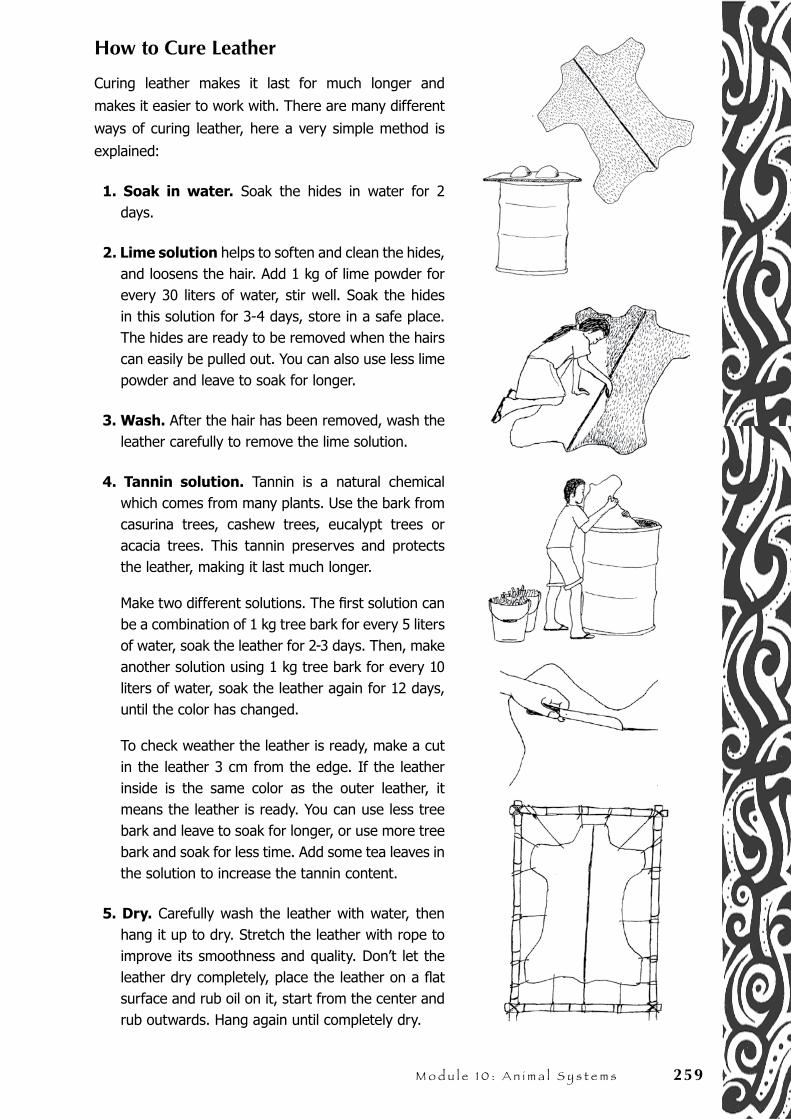
M o d u l e 1 0 : A n i m a l S y s t e m s 259
How to Cure Leather
Curing leather makes it last for much longer and
makes it easier to work with. There are many different
ways of curing leather, here a very simple method is
explained:
1. Soak in water. Soak the hides in water for 2 days.
2. Lime solution helps to soften and clean the hides, and loosens the hair. Add 1 kg of lime powder for every 30 liters of water, stir well. Soak the hides in this solution for 3-4 days, store in a safe place. The hides are ready to be removed when the hairs can easily be pulled out. You can also use less lime powder and leave to soak for longer.
3. Wash. After the hair has been removed, wash the leather carefully to remove the lime solution.
4. Tannin solution. Tannin is a natural chemical which comes from many plants. Use the bark from casurina trees, cashew trees, eucalypt trees or acacia trees. This tannin preserves and protects the leather, making it last much longer.
Make two different solutions. The first solution can be a combination of 1 kg tree bark for every 5 liters of water, soak the leather for 2-3 days. Then, make another solution using 1 kg tree bark for every 10 liters of water, soak the leather again for 12 days, until the color has changed.
To check weather the leather is ready, make a cut in the leather 3 cm from the edge. If the leather inside is the same color as the outer leather, it means the leather is ready. You can use less tree bark and leave to soak for longer, or use more tree bark and soak for less time. Add some tea leaves in the solution to increase the tannin content.
5. Dry. Carefully wash the leather with water, then hang it up to dry. Stretch the leather with rope to improve its smoothness and quality. Don’t let the leather dry completely, place the leather on a flat surface and rub oil on it, start from the center and rub outwards. Hang again until completely dry.
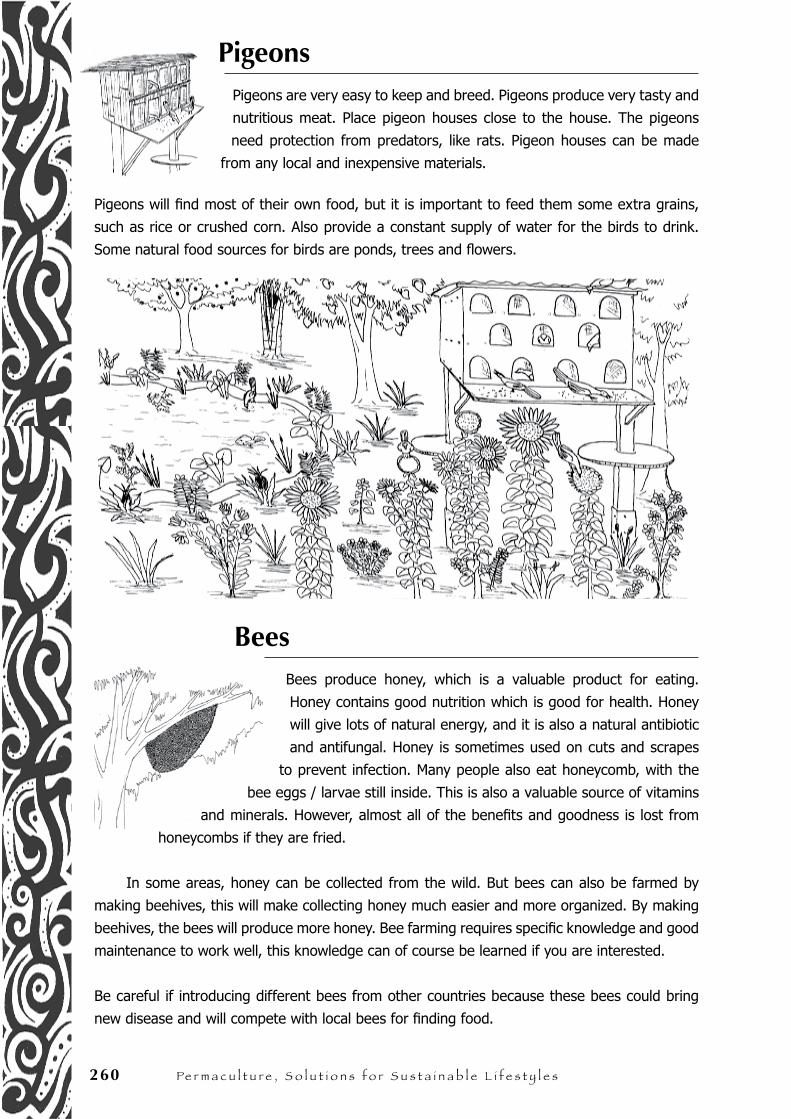
260 Pe r m a c u l t u r e , S o l u t i o n s f o r S u s t a i n a b l e l i f e s t y l e s
PigeonsPigeons are very easy to keep and breed. Pigeons produce very tasty and
nutritious meat. Place pigeon houses close to the house. The pigeons
need protection from predators, like rats. Pigeon houses can be made
from any local and inexpensive materials.
Pigeons will find most of their own food, but it is important to feed them some extra grains,
such as rice or crushed corn. Also provide a constant supply of water for the birds to drink.
Some natural food sources for birds are ponds, trees and flowers.
BeesBees produce honey, which is a valuable product for eating.
Honey contains good nutrition which is good for health. Honey
will give lots of natural energy, and it is also a natural antibiotic
and antifungal. Honey is sometimes used on cuts and scrapes
to prevent infection. Many people also eat honeycomb, with the
bee eggs / larvae still inside. This is also a valuable source of vitamins
and minerals. However, almost all of the benefits and goodness is lost from
honeycombs if they are fried.
In some areas, honey can be collected from the wild. But bees can also be farmed by
making beehives, this will make collecting honey much easier and more organized. By making
beehives, the bees will produce more honey. Bee farming requires specific knowledge and good
maintenance to work well, this knowledge can of course be learned if you are interested.
Be careful if introducing different bees from other countries because these bees could bring
new disease and will compete with local bees for finding food.
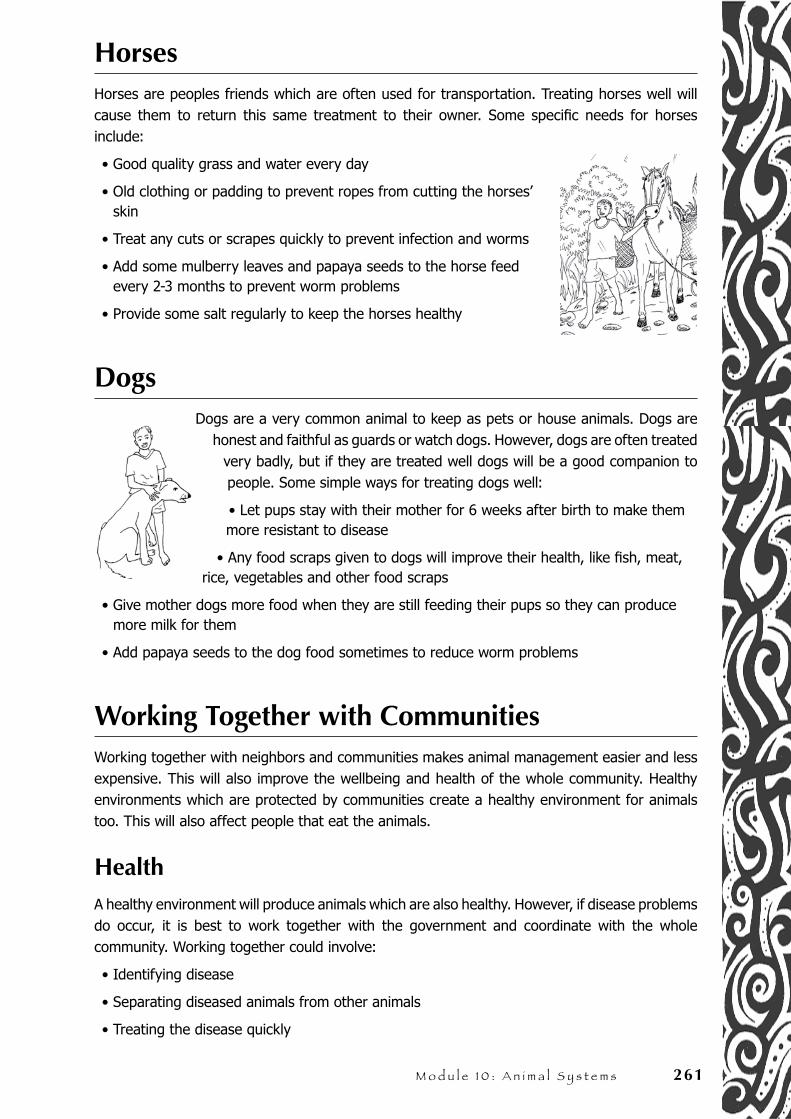
M o d u l e 1 0 : A n i m a l S y s t e m s 261
HorsesHorses are peoples friends which are often used for transportation. Treating horses well will cause them to return this same treatment to their owner. Some specific needs for horses include:
• Good quality grass and water every day
• Old clothing or padding to prevent ropes from cutting the horses’ skin
• Treat any cuts or scrapes quickly to prevent infection and worms
• Add some mulberry leaves and papaya seeds to the horse feed every 2-3 months to prevent worm problems
• Provide some salt regularly to keep the horses healthy
DogsDogs are a very common animal to keep as pets or house animals. Dogs are
honest and faithful as guards or watch dogs. However, dogs are often treated very badly, but if they are treated well dogs will be a good companion to people. Some simple ways for treating dogs well:
• Let pups stay with their mother for 6 weeks after birth to make them more resistant to disease
• Any food scraps given to dogs will improve their health, like fish, meat, rice, vegetables and other food scraps
• Give mother dogs more food when they are still feeding their pups so they can produce more milk for them
• Add papaya seeds to the dog food sometimes to reduce worm problems
Working Together with CommunitiesWorking together with neighbors and communities makes animal management easier and less expensive. This will also improve the wellbeing and health of the whole community. Healthy environments which are protected by communities create a healthy environment for animals too. This will also affect people that eat the animals.
HealthA healthy environment will produce animals which are also healthy. However, if disease problems do occur, it is best to work together with the government and coordinate with the whole community. Working together could involve:
• Identifying disease
• Separating diseased animals from other animals
• Treating the disease quickly
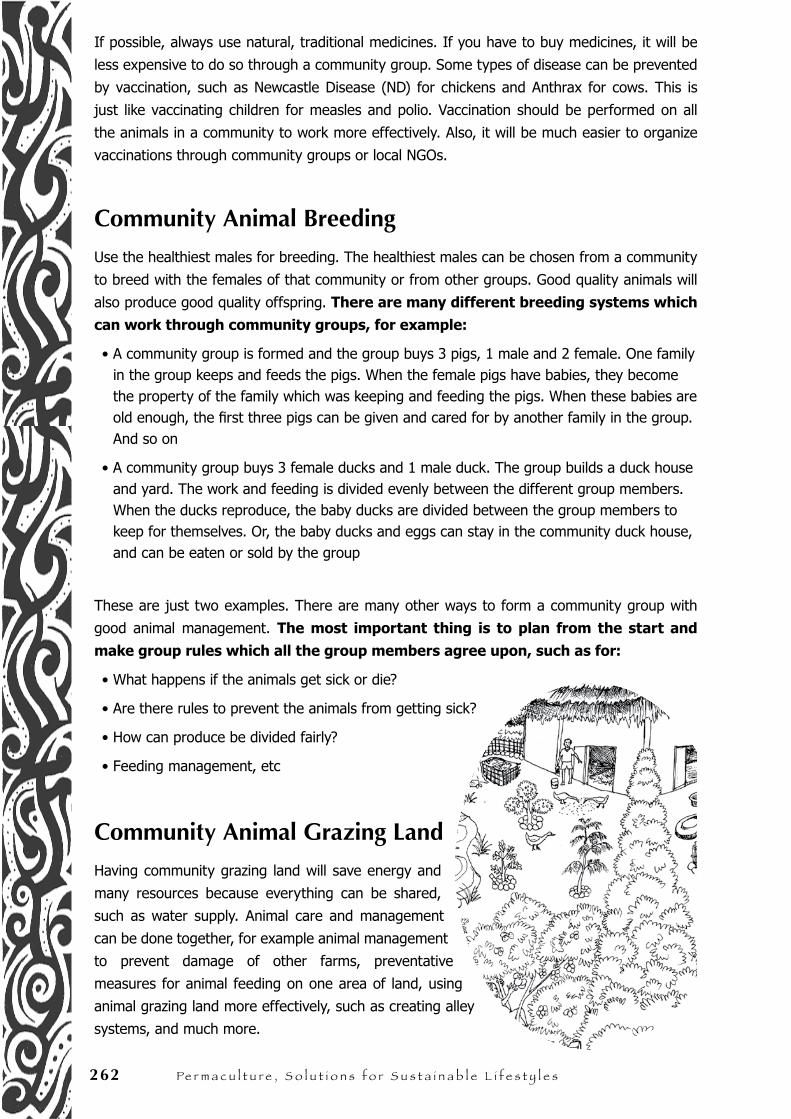
262 Pe r m a c u l t u r e , S o l u t i o n s f o r S u s t a i n a b l e l i f e s t y l e s
If possible, always use natural, traditional medicines. If you have to buy medicines, it will be
less expensive to do so through a community group. Some types of disease can be prevented
by vaccination, such as Newcastle Disease (ND) for chickens and Anthrax for cows. This is
just like vaccinating children for measles and polio. Vaccination should be performed on all
the animals in a community to work more effectively. Also, it will be much easier to organize
vaccinations through community groups or local NGOs.
Community Animal Breeding
Use the healthiest males for breeding. The healthiest males can be chosen from a community
to breed with the females of that community or from other groups. Good quality animals will
also produce good quality offspring. There are many different breeding systems which
can work through community groups, for example:
• A community group is formed and the group buys 3 pigs, 1 male and 2 female. One family in the group keeps and feeds the pigs. When the female pigs have babies, they become the property of the family which was keeping and feeding the pigs. When these babies are old enough, the first three pigs can be given and cared for by another family in the group. And so on
• A community group buys 3 female ducks and 1 male duck. The group builds a duck house and yard. The work and feeding is divided evenly between the different group members. When the ducks reproduce, the baby ducks are divided between the group members to keep for themselves. Or, the baby ducks and eggs can stay in the community duck house, and can be eaten or sold by the group
These are just two examples. There are many other ways to form a community group with
good animal management. The most important thing is to plan from the start and
make group rules which all the group members agree upon, such as for:
• What happens if the animals get sick or die?
• Are there rules to prevent the animals from getting sick?
• How can produce be divided fairly?
• Feeding management, etc
Community Animal Grazing Land
Having community grazing land will save energy and
many resources because everything can be shared,
such as water supply. Animal care and management
can be done together, for example animal management
to prevent damage of other farms, preventative
measures for animal feeding on one area of land, using
animal grazing land more effectively, such as creating alley
systems, and much more.

M o d u l e 1 0 : A n i m a l S y s t e m s 263
Community Animal Yards and Houses
A community animal yard or house can be built on community land. This system should be
made as good as possible to fulfill common needs. On community feeding land, every group
member can use the land for improving animal quality, for example the land can be used for
fattening animals before they are to be eaten or sold.
This will provide many benefits, such as:
• Saving labour and resources by having one animal yard and building one large shelter, which is complete, rather than having to build many small shelters
• Manure can be collected for community needs
• Providing a place for trading and selling animals within the group or between groups
Protecting Land, Rivers and Springs
This is very important for our future. Protection for land, rivers
and springs, as well as erosion prevention is the responsibility of
every individual, family, community, district and even of the nation.
Destruction of these resources is a loss for the future of all people.
Damage to these resources is caused by many things, such as:
• Animals, especially cows and buffalo damaging river edges because they eat river foliage, or from walking too often along the river edges
• Removing too many trees from land which is very sloped / steep
• Burning land
• A lack of interest from the law in issues to do with protecting nature
Some solutions are simple, and can be implemented
by communities themselves, for example:
• Protecting springs from animals by making water holes for animals further away from the spring
• Protecting the vegetation along river edges to help prevent erosion. Make some areas along the river edge specifically for animals to drink and bathe from so that the remaining river edge does not become damaged. In mountain areas this is very important
• Make swale and terrace systems, and prevent land burning
• Protect animal grazing lands from grass loss because of animals eating all of it. If too much grass is removed from the land, the soil will be at more risk of erosion
Every step taken will be more successful if there is good
coordination between communities and the government.
before river management
after river management
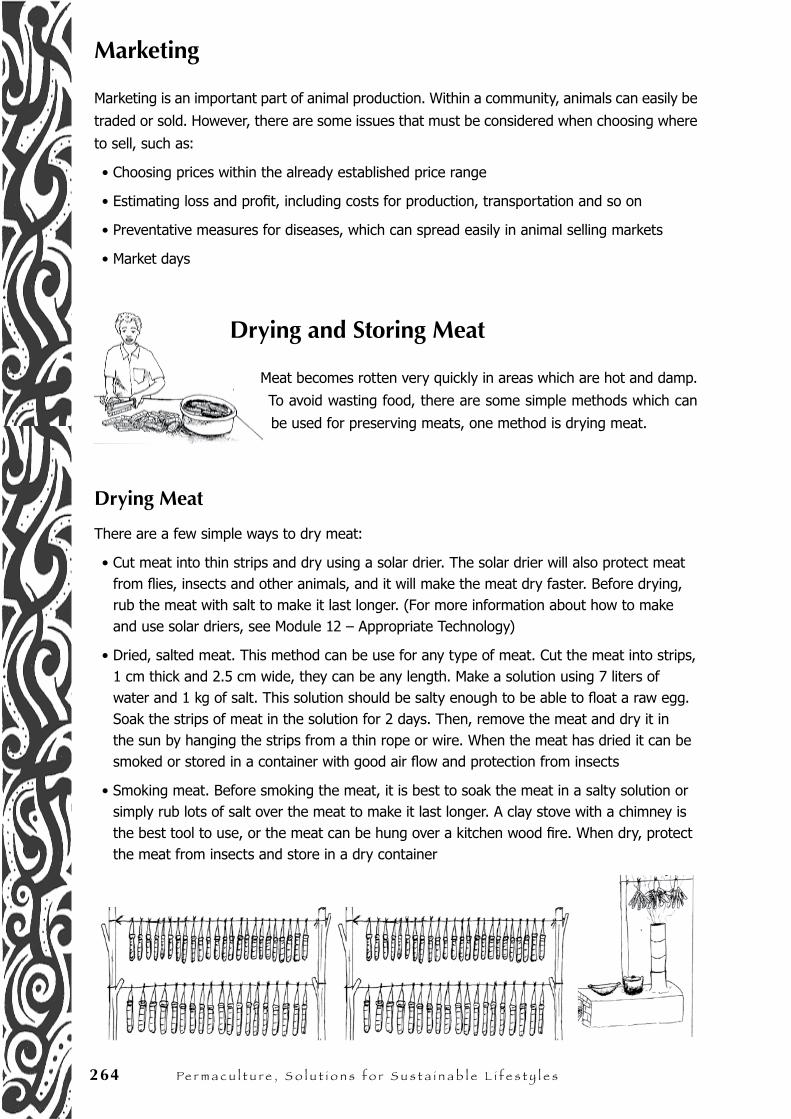
264 Pe r m a c u l t u r e , S o l u t i o n s f o r S u s t a i n a b l e l i f e s t y l e s
Marketing
Marketing is an important part of animal production. Within a community, animals can easily be
traded or sold. However, there are some issues that must be considered when choosing where
to sell, such as:
• Choosing prices within the already established price range
• Estimating loss and profit, including costs for production, transportation and so on
• Preventative measures for diseases, which can spread easily in animal selling markets
• Market days
Drying and Storing Meat
Meat becomes rotten very quickly in areas which are hot and damp.
To avoid wasting food, there are some simple methods which can
be used for preserving meats, one method is drying meat.
Drying Meat
There are a few simple ways to dry meat:
• Cut meat into thin strips and dry using a solar drier. The solar drier will also protect meat from flies, insects and other animals, and it will make the meat dry faster. Before drying, rub the meat with salt to make it last longer. (For more information about how to make and use solar driers, see Module 12 – Appropriate Technology)
• Dried, salted meat. This method can be use for any type of meat. Cut the meat into strips, 1 cm thick and 2.5 cm wide, they can be any length. Make a solution using 7 liters of water and 1 kg of salt. This solution should be salty enough to be able to float a raw egg. Soak the strips of meat in the solution for 2 days. Then, remove the meat and dry it in the sun by hanging the strips from a thin rope or wire. When the meat has dried it can be smoked or stored in a container with good air flow and protection from insects
• Smoking meat. Before smoking the meat, it is best to soak the meat in a salty solution or simply rub lots of salt over the meat to make it last longer. A clay stove with a chimney is the best tool to use, or the meat can be hung over a kitchen wood fire. When dry, protect the meat from insects and store in a dry container
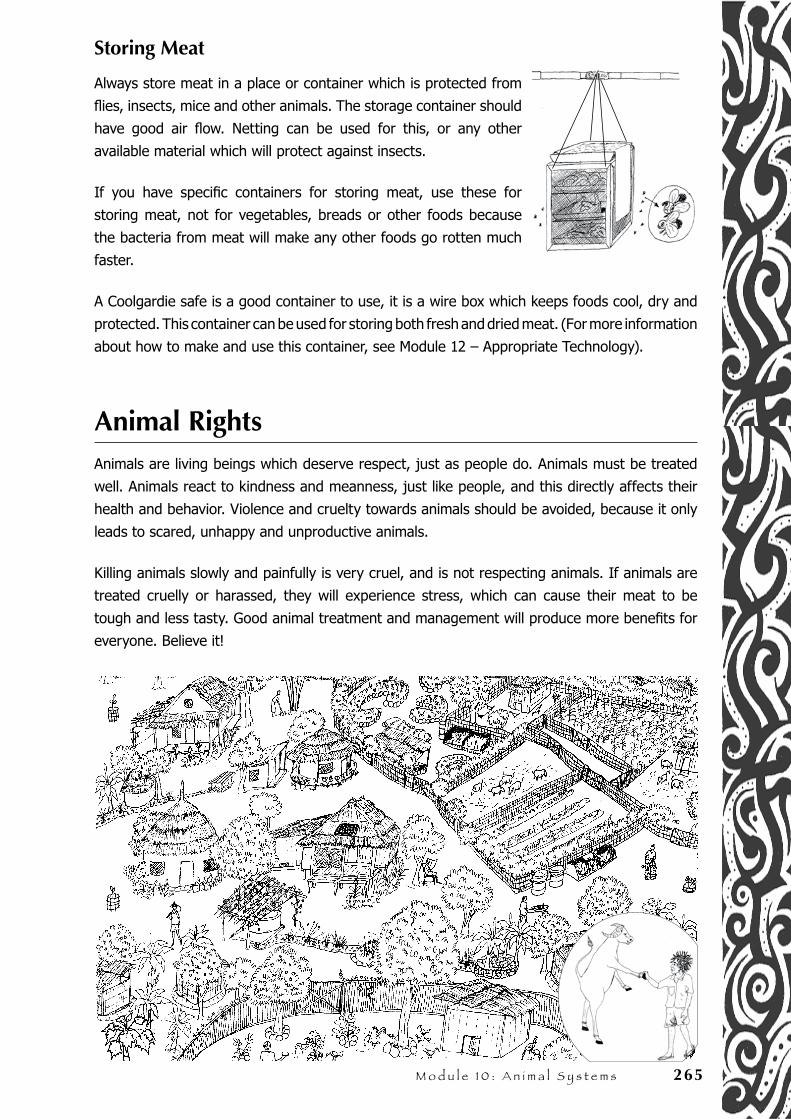
M o d u l e 1 0 : A n i m a l S y s t e m s 265
Storing Meat
Always store meat in a place or container which is protected from
flies, insects, mice and other animals. The storage container should
have good air flow. Netting can be used for this, or any other
available material which will protect against insects.
If you have specific containers for storing meat, use these for
storing meat, not for vegetables, breads or other foods because
the bacteria from meat will make any other foods go rotten much
faster.
A Coolgardie safe is a good container to use, it is a wire box which keeps foods cool, dry and
protected. This container can be used for storing both fresh and dried meat. (For more information
about how to make and use this container, see Module 12 – Appropriate Technology).
Animal RightsAnimals are living beings which deserve respect, just as people do. Animals must be treated
well. Animals react to kindness and meanness, just like people, and this directly affects their
health and behavior. Violence and cruelty towards animals should be avoided, because it only
leads to scared, unhappy and unproductive animals.
Killing animals slowly and painfully is very cruel, and is not respecting animals. If animals are
treated cruelly or harassed, they will experience stress, which can cause their meat to be
tough and less tasty. Good animal treatment and management will produce more benefits for
everyone. Believe it!

266 Pe r m a c u l t u r e , S o l u t i o n s f o r S u s t a i n a b l e l i f e s t y l e s
N o t e s . . .
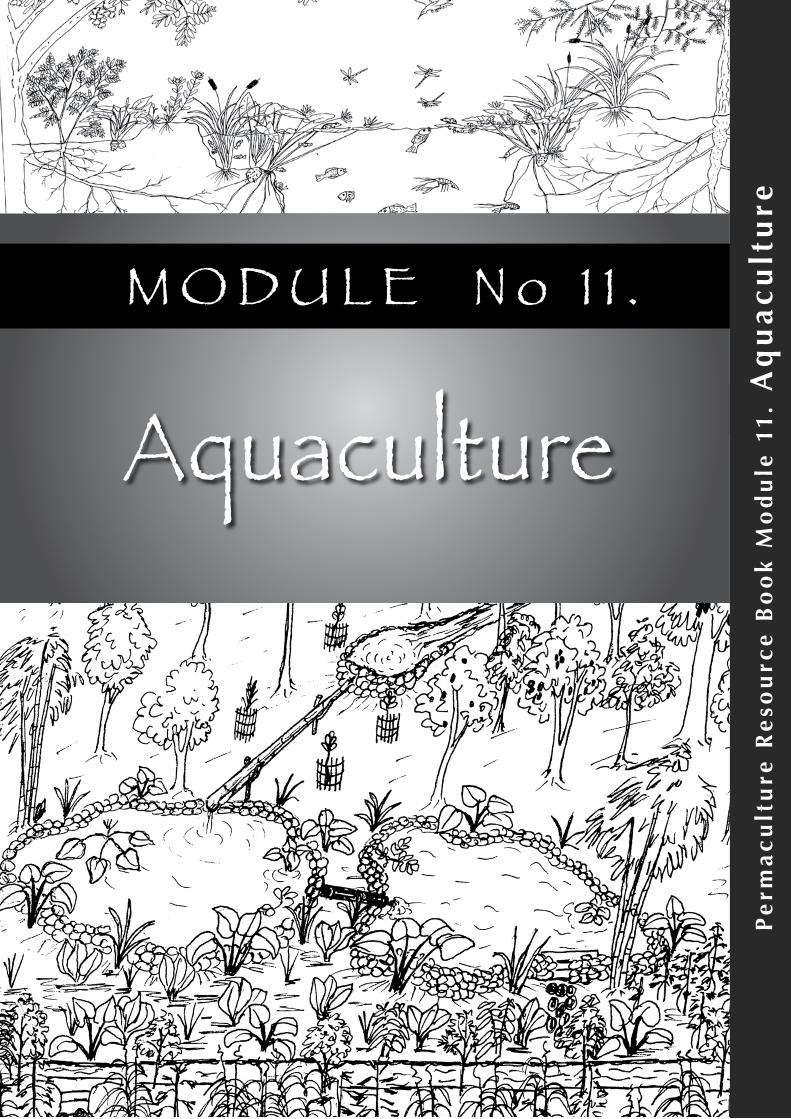
Pe
rma
cu
ltu
re R
eso
urc
e B
oo
k M
od
ule
11
. A
qu
ac
ult
ure
M o d u l e N o 1 1 .
Aquaculture

268 Pe r m a c u l t u r e , S o l u t i o n s f o r S u s t a i n a b l e l i f e s t y l e s
N o t e s . . .
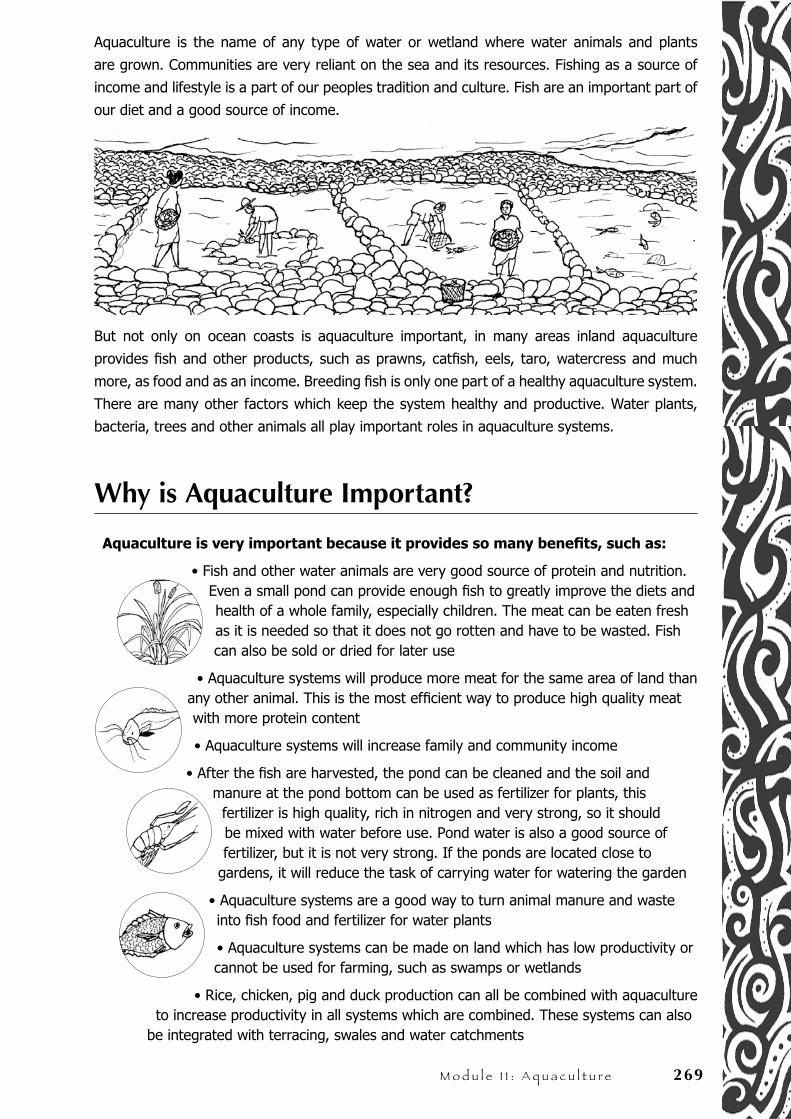
M o d u l e 1 1 : A q u a c u l t u r e 269
Aquaculture is the name of any type of water or wetland where water animals and plants
are grown. Communities are very reliant on the sea and its resources. Fishing as a source of
income and lifestyle is a part of our peoples tradition and culture. Fish are an important part of
our diet and a good source of income.
But not only on ocean coasts is aquaculture important, in many areas inland aquaculture
provides fish and other products, such as prawns, catfish, eels, taro, watercress and much
more, as food and as an income. Breeding fish is only one part of a healthy aquaculture system.
There are many other factors which keep the system healthy and productive. Water plants,
bacteria, trees and other animals all play important roles in aquaculture systems.
Why is Aquaculture Important?
Aquaculture is very important because it provides so many benefits, such as:
• Fish and other water animals are very good source of protein and nutrition. Even a small pond can provide enough fish to greatly improve the diets and health of a whole family, especially children. The meat can be eaten fresh as it is needed so that it does not go rotten and have to be wasted. Fish can also be sold or dried for later use
• Aquaculture systems will produce more meat for the same area of land than any other animal. This is the most efficient way to produce high quality meat with more protein content
• Aquaculture systems will increase family and community income
• After the fish are harvested, the pond can be cleaned and the soil and manure at the pond bottom can be used as fertilizer for plants, this
fertilizer is high quality, rich in nitrogen and very strong, so it should be mixed with water before use. Pond water is also a good source of fertilizer, but it is not very strong. If the ponds are located close to
gardens, it will reduce the task of carrying water for watering the garden
• Aquaculture systems are a good way to turn animal manure and waste into fish food and fertilizer for water plants
• Aquaculture systems can be made on land which has low productivity or cannot be used for farming, such as swamps or wetlands
• Rice, chicken, pig and duck production can all be combined with aquaculture to increase productivity in all systems which are combined. These systems can also
be integrated with terracing, swales and water catchments
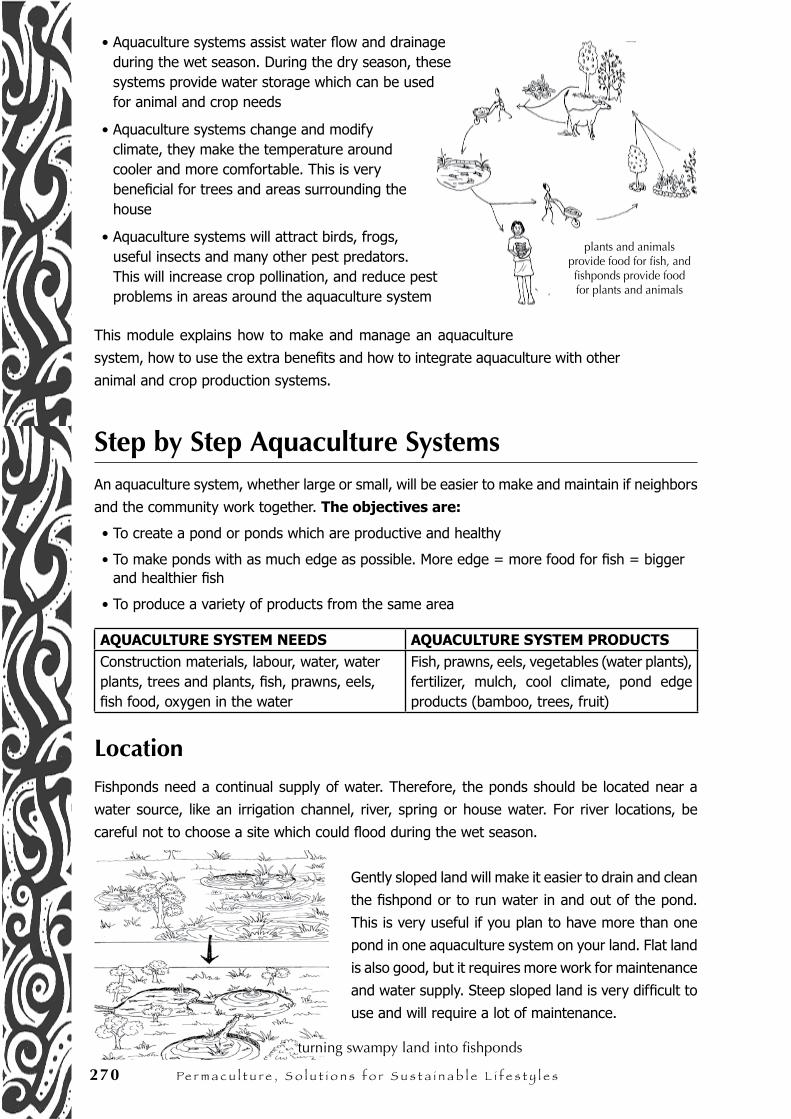
270 Pe r m a c u l t u r e , S o l u t i o n s f o r S u s t a i n a b l e l i f e s t y l e s
• Aquaculture systems assist water flow and drainage during the wet season. During the dry season, these systems provide water storage which can be used for animal and crop needs
• Aquaculture systems change and modify climate, they make the temperature around cooler and more comfortable. This is very beneficial for trees and areas surrounding the house
• Aquaculture systems will attract birds, frogs, useful insects and many other pest predators. This will increase crop pollination, and reduce pest problems in areas around the aquaculture system
This module explains how to make and manage an aquaculture
system, how to use the extra benefits and how to integrate aquaculture with other
animal and crop production systems.
Step by Step Aquaculture SystemsAn aquaculture system, whether large or small, will be easier to make and maintain if neighbors
and the community work together. The objectives are:
• To create a pond or ponds which are productive and healthy
• To make ponds with as much edge as possible. More edge = more food for fish = bigger and healthier fish
• To produce a variety of products from the same area
AQUACULTURE SYSTEM NEEDS AQUACULTURE SYSTEM PRODUCTSConstruction materials, labour, water, water plants, trees and plants, fish, prawns, eels, fish food, oxygen in the water
Fish, prawns, eels, vegetables (water plants), fertilizer, mulch, cool climate, pond edge products (bamboo, trees, fruit)
Location
Fishponds need a continual supply of water. Therefore, the ponds should be located near a
water source, like an irrigation channel, river, spring or house water. For river locations, be
careful not to choose a site which could flood during the wet season.
Gently sloped land will make it easier to drain and clean
the fishpond or to run water in and out of the pond.
This is very useful if you plan to have more than one
pond in one aquaculture system on your land. Flat land
is also good, but it requires more work for maintenance
and water supply. Steep sloped land is very difficult to
use and will require a lot of maintenance.
plants and animals provide food for fish, and fishponds provide food for plants and animals
turning swampy land into fishponds
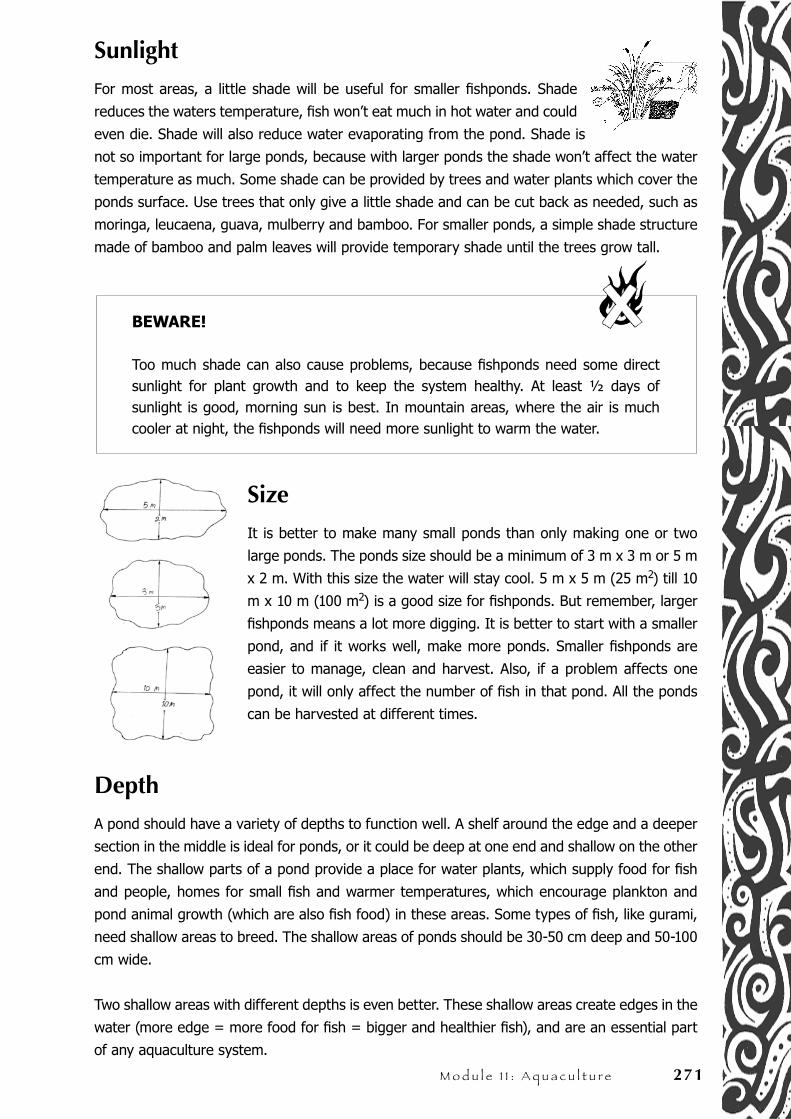
M o d u l e 1 1 : A q u a c u l t u r e 271
Sunlight
For most areas, a little shade will be useful for smaller fishponds. Shade
reduces the waters temperature, fish won’t eat much in hot water and could
even die. Shade will also reduce water evaporating from the pond. Shade is
not so important for large ponds, because with larger ponds the shade won’t affect the water
temperature as much. Some shade can be provided by trees and water plants which cover the
ponds surface. Use trees that only give a little shade and can be cut back as needed, such as
moringa, leucaena, guava, mulberry and bamboo. For smaller ponds, a simple shade structure
made of bamboo and palm leaves will provide temporary shade until the trees grow tall.
BEWARE!
Too much shade can also cause problems, because fishponds need some direct sunlight for plant growth and to keep the system healthy. At least ½ days of sunlight is good, morning sun is best. In mountain areas, where the air is much cooler at night, the fishponds will need more sunlight to warm the water.
Size
It is better to make many small ponds than only making one or two
large ponds. The ponds size should be a minimum of 3 m x 3 m or 5 m
x 2 m. With this size the water will stay cool. 5 m x 5 m (25 m2) till 10
m x 10 m (100 m2) is a good size for fishponds. But remember, larger
fishponds means a lot more digging. It is better to start with a smaller
pond, and if it works well, make more ponds. Smaller fishponds are
easier to manage, clean and harvest. Also, if a problem affects one
pond, it will only affect the number of fish in that pond. All the ponds
can be harvested at different times.
Depth
A pond should have a variety of depths to function well. A shelf around the edge and a deeper
section in the middle is ideal for ponds, or it could be deep at one end and shallow on the other
end. The shallow parts of a pond provide a place for water plants, which supply food for fish
and people, homes for small fish and warmer temperatures, which encourage plankton and
pond animal growth (which are also fish food) in these areas. Some types of fish, like gurami,
need shallow areas to breed. The shallow areas of ponds should be 30-50 cm deep and 50-100
cm wide.
Two shallow areas with different depths is even better. These shallow areas create edges in the
water (more edge = more food for fish = bigger and healthier fish), and are an essential part
of any aquaculture system.
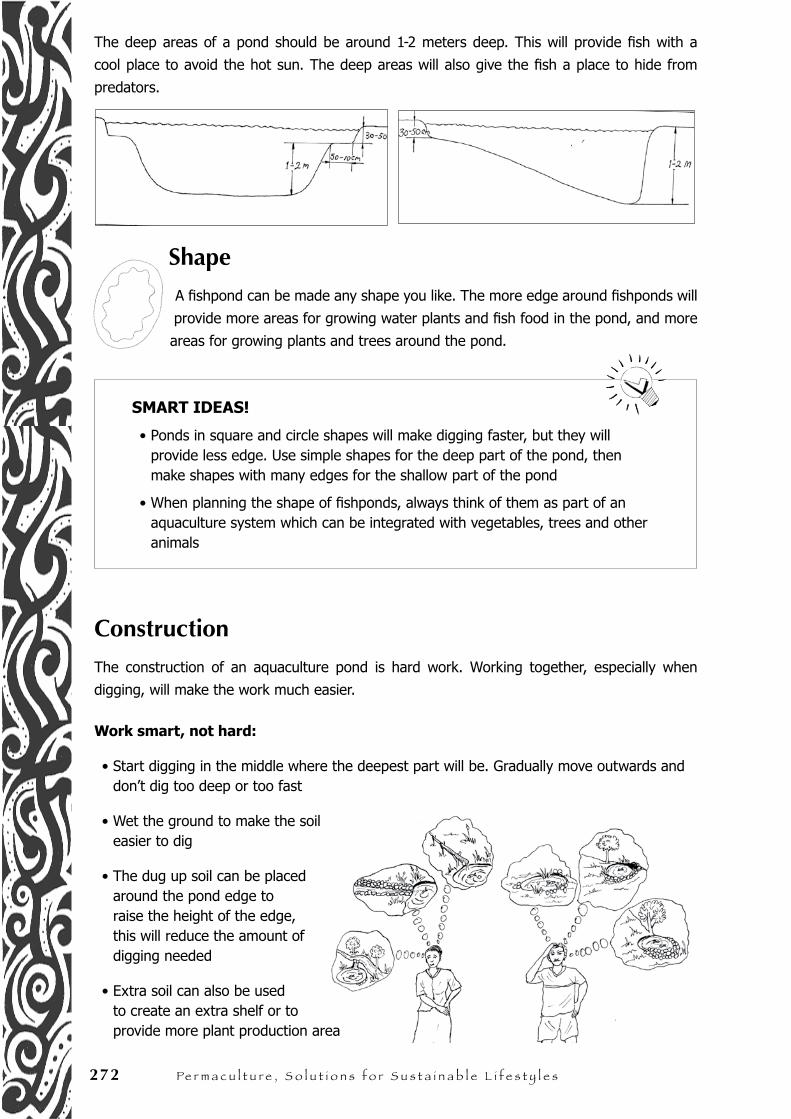
272 Pe r m a c u l t u r e , S o l u t i o n s f o r S u s t a i n a b l e l i f e s t y l e s
The deep areas of a pond should be around 1-2 meters deep. This will provide fish with a
cool place to avoid the hot sun. The deep areas will also give the fish a place to hide from
predators.
Shape
A fishpond can be made any shape you like. The more edge around fishponds will
provide more areas for growing water plants and fish food in the pond, and more
areas for growing plants and trees around the pond.
SMART IDEAS!
• Ponds in square and circle shapes will make digging faster, but they will provide less edge. Use simple shapes for the deep part of the pond, then make shapes with many edges for the shallow part of the pond
• When planning the shape of fishponds, always think of them as part of an aquaculture system which can be integrated with vegetables, trees and other animals
Construction
The construction of an aquaculture pond is hard work. Working together, especially when
digging, will make the work much easier.
Work smart, not hard:
• Start digging in the middle where the deepest part will be. Gradually move outwards and don’t dig too deep or too fast
• Wet the ground to make the soil easier to dig
• The dug up soil can be placed around the pond edge to raise the height of the edge, this will reduce the amount of digging needed
• Extra soil can also be used to create an extra shelf or to provide more plant production area
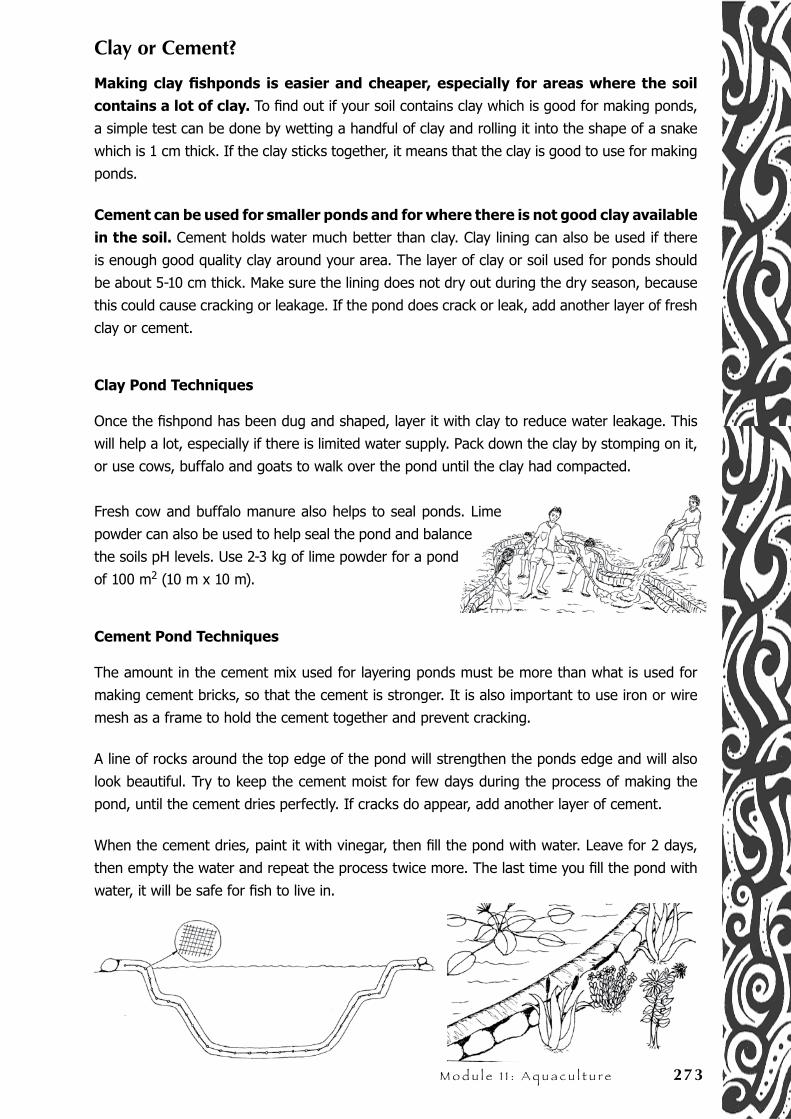
M o d u l e 1 1 : A q u a c u l t u r e 273
Clay or Cement?
Making clay fishponds is easier and cheaper, especially for areas where the soil
contains a lot of clay. To find out if your soil contains clay which is good for making ponds,
a simple test can be done by wetting a handful of clay and rolling it into the shape of a snake
which is 1 cm thick. If the clay sticks together, it means that the clay is good to use for making
ponds.
Cement can be used for smaller ponds and for where there is not good clay available
in the soil. Cement holds water much better than clay. Clay lining can also be used if there
is enough good quality clay around your area. The layer of clay or soil used for ponds should
be about 5-10 cm thick. Make sure the lining does not dry out during the dry season, because
this could cause cracking or leakage. If the pond does crack or leak, add another layer of fresh
clay or cement.
Clay Pond Techniques
Once the fishpond has been dug and shaped, layer it with clay to reduce water leakage. This
will help a lot, especially if there is limited water supply. Pack down the clay by stomping on it,
or use cows, buffalo and goats to walk over the pond until the clay had compacted.
Fresh cow and buffalo manure also helps to seal ponds. Lime
powder can also be used to help seal the pond and balance
the soils pH levels. Use 2-3 kg of lime powder for a pond
of 100 m2 (10 m x 10 m).
Cement Pond Techniques
The amount in the cement mix used for layering ponds must be more than what is used for
making cement bricks, so that the cement is stronger. It is also important to use iron or wire
mesh as a frame to hold the cement together and prevent cracking.
A line of rocks around the top edge of the pond will strengthen the ponds edge and will also
look beautiful. Try to keep the cement moist for few days during the process of making the
pond, until the cement dries perfectly. If cracks do appear, add another layer of cement.
When the cement dries, paint it with vinegar, then fill the pond with water. Leave for 2 days,
then empty the water and repeat the process twice more. The last time you fill the pond with
water, it will be safe for fish to live in.
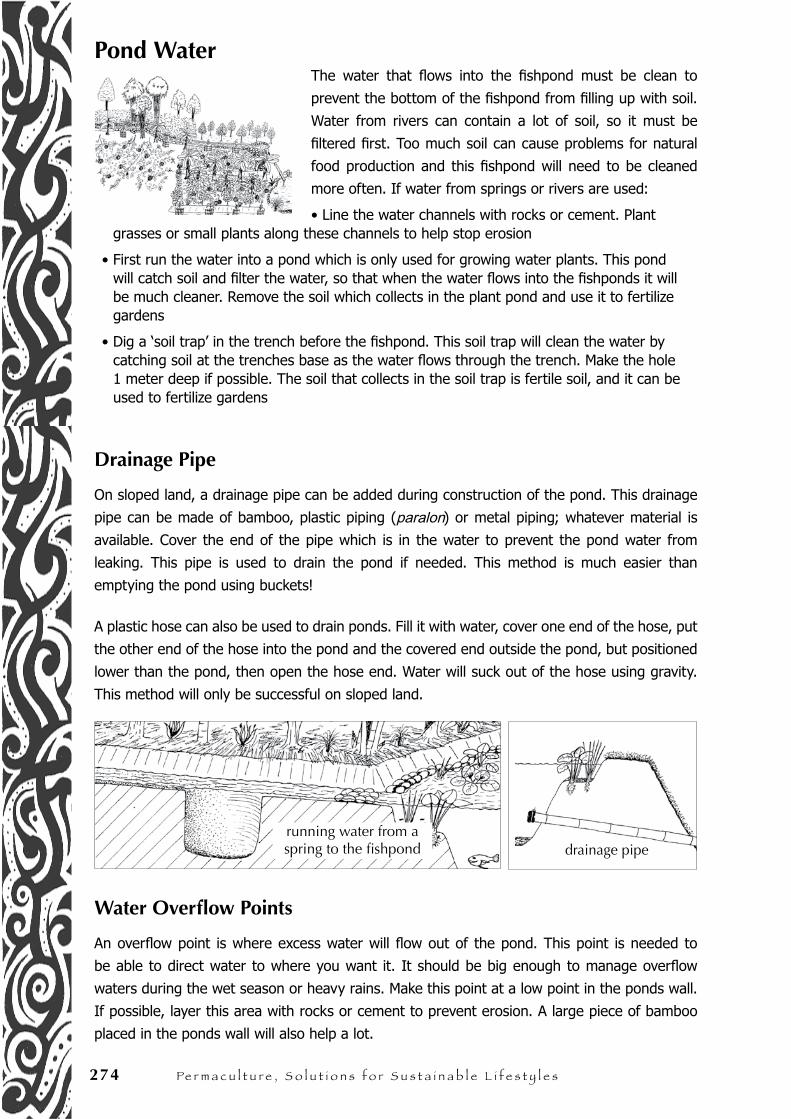
274 Pe r m a c u l t u r e , S o l u t i o n s f o r S u s t a i n a b l e l i f e s t y l e s
Pond WaterThe water that flows into the fishpond must be clean to
prevent the bottom of the fishpond from filling up with soil.
Water from rivers can contain a lot of soil, so it must be
filtered first. Too much soil can cause problems for natural
food production and this fishpond will need to be cleaned
more often. If water from springs or rivers are used:
• Line the water channels with rocks or cement. Plant grasses or small plants along these channels to help stop erosion
• First run the water into a pond which is only used for growing water plants. This pond will catch soil and filter the water, so that when the water flows into the fishponds it will be much cleaner. Remove the soil which collects in the plant pond and use it to fertilize gardens
• Dig a ‘soil trap’ in the trench before the fishpond. This soil trap will clean the water by catching soil at the trenches base as the water flows through the trench. Make the hole 1 meter deep if possible. The soil that collects in the soil trap is fertile soil, and it can be used to fertilize gardens
Drainage Pipe
On sloped land, a drainage pipe can be added during construction of the pond. This drainage
pipe can be made of bamboo, plastic piping (paralon) or metal piping; whatever material is
available. Cover the end of the pipe which is in the water to prevent the pond water from
leaking. This pipe is used to drain the pond if needed. This method is much easier than
emptying the pond using buckets!
A plastic hose can also be used to drain ponds. Fill it with water, cover one end of the hose, put
the other end of the hose into the pond and the covered end outside the pond, but positioned
lower than the pond, then open the hose end. Water will suck out of the hose using gravity.
This method will only be successful on sloped land.
Water Overflow Points
An overflow point is where excess water will flow out of the pond. This point is needed to
be able to direct water to where you want it. It should be big enough to manage overflow
waters during the wet season or heavy rains. Make this point at a low point in the ponds wall.
If possible, layer this area with rocks or cement to prevent erosion. A large piece of bamboo
placed in the ponds wall will also help a lot.
drainage piperunning water from a spring to the fishpond
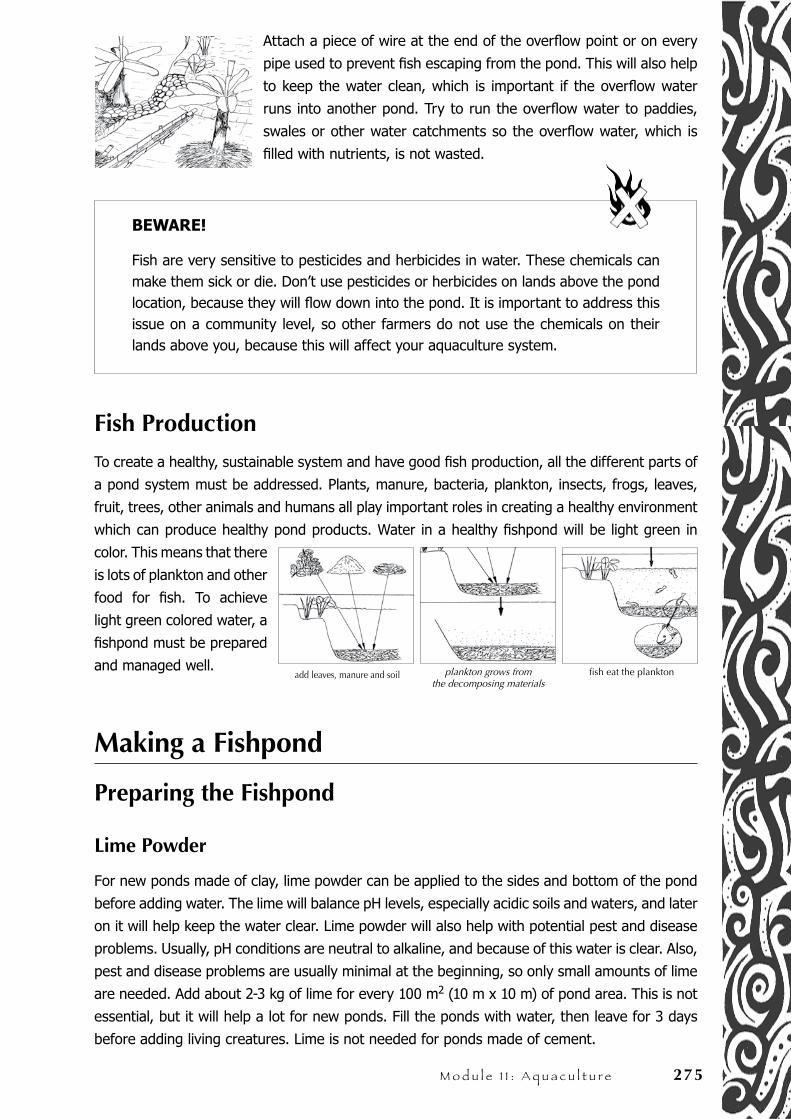
M o d u l e 1 1 : A q u a c u l t u r e 275
Attach a piece of wire at the end of the overflow point or on every
pipe used to prevent fish escaping from the pond. This will also help
to keep the water clean, which is important if the overflow water
runs into another pond. Try to run the overflow water to paddies,
swales or other water catchments so the overflow water, which is
filled with nutrients, is not wasted.
BEWARE!
Fish are very sensitive to pesticides and herbicides in water. These chemicals can make them sick or die. Don’t use pesticides or herbicides on lands above the pond location, because they will flow down into the pond. It is important to address this issue on a community level, so other farmers do not use the chemicals on their lands above you, because this will affect your aquaculture system.
Fish Production
To create a healthy, sustainable system and have good fish production, all the different parts of
a pond system must be addressed. Plants, manure, bacteria, plankton, insects, frogs, leaves,
fruit, trees, other animals and humans all play important roles in creating a healthy environment
which can produce healthy pond products. Water in a healthy fishpond will be light green in
color. This means that there
is lots of plankton and other
food for fish. To achieve
light green colored water, a
fishpond must be prepared
and managed well.
Making a Fishpond
Preparing the Fishpond
Lime Powder
For new ponds made of clay, lime powder can be applied to the sides and bottom of the pond
before adding water. The lime will balance pH levels, especially acidic soils and waters, and later
on it will help keep the water clear. Lime powder will also help with potential pest and disease
problems. Usually, pH conditions are neutral to alkaline, and because of this water is clear. Also,
pest and disease problems are usually minimal at the beginning, so only small amounts of lime
are needed. Add about 2-3 kg of lime for every 100 m2 (10 m x 10 m) of pond area. This is not
essential, but it will help a lot for new ponds. Fill the ponds with water, then leave for 3 days
before adding living creatures. Lime is not needed for ponds made of cement.
plankton grows from the decomposing materials
fish eat the planktonadd leaves, manure and soil
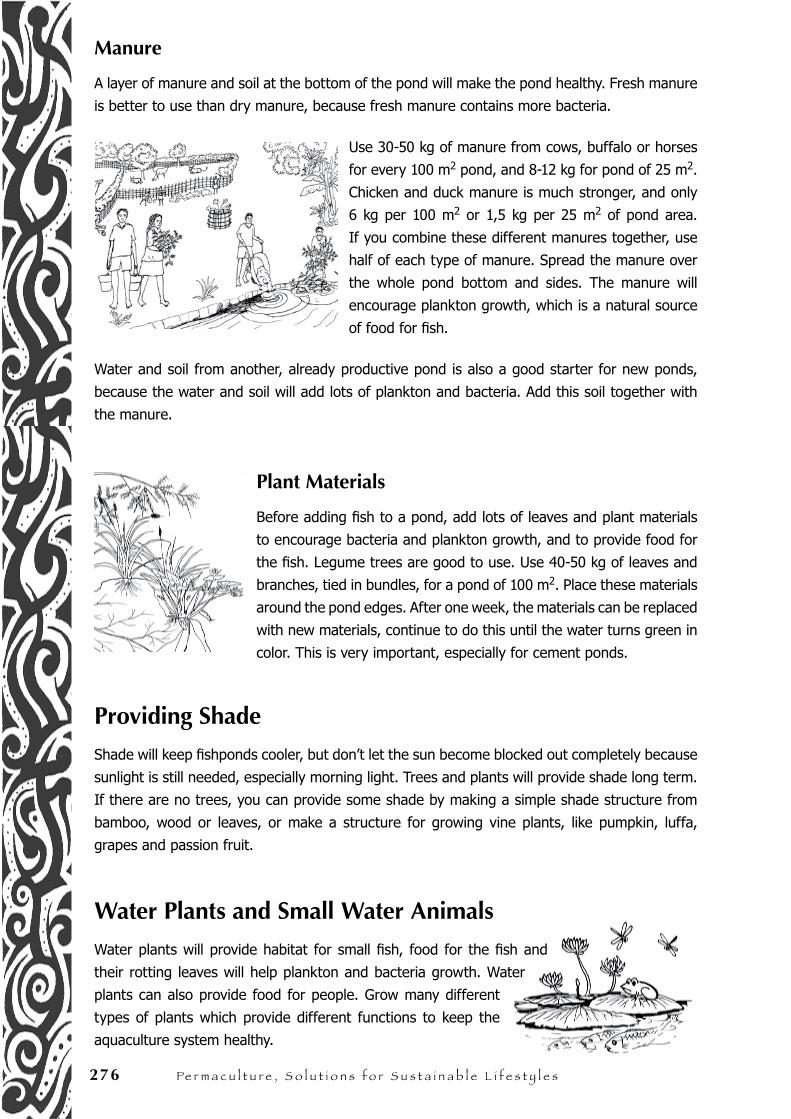
276 Pe r m a c u l t u r e , S o l u t i o n s f o r S u s t a i n a b l e l i f e s t y l e s
Manure
A layer of manure and soil at the bottom of the pond will make the pond healthy. Fresh manure
is better to use than dry manure, because fresh manure contains more bacteria.
Use 30-50 kg of manure from cows, buffalo or horses
for every 100 m2 pond, and 8-12 kg for pond of 25 m2.
Chicken and duck manure is much stronger, and only
6 kg per 100 m2 or 1,5 kg per 25 m2 of pond area.
If you combine these different manures together, use
half of each type of manure. Spread the manure over
the whole pond bottom and sides. The manure will
encourage plankton growth, which is a natural source
of food for fish.
Water and soil from another, already productive pond is also a good starter for new ponds,
because the water and soil will add lots of plankton and bacteria. Add this soil together with
the manure.
Plant Materials
Before adding fish to a pond, add lots of leaves and plant materials
to encourage bacteria and plankton growth, and to provide food for
the fish. Legume trees are good to use. Use 40-50 kg of leaves and
branches, tied in bundles, for a pond of 100 m2. Place these materials
around the pond edges. After one week, the materials can be replaced
with new materials, continue to do this until the water turns green in
color. This is very important, especially for cement ponds.
Providing Shade
Shade will keep fishponds cooler, but don’t let the sun become blocked out completely because
sunlight is still needed, especially morning light. Trees and plants will provide shade long term.
If there are no trees, you can provide some shade by making a simple shade structure from
bamboo, wood or leaves, or make a structure for growing vine plants, like pumpkin, luffa,
grapes and passion fruit.
Water Plants and Small Water Animals
Water plants will provide habitat for small fish, food for the fish and
their rotting leaves will help plankton and bacteria growth. Water
plants can also provide food for people. Grow many different
types of plants which provide different functions to keep the
aquaculture system healthy.
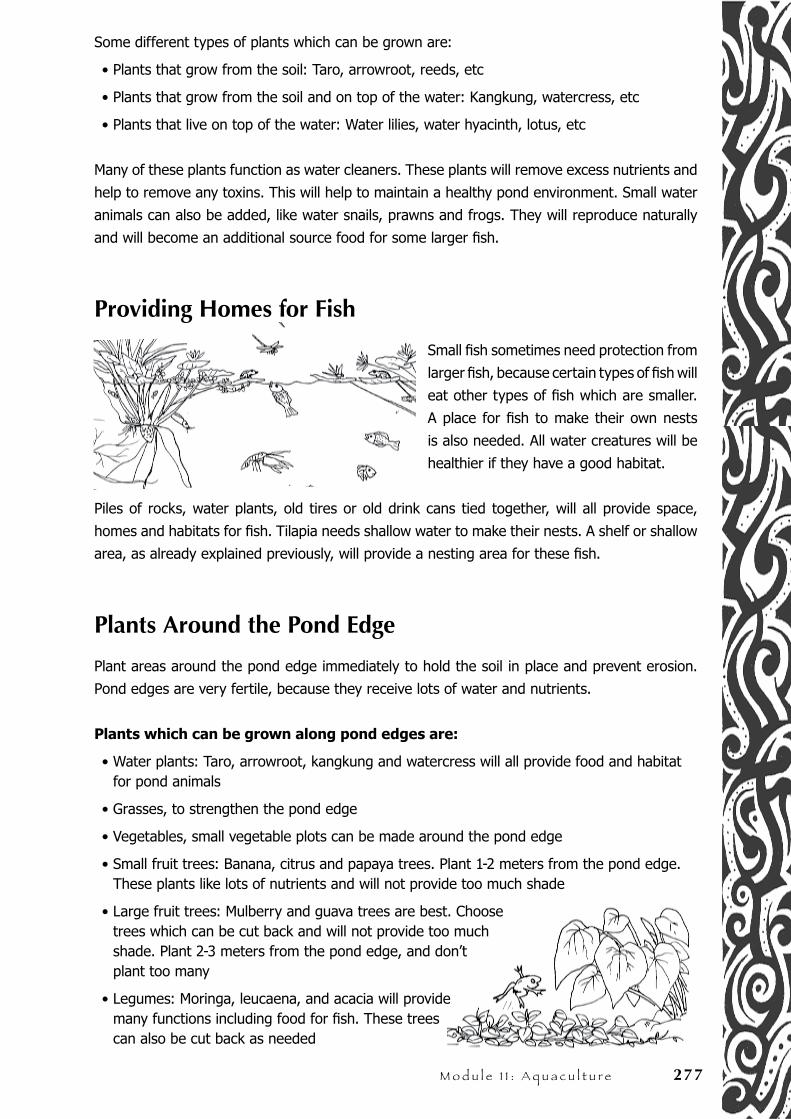
M o d u l e 1 1 : A q u a c u l t u r e 277
Some different types of plants which can be grown are:
• Plants that grow from the soil: Taro, arrowroot, reeds, etc
• Plants that grow from the soil and on top of the water: Kangkung, watercress, etc
• Plants that live on top of the water: Water lilies, water hyacinth, lotus, etc
Many of these plants function as water cleaners. These plants will remove excess nutrients and
help to remove any toxins. This will help to maintain a healthy pond environment. Small water
animals can also be added, like water snails, prawns and frogs. They will reproduce naturally
and will become an additional source food for some larger fish.
Providing Homes for Fish
Small fish sometimes need protection from
larger fish, because certain types of fish will
eat other types of fish which are smaller.
A place for fish to make their own nests
is also needed. All water creatures will be
healthier if they have a good habitat.
Piles of rocks, water plants, old tires or old drink cans tied together, will all provide space,
homes and habitats for fish. Tilapia needs shallow water to make their nests. A shelf or shallow
area, as already explained previously, will provide a nesting area for these fish.
Plants Around the Pond Edge
Plant areas around the pond edge immediately to hold the soil in place and prevent erosion.
Pond edges are very fertile, because they receive lots of water and nutrients.
Plants which can be grown along pond edges are:
• Water plants: Taro, arrowroot, kangkung and watercress will all provide food and habitat for pond animals
• Grasses, to strengthen the pond edge
• Vegetables, small vegetable plots can be made around the pond edge
• Small fruit trees: Banana, citrus and papaya trees. Plant 1-2 meters from the pond edge. These plants like lots of nutrients and will not provide too much shade
• Large fruit trees: Mulberry and guava trees are best. Choose trees which can be cut back and will not provide too much shade. Plant 2-3 meters from the pond edge, and don’t plant too many
• Legumes: Moringa, leucaena, and acacia will provide many functions including food for fish. These trees can also be cut back as needed
278 Pe r m a c u l t u r e , S o l u t i o n s f o r S u s t a i n a b l e l i f e s t y l e s
Add the Fish
There are many types of fish which can be grown, including: Carp, mujair, tilapia, catfish,
gurami, prawns and eels.
Fish Categories Based on Diet
Based on what fish eat, they can be divided into 3 categories:
1. Herbivores: Only eat plants, plankton, leaves and grains, for example carp
2. Carnivores: Only eat meat or animals, including insects, small pond animals and other fish, for example eels and catfish
3. Omnivores: Eat everything, they eat plants and also eat meat, insects and small pond creatures, for example tilapia, gurami, catfish, mujair and carp
There are many different types of catfish in the world, there are some that are carnivores and
others which are omnivores, but the most common type is omnivore. There are also different
types of carp, some which are herbivores and others which are omnivores.
A healthy aquaculture system can contain many different types of fish. The fish will naturally
create a balance between themselves. Different types of fish will feed on different layers in
the water and will maximise the use of food and space in the pond. These fish will also play
different roles in keeping the pond healthy.
The fish that feed at the top and middle of the pond, like tilapia fish, will eat most of the fish
food, mosquito larvae and other insects. The fish that feed at the bottom of the pond, like carp,
mujair and catfish, will eat food and plant materials that drop to the bottom of the pond and
the plankton which grows at the bottom of the pond. Larger ponds will provide enough space
to breed many different types of fish.
If you want to keep all three categories of fish, you must introduce them to the
pond in the right order:
First: Add herbivore fish
Second: Add omnivore fish when the herbivore fish are 3 months old or more
Third: Add carnivore fish 3 months later
Carnivore fish, like catfish, will eat other small fish so they must be added last. The omnivore
fish usually won’t eat the other small fish.
Once the fishpond is established, it will manage itself. However, some additional food and
general maintenance is still needed. Continuously observe the health of the fish and number
of each different type of fish.
The carnivore fish will control the number of small fish by eating them. This will help to prevent
overstocking the pond with fish. Some protection in the pond like rocks, water plants and old
drink cans, will provide the smaller fish with a place to hide so some of them will still survive.
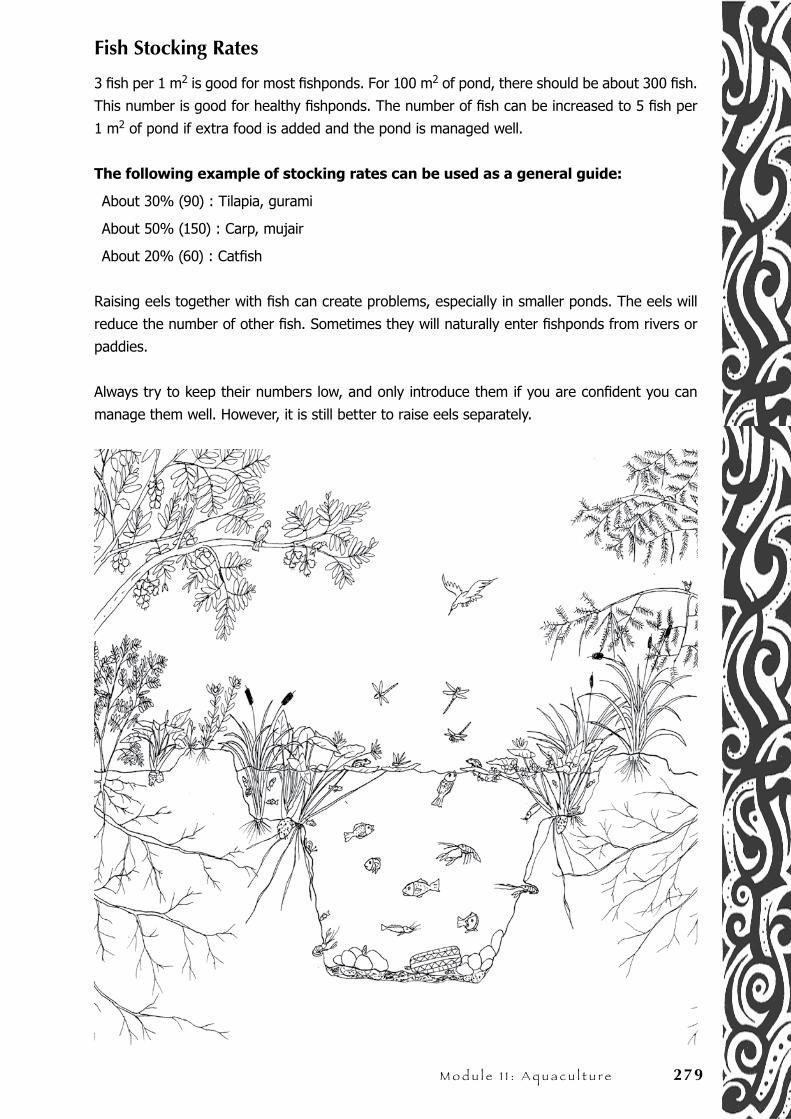
M o d u l e 1 1 : A q u a c u l t u r e 279
Fish Stocking Rates
3 fish per 1 m2 is good for most fishponds. For 100 m2 of pond, there should be about 300 fish.
This number is good for healthy fishponds. The number of fish can be increased to 5 fish per
1 m2 of pond if extra food is added and the pond is managed well.
The following example of stocking rates can be used as a general guide:
About 30% (90) : Tilapia, gurami
About 50% (150) : Carp, mujair
About 20% (60) : Catfish
Raising eels together with fish can create problems, especially in smaller ponds. The eels will
reduce the number of other fish. Sometimes they will naturally enter fishponds from rivers or
paddies.
Always try to keep their numbers low, and only introduce them if you are confident you can
manage them well. However, it is still better to raise eels separately.
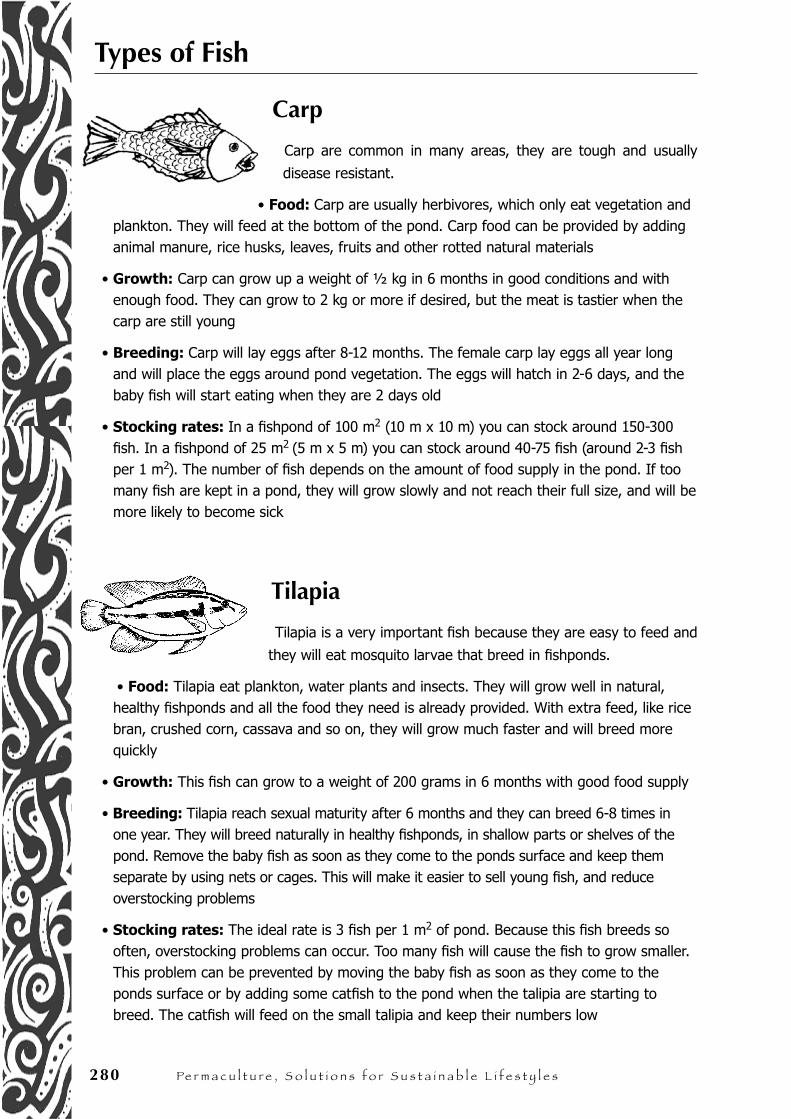
280 Pe r m a c u l t u r e , S o l u t i o n s f o r S u s t a i n a b l e l i f e s t y l e s
Types of Fish
Carp
Carp are common in many areas, they are tough and usually
disease resistant.
• Food: Carp are usually herbivores, which only eat vegetation and plankton. They will feed at the bottom of the pond. Carp food can be provided by adding animal manure, rice husks, leaves, fruits and other rotted natural materials
• Growth: Carp can grow up a weight of ½ kg in 6 months in good conditions and with enough food. They can grow to 2 kg or more if desired, but the meat is tastier when the carp are still young
• Breeding: Carp will lay eggs after 8-12 months. The female carp lay eggs all year long and will place the eggs around pond vegetation. The eggs will hatch in 2-6 days, and the baby fish will start eating when they are 2 days old
• Stocking rates: In a fishpond of 100 m2 (10 m x 10 m) you can stock around 150-300 fish. In a fishpond of 25 m2 (5 m x 5 m) you can stock around 40-75 fish (around 2-3 fish per 1 m2). The number of fish depends on the amount of food supply in the pond. If too many fish are kept in a pond, they will grow slowly and not reach their full size, and will be more likely to become sick
Tilapia
Tilapia is a very important fish because they are easy to feed and
they will eat mosquito larvae that breed in fishponds.
• Food: Tilapia eat plankton, water plants and insects. They will grow well in natural, healthy fishponds and all the food they need is already provided. With extra feed, like rice bran, crushed corn, cassava and so on, they will grow much faster and will breed more quickly
• Growth: This fish can grow to a weight of 200 grams in 6 months with good food supply
• Breeding: Tilapia reach sexual maturity after 6 months and they can breed 6-8 times in one year. They will breed naturally in healthy fishponds, in shallow parts or shelves of the pond. Remove the baby fish as soon as they come to the ponds surface and keep them separate by using nets or cages. This will make it easier to sell young fish, and reduce overstocking problems
• Stocking rates: The ideal rate is 3 fish per 1 m2 of pond. Because this fish breeds so often, overstocking problems can occur. Too many fish will cause the fish to grow smaller. This problem can be prevented by moving the baby fish as soon as they come to the ponds surface or by adding some catfish to the pond when the talipia are starting to breed. The catfish will feed on the small talipia and keep their numbers low

M o d u l e 1 1 : A q u a c u l t u r e 281
CatfishCatfish taste good and are disease resistant.
• Food: The type of catfish most commonly raised are omnivore. Almost all food needed for this type of fish is naturally available in healthy ponds. Extra feed can be added, such as meat or food scraps
• Growth: Catfish can be eaten between the age of 6-18 months
• Breeding: Catfish carry their eggs in their mouth until the eggs hatch. They will produce many young if their eggs hatch. However, catfish are difficult to breed so to increase their numbers you can collect more fish from rivers or paddies
• Stocking rates: These fish can be kept at a rate of 1-2 fish per 1 m2 of pond. If you want to stock more than this number, extra feed must be provided
GuramiGurami prefer ponds with lots of water plants. Therefore, they are
good for raising with water vegetables or rice production.
• Food: Gurami are omnivores and will eat water plants, insects, plankton and fruit
• Growth: They can grow to a weight of 80-120 grams in 6 months
• Breeding: This fish will breed naturally, but the survival rate of the baby fish is very low
• Stocking rates: The stocking rates for this fish is around 5-10 fish per 1 m2 of pond, if enough food is available
Mujair Mujair have similar behavior traits as carp.
• Food: Use same food as for carp
• Growth: They will grow to a good eating size in 4-6 months
• Breeding: Mujair fish breed easily, and can breed 2-3 times a year
• Stocking rates: Mujair are smaller than carp so the stocking rates can be slightly higher, about 2-4 fish per 1 m2 of pond, or 200-400 fish per 100 m2
Freshwater Prawns
In many areas, freshwater prawns grow naturally in rivers and ponds.
They are very difficult to raise from eggs or young. Therefore, you can catch them in rivers
and transfer the smaller prawns to ponds. The best time is when the young prawns have shed
their first skin and have just started growing their adult skin. Before this time, they need special
attention, different water temperatures and specific foods. The benefit of growing prawns in
a pond is that they will grow much larger than they do in the wild. The prawns can survive in
smaller sized ponds. Prawns like ponds with lots of fresh water or if possible running water.
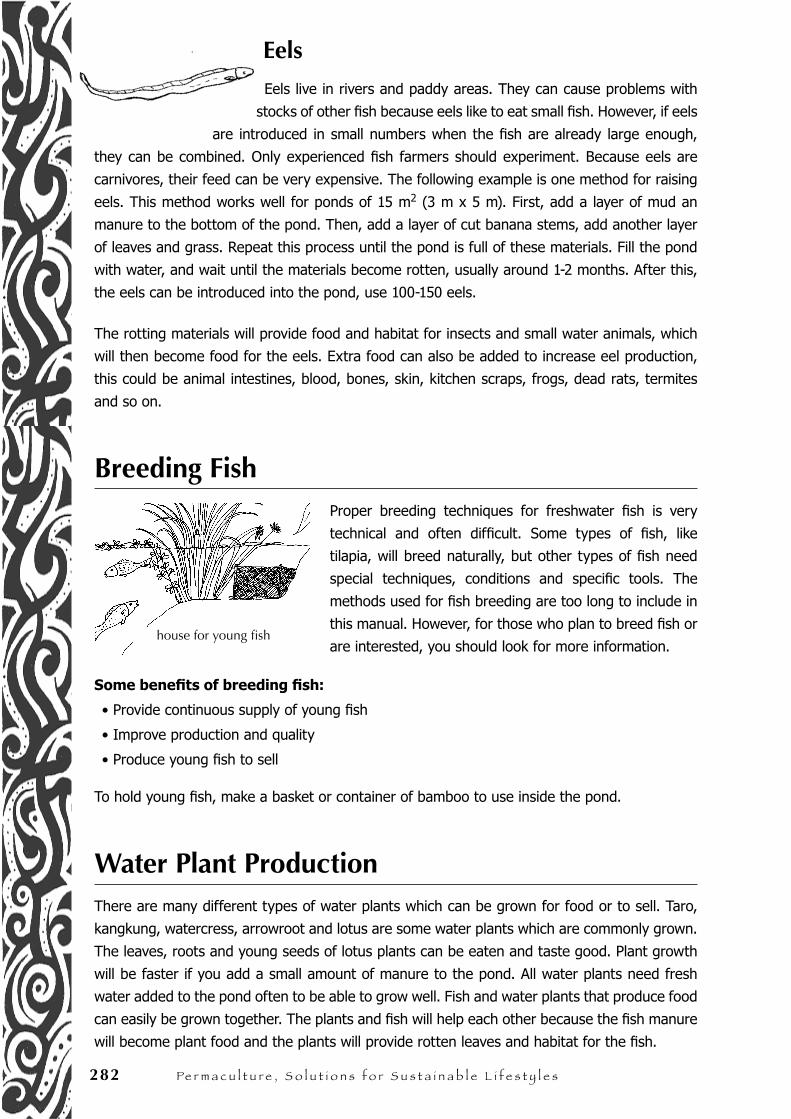
282 Pe r m a c u l t u r e , S o l u t i o n s f o r S u s t a i n a b l e l i f e s t y l e s
Eels
Eels live in rivers and paddy areas. They can cause problems with
stocks of other fish because eels like to eat small fish. However, if eels
are introduced in small numbers when the fish are already large enough,
they can be combined. Only experienced fish farmers should experiment. Because eels are
carnivores, their feed can be very expensive. The following example is one method for raising
eels. This method works well for ponds of 15 m2 (3 m x 5 m). First, add a layer of mud an
manure to the bottom of the pond. Then, add a layer of cut banana stems, add another layer
of leaves and grass. Repeat this process until the pond is full of these materials. Fill the pond
with water, and wait until the materials become rotten, usually around 1-2 months. After this,
the eels can be introduced into the pond, use 100-150 eels.
The rotting materials will provide food and habitat for insects and small water animals, which
will then become food for the eels. Extra food can also be added to increase eel production,
this could be animal intestines, blood, bones, skin, kitchen scraps, frogs, dead rats, termites
and so on.
Breeding FishProper breeding techniques for freshwater fish is very
technical and often difficult. Some types of fish, like
tilapia, will breed naturally, but other types of fish need
special techniques, conditions and specific tools. The
methods used for fish breeding are too long to include in
this manual. However, for those who plan to breed fish or
are interested, you should look for more information.
Some benefits of breeding fish:
• Provide continuous supply of young fish
• Improve production and quality
• Produce young fish to sell
To hold young fish, make a basket or container of bamboo to use inside the pond.
Water Plant ProductionThere are many different types of water plants which can be grown for food or to sell. Taro,
kangkung, watercress, arrowroot and lotus are some water plants which are commonly grown.
The leaves, roots and young seeds of lotus plants can be eaten and taste good. Plant growth
will be faster if you add a small amount of manure to the pond. All water plants need fresh
water added to the pond often to be able to grow well. Fish and water plants that produce food
can easily be grown together. The plants and fish will help each other because the fish manure
will become plant food and the plants will provide rotten leaves and habitat for the fish.
house for young fish
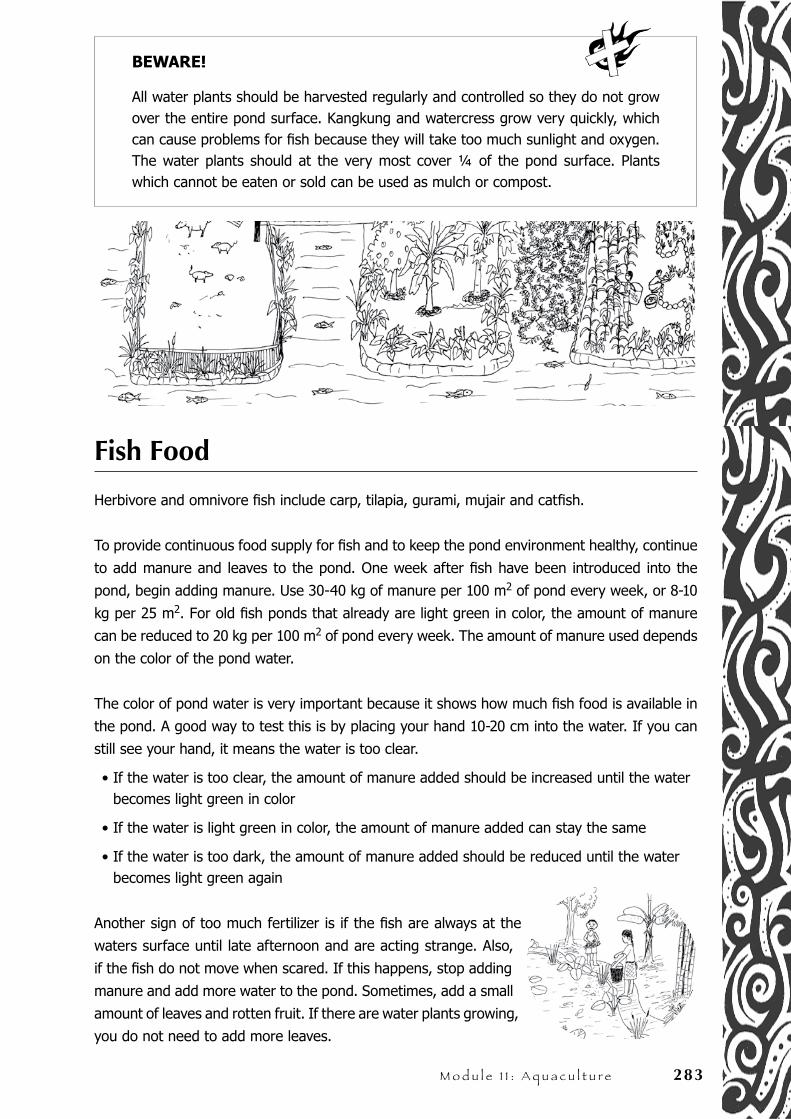
M o d u l e 1 1 : A q u a c u l t u r e 283
BEWARE!
All water plants should be harvested regularly and controlled so they do not grow over the entire pond surface. Kangkung and watercress grow very quickly, which can cause problems for fish because they will take too much sunlight and oxygen. The water plants should at the very most cover ¼ of the pond surface. Plants which cannot be eaten or sold can be used as mulch or compost.
Fish Food
Herbivore and omnivore fish include carp, tilapia, gurami, mujair and catfish.
To provide continuous food supply for fish and to keep the pond environment healthy, continue
to add manure and leaves to the pond. One week after fish have been introduced into the
pond, begin adding manure. Use 30-40 kg of manure per 100 m2 of pond every week, or 8-10
kg per 25 m2. For old fish ponds that already are light green in color, the amount of manure
can be reduced to 20 kg per 100 m2 of pond every week. The amount of manure used depends
on the color of the pond water.
The color of pond water is very important because it shows how much fish food is available in
the pond. A good way to test this is by placing your hand 10-20 cm into the water. If you can
still see your hand, it means the water is too clear.
• If the water is too clear, the amount of manure added should be increased until the water becomes light green in color
• If the water is light green in color, the amount of manure added can stay the same
• If the water is too dark, the amount of manure added should be reduced until the water becomes light green again
Another sign of too much fertilizer is if the fish are always at the
waters surface until late afternoon and are acting strange. Also,
if the fish do not move when scared. If this happens, stop adding
manure and add more water to the pond. Sometimes, add a small
amount of leaves and rotten fruit. If there are water plants growing,
you do not need to add more leaves.
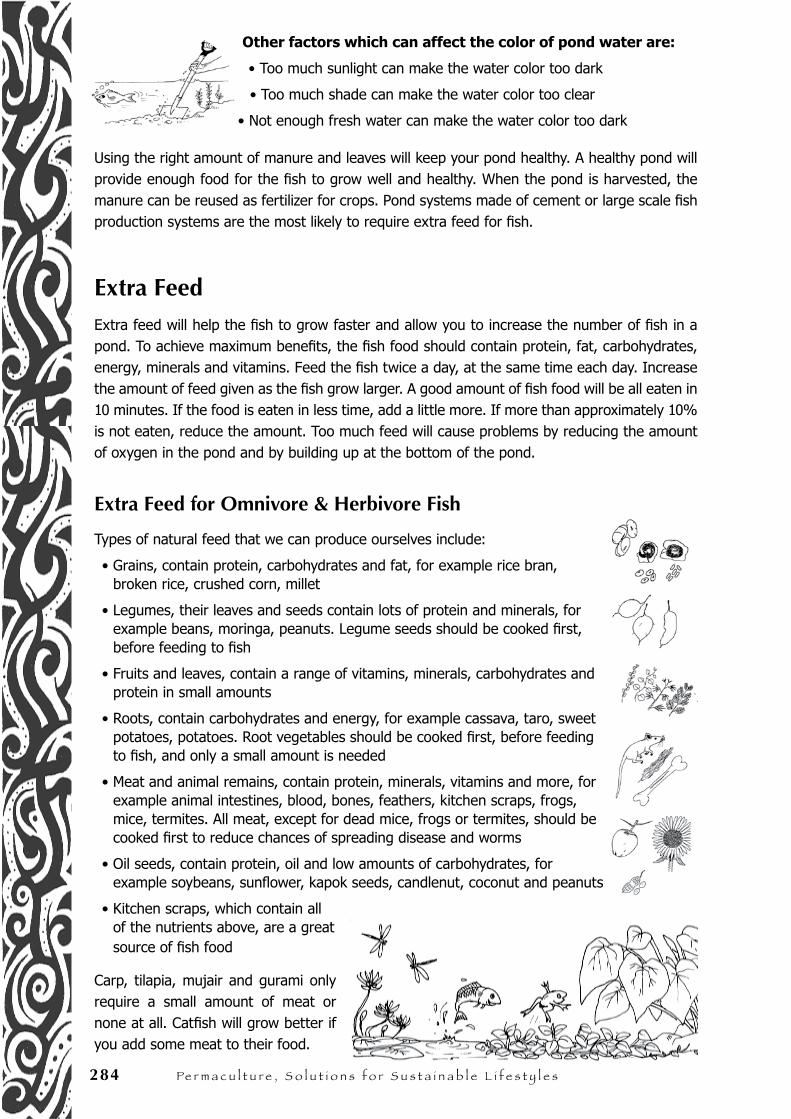
284 Pe r m a c u l t u r e , S o l u t i o n s f o r S u s t a i n a b l e l i f e s t y l e s
Other factors which can affect the color of pond water are:
• Too much sunlight can make the water color too dark
• Too much shade can make the water color too clear
• Not enough fresh water can make the water color too dark
Using the right amount of manure and leaves will keep your pond healthy. A healthy pond will provide enough food for the fish to grow well and healthy. When the pond is harvested, the manure can be reused as fertilizer for crops. Pond systems made of cement or large scale fish production systems are the most likely to require extra feed for fish.
Extra FeedExtra feed will help the fish to grow faster and allow you to increase the number of fish in a pond. To achieve maximum benefits, the fish food should contain protein, fat, carbohydrates, energy, minerals and vitamins. Feed the fish twice a day, at the same time each day. Increase the amount of feed given as the fish grow larger. A good amount of fish food will be all eaten in 10 minutes. If the food is eaten in less time, add a little more. If more than approximately 10% is not eaten, reduce the amount. Too much feed will cause problems by reducing the amount of oxygen in the pond and by building up at the bottom of the pond.
Extra Feed for Omnivore & Herbivore Fish
Types of natural feed that we can produce ourselves include:
• Grains, contain protein, carbohydrates and fat, for example rice bran, broken rice, crushed corn, millet
• Legumes, their leaves and seeds contain lots of protein and minerals, for example beans, moringa, peanuts. Legume seeds should be cooked first, before feeding to fish
• Fruits and leaves, contain a range of vitamins, minerals, carbohydrates and protein in small amounts
• Roots, contain carbohydrates and energy, for example cassava, taro, sweet potatoes, potatoes. Root vegetables should be cooked first, before feeding to fish, and only a small amount is needed
• Meat and animal remains, contain protein, minerals, vitamins and more, for example animal intestines, blood, bones, feathers, kitchen scraps, frogs, mice, termites. All meat, except for dead mice, frogs or termites, should be cooked first to reduce chances of spreading disease and worms
• Oil seeds, contain protein, oil and low amounts of carbohydrates, for example soybeans, sunflower, kapok seeds, candlenut, coconut and peanuts
• Kitchen scraps, which contain all of the nutrients above, are a great source of fish food
Carp, tilapia, mujair and gurami only require a small amount of meat or none at all. Catfish will grow better if you add some meat to their food.
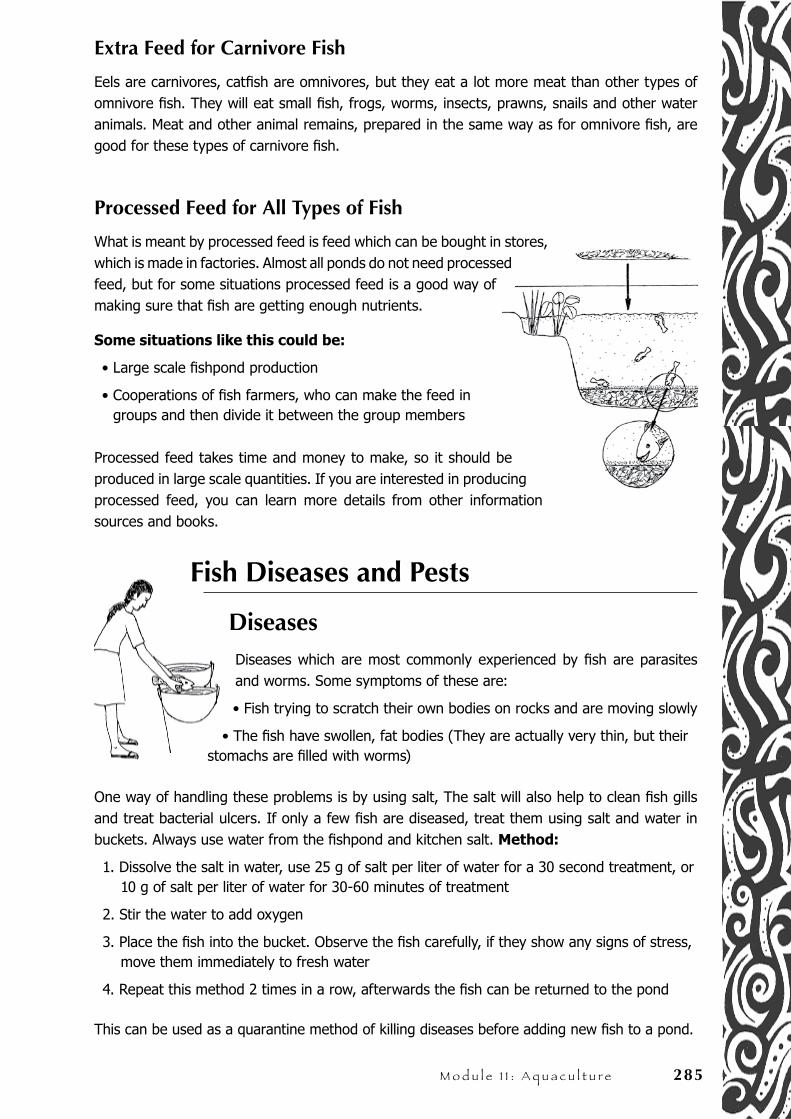
M o d u l e 1 1 : A q u a c u l t u r e 285
Extra Feed for Carnivore Fish
Eels are carnivores, catfish are omnivores, but they eat a lot more meat than other types of omnivore fish. They will eat small fish, frogs, worms, insects, prawns, snails and other water animals. Meat and other animal remains, prepared in the same way as for omnivore fish, are good for these types of carnivore fish.
Processed Feed for All Types of Fish
What is meant by processed feed is feed which can be bought in stores, which is made in factories. Almost all ponds do not need processed feed, but for some situations processed feed is a good way of making sure that fish are getting enough nutrients.
Some situations like this could be:
• Large scale fishpond production
• Cooperations of fish farmers, who can make the feed in groups and then divide it between the group members
Processed feed takes time and money to make, so it should be produced in large scale quantities. If you are interested in producing processed feed, you can learn more details from other information sources and books.
Fish Diseases and Pests
DiseasesDiseases which are most commonly experienced by fish are parasites and worms. Some symptoms of these are:
• Fish trying to scratch their own bodies on rocks and are moving slowly
• The fish have swollen, fat bodies (They are actually very thin, but their stomachs are filled with worms)
One way of handling these problems is by using salt, The salt will also help to clean fish gills and treat bacterial ulcers. If only a few fish are diseased, treat them using salt and water in buckets. Always use water from the fishpond and kitchen salt. Method:
1. Dissolve the salt in water, use 25 g of salt per liter of water for a 30 second treatment, or 10 g of salt per liter of water for 30-60 minutes of treatment
2. Stir the water to add oxygen
3. Place the fish into the bucket. Observe the fish carefully, if they show any signs of stress, move them immediately to fresh water
4. Repeat this method 2 times in a row, afterwards the fish can be returned to the pond
This can be used as a quarantine method of killing diseases before adding new fish to a pond.
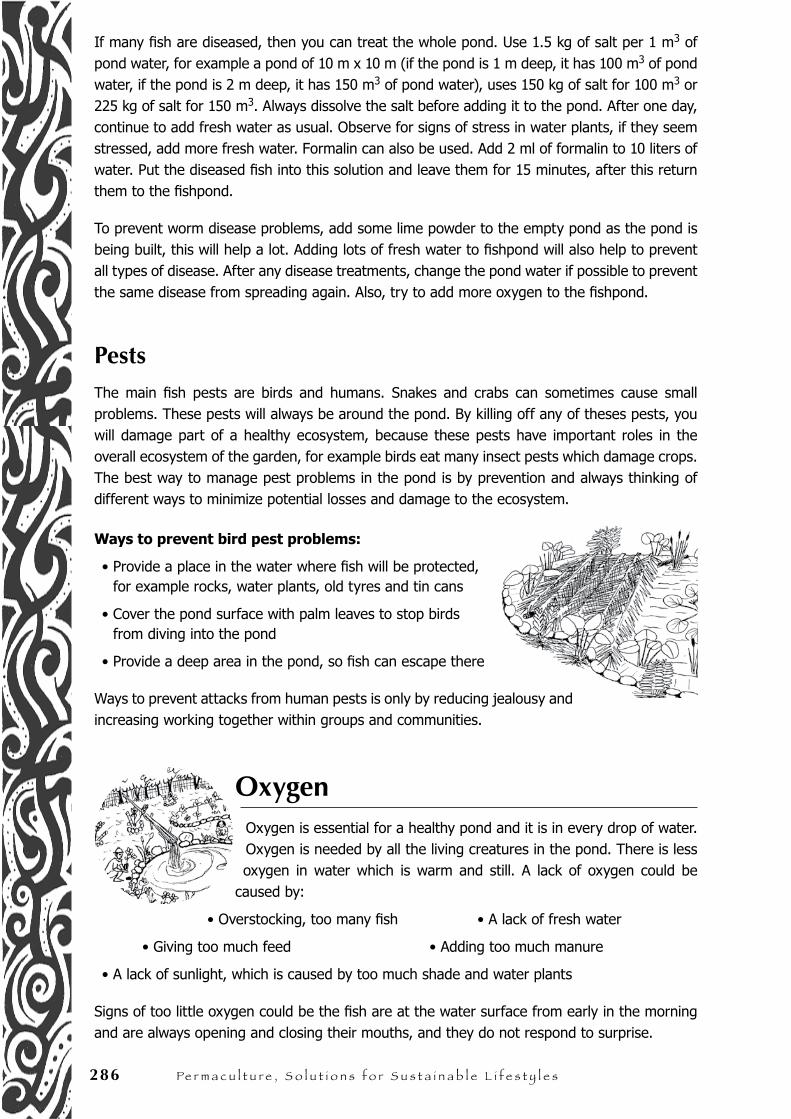
286 Pe r m a c u l t u r e , S o l u t i o n s f o r S u s t a i n a b l e l i f e s t y l e s
If many fish are diseased, then you can treat the whole pond. Use 1.5 kg of salt per 1 m3 of pond water, for example a pond of 10 m x 10 m (if the pond is 1 m deep, it has 100 m3 of pond water, if the pond is 2 m deep, it has 150 m3 of pond water), uses 150 kg of salt for 100 m3 or 225 kg of salt for 150 m3. Always dissolve the salt before adding it to the pond. After one day, continue to add fresh water as usual. Observe for signs of stress in water plants, if they seem stressed, add more fresh water. Formalin can also be used. Add 2 ml of formalin to 10 liters of water. Put the diseased fish into this solution and leave them for 15 minutes, after this return them to the fishpond.
To prevent worm disease problems, add some lime powder to the empty pond as the pond is being built, this will help a lot. Adding lots of fresh water to fishpond will also help to prevent all types of disease. After any disease treatments, change the pond water if possible to prevent the same disease from spreading again. Also, try to add more oxygen to the fishpond.
PestsThe main fish pests are birds and humans. Snakes and crabs can sometimes cause small problems. These pests will always be around the pond. By killing off any of theses pests, you will damage part of a healthy ecosystem, because these pests have important roles in the overall ecosystem of the garden, for example birds eat many insect pests which damage crops. The best way to manage pest problems in the pond is by prevention and always thinking of different ways to minimize potential losses and damage to the ecosystem.
Ways to prevent bird pest problems:
• Provide a place in the water where fish will be protected, for example rocks, water plants, old tyres and tin cans
• Cover the pond surface with palm leaves to stop birds from diving into the pond
• Provide a deep area in the pond, so fish can escape there
Ways to prevent attacks from human pests is only by reducing jealousy and increasing working together within groups and communities.
OxygenOxygen is essential for a healthy pond and it is in every drop of water. Oxygen is needed by all the living creatures in the pond. There is less oxygen in water which is warm and still. A lack of oxygen could be
caused by:
• Overstocking, too many fish • A lack of fresh water
• Giving too much feed • Adding too much manure
• A lack of sunlight, which is caused by too much shade and water plants
Signs of too little oxygen could be the fish are at the water surface from early in the morning and are always opening and closing their mouths, and they do not respond to surprise.
M o d u l e 1 1 : A q u a c u l t u r e 287
Oxygen can be replaced and increased by:
• Flowing water into the pond. If there is a continual supply of water, than only a small amount of water needs to be run into the pond
• Adding fresh water regularly, every few days, especially for small ponds
• Increasing the pond depth. A deep pond will stay cooler than a shallow pond. Cool water holds more oxygen than warm water
• Moving the water. Moving water will return oxygen to the water. Move the water as often as possible, by using the wind, water pumps, windmills or by simply stirring the water
Cleaning the PondThe best time to clean the pond is after harvesting fish. If there are
fish still being kept in the pond, move the fish to a container and
return them to the pond after it has been cleaned. Leave a very thin
layer of soil or manure at the bottom of the pond so good bacteria
stays there. Don’t forget to use the pond bottom soil to fertilize your
garden.
Potential Problems
Pollution
Pollution can cause big problems for fishponds. Pollution can come from
chemicals, oil, petrol and even soap water. Water from the kitchen and
washing water contains detergents, and this water cannot be run directly
into fishponds. This water must be cleaned first by running it into a
separate pond used to filter the water, after this process it can be run into
the fishpond. Grow water plants, like reeds, lotus and water hyacinth, in
the water filter pond. Don’t use plants which will be eaten. These plants,
besides functioning to filter the water, can also be used for mulch. (For more
information about how to clean water, see Module 3 – Houses, Water and
Waste Management). Using pesticides and herbicides is also dangerous. To
reduce potential pollution problems, don’t use pesticides and herbicides on
land above the pond area, because they flow down into the pond. Water
pollution could come from sources far away, especially if you are using water
from rivers. Work together with you community to reduce using chemical
products which could pollute irrigation water. Working together will benefit
everyone involved.
288 Pe r m a c u l t u r e , S o l u t i o n s f o r S u s t a i n a b l e l i f e s t y l e s
Over FeedingOver feeding can cause problems to do with water quality and the amount of oxygen available in the water. Water piling up at the bottom of the pond will also make the pond more shallow quickly. If these problems do occur, the quickest solution is to change the pond water.
MosquitoesMosquitoes can carry many dangerous diseases, such as malaria and dengue fever. Mosquitoes lay their eggs in ponds, and the mosquito larvae will stay there until they are ready to fly. Some types of fish, like tilapia, will eat mosquito eggs and larvae, frogs will also help with this. Neem leaves can be added to the fishpond to stop mosquito problems. Add neem leaves to the pond regularly, or spray a liquid solution of 3-4 ml neem oil and 1 liter of water over the pond surface. Neem will stop mosquitoes from breeding without harming the fish. Be careful using other types of natural pesticides, because they could be harmful to fish.
Other Types of Fishponds
Wet Season FishpondsIf during the dry season there is limited water supply or no water at all, a pond can be made for use only during the wet season. Trenches, swales and good irrigation can be used to increase water supply. Soil traps to filter water can be made if swales or trenches are used, or if the water comes from rivers. The amount of oxygen in the water will be reduced if the water supply is not regular.
SMART IDEAS!
• To grow fish to their maximal size, raise them in a separate container or water tank for 1-2 months, then move them into the pond at the beginning of the wet season
• During the dry season, when the pond is not being used, the bottom of the pond can be used for growing vegetables
• If the pond is not used for growing vegetables, cover it with a temporary shade structure to prevent cracking (including ponds made of cement)
Saltwater FishpondsFor areas close to the sea, a saltwater fishpond can be made. The pond is made by simply digging a hole near the sea, which will then naturally fill with saltwater. The location of the pond should not be much higher than sea level, because if it is too high it will be difficult to reach the water. The best areas are where water plants are already growing (swampy areas). By creating a fishpond, you will create a productive area on unproductive land which is not being used for anything. However, be careful not to change the natural environment too much or damage the surrounding area, because these areas are very important for keeping the coast and sea healthy. Create an area as natural as possible by using local plants. The most common fish raised in saltwater ponds is the milkfish.
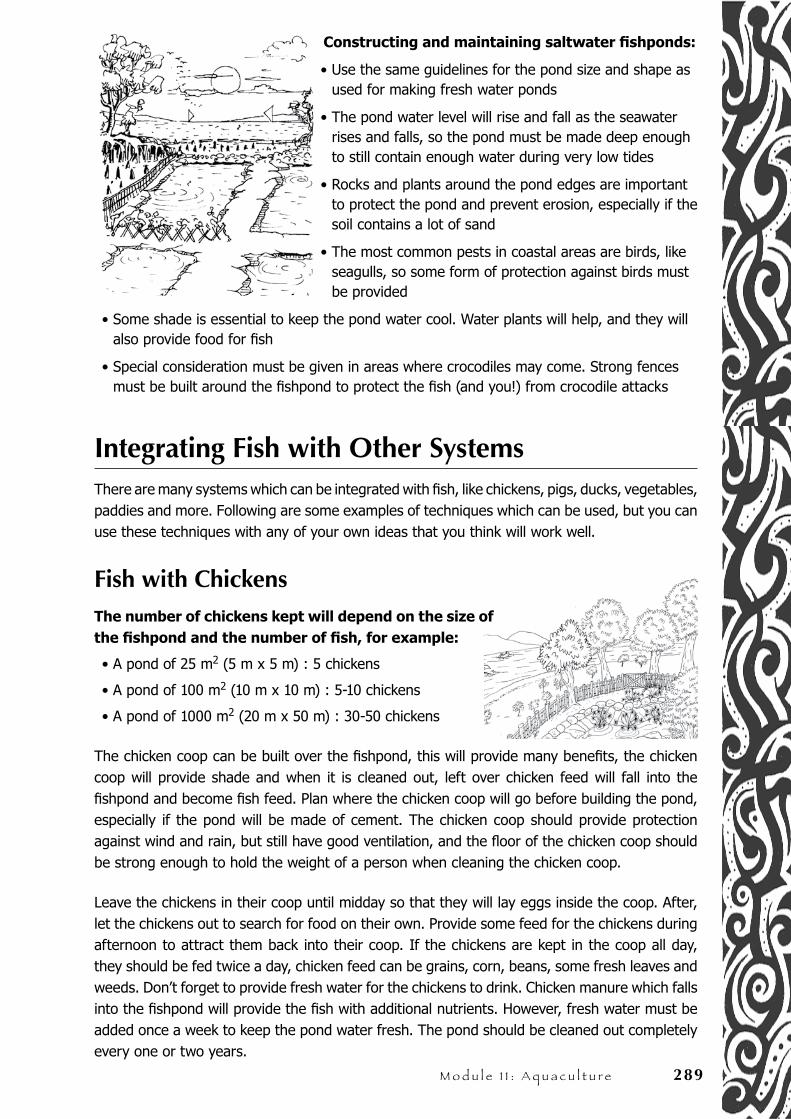
M o d u l e 1 1 : A q u a c u l t u r e 289
Constructing and maintaining saltwater fishponds:
• Use the same guidelines for the pond size and shape as used for making fresh water ponds
• The pond water level will rise and fall as the seawater rises and falls, so the pond must be made deep enough to still contain enough water during very low tides
• Rocks and plants around the pond edges are important to protect the pond and prevent erosion, especially if the soil contains a lot of sand
• The most common pests in coastal areas are birds, like seagulls, so some form of protection against birds must be provided
• Some shade is essential to keep the pond water cool. Water plants will help, and they will also provide food for fish
• Special consideration must be given in areas where crocodiles may come. Strong fences must be built around the fishpond to protect the fish (and you!) from crocodile attacks
Integrating Fish with Other SystemsThere are many systems which can be integrated with fish, like chickens, pigs, ducks, vegetables, paddies and more. Following are some examples of techniques which can be used, but you can use these techniques with any of your own ideas that you think will work well.
Fish with ChickensThe number of chickens kept will depend on the size of the fishpond and the number of fish, for example:
• A pond of 25 m2 (5 m x 5 m) : 5 chickens
• A pond of 100 m2 (10 m x 10 m) : 5-10 chickens
• A pond of 1000 m2 (20 m x 50 m) : 30-50 chickens
The chicken coop can be built over the fishpond, this will provide many benefits, the chicken coop will provide shade and when it is cleaned out, left over chicken feed will fall into the fishpond and become fish feed. Plan where the chicken coop will go before building the pond, especially if the pond will be made of cement. The chicken coop should provide protection against wind and rain, but still have good ventilation, and the floor of the chicken coop should be strong enough to hold the weight of a person when cleaning the chicken coop.
Leave the chickens in their coop until midday so that they will lay eggs inside the coop. After, let the chickens out to search for food on their own. Provide some feed for the chickens during afternoon to attract them back into their coop. If the chickens are kept in the coop all day, they should be fed twice a day, chicken feed can be grains, corn, beans, some fresh leaves and weeds. Don’t forget to provide fresh water for the chickens to drink. Chicken manure which falls into the fishpond will provide the fish with additional nutrients. However, fresh water must be added once a week to keep the pond water fresh. The pond should be cleaned out completely every one or two years.

290 Pe r m a c u l t u r e , S o l u t i o n s f o r S u s t a i n a b l e l i f e s t y l e s
Fish with PigsThis system is similar to the fish and chicken system. Use 2-3 pigs for a pond of 100 m2 (10 m x 10 m) or larger. The pig pen can be used for raising young pigs. The piglets can be raised in the pen from 2-4 months, then change them for new piglets. The pigs can be let out of the pen, but a fence will be needed to manage them.
The pig pen should be made above the irrigation water that flows into the pond, not directly above the pond. In this way the amount of fertilizer and feed that enters the pond can be regulated. If there is too much manure and feed from the pig pen, it can be diverted or used as compost material. In China, the pig manure and left over feed is composted first and then added to the fishpond.
Fish and Rice Paddy Systems (Mina Padi)There are some types of fish, like catfish and eels, which naturally live in paddies. However, other types fish, like tilapia, gurami and carp can also be raised in paddies, so long as there is enough water and the paddies are free of pesticides. If the paddies used are close to the house, this is much better because they will be easier to manage. Small fish should be raised in separate ponds and added to the paddies after the rice is already growing. This will prevent the fish from eating the young rice plants. A separate, deeper pond can be made connected to the rice paddies. When harvest time is close, the water will dry up and become warmer, and the fish will then naturally escape to this separate pond. This pond should be made in area lower than the paddies. This system can be managed the same as a normal fishpond. Water flow and fish population can be controlled by using trenches and doors.
Some benefits of using this system:
• There will be two different products from the rice paddies, fish and rice
• Some fish, like tilapia and gurami, will eat mosquito larvae and reduce mosquito problems in the paddies, they will also feed on insect pests which damage rice crops
• Fish manure will fertilize the rice paddies
• Rotten vegetation from the rice crops will become food for fish
Small ponds for young fish can be made next to the irrigation trenches which flow into the rice paddies.
BEWARE!
If you use pesticides and herbicides you will kill the fish. Even some natural pesticides, like tuha and tobacco, are too strong and dangerous (tuha is actually used as a fish poison). Use Integrated Pest Management (ITP) techniques for managing rice crops and be careful with natural pesticides. (For more information about ITP, see Module 9 – Integrated Pest Management).
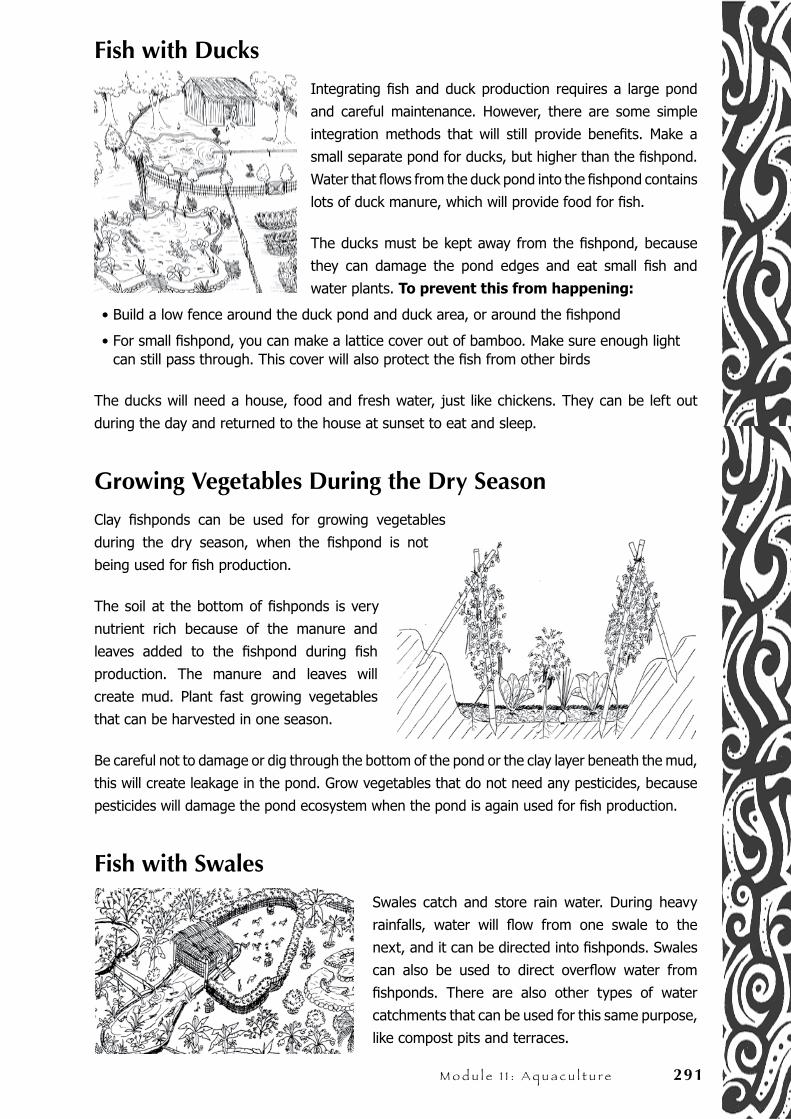
M o d u l e 1 1 : A q u a c u l t u r e 291
Fish with Ducks
Integrating fish and duck production requires a large pond
and careful maintenance. However, there are some simple
integration methods that will still provide benefits. Make a
small separate pond for ducks, but higher than the fishpond.
Water that flows from the duck pond into the fishpond contains
lots of duck manure, which will provide food for fish.
The ducks must be kept away from the fishpond, because
they can damage the pond edges and eat small fish and
water plants. To prevent this from happening:
• Build a low fence around the duck pond and duck area, or around the fishpond
• For small fishpond, you can make a lattice cover out of bamboo. Make sure enough light can still pass through. This cover will also protect the fish from other birds
The ducks will need a house, food and fresh water, just like chickens. They can be left out
during the day and returned to the house at sunset to eat and sleep.
Growing Vegetables During the Dry Season
Clay fishponds can be used for growing vegetables
during the dry season, when the fishpond is not
being used for fish production.
The soil at the bottom of fishponds is very
nutrient rich because of the manure and
leaves added to the fishpond during fish
production. The manure and leaves will
create mud. Plant fast growing vegetables
that can be harvested in one season.
Be careful not to damage or dig through the bottom of the pond or the clay layer beneath the mud,
this will create leakage in the pond. Grow vegetables that do not need any pesticides, because
pesticides will damage the pond ecosystem when the pond is again used for fish production.
Fish with Swales
Swales catch and store rain water. During heavy
rainfalls, water will flow from one swale to the
next, and it can be directed into fishponds. Swales
can also be used to direct overflow water from
fishponds. There are also other types of water
catchments that can be used for this same purpose,
like compost pits and terraces.
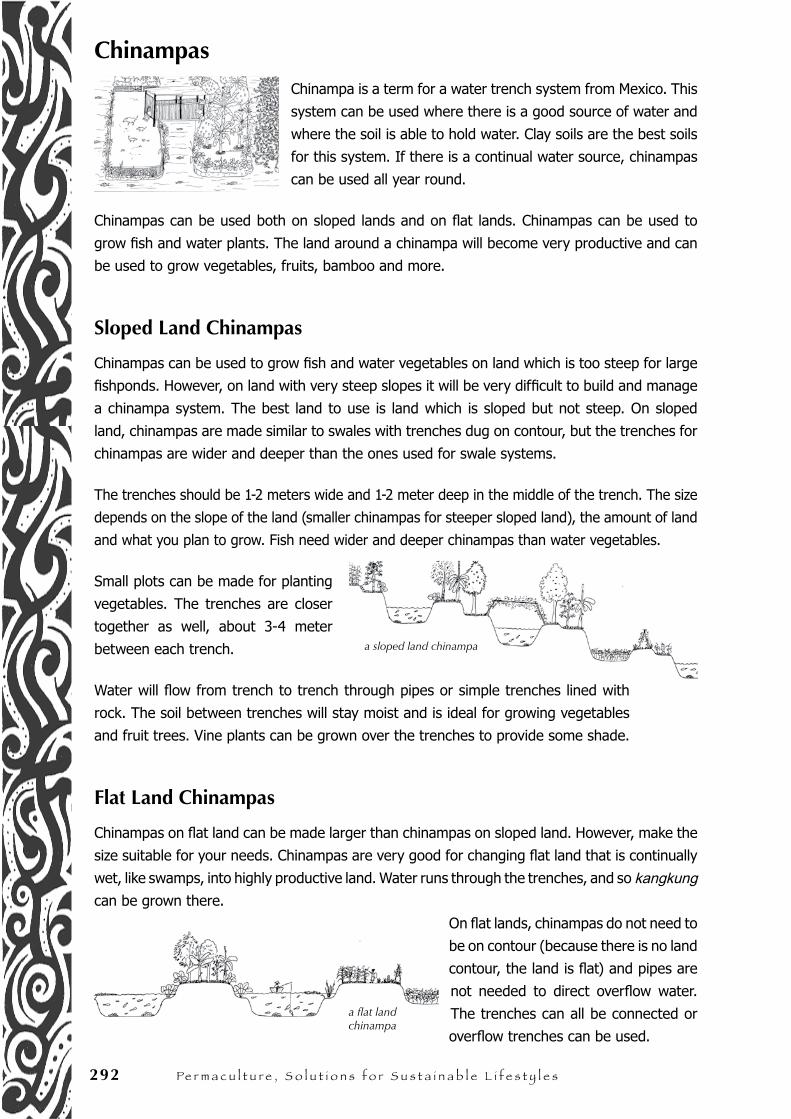
292 Pe r m a c u l t u r e , S o l u t i o n s f o r S u s t a i n a b l e l i f e s t y l e s
a sloped land chinampa
Chinampas
Chinampa is a term for a water trench system from Mexico. This
system can be used where there is a good source of water and
where the soil is able to hold water. Clay soils are the best soils
for this system. If there is a continual water source, chinampas
can be used all year round.
Chinampas can be used both on sloped lands and on flat lands. Chinampas can be used to
grow fish and water plants. The land around a chinampa will become very productive and can
be used to grow vegetables, fruits, bamboo and more.
Sloped Land Chinampas
Chinampas can be used to grow fish and water vegetables on land which is too steep for large
fishponds. However, on land with very steep slopes it will be very difficult to build and manage
a chinampa system. The best land to use is land which is sloped but not steep. On sloped
land, chinampas are made similar to swales with trenches dug on contour, but the trenches for
chinampas are wider and deeper than the ones used for swale systems.
The trenches should be 1-2 meters wide and 1-2 meter deep in the middle of the trench. The size
depends on the slope of the land (smaller chinampas for steeper sloped land), the amount of land
and what you plan to grow. Fish need wider and deeper chinampas than water vegetables.
Small plots can be made for planting
vegetables. The trenches are closer
together as well, about 3-4 meter
between each trench.
Water will flow from trench to trench through pipes or simple trenches lined with
rock. The soil between trenches will stay moist and is ideal for growing vegetables
and fruit trees. Vine plants can be grown over the trenches to provide some shade.
Flat Land Chinampas
Chinampas on flat land can be made larger than chinampas on sloped land. However, make the
size suitable for your needs. Chinampas are very good for changing flat land that is continually
wet, like swamps, into highly productive land. Water runs through the trenches, and so kangkung
can be grown there.
On flat lands, chinampas do not need to
be on contour (because there is no land
contour, the land is flat) and pipes are
not needed to direct overflow water.
The trenches can all be connected or
overflow trenches can be used.
a flat land chinampa
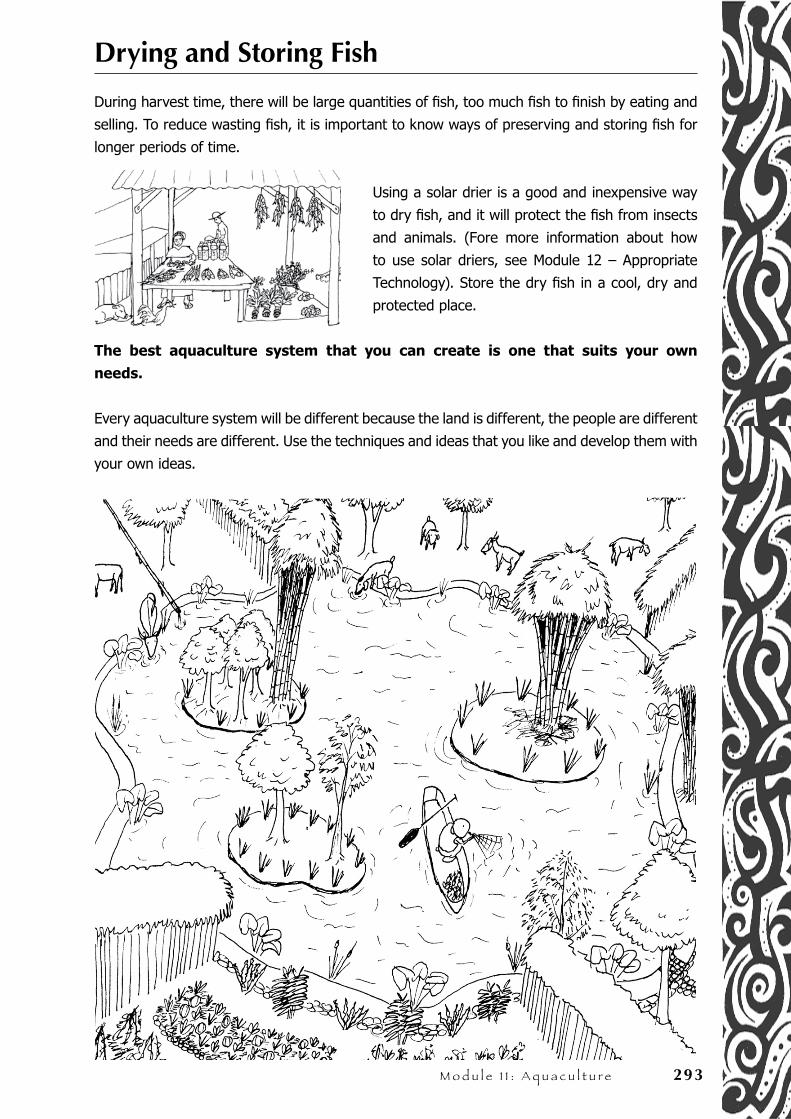
M o d u l e 1 1 : A q u a c u l t u r e 293
Drying and Storing Fish
During harvest time, there will be large quantities of fish, too much fish to finish by eating and
selling. To reduce wasting fish, it is important to know ways of preserving and storing fish for
longer periods of time.
Using a solar drier is a good and inexpensive way
to dry fish, and it will protect the fish from insects
and animals. (Fore more information about how
to use solar driers, see Module 12 – Appropriate
Technology). Store the dry fish in a cool, dry and
protected place.
The best aquaculture system that you can create is one that suits your own
needs.
Every aquaculture system will be different because the land is different, the people are different
and their needs are different. Use the techniques and ideas that you like and develop them with
your own ideas.

294 Pe r m a c u l t u r e , S o l u t i o n s f o r S u s t a i n a b l e l i f e s t y l e s
N o t e s . . .
Pe
rma
cu
ltu
re R
eso
urc
e B
oo
k M
od
ule
12
. A
pp
rop
ria
te T
ec
hn
olo
gy
M o d u l e N o 1 2 .
Appropriate Technology

296 Pe r m a c u l t u r e , S o l u t i o n s f o r S u s t a i n a b l e l i f e s t y l e s
N o t e s . . .
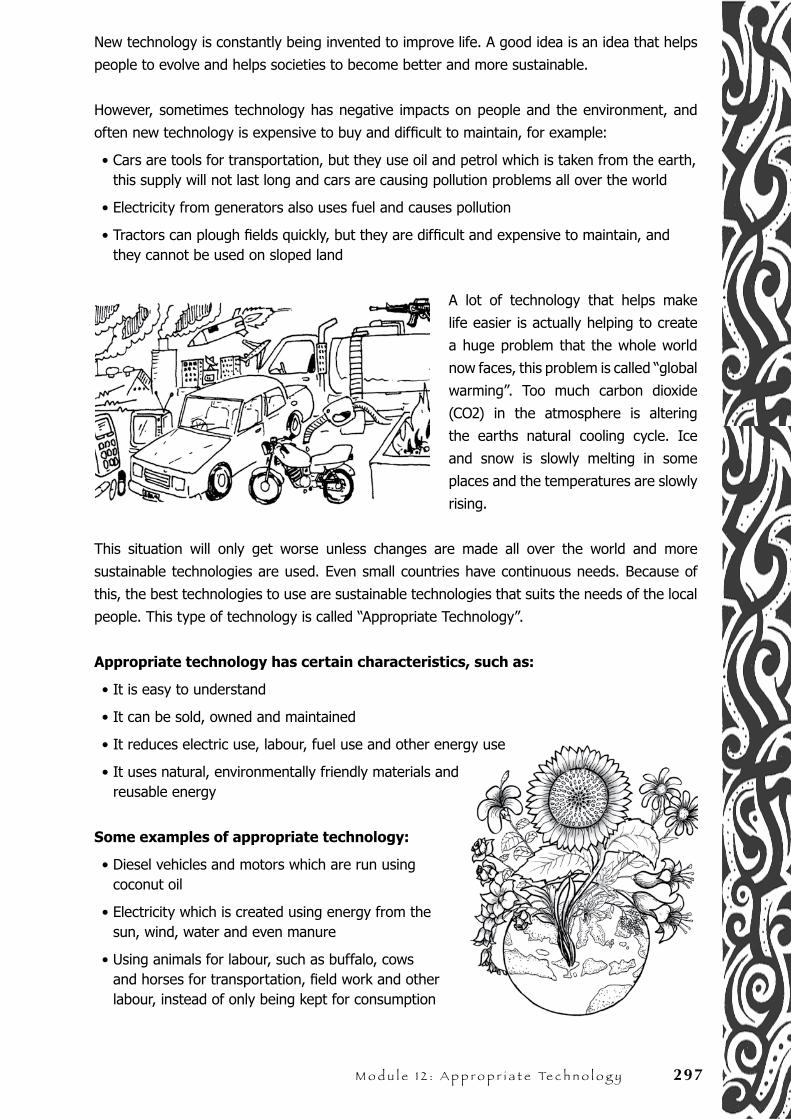
M o d u l e 1 2 : A p p r o p r i a t e Te c h n o l o g y 297
New technology is constantly being invented to improve life. A good idea is an idea that helps
people to evolve and helps societies to become better and more sustainable.
However, sometimes technology has negative impacts on people and the environment, and
often new technology is expensive to buy and difficult to maintain, for example:
• Cars are tools for transportation, but they use oil and petrol which is taken from the earth, this supply will not last long and cars are causing pollution problems all over the world
• Electricity from generators also uses fuel and causes pollution
• Tractors can plough fields quickly, but they are difficult and expensive to maintain, and they cannot be used on sloped land
A lot of technology that helps make
life easier is actually helping to create
a huge problem that the whole world
now faces, this problem is called “global
warming”. Too much carbon dioxide
(CO2) in the atmosphere is altering
the earths natural cooling cycle. Ice
and snow is slowly melting in some
places and the temperatures are slowly
rising.
This situation will only get worse unless changes are made all over the world and more
sustainable technologies are used. Even small countries have continuous needs. Because of
this, the best technologies to use are sustainable technologies that suits the needs of the local
people. This type of technology is called “Appropriate Technology”.
Appropriate technology has certain characteristics, such as:
• It is easy to understand
• It can be sold, owned and maintained
• It reduces electric use, labour, fuel use and other energy use
• It uses natural, environmentally friendly materials and reusable energy
Some examples of appropriate technology:
• Diesel vehicles and motors which are run using coconut oil
• Electricity which is created using energy from the sun, wind, water and even manure
• Using animals for labour, such as buffalo, cows and horses for transportation, field work and other labour, instead of only being kept for consumption
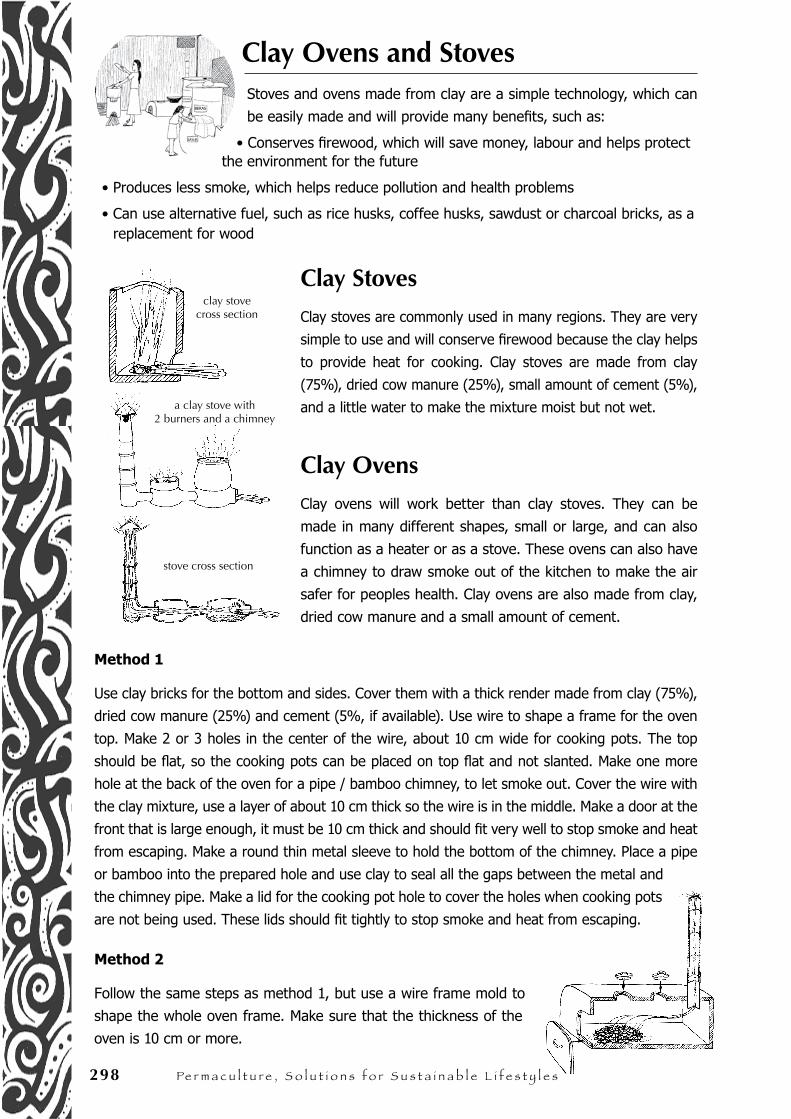
298 Pe r m a c u l t u r e , S o l u t i o n s f o r S u s t a i n a b l e l i f e s t y l e s
Clay Ovens and StovesStoves and ovens made from clay are a simple technology, which can
be easily made and will provide many benefits, such as:
• Conserves firewood, which will save money, labour and helps protect the environment for the future
• Produces less smoke, which helps reduce pollution and health problems
• Can use alternative fuel, such as rice husks, coffee husks, sawdust or charcoal bricks, as a replacement for wood
Clay Stoves
Clay stoves are commonly used in many regions. They are very
simple to use and will conserve firewood because the clay helps
to provide heat for cooking. Clay stoves are made from clay
(75%), dried cow manure (25%), small amount of cement (5%),
and a little water to make the mixture moist but not wet.
Clay Ovens
Clay ovens will work better than clay stoves. They can be
made in many different shapes, small or large, and can also
function as a heater or as a stove. These ovens can also have
a chimney to draw smoke out of the kitchen to make the air
safer for peoples health. Clay ovens are also made from clay,
dried cow manure and a small amount of cement.
Method 1
Use clay bricks for the bottom and sides. Cover them with a thick render made from clay (75%),
dried cow manure (25%) and cement (5%, if available). Use wire to shape a frame for the oven
top. Make 2 or 3 holes in the center of the wire, about 10 cm wide for cooking pots. The top
should be flat, so the cooking pots can be placed on top flat and not slanted. Make one more
hole at the back of the oven for a pipe / bamboo chimney, to let smoke out. Cover the wire with
the clay mixture, use a layer of about 10 cm thick so the wire is in the middle. Make a door at the
front that is large enough, it must be 10 cm thick and should fit very well to stop smoke and heat
from escaping. Make a round thin metal sleeve to hold the bottom of the chimney. Place a pipe
or bamboo into the prepared hole and use clay to seal all the gaps between the metal and
the chimney pipe. Make a lid for the cooking pot hole to cover the holes when cooking pots
are not being used. These lids should fit tightly to stop smoke and heat from escaping.
Method 2
Follow the same steps as method 1, but use a wire frame mold to
shape the whole oven frame. Make sure that the thickness of the
oven is 10 cm or more.
clay stove cross section
a clay stove with 2 burners and a chimney
stove cross section
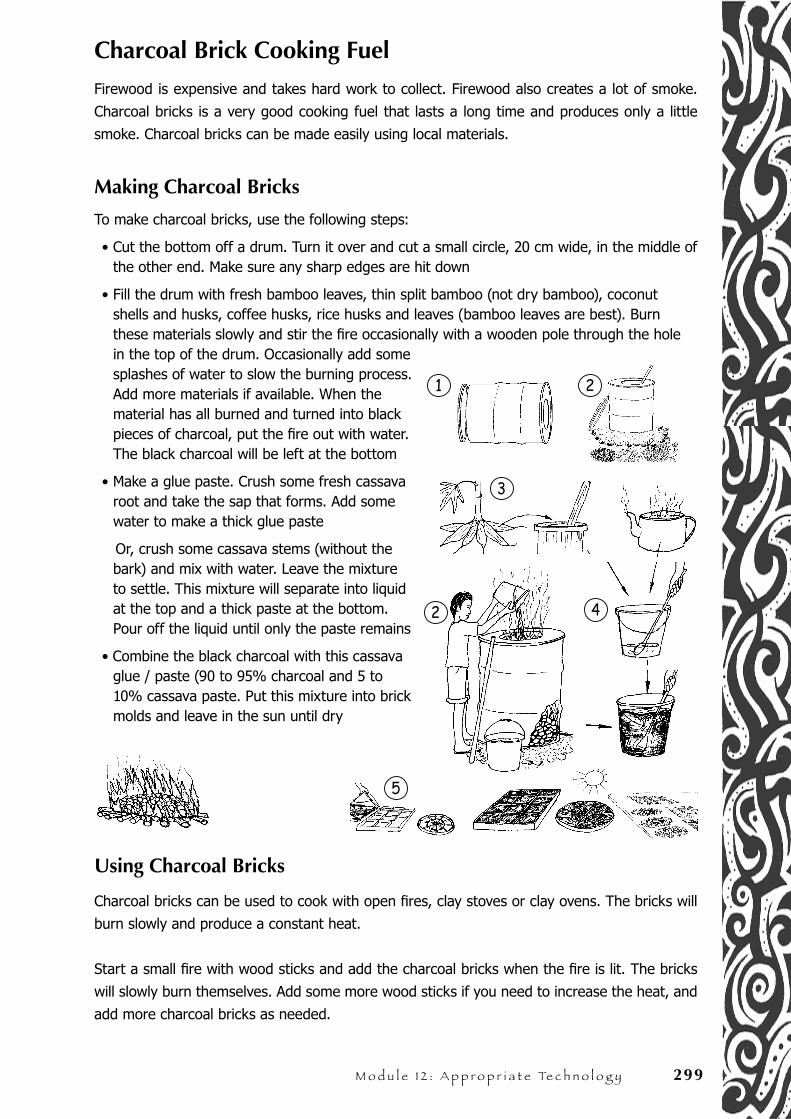
M o d u l e 1 2 : A p p r o p r i a t e Te c h n o l o g y 299
Charcoal Brick Cooking Fuel
Firewood is expensive and takes hard work to collect. Firewood also creates a lot of smoke.
Charcoal bricks is a very good cooking fuel that lasts a long time and produces only a little
smoke. Charcoal bricks can be made easily using local materials.
Making Charcoal Bricks
To make charcoal bricks, use the following steps:
• Cut the bottom off a drum. Turn it over and cut a small circle, 20 cm wide, in the middle of the other end. Make sure any sharp edges are hit down
• Fill the drum with fresh bamboo leaves, thin split bamboo (not dry bamboo), coconut shells and husks, coffee husks, rice husks and leaves (bamboo leaves are best). Burn these materials slowly and stir the fire occasionally with a wooden pole through the hole in the top of the drum. Occasionally add some splashes of water to slow the burning process. Add more materials if available. When the material has all burned and turned into black pieces of charcoal, put the fire out with water. The black charcoal will be left at the bottom
• Make a glue paste. Crush some fresh cassava root and take the sap that forms. Add some water to make a thick glue paste
Or, crush some cassava stems (without the bark) and mix with water. Leave the mixture to settle. This mixture will separate into liquid at the top and a thick paste at the bottom. Pour off the liquid until only the paste remains
• Combine the black charcoal with this cassava glue / paste (90 to 95% charcoal and 5 to 10% cassava paste. Put this mixture into brick molds and leave in the sun until dry
Using Charcoal Bricks
Charcoal bricks can be used to cook with open fires, clay stoves or clay ovens. The bricks will
burn slowly and produce a constant heat.
Start a small fire with wood sticks and add the charcoal bricks when the fire is lit. The bricks
will slowly burn themselves. Add some more wood sticks if you need to increase the heat, and
add more charcoal bricks as needed.
5
1 2
3
42
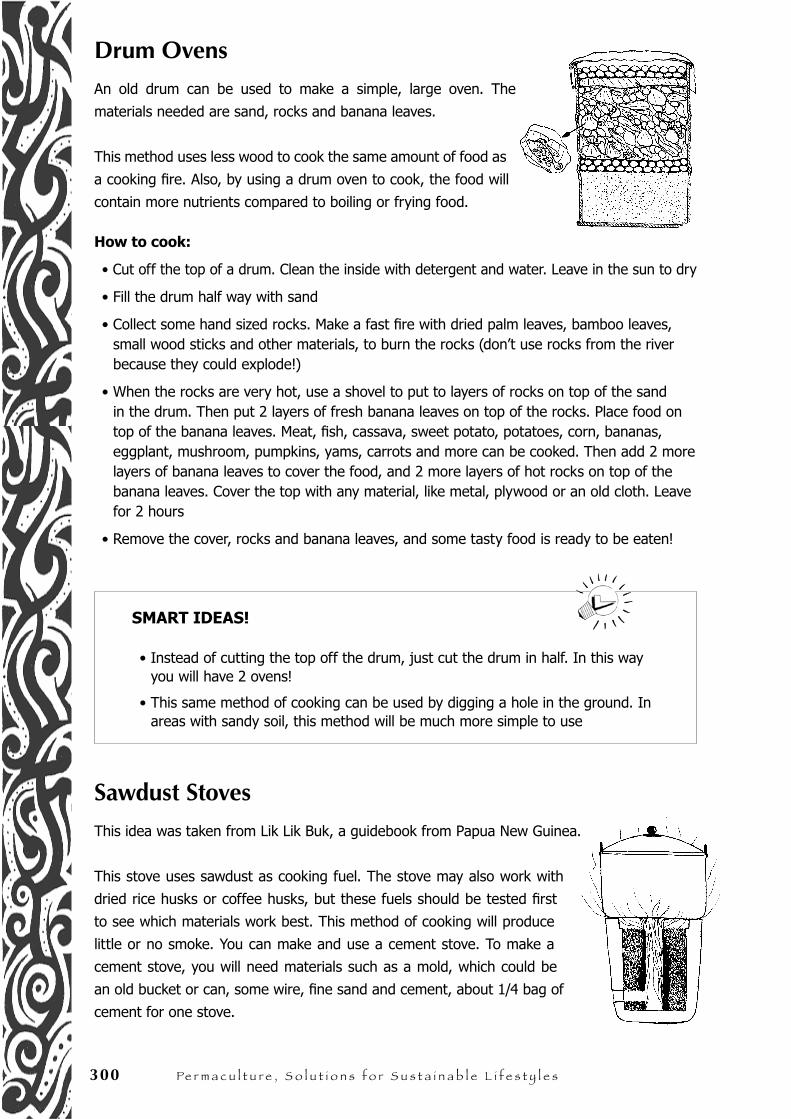
300 Pe r m a c u l t u r e , S o l u t i o n s f o r S u s t a i n a b l e l i f e s t y l e s
Drum Ovens
An old drum can be used to make a simple, large oven. The
materials needed are sand, rocks and banana leaves.
This method uses less wood to cook the same amount of food as
a cooking fire. Also, by using a drum oven to cook, the food will
contain more nutrients compared to boiling or frying food.
How to cook:
• Cut off the top of a drum. Clean the inside with detergent and water. Leave in the sun to dry
• Fill the drum half way with sand
• Collect some hand sized rocks. Make a fast fire with dried palm leaves, bamboo leaves, small wood sticks and other materials, to burn the rocks (don’t use rocks from the river because they could explode!)
• When the rocks are very hot, use a shovel to put to layers of rocks on top of the sand in the drum. Then put 2 layers of fresh banana leaves on top of the rocks. Place food on top of the banana leaves. Meat, fish, cassava, sweet potato, potatoes, corn, bananas, eggplant, mushroom, pumpkins, yams, carrots and more can be cooked. Then add 2 more layers of banana leaves to cover the food, and 2 more layers of hot rocks on top of the banana leaves. Cover the top with any material, like metal, plywood or an old cloth. Leave for 2 hours
• Remove the cover, rocks and banana leaves, and some tasty food is ready to be eaten!
SMART IDEAS!
• Instead of cutting the top off the drum, just cut the drum in half. In this way you will have 2 ovens!
• This same method of cooking can be used by digging a hole in the ground. In areas with sandy soil, this method will be much more simple to use
Sawdust Stoves
This idea was taken from Lik Lik Buk, a guidebook from Papua New Guinea.
This stove uses sawdust as cooking fuel. The stove may also work with
dried rice husks or coffee husks, but these fuels should be tested first
to see which materials work best. This method of cooking will produce
little or no smoke. You can make and use a cement stove. To make a
cement stove, you will need materials such as a mold, which could be
an old bucket or can, some wire, fine sand and cement, about 1/4 bag of
cement for one stove.
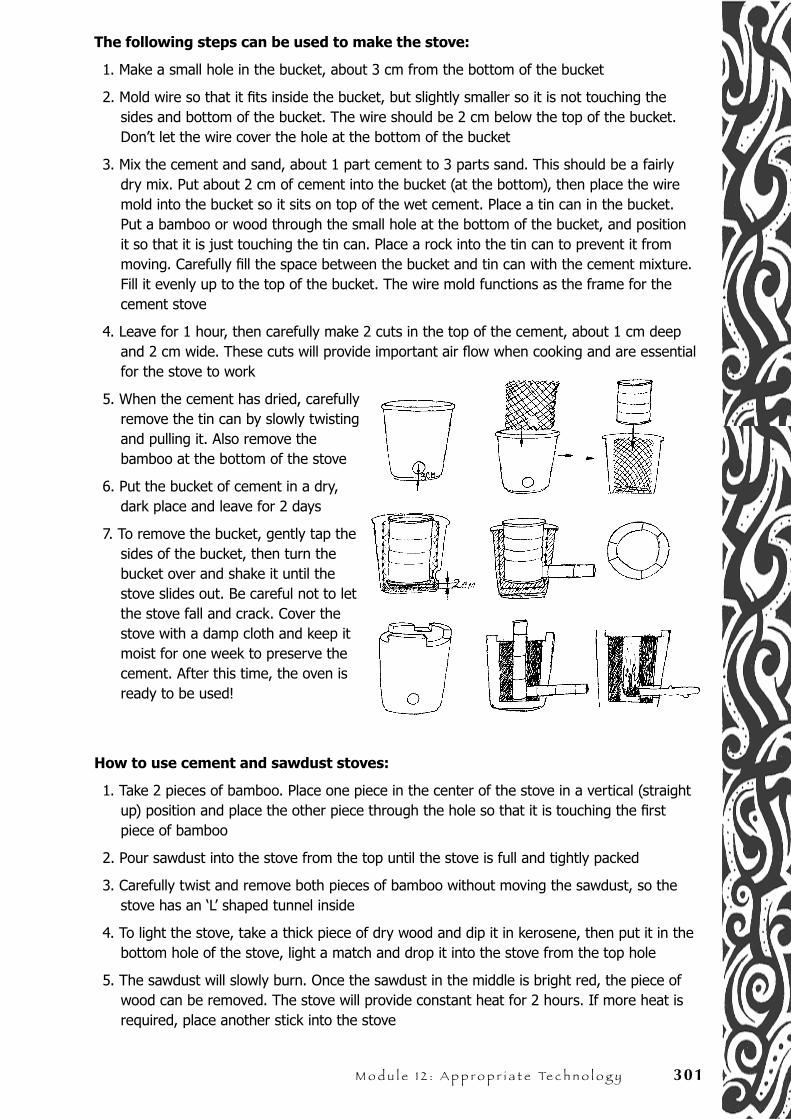
M o d u l e 1 2 : A p p r o p r i a t e Te c h n o l o g y 301
The following steps can be used to make the stove:
1. Make a small hole in the bucket, about 3 cm from the bottom of the bucket
2. Mold wire so that it fits inside the bucket, but slightly smaller so it is not touching the sides and bottom of the bucket. The wire should be 2 cm below the top of the bucket. Don’t let the wire cover the hole at the bottom of the bucket
3. Mix the cement and sand, about 1 part cement to 3 parts sand. This should be a fairly dry mix. Put about 2 cm of cement into the bucket (at the bottom), then place the wire mold into the bucket so it sits on top of the wet cement. Place a tin can in the bucket. Put a bamboo or wood through the small hole at the bottom of the bucket, and position it so that it is just touching the tin can. Place a rock into the tin can to prevent it from moving. Carefully fill the space between the bucket and tin can with the cement mixture. Fill it evenly up to the top of the bucket. The wire mold functions as the frame for the cement stove
4. Leave for 1 hour, then carefully make 2 cuts in the top of the cement, about 1 cm deep and 2 cm wide. These cuts will provide important air flow when cooking and are essential for the stove to work
5. When the cement has dried, carefully remove the tin can by slowly twisting and pulling it. Also remove the bamboo at the bottom of the stove
6. Put the bucket of cement in a dry, dark place and leave for 2 days
7. To remove the bucket, gently tap the sides of the bucket, then turn the bucket over and shake it until the stove slides out. Be careful not to let the stove fall and crack. Cover the stove with a damp cloth and keep it moist for one week to preserve the cement. After this time, the oven is ready to be used!
How to use cement and sawdust stoves:
1. Take 2 pieces of bamboo. Place one piece in the center of the stove in a vertical (straight up) position and place the other piece through the hole so that it is touching the first piece of bamboo
2. Pour sawdust into the stove from the top until the stove is full and tightly packed
3. Carefully twist and remove both pieces of bamboo without moving the sawdust, so the stove has an ‘L’ shaped tunnel inside
4. To light the stove, take a thick piece of dry wood and dip it in kerosene, then put it in the bottom hole of the stove, light a match and drop it into the stove from the top hole
5. The sawdust will slowly burn. Once the sawdust in the middle is bright red, the piece of wood can be removed. The stove will provide constant heat for 2 hours. If more heat is required, place another stick into the stove
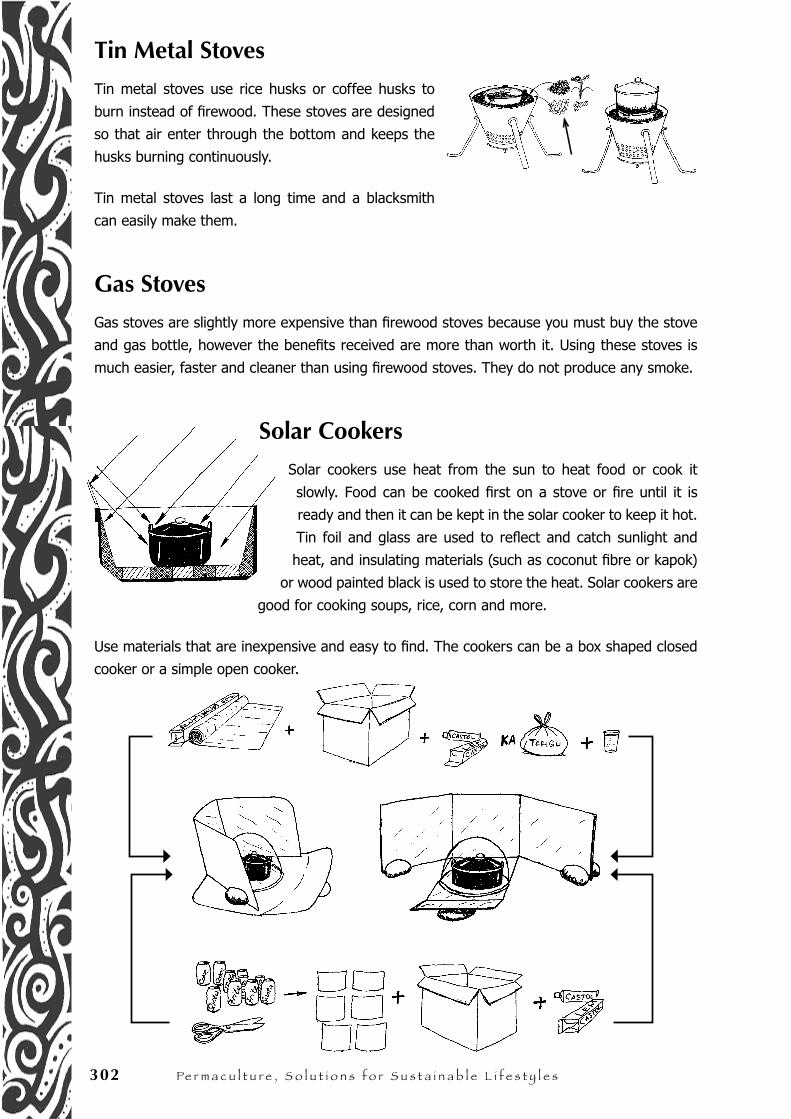
302 Pe r m a c u l t u r e , S o l u t i o n s f o r S u s t a i n a b l e l i f e s t y l e s
Tin Metal Stoves
Tin metal stoves use rice husks or coffee husks to
burn instead of firewood. These stoves are designed
so that air enter through the bottom and keeps the
husks burning continuously.
Tin metal stoves last a long time and a blacksmith
can easily make them.
Gas Stoves
Gas stoves are slightly more expensive than firewood stoves because you must buy the stove
and gas bottle, however the benefits received are more than worth it. Using these stoves is
much easier, faster and cleaner than using firewood stoves. They do not produce any smoke.
Solar Cookers
Solar cookers use heat from the sun to heat food or cook it
slowly. Food can be cooked first on a stove or fire until it is
ready and then it can be kept in the solar cooker to keep it hot.
Tin foil and glass are used to reflect and catch sunlight and
heat, and insulating materials (such as coconut fibre or kapok)
or wood painted black is used to store the heat. Solar cookers are
good for cooking soups, rice, corn and more.
Use materials that are inexpensive and easy to find. The cookers can be a box shaped closed
cooker or a simple open cooker.
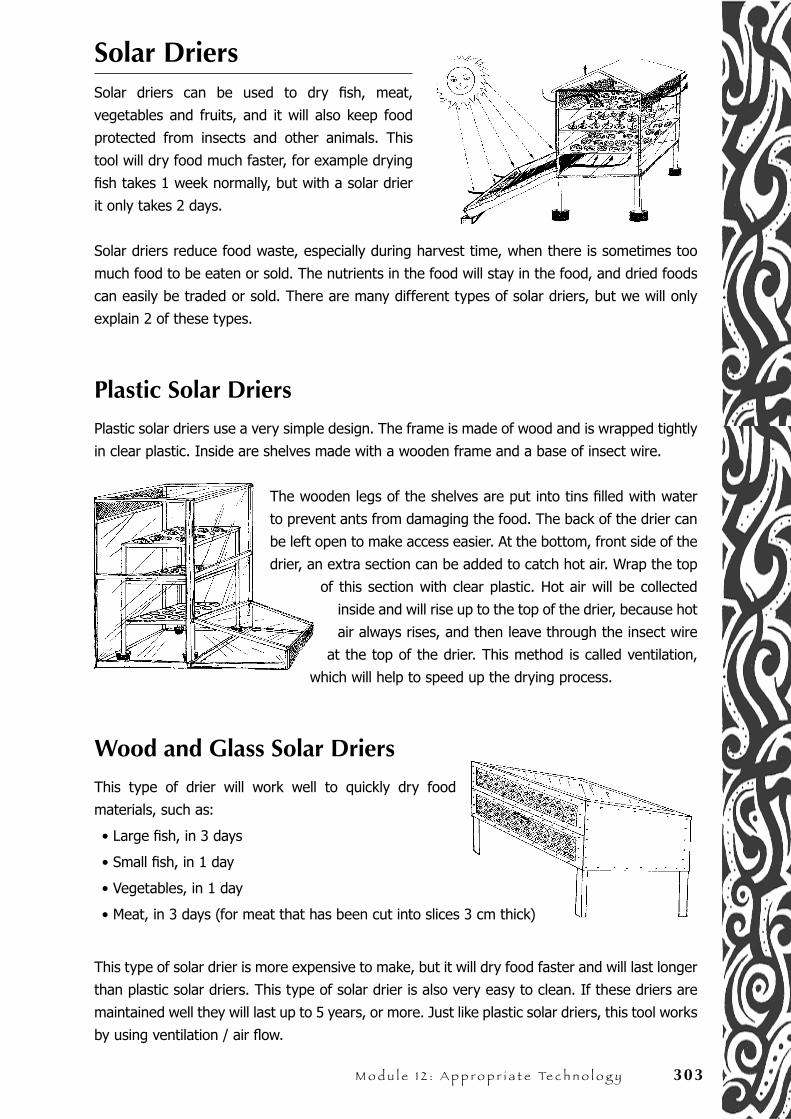
M o d u l e 1 2 : A p p r o p r i a t e Te c h n o l o g y 303
Solar DriersSolar driers can be used to dry fish, meat,
vegetables and fruits, and it will also keep food
protected from insects and other animals. This
tool will dry food much faster, for example drying
fish takes 1 week normally, but with a solar drier
it only takes 2 days.
Solar driers reduce food waste, especially during harvest time, when there is sometimes too
much food to be eaten or sold. The nutrients in the food will stay in the food, and dried foods
can easily be traded or sold. There are many different types of solar driers, but we will only
explain 2 of these types.
Plastic Solar Driers
Plastic solar driers use a very simple design. The frame is made of wood and is wrapped tightly
in clear plastic. Inside are shelves made with a wooden frame and a base of insect wire.
The wooden legs of the shelves are put into tins filled with water
to prevent ants from damaging the food. The back of the drier can
be left open to make access easier. At the bottom, front side of the
drier, an extra section can be added to catch hot air. Wrap the top
of this section with clear plastic. Hot air will be collected
inside and will rise up to the top of the drier, because hot
air always rises, and then leave through the insect wire
at the top of the drier. This method is called ventilation,
which will help to speed up the drying process.
Wood and Glass Solar Driers
This type of drier will work well to quickly dry food
materials, such as:
• Large fish, in 3 days
• Small fish, in 1 day
• Vegetables, in 1 day
• Meat, in 3 days (for meat that has been cut into slices 3 cm thick)
This type of solar drier is more expensive to make, but it will dry food faster and will last longer
than plastic solar driers. This type of solar drier is also very easy to clean. If these driers are
maintained well they will last up to 5 years, or more. Just like plastic solar driers, this tool works
by using ventilation / air flow.
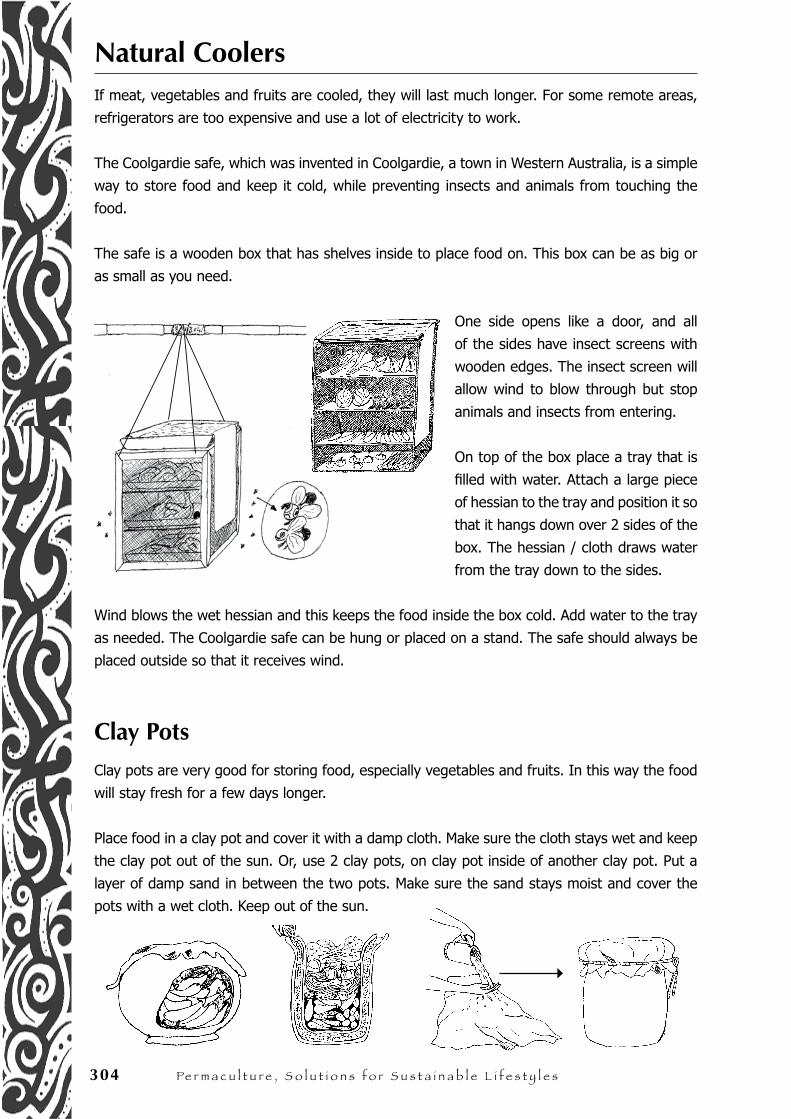
304 Pe r m a c u l t u r e , S o l u t i o n s f o r S u s t a i n a b l e l i f e s t y l e s
Natural CoolersIf meat, vegetables and fruits are cooled, they will last much longer. For some remote areas,
refrigerators are too expensive and use a lot of electricity to work.
The Coolgardie safe, which was invented in Coolgardie, a town in Western Australia, is a simple
way to store food and keep it cold, while preventing insects and animals from touching the
food.
The safe is a wooden box that has shelves inside to place food on. This box can be as big or
as small as you need.
One side opens like a door, and all
of the sides have insect screens with
wooden edges. The insect screen will
allow wind to blow through but stop
animals and insects from entering.
On top of the box place a tray that is
filled with water. Attach a large piece
of hessian to the tray and position it so
that it hangs down over 2 sides of the
box. The hessian / cloth draws water
from the tray down to the sides.
Wind blows the wet hessian and this keeps the food inside the box cold. Add water to the tray
as needed. The Coolgardie safe can be hung or placed on a stand. The safe should always be
placed outside so that it receives wind.
Clay Pots
Clay pots are very good for storing food, especially vegetables and fruits. In this way the food
will stay fresh for a few days longer.
Place food in a clay pot and cover it with a damp cloth. Make sure the cloth stays wet and keep
the clay pot out of the sun. Or, use 2 clay pots, on clay pot inside of another clay pot. Put a
layer of damp sand in between the two pots. Make sure the sand stays moist and cover the
pots with a wet cloth. Keep out of the sun.
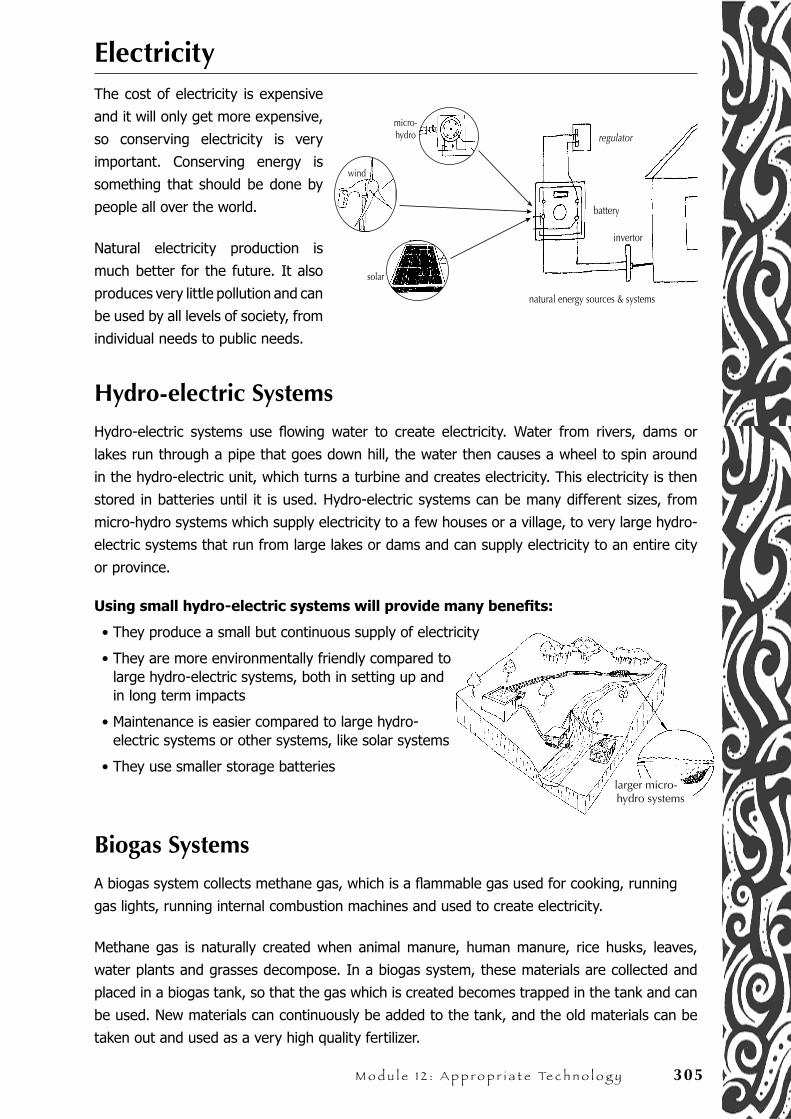
M o d u l e 1 2 : A p p r o p r i a t e Te c h n o l o g y 305
ElectricityThe cost of electricity is expensive
and it will only get more expensive,
so conserving electricity is very
important. Conserving energy is
something that should be done by
people all over the world.
Natural electricity production is
much better for the future. It also
produces very little pollution and can
be used by all levels of society, from
individual needs to public needs.
Hydro-electric Systems
Hydro-electric systems use flowing water to create electricity. Water from rivers, dams or
lakes run through a pipe that goes down hill, the water then causes a wheel to spin around
in the hydro-electric unit, which turns a turbine and creates electricity. This electricity is then
stored in batteries until it is used. Hydro-electric systems can be many different sizes, from
micro-hydro systems which supply electricity to a few houses or a village, to very large hydro-
electric systems that run from large lakes or dams and can supply electricity to an entire city
or province.
Using small hydro-electric systems will provide many benefits:
• They produce a small but continuous supply of electricity
• They are more environmentally friendly compared to large hydro-electric systems, both in setting up and in long term impacts
• Maintenance is easier compared to large hydro-electric systems or other systems, like solar systems
• They use smaller storage batteries
Biogas Systems
A biogas system collects methane gas, which is a flammable gas used for cooking, running
gas lights, running internal combustion machines and used to create electricity.
Methane gas is naturally created when animal manure, human manure, rice husks, leaves,
water plants and grasses decompose. In a biogas system, these materials are collected and
placed in a biogas tank, so that the gas which is created becomes trapped in the tank and can
be used. New materials can continuously be added to the tank, and the old materials can be
taken out and used as a very high quality fertilizer.
larger micro-hydro systems
micro- hydro
wind
solar
natural energy sources & systems
battery
regulator
invertor
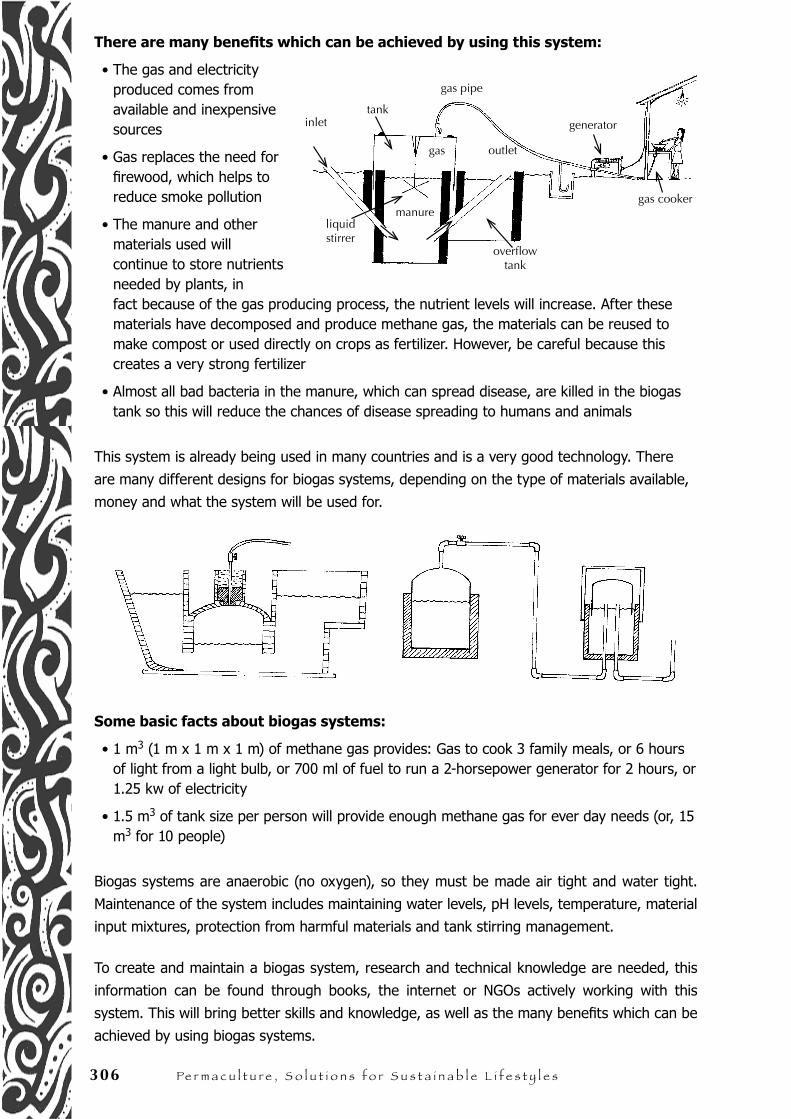
306 Pe r m a c u l t u r e , S o l u t i o n s f o r S u s t a i n a b l e l i f e s t y l e s
There are many benefits which can be achieved by using this system:
• The gas and electricity produced comes from available and inexpensive sources
• Gas replaces the need for firewood, which helps to reduce smoke pollution
• The manure and other materials used will continue to store nutrients needed by plants, in fact because of the gas producing process, the nutrient levels will increase. After these materials have decomposed and produce methane gas, the materials can be reused to make compost or used directly on crops as fertilizer. However, be careful because this creates a very strong fertilizer
• Almost all bad bacteria in the manure, which can spread disease, are killed in the biogas tank so this will reduce the chances of disease spreading to humans and animals
This system is already being used in many countries and is a very good technology. There
are many different designs for biogas systems, depending on the type of materials available,
money and what the system will be used for.
Some basic facts about biogas systems:
• 1 m3 (1 m x 1 m x 1 m) of methane gas provides: Gas to cook 3 family meals, or 6 hours of light from a light bulb, or 700 ml of fuel to run a 2-horsepower generator for 2 hours, or 1.25 kw of electricity
• 1.5 m3 of tank size per person will provide enough methane gas for ever day needs (or, 15 m3 for 10 people)
Biogas systems are anaerobic (no oxygen), so they must be made air tight and water tight.
Maintenance of the system includes maintaining water levels, pH levels, temperature, material
input mixtures, protection from harmful materials and tank stirring management.
To create and maintain a biogas system, research and technical knowledge are needed, this
information can be found through books, the internet or NGOs actively working with this
system. This will bring better skills and knowledge, as well as the many benefits which can be
achieved by using biogas systems.
inlet
liquid stirrer
manure
gas
gas pipe
tank
gas cooker
outlet
generator
overflow tank
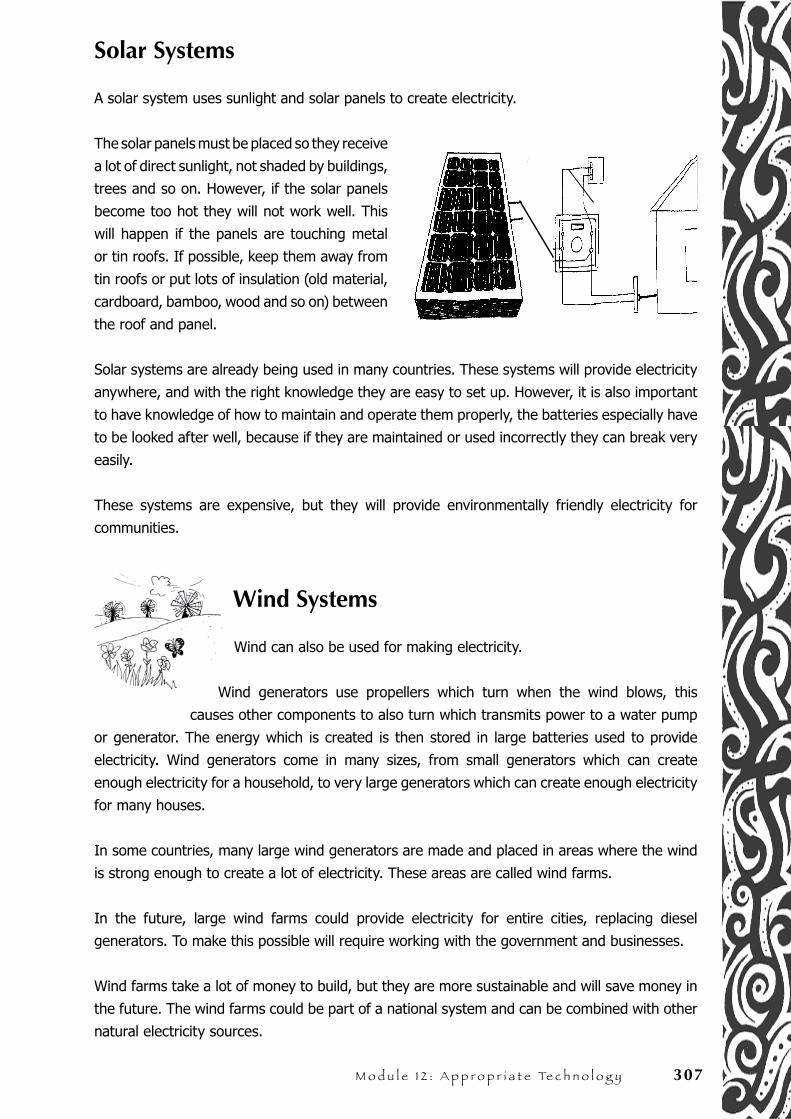
M o d u l e 1 2 : A p p r o p r i a t e Te c h n o l o g y 307
Solar Systems
A solar system uses sunlight and solar panels to create electricity.
The solar panels must be placed so they receive
a lot of direct sunlight, not shaded by buildings,
trees and so on. However, if the solar panels
become too hot they will not work well. This
will happen if the panels are touching metal
or tin roofs. If possible, keep them away from
tin roofs or put lots of insulation (old material,
cardboard, bamboo, wood and so on) between
the roof and panel.
Solar systems are already being used in many countries. These systems will provide electricity
anywhere, and with the right knowledge they are easy to set up. However, it is also important
to have knowledge of how to maintain and operate them properly, the batteries especially have
to be looked after well, because if they are maintained or used incorrectly they can break very
easily.
These systems are expensive, but they will provide environmentally friendly electricity for
communities.
Wind Systems
Wind can also be used for making electricity.
Wind generators use propellers which turn when the wind blows, this
causes other components to also turn which transmits power to a water pump
or generator. The energy which is created is then stored in large batteries used to provide
electricity. Wind generators come in many sizes, from small generators which can create
enough electricity for a household, to very large generators which can create enough electricity
for many houses.
In some countries, many large wind generators are made and placed in areas where the wind
is strong enough to create a lot of electricity. These areas are called wind farms.
In the future, large wind farms could provide electricity for entire cities, replacing diesel
generators. To make this possible will require working with the government and businesses.
Wind farms take a lot of money to build, but they are more sustainable and will save money in
the future. The wind farms could be part of a national system and can be combined with other
natural electricity sources.
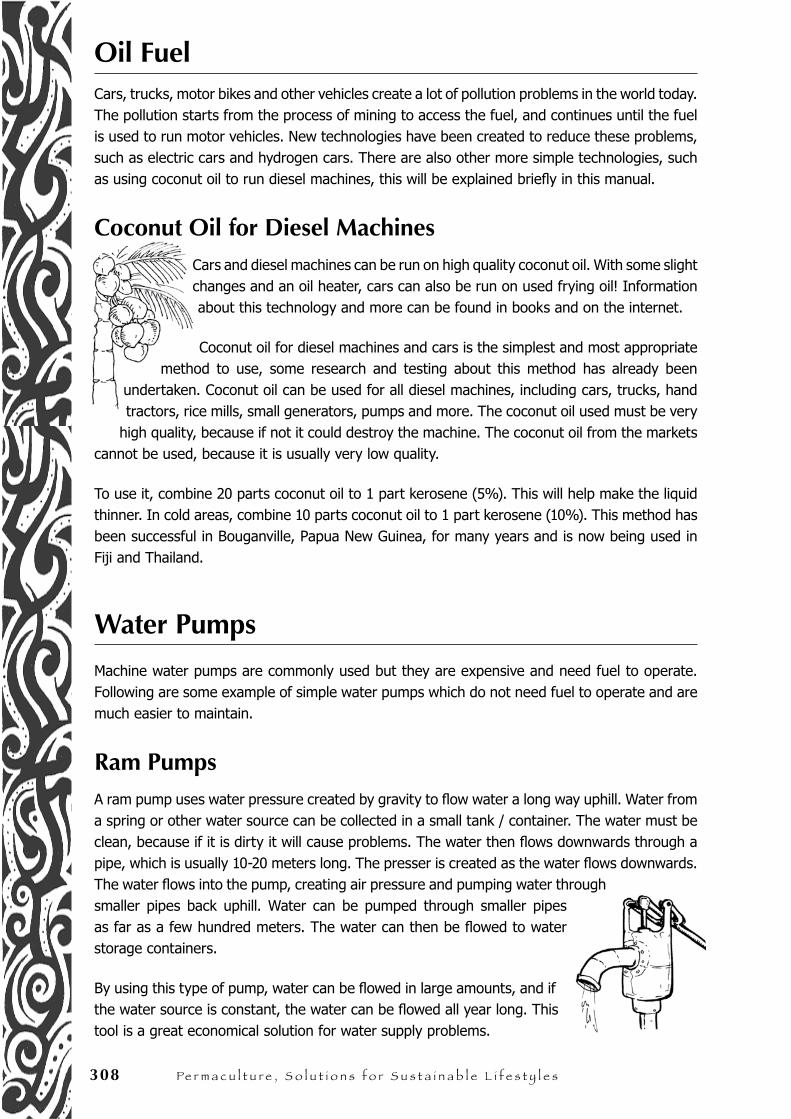
308 Pe r m a c u l t u r e , S o l u t i o n s f o r S u s t a i n a b l e l i f e s t y l e s
Oil FuelCars, trucks, motor bikes and other vehicles create a lot of pollution problems in the world today. The pollution starts from the process of mining to access the fuel, and continues until the fuel is used to run motor vehicles. New technologies have been created to reduce these problems, such as electric cars and hydrogen cars. There are also other more simple technologies, such as using coconut oil to run diesel machines, this will be explained briefly in this manual.
Coconut Oil for Diesel MachinesCars and diesel machines can be run on high quality coconut oil. With some slight changes and an oil heater, cars can also be run on used frying oil! Information about this technology and more can be found in books and on the internet.
Coconut oil for diesel machines and cars is the simplest and most appropriate method to use, some research and testing about this method has already been
undertaken. Coconut oil can be used for all diesel machines, including cars, trucks, hand tractors, rice mills, small generators, pumps and more. The coconut oil used must be very
high quality, because if not it could destroy the machine. The coconut oil from the markets cannot be used, because it is usually very low quality.
To use it, combine 20 parts coconut oil to 1 part kerosene (5%). This will help make the liquid thinner. In cold areas, combine 10 parts coconut oil to 1 part kerosene (10%). This method has been successful in Bouganville, Papua New Guinea, for many years and is now being used in Fiji and Thailand.
Water Pumps
Machine water pumps are commonly used but they are expensive and need fuel to operate. Following are some example of simple water pumps which do not need fuel to operate and are much easier to maintain.
Ram PumpsA ram pump uses water pressure created by gravity to flow water a long way uphill. Water from a spring or other water source can be collected in a small tank / container. The water must be clean, because if it is dirty it will cause problems. The water then flows downwards through a pipe, which is usually 10-20 meters long. The presser is created as the water flows downwards. The water flows into the pump, creating air pressure and pumping water through smaller pipes back uphill. Water can be pumped through smaller pipes as far as a few hundred meters. The water can then be flowed to water storage containers.
By using this type of pump, water can be flowed in large amounts, and if the water source is constant, the water can be flowed all year long. This tool is a great economical solution for water supply problems.
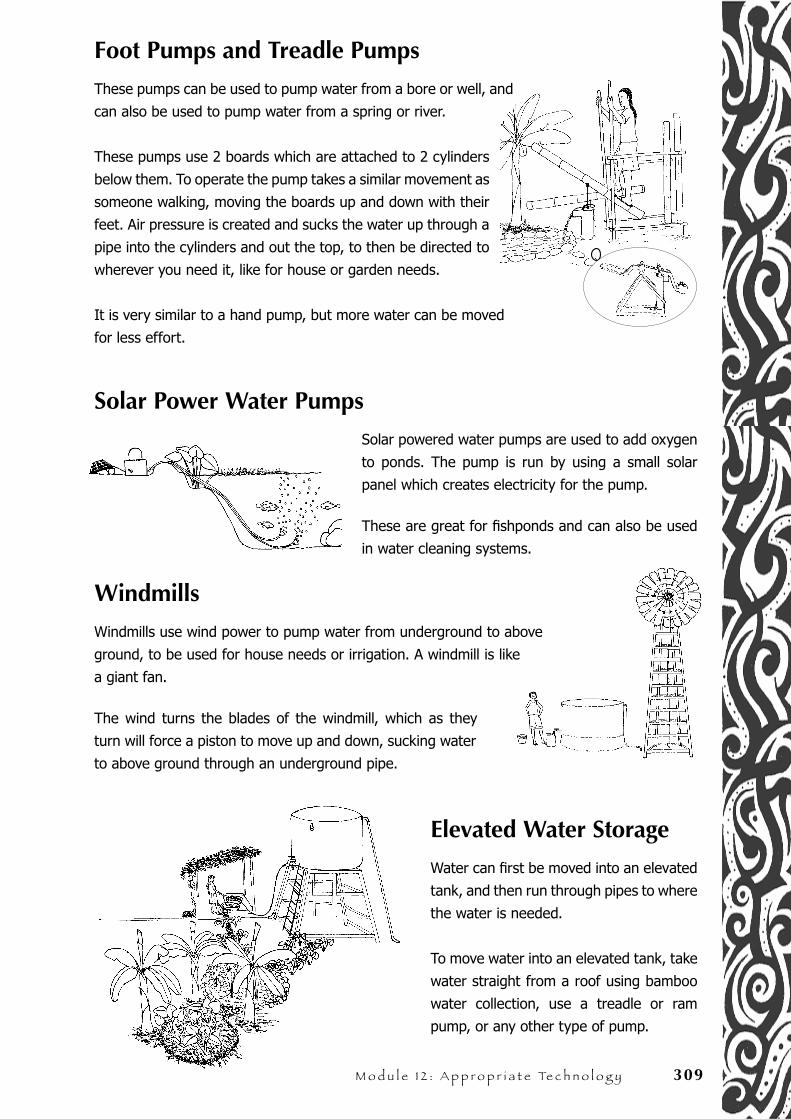
M o d u l e 1 2 : A p p r o p r i a t e Te c h n o l o g y 309
Foot Pumps and Treadle Pumps
These pumps can be used to pump water from a bore or well, and
can also be used to pump water from a spring or river.
These pumps use 2 boards which are attached to 2 cylinders
below them. To operate the pump takes a similar movement as
someone walking, moving the boards up and down with their
feet. Air pressure is created and sucks the water up through a
pipe into the cylinders and out the top, to then be directed to
wherever you need it, like for house or garden needs.
It is very similar to a hand pump, but more water can be moved
for less effort.
Solar Power Water Pumps
Solar powered water pumps are used to add oxygen
to ponds. The pump is run by using a small solar
panel which creates electricity for the pump.
These are great for fishponds and can also be used
in water cleaning systems.
Windmills
Windmills use wind power to pump water from underground to above
ground, to be used for house needs or irrigation. A windmill is like
a giant fan.
The wind turns the blades of the windmill, which as they
turn will force a piston to move up and down, sucking water
to above ground through an underground pipe.
Elevated Water Storage
Water can first be moved into an elevated
tank, and then run through pipes to where
the water is needed.
To move water into an elevated tank, take
water straight from a roof using bamboo
water collection, use a treadle or ram
pump, or any other type of pump.

310 Pe r m a c u l t u r e , S o l u t i o n s f o r S u s t a i n a b l e l i f e s t y l e s
Other Simple Tools
Pedal Powered Grinders
A simple but effective technology, a grinder that can
be used to grind corn, rice, nuts and more.
This grinder is connected to a bicycle, and the bike
chain, which would normally turn the bike wheel, is
attached to a cog which spins the grinder.
This is much easier than pounding corn and much cheaper than using a petrol grinder.
Oil Press
An oil press is a tool used for extracting oil from seeds, nuts and other plant materials which
produce oil, like coconut, candlenut and avocado. The oil that is produced is of high quality and
it will greatly improve nutrition, especially for children, or it can be sold or traded. Good quality
organic oils are a possible export market.
Using the Internet
The internet is one of the most important technologies for the future. The internet contains
large amount of information which is useful for developing a sustainable future. With the
internet, we will be able to share technologies and information with partner groups from all
over the world.

M o d u l e 1 2 : A p p r o p r i a t e Te c h n o l o g y 311
N o t e s . . .

312 Pe r m a c u l t u r e , S o l u t i o n s f o r S u s t a i n a b l e l i f e s t y l e s
N o t e s . . .
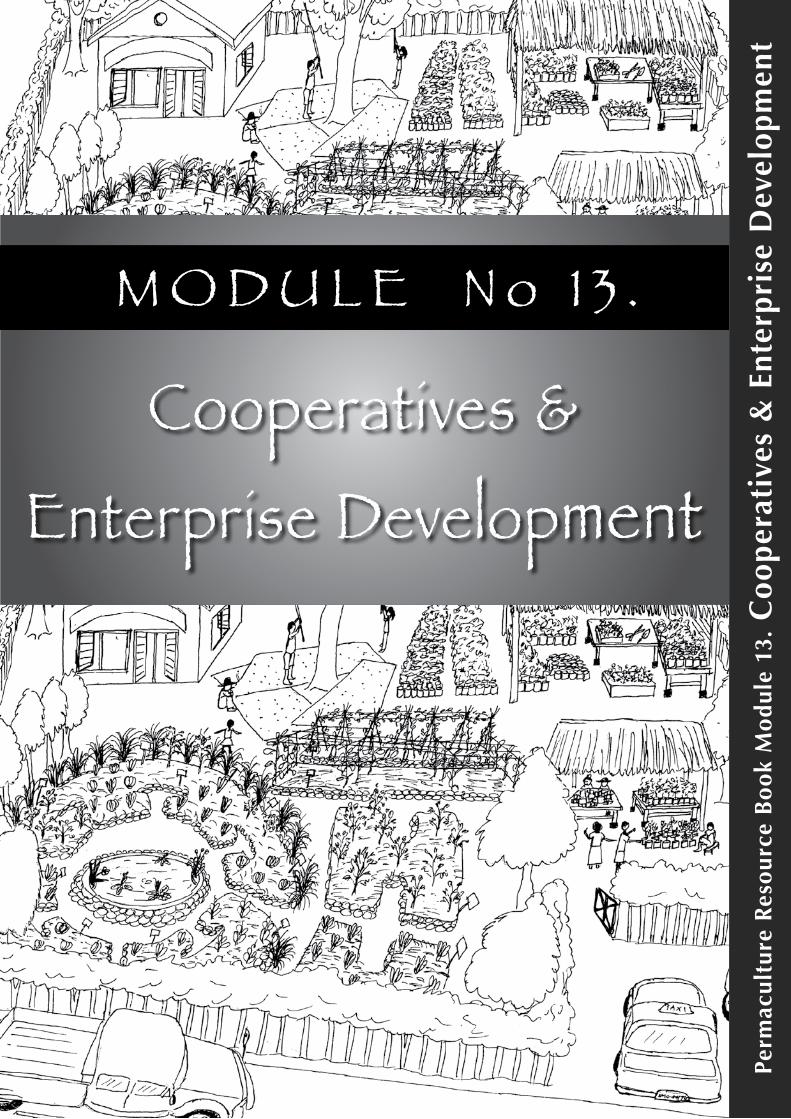
Perm
acul
ture
Res
ourc
e B
ook
Mod
ule
13. C
oope
rati
ves
& E
nter
pris
e D
evel
opm
ent
M o d u l e N o 1 3 .
Cooperatives &
enterprise development

314 Pe r m a c u l t u r e , S o l u t i o n s f o r S u s t a i n a b l e l i f e s t y l e s
N o t e s . . .
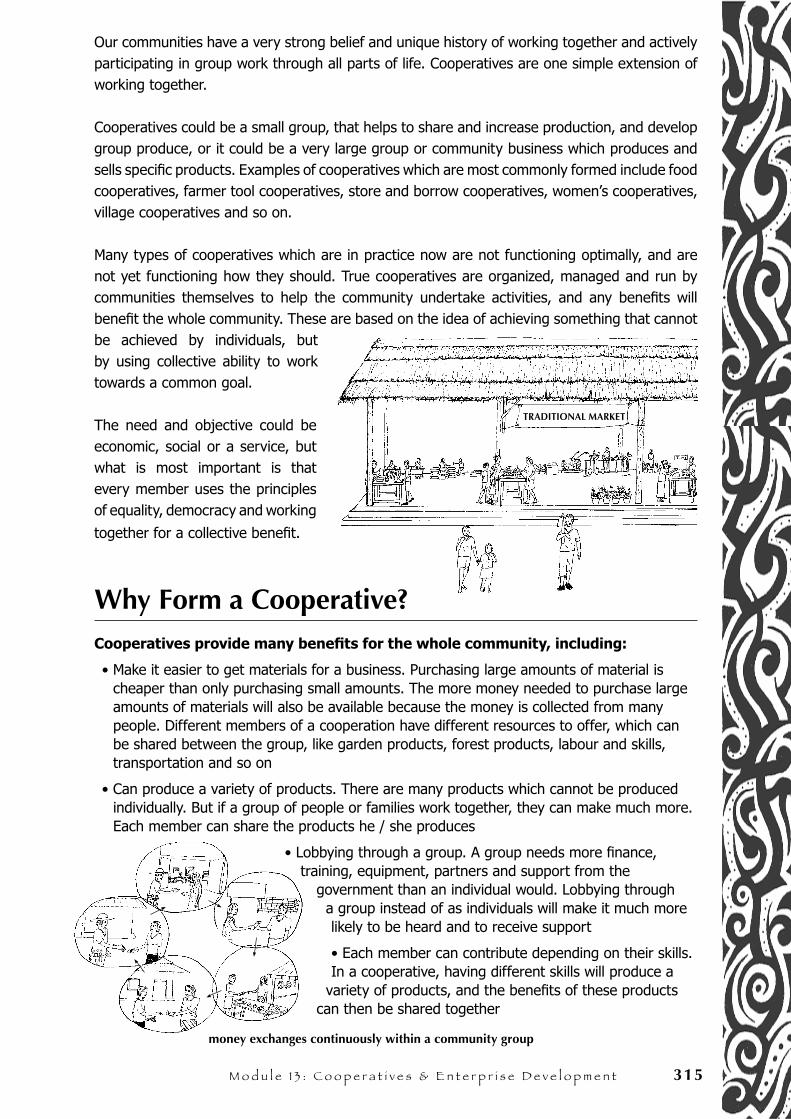
M o d u l e 1 3 : C o o p e r a t i v e s & e n t e r p r i s e d e v e l o p m e n t 315
Our communities have a very strong belief and unique history of working together and actively participating in group work through all parts of life. Cooperatives are one simple extension of working together.
Cooperatives could be a small group, that helps to share and increase production, and develop group produce, or it could be a very large group or community business which produces and sells specific products. Examples of cooperatives which are most commonly formed include food cooperatives, farmer tool cooperatives, store and borrow cooperatives, women’s cooperatives, village cooperatives and so on.
Many types of cooperatives which are in practice now are not functioning optimally, and are not yet functioning how they should. True cooperatives are organized, managed and run by communities themselves to help the community undertake activities, and any benefits will benefit the whole community. These are based on the idea of achieving something that cannot be achieved by individuals, but by using collective ability to work towards a common goal.
The need and objective could be economic, social or a service, but what is most important is that every member uses the principles of equality, democracy and working
together for a collective benefit.
Why Form a Cooperative?Cooperatives provide many benefits for the whole community, including:
• Make it easier to get materials for a business. Purchasing large amounts of material is cheaper than only purchasing small amounts. The more money needed to purchase large amounts of materials will also be available because the money is collected from many people. Different members of a cooperation have different resources to offer, which can be shared between the group, like garden products, forest products, labour and skills, transportation and so on
• Can produce a variety of products. There are many products which cannot be produced individually. But if a group of people or families work together, they can make much more. Each member can share the products he / she produces
• Lobbying through a group. A group needs more finance, training, equipment, partners and support from the
government than an individual would. Lobbying through a group instead of as individuals will make it much more likely to be heard and to receive support
• Each member can contribute depending on their skills. In a cooperative, having different skills will produce a
variety of products, and the benefits of these products can then be shared together
money exchanges continuously within a community group
TRADITIONAL MARKET
316 Pe r m a c u l t u r e , S o l u t i o n s f o r S u s t a i n a b l e l i f e s t y l e s
• Makes marketing products easier. Marketing products is much easier through a group because representatives from the group can work together to arrange transportation schedules, market schedules and markets for products, such as traditional markets, restaurants, supermarkets, shops and so on. It is very difficult to do this work alone, and it takes a lot of time. A group will be able to hold larger responsibilities. Make brand names for products which relate to the name of the group. This will help with marketing of products, where quality and reliability should continue to improve. Quality and reliability are important factors which are the base for sustainable marketing. Having a cooperative will also help to provide a regular supply of products
• Members will be able to learn new professions and skills through interacting within the group. Each member of the group can participate according to their skills and share knowledge and experience within the group
• Money and product circulation will happen more between members of one cooperative
• More jobs opportunities will be created, especially in village locations
• The name of the group can be used in product packaging, which will give a sense of pride. Especially if the name assures good quality
Illustrating a CooperativeA cooperative or enterprise group can be illustrated as a tree, in this case a mango tree. First it starts with a seed. This seed is an idea.
Imagine the seed growing, first it will start developing roots, a trunk and leaves, it searches for water and nutrients. This represents and analysis of needs, available resources, products, marketing and so on.
The tree will need a place to grow into its full size. This represents the right place, good planning, structure and a vision for the future, providing community support, training, financing and transportation.
When the tree is fully established, it will be a healthy tree with a strong root system, a strong trunk, many branches and leaves, and it will produce lots of flowers, fruits and new seeds which will grow into new trees.
In other words, if a tree is a metaphor for a cooperative:
• The roots are the resource base. These resources could be land, labour, natural resources, skills, equipment, buildings, money, connections with NGOs / the government / support groups, etc
• The trunk is the management structure. It enables efficient flow from resources to projects, and must be strong and supporting. Management decides which projects (branches) to support
• The branches are the different projects. Many smaller projects are better and more sustainable than only one big project. Diversity is important
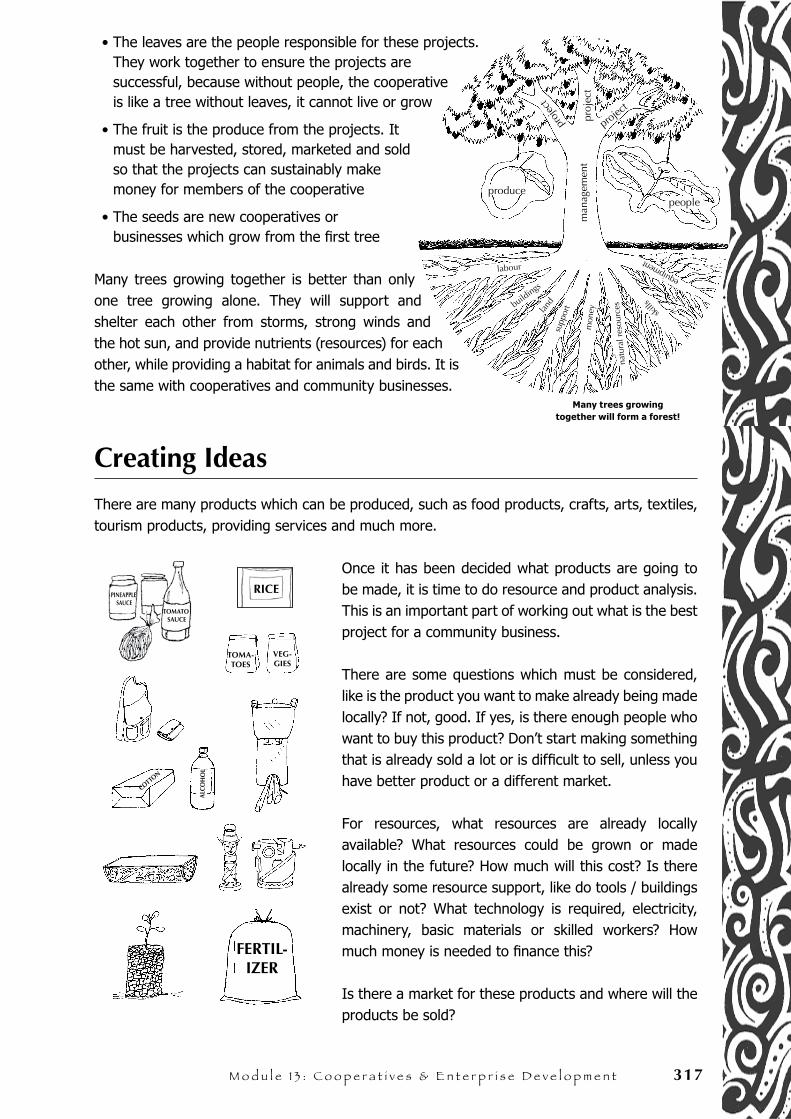
M o d u l e 1 3 : C o o p e r a t i v e s & e n t e r p r i s e d e v e l o p m e n t 317
• The leaves are the people responsible for these projects. They work together to ensure the projects are successful, because without people, the cooperative is like a tree without leaves, it cannot live or grow
• The fruit is the produce from the projects. It must be harvested, stored, marketed and sold so that the projects can sustainably make money for members of the cooperative
• The seeds are new cooperatives or businesses which grow from the first tree
Many trees growing together is better than only one tree growing alone. They will support and shelter each other from storms, strong winds and the hot sun, and provide nutrients (resources) for each other, while providing a habitat for animals and birds. It is the same with cooperatives and community businesses.
Creating Ideas
There are many products which can be produced, such as food products, crafts, arts, textiles, tourism products, providing services and much more.
Once it has been decided what products are going to be made, it is time to do resource and product analysis. This is an important part of working out what is the best project for a community business.
There are some questions which must be considered, like is the product you want to make already being made locally? If not, good. If yes, is there enough people who want to buy this product? Don’t start making something that is already sold a lot or is difficult to sell, unless you have better product or a different market.
For resources, what resources are already locally available? What resources could be grown or made locally in the future? How much will this cost? Is there already some resource support, like do tools / buildings exist or not? What technology is required, electricity, machinery, basic materials or skilled workers? How much money is needed to finance this?
Is there a market for these products and where will the products be sold?
producepeople
man
agem
ent
proj
ect
project
proj
ect
labour
buildings
land
supp
ort
mon
ey
natu
ral r
esou
rces skill
s
equipment
Many trees growing together will form a forest!
RICE
TOMA-TOES
VEG-GIES
TOMATO SAUCE
PINEAPPLE SAUCE
ALC
OH
OL
COTTON
FERTIL-IZER
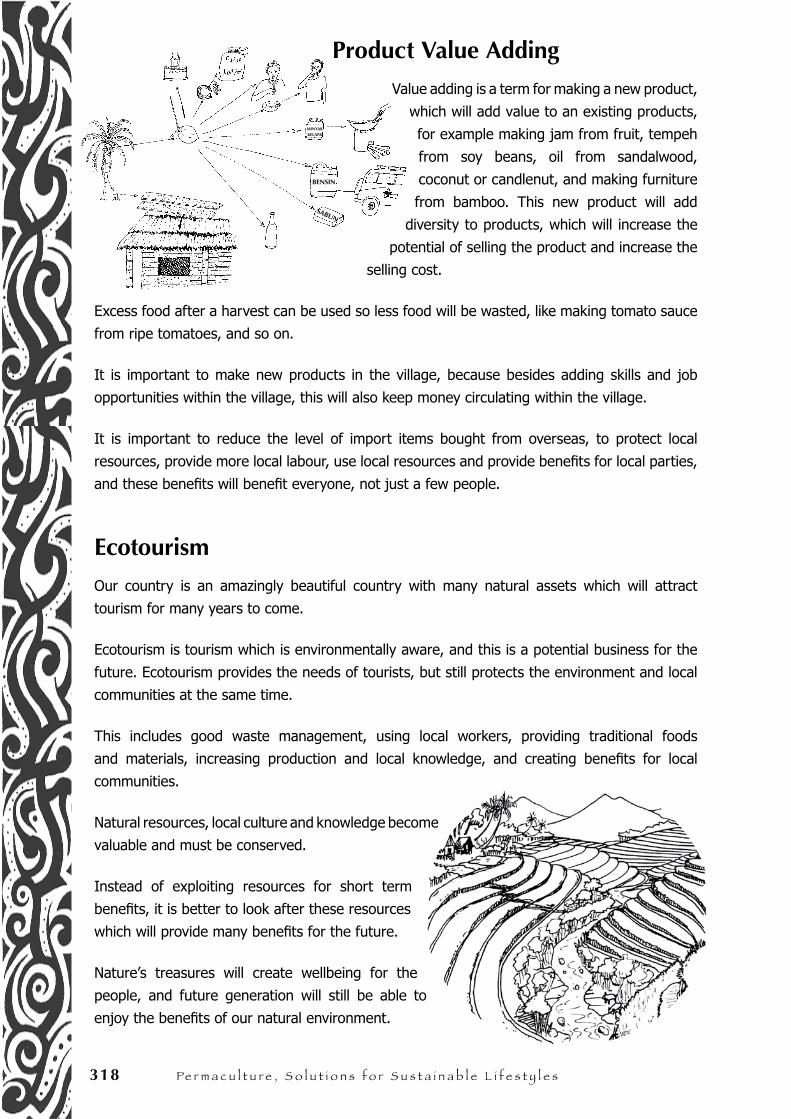
318 Pe r m a c u l t u r e , S o l u t i o n s f o r S u s t a i n a b l e l i f e s t y l e s
Product Value Adding
Value adding is a term for making a new product,
which will add value to an existing products,
for example making jam from fruit, tempeh
from soy beans, oil from sandalwood,
coconut or candlenut, and making furniture
from bamboo. This new product will add
diversity to products, which will increase the
potential of selling the product and increase the
selling cost.
Excess food after a harvest can be used so less food will be wasted, like making tomato sauce
from ripe tomatoes, and so on.
It is important to make new products in the village, because besides adding skills and job
opportunities within the village, this will also keep money circulating within the village.
It is important to reduce the level of import items bought from overseas, to protect local
resources, provide more local labour, use local resources and provide benefits for local parties,
and these benefits will benefit everyone, not just a few people.
Ecotourism
Our country is an amazingly beautiful country with many natural assets which will attract
tourism for many years to come.
Ecotourism is tourism which is environmentally aware, and this is a potential business for the
future. Ecotourism provides the needs of tourists, but still protects the environment and local
communities at the same time.
This includes good waste management, using local workers, providing traditional foods
and materials, increasing production and local knowledge, and creating benefits for local
communities.
Natural resources, local culture and knowledge become
valuable and must be conserved.
Instead of exploiting resources for short term
benefits, it is better to look after these resources
which will provide many benefits for the future.
Nature’s treasures will create wellbeing for the
people, and future generation will still be able to
enjoy the benefits of our natural environment.

M o d u l e 1 3 : C o o p e r a t i v e s & e n t e r p r i s e d e v e l o p m e n t 319
The Importance of Management It is very important to create a good management structure before starting a project. It is best if everyone in the group is involved in creating this management structure. It will be very useful to include inputs and suggestions from other people with experience and knowledge about cooperatives, as well as from community leaders, government workers, spiritual leaders etc. A good management structure should include a vision statement, ethical structure, management system, set wages, prices and profits, a bookkeeping system and plans for future development.
A Vision StatementA vision statement is a small document which is written by everyone involved in the group. It states how members of the group will work together as a group, and the goals of the group, for now and in the future. The vision statement should be short and simple.
An Ethical StructureThese make up guidelines and principles of how the group will function. Every person in the group should be a part of making the guidelines and principles, and everyone must agree to work by them as a part of their contract. This will help an organization to work well and effectively, and help individuals to have sufficient knowledge about the organization and its policies to make individual decisions based on what has already been agreed upon together.
This could include:
• Workers rights and obligations
• Equal rights for men and women, especially during group meetings
• Environmental conservation
• Sustainable use of resources
• Group and community involvement
A Management SystemThis will depend on how big the group is and what it plans to produce. For example, a large group should include a steering committee, coordinators, finance officers, secretaries, production workers, transportation workers, marketing and selling departments and more.
The steering committee should be separate from the coordinators and might include a community leader, government representative or other community representatives. The production, transport and marketing workers should also have representatives as part of the coordinator group.
In a cooperative, the different producers will be the coordinators, and will also be involved in marketing and selling.
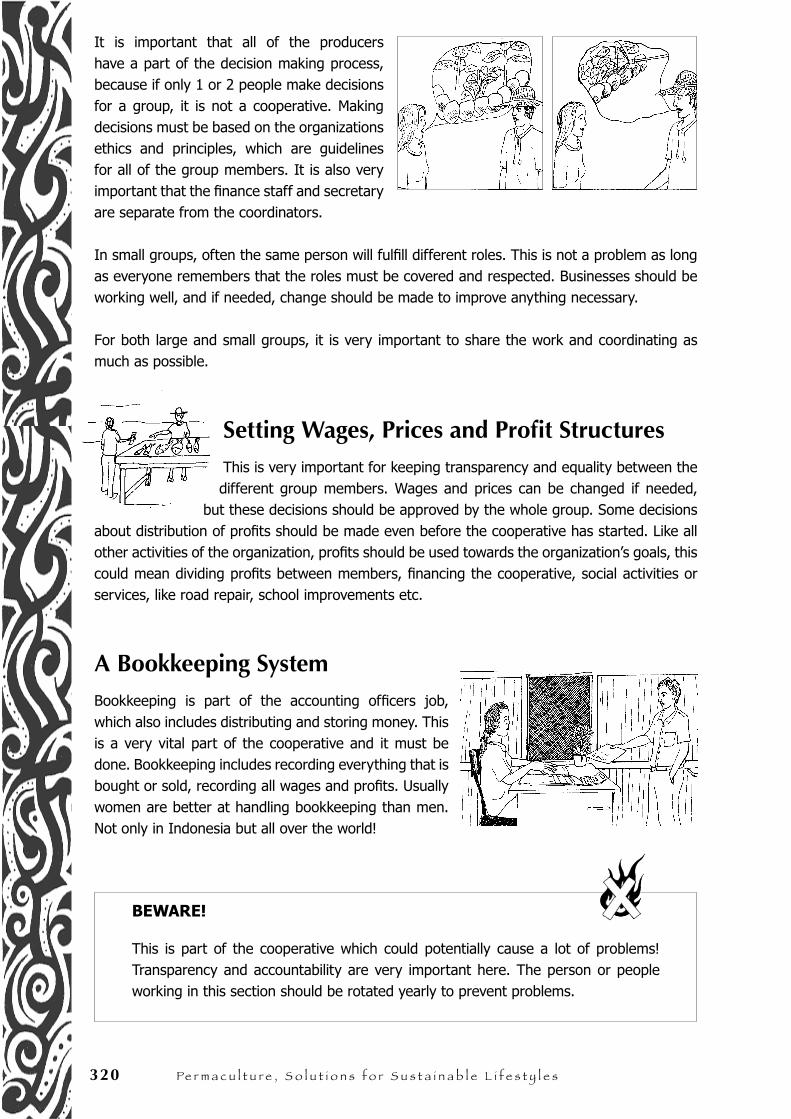
320 Pe r m a c u l t u r e , S o l u t i o n s f o r S u s t a i n a b l e l i f e s t y l e s
It is important that all of the producers have a part of the decision making process, because if only 1 or 2 people make decisions for a group, it is not a cooperative. Making decisions must be based on the organizations ethics and principles, which are guidelines for all of the group members. It is also very important that the finance staff and secretary are separate from the coordinators.
In small groups, often the same person will fulfill different roles. This is not a problem as long as everyone remembers that the roles must be covered and respected. Businesses should be working well, and if needed, change should be made to improve anything necessary.
For both large and small groups, it is very important to share the work and coordinating as much as possible.
Setting Wages, Prices and Profit StructuresThis is very important for keeping transparency and equality between the different group members. Wages and prices can be changed if needed,
but these decisions should be approved by the whole group. Some decisions about distribution of profits should be made even before the cooperative has started. Like all other activities of the organization, profits should be used towards the organization’s goals, this could mean dividing profits between members, financing the cooperative, social activities or services, like road repair, school improvements etc.
A Bookkeeping SystemBookkeeping is part of the accounting officers job, which also includes distributing and storing money. This is a very vital part of the cooperative and it must be done. Bookkeeping includes recording everything that is bought or sold, recording all wages and profits. Usually women are better at handling bookkeeping than men. Not only in Indonesia but all over the world!
BEWARE!
This is part of the cooperative which could potentially cause a lot of problems! Transparency and accountability are very important here. The person or people working in this section should be rotated yearly to prevent problems.
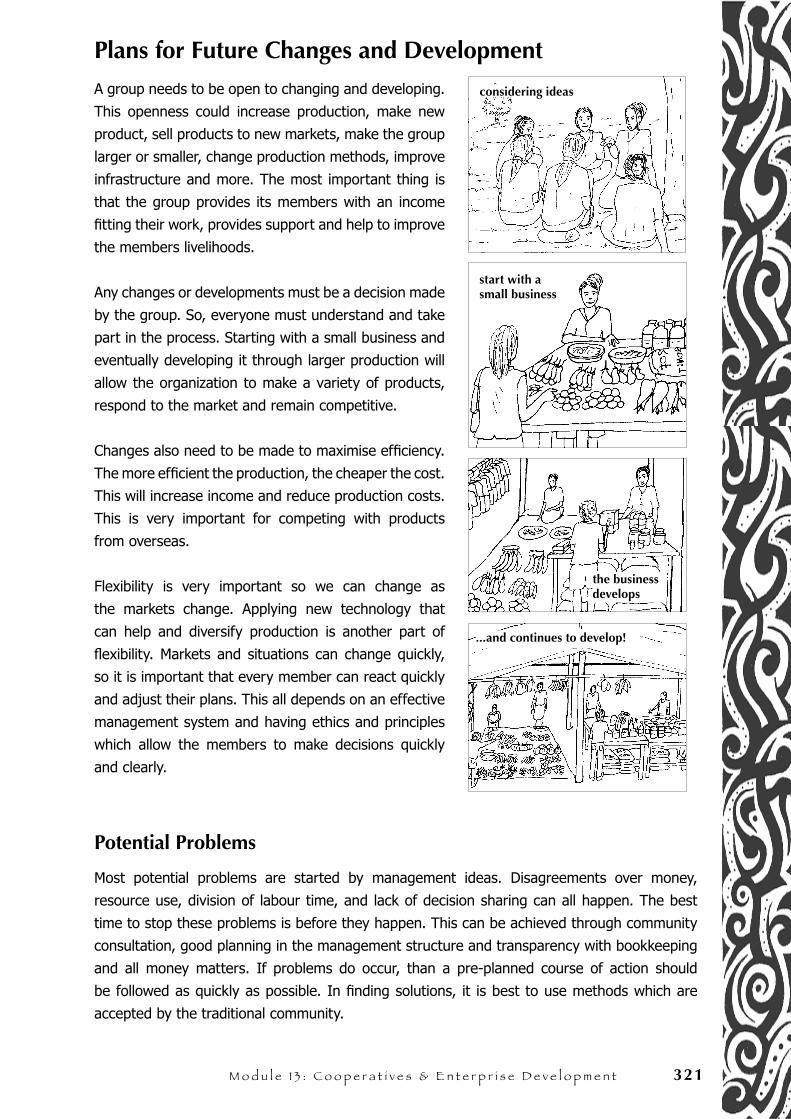
M o d u l e 1 3 : C o o p e r a t i v e s & e n t e r p r i s e d e v e l o p m e n t 321
Plans for Future Changes and Development
A group needs to be open to changing and developing.
This openness could increase production, make new
product, sell products to new markets, make the group
larger or smaller, change production methods, improve
infrastructure and more. The most important thing is
that the group provides its members with an income
fitting their work, provides support and help to improve
the members livelihoods.
Any changes or developments must be a decision made
by the group. So, everyone must understand and take
part in the process. Starting with a small business and
eventually developing it through larger production will
allow the organization to make a variety of products,
respond to the market and remain competitive.
Changes also need to be made to maximise efficiency.
The more efficient the production, the cheaper the cost.
This will increase income and reduce production costs.
This is very important for competing with products
from overseas.
Flexibility is very important so we can change as
the markets change. Applying new technology that
can help and diversify production is another part of
flexibility. Markets and situations can change quickly,
so it is important that every member can react quickly
and adjust their plans. This all depends on an effective
management system and having ethics and principles
which allow the members to make decisions quickly
and clearly.
Potential Problems
Most potential problems are started by management ideas. Disagreements over money,
resource use, division of labour time, and lack of decision sharing can all happen. The best
time to stop these problems is before they happen. This can be achieved through community
consultation, good planning in the management structure and transparency with bookkeeping
and all money matters. If problems do occur, than a pre-planned course of action should
be followed as quickly as possible. In finding solutions, it is best to use methods which are
accepted by the traditional community.
considering ideas
start with a small business
the business develops
...and continues to develop!

322 Pe r m a c u l t u r e , S o l u t i o n s f o r S u s t a i n a b l e l i f e s t y l e s
N o t e s . . .

The background of this book…
About Permatil
Permatil is the organization that developed the original version of this book. The
original version was developed in response to Timor Leste’s immediate agriculture
and environmental concerns. It was created as a contribution to Timor Leste for a
sustainable path for the future. The information for the book was gathered from five
years working with farmers and communities in Timor Leste as well as experiences in
other countries, books and the Internet. It was developed by PERMATIL (Permaculture
Timor Lorosa’e), an East Timorese NGO that works towards sustainable development
in Timor Leste, through education, advocacy, demonstrations and partnerships with
local Government, NGOs and community groups.
About IDEP Foundation
IDEP Foundation is the organization that helped develop and adapt this book for
Indonesia. IDEP Foundation is a local Indonesian NGO, which specializes in the
development and dissemination of curriculum media, and practical programs that
educate and empower local communities in sustainable development and disaster
management. To see samples of IDEP publications please visit: www.idepfoundation.
org/idep_downloads.html. Since 1998 IDEP has been delivering Permaculture Training
Courses for NGOs and communities from throughout Indonesia. The organization has two
Permaculture Field Schools, one in central Bali and another in Aceh, which are teaching
sustainable development as well as disaster recovery using Permaculture techniques.
For examples of IDEP Permaculture training activities see: www.idepfoundation.org/
idep_history_training.html and www.idepfoundation.org/GFS.html
About the Companion Facilitators Handbook
A companion Facilitator’s Handbook has been developed, which can be used by local
facilitators to design and implement effective courses appropriate to the needs in their
area. Contents include:
Instructions - Instruction for conducting pre and post training assessments
Preparations - Preparations and tools needed for conducting Permaculture
courses
Tools - tools for course evaluation
Over 150 presentations and exercises for creative thinking and practical
hands-on exercises
First Edition by IDEP Foundation © 2006
w w w . i d e p f o u n d a t i o n . o r g
ISBN : 979-15305-0-5
•
•
•
•

I S B N : 9 7 9 - 1 5 3 0 5 - 0 - 5
THE AIM OF THIS BOOK IS: To offer knowledge and practical techniques for environmental
rehabilitation and sustainability, strengthening community resilience and local economies. The contents of
the book are based on concepts of deep ecology, the interconnectedness of our environment and culture
and the principles and ethics of sustainable community development. Combining traditional techniques for
providing natural resources, food, shelter and energy with modern sustainable practices, the techniques
outlined in this book provide integrated, practical solutions for challenges being faced by community
members and farmers throughout Indonesia today.
This Resource Book for Permaculture - Solutions for Sustainable Lifestyles has been developed using
simple language and many detailed illustrations to insure that the information contained is accessible
to all those interested, even low literacy groups. It is an appropriate reference and guidebook for use by
community cooperatives and sustainable development facilitators, Indonesian community groups, NGOs,
farmers groups, government workers, universities and other organizations.
T H I S B O O K I N C L U D E S D E T A I L E D M O D U L E S A B O U T :
Created by Permatil (Permaculture Timor Lorosa’e)
Adapted for Indonesia and Published by IDEP Foundation • www.idepfoundation.org
Permaculture & Sustainable Community Design
Patterns in Nature & Methods for Design
Houses, Water & Waste Management
Soil improvement
Seed Saving & Nurseries
Home & Community Gardens
Farming
•
•
•
•
•
•
•
Forests, Tree Crops & Bamboo
Integrated pest management (IPM)
Animal Systems
Aquaculture
Appropriate technology
Cooperatives & Enterprise development
•
•
•
•
•
•
A RESOURCE BOOK~ for ~
PERMACULTURE Solut ions for Sustainable Lifestyles