Embed Size (px)
Citation preview
Mode
XP recom
We1
Personal Computer
Reference Manual
l No. CF-Y2/CF-W2 Series
mend that this Reference Manual be printed.
in
r
.
.
2
Read Me First
Some of the illustrations in this manual may differ slightly in shape from the actual items order to make the explanation easier to understand.
If the user has logged on without the administrator authority, some functions may not beexecutable, and some screens may not be displayed as shown in this manual.If this happens, log on with the administrator authority to enable these functions.
Confirm the latest information on optional products in catalogs, etc.
In this manual, the following software packages are described as follows:"WinDVD™ 5 (OEM Version)" as "WinDVD""B's Recorder GOLD7 BASIC" as "B's Recorder""B's CLiP 5" as "B's CLiP"
Circular media such as DVD-ROM and CD-ROM are described as "discs".
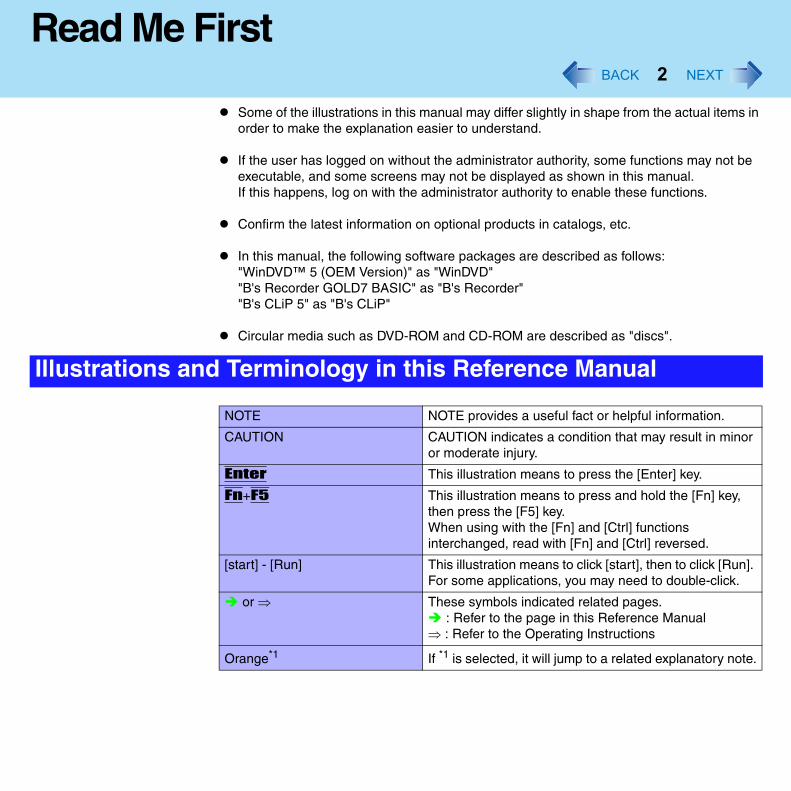
Illustrations and Terminology in this Reference Manual
NOTE NOTE provides a useful fact or helpful information.
CAUTION CAUTION indicates a condition that may result in minoor moderate injury.
Enter This illustration means to press the [Enter] key.
Fn+F5 This illustration means to press and hold the [Fn] key, then press the [F5] key.When using with the [Fn] and [Ctrl] functions interchanged, read with [Fn] and [Ctrl] reversed.
[start] - [Run] This illustration means to click [start], then to click [Run]For some applications, you may need to double-click.
or ⇒ These symbols indicated related pages. : Refer to the page in this Reference Manual
⇒ : Refer to the Operating Instructions
Orange*1 If *1 is selected, it will jump to a related explanatory note
Read M
r
2
].
About
3
e First
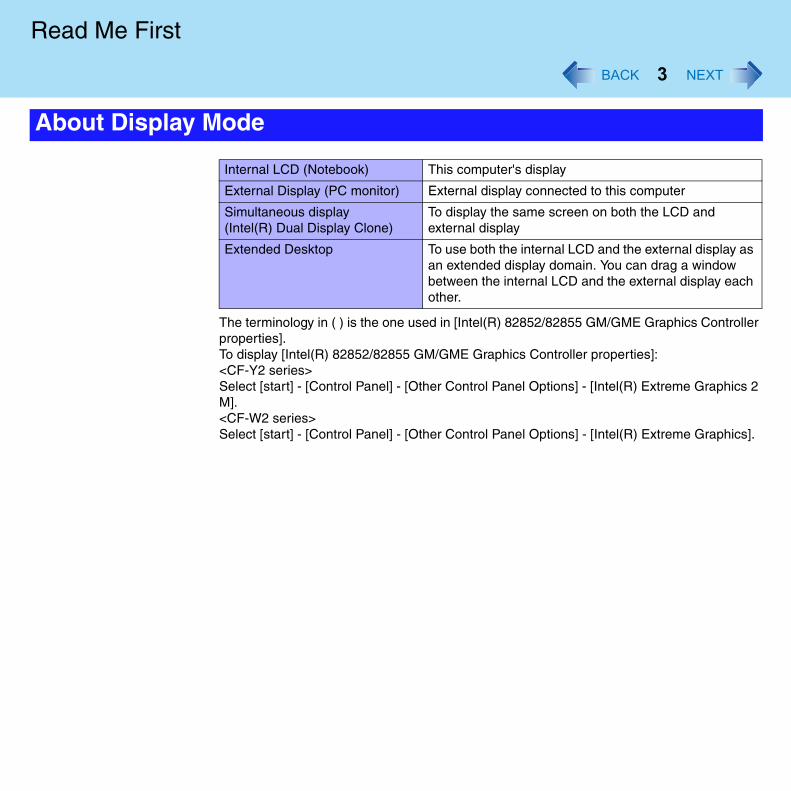
The terminology in ( ) is the one used in [Intel(R) 82852/82855 GM/GME Graphics Controlleproperties].To display [Intel(R) 82852/82855 GM/GME Graphics Controller properties]:<CF-Y2 series>Select [start] - [Control Panel] - [Other Control Panel Options] - [Intel(R) Extreme Graphics M].<CF-W2 series>Select [start] - [Control Panel] - [Other Control Panel Options] - [Intel(R) Extreme Graphics
Display Mode
Internal LCD (Notebook) This computer's display
External Display (PC monitor) External display connected to this computer
Simultaneous display (Intel(R) Dual Display Clone)
To display the same screen on both the LCD and external display
Extended Desktop To use both the internal LCD and the external display asan extended display domain. You can drag a window between the internal LCD and the external display eachother.

4
Key Combinations
CAUTION
Do not press the following key combinations repeatedly in (quick) succession. Also, donot press different key combinations quickly one after another.Do not press the following key combinations while using the touch pad (external mouse) or other keys.
NOTE
Do not press the following key combinations until you log on to Windows and the hard disk drive indicator turns off. Note, however, that the key combinations Fn+F1, Fn+F2 and Fn+F3 are operable in the Setup Utility.The key combinations below may not work while some applications are running. Besides, the popup window may not be displayed depending on the state of the application you are using (e.g., when [Command Prompt] is set to "Full Screen").When using with the Fn and Ctrl functions interchanged. ( page 99)• Press Ctrl instead of Fn.• It is not possible to replace the markings on the keys, or the keys themselves.
Key Functions Popup Window(Displayed after logging
on to Windows)
Fn+F1
Fn+F2
LCD brightness control (down)
LCD brightness control (up)Pressing this key combination adjusts the brightness of LCD.The brightness setting is stored in memory separately under the condition the AC adaptor is connected and under the condition the AC adaptor is not connected.
Key Co
5
mbinations
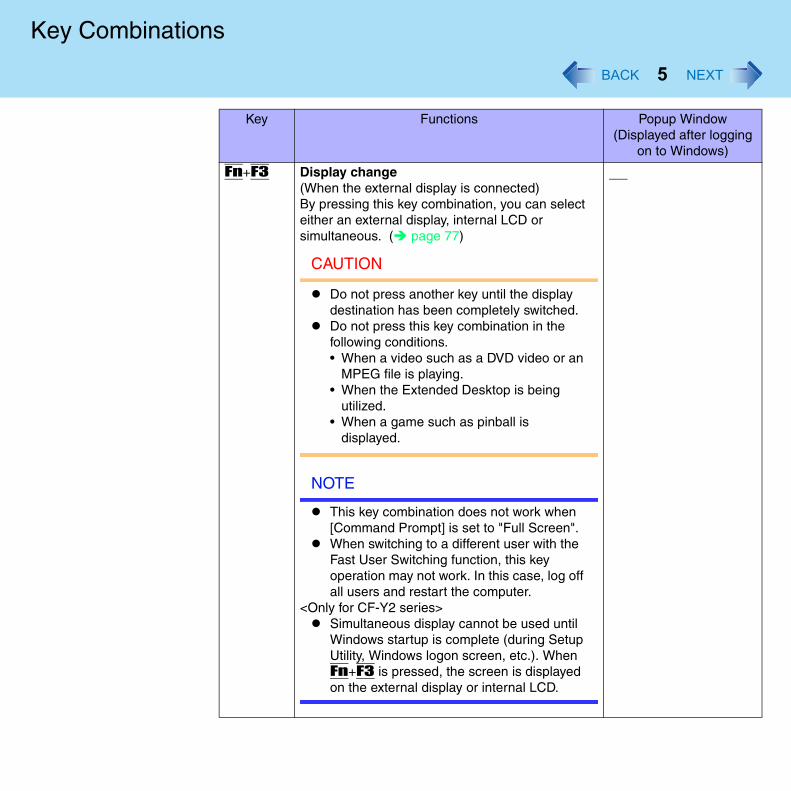
Fn+F3 Display change(When the external display is connected)By pressing this key combination, you can select either an external display, internal LCD or simultaneous. ( page 77)
CAUTION
Do not press another key until the display destination has been completely switched.Do not press this key combination in the following conditions.• When a video such as a DVD video or an
MPEG file is playing.• When the Extended Desktop is being
utilized.• When a game such as pinball is
displayed.
NOTE
This key combination does not work when [Command Prompt] is set to "Full Screen".When switching to a different user with the Fast User Switching function, this key operation may not work. In this case, log off all users and restart the computer.
<Only for CF-Y2 series>Simultaneous display cannot be used until Windows startup is complete (during Setup Utility, Windows logon screen, etc.). When Fn+F3 is pressed, the screen is displayed on the external display or internal LCD.
Key Functions Popup Window(Displayed after logging
on to Windows)
Key Co
6
mbinations
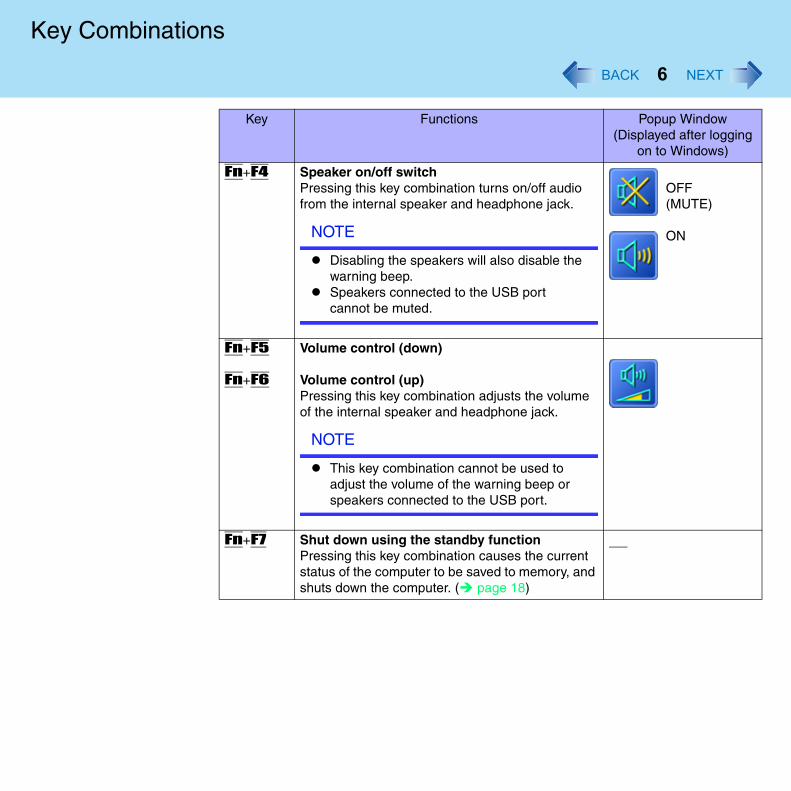
Fn+F4 Speaker on/off switchPressing this key combination turns on/off audio from the internal speaker and headphone jack.
NOTE
Disabling the speakers will also disable the warning beep.Speakers connected to the USB port cannot be muted.
OFF(MUTE)
ON
Fn+F5
Fn+F6
Volume control (down)
Volume control (up)Pressing this key combination adjusts the volume of the internal speaker and headphone jack.
NOTE
This key combination cannot be used to adjust the volume of the warning beep or speakers connected to the USB port.
Fn+F7 Shut down using the standby functionPressing this key combination causes the current status of the computer to be saved to memory, and shuts down the computer. ( page 18)
Key Functions Popup Window(Displayed after logging
on to Windows)
Key Co
7
mbinations
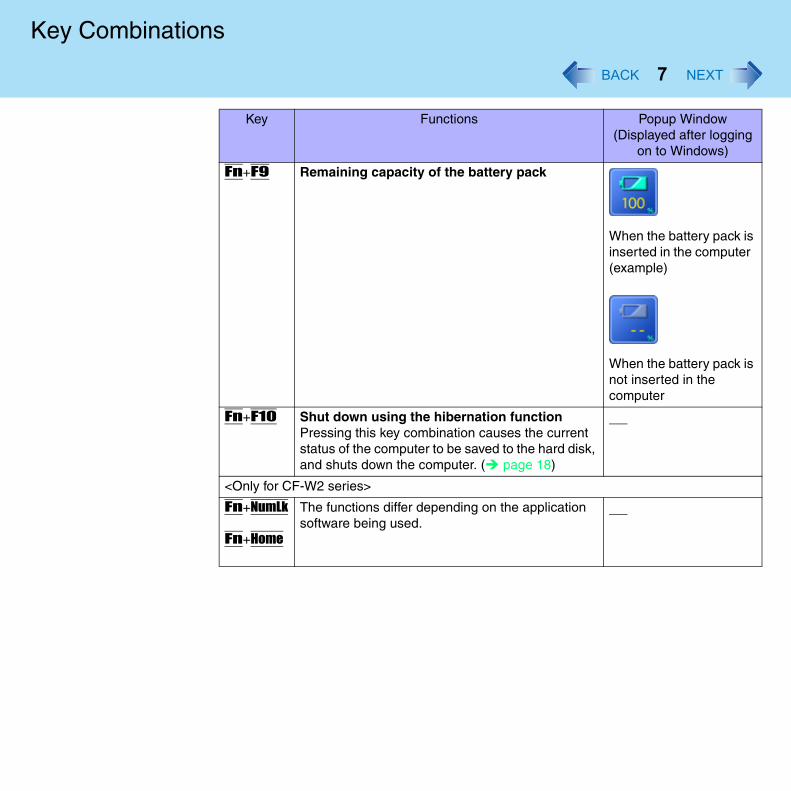
Fn+F9 Remaining capacity of the battery pack
When the battery pack isinserted in the computer(example)
When the battery pack isnot inserted in the computer
Fn+F10 Shut down using the hibernation functionPressing this key combination causes the current status of the computer to be saved to the hard disk, and shuts down the computer. ( page 18)
<Only for CF-W2 series>
Fn+NumLk
Fn+Home
The functions differ depending on the application software being used.
Key Functions Popup Window(Displayed after logging
on to Windows)

Key Co
Hotke
8
mbinations
There are two Fn key functions as follows:Fn key lock functionAfter Fn is pressed once, it stays in the "pressed" position until another key is pressed.This is convenient when it is difficult to press two buttons simultaneously.Popup windows display ON/OFF
NOTE
The Hotkey settings can be set separately for each user.When using with the Fn and Ctrl functions interchanged ( page 99), read with Fn and Ctrl reversed.
1 Run the Hotkey Settings.Select [start] - [All Programs] - [Panasonic] - [Hotkey Settings].
2 Set the parameters.A. Use Fn key lock
Add the check mark if you want to enable the Fn key lock function. The following Fn key lock function will then be enabled.
To use Fn only once:A Press Fn once. (Locked)B Press another key for combination. (Lock released)
To use Fn successively:A Press Fn twice. (Locked)B Press another key for combination.
Fn key remains locked until Fn is pressed once more.B. Notification
This setting is only available when [Use Fn key lock] is checked.
[Make sounds when Fn key is pressed]*1
Notifies the user with a sound when Fn is locked or released.[Show status on screen]:Displays the Fn key status on the taskbar.
:Fn is locked:Fn is not locked
y Settings
Key Co
9
mbinations
C. Disable popupAdd the check mark if you want to turn the popup window display function OFF."Full Screen" of [Command Prompt] or MPEG files may change to a window
display if Fn+Fx*2 keys are pressed. To prevent this, turn the popup window display function OFF.
3 Select [OK].*1 If MUTE is set, you will not hear a beep.*2 "Fx" indicates any function key from F1 to F10.
10
LED Indicators
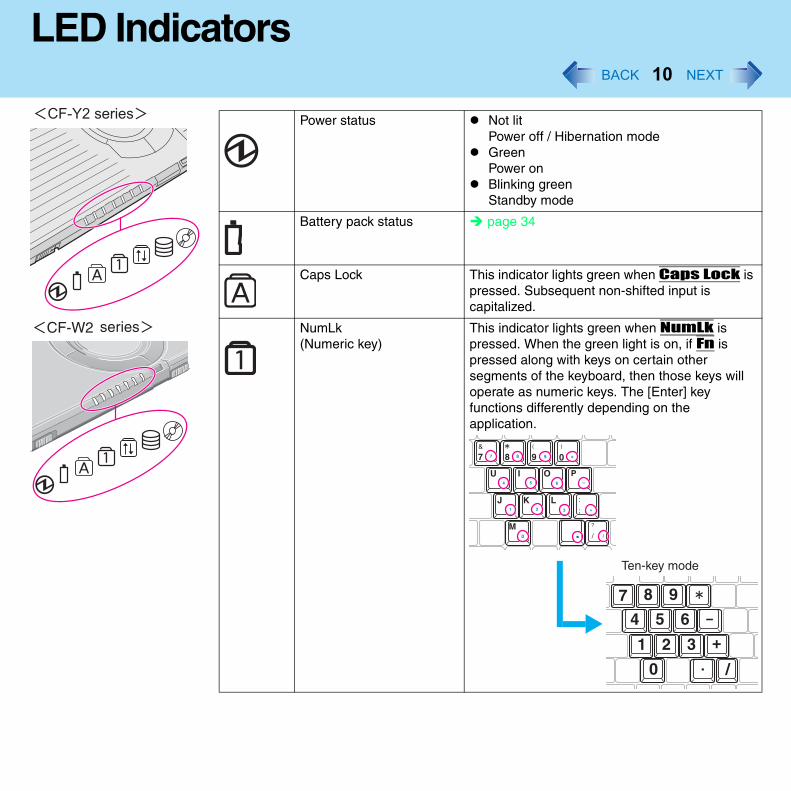
Power status Not litPower off / Hibernation modeGreenPower onBlinking greenStandby mode
Battery pack status page 34
Caps Lock This indicator lights green when Caps Lock ispressed. Subsequent non-shifted input is capitalized.
NumLk(Numeric key)
This indicator lights green when NumLk is pressed. When the green light is on, if Fn is pressed along with keys on certain other segments of the keyboard, then those keys will operate as numeric keys. The [Enter] key functions differently depending on the application.
LED In
/
11
dicators
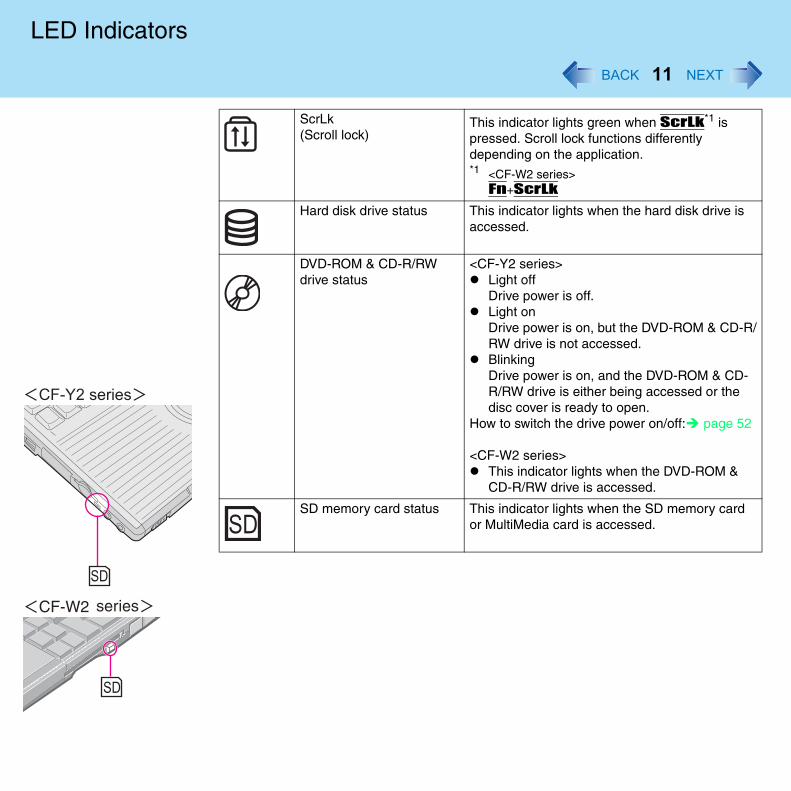
ScrLk(Scroll lock)
This indicator lights green when ScrLk*1 is pressed. Scroll lock functions differently depending on the application.*1 <CF-W2 series>
Fn+ScrLk
Hard disk drive status This indicator lights when the hard disk drive is accessed.
DVD-ROM & CD-R/RW drive status
<CF-Y2 series>Light offDrive power is off.Light onDrive power is on, but the DVD-ROM & CD-RRW drive is not accessed.BlinkingDrive power is on, and the DVD-ROM & CD-R/RW drive is either being accessed or the disc cover is ready to open.
How to switch the drive power on/off: page 52
<CF-W2 series>This indicator lights when the DVD-ROM & CD-R/RW drive is accessed.
SD memory card status This indicator lights when the SD memory card or MultiMedia card is accessed.
12
Touch Pad
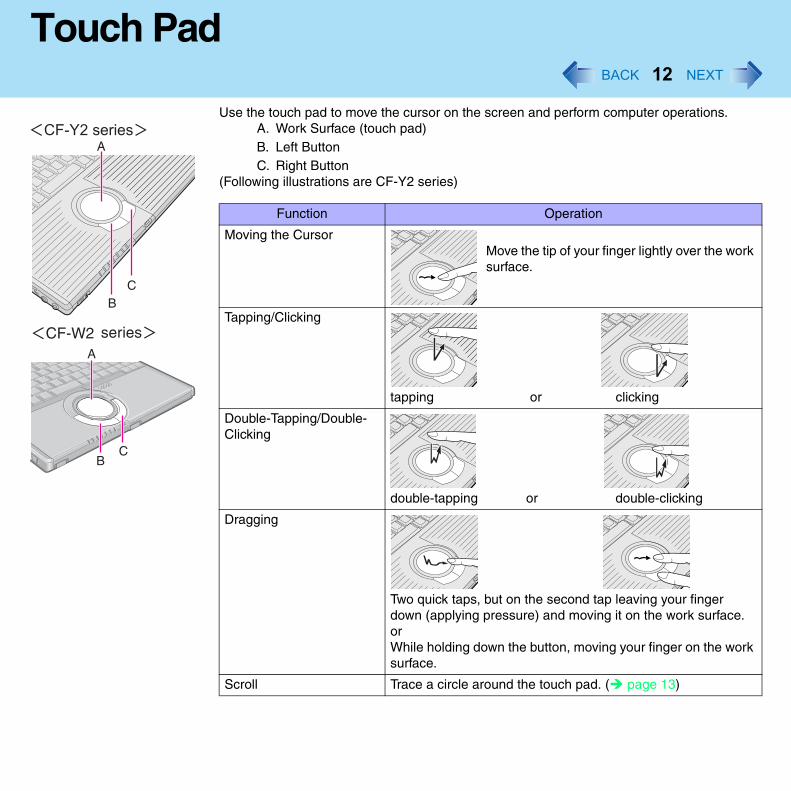
Use the touch pad to move the cursor on the screen and perform computer operations.A. Work Surface (touch pad)B. Left ButtonC. Right Button
(Following illustrations are CF-Y2 series)
Function Operation
Moving the CursorMove the tip of your finger lightly over the worksurface.
Tapping/Clicking
tapping or clicking
Double-Tapping/Double-Clicking
double-tapping or double-clicking
Dragging
Two quick taps, but on the second tap leaving your finger down (applying pressure) and moving it on the work surface.orWhile holding down the button, moving your finger on the worksurface.
Scroll Trace a circle around the touch pad. ( page 13)

Touch
How to
Using
13
Pad
NOTE
Refer to [Mouse Properties] for information on basic operations other than the above.To display [Mouse Properties]:Select [start] - [Control Panel] - [Printers and Other Hardware] - [Mouse].Sensitivity when touching the touch pad can be adjusted. ( page 16)When an external mouse is connected and the cursor does not operate properly:In the [Main] menu of the Setup Utility, set [Touch Pad] to [Disable]. When you want to use the touch pad again, return the setting to [Enable]. ( page 99)
The Touch Pad utility enables you to scroll easily by tracing a circle around the touch pad.
NOTE
Depending on the application software, the scroll operation may differ, or the scroll function may not operate properly.When the external mouse driver is installed, the scroll function may not operate prop-erly.
Scroll
1 Select the screen you want to scroll.
2 Position the cursor over the area you want to scroll.
3 Trace a circle around the edge of the touch pad as indicated in the diagrams.When you touch the scroll startup area on the touch pad, the icon on the taskbarwill change to .
To scroll down (trace clockwise)
the Touch Pad Utility

Touch
d
n
t
Hints fo
14
Pad
To scroll up (trace counter-clockwise)
Scrolling will begin more easily if you start from the position marked by the andtrace as indicated by the arrow.
On screens that cannot be scrolled (e.g., desktop screen), if you use the touchpad as described in Step 3 ( page 13), the computer may try to scroll the screen, causing the cursor to freeze. If this happens, remove your finger from the touch pad and begin again, this time starting from the center of the touch pad.
4 Once scrolling has begun, continue to trace a circle on the touch pawithout removing your finger from the pad.
As long as you are tracing a circle, you can continue scrolling using any positioon the touch pad. It is not necessary to trace a circle around the edge of the pad.To scroll in the opposite direction, trace a circle in the opposite direction withouremoving your finger from the touch pad.
5 When you finish scrolling, remove your finger from the touch pad.
r Easier Touch Pad Operation
You can change various touch pad settings using the following procedure:[start] - [All Programs] - [Panasonic] - [Touch Pad utility settings]Settings can be changed for the following functions:• Use Touch Pad function (On/Off)• Display icon in task tray (On/Off)• Animated icon in task tray (On/Off)• Rotate icon when wheel is operated (On/Off)• Scroll item under mouse cursor (On/Off)• Scroll speed setting• Set initial scroll scope

Touch
Using t
n
15
Pad
he Virtual Scrolling Function
NOTE
Because the Touch Pad utility and the Virtual Scrolling function both offer scrolling functions that use the touch pad, these two features cannot be used simultaneously. Ifyou try to use them at the same time, a message may be displayed asking you if you want to enable the Touch Pad utility.• To use the Touch Pad utility:
Select [Yes]. The Virtual Scrolling function will be disabled.• To use the Virtual Scrolling function:
Select [No], and then remove the Touch Pad utility and set the Virtual Scrolling function using the following procedure. In this case, the Touch Pad utility will be disabled.
1 Log on with the administrator authority.Do not use the Fast User Switching function.
2 Select on the taskbar with the right button, and select [Exit].If is not displayed on the taskbar:In [start] - [All Programs] - [Panasonic] - [Touch Pad utility settings] - [General settings], add a check mark for [Display icon in task tray] and select [OK].
3 In [start] - [Control Panel] - [Add or Remove Programs], select [TouchPadUtility], then select [Change/Remove].
4 At the confirmation message, select [OK], then select [Finish].
5 Select at [Add or Remove Programs].
6 Select [start] - [Control Panel] - [Printers and Other Hardware] - [Mouse] - [Device Settings].
7 Select the device name in [Devices] (e.g., Synaptics TouchPad), theselect [Settings].
Touch
e if r
n
.
Adjus
16
Pad
8 Select [Virtual Scrolling], add a check mark for the scroll functions you want to use, then select [OK].
9 Select [OK] at [Mouse Properties].
NOTE
To begin using the Touch Pad utility again:A Log on with the administrator authority.B Run the setup program.
Select [start] - [Run], input [c:\util\touchpad\setup.exe], then select [OK].C Select [Next] at the welcome message.D Select [Finish].At the confirmation message asking if you want to enable the Touch Pad utility, select [Yes].When the setup is complete, will be displayed on the taskbar.
When operating the keyboard, if your hand touches the touch pad unintentionally causing thcursor to move, adjust the sensitivity using "PalmCheck™." When operating the touch pad,your finger touches the touch pad unintentionally causing the cursor to move, or if the cursodoes not move even when you move your finger above the touch pad, adjust the sensitivityusing the "Touch sensitivity" setting.Adjust these two sensitivity settings until you find the setting that is easiest to use.Adjust [PalmCheck™] and [Touch Sensitivity] using the following procedure:
1 Select [start] - [Control Panel] - [Printers and Other Hardware] - [Mouse] - [Device Settings].
2 Select the device name in [Devices] (e.g. Synaptics TouchPad), theselect [Settings].
3 Select [Sensitivity], then select [PalmCheck™] or [Touch Sensitivity]After making the adjustment, select [OK].
ting the Sensitivity when Touching the Touch Pad
Touch
th
th
e
th
Handl
17
Pad
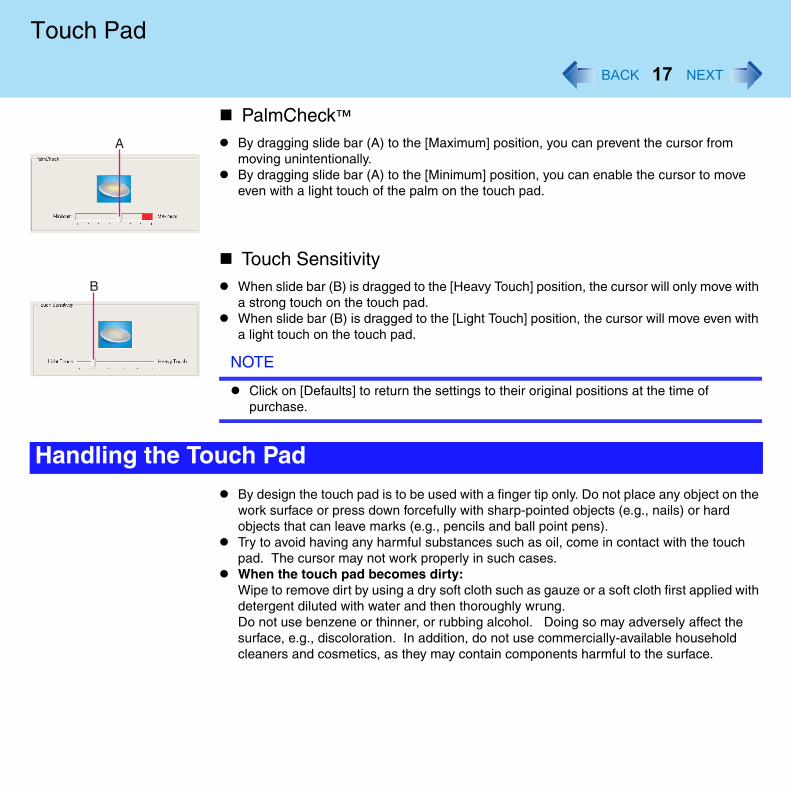
PalmCheck™
By dragging slide bar (A) to the [Maximum] position, you can prevent the cursor from moving unintentionally.By dragging slide bar (A) to the [Minimum] position, you can enable the cursor to move even with a light touch of the palm on the touch pad.
Touch SensitivityWhen slide bar (B) is dragged to the [Heavy Touch] position, the cursor will only move wia strong touch on the touch pad.When slide bar (B) is dragged to the [Light Touch] position, the cursor will move even wia light touch on the touch pad.
NOTE
Click on [Defaults] to return the settings to their original positions at the time of purchase.
By design the touch pad is to be used with a finger tip only. Do not place any object on thwork surface or press down forcefully with sharp-pointed objects (e.g., nails) or hard objects that can leave marks (e.g., pencils and ball point pens).Try to avoid having any harmful substances such as oil, come in contact with the touch pad. The cursor may not work properly in such cases.When the touch pad becomes dirty:Wipe to remove dirt by using a dry soft cloth such as gauze or a soft cloth first applied widetergent diluted with water and then thoroughly wrung.Do not use benzene or thinner, or rubbing alcohol. Doing so may adversely affect the surface, e.g., discoloration. In addition, do not use commercially-available household cleaners and cosmetics, as they may contain components harmful to the surface.
ing the Touch Pad
r t
18
Standby/Hibernation Functions
If you use the standby or hibernation function, you can shut down the computer without closing programs and documents. Upon restarting your computer from either the standby ohibernation mode, you can immediately continue working in all programs, or documents thawere open at the time the computer was placed into standby or hibernation mode.
Differences between the Standby and Hibernation Functions
NOTE
We recommend plugging in the AC adaptor if the standby function is to be used for a long period of time. If the AC adaptor cannot be connected, we recommend that hibernation mode be used instead of the standby mode.If the standby or hibernation function is used repeatedly, the computer may not work properly. To stabilize computer operations, shut down Windows on a regular basis (about once a week) without using the standby or hibernation function.
Use any of the following methods to enter the standby or hibernation mode.To use the hibernation mode, set [Power Options] in advance ( page 19).(Enabled in factory preset.)
Using Fn key combinations ( page 6)Using the power switch ( page 21)Using the display ( page 22)
Starting Up Your Computer Quickly
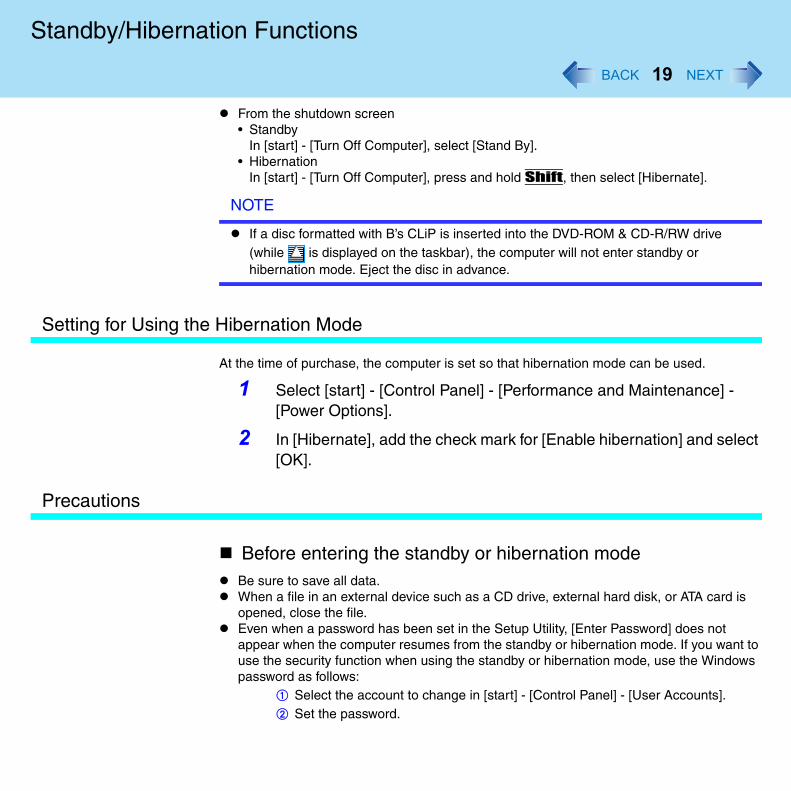
Function Where data is saved to
Time until resume
Requires power supply
Standby function
Memory Short Yes(if power is cut, all data is lost)
Hibernation function
Hard disk Rather long Power is not required to maintain data
Entering the Standby or Hibernation Mode
Standb
Setting
t
Precau
o s
19
y/Hibernation Functions
From the shutdown screen• Standby
In [start] - [Turn Off Computer], select [Stand By].• Hibernation
In [start] - [Turn Off Computer], press and hold Shift, then select [Hibernate].
NOTE
If a disc formatted with B’s CLiP is inserted into the DVD-ROM & CD-R/RW drive (while is displayed on the taskbar), the computer will not enter standby or hibernation mode. Eject the disc in advance.
for Using the Hibernation Mode
At the time of purchase, the computer is set so that hibernation mode can be used.
1 Select [start] - [Control Panel] - [Performance and Maintenance] - [Power Options].
2 In [Hibernate], add the check mark for [Enable hibernation] and selec[OK].
tions
Before entering the standby or hibernation modeBe sure to save all data.When a file in an external device such as a CD drive, external hard disk, or ATA card is opened, close the file.Even when a password has been set in the Setup Utility, [Enter Password] does not appear when the computer resumes from the standby or hibernation mode. If you want tuse the security function when using the standby or hibernation mode, use the Windowpassword as follows:
A Select the account to change in [start] - [Control Panel] - [User Accounts].B Set the password.
Standb
e
le
20
y/Hibernation Functions
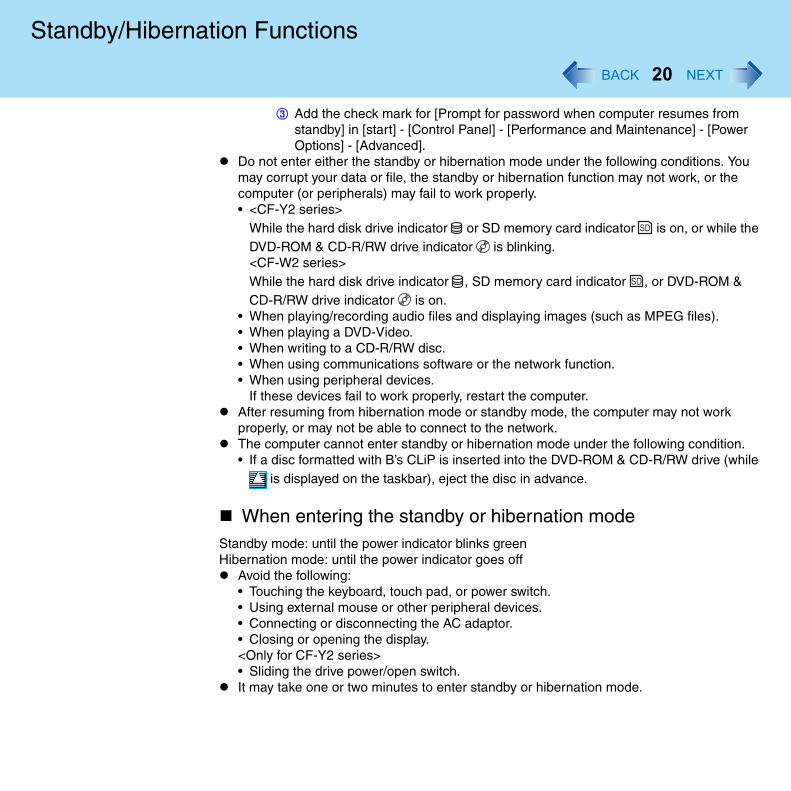
C Add the check mark for [Prompt for password when computer resumes from standby] in [start] - [Control Panel] - [Performance and Maintenance] - [PowerOptions] - [Advanced].
Do not enter either the standby or hibernation mode under the following conditions. Youmay corrupt your data or file, the standby or hibernation function may not work, or the computer (or peripherals) may fail to work properly.• <CF-Y2 series>
While the hard disk drive indicator or SD memory card indicator is on, or while thDVD-ROM & CD-R/RW drive indicator is blinking.<CF-W2 series>While the hard disk drive indicator , SD memory card indicator , or DVD-ROM & CD-R/RW drive indicator is on.
• When playing/recording audio files and displaying images (such as MPEG files).• When playing a DVD-Video.• When writing to a CD-R/RW disc.• When using communications software or the network function.• When using peripheral devices.
If these devices fail to work properly, restart the computer.After resuming from hibernation mode or standby mode, the computer may not work properly, or may not be able to connect to the network.The computer cannot enter standby or hibernation mode under the following condition.• If a disc formatted with B’s CLiP is inserted into the DVD-ROM & CD-R/RW drive (whi
is displayed on the taskbar), eject the disc in advance.
When entering the standby or hibernation modeStandby mode: until the power indicator blinks greenHibernation mode: until the power indicator goes off
Avoid the following:• Touching the keyboard, touch pad, or power switch.• Using external mouse or other peripheral devices.• Connecting or disconnecting the AC adaptor.• Closing or opening the display.<Only for CF-Y2 series>• Sliding the drive power/open switch.It may take one or two minutes to enter standby or hibernation mode.
Standb
it
Using t
.e
21
y/Hibernation Functions
In standby or hibernation modeDo not insert or remove peripherals; abnormal operation may result.In standby mode, power is consumed. If PC Cards are inserted, more of that power is consumed. When all power has been consumed, all data saved at standby is lost sinceis retained in memory. We therefore recommend plugging in the AC adaptor when usingthe standby function.
he Power Switch
Setting
1 Select [start] - [Control Panel] - [Performance and Maintenance] - [Power Options] - [Advanced].
2 Select [Stand by] or [Hibernate] for [When I press the power button on my computer], and then select [OK].
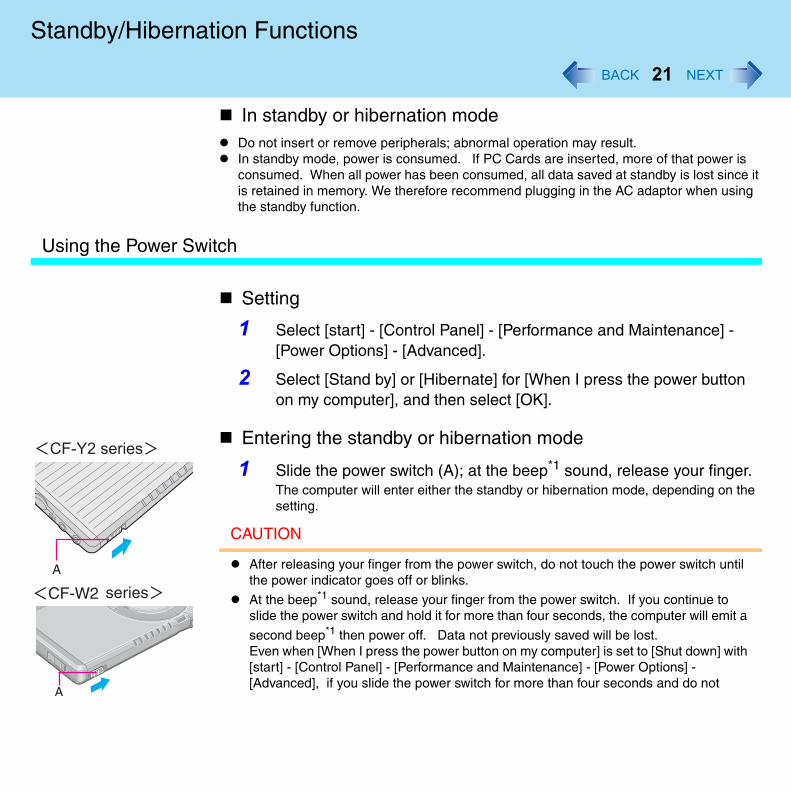
Entering the standby or hibernation mode
1 Slide the power switch (A); at the beep*1 sound, release your fingerThe computer will enter either the standby or hibernation mode, depending on thsetting.
CAUTION
After releasing your finger from the power switch, do not touch the power switch until the power indicator goes off or blinks.
At the beep*1 sound, release your finger from the power switch. If you continue to slide the power switch and hold it for more than four seconds, the computer will emit a
second beep*1 then power off. Data not previously saved will be lost.Even when [When I press the power button on my computer] is set to [Shut down] with[start] - [Control Panel] - [Performance and Maintenance] - [Power Options] - [Advanced], if you slide the power switch for more than four seconds and do not
Standb
p
Using t
e
Resum
22
y/Hibernation Functions
release it, a second beep*1 will sound and the power will be turned off forcibly. Data not previously saved will be lost.
*1 When the speaker function is disabled, e.g., by the key combination Fn+F4, there will be no beesound.
he Display
Setting
1 Select [start] - [Control Panel] - [Performance and Maintenance] - [Power Options] - [Advanced].
2 Select [Stand by] or [Hibernate] for [When I close the lid of my portable computer], and then select [OK].
Entering the standby or hibernation mode
1 Close the display.The computer will enter either the standby or hibernation mode, depending on thsetting.
When entering the standby or hibernation mode, close the display correctly. Ifyou do not do so, (for example, if you open the display soon after you close it)the computer may not enter standby or hibernation mode.
CAUTION
Until resuming is complete (requires about 15 seconds, or 60 seconds if connected to a network, after the display returns), avoid the following:• Touching the keyboard (except for password input), touch pad, or power switch.• Using external mouse or other peripheral devices.• Connecting or disconnecting the AC adaptor.• Closing or opening the display.
ing Operation
Standb
Using t
23
y/Hibernation Functions
• Shutting down or restarting Windows.• Entering either the standby or hibernation mode again.
<Only for CF-Y2 series>• Sliding the drive power/open switch.
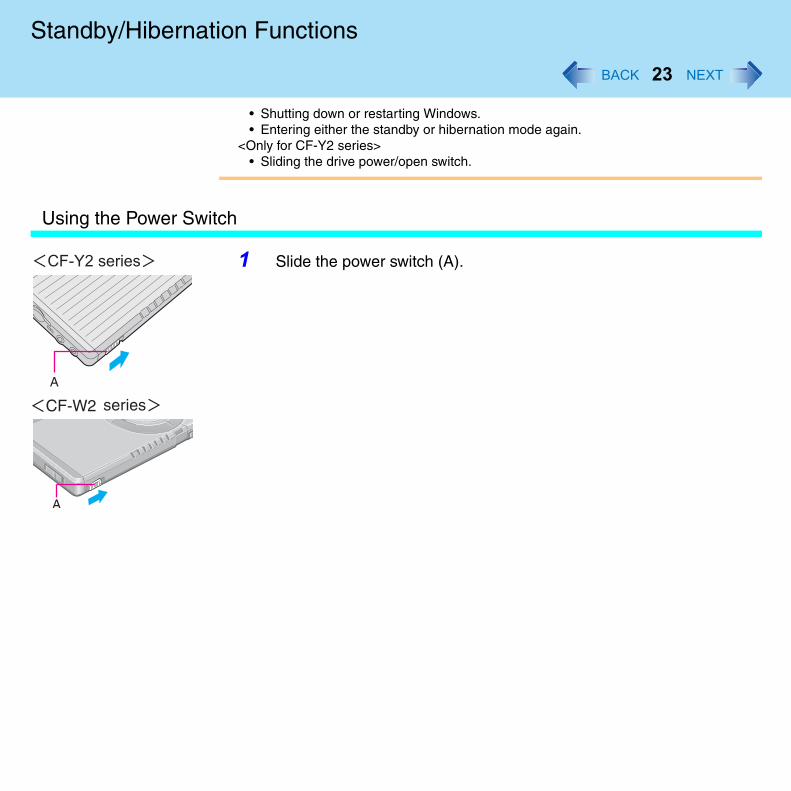
he Power Switch
1 Slide the power switch (A).
Standb
Using t
24
y/Hibernation Functions
he Display
When [Stand by] or [Hibernate] is selected as the setting for [When I close the lid of my portable computer] ( page 22), you can resume operation using the following procedure.
1 Open the display.Even if the display is closed after the computer has entered either the standby orhibernation mode, operation will resume when the display is opened. If the computer does not resume when the display is opened, slide the power switch.
25
Security Measures
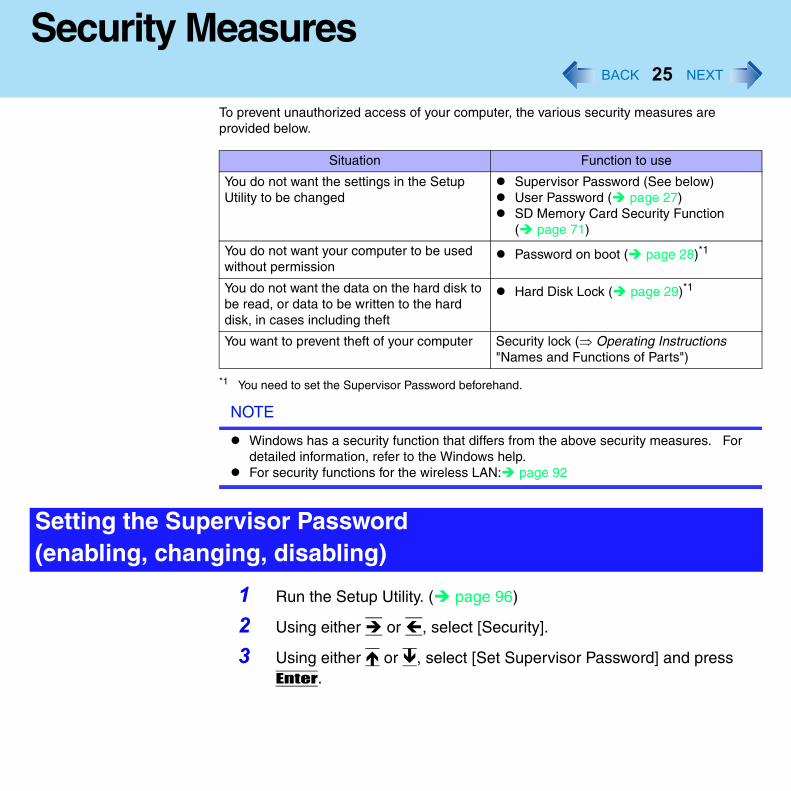
To prevent unauthorized access of your computer, the various security measures are provided below.
*1 You need to set the Supervisor Password beforehand.
NOTE
Windows has a security function that differs from the above security measures. For detailed information, refer to the Windows help.For security functions for the wireless LAN: page 92
1 Run the Setup Utility. ( page 96)
2 Using either or , select [Security].
3 Using either or , select [Set Supervisor Password] and press Enter.
Situation Function to use
You do not want the settings in the Setup Utility to be changed
Supervisor Password (See below)User Password ( page 27)SD Memory Card Security Function ( page 71)
You do not want your computer to be used without permission
Password on boot ( page 28)*1
You do not want the data on the hard disk to be read, or data to be written to the hard disk, in cases including theft
Hard Disk Lock ( page 29)*1
You want to prevent theft of your computer Security lock (⇒ Operating Instructions "Names and Functions of Parts")
Setting the Supervisor Password(enabling, changing, disabling)
Securi
26
ty Measures
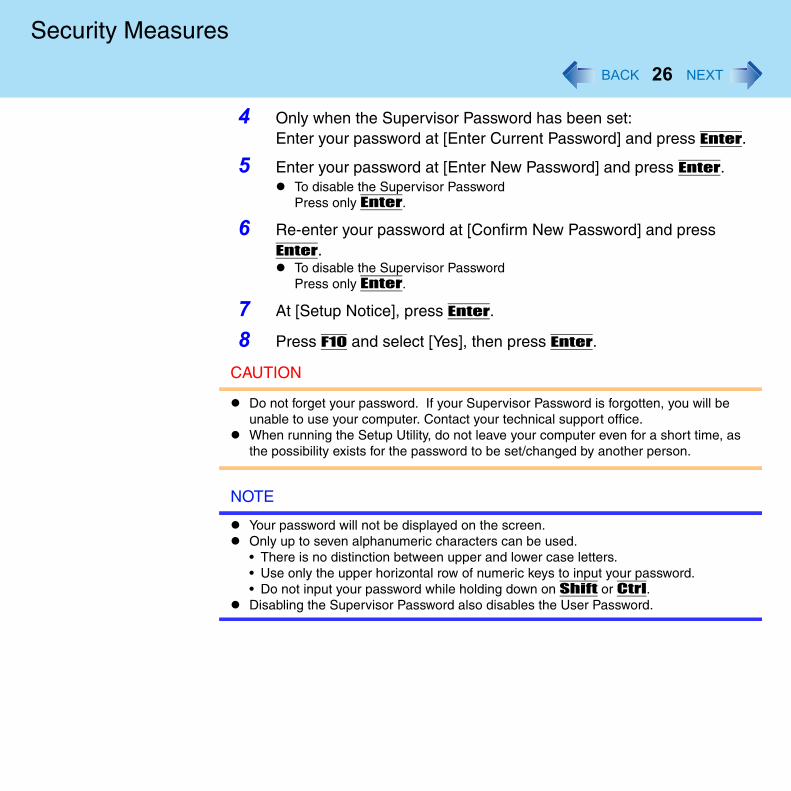
4 Only when the Supervisor Password has been set:Enter your password at [Enter Current Password] and press Enter.
5 Enter your password at [Enter New Password] and press Enter.To disable the Supervisor PasswordPress only Enter.
6 Re-enter your password at [Confirm New Password] and press Enter.
To disable the Supervisor PasswordPress only Enter.
7 At [Setup Notice], press Enter.
8 Press F10 and select [Yes], then press Enter.
CAUTION
Do not forget your password. If your Supervisor Password is forgotten, you will be unable to use your computer. Contact your technical support office.When running the Setup Utility, do not leave your computer even for a short time, as the possibility exists for the password to be set/changed by another person.
NOTE
Your password will not be displayed on the screen.Only up to seven alphanumeric characters can be used.• There is no distinction between upper and lower case letters.• Use only the upper horizontal row of numeric keys to input your password.• Do not input your password while holding down on Shift or Ctrl.Disabling the Supervisor Password also disables the User Password.
Securi
Settin
27
ty Measures
NOTE
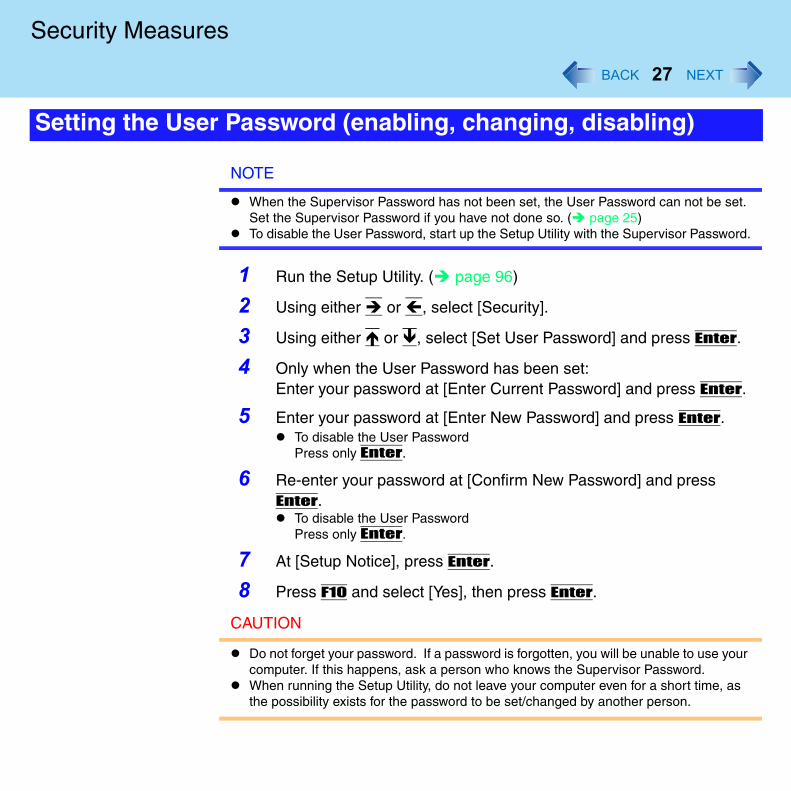
When the Supervisor Password has not been set, the User Password can not be set. Set the Supervisor Password if you have not done so. ( page 25)To disable the User Password, start up the Setup Utility with the Supervisor Password.
1 Run the Setup Utility. ( page 96)
2 Using either or , select [Security].
3 Using either or , select [Set User Password] and press Enter.
4 Only when the User Password has been set:Enter your password at [Enter Current Password] and press Enter.
5 Enter your password at [Enter New Password] and press Enter.To disable the User PasswordPress only Enter.
6 Re-enter your password at [Confirm New Password] and press Enter.
To disable the User PasswordPress only Enter.
7 At [Setup Notice], press Enter.
8 Press F10 and select [Yes], then press Enter.
CAUTION
Do not forget your password. If a password is forgotten, you will be unable to use yourcomputer. If this happens, ask a person who knows the Supervisor Password.When running the Setup Utility, do not leave your computer even for a short time, as the possibility exists for the password to be set/changed by another person.
g the User Password (enabling, changing, disabling)
Securi
e
Setting
Whenpermi
28
ty Measures
NOTE
Your password will not be displayed on the screen.Only up to seven alphanumeric characters can be used.• There is no distinction between upper and lower case letters.• Use only the upper horizontal row of numeric keys to input your password.• Do not input your password while holding down on Shift or Ctrl.When you do not want the User Password enabled or changed without permission:
A Run the Setup Utility and enter the Supervisor Password.B Go to [Security] menu. Using and , select [User Password Protection] and
press Enter.C Using either or , select [Protected] and press Enter.
When [Password on boot] is set to [Enable], it is impossible to start the computer without thpassword.
NOTE
You cannot set [Password on boot] without setting the Supervisor Password. Set the Supervisor Password if you have not done so. ( page 25)When starting up the Setup Utility, the password input screen will be displayed if a Supervisor Password or Use Password has been set, even if [Password on boot] is setto [Disable].
the Password on boot (enabling, disabling)
1 Run the Setup Utility. ( page 96)
2 Using either or , select [Security].
3 Using either or , select [Password on boot] and press Enter.
you do not want your computer to be used without ssion
Securi
Starting
r
et d e
Whenwritte
29
ty Measures
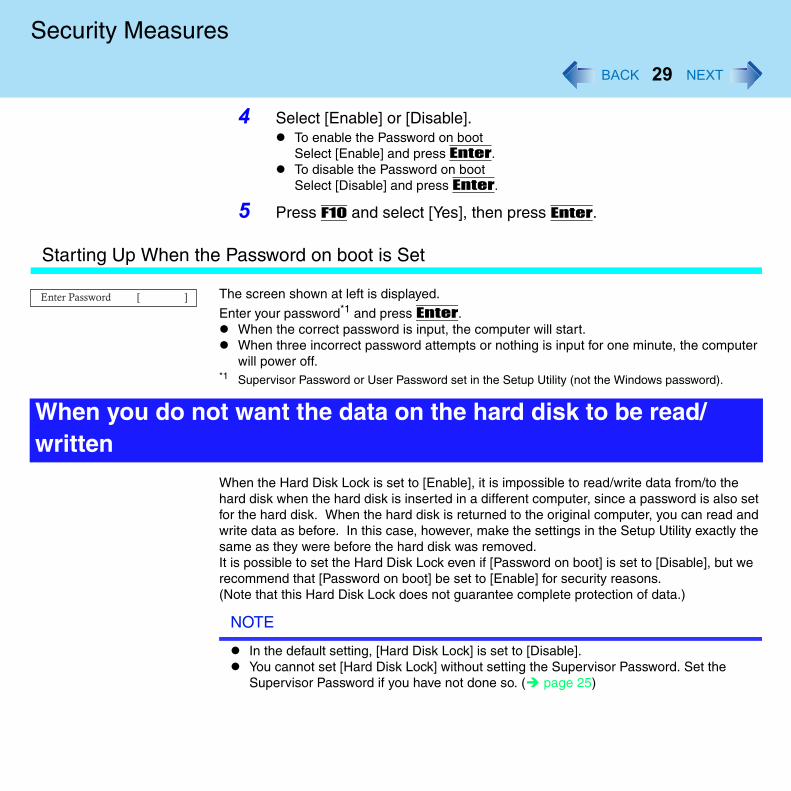
4 Select [Enable] or [Disable].To enable the Password on bootSelect [Enable] and press Enter. To disable the Password on bootSelect [Disable] and press Enter.
5 Press F10 and select [Yes], then press Enter.
Up When the Password on boot is Set
The screen shown at left is displayed.
Enter your password*1 and press Enter.When the correct password is input, the computer will start.When three incorrect password attempts or nothing is input for one minute, the computewill power off.
*1 Supervisor Password or User Password set in the Setup Utility (not the Windows password).
When the Hard Disk Lock is set to [Enable], it is impossible to read/write data from/to the hard disk when the hard disk is inserted in a different computer, since a password is also sfor the hard disk. When the hard disk is returned to the original computer, you can read anwrite data as before. In this case, however, make the settings in the Setup Utility exactly thsame as they were before the hard disk was removed.It is possible to set the Hard Disk Lock even if [Password on boot] is set to [Disable], but werecommend that [Password on boot] be set to [Enable] for security reasons.(Note that this Hard Disk Lock does not guarantee complete protection of data.)
NOTE
In the default setting, [Hard Disk Lock] is set to [Disable].You cannot set [Hard Disk Lock] without setting the Supervisor Password. Set the Supervisor Password if you have not done so. ( page 25)
you do not want the data on the hard disk to be read/n
Securi
Setting
30
ty Measures
The hard disk lock function only works with the internal hard disk. This function does not work with the external hard disk.
the Hard Disk Lock (enabling, disabling)
1 Run the Setup Utility. ( page 96)
2 Using either or , select [Security].
3 Using either or , select [Hard Disk Lock] and press Enter.
4 Select [Enable] or [Disable].To enable the Hard Disk LockSelect [Enable] and press Enter. At [Caution], press Enter.To disable the Hard Disk LockSelect [Disable] and press Enter.
5 Press F10 and select [Yes], then press Enter.
CAUTION
If your computer requires repair• Be sure to set [Hard Disk Lock] to [Disable].

to
U
31
Computing on the Road
One of the main features of notebook-type computers is that you have the power of computing away from your home or office. In the following, information is provided on how maximize use of the battery pack which is necessary for such computing.
Four Important Points• POINT 1
Be sure to charge your battery before and after use.• POINT 2
To get the maximum use of your battery, set the power management mode.• POINT 3
Check to see that you have your AC adaptor with you before leaving your home or office.Purchasing a following spare battery:CF-Y2 series: CF-VZSU27AUCF-W2 series: CF-VZSU27, CF-VZSU27AU (When this battery pack is attached, its capacity is 6.6 Ah.)
• POINT 4Always watch your battery level!
Power Saving Methods
Change [Power Schemes]Select [start] - [Control Panel] - [Performance and Maintenance] - [Power Options], and then set [Power schemes] to [Max Battery].Power consumption can also be minimized with detailed settings; for example, by reducing the time setting for [Turn off monitor].Adjust the brightness (darker) with Fn+F1 ( page 4)Leave your computer off when it is not in use(⇒ Operating Instructions "Starting Up/Shutting Down")Before stepping away from your computer, press Fn+F7 or Fn+F10 to put your computer in the standby or hibernation mode ( page 6)Remove peripheral devices (USB devices, PC Cards, external mouse, etc.) when not in useWe recommend turning the wireless LAN off when it is not used or out of rangeWe recommend against using applications that place a significant load on the CPSome screensavers place a large burden on the CPU even when you are not operating
Saving Power
Compu
o
32
ting on the Road
the computer. We recommend that you do not use a screensaver.We recommend that you fully charge the battery pack beforehandRefer to [Important Tips] as well ( page 34)
<CF-Y2 series>Minimize power consumption for the DVD-ROM & CD-R/RW drive• Power consumption for the DVD-ROM & CD-R/RW drive can be minimized using the
settings in [Main] menu of the Setup Utility. ( page 99)• Set [CD/DVD Drive Power] to [Off].
The DVD-ROM & CD-R/RW drive power will always be off when the computer is started up.The drive consumes power when the power is on, even if it is not being used. Even if [CD/DVD Drive Power] is set to [Off], when the computer is on, the drive power can be turned on sliding the drive power/open switch.If you want to use the drive with [CD/DVD Drive Power] set to [On], the power can beturned off sliding the drive power/open switch.
• Set [CD/DVD Drive Speed] to [Low].• Use the Optical Disk Drive Power-Saving utility. ( page 53)Use the memory and video power conservation setting.Using [Memory/Video Power Save] in [Main] menu of the Setup Utility, you can adjust settings to give priority to either power conservation or computer processing speed.At the time of purchase, the computer is set to [Battery Optimized] which gives priority tpower conservation.If you want to give priority to computer processing speed, change the setting to [Max Performance].
<CF-W2 series>Set [CD/DVD Drive Speed] to [Low]. ( page 99)
CAUTION
When installed in a network environment (except when the Wake Up from LAN function is in use).Do not use the standby or hibernation mode.After resuming operation from the standby or hibernation mode, the network connection may be severed or the computer will not work properly.
Compu
To Avo
33
ting on the Road
id Problems When Remaining Battery Power Is Low
We recommend that you check in advance regarding battery power confirmation methods ( page 35) and alarm settings for warning when battery power is low ( page 38).Alarm settings can be changed.
NOTE
When using the computer while on the move, we recommend that you always carry the AC adaptor as well.
]
r
l
r
34
Battery Power
For using the battery pack, select to view [Important Tips].Important Tips provides information on how to maximize use of the battery pack, which is necessary for computing away from your home or office. You can also view [Important Tipsusing the following procedures.Select [Important Tips] in [start] - [All Programs] - [Panasonic] - [On-Line Manuals].
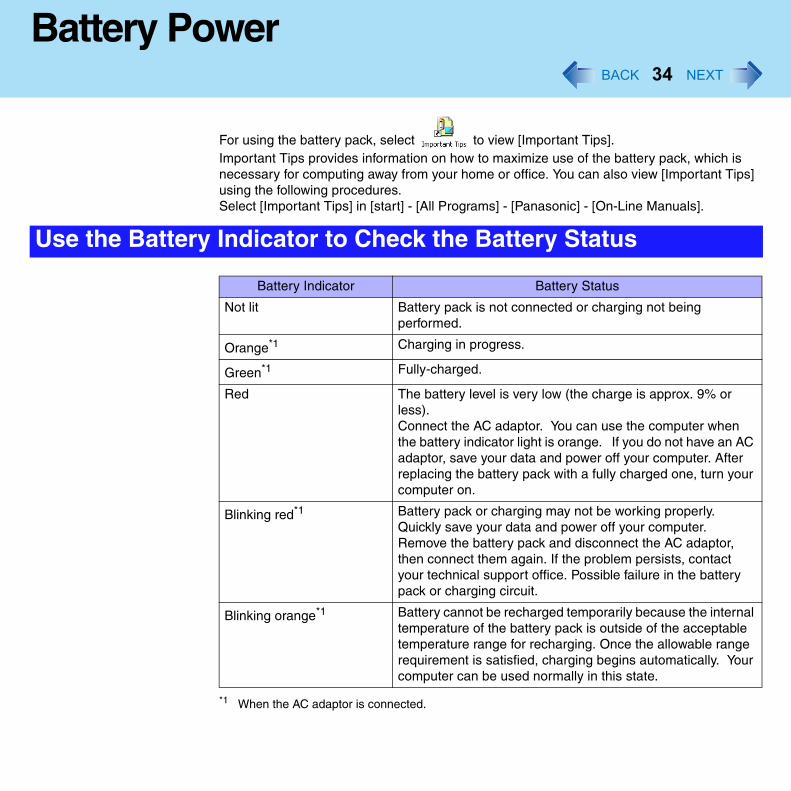
*1 When the AC adaptor is connected.
Use the Battery Indicator to Check the Battery Status
Battery Indicator Battery Status
Not lit Battery pack is not connected or charging not being performed.
Orange*1 Charging in progress.
Green*1 Fully-charged.
Red The battery level is very low (the charge is approx. 9% or less).Connect the AC adaptor. You can use the computer when the battery indicator light is orange. If you do not have an ACadaptor, save your data and power off your computer. After replacing the battery pack with a fully charged one, turn youcomputer on.
Blinking red*1 Battery pack or charging may not be working properly. Quickly save your data and power off your computer. Remove the battery pack and disconnect the AC adaptor, then connect them again. If the problem persists, contact your technical support office. Possible failure in the battery pack or charging circuit.
Blinking orange*1 Battery cannot be recharged temporarily because the internatemperature of the battery pack is outside of the acceptable temperature range for recharging. Once the allowable rangerequirement is satisfied, charging begins automatically. Youcomputer can be used normally in this state.

Battery
Check
35
Power
NOTE
This computer prevents overcharging of the battery by recharging only when the remaining power is less than approx. 95% of capacity after the battery is fully charged.
There are three methods to check the remaining battery power.Press Fn+F9. (After logging on to Windows)( page 36)Check the Windows battery meter. (After logging on to Windows)( page 36)Check the number of lighting LED indicators. (When the power is off or in standby/hibernation mode) ( page 37)
NOTE
In the following cases, there may be a difference between the remaining battery capacity displayed on the indicator and the actual remaining battery capacity. To correct this, perform the "Battery Recalibration." ( page 39)• The battery indicator light remains red.• The battery remaining displays 99% and the indicator light is orange for a long
period of time.• Low battery warning appears after a short period of time.
This may be caused by the use of standby mode for long periods of time. The battery is discharging while the computer is in standby mode when the AC adaptor is not connected.
The remaining battery power and remaining time indicated in the Windows battery meter ([Power Meter] in [Power Options Properties]) are calculated based on the computer's usage conditions at that time, so these displays may change when usage conditions change. (These displays are only a guide.)The remaining battery power displayed using Fn+F9 is calculated differently, so displays may differ to some degree. This is not a malfunction.
the Remaining Battery Power
Battery
Press F(After lo
Check Meter
36
Power
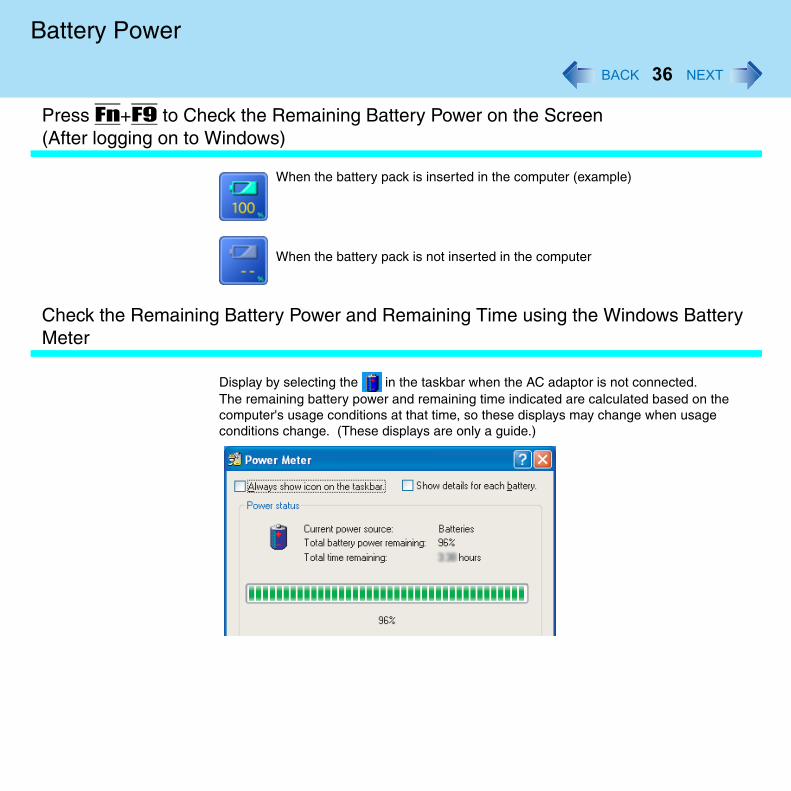
n+F9 to Check the Remaining Battery Power on the Screengging on to Windows)
When the battery pack is inserted in the computer (example)
When the battery pack is not inserted in the computer
the Remaining Battery Power and Remaining Time using the Windows Battery
Display by selecting the in the taskbar when the AC adaptor is not connected.The remaining battery power and remaining time indicated are calculated based on the computer's usage conditions at that time, so these displays may change when usage conditions change. (These displays are only a guide.)
Battery
Check (When
37
Power
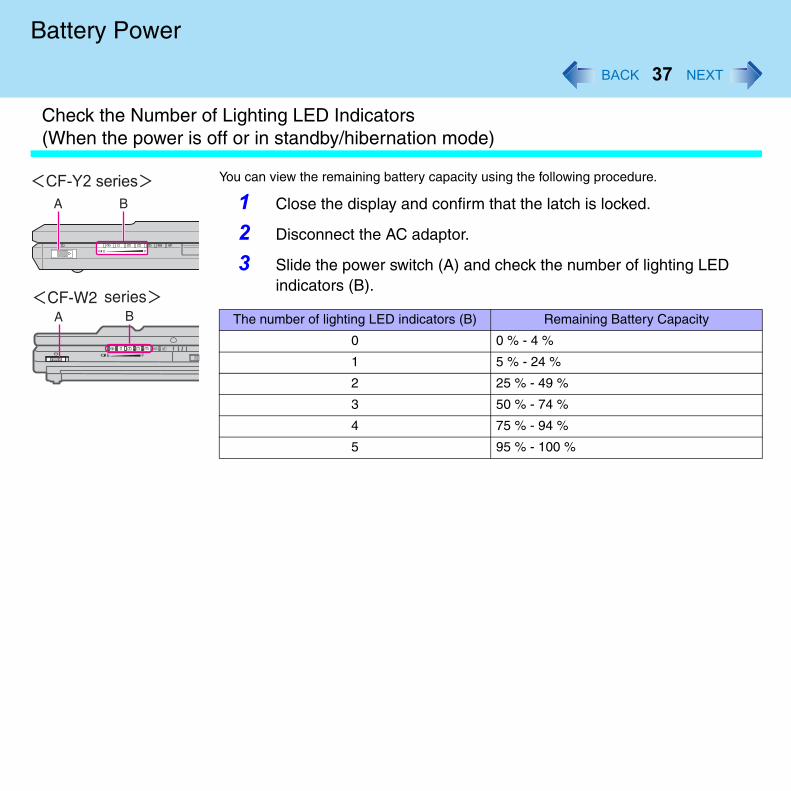
the Number of Lighting LED Indicatorsthe power is off or in standby/hibernation mode)
You can view the remaining battery capacity using the following procedure.
1 Close the display and confirm that the latch is locked.
2 Disconnect the AC adaptor.
3 Slide the power switch (A) and check the number of lighting LED indicators (B).
The number of lighting LED indicators (B) Remaining Battery Capacity
0 0 % - 4 %
1 5 % - 24 %
2 25 % - 49 %
3 50 % - 74 %
4 75 % - 94 %
5 95 % - 100 %
Battery
When t
.
, ,
38
Power
he Remaining Battery Charge Becomes Low
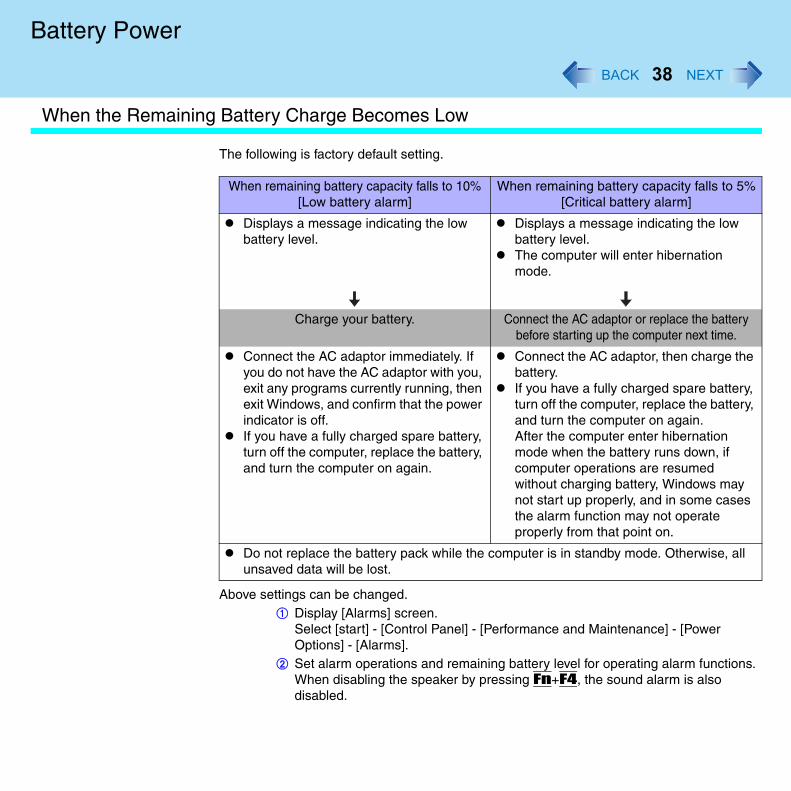
The following is factory default setting.
Above settings can be changed.A Display [Alarms] screen.
Select [start] - [Control Panel] - [Performance and Maintenance] - [Power Options] - [Alarms].
B Set alarm operations and remaining battery level for operating alarm functionsWhen disabling the speaker by pressing Fn+F4, the sound alarm is also disabled.
When remaining battery capacity falls to 10%[Low battery alarm]
When remaining battery capacity falls to 5%[Critical battery alarm]
Displays a message indicating the low battery level.
Displays a message indicating the low battery level.The computer will enter hibernation mode.
Charge your battery. Connect the AC adaptor or replace the batterybefore starting up the computer next time.
Connect the AC adaptor immediately. If you do not have the AC adaptor with you, exit any programs currently running, then exit Windows, and confirm that the power indicator is off.If you have a fully charged spare battery, turn off the computer, replace the battery, and turn the computer on again.
Connect the AC adaptor, then charge thebattery.If you have a fully charged spare batteryturn off the computer, replace the batteryand turn the computer on again.After the computer enter hibernation mode when the battery runs down, if computer operations are resumed without charging battery, Windows may not start up properly, and in some casesthe alarm function may not operate properly from that point on.
Do not replace the battery pack while the computer is in standby mode. Otherwise, all unsaved data will be lost.
Battery
is
Accur
39
Power
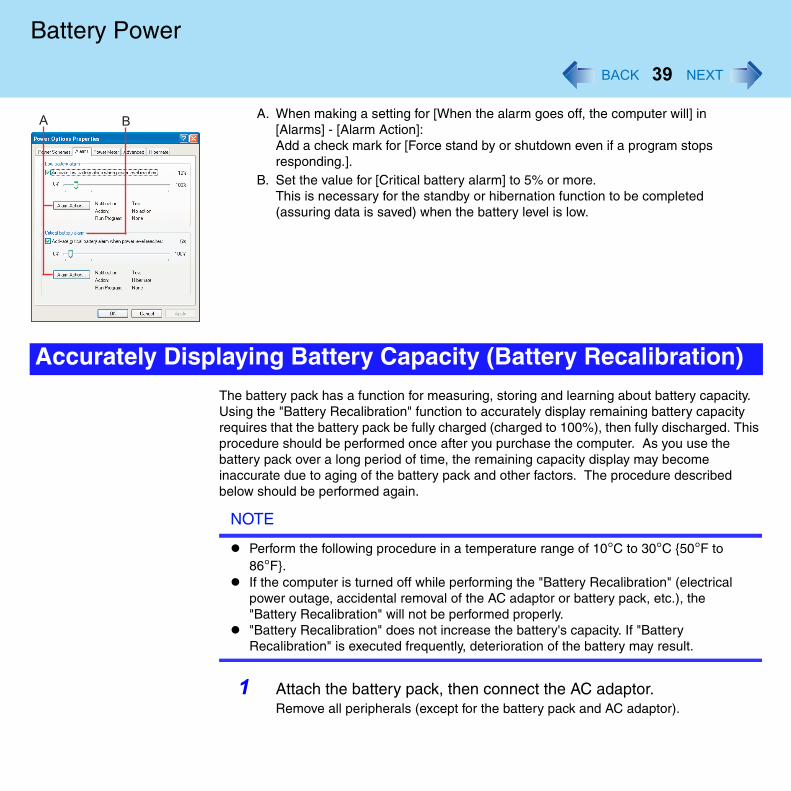
A. When making a setting for [When the alarm goes off, the computer will] in [Alarms] - [Alarm Action]:Add a check mark for [Force stand by or shutdown even if a program stops responding.].
B. Set the value for [Critical battery alarm] to 5% or more.This is necessary for the standby or hibernation function to be completed (assuring data is saved) when the battery level is low.
The battery pack has a function for measuring, storing and learning about battery capacity.Using the "Battery Recalibration" function to accurately display remaining battery capacity requires that the battery pack be fully charged (charged to 100%), then fully discharged. Thprocedure should be performed once after you purchase the computer. As you use the battery pack over a long period of time, the remaining capacity display may become inaccurate due to aging of the battery pack and other factors. The procedure described below should be performed again.
NOTE
Perform the following procedure in a temperature range of 10°C to 30°C {50°F to 86°F}.If the computer is turned off while performing the "Battery Recalibration" (electrical power outage, accidental removal of the AC adaptor or battery pack, etc.), the "Battery Recalibration" will not be performed properly."Battery Recalibration" does not increase the battery's capacity. If "Battery Recalibration" is executed frequently, deterioration of the battery may result.
1 Attach the battery pack, then connect the AC adaptor.Remove all peripherals (except for the battery pack and AC adaptor).
ately Displaying Battery Capacity (Battery Recalibration)
Battery
-
-
y
e
Repla
40
Power
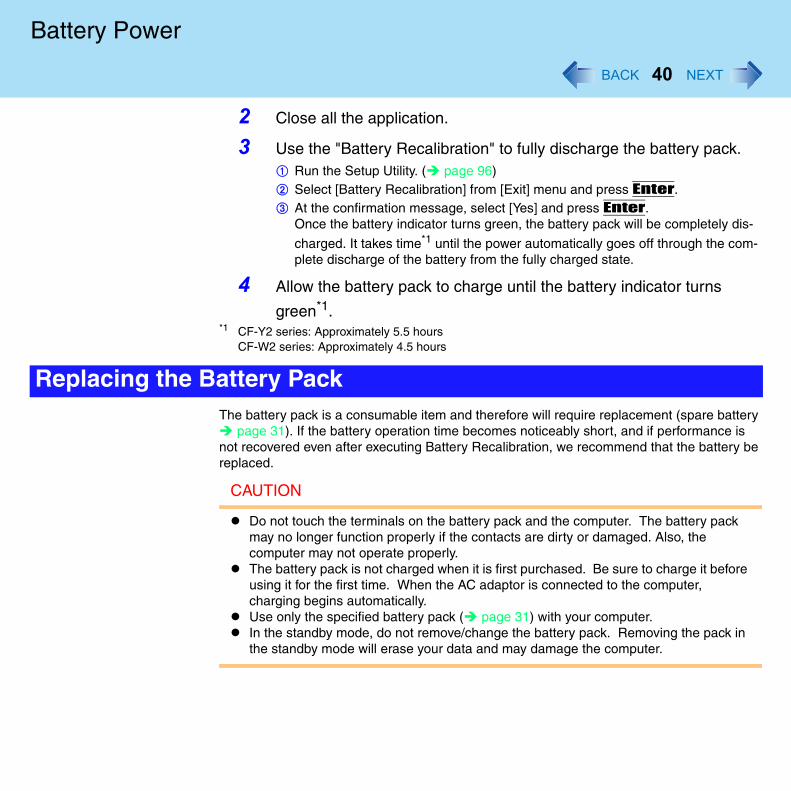
2 Close all the application.
3 Use the "Battery Recalibration" to fully discharge the battery pack.A Run the Setup Utility. ( page 96)B Select [Battery Recalibration] from [Exit] menu and press Enter.C At the confirmation message, select [Yes] and press Enter.
Once the battery indicator turns green, the battery pack will be completely dis
charged. It takes time*1 until the power automatically goes off through the complete discharge of the battery from the fully charged state.
4 Allow the battery pack to charge until the battery indicator turns
green*1.*1 CF-Y2 series: Approximately 5.5 hours
CF-W2 series: Approximately 4.5 hours
The battery pack is a consumable item and therefore will require replacement (spare batterpage 31). If the battery operation time becomes noticeably short, and if performance is
not recovered even after executing Battery Recalibration, we recommend that the battery breplaced.
CAUTION
Do not touch the terminals on the battery pack and the computer. The battery pack may no longer function properly if the contacts are dirty or damaged. Also, the computer may not operate properly.The battery pack is not charged when it is first purchased. Be sure to charge it before using it for the first time. When the AC adaptor is connected to the computer, charging begins automatically.Use only the specified battery pack ( page 31) with your computer.In the standby mode, do not remove/change the battery pack. Removing the pack in the standby mode will erase your data and may damage the computer.
cing the Battery Pack
Battery
at e
n
41
Power
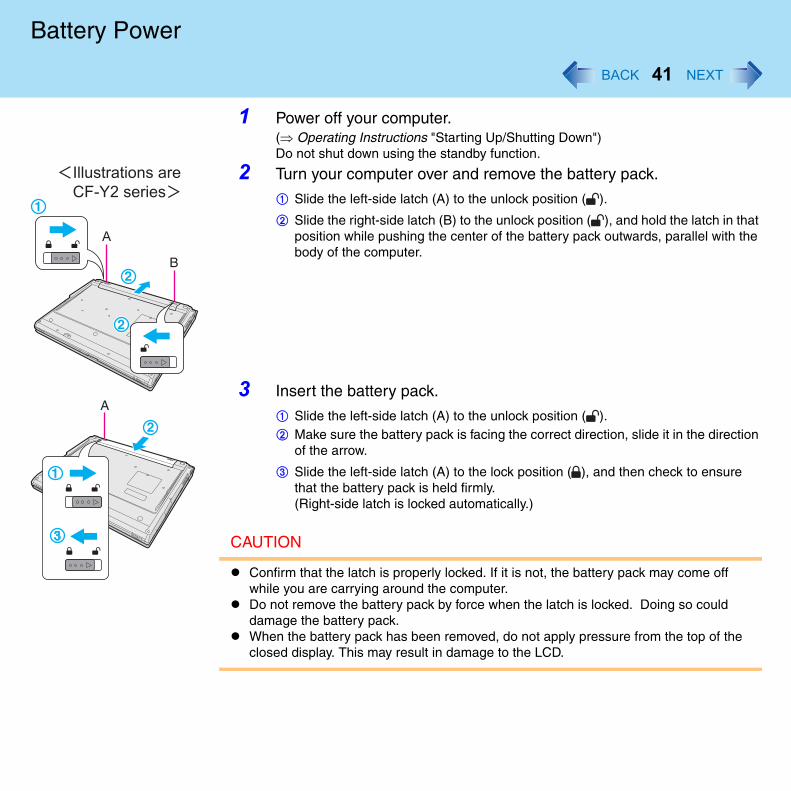
1 Power off your computer.(⇒ Operating Instructions "Starting Up/Shutting Down") Do not shut down using the standby function.
2 Turn your computer over and remove the battery pack.
A Slide the left-side latch (A) to the unlock position ( ).
B Slide the right-side latch (B) to the unlock position ( ), and hold the latch in thposition while pushing the center of the battery pack outwards, parallel with thbody of the computer.
3 Insert the battery pack.
A Slide the left-side latch (A) to the unlock position ( ).B Make sure the battery pack is facing the correct direction, slide it in the directio
of the arrow.
C Slide the left-side latch (A) to the lock position ( ), and then check to ensure that the battery pack is held firmly.(Right-side latch is locked automatically.)
CAUTION
Confirm that the latch is properly locked. If it is not, the battery pack may come off while you are carrying around the computer.Do not remove the battery pack by force when the latch is locked. Doing so could damage the battery pack.When the battery pack has been removed, do not apply pressure from the top of the closed display. This may result in damage to the LCD.

42
SD-MovieStage
SD-MovieStage makes it possible to record the multimedia contents stored on your hard disk drive or various other media onto an SD memory card.
1 Select [start] - [Run], input [c:\util\sdmovie\setup.exe], then select [OK].Follow the on-screen instructions.
NOTE
At [Choose Destination Location], do not change the destination folder.At [Select the Video System], select [NTSC] or [PAL].
CAUTION
Be sure to log on with the administrator authority when running the SD-MovieStage.
1 Select [start] - [All Programs] - [Panasonic] - [SD-MovieStage] - [SD-MovieStage].
NOTE
The screensaver may not work while SD-MovieStage is running.For more detailed information, refer to the operation manual of the SD-MovieStage.Select [start] - [All Programs] - [Panasonic] - [SD-MovieStage] - [Manual].
Setting Up the SD-MovieStage
Running the SD-MovieStage

t
n
/
r
/
43
DVD-ROM & CD-R/RW Drive
Before using the driveDo not expose the DVD-ROM & CD-R/RW drive to excessive smoke that may leave a residue, e.g., oil smoke, or tobacco smoke. Doing so could shorten the life of the drive lens.
When opening/closing the disc cover<CF-Y2 series>• When the computer is on, be sure to use the drive power/open switch on the front righ
of the computer or perform the ejecting operation through Windows.When using B's Recorder or B's CLiP: ( page 59)
• When closing the disc cover, press the left side of the cover above the drive power/opeswitch (indicated by an arrow) to ensure that cover is locked in place.
• Do not access the drive until after the disc cover is closed and the DVD-ROM & CD-RRW drive status indicator changes to lighting from blinking.
<CF-W2 series>• When the computer is on, be sure to use the open lever on the left side of the compute
or perform the ejecting operation through Windows.When using B's Recorder or B's CLiP: ( page 59)
• When closing the disc cover, press down near the power indicator (position of the arrow) to ensure that the cover is locked.
• Do not access the drive until after the disc cover is closed and the DVD-ROM & CD-RRW drive status indicator is off.
Usage Precautions
DVD-R
n
it
.
.
M
e
-
44
OM & CD-R/RW Drive
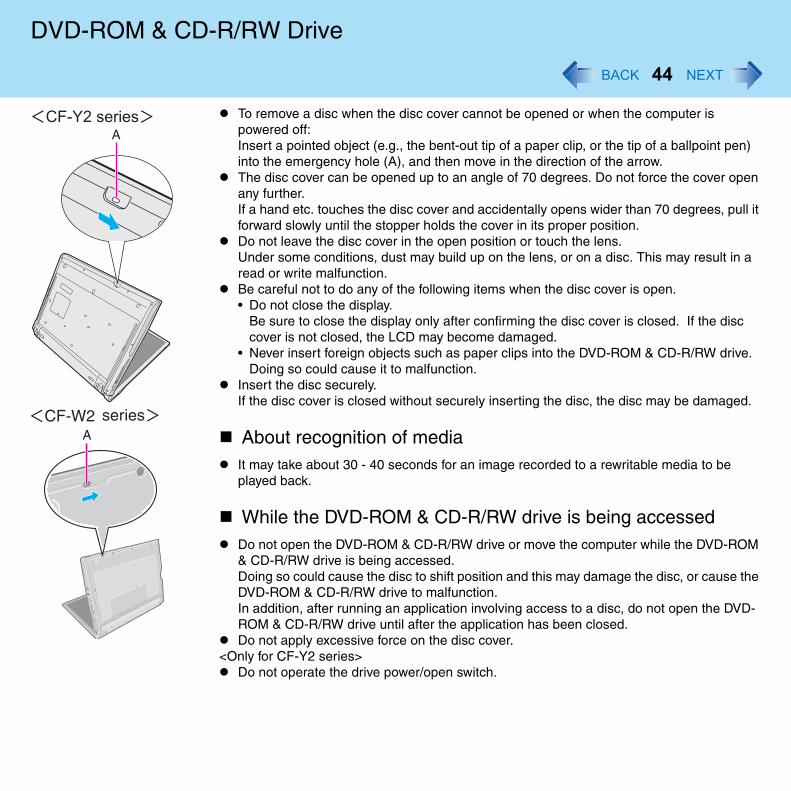
To remove a disc when the disc cover cannot be opened or when the computer is powered off:Insert a pointed object (e.g., the bent-out tip of a paper clip, or the tip of a ballpoint pen)into the emergency hole (A), and then move in the direction of the arrow. The disc cover can be opened up to an angle of 70 degrees. Do not force the cover opeany further.If a hand etc. touches the disc cover and accidentally opens wider than 70 degrees, pullforward slowly until the stopper holds the cover in its proper position. Do not leave the disc cover in the open position or touch the lens.Under some conditions, dust may build up on the lens, or on a disc. This may result in aread or write malfunction.Be careful not to do any of the following items when the disc cover is open.• Do not close the display.
Be sure to close the display only after confirming the disc cover is closed. If the disc cover is not closed, the LCD may become damaged.
• Never insert foreign objects such as paper clips into the DVD-ROM & CD-R/RW driveDoing so could cause it to malfunction.
Insert the disc securely.If the disc cover is closed without securely inserting the disc, the disc may be damaged
About recognition of mediaIt may take about 30 - 40 seconds for an image recorded to a rewritable media to be played back.
While the DVD-ROM & CD-R/RW drive is being accessedDo not open the DVD-ROM & CD-R/RW drive or move the computer while the DVD-RO& CD-R/RW drive is being accessed.Doing so could cause the disc to shift position and this may damage the disc, or cause thDVD-ROM & CD-R/RW drive to malfunction.In addition, after running an application involving access to a disc, do not open the DVDROM & CD-R/RW drive until after the application has been closed.Do not apply excessive force on the disc cover.
<Only for CF-Y2 series>Do not operate the drive power/open switch.

DVD-R
45
OM & CD-R/RW Drive
CleaningWe recommend cleaning the drive with an air puffer used for camera lenses.(Do not use any spray-type of lens cleaning products.)
DVD-R
About D
.
When U
46
OM & CD-R/RW Drive
iscs
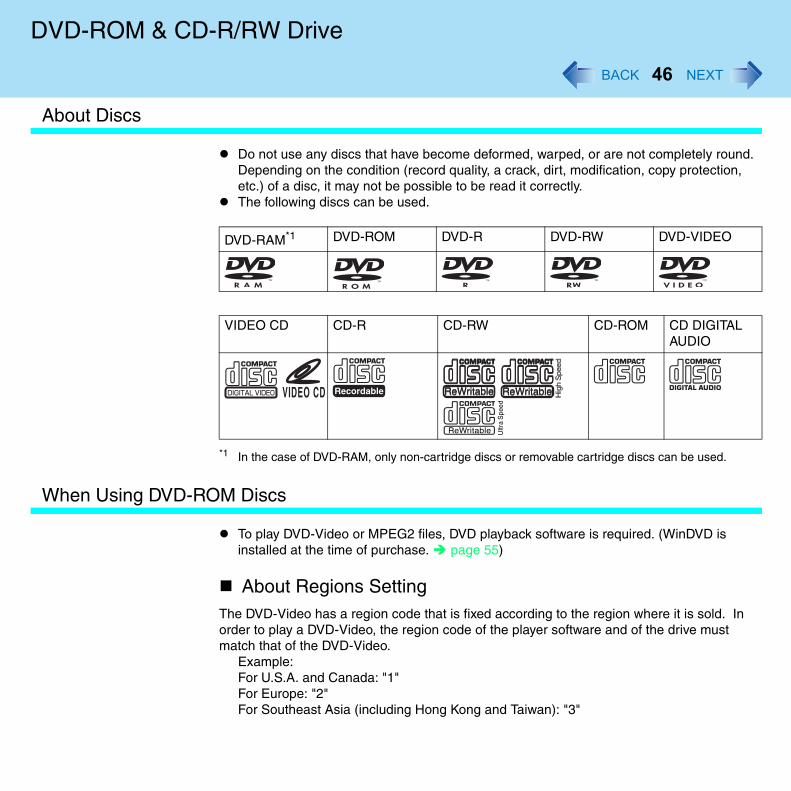
Do not use any discs that have become deformed, warped, or are not completely roundDepending on the condition (record quality, a crack, dirt, modification, copy protection, etc.) of a disc, it may not be possible to be read it correctly.The following discs can be used.
*1 In the case of DVD-RAM, only non-cartridge discs or removable cartridge discs can be used.
sing DVD-ROM Discs
To play DVD-Video or MPEG2 files, DVD playback software is required. (WinDVD is installed at the time of purchase. page 55)
About Regions SettingThe DVD-Video has a region code that is fixed according to the region where it is sold. In order to play a DVD-Video, the region code of the player software and of the drive must match that of the DVD-Video.
Example:For U.S.A. and Canada: "1"For Europe: "2"For Southeast Asia (including Hong Kong and Taiwan): "3"
DVD-RAM*1 DVD-ROM DVD-R DVD-RW DVD-VIDEO
VIDEO CD CD-R CD-RW CD-ROM CD DIGITAL AUDIO
VIDEO CD Recordable

DVD-R
d
47
OM & CD-R/RW Drive
This drive's region code is not set at the time of shipment from the factory. Therefore, operations will differ depending on the first DVD-Video played.
In the case of a DVD-Video with a specific region code:The drive will automatically be set with the same region code as the DVD-Video.In the case of any other DVD-Video:[Confirm Region] appears. Select region code and select [OK]. Play now begins.([Confirm Region] may not be displayed for some DVD-Videos. To confirm the current region code and the number of settings remaining, right-click on the WinDVD screen anselect [Setup] - [Region].)
CAUTION
The region code can be set a total of five times, including the initial setting. Proceed very carefully, because after the fifth change has been made, the region code set last is fixed and no further changes can be made.The user must take responsibility for any trouble that results from illegally changing or altering the region code.
NOTE
[Confirm Region] will also be displayed if a DVD-Video with one region code is inserted into a drive for which another region code has already been set.
DVD-R
When U
C
48
OM & CD-R/RW Drive
sing CD-R or CD-RW Discs
When using CD-R or CD-RW discs, read the description on the disc package.
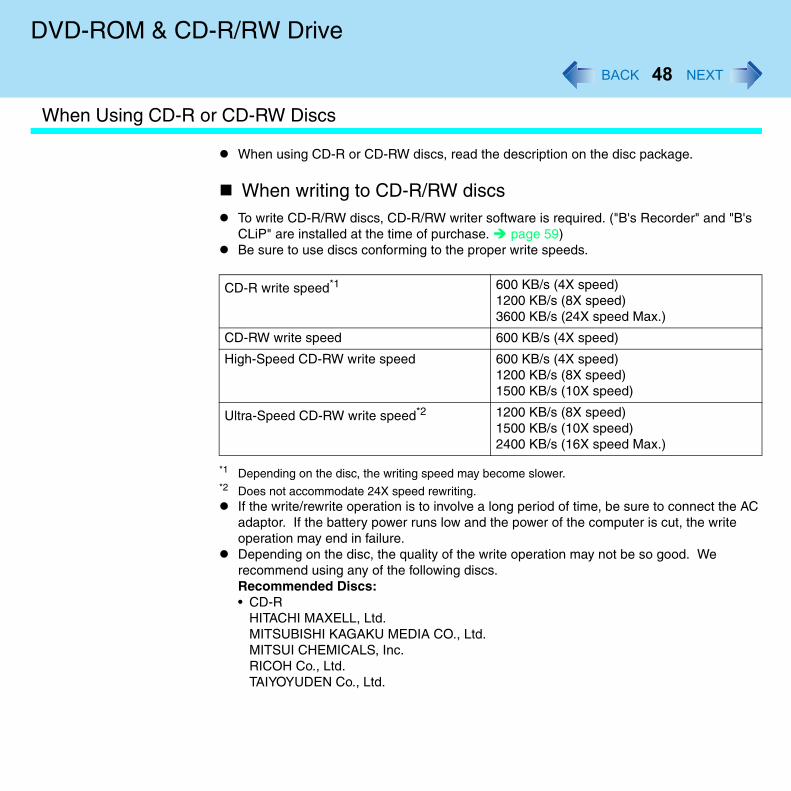
When writing to CD-R/RW discsTo write CD-R/RW discs, CD-R/RW writer software is required. ("B's Recorder" and "B'sCLiP" are installed at the time of purchase. page 59)Be sure to use discs conforming to the proper write speeds.
*1 Depending on the disc, the writing speed may become slower.*2 Does not accommodate 24X speed rewriting.
If the write/rewrite operation is to involve a long period of time, be sure to connect the Aadaptor. If the battery power runs low and the power of the computer is cut, the write operation may end in failure.Depending on the disc, the quality of the write operation may not be so good. We recommend using any of the following discs.Recommended Discs:• CD-R
HITACHI MAXELL, Ltd.MITSUBISHI KAGAKU MEDIA CO., Ltd.MITSUI CHEMICALS, Inc.RICOH Co., Ltd.TAIYOYUDEN Co., Ltd.
CD-R write speed*1 600 KB/s (4X speed)1200 KB/s (8X speed)3600 KB/s (24X speed Max.)
CD-RW write speed 600 KB/s (4X speed)
High-Speed CD-RW write speed 600 KB/s (4X speed)1200 KB/s (8X speed)1500 KB/s (10X speed)
Ultra-Speed CD-RW write speed*2 1200 KB/s (8X speed)1500 KB/s (10X speed)2400 KB/s (16X speed Max.)

DVD-R
To Avo
t.r
c.
49
OM & CD-R/RW Drive
• CD-RW /High-Speed CD-RWMITSUBISHI KAGAKU MEDIA CO., Ltd.RICOH Co., Ltd.
• Ultra-Speed CD-RWMITSUBISHI KAGAKU MEDIA CO., Ltd.
id Damaging Discs
Do not touch the data surface (the side opposite the side with the title printed on it) as itcan cause the disc to become dirty or scratched.Do not allow discs to become dirty or scratched.Do not place or store discs in locations exposed to heat, direct sunlight, humidity or dusDo not write on the surface of the disc with a ballpoint pen or other writing instrument nopaste any paper to it.Do not drop, bend, or place heavy objects on top of discs.If the disc is brought from a cold into a warm environment, moisture may form on the disWipe this moisture off with a soft, dry, lint-free cloth before using the disc.Cleaning the disc using a disc cleaner is recommended once every 2 or 3 months.
DVD-R
e
Settin
50
OM & CD-R/RW Drive
CAUTION
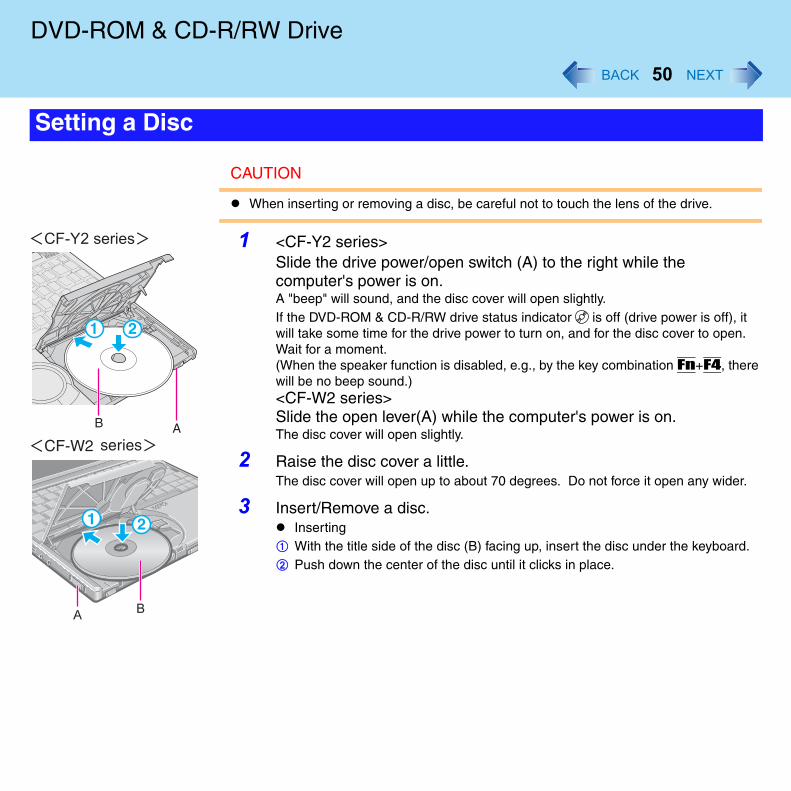
When inserting or removing a disc, be careful not to touch the lens of the drive.
1 <CF-Y2 series>Slide the drive power/open switch (A) to the right while the computer's power is on.A "beep" will sound, and the disc cover will open slightly.If the DVD-ROM & CD-R/RW drive status indicator is off (drive power is off), it will take some time for the drive power to turn on, and for the disc cover to open. Wait for a moment.(When the speaker function is disabled, e.g., by the key combination Fn+F4, therwill be no beep sound.)<CF-W2 series>Slide the open lever(A) while the computer's power is on.The disc cover will open slightly.
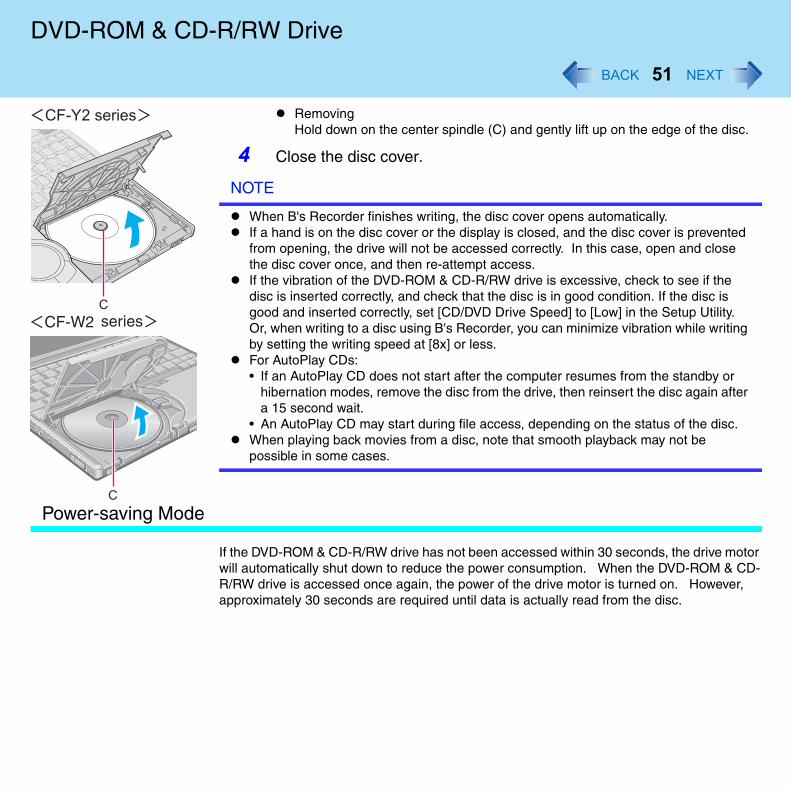
2 Raise the disc cover a little.The disc cover will open up to about 70 degrees. Do not force it open any wider.
3 Insert/Remove a disc.Inserting
A With the title side of the disc (B) facing up, insert the disc under the keyboard.B Push down the center of the disc until it clicks in place.
g a Disc
DVD-R
Power-
r -
51
OM & CD-R/RW Drive
RemovingHold down on the center spindle (C) and gently lift up on the edge of the disc.
4 Close the disc cover.
NOTE
When B's Recorder finishes writing, the disc cover opens automatically.If a hand is on the disc cover or the display is closed, and the disc cover is prevented from opening, the drive will not be accessed correctly. In this case, open and close the disc cover once, and then re-attempt access.If the vibration of the DVD-ROM & CD-R/RW drive is excessive, check to see if the disc is inserted correctly, and check that the disc is in good condition. If the disc is good and inserted correctly, set [CD/DVD Drive Speed] to [Low] in the Setup Utility. Or, when writing to a disc using B's Recorder, you can minimize vibration while writingby setting the writing speed at [8x] or less.For AutoPlay CDs:• If an AutoPlay CD does not start after the computer resumes from the standby or
hibernation modes, remove the disc from the drive, then reinsert the disc again aftera 15 second wait.
• An AutoPlay CD may start during file access, depending on the status of the disc.When playing back movies from a disc, note that smooth playback may not be possible in some cases.
saving Mode
If the DVD-ROM & CD-R/RW drive has not been accessed within 30 seconds, the drive motowill automatically shut down to reduce the power consumption. When the DVD-ROM & CDR/RW drive is accessed once again, the power of the drive motor is turned on. However, approximately 30 seconds are required until data is actually read from the disc.
DVD-R
About
52
OM & CD-R/RW Drive
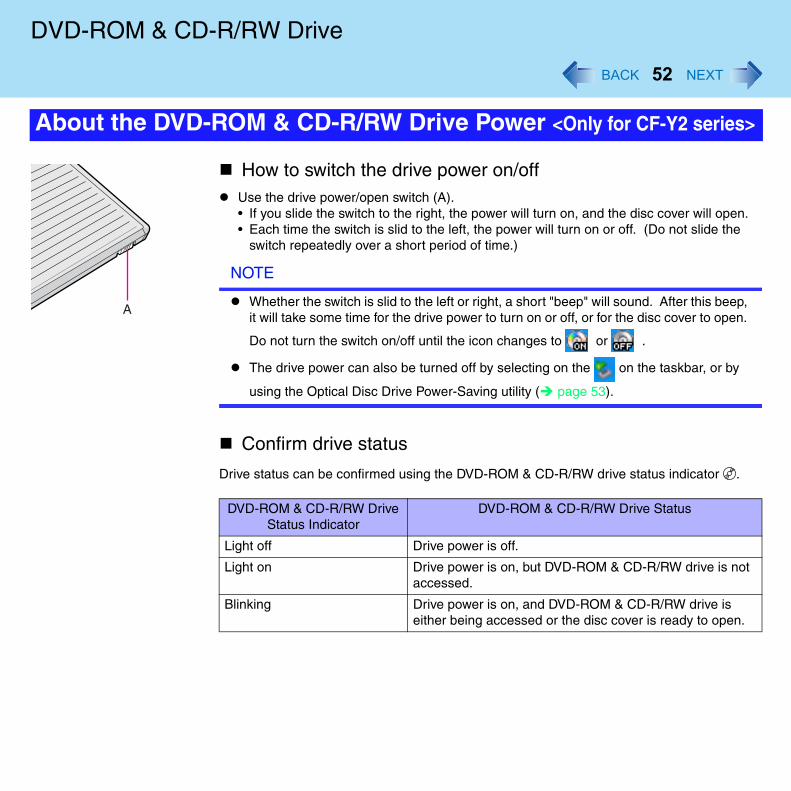
How to switch the drive power on/offUse the drive power/open switch (A).• If you slide the switch to the right, the power will turn on, and the disc cover will open.• Each time the switch is slid to the left, the power will turn on or off. (Do not slide the
switch repeatedly over a short period of time.)
NOTE
Whether the switch is slid to the left or right, a short "beep" will sound. After this beep, it will take some time for the drive power to turn on or off, or for the disc cover to open.
Do not turn the switch on/off until the icon changes to or .
The drive power can also be turned off by selecting on the on the taskbar, or by
using the Optical Disc Drive Power-Saving utility ( page 53).
Confirm drive status
Drive status can be confirmed using the DVD-ROM & CD-R/RW drive status indicator .
the DVD-ROM & CD-R/RW Drive Power <Only for CF-Y2 series>
DVD-ROM & CD-R/RW Drive Status Indicator
DVD-ROM & CD-R/RW Drive Status
Light off Drive power is off.
Light on Drive power is on, but DVD-ROM & CD-R/RW drive is notaccessed.
Blinking Drive power is on, and DVD-ROM & CD-R/RW drive is either being accessed or the disc cover is ready to open.
DVD-R
r
le
n
e
About t
53
OM & CD-R/RW Drive
How to set drive power status when the computer is started upUsing [CD/DVD Drive Power] in [Main] menu of the Setup Utility, you can set the drive poweto [On] or [Off] when the computer is started up. ( page 99)
When [CD/DVD Drive Power] is set to [On] (setting at time of purchase)The drive power turns on automatically when the computer is turned on.When [CD/DVD Drive Power] is set to [Off]The drive power remains off when the computer is started up, so that you will not be abto boot from the DVD-ROM & CD-R/RW drive.
For example, when you want to minimize power consumption:Set [CD/DVD Drive Power] to [Off].When using the drive or inserting a disc, turn the power [On] sliding the drive power/opeswitch.When finished using the drive, remove the disc, and turn the power [Off] sliding the drivpower/open switch.
NOTE
When the DVD-ROM & CD-R/RW drive power is turned off, a message may appear indicating that [MATSHITA... can now be disconnected safely,] but the DVD-ROM & CD-R/RW drive cannot be disconnected because it is a built-in unit.
he Optical Disc Drive Power-Saving Utility <Only for CF-Y2 series>
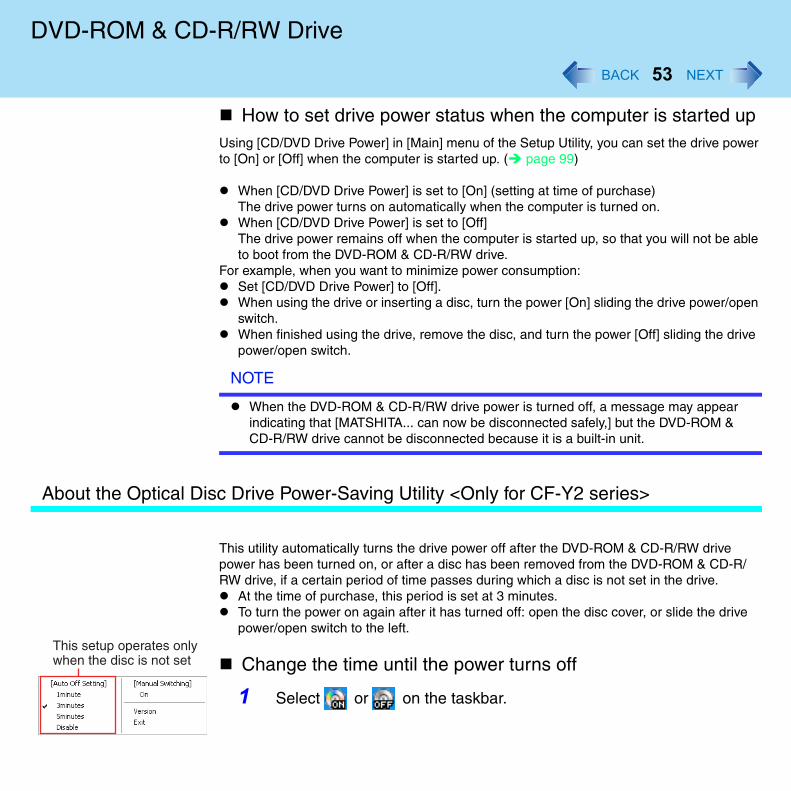
This utility automatically turns the drive power off after the DVD-ROM & CD-R/RW drive power has been turned on, or after a disc has been removed from the DVD-ROM & CD-R/RW drive, if a certain period of time passes during which a disc is not set in the drive.
At the time of purchase, this period is set at 3 minutes.To turn the power on again after it has turned off: open the disc cover, or slide the drivepower/open switch to the left.
Change the time until the power turns off
1 Select or on the taskbar.
DVD-R
e
54
OM & CD-R/RW Drive
2 Select the desired time in [Auto Off Setting].There is a check mark in the current settings. Select [Disable] to deactivate th[Auto Off Setting].
NOTE
Using this utility, you can turn the drive power on or off. In this case, select [On] or [Off] for [Manual Switching].[Manual Switching] operates regardless of whether or not a disc is set in the drive.Select [Exit] to close the Optical Disc Drive Power-Saving utility.To restart this utility, select [start] - [All programs] - [Panasonic] - [Optical Disk Drive Power-Saving Utility], or restart the computer.When the disc cover is open, the power will not turn off even after passage of the time set in [Auto Off Setting].
When the cursor is placed over the or the , pop-up text will indicate the drive
status and the setting time.
When the drive power is off, is displayed on the taskbar (only when B’s CLiP is running).
to
55
WinDVD
WinDVD is a software application for DVD playback. Here, you will find explanations and general information on the usage precautions and how access the online manual.Refer to the online manual concerning the detailed use of the software application. ( page 58)
CAUTION
Be sure that the DVD-ROM & CD-R/RW drive power is turned on before running WinDVD. Even if the DVD-ROM & CD-R/RW drive status indicator is lit after running WinDVD, the display of the Optical Disc Drive Power-Saving utility may be set to [Off], and the drive cannot be used. (This may happen when the drive power is off while thedisc has been set). In this case, restart the computer and turn on the drive power, thenrun WinDVD.
You can run WinDVD using either of the following procedures.
Select on the desktop.
Select [start] - [All Programs] - [InterVideo WinDVD] - [InterVideo WinDVD].
During WinDVD is running, do not perform the following.• Entering the standby or hibernation mode• Switching the display by pressing Fn + F3 • <CF-Y2 series>
Turning off the DVD-ROM & CD-R/RW drive powerIf performing WinDVD, shut it down, then restart the computer.
Do not start WinDVD while the hard disk drive indicator is blinking immediately afterthe computer was started up.During video playback, do not perform the following.• Ejecting the disc• Using other applications or the Command Prompt• Changing the settings of the screen properties
Running WinDVD
Usage Precautions
WinDV
e
h,
]
d
is ir e
y,
56
D
• <CF-Y2 series>Turning off the DVD-ROM & CD-R/RW drive power
If performing WinDVD, shut it down, then restart the computer.If you maximize the video display window, you can return to the original window size bydouble-clicking over the images.To adjust the volume, use the WinDVD control panel.• While WinDVD is running, the volume setting may return to the volume adjusted with th
WinDVD when you pause, fast-forward, fast-reverse or skip between chapters since priority is given to the volume adjusted by WinDVD, even if the volume is adjusted usingFn + F5 / F6 or the taskbar icon.
• After shutting down WinDVD, the volume and mute settings adjusted with the WinDVDwill return to the original settings.
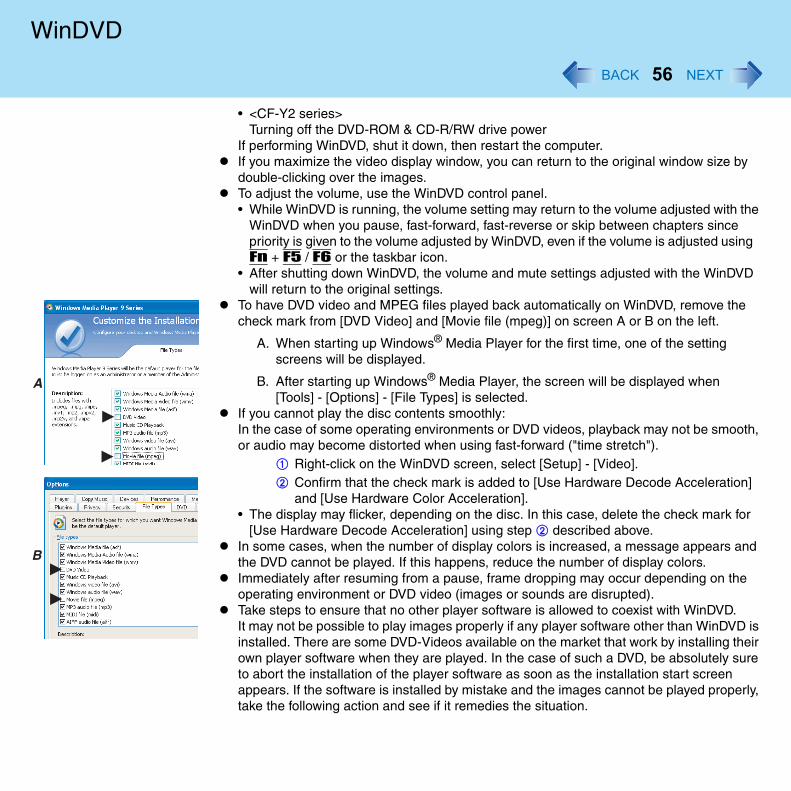
To have DVD video and MPEG files played back automatically on WinDVD, remove the check mark from [DVD Video] and [Movie file (mpeg)] on screen A or B on the left.
A. When starting up Windows® Media Player for the first time, one of the setting screens will be displayed.
B. After starting up Windows® Media Player, the screen will be displayed when [Tools] - [Options] - [File Types] is selected.
If you cannot play the disc contents smoothly:In the case of some operating environments or DVD videos, playback may not be smootor audio may become distorted when using fast-forward ("time stretch").
A Right-click on the WinDVD screen, select [Setup] - [Video].B Confirm that the check mark is added to [Use Hardware Decode Acceleration
and [Use Hardware Color Acceleration].• The display may flicker, depending on the disc. In this case, delete the check mark for
[Use Hardware Decode Acceleration] using step B described above.In some cases, when the number of display colors is increased, a message appears anthe DVD cannot be played. If this happens, reduce the number of display colors.Immediately after resuming from a pause, frame dropping may occur depending on the operating environment or DVD video (images or sounds are disrupted).Take steps to ensure that no other player software is allowed to coexist with WinDVD.It may not be possible to play images properly if any player software other than WinDVD installed. There are some DVD-Videos available on the market that work by installing theown player software when they are played. In the case of such a DVD, be absolutely surto abort the installation of the player software as soon as the installation start screen appears. If the software is installed by mistake and the images cannot be played properltake the following action and see if it remedies the situation.
WinDV
r
e
d
t
s
.
er.
57
D
• Specify WinDVD if the DVD’s player software settings enable WinDVD to be specified foplaying the DVD.
• Uninstall the DVD’s player software which has been installed. (Refer to the DVD-Video’s instructions for the name of the player software which is to buninstalled.)Uninstall the player software by selecting [start] - [Control Panel] - [Add or Remove Programs].
Before using the capture function in WinDVD, first remove the check mark from [Use Hardware Decode Acceleration]. (To display the [Use Hardware Decode Acceleration] setting screen, right-click on the WinDVD screen, and select [Setup] - [Video].)When the playback screen appears too white:Right-click on the WinDVD screen, and select [Setup] - [Video] to display the [Color Preset] setting screen, and then [Color Preset] to [Custom].
To change color settings in WinDVD, select on the WinDVD control panel, select [Color], and set [Brightness], [Contrast], and [Color] on the sub-panel.When battery operation time has become short:Set [Deinterlace] to [Auto]. If this is set to [Advanced], the CPU usage rate increases, an
more battery power is consumed. (Select on the WinDVD control panel, then selec[Display] to show the sub-panel for changing the [Deinterlace] setting.) In the Extended Desktop or simultaneous (internal/external) display mode, there are timewhen images or video are not displayed correctly.If you have uninstalled WinDVD accidentally, reinstall it by following the steps below.
A Set the Product Recovery DVD-ROM in the DVD-ROM & CD-R/RW drive.
B Input [d:\windvd\setup.exe]*1 in [start] - [Run] and select [OK]. C Select [Next] at the Welcome Message.
D After reading the "License Agreement"*2, select [Yes] if you agree to the termsE Follow the on-screen instructions and install WinDVD.
*1 "d" is the drive letter of the DVD-ROM & CD-R/RW drive. Change this to match the drive letter onyour own computer.
*2 Refer to the "LIMITED USE LICENSE AGREEMENT" on the Operating Instructions of the comput
WinDV
y
How t
About
58
D
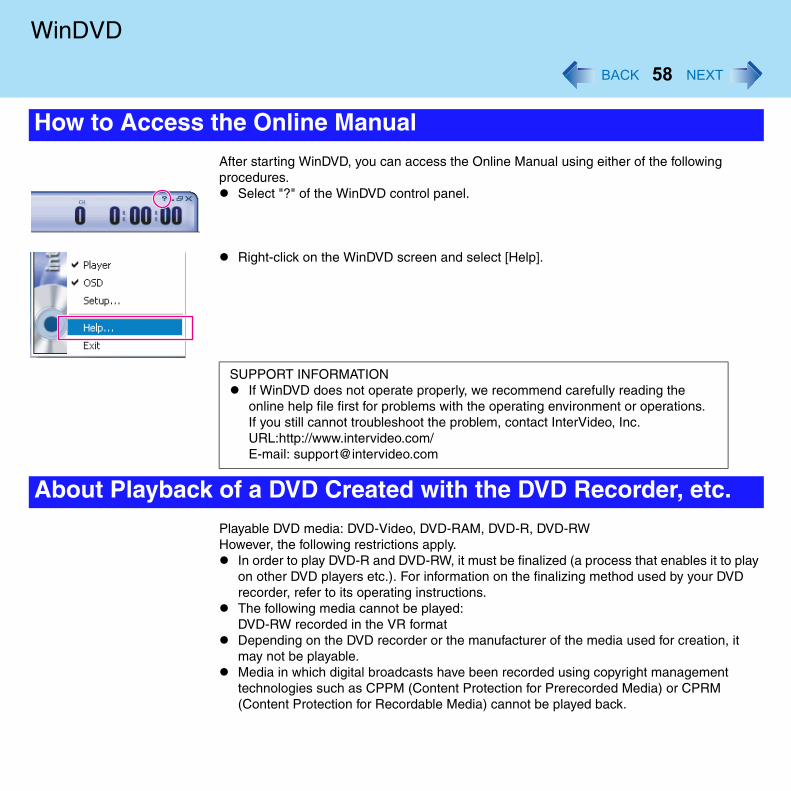
After starting WinDVD, you can access the Online Manual using either of the following procedures.
Select "?" of the WinDVD control panel.
Right-click on the WinDVD screen and select [Help].
Playable DVD media: DVD-Video, DVD-RAM, DVD-R, DVD-RWHowever, the following restrictions apply.
In order to play DVD-R and DVD-RW, it must be finalized (a process that enables it to plaon other DVD players etc.). For information on the finalizing method used by your DVD recorder, refer to its operating instructions.The following media cannot be played:DVD-RW recorded in the VR formatDepending on the DVD recorder or the manufacturer of the media used for creation, it may not be playable.Media in which digital broadcasts have been recorded using copyright management technologies such as CPPM (Content Protection for Prerecorded Media) or CPRM (Content Protection for Recordable Media) cannot be played back.
o Access the Online Manual
SUPPORT INFORMATIONIf WinDVD does not operate properly, we recommend carefully reading the online help file first for problems with the operating environment or operations.If you still cannot troubleshoot the problem, contact InterVideo, Inc.URL:http://www.intervideo.com/E-mail: [email protected]
Playback of a DVD Created with the DVD Recorder, etc.

f
c
59
B's Recorder/B's CLiP
"B's Recorder" and "B's CLiP" are CD recording software applications developed by B.H.A Corporation.Here, explanations are given on general information about B's Recorder and B's CLiP and how to access the online manual. Refer to the online manual concerning the detailed use othe software application. ( page 61)
Applicable Media
• CD-R*1 (one-time recordable CD media)• CD-RW (rewritable CD media)
*1 Applicable only for B's Recorder. Cannot read from or write to CD-R disc using B's CLiP.
B's RecorderYou can run B's Recorder/B's CLiP using either of the following procedures.
Select on the desktop.
Select [start] - [All Programs] - [B.H.A] - [B's Recorder GOLD BASIC] - [B's Recorder GOLD BASIC].
B's CLiPB's CLiP runs when the computer starts up, and or is displayed on the taskbar.
When formatting a disc with B's CLiP• Select or with the right button and select [Format].
Do not format discs in any other way except B's CLiP.• After formatting the disc, if the disc does not mount (is not recognized), remove the dis
before using, and insert it again.
About CopiesWhen writing to discs, make sure that you are not infringing any copyrights.It is illegal to copy audio CDs for non-personal use.When backing up software, make sure that you are not infringing any software copyrights for that product.
Running B's Recorder/B's CLiP
Usage Precautions
B's Re
of in
g
/
60
corder/B's CLiP
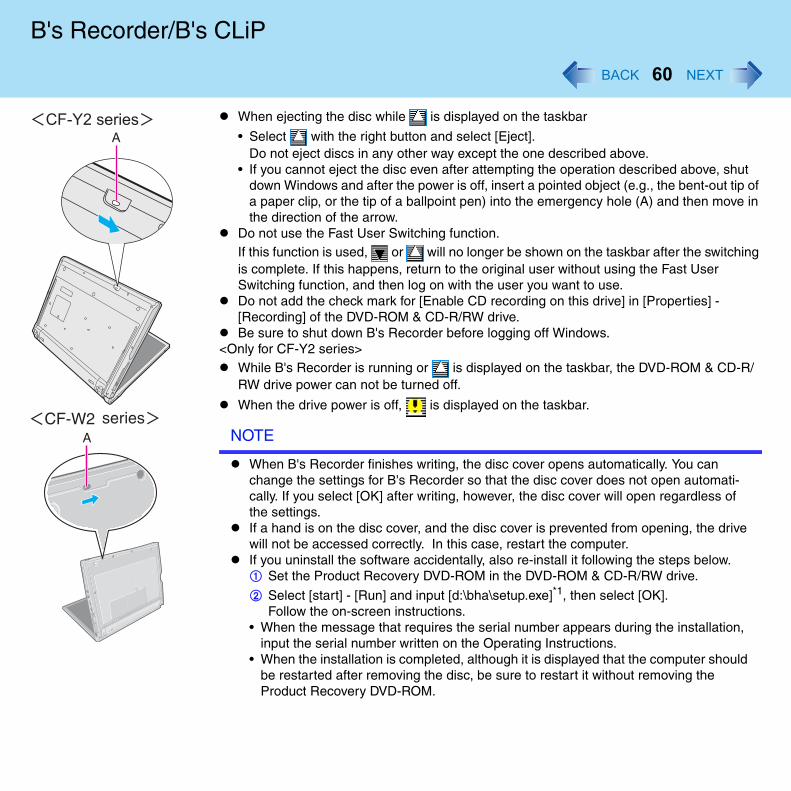
When ejecting the disc while is displayed on the taskbar
• Select with the right button and select [Eject].Do not eject discs in any other way except the one described above.
• If you cannot eject the disc even after attempting the operation described above, shutdown Windows and after the power is off, insert a pointed object (e.g., the bent-out tip a paper clip, or the tip of a ballpoint pen) into the emergency hole (A) and then move the direction of the arrow.
Do not use the Fast User Switching function.If this function is used, or will no longer be shown on the taskbar after the switchinis complete. If this happens, return to the original user without using the Fast User Switching function, and then log on with the user you want to use.Do not add the check mark for [Enable CD recording on this drive] in [Properties] - [Recording] of the DVD-ROM & CD-R/RW drive.Be sure to shut down B's Recorder before logging off Windows.
<Only for CF-Y2 series>While B's Recorder is running or is displayed on the taskbar, the DVD-ROM & CD-RRW drive power can not be turned off.
When the drive power is off, is displayed on the taskbar.
NOTE
When B's Recorder finishes writing, the disc cover opens automatically. You can change the settings for B's Recorder so that the disc cover does not open automati-cally. If you select [OK] after writing, however, the disc cover will open regardless of the settings.If a hand is on the disc cover, and the disc cover is prevented from opening, the drive will not be accessed correctly. In this case, restart the computer.If you uninstall the software accidentally, also re-install it following the steps below.A Set the Product Recovery DVD-ROM in the DVD-ROM & CD-R/RW drive.
B Select [start] - [Run] and input [d:\bha\setup.exe]*1, then select [OK].Follow the on-screen instructions.
• When the message that requires the serial number appears during the installation, input the serial number written on the Operating Instructions.
• When the installation is completed, although it is displayed that the computer shouldbe restarted after removing the disc, be sure to restart it without removing the Product Recovery DVD-ROM.
B's Re
How t
61
corder/B's CLiP
*1 "d:" is the drive letter of the DVD-ROM & CD-R/RW drive. Change this to match the drive letter onyour own computer.
B's RecorderSelect [start] - [All Programs] - [B.H.A] - [B's Recorder GOLD BASIC] - [DOC] - [User's Manual].
B's CLiPSelect [start] - [All Programs] - [B.H.A] - [B's CLiP] - [User's Manual].
o Access the Online Manual
SUPPORT INFOMATIONIf B’s Recorder and B's CLiP do not operate properly, we recommend carefully readingthe online help file first for problems with the operating environment or operations.If you still cannot troubleshoot the problem, contact B.H.A.URL:http://www.bhacorp.com/
62
PC Cards
This slot conforms to the PC Card Standard; therefore, communications and SCSI devicesmay be utilized. The slot allows you to use one Type I or Type II card.
CAUTION
Check the PC Cards' specifications. Be sure the total operating current does not exceed the specified limit. Damage may result otherwise.Allowable Current: 3.3 V: 400 mA, 5 V: 400 mAZV card, SRAM card, FLASH ROM card (except for an ATA interface) and card requiring 12V are not supported.With the repeated insertion/removal of a PC Card, the computer may no longer recognize the PC Card (depending on the type of card). In such cases, restart the computer.If the computer freezes after resuming from the standby or hibernation mode, try removing and then reinserting the PC Card. If this does not correct the problem, restart the computer.
PC Ca
Insertin
Remov
Insert
63
rds
g a PC Card
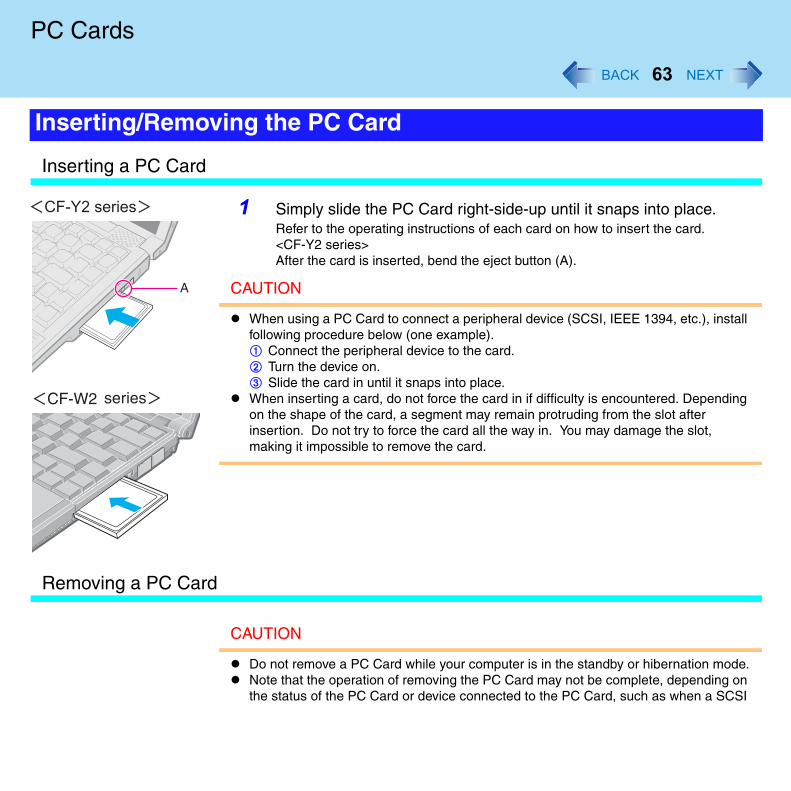
1 Simply slide the PC Card right-side-up until it snaps into place.Refer to the operating instructions of each card on how to insert the card.<CF-Y2 series>After the card is inserted, bend the eject button (A).
CAUTION
When using a PC Card to connect a peripheral device (SCSI, IEEE 1394, etc.), install following procedure below (one example).A Connect the peripheral device to the card.B Turn the device on.C Slide the card in until it snaps into place.When inserting a card, do not force the card in if difficulty is encountered. Depending on the shape of the card, a segment may remain protruding from the slot after insertion. Do not try to force the card all the way in. You may damage the slot, making it impossible to remove the card.
ing a PC Card
CAUTION
Do not remove a PC Card while your computer is in the standby or hibernation mode.Note that the operation of removing the PC Card may not be complete, depending on the status of the PC Card or device connected to the PC Card, such as when a SCSI
ing/Removing the PC Card
PC Ca
p
p
64
rds
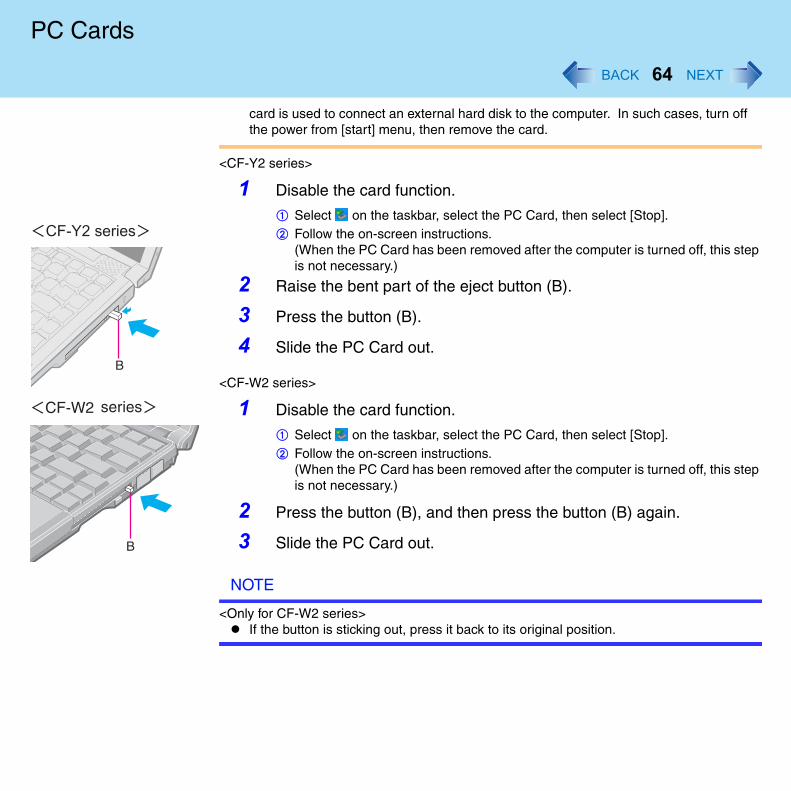
card is used to connect an external hard disk to the computer. In such cases, turn off the power from [start] menu, then remove the card.
<CF-Y2 series>
1 Disable the card function.
A Select on the taskbar, select the PC Card, then select [Stop].B Follow the on-screen instructions.
(When the PC Card has been removed after the computer is turned off, this steis not necessary.)
2 Raise the bent part of the eject button (B).
3 Press the button (B).
4 Slide the PC Card out.
<CF-W2 series>
1 Disable the card function.
A Select on the taskbar, select the PC Card, then select [Stop].B Follow the on-screen instructions.
(When the PC Card has been removed after the computer is turned off, this steis not necessary.)
2 Press the button (B), and then press the button (B) again.
3 Slide the PC Card out.
NOTE
<Only for CF-W2 series>If the button is sticking out, press it back to its original position.

r
s
65
SD Memory Card/MultiMedia Card
Both the SD memory card and the MultiMedia card can be used in this computer.
SD Memory Card
The SD memory card may be used in ways such as the following.Storing files, etc.Use to exchange data with devices equipped with an SD memory card slot. Write music data (checkout) to the card and listen to the music.• The SD memory card has a copyright protection function which is compatible with
content on-demand services on the Internet, etc.Use instead of entering a password. ( page 70)You can insert an SD memory card instead of entering a password to start your computeor log on to Windows.
Formats for SD memory cardsAlthough your SD memory card has been formatted prior to purchase, when you re-format, use SD memory card format software. (Do not use [Format] of Windows.)Formatting software can be downloaded from our web site.Address: http://panasonic.jp/support/audio/sd/download/sd_formatter_e.htmlWhen using the SD memory card with other peripheral devices, format the SD memorycard using the peripheral device. For details, refer to the instruction manual for that device.
Data transfer rate
The transfer rate using the SD memory card slot on this computer is 2MB*1 per second.
The transfer rate is 2MB*1 per second even if you use an SD memory card that supporthigh-speed transfer rates.
*1 This is a theoretical value, and differs from actual speeds.
Important handling and storage informationAlways store the SD memory card in its case after removing it from a computer.Do not:• Take the SD memory card apart or try to modify it• Hit, bend, or drop the card, or allow it to get wet• Touch the metal terminals with your hands or with metal
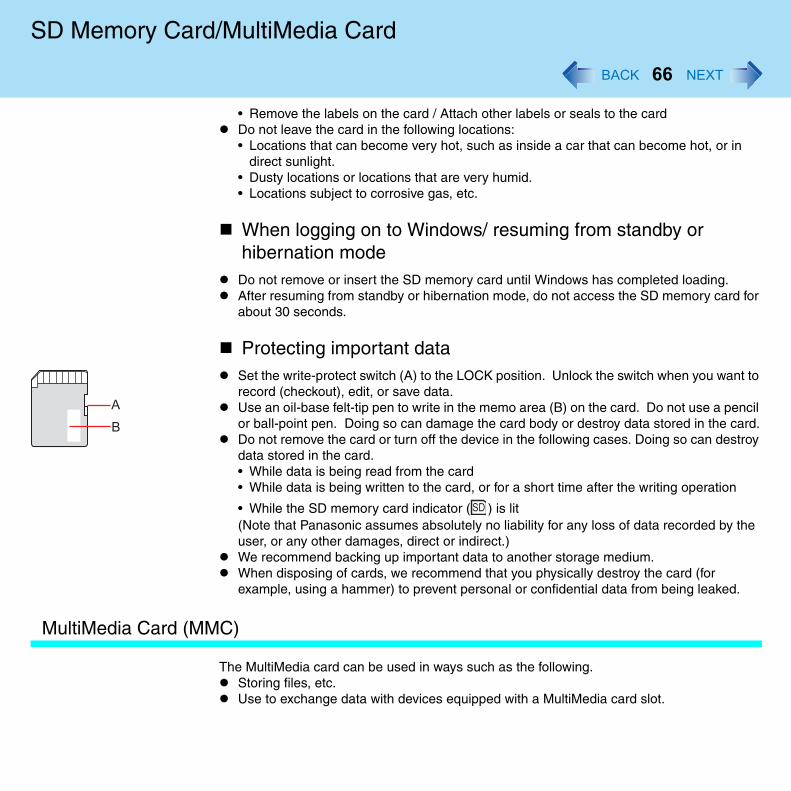
SD Me
r
to
il d.y
e
MultiMe
66
mory Card/MultiMedia Card
• Remove the labels on the card / Attach other labels or seals to the cardDo not leave the card in the following locations:• Locations that can become very hot, such as inside a car that can become hot, or in
direct sunlight.• Dusty locations or locations that are very humid.• Locations subject to corrosive gas, etc.
When logging on to Windows/ resuming from standby or hibernation mode
Do not remove or insert the SD memory card until Windows has completed loading.After resuming from standby or hibernation mode, do not access the SD memory card foabout 30 seconds.
Protecting important dataSet the write-protect switch (A) to the LOCK position. Unlock the switch when you want record (checkout), edit, or save data.Use an oil-base felt-tip pen to write in the memo area (B) on the card. Do not use a pencor ball-point pen. Doing so can damage the card body or destroy data stored in the carDo not remove the card or turn off the device in the following cases. Doing so can destrodata stored in the card.• While data is being read from the card• While data is being written to the card, or for a short time after the writing operation
• While the SD memory card indicator ( ) is lit(Note that Panasonic assumes absolutely no liability for any loss of data recorded by thuser, or any other damages, direct or indirect.)We recommend backing up important data to another storage medium.When disposing of cards, we recommend that you physically destroy the card (for example, using a hammer) to prevent personal or confidential data from being leaked.
dia Card (MMC)
The MultiMedia card can be used in ways such as the following.Storing files, etc.Use to exchange data with devices equipped with a MultiMedia card slot.

SD Me
if
Insertin
Insert
67
mory Card/MultiMedia Card
This computer may be unable to use MultiMedia cards under some conditions; for example,the MultiMedia card has been formatted using certain peripheral devices.
g the Card
1 Insert the card firmly with the label side facing up and with the cut corner in front.
CAUTION
Make sure you insert the card in the proper direction. If the card is inserted in the wrong direction, the card or slot may be damaged.
ing/Removing the SD Memory Card/MultiMedia Card
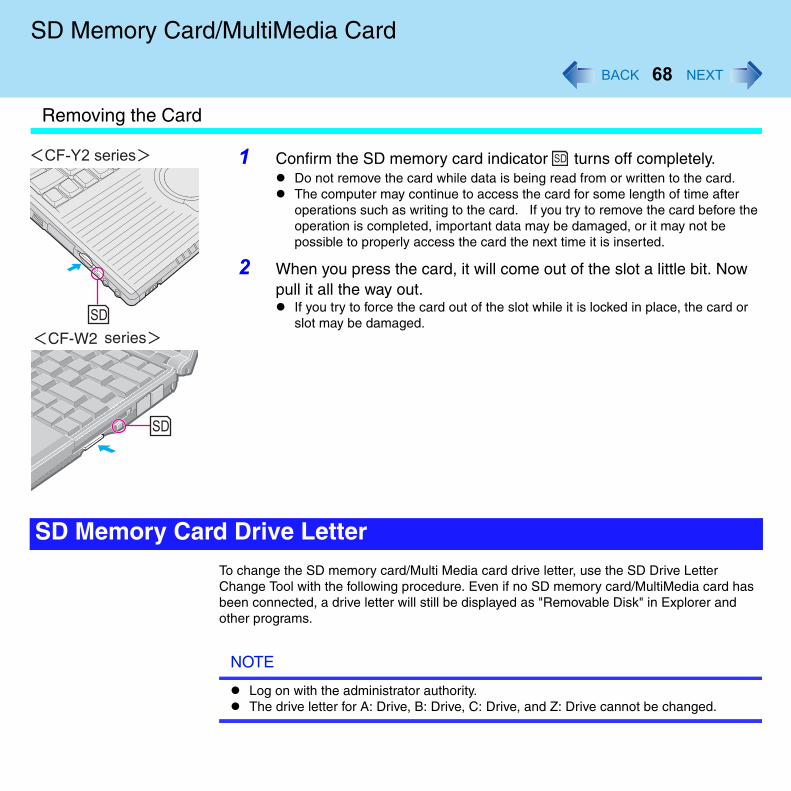
SD Me
Remov
e
SD Me
68
mory Card/MultiMedia Card
ing the Card
1 Confirm the SD memory card indicator turns off completely.Do not remove the card while data is being read from or written to the card.The computer may continue to access the card for some length of time after operations such as writing to the card. If you try to remove the card before thoperation is completed, important data may be damaged, or it may not be possible to properly access the card the next time it is inserted.
2 When you press the card, it will come out of the slot a little bit. Nowpull it all the way out.
If you try to force the card out of the slot while it is locked in place, the card orslot may be damaged.
To change the SD memory card/Multi Media card drive letter, use the SD Drive Letter Change Tool with the following procedure. Even if no SD memory card/MultiMedia card hasbeen connected, a drive letter will still be displayed as "Removable Disk" in Explorer and other programs.
NOTE
Log on with the administrator authority.The drive letter for A: Drive, B: Drive, C: Drive, and Z: Drive cannot be changed.
mory Card Drive Letter

SD Me
69
mory Card/MultiMedia Card
How to install the SD Drive Letter Name Change ToolA Select [start] - [Run].B Input [c:\util\chgsddrv\setup.exe] and select [OK], then follow the on-screen
instructions.
How to change drive letterA Select [start] - [All Programs] - [Panasonic] - [SD Drive Letter Change Tool].
B Select in [New drive letter], select the drive letter, and select [OK].
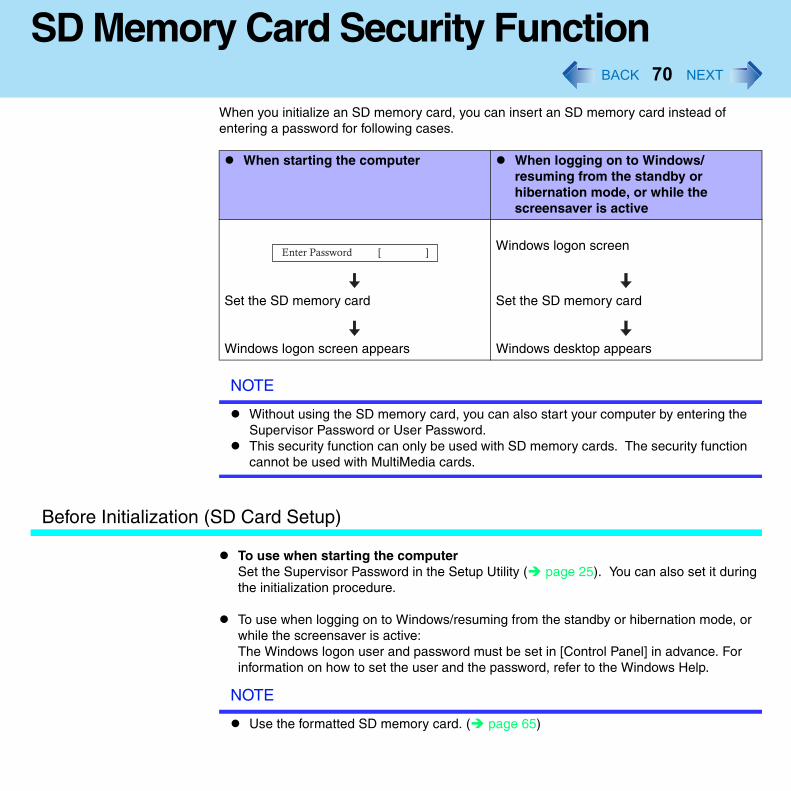
g
70
SD Memory Card Security Function
When you initialize an SD memory card, you can insert an SD memory card instead of entering a password for following cases.
NOTE
Without using the SD memory card, you can also start your computer by entering the Supervisor Password or User Password.This security function can only be used with SD memory cards. The security function cannot be used with MultiMedia cards.
Before Initialization (SD Card Setup)
To use when starting the computer Set the Supervisor Password in the Setup Utility ( page 25). You can also set it durinthe initialization procedure.
To use when logging on to Windows/resuming from the standby or hibernation mode, orwhile the screensaver is active:The Windows logon user and password must be set in [Control Panel] in advance. For information on how to set the user and the password, refer to the Windows Help.
NOTE
Use the formatted SD memory card. ( page 65)
When starting the computer When logging on to Windows/resuming from the standby or hibernation mode, or while the screensaver is active
Windows logon screen
Set the SD memory card Set the SD memory card
Windows logon screen appears Windows desktop appears
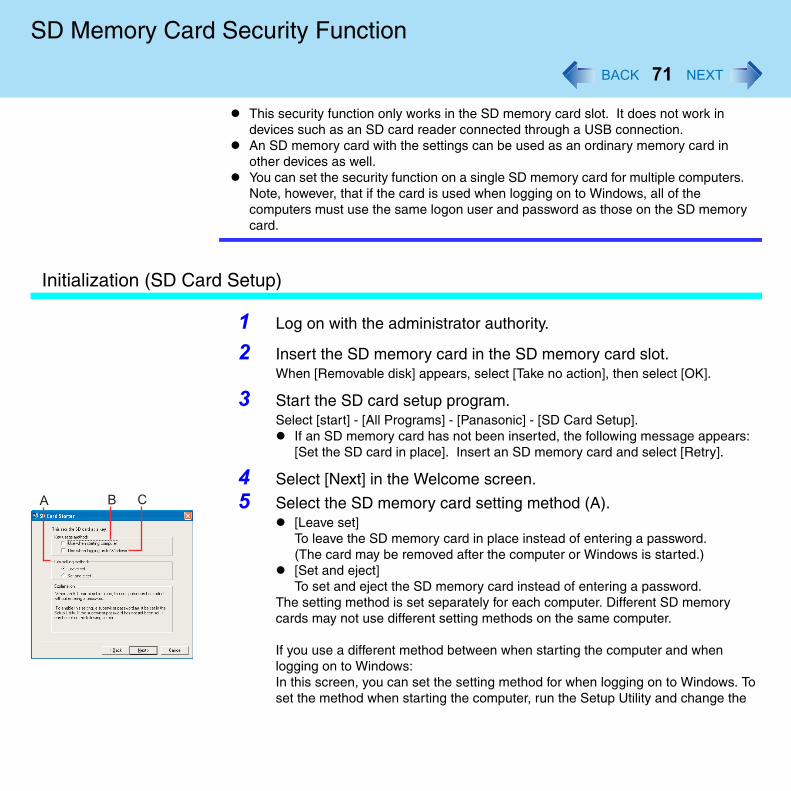
SD Me
Initializ
o
71
mory Card Security Function
This security function only works in the SD memory card slot. It does not work in devices such as an SD card reader connected through a USB connection.An SD memory card with the settings can be used as an ordinary memory card in other devices as well.You can set the security function on a single SD memory card for multiple computers. Note, however, that if the card is used when logging on to Windows, all of the computers must use the same logon user and password as those on the SD memory card.
ation (SD Card Setup)
1 Log on with the administrator authority.
2 Insert the SD memory card in the SD memory card slot.When [Removable disk] appears, select [Take no action], then select [OK].
3 Start the SD card setup program.Select [start] - [All Programs] - [Panasonic] - [SD Card Setup].
If an SD memory card has not been inserted, the following message appears:[Set the SD card in place]. Insert an SD memory card and select [Retry].
4 Select [Next] in the Welcome screen.
5 Select the SD memory card setting method (A).[Leave set]To leave the SD memory card in place instead of entering a password.(The card may be removed after the computer or Windows is started.)[Set and eject]To set and eject the SD memory card instead of entering a password.
The setting method is set separately for each computer. Different SD memory cards may not use different setting methods on the same computer.
If you use a different method between when starting the computer and when logging on to Windows:In this screen, you can set the setting method for when logging on to Windows. Tset the method when starting the computer, run the Setup Utility and change the
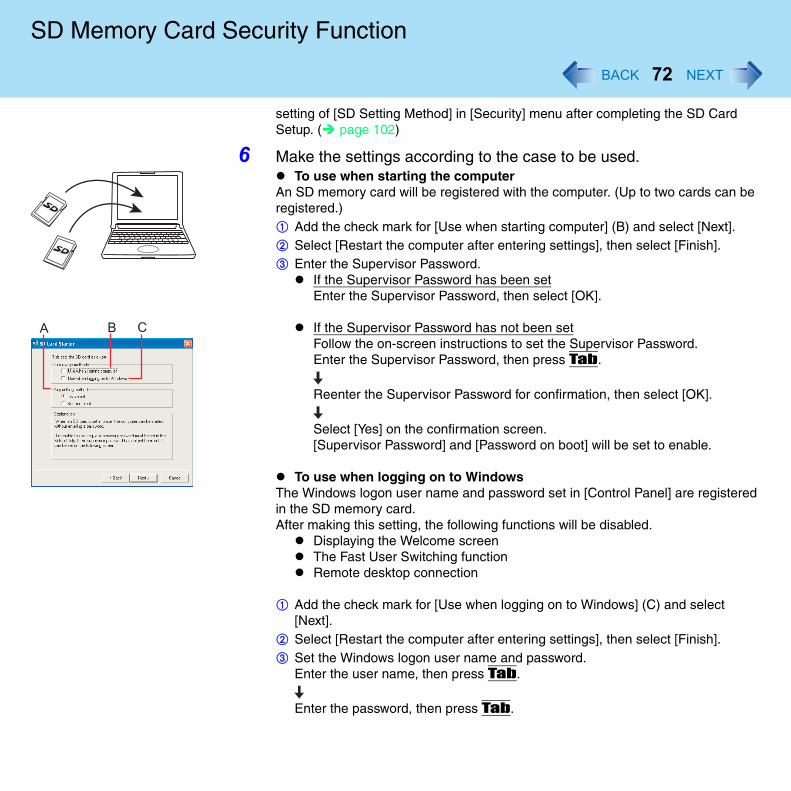
SD Me
d
72
mory Card Security Function
setting of [SD Setting Method] in [Security] menu after completing the SD Card Setup. ( page 102)
6 Make the settings according to the case to be used.To use when starting the computer
An SD memory card will be registered with the computer. (Up to two cards can beregistered.)A Add the check mark for [Use when starting computer] (B) and select [Next].B Select [Restart the computer after entering settings], then select [Finish].C Enter the Supervisor Password.
If the Supervisor Password has been setEnter the Supervisor Password, then select [OK].
If the Supervisor Password has not been setFollow the on-screen instructions to set the Supervisor Password.Enter the Supervisor Password, then press Tab.
Reenter the Supervisor Password for confirmation, then select [OK].
Select [Yes] on the confirmation screen.[Supervisor Password] and [Password on boot] will be set to enable.
To use when logging on to WindowsThe Windows logon user name and password set in [Control Panel] are registerein the SD memory card.After making this setting, the following functions will be disabled.
Displaying the Welcome screenThe Fast User Switching functionRemote desktop connection
A Add the check mark for [Use when logging on to Windows] (C) and select [Next].
B Select [Restart the computer after entering settings], then select [Finish].C Set the Windows logon user name and password.
Enter the user name, then press Tab.
Enter the password, then press Tab.
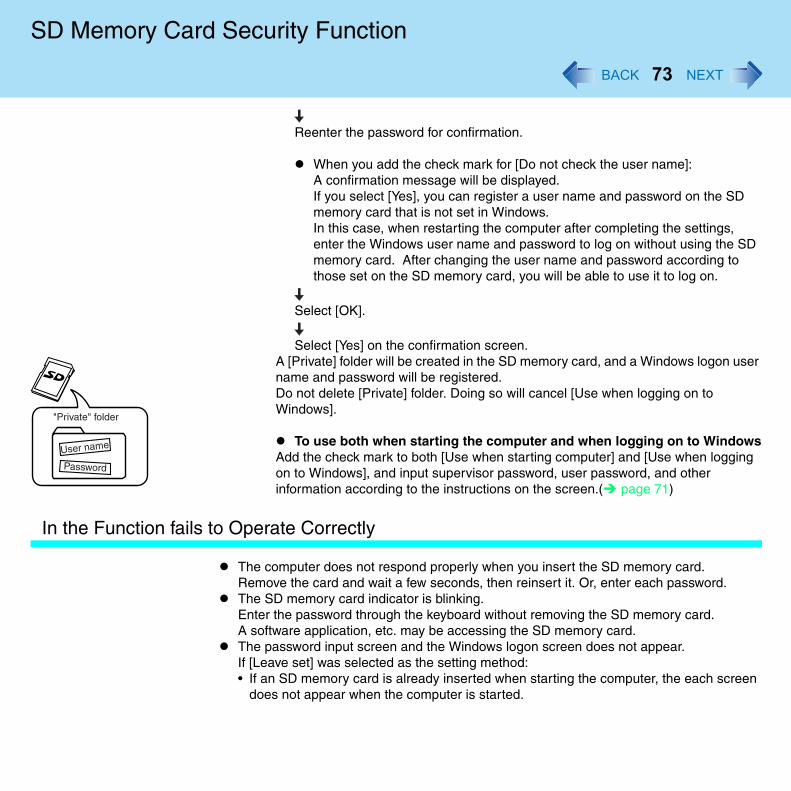
SD Me
r
s
In the F
n
73
mory Card Security Function
Reenter the password for confirmation.
When you add the check mark for [Do not check the user name]:A confirmation message will be displayed.If you select [Yes], you can register a user name and password on the SD memory card that is not set in Windows.In this case, when restarting the computer after completing the settings, enter the Windows user name and password to log on without using the SDmemory card. After changing the user name and password according to those set on the SD memory card, you will be able to use it to log on.
Select [OK].
Select [Yes] on the confirmation screen.A [Private] folder will be created in the SD memory card, and a Windows logon usename and password will be registered. Do not delete [Private] folder. Doing so will cancel [Use when logging on to Windows].
To use both when starting the computer and when logging on to WindowAdd the check mark to both [Use when starting computer] and [Use when loggingon to Windows], and input supervisor password, user password, and other information according to the instructions on the screen.( page 71)
unction fails to Operate Correctly
The computer does not respond properly when you insert the SD memory card.Remove the card and wait a few seconds, then reinsert it. Or, enter each password.The SD memory card indicator is blinking.Enter the password through the keyboard without removing the SD memory card.A software application, etc. may be accessing the SD memory card.The password input screen and the Windows logon screen does not appear.If [Leave set] was selected as the setting method:• If an SD memory card is already inserted when starting the computer, the each scree
does not appear when the computer is started.
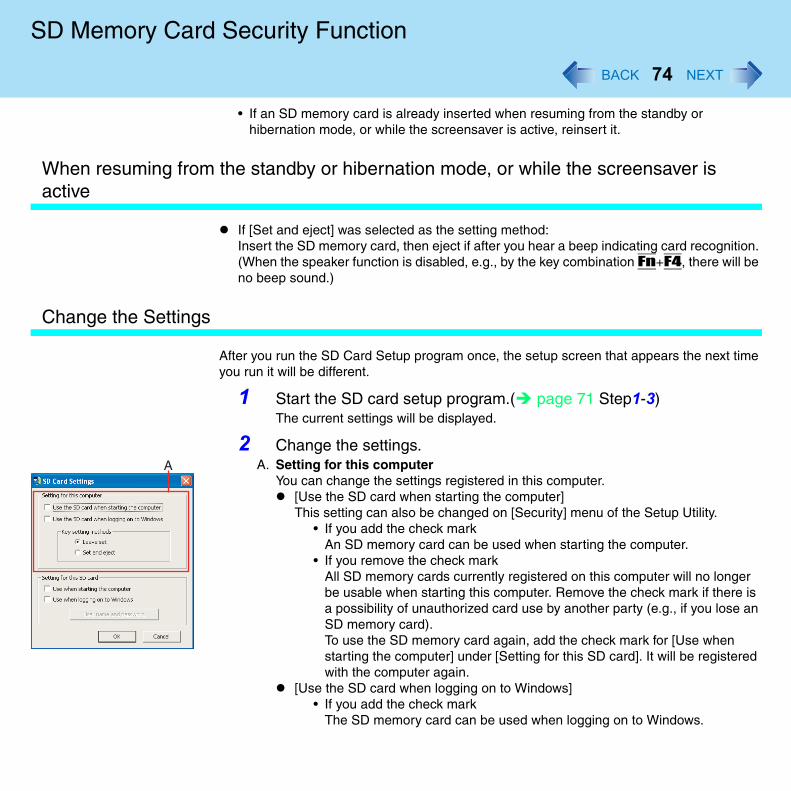
SD Me
When ractive
n. e
Change
e
s n
d
74
mory Card Security Function
• If an SD memory card is already inserted when resuming from the standby or hibernation mode, or while the screensaver is active, reinsert it.
esuming from the standby or hibernation mode, or while the screensaver is
If [Set and eject] was selected as the setting method:Insert the SD memory card, then eject if after you hear a beep indicating card recognitio(When the speaker function is disabled, e.g., by the key combination Fn+F4, there will bno beep sound.)
the Settings
After you run the SD Card Setup program once, the setup screen that appears the next timyou run it will be different.
1 Start the SD card setup program.( page 71 Step1-3)The current settings will be displayed.
2 Change the settings. A. Setting for this computer
You can change the settings registered in this computer.[Use the SD card when starting the computer]This setting can also be changed on [Security] menu of the Setup Utility.
• If you add the check markAn SD memory card can be used when starting the computer.
• If you remove the check markAll SD memory cards currently registered on this computer will no longerbe usable when starting this computer. Remove the check mark if there ia possibility of unauthorized card use by another party (e.g., if you lose aSD memory card).To use the SD memory card again, add the check mark for [Use when starting the computer] under [Setting for this SD card]. It will be registerewith the computer again.
[Use the SD card when logging on to Windows]• If you add the check mark
The SD memory card can be used when logging on to Windows.
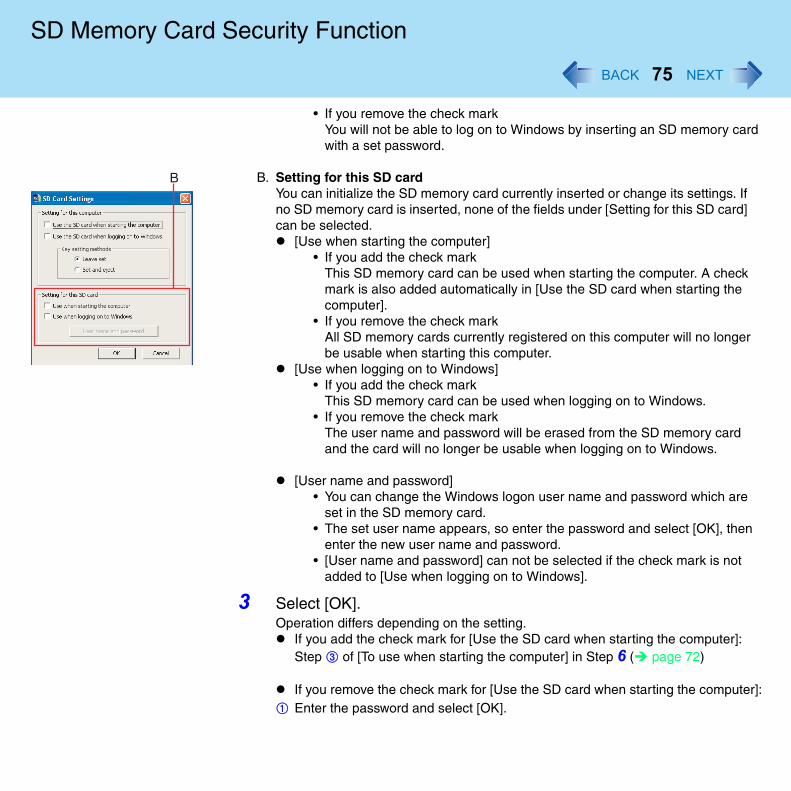
SD Me
d
r]:
75
mory Card Security Function
• If you remove the check markYou will not be able to log on to Windows by inserting an SD memory carwith a set password.
B. Setting for this SD cardYou can initialize the SD memory card currently inserted or change its settings. If no SD memory card is inserted, none of the fields under [Setting for this SD card] can be selected.
[Use when starting the computer]• If you add the check mark
This SD memory card can be used when starting the computer. A checkmark is also added automatically in [Use the SD card when starting the computer].
• If you remove the check markAll SD memory cards currently registered on this computer will no longerbe usable when starting this computer.
[Use when logging on to Windows]• If you add the check mark
This SD memory card can be used when logging on to Windows.• If you remove the check mark
The user name and password will be erased from the SD memory card and the card will no longer be usable when logging on to Windows.
[User name and password]• You can change the Windows logon user name and password which are
set in the SD memory card.• The set user name appears, so enter the password and select [OK], then
enter the new user name and password.• [User name and password] can not be selected if the check mark is not
added to [Use when logging on to Windows].
3 Select [OK].Operation differs depending on the setting.
If you add the check mark for [Use the SD card when starting the computer]:Step C of [To use when starting the computer] in Step 6 ( page 72)
If you remove the check mark for [Use the SD card when starting the computeA Enter the password and select [OK].
SD Me
76
mory Card Security Function
B At the confirmation message [The SD card information registered in the SetupUtility will be erased...], select [Yes].
If you add the check mark for [Use when logging on to Windows]:Step C of [To use when logging on to Windows] in Step 6 ( page 72)
If you remove the check mark from [Use when logging on to Windows]:A Enter the password and select [OK].B At the confirmation message [The user name and password registered in the
SD card will be erased...], select [Yes].
4 Restart the computer.
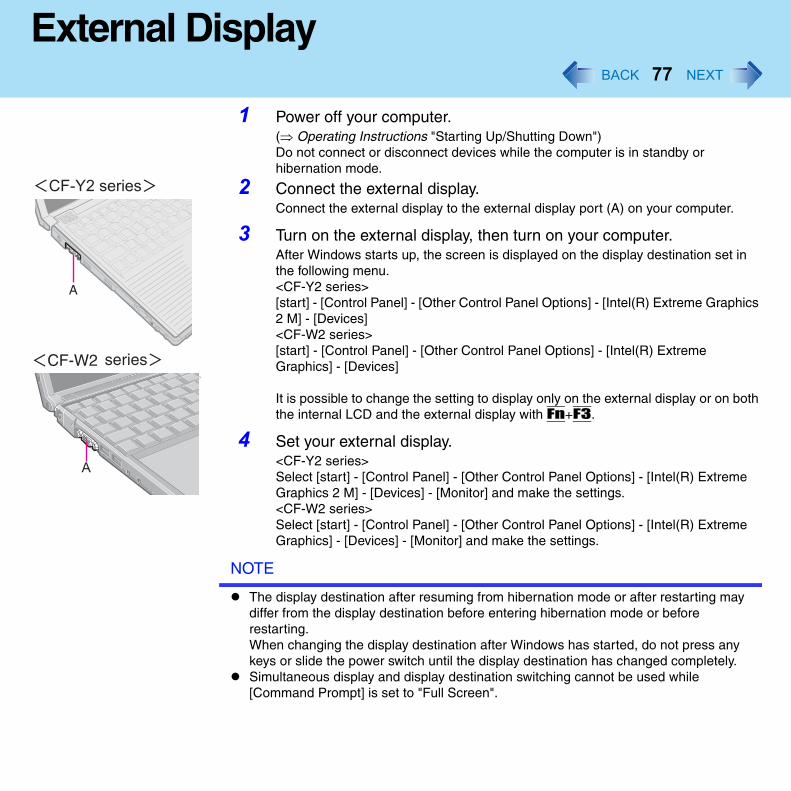
s
th
77
External Display
1 Power off your computer.(⇒ Operating Instructions "Starting Up/Shutting Down")Do not connect or disconnect devices while the computer is in standby or hibernation mode.
2 Connect the external display.Connect the external display to the external display port (A) on your computer.
3 Turn on the external display, then turn on your computer.After Windows starts up, the screen is displayed on the display destination set in the following menu.<CF-Y2 series>[start] - [Control Panel] - [Other Control Panel Options] - [Intel(R) Extreme Graphic2 M] - [Devices]<CF-W2 series>[start] - [Control Panel] - [Other Control Panel Options] - [Intel(R) Extreme Graphics] - [Devices]
It is possible to change the setting to display only on the external display or on bothe internal LCD and the external display with Fn+F3.
4 Set your external display.<CF-Y2 series>Select [start] - [Control Panel] - [Other Control Panel Options] - [Intel(R) Extreme Graphics 2 M] - [Devices] - [Monitor] and make the settings.<CF-W2 series>Select [start] - [Control Panel] - [Other Control Panel Options] - [Intel(R) Extreme Graphics] - [Devices] - [Monitor] and make the settings.
NOTE
The display destination after resuming from hibernation mode or after restarting may differ from the display destination before entering hibernation mode or before restarting.When changing the display destination after Windows has started, do not press any keys or slide the power switch until the display destination has changed completely.Simultaneous display and display destination switching cannot be used while [Command Prompt] is set to "Full Screen".
Extern
al
Exten
78
al Display
When the external display is used alone, set the number of colors, resolution, or refresh rate to suit the external display. These settings are separate from when the internal LCD is used alone or with an external display simultaneously.When the computer is set to display on both the internal LCD and the external display,DVD-Video, MPEG files and other video files may not be played back smoothly.When connecting a monitor that does not conform to the Plug & Play standards:Either select the correct external display driver using in the following menu. Or use the driver disk that was supplied with your monitor.[start] - [Control Panel] - [Appearance and Themes] - [Display] - [Settings] - [Advanced] - [Monitor] - [Properties] - [Driver] - [Update Driver]If a picture is not displayed properly, lower the level of [Hardware acceleration] in the following menu.[start] - [Control Panel] - [Appearance and Themes] - [Display] - [Settings] - [Advanced] - [Troubleshoot]Also, carefully read the operating instructions of the external display.
<Only for CF-Y2 series>Simultaneous display cannot be used until Windows startup is complete (during SetupUtility, Windows logon screen, etc.). When Fn+F3 is pressed, the screen is displayed on the external display or internal LCD.
With Extended Desktop, you can use both the internal LCD and the external display as an extended display domain. You can also drag a window from the internal LCD to the externdisplay. To use Extended Desktop;
1 Display [Intel(R) Extreme Graphics 2 M]*1 screen.Select [start] - [Control Panel] - [Other Control Panel Options] - [Intel(R) Extreme
Graphics 2 M]*1 - [Devices].*1 CF-W2 series: [Intel(R) Extreme Graphics]
2 Select [Extended Desktop], make the settings for [Primary Device] and [Secondary Device].To make the settings for each display (colors, screen area, etc.), select [Device Settings] and change the settings where necessary, then select [OK].
3 Select [OK].
ded Desktop

Extern
Precau
r
r
79
al Display
At the confirmation message, select [OK].
NOTE
There are some applications that cannot be used in the Extended Desktop.When the button to maximize a window is pressed, one of the displays will show the maximized display.A window that has been maximized cannot be moved to the other display.You cannot switch the display destination by pressing Fn+F3.When the Extended Desktop is being utilized;• The pop-up window displayed by Fn key combination is shown only on the primary
device.When changing the primary device ([1]) and secondary device ([2]), be sure to change them in the following menu. If you use other procedures, the window may not be displayed properly.Select [start] - [Control Panel] - [Other Control Panel Options] - [Intel(R) Extreme
Graphics 2 M]*1 - [Devices] - [Extended Desktop]
*1 CF-W2 series: [Intel(R) Extreme Graphics]
tions
When the application running is not shown on the display, refeto the following items.
Under the condition the application is in the external display, or after the application is closed in the external display, there are cases the application will not be shown in the display when executed the next time if the position of the extended display is changed othe Extended Desktop is closed.
When there is no display after the position of the extended display is changed:The application running is being displayed at the position of the extended display beforethe change. Return the position of the extended display to the condition before the change. Move the application to the internal LCD, and then correct the position of the extended display.
Extern
,
s,
80
al Display
When there is no display when the Extended Desktop is disabled:The application running is being displayed in the external display. Set the Extended Desktop again, move the application from the external display to the internal LCD and then disable the Extended Desktop.
To prevent images from being burned onto the external displayManually shut off the power to the external display when not in use.
When the display domain for the Extended Desktop is changedthere are cases the wallpaper and icons become displaced.
Wallpaper: Change the setting for the wallpaper.Icons: Right-click on the desktop, and select [Arrange Icons By] - [Auto Arrange].
When an animated pointer is used for the mouse pointer (e.g.,when changing the theme in [Appearance and Themes] of [Control Panel])
An error may occur when resuming from the standby or hibernation mode. In such casechange the mouse pointer to the standard pointer with the following procedure.
A Display [Mouse Properties].Select [start] - [Control Panel] - [Printers and Other Hardware] - [Mouse].
B Select [Pointers].C Select [None] in [Scheme], then select [OK].
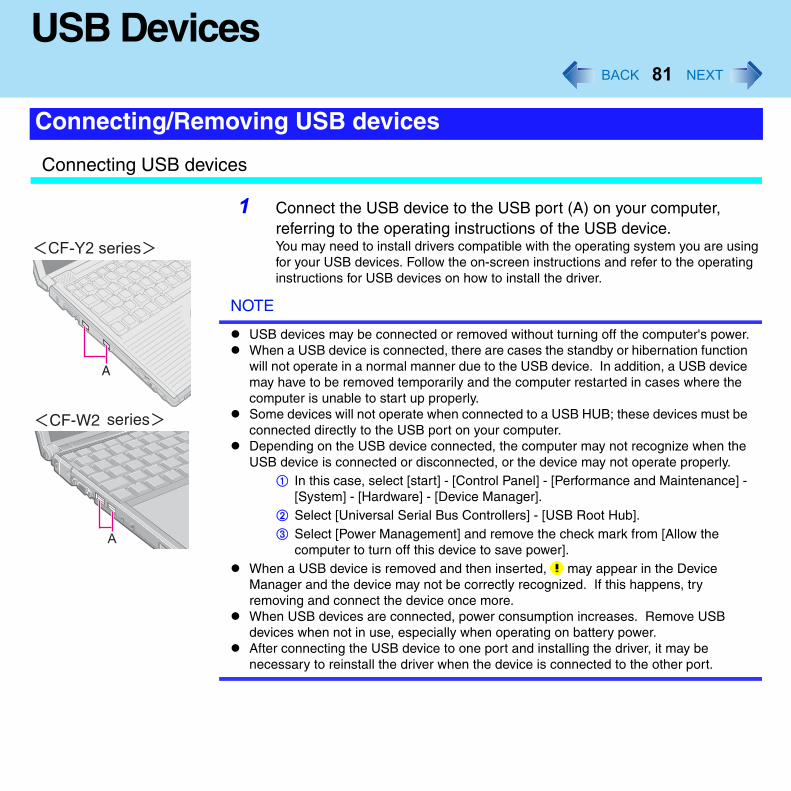
g
81
USB Devices
Connecting USB devices
1 Connect the USB device to the USB port (A) on your computer, referring to the operating instructions of the USB device.You may need to install drivers compatible with the operating system you are usinfor your USB devices. Follow the on-screen instructions and refer to the operatinginstructions for USB devices on how to install the driver.
NOTE
USB devices may be connected or removed without turning off the computer's power.When a USB device is connected, there are cases the standby or hibernation functionwill not operate in a normal manner due to the USB device. In addition, a USB device may have to be removed temporarily and the computer restarted in cases where the computer is unable to start up properly.Some devices will not operate when connected to a USB HUB; these devices must beconnected directly to the USB port on your computer.Depending on the USB device connected, the computer may not recognize when the USB device is connected or disconnected, or the device may not operate properly.
A In this case, select [start] - [Control Panel] - [Performance and Maintenance] - [System] - [Hardware] - [Device Manager].
B Select [Universal Serial Bus Controllers] - [USB Root Hub].C Select [Power Management] and remove the check mark from [Allow the
computer to turn off this device to save power].When a USB device is removed and then inserted, may appear in the Device Manager and the device may not be correctly recognized. If this happens, try removing and connect the device once more.When USB devices are connected, power consumption increases. Remove USB devices when not in use, especially when operating on battery power.After connecting the USB device to one port and installing the driver, it may be necessary to reinstall the driver when the device is connected to the other port.
Connecting/Removing USB devices
USB D
Remov
to
USB Fl
y
in
,
82
evices
ing USB devices
CAUTION
Do not remove a USB device while your computer is in the standby or hibernation mode.Save important data and close each application.
1 Disable the device function.
A Select on the taskbar and select the USB device, then select [Stop].B Follow the on-screen instructions.
(This step is not necessary when the USB device has been removed after thecomputer is turned off, if is not displayed, or if the USB device that is going be disconnected is not displayed in step A.)
2 Remove the USB device.
oppy Disk Drive
Note the following when using an optional USB floppy disk drive (CF-VFDU03).Do not power off your computer or press the floppy disk drive eject button while the floppdisk drive being accessed.Doing so may damage the data on the floppy disk and render the floppy disk useless.Use care when handling floppy disks.To protect the data on your floppy disks or to prevent a floppy disk from becoming stuck your computer, avoid the following:• Sliding the shutter on the floppy disk manually.• Exposing the disk to a magnetic field.• Storing the disk in locations prone to high temperatures, low pitched noise, dampness
or dust.• Applying more than one label on the disk.Confirm the contents of a floppy disk before formatting it.Confirm that no important data is on the floppy disk, because all data on the floppy diskwill be erased.
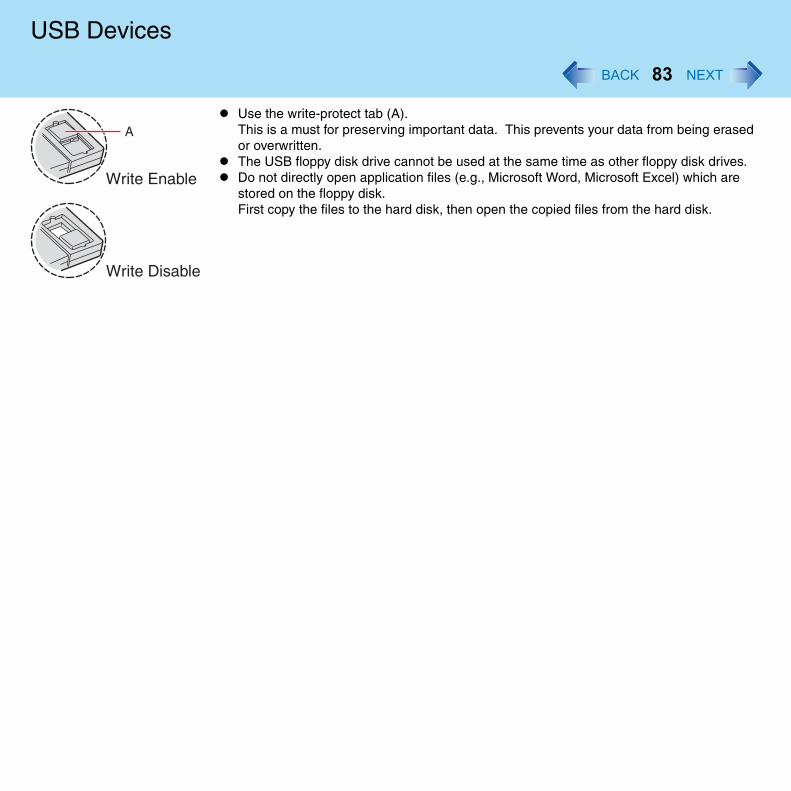
USB D
83
evices
Use the write-protect tab (A).This is a must for preserving important data. This prevents your data from being erasedor overwritten.The USB floppy disk drive cannot be used at the same time as other floppy disk drives.Do not directly open application files (e.g., Microsoft Word, Microsoft Excel) which are stored on the floppy disk.First copy the files to the hard disk, then open the copied files from the hard disk.
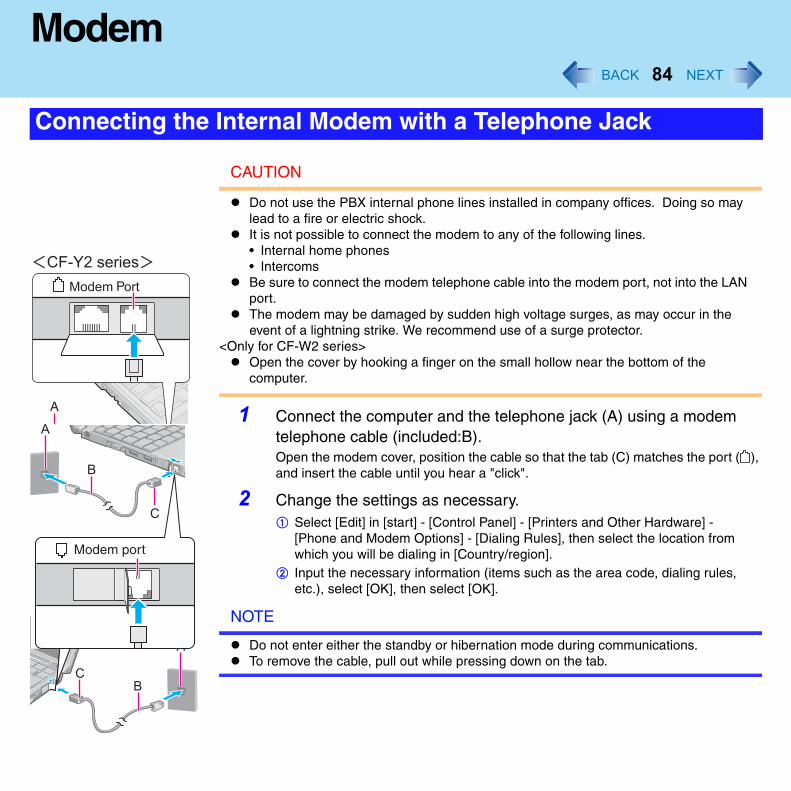
),
84
Modem
CAUTION
Do not use the PBX internal phone lines installed in company offices. Doing so may lead to a fire or electric shock.It is not possible to connect the modem to any of the following lines.• Internal home phones• IntercomsBe sure to connect the modem telephone cable into the modem port, not into the LAN port.The modem may be damaged by sudden high voltage surges, as may occur in the event of a lightning strike. We recommend use of a surge protector.
<Only for CF-W2 series>Open the cover by hooking a finger on the small hollow near the bottom of the computer.
1 Connect the computer and the telephone jack (A) using a modem telephone cable (included:B).Open the modem cover, position the cable so that the tab (C) matches the port (and insert the cable until you hear a "click".
2 Change the settings as necessary.A Select [Edit] in [start] - [Control Panel] - [Printers and Other Hardware] -
[Phone and Modem Options] - [Dialing Rules], then select the location from which you will be dialing in [Country/region].
B Input the necessary information (items such as the area code, dialing rules, etc.), select [OK], then select [OK].
NOTE
Do not enter either the standby or hibernation mode during communications.To remove the cable, pull out while pressing down on the tab.
Connecting the Internal Modem with a Telephone Jack
Modem
e,
s
r
Enablin
o
m
g
to
rk
Ring R
85
With this function, if the telephone that is connected to the modem rings in the standby modthe power of the computer automatically switches ON.This function is convenient when using automatic information receiving applications such aa FAX application.When using this function, it is necessary to run a software application able to maintain the condition to receive telephone calls and to return the computer to the original condition aftea call.
g the Ring Resume Function
A Select [start] - [Printers and Faxes].B Select [Set up faxing] in [Printer Tasks] on the left.
The fax icon is displayed.This operation is not necessary next time.
C Right-click on the fax icon and select [Properties].D In [Devices] - [Properties] - [Receive], add the check mark for [Enable device t
receive] and select [OK].E Select [Device Manager] in [start] - [Control Panel] - [Performance and
Maintenance] - [System] - [Hardware], and then select the internal modem fro[Modems].
F Select [Power Management], add the check mark for [Allow this device to brinthe computer out of standby], then select [OK].
When using the settings in steps A-D above, the battery operation time will be shortened some degree.When not using the Modem Ring Resume function, we recommend removing the check mafrom the [Enable device to receive] in the settings in step D.
CAUTION
When using this function, it is recommended that the AC adaptor be connected to the computer.
Concerning the setting for [System standby]*1
• Roughly consider the communication time and then set [System standby]. There may be cases where the computer enters the standby mode after the time set for
esume Function
Modem
86
[System standby] elapses even during communications, and cuts off the communications.
• If [Never] is set, the computer will not enter the standby mode during communications, but once the computer resumes, the power of the computer will remain on while the user is absent.
When the Ring Resume function is being used, some time elapses before a connection is established (equal to the time for the computer to resume). To allow the computer to resume, set the "Call" to a larger value than a typical telephone call. If it isnot possible for the sending side to set a long "Call", set the "Number of rings until answer" (with the software application that is able to maintain the condition to receive telephone calls) to a small value.
*1 To display the setting for [System standby]:Select [start] - [Control Panel] - [Performance and Maintenance] - [Power Options] - [Power Schemes].
NOTE
This function does not work when the computer is off or is in hibernation mode.After operations are resumed from standby mode, the screen remains dark. The former screen display will be restored when the keyboard or touch pad is touched.The computer cannot resume if a telephone is connected to the line of a modem (e.g.,a PC Card modem) other than the internal modem.
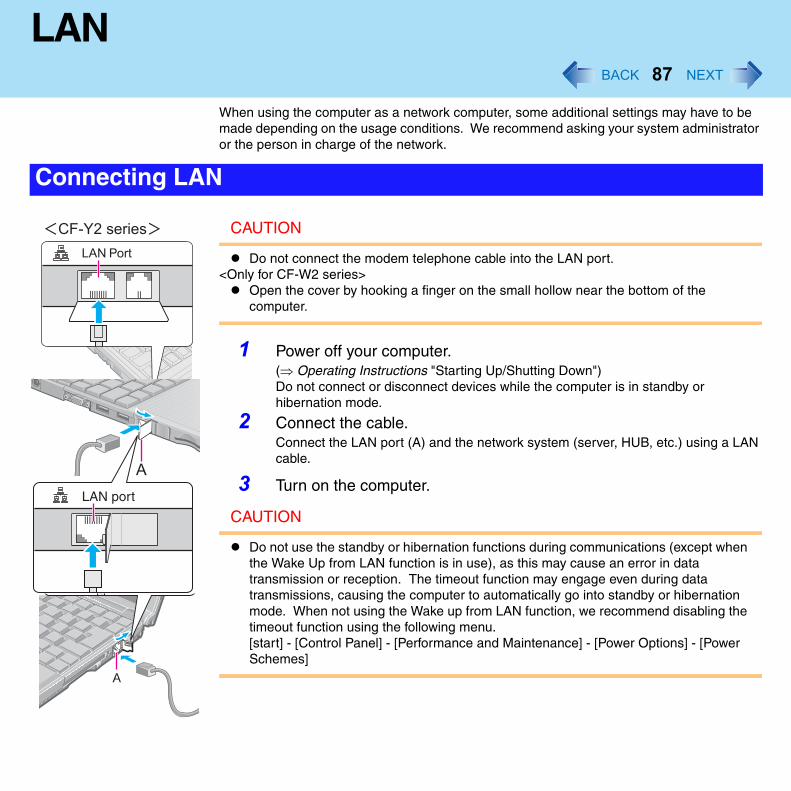
r
N
87
LAN
When using the computer as a network computer, some additional settings may have to bemade depending on the usage conditions. We recommend asking your system administratoor the person in charge of the network.
CAUTION
Do not connect the modem telephone cable into the LAN port.<Only for CF-W2 series>
Open the cover by hooking a finger on the small hollow near the bottom of the computer.
1 Power off your computer.(⇒ Operating Instructions "Starting Up/Shutting Down")Do not connect or disconnect devices while the computer is in standby or hibernation mode.
2 Connect the cable.Connect the LAN port (A) and the network system (server, HUB, etc.) using a LAcable.
3 Turn on the computer.
CAUTION
Do not use the standby or hibernation functions during communications (except when the Wake Up from LAN function is in use), as this may cause an error in data transmission or reception. The timeout function may engage even during data transmissions, causing the computer to automatically go into standby or hibernation mode. When not using the Wake up from LAN function, we recommend disabling the timeout function using the following menu.[start] - [Control Panel] - [Performance and Maintenance] - [Power Options] - [Power Schemes]
Connecting LAN
LAN
k
Enablin
n of
Wake
88
NOTE
If you are unable to connect to the network (when the indicator of your HUB unit does not light):A Display [Device Manager] screen.
Select [Device Manager] in [start] - [Control Panel] - [Performance and Maintenance] - [System] - [Hardware].
B Select the network adaptor you are using from [Network adapters].C Select [Advanced].D Confirm the settings of each item.
This is a function of the internal LAN to automatically power the computer on from a networserver when the computer is in the standby or hibernation mode. To use this function, it is necessary to have a network environment that accommodates Wake up from LAN.
g the Wake up from LAN Function
A Select [Device Manager] in [start] - [Control Panel] - [Performance and Maintenance] - [System] - [Hardware].
B Select the internal network adaptor from [Network adapters].C Select [Power Management], add the check mark for [Allow the computer to tur
off this device to save power] and [Allow this device to bring the computer out standby], then select [OK].
CAUTION
Be sure to connect the AC adaptor, and enable the supply of power.
NOTE
Even when a password is set in the Setup Utility and [Password on boot] is set to [Enable], it is not necessary to input the password set in the Setup Utility when the computer resumes from standby or hibernation mode.
up from LAN
LAN
r
89
The Wake up from LAN function will not operate under the following conditions:• When the computer has been shut down.• When the power switch is slide over for four seconds or longer to turn off the power
(e.g., when the computer hangs).• When the AC adaptor and battery pack are removed from the computer or
reattached to the computer.After operations are resumed from standby mode, the screen remains dark. The former screen display will be restored when the keyboard or touch pad is touched.The computer may start up if accessed by another computer on the network.The following procedure can be used to prevent startup due to unintentional access by a computer.
A Select [start] - [Control Panel] - [Performance and Maintenance] - [System] - [Hardware] - [Device Manager] - [Network adapters].
B Select the internal network adaptor, and then select [Power Management].C Add the check mark for [Only allow management stations to bring the compute
out of standby], then select [OK].
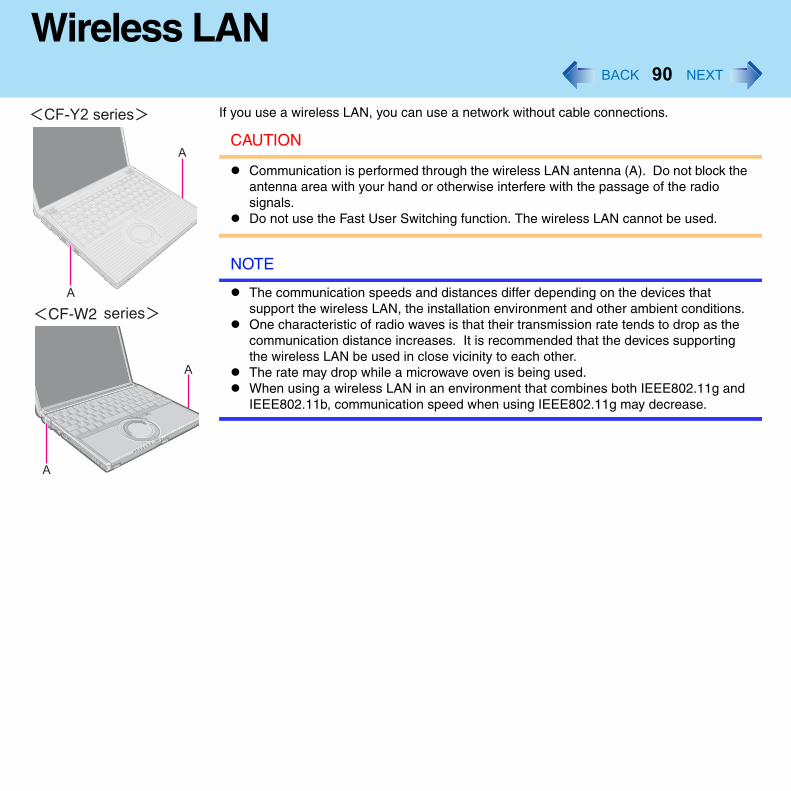
90
Wireless LAN
If you use a wireless LAN, you can use a network without cable connections.
CAUTION
Communication is performed through the wireless LAN antenna (A). Do not block the antenna area with your hand or otherwise interfere with the passage of the radio signals.Do not use the Fast User Switching function. The wireless LAN cannot be used.
NOTE
The communication speeds and distances differ depending on the devices that support the wireless LAN, the installation environment and other ambient conditions.One characteristic of radio waves is that their transmission rate tends to drop as the communication distance increases. It is recommended that the devices supporting the wireless LAN be used in close vicinity to each other.The rate may drop while a microwave oven is being used.When using a wireless LAN in an environment that combines both IEEE802.11g and IEEE802.11b, communication speed when using IEEE802.11g may decrease.
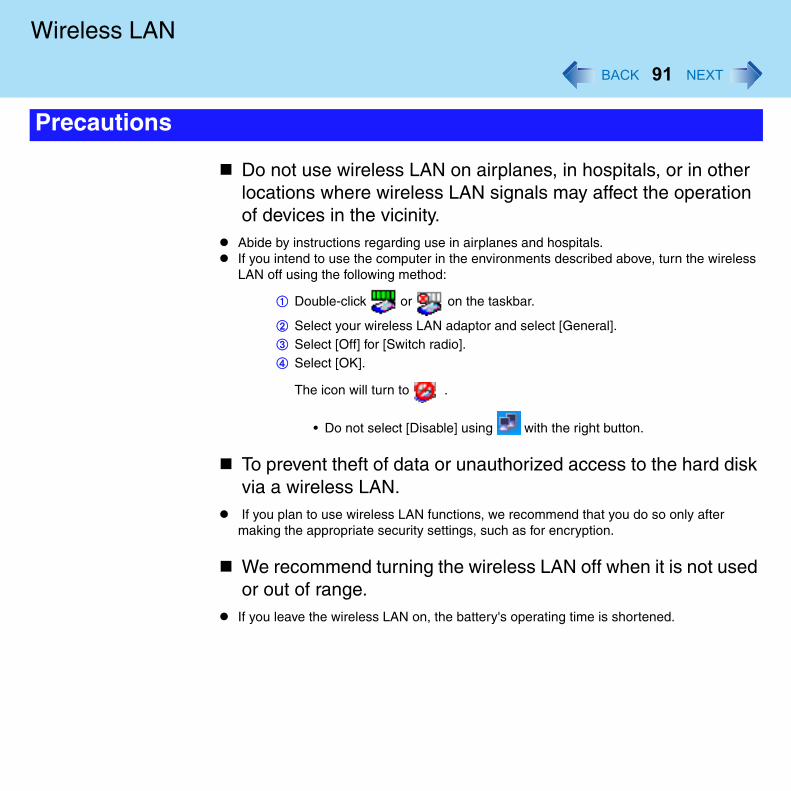
Wirele
s
k
Preca
91
ss LAN
Do not use wireless LAN on airplanes, in hospitals, or in otherlocations where wireless LAN signals may affect the operationof devices in the vicinity.
Abide by instructions regarding use in airplanes and hospitals.If you intend to use the computer in the environments described above, turn the wirelesLAN off using the following method:
A Double-click or on the taskbar.
B Select your wireless LAN adaptor and select [General].C Select [Off] for [Switch radio].D Select [OK].
The icon will turn to .
• Do not select [Disable] using with the right button.
To prevent theft of data or unauthorized access to the hard disvia a wireless LAN.
If you plan to use wireless LAN functions, we recommend that you do so only after making the appropriate security settings, such as for encryption.
We recommend turning the wireless LAN off when it is not usedor out of range.
If you leave the wireless LAN on, the battery's operating time is shortened.
utions
Wirele
d r
.
The S
92
ss LAN
To use the wireless LAN, set the profile using the following procedure.The settings will vary for different network environments depending on the network systembeing used. For more details, ask your system administrator or the person in charge of thenetwork.
CAUTION
Set profiles for each user using the following procedure.
1 Double-click on the taskbar.
2 Select your wireless LAN adaptor and select [General].
3 Select [On] for [Switch radio].
4 Select [Networks] and select [Add].
5 Enter the profile name and network name (SSID), and then make other necessary changes, then select [Next].
6 Make necessary changes and select [Finish].For security, we recommend that you enable encryption (WEP). If you enable WEP, enable encryption on the access point side as well. (The setting describebelow is only an example. For the other settings, ask your system administratoor the person in charge of the network.)
A Select [64-bit] or [128-bit] from [Encryption Level].B Select [Use pass phrase] or [Use hex key], and input the pass phrase or key.
In the case of ASCII character: [64-bit (5 characters)] [128-bit (13 characters)]In the case of hexadecimal: [64-bit (10 digits)] [128-bit (26 digits)].
• Set the same values for the computer side and the access point side.• When using an access point for which "128-bit" can be set (some access
points display "104-bit"), we recommend setting data encryption to "128-bit" to prevent unauthorized decryption.
ettings
Wirele
g
.
r.
If the fu
t
l"
ly.
Check
93
ss LAN
7 Select the profile you have set and select [Connect].If the setting of the profile that is currently connected is changed, the new settinwill not be enabled until you select the profile and then select [Connect].
8 Select [OK].
Open the Intel PROSet using either of the following procedures.Select [start] - [All Programs] - [Intel Network Adapters] - [Intel(R) PROSet for Wireless]
Select or on the taskbar to check the communication status.
For more information about how to use the Intel PROSet, refer to [Help] in the menu ba
nction fails to operate correctly
Read the operating instructions for the access point carefully and check the settings.
The access point fails to be displayed in [Available Networks]Select [Networks], then select the profile you are using, and select [Advanced]. [Connecto ad hoc networks only] may have been selected in [Connection preference]. In this case, select [Connect to infrastructure and ad hoc networks].
This computer uses channels 1 through 11*1. Check the channel being used by the access point.Ask your system administrator or the person in charge of the network.
*1 In the case of wireless communications, the frequency band being used can be divided into segments, so that different communications can be conducted on each band segment. A "Channerefers to the individual frequency bandwidth divisions.
The access point cannot be accessedThe network key setting may not conform to the access point.Check the network key setting of the access point and, if necessary, set it again correctDepending on the access point and settings, access may not be accepted unless the computer's MAC address is registered beforehand. In this case, check the computer's
the Communication Status
Wirele
s
94
ss LAN
MAC address using the following procedure and register it according to the operating instructions of the access point.
A Display [Command Prompt].Select [start] - [All Programs] - [Accessories] - [Command Prompt].
B Input [ipconfig /all], and press Enter.C Make a note of the 12-digit string of alphanumerics displayed on the wireless
LAN's "Physical Address" line. Then input [exit], and press Enter.
The IP address of the access point is wrongFollowing the operating instructions of the access point, set the IP address of the accespoint again correctly.
Wirele
u
d
]
Wirele
95
ss LAN
When making a wireless connection to Panasonic Wireless LCD Projector PT-LB10NTU, yocan use the Wireless Manager mobile edition for wireless projection without using the CD-ROM that comes with the projector.Wireless Manager mobile edition is an application software for sending a screen from a computer to a projector via wireless LAN.
Refer to [How to access the online manual] below for information on how to use the application software. The online manual for Wireless Manager mobile edition is installeon the hard disk of this computer.
Running Wireless Manager mobile edition
1 Turn on the projector.
2 Log on with the administrator authority.
3 In [start] - [All Programs] - [Panasonic Wireless Display], select [Wireless Manager mobile edition].
4 Select the projector to be connected, and then select [OK].Select the function to be used from the displayed screen.
How to access the online manual
1 In [start] - [Run], input [c:\util\wlprjct\network_sd.pdf\usa_network_sd.pdfand select [OK].Also read the supplementary explanation in the following file:[c:\util\wlprjct\supplement.pdf]
ss Connection to Projector <Only for CF-Y2 series>
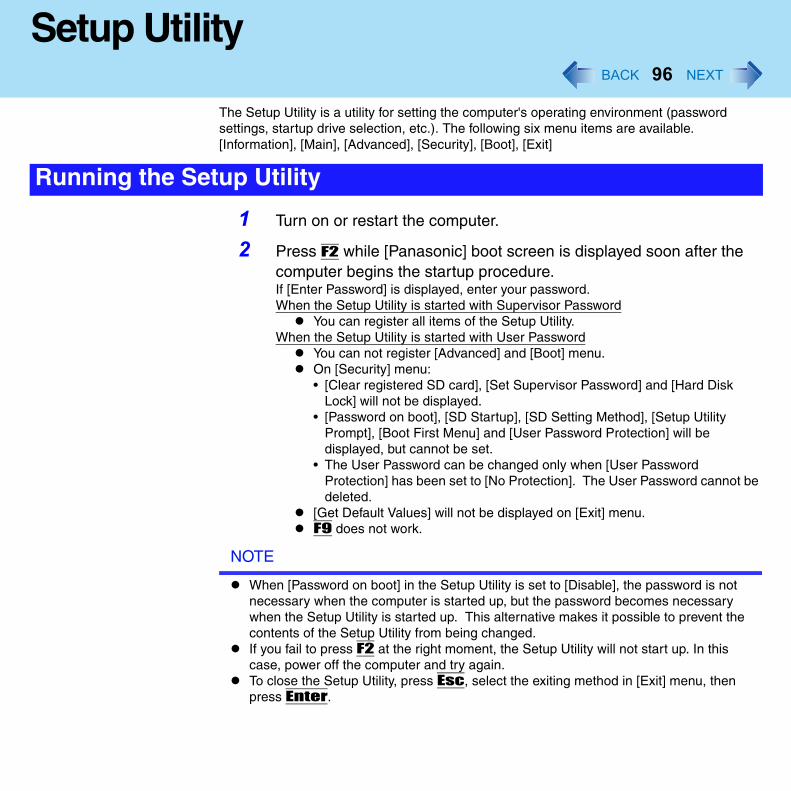
e
96
Setup Utility
The Setup Utility is a utility for setting the computer's operating environment (password settings, startup drive selection, etc.). The following six menu items are available.[Information], [Main], [Advanced], [Security], [Boot], [Exit]
1 Turn on or restart the computer.
2 Press F2 while [Panasonic] boot screen is displayed soon after the computer begins the startup procedure.If [Enter Password] is displayed, enter your password.When the Setup Utility is started with Supervisor Password
You can register all items of the Setup Utility.When the Setup Utility is started with User Password
You can not register [Advanced] and [Boot] menu.On [Security] menu:• [Clear registered SD card], [Set Supervisor Password] and [Hard Disk
Lock] will not be displayed.• [Password on boot], [SD Startup], [SD Setting Method], [Setup Utility
Prompt], [Boot First Menu] and [User Password Protection] will be displayed, but cannot be set.
• The User Password can be changed only when [User Password Protection] has been set to [No Protection]. The User Password cannot bdeleted.
[Get Default Values] will not be displayed on [Exit] menu. F9 does not work.
NOTE
When [Password on boot] in the Setup Utility is set to [Disable], the password is not necessary when the computer is started up, but the password becomes necessary when the Setup Utility is started up. This alternative makes it possible to prevent the contents of the Setup Utility from being changed.If you fail to press F2 at the right moment, the Setup Utility will not start up. In this case, power off the computer and try again.To close the Setup Utility, press Esc, select the exiting method in [Exit] menu, then press Enter.
Running the Setup Utility
Setup
Key Op
97
Utility
<Only for CF-Y2 series>Cannot display the Setup Utility screen in simultaneous display.By pressing Fn+F3, display destinations can be changed either external display or the internal LCD.
erations
F1To display the corresponding "help" file.EscTo display [Exit] menu.
To move among the items.
To move among the menus.F5 F6To move among the values.EnterTo display sub-menu of each item selected by or .F9To set default settings (except the password, System Time and System Date).F10To save the settings and exit.
NOTE
When setting date and time, Tab can be used to move the cursor.
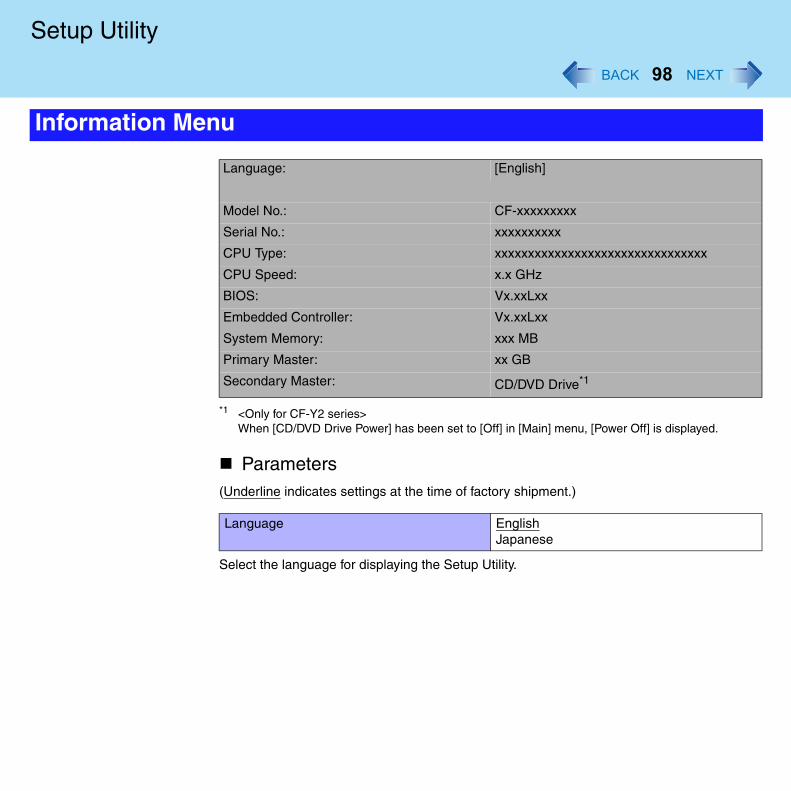
Setup
Inform
98
Utility
*1 <Only for CF-Y2 series>When [CD/DVD Drive Power] has been set to [Off] in [Main] menu, [Power Off] is displayed.
Parameters(Underline indicates settings at the time of factory shipment.)
Select the language for displaying the Setup Utility.
ation Menu
Language: [English]
Model No.: CF-xxxxxxxxx
Serial No.: xxxxxxxxxx
CPU Type: xxxxxxxxxxxxxxxxxxxxxxxxxxxxxxxx
CPU Speed: x.x GHz
BIOS: Vx.xxLxx
Embedded Controller: Vx.xxLxx
System Memory: xxx MB
Primary Master: xx GB
Secondary Master: CD/DVD Drive*1
Language EnglishJapanese
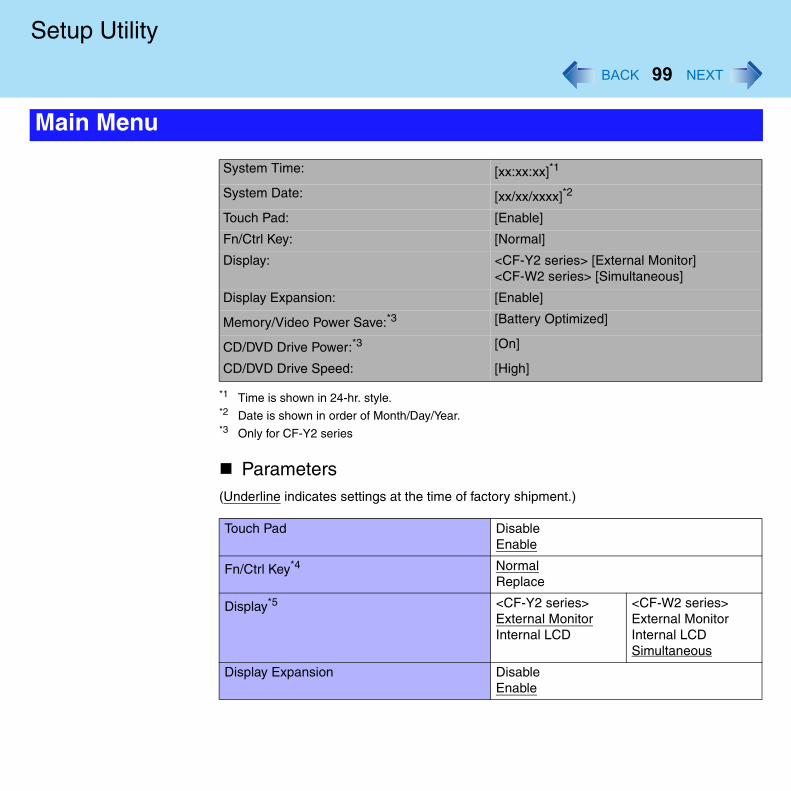
Setup
Main M
99
Utility
*1 Time is shown in 24-hr. style.*2 Date is shown in order of Month/Day/Year.*3 Only for CF-Y2 series
Parameters(Underline indicates settings at the time of factory shipment.)
enu
System Time: [xx:xx:xx]*1
System Date: [xx/xx/xxxx]*2
Touch Pad: [Enable]
Fn/Ctrl Key: [Normal]
Display: <CF-Y2 series> [External Monitor]<CF-W2 series> [Simultaneous]
Display Expansion: [Enable]
Memory/Video Power Save:*3 [Battery Optimized]
CD/DVD Drive Power:*3 [On]
CD/DVD Drive Speed: [High]
Touch Pad DisableEnable
Fn/Ctrl Key*4 NormalReplace
Display*5 <CF-Y2 series>External MonitorInternal LCD
<CF-W2 series>External MonitorInternal LCDSimultaneous
Display Expansion DisableEnable
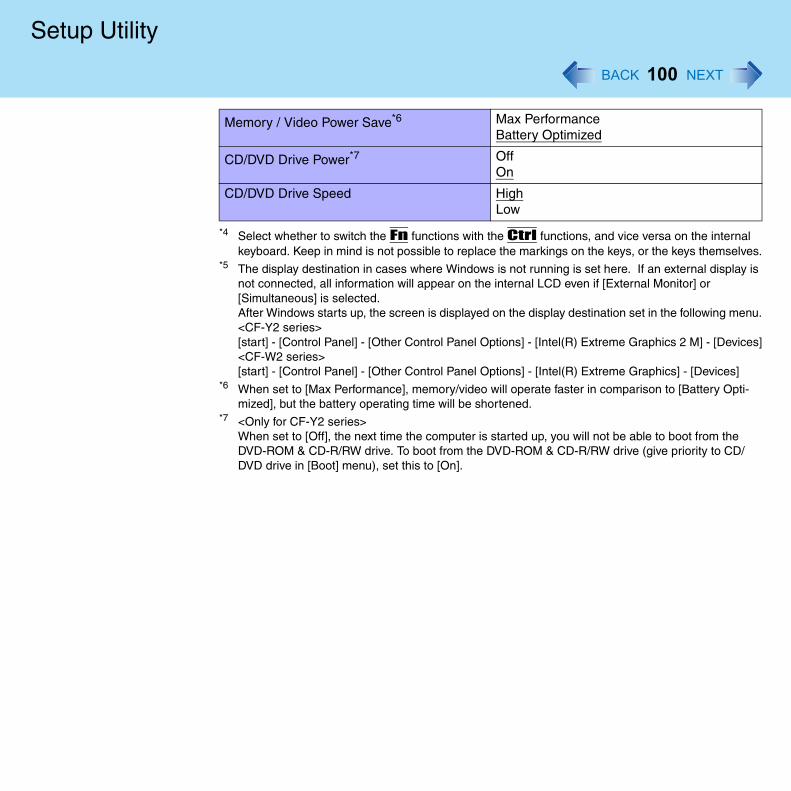
Setup
l s.
is
u.
s]
100
Utility
*4 Select whether to switch the Fn functions with the Ctrl functions, and vice versa on the internakeyboard. Keep in mind is not possible to replace the markings on the keys, or the keys themselve
*5 The display destination in cases where Windows is not running is set here. If an external display not connected, all information will appear on the internal LCD even if [External Monitor] or [Simultaneous] is selected.After Windows starts up, the screen is displayed on the display destination set in the following men<CF-Y2 series>[start] - [Control Panel] - [Other Control Panel Options] - [Intel(R) Extreme Graphics 2 M] - [Device<CF-W2 series>[start] - [Control Panel] - [Other Control Panel Options] - [Intel(R) Extreme Graphics] - [Devices]
*6 When set to [Max Performance], memory/video will operate faster in comparison to [Battery Opti-mized], but the battery operating time will be shortened.
*7 <Only for CF-Y2 series>When set to [Off], the next time the computer is started up, you will not be able to boot from the DVD-ROM & CD-R/RW drive. To boot from the DVD-ROM & CD-R/RW drive (give priority to CD/DVD drive in [Boot] menu), set this to [On].
Memory / Video Power Save*6 Max PerformanceBattery Optimized
CD/DVD Drive Power*7 OffOn
CD/DVD Drive Speed HighLow
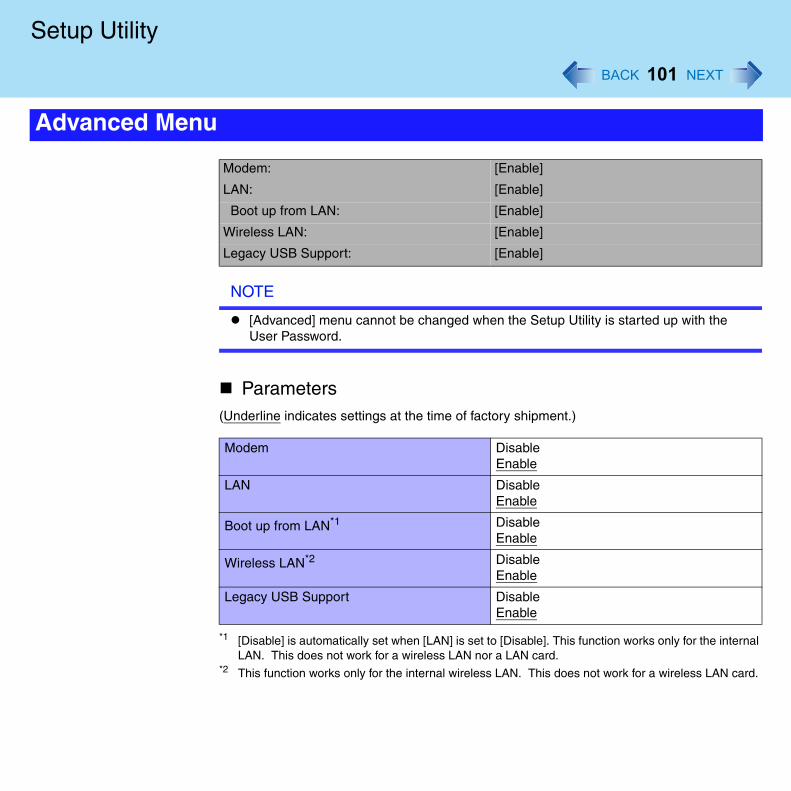
Setup
al
d.
Advan
101
Utility
NOTE
[Advanced] menu cannot be changed when the Setup Utility is started up with the User Password.
Parameters(Underline indicates settings at the time of factory shipment.)
*1 [Disable] is automatically set when [LAN] is set to [Disable]. This function works only for the internLAN. This does not work for a wireless LAN nor a LAN card.
*2 This function works only for the internal wireless LAN. This does not work for a wireless LAN car
ced Menu
Modem: [Enable]
LAN: [Enable]
Boot up from LAN: [Enable]
Wireless LAN: [Enable]
Legacy USB Support: [Enable]
Modem DisableEnable
LAN DisableEnable
Boot up from LAN*1 DisableEnable
Wireless LAN*2 DisableEnable
Legacy USB Support DisableEnable
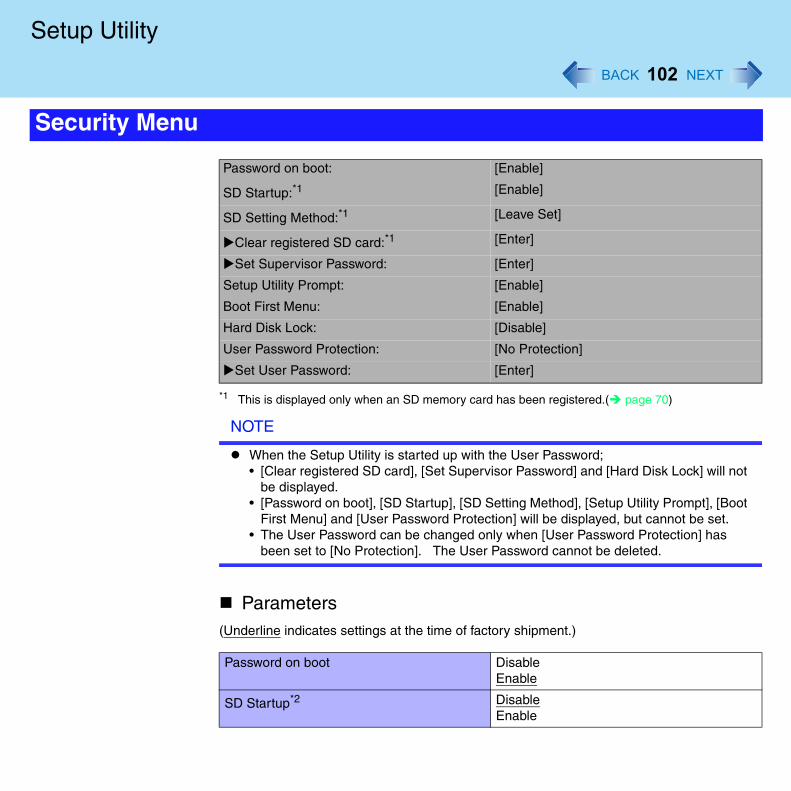
Setup
Secur
102
Utility
*1 This is displayed only when an SD memory card has been registered.( page 70)
NOTE
When the Setup Utility is started up with the User Password;• [Clear registered SD card], [Set Supervisor Password] and [Hard Disk Lock] will not
be displayed.• [Password on boot], [SD Startup], [SD Setting Method], [Setup Utility Prompt], [Boot
First Menu] and [User Password Protection] will be displayed, but cannot be set.• The User Password can be changed only when [User Password Protection] has
been set to [No Protection]. The User Password cannot be deleted.
Parameters(Underline indicates settings at the time of factory shipment.)
ity Menu
Password on boot: [Enable]
SD Startup:*1 [Enable]
SD Setting Method:*1 [Leave Set]
Clear registered SD card:*1 [Enter]
Set Supervisor Password: [Enter]
Setup Utility Prompt: [Enable]
Boot First Menu: [Enable]
Hard Disk Lock: [Disable]
User Password Protection: [No Protection]
Set User Password: [Enter]
Password on boot DisableEnable
SD Startup*2 DisableEnable
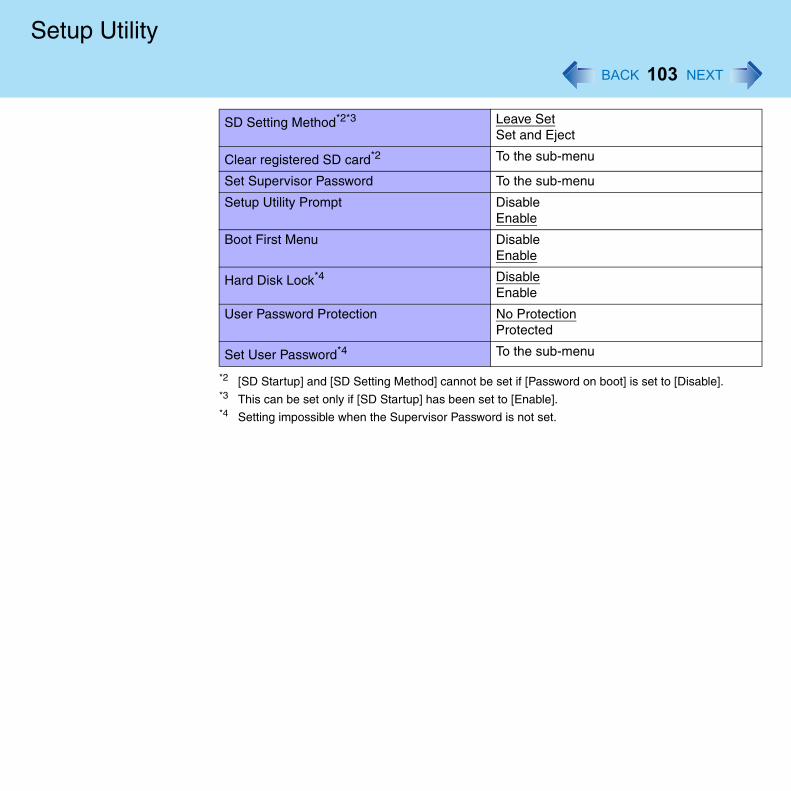
Setup
103
Utility
*2 [SD Startup] and [SD Setting Method] cannot be set if [Password on boot] is set to [Disable].*3 This can be set only if [SD Startup] has been set to [Enable].*4 Setting impossible when the Supervisor Password is not set.
SD Setting Method*2*3 Leave SetSet and Eject
Clear registered SD card*2 To the sub-menu
Set Supervisor Password To the sub-menu
Setup Utility Prompt DisableEnable
Boot First Menu DisableEnable
Hard Disk Lock*4 DisableEnable
User Password Protection No ProtectionProtected
Set User Password*4 To the sub-menu
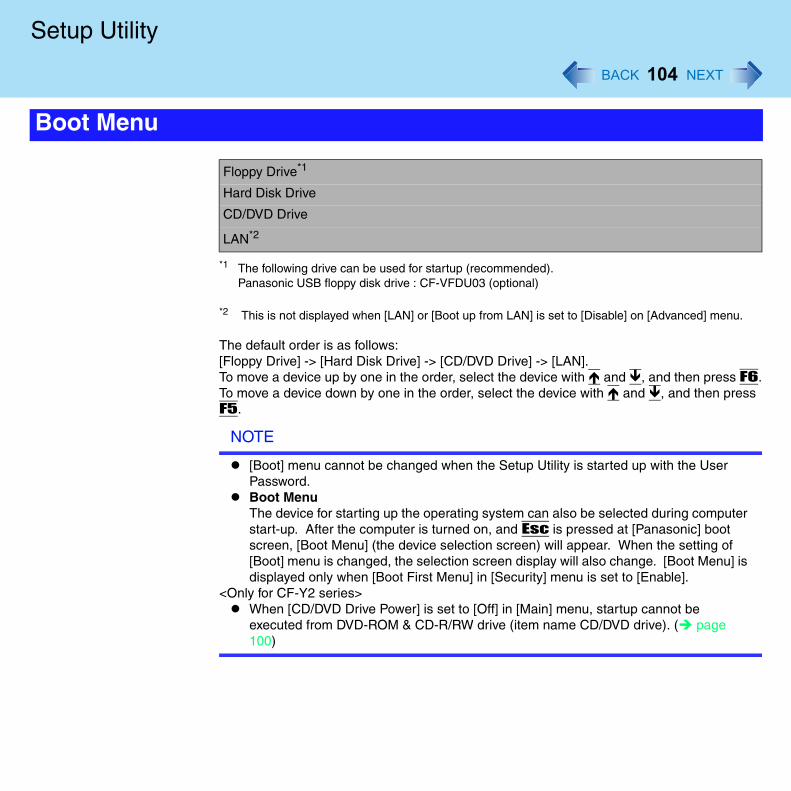
Setup
6.s
Boot M
104
Utility
*1 The following drive can be used for startup (recommended).Panasonic USB floppy disk drive : CF-VFDU03 (optional)
*2 This is not displayed when [LAN] or [Boot up from LAN] is set to [Disable] on [Advanced] menu.
The default order is as follows:[Floppy Drive] -> [Hard Disk Drive] -> [CD/DVD Drive] -> [LAN].To move a device up by one in the order, select the device with and , and then press FTo move a device down by one in the order, select the device with and , and then presF5.
NOTE
[Boot] menu cannot be changed when the Setup Utility is started up with the User Password.Boot MenuThe device for starting up the operating system can also be selected during computer start-up. After the computer is turned on, and Esc is pressed at [Panasonic] boot screen, [Boot Menu] (the device selection screen) will appear. When the setting of [Boot] menu is changed, the selection screen display will also change. [Boot Menu] is displayed only when [Boot First Menu] in [Security] menu is set to [Enable].
<Only for CF-Y2 series>When [CD/DVD Drive Power] is set to [Off] in [Main] menu, startup cannot be executed from DVD-ROM & CD-R/RW drive (item name CD/DVD drive). ( page 100)
enu
Floppy Drive*1
Hard Disk Drive
CD/DVD Drive
LAN*2
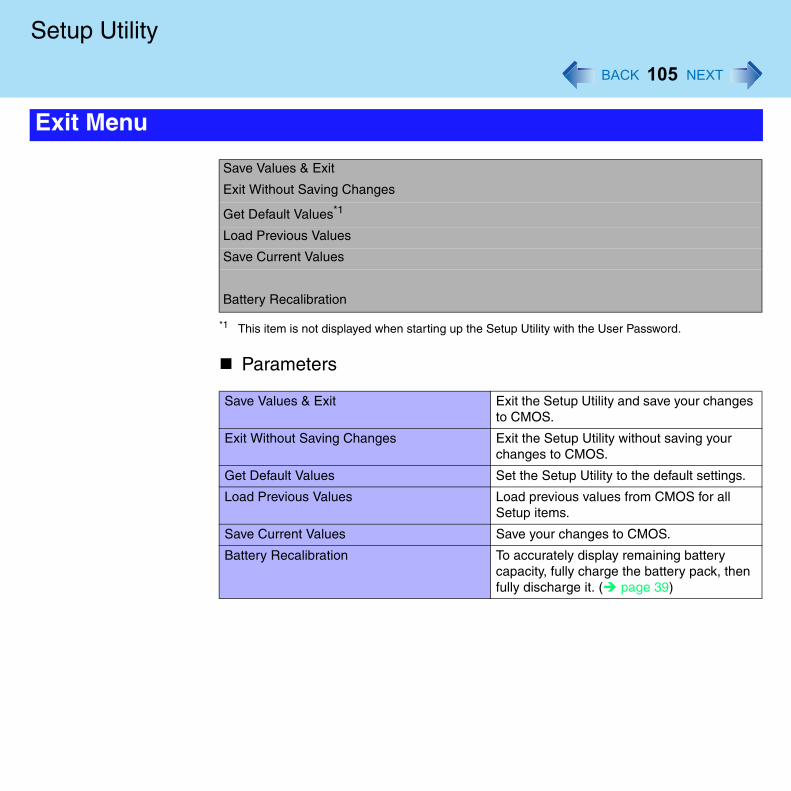
Setup
Exit M
105
Utility
*1 This item is not displayed when starting up the Setup Utility with the User Password.
Parameters
enu
Save Values & Exit
Exit Without Saving Changes
Get Default Values*1
Load Previous Values
Save Current Values
Battery Recalibration
Save Values & Exit Exit the Setup Utility and save your changesto CMOS.
Exit Without Saving Changes Exit the Setup Utility without saving your changes to CMOS.
Get Default Values Set the Setup Utility to the default settings.
Load Previous Values Load previous values from CMOS for all Setup items.
Save Current Values Save your changes to CMOS.
Battery Recalibration To accurately display remaining battery capacity, fully charge the battery pack, thenfully discharge it. ( page 39)

106
Icon Enlarger
If the characters, icons, title bars, mouse cursor, or other items are too small and difficult to see on the screen, use the "Icon Enlarger," and change the screen display by switching among [Normal Size], [Large Size], and [Extra Large Size].
Characters on Internet screens*1 displayed on Internet Explorer, as well as characters*1 in
sent and received mail in Outlook Express and characters*1 in mail text boxes, change according to the settings in the "Icon Enlarger".In the default settings, [Normal Size] is set.
*1 Some characters in homepages and HTML e-mails may not be magnified.
NOTE
Icon Enlarger will not start up if the display resolution is set lower than 1024 x 768 dots.When magnifying screen, a part of the menu or other screen elements may become hidden. In this case, overlay the cursor to display pop-ups, scroll the screen, or use other functions to display the hidden elements.Change the screen display after the other application has been closed.
1 Select [start] - [All Programs] - [Panasonic] - [Icon Enlarger].
2 Select the display size as [Normal Size], [Large Size], or [Extra Large Size].
3 Select [OK].The screen will be displayed in the selected size.
How to Magnify the Computer Screen Display
107
Technical Information
If the power saving function (standby or hibernation mode) activates while communications software is being used, the network connection may be interrupted, or performance may be adversely affected. If this happens, restart the computer.Be sure to close the communications software before using the power saving function.When using the computer in a network environment, we recommend that you set [System standby] and [System hibernates] to [Never], using the following procedure:Select [start] - [Control Panel] - [Performance and Maintenance] - [Power Options] - [Power Schemes].
The Windows files included in the Retail Version of the Windows CD-ROM for each OS are contained in the following folders:c:\windows\docs, c:\windows\dotnetfx, c:\windows\i386, c:\windows\support, c:\windows\valueadd
Network Connections and Communications Software
When Using the Files on the Retail Version of the Windows CD-ROM
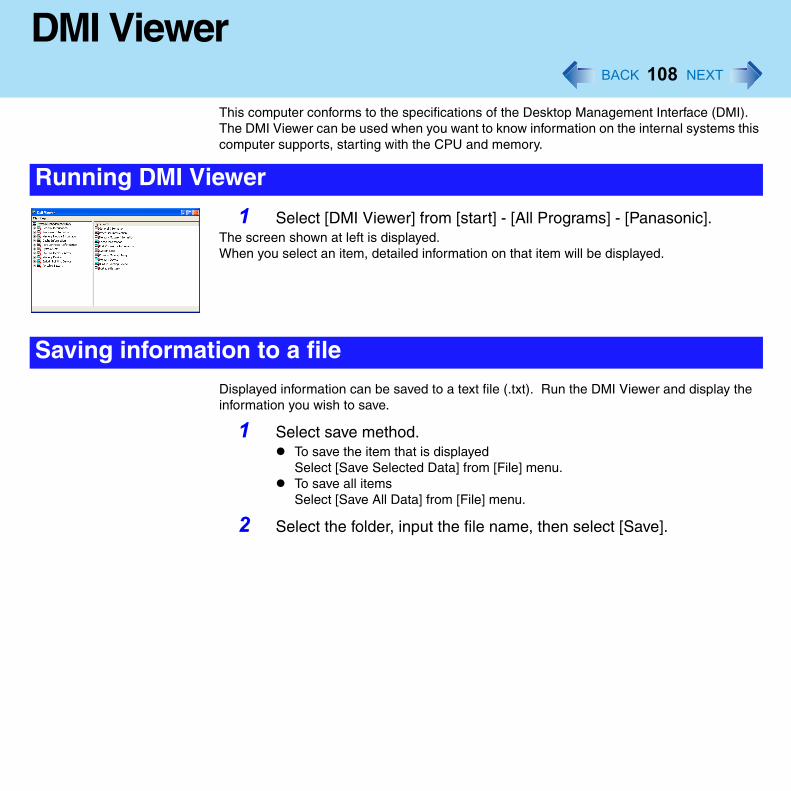
108
DMI Viewer
This computer conforms to the specifications of the Desktop Management Interface (DMI). The DMI Viewer can be used when you want to know information on the internal systems this computer supports, starting with the CPU and memory.
1 Select [DMI Viewer] from [start] - [All Programs] - [Panasonic].The screen shown at left is displayed.When you select an item, detailed information on that item will be displayed.
Displayed information can be saved to a text file (.txt). Run the DMI Viewer and display the information you wish to save.
1 Select save method.To save the item that is displayedSelect [Save Selected Data] from [File] menu.To save all itemsSelect [Save All Data] from [File] menu.
2 Select the folder, input the file name, then select [Save].
Running DMI Viewer
Saving information to a file

,
t
t
t
109
List of Error Codes
When turning on the computer, if one of the following error codes or messages is displayedfollow the instructions shown below.If the problem persists, or if the error code or message displayed is not shown here, contacyour technical support office.
Error Code/Message Action
0212: Keyboard error If an external keyboard is connected, disconnect thisdevice.
0251: System CMOS checksum bad - Default configuration used
An error has occurred in the memory that stores the Setup Utility settings. This error occurs when the memory content is changed through some inadvertent operation by a program or other function.
Run the Setup Utility and load the default values, then change the settings to the appropriate values asneeded. ( page 96)If the problem persists, the internal clock battery mayneed to be replaced. Contact your technical supporoffice.
0271: Check date and time settings
The date and time setting are incorrect.Run the Setup Utility and set the date and time correctly. ( page 99)If the problem persists, the internal clock battery mayneed to be replaced. Contact your technical supporoffice.
0280: Previous boot incomplete - Default configuration used
Startup has failed repeatedly, so the Setup Utility settings have been returned to their default values, andthe computer has been booted.
Run the Setup Utility and load the default values, then change the settings to the appropriate values asneeded. ( page 96)
02B0: Diskette drive A error Disconnect the floppy disk drive and reconnect it. Make sure the drive is secured correctly.
Press <F1> to resume, <F2> to Setup
Write down the error details and press F2 to run theSetup Utility. Confirm the settings, and change the settings to the appropriate values as needed. ( page 96)
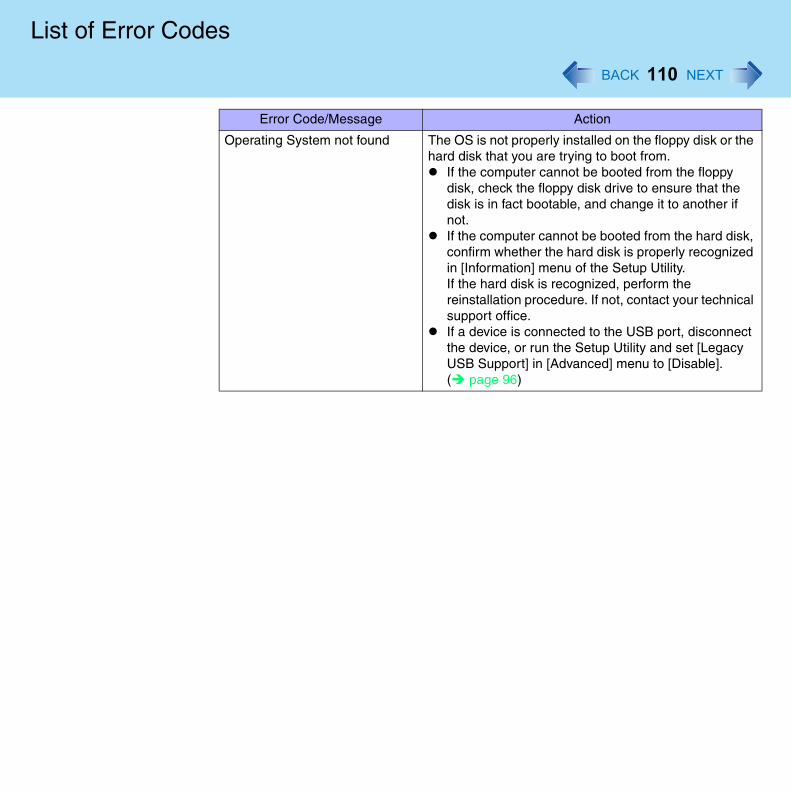
List of
,
l
t
110
Error Codes
Operating System not found The OS is not properly installed on the floppy disk or thehard disk that you are trying to boot from.
If the computer cannot be booted from the floppy disk, check the floppy disk drive to ensure that the disk is in fact bootable, and change it to another if not.If the computer cannot be booted from the hard diskconfirm whether the hard disk is properly recognizedin [Information] menu of the Setup Utility.If the hard disk is recognized, perform the reinstallation procedure. If not, contact your technicasupport office.If a device is connected to the USB port, disconnecthe device, or run the Setup Utility and set [Legacy USB Support] in [Advanced] menu to [Disable]. ( page 96)
Error Code/Message Action

e
f
111
Dealing with Problems (Advanced)
When a problem occurs, refer to this page. If a problem appears to be related to a softwarapplication, read the software related manual. If you still cannot troubleshoot the problem,contact your technical support office. You can use the PC Information Viewer to check the computer's usage status ( page 125).
Starting Up
The power indicator or battery indicator is not lit
Check the cable connection for the AC adaptor. Check to see if a fully charged battery is properly inserted.Remove the battery pack and disconnect the AC adaptor, then connect them again.
The computer does not operate when a USB device is connected
The computer may not operate when certain USB devices are connected. Disconnect the USB device, or set [Legacy USB Support] to [Disable] in [Advanced] menu of the Setup Utility.
[Enter Password] is displayed Input your Supervisor Password or User Password. If you have forgotten it, contact your technical support office.
POST Startup Error(s) is displayed page 109
Windows startup, or an operation is extremely slow
Press F9 in the Setup Utility ( page 96).This will restore the Setup Utility's settings to their default values (except the password settings). Then, the Setup Utility must be run once again for you to input the appropriate operating environment settings.(The processing speed depends on the application software used, so this operation may not cause the processing speed to increase.)If operations slow down during streaming playback, try changing the number ocolors of the display.Disable any resident software.
The date and time are incorrect You can set the date and time using the following menu:[start] - [Control Panel] - [Date, Time, Language, and Regional Options] - [Dateand Time]If you continue to experience problems, the internal battery maintaining the clock may need to be replaced. Contact your technical support office.When the computer is connected to a LAN, confirm the date and time of the server.This computer will not correctly recognize the date and time starting from the year 2100 A.D.
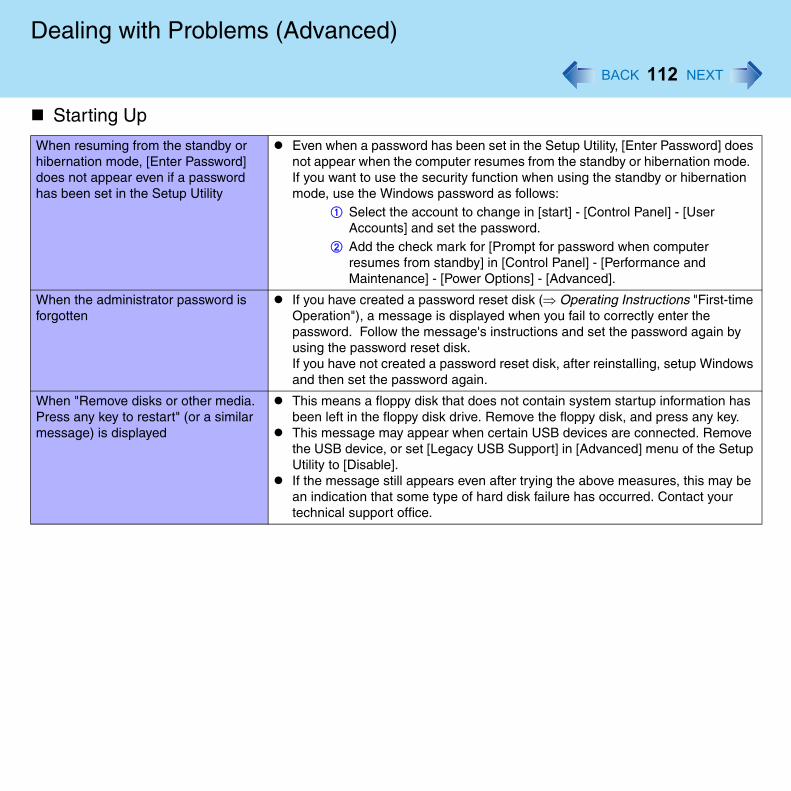
Dealin
When resuhibernationdoes not ahas been s
When the aforgotten
When "RemPress any message)
Starti
112
g with Problems (Advanced)
ming from the standby or mode, [Enter Password]
ppear even if a password et in the Setup Utility
Even when a password has been set in the Setup Utility, [Enter Password] doesnot appear when the computer resumes from the standby or hibernation mode.If you want to use the security function when using the standby or hibernation mode, use the Windows password as follows:
A Select the account to change in [start] - [Control Panel] - [User Accounts] and set the password.
B Add the check mark for [Prompt for password when computer resumes from standby] in [Control Panel] - [Performance and Maintenance] - [Power Options] - [Advanced].
dministrator password is If you have created a password reset disk (⇒ Operating Instructions "First-timeOperation"), a message is displayed when you fail to correctly enter the password. Follow the message's instructions and set the password again by using the password reset disk.If you have not created a password reset disk, after reinstalling, setup Windowsand then set the password again.
ove disks or other media. key to restart" (or a similar is displayed
This means a floppy disk that does not contain system startup information hasbeen left in the floppy disk drive. Remove the floppy disk, and press any key.This message may appear when certain USB devices are connected. Removethe USB device, or set [Legacy USB Support] in [Advanced] menu of the SetupUtility to [Disable].If the message still appears even after trying the above measures, this may bean indication that some type of hard disk failure has occurred. Contact your technical support office.
ng Up
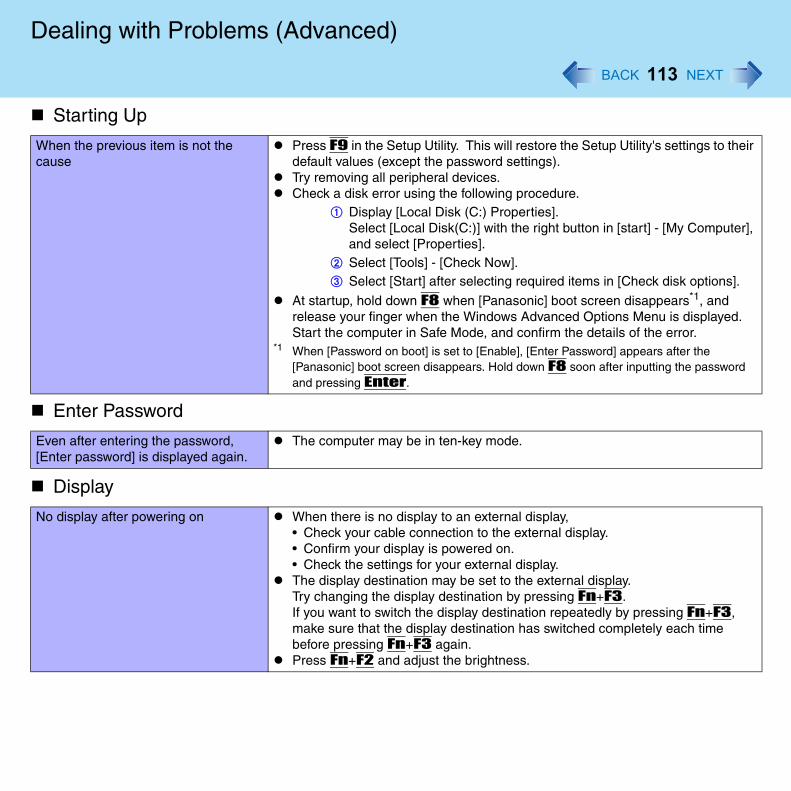
Dealin
When the pcause
r
,
Enter
Even after [Enter pass
Displa
No display
Starti
113
g with Problems (Advanced)
revious item is not the Press F9 in the Setup Utility. This will restore the Setup Utility's settings to theidefault values (except the password settings).Try removing all peripheral devices.Check a disk error using the following procedure.
A Display [Local Disk (C:) Properties].Select [Local Disk(C:)] with the right button in [start] - [My Computer]and select [Properties].
B Select [Tools] - [Check Now].C Select [Start] after selecting required items in [Check disk options].
At startup, hold down F8 when [Panasonic] boot screen disappears*1, and release your finger when the Windows Advanced Options Menu is displayed. Start the computer in Safe Mode, and confirm the details of the error.
*1 When [Password on boot] is set to [Enable], [Enter Password] appears after the [Panasonic] boot screen disappears. Hold down F8 soon after inputting the password and pressing Enter.
Password
entering the password, word] is displayed again.
The computer may be in ten-key mode.
y
after powering on When there is no display to an external display,• Check your cable connection to the external display.• Confirm your display is powered on.• Check the settings for your external display.The display destination may be set to the external display.Try changing the display destination by pressing Fn+F3.If you want to switch the display destination repeatedly by pressing Fn+F3, make sure that the display destination has switched completely each time before pressing Fn+F3 again.Press Fn+F2 and adjust the brightness.
ng Up
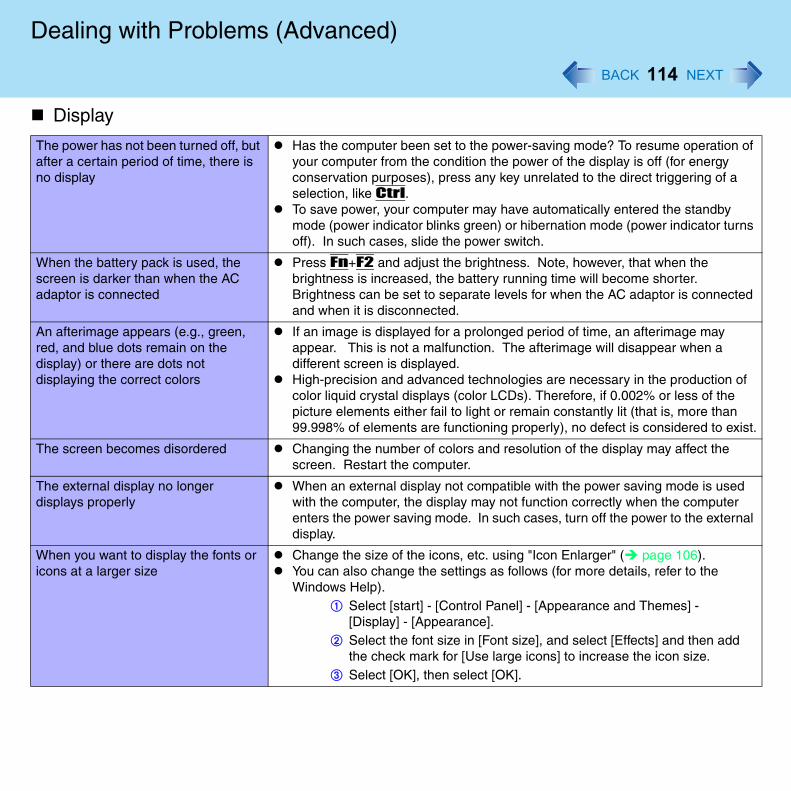
Dealin
The powerafter a certno display
f
When the bscreen is dadaptor is
An afterimared, and bldisplay) or displaying
t.
The screen
The externdisplays pr
l
When you icons at a l
Displa
114
g with Problems (Advanced)
has not been turned off, but ain period of time, there is
Has the computer been set to the power-saving mode? To resume operation oyour computer from the condition the power of the display is off (for energy conservation purposes), press any key unrelated to the direct triggering of a selection, like Ctrl.To save power, your computer may have automatically entered the standby mode (power indicator blinks green) or hibernation mode (power indicator turnsoff). In such cases, slide the power switch.
attery pack is used, the arker than when the AC connected
Press Fn+F2 and adjust the brightness. Note, however, that when the brightness is increased, the battery running time will become shorter. Brightness can be set to separate levels for when the AC adaptor is connectedand when it is disconnected.
ge appears (e.g., green, ue dots remain on the there are dots not the correct colors
If an image is displayed for a prolonged period of time, an afterimage may appear. This is not a malfunction. The afterimage will disappear when a different screen is displayed.High-precision and advanced technologies are necessary in the production of color liquid crystal displays (color LCDs). Therefore, if 0.002% or less of the picture elements either fail to light or remain constantly lit (that is, more than 99.998% of elements are functioning properly), no defect is considered to exis
becomes disordered Changing the number of colors and resolution of the display may affect the screen. Restart the computer.
al display no longer operly
When an external display not compatible with the power saving mode is used with the computer, the display may not function correctly when the computer enters the power saving mode. In such cases, turn off the power to the externadisplay.
want to display the fonts or arger size
Change the size of the icons, etc. using "Icon Enlarger" ( page 106).You can also change the settings as follows (for more details, refer to the Windows Help).
A Select [start] - [Control Panel] - [Appearance and Themes] - [Display] - [Appearance].
B Select the font size in [Font size], and select [Effects] and then add the check mark for [Use large icons] to increase the icon size.
C Select [OK], then select [OK].
y
Dealin
During simthe screen
When a vida DVD vide
WinDVD orthe displayswitched u
Setup
[Enter Pas
[Advancnot be rSome itnot be rF9 doe
Shutti
Windows crestarted
Displa
115
g with Problems (Advanced)
ultaneous display, one of s becomes disordered
Try changing the display by pressing Fn+F3.If you continue to experience problems, try changing the display destination inthe following menu.<CF-Y2 series>[start] - [Control Panel] - [Other Control Panel Options] - [Intel(R) Extreme Graphics 2 M] - [Devices]<CF-W2 series>[start] - [Control Panel] - [Other Control Panel Options] - [Intel(R) Extreme Graphics] - [Devices]When [Command Prompt] is set to "Full Screen" by pressing Alt + Enter, thescreen is displayed on one of the displays only. When the window display is restored by pressing Alt + Enter, the screen is displayed on both displays.
<Only for CF-Y2 series>Simultaneous display cannot be used until Windows startup is complete (duringSetup Utility, Windows logon screen, etc.). When Fn+F3 is pressed, the screenis displayed on the external display or internal LCD.
eo such as an MPEG file or o is being played with
Windows® Media Player, destination cannot be sing Fn+F3
The display destination cannot be switched while a video such as an MPEG fileand a DVD video is playing. Stop playing the video before switching the displaydestination.
Utility
sword] is displayed Enter the Supervisor Password or User Password. If you have forgotten it, contact your technical support office.
ed] and [Boot] menu can egisteredems in [Security] menu can egistereds not work
Restart the Setup Utility with the Supervisor Password.
ng Down
annot be shut down or If a USB device is connected, try removing it.
y

Dealin
Stand
Unable to emode
Unable to aor hibernat
The compu
Batter
The red indr f
116
g with Problems (Advanced)
by/Hibernation Function
nter standby or hibernation If a USB device is connected to the computer (note: only for some USB devices), remove the USB device temporarily. If the problem persists, restart the computer.It may take one or two minutes to enter standby or hibernation mode.If there is a disc in the DVD-ROM & CD-R/RW drive that has been formatted using B's CLiP, the computer will not enter standby or hibernation mode. Remove the disc.The computer may not enter standby mode properly and seems to be frozen inthe case that the computer is communicating via the modem. If this happens, slide the power switch for four seconds or more to forcibly turn your computer off.
utomatically enter standby ion mode
If a peripheral is connected to the computer, disconnect the device.If there is a disc in the DVD-ROM & CD-R/RW drive that has been formatted using B’s CLiP, the computer will not enter standby or hibernation mode. Remove the disc.When the internal LCD is closed, the computer may not enter standby or hibernation mode. In order to activate standby or hibernation automatically while using the computer with the internal LCD closed, set [Touch Pad] to [Disable] in [Main] menu of the Setup Utility.
ter does not resume Did you disconnect the AC adaptor or the battery pack while the computer wasin standby mode? If the computer's power supply is disconnected while the computer is in standby mode, all unsaved data will be lost.Did you slide the power switch and hold it for four seconds or more? If you slidethe power switch and hold it for four seconds or more, the power will be turnedoff forcibly. In this case, all unsaved data will be lost.
y Indicator
icator lights The battery level is very low (the charge is approx. 9% or less).Connect the AC adaptor. You can use the computer when the battery indicatolight is orange. If you do not have an AC adaptor, save your data and power ofyour computer. After replacing the battery pack with a fully charged one, turn your computer on.
Dealin
The red ind
The orange.
Keybo
Only numb
Only capita
How to inpà, ç etc.), ssymbol is u
Netwo
Unable to c
,
Batter
117
g with Problems (Advanced)
icator blinks Quickly save your data and power off your computer. Remove the battery packand disconnect the AC adaptor, then connect them again. If the problem persists, contact your technical support office. Possible failure in the battery pack or charging circuit.
indicator blinks Battery cannot be recharged temporarily because the internal temperature of the battery pack is outside of the acceptable temperature range for rechargingOnce the allowable range requirement is satisfied, charging begins automatically. Your computer can be used normally in this state.
ard
ers can be inputted Check whether the indicator is on. If it is on, the computer is in ten-key keyboard mode. To disable the ten-key mode, press NumLk.
l letters are being input Check whether the indicator is on. If it is on, the computer is in Caps Lock mode. To disable the Caps Lock mode, press CapsLock.
ut European characters (ß, ymbols or Euro currency nclear
Display the character map and point to the desired font name, such as European fonts, and select it with the following procedure.Select [start] - [All Programs] - [Accessories] - [System Tools] - [Character Map].
rk
onnect to a network Confirm that either [Modem], [LAN] or [Wireless LAN] is set to [Enable] in the Setup Utility.When using the computer as a network computer, some additional settings mayhave to be made depending on the usage conditions. We recommend askingyour system administrator or the person in charge of the network.If the standby or hibernation mode is entered, the computer may have to be restarted.If the link lamp on the HUB unit is not on and the network cannot be accessedset the speed to match the HUB unit. ( page 88)The wireless function at the access point may be disabled.Follow the instructions in the manual for the access point, and confirm the access point settings
y Indicator
Dealin
Unable to u
-
The followiThe LANdown dWireles
Conn
An error ocdriver
Your periph
Netwo
118
g with Problems (Advanced)
se wireless LAN Confirm that [Wireless LAN] is set to [Enable] in the Setup Utility.Confirm that is displayed on the taskbar.If is not displayed on the taskbar, confirm that [On] is selected for [Switch radio] in [Intel(R) PROSet] - [General]. ( page 92)Confirm the setting of the IP address for the access point, following the operating instructions for that access point.Confirm whether the Intel(R) PROSet is installed using the following menu. [start] - [Control Panel] - [Add or Remove Programs].If it has not been installed, input [c:\util\drivers\wlan\proset\isetup.exe] in [start] [Run] to install.
ng phenomena occur transmission speed slows
ramaticallys LAN connection drops out
page 120
ecting Peripherals
curs while installing the When you install the driver for a PC Card or peripheral device, be sure to use adriver that is compatible with the operating system. If you use an incompatibledriver, malfunction may occur. For information on drivers, contact the manufacturer of the peripheral device you purchased.
eral does not work Make sure a driver is installed.Contact the manufacturer of the product.When operation resumes from the standby or hibernation mode, devices suchas a mouse, modem or PC Cards may not function properly. In such cases, you will need to restart your computer or reinitialize the individual devices.When is displayed in the Device Manager, try removing and inserting the device once more. If the problem persists, restart the computer.Depending on the device connected, the computer may not recognize when thedevice is connected or disconnected, or the device may not operate properly.Use the following procedure.Select the applied device in [start] - [Control Panel] - [Performance and Maintenance] - [System] - [Hardware] - [Device Manager], then remove the check mark for [Allow the computer to turn off this device to save power] in [Power Management]. (This item may be unavailable for some types of devices.)
rk
Dealin
The cursoroperations
The devicedifferent m
A PC Card
t
USB floppya boot driv
.
You do notmodule
Cannot tellhas been c
Conn
119
g with Problems (Advanced)
does not move from mouse Check your mouse connection.A driver which is compatible with the connected mouse must be installed.If the device does not operate when the driver is installed:In the Setup Utility, set [Touch Pad] to [Disable].
will not operate if a ouse driver is installed
When you install a different mouse driver, such as IntelliPoint for Microsoft's IntelliMouse, the mouse driver currently installed in the computer may need tobe uninstalled. Use the following procedure to uninstall this driver.
A Display the screen to uninstall the program.Select [start] - [Control Panel] - [Add or Remove Programs].
B Uninstall [Synaptics Pointing Device Driver] and [TouchPadUtility] separately.
does not work Make sure the card is properly inserted.Confirm that the card conforms to the PC Card Standard.Note that after a driver (PC Card driver on other) is installed, the computer musbe restarted.Check that the proper port settings have been made.Read the operating instructions for the PC Card. Or, you may need to call themanufacturer of the PC Card.Try removing/reinserting the PC Card by following the proper procedure. ( page 63)Confirm that a driver for your operating system has been installed.ZV card, SRAM card, FLASH ROM card (except for an ATA interface) and cardrequiring 12V are not supported.
disk drives do not work as e
Only the Panasonic CF-VFDU03 USB floppy disk drive (optional) can be usedMake sure [Legacy USB Support] is enable in the Setup Utility.After powering off the computer, connect the USB floppy disk drive and restartthe computer.
know the available RAM ⇒ Operating Instructions "RAM Module"
whether the RAM module orrectly installed
You can check whether the RAM module is recognized using [Information] menu in the Setup Utility. If the RAM module is not recognized, turn the computer off and reinsert the RAM module.
ecting Peripherals
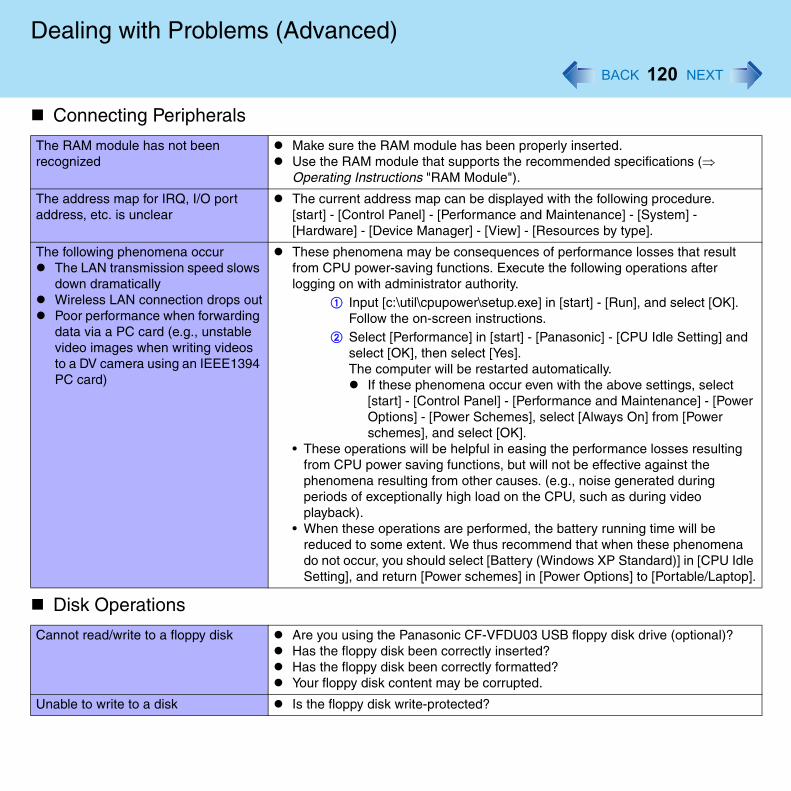
Dealin
The RAM mrecognized
The addresaddress, e
The followiThe LANdown dWirelesPoor pedata viavideo imto a DV PC card
r
].
Disk O
Cannot rea
Unable to w
Conn
120
g with Problems (Advanced)
odule has not been Make sure the RAM module has been properly inserted.Use the RAM module that supports the recommended specifications (⇒ Operating Instructions "RAM Module").
s map for IRQ, I/O port tc. is unclear
The current address map can be displayed with the following procedure.[start] - [Control Panel] - [Performance and Maintenance] - [System] - [Hardware] - [Device Manager] - [View] - [Resources by type].
ng phenomena occur transmission speed slows
ramaticallys LAN connection drops outrformance when forwarding a PC card (e.g., unstable ages when writing videos
camera using an IEEE1394 )
These phenomena may be consequences of performance losses that result from CPU power-saving functions. Execute the following operations after logging on with administrator authority.
A Input [c:\util\cpupower\setup.exe] in [start] - [Run], and select [OK].Follow the on-screen instructions.
B Select [Performance] in [start] - [Panasonic] - [CPU Idle Setting] andselect [OK], then select [Yes].The computer will be restarted automatically.
If these phenomena occur even with the above settings, select [start] - [Control Panel] - [Performance and Maintenance] - [PoweOptions] - [Power Schemes], select [Always On] from [Power schemes], and select [OK].
• These operations will be helpful in easing the performance losses resulting from CPU power saving functions, but will not be effective against the phenomena resulting from other causes. (e.g., noise generated during periods of exceptionally high load on the CPU, such as during video playback).
• When these operations are performed, the battery running time will be reduced to some extent. We thus recommend that when these phenomena do not occur, you should select [Battery (Windows XP Standard)] in [CPU IdleSetting], and return [Power schemes] in [Power Options] to [Portable/Laptop
perations
d/write to a floppy disk Are you using the Panasonic CF-VFDU03 USB floppy disk drive (optional)?Has the floppy disk been correctly inserted?Has the floppy disk been correctly formatted?Your floppy disk content may be corrupted.
rite to a disk Is the floppy disk write-protected?
ecting Peripherals
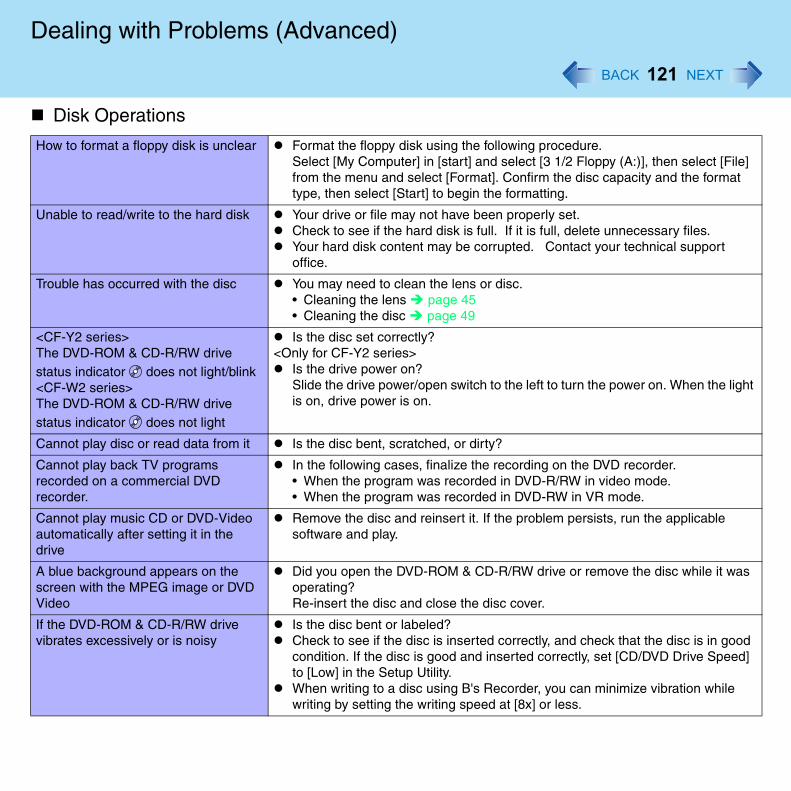
Dealin
How to form
Unable to r
Trouble ha
<CF-Y2 seThe DVD-Rstatus indic<CF-W2 seThe DVD-Rstatus indic
t
Cannot pla
Cannot plarecorded orecorder.
Cannot plaautomaticadrive
A blue bacscreen withVideo
If the DVD-vibrates ex
Disk O
121
g with Problems (Advanced)
at a floppy disk is unclear Format the floppy disk using the following procedure.Select [My Computer] in [start] and select [3 1/2 Floppy (A:)], then select [File]from the menu and select [Format]. Confirm the disc capacity and the format type, then select [Start] to begin the formatting.
ead/write to the hard disk Your drive or file may not have been properly set.Check to see if the hard disk is full. If it is full, delete unnecessary files.Your hard disk content may be corrupted. Contact your technical support office.
s occurred with the disc You may need to clean the lens or disc.• Cleaning the lens page 45• Cleaning the disc page 49
ries>OM & CD-R/RW drive ator does not light/blinkries>OM & CD-R/RW drive ator does not light
Is the disc set correctly?<Only for CF-Y2 series>
Is the drive power on?Slide the drive power/open switch to the left to turn the power on. When the lighis on, drive power is on.
y disc or read data from it Is the disc bent, scratched, or dirty?
y back TV programs n a commercial DVD
In the following cases, finalize the recording on the DVD recorder.• When the program was recorded in DVD-R/RW in video mode.• When the program was recorded in DVD-RW in VR mode.
y music CD or DVD-Video lly after setting it in the
Remove the disc and reinsert it. If the problem persists, run the applicable software and play.
kground appears on the the MPEG image or DVD
Did you open the DVD-ROM & CD-R/RW drive or remove the disc while it wasoperating?Re-insert the disc and close the disc cover.
ROM & CD-R/RW drive cessively or is noisy
Is the disc bent or labeled?Check to see if the disc is inserted correctly, and check that the disc is in goodcondition. If the disc is good and inserted correctly, set [CD/DVD Drive Speed]to [Low] in the Setup Utility.When writing to a disc using B's Recorder, you can minimize vibration while writing by setting the writing speed at [8x] or less.
perations
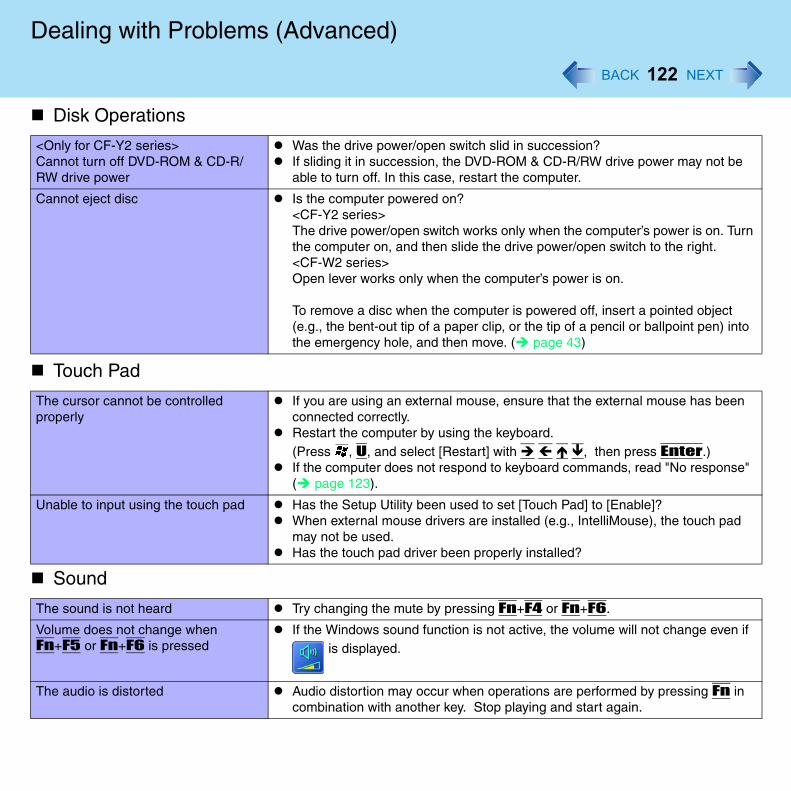
Dealin
<Only for CCannot turRW drive p
Cannot eje
Touch
The cursorproperly
Unable to i
Sound
The sound
Volume doFn+F5 or
The audio
Disk O
122
g with Problems (Advanced)
F-Y2 series>n off DVD-ROM & CD-R/ower
Was the drive power/open switch slid in succession?If sliding it in succession, the DVD-ROM & CD-R/RW drive power may not be able to turn off. In this case, restart the computer.
ct disc Is the computer powered on?<CF-Y2 series>The drive power/open switch works only when the computer’s power is on. Turnthe computer on, and then slide the drive power/open switch to the right.<CF-W2 series>Open lever works only when the computer’s power is on.
To remove a disc when the computer is powered off, insert a pointed object (e.g., the bent-out tip of a paper clip, or the tip of a pencil or ballpoint pen) intothe emergency hole, and then move. ( page 43)
Pad
cannot be controlled If you are using an external mouse, ensure that the external mouse has been connected correctly.Restart the computer by using the keyboard. (Press , U, and select [Restart] with , then press Enter.)If the computer does not respond to keyboard commands, read "No response"( page 123).
nput using the touch pad Has the Setup Utility been used to set [Touch Pad] to [Enable]? When external mouse drivers are installed (e.g., IntelliMouse), the touch pad may not be used. Has the touch pad driver been properly installed?
is not heard Try changing the mute by pressing Fn+F4 or Fn+F6.
es not change when Fn+F6 is pressed
If the Windows sound function is not active, the volume will not change even if is displayed.
is distorted Audio distortion may occur when operations are performed by pressing Fn in combination with another key. Stop playing and start again.
perations
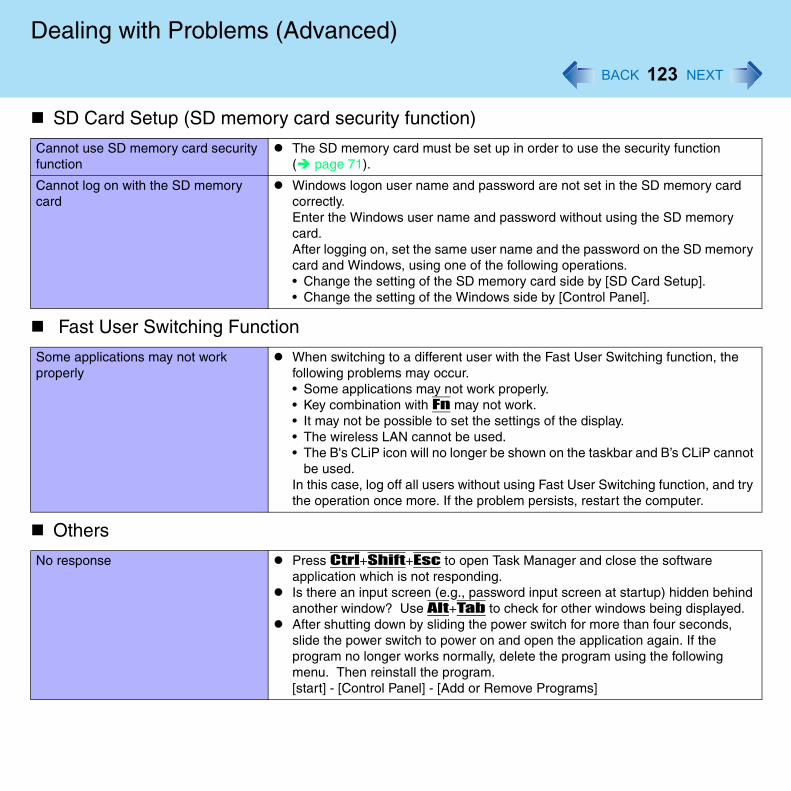
Dealin
SD C
Cannot usefunction
Cannot logcard
Fast
Some applproperly
t
Other
No respon
123
g with Problems (Advanced)
ard Setup (SD memory card security function)
SD memory card security The SD memory card must be set up in order to use the security function ( page 71).
on with the SD memory Windows logon user name and password are not set in the SD memory card correctly.Enter the Windows user name and password without using the SD memory card.After logging on, set the same user name and the password on the SD memorycard and Windows, using one of the following operations.• Change the setting of the SD memory card side by [SD Card Setup].• Change the setting of the Windows side by [Control Panel].
User Switching Function
ications may not work When switching to a different user with the Fast User Switching function, the following problems may occur.• Some applications may not work properly.• Key combination with Fn may not work.• It may not be possible to set the settings of the display.• The wireless LAN cannot be used.• The B's CLiP icon will no longer be shown on the taskbar and B’s CLiP canno
be used.In this case, log off all users without using Fast User Switching function, and trythe operation once more. If the problem persists, restart the computer.
s
se Press Ctrl+Shift+Esc to open Task Manager and close the software application which is not responding.Is there an input screen (e.g., password input screen at startup) hidden behindanother window? Use Alt+Tab to check for other windows being displayed.After shutting down by sliding the power switch for more than four seconds, slide the power switch to power on and open the application again. If the program no longer works normally, delete the program using the following menu. Then reinstall the program.[start] - [Control Panel] - [Add or Remove Programs]
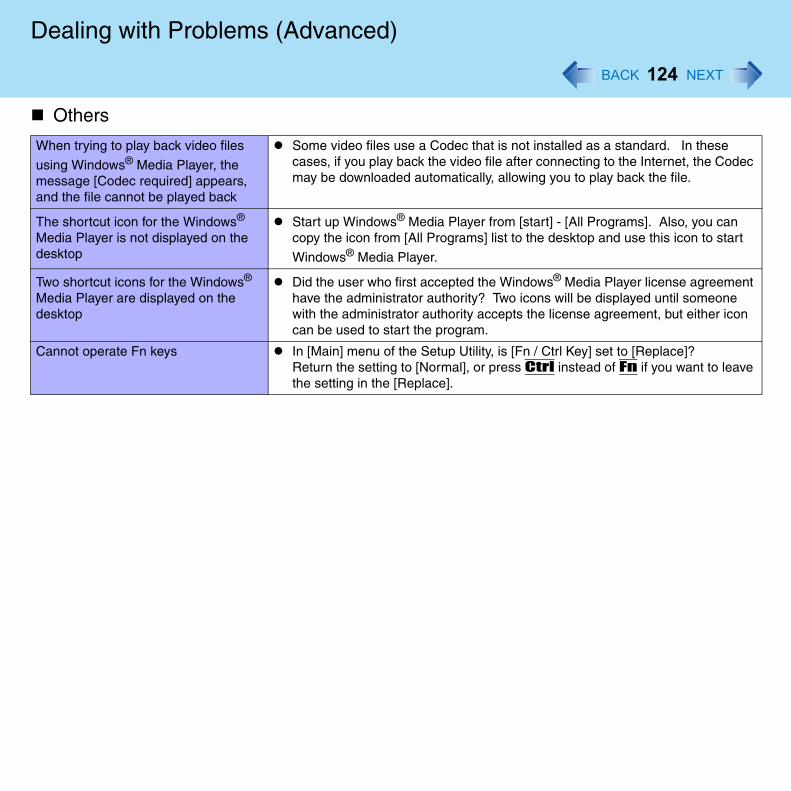
Dealin
When tryin
using Windmessage [and the file
The shortcMedia Playdesktop
Two shortcMedia Playdesktop
t
Cannot op
Other
124
g with Problems (Advanced)
g to play back video files
ows® Media Player, the Codec required] appears, cannot be played back
Some video files use a Codec that is not installed as a standard. In these cases, if you play back the video file after connecting to the Internet, the Codecmay be downloaded automatically, allowing you to play back the file.
ut icon for the Windows® er is not displayed on the
Start up Windows® Media Player from [start] - [All Programs]. Also, you can copy the icon from [All Programs] list to the desktop and use this icon to start
Windows® Media Player.
ut icons for the Windows® er are displayed on the
Did the user who first accepted the Windows® Media Player license agreemenhave the administrator authority? Two icons will be displayed until someone with the administrator authority accepts the license agreement, but either iconcan be used to start the program.
erate Fn keys In [Main] menu of the Setup Utility, is [Fn / Ctrl Key] set to [Replace]?Return the setting to [Normal], or press Ctrl instead of Fn if you want to leavethe setting in the [Replace].
s
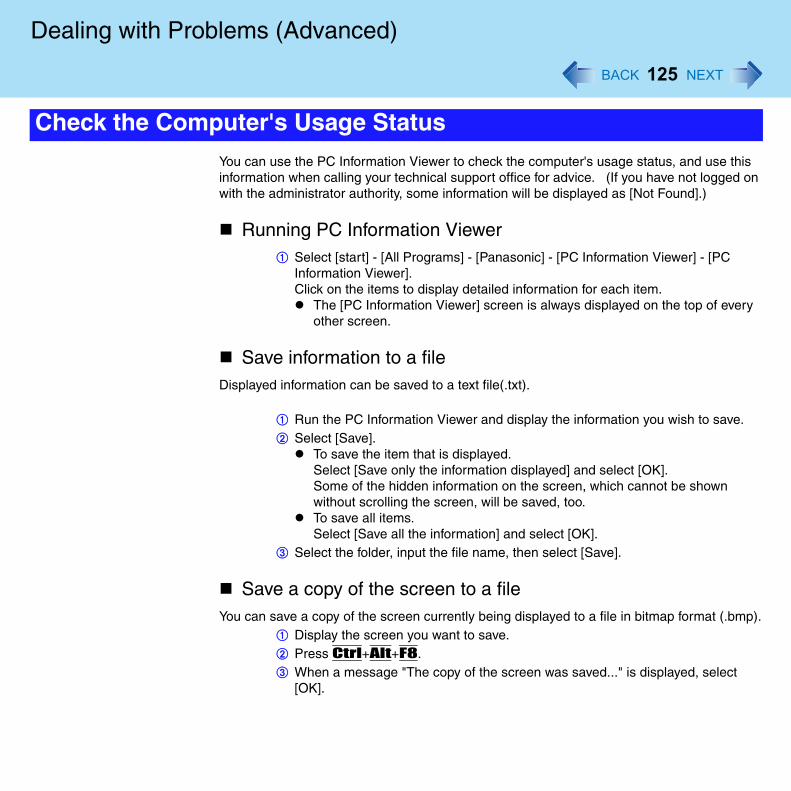
Dealin
n
).
Check
125
g with Problems (Advanced)
You can use the PC Information Viewer to check the computer's usage status, and use thisinformation when calling your technical support office for advice. (If you have not logged owith the administrator authority, some information will be displayed as [Not Found].)
Running PC Information ViewerA Select [start] - [All Programs] - [Panasonic] - [PC Information Viewer] - [PC
Information Viewer]. Click on the items to display detailed information for each item.
The [PC Information Viewer] screen is always displayed on the top of everyother screen.
Save information to a fileDisplayed information can be saved to a text file(.txt).
A Run the PC Information Viewer and display the information you wish to save.B Select [Save].
To save the item that is displayed.Select [Save only the information displayed] and select [OK].Some of the hidden information on the screen, which cannot be shown without scrolling the screen, will be saved, too.To save all items.Select [Save all the information] and select [OK].
C Select the folder, input the file name, then select [Save].
Save a copy of the screen to a fileYou can save a copy of the screen currently being displayed to a file in bitmap format (.bmp
A Display the screen you want to save.B Press Ctrl+Alt+F8.C When a message "The copy of the screen was saved..." is displayed, select
[OK].
the Computer's Usage Status
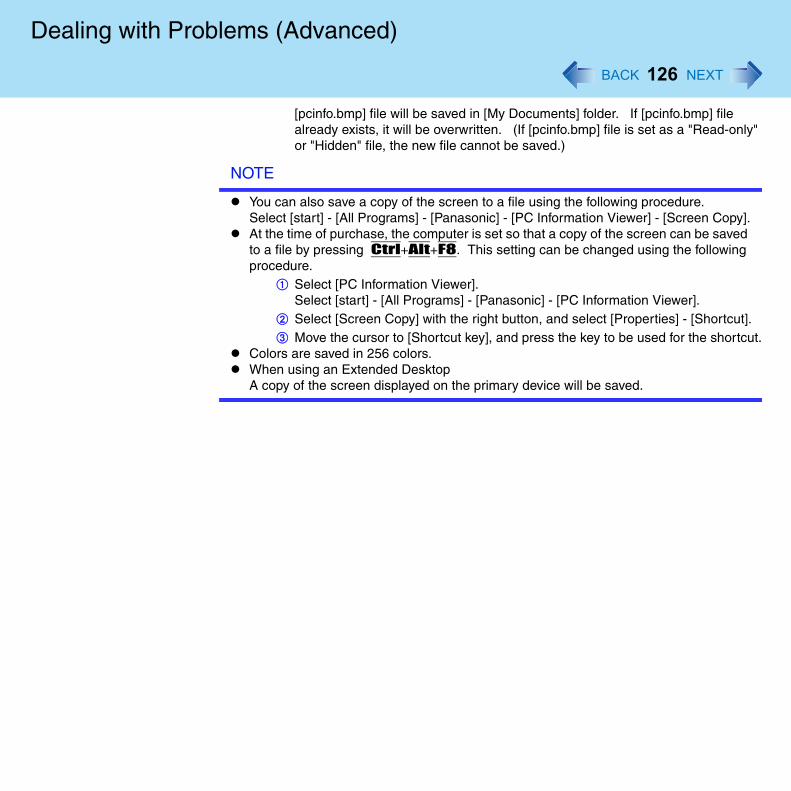
Dealin
"
.t.
126
g with Problems (Advanced)
[pcinfo.bmp] file will be saved in [My Documents] folder. If [pcinfo.bmp] file already exists, it will be overwritten. (If [pcinfo.bmp] file is set as a "Read-onlyor "Hidden" file, the new file cannot be saved.)
NOTE
You can also save a copy of the screen to a file using the following procedure.Select [start] - [All Programs] - [Panasonic] - [PC Information Viewer] - [Screen Copy].At the time of purchase, the computer is set so that a copy of the screen can be savedto a file by pressing Ctrl+Alt+F8. This setting can be changed using the following procedure.
A Select [PC Information Viewer].Select [start] - [All Programs] - [Panasonic] - [PC Information Viewer].
B Select [Screen Copy] with the right button, and select [Properties] - [Shortcut]C Move the cursor to [Shortcut key], and press the key to be used for the shortcu
Colors are saved in 256 colors.When using an Extended DesktopA copy of the screen displayed on the primary device will be saved.
127
CopyrightThis manual is copyrighted by Matsushita Electric Industrial Co., Ltd. with all rights reserved. No part of this manual may be reproduced in any form without the prior written permission of Matsushita Electric Industrial Co., Ltd. No patent liability is assumed with respect to the use of the information contained herein.
© 2004 Matsushita Electric Industrial Co., Ltd. All Rights Reserved.
DisclaimerComputer specifications and manuals are subject to change without notice. Matsushita Electric Industrial Co., Ltd. assumes no liability for damage incurred directly or indirectly from errors, omissions or discrepancies between the computer and the manuals.
Trademarks• Microsoft, Windows, the Windows logo and IntelliMouse are registered trademarks of
Microsoft Corporation of the United States and/or other countries.• Intel, Pentium and PROSet are either registered trademarks or trademarks of Intel
Corporation.• SD Logo is a trademark.
• Adobe® and Acrobat® are either registered trademarks or trademarks of Adobe Systems Incorporated in the United States and/or other countries.
• WinDVD™ is a trademark of InterVideo, Inc.• Panasonic is a registered trademark of Matsushita Electric Industrial Co., Ltd.
PCE0151B_XP


![· 178 w2~uz− 179 w2~− 182 w2¶a 183 w2,v0 185 w2fl 186 w2,´‡ 187 w2,^M 188 w2,â 190 w2,˛− 195 w2,ðg− 196 w2,ðg! 198 w2,ð¾ 200 w2,ð−a 201 w2,ðgG Ž ]* Z˜ ß9ü](https://img.pdfslide.net/doc/110x75/5ec4169f9cf111271f3cdc4b/178-w2uza-179-w2a-182-w2a-183-w2v0-185-w2i-186-w2a-187-w2m-188.jpg)