Embed Size (px)
Citation preview

PHYSICAL INVENTORY
MaddenCo, Inc. Revised October 2009
Copyright © 2009 MaddenCo, Inc. All Rights Reserved.

2
Please understand that MaddenCo, Inc. has expended substantial sums in developing and maintaining its software, systems and related materials, and as a result, it has and will continue to have substantial proprietary interest and valuable trade secrets therein. Also understand that MaddenCo, Inc.’s software, systems, related materials and the "ideas" represented by software, as well as the physical materials, are valuable trade secrets and are strictly confidential material, and important, and that its confidentiality gravely affects the successful conduct of the business of MaddenCo, Inc.
3
TABLE OF CONTENTS
PHYSICAL INVENTORY OVERVIEW .................................................................................................................. 5
PHYSICAL INVENTORY..................................................................................................................................... 6
CREATE TO BE INVENTORIED FILE ....................................................................................................................... 7 CAPTURE SYSTEM COUNTS .............................................................................................................................. 10 PRINT COUNT SHEETS .................................................................................................................................... 12 INPUT COUNTS.............................................................................................................................................. 16
Serial Number Count Input ................................................................................................................... 18 Toggle Between Incremental and Total Quantity................................................................................. 19 Customer retread count detail.............................................................................................................. 20
PRINT EDIT REGISTER ..................................................................................................................................... 21 CREATE ADJUSTMENT FILE .............................................................................................................................. 24
OTHER PHYSICAL INVENTORY MENU OPTIONS............................................................................................ 27
ACCOUNTING FOR PRODUCT ON OPEN ORDERS AND RECEIVERS............................................................... 29
RECOMMENDED STEPS WHEN TAKING A PHYSICAL INVENTORY ................................................................ 31
TIRE DEALER SYSTEM PHYSICAL INVENTORY CONTROL RECORDS............................................................... 32
PRODUCT BARCODE MAINTENANCE............................................................................................................ 35
SCAN INVENTORY USING A PORTABLE HAND‐HELD DEVICE ........................................................................ 37
SCANNING BARCODE AT PHYSICAL INVENTORY TIME ............................................................................................ 38 SAMPLE RETREAD FINISHED GOODS LABEL ......................................................................................................... 41
Error and Warning Messages You May Encounter............................................................................... 42 APPLYING SCANNED INVENTORY....................................................................................................................... 46
INVENTORY ADJUSTMENTS .......................................................................................................................... 47
CREATE A MANUAL ADJUSTMENT..................................................................................................................... 48 ADJUSTING AN INVENTORY ITEM ...................................................................................................................... 49
Inventory adjustment quantity ............................................................................................................. 50 Work with Inventory Adjustment Detail ............................................................................................... 51 Serial Numbered Item Adjustment ....................................................................................................... 52 Core Product Adjustment...................................................................................................................... 55 Input a Dollar Adjustment .................................................................................................................... 55 Retread Inventory Adjustment ............................................................................................................. 56
PRINTING AN ADJUSTMENT REGISTER................................................................................................................ 59 Sample Inventory Adjustment Register ................................................................................................ 59
INVENTORY ADJUSTMENT COST CALCULATIONS .................................................................................................... 60 INVENTORY ADJUSTMENT GL POSTING COST CALCULATIONS................................................................................... 60
TIRE DEALER SYSTEM INVENTORY ADJUSTMENT CONTROL RECORDS ........................................................ 61

4
5
Physical Inventory Overview The MaddenCo Physical Inventory feature is designed to simplify the process of taking your inventory counts and calculating and keying in the inventory adjustment differences. By having you build a file with items you wish to count and capturing the on hands at that very moment you are counting, this feature also reduces the urgency to have all of your count values immediately keyed into the system. The saying “Timing is everything” is the most important point to keep in mind as you implement this functionality. Planning a schedule for your inventory and performing the appropriate steps described in this manual, in the proper order, will help eliminate the challenges involved in taking an accurate inventory. As a guide, please refer to the “Recommended Steps When Taking a Physical Inventory” section of this document for a list of steps that should be taken. Here, the steps involved are listed in the order they should occur. To help further improve the accuracy of your inventory, MaddenCo has added advanced functionality that now allows inventory counts to be taken using the latest wireless computer technologies. These technologies include the use of Portable Wireless hand-held scanners to scan barcodes on inventory items in place of manually counting and writing quantities on paper count sheets. Yes, taking inventory can now be a paperless process which will eliminate a lot of errors that occur whenever you are “moving a lot of paperwork around the office”. With many vendors now shipping products with barcode labels on them, the ability to implement scanning has become that much easier. In addition, taking inventories with a scanner has been shown to increase not only the accuracy of your inventories but also saves a tremendous amount of time in the process. In fact, MaddenCo customers (of all sizes) who have started initially with limited deployments of inventory scanning have, after seeing the results, quickly expanded their implementations throughout their organizations. To get started using the Physical Inventory module, we suggest reviewing this manual and getting all the necessary control records setup that allow the module to be used the way you handle taking your physical inventory counts. As with all MaddenCo functionality, you should find that the Physical Inventory Module is also very flexible in order to fit the way you do business. You will start the process by deciding which products you will be counting. Keep in mind that you can choose to inventory all products or limit your counts by product vendor, type, or class. You can also single out groups of products to inventory by many of the other fields you see in your product maintenance records. After deciding which products to inventory, you will want to schedule your counts so they occur after a regular end of day update is run. Remember, on hand as of last update counts (which most people use as the ones to reconcile) are updated when an end of day update occurs. So again, as noted, you will want to start your physical inventory process fresh right after a daily update. When the end of day update is complete, your next step is to create what we call “To Be Inventoried Files”. These are the files that will contain the products that you wish to count and the captured system on hand quantities that you will match your counts up against. Let’s begin our tour of “Physical Inventory” by guiding you through each of the screens involved starting with the initial step of creating your “To Be Inventoried Files”.
6
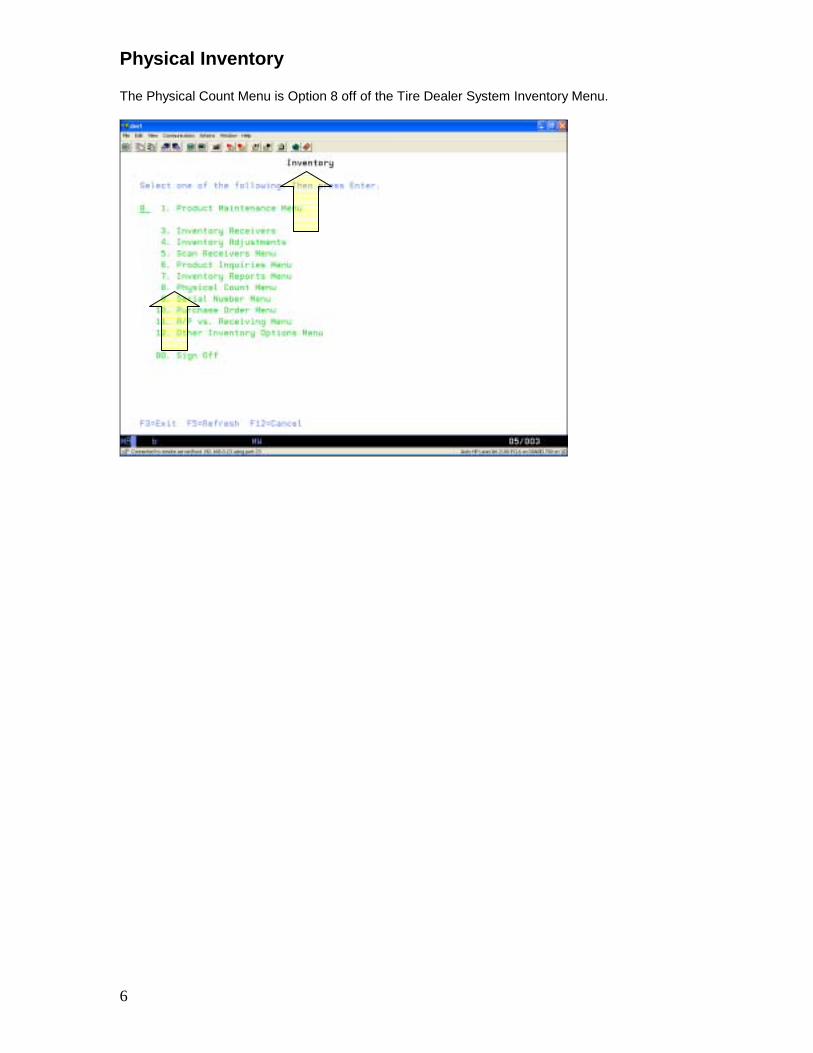
Physical Inventory The Physical Count Menu is Option 8 off of the Tire Dealer System Inventory Menu.
7
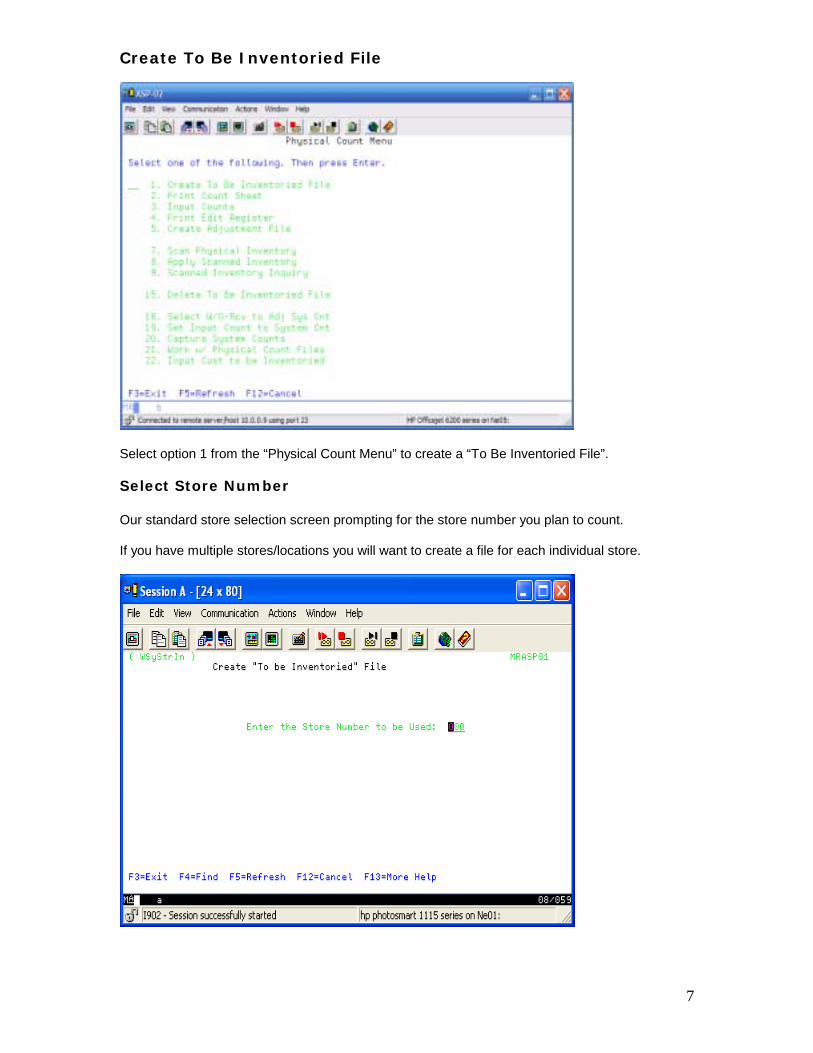
Create To Be Inventoried File
Select option 1 from the “Physical Count Menu” to create a “To Be Inventoried File”. Select Store Number Our standard store selection screen prompting for the store number you plan to count. If you have multiple stores/locations you will want to create a file for each individual store.
8
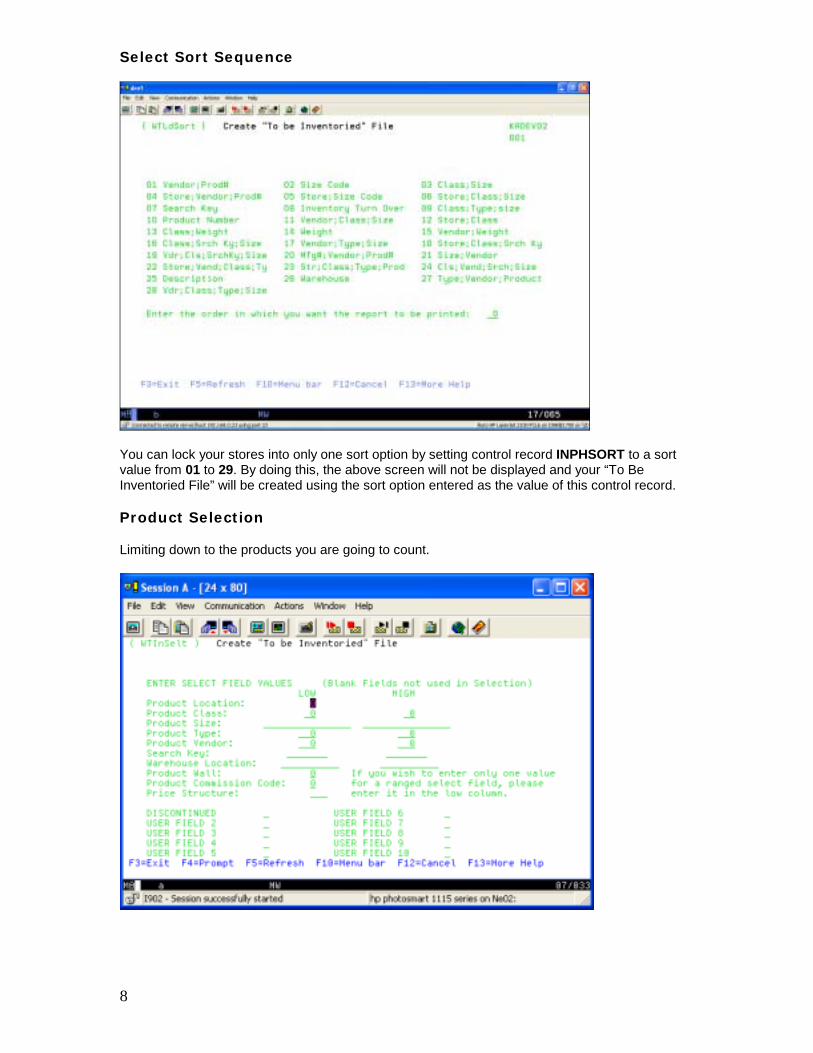
Select Sort Sequence
You can lock your stores into only one sort option by setting control record INPHSORT to a sort value from 01 to 29. By doing this, the above screen will not be displayed and your “To Be Inventoried File” will be created using the sort option entered as the value of this control record. Product Selection Limiting down to the products you are going to count.
9
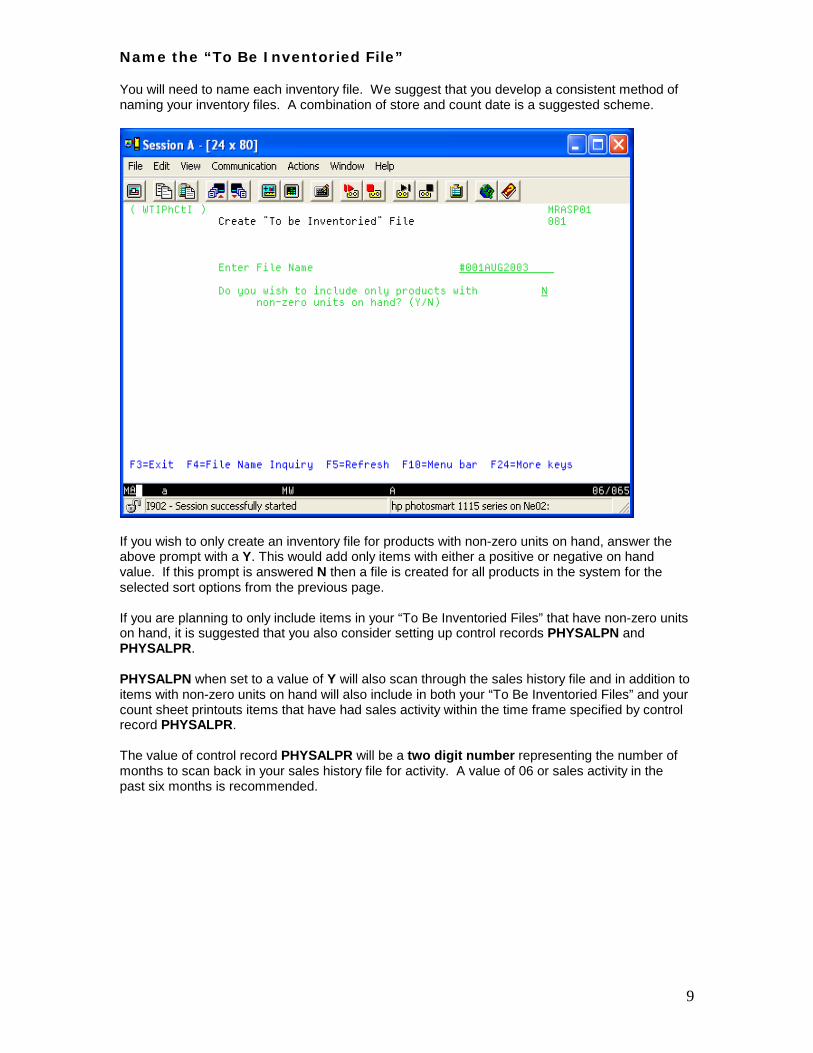
Name the “To Be Inventoried File” You will need to name each inventory file. We suggest that you develop a consistent method of naming your inventory files. A combination of store and count date is a suggested scheme.
If you wish to only create an inventory file for products with non-zero units on hand, answer the above prompt with a Y. This would add only items with either a positive or negative on hand value. If this prompt is answered N then a file is created for all products in the system for the selected sort options from the previous page. If you are planning to only include items in your “To Be Inventoried Files” that have non-zero units on hand, it is suggested that you also consider setting up control records PHYSALPN and PHYSALPR. PHYSALPN when set to a value of Y will also scan through the sales history file and in addition to items with non-zero units on hand will also include in both your “To Be Inventoried Files” and your count sheet printouts items that have had sales activity within the time frame specified by control record PHYSALPR. The value of control record PHYSALPR will be a two digit number representing the number of months to scan back in your sales history file for activity. A value of 06 or sales activity in the past six months is recommended.
10
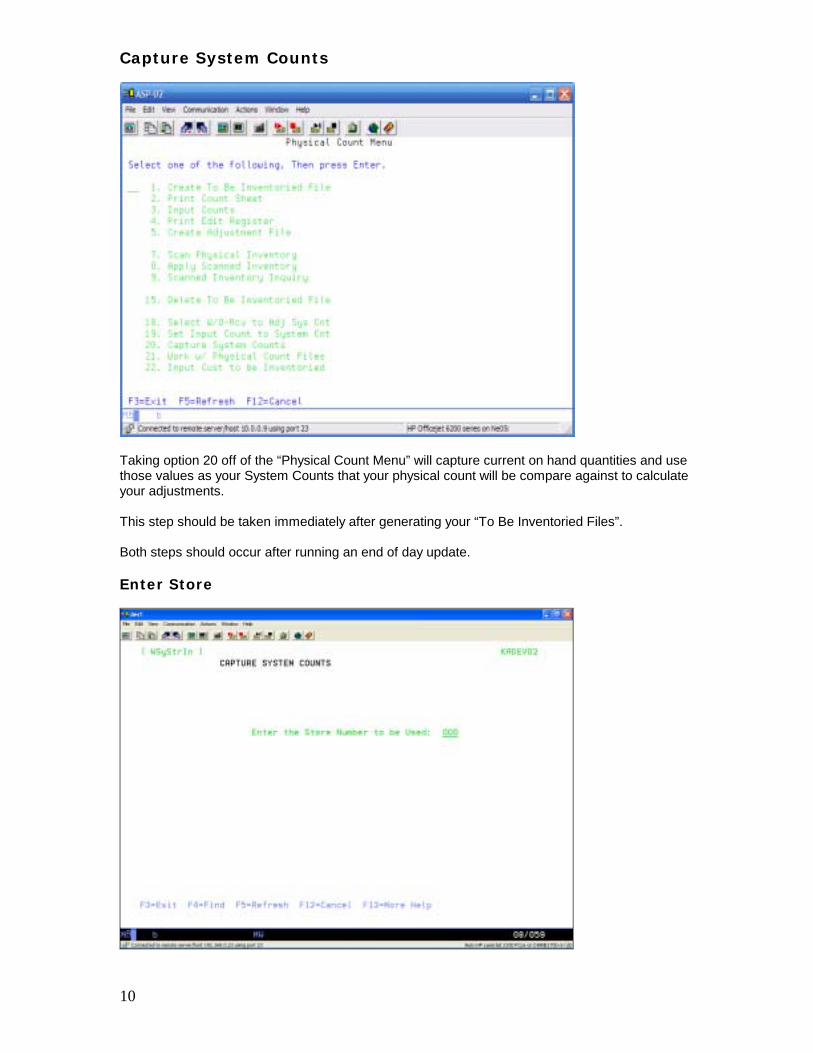
Capture System Counts
Taking option 20 off of the “Physical Count Menu” will capture current on hand quantities and use those values as your System Counts that your physical count will be compare against to calculate your adjustments. This step should be taken immediately after generating your “To Be Inventoried Files”. Both steps should occur after running an end of day update. Enter Store
11
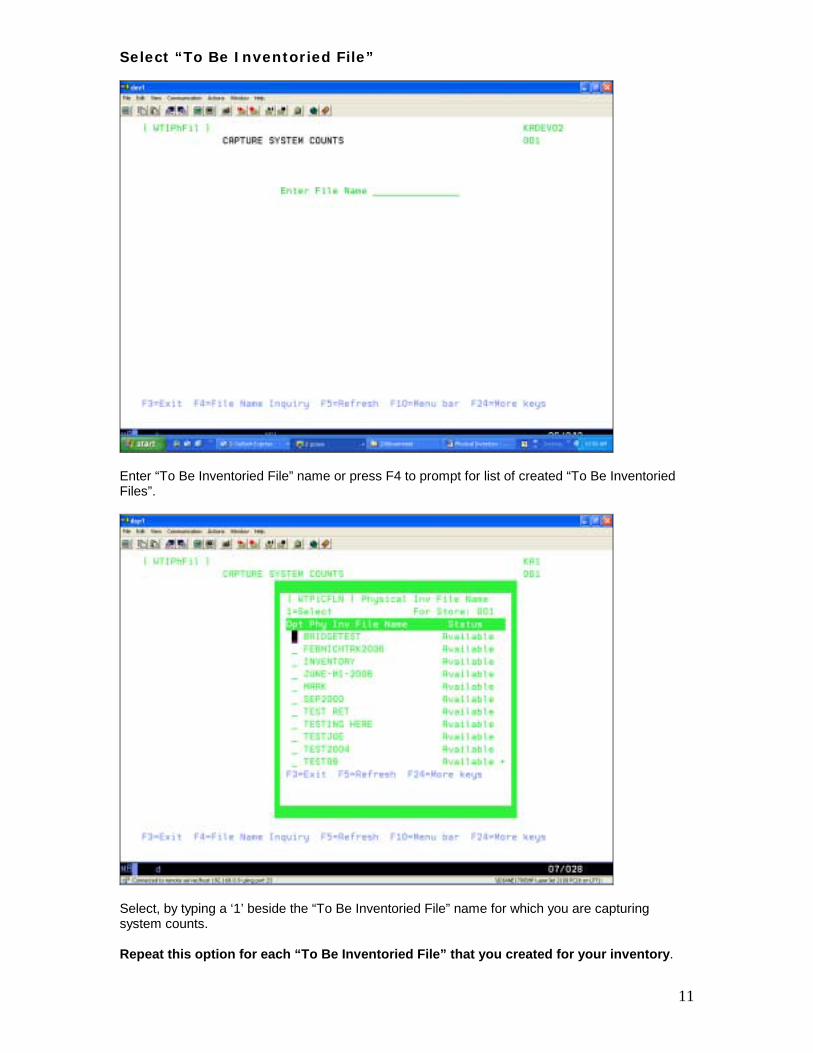
Select “To Be Inventoried File”
Enter “To Be Inventoried File” name or press F4 to prompt for list of created “To Be Inventoried Files”.
Select, by typing a ‘1’ beside the “To Be Inventoried File” name for which you are capturing system counts. Repeat this option for each “To Be Inventoried File” that you created for your inventory.
12
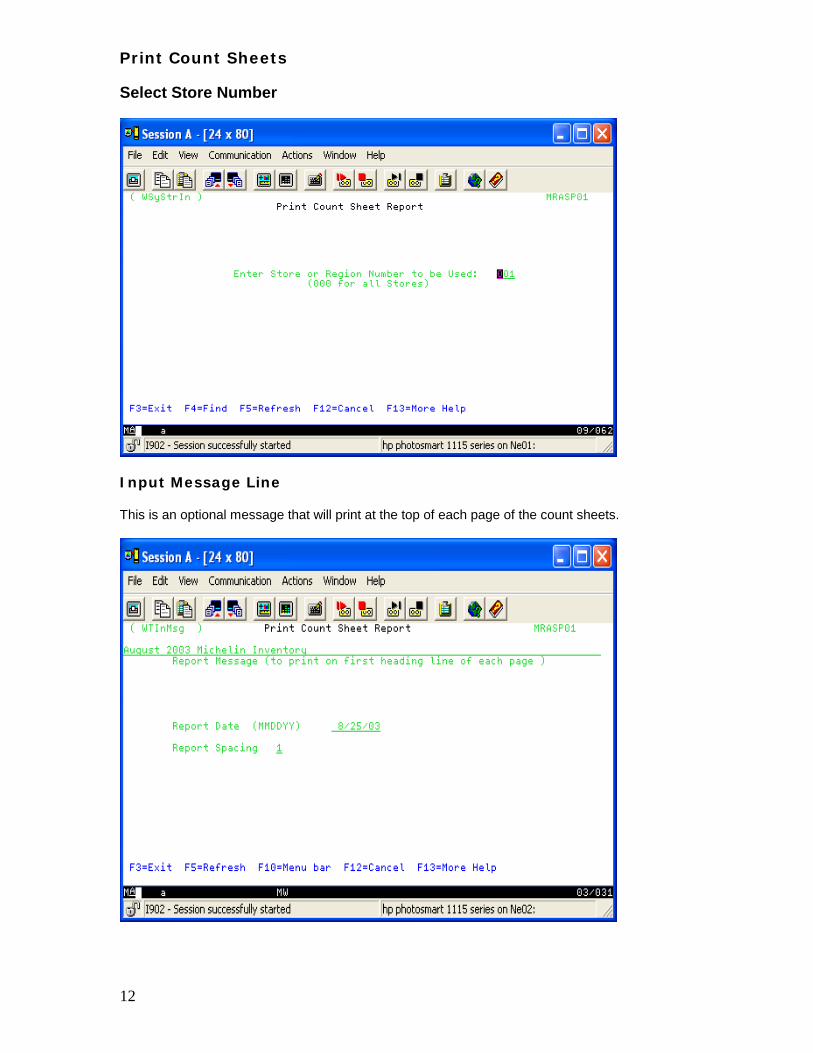
Print Count Sheets Select Store Number
Input Message Line This is an optional message that will print at the top of each page of the count sheets.
13
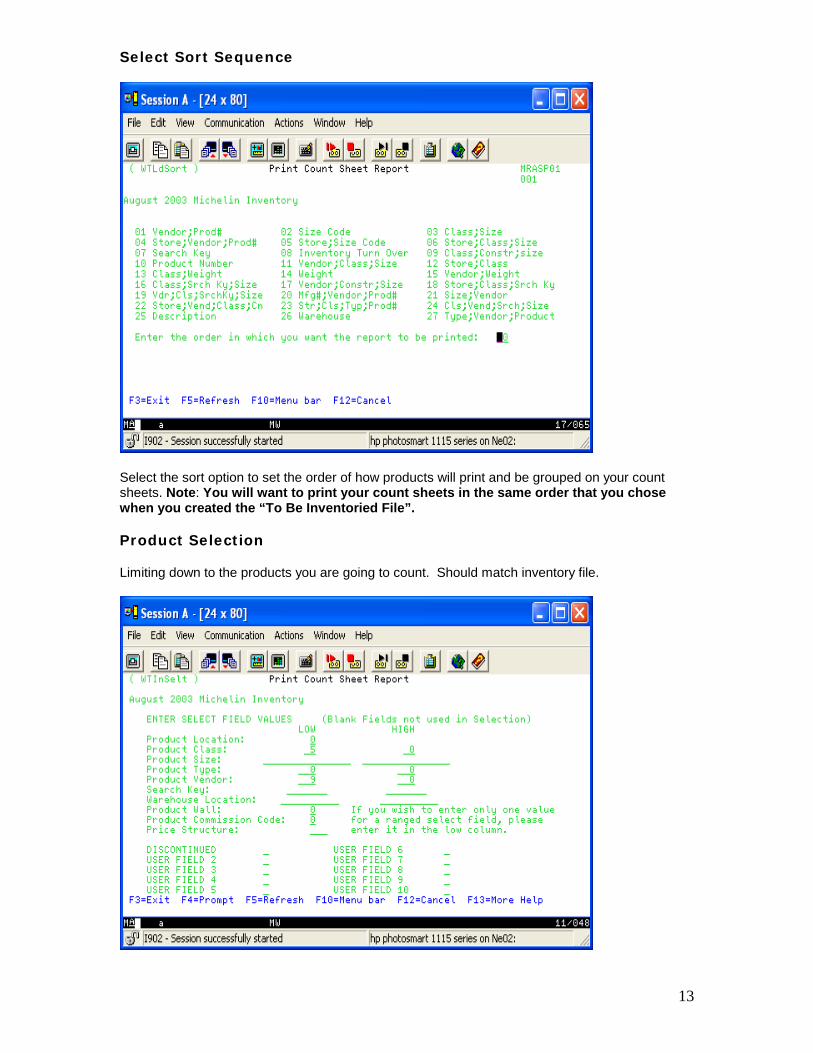
Select Sort Sequence
Select the sort option to set the order of how products will print and be grouped on your count sheets. Note: You will want to print your count sheets in the same order that you chose when you created the “To Be Inventoried File”. Product Selection Limiting down to the products you are going to count. Should match inventory file.
14
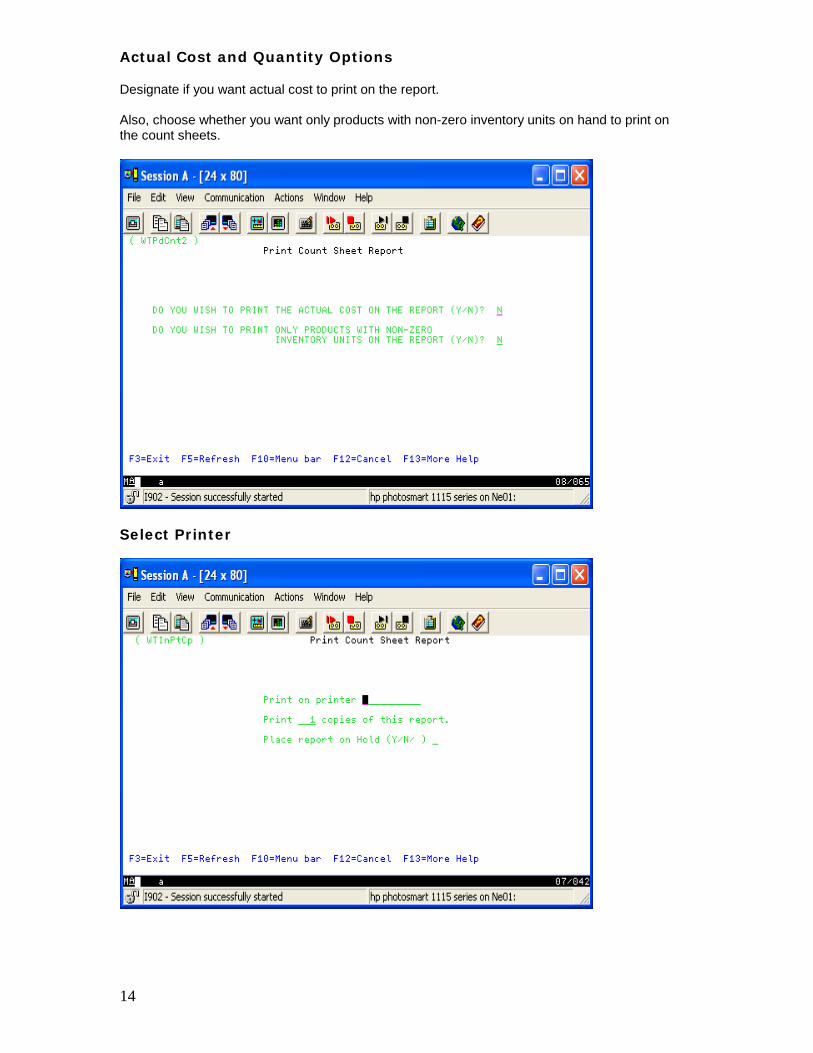
Actual Cost and Quantity Options Designate if you want actual cost to print on the report. Also, choose whether you want only products with non-zero inventory units on hand to print on the count sheets.
Select Printer
15
If control record PERSTORE contains a Y, a separate count sheet will print for each store. This is only for sort options 4, 5, 6, 12 and 18. If control record PGBRKCLS is answered Y, the report will page break by product class if you have selected a sort by product class. If control record PGBRKVND is answered Y, the report will page break by vendor if you have selected a sort by vendor. If both control records are set to a Y, the sort order must include both vendor and class for a page break to occur. If you chose to print only products with non-zero inventory and control record PHYSALYN is answered Y, the sales file is checked for activity and control record PHYSALPR contains a two digit number of how many previous months back to check for sales activity. This will print items without inventory that have had recent sales activity. If control record PHYSALPR is not on file or has 00, then sales history will not be checked. If control record PHYPRWRH contains a Y, the warehouse location and/or alternate warehouse location will print on the report. If control record PHYCPSER is answered Y, serial number products will be printed if their available inventory quantity is greater than 0. Control key TRACSER# should contain a Y in order for serial number processing to be used. Control record PHYINVOH indicates which inventory quantity will print on the count sheets. If answered with an M, the memo quantity is printed, if answered with a U, the on hand as of last nights update is printed. If the control record does not exist or is not set to a U or an M, neither quantity will print on the report. If control record PHYPRODO is answered Y, there will be 4 lines printed after the product number for writing in counts, otherwise only one line will print. If answered Y, no on hand quantities will be printed and control record PHYINVOH will not be read. To print a barcode representing the product on the printed count sheet, set control record PRTBCCNS to a Y. You can also set the number of blanks lines to print before and after the barcode to control spacing. Set control key PRTBCLBF to the number of blank lines before the barcode and control record PRTBCLAF to the number of blank lines to print after the barcode.
16
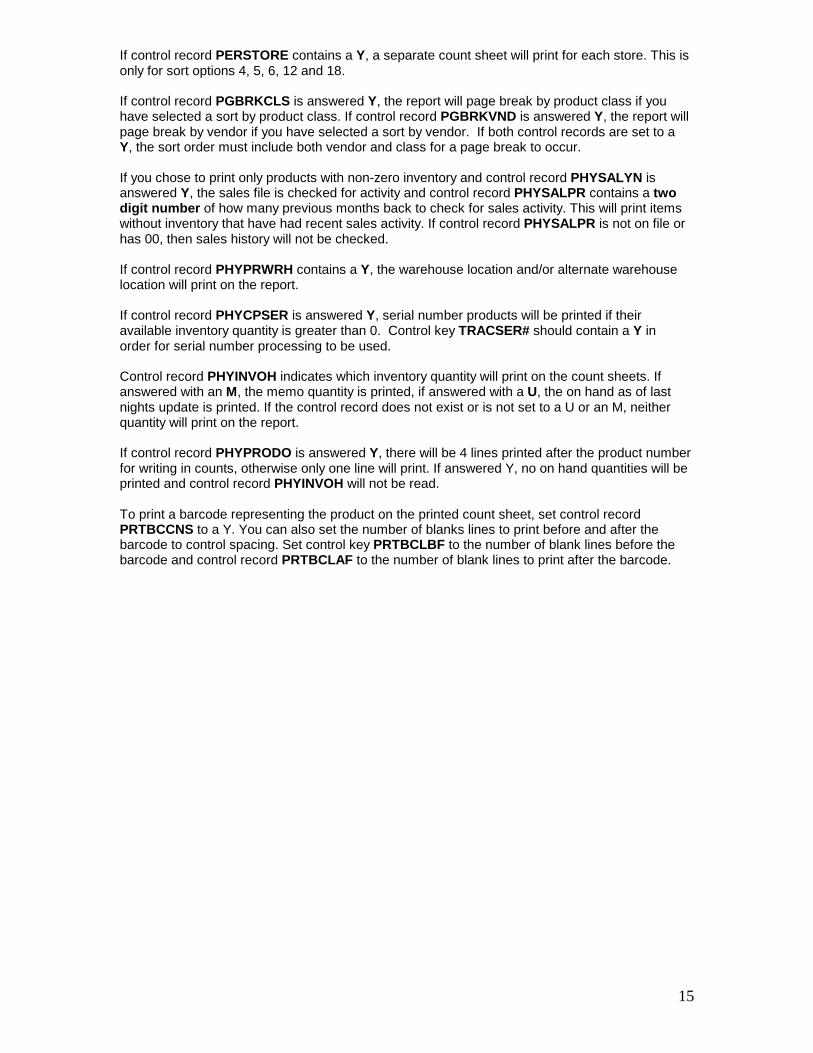
Input Counts After counts are taken, you will begin inputting your counts. Take option 3 from the “Physical Count Menu”. Select Store Number
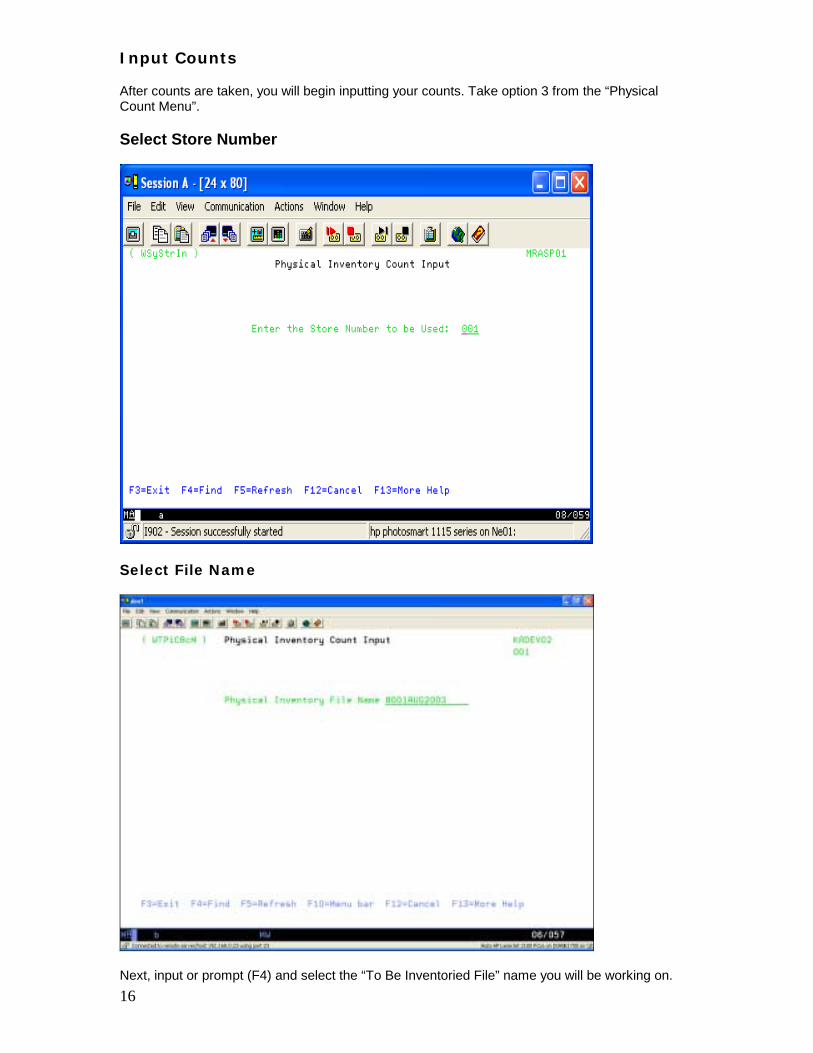
Select File Name
Next, input or prompt (F4) and select the “To Be Inventoried File” name you will be working on.
17
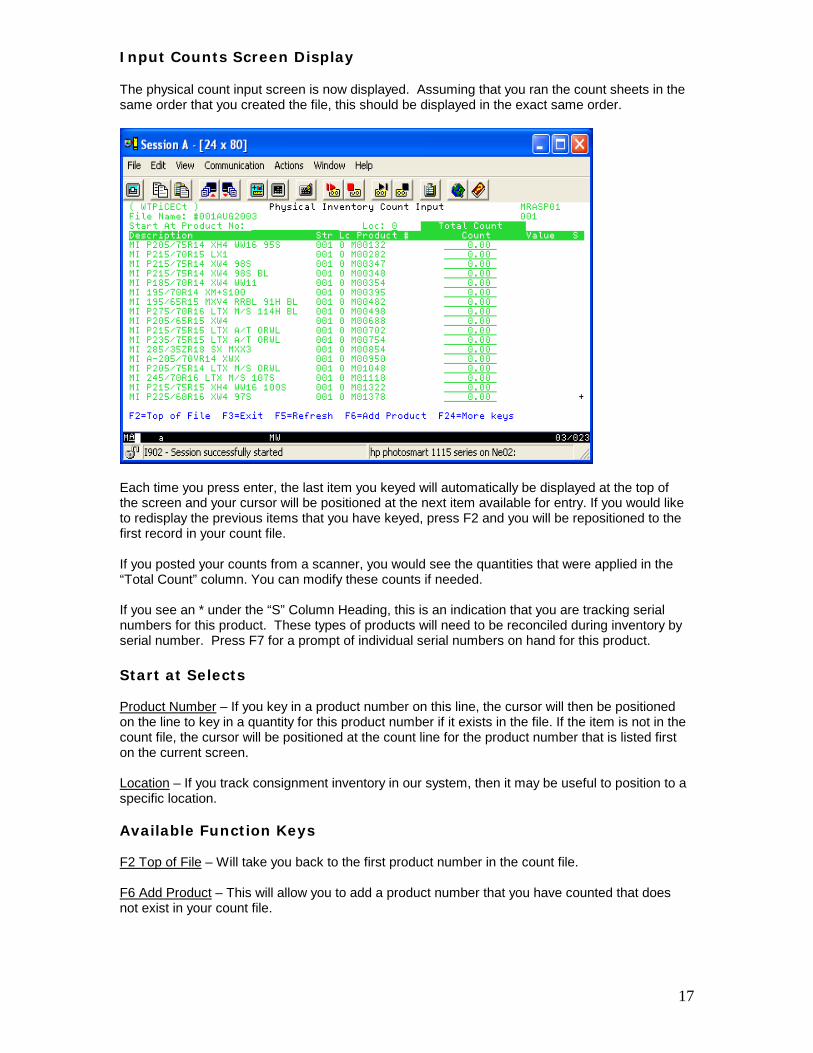
Input Counts Screen Display The physical count input screen is now displayed. Assuming that you ran the count sheets in the same order that you created the file, this should be displayed in the exact same order.
Each time you press enter, the last item you keyed will automatically be displayed at the top of the screen and your cursor will be positioned at the next item available for entry. If you would like to redisplay the previous items that you have keyed, press F2 and you will be repositioned to the first record in your count file. If you posted your counts from a scanner, you would see the quantities that were applied in the “Total Count” column. You can modify these counts if needed. If you see an * under the “S” Column Heading, this is an indication that you are tracking serial numbers for this product. These types of products will need to be reconciled during inventory by serial number. Press F7 for a prompt of individual serial numbers on hand for this product. Start at Selects Product Number – If you key in a product number on this line, the cursor will then be positioned on the line to key in a quantity for this product number if it exists in the file. If the item is not in the count file, the cursor will be positioned at the count line for the product number that is listed first on the current screen. Location – If you track consignment inventory in our system, then it may be useful to position to a specific location. Available Function Keys F2 Top of File – Will take you back to the first product number in the count file. F6 Add Product – This will allow you to add a product number that you have counted that does not exist in your count file.
18
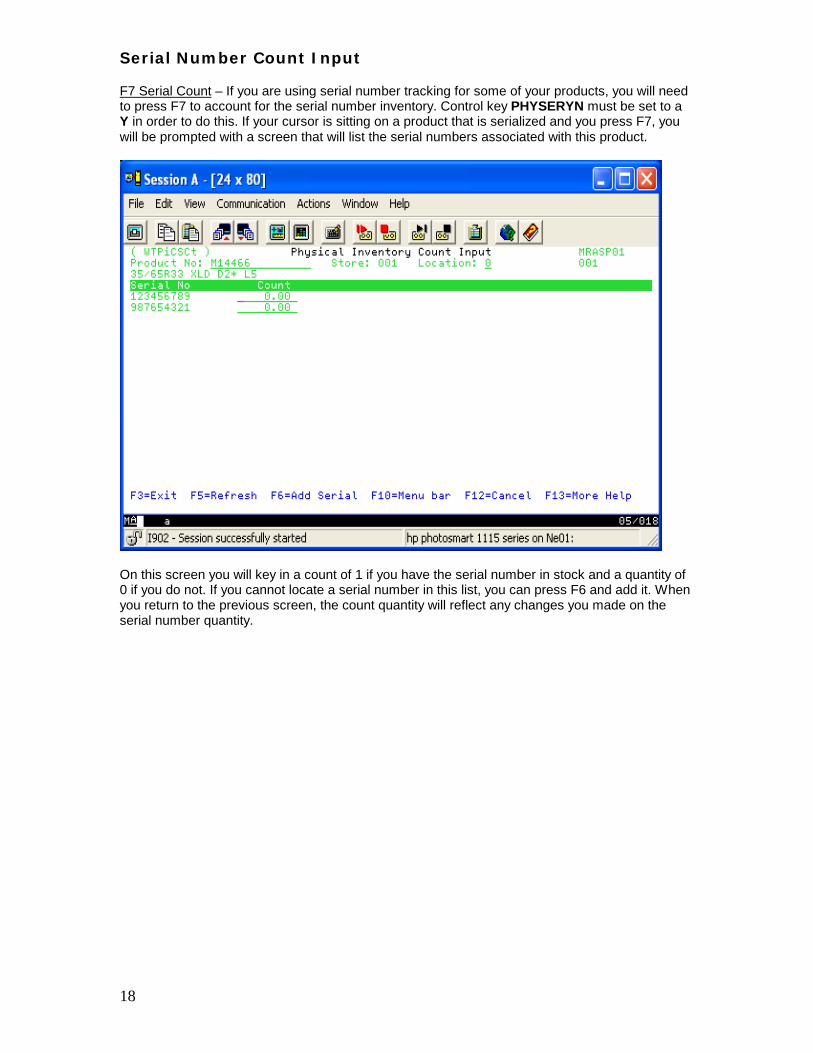
Serial Number Count Input F7 Serial Count – If you are using serial number tracking for some of your products, you will need to press F7 to account for the serial number inventory. Control key PHYSERYN must be set to a Y in order to do this. If your cursor is sitting on a product that is serialized and you press F7, you will be prompted with a screen that will list the serial numbers associated with this product.
On this screen you will key in a count of 1 if you have the serial number in stock and a quantity of 0 if you do not. If you cannot locate a serial number in this list, you can press F6 and add it. When you return to the previous screen, the count quantity will reflect any changes you made on the serial number quantity.
19
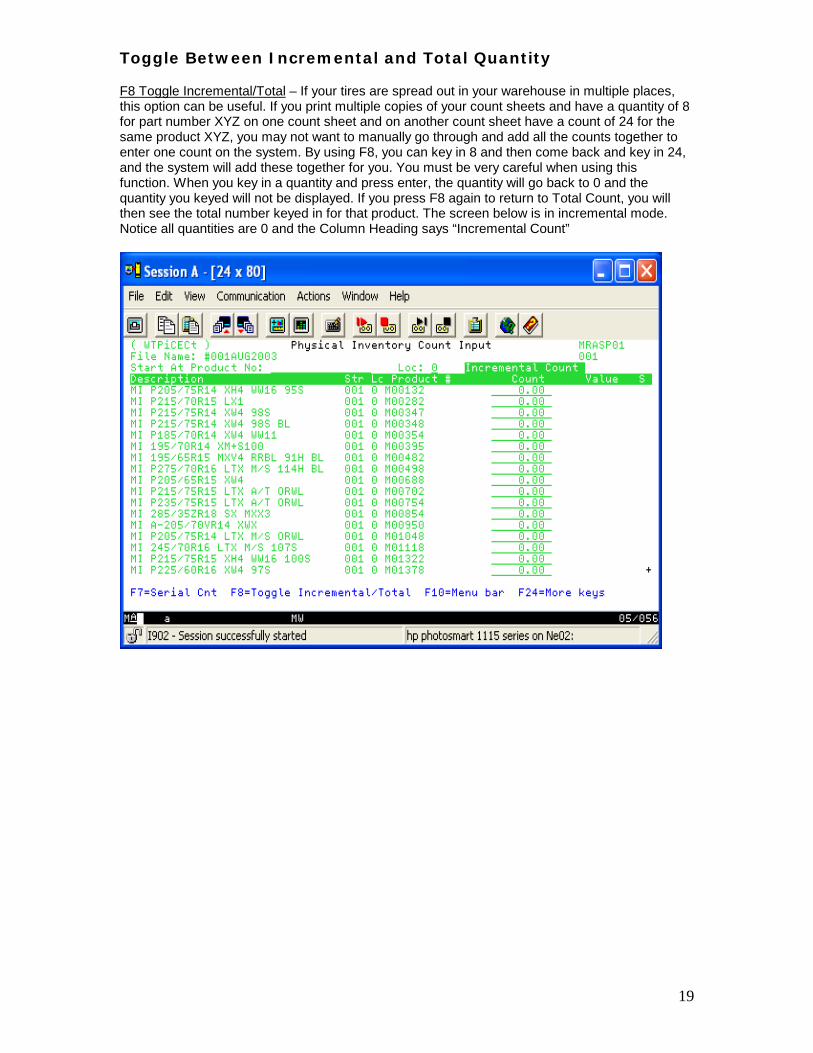
Toggle Between Incremental and Total Quantity F8 Toggle Incremental/Total – If your tires are spread out in your warehouse in multiple places, this option can be useful. If you print multiple copies of your count sheets and have a quantity of 8 for part number XYZ on one count sheet and on another count sheet have a count of 24 for the same product XYZ, you may not want to manually go through and add all the counts together to enter one count on the system. By using F8, you can key in 8 and then come back and key in 24, and the system will add these together for you. You must be very careful when using this function. When you key in a quantity and press enter, the quantity will go back to 0 and the quantity you keyed will not be displayed. If you press F8 again to return to Total Count, you will then see the total number keyed in for that product. The screen below is in incremental mode. Notice all quantities are 0 and the Column Heading says “Incremental Count”
20
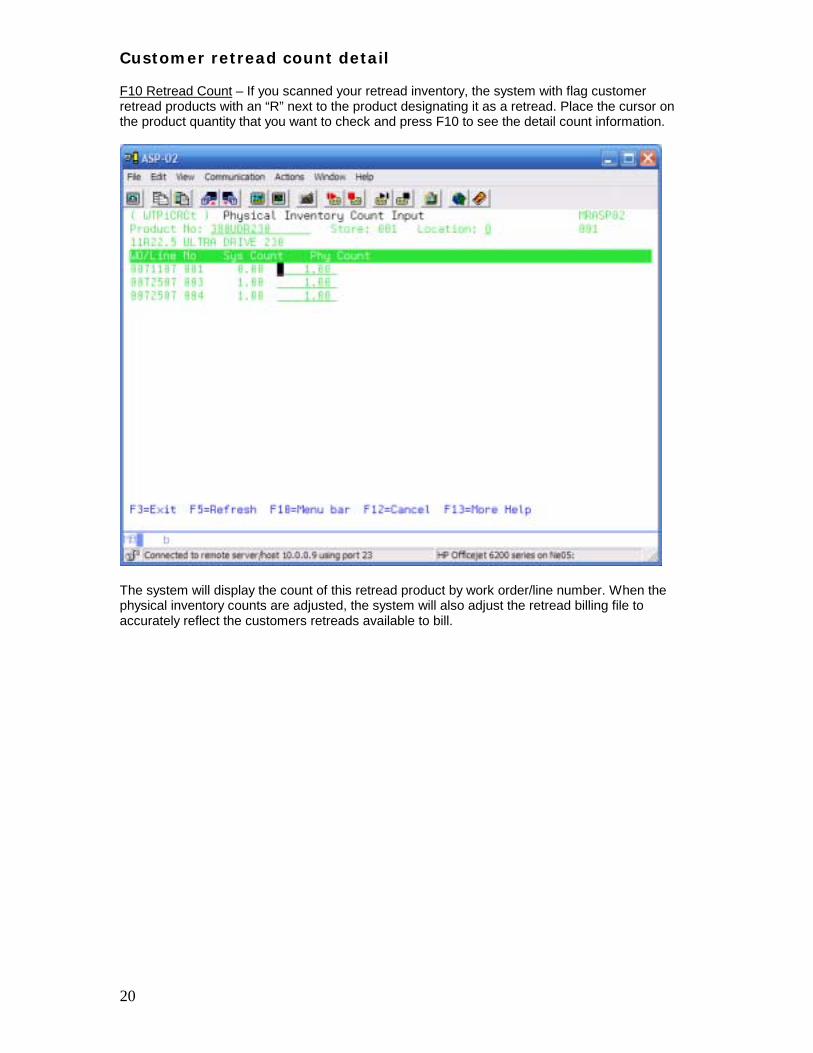
Customer retread count detail F10 Retread Count – If you scanned your retread inventory, the system with flag customer retread products with an “R” next to the product designating it as a retread. Place the cursor on the product quantity that you want to check and press F10 to see the detail count information.
The system will display the count of this retread product by work order/line number. When the physical inventory counts are adjusted, the system will also adjust the retread billing file to accurately reflect the customers retreads available to bill.
21
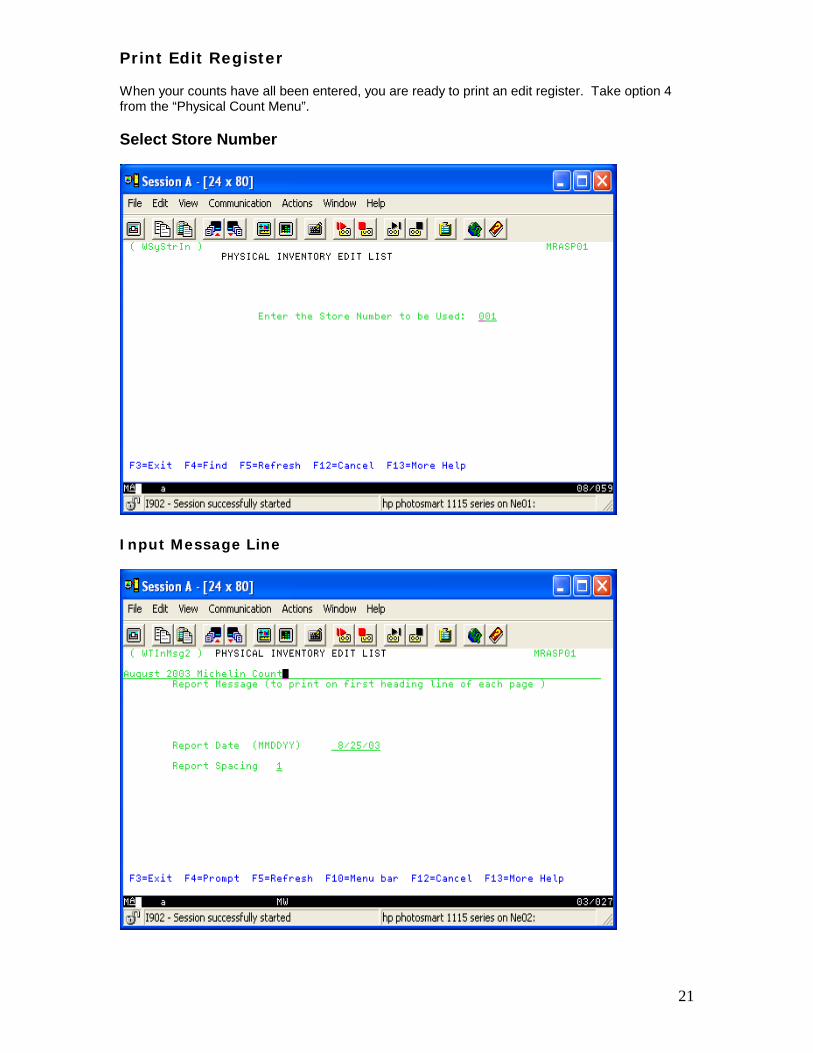
Print Edit Register When your counts have all been entered, you are ready to print an edit register. Take option 4 from the “Physical Count Menu”. Select Store Number
Input Message Line
22
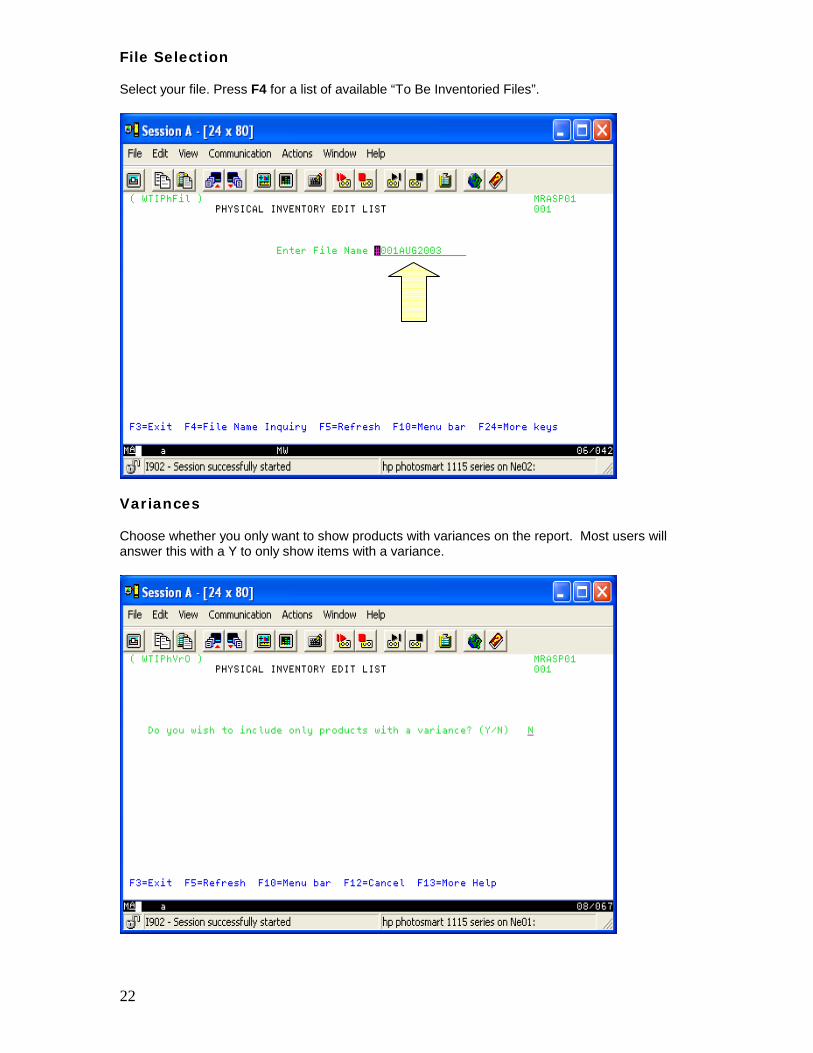
File Selection Select your file. Press F4 for a list of available “To Be Inventoried Files”.
Variances Choose whether you only want to show products with variances on the report. Most users will answer this with a Y to only show items with a variance.
23
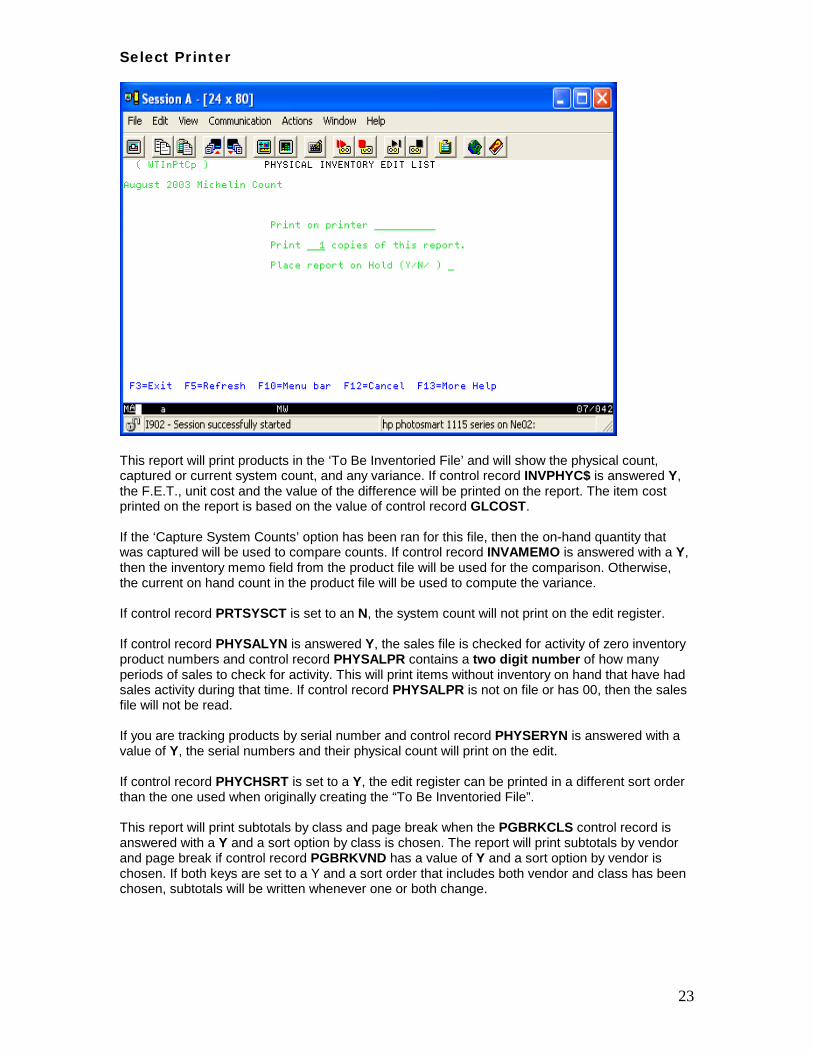
Select Printer
This report will print products in the ‘To Be Inventoried File’ and will show the physical count, captured or current system count, and any variance. If control record INVPHYC$ is answered Y, the F.E.T., unit cost and the value of the difference will be printed on the report. The item cost printed on the report is based on the value of control record GLCOST. If the ‘Capture System Counts’ option has been ran for this file, then the on-hand quantity that was captured will be used to compare counts. If control record INVAMEMO is answered with a Y, then the inventory memo field from the product file will be used for the comparison. Otherwise, the current on hand count in the product file will be used to compute the variance. If control record PRTSYSCT is set to an N, the system count will not print on the edit register. If control record PHYSALYN is answered Y, the sales file is checked for activity of zero inventory product numbers and control record PHYSALPR contains a two digit number of how many periods of sales to check for activity. This will print items without inventory on hand that have had sales activity during that time. If control record PHYSALPR is not on file or has 00, then the sales file will not be read. If you are tracking products by serial number and control record PHYSERYN is answered with a value of Y, the serial numbers and their physical count will print on the edit. If control record PHYCHSRT is set to a Y, the edit register can be printed in a different sort order than the one used when originally creating the “To Be Inventoried File”. This report will print subtotals by class and page break when the PGBRKCLS control record is answered with a Y and a sort option by class is chosen. The report will print subtotals by vendor and page break if control record PGBRKVND has a value of Y and a sort option by vendor is chosen. If both keys are set to a Y and a sort order that includes both vendor and class has been chosen, subtotals will be written whenever one or both change.
24
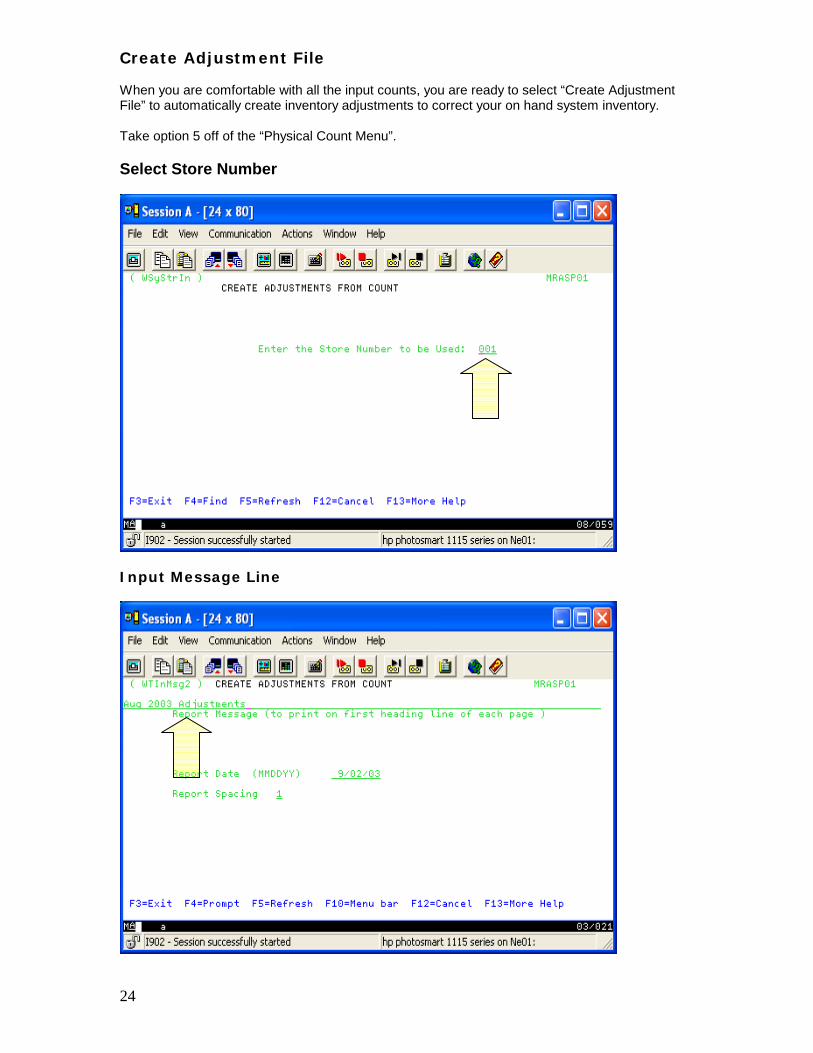
Create Adjustment File When you are comfortable with all the input counts, you are ready to select “Create Adjustment File” to automatically create inventory adjustments to correct your on hand system inventory. Take option 5 off of the “Physical Count Menu”. Select Store Number
Input Message Line
25
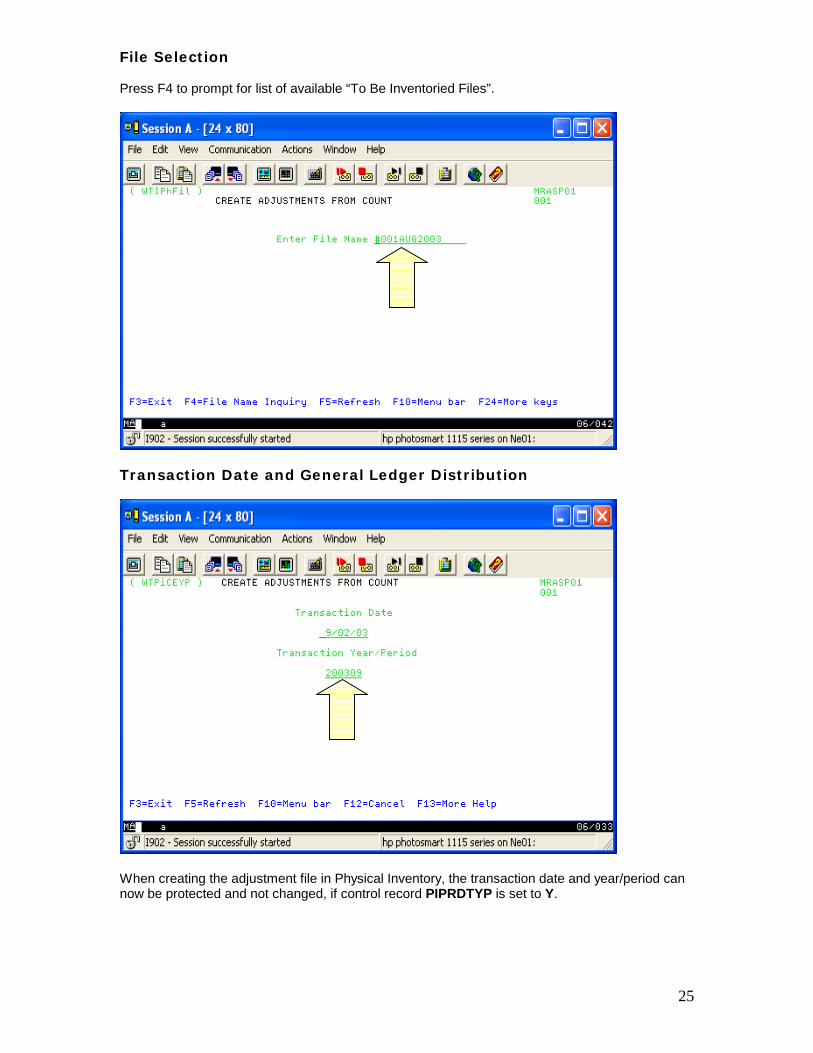
File Selection Press F4 to prompt for list of available “To Be Inventoried Files”.
Transaction Date and General Ledger Distribution
When creating the adjustment file in Physical Inventory, the transaction date and year/period can now be protected and not changed, if control record PIPRDTYP is set to Y.
26
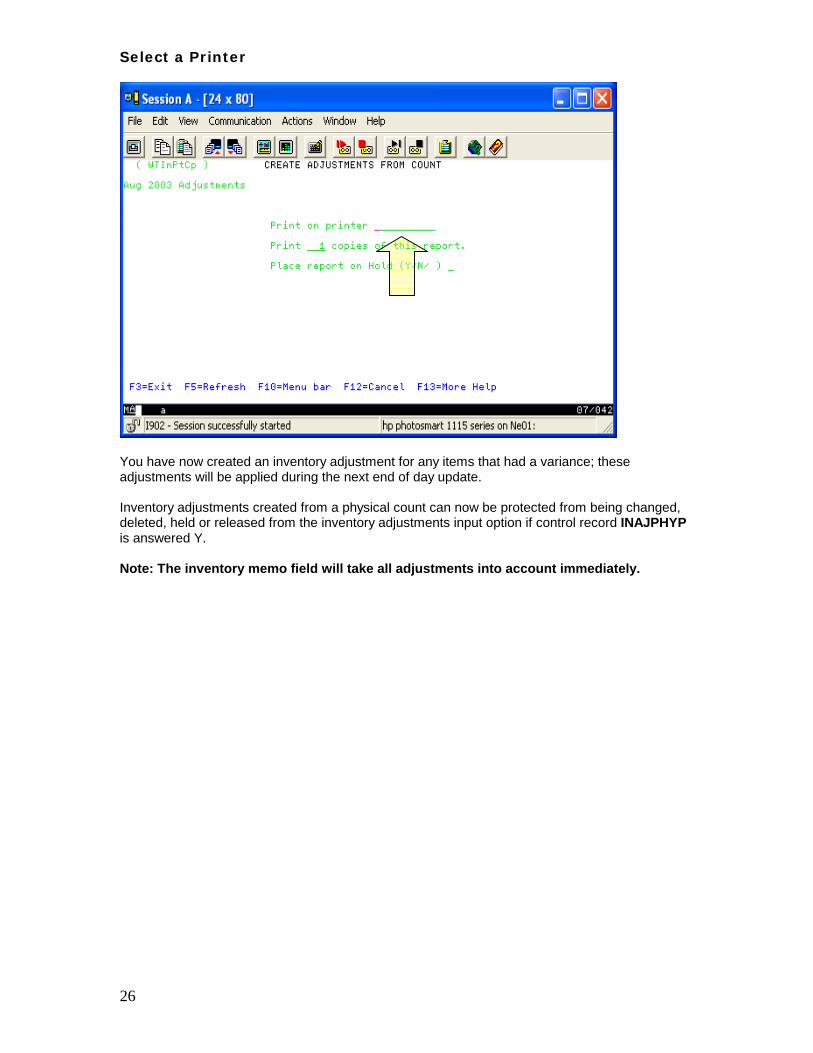
Select a Printer
You have now created an inventory adjustment for any items that had a variance; these adjustments will be applied during the next end of day update. Inventory adjustments created from a physical count can now be protected from being changed, deleted, held or released from the inventory adjustments input option if control record INAJPHYP is answered Y. Note: The inventory memo field will take all adjustments into account immediately.
27
Other Physical Inventory Menu Options There are a few other things that you can do with physical counts. Option 9, “Scanned Inventory Inquiry” is used to view what items have already been scanned. Information will be displayed listing the who, what, when and where a barcode was scanned. Option 15, “Delete To Be Inventoried File” is used if you need to delete a “To Be Inventoried File” that you created in error or decide not to use to adjust your inventory. Option 18, “Select W/O-Receivers to Adjust System Count” is used to select inventory receivers and POS work orders that need to be adjusted to the system count for products affecting the physical count. Option 19, “Set Input Count to System Count”, is used to set the input count to the current on hand for each product line in the “To be Inventoried” file. By using this option you would only need to input counts that are different from what the system says you have on hand. This is not the recommenced method for inputting counts. If control record INVSICOH is set to a Y – On hand will be used, otherwise inventory memo field will be used. Option 21, “Work with Physical Count Files”, is used to view the status of the existing “To Be Inventoried Files” that are on your system. Information will be displayed such as the date and time each “To Be Inventoried File” was created and the date and time the System Count was captured for each file. It is also where you can reset a “To Be Inventoried File” that has become locked when power to your terminal was lost while you were accessing the file. The @ (Shift + 2) option can be used to reset a file. Option 22, “Input Customer to be Inventoried”, is used to assign customers to a Physical Inventory file that will be used to take a retread physical inventory for a customer or group of customers.

28
29
Accounting for Product on Open Orders and Receivers
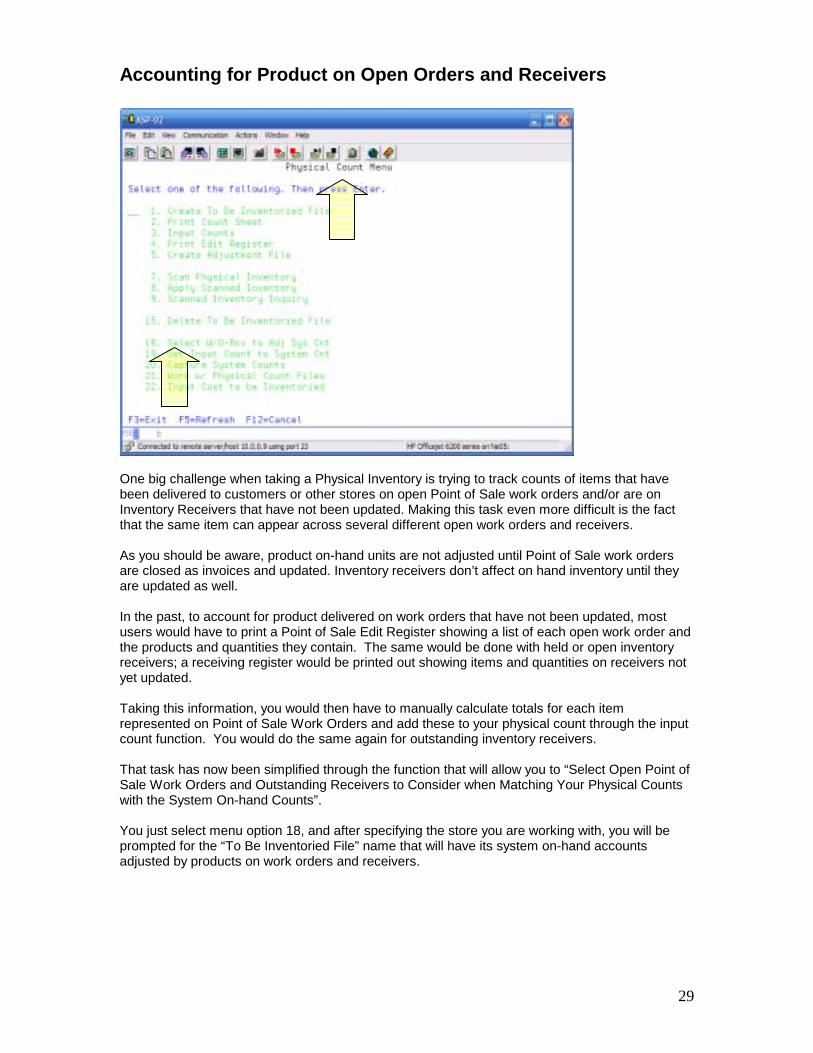
One big challenge when taking a Physical Inventory is trying to track counts of items that have been delivered to customers or other stores on open Point of Sale work orders and/or are on Inventory Receivers that have not been updated. Making this task even more difficult is the fact that the same item can appear across several different open work orders and receivers. As you should be aware, product on-hand units are not adjusted until Point of Sale work orders are closed as invoices and updated. Inventory receivers don’t affect on hand inventory until they are updated as well. In the past, to account for product delivered on work orders that have not been updated, most users would have to print a Point of Sale Edit Register showing a list of each open work order and the products and quantities they contain. The same would be done with held or open inventory receivers; a receiving register would be printed out showing items and quantities on receivers not yet updated. Taking this information, you would then have to manually calculate totals for each item represented on Point of Sale Work Orders and add these to your physical count through the input count function. You would do the same again for outstanding inventory receivers. That task has now been simplified through the function that will allow you to “Select Open Point of Sale Work Orders and Outstanding Receivers to Consider when Matching Your Physical Counts with the System On-hand Counts”. You just select menu option 18, and after specifying the store you are working with, you will be prompted for the “To Be Inventoried File” name that will have its system on-hand accounts adjusted by products on work orders and receivers.
30
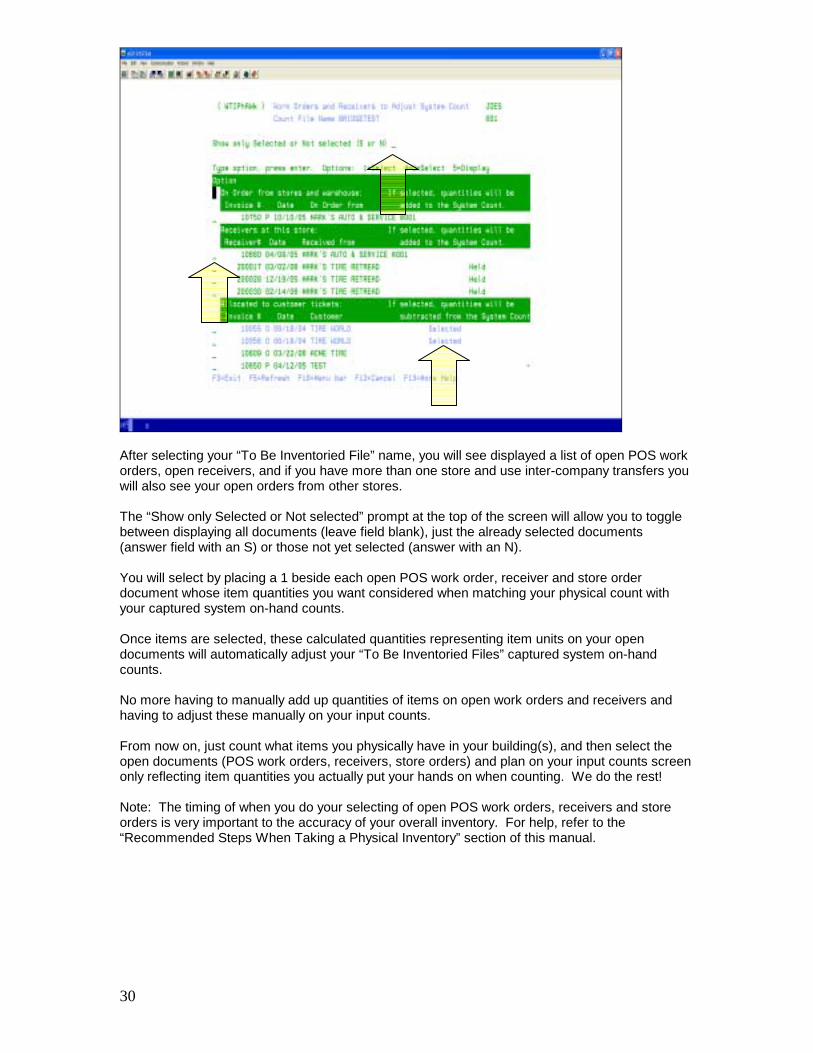
After selecting your “To Be Inventoried File” name, you will see displayed a list of open POS work orders, open receivers, and if you have more than one store and use inter-company transfers you will also see your open orders from other stores. The “Show only Selected or Not selected” prompt at the top of the screen will allow you to toggle between displaying all documents (leave field blank), just the already selected documents (answer field with an S) or those not yet selected (answer with an N). You will select by placing a 1 beside each open POS work order, receiver and store order document whose item quantities you want considered when matching your physical count with your captured system on-hand counts. Once items are selected, these calculated quantities representing item units on your open documents will automatically adjust your “To Be Inventoried Files” captured system on-hand counts. No more having to manually add up quantities of items on open work orders and receivers and having to adjust these manually on your input counts. From now on, just count what items you physically have in your building(s), and then select the open documents (POS work orders, receivers, store orders) and plan on your input counts screen only reflecting item quantities you actually put your hands on when counting. We do the rest! Note: The timing of when you do your selecting of open POS work orders, receivers and store orders is very important to the accuracy of your overall inventory. For help, refer to the “Recommended Steps When Taking a Physical Inventory” section of this manual.
31
Recommended Steps When Taking a Physical Inventory
1. Run an End of Day Update. 2. Create your “To Be Inventoried Files” (option 1 off of the Tire Dealer Physical Count
Menu).
3. Immediately after the “To Be Inventoried Files” are created, run the “Capture System Counts” function (option 20 off of the Tire Dealer Physical Count Menu) for each “To Be Inventoried File”.
4. Use the “Select Work Orders/Receivers to Adjust System Counts” function (option 18 off
of the Tire Dealer Physical Count Menu) and select from the displayed list of open Work Orders, Receivers, and store orders the documents that need to be considered to adjust the captured system count that will be used to compare with your physical count.
5. If taking manual counts, print your count sheets (option 3 off of the Tire Dealer Physical
Count Menu) making sure they are in the same exact order as the corresponding “To Be Inventoried Files”.
6. Take manual counts and/or Physical Counts using a portable wireless handheld scanner.
7. If you are using handheld scanners to capture your physical counts, take option 8 to
apply the scanned counts to the inventory file.
8. If you are not scanning, manually type in your unit counts directly from your count sheets using “Input Counts” (option 3 off of the Tire Dealer Physical Count Menu).
9. If not using the “Select Work Orders/Receivers to Adjust System Counts” function (option
18 off of the Tire Dealer Physical Count Menu), then print both a work order edit register and receiving register to use to calculate item counts to use to manually adjust your input physical inventory counts.
10. When input is all complete, print an edit register (option 4 off of the Tire Dealer Physical
Count Menu) for each “To Be Inventoried File” to review the potential adjustments that will be created once you update your counts. Now is the time to catch errors before taking the final “Create Adjustments” option.
11. If errors are found while reviewing Edit Registers, use “Input Counts” (option 3 off of the
Tire Dealer Physical Count Menu) again to correct errors and rerun edit registers to double check for accuracy.
12. When edit registers look correct, run Option 5; “Create Adjustment File” from the Tire
Dealer Physical Count Menu. This will create adjustment files in MaddenCo’s Inventory Adjustment screen for each “To Be Inventoried File” that is updated. Your adjustments will update during the next end of day update.
32
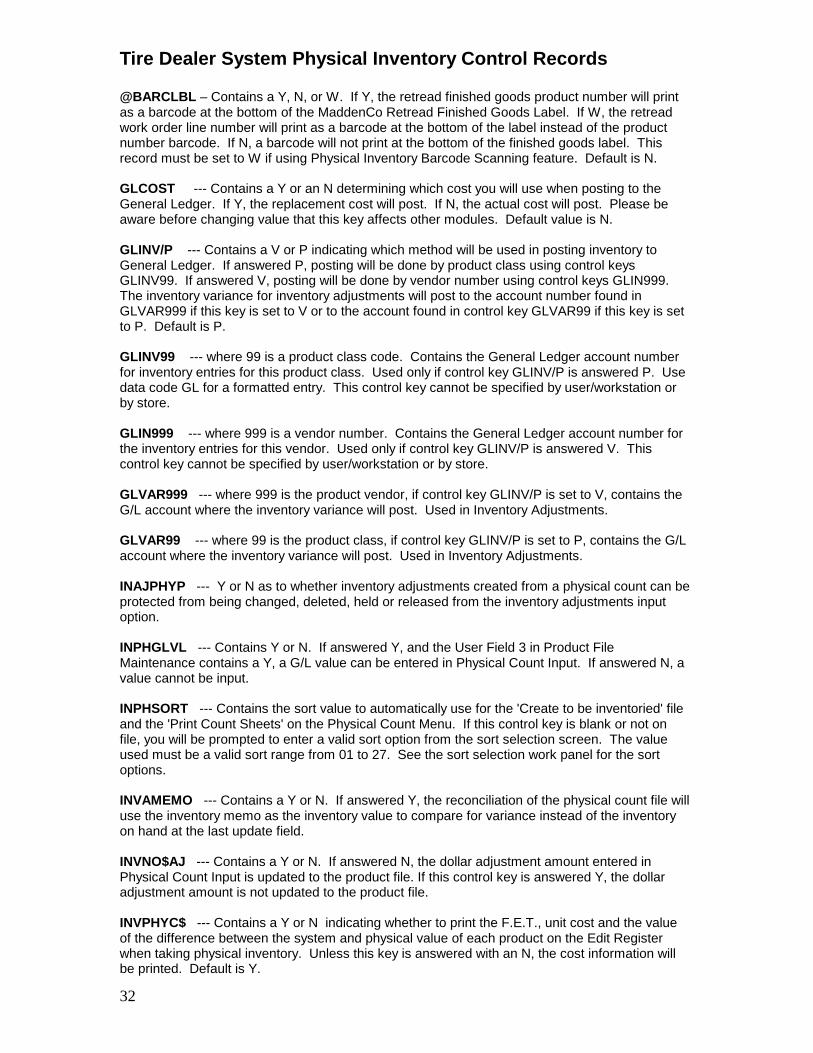
Tire Dealer System Physical Inventory Control Records @BARCLBL – Contains a Y, N, or W. If Y, the retread finished goods product number will print as a barcode at the bottom of the MaddenCo Retread Finished Goods Label. If W, the retread work order line number will print as a barcode at the bottom of the label instead of the product number barcode. If N, a barcode will not print at the bottom of the finished goods label. This record must be set to W if using Physical Inventory Barcode Scanning feature. Default is N. GLCOST --- Contains a Y or an N determining which cost you will use when posting to the General Ledger. If Y, the replacement cost will post. If N, the actual cost will post. Please be aware before changing value that this key affects other modules. Default value is N. GLINV/P --- Contains a V or P indicating which method will be used in posting inventory to General Ledger. If answered P, posting will be done by product class using control keys GLINV99. If answered V, posting will be done by vendor number using control keys GLIN999. The inventory variance for inventory adjustments will post to the account number found in GLVAR999 if this key is set to V or to the account found in control key GLVAR99 if this key is set to P. Default is P. GLINV99 --- where 99 is a product class code. Contains the General Ledger account number for inventory entries for this product class. Used only if control key GLINV/P is answered P. Use data code GL for a formatted entry. This control key cannot be specified by user/workstation or by store. GLIN999 --- where 999 is a vendor number. Contains the General Ledger account number for the inventory entries for this vendor. Used only if control key GLINV/P is answered V. This control key cannot be specified by user/workstation or by store. GLVAR999 --- where 999 is the product vendor, if control key GLINV/P is set to V, contains the G/L account where the inventory variance will post. Used in Inventory Adjustments. GLVAR99 --- where 99 is the product class, if control key GLINV/P is set to P, contains the G/L account where the inventory variance will post. Used in Inventory Adjustments. INAJPHYP --- Y or N as to whether inventory adjustments created from a physical count can be protected from being changed, deleted, held or released from the inventory adjustments input option. INPHGLVL --- Contains Y or N. If answered Y, and the User Field 3 in Product File Maintenance contains a Y, a G/L value can be entered in Physical Count Input. If answered N, a value cannot be input. INPHSORT --- Contains the sort value to automatically use for the 'Create to be inventoried' file and the 'Print Count Sheets' on the Physical Count Menu. If this control key is blank or not on file, you will be prompted to enter a valid sort option from the sort selection screen. The value used must be a valid sort range from 01 to 27. See the sort selection work panel for the sort options. INVAMEMO --- Contains a Y or N. If answered Y, the reconciliation of the physical count file will use the inventory memo as the inventory value to compare for variance instead of the inventory on hand at the last update field. INVNO$AJ --- Contains a Y or N. If answered N, the dollar adjustment amount entered in Physical Count Input is updated to the product file. If this control key is answered Y, the dollar adjustment amount is not updated to the product file. INVPHYC$ --- Contains a Y or N indicating whether to print the F.E.T., unit cost and the value of the difference between the system and physical value of each product on the Edit Register when taking physical inventory. Unless this key is answered with an N, the cost information will be printed. Default is Y.
33
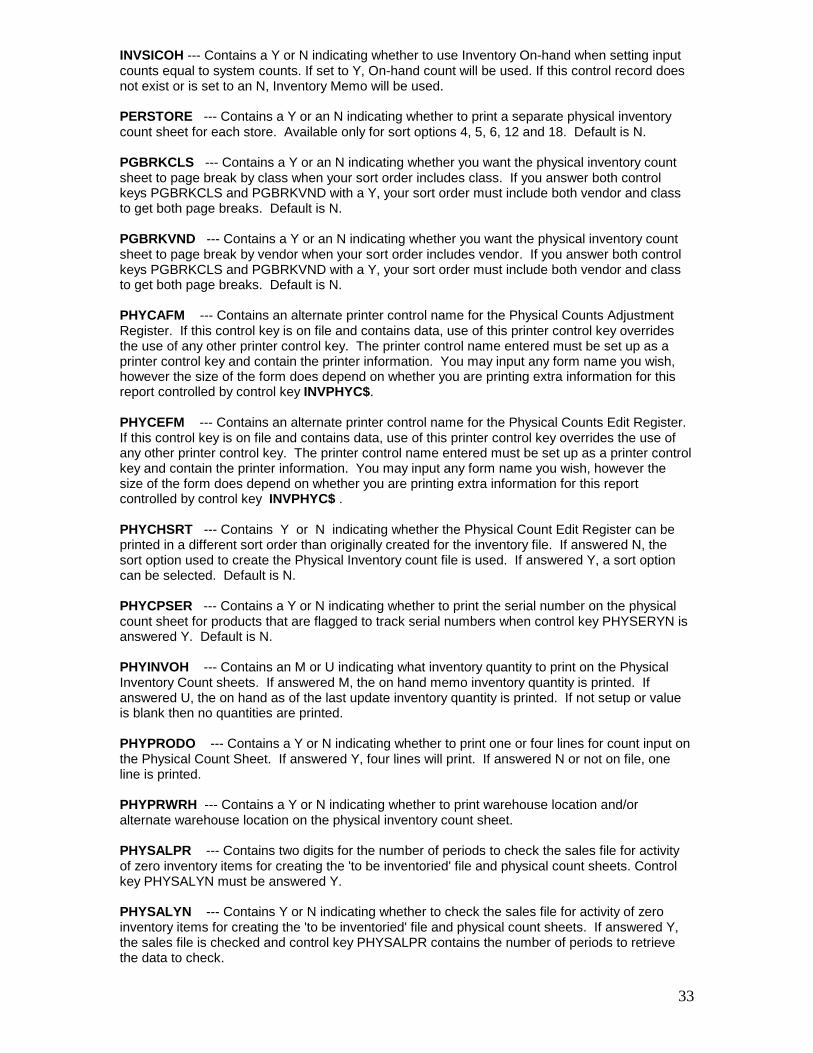
INVSICOH --- Contains a Y or N indicating whether to use Inventory On-hand when setting input counts equal to system counts. If set to Y, On-hand count will be used. If this control record does not exist or is set to an N, Inventory Memo will be used. PERSTORE --- Contains a Y or an N indicating whether to print a separate physical inventory count sheet for each store. Available only for sort options 4, 5, 6, 12 and 18. Default is N. PGBRKCLS --- Contains a Y or an N indicating whether you want the physical inventory count sheet to page break by class when your sort order includes class. If you answer both control keys PGBRKCLS and PGBRKVND with a Y, your sort order must include both vendor and class to get both page breaks. Default is N. PGBRKVND --- Contains a Y or an N indicating whether you want the physical inventory count sheet to page break by vendor when your sort order includes vendor. If you answer both control keys PGBRKCLS and PGBRKVND with a Y, your sort order must include both vendor and class to get both page breaks. Default is N. PHYCAFM --- Contains an alternate printer control name for the Physical Counts Adjustment Register. If this control key is on file and contains data, use of this printer control key overrides the use of any other printer control key. The printer control name entered must be set up as a printer control key and contain the printer information. You may input any form name you wish, however the size of the form does depend on whether you are printing extra information for this report controlled by control key INVPHYC$. PHYCEFM --- Contains an alternate printer control name for the Physical Counts Edit Register. If this control key is on file and contains data, use of this printer control key overrides the use of any other printer control key. The printer control name entered must be set up as a printer control key and contain the printer information. You may input any form name you wish, however the size of the form does depend on whether you are printing extra information for this report controlled by control key INVPHYC$ . PHYCHSRT --- Contains Y or N indicating whether the Physical Count Edit Register can be printed in a different sort order than originally created for the inventory file. If answered N, the sort option used to create the Physical Inventory count file is used. If answered Y, a sort option can be selected. Default is N. PHYCPSER --- Contains a Y or N indicating whether to print the serial number on the physical count sheet for products that are flagged to track serial numbers when control key PHYSERYN is answered Y. Default is N. PHYINVOH --- Contains an M or U indicating what inventory quantity to print on the Physical Inventory Count sheets. If answered M, the on hand memo inventory quantity is printed. If answered U, the on hand as of the last update inventory quantity is printed. If not setup or value is blank then no quantities are printed. PHYPRODO --- Contains a Y or N indicating whether to print one or four lines for count input on the Physical Count Sheet. If answered Y, four lines will print. If answered N or not on file, one line is printed. PHYPRWRH --- Contains a Y or N indicating whether to print warehouse location and/or alternate warehouse location on the physical inventory count sheet. PHYSALPR --- Contains two digits for the number of periods to check the sales file for activity of zero inventory items for creating the 'to be inventoried' file and physical count sheets. Control key PHYSALYN must be answered Y. PHYSALYN --- Contains Y or N indicating whether to check the sales file for activity of zero inventory items for creating the 'to be inventoried' file and physical count sheets. If answered Y, the sales file is checked and control key PHYSALPR contains the number of periods to retrieve the data to check.
34
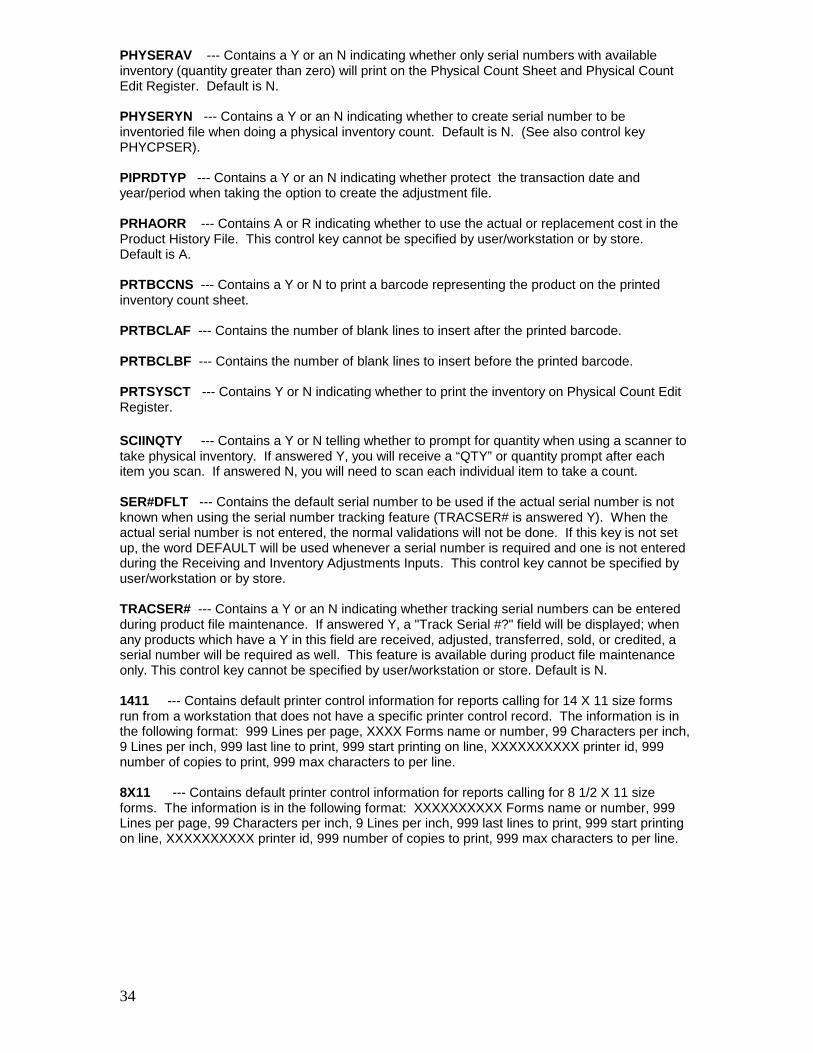
PHYSERAV --- Contains a Y or an N indicating whether only serial numbers with available inventory (quantity greater than zero) will print on the Physical Count Sheet and Physical Count Edit Register. Default is N. PHYSERYN --- Contains a Y or an N indicating whether to create serial number to be inventoried file when doing a physical inventory count. Default is N. (See also control key PHYCPSER). PIPRDTYP --- Contains a Y or an N indicating whether protect the transaction date and year/period when taking the option to create the adjustment file. PRHAORR --- Contains A or R indicating whether to use the actual or replacement cost in the Product History File. This control key cannot be specified by user/workstation or by store. Default is A. PRTBCCNS --- Contains a Y or N to print a barcode representing the product on the printed inventory count sheet. PRTBCLAF --- Contains the number of blank lines to insert after the printed barcode. PRTBCLBF --- Contains the number of blank lines to insert before the printed barcode. PRTSYSCT --- Contains Y or N indicating whether to print the inventory on Physical Count Edit Register. SCIINQTY --- Contains a Y or N telling whether to prompt for quantity when using a scanner to take physical inventory. If answered Y, you will receive a “QTY” or quantity prompt after each item you scan. If answered N, you will need to scan each individual item to take a count. SER#DFLT --- Contains the default serial number to be used if the actual serial number is not known when using the serial number tracking feature (TRACSER# is answered Y). When the actual serial number is not entered, the normal validations will not be done. If this key is not set up, the word DEFAULT will be used whenever a serial number is required and one is not entered during the Receiving and Inventory Adjustments Inputs. This control key cannot be specified by user/workstation or by store. TRACSER# --- Contains a Y or an N indicating whether tracking serial numbers can be entered during product file maintenance. If answered Y, a "Track Serial #?" field will be displayed; when any products which have a Y in this field are received, adjusted, transferred, sold, or credited, a serial number will be required as well. This feature is available during product file maintenance only. This control key cannot be specified by user/workstation or store. Default is N. 1411 --- Contains default printer control information for reports calling for 14 X 11 size forms run from a workstation that does not have a specific printer control record. The information is in the following format: 999 Lines per page, XXXX Forms name or number, 99 Characters per inch, 9 Lines per inch, 999 last line to print, 999 start printing on line, XXXXXXXXXX printer id, 999 number of copies to print, 999 max characters to per line.
8X11 --- Contains default printer control information for reports calling for 8 1/2 X 11 size forms. The information is in the following format: XXXXXXXXXX Forms name or number, 999 Lines per page, 99 Characters per inch, 9 Lines per inch, 999 last lines to print, 999 start printing on line, XXXXXXXXXX printer id, 999 number of copies to print, 999 max characters to per line.
35
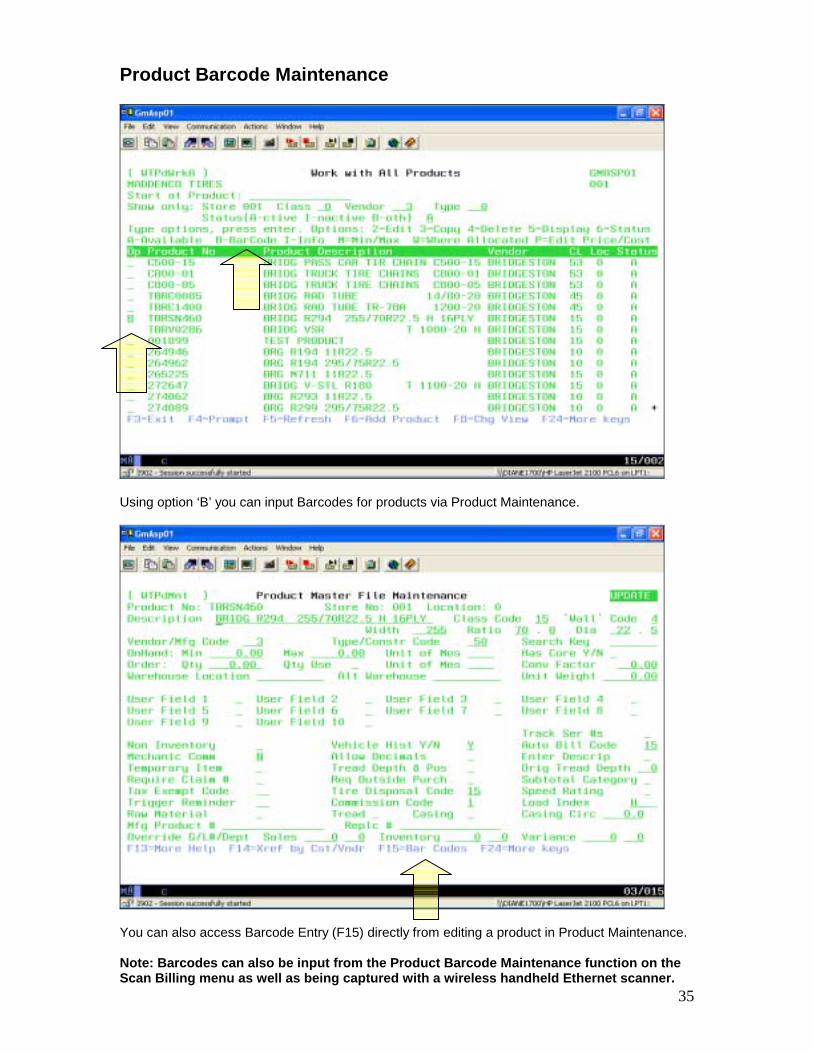
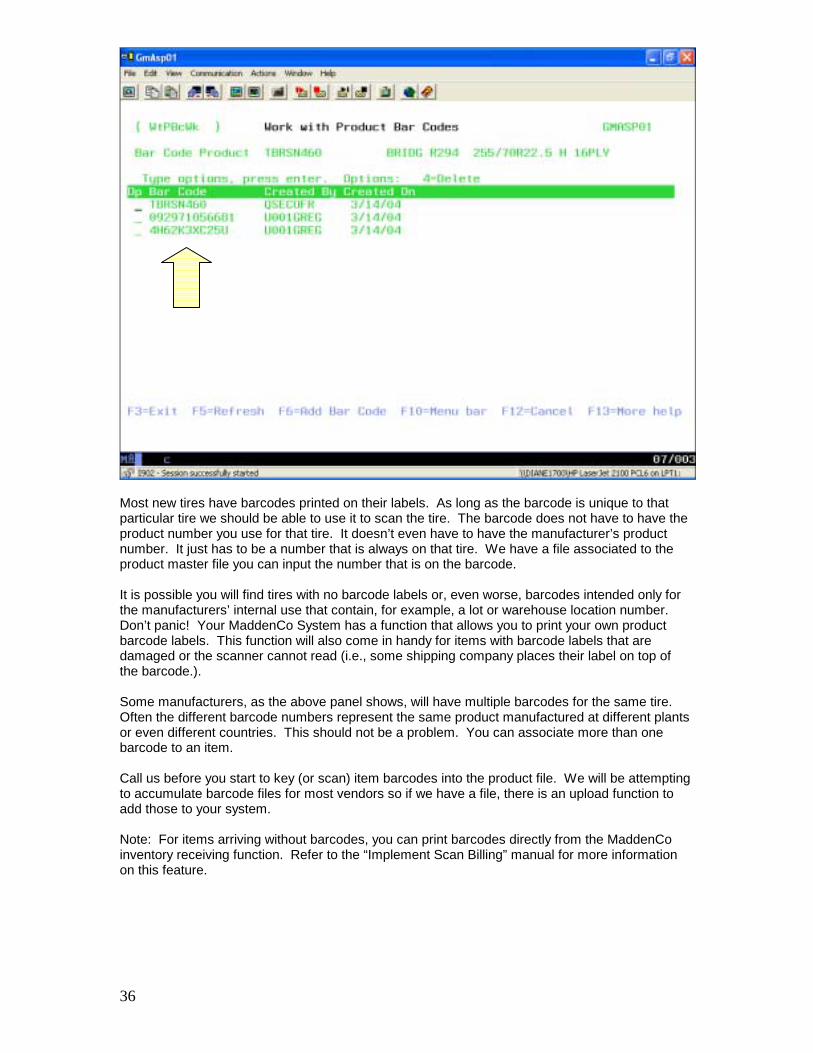
Product Barcode Maintenance
Using option ‘B’ you can input Barcodes for products via Product Maintenance.
You can also access Barcode Entry (F15) directly from editing a product in Product Maintenance. Note: Barcodes can also be input from the Product Barcode Maintenance function on the Scan Billing menu as well as being captured with a wireless handheld Ethernet scanner.
36
Most new tires have barcodes printed on their labels. As long as the barcode is unique to that particular tire we should be able to use it to scan the tire. The barcode does not have to have the product number you use for that tire. It doesn’t even have to have the manufacturer’s product number. It just has to be a number that is always on that tire. We have a file associated to the product master file you can input the number that is on the barcode. It is possible you will find tires with no barcode labels or, even worse, barcodes intended only for the manufacturers’ internal use that contain, for example, a lot or warehouse location number. Don’t panic! Your MaddenCo System has a function that allows you to print your own product barcode labels. This function will also come in handy for items with barcode labels that are damaged or the scanner cannot read (i.e., some shipping company places their label on top of the barcode.). Some manufacturers, as the above panel shows, will have multiple barcodes for the same tire. Often the different barcode numbers represent the same product manufactured at different plants or even different countries. This should not be a problem. You can associate more than one barcode to an item. Call us before you start to key (or scan) item barcodes into the product file. We will be attempting to accumulate barcode files for most vendors so if we have a file, there is an upload function to add those to your system. Note: For items arriving without barcodes, you can print barcodes directly from the MaddenCo inventory receiving function. Refer to the “Implement Scan Billing” manual for more information on this feature.

37
Scan Inventory Using a Portable Hand-Held Device If you have uniquely identified any part of your inventory with a barcode, these barcodes can be scanned at physical inventory time. You can scan using either a regular workstation in the warehouse with an attached scanner or by using a Portable Wireless Hand-held Scanner Device. The process is fairly simple. You still create the “To Be Inventoried File”. You just scan each item’s barcode instead of counting them manually and writing them in on the count sheet. Once you have scanned all of your barcodes you take an option to apply the scans and it will automatically update the counts in the “To Be Inventoried File” just as if you had hand keyed them in through the “Input Counts” option. For inventory with no barcode, just write them in on a count sheet and you can still manually key those in. Barcode tracked retreads can also be scanned. Once applied to the inventory file, the retreads are flagged with an “R” to the right of the count. If you place the cursor on a retread count, then press F10, the system will display the detailed retread count information. Simply follow the rest of the physical inventory process to generate your tracked retread inventory adjustments. The retread detail will print on the Inventory Edit Register.
38
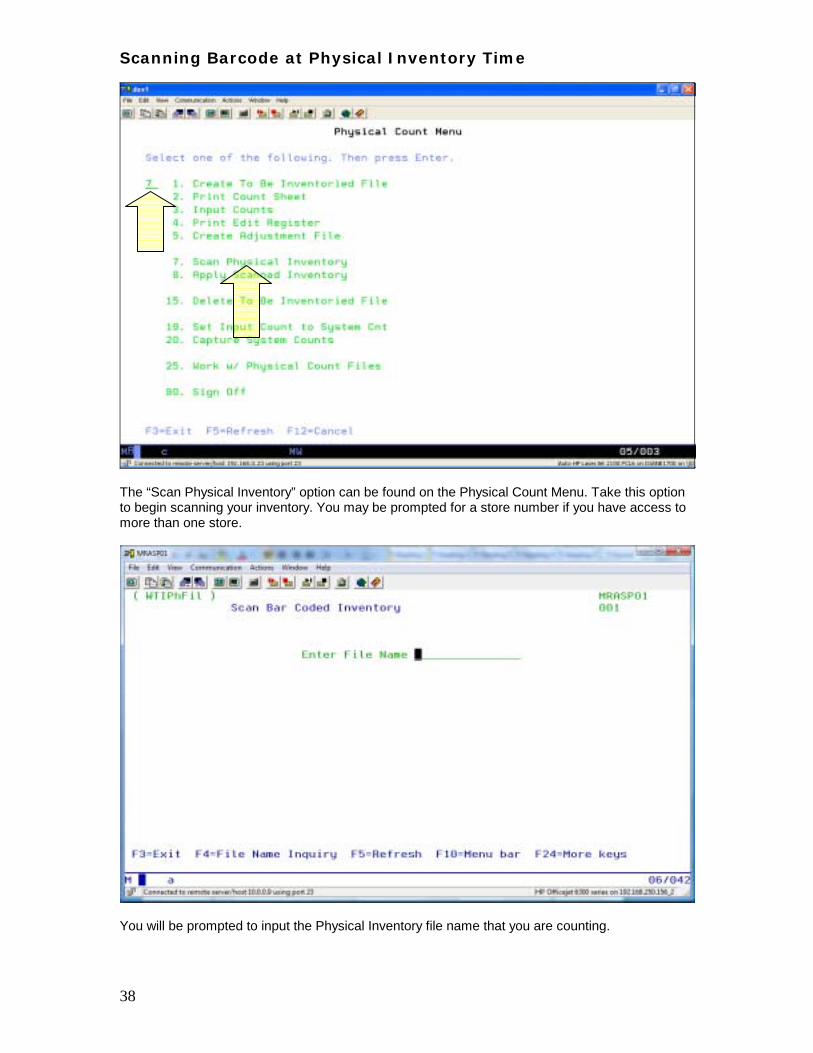
Scanning Barcode at Physical Inventory Time
The “Scan Physical Inventory” option can be found on the Physical Count Menu. Take this option to begin scanning your inventory. You may be prompted for a store number if you have access to more than one store.
You will be prompted to input the Physical Inventory file name that you are counting.
39
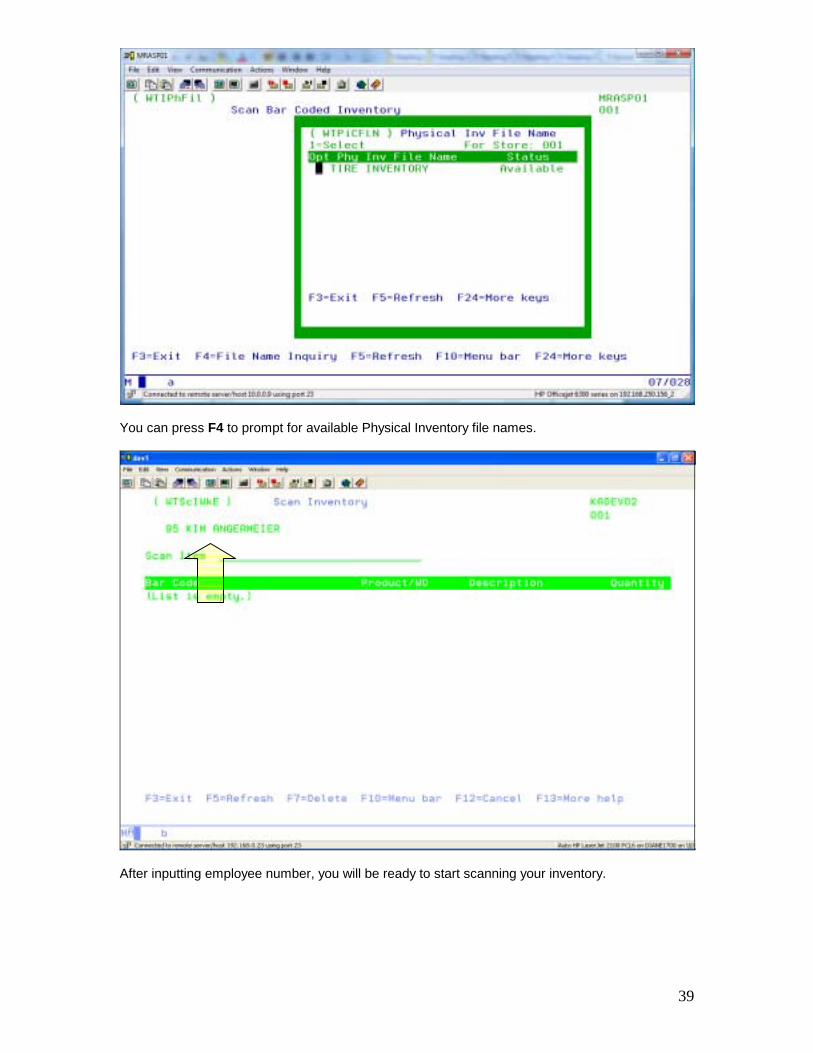
You can press F4 to prompt for available Physical Inventory file names.
After inputting employee number, you will be ready to start scanning your inventory.
40
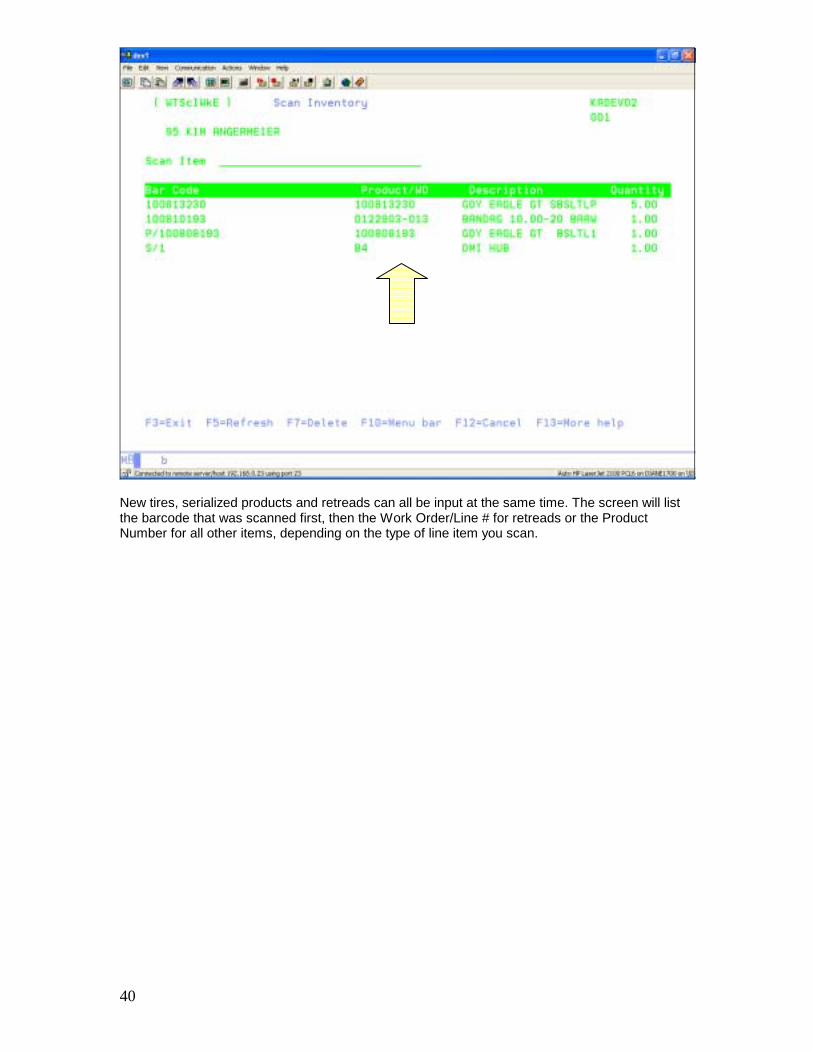
New tires, serialized products and retreads can all be input at the same time. The screen will list the barcode that was scanned first, then the Work Order/Line # for retreads or the Product Number for all other items, depending on the type of line item you scan.
41
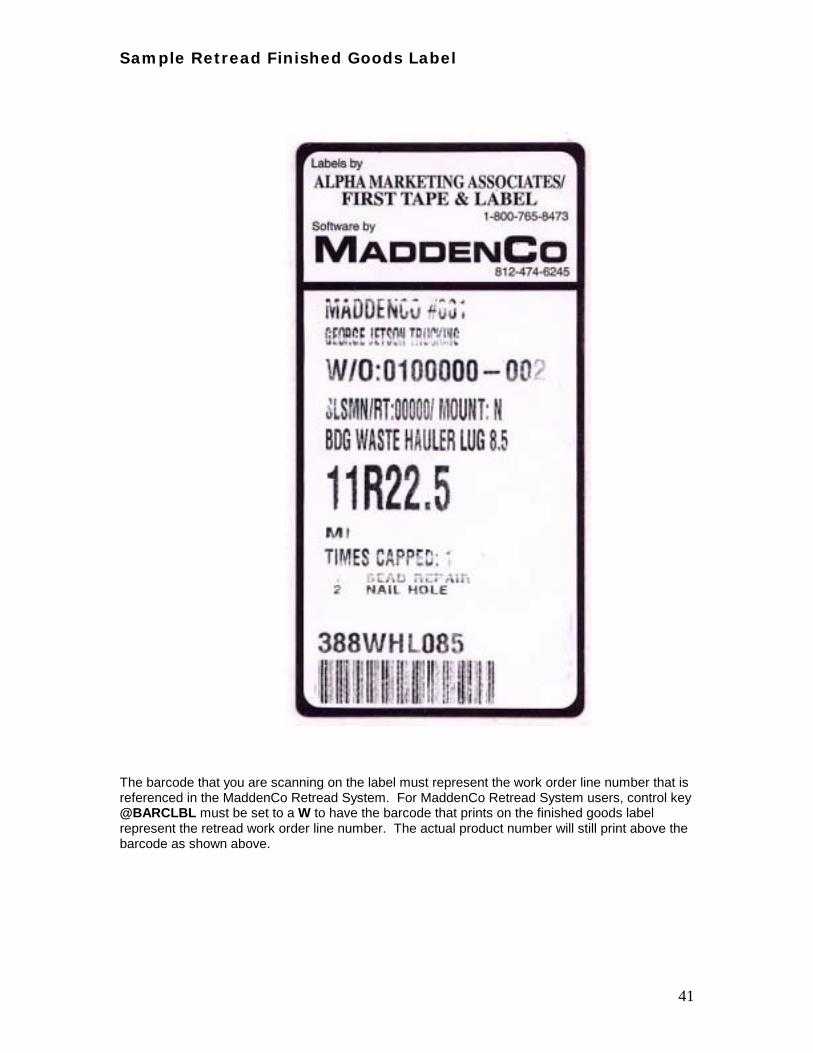
Sample Retread Finished Goods Label
The barcode that you are scanning on the label must represent the work order line number that is referenced in the MaddenCo Retread System. For MaddenCo Retread System users, control key @BARCLBL must be set to a W to have the barcode that prints on the finished goods label represent the retread work order line number. The actual product number will still print above the barcode as shown above.
42
Error and Warning Messages You May Encounter
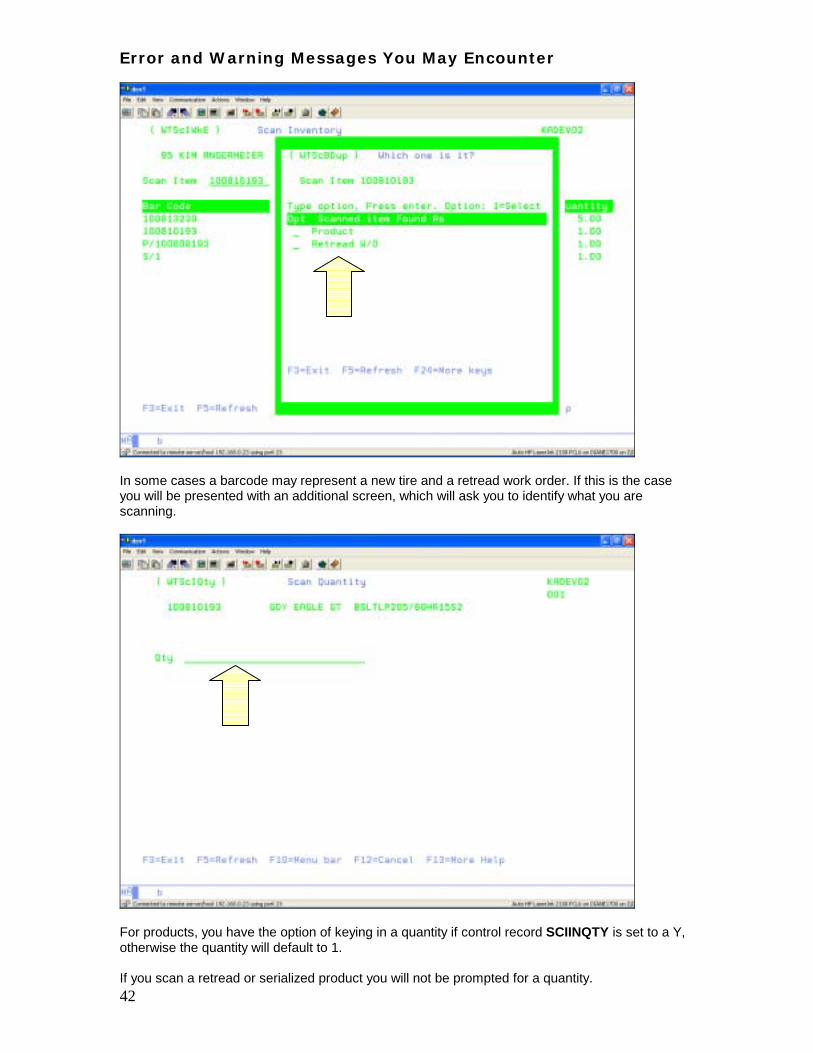
In some cases a barcode may represent a new tire and a retread work order. If this is the case you will be presented with an additional screen, which will ask you to identify what you are scanning.
For products, you have the option of keying in a quantity if control record SCIINQTY is set to a Y, otherwise the quantity will default to 1. If you scan a retread or serialized product you will not be prompted for a quantity.
43
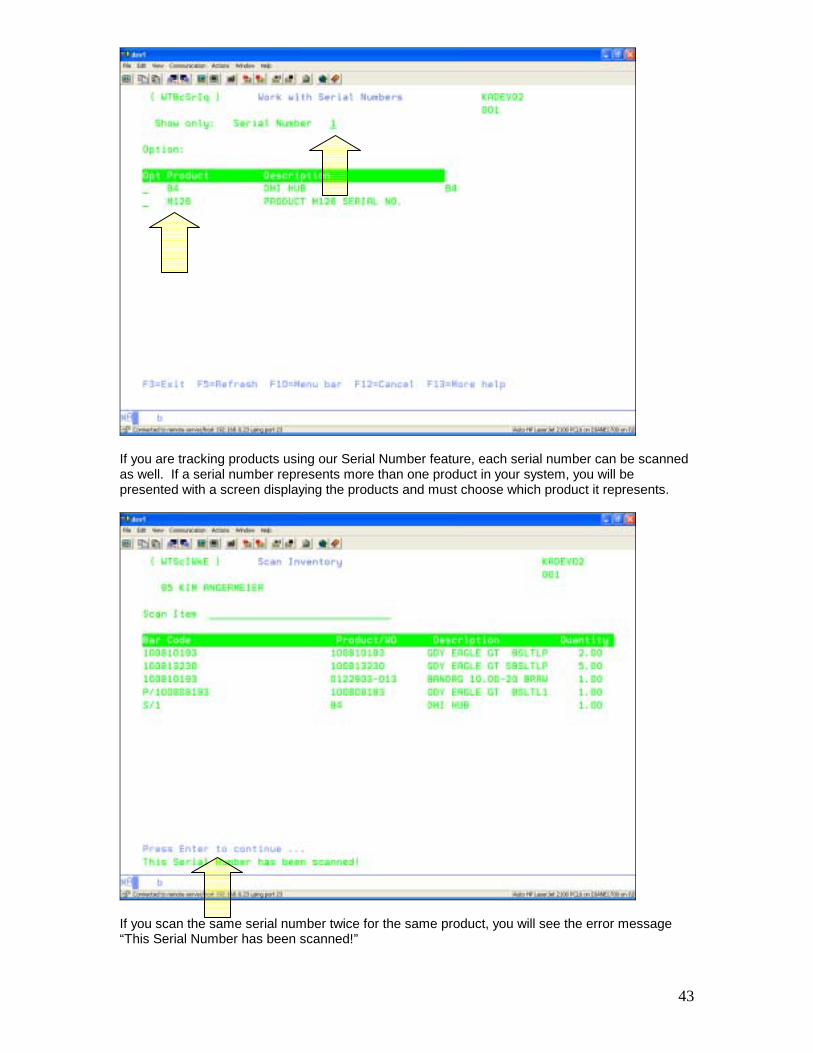
If you are tracking products using our Serial Number feature, each serial number can be scanned as well. If a serial number represents more than one product in your system, you will be presented with a screen displaying the products and must choose which product it represents.
If you scan the same serial number twice for the same product, you will see the error message “This Serial Number has been scanned!”
44
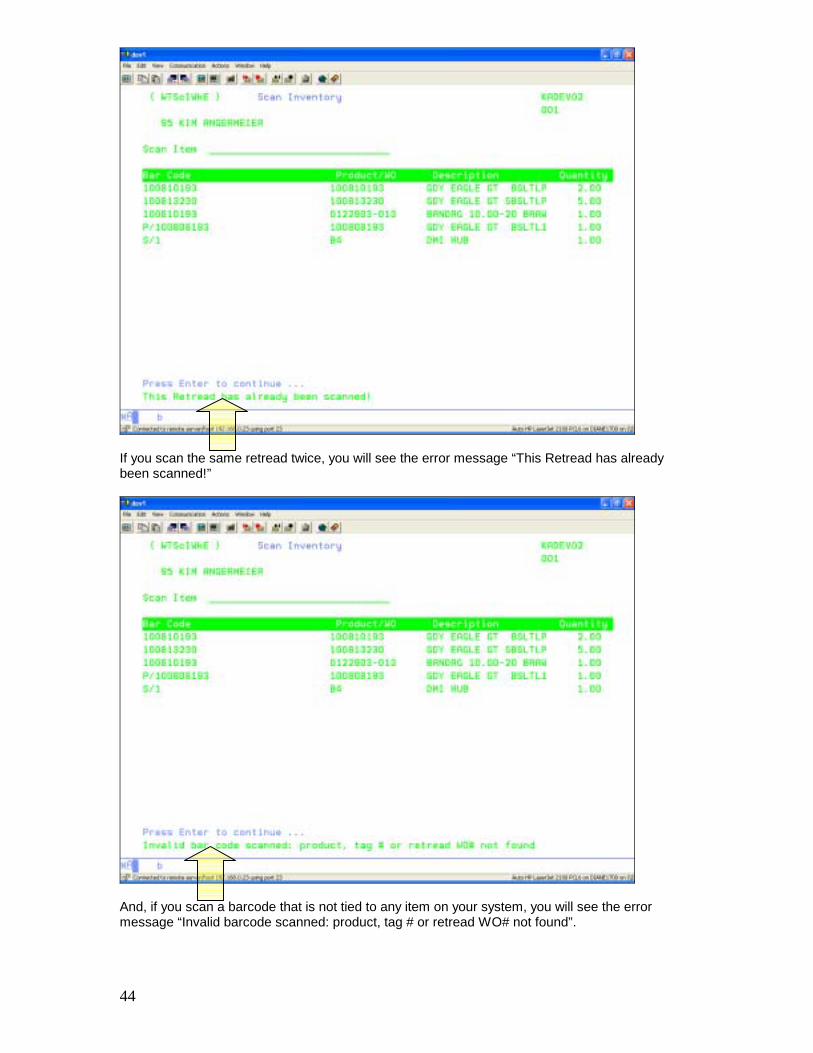
If you scan the same retread twice, you will see the error message “This Retread has already been scanned!”
And, if you scan a barcode that is not tied to any item on your system, you will see the error message “Invalid barcode scanned: product, tag # or retread WO# not found”.
45
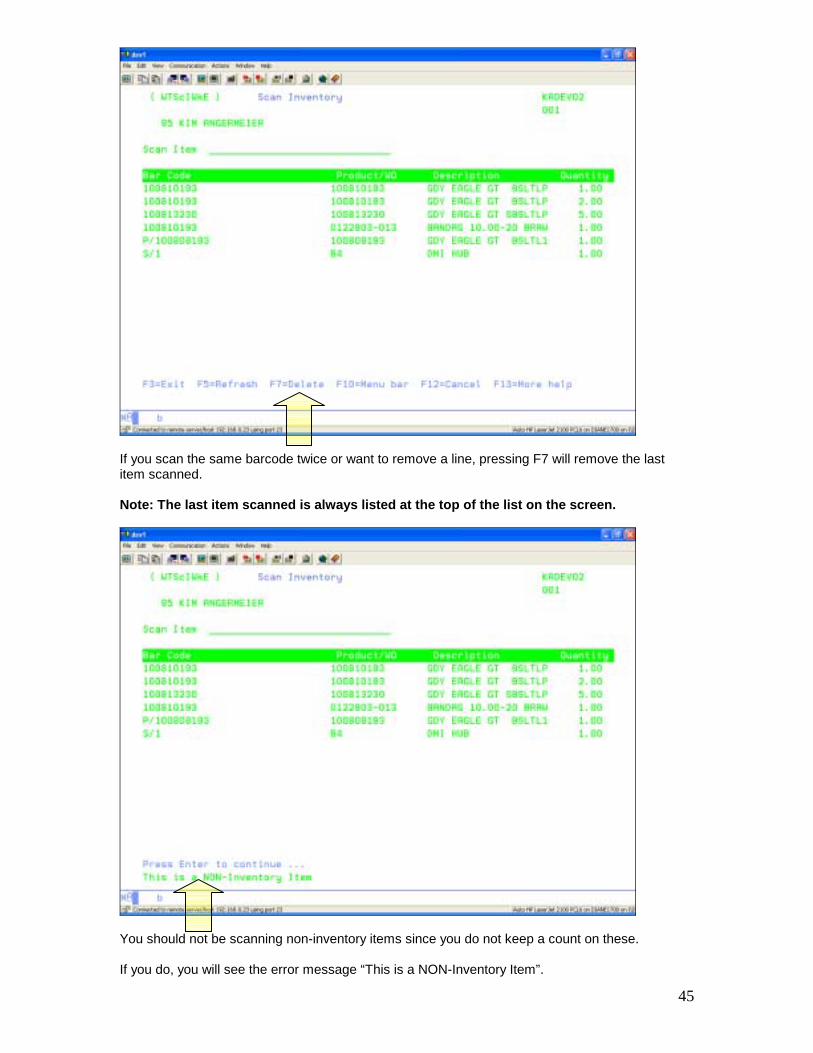
If you scan the same barcode twice or want to remove a line, pressing F7 will remove the last item scanned. Note: The last item scanned is always listed at the top of the list on the screen.
You should not be scanning non-inventory items since you do not keep a count on these. If you do, you will see the error message “This is a NON-Inventory Item”.
46
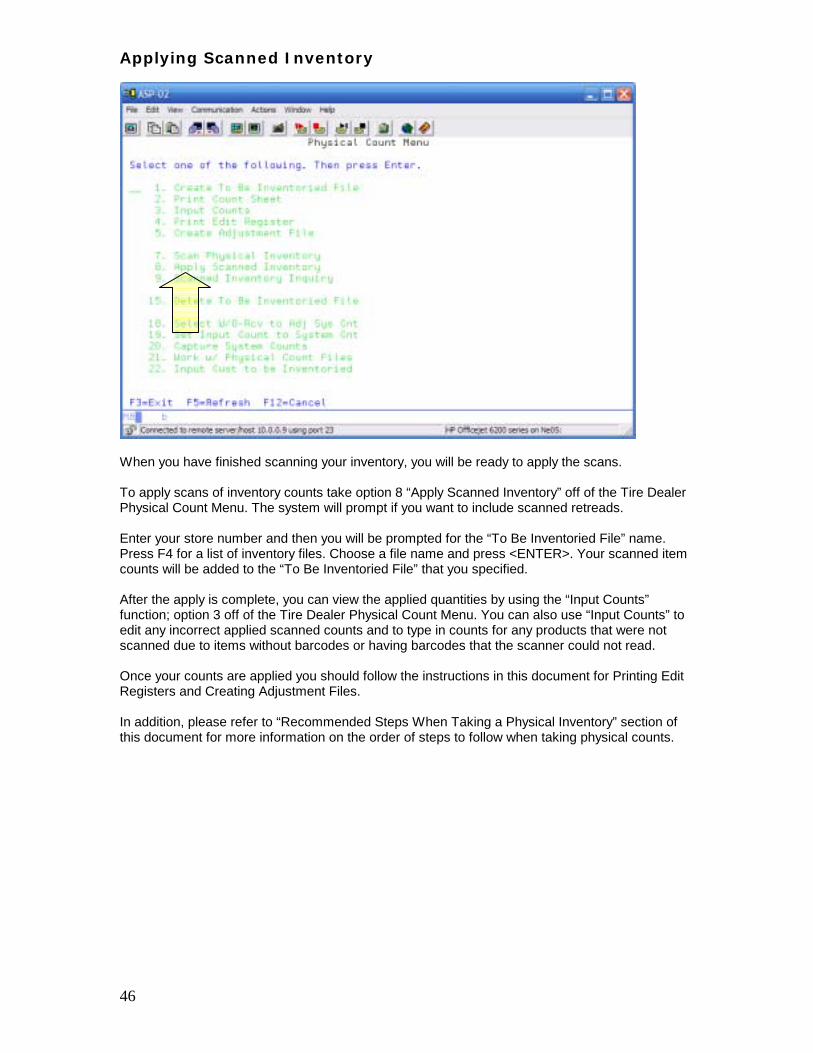
Applying Scanned Inventory
When you have finished scanning your inventory, you will be ready to apply the scans. To apply scans of inventory counts take option 8 “Apply Scanned Inventory” off of the Tire Dealer Physical Count Menu. The system will prompt if you want to include scanned retreads. Enter your store number and then you will be prompted for the “To Be Inventoried File” name. Press F4 for a list of inventory files. Choose a file name and press <ENTER>. Your scanned item counts will be added to the “To Be Inventoried File” that you specified. After the apply is complete, you can view the applied quantities by using the “Input Counts” function; option 3 off of the Tire Dealer Physical Count Menu. You can also use “Input Counts” to edit any incorrect applied scanned counts and to type in counts for any products that were not scanned due to items without barcodes or having barcodes that the scanner could not read. Once your counts are applied you should follow the instructions in this document for Printing Edit Registers and Creating Adjustment Files. In addition, please refer to “Recommended Steps When Taking a Physical Inventory” section of this document for more information on the order of steps to follow when taking physical counts.
47
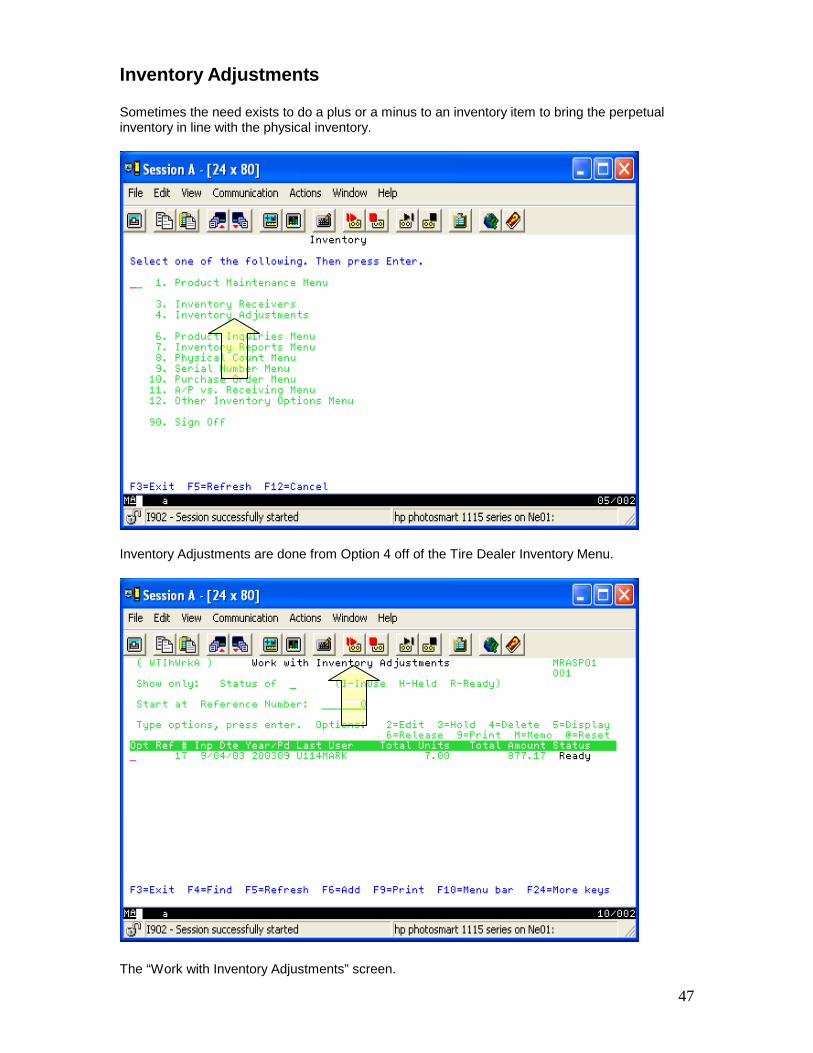
Inventory Adjustments Sometimes the need exists to do a plus or a minus to an inventory item to bring the perpetual inventory in line with the physical inventory.
Inventory Adjustments are done from Option 4 off of the Tire Dealer Inventory Menu.
The “Work with Inventory Adjustments” screen.
48
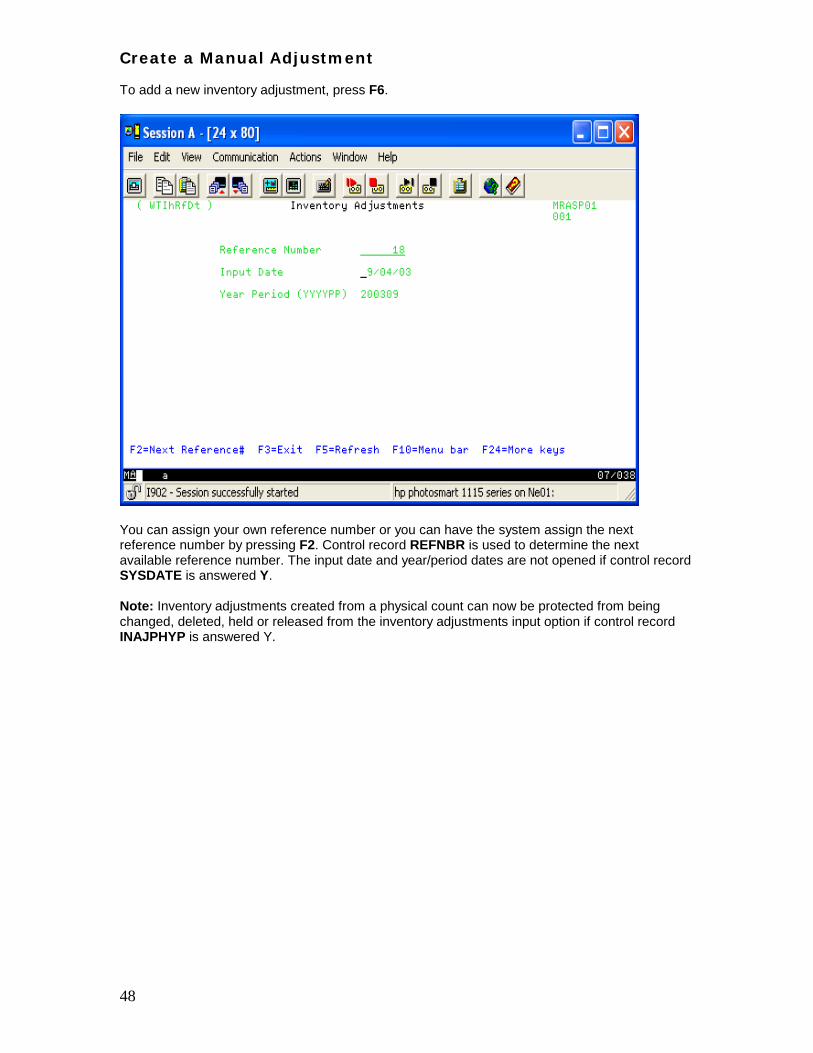
Create a Manual Adjustment To add a new inventory adjustment, press F6.
You can assign your own reference number or you can have the system assign the next reference number by pressing F2. Control record REFNBR is used to determine the next available reference number. The input date and year/period dates are not opened if control record SYSDATE is answered Y. Note: Inventory adjustments created from a physical count can now be protected from being changed, deleted, held or released from the inventory adjustments input option if control record INAJPHYP is answered Y.
49
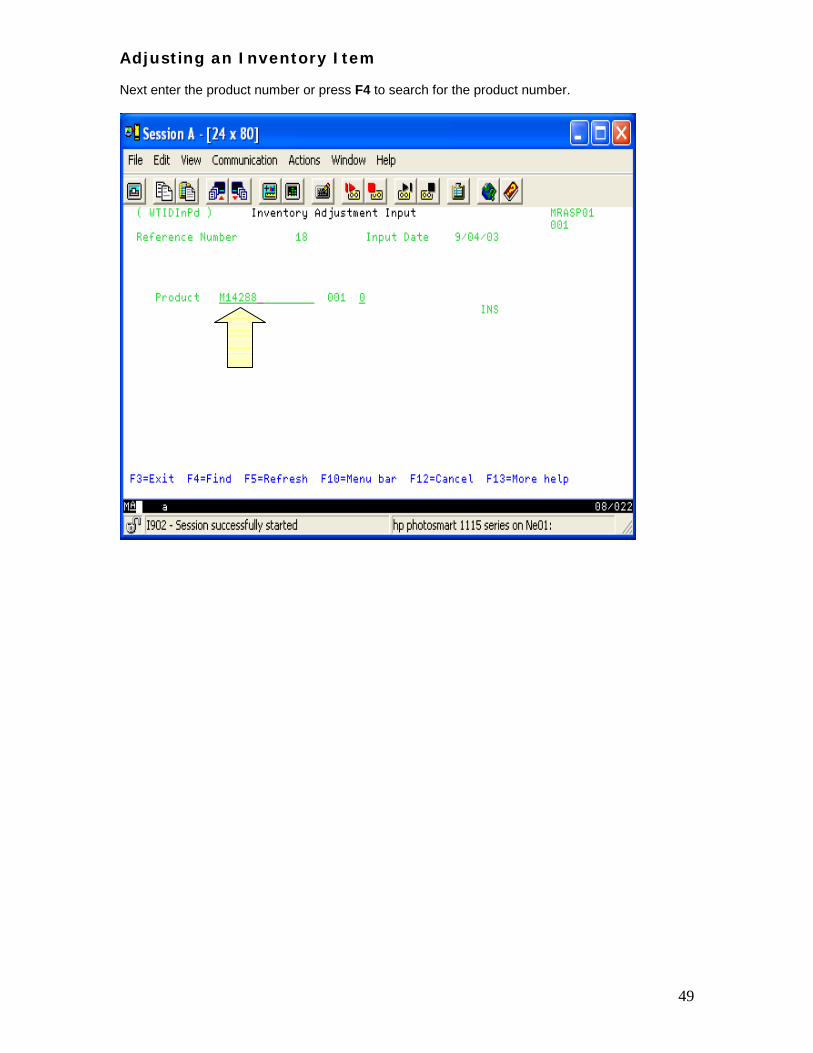
Adjusting an Inventory Item Next enter the product number or press F4 to search for the product number.
50
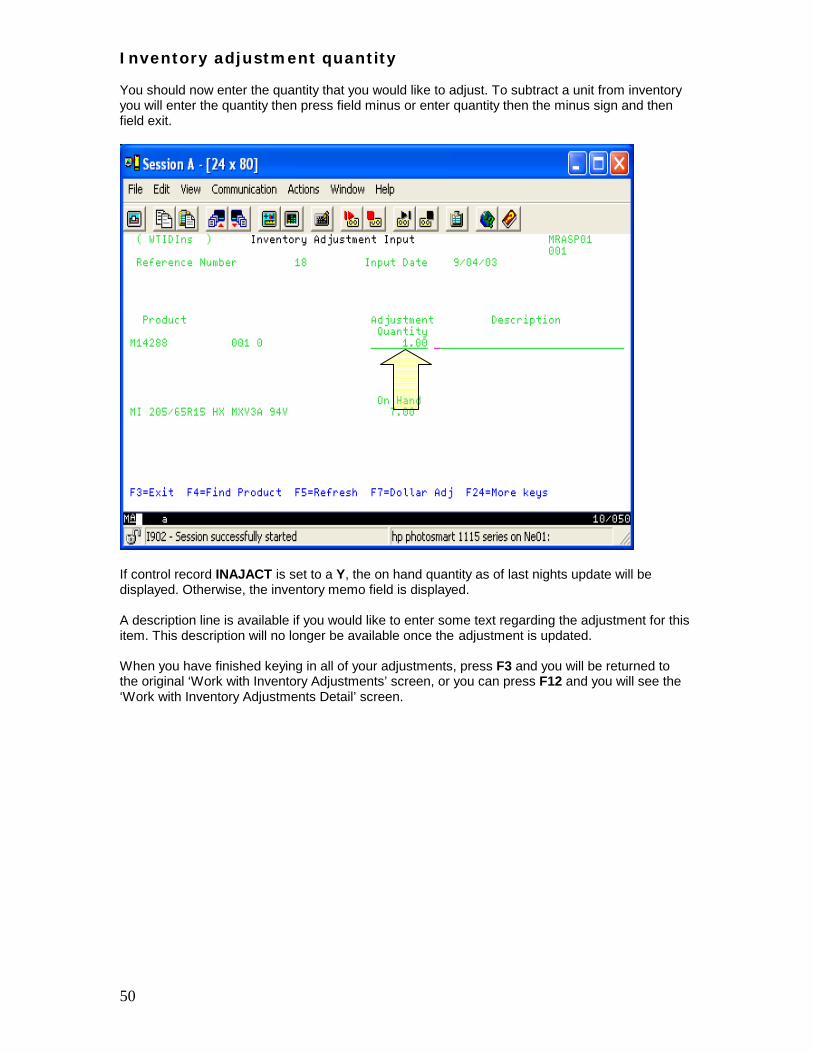
Inventory adjustment quantity You should now enter the quantity that you would like to adjust. To subtract a unit from inventory you will enter the quantity then press field minus or enter quantity then the minus sign and then field exit.
If control record INAJACT is set to a Y, the on hand quantity as of last nights update will be displayed. Otherwise, the inventory memo field is displayed. A description line is available if you would like to enter some text regarding the adjustment for this item. This description will no longer be available once the adjustment is updated. When you have finished keying in all of your adjustments, press F3 and you will be returned to the original ‘Work with Inventory Adjustments’ screen, or you can press F12 and you will see the ‘Work with Inventory Adjustments Detail’ screen.
51
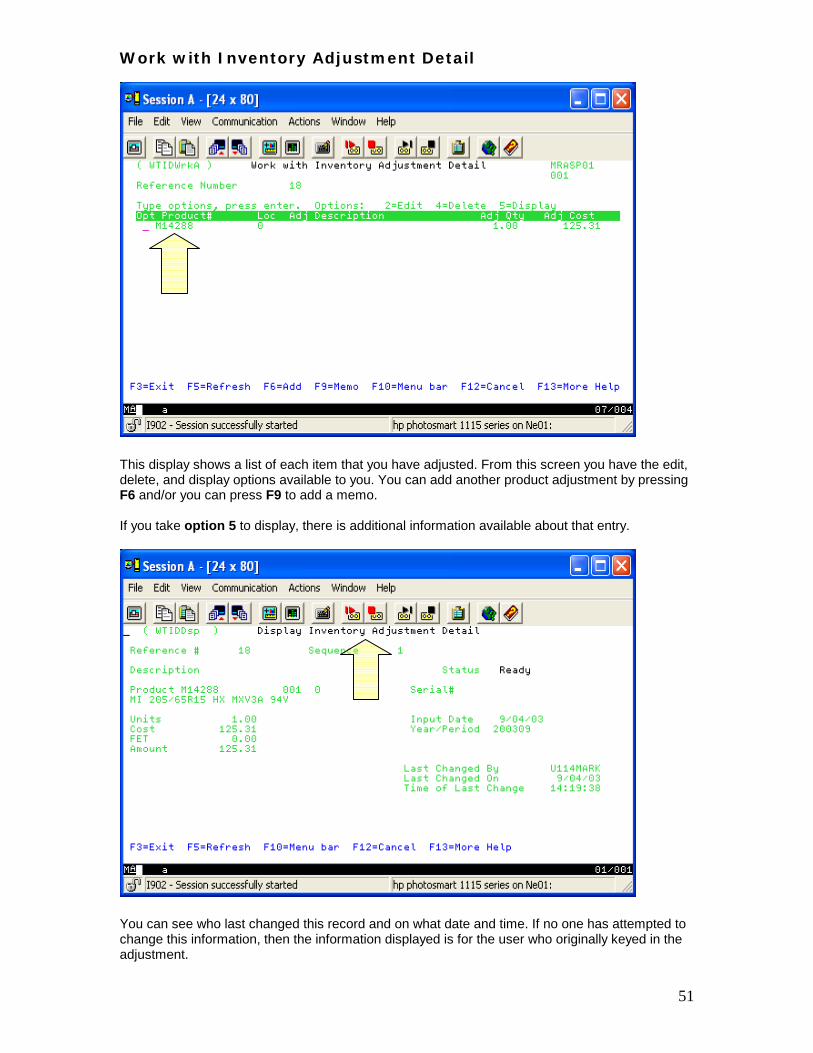
Work with Inventory Adjustment Detail
This display shows a list of each item that you have adjusted. From this screen you have the edit, delete, and display options available to you. You can add another product adjustment by pressing F6 and/or you can press F9 to add a memo. If you take option 5 to display, there is additional information available about that entry.
You can see who last changed this record and on what date and time. If no one has attempted to change this information, then the information displayed is for the user who originally keyed in the adjustment.
52
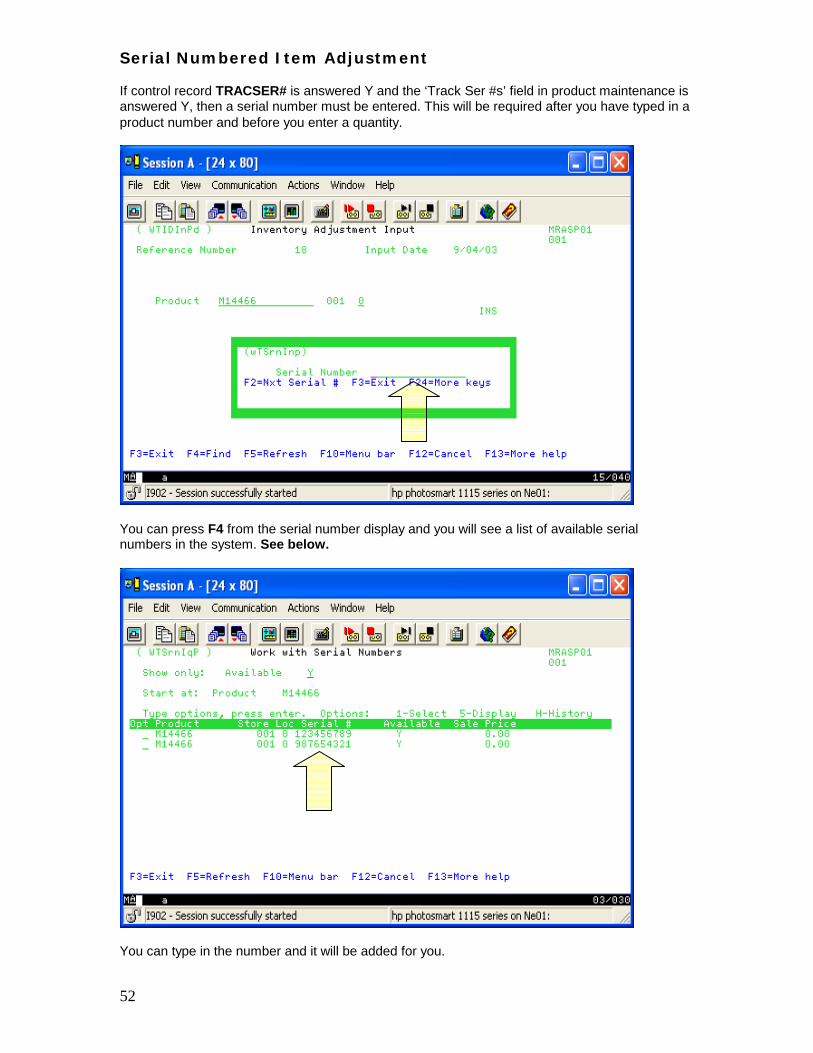
Serial Numbered Item Adjustment If control record TRACSER# is answered Y and the ‘Track Ser #s’ field in product maintenance is answered Y, then a serial number must be entered. This will be required after you have typed in a product number and before you enter a quantity.
You can press F4 from the serial number display and you will see a list of available serial numbers in the system. See below.
You can type in the number and it will be added for you.
53
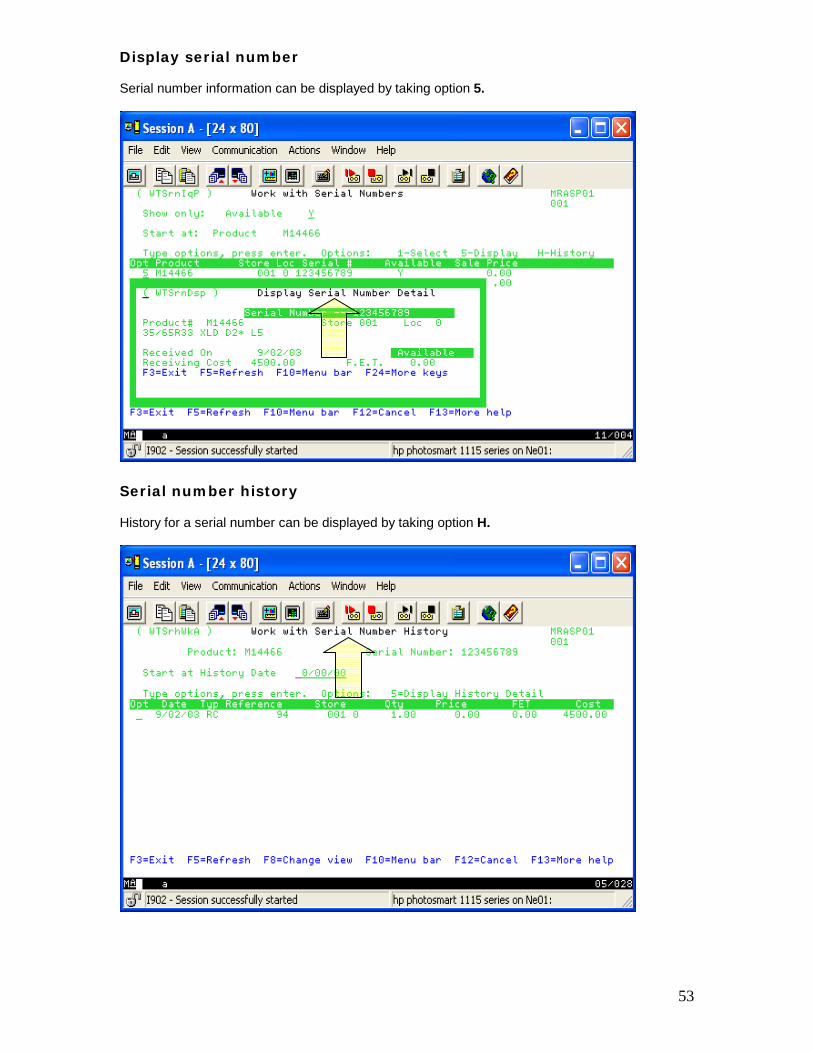
Display serial number Serial number information can be displayed by taking option 5.
Serial number history History for a serial number can be displayed by taking option H.
54
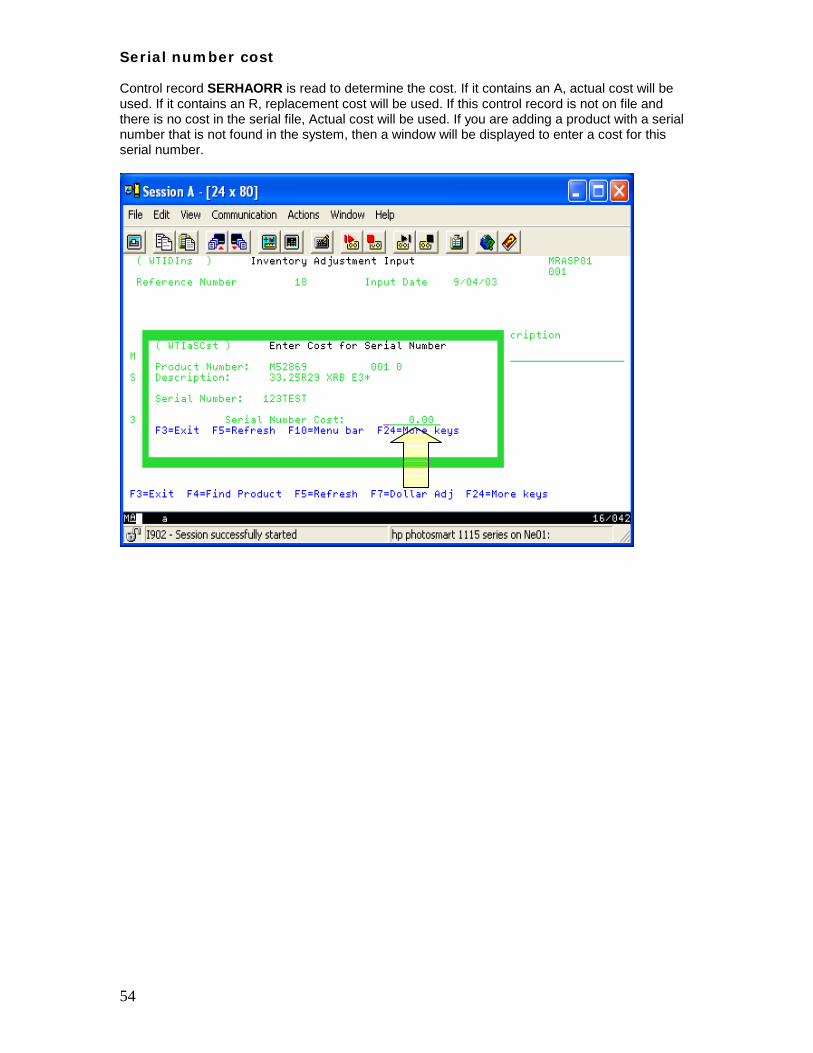
Serial number cost Control record SERHAORR is read to determine the cost. If it contains an A, actual cost will be used. If it contains an R, replacement cost will be used. If this control record is not on file and there is no cost in the serial file, Actual cost will be used. If you are adding a product with a serial number that is not found in the system, then a window will be displayed to enter a cost for this serial number.
55
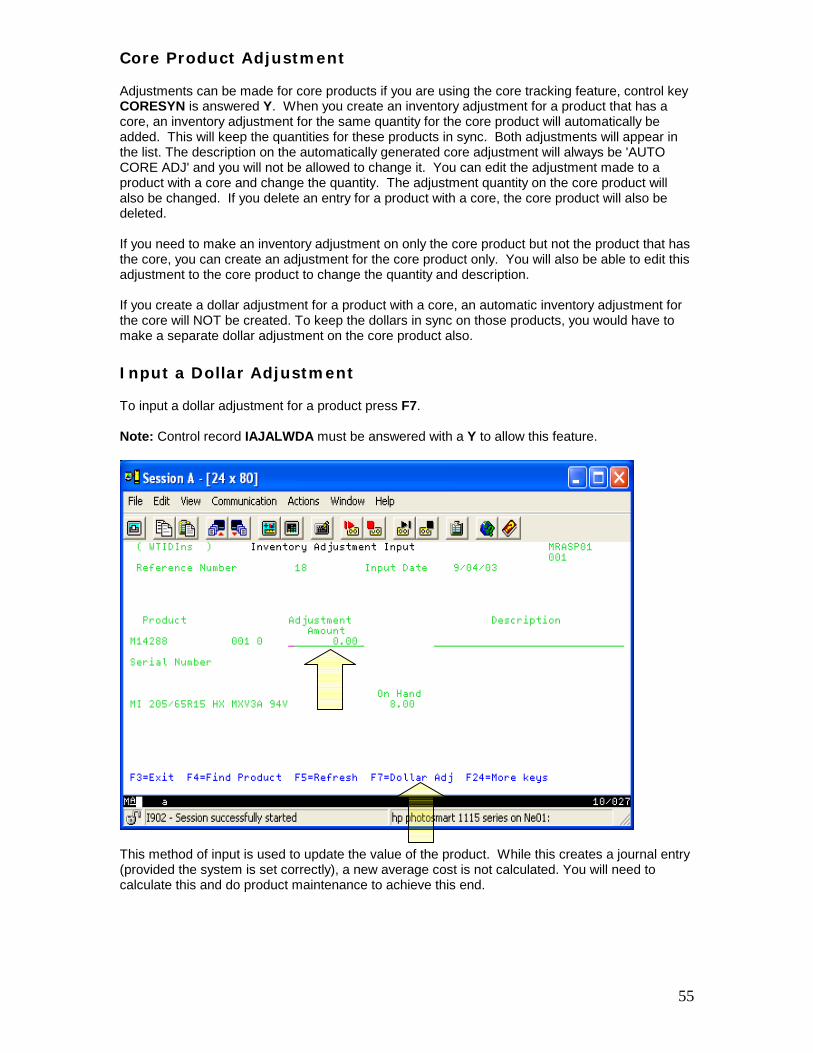
Core Product Adjustment Adjustments can be made for core products if you are using the core tracking feature, control key CORESYN is answered Y. When you create an inventory adjustment for a product that has a core, an inventory adjustment for the same quantity for the core product will automatically be added. This will keep the quantities for these products in sync. Both adjustments will appear in the list. The description on the automatically generated core adjustment will always be 'AUTO CORE ADJ' and you will not be allowed to change it. You can edit the adjustment made to a product with a core and change the quantity. The adjustment quantity on the core product will also be changed. If you delete an entry for a product with a core, the core product will also be deleted. If you need to make an inventory adjustment on only the core product but not the product that has the core, you can create an adjustment for the core product only. You will also be able to edit this adjustment to the core product to change the quantity and description. If you create a dollar adjustment for a product with a core, an automatic inventory adjustment for the core will NOT be created. To keep the dollars in sync on those products, you would have to make a separate dollar adjustment on the core product also. Input a Dollar Adjustment To input a dollar adjustment for a product press F7. Note: Control record IAJALWDA must be answered with a Y to allow this feature.
This method of input is used to update the value of the product. While this creates a journal entry (provided the system is set correctly), a new average cost is not calculated. You will need to calculate this and do product maintenance to achieve this end.
56
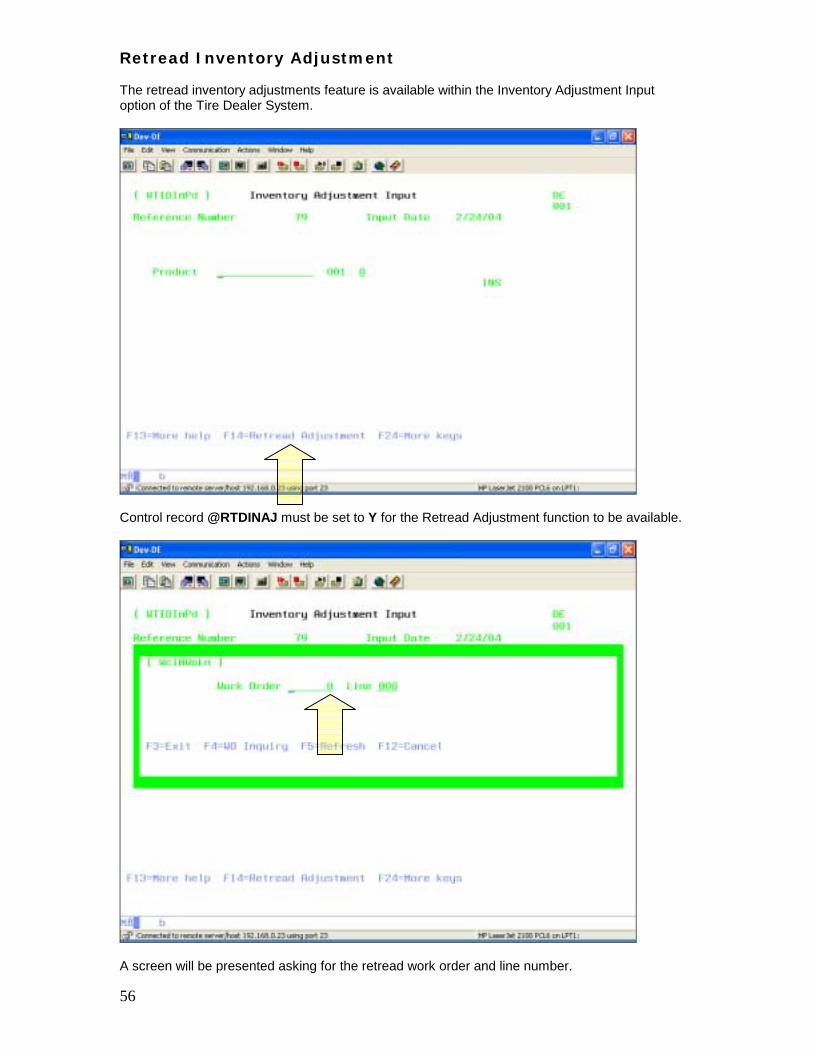
Retread Inventory Adjustment The retread inventory adjustments feature is available within the Inventory Adjustment Input option of the Tire Dealer System.
Control record @RTDINAJ must be set to Y for the Retread Adjustment function to be available.
A screen will be presented asking for the retread work order and line number.
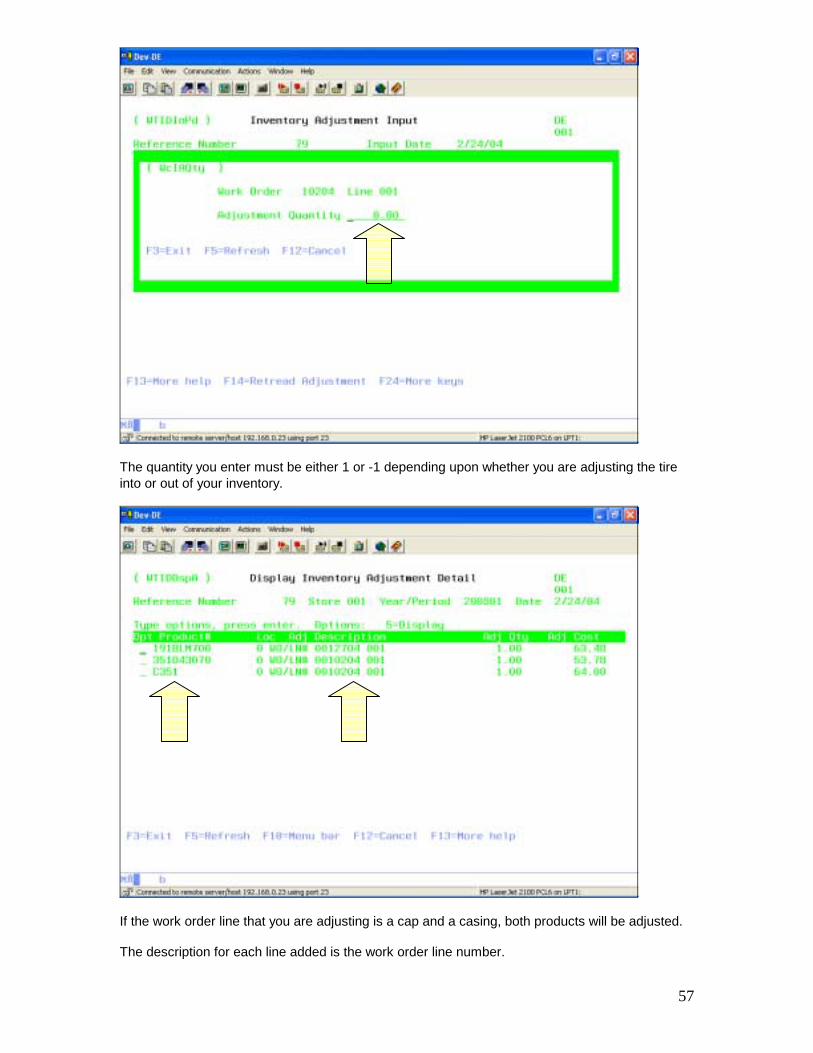
57
The quantity you enter must be either 1 or -1 depending upon whether you are adjusting the tire into or out of your inventory.
If the work order line that you are adjusting is a cap and a casing, both products will be adjusted. The description for each line added is the work order line number.

58
If the system “thinks” the work order line is on hand at another store and you are adjusting it into your inventory, an inventory adjustment transaction will automatically be created at the other store to take it out of their inventory.
The adjustments are logged in the retread time stamp file and are listed on the retread work order inquiry screen.
59
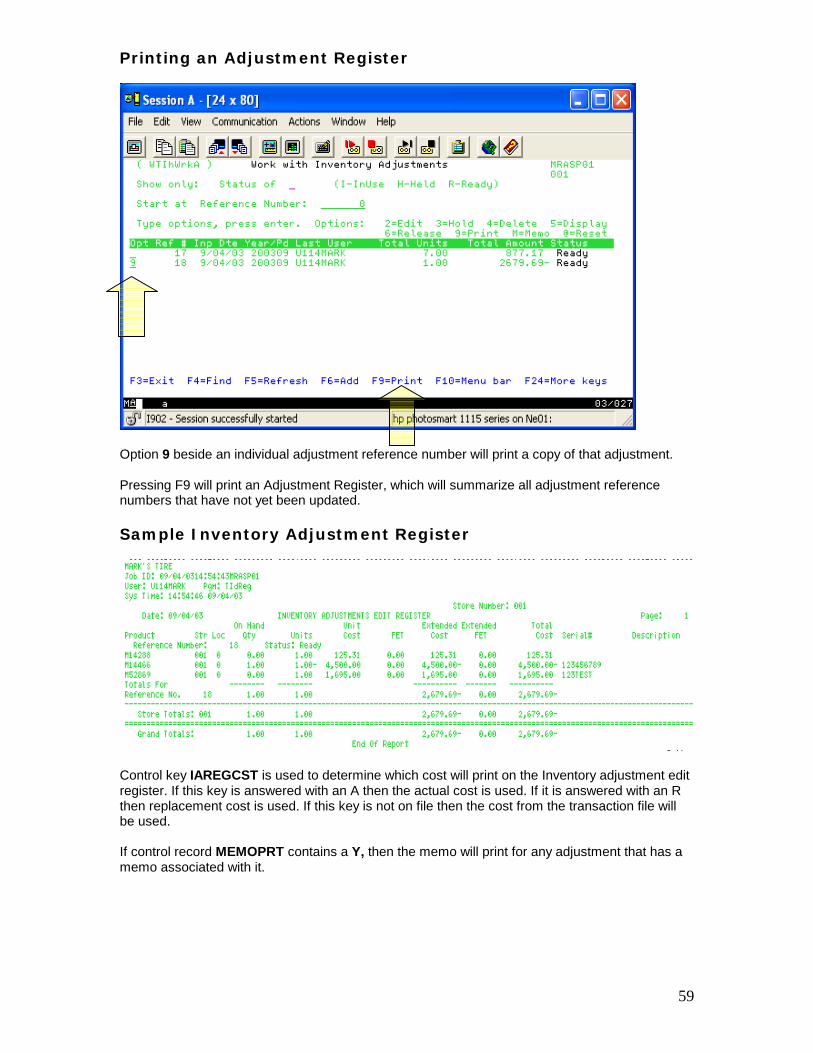
Printing an Adjustment Register
Option 9 beside an individual adjustment reference number will print a copy of that adjustment. Pressing F9 will print an Adjustment Register, which will summarize all adjustment reference numbers that have not yet been updated. Sample Inventory Adjustment Register
Control key IAREGCST is used to determine which cost will print on the Inventory adjustment edit register. If this key is answered with an A then the actual cost is used. If it is answered with an R then replacement cost is used. If this key is not on file then the cost from the transaction file will be used. If control record MEMOPRT contains a Y, then the memo will print for any adjustment that has a memo associated with it.
60
Inventory adjustment cost calculations If control record PRHAORR contains an A, then the actual cost is used to calculate the adjustment amount. If it contains an R, then the replacement cost is used. This control key is also used to determine which cost to use when writing to the product history file. This cost is also used to display cost from the inventory adjustment options. If this control record does not exist, actual cost will be used. Inventory adjustment GL posting cost calculations If you would like to post inventory adjustments to the General Ledger, you will need to set control record POSTGLIA to a Y. Note: See GL Posting document for more detail of how the system will post the inventory adjustment to the general ledger. When posting inventory adjustments to the general ledger, Control record GLCOST is used to determine which cost is used. If this control record contains a Y then replacement cost is used, if it contains an N then actual cost is used.
61
Tire Dealer System Inventory Adjustment Control Records @RTDINAJ --- Contains a Y or an N indicating whether Retread Work Order/Line Numbers can be adjusted. CORESYN --- Contains a Y or N indicating whether you will be using the Core feature. If answered Y, then the core will be adjusted with the product. GLCOST --- Contains a Y or an N determining which cost you want to use when posting to the General Ledger. If Y, the replacement cost will be used. If N, the actual cost will be used. This control key cannot be specified by user/workstation or by store. Default is N. IAREGCST --- Contains A or R indicating which cost to use for the inventory adjustment edit register. If this key is not set up the cost from the transaction file will be used. INAJACT --- Contains a Y or an N indicating whether to display actual inventory on the inventory adjustment input screen (otherwise displays the inventory memo field). Default is N. INAJALWDA --- Contains a Y or an N indicating whether to allow the dollar adjustment feature from inventory adjustments. If this is answered N then the F7 Dollar Adjustment is not allowed. MEMOPRT --- Contains a Y or N indicating whether to print a memo that is associated with inventory adjustments on the edit register. Default is N. POSTGLIA --- Contains a Y or N. If answered with Y, the dollar amount of all inventory adjustments will post to general ledger. The inventory side of the posting will be to the G/L account contained in the control key GLINV99, where 99 is the product class, if control key GLINV/P is set to P, otherwise it will post to the G/L account contained in the control key GLIN999, where 999 is the product vendor. The inventory variance will post to the G/L account contained in control record GLVAR999, where 999 is the product vendor, if control record is set to V, otherwise it will post to the G/L account contained in control record GLVAR99 where 99 is the product class. PRHAORR --- Contains A or R indicating whether to use the actual or replacement cost in the Product History File. This control key cannot be specified by user/workstation or by store. Default is A. PRHSTYN --- Contains a Y or N telling whether to maintain a Product History File which will contain a record of each transaction that each product is involved in. This control key cannot be specified by user/workstation or by store. Default is N. REFNBR --- Contains the reference number for inventory adjustment entry and is incremented by one with each use. This control key cannot be specified by store. SERHAORR --- Contains an A or an R indicating whether the actual or replacement cost will be written to the serial number history file during the invoice update when the serial number tracking feature is in use (TRACSER# = Y). This control key cannot be specified by user/workstation or by store. Default is A. SERUNQYN --- Contains a Y or N indicating whether to use unique serial numbers. If answered Y, this serial number is not just by product number but is unique throughout the serial number file. This control key cannot be specified by user/workstation or store. SER#DFLT --- Contains the default serial number to be used if the actual serial number is not known when using the serial number tracking feature (TRACSER# = Y). When the actual serial number is not entered, the normal validations will not be done. If this key is not set up, the word DEFAULT will be used whenever a serial number is required and one is not entered during the receiving and Inventory Adjustments Inputs. This control key cannot be specified by user/workstation or by store.

62
SYSDATE --- Contains a Y or an N telling whether to use the system date for the input date. If Y, the system date will also be used to derive the Year/Period and the Change Date command option will not be allowed in the data entry programs; the date and year/period front end screen will not be displayed during the data entry programs. Default is N. TRACSER# --- Contains a Y or N indicating whether tracking serial numbers can be entered during product file maintenance. If answered Y, a "Track Serial #?" field will be displayed; when any products which have a Y in this field are received, adjusted, transferred, sold, or credited, a serial number will be required as well. This feature is available during product file maintenance only. This control key cannot be specified by user/workstation or store. Default is N.


![Physical Inventory[2]](https://img.pdfslide.net/doc/110x75/577d290e1a28ab4e1ea5e3f8/physical-inventory2.jpg)