Embed Size (px)
Citation preview
PIRATE SHIPDIY tutorialAge: 9-10 years old
I am going to use materials easily found at home.In the tutorial, I will be using: a craft knife, a hot glue gun, a nail and a hammer. It is highly recommended to use them under the supervision of an adult.
MATERIALS:1. Fabric softener bottle2. Empty spreadable cheese container3. Plastic soft drink cap4. A4 black sheet of paper5. 9 wooden sticks6. 5 corks7. 5 skewers8. 8 toothpicks9. Cardboard egg box10. String11. Duct tape12. Paint + paintbrush + small jar with water
TOOLS:1. Cutting mat2. Scissors + craft knife3. Liquid glue 4. Ruler + pencil
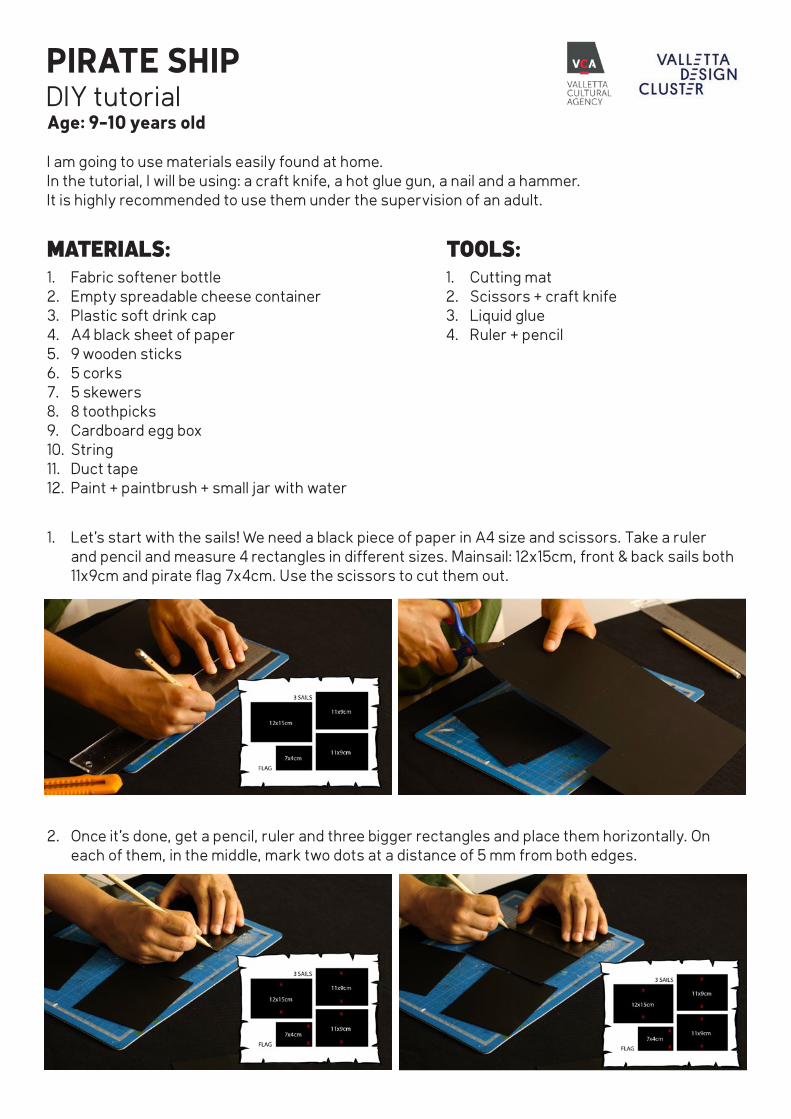
1. Let’s start with the sails! We need a black piece of paper in A4 size and scissors. Take a ruler and pencil and measure 4 rectangles in different sizes. Mainsail: 12x15cm, front & back sails both 11x9cm and pirate flag 7x4cm. Use the scissors to cut them out.
2. Once it’s done, get a pencil, ruler and three bigger rectangles and place them horizontally. On each of them, in the middle, mark two dots at a distance of 5 mm from both edges.
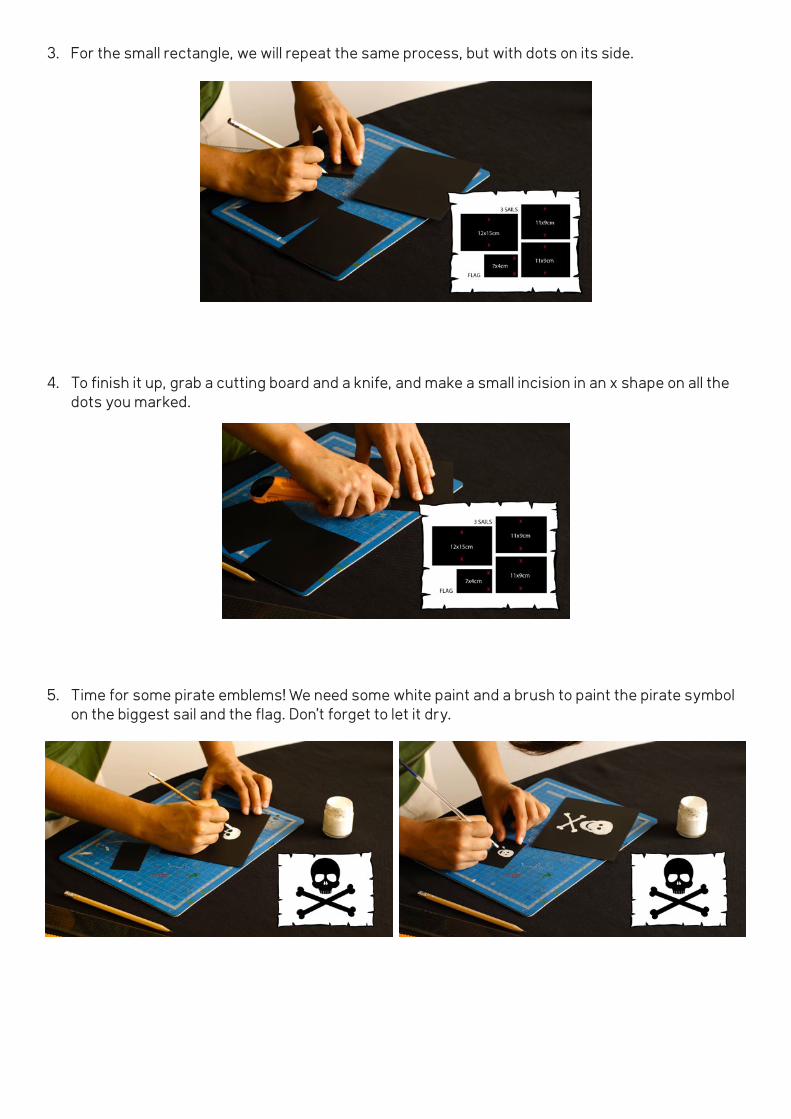
3. For the small rectangle, we will repeat the same process, but with dots on its side.
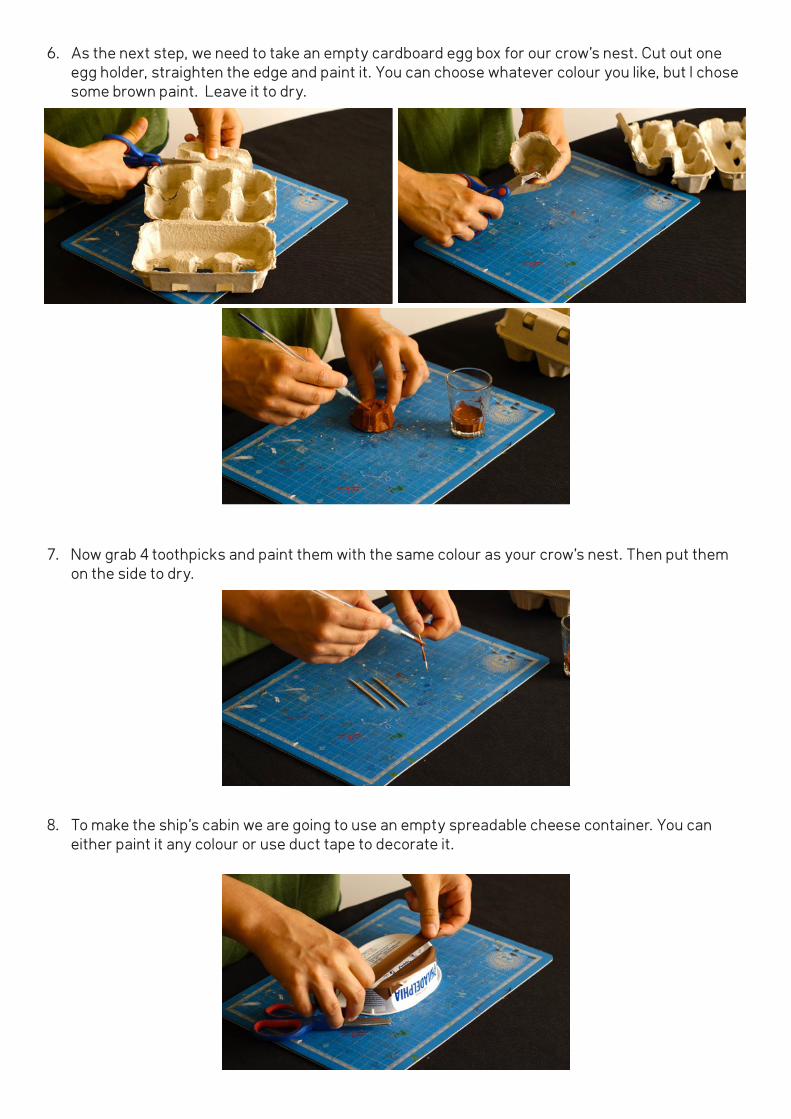
4. To finish it up, grab a cutting board and a knife, and make a small incision in an x shape on all the dots you marked.
5. Time for some pirate emblems! We need some white paint and a brush to paint the pirate symbol on the biggest sail and the flag. Don’t forget to let it dry.
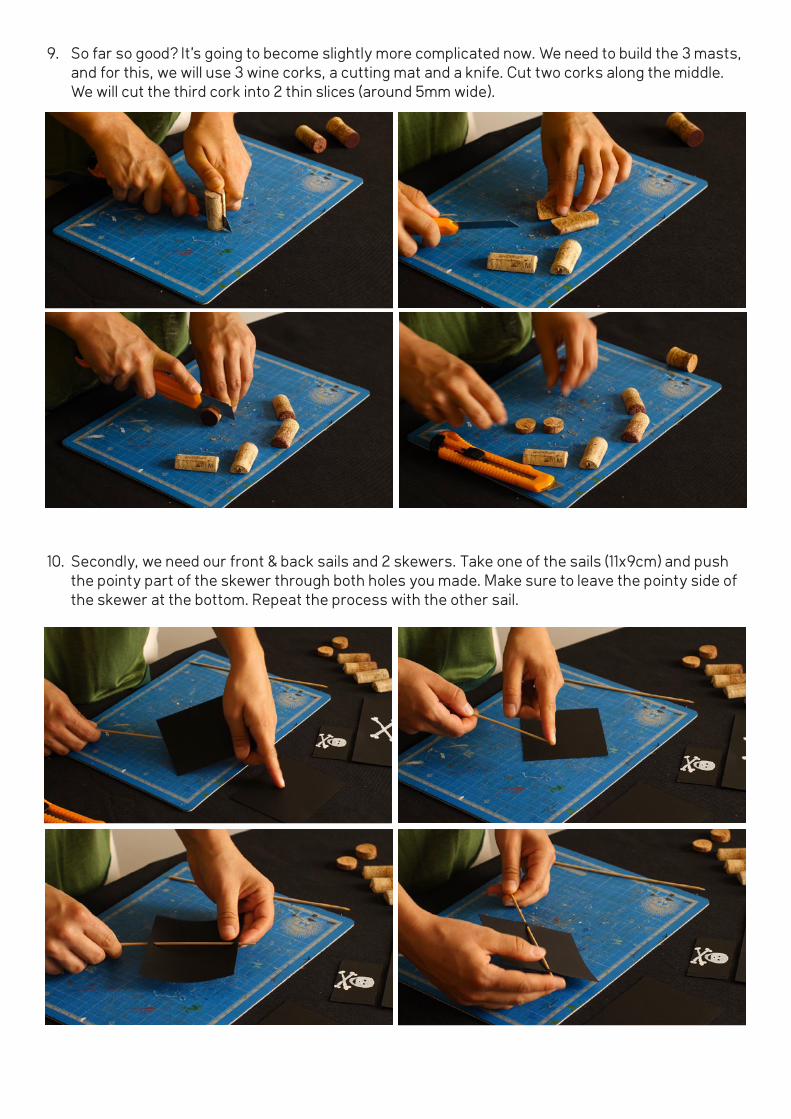
6. As the next step, we need to take an empty cardboard egg box for our crow’s nest. Cut out one egg holder, straighten the edge and paint it. You can choose whatever colour you like, but I chose some brown paint. Leave it to dry.
7. Now grab 4 toothpicks and paint them with the same colour as your crow’s nest. Then put them on the side to dry.
8. To make the ship’s cabin we are going to use an empty spreadable cheese container. You can either paint it any colour or use duct tape to decorate it.
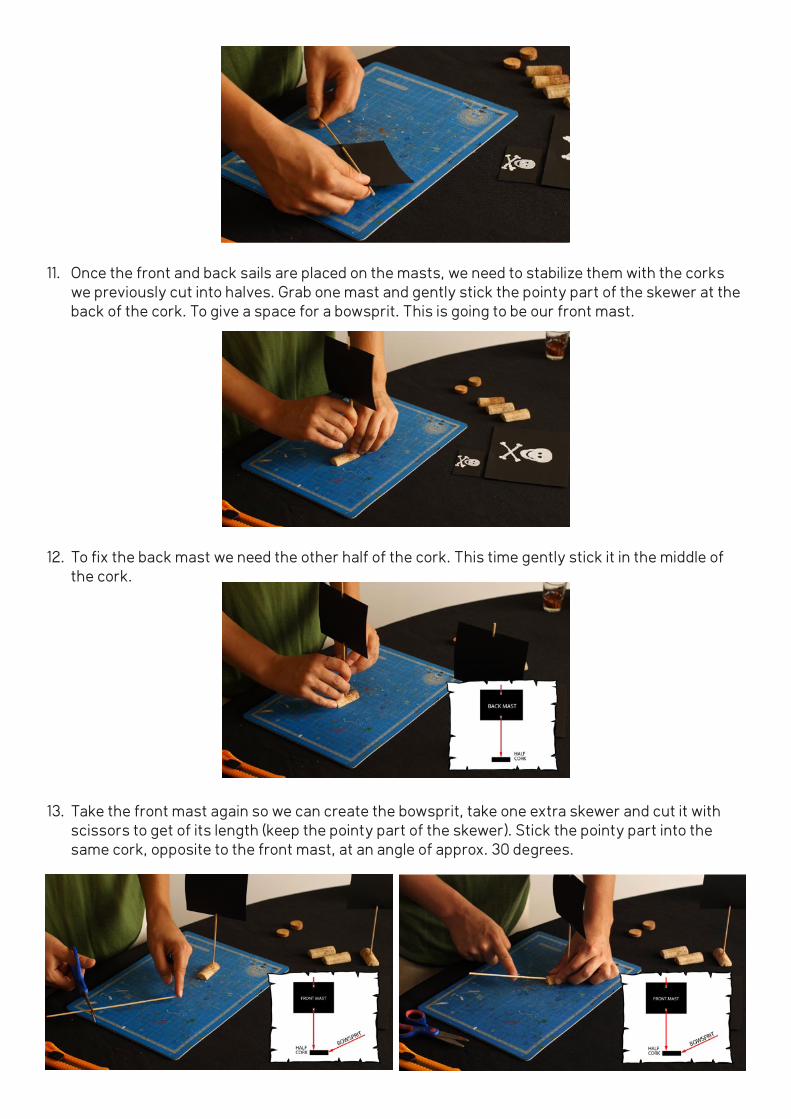
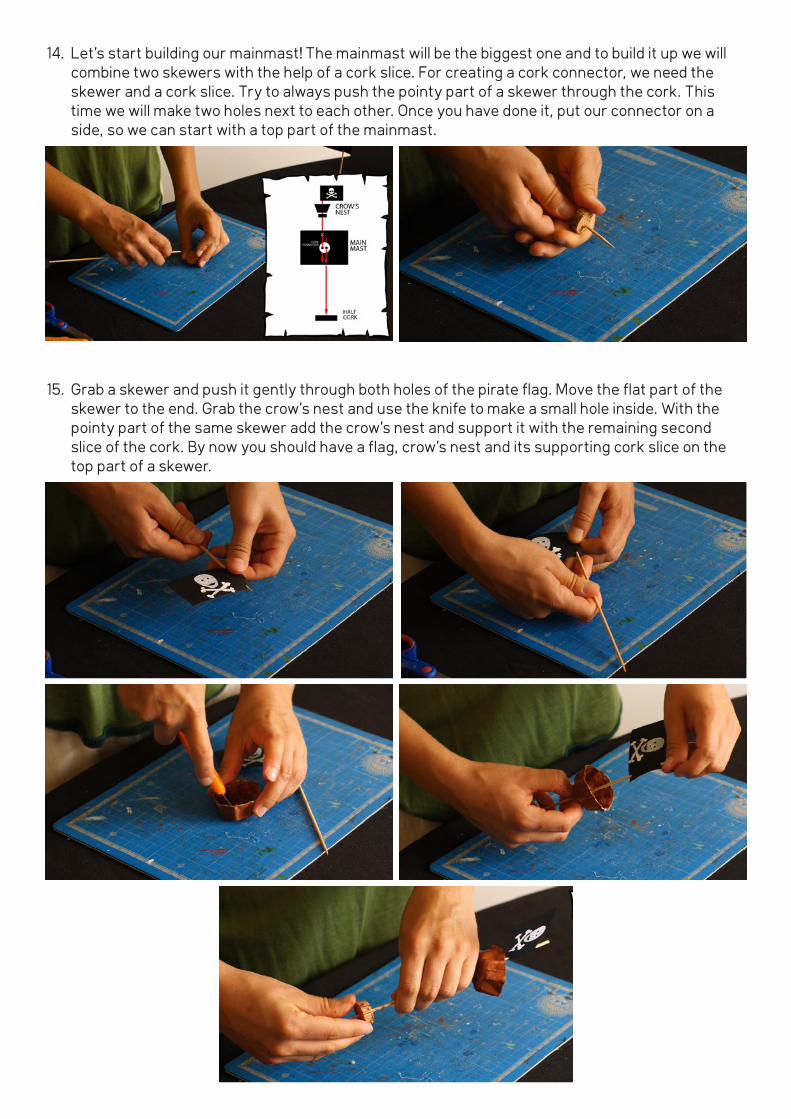
9. So far so good? It’s going to become slightly more complicated now. We need to build the 3 masts, and for this, we will use 3 wine corks, a cutting mat and a knife. Cut two corks along the middle. We will cut the third cork into 2 thin slices (around 5mm wide).
10. Secondly, we need our front & back sails and 2 skewers. Take one of the sails (11x9cm) and push the pointy part of the skewer through both holes you made. Make sure to leave the pointy side of the skewer at the bottom. Repeat the process with the other sail.
11. Once the front and back sails are placed on the masts, we need to stabilize them with the corks we previously cut into halves. Grab one mast and gently stick the pointy part of the skewer at the back of the cork. To give a space for a bowsprit. This is going to be our front mast.
12. To fix the back mast we need the other half of the cork. This time gently stick it in the middle of the cork.
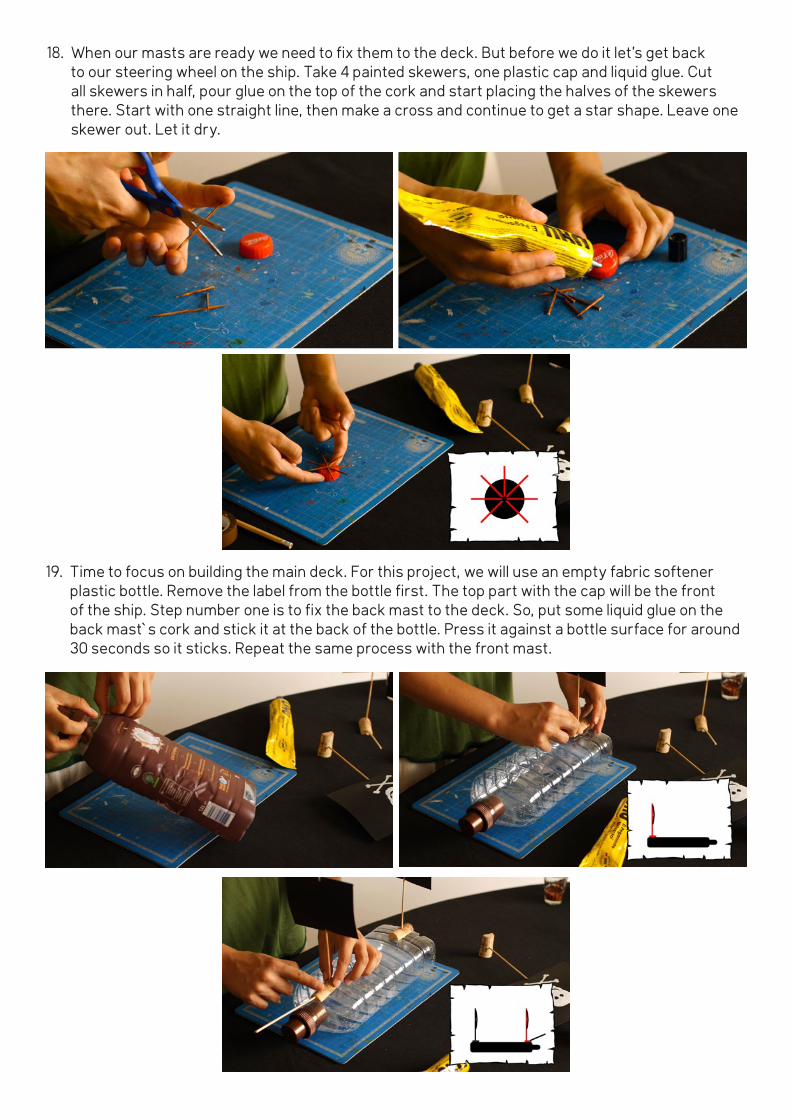
13. Take the front mast again so we can create the bowsprit, take one extra skewer and cut it with scissors to get of its length (keep the pointy part of the skewer). Stick the pointy part into the same cork, opposite to the front mast, at an angle of approx. 30 degrees.
14. Let’s start building our mainmast! The mainmast will be the biggest one and to build it up we will combine two skewers with the help of a cork slice. For creating a cork connector, we need the skewer and a cork slice. Try to always push the pointy part of a skewer through the cork. This time we will make two holes next to each other. Once you have done it, put our connector on a side, so we can start with a top part of the mainmast.
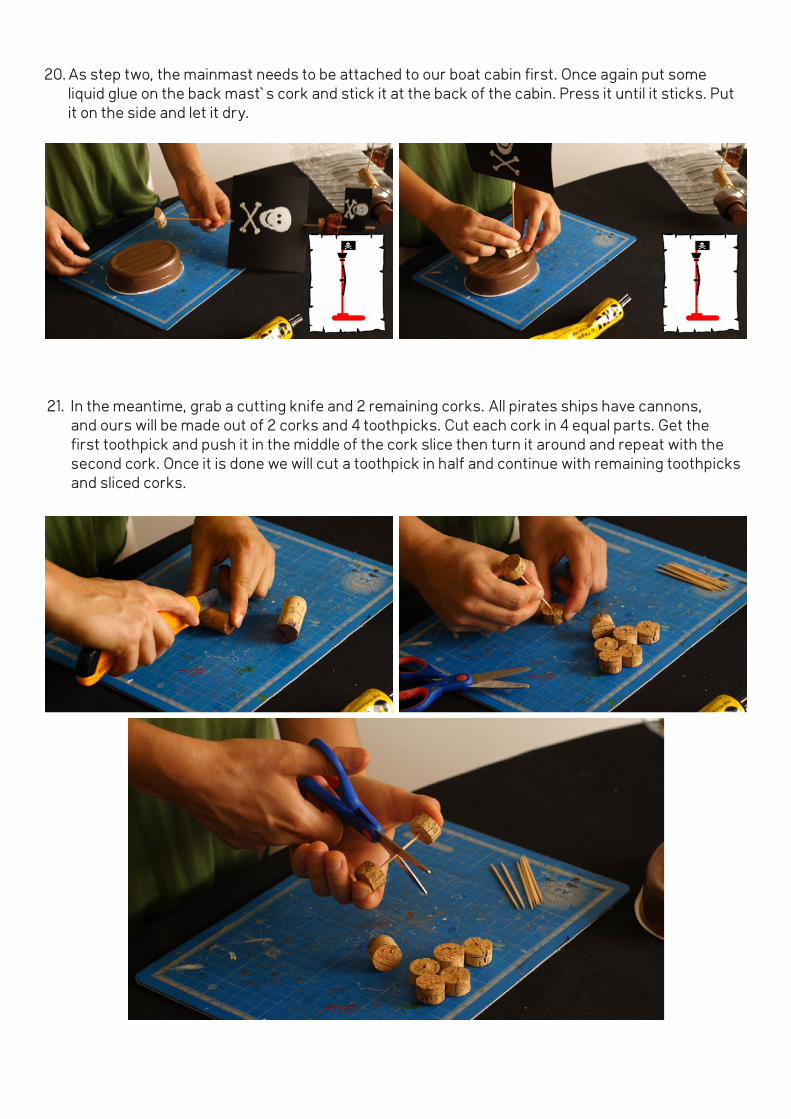
15. Grab a skewer and push it gently through both holes of the pirate flag. Move the flat part of the skewer to the end. Grab the crow’s nest and use the knife to make a small hole inside. With the pointy part of the same skewer add the crow’s nest and support it with the remaining second slice of the cork. By now you should have a flag, crow’s nest and its supporting cork slice on the top part of a skewer.
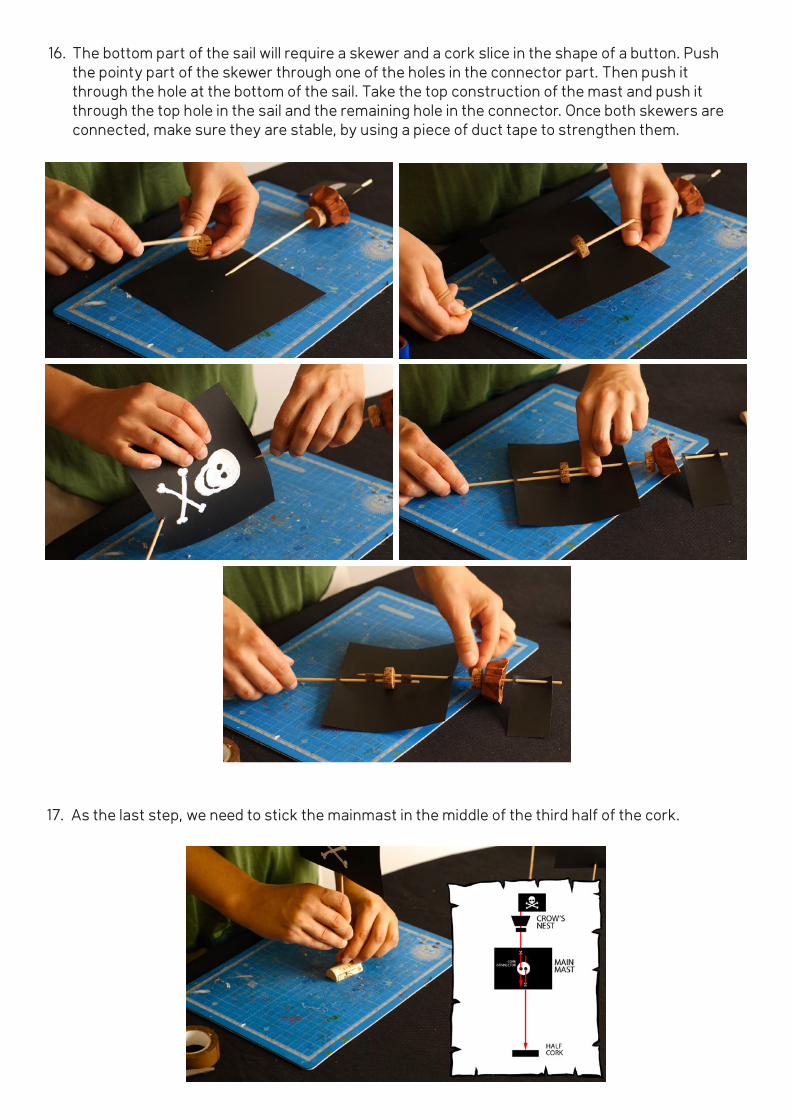
16. The bottom part of the sail will require a skewer and a cork slice in the shape of a button. Push the pointy part of the skewer through one of the holes in the connector part. Then push it through the hole at the bottom of the sail. Take the top construction of the mast and push it through the top hole in the sail and the remaining hole in the connector. Once both skewers are connected, make sure they are stable, by using a piece of duct tape to strengthen them.
17. As the last step, we need to stick the mainmast in the middle of the third half of the cork.
18. When our masts are ready we need to fix them to the deck. But before we do it let’s get back to our steering wheel on the ship. Take 4 painted skewers, one plastic cap and liquid glue. Cut all skewers in half, pour glue on the top of the cork and start placing the halves of the skewers there. Start with one straight line, then make a cross and continue to get a star shape. Leave one skewer out. Let it dry.
19. Time to focus on building the main deck. For this project, we will use an empty fabric softener plastic bottle. Remove the label from the bottle first. The top part with the cap will be the front of the ship. Step number one is to fix the back mast to the deck. So, put some liquid glue on the back mast`s cork and stick it at the back of the bottle. Press it against a bottle surface for around 30 seconds so it sticks. Repeat the same process with the front mast.
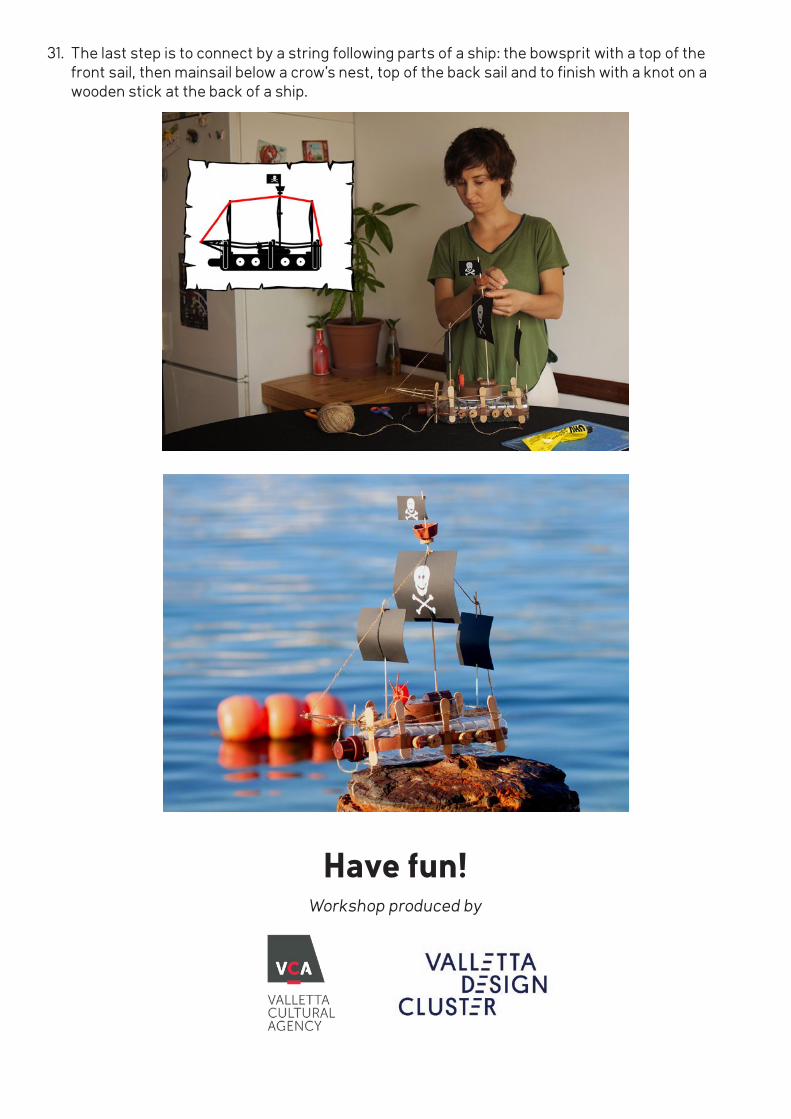
20. As step two, the mainmast needs to be attached to our boat cabin first. Once again put some liquid glue on the back mast`s cork and stick it at the back of the cabin. Press it until it sticks. Put it on the side and let it dry.
21. In the meantime, grab a cutting knife and 2 remaining corks. All pirates ships have cannons, and ours will be made out of 2 corks and 4 toothpicks. Cut each cork in 4 equal parts. Get the first toothpick and push it in the middle of the cork slice then turn it around and repeat with the second cork. Once it is done we will cut a toothpick in half and continue with remaining toothpicks and sliced corks.
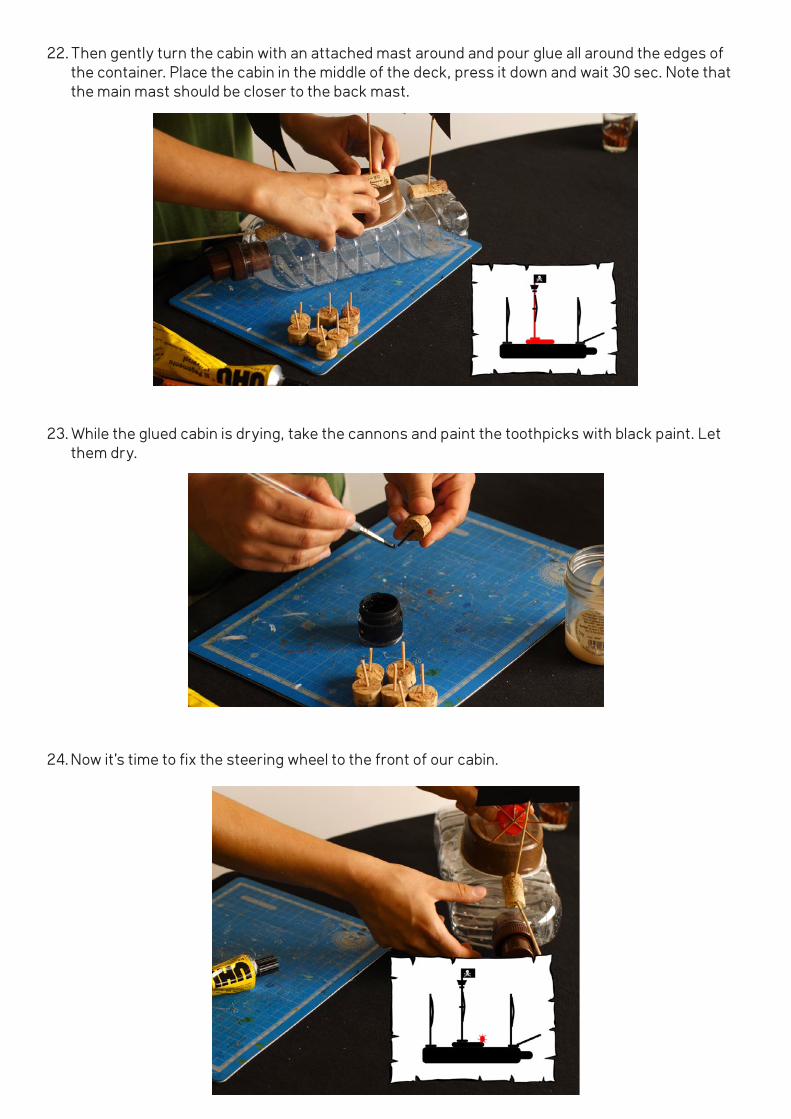
22. Then gently turn the cabin with an attached mast around and pour glue all around the edges of the container. Place the cabin in the middle of the deck, press it down and wait 30 sec. Note that the main mast should be closer to the back mast.
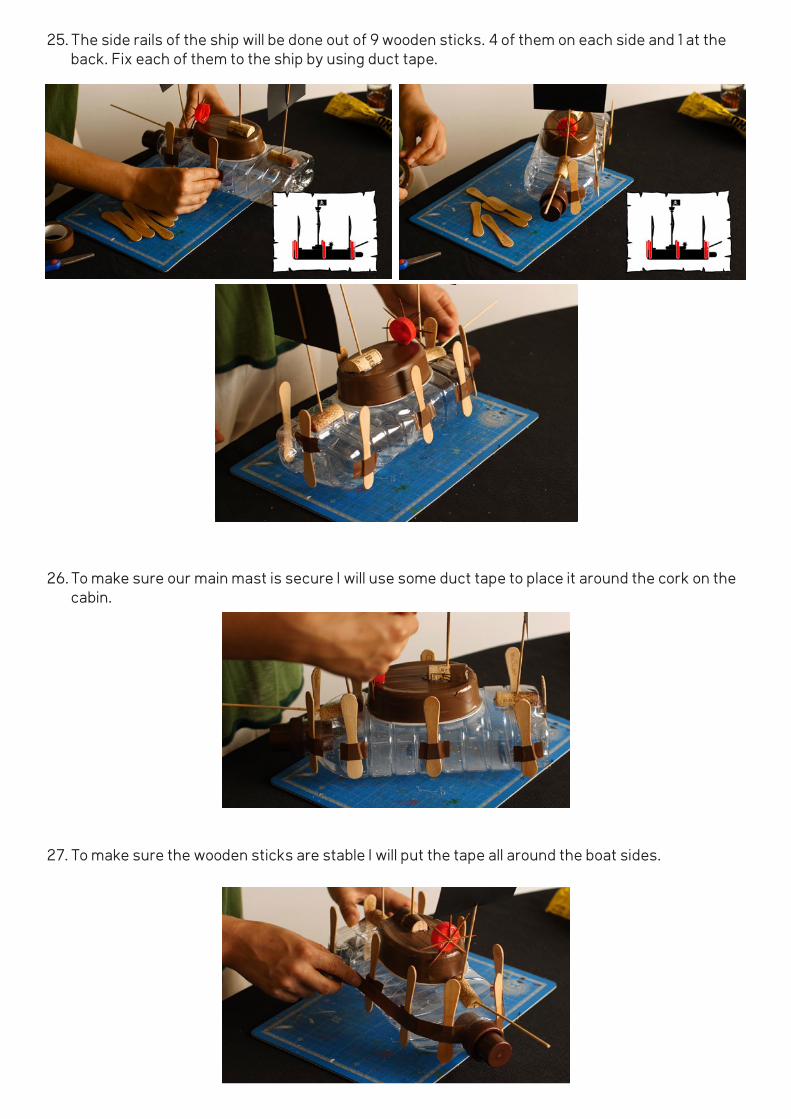
23. While the glued cabin is drying, take the cannons and paint the toothpicks with black paint. Let them dry.
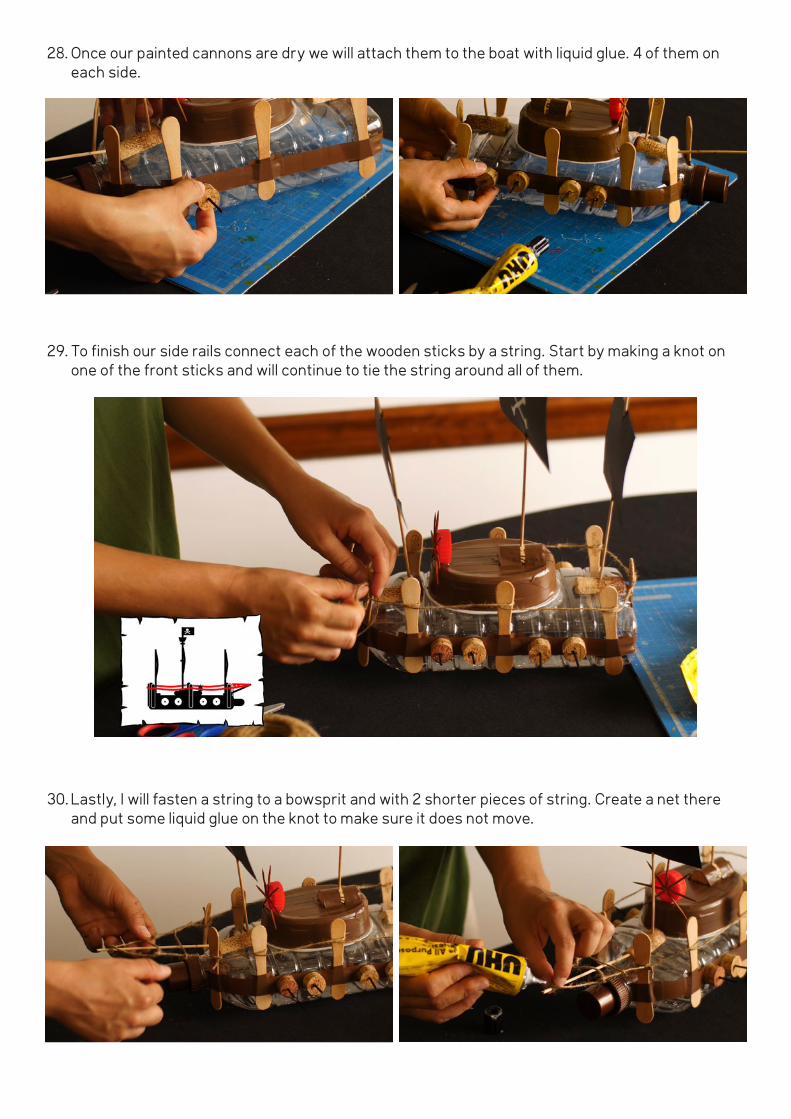
24. Now it’s time to fix the steering wheel to the front of our cabin.
25. The side rails of the ship will be done out of 9 wooden sticks. 4 of them on each side and 1 at the back. Fix each of them to the ship by using duct tape.
26. To make sure our main mast is secure I will use some duct tape to place it around the cork on the cabin.
27. To make sure the wooden sticks are stable I will put the tape all around the boat sides.
28. Once our painted cannons are dry we will attach them to the boat with liquid glue. 4 of them on each side.
29. To finish our side rails connect each of the wooden sticks by a string. Start by making a knot on one of the front sticks and will continue to tie the string around all of them.
30. Lastly, I will fasten a string to a bowsprit and with 2 shorter pieces of string. Create a net there and put some liquid glue on the knot to make sure it does not move.
Have fun!Workshop produced by
31. The last step is to connect by a string following parts of a ship: the bowsprit with a top of the front sail, then mainsail below a crow’s nest, top of the back sail and to finish with a knot on a wooden stick at the back of a ship.