Embed Size (px)
Citation preview
Portable Class Libraries ---
Overview In this lab, you’ll learn about Portable Class Libraries (PCLs). PCLs enable you to create managed
assemblies that work on more than one .NET Framework platform. Within these assemblies, you can
share binary code as-is across projects running on different platforms without recompilation, such as
common business logic.
You can build a single portable assembly that works without modification on the full .NET Framework,
the Core version of .NET available in modern Windows 8 applications, Silverlight, Windows Phone 7 & 8,
Xbox 360, and even other platforms. As you work on a PCL project, Visual Studio constrains you to using
only the subset of .NET Framework APIs common to your chosen target platforms. This helps ensure
that a single portable library is able to run without modification on all these platforms.
You can build portable .NET class libraries by simply using Visual Studio’s PCL template when creating a
new project. It will ask you to choose which target platforms you want to support at that point, but you
can adjust this later on if necessary. You can then program as you normally would—the only difference
from writing a normal class library is that you’ll find fewer types from the .NET Framework are available,
and that some of those types have fewer members because Visual Studio only lets you use the features
available across all of your targets.
To learn more about portable class libraries, check out this article on MSDN:
http://msdn.microsoft.com/en-us/library/gg597391(v=VS.110).aspx.
Objectives In this hands-on lab, you will learn how to:
- Build a Portable Class Library
- Import PCL-compatible functionality via NuGet
- Access platform-specific functionality via proper abstraction
- Refactor a WPF application to support WinRT and Windows Phone clients
Prerequisites The following is required to complete this hands-on lab:
- Microsoft Visual Studio 2013 (with Update 2 RC applied)
Notes Estimated time to complete this lab: 30 minutes.
Note: You can log into the virtual machine with user name “User” and password “P2ssw0rd”.
Note: This lab may make references to code and other assets that are needed to complete the exercises.
You can find these assets on the desktop in a folder named TechEd 2014. Within that folder, you will
find additional folders that match the name of the lab you are working on.
Exercise 1: Creating a Portable Class Library In this exercise, you’ll go through the process of refactoring a PCL out of an existing WPF app. Once the
PCL is ready, it can be easily leveraged by applications on supported platforms, such as WinRT and
Windows Phone.
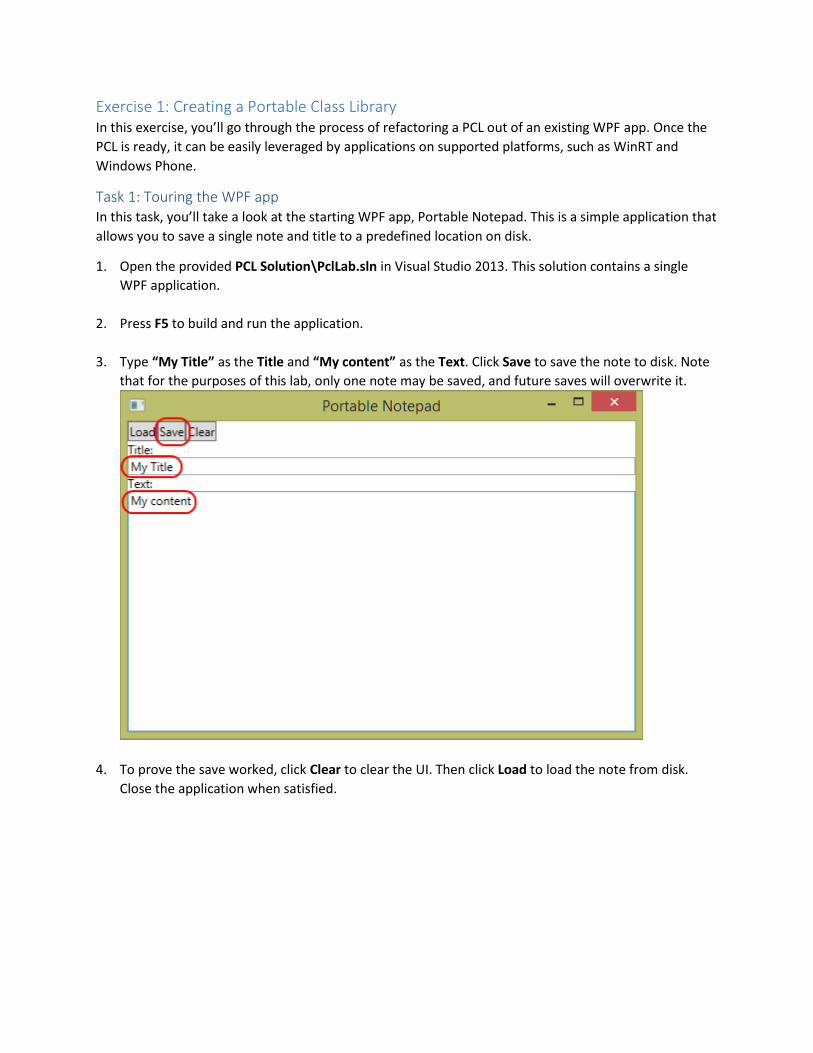
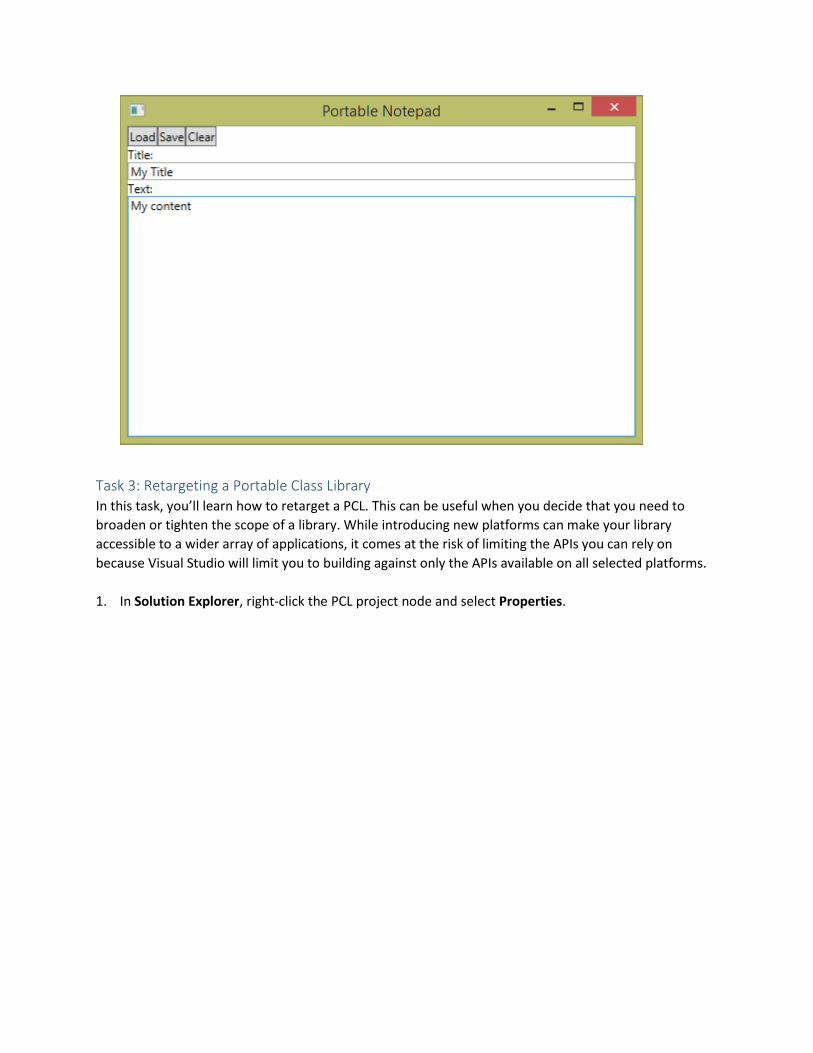
Task 1: Touring the WPF app In this task, you’ll take a look at the starting WPF app, Portable Notepad. This is a simple application that
allows you to save a single note and title to a predefined location on disk.
1. Open the provided PCL Solution\PclLab.sln in Visual Studio 2013. This solution contains a single
WPF application.
2. Press F5 to build and run the application.
3. Type “My Title” as the Title and “My content” as the Text. Click Save to save the note to disk. Note
that for the purposes of this lab, only one note may be saved, and future saves will overwrite it.
4. To prove the save worked, click Clear to clear the UI. Then click Load to load the note from disk.
Close the application when satisfied.
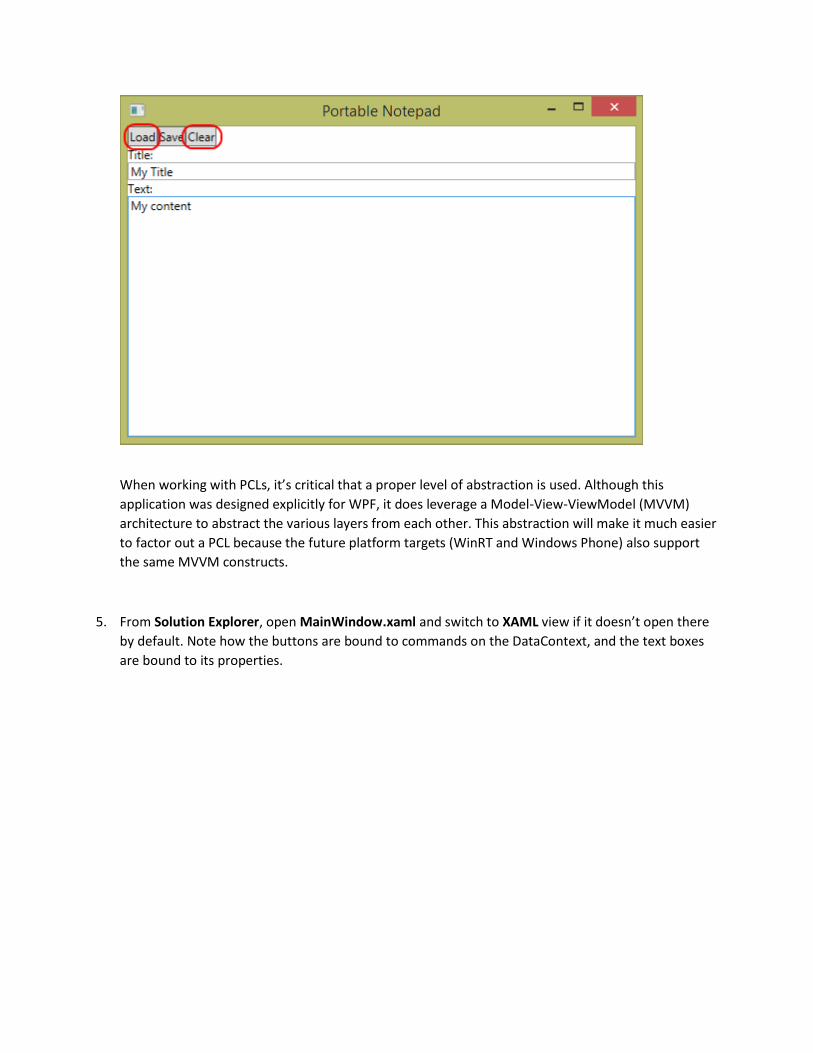
When working with PCLs, it’s critical that a proper level of abstraction is used. Although this
application was designed explicitly for WPF, it does leverage a Model-View-ViewModel (MVVM)
architecture to abstract the various layers from each other. This abstraction will make it much easier
to factor out a PCL because the future platform targets (WinRT and Windows Phone) also support
the same MVVM constructs.
5. From Solution Explorer, open MainWindow.xaml and switch to XAML view if it doesn’t open there
by default. Note how the buttons are bound to commands on the DataContext, and the text boxes
are bound to its properties.
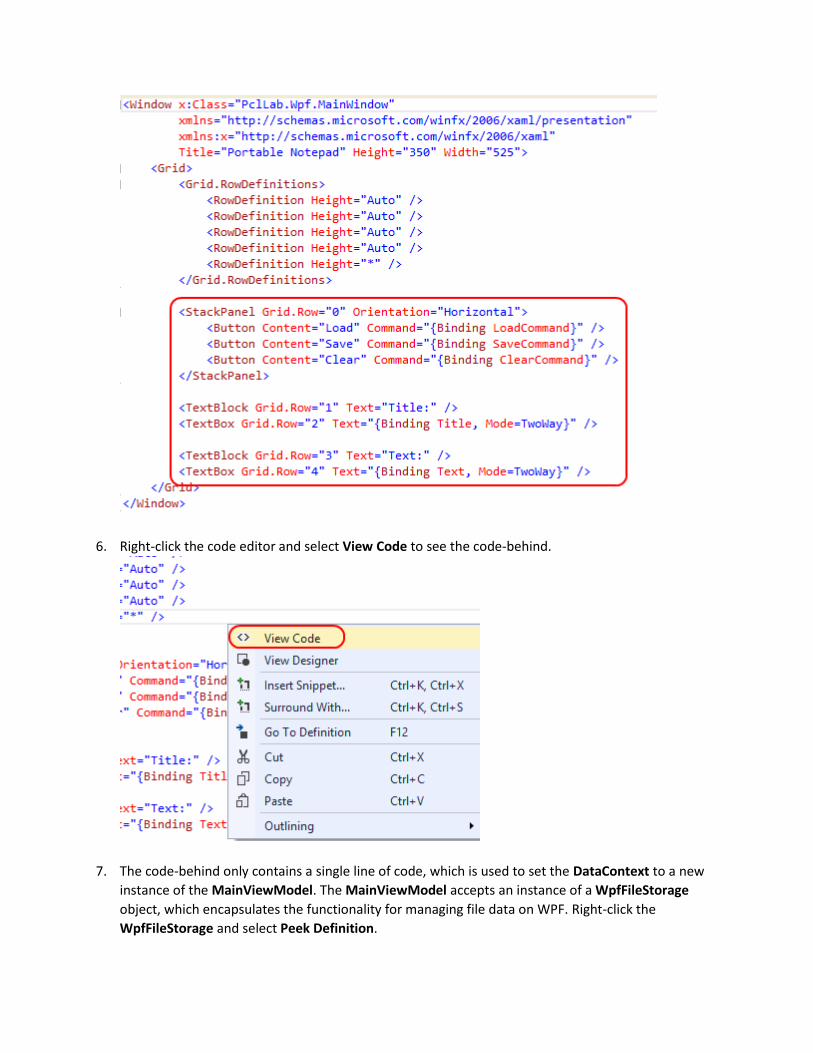
6. Right-click the code editor and select View Code to see the code-behind.
7. The code-behind only contains a single line of code, which is used to set the DataContext to a new
instance of the MainViewModel. The MainViewModel accepts an instance of a WpfFileStorage
object, which encapsulates the functionality for managing file data on WPF. Right-click the
WpfFileStorage and select Peek Definition.
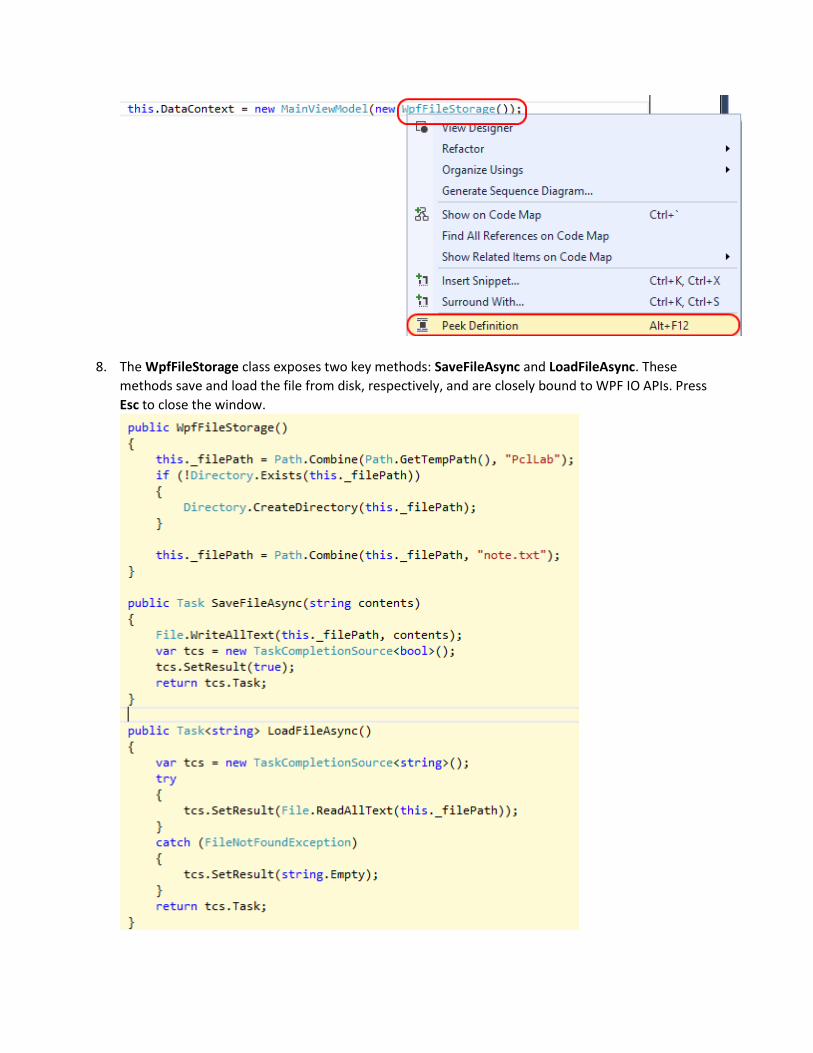
8. The WpfFileStorage class exposes two key methods: SaveFileAsync and LoadFileAsync. These
methods save and load the file from disk, respectively, and are closely bound to WPF IO APIs. Press
Esc to close the window.
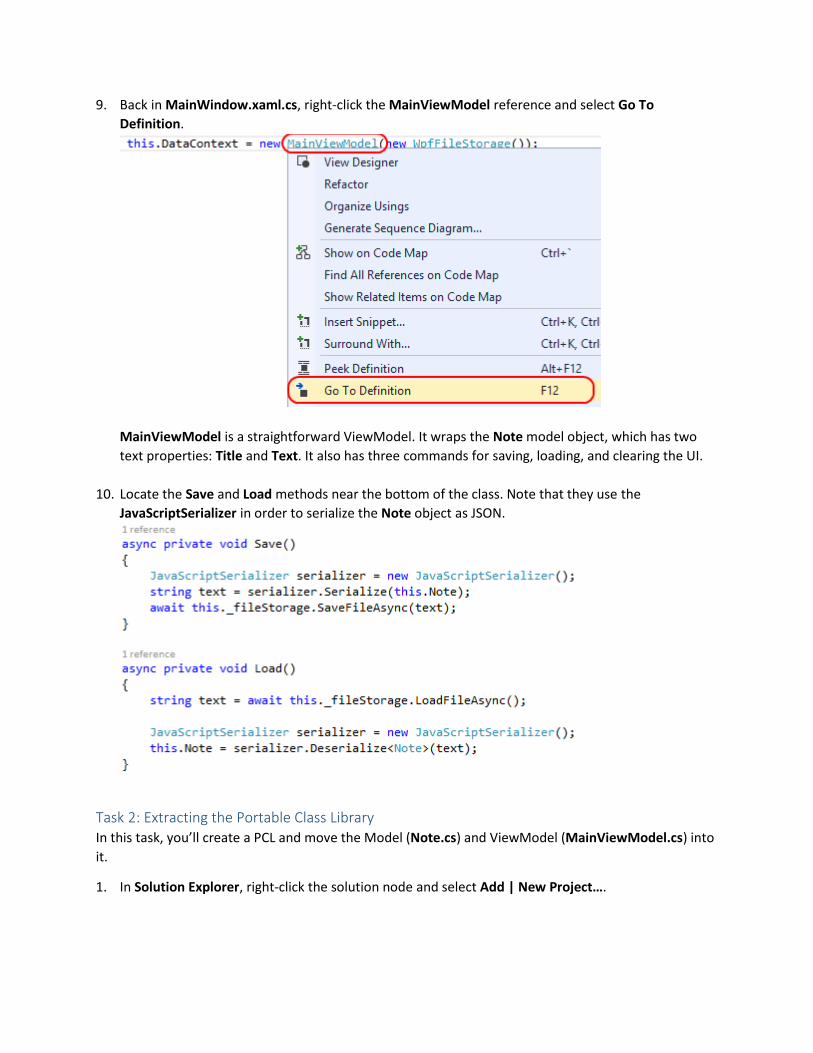
9. Back in MainWindow.xaml.cs, right-click the MainViewModel reference and select Go To
Definition.
MainViewModel is a straightforward ViewModel. It wraps the Note model object, which has two
text properties: Title and Text. It also has three commands for saving, loading, and clearing the UI.
10. Locate the Save and Load methods near the bottom of the class. Note that they use the
JavaScriptSerializer in order to serialize the Note object as JSON.
Task 2: Extracting the Portable Class Library In this task, you’ll create a PCL and move the Model (Note.cs) and ViewModel (MainViewModel.cs) into
it.
1. In Solution Explorer, right-click the solution node and select Add | New Project….
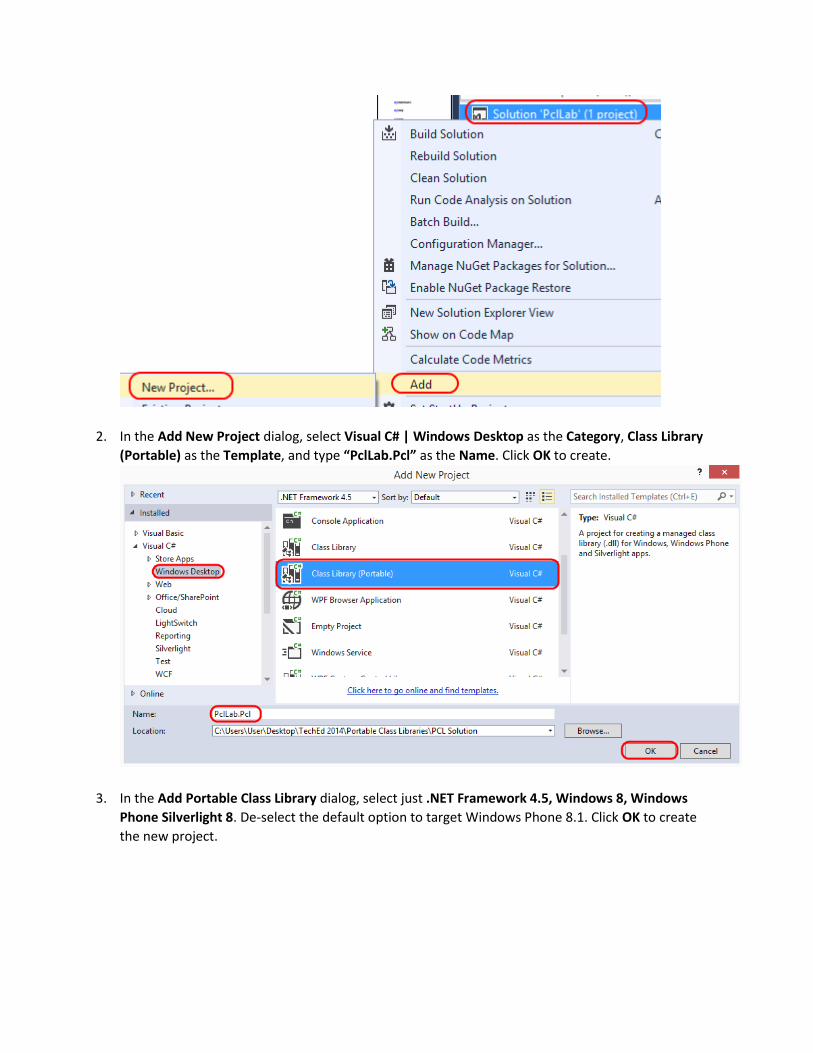
2. In the Add New Project dialog, select Visual C# | Windows Desktop as the Category, Class Library
(Portable) as the Template, and type “PclLab.Pcl” as the Name. Click OK to create.
3. In the Add Portable Class Library dialog, select just .NET Framework 4.5, Windows 8, Windows
Phone Silverlight 8. De-select the default option to target Windows Phone 8.1. Click OK to create
the new project.
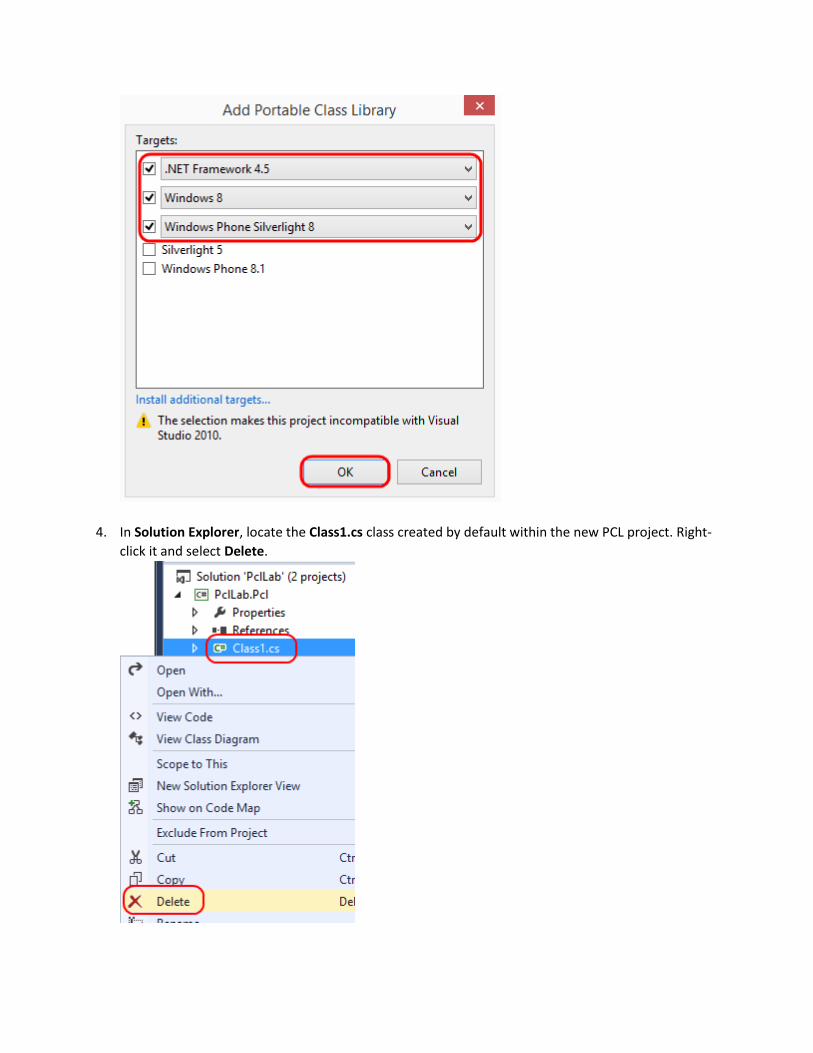
4. In Solution Explorer, locate the Class1.cs class created by default within the new PCL project. Right-
click it and select Delete.
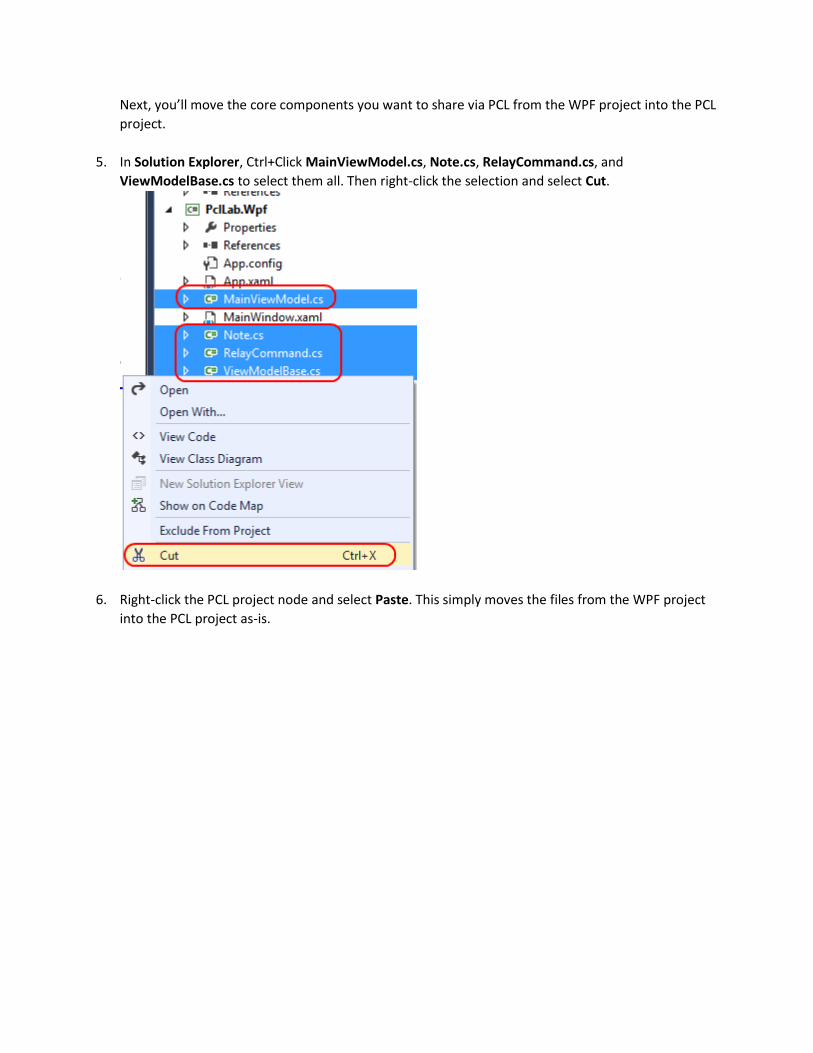
Next, you’ll move the core components you want to share via PCL from the WPF project into the PCL
project.
5. In Solution Explorer, Ctrl+Click MainViewModel.cs, Note.cs, RelayCommand.cs, and
ViewModelBase.cs to select them all. Then right-click the selection and select Cut.
6. Right-click the PCL project node and select Paste. This simply moves the files from the WPF project
into the PCL project as-is.
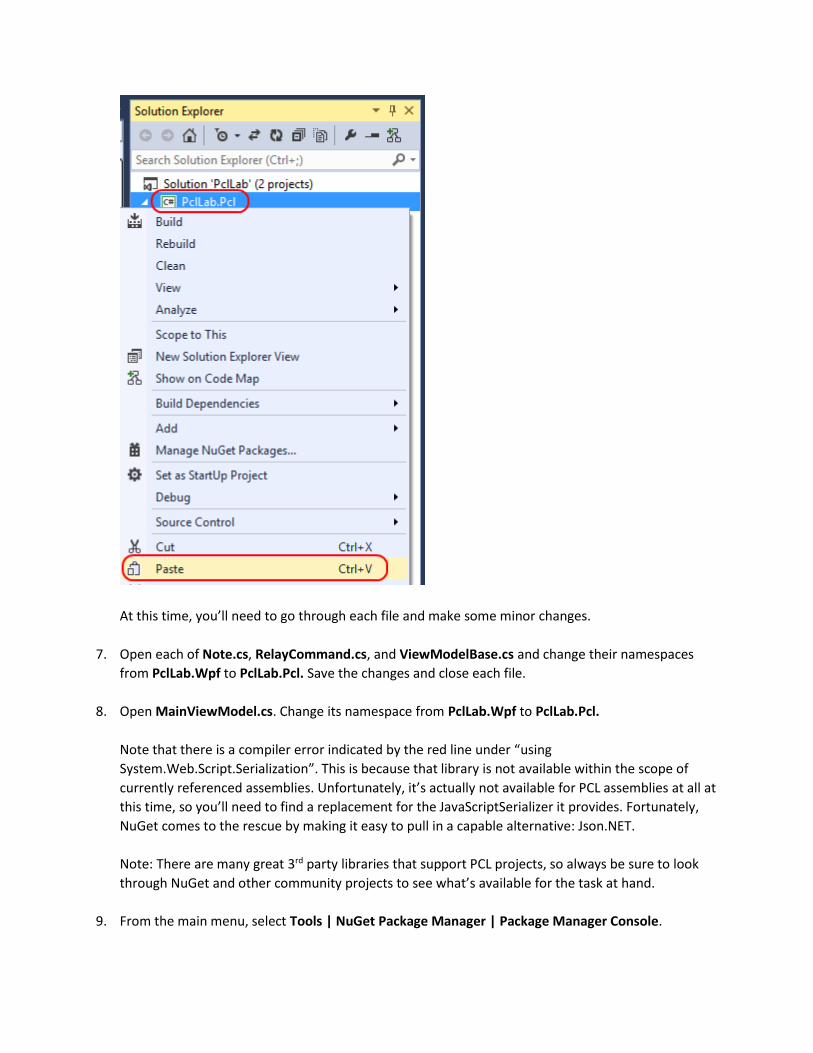
At this time, you’ll need to go through each file and make some minor changes.
7. Open each of Note.cs, RelayCommand.cs, and ViewModelBase.cs and change their namespaces
from PclLab.Wpf to PclLab.Pcl. Save the changes and close each file.
8. Open MainViewModel.cs. Change its namespace from PclLab.Wpf to PclLab.Pcl.
Note that there is a compiler error indicated by the red line under “using
System.Web.Script.Serialization”. This is because that library is not available within the scope of
currently referenced assemblies. Unfortunately, it’s actually not available for PCL assemblies at all at
this time, so you’ll need to find a replacement for the JavaScriptSerializer it provides. Fortunately,
NuGet comes to the rescue by making it easy to pull in a capable alternative: Json.NET.
Note: There are many great 3rd party libraries that support PCL projects, so always be sure to look
through NuGet and other community projects to see what’s available for the task at hand.
9. From the main menu, select Tools | NuGet Package Manager | Package Manager Console.
10. Enter the following to install Json.NET into the PCL project.
Text Install-Package Newtonsoft.Json -Version 6.0.1 -project PclLab.Pcl
11. Replace the following using declaration:
C# using System.Web.Script.Serialization;
with:
C# using Newtonsoft.Json;
12. Scroll down to the Save method and replace this code:
C# JavaScriptSerializer serializer = new JavaScriptSerializer(); string text = serializer.Serialize(this.Note);
with:
C# string text = JsonConvert.SerializeObject(this.Note);
13. Scroll down to the Load method and replace this code:
C# JavaScriptSerializer serializer = new JavaScriptSerializer(); this.Note = serializer.Deserialize<Note>(text);
with:
C# this.Note = JsonConvert.DeserializeObject<Note>(text);
Now that the JSON issue has been resolved, there’s one other item that need to be addressed:
WpfFileStorage. Since that class has dependencies on APIs not available to PCLs, it will need to stay
in the platform-specific project. However, this is something that can be easily worked around with
the proper abstraction.
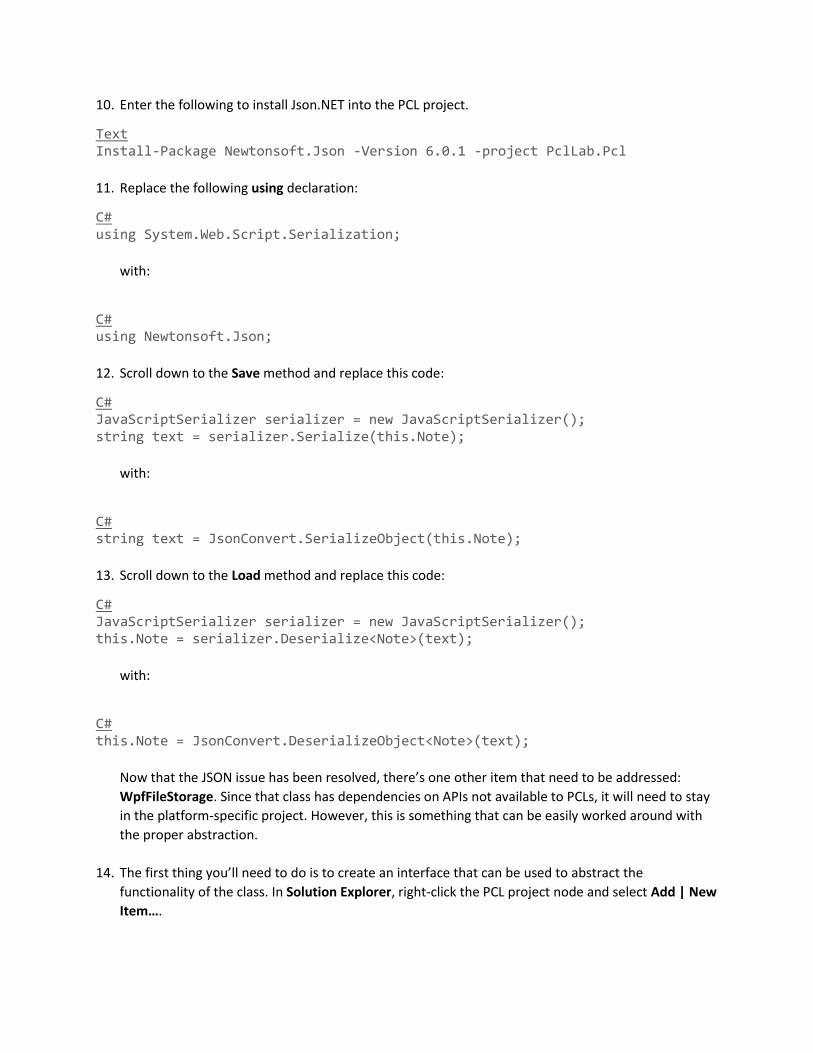
14. The first thing you’ll need to do is to create an interface that can be used to abstract the
functionality of the class. In Solution Explorer, right-click the PCL project node and select Add | New
Item….
15. Select the Interface template and type “IFileStorage.cs” as the Name. Click Add to add.
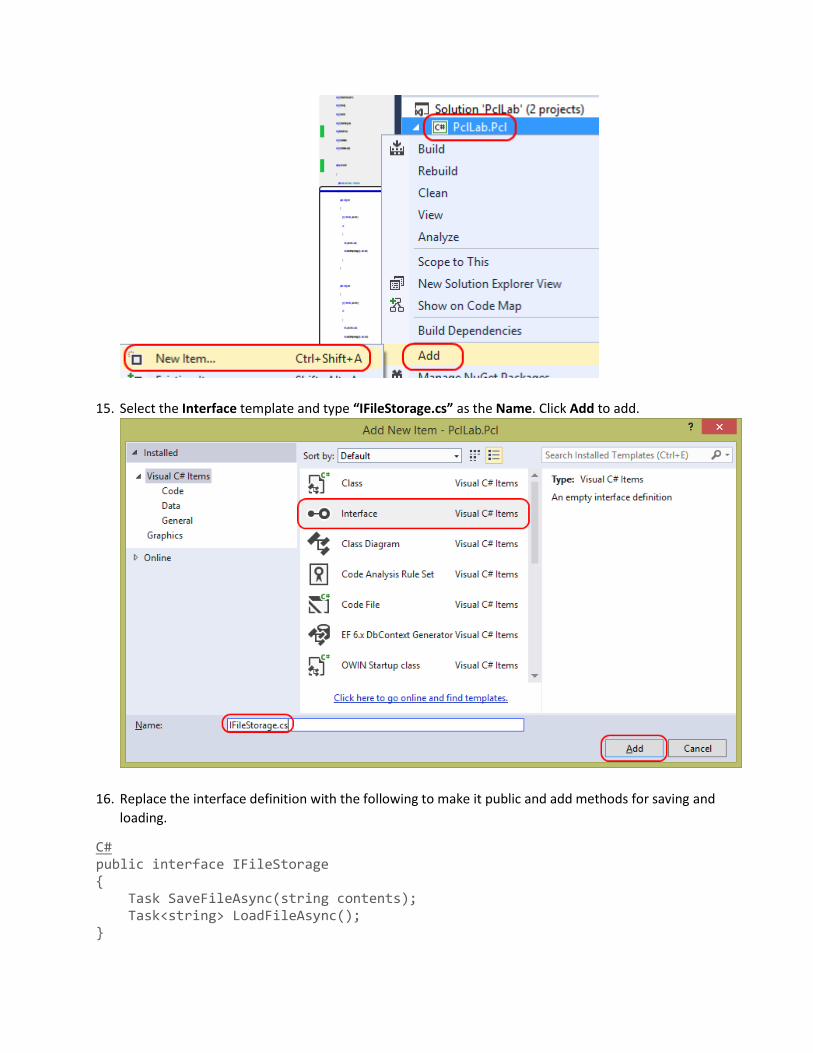
16. Replace the interface definition with the following to make it public and add methods for saving and
loading.
C# public interface IFileStorage { Task SaveFileAsync(string contents); Task<string> LoadFileAsync(); }
17. In MainViewModel.cs, locate the two references to WpfFileStorage and replace them with
references to IFileStorage.
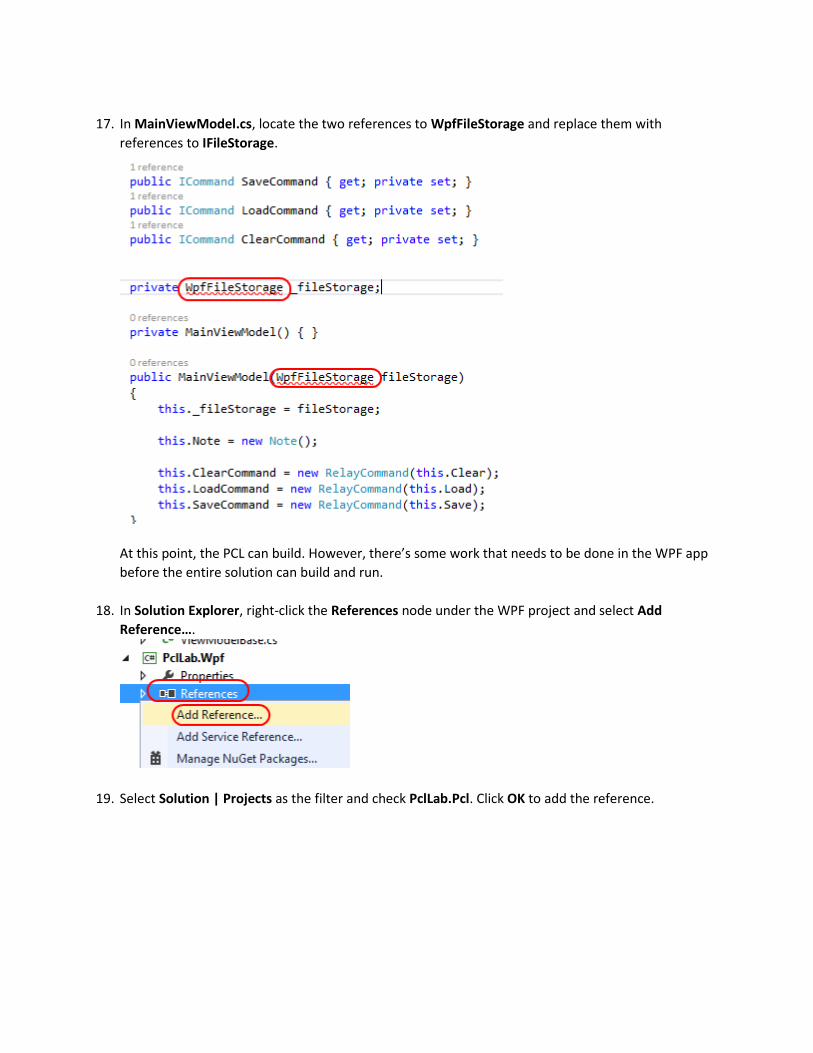
At this point, the PCL can build. However, there’s some work that needs to be done in the WPF app
before the entire solution can build and run.
18. In Solution Explorer, right-click the References node under the WPF project and select Add
Reference….
19. Select Solution | Projects as the filter and check PclLab.Pcl. Click OK to add the reference.
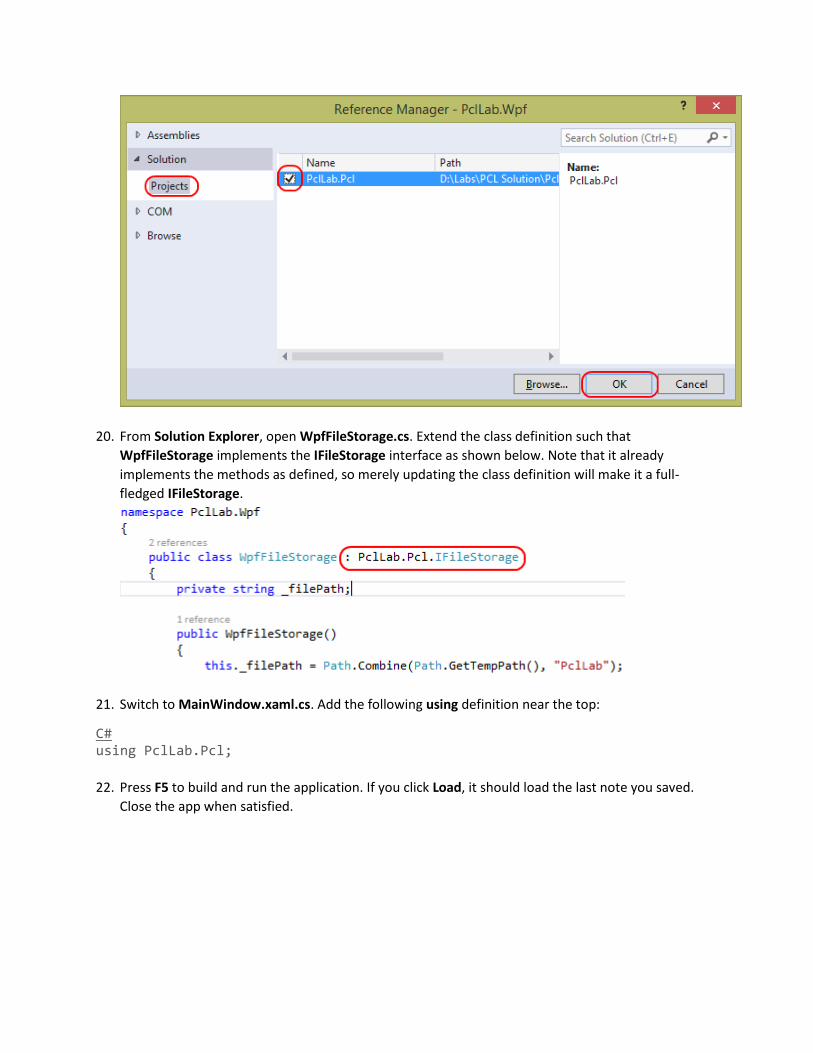
20. From Solution Explorer, open WpfFileStorage.cs. Extend the class definition such that
WpfFileStorage implements the IFileStorage interface as shown below. Note that it already
implements the methods as defined, so merely updating the class definition will make it a full-
fledged IFileStorage.
21. Switch to MainWindow.xaml.cs. Add the following using definition near the top:
C# using PclLab.Pcl;
22. Press F5 to build and run the application. If you click Load, it should load the last note you saved.
Close the app when satisfied.
Task 3: Retargeting a Portable Class Library In this task, you’ll learn how to retarget a PCL. This can be useful when you decide that you need to
broaden or tighten the scope of a library. While introducing new platforms can make your library
accessible to a wider array of applications, it comes at the risk of limiting the APIs you can rely on
because Visual Studio will limit you to building against only the APIs available on all selected platforms.
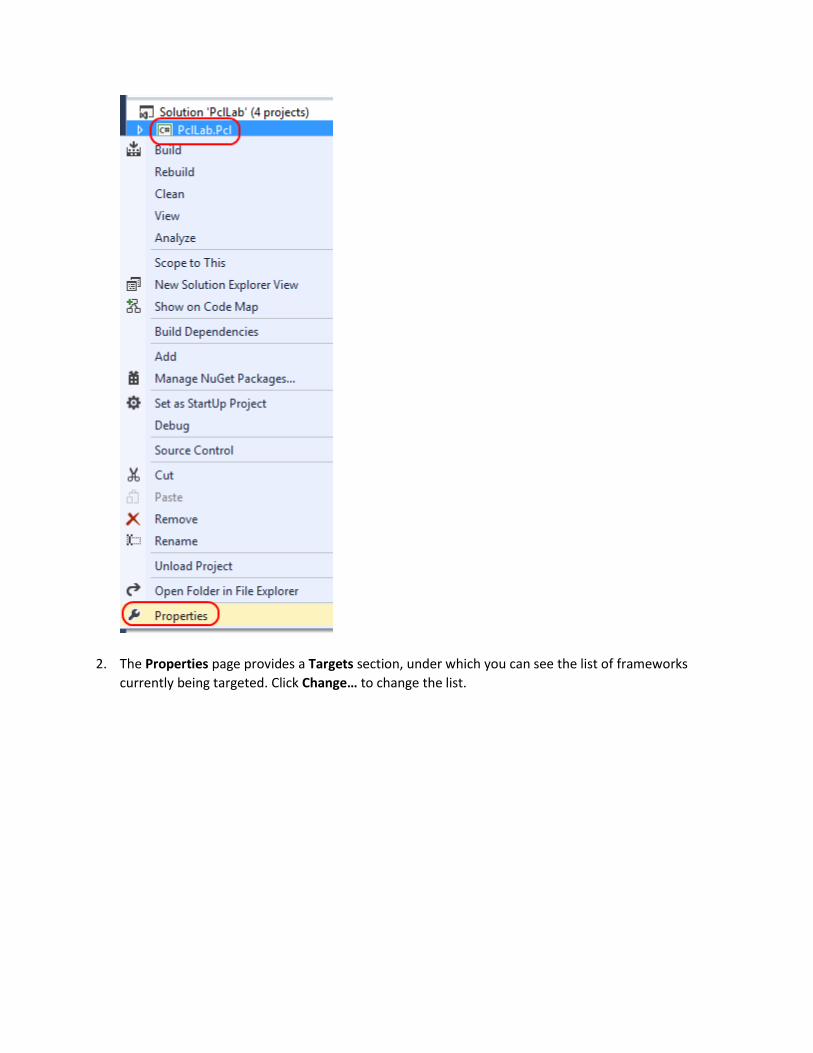
1. In Solution Explorer, right-click the PCL project node and select Properties.
2. The Properties page provides a Targets section, under which you can see the list of frameworks
currently being targeted. Click Change… to change the list.
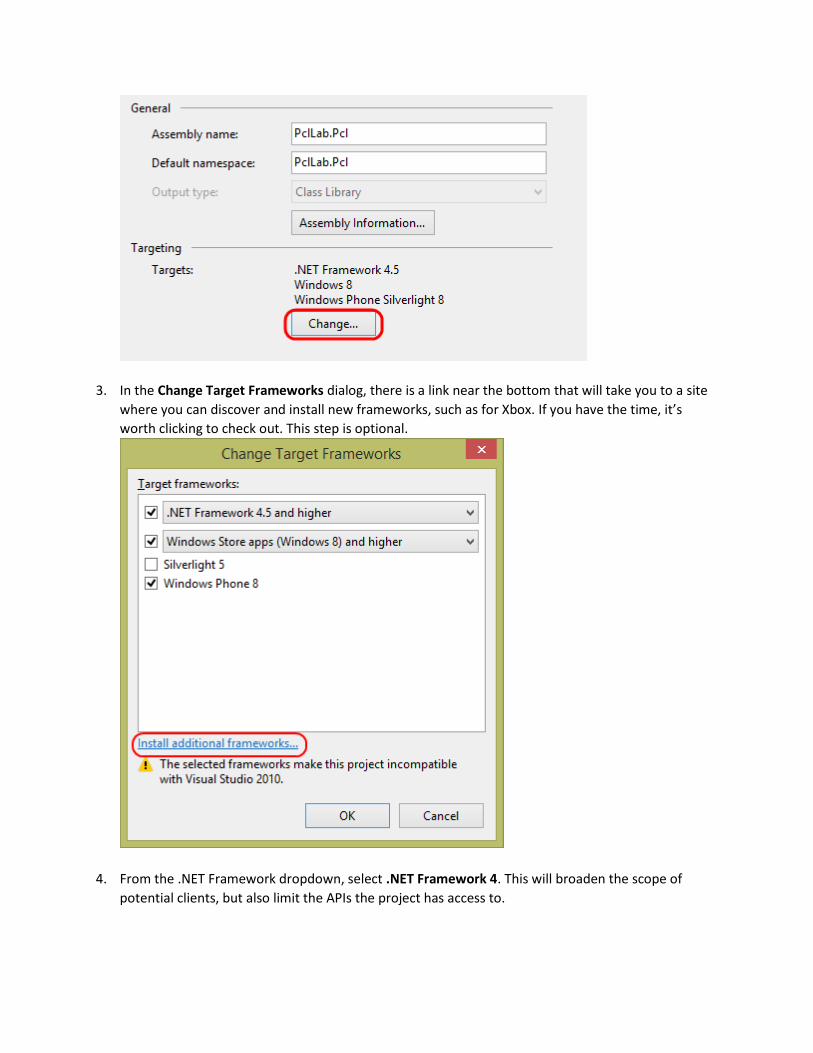
3. In the Change Target Frameworks dialog, there is a link near the bottom that will take you to a site
where you can discover and install new frameworks, such as for Xbox. If you have the time, it’s
worth clicking to check out. This step is optional.
4. From the .NET Framework dropdown, select .NET Framework 4. This will broaden the scope of
potential clients, but also limit the APIs the project has access to.

5. Note that since the Silverlight 5 portable functionality is a superset of the portable APIs available in
all of these platforms, it’s automatically included as a target. Click OK to retarget.
6. From the main menu, select Build | Build Solution. Note that the build is now failing because
several items the project currently relies on are not supported in .NET 4.0.
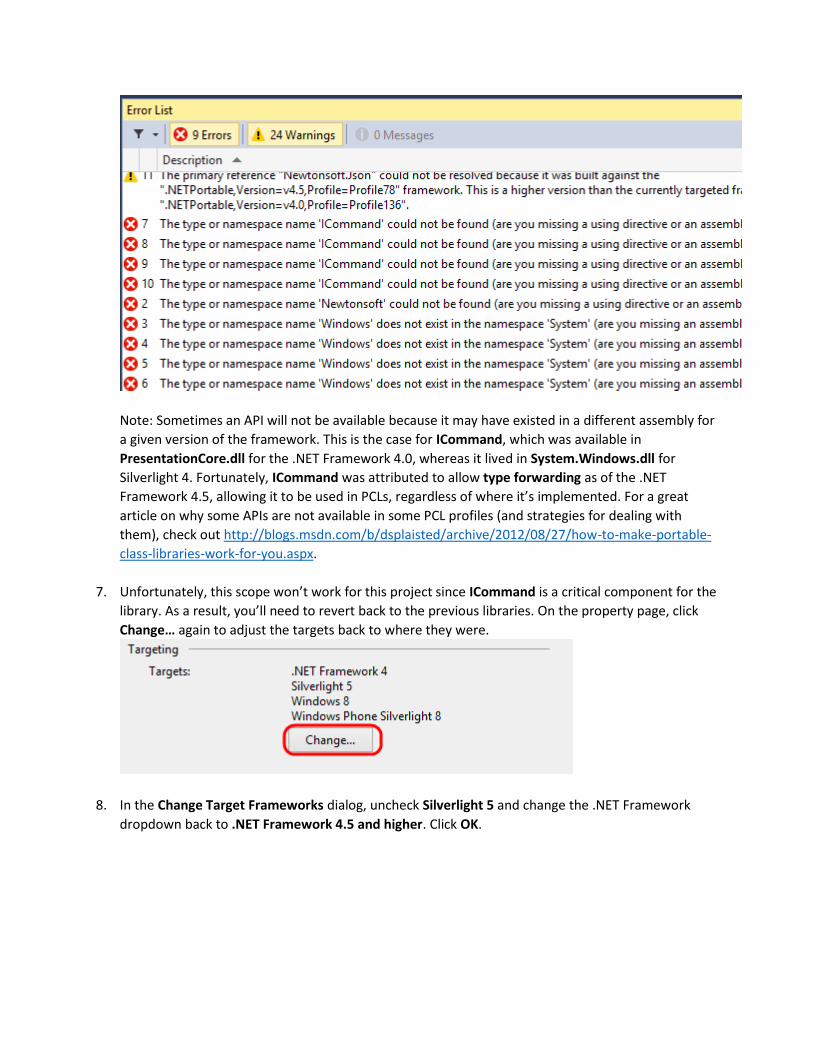
Note: Sometimes an API will not be available because it may have existed in a different assembly for
a given version of the framework. This is the case for ICommand, which was available in
PresentationCore.dll for the .NET Framework 4.0, whereas it lived in System.Windows.dll for
Silverlight 4. Fortunately, ICommand was attributed to allow type forwarding as of the .NET
Framework 4.5, allowing it to be used in PCLs, regardless of where it’s implemented. For a great
article on why some APIs are not available in some PCL profiles (and strategies for dealing with
them), check out http://blogs.msdn.com/b/dsplaisted/archive/2012/08/27/how-to-make-portable-
class-libraries-work-for-you.aspx.
7. Unfortunately, this scope won’t work for this project since ICommand is a critical component for the
library. As a result, you’ll need to revert back to the previous libraries. On the property page, click
Change… again to adjust the targets back to where they were.
8. In the Change Target Frameworks dialog, uncheck Silverlight 5 and change the .NET Framework
dropdown back to .NET Framework 4.5 and higher. Click OK.
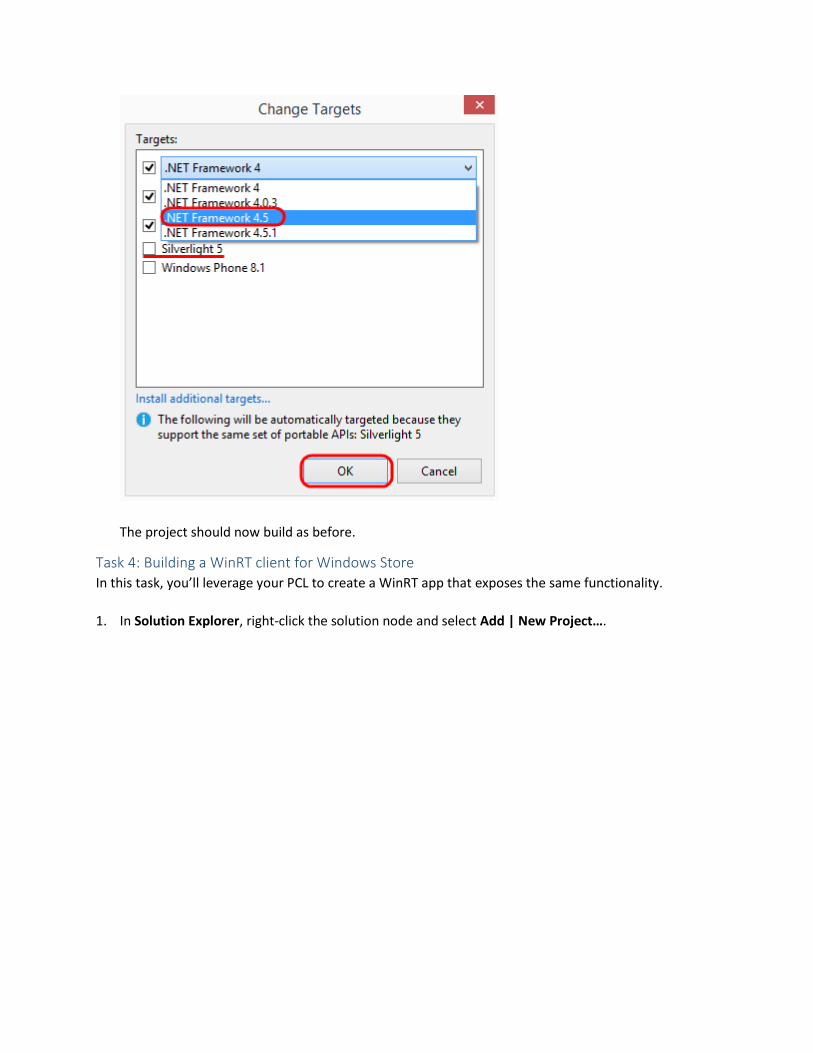
The project should now build as before.
Task 4: Building a WinRT client for Windows Store In this task, you’ll leverage your PCL to create a WinRT app that exposes the same functionality.
1. In Solution Explorer, right-click the solution node and select Add | New Project….
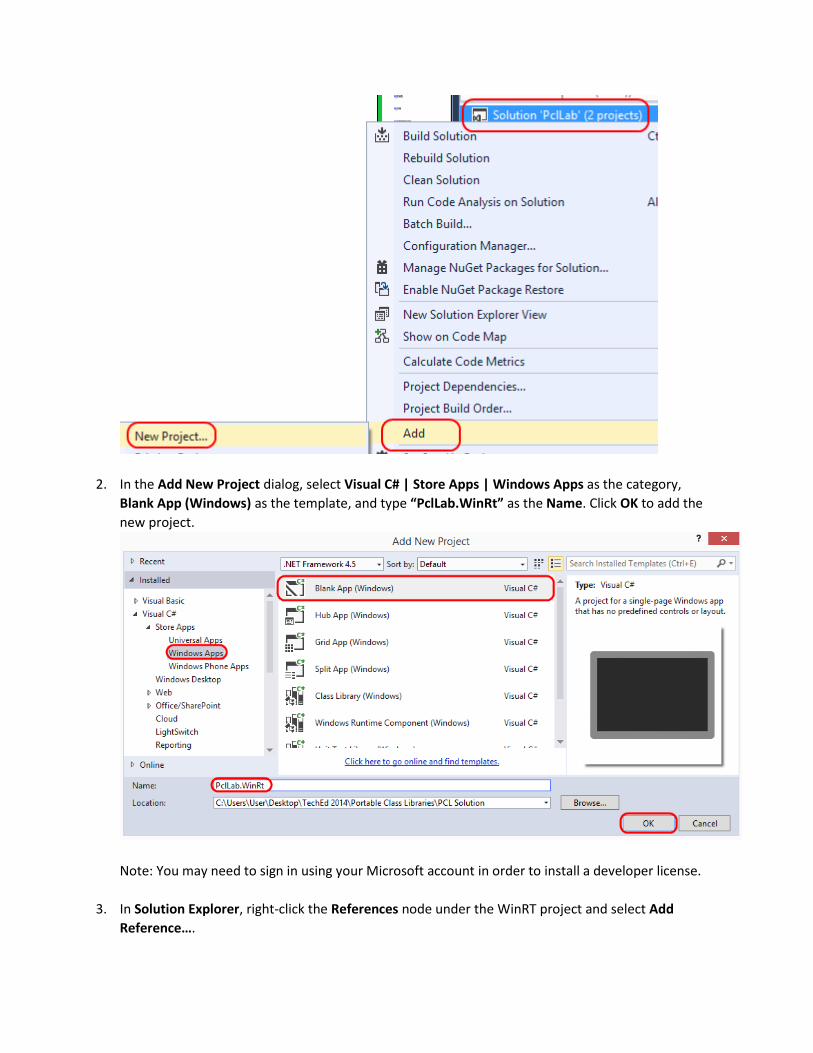
2. In the Add New Project dialog, select Visual C# | Store Apps | Windows Apps as the category,
Blank App (Windows) as the template, and type “PclLab.WinRt” as the Name. Click OK to add the
new project.
Note: You may need to sign in using your Microsoft account in order to install a developer license.
3. In Solution Explorer, right-click the References node under the WinRT project and select Add
Reference….
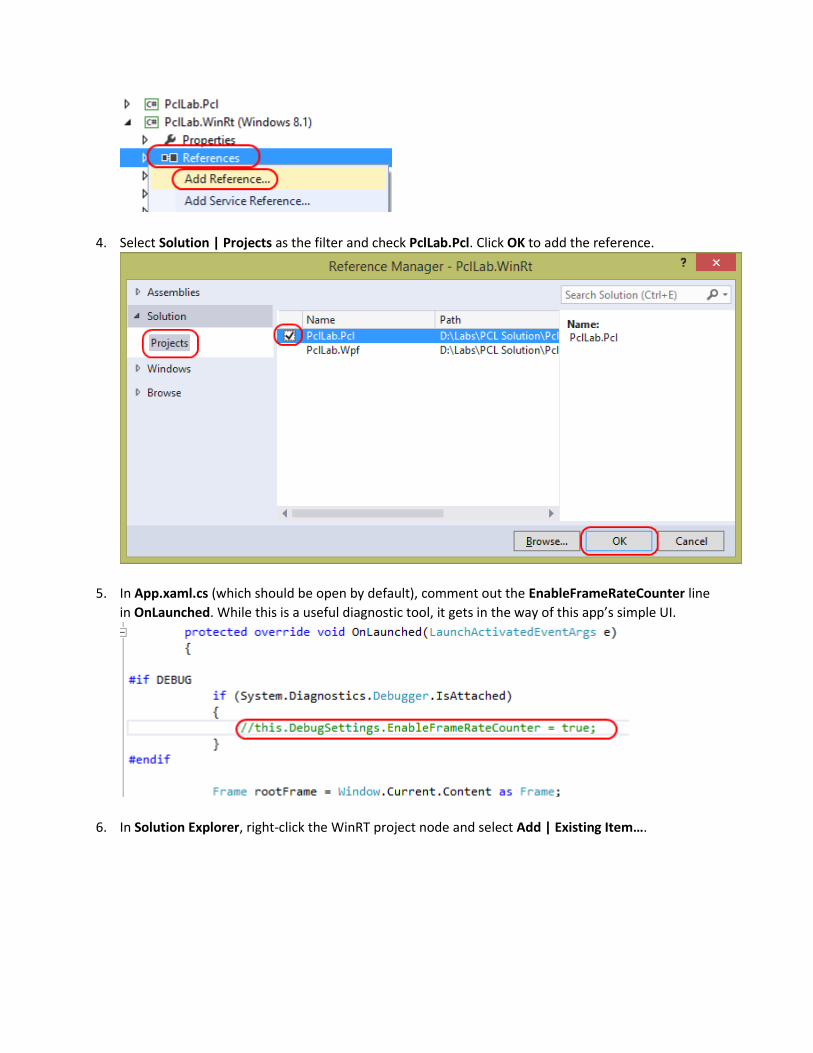
4. Select Solution | Projects as the filter and check PclLab.Pcl. Click OK to add the reference.
5. In App.xaml.cs (which should be open by default), comment out the EnableFrameRateCounter line
in OnLaunched. While this is a useful diagnostic tool, it gets in the way of this app’s simple UI.
6. In Solution Explorer, right-click the WinRT project node and select Add | Existing Item….
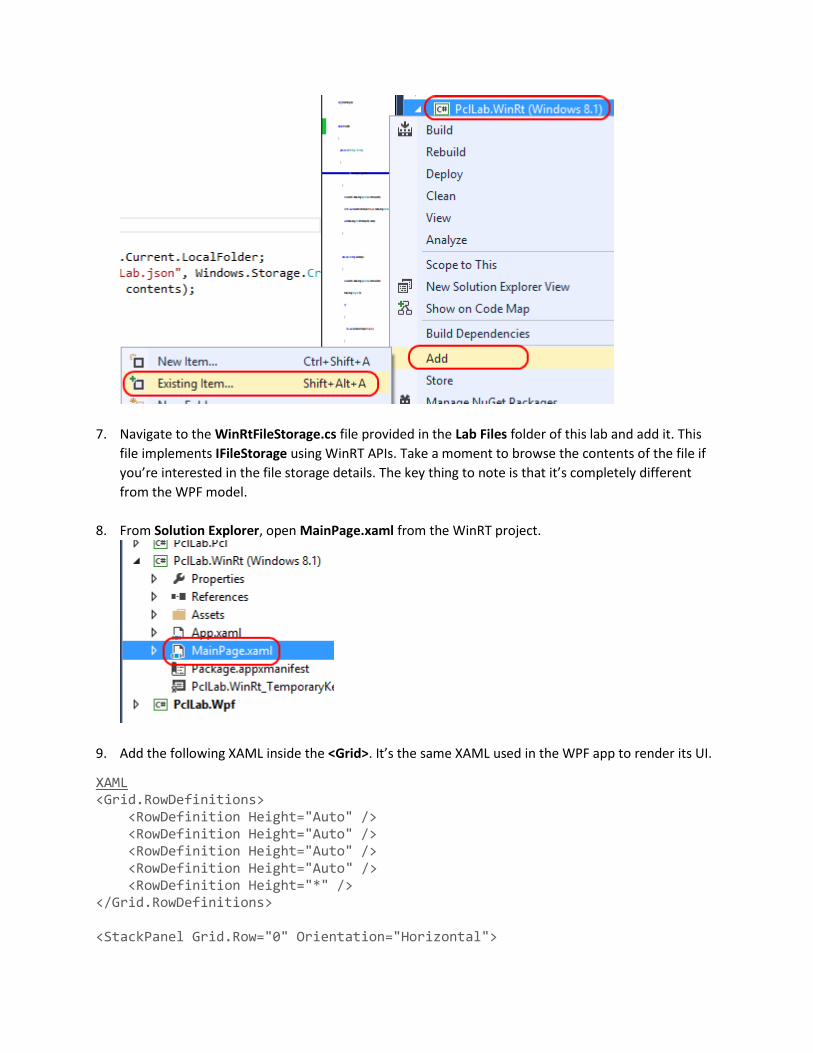
7. Navigate to the WinRtFileStorage.cs file provided in the Lab Files folder of this lab and add it. This
file implements IFileStorage using WinRT APIs. Take a moment to browse the contents of the file if
you’re interested in the file storage details. The key thing to note is that it’s completely different
from the WPF model.
8. From Solution Explorer, open MainPage.xaml from the WinRT project.
9. Add the following XAML inside the <Grid>. It’s the same XAML used in the WPF app to render its UI.
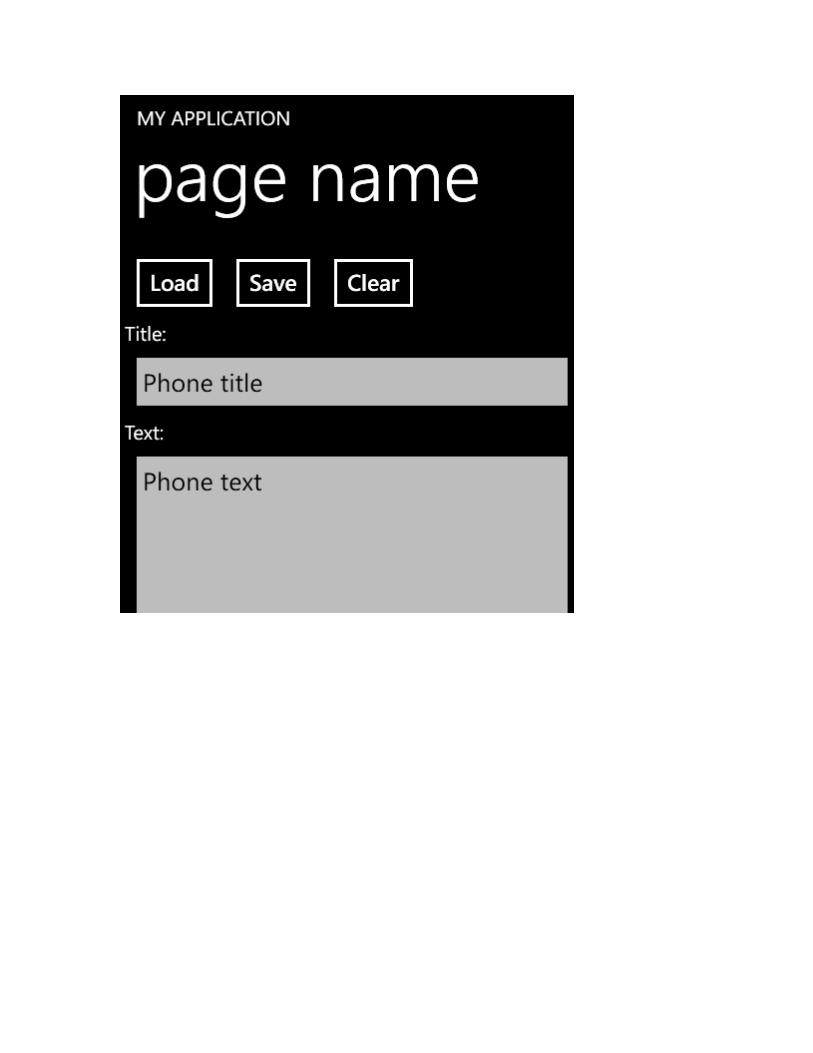
XAML <Grid.RowDefinitions> <RowDefinition Height="Auto" /> <RowDefinition Height="Auto" /> <RowDefinition Height="Auto" /> <RowDefinition Height="Auto" /> <RowDefinition Height="*" /> </Grid.RowDefinitions> <StackPanel Grid.Row="0" Orientation="Horizontal">

<Button Content="Load" Command="{Binding LoadCommand}" /> <Button Content="Save" Command="{Binding SaveCommand}" /> <Button Content="Clear" Command="{Binding ClearCommand}" /> </StackPanel> <TextBlock Grid.Row="1" Text="Title:" /> <TextBox Grid.Row="2" Text="{Binding Title, Mode=TwoWay}" /> <TextBlock Grid.Row="3" Text="Text:" /> <TextBox Grid.Row="4" Text="{Binding Text, Mode=TwoWay}" />
10. Right-click inside the XAML editor and select View Code to get to the code-behind.
11. Add the following using statement to the top of MainPage.xaml.cs.
C# using PclLab.Pcl;
12. Add the following code directly after this. InitializeComponent() in the MainPage constructor.
C# this.DataContext = new MainViewModel(new WinRtFileStorage());
Now that you’ve added the reference and a little bit of plumbing, the app is ready to go.
13. In Solution Explorer, right-click the WinRT project and select Debug | Start new instance.
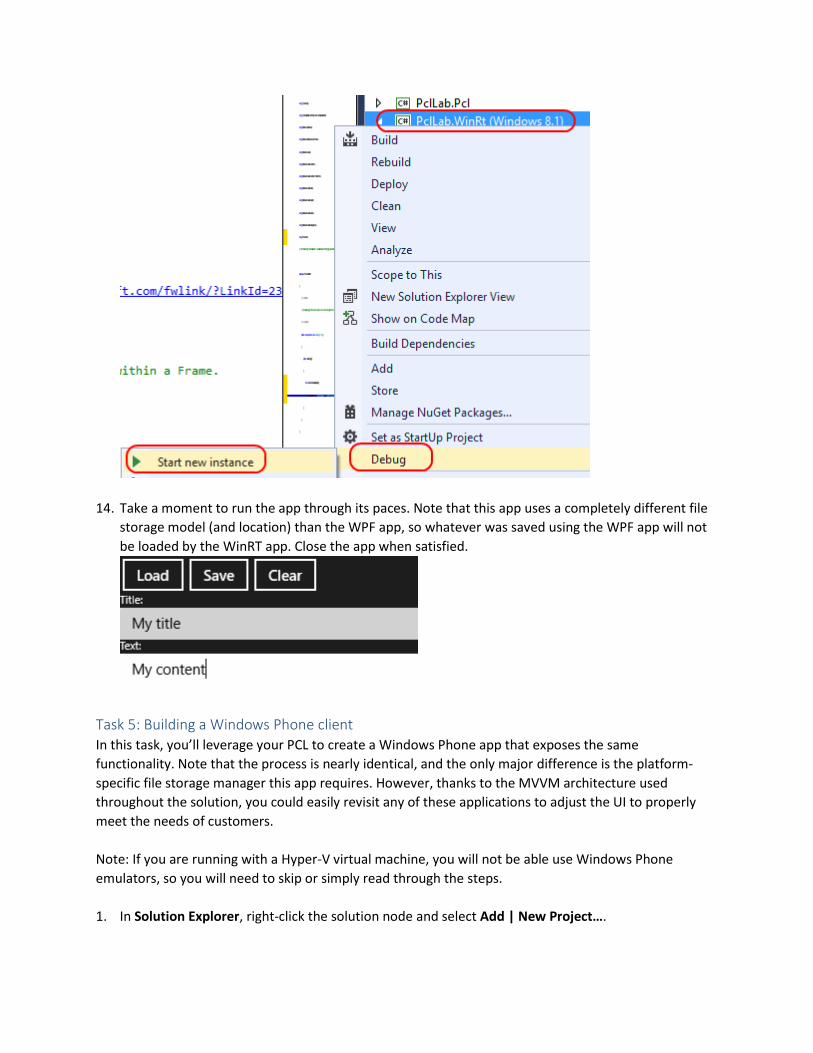
14. Take a moment to run the app through its paces. Note that this app uses a completely different file
storage model (and location) than the WPF app, so whatever was saved using the WPF app will not
be loaded by the WinRT app. Close the app when satisfied.
Task 5: Building a Windows Phone client In this task, you’ll leverage your PCL to create a Windows Phone app that exposes the same
functionality. Note that the process is nearly identical, and the only major difference is the platform-
specific file storage manager this app requires. However, thanks to the MVVM architecture used
throughout the solution, you could easily revisit any of these applications to adjust the UI to properly
meet the needs of customers.
Note: If you are running with a Hyper-V virtual machine, you will not be able use Windows Phone
emulators, so you will need to skip or simply read through the steps.
1. In Solution Explorer, right-click the solution node and select Add | New Project….
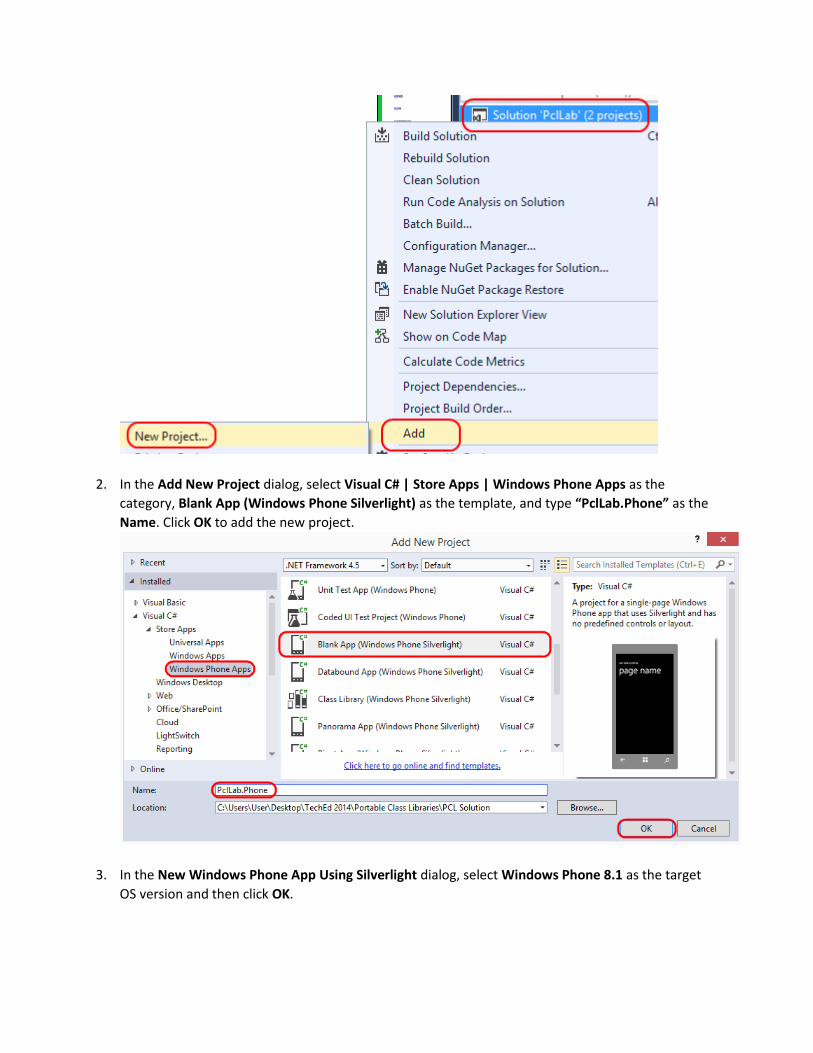
2. In the Add New Project dialog, select Visual C# | Store Apps | Windows Phone Apps as the
category, Blank App (Windows Phone Silverlight) as the template, and type “PclLab.Phone” as the
Name. Click OK to add the new project.
3. In the New Windows Phone App Using Silverlight dialog, select Windows Phone 8.1 as the target
OS version and then click OK.
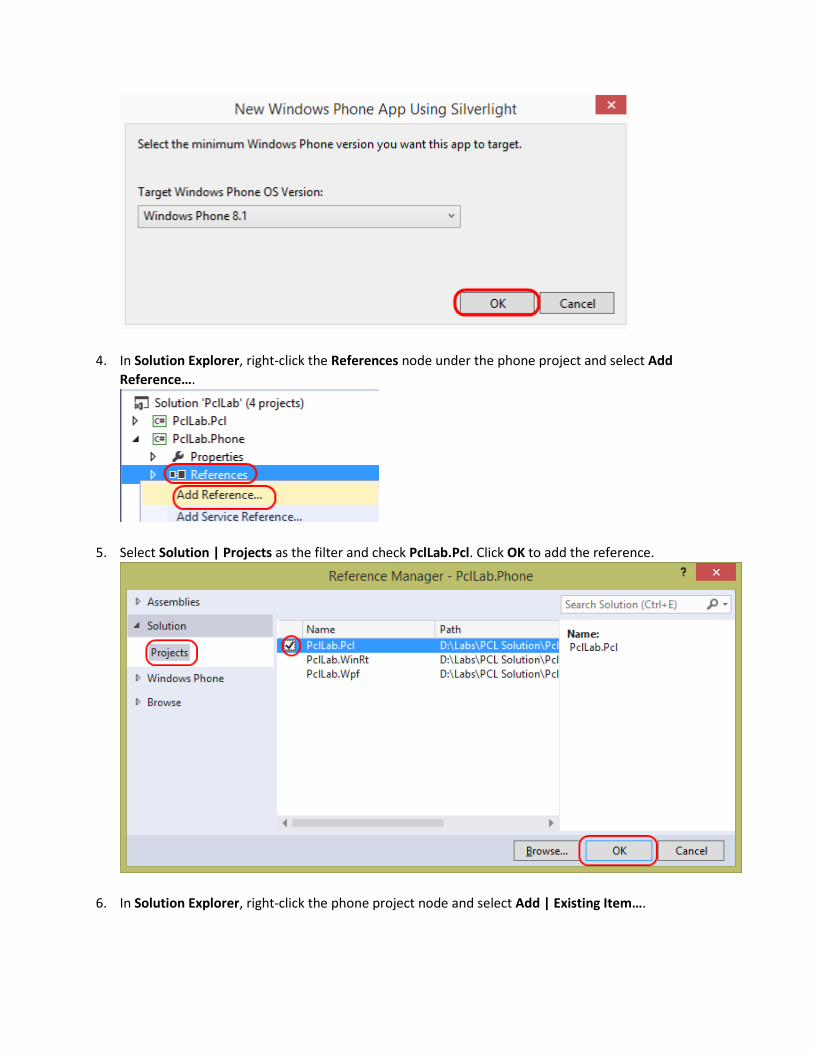
4. In Solution Explorer, right-click the References node under the phone project and select Add
Reference….
5. Select Solution | Projects as the filter and check PclLab.Pcl. Click OK to add the reference.
6. In Solution Explorer, right-click the phone project node and select Add | Existing Item….
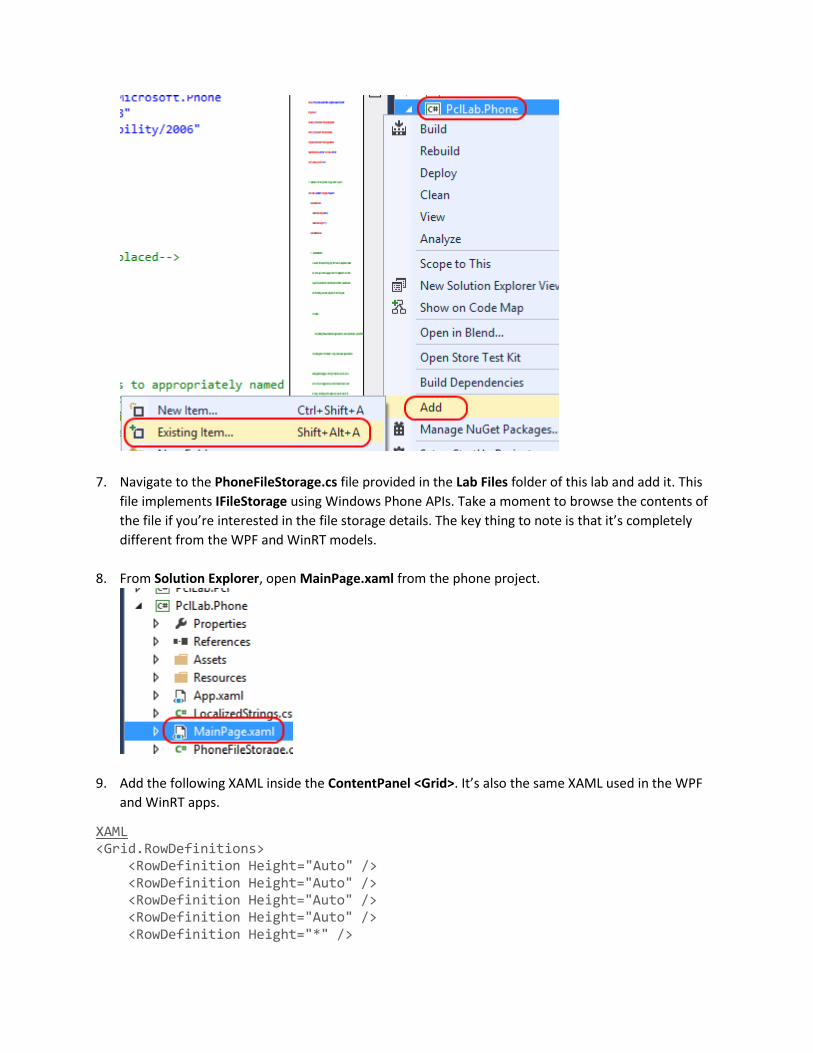
7. Navigate to the PhoneFileStorage.cs file provided in the Lab Files folder of this lab and add it. This
file implements IFileStorage using Windows Phone APIs. Take a moment to browse the contents of
the file if you’re interested in the file storage details. The key thing to note is that it’s completely
different from the WPF and WinRT models.
8. From Solution Explorer, open MainPage.xaml from the phone project.
9. Add the following XAML inside the ContentPanel <Grid>. It’s also the same XAML used in the WPF
and WinRT apps.
XAML <Grid.RowDefinitions> <RowDefinition Height="Auto" /> <RowDefinition Height="Auto" /> <RowDefinition Height="Auto" /> <RowDefinition Height="Auto" /> <RowDefinition Height="*" />
</Grid.RowDefinitions> <StackPanel Grid.Row="0" Orientation="Horizontal"> <Button Content="Load" Command="{Binding LoadCommand}" /> <Button Content="Save" Command="{Binding SaveCommand}" /> <Button Content="Clear" Command="{Binding ClearCommand}" /> </StackPanel> <TextBlock Grid.Row="1" Text="Title:" /> <TextBox Grid.Row="2" Text="{Binding Title, Mode=TwoWay}" /> <TextBlock Grid.Row="3" Text="Text:" /> <TextBox Grid.Row="4" Text="{Binding Text, Mode=TwoWay}" />
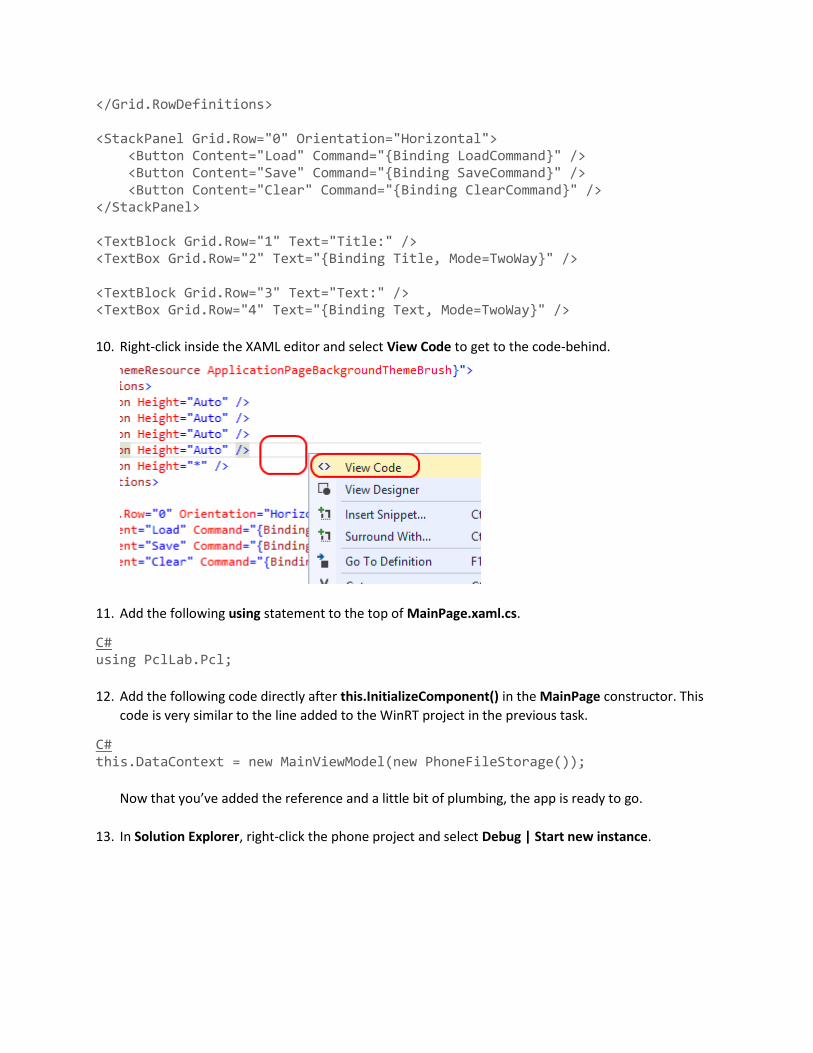
10. Right-click inside the XAML editor and select View Code to get to the code-behind.
11. Add the following using statement to the top of MainPage.xaml.cs.
C# using PclLab.Pcl;
12. Add the following code directly after this.InitializeComponent() in the MainPage constructor. This
code is very similar to the line added to the WinRT project in the previous task.
C# this.DataContext = new MainViewModel(new PhoneFileStorage());
Now that you’ve added the reference and a little bit of plumbing, the app is ready to go.
13. In Solution Explorer, right-click the phone project and select Debug | Start new instance.
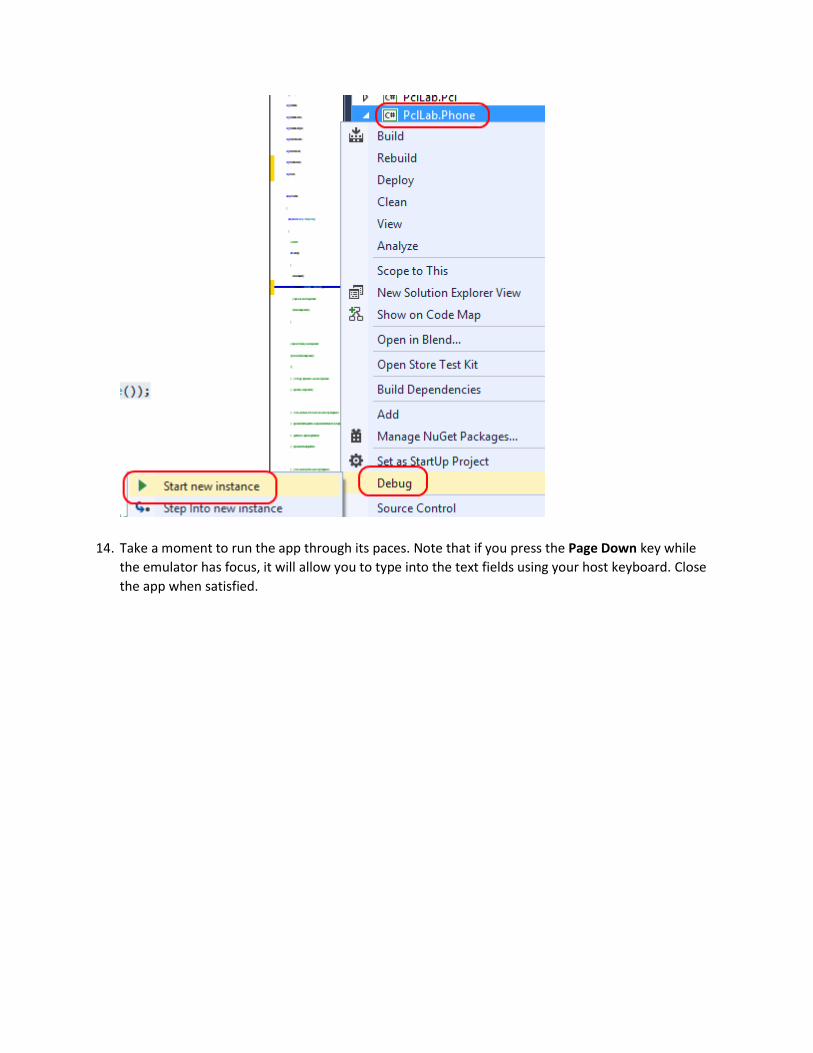
14. Take a moment to run the app through its paces. Note that if you press the Page Down key while
the emulator has focus, it will allow you to type into the text fields using your host keyboard. Close
the app when satisfied.