Embed Size (px)
Citation preview

Postgres Enterprise ManagerRelease 7.9
PEM Getting Started Guide
Aug 21, 2019
Contents
1 PEM Overview 21.1 Why Postgres Enterprise Manager? . . . . . . . . . . . . . . . . . . . . . . . . . . . . . . 31.2 General Architecture . . . . . . . . . . . . . . . . . . . . . . . . . . . . . . . . . . . . . . 51.3 Supported Versions and Platforms . . . . . . . . . . . . . . . . . . . . . . . . . . . . . . . 71.4 Installing PEM - Overview . . . . . . . . . . . . . . . . . . . . . . . . . . . . . . . . . . . 81.5 Using the PEM Web Interface . . . . . . . . . . . . . . . . . . . . . . . . . . . . . . . . . 9
1.5.1 The PEM Toolbar . . . . . . . . . . . . . . . . . . . . . . . . . . . . . . . . . . . 111.5.2 Controlling and Customizing Charts, Graphs and Tables . . . . . . . . . . . . . . 181.5.3 Online Help and Documentation . . . . . . . . . . . . . . . . . . . . . . . . . . . 19
2 Registering a Server 202.1 Manually Registering a Server . . . . . . . . . . . . . . . . . . . . . . . . . . . . . . . . . 202.2 Automatic Server Discovery . . . . . . . . . . . . . . . . . . . . . . . . . . . . . . . . . . 292.3 Using the pemworker Utility to Register a Server . . . . . . . . . . . . . . . . . . . . . . . 31
2.3.1 Using the pemworker Utility to Unregister a Server . . . . . . . . . . . . . . . . . 332.4 Verifying the Connection and Binding . . . . . . . . . . . . . . . . . . . . . . . . . . . . . 34
3 Managing Certificates 353.1 Replacing SSL Certificates . . . . . . . . . . . . . . . . . . . . . . . . . . . . . . . . . . . 363.2 Updating Agent SSL Certificates . . . . . . . . . . . . . . . . . . . . . . . . . . . . . . . 39
4 Managing a PEM Server 414.1 Starting and Stopping the PEM Server and Agents . . . . . . . . . . . . . . . . . . . . . . 414.2 Remotely Starting and Stopping Monitored Servers . . . . . . . . . . . . . . . . . . . . . . 434.3 Controlling the PEM Server or PEM Agent on Linux . . . . . . . . . . . . . . . . . . . . . 444.4 Controlling the PEM Server or PEM Agent on Windows . . . . . . . . . . . . . . . . . . . 454.5 Controlling the HTTPD Server . . . . . . . . . . . . . . . . . . . . . . . . . . . . . . . . 464.6 Modifying the pg_hba.conf File . . . . . . . . . . . . . . . . . . . . . . . . . . . . . . . . 474.7 Creating and Maintaining Databases and Objects . . . . . . . . . . . . . . . . . . . . . . . 494.8 Managing PEM Authentication . . . . . . . . . . . . . . . . . . . . . . . . . . . . . . . . 504.9 Modifying PEM to Use a Proxy Server . . . . . . . . . . . . . . . . . . . . . . . . . . . . 514.10 Editing the PEM Server Configuration . . . . . . . . . . . . . . . . . . . . . . . . . . . . . 53
i
4.11 Managing Security . . . . . . . . . . . . . . . . . . . . . . . . . . . . . . . . . . . . . . . 544.11.1 Login Roles . . . . . . . . . . . . . . . . . . . . . . . . . . . . . . . . . . . . . . 544.11.2 Group Roles . . . . . . . . . . . . . . . . . . . . . . . . . . . . . . . . . . . . . . 564.11.3 Using PEM Pre-Defined Roles to Manage Access to PEM Functionality . . . . . . 574.11.4 Using a Team Role . . . . . . . . . . . . . . . . . . . . . . . . . . . . . . . . . . 604.11.5 Object Permissions . . . . . . . . . . . . . . . . . . . . . . . . . . . . . . . . . . 61
4.12 Managing Job Notifications . . . . . . . . . . . . . . . . . . . . . . . . . . . . . . . . . . 624.12.1 Configuring job notifications at job level . . . . . . . . . . . . . . . . . . . . . . . 624.12.2 Configuring job notifications at agent level . . . . . . . . . . . . . . . . . . . . . . 634.12.3 Configuring job notifications at server level . . . . . . . . . . . . . . . . . . . . . 64
4.13 Managing PEM Scheduled Jobs . . . . . . . . . . . . . . . . . . . . . . . . . . . . . . . . 64
5 Managing a PEM Agent 745.1 Agent Privileges . . . . . . . . . . . . . . . . . . . . . . . . . . . . . . . . . . . . . . . . 745.2 Agent Configuration . . . . . . . . . . . . . . . . . . . . . . . . . . . . . . . . . . . . . . 775.3 Agent Properties . . . . . . . . . . . . . . . . . . . . . . . . . . . . . . . . . . . . . . . . 81
6 Conclusion 82
Index 83
ii
Postgres Enterprise Manager, Release 7.9
This document provides an introduction to Postgres Enterprise Manager™ (PEM). The guide will acquaintyou with the basics of the toolset, and help you be successful in your database management activities. Theguide is broken up into the following core sections and categories:
• Postgres Enterprise Manager Overview – This section provides information about PEM function-ality, components, architecture, and supported platforms. The section also provides an overview ofPEM’s web interface. The web interface is installed with the PEM server, and can be used from yourbrowser of choice.
• Registering a Server - This section provides information about the different tools available to assistwith server registration.
• Managing Certificates - This section provides information about managing certificates for PEM.
• Managing a PEM server - This section provides information about tasks related to PEM server suchas restarting the PEM server and agent, controlling the PEM server or PEM agent, controlling theHTTPD service on Linux and Windows, controlling the HTTPD server, managing PEM authenticationand security, modifying the pg_hba.conf file, modifying PEM to use a proxy server etc.
• Managing a PEM agent - This section provides information about configuring and managing a PEMagent.
This document uses Postgres to mean either the PostgreSQL or EDB Postgres Advanced Server database.
Contents 1

CHAPTER 1
PEM Overview
Postgres Enterprise Manager (PEM) is an enterprise management tool designed to assist database adminis-trators, system architects, and performance analysts in administering, monitoring, and tuning PostgreSQLand EnterpriseDB Advanced Server database servers. PEM is architected to manage and monitor anywherefrom a handful, to hundreds of servers from a single console, allowing complete and remote control over allaspects of your databases.
2
Postgres Enterprise Manager, Release 7.9
1.1 Why Postgres Enterprise Manager?
PEM provides a number of benefits not found in any other PostgreSQL management tool:
• Management en Masse Design. PEM is designed for enterprise database management, and is builtto tackle the management of large numbers of servers across geographical boundaries. Global dash-boards keep you up to date on the up/down/performance status of all your servers in an at-a-glancefashion.
• Distributed Architecture. PEM is architected in a way that maximizes its ability to gather statisticalinformation and to perform operations remotely on machines regardless of operating system platform.
• Graphical Administration. All aspects of database administration can be carried out in the PEMclient via a graphical interface. Server startup and shutdown, configuration management, storage andsecurity control, object creation, performance management, and more can be handled from a singleconsole.
• Full SQL IDE. PEM contains a robust SQL integrated development environment (IDE) that providesad-hoc SQL querying, stored procedure/function development, and a graphical debugger.
• Enterprise Performance Monitoring. PEM provides enterprise-class performance monitoring forall managed database servers. Lightweight and efficient agents monitor all aspects of each databaseserver’s operations as well as each machine’s underlying operating system and provide detailed statis-tics back to easily navigated performance pages within the interface.
• Proactive Alert Management. PEM ships out-of-the-box with the ability to create performancethresholds for each key metric (e.g. memory, storage, etc.) that are monitored around-the-clock. Anythreshold violation results in an alert being sent to a centralized dashboard that communicates thenature of the problem and what actions are necessary to prevent the situation from jeopardizing theoverall performance of the server.
• Simplified Capacity Planning. All key performance-related statistics are automatically collected andretained for a specified period of time in PEM’s repository. The Capacity Manager utility allows youto select various statistics and perform trend analysis over time to understand things such as peak loadperiods, storage consumption trends, and much more. A forecasting mechanism in the tool allows youto also forecast resource usage in the future and plan/budget accordingly.
• Audit Manager. The Audit Manager configures audit logging on Advanced Server instances. Activ-ities such as connections to a database, disconnections from a database, and the SQL statements runagainst a database can be logged. The Audit Log dashboard can then be used to filter and view thelog.
• Log Manager. The Log Manager wizard configures server logging parameters, with (optional) logcollection into a central table. Use the wizard to specify your preference for logging behaviors suchas log file rotation, log destination and error message severity. Use the Server Log dashboard to filterand review the collected server log entries.
• SQL Workload Profiling. PEM contains a SQL profiling utility that allows you to trace the SQLstatements that are executed against one or more servers. SQL profiling can either be done in anad-hoc or scheduled manner. Captured SQL statements can then be filtered so you can easily identifyand tune poorly running SQL statements. SQL statements can also be fed into an Index Advisor
1.1. Why Postgres Enterprise Manager? 3
Postgres Enterprise Manager, Release 7.9
on Advanced Server that analyzes each statement and makes recommendations on new indexes thatshould be created to help performance.
• Expert Database Analysis. PEM includes the Postgres Expert utility. Postgres Expert analyzes se-lected databases for best practice enforcement purposes. Areas such as general configuration, securitysetup, and much more are examined. Any deviations from recommended best practices are reportedback to you, along with an explanation of each particular issue, and expert help on what to do aboutmaking things right.
• Streaming Replication Configuration and Monitoring. The Streaming Replication wizard sim-plifies the process of adding new servers to a Postgres streaming replication scenario or configuringexisting servers to create a replication scenario. After configuring the replication scenario, you canmonitor the scenario on the Streaming Replication dashboard or use options on the PEM client topromote a standby node to the master node.
• Secure Client Connectivity. PEM supports secure client connections through an encrypted SSHtunnel. The full-featured PEM client includes an SSH Tunnel definition dialog that allows you toprovide connection information for a secure connection.
• Wide Platform Support. PEM supports most major Linux and Windows platforms.
1.1. Why Postgres Enterprise Manager? 4
Postgres Enterprise Manager, Release 7.9
1.2 General Architecture
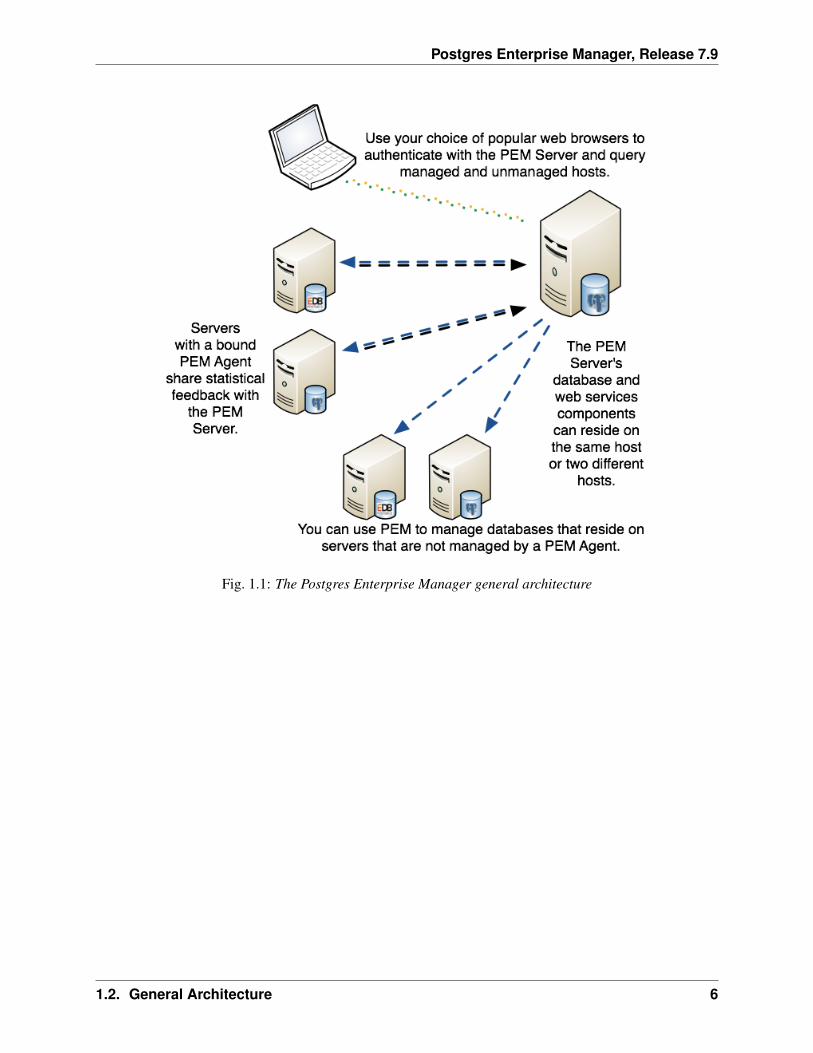
PEM is composed of three primary components:
The PEM Server
The PEM server provides the functionality at the core of Postgres Enterprise Manager. Theserver is responsible for:
• Performing administrative functions.
• Processing information received from agents.
• Maintaining information in its repository.
The PEM Agent
The PEM agent is responsible for performing tasks on each managed machine and collectingstatistics for the database server and operating system.
The PEM Web Interface
Distributed with the PEM server, the PEM web interface allows you to connect to the serverwith your choice of browser to manage and monitor your Postgres servers.
1.2. General Architecture 5
Postgres Enterprise Manager, Release 7.9
Fig. 1.1: The Postgres Enterprise Manager general architecture
1.2. General Architecture 6

Postgres Enterprise Manager, Release 7.9
1.3 Supported Versions and Platforms
The PEM server and agent use Advanced Server or PostgreSQL backing databases (version 9.4 and higher).PEM can manage and monitor Advanced Server and PostgreSQL database versions 9.4 and higher.
The PEM server and agent are supported on:
64-bit Linux:
• CentOS 6.x and 7.x
• OEL 6.x and 7.x
• Red Hat Enterprise Linux 6.x and 7.x
• SLES 12.x
• Debian 9.x (stretch) with .deb packages
• Ubuntu 18.04+ (bionic) with .deb packages
64-bit Windows:
• Windows Server 2012 R2
• Windows Server 2016
• Windows Server 2019
The PEM agent is also supported on Linux ppc64le using RHEL / CentOS 7.x as a PEM server host.
RPM packages for the PEM agent are available for RHEL 6.x and 7.x.
The PEM client is supported on the following browsers:
• Google Chrome
• Mozilla Firefox
• Internet Explorer
• Apple Safari
SQL Profiler is supported on Advanced Server and EnterpriseDB distributions of PostgreSQL version 9.4and above.
1.3. Supported Versions and Platforms 7
Postgres Enterprise Manager, Release 7.9
1.4 Installing PEM - Overview
For detailed instructions about installing PEM, please consult the PEM Installation Guide, available at:
http://enterprisedb.com/products-services-training/products/documentation
The basic steps involved in the PEM installation process are:
1. Install the PEM server components. The PEM server software and backend database (named pem)may reside on the same host as the supporting httpd server, or may reside on a separate host.
The PEM server installer installs a PEM agent and the PEM client on the host of the PEM server.
2. Register each additional physical or virtual machine that you would like to manage with PEM. Forconvenience, PEM supports remote monitoring (an agent is not required to reside on the same host asthe server that it monitors).
Please note that a remote agent cannot retrieve all of the information available from a monitoredserver; you may wish to install an agent on each server host.
3. Install the SQL Profiler component into each Postgres instance on which you want to perform SQLcapture and analysis. The SQL Profiler installer will prompt you for the location of your Postgresinstallation, and place the required software into that directory. The SQL Profiler plugin is alreadyinstalled on Advanced Server instances, and requires only configuration to enable profiling.
1.4. Installing PEM - Overview 8
Postgres Enterprise Manager, Release 7.9
1.5 Using the PEM Web Interface
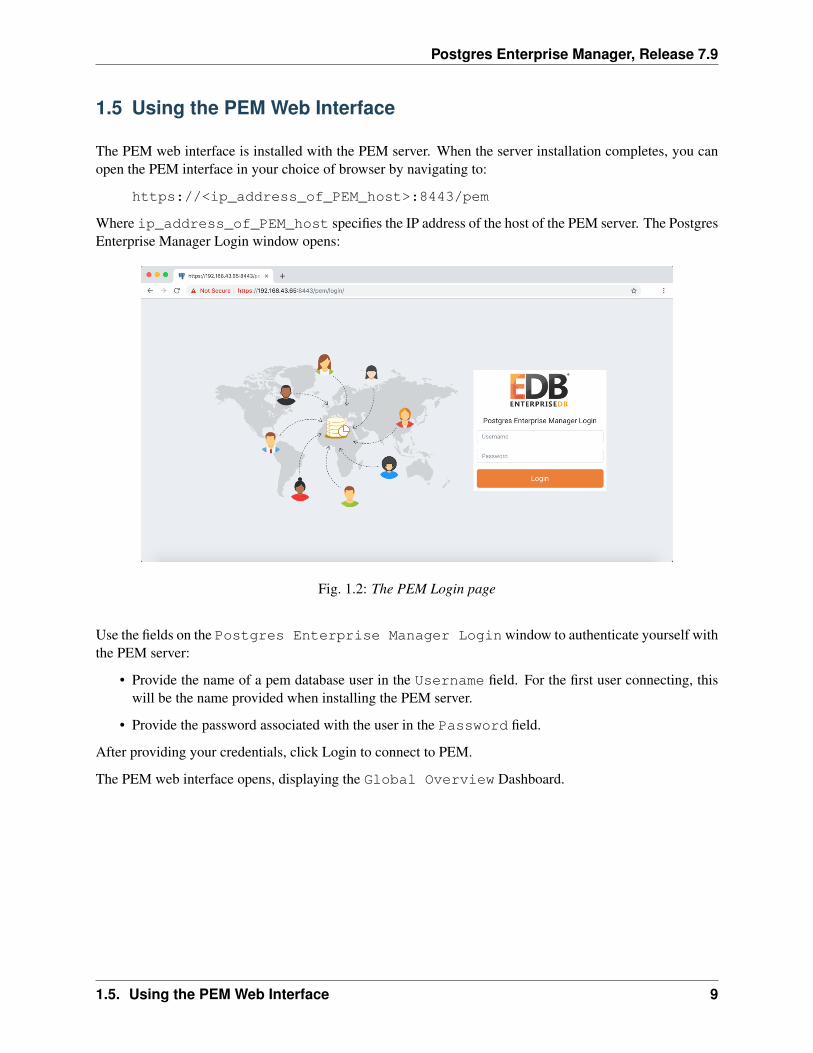
The PEM web interface is installed with the PEM server. When the server installation completes, you canopen the PEM interface in your choice of browser by navigating to:
https://<ip_address_of_PEM_host>:8443/pem
Where ip_address_of_PEM_host specifies the IP address of the host of the PEM server. The PostgresEnterprise Manager Login window opens:
Fig. 1.2: The PEM Login page
Use the fields on the Postgres Enterprise Manager Loginwindow to authenticate yourself withthe PEM server:
• Provide the name of a pem database user in the Username field. For the first user connecting, thiswill be the name provided when installing the PEM server.
• Provide the password associated with the user in the Password field.
After providing your credentials, click Login to connect to PEM.
The PEM web interface opens, displaying the Global Overview Dashboard.
1.5. Using the PEM Web Interface 9

Postgres Enterprise Manager, Release 7.9
Fig. 1.3: The Global Overview dashboard, displayed in the client
The Browser pane displays a tree control that provides access to information about the database objectsthat reside on each server. The tree control expands to display a hierarchical view of the servers and objectsthat are monitored by the PEM server.
The PEM menu bar provides access to commands and features that you can use to manage your databaseservers and the objects that reside on those servers. If an option is disabled:
• The database server to which you are currently connected may not support the selected feature.
• The selected menu option may not be valid for the current object (by design).
• The role that you have used to connect to the server may have insufficient privileges to change theselected object.
1.5. Using the PEM Web Interface 10
Postgres Enterprise Manager, Release 7.9
1.5.1 The PEM Toolbar
Context-sensitive menus across the top of the PEM web interface allow you to customize your environmentand provide access to the enterprise management features of PEM.
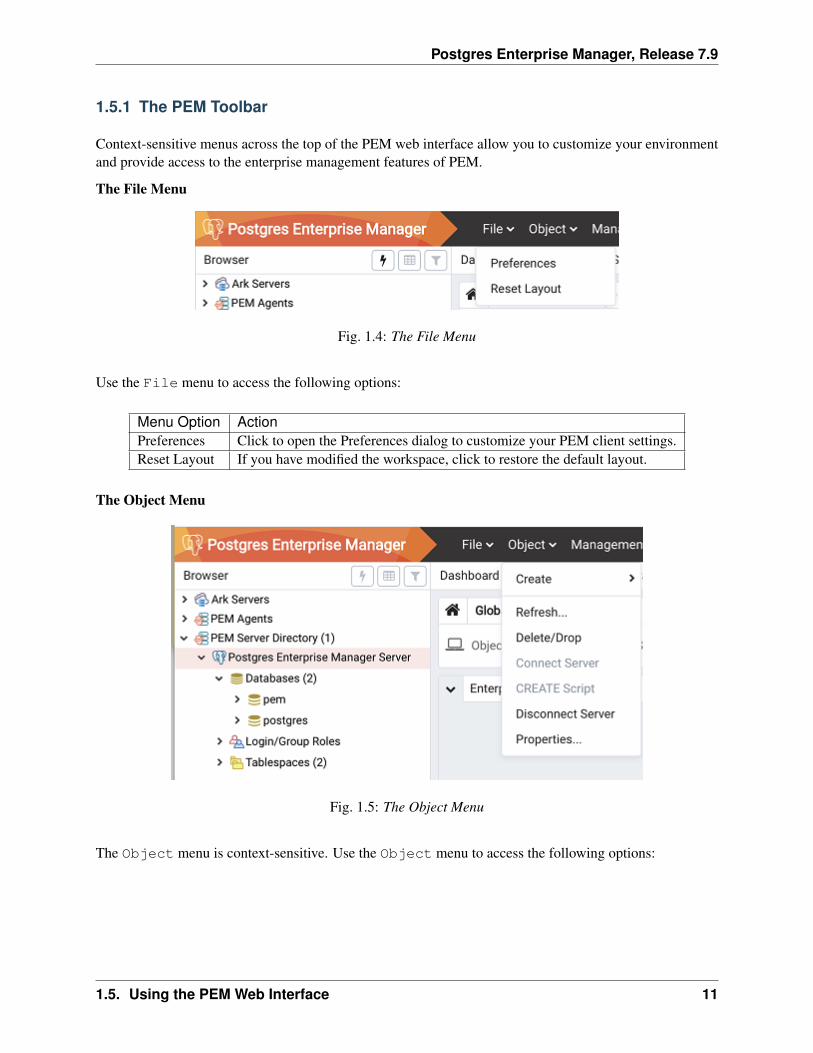
The File Menu
Fig. 1.4: The File Menu
Use the File menu to access the following options:
Menu Option ActionPreferences Click to open the Preferences dialog to customize your PEM client settings.Reset Layout If you have modified the workspace, click to restore the default layout.
The Object Menu
Fig. 1.5: The Object Menu
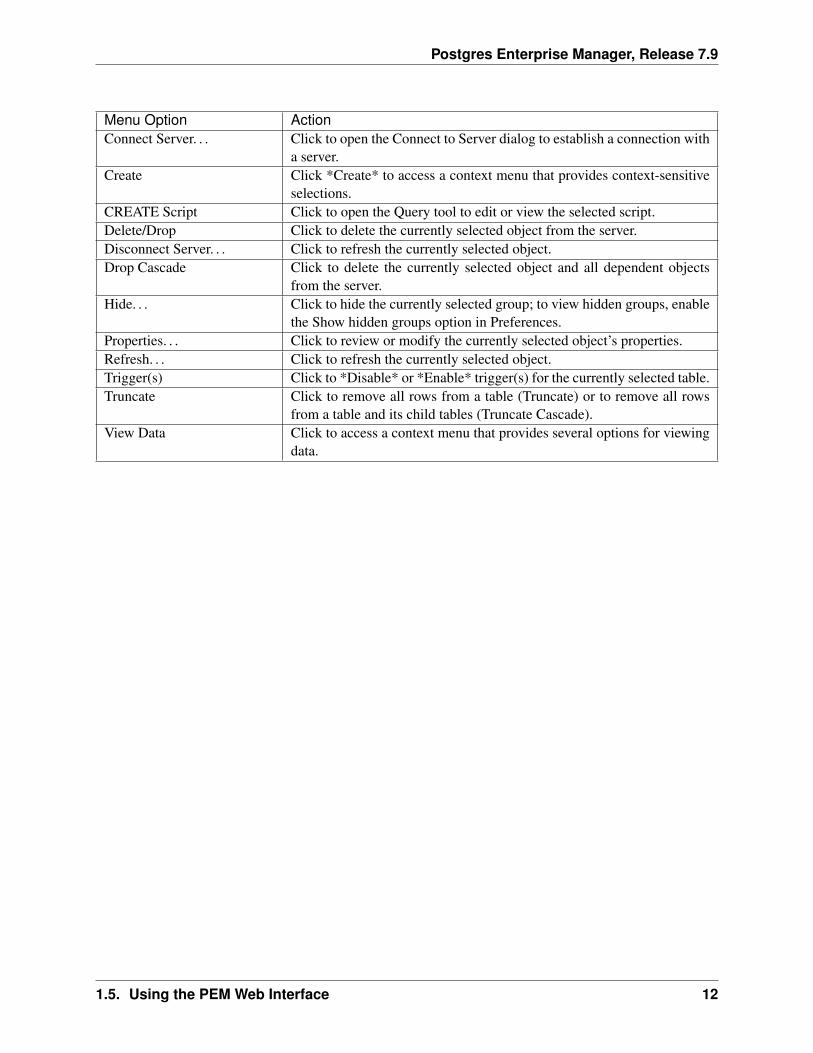
The Object menu is context-sensitive. Use the Object menu to access the following options:
1.5. Using the PEM Web Interface 11
Postgres Enterprise Manager, Release 7.9
Menu Option ActionConnect Server. . . Click to open the Connect to Server dialog to establish a connection with
a server.Create Click *Create* to access a context menu that provides context-sensitive
selections.CREATE Script Click to open the Query tool to edit or view the selected script.Delete/Drop Click to delete the currently selected object from the server.Disconnect Server. . . Click to refresh the currently selected object.Drop Cascade Click to delete the currently selected object and all dependent objects
from the server.Hide. . . Click to hide the currently selected group; to view hidden groups, enable
the Show hidden groups option in Preferences.Properties. . . Click to review or modify the currently selected object’s properties.Refresh. . . Click to refresh the currently selected object.Trigger(s) Click to *Disable* or *Enable* trigger(s) for the currently selected table.Truncate Click to remove all rows from a table (Truncate) or to remove all rows
from a table and its child tables (Truncate Cascade).View Data Click to access a context menu that provides several options for viewing
data.
1.5. Using the PEM Web Interface 12
Postgres Enterprise Manager, Release 7.9
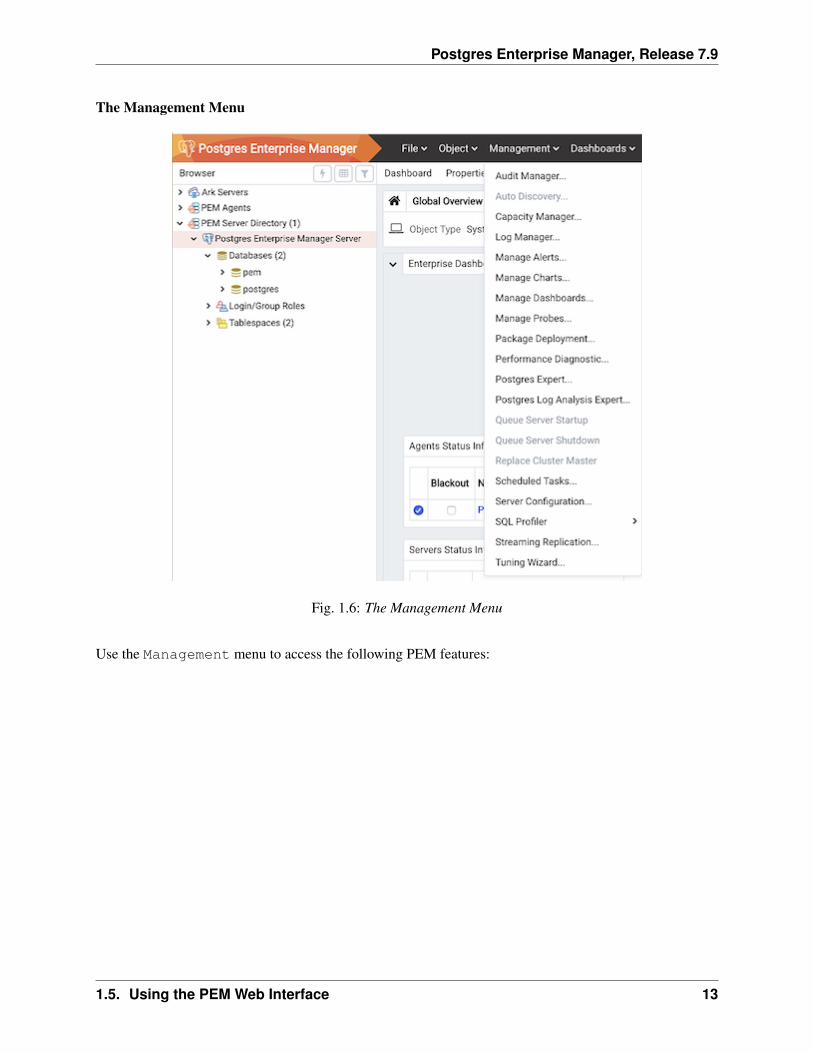
The Management Menu
Fig. 1.6: The Management Menu
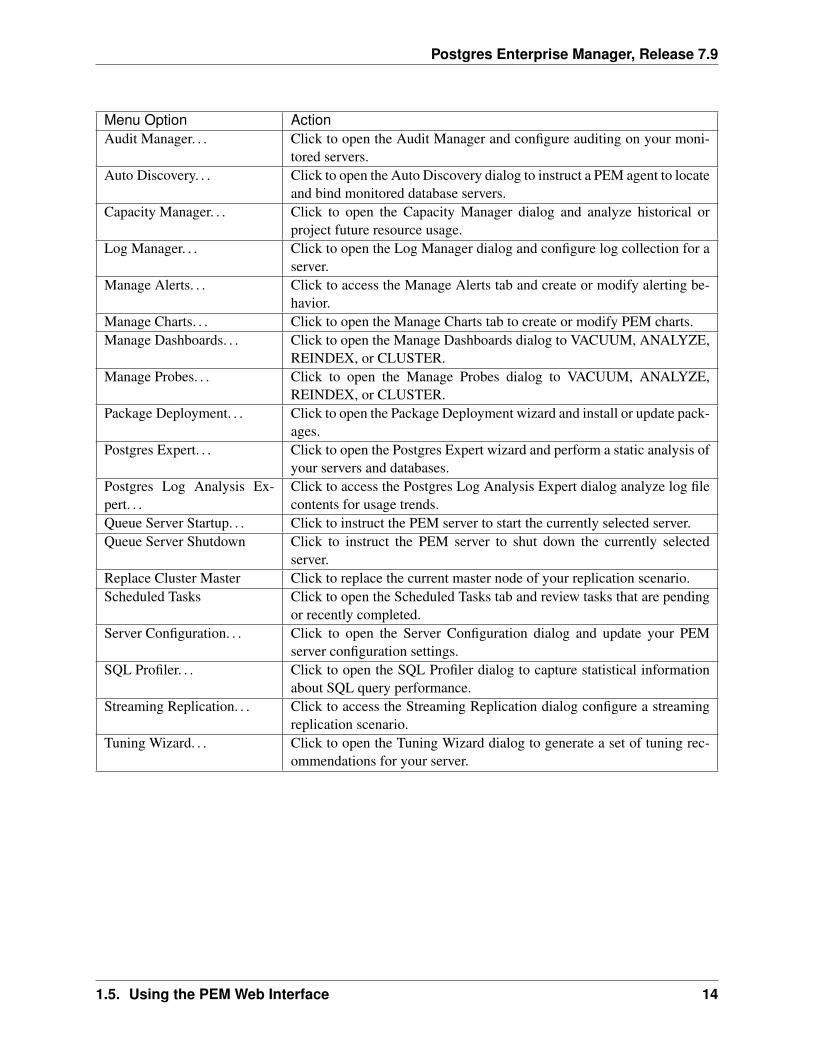
Use the Management menu to access the following PEM features:
1.5. Using the PEM Web Interface 13
Postgres Enterprise Manager, Release 7.9
Menu Option ActionAudit Manager. . . Click to open the Audit Manager and configure auditing on your moni-
tored servers.Auto Discovery. . . Click to open the Auto Discovery dialog to instruct a PEM agent to locate
and bind monitored database servers.Capacity Manager. . . Click to open the Capacity Manager dialog and analyze historical or
project future resource usage.Log Manager. . . Click to open the Log Manager dialog and configure log collection for a
server.Manage Alerts. . . Click to access the Manage Alerts tab and create or modify alerting be-
havior.Manage Charts. . . Click to open the Manage Charts tab to create or modify PEM charts.Manage Dashboards. . . Click to open the Manage Dashboards dialog to VACUUM, ANALYZE,
REINDEX, or CLUSTER.Manage Probes. . . Click to open the Manage Probes dialog to VACUUM, ANALYZE,
REINDEX, or CLUSTER.Package Deployment. . . Click to open the Package Deployment wizard and install or update pack-
ages.Postgres Expert. . . Click to open the Postgres Expert wizard and perform a static analysis of
your servers and databases.Postgres Log Analysis Ex-pert. . .
Click to access the Postgres Log Analysis Expert dialog analyze log filecontents for usage trends.
Queue Server Startup. . . Click to instruct the PEM server to start the currently selected server.Queue Server Shutdown Click to instruct the PEM server to shut down the currently selected
server.Replace Cluster Master Click to replace the current master node of your replication scenario.Scheduled Tasks Click to open the Scheduled Tasks tab and review tasks that are pending
or recently completed.Server Configuration. . . Click to open the Server Configuration dialog and update your PEM
server configuration settings.SQL Profiler. . . Click to open the SQL Profiler dialog to capture statistical information
about SQL query performance.Streaming Replication. . . Click to access the Streaming Replication dialog configure a streaming
replication scenario.Tuning Wizard. . . Click to open the Tuning Wizard dialog to generate a set of tuning rec-
ommendations for your server.
1.5. Using the PEM Web Interface 14
Postgres Enterprise Manager, Release 7.9
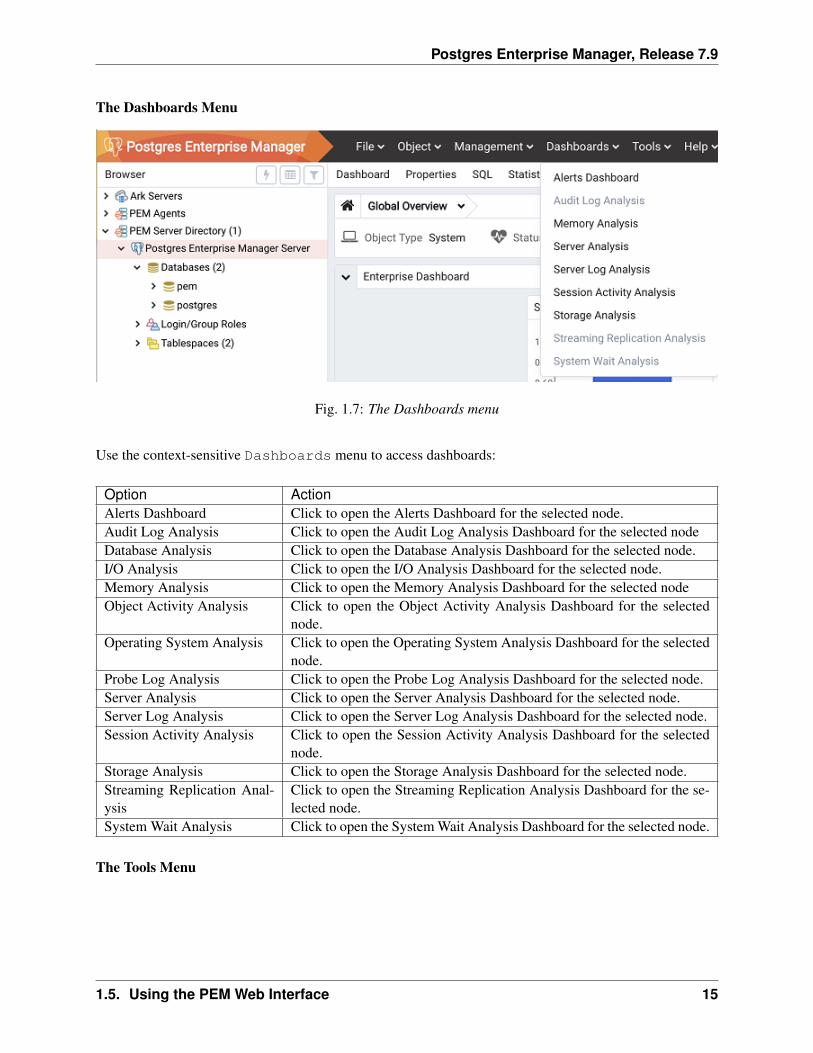
The Dashboards Menu
Fig. 1.7: The Dashboards menu
Use the context-sensitive Dashboards menu to access dashboards:
Option ActionAlerts Dashboard Click to open the Alerts Dashboard for the selected node.Audit Log Analysis Click to open the Audit Log Analysis Dashboard for the selected nodeDatabase Analysis Click to open the Database Analysis Dashboard for the selected node.I/O Analysis Click to open the I/O Analysis Dashboard for the selected node.Memory Analysis Click to open the Memory Analysis Dashboard for the selected nodeObject Activity Analysis Click to open the Object Activity Analysis Dashboard for the selected
node.Operating System Analysis Click to open the Operating System Analysis Dashboard for the selected
node.Probe Log Analysis Click to open the Probe Log Analysis Dashboard for the selected node.Server Analysis Click to open the Server Analysis Dashboard for the selected node.Server Log Analysis Click to open the Server Log Analysis Dashboard for the selected node.Session Activity Analysis Click to open the Session Activity Analysis Dashboard for the selected
node.Storage Analysis Click to open the Storage Analysis Dashboard for the selected node.Streaming Replication Anal-ysis
Click to open the Streaming Replication Analysis Dashboard for the se-lected node.
System Wait Analysis Click to open the System Wait Analysis Dashboard for the selected node.
The Tools Menu
1.5. Using the PEM Web Interface 15
Postgres Enterprise Manager, Release 7.9
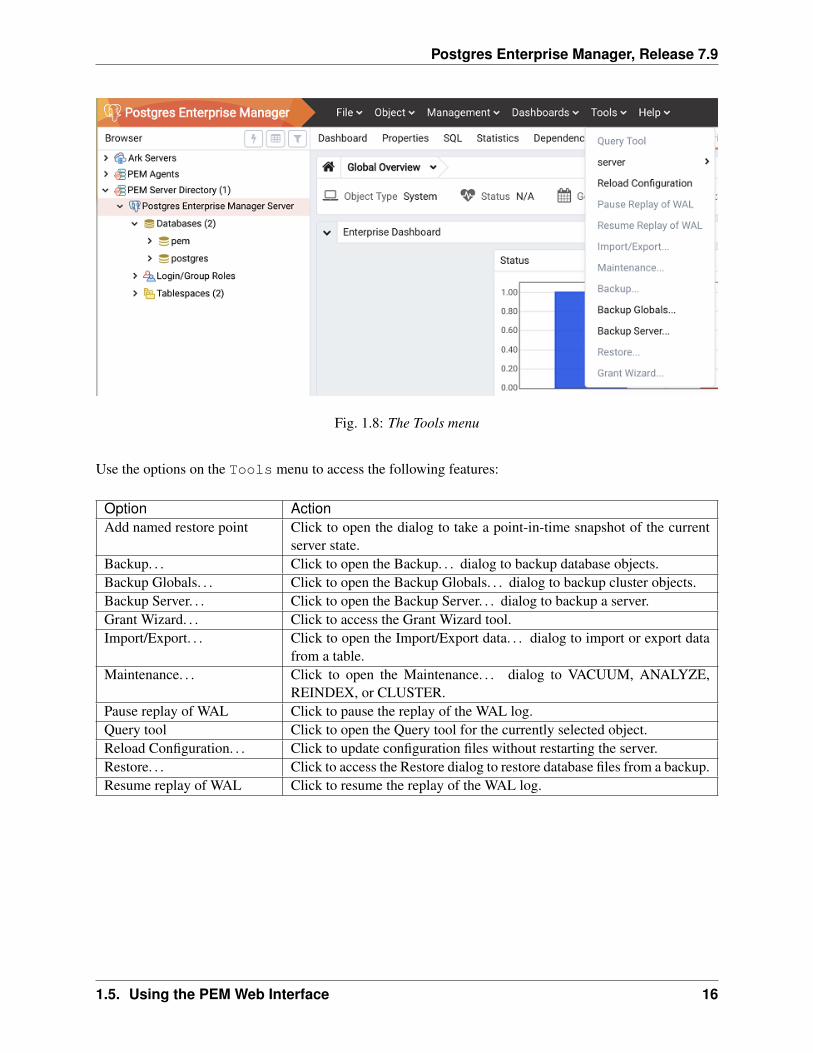
Fig. 1.8: The Tools menu
Use the options on the Tools menu to access the following features:
Option ActionAdd named restore point Click to open the dialog to take a point-in-time snapshot of the current
server state.Backup. . . Click to open the Backup. . . dialog to backup database objects.Backup Globals. . . Click to open the Backup Globals. . . dialog to backup cluster objects.Backup Server. . . Click to open the Backup Server. . . dialog to backup a server.Grant Wizard. . . Click to access the Grant Wizard tool.Import/Export. . . Click to open the Import/Export data. . . dialog to import or export data
from a table.Maintenance. . . Click to open the Maintenance. . . dialog to VACUUM, ANALYZE,
REINDEX, or CLUSTER.Pause replay of WAL Click to pause the replay of the WAL log.Query tool Click to open the Query tool for the currently selected object.Reload Configuration. . . Click to update configuration files without restarting the server.Restore. . . Click to access the Restore dialog to restore database files from a backup.Resume replay of WAL Click to resume the replay of the WAL log.
1.5. Using the PEM Web Interface 16
Postgres Enterprise Manager, Release 7.9
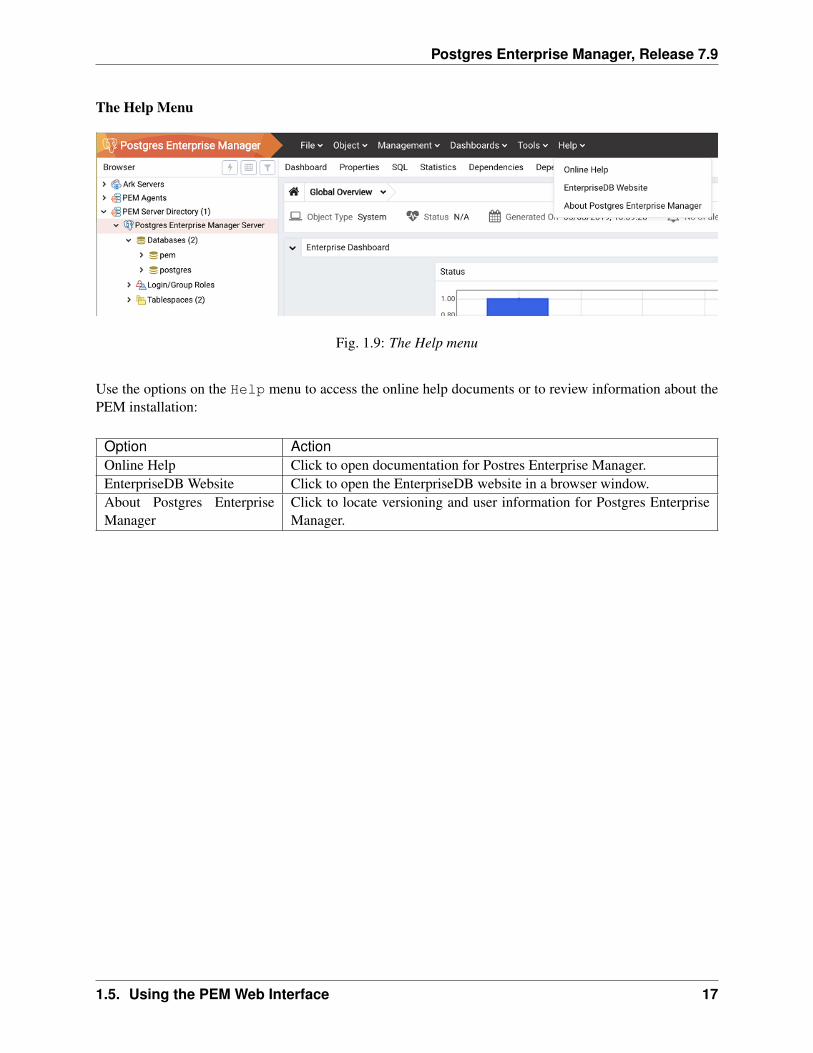
The Help Menu
Fig. 1.9: The Help menu
Use the options on the Help menu to access the online help documents or to review information about thePEM installation:
Option ActionOnline Help Click to open documentation for Postres Enterprise Manager.EnterpriseDB Website Click to open the EnterpriseDB website in a browser window.About Postgres EnterpriseManager
Click to locate versioning and user information for Postgres EnterpriseManager.
1.5. Using the PEM Web Interface 17
Postgres Enterprise Manager, Release 7.9
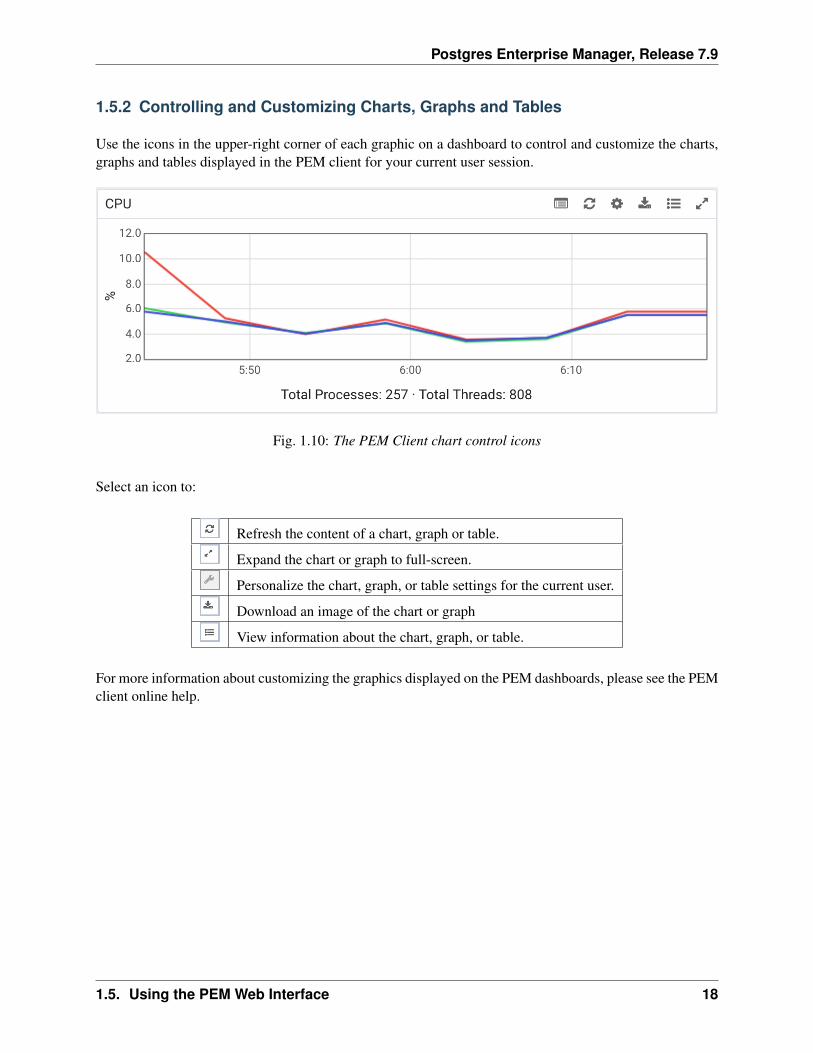
1.5.2 Controlling and Customizing Charts, Graphs and Tables
Use the icons in the upper-right corner of each graphic on a dashboard to control and customize the charts,graphs and tables displayed in the PEM client for your current user session.
Fig. 1.10: The PEM Client chart control icons
Select an icon to:
Refresh the content of a chart, graph or table.
Expand the chart or graph to full-screen.
Personalize the chart, graph, or table settings for the current user.
Download an image of the chart or graph
View information about the chart, graph, or table.
For more information about customizing the graphics displayed on the PEM dashboards, please see the PEMclient online help.
1.5. Using the PEM Web Interface 18
Postgres Enterprise Manager, Release 7.9
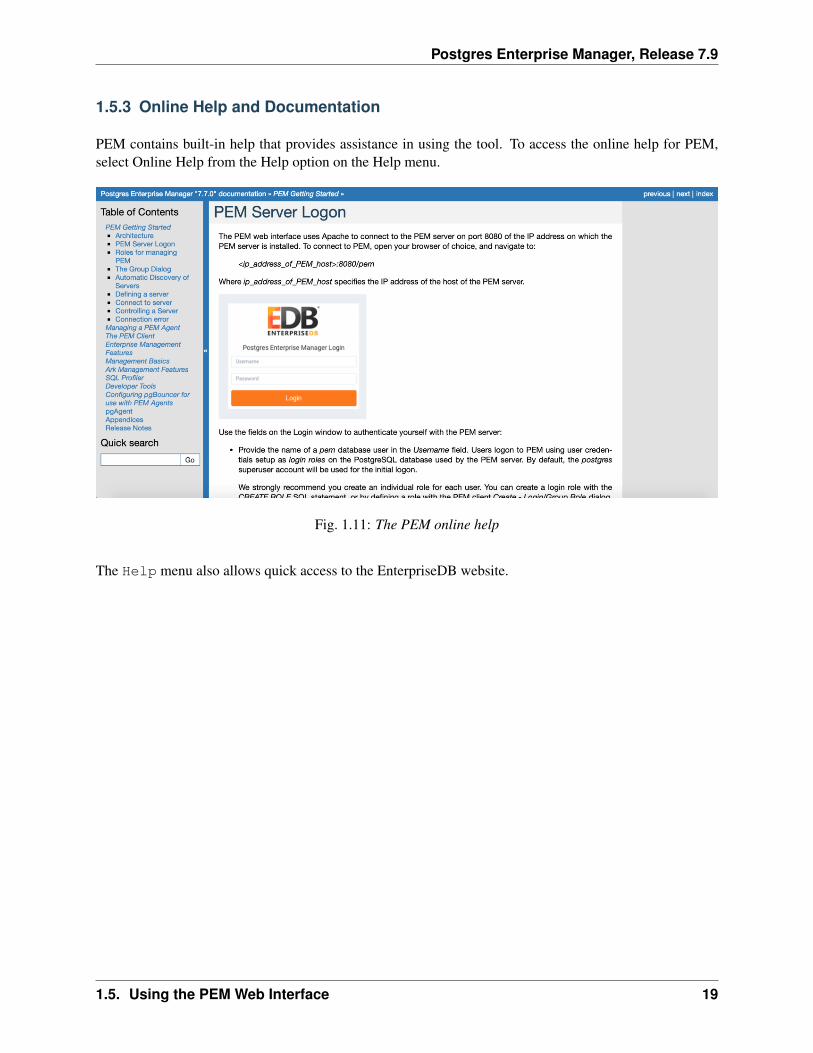
1.5.3 Online Help and Documentation
PEM contains built-in help that provides assistance in using the tool. To access the online help for PEM,select Online Help from the Help option on the Help menu.
Fig. 1.11: The PEM online help
The Help menu also allows quick access to the EnterpriseDB website.
1.5. Using the PEM Web Interface 19
CHAPTER 2
Registering a Server
Before you can manage or monitor a server with PEM, you must register the server with PEM, and bindan agent. A server may be bound to a remote agent (an agent that resides on a different host), but if theagent does not reside on the same host, it will not have access to all of the statistical information about theinstance.
2.1 Manually Registering a Server
To manage or monitor a server with PEM, you must:
• Register your Advanced Server or PostgreSQL server with the PEM server.
• Bind the server to a PEM agent.
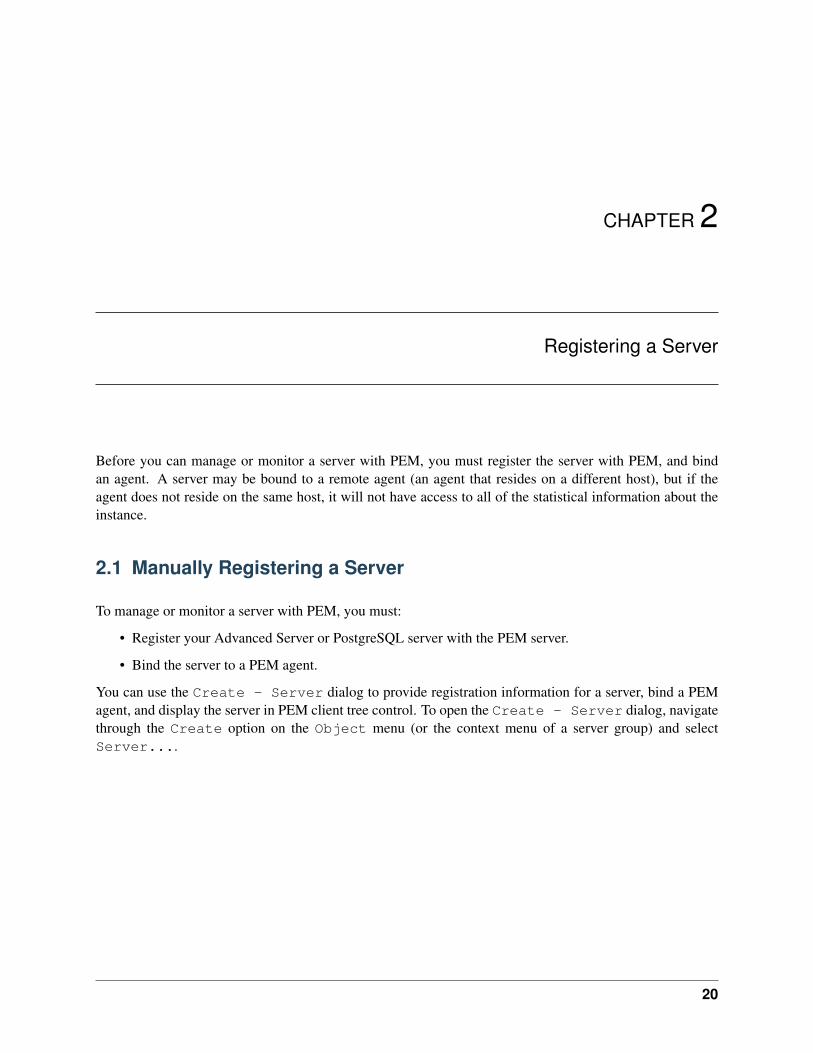
You can use the Create - Server dialog to provide registration information for a server, bind a PEMagent, and display the server in PEM client tree control. To open the Create - Server dialog, navigatethrough the Create option on the Object menu (or the context menu of a server group) and selectServer....
20
Postgres Enterprise Manager, Release 7.9
Fig. 2.1: Accessing the Create – Server dialog
Note: You must ensure the pg_hba.conf file of the Postgres server that you are registering allowsconnections from the host of the PEM client before attempting to connect.
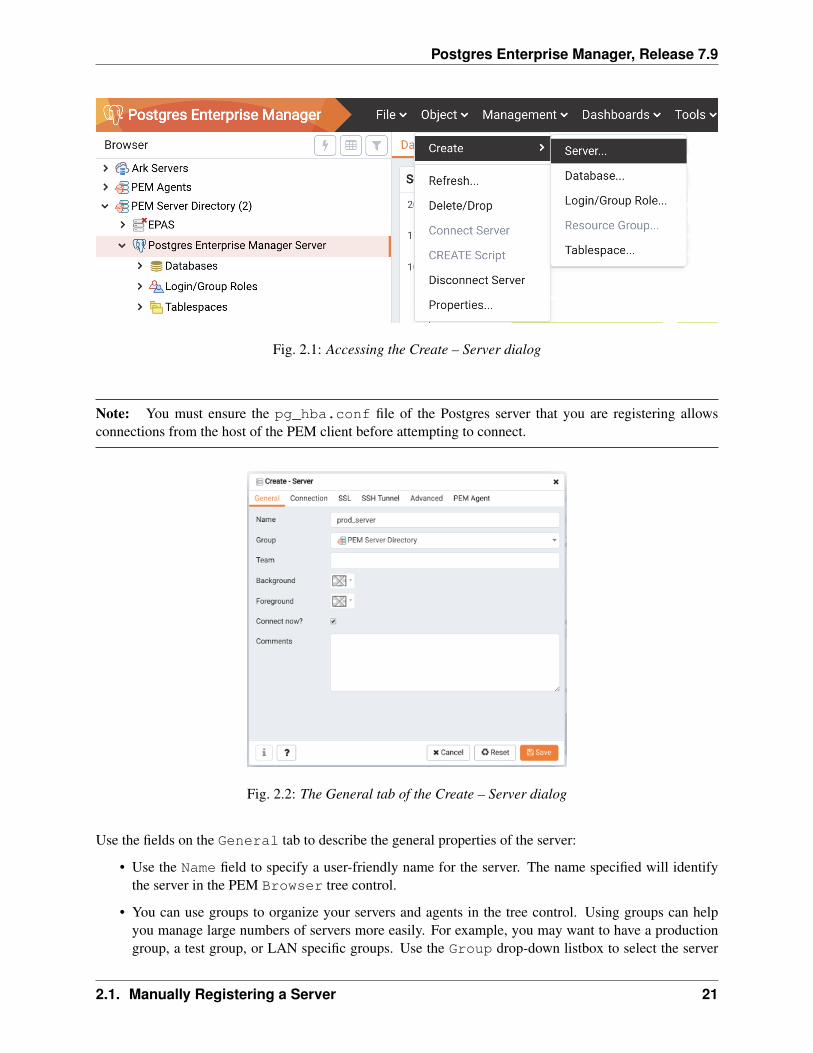
Fig. 2.2: The General tab of the Create – Server dialog
Use the fields on the General tab to describe the general properties of the server:
• Use the Name field to specify a user-friendly name for the server. The name specified will identifythe server in the PEM Browser tree control.
• You can use groups to organize your servers and agents in the tree control. Using groups can helpyou manage large numbers of servers more easily. For example, you may want to have a productiongroup, a test group, or LAN specific groups. Use the Group drop-down listbox to select the server
2.1. Manually Registering a Server 21
Postgres Enterprise Manager, Release 7.9
group in which the new server will be displayed.
• Use the Team field to specify a Postgres role name. Only PEM users who are members of this role,who created the server initially, or have superuser privileges on the PEM server will see this serverwhen they logon to PEM. If this field is left blank, all PEM users will see the server.
• Use the Background color selector to select the color that will be displayed in the PEM tree controlbehind database objects that are stored on the server.
• Use the Foreground color selector to select the font color of labels in the PEM tree control forobjects stored on the server.
• Check the box next to Connect now? to instruct PEM to attempt a server connection when youclick the Save button. Leave Connect now? unchecked if you do not want the PEM client tovalidate the specified connection parameters until a later connection attempt.
• Provide notes about the server in the Comments field.
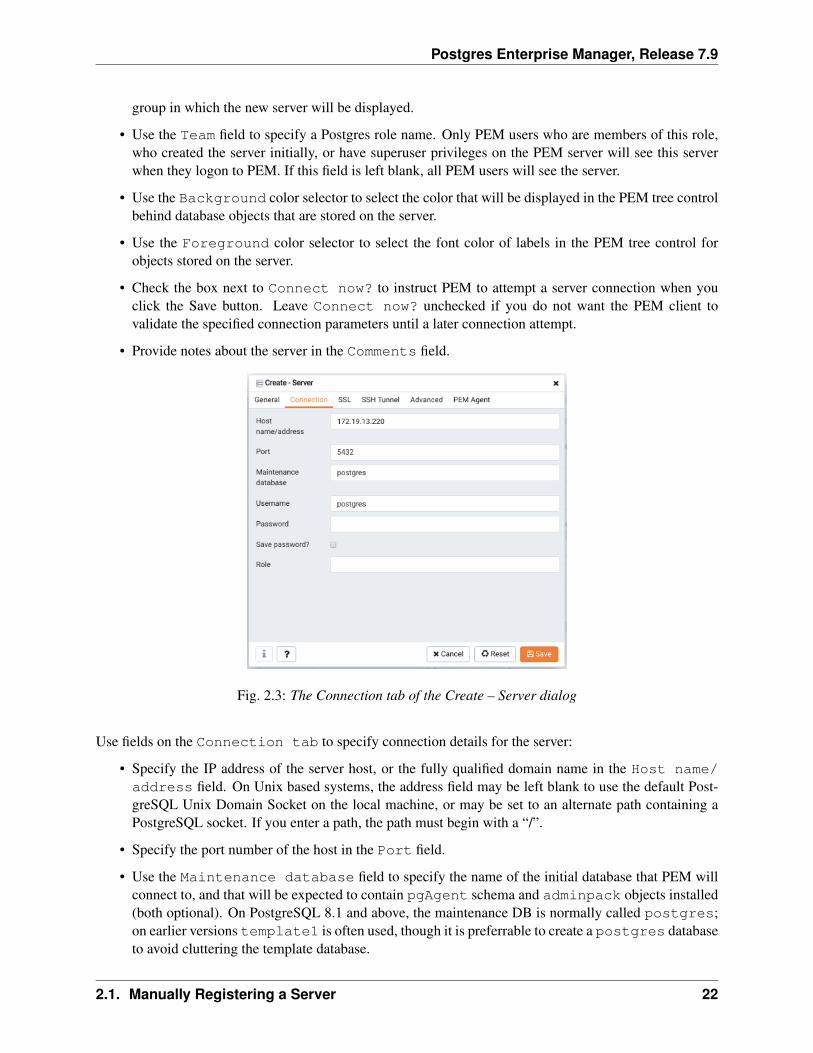
Fig. 2.3: The Connection tab of the Create – Server dialog
Use fields on the Connection tab to specify connection details for the server:
• Specify the IP address of the server host, or the fully qualified domain name in the Host name/address field. On Unix based systems, the address field may be left blank to use the default Post-greSQL Unix Domain Socket on the local machine, or may be set to an alternate path containing aPostgreSQL socket. If you enter a path, the path must begin with a “/”.
• Specify the port number of the host in the Port field.
• Use the Maintenance database field to specify the name of the initial database that PEM willconnect to, and that will be expected to contain pgAgent schema and adminpack objects installed(both optional). On PostgreSQL 8.1 and above, the maintenance DB is normally called postgres;on earlier versions template1 is often used, though it is preferrable to create a postgres databaseto avoid cluttering the template database.
2.1. Manually Registering a Server 22
Postgres Enterprise Manager, Release 7.9
• Specify the name that will be used when authenticating with the server in the Username field.
• Provide the password associated with the specified user in the Password field.
• Check the box next to Save password? to instruct PEM to store passwords in the ~/.pgpassfile (on Linux) or %APPDATA%\postgresql\pgpass.conf (on Windows) for later reuse. Fordetails, see the pgpass documentation. Stored passwords will be used for all libpq based tools. Toremove a password, disconnect from the server, open the server’s Properties dialog and uncheck theselection.
• Use the Role field to specify the name of the role that is assigned the privileges that the client shoulduse after connecting to the server. This allows you to connect as one role, and then assume thepermissions of another role when the connection is established (the one you specified in this field).The connecting role must be a member of the role specified.
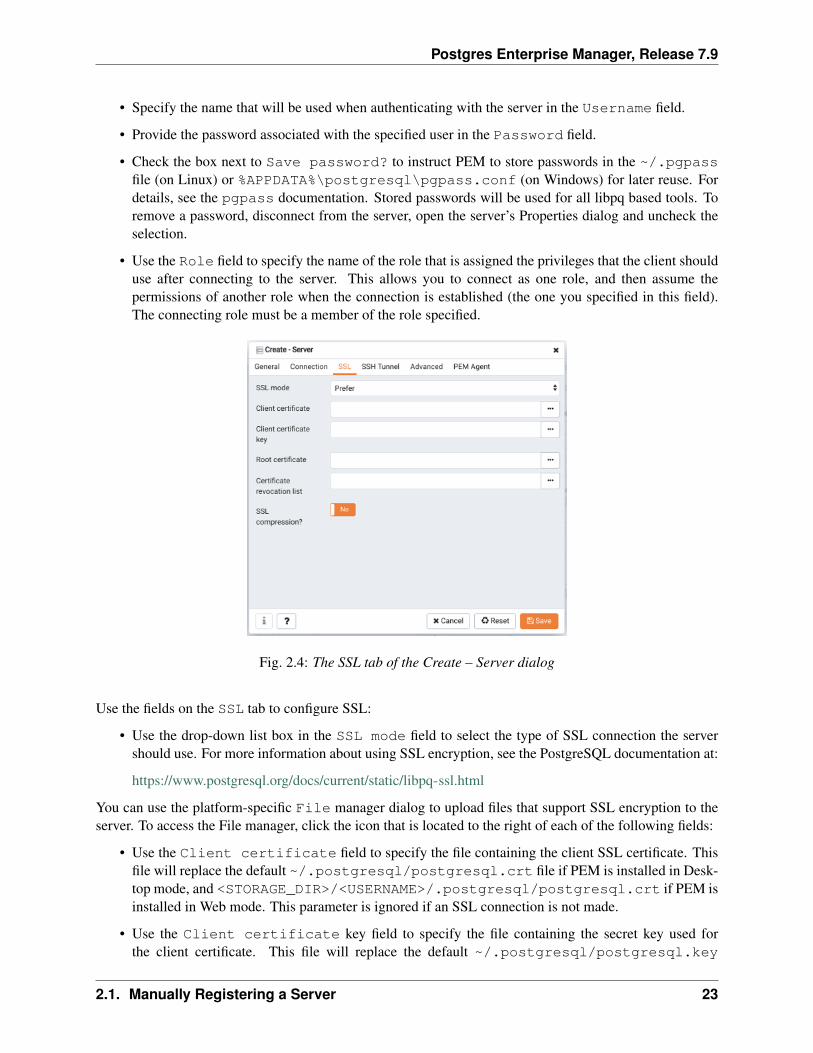
Fig. 2.4: The SSL tab of the Create – Server dialog
Use the fields on the SSL tab to configure SSL:
• Use the drop-down list box in the SSL mode field to select the type of SSL connection the servershould use. For more information about using SSL encryption, see the PostgreSQL documentation at:
https://www.postgresql.org/docs/current/static/libpq-ssl.html
You can use the platform-specific File manager dialog to upload files that support SSL encryption to theserver. To access the File manager, click the icon that is located to the right of each of the following fields:
• Use the Client certificate field to specify the file containing the client SSL certificate. Thisfile will replace the default ~/.postgresql/postgresql.crt file if PEM is installed in Desk-top mode, and <STORAGE_DIR>/<USERNAME>/.postgresql/postgresql.crt if PEM isinstalled in Web mode. This parameter is ignored if an SSL connection is not made.
• Use the Client certificate key field to specify the file containing the secret key used forthe client certificate. This file will replace the default ~/.postgresql/postgresql.key
2.1. Manually Registering a Server 23
Postgres Enterprise Manager, Release 7.9
if PEM is installed in Desktop mode, and <STORAGE_DIR>/<USERNAME>/.postgresql/postgresql.key if PEM is installed in Web mode. This parameter is ignored if an SSL connectionis not made.
• Use the Root certificate field to specify the file containing the SSL certificate authority. Thisfile will replace the default ~/.postgresql/root.crt file. This parameter is ignored if an SSLconnection is not made.
• Use the Certificate revocation list field to specify the file containing the SSL certificaterevocation list. This list will replace the default list, found in ~/.postgresql/root.crl. Thisparameter is ignored if an SSL connection is not made.
• When SSL compression? is set to True, data sent over SSL connections will be compressed. Thedefault value is False (compression is disabled). This parameter is ignored if an SSL connection isnot made.
Warning: Certificates, private keys, and the revocation list are stored in the per-user file storage area onthe server, which is owned by the user account under which the PEM server process is run. This meansthat administrators of the server may be able to access those files; appropriate caution should be takenbefore choosing to use this feature.
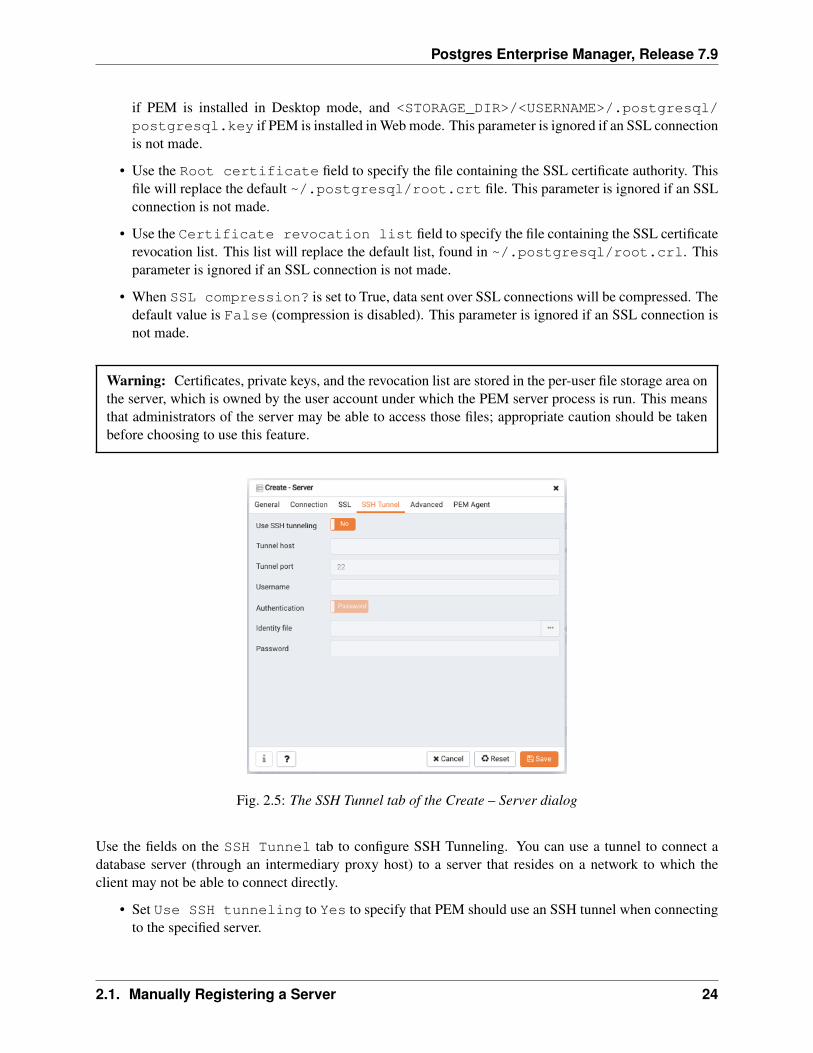
Fig. 2.5: The SSH Tunnel tab of the Create – Server dialog
Use the fields on the SSH Tunnel tab to configure SSH Tunneling. You can use a tunnel to connect adatabase server (through an intermediary proxy host) to a server that resides on a network to which theclient may not be able to connect directly.
• Set Use SSH tunneling to Yes to specify that PEM should use an SSH tunnel when connectingto the specified server.
2.1. Manually Registering a Server 24
Postgres Enterprise Manager, Release 7.9
• Specify the name or IP address of the SSH host (through which client connections will be forwarded)in the Tunnel host field.
• Specify the port of the SSH host (through which client connections will be forwarded) in the Tunnelport field.
• Specify the name of a user with login privileges for the SSH host in the Username field.
• Specify the type of authentication that will be used when connecting to the SSH host in theAuthentication field.
• Select Password to specify that PEM will use a password for authentication to the SSH host. Thisis the default.
• Select Identity file to specify that PEM will use a private key file when connecting.
• If the SSH host is expecting a private key file for authentication, use the Identity file field tospecify the location of the key file.
• If the SSH host is expecting a password, use the Password field to specify the password, or if anidentity file is being used, the passphrase.
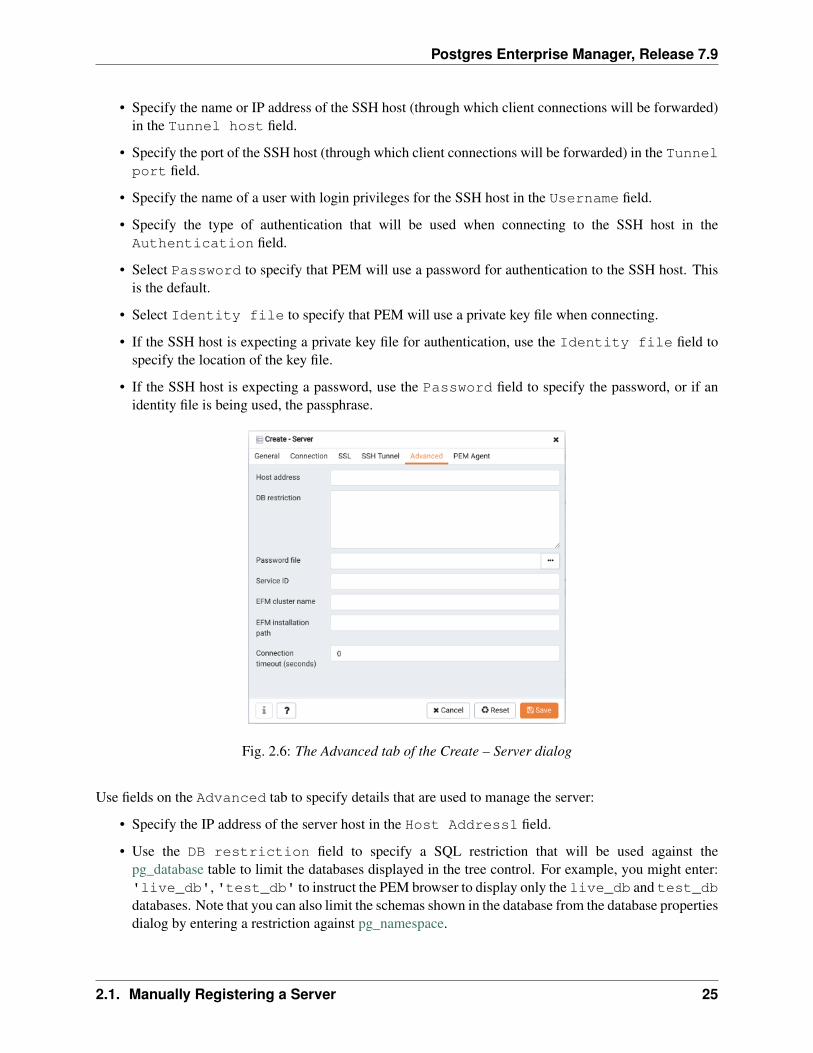
Fig. 2.6: The Advanced tab of the Create – Server dialog
Use fields on the Advanced tab to specify details that are used to manage the server:
• Specify the IP address of the server host in the Host Address1 field.
• Use the DB restriction field to specify a SQL restriction that will be used against thepg_database table to limit the databases displayed in the tree control. For example, you might enter:'live_db', 'test_db' to instruct the PEM browser to display only the live_db and test_dbdatabases. Note that you can also limit the schemas shown in the database from the database propertiesdialog by entering a restriction against pg_namespace.
2.1. Manually Registering a Server 25
Postgres Enterprise Manager, Release 7.9
• Use the Password file field to specify the location of a password file (.pgpass). The .pgpass file allows a user to login without providing a password when they connect. For moreinformation, see the Postgres documentation at:
http://www.postgresql.org/docs/current/static/libpq-pgpass.html
Note: Use of a password file is only supported when PEM is using libpq v10.0 or later to connect to theserver.
• Use the Service ID field to specify parameters to control the database service process. For serversthat are stored in the Enterprise Manager directory, enter the service ID. On Windows machines, thisis the identifier for the Windows service. On Linux machines, this is the name of the init script usedto start the server in /etc/init.d. For example, the name of the Advanced Server 10 service isedb-as-10. For local servers, the setting is operating system dependent:
– If the PEM client is running on a Windows machine, it can control the postmaster service if youhave sufficient access rights. Enter the name of the service. In case of a remote server, it must beprepended by the machine name (e.g. PSE1\pgsql-8.0). PEM will automatically discoverservices running on your local machine.
– If the PEM client is running on a Linux machine, it can control processes running on the localmachine if you have enough access rights. Provide a full path and needed options to access thepg_ctl program. When executing service control functions, PEM will append status/start/stopkeywords to this. For example:
sudo /usr/local/pgsql/bin/pg_ctl -D /data/pgsql
• If the server is a member of a Failover Manager cluster, you can use PEM to monitor the health ofthe cluster and to replace the master node if necessary. To enable PEM to monitor Failover Manager,use the EFM cluster name field to specify the cluster name. The cluster name is the prefix ofthe name of the Failover Manager cluster properties file. For example, if the cluster properties file isnamed efm.properties, the cluster name is efm.
• If you are using PEM to monitor the status of a Failover Manager cluster, use the EFMinstallation path field to specify the location of the Failover Manager binary file. By de-fault, the Failover Manager binary file is installed in /usr/efm-2.x/bin, where x specifies theFailover Manager version.
2.1. Manually Registering a Server 26
Postgres Enterprise Manager, Release 7.9
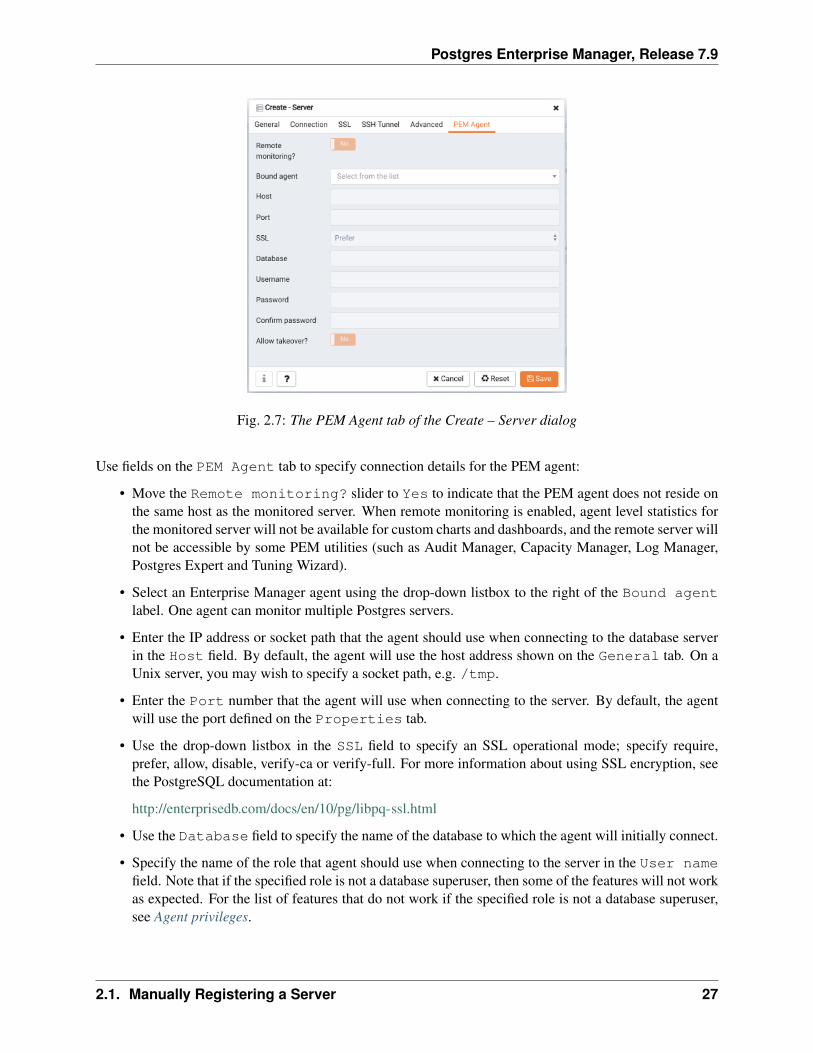
Fig. 2.7: The PEM Agent tab of the Create – Server dialog
Use fields on the PEM Agent tab to specify connection details for the PEM agent:
• Move the Remote monitoring? slider to Yes to indicate that the PEM agent does not reside onthe same host as the monitored server. When remote monitoring is enabled, agent level statistics forthe monitored server will not be available for custom charts and dashboards, and the remote server willnot be accessible by some PEM utilities (such as Audit Manager, Capacity Manager, Log Manager,Postgres Expert and Tuning Wizard).
• Select an Enterprise Manager agent using the drop-down listbox to the right of the Bound agentlabel. One agent can monitor multiple Postgres servers.
• Enter the IP address or socket path that the agent should use when connecting to the database serverin the Host field. By default, the agent will use the host address shown on the General tab. On aUnix server, you may wish to specify a socket path, e.g. /tmp.
• Enter the Port number that the agent will use when connecting to the server. By default, the agentwill use the port defined on the Properties tab.
• Use the drop-down listbox in the SSL field to specify an SSL operational mode; specify require,prefer, allow, disable, verify-ca or verify-full. For more information about using SSL encryption, seethe PostgreSQL documentation at:
http://enterprisedb.com/docs/en/10/pg/libpq-ssl.html
• Use the Database field to specify the name of the database to which the agent will initially connect.
• Specify the name of the role that agent should use when connecting to the server in the User namefield. Note that if the specified role is not a database superuser, then some of the features will not workas expected. For the list of features that do not work if the specified role is not a database superuser,see Agent privileges.
2.1. Manually Registering a Server 27
Postgres Enterprise Manager, Release 7.9
If you are using Postgres version 10 or above, you can use the pg_monitor role to grant therequired privileges to a non-superuser. For information about pg_monitor role, see:
https://www.postgresql.org/docs/current/default-roles.html
• Specify the password that the agent should use when connecting to the server in the Password field,and verify it by typing it again in the Confirm password field. If you do not specify a password,you will need to configure the authentication for the agent manually; for example, you can use a.pgpass file.
• Set the Allow takeover? slider to Yes to specify that the server may be taken over by anotheragent. This feature allows an agent to take responsibility for the monitoring of the database server if,for example, the server has been moved to another host as part of a high availability failover process.
To view the properties of a server, right-click on the server name in the PEM client tree control, and selectthe Properties... option from the context menu. To modify a server’s properties, disconnect from theserver before opening the Properties dialog.
2.1. Manually Registering a Server 28
Postgres Enterprise Manager, Release 7.9
2.2 Automatic Server Discovery
If the server you wish to monitor resides on the same host as the monitoring agent, you can use the AutoDiscovery dialog to simplify the registration and binding process.
To enable auto discovery for a specific agent, you must enable the Server Auto Discovery probe. Toaccess the Manage Probes tab, highlight the name of a PEM agent in the PEM client tree control, and selectManage Probes... from the Management menu. When the Manage Probes tab opens, confirmthat the slider control in the Enabled? column is set to Yes.
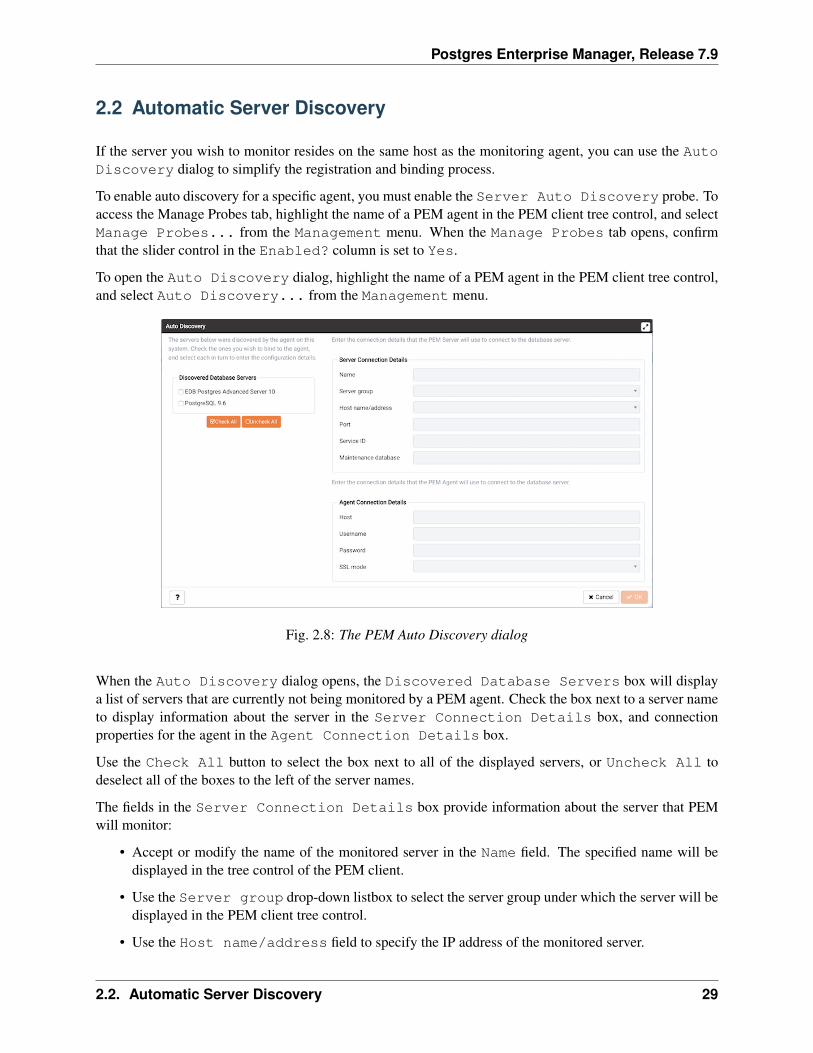
To open the Auto Discovery dialog, highlight the name of a PEM agent in the PEM client tree control,and select Auto Discovery... from the Management menu.
Fig. 2.8: The PEM Auto Discovery dialog
When the Auto Discovery dialog opens, the Discovered Database Servers box will displaya list of servers that are currently not being monitored by a PEM agent. Check the box next to a server nameto display information about the server in the Server Connection Details box, and connectionproperties for the agent in the Agent Connection Details box.
Use the Check All button to select the box next to all of the displayed servers, or Uncheck All todeselect all of the boxes to the left of the server names.
The fields in the Server Connection Details box provide information about the server that PEMwill monitor:
• Accept or modify the name of the monitored server in the Name field. The specified name will bedisplayed in the tree control of the PEM client.
• Use the Server group drop-down listbox to select the server group under which the server will bedisplayed in the PEM client tree control.
• Use the Host name/address field to specify the IP address of the monitored server.
2.2. Automatic Server Discovery 29
Postgres Enterprise Manager, Release 7.9
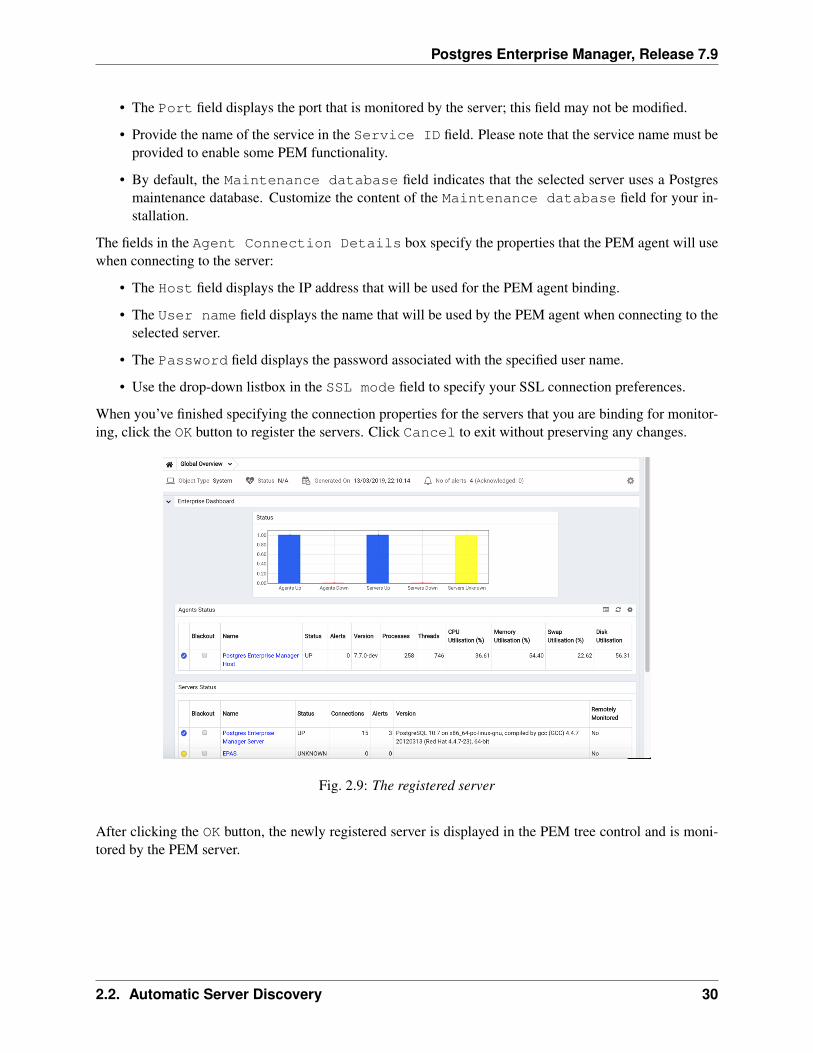
• The Port field displays the port that is monitored by the server; this field may not be modified.
• Provide the name of the service in the Service ID field. Please note that the service name must beprovided to enable some PEM functionality.
• By default, the Maintenance database field indicates that the selected server uses a Postgresmaintenance database. Customize the content of the Maintenance database field for your in-stallation.
The fields in the Agent Connection Details box specify the properties that the PEM agent will usewhen connecting to the server:
• The Host field displays the IP address that will be used for the PEM agent binding.
• The User name field displays the name that will be used by the PEM agent when connecting to theselected server.
• The Password field displays the password associated with the specified user name.
• Use the drop-down listbox in the SSL mode field to specify your SSL connection preferences.
When you’ve finished specifying the connection properties for the servers that you are binding for monitor-ing, click the OK button to register the servers. Click Cancel to exit without preserving any changes.
Fig. 2.9: The registered server
After clicking the OK button, the newly registered server is displayed in the PEM tree control and is moni-tored by the PEM server.
2.2. Automatic Server Discovery 30
Postgres Enterprise Manager, Release 7.9
2.3 Using the pemworker Utility to Register a Server
You can use the pemworker utility to register a server for monitoring by the PEM server or to unregistera database server. During registration, the pemworker utility will bind the new server to the agent thatresides on the system from which you invoked the registration command. To register a server:
on a Linux host, use the command:
pemworker --register-server
on a Windows host, use the command:
pemworker.exe REGISTER-SERVICE
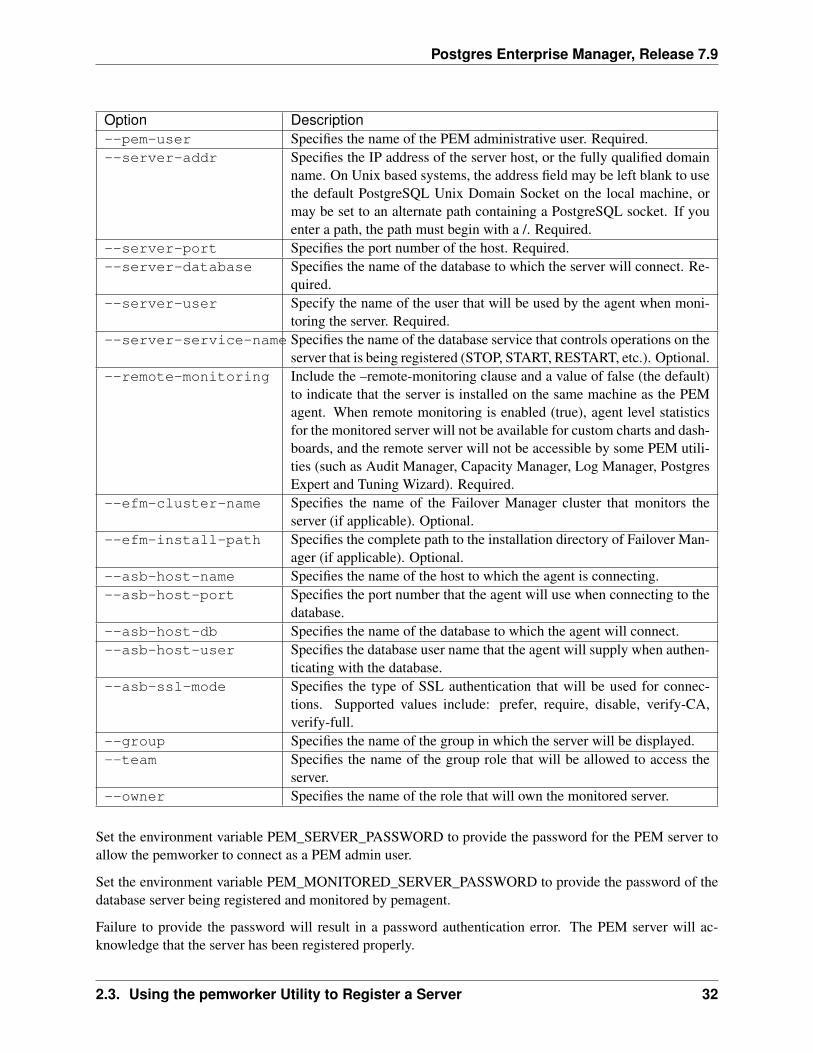
Append command line options to the command string when invoking the pemworker utility. Each optionshould be followed by a corresponding value:
2.3. Using the pemworker Utility to Register a Server 31
Postgres Enterprise Manager, Release 7.9
Option Description--pem-user Specifies the name of the PEM administrative user. Required.--server-addr Specifies the IP address of the server host, or the fully qualified domain
name. On Unix based systems, the address field may be left blank to usethe default PostgreSQL Unix Domain Socket on the local machine, ormay be set to an alternate path containing a PostgreSQL socket. If youenter a path, the path must begin with a /. Required.
--server-port Specifies the port number of the host. Required.--server-database Specifies the name of the database to which the server will connect. Re-
quired.--server-user Specify the name of the user that will be used by the agent when moni-
toring the server. Required.--server-service-name Specifies the name of the database service that controls operations on the
server that is being registered (STOP, START, RESTART, etc.). Optional.--remote-monitoring Include the –remote-monitoring clause and a value of false (the default)
to indicate that the server is installed on the same machine as the PEMagent. When remote monitoring is enabled (true), agent level statisticsfor the monitored server will not be available for custom charts and dash-boards, and the remote server will not be accessible by some PEM utili-ties (such as Audit Manager, Capacity Manager, Log Manager, PostgresExpert and Tuning Wizard). Required.
--efm-cluster-name Specifies the name of the Failover Manager cluster that monitors theserver (if applicable). Optional.
--efm-install-path Specifies the complete path to the installation directory of Failover Man-ager (if applicable). Optional.
--asb-host-name Specifies the name of the host to which the agent is connecting.--asb-host-port Specifies the port number that the agent will use when connecting to the
database.--asb-host-db Specifies the name of the database to which the agent will connect.--asb-host-user Specifies the database user name that the agent will supply when authen-
ticating with the database.--asb-ssl-mode Specifies the type of SSL authentication that will be used for connec-
tions. Supported values include: prefer, require, disable, verify-CA,verify-full.
--group Specifies the name of the group in which the server will be displayed.--team Specifies the name of the group role that will be allowed to access the
server.--owner Specifies the name of the role that will own the monitored server.
Set the environment variable PEM_SERVER_PASSWORD to provide the password for the PEM server toallow the pemworker to connect as a PEM admin user.
Set the environment variable PEM_MONITORED_SERVER_PASSWORD to provide the password of thedatabase server being registered and monitored by pemagent.
Failure to provide the password will result in a password authentication error. The PEM server will ac-knowledge that the server has been registered properly.
2.3. Using the pemworker Utility to Register a Server 32
Postgres Enterprise Manager, Release 7.9
2.3.1 Using the pemworker Utility to Unregister a Server
You can use the pemworker utility to unregister a database server; to unregister a server, invoke thepemworker utility:
on a Linux host, use the command:
pemworker --unregister-server
on a Windows host, use the command:
pemworker.exe UNREGISTER-SERVICE
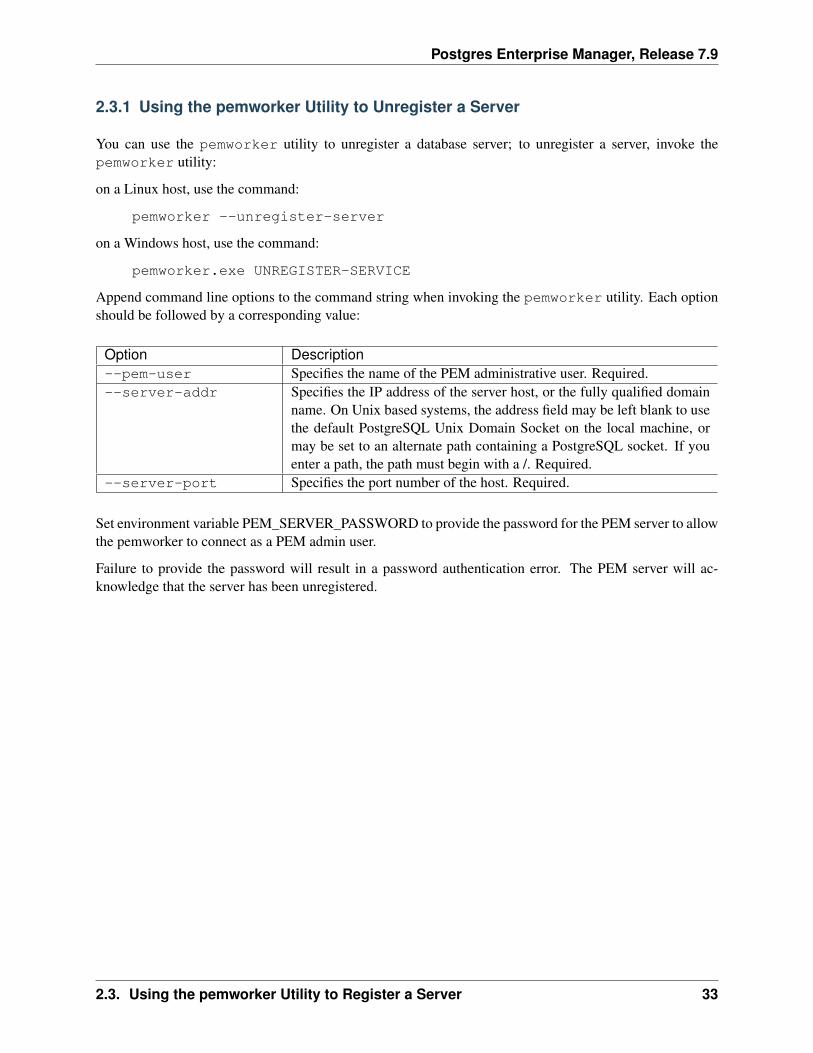
Append command line options to the command string when invoking the pemworker utility. Each optionshould be followed by a corresponding value:
Option Description--pem-user Specifies the name of the PEM administrative user. Required.--server-addr Specifies the IP address of the server host, or the fully qualified domain
name. On Unix based systems, the address field may be left blank to usethe default PostgreSQL Unix Domain Socket on the local machine, ormay be set to an alternate path containing a PostgreSQL socket. If youenter a path, the path must begin with a /. Required.
--server-port Specifies the port number of the host. Required.
Set environment variable PEM_SERVER_PASSWORD to provide the password for the PEM server to allowthe pemworker to connect as a PEM admin user.
Failure to provide the password will result in a password authentication error. The PEM server will ac-knowledge that the server has been unregistered.
2.3. Using the pemworker Utility to Register a Server 33
Postgres Enterprise Manager, Release 7.9
2.4 Verifying the Connection and Binding
Once registered, the new server will be added to the PEM Browser tree control, and be displayed on theGlobal Overview.
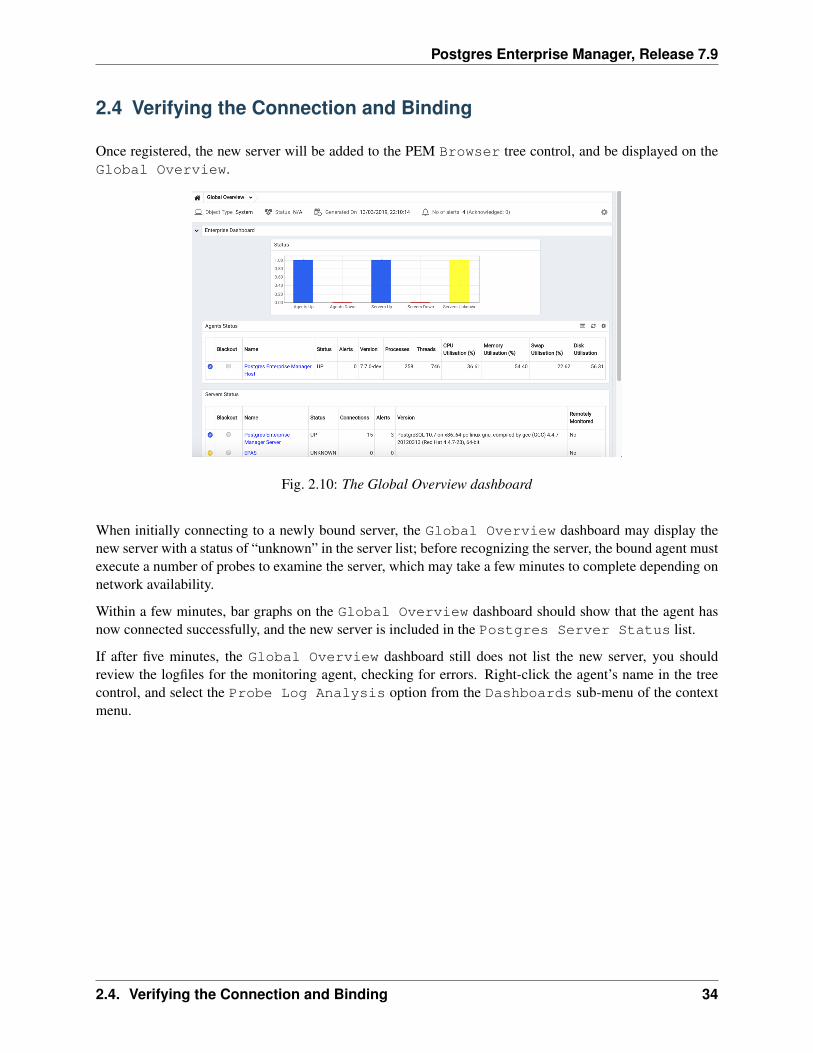
Fig. 2.10: The Global Overview dashboard
When initially connecting to a newly bound server, the Global Overview dashboard may display thenew server with a status of “unknown” in the server list; before recognizing the server, the bound agent mustexecute a number of probes to examine the server, which may take a few minutes to complete depending onnetwork availability.
Within a few minutes, bar graphs on the Global Overview dashboard should show that the agent hasnow connected successfully, and the new server is included in the Postgres Server Status list.
If after five minutes, the Global Overview dashboard still does not list the new server, you shouldreview the logfiles for the monitoring agent, checking for errors. Right-click the agent’s name in the treecontrol, and select the Probe Log Analysis option from the Dashboards sub-menu of the contextmenu.
2.4. Verifying the Connection and Binding 34

CHAPTER 3
Managing Certificates
Files stored in the data directory of the PEM server backing database contain information that helps thePEM server utilize secure connections:
• ca_certificate.crt
• ca_key.key
• server.crt
• server.key
• root.crl
• root.crt
The PEM agent that is installed with the PEM server monitors the expiration date of theca_certificate.crt file. When the certificate is about to expire, PEM will:
• Make a backup of the existing certificate files.
• Create new certificate files, appending the new CA certificate file to the root.crt file on the PEM server.
• Create a job that renews the certificate file of any active agents.
• Restart the PEM server.
When you uninstall an agent, the certificate associated with that agent will be added to the certificate revo-cation list (maintained in the root.crl file) to ensure that the certificate cannot be used to connect to thePEM server.
The following sections contain detailed information about manually replacing certificate files.
35
Postgres Enterprise Manager, Release 7.9
3.1 Replacing SSL Certificates
The following steps detail replacing the SSL certificates on an existing PEM installation. If you plan toupgrade your server to a new version at the same time, invoke all of the PEM installers (first the serverinstaller, then agent installers) before replacing the SSL certificates. Then:
1. Stop all running PEM agents, first on the server host, and then on any monitored node.
To stop a PEM agent on a Linux host, open a terminal window, assume superuser privileges, and enterthe command:
/etc/init.d/pemagent stop
On a Windows host, you can use the Services applet to stop the PEM agent. The PEM agentservice is named Postgres Enterprise Manager Agent; highlight the service name in the Servicesdialog, and click Stop the service.
2. Take a backup of the existing SSL keys and certificates. The SSL keys and certificates are stored inthe data directory under your PEM installation. For example, the default location on a Linux systemis:
/opt/PostgreSQL/10/data
Make a copy of the following files, adding an extension to each file to make the name unique:
• ca_certificate.crt
• ca_key.key
• root.crt
• root.crl
• server.key
• server.crt
For example, the command:
# cp ca_certificate.crt ca_certificate_old.crt
creates a backup of the ca_certificate file with the word old appended to the entry.
3. Use the openssl_rsa_generate_key() function to generate the ca_key.key file:
/opt/PostgreSQL/10/bin/psql -U postgres -d pem --no-psqlrc -t -A -c"SELECT public.openssl_rsa_generate_key(1024)" > /opt/PostgreSQL/10/data/ca_key.key
After creating the ca_key.key file, cat the contents to the variable CA_KEY for use when gener-ating the ca_certificate.crt file and modify the privileges on the ca_key.key file:
CA_KEY=$(cat /opt/PostgreSQL/10/data/ca_key.key)
chmod 600 /opt/PostgreSQL/10/data/ca_key.key
4. Use the key to generate the ca_certificate.crt file. For simplicity, place the SQL query intoa temporary file with a unique name:
3.1. Replacing SSL Certificates 36
Postgres Enterprise Manager, Release 7.9
echo "SELECT openssl_csr_to_crt(openssl_rsa_key_to_csr('${CA_KEY}','PEM','US', 'MA', 'Bedford', 'Postgres Enterprise Manager','[email protected]'), NULL, '/opt/PostgreSQL/10/data/ca_key.key')" > /tmp/_random.$$
Then use the variable to execute the query, placing the content into the ca_certificate.crtfile.
/opt/PostgreSQL/10/bin/psql -U postgres -d pem --no-psqlrc -t -A -f/tmp/_random.$$ > /opt/PostgreSQL/10/data/ca_certificate.crt
Modify the permissions of the ca_certificate.crt file, and remove the temporary file thatcontained the SQL command:
chmod 600 /opt/PostgreSQL/10/data/ca_certificate.crt
rm -f /tmp/_random.$$
5. Re-use the ca_certificate.crt file as the root.crt file:
cp /opt/PostgreSQL/10/data/ca_certificate.crt /opt/PostgreSQL/10/data/root.crt
Modify the permissions of the root.crt file:
chmod 600 /opt/PostgreSQL/10/data/root.crt
6. Use the openssl_rsa_generate_crl() function to create the certificate revocation list(root.crl) :
/opt/PostgreSQL/10/bin/psql -U postgres -d pem --no-psqlrc -t -A-c "SELECT openssl_rsa_generate_crl('/opt/PostgreSQL/9.5/data/ca_certificate.crt', '/opt/PostgreSQL/10/data/ca_key.key')" > /opt/PostgreSQL/10/data/root.crl
Modify the permissions of the root.crl file:
chmod 600 /opt/PostgreSQL/10/data/root.crl
7. Use the openssl_rsa_generate_key() function to generate the server.key file:
/opt/PostgreSQL/10/bin/psql -U postgres -d pem --no-psqlrc -t -A -c"SELECT public.openssl_rsa_generate_key(1024)" >> /opt/PostgreSQL/10/data/server.key
After creating the server.key file, cat the contents to the variable SSL_KEY for use when gen-erating the server.crt file and modify the privileges on the server.key file:
SSL_KEY=$(cat /opt/PostgreSQL/10/data/server.key)
chmod 600 /opt/PostgreSQL/10/data/server.key
8. Use the SSL_KEY to generate the server certificate. Save the certificate in the server.crt file. Forsimplicity, first place the SQL query into a temporary file with a unique name:
echo "SELECT openssl_csr_to_crt(openssl_rsa_key_to_csr('${SSL_KEY}','PEM','US', 'MA', 'Bedford', 'Postgres Enterprise Manager',
3.1. Replacing SSL Certificates 37
Postgres Enterprise Manager, Release 7.9
'[email protected]'), '/opt/PostgreSQL/10/data/ca_certificate.crt', '/opt/PostgreSQL/10/data/ca_key.key')" > /tmp/_random.$$
/opt/PostgreSQL/10/bin/psql -U postgres -d pem --no-psqlrc -t -A -f/tmp/_random.$$ >> /opt/PostgreSQL/10/data/server.crt
9. Modify the privileges on the server.crt file, and delete the temporary file:
chmod 600 /opt/PostgreSQL/10/data/server.crt
rm -f /tmp/_random.$$
10. Restart the Postgres server:
/etc/init.d/postgresql-10 restart
3.1. Replacing SSL Certificates 38
Postgres Enterprise Manager, Release 7.9
3.2 Updating Agent SSL Certificates
For each agent that interacts with the PEM server, you must:
• generate an rsa key and a certificate.
• copy the key and certificate to the agent.
• restart the agent.
Each agent has a unique identifier that is stored in the pem.agent table in the pem database. You mustreplace the key and certificate files with the key or certificate that corresponds to the agent’s identifier.Please note that you must move the agent.key and agent.crt files (generated in Steps 2 and 3 intoplace on their respective PEM agent host before generating the next key file pair; subsequent commands willoverwrite the previously generated file.
To generate a PEM agent key file pair:
1. Use psql to find the number of agents and their corresponding identifiers:
/opt/PostgreSQL/10/bin/psql -U postgres -d pem --no-psqlrc -t -A -c"SELECT ID FROM pem.agent"
• On Linux, you can also find the agent identifier and location of the keys and certificates in thePEMagent section of the /etc/postgres-reg.ini file.
• On Windows, the information is stored in the registry:
– On a 64-bit Windows installation, check:
HKEY_LOCAL_MACHINE\SOFTWARE\Wow6432Node\EnterpriseDB\PEM\agent
– On a 32-bit Windows installation, check:
HKEY_LOCAL_MACHINE\SOFTWARE\EnterpriseDB\PEM\agent
2. After identifying the agents that will need key files, generate an agent.key for each agent. Togenerate the key, execute the following command, capturing the output in a file:
/opt/PostgreSQL/10/bin/psql -U postgres -d pem --no-psqlrc -t -A -c"SELECT openssl_rsa_generate_key(1024)" > agent.key
Modify the privileges of the agent.key file:
chmod 600 agent.key
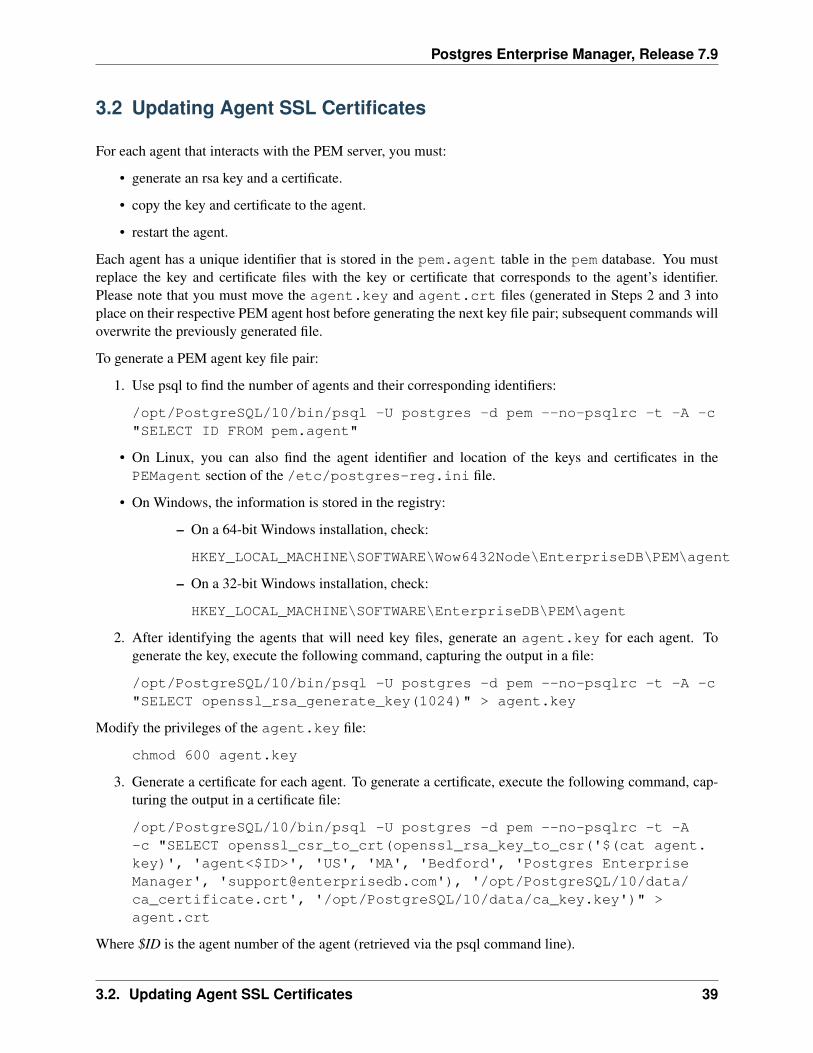
3. Generate a certificate for each agent. To generate a certificate, execute the following command, cap-turing the output in a certificate file:
/opt/PostgreSQL/10/bin/psql -U postgres -d pem --no-psqlrc -t -A-c "SELECT openssl_csr_to_crt(openssl_rsa_key_to_csr('$(cat agent.key)', 'agent<$ID>', 'US', 'MA', 'Bedford', 'Postgres EnterpriseManager', '[email protected]'), '/opt/PostgreSQL/10/data/ca_certificate.crt', '/opt/PostgreSQL/10/data/ca_key.key')" >agent.crt
Where $ID is the agent number of the agent (retrieved via the psql command line).
3.2. Updating Agent SSL Certificates 39
Postgres Enterprise Manager, Release 7.9
4. Modify the privileges of the agent.crt file:
chmod 600 agent.crt
5. Replace each agent’s key and certificate file with the newly generated files before restarting the PEMagent service:
• On Linux, restart the service with the command:
/etc/init.d/pemagent start
• On a Windows host, you can use the Services applet to start the PEM agent. The PEM agent serviceis named Postgres Enterprise Manager Agent; highlight the service name in the Servicesdialog, and click Start the service.
3.2. Updating Agent SSL Certificates 40
CHAPTER 4
Managing a PEM Server
The sections that follow provide information about tasks related to PEM server such as restarting the PEMserver and agent, controlling the PEM server or PEM agent, controlling the HTTPD service on Linuxand Windows, controlling the HTTPD server, managing PEM authentication and security, modifying thepg_hba.conf file, modifying PEM to use a proxy server etc.
4.1 Starting and Stopping the PEM Server and Agents
The PEM server starts, stops and restarts when the Postgres server instance on which it resides starts, stopsor restarts; use the same commands to control the PEM server that you would use to control the Postgresserver. On Linux platforms, the command that stops and starts the service script will vary by platform andOS version.
The PEM agent is controlled by a service named pemagent.
The Windows operating system includes a graphical service controller that displays the server status, and of-fers point-and-click server control. The Services utility can be accessed through the Windows ControlPanel. When the utility opens, use the scroll bar to navigate through the listed services to highlight theservice name.
41
Postgres Enterprise Manager, Release 7.9
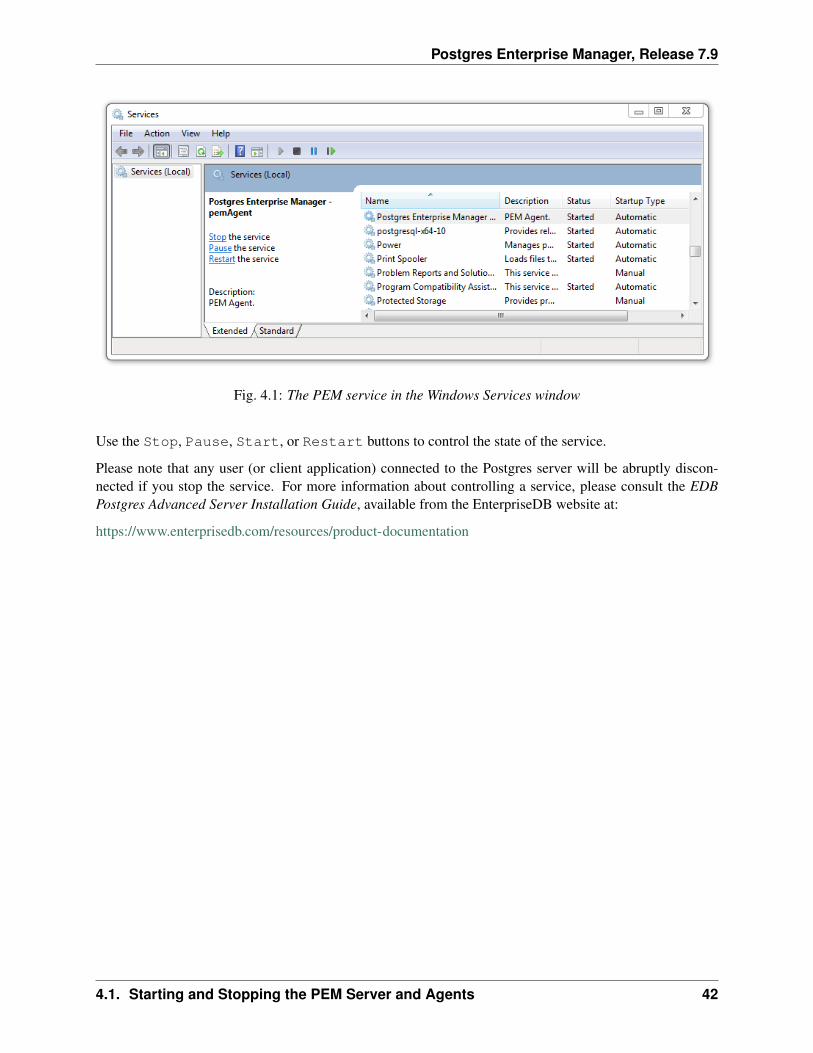
Fig. 4.1: The PEM service in the Windows Services window
Use the Stop, Pause, Start, or Restart buttons to control the state of the service.
Please note that any user (or client application) connected to the Postgres server will be abruptly discon-nected if you stop the service. For more information about controlling a service, please consult the EDBPostgres Advanced Server Installation Guide, available from the EnterpriseDB website at:
https://www.enterprisedb.com/resources/product-documentation
4.1. Starting and Stopping the PEM Server and Agents 42
Postgres Enterprise Manager, Release 7.9
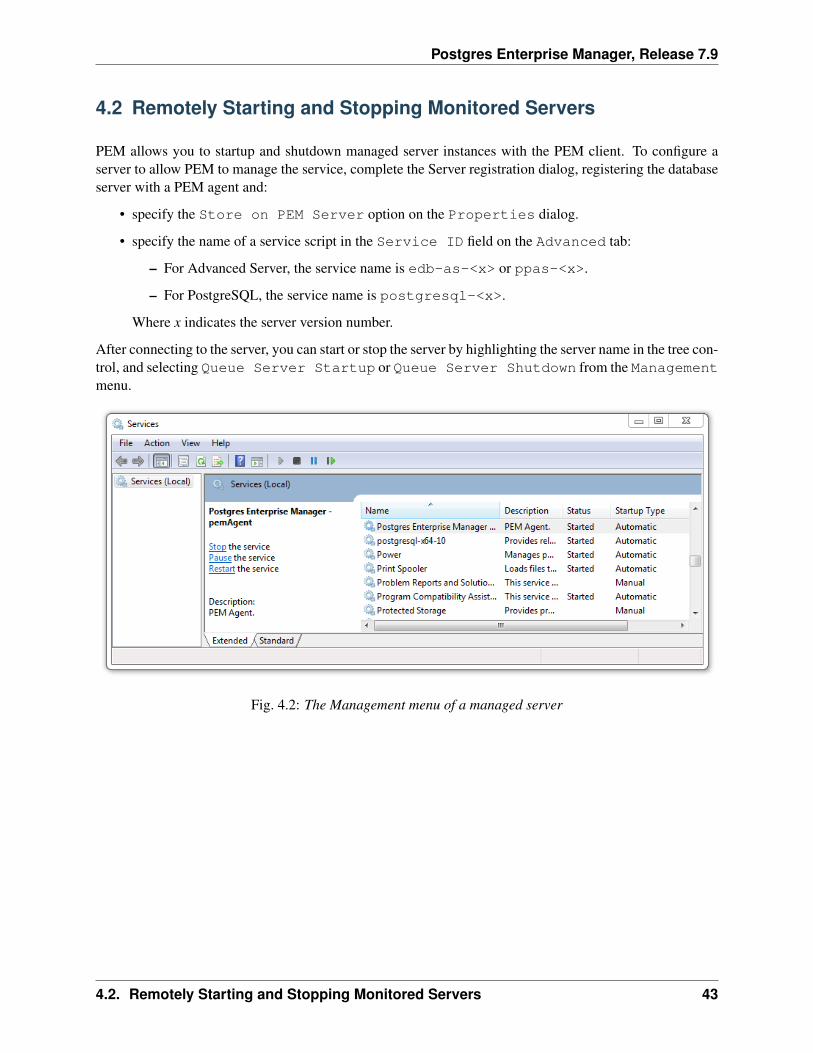
4.2 Remotely Starting and Stopping Monitored Servers
PEM allows you to startup and shutdown managed server instances with the PEM client. To configure aserver to allow PEM to manage the service, complete the Server registration dialog, registering the databaseserver with a PEM agent and:
• specify the Store on PEM Server option on the Properties dialog.
• specify the name of a service script in the Service ID field on the Advanced tab:
– For Advanced Server, the service name is edb-as-<x> or ppas-<x>.
– For PostgreSQL, the service name is postgresql-<x>.
Where x indicates the server version number.
After connecting to the server, you can start or stop the server by highlighting the server name in the tree con-trol, and selecting Queue Server Startup or Queue Server Shutdown from the Managementmenu.
Fig. 4.2: The Management menu of a managed server
4.2. Remotely Starting and Stopping Monitored Servers 43

Postgres Enterprise Manager, Release 7.9
4.3 Controlling the PEM Server or PEM Agent on Linux
On Linux platforms, the name of the service script that controls:
• a PEM server on Advanced Server is edb-as-<x> or ppas-<x>
• a PEM server on PostgreSQL is postgresql-<x>
• a PEM agent is pemagent
Where x indicates the server version number.
You can use the service script to control the service.
• To control a service on RHEL or CentOS version 6.x, open a command line, assume superuser privi-leges, and enter:
/etc/init.d/<service_name> <action>
• To control a service on RHEL or CentOS version 7.x, open a command line, assume superuser privi-leges, and issue the command:
systemctl <service_name> <action>
Where:
service_name is the name of the service.
action specifies the action taken by the service. Specify:
• start to start the service.
• stop to stop the service.
• restart to stop and then start the service.
• status to check the status of the service.
4.3. Controlling the PEM Server or PEM Agent on Linux 44
Postgres Enterprise Manager, Release 7.9
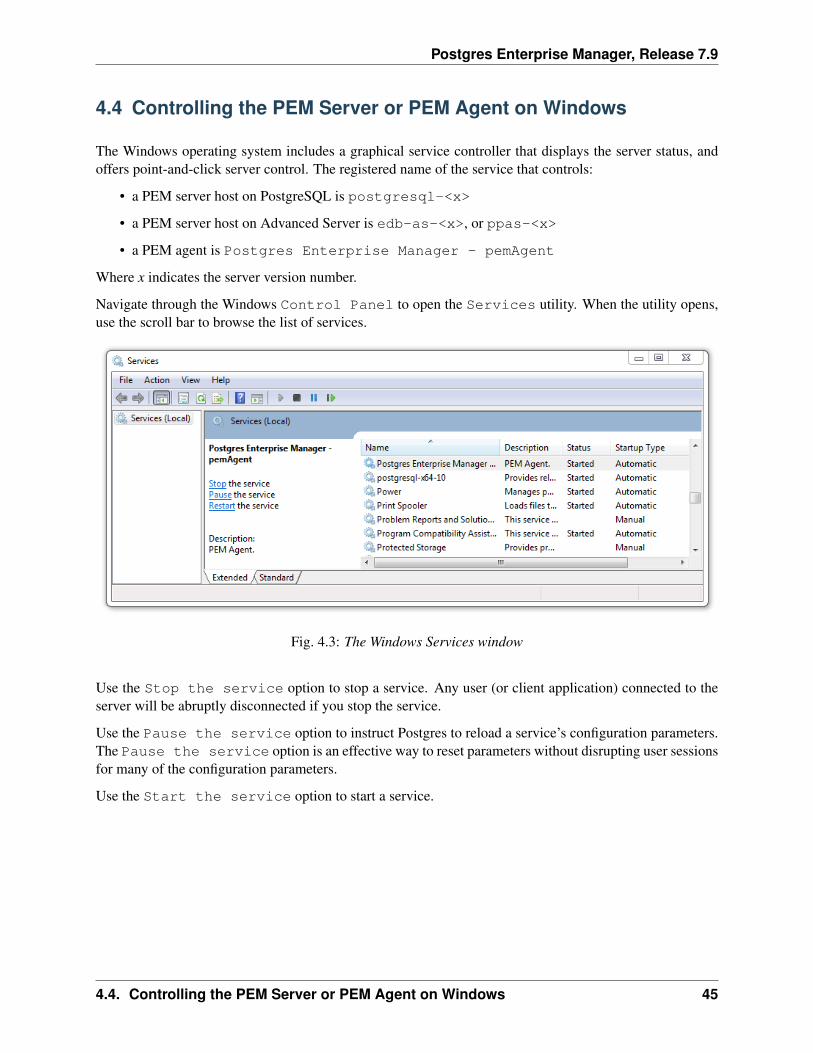
4.4 Controlling the PEM Server or PEM Agent on Windows
The Windows operating system includes a graphical service controller that displays the server status, andoffers point-and-click server control. The registered name of the service that controls:
• a PEM server host on PostgreSQL is postgresql-<x>
• a PEM server host on Advanced Server is edb-as-<x>, or ppas-<x>
• a PEM agent is Postgres Enterprise Manager - pemAgent
Where x indicates the server version number.
Navigate through the Windows Control Panel to open the Services utility. When the utility opens,use the scroll bar to browse the list of services.
Fig. 4.3: The Windows Services window
Use the Stop the service option to stop a service. Any user (or client application) connected to theserver will be abruptly disconnected if you stop the service.
Use the Pause the service option to instruct Postgres to reload a service’s configuration parameters.The Pause the service option is an effective way to reset parameters without disrupting user sessionsfor many of the configuration parameters.
Use the Start the service option to start a service.
4.4. Controlling the PEM Server or PEM Agent on Windows 45

Postgres Enterprise Manager, Release 7.9
4.5 Controlling the HTTPD Server
On Linux, you can confirm the status of the PEM-HTTPD service by opening a command line, and enteringthe following command:
ps -ef \| grep httpd
If Linux responds with an answer that is similar to the following example, httpd is not running:
user 13321 13267 0 07:37 pts/1 00:00:00 grep httpd
To start the service on a CentOS or RHEL 6.x system, use the command:
/etc/init.d/httpd start
To start the service on a CentOS or RHEL 7.x system, use the command:
systemctl start httpd
On Windows, you can use the Services applet to check the status of the PEM HTTPD service. Afteropening the Services applet, scroll through the list to locate the PEM HTTPD service.
Fig. 4.4: The PEM HTTPD Windows service
The Status column displays the current state of the server. Click the Start link to start PEM HTTPD ifthe service is not running.
4.5. Controlling the HTTPD Server 46
Postgres Enterprise Manager, Release 7.9
4.6 Modifying the pg_hba.conf File
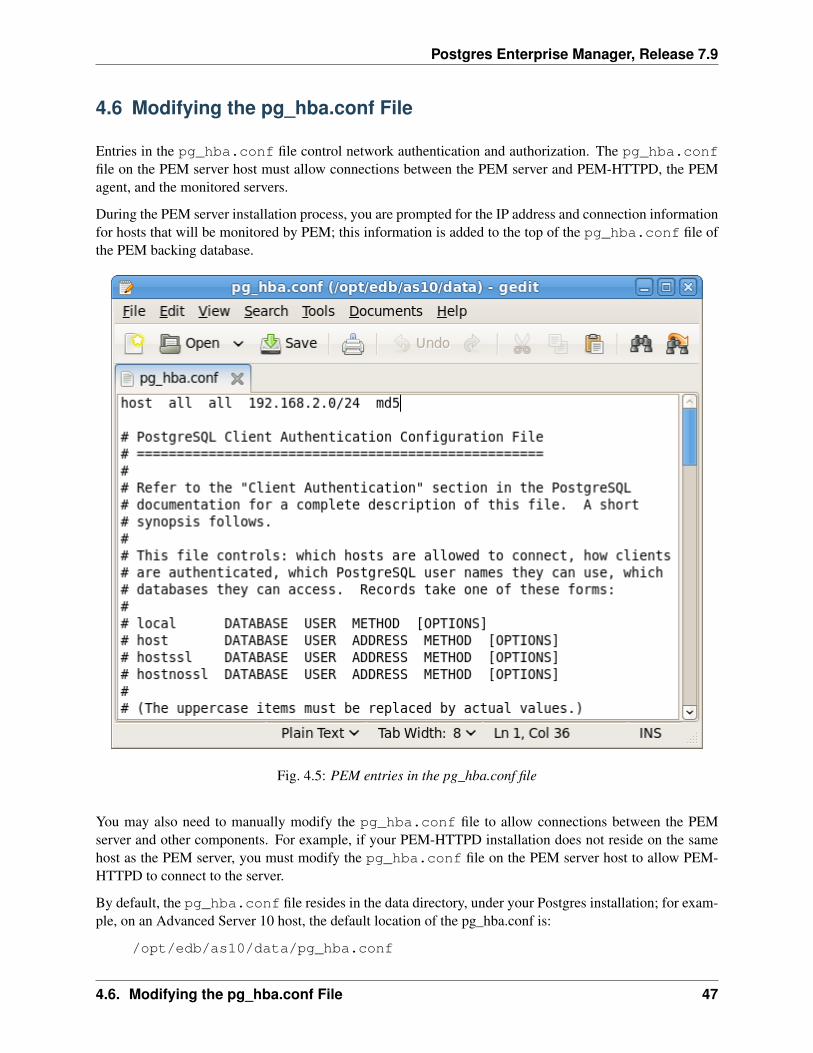
Entries in the pg_hba.conf file control network authentication and authorization. The pg_hba.conffile on the PEM server host must allow connections between the PEM server and PEM-HTTPD, the PEMagent, and the monitored servers.
During the PEM server installation process, you are prompted for the IP address and connection informationfor hosts that will be monitored by PEM; this information is added to the top of the pg_hba.conf file ofthe PEM backing database.
Fig. 4.5: PEM entries in the pg_hba.conf file
You may also need to manually modify the pg_hba.conf file to allow connections between the PEMserver and other components. For example, if your PEM-HTTPD installation does not reside on the samehost as the PEM server, you must modify the pg_hba.conf file on the PEM server host to allow PEM-HTTPD to connect to the server.
By default, the pg_hba.conf file resides in the data directory, under your Postgres installation; for exam-ple, on an Advanced Server 10 host, the default location of the pg_hba.conf is:
/opt/edb/as10/data/pg_hba.conf
4.6. Modifying the pg_hba.conf File 47
Postgres Enterprise Manager, Release 7.9
You can modify the pg_hba.conf file with your editor of choice. After modifying the file, restart theserver for changes to take effect.
The following example shows a pg_hba.conf entry that allows an md5 password authenticated connec-tion from a user named postgres, to the postgres database on the host on which the pg_hba.conf fileresides. The connection is coming from an IP address of 192.168.10.102:
# TYPE DATABASE USER CIDR-ADDRESS METHOD# IPv4 local connections:host postgres postgres 192.168.10.102/32 md5
You may specify the address of a network host, or a network address range. For example, if you wish toallow connections from servers with the addresses 192.168.10.23, 192.168.10.76 and 192.168.10.184, enter a CIDR-ADDRESS of 192.168.10.0/24 to allow connections from all of the hosts inthat network:
# TYPE DATABASE USER CIDR-ADDRESS METHOD# IPv4 local connections:
host postgres all 192.168.10.0/24 md5
For more information about formatting a pg_hba.conf file entry, please see the PostgreSQL core docu-mentation at:
http://www.postgresql.org/docs/10/static/auth-pg-hba-conf.html
Before you can connect to a Postgres server with PEM, you must ensure that the pg_hba.conf file onboth servers allows the connection.
If you receive this error when connecting to the database server, modify the pg_hba.conf file, adding anentry that allows the connection.
4.6. Modifying the pg_hba.conf File 48

Postgres Enterprise Manager, Release 7.9
4.7 Creating and Maintaining Databases and Objects
Each instance of a Postgres server manages one or more databases; each user must provide authenticationinformation to connect to the database before accessing the information contained within it. The PEM clientprovides dialogs that allow you to create and manage databases, and all of the various objects that comprisea database (e.g. tables, indexes, stored procedures, etc.).
Creating a database is easy in PEM: simply right click on any managed server’s Databases node andselect Database... from the Create menu. After defining a database, you can create objects withinthe new database.
For example, to create a new table, right click on a Tables node, and select Table... from the Createmenu. When the New Table dialog opens, specify the attributes of the new table.
Fig. 4.6: Use PEM’s dialogs to create and manage database objects
PEM provides similar dialogs for the creation and management of other database objects:
• tables
• indexes
• stored procedures
• functions
• triggers
• views
• constraints, etc.
Each object type is displayed in the tree control; right click on the node that corresponds to an object typeto access the Create menu and create a new object, or select Properties from the context menu of anamed node to perform administrative tasks for the highlighted object.
4.7. Creating and Maintaining Databases and Objects 49
Postgres Enterprise Manager, Release 7.9
4.8 Managing PEM Authentication
Postgres supports a number of authentication methods:
• Secure password (md5)
• GSSAPI
• SSPI
• Kerberos
• Ident
• LDAP
• RADIUS
• Certificate (SSL)
• PAM
Postgres (and PEM) authentication is controlled by the pg_hba.conf configuration file. Entries withinthe configuration file specify who may connect to a specific database, and the type of authentication requiredbefore that user is allowed to connect.
A typical entry in the pg_hba.conf file that allows a user named postgres to connect to all databasesfrom the local host (127.0.0.1/32) using secure password (md5) authentication connections would take theform:
host all postgres 127.0.0.1/32 md5
Depending on your system’s configuration, you may also need to create a password file for the user accountthat the PEM agent uses to connect to the server, to allow the agent to properly respond to the server’sauthentication request. An entry in the password file for a user named postgres, with a password of1safepwd would take the form:
localhost:5432:*:postgres:1safepwd
The password file is usually named ~root/.pgpass on Linux systems, or%APPDATA%\postgresql\pgpass.conf (on Windows). For more information about configur-ing a password file, visit the EnterpriseDB website at:
http://www.postgresql.org/docs/10/static/libpq-pgpass.html
For more information about the authentication methods supported by Postgres, see the PostgreSQL coredocumentation at:
http://www.postgresql.org/docs/10/static/client-authentication.html
4.8. Managing PEM Authentication 50
Postgres Enterprise Manager, Release 7.9
4.9 Modifying PEM to Use a Proxy Server
If your network configuration prevents direct communication between PEM and the EnterpriseDB website,you can configure a proxy server for use by PEM when:
• updating the package_catalog table with information about the packages that are available forinstallation or update
• reading package options
• downloading packages
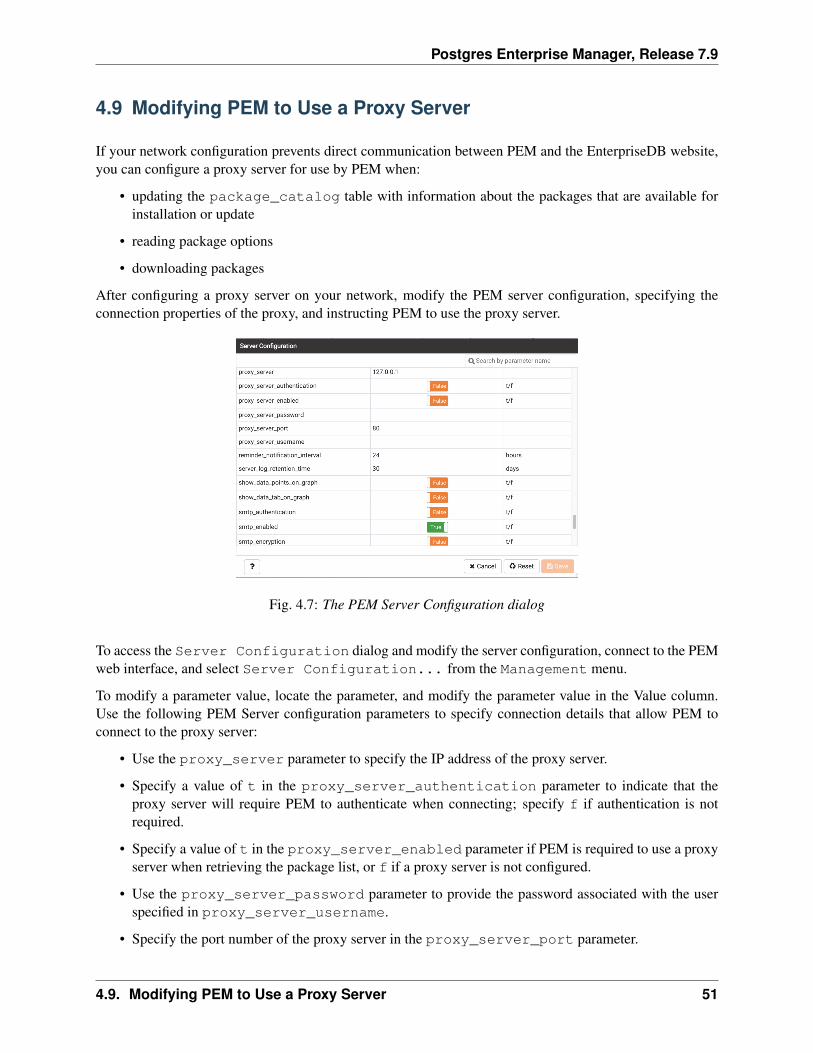
After configuring a proxy server on your network, modify the PEM server configuration, specifying theconnection properties of the proxy, and instructing PEM to use the proxy server.
Fig. 4.7: The PEM Server Configuration dialog
To access the Server Configuration dialog and modify the server configuration, connect to the PEMweb interface, and select Server Configuration... from the Management menu.
To modify a parameter value, locate the parameter, and modify the parameter value in the Value column.Use the following PEM Server configuration parameters to specify connection details that allow PEM toconnect to the proxy server:
• Use the proxy_server parameter to specify the IP address of the proxy server.
• Specify a value of t in the proxy_server_authentication parameter to indicate that theproxy server will require PEM to authenticate when connecting; specify f if authentication is notrequired.
• Specify a value of t in the proxy_server_enabled parameter if PEM is required to use a proxyserver when retrieving the package list, or f if a proxy server is not configured.
• Use the proxy_server_password parameter to provide the password associated with the userspecified in proxy_server_username.
• Specify the port number of the proxy server in the proxy_server_port parameter.
4.9. Modifying PEM to Use a Proxy Server 51
Postgres Enterprise Manager, Release 7.9
• Specify the user name that should be used when authenticating with the proxy server in theproxy_server_username parameter.
When you’ve finished updating the parameters required to configure the proxy server, click the Save iconin the upper-right corner of the dialog before closing the dialog.
4.9. Modifying PEM to Use a Proxy Server 52
Postgres Enterprise Manager, Release 7.9
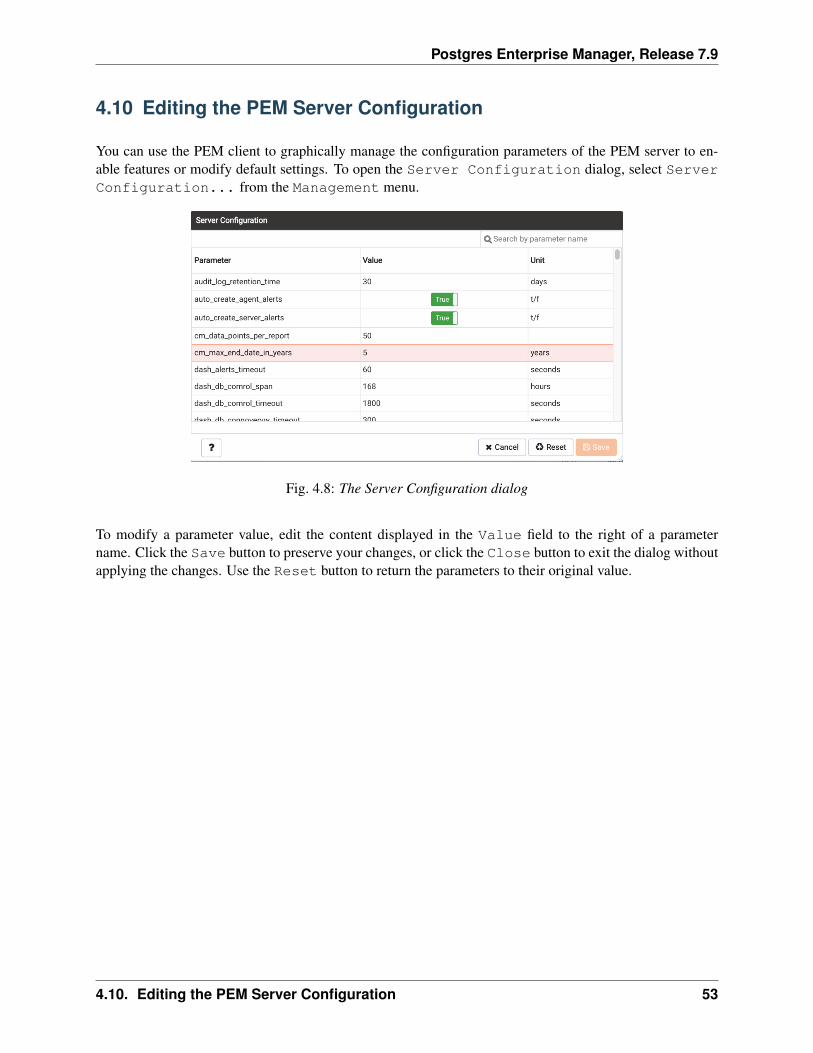
4.10 Editing the PEM Server Configuration
You can use the PEM client to graphically manage the configuration parameters of the PEM server to en-able features or modify default settings. To open the Server Configuration dialog, select ServerConfiguration... from the Management menu.
Fig. 4.8: The Server Configuration dialog
To modify a parameter value, edit the content displayed in the Value field to the right of a parametername. Click the Save button to preserve your changes, or click the Close button to exit the dialog withoutapplying the changes. Use the Reset button to return the parameters to their original value.
4.10. Editing the PEM Server Configuration 53

Postgres Enterprise Manager, Release 7.9
4.11 Managing Security
PEM provides a graphical way to manage your Postgres roles and servers.
4.11.1 Login Roles
When you connect to the PEM server, you must provide role credentials that allow access to the databaseon which the PEM server stores data. By default, the postgres superuser account is used to initially connectto the server, but it is strongly recommended (for both security and auditing purposes) that individual rolesare created for each connecting user. You can use the PEM Query Tool, the PEM web interface Create -Login/Group Role dialog, or a command line client (such as psql) to create a role.
To use the Create - Login/Group Role dialog to create a role, expand the node for the server onwhich the role will reside in the PEM tree control, and right-click on the Login/Group Roles node toaccess the context menu. Then, select Login/Group Role... from the Create menu.
Fig. 4.9: The context menu of the Login Roles node
Use fields on the tabs of the Create - Login/Group Role dialog to define the role. To display thePEM online help in a browser tab, click the help (?) button located in the lower-left corner of the dialog.
When you’ve finished defining the new role, click Save to create the role.
4.11. Managing Security 54
Postgres Enterprise Manager, Release 7.9
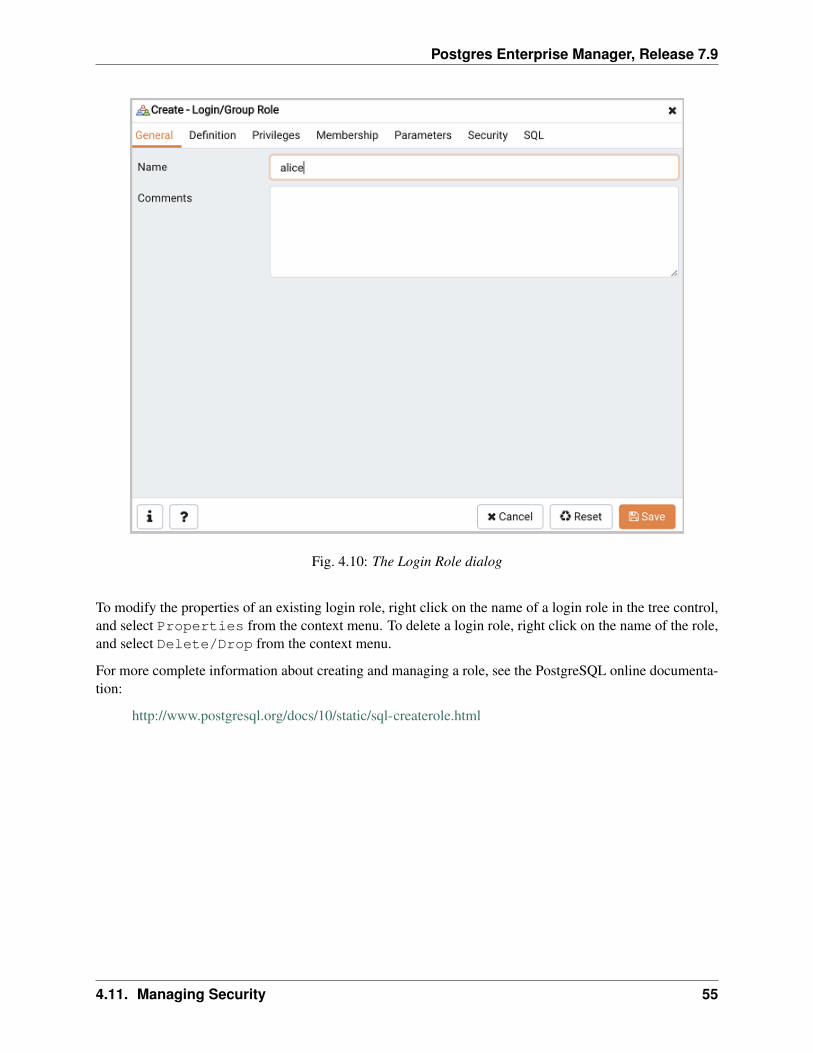
Fig. 4.10: The Login Role dialog
To modify the properties of an existing login role, right click on the name of a login role in the tree control,and select Properties from the context menu. To delete a login role, right click on the name of the role,and select Delete/Drop from the context menu.
For more complete information about creating and managing a role, see the PostgreSQL online documenta-tion:
http://www.postgresql.org/docs/10/static/sql-createrole.html
4.11. Managing Security 55
Postgres Enterprise Manager, Release 7.9
4.11.2 Group Roles
Group roles can serve as containers, used to dispense system privileges (such as creating databases) andobject privileges (e.g. inserting data into a particular table). The primary purpose of a group role is to makethe mass management of system and object permissions much easier for a DBA. Rather than assigning ormodifying privileges individually across many different login accounts, you can assign or change privilegesfor a single role and then grant that role to many login roles at once.
Use the Group Roles node (located beneath the name of each registered server in the PEM tree control)to create and manage group roles. Options on the context menu provide access to a dialog that allows you tocreate a new role or modify the properties of an existing role. You can find more information about creatingroles at:
http://www.postgresql.org/docs/10/static/sql-createrole.html
4.11. Managing Security 56
Postgres Enterprise Manager, Release 7.9
4.11.3 Using PEM Pre-Defined Roles to Manage Access to PEM Functionality
You can use the Login/Group Role dialog to allow a role with limited privileges to access PEM featuressuch as the Audit Manager, Capacity Manager, or SQL Profiler. PEM pre-defined roles allow access to PEMfunctionality; roles that are assigned membership in these roles can access the associated feature.
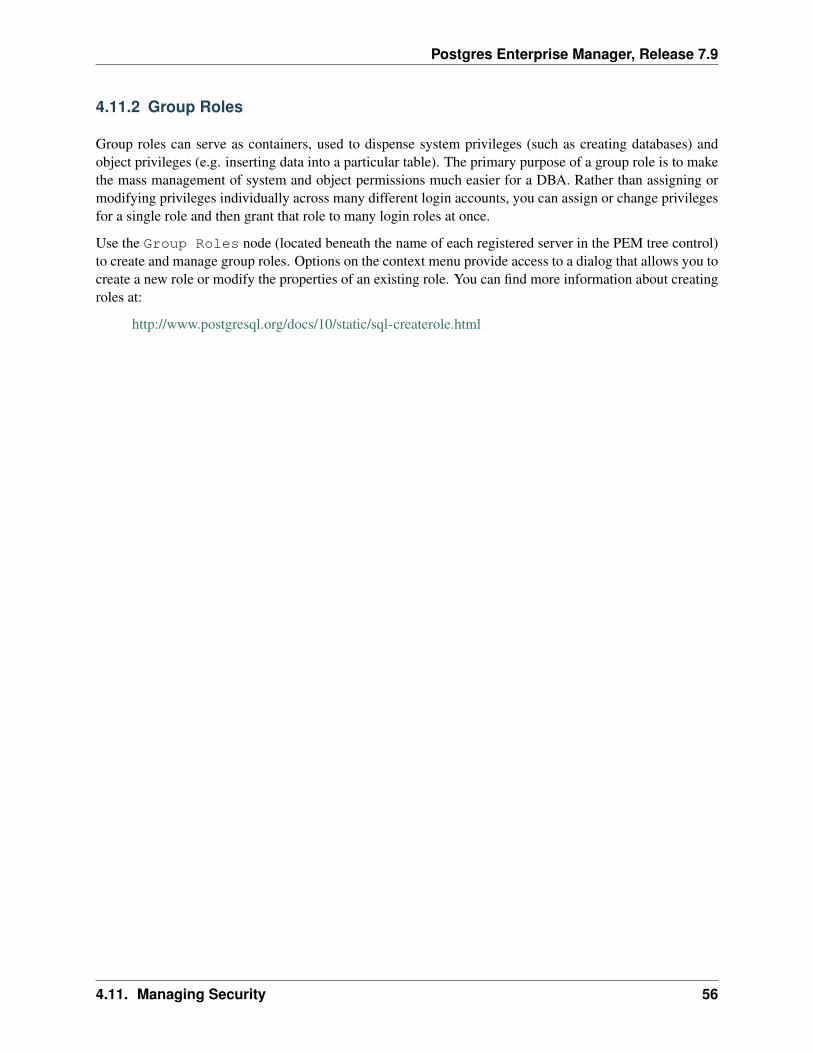
Fig. 4.11: The Membership tab
When defining a user, use the Membership tab to specify the roles in which the new user is a member.The new user will share the privileges associated with each role in which it is a member. For a user to haveaccess to PEM extended functionality, the role must be a member of the pem_user role and the pre-definedrole that grants access to the feature. Use the Roles field to select pre-defined role names from a dropdown list.
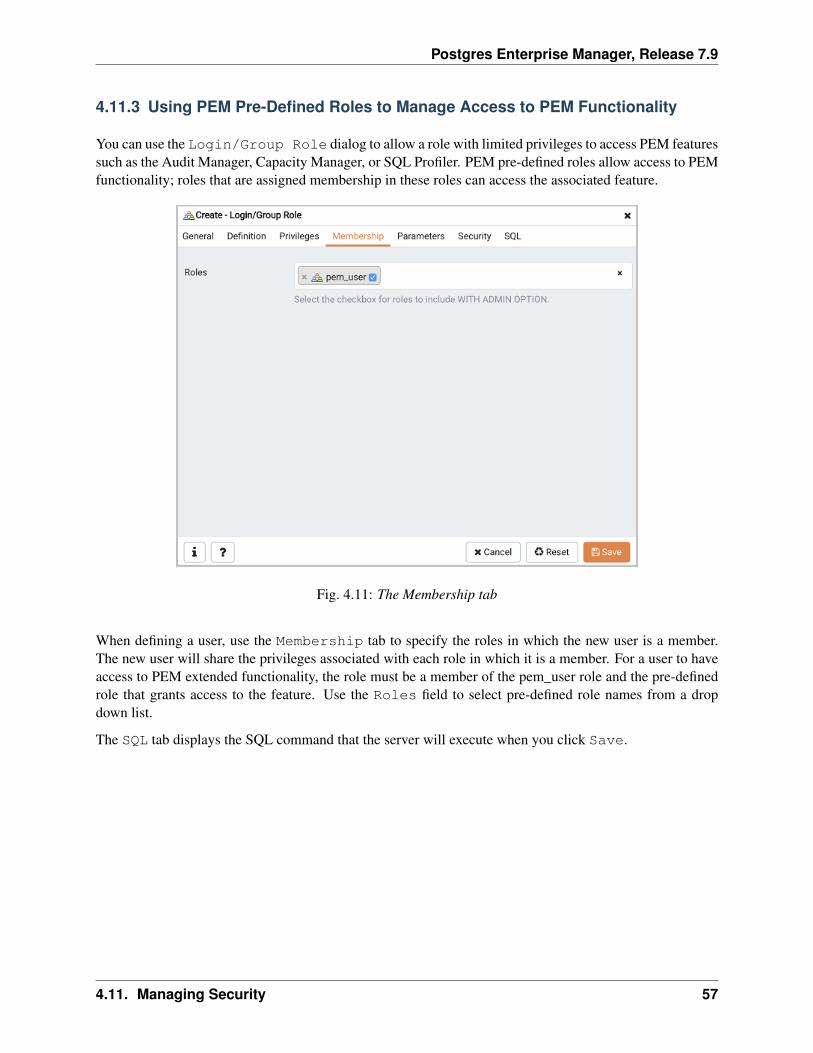
The SQL tab displays the SQL command that the server will execute when you click Save.
4.11. Managing Security 57
Postgres Enterprise Manager, Release 7.9
Fig. 4.12: The SQL tab
The example shown above creates a login role named acctg_clerk that will have access to the AuditManager; the role can make unlimited connections to the server at any given time.
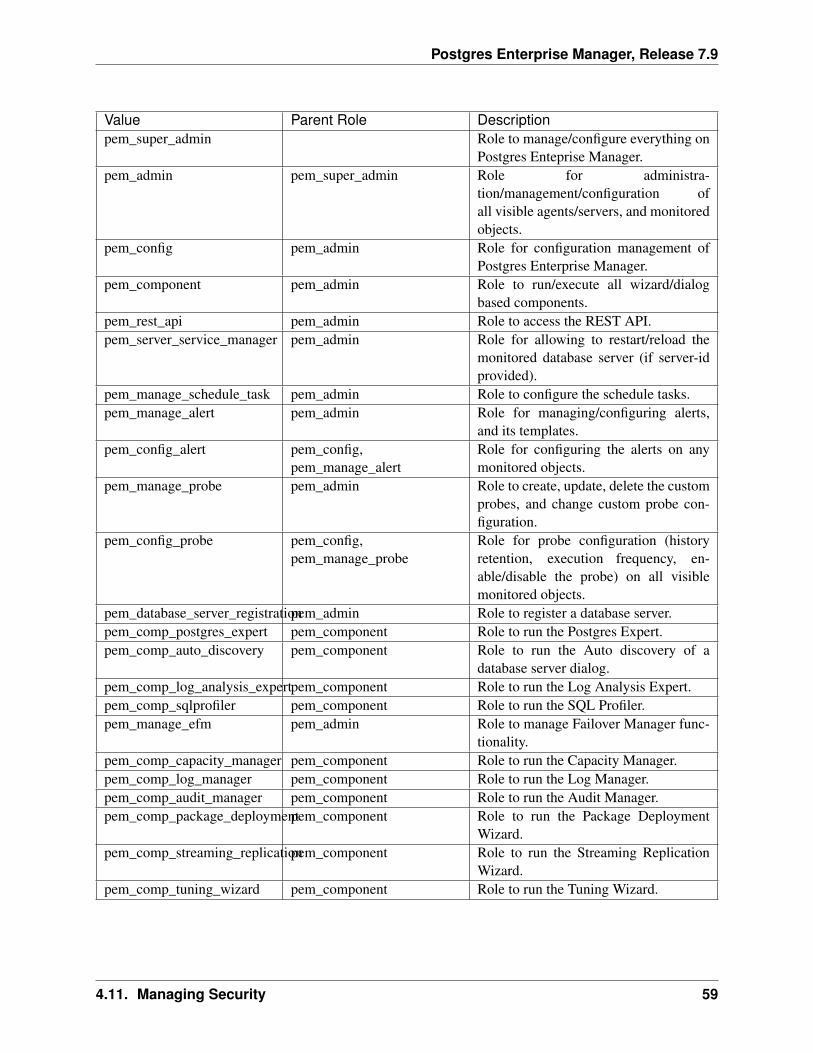
You can use PEM pre-defined roles to allow access to the functionality listed in the table below:
4.11. Managing Security 58
Postgres Enterprise Manager, Release 7.9
Value Parent Role Descriptionpem_super_admin Role to manage/configure everything on
Postgres Enteprise Manager.pem_admin pem_super_admin Role for administra-
tion/management/configuration ofall visible agents/servers, and monitoredobjects.
pem_config pem_admin Role for configuration management ofPostgres Enterprise Manager.
pem_component pem_admin Role to run/execute all wizard/dialogbased components.
pem_rest_api pem_admin Role to access the REST API.pem_server_service_manager pem_admin Role for allowing to restart/reload the
monitored database server (if server-idprovided).
pem_manage_schedule_task pem_admin Role to configure the schedule tasks.pem_manage_alert pem_admin Role for managing/configuring alerts,
and its templates.pem_config_alert pem_config,
pem_manage_alertRole for configuring the alerts on anymonitored objects.
pem_manage_probe pem_admin Role to create, update, delete the customprobes, and change custom probe con-figuration.
pem_config_probe pem_config,pem_manage_probe
Role for probe configuration (historyretention, execution frequency, en-able/disable the probe) on all visiblemonitored objects.
pem_database_server_registrationpem_admin Role to register a database server.pem_comp_postgres_expert pem_component Role to run the Postgres Expert.pem_comp_auto_discovery pem_component Role to run the Auto discovery of a
database server dialog.pem_comp_log_analysis_expertpem_component Role to run the Log Analysis Expert.pem_comp_sqlprofiler pem_component Role to run the SQL Profiler.pem_manage_efm pem_admin Role to manage Failover Manager func-
tionality.pem_comp_capacity_manager pem_component Role to run the Capacity Manager.pem_comp_log_manager pem_component Role to run the Log Manager.pem_comp_audit_manager pem_component Role to run the Audit Manager.pem_comp_package_deploymentpem_component Role to run the Package Deployment
Wizard.pem_comp_streaming_replicationpem_component Role to run the Streaming Replication
Wizard.pem_comp_tuning_wizard pem_component Role to run the Tuning Wizard.
4.11. Managing Security 59
Postgres Enterprise Manager, Release 7.9
4.11.4 Using a Team Role
When you register a server for monitoring by PEM, you can specify a Team that will be associated with theserver. A Team is a group role that can be used to allow or restrict access to one or more monitored serversto a limited group of role members. The PEM client will only display a server with a specified Team tothose users who are:
• a member of the Team role
• the role that created the server
• a role with superuser privileges on the PEM server.
To create a team role, expand the node for the server on which the role will reside in the PEM tree control,and right-click on the Login/Group Roles node to access the context menu. Then, select Login/Group Role... from the Create menu; when the Create - Login/Group Role dialog opens,use the fields provided to specify the properties of the team role.
4.11. Managing Security 60

Postgres Enterprise Manager, Release 7.9
4.11.5 Object Permissions
A role must be granted sufficient privileges before accessing, executing, or creating any database object.PEM allows you to assign (GRANT) and remove (REVOKE) object permissions to group roles or loginaccounts using the graphical interface of the PEM client.
Object permissions are managed via the graphical object editor for each particular object. For example, toassign privileges to access a database table, right click on the table name in the tree control, and select theProperties option from the context menu. Use the options displayed on the Privileges tab to assign privilegesfor the table.
The PEM client also contains a Grant Wizard (accessed through the Tools menu) that allows you tomanage many object permissions at once.
4.11. Managing Security 61
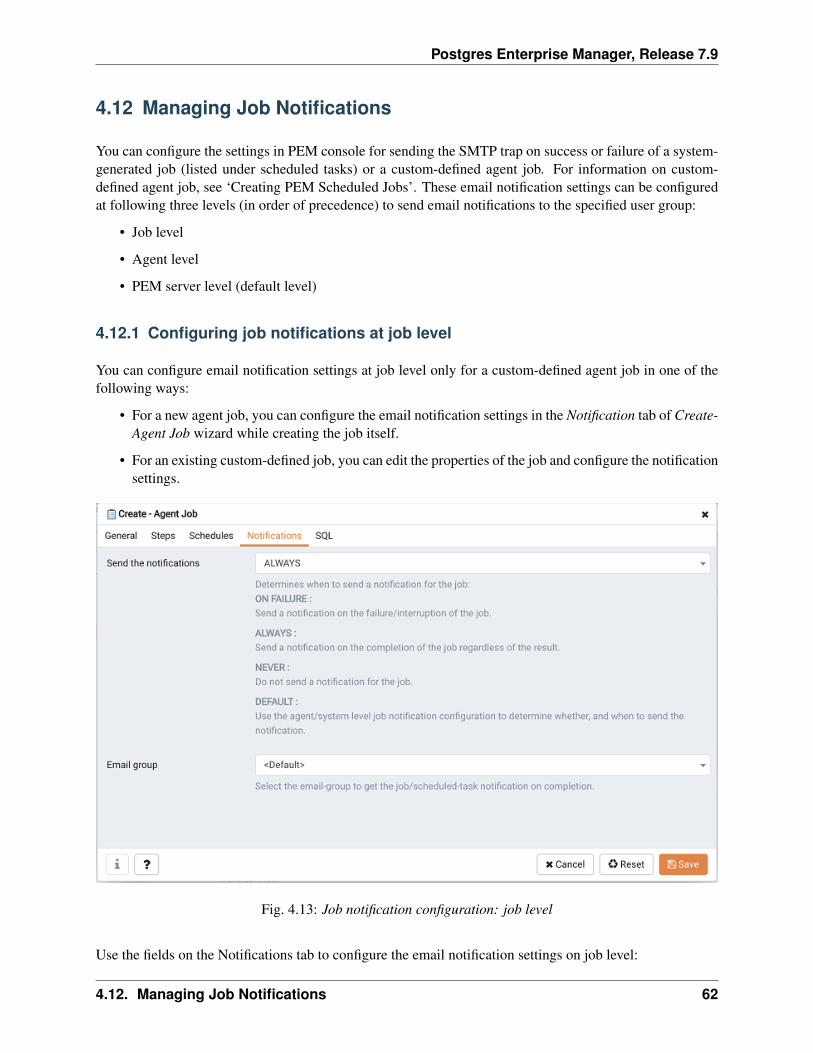
Postgres Enterprise Manager, Release 7.9
4.12 Managing Job Notifications
You can configure the settings in PEM console for sending the SMTP trap on success or failure of a system-generated job (listed under scheduled tasks) or a custom-defined agent job. For information on custom-defined agent job, see ‘Creating PEM Scheduled Jobs’. These email notification settings can be configuredat following three levels (in order of precedence) to send email notifications to the specified user group:
• Job level
• Agent level
• PEM server level (default level)
4.12.1 Configuring job notifications at job level
You can configure email notification settings at job level only for a custom-defined agent job in one of thefollowing ways:
• For a new agent job, you can configure the email notification settings in the Notification tab of Create-Agent Job wizard while creating the job itself.
• For an existing custom-defined job, you can edit the properties of the job and configure the notificationsettings.
Fig. 4.13: Job notification configuration: job level
Use the fields on the Notifications tab to configure the email notification settings on job level:
4.12. Managing Job Notifications 62

Postgres Enterprise Manager, Release 7.9
• Use the Send the notifications field to specify when you want the email notifications to be sent.
• Use the Email group field to specify the email group that should receive the email notification.
4.12.2 Configuring job notifications at agent level
Select the agent in the tree view, right click and select Properties. In the Properties dialog, select the Jobnotifications tab.
Fig. 4.14: Job notification configuration: agent level
Use the fields on the Job notifications tab to configure the email notification settings on agent level:
• Use the Override default configuration? switch to specify if you want the agent level job notificationsettings to override the default job notification settings. If you select Yes for this switch, you can usethe rest of the settings on this dialog to define when and to whom the job notifications should be sent.Please note that the rest of the settings on this dialog work only if you enable the Override defaultconfiguration? switch.
• Use the Email on job completion? switch to specify if the job notification should be sent on thesuccessful job completion.
• Use the Email on a job failure? switch to specify if the job notification should be sent on the failureof a job.
• Use the Email group field to specify the email group to whom the job notification should be sent.
4.12. Managing Job Notifications 63
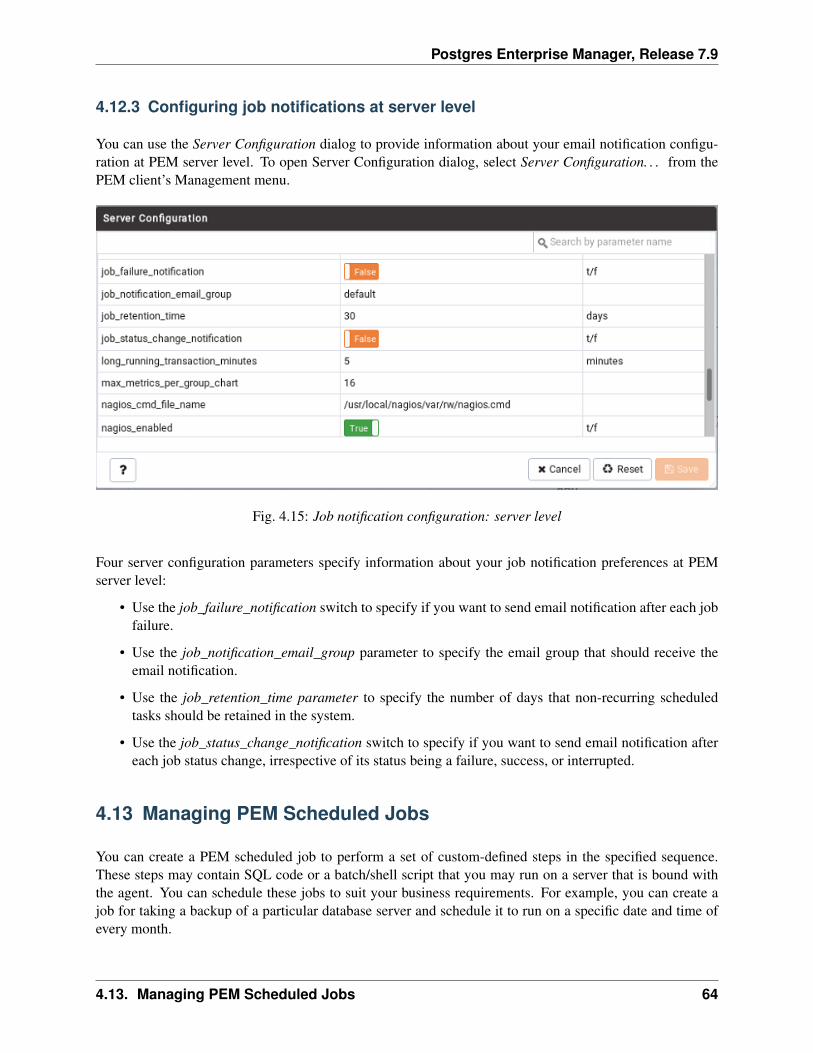
Postgres Enterprise Manager, Release 7.9
4.12.3 Configuring job notifications at server level
You can use the Server Configuration dialog to provide information about your email notification configu-ration at PEM server level. To open Server Configuration dialog, select Server Configuration. . . from thePEM client’s Management menu.
Fig. 4.15: Job notification configuration: server level
Four server configuration parameters specify information about your job notification preferences at PEMserver level:
• Use the job_failure_notification switch to specify if you want to send email notification after each jobfailure.
• Use the job_notification_email_group parameter to specify the email group that should receive theemail notification.
• Use the job_retention_time parameter to specify the number of days that non-recurring scheduledtasks should be retained in the system.
• Use the job_status_change_notification switch to specify if you want to send email notification aftereach job status change, irrespective of its status being a failure, success, or interrupted.
4.13 Managing PEM Scheduled Jobs
You can create a PEM scheduled job to perform a set of custom-defined steps in the specified sequence.These steps may contain SQL code or a batch/shell script that you may run on a server that is bound withthe agent. You can schedule these jobs to suit your business requirements. For example, you can create ajob for taking a backup of a particular database server and schedule it to run on a specific date and time ofevery month.
4.13. Managing PEM Scheduled Jobs 64
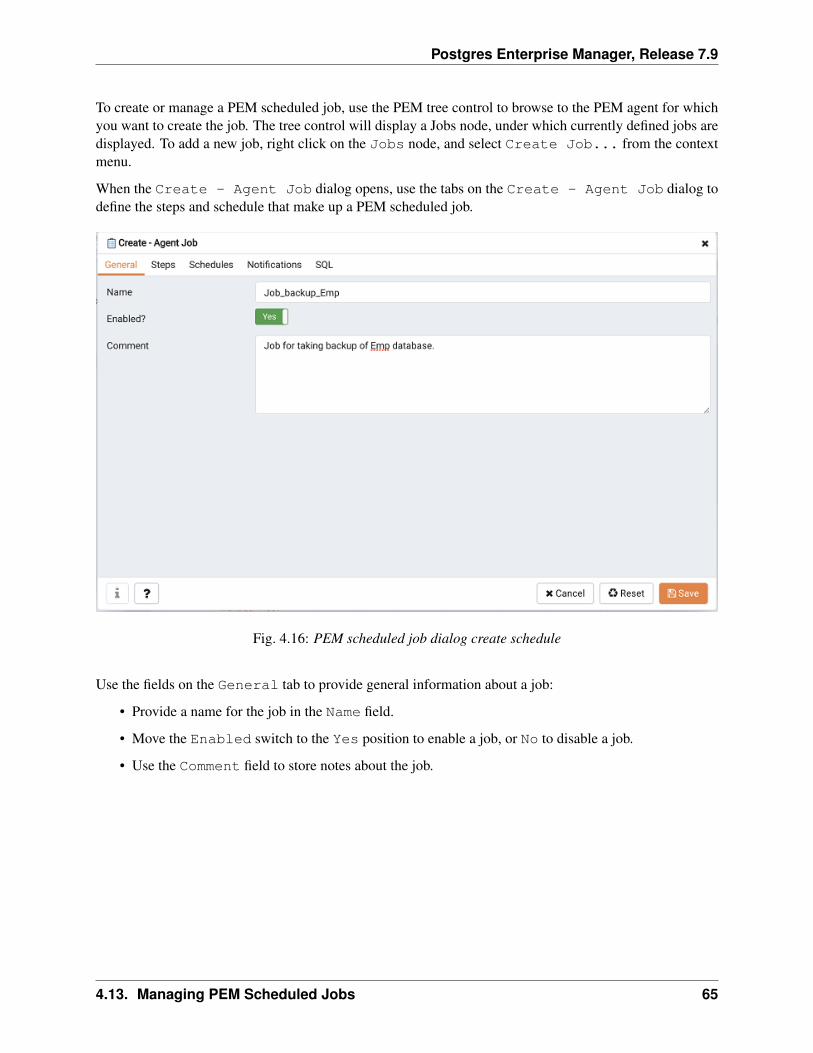
Postgres Enterprise Manager, Release 7.9
To create or manage a PEM scheduled job, use the PEM tree control to browse to the PEM agent for whichyou want to create the job. The tree control will display a Jobs node, under which currently defined jobs aredisplayed. To add a new job, right click on the Jobs node, and select Create Job... from the contextmenu.
When the Create - Agent Job dialog opens, use the tabs on the Create - Agent Job dialog todefine the steps and schedule that make up a PEM scheduled job.
Fig. 4.16: PEM scheduled job dialog create schedule
Use the fields on the General tab to provide general information about a job:
• Provide a name for the job in the Name field.
• Move the Enabled switch to the Yes position to enable a job, or No to disable a job.
• Use the Comment field to store notes about the job.
4.13. Managing PEM Scheduled Jobs 65
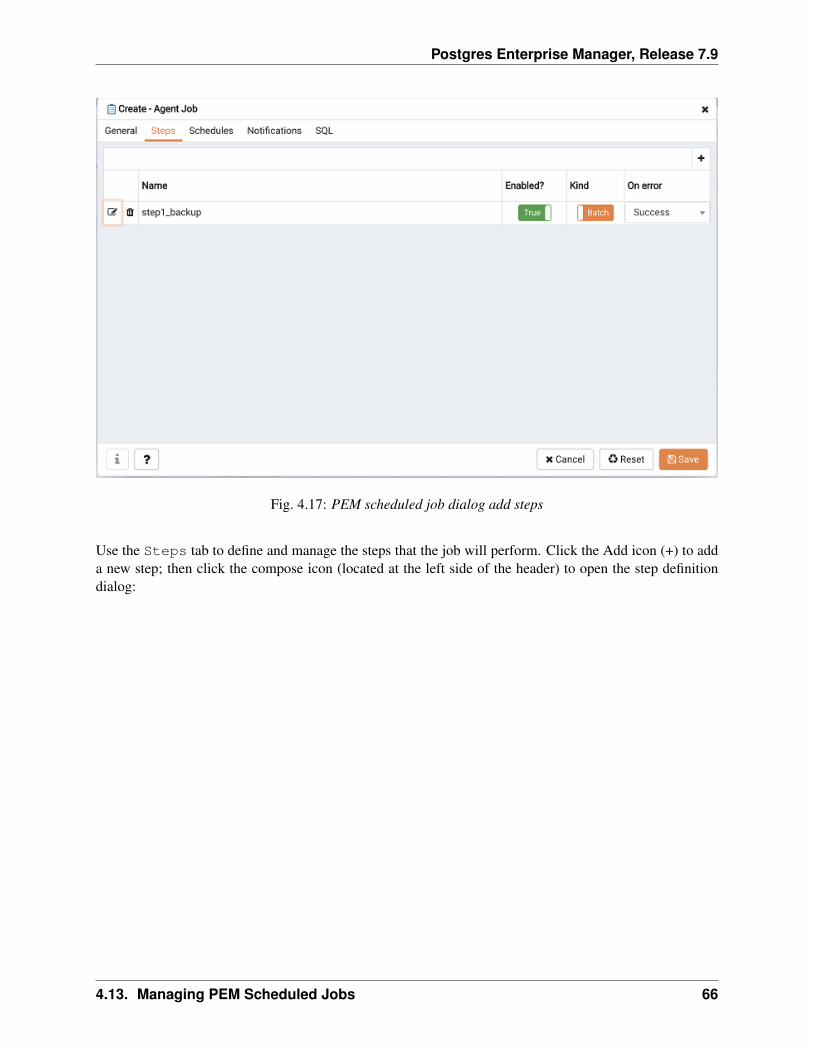
Postgres Enterprise Manager, Release 7.9
Fig. 4.17: PEM scheduled job dialog add steps
Use the Steps tab to define and manage the steps that the job will perform. Click the Add icon (+) to adda new step; then click the compose icon (located at the left side of the header) to open the step definitiondialog:
4.13. Managing PEM Scheduled Jobs 66
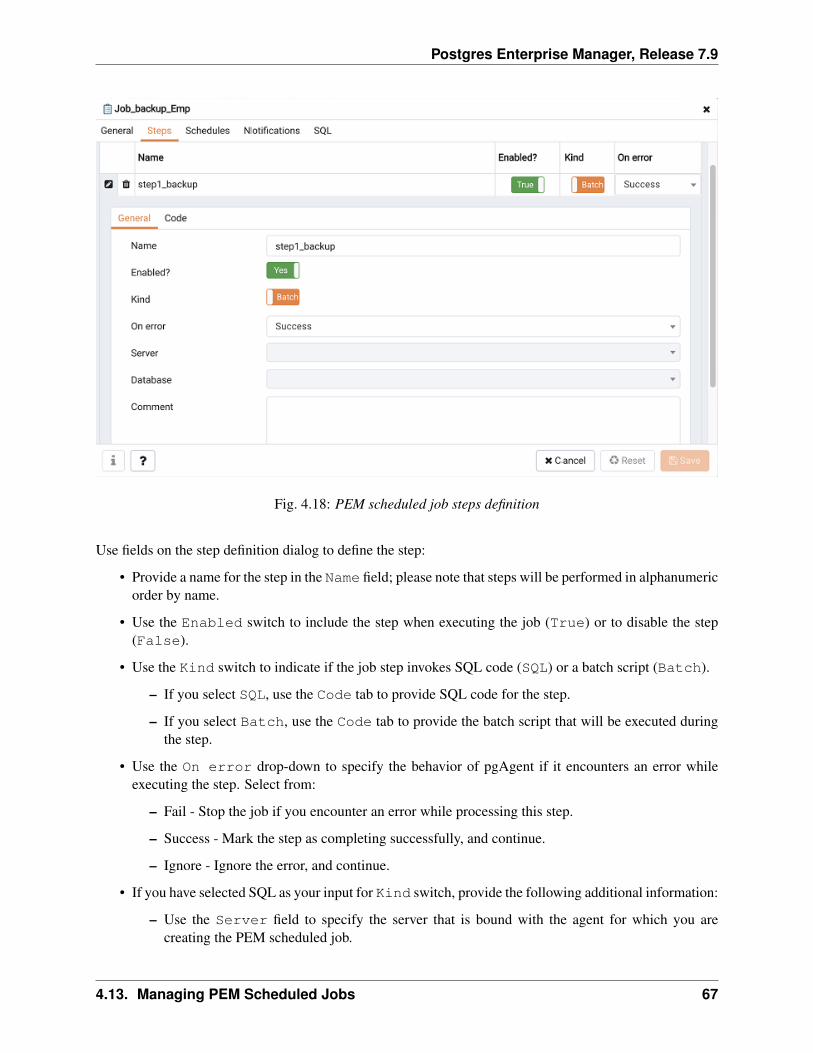
Postgres Enterprise Manager, Release 7.9
Fig. 4.18: PEM scheduled job steps definition
Use fields on the step definition dialog to define the step:
• Provide a name for the step in the Name field; please note that steps will be performed in alphanumericorder by name.
• Use the Enabled switch to include the step when executing the job (True) or to disable the step(False).
• Use the Kind switch to indicate if the job step invokes SQL code (SQL) or a batch script (Batch).
– If you select SQL, use the Code tab to provide SQL code for the step.
– If you select Batch, use the Code tab to provide the batch script that will be executed duringthe step.
• Use the On error drop-down to specify the behavior of pgAgent if it encounters an error whileexecuting the step. Select from:
– Fail - Stop the job if you encounter an error while processing this step.
– Success - Mark the step as completing successfully, and continue.
– Ignore - Ignore the error, and continue.
• If you have selected SQL as your input for Kind switch, provide the following additional information:
– Use the Server field to specify the server that is bound with the agent for which you arecreating the PEM scheduled job.
4.13. Managing PEM Scheduled Jobs 67
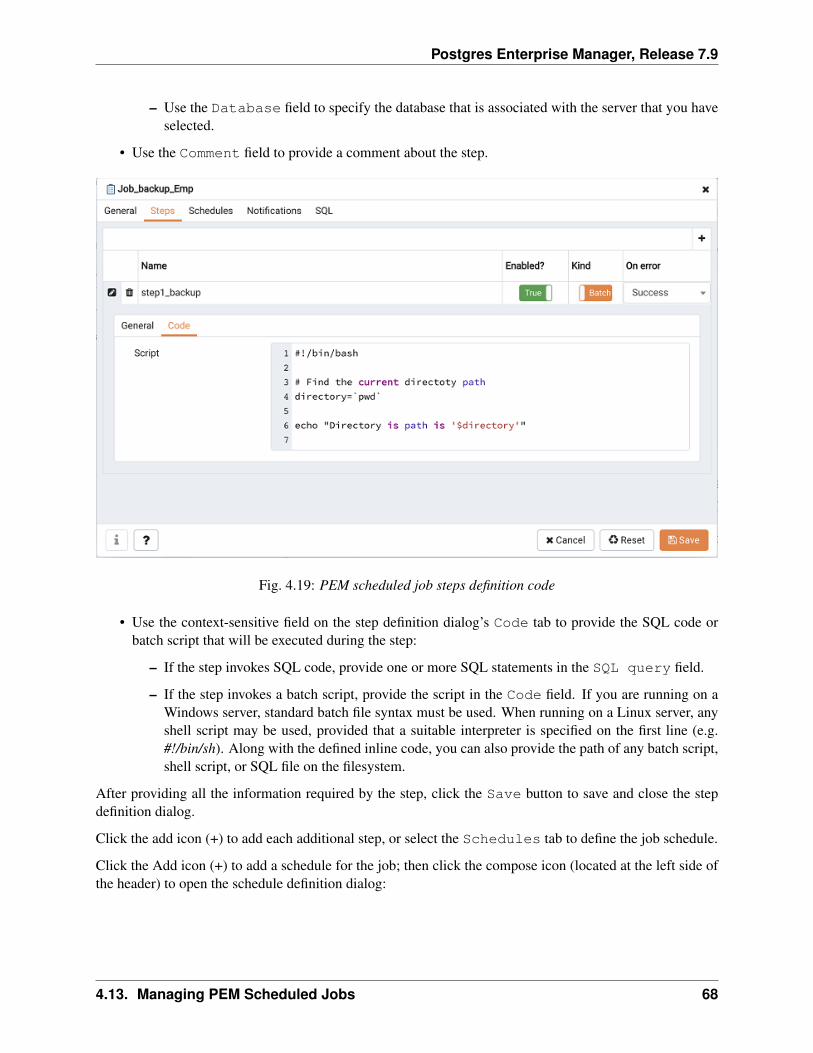
Postgres Enterprise Manager, Release 7.9
– Use the Database field to specify the database that is associated with the server that you haveselected.
• Use the Comment field to provide a comment about the step.
Fig. 4.19: PEM scheduled job steps definition code
• Use the context-sensitive field on the step definition dialog’s Code tab to provide the SQL code orbatch script that will be executed during the step:
– If the step invokes SQL code, provide one or more SQL statements in the SQL query field.
– If the step invokes a batch script, provide the script in the Code field. If you are running on aWindows server, standard batch file syntax must be used. When running on a Linux server, anyshell script may be used, provided that a suitable interpreter is specified on the first line (e.g.#!/bin/sh). Along with the defined inline code, you can also provide the path of any batch script,shell script, or SQL file on the filesystem.
After providing all the information required by the step, click the Save button to save and close the stepdefinition dialog.
Click the add icon (+) to add each additional step, or select the Schedules tab to define the job schedule.
Click the Add icon (+) to add a schedule for the job; then click the compose icon (located at the left side ofthe header) to open the schedule definition dialog:
4.13. Managing PEM Scheduled Jobs 68
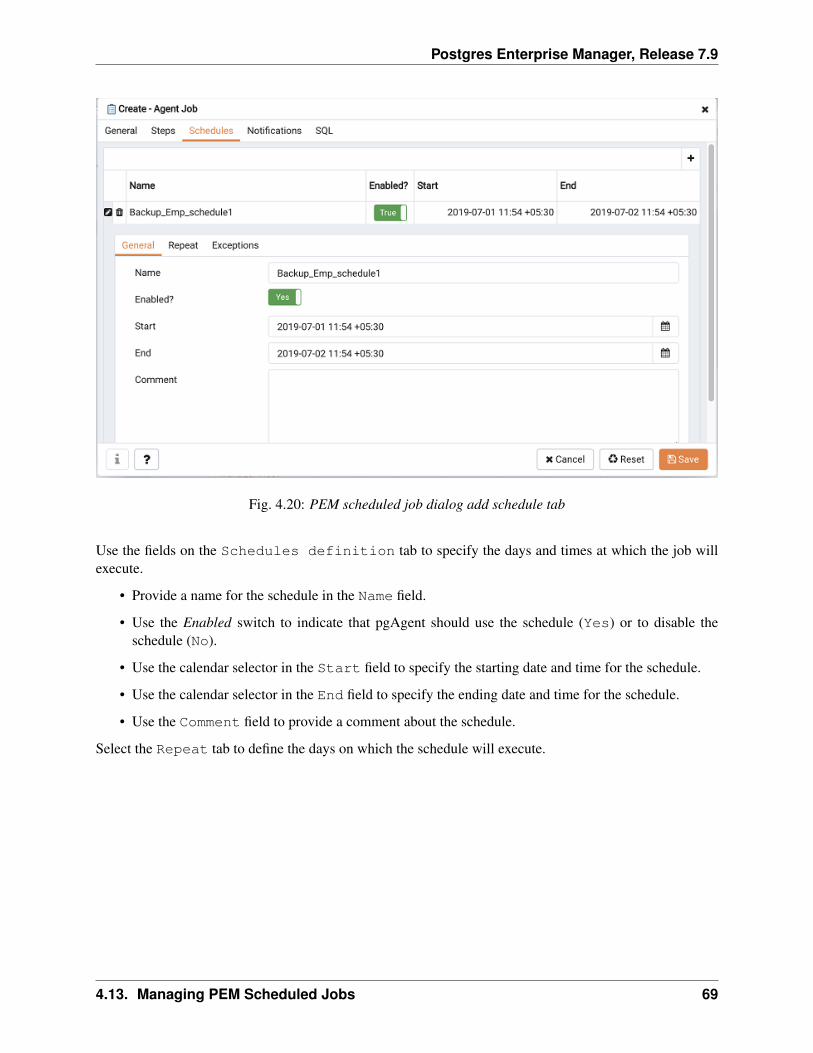
Postgres Enterprise Manager, Release 7.9
Fig. 4.20: PEM scheduled job dialog add schedule tab
Use the fields on the Schedules definition tab to specify the days and times at which the job willexecute.
• Provide a name for the schedule in the Name field.
• Use the Enabled switch to indicate that pgAgent should use the schedule (Yes) or to disable theschedule (No).
• Use the calendar selector in the Start field to specify the starting date and time for the schedule.
• Use the calendar selector in the End field to specify the ending date and time for the schedule.
• Use the Comment field to provide a comment about the schedule.
Select the Repeat tab to define the days on which the schedule will execute.
4.13. Managing PEM Scheduled Jobs 69
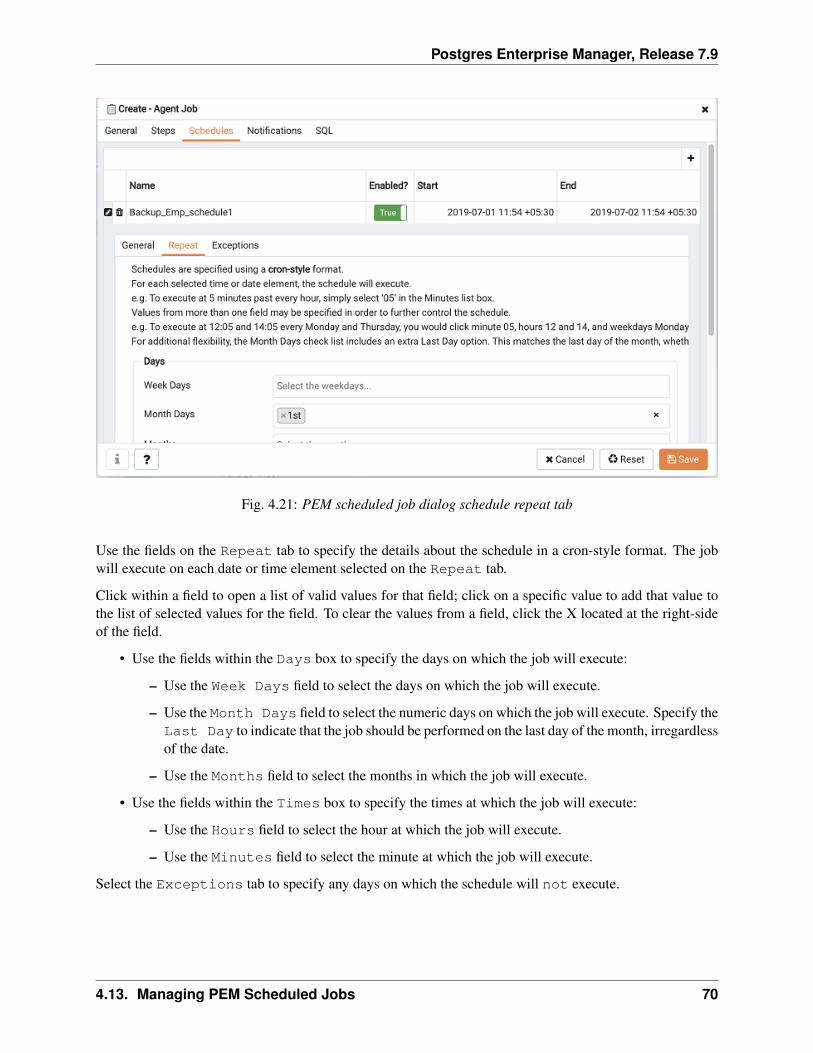
Postgres Enterprise Manager, Release 7.9
Fig. 4.21: PEM scheduled job dialog schedule repeat tab
Use the fields on the Repeat tab to specify the details about the schedule in a cron-style format. The jobwill execute on each date or time element selected on the Repeat tab.
Click within a field to open a list of valid values for that field; click on a specific value to add that value tothe list of selected values for the field. To clear the values from a field, click the X located at the right-sideof the field.
• Use the fields within the Days box to specify the days on which the job will execute:
– Use the Week Days field to select the days on which the job will execute.
– Use the Month Days field to select the numeric days on which the job will execute. Specify theLast Day to indicate that the job should be performed on the last day of the month, irregardlessof the date.
– Use the Months field to select the months in which the job will execute.
• Use the fields within the Times box to specify the times at which the job will execute:
– Use the Hours field to select the hour at which the job will execute.
– Use the Minutes field to select the minute at which the job will execute.
Select the Exceptions tab to specify any days on which the schedule will not execute.
4.13. Managing PEM Scheduled Jobs 70

Postgres Enterprise Manager, Release 7.9
Fig. 4.22: PEM scheduled job dialog exceptions tab
Use the fields on the Exceptions tab to specify days on which you wish the job to not execute; forexample, you may wish for jobs to not execute on national holidays.
Click the Add icon (+) to add a row to the exception table, then:
• Click within the Date column to open a calendar selector, and select a date on which the job will notexecute. Specify <Any> in the Date column to indicate that the job should not execute on any dayat the time selected.
• Click within the Time column to open a time selector, and specify a time on which the job will notexecute. Specify <Any> in the Time column to indicate that the job should not execute at any timeon the day selected.
Select the Notifications tab to configure the email notification settings on job level:
4.13. Managing PEM Scheduled Jobs 71
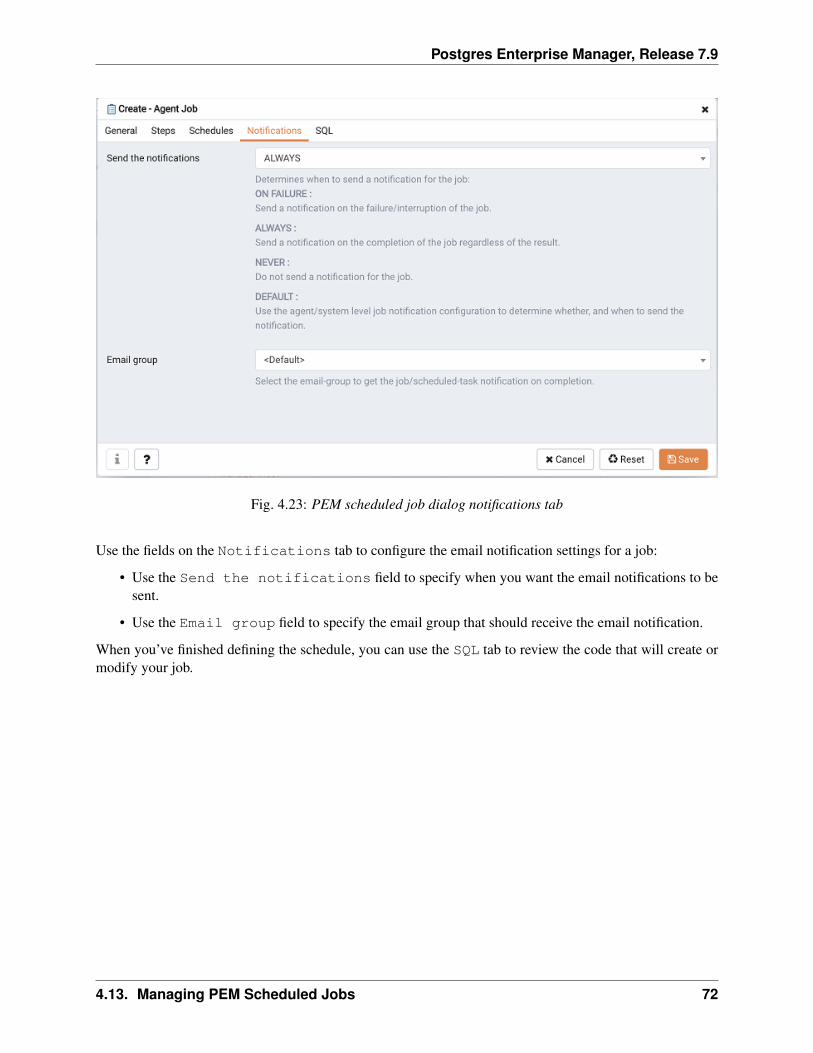
Postgres Enterprise Manager, Release 7.9
Fig. 4.23: PEM scheduled job dialog notifications tab
Use the fields on the Notifications tab to configure the email notification settings for a job:
• Use the Send the notifications field to specify when you want the email notifications to besent.
• Use the Email group field to specify the email group that should receive the email notification.
When you’ve finished defining the schedule, you can use the SQL tab to review the code that will create ormodify your job.
4.13. Managing PEM Scheduled Jobs 72
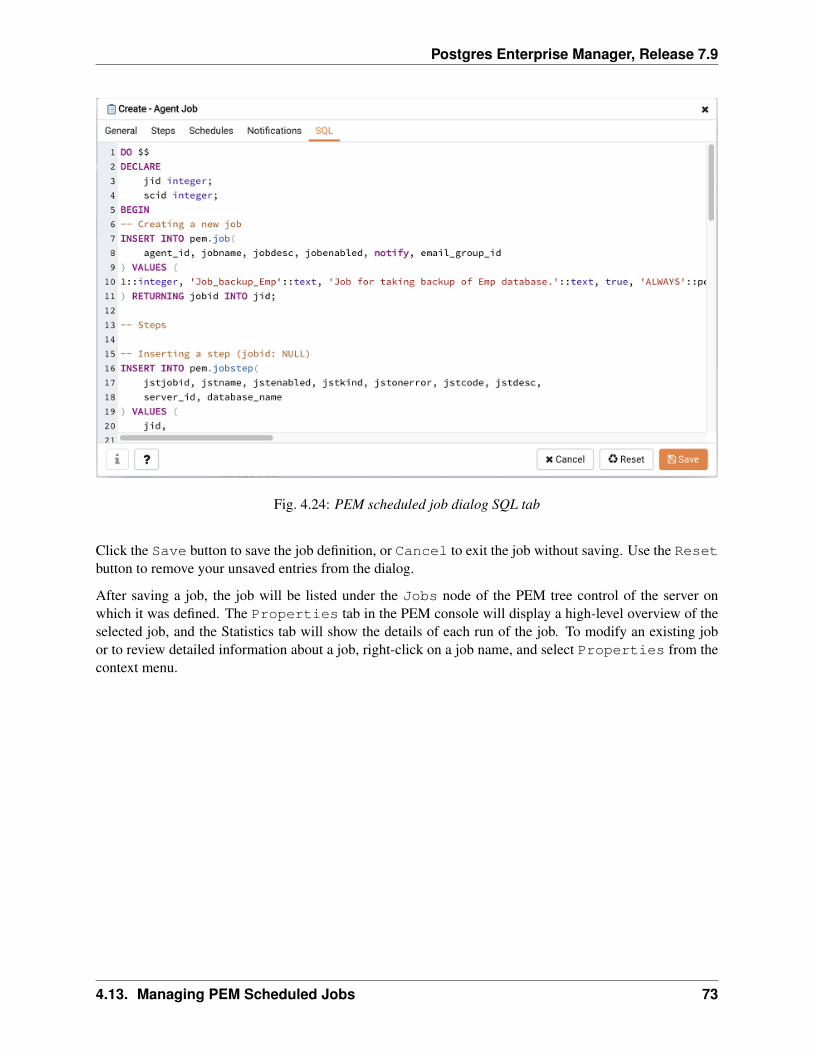
Postgres Enterprise Manager, Release 7.9
Fig. 4.24: PEM scheduled job dialog SQL tab
Click the Save button to save the job definition, or Cancel to exit the job without saving. Use the Resetbutton to remove your unsaved entries from the dialog.
After saving a job, the job will be listed under the Jobs node of the PEM tree control of the server onwhich it was defined. The Properties tab in the PEM console will display a high-level overview of theselected job, and the Statistics tab will show the details of each run of the job. To modify an existing jobor to review detailed information about a job, right-click on a job name, and select Properties from thecontext menu.
4.13. Managing PEM Scheduled Jobs 73

CHAPTER 5
Managing a PEM Agent
The sections that follow provide information about the behavior and management of a PEM agent.
5.1 Agent Privileges
By default, the PEM agent is installed with root privileges for the operating system host and superuserprivileges for the database server. These privileges allow the PEM agent to invoke unrestricted probes onthe monitored host and database server about system usage, retrieving and returning the information to thePEM server.
Please note that PEM functionality diminishes as the privileges of the PEM agent decrease. For completefunctionality, the PEM agent should run as root. If the PEM agent is run under the database server’sservice account, PEM probes will not have complete access to the statistical information used to generatereports, and functionality will be limited to the capabilities of that account. If the PEM agent is run underanother lesser-privileged account, functionality will be limited even further.
If you limit the operating system privileges of the PEM agent, some of the PEM probes will not returninformation, and the following functionality may be affected:
74
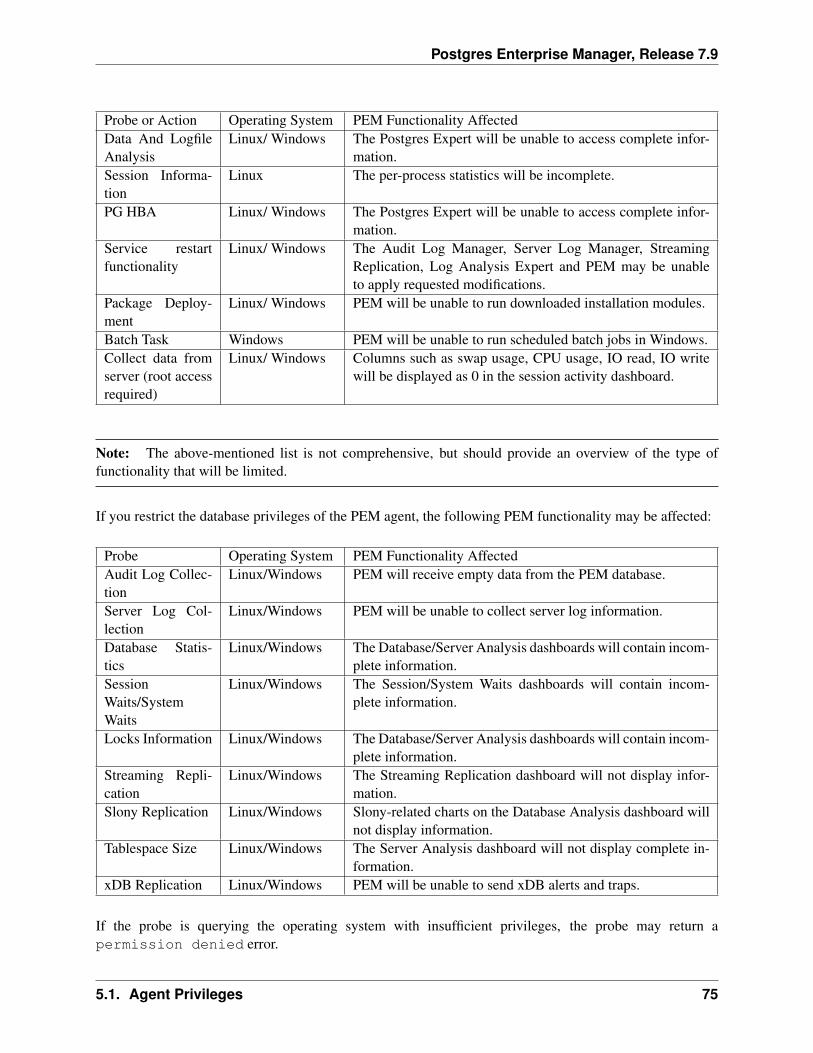
Postgres Enterprise Manager, Release 7.9
Probe or Action Operating System PEM Functionality AffectedData And LogfileAnalysis
Linux/ Windows The Postgres Expert will be unable to access complete infor-mation.
Session Informa-tion
Linux The per-process statistics will be incomplete.
PG HBA Linux/ Windows The Postgres Expert will be unable to access complete infor-mation.
Service restartfunctionality
Linux/ Windows The Audit Log Manager, Server Log Manager, StreamingReplication, Log Analysis Expert and PEM may be unableto apply requested modifications.
Package Deploy-ment
Linux/ Windows PEM will be unable to run downloaded installation modules.
Batch Task Windows PEM will be unable to run scheduled batch jobs in Windows.Collect data fromserver (root accessrequired)
Linux/ Windows Columns such as swap usage, CPU usage, IO read, IO writewill be displayed as 0 in the session activity dashboard.
Note: The above-mentioned list is not comprehensive, but should provide an overview of the type offunctionality that will be limited.
If you restrict the database privileges of the PEM agent, the following PEM functionality may be affected:
Probe Operating System PEM Functionality AffectedAudit Log Collec-tion
Linux/Windows PEM will receive empty data from the PEM database.
Server Log Col-lection
Linux/Windows PEM will be unable to collect server log information.
Database Statis-tics
Linux/Windows The Database/Server Analysis dashboards will contain incom-plete information.
SessionWaits/SystemWaits
Linux/Windows The Session/System Waits dashboards will contain incom-plete information.
Locks Information Linux/Windows The Database/Server Analysis dashboards will contain incom-plete information.
Streaming Repli-cation
Linux/Windows The Streaming Replication dashboard will not display infor-mation.
Slony Replication Linux/Windows Slony-related charts on the Database Analysis dashboard willnot display information.
Tablespace Size Linux/Windows The Server Analysis dashboard will not display complete in-formation.
xDB Replication Linux/Windows PEM will be unable to send xDB alerts and traps.
If the probe is querying the operating system with insufficient privileges, the probe may return apermission denied error.
5.1. Agent Privileges 75
Postgres Enterprise Manager, Release 7.9
If the probe is querying the database with insufficient privileges, the probe may return a permissiondenied error or display the returned data in a PEM chart or graph as an empty value.
When a probe fails, an entry will be written to the log file that contains the name of the probe, the reason theprobe failed, and a hint that will help you resolve the problem.
You can view probe-related errors that occurred on the server in the Probe Log Dashboard, or reviewerror messages in the PEM worker log files. On Linux, the default location of the log file is:
/var/log/pem/worker.log
On Windows, log information is available on the Event Viewer.
5.1. Agent Privileges 76
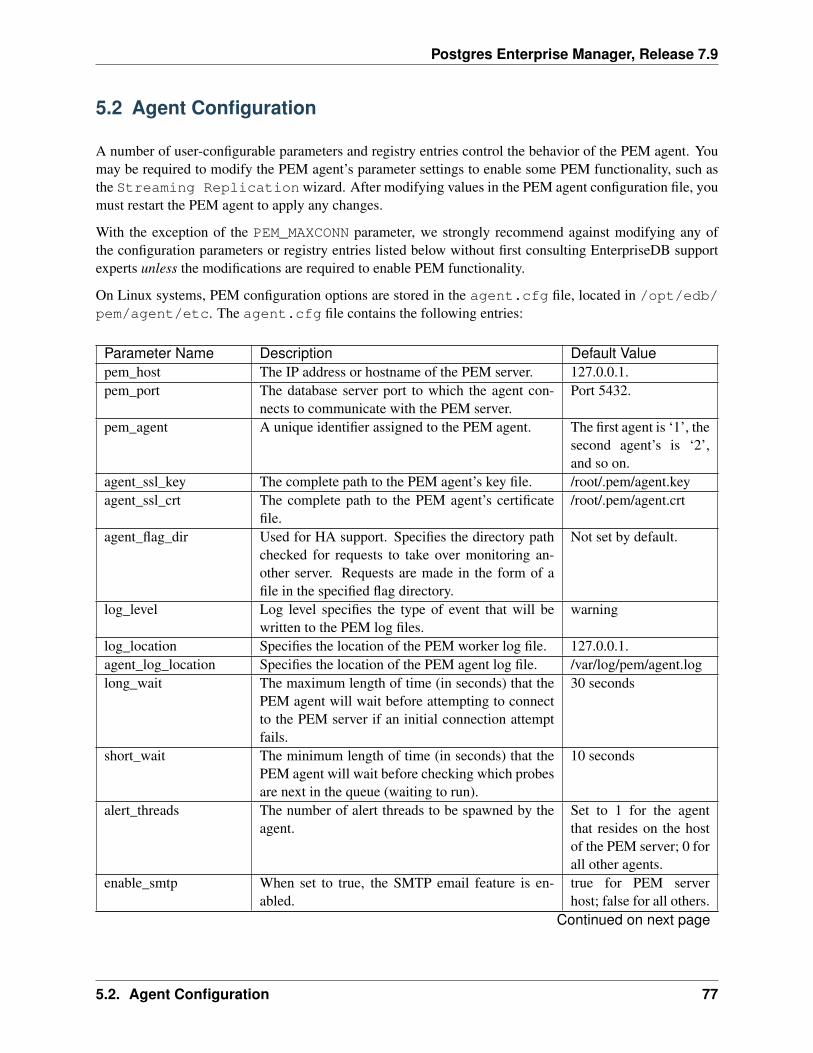
Postgres Enterprise Manager, Release 7.9
5.2 Agent Configuration
A number of user-configurable parameters and registry entries control the behavior of the PEM agent. Youmay be required to modify the PEM agent’s parameter settings to enable some PEM functionality, such asthe Streaming Replication wizard. After modifying values in the PEM agent configuration file, youmust restart the PEM agent to apply any changes.
With the exception of the PEM_MAXCONN parameter, we strongly recommend against modifying any ofthe configuration parameters or registry entries listed below without first consulting EnterpriseDB supportexperts unless the modifications are required to enable PEM functionality.
On Linux systems, PEM configuration options are stored in the agent.cfg file, located in /opt/edb/pem/agent/etc. The agent.cfg file contains the following entries:
Parameter Name Description Default Valuepem_host The IP address or hostname of the PEM server. 127.0.0.1.pem_port The database server port to which the agent con-
nects to communicate with the PEM server.Port 5432.
pem_agent A unique identifier assigned to the PEM agent. The first agent is ‘1’, thesecond agent’s is ‘2’,and so on.
agent_ssl_key The complete path to the PEM agent’s key file. /root/.pem/agent.keyagent_ssl_crt The complete path to the PEM agent’s certificate
file./root/.pem/agent.crt
agent_flag_dir Used for HA support. Specifies the directory pathchecked for requests to take over monitoring an-other server. Requests are made in the form of afile in the specified flag directory.
Not set by default.
log_level Log level specifies the type of event that will bewritten to the PEM log files.
warning
log_location Specifies the location of the PEM worker log file. 127.0.0.1.agent_log_location Specifies the location of the PEM agent log file. /var/log/pem/agent.loglong_wait The maximum length of time (in seconds) that the
PEM agent will wait before attempting to connectto the PEM server if an initial connection attemptfails.
30 seconds
short_wait The minimum length of time (in seconds) that thePEM agent will wait before checking which probesare next in the queue (waiting to run).
10 seconds
alert_threads The number of alert threads to be spawned by theagent.
Set to 1 for the agentthat resides on the hostof the PEM server; 0 forall other agents.
enable_smtp When set to true, the SMTP email feature is en-abled.
true for PEM serverhost; false for all others.
Continued on next page
5.2. Agent Configuration 77

Postgres Enterprise Manager, Release 7.9
Table 5.1 – continued from previous pageParameter Name Description Default Valueenable_snmp When set to true, the SNMP trap feature is enabled. true for PEM server
host; false for all others.enable_nagios When set to true, Nagios alerting is enabled. true for PEM server
host; false for all others.connect_timeout The max time in seconds (a decimal integer string)
that the agent will wait for a connection.Not set by default; setto 0 to indicate the agentshould wait indefinitely.
allow_server_restart If set to TRUE, the agent can restart the databaseserver that it monitors. Some PEM features maybe enabled/disabled, depending on the value of thisparameter.
True
allow_package_managementIf set to TRUE, the Update Monitor and PackageManagement features are enabled.
false
max_connections The maximum number of probe connections usedby the connection throttler.
0 (an unlimited number)
connection_lifetime Use ConnectionLifetime (or connection_lifetime)to specify the minimum number of seconds an openbut idle connection is retained. This parameter isignored if the value specified in MaxConnectionsis reached and a new connection (to a differentdatabase) is required to satisfy a waiting request.
By default, set to 0 (aconnection is droppedwhen the connection isidle after the agent’sprocessing loop).
allow_batch_probes If set to TRUE, the user will be able to create batchprobes using the custom probes feature.
false
heartbeat_connection When set to TRUE, a dedicated connection is usedfor sending the heartbeats.
false
allow_streaming_replicationIf set to TRUE, the user will be able to configureand setup streaming replication.
false
batch_script_dir Provide the path where script file (for alerting) willbe stored.
/tmp
connection_custom_setup Use to provide SQL code that will be invoked whena new connection with a monitored server is made.
Not set by default.
ca_file Provide the path where the CA certificate resides. /opt/PEM/agent/share/certs/ca-bundle.crt.
On 64 bit Windows systems, PEM registry entries are located in:
HKEY_LOCAL_MACHINE\\Software\\Wow6432Node\\EnterpriseDB\\PEM\\agent.
The registry contains the following entries:
Parameter Name Description Default ValuePEM_HOST The IP address or hostname of the PEM server. 127.0.0.1.PEM_PORT The database server port to which the agent con-
nects to communicate with the PEM server.Port 5432.
Continued on next page
5.2. Agent Configuration 78
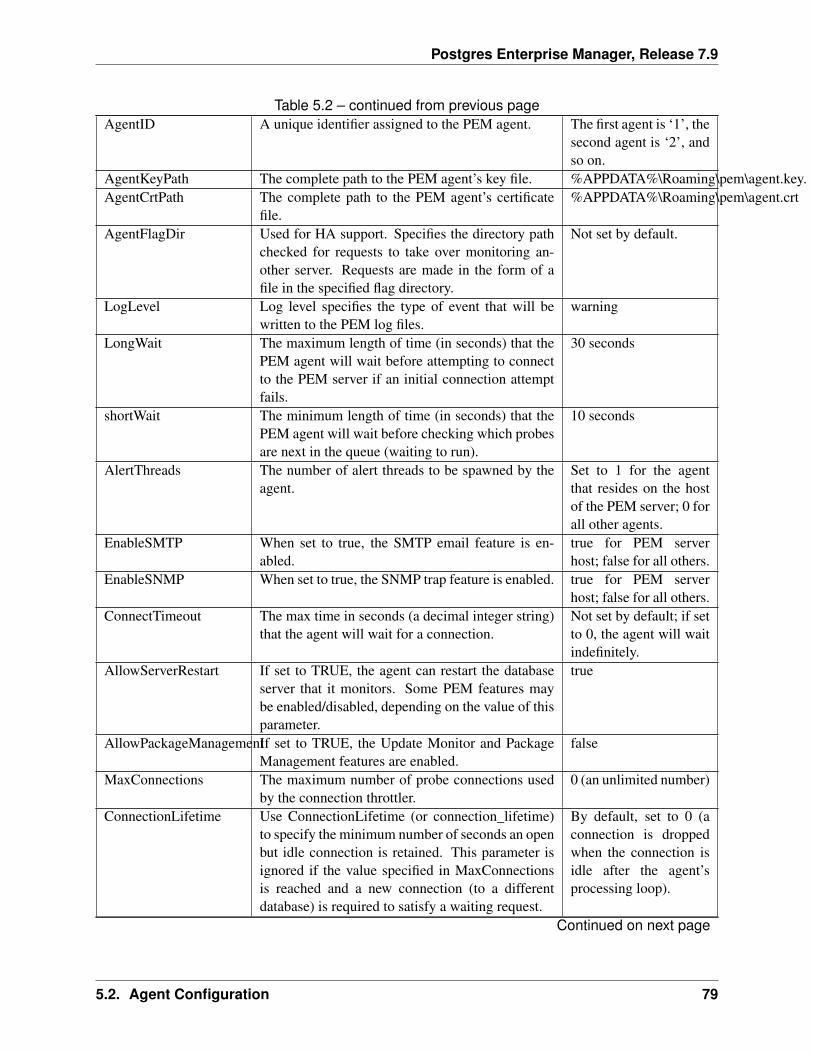
Postgres Enterprise Manager, Release 7.9
Table 5.2 – continued from previous pageAgentID A unique identifier assigned to the PEM agent. The first agent is ‘1’, the
second agent is ‘2’, andso on.
AgentKeyPath The complete path to the PEM agent’s key file. %APPDATA%\Roaming\pem\agent.key.AgentCrtPath The complete path to the PEM agent’s certificate
file.%APPDATA%\Roaming\pem\agent.crt
AgentFlagDir Used for HA support. Specifies the directory pathchecked for requests to take over monitoring an-other server. Requests are made in the form of afile in the specified flag directory.
Not set by default.
LogLevel Log level specifies the type of event that will bewritten to the PEM log files.
warning
LongWait The maximum length of time (in seconds) that thePEM agent will wait before attempting to connectto the PEM server if an initial connection attemptfails.
30 seconds
shortWait The minimum length of time (in seconds) that thePEM agent will wait before checking which probesare next in the queue (waiting to run).
10 seconds
AlertThreads The number of alert threads to be spawned by theagent.
Set to 1 for the agentthat resides on the hostof the PEM server; 0 forall other agents.
EnableSMTP When set to true, the SMTP email feature is en-abled.
true for PEM serverhost; false for all others.
EnableSNMP When set to true, the SNMP trap feature is enabled. true for PEM serverhost; false for all others.
ConnectTimeout The max time in seconds (a decimal integer string)that the agent will wait for a connection.
Not set by default; if setto 0, the agent will waitindefinitely.
AllowServerRestart If set to TRUE, the agent can restart the databaseserver that it monitors. Some PEM features maybe enabled/disabled, depending on the value of thisparameter.
true
AllowPackageManagementIf set to TRUE, the Update Monitor and PackageManagement features are enabled.
false
MaxConnections The maximum number of probe connections usedby the connection throttler.
0 (an unlimited number)
ConnectionLifetime Use ConnectionLifetime (or connection_lifetime)to specify the minimum number of seconds an openbut idle connection is retained. This parameter isignored if the value specified in MaxConnectionsis reached and a new connection (to a differentdatabase) is required to satisfy a waiting request.
By default, set to 0 (aconnection is droppedwhen the connection isidle after the agent’sprocessing loop).
Continued on next page
5.2. Agent Configuration 79
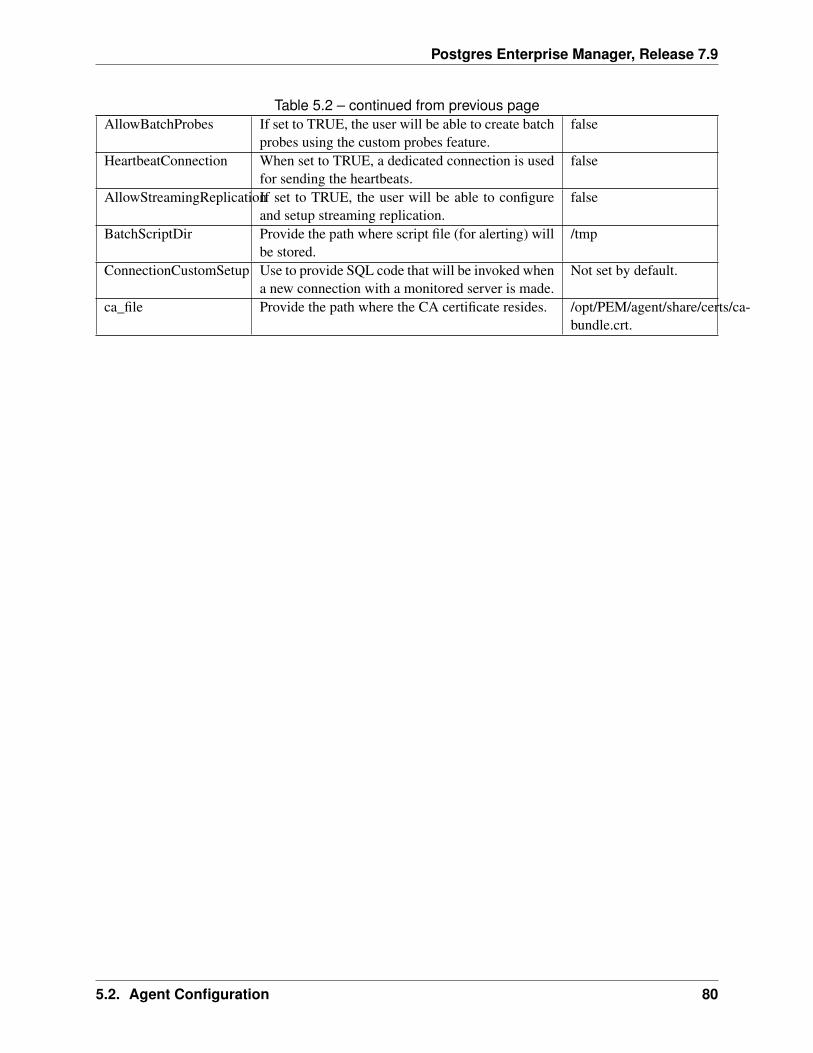
Postgres Enterprise Manager, Release 7.9
Table 5.2 – continued from previous pageAllowBatchProbes If set to TRUE, the user will be able to create batch
probes using the custom probes feature.false
HeartbeatConnection When set to TRUE, a dedicated connection is usedfor sending the heartbeats.
false
AllowStreamingReplicationIf set to TRUE, the user will be able to configureand setup streaming replication.
false
BatchScriptDir Provide the path where script file (for alerting) willbe stored.
/tmp
ConnectionCustomSetup Use to provide SQL code that will be invoked whena new connection with a monitored server is made.
Not set by default.
ca_file Provide the path where the CA certificate resides. /opt/PEM/agent/share/certs/ca-bundle.crt.
5.2. Agent Configuration 80
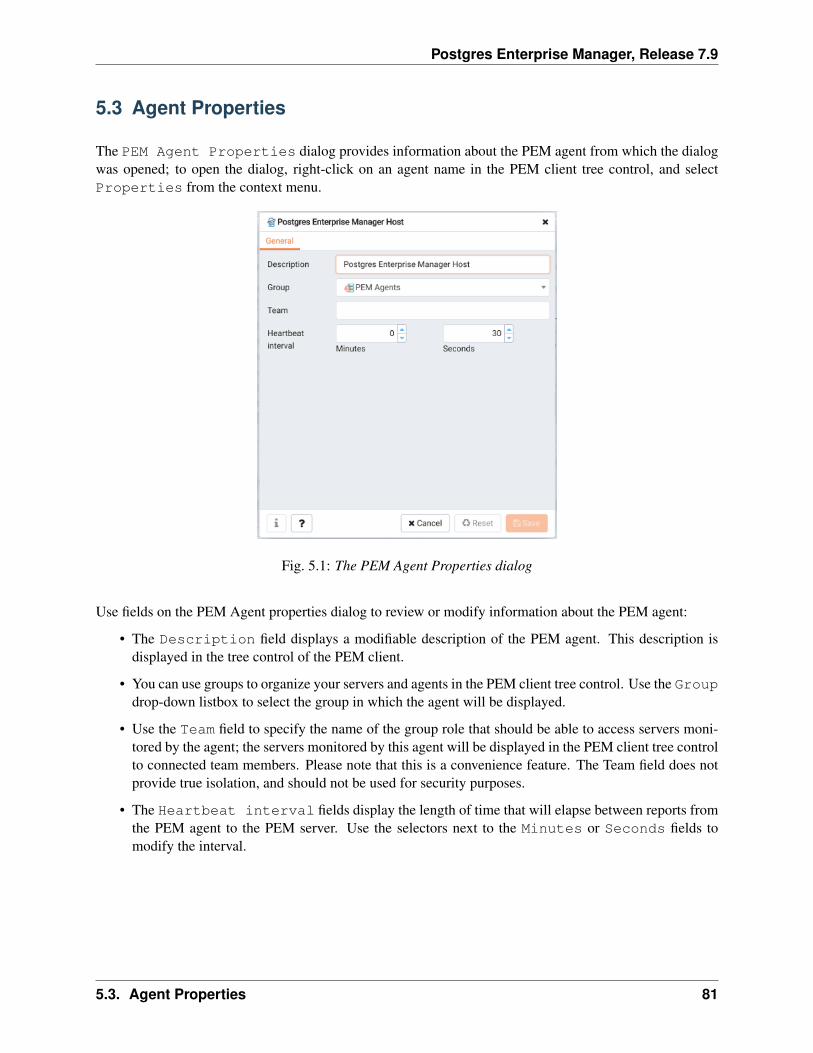
Postgres Enterprise Manager, Release 7.9
5.3 Agent Properties
The PEM Agent Properties dialog provides information about the PEM agent from which the dialogwas opened; to open the dialog, right-click on an agent name in the PEM client tree control, and selectProperties from the context menu.
Fig. 5.1: The PEM Agent Properties dialog
Use fields on the PEM Agent properties dialog to review or modify information about the PEM agent:
• The Description field displays a modifiable description of the PEM agent. This description isdisplayed in the tree control of the PEM client.
• You can use groups to organize your servers and agents in the PEM client tree control. Use the Groupdrop-down listbox to select the group in which the agent will be displayed.
• Use the Team field to specify the name of the group role that should be able to access servers moni-tored by the agent; the servers monitored by this agent will be displayed in the PEM client tree controlto connected team members. Please note that this is a convenience feature. The Team field does notprovide true isolation, and should not be used for security purposes.
• The Heartbeat interval fields display the length of time that will elapse between reports fromthe PEM agent to the PEM server. Use the selectors next to the Minutes or Seconds fields tomodify the interval.
5.3. Agent Properties 81
CHAPTER 6
Conclusion
Postgres Enterprise Manager Getting Started Guide
Copyright © 2013 - 2019 EnterpriseDB Corporation. All rights reserved.
EnterpriseDB® Corporation 34 Crosby Drive, Suite 201, Bedford, MA 01730, USA
T +1 781 357 3390 F +1 978 467 1307 E [email protected] www.enterprisedb.com
• EDB designs, establishes coding best practices, reviews, and verifies input validation for the logon UIfor Postgres Enterprise Manager where present. EDB follows the same approach for additional inputcomponents, however the nature of the product may require that it accepts freeform SQL, WMI orother strings to be entered and submitted by trusted users for which limited validation is possible. Insuch cases it is not possible to prevent users from entering incorrect or otherwise dangerous inputs.
• EDB reserves the right to add features to products that accept freeform SQL, WMI or other potentiallydangerous inputs from authenticated, trusted users in the future, but will ensure all such features aredesigned and tested to ensure they provide the minimum possible risk, and where possible, requiresuperuser or equivalent privileges.
• EDB does not that warrant that we can or will anticipate all potential threats and therefore our processcannot fully guarantee that all potential vulnerabilities have been addressed or considered.
82
Index
AAgent Configuration, 77Agent Privileges, 74Agent Properties, 81agent ssl certificate, 39
CConclusion, 82control server remotely, 42Control service on Linux, 43Control service on Windows, 44Creating PEM scheduled jobs, 64
GGeneral Architecture, 5Group Roles, 55
HHTTPD server, 45
IInstalling PEM - Overview, 8
LLogin Roles, 54
MManaging a PEM Agent, 74Managing a PEM Server, 41Managing Certificates, 35
PPEM
architecture, 5installlation, 8
overview, 1PEM Overview, 2PEM Server Configuration, 52pg_hba.conf file, 46
RRegistering a Server, 20replacing, 35replacing ssl certificates, 35restart PEM agent, 41restart PEM service, 41
SSecurity, 53Sending email notifications for a job, 62ssl certificates, 35starting service, 41Supported Versions and Platforms, 7
Uupdate agent ssl certificate, 39Using the PEM Web Interface, 9
WWhy Postgres Enterprise Manager?, 3
83