Embed Size (px)
Citation preview
P O T A S O F T W A R E | P A C K A G E S & C U S T O M E R D E S I G N
System Manual for CR7E
POTA Customer Relationship Management System(CR7E)
Pota Software Pota Technologies Ltd. E-mail: [email protected]
Table of Contents
1. Introduction ........................................................................................... 1
Our Team ........................................................................................ 1
Understanding the Trial Period ........................................................ 1
Get Helped ...................................................................................... 2
The Product - CR7E ......................................................................... 2
2. Data administration ................................................................................ 3
Back Up Your Data .......................................................................... 3
Restore Your Data ........................................................................... 4
Rebuild or Re-index Your Data ........................................................ 4
3. Customer Maintenance .......................................................................... 5
Add a new customer........................................................................ 5
Edit/update customer data .............................................................. 6
Delete a customer ........................................................................... 6
Edit Group Customer Records ......................................................... 7
4. Contact Event ........................................................................................ 8
Add a new Event ............................................................................. 8
Edit/Delete Event Records ............................................................... 9
Edit/Delete Event Records - listed by date .................................... 10
Add Event Records to Selected Customers .................................... 11
5. Advanced Search ................................................................................. 12
Customer Advanced Search ........................................................... 12
Quick Search ................................................................................. 13
6. Other Settings ...................................................................................... 14
Customer Category Maintenance ................................................... 14
Customer Title Maintenance .......................................................... 15
Contact Person Maintenance ......................................................... 15
Association Maintenance ............................................................... 16
Handler Maintenance ..................................................................... 16
Brief Note Maintenance ................................................................. 17
Change Customer No .................................................................... 17
Change Caption of Field ................................................................ 18
7. Reports ................................................................................................ 19
List of Customers ........................................................................... 19
List of Customers by Customized Conditions ................................. 20
List of Customers of Selected Day of Entry ................................... 21
List of Customers Marked No-Printing-Label or No-Sending-SMS .. 22
List of Customers of Ranged Amount ............................................ 22
List of Customer of Event Records & Amount ............................... 23
Number of Event Records of Selected Customer Category ............ 23
List of Events of Selected Customer Category ............................... 24
List of Event/Amount of Selected Customer .................................. 25
Total Amount of Selected Contact Person ..................................... 26
List of Amount Ranking by Selected Customer Category ............... 27
8. Printing Address Labels ........................................................................ 28
Print the Selected Customer Category ........................................... 28
Print the Selected Associations ...................................................... 29
Print Address Labels by Customized Conditions ............................ 29
Print by Chosen Customer No........................................................ 30
Print by Ranged Amount ............................................................... 31
9. Mass Email ........................................................................................... 32
Email Server Setting ...................................................................... 32
Send Email to Customers .............................................................. 32
10. Bulk SMS ........................................................................................... 34
SMS Account Setting ..................................................................... 34
Send Bulk SMS .............................................................................. 35
11. Mass Import/Export ........................................................................... 36
Import Customer Records from Excel ............................................ 36
Export All Customer Records to Excel............................................ 37
12. Live Update ........................................................................................ 38
Live Update ................................................................................... 38
13. How to Buy ........................................................................................ 39
1
1. Introduction
OTA Technologies Ltd. has been established in 1992, and we have more
than 20 years experience in producing software packages and customer
design.
Our Team
The designers have been trained their skills and knowledge in the U.S., UK,
and Mainland China with related degrees such as Computer Science,
Marketing, Publishing etc. Every designer has more than 10 years
experience.
Our aim is to provide you - wherever you are and in whatever kind of
division- with the sort of friendly products and personal support that you need.
Understanding the Trial Period
The free trial Period for CR7E is up to 9 months. After the free trial, you can
continue your service by buying the full version at POTA Software’s website
(http://en.potasoft.com/). Your free trial countdown will begin after the
software being installed and launched. You are able to check your free trial
count down at the
Menu > Help >About the POTA Customer Relationship Management System
Chapter
1
P

D E S I G N C U S T O M I Z A T I O N
Get Helped
To view this manual, click
Menu > Help > Manual Download
Or visit our website (http://en.potasoft.com/) and contact us.
The Product - CR7E
Pota Customer Relationship Management System (CR7E) is a conventional,
traditional, so-called on-premise/in house CRM desktop application. It is a not web-
based CRM or Apple Mac CRM solution.
It can run on a single desktop or on a Client/Server network architecture. This is
where you typically have a more powerful, dedicated PC acting as a Server, with the
Clients, or Workstations attached or networked to it.
It is a concise and informative Customer Relationship Management System, you
can view/add/edit/ the customer's detailed information in one screen, including the
customer's name, address, photo, contact event records, and attached files. The
CR7E is a feature-rich CRM, you can customize your own contact events, brief note,
contact person, handler (in house service person) .
The best feature of the system is the Powerful Search: you may input your query in
any field (Name, Phone, Category, Associations…) and then click “Begin to Search.”
The system will return the best result which matches your query.
3
2. Data administration
This chapter will demonstrate how to backup, restore, and re-index your
database in the POTA Customer Relationship Management System.
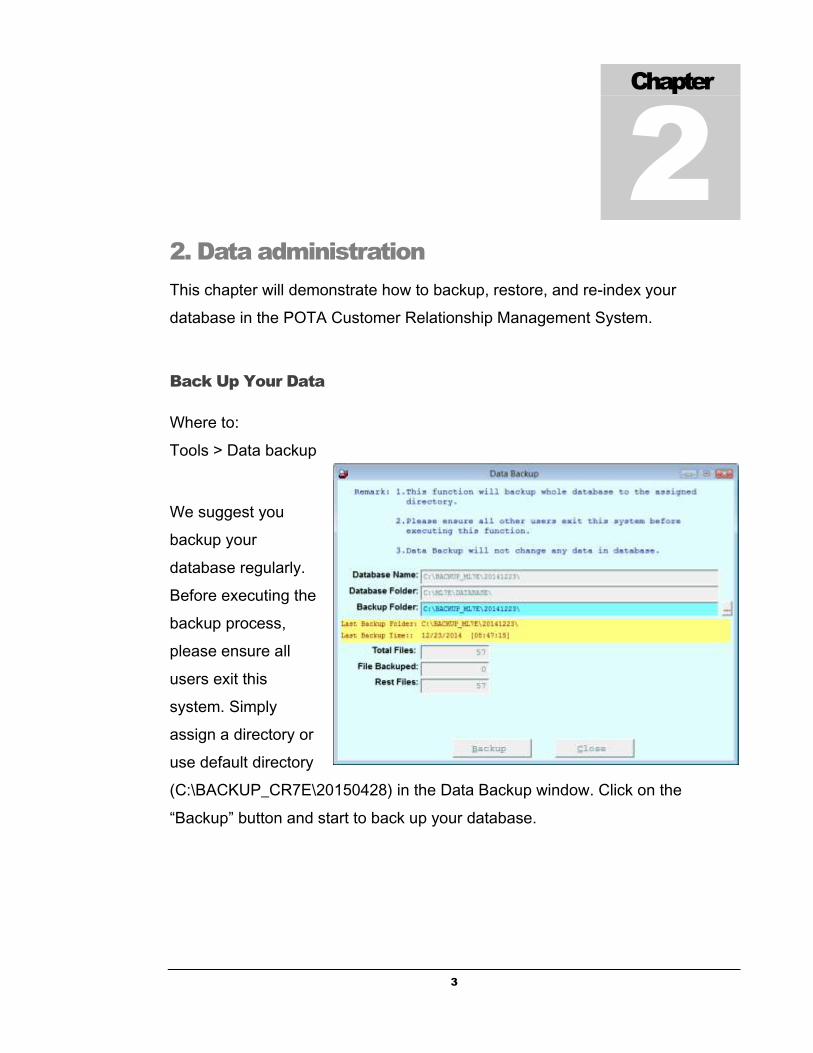
Back Up Your Data
Where to:
Tools > Data backup
We suggest you
backup your
database regularly.
Before executing the
backup process,
please ensure all
users exit this
system. Simply
assign a directory or
use default directory
(C:\BACKUP_CR7E\20150428) in the Data Backup window. Click on the
“Backup” button and start to back up your database.
Chapter
2
4
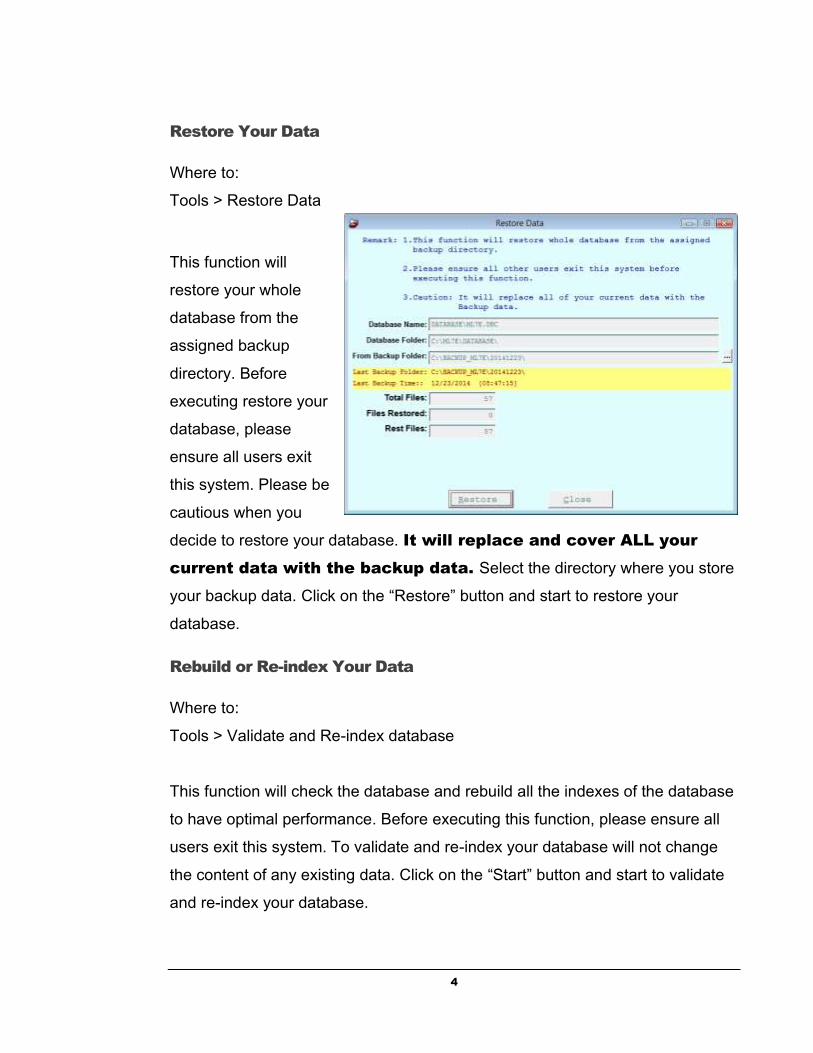
Restore Your Data
Where to:
Tools > Restore Data
This function will
restore your whole
database from the
assigned backup
directory. Before
executing restore your
database, please
ensure all users exit
this system. Please be
cautious when you
decide to restore your database. It will replace and cover ALL your
current data with the backup data. Select the directory where you store
your backup data. Click on the “Restore” button and start to restore your
database.
Rebuild or Re-index Your Data
Where to:
Tools > Validate and Re-index database
This function will check the database and rebuild all the indexes of the database
to have optimal performance. Before executing this function, please ensure all
users exit this system. To validate and re-index your database will not change
the content of any existing data. Click on the “Start” button and start to validate
and re-index your database.
5
3. Customer Maintenance
CR7E is a concise and informative Customer Relationship Management System,
you can have the customer's information in one screen, including the customer's
detail, photo, contact event records, and attached files.
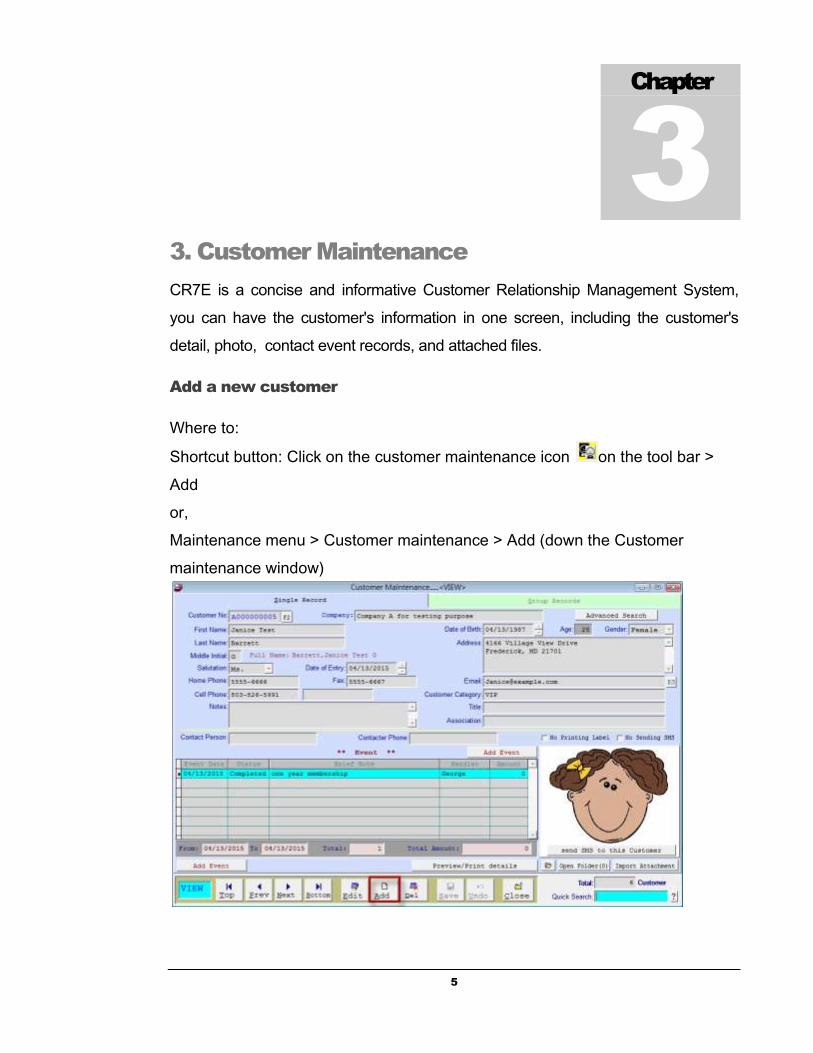
Add a new customer
Where to:
Shortcut button: Click on the customer maintenance icon on the tool bar >
Add
or,
Maintenance menu > Customer maintenance > Add (down the Customer
maintenance window)
Chapter
3
6
In the “Add” window, feel free to fill in all the fields. Please notice that the
“Customer No.” cannot be changed once you saved the data.
If you really want to change the Customer No, please go to Tools> Change
Customer No. The Event Records will go with the new Customer No.
Fast Add or change Customer No:
Right click on "Add" button, you can copy current record to a new record, edit
every field and save as a new customer record.
Edit/update customer data
Where to:
Maintenance menu > Customer maintenance > Edit (down the Customer
maintenance window)
Shortcut button: Click on the customer maintenance icon on the tool bar >
Edit
In the “Edit” window, feel free to edit or update the existed data. Click “Save” if
you want to save the data; click “Undo” if you want to leave this window.
Delete a customer
Where to:
Maintenance menu > Customer maintenance > Del
Shortcut button: Click on the Customer maintenance on the tool bar > Del
View your group records and find the record(s) you want to remove. Click on the
record you want to delete and click “Del” (down the group record window)
7
Edit Group Customer Records
Where to:
Maintenance menu > Customer maintenance > Group records tab
Shortcut button: Click on the Customer maintenance on the tool bar >
Group records tab
View your group records and find the record(s) you want to remove. Click on the
record you want to delete and click “Del” (down the group record window)
8
4. Contact Event
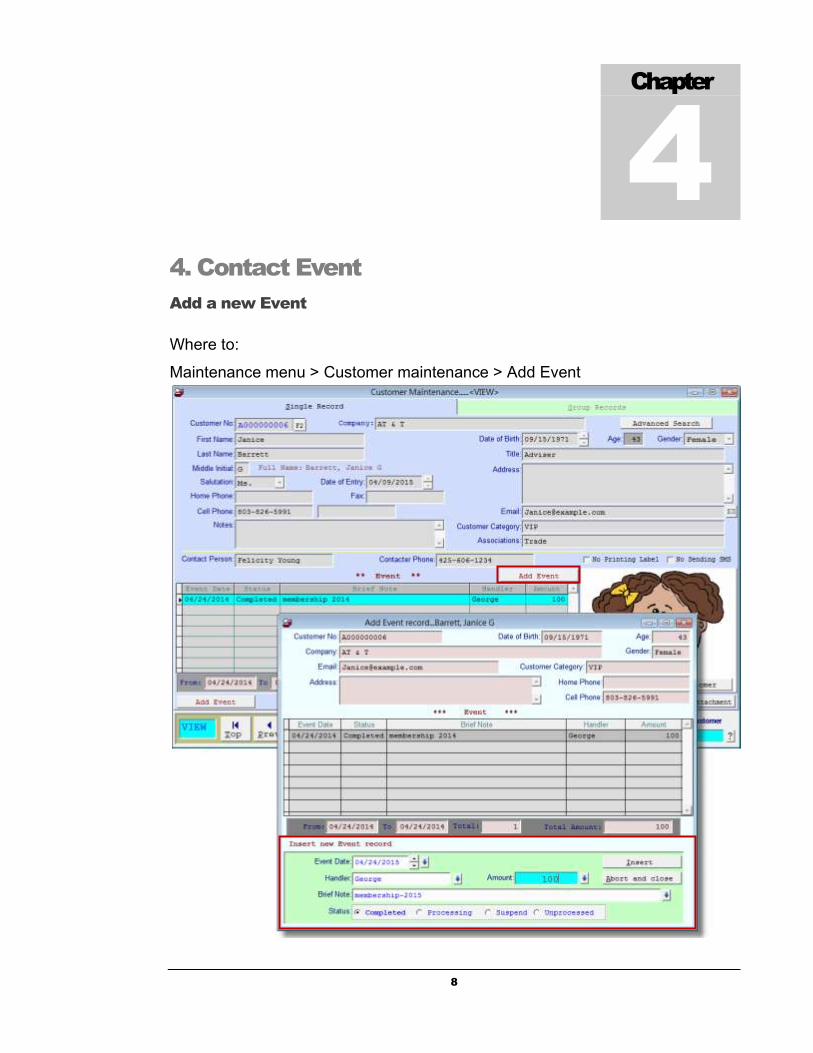
Add a new Event
Where to:
Maintenance menu > Customer maintenance > Add Event
Chapter
4

9
In the “Add Event Record” window, you can choose Handler, Brief Note, and
input the Amount. You may input Brief Note instead of choosing from the
existing data.
Click “Insert” if you want to save the event record; click “Abort and Close” if you
want to leave this window.
Edit/Delete Event Records
Where to:
Maintenance menu > Customer maintenance > Edit (down the Customer
maintenance window)>Select the Event by click the mouse>Edit Event
In the Edit Windows, you can change the Handler, Amount, Brief Note and Save, or
you can also Delete the Event Record.
Click the event that you want to edit>>Edit Event

10
Edit/Delete Event Records - listed by date
Where to:
Maintenance menu > Edit Event Record > Select starting date of editing>Search
Event record>Click the Event that you want to edit>
Select the Event by click the mouse>Edit Event
In the Edit Windows, you can change the Handler, Amount, Brief Note and then
Save the change, or you can also Delete the selected Event Record.
11
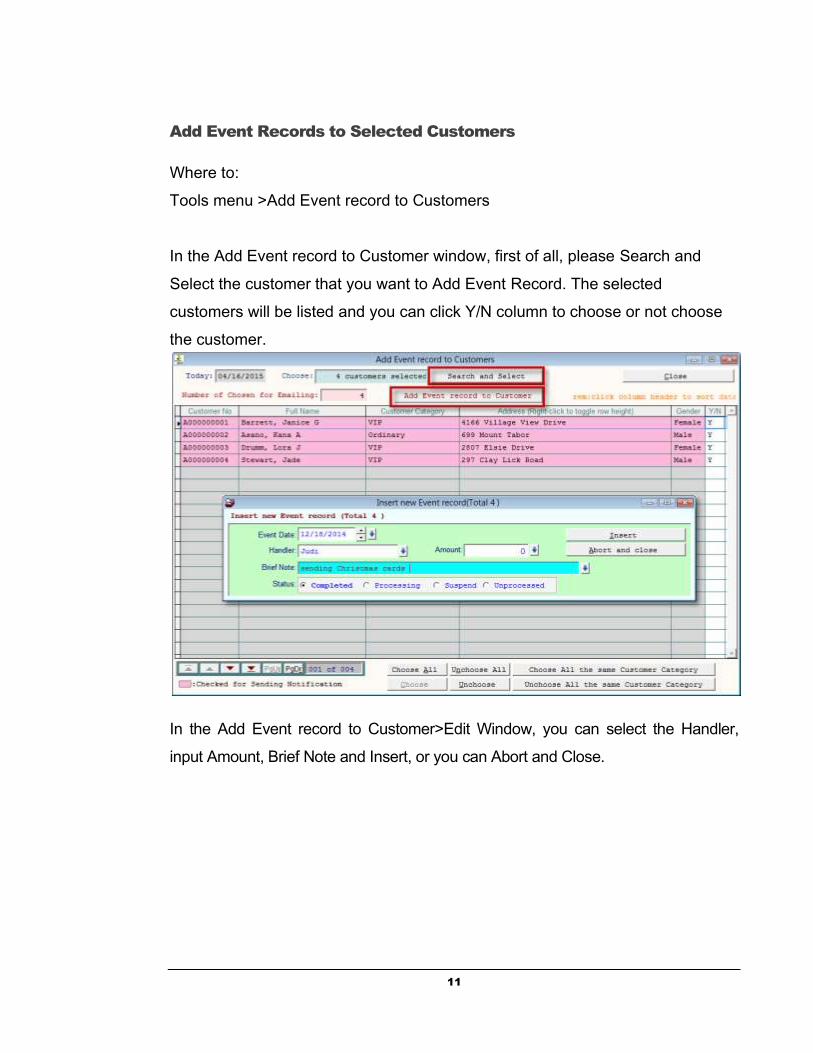
Add Event Records to Selected Customers
Where to:
Tools menu >Add Event record to Customers
In the Add Event record to Customer window, first of all, please Search and
Select the customer that you want to Add Event Record. The selected
customers will be listed and you can click Y/N column to choose or not choose
the customer.
In the Add Event record to Customer>Edit Window, you can select the Handler,
input Amount, Brief Note and Insert, or you can Abort and Close.
12
5. Advanced Search
This chapter can help you with searching Customers within the system.
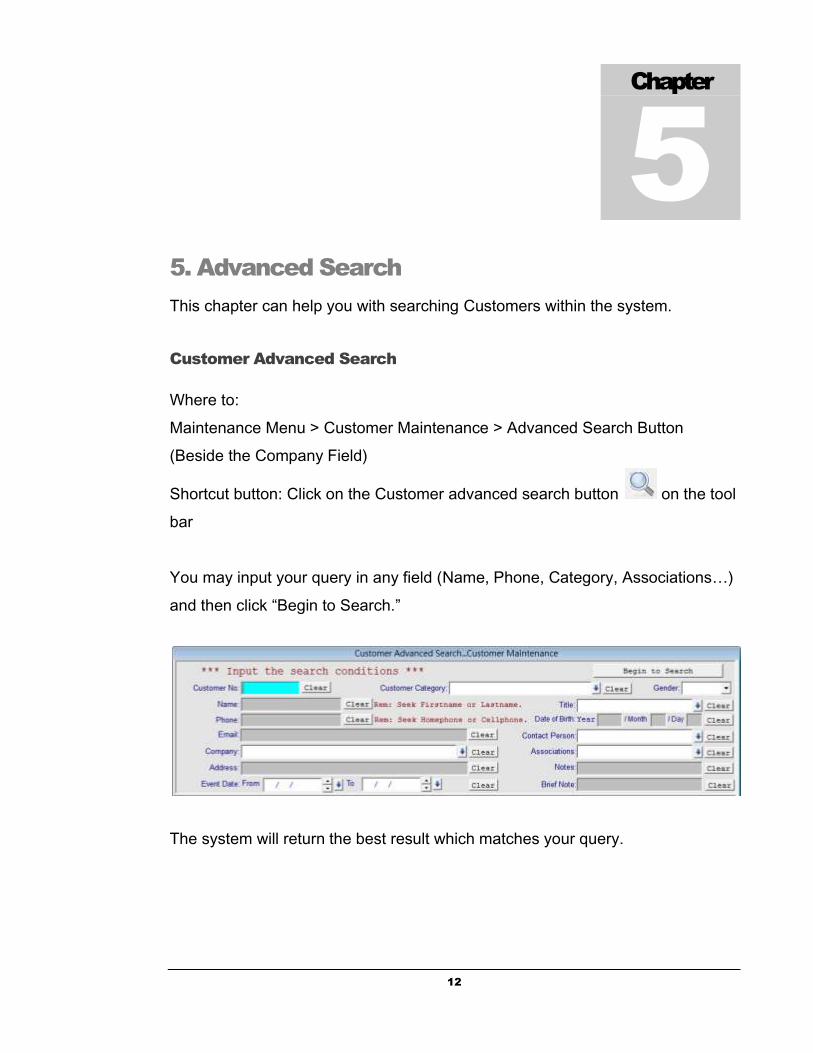
Customer Advanced Search
Where to:
Maintenance Menu > Customer Maintenance > Advanced Search Button
(Beside the Company Field)
Shortcut button: Click on the Customer advanced search button on the tool
bar
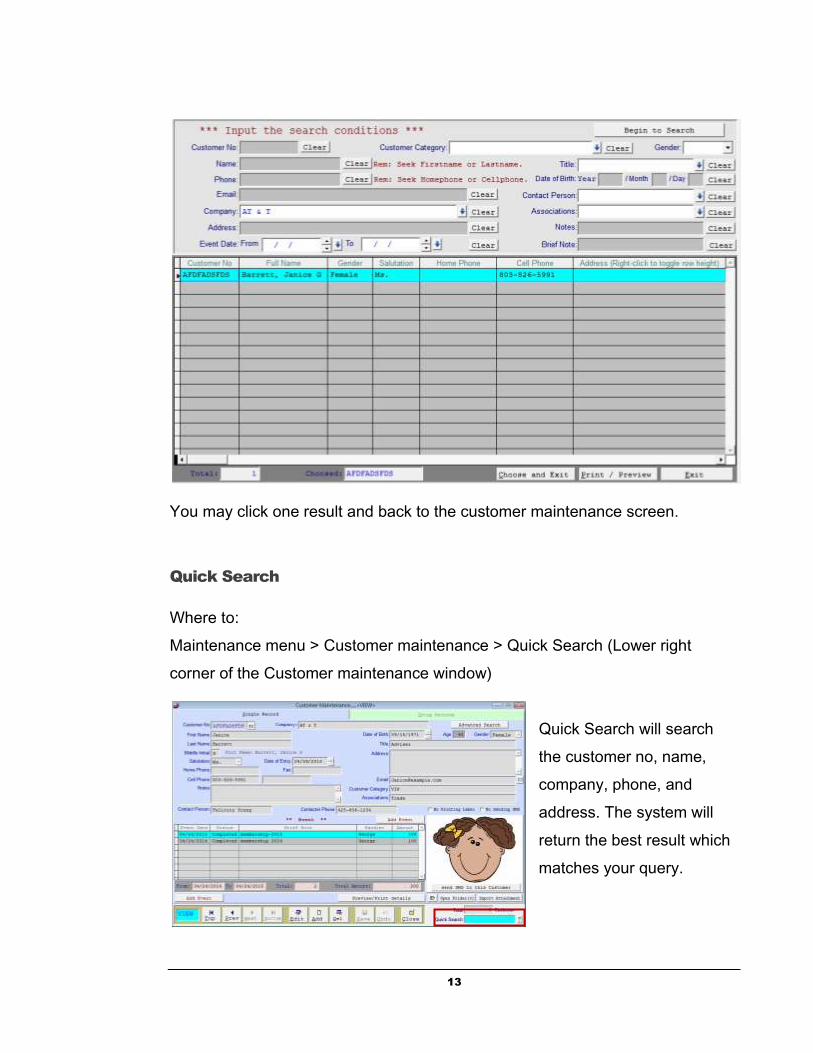
You may input your query in any field (Name, Phone, Category, Associations…)
and then click “Begin to Search.”
The system will return the best result which matches your query.
Chapter
5
13
You may click one result and back to the customer maintenance screen.
Quick Search
Where to:
Maintenance menu > Customer maintenance > Quick Search (Lower right
corner of the Customer maintenance window)
Quick Search will search
the customer no, name,
company, phone, and
address. The system will
return the best result which
matches your query.
14
6. Other Settings
Customer Category Maintenance
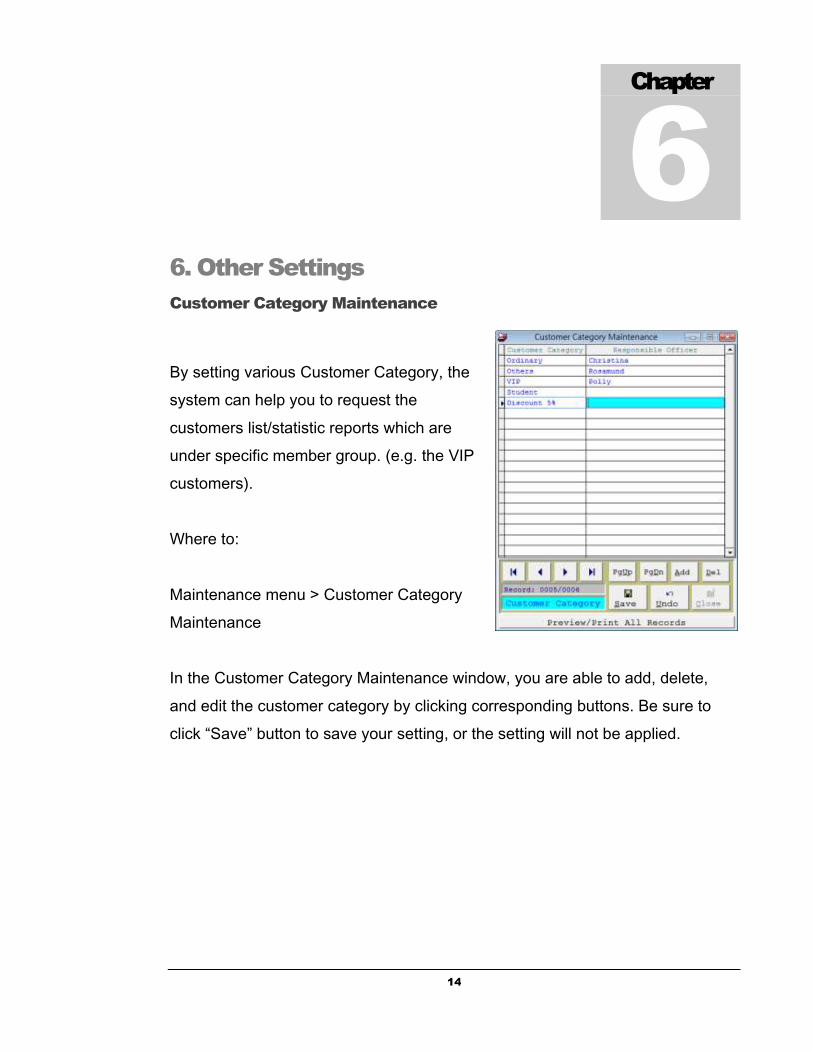
By setting various Customer Category, the
system can help you to request the
customers list/statistic reports which are
under specific member group. (e.g. the VIP
customers).
Where to:
Maintenance menu > Customer Category
Maintenance
In the Customer Category Maintenance window, you are able to add, delete,
and edit the customer category by clicking corresponding buttons. Be sure to
click “Save” button to save your setting, or the setting will not be applied.
Chapter
6
15
Customer Title Maintenance
By setting various title, the system can help you to apply the title to each
customer.
Where to:
Maintenance menu > Title Maintenance
In the Title Maintenance window, you are able to add, delete, and edit the Title
by clicking corresponding buttons. Be sure to click “Save” button to save your
setting, or the setting will not be applied.
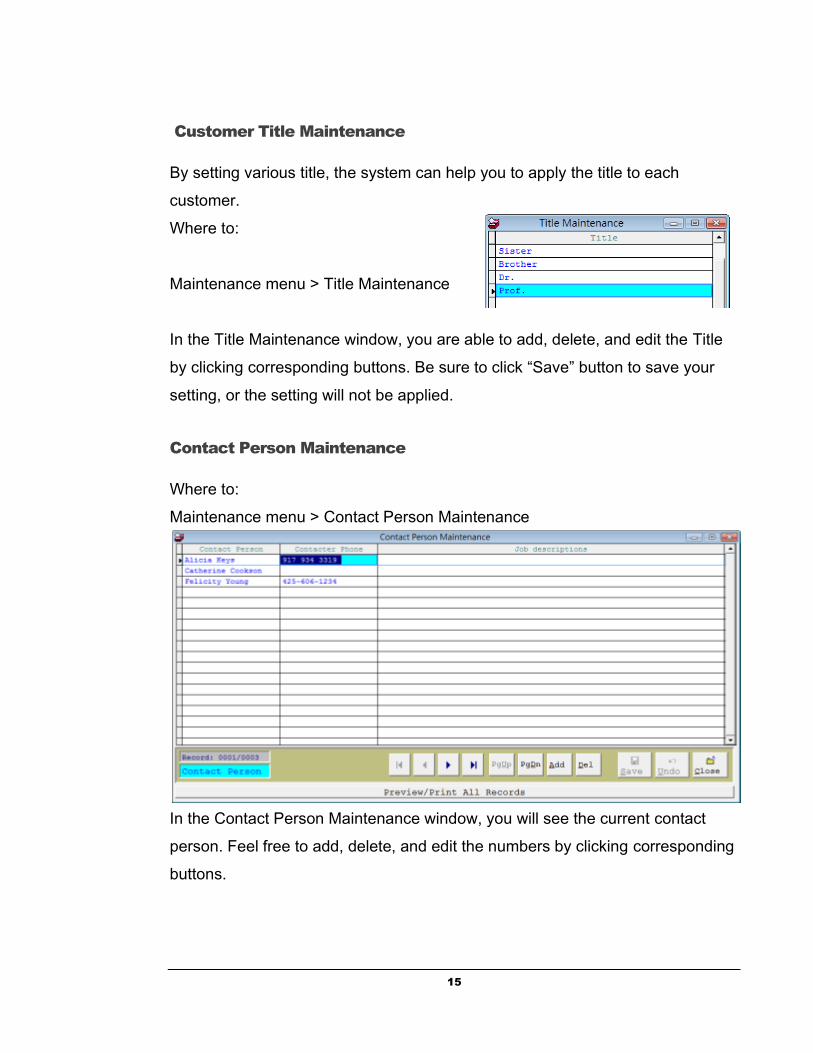
Contact Person Maintenance
Where to:
Maintenance menu > Contact Person Maintenance
In the Contact Person Maintenance window, you will see the current contact
person. Feel free to add, delete, and edit the numbers by clicking corresponding
buttons.
16
Association Maintenance
Where to:
Maintenance menu > Association
Maintenance
In the Association Maintenance
window, you will see the sample
associations. Feel free to add, delete,
and edit by clicking the corresponding
buttons.
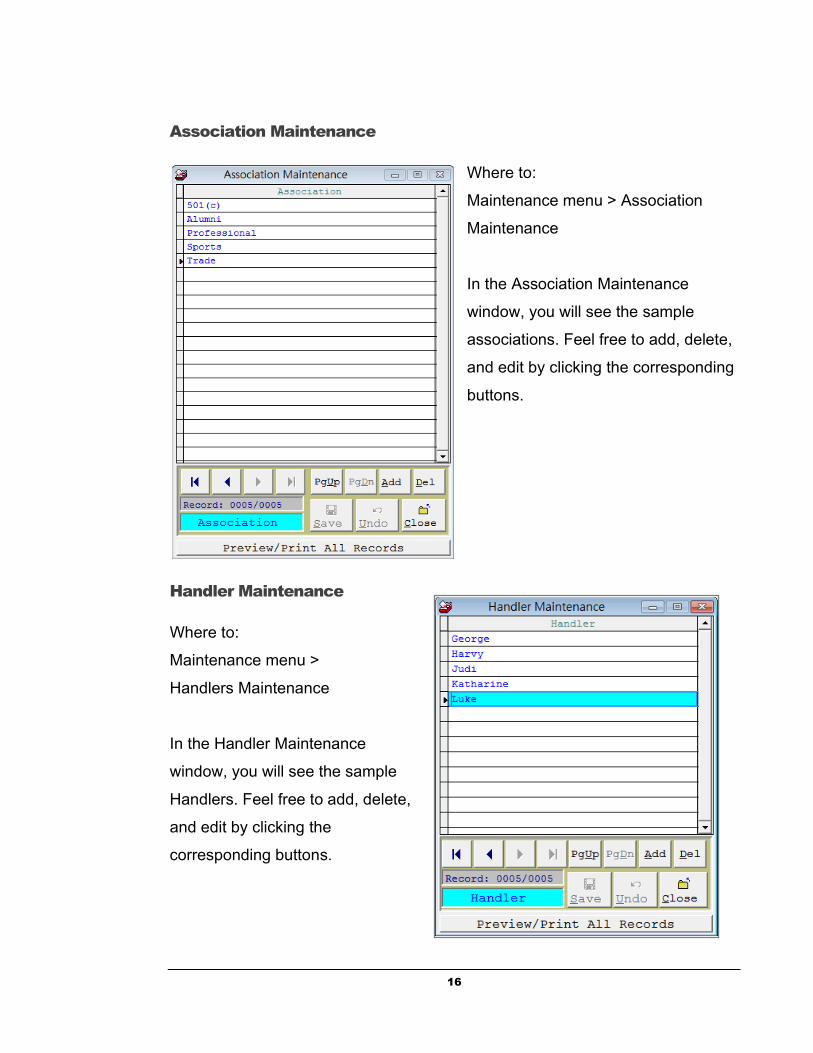
Handler Maintenance
Where to:
Maintenance menu >
Handlers Maintenance
In the Handler Maintenance
window, you will see the sample
Handlers. Feel free to add, delete,
and edit by clicking the
corresponding buttons.
17
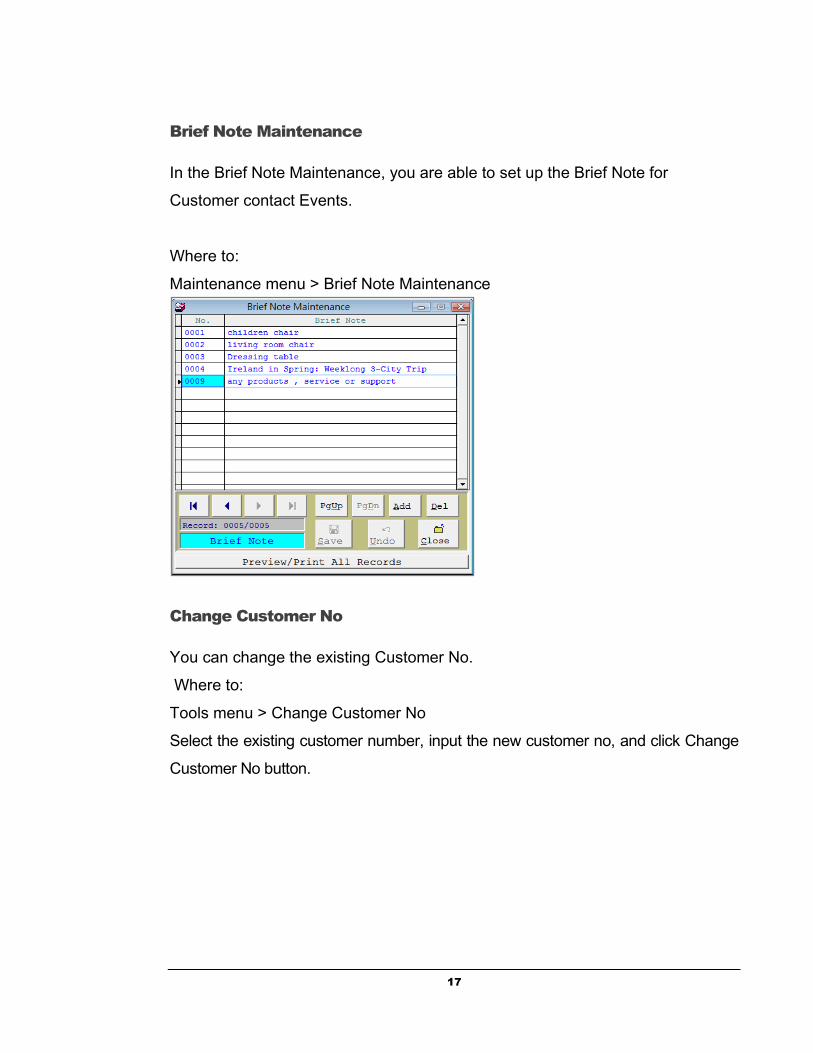
Brief Note Maintenance
In the Brief Note Maintenance, you are able to set up the Brief Note for
Customer contact Events.
Where to:
Maintenance menu > Brief Note Maintenance
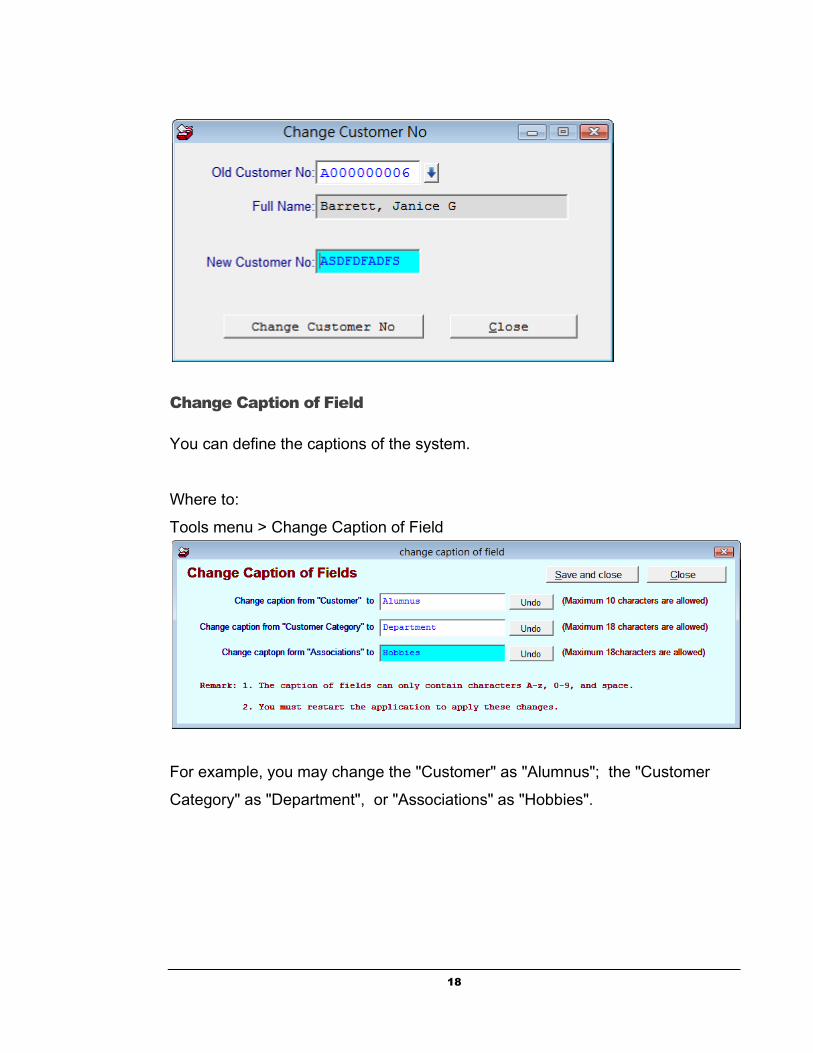
Change Customer No
You can change the existing Customer No.
Where to:
Tools menu > Change Customer No
Select the existing customer number, input the new customer no, and click Change
Customer No button.
18
Change Caption of Field
You can define the captions of the system.
Where to:
Tools menu > Change Caption of Field
For example, you may change the "Customer" as "Alumnus"; the "Customer
Category" as "Department", or "Associations" as "Hobbies".
19
7. Reports
This Chapter will guide you how to view and print reports of the customers,
contact events history, amount they paid, and other statistic data.
All the reports under the conditions that you selected can be exported into Excel
file type.
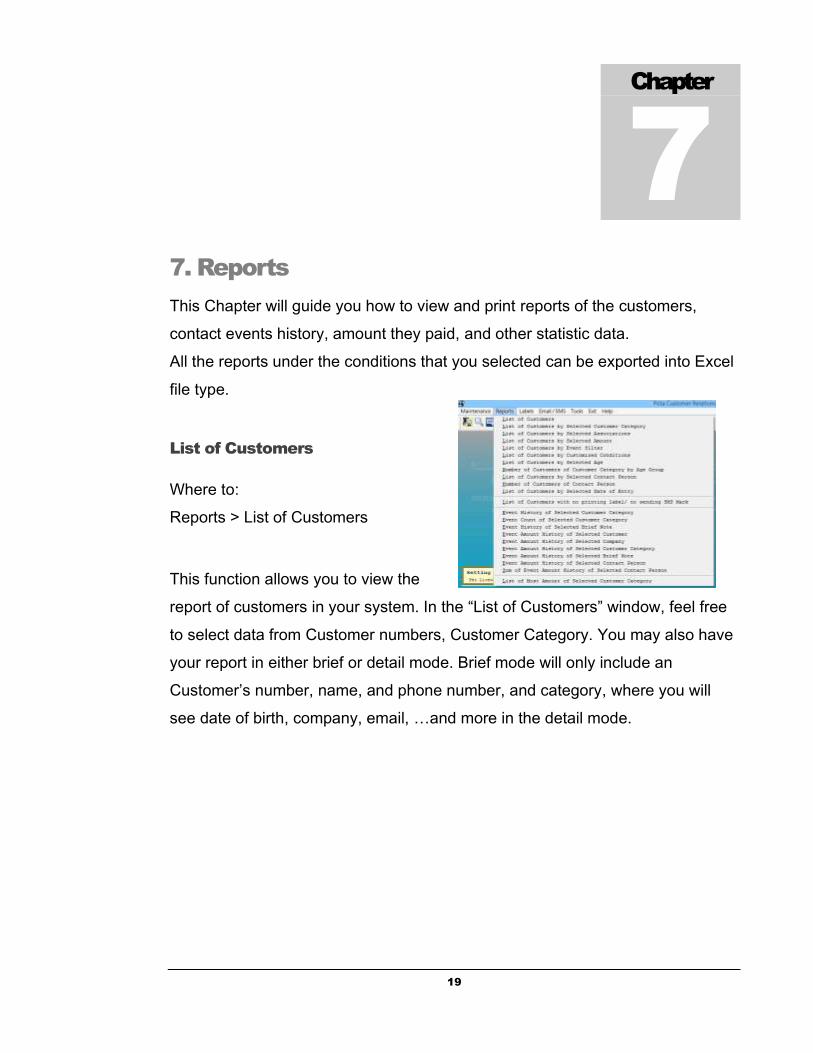
List of Customers
Where to:
Reports > List of Customers
This function allows you to view the
report of customers in your system. In the “List of Customers” window, feel free
to select data from Customer numbers, Customer Category. You may also have
your report in either brief or detail mode. Brief mode will only include an
Customer’s number, name, and phone number, and category, where you will
see date of birth, company, email, …and more in the detail mode.
Chapter
7
20
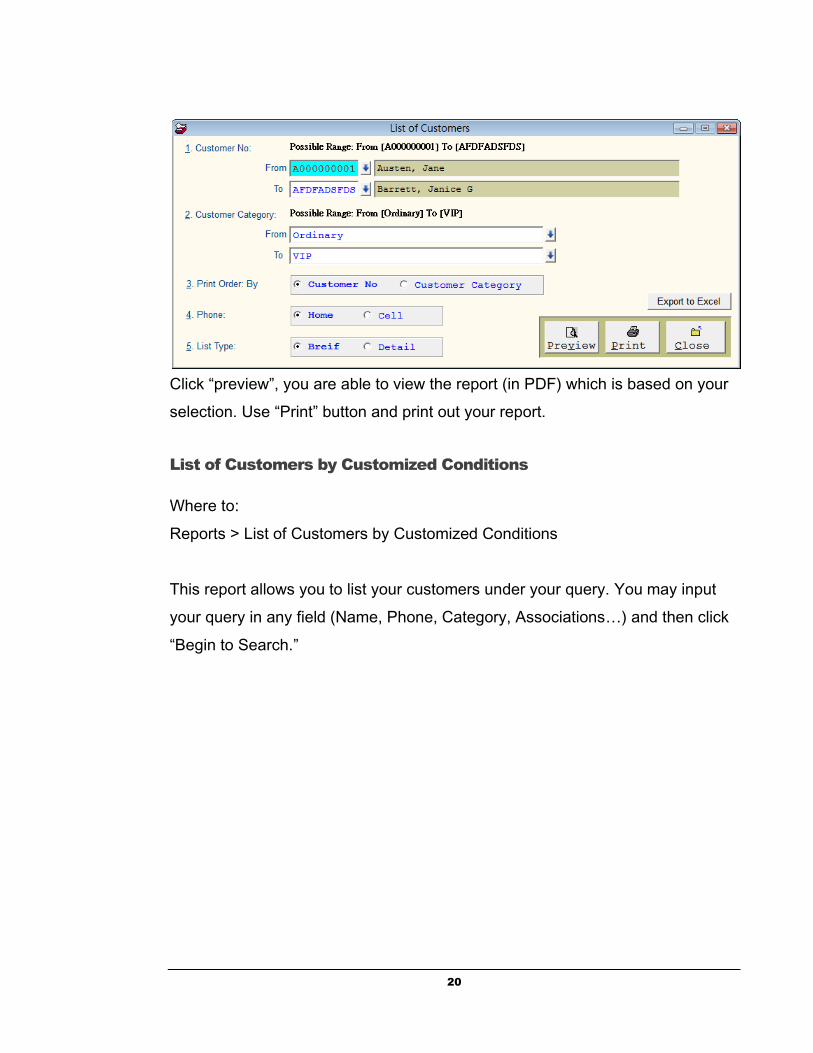
Click “preview”, you are able to view the report (in PDF) which is based on your
selection. Use “Print” button and print out your report.
List of Customers by Customized Conditions
Where to:
Reports > List of Customers by Customized Conditions
This report allows you to list your customers under your query. You may input
your query in any field (Name, Phone, Category, Associations…) and then click
“Begin to Search.”
21
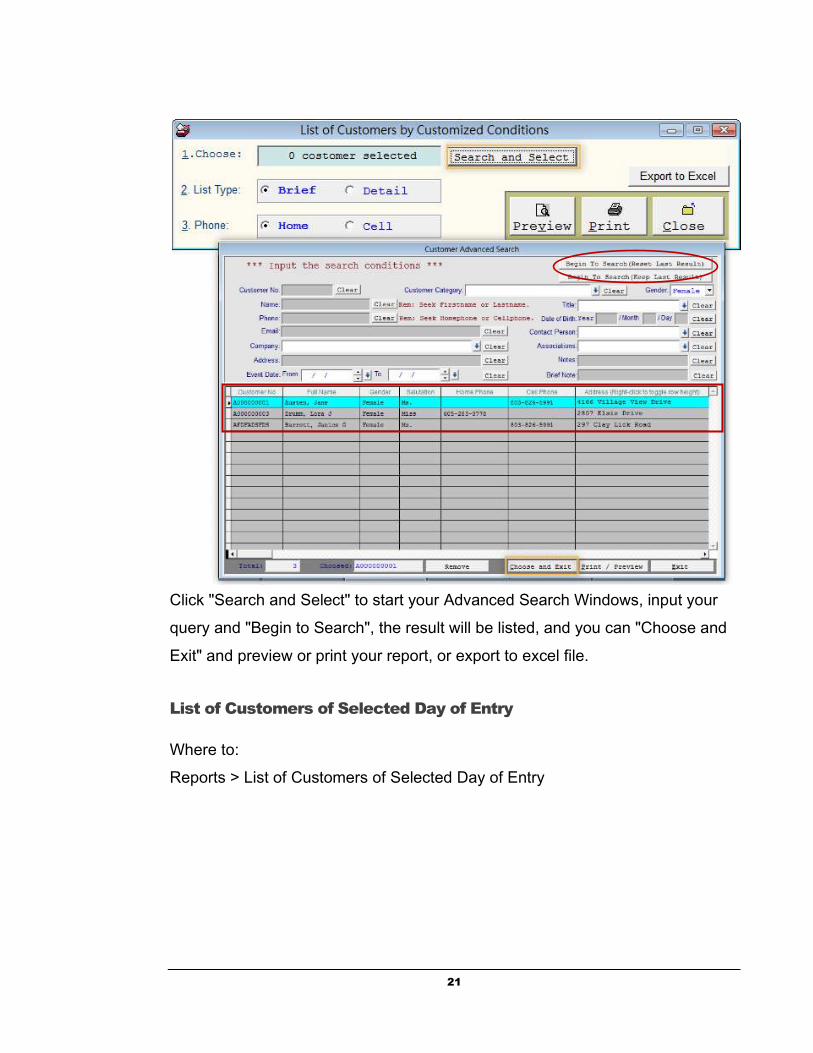
Click "Search and Select" to start your Advanced Search Windows, input your
query and "Begin to Search", the result will be listed, and you can "Choose and
Exit" and preview or print your report, or export to excel file.
List of Customers of Selected Day of Entry
Where to:
Reports > List of Customers of Selected Day of Entry
22
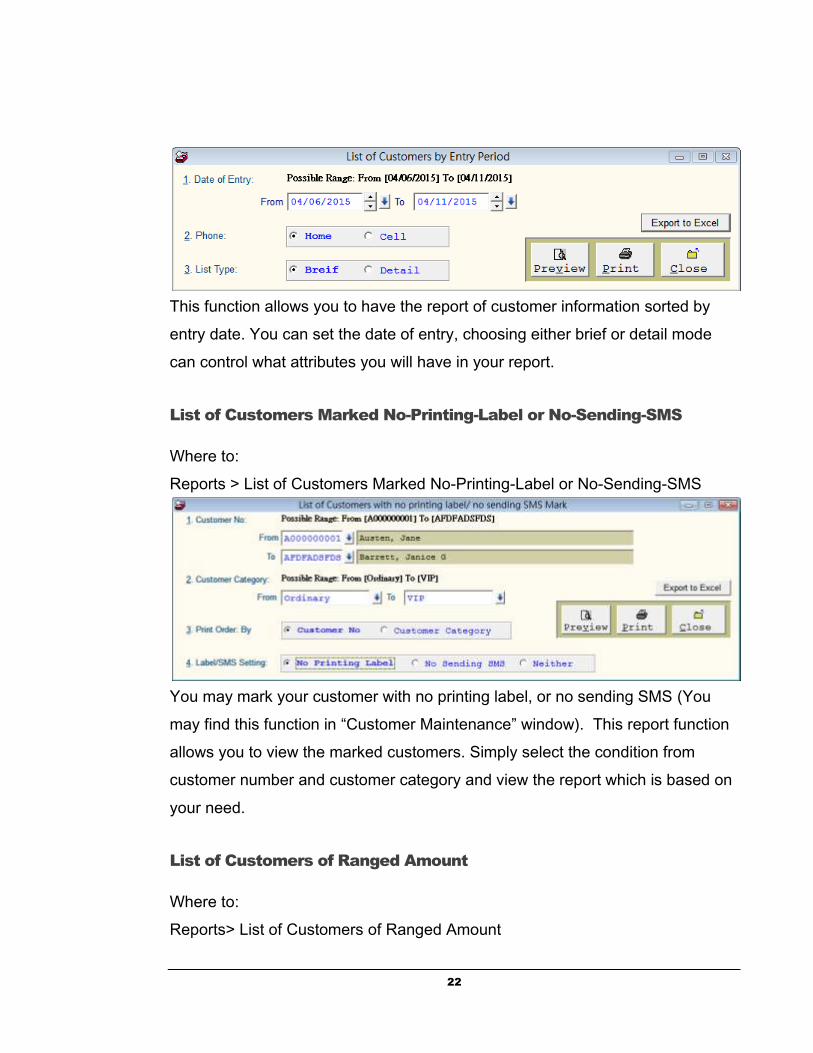
This function allows you to have the report of customer information sorted by
entry date. You can set the date of entry, choosing either brief or detail mode
can control what attributes you will have in your report.
List of Customers Marked No-Printing-Label or No-Sending-SMS
Where to:
Reports > List of Customers Marked No-Printing-Label or No-Sending-SMS
You may mark your customer with no printing label, or no sending SMS (You
may find this function in “Customer Maintenance” window). This report function
allows you to view the marked customers. Simply select the condition from
customer number and customer category and view the report which is based on
your need.
List of Customers of Ranged Amount
Where to:
Reports> List of Customers of Ranged Amount
23
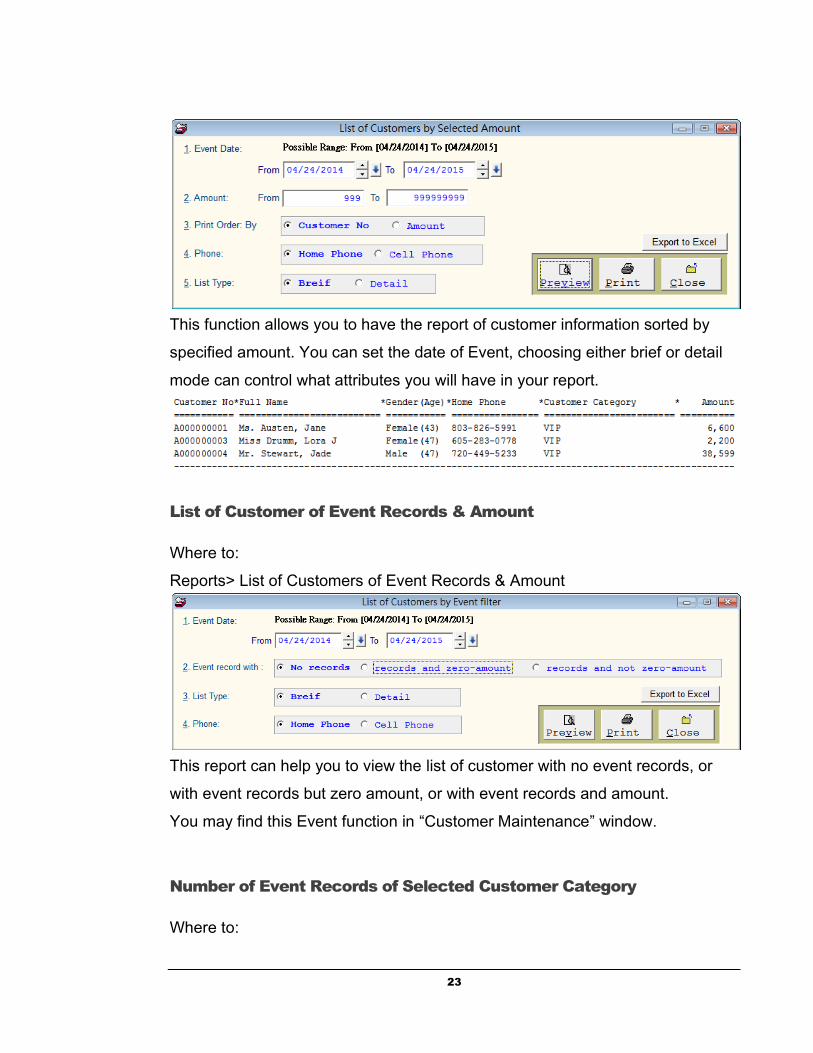
This function allows you to have the report of customer information sorted by
specified amount. You can set the date of Event, choosing either brief or detail
mode can control what attributes you will have in your report.
List of Customer of Event Records & Amount
Where to:
Reports> List of Customers of Event Records & Amount
This report can help you to view the list of customer with no event records, or
with event records but zero amount, or with event records and amount.
You may find this Event function in “Customer Maintenance” window.
Number of Event Records of Selected Customer Category
Where to:
24
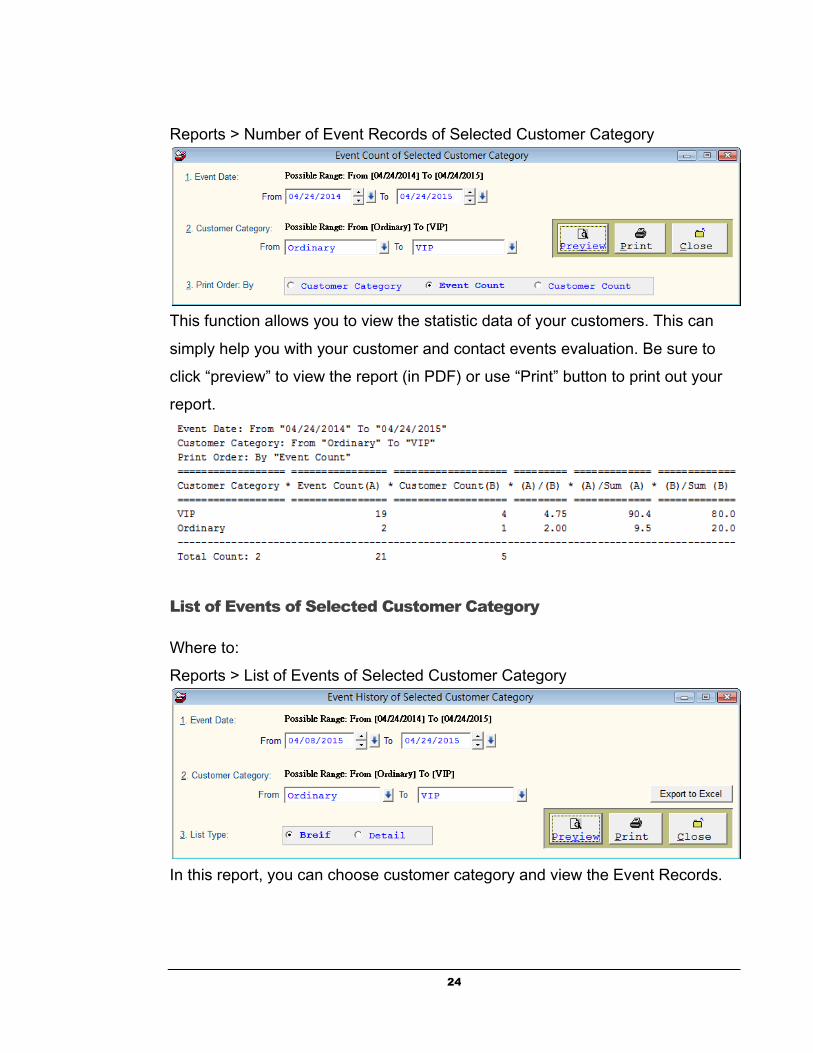
Reports > Number of Event Records of Selected Customer Category
This function allows you to view the statistic data of your customers. This can
simply help you with your customer and contact events evaluation. Be sure to
click “preview” to view the report (in PDF) or use “Print” button to print out your
report.
List of Events of Selected Customer Category
Where to:
Reports > List of Events of Selected Customer Category
In this report, you can choose customer category and view the Event Records.
25
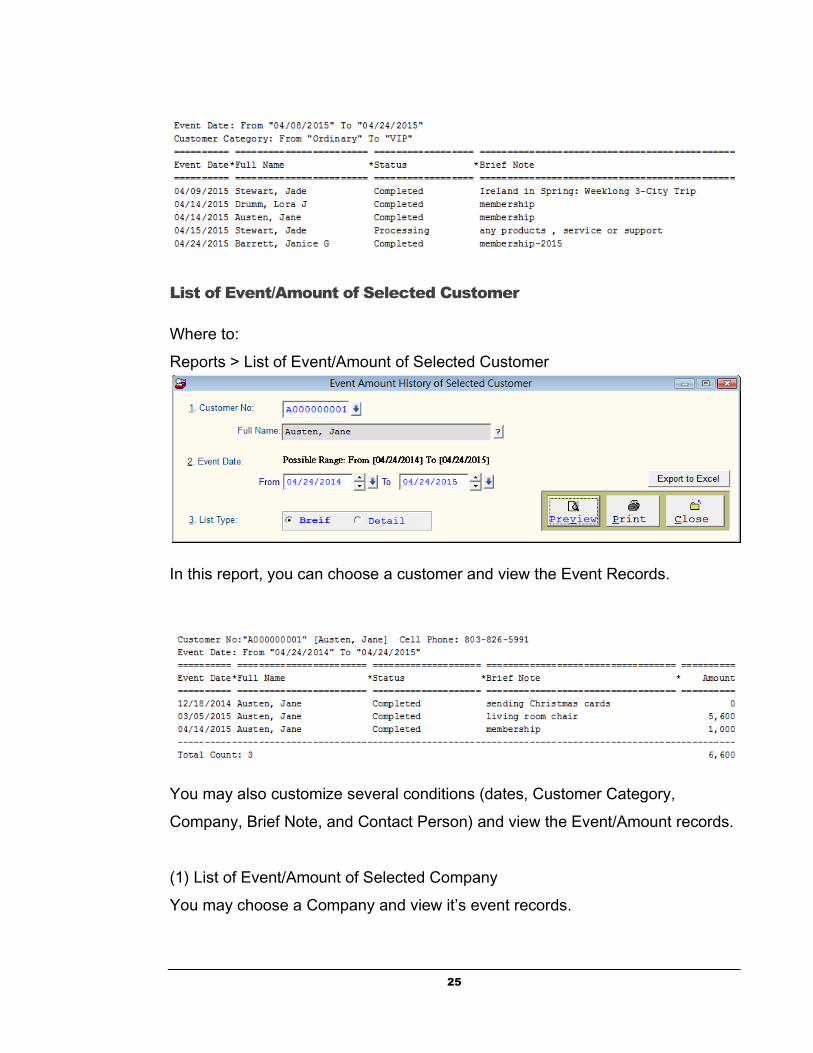
List of Event/Amount of Selected Customer
Where to:
Reports > List of Event/Amount of Selected Customer
In this report, you can choose a customer and view the Event Records.
You may also customize several conditions (dates, Customer Category,
Company, Brief Note, and Contact Person) and view the Event/Amount records.
(1) List of Event/Amount of Selected Company
You may choose a Company and view it’s event records.
26
(2) List of Event/Amount of Selected Customer Category
You may choose a Customer Category and view it’s event records.
(3) List of Event/Amount of Selected Brief Note
You may choose a Brief Note in your Event records, and view the list of Event
records.
(4) List of Event/Amount of Selected Contact Person
You may choose a Contact Person in your Event records, and view the list of
Event records.
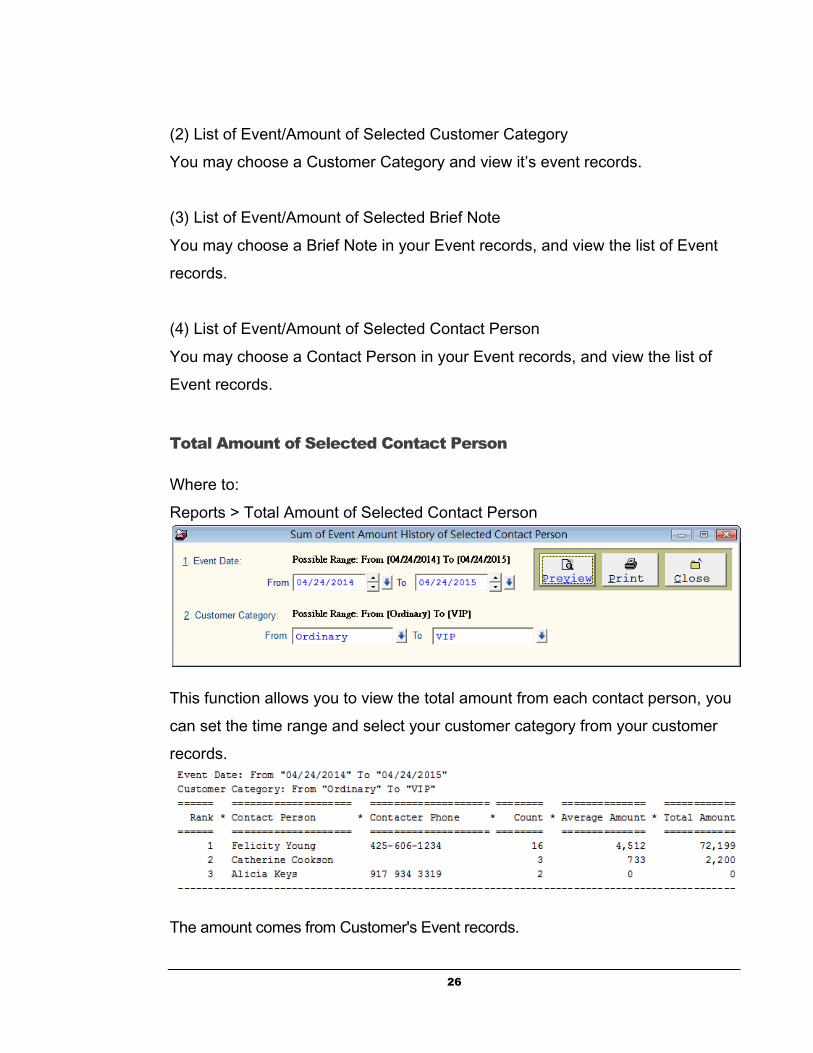
Total Amount of Selected Contact Person
Where to:
Reports > Total Amount of Selected Contact Person
This function allows you to view the total amount from each contact person, you
can set the time range and select your customer category from your customer
records.
The amount comes from Customer's Event records.

27
List of Amount Ranking by Selected Customer Category
Where to:
Reports > List of Amount Ranking by Selected Customer Category
This function allows you to view the amount ranking of your customers. The
result can help you with your customer and contact events evaluation. Be sure
to click “preview” to view the report (in PDF) or use “Print” button to print out
your report.
The amount comes from Customer's Event records.
28
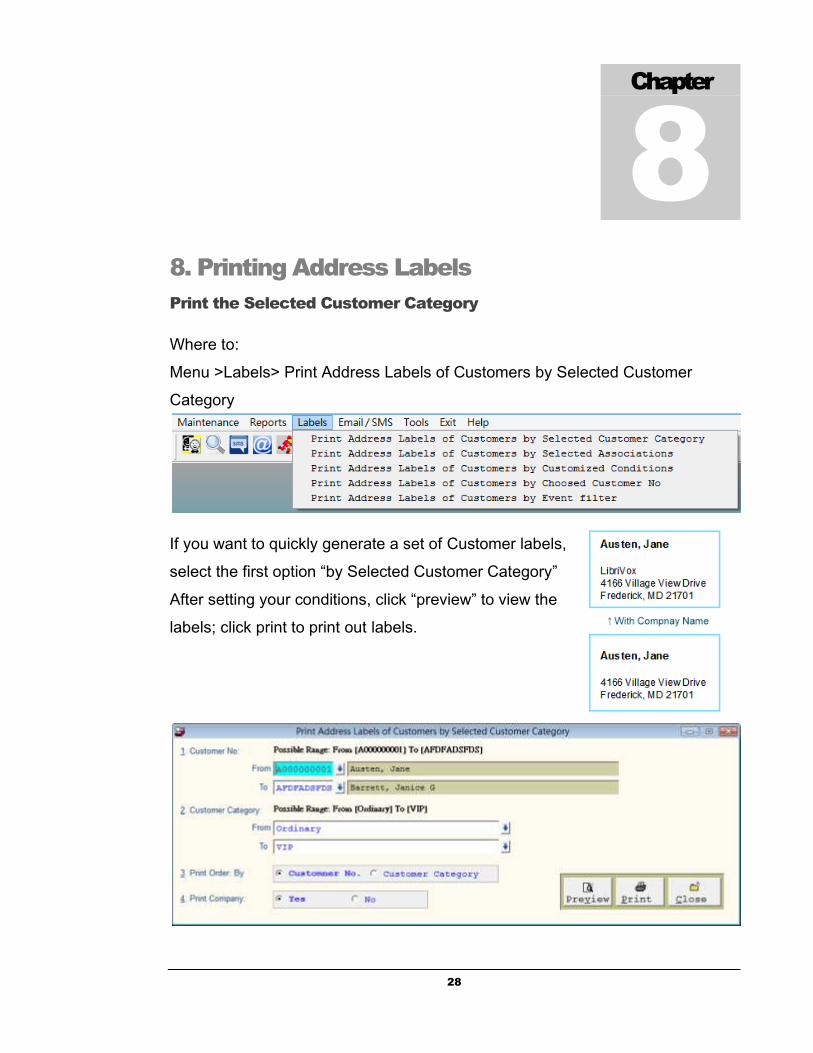
8. Printing Address Labels
Print the Selected Customer Category
Where to:
Menu >Labels> Print Address Labels of Customers by Selected Customer
Category
If you want to quickly generate a set of Customer labels,
select the first option “by Selected Customer Category”
After setting your conditions, click “preview” to view the
labels; click print to print out labels.
Chapter
8
29
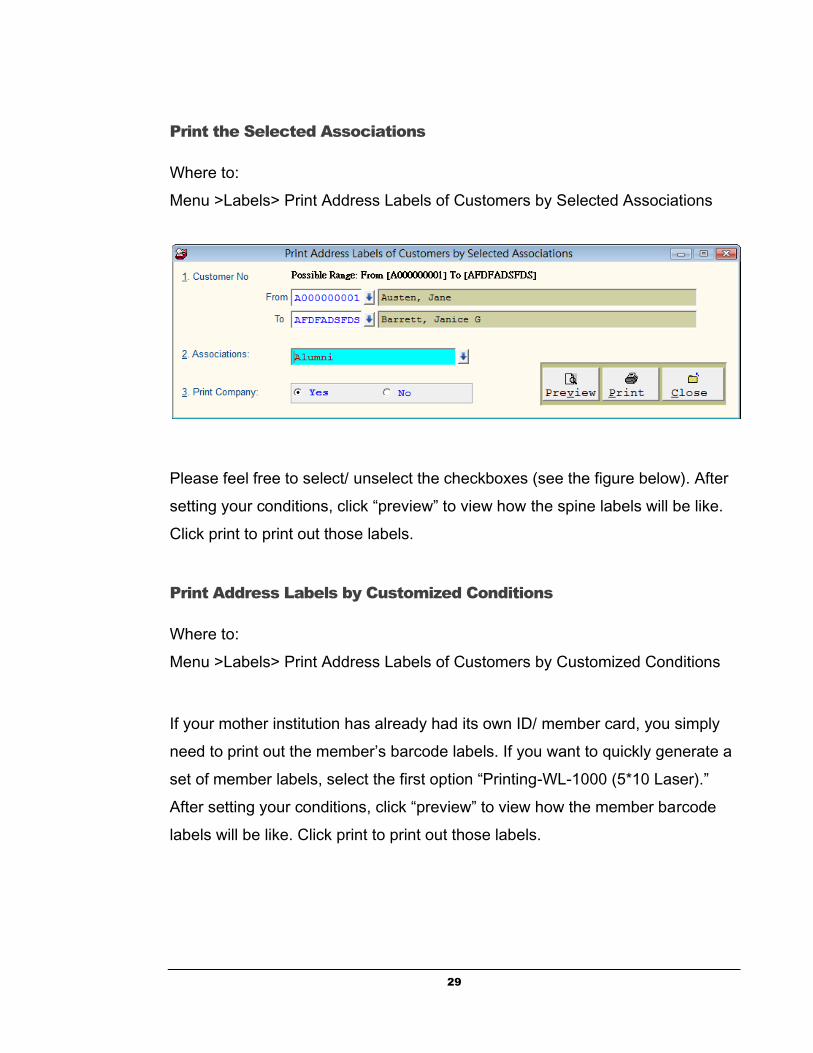
Print the Selected Associations
Where to:
Menu >Labels> Print Address Labels of Customers by Selected Associations
Please feel free to select/ unselect the checkboxes (see the figure below). After
setting your conditions, click “preview” to view how the spine labels will be like.
Click print to print out those labels.
Print Address Labels by Customized Conditions
Where to:
Menu >Labels> Print Address Labels of Customers by Customized Conditions
If your mother institution has already had its own ID/ member card, you simply
need to print out the member’s barcode labels. If you want to quickly generate a
set of member labels, select the first option “Printing-WL-1000 (5*10 Laser).”
After setting your conditions, click “preview” to view how the member barcode
labels will be like. Click print to print out those labels.
30
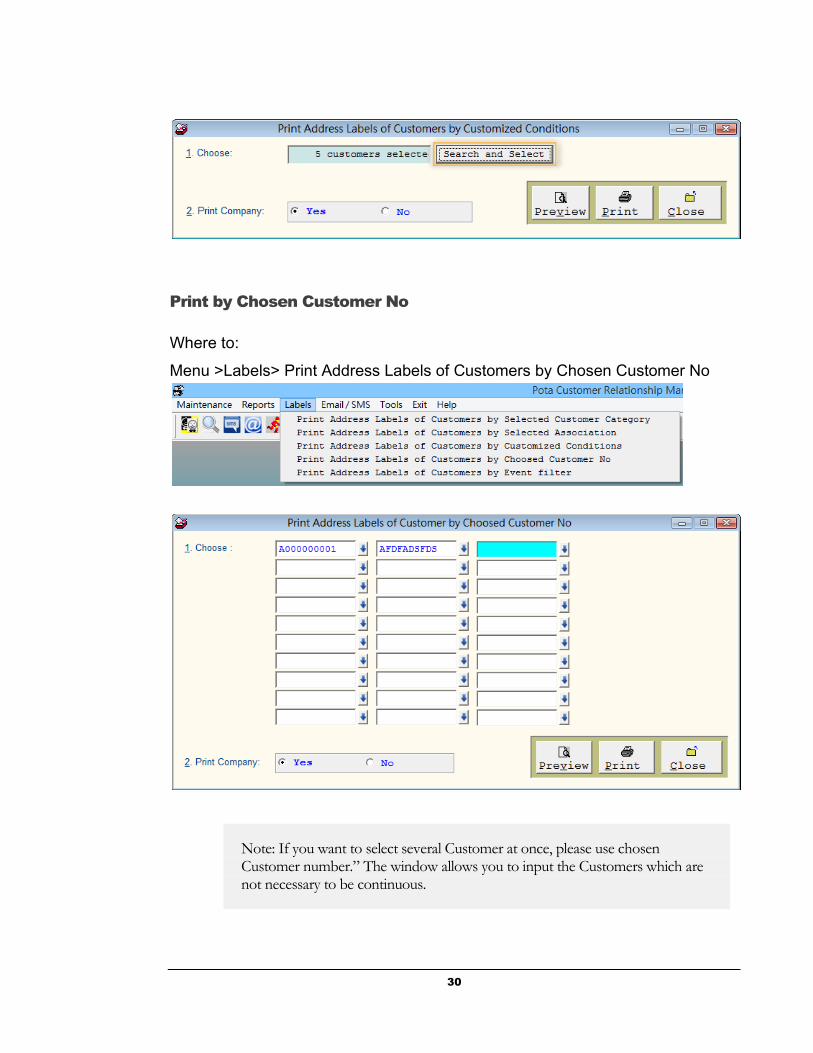
Print by Chosen Customer No
Where to:
Menu >Labels> Print Address Labels of Customers by Chosen Customer No
Note: If you want to select several Customer at once, please use chosen Customer number.” The window allows you to input the Customers which are not necessary to be continuous.

31
If you want to quickly generate a set of library cards, select the first option
“Printing-WL-OL244 (2*5 Laser).” After setting your conditions, click “preview” to
view how the library cards will be like. Click print to print out those cards.
Print by Ranged Amount
Where to:
Menu >Labels> Print Address Labels of Customers by Chosen Customer No
32
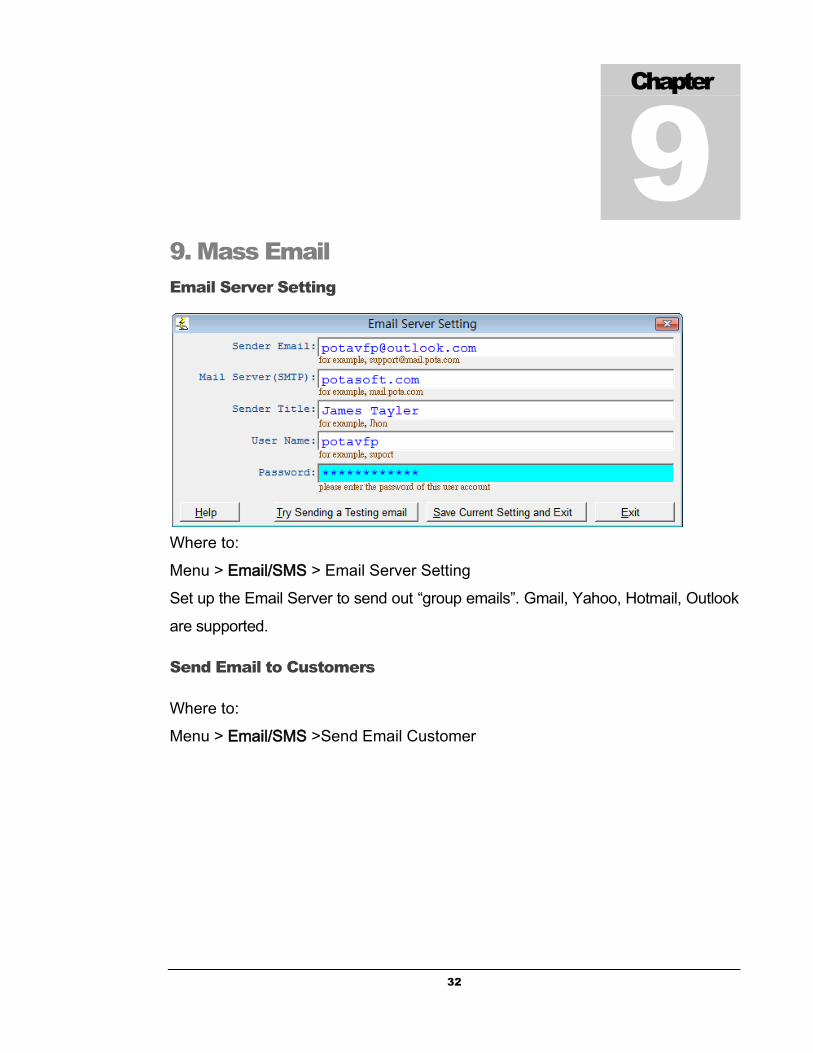
9. Mass Email
Email Server Setting
Where to:
Menu > Email/SMS > Email Server Setting
Set up the Email Server to send out “group emails”. Gmail, Yahoo, Hotmail, Outlook
are supported.
Send Email to Customers
Where to:
Menu > Email/SMS >Send Email Customer
Chapter
9

33
E-mail Content setting
Each email will show the recipient's first name, the sample is as below.
34
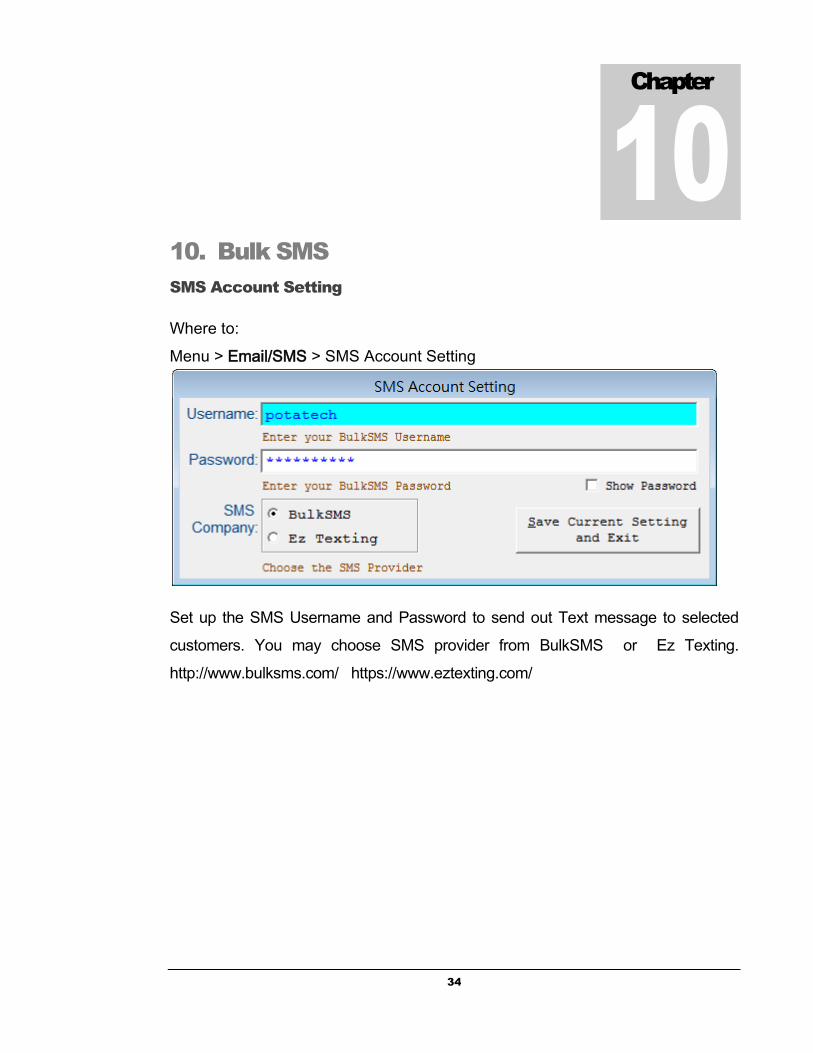
10. Bulk SMS
SMS Account Setting
Where to:
Menu > Email/SMS > SMS Account Setting
Set up the SMS Username and Password to send out Text message to selected
customers. You may choose SMS provider from BulkSMS or Ez Texting.
http://www.bulksms.com/ https://www.eztexting.com/
Chapter
9
Chapter
10
35
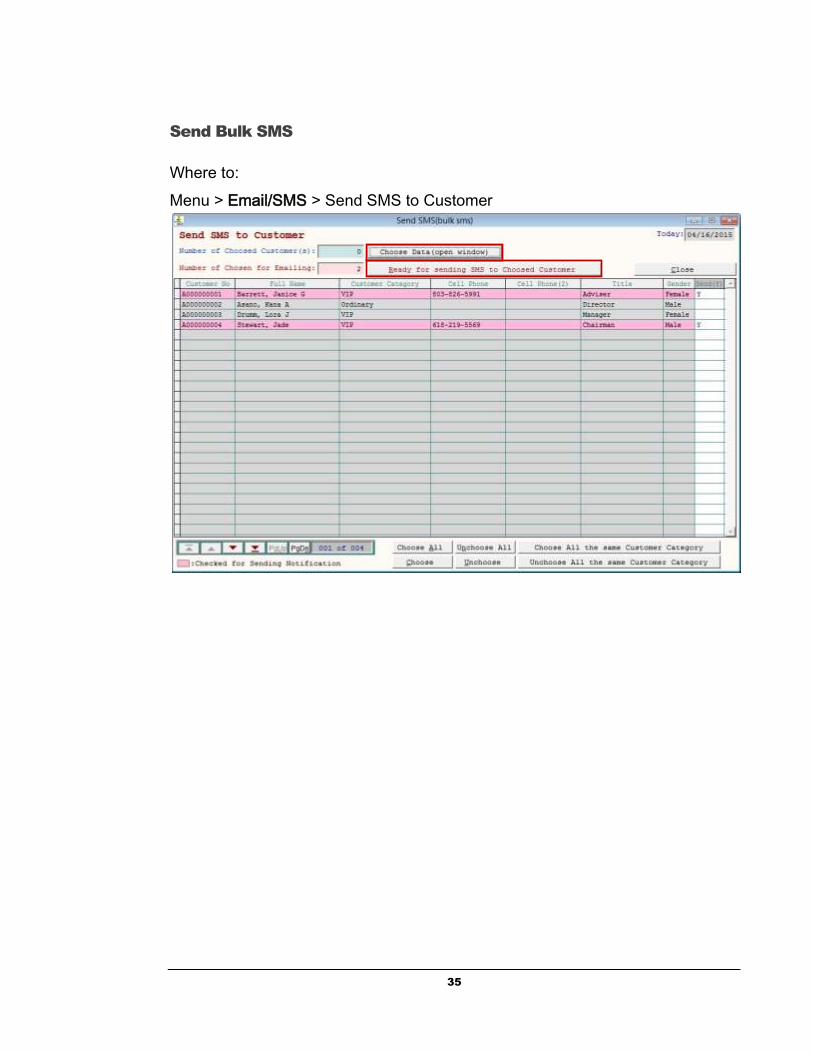
Send Bulk SMS
Where to:
Menu > Email/SMS > Send SMS to Customer
36
11. Mass Import/Export
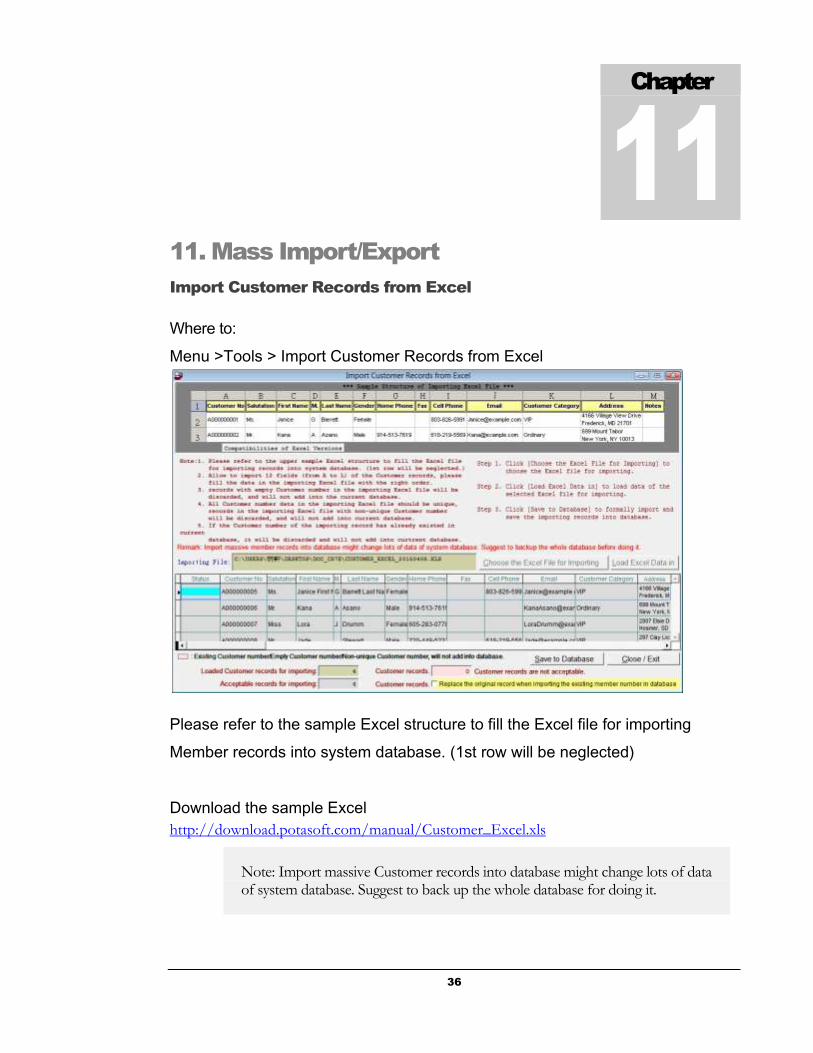
Import Customer Records from Excel
Where to:
Menu >Tools > Import Customer Records from Excel
Please refer to the sample Excel structure to fill the Excel file for importing
Member records into system database. (1st row will be neglected)
Download the sample Excel
http://download.potasoft.com/manual/Customer_Excel.xls
Chapter Chapter
11
Note: Import massive Customer records into database might change lots of data of system database. Suggest to back up the whole database for doing it.
37
To replace the original data, by click on “Replace the original record when
importing the existing Customer number in database”.
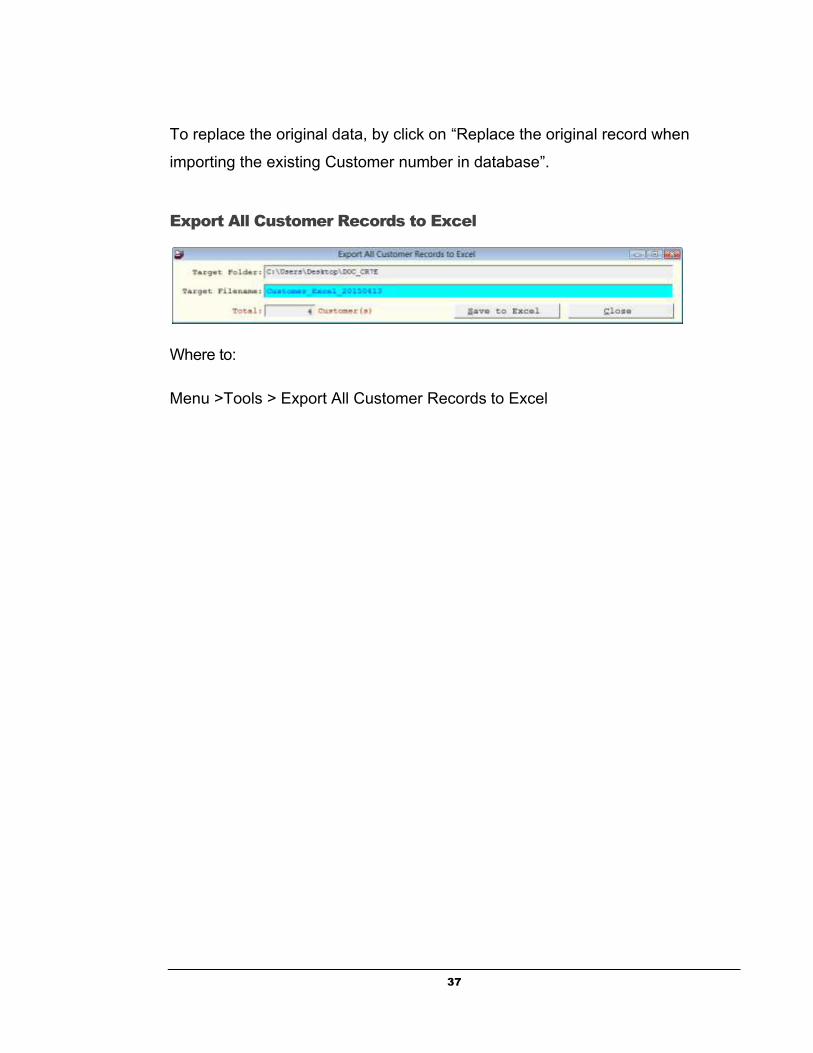
Export All Customer Records to Excel
Where to:
Menu >Tools > Export All Customer Records to Excel
38
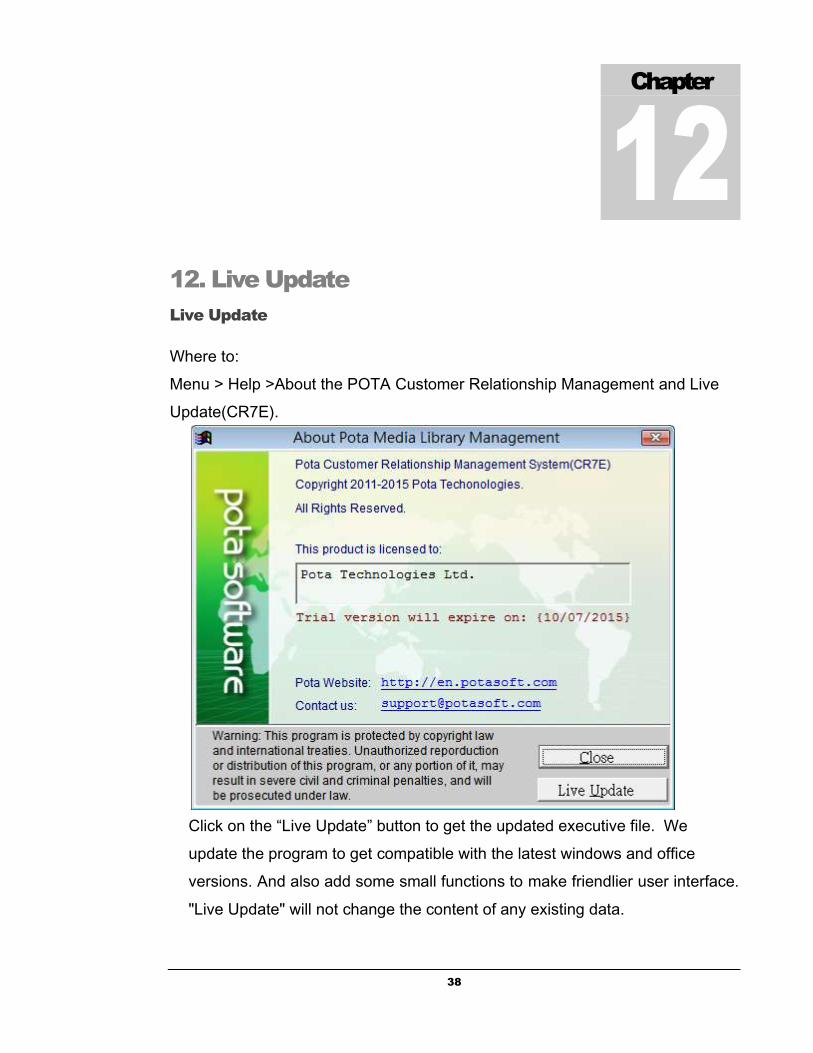
12. Live Update
Live Update
Where to:
Menu > Help >About the POTA Customer Relationship Management and Live
Update(CR7E).
Click on the “Live Update” button to get the updated executive file. We
update the program to get compatible with the latest windows and office
versions. And also add some small functions to make friendlier user interface.
"Live Update" will not change the content of any existing data.
Chapter
12
39
13. How to Buy
We offer up to 90 day & 990 record limitation free trial version, you can try all
of the features in the program to get a feel for it. And will remind you when
your trial is coming to an end. If you want to convert to the full version, please
visit our website (http://en.potasoft.com/) to see the instruction. We take
PayPal and other forms of payment upon request. If you have any questions,
please visit our website or contact us via email [email protected] or
Skype ID: pota.soft
Chapter
13


![Recetario de Pota 2010[1]](https://img.pdfslide.net/doc/110x75/55cf97ae550346d03392f9c7/recetario-de-pota-20101.jpg)

