Embed Size (px)
Citation preview

Informatica PowerCenter (Version 9.0)
Mapping Analyst for Excel Guide

Informatica PowerCenter Mapping Analyst for Excel Guide
Version 9 .0December 2009
Copyright (c) 1998-2009 Informatica. All rights reserved.
This software and documentation contain proprietary information of Informatica Corporation and are provided under a license agreementcontaining restrictions on use and disclosure and are also protected by copyright law. Reverse engineering of the software is prohibited.No part of this document may be reproduced or transmitted in any form, by any means (electronic, photocopying, recording or otherwise)without prior consent of Informatica Corporation. This Software may be protected by U.S. and/or international Patents and other PatentsPending.
Use, duplication, or disclosure of the Software by the U.S. Government is subject to the restrictions set forth in the applicable softwarelicense agreement and as provided in DFARS 227.7202-1(a) and 227.7702-3(a) (1995), DFARS 252.227-7013©(1)(ii) (OCT 1988), FAR12.212(a) (1995), FAR 52.227-19, or FAR 52.227-14 (ALT III), as applicable.
The information in this product or documentation is subject to change without notice. If you find any problems in this product ordocumentation, please report them to us in writing.
Informatica, Informatica Platform, Informatica Data Services, PowerCenter, PowerCenterRT, PowerCenter Connect, PowerCenter DataAnalyzer, PowerExchange, PowerMart, Metadata Manager, Informatica Data Quality, Informatica Data Explorer, Informatica B2B DataTransformation, Informatica B2B Data Exchange and Informatica On Demand are trademarks or registered trademarks of InformaticaCorporation in the United States and in jurisdictions throughout the world. All other company and product names may be trade names ortrademarks of their respective owners.
Portions of this software and/or documentation are subject to copyright held by third parties, including without limitation: CopyrightDataDirect Technologies. All rights reserved. Copyright © Sun Microsystems. All rights reserved. Copyright © RSA Security Inc. All RightsReserved. Copyright © Ordinal Technology Corp. All rights reserved.Copyright © Aandacht c.v. All rights reserved. Copyright Genivia, Inc.All rights reserved. Copyright 2007 Isomorphic Software. All rights reserved. Copyright © Meta Integration Technology, Inc. All rightsreserved. Copyright © Intalio. All rights reserved. Copyright © Oracle. All rights reserved. Copyright © Adobe Systems Incorporated. Allrights reserved. Copyright © DataArt, Inc. All rights reserved. Copyright © ComponentSource. All rights reserved. Copyright © MicrosoftCorporation. All rights reserved. Copyright © Rouge Wave Software, Inc. All rights reserved. Copyright © Teradata Corporation. All rightsreserved. Copyright © Yahoo! Inc. All rights reserved. Copyright © Glyph & Cog, LLC. All rights reserved.
This product includes software developed by the Apache Software Foundation (http://www.apache.org/), and other software which islicensed under the Apache License, Version 2.0 (the "License"). You may obtain a copy of the License at http://www.apache.org/licenses/LICENSE-2.0. Unless required by applicable law or agreed to in writing, software distributed under the License is distributed on an "ASIS" BASIS, WITHOUT WARRANTIES OR CONDITIONS OF ANY KIND, either express or implied. See the License for the specificlanguage governing permissions and limitations under the License.
This product includes software which was developed by Mozilla (http://www.mozilla.org/), software copyright The JBoss Group, LLC, allrights reserved; software copyright © 1999-2006 by Bruno Lowagie and Paulo Soares and other software which is licensed under theGNU Lesser General Public License Agreement, which may be found at http://www.gnu.org/licenses/lgpl.html. The materials are providedfree of charge by Informatica, "as-is", without warranty of any kind, either express or implied, including but not limited to the impliedwarranties of merchantability and fitness for a particular purpose.
The product includes ACE(TM) and TAO(TM) software copyrighted by Douglas C. Schmidt and his research group at WashingtonUniversity, University of California, Irvine, and Vanderbilt University, Copyright (©) 1993-2006, all rights reserved.
This product includes software developed by the OpenSSL Project for use in the OpenSSL Toolkit (copyright The OpenSSL Project. AllRights Reserved) and redistribution of this software is subject to terms available at http://www.openssl.org.
This product includes Curl software which is Copyright 1996-2007, Daniel Stenberg, <[email protected]>. All Rights Reserved.Permissions and limitations regarding this software are subject to terms available at http://curl.haxx.se/docs/copyright.html. Permission touse, copy, modify, and distribute this software for any purpose with or without fee is hereby granted, provided that the above copyrightnotice and this permission notice appear in all copies.
The product includes software copyright 2001-2005 (©) MetaStuff, Ltd. All Rights Reserved. Permissions and limitations regarding thissoftware are subject to terms available at http://www.dom4j.org/ license.html.
The product includes software copyright © 2004-2007, The Dojo Foundation. All Rights Reserved. Permissions and limitations regardingthis software are subject to terms available at http:// svn.dojotoolkit.org/dojo/trunk/LICENSE.
This product includes ICU software which is copyright International Business Machines Corporation and others. All rights reserved.Permissions and limitations regarding this software are subject to terms available at http://source.icu-project.org/repos/icu/icu/trunk/license.html.
This product includes software copyright © 1996-2006 Per Bothner. All rights reserved. Your right to use such materials is set forth in thelicense which may be found at http://www.gnu.org/software/ kawa/Software-License.html.
This product includes OSSP UUID software which is Copyright © 2002 Ralf S. Engelschall, Copyright © 2002 The OSSP ProjectCopyright © 2002 Cable & Wireless Deutschland. Permissions and limitations regarding this software are subject to terms available athttp://www.opensource.org/licenses/mit-license.php.

This product includes software developed by Boost (http://www.boost.org/) or under the Boost software license. Permissions andlimitations regarding this software are subject to terms available at http:/ /www.boost.org/LICENSE_1_0.txt.
This product includes software copyright © 1997-2007 University of Cambridge. Permissions and limitations regarding this software aresubject to terms available at http://www.pcre.org/license.txt.
This product includes software copyright © 2007 The Eclipse Foundation. All Rights Reserved. Permissions and limitations regarding thissoftware are subject to terms available at http:// www.eclipse.org/org/documents/epl-v10.php.
This product includes software licensed under the terms at http://www.tcl.tk/software/tcltk/license.html, http://www.bosrup.com/web/overlib/?License, http://www.stlport.org/doc/license.html, http://www.asm.ow2.org/license.html, http://www.cryptix.org/LICENSE.TXT,http://hsqldb.org/web/hsqlLicense.html, http://httpunit.sourceforge.net/doc/license.html, http://jung.sourceforge.net/license.txt , http://www.gzip.org/zlib/zlib_license.html, http://www.openldap.org/software/release/license.html, http://www.libssh2.org, http://slf4j.org/license.html, and http://www.sente.ch/software/OpenSourceLicense.htm.
This product includes software licensed under the Academic Free License (http://www.opensource.org/licenses/afl-3.0.php), the CommonDevelopment and Distribution License (http://www.opensource.org/licenses/cddl1.php) the Common Public License (http://www.opensource.org/licenses/cpl1.0.php) and the BSD License (http://www.opensource.org/licenses/bsd-license.php).
This product includes software copyright © 2003-2006 Joe WaInes, 2006-2007 XStream Committers. All rights reserved. Permissions andlimitations regarding this software are subject to terms available at http://xstream.codehaus.org/license.html. This product includessoftware developed by the Indiana University Extreme! Lab. For further information please visit http://www.extreme.indiana.edu/.
This Software is protected by U.S. Patent Numbers 5,794,246; 6,014,670; 6,016,501; 6,029,178; 6,032,158; 6,035,307; 6,044,374;6,092,086; 6,208,990; 6,339,775; 6,640,226; 6,789,096; 6,820,077; 6,823,373; 6,850,947; 6,895,471; 7,117,215; 7,162,643; 7,254,590; 7,281,001; 7,421,458; and 7,584,422, international Patents and other Patents Pending..
DISCLAIMER: Informatica Corporation provides this documentation "as is" without warranty of any kind, either express or implied,including, but not limited to, the implied warranties of non-infringement, merchantability, or use for a particular purpose. InformaticaCorporation does not warrant that this software or documentation is error free. The information provided in this software or documentationmay include technical inaccuracies or typographical errors. The information in this software and documentation is subject to change atany time without notice.
NOTICES
This Informatica product (the “Software”) includes certain drivers (the “DataDirect Drivers”) from DataDirect Technologies, an operating company of Progress SoftwareCorporation (“DataDirect”) which are subject to the following terms and conditions:
1.THE DATADIRECT DRIVERS ARE PROVIDED “AS IS” WITHOUT WARRANTY OF ANY KIND, EITHER EXPRESSED OR IMPLIED, INCLUDING BUT NOTLIMITED TO, THE IMPLIED WARRANTIES OF MERCHANTABILITY, FITNESS FOR A PARTICULAR PURPOSE AND NON-INFRINGEMENT.
2. IN NO EVENT WILL DATADIRECT OR ITS THIRD PARTY SUPPLIERS BE LIABLE TO THE END-USER CUSTOMER FOR ANY DIRECT, INDIRECT,INCIDENTAL, SPECIAL, CONSEQUENTIAL OR OTHER DAMAGES ARISING OUT OF THE USE OF THE ODBC DRIVERS, WHETHER OR NOT INFORMED OFTHE POSSIBILITIES OF DAMAGES IN ADVANCE. THESE LIMITATIONS APPLY TO ALL CAUSES OF ACTION, INCLUDING, WITHOUT LIMITATION, BREACHOF CONTRACT, BREACH OF WARRANTY, NEGLIGENCE, STRICT LIABILITY, MISREPRESENTATION AND OTHER TORTS.
Part Number: PC-MAE-90000-0001

Table of Contents
Preface . . . . . . . . . . . . . . . . . . . . . . . . . . . . . . . . . . . . . . . . . . . . . . . . . . . . . . . . . . . . . viiInformatica Resources . . . . . . . . . . . . . . . . . . . . . . . . . . . . . . . . . . . . . . . . . . . . . . . . . . . . . vii
Informatica Customer Portal . . . . . . . . . . . . . . . . . . . . . . . . . . . . . . . . . . . . . . . . . . . . . vii
Informatica Documentation . . . . . . . . . . . . . . . . . . . . . . . . . . . . . . . . . . . . . . . . . . . . . vii
Informatica Web Site . . . . . . . . . . . . . . . . . . . . . . . . . . . . . . . . . . . . . . . . . . . . . . . . . . vii
Informatica How-To Library . . . . . . . . . . . . . . . . . . . . . . . . . . . . . . . . . . . . . . . . . . . . . vii
Informatica Knowledge Base . . . . . . . . . . . . . . . . . . . . . . . . . . . . . . . . . . . . . . . . . . . . . viii
Informatica Global Customer Support . . . . . . . . . . . . . . . . . . . . . . . . . . . . . . . . . . . . . . viii
Chapter 1: Understanding Mapping Analyst for Excel . . . . . . . . . . . . . . . . . . . . . . . . . 1Overview . . . . . . . . . . . . . . . . . . . . . . . . . . . . . . . . . . . . . . . . . . . . . . . . . . . . . . . . . . . . . . . 1
Architecture . . . . . . . . . . . . . . . . . . . . . . . . . . . . . . . . . . . . . . . . . . . . . . . . . . . . . . . . . . . . . 1
Mapping Specifications . . . . . . . . . . . . . . . . . . . . . . . . . . . . . . . . . . . . . . . . . . . . . . . . . . 1
Metamaps . . . . . . . . . . . . . . . . . . . . . . . . . . . . . . . . . . . . . . . . . . . . . . . . . . . . . . . . . . . 2
Mapping Analyst for Excel Process . . . . . . . . . . . . . . . . . . . . . . . . . . . . . . . . . . . . . . . . . 2
Mapping Specification Templates . . . . . . . . . . . . . . . . . . . . . . . . . . . . . . . . . . . . . . . . . . . . . 3
Mapping Template . . . . . . . . . . . . . . . . . . . . . . . . . . . . . . . . . . . . . . . . . . . . . . . . . . . . . 3
Source-Target-Matrix Template . . . . . . . . . . . . . . . . . . . . . . . . . . . . . . . . . . . . . . . . . . . . 3
Chapter 2: Configuring One Mapping . . . . . . . . . . . . . . . . . . . . . . . . . . . . . . . . . . . . . . 5Overview . . . . . . . . . . . . . . . . . . . . . . . . . . . . . . . . . . . . . . . . . . . . . . . . . . . . . . . . . . . . . . . 5
Copying and Renaming the Mapping Template . . . . . . . . . . . . . . . . . . . . . . . . . . . . . . . . . . . 6
Main Worksheet . . . . . . . . . . . . . . . . . . . . . . . . . . . . . . . . . . . . . . . . . . . . . . . . . . . . . . . . . . 6
Source and Target Worksheets . . . . . . . . . . . . . . . . . . . . . . . . . . . . . . . . . . . . . . . . . . . . . . . . 7
Database/Schema Name Section . . . . . . . . . . . . . . . . . . . . . . . . . . . . . . . . . . . . . . . . . . . 7
Classes/Entities/Tables/Records Section . . . . . . . . . . . . . . . . . . . . . . . . . . . . . . . . . . . . . . 7
Attributes/Columns/Fields Section . . . . . . . . . . . . . . . . . . . . . . . . . . . . . . . . . . . . . . . . . 7
Types Section . . . . . . . . . . . . . . . . . . . . . . . . . . . . . . . . . . . . . . . . . . . . . . . . . . . . . . . . . 8
Mapping Analyst for Excel Datatypes . . . . . . . . . . . . . . . . . . . . . . . . . . . . . . . . . . . . . . . 8
Configuring Target Ports . . . . . . . . . . . . . . . . . . . . . . . . . . . . . . . . . . . . . . . . . . . . . . . . 8
Functions . . . . . . . . . . . . . . . . . . . . . . . . . . . . . . . . . . . . . . . . . . . . . . . . . . . . . . . . . . . . . . . 9
Transformations . . . . . . . . . . . . . . . . . . . . . . . . . . . . . . . . . . . . . . . . . . . . . . . . . . . . . . . . . . 9
Joiner Transformation . . . . . . . . . . . . . . . . . . . . . . . . . . . . . . . . . . . . . . . . . . . . . . . . . . . 9
Lookup Transformation . . . . . . . . . . . . . . . . . . . . . . . . . . . . . . . . . . . . . . . . . . . . . . . . 10
Filter Transformation . . . . . . . . . . . . . . . . . . . . . . . . . . . . . . . . . . . . . . . . . . . . . . . . . . 11
Aggregator Transformation . . . . . . . . . . . . . . . . . . . . . . . . . . . . . . . . . . . . . . . . . . . . . . 11
Expression Transformation . . . . . . . . . . . . . . . . . . . . . . . . . . . . . . . . . . . . . . . . . . . . . . 12
Validating the Mapping Specification . . . . . . . . . . . . . . . . . . . . . . . . . . . . . . . . . . . . . . . . . 12
Chapter 3: Configuring One Mapping - Example . . . . . . . . . . . . . . . . . . . . . . . . . . . . 15Overview . . . . . . . . . . . . . . . . . . . . . . . . . . . . . . . . . . . . . . . . . . . . . . . . . . . . . . . . . . . . . . 15
Step 1. Establish the PowerCenter Environment . . . . . . . . . . . . . . . . . . . . . . . . . . . . . . . . . . 16
i i i
Step 2. Configure the Mapping Specification in Microsoft Excel . . . . . . . . . . . . . . . . . . . . . . 16
Create a Mapping Specification . . . . . . . . . . . . . . . . . . . . . . . . . . . . . . . . . . . . . . . . . . . 17
Configure the Main Worksheet . . . . . . . . . . . . . . . . . . . . . . . . . . . . . . . . . . . . . . . . . . . 17
Configure the Source Worksheet . . . . . . . . . . . . . . . . . . . . . . . . . . . . . . . . . . . . . . . . . . 17
Configure the Target Worksheet . . . . . . . . . . . . . . . . . . . . . . . . . . . . . . . . . . . . . . . . . . 18
Step 3. Validate the Mapping Specification . . . . . . . . . . . . . . . . . . . . . . . . . . . . . . . . . . . . . 19
Step 4. Save the Mapping Specification to a Shared Location . . . . . . . . . . . . . . . . . . . . . . . . . 20
Step 5. Import the Mapping Specification . . . . . . . . . . . . . . . . . . . . . . . . . . . . . . . . . . . . . . 20
Step 6. Edit the PowerCenter Mapping and Generate a Workflow . . . . . . . . . . . . . . . . . . . . . 21
Edit the PowerCenter Mapping . . . . . . . . . . . . . . . . . . . . . . . . . . . . . . . . . . . . . . . . . . . 21
Generate and Run a Workflow from the Mapping . . . . . . . . . . . . . . . . . . . . . . . . . . . . . 22
Chapter 4: Configuring Multiple Mappings . . . . . . . . . . . . . . . . . . . . . . . . . . . . . . . . . 23Overview . . . . . . . . . . . . . . . . . . . . . . . . . . . . . . . . . . . . . . . . . . . . . . . . . . . . . . . . . . . . . . 23
Copying and Renaming the Source-Target-Matrix Template . . . . . . . . . . . . . . . . . . . . . . . . . 23
Mapping Names . . . . . . . . . . . . . . . . . . . . . . . . . . . . . . . . . . . . . . . . . . . . . . . . . . . . . . . . . 24
Sources . . . . . . . . . . . . . . . . . . . . . . . . . . . . . . . . . . . . . . . . . . . . . . . . . . . . . . . . . . . . . . . 24
Expression Transformations . . . . . . . . . . . . . . . . . . . . . . . . . . . . . . . . . . . . . . . . . . . . . . . . . 25
Targets . . . . . . . . . . . . . . . . . . . . . . . . . . . . . . . . . . . . . . . . . . . . . . . . . . . . . . . . . . . . . . . . 25
Chapter 5: Configuring Multiple Mappings - Example . . . . . . . . . . . . . . . . . . . . . . . . 27Overview . . . . . . . . . . . . . . . . . . . . . . . . . . . . . . . . . . . . . . . . . . . . . . . . . . . . . . . . . . . . . . 27
Step 1. Establish the PowerCenter Environment . . . . . . . . . . . . . . . . . . . . . . . . . . . . . . . . . . 28
Create the Source Flat File . . . . . . . . . . . . . . . . . . . . . . . . . . . . . . . . . . . . . . . . . . . . . . 28
Create Target Tables . . . . . . . . . . . . . . . . . . . . . . . . . . . . . . . . . . . . . . . . . . . . . . . . . . . 28
Step 2. Configure the Mapping Specification in Microsoft Excel . . . . . . . . . . . . . . . . . . . . . . 28
Create a Mapping Specification . . . . . . . . . . . . . . . . . . . . . . . . . . . . . . . . . . . . . . . . . . . 29
Configure the Mappings . . . . . . . . . . . . . . . . . . . . . . . . . . . . . . . . . . . . . . . . . . . . . . . . 29
Step 3. Save the Mapping Specification to a Shared Location . . . . . . . . . . . . . . . . . . . . . . . . . 30
Step 4. Import the Mapping Specification . . . . . . . . . . . . . . . . . . . . . . . . . . . . . . . . . . . . . . 30
Step 5. Edit the PowerCenter Mappings and Generate Workflows . . . . . . . . . . . . . . . . . . . . . 31
Edit the PowerCenter Mappings . . . . . . . . . . . . . . . . . . . . . . . . . . . . . . . . . . . . . . . . . . 31
Generate and Run Workflows from the Mappings . . . . . . . . . . . . . . . . . . . . . . . . . . . . . 31
Chapter 6: Importing and Exporting Mapping Specifications . . . . . . . . . . . . . . . . . . 33Overview . . . . . . . . . . . . . . . . . . . . . . . . . . . . . . . . . . . . . . . . . . . . . . . . . . . . . . . . . . . . . . 33
Importing Mapping Specifications . . . . . . . . . . . . . . . . . . . . . . . . . . . . . . . . . . . . . . . . . . . . 34
Exporting Mappings . . . . . . . . . . . . . . . . . . . . . . . . . . . . . . . . . . . . . . . . . . . . . . . . . . . . . . 36
Troubleshooting . . . . . . . . . . . . . . . . . . . . . . . . . . . . . . . . . . . . . . . . . . . . . . . . . . . . . . . . . 37
Chapter 7: Customizing Mapping Specification Templates . . . . . . . . . . . . . . . . . . . . 39Overview . . . . . . . . . . . . . . . . . . . . . . . . . . . . . . . . . . . . . . . . . . . . . . . . . . . . . . . . . . . . . . 39
Metamap Hierarchy . . . . . . . . . . . . . . . . . . . . . . . . . . . . . . . . . . . . . . . . . . . . . . . . . . . 39
Rules and Guidelines . . . . . . . . . . . . . . . . . . . . . . . . . . . . . . . . . . . . . . . . . . . . . . . . . . 41
Configuring a Custom Mapping Specification Template . . . . . . . . . . . . . . . . . . . . . . . . . . . . 41
iv Table of Contents
Modifying the Mapping Template . . . . . . . . . . . . . . . . . . . . . . . . . . . . . . . . . . . . . . . . . 41
Modifying the Source-Target-Matrix Template and Repeating Sheet File . . . . . . . . . . . . . 42
Creating a New Template . . . . . . . . . . . . . . . . . . . . . . . . . . . . . . . . . . . . . . . . . . . . . . . 42
Copying and Renaming the Metamap . . . . . . . . . . . . . . . . . . . . . . . . . . . . . . . . . . . . . . . . . 43
Associating the Metamap with the Custom Template or Repeating Sheet File . . . . . . . . . . . . . 43
Matching Criteria in the Metamap . . . . . . . . . . . . . . . . . . . . . . . . . . . . . . . . . . . . . . . . . . . 44
Model, Source, Target, and Mapping Worksheet Types in the Metamap . . . . . . . . . . . . . . . . . 45
Excel Table Parameters . . . . . . . . . . . . . . . . . . . . . . . . . . . . . . . . . . . . . . . . . . . . . . . . . 45
Required Properties . . . . . . . . . . . . . . . . . . . . . . . . . . . . . . . . . . . . . . . . . . . . . . . . . . . 45
User-Defined Properties . . . . . . . . . . . . . . . . . . . . . . . . . . . . . . . . . . . . . . . . . . . . . . . . 47
Modifying the Cell Location of Metadata . . . . . . . . . . . . . . . . . . . . . . . . . . . . . . . . . . . 47
Import and Export Parameters in the Metamap . . . . . . . . . . . . . . . . . . . . . . . . . . . . . . . . . . 49
Import Parameters . . . . . . . . . . . . . . . . . . . . . . . . . . . . . . . . . . . . . . . . . . . . . . . . . . . . 49
Export Parameters . . . . . . . . . . . . . . . . . . . . . . . . . . . . . . . . . . . . . . . . . . . . . . . . . . . . 50
Saving the Metamap as an XML Spreadsheet . . . . . . . . . . . . . . . . . . . . . . . . . . . . . . . . . . . . 50
Chapter 8: Customizing Mapping Specification Templates - Example . . . . . . . . . . . 53Overview . . . . . . . . . . . . . . . . . . . . . . . . . . . . . . . . . . . . . . . . . . . . . . . . . . . . . . . . . . . . . . 53
Step 1. Copy the Mapping Specification Template, Repeating Sheet File, and Metamap . . . . . 54
Step 2. Associate the Metamap with the Repeating Sheet File . . . . . . . . . . . . . . . . . . . . . . . . 54
Step 3. Edit the Mapping Specification Template and the Repeating Sheet File . . . . . . . . . . . . 55
Step 4. Edit the Metamap . . . . . . . . . . . . . . . . . . . . . . . . . . . . . . . . . . . . . . . . . . . . . . . . . . 56
Edit the Matching Criteria on the Overview Worksheet . . . . . . . . . . . . . . . . . . . . . . . . . 56
Edit the TargetClasses Worksheet . . . . . . . . . . . . . . . . . . . . . . . . . . . . . . . . . . . . . . . . . 57
Edit the TargetAttributes Worksheet . . . . . . . . . . . . . . . . . . . . . . . . . . . . . . . . . . . . . . . 58
Edit the FeatureMaps Worksheet . . . . . . . . . . . . . . . . . . . . . . . . . . . . . . . . . . . . . . . . . . 59
Save the Metamap as an XML Spreadsheet . . . . . . . . . . . . . . . . . . . . . . . . . . . . . . . . . . . 60
Appendix A: Metamap Worksheets . . . . . . . . . . . . . . . . . . . . . . . . . . . . . . . . . . . . . . 61Overview Worksheet . . . . . . . . . . . . . . . . . . . . . . . . . . . . . . . . . . . . . . . . . . . . . . . . . . . . . 61
Models Worksheet . . . . . . . . . . . . . . . . . . . . . . . . . . . . . . . . . . . . . . . . . . . . . . . . . . . . . . . 61
Source and Target Worksheets . . . . . . . . . . . . . . . . . . . . . . . . . . . . . . . . . . . . . . . . . . . . . . 62
DataPackages Worksheets . . . . . . . . . . . . . . . . . . . . . . . . . . . . . . . . . . . . . . . . . . . . . . . 62
Schemas Worksheets . . . . . . . . . . . . . . . . . . . . . . . . . . . . . . . . . . . . . . . . . . . . . . . . . . . 62
Classes Worksheets . . . . . . . . . . . . . . . . . . . . . . . . . . . . . . . . . . . . . . . . . . . . . . . . . . . . 62
Attributes Worksheets . . . . . . . . . . . . . . . . . . . . . . . . . . . . . . . . . . . . . . . . . . . . . . . . . . 63
DataTypes Worksheets . . . . . . . . . . . . . . . . . . . . . . . . . . . . . . . . . . . . . . . . . . . . . . . . . 63
Mapping Worksheets . . . . . . . . . . . . . . . . . . . . . . . . . . . . . . . . . . . . . . . . . . . . . . . . . . . . . 64
MappingDesignPackages Worksheet . . . . . . . . . . . . . . . . . . . . . . . . . . . . . . . . . . . . . . . 64
TransformationTasks Worksheet . . . . . . . . . . . . . . . . . . . . . . . . . . . . . . . . . . . . . . . . . . 64
Filters Worksheet . . . . . . . . . . . . . . . . . . . . . . . . . . . . . . . . . . . . . . . . . . . . . . . . . . . . . 64
Lookups Worksheet . . . . . . . . . . . . . . . . . . . . . . . . . . . . . . . . . . . . . . . . . . . . . . . . . . . 65
Joins Worksheet . . . . . . . . . . . . . . . . . . . . . . . . . . . . . . . . . . . . . . . . . . . . . . . . . . . . . . 65
FeatureMaps Worksheet . . . . . . . . . . . . . . . . . . . . . . . . . . . . . . . . . . . . . . . . . . . . . . . . 65
MITI_SystemTypes Worksheet . . . . . . . . . . . . . . . . . . . . . . . . . . . . . . . . . . . . . . . . . . . . . . 66
MITI_DataTypes Worksheet . . . . . . . . . . . . . . . . . . . . . . . . . . . . . . . . . . . . . . . . . . . . . . . . 66
Table of Contents v

Appendix B: Glossary . . . . . . . . . . . . . . . . . . . . . . . . . . . . . . . . . . . . . . . . . . . . . . . . . 67Mapping Analyst for Excel Glossary of Terms . . . . . . . . . . . . . . . . . . . . . . . . . . . . . . . . . . . . 67
Index . . . . . . . . . . . . . . . . . . . . . . . . . . . . . . . . . . . . . . . . . . . . . . . . . . . . . . . . . . . . . . . 69
vi Table of Contents
Preface
The PowerCenter Mapping Analyst for Excel Guide is written for business analysts who want to use Microsoft Excel to develop PowerCenter mappings. It is also written for PowerCenter developers who want to use the Microsoft Excel files to begin developing PowerCenter mappings. This book assumes you have a working knowledge of Microsoft Excel.
Informatica Resources
Informatica Customer PortalAs an Informatica customer, you can access the Informatica Customer Portal site at http://my.informatica.com. The site contains product information, user group information, newsletters, access to the Informatica customer support case management system (ATLAS), the Informatica How-To Library, the Informatica Knowledge Base, Informatica Documentation Center, and access to the Informatica user community.
Informatica DocumentationThe Informatica Documentation team takes every effort to create accurate, usable documentation. If you have questions, comments, or ideas about this documentation, contact the Informatica Documentation team through email at [email protected]. We will use your feedback to improve our documentation. Let us know if we can contact you regarding your comments.
The Documentation team updates documentation as needed. To get the latest documentation for your product, navigate to the Informatica Documentation Center from http://my.informatica.com.
Informatica Web SiteYou can access the Informatica corporate web site at http://www.informatica.com. The site contains information about Informatica, its background, upcoming events, and sales offices. You will also find product and partner information. The services area of the site includes important information about technical support, training and education, and implementation services.
Informatica How-To LibraryAs an Informatica customer, you can access the Informatica How-To Library at http://my.informatica.com. The How-To Library is a collection of resources to help you learn more about Informatica products and features. It includes articles and interactive demonstrations that provide solutions to common problems, compare features and behaviors, and guide you through performing specific real-world tasks.
vii
Informatica Knowledge BaseAs an Informatica customer, you can access the Informatica Knowledge Base at http://my.informatica.com. Use the Knowledge Base to search for documented solutions to known technical issues about Informatica products. You can also find answers to frequently asked questions, technical white papers, and technical tips.
Informatica Global Customer SupportThere are many ways to access Informatica Global Customer Support. You can contact a Customer Support Center through telephone, email, or the WebSupport Service.
Use the following email addresses to contact Informatica Global Customer Support:
♦ [email protected] for technical inquiries
♦ [email protected] for general customer service requests
WebSupport requires a user name and password. You can request a user name and password at http://my.informatica.com.
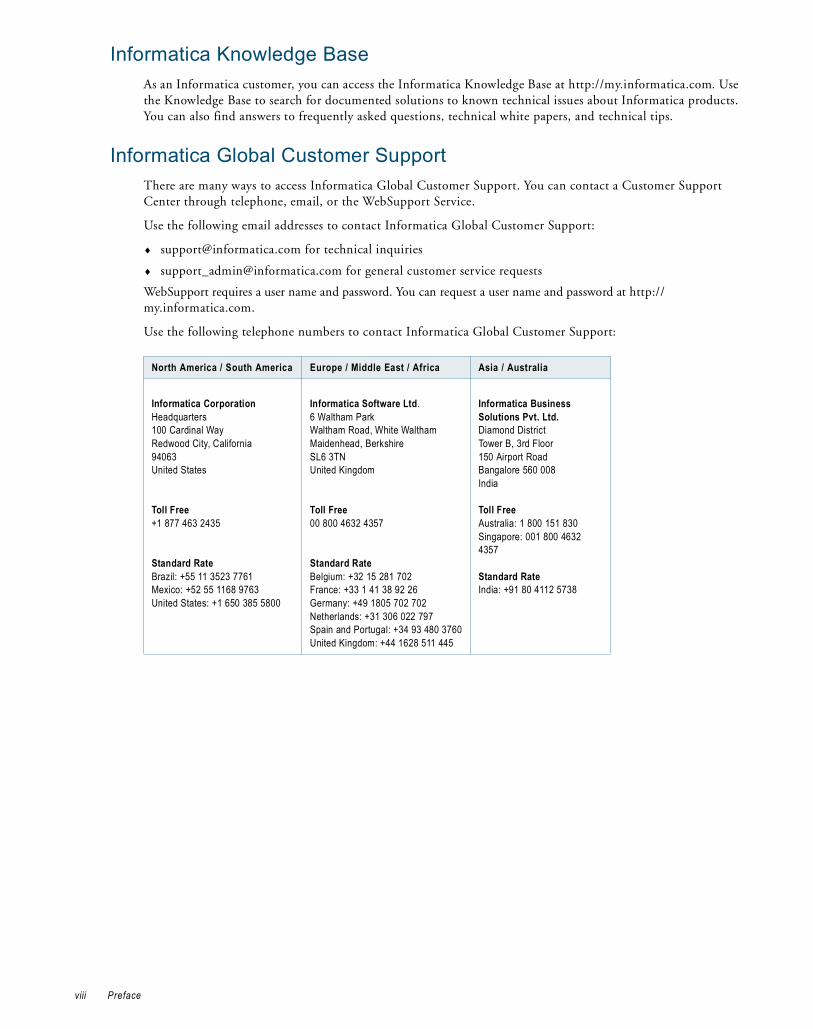
Use the following telephone numbers to contact Informatica Global Customer Support:
North America / South America Europe / Middle East / Africa Asia / Australia
Informatica Corporation Headquarters100 Cardinal WayRedwood City, California 94063United States
Toll Free +1 877 463 2435
Standard RateBrazil: +55 11 3523 7761 Mexico: +52 55 1168 9763 United States: +1 650 385 5800
Informatica Software Ltd.6 Waltham ParkWaltham Road, White WalthamMaidenhead, BerkshireSL6 3TNUnited Kingdom
Toll Free 00 800 4632 4357
Standard RateBelgium: +32 15 281 702France: +33 1 41 38 92 26Germany: +49 1805 702 702Netherlands: +31 306 022 797Spain and Portugal: +34 93 480 3760United Kingdom: +44 1628 511 445
Informatica Business Solutions Pvt. Ltd.Diamond DistrictTower B, 3rd Floor150 Airport RoadBangalore 560 008India
Toll Free Australia: 1 800 151 830Singapore: 001 800 4632 4357
Standard RateIndia: +91 80 4112 5738
viii Preface
C H A P T E R 1
Understanding Mapping Analyst for Excel
This chapter includes the following topics:
♦ Overview, 1
♦ Architecture, 1
♦ Mapping Specification Templates, 3
OverviewUse Mapping Analyst for Excel to configure PowerCenter mappings in Microsoft Office Excel. The following individuals can collaborate when creating PowerCenter mappings:
♦ Business analyst. Creates a mapping specification in Microsoft Office Excel to define a mapping that can include sources, targets, and transformations. A business analyst is familiar with project requirements and source and target data, but is not a PowerCenter user.
♦ PowerCenter developer. Imports the mapping specification using the Repository Manager to create the corresponding PowerCenter objects. The PowerCenter developer can edit the objects, implement additional functionality that might be required, and run a workflow generated from the mapping. The PowerCenter developer can use the Repository Manager to export any valid mapping to a mapping specification for a business analyst to review in Microsoft Excel.
For example, a business analyst wants to merge employee data from multiple sources into a single data warehouse but is not familiar enough with the PowerCenter Client to create the required mapping. The business analyst can use the templates included with the PowerCenter Client to create a mapping specification that describes the required sources, transformations, and targets. A PowerCenter developer can then import the mapping specification into a PowerCenter repository, continue development of the mapping in the PowerCenter Client, and export the completed mapping for review by the business analyst.
ArchitectureMapping Analyst for Excel includes mapping specifications and metamaps.
Mapping SpecificationsA mapping specification is a Microsoft Excel file that includes metadata to import into the PowerCenter repository. Use a mapping specification to define sources or targets or to define a mapping by describing the
Overview 1
sources and targets and the transformations between sources and targets. Mapping Analyst for Excel includes templates for mapping specifications. Use the mapping specification templates as a starting point to develop mapping specifications in Excel. You can also create a custom mapping specification template.
When you create a mapping specification, you do not have to define all objects. For example, if you do not define transformations, the Repository Service imports only sources and targets.
MetamapsA metamap is a hierarchical representation of the metadata in a mapping specification. A metamap determines how the Repository Service reads the metadata. Each mapping specification has an associated metamap. Mapping Analyst for Excel uses the same metamap for each mapping specification you create from a template.
The metamap contains multiple worksheets that define import and export options and the cell location of metadata in a mapping specification.
Mapping Analyst for Excel includes metamaps in XML and Excel formats. Mapping Analyst for Excel uses the XML version of the metamap when you import mapping specifications or export mappings. Use the Excel version of the metamap to modify metamap properties when you create a custom mapping specification template.
Note: If you create a mapping specification from a template included with Mapping Analyst for Excel, you do not need to modify the metamap.
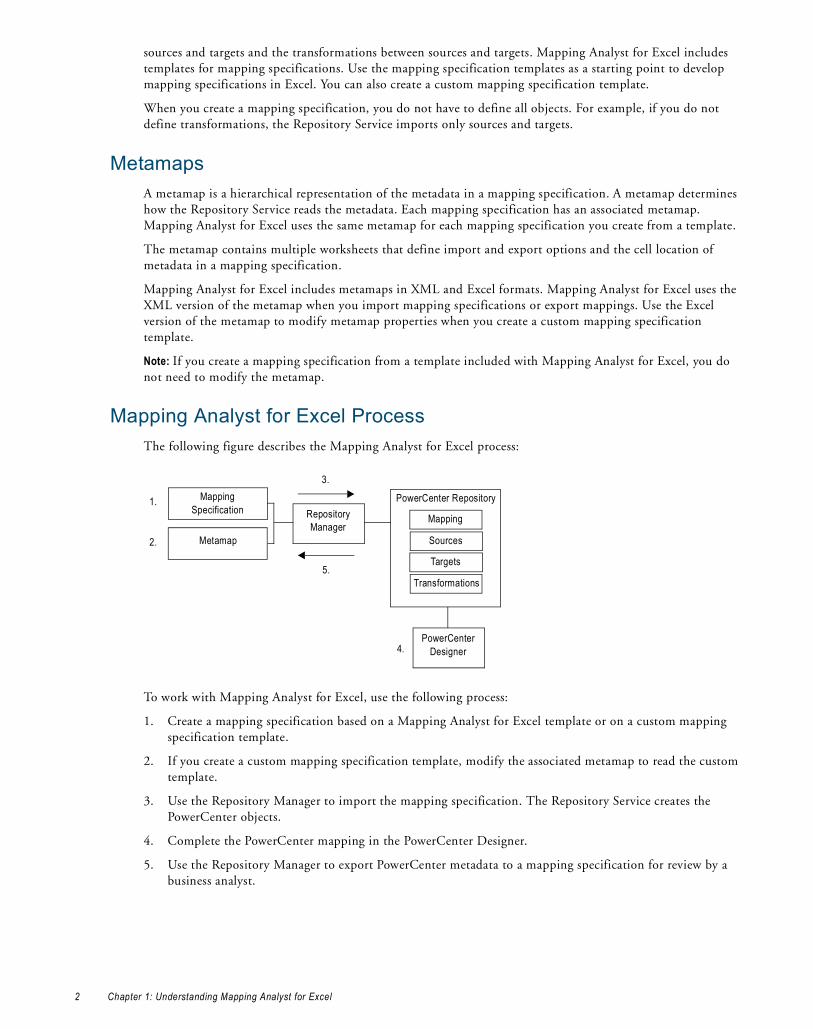
Mapping Analyst for Excel ProcessThe following figure describes the Mapping Analyst for Excel process:
To work with Mapping Analyst for Excel, use the following process:
1. Create a mapping specification based on a Mapping Analyst for Excel template or on a custom mapping specification template.
2. If you create a custom mapping specification template, modify the associated metamap to read the custom template.
3. Use the Repository Manager to import the mapping specification. The Repository Service creates the PowerCenter objects.
4. Complete the PowerCenter mapping in the PowerCenter Designer.
5. Use the Repository Manager to export PowerCenter metadata to a mapping specification for review by a business analyst.
Mapping Specification
Metamap
RepositoryManager
PowerCenter Repository
Transformations
Targets
Sources
PowerCenter Designer
1.
2.
3.
5.
4.
Mapping
2 Chapter 1: Understanding Mapping Analyst for Excel
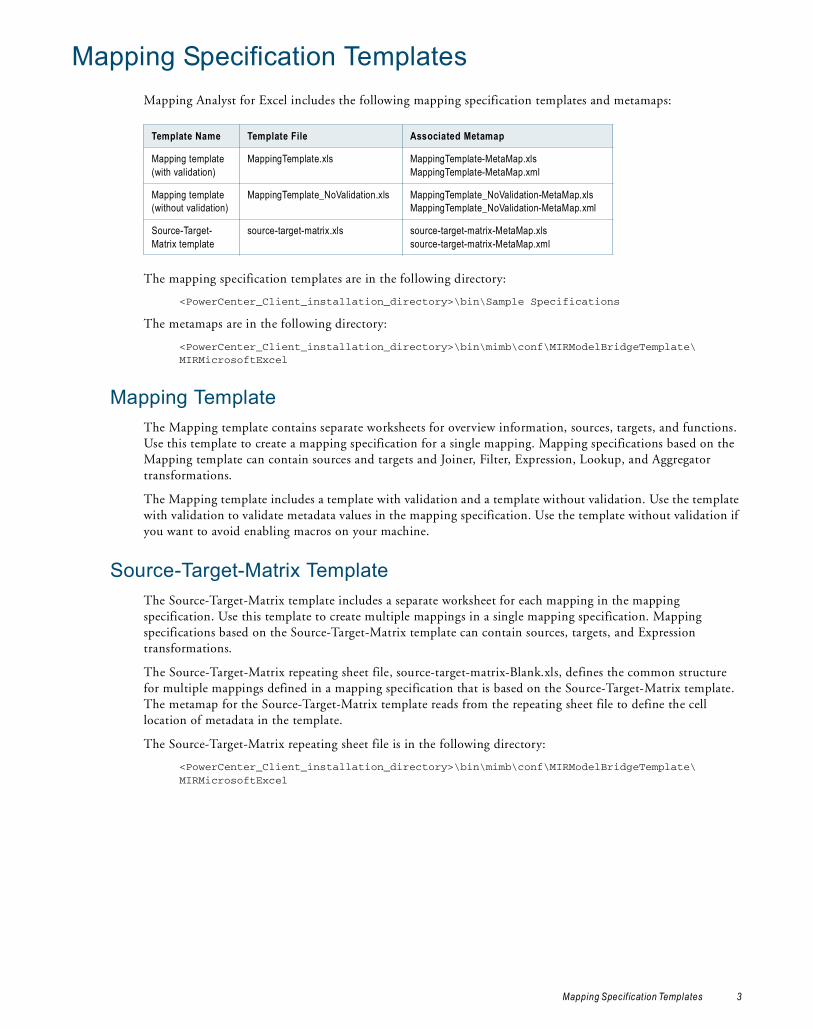
Mapping Specification TemplatesMapping Analyst for Excel includes the following mapping specification templates and metamaps:
The mapping specification templates are in the following directory:
<PowerCenter_Client_installation_directory>\bin\Sample Specifications
The metamaps are in the following directory:
<PowerCenter_Client_installation_directory>\bin\mimb\conf\MIRModelBridgeTemplate\ MIRMicrosoftExcel
Mapping TemplateThe Mapping template contains separate worksheets for overview information, sources, targets, and functions. Use this template to create a mapping specification for a single mapping. Mapping specifications based on the Mapping template can contain sources and targets and Joiner, Filter, Expression, Lookup, and Aggregator transformations.
The Mapping template includes a template with validation and a template without validation. Use the template with validation to validate metadata values in the mapping specification. Use the template without validation if you want to avoid enabling macros on your machine.
Source-Target-Matrix TemplateThe Source-Target-Matrix template includes a separate worksheet for each mapping in the mapping specification. Use this template to create multiple mappings in a single mapping specification. Mapping specifications based on the Source-Target-Matrix template can contain sources, targets, and Expression transformations.
The Source-Target-Matrix repeating sheet file, source-target-matrix-Blank.xls, defines the common structure for multiple mappings defined in a mapping specification that is based on the Source-Target-Matrix template. The metamap for the Source-Target-Matrix template reads from the repeating sheet file to define the cell location of metadata in the template.
The Source-Target-Matrix repeating sheet file is in the following directory:
<PowerCenter_Client_installation_directory>\bin\mimb\conf\MIRModelBridgeTemplate\ MIRMicrosoftExcel
Template Name Template File Associated Metamap
Mapping template (with validation)
MappingTemplate.xls MappingTemplate-MetaMap.xlsMappingTemplate-MetaMap.xml
Mapping template (without validation)
MappingTemplate_NoValidation.xls MappingTemplate_NoValidation-MetaMap.xlsMappingTemplate_NoValidation-MetaMap.xml
Source-Target-Matrix template
source-target-matrix.xls source-target-matrix-MetaMap.xlssource-target-matrix-MetaMap.xml
Mapping Specif icat ion Templates 3

4 Chapter 1: Understanding Mapping Analyst for Excel
C H A P T E R 2
Configuring One Mapping
This chapter includes the following topics:
♦ Overview, 5
♦ Copying and Renaming the Mapping Template, 6
♦ Main Worksheet, 6
♦ Source and Target Worksheets, 7
♦ Functions, 9
♦ Transformations, 9
♦ Validating the Mapping Specification, 12
OverviewA business analyst uses the Mapping template to create a mapping specification for a single mapping. The Mapping template contains separate worksheets for overview information, sources, targets, and functions. Mapping specifications based on the Mapping template can contain sources and targets and Joiner, Filter, Expression, Lookup, and Aggregator transformations. A PowerCenter developer imports the mapping specification using the Repository Manager to create the corresponding PowerCenter objects. During import, the Repository Service names each mapping “Mapping.” The PowerCenter developer can change the mapping name in the Designer.
Before you create a mapping specification based on the Mapping template, choose whether to use a template with or without validation. The structure of the template without validation is the same as the template with validation.
To create a mapping specification based on the Mapping template, a business analyst completes the following steps:
1. Copy and rename the template.
2. Configure the Main worksheet.
3. Configure sources and targets.
4. Optionally add functions to the Functions worksheet.
5. Configure transformations.
6. Based on the mapping specification template type, click Validate to validate the transformations.
Overview 5
Copying and Renaming the Mapping TemplateTo create a mapping specification based on the Informatica Mapping template, copy and rename one of the following templates:
♦ MappingTemplate.xls. Mapping template with validation.
♦ MappingTemplate_NoValidation.xls. Mapping template without validation.
The templates are in the following directory:
<PowerCenter Client installation directory>\bin\Sample Specifications
Main WorksheetUse the Main worksheet to enter general information for the mapping, such as the name of the source or target database or file system. The Main worksheet includes the following sections:
♦ Model. Entity that contains all mapping metadata.
♦ Data Store. Contains the source and target database name and type.
In general, when you configure a mapping specification, you do not need to enter all requested metadata. However, certain metadata is required to import the mapping specification into the repository.
Enter the following properties in the Model section:
Enter the following properties in the Source Data Store and Target Data Store sections:
Property Required/Optional Description
Model Name Required Name of the model. Mapping Analyst for Excel requires a model name during the import process. However, the Repository Service does not import this value.
Model Description Optional Description for the model. The Repository Service does not import this value.
Model Creation Time Optional Time the model was created. The Repository Service does not import this value.
Property Required/Optional Description
Name Required Name of the source or target data store. Source and target data stores must have different names. During import, the Repository Service concatenates the Source Data Store Name and the Source Schema Name using the format <SourceDataStoreName>_<SourceSchemaName>. It assigns the concatenated name to the database name for the source definition.
Description Optional Description for the source or target data store. The Repository Service does not import this value.
System Type Required Source or target database or file system type. The Repository Service assigns this database type to the source or target definition.
6 Chapter 2: Configuring One Mapping
Source and Target WorksheetsUse the Source and Target worksheets to configure the sources and targets for the mapping. You can also configure transformations. The Source and Target worksheets include the following sections:
♦ Database/Schema Name. Name of the source or target database or file system.
♦ Classes/Entities/Tables/Records. Source or target table and file information.
♦ Attributes/Columns/Fields. Source or target column and field details.
♦ Types. Datatype for each column or field.
♦ Transformations. Transformations to include in the mapping. The worksheet you configure determines the type of transformations you can configure. For more information, see “Transformations” on page 9.
Database/Schema Name SectionIn the Database/Schema name column, optionally enter the name of the source or target database or file system. This property must be blank or must match the value for the Schema Name property on the Main worksheet.
Classes/Entities/Tables/Records SectionThe Classes/Entities/Tables/Records section includes source or target table and file information.
Enter the following information for each source and target in the mapping:
Attributes/Columns/Fields SectionThe Attributes/Columns/Fields section contains source or target column and field details.
Schema Names Required Name of the source or target database or file system. During import, the Repository Service concatenates the Source Data Store Name and the Source Schema Name using the format <SourceDataStoreName>_<SourceSchemaName>. It assigns the concatenated name to the database name for the source definition.
Description Optional Description for the source or target database or file system. The Repository Service does not import this value.
Column Name Required/Optional Description
Physical Name Required Table or file name. The Repository Service creates a PowerCenter source or target definition with this name.
Business Name Optional Business name for the table or file name. The Repository Service assigns this value to the business name of the source or target definition. If you do not enter a value, the Repository Service uses the physical name for the business name.
Description Optional Description for the table or file name. The Repository Service assigns this value to the description of the source or target definition.
Property Required/Optional Description
Source and Target Worksheets 7
Enter the following information for each source and target in the mapping:
Types SectionThe Types section contains the datatype for each column or field.
Enter the following information for each source and target in the mapping:
Mapping Analyst for Excel DatatypesWhen you import a mapping specification, the Repository Service uses the associated metamap to define mapping datatypes. The metamap lists native datatypes for each supported system or file type and the corresponding Mapping Analyst for Excel datatype.
To ensure the accuracy of source and target datatypes for relational databases after you import a mapping specification, use the Mapping Analyst for Excel datatypes when you configure relational sources and targets. For example, to create an Integer column for a Microsoft SQL Server table, enter SQL_INTEGER for the datatype in the mapping specification.
The metamap lists source and target datatypes and the corresponding Mapping Analyst for Excel datatypes. You can locate the list on the MITI_Datatypes worksheet. Mapping Analyst for Excel datatypes appear in the MIR Datatype column.
Tip: If you do not have exact or complete datatype information, you can use the description column in the mapping specification to provide information for the PowerCenter developer.
Configuring Target PortsTo configure a target port, enter an expression in the Formula/Expression column for the target port. The expression can be the name of a source or lookup table port or an aggregate or non-aggregate expression. Unconfigured target ports appear in a PowerCenter target definition but are not connected to the PowerCenter mapping pipeline.
Column Name Required/Optional Description
Physical Name Required Column name. The Repository Service creates a port in the source or target definition with this name.
Business Name Optional Business name for the column. The Repository Service assigns this value to the port business name. If you do not enter a value, the Repository Service uses the physical name for the business name.
Description Optional Description for the column. The Repository Service assigns this value to the port description.
Column Name Required/Optional Description
Datatype Required Datatype of the column. For sources and targets in relational databases, enter the Mapping Analyst for Excel datatype. The Repository Service assigns the corresponding native datatype to the port in the source or target definition. For more information, see “Mapping Analyst for Excel Datatypes” on page 8.
Length Required Length of the column. The Repository Service assigns this value to the precision of the port.
Scale Required Scale of the column. The Repository Service assigns this value to the scale of the port.
8 Chapter 2: Configuring One Mapping

To avoid validation errors when defining target ports, use the source table name and column name as follows:
<TableName>.<portname>
Table and port names are case sensitive.
The following table describes how target port configuration corresponds to a PowerCenter mapping:
FunctionsThe Functions worksheet lists the PowerCenter functions that you can use to configure transformation expressions. Functions that you can use in aggregate expressions are labeled Aggregation. You can add custom functions to the Functions worksheet.
The validation macros compare functions used in expressions with the list on the Functions worksheet.
To add functions:
1. On the Functions worksheet, add the custom function name to the list.
2. If the function is an aggregate function, label the function Aggregation in the Type column.
TransformationsYou add transformations to a mapping specification on the following worksheets:
♦ Source worksheet. Configure Joiner, Lookup, and Filter transformations.
♦ Target worksheet. Configure Expression and Aggregator transformations.
Joiner TransformationYou can join source data from two related heterogeneous sources residing in different locations or file systems. You join source data by matching one or more pairs of columns between the two sources. You configure a join on the Source worksheet of the mapping specification. A join in the mapping specification becomes a Joiner transformation in a PowerCenter mapping.
Formula/Expression Example PowerCenter Mapping Results
Name of a source port INVENTORY.ItemName Connects the pipeline related to the source port to the target port.
Name of a lookup table port
REVENUE.MonthlyRecognizedRevenue
Includes return values from the lookup table that the Integration Service returns when the lookup condition is met. Use when the mapping pipeline includes a Lookup transformation. For more information, see “Lookup Transformation” on page 10.
Aggregate expression AVG (INVENTORY.Cost) Creates an Aggregator transformation. For more information, see “Aggregator Transformation” on page 11.
Non-aggregate expression
INVENTORY.Price – INVENTORY.Cost
Creates an Expression transformation. For more information, see “Expression Transformation” on page 12.
Functions 9
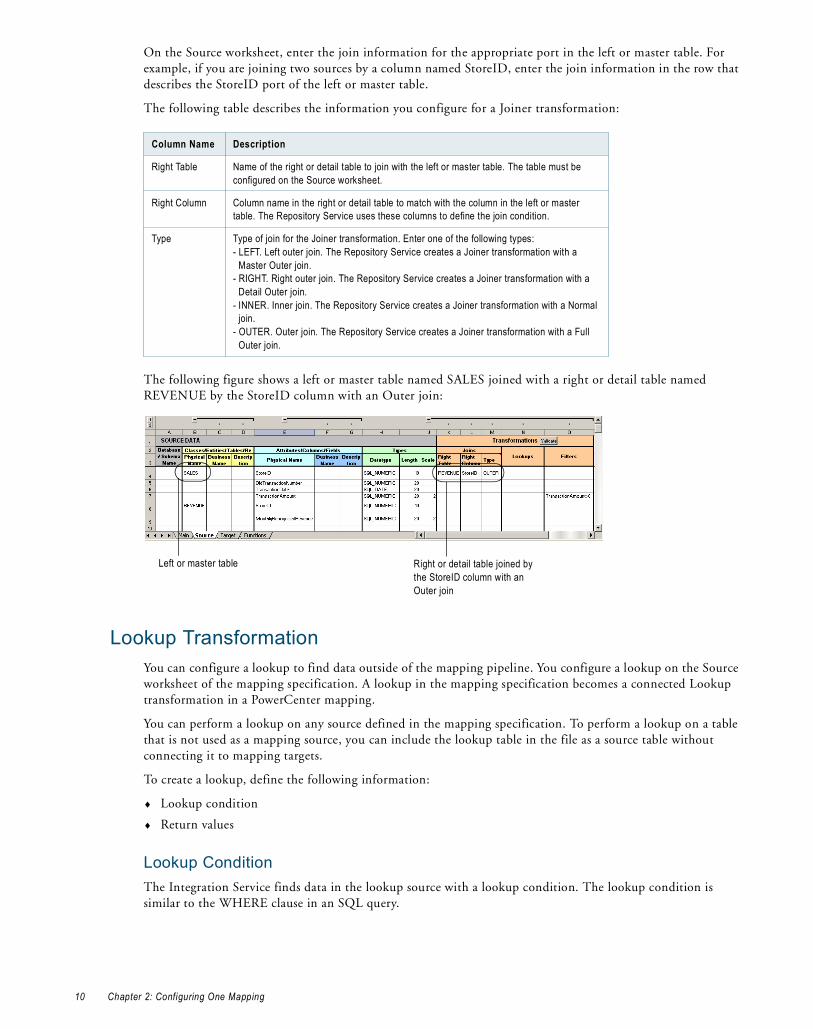
On the Source worksheet, enter the join information for the appropriate port in the left or master table. For example, if you are joining two sources by a column named StoreID, enter the join information in the row that describes the StoreID port of the left or master table.
The following table describes the information you configure for a Joiner transformation:
The following figure shows a left or master table named SALES joined with a right or detail table named REVENUE by the StoreID column with an Outer join:
Lookup TransformationYou can configure a lookup to find data outside of the mapping pipeline. You configure a lookup on the Source worksheet of the mapping specification. A lookup in the mapping specification becomes a connected Lookup transformation in a PowerCenter mapping.
You can perform a lookup on any source defined in the mapping specification. To perform a lookup on a table that is not used as a mapping source, you can include the lookup table in the file as a source table without connecting it to mapping targets.
To create a lookup, define the following information:
♦ Lookup condition
♦ Return values
Lookup Condition The Integration Service finds data in the lookup source with a lookup condition. The lookup condition is similar to the WHERE clause in an SQL query.
Column Name Description
Right Table Name of the right or detail table to join with the left or master table. The table must be configured on the Source worksheet.
Right Column Column name in the right or detail table to match with the column in the left or master table. The Repository Service uses these columns to define the join condition.
Type Type of join for the Joiner transformation. Enter one of the following types:- LEFT. Left outer join. The Repository Service creates a Joiner transformation with a
Master Outer join.- RIGHT. Right outer join. The Repository Service creates a Joiner transformation with a
Detail Outer join.- INNER. Inner join. The Repository Service creates a Joiner transformation with a Normal
join.- OUTER. Outer join. The Repository Service creates a Joiner transformation with a Full
Outer join.
Left or master table Right or detail table joined by the StoreID column with an Outer join
10 Chapter 2: Configuring One Mapping
Define the condition for the appropriate column in the lookup table. For example, to return values from a REVENUE lookup table for matching store IDs, enter the following lookup condition in the Lookups column for the row that describes the StoreID port of the REVENUE table:
REVENUE.StoreID=SALES.StoreID
Return ValuesReturn values are the values from the lookup table that the Integration Service returns when the lookup condition is met.
Define return values by entering the name of a lookup table column as an expression for a target column on the Target worksheet. For example, to include monthly revenue data from the lookup table in the mapping, define REVENUE.MonthlyRecognizedRevenue as the expression for the MonthlyRecognizedRevenue target column on the Target worksheet.
Filter TransformationYou can configure a filter to remove source data from the mapping pipeline. You configure a filter on the Source worksheet of the mapping specification. A filter defined in the mapping specification becomes a Filter transformation in a PowerCenter mapping.
Configure a filter by defining a filter condition. The filter condition is an expression that returns TRUE or FALSE. For example, use the following expression to filter out transactions with negative values, such as returns:
TransactionAmount > 0
You can also specify multiple components for a condition using the AND and OR logical operators.
Define a filter condition for the appropriate port in the source table. For example, enter the TransactionAmount condition in the Filters column for the row that describes the TransactionAmount port.
Aggregator TransformationYou can configure an aggregate expression to perform calculations on multiple values in a port. You configure an aggregate expression on the Target worksheet. An aggregate expression defined in the mapping specification becomes an Aggregator transformation in a PowerCenter mapping.
Use aggregate functions to perform calculations on multiple values in a port. For example, the following aggregate expression evaluates all values in the Quantity port of the SALES table and returns the highest value:
MAX(SALES.Quantity)
You can use an aggregate function, conditional clauses, and non-aggregate functions in an aggregate expression. You can also nest one aggregate function within another aggregate function, for example:
MAX( COUNT( SALES.Quantity))
In the Mapping template, aggregate functions are marked “Aggregation” in the list of functions on the Functions worksheet.
Define an aggregate expression in the Formula/Expression column for the row where you want return values to be written.
When you validate the Target worksheet in the mapping specification, Microsoft Excel defines the expression type in the Transformations Type column.
Transformations 11
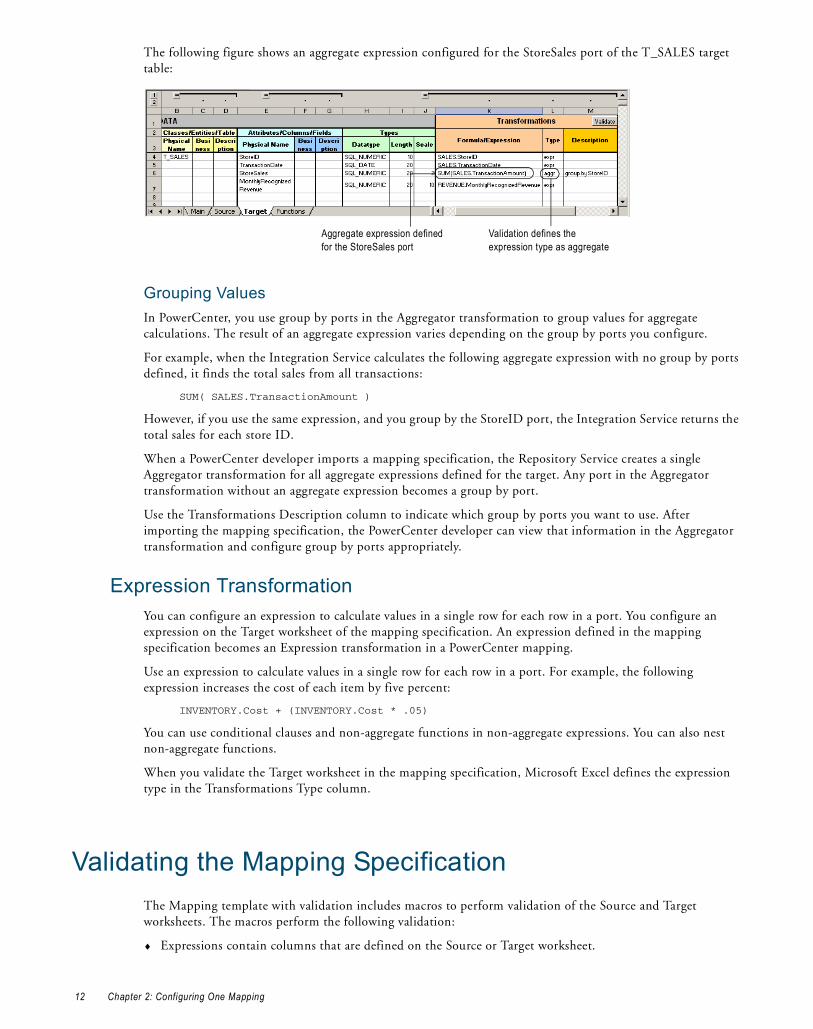
The following figure shows an aggregate expression configured for the StoreSales port of the T_SALES target table:
Grouping ValuesIn PowerCenter, you use group by ports in the Aggregator transformation to group values for aggregate calculations. The result of an aggregate expression varies depending on the group by ports you configure.
For example, when the Integration Service calculates the following aggregate expression with no group by ports defined, it finds the total sales from all transactions:
SUM( SALES.TransactionAmount )
However, if you use the same expression, and you group by the StoreID port, the Integration Service returns the total sales for each store ID.
When a PowerCenter developer imports a mapping specification, the Repository Service creates a single Aggregator transformation for all aggregate expressions defined for the target. Any port in the Aggregator transformation without an aggregate expression becomes a group by port.
Use the Transformations Description column to indicate which group by ports you want to use. After importing the mapping specification, the PowerCenter developer can view that information in the Aggregator transformation and configure group by ports appropriately.
Expression TransformationYou can configure an expression to calculate values in a single row for each row in a port. You configure an expression on the Target worksheet of the mapping specification. An expression defined in the mapping specification becomes an Expression transformation in a PowerCenter mapping.
Use an expression to calculate values in a single row for each row in a port. For example, the following expression increases the cost of each item by five percent:
INVENTORY.Cost + (INVENTORY.Cost * .05)
You can use conditional clauses and non-aggregate functions in non-aggregate expressions. You can also nest non-aggregate functions.
When you validate the Target worksheet in the mapping specification, Microsoft Excel defines the expression type in the Transformations Type column.
Validating the Mapping SpecificationThe Mapping template with validation includes macros to perform validation of the Source and Target worksheets. The macros perform the following validation:
♦ Expressions contain columns that are defined on the Source or Target worksheet.
Aggregate expression defined for the StoreSales port
Validation defines the expression type as aggregate
12 Chapter 2: Configuring One Mapping
♦ Functions used in the mapping are listed on the Functions worksheet.
♦ Function types are defined in the Type column in the Target worksheet based on the definitions on the Functions worksheet.
To perform validation:
1. On the Source worksheet of the Mapping template with validation, click Validate.
The validation notifies you of any error.
2. Correct errors and click Validate again.
3. On the Target worksheet, click Validate.
The validation fills in the transformation types, “expr” for expression and “aggr” for aggregation and notifies you of any error.
4. Correct errors and click Validate again.
Validating the Mapping Specif ication 13

14 Chapter 2: Configuring One Mapping
C H A P T E R 3
Configuring One Mapping - Example
This chapter includes the following topics:
♦ Overview, 15
♦ Step 1. Establish the PowerCenter Environment, 16
♦ Step 2. Configure the Mapping Specification in Microsoft Excel, 16
♦ Step 3. Validate the Mapping Specification, 19
♦ Step 4. Save the Mapping Specification to a Shared Location, 20
♦ Step 5. Import the Mapping Specification, 20
♦ Step 6. Edit the PowerCenter Mapping and Generate a Workflow, 21
OverviewThis example uses the Mapping template with validation to configure a mapping that aggregates sales and revenue data into a data warehouse for analysis. In addition, the example mapping performs the following tasks:
♦ Uses the store ID to look up monthly revenue values in a source table.
♦ Filters negative transactions, such as returns, out of the pipeline.
♦ Calculates the total sales for each store.
The mapping reads from the following source tables located in an Oracle schema named Sales:
♦ Sales. Stores the current month's sales data for each store.
♦ Revenue. Stores the revenue recognized in the current month from sales that have been occurring at each store.
The mapping writes the aggregated data to a target table named T_Sales located in an Oracle schema named DM.
To create this example mapping, the business analyst and PowerCenter developer complete the following steps:
1. Establish the PowerCenter environment (Developer). The PowerCenter developer configures the database connectivity, designates a repository folder to store the imported objects, and creates the source and target tables.
2. Configure the mapping specification in Microsoft Excel (Business Analyst). The business analyst creates a mapping specification from the Mapping template and configures the Main, Source, and Target worksheets.
3. Validate the mapping specification. (Business Analyst).
Overview 15
4. Save the mapping specification to a shared location (Business Analyst).
5. Import the mapping specification (Developer).
6. Edit the PowerCenter mapping and generate a workflow (Developer).
Step 1. Establish the PowerCenter EnvironmentBefore the business analyst creates a mapping specification, the PowerCenter developer completes the following tasks to establish the PowerCenter environment:
♦ Configure database connections. Use the Workflow Manager to configure connection objects so that the Integration Service can connect to the source and target databases.
♦ Designate a repository folder to store the imported objects. Use the Repository Manager to select an existing folder or to create a folder for the PowerCenter objects that are imported from the mapping specification.
♦ Create source and target tables. Use Oracle SQL Plus to run SQL statements to use the sample data in this example.
To use the source tables included in this example, use Oracle SQL Plus to run the following SQL statements to create the Sales and Revenue source tables in an Oracle schema named Sales:
Connect sales/salesCREATE TABLE sales.sales (StoreID NUMBER, OldTransactionNumber NUMBER, TransactionDate DATE, TransactionAmount NUMBER);
Insert into sales.sales values (1,100,'1-JAN-2008',1000);Insert into sales.sales values (1,101,'1-JAN-2008',2000);Insert into sales.sales values (1,102,'3-JAN-2008',3000);Insert into sales.sales values (1,103,'3-JAN-2008',4000);Insert into sales.sales values (2,104,'2-JAN-2008',1000);Insert into sales.sales values (2,105,'2-JAN-2008',2000);Insert into sales.sales values (2,106,'4-JAN-2008',2000);Insert into sales.sales values (2,107,'4-JAN-2008',3000);
CREATE TABLE sales.revenue (StoreID NUMBER, MonthlyRecognizedRevenue NUMBER);
Insert into sales.revenue values (1,8000);Insert into sales.revenue values (2,7000);Commit;
To use the target table included in this example, use Oracle SQL Plus to run the following SQL statements to create the T_Sales target table in an Oracle schema named DM:
Connect DM/DMCREATE TABLE DM.T_Sales (StoreID NUMBER, TransactionDate DATE, StoreSales NUMBER, MonthlyRecognizedRevenue NUMBER);
Step 2. Configure the Mapping Specification in Microsoft Excel
The business analyst completes the following tasks to configure the mapping specification in Microsoft Excel:
♦ Create a mapping specification based on the Mapping template.
♦ Configure the Main worksheet.
♦ Configure the Source worksheet.
16 Chapter 3: Configuring One Mapping - Example
♦ Configure the Target worksheet.
The Functions worksheet lists a set of functions that you can use to configure transformation expressions. In this example, you do not need to configure the Functions worksheet.
Create a Mapping SpecificationTo create a mapping specification based on the Informatica Mapping template, copy and rename the template. You can find the Mapping template, MappingTemplate.xls, in the following directory:
<PowerCenter Client installation directory>\bin\Sample Specifications
For example, copy and rename the template AggregateMapping.xls.
Configure the Main WorksheetThe Main worksheet defines metadata about the mapping specification, mapping, and source and target data sources.
In general, when you configure a mapping specification, you do not need to enter all requested metadata. However, certain metadata is required to import the mapping specification into the repository.
The following table describes the required metadata on the Main worksheet:
Optionally, you can enter a model description and creation time as well as descriptions for the source, source schemas, target, and target schemas.
Configure the Source WorksheetUse the Source worksheet to define the sources. You can also define join, lookup, and filter metadata for the mapping. In this example, you configure the following metadata:
♦ Source tables named SALES and REVENUE. A source defined in the mapping specification is imported as a source definition and Source Qualifier transformation in a PowerCenter mapping.
♦ Lookup condition. You can configure a lookup condition to find data in a source defined in the mapping specification. A lookup in the mapping specification becomes a connected Lookup transformation in a PowerCenter mapping. Define the lookup condition in the appropriate column in the source table. This example uses the following lookup condition to return values from the REVENUE source table for matching store IDs:
REVENUE.StoreID=SALES.StoreID
♦ Filter condition. You can configure a filter to remove source data from the mapping pipeline. A filter defined in the mapping specification becomes a Filter transformation in a PowerCenter mapping. Define the filter condition in the appropriate column in the source table. This example uses the following filter condition to remove transactions with negative values, such as returns:
TransactionAmount > 0
Information Description
Model Name Name of the model that contains all of the mapping metadata.
Source Data Store Name Name of the source data store that contains the mapping sources.
Source System Type Type of source database. For example, enter Oracle.
Source Schema Names Name of the source schema. For example, enter Sales.
Target Data Store Name Name of the target data store that contains the mapping targets. Cannot be identical to the Source Data Store Name.
Target System Type Type of target database. For example, enter Oracle.
Target Schema name Name of the target schema. For example, enter DM.
Step 2. Configure the Mapping Specification in Microsoft Excel 17

To configure the Source worksheet:
1. On the Source worksheet, enter the following information:
Table and column names are case sensitive.
2. To configure a filter that removes negative transactions, such as returns, enter the following expression in the Filters column for the SALES.TransactionAmount row:
TransactionAmount > 0
3. To configure a lookup condition, enter the following expression in the Lookups column for the REVENUE.StoreID row:
REVENUE.StoreID=SALES.StoreID
4. Save the changes.
The following figure shows the completed Source worksheet:
Configure the Target WorksheetUse the Target worksheet to define the targets. You can also define aggregate and non-aggregate expressions for the mapping. In this example, you configure the following metadata:
♦ Target table named T_SALES. A target defined in the mapping specification becomes a target definition in a PowerCenter mapping. To configure a target port in the mapping specification, enter an expression in the Formula/Expression column for the target port. The expression can be the name of a source port or an aggregate or non-aggregate expression. Unconfigured target ports appear in a PowerCenter target definition but are not connected to the PowerCenter mapping pipeline. When defining target ports, use the target table name and column name as follows:
<TableName>.<ColumnName>
♦ Aggregate expression. Use aggregate expressions to perform calculations on multiple values in a port. An aggregate expression defined in a mapping specification becomes an Aggregator transformation in a PowerCenter mapping. Define an aggregate expression in the row where you want return values to be written. This example uses the following aggregate expression to find the total sales from all transactions grouped by store ID:
SUM( SALES.TransactionAmount )
When you import a mapping specification, any port in the Aggregator transformation without an aggregate expression becomes a group by port. Use the Transformations Description column in the Target worksheet to indicate the group by ports you want to use. After importing the mapping specification, the PowerCenter
Classes/Entities/ Tables/Records Physical Name
Attributes/Columns/ Fields Physical Name Datatype Length Scale
SALES StoreID SQL_NUMERIC 10
OldTransactionNumber SQL_NUMERIC 20
TransactionDate SQL_DATE 20
TransactionAmount SQL_NUMERIC 20
REVENUE StoreID SQL_NUMERIC 10
MonthlyRecognizedRevenue SQL_NUMERIC 20 2
18 Chapter 3: Configuring One Mapping - Example
developer can view that information in the Aggregator transformation and configure the group by ports appropriately.
To configure the Target worksheet:
1. On the Target worksheet, enter the following information:
Table and column names are case sensitive.
2. To configure an aggregate expression that calculates total sales by store, enter the following expression in the Transformation Formula/Expression column for the T_SALES.StoreSales row:
SUM(SALES.TransactionAmount)
3. In the Description column, enter the following information for the PowerCenter developer:
group by StoreID
4. To define the return value of the lookup condition of the REVENUE table, enter the following expression in the Transformation Formula/Expression column for the T_SALES.MonthlyRecognizedRevenue row:
REVENUE.MonthlyRecognizedRevenue
5. To configure the remaining target ports, enter the following information:
6. Save the changes.
The following figure shows the completed Target worksheet:
Step 3. Validate the Mapping SpecificationThe Mapping template with validation includes macros to perform validation of the Source and Target worksheets.
To perform validation:
1. On the Source worksheet, click Validate.
The validation notifies you of any error.
Classes/Entities/ Tables/Records Physical Name
Attributes/Columns/ Fields Physical Name Datatype Length Scale
T_SALES StoreID SQL_NUMERIC 10
TransactionDate SQL_DATE 20
StoreSales SQL_NUMERIC 20 2
MonthlyRecognizedRevenue SQL_NUMERIC 20 10
Attributes/Columns/Fields Physical Name
Transformations Formula/Expression
StoreID SALES.StoreID
TransactionDate SALES.TransactionDate
Step 3. Validate the Mapping Specification 19
2. Correct errors and click Validate again.
3. On the Target worksheet, click Validate.
The validation fills in the transformation types, “expr” for expression and “aggr” for aggregation and notifies you of any error.
4. Correct errors and click Validate again.
5. Save the changes.
Step 4. Save the Mapping Specification to a Shared Location
Save the mapping specification named AggregateMapping.xls to a shared location so that the PowerCenter developer can access the file. The PowerCenter developer imports the mapping specification into PowerCenter.
Step 5. Import the Mapping SpecificationThe PowerCenter developer uses the Repository Manager to import a Mapping Analyst for Excel mapping specification. The Repository Service exports mapping metadata from the mapping specification and then imports it to the PowerCenter repository as PowerCenter objects.
To import a mapping specification:
1. Copy the mapping specification named AggregateMapping.xls from the shared location to the following directory on your local machine:
<PowerCenter Client installation directory>\bin\Sample Specifications
2. In the Repository Manager, open the folder that you selected to store the imported PowerCenter objects.
3. Click Repository > Import Metadata.
The Tool Selection page appears.
4. For Source Tool, select Microsoft Office Excel and click Next.
The Microsoft Office Excel Options page appears.
5. For File, click the Value field to locate and select the mapping specification that you created.
For example, select AggregateMapping.xls.
6. Click Next.
The PowerCenter Options page appears.
7. For Export Objects, select Sources, Targets, and Mappings to import the entire mapping.
8. For Code Page, enter the name of the PowerCenter Repository Service code page.
For example, if the PowerCenter Repository Service uses the “MS Windows Latin 1 (ANSI), superset of Latin1” code page, enter the corresponding code page name MS1252. For a list of supported code page names, see the PowerCenter Administrator Guide.
9. Use the default values of the remaining options.
10. Click Next.
20 Chapter 3: Configuring One Mapping - Example
In the Import Results dialog box, a message appears if the export from the mapping specification is successful. Error messages display when the export is not successful.
11. Click Show Details to view log events. You can also click Save Log to save the log events to a file.
12. Click Next.
The Selection dialog box displays the sources or targets in the mapping specification with all objects selected by default.
13. Select all objects for import and click Finish.
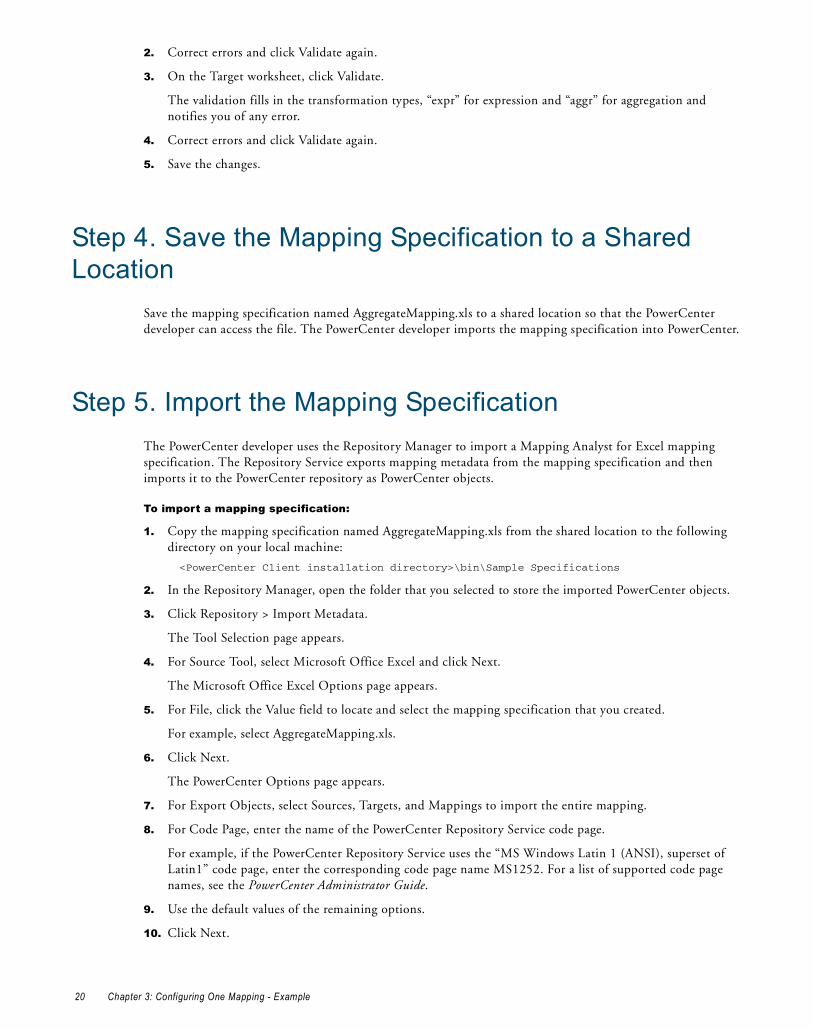
The Repository Service imports the mapping from the mapping specification. The results of the import appear in the Output window. By default, the mapping is named Mapping. You can change the mapping name when you edit the mapping.
You can view and edit the mapping in the Designer. The following figure shows the imported mapping:
Step 6. Edit the PowerCenter Mapping and Generate a Workflow
The PowerCenter developer completes the following tasks in the PowerCenter Client:
♦ Edit the PowerCenter mapping.
♦ Generate and run a workflow from the mapping.
Edit the PowerCenter MappingThe PowerCenter developer uses the Designer to view and edit the PowerCenter mapping. The developer can implement additional functionality that might be required. For this example, edit the mapping to configure the Aggregator transformation group by ports.
To edit the mapping to configure the Aggregator transformation group by ports:
1. In the Mapping Designer, open the mapping for editing.
2. To rename the mapping, click Mapping > Edit, enter a name, and click OK.
For example, enter AggregateMappingExample.
3. Double-click the Aggregator transformation.
4. On the Ports tab, click the StoreSales port.
The Description field displays the note to configure StoreID as the group by port.
5. Select the GroupBy option for the StoreID port, and clear the option for all other ports.
6. Click OK.
7. Save the mapping.
Step 6. Edit the PowerCenter Mapping and Generate a Workflow 21

Generate and Run a Workflow from the MappingThe PowerCenter developer uses the Workflow Generation Wizard in the Designer to generate a workflow from the mapping. The developer then runs the workflow to populate the target table. For more information about using the Workflow Generation Wizard, see the PowerCenter Designer Guide.
After the workflow runs, use Oracle SQL Developer to review the contents of the target table. For example, run the following SQL statement to view the contents of the table:
Select * from dm.T_Sales order by storeID;
22 Chapter 3: Configuring One Mapping - Example
C H A P T E R 4
Configuring Multiple Mappings
This chapter includes the following topics:
♦ Overview, 23
♦ Copying and Renaming the Source-Target-Matrix Template, 23
♦ Mapping Names, 24
♦ Sources, 24
♦ Expression Transformations, 25
♦ Targets, 25
OverviewA business analyst uses the Source-Target-Matrix template to create a mapping specification for multiple mappings. The Source-Target-Matrix template contains a separate worksheet for each mapping in the mapping specification. Mapping specifications based on the Source-Target-Matrix template can contain sources, targets, and Expression transformations. A PowerCenter developer imports the mapping specification using the Repository Manager to create the corresponding PowerCenter objects.
To create a mapping specification based on the Source-Target-Matrix template, a business analyst completes the following steps:
1. Copy and rename the template.
2. Configure the name for each mapping.
3. Configure sources.
4. Configure Expression transformations.
5. Configure targets.
Note: You can use the Source-Target-Matrix template to create a mapping specification with a single mapping.
Copying and Renaming the Source-Target-Matrix Template
To create a mapping specification based on the Informatica Source-Target-Matrix template, copy and rename the template. You can find the Source-Target-Matrix template, source-target-matrix.xls, in the following directory:
<PowerCenter Client installation directory>\bin\Sample Specifications
Overview 23
Mapping NamesThe Source-Target-Matrix template contains three worksheets named mapping1, mapping2, and mapping3. When a PowerCenter developer imports a mapping specification created from the Source-Target-Matrix template, the Repository Service performs the following actions:
♦ Names each mapping and target in the mapping specification with the worksheet name. Rename each worksheet with an appropriate mapping and target name.
♦ Creates a new mapping for every worksheet in the file. To avoid importing unused worksheets, delete all unused worksheets from the file.
SourcesUse the Source section on each worksheet to enter source information for the mapping.
Enter the following properties in the Source section:
To specify a database type for the source, the PowerCenter developer can complete one of the following tasks:
♦ Select a database type when importing the mapping specification. On the PowerCenter Options page of the Import Wizard, select a database type for the Database type option. During import, the Repository Service assigns this database type to all sources and targets for each mapping configured in the mapping specification. For more information, see “Importing Mapping Specifications” on page 34.
♦ Edit the database type for the source definition in the Designer. After importing the mapping specification, open the source definition in the Source Analyzer. In the Table tab, select the database type.
To specify a database name for the source, the PowerCenter developer can enter the database name when importing the mapping specification. On the PowerCenter Options page of the Import Wizard, enter a name for the Database name option. All sources for each mapping configured in the mapping specification will have the same database name. For more information, see “Importing Mapping Specifications” on page 34.
Property Required/Optional Description
File/table Required File or table name. The Repository Service creates a PowerCenter source definition with this name.
Field/column Required Field or column name. The Repository Service creates a port in the source definition with this name. Add related fields and columns in the same order as in the Target section on the worksheet. When you import the mapping specification, the Reporting Service links transformation ports by position. For example, the Reporting Service links the first output port to the first input port, and the second output port to the second input port.
Field/column Datatype Required Datatype of the field or column. For sources in relational databases, enter the Mapping Analyst for Excel datatype. The Repository Service assigns the corresponding native datatype to the port in the source definition. For more information, see “Mapping Analyst for Excel Datatypes” on page 8.
Field/column Description
Optional Description for the field or column. The Repository Service uses this description for the port in the source definition.
24 Chapter 4: Configuring Multiple Mappings
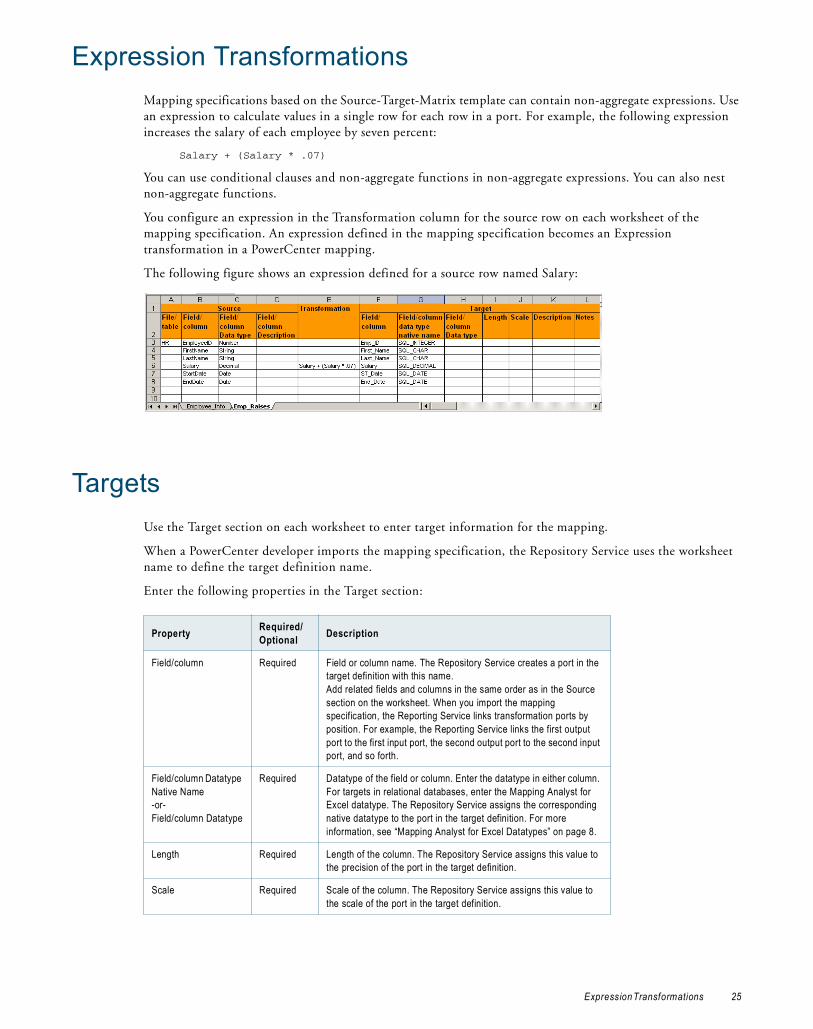
Expression TransformationsMapping specifications based on the Source-Target-Matrix template can contain non-aggregate expressions. Use an expression to calculate values in a single row for each row in a port. For example, the following expression increases the salary of each employee by seven percent:
Salary + (Salary * .07)
You can use conditional clauses and non-aggregate functions in non-aggregate expressions. You can also nest non-aggregate functions.
You configure an expression in the Transformation column for the source row on each worksheet of the mapping specification. An expression defined in the mapping specification becomes an Expression transformation in a PowerCenter mapping.
The following figure shows an expression defined for a source row named Salary:
TargetsUse the Target section on each worksheet to enter target information for the mapping.
When a PowerCenter developer imports the mapping specification, the Repository Service uses the worksheet name to define the target definition name.
Enter the following properties in the Target section:
Property Required/Optional Description
Field/column Required Field or column name. The Repository Service creates a port in the target definition with this name.Add related fields and columns in the same order as in the Source section on the worksheet. When you import the mapping specification, the Reporting Service links transformation ports by position. For example, the Reporting Service links the first output port to the first input port, the second output port to the second input port, and so forth.
Field/column Datatype Native Name-or-Field/column Datatype
Required Datatype of the field or column. Enter the datatype in either column. For targets in relational databases, enter the Mapping Analyst for Excel datatype. The Repository Service assigns the corresponding native datatype to the port in the target definition. For more information, see “Mapping Analyst for Excel Datatypes” on page 8.
Length Required Length of the column. The Repository Service assigns this value to the precision of the port in the target definition.
Scale Required Scale of the column. The Repository Service assigns this value to the scale of the port in the target definition.
Expression Transformations 25
To specify a database type for the target, the PowerCenter developer can complete one of the following tasks:
♦ Select a database type when importing the mapping specification. On the PowerCenter Options page of the Import Wizard, select a database type for the Database type option. During import, the Repository Service assigns this database type to all sources and targets for each mapping configured in the mapping specification. For more information, see “Importing Mapping Specifications” on page 34.
♦ Edit the database type for the target definition in the Designer. After importing the mapping specification, open the target definition in the Target Designer. In the Table tab, select the database type.
Description Optional Description for the field or column. The Repository Service uses this description for the port in the target definition.
Notes Optional Description for the field or column. The Repository Service uses this description for the port in the target definition. When you enter values for both the Description and Notes properties, the Repository Service uses the Notes property.
Property Required/Optional Description
26 Chapter 4: Configuring Multiple Mappings

C H A P T E R 5
Configuring Multiple Mappings - Example
This chapter includes the following topics:
♦ Overview, 27
♦ Step 1. Establish the PowerCenter Environment, 28
♦ Step 2. Configure the Mapping Specification in Microsoft Excel, 28
♦ Step 3. Save the Mapping Specification to a Shared Location, 30
♦ Step 4. Import the Mapping Specification, 30
♦ Step 5. Edit the PowerCenter Mappings and Generate Workflows, 31
OverviewThis example uses the Source-Target-Matrix mapping specification template to configure mappings that read human resources data from a flat file and write the data to an Oracle database. The mapping specification in this example configures the following mappings:
♦ Employee_Info. Reads a delimited flat file containing employee information and writes the data to a target table named Employee_Info located in an Oracle schema named DM.
♦ Emp_Raises. Reads the same delimited flat file, includes an Expression transformation that calculates a salary increase for each employee, and writes the data to a target table named Emp_Raises located in an Oracle schema named DM.
To create these example mappings, the business analyst and PowerCenter developer complete the following steps:
1. Establish the PowerCenter environment (Developer). The PowerCenter developer configures the database connectivity, designates a repository folder to store the imported objects, and creates the sample flat file source and the target tables.
2. Configure the mapping specification in Microsoft Excel (Business Analyst). The business analyst creates a mapping specification from the Source-Target-Matrix template and configures the Employee_Info and Emp_Raises mappings on separate worksheets.
3. Save the mapping specification to a shared location (Business Analyst).
4. Import the mapping specification (Developer).
5. Edit the PowerCenter mappings and generate workflows (Developer).
Overview 27
Step 1. Establish the PowerCenter EnvironmentBefore the business analyst creates a mapping specification, the PowerCenter developer completes the following tasks to establish the PowerCenter environment:
♦ Configure database connections. Use the Workflow Manager to configure connection objects so that the Integration Service can connect to the source and target databases.
♦ Designate a repository folder to store the imported objects. Use the Repository Manager to select an existing folder or to create a folder for the PowerCenter objects that are imported from the mapping specification.
♦ Create the source flat file. Create a flat file that contains the sample data used in this example.
♦ Create target tables. Use Oracle SQL Plus to run SQL statements to use the sample data in this example.
Create the Source Flat FileTo use the source flat file included in this example, create a sample flat file that contains the following data:
♦ EmployeeID
♦ FirstName
♦ LastName
♦ Salary
♦ StartDate
♦ EndDate
For example, create a file named HR.txt that contains the following sample data:
1,John,Baer,100000,1/1/2005 00:00:00,1/1/2006 00:00:002,Bobbi,Apperley,120000,1/1/2005 00:00:00,1/1/2007 00:00:00
Save the file to the source file directory for the Integration Service process. The directory is defined in the $PMSourceFileDir service process variable. By default, the variable is set to the following directory:
<PowerCenter installation directory>\server\infa_shared\SrcFiles
Create Target TablesTo use the target tables included in this example, use Oracle SQL Plus to run the following SQL statements to create the Employee_Info and Emp_Raises target tables in an Oracle schema named DM:
Connect DM/DMCREATE TABLE DM.Employee_Info (Emp_ID number, First_Name varchar2(40), Last_Name varchar2(40), Salary number, ST_Date date, End_Date date);
CREATE TABLE DM.Emp_Raises (Emp_ID number, First_Name varchar2(40), Last_Name varchar2(40), Salary number, ST_Date date, End_Date date);
Step 2. Configure the Mapping Specification in Microsoft Excel
The business analyst completes the following tasks to configure the mapping specification in Microsoft Excel:
♦ Create a mapping specification based on the Source-Target-Matrix template.
♦ Configure the mappings.
28 Chapter 5: Configuring Multiple Mappings - Example
Create a Mapping SpecificationTo create a mapping specification based on the Informatica Source-Target-Matrix template, copy and rename the template. You can find the Source-Target-Matrix template, source-target-matrix.xls, in the following directory:
<PowerCenter Client installation directory>\bin\Sample Specifications
For example, copy and rename the template HR_Data_Load.xls.
Configure the MappingsConfigure each mapping on a different worksheet in the mapping specification and name each worksheet. The Source-Target-Matrix template uses the worksheet name for both mapping names and target names in the mapping.
To configure multiple mappings:
1. Open HR_Data_Load.xls.
2. Rename the first worksheet Employee_Info and press Enter.
3. In the Source section of the Employee_Info worksheet, enter the following information:
4. In the Target section of the Employee_Info worksheet, enter the following information:
5. Save the changes.
6. To create the second mapping, copy rows 3 through 8 from the Employee_Info worksheet to the second worksheet.
7. Rename the second worksheet Emp_Raises and press Enter.
8. In the Salary row, enter the following expression in the Transformation column to define a seven percent increase in salary for all employees:
Salary + (Salary * .07)
9. Save the changes.
10. Delete the unused worksheet named mapping3.
File/Table Field/Column Field/Column Datatype
HR EmployeeID Number
FirstName String
LastName String
Salary Decimal
StartDate Date
EndDate Date
Field/Column Field/Column Datatype Native Name
Emp_ID SQL_INTEGER
First_Name SQL_CHAR
Last_Name SQL_CHAR
Salary SQL_DECIMAL
ST_Date SQL_DATE
End_Date SQL_DATE
Step 2. Configure the Mapping Specification in Microsoft Excel 29
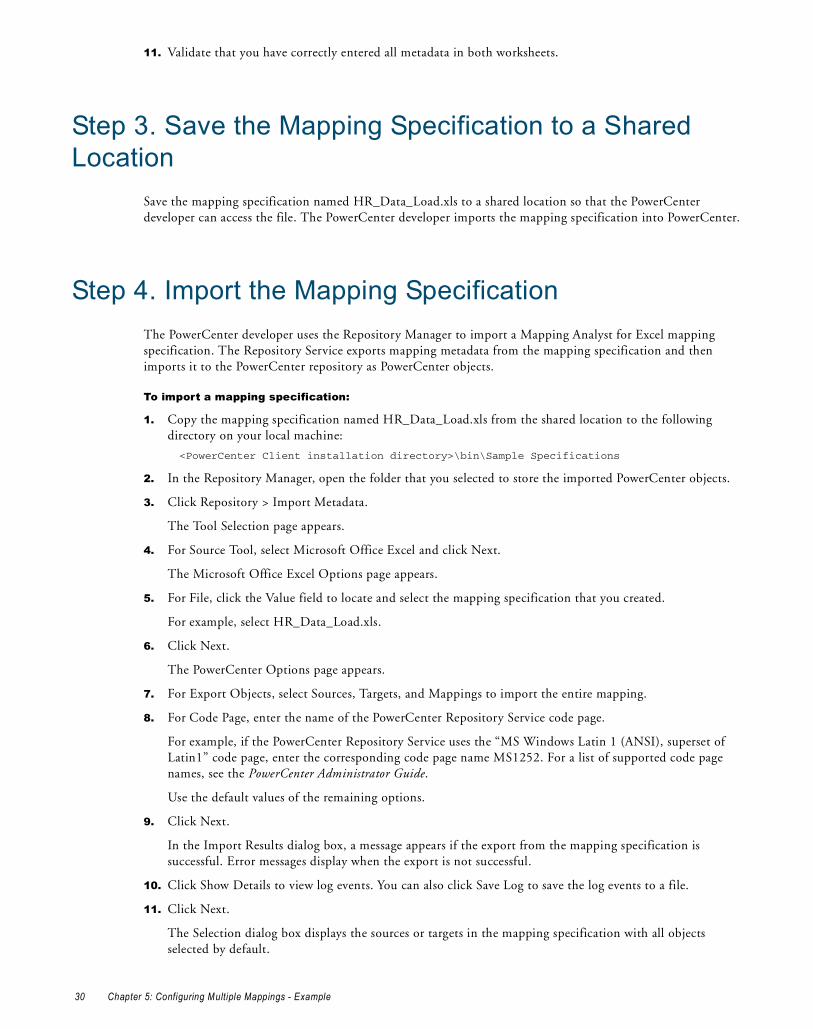
11. Validate that you have correctly entered all metadata in both worksheets.
Step 3. Save the Mapping Specification to a Shared Location
Save the mapping specification named HR_Data_Load.xls to a shared location so that the PowerCenter developer can access the file. The PowerCenter developer imports the mapping specification into PowerCenter.
Step 4. Import the Mapping SpecificationThe PowerCenter developer uses the Repository Manager to import a Mapping Analyst for Excel mapping specification. The Repository Service exports mapping metadata from the mapping specification and then imports it to the PowerCenter repository as PowerCenter objects.
To import a mapping specification:
1. Copy the mapping specification named HR_Data_Load.xls from the shared location to the following directory on your local machine:
<PowerCenter Client installation directory>\bin\Sample Specifications
2. In the Repository Manager, open the folder that you selected to store the imported PowerCenter objects.
3. Click Repository > Import Metadata.
The Tool Selection page appears.
4. For Source Tool, select Microsoft Office Excel and click Next.
The Microsoft Office Excel Options page appears.
5. For File, click the Value field to locate and select the mapping specification that you created.
For example, select HR_Data_Load.xls.
6. Click Next.
The PowerCenter Options page appears.
7. For Export Objects, select Sources, Targets, and Mappings to import the entire mapping.
8. For Code Page, enter the name of the PowerCenter Repository Service code page.
For example, if the PowerCenter Repository Service uses the “MS Windows Latin 1 (ANSI), superset of Latin1” code page, enter the corresponding code page name MS1252. For a list of supported code page names, see the PowerCenter Administrator Guide.
Use the default values of the remaining options.
9. Click Next.
In the Import Results dialog box, a message appears if the export from the mapping specification is successful. Error messages display when the export is not successful.
10. Click Show Details to view log events. You can also click Save Log to save the log events to a file.
11. Click Next.
The Selection dialog box displays the sources or targets in the mapping specification with all objects selected by default.
30 Chapter 5: Configuring Multiple Mappings - Example
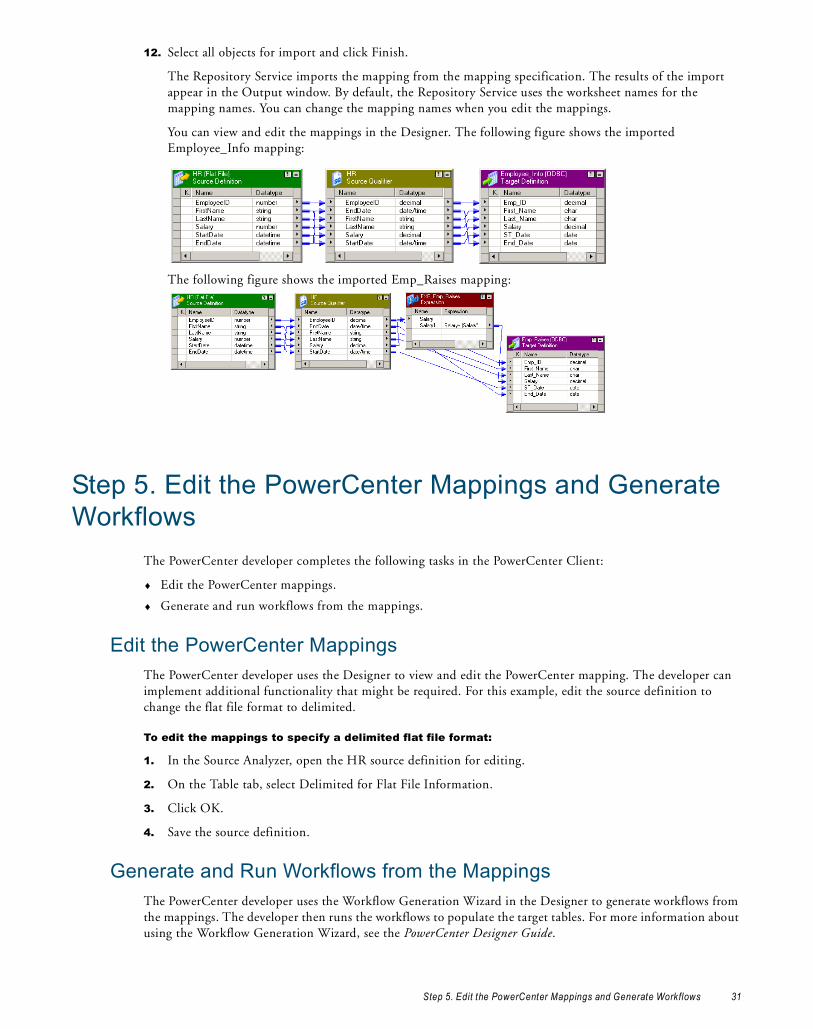
12. Select all objects for import and click Finish.
The Repository Service imports the mapping from the mapping specification. The results of the import appear in the Output window. By default, the Repository Service uses the worksheet names for the mapping names. You can change the mapping names when you edit the mappings.
You can view and edit the mappings in the Designer. The following figure shows the imported Employee_Info mapping:
The following figure shows the imported Emp_Raises mapping:
Step 5. Edit the PowerCenter Mappings and Generate Workflows
The PowerCenter developer completes the following tasks in the PowerCenter Client:
♦ Edit the PowerCenter mappings.
♦ Generate and run workflows from the mappings.
Edit the PowerCenter MappingsThe PowerCenter developer uses the Designer to view and edit the PowerCenter mapping. The developer can implement additional functionality that might be required. For this example, edit the source definition to change the flat file format to delimited.
To edit the mappings to specify a delimited flat file format:
1. In the Source Analyzer, open the HR source definition for editing.
2. On the Table tab, select Delimited for Flat File Information.
3. Click OK.
4. Save the source definition.
Generate and Run Workflows from the MappingsThe PowerCenter developer uses the Workflow Generation Wizard in the Designer to generate workflows from the mappings. The developer then runs the workflows to populate the target tables. For more information about using the Workflow Generation Wizard, see the PowerCenter Designer Guide.
Step 5. Edit the PowerCenter Mappings and Generate Workflows 31

After the workflows run, use Oracle SQL Developer to review the contents of the target tables. For example, run the following SQL statements to view the contents of the tables:
Select * from dm.Employee_Info;Select * from dm.Emp_Raises;
Compare the Salary column in both tables to review the salary increases.
32 Chapter 5: Configuring Multiple Mappings - Example
C H A P T E R 6
Importing and Exporting Mapping Specifications
This chapter includes the following topics:
♦ Overview, 33
♦ Importing Mapping Specifications, 34
♦ Exporting Mappings, 36
♦ Troubleshooting, 37
OverviewYou can use the PowerCenter Repository Manager to import the following information from a mapping specification:
♦ Source definitions
♦ Target definitions
♦ A single mapping
♦ Multiple mappings that use the same mapping specification template
For example, a business analyst creates a mapping specification in Microsoft Excel to define a mapping that includes sources, targets, and transformations. A PowerCenter developer imports the mapping specification to create the PowerCenter objects.
You can use the PowerCenter Repository Manager to export the following information from a PowerCenter repository to a mapping specification:
♦ Source definitions
♦ Target definitions
♦ A single, valid mapping
You might want to export PowerCenter objects to Microsoft Excel for the following reasons:
♦ Several workflows are running in production. However, no documentation about these workflows or mappings exists. A PowerCenter developer can export the mappings to mapping specifications for documentation and business analyst review.
♦ You are using Mapping Analyst for Excel to configure PowerCenter mappings, and the business analyst needs to review the implementation of their mapping specifications. A PowerCenter developer can export the mapping for a business analyst to review at any point in the development process.
Overview 33

Importing Mapping SpecificationsUse the Repository Manager to import a mapping specification. You can import sources and targets, or you can import an entire mapping. You can also import more than one mapping at a time if the mapping specification contains multiple mappings. Mappings do not have to be complete or valid.
When you import a mapping specification, the Repository Service exports metadata from the mapping specification and imports it into the PowerCenter repository.
You can use the Mapping template, the Source-Target-Matrix template, or a custom template to create a mapping specification. The following table describes the PowerCenter objects that the Repository Service creates when you import a mapping specification based on the Mapping or Source-Target-Matrix template:
After you import a mapping specification, review the imported objects. Most mappings imported from a mapping specification require editing before validation.
To import a mapping specification:
1. In the Repository Manager, open a folder and click Repository > Import Metadata.
The Tool Selection page appears.
2. In the Source Tool field, select Microsoft Office Excel and click Next.
The Microsoft Office Excel Options page appears.
3. Click the Value field for the File option to locate and select the mapping specification to import.
4. Click Next.
The PowerCenter Options page appears.
Mapping Analyst for Excel Component Template PowerCenter Repository Object
Source information. MappingSource-Target-Matrix
Source definitions.
Filter expression to filter data from the pipeline.
Mapping Filter transformation.
Join expression to join two sources. To join more than two sources, you can enter multiple join expressions.
Mapping Joiner transformation.
Lookup expression to perform a lookup on source data.
Mapping Connected Lookup transformation. Includes ports that are used in the mapping.
Aggregate data transformation expression. Mapping Aggregator transformation.
Single row data transformation expression. MappingSource-Target-Matrix
Expression transformation.
Target information. MappingSource-Target-Matrix
Target definitions.
Additional comments or descriptions MappingSource-Target-Matrix
Descriptions associated with transformations and source and target definitions. Provides additional notes to the PowerCenter developer.
34 Chapter 6: Importing and Exporting Mapping Specifications
5. Enter the following information:
6. Click Use Defaults to revert to default options.
7. Click Next.
In the Import Results dialog box, a message appears if the export from the mapping specification is successful. Error messages appear when the export is not successful.
Click Show Details to view log events. You can also click Save Log to save the log events to a file.
8. Click Next.
The Source Selection dialog box displays the sources or targets in the mapping specification with all objects selected by default.
9. Select the objects that you want to import and click Finish.
The Repository Service imports the metadata from the mapping specification.
If the import folder contains objects of the same name as those you are importing, the Conflict Resolution Wizard displays. For more information about the conflict, click Compare Conflict.
Otherwise for each conflicting object, select the object and choose one of the following resolutions:
♦ Rename. Change the object name when importing it to the target folder.
♦ Replace. Replace the existing object in the target folder.
♦ Reuse. Use the existing object in the target folder.
♦ Skip. Skip importing the object.
You can also apply the same resolution to all sources or to all conflicts.
10. Click Next, and then click Close to close the Conflict Resolution Wizard.
Option Description
Export Objects Objects you want to import into the PowerCenter repository. Select one of the following options:- Sources, targets, and mappings. Imports an entire mapping from the
mapping specification. Use for mapping specifications that describe an entire mapping.
- Tables as sources. Imports all tables or files as sources.- Tables as targets. Imports all tables or files as targets.Default is Tables as sources.
Database type Database type of the source and target databases. Select a database type, Flat File, or select Auto Detect to allow PowerCenter to determine the database type from the mapping specification. Default is Auto Detect.
Database name Database name for imported source tables. Overrides the source database name entered in the mapping specification. Optional.
Code page Name of the PowerCenter Repository Service code page. Default is MS 1252.
Export metadata extensions
Import descriptions and comments as PowerCenter metadata extensions. Select one of the following options:- True. Import descriptions and comments.- False. Do not import descriptions and comments.Default is true.
Importing Mapping Specifications 35
Exporting MappingsUse the Repository Manager to export objects from the PowerCenter repository to a mapping specification. You can export sources and targets, or you can export a valid mapping.
Informatica provides mapping specification templates that organize the mapping metadata in different ways. When you export a mapping to Microsoft Excel, use one of the following mapping specification templates:
♦ Mapping template (with validation). Contains a single mapping configured on multiple worksheets for overview information, sources, targets, and functions. Mapping specifications based on this template can contain source and target data and Joiner, Lookup, Filter, Expression, and Aggregator transformations. This template performs some validation of the metadata.
♦ Mapping template (without validation). Is the same as the Mapping template (with validation). However, this template does not perform validation of the metadata. Use this template if you want to avoid enabling macros on your machine.
♦ Source-Target-Matrix template. Can contain multiple mappings, each configured on a separate worksheet. Mapping specifications based on this template can contain source and target data and Expression transformations. If the mapping being exported contains additional transformations, use the Mapping template.
♦ Custom template. Contains a custom format. You can create a custom mapping specification template if you want to use a format different from the Mapping Analyst for Excel templates.
The Repository Service exports only supported transformations. When you export a mapping that includes other transformations, target definitions in the same pipeline might not contain all ports in the mapping specification.
You can export a Lookup transformation that performs a lookup on a source definition. The Repository Service does not export a Lookup transformation based on a lookup source that is not defined in the mapping.
To export PowerCenter repository objects to a mapping specification:
1. In the Repository Manager, open a folder that contains the repository objects that you want to export.
2. In the Navigator, select the mapping or set of sources or targets that you want to export.
3. Click Repository > Export Metadata.
The Tool Selection page appears.
4. For Target Tool, select Microsoft Office Excel and click Next.
The Microsoft Office Excel Options page appears.
5. Enter the following information:
Microsoft Excel Option Description
File Name of the mapping specification for exported metadata. Click the Value field to locate and select the mapping specification you want to use. Or, enter a file name for the wizard to create.You can export metadata to the same file more than once. When you export to a mapping specification that contains existing data, the Repository Service writes information to empty cells or overwrites existing data.
36 Chapter 6: Importing and Exporting Mapping Specifications
6. Click Use Defaults to reset to default values.
7. Click Export.
In the Export Results dialog box, a message appears if the export is successful. Error messages display when the export is not successful.
Click Show Details to view log events. You can also click Save Log to save the log events to a log file.
8. Click Finish.
TroubleshootingI have several mappings in a single file. Each mapping uses the same template and is on a single worksheet. However, I cannot import the mapping specification.Verify that the Source-Target-Matrix repeating sheet file and metamap are configured correctly. The metamap must reference fields in the Source-Target-Matrix repeating sheet file.
I receive the following error when I import a mapping specification: This workbook contains links to other data sources....
The metamap references an unrelated mapping specification template. Update the metamap and import the mapping specification again.
The following error message appears in the log when I import a mapping specification based on a custom template: To avoid potential complications with metadata mapping, it is strongly recommended to use metadata mapping file in XML format.
Mapping Analyst for Excel uses the XML version of the metamap when you import mapping specifications or export mappings. Save the custom metamap as an XML file and import the mapping specification again.
I used the Mapping template to export a mapping that contains an Aggregator transformation. However, the exported mapping specification does not include the aggregate expression on the Target worksheet.In the Designer, verify that the expression port in the Aggregator transformation is connected to a mapping target. To export an aggregate expression to a mapping specification, the expression port in the Aggregator transformation must be connected to a mapping target.
Operation Type of export operation to perform. Select one of the following options:- Create. Exports all metadata to a new or an existing mapping specification.- Update Sources. Exports source metadata to an existing mapping
specification.- Update Targets. Exports target metadata to an existing mapping specification.Default is Create.
Format Format name of the metamap associated with the mapping specification template you want to use. Enter one of the following metamap values:- MappingTemplate. Enter if using the Mapping template with validation.- MappingTemplate_NoValidation. Enter if using the Mapping template without
validation.- source-target-matrix. Enter if using the Source-Target-Matrix template.- <custom-format>. If using a custom mapping specification template, enter the
format name of the associated custom metamap. For example, if the custom metamap is named MyCustom-MetaMap.xml, enter MyCustom.
If you do not enter a format, Mapping Analyst for Excel uses the Default format that specifies Default-MetaMap.xml.
Microsoft Excel Option Description
Troubleshooting 37

38 Chapter 6: Importing and Exporting Mapping Specifications
C H A P T E R 7
Customizing Mapping Specification Templates
This chapter includes the following topics:
♦ Overview, 39
♦ Configuring a Custom Mapping Specification Template, 41
♦ Copying and Renaming the Metamap, 43
♦ Associating the Metamap with the Custom Template or Repeating Sheet File, 43
♦ Matching Criteria in the Metamap, 44
♦ Model, Source, Target, and Mapping Worksheet Types in the Metamap, 45
♦ Import and Export Parameters in the Metamap, 49
♦ Saving the Metamap as an XML Spreadsheet, 50
OverviewCreate a custom mapping specification template and associated metamap if you want to use a format different from the Mapping Analyst for Excel templates. After you configure a custom mapping specification template and the associated metamap, you can use the custom mapping specification template to configure a mapping specification.
To create a custom mapping specification template and associated metamap, complete the following steps:
1. Configure a custom mapping specification template.
2. Copy and rename the metamap.
3. Associate the metamap with the custom mapping specification template or repeating sheet file.
4. Edit the matching criteria in the metamap.
5. Configure the Model, Source, Target, and Mapping worksheets in the metamap.
6. Optionally configure import and export parameters in the metamap.
7. Save the metamap as an XML spreadsheet.
Metamap HierarchyThe metamap divides the mapping specification metadata into a hierarchy for sources, targets, transformations, and mappings. The metamap contains a worksheet for each object in the hierarchy. When you import the
Overview 39

mapping specification, the Repository Service imports the metadata in the file starting at the top of the hierarchy.
The following figure shows the Mapping Analyst for Excel metadata hierarchy:
The metamap hierarchy contains parent and child objects. If you configure a child object, you must also configure the parent object on its corresponding worksheet. For example, a source schema is a child object of a source data package and a model. If you configure a source schema, you also must configure a data package and a model.
Each metamap worksheet describes metadata for objects at that level and identifies all parent objects. For example, the SourceSchemas worksheet describes the source schema and identifies its parent source data package and parent model.
When you modify the associated metamap to reflect the changes made to a custom mapping specification template, you edit the metamap worksheets for the metadata type that you modified. For example, if you modify the source metadata in a custom version of the Mapping template, you modify the source and mapping worksheets in the metamap. You do not modify the target worksheets.
Mapping Analyst for Excel requires you to create some objects that are part of the metadata hierarchy that PowerCenter does not import. For example, the Repository Service does not import the Model and Data Package name. You can enter constant values for these objects in the metamap if the mapping specification does not contain values.
The following table describes the metamap worksheet types and how the Repository Service reads each worksheet type:
Worksheet Type Worksheet Names Description
Overview Overview Determines how the Repository Service imports and exports metadata, the template type you want to use, and the matching criteria that identifies the associated mapping specification template.
Model Models Defines the location of the entity that contains all mapping metadata. The Repository Service does not import this information.
Mapping Design Packages
Source Data Packages
Target Data Packages
Transformation Tasks
Target Schemas
Source Schemas
Source Classes
Source Attributes
SourceDataTypes
TargetClasses
Filters
Target Attributes
TargetDataTypes
Lookups
Joins
Feature Maps
Model
TargetAttributes
Target Schemas
40 Chapter 7: Customizing Mapping Specification Templates
Rules and GuidelinesUse the following rules and guidelines when you create a custom mapping specification template:
♦ Decide on a mapping structure before you design the template. One or two templates and associated metamaps are more efficient than multiple templates and associated metamaps for each mapping.
♦ Create separate fields for different types of metadata. This allows you to match each field to different parts of the metamap.
♦ Configure names for the mapping, sources, targets, or transformations in the mapping specification or as constants in the metamap.
♦ Use a single worksheet to import more than one mapping at a time.
♦ Edit the metamap to reflect the custom mapping specification template structure. To avoid confusion, complete the template design before you configure the metamap.
Configuring a Custom Mapping Specification Template Use one of the following methods to configure a custom mapping specification template:
♦ Modify the Mapping template.
♦ Modify the Source-Target-Matrix template and repeating sheet file.
♦ Create a new template.
Modifying the Mapping TemplateIf the Mapping template contains most of the metadata you need, create a custom mapping specification template based on the Mapping template.
To avoid altering the original file, copy and rename the Mapping template.
Source SourceDataPackagesSourceSchemasSourceClasses SourceAttributesSourceDatatypes
Defines the location of source metadata. The Repository Service reads each worksheet in the hierarchy to create a source definition.
Target TargetDataPackagesTargetSchemasTargetClasses TargetAttributesTargetDatatypes
Defines the location of target metadata. The Repository Service reads each worksheet in the hierarchy to create a target definition.
Mapping MappingDesignPackagesTransformationTasksFiltersLookupsJoins FeatureMaps
Defines the location of mapping and transformation metadata, including how to map the source and target columns. The Repository Service reads each worksheet in the hierarchy to create a mapping.
System Types MITI_SystemTypes Lists the file and relational source and target types that Mapping Analyst for Excel supports.
Data Types MITI_DataTypes Lists native datatypes and the corresponding Mapping Analyst for Excel datatype. For more information, see “Mapping Analyst for Excel Datatypes” on page 8.
Worksheet Type Worksheet Names Description
Configuring a Custom Mapping Specificat ion Template 41
To modify the Mapping template:
1. Copy MappingTemplate-Blank.xls or MappingTemplate_NoValidation-Blank.xls, depending on whether you want to use a template with or without validation.
The blank versions of the mapping specification templates are located in the following directory:
<PowerCenter_Client_installation_directory>\bin\mimb\conf\MIRModelBridgeTemplate\ MIRMicrosoftExcel
2. Paste the copy of the mapping specification template in the same directory.
3. Rename the mapping specification template using the following naming convention:
<format>-Blank.xls
For example, CustomTemplate-Blank.xls is a valid name.
4. Use Microsoft Excel to modify the renamed mapping specification template by adding or deleting columns.
Modifying the Source-Target-Matrix Template and Repeating Sheet File
If the Source-Target-Matrix template contains most of the metadata you need, create a custom mapping specification template based on the Source-Target-Matrix template.
The Source-Target-Matrix repeating sheet file defines the common structure for multiple mappings defined in a mapping specification that is based on the Source-Target-Matrix template. When you modify a custom version of the Source-Target-Matrix template, you must make the same changes to a custom version of the Source-Target-Matrix repeating sheet file. The Source-Target-Matrix metamap uses the Source-Target-Matrix repeating sheet file to define the location of metadata in the Source-Target-Matrix mapping specification template.
To avoid altering the original files, copy and rename the Source-Target-Matrix template and repeating sheet file.
To modify the Source-Target-Matrix template and repeating sheet file:
1. Copy the Source-Target-Matrix mapping specification template (source-target-matrix.xls) located in the following directory:
<PowerCenter Client installation directory>\bin\Sample Specifications
2. Paste the copy of the mapping specification template in the same directory.
3. Rename the mapping specification template using the following naming convention:
<format>.xls
For example, custom-stm.xls is a valid name.
4. Copy the Source-Target-Matrix repeating sheet file (source-target-matrix-Blank.xls) located in the following directory:
<PowerCenter_Client_installation_directory>\bin\mimb\conf\MIRModelBridgeTemplate\ MIRMicrosoftExcel
5. Paste the copy of the repeating sheet file in the same directory.
6. Rename the repeating sheet file using the following naming convention:
<format>-Blank.xls
The format name must match the format name of the custom Source-Target-Matrix template. For example, custom-stm-Blank.xls is a valid name.
7. Use Microsoft Excel to modify the renamed mapping specification template and repeating sheet file by adding or deleting columns.
Creating a New TemplateUse Microsoft Excel to create a new spreadsheet if the metadata format that you want to use differs significantly from the Informatica mapping specification templates.
42 Chapter 7: Customizing Mapping Specification Templates
To create a new template:
1. Use Microsoft Excel to create a new spreadsheet.
2. Name the custom mapping specification template using the following naming convention:
<format>-Blank.xls
For example, CustomTemplate-Blank.xls is a valid name.
3. Save the custom mapping specification template to the following directory:
<PowerCenter_Client_installation_directory>\bin\mimb\conf\MIRModelBridgeTemplate\ MIRMicrosoftExcel
Copying and Renaming the MetamapCopy and rename the .xls version of an existing metamap. Mapping Analyst for Excel includes metamaps in Excel and XML formats. Use the Excel version of the metamap to modify metamap properties when you create a custom mapping specification template.
If your custom mapping specification template is based on an existing template, copy and rename the associated metamap for the existing template: MappingTemplate-MetaMap.xls, MappingTemplate_NoValidation-MetaMap.xls, or source-target-matrix-MetaMap.xls.
If you created a new custom mapping specification template, copy and rename any of the existing metamaps. When you create a new mapping specification template, you must modify each worksheet in a metamap. As a result, you can use any existing metamap to create the custom version.
The original metamaps are in the following directory:
<PowerCenter_Client_installation_directory>\bin\mimb\conf\MIRModelBridgeTemplate\ MIRMicrosoftExcel
When you rename the metamap, use the following naming convention:
<format>-MetaMap.xls
The format name must match the format name of the associated custom mapping specification template. For example, if the custom mapping specification template is named CustomTemplate-Blank.xls, name the associated metamap CustomTemplate-MetaMap.xls.
Save the custom metamap in the same directory as the original metamap.
Note: A metamap uses relative links to find the location of metadata in a mapping specification. Use Windows Explorer to copy the templates. If you use the Save As menu option in Microsoft Excel, the metamap may contain broken links.
Associating the Metamap with the Custom Template or Repeating Sheet File
Use Microsoft Excel to associate a custom metamap with the file that the metamap needs to read. The file that you associate depends on the following existing metamaps that you used to create the custom metamap:
♦ Mapping metamap. Reads from the blank version of the Mapping template to determine the structure of the mapping. When you rename the Mapping template, you must associate the metamap with the new name to maintain the metamap links to the mapping specification template.
♦ Source-Target-Matrix metamap. Reads from the Source-Target-Matrix repeating sheet file to determine the structure of the mapping on each worksheet of a mapping specification that is based on the Source-Target-
Copying and Renaming the Metamap 43
Matrix template. When you rename the repeating sheet file, you must associate the metamap with the new repeating sheet file name to maintain the metamap links to the repeating sheet file.
To associate the metamap with the mapping specification template or repeating sheet file:
1. Open the custom mapping specification template or repeating sheet file.
2. Open the custom metamap.
3. If a security warning appears to warn against using macros, click Enable Macros to enable the validation macros.
4. If a message box states that the metamap contains links to other data sources, click Don’t Update.
5. Navigate to the Overview worksheet.
6. Click Edit > Links.
The Edit Links dialog box appears.
7. Click Change Source.
8. Select the custom mapping specification template or repeating sheet file, and click OK.
9. Click Close to close the Edit Links dialog box.
10. Save the metamap.
Matching Criteria in the MetamapThe Overview worksheet in the metamap contains a Match Criteria section. This section contains references to cells in the associated mapping specification template or repeating sheet file. When you import a mapping specification or export a mapping, Mapping Analyst for Excel uses the matching criteria to detect the associated metamap for the mapping specification.
Edit the Match Criteria section to use matching criteria that identifies the associated mapping specification template or repeating sheet file. You can use up to five matching criteria.
The following table describes the matching criteria parameters you configure:
Note: The Source-Target-Matrix metamap does not contain a Match Criteria section on the Overview worksheet. If you copied and renamed the Source-Target-Matrix metamap to create the custom metamap, copy and paste the Match Criteria section from MappingTemplate-MetaMap.xls. Then, edit the section to identify the associated repeating sheet file.
Parameter Description
Spreadsheet Match Criteria Name of the matching criteria. For example, you can enter the name of the worksheet and identifying cell in the mapping specification template.
Contents Contents of the identifying cell in the mapping specification template. Enter the name of the cell in the mapping specification template.
Link Contains the location of the identifying cell in the mapping specification template. To add the cell location, see “Modifying the Cell Location of Metadata” on page 47.
44 Chapter 7: Customizing Mapping Specification Templates
Model, Source, Target, and Mapping Worksheet Types in the Metamap
Edit the metamap worksheets for the metadata type that you modified in the mapping specification template. For example, if you modify the source metadata in a custom version of the Mapping template, you modify the source and mapping worksheets in the metamap. You do not modify the target worksheets.
Each metamap worksheet for the model, sources, targets, and mappings contains the following sections that you configure:
♦ Excel Table Parameters. First and last lines to process in the mapping specification template.
♦ Required Properties. The location of metadata in the mapping specification template.
♦ User-Defined Properties. The location of user-defined properties in the mapping specification template.
When you configure each section, you modify the location of metadata in the mapping specification template.
Note: When Hide Special Fields is selected in a metamap worksheet, the worksheet hides internal cells needed for proper functioning of the metamap. If you clear this option, do not modify the internal cells.
Excel Table ParametersWhen you import a mapping specification, the Repository Service processes lines on each worksheet from top to bottom until it reaches the last line. The Excel Table Parameters section on each model, sources, targets, and mappings worksheet in the metamap defines the first and last line to process in a mapping specification worksheet.
For example, a mapping specification has a column that contains source attribute names. The attribute names start in column B, row 4. On the SourceAttributes worksheet in the metamap, configure the first line to process as an Exact Line starting at row 4.
When you enter constants in a metamap worksheet, you can set the first and last lines to be column A, row 1. The Repository Service processes only one line when you import the mapping specification.
On each worksheet for the model, sources, targets, and mappings in the metamap, configure the following Excel Table Parameters for the first and last lines:
Required PropertiesWhen you configure the required properties, you define the location of the metadata in the mapping specification template.
Parameter Description
How to Detect Determines when the Repository Service starts or stops processing mapping specification lines for an object. Select one of the following options:- Exact Line. The Repository Service starts or stops processing when it reads a
specific line. Default is Exact Line for the first line.- First Empty Line. The Repository Service stops processing when it reads the first
empty line.- Count of Empty Lines. The Repository Service stops processing when it reads a
number of empty lines.
Detection Parameter Indicates a cell or line where the Repository Service starts or stops processing the mapping specification. Enter one of the following options:- Cell Location. The location of a cell where the Repository Service starts or stops
processing lines on the mapping specification worksheet. Required if the processing is configured for an exact line. To add the cell location, see “Modifying the Cell Location of Metadata” on page 47.
- Number of Lines. The number of empty lines to read before the Repository Service stops processing the mapping specification worksheet. Required if the processing is configured to stop when a number of empty lines are read.
Model, Source, Target, and Mapping Worksheet Types in the Metamap 45
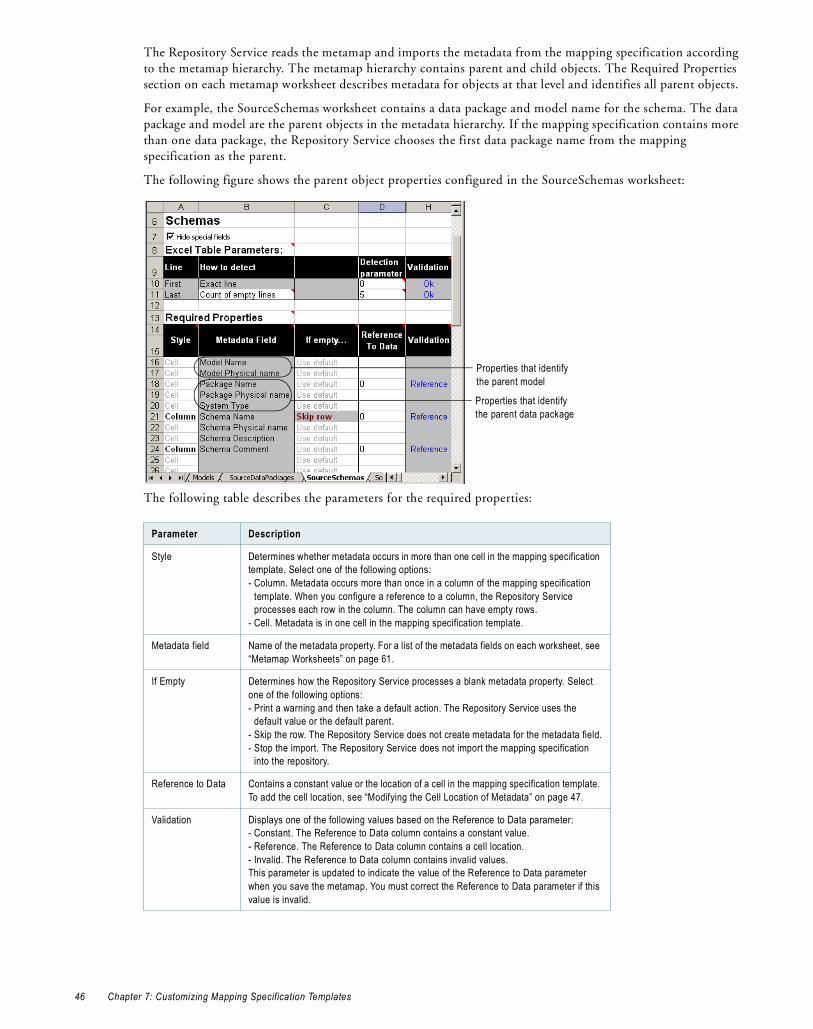
The Repository Service reads the metamap and imports the metadata from the mapping specification according to the metamap hierarchy. The metamap hierarchy contains parent and child objects. The Required Properties section on each metamap worksheet describes metadata for objects at that level and identifies all parent objects.
For example, the SourceSchemas worksheet contains a data package and model name for the schema. The data package and model are the parent objects in the metadata hierarchy. If the mapping specification contains more than one data package, the Repository Service chooses the first data package name from the mapping specification as the parent.
The following figure shows the parent object properties configured in the SourceSchemas worksheet:
The following table describes the parameters for the required properties:
Parameter Description
Style Determines whether metadata occurs in more than one cell in the mapping specification template. Select one of the following options:- Column. Metadata occurs more than once in a column of the mapping specification
template. When you configure a reference to a column, the Repository Service processes each row in the column. The column can have empty rows.
- Cell. Metadata is in one cell in the mapping specification template.
Metadata field Name of the metadata property. For a list of the metadata fields on each worksheet, see “Metamap Worksheets” on page 61.
If Empty Determines how the Repository Service processes a blank metadata property. Select one of the following options:- Print a warning and then take a default action. The Repository Service uses the
default value or the default parent. - Skip the row. The Repository Service does not create metadata for the metadata field.- Stop the import. The Repository Service does not import the mapping specification
into the repository.
Reference to Data Contains a constant value or the location of a cell in the mapping specification template. To add the cell location, see “Modifying the Cell Location of Metadata” on page 47.
Validation Displays one of the following values based on the Reference to Data parameter:- Constant. The Reference to Data column contains a constant value.- Reference. The Reference to Data column contains a cell location.- Invalid. The Reference to Data column contains invalid values.This parameter is updated to indicate the value of the Reference to Data parameter when you save the metamap. You must correct the Reference to Data parameter if this value is invalid.
Properties that identify the parent model
Properties that identify the parent data package
46 Chapter 7: Customizing Mapping Specification Templates
User-Defined PropertiesYou can optionally configure user-defined properties to add metadata not defined in the metamap. When you import the mapping specification, the Repository Service creates the property as a metadata extension.
The mapping specification templates do not contain a column to add user-defined properties. If you want to add the properties to a mapping specification template, modify the template to add a column that contains the metadata for the user-defined property.
The following table describes the parameters you can configure for user-defined properties:
Modifying the Cell Location of MetadataThe Excel Table Parameters, Required Properties, and User-Defined Properties sections in the metamap worksheets contain the cell locations of metadata in a mapping specification template. For example, if you define a source table in a mapping specification template, you provide the table properties such as the columns in the table, the table business name, and the table description. The metamap references where each table property is located in the mapping specification template. The metamap stores each cell location on the SourceClasses, SourceAttributes, and SourceDatatypes worksheets.
Parameter Description
Name Style Determines whether the name of the user-defined property occurs in more than one cell in the mapping specification template. Select one of the following options:- Column. Metadata occurs more than once in a column of the mapping specification
template. When you configure a reference to a column, the Repository Service processes each row in the column. The column can have empty rows.
- Cell. Metadata is in one cell in the mapping specification template.
Name Reference or Constant
Defines the name of the user-defined property. Contains a constant value or the location of a cell in the mapping specification template. To add the cell location, see “Modifying the Cell Location of Metadata” on page 47.
Value Style Determines whether the value of the user-defined property occurs in more than one cell in the mapping specification template. Select one of the following options:- Column. Metadata occurs more than once in a column of the mapping specification
template. When you configure a reference to a column, the Repository Service processes each row in the column. The column can have empty rows.
- Cell. Metadata is in one cell in the mapping specification template.
Value Reference or Constant
Defines the value of the user-defined property. Contains a constant value or the location of a cell in the mapping specification template. To add the cell location, see “Modifying the Cell Location of Metadata” on page 47.
Type Defines the datatype of the user-defined property. Select one of the following datatypes:- String- Number- Date- Boolean
If Empty Determines how the Repository Service processes a blank metadata property. Select one of the following options:- Print a warning and then take a default action. The Repository Service uses the
default value or the default parent. - Skip the row. The Repository Service does not create metadata for the metadata field.- Stop the import. The Repository Service does not import the mapping specification
into the repository.
Default Value Default value of the property if the mapping specification does not contain a value for the property.
Validation Displays one of the following values based on the Reference to Data parameter:- Constant. The Reference to Data column contains a constant value.- Reference. The Reference to Data column contains a cell location.- Invalid. The Reference to Data column contains invalid values.This parameter is updated to indicate the value of the Reference to Data parameter when you save the metamap. You must correct the Reference to Data parameter if this value is invalid.
Model, Source, Target, and Mapping Worksheet Types in the Metamap 47
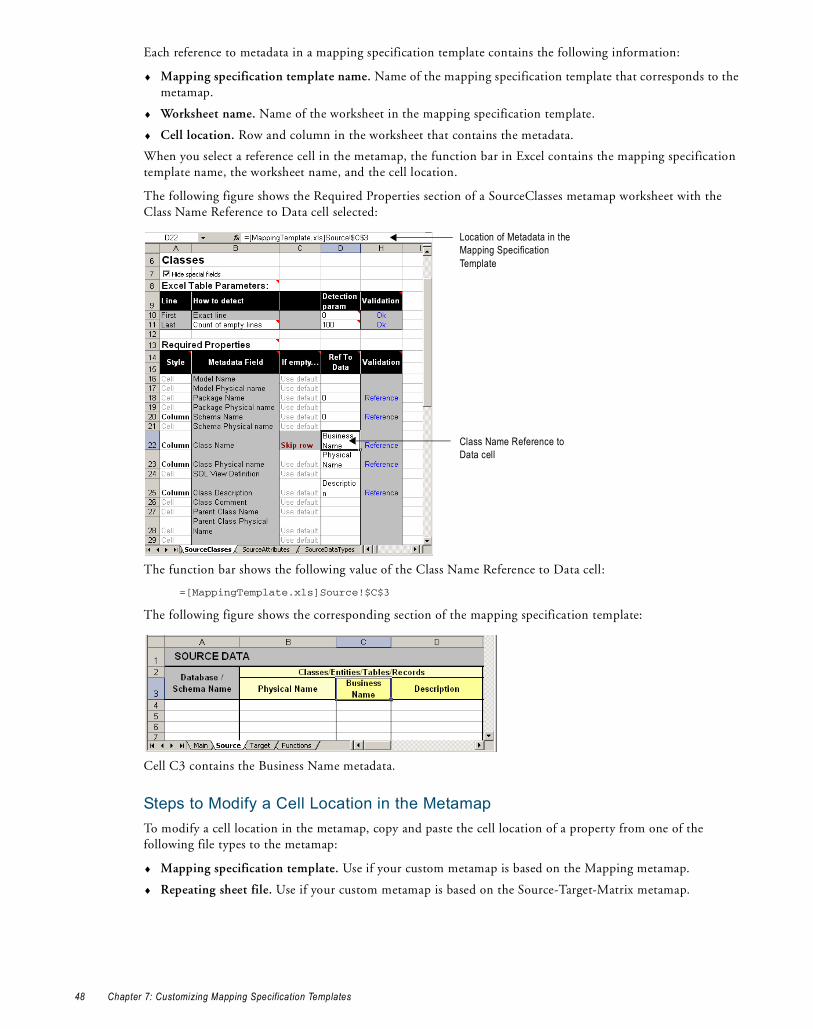
Each reference to metadata in a mapping specification template contains the following information:
♦ Mapping specification template name. Name of the mapping specification template that corresponds to the metamap.
♦ Worksheet name. Name of the worksheet in the mapping specification template.
♦ Cell location. Row and column in the worksheet that contains the metadata.
When you select a reference cell in the metamap, the function bar in Excel contains the mapping specification template name, the worksheet name, and the cell location.
The following figure shows the Required Properties section of a SourceClasses metamap worksheet with the Class Name Reference to Data cell selected:
The function bar shows the following value of the Class Name Reference to Data cell:
=[MappingTemplate.xls]Source!$C$3
The following figure shows the corresponding section of the mapping specification template:
Cell C3 contains the Business Name metadata.
Steps to Modify a Cell Location in the MetamapTo modify a cell location in the metamap, copy and paste the cell location of a property from one of the following file types to the metamap:
♦ Mapping specification template. Use if your custom metamap is based on the Mapping metamap.
♦ Repeating sheet file. Use if your custom metamap is based on the Source-Target-Matrix metamap.
Location of Metadata in the Mapping Specification Template
Class Name Reference to Data cell
48 Chapter 7: Customizing Mapping Specification Templates
To modify a cell location in the metamap:
1. Open the mapping specification template or repeating sheet file and the metamap.
2. In the mapping specification template or repeating sheet file, navigate to the cell for the metadata that you need to reference in the metamap.
3. Right-click the cell and select Copy.
4. In the metamap, navigate to the appropriate worksheet.
5. Right-click one of the following cells and click Paste Special:
♦ Detection Parameter cell in the Excel Table Parameters section
♦ Reference to Data cell for the appropriate Metadata Field in the Required Properties section
♦ Reference or Constant cell in the User-Defined Properties section
6. Click Paste Link.
The metamap stores the location of the property in the mapping specification template or repeating sheet file. The location includes the name of the mapping specification template or repeating sheet file and the worksheet name that contains the cell.
Import and Export Parameters in the MetamapThe Overview worksheet in the metamap contains default import and export parameters. The Repository Service reads the import parameters when you import a mapping specification. The Repository Service reads the export parameters when you export a mapping specification. You can optionally override the default parameters by editing the values in the Excel metamap and saving it as an XML file.
Import ParametersThe following table describes the parameters you configure to import a mapping specification into the PowerCenter repository:
Parameter Description
Compare names ignoring case
Determines whether name evaluation is case sensitive. Select one of the following options:- True. Ignore case when evaluating names. - False. Performs a case-sensitive evaluation. Default is True.
Merge objects with same name
Merge objects with the same name in the mapping specification. Select one of the following options:- True. Merge objects with the same name.- False. Keep all objects. Use this option when the mapping specification includes
different objects with the same name.Default is True.
ETL data stream merging strategy
Action to take when the mapping specification contains two or more sources without a join expression. Select one of the following options:- Add joins if needed. Adds a Joiner transformation to the mapping.- Add union if needed. Use separate pipelines for sources.- Do not change. Do not add a join or a union.Default is Add joins if needed.
Print warnings if rows are skipped
Print warnings in the Import Metadata wizard when rows are skipped. The Import Wizard displays errors when you import mapping specifications. Select one of the following options:- True. Print warnings for skipped rows.- False. Do not print warnings for skipped rows.Default is False.
Import and Export Parameters in the Metamap 49
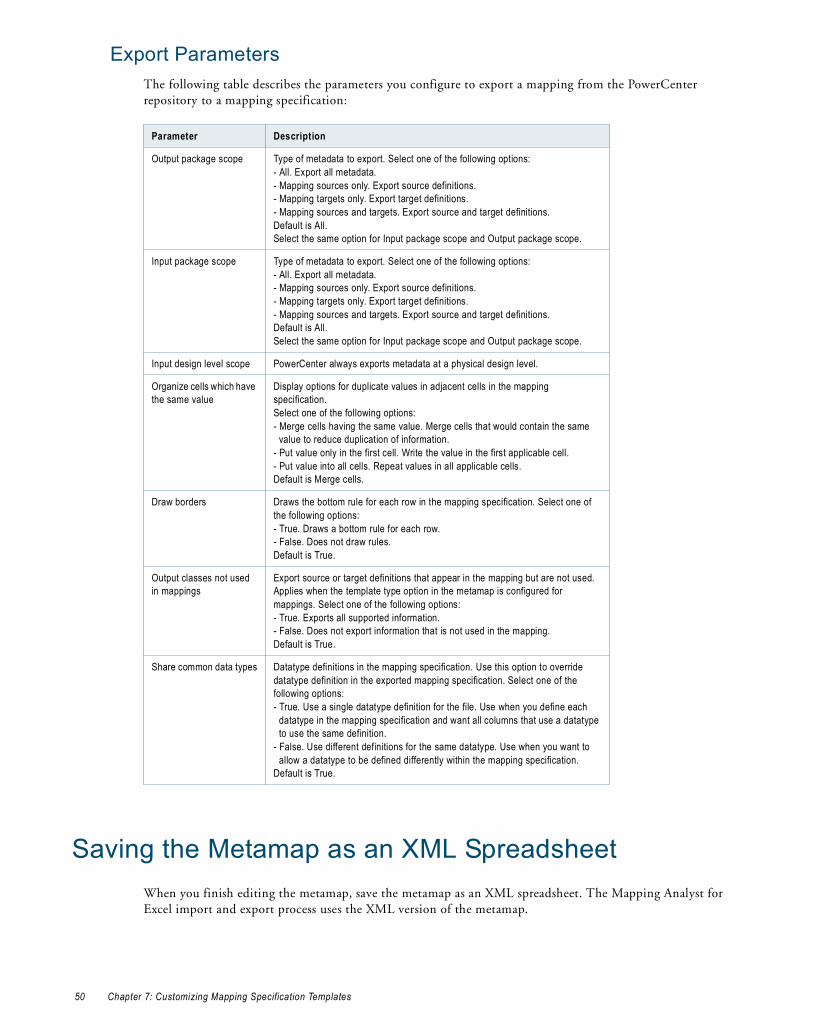
Export ParametersThe following table describes the parameters you configure to export a mapping from the PowerCenter repository to a mapping specification:
Saving the Metamap as an XML SpreadsheetWhen you finish editing the metamap, save the metamap as an XML spreadsheet. The Mapping Analyst for Excel import and export process uses the XML version of the metamap.
Parameter Description
Output package scope Type of metadata to export. Select one of the following options:- All. Export all metadata.- Mapping sources only. Export source definitions. - Mapping targets only. Export target definitions.- Mapping sources and targets. Export source and target definitions.Default is All.Select the same option for Input package scope and Output package scope.
Input package scope Type of metadata to export. Select one of the following options:- All. Export all metadata.- Mapping sources only. Export source definitions. - Mapping targets only. Export target definitions.- Mapping sources and targets. Export source and target definitions.Default is All.Select the same option for Input package scope and Output package scope.
Input design level scope PowerCenter always exports metadata at a physical design level.
Organize cells which have the same value
Display options for duplicate values in adjacent cells in the mapping specification.Select one of the following options:- Merge cells having the same value. Merge cells that would contain the same
value to reduce duplication of information.- Put value only in the first cell. Write the value in the first applicable cell. - Put value into all cells. Repeat values in all applicable cells.Default is Merge cells.
Draw borders Draws the bottom rule for each row in the mapping specification. Select one of the following options:- True. Draws a bottom rule for each row. - False. Does not draw rules. Default is True.
Output classes not used in mappings
Export source or target definitions that appear in the mapping but are not used. Applies when the template type option in the metamap is configured for mappings. Select one of the following options:- True. Exports all supported information.- False. Does not export information that is not used in the mapping. Default is True.
Share common data types Datatype definitions in the mapping specification. Use this option to override datatype definition in the exported mapping specification. Select one of the following options:- True. Use a single datatype definition for the file. Use when you define each
datatype in the mapping specification and want all columns that use a datatype to use the same definition.
- False. Use different definitions for the same datatype. Use when you want to allow a datatype to be defined differently within the mapping specification.
Default is True.
50 Chapter 7: Customizing Mapping Specification Templates

To save the metamap as an XML spreadsheet:
1. In the metamap, click File > Save As.
2. Select the following directory:
<PowerCenter_Client_installation_directory>\bin\mimb\conf\MIRModelBridgeTemplate\ MIRMicrosoftExcel
3. For Save As Type, select XML Spreadsheet.
4. Click Save.
Saving the Metamap as an XML Spreadsheet 51

52 Chapter 7: Customizing Mapping Specification Templates
C H A P T E R 8
Customizing Mapping Specification Templates - Example
This chapter includes the following topics:
♦ Overview, 53
♦ Step 1. Copy the Mapping Specification Template, Repeating Sheet File, and Metamap, 54
♦ Step 2. Associate the Metamap with the Repeating Sheet File, 54
♦ Step 3. Edit the Mapping Specification Template and the Repeating Sheet File, 55
♦ Step 4. Edit the Metamap, 56
OverviewAs a business analyst, you want to create multiple mappings in a single mapping specification. You can use the Source-Target-Matrix template to create multiple mappings on separate worksheets. When you import mapping specifications based on the Source-Target-Matrix template, the Repository Service uses the worksheet name for both the mapping and target definition names. However, you want to use the names of the target database tables for the target definition names in the mapping.
The Source-Target-Matrix template does not include a target name column. To add a target name column to the template, configure a custom mapping specification template based on the Source-Target-Matrix template.
To customize the Source-Target-Matrix mapping specification template, copy and modify the following files:
♦ Source-Target-Matrix mapping specification template (source-target-matrix.xls). Includes a separate worksheet for each mapping in the mapping specification.
♦ Source-Target-Matrix repeating sheet file (source-target-matrix-Blank.xls). Defines the common structure for multiple mappings defined in a mapping specification that is based on the Source-Target-Matrix template. When you modify the Source-Target-Matrix template, you must make the same changes to a custom version of the Source-Target-Matrix repeating sheet file.
♦ Source-Target-Matrix metamap (source-target-matrix-MetaMap.xls). Uses the Source-Target-Matrix repeating sheet file to define the location of metadata in the Source-Target-Matrix mapping specification template. When you modify the Source-Target-Matrix template and repeating sheet file, you must modify a custom version of the Source-Target-Matrix metamap to describe the modified template and repeating sheet file.
To customize the Source-Target-Matrix mapping specification template, complete the following steps:
1. Copy the mapping specification template, repeating sheet file, and the metamap.
2. Associate the metamap with the repeating sheet file.
3. Edit the mapping specification template and the repeating sheet file.
Overview 53
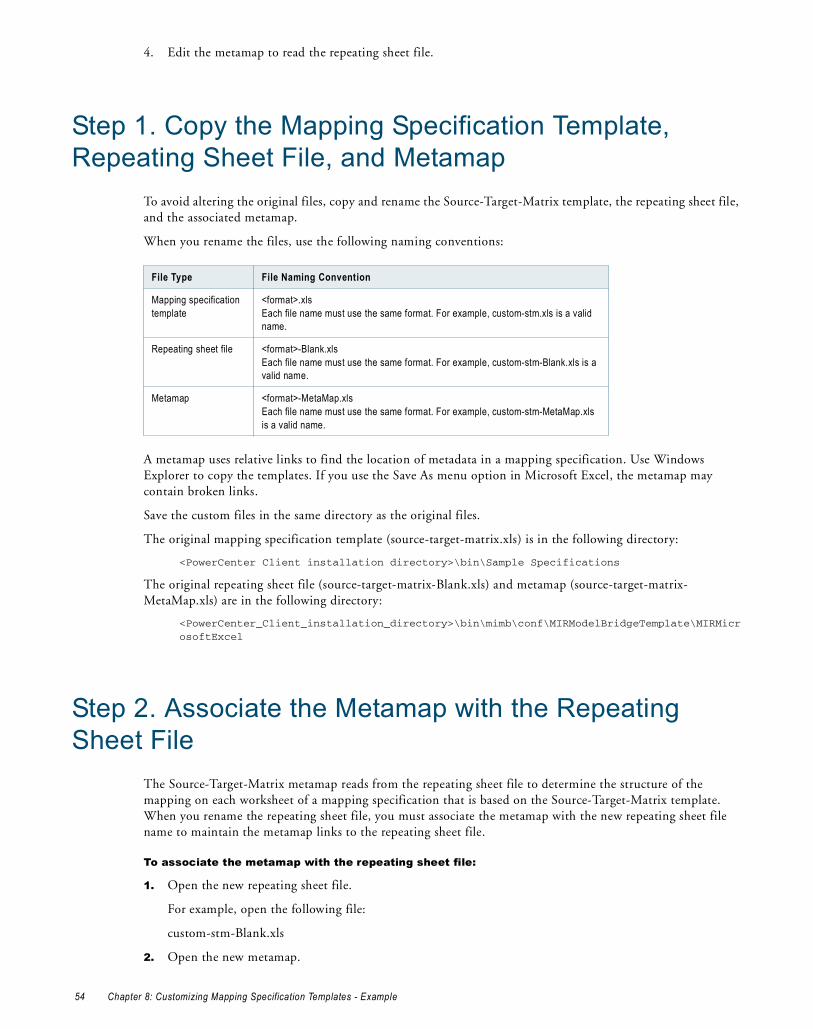
4. Edit the metamap to read the repeating sheet file.
Step 1. Copy the Mapping Specification Template, Repeating Sheet File, and Metamap
To avoid altering the original files, copy and rename the Source-Target-Matrix template, the repeating sheet file, and the associated metamap.
When you rename the files, use the following naming conventions:
A metamap uses relative links to find the location of metadata in a mapping specification. Use Windows Explorer to copy the templates. If you use the Save As menu option in Microsoft Excel, the metamap may contain broken links.
Save the custom files in the same directory as the original files.
The original mapping specification template (source-target-matrix.xls) is in the following directory:
<PowerCenter Client installation directory>\bin\Sample Specifications
The original repeating sheet file (source-target-matrix-Blank.xls) and metamap (source-target-matrix-MetaMap.xls) are in the following directory:
<PowerCenter_Client_installation_directory>\bin\mimb\conf\MIRModelBridgeTemplate\MIRMicrosoftExcel
Step 2. Associate the Metamap with the Repeating Sheet File
The Source-Target-Matrix metamap reads from the repeating sheet file to determine the structure of the mapping on each worksheet of a mapping specification that is based on the Source-Target-Matrix template. When you rename the repeating sheet file, you must associate the metamap with the new repeating sheet file name to maintain the metamap links to the repeating sheet file.
To associate the metamap with the repeating sheet file:
1. Open the new repeating sheet file.
For example, open the following file:
custom-stm-Blank.xls
2. Open the new metamap.
File Type File Naming Convention
Mapping specification template
<format>.xlsEach file name must use the same format. For example, custom-stm.xls is a valid name.
Repeating sheet file <format>-Blank.xlsEach file name must use the same format. For example, custom-stm-Blank.xls is a valid name.
Metamap <format>-MetaMap.xlsEach file name must use the same format. For example, custom-stm-MetaMap.xls is a valid name.
54 Chapter 8: Customizing Mapping Specification Templates - Example
For example, open the following file:
custom-stm-MetaMap.xls
3. If a security warning appears to warn against using macros, click Enable Macros to enable the validation macros.
4. If a message box states that the metamap contains links to other data sources, click Don’t Update.
5. Navigate to the Overview worksheet.
6. Click Edit > Links.
The Edit Links dialog box appears.
7. Click Change Source.
8. Select the new repeating sheet file, and click OK.
9. Click Close to close the Edit Links dialog box.
10. Save the metamap.
Step 3. Edit the Mapping Specification Template and the Repeating Sheet File
Add a target name column to the new mapping specification template and repeating sheet file so that you can configure names for imported target definitions.
The mapping specification template and repeating sheet file contain several columns grouped together under a Target heading. To avoid additional format changes, add a column to the right of the first target column, and then name the columns.
To add a target name column:
1. Open the repeating sheet file.
For example, open the following file:
custom-stm-Blank.xls
2. On the _MIR_REPEATING_SHEET_ worksheet, click in the Target Field/Column Datatype Native Name column.
3. Click Insert > Column.
A new column displays on the left side of the column.
4. In the new column, enter Field/Column for the column name.
5. Rename the original Field/Column name to File/Table.
This is the new target name column.
6. Save the changes.
7. Open the new mapping specification template.
For example, open the following file:
custom-stm.xls
8. Repeat steps 2 through 6 to add a target name column to the following worksheets:
♦ mapping1
♦ mapping2
Step 3. Edit the Mapping Specificat ion Template and the Repeating Sheet File 55
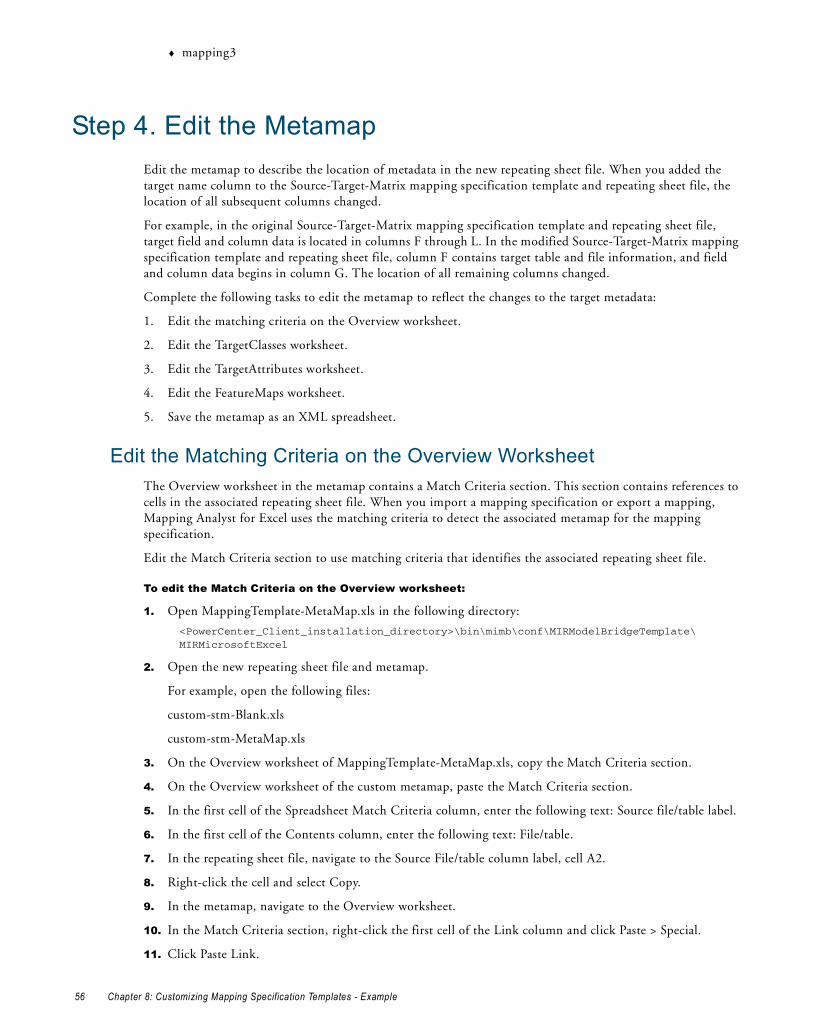
♦ mapping3
Step 4. Edit the MetamapEdit the metamap to describe the location of metadata in the new repeating sheet file. When you added the target name column to the Source-Target-Matrix mapping specification template and repeating sheet file, the location of all subsequent columns changed.
For example, in the original Source-Target-Matrix mapping specification template and repeating sheet file, target field and column data is located in columns F through L. In the modified Source-Target-Matrix mapping specification template and repeating sheet file, column F contains target table and file information, and field and column data begins in column G. The location of all remaining columns changed.
Complete the following tasks to edit the metamap to reflect the changes to the target metadata:
1. Edit the matching criteria on the Overview worksheet.
2. Edit the TargetClasses worksheet.
3. Edit the TargetAttributes worksheet.
4. Edit the FeatureMaps worksheet.
5. Save the metamap as an XML spreadsheet.
Edit the Matching Criteria on the Overview WorksheetThe Overview worksheet in the metamap contains a Match Criteria section. This section contains references to cells in the associated repeating sheet file. When you import a mapping specification or export a mapping, Mapping Analyst for Excel uses the matching criteria to detect the associated metamap for the mapping specification.
Edit the Match Criteria section to use matching criteria that identifies the associated repeating sheet file.
To edit the Match Criteria on the Overview worksheet:
1. Open MappingTemplate-MetaMap.xls in the following directory:
<PowerCenter_Client_installation_directory>\bin\mimb\conf\MIRModelBridgeTemplate\ MIRMicrosoftExcel
2. Open the new repeating sheet file and metamap.
For example, open the following files:
custom-stm-Blank.xls
custom-stm-MetaMap.xls
3. On the Overview worksheet of MappingTemplate-MetaMap.xls, copy the Match Criteria section.
4. On the Overview worksheet of the custom metamap, paste the Match Criteria section.
5. In the first cell of the Spreadsheet Match Criteria column, enter the following text: Source file/table label.
6. In the first cell of the Contents column, enter the following text: File/table.
7. In the repeating sheet file, navigate to the Source File/table column label, cell A2.
8. Right-click the cell and select Copy.
9. In the metamap, navigate to the Overview worksheet.
10. In the Match Criteria section, right-click the first cell of the Link column and click Paste > Special.
11. Click Paste Link.
56 Chapter 8: Customizing Mapping Specification Templates - Example
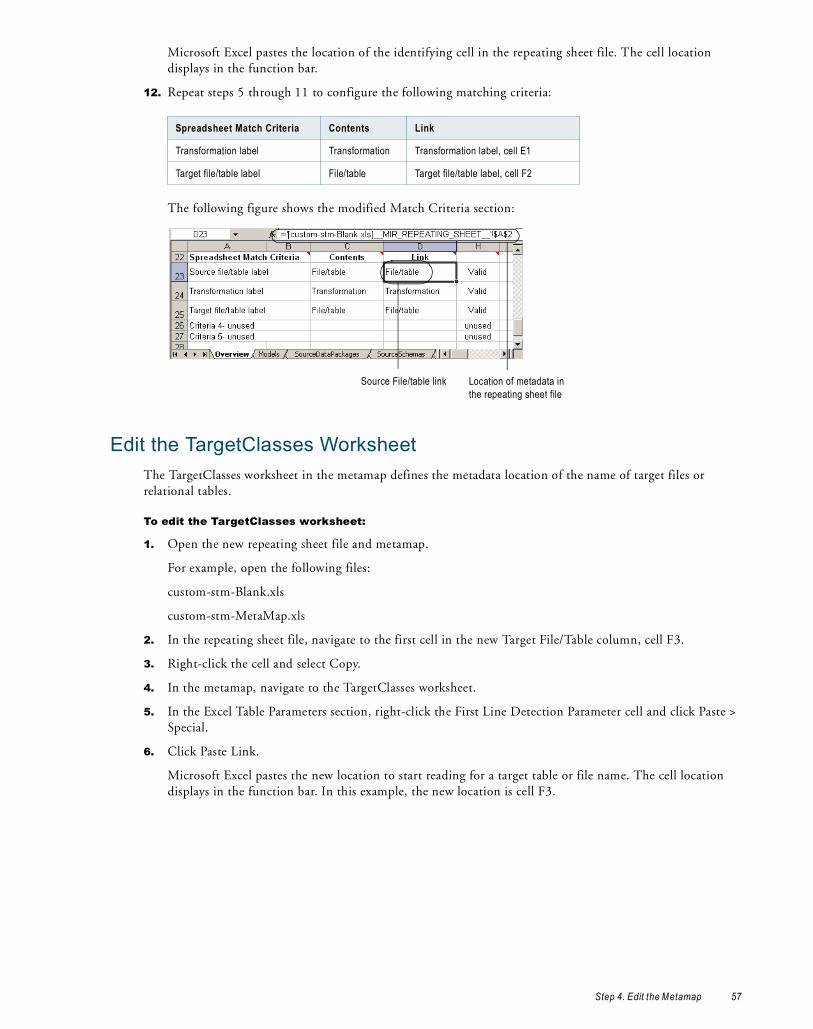
Microsoft Excel pastes the location of the identifying cell in the repeating sheet file. The cell location displays in the function bar.
12. Repeat steps 5 through 11 to configure the following matching criteria:
The following figure shows the modified Match Criteria section:
Edit the TargetClasses WorksheetThe TargetClasses worksheet in the metamap defines the metadata location of the name of target files or relational tables.
To edit the TargetClasses worksheet:
1. Open the new repeating sheet file and metamap.
For example, open the following files:
custom-stm-Blank.xls
custom-stm-MetaMap.xls
2. In the repeating sheet file, navigate to the first cell in the new Target File/Table column, cell F3.
3. Right-click the cell and select Copy.
4. In the metamap, navigate to the TargetClasses worksheet.
5. In the Excel Table Parameters section, right-click the First Line Detection Parameter cell and click Paste > Special.
6. Click Paste Link.
Microsoft Excel pastes the new location to start reading for a target table or file name. The cell location displays in the function bar. In this example, the new location is cell F3.
Spreadsheet Match Criteria Contents Link
Transformation label Transformation Transformation label, cell E1
Target file/table label File/table Target file/table label, cell F2
Location of metadata in the repeating sheet file
Source File/table link
Step 4. Edit the Metamap 57
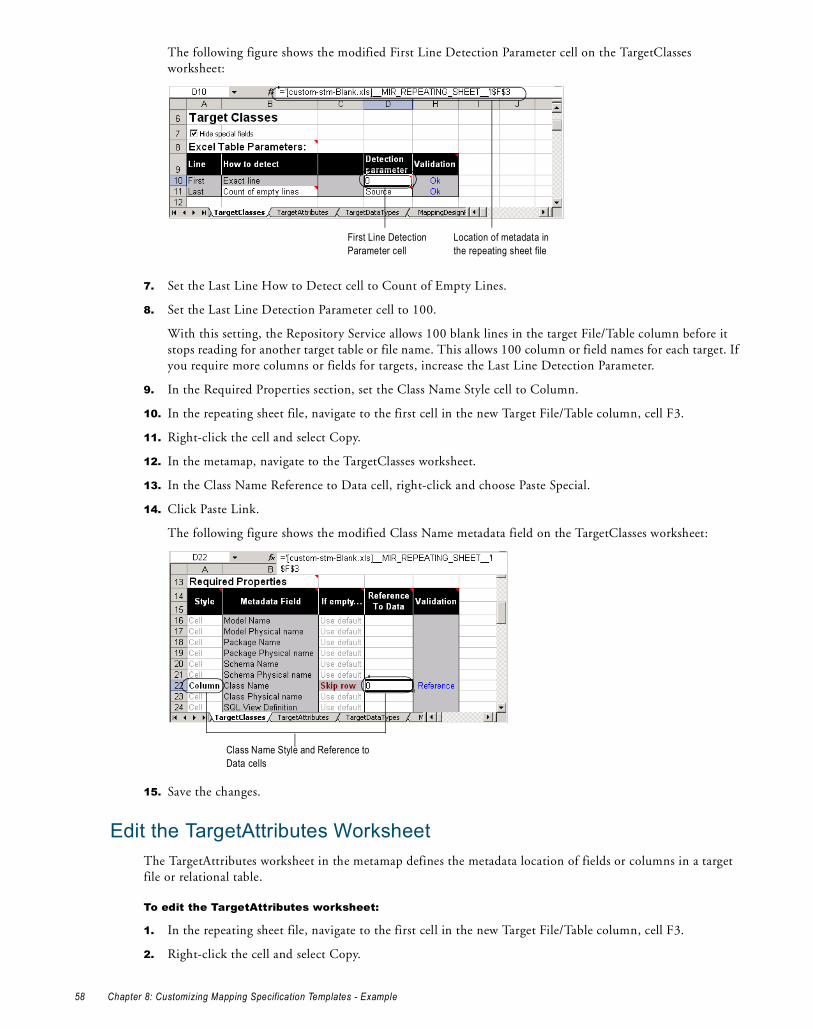
The following figure shows the modified First Line Detection Parameter cell on the TargetClasses worksheet:
7. Set the Last Line How to Detect cell to Count of Empty Lines.
8. Set the Last Line Detection Parameter cell to 100.
With this setting, the Repository Service allows 100 blank lines in the target File/Table column before it stops reading for another target table or file name. This allows 100 column or field names for each target. If you require more columns or fields for targets, increase the Last Line Detection Parameter.
9. In the Required Properties section, set the Class Name Style cell to Column.
10. In the repeating sheet file, navigate to the first cell in the new Target File/Table column, cell F3.
11. Right-click the cell and select Copy.
12. In the metamap, navigate to the TargetClasses worksheet.
13. In the Class Name Reference to Data cell, right-click and choose Paste Special.
14. Click Paste Link.
The following figure shows the modified Class Name metadata field on the TargetClasses worksheet:
15. Save the changes.
Edit the TargetAttributes WorksheetThe TargetAttributes worksheet in the metamap defines the metadata location of fields or columns in a target file or relational table.
To edit the TargetAttributes worksheet:
1. In the repeating sheet file, navigate to the first cell in the new Target File/Table column, cell F3.
2. Right-click the cell and select Copy.
Location of metadata in the repeating sheet file
First Line Detection Parameter cell
Class Name Style and Reference to Data cells
58 Chapter 8: Customizing Mapping Specification Templates - Example
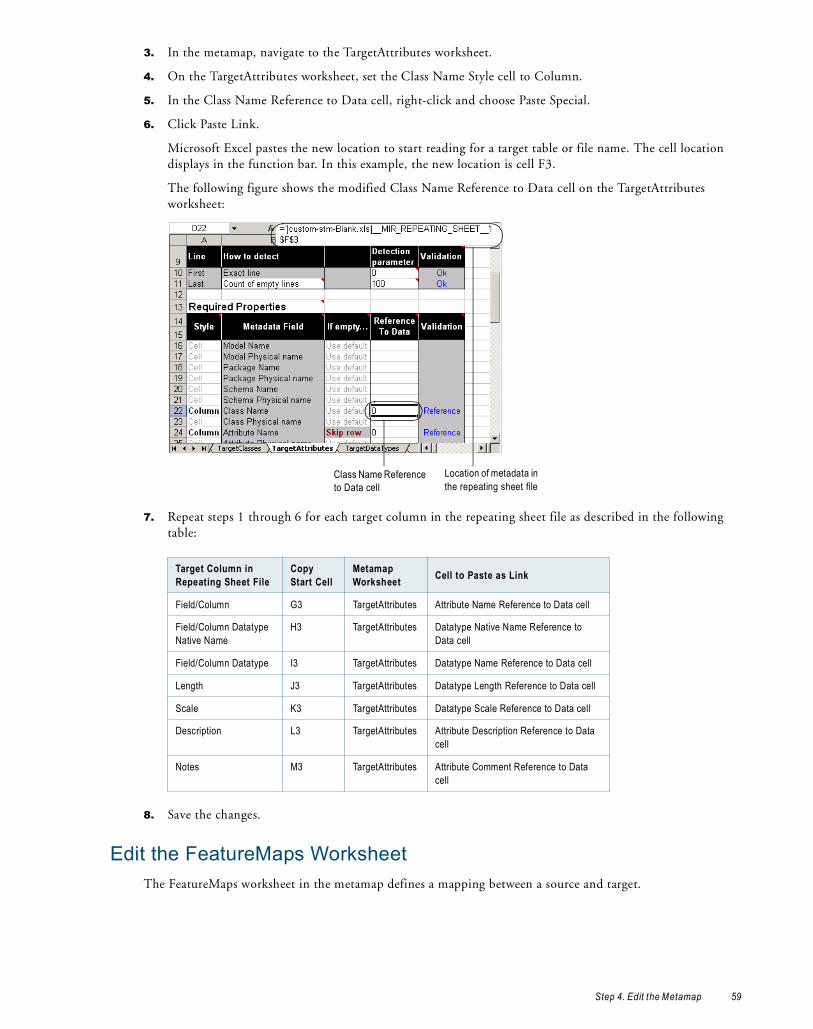
3. In the metamap, navigate to the TargetAttributes worksheet.
4. On the TargetAttributes worksheet, set the Class Name Style cell to Column.
5. In the Class Name Reference to Data cell, right-click and choose Paste Special.
6. Click Paste Link.
Microsoft Excel pastes the new location to start reading for a target table or file name. The cell location displays in the function bar. In this example, the new location is cell F3.
The following figure shows the modified Class Name Reference to Data cell on the TargetAttributes worksheet:
7. Repeat steps 1 through 6 for each target column in the repeating sheet file as described in the following table:
8. Save the changes.
Edit the FeatureMaps WorksheetThe FeatureMaps worksheet in the metamap defines a mapping between a source and target.
Target Column in Repeating Sheet File
Copy Start Cell
Metamap Worksheet Cell to Paste as Link
Field/Column G3 TargetAttributes Attribute Name Reference to Data cell
Field/Column Datatype Native Name
H3 TargetAttributes Datatype Native Name Reference to Data cell
Field/Column Datatype I3 TargetAttributes Datatype Name Reference to Data cell
Length J3 TargetAttributes Datatype Length Reference to Data cell
Scale K3 TargetAttributes Datatype Scale Reference to Data cell
Description L3 TargetAttributes Attribute Description Reference to Data cell
Notes M3 TargetAttributes Attribute Comment Reference to Data cell
Location of metadata in the repeating sheet file
Class Name Reference to Data cell
Step 4. Edit the Metamap 59
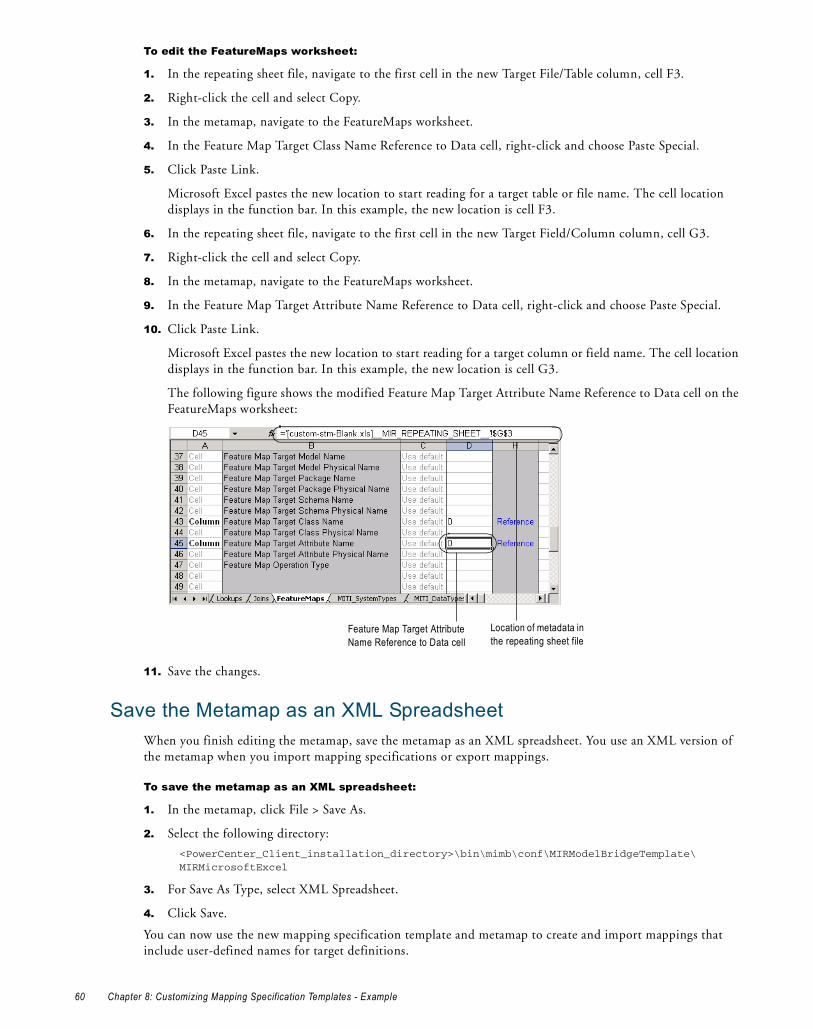
To edit the FeatureMaps worksheet:
1. In the repeating sheet file, navigate to the first cell in the new Target File/Table column, cell F3.
2. Right-click the cell and select Copy.
3. In the metamap, navigate to the FeatureMaps worksheet.
4. In the Feature Map Target Class Name Reference to Data cell, right-click and choose Paste Special.
5. Click Paste Link.
Microsoft Excel pastes the new location to start reading for a target table or file name. The cell location displays in the function bar. In this example, the new location is cell F3.
6. In the repeating sheet file, navigate to the first cell in the new Target Field/Column column, cell G3.
7. Right-click the cell and select Copy.
8. In the metamap, navigate to the FeatureMaps worksheet.
9. In the Feature Map Target Attribute Name Reference to Data cell, right-click and choose Paste Special.
10. Click Paste Link.
Microsoft Excel pastes the new location to start reading for a target column or field name. The cell location displays in the function bar. In this example, the new location is cell G3.
The following figure shows the modified Feature Map Target Attribute Name Reference to Data cell on the FeatureMaps worksheet:
11. Save the changes.
Save the Metamap as an XML SpreadsheetWhen you finish editing the metamap, save the metamap as an XML spreadsheet. You use an XML version of the metamap when you import mapping specifications or export mappings.
To save the metamap as an XML spreadsheet:
1. In the metamap, click File > Save As.
2. Select the following directory:
<PowerCenter_Client_installation_directory>\bin\mimb\conf\MIRModelBridgeTemplate\ MIRMicrosoftExcel
3. For Save As Type, select XML Spreadsheet.
4. Click Save.
You can now use the new mapping specification template and metamap to create and import mappings that include user-defined names for target definitions.
Location of metadata in the repeating sheet file
Feature Map Target Attribute Name Reference to Data cell
60 Chapter 8: Customizing Mapping Specification Templates - Example
A P P E N D I X A
Metamap Worksheets
This appendix includes the following topics:
♦ Overview Worksheet, 61
♦ Models Worksheet, 61
♦ Source and Target Worksheets, 62
♦ Mapping Worksheets, 64
♦ MITI_SystemTypes Worksheet, 66
♦ MITI_DataTypes Worksheet, 66
Overview Worksheet The Overview worksheet in a metamap contains options that determine how the Repository Service imports and exports metadata, the template type you want to use, and the matching criteria that identifies the associated mapping specification template.
You can configure the import and export parameters. The import parameters determine how the Repository Service imports the metadata in the mapping specification. The export parameters determine how the Repository Service exports metadata from the repository to a mapping specification.
Select one of the following template types from the Overview worksheet:
♦ Mapping. Select to configure sources, targets, and mappings in a mapping specification. When selected, the metamap displays all worksheets.
♦ Data Dictionary. Select to configure source tables or files in a mapping specification. When selected, the metamap displays source worksheets only.
The default template type is Mapping.
Configure the Match Criteria section to identify the associated mapping specification template. For more information, see “Matching Criteria in the Metamap” on page 44.
Models WorksheetThe Models worksheet in a metamap contains references to the entity that contains all metadata. The metadata fields in the Required Properties section contain the metadata references. The Mapping metamap and the Source-Target-Matrix metamap do not use all of the metadata fields in the Models worksheet.
Overview Worksheet 61
The following table describes the metadata fields in the Models worksheet that the Informatica metamaps use:
Source and Target Worksheets The source and target worksheets in a metamap contain references to source and target metadata. The Repository Service reads each worksheet in the hierarchy to create a source or target definition.
The metadata fields in the Required Properties section contain the metadata references. The Mapping metamap and the Source-Target-Matrix metamap do not use all of the metadata fields in the source and target worksheets.
DataPackages WorksheetsThe SourceDataPackages and TargetDataPackages worksheets contain references to the type of the source or target database or file system, such as Oracle, DB2, or flat file.
The following table describes the metadata fields in the SourceDataPackages and TargetDataPackages worksheets that the Informatica metamaps use:
Schemas WorksheetsThe SourceSchemas and TargetSchemas worksheets contain references to the name of the source or target database or file system.
The following table describes the metadata fields in the SourceSchemas and TargetSchemas worksheets that the Informatica metamaps use:
Classes WorksheetsThe SourceClasses and TargetClasses worksheets contain references to source and target tables and files.
Metadata Field Used by Metamap Usage
Model Name MappingSource-Target-Matrix
Name of the model. Required by the Mapping Analyst for Excel import process. The Repository Service does not import this value.
Metadata Field Used by Metamap Usage
Package Name MappingSource-Target-Matrix
Name of the data package. Required by the Mapping Analyst for Excel import process. The Repository Service does not import this value.
Package Description
Mapping Description of the data package. The Repository Service does not import this value.
System Type MappingSource-Target-Matrix
Type of the source or target database or file system.
Metadata Field Used by Metamap Usage
Package Name Mapping Identifies the parent data package.
Schema Name MappingSource-Target-Matrix
Name of the source or target database or file system.
Schema Comment Mapping Description of the source or target database or file system. The Repository Service does not import this value.
62 Appendix A: Metamap Worksheets
The following table describes the metadata fields in the SourceClasses and TargetClasses worksheets that the Informatica metamaps use:
Attributes WorksheetsThe SourceAttributes and TargetAttributes worksheets contain references to fields or columns in a relational table or file.
The following table describes the metadata fields in the SourceAttributes and TargetAttributes worksheets that the Informatica metamaps use:
DataTypes WorksheetsThe SourceDataTypes and TargetDataTypes worksheets contain references to datatype definitions. Configure the datatypes worksheets when you define enumerated data types in a mapping specification template.
Metadata Field Used by Metamap Usage
Package Name Mapping Identifies the parent data package.
Schema Name Mapping Identifies the parent schema.
Class Name MappingSource-Target-Matrix
Business name of the source or target definition.
Class Physical Name
Mapping Name of the source or target definition.
Class Description Mapping Description of the source or target definition.
Metadata Field Used by Metamap Usage
Package Name Mapping Identifies the parent data package.
Schema Name Mapping Identifies the parent schema.
Class Name Source-Target-Matrix Identifies the parent class.
Class Physical Name
Mapping Identifies the parent class.
Attribute Name MappingSource-Target-Matrix
Business name for the column.
Attribute Physical Name
Mapping Column name.
Attribute Description
MappingSource-Target-Matrix
Description for the column.
Attribute Comment Source-Target-Matrix Description for the column. When used, overrides the Attribute Description metadata field.Used on the TargetAttributes worksheet only.
Data Type Name Source-Target-Matrix Datatype of the column.
Data Type Mapping Datatype of the column.
Data Type Native Name
Source-Target-Matrix Datatype of the column. When used, overrides the Data Type Name metadata field.Used on the TargetAttributes worksheet only.
Data Type Length MappingSource-Target-Matrix
Precision of the column.
Data Type Scale MappingSource-Target-Matrix
Scale of the column.Used on the TargetAttributes worksheet only.
Source and Target Worksheets 63
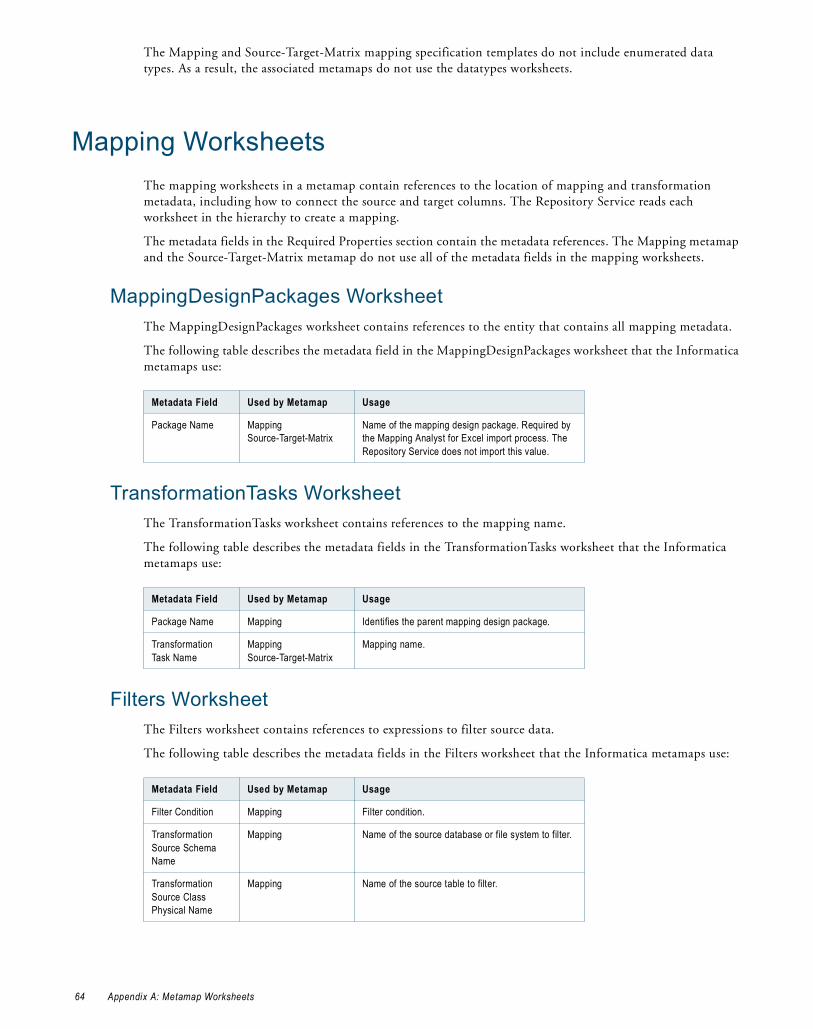
The Mapping and Source-Target-Matrix mapping specification templates do not include enumerated data types. As a result, the associated metamaps do not use the datatypes worksheets.
Mapping WorksheetsThe mapping worksheets in a metamap contain references to the location of mapping and transformation metadata, including how to connect the source and target columns. The Repository Service reads each worksheet in the hierarchy to create a mapping.
The metadata fields in the Required Properties section contain the metadata references. The Mapping metamap and the Source-Target-Matrix metamap do not use all of the metadata fields in the mapping worksheets.
MappingDesignPackages WorksheetThe MappingDesignPackages worksheet contains references to the entity that contains all mapping metadata.
The following table describes the metadata field in the MappingDesignPackages worksheet that the Informatica metamaps use:
TransformationTasks WorksheetThe TransformationTasks worksheet contains references to the mapping name.
The following table describes the metadata fields in the TransformationTasks worksheet that the Informatica metamaps use:
Filters WorksheetThe Filters worksheet contains references to expressions to filter source data.
The following table describes the metadata fields in the Filters worksheet that the Informatica metamaps use:
Metadata Field Used by Metamap Usage
Package Name MappingSource-Target-Matrix
Name of the mapping design package. Required by the Mapping Analyst for Excel import process. The Repository Service does not import this value.
Metadata Field Used by Metamap Usage
Package Name Mapping Identifies the parent mapping design package.
Transformation Task Name
MappingSource-Target-Matrix
Mapping name.
Metadata Field Used by Metamap Usage
Filter Condition Mapping Filter condition.
Transformation Source Schema Name
Mapping Name of the source database or file system to filter.
Transformation Source Class Physical Name
Mapping Name of the source table to filter.
64 Appendix A: Metamap Worksheets
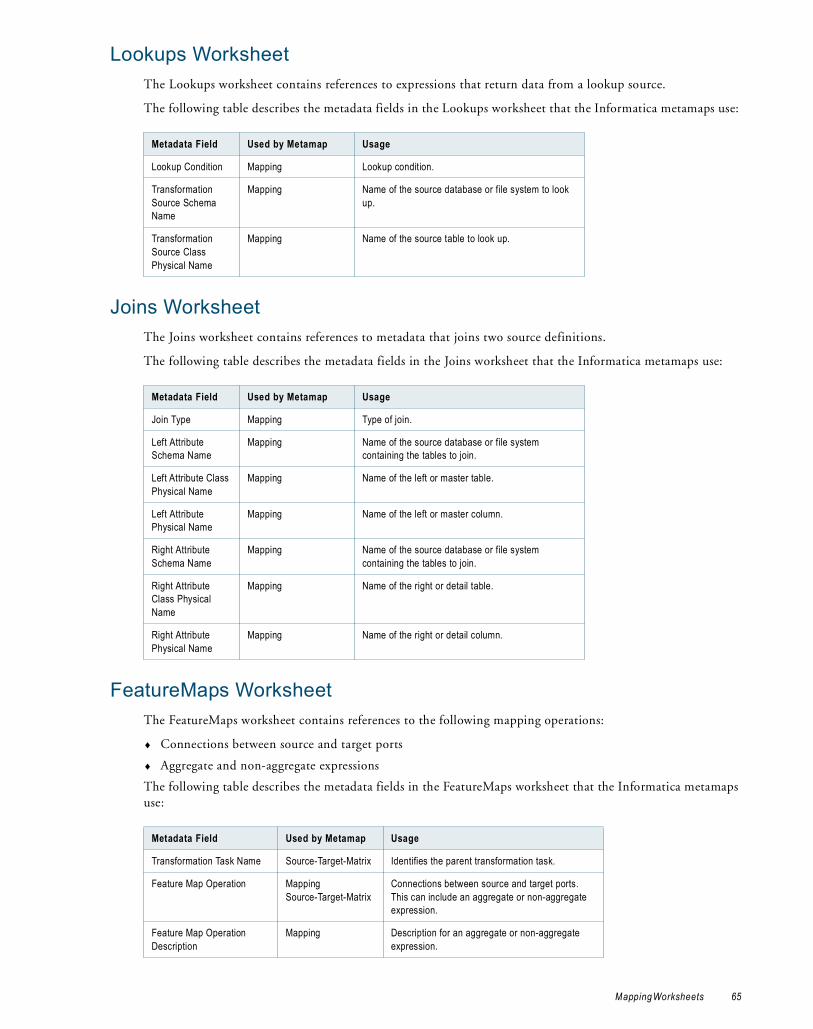
Lookups WorksheetThe Lookups worksheet contains references to expressions that return data from a lookup source.
The following table describes the metadata fields in the Lookups worksheet that the Informatica metamaps use:
Joins WorksheetThe Joins worksheet contains references to metadata that joins two source definitions.
The following table describes the metadata fields in the Joins worksheet that the Informatica metamaps use:
FeatureMaps WorksheetThe FeatureMaps worksheet contains references to the following mapping operations:
♦ Connections between source and target ports
♦ Aggregate and non-aggregate expressions
The following table describes the metadata fields in the FeatureMaps worksheet that the Informatica metamaps use:
Metadata Field Used by Metamap Usage
Lookup Condition Mapping Lookup condition.
Transformation Source Schema Name
Mapping Name of the source database or file system to look up.
Transformation Source Class Physical Name
Mapping Name of the source table to look up.
Metadata Field Used by Metamap Usage
Join Type Mapping Type of join.
Left Attribute Schema Name
Mapping Name of the source database or file system containing the tables to join.
Left Attribute Class Physical Name
Mapping Name of the left or master table.
Left Attribute Physical Name
Mapping Name of the left or master column.
Right Attribute Schema Name
Mapping Name of the source database or file system containing the tables to join.
Right Attribute Class Physical Name
Mapping Name of the right or detail table.
Right Attribute Physical Name
Mapping Name of the right or detail column.
Metadata Field Used by Metamap Usage
Transformation Task Name Source-Target-Matrix Identifies the parent transformation task.
Feature Map Operation MappingSource-Target-Matrix
Connections between source and target ports. This can include an aggregate or non-aggregate expression.
Feature Map Operation Description
Mapping Description for an aggregate or non-aggregate expression.
Mapping Worksheets 65
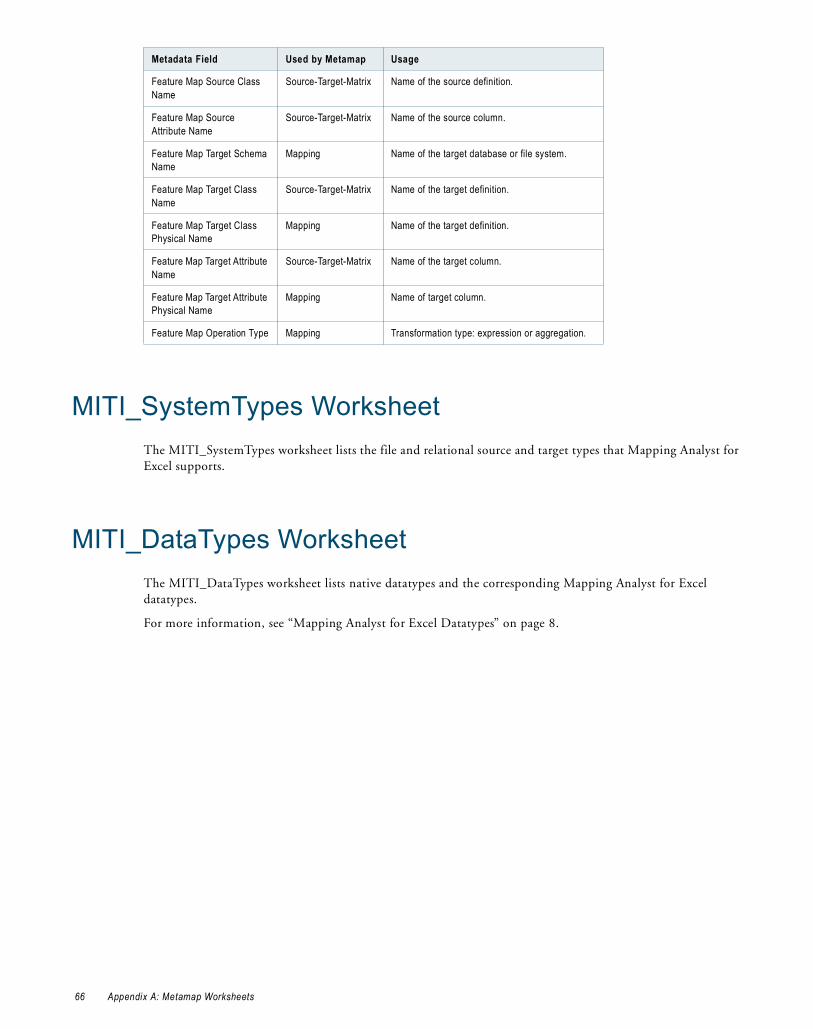
MITI_SystemTypes WorksheetThe MITI_SystemTypes worksheet lists the file and relational source and target types that Mapping Analyst for Excel supports.
MITI_DataTypes WorksheetThe MITI_DataTypes worksheet lists native datatypes and the corresponding Mapping Analyst for Excel datatypes.
For more information, see “Mapping Analyst for Excel Datatypes” on page 8.
Feature Map Source Class Name
Source-Target-Matrix Name of the source definition.
Feature Map Source Attribute Name
Source-Target-Matrix Name of the source column.
Feature Map Target Schema Name
Mapping Name of the target database or file system.
Feature Map Target Class Name
Source-Target-Matrix Name of the target definition.
Feature Map Target Class Physical Name
Mapping Name of the target definition.
Feature Map Target Attribute Name
Source-Target-Matrix Name of the target column.
Feature Map Target Attribute Physical Name
Mapping Name of target column.
Feature Map Operation Type Mapping Transformation type: expression or aggregation.
Metadata Field Used by Metamap Usage
66 Appendix A: Metamap Worksheets
A P P E N D I X B
Glossary
This appendix includes the following topic:
♦ Mapping Analyst for Excel Glossary of Terms, 67
Mapping Analyst for Excel Glossary of Termsmapping specificationA Microsoft Excel file that contains mapping metadata to import into the PowerCenter repository. The mapping metadata can include sources, targets, and transformations. Each mapping specification requires an associated metamap.
mapping specification templateMicrosoft Excel files installed with the PowerCenter Client that define the structure for a mapping specification. Use a mapping specification template as a starting point to create a mapping specification.
metamapA Microsoft Excel or XML file that contains a hierarchical representation of the metadata in a mapping specification. The metamap contains import and export options and cell references to metadata in a mapping specification.
repeating sheet fileA Microsoft Excel file that defines the common structure for multiple mappings defined in a mapping specification that is based on the Source-Target-Matrix mapping specification template.
Mapping Analyst for Excel Glossary of Terms 67

68 Appendix B: Glossary
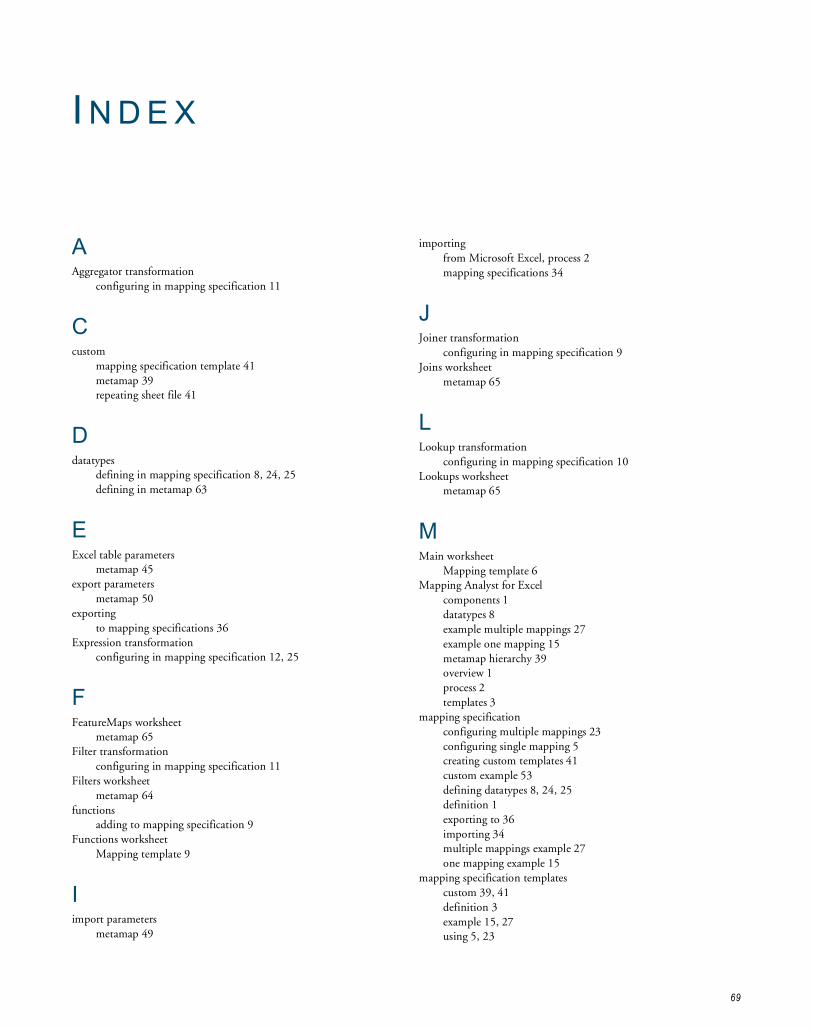
I N D E X
AAggregator transformation
configuring in mapping specification 11
Ccustom
mapping specification template 41metamap 39repeating sheet file 41
Ddatatypes
defining in mapping specification 8, 24, 25defining in metamap 63
EExcel table parameters
metamap 45export parameters
metamap 50exporting
to mapping specifications 36Expression transformation
configuring in mapping specification 12, 25
FFeatureMaps worksheet
metamap 65Filter transformation
configuring in mapping specification 11Filters worksheet
metamap 64functions
adding to mapping specification 9Functions worksheet
Mapping template 9
Iimport parameters
metamap 49
importingfrom Microsoft Excel, process 2mapping specifications 34
JJoiner transformation
configuring in mapping specification 9Joins worksheet
metamap 65
LLookup transformation
configuring in mapping specification 10Lookups worksheet
metamap 65
MMain worksheet
Mapping template 6Mapping Analyst for Excel
components 1datatypes 8example multiple mappings 27example one mapping 15metamap hierarchy 39overview 1process 2templates 3
mapping specificationconfiguring multiple mappings 23configuring single mapping 5creating custom templates 41custom example 53defining datatypes 8, 24, 25definition 1exporting to 36importing 34multiple mappings example 27one mapping example 15
mapping specification templatescustom 39, 41definition 3example 15, 27using 5, 23
69
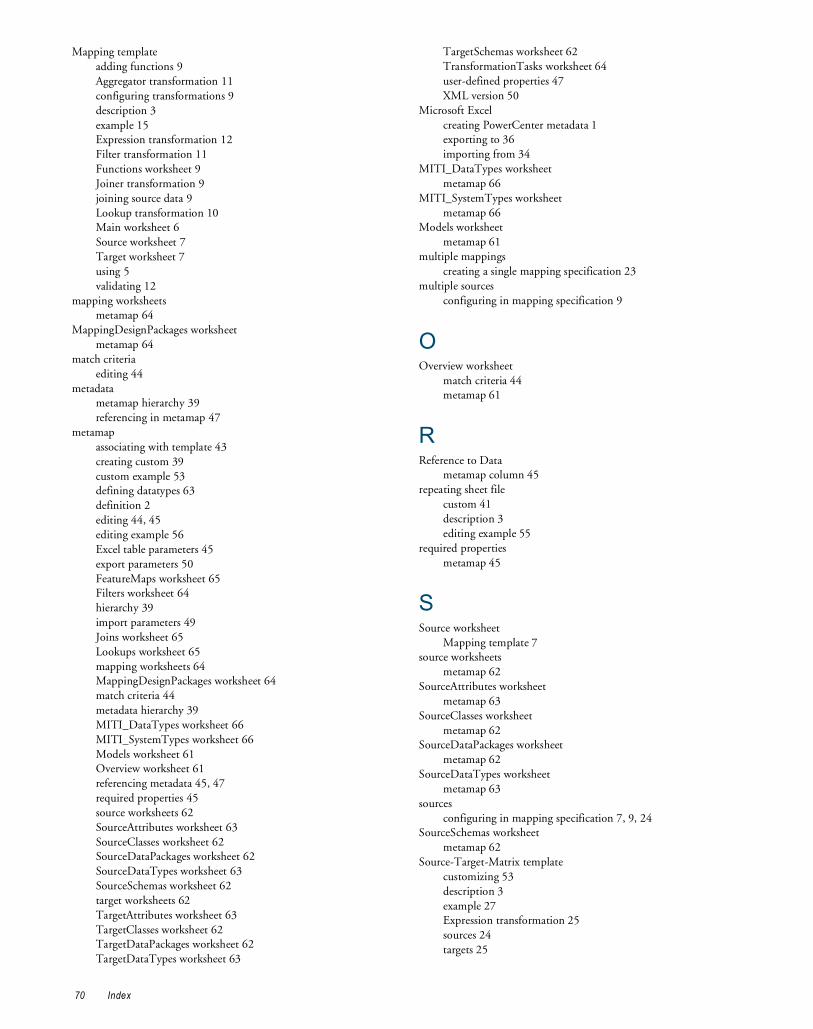
Mapping templateadding functions 9Aggregator transformation 11configuring transformations 9description 3example 15Expression transformation 12Filter transformation 11Functions worksheet 9Joiner transformation 9joining source data 9Lookup transformation 10Main worksheet 6Source worksheet 7Target worksheet 7using 5validating 12
mapping worksheetsmetamap 64
MappingDesignPackages worksheetmetamap 64
match criteriaediting 44
metadatametamap hierarchy 39referencing in metamap 47
metamapassociating with template 43creating custom 39custom example 53defining datatypes 63definition 2editing 44, 45editing example 56Excel table parameters 45export parameters 50FeatureMaps worksheet 65Filters worksheet 64hierarchy 39import parameters 49Joins worksheet 65Lookups worksheet 65mapping worksheets 64MappingDesignPackages worksheet 64match criteria 44metadata hierarchy 39MITI_DataTypes worksheet 66MITI_SystemTypes worksheet 66Models worksheet 61Overview worksheet 61referencing metadata 45, 47required properties 45source worksheets 62SourceAttributes worksheet 63SourceClasses worksheet 62SourceDataPackages worksheet 62SourceDataTypes worksheet 63SourceSchemas worksheet 62target worksheets 62TargetAttributes worksheet 63TargetClasses worksheet 62TargetDataPackages worksheet 62TargetDataTypes worksheet 63
TargetSchemas worksheet 62TransformationTasks worksheet 64user-defined properties 47XML version 50
Microsoft Excelcreating PowerCenter metadata 1exporting to 36importing from 34
MITI_DataTypes worksheetmetamap 66
MITI_SystemTypes worksheetmetamap 66
Models worksheetmetamap 61
multiple mappingscreating a single mapping specification 23
multiple sourcesconfiguring in mapping specification 9
OOverview worksheet
match criteria 44metamap 61
RReference to Data
metamap column 45repeating sheet file
custom 41description 3editing example 55
required propertiesmetamap 45
SSource worksheet
Mapping template 7source worksheets
metamap 62SourceAttributes worksheet
metamap 63SourceClasses worksheet
metamap 62SourceDataPackages worksheet
metamap 62SourceDataTypes worksheet
metamap 63sources
configuring in mapping specification 7, 9, 24SourceSchemas worksheet
metamap 62Source-Target-Matrix template
customizing 53description 3example 27Expression transformation 25sources 24targets 25
70 Index

using 23
TTarget worksheet
Mapping template 7target worksheets
metamap 62TargetAttributes worksheet
metamap 63TargetClasses worksheet
metamap 62TargetDataPackages worksheet
metamap 62TargetDataTypes worksheet
metamap 63targets
configuring in mapping specification 7, 25TargetSchemas worksheet
metamap 62templates
custom mapping specification 39mapping specification 3
transformationsconfiguring in mapping specification 9, 25
TransformationTasks worksheetmetamap 64
Uuser-defined properties
metamap 47
Vvalidation
Mapping template 12
XXML spreadsheet
metamap 50
Index 71

72 Index