Embed Size (px)
Citation preview
PRE AMPLIFIER
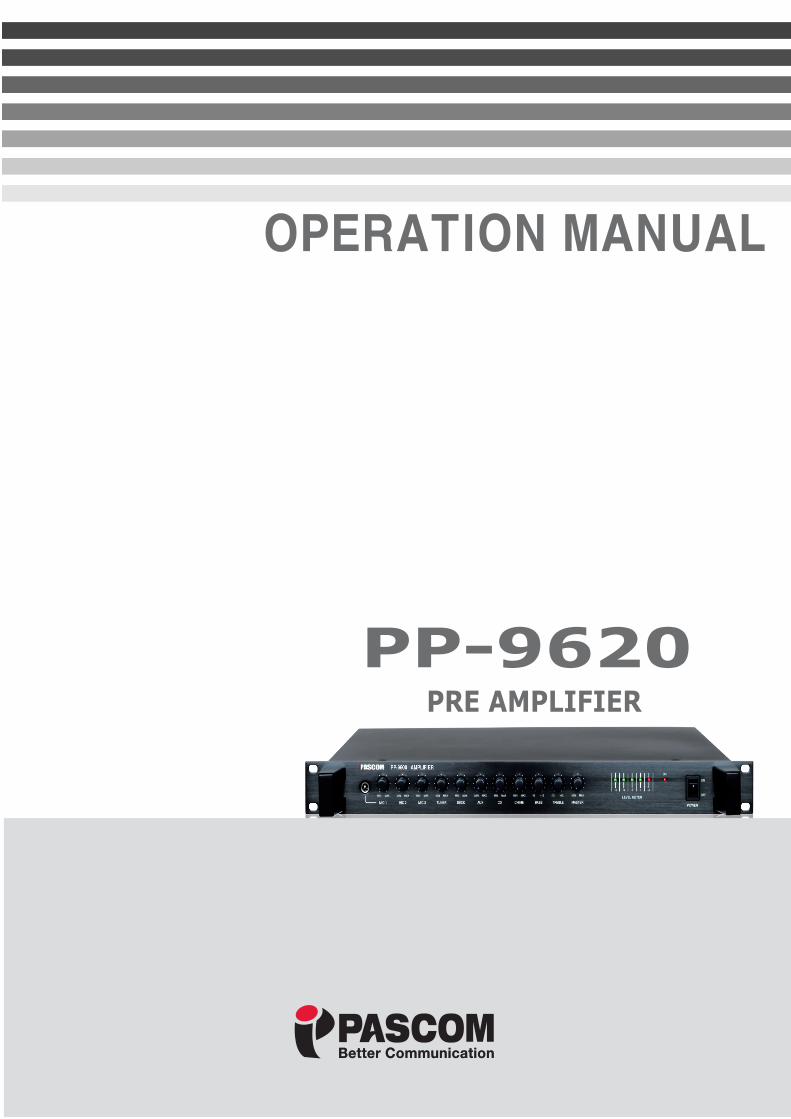
PP-9620
Better CommunicationBetter Communication
3. Front Panel ---------------------------------------------------------------------------------------------- 3
4. Back Panel ---------------------------------------------------------------------------------------------- 5
1. Unpacking ----------------------------------------------------------------------------------------------- 1
2. Installation ---------------------------------------------------------------------------------------------- 2
5. Electrical Specification --------------------------------------------------------------------------------- 7
6. General Specification cad Feature -------------------------------------------------------------------- 8

PP-9620.1
2.PP-9620
InstallationInstallation
EnvironmentNever place this product in any environment which could alter its performance or reduce its
service life. Such environments usually include high levels of heat, dust, moisture, and vibration.
Important Safety Instructions
1. Read these instructions and follow as written.
2. Keep this user manual for later use.
3. Do not use this product near water or any humid area.
4. Clean only with dry cloth.
5. Do not block any ventilation openings. Install in accordance with the manufacturer’s
instructions.
6. Do not install near any heat sources such as radiators, heater, stoves, or other
amplifiers or electronic products that produce heat.
7. Protect the power cord from being walked on or pinched, especially on plugs and
convenience receptacles.
8. Only use attachments/ accessories supplied by the manufacturer or authorized seller.
9. Do not defeat the safety purpose of the polarized or grounding- type plug. A polarized
plug has two blades with one wider than the other. A grounding type plug has two blades
and a third grounding prong. The wide blade or the third prong are provided for your
safety. If the provided plug does not fit into your outlet, consult an electrician for
replacement of the obsolete outlet.
10. Use only with the cart, stand, tripod, bracket, or table specified by the manufacturer or
authorized seller. When operating with such accessory, be extra careful to avoid accidents.
11. Leave this device unplugged when not used for long periods of time.
12. Make sure this device is unplugged during lightening storm.
13. Refer all service to qualified service personnel. When opened, damaged or repaired by
anyone unauthorized, service warranty might be invalid.
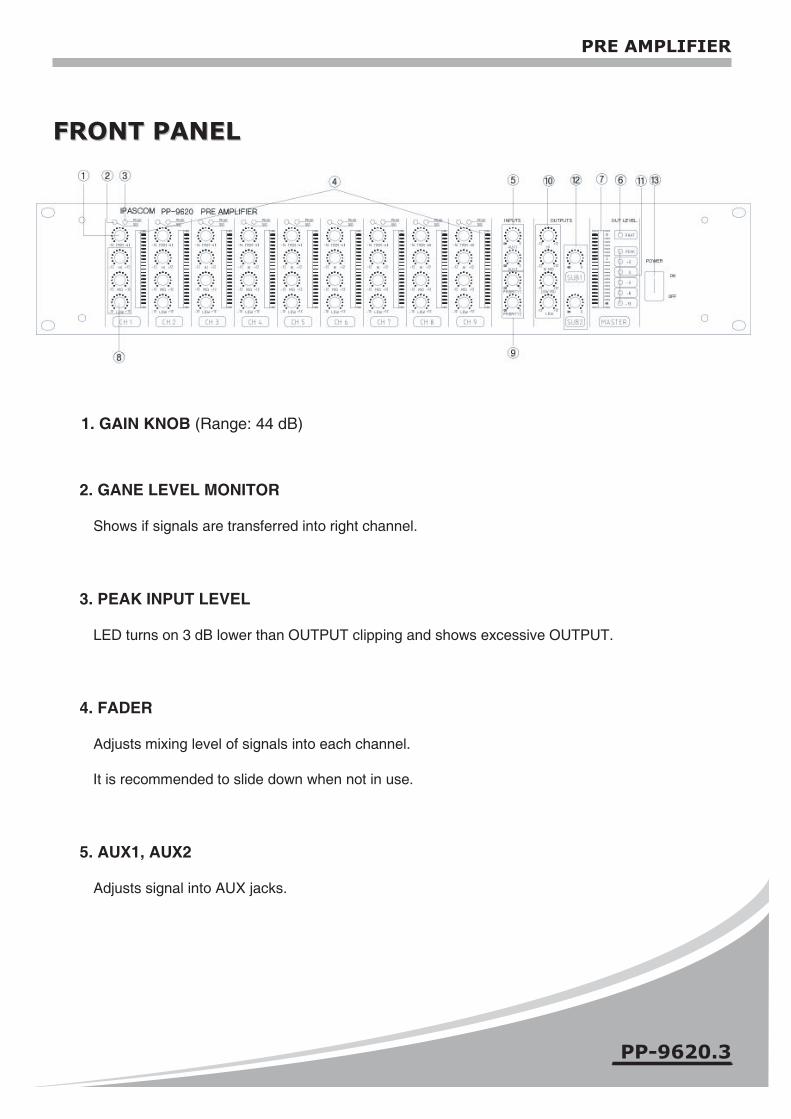
FRONT PANEL
PP-9620.3
FRONT PANEL
1. GAIN KNOB (Range: 44 dB)
2. GANE LEVEL MONITOR
Shows if signals are transferred into right channel.
3. PEAK INPUT LEVEL
LED turns on 3 dB lower than OUTPUT clipping and shows excessive OUTPUT.
4. FADER
Adjusts mixing level of signals into each channel.
It is recommended to slide down when not in use.
5. AUX1, AUX2
Adjusts signal into AUX jacks.
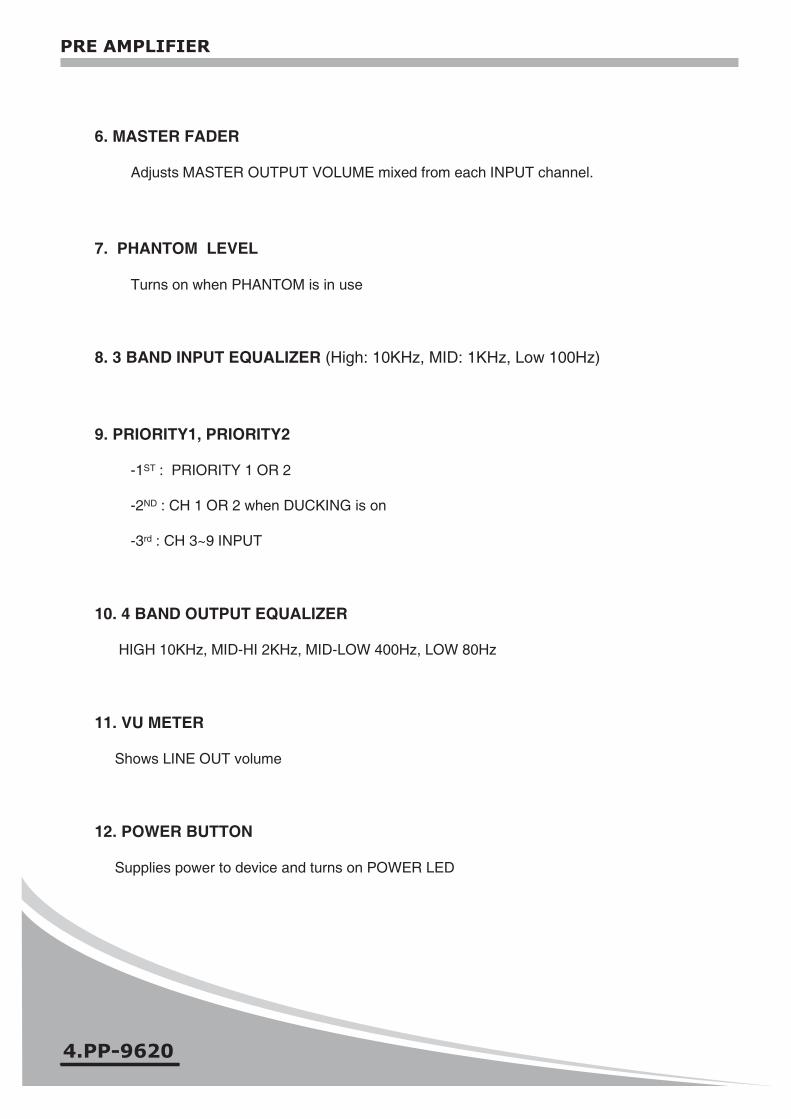
6. MASTER FADER
Adjusts MASTER OUTPUT VOLUME mixed from each INPUT channel.
7. PHANTOM LEVEL
Turns on when PHANTOM is in use
8. 3 BAND INPUT EQUALIZER (High: 10KHz, MID: 1KHz, Low 100Hz)
9. PRIORITY1, PRIORITY2
-1ST : PRIORITY 1 OR 2
-2ND : CH 1 OR 2 when DUCKING is on
-3rd : CH 3~9 INPUT
10. 4 BAND OUTPUT EQUALIZER
HIGH 10KHz, MID-HI 2KHz, MID-LOW 400Hz, LOW 80Hz
11. VU METER
Shows LINE OUT volume
12. POWER BUTTON
Supplies power to device and turns on POWER LED
4.PP-9620
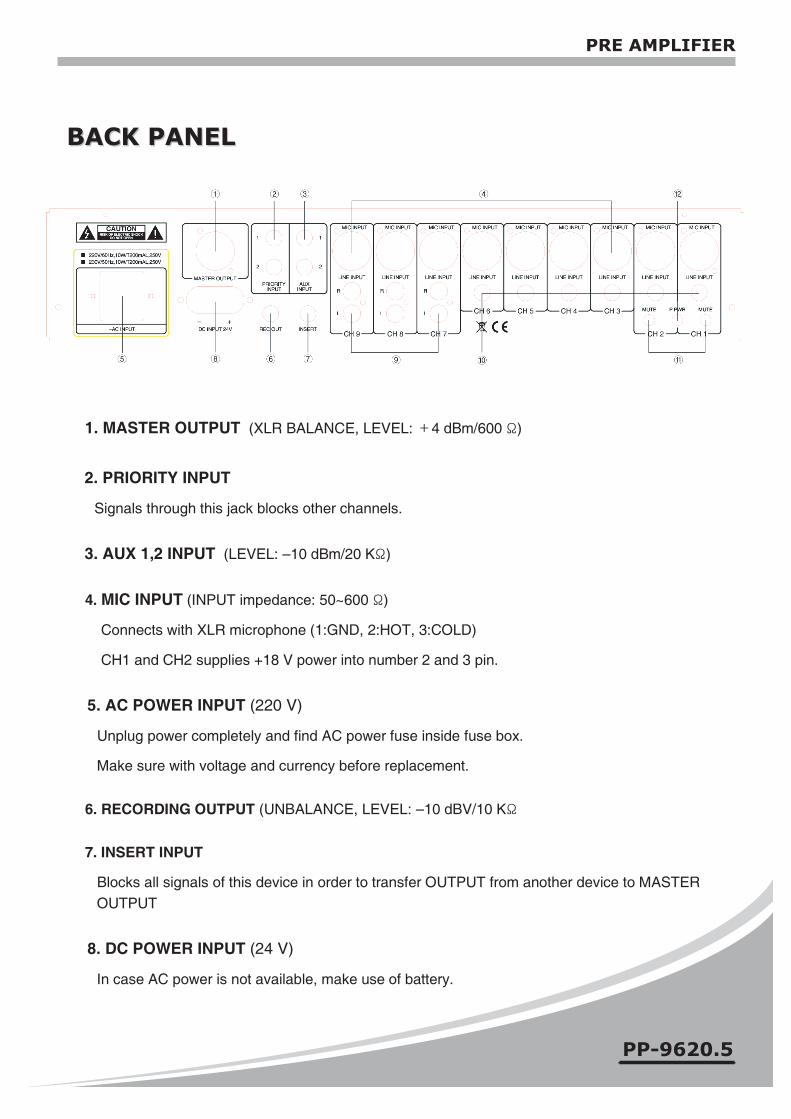
BACK PANELBACK PANEL
1. MASTER OUTPUT (XLR BALANCE, LEVEL:+4 dBm/600 Ω)
2. PRIORITY INPUT
Signals through this jack blocks other channels.
3. AUX 1,2 INPUT (LEVEL: –10 dBm/20 KΩ)
4. MIC INPUT (INPUT impedance: 50~600 Ω)
Connects with XLR microphone (1:GND, 2:HOT, 3:COLD)
CH1 and CH2 supplies +18 V power into number 2 and 3 pin.
5. AC POWER INPUT (220 V)
Unplug power completely and find AC power fuse inside fuse box.
Make sure with voltage and currency before replacement.
6. RECORDING OUTPUT (UNBALANCE, LEVEL: –10 dBV/10 KΩ
7. INSERT INPUT
Blocks all signals of this device in order to transfer OUTPUT from another device to MASTEROUTPUT
8. DC POWER INPUT (24 V)
In case AC power is not available, make use of battery.
PP-9620.5
9. STEREO LINE INPUTFor CD, tuner, cassette deck, etc
10. MONO LINE INPUT모노라인입력For CD, tuner, cassette deck, etc
11. DUCKING
While this switch is pressed in, other channels are blocked except connected microphone.
* PROIRITY function blocks DUCKING microphone.
12. PHANTOM POWER
Supplies +18 V BALANCED power to number 2 and 3 pin of XLR condenser microphone.
In case other microphones need to be connected, make sure to keep plugs BALANCED.
※CAUTION: MAKE SURE INPUT CHANNEL VOLUME AND MASTER VOLUMNE IS MINIMIZED
BEFORE TURNING ON PHANTOM POWER IS IN ORDER TO PROTECTSPEAKERS FROM SHOCK AND/OR DAMAGE FROM SUDDEN POWER SUPPLY
6.PP-9620
ELECTRICAL SPECIFICATIONELECTRICAL SPECIFICATION
OUTPUT POWER
MASTER OUTPUT
SUB 1,2 OUTPUT
RECORDING OUTPUT
INPUT SENSATIVITY / IMPDEANCE----------------------------
MIC (CH1~CH9)
LINE (CH1~CH6)
LINE (CH1~CH9)
AUX 1,2
PRIORITY 1,2
INSERT
TERMINAL HANDLING CHARGE------------------------------
FREQUENCY RESPONSE----------------------------------------
INPUT CHANNEL EQUALIZER
HIGH (10KHz)
MID (1KHz)
LOW (100Hz)
OUTPUT CHANNEL EQUALIZER-------------------------------
HIGH (10KHz)
HI-MID (2KHz)
LOW-MID (400Hz)
LOW (80Hz)
RESIDUAL NOISE
CROSSTALK
PHANTOM POWER
+4 dBm/600 Ω, BALANCED
+4 dBm/600 Ω, UNBALANCED
-10 dBV/10 KΩ, UNBALANCED
-60 dBm/600 Ω, BALANCED
-20 dBm/47K Ω, BALANCED
-20 dBm/47K Ω, UNBALANCED
-10 dBm/20K Ω, UNBALANCED
0 dBm/20K Ω, UNBALANCED
0 dBm/20K Ω, UNBALANCED
≤ 0.3 %
30 Hz-20 KHz (+1 d, -3 dB)
±12 dB
±12 dB
±12 dB
±12 dB
±12 dB
±12 dB
±12 dB
≤-90 dB
≤ -60 dB
+18 VDC
PP-9620.7
GENERAL SPECIFICATION AND FEATURE
±12 Db)
GENERAL SPECIFICATION AND FEATURE POWER SOURCE
POWER CONSUMPTION
WEIGHT
DIMENSION (mm)
FEATURES
-9 CH OUTPUT, 1 CH MASTER OUTPUT, 1CH RECORDING OUTPUT
-AUX INPUT AND 2 CH PRIORITY FUNCTION
- EQUALIZER FOR EACH INDIVIDUAL CHANNEL (GANE:
- PHANTOM MIC POWER (2 MIC CH, +18V)
- DUCKING : CH 1 AND CH 2 are prior to other CHs
8.PP-9620
AC 220 V,60 Hz,DC 24 V
10 W
7.5 Kg
482(W)×88(H)×280(D)

MADE IN KOREAwww.ipascom.com
Better CommunicationBetter Communication

![carmen don.ppt [Read-Only] · CH1:1. CH1:2. CH1:3. CH1:4 DREDGING UFGS SECTION 02325. CH1:5 HOW IT STARTED Corps Spec Steering Committee: Need Suggested Queried Districts Districts:](https://img.pdfslide.net/doc/110x75/5f13e2ca0b294765f40b232e/carmen-donppt-read-only-ch11-ch12-ch13-ch14-dredging-ufgs-section-02325.jpg)