Embed Size (px)
Citation preview
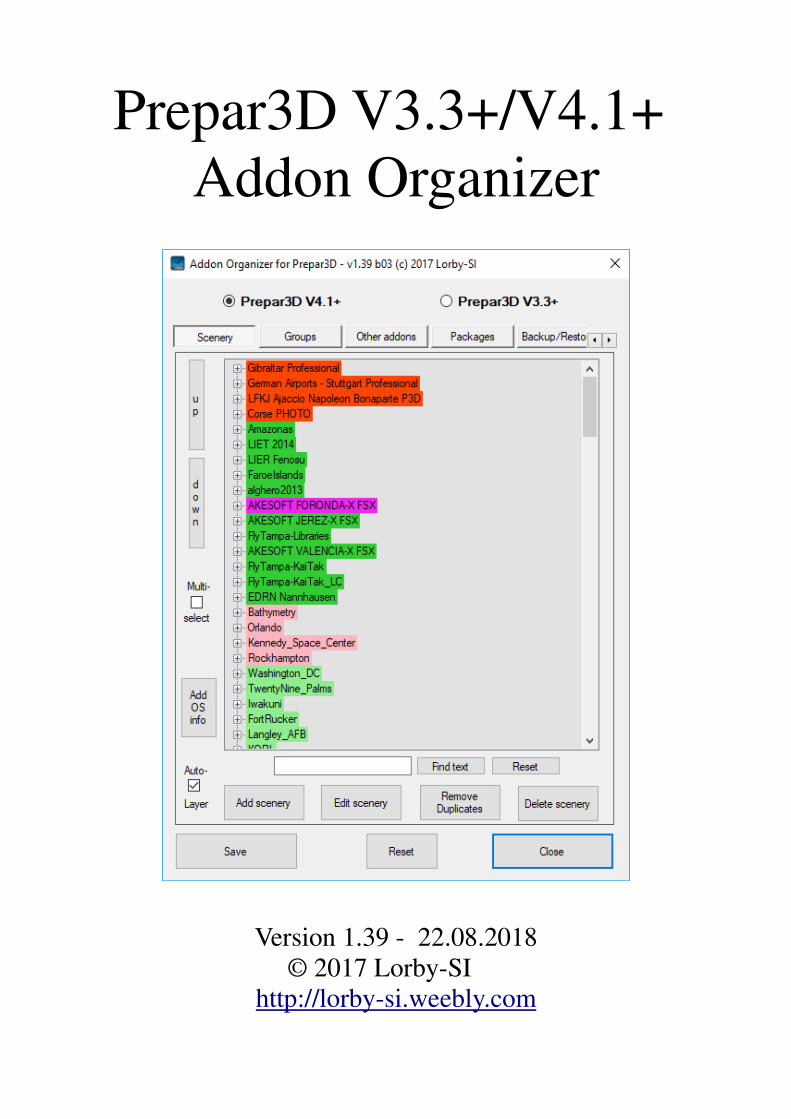
Prepar3D V3.3+/V4.1+
Addon Organizer
Version 1.39 - 22.08.2018
© 2017 Lorby-SI
http://lorby-si.weebly.com
1. Overview
2. Installation
2.1. Distribution
2.2. Installation
2.3. Microsoft .Net 4.6.2
3. Operations
3.1. Main Window
3.2. Enabling/Disabling addons
3.3. Managing scenery
3.4. Scenery groups
3.5. Managing other addons
3.6. Package view
3.7. Backup and Restore
3.8. Importing an earlier scenery.cfg
3.9. Creating a scenery.cfg for external tools
3.10. Creating a simobjects.cfg for external tools
3.11. Tools
3.12. Enforcing the “strict layer order”
3.13. Enforcing the “strict package law”
4. Disclaimer
1. Overview
The Prepar3D V3.3+/V4 Addon Organizer (P4AO) is a simple application
that will manage addons to your simulator with external XML files, as
recommended by Lockheed Martin.
You can:
– Add or delete scenery and other addons
– Activate and deactivate existing addons
– Manipulate the order of your addon packages
– Change scenery layering
– Make a backup of your addon configuration files and restore it
– Import a scenery.cfg from a previous P3D/FSX installation
– Export the complete library in scenery.cfg format for other scenery
related addons to use that have not been updated to P3D V3.3+/V4
yet.
– Export all SimObjects paths to a simobjects.cfg file for other addons
that for example need to find all aircraft.
– Compare checkpoints created with this app at different points in
time, checking for changes to the simulators files.
The files being edited by this app are:
Prepar3D V3:
• C:\ProgramData\Lockheed Martin\Prepar3D v3\scenery.cfg
• C:\ProgramData\Lockheed Martin\Prepar3D v3\add-ons.cfg
• ..\AppData\Roaming\Lockheed Martin\Prepar3D v3\add-ons.cfg
• and the add-on.xml files in \Documents\Prepar3D v3 Files\add-ons\
Prepar3D V4:
• C:\ProgramData\Lockheed Martin\Prepar3D v4\scenery.cfg
• C:\ProgramData\Lockheed Martin\Prepar3D v4\add-ons.cfg
• ..\AppData\Roaming\Lockheed Martin\Prepar3D v4\add-ons.cfg
• and the add-on.xml files in \Documents\Prepar3D v4 Add-ons\
The P4AO will always create two backup files for each of them:
- The original file is renamed to "*.orig"
- The last version before this change is saved as "*.PSSCBAK"
2. Installation
2.1 Distribution
P4AO is distributed as a self-extracting installer package:
– AddonOrganizer_Install_P3D_V4.exe
2.2 Installation
Double click on the installer file. The program will be installed by default
into a subdirectory of your Documents\Prepar3D V4 Add-ons\ folder.
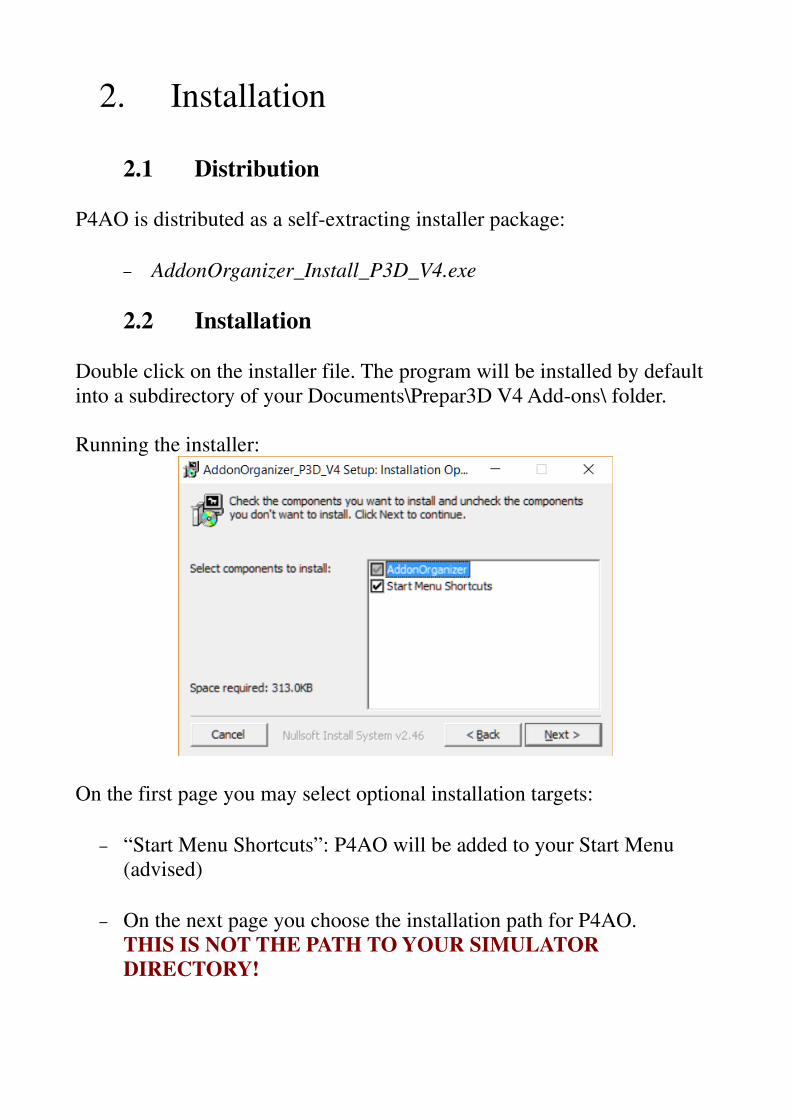
Running the installer:
On the first page you may select optional installation targets:
– “Start Menu Shortcuts”: P4AO will be added to your Start Menu
(advised)
– On the next page you choose the installation path for P4AO.
THIS IS NOT THE PATH TO YOUR SIMULATOR
DIRECTORY!
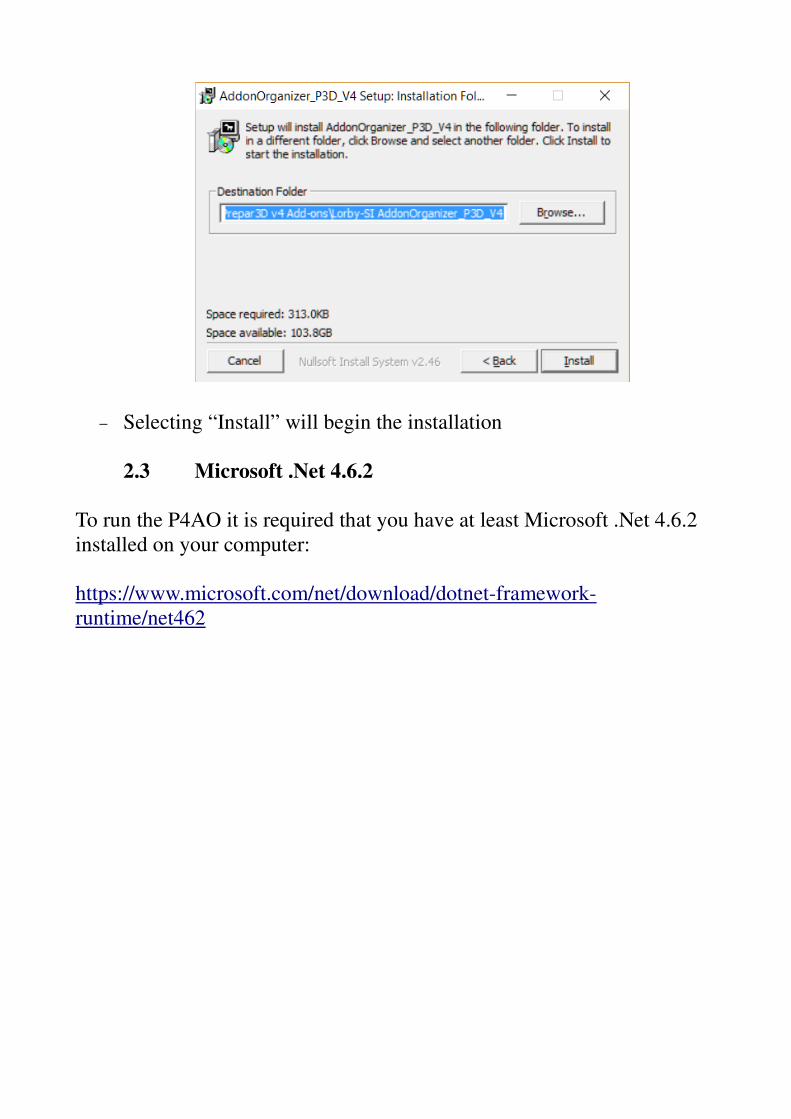
– Selecting “Install” will begin the installation
2.3 Microsoft .Net 4.6.2
To run the P4AO it is required that you have at least Microsoft .Net 4.6.2
installed on your computer:
https://www.microsoft.com/net/download/dotnet-framework-
runtime/net462
3. Operations
3.1 Main Window
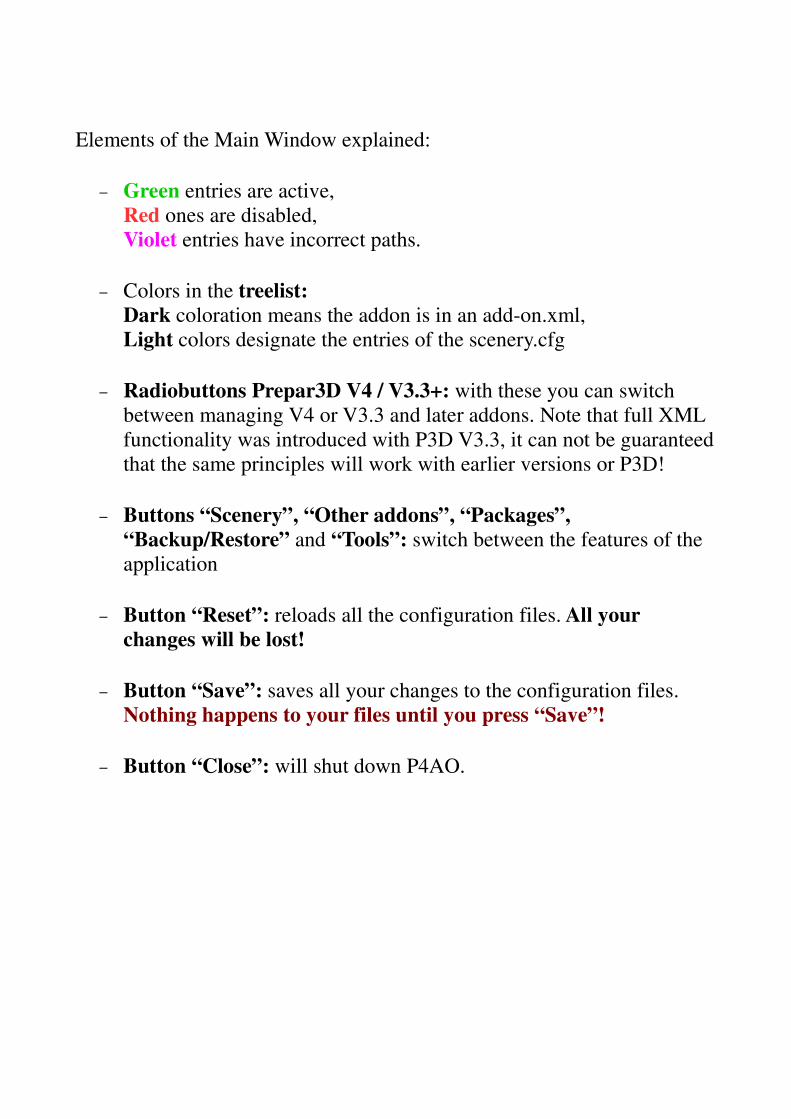
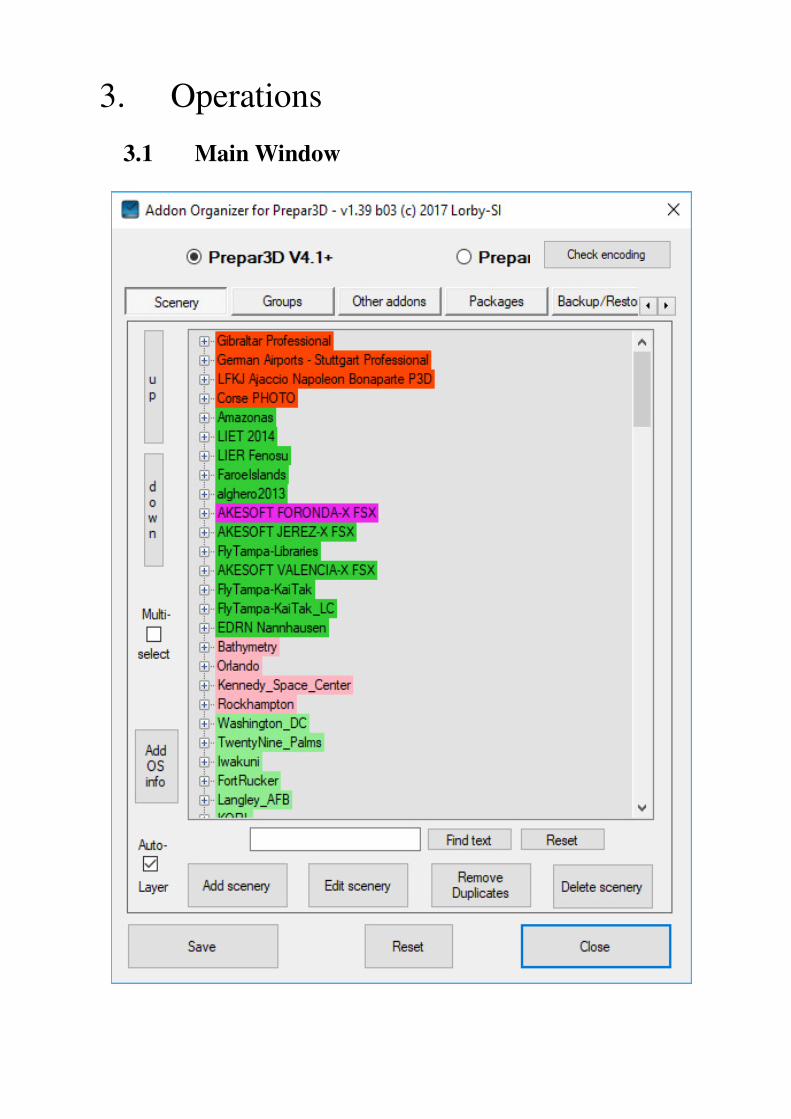
Elements of the Main Window explained:
– Green entries are active,
Red ones are disabled,
Violet entries have incorrect paths.
– Colors in the treelist:
Dark coloration means the addon is in an add-on.xml,
Light colors designate the entries of the scenery.cfg
– Radiobuttons Prepar3D V4 / V3.3+: with these you can switch
between managing V4 or V3.3 and later addons. Note that full XML
functionality was introduced with P3D V3.3, it can not be guaranteed
that the same principles will work with earlier versions or P3D!
– Buttons “Scenery”, “Other addons”, “Packages”,
“Backup/Restore” and “Tools”: switch between the features of the
application
– Button “Reset”: reloads all the configuration files. All your
changes will be lost!
– Button “Save”: saves all your changes to the configuration files.
Nothing happens to your files until you press “Save”!
– Button “Close”: will shut down P4AO.
3.2 Enabling and disabling addons
And add-on.xml is called an “Addon package” in the terms of the P3D
Learning Center. The correct way to disable an addon is to go to the
Options->Add-ons dialog in P3D and deactivate the addon package there.
The P3D Options->Add-ons dialog basically corresponds to the
“Packages” tab in P4AO. And the simple rule is:
Scenery + OtherAddons = Package.
With P4AO you can now enable/disable (or “activate/deactivate”)
individual components of the addon packages (= sceneries or other
addons). But strictly speaking this is against the P3D specification, as it
happens by reassigning the AddonComponents to a different nodename
that is unknown to P3D (“Addon.Component.Disabled”). This will cause
an entry in the content error log that P3D writes, but the addon component
is no longer there either.
The correct way to disable content is to deactivate the complete addon
package – and this will not cause any content errors.
Please keep this in mind, because disabling the package will mean that
you can not re-enable a scenery on the “Scenery” tab – it doesn't exist
as far as P3D is concerned!
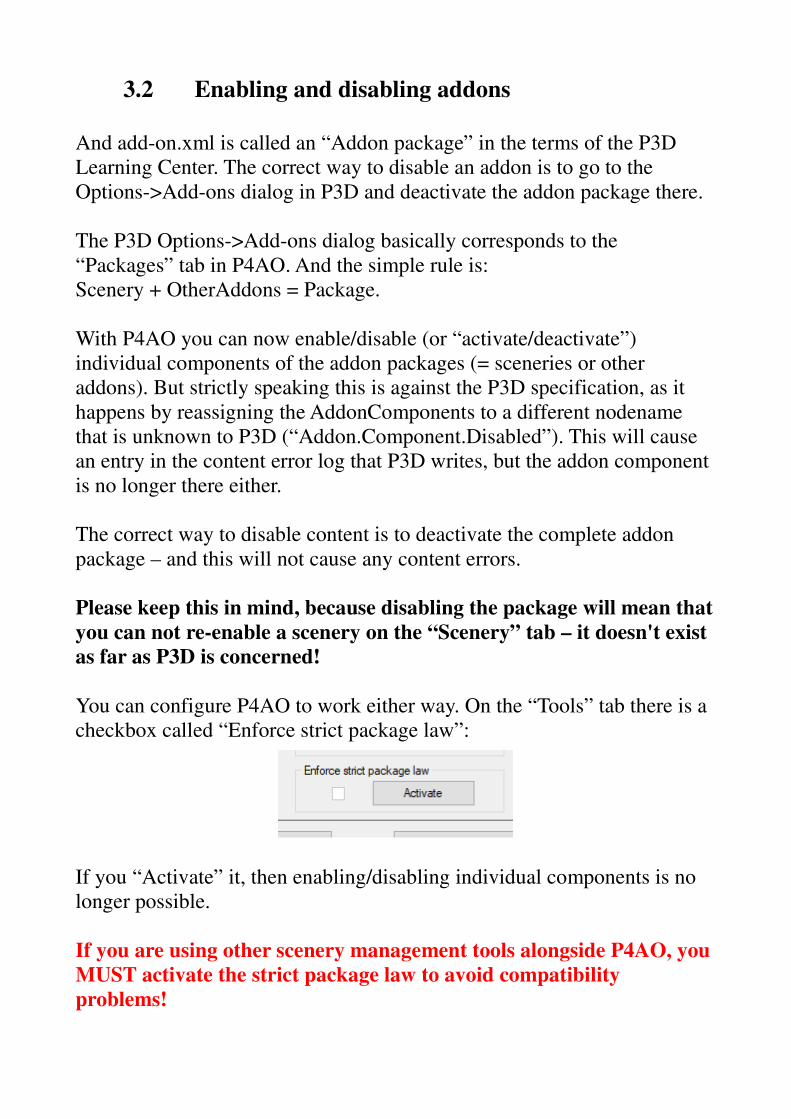
You can configure P4AO to work either way. On the “Tools” tab there is a
checkbox called “Enforce strict package law”:
If you “Activate” it, then enabling/disabling individual components is no
longer possible.
If you are using other scenery management tools alongside P4AO, you
MUST activate the strict package law to avoid compatibility
problems!
3.3 Manage Scenery
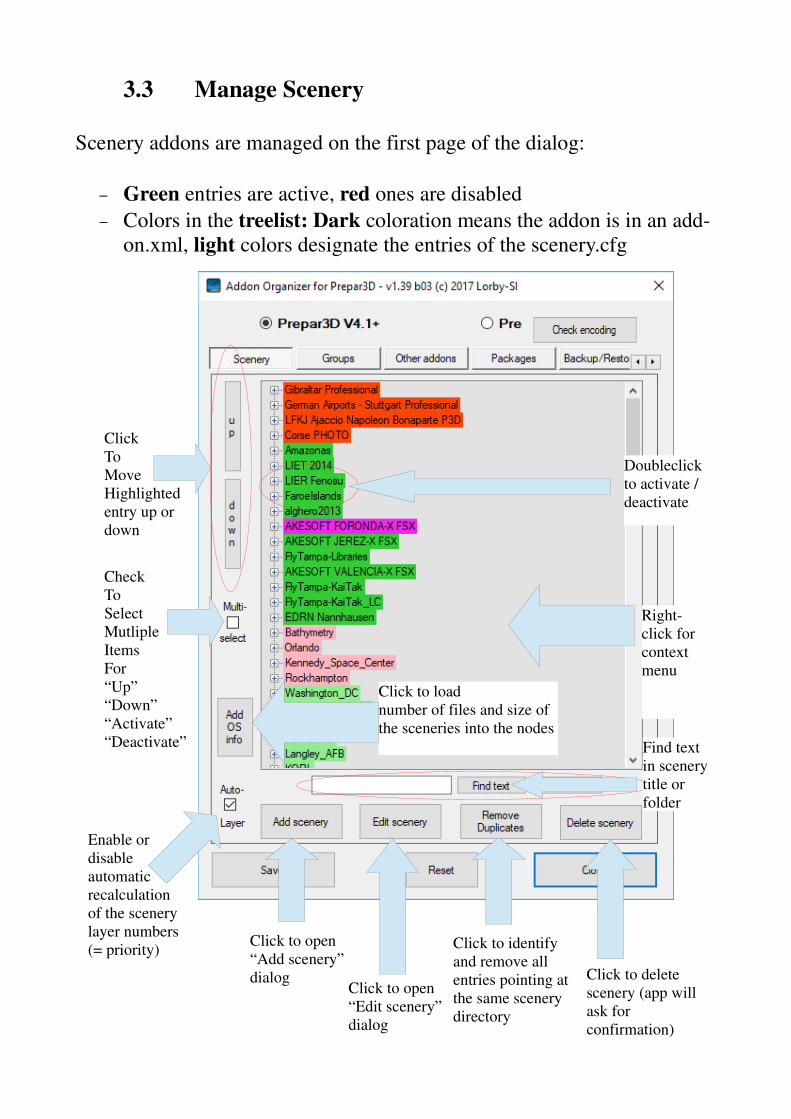
Scenery addons are managed on the first page of the dialog:
– Green entries are active, red ones are disabled
– Colors in the treelist: Dark coloration means the addon is in an add-
on.xml, light colors designate the entries of the scenery.cfg
Click
To
Move
Highlighted
entry up or
down
Doubleclick
to activate /
deactivate
Click to delete
scenery (app will
ask for
confirmation)
Click to open
“Add scenery”
dialog
Check
To
Select
Mutliple
Items
For
“Up”
“Down”
“Activate”
“Deactivate”
Click to load
number of files and size of
the sceneries into the nodes
Right-
click for
context
menu
Click to open
“Edit scenery”
dialog
Click to identify
and remove all
entries pointing at
the same scenery
directory
Enable or
disable
automatic
recalculation
of the scenery
layer numbers
(= priority)
Find text
in scenery
title or
folder
3.2.1 Right-click context menu
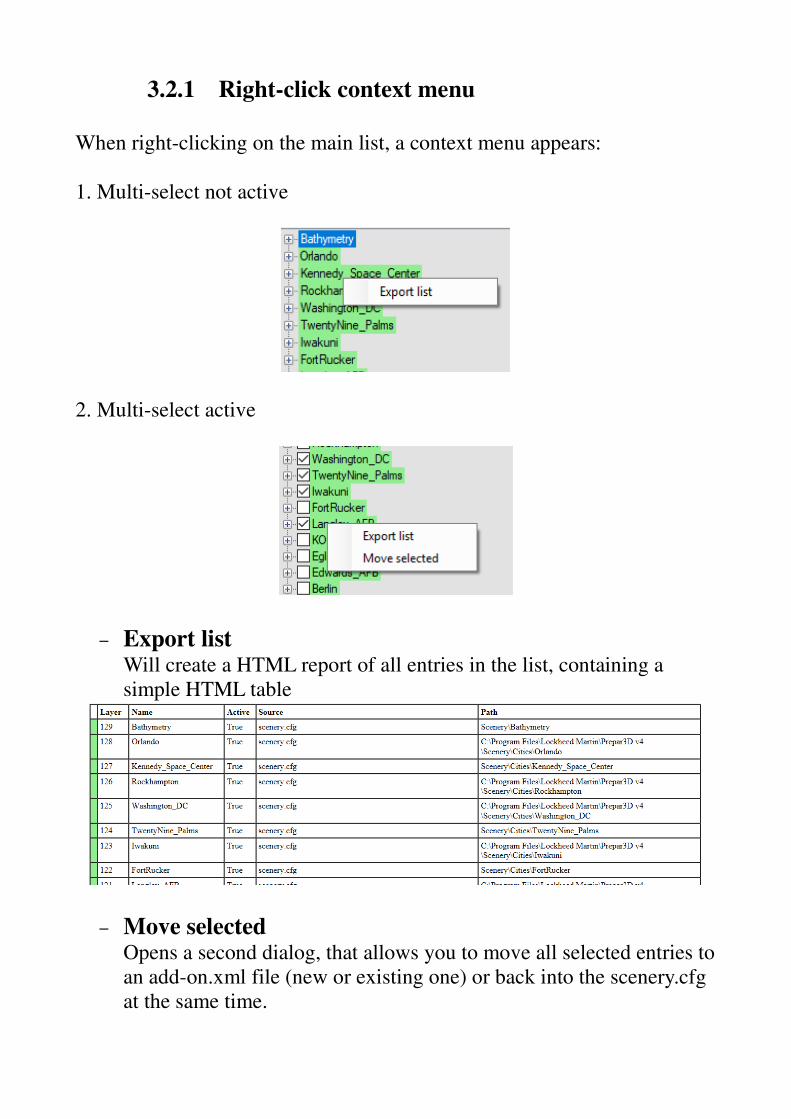
When right-clicking on the main list, a context menu appears:
1. Multi-select not active
2. Multi-select active
– Export listWill create a HTML report of all entries in the list, containing a
simple HTML table
– Move selectedOpens a second dialog, that allows you to move all selected entries to
an add-on.xml file (new or existing one) or back into the scenery.cfg
at the same time.
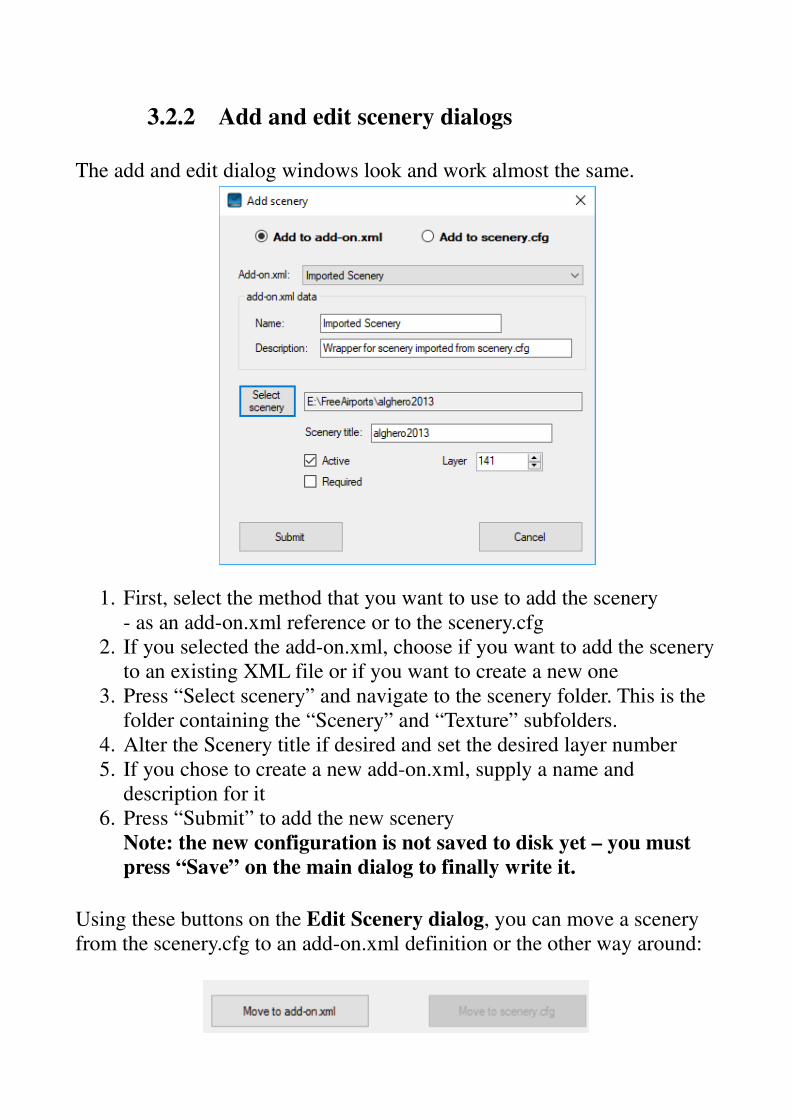
3.2.2 Add and edit scenery dialogs
The add and edit dialog windows look and work almost the same.
1. First, select the method that you want to use to add the scenery
- as an add-on.xml reference or to the scenery.cfg
2. If you selected the add-on.xml, choose if you want to add the scenery
to an existing XML file or if you want to create a new one
3. Press “Select scenery” and navigate to the scenery folder. This is the
folder containing the “Scenery” and “Texture” subfolders.
4. Alter the Scenery title if desired and set the desired layer number
5. If you chose to create a new add-on.xml, supply a name and
description for it
6. Press “Submit” to add the new scenery
Note: the new configuration is not saved to disk yet – you must
press “Save” on the main dialog to finally write it.
Using these buttons on the Edit Scenery dialog, you can move a scenery
from the scenery.cfg to an add-on.xml definition or the other way around:
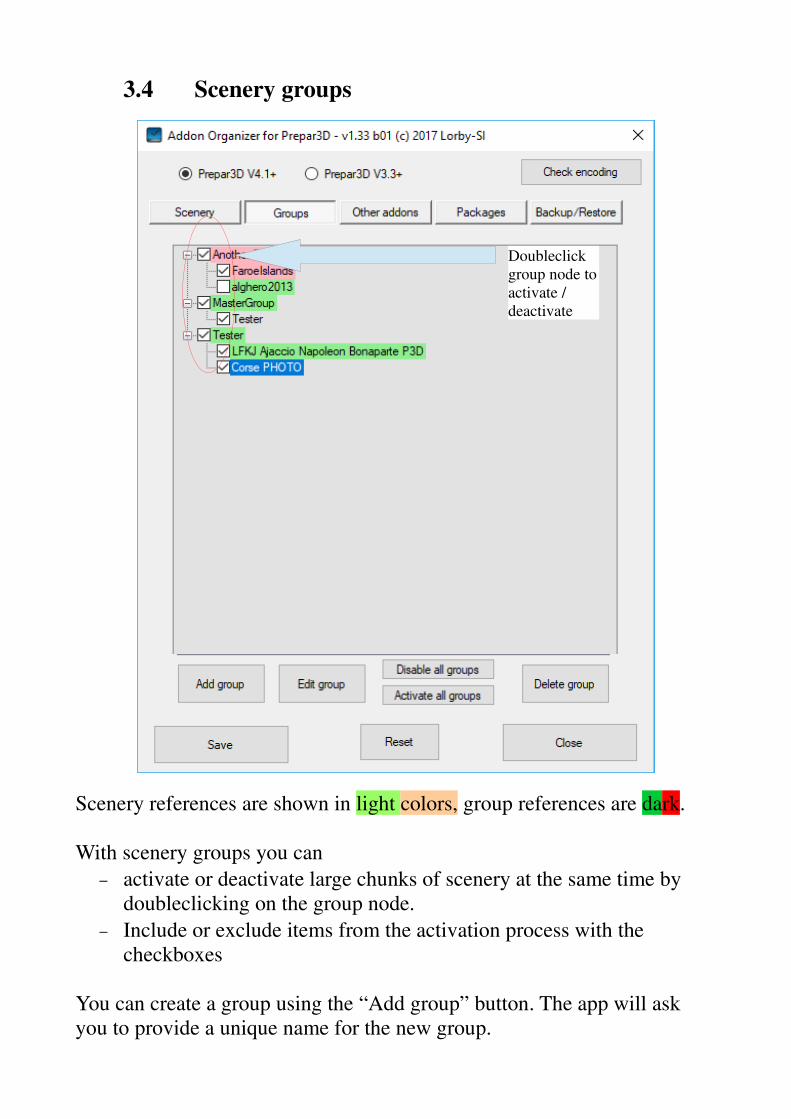
3.4 Scenery groups
Scenery references are shown in light colors, group references are dark.
With scenery groups you can
– activate or deactivate large chunks of scenery at the same time by
doubleclicking on the group node.
– Include or exclude items from the activation process with the
checkboxes
You can create a group using the “Add group” button. The app will ask
you to provide a unique name for the new group.
Doubleclick
group node to
activate /
deactivate
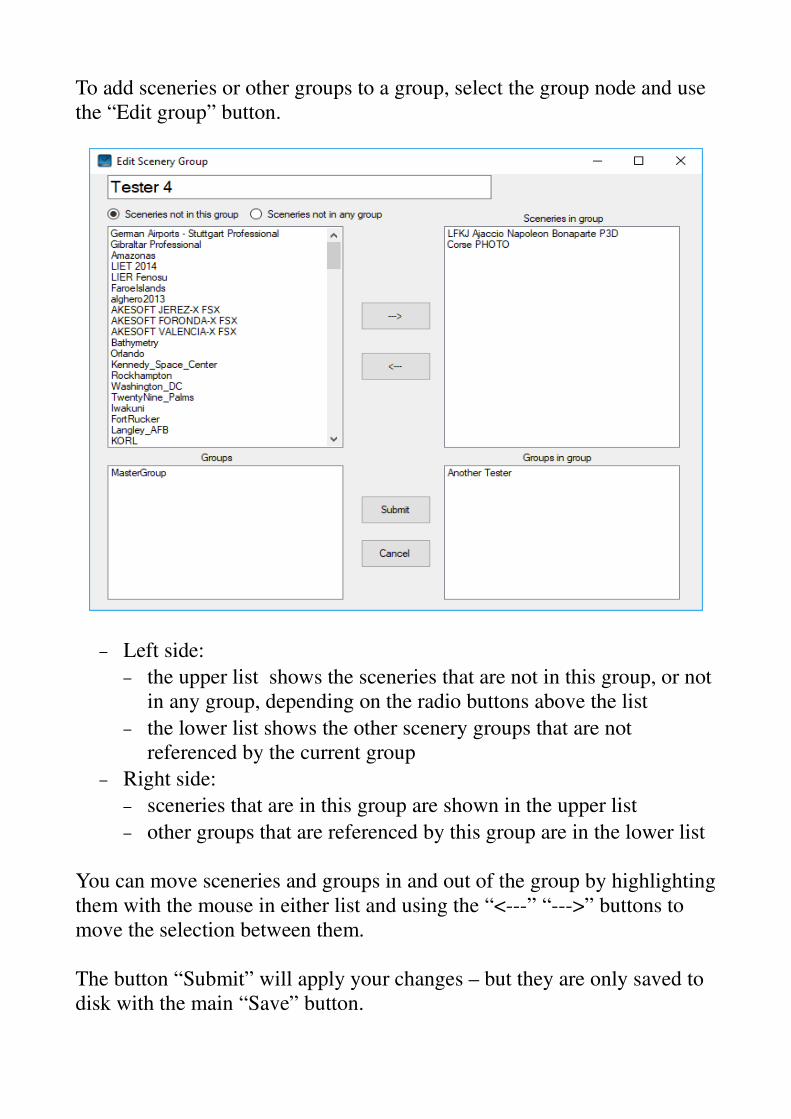
To add sceneries or other groups to a group, select the group node and use
the “Edit group” button.
– Left side:
– the upper list shows the sceneries that are not in this group, or not
in any group, depending on the radio buttons above the list
– the lower list shows the other scenery groups that are not
referenced by the current group
– Right side:
– sceneries that are in this group are shown in the upper list
– other groups that are referenced by this group are in the lower list
You can move sceneries and groups in and out of the group by highlighting
them with the mouse in either list and using the “<---” “--->” buttons to
move the selection between them.
The button “Submit” will apply your changes – but they are only saved to
disk with the main “Save” button.
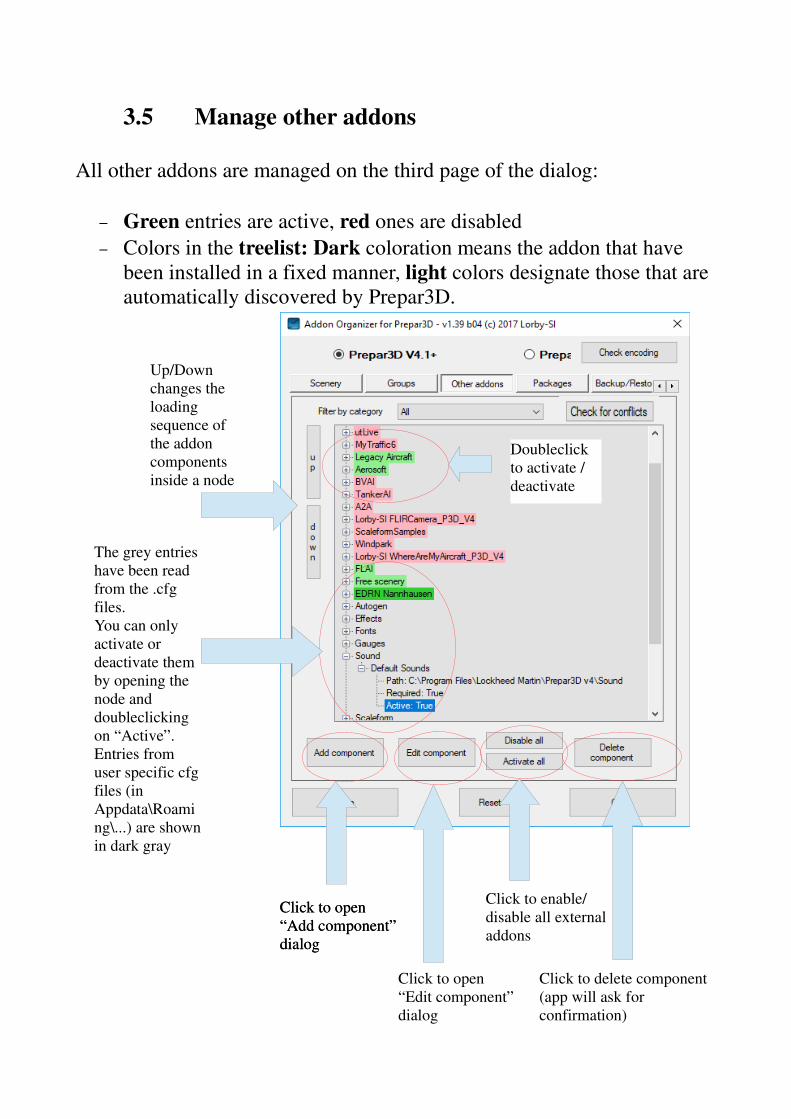
3.5 Manage other addons
All other addons are managed on the third page of the dialog:
– Green entries are active, red ones are disabled
– Colors in the treelist: Dark coloration means the addon that have
been installed in a fixed manner, light colors designate those that are
automatically discovered by Prepar3D.
Up/Down
changes the
loading
sequence of
the addon
components
inside a node
Click to open
“Add component”
dialog
Click to open
“Edit component”
dialog
Click to delete component
(app will ask for
confirmation)
The grey entries
have been read
from the .cfg
files.
You can only
activate or
deactivate them
by opening the
node and
doubleclicking
on “Active”.
Entries from
user specific cfg
files (in
Appdata\Roami
ng\...) are shown
in dark gray
Doubleclick
to activate /
deactivate
Click to open
“Add component”
dialog
Click to enable/
disable all external
addons
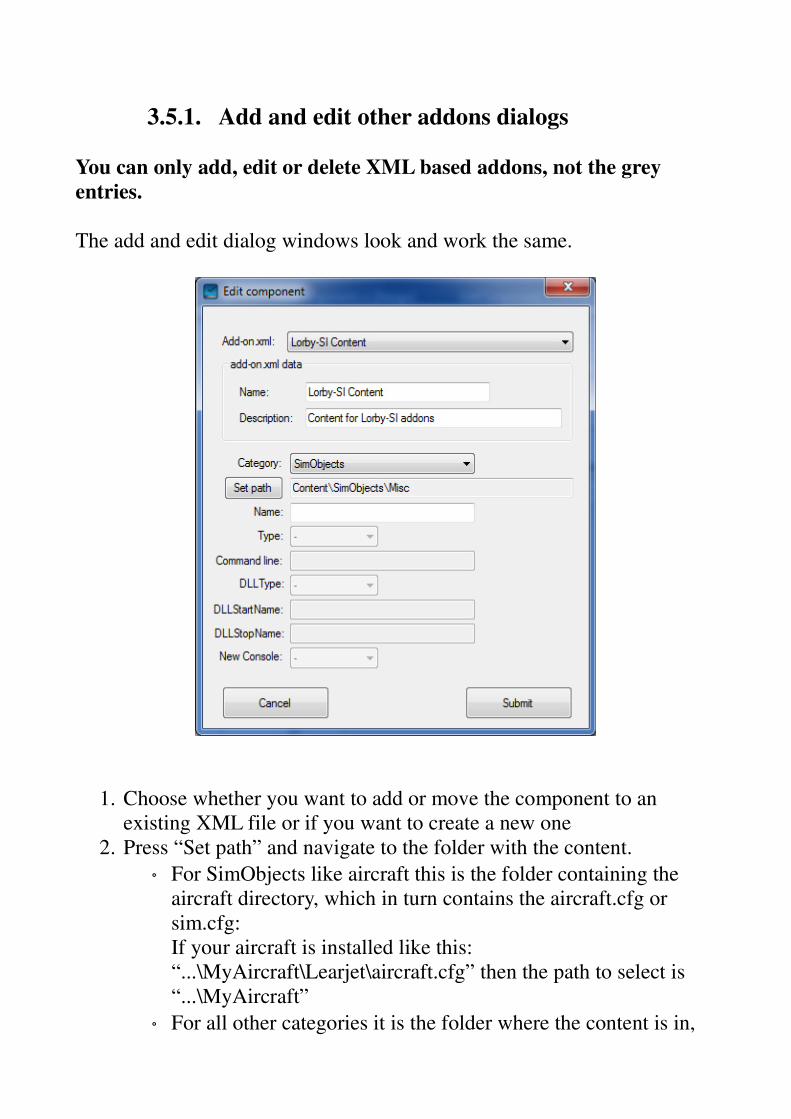
3.5.1. Add and edit other addons dialogs
You can only add, edit or delete XML based addons, not the grey
entries.
The add and edit dialog windows look and work the same.
1. Choose whether you want to add or move the component to an
existing XML file or if you want to create a new one
2. Press “Set path” and navigate to the folder with the content.
◦ For SimObjects like aircraft this is the folder containing the
aircraft directory, which in turn contains the aircraft.cfg or
sim.cfg:
If your aircraft is installed like this:
“...\MyAircraft\Learjet\aircraft.cfg” then the path to select is
“...\MyAircraft”
◦ For all other categories it is the folder where the content is in,
for example the folder that contains the gauges.
◦ For EXE and DLL type addons you have to navigate to the
actual file
3. Alter the necessary fields if desired. Please consult the P3D V4
Learning Center for details (“SDK->Add-ons->Add-on Packages”)
4. If you chose to create a new add-on.xml, supply a name and
description for it
5. Press “Submit” to add the new component
Note: the new configuration is not saved to disk yet – you must
press “Save” on the main dialog to finally write it.
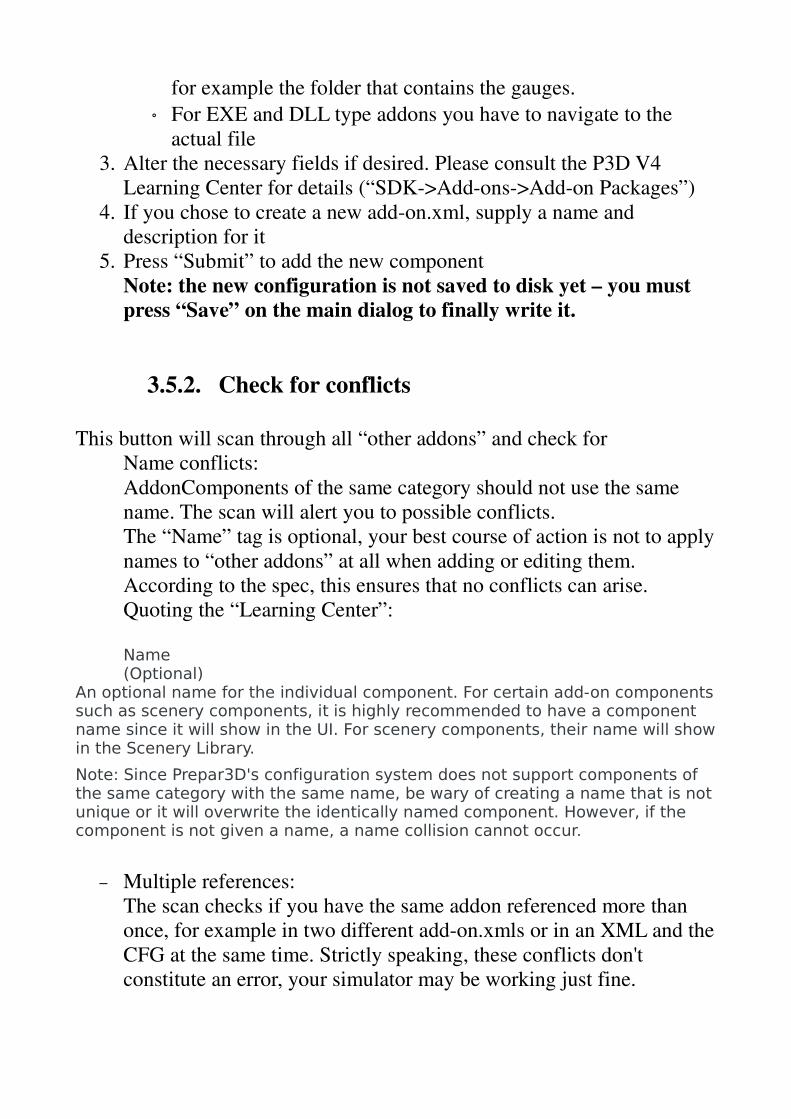
3.5.2. Check for conflicts
This button will scan through all “other addons” and check for– Name conflicts:
AddonComponents of the same category should not use the same
name. The scan will alert you to possible conflicts.
The “Name” tag is optional, your best course of action is not to apply
names to “other addons” at all when adding or editing them.
According to the spec, this ensures that no conflicts can arise.
Quoting the “Learning Center”:
Name(Optional)
An optional name for the individual component. For certain add-on componentssuch as scenery components, it is highly recommended to have a component name since it will show in the UI. For scenery components, their name will showin the Scenery Library.
Note: Since Prepar3D's configuration system does not support components of the same category with the same name, be wary of creating a name that is notunique or it will overwrite the identically named component. However, if the component is not given a name, a name collision cannot occur.
– Multiple references:
The scan checks if you have the same addon referenced more than
once, for example in two different add-on.xmls or in an XML and the
CFG at the same time. Strictly speaking, these conflicts don't
constitute an error, your simulator may be working just fine.
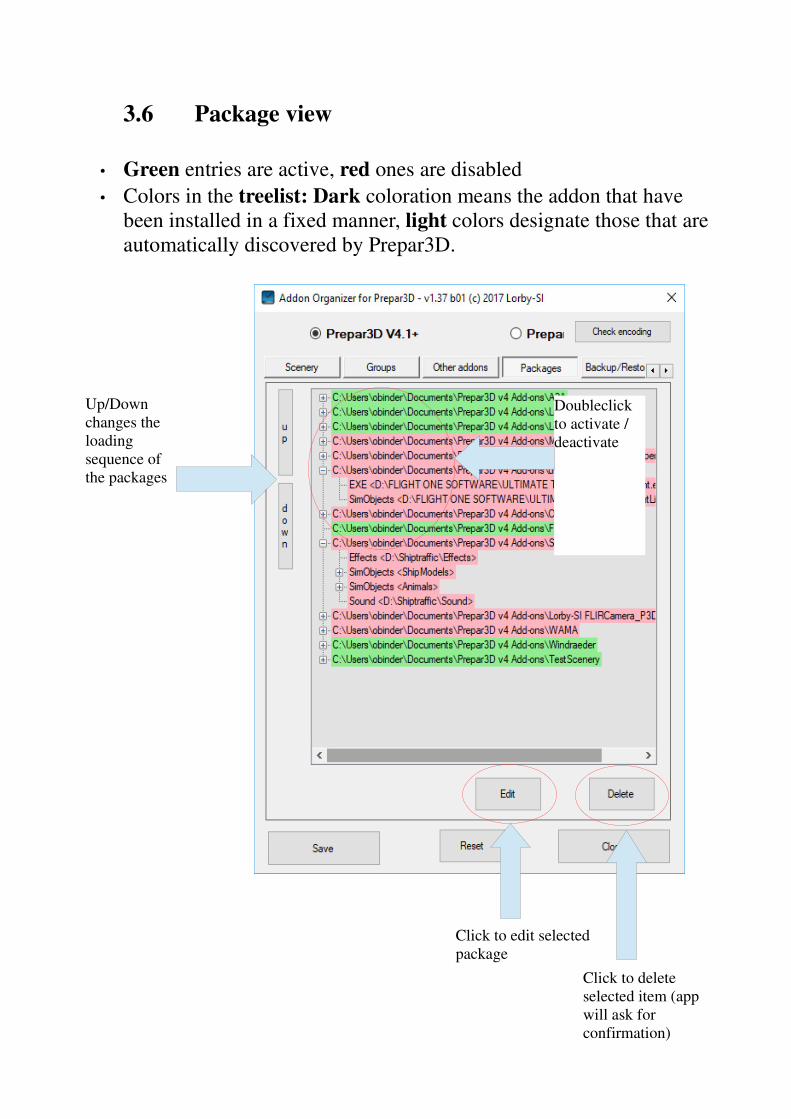
3.6 Package view
• Green entries are active, red ones are disabled
• Colors in the treelist: Dark coloration means the addon that have
been installed in a fixed manner, light colors designate those that are
automatically discovered by Prepar3D.
Doubleclick
to activate /
deactivate
Click to delete
selected item (app
will ask for
confirmation)
Click to edit selected
package
Up/Down
changes the
loading
sequence of
the packages
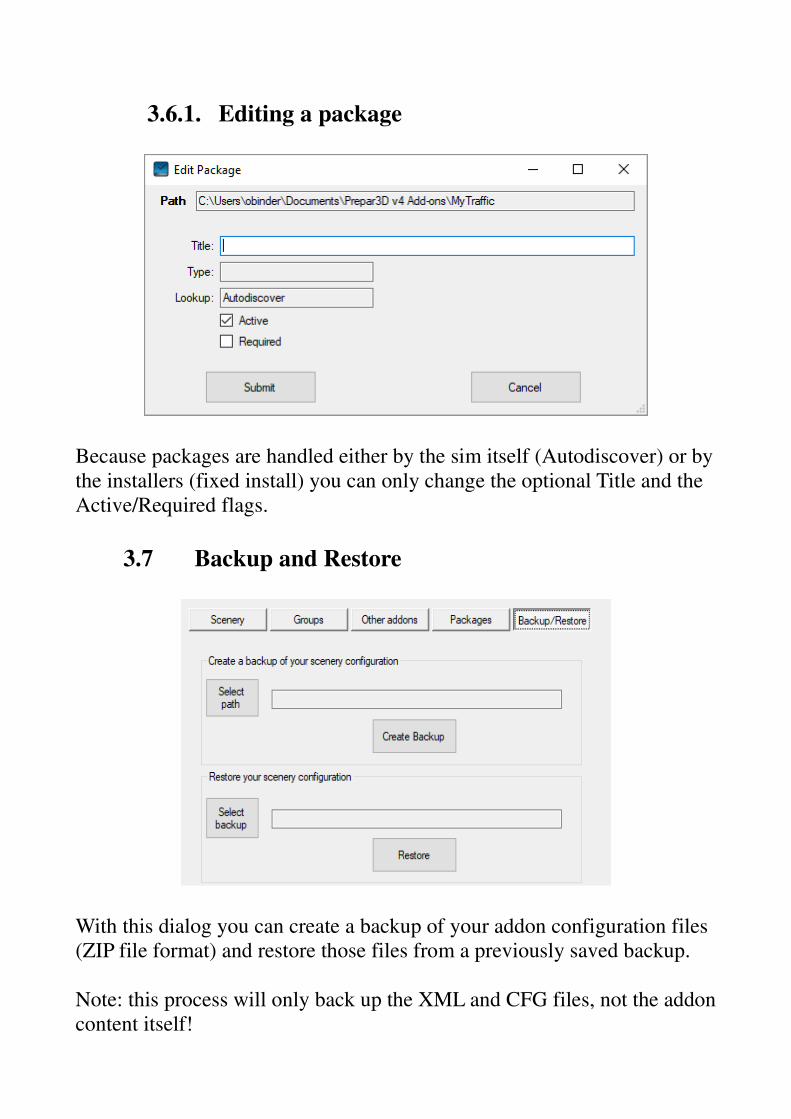
3.6.1. Editing a package
Because packages are handled either by the sim itself (Autodiscover) or by
the installers (fixed install) you can only change the optional Title and the
Active/Required flags.
3.7 Backup and Restore
With this dialog you can create a backup of your addon configuration files
(ZIP file format) and restore those files from a previously saved backup.
Note: this process will only back up the XML and CFG files, not the addon
content itself!

3.8 Importing a scenery.cfg
An additional option is to import the data from an existing scenery.cfg file.
Navigate to and select the file with the button “Select file”, then press
“Import”. The app will scan the scenery.cfg for valid content, and group all
that remains into a separate package named “Imported Scenery”.
Note: relative paths, that were referencing scenery in the root folder of
your old simulator, are not imported, and neither are duplicate entries or
invalid folders.
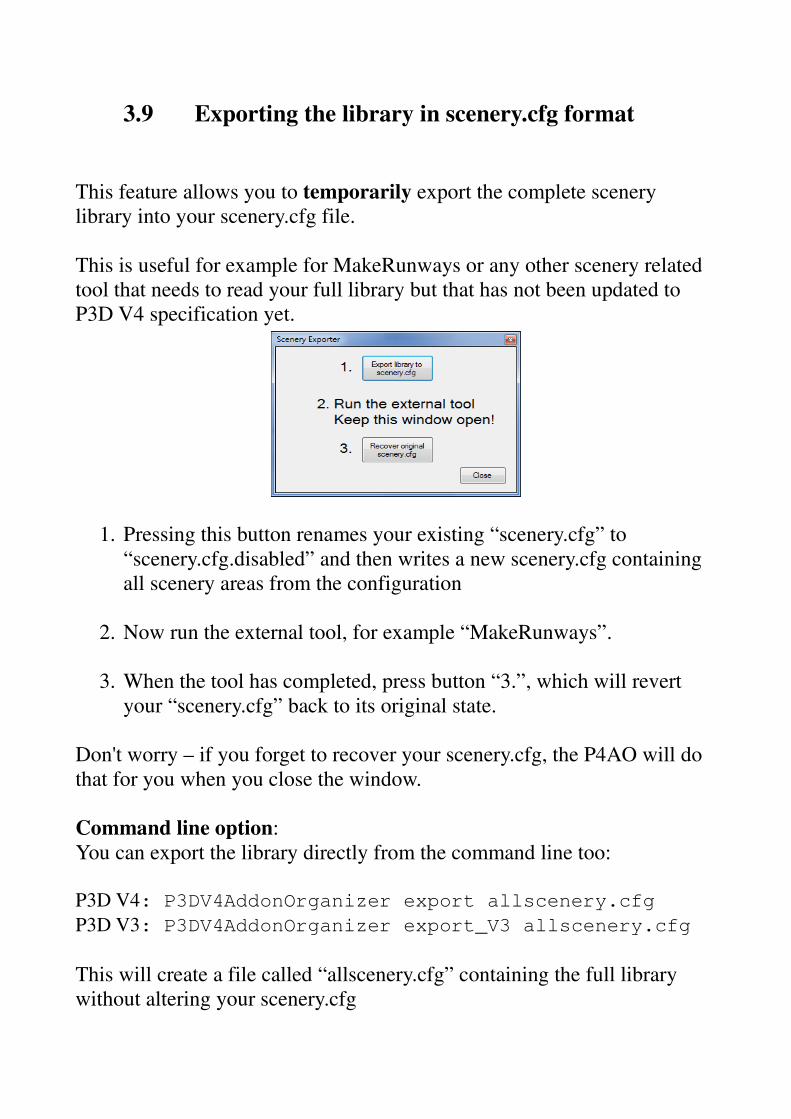
3.9 Exporting the library in scenery.cfg format
This feature allows you to temporarily export the complete scenery
library into your scenery.cfg file.
This is useful for example for MakeRunways or any other scenery related
tool that needs to read your full library but that has not been updated to
P3D V4 specification yet.
1. Pressing this button renames your existing “scenery.cfg” to
“scenery.cfg.disabled” and then writes a new scenery.cfg containing
all scenery areas from the configuration
2. Now run the external tool, for example “MakeRunways”.
3. When the tool has completed, press button “3.”, which will revert
your “scenery.cfg” back to its original state.
Don't worry – if you forget to recover your scenery.cfg, the P4AO will do
that for you when you close the window.
Command line option:
You can export the library directly from the command line too:
P3D V4: P3DV4AddonOrganizer export allscenery.cfg
P3D V3: P3DV4AddonOrganizer export_V3 allscenery.cfg
This will create a file called “allscenery.cfg” containing the full library
without altering your scenery.cfg
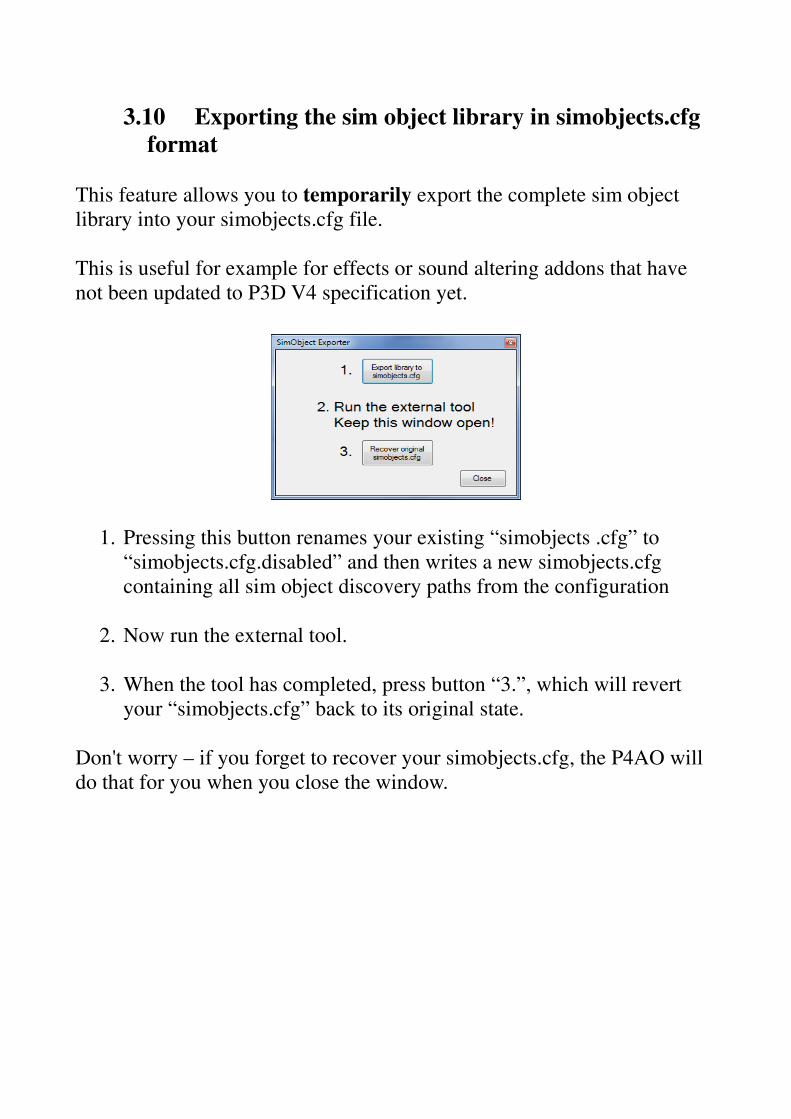
3.10 Exporting the sim object library in simobjects.cfg
format
This feature allows you to temporarily export the complete sim object
library into your simobjects.cfg file.
This is useful for example for effects or sound altering addons that have
not been updated to P3D V4 specification yet.
1. Pressing this button renames your existing “simobjects .cfg” to
“simobjects.cfg.disabled” and then writes a new simobjects.cfg
containing all sim object discovery paths from the configuration
2. Now run the external tool.
3. When the tool has completed, press button “3.”, which will revert
your “simobjects.cfg” back to its original state.
Don't worry – if you forget to recover your simobjects.cfg, the P4AO will
do that for you when you close the window.
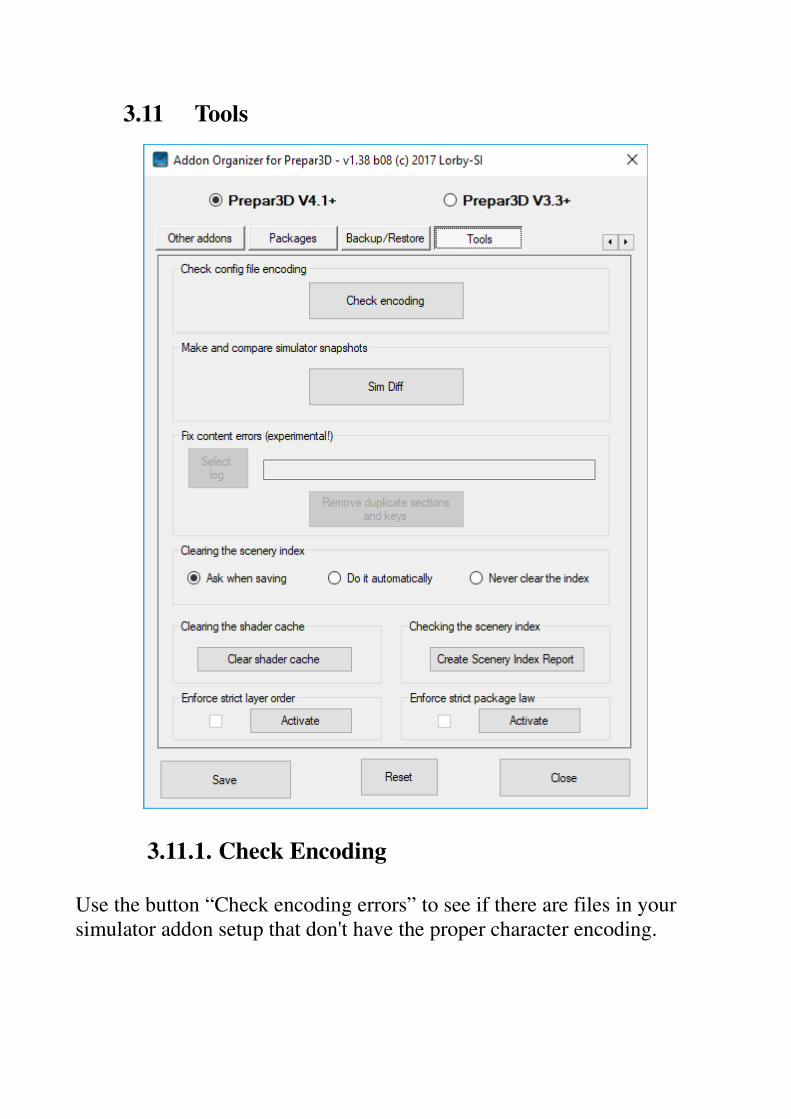
3.11 Tools
3.11.1. Check Encoding
Use the button “Check encoding errors” to see if there are files in your
simulator addon setup that don't have the proper character encoding.
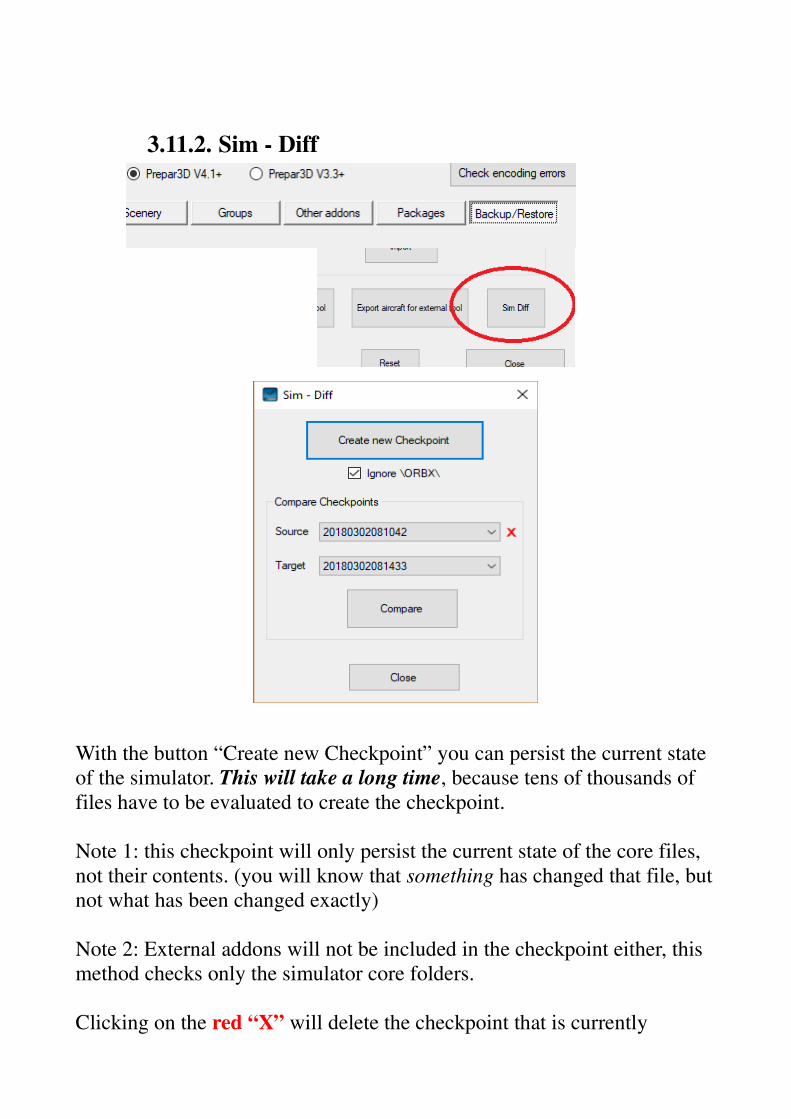
3.11.2. Sim - Diff
With the button “Create new Checkpoint” you can persist the current state
of the simulator. This will take a long time, because tens of thousands of
files have to be evaluated to create the checkpoint.
Note 1: this checkpoint will only persist the current state of the core files,
not their contents. (you will know that something has changed that file, but
not what has been changed exactly)
Note 2: External addons will not be included in the checkpoint either, this
method checks only the simulator core folders.
Clicking on the red “X” will delete the checkpoint that is currently
selected in the “Source” box.
The checkbox “Ignore \ORBX\” will ignore ORBX's subfolder of the main
simulator directory to speed up checkpointing.
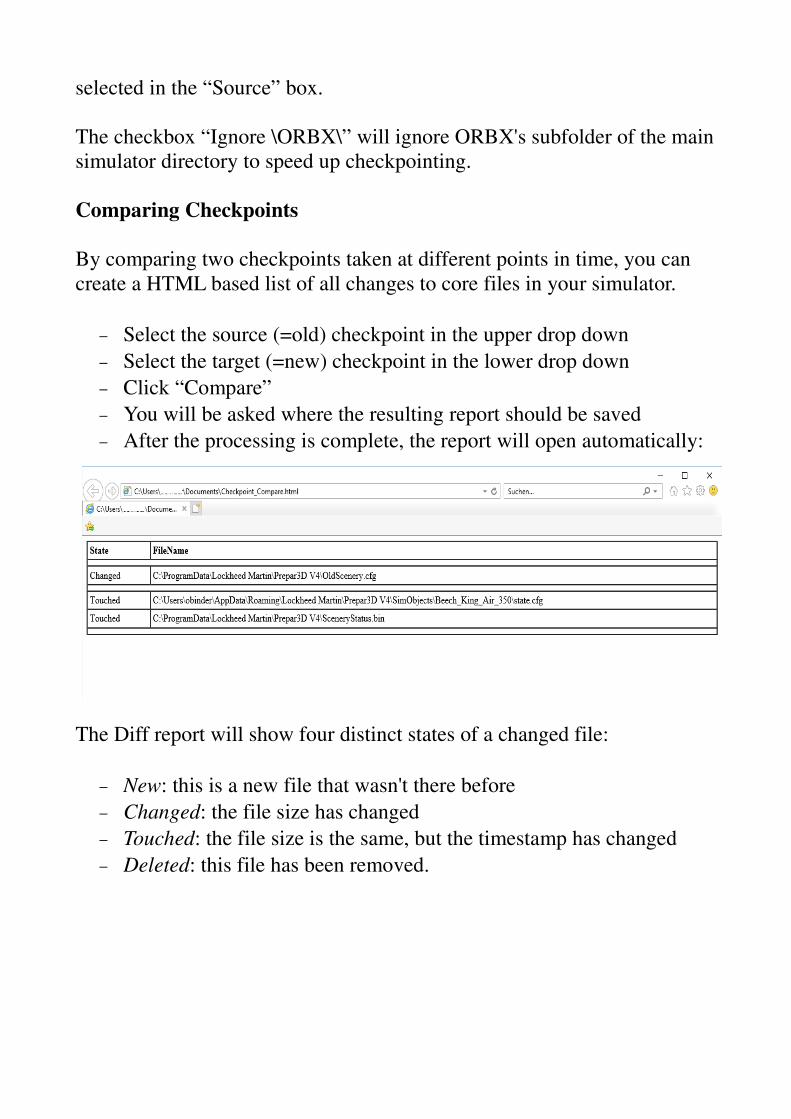
Comparing Checkpoints
By comparing two checkpoints taken at different points in time, you can
create a HTML based list of all changes to core files in your simulator.
– Select the source (=old) checkpoint in the upper drop down
– Select the target (=new) checkpoint in the lower drop down
– Click “Compare”
– You will be asked where the resulting report should be saved
– After the processing is complete, the report will open automatically:
The Diff report will show four distinct states of a changed file:
– New: this is a new file that wasn't there before
– Changed: the file size has changed
– Touched: the file size is the same, but the timestamp has changed
– Deleted: this file has been removed.
3.11.3. Fix content errors
This feature is currently on hold, pending answers to a couple of questions
that were asked on the P3D developers forum.
3.11.4. Clearing the scenery index
P4AO can clear the scenery index for you, so that it is rebuilt when you
start Prepar3D. Normally this should happen automatically when the
scenery changes, but in some cases there seem to be issues when the index
is not forced to rebuild.
– “Ask when saving”: will bring up a dialog that will ask you if you
want the index to be deleted every time that you press “Save”.
– “Do it automatically”: will clear the scenery index every time you
press “Save”.
– “Never clear the index”: will leave the scenery index alone.
The index will be rebuilt the next time that you start the simulator.
3.11.5. Clearing the shader cache
This button will clear the pre-compiled shaders of Prepar3D. They will be
rebuilt the next time that you start the simulator.
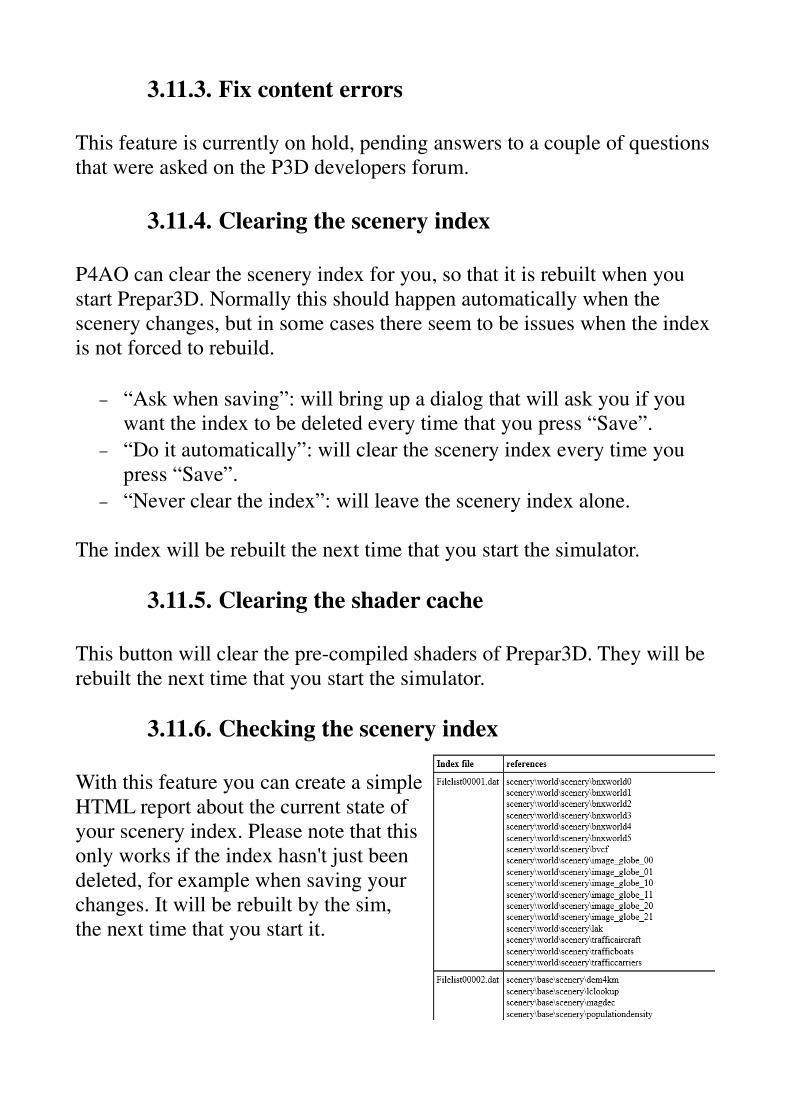
3.11.6. Checking the scenery index
With this feature you can create a simple
HTML report about the current state of
your scenery index. Please note that this
only works if the index hasn't just been
deleted, for example when saving your
changes. It will be rebuilt by the sim,
the next time that you start it.

3.12 Enforcing the “strict layer order”
There is a special setting on the “Tools” tab that will activate a very strict
logic when it comes to scenery layers in your library.
“Strict layer order” means, that no add-on.xml based scenery is
allowed to have a layer inside the numerical range of the scenery.cfg.
Reason for this feature:
There are scenery products on the market that rely on special methods as
to how the scenery loading is supposed to work in P3D. These products are
in trouble when you insert external scenery definitions layers between
those from the scenery.cfg.
Please only activate this option if you are told to do so by the
manufacturer of the scenery product! Make sure to check the scenery
library first so you don't destroy another scenery product by accident!
When the strict layer order is in effect, the following happens:
-> if offending sceneries are detected, P4AO will ask you if those scenery
definitions should be moved to the scenery.cfg automatically.
-> In all other operations it will lock you out of moving sceneries with the
up/down buttons into or out of the layer range of the scenery.cfg. But as
before, you always have the option to convert an add-on.xml based
scenery to the scenery.cfg at any time.
3.13 Enforcing the “strict package law”
There is a special setting on the “Tools” tab that will activate a very strict
logic for enabling / disabling scenery or “other addon” components
“Strict package law” means, that components inside and add-on.xml
cannot be enabled/disabled separately. Instead, the whole addon
package must be activated or deactivated.
Please activate this option if you are using multiple scenery
management tools at the same time!!
The method how P4AO activates/deactivates single addon components
generally speaking is not allowed. It will lead to problems with other
scenery management tools, except for the Scenery Library dialog in
Prepa3D – that dialog works correctly with P4AO.
Also check chapter 3.2 for more information.
4. Disclaimer
The Prepar3d V4 Addon Organizer is provided free of charge, for private
use only. All property rights remain with the author. You may not distribute
this package or parts of it. Disassembling, refactoring or changes of any
kind are prohibited.
Disclaimer of Warranties. The author disclaims to the fullest extent
authorized by law any and all other warranties, whether express or
implied, including, without limitation, any implied warranties of title,
non-infringement, merchantability or fitness for a particular purpose.
Without limitation of the foregoing, the author expressly does not warrant
that:
• the software will meet your requirements or expectations
• the software or the software content will be free of bugs, errors,
viruses or other defects;
• any results, output, or data provided through or generated by the
software will be accurate, up-to-date, complete or reliable;
• the software will be compatible with third party software;
• any errors in the software will be corrected or that any further
development will take place
• the software will not cause errors or damage to the computer system
it is installed on.
(c) 2017 Lorby-SI
Project Management - Development - Consulting
http://lorby-si.weebly.com