Embed Size (px)
Citation preview
PALLIATIVE CARE PROGRAM
Procedure for Subcutaneous Insertion, Removal, and
Medication Administration
Review: April 2017
APPROVED: [June 2015]
WRHA Palliative Care Program Programme de soins palliatifs, ORSW
Procedure for Subcutaneous Insertion, Removal and Medication Administration
PART I: PART II:
PART III: PART IV:
APPENDIX A: APPENDIX B:
Establishing a Subcutaneous Site Intermittent Subcutaneous Medication Administration Removal of a Subcutaneous Device Special Note Regarding Pediatric Patients and Insuflon™ Catheters Subcutaneous Medication Compatibility Subcutaneous Insertion Sites
PURPOSE: To provide an evidence-based, standard approach to establishing a subcutaneous route for medication in non-emergent situations in the home (when other routes of administration are contraindicated or unavailable.) For many palliative patients, continued use of the oral route for medication administration will not be possible at some point during the course of illness. Medication administration will require use of another route. The subcutaneous route is the preferred route of administration for palliative care patients, for the following reasons:
1. Complications of use of this route (including redness, tenderness or inflammation at the insertion site, leaking needles and catheter malfunction) are rarely reported (Letizia, Shenk & Jones, 2000).
2. A small-gauge needle is only required at the time the subcutaneous site is established, reducing the risk of needle-stick injuries, particularly with intermittent administration of subcutaneous medications (Dawkins, Britton, Johnson, Higgins & Dean, 2000).
3. Infusions can be started and stopped with little risk to the patient of thrombosis or major bleeding (Steiner & Bruera, 1998).
4. The subcutaneous route is relatively easy to manage in the home setting (Steiner & Bruera, 1998).
Intramuscular routes of administration are not appropriate as they are painful and may be unreliable in terms of absorption.
Procedure for Subcutaneous Insertion, Removal and Medication Administration PROCEDURES REVISED MARCH 2015 Page 2
WRHA Palliative Care Program Programme de soins palliatifs, ORSW
INDICATIONS: Common indications for use of the subcutaneous route of administration of medication and / or fluids include:
1. Circumstances that preclude or compromise oral administration that may include:
a. Dysphagia / difficulty swallowing – due to neuromuscular weakness or mechanical obstruction
b. Decreased level of consciousness / coma c. Intestinal obstruction d. Persistent nausea and / or vomiting
2. Symptom control requiring rapid and reliable medication administration and absorption.
PROCEDURE: PART I: Establishing a Subcutaneous Site:
A physician’s order is required prior to establishing a subcutaneous line and prior to administering medications / fluids via the subcutaneous line. The subcutaneous site must be changed every seven (7) days or sooner, if necessary. When changing sites, the chosen sites should be rotated to avoid using the same site repeatedly. 1. Obtain necessary equipment and supplies including:
a. 1 – BD Saf-T-Intima Safety System 24 gauge winged Subcut infusion device b. 2 – Appropriate transparent moisture-responsive dressings c. 1 – Injection Cap / End Cap d. 1 Single-use Syringe prefilled with 0.9% Sodium Chloride (Normal Saline) for
injection e. 1 – Chlorhexidine 2% with 70% alcohol swab stick f. Clean, disposable gloves g. Sharps Disposal Container h. “SUBCUT LINE” Identification Label
2. Perform hand hygiene.
3. Explain procedure and expected outcomes to patient.
4. Select an appropriate subcutaneous insertion site (see Appendix B):
Preferred Injection sites include: • Upper arms • Abdomen • Anterior aspect of thighs • Above Scapula
Procedure for Subcutaneous Insertion, Removal and Medication Administration PROCEDURES REVISED MARCH 2015 Page 3
WRHA Palliative Care Program Programme de soins palliatifs, ORSW
Site should be: • Easily accessible • Free of lesions • Away from large vessels, joints and bones • Away from edematous tissue that may alter medication / fluid absorption
5. Don clean gloves.
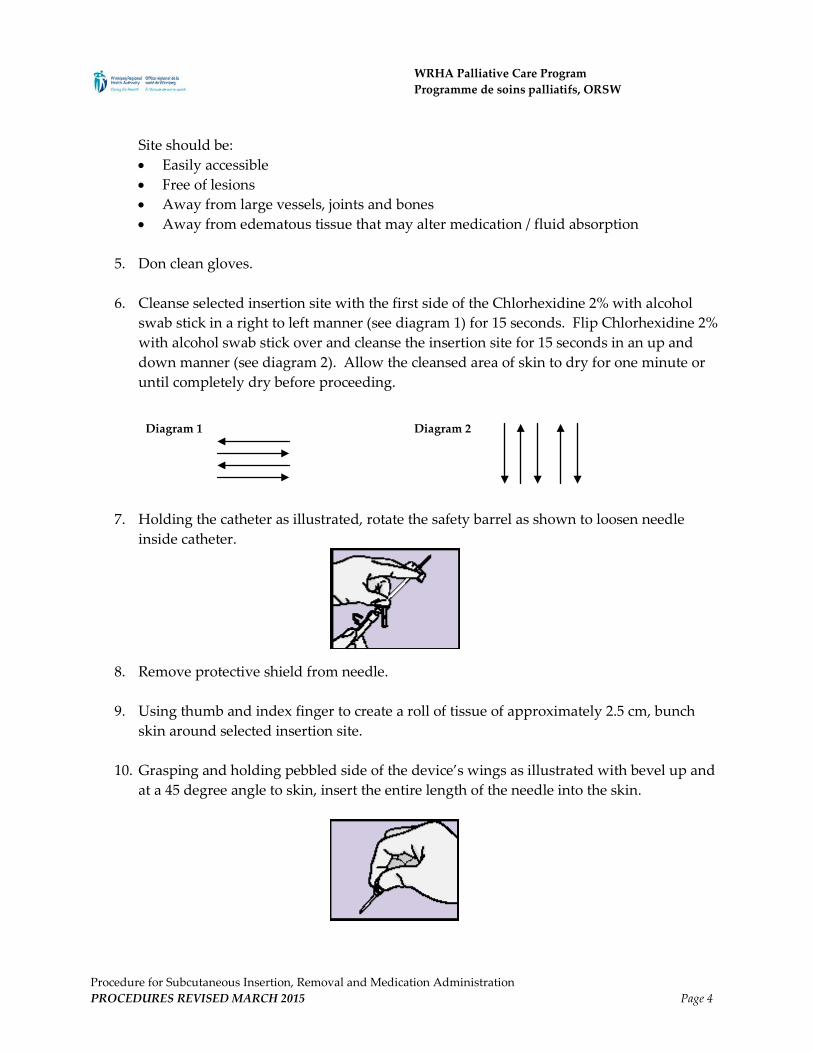
6. Cleanse selected insertion site with the first side of the Chlorhexidine 2% with alcohol
swab stick in a right to left manner (see diagram 1) for 15 seconds. Flip Chlorhexidine 2% with alcohol swab stick over and cleanse the insertion site for 15 seconds in an up and down manner (see diagram 2). Allow the cleansed area of skin to dry for one minute or until completely dry before proceeding.
Diagram 1
Diagram 2
7. Holding the catheter as illustrated, rotate the safety barrel as shown to loosen needle
inside catheter.
8. Remove protective shield from needle.
9. Using thumb and index finger to create a roll of tissue of approximately 2.5 cm, bunch skin around selected insertion site.
10. Grasping and holding pebbled side of the device’s wings as illustrated with bevel up and
at a 45 degree angle to skin, insert the entire length of the needle into the skin.
Procedure for Subcutaneous Insertion, Removal and Medication Administration PROCEDURES REVISED MARCH 2015 Page 4

WRHA Palliative Care Program Programme de soins palliatifs, ORSW
11. If blood appears in the tubing behind wings, remove and discard the device, select new injection site and start over with new device.
12. Stabilize catheter wings, grasp safety barrel and pulling in a straight continuous motion, remove needle. Safety barrel will come off, exposing the injection cap.
13. Immediately dispose of the safety barrel containing the contaminated needle into an appropriate sharps container.
14. Remove the existing injection cap with a gentle twisting motion and attach injection / end cap.
15. Insert the prefilled syringe into the injection / end cap and gently draw plunger back to assess for blood return. • If blood appears in the tubing, remove and discard the injection device, select a new
injection site and start over. • If no blood appears in the tubing, instill 0.5 ml Normal Saline to flush the tubing.
16. Remove the syringe from the injection cap and discard.
17. Cover the insertion site, hub and wings with a transparent moisture-responsive dressing.
18. Loop excess tubing and secure with a transparent moisture-responsive dressing to
prevent tension and possible dislodgement of the infusion device.
19. Nurse who established the subcutaneous site writes the date of insertion, their name and signature on the green line label.
20. Complete the required documentation.
Procedure for Subcutaneous Insertion, Removal and Medication Administration PROCEDURES REVISED MARCH 2015 Page 5
WRHA Palliative Care Program Programme de soins palliatifs, ORSW
Part II: Intermittent Subcutaneous Medication Administration A physician’s order is required prior to administering medication / fluids via the subcutaneous line. Note: If medications being administered are not compatible, more than one site will be required.
(See Appendix A) Ensure that each site is clearly labeled as to which medication is being administered through each site.
1. Determine whether there is an existing subcutaneous site, or whether one must be established. If a new site needs to be established, refer to Part I of this procedure.
2. Obtain necessary equipment and supplies including:
a. 3 – Alcohol Swabs b. Medication as ordered c. 1 – Single-use Blunt Fill Needle for drawing medication(s) d. 1 – Single-use Syringe for medication e. 0.9% Sodium Chloride (Normal Saline) for injection in a single-use prefilled
syringe
3. Perform hand hygiene.
4. Explain procedure and expected outcomes to patient and family.
5. Following the physician’s orders, draw up medication in a syringe and attach a syringe cap if not administering medication immediately.
6. Assess the insertion site pre and post-medication administration for: pain / tenderness,
inflammation, bruising, edema, hardness, heat, exudates / leaking, discharge, itching, burning, unresolved blanching, necrosis and cannula displacement. If any of these signs and symptoms are present, change the injection site immediately.
7. Cleanse the injection / end cap using 2 – 3 alcohol swabs for a total of 30 seconds.
Procedure for Subcutaneous Insertion, Removal and Medication Administration PROCEDURES REVISED MARCH 2015 Page 6
WRHA Palliative Care Program Programme de soins palliatifs, ORSW
8. Insert the medication syringe into the injection / end cap. • To help optimize medication absorption and patient comfort, the maximum amount of
medication to be administered at one time (excluding flush) is 2 mL. • If the volume of medication exceeds 2 mL:
o Attempt to obtain a more concentrated preparation of the ordered medication to ensure that the maximum amount of medication administered does not exceed 2 ml. If this is not possible, then:
o Administer 2 ml of the ordered medication, wait 15-20 minutes. If the medication has not absorbed after this time (i.e. presence of palpable “bump” indicating incomplete absorption), decide if a second site is required for future doses and / or wait another 15-20 minutes and then administer the remainder of the medication (no more than 2 ml at one time).
9. Instill the 0.5 ml Normal Saline flush.
10. Complete required documentation, including any adverse effects or difficulties
encountered.
PART III: Removal of a Subcutaneous Injection Device
1. Obtain necessary equipment and supplies including: a. Clean Gloves b. 1 – 2x2 Gauze Pad c. Adhesive Bandage prn
2. Perform hand hygiene.
3. Explain procedure and expected outcomes to patient and family.
4. Don clean gloves.
5. Remove green “SUBCUT LINE” label and transparent dressings from the existing subcut
site.
6. Having 2x2 gauze dressing readily accessible, pull the subcutaneous injection device out parallel to the skin.
7. Using 2x2 gauze apply gentle pressure over the site.
8. The insertion site may be left open to air or covered by an adhesive bandage, if required.
9. Complete required documentation in patient’s medical record.
Procedure for Subcutaneous Insertion, Removal and Medication Administration PROCEDURES REVISED MARCH 2015 Page 7

WRHA Palliative Care Program Programme de soins palliatifs, ORSW
PART IV: Special Note Regarding Pediatric Patients
In pediatric patients, consider obtaining an order for a topical anesthetic to be applied prior to inserting the subcutaneous line. Medications such as EMLA® cream can be applied an hour prior to the procedure, but the site should be cleaned and disinfected just prior to inserting the cathalon. The procedure for inserting a subcutaneous line and administering medications in the pediatric population is the same as in the general procedure for the adult population as above, unless using an Insuflon® cathalon (see procedures below). If available, an Insuflon® cathalon should only be inserted by members of the Pediatric Palliative Care Team.
A. For pediatric patients, the smallest available gauge of intravenous butterfly cathalon (e.g. 25 G, Saf-T-Intima™) should be used to initiate a subcutaneous line, following the procedure described above. It is suggested that there be no extension tubing between the hub of the cathalon and the injection cap to ensure that all medications clear the line because of the low volumes of medications used for pediatric patients.
• If this type of subcutaneous line is initiated, all of the procedures outlined in Parts I –
V are applicable in the pediatric patient population. • A saline flush of 0.5 ml is required after each medication administration.
B. For pediatric patients under one year of age (and other special patient circumstances
approved by the WRHA Palliative Care Program, Medical Director, Program Director or their delegates), an Insuflon® cannula may be considered for the subcutaneous administration of medication (if available in the care setting where care is being provided). Rationale for using the Insuflon® cannula in infants and other special circumstances include: • the shorter cannula is flush with the skin; • the length of the soft flexible cannula is short and is only 25 G in diameter; • the self-sealing membrane can be used to access the device for at least 75 injections; • the cannula is easy to insert; • the Insuflon® does not require flushing after insertion or following medication
administration (as a result however, only medications that are known to be compatible may be instilled through a single Insuflon® otherwise another site must be initiated.)
Procedure for Subcutaneous Insertion, Removal and Medication Administration PROCEDURES REVISED MARCH 2015 Page 8
WRHA Palliative Care Program Programme de soins palliatifs, ORSW
Disadvantages for using the Insuflon®: • The injection cap is only 1 – 2 mm in diameter so can be awkward to access. • The use of this cathalon requires the use of a short, small bore needle (27-31 G; no
more than 3/8”) on a syringe (i.e. insulin-type syringe) rather than the Interlink system for injecting medications.
• The needle MUST be inserted at a specific length of between 1/8” and 3/8” to be safe and effective.
• It is not available in all care settings.
Procedure for Insertion of Insuflon® Catheter: A physician’s order is required prior to establishing a subcutaneous route and prior to administering medications / fluids via the Insuflon®.
1. Obtain necessary equipment and supplies including: a. 1 - Insuflon® Catheter with accompanying adhesive b. 1 – Chlorhexidine 2% with alcohol swab stick c. Clean, disposable gloves d. Sharps Disposal Container
2. Perform hand hygiene.
3. Explain procedure and expected out comes to patient and / or family.
4. Select an appropriate subcut insertion site (see Appendix A):
Preferred injection sites include: • Upper arms • Abdomen • Anterior aspect of thighs
Site should be: • Easily accessible • Free of lesions • Away from large vessels, joints and bones • Away from edematous tissue that may alter medication / fluid absorption
5. Don clean gloves.
Procedure for Subcutaneous Insertion, Removal and Medication Administration PROCEDURES REVISED MARCH 2015 Page 9
WRHA Palliative Care Program Programme de soins palliatifs, ORSW
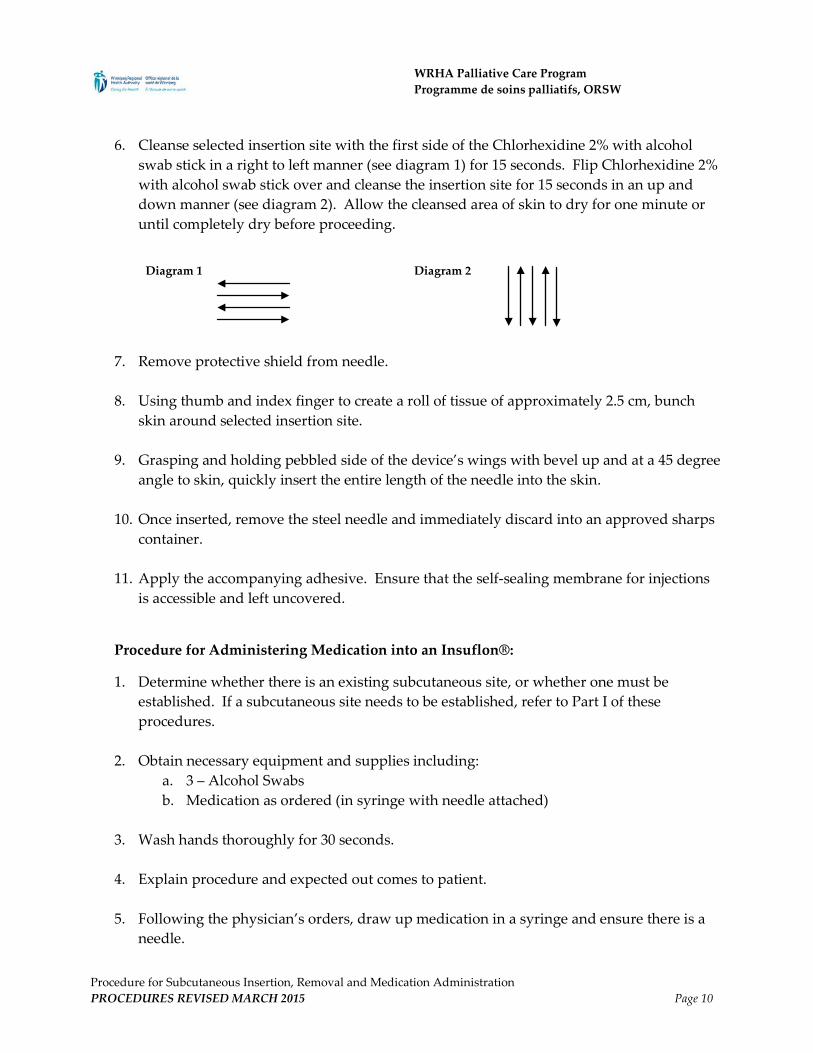
6. Cleanse selected insertion site with the first side of the Chlorhexidine 2% with alcohol swab stick in a right to left manner (see diagram 1) for 15 seconds. Flip Chlorhexidine 2% with alcohol swab stick over and cleanse the insertion site for 15 seconds in an up and down manner (see diagram 2). Allow the cleansed area of skin to dry for one minute or until completely dry before proceeding.
Diagram 1
Diagram 2
7. Remove protective shield from needle.
8. Using thumb and index finger to create a roll of tissue of approximately 2.5 cm, bunch
skin around selected insertion site.
9. Grasping and holding pebbled side of the device’s wings with bevel up and at a 45 degree angle to skin, quickly insert the entire length of the needle into the skin.
10. Once inserted, remove the steel needle and immediately discard into an approved sharps
container.
11. Apply the accompanying adhesive. Ensure that the self-sealing membrane for injections is accessible and left uncovered.
Procedure for Administering Medication into an Insuflon®:
1. Determine whether there is an existing subcutaneous site, or whether one must be established. If a subcutaneous site needs to be established, refer to Part I of these procedures.
2. Obtain necessary equipment and supplies including: a. 3 – Alcohol Swabs b. Medication as ordered (in syringe with needle attached)
3. Wash hands thoroughly for 30 seconds.
4. Explain procedure and expected out comes to patient.
5. Following the physician’s orders, draw up medication in a syringe and ensure there is a
needle.
Procedure for Subcutaneous Insertion, Removal and Medication Administration PROCEDURES REVISED MARCH 2015 Page 10
WRHA Palliative Care Program Programme de soins palliatifs, ORSW
6. Assess the subcut insertion site pre and post medication administration for: pain /
tenderness, inflammation, bruising, edema, hardness, heat, exudates / leaking, discharge, itching, burning, unresolved blanching, necrosis and cannula displacement. Change the injection site immediately if any of these signs and symptoms are present.
7. Cleanse the self-sealing membrane with two to three alcohol swabs for a total of 30 seconds.
8. Access the self-sealing membrane by inserting the needle and rotating gently as you
advance it. Insert the needle to a maximum of half way (the needle must penetrate the membrane by at least 1/8” (3mm) and not more than 3/8” (10mm). DO NOT USE EXCESSIVE FORCE.
9. Push the syringe plunger to inject the medication.
10. Remove the needle from the hub, while stabilizing the Insuflon® hub with the other hand;
dispose of the needle in the Sharps Disposal Container.
11. Wash your hands.
12. Complete required documentation, including any adverse effects or difficulties encountered.
Removal of any Subcutaneous Catheter: 1. Don gloves 2. Explain procedure to the patient and / or their family.
3. Loosen the entire dressing gently, beginning at the catheter end of the foam pad.
4. Placing gauze over insertion site with one hand gently pull the cathalon out parallel to the
skin.
5. Apply gentle pressure for a few seconds.
6. If there is remaining adhesive please use appropriate remover for same.
7. Apply Band-Aid if needed, although scant or no bleeding is anticipated.
8. Complete required documentation, including any adverse effects or difficulties encountered.
Procedure for Subcutaneous Insertion, Removal and Medication Administration PROCEDURES REVISED MARCH 2015 Page 11
WRHA Palliative Care Program Programme de soins palliatifs, ORSW
Appendix A
Subcutaneous Medication Compatibility Information
A compatibility chart for subcutaneous medications is not included as part of this policy. Since changes are continuously made to the compatibility chart, updated compatibility charts will be handed out to the Palliative Care Community Registered Nursing Team at their monthly meetings. The compatibility chart will contain the date of the last revision. If you do not have a copy of this chart please contact the Palliative Care Coordinator in your area or the Palliative Care CRN to obtain a copy. The chart will be available on the WRHA Palliative Care Program Regional Shared Drive. When administering more than one medication, ensure medications to be administered are compatible with one another. If the medications are incompatible, a separate subcut site for each incompatible medication must be set up. Each site should be clearly labeled as to which medication is to be administered in that site. Use the compatibility chart as the guide for determining medication compatibility. Compatible drugs can be given together (one given in the line immediately after the other, with no flush needed between the medications), as long as the total volume does not exceed 2 ml (excluding Normal Saline Flush).
Procedure for Subcutaneous Insertion, Removal and Medication Administration PROCEDURES REVISED MARCH 2015 Page 12
WRHA Palliative Care Program Programme de soins palliatifs, ORSW
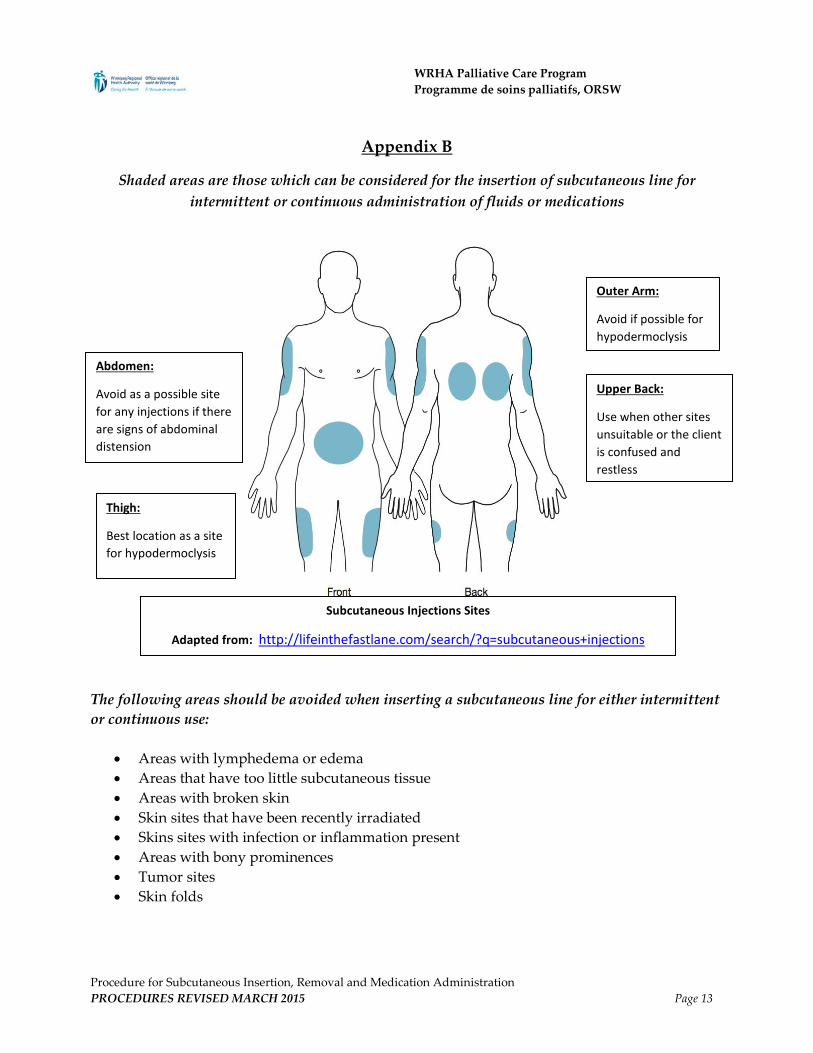
Appendix B
Shaded areas are those which can be considered for the insertion of subcutaneous line for intermittent or continuous administration of fluids or medications
The following areas should be avoided when inserting a subcutaneous line for either intermittent or continuous use:
• Areas with lymphedema or edema • Areas that have too little subcutaneous tissue • Areas with broken skin • Skin sites that have been recently irradiated • Skins sites with infection or inflammation present • Areas with bony prominences • Tumor sites • Skin folds
Outer Arm:
Avoid if possible for hypodermoclysis
Thigh:
Best location as a site for hypodermoclysis
Abdomen:
Avoid as a possible site for any injections if there are signs of abdominal distension
Upper Back:
Use when other sites unsuitable or the client is confused and restless
Subcutaneous Injections Sites
Adapted from: http://lifeinthefastlane.com/search/?q=subcutaneous+injections
Procedure for Subcutaneous Insertion, Removal and Medication Administration PROCEDURES REVISED MARCH 2015 Page 13
WRHA Palliative Care Program Programme de soins palliatifs, ORSW
References
BC Children’s Hospital Child and Youth Health Policy: Indwelling subcutaneous catheter (Insuflon®) insertion, medication administration and removal, CM.03.26, revised February 2013.
BC Children’s Hospital Child and Youth Health Policy: Continuous subcutaneous medication or fluid infusion,
CM.03.09, revised February 2013. Canuck Place Policy: Indwelling subcutaneous catheters: intermittent medication administration; C.PT. 04, revised July
2012. Canuck Place Policy: Indwelling subcutaneous catheters: continuous, C. PT.05, revised August 2013. O’Grady, N.P. et al (2011). Guidelines for the prevention of intravascular catheter-related infections, 2011; Centers for
Disease Control (CDC) Prevention. Online source from http://www.cdc.gov/hicpac/pdf/guidelines/bsi-guidelines-2011.pdf
Children’s Hospitals and Clinics of Minnesota (no date). Insuflon ® (indwelling subcutaneous catheter) Patient/Family
Education sheet. Dawkins, L., Britton, D., Johnson, I., Higgins, B., & Dean, T. (2000). A randomized trial of winged Vialon cannulae and
metal butterfly needles. International Journal of Palliative Nursing, 6(3), 110-116. Embleton, L. & Harlos, M. (2010). Procedure for Subcutaneous Insertion, Removal, Medication Administration and Fluid
Administration for Community Palliative Care Patients. Winnipeg Regional Health Authority Palliative Care Program; Unpublished document at www.palliative.info.
Khan, M. & Younger, G. (2007). Promoting Safe Administration of Subcutaneous Infusions. Nursing Standards. 21, 31, 50-56. Letizia, M., Shenk, J., & Jones, T. D. (2000). Intermittent subcutaneous injections for symptom control in hospice care: A
retrospective investigation. The Hospice Journal, 15(2): 1-11. Mitten, T. (2001). Subcutaneous drug infusions: A review of problems and solutions. International Journal of Palliative
Nursing, 7(2), 75-85. Perry, A. & Potter, P. (2010). Clinical Nursing Skills & Techniques. (7th ed.). St. Louis: Mosby Elsevier Registered Nurses’ Association of Ontario. (2005; revised 2008). Care and Maintenance to Reduce Vascular Access
Complications. Toronto, Canada: Registered Nurses’ Association of Ontario. Steiner, N. & Bruera, E. (1998). Methods of hydration in palliative care patients. Journal of Palliative Care, 14(2):6-13 The Royal Children’s Hospital Melbourne Clinical Nursing Guideline: Insuflon® insertion procedure, online source
from http://www.rch.org.au/rchcpg/hospital_clinical_guideline_index/Indwelling_subcutaneous_catheter_Insuflon_management/, last updated January 2013.
Procedure for Subcutaneous Insertion, Removal and Medication Administration PROCEDURES REVISED MARCH 2015 Page 14
![Fu's Subcutaneous Needling, a Modern Style of Ancient ... › pdfs › 43314 › InTech-Fu_s_subcutaneo… · Since the 1940s, dry Needling [8-14], which refers to the insertion of](https://img.pdfslide.net/doc/110x75/5f0d41007e708231d4396e91/fus-subcutaneous-needling-a-modern-style-of-ancient-a-pdfs-a-43314-a.jpg)