Embed Size (px)
Citation preview

ProgressBook GradeBook Teacher Guide: Getting Started

© 2015 Software Answers, Inc. All Rights Reserved. All other company and product names included in this material may be Trademarks, Registered Trademarks or Service Marks of the companies with which they are associated. Software Answers, Inc. reserves the right at any time and without notice to change these materials or any of the functions, features or specifications of any of the software described herein.
ProgressBook GradeBook Teacher Guide: Getting Started(This document is current for v15.0.0 or later.)
Software Answers, Inc. www.progressbook.com6770 Snowville Rd., Suite 200 www.software-answers.comBrecksville, Ohio 44141

Change Log
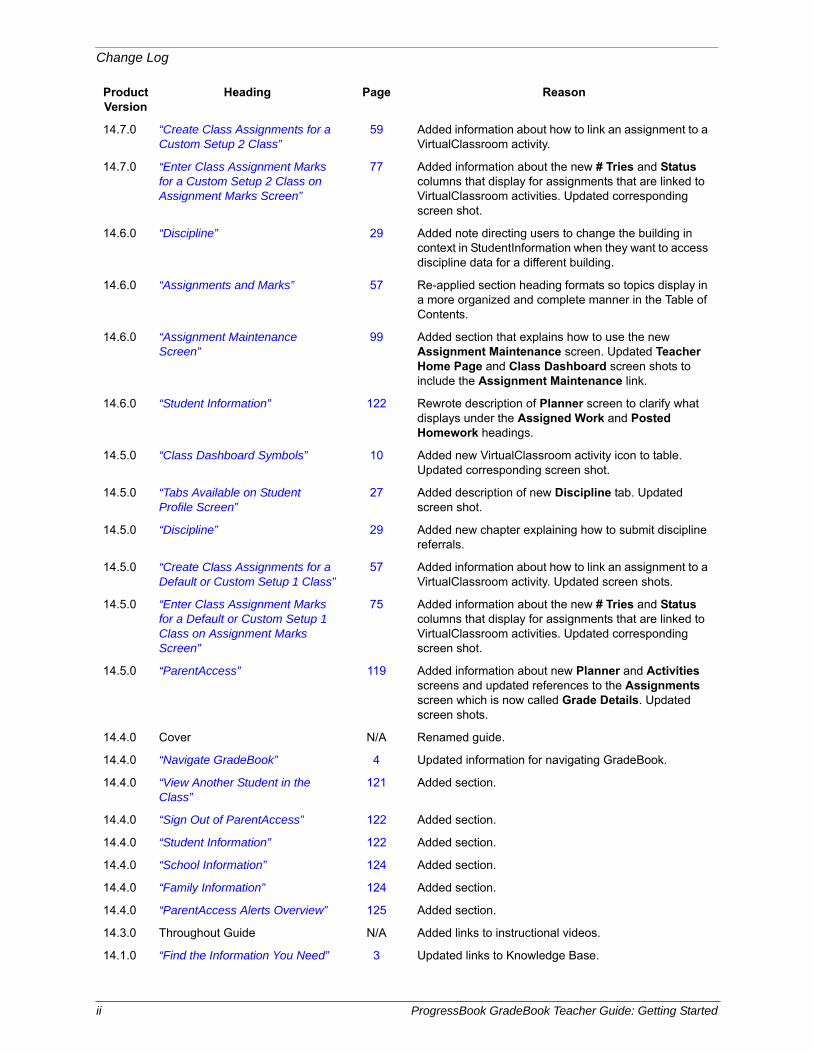
The following Change Log explains by Product Version, Heading, Page and Reason where changes have been made in the ProgressBook GradeBook Teacher Guide: Getting Started.
ProductVersion
Heading Page Reason
15.0.0 Throughout Guide N/A Removed all references to integration with student information systems other than ProgressBook StudentInformation.
15.0.0 Throughout Guide N/A Updated Teacher Home Page and Class Dashboard screen shots to show new Activity Builder and View Active Discussions links and new Student Search area.
15.0.0 “Teacher Home Page” 5 Updated introduction to include new Student Search feature.
15.0.0 “Search for a Student” 8 Added section.
15.0.0 “Class Dashboard Symbols” 10 Added new VirtualClassroom discussion icon to table. Updated corresponding screen shot.
15.0.0 “Student Profile Information” 27 Added description of the new Report Cards tab to the Tabs Available on Student Profile Screen table. Updated descriptions to include that primary contact information now displays on the Personal tab and all contact information from StudentInformation now displays on the Contacts tab. Updated screen shot.
15.0.0 “Student Progress Reports” 114 Updated procedures to indicate that you can now double-click class or student names to select them for running these reports. Updated relevant screen shots.
15.0.0 “ParentAccess” 119 Revised screen shots to reflect updated user interface.
15.0.0 “Student Information” 122 Updated description of Daily Attendance screen to include new Attendance Totals. Updated description of Report Card screen to include new options to view a PDF version of the most recent report card and any past, permanently stored report cards.
15.0.0 “Family Information” 124 Added information about the new Student Profile link. Updated screen shot and procedure for changing a student’s password to reflect new screen names.
14.8.0 “Enter Interim/Report Card Grades by Student”
101 Updated note in step 12 of the procedure to include rounding down to a maximum grade threshold.
14.8.0 “Enter Interim/Report Card Grades by Class”
103 Updated note in step 12 of the procedure to include rounding down to a maximum grade threshold.
14.7.0 “Send Class Notifications” 25 Updated procedure to include the option of using the text editor to format notifications and added that you now receive a copy of notifications you send. Updated screen shot.
14.7.0 “Assignments and Marks” 57 Updated screen shots for Custom Setup 2 assignments to include new VirtualClassroom Activity? check box.
ProgressBook GradeBook Teacher Guide: Getting Started i
Change Log
14.7.0 “Create Class Assignments for a Custom Setup 2 Class”
59 Added information about how to link an assignment to a VirtualClassroom activity.
14.7.0 “Enter Class Assignment Marks for a Custom Setup 2 Class on Assignment Marks Screen”
77 Added information about the new # Tries and Status columns that display for assignments that are linked to VirtualClassroom activities. Updated corresponding screen shot.
14.6.0 “Discipline” 29 Added note directing users to change the building in context in StudentInformation when they want to access discipline data for a different building.
14.6.0 “Assignments and Marks” 57 Re-applied section heading formats so topics display in a more organized and complete manner in the Table of Contents.
14.6.0 “Assignment Maintenance Screen”
99 Added section that explains how to use the new Assignment Maintenance screen. Updated Teacher Home Page and Class Dashboard screen shots to include the Assignment Maintenance link.
14.6.0 “Student Information” 122 Rewrote description of Planner screen to clarify what displays under the Assigned Work and Posted Homework headings.
14.5.0 “Class Dashboard Symbols” 10 Added new VirtualClassroom activity icon to table. Updated corresponding screen shot.
14.5.0 “Tabs Available on Student Profile Screen”
27 Added description of new Discipline tab. Updated screen shot.
14.5.0 “Discipline” 29 Added new chapter explaining how to submit discipline referrals.
14.5.0 “Create Class Assignments for a Default or Custom Setup 1 Class”
57 Added information about how to link an assignment to a VirtualClassroom activity. Updated screen shots.
14.5.0 “Enter Class Assignment Marks for a Default or Custom Setup 1 Class on Assignment Marks Screen”
75 Added information about the new # Tries and Status columns that display for assignments that are linked to VirtualClassroom activities. Updated corresponding screen shot.
14.5.0 “ParentAccess” 119 Added information about new Planner and Activities screens and updated references to the Assignments screen which is now called Grade Details. Updated screen shots.
14.4.0 Cover N/A Renamed guide.
14.4.0 “Navigate GradeBook” 4 Updated information for navigating GradeBook.
14.4.0 “View Another Student in the Class”
121 Added section.
14.4.0 “Sign Out of ParentAccess” 122 Added section.
14.4.0 “Student Information” 122 Added section.
14.4.0 “School Information” 124 Added section.
14.4.0 “Family Information” 124 Added section.
14.4.0 “ParentAccess Alerts Overview” 125 Added section.
14.3.0 Throughout Guide N/A Added links to instructional videos.
14.1.0 “Find the Information You Need” 3 Updated links to Knowledge Base.
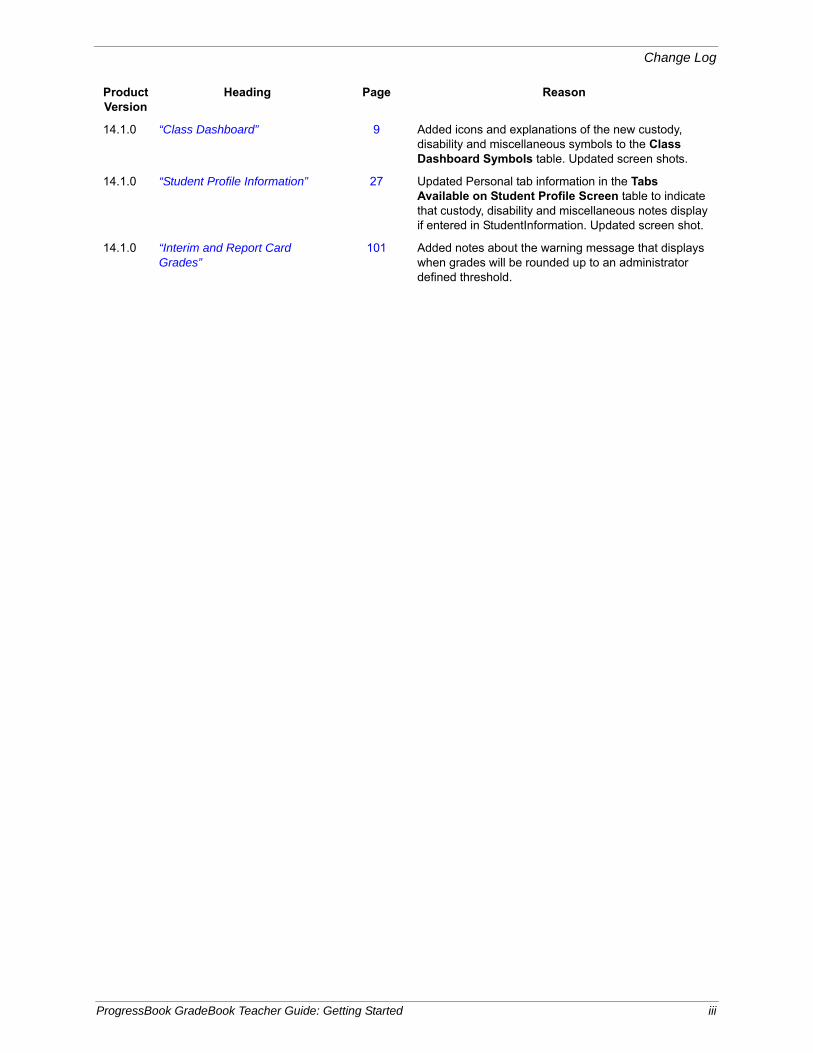
ProductVersion
Heading Page Reason
ii ProgressBook GradeBook Teacher Guide: Getting Started
Change Log
14.1.0 “Class Dashboard” 9 Added icons and explanations of the new custody, disability and miscellaneous symbols to the Class Dashboard Symbols table. Updated screen shots.
14.1.0 “Student Profile Information” 27 Updated Personal tab information in the Tabs Available on Student Profile Screen table to indicate that custody, disability and miscellaneous notes display if entered in StudentInformation. Updated screen shot.
14.1.0 “Interim and Report Card Grades”
101 Added notes about the warning message that displays when grades will be rounded up to an administrator defined threshold.
ProductVersion
Heading Page Reason
ProgressBook GradeBook Teacher Guide: Getting Started iii

Change Log
This page intentionally left blank.
iv ProgressBook GradeBook Teacher Guide: Getting Started
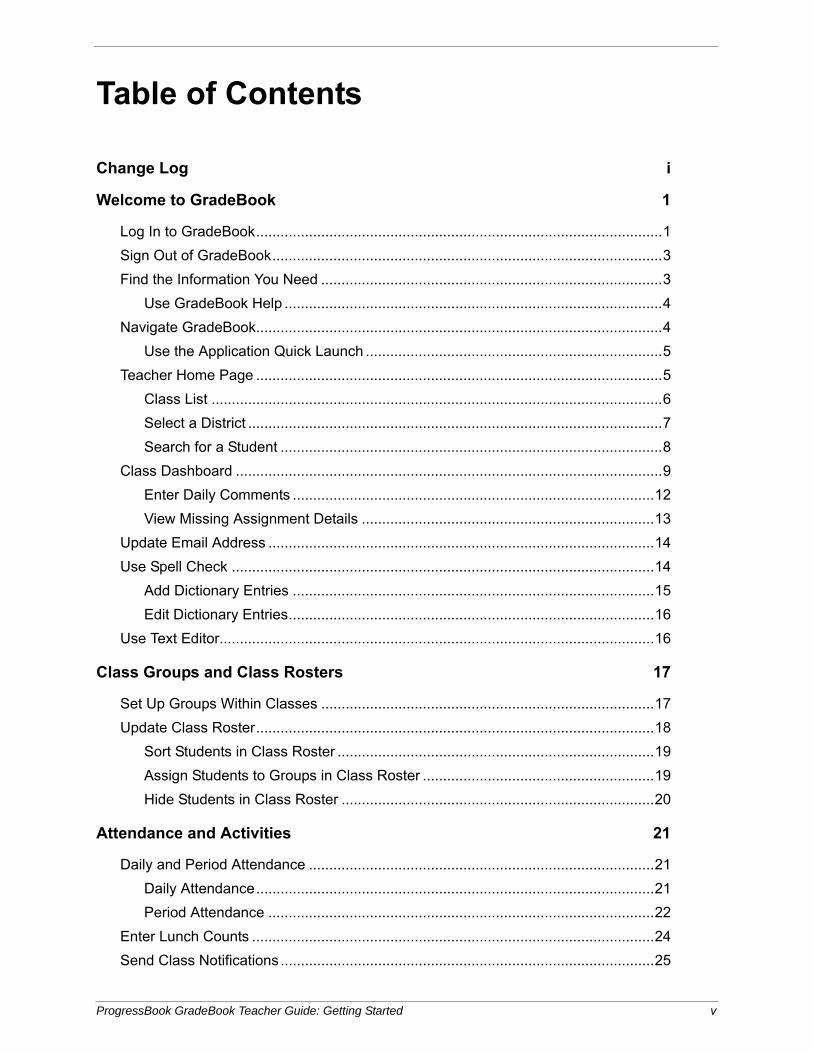
Table of Contents
Change Log i
Welcome to GradeBook 1
Log In to GradeBook....................................................................................................1
Sign Out of GradeBook................................................................................................3
Find the Information You Need ....................................................................................3
Use GradeBook Help .............................................................................................4
Navigate GradeBook....................................................................................................4
Use the Application Quick Launch .........................................................................5
Teacher Home Page ....................................................................................................5
Class List ...............................................................................................................6
Select a District ......................................................................................................7
Search for a Student ..............................................................................................8
Class Dashboard .........................................................................................................9
Enter Daily Comments .........................................................................................12
View Missing Assignment Details ........................................................................13
Update Email Address ...............................................................................................14
Use Spell Check ........................................................................................................14
Add Dictionary Entries .........................................................................................15
Edit Dictionary Entries..........................................................................................16
Use Text Editor...........................................................................................................16
Class Groups and Class Rosters 17
Set Up Groups Within Classes ..................................................................................17
Update Class Roster..................................................................................................18
Sort Students in Class Roster ..............................................................................19
Assign Students to Groups in Class Roster .........................................................19
Hide Students in Class Roster .............................................................................20
Attendance and Activities 21
Daily and Period Attendance .....................................................................................21
Daily Attendance..................................................................................................21
Period Attendance ...............................................................................................22
Enter Lunch Counts ...................................................................................................24
Send Class Notifications ............................................................................................25
ProgressBook GradeBook Teacher Guide: Getting Started v
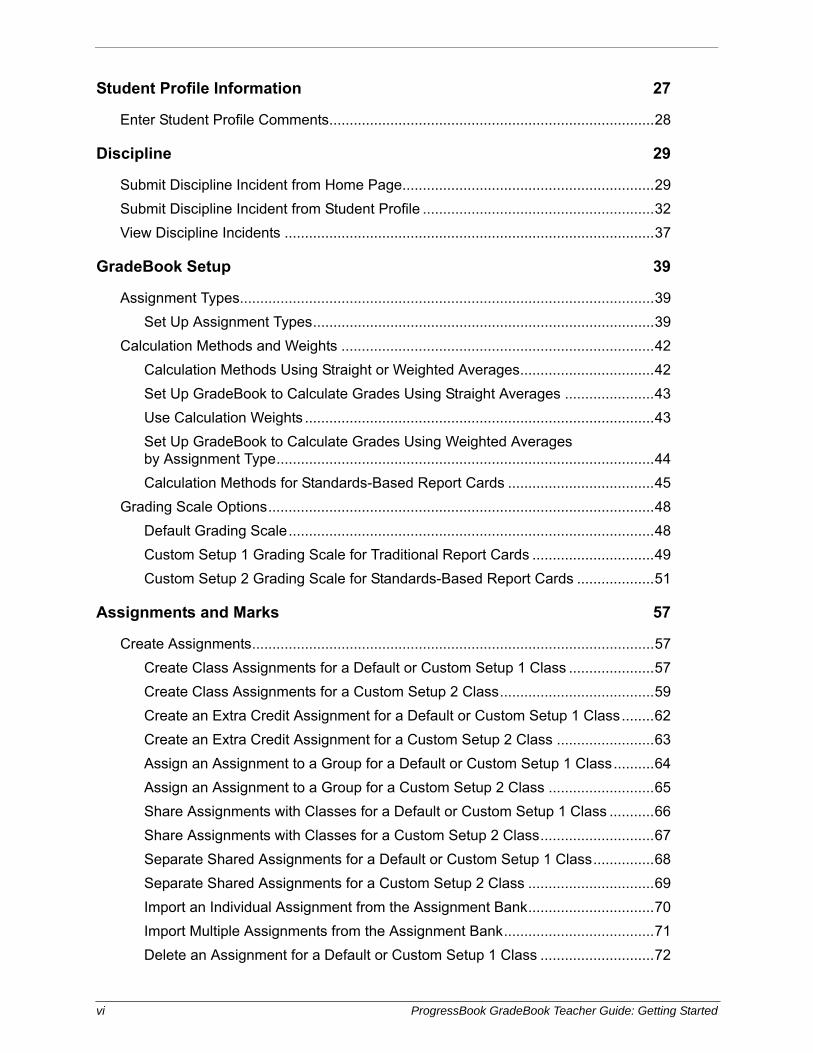
Student Profile Information 27
Enter Student Profile Comments................................................................................28
Discipline 29
Submit Discipline Incident from Home Page..............................................................29
Submit Discipline Incident from Student Profile .........................................................32
View Discipline Incidents ...........................................................................................37
GradeBook Setup 39
Assignment Types......................................................................................................39
Set Up Assignment Types....................................................................................39
Calculation Methods and Weights .............................................................................42
Calculation Methods Using Straight or Weighted Averages.................................42
Set Up GradeBook to Calculate Grades Using Straight Averages ......................43
Use Calculation Weights ......................................................................................43
Set Up GradeBook to Calculate Grades Using Weighted Averages by Assignment Type.............................................................................................44
Calculation Methods for Standards-Based Report Cards ....................................45
Grading Scale Options...............................................................................................48
Default Grading Scale..........................................................................................48
Custom Setup 1 Grading Scale for Traditional Report Cards ..............................49
Custom Setup 2 Grading Scale for Standards-Based Report Cards ...................51
Assignments and Marks 57
Create Assignments...................................................................................................57
Create Class Assignments for a Default or Custom Setup 1 Class .....................57
Create Class Assignments for a Custom Setup 2 Class......................................59
Create an Extra Credit Assignment for a Default or Custom Setup 1 Class........62
Create an Extra Credit Assignment for a Custom Setup 2 Class ........................63
Assign an Assignment to a Group for a Default or Custom Setup 1 Class..........64
Assign an Assignment to a Group for a Custom Setup 2 Class ..........................65
Share Assignments with Classes for a Default or Custom Setup 1 Class ...........66
Share Assignments with Classes for a Custom Setup 2 Class............................67
Separate Shared Assignments for a Default or Custom Setup 1 Class...............68
Separate Shared Assignments for a Custom Setup 2 Class ...............................69
Import an Individual Assignment from the Assignment Bank...............................70
Import Multiple Assignments from the Assignment Bank.....................................71
Delete an Assignment for a Default or Custom Setup 1 Class ............................72
vi ProgressBook GradeBook Teacher Guide: Getting Started
Delete an Assignment for a Custom Setup 2 Class.............................................73
Assignment and Assessment Marks..........................................................................75
Enter Class Assignment Marks for a Default or Custom Setup 1 Class on Assignment Marks Screen ..............................................................................75
Enter Class Assignment Marks for a Custom Setup 2 Class on Assignment Marks Screen.......................................................................................................77
Grade Book Grid ........................................................................................................80
Navigate Grade Book Grid...................................................................................82
Enter Class Assignment Marks on Grade Book Grid...........................................84
Standards Based Grid................................................................................................86
Navigate Standards Based Grid...........................................................................88
Enter Assessment Marks on Standards Based Grid............................................89
Copy Previous Reporting Period Marks on the Standards Based Grid................91
Sort Assessments on the Standards Based Grid .................................................92
Progress By Student ..................................................................................................93
Enter Assignment Marks on the Progress By Student Screen.............................94
Create Individual Student Assignment .................................................................95
Enter Individual Student Assignment Marks on Progress By Student Screen .....98
Assignment Maintenance Screen ..............................................................................99
Grades 101
Interim and Report Card Grades..............................................................................101
Enter Interim/Report Card Grades by Student ...................................................101
Enter Interim/Report Card Grades by Class ......................................................103
Seating Chart 107
Create a Seating Chart ............................................................................................107
Customize a Seating Chart ......................................................................................109
Reports 111
Classic Reports........................................................................................................112
Class Progress Report.......................................................................................112
Class Roster Report...........................................................................................113
Gradebook Summary Report - Elementary........................................................113
Homeroom Roster List Report ...........................................................................113
Lesson Plan Report ...........................................................................................113
Missing Assignment Report ...............................................................................113
ParentAccess Login Activity Audit .....................................................................113
Period Attendance Report..................................................................................113
ProgressBook GradeBook Teacher Guide: Getting Started vii

Post Homework & Marks to Web Audit ..............................................................114
Student Progress Reports..................................................................................114
Report Builder Reports ............................................................................................114
ParentAccess 119
View ParentAccess ..................................................................................................119
Navigate ParentAccess............................................................................................120
View Another Student in the Class...........................................................................121
Sign Out of ParentAccess........................................................................................122
Student Information..................................................................................................122
School Information...................................................................................................124
Family Information ...................................................................................................124
Change a Student's Password in ParentAccess................................................124
ParentAccess Alerts Overview.................................................................................125
viii ProgressBook GradeBook Teacher Guide: Getting Started
Welcome to GradeBook
GradeBook is a classroom management solution that integrates grade book, lesson plan development, attendance, special education and parent communication into one comprehensive, Web-based system. GradeBook provides a user-friendly interface for teachers, school administrators, cafeteria personnel and others to track and maintain student information. Class and student data is automatically populated into GradeBook from StudentInformation, eliminating the need for data re-entry. GradeBook supports standards-based reporting, which is essential in today’s education environment.
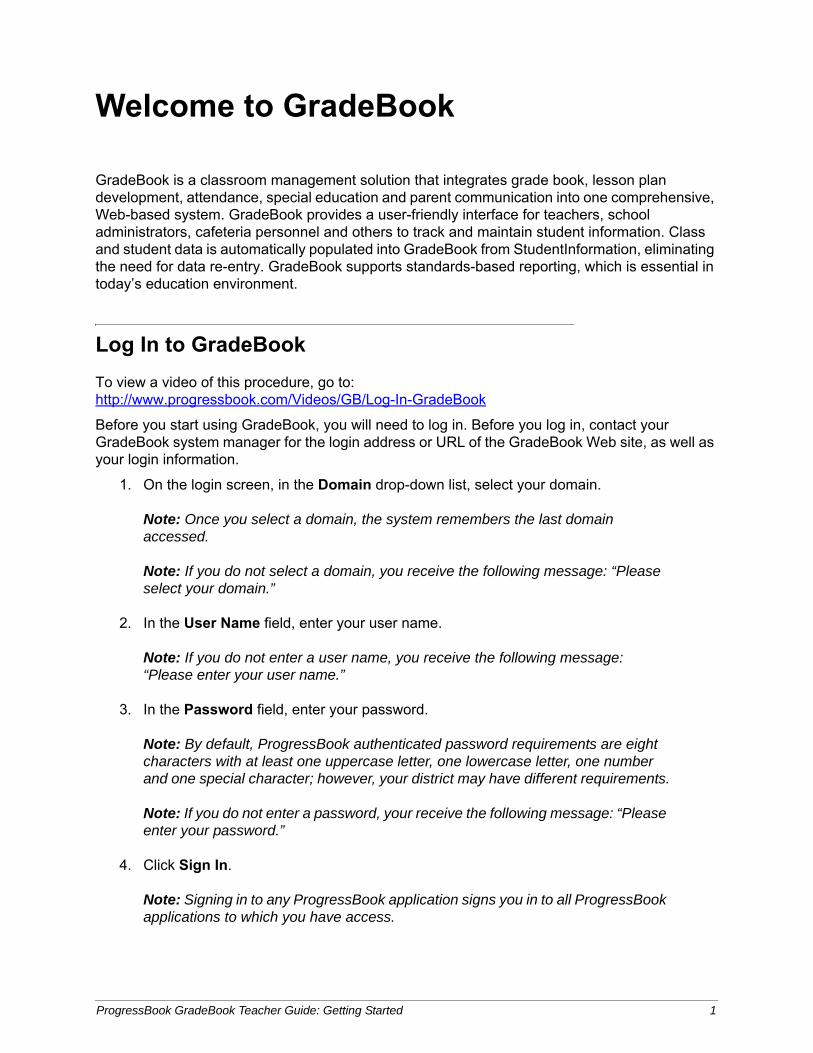
Log In to GradeBook
To view a video of this procedure, go to:http://www.progressbook.com/Videos/GB/Log-In-GradeBook
Before you start using GradeBook, you will need to log in. Before you log in, contact your GradeBook system manager for the login address or URL of the GradeBook Web site, as well as your login information.
1. On the login screen, in the Domain drop-down list, select your domain.
Note: Once you select a domain, the system remembers the last domain accessed.
Note: If you do not select a domain, you receive the following message: “Please select your domain.”
2. In the User Name field, enter your user name.
Note: If you do not enter a user name, you receive the following message: “Please enter your user name.”
3. In the Password field, enter your password.
Note: By default, ProgressBook authenticated password requirements are eight characters with at least one uppercase letter, one lowercase letter, one number and one special character; however, your district may have different requirements.
Note: If you do not enter a password, your receive the following message: “Please enter your password.”
4. Click Sign In.
Note: Signing in to any ProgressBook application signs you in to all ProgressBook applications to which you have access.
ProgressBook GradeBook Teacher Guide: Getting Started 1

Welcome to GradeBook
Note: For ProgressBook authenticated users, once you log in, if your password is soon to expire, the Your password is expiring soon! screen displays. The following message displays: “Your password will be expiring on ‘MM/DD/YYYY’ ‘H:M:S’ ‘AM/PM’. Would you like to change your password now?” Underneath the message, you have the following options: Change Password or Continue.
Note: If your password is expired, CentralAdmin displays the Password expired screen, and you must change your password to access ProgressBook applications.
Note: If you enter your user name and/or password incorrectly or if your account is locked, you receive the following message: “The User Name or Password supplied is invalid or your account may be locked.”
Note: If your account is locked, the amount of time it is locked is based on system settings. By default, it remains locked for 5 minutes; however, your district may have different settings.
Login Screen for ProgressBook Applications
Your password is expiring soon! Screen
2 ProgressBook GradeBook Teacher Guide: Getting Started
Welcome to GradeBook
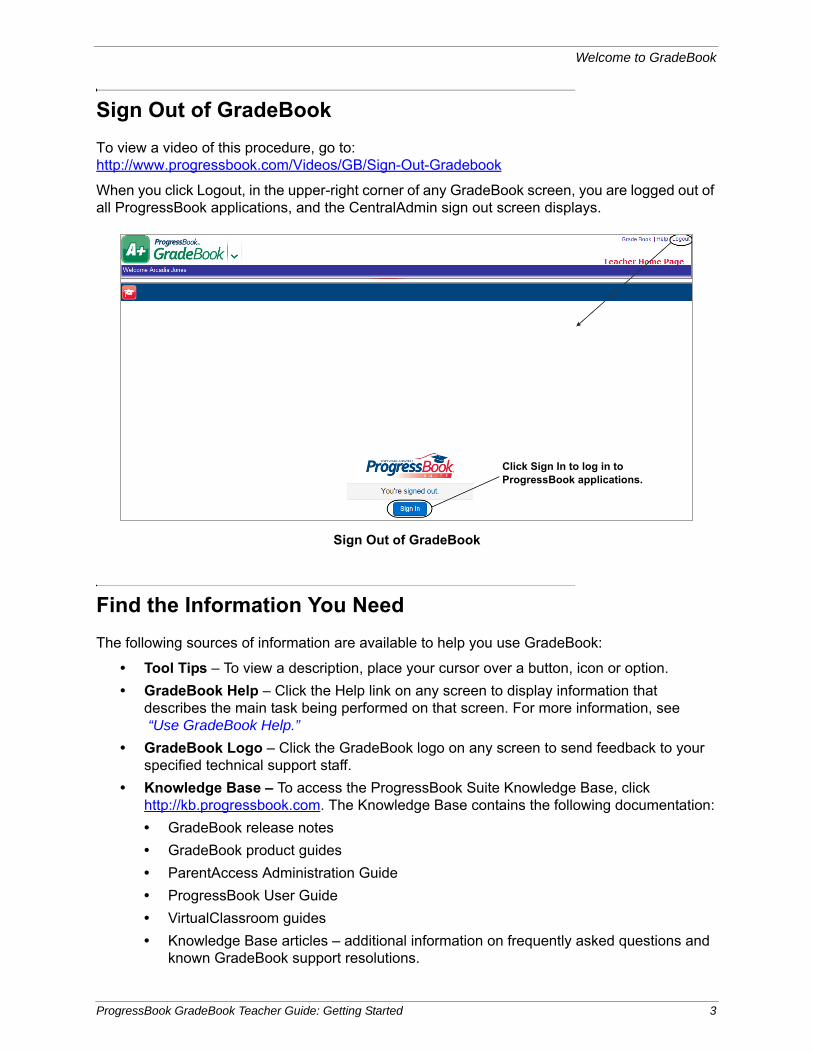
Sign Out of GradeBook
To view a video of this procedure, go to:http://www.progressbook.com/Videos/GB/Sign-Out-Gradebook
When you click Logout, in the upper-right corner of any GradeBook screen, you are logged out of all ProgressBook applications, and the CentralAdmin sign out screen displays.
Find the Information You Need
The following sources of information are available to help you use GradeBook:
• Tool Tips – To view a description, place your cursor over a button, icon or option.
• GradeBook Help – Click the Help link on any screen to display information that describes the main task being performed on that screen. For more information, see “Use GradeBook Help.”
• GradeBook Logo – Click the GradeBook logo on any screen to send feedback to your specified technical support staff.
• Knowledge Base – To access the ProgressBook Suite Knowledge Base, click http://kb.progressbook.com. The Knowledge Base contains the following documentation:
• GradeBook release notes
• GradeBook product guides
• ParentAccess Administration Guide
• ProgressBook User Guide
• VirtualClassroom guides
• Knowledge Base articles – additional information on frequently asked questions and known GradeBook support resolutions.
Sign Out of GradeBook
Click Sign In to log in to ProgressBook applications.
ProgressBook GradeBook Teacher Guide: Getting Started 3
Welcome to GradeBook
Use GradeBook HelpTo view a video of this procedure, go to:http://www.progressbook.com/Videos/GB/Use-GradeBook-Help
GradeBook Help provides overview, procedural and reference information about GradeBook. View the help topic related to the screen you are viewing by clicking the Help link in the upper-right corner on any GradeBook screen.
GradeBook Help displays in a separate tab or browser window (depending on your browser settings) where you can browse the table of contents for specific topic titles, search for information in the index by using keywords, or type a word or phrase in the search field to return a list of possible help topics.
To print a help topic, click located in the navigation pane of the GradeBook Help window, and then click Print on the Print window.
Navigate GradeBook
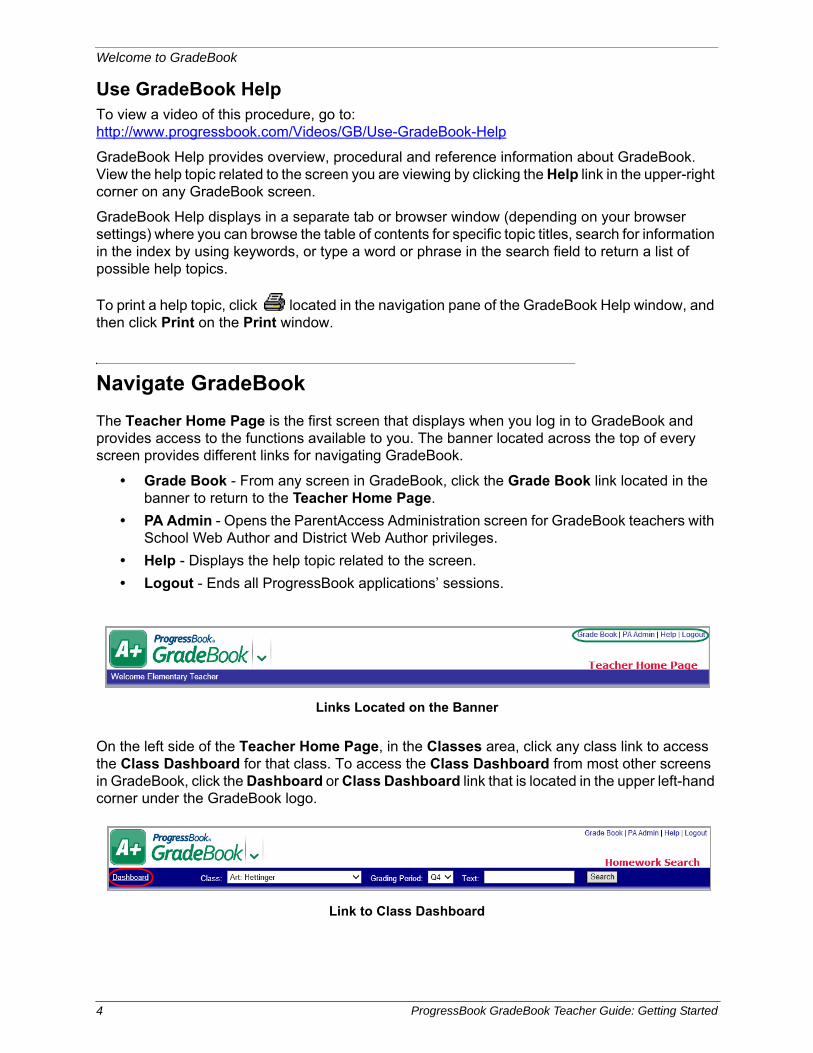
The Teacher Home Page is the first screen that displays when you log in to GradeBook and provides access to the functions available to you. The banner located across the top of every screen provides different links for navigating GradeBook.
• Grade Book - From any screen in GradeBook, click the Grade Book link located in the banner to return to the Teacher Home Page.
• PA Admin - Opens the ParentAccess Administration screen for GradeBook teachers with School Web Author and District Web Author privileges.
• Help - Displays the help topic related to the screen.
• Logout - Ends all ProgressBook applications’ sessions.
On the left side of the Teacher Home Page, in the Classes area, click any class link to access the Class Dashboard for that class. To access the Class Dashboard from most other screens in GradeBook, click the Dashboard or Class Dashboard link that is located in the upper left-hand corner under the GradeBook logo.
Links Located on the Banner
Link to Class Dashboard
4 ProgressBook GradeBook Teacher Guide: Getting Started
Welcome to GradeBook
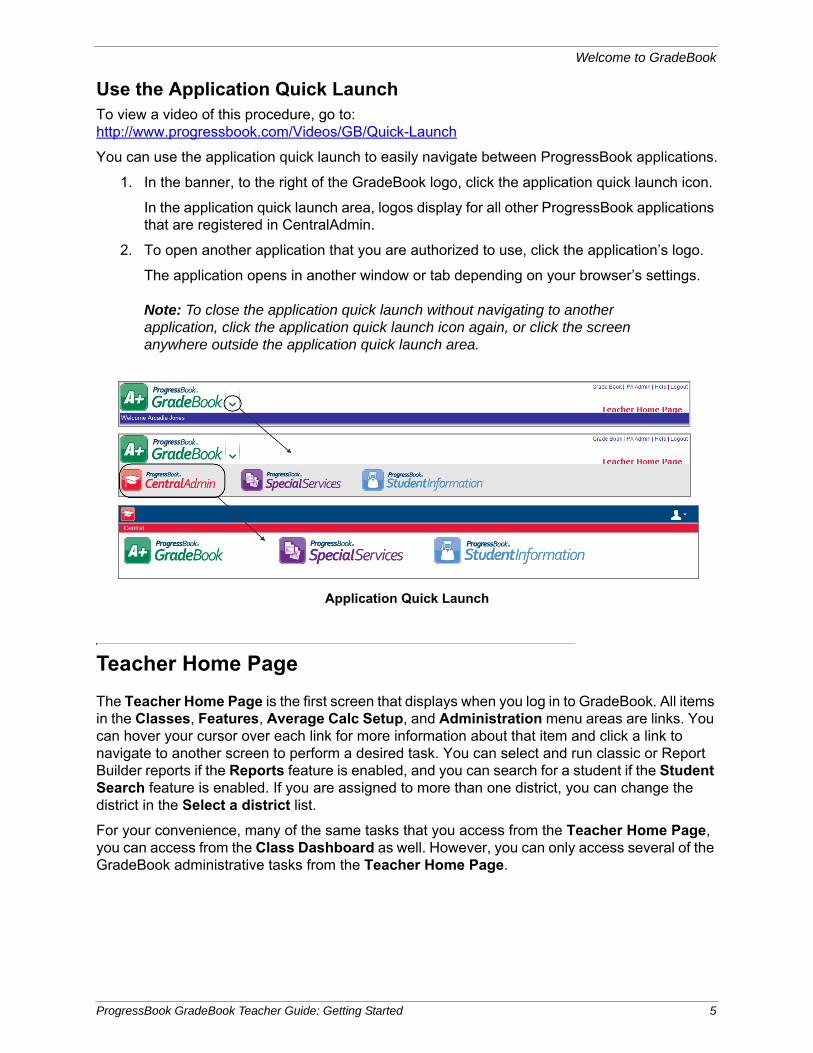
Use the Application Quick LaunchTo view a video of this procedure, go to:http://www.progressbook.com/Videos/GB/Quick-Launch
You can use the application quick launch to easily navigate between ProgressBook applications.
1. In the banner, to the right of the GradeBook logo, click the application quick launch icon.
In the application quick launch area, logos display for all other ProgressBook applications that are registered in CentralAdmin.
2. To open another application that you are authorized to use, click the application’s logo.
The application opens in another window or tab depending on your browser’s settings.
Note: To close the application quick launch without navigating to another application, click the application quick launch icon again, or click the screen anywhere outside the application quick launch area.
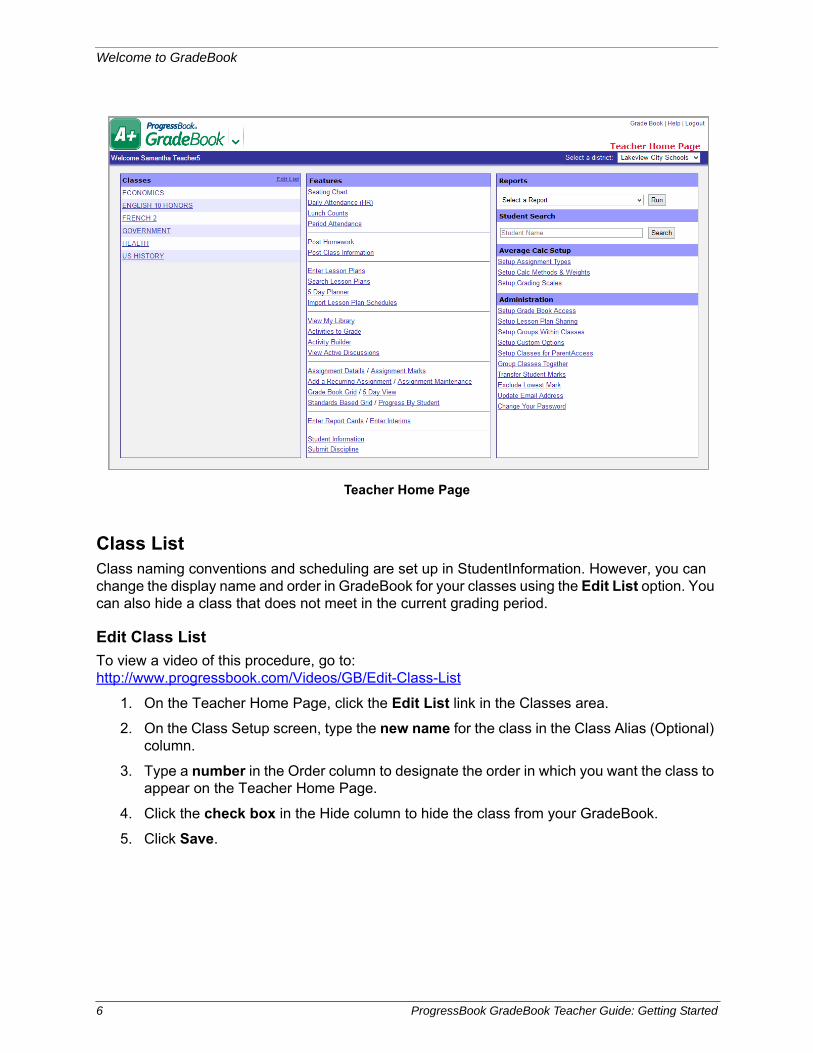
Teacher Home Page
The Teacher Home Page is the first screen that displays when you log in to GradeBook. All items in the Classes, Features, Average Calc Setup, and Administration menu areas are links. You can hover your cursor over each link for more information about that item and click a link to navigate to another screen to perform a desired task. You can select and run classic or Report Builder reports if the Reports feature is enabled, and you can search for a student if the Student Search feature is enabled. If you are assigned to more than one district, you can change the district in the Select a district list.
For your convenience, many of the same tasks that you access from the Teacher Home Page, you can access from the Class Dashboard as well. However, you can only access several of the GradeBook administrative tasks from the Teacher Home Page.
Application Quick Launch
ProgressBook GradeBook Teacher Guide: Getting Started 5
Welcome to GradeBook
Class ListClass naming conventions and scheduling are set up in StudentInformation. However, you can change the display name and order in GradeBook for your classes using the Edit List option. You can also hide a class that does not meet in the current grading period.
Edit Class List
To view a video of this procedure, go to:http://www.progressbook.com/Videos/GB/Edit-Class-List
1. On the Teacher Home Page, click the Edit List link in the Classes area.
2. On the Class Setup screen, type the new name for the class in the Class Alias (Optional) column.
3. Type a number in the Order column to designate the order in which you want the class to appear on the Teacher Home Page.
4. Click the check box in the Hide column to hide the class from your GradeBook.
5. Click Save.
Teacher Home Page
6 ProgressBook GradeBook Teacher Guide: Getting Started
Welcome to GradeBook
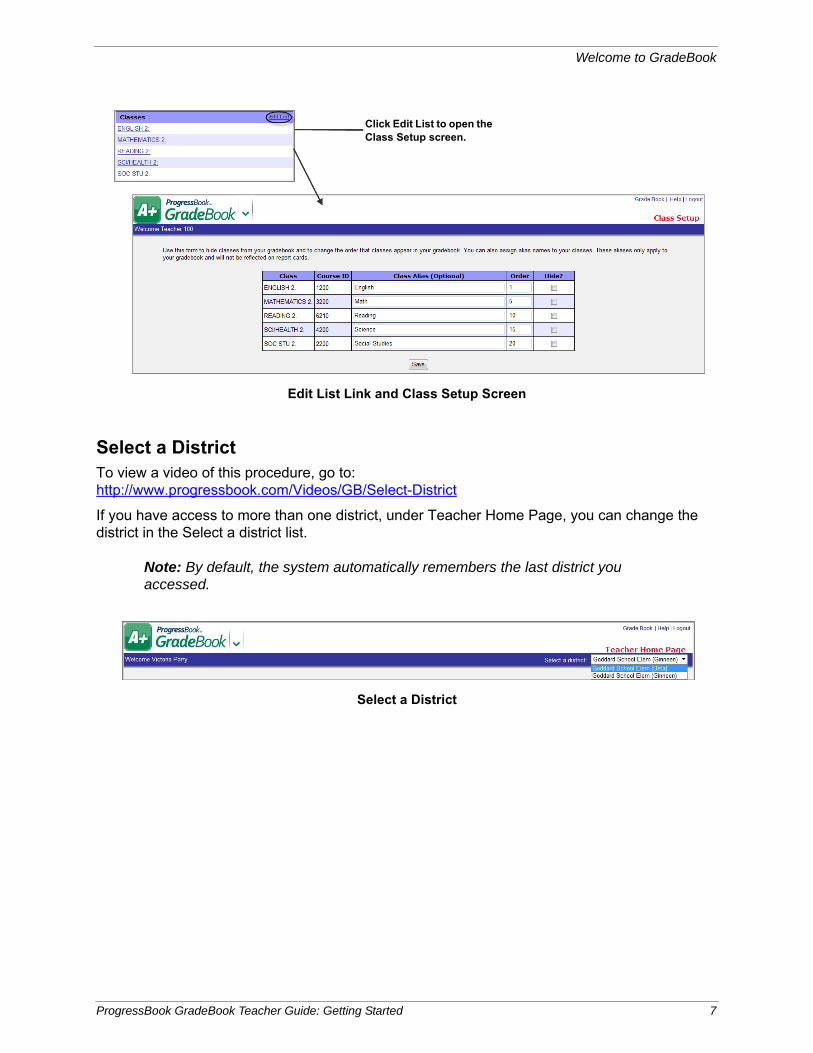
Select a DistrictTo view a video of this procedure, go to:http://www.progressbook.com/Videos/GB/Select-District
If you have access to more than one district, under Teacher Home Page, you can change the district in the Select a district list.
Note: By default, the system automatically remembers the last district you accessed.
Edit List Link and Class Setup Screen
Select a District
Click Edit List to open the Class Setup screen.
ProgressBook GradeBook Teacher Guide: Getting Started 7
Welcome to GradeBook
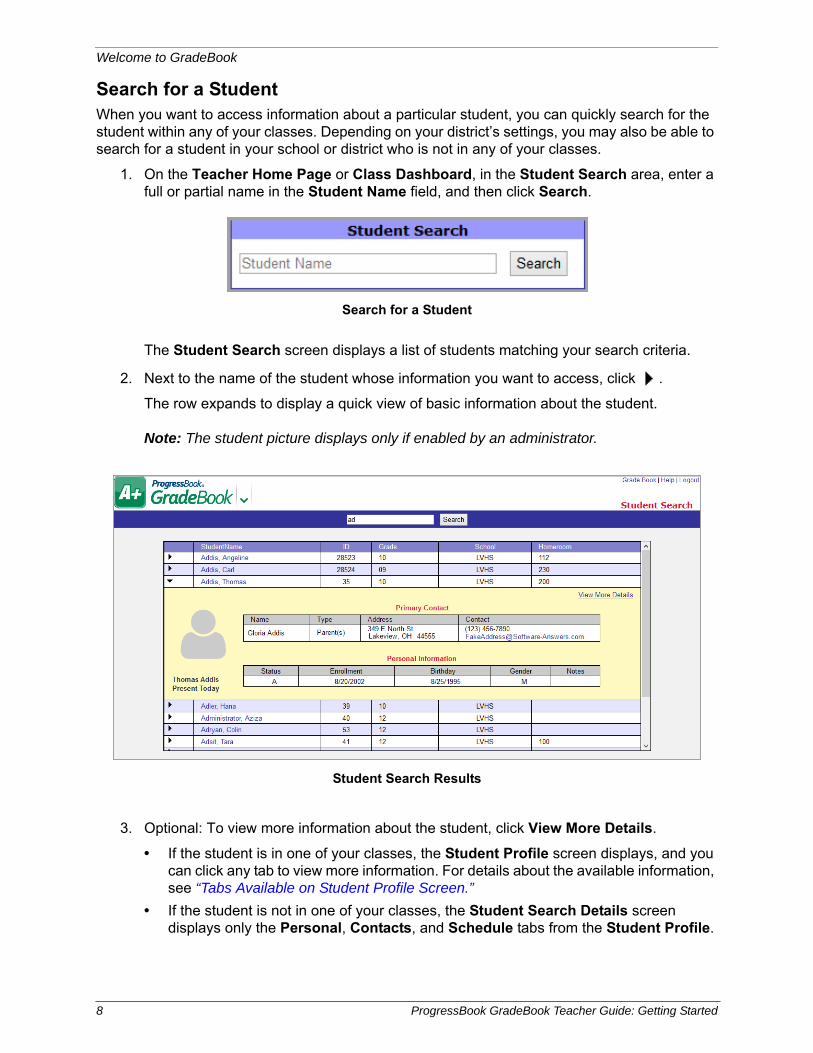
Search for a StudentWhen you want to access information about a particular student, you can quickly search for the student within any of your classes. Depending on your district’s settings, you may also be able to search for a student in your school or district who is not in any of your classes.
1. On the Teacher Home Page or Class Dashboard, in the Student Search area, enter a full or partial name in the Student Name field, and then click Search.
The Student Search screen displays a list of students matching your search criteria.
2. Next to the name of the student whose information you want to access, click .
The row expands to display a quick view of basic information about the student.
Note: The student picture displays only if enabled by an administrator.
3. Optional: To view more information about the student, click View More Details.
• If the student is in one of your classes, the Student Profile screen displays, and you can click any tab to view more information. For details about the available information, see “Tabs Available on Student Profile Screen.”
• If the student is not in one of your classes, the Student Search Details screen displays only the Personal, Contacts, and Schedule tabs from the Student Profile.
Search for a Student
Student Search Results
8 ProgressBook GradeBook Teacher Guide: Getting Started
Welcome to GradeBook
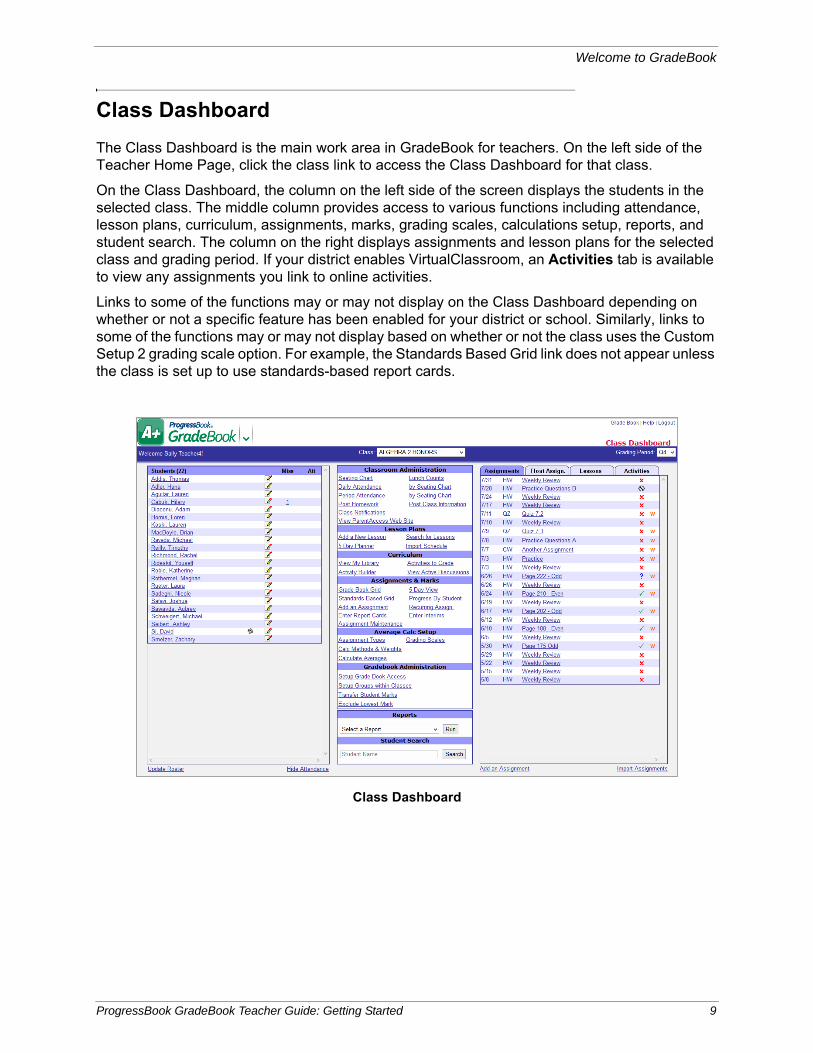
Class Dashboard
The Class Dashboard is the main work area in GradeBook for teachers. On the left side of the Teacher Home Page, click the class link to access the Class Dashboard for that class.
On the Class Dashboard, the column on the left side of the screen displays the students in the selected class. The middle column provides access to various functions including attendance, lesson plans, curriculum, assignments, marks, grading scales, calculations setup, reports, and student search. The column on the right displays assignments and lesson plans for the selected class and grading period. If your district enables VirtualClassroom, an Activities tab is available to view any assignments you link to online activities.
Links to some of the functions may or may not display on the Class Dashboard depending on whether or not a specific feature has been enabled for your district or school. Similarly, links to some of the functions may or may not display based on whether or not the class uses the Custom Setup 2 grading scale option. For example, the Standards Based Grid link does not appear unless the class is set up to use standards-based report cards.
Class Dashboard
ProgressBook GradeBook Teacher Guide: Getting Started 9
Welcome to GradeBook
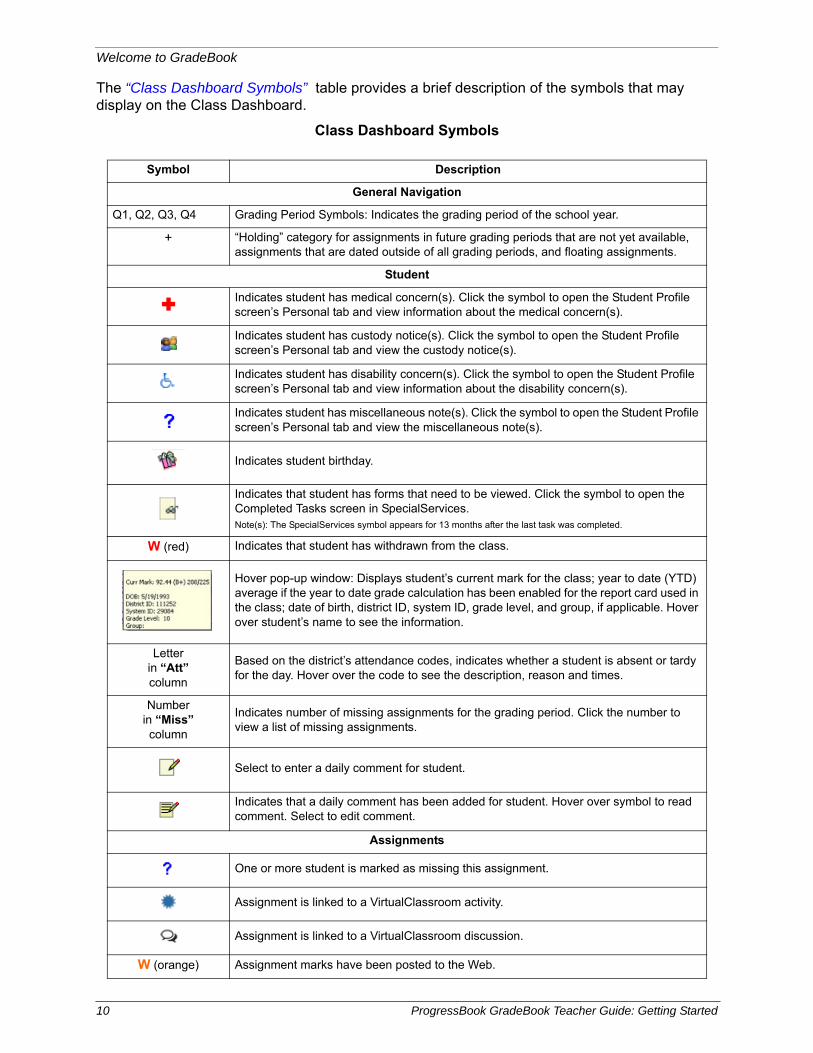
The “Class Dashboard Symbols” table provides a brief description of the symbols that may display on the Class Dashboard.
Class Dashboard Symbols
Symbol Description
General Navigation
Q1, Q2, Q3, Q4 Grading Period Symbols: Indicates the grading period of the school year.
+ “Holding” category for assignments in future grading periods that are not yet available, assignments that are dated outside of all grading periods, and floating assignments.
Student
Indicates student has medical concern(s). Click the symbol to open the Student Profile screen’s Personal tab and view information about the medical concern(s).
Indicates student has custody notice(s). Click the symbol to open the Student Profile screen’s Personal tab and view the custody notice(s).
Indicates student has disability concern(s). Click the symbol to open the Student Profile screen’s Personal tab and view information about the disability concern(s).
Indicates student has miscellaneous note(s). Click the symbol to open the Student Profile screen’s Personal tab and view the miscellaneous note(s).
Indicates student birthday.
Indicates that student has forms that need to be viewed. Click the symbol to open the Completed Tasks screen in SpecialServices.Note(s): The SpecialServices symbol appears for 13 months after the last task was completed.
W (red) Indicates that student has withdrawn from the class.
Hover pop-up window: Displays student’s current mark for the class; year to date (YTD) average if the year to date grade calculation has been enabled for the report card used in the class; date of birth, district ID, system ID, grade level, and group, if applicable. Hover over student’s name to see the information.
Letterin “Att”column
Based on the district’s attendance codes, indicates whether a student is absent or tardy for the day. Hover over the code to see the description, reason and times.
Numberin “Miss”column
Indicates number of missing assignments for the grading period. Click the number to view a list of missing assignments.
Select to enter a daily comment for student.
Indicates that a daily comment has been added for student. Hover over symbol to read comment. Select to edit comment.
Assignments
One or more student is marked as missing this assignment.
Assignment is linked to a VirtualClassroom activity.
Assignment is linked to a VirtualClassroom discussion.
W (orange) Assignment marks have been posted to the Web.
10 ProgressBook GradeBook Teacher Guide: Getting Started
Welcome to GradeBook
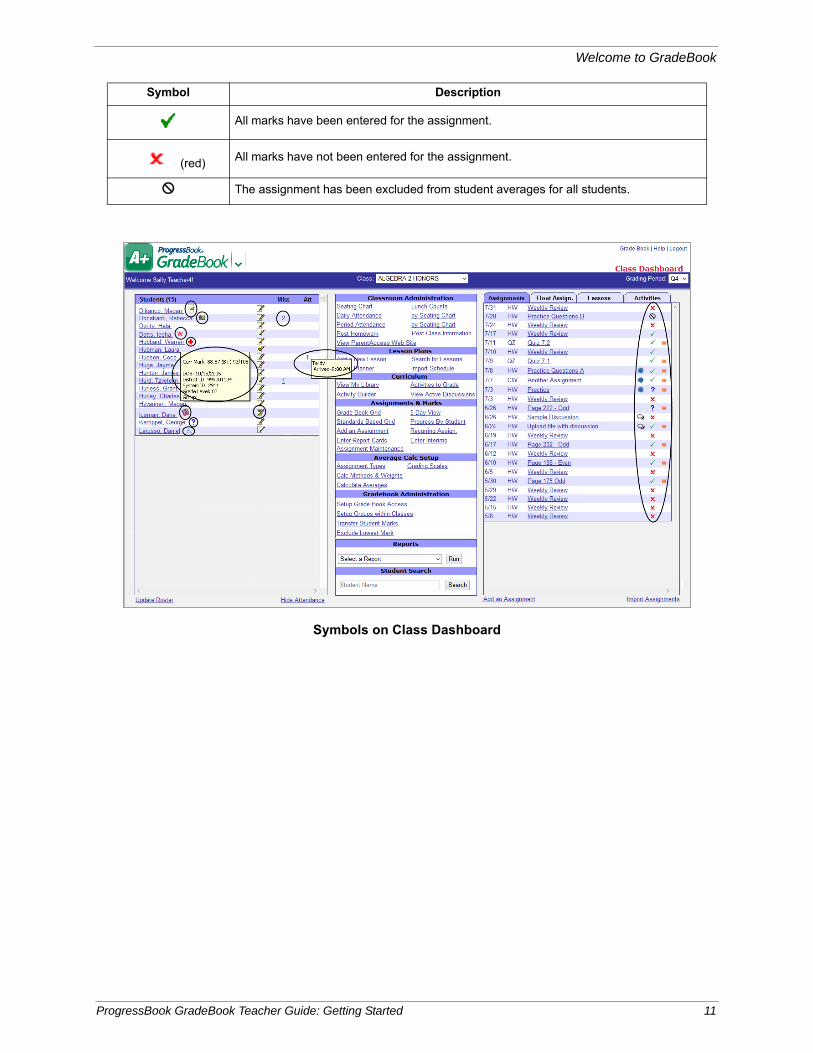
All marks have been entered for the assignment.
(red) All marks have not been entered for the assignment.
The assignment has been excluded from student averages for all students.
Symbols on Class Dashboard
Symbol Description
ProgressBook GradeBook Teacher Guide: Getting Started 11
Welcome to GradeBook
Enter Daily CommentsTo view a video of this procedure, go to:http://www.progressbook.com/Videos/GB/Enter-View-Daily-Comments
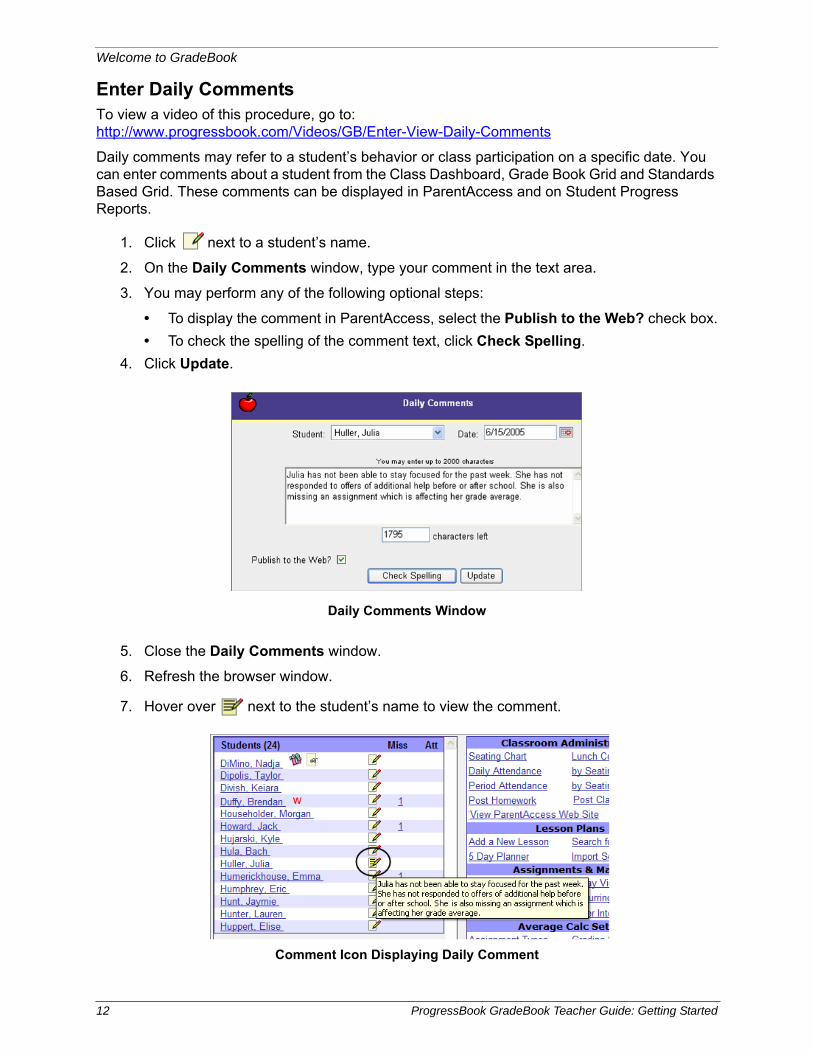
Daily comments may refer to a student’s behavior or class participation on a specific date. You can enter comments about a student from the Class Dashboard, Grade Book Grid and Standards Based Grid. These comments can be displayed in ParentAccess and on Student Progress Reports.
1. Click next to a student’s name.
2. On the Daily Comments window, type your comment in the text area.
3. You may perform any of the following optional steps:
• To display the comment in ParentAccess, select the Publish to the Web? check box.
• To check the spelling of the comment text, click Check Spelling.
4. Click Update.
5. Close the Daily Comments window.
6. Refresh the browser window.
7. Hover over next to the student’s name to view the comment.
Daily Comments Window
Comment Icon Displaying Daily Comment
12 ProgressBook GradeBook Teacher Guide: Getting Started
Welcome to GradeBook
Note: To view all the daily comments entered for a student, select the student on the Class Dashboard, and then click the Progress tab on the Student Profile screen. Daily comments are listed under assignments.
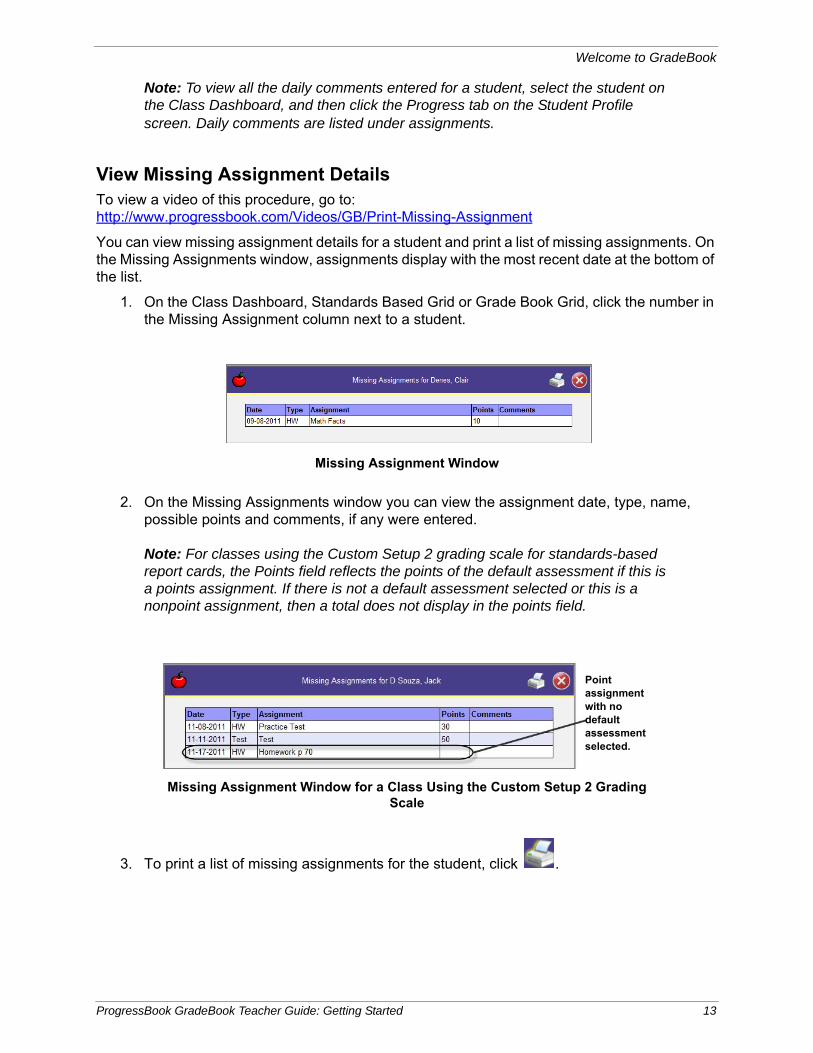
View Missing Assignment DetailsTo view a video of this procedure, go to:http://www.progressbook.com/Videos/GB/Print-Missing-Assignment
You can view missing assignment details for a student and print a list of missing assignments. On the Missing Assignments window, assignments display with the most recent date at the bottom of the list.
1. On the Class Dashboard, Standards Based Grid or Grade Book Grid, click the number in the Missing Assignment column next to a student.
2. On the Missing Assignments window you can view the assignment date, type, name, possible points and comments, if any were entered.
Note: For classes using the Custom Setup 2 grading scale for standards-based report cards, the Points field reflects the points of the default assessment if this is a points assignment. If there is not a default assessment selected or this is a nonpoint assignment, then a total does not display in the points field.
3. To print a list of missing assignments for the student, click .
Missing Assignment Window
Missing Assignment Window for a Class Using the Custom Setup 2 Grading Scale
Point assignment with no default assessment selected.
ProgressBook GradeBook Teacher Guide: Getting Started 13
Welcome to GradeBook
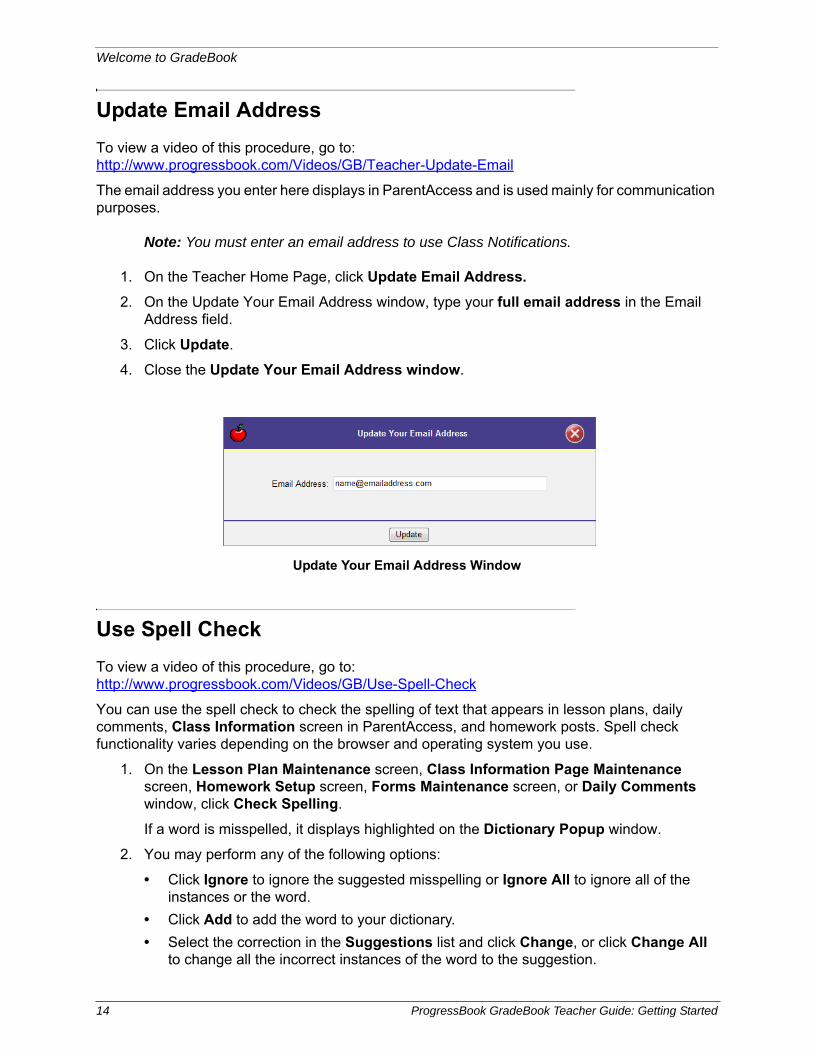
Update Email Address
To view a video of this procedure, go to:http://www.progressbook.com/Videos/GB/Teacher-Update-Email
The email address you enter here displays in ParentAccess and is used mainly for communication purposes.
Note: You must enter an email address to use Class Notifications.
1. On the Teacher Home Page, click Update Email Address.
2. On the Update Your Email Address window, type your full email address in the Email Address field.
3. Click Update.
4. Close the Update Your Email Address window.
Use Spell Check
To view a video of this procedure, go to:http://www.progressbook.com/Videos/GB/Use-Spell-Check
You can use the spell check to check the spelling of text that appears in lesson plans, daily comments, Class Information screen in ParentAccess, and homework posts. Spell check functionality varies depending on the browser and operating system you use.
1. On the Lesson Plan Maintenance screen, Class Information Page Maintenance screen, Homework Setup screen, Forms Maintenance screen, or Daily Comments window, click Check Spelling.
If a word is misspelled, it displays highlighted on the Dictionary Popup window.
2. You may perform any of the following options:
• Click Ignore to ignore the suggested misspelling or Ignore All to ignore all of the instances or the word.
• Click Add to add the word to your dictionary.
• Select the correction in the Suggestions list and click Change, or click Change All to change all the incorrect instances of the word to the suggestion.
Update Your Email Address Window
14 ProgressBook GradeBook Teacher Guide: Getting Started

Welcome to GradeBook
• Click Finish when you have finished checking the spelling and to close the Dictionary Popup window.
3. When the “Spelling Check is complete” message displays, click OK.
Add Dictionary EntriesTo view a video of this procedure, go to:http://www.progressbook.com/Videos/GB/Add-Dictionary-Entries
You can personalize the GradeBook dictionary so that the Spell Check feature recognizes words, proper names, and abbreviations not common in the dictionary.
1. On the Teacher Home Page, under Administration, click Setup Custom Options.
2. On the Custom Options screen, click on the left side of the screen.
3. On the Dictionary screen, click Add New Word to Dictionary.
4. Type the new word in the Word field.
5. Click Save.
Dictionary Popup Window
Adding a Dictionary Entry
ProgressBook GradeBook Teacher Guide: Getting Started 15
Welcome to GradeBook
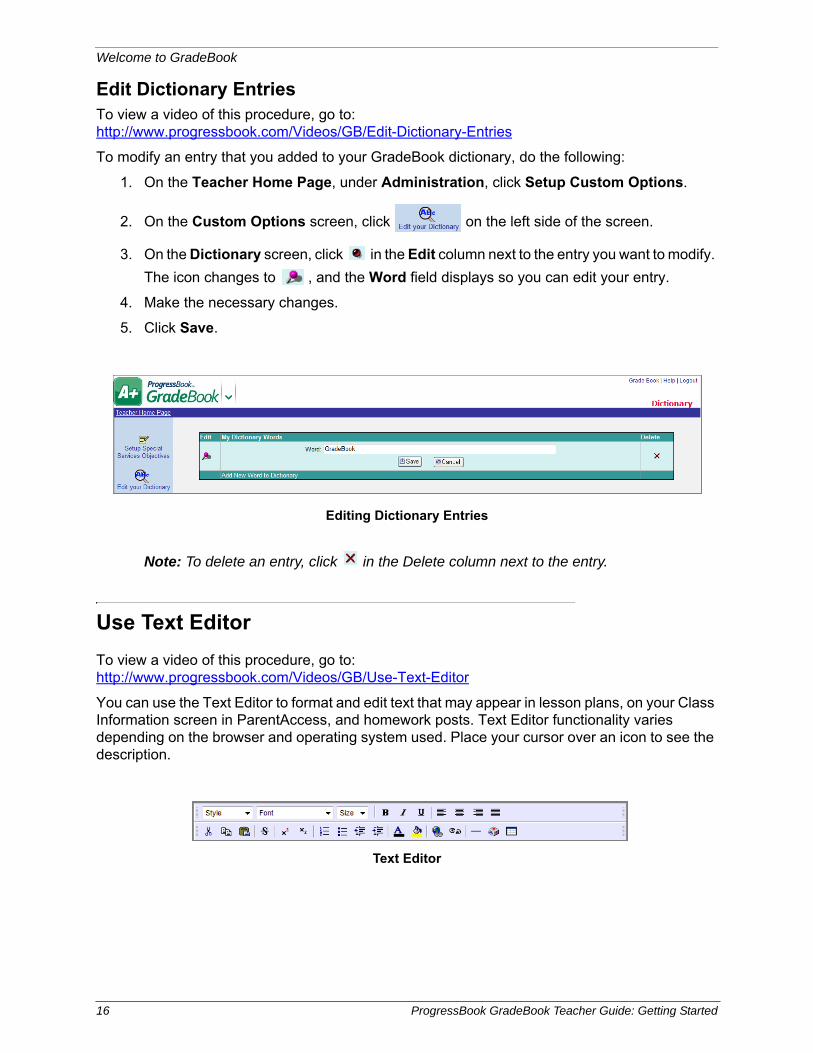
Edit Dictionary EntriesTo view a video of this procedure, go to:http://www.progressbook.com/Videos/GB/Edit-Dictionary-Entries
To modify an entry that you added to your GradeBook dictionary, do the following:
1. On the Teacher Home Page, under Administration, click Setup Custom Options.
2. On the Custom Options screen, click on the left side of the screen.
3. On the Dictionary screen, click in the Edit column next to the entry you want to modify.
The icon changes to , and the Word field displays so you can edit your entry.
4. Make the necessary changes.
5. Click Save.
Note: To delete an entry, click in the Delete column next to the entry.
Use Text Editor
To view a video of this procedure, go to:http://www.progressbook.com/Videos/GB/Use-Text-Editor
You can use the Text Editor to format and edit text that may appear in lesson plans, on your Class Information screen in ParentAccess, and homework posts. Text Editor functionality varies depending on the browser and operating system used. Place your cursor over an icon to see the description.
Editing Dictionary Entries
Text Editor
16 ProgressBook GradeBook Teacher Guide: Getting Started
Class Groups and Class Rosters
Class Groups and Class Rosters
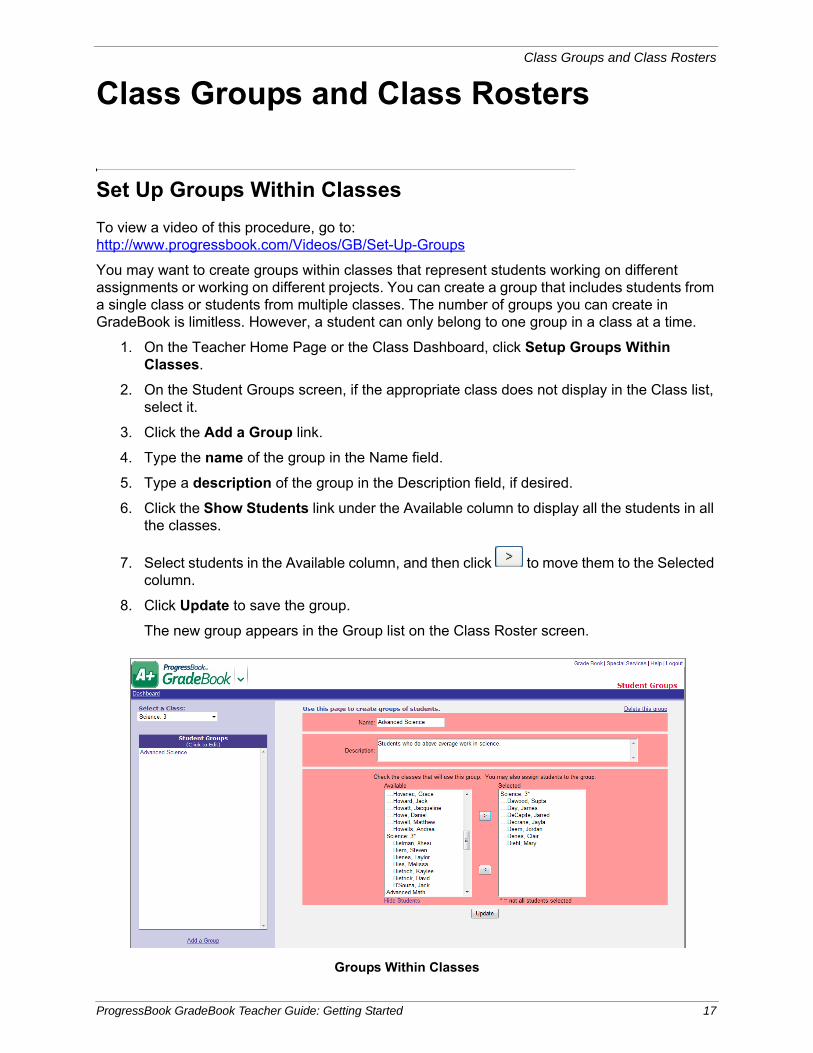
Set Up Groups Within Classes
To view a video of this procedure, go to:http://www.progressbook.com/Videos/GB/Set-Up-Groups
You may want to create groups within classes that represent students working on different assignments or working on different projects. You can create a group that includes students from a single class or students from multiple classes. The number of groups you can create in GradeBook is limitless. However, a student can only belong to one group in a class at a time.
1. On the Teacher Home Page or the Class Dashboard, click Setup Groups Within Classes.
2. On the Student Groups screen, if the appropriate class does not display in the Class list, select it.
3. Click the Add a Group link.
4. Type the name of the group in the Name field.
5. Type a description of the group in the Description field, if desired.
6. Click the Show Students link under the Available column to display all the students in all the classes.
7. Select students in the Available column, and then click to move them to the Selected column.
8. Click Update to save the group.
The new group appears in the Group list on the Class Roster screen.
Groups Within Classes
ProgressBook GradeBook Teacher Guide: Getting Started 17
Class Groups and Class Rosters
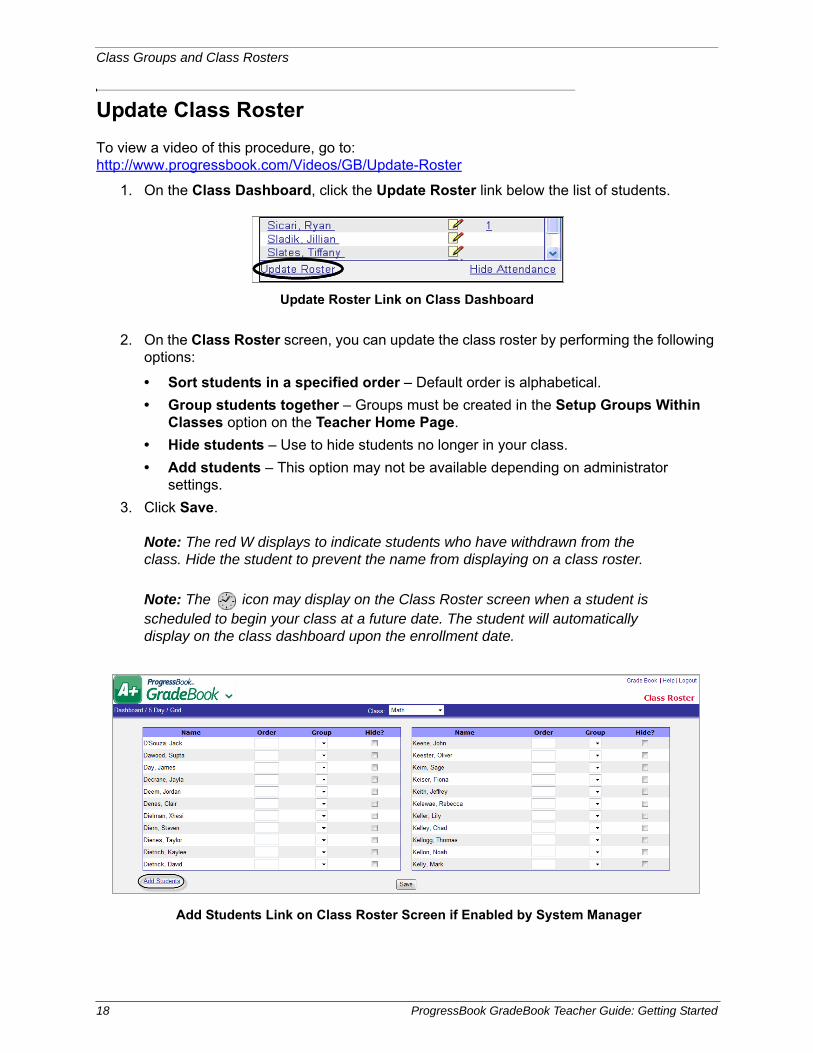
Update Class Roster
To view a video of this procedure, go to:http://www.progressbook.com/Videos/GB/Update-Roster
1. On the Class Dashboard, click the Update Roster link below the list of students.
2. On the Class Roster screen, you can update the class roster by performing the following options:
• Sort students in a specified order – Default order is alphabetical.
• Group students together – Groups must be created in the Setup Groups Within Classes option on the Teacher Home Page.
• Hide students – Use to hide students no longer in your class.
• Add students – This option may not be available depending on administrator settings.
3. Click Save.
Note: The red W displays to indicate students who have withdrawn from the class. Hide the student to prevent the name from displaying on a class roster.
Note: The icon may display on the Class Roster screen when a student is scheduled to begin your class at a future date. The student will automatically display on the class dashboard upon the enrollment date.
Update Roster Link on Class Dashboard
Add Students Link on Class Roster Screen if Enabled by System Manager
18 ProgressBook GradeBook Teacher Guide: Getting Started
Class Groups and Class Rosters
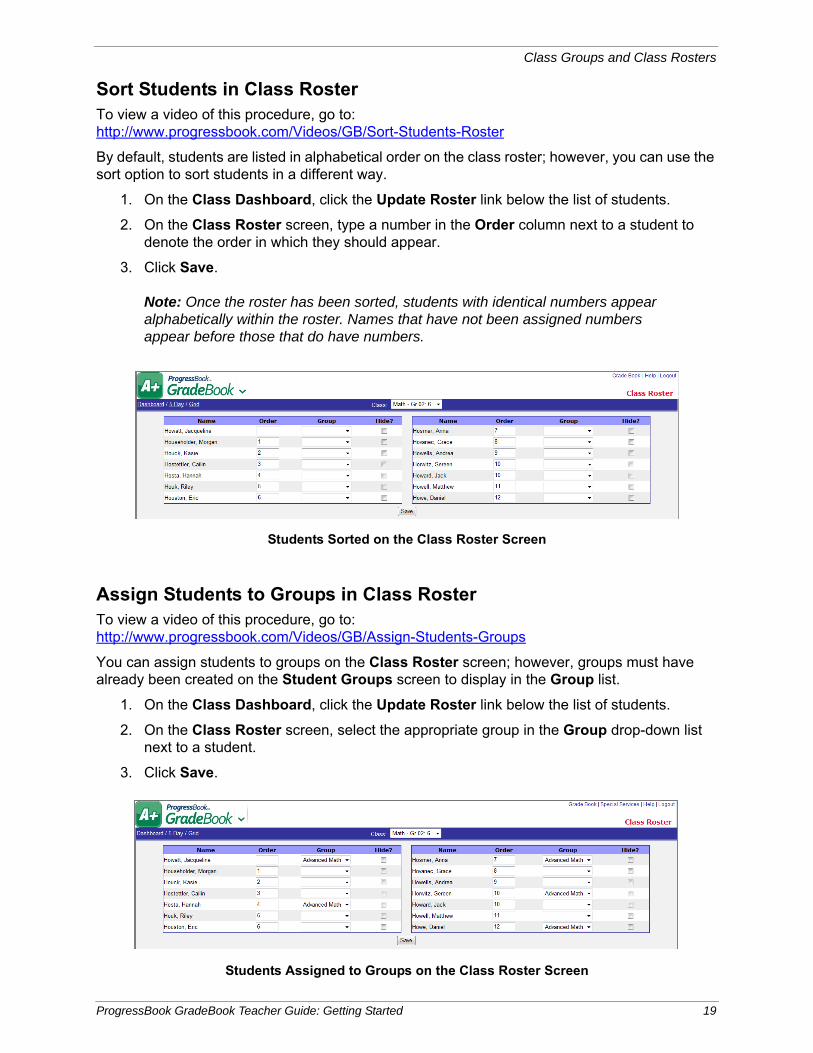
Sort Students in Class RosterTo view a video of this procedure, go to:http://www.progressbook.com/Videos/GB/Sort-Students-Roster
By default, students are listed in alphabetical order on the class roster; however, you can use the sort option to sort students in a different way.
1. On the Class Dashboard, click the Update Roster link below the list of students.
2. On the Class Roster screen, type a number in the Order column next to a student to denote the order in which they should appear.
3. Click Save.
Note: Once the roster has been sorted, students with identical numbers appear alphabetically within the roster. Names that have not been assigned numbers appear before those that do have numbers.
Assign Students to Groups in Class RosterTo view a video of this procedure, go to:http://www.progressbook.com/Videos/GB/Assign-Students-Groups
You can assign students to groups on the Class Roster screen; however, groups must have already been created on the Student Groups screen to display in the Group list.
1. On the Class Dashboard, click the Update Roster link below the list of students.
2. On the Class Roster screen, select the appropriate group in the Group drop-down list next to a student.
3. Click Save.
Students Sorted on the Class Roster Screen
Students Assigned to Groups on the Class Roster Screen
ProgressBook GradeBook Teacher Guide: Getting Started 19
Class Groups and Class Rosters
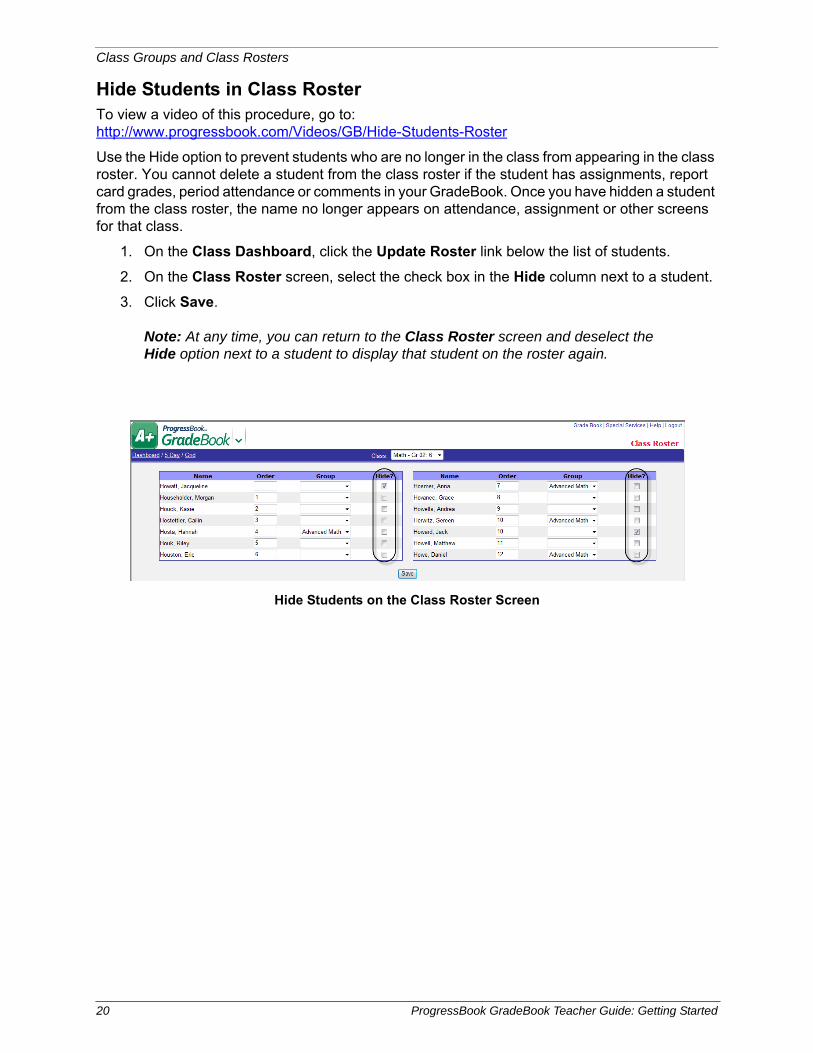
Hide Students in Class RosterTo view a video of this procedure, go to:http://www.progressbook.com/Videos/GB/Hide-Students-Roster
Use the Hide option to prevent students who are no longer in the class from appearing in the class roster. You cannot delete a student from the class roster if the student has assignments, report card grades, period attendance or comments in your GradeBook. Once you have hidden a student from the class roster, the name no longer appears on attendance, assignment or other screens for that class.
1. On the Class Dashboard, click the Update Roster link below the list of students.
2. On the Class Roster screen, select the check box in the Hide column next to a student.
3. Click Save.
Note: At any time, you can return to the Class Roster screen and deselect the Hide option next to a student to display that student on the roster again.
Hide Students on the Class Roster Screen
20 ProgressBook GradeBook Teacher Guide: Getting Started
Attendance and Activities
Attendance and Activities
Daily and Period Attendance
The Daily Attendance screen uses red shading while the Period Attendance screen uses blue shading. The available absence type codes used for taking daily and period attendance are set up in StudentInformation (but can also be added or updated by the GradeBook system manager) and may vary for each school.
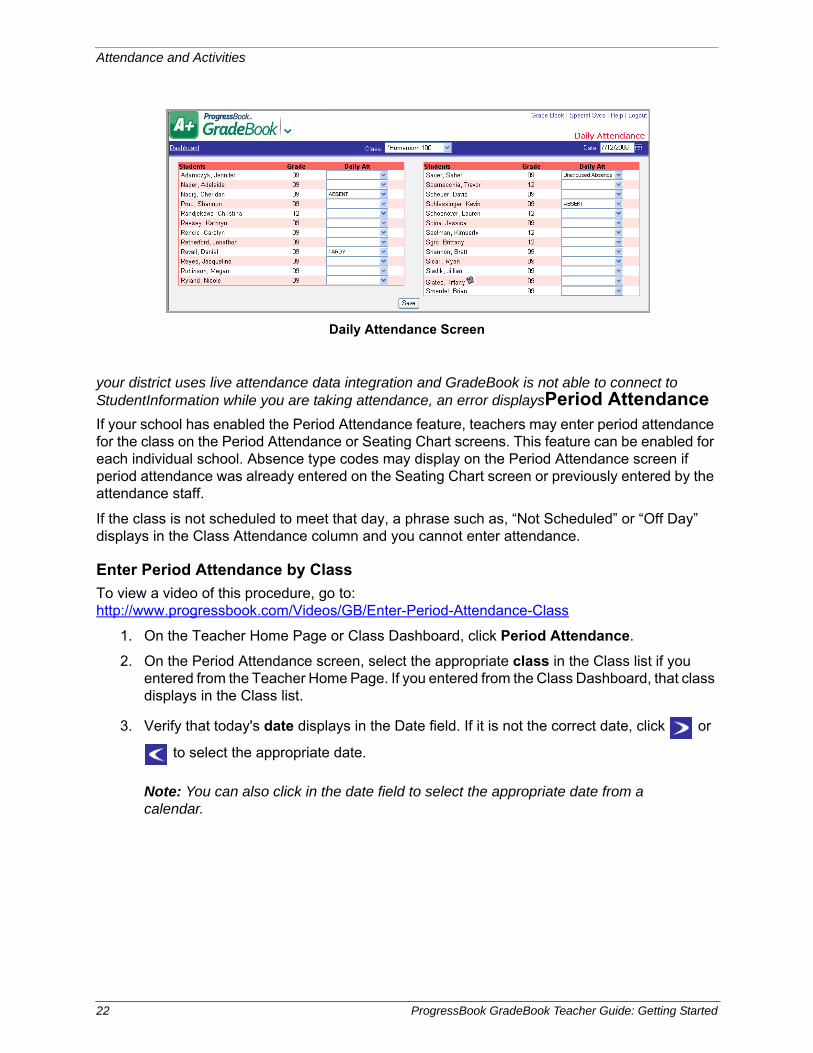
Daily AttendanceIn the absence of a formal homeroom, teachers can take daily attendance using a class designated by office administrators. If you take daily attendance in GradeBook, you should take it every day, even if you do not select any of the attendance codes. Clicking Save on the Daily Attendance screen denotes that daily attendance was taken. Once daily attendance has been saved, most schools require the school attendance personnel to make necessary changes to the attendance.
The available attendance codes are set up by the GradeBook system manager and may vary for each school.
Note: If a student has withdrawn from a class, a red W displays next to the student.
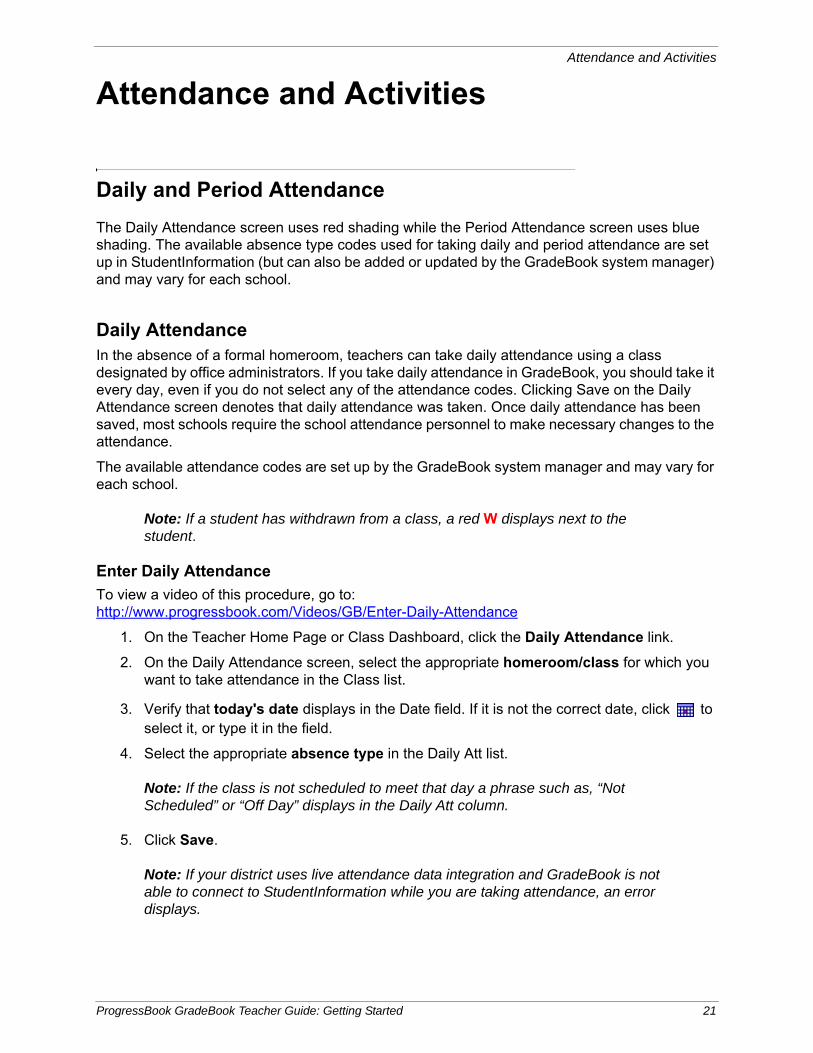
Enter Daily Attendance
To view a video of this procedure, go to:http://www.progressbook.com/Videos/GB/Enter-Daily-Attendance
1. On the Teacher Home Page or Class Dashboard, click the Daily Attendance link.
2. On the Daily Attendance screen, select the appropriate homeroom/class for which you want to take attendance in the Class list.
3. Verify that today's date displays in the Date field. If it is not the correct date, click to select it, or type it in the field.
4. Select the appropriate absence type in the Daily Att list.
Note: If the class is not scheduled to meet that day a phrase such as, “Not Scheduled” or “Off Day” displays in the Daily Att column.
5. Click Save.
Note: If your district uses live attendance data integration and GradeBook is not able to connect to StudentInformation while you are taking attendance, an error displays.
ProgressBook GradeBook Teacher Guide: Getting Started 21
Attendance and Activities
your district uses live attendance data integration and GradeBook is not able to connect to StudentInformation while you are taking attendance, an error displaysPeriod AttendanceIf your school has enabled the Period Attendance feature, teachers may enter period attendance for the class on the Period Attendance or Seating Chart screens. This feature can be enabled for each individual school. Absence type codes may display on the Period Attendance screen if period attendance was already entered on the Seating Chart screen or previously entered by the attendance staff.
If the class is not scheduled to meet that day, a phrase such as, “Not Scheduled” or “Off Day” displays in the Class Attendance column and you cannot enter attendance.
Enter Period Attendance by Class
To view a video of this procedure, go to:http://www.progressbook.com/Videos/GB/Enter-Period-Attendance-Class
1. On the Teacher Home Page or Class Dashboard, click Period Attendance.
2. On the Period Attendance screen, select the appropriate class in the Class list if you entered from the Teacher Home Page. If you entered from the Class Dashboard, that class displays in the Class list.
3. Verify that today's date displays in the Date field. If it is not the correct date, click or
to select the appropriate date.
Note: You can also click in the date field to select the appropriate date from a calendar.
Daily Attendance Screen
22 ProgressBook GradeBook Teacher Guide: Getting Started
Attendance and Activities
Note: If your school has enabled the Prior Day feature, you cannot enter or modify period attendance on the Period Attendance screen or Seating Chart on a day that is past the number of days set to allow for period attendance. The list of attendance codes is not available in the Class Attendance list on the Period Attendance screen, and the following message displays, “Altering period attendance in the past is only available for X day(s) prior to the current date.”
4. Select the appropriate absence type in the Class Attendance list. Leaving the absence type blank indicates the student is present.
Note: The available absence type codes are set up by your district's GradeBook system manager and may vary for each school.
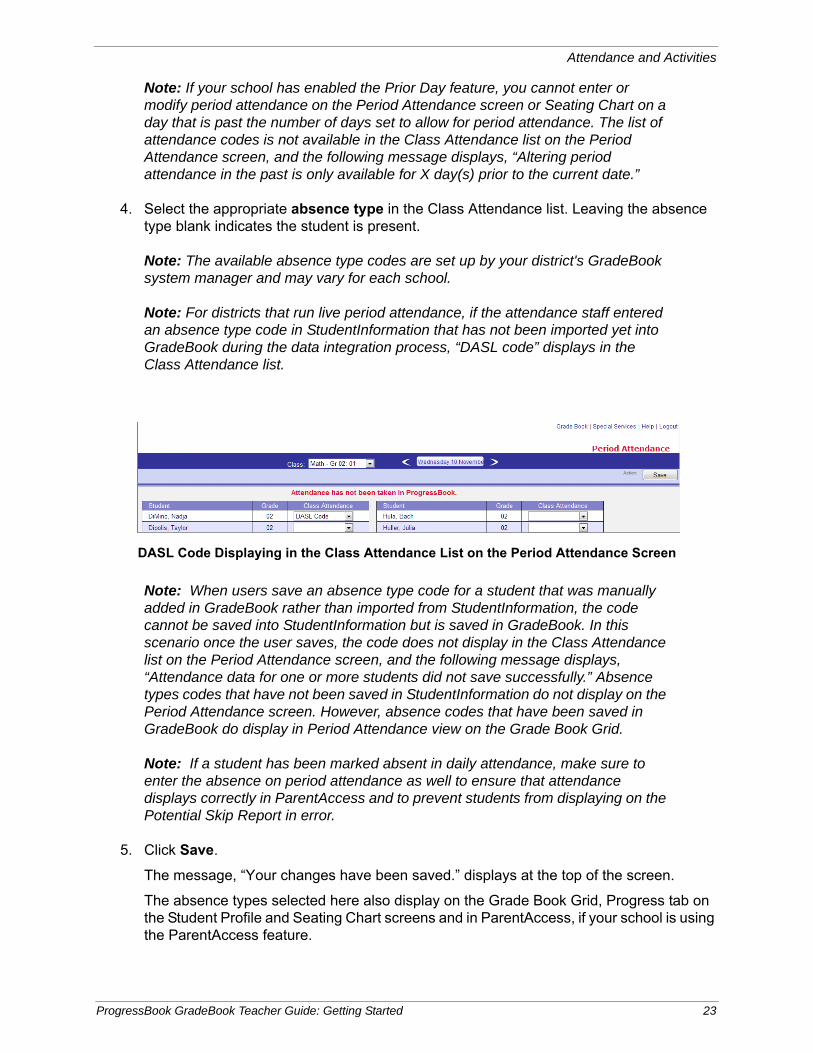
Note: For districts that run live period attendance, if the attendance staff entered an absence type code in StudentInformation that has not been imported yet into GradeBook during the data integration process, “DASL code” displays in the Class Attendance list.
Note: When users save an absence type code for a student that was manually added in GradeBook rather than imported from StudentInformation, the code cannot be saved into StudentInformation but is saved in GradeBook. In this scenario once the user saves, the code does not display in the Class Attendance list on the Period Attendance screen, and the following message displays, “Attendance data for one or more students did not save successfully.” Absence types codes that have not been saved in StudentInformation do not display on the Period Attendance screen. However, absence codes that have been saved in GradeBook do display in Period Attendance view on the Grade Book Grid.
Note: If a student has been marked absent in daily attendance, make sure to enter the absence on period attendance as well to ensure that attendance displays correctly in ParentAccess and to prevent students from displaying on the Potential Skip Report in error.
5. Click Save.
The message, “Your changes have been saved.” displays at the top of the screen.
The absence types selected here also display on the Grade Book Grid, Progress tab on the Student Profile and Seating Chart screens and in ParentAccess, if your school is using the ParentAccess feature.
DASL Code Displaying in the Class Attendance List on the Period Attendance Screen
ProgressBook GradeBook Teacher Guide: Getting Started 23
Attendance and Activities
Enter Lunch Counts
To view a video of this procedure, go to:http://www.progressbook.com/Videos/GB/Enter-Lunch-Counts
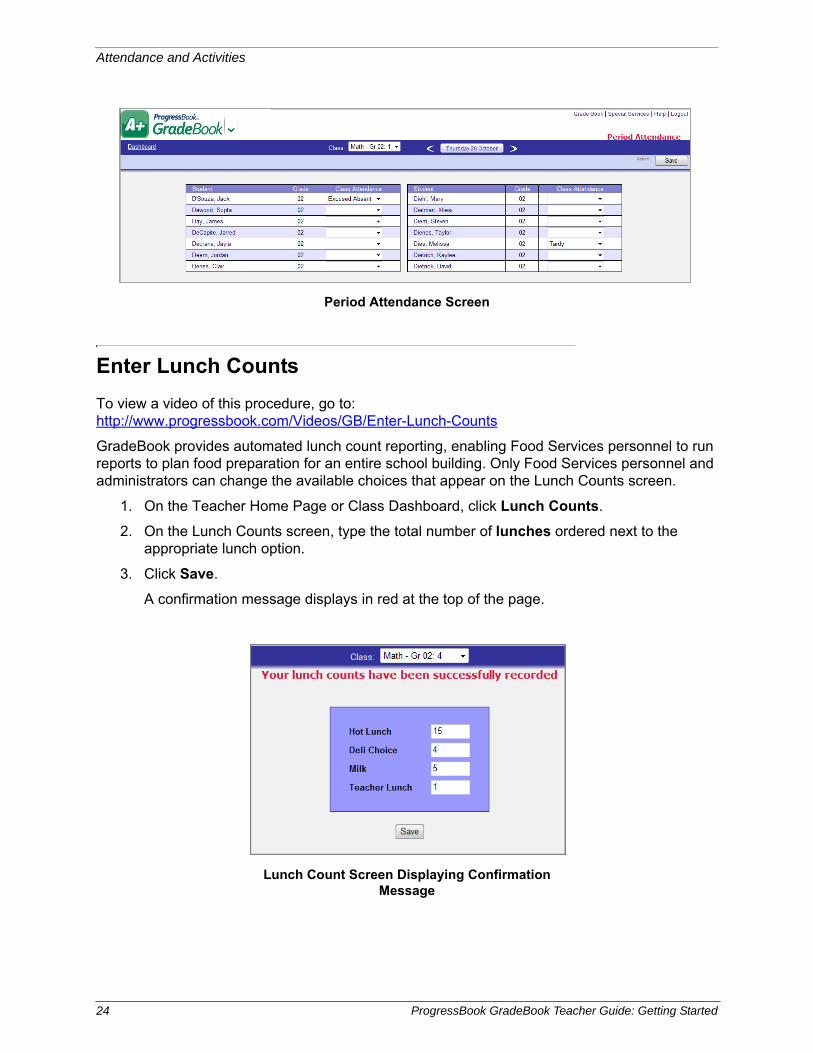
GradeBook provides automated lunch count reporting, enabling Food Services personnel to run reports to plan food preparation for an entire school building. Only Food Services personnel and administrators can change the available choices that appear on the Lunch Counts screen.
1. On the Teacher Home Page or Class Dashboard, click Lunch Counts.
2. On the Lunch Counts screen, type the total number of lunches ordered next to the appropriate lunch option.
3. Click Save.
A confirmation message displays in red at the top of the page.
Period Attendance Screen
Lunch Count Screen Displaying Confirmation Message
24 ProgressBook GradeBook Teacher Guide: Getting Started
Attendance and Activities
Send Class Notifications
To view a video of this procedure, go to:http://www.progressbook.com/Videos/GB/Send-Class-Notifications
From the Class Dashboard, you can send emails to students, parents, or students and parents who have registered an email address in ParentAccess if your district has enabled the feature.
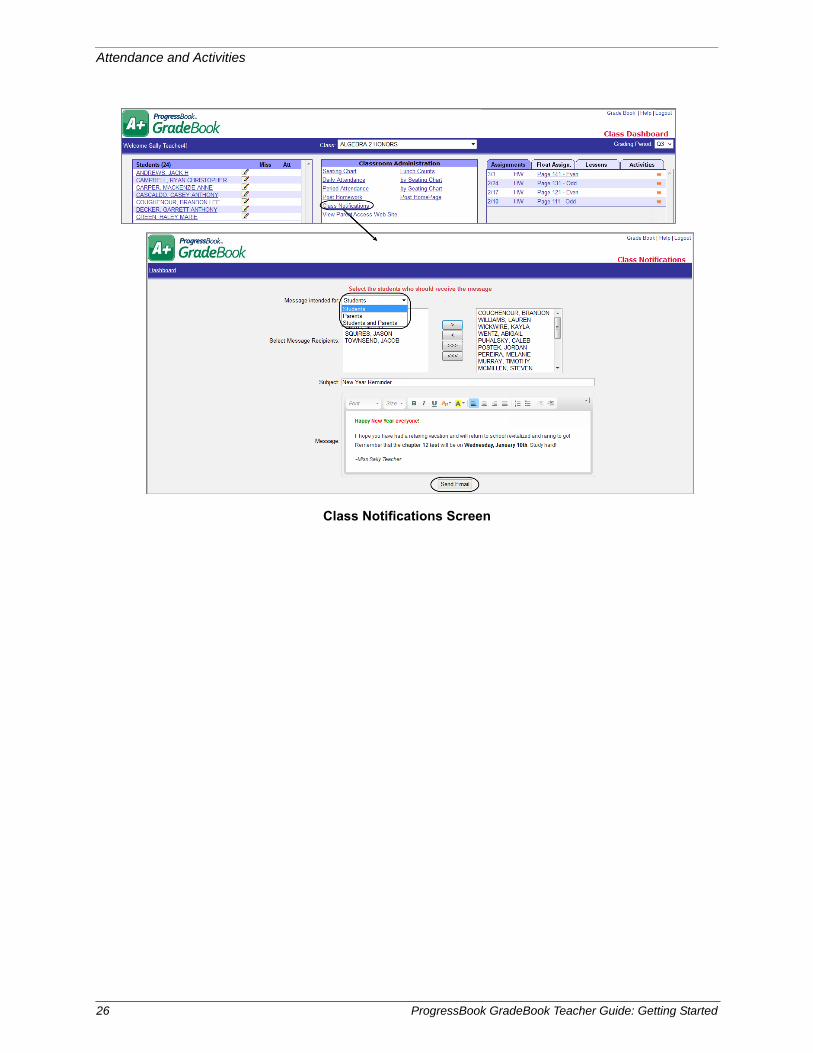
1. On the Class Dashboard under Classroom Administration, click Class Notifications.
Note: If you have not entered an email address in GradeBook, or if you set up an email address that is not a district supplied email address, a warning message displays and instructs you to enter or update your email address.
2. On the Class Notifications screen, in the Message intended for drop-down list, select “Students,” “Parents,” or “Students and Parents.”
Note: A student’s name only appears in the Select Message Recipients field if the student or the student’s parent has entered an email address in ParentAccess.
3. In the Select Message Recipients field, select the student(s) for whom you want to send
an email, and then click .
The name(s) display in the box on the right side of the screen.
Note: On the Class Notifications screen, students display in the order you selected on the Class Roster screen, if applicable. If you hid a student on the Class Roster screen, the Class Notifications screen hides the student.
Note: If you want to select all students, click . To remove a student, click
, or to remove all students, click .
4. In the Subject field, enter the subject of the email.
5. In the Message field, enter the email message.
Spell check automatically alerts you of spelling errors as you type.
6. Optional: Use the built-in text editor to format your message as desired.
7. Click Send Email.
The notification message is sent to you, and a bcc (blind carbon copy) is sent to each of the message recipients that you selected.
ProgressBook GradeBook Teacher Guide: Getting Started 25
Attendance and Activities
Class Notifications Screen
26 ProgressBook GradeBook Teacher Guide: Getting Started
Student Profile Information
Student Profile Information
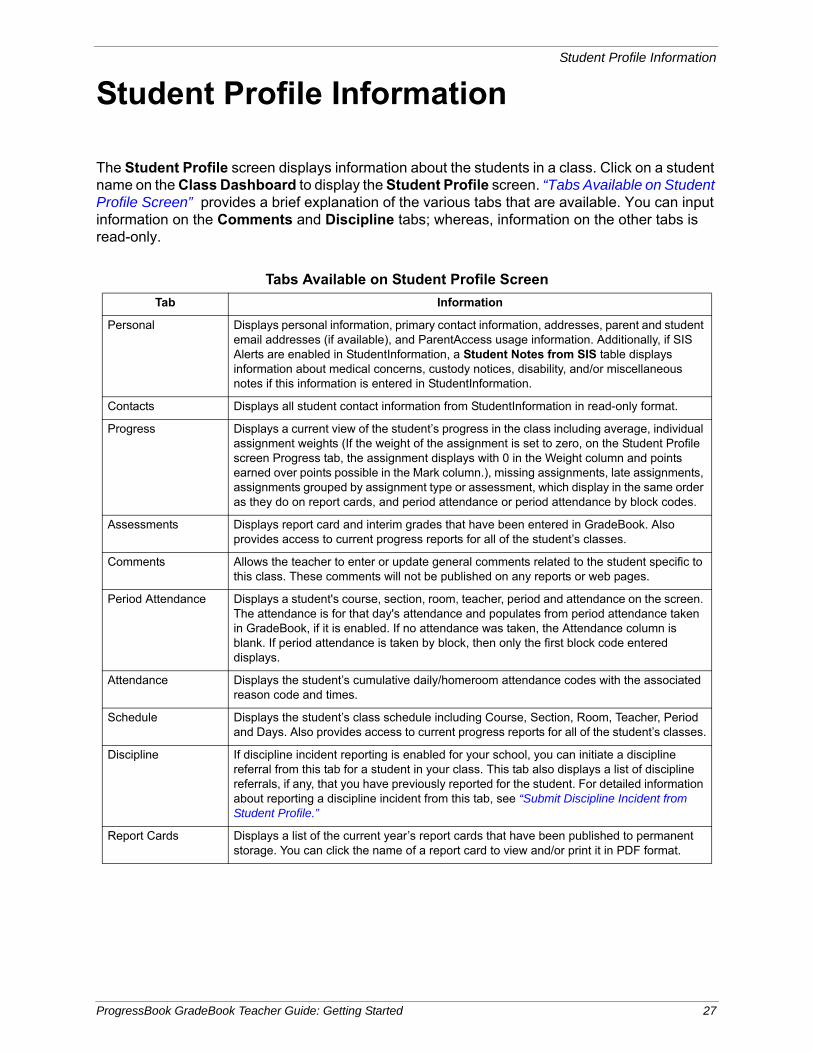
The Student Profile screen displays information about the students in a class. Click on a student name on the Class Dashboard to display the Student Profile screen. “Tabs Available on Student Profile Screen” provides a brief explanation of the various tabs that are available. You can input information on the Comments and Discipline tabs; whereas, information on the other tabs is read-only.
Tabs Available on Student Profile Screen
Tab Information
Personal Displays personal information, primary contact information, addresses, parent and student email addresses (if available), and ParentAccess usage information. Additionally, if SIS Alerts are enabled in StudentInformation, a Student Notes from SIS table displays information about medical concerns, custody notices, disability, and/or miscellaneous notes if this information is entered in StudentInformation.
Contacts Displays all student contact information from StudentInformation in read-only format.
Progress Displays a current view of the student’s progress in the class including average, individual assignment weights (If the weight of the assignment is set to zero, on the Student Profile screen Progress tab, the assignment displays with 0 in the Weight column and points earned over points possible in the Mark column.), missing assignments, late assignments, assignments grouped by assignment type or assessment, which display in the same order as they do on report cards, and period attendance or period attendance by block codes.
Assessments Displays report card and interim grades that have been entered in GradeBook. Also provides access to current progress reports for all of the student’s classes.
Comments Allows the teacher to enter or update general comments related to the student specific to this class. These comments will not be published on any reports or web pages.
Period Attendance Displays a student's course, section, room, teacher, period and attendance on the screen. The attendance is for that day's attendance and populates from period attendance taken in GradeBook, if it is enabled. If no attendance was taken, the Attendance column is blank. If period attendance is taken by block, then only the first block code entered displays.
Attendance Displays the student’s cumulative daily/homeroom attendance codes with the associated reason code and times.
Schedule Displays the student’s class schedule including Course, Section, Room, Teacher, Period and Days. Also provides access to current progress reports for all of the student’s classes.
Discipline If discipline incident reporting is enabled for your school, you can initiate a discipline referral from this tab for a student in your class. This tab also displays a list of discipline referrals, if any, that you have previously reported for the student. For detailed information about reporting a discipline incident from this tab, see “Submit Discipline Incident from Student Profile.”
Report Cards Displays a list of the current year’s report cards that have been published to permanent storage. You can click the name of a report card to view and/or print it in PDF format.
ProgressBook GradeBook Teacher Guide: Getting Started 27
Student Profile Information
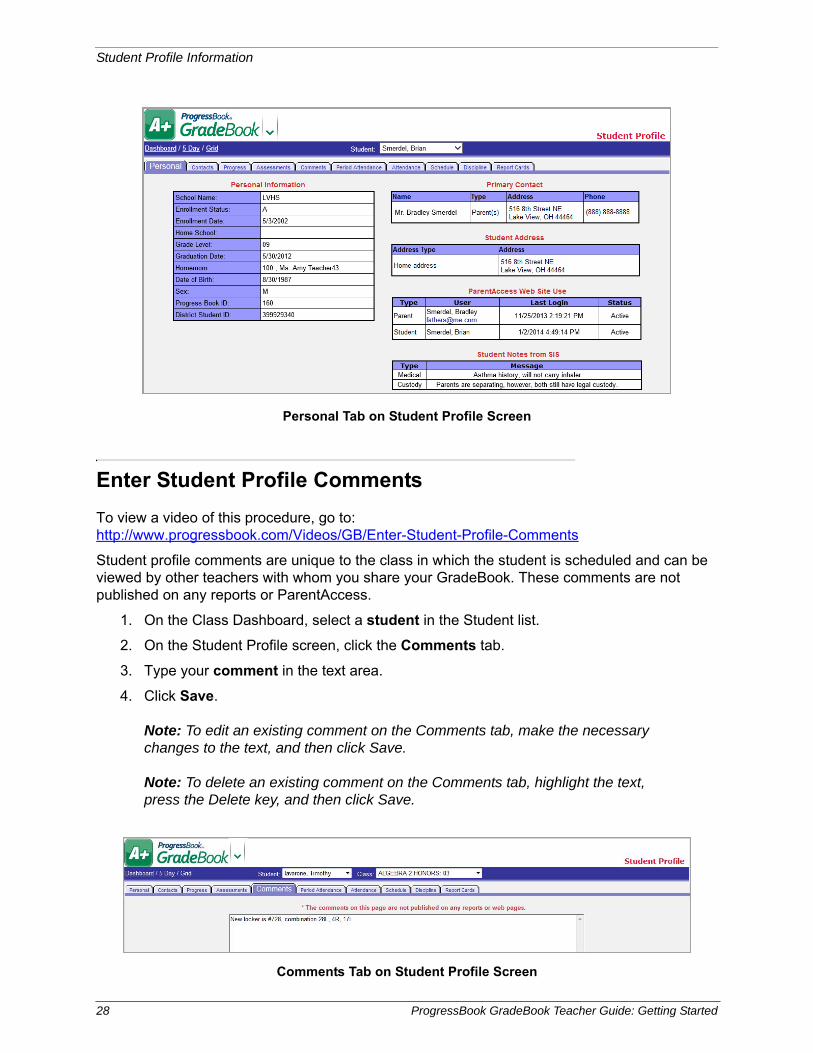
Enter Student Profile Comments
To view a video of this procedure, go to:http://www.progressbook.com/Videos/GB/Enter-Student-Profile-Comments
Student profile comments are unique to the class in which the student is scheduled and can be viewed by other teachers with whom you share your GradeBook. These comments are not published on any reports or ParentAccess.
1. On the Class Dashboard, select a student in the Student list.
2. On the Student Profile screen, click the Comments tab.
3. Type your comment in the text area.
4. Click Save.
Note: To edit an existing comment on the Comments tab, make the necessary changes to the text, and then click Save.
Note: To delete an existing comment on the Comments tab, highlight the text, press the Delete key, and then click Save.
Personal Tab on Student Profile Screen
Comments Tab on Student Profile Screen
28 ProgressBook GradeBook Teacher Guide: Getting Started
Discipline
Discipline
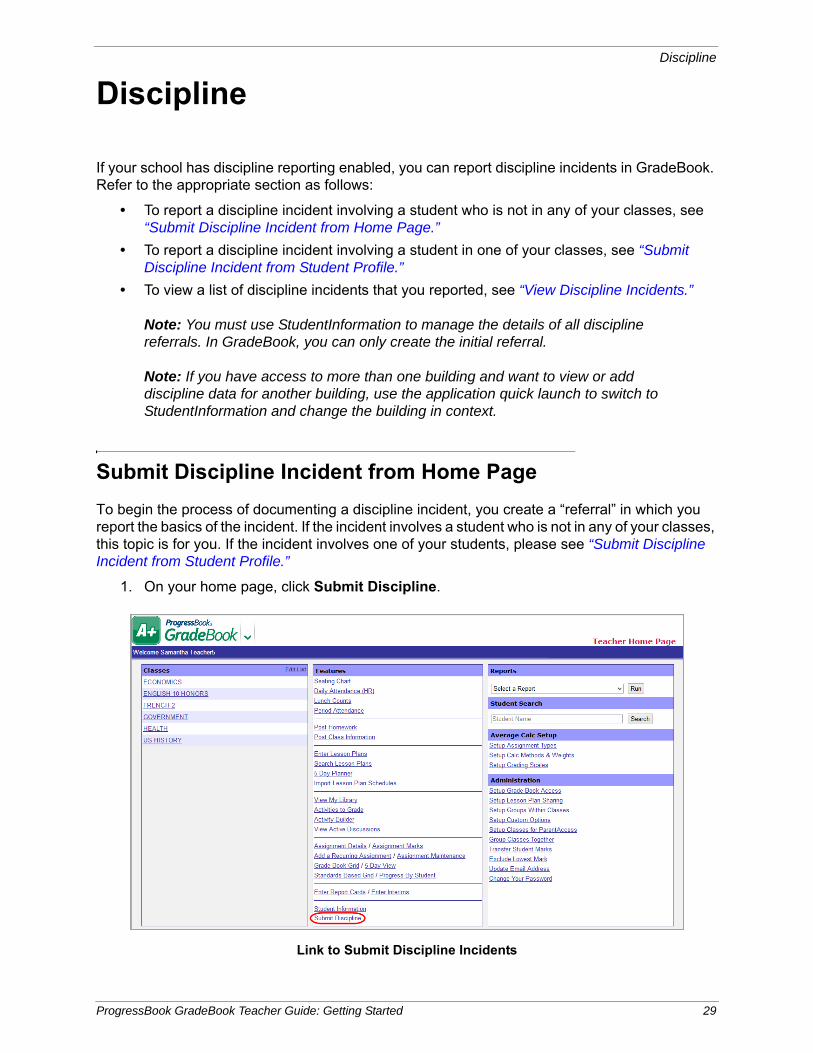
If your school has discipline reporting enabled, you can report discipline incidents in GradeBook. Refer to the appropriate section as follows:
• To report a discipline incident involving a student who is not in any of your classes, see “Submit Discipline Incident from Home Page.”
• To report a discipline incident involving a student in one of your classes, see “Submit Discipline Incident from Student Profile.”
• To view a list of discipline incidents that you reported, see “View Discipline Incidents.”
Note: You must use StudentInformation to manage the details of all discipline referrals. In GradeBook, you can only create the initial referral.
Note: If you have access to more than one building and want to view or add discipline data for another building, use the application quick launch to switch to StudentInformation and change the building in context.
Submit Discipline Incident from Home Page
To begin the process of documenting a discipline incident, you create a “referral” in which you report the basics of the incident. If the incident involves a student who is not in any of your classes, this topic is for you. If the incident involves one of your students, please see “Submit Discipline Incident from Student Profile.”
1. On your home page, click Submit Discipline.
Link to Submit Discipline Incidents
ProgressBook GradeBook Teacher Guide: Getting Started 29
Discipline
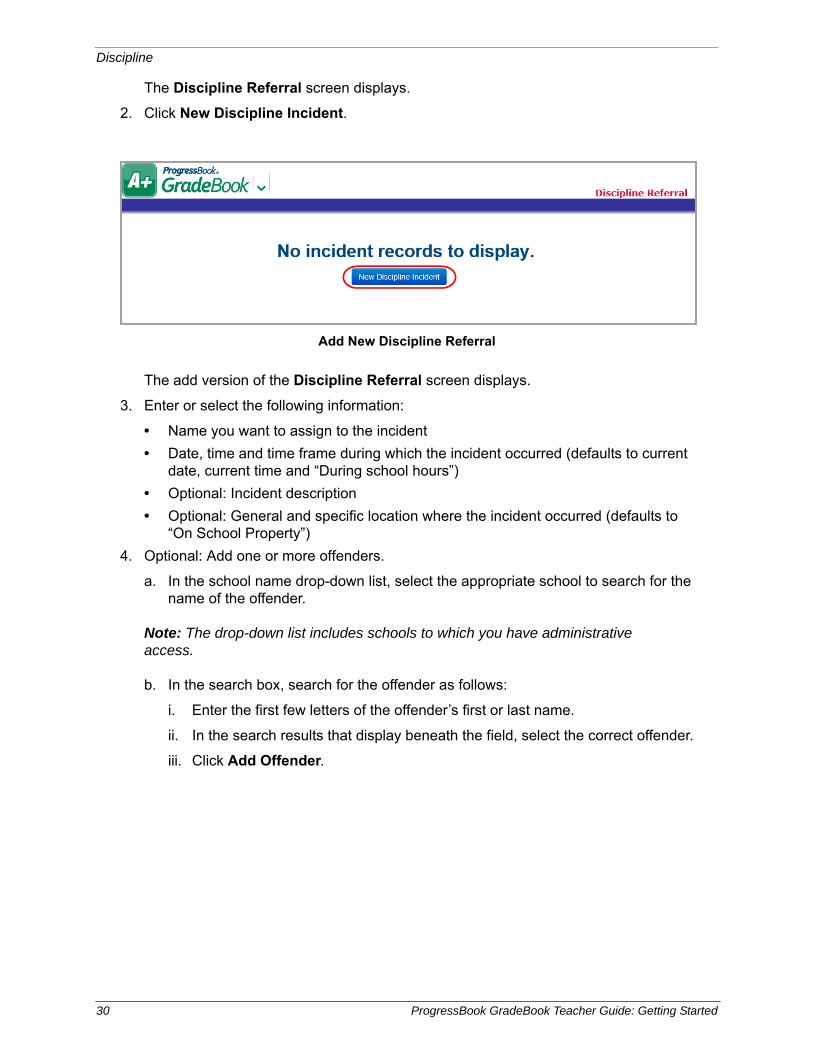
The Discipline Referral screen displays.
2. Click New Discipline Incident.
The add version of the Discipline Referral screen displays.
3. Enter or select the following information:
• Name you want to assign to the incident
• Date, time and time frame during which the incident occurred (defaults to current date, current time and “During school hours”)
• Optional: Incident description
• Optional: General and specific location where the incident occurred (defaults to “On School Property”)
4. Optional: Add one or more offenders.
a. In the school name drop-down list, select the appropriate school to search for the name of the offender.
Note: The drop-down list includes schools to which you have administrative access.
b. In the search box, search for the offender as follows:
i. Enter the first few letters of the offender’s first or last name.
ii. In the search results that display beneath the field, select the correct offender.
iii. Click Add Offender.
Add New Discipline Referral
30 ProgressBook GradeBook Teacher Guide: Getting Started
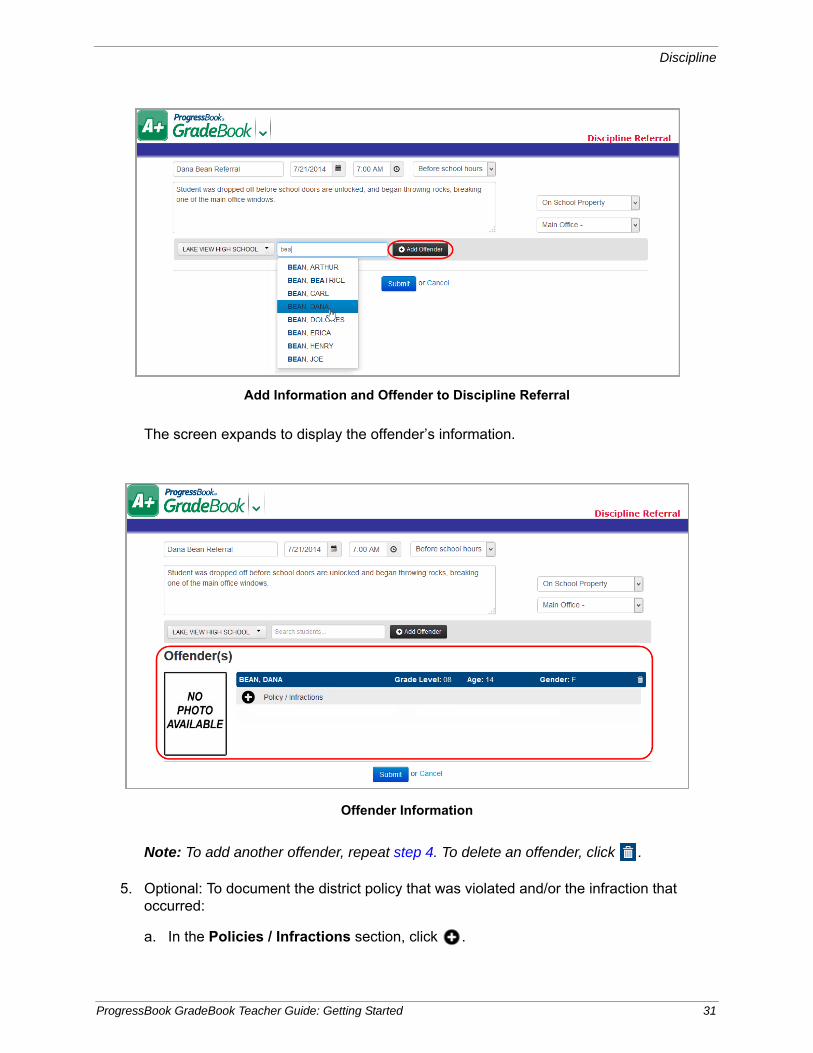
Discipline
The screen expands to display the offender’s information.
Note: To add another offender, repeat step 4. To delete an offender, click .
5. Optional: To document the district policy that was violated and/or the infraction that occurred:
a. In the Policies / Infractions section, click .
Add Information and Offender to Discipline Referral
Offender Information
ProgressBook GradeBook Teacher Guide: Getting Started 31
Discipline
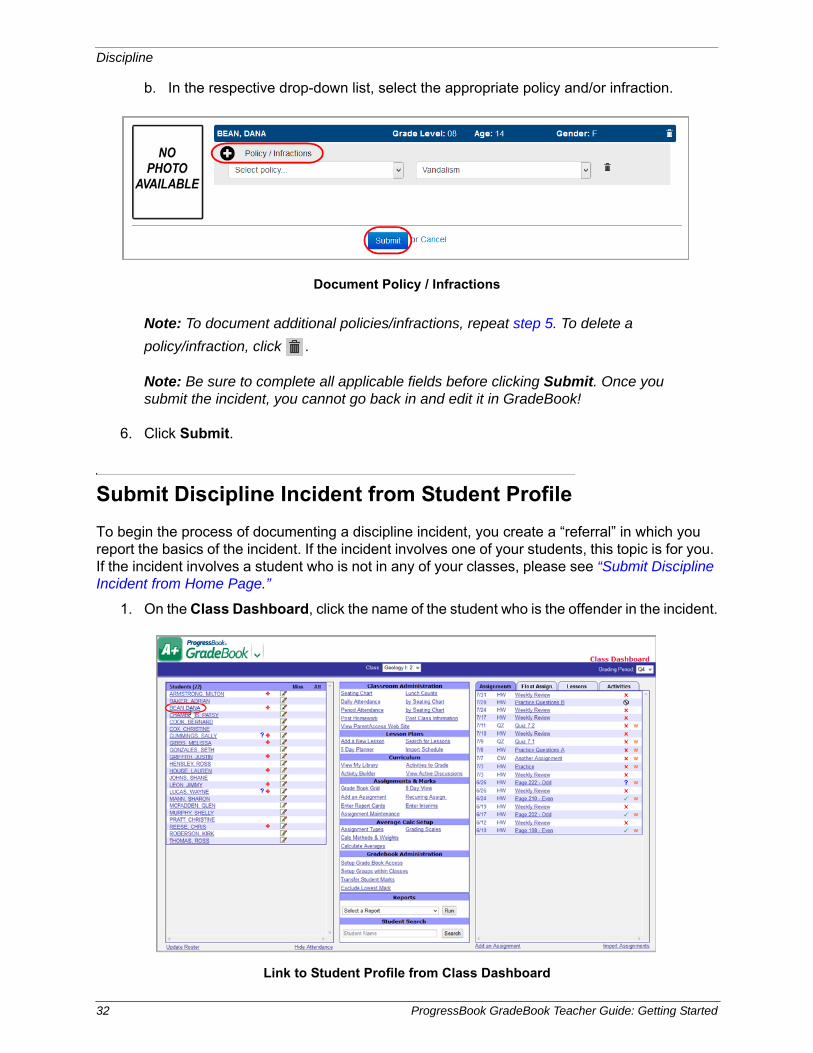
b. In the respective drop-down list, select the appropriate policy and/or infraction.
Note: To document additional policies/infractions, repeat step 5. To delete a
policy/infraction, click .
Note: Be sure to complete all applicable fields before clicking Submit. Once you submit the incident, you cannot go back in and edit it in GradeBook!
6. Click Submit.
Submit Discipline Incident from Student Profile
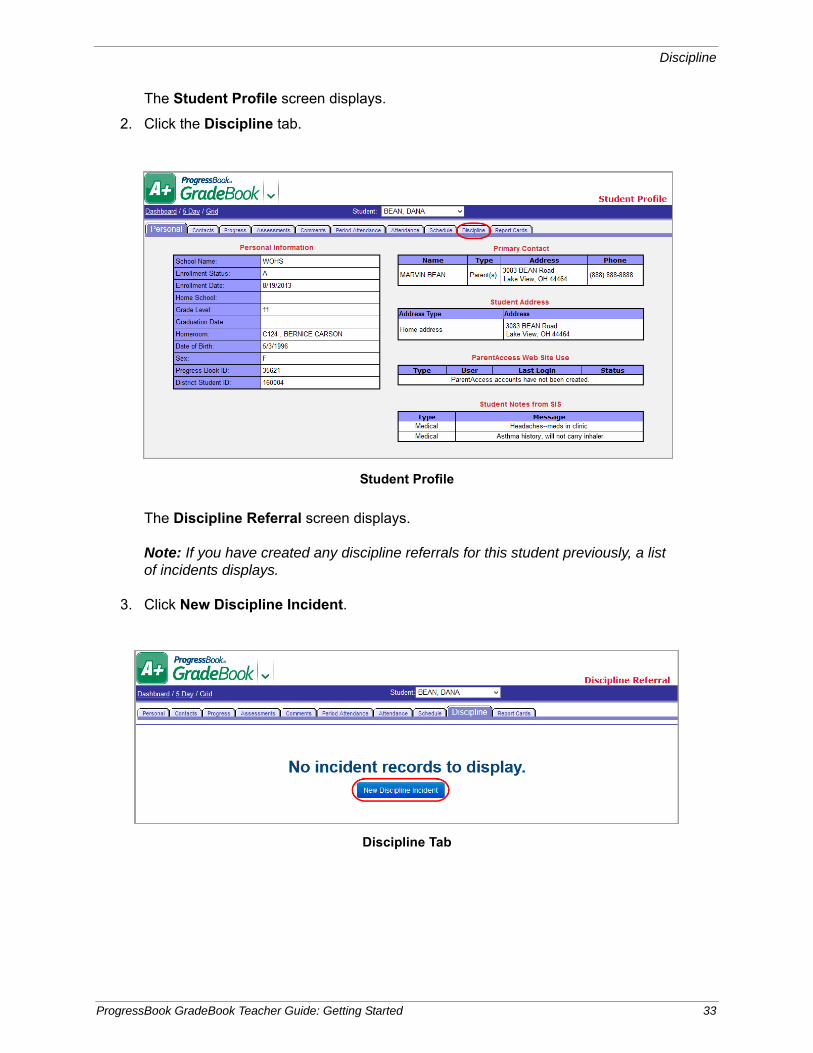
To begin the process of documenting a discipline incident, you create a “referral” in which you report the basics of the incident. If the incident involves one of your students, this topic is for you. If the incident involves a student who is not in any of your classes, please see “Submit Discipline Incident from Home Page.”
1. On the Class Dashboard, click the name of the student who is the offender in the incident.
Document Policy / Infractions
Link to Student Profile from Class Dashboard
32 ProgressBook GradeBook Teacher Guide: Getting Started
Discipline
The Student Profile screen displays.
2. Click the Discipline tab.
The Discipline Referral screen displays.
Note: If you have created any discipline referrals for this student previously, a list of incidents displays.
3. Click New Discipline Incident.
Student Profile
Discipline Tab
ProgressBook GradeBook Teacher Guide: Getting Started 33
Discipline
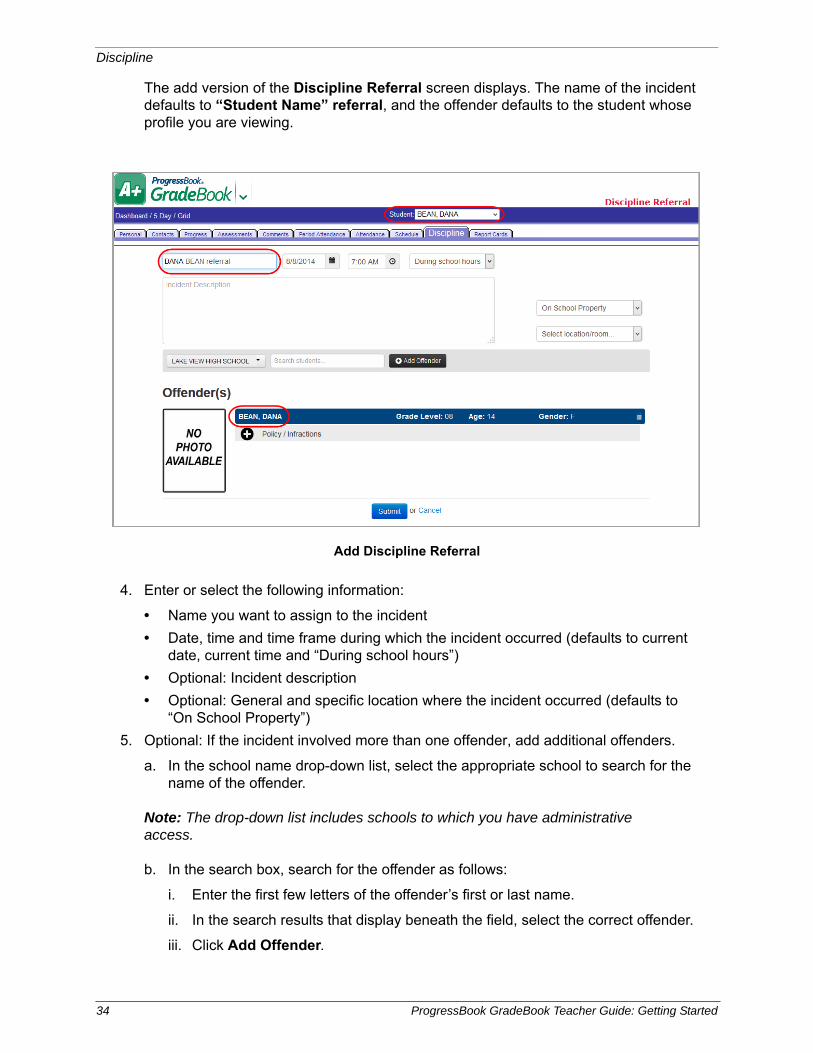
The add version of the Discipline Referral screen displays. The name of the incident defaults to “Student Name” referral, and the offender defaults to the student whose profile you are viewing.
4. Enter or select the following information:
• Name you want to assign to the incident
• Date, time and time frame during which the incident occurred (defaults to current date, current time and “During school hours”)
• Optional: Incident description
• Optional: General and specific location where the incident occurred (defaults to “On School Property”)
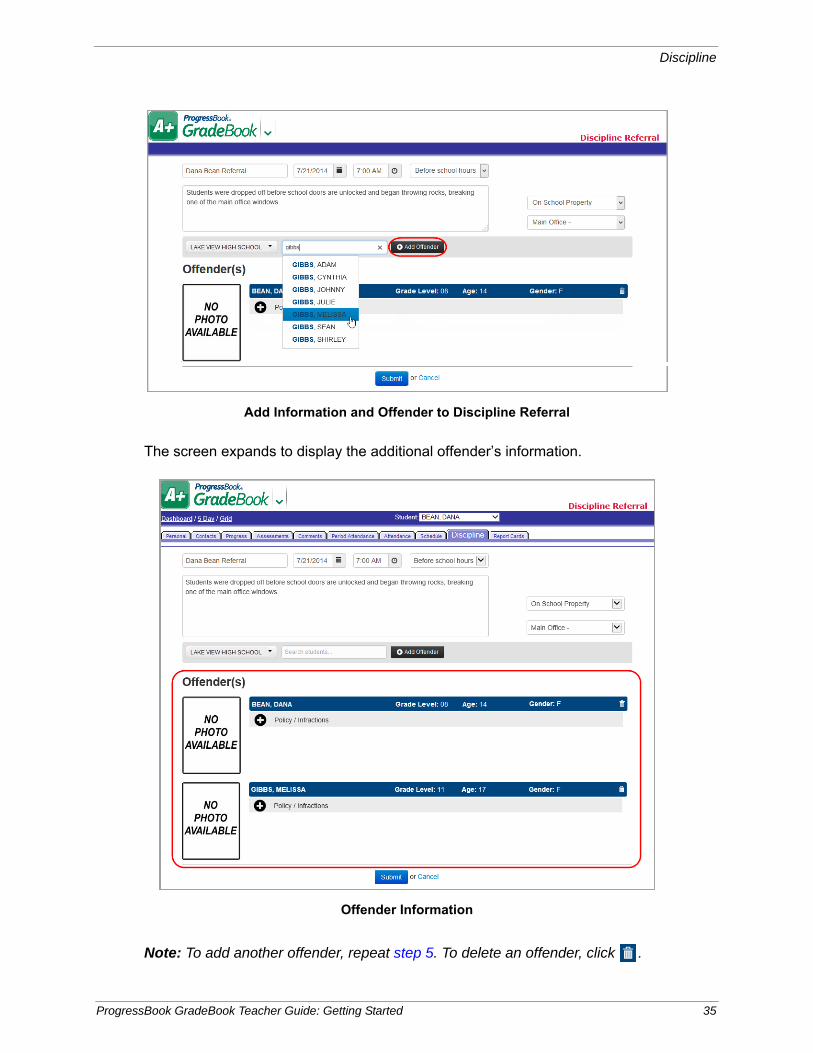
5. Optional: If the incident involved more than one offender, add additional offenders.
a. In the school name drop-down list, select the appropriate school to search for the name of the offender.
Note: The drop-down list includes schools to which you have administrative access.
b. In the search box, search for the offender as follows:
i. Enter the first few letters of the offender’s first or last name.
ii. In the search results that display beneath the field, select the correct offender.
iii. Click Add Offender.
Add Discipline Referral
34 ProgressBook GradeBook Teacher Guide: Getting Started
Discipline
The screen expands to display the additional offender’s information.
Note: To add another offender, repeat step 5. To delete an offender, click .
Add Information and Offender to Discipline Referral
Offender Information
ProgressBook GradeBook Teacher Guide: Getting Started 35
Discipline
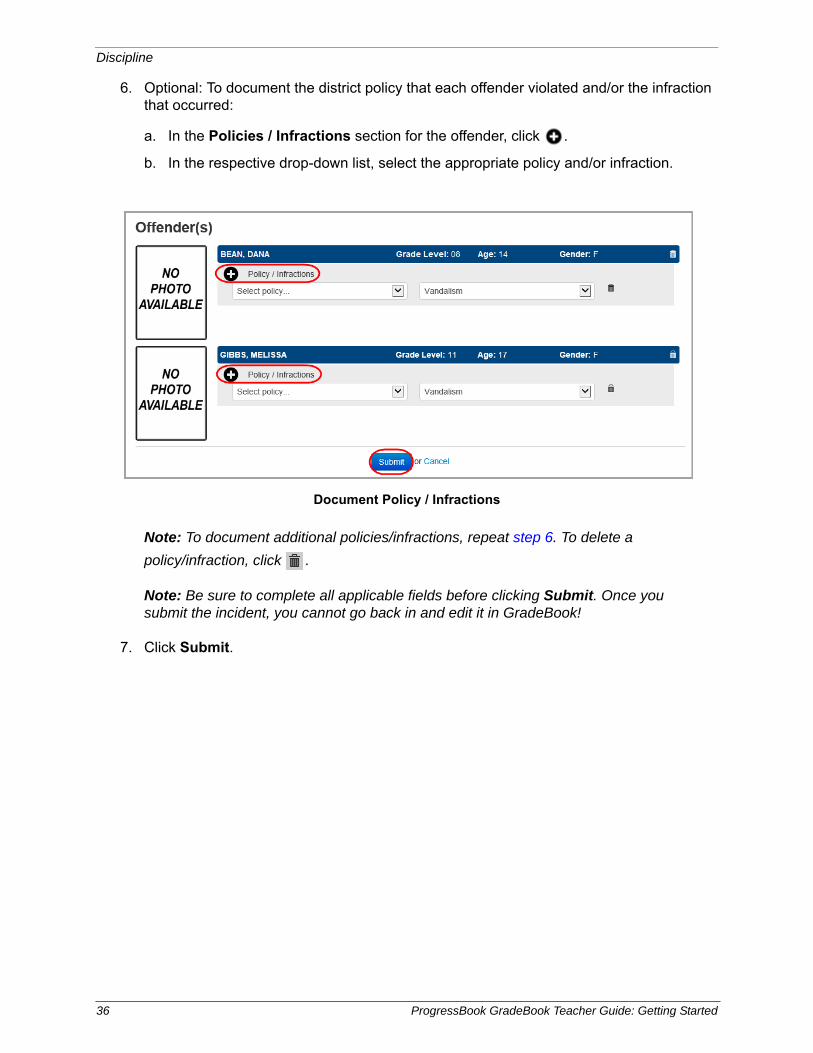
6. Optional: To document the district policy that each offender violated and/or the infraction that occurred:
a. In the Policies / Infractions section for the offender, click .
b. In the respective drop-down list, select the appropriate policy and/or infraction.
Note: To document additional policies/infractions, repeat step 6. To delete a
policy/infraction, click .
Note: Be sure to complete all applicable fields before clicking Submit. Once you submit the incident, you cannot go back in and edit it in GradeBook!
7. Click Submit.
Document Policy / Infractions
36 ProgressBook GradeBook Teacher Guide: Getting Started
Discipline
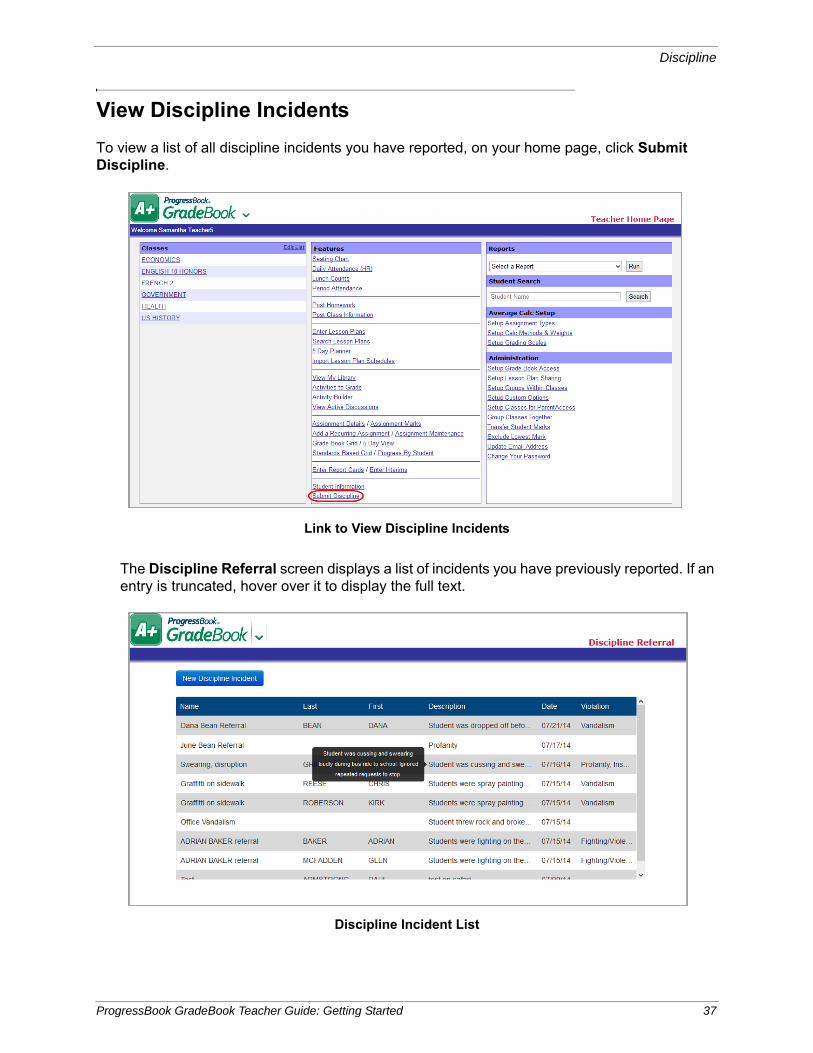
View Discipline Incidents
To view a list of all discipline incidents you have reported, on your home page, click Submit Discipline.
The Discipline Referral screen displays a list of incidents you have previously reported. If an entry is truncated, hover over it to display the full text.
Link to View Discipline Incidents
Discipline Incident List
ProgressBook GradeBook Teacher Guide: Getting Started 37

Discipline
This page intentionally left blank.
38 ProgressBook GradeBook Teacher Guide: Getting Started
GradeBook Setup
GradeBook Setup
Assignment Types
You must set up categories of classroom activities such as classwork, homework, quizzes, tests, etc., and assign a mark type to each category to be able to create assignments and share individual assignments that use those categories in multiple classes. You must also create a unique name and abbreviation for each assignment type.
GradeBook allows a variety of mark types including points, letters, percentages, pass/fail and more. It is recommended to use points as the mark type for all assignment types. GradeBook then translates the student averages into the appropriate letter grade based on the grading scale setup option to be selected later.
It is not recommended to use letter and number mark types within the same class if the class uses traditional report cards because GradeBook will not be able to calculate an average. In classes that use standards-based report cards, it is possible to combine letter and number mark types within the same class to calculate students’ grades, depending on the calculation method used for each assessment. But generally, you would not combine letter and number mark types within the same assessment calculation. See “Custom Setup 2 Grading Scale for Standards-Based Report Cards.”
Set Up Assignment TypesTo view a video of this procedure, go to:http://www.progressbook.com/Videos/GB/Set-Up-Assignment-Types
Before you begin creating assignments, you must set up categories of classroom activities such as classwork, homework, quizzes, tests, etc., and assign a mark type to each category. GradeBook allows a variety of mark types including points, letters, percentages, pass/fail and more. However, points is the recommended mark type for all assignment types.
1. On the Teacher Home Page, select Setup Assignment Types
Note: Each assignment type name and abbreviation must be unique.
2. On the Assignment Types screen, enter the name for the assignment type in the Name column.
3. Enter an abbreviation, up to four characters, for each assignment type in the Abbr column.
Note: It is recommended to use points as the mark type for all assignment types. Do not use letter and number mark types within the same class because GradeBook will not be able to calculate an average.
4. Select the appropriate mark type from the list for each assignment type.
Note: The mark types selected for the assignment types determine the type of mark you can enter in the Mark field throughout GradeBook.
ProgressBook GradeBook Teacher Guide: Getting Started 39
GradeBook Setup
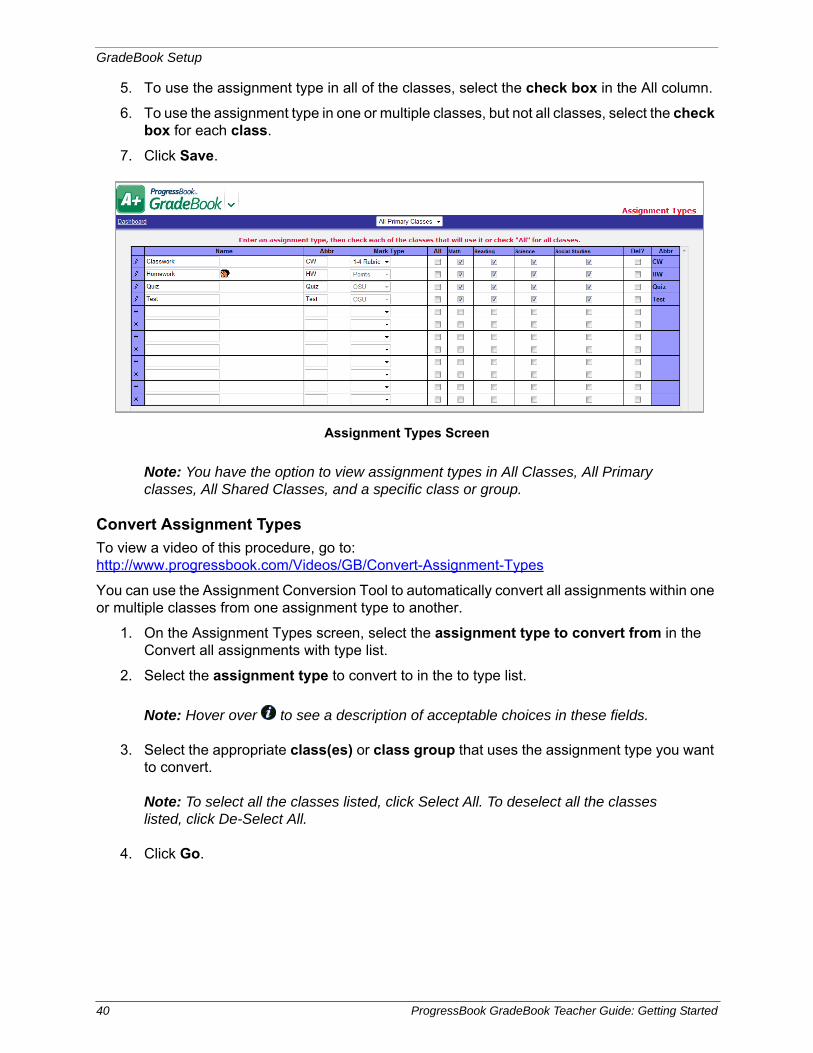
5. To use the assignment type in all of the classes, select the check box in the All column.
6. To use the assignment type in one or multiple classes, but not all classes, select the check box for each class.
7. Click Save.
Note: You have the option to view assignment types in All Classes, All Primary classes, All Shared Classes, and a specific class or group.
Convert Assignment Types
To view a video of this procedure, go to:http://www.progressbook.com/Videos/GB/Convert-Assignment-Types
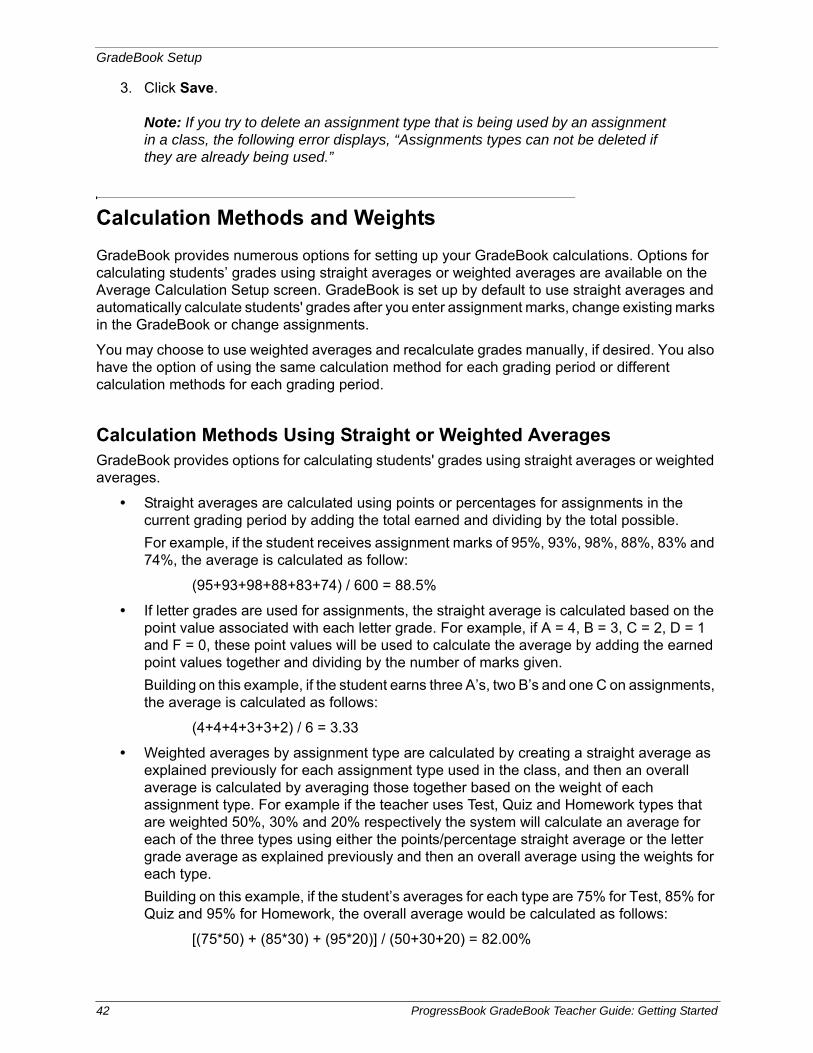
You can use the Assignment Conversion Tool to automatically convert all assignments within one or multiple classes from one assignment type to another.
1. On the Assignment Types screen, select the assignment type to convert from in the Convert all assignments with type list.
2. Select the assignment type to convert to in the to type list.
Note: Hover over to see a description of acceptable choices in these fields.
3. Select the appropriate class(es) or class group that uses the assignment type you want to convert.
Note: To select all the classes listed, click Select All. To deselect all the classes listed, click De-Select All.
4. Click Go.
Assignment Types Screen
40 ProgressBook GradeBook Teacher Guide: Getting Started
GradeBook Setup
If the conversion was successful, the following message displays, “Your assignments were successfully converted.”
Delete Assignment Types
To view a video of this procedure, go to:http://www.progressbook.com/Videos/GB/Delete-Assignment-Types
You can delete an assignment type only if it is not being used by an assignment in a class. If the assignment type you want to delete is being used in an assignment, use the Assignment Conversion tool to convert that assignment type to another assignment type. Then, you can delete the desired assignment type.
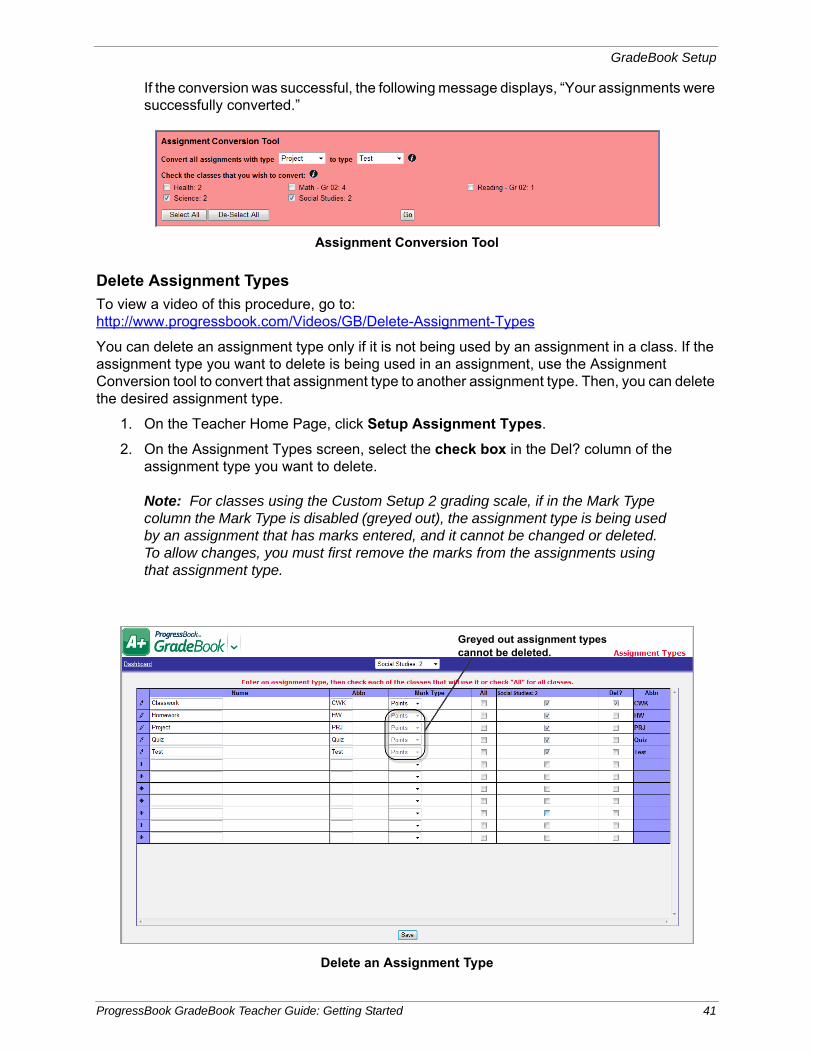
1. On the Teacher Home Page, click Setup Assignment Types.
2. On the Assignment Types screen, select the check box in the Del? column of the assignment type you want to delete.
Note: For classes using the Custom Setup 2 grading scale, if in the Mark Type column the Mark Type is disabled (greyed out), the assignment type is being used by an assignment that has marks entered, and it cannot be changed or deleted. To allow changes, you must first remove the marks from the assignments using that assignment type.
Assignment Conversion Tool
Delete an Assignment Type
Greyed out assignment types cannot be deleted.
ProgressBook GradeBook Teacher Guide: Getting Started 41
GradeBook Setup
3. Click Save.
Note: If you try to delete an assignment type that is being used by an assignment in a class, the following error displays, “Assignments types can not be deleted if they are already being used.”
Calculation Methods and Weights
GradeBook provides numerous options for setting up your GradeBook calculations. Options for calculating students’ grades using straight averages or weighted averages are available on the Average Calculation Setup screen. GradeBook is set up by default to use straight averages and automatically calculate students' grades after you enter assignment marks, change existing marks in the GradeBook or change assignments.
You may choose to use weighted averages and recalculate grades manually, if desired. You also have the option of using the same calculation method for each grading period or different calculation methods for each grading period.
Calculation Methods Using Straight or Weighted AveragesGradeBook provides options for calculating students' grades using straight averages or weighted averages.
• Straight averages are calculated using points or percentages for assignments in the current grading period by adding the total earned and dividing by the total possible.
For example, if the student receives assignment marks of 95%, 93%, 98%, 88%, 83% and 74%, the average is calculated as follow:
(95+93+98+88+83+74) / 600 = 88.5%
• If letter grades are used for assignments, the straight average is calculated based on the point value associated with each letter grade. For example, if A = 4, B = 3, C = 2, D = 1 and F = 0, these point values will be used to calculate the average by adding the earned point values together and dividing by the number of marks given.
Building on this example, if the student earns three A’s, two B’s and one C on assignments, the average is calculated as follows:
(4+4+4+3+3+2) / 6 = 3.33
• Weighted averages by assignment type are calculated by creating a straight average as explained previously for each assignment type used in the class, and then an overall average is calculated by averaging those together based on the weight of each assignment type. For example if the teacher uses Test, Quiz and Homework types that are weighted 50%, 30% and 20% respectively the system will calculate an average for each of the three types using either the points/percentage straight average or the letter grade average as explained previously and then an overall average using the weights for each type.
Building on this example, if the student’s averages for each type are 75% for Test, 85% for Quiz and 95% for Homework, the overall average would be calculated as follows:
[(75*50) + (85*30) + (95*20)] / (50+30+20) = 82.00%
42 ProgressBook GradeBook Teacher Guide: Getting Started
GradeBook Setup
Alternatively, if the teacher does not give any Quiz assignments during the grading period, and the student earned 75% for Test and 95% for Homework, the overall average would be calculated as follows:
[(75*50) + (95*20)] / (50+20) = 80.71%
GradeBook will then translate these averages into the appropriate letter grade for the report card based on the grading scale used in the class. Grading scales are defined by the GradeBook system manager and selected by the teacher during the initial GradeBook set up. The grading scale should include both a percentage range for each letter grade as well as a point range in the event teachers are using letter grades for their assignments.
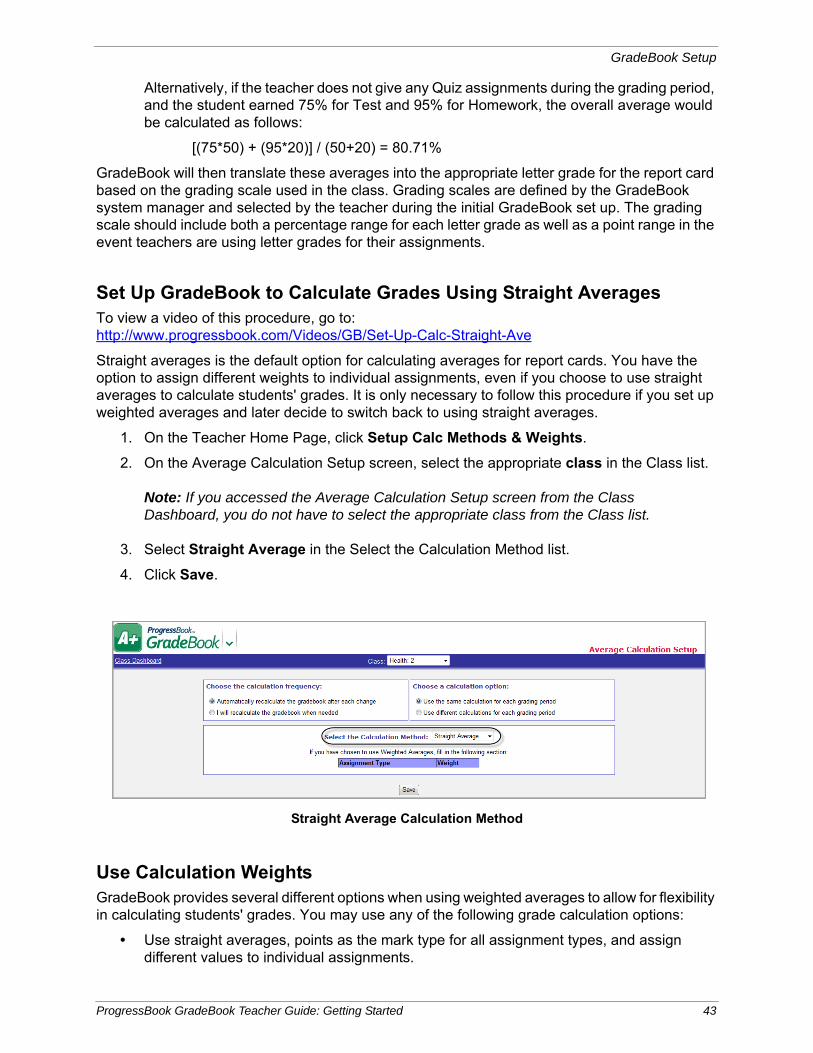
Set Up GradeBook to Calculate Grades Using Straight AveragesTo view a video of this procedure, go to:http://www.progressbook.com/Videos/GB/Set-Up-Calc-Straight-Ave
Straight averages is the default option for calculating averages for report cards. You have the option to assign different weights to individual assignments, even if you choose to use straight averages to calculate students' grades. It is only necessary to follow this procedure if you set up weighted averages and later decide to switch back to using straight averages.
1. On the Teacher Home Page, click Setup Calc Methods & Weights.
2. On the Average Calculation Setup screen, select the appropriate class in the Class list.
Note: If you accessed the Average Calculation Setup screen from the Class Dashboard, you do not have to select the appropriate class from the Class list.
3. Select Straight Average in the Select the Calculation Method list.
4. Click Save.
Use Calculation WeightsGradeBook provides several different options when using weighted averages to allow for flexibility in calculating students' grades. You may use any of the following grade calculation options:
• Use straight averages, points as the mark type for all assignment types, and assign different values to individual assignments.
Straight Average Calculation Method
ProgressBook GradeBook Teacher Guide: Getting Started 43

GradeBook Setup
• Use straight averages and weight individual assignments as desired.
• Use weighted averages and assign different weight values to each assignment type.
• Use weighted averages, assign different weight values to each assignment type, and assign different values to individual assignments.
• Use weighted averages and straight averages in different grading periods in the same school year.
If you use straight averages to calculate students' grades, points as the mark type for assignment types, you can weight grades by assigning a different point value to each assignment type. For example, homework assignments may be worth 5 points; while quizzes are worth 25 points; and tests are worth 100 points.
Set Up GradeBook to Calculate Grades Using Weighted Averages by Assignment TypeTo view a video of this procedure, go to:http://www.progressbook.com/Videos/GB/Calc-Grades-Weighted
You can set averages to calculate using weights for each assignment type used in the class. GradeBook calculates students' averages first by averaging the assignments for each type and then calculates an overall average by averaging those grades according to the weights assigned to each type. For example, if the weight of homework = 1, quizzes = 1 and tests = 2, GradeBook calculates homework as 25%, quizzes as 25% and tests as 50% of the student’s average.
If you prefer to use a factor-based weighting method where each assignment counts a specified number of times in the overall average, use the straight average calculation and then change the weight of the individual assignments as desired. For example, if you want all tests to count three times, change the Weight field for each test assignment to 3.
1. On the Teacher Home Page, click Setup Calc Methods & Weights.
2. On the Average Calculation Setup screen, select the appropriate class in the Class list.
Note: If you accessed the Average Calculation Setup screen from the Class Dashboard, you do not have to select the appropriate class from the Class list.
3. Select Weighted Average in the Select the Calculation Method list.
Note: When you are entering weights, you can use simple numbers or numbers that represent a percent of the student’s overall grade. For example, if the weight of homework = 1, quizzes = 1, and test = 2, you can also enter the weight as 25 for homework, 25 for quizzes and 50 for test.
4. Enter a weight value for each assignment type displayed in the Assignment Type Weight field.
Note: An extra credit assignment type cannot be used as a weighted average because the system cannot divide by zero.
44 ProgressBook GradeBook Teacher Guide: Getting Started
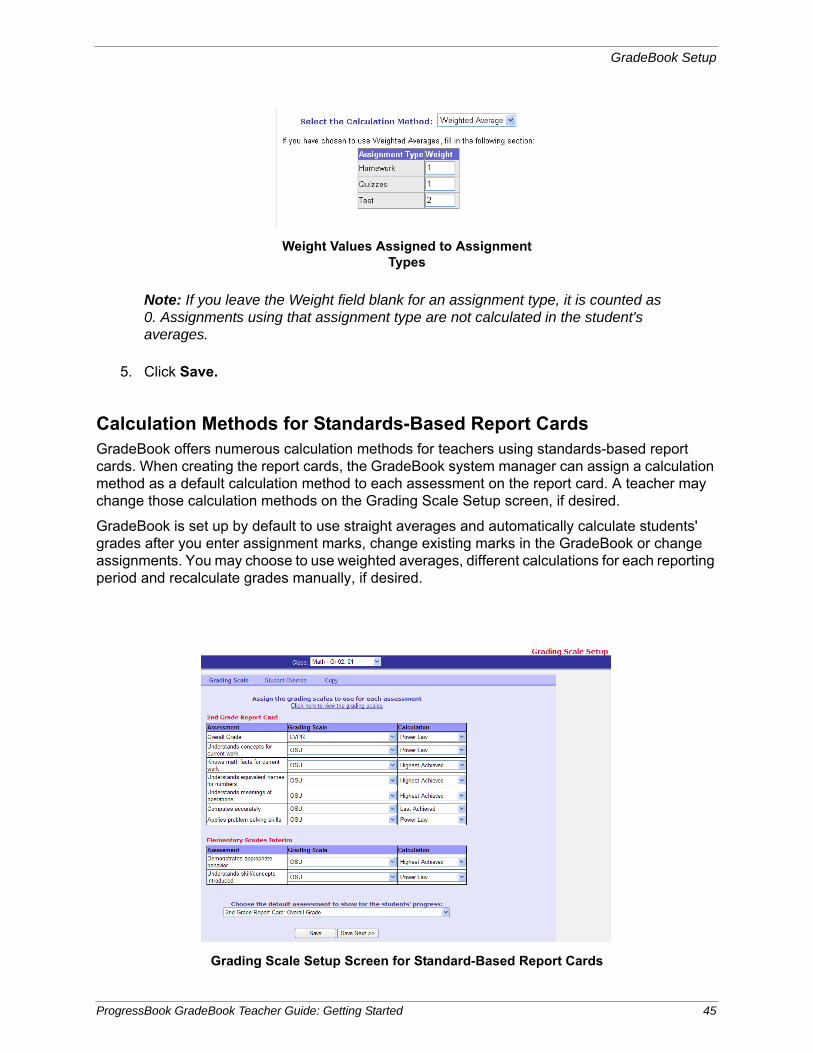
GradeBook Setup
Note: If you leave the Weight field blank for an assignment type, it is counted as 0. Assignments using that assignment type are not calculated in the student's averages.
5. Click Save.
Calculation Methods for Standards-Based Report CardsGradeBook offers numerous calculation methods for teachers using standards-based report cards. When creating the report cards, the GradeBook system manager can assign a calculation method as a default calculation method to each assessment on the report card. A teacher may change those calculation methods on the Grading Scale Setup screen, if desired.
GradeBook is set up by default to use straight averages and automatically calculate students' grades after you enter assignment marks, change existing marks in the GradeBook or change assignments. You may choose to use weighted averages, different calculations for each reporting period and recalculate grades manually, if desired.
Weight Values Assigned to Assignment Types
Grading Scale Setup Screen for Standard-Based Report Cards
ProgressBook GradeBook Teacher Guide: Getting Started 45
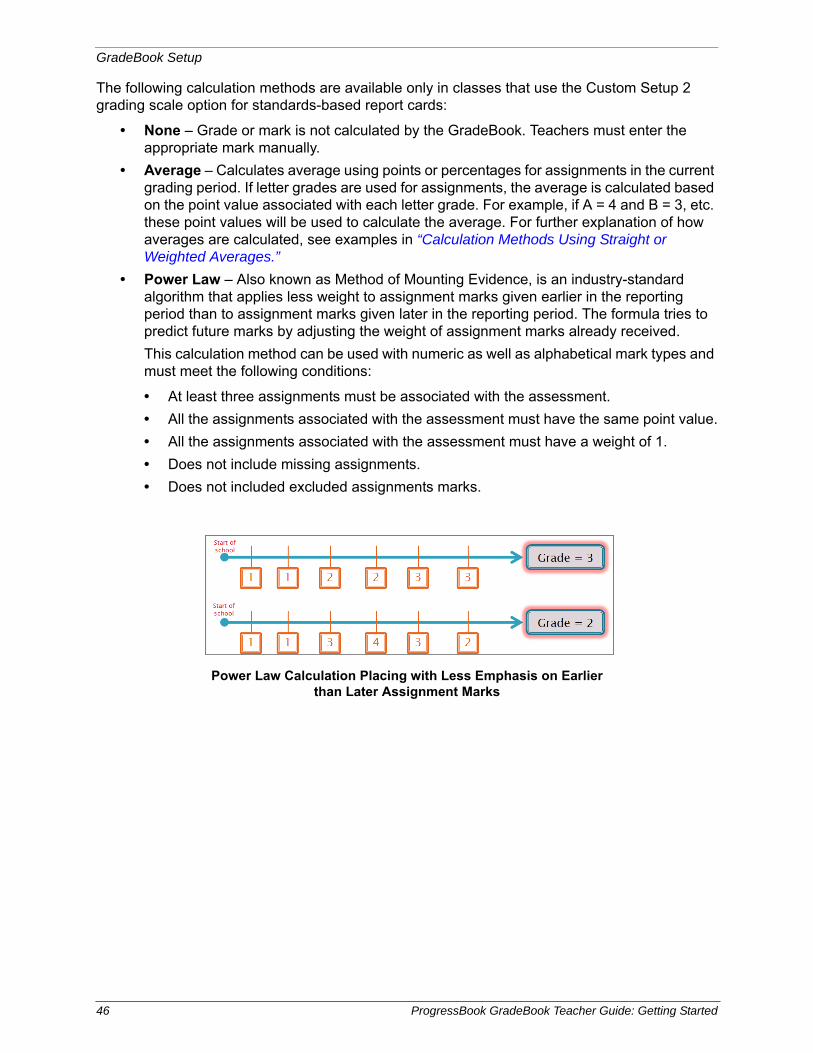
GradeBook Setup
The following calculation methods are available only in classes that use the Custom Setup 2 grading scale option for standards-based report cards:
• None – Grade or mark is not calculated by the GradeBook. Teachers must enter the appropriate mark manually.
• Average – Calculates average using points or percentages for assignments in the current grading period. If letter grades are used for assignments, the average is calculated based on the point value associated with each letter grade. For example, if A = 4 and B = 3, etc. these point values will be used to calculate the average. For further explanation of how averages are calculated, see examples in “Calculation Methods Using Straight or Weighted Averages.”
• Power Law – Also known as Method of Mounting Evidence, is an industry-standard algorithm that applies less weight to assignment marks given earlier in the reporting period than to assignment marks given later in the reporting period. The formula tries to predict future marks by adjusting the weight of assignment marks already received.
This calculation method can be used with numeric as well as alphabetical mark types and must meet the following conditions:
• At least three assignments must be associated with the assessment.
• All the assignments associated with the assessment must have the same point value.
• All the assignments associated with the assessment must have a weight of 1.
• Does not include missing assignments.
• Does not included excluded assignments marks.
Power Law Calculation Placing with Less Emphasis on Earlier than Later Assignment Marks
46 ProgressBook GradeBook Teacher Guide: Getting Started
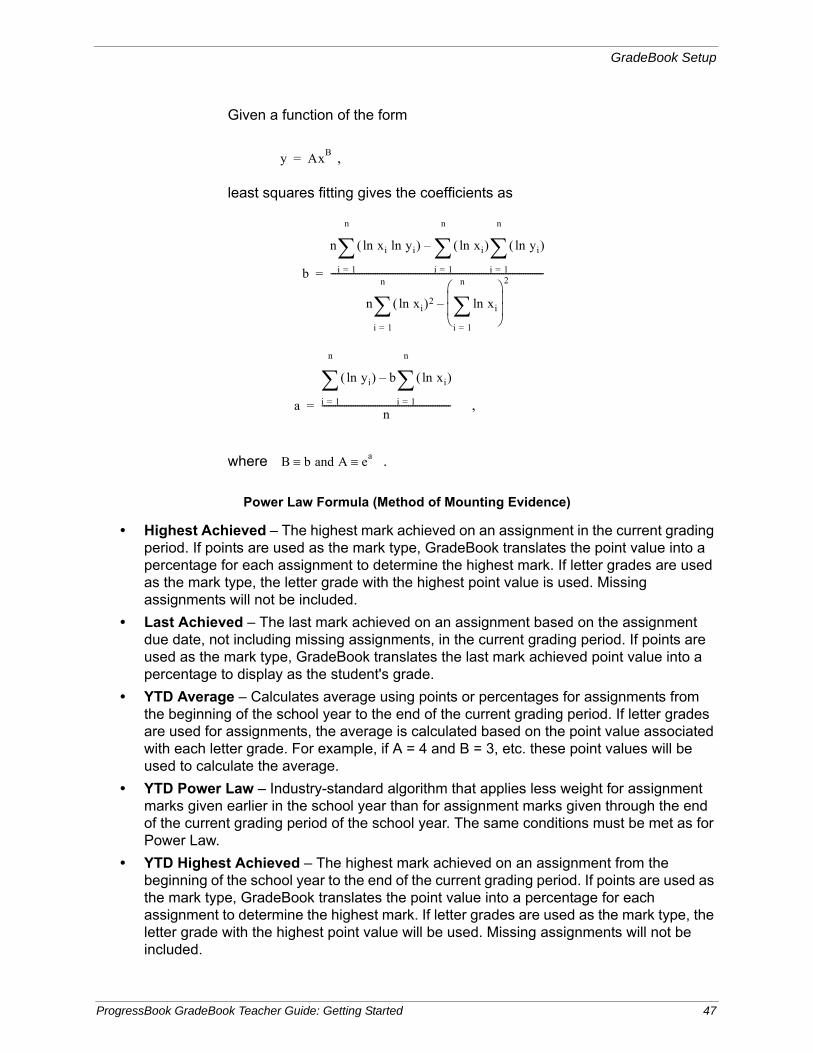
GradeBook Setup
• Highest Achieved – The highest mark achieved on an assignment in the current grading period. If points are used as the mark type, GradeBook translates the point value into a percentage for each assignment to determine the highest mark. If letter grades are used as the mark type, the letter grade with the highest point value is used. Missing assignments will not be included.
• Last Achieved – The last mark achieved on an assignment based on the assignment due date, not including missing assignments, in the current grading period. If points are used as the mark type, GradeBook translates the last mark achieved point value into a percentage to display as the student's grade.
• YTD Average – Calculates average using points or percentages for assignments from the beginning of the school year to the end of the current grading period. If letter grades are used for assignments, the average is calculated based on the point value associated with each letter grade. For example, if A = 4 and B = 3, etc. these point values will be used to calculate the average.
• YTD Power Law – Industry-standard algorithm that applies less weight for assignment marks given earlier in the school year than for assignment marks given through the end of the current grading period of the school year. The same conditions must be met as for Power Law.
• YTD Highest Achieved – The highest mark achieved on an assignment from the beginning of the school year to the end of the current grading period. If points are used as the mark type, GradeBook translates the point value into a percentage for each assignment to determine the highest mark. If letter grades are used as the mark type, the letter grade with the highest point value will be used. Missing assignments will not be included.
Power Law Formula (Method of Mounting Evidence)
Given a function of the form
,
least squares fitting gives the coefficients as
,
where .
y AxB
=
b
n ln xi ln yi
i 1=
n
ln xi ln yi
i 1=
n
i 1=
n
–
n ln xi 2 ln xi
i 1=
n
2
–
i 1=
n
------------------------------------------------------------------------------------------------=
a
ln yi b ln xi
i 1=
n
–
i 1=
n
n
----------------------------------------------------------=
B b and A ea
ProgressBook GradeBook Teacher Guide: Getting Started 47
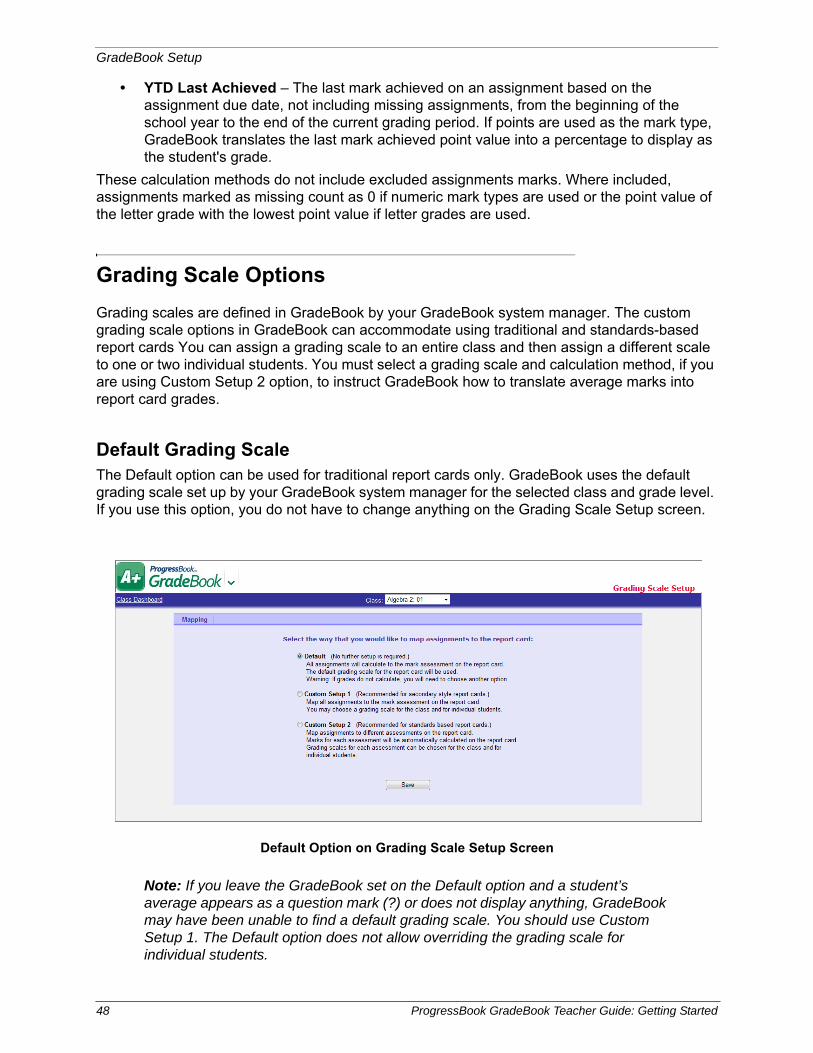
GradeBook Setup
• YTD Last Achieved – The last mark achieved on an assignment based on the assignment due date, not including missing assignments, from the beginning of the school year to the end of the current grading period. If points are used as the mark type, GradeBook translates the last mark achieved point value into a percentage to display as the student's grade.
These calculation methods do not include excluded assignments marks. Where included, assignments marked as missing count as 0 if numeric mark types are used or the point value of the letter grade with the lowest point value if letter grades are used.
Grading Scale Options
Grading scales are defined in GradeBook by your GradeBook system manager. The custom grading scale options in GradeBook can accommodate using traditional and standards-based report cards You can assign a grading scale to an entire class and then assign a different scale to one or two individual students. You must select a grading scale and calculation method, if you are using Custom Setup 2 option, to instruct GradeBook how to translate average marks into report card grades.
Default Grading ScaleThe Default option can be used for traditional report cards only. GradeBook uses the default grading scale set up by your GradeBook system manager for the selected class and grade level. If you use this option, you do not have to change anything on the Grading Scale Setup screen.
Note: If you leave the GradeBook set on the Default option and a student’s average appears as a question mark (?) or does not display anything, GradeBook may have been unable to find a default grading scale. You should use Custom Setup 1. The Default option does not allow overriding the grading scale for individual students.
Default Option on Grading Scale Setup Screen
48 ProgressBook GradeBook Teacher Guide: Getting Started
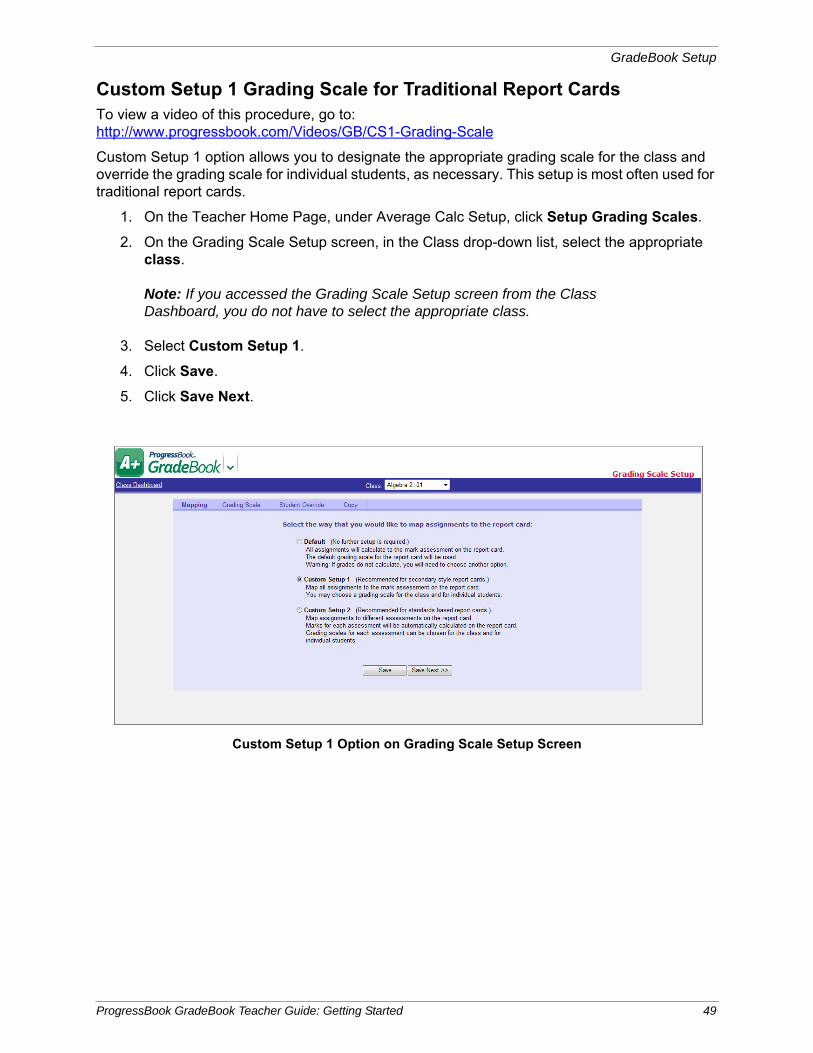
GradeBook Setup
Custom Setup 1 Grading Scale for Traditional Report CardsTo view a video of this procedure, go to:http://www.progressbook.com/Videos/GB/CS1-Grading-Scale
Custom Setup 1 option allows you to designate the appropriate grading scale for the class and override the grading scale for individual students, as necessary. This setup is most often used for traditional report cards.
1. On the Teacher Home Page, under Average Calc Setup, click Setup Grading Scales.
2. On the Grading Scale Setup screen, in the Class drop-down list, select the appropriate class.
Note: If you accessed the Grading Scale Setup screen from the Class Dashboard, you do not have to select the appropriate class.
3. Select Custom Setup 1.
4. Click Save.
5. Click Save Next.
Custom Setup 1 Option on Grading Scale Setup Screen
ProgressBook GradeBook Teacher Guide: Getting Started 49
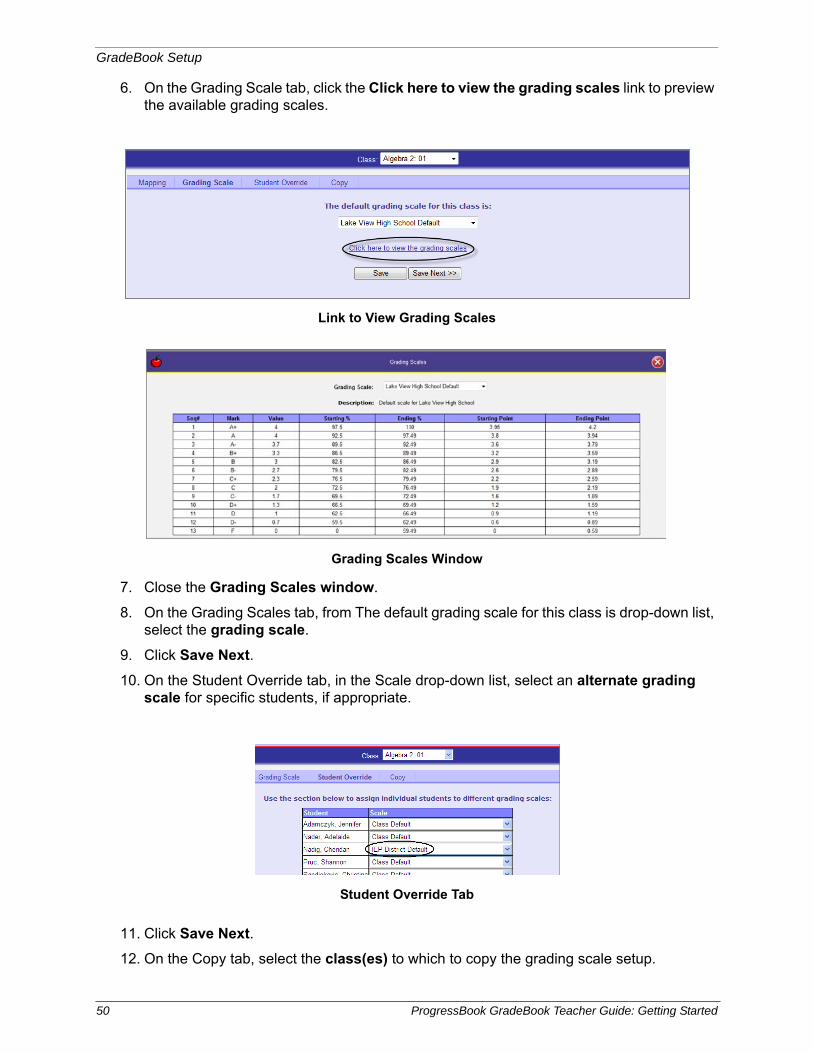
GradeBook Setup
6. On the Grading Scale tab, click the Click here to view the grading scales link to preview the available grading scales.
7. Close the Grading Scales window.
8. On the Grading Scales tab, from The default grading scale for this class is drop-down list, select the grading scale.
9. Click Save Next.
10. On the Student Override tab, in the Scale drop-down list, select an alternate grading scale for specific students, if appropriate.
11. Click Save Next.
12. On the Copy tab, select the class(es) to which to copy the grading scale setup.
Link to View Grading Scales
Grading Scales Window
Student Override Tab
50 ProgressBook GradeBook Teacher Guide: Getting Started
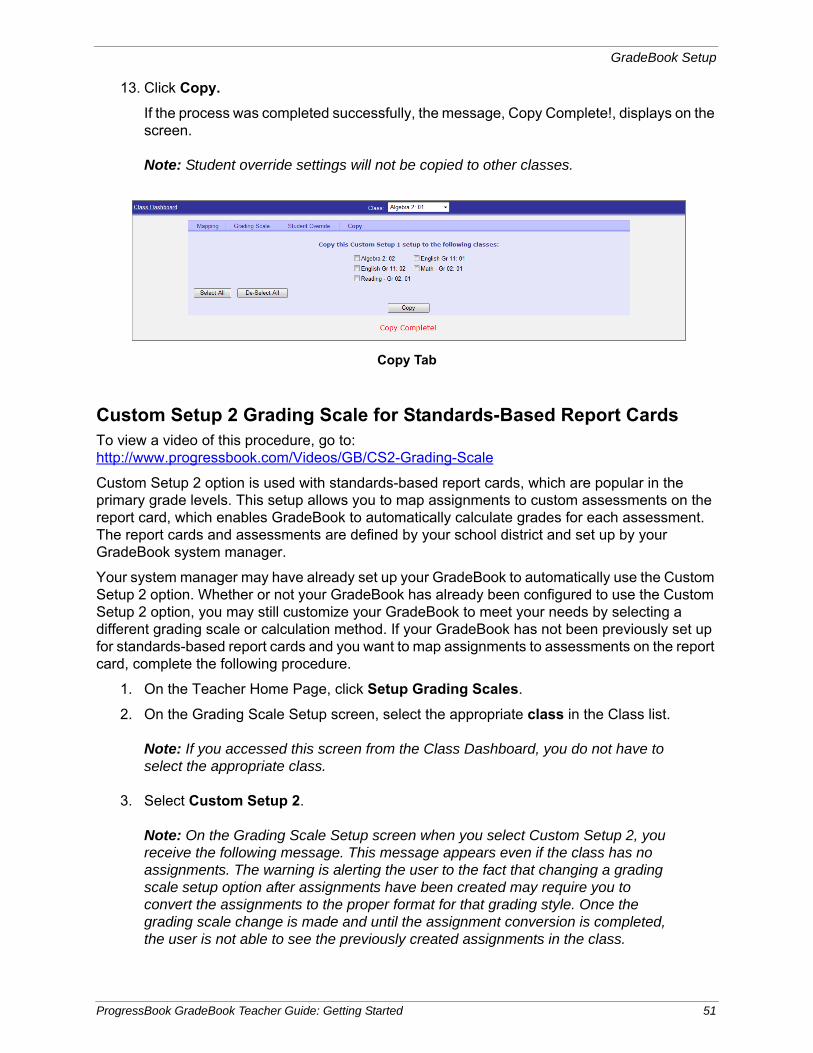
GradeBook Setup
13. Click Copy.
If the process was completed successfully, the message, Copy Complete!, displays on the screen.
Note: Student override settings will not be copied to other classes.
Custom Setup 2 Grading Scale for Standards-Based Report CardsTo view a video of this procedure, go to:http://www.progressbook.com/Videos/GB/CS2-Grading-Scale
Custom Setup 2 option is used with standards-based report cards, which are popular in the primary grade levels. This setup allows you to map assignments to custom assessments on the report card, which enables GradeBook to automatically calculate grades for each assessment. The report cards and assessments are defined by your school district and set up by your GradeBook system manager.
Your system manager may have already set up your GradeBook to automatically use the Custom Setup 2 option. Whether or not your GradeBook has already been configured to use the Custom Setup 2 option, you may still customize your GradeBook to meet your needs by selecting a different grading scale or calculation method. If your GradeBook has not been previously set up for standards-based report cards and you want to map assignments to assessments on the report card, complete the following procedure.
1. On the Teacher Home Page, click Setup Grading Scales.
2. On the Grading Scale Setup screen, select the appropriate class in the Class list.
Note: If you accessed this screen from the Class Dashboard, you do not have to select the appropriate class.
3. Select Custom Setup 2.
Note: On the Grading Scale Setup screen when you select Custom Setup 2, you receive the following message. This message appears even if the class has no assignments. The warning is alerting the user to the fact that changing a grading scale setup option after assignments have been created may require you to convert the assignments to the proper format for that grading style. Once the grading scale change is made and until the assignment conversion is completed, the user is not able to see the previously created assignments in the class.
Copy Tab
ProgressBook GradeBook Teacher Guide: Getting Started 51
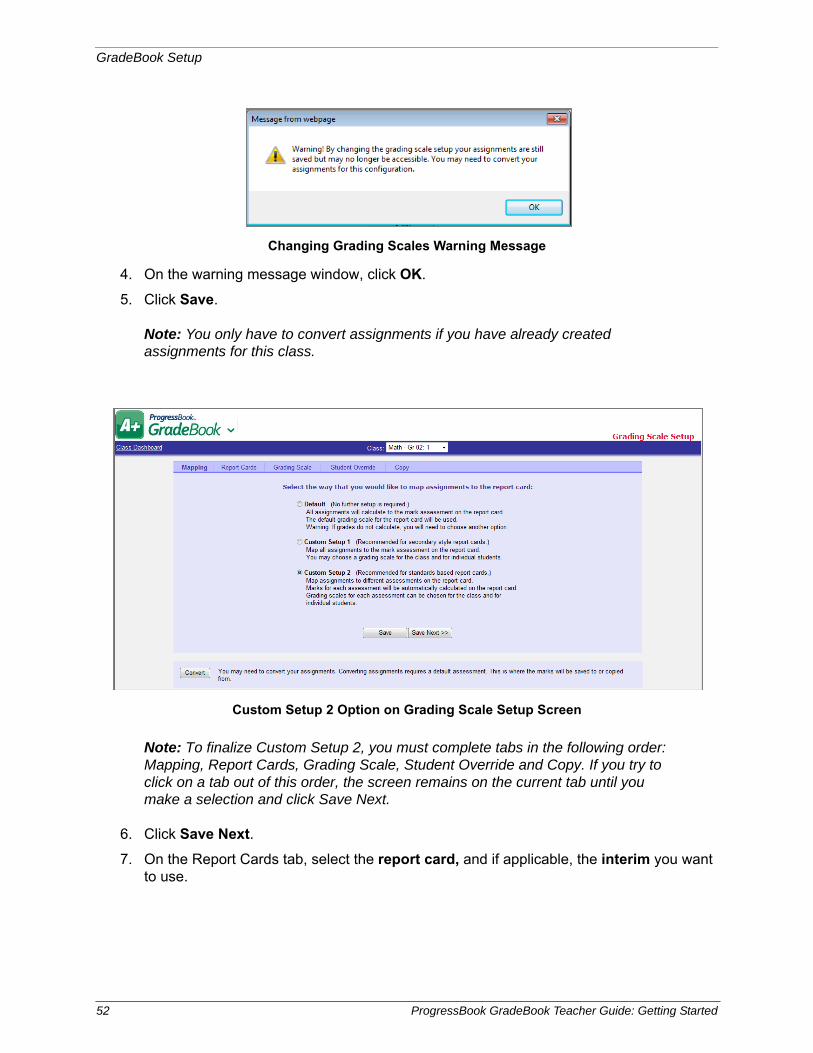
GradeBook Setup
4. On the warning message window, click OK.
5. Click Save.
Note: You only have to convert assignments if you have already created assignments for this class.
Note: To finalize Custom Setup 2, you must complete tabs in the following order: Mapping, Report Cards, Grading Scale, Student Override and Copy. If you try to click on a tab out of this order, the screen remains on the current tab until you make a selection and click Save Next.
6. Click Save Next.
7. On the Report Cards tab, select the report card, and if applicable, the interim you want to use.
Changing Grading Scales Warning Message
Custom Setup 2 Option on Grading Scale Setup Screen
52 ProgressBook GradeBook Teacher Guide: Getting Started
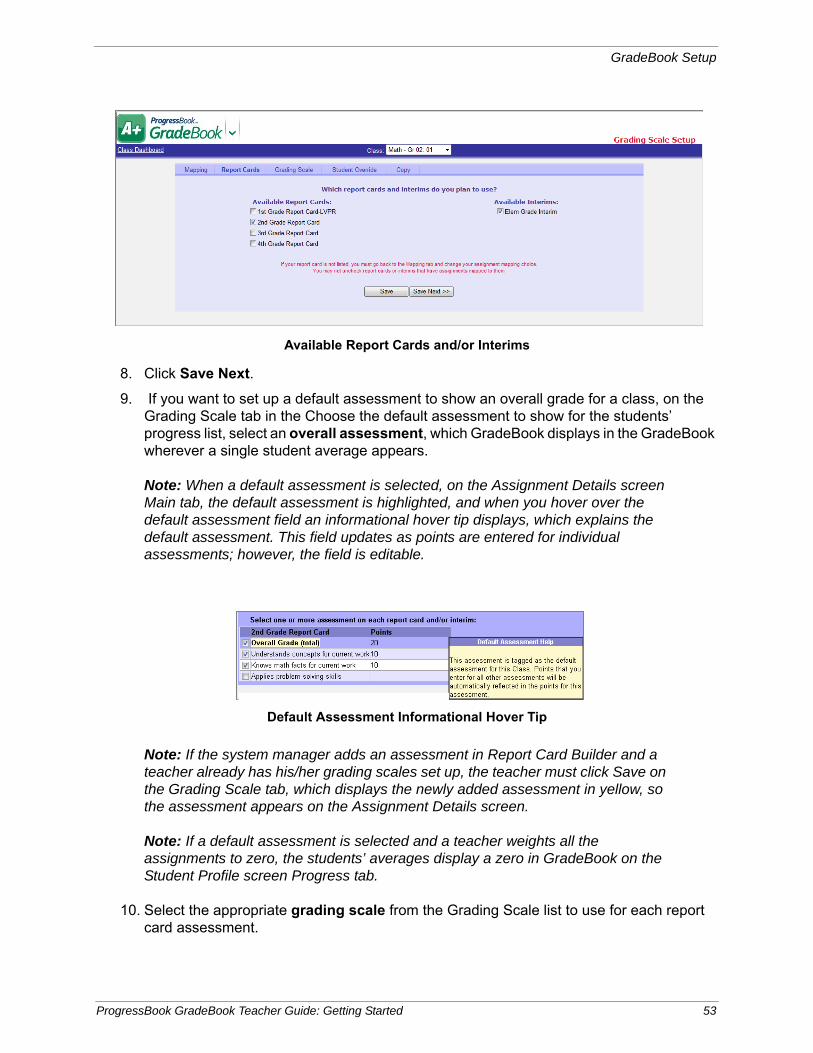
GradeBook Setup
8. Click Save Next.
9. If you want to set up a default assessment to show an overall grade for a class, on the Grading Scale tab in the Choose the default assessment to show for the students’ progress list, select an overall assessment, which GradeBook displays in the GradeBook wherever a single student average appears.
Note: When a default assessment is selected, on the Assignment Details screen Main tab, the default assessment is highlighted, and when you hover over the default assessment field an informational hover tip displays, which explains the default assessment. This field updates as points are entered for individual assessments; however, the field is editable.
Note: If the system manager adds an assessment in Report Card Builder and a teacher already has his/her grading scales set up, the teacher must click Save on the Grading Scale tab, which displays the newly added assessment in yellow, so the assessment appears on the Assignment Details screen.
Note: If a default assessment is selected and a teacher weights all the assignments to zero, the students’ averages display a zero in GradeBook on the Student Profile screen Progress tab.
10. Select the appropriate grading scale from the Grading Scale list to use for each report card assessment.
Available Report Cards and/or Interims
Default Assessment Informational Hover Tip
ProgressBook GradeBook Teacher Guide: Getting Started 53
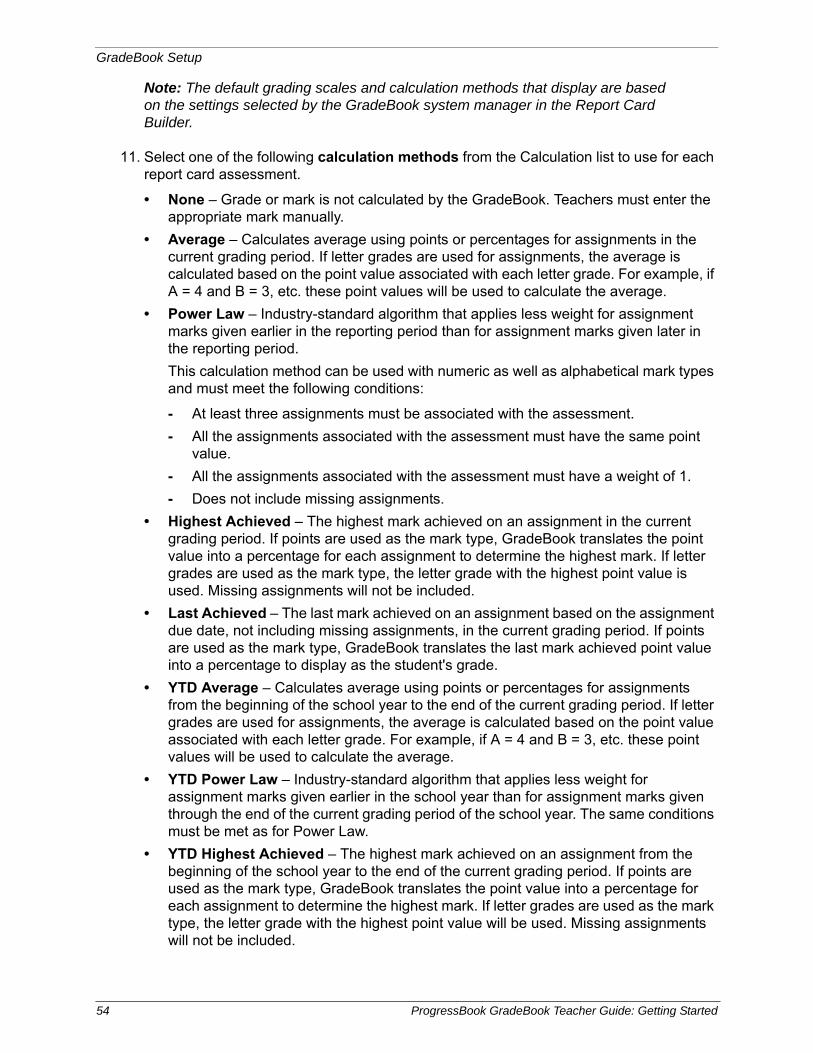
GradeBook Setup
Note: The default grading scales and calculation methods that display are based on the settings selected by the GradeBook system manager in the Report Card Builder.
11. Select one of the following calculation methods from the Calculation list to use for each report card assessment.
• None – Grade or mark is not calculated by the GradeBook. Teachers must enter the appropriate mark manually.
• Average – Calculates average using points or percentages for assignments in the current grading period. If letter grades are used for assignments, the average is calculated based on the point value associated with each letter grade. For example, if A = 4 and B = 3, etc. these point values will be used to calculate the average.
• Power Law – Industry-standard algorithm that applies less weight for assignment marks given earlier in the reporting period than for assignment marks given later in the reporting period.
This calculation method can be used with numeric as well as alphabetical mark types and must meet the following conditions:
- At least three assignments must be associated with the assessment.
- All the assignments associated with the assessment must have the same point value.
- All the assignments associated with the assessment must have a weight of 1.
- Does not include missing assignments.
• Highest Achieved – The highest mark achieved on an assignment in the current grading period. If points are used as the mark type, GradeBook translates the point value into a percentage for each assignment to determine the highest mark. If letter grades are used as the mark type, the letter grade with the highest point value is used. Missing assignments will not be included.
• Last Achieved – The last mark achieved on an assignment based on the assignment due date, not including missing assignments, in the current grading period. If points are used as the mark type, GradeBook translates the last mark achieved point value into a percentage to display as the student's grade.
• YTD Average – Calculates average using points or percentages for assignments from the beginning of the school year to the end of the current grading period. If letter grades are used for assignments, the average is calculated based on the point value associated with each letter grade. For example, if A = 4 and B = 3, etc. these point values will be used to calculate the average.
• YTD Power Law – Industry-standard algorithm that applies less weight for assignment marks given earlier in the school year than for assignment marks given through the end of the current grading period of the school year. The same conditions must be met as for Power Law.
• YTD Highest Achieved – The highest mark achieved on an assignment from the beginning of the school year to the end of the current grading period. If points are used as the mark type, GradeBook translates the point value into a percentage for each assignment to determine the highest mark. If letter grades are used as the mark type, the letter grade with the highest point value will be used. Missing assignments will not be included.
54 ProgressBook GradeBook Teacher Guide: Getting Started
GradeBook Setup
• YTD Last Achieved – The last mark achieved on an assignment based on the assignment due date, not including missing assignments, from the beginning of the school year to the end of the current grading period. If points are used as the mark type, GradeBook translates the last mark achieved point value into a percentage to display as the student's grade.
12. Select the appropriate grading scale from the list to use for each interim assessment, if applicable.
13. Select one of the following calculation methods from the Calculation list to use for each interim assessment, if applicable. See the options listed in step 11 for further details.
14. Click Save Next.
15. On the Student Override tab, select the student that will use an alternate grading scale, and then select the alternate grading scale for each report card assessment.
16. Click Save Next.
Note: If you need to override more than one student, click Save and then repeat step 15.
17. To copy this setup to another class, on the Copy tab, select a class from the list.
If there are no available classes to copy the grading scale setup the following message is displayed, “There are no compatible classes to copy to because you do not have any other classes that use the same report card assessments. Return to the Mapping tab to set up another class.”
Default Grading Scales and Calculation Methods for Each Assessment on the Report Card
ProgressBook GradeBook Teacher Guide: Getting Started 55
GradeBook Setup
Note: On the Copy tab, only classes associated with courses in the same course group on the selected report card are available, and class groups are not available.
18. Click Copy.
If the process was completed successfully, the message “Copy Complete!” displays.
Note: Student override settings will not be copied to other classes.
56 ProgressBook GradeBook Teacher Guide: Getting Started
Assignments and Marks
Assignments and Marks
GradeBook provides a variety of options for creating and working with assignments from many screens in your system. Depending on the type of assignment you are creating, and whether or not the assignment is used in a class that uses traditional or standards-based report cards, teachers can create class or individual student assignments, which can be associated with a specific report card assessment. Numerous options allow for creating various types of class assignments such as recurring, floating or weighted. Once assignments have been created, you can copy assignments, share assignments with other classes, enter assignment marks and post them to ParentAccess. After an assignment’s due date has passed, various icons, symbols and colors represent its grading status throughout GradeBook. Parents and students can even subscribe to alerts in ParentAccess that denote a student’s progress regarding specific assignments.
Create Assignments
GradeBook allows you to create an assignment for the entire class or an individual assignment that is unique to one student. Options exist for creating various types of class assignments such as recurring, floating or weighted. Once assignments have been created, you can copy and share assignments or exclude the lowest assignment marks. For assignments used only in a class that uses Custom Setup 2 grading scale option for standards-based report cards, you can create an unique assignment for an individual student and associate an assignment with a specific report card assessment. Creating and working with assignments can be completed from numerous screens in your GradeBook system.
You create an assignment for the entire class on the Assignment Details screen where many options enable you to assign the assignment to a specific group, designate the assignment as a floating assignment, share it with other classes or make it available in ParentAccess.
The Assignment Details screen includes three tabs: Main, Standards and Marks. Only the Main tab is visible when you begin to create an assignment. Once the assignment has been saved, then the other tabs are available.
If you use the Custom Setup 2 Grading Scale option for standards-based report cards, you must select one or more assessment on each report card and/or interim for an assignment. Those assignments display with the associated assessment for a student on the Progress By Student screen. In addition, you can add an individual assignment associated with a specific assessment that is unique to a student.
Create Class Assignments for a Default or Custom Setup 1 ClassTo view a video of this procedure, go to:http://www.progressbook.com/Videos/GB/DCS1-Create-Class-Assignments
1. On the Class Dashboard, click Add an Assignment.
Note: If you have not created any assignment types, a message displays with a link to add assignment types.
ProgressBook GradeBook Teacher Guide: Getting Started 57
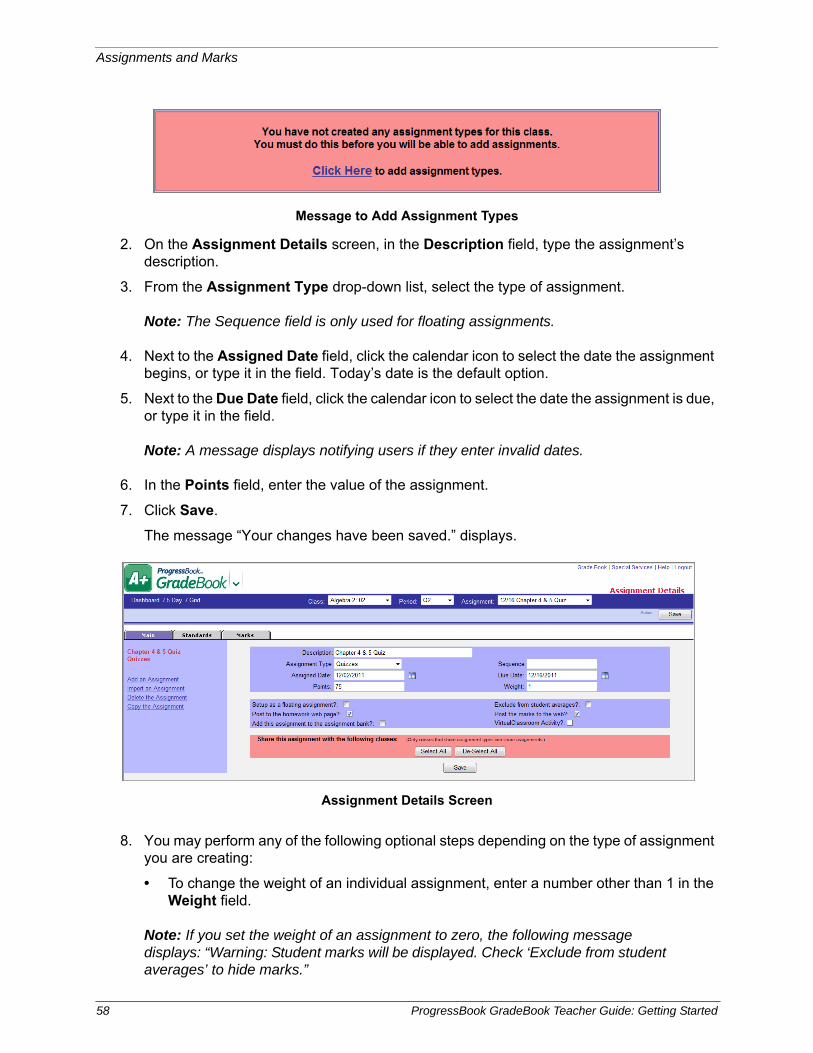
Assignments and Marks
2. On the Assignment Details screen, in the Description field, type the assignment’s description.
3. From the Assignment Type drop-down list, select the type of assignment.
Note: The Sequence field is only used for floating assignments.
4. Next to the Assigned Date field, click the calendar icon to select the date the assignment begins, or type it in the field. Today’s date is the default option.
5. Next to the Due Date field, click the calendar icon to select the date the assignment is due, or type it in the field.
Note: A message displays notifying users if they enter invalid dates.
6. In the Points field, enter the value of the assignment.
7. Click Save.
The message “Your changes have been saved.” displays.
8. You may perform any of the following optional steps depending on the type of assignment you are creating:
• To change the weight of an individual assignment, enter a number other than 1 in the Weight field.
Note: If you set the weight of an assignment to zero, the following message displays: “Warning: Student marks will be displayed. Check ‘Exclude from student averages’ to hide marks.”
Message to Add Assignment Types
Assignment Details Screen
58 ProgressBook GradeBook Teacher Guide: Getting Started
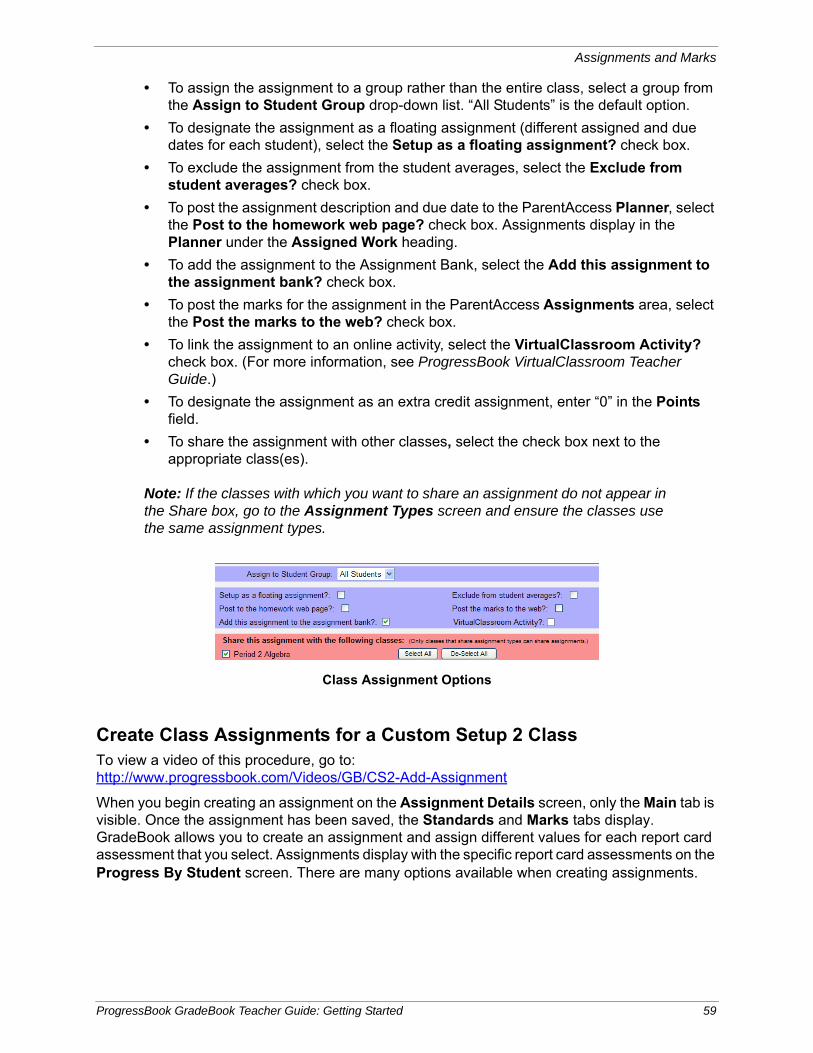
Assignments and Marks
• To assign the assignment to a group rather than the entire class, select a group from the Assign to Student Group drop-down list. “All Students” is the default option.
• To designate the assignment as a floating assignment (different assigned and due dates for each student), select the Setup as a floating assignment? check box.
• To exclude the assignment from the student averages, select the Exclude from student averages? check box.
• To post the assignment description and due date to the ParentAccess Planner, select the Post to the homework web page? check box. Assignments display in the Planner under the Assigned Work heading.
• To add the assignment to the Assignment Bank, select the Add this assignment to the assignment bank? check box.
• To post the marks for the assignment in the ParentAccess Assignments area, select the Post the marks to the web? check box.
• To link the assignment to an online activity, select the VirtualClassroom Activity? check box. (For more information, see ProgressBook VirtualClassroom Teacher Guide.)
• To designate the assignment as an extra credit assignment, enter “0” in the Points field.
• To share the assignment with other classes, select the check box next to the appropriate class(es).
Note: If the classes with which you want to share an assignment do not appear in the Share box, go to the Assignment Types screen and ensure the classes use the same assignment types.
Create Class Assignments for a Custom Setup 2 ClassTo view a video of this procedure, go to:http://www.progressbook.com/Videos/GB/CS2-Add-Assignment
When you begin creating an assignment on the Assignment Details screen, only the Main tab is visible. Once the assignment has been saved, the Standards and Marks tabs display. GradeBook allows you to create an assignment and assign different values for each report card assessment that you select. Assignments display with the specific report card assessments on the Progress By Student screen. There are many options available when creating assignments.
Class Assignment Options
ProgressBook GradeBook Teacher Guide: Getting Started 59
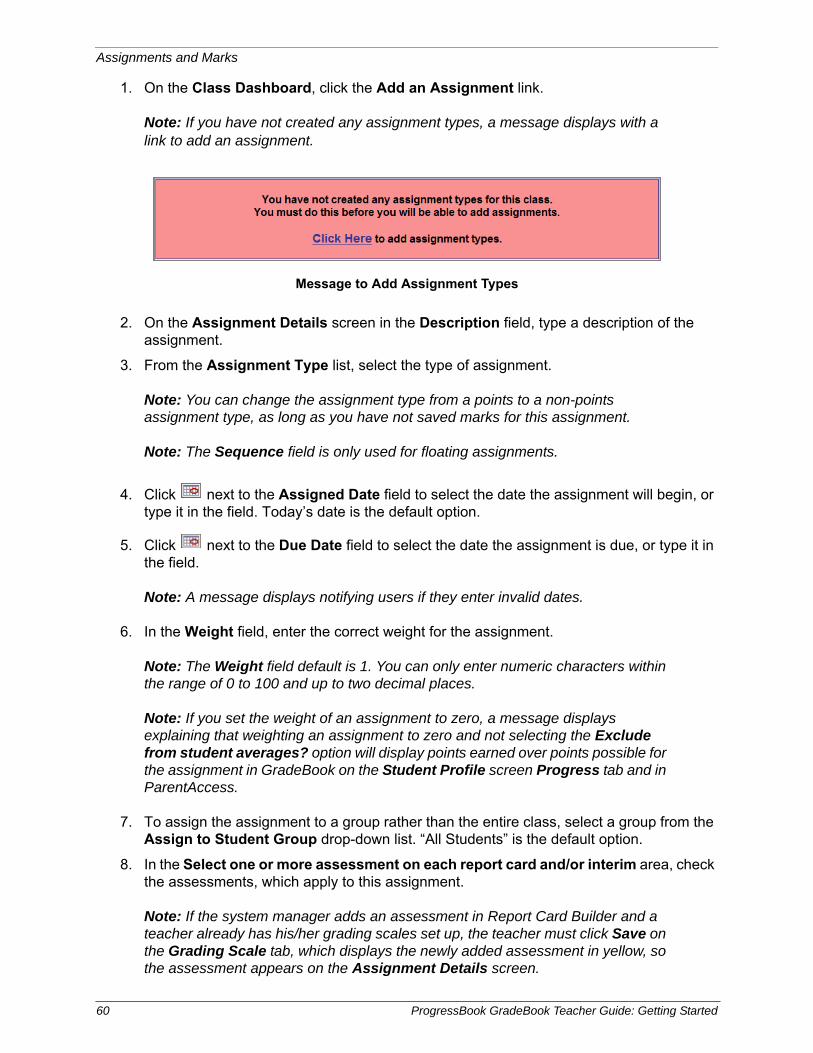
Assignments and Marks
1. On the Class Dashboard, click the Add an Assignment link.
Note: If you have not created any assignment types, a message displays with a link to add an assignment.
2. On the Assignment Details screen in the Description field, type a description of the assignment.
3. From the Assignment Type list, select the type of assignment.
Note: You can change the assignment type from a points to a non-points assignment type, as long as you have not saved marks for this assignment.
Note: The Sequence field is only used for floating assignments.
4. Click next to the Assigned Date field to select the date the assignment will begin, or type it in the field. Today’s date is the default option.
5. Click next to the Due Date field to select the date the assignment is due, or type it in the field.
Note: A message displays notifying users if they enter invalid dates.
6. In the Weight field, enter the correct weight for the assignment.
Note: The Weight field default is 1. You can only enter numeric characters within the range of 0 to 100 and up to two decimal places.
Note: If you set the weight of an assignment to zero, a message displays explaining that weighting an assignment to zero and not selecting the Exclude from student averages? option will display points earned over points possible for the assignment in GradeBook on the Student Profile screen Progress tab and in ParentAccess.
7. To assign the assignment to a group rather than the entire class, select a group from the Assign to Student Group drop-down list. “All Students” is the default option.
8. In the Select one or more assessment on each report card and/or interim area, check the assessments, which apply to this assignment.
Note: If the system manager adds an assessment in Report Card Builder and a teacher already has his/her grading scales set up, the teacher must click Save on the Grading Scale tab, which displays the newly added assessment in yellow, so the assessment appears on the Assignment Details screen.
Message to Add Assignment Types
60 ProgressBook GradeBook Teacher Guide: Getting Started
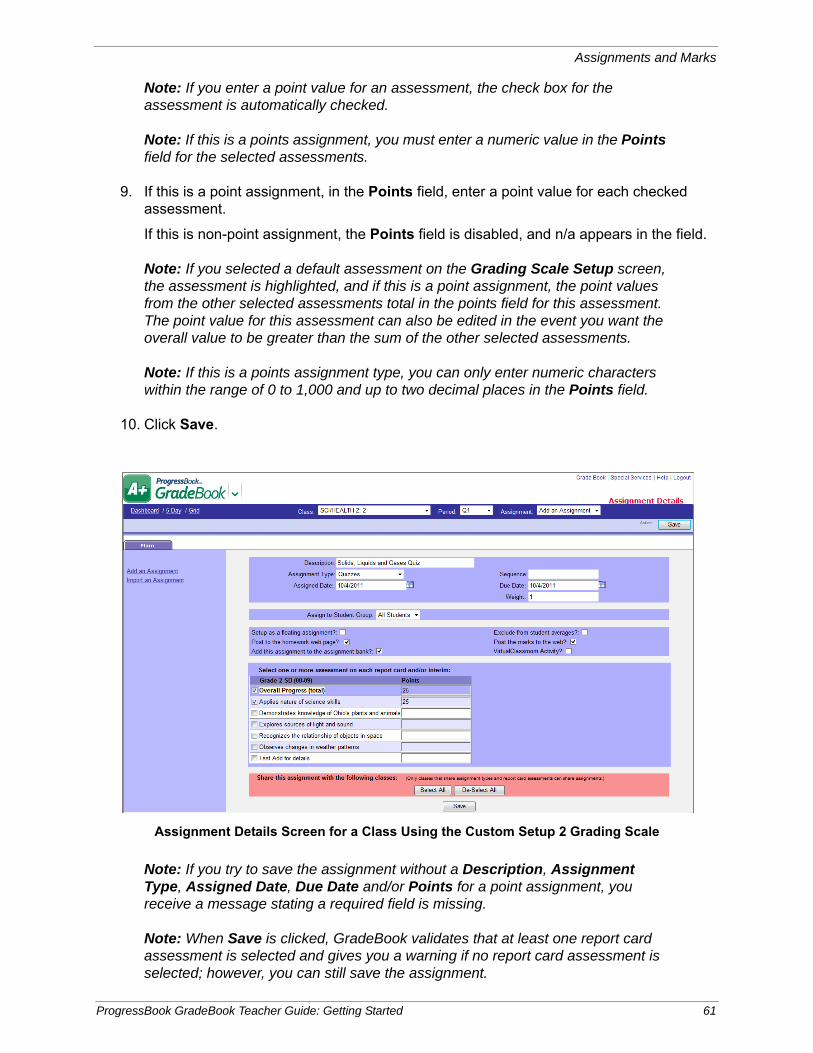
Assignments and Marks
Note: If you enter a point value for an assessment, the check box for the assessment is automatically checked.
Note: If this is a points assignment, you must enter a numeric value in the Points field for the selected assessments.
9. If this is a point assignment, in the Points field, enter a point value for each checked assessment.
If this is non-point assignment, the Points field is disabled, and n/a appears in the field.
Note: If you selected a default assessment on the Grading Scale Setup screen, the assessment is highlighted, and if this is a point assignment, the point values from the other selected assessments total in the points field for this assessment. The point value for this assessment can also be edited in the event you want the overall value to be greater than the sum of the other selected assessments.
Note: If this is a points assignment type, you can only enter numeric characters within the range of 0 to 1,000 and up to two decimal places in the Points field.
10. Click Save.
Note: If you try to save the assignment without a Description, Assignment Type, Assigned Date, Due Date and/or Points for a point assignment, you receive a message stating a required field is missing.
Note: When Save is clicked, GradeBook validates that at least one report card assessment is selected and gives you a warning if no report card assessment is selected; however, you can still save the assignment.
Assignment Details Screen for a Class Using the Custom Setup 2 Grading Scale
ProgressBook GradeBook Teacher Guide: Getting Started 61
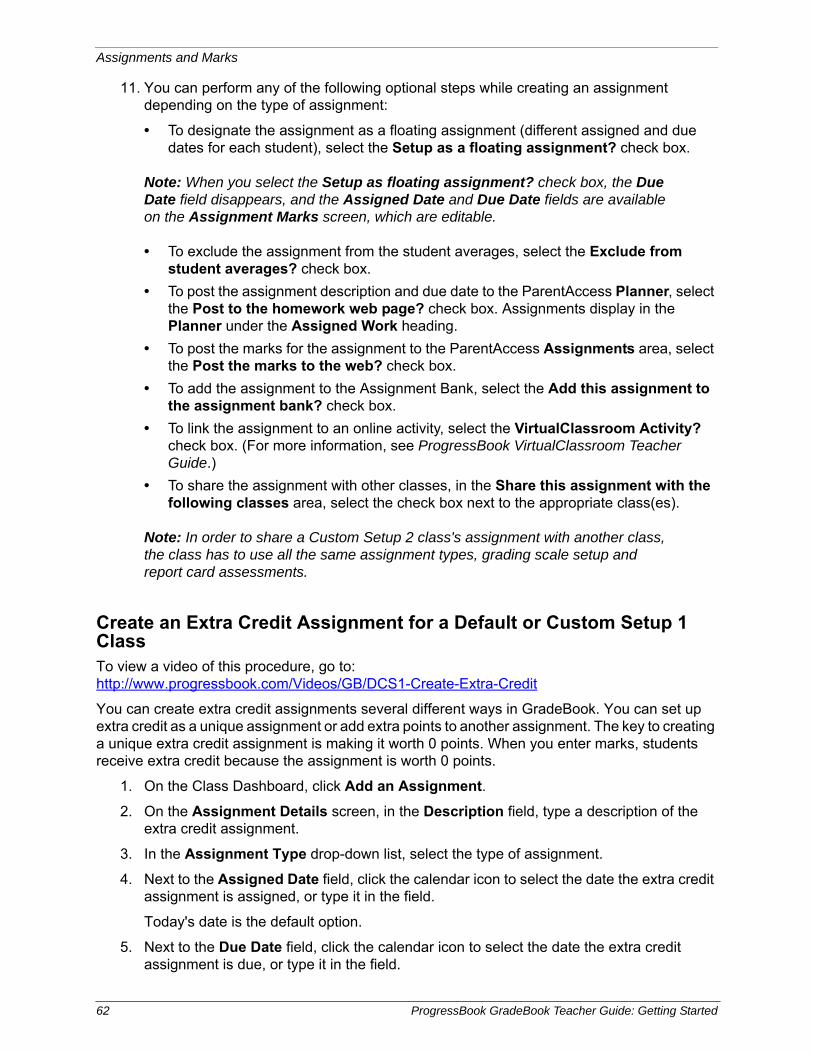
Assignments and Marks
11. You can perform any of the following optional steps while creating an assignment depending on the type of assignment:
• To designate the assignment as a floating assignment (different assigned and due dates for each student), select the Setup as a floating assignment? check box.
Note: When you select the Setup as floating assignment? check box, the Due Date field disappears, and the Assigned Date and Due Date fields are available on the Assignment Marks screen, which are editable.
• To exclude the assignment from the student averages, select the Exclude from student averages? check box.
• To post the assignment description and due date to the ParentAccess Planner, select the Post to the homework web page? check box. Assignments display in the Planner under the Assigned Work heading.
• To post the marks for the assignment to the ParentAccess Assignments area, select the Post the marks to the web? check box.
• To add the assignment to the Assignment Bank, select the Add this assignment to the assignment bank? check box.
• To link the assignment to an online activity, select the VirtualClassroom Activity? check box. (For more information, see ProgressBook VirtualClassroom Teacher Guide.)
• To share the assignment with other classes, in the Share this assignment with the following classes area, select the check box next to the appropriate class(es).
Note: In order to share a Custom Setup 2 class's assignment with another class, the class has to use all the same assignment types, grading scale setup and report card assessments.
Create an Extra Credit Assignment for a Default or Custom Setup 1 ClassTo view a video of this procedure, go to:http://www.progressbook.com/Videos/GB/DCS1-Create-Extra-Credit
You can create extra credit assignments several different ways in GradeBook. You can set up extra credit as a unique assignment or add extra points to another assignment. The key to creating a unique extra credit assignment is making it worth 0 points. When you enter marks, students receive extra credit because the assignment is worth 0 points.
1. On the Class Dashboard, click Add an Assignment.
2. On the Assignment Details screen, in the Description field, type a description of the extra credit assignment.
3. In the Assignment Type drop-down list, select the type of assignment.
4. Next to the Assigned Date field, click the calendar icon to select the date the extra credit assignment is assigned, or type it in the field.
Today's date is the default option.
5. Next to the Due Date field, click the calendar icon to select the date the extra credit assignment is due, or type it in the field.
62 ProgressBook GradeBook Teacher Guide: Getting Started
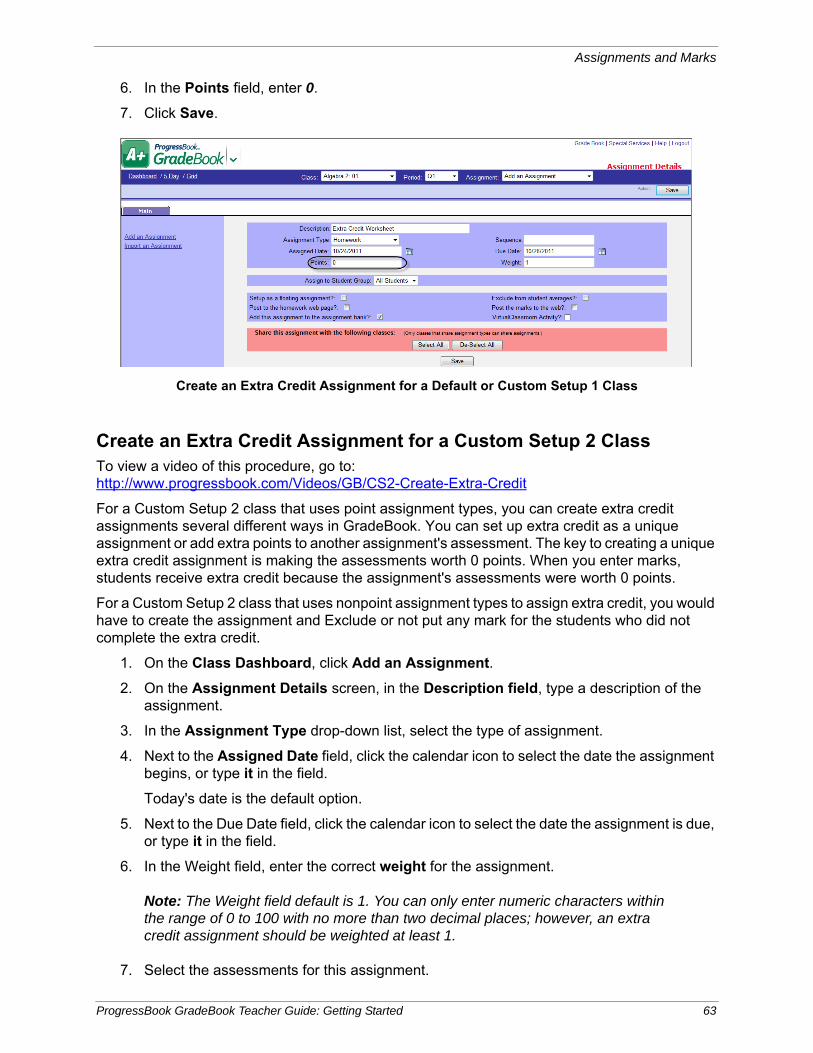
Assignments and Marks
6. In the Points field, enter 0.
7. Click Save.
Create an Extra Credit Assignment for a Custom Setup 2 ClassTo view a video of this procedure, go to:http://www.progressbook.com/Videos/GB/CS2-Create-Extra-Credit
For a Custom Setup 2 class that uses point assignment types, you can create extra credit assignments several different ways in GradeBook. You can set up extra credit as a unique assignment or add extra points to another assignment's assessment. The key to creating a unique extra credit assignment is making the assessments worth 0 points. When you enter marks, students receive extra credit because the assignment's assessments were worth 0 points.
For a Custom Setup 2 class that uses nonpoint assignment types to assign extra credit, you would have to create the assignment and Exclude or not put any mark for the students who did not complete the extra credit.
1. On the Class Dashboard, click Add an Assignment.
2. On the Assignment Details screen, in the Description field, type a description of the assignment.
3. In the Assignment Type drop-down list, select the type of assignment.
4. Next to the Assigned Date field, click the calendar icon to select the date the assignment begins, or type it in the field.
Today's date is the default option.
5. Next to the Due Date field, click the calendar icon to select the date the assignment is due, or type it in the field.
6. In the Weight field, enter the correct weight for the assignment.
Note: The Weight field default is 1. You can only enter numeric characters within the range of 0 to 100 with no more than two decimal places; however, an extra credit assignment should be weighted at least 1.
7. Select the assessments for this assignment.
Create an Extra Credit Assignment for a Default or Custom Setup 1 Class
ProgressBook GradeBook Teacher Guide: Getting Started 63
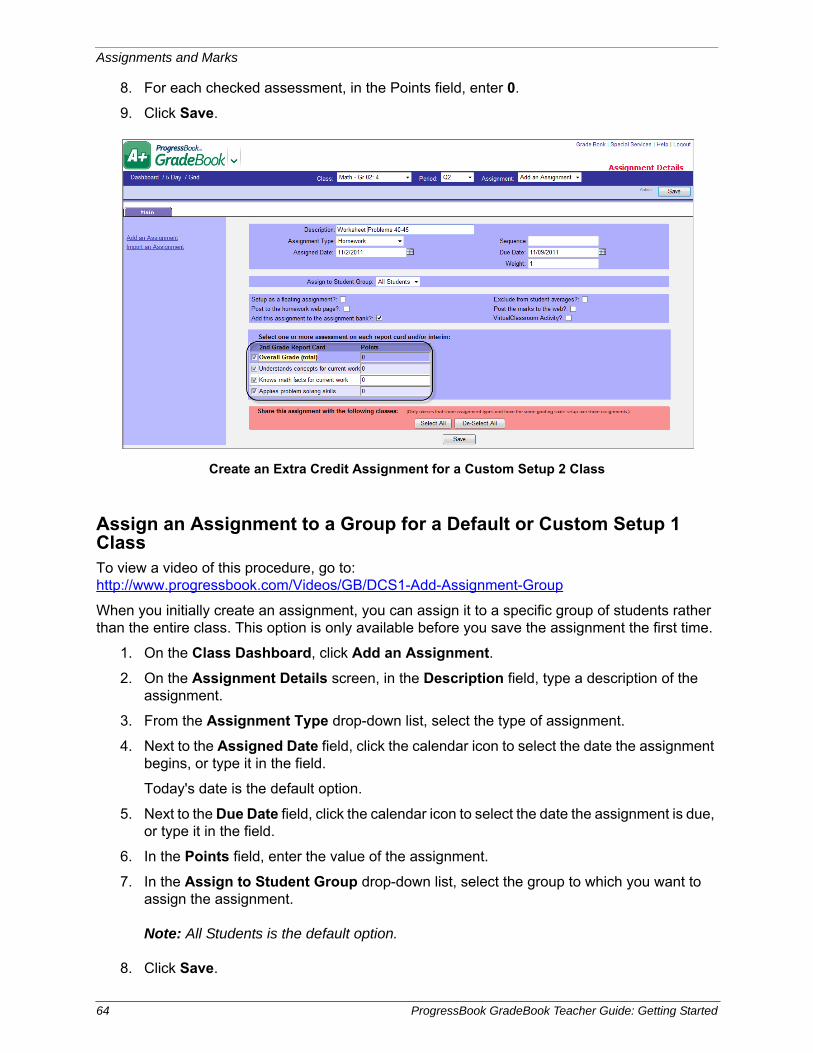
Assignments and Marks
8. For each checked assessment, in the Points field, enter 0.
9. Click Save.
Assign an Assignment to a Group for a Default or Custom Setup 1 ClassTo view a video of this procedure, go to:http://www.progressbook.com/Videos/GB/DCS1-Add-Assignment-Group
When you initially create an assignment, you can assign it to a specific group of students rather than the entire class. This option is only available before you save the assignment the first time.
1. On the Class Dashboard, click Add an Assignment.
2. On the Assignment Details screen, in the Description field, type a description of the assignment.
3. From the Assignment Type drop-down list, select the type of assignment.
4. Next to the Assigned Date field, click the calendar icon to select the date the assignment begins, or type it in the field.
Today's date is the default option.
5. Next to the Due Date field, click the calendar icon to select the date the assignment is due, or type it in the field.
6. In the Points field, enter the value of the assignment.
7. In the Assign to Student Group drop-down list, select the group to which you want to assign the assignment.
Note: All Students is the default option.
8. Click Save.
Create an Extra Credit Assignment for a Custom Setup 2 Class
64 ProgressBook GradeBook Teacher Guide: Getting Started
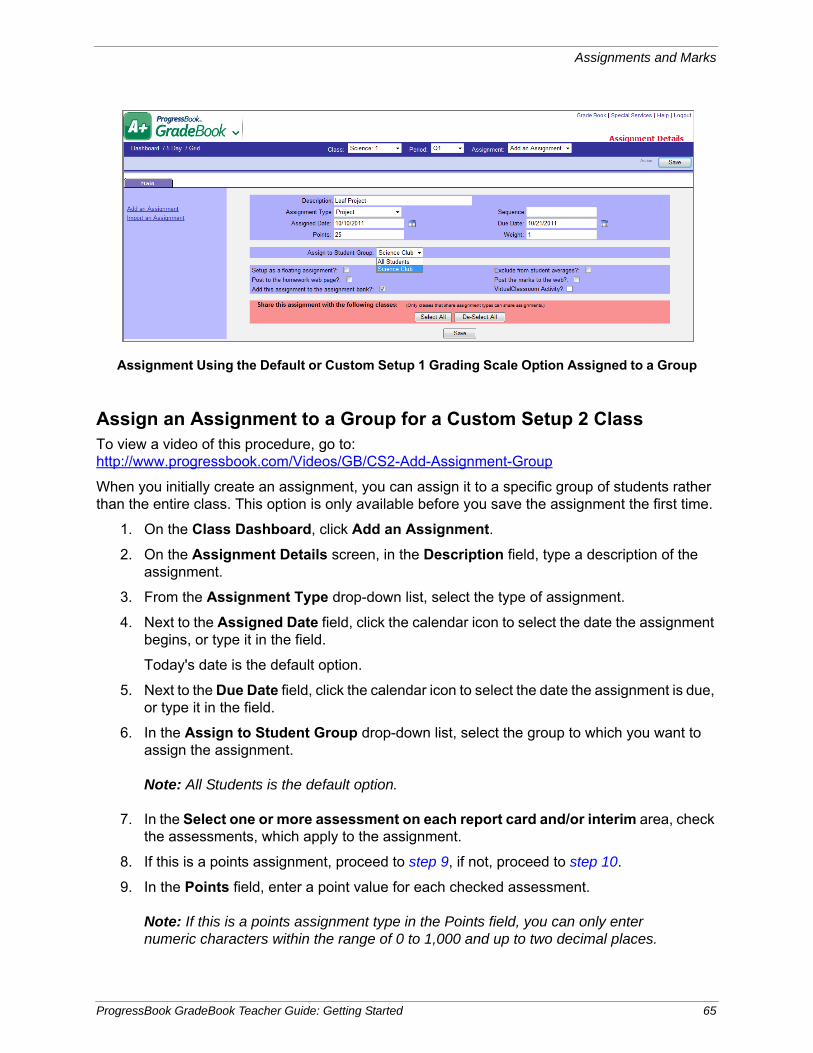
Assignments and Marks
Assign an Assignment to a Group for a Custom Setup 2 ClassTo view a video of this procedure, go to:http://www.progressbook.com/Videos/GB/CS2-Add-Assignment-Group
When you initially create an assignment, you can assign it to a specific group of students rather than the entire class. This option is only available before you save the assignment the first time.
1. On the Class Dashboard, click Add an Assignment.
2. On the Assignment Details screen, in the Description field, type a description of the assignment.
3. From the Assignment Type drop-down list, select the type of assignment.
4. Next to the Assigned Date field, click the calendar icon to select the date the assignment begins, or type it in the field.
Today's date is the default option.
5. Next to the Due Date field, click the calendar icon to select the date the assignment is due, or type it in the field.
6. In the Assign to Student Group drop-down list, select the group to which you want to assign the assignment.
Note: All Students is the default option.
7. In the Select one or more assessment on each report card and/or interim area, check the assessments, which apply to the assignment.
8. If this is a points assignment, proceed to step 9, if not, proceed to step 10.
9. In the Points field, enter a point value for each checked assessment.
Note: If this is a points assignment type in the Points field, you can only enter numeric characters within the range of 0 to 1,000 and up to two decimal places.
Assignment Using the Default or Custom Setup 1 Grading Scale Option Assigned to a Group
ProgressBook GradeBook Teacher Guide: Getting Started 65
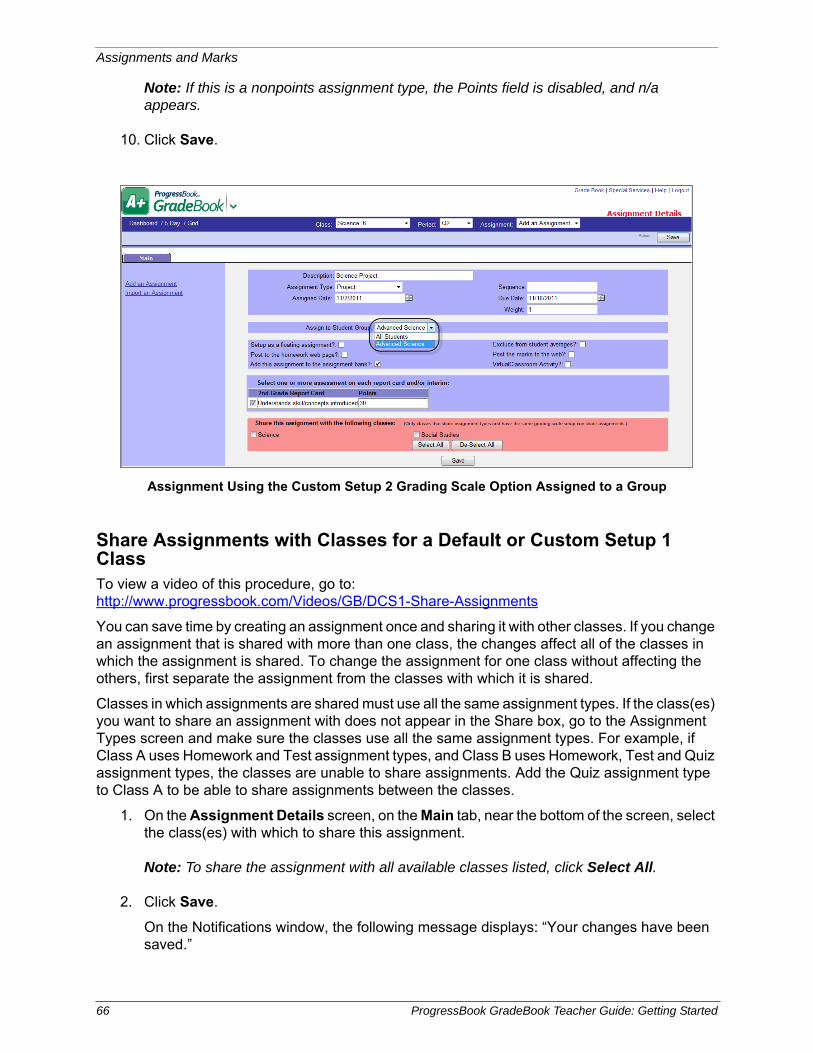
Assignments and Marks
Note: If this is a nonpoints assignment type, the Points field is disabled, and n/a appears.
10. Click Save.
Share Assignments with Classes for a Default or Custom Setup 1 ClassTo view a video of this procedure, go to:http://www.progressbook.com/Videos/GB/DCS1-Share-Assignments
You can save time by creating an assignment once and sharing it with other classes. If you change an assignment that is shared with more than one class, the changes affect all of the classes in which the assignment is shared. To change the assignment for one class without affecting the others, first separate the assignment from the classes with which it is shared.
Classes in which assignments are shared must use all the same assignment types. If the class(es) you want to share an assignment with does not appear in the Share box, go to the Assignment Types screen and make sure the classes use all the same assignment types. For example, if Class A uses Homework and Test assignment types, and Class B uses Homework, Test and Quiz assignment types, the classes are unable to share assignments. Add the Quiz assignment type to Class A to be able to share assignments between the classes.
1. On the Assignment Details screen, on the Main tab, near the bottom of the screen, select the class(es) with which to share this assignment.
Note: To share the assignment with all available classes listed, click Select All.
2. Click Save.
On the Notifications window, the following message displays: “Your changes have been saved.”
Assignment Using the Custom Setup 2 Grading Scale Option Assigned to a Group
66 ProgressBook GradeBook Teacher Guide: Getting Started
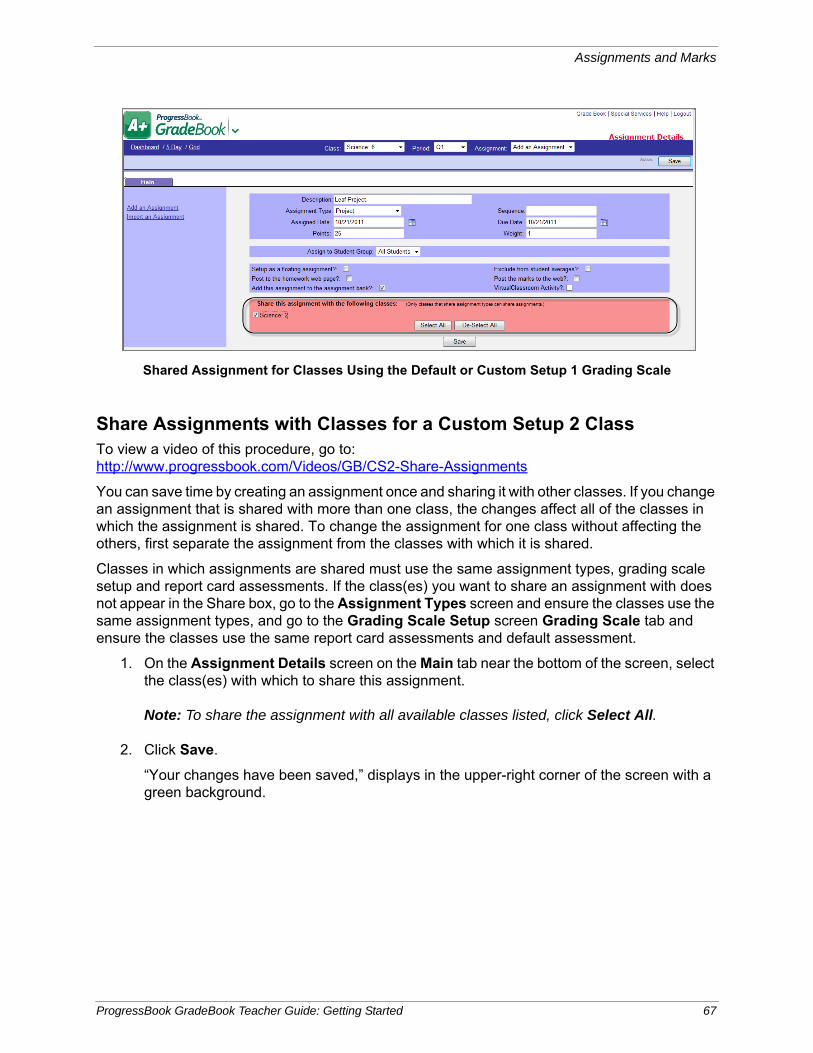
Assignments and Marks
Share Assignments with Classes for a Custom Setup 2 ClassTo view a video of this procedure, go to:http://www.progressbook.com/Videos/GB/CS2-Share-Assignments
You can save time by creating an assignment once and sharing it with other classes. If you change an assignment that is shared with more than one class, the changes affect all of the classes in which the assignment is shared. To change the assignment for one class without affecting the others, first separate the assignment from the classes with which it is shared.
Classes in which assignments are shared must use the same assignment types, grading scale setup and report card assessments. If the class(es) you want to share an assignment with does not appear in the Share box, go to the Assignment Types screen and ensure the classes use the same assignment types, and go to the Grading Scale Setup screen Grading Scale tab and ensure the classes use the same report card assessments and default assessment.
1. On the Assignment Details screen on the Main tab near the bottom of the screen, select the class(es) with which to share this assignment.
Note: To share the assignment with all available classes listed, click Select All.
2. Click Save.
“Your changes have been saved,” displays in the upper-right corner of the screen with a green background.
Shared Assignment for Classes Using the Default or Custom Setup 1 Grading Scale
ProgressBook GradeBook Teacher Guide: Getting Started 67
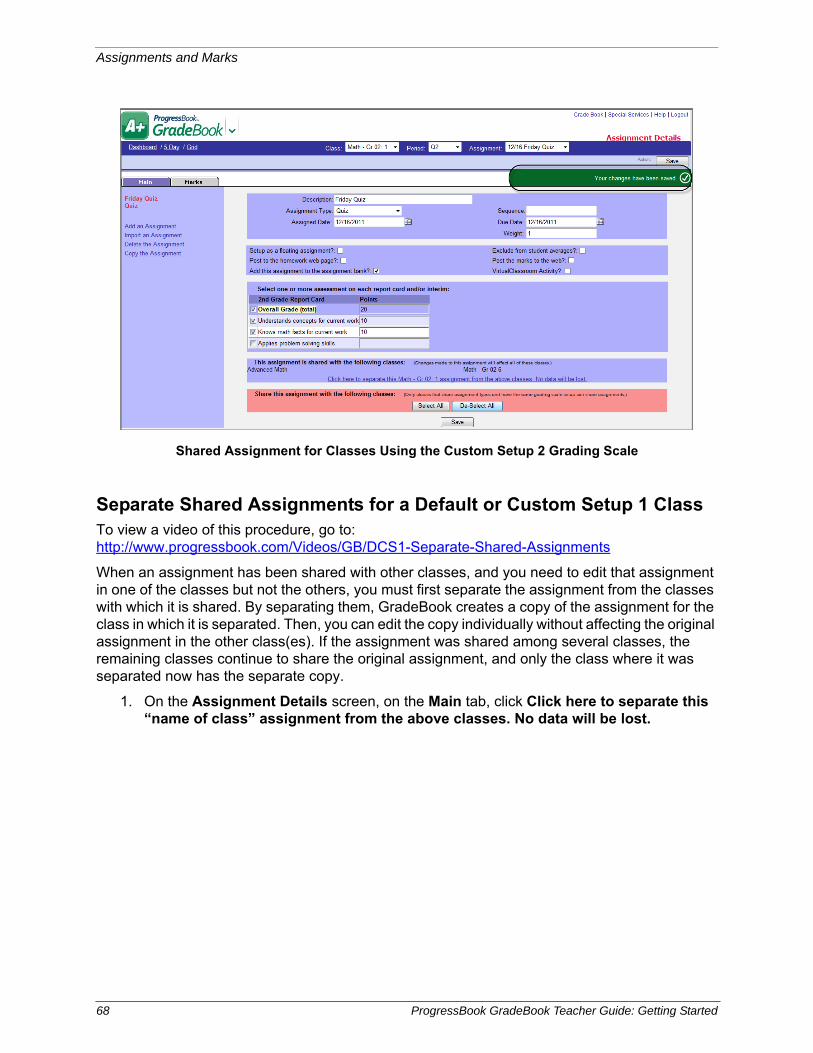
Assignments and Marks
Separate Shared Assignments for a Default or Custom Setup 1 ClassTo view a video of this procedure, go to:http://www.progressbook.com/Videos/GB/DCS1-Separate-Shared-Assignments
When an assignment has been shared with other classes, and you need to edit that assignment in one of the classes but not the others, you must first separate the assignment from the classes with which it is shared. By separating them, GradeBook creates a copy of the assignment for the class in which it is separated. Then, you can edit the copy individually without affecting the original assignment in the other class(es). If the assignment was shared among several classes, the remaining classes continue to share the original assignment, and only the class where it was separated now has the separate copy.
1. On the Assignment Details screen, on the Main tab, click Click here to separate this “name of class” assignment from the above classes. No data will be lost.
Shared Assignment for Classes Using the Custom Setup 2 Grading Scale
68 ProgressBook GradeBook Teacher Guide: Getting Started
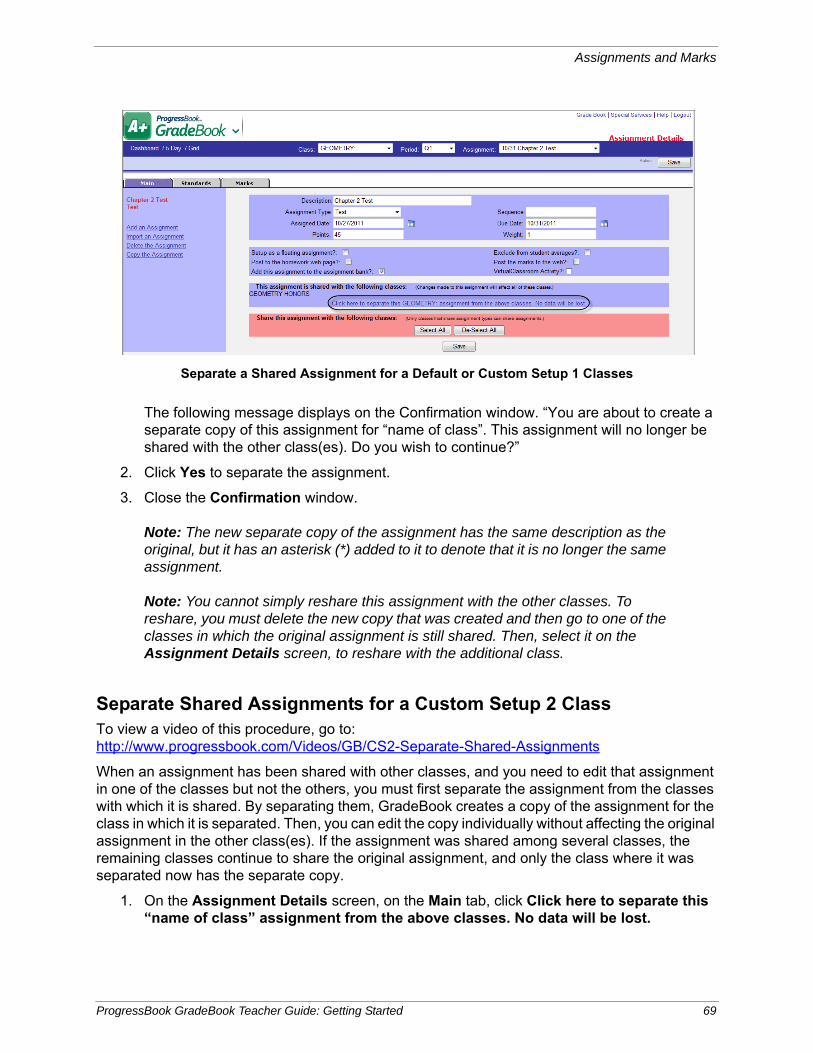
Assignments and Marks
The following message displays on the Confirmation window. “You are about to create a separate copy of this assignment for “name of class”. This assignment will no longer be shared with the other class(es). Do you wish to continue?”
2. Click Yes to separate the assignment.
3. Close the Confirmation window.
Note: The new separate copy of the assignment has the same description as the original, but it has an asterisk (*) added to it to denote that it is no longer the same assignment.
Note: You cannot simply reshare this assignment with the other classes. To reshare, you must delete the new copy that was created and then go to one of the classes in which the original assignment is still shared. Then, select it on the Assignment Details screen, to reshare with the additional class.
Separate Shared Assignments for a Custom Setup 2 ClassTo view a video of this procedure, go to:http://www.progressbook.com/Videos/GB/CS2-Separate-Shared-Assignments
When an assignment has been shared with other classes, and you need to edit that assignment in one of the classes but not the others, you must first separate the assignment from the classes with which it is shared. By separating them, GradeBook creates a copy of the assignment for the class in which it is separated. Then, you can edit the copy individually without affecting the original assignment in the other class(es). If the assignment was shared among several classes, the remaining classes continue to share the original assignment, and only the class where it was separated now has the separate copy.
1. On the Assignment Details screen, on the Main tab, click Click here to separate this “name of class” assignment from the above classes. No data will be lost.
Separate a Shared Assignment for a Default or Custom Setup 1 Classes
ProgressBook GradeBook Teacher Guide: Getting Started 69
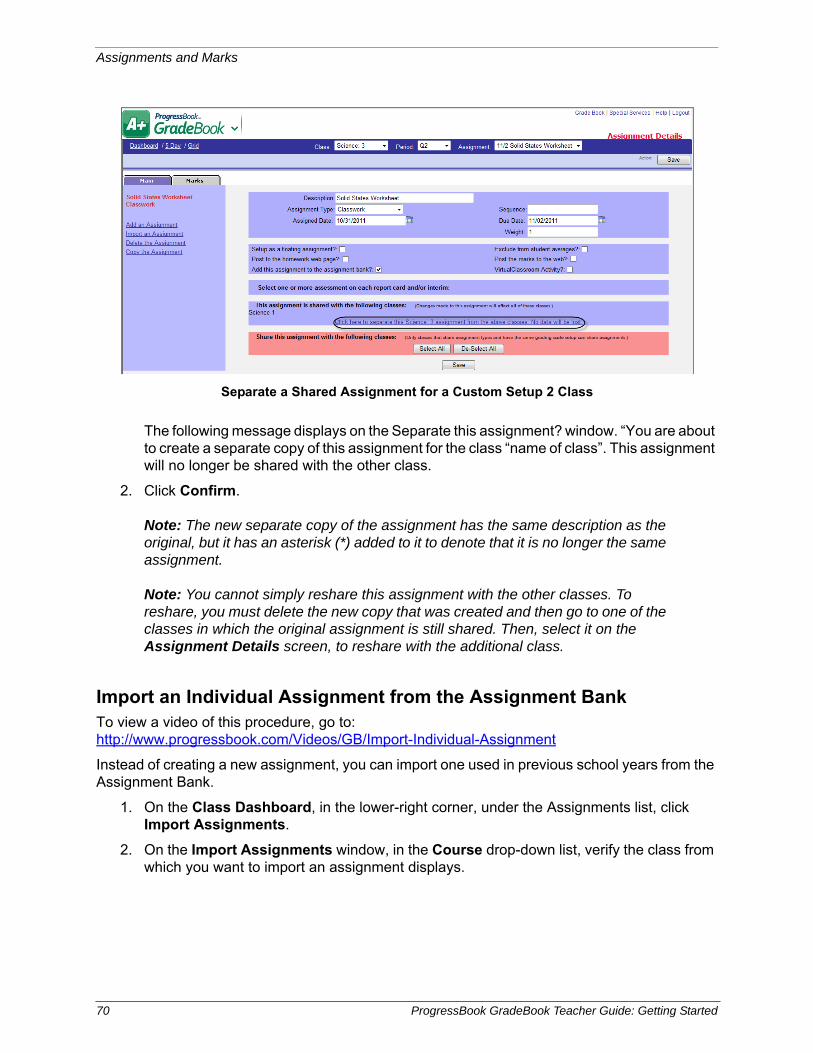
Assignments and Marks
The following message displays on the Separate this assignment? window. “You are about to create a separate copy of this assignment for the class “name of class”. This assignment will no longer be shared with the other class.
2. Click Confirm.
Note: The new separate copy of the assignment has the same description as the original, but it has an asterisk (*) added to it to denote that it is no longer the same assignment.
Note: You cannot simply reshare this assignment with the other classes. To reshare, you must delete the new copy that was created and then go to one of the classes in which the original assignment is still shared. Then, select it on the Assignment Details screen, to reshare with the additional class.
Import an Individual Assignment from the Assignment BankTo view a video of this procedure, go to:http://www.progressbook.com/Videos/GB/Import-Individual-Assignment
Instead of creating a new assignment, you can import one used in previous school years from the Assignment Bank.
1. On the Class Dashboard, in the lower-right corner, under the Assignments list, click Import Assignments.
2. On the Import Assignments window, in the Course drop-down list, verify the class from which you want to import an assignment displays.
Separate a Shared Assignment for a Custom Setup 2 Class
70 ProgressBook GradeBook Teacher Guide: Getting Started
Assignments and Marks
Note: Assignment banks for Default and Custom Setup 1 classes are separate from assignment banks for Custom Setup 2 classes, and assignments created in a Custom Setup 2 class cannot be imported into a class using the Default or Custom Setup 1 grading scale. Assignment banks for Custom Setup 2 classes include assignments, which were created before the split marks enhancement. When the assignment is imported, it is added to the class in the Custom Setup 2 format.
Note: To search for an assignment, use the Type drop-down list and Phrase field, and then click Search. The assignments that most closely match your search criteria display.
3. Next to the Type column of the assignment you want to import, click the download icon.
The assignment displays on the Assignment Details screen. Today’s date is the default date for the Assigned Date and Due Date.
Note: You can also import multiple assignments at once.
4. Next to the Assigned Date field, click the calendar icon to select the new assigned date, or type it in the field.
5. Next to the Due Date field, click the calendar icon to select the new due date, or type it in the field.
6. If needed, make any other changes to the imported assignment.
7. Click Save.
Import Multiple Assignments from the Assignment BankTo view a video of this procedure, go to:http://www.progressbook.com/Videos/GB/Import-Multiple-Assignments
To save time when creating assignments, you can import multiple assignments used in previous school years from the Assignment Bank.
1. On the Class Dashboard, in the lower-right corner of the screen, click Import Assignments.
2. On the Import Assignments window, in the Course list, verify that the class from which you want to import assignments displays.
Note: To search for an assignment(s), use the Type drop-down list and Phrase field, and then click Search. The assignments that most closely match your search criteria display.
3. In the Date column, for each assignment that you want to import, type the date you want the assignment to be due.
4. Click Import Assignments.
ProgressBook GradeBook Teacher Guide: Getting Started 71
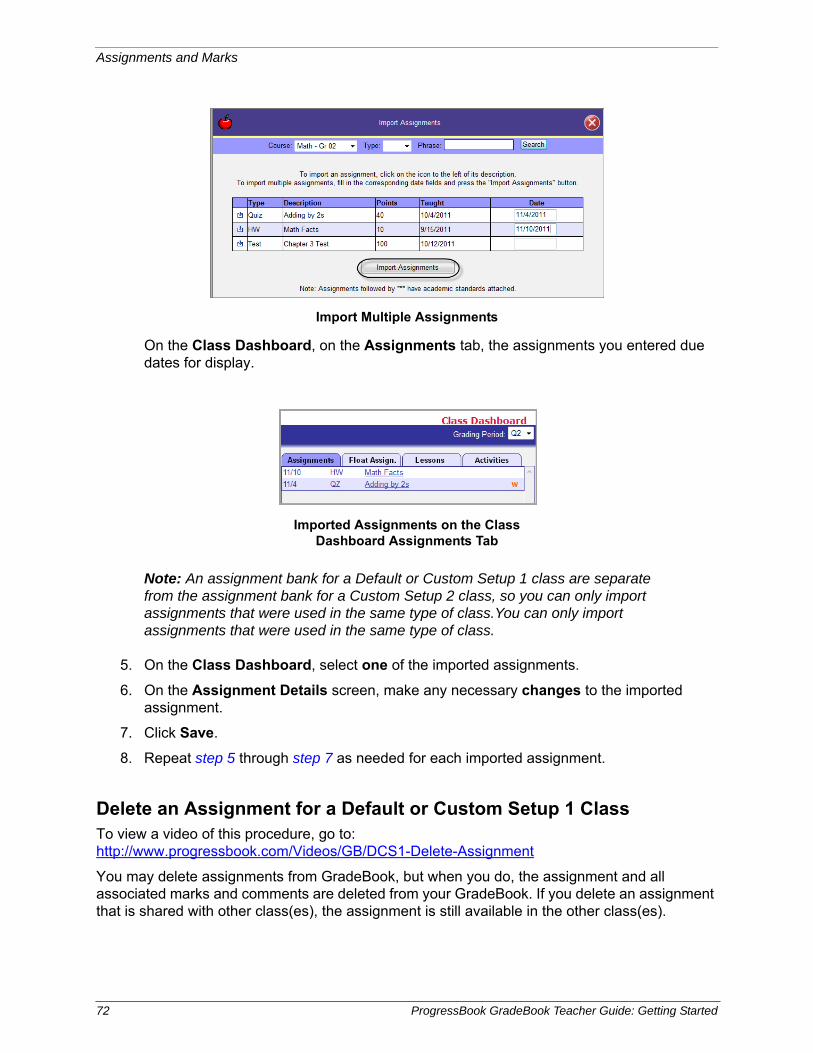
Assignments and Marks
On the Class Dashboard, on the Assignments tab, the assignments you entered due dates for display.
Note: An assignment bank for a Default or Custom Setup 1 class are separate from the assignment bank for a Custom Setup 2 class, so you can only import assignments that were used in the same type of class.You can only import assignments that were used in the same type of class.
5. On the Class Dashboard, select one of the imported assignments.
6. On the Assignment Details screen, make any necessary changes to the imported assignment.
7. Click Save.
8. Repeat step 5 through step 7 as needed for each imported assignment.
Delete an Assignment for a Default or Custom Setup 1 ClassTo view a video of this procedure, go to:http://www.progressbook.com/Videos/GB/DCS1-Delete-Assignment
You may delete assignments from GradeBook, but when you do, the assignment and all associated marks and comments are deleted from your GradeBook. If you delete an assignment that is shared with other class(es), the assignment is still available in the other class(es).
Import Multiple Assignments
Imported Assignments on the Class Dashboard Assignments Tab
72 ProgressBook GradeBook Teacher Guide: Getting Started
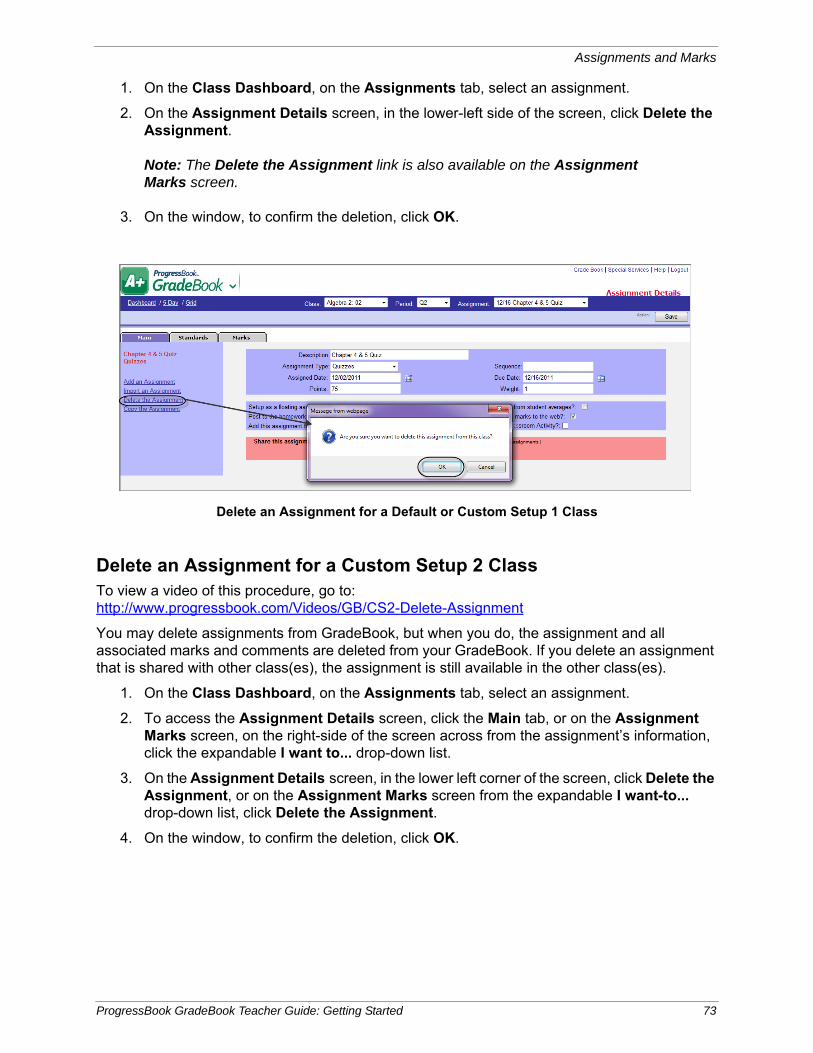
Assignments and Marks
1. On the Class Dashboard, on the Assignments tab, select an assignment.
2. On the Assignment Details screen, in the lower-left side of the screen, click Delete the Assignment.
Note: The Delete the Assignment link is also available on the Assignment Marks screen.
3. On the window, to confirm the deletion, click OK.
Delete an Assignment for a Custom Setup 2 ClassTo view a video of this procedure, go to:http://www.progressbook.com/Videos/GB/CS2-Delete-Assignment
You may delete assignments from GradeBook, but when you do, the assignment and all associated marks and comments are deleted from your GradeBook. If you delete an assignment that is shared with other class(es), the assignment is still available in the other class(es).
1. On the Class Dashboard, on the Assignments tab, select an assignment.
2. To access the Assignment Details screen, click the Main tab, or on the Assignment Marks screen, on the right-side of the screen across from the assignment’s information, click the expandable I want to... drop-down list.
3. On the Assignment Details screen, in the lower left corner of the screen, click Delete the Assignment, or on the Assignment Marks screen from the expandable I want-to... drop-down list, click Delete the Assignment.
4. On the window, to confirm the deletion, click OK.
Delete an Assignment for a Default or Custom Setup 1 Class
ProgressBook GradeBook Teacher Guide: Getting Started 73
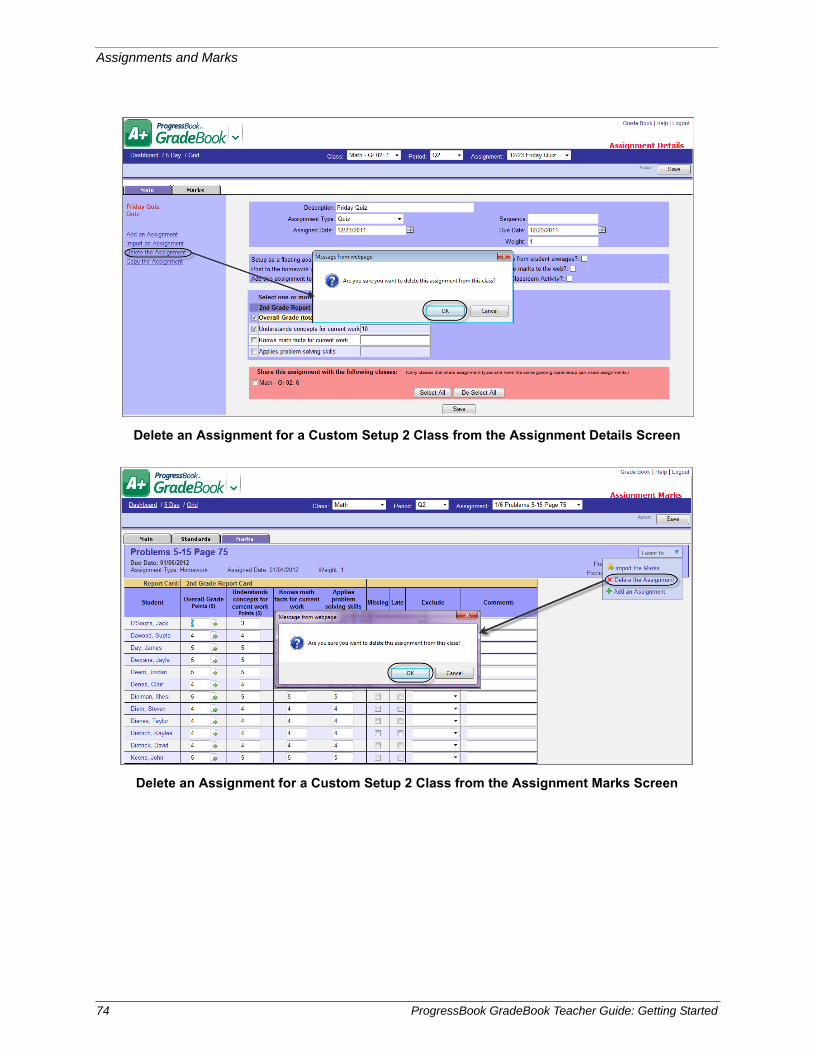
Assignments and Marks
Delete an Assignment for a Custom Setup 2 Class from the Assignment Details Screen
Delete an Assignment for a Custom Setup 2 Class from the Assignment Marks Screen
74 ProgressBook GradeBook Teacher Guide: Getting Started
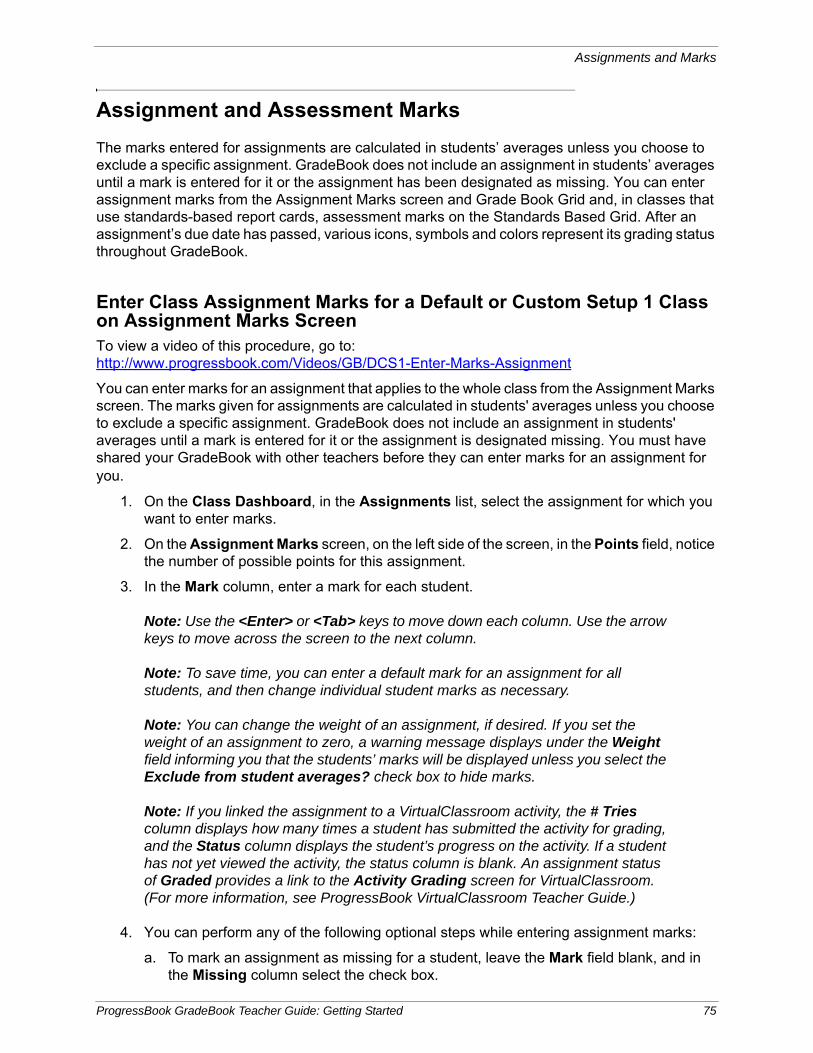
Assignments and Marks
Assignment and Assessment Marks
The marks entered for assignments are calculated in students’ averages unless you choose to exclude a specific assignment. GradeBook does not include an assignment in students’ averages until a mark is entered for it or the assignment has been designated as missing. You can enter assignment marks from the Assignment Marks screen and Grade Book Grid and, in classes that use standards-based report cards, assessment marks on the Standards Based Grid. After an assignment’s due date has passed, various icons, symbols and colors represent its grading status throughout GradeBook.
Enter Class Assignment Marks for a Default or Custom Setup 1 Class on Assignment Marks ScreenTo view a video of this procedure, go to:http://www.progressbook.com/Videos/GB/DCS1-Enter-Marks-Assignment
You can enter marks for an assignment that applies to the whole class from the Assignment Marks screen. The marks given for assignments are calculated in students' averages unless you choose to exclude a specific assignment. GradeBook does not include an assignment in students' averages until a mark is entered for it or the assignment is designated missing. You must have shared your GradeBook with other teachers before they can enter marks for an assignment for you.
1. On the Class Dashboard, in the Assignments list, select the assignment for which you want to enter marks.
2. On the Assignment Marks screen, on the left side of the screen, in the Points field, notice the number of possible points for this assignment.
3. In the Mark column, enter a mark for each student.
Note: Use the <Enter> or <Tab> keys to move down each column. Use the arrow keys to move across the screen to the next column.
Note: To save time, you can enter a default mark for an assignment for all students, and then change individual student marks as necessary.
Note: You can change the weight of an assignment, if desired. If you set the weight of an assignment to zero, a warning message displays under the Weight field informing you that the students’ marks will be displayed unless you select the Exclude from student averages? check box to hide marks.
Note: If you linked the assignment to a VirtualClassroom activity, the # Tries column displays how many times a student has submitted the activity for grading, and the Status column displays the student’s progress on the activity. If a student has not yet viewed the activity, the status column is blank. An assignment status of Graded provides a link to the Activity Grading screen for VirtualClassroom. (For more information, see ProgressBook VirtualClassroom Teacher Guide.)
4. You can perform any of the following optional steps while entering assignment marks:
a. To mark an assignment as missing for a student, leave the Mark field blank, and in the Missing column select the check box.
ProgressBook GradeBook Teacher Guide: Getting Started 75
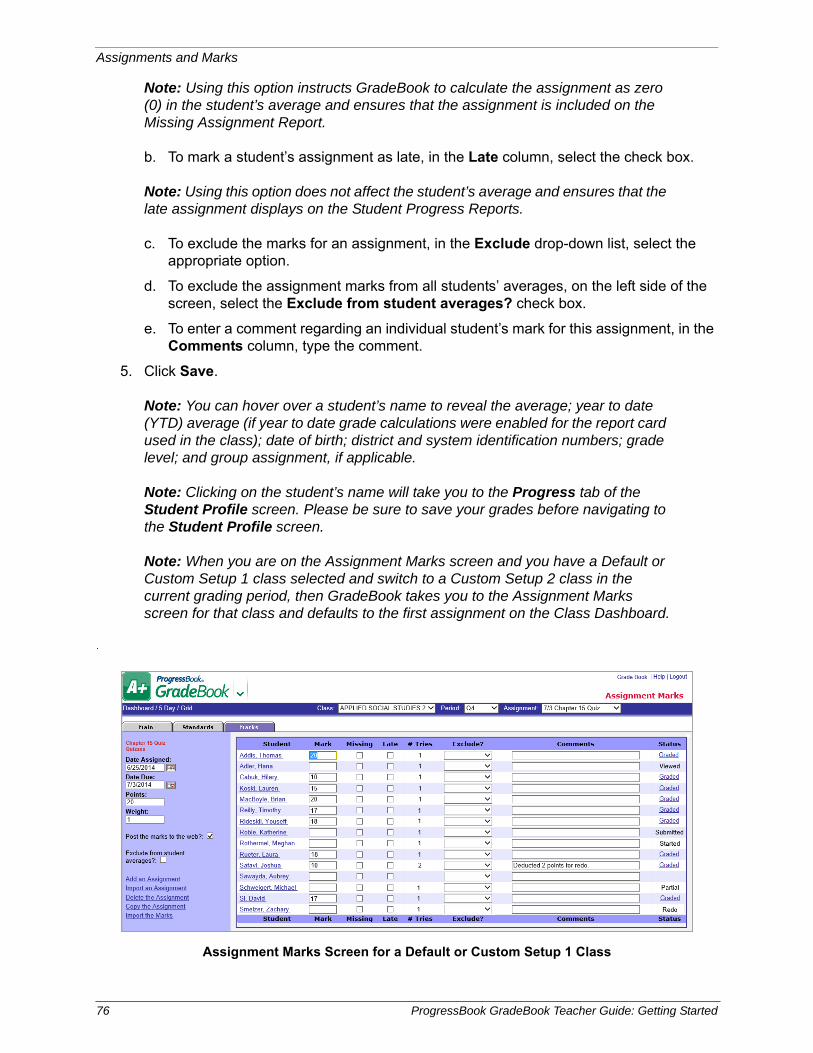
Assignments and Marks
Note: Using this option instructs GradeBook to calculate the assignment as zero (0) in the student’s average and ensures that the assignment is included on the Missing Assignment Report.
b. To mark a student’s assignment as late, in the Late column, select the check box.
Note: Using this option does not affect the student’s average and ensures that the late assignment displays on the Student Progress Reports.
c. To exclude the marks for an assignment, in the Exclude drop-down list, select the appropriate option.
d. To exclude the assignment marks from all students’ averages, on the left side of the screen, select the Exclude from student averages? check box.
e. To enter a comment regarding an individual student’s mark for this assignment, in the Comments column, type the comment.
5. Click Save.
Note: You can hover over a student’s name to reveal the average; year to date (YTD) average (if year to date grade calculations were enabled for the report card used in the class); date of birth; district and system identification numbers; grade level; and group assignment, if applicable.
Note: Clicking on the student’s name will take you to the Progress tab of the Student Profile screen. Please be sure to save your grades before navigating to the Student Profile screen.
Note: When you are on the Assignment Marks screen and you have a Default or Custom Setup 1 class selected and switch to a Custom Setup 2 class in the current grading period, then GradeBook takes you to the Assignment Marks screen for that class and defaults to the first assignment on the Class Dashboard.
.
Assignment Marks Screen for a Default or Custom Setup 1 Class
76 ProgressBook GradeBook Teacher Guide: Getting Started
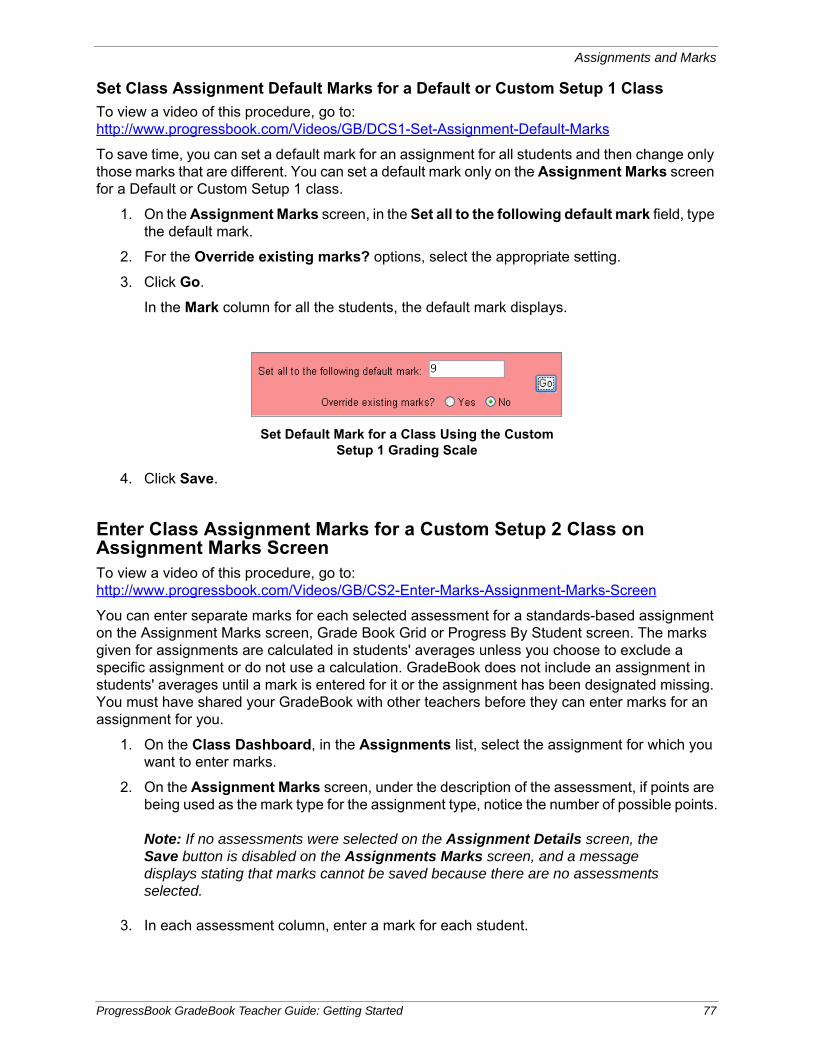
Assignments and Marks
Set Class Assignment Default Marks for a Default or Custom Setup 1 Class
To view a video of this procedure, go to:http://www.progressbook.com/Videos/GB/DCS1-Set-Assignment-Default-Marks
To save time, you can set a default mark for an assignment for all students and then change only those marks that are different. You can set a default mark only on the Assignment Marks screen for a Default or Custom Setup 1 class.
1. On the Assignment Marks screen, in the Set all to the following default mark field, type the default mark.
2. For the Override existing marks? options, select the appropriate setting.
3. Click Go.
In the Mark column for all the students, the default mark displays.
4. Click Save.
Enter Class Assignment Marks for a Custom Setup 2 Class on Assignment Marks ScreenTo view a video of this procedure, go to:http://www.progressbook.com/Videos/GB/CS2-Enter-Marks-Assignment-Marks-Screen
You can enter separate marks for each selected assessment for a standards-based assignment on the Assignment Marks screen, Grade Book Grid or Progress By Student screen. The marks given for assignments are calculated in students' averages unless you choose to exclude a specific assignment or do not use a calculation. GradeBook does not include an assignment in students' averages until a mark is entered for it or the assignment has been designated missing. You must have shared your GradeBook with other teachers before they can enter marks for an assignment for you.
1. On the Class Dashboard, in the Assignments list, select the assignment for which you want to enter marks.
2. On the Assignment Marks screen, under the description of the assessment, if points are being used as the mark type for the assignment type, notice the number of possible points.
Note: If no assessments were selected on the Assignment Details screen, the Save button is disabled on the Assignments Marks screen, and a message displays stating that marks cannot be saved because there are no assessments selected.
3. In each assessment column, enter a mark for each student.
Set Default Mark for a Class Using the Custom Setup 1 Grading Scale
ProgressBook GradeBook Teacher Guide: Getting Started 77
Assignments and Marks
Note: If a class uses more than one report card, the assessments are grouped by report card in their report card sequence order with the name of the report card above the assessment columns, and a gold divider line separates assessments from different report cards.
Note: If you selected a default assessment on the Assignment Details screen for a point assignment type, the default assessment’s column heading is grey, and the points entered for the other selected assessments total in the default assessment field. However, if on the Assignment Details screen you made the default assessment’s point value a different value than the sum of the assessments, totalling is disabled on the Assignment Marks screen for that assignment.
Note: If on the Assignment Marks screen you do not want the sum to equal the other assessments, the point value for default assessment is editable.
Note: When you enter marks for an assessment, you can enter numeric values between -1,000 through 2,000 and up to two decimal places.
Note: When entering marks for the first student on the roster, you have the option to Copy Marks, Duplicate or Clear Marks. The Copy Marks and Clear Marks options applies to all of the students for that assignment or assessment. The Copy Marks and Clear Marks options can also be used in the Missing, Late, Exclude and Comments column. When you use the Copy Marks option, the option does not override previously entered marks, exclusions or late flags; however, if a student was previously entered as Missing the assignment, the Copy Marks option overrides the Missing indicator.
Note: The Duplicate option is available for any cell in the first row, except the last. When you click Duplicate, it duplicates the mark entered to all additional assessments to the right, and it does not override previously entered marks. When you hover over Duplicate, a tool tip displays, and the column, which is to be duplicated, is highlighted in yellow.
Note: In the first assessment column, you can also click the duplicate icon to duplicate the mark entered to all additional assessments for this student.
Note: When entering marks for the first student on the roster, you can duplicate the mark for every student’s assessments by entering the mark for the first student in the roster, clicking Copy Marks and then clicking Duplicate.
Note: You can use the arrow keys to navigate on the page. Also, the Enter key moves the cursor down the same column, and the Tab key moves across the row.
Note: If you linked the assignment to a VirtualClassroom activity, the # Tries column displays how many times a student has submitted the activity for grading, and the Status column displays the student’s progress on the activity. If a student has not yet viewed the activity, the status column is blank. An assignment status of Graded provides a link to the Activity Grading screen for VirtualClassroom. (For more information, see ProgressBook VirtualClassroom Teacher Guide.)
78 ProgressBook GradeBook Teacher Guide: Getting Started
Assignments and Marks
4. For each assessment, continue entering a mark for each student.
Note: On the Assignment Marks screen if you enter points for an assessment, which are higher than the possible points for the assessment, the points are shown in red, so you notice the inconsistency. The extra points are calculated into the student’s grade as extra credit.
5. You can perform any of the following optional steps while entering assessment marks:
a. To mark an assignment as missing for a student, leave the Mark field blank, and in the Missing column select the check box.
Note: Using this option instructs GradeBook to calculate the assignment as zero (0) in the student’s average and ensures that the assignment is included on the Missing Assignment Report.
b. To mark a student’s assignment as late, in the Late column, select the check box.
Note: Using this option does not affect the student’s average and ensures that the late assignment displays on the Student Progress Reports.
c. To exclude the marks for an assignment, in the Exclude drop-down list, select the appropriate option.
d. To exclude the assignment from all students’ averages, select the Exclude from student averages? check box.
e. To enter a comment regarding an individual student’s mark for this assignment, in the Comments column, type the comment.
Note: In a comment field, you can enter a comment up to 1,000 characters, and if a comment is entered, you can use the arrow keys to move the cursor through the comment; however, if a comment is not entered when you use the enter keys, the cursor moves to the next field in the following row.
6. Click Save.
Note: If your assignment marks do not save, you receive an error message on the screen that the marks did not save.
ProgressBook GradeBook Teacher Guide: Getting Started 79
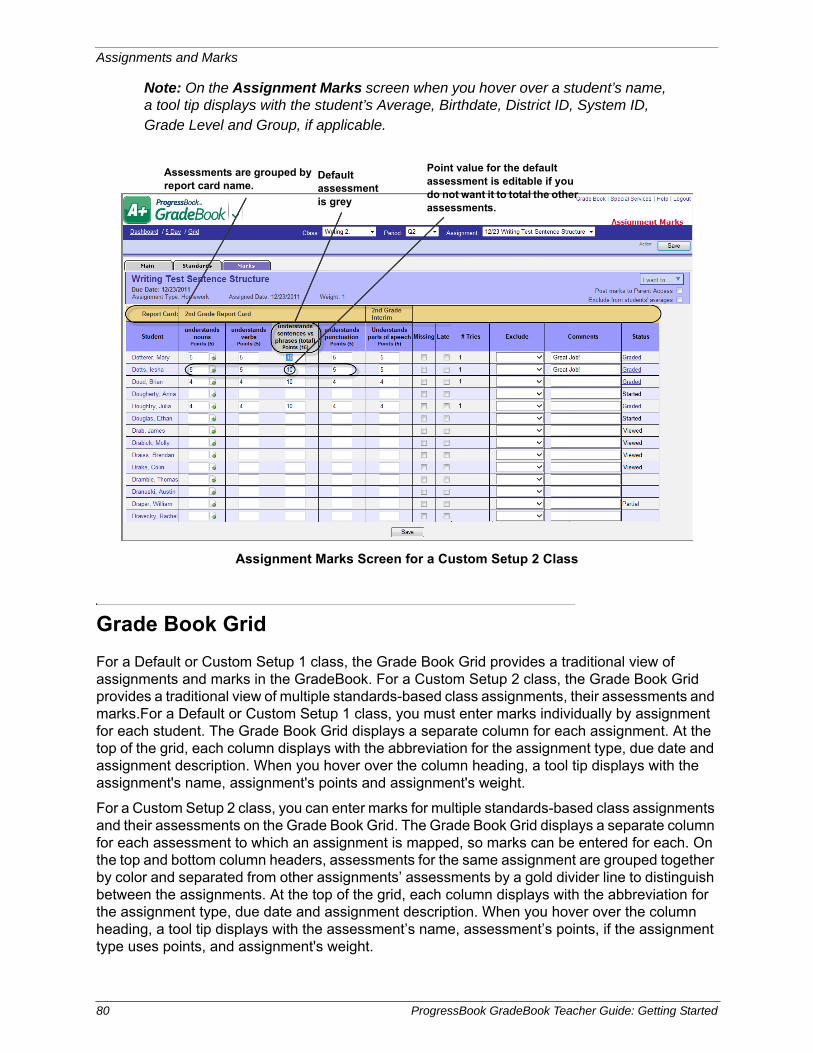
Assignments and Marks
Note: On the Assignment Marks screen when you hover over a student’s name, a tool tip displays with the student’s Average, Birthdate, District ID, System ID, Grade Level and Group, if applicable.
Grade Book Grid
For a Default or Custom Setup 1 class, the Grade Book Grid provides a traditional view of assignments and marks in the GradeBook. For a Custom Setup 2 class, the Grade Book Grid provides a traditional view of multiple standards-based class assignments, their assessments and marks.For a Default or Custom Setup 1 class, you must enter marks individually by assignment for each student. The Grade Book Grid displays a separate column for each assignment. At the top of the grid, each column displays with the abbreviation for the assignment type, due date and assignment description. When you hover over the column heading, a tool tip displays with the assignment's name, assignment's points and assignment's weight.
For a Custom Setup 2 class, you can enter marks for multiple standards-based class assignments and their assessments on the Grade Book Grid. The Grade Book Grid displays a separate column for each assessment to which an assignment is mapped, so marks can be entered for each. On the top and bottom column headers, assessments for the same assignment are grouped together by color and separated from other assignments’ assessments by a gold divider line to distinguish between the assignments. At the top of the grid, each column displays with the abbreviation for the assignment type, due date and assignment description. When you hover over the column heading, a tool tip displays with the assessment’s name, assessment’s points, if the assignment type uses points, and assignment's weight.
Assignment Marks Screen for a Custom Setup 2 Class
Default assessment is grey
Point value for the default assessment is editable if you do not want it to total the other assessments.
Assessments are grouped by report card name.
80 ProgressBook GradeBook Teacher Guide: Getting Started
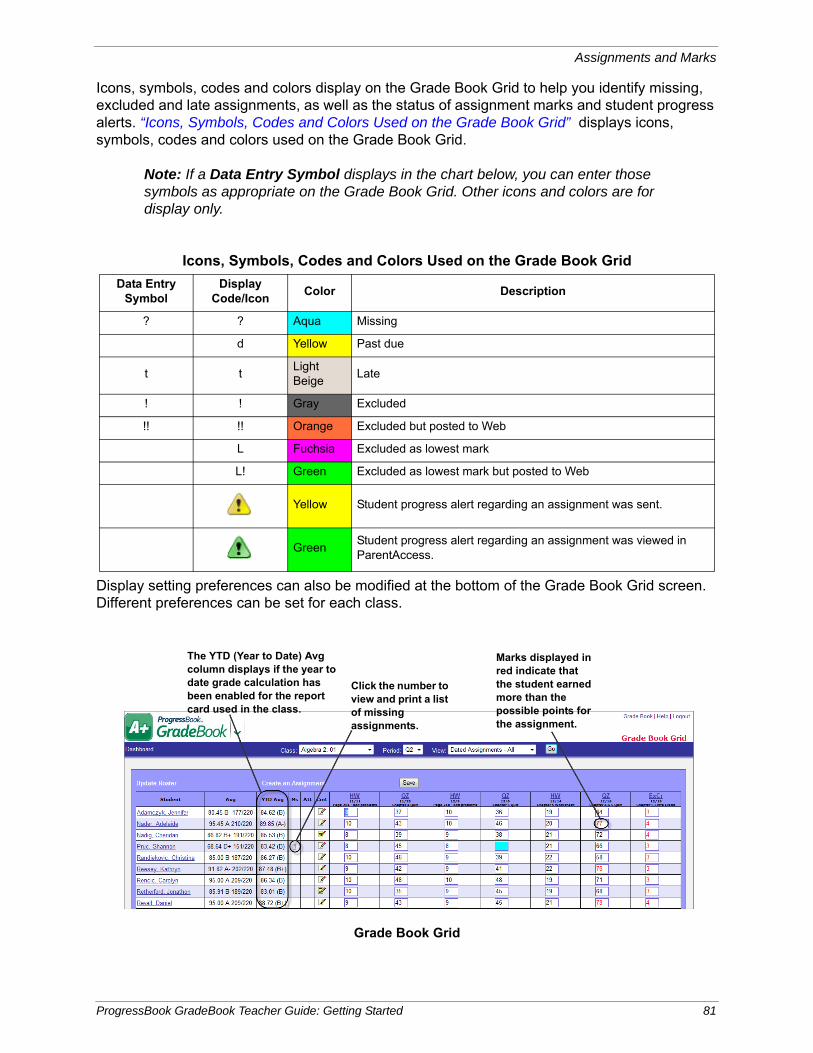
Assignments and Marks
Icons, symbols, codes and colors display on the Grade Book Grid to help you identify missing, excluded and late assignments, as well as the status of assignment marks and student progress alerts. “Icons, Symbols, Codes and Colors Used on the Grade Book Grid” displays icons, symbols, codes and colors used on the Grade Book Grid.
Note: If a Data Entry Symbol displays in the chart below, you can enter those symbols as appropriate on the Grade Book Grid. Other icons and colors are for display only.
Display setting preferences can also be modified at the bottom of the Grade Book Grid screen. Different preferences can be set for each class.
Icons, Symbols, Codes and Colors Used on the Grade Book Grid
Data Entry Symbol
DisplayCode/Icon
Color Description
? ? Aqua Missing
d Yellow Past due
t tLight Beige
Late
! ! Gray Excluded
!! !! Orange Excluded but posted to Web
L Fuchsia Excluded as lowest mark
L! Green Excluded as lowest mark but posted to Web
Yellow Student progress alert regarding an assignment was sent.
GreenStudent progress alert regarding an assignment was viewed in ParentAccess.
Grade Book Grid
Click the number to view and print a list of missing assignments.
The YTD (Year to Date) Avg column displays if the year to date grade calculation has been enabled for the report card used in the class.
Marks displayed in red indicate that the student earned more than the possible points for the assignment.
ProgressBook GradeBook Teacher Guide: Getting Started 81
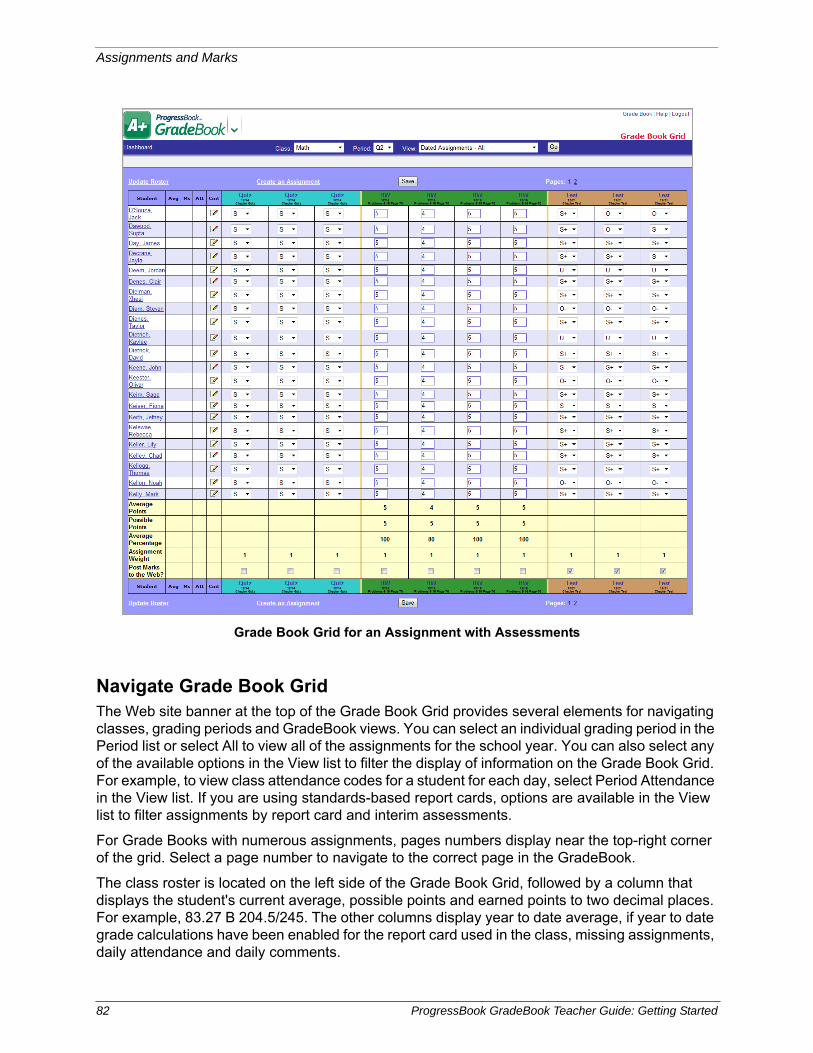
Assignments and Marks
Navigate Grade Book GridThe Web site banner at the top of the Grade Book Grid provides several elements for navigating classes, grading periods and GradeBook views. You can select an individual grading period in the Period list or select All to view all of the assignments for the school year. You can also select any of the available options in the View list to filter the display of information on the Grade Book Grid. For example, to view class attendance codes for a student for each day, select Period Attendance in the View list. If you are using standards-based report cards, options are available in the View list to filter assignments by report card and interim assessments.
For Grade Books with numerous assignments, pages numbers display near the top-right corner of the grid. Select a page number to navigate to the correct page in the GradeBook.
The class roster is located on the left side of the Grade Book Grid, followed by a column that displays the student's current average, possible points and earned points to two decimal places. For example, 83.27 B 204.5/245. The other columns display year to date average, if year to date grade calculations have been enabled for the report card used in the class, missing assignments, daily attendance and daily comments.
Grade Book Grid for an Assignment with Assessments
82 ProgressBook GradeBook Teacher Guide: Getting Started
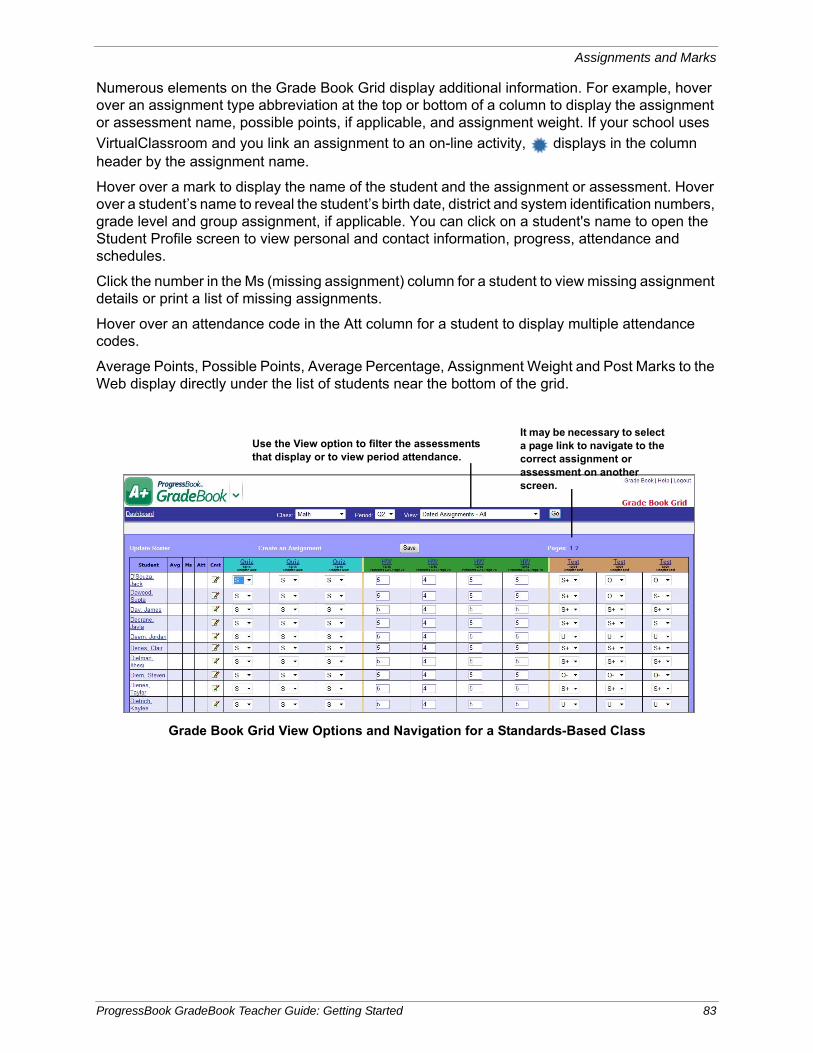
Assignments and Marks
Numerous elements on the Grade Book Grid display additional information. For example, hover over an assignment type abbreviation at the top or bottom of a column to display the assignment or assessment name, possible points, if applicable, and assignment weight. If your school uses
VirtualClassroom and you link an assignment to an on-line activity, displays in the column header by the assignment name.
Hover over a mark to display the name of the student and the assignment or assessment. Hover over a student’s name to reveal the student’s birth date, district and system identification numbers, grade level and group assignment, if applicable. You can click on a student's name to open the Student Profile screen to view personal and contact information, progress, attendance and schedules.
Click the number in the Ms (missing assignment) column for a student to view missing assignment details or print a list of missing assignments.
Hover over an attendance code in the Att column for a student to display multiple attendance codes.
Average Points, Possible Points, Average Percentage, Assignment Weight and Post Marks to the Web display directly under the list of students near the bottom of the grid.
Grade Book Grid View Options and Navigation for a Standards-Based Class
Use the View option to filter the assessments that display or to view period attendance.
It may be necessary to select a page link to navigate to the correct assignment or assessment on another screen.
ProgressBook GradeBook Teacher Guide: Getting Started 83
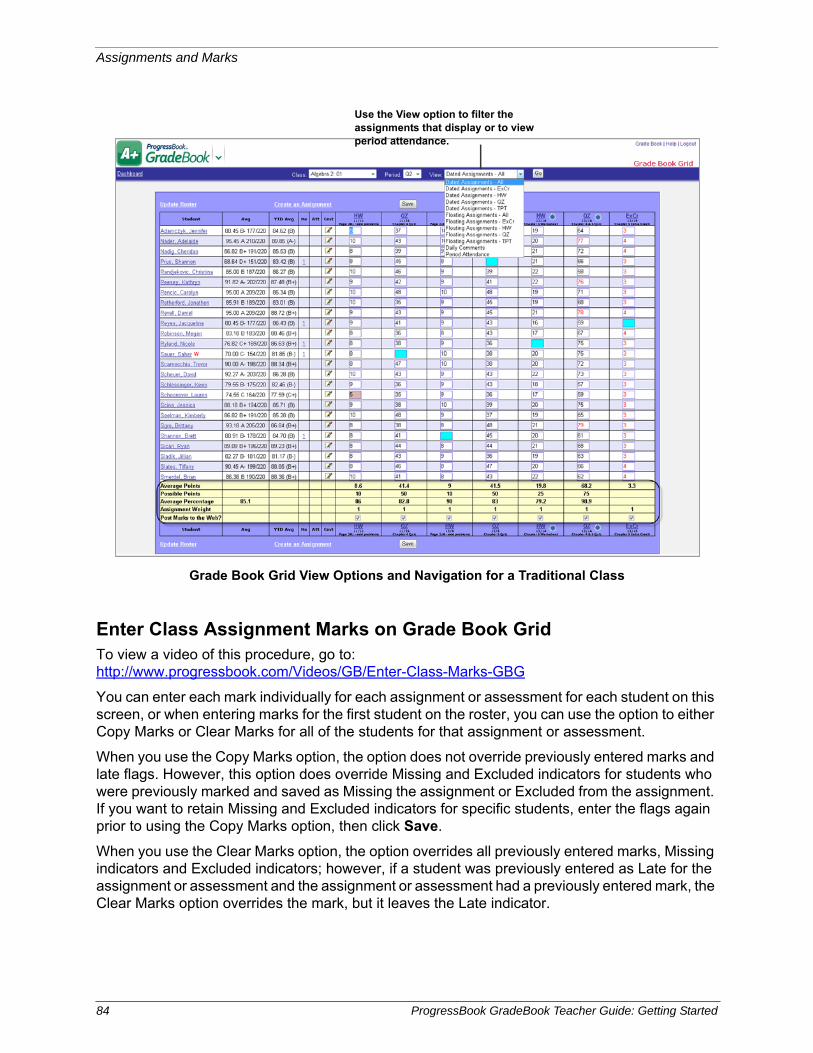
Assignments and Marks
Enter Class Assignment Marks on Grade Book GridTo view a video of this procedure, go to:http://www.progressbook.com/Videos/GB/Enter-Class-Marks-GBG
You can enter each mark individually for each assignment or assessment for each student on this screen, or when entering marks for the first student on the roster, you can use the option to either Copy Marks or Clear Marks for all of the students for that assignment or assessment.
When you use the Copy Marks option, the option does not override previously entered marks and late flags. However, this option does override Missing and Excluded indicators for students who were previously marked and saved as Missing the assignment or Excluded from the assignment. If you want to retain Missing and Excluded indicators for specific students, enter the flags again prior to using the Copy Marks option, then click Save.
When you use the Clear Marks option, the option overrides all previously entered marks, Missing indicators and Excluded indicators; however, if a student was previously entered as Late for the assignment or assessment and the assignment or assessment had a previously entered mark, the Clear Marks option overrides the mark, but it leaves the Late indicator.
Grade Book Grid View Options and Navigation for a Traditional Class
Use the View option to filter the assignments that display or to view period attendance.
84 ProgressBook GradeBook Teacher Guide: Getting Started
Assignments and Marks
When entering marks, you can use the Tab and Enter keys to navigate on the page. The Tab key moves the cursor across the screen from left to right. When the cursor reaches the end of a row, it will move down to the first mark field of the next row. The Enter key moves the cursor down the screen from top to bottom. When the cursor reaches the bottom of the Marks column, it will return to the top of the column. You can also use the arrow keys to navigate on the page.
1. On the Teacher Home Page or Class Dashboard, click Grade Book Grid.
2. If you entered the Grade Book Grid from the Teacher Home Page in the Class drop-down list, select the class you want to view. If you entered from the Class Dashboard, in the Class drop-down list, that class displays.
3. In the Period drop-down list, ensure the current reporting period displays.
4. In the View drop-down list, select the appropriate assignment or assessment view to display.
5. Click Go.
Note: For a Default or Custom Setup 1 class, if the assignment name does not display under the date at the top of the assignment column, hover over the assignment abbreviation to display the description and identify the correct column in which to enter marks.
Note: For a Custom Setup 2 class, hover over assignment type abbreviation to display the assessment and identify the correct column in which to enter marks.
6. In the assignment or assessment field for each student, type the appropriate mark.
Note: You can enter a mark for the first student on the roster and use the Copy Marks option.
Note: For classes using the Custom Setup 2 grading scale, Missing and Excluded applies to the entire assignment, so entering the ? or ! symbols to one assessment to which the assignment is mapped automatically enters it for all assessments for that assignment.
Note: To enter numeric assignment marks quickly, use the number keys and the <Enter> key on the Number Pad area of the keyboard to move from field to field.
7. Click Save.
The following message displays: “Your changes have been saved.”
Note: If the school sends student progress alerts and parents subscribe to them,
a yellow alert icon displays next to an assignment that was posted to ParentAccess and marked as missing or received a low mark. After a parent
views the alert, the icon turns green .
ProgressBook GradeBook Teacher Guide: Getting Started 85
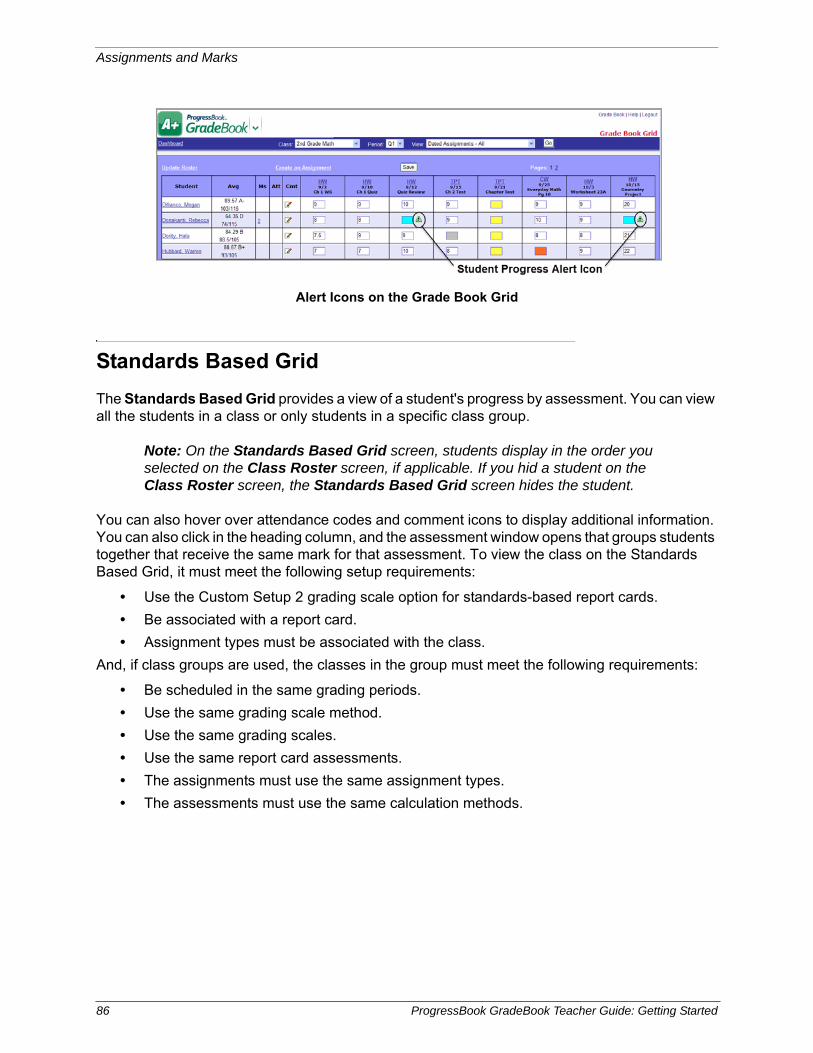
Assignments and Marks
Standards Based Grid
The Standards Based Grid provides a view of a student's progress by assessment. You can view all the students in a class or only students in a specific class group.
Note: On the Standards Based Grid screen, students display in the order you selected on the Class Roster screen, if applicable. If you hid a student on the Class Roster screen, the Standards Based Grid screen hides the student.
You can also hover over attendance codes and comment icons to display additional information. You can also click in the heading column, and the assessment window opens that groups students together that receive the same mark for that assessment. To view the class on the Standards Based Grid, it must meet the following setup requirements:
• Use the Custom Setup 2 grading scale option for standards-based report cards.
• Be associated with a report card.
• Assignment types must be associated with the class.
And, if class groups are used, the classes in the group must meet the following requirements:
• Be scheduled in the same grading periods.
• Use the same grading scale method.
• Use the same grading scales.
• Use the same report card assessments.
• The assignments must use the same assignment types.
• The assessments must use the same calculation methods.
Alert Icons on the Grade Book Grid
86 ProgressBook GradeBook Teacher Guide: Getting Started
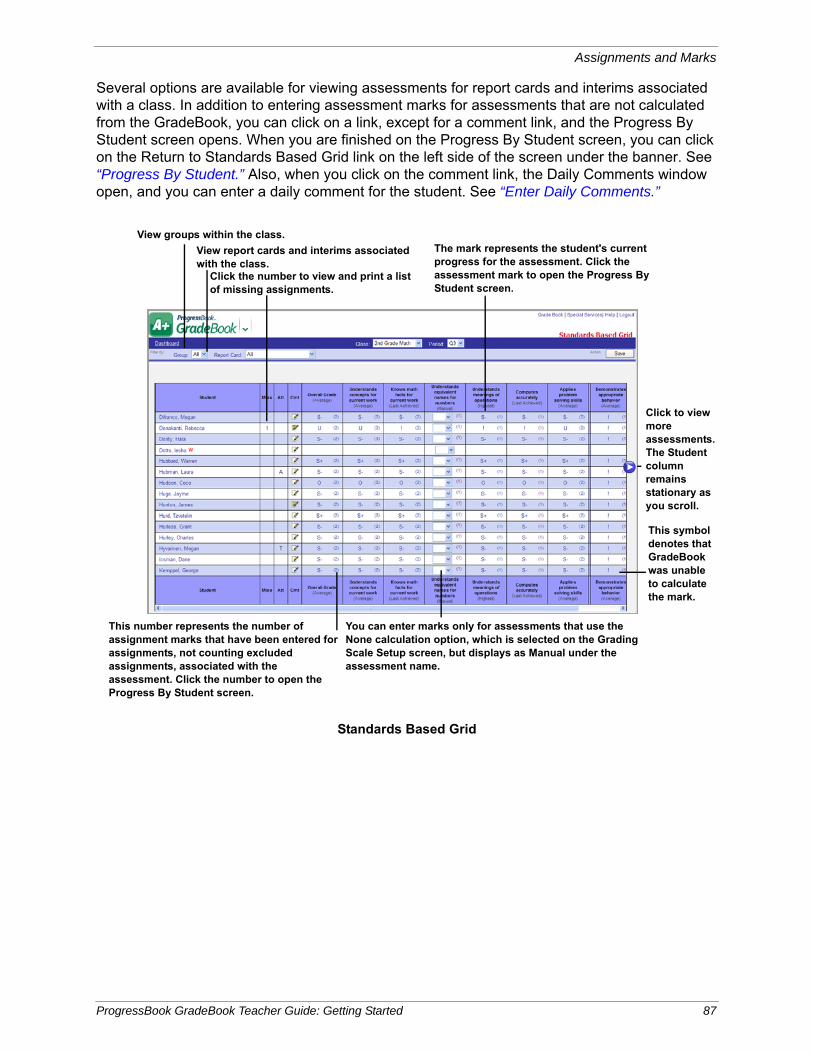
Assignments and Marks
Several options are available for viewing assessments for report cards and interims associated with a class. In addition to entering assessment marks for assessments that are not calculated from the GradeBook, you can click on a link, except for a comment link, and the Progress By Student screen opens. When you are finished on the Progress By Student screen, you can click on the Return to Standards Based Grid link on the left side of the screen under the banner. See “Progress By Student.” Also, when you click on the comment link, the Daily Comments window open, and you can enter a daily comment for the student. See “Enter Daily Comments.”
Standards Based Grid
View groups within the class.
View report cards and interims associated with the class.
Click the number to view and print a list of missing assignments.
This number represents the number of assignment marks that have been entered for assignments, not counting excluded assignments, associated with the assessment. Click the number to open the Progress By Student screen.
The mark represents the student's current progress for the assessment. Click the assessment mark to open the Progress By Student screen.
You can enter marks only for assessments that use the None calculation option, which is selected on the Grading Scale Setup screen, but displays as Manual under the assessment name.
This symbol denotes that GradeBook was unable to calculate the mark.
Click to view more assessments. The Student column remains stationary as you scroll.
ProgressBook GradeBook Teacher Guide: Getting Started 87
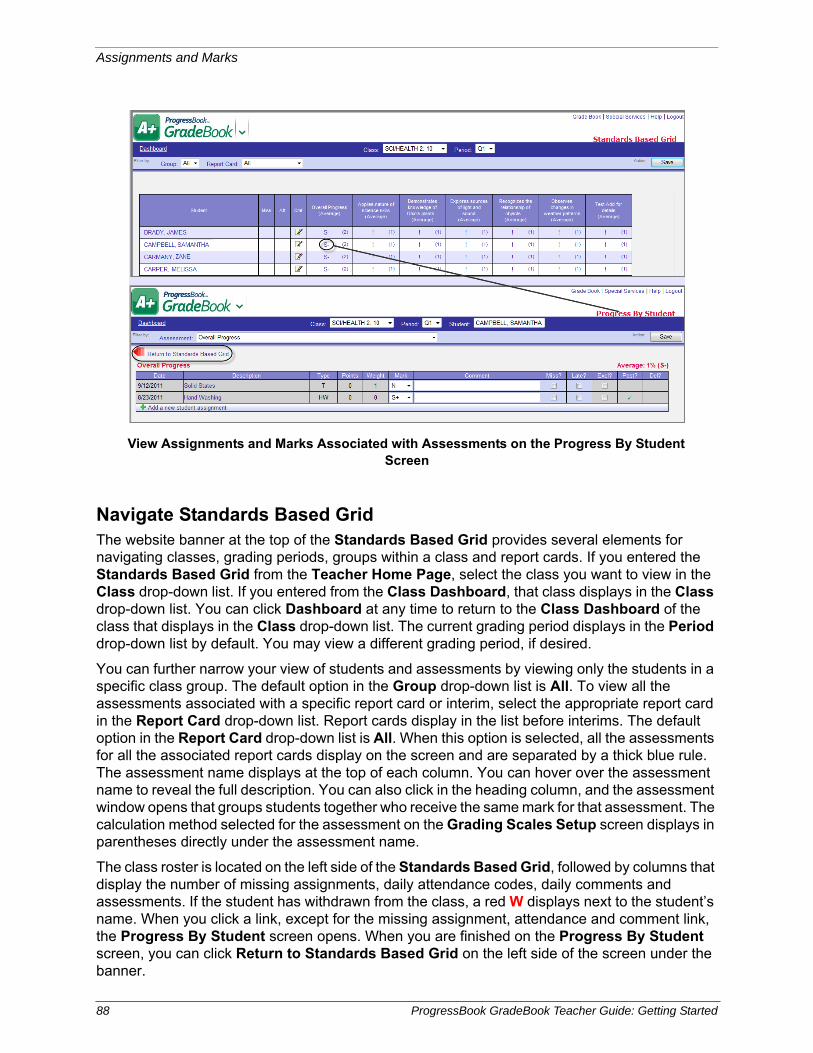
Assignments and Marks
Navigate Standards Based GridThe website banner at the top of the Standards Based Grid provides several elements for navigating classes, grading periods, groups within a class and report cards. If you entered the Standards Based Grid from the Teacher Home Page, select the class you want to view in the Class drop-down list. If you entered from the Class Dashboard, that class displays in the Class drop-down list. You can click Dashboard at any time to return to the Class Dashboard of the class that displays in the Class drop-down list. The current grading period displays in the Period drop-down list by default. You may view a different grading period, if desired.
You can further narrow your view of students and assessments by viewing only the students in a specific class group. The default option in the Group drop-down list is All. To view all the assessments associated with a specific report card or interim, select the appropriate report card in the Report Card drop-down list. Report cards display in the list before interims. The default option in the Report Card drop-down list is All. When this option is selected, all the assessments for all the associated report cards display on the screen and are separated by a thick blue rule. The assessment name displays at the top of each column. You can hover over the assessment name to reveal the full description. You can also click in the heading column, and the assessment window opens that groups students together who receive the same mark for that assessment. The calculation method selected for the assessment on the Grading Scales Setup screen displays in parentheses directly under the assessment name.
The class roster is located on the left side of the Standards Based Grid, followed by columns that display the number of missing assignments, daily attendance codes, daily comments and assessments. If the student has withdrawn from the class, a red W displays next to the student’s name. When you click a link, except for the missing assignment, attendance and comment link, the Progress By Student screen opens. When you are finished on the Progress By Student screen, you can click Return to Standards Based Grid on the left side of the screen under the banner.
View Assignments and Marks Associated with Assessments on the Progress By Student Screen
88 ProgressBook GradeBook Teacher Guide: Getting Started
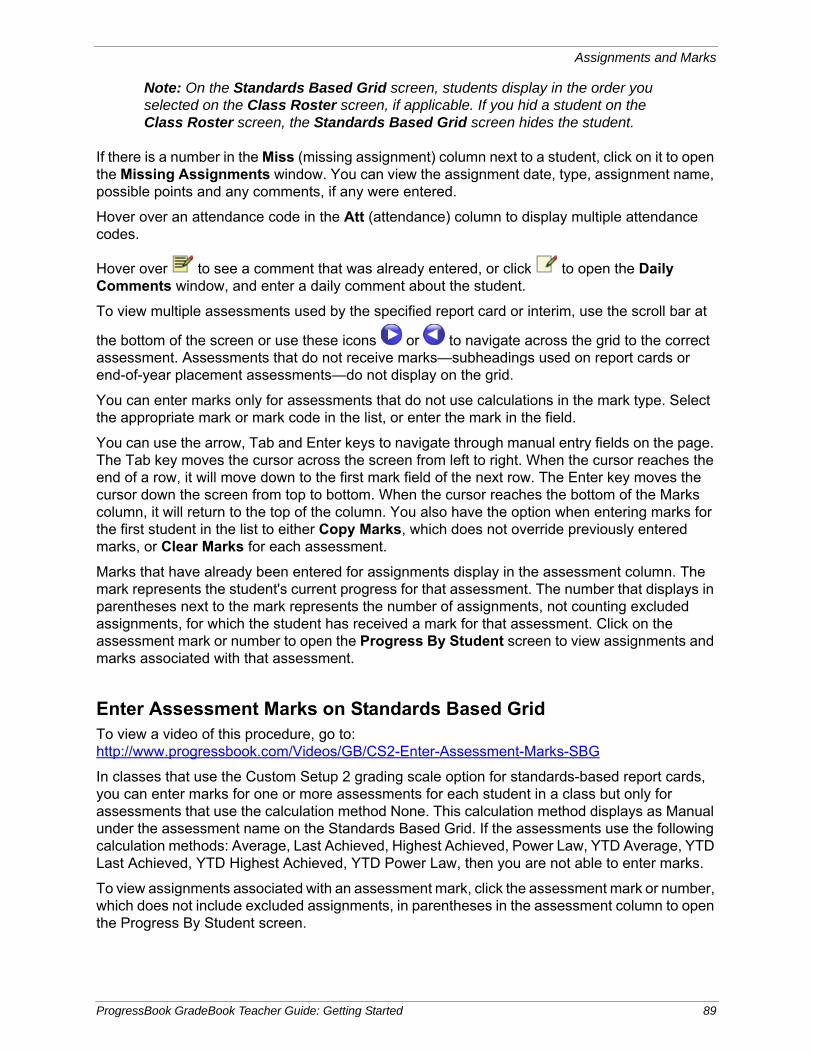
Assignments and Marks
Note: On the Standards Based Grid screen, students display in the order you selected on the Class Roster screen, if applicable. If you hid a student on the Class Roster screen, the Standards Based Grid screen hides the student.
If there is a number in the Miss (missing assignment) column next to a student, click on it to open the Missing Assignments window. You can view the assignment date, type, assignment name, possible points and any comments, if any were entered.
Hover over an attendance code in the Att (attendance) column to display multiple attendance codes.
Hover over to see a comment that was already entered, or click to open the Daily Comments window, and enter a daily comment about the student.
To view multiple assessments used by the specified report card or interim, use the scroll bar at
the bottom of the screen or use these icons or to navigate across the grid to the correct assessment. Assessments that do not receive marks—subheadings used on report cards or end-of-year placement assessments—do not display on the grid.
You can enter marks only for assessments that do not use calculations in the mark type. Select the appropriate mark or mark code in the list, or enter the mark in the field.
You can use the arrow, Tab and Enter keys to navigate through manual entry fields on the page. The Tab key moves the cursor across the screen from left to right. When the cursor reaches the end of a row, it will move down to the first mark field of the next row. The Enter key moves the cursor down the screen from top to bottom. When the cursor reaches the bottom of the Marks column, it will return to the top of the column. You also have the option when entering marks for the first student in the list to either Copy Marks, which does not override previously entered marks, or Clear Marks for each assessment.
Marks that have already been entered for assignments display in the assessment column. The mark represents the student's current progress for that assessment. The number that displays in parentheses next to the mark represents the number of assignments, not counting excluded assignments, for which the student has received a mark for that assessment. Click on the assessment mark or number to open the Progress By Student screen to view assignments and marks associated with that assessment.
Enter Assessment Marks on Standards Based GridTo view a video of this procedure, go to:http://www.progressbook.com/Videos/GB/CS2-Enter-Assessment-Marks-SBG
In classes that use the Custom Setup 2 grading scale option for standards-based report cards, you can enter marks for one or more assessments for each student in a class but only for assessments that use the calculation method None. This calculation method displays as Manual under the assessment name on the Standards Based Grid. If the assessments use the following calculation methods: Average, Last Achieved, Highest Achieved, Power Law, YTD Average, YTD Last Achieved, YTD Highest Achieved, YTD Power Law, then you are not able to enter marks.
To view assignments associated with an assessment mark, click the assessment mark or number, which does not include excluded assignments, in parentheses in the assessment column to open the Progress By Student screen.
ProgressBook GradeBook Teacher Guide: Getting Started 89
Assignments and Marks
1. On the Teacher Home Page or Class Dashboard, click Standards Based Grid.
2. If you entered the Standards Based Grid from the Teacher Home Page, select the class you want to view in the list. If you entered from the Class Dashboard, that class displays in the list.
3. The current quarter displays in the Period list. You may select a different grading period, if desired.
4. Select the appropriate class group in the Group list, if necessary.
5. Select the appropriate report card or interim in the Report Card list.
Note: The assessment name displays at the top of the column. You can hover over the assessment name to display the full description. The calculation method used for the assessment displays in parentheses directly under the assessment name. Manual denotes that no calculations were used and that None was selected as the calculation method on the Grading Scale Setup screen or Assessments tab in the Report Card Builder. You can also click in the heading column, and the assessment window opens that groups students together that receive the same mark for that assessment.
6. Enter the appropriate mark or select the appropriate mark or mark code in the list for an assessment for a student.
Note: The area available for entering marks is based on the mark type that was selected for the assessment when the report card was created.
Note: You can use the Tab key to move from field to field in each row, and you can use the arrow keys to navigate through manual entry fields on the page. You also have the option when entering marks for the first student in the list to either Copy Marks, which does not override previously entered marks, or Clear marks for each assessment.
To view a video of this procedure, go to:http://www.progressbook.com/Videos/GB/CS2-Copy-Clear-Marks-Options-SBG
7. Click Save.
The message “Your changes have been saved.” displays.
90 ProgressBook GradeBook Teacher Guide: Getting Started
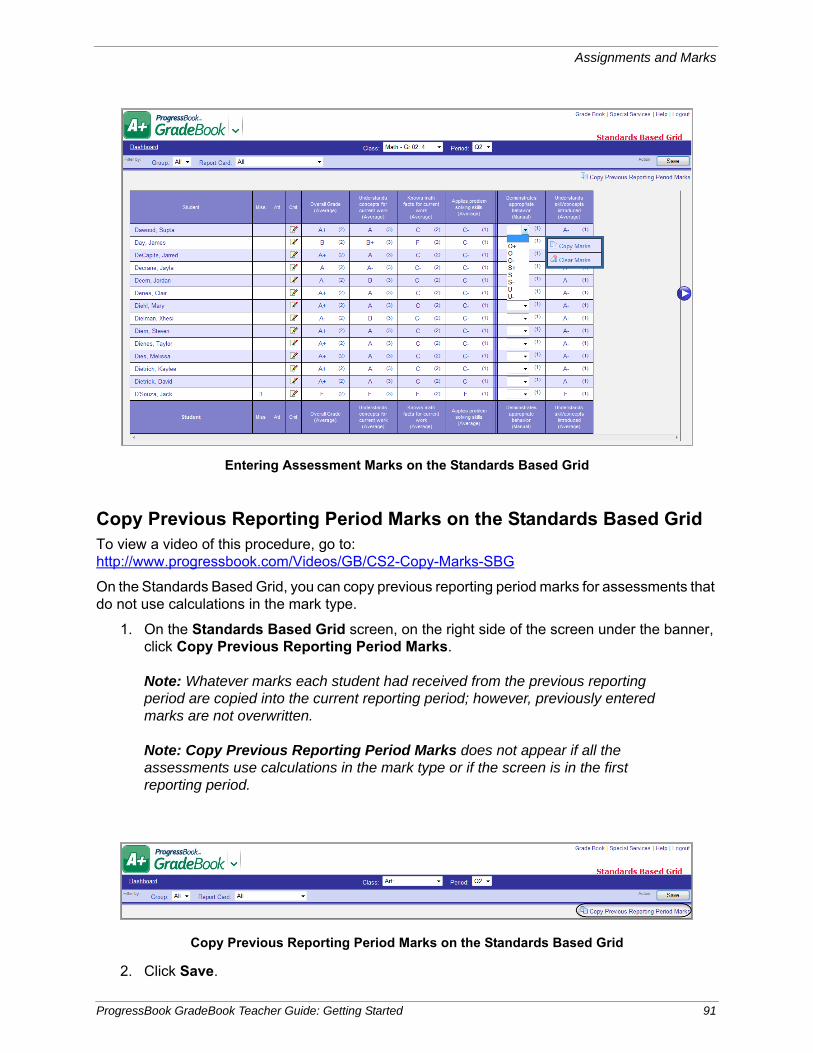
Assignments and Marks
Copy Previous Reporting Period Marks on the Standards Based GridTo view a video of this procedure, go to:http://www.progressbook.com/Videos/GB/CS2-Copy-Marks-SBG
On the Standards Based Grid, you can copy previous reporting period marks for assessments that do not use calculations in the mark type.
1. On the Standards Based Grid screen, on the right side of the screen under the banner, click Copy Previous Reporting Period Marks.
Note: Whatever marks each student had received from the previous reporting period are copied into the current reporting period; however, previously entered marks are not overwritten.
Note: Copy Previous Reporting Period Marks does not appear if all the assessments use calculations in the mark type or if the screen is in the first reporting period.
2. Click Save.
Entering Assessment Marks on the Standards Based Grid
Copy Previous Reporting Period Marks on the Standards Based Grid
ProgressBook GradeBook Teacher Guide: Getting Started 91
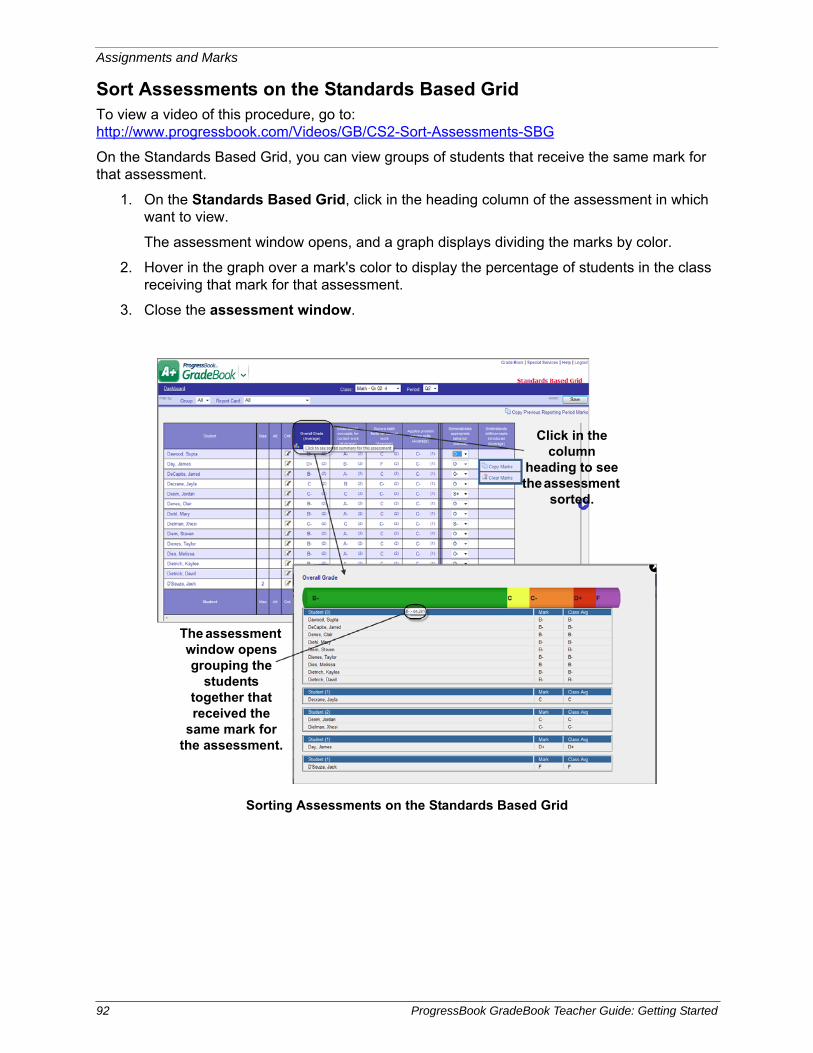
Assignments and Marks
Sort Assessments on the Standards Based GridTo view a video of this procedure, go to:http://www.progressbook.com/Videos/GB/CS2-Sort-Assessments-SBG
On the Standards Based Grid, you can view groups of students that receive the same mark for that assessment.
1. On the Standards Based Grid, click in the heading column of the assessment in which want to view.
The assessment window opens, and a graph displays dividing the marks by color.
2. Hover in the graph over a mark's color to display the percentage of students in the class receiving that mark for that assessment.
3. Close the assessment window.
Sorting Assessments on the Standards Based Grid
Click in the column
heading to see the assessment
sorted.
The assessment window opens grouping the
students together that received the
same mark for the assessment.
92 ProgressBook GradeBook Teacher Guide: Getting Started

Assignments and Marks
Progress By Student
The Progress By Student screen provides a view of a student's progress by assessment and the related assignments for all assessments associated with a specific report card or interim. To view the class on the Progress By Student screen, it must meet the following setup requirements:
• Use the Custom Setup 2 grading scale option for standards-based report cards.
• Be associated with a report card.
• Assignment types must be associated with the class.
And, if class groups are used, the classes in the group must meet the following requirements:
• Be scheduled in the same grading periods.
• Use the same grading scale method.
• Use the same grading scales.
• Use the same report card assessments.
• The assignments must use the same assignment types.
• The assessments must use the same calculation methods.
If the class is not set up properly, various informational messages display directing you to the appropriate screen to complete the setup.
On the Progress By Student screen, you can view all the assessments for all the report cards associated with the class or class group, all the assessments used by a specific report card or interim or only a specific assessment. Report cards display before interims in the Assessment list and All is the default option. Once you have selected an assessment, all the related assignments are listed below it. If a class assignment has been excluded from all student averages on the
Assignment Details or Assignment Marks screens, displays in the Excl? column for the assignment. The assessment name displays in red on the far left, and the student’s average displays on the far right. If the assignment type uses points, then a percentage displays; however, if the assignment type uses nonpoints, then a number displays.
In addition to entering marks for assignments associated with specific assessments, you can also perform the following tasks:
• View class assignment details – Click the class assignment name in the Description column to open the Assignment Marks screen and view assignment details and marks.
• Create and update individual student assignments
• Delete individual student assignments
• Enter overall marks only for assessments that do not use calculations in the mark type – To enter a mark for an assessment that overrides all the individual assignment marks displayed for that assessment, type the appropriate mark in the Current Mark field or select the mark or mark code in the list, and then click Save.
The area available for entering marks is determined by the Graphical User Interface (GUI) option associated with the mark type that was selected for the assessment when the report card was created.
ProgressBook GradeBook Teacher Guide: Getting Started 93
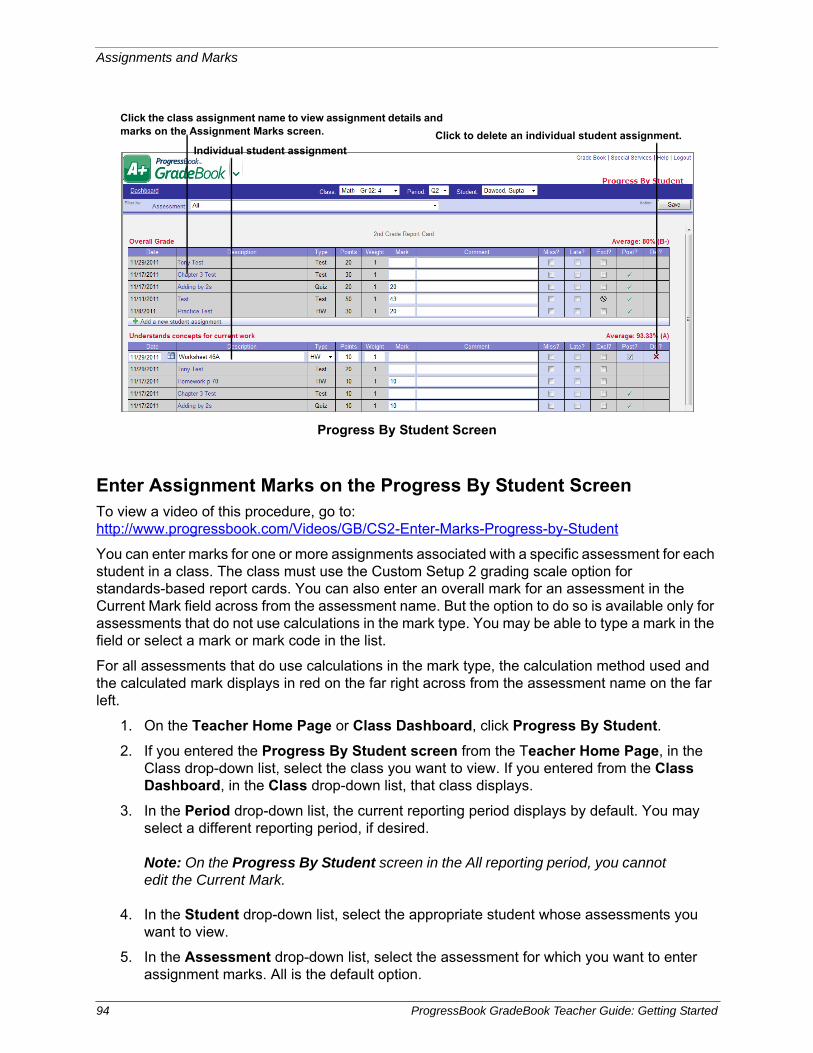
Assignments and Marks
Enter Assignment Marks on the Progress By Student ScreenTo view a video of this procedure, go to:http://www.progressbook.com/Videos/GB/CS2-Enter-Marks-Progress-by-Student
You can enter marks for one or more assignments associated with a specific assessment for each student in a class. The class must use the Custom Setup 2 grading scale option for standards-based report cards. You can also enter an overall mark for an assessment in the Current Mark field across from the assessment name. But the option to do so is available only for assessments that do not use calculations in the mark type. You may be able to type a mark in the field or select a mark or mark code in the list.
For all assessments that do use calculations in the mark type, the calculation method used and the calculated mark displays in red on the far right across from the assessment name on the far left.
1. On the Teacher Home Page or Class Dashboard, click Progress By Student.
2. If you entered the Progress By Student screen from the Teacher Home Page, in the Class drop-down list, select the class you want to view. If you entered from the Class Dashboard, in the Class drop-down list, that class displays.
3. In the Period drop-down list, the current reporting period displays by default. You may select a different reporting period, if desired.
Note: On the Progress By Student screen in the All reporting period, you cannot edit the Current Mark.
4. In the Student drop-down list, select the appropriate student whose assessments you want to view.
5. In the Assessment drop-down list, select the assessment for which you want to enter assignment marks. All is the default option.
Progress By Student Screen
Click to delete an individual student assignment.
Click the class assignment name to view assignment details and marks on the Assignment Marks screen.
Individual student assignment
94 ProgressBook GradeBook Teacher Guide: Getting Started
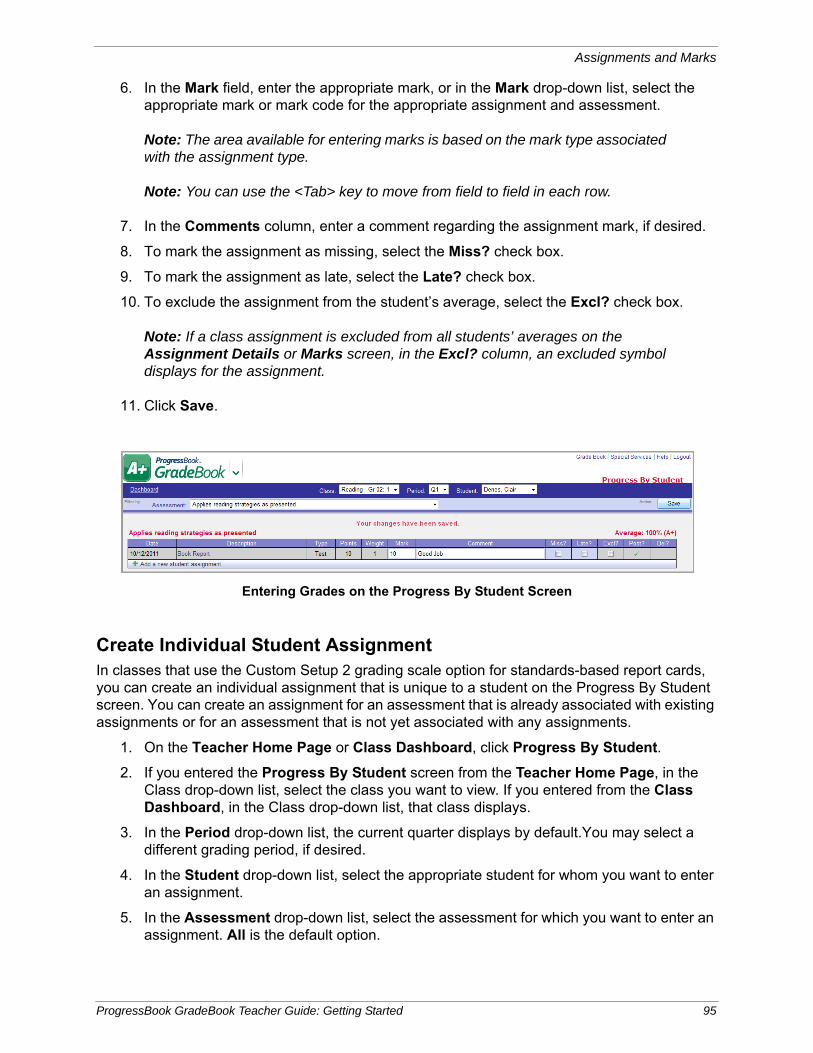
Assignments and Marks
6. In the Mark field, enter the appropriate mark, or in the Mark drop-down list, select the appropriate mark or mark code for the appropriate assignment and assessment.
Note: The area available for entering marks is based on the mark type associated with the assignment type.
Note: You can use the <Tab> key to move from field to field in each row.
7. In the Comments column, enter a comment regarding the assignment mark, if desired.
8. To mark the assignment as missing, select the Miss? check box.
9. To mark the assignment as late, select the Late? check box.
10. To exclude the assignment from the student’s average, select the Excl? check box.
Note: If a class assignment is excluded from all students’ averages on the Assignment Details or Marks screen, in the Excl? column, an excluded symbol displays for the assignment.
11. Click Save.
Create Individual Student AssignmentIn classes that use the Custom Setup 2 grading scale option for standards-based report cards, you can create an individual assignment that is unique to a student on the Progress By Student screen. You can create an assignment for an assessment that is already associated with existing assignments or for an assessment that is not yet associated with any assignments.
1. On the Teacher Home Page or Class Dashboard, click Progress By Student.
2. If you entered the Progress By Student screen from the Teacher Home Page, in the Class drop-down list, select the class you want to view. If you entered from the Class Dashboard, in the Class drop-down list, that class displays.
3. In the Period drop-down list, the current quarter displays by default.You may select a different grading period, if desired.
4. In the Student drop-down list, select the appropriate student for whom you want to enter an assignment.
5. In the Assessment drop-down list, select the assessment for which you want to enter an assignment. All is the default option.
Entering Grades on the Progress By Student Screen
ProgressBook GradeBook Teacher Guide: Getting Started 95
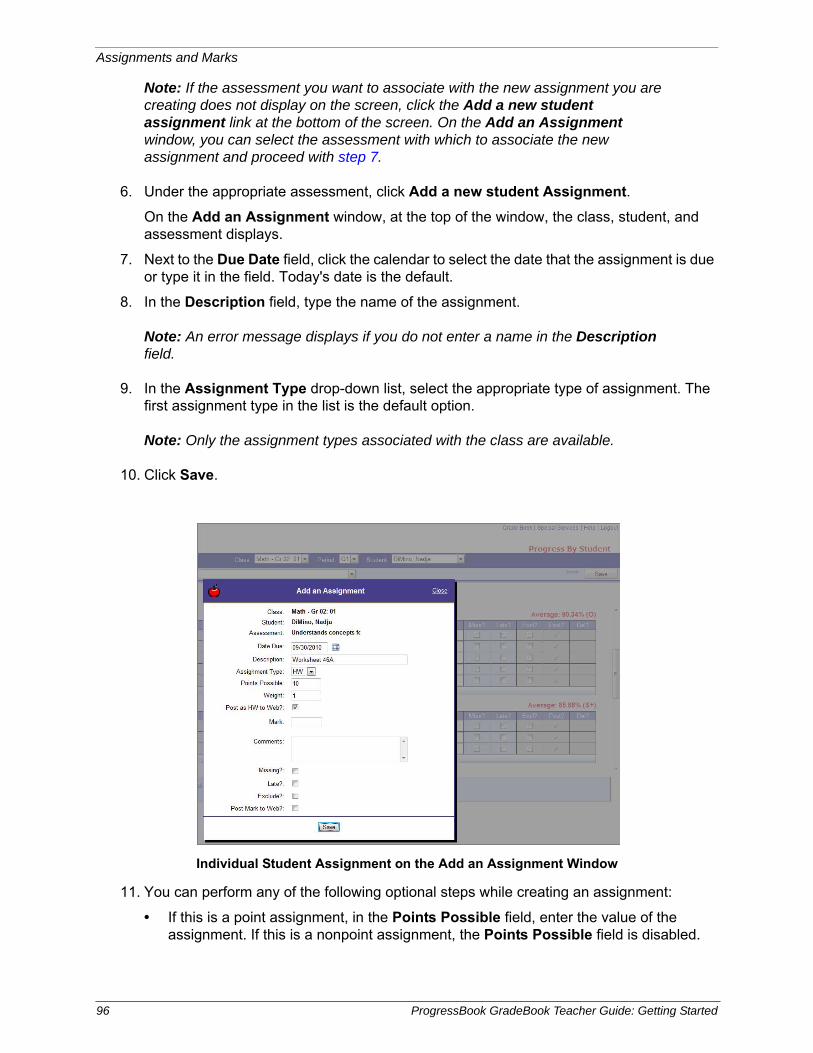
Assignments and Marks
Note: If the assessment you want to associate with the new assignment you are creating does not display on the screen, click the Add a new student assignment link at the bottom of the screen. On the Add an Assignment window, you can select the assessment with which to associate the new assignment and proceed with step 7.
6. Under the appropriate assessment, click Add a new student Assignment.
On the Add an Assignment window, at the top of the window, the class, student, and assessment displays.
7. Next to the Due Date field, click the calendar to select the date that the assignment is due or type it in the field. Today's date is the default.
8. In the Description field, type the name of the assignment.
Note: An error message displays if you do not enter a name in the Description field.
9. In the Assignment Type drop-down list, select the appropriate type of assignment. The first assignment type in the list is the default option.
Note: Only the assignment types associated with the class are available.
10. Click Save.
11. You can perform any of the following optional steps while creating an assignment:
• If this is a point assignment, in the Points Possible field, enter the value of the assignment. If this is a nonpoint assignment, the Points Possible field is disabled.
Individual Student Assignment on the Add an Assignment Window
96 ProgressBook GradeBook Teacher Guide: Getting Started
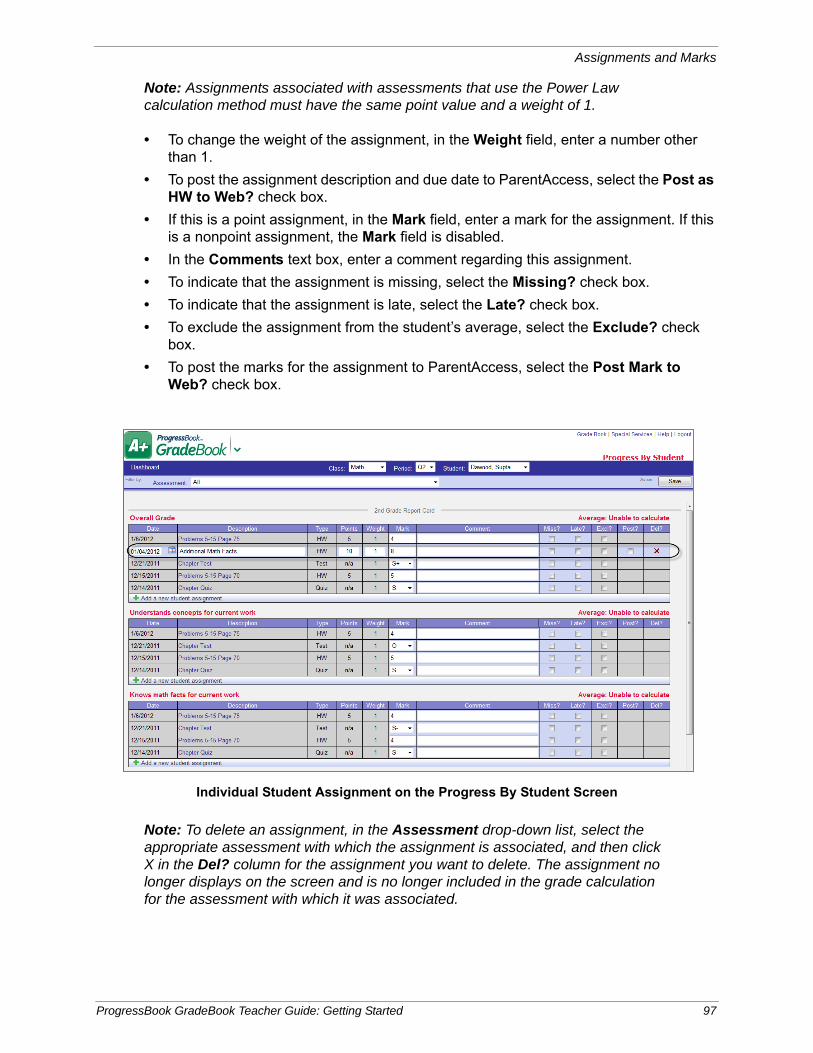
Assignments and Marks
Note: Assignments associated with assessments that use the Power Law calculation method must have the same point value and a weight of 1.
• To change the weight of the assignment, in the Weight field, enter a number other than 1.
• To post the assignment description and due date to ParentAccess, select the Post as HW to Web? check box.
• If this is a point assignment, in the Mark field, enter a mark for the assignment. If this is a nonpoint assignment, the Mark field is disabled.
• In the Comments text box, enter a comment regarding this assignment.
• To indicate that the assignment is missing, select the Missing? check box.
• To indicate that the assignment is late, select the Late? check box.
• To exclude the assignment from the student’s average, select the Exclude? check box.
• To post the marks for the assignment to ParentAccess, select the Post Mark to Web? check box.
Note: To delete an assignment, in the Assessment drop-down list, select the appropriate assessment with which the assignment is associated, and then click X in the Del? column for the assignment you want to delete. The assignment no longer displays on the screen and is no longer included in the grade calculation for the assessment with which it was associated.
Individual Student Assignment on the Progress By Student Screen
ProgressBook GradeBook Teacher Guide: Getting Started 97
Assignments and Marks
Enter Individual Student Assignment Marks on Progress By Student ScreenYou can enter marks for one or more assignments associated with a specific assessment for each student in a class. The class must use the Custom Setup 2 grading scale option for standards-based report cards. You can also enter an overall mark for an assessment in the Current Mark field across from the assessment name. But the option to do so is available only for assessments that do not use calculations in the mark type. You may be able to type a mark in the field or select a mark or mark code in the list.
For all assessments that do use calculations in the mark type, the calculation method used and the calculated mark displays in red on the right across from the assessment name on the left.
1. On the Teacher Home Page or Class Dashboard, click Progress By Student.
2. If you entered the Progress By Student screen from the Teacher Home Page, select the class you want to view in the Class list. If you entered from the Class Dashboard, that class displays in the Class list.
3. The current quarter displays in the Period list by default. You may select a different grading period, if desired.
Note: On the Progress By Student screen in the All reporting period, you cannot edit the Current Mark.
4. Select the appropriate student whose assessments you want to view in the Student list.
5. Select the assessment for which you want to enter assignment marks in the Assessment list. All is the default option.
6. Enter the appropriate mark or select the appropriate mark or mark code in the list for the appropriate assignment and assessment.
Note: The area available for entering marks in the Mark column is based on the mark type associated with the assignment type.
Note: You can use the <Tab> key to move from field to field in each row.
7. Enter a comment regarding the assignment mark in the Comments column, if desired.
8. To mark the assignment as missing, select the Miss? check box. Using this option instructs GradeBook to calculate the assignment as zero (0) in the student’s average, and ensures that the assignment is included on the Missing Assignment Report
9. To mark the assignment as late, select the Late? check box. Using this option does not affect the student’s average and ensures that the late assignment displays on the Student Progress Reports.
10. To exclude the assignment from the student’s average, select the Excl? check box.
Note: If a class assignment has been excluded from all students’ averages on the
Assignment Details or Marks screens, displays in the Excl? column for the assignment on the Progress by Student screen.
98 ProgressBook GradeBook Teacher Guide: Getting Started
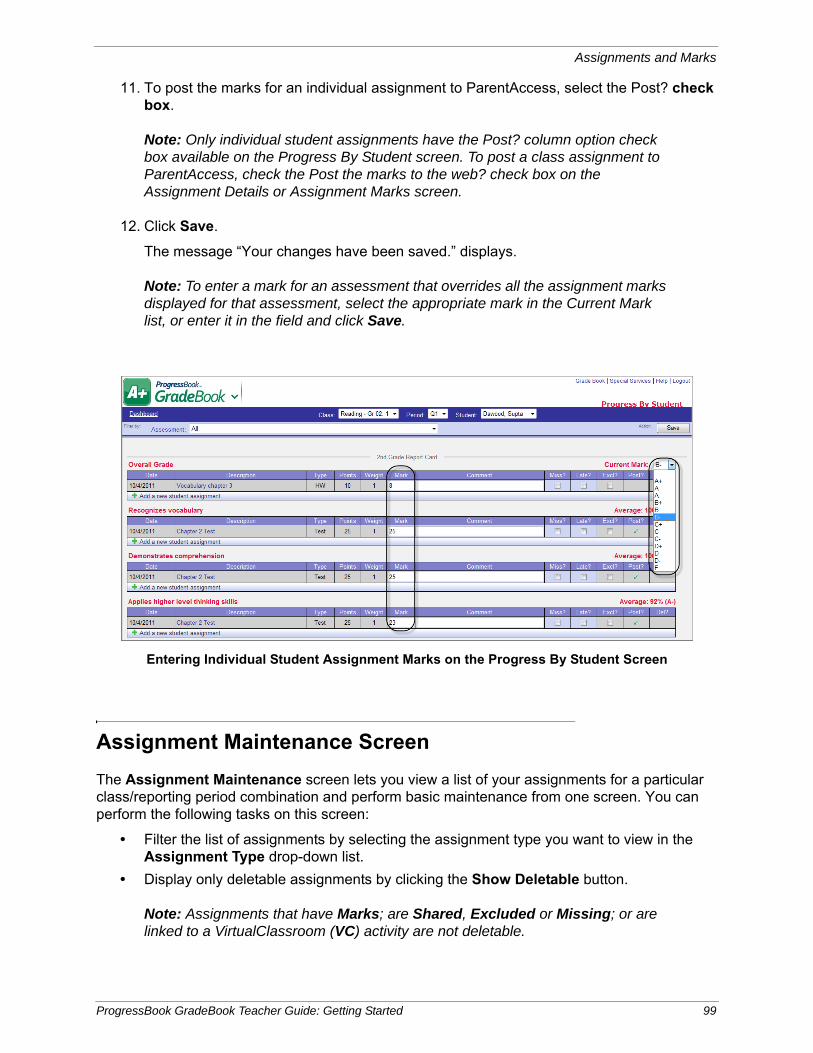
Assignments and Marks
11. To post the marks for an individual assignment to ParentAccess, select the Post? check box.
Note: Only individual student assignments have the Post? column option check box available on the Progress By Student screen. To post a class assignment to ParentAccess, check the Post the marks to the web? check box on the Assignment Details or Assignment Marks screen.
12. Click Save.
The message “Your changes have been saved.” displays.
Note: To enter a mark for an assessment that overrides all the assignment marks displayed for that assessment, select the appropriate mark in the Current Mark list, or enter it in the field and click Save.
Assignment Maintenance Screen
The Assignment Maintenance screen lets you view a list of your assignments for a particular class/reporting period combination and perform basic maintenance from one screen. You can perform the following tasks on this screen:
• Filter the list of assignments by selecting the assignment type you want to view in the Assignment Type drop-down list.
• Display only deletable assignments by clicking the Show Deletable button.
Note: Assignments that have Marks; are Shared, Excluded or Missing; or are linked to a VirtualClassroom (VC) activity are not deletable.
Entering Individual Student Assignment Marks on the Progress By Student Screen
ProgressBook GradeBook Teacher Guide: Getting Started 99
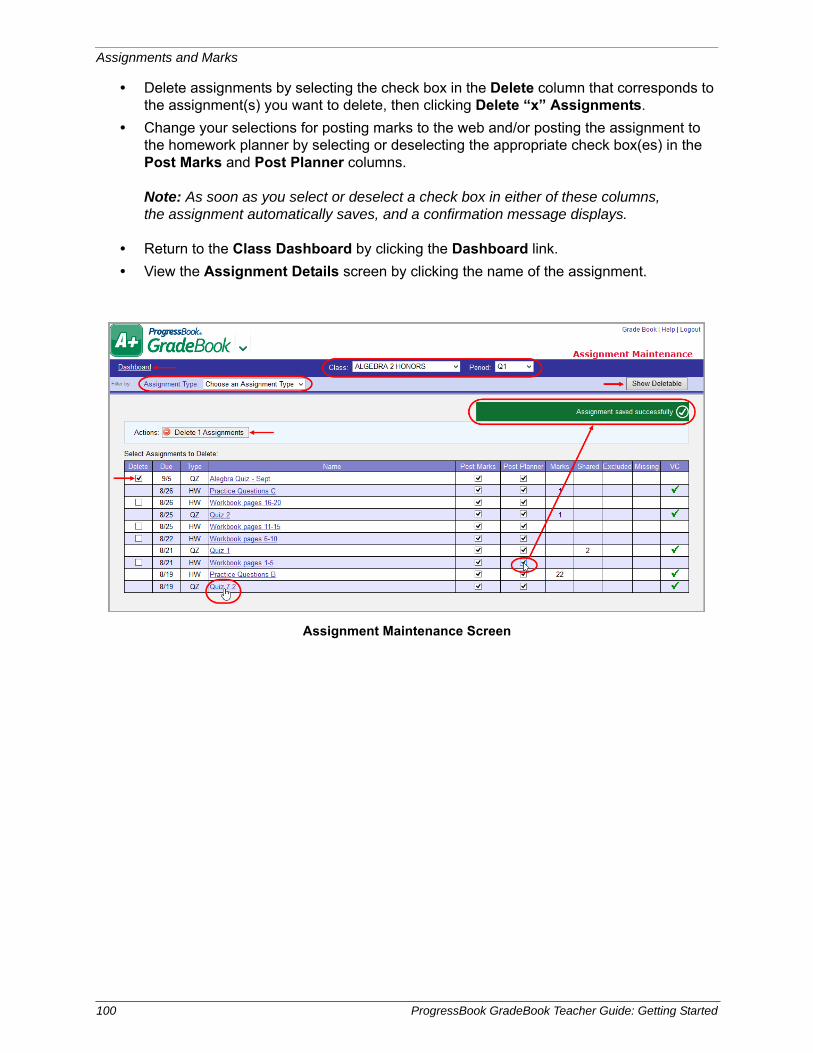
Assignments and Marks
• Delete assignments by selecting the check box in the Delete column that corresponds to the assignment(s) you want to delete, then clicking Delete “x” Assignments.
• Change your selections for posting marks to the web and/or posting the assignment to the homework planner by selecting or deselecting the appropriate check box(es) in the Post Marks and Post Planner columns.
Note: As soon as you select or deselect a check box in either of these columns, the assignment automatically saves, and a confirmation message displays.
• Return to the Class Dashboard by clicking the Dashboard link.
• View the Assignment Details screen by clicking the name of the assignment.
Assignment Maintenance Screen
100 ProgressBook GradeBook Teacher Guide: Getting Started
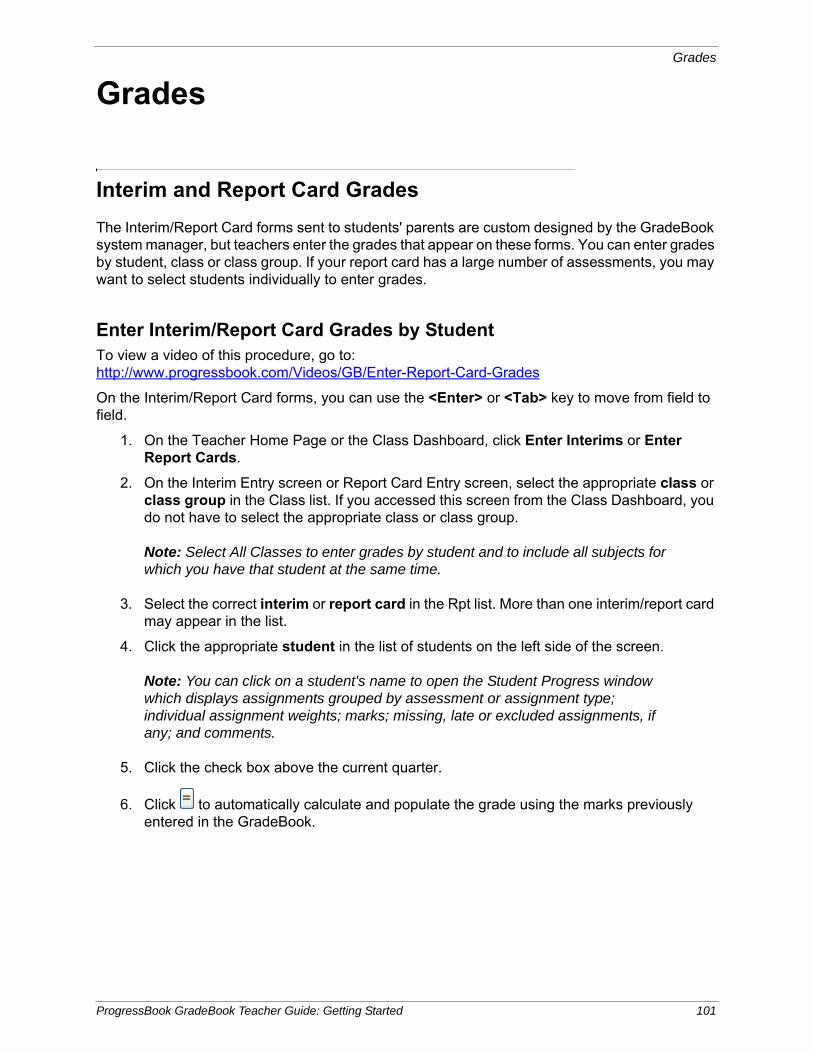
Grades
Grades
Interim and Report Card Grades
The Interim/Report Card forms sent to students' parents are custom designed by the GradeBook system manager, but teachers enter the grades that appear on these forms. You can enter grades by student, class or class group. If your report card has a large number of assessments, you may want to select students individually to enter grades.
Enter Interim/Report Card Grades by StudentTo view a video of this procedure, go to:http://www.progressbook.com/Videos/GB/Enter-Report-Card-Grades
On the Interim/Report Card forms, you can use the <Enter> or <Tab> key to move from field to field.
1. On the Teacher Home Page or the Class Dashboard, click Enter Interims or Enter Report Cards.
2. On the Interim Entry screen or Report Card Entry screen, select the appropriate class or class group in the Class list. If you accessed this screen from the Class Dashboard, you do not have to select the appropriate class or class group.
Note: Select All Classes to enter grades by student and to include all subjects for which you have that student at the same time.
3. Select the correct interim or report card in the Rpt list. More than one interim/report card may appear in the list.
4. Click the appropriate student in the list of students on the left side of the screen.
Note: You can click on a student's name to open the Student Progress window which displays assignments grouped by assessment or assignment type; individual assignment weights; marks; missing, late or excluded assignments, if any; and comments.
5. Click the check box above the current quarter.
6. Click to automatically calculate and populate the grade using the marks previously entered in the GradeBook.
ProgressBook GradeBook Teacher Guide: Getting Started 101
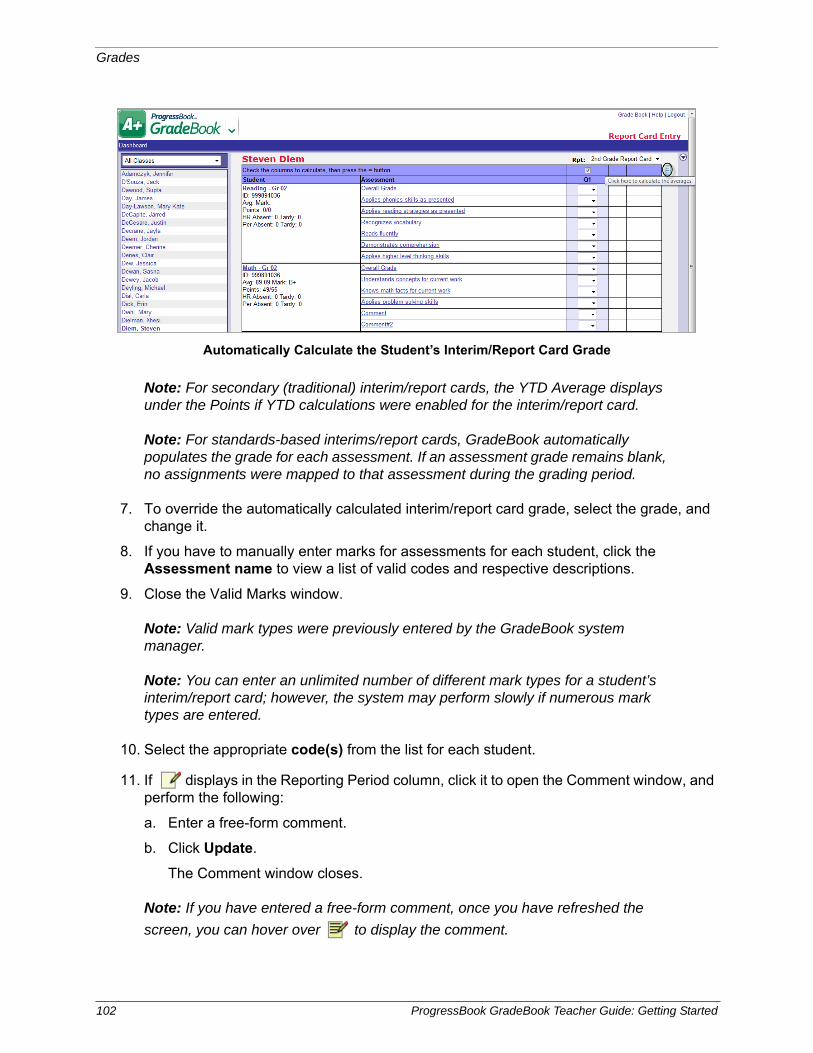
Grades
Note: For secondary (traditional) interim/report cards, the YTD Average displays under the Points if YTD calculations were enabled for the interim/report card.
Note: For standards-based interims/report cards, GradeBook automatically populates the grade for each assessment. If an assessment grade remains blank, no assignments were mapped to that assessment during the grading period.
7. To override the automatically calculated interim/report card grade, select the grade, and change it.
8. If you have to manually enter marks for assessments for each student, click the Assessment name to view a list of valid codes and respective descriptions.
9. Close the Valid Marks window.
Note: Valid mark types were previously entered by the GradeBook system manager.
Note: You can enter an unlimited number of different mark types for a student’s interim/report card; however, the system may perform slowly if numerous mark types are entered.
10. Select the appropriate code(s) from the list for each student.
11. If displays in the Reporting Period column, click it to open the Comment window, and perform the following:
a. Enter a free-form comment.
b. Click Update.
The Comment window closes.
Note: If you have entered a free-form comment, once you have refreshed the
screen, you can hover over to display the comment.
Automatically Calculate the Student’s Interim/Report Card Grade
102 ProgressBook GradeBook Teacher Guide: Getting Started
Grades
12. Click Save Next to save the grades for that student, and proceed to the next student, or you can click Next or Previous to change students without saving grades.
Note: If your district administrator enables threshold override for this report card, and the student’s grades are below the minimum or above the maximum threshold, a warning message displays to inform you that the grades are subject to rounding and that any grades below or above the administrator defined threshold(s) will be rounded up or down to the respective threshold.
13. Continue to perform step 4 through step 12 for each student.
Note: You may use the icons to jump to the top or bottom of the list if the class includes a large number of students.
Note: A red outline appears around the field if the grade has not been saved.
Enter Interim/Report Card Grades by ClassOn the Interim/Report Card forms, you can use the <Enter> or <Tab> key to move from field to field.
1. On the Teacher Home Page or the Class Dashboard, click Enter Interims or Enter Report Cards.
2. On the Interim Entry screen or Report Card Entry screen, select the appropriate class or class group in the Class list. If you accessed this screen from the Class Dashboard, you do not have to select the appropriate class or class group.
3. Click the Show All Students link under the Class list.
Note: To enter grades by student, click the appropriate student in the list.
4. Select the correct interim or report card in the Rpt list. More than one report card may appear in the list.
Note: Only the report card(s) associated with the students in the class or in the classes included in the class group display in the list.
Note: In class groups, teachers can enter grades only for the students associated with the selected report card.
Note: You can click on a student's name to open the Student Progress window which displays assignments grouped by assessment or assignment type; individual assignment weights; marks; missing, late or excluded assignments, if any; and comments.
5. Click the check box above the current quarter.
6. Click to automatically calculate and populate the grade using the marks previously entered in the GradeBook.
ProgressBook GradeBook Teacher Guide: Getting Started 103
Grades
Note: For secondary (traditional) report cards, the Year to Date (YTD) Average displays under the Points if Year to Date calculations were enabled for the report card.
Note: For standards-based report cards, GradeBook automatically populates the grade for each assessment. If an assessment grade remains blank, no assignments were mapped to that assessment during the grading period.
7. To override the automatically calculated interim mark, select the mark, and change it.
8. If you have to manually enter assessments for each student, click the Assessment name to view a list of valid codes and respective descriptions.
9. Close the Valid Marks window.
Note: Valid mark types were previously entered by the GradeBook system manager.
Note: You can enter an unlimited number of different mark types for a student’s interim/report card; however, the system may perform slowly if numerous mark types are entered.
10. Select the appropriate code(s) from the list for each student.
11. If displays in the Reporting Period column, click it to open the Comment window.
a. Enter a free-form comment.
b. Click Update.
The Comment window closes.
Note: If you have entered a free-form comment, once you have refreshed the
screen you can hover over to display the comment.
12. Click Save.
Note: If your district administrator enables threshold override for this report card, and any of the students’ grades are below the minimum or above the maximum threshold, a warning message displays to inform you that the grades are subject to rounding and that any grades below or above the administrator defined threshold(s) will be rounded up or down to the respective threshold.
Note: When entering grades by class, click the name of the student to open the Student Progress window. Assignments display grouped by report card assessments in classes that use the Custom Setup 2 grading scale option.
Note: You may use the icons to jump to the top or bottom of the list if the class includes a large number of students.
104 ProgressBook GradeBook Teacher Guide: Getting Started
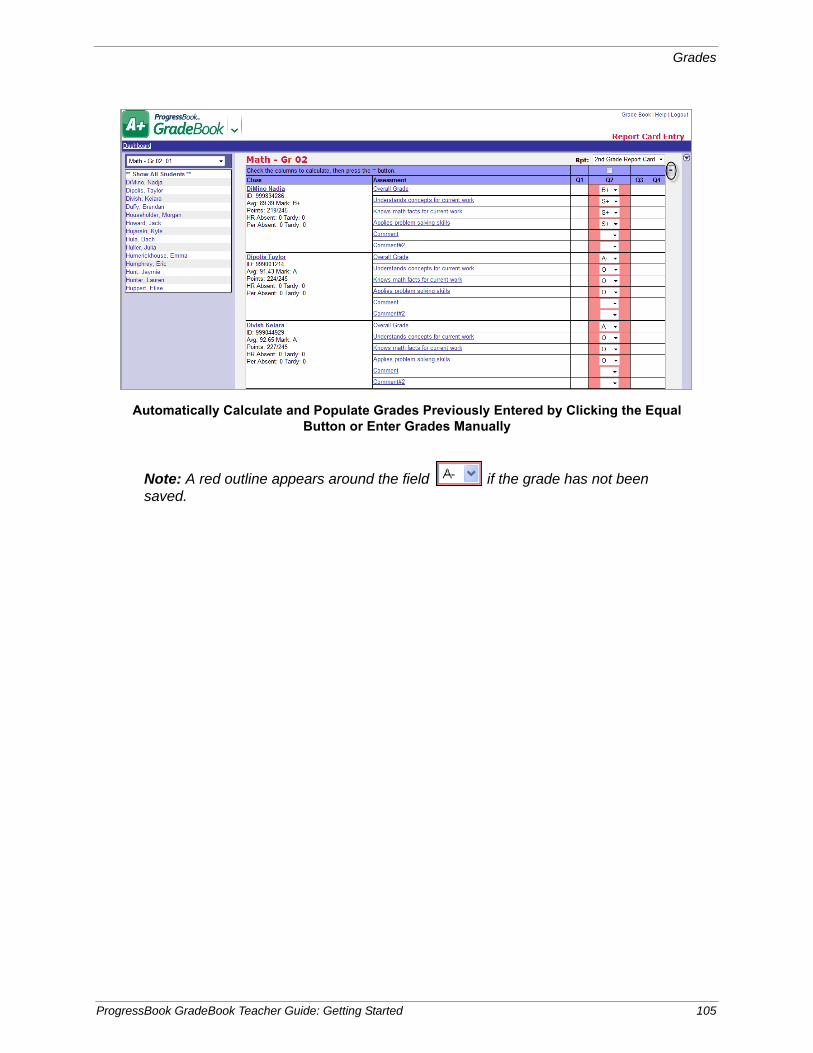
Grades
Note: A red outline appears around the field if the grade has not been saved.
Automatically Calculate and Populate Grades Previously Entered by Clicking the Equal Button or Enter Grades Manually
ProgressBook GradeBook Teacher Guide: Getting Started 105

Grades
This page intentionally left blank.
106 ProgressBook GradeBook Teacher Guide: Getting Started
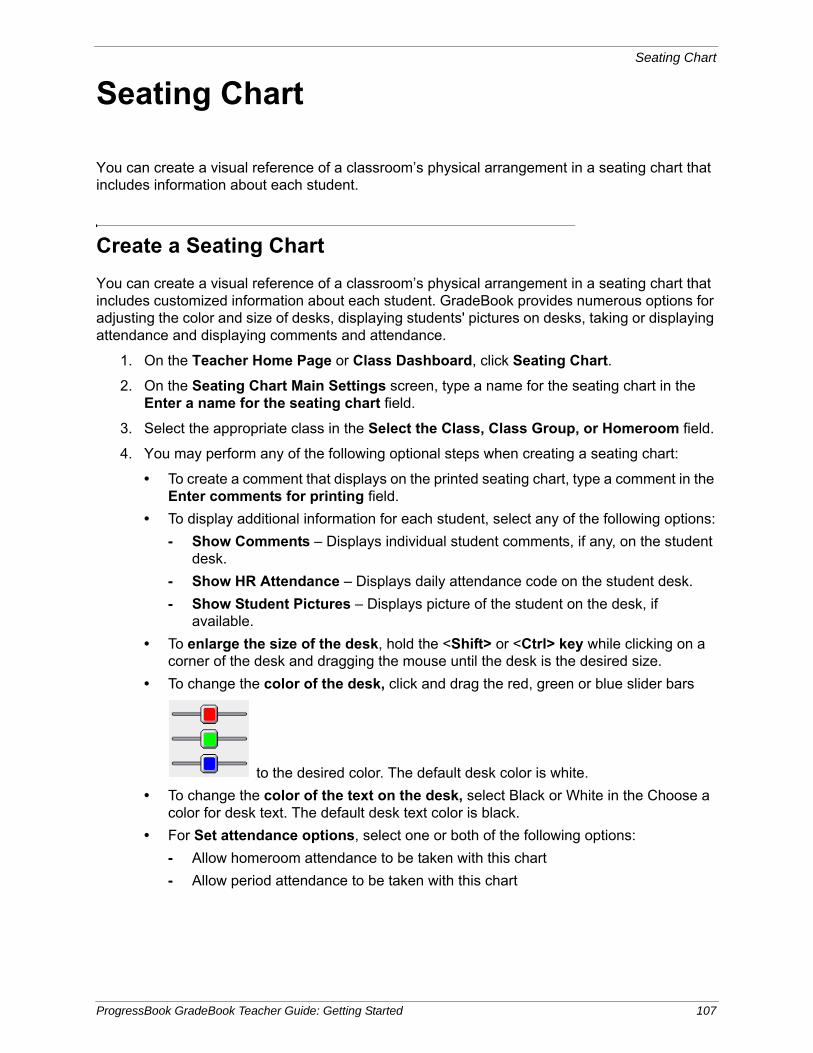
Seating Chart
Seating Chart
You can create a visual reference of a classroom’s physical arrangement in a seating chart that includes information about each student.
Create a Seating Chart
You can create a visual reference of a classroom’s physical arrangement in a seating chart that includes customized information about each student. GradeBook provides numerous options for adjusting the color and size of desks, displaying students' pictures on desks, taking or displaying attendance and displaying comments and attendance.
1. On the Teacher Home Page or Class Dashboard, click Seating Chart.
2. On the Seating Chart Main Settings screen, type a name for the seating chart in the Enter a name for the seating chart field.
3. Select the appropriate class in the Select the Class, Class Group, or Homeroom field.
4. You may perform any of the following optional steps when creating a seating chart:
• To create a comment that displays on the printed seating chart, type a comment in the Enter comments for printing field.
• To display additional information for each student, select any of the following options:
- Show Comments – Displays individual student comments, if any, on the student desk.
- Show HR Attendance – Displays daily attendance code on the student desk.
- Show Student Pictures – Displays picture of the student on the desk, if available.
• To enlarge the size of the desk, hold the <Shift> or <Ctrl> key while clicking on a corner of the desk and dragging the mouse until the desk is the desired size.
• To change the color of the desk, click and drag the red, green or blue slider bars
to the desired color. The default desk color is white.
• To change the color of the text on the desk, select Black or White in the Choose a color for desk text. The default desk text color is black.
• For Set attendance options, select one or both of the following options:
- Allow homeroom attendance to be taken with this chart
- Allow period attendance to be taken with this chart
ProgressBook GradeBook Teacher Guide: Getting Started 107
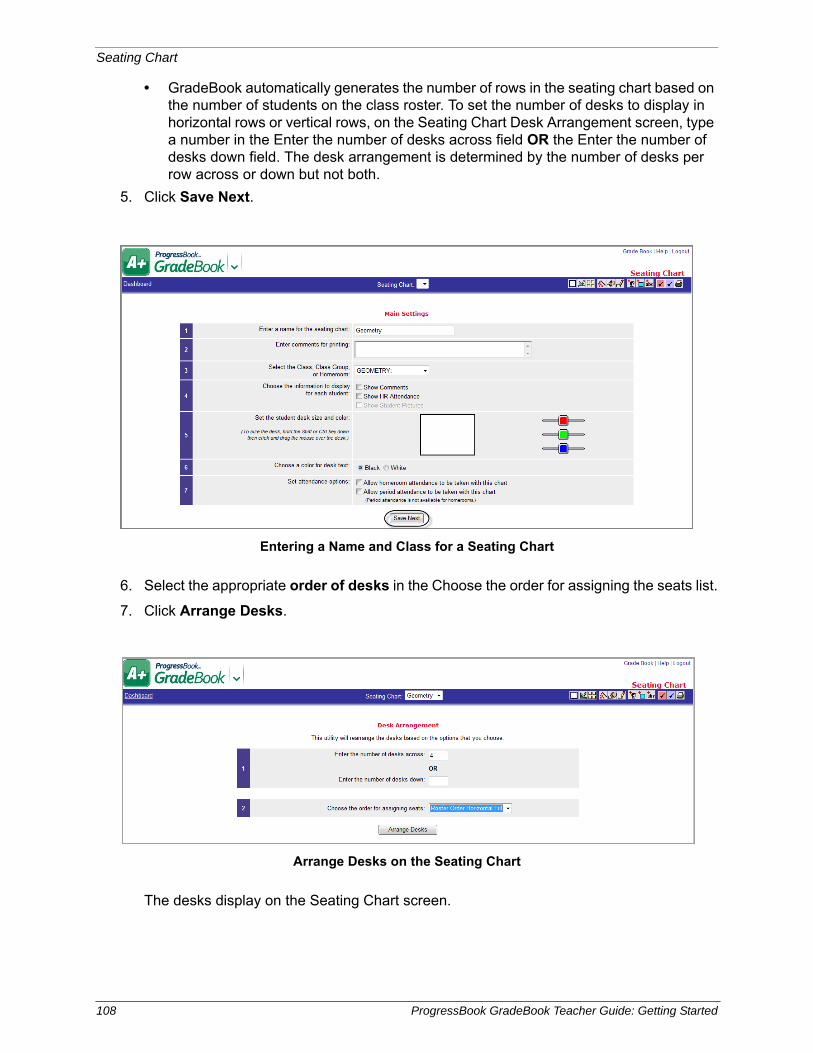
Seating Chart
• GradeBook automatically generates the number of rows in the seating chart based on the number of students on the class roster. To set the number of desks to display in horizontal rows or vertical rows, on the Seating Chart Desk Arrangement screen, type a number in the Enter the number of desks across field OR the Enter the number of desks down field. The desk arrangement is determined by the number of desks per row across or down but not both.
5. Click Save Next.
6. Select the appropriate order of desks in the Choose the order for assigning the seats list.
7. Click Arrange Desks.
The desks display on the Seating Chart screen.
Entering a Name and Class for a Seating Chart
Arrange Desks on the Seating Chart
108 ProgressBook GradeBook Teacher Guide: Getting Started
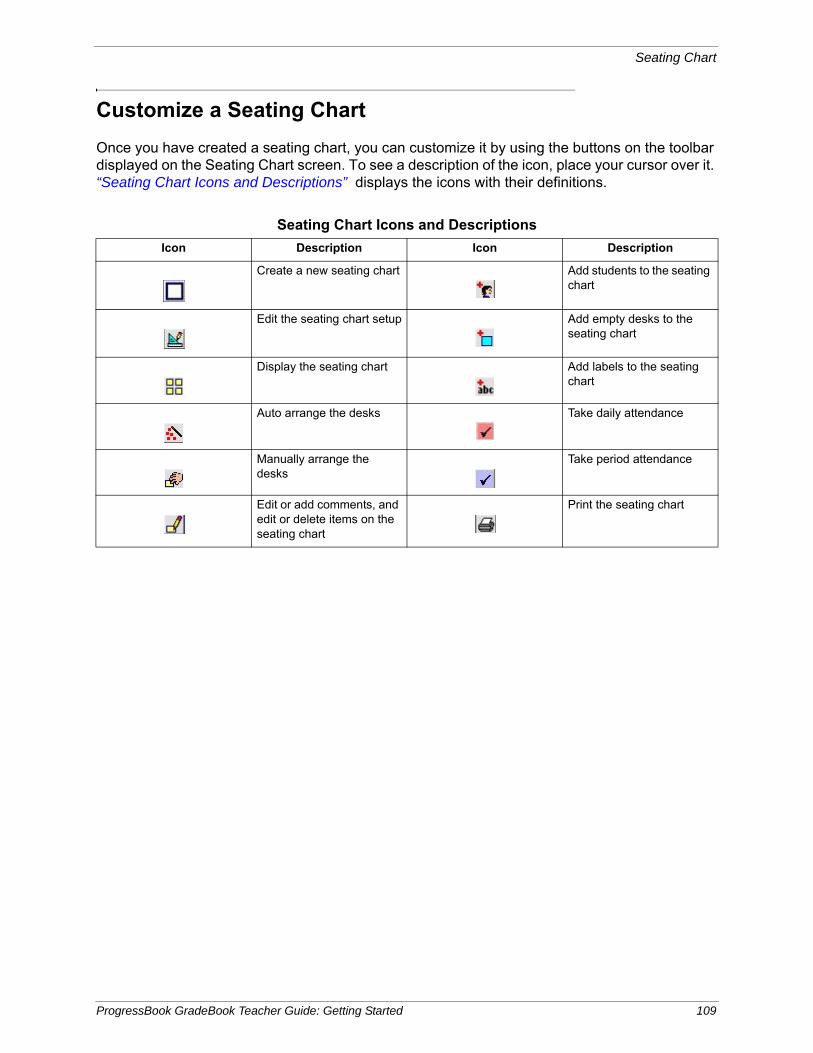
Seating Chart
Customize a Seating Chart
Once you have created a seating chart, you can customize it by using the buttons on the toolbar displayed on the Seating Chart screen. To see a description of the icon, place your cursor over it. “Seating Chart Icons and Descriptions” displays the icons with their definitions.
Seating Chart Icons and Descriptions
Icon Description Icon Description
Create a new seating chart Add students to the seating chart
Edit the seating chart setup Add empty desks to the seating chart
Display the seating chart Add labels to the seating chart
Auto arrange the desks Take daily attendance
Manually arrange the desks
Take period attendance
Edit or add comments, and edit or delete items on the seating chart
Print the seating chart
ProgressBook GradeBook Teacher Guide: Getting Started 109

Seating Chart
This page intentionally left blank.
110 ProgressBook GradeBook Teacher Guide: Getting Started
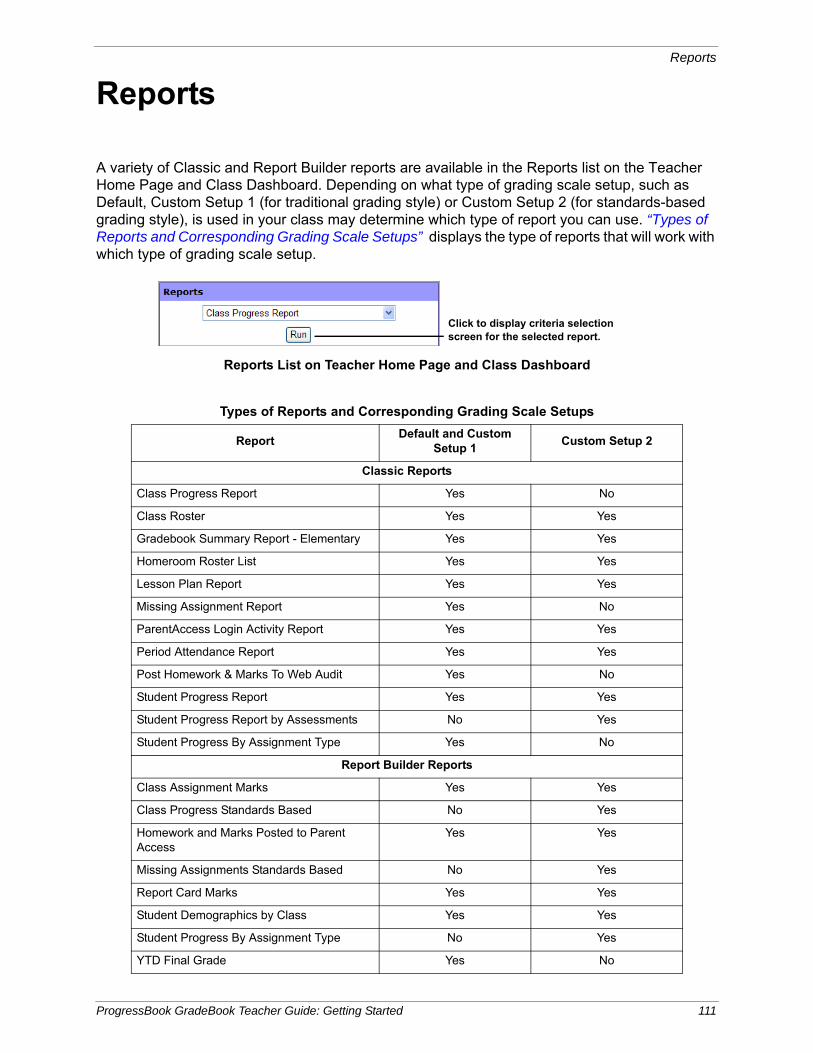
Reports
Reports
A variety of Classic and Report Builder reports are available in the Reports list on the Teacher Home Page and Class Dashboard. Depending on what type of grading scale setup, such as Default, Custom Setup 1 (for traditional grading style) or Custom Setup 2 (for standards-based grading style), is used in your class may determine which type of report you can use. “Types of Reports and Corresponding Grading Scale Setups” displays the type of reports that will work with which type of grading scale setup.
Reports List on Teacher Home Page and Class Dashboard
Types of Reports and Corresponding Grading Scale Setups
ReportDefault and Custom
Setup 1Custom Setup 2
Classic Reports
Class Progress Report Yes No
Class Roster Yes Yes
Gradebook Summary Report - Elementary Yes Yes
Homeroom Roster List Yes Yes
Lesson Plan Report Yes Yes
Missing Assignment Report Yes No
ParentAccess Login Activity Report Yes Yes
Period Attendance Report Yes Yes
Post Homework & Marks To Web Audit Yes No
Student Progress Report Yes Yes
Student Progress Report by Assessments No Yes
Student Progress By Assignment Type Yes No
Report Builder Reports
Class Assignment Marks Yes Yes
Class Progress Standards Based No Yes
Homework and Marks Posted to Parent Access
Yes Yes
Missing Assignments Standards Based No Yes
Report Card Marks Yes Yes
Student Demographics by Class Yes Yes
Student Progress By Assignment Type No Yes
YTD Final Grade Yes No
Click to display criteria selection screen for the selected report.
ProgressBook GradeBook Teacher Guide: Getting Started 111

Reports
Classic Reports
The report criteria selection screens provide a list of available classes from which you can select one or more. Where this option is available, you can also select individual students from the class, if desired. See “Types of Reports and Corresponding Grading Scale Setups” on which type of grading scale setup will work with Classic reports.
A common report parameter is date selection, either by reporting period or date range.
Naming conventions for reporting periods such as Quarter, Period, Marking Period, Grading Period, etc., on the report criteria selection screens may appear differently in GradeBook because they are defined by the school district.
To view and modify the report you must have the appropriate application installed on your computer. Classic reports can be displayed in the following formats:
• HTML – Format can be viewed in a browser and saved. To edit, you must have HTML editing software installed on the computer and/or knowledge of HTML code.
• PDF – Portable document file format that cannot be edited. To view the report you must have Adobe Reader installed on the computer.
• Excel – Format provides full functionality of Microsoft Excel. To view, edit or save the report in this format, you must have Excel installed on the computer.
• RTF – Formatted document file type that can be edited. To edit the report, you must have a word processing software installed on the computer.
• TIFF – Large graphic file format that may take longer to open than other file types and cannot be edited.
When you have selected the appropriate report parameters on the report criteria selection screen, click Run the Report or Submit to display the report. All reports open in a separate browser window. After you have viewed the report, close the report window and return to the report criteria selection screen. Classic reports cannot be deleted.
Note: Reports open in a separate browser window, which may display behind GradeBook. If you cannot see the reports, check the pop-up blocker setting in your browser. If the pop-up blocker setting is enabled, disable it for the GradeBook website.
To print the report you must select the print option from within the software application in which it is displayed.
Class Progress ReportThis is a Classic style report, which now only works for traditional classes using the Default or Custom Setup 1 grading scale. If you are trying to run a report for a class using standards-based grading, please use the Report Builder report. The Class Progress Report displays assignment marks, assignment type averages, and overall averages for all students in a class. You can print this report using student numbers instead of names to ensure anonymity in the classroom. This report is also a good option for printing a paper backup of your GradeBook.
112 ProgressBook GradeBook Teacher Guide: Getting Started
Reports
Class Roster ReportThe Class Roster Report lists the students in a class. You can run one Class Roster Report for multiple classes.
Gradebook Summary Report - ElementaryThe Gradebook Summary Report – Elementary lists students’ marks including letter grades and percentages for all their classes. The report also displays daily attendance.
Homeroom Roster List ReportThe Homeroom Roster List Report displays the physical location, teacher and list of students assigned to a teacher’s homeroom. Most teachers have a single homeroom from which to choose. However, kindergarten teachers with morning and afternoon classes will have two homerooms.
Lesson Plan ReportThe Lesson Plan Report options allow you to print lesson plans for a range of dates with or without the academic standards. In addition, several options are available for reporting the number of times academic standards have been reinforced by the lesson plan.
Missing Assignment ReportThis is a Classic style report, which now only works for traditional classes using the Default or Custom Setup 1 grading scale. If you are trying to run a report for a class using standards-based grading, please use the Report Builder report. The Missing Assignment Report lists missing assignments by student or assignment. To include assignments in this report, you must have designated assignments as missing on the Assignment Marks screen.
ParentAccess Login Activity AuditThe ParentAccess Login Activity Audit allows teachers to monitor the last time parents and students logged in to ParentAccess. Another option displays the parents and students who have never logged in to use ParentAccess.
Period Attendance ReportThe Period Attendance Report provides teachers with numerous options for presenting summary- and detail-level period attendance data. Three detailed report versions display attendance information using a variety of grouping and filtering combinations. A summary report version displays attendance information by teacher, class, and student. The Basic Details – Two Column report version does not allow filtering.
ProgressBook GradeBook Teacher Guide: Getting Started 113
Reports
Post Homework & Marks to Web AuditThis is a Classic style report, which now only works for traditional classes using the Default or Custom Setup 1 grading scale. If you are trying to run a report for a class using standards-based grading, please use the Report Builder report, Homework and Marks Posted to Parent Access. The Post Homework & Marks to Web Audit for Default and Custom Setup 1 classes displays assignments for one or more class by date, assignment type, and whether or not marks were posted to ParentAccess.
Student Progress ReportsThe following are variations of Student Progress Reports:
• If you want to run a basic year to date progress report, see “Student Progress Report.”
• If you use standards-based report cards and want to display student progress by report card assessments, see “Student Progress Report by Assessments.”
• If you want to display a student’s averages by assignment type, see “Student Progress Report by Assignment Type for Default and Custom Setup 1 Classes.”
Student Progress Report
The Student Progress Report displays a student’s cumulative performance; year to date final grade if the year to date grade calculation has been enabled for the report card used in the class; assignment details, including missing and late assignments, and assignment weights if they are used; and absence information based on the features selected. This report can be used in place of interim report cards and for Parent/Teacher conferences.
Student Progress Report by Assessments
When using standards-based report cards, this report is particularly useful because it displays student progress by report card assessments. Assignments display under each report card assessment to which they are mapped. You can use this report in place of interim report cards and for parent-teacher conferences.
Student Progress Report by Assignment Type for Default and Custom Setup 1 Classes
The Student Progress by Assignment Type Report displays the student’s overall averages, averages by assignment type, as well as period attendance.
Report Builder Reports
Report Builder reports offer numerous filter options for defining customized class assignment mark; report card grade; student demographic information; student progress by assignment type; class progress; missing assignments; and homework and marks posted to ParentAccess; as well as numerous column options for displaying the results. Once you have selected the desired settings, you can save the report with those settings to use in the future. See “Types of Reports and Corresponding Grading Scale Setups” to learn which type of grading scale setup will work with Report Builder reports.
114 ProgressBook GradeBook Teacher Guide: Getting Started
Reports
The following reports are available:
• Class Assignment Marks – For a Default or Custom Setup 1 class, the report displays class assignment mark information for individual or multiple classes in individual or multiple reporting periods. For a Custom Setup 2 class, it displays class assignment assessment mark information for individual or multiple classes in individual or multiple reporting periods.
• Class Progress Standards Based – Displays assignment type averages, assignment assessment marks and class averages for an individual class in a reporting period. This report is also a good option for printing a paper backup of your GradeBook. If you are trying to run a Class Progress Report on a class using traditional grading, please use the Class Progress Report in the Classic Report list.
• Homework and Marks Posted to Parent Access – Displays assignments and assignment types for individual or multiple classes within a date range with an indication of whether or not marks are posted to ParentAccess.
• Missing Assignments Standards Based – Displays missing assignment information for individual and multiple classes in individual and multiple reporting periods. To include assignments in this report, you must have designated assignments as missing on the Assignment Marks screen. If you are trying to run a Missing Assignment Report on a class using traditional grading, please use the Missing Assignment Report in the Classic Report list.
• Report Card Marks – Provides numerous options for presenting report card information for individual or multiple class(es). For example, you can apply specific filter options to create a report that displays students with grades above or below a grade threshold.
• Student Demographics by Class – Provides numerous options for displaying student demographic information for individual or multiple classes, class groups or homerooms.
• Student Progress By Assignment Type – Displays the students’ overall class averages, averages by assignment type with total points earned out of total points possible, as well as period attendance for individual and multiple classes in individual or multiple reporting periods.
• YTD Final Grade – Provides numerous options for displaying year to date grade information for students in a class or class group. The YTD Final Grade Report can only be used on classes where the YTD Grade calculation has been enabled on the report card for the class.
Naming conventions for reporting periods such as Quarter, Period, Marking Period, Grading Period, etc., on the Report Viewer screen are defined by the school district.
The appearance of this icon in the top right corner of the banner indicates that the report is
a core report—provided by GradeBook—or a user-defined version of a core report. This icon does not display for add-on reports—reports that have been customized and then uploaded by your support staff.
Once you have generated the report, numerous features are available:
• To view the report, click View Report or .
• To show report headers, required parameters, optional filters and columns, click
Show Setup. To hide this area, click Hide Setup.
ProgressBook GradeBook Teacher Guide: Getting Started 115
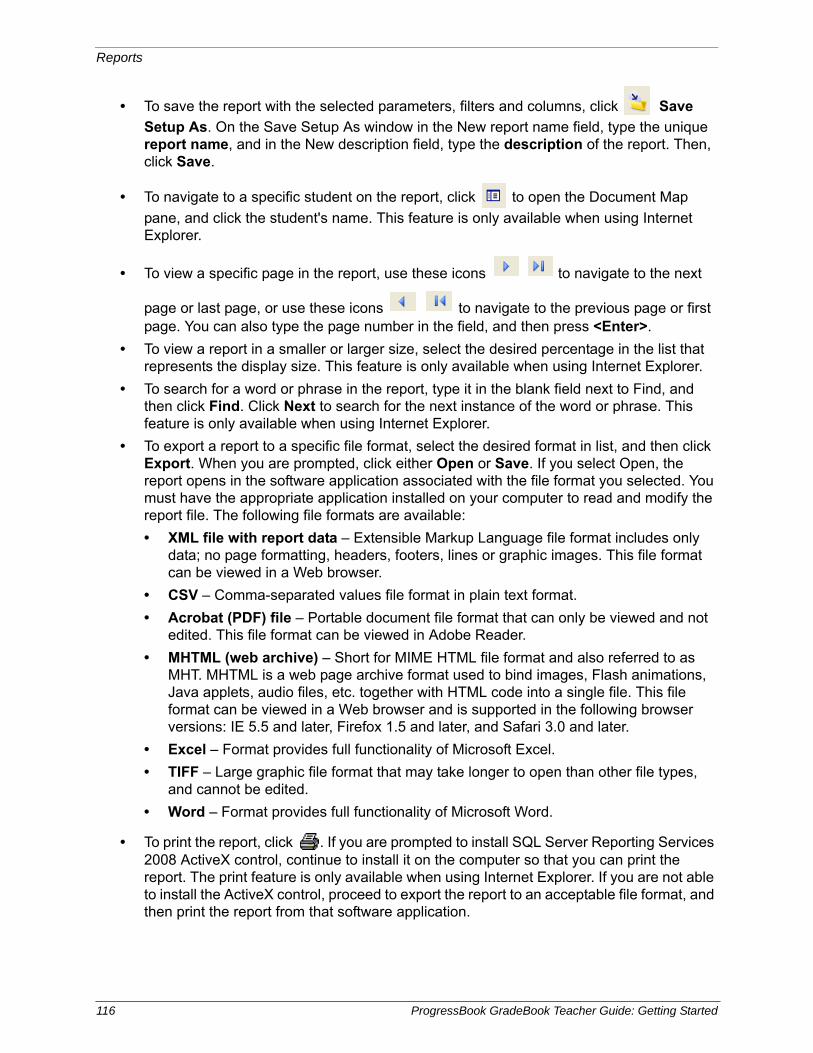
Reports
• To save the report with the selected parameters, filters and columns, click Save
Setup As. On the Save Setup As window in the New report name field, type the unique report name, and in the New description field, type the description of the report. Then, click Save.
• To navigate to a specific student on the report, click to open the Document Map
pane, and click the student's name. This feature is only available when using Internet Explorer.
• To view a specific page in the report, use these icons to navigate to the next
page or last page, or use these icons to navigate to the previous page or first page. You can also type the page number in the field, and then press <Enter>.
• To view a report in a smaller or larger size, select the desired percentage in the list that represents the display size. This feature is only available when using Internet Explorer.
• To search for a word or phrase in the report, type it in the blank field next to Find, and then click Find. Click Next to search for the next instance of the word or phrase. This feature is only available when using Internet Explorer.
• To export a report to a specific file format, select the desired format in list, and then click Export. When you are prompted, click either Open or Save. If you select Open, the report opens in the software application associated with the file format you selected. You must have the appropriate application installed on your computer to read and modify the report file. The following file formats are available:
• XML file with report data – Extensible Markup Language file format includes only data; no page formatting, headers, footers, lines or graphic images. This file format can be viewed in a Web browser.
• CSV – Comma-separated values file format in plain text format.
• Acrobat (PDF) file – Portable document file format that can only be viewed and not edited. This file format can be viewed in Adobe Reader.
• MHTML (web archive) – Short for MIME HTML file format and also referred to as MHT. MHTML is a web page archive format used to bind images, Flash animations, Java applets, audio files, etc. together with HTML code into a single file. This file format can be viewed in a Web browser and is supported in the following browser versions: IE 5.5 and later, Firefox 1.5 and later, and Safari 3.0 and later.
• Excel – Format provides full functionality of Microsoft Excel.
• TIFF – Large graphic file format that may take longer to open than other file types, and cannot be edited.
• Word – Format provides full functionality of Microsoft Word.
• To print the report, click . If you are prompted to install SQL Server Reporting Services 2008 ActiveX control, continue to install it on the computer so that you can print the report. The print feature is only available when using Internet Explorer. If you are not able to install the ActiveX control, proceed to export the report to an acceptable file format, and then print the report from that software application.
116 ProgressBook GradeBook Teacher Guide: Getting Started
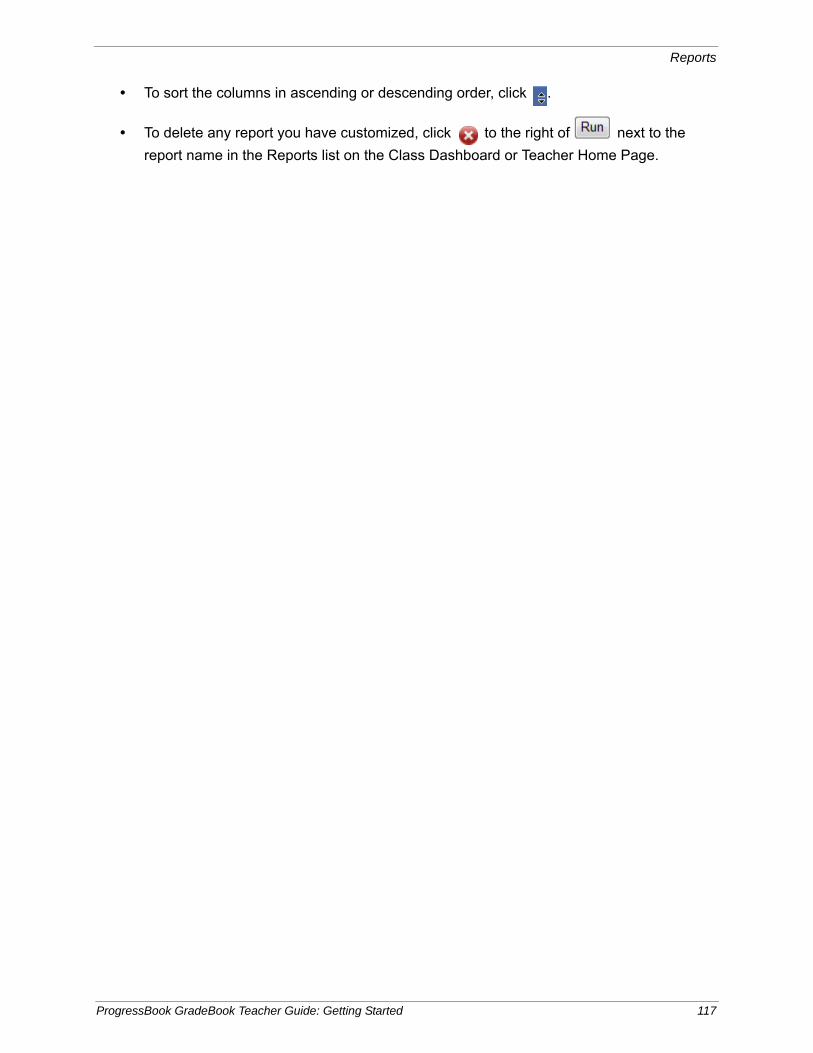
Reports
• To sort the columns in ascending or descending order, click .
• To delete any report you have customized, click to the right of next to the
report name in the Reports list on the Class Dashboard or Teacher Home Page.
ProgressBook GradeBook Teacher Guide: Getting Started 117

Reports
This page intentionally left blank.
118 ProgressBook GradeBook Teacher Guide: Getting Started
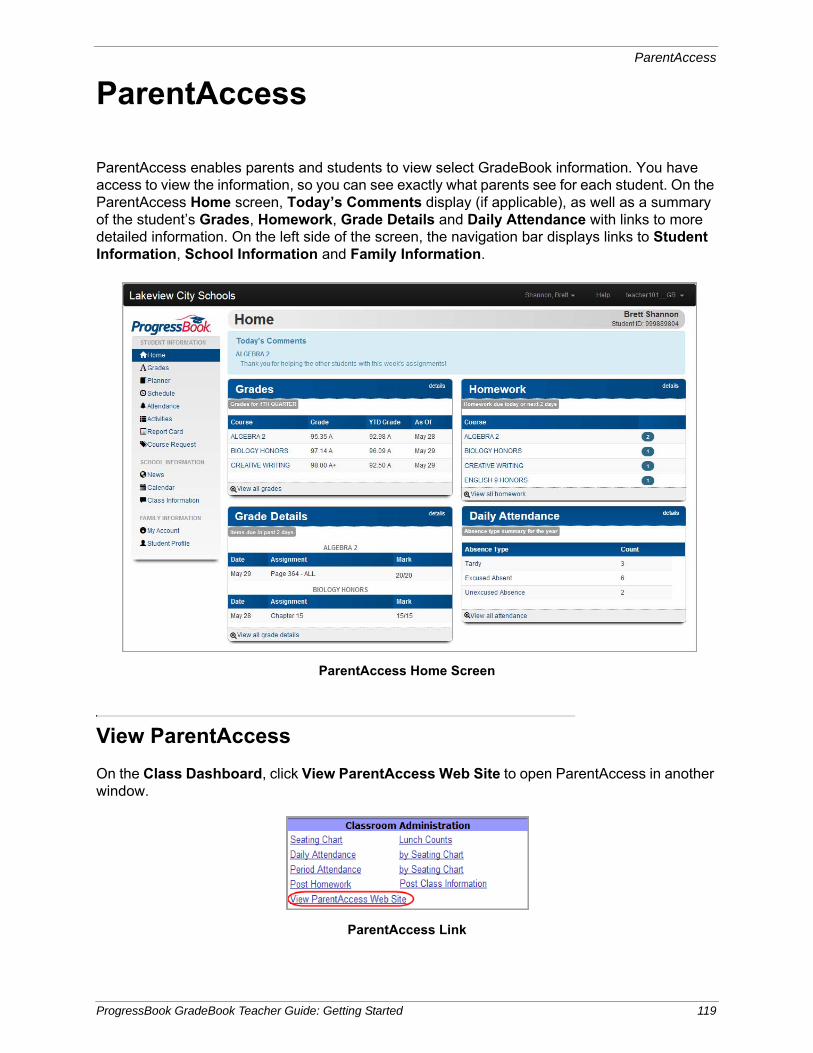
ParentAccess
ParentAccess
ParentAccess enables parents and students to view select GradeBook information. You have access to view the information, so you can see exactly what parents see for each student. On the ParentAccess Home screen, Today’s Comments display (if applicable), as well as a summary of the student’s Grades, Homework, Grade Details and Daily Attendance with links to more detailed information. On the left side of the screen, the navigation bar displays links to Student Information, School Information and Family Information.
View ParentAccess
On the Class Dashboard, click View ParentAccess Web Site to open ParentAccess in another window.
ParentAccess Home Screen
ParentAccess Link
ProgressBook GradeBook Teacher Guide: Getting Started 119
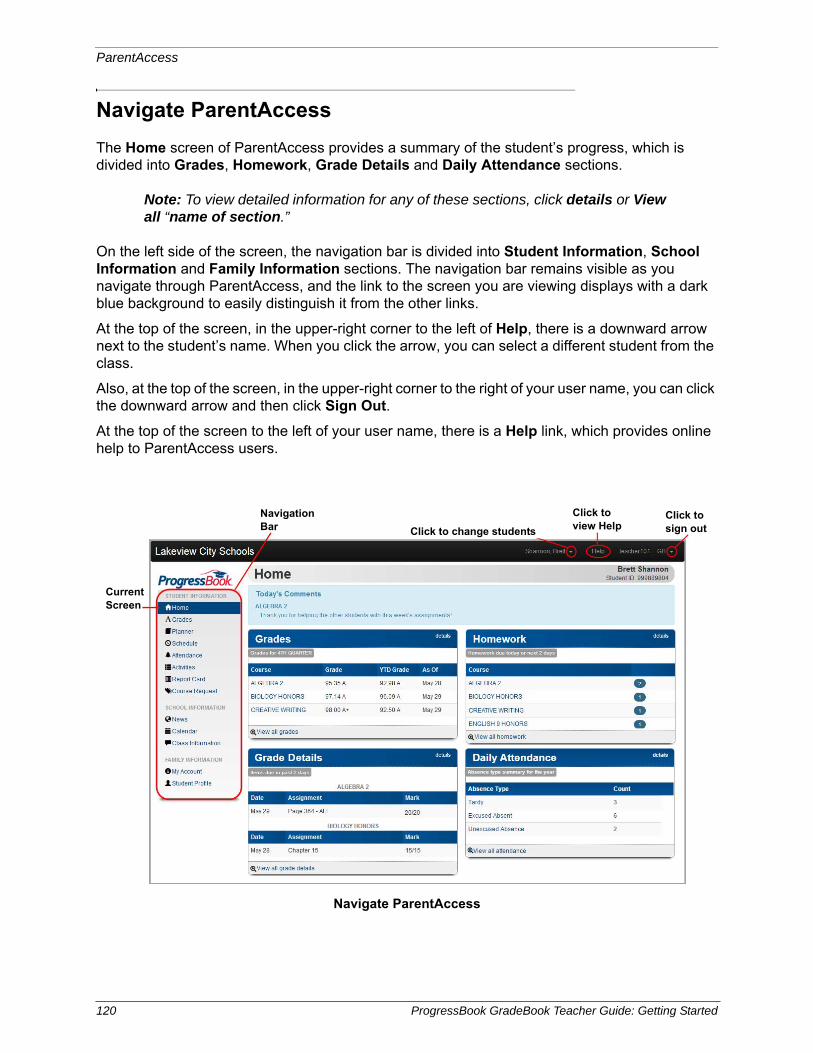
ParentAccess
Navigate ParentAccess
The Home screen of ParentAccess provides a summary of the student’s progress, which is divided into Grades, Homework, Grade Details and Daily Attendance sections.
Note: To view detailed information for any of these sections, click details or View all “name of section.”
On the left side of the screen, the navigation bar is divided into Student Information, School Information and Family Information sections. The navigation bar remains visible as you navigate through ParentAccess, and the link to the screen you are viewing displays with a dark blue background to easily distinguish it from the other links.
At the top of the screen, in the upper-right corner to the left of Help, there is a downward arrow next to the student’s name. When you click the arrow, you can select a different student from the class.
Also, at the top of the screen, in the upper-right corner to the right of your user name, you can click the downward arrow and then click Sign Out.
At the top of the screen to the left of your user name, there is a Help link, which provides online help to ParentAccess users.
Navigate ParentAccess
Navigation Bar
Current Screen
Click to change students
Click to sign out
Click to view Help
120 ProgressBook GradeBook Teacher Guide: Getting Started
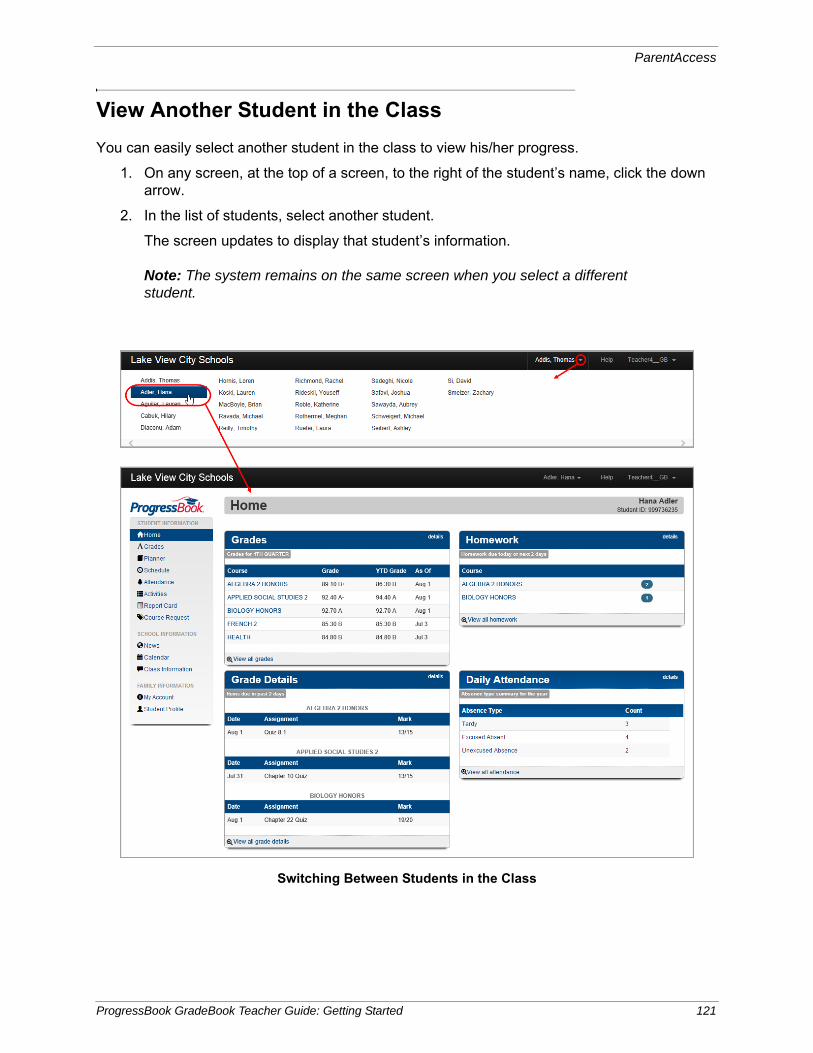
ParentAccess
View Another Student in the Class
You can easily select another student in the class to view his/her progress.
1. On any screen, at the top of a screen, to the right of the student’s name, click the down arrow.
2. In the list of students, select another student.
The screen updates to display that student’s information.
Note: The system remains on the same screen when you select a different student.
Switching Between Students in the Class
ProgressBook GradeBook Teacher Guide: Getting Started 121
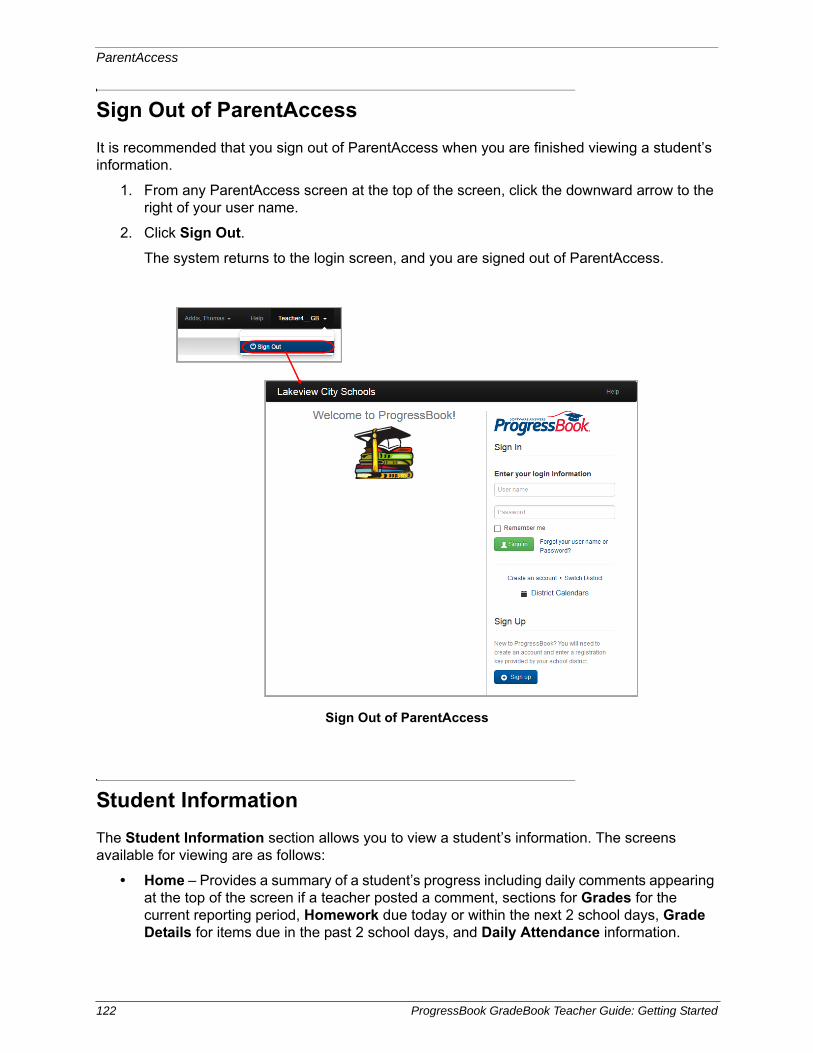
ParentAccess
Sign Out of ParentAccess
It is recommended that you sign out of ParentAccess when you are finished viewing a student’s information.
1. From any ParentAccess screen at the top of the screen, click the downward arrow to the right of your user name.
2. Click Sign Out.
The system returns to the login screen, and you are signed out of ParentAccess.
Student Information
The Student Information section allows you to view a student’s information. The screens available for viewing are as follows:
• Home – Provides a summary of a student’s progress including daily comments appearing at the top of the screen if a teacher posted a comment, sections for Grades for the current reporting period, Homework due today or within the next 2 school days, Grade Details for items due in the past 2 school days, and Daily Attendance information.
Sign Out of ParentAccess
122 ProgressBook GradeBook Teacher Guide: Getting Started
ParentAccess
• Grades – Provides detailed information about a student’s grades for a reporting period including Course, Grade and As Of date. The courses are links, so you can easily navigate to the Grade Details screen to view a student’s assignments for that course.
Grade Details – Provides detailed information about a student’s assignments for a course. For traditional (high school) courses, the default view is by date, but you can also view by assignment type. For standards-based (elementary) courses, the default view is by standards, but you can also view by assignment summary and assessment type. At the top of the screen, you can select the student’s other courses, and on the right-hand side of the screen, you can select different reporting periods.
Note: Missing assignments display as 0/possible points and 0%, so parents/students realize the missing assignment counts as a zero.
• Planner Screen – Provides detailed information about a student’s Assigned Work and/or Posted Homework.
Assigned Work – When you create an assignment, if you select Post to the homework web page?, the assignment displays in the student Planner under the Assigned Work heading. If you tied the assignment to a VirtualClassroom activity, a View Activity link also displays.
Posted Homework – When you use the Post Homework feature, the homework and associated links and/or attachments display in the student Planner under the Posted Homework heading.
• Schedule Screen – Provides detailed information about a student’s schedule. The default view is for the current day, but you can change the date or view the full schedule for the school year. If you view the schedule on the weekend and school is not scheduled, then you will see the schedule for the following Monday. You can also email the class’s teacher from the Schedule screen.
• Attendance Screen – Provides information about a student’s Daily and Period Attendance with links to view detailed information for Daily and Period Attendance.
Daily Attendance Screen – Provides detailed information about a student’s daily attendance including Date, Absence Type, Reason, if a reason was entered, Attendance Comments, if a comment was entered, and Arrival and Dismissal Times, if they exist. The information displayed is live from StudentInformation if live integration is enabled. The default view is by reporting period with links on the right-hand side to view different reporting periods or a summary for the school year. If Attendance Totals are enabled by your administrator, Total Absent and Total Tardy display for each reporting period (but not for the Summary view). There is also a link to view period attendance details.
Period Attendance Screen – Provides detailed information about a student’s period attendance including Absence Date and Absence Type. The information displayed is live from StudentInformation if live integration is enabled. The default view is the current reporting period. You can also view period attendance for another reporting period. There is also a link to view daily attendance details.
• Activities Screen – If your school has enabled VirtualClassroom, the Activities screen displays a list of the online activities you assign to the students, including due date and status. The activity name serves as a link for students to access and work on the activity when they are signed in to their account. When parents sign in to their account, they can view online activities in read-only format.
ProgressBook GradeBook Teacher Guide: Getting Started 123
ParentAccess
• Report Card Screen – Provides detailed information about a student’s report card. If your school uses more than one report card, such as an interim, in the Report Cards drop-down list, you can select a different report card or interim to view. Click the View Paper Report Card link to display a PDF of the student’s most recent report card. Click the View Paper History link to open the Report Card History screen, which lists report cards from previous grading periods and previous school years. Click the name of a report card to display it as a PDF.
School Information
The School Information section allows you to view the following:
• News – Provides a news selection screen in tile format where you select news for the district or for the schools in your district
Note: If a district or school has information, the district’s or school’s name appears in green.
• Calendar – Provides a calendar on which you select preferences to appear for event categories, classes and schools
• Class Information – Provides a class selection screen showing all the student’s classes in tile format.
Note: If a class has information, the class name appears in green, and if the class’s teacher has uploaded a class logo, the logo appears on the right side of the tile.
Family Information
The Family Information section provides the following links if enabled by the ParentAccess administrator:
• My Account – Click to access the My Account screen where you can reset a student’s ParentAccess password. (See “Change a Student's Password in ParentAccess.”)
• Student Profile – Click to view the school and demographic information on file for the student whose ParentAccess account you are viewing. This information is read-only.
Change a Student's Password in ParentAccessYou can change a student’s password in ParentAccess in the event the student forgets it.
1. On the Class Dashboard, click View ParentAccess Web Site.
2. On the left side of the screen in the navigation bar, under Family Information, click My Account.
The My Account screen displays a list of students in your class.
3. On the My Account screen, in the row of the student whose password you want to reset, click Reset Password.
124 ProgressBook GradeBook Teacher Guide: Getting Started
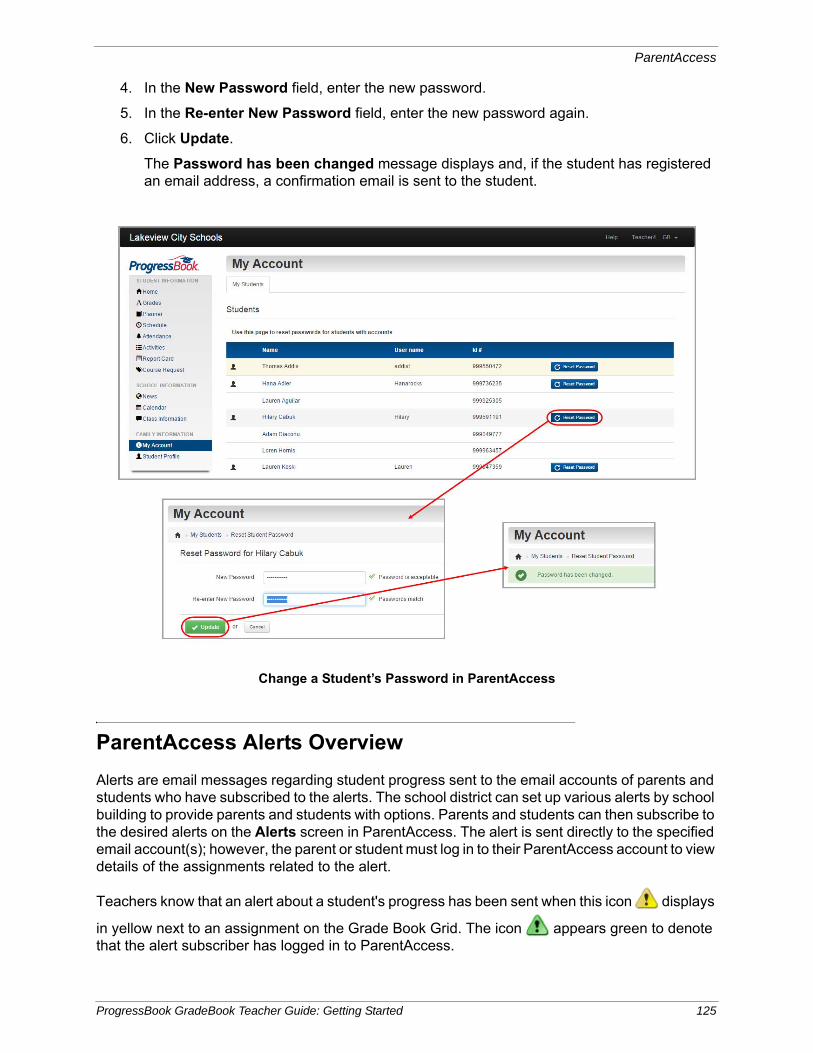
ParentAccess
4. In the New Password field, enter the new password.
5. In the Re-enter New Password field, enter the new password again.
6. Click Update.
The Password has been changed message displays and, if the student has registered an email address, a confirmation email is sent to the student.
ParentAccess Alerts Overview
Alerts are email messages regarding student progress sent to the email accounts of parents and students who have subscribed to the alerts. The school district can set up various alerts by school building to provide parents and students with options. Parents and students can then subscribe to the desired alerts on the Alerts screen in ParentAccess. The alert is sent directly to the specified email account(s); however, the parent or student must log in to their ParentAccess account to view details of the assignments related to the alert.
Teachers know that an alert about a student's progress has been sent when this icon displays
in yellow next to an assignment on the Grade Book Grid. The icon appears green to denote that the alert subscriber has logged in to ParentAccess.
Change a Student’s Password in ParentAccess
ProgressBook GradeBook Teacher Guide: Getting Started 125

ParentAccess
This page intentionally left blank.
126 ProgressBook GradeBook Teacher Guide: Getting Started