Embed Size (px)
Citation preview
Project Plan: Miter Saw Extension Wings©2019 Kreg Tool Company. All Rights Reserved.
Miter Saw Extension Wings Project Plans
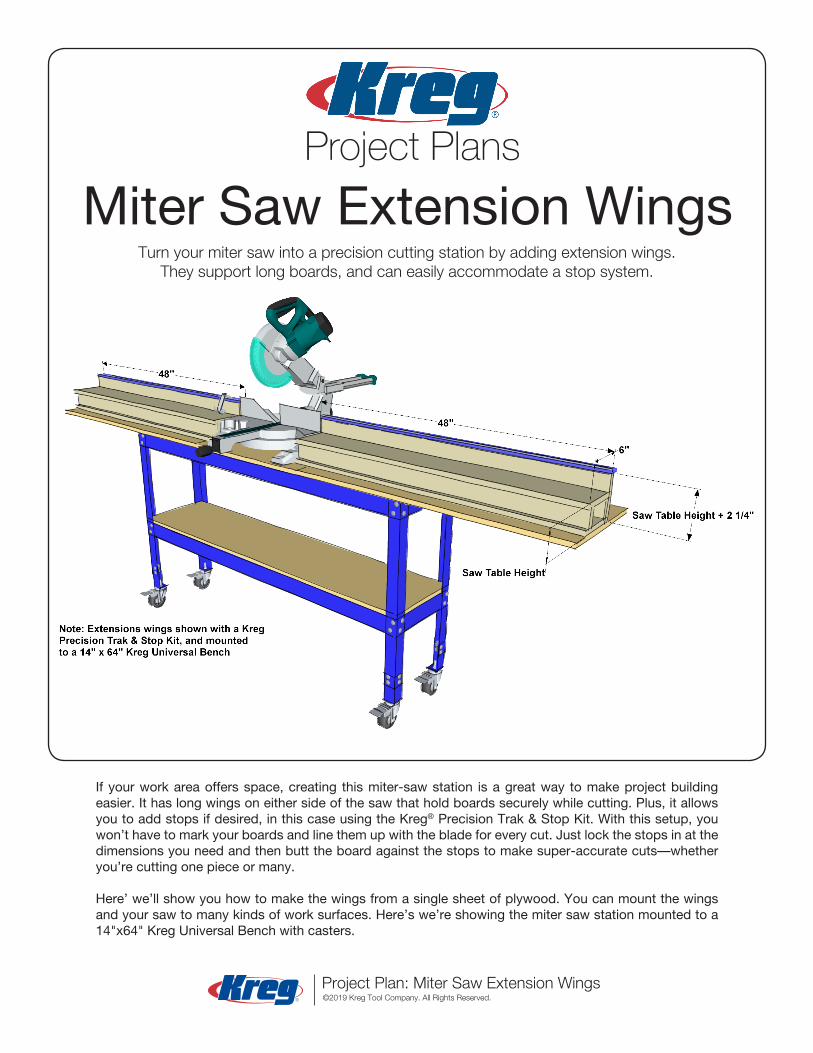
Turn your miter saw into a precision cutting station by adding extension wings. They support long boards, and can easily accommodate a stop system.
If your work area offers space, creating this miter-saw station is a great way to make project building easier. It has long wings on either side of the saw that hold boards securely while cutting. Plus, it allows you to add stops if desired, in this case using the Kreg® Precision Trak & Stop Kit. With this setup, you won’t have to mark your boards and line them up with the blade for every cut. Just lock the stops in at the dimensions you need and then butt the board against the stops to make super-accurate cuts—whether you’re cutting one piece or many.
Here’ we’ll show you how to make the wings from a single sheet of plywood. You can mount the wings and your saw to many kinds of work surfaces. Here’s we’re showing the miter saw station mounted to a 14"x64" Kreg Universal Bench with casters.

Project Plan: Miter Saw Extension Wings©2019 Kreg Tool Company. All Rights Reserved.
What You’ll Need:
Cutting Diagram
Materials Tools Supplies• (1) 3⁄4" plywood, 48" x 96" • Miter Saw • (60) 11⁄4" coarse-thread pocket-hole screws
• (1) Kreg Precision Trak & Stop • Circular Saw • Sandpaper
• (1) Kreg 14"x64" Universal Bench • Circular Saw Guide
• Kreg Pocket-Hole Jig
• Tape Measure
• Square
• Clamps
• Workbench
Quantity Part Name Dimensions(2) Table 3⁄4" x 6" x 48"
(2) Base 3⁄4" x 6" x 48"
(4) Riser 3⁄4" x cut to fit x 48"
(2) Back 3⁄4" x cut to fit x 48"
Parts List:
Project Plan: Miter Saw Extension Wings©2019 Kreg Tool Company. All Rights Reserved.
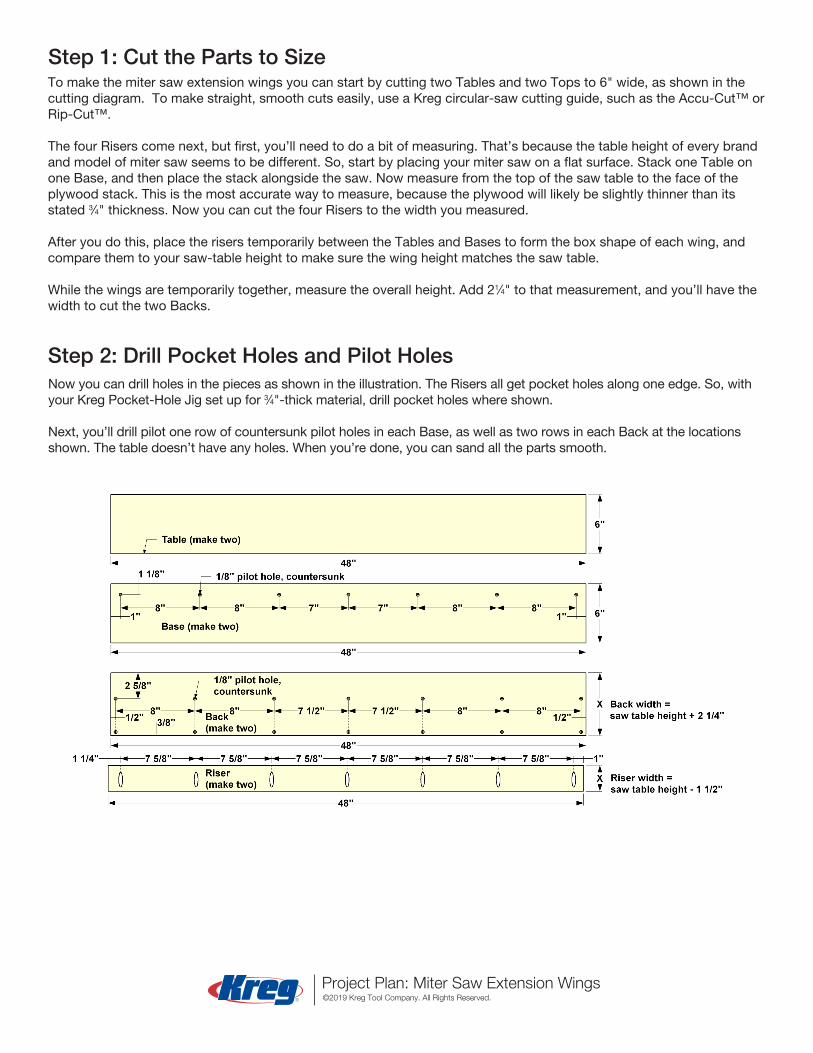
To make the miter saw extension wings you can start by cutting two Tables and two Tops to 6" wide, as shown in the cutting diagram. To make straight, smooth cuts easily, use a Kreg circular-saw cutting guide, such as the Accu-Cut™ or Rip-Cut™.
The four Risers come next, but first, you’ll need to do a bit of measuring. That’s because the table height of every brand and model of miter saw seems to be different. So, start by placing your miter saw on a flat surface. Stack one Table on one Base, and then place the stack alongside the saw. Now measure from the top of the saw table to the face of the plywood stack. This is the most accurate way to measure, because the plywood will likely be slightly thinner than its stated 3⁄4" thickness. Now you can cut the four Risers to the width you measured.
After you do this, place the risers temporarily between the Tables and Bases to form the box shape of each wing, and compare them to your saw-table height to make sure the wing height matches the saw table.
While the wings are temporarily together, measure the overall height. Add 21⁄4" to that measurement, and you’ll have the width to cut the two Backs.
Now you can drill holes in the pieces as shown in the illustration. The Risers all get pocket holes along one edge. So, with your Kreg Pocket-Hole Jig set up for 3⁄4"-thick material, drill pocket holes where shown.
Next, you’ll drill pilot one row of countersunk pilot holes in each Base, as well as two rows in each Back at the locations shown. The table doesn’t have any holes. When you’re done, you can sand all the parts smooth.
Step 1: Cut the Parts to Size
Step 2: Drill Pocket Holes and Pilot Holes
Project Plan: Miter Saw Extension Wings©2019 Kreg Tool Company. All Rights Reserved.
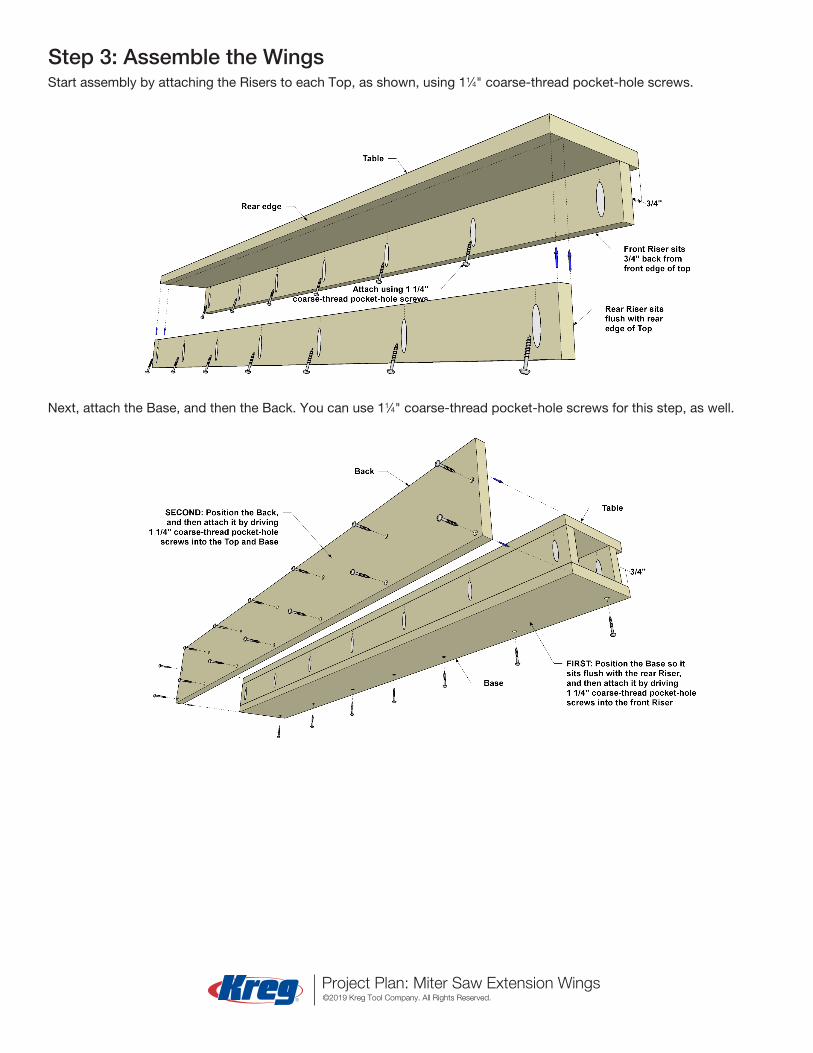
Start assembly by attaching the Risers to each Top, as shown, using 11⁄4" coarse-thread pocket-hole screws.
Next, attach the Base, and then the Back. You can use 11⁄4" coarse-thread pocket-hole screws for this step, as well.
Step 3: Assemble the Wings
Project Plan: Miter Saw Extension Wings©2019 Kreg Tool Company. All Rights Reserved.
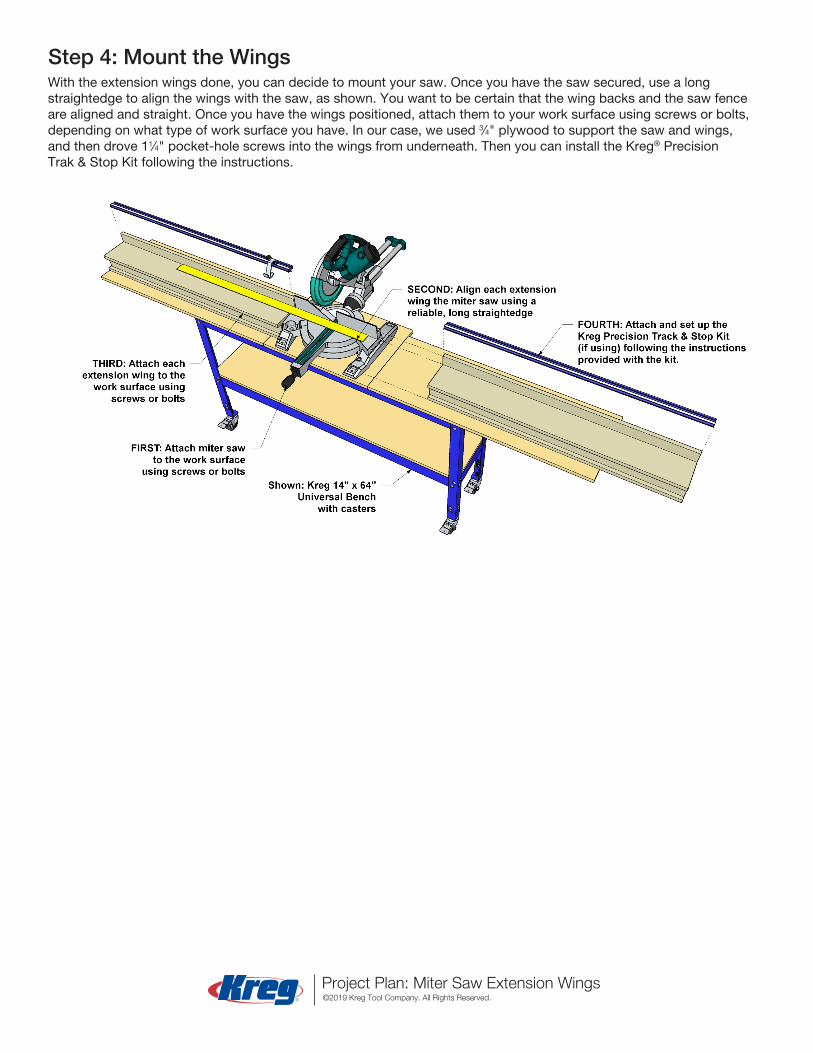
With the extension wings done, you can decide to mount your saw. Once you have the saw secured, use a long straightedge to align the wings with the saw, as shown. You want to be certain that the wing backs and the saw fence are aligned and straight. Once you have the wings positioned, attach them to your work surface using screws or bolts, depending on what type of work surface you have. In our case, we used 3⁄4" plywood to support the saw and wings, and then drove 11⁄4" pocket-hole screws into the wings from underneath. Then you can install the Kreg® Precision Trak & Stop Kit following the instructions.
Step 4: Mount the Wings


![Ryobi Miter saw TS1355LA_130_eng[1]](https://img.pdfslide.net/doc/110x75/577d38db1a28ab3a6b98a04e/ryobi-miter-saw-ts1355la130eng1.jpg)