Embed Size (px)
Citation preview
DUKANE CORP AV SERVICE DEPT2900 Dukane DriveSt Charles, IL 60174800-676-2487 / 630-762-4032Fax [email protected]
1
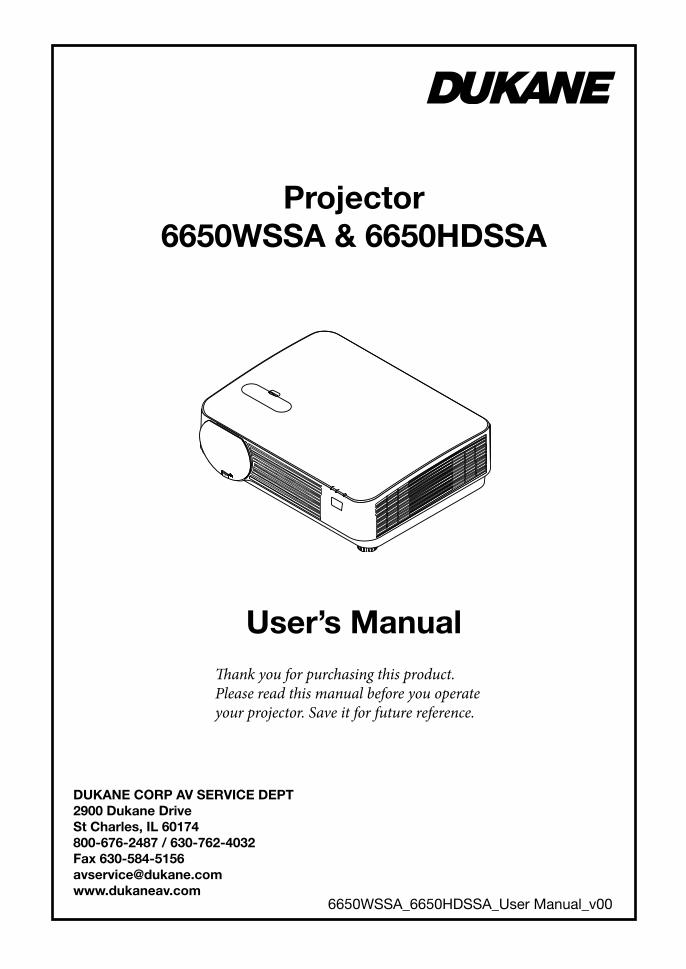
Projector6650WSSA & 6650HDSSA
User’s ManualThank you for purchasing this product. Please read this manual before you operate your projector. Save it for future reference.
6650WSSA_6650HDSSA_User Manual_v00

• MultiPresenterisatrademarkorregisteredtrademarkofNECDisplaySolutions,Ltd.inJapanandothercountries.
• Apple,Mac,MacOS,MacBook,andiMacaretrademarksofAppleInc.registeredintheU.S.andothercountries.
• AppStoreisaservicemarkofAppleInc.
• IOSisatrademarkorregisteredtrademarkofCiscointheU.S.andothercountriesandisusedunderlicense.
• Microsoft,Windows,WindowsVista, InternetExplorer, .NETFrameworkandPowerPointareeitheraregisteredtrademarkortrademarkofMicrosoftCorporationintheUnitedStatesand/orothercountries.
• MicroSaverisaregisteredtrademarkofKensingtonComputerProductsGroup,adivisionofACCOBrands.
• ThetermsHDMIandHDMIHigh-DefinitionMultimediaInterface,andtheHDMILogoaretrademarksorregisteredtrademarksofHDMILicensingLLCintheUnitedStatesandothercountries.
• HDBaseT™isatrademarkofHDBaseTAlliance.
• DLPisatrademarkofTexasInstruments.
• TrademarkPJLinkisatrademarkappliedfortrademarkrightsinJapan,theUnitedStatesofAmericaandothercountries and areas.
• Wi-Fi®,Wi-FiAlliance®,Wi-FiProtectedAccess®,Wi-FiDirect®areregisteredtrademarksoftheWi-FiAlliance®. WPA™,WPA2™,Wi-FiProtectedSetup™,Miracast™aretrademarksoftheWi-FiAlliance®.
• Blu-rayisatrademarkofBlu-rayDiscAssociation
• CRESTRONandROOMVIEWareregisteredtrademarksofCrestronElectronics,Inc.intheUnitedStatesandothercountries.
• EthernetiseitheraregisteredtrademarkortrademarkofFujiXeroxCo.,Ltd.
• GooglePlayandAndroidaretrademarksofGoogleInc.
• Otherproductnamesandcompanylogosmentionedinthisuser’smanualmaybethetrademarksorregisteredtrademarksoftheirrespectiveholders.
• VirtualRemoteToolusesWinI2C/DDClibrary,©NicomsoftLtd.
• GPL/LGPLSoftwareLicenses
TheproductincludessoftwarelicensedunderGNUGeneralPublicLicense(GPL),GNULesserGeneralPublicLicense(LGPL),andothers.
Formoreinformationoneachsoftware,see“readme.pdf”insidethe“aboutGPL&LGPL”folderonthesuppliedCD-ROM.
NOTES(1)Thecontentsofthisuser’smanualmaynotbereprintedinpartorwholewithoutpermission.
(2)Thecontentsofthisuser’smanualaresubjecttochangewithoutnotice.
(3)Greatcarehasbeentakeninthepreparationofthisuser’smanual;however,shouldyounoticeanyquestionablepoints, errors or omissions, please contact us.
(4)Notwithstandingarticle(3),DUKANEwillnotberesponsibleforanyclaimsonlossofprofitorothermattersdeemedtoresultfromusingtheProjector.

i
Important InformationSafety CautionsPrecautionsPleasereadthismanualcarefullybeforeusingyourprojectorandkeepthemanualhandyforfuturereference.
CAUTIONToturnoffmainpower,besuretoremovetheplugfrompoweroutlet.Thepoweroutletsocketshouldbeinstalledasneartotheequipmentaspossible,andshouldbeeasilyaccessible.
CAUTIONTOPREVENTSHOCK,DONOTOPENTHECABINET.THEREAREHIGH-VOLTAGECOMPONENTSINSIDE.REFERSERVICINGTOQUALIFIEDSERVICEPERSONNEL.
Thissymbolwarnstheuserthatuninsulatedvoltagewithintheunitmaybesufficienttocauseelectricalshock.Therefore,itisdangeroustomakeanykindofcontactwithanypartinsideoftheunit.
Thissymbolalertstheuserthatimportantinformationconcerningtheoperationandmaintenanceofthisunit has been provided.Theinformationshouldbereadcarefullytoavoidproblems.
WARNING:TOPREVENTFIREORSHOCK,DONOTEXPOSETHISUNITTORAINORMOISTURE.DONOTUSETHISUNIT’SPLUGWITHANEXTENSIONCORDORINANOUTLETUNLESSALLTHEPRONGSCANBEFULLYINSERTED.
DOC Compliance Notice (for Canada only)ThisClassBdigitalapparatuscomplieswithCanadianICES-003.
Machine Noise Information Regulation - 3. GPSGV,Thehighestsoundpressurelevelislessthan70dB(A)inaccordancewithENISO7779.
Disposing of your used product
EU-widelegislationasimplementedineachMemberStaterequiresthatusedelectricalandelectronicprod-uctscarryingthemark(left)mustbedisposedofseparatelyfromnormalhouseholdwaste.Thisincludesprojectorsandtheirelectricalaccessories.Whenyoudisposeofsuchproducts,pleasefollowtheguidanceofyourlocalauthorityand/orasktheshopwhereyoupurchasedtheproduct.Aftercollectingtheusedproducts,theyarereusedandrecycledinaproperway.Thiseffortwillhelpusreducethewastesaswellasthenegativeimpacttothehumanhealthandtheenvironmentattheminimumlevel.ThemarkontheelectricalandelectronicproductsonlyappliestothecurrentEuropeanUnionMemberStates.
For EU:Thecrossed-outwheeledbinimpliesthatusedbatteriesshouldnotbeputtothegeneralhouseholdwaste!Thereisaseparatecollectionsystemforusedbatteries,toallowpropertreatmentandrecyclinginaccordancewithlegislation.
According the EU directive 2006/66/EC, the battery can’t be disposed improperly. The battery shall be sepa-rated to collect by local service.
ii
Important Information
WARNING TO CALIFORNIA RESIDENTS:Handlingthecablessuppliedwiththisproductwillexposeyoutolead,achemicalknowntotheStateofCaliforniatocausebirthdefectsorotherreproductiveharm.WASHHANDSAFTERHANDLING.
RF Interference (for USA only)
WARNINGTheFederalCommunicationsCommissiondoesnotallowanymodificationsorchangestotheunitEXCEPTthosespecifiedbyDUKANE Corpinthismanual.Failuretocomplywiththisgovernmentregulation couldvoidyourrighttooperatethisequipment.Thisequipmenthasbeentestedandfoundtocomplywith thelimitsforaClassBdigitaldevice,pursuanttoPart15oftheFCCRules.Theselimitsaredesignedtoprovidereasonableprotectionagainstharmfulinterferenceinaresidentialinstallation.Thisequipmentgenerates,uses,andcanradiateradiofrequencyenergyand,ifnotinstalledandusedinaccordancewiththeinstructions,maycauseharmfulinterferencetoradiocommunications.However,thereisnoguaranteethatinterferencewillnotoccurinaparticular installation.Ifthisequipmentdoescauseharmfulinterferencetoradioortelevisionreception,whichcanbedeterminedbyturningtheequipmentoffandon,theuserisencouragedtotrytocorrecttheinterferencebyoneormoreofthefollowingmeasures:
• Reorientorrelocatethereceivingantenna.• Increasetheseparationbetweentheequipmentandreceiver.• Connecttheequipmentintoanoutletonacircuitdifferentfromthattowhichthereceiverisconnected.• Consultthedealeroranexperiencedradio/TVtechnicianforhelp.
ForUKonly:InUK,aBSapprovedpowercordwithmouldedplughasaBlack(15Amps)fuseinstalledforusewiththisequipment.Ifapowercordisnotsuppliedwiththisequipmentpleasecontactyoursupplier.
Important SafeguardsThesesafetyinstructionsaretoensurethelonglifeofyourprojectorandtopreventfireandshock.Pleasereadthemcarefullyandheedallwarnings.
Installation• Donotplacetheprojectorinthefollowingconditions:
- Outdoors- on an unstable cart, stand, or table.- near water, baths, or damp rooms.- indirectsunlight,nearheaters,orheatradiatingappliances.- inadusty,smokyorsteamyenvironment.- onasheetofpaperorcloth,rugsorcarpets.
• Donotinstallandstoretheprojectorinthebelowcircumstances.Failuretodosomaycauseofmalfunction.- Inpowerfulmagneticfields- Incorrosivegasenvironment
• Ifyouwishtohavetheprojectorinstalledontheceiling:- Donotattempttoinstalltheprojectoryourself.- Theprojectormustbeinstalledbyqualifiedtechniciansinordertoensureproperoperationandreducetherisk
of bodily injury.- Inaddition,theceilingmustbestrongenoughtosupporttheprojectorandtheinstallationmustbeinaccordance
withanylocalbuildingcodes.- Please consult your dealer for more information.
iii
Important Information
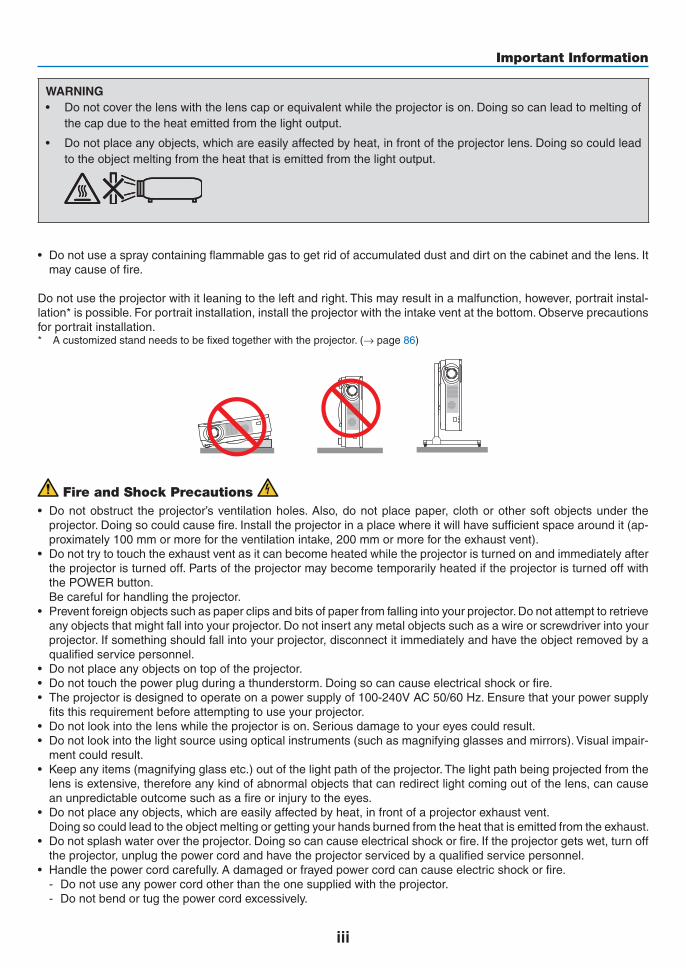
WARNING• Donotcoverthelenswiththelenscaporequivalentwhiletheprojectorison.Doingsocanleadtomeltingof
thecapduetotheheatemittedfromthelightoutput.
• Donotplaceanyobjects,whichareeasilyaffectedbyheat,infrontoftheprojectorlens.Doingsocouldleadtotheobjectmeltingfromtheheatthatisemittedfromthelightoutput.
• Donotuseaspraycontainingflammablegastogetridofaccumulateddustanddirtonthecabinetandthelens.Itmaycauseoffire.
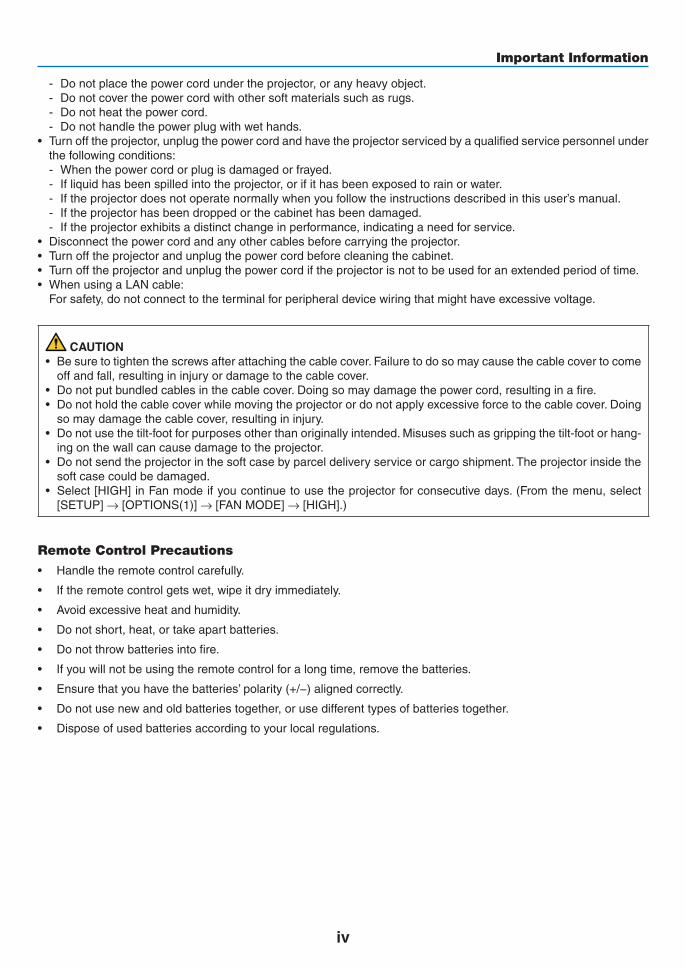
Donotusetheprojectorwithitleaningtotheleftandright.Thismayresultinamalfunction,however,portraitinstal-lation*ispossible.Forportraitinstallation,installtheprojectorwiththeintakeventatthebottom.Observeprecautionsfor portrait installation.* Acustomizedstandneedstobefixedtogetherwiththeprojector.(→page86)
Fire and Shock Precautions • Donotobstruct theprojector’sventilationholes.Also,donotplacepaper,clothorothersoftobjectsunder the
projector.Doingsocouldcausefire.Installtheprojectorinaplacewhereitwillhavesufficientspacearoundit(ap-proximately100mmormorefortheventilationintake,200mmormorefortheexhaustvent).
• Donottrytotouchtheexhaustventasitcanbecomeheatedwhiletheprojectoristurnedonandimmediatelyafterthe projector is turned off. Parts of the projector may become temporarily heated if the projector is turned off with thePOWERbutton.
Becarefulforhandlingtheprojector.• Preventforeignobjectssuchaspaperclipsandbitsofpaperfromfallingintoyourprojector.Donotattempttoretrieve
anyobjectsthatmightfallintoyourprojector.Donotinsertanymetalobjectssuchasawireorscrewdriverintoyourprojector.Ifsomethingshouldfallintoyourprojector,disconnectitimmediatelyandhavetheobjectremovedbyaqualifiedservicepersonnel.
• Donotplaceanyobjectsontopoftheprojector.• Donottouchthepowerplugduringathunderstorm.Doingsocancauseelectricalshockorfire.• Theprojectorisdesignedtooperateonapowersupplyof100-240VAC50/60Hz.Ensurethatyourpowersupply
fitsthisrequirementbeforeattemptingtouseyourprojector.• Donotlookintothelenswhiletheprojectorison.Seriousdamagetoyoureyescouldresult.• Donotlookintothelightsourceusingopticalinstruments(suchasmagnifyingglassesandmirrors).Visualimpair-
ment could result.• Keepanyitems(magnifyingglassetc.)outofthelightpathoftheprojector.Thelightpathbeingprojectedfromthe
lensisextensive,thereforeanykindofabnormalobjectsthatcanredirectlightcomingoutofthelens,cancauseanunpredictableoutcomesuchasafireorinjurytotheeyes.
• Donotplaceanyobjects,whichareeasilyaffectedbyheat,infrontofaprojectorexhaustvent. Doingsocouldleadtotheobjectmeltingorgettingyourhandsburnedfromtheheatthatisemittedfromtheexhaust.• Donotsplashwaterovertheprojector.Doingsocancauseelectricalshockorfire.Iftheprojectorgetswet,turnoff
theprojector,unplugthepowercordandhavetheprojectorservicedbyaqualifiedservicepersonnel.• Handlethepowercordcarefully.Adamagedorfrayedpowercordcancauseelectricshockorfire.
- Donotuseanypowercordotherthantheonesuppliedwiththeprojector.- Donotbendortugthepowercordexcessively.
iv
Important Information
- Donotplacethepowercordundertheprojector,oranyheavyobject.- Donotcoverthepowercordwithothersoftmaterialssuchasrugs.- Donotheatthepowercord.- Donothandlethepowerplugwithwethands.
• Turnofftheprojector,unplugthepowercordandhavetheprojectorservicedbyaqualifiedservicepersonnelunderthefollowingconditions:- Whenthepowercordorplugisdamagedorfrayed.- Ifliquidhasbeenspilledintotheprojector,orifithasbeenexposedtorainorwater.- Iftheprojectordoesnotoperatenormallywhenyoufollowtheinstructionsdescribedinthisuser’smanual.- Iftheprojectorhasbeendroppedorthecabinethasbeendamaged.- Iftheprojectorexhibitsadistinctchangeinperformance,indicatinganeedforservice.
• Disconnectthepowercordandanyothercablesbeforecarryingtheprojector.• Turnofftheprojectorandunplugthepowercordbeforecleaningthecabinet.• Turnofftheprojectorandunplugthepowercordiftheprojectorisnottobeusedforanextendedperiodoftime.• WhenusingaLANcable: Forsafety,donotconnecttotheterminalforperipheraldevicewiringthatmighthaveexcessivevoltage.
CAUTION• Besuretotightenthescrewsafterattachingthecablecover.Failuretodosomaycausethecablecovertocome
offandfall,resultingininjuryordamagetothecablecover.• Donotputbundledcablesinthecablecover.Doingsomaydamagethepowercord,resultinginafire.• Donotholdthecablecoverwhilemovingtheprojectorordonotapplyexcessiveforcetothecablecover.Doing
somaydamagethecablecover,resultingininjury.• Donotusethetilt-footforpurposesotherthanoriginallyintended.Misusessuchasgrippingthetilt-footorhang-
ingonthewallcancausedamagetotheprojector.• Donotsendtheprojectorinthesoftcasebyparceldeliveryserviceorcargoshipment.Theprojectorinsidethe
softcasecouldbedamaged.• Select[HIGH]inFanmodeifyoucontinuetousetheprojectorforconsecutivedays.(Fromthemenu,select
[SETUP]→[OPTIONS(1)]→[FANMODE]→[HIGH].)
Remote Control Precautions
• Handletheremotecontrolcarefully.
• Iftheremotecontrolgetswet,wipeitdryimmediately.
• Avoidexcessiveheatandhumidity.
• Donotshort,heat,ortakeapartbatteries.
• Donotthrowbatteriesintofire.
• Ifyouwillnotbeusingtheremotecontrolforalongtime,removethebatteries.
• Ensurethatyouhavethebatteries’polarity(+/−)alignedcorrectly.
• Donotusenewandoldbatteriestogether,orusedifferenttypesofbatteriestogether.
• Disposeofusedbatteriesaccordingtoyourlocalregulations.
v
Important Information
Light Module
1. Alightmodulecontainingmultiplelaserdiodesisequippedintheproductasthelightsource.
2. Theselaserdiodesaresealedinthelightmodule.Nomaintenanceorserviceisrequiredfortheperformanceofthelightmodule.
3. Enduserisnotallowedtoreplacethelightmodule.
4. Contactqualifieddistributorforlightmodulereplacementandfurtherinformation.
Laser Safety Caution• Thelasermoduleisequippedinthisproduct. Useofcontrolsoradjustmentsofproceduresotherthanthosespecifiedhereinmayresultinhazardousradiation
exposure.• ThisproductisclassifiedasClass1ofIEC60825-1Thirdedition2014-05. ThisproductisclassifiedasClass2ofIEC60825-1Secondedition2007-03.AlsocomplieswithFDAperformance
standards21CFR1040.10and1040.11forlaserproductsexceptfordeviationspursuanttoLaserNoticeNo.50,datedJune24,2007.
Obeythelawsandregulationsofyourcountryinrelationtotheinstallationandmanagementofthedevice.• Bluelaserdiodes:Wavelength455nm,Outputpower120W• Donotlookintothelenswhiletheprojectorison.Seriousdamagetoyoureyescouldresult.Payenoughattention
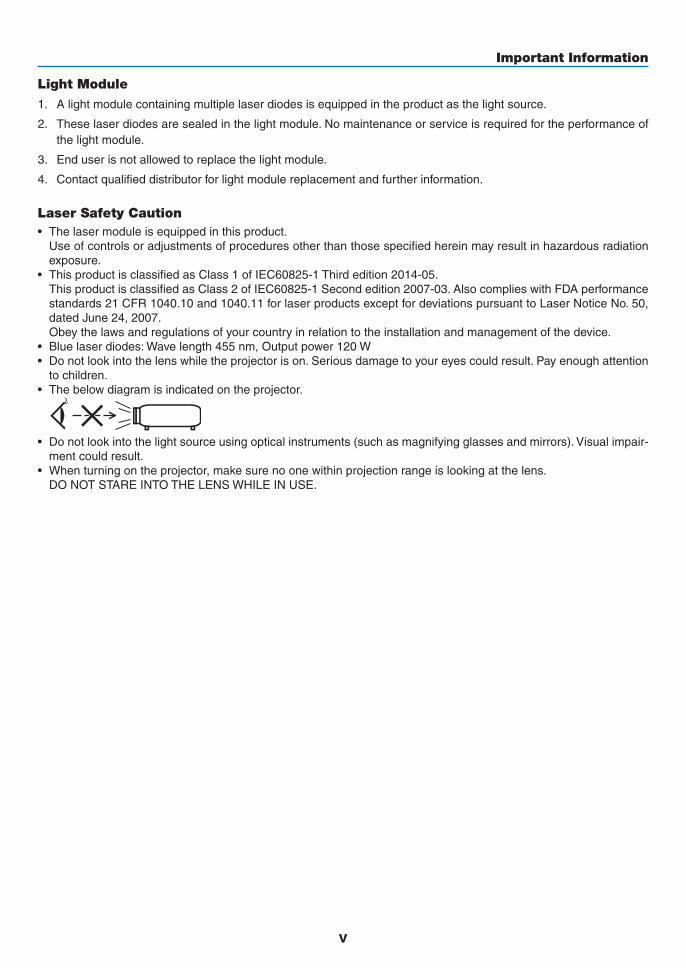
to children.• Thebelowdiagramisindicatedontheprojector.
• Donotlookintothelightsourceusingopticalinstruments(suchasmagnifyingglassesandmirrors).Visualimpair-
ment could result.• Whenturningontheprojector,makesurenoonewithinprojectionrangeislookingatthelens. DONOTSTAREINTOTHELENSWHILEINUSE.
vi
Important Information
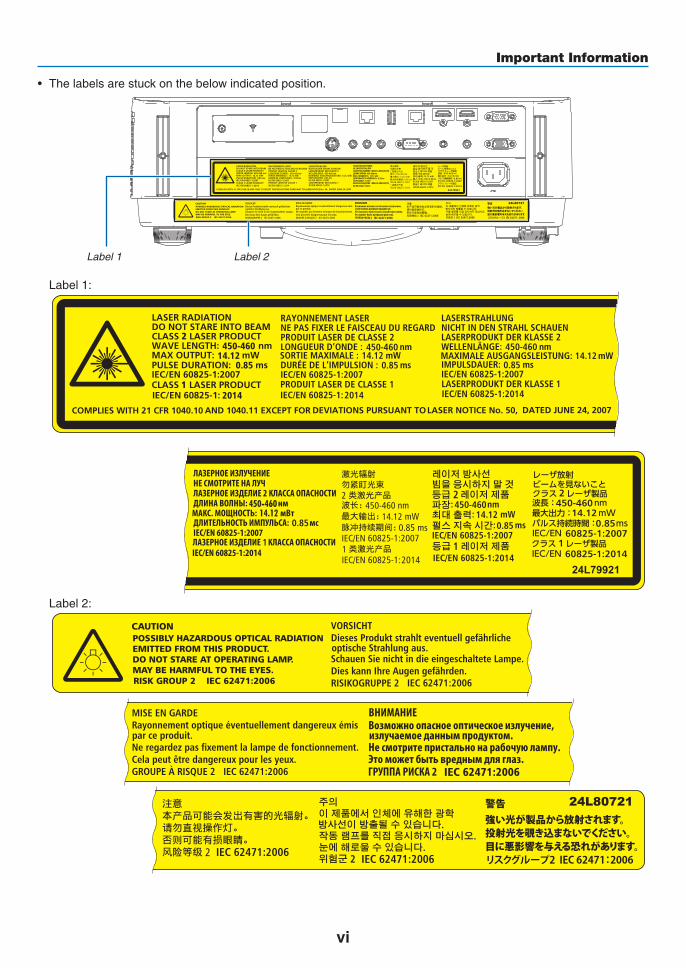
• Thelabelsarestuckonthebelowindicatedposition.
Label 1 Label 2
Label 1:
Label 2:

vii
Important Information
About Copyright of original projected pictures:Pleasenotethatusingthisprojectorforthepurposeofcommercialgainortheattractionofpublicattentioninavenuesuchasacoffeeshoporhotelandemployingcompressionorexpansionofthescreenimagewiththefollowingfunc-tionsmayraiseconcernabouttheinfringementofcopyrightswhichareprotectedbycopyrightlaw.[ASPECTRATIO],[KEYSTONE],Magnifyingfeatureandothersimilarfeatures.
Turkish RoHS information relevant for Turkish marketEEE Yonetmeliğine Uygundur.
Thisdeviceisnotintendedforuseinthedirectfieldofviewatvisualdisplayworkplaces.Toavoidincommodingreflec-tionsatvisualdisplayworkplacesthisdevicemustnotbeplacedinthedirectfieldofview.
Note: The Dukane models described in this document are manufactured by NEC and use the same firmware, software programs, control code, and accessory parts. The equivalent Dukane to NEC models are 6650WSSA (NP-P502WL-2 ) and 6650HDSSA ( NP-P502HL-2).

viii
Important Information
Power management functionTheprojectorhaspowermanagementfunctions.Toreducepowerconsumption,thepowermanagementfunctions(1and2)arefactorypresetasshownbelow.TocontroltheprojectorfromanexternaldeviceviaaLANorserialcableconnection,usetheon-screenmenutochangethesettingsfor1and2.
1. STANDBY MODE (Factory preset: NORMAL)
To control the projector from an external device, select [NETWORK STANDBY] for [STANDBY MODE].
NOTE:• When[NORMAL]isselectedfor[STANDBYMODE],thefollowingterminalsandfunctionswillnotwork: MONITOROUT(COMP.)terminal,AUDIOOUTterminal,LANfunctions,MailAlertfunction,DDC/CI(VirtualRemoteTool).Please
refertopage60aboutdetails.• When[NETWORKSTANDBY]hasbeensetfor[STANDBYMODE]andtheLANhasbeeninlink-downconditionfor3minutes,
[STANDBYMODE]willtransitinto[NORMAL]automaticallyforthepurposetosavetheconsumptionpower.
2. AUTO POWER OFF (Factory preset: 1 hour)
To control the projector from an external device, select [OFF] for [AUTO POWER OFF].
NOTE:• When[1:00]isselectedfor[AUTOPOWEROFF],youcanenabletheprojectortoautomaticallyturnoffin60minutesifthereis
nosignalreceivedbyanyinputorifnooperationisperformed.
Health precautions to users viewing 3D images
Beforeviewing,besuretoreadhealthcareprecautionsthatmaybefoundintheuser’smanualincludedwithyourLCDshuttereyeglassesoryour3DcompatiblecontentsuchasDVDs,videogames,computer'svideofilesandthelike.Toavoidanyadversesymptoms,heedthefollowing:• DonotuseLCDshuttereyeglassesforviewinganymaterialotherthan3Dimages.
• Allowadistanceof2m/7feetorgreaterbetweenthescreenandauser.Viewing3Dimagesfromtoocloseadistance can strain your eyes.
• Avoidviewing3Dimagesforaprolongedperiodoftime.Takeabreakof15minutesorlongeraftereveryhourofviewing.
• Ifyouoranymemberofyourfamilyhasahistoryoflight-sensitiveseizures,consultadoctorbeforeviewing3Dimages.
• Whileviewing3Dimages,ifyougetsicksuchasnausea,dizziness,queasiness,headache,eyestrain,blurryvision,convulsions,andnumbness,stopviewingthem.Ifsymptomsstillpersist,consultadoctor.
• View3Dimagesfromthefrontofthescreen.Viewingfromananglemaycausefatigueoreyestrain.
Model Number of Wireless LAN unitWirelessLANunitisanoptionalitem.Tofindtheappropriatemodeltoyourarea,pleasevisitthecompanywebsite:URL: http://www.dukaneav.com
DUKANE CORP AV SERVICE DEPT2900 Dukane DriveSt Charles, IL 60174800-676-2487 / 630-762-4032Fax [email protected]
ix
Table of ContentsImportant Information ............................................................................................ i
1. Introduction ...........................................................................................................1❶What’sintheBox? ..........................................................................................................1❷IntroductiontotheProjector ...........................................................................................2
General .....................................................................................................................2Lightsource·Brightness ..........................................................................................2Installation .................................................................................................................2Videos .......................................................................................................................2Network .....................................................................................................................2Energy-saving ...........................................................................................................3Aboutthisuser’smanual ...........................................................................................3
❸ Part Names of the Projector ...........................................................................................4Front ..........................................................................................................................4Mountingthelenscapstrap ......................................................................................4Rear ..........................................................................................................................5Controls/Indicators ....................................................................................................6TerminalPanelFeatures ...........................................................................................7
❹PartNamesoftheRemoteControl ................................................................................8BatteryInstallation ....................................................................................................9RemoteControlPrecautions .....................................................................................9OperatingRangeforWirelessRemoteControl .........................................................9
2. Projecting an Image (Basic Operation) ...............................................10❶FlowofProjectinganImage .........................................................................................10❷ConnectingYourComputer/ConnectingthePowerCord ..............................................11❸TurningontheProjector ...............................................................................................12
NoteonStartupscreen(MenuLanguageSelectscreen) .......................................13❹SelectingaSource .......................................................................................................14
Selectingthecomputerorvideosource..................................................................14❺AdjustingthePictureSizeandPosition ........................................................................16
Adjustingtheverticalpositionofaprojectedimage(Lensshift) .............................17Focus ......................................................................................................................19Zoom .......................................................................................................................19Adjustingthetilt(Tiltfoot) .......................................................................................20
❻CorrectingKeystoneDistortion[KEYSTONE] ..............................................................21❼OptimizingComputerSignalAutomatically ..................................................................23
AdjustingtheImageUsingAutoAdjust ...................................................................23❽TurningUporDownVolume .........................................................................................23❾TurningofftheProjector ...............................................................................................24❿WhenMovingtheProjector ..........................................................................................25
3. Convenient Features ......................................................................................26❶TurningofftheImageandSound .................................................................................26❷FreezingaPicture ........................................................................................................26❸MagnifyingaPicture .....................................................................................................27❹ChangingEcoMode/CheckingEnergy-SavingEffect .................................................28
UsingEcoMode[ECOMODE] ...............................................................................28
x
Table of Contents
CheckingEnergy-SavingEffect[CARBONMETER] ..............................................29❺PreventingtheUnauthorizedUseoftheProjector[SECURITY] ..................................30❻Viewing3DImages .......................................................................................................33
LCDshuttereyeglasses(recommended) ...............................................................33Stepsforviewing3Dimagesontheprojector.........................................................33Troubleshootingonviewing3Dimages...................................................................36
4. Using On-Screen Menu .................................................................................37❶UsingtheMenus ...........................................................................................................37
MenuElements .......................................................................................................38❷ListofMenuItems ........................................................................................................39❸MenuDescriptions&Functions[SOURCE] .................................................................42
HDMI1andHDMI2..................................................................................................42COMPUTER ...........................................................................................................42VIDEO .....................................................................................................................42HDBaseT ................................................................................................................42APPS ......................................................................................................................42
❹MenuDescriptions&Functions[ADJUST] ...................................................................43[PICTURE] ..............................................................................................................43[IMAGEOPTIONS] .................................................................................................46
❺MenuDescriptions&Functions[SETUP] .....................................................................50[GENERAL] .............................................................................................................50[MENU] ...................................................................................................................53[INSTALLATION] .....................................................................................................54[OPTIONS(1)] .........................................................................................................58[OPTIONS(2)] .........................................................................................................60[3D] .........................................................................................................................63
❻MenuDescriptions&Functions[INFO.] .......................................................................65[USAGETIME] ........................................................................................................65[SOURCE(1)] ..........................................................................................................65[SOURCE(2)] ..........................................................................................................65[HDBaseT] ..............................................................................................................65[WIREDLAN] ..........................................................................................................65[WIRELESSLAN] ...................................................................................................65[VERSION(1)] .........................................................................................................65[VERSION(2)] .........................................................................................................65[OTHERS] ...............................................................................................................65
❼MenuDescriptions&Functions[RESET] .....................................................................66ReturningtoFactoryDefault[RESET] ....................................................................66
5. Installation and Connections ....................................................................67❶SettingUptheScreenandtheProjector ......................................................................67
Tablesofscreensizesanddimensions ..................................................................69Exampleofinstallationonadesktop ......................................................................70Lensshiftingrange ..................................................................................................71
❷MakingConnections .....................................................................................................73ConnectingYourComputer .....................................................................................73ConnectinganExternalMonitor .............................................................................75ConnectingYourDVDPlayerorOtherAVEquipment .............................................76ConnectingComponentInput .................................................................................77
xi
Table of Contents
ConnectingHDMIInput...........................................................................................78Connectingyourdocumentcamera ........................................................................79ConnectingtoaWiredLAN ....................................................................................80ConnectingtoaWirelessLAN(Optional:NP05LMseries) .....................................81ConnectingtoaHDBaseTtransmissiondevice(soldcommercially) ......................84Portraitprojection(verticalorientation) ...................................................................86
6. APPS MENU .........................................................................................................88❶WhatcanyoudowiththeAPPSMENU? .....................................................................88
7. User Supportware ............................................................................................92❶SoftwareAvailable for Downloading .............................................................................92❷ProjectingYourComputer’sScreenImagefromtheProjectoroveraLAN(Image
ExpressUtilityLite) .................................................................................................93StartingImageExpressUtilityLitefromaUSBMemoryorSDCard .....................96
❸ProjectinganImagefromanAngle(GeometricCorrectionToolinImageExpressUtilityLite) ...............................................................................................................98WhatyoucandowithGCT .....................................................................................98ProjectinganImagefromanAngle(GCT) ..............................................................98
❹ControllingtheProjectoroveraLAN(PCControlUtilityPro4/Pro5) ........................101❺UsingtheComputerCable(VGA)toOperatetheProjector(VirtualRemoteTool) ....106❻IntroductionofMultiPresenterapplication ..................................................................112
8. Maintenance .....................................................................................................113❶CleaningtheLens.......................................................................................................113❷CleaningtheCabinet ..................................................................................................114
9. Appendix ..............................................................................................................115❶Troubleshooting ..........................................................................................................115
IndicatorMessages ...............................................................................................115CommonProblems&Solutions ............................................................................117Ifthereisnopicture,orthepictureisnotdisplayedcorrectly. ...............................118
❷Specifications .............................................................................................................119❸CabinetDimensions ...................................................................................................121❹AttachingtheOptionalCableCover(NP08CV) ..........................................................122
Attachingthecablecover ......................................................................................122Removingthecablecover .....................................................................................123
❺Pinassignmentsandsignalnamesofmainterminals ...............................................124❻CompatibleInputSignalList .......................................................................................126❼PCControlCodesandCableConnection ..................................................................127❽UpdatetheSoftware ...................................................................................................128❾TroubleshootingCheckList .........................................................................................130❿TCOCertification ........................................................................................................132⓫REGISTERYOURPROJECTOR!(forresidentsintheUnitedStates,Canada,and
Mexico) .................................................................................................................133
1
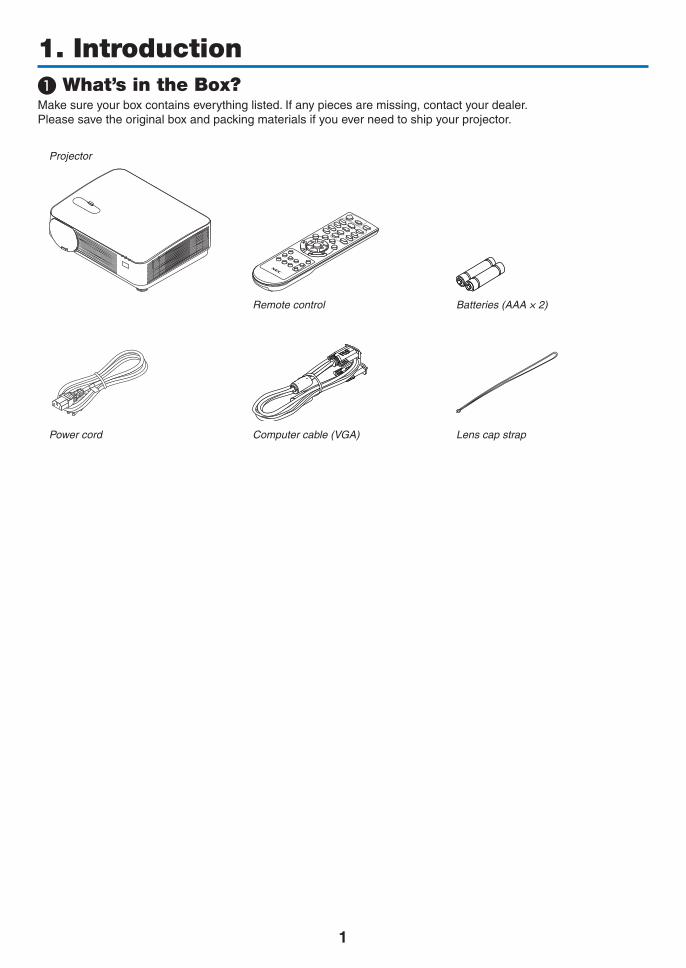
1. Introduction❶ What’s in the Box?Makesureyourboxcontainseverythinglisted.Ifanypiecesaremissing,contactyourdealer.Pleasesavetheoriginalboxandpackingmaterialsifyoueverneedtoshipyourprojector.
Projector
Remote control Batteries (AAA × 2)
Power cord Computer cable (VGA) Lens cap strap
2
1. Introduction
❷ Introduction to the ProjectorThissectionintroducesyoutoyournewprojectoranddescribesthefeaturesandcontrols.
General
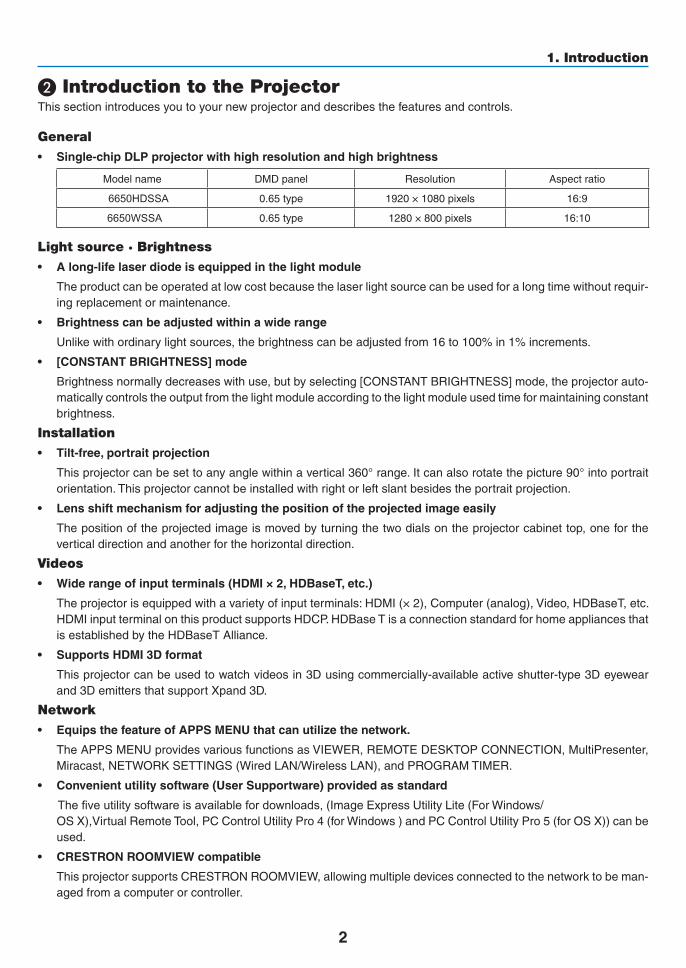
• Single-chipDLPprojectorwithhighresolutionandhighbrightness
Model name DMDpanel Resolution Aspectratio
6650HDSSA 0.65 type 1920×1080pixels 16:9
6650WSSA 0.65 type 1280×800pixels 16:10
Light source · Brightness
• Along-lifelaserdiodeisequippedinthelightmodule
Theproductcanbeoperatedatlowcostbecausethelaserlightsourcecanbeusedforalongtimewithoutrequir-ingreplacementormaintenance.
• Brightnesscanbeadjustedwithinawiderange
Unlikewithordinarylightsources,thebrightnesscanbeadjustedfrom16to100%in1%increments.
• [CONSTANTBRIGHTNESS]mode
Brightnessnormallydecreaseswithuse,butbyselecting[CONSTANTBRIGHTNESS]mode,theprojectorauto-maticallycontrolstheoutputfromthelightmoduleaccordingtothelightmoduleusedtimeformaintainingconstantbrightness.
Installation
• Tilt-free,portraitprojection
Thisprojectorcanbesettoanyanglewithinavertical360°range.Itcanalsorotatethepicture90°intoportraitorientation.Thisprojectorcannotbeinstalledwithrightorleftslantbesidestheportraitprojection.
• Lensshiftmechanismforadjustingthepositionoftheprojectedimageeasily
Thepositionoftheprojectedimageismovedbyturningthetwodialsontheprojectorcabinettop,onefortheverticaldirectionandanotherforthehorizontaldirection.
Videos
• Widerangeofinputterminals(HDMI×2,HDBaseT,etc.)
Theprojectorisequippedwithavarietyofinputterminals:HDMI(×2),Computer(analog),Video,HDBaseT,etc.HDMIinputterminalonthisproductsupportsHDCP.HDBaseTisaconnectionstandardforhomeappliancesthatisestablishedbytheHDBaseTAlliance.
• SupportsHDMI3Dformat
Thisprojectorcanbeusedtowatchvideosin3Dusingcommercially-availableactiveshutter-type3Deyewearand3DemittersthatsupportXpand3D.
Network
• EquipsthefeatureofAPPSMENUthatcanutilizethenetwork.
TheAPPSMENUprovidesvariousfunctionsasVIEWER,REMOTEDESKTOPCONNECTION,MultiPresenter,Miracast,NETWORKSETTINGS(WiredLAN/WirelessLAN),andPROGRAMTIMER.
• Convenientutilitysoftware(UserSupportware)providedasstandard
The five utility software is available for downloads,(ImageExpressUtilityLite(ForWindows/OSX),VirtualRemoteTool,PCControlUtilityPro4(forWindows)andPCControlUtilityPro5(forOSX))canbeused.
• CRESTRONROOMVIEWcompatible
ThisprojectorsupportsCRESTRONROOMVIEW,allowingmultipledevicesconnectedtothenetworktobeman-agedfromacomputerorcontroller.
3
1. Introduction
• CompatiblewiththeMultiPresenterapplication
ThisprojectoriscompatiblewiththeNECMultiPresenterapplication,somulti-screenprojectionispossibleviathenetwork(wiredLAN/wirelessLAN).
Energy-saving
• 0.15W(100-130VAC)/0.36W(200-240VAC)instandbyconditionwithenergysavingtechnology
Selecting[NORMAL]for[STANDBYMODE]fromthemenucanputtheprojectorinpower-savingmode.
NORMAL:0.15W(100-130VAC)/0.36W(200-240VAC)
NETWORKSTANDBY:2.1W(100-130VAC)/2.3W(200-240VAC)
• “ECOMODE”forlowpowerconsumptionand“CARBONMETER”display
Theprojectorisequippedwitha“LIGHTMODE”forreducingpowerconsumptionduringuse.Furthermore,thepower-savingeffectwhenthe[ECOMODE]issetisconvertedintotheamountofreductionsofCO2 emissions andthisisindicatedontheconfirmationmessagedisplayedwhenthepoweristurnedoffandat[INFO.]ontheon-screenmenu(CARBONMETER).
About this user’s manualThefastestwaytogetstartedistotakeyourtimeanddoeverythingrightthefirsttime.Takeafewminutesnowtoreviewtheuser’smanual.Thismaysaveyoutimelateron.Atthebeginningofeachsectionofthemanualyou’llfindanoverview.Ifthesectiondoesn’tapply,youcanskipit.
4
1. Introduction
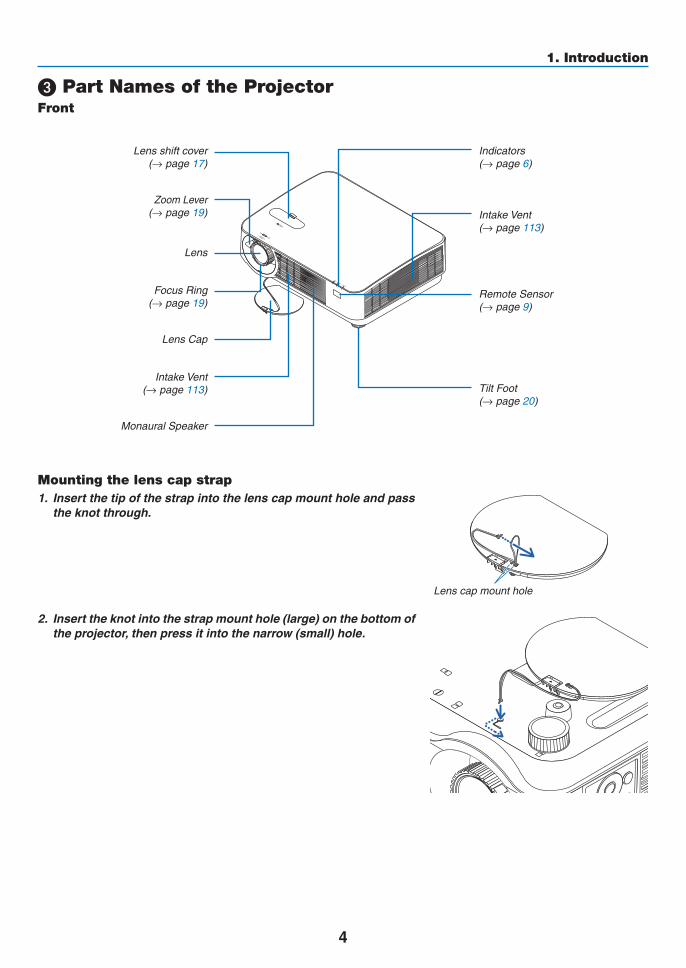
❸ Part Names of the ProjectorFront
IntakeVent(→ page 113)
Lens shift cover(→ page 17)
Lens Cap
Tilt Foot(→ page 20)
IntakeVent(→ page 113)
Remote Sensor(→ page 9)
Focus Ring(→ page 19)
Indicators(→ page 6)
Zoom Lever (→ page 19)
Lens
MonauralSpeaker
Mounting the lens cap strap1. Insert the tip of the strap into the lens cap mount hole and pass
the knot through.
Lens cap mount hole
2. Insert the knot into the strap mount hole (large) on the bottom of the projector, then press it into the narrow (small) hole.
5
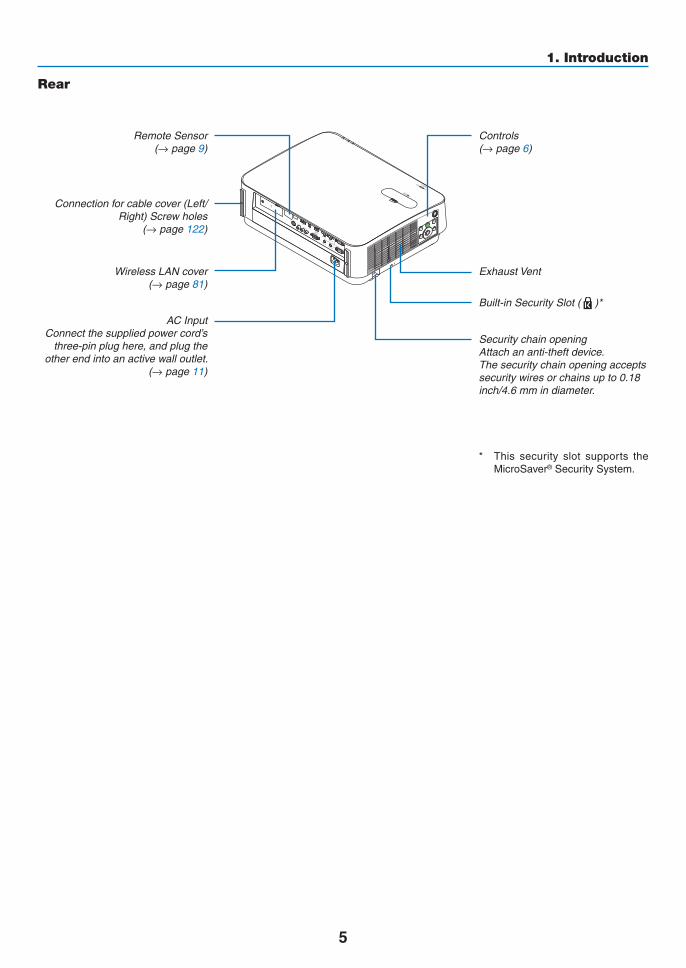
1. Introduction
Controls(→ page 6)
Remote Sensor(→ page 9)
Built-in Security Slot ( )*
Wireless LAN cover (→ page 81)
ACInputConnect the supplied power cord’s
three-pin plug here, and plug the other end into an active wall outlet.
(→ page 11)
Exhaust Vent
Security chain opening Attach an anti-theft device.The security chain opening accepts security wires or chains up to 0.18 inch/4.6 mm in diameter.
Rear
Connection for cable cover (Left/Right) Screw holes
(→ page 122)
* This security slot supports theMicroSaver®SecuritySystem.
6
1. Introduction
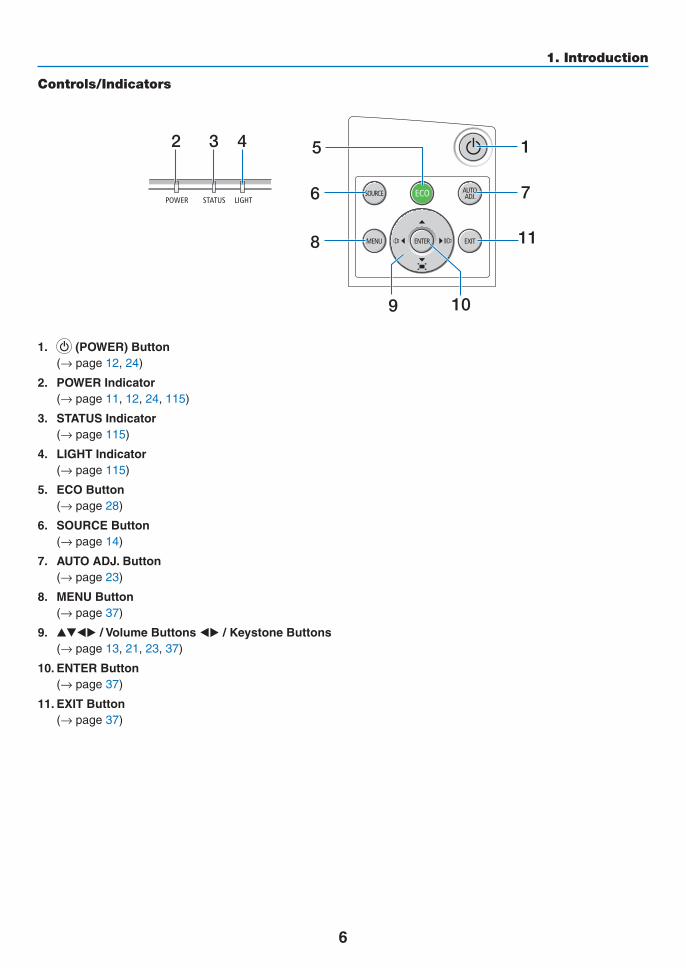
Controls/Indicators
7
9
11
10
2 3 4
6
8
15
1. (POWER)Button (→page12, 24)
2. POWERIndicator (→page11, 12, 24, 115)
3. STATUS Indicator (→page115)
4. LIGHTIndicator (→page115)
5. ECOButton (→page28)
6. SOURCEButton (→page14)
7. AUTOADJ.Button (→page23)
8. MENUButton (→page37)
9. ▲▼◀▶/VolumeButtons◀▶/KeystoneButtons (→page13, 21, 23, 37)
10.ENTERButton (→page37)
11.EXITButton (→page37)
7
1. Introduction
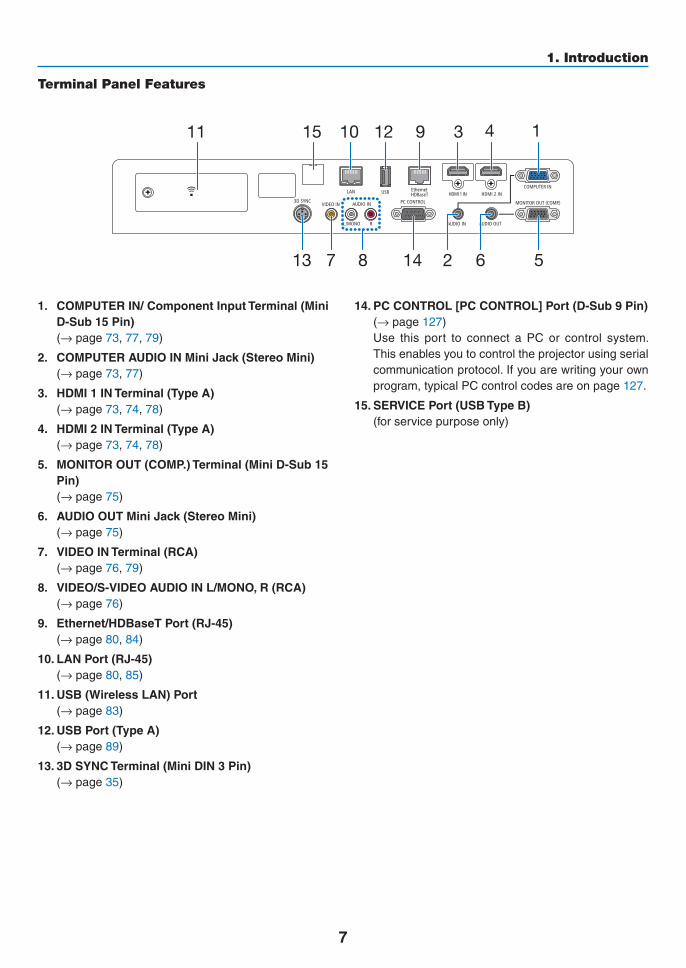
Terminal Panel Features
1. COMPUTERIN/ComponentInputTerminal(MiniD-Sub15Pin)
(→page73, 77, 79)
2. COMPUTERAUDIOINMiniJack(StereoMini) (→page73, 77)
3. HDMI1INTerminal(TypeA) (→page73, 74, 78)
4. HDMI2INTerminal(TypeA) (→page73, 74, 78)
5. MONITOROUT(COMP.)Terminal(MiniD-Sub15Pin)
(→page75)
6. AUDIOOUTMiniJack(StereoMini) (→page75)
7. VIDEOINTerminal(RCA) (→page76, 79)
8. VIDEO/S-VIDEOAUDIOINL/MONO,R(RCA) (→page76)
9. Ethernet/HDBaseTPort(RJ-45) (→page80, 84)
10.LANPort(RJ-45) (→page80, 85)
11.USB(WirelessLAN)Port (→page83)
12.USBPort(TypeA) (→page89)
13.3DSYNCTerminal(MiniDIN3Pin) (→page35)
14.PCCONTROL[PCCONTROL]Port(D-Sub9Pin) (→page127) Use this port to connect a PC or control system.
Thisenablesyoutocontroltheprojectorusingserialcommunicationprotocol.Ifyouarewritingyourownprogram,typicalPCcontrolcodesareonpage127.
15.SERVICEPort(USBTypeB) (forservicepurposeonly)
14
2 6
39121011
8713 14 5
15
8
1. Introduction
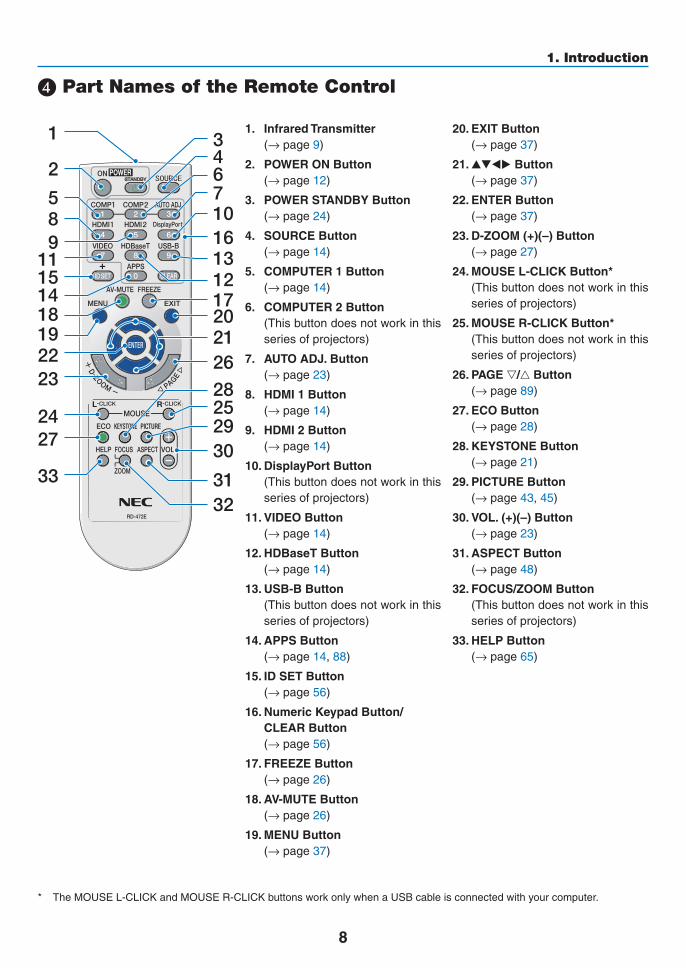
❹ Part Names of the Remote Control
+
3467
1
2
1016
171514
9
58
13
30
3132
20212628
292524
2322
27
33
1918
1211
1. InfraredTransmitter (→page9)
2. POWERONButton (→page12)
3. POWERSTANDBYButton (→page24)
4. SOURCEButton (→page14)
5. COMPUTER1Button (→page14)
6. COMPUTER2Button (Thisbuttondoesnotworkinthis
seriesofprojectors)
7. AUTOADJ.Button (→page23)
8. HDMI1Button (→page14)
9. HDMI2Button (→page14)
10.DisplayPortButton (Thisbuttondoesnotworkinthis
seriesofprojectors)
11.VIDEOButton (→page14)
12.HDBaseTButton (→page14)
13.USB-BButton (Thisbuttondoesnotworkinthis
seriesofprojectors)
14.APPSButton (→page14, 88)
15.IDSETButton (→page56)
16.NumericKeypadButton/CLEARButton
(→page56)
17.FREEZEButton (→page26)
18.AV-MUTEButton (→page26)
19.MENUButton (→page37)
20.EXITButton (→page37)
21. ▲▼◀▶Button (→page37)
22.ENTERButton (→page37)
23.D-ZOOM(+)(–)Button (→page27)
24.MOUSEL-CLICKButton* (Thisbuttondoesnotworkinthis
seriesofprojectors)
25.MOUSER-CLICKButton* (Thisbuttondoesnotworkinthis
seriesofprojectors)
26.PAGE▽/△Button (→page89)
27.ECOButton (→page28)
28.KEYSTONEButton (→page21)
29.PICTUREButton (→page43, 45)
30.VOL.(+)(–)Button (→page23)
31.ASPECTButton (→page48)
32.FOCUS/ZOOMButton (Thisbuttondoesnotworkinthis
seriesofprojectors)
33.HELPButton (→page65)
* TheMOUSEL-CLICKandMOUSER-CLICKbuttonsworkonlywhenaUSBcableisconnectedwithyourcomputer.
9
1. Introduction
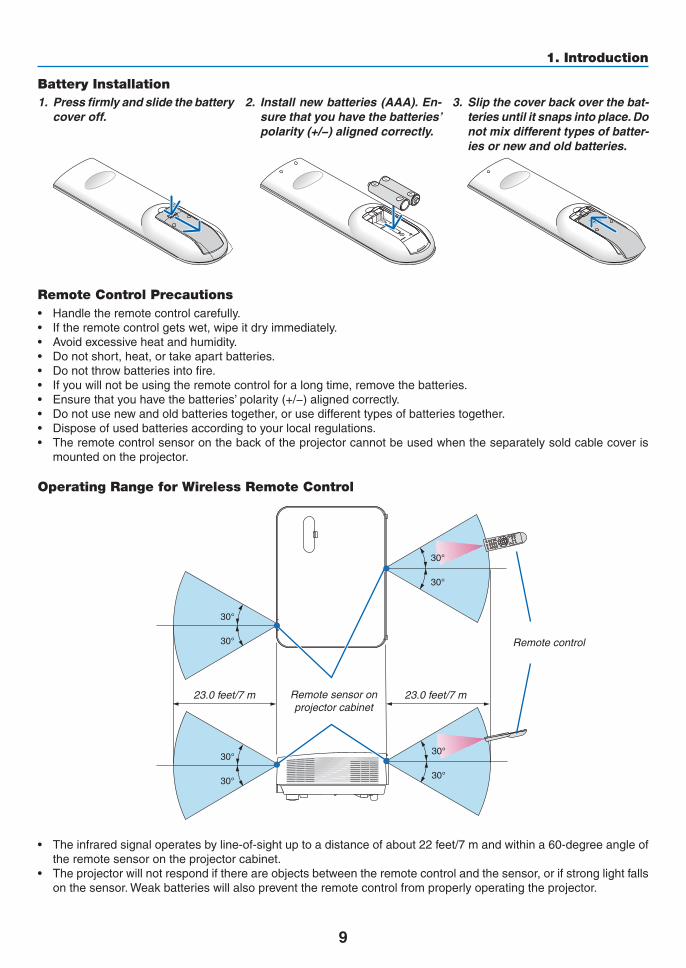
Battery Installation1. Press firmly and slide the battery
cover off.2. Install new batteries (AAA). En-
sure that you have the batteries’ polarity (+/−) aligned correctly.
3. Slip the cover back over the bat-teries until it snaps into place. Do not mix different types of batter-ies or new and old batteries.
OPEN
OPEN
Remote Control Precautions• Handletheremotecontrolcarefully.• Iftheremotecontrolgetswet,wipeitdryimmediately.• Avoidexcessiveheatandhumidity.• Donotshort,heat,ortakeapartbatteries.• Donotthrowbatteriesintofire.• Ifyouwillnotbeusingtheremotecontrolforalongtime,removethebatteries.• Ensurethatyouhavethebatteries’polarity(+/−)alignedcorrectly.• Donotusenewandoldbatteriestogether,orusedifferenttypesofbatteriestogether.• Disposeofusedbatteriesaccordingtoyourlocalregulations.• Theremotecontrolsensoronthebackoftheprojectorcannotbeusedwhentheseparatelysoldcablecoveris
mounted on the projector.
Operating Range for Wireless Remote Control
30°
30°
30°
30°
30°
30°
30°
30°
23.0 feet/7 m23.0 feet/7 m Remote sensor on projector cabinet
Remote control
• Theinfraredsignaloperatesbyline-of-sightuptoadistanceofabout22feet/7mandwithina60-degreeangleofthe remote sensor on the projector cabinet.
• Theprojectorwillnotrespondifthereareobjectsbetweentheremotecontrolandthesensor,orifstronglightfallsonthesensor.Weakbatterieswillalsopreventtheremotecontrolfromproperlyoperatingtheprojector.
10
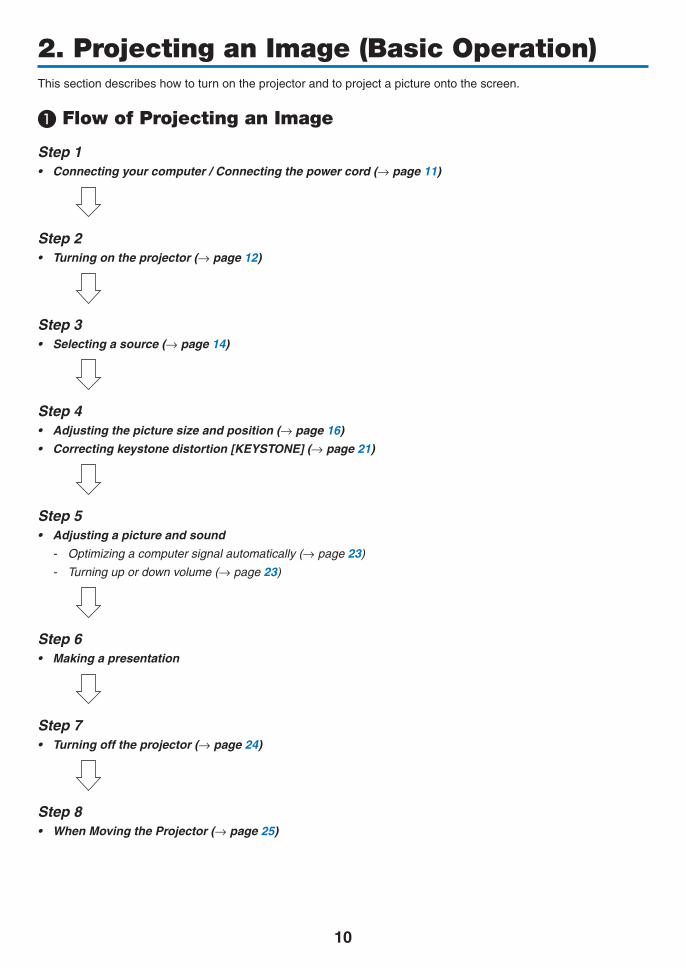
Thissectiondescribeshowtoturnontheprojectorandtoprojectapictureontothescreen.
❶ Flow of Projecting an Image
Step 1• Connectingyourcomputer/Connectingthepowercord(→ page 11)
Step 2 • Turningontheprojector(→ page 12)
Step 3 • Selectingasource(→ page 14)
Step 4• Adjustingthepicturesizeandposition(→ page 16)
• Correctingkeystonedistortion[KEYSTONE](→ page 21)
Step 5• Adjustingapictureandsound
- Optimizing a computer signal automatically (→ page 23)
- Turning up or down volume (→ page 23)
Step 6• Makingapresentation
Step 7• Turningofftheprojector(→ page 24)
Step 8• WhenMovingtheProjector(→ page 25)
2. Projecting an Image (Basic Operation)
11
2. Projecting an Image (Basic Operation)
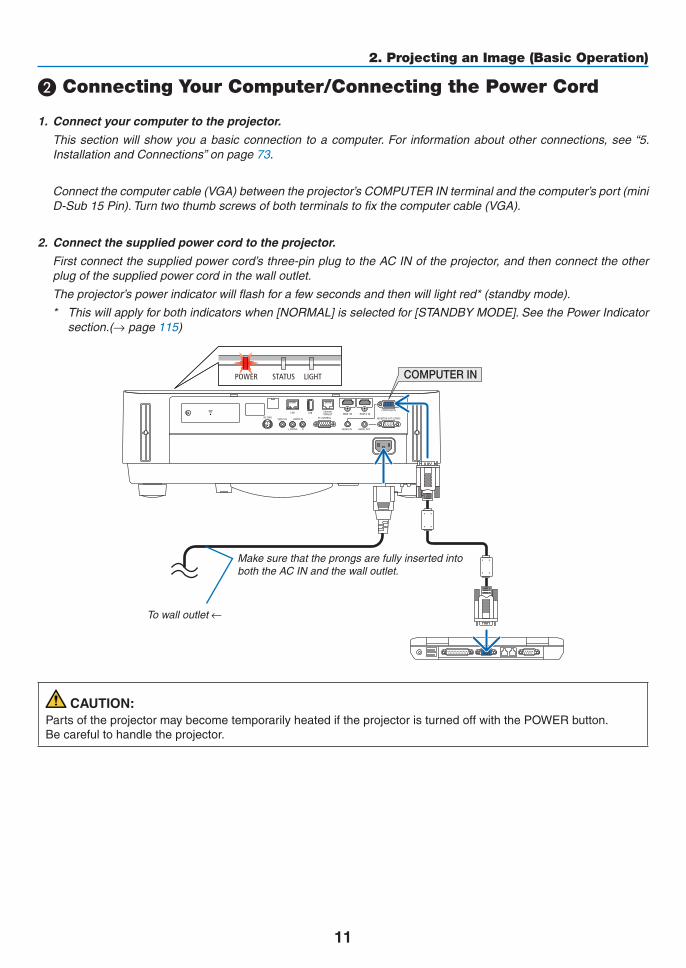
❷ Connecting Your Computer/Connecting the Power Cord
1. Connectyourcomputertotheprojector.
This section will show you a basic connection to a computer. For information about other connections, see “5. InstallationandConnections”onpage73.
Connectthecomputercable(VGA)betweentheprojector’sCOMPUTERINterminalandthecomputer’sport(miniD-Sub 15 Pin). Turn two thumb screws of both terminals to fix the computer cable (VGA).
2. Connectthesuppliedpowercordtotheprojector.
Firstconnectthesuppliedpowercord’sthree-pinplugtotheACINoftheprojector,andthenconnecttheotherplug of the supplied power cord in the wall outlet.
The projector’s power indicator will flash for a few seconds and then will light red* (standby mode).
* Thiswillapplyforbothindicatorswhen[NORMAL]isselectedfor[STANDBYMODE].SeethePowerIndicatorsection.(→ page 115)
COMPUTER IN
MakesurethattheprongsarefullyinsertedintoboththeACINandthewalloutlet.
To wall outlet ←
CAUTION:PartsoftheprojectormaybecometemporarilyheatediftheprojectoristurnedoffwiththePOWERbutton.Becarefultohandletheprojector.
12
2. Projecting an Image (Basic Operation)
❸ Turning on the Projector
WARNING
Theprojectorproducesastronglight.Whenturningonthepower,makesurenoonewithinprojectionrangeislookingatthelens.
1. Remove the lens cap.
With the lens cap’s stopper pressed up, pull forward and off.
Stopper
2. Press the (POWER) button on the projector cabinet or the POWER ON button on the remote control.
The POWER indicator lights blue and the image is projected on the screen.
TIP:• Whenthemessage“PROJECTORISLOCKED!ENTERYOUR
PASSWORD.” is displayed, it means that the [SECURITY]featureisturnedon.(→page38)
After you turn on your projector, ensure that the computer or video source is turned on.
NOTE:Whenno inputsignal ispresent, theno-signalguidance isdisplayed(factorymenusetting).
Standby Blinking Power On
Steady red light Blinking blue light
Steady blue light
(→page115)
13
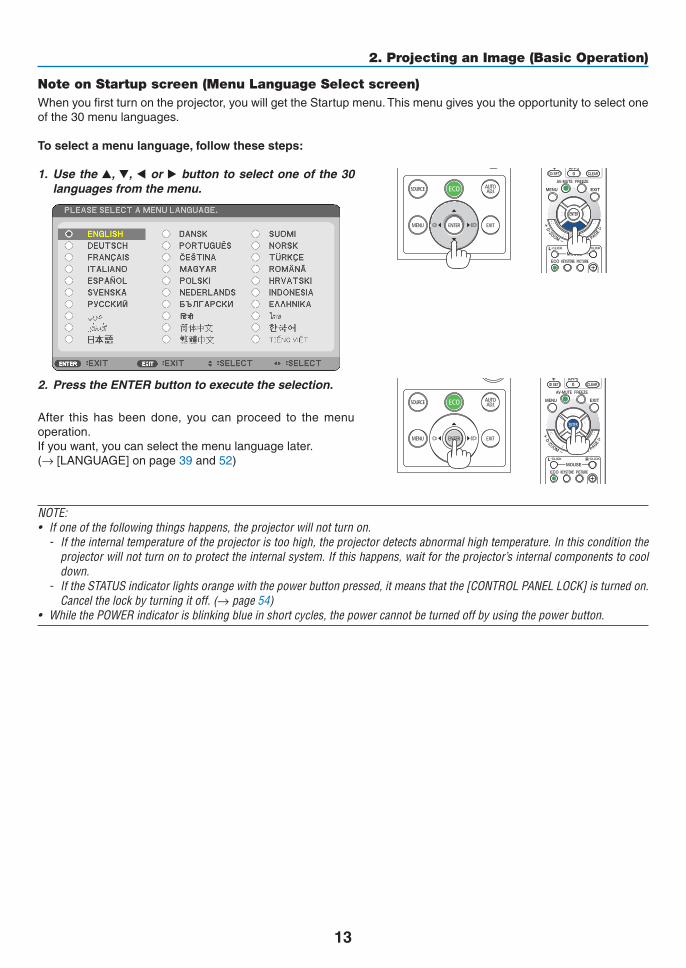
2. Projecting an Image (Basic Operation)
Note on Startup screen (Menu Language Select screen)Whenyoufirstturnontheprojector,youwillgettheStartupmenu.Thismenugivesyoutheopportunitytoselectoneofthe30menulanguages.
Toselectamenulanguage,followthesesteps:
1. Use the ▲, ▼, ◀ or ▶ button to select one of the 30 languages from the menu.
2. Press the ENTER button to execute the selection.
After this has been done, you can proceed to the menuoperation.Ifyouwant,youcanselectthemenulanguagelater.(→[LANGUAGE]onpage39 and 52)
NOTE:• Ifoneofthefollowingthingshappens,theprojectorwillnotturnon.
- Iftheinternaltemperatureoftheprojectoristoohigh,theprojectordetectsabnormalhightemperature.Inthisconditiontheprojectorwillnotturnontoprotecttheinternalsystem.Ifthishappens,waitfortheprojector’sinternalcomponentstocooldown.
- IftheSTATUSindicatorlightsorangewiththepowerbuttonpressed,itmeansthatthe[CONTROLPANELLOCK]isturnedon.Cancelthelockbyturningitoff.(→page54)
• WhilethePOWERindicatorisblinkingblueinshortcycles,thepowercannotbeturnedoffbyusingthepowerbutton.
14
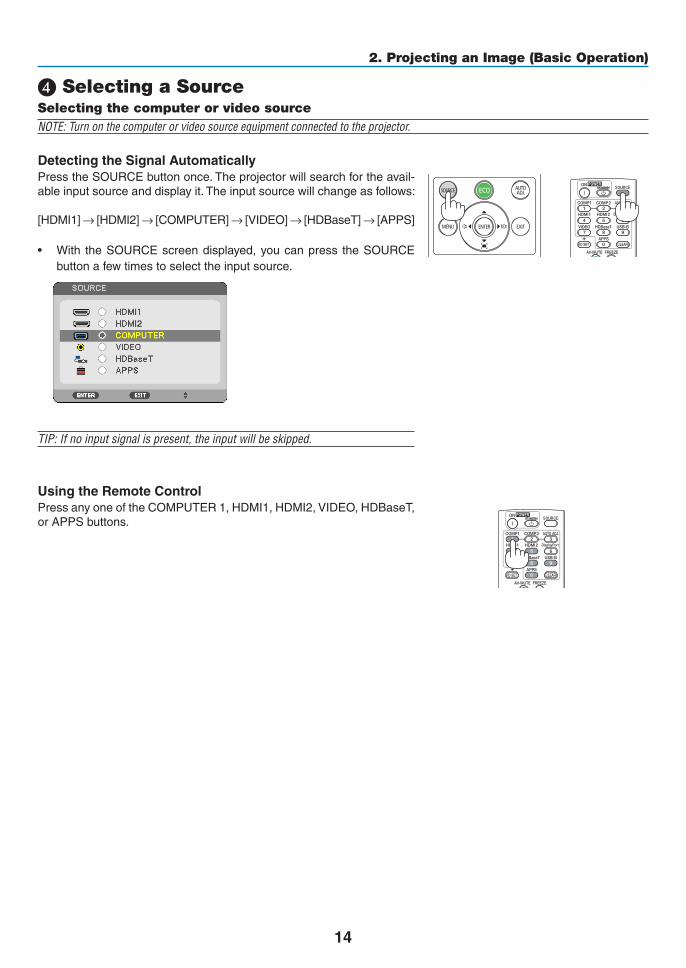
2. Projecting an Image (Basic Operation)
❹ Selecting a SourceSelecting the computer or video sourceNOTE:Turnonthecomputerorvideosourceequipmentconnectedtotheprojector.
Detecting the Signal AutomaticallyPresstheSOURCEbuttononce.Theprojectorwillsearchfortheavail-ableinputsourceanddisplayit.Theinputsourcewillchangeasfollows:
[HDMI1]→[HDMI2]→[COMPUTER]→[VIDEO]→[HDBaseT]→[APPS]
• With theSOURCEscreendisplayed,youcanpress theSOURCEbutton a few times to select the input source.
TIP:Ifnoinputsignalispresent,theinputwillbeskipped.
Using the Remote ControlPressanyoneoftheCOMPUTER1,HDMI1,HDMI2,VIDEO,HDBaseT,orAPPSbuttons.
15
2. Projecting an Image (Basic Operation)
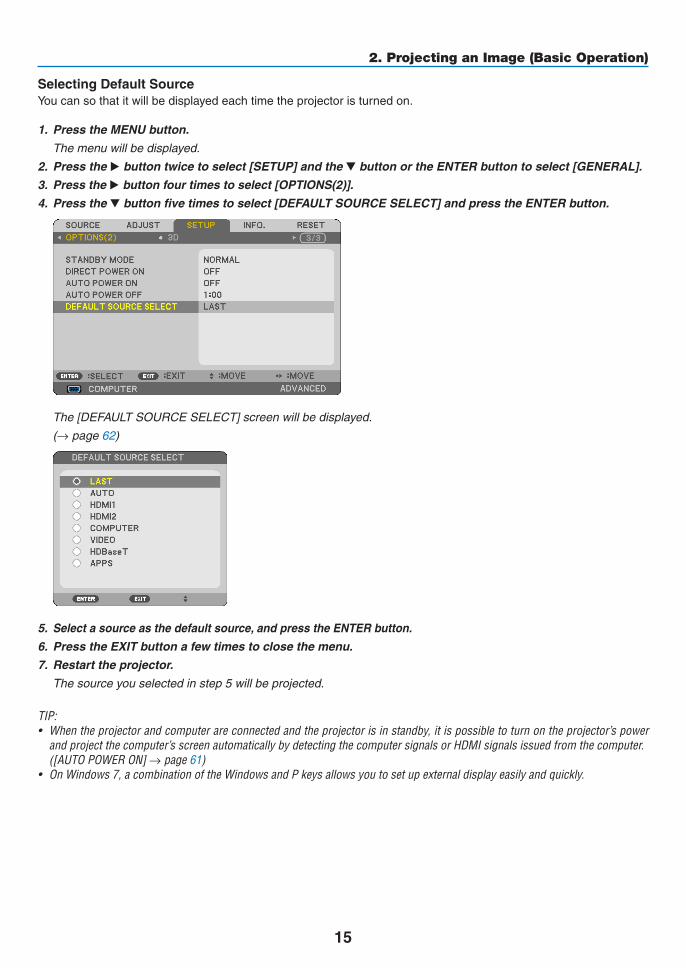
SelectingDefaultSourceYoucansothatitwillbedisplayedeachtimetheprojectoristurnedon.
1. Press the MENU button.
The menu will be displayed.
2. Press the ▶buttontwicetoselect[SETUP]andthe▼buttonortheENTERbuttontoselect[GENERAL].
3. Press the ▶buttonfourtimestoselect[OPTIONS(2)].
4. Press the ▼buttonfivetimestoselect[DEFAULTSOURCESELECT]andpresstheENTERbutton.
The [DEFAULT SOURCE SELECT] screen will be displayed.
(→ page 62)
5. Select a source as the default source, and press the ENTER button.
6. Press the EXIT button a few times to close the menu.
7. Restart the projector.
The source you selected in step 5 will be projected.
TIP:• Whentheprojectorandcomputerareconnectedandtheprojectorisinstandby,itispossibletoturnontheprojector’spower
andprojectthecomputer’sscreenautomaticallybydetectingthecomputersignalsorHDMIsignalsissuedfromthecomputer. ([AUTOPOWERON]→page61)• OnWindows7,acombinationoftheWindowsandPkeysallowsyoutosetupexternaldisplayeasilyandquickly.
16
2. Projecting an Image (Basic Operation)
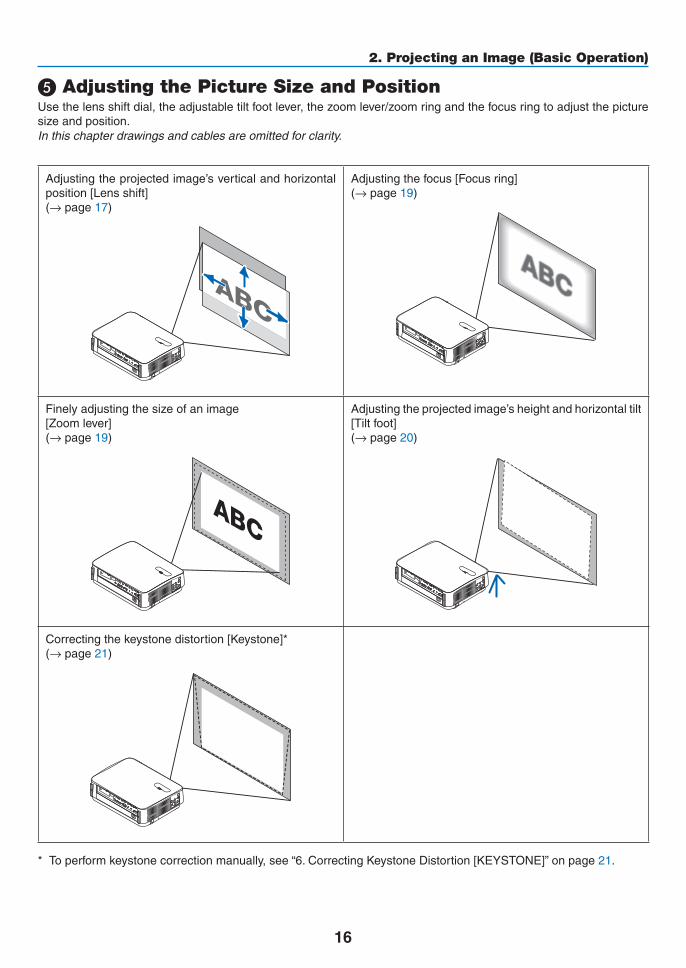
❺ Adjusting the Picture Size and PositionUsethelensshiftdial,theadjustabletiltfootlever,thezoomlever/zoomringandthefocusringtoadjustthepicturesizeandposition.Inthischapterdrawingsandcablesareomittedforclarity.
Adjustingtheprojectedimage’sverticalandhorizontalposition[Lensshift](→page17)
Adjustingthefocus[Focusring](→page19)
Finelyadjustingthesizeofanimage[Zoomlever](→page19)
Adjustingtheprojectedimage’sheightandhorizontaltilt[Tiltfoot](→page20)
Correctingthekeystonedistortion[Keystone]*(→page21)
* Toperformkeystonecorrectionmanually,see“6.CorrectingKeystoneDistortion[KEYSTONE]”onpage21.
17
2. Projecting an Image (Basic Operation)
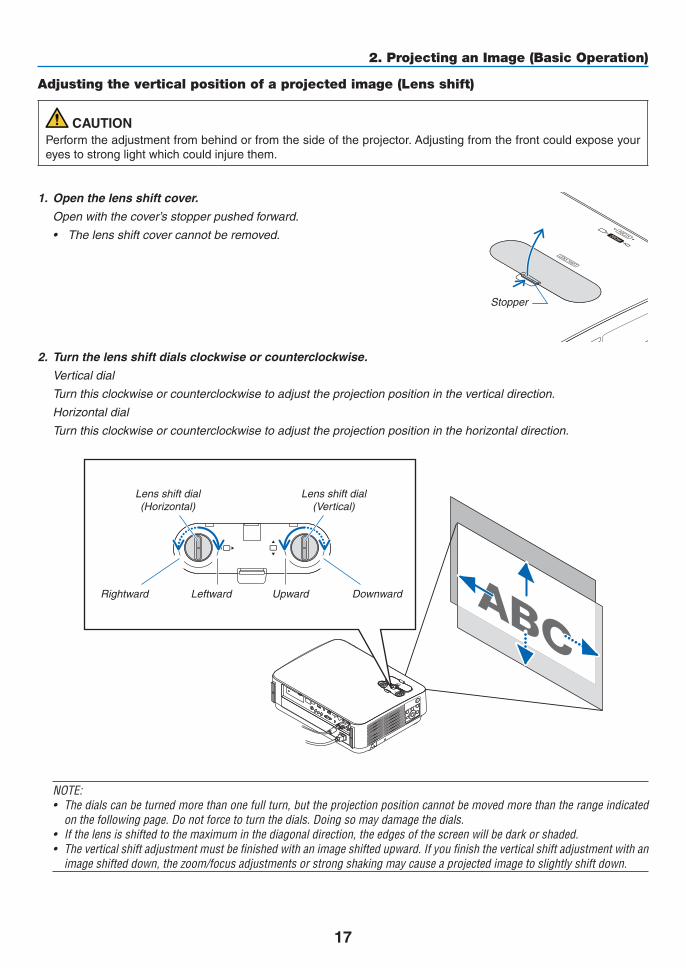
Adjusting the vertical position of a projected image (Lens shift)
CAUTIONPerformtheadjustmentfrombehindorfromthesideoftheprojector.Adjustingfromthefrontcouldexposeyoureyestostronglightwhichcouldinjurethem.
1. Open the lens shift cover.
Open with the cover’s stopper pushed forward.
• Thelensshiftcovercannotberemoved.
Stopper
2. Turn the lens shift dials clockwise or counterclockwise.
Vertical dial
Turnthisclockwiseorcounterclockwisetoadjusttheprojectionpositionintheverticaldirection.
Horizontal dial
Turnthisclockwiseorcounterclockwisetoadjusttheprojectionpositioninthehorizontaldirection.
Lens shift dial (Horizontal)
Lens shift dial (Vertical)
DownwardLeftward UpwardRightward
NOTE:• Thedialscanbeturnedmorethanonefullturn,buttheprojectionpositioncannotbemovedmorethantherangeindicated
onthefollowingpage.Donotforcetoturnthedials.Doingsomaydamagethedials.• Ifthelensisshiftedtothemaximuminthediagonaldirection,theedgesofthescreenwillbedarkorshaded.• Theverticalshiftadjustmentmustbefinishedwithanimageshiftedupward.Ifyoufinishtheverticalshiftadjustmentwithan
imageshifteddown,thezoom/focusadjustmentsorstrongshakingmaycauseaprojectedimagetoslightlyshiftdown.
18
2. Projecting an Image (Basic Operation)
3. Closethelensshiftcover.
Insertthecover’s2(two)hooksintothegroovesintheprojector,thenclose the cover.
Hook
Groove
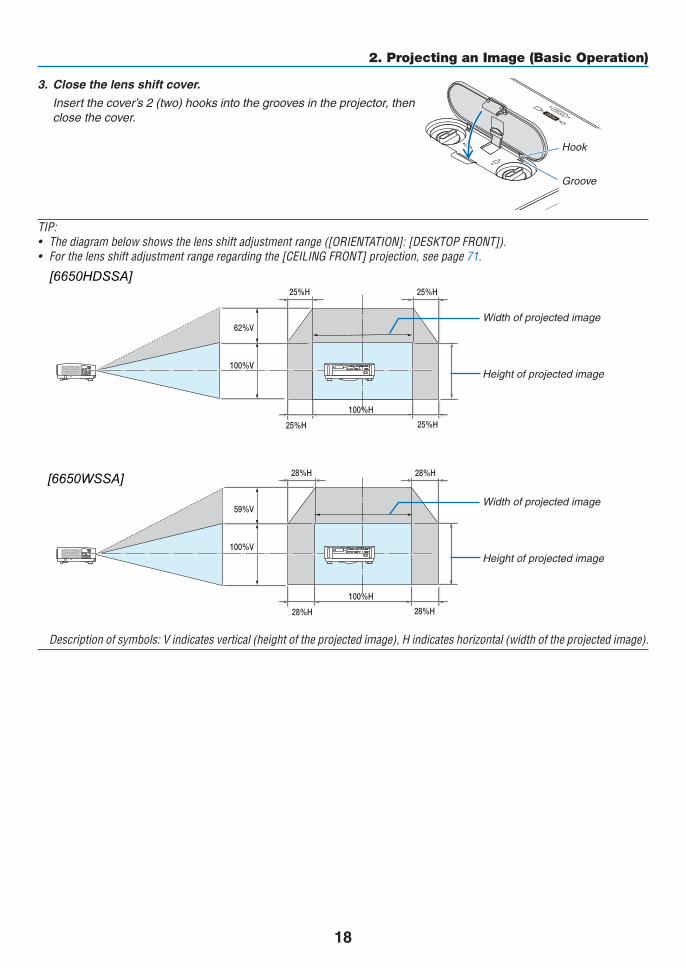
TIP:• Thediagrambelowshowsthelensshiftadjustmentrange([ORIENTATION]:[DESKTOPFRONT]).• Forthelensshiftadjustmentrangeregardingthe[CEILINGFRONT]projection,seepage71.
100%V
62%V
100%H
25%H 25%H
25%H 25%H
Height of projected image
Width of projected image
100%V
59%V
100%H
28%H 28%H
28%H 28%H
Height of projected image
Width of projected image
Descriptionofsymbols:Vindicatesvertical(heightoftheprojectedimage),Hindicateshorizontal(widthoftheprojectedimage).
[6650WSSA]
[6650HDSSA]
19
2. Projecting an Image (Basic Operation)
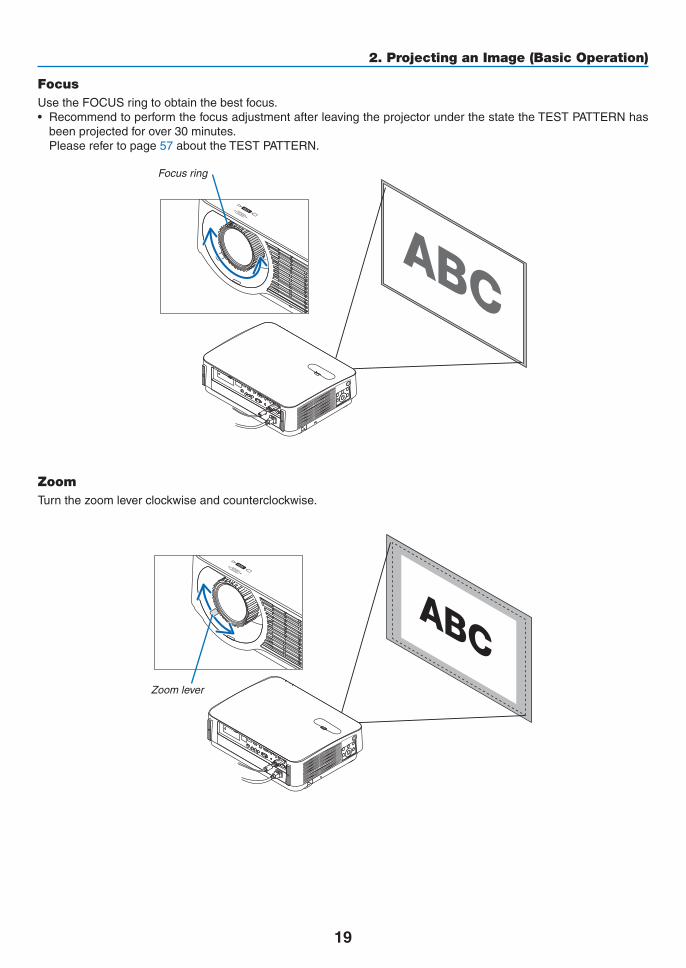
FocusUsetheFOCUSringtoobtainthebestfocus.• RecommendtoperformthefocusadjustmentafterleavingtheprojectorunderthestatetheTESTPATTERNhas
beenprojectedforover30minutes. Pleaserefertopage57abouttheTESTPATTERN.
Focus ring
ZoomTurnthezoomleverclockwiseandcounterclockwise.
Zoom lever
20
2. Projecting an Image (Basic Operation)
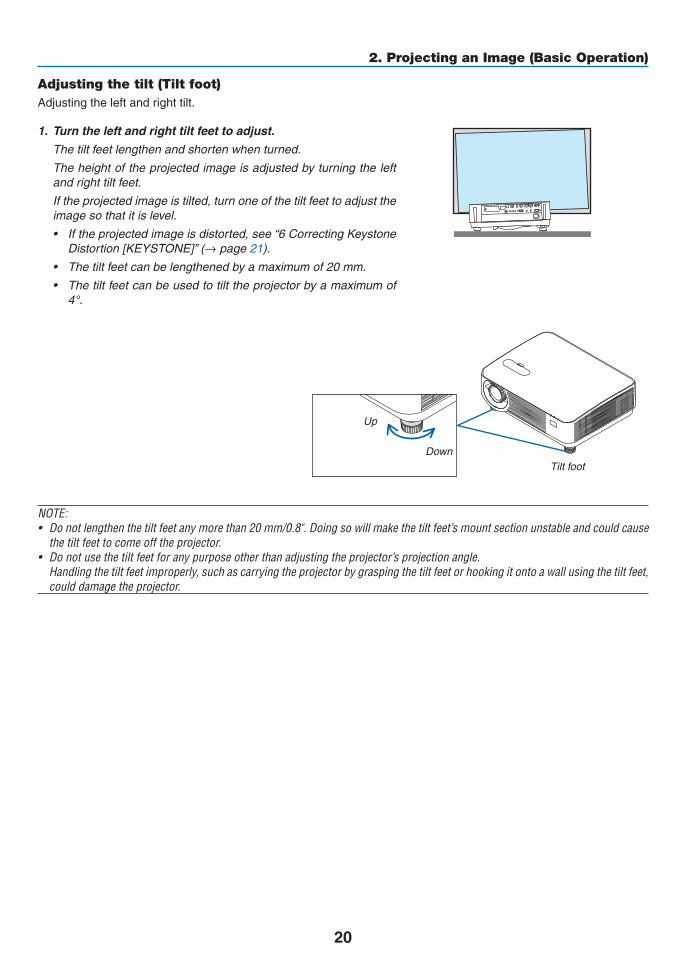
Adjusting the tilt (Tilt foot)Adjustingtheleftandrighttilt.
1. Turn the left and right tilt feet to adjust.
The tilt feet lengthen and shorten when turned.
The height of the projected image is adjusted by turning the left and right tilt feet.
Iftheprojectedimageistilted,turnoneofthetiltfeettoadjusttheimage so that it is level.
• Iftheprojectedimageisdistorted,see“6CorrectingKeystoneDistortion[KEYSTONE]”(→ page 21).
• Thetiltfeetcanbelengthenedbyamaximumof20mm.
• Thetiltfeetcanbeusedtotilttheprojectorbyamaximumof4°.
Up
DownTilt foot
NOTE:• Donotlengthenthetiltfeetanymorethan20mm/0.8".Doingsowillmakethetiltfeet’smountsectionunstableandcouldcause
thetiltfeettocomeofftheprojector.• Donotusethetiltfeetforanypurposeotherthanadjustingtheprojector’sprojectionangle. Handlingthetiltfeetimproperly,suchascarryingtheprojectorbygraspingthetiltfeetorhookingitontoawallusingthetiltfeet,
coulddamagetheprojector.
21
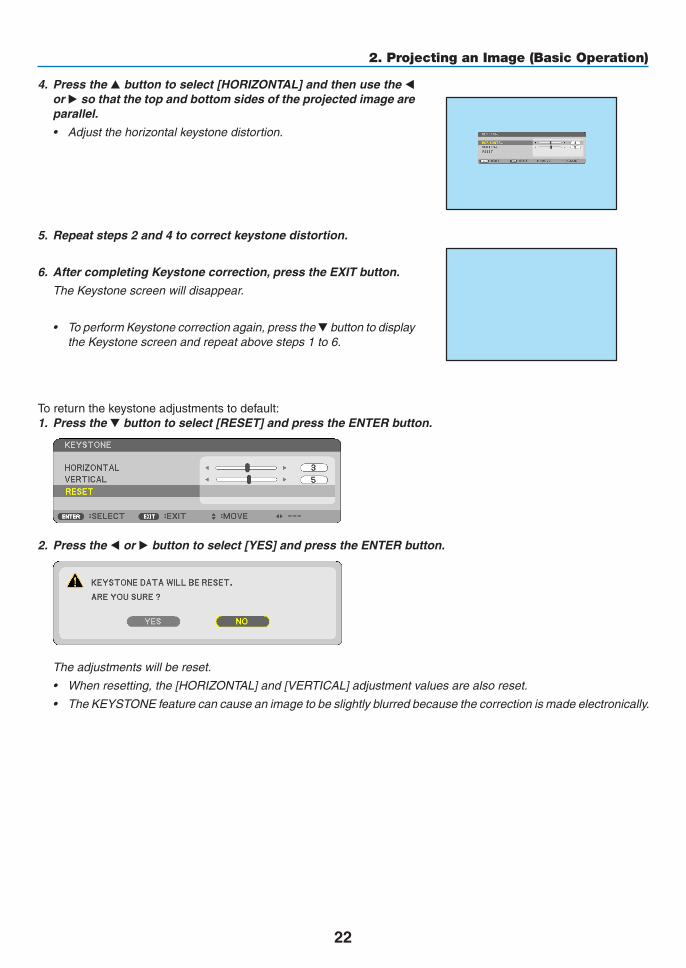
2. Projecting an Image (Basic Operation)
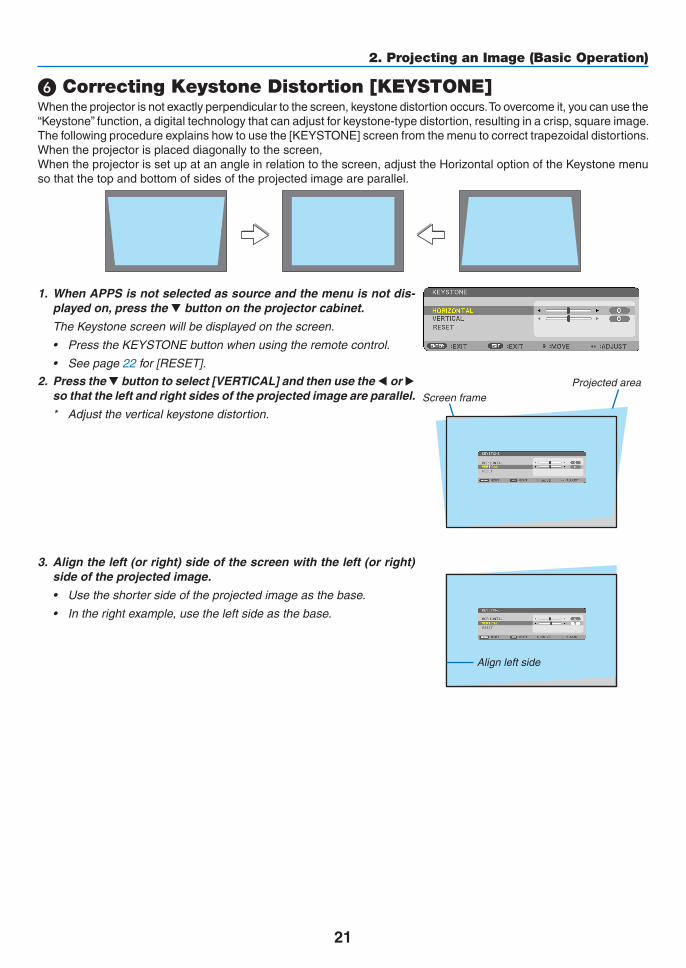
❻ Correcting Keystone Distortion [KEYSTONE]Whentheprojectorisnotexactlyperpendiculartothescreen,keystonedistortionoccurs.Toovercomeit,youcanusethe“Keystone”function,adigitaltechnologythatcanadjustforkeystone-typedistortion,resultinginacrisp,squareimage.Thefollowingprocedureexplainshowtousethe[KEYSTONE]screenfromthemenutocorrecttrapezoidaldistortions.Whentheprojectorisplaceddiagonallytothescreen,Whentheprojectorissetupatanangleinrelationtothescreen,adjusttheHorizontaloptionoftheKeystonemenusothatthetopandbottomofsidesoftheprojectedimageareparallel.
1. When APPS is not selected as source and the menu is not dis-played on, press the ▼ button on the projector cabinet.
The Keystone screen will be displayed on the screen.
• PresstheKEYSTONEbuttonwhenusingtheremotecontrol.
• Seepage22 for [RESET].
2. Press the ▼buttontoselect[VERTICAL]andthenusethe◀ or ▶ so that the left and right sides of the projected image are parallel.
* Adjusttheverticalkeystonedistortion.
Projected areaScreen frame
3. Align the left (or right) side of the screen with the left (or right) side of the projected image.
• Usetheshortersideoftheprojectedimageasthebase.
• Intherightexample,usetheleftsideasthebase.
Align left side
22
2. Projecting an Image (Basic Operation)
4. Press the ▲buttontoselect[HORIZONTAL]andthenusethe◀ or ▶ so that the top and bottom sides of the projected image are parallel.
• Adjustthehorizontalkeystonedistortion.
5. Repeat steps 2 and 4 to correct keystone distortion.
6. AftercompletingKeystonecorrection,presstheEXITbutton.
The Keystone screen will disappear.
• ToperformKeystonecorrectionagain,pressthe▼ button to display the Keystone screen and repeat above steps 1 to 6.
Toreturnthekeystoneadjustmentstodefault:1. Press the ▼buttontoselect[RESET]andpresstheENTERbutton.
2. Press the ◀ or ▶buttontoselect[YES]andpresstheENTERbutton.
The adjustments will be reset.
• Whenresetting,the[HORIZONTAL]and[VERTICAL]adjustmentvaluesarealsoreset.
• TheKEYSTONEfeaturecancauseanimagetobeslightlyblurredbecausethecorrectionismadeelectronically.
23
2. Projecting an Image (Basic Operation)
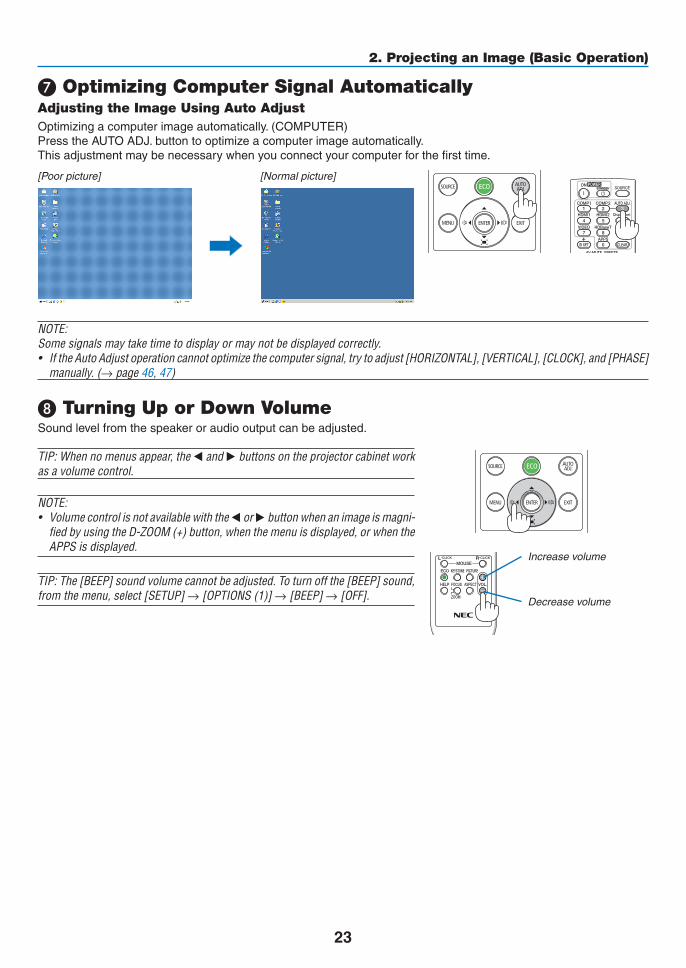
❼ Optimizing Computer Signal AutomaticallyAdjusting the Image Using Auto AdjustOptimizingacomputerimageautomatically.(COMPUTER)PresstheAUTOADJ.buttontooptimizeacomputerimageautomatically.Thisadjustmentmaybenecessarywhenyouconnectyourcomputerforthefirsttime.
[Poor picture] [Normal picture]
NOTE:Somesignalsmaytaketimetodisplayormaynotbedisplayedcorrectly.• IftheAutoAdjustoperationcannotoptimizethecomputersignal,trytoadjust[HORIZONTAL],[VERTICAL],[CLOCK],and[PHASE]
manually.(→page46,47)
❽ Turning Up or Down VolumeSoundlevelfromthespeakeroraudiooutputcanbeadjusted.
TIP:Whennomenusappear,the◀and▶buttonsontheprojectorcabinetworkasavolumecontrol.
NOTE:• Volumecontrolisnotavailablewiththe◀or▶buttonwhenanimageismagni-
fiedbyusingtheD-ZOOM(+)button,whenthemenuisdisplayed,orwhentheAPPSisdisplayed.
TIP:The[BEEP]soundvolumecannotbeadjusted.Toturnoffthe[BEEP]sound,fromthemenu,select[SETUP]→[OPTIONS(1)]→[BEEP]→[OFF].
Increasevolume
Decrease volume
24
2. Projecting an Image (Basic Operation)
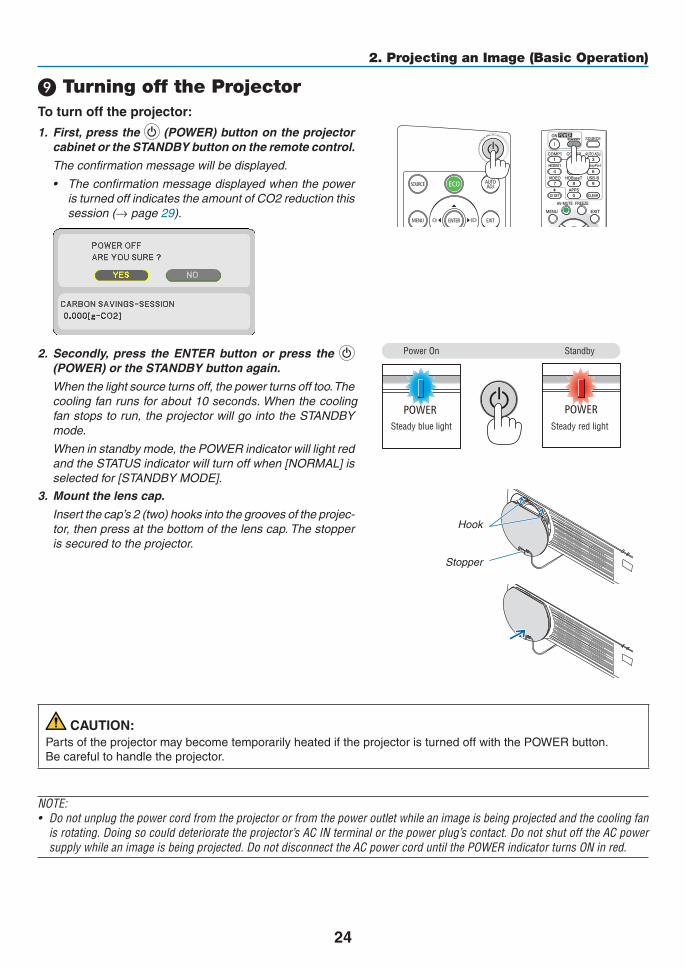
❾ Turning off the ProjectorToturnofftheprojector:
1. First, press the (POWER) button on the projector cabinet or the STANDBY button on the remote control.
The confirmation message will be displayed.
• Theconfirmationmessagedisplayedwhenthepoweris turned off indicates the amount of CO2 reduction this session (→ page 29).
2. Secondly, press the ENTER button or press the (POWER) or the STANDBY button again.
When the light source turns off, the power turns off too. The cooling fan runs for about 10 seconds. When the cooling fan stops to run, the projector will go into the STANDBY mode.
When in standby mode, the POWER indicator will light red and the STATUS indicator will turn off when [NORMAL] is selected for [STANDBY MODE].
Power On
Steady blue light
Standby
Steady red light
3. Mount the lens cap.
Insertthecap’s2(two)hooksintothegroovesoftheprojec-tor, then press at the bottom of the lens cap. The stopper is secured to the projector.
Hook
Stopper
CAUTION:PartsoftheprojectormaybecometemporarilyheatediftheprojectoristurnedoffwiththePOWERbutton.Becarefultohandletheprojector.
NOTE:• Donotunplugthepowercordfromtheprojectororfromthepoweroutletwhileanimageisbeingprojectedandthecoolingfan
isrotating.Doingsocoulddeterioratetheprojector’sACINterminalorthepowerplug’scontact.DonotshutofftheACpowersupplywhileanimageisbeingprojected.DonotdisconnecttheACpowercorduntilthePOWERindicatorturnsONinred.

25
2. Projecting an Image (Basic Operation)
❿ When Moving the ProjectorPreparation:Makesurethattheprojectoristurnedoff.
1. If the separately sold cable cover is mounted, remove it.
(→ page 122)
2. Unplug the power cord.
3. Disconnect any other cables.
• RemovetheUSBmemoryifitisinsertedintotheprojector.

26
❶ Turning off the Image and SoundPresstheAV-MUTEbuttontoturnofftheimageandsoundforashortperiodoftime.Pressagaintorestoretheimageandsound.
NOTE:• Eventhoughtheimageisturnedoff,themenustillremainsonthescreen.
❷ Freezing a PicturePresstheFREEZEbutton.IftheimageofaDVDplayer,etc.,isbe-ingprojected,thevideoswitchestoastillimage.PresstheFREEZEbuttonagaintoresumethevideo.
NOTE:Theimageisfrozenbuttheoriginalvideoisstillplayingback.
3. Convenient Features
27
3. Convenient Features
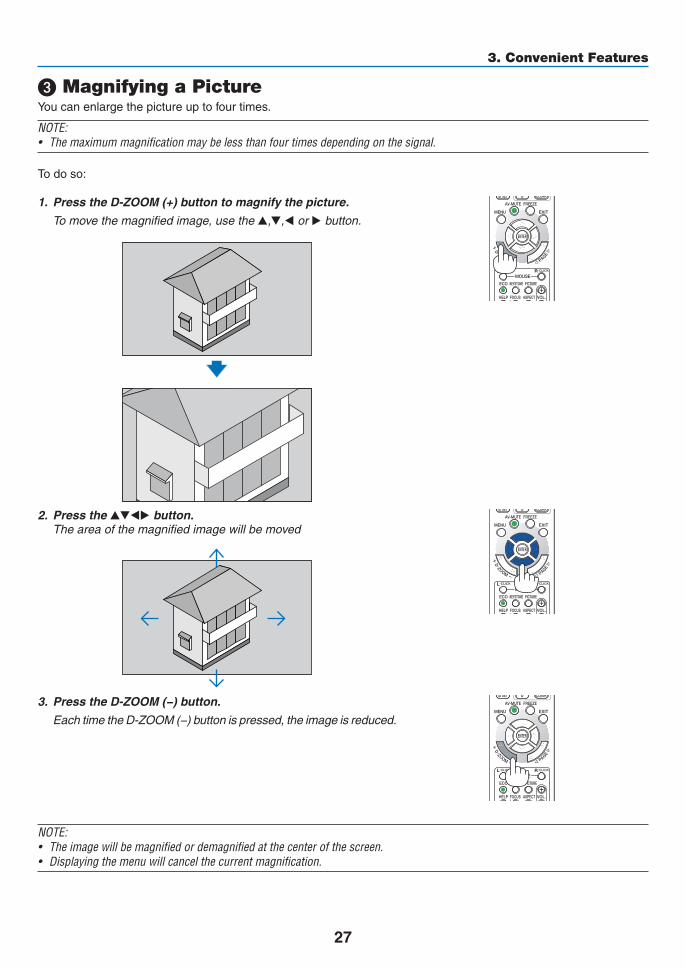
❸ Magnifying a PictureYoucanenlargethepictureuptofourtimes.
NOTE:• Themaximummagnificationmaybelessthanfourtimesdependingonthesignal.
Todoso:
1. PresstheD-ZOOM(+)buttontomagnifythepicture.
To move the magnified image, use the ▲,▼,◀ or ▶ button.
2. Press the ▲▼◀▶ button. The area of the magnified image will be moved
3. PresstheD-ZOOM(−)button.
Each time the D-ZOOM (−) button is pressed, the image is reduced.
NOTE:• Theimagewillbemagnifiedordemagnifiedatthecenterofthescreen.• Displayingthemenuwillcancelthecurrentmagnification.
28
3. Convenient Features
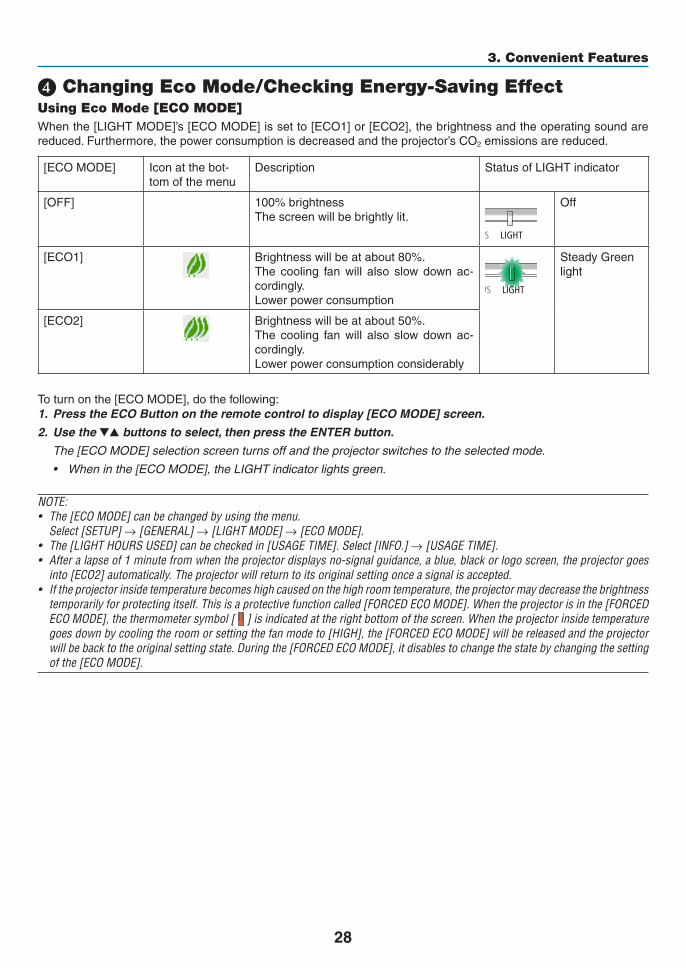
❹ Changing Eco Mode/Checking Energy-Saving Effect Using Eco Mode [ECO MODE]Whenthe[LIGHTMODE]’s[ECOMODE]issetto[ECO1]or[ECO2],thebrightnessandtheoperatingsoundarereduced.Furthermore,thepowerconsumptionisdecreasedandtheprojector’sCO2 emissions are reduced.
[ECOMODE] Iconatthebot-tom of the menu
Description StatusofLIGHTindicator
[OFF] 100%brightnessThescreenwillbebrightlylit.
Off
[ECO1] Brightnesswillbeatabout80%.The cooling fan will also slow down ac-cordingly.Lower power consumption
SteadyGreenlight
[ECO2] Brightnesswillbeatabout50%.The cooling fan will also slow down ac-cordingly.Lower power consumption considerably
Toturnonthe[ECOMODE],dothefollowing:1. PresstheECOButtonontheremotecontroltodisplay[ECOMODE]screen.
2. Use the ▼▲ buttons to select, then press the ENTER button.
The [ECO MODE] selection screen turns off and the projector switches to the selected mode.
• Wheninthe[ECOMODE],theLIGHTindicatorlightsgreen.
NOTE:• The[ECOMODE]canbechangedbyusingthemenu. Select[SETUP]→[GENERAL]→[LIGHTMODE]→[ECOMODE].• The[LIGHTHOURSUSED]canbecheckedin[USAGETIME].Select[INFO.]→[USAGETIME].• Afteralapseof1minutefromwhentheprojectordisplaysno-signalguidance,ablue,blackorlogoscreen,theprojectorgoes
into[ECO2]automatically.Theprojectorwillreturntoitsoriginalsettingonceasignalisaccepted.• Iftheprojectorinsidetemperaturebecomeshighcausedonthehighroomtemperature,theprojectormaydecreasethebrightness
temporarilyforprotectingitself.Thisisaprotectivefunctioncalled[FORCEDECOMODE].Whentheprojectorisinthe[FORCEDECOMODE],thethermometersymbol[ ]isindicatedattherightbottomofthescreen.Whentheprojectorinsidetemperaturegoesdownbycoolingtheroomorsettingthefanmodeto[HIGH],the[FORCEDECOMODE]willbereleasedandtheprojectorwillbebacktotheoriginalsettingstate.Duringthe[FORCEDECOMODE],itdisablestochangethestatebychangingthesettingofthe[ECOMODE].

29
3. Convenient Features
Checking Energy-Saving Effect [CARBON METER]Thisfeaturewillshowenergy-savingeffectintermsofCO2emissionreduction(kg)whentheprojector’s[ECOMODE]issetto[ECO1]or[ECO2].Thisfeatureiscalledas[CARBONMETER].
Therearetwomessages:[TOTALCARBONSAVINGS]and[CARBONSAVINGS-SESSION].The[TOTALCARBONSAVINGS]messageshowsthetotalamountofCO2emissionreductionfromthetimeofshipmentuptonow.Youcanchecktheinformationon[USAGETIME]from[INFO.]ofthemenu.(→page65)
The[CARBONSAVINGS-SESSION]messageshowstheamountofCO2 emission reduction between the time of changingtoECOMODEimmediatelyafterthetimeofpower-onandthetimeofpower-off.The[CARBONSAVINGS-SESSION]messagewillbedisplayedinthe[POWEROFF/AREYOUSURE?]messageatthetimeofpower-off.
TIP:• TheformulaasshownbelowisusedtocalculatetheamountofCO2emissionreduction. AmountofCO2emissionreduction=(Powerconsumptionin[OFF]for[ECOMODE]−Powerconsumptionin[ECO1]/[ECO2]for
[ECOMODE])×CO2conversionfactor.*WhentheimageisturnedoffwiththeAV-MUTEbutton,theamountofCO2emmissionreductionwillalsoincrease.* CalculationforamountofCO2emissionreductionisbasedonanOECDpublication“CO2EmissionsfromFuelCombustion,
2008Edition”.• The[TOTALCARBONSAVINGS]iscalculatedbasedonsavingsrecordedin15minutesintervals.• Thisformulawillnotapplytothepowerconsumptionwhichisnotaffectedbywhether[ECOMODE]isturnedonoroff.
30
3. Convenient Features
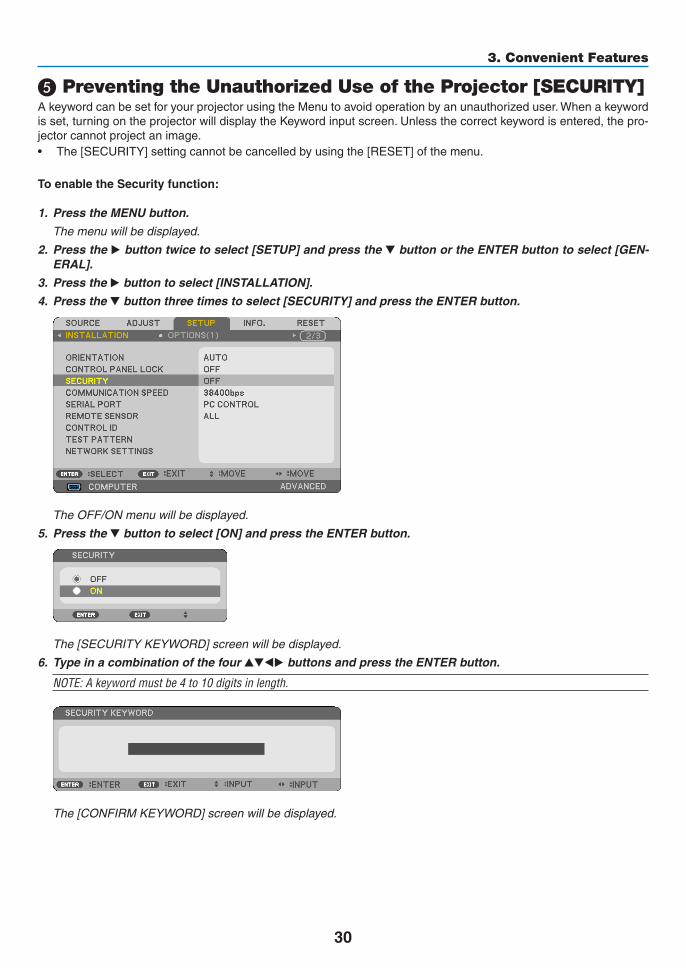
❺ Preventing the Unauthorized Use of the Projector [SECURITY]AkeywordcanbesetforyourprojectorusingtheMenutoavoidoperationbyanunauthorizeduser.Whenakeywordisset,turningontheprojectorwilldisplaytheKeywordinputscreen.Unlessthecorrectkeywordisentered,thepro-jectorcannotprojectanimage.• The[SECURITY]settingcannotbecancelledbyusingthe[RESET]ofthemenu.
ToenabletheSecurityfunction:
1. Press the MENU button.
The menu will be displayed.
2. Press the ▶buttontwicetoselect[SETUP]andpressthe▼buttonortheENTERbuttontoselect[GEN-ERAL].
3. Press the ▶buttontoselect[INSTALLATION].
4. Press the ▼buttonthreetimestoselect[SECURITY]andpresstheENTERbutton.
The OFF/ON menu will be displayed.
5. Press the ▼buttontoselect[ON]andpresstheENTERbutton.
The[SECURITYKEYWORD]screenwillbedisplayed.
6. Type in a combination of the four ▲▼◀▶ buttons and press the ENTER button.
NOTE:Akeywordmustbe4to10digitsinlength.
The[CONFIRMKEYWORD]screenwillbedisplayed.

31
3. Convenient Features
7. Type in the same combination of ▲▼◀▶ buttons and press the ENTER button.
The confirmation screen will be displayed.
8. Select[YES]andpresstheENTERbutton.
TheSECURITYfunctionhasbeenenabled.
Toturnontheprojectorwhen[SECURITY]isenabled:
1. Press the POWER button.
Theprojectorwillbeturnedonanddisplayamessagetotheeffectthattheprojectorislocked.
2. Press the MENU button.
3. Type in the correct keyword and press the ENTER button. The projector will display an image.
NOTE:Thesecuritydisablemodeismaintaineduntilthemainpoweristurnedofforunpluggingthepowercord.
32
3. Convenient Features
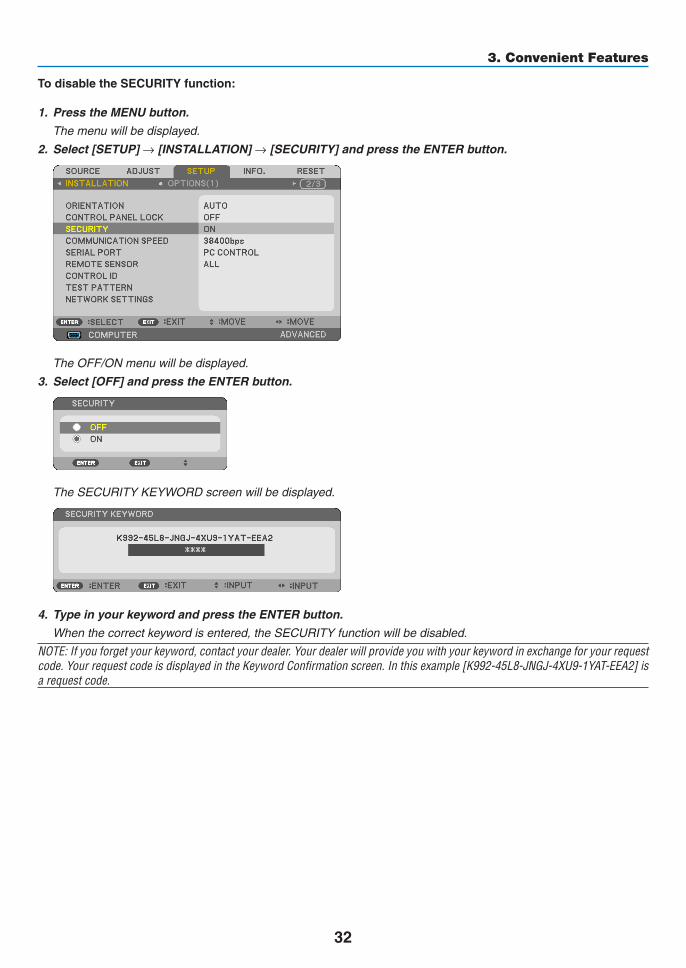
TodisabletheSECURITYfunction:
1. Press the MENU button.
The menu will be displayed.
2.Select[SETUP]→[INSTALLATION]→[SECURITY]andpresstheENTERbutton.
The OFF/ON menu will be displayed.
3. Select[OFF]andpresstheENTERbutton.
TheSECURITYKEYWORDscreenwillbedisplayed.
4. Type in your keyword and press the ENTER button.
Whenthecorrectkeywordisentered,theSECURITYfunctionwillbedisabled.
NOTE:Ifyouforgetyourkeyword,contactyourdealer.Yourdealerwillprovideyouwithyourkeywordinexchangeforyourrequestcode.YourrequestcodeisdisplayedintheKeywordConfirmationscreen.Inthisexample[K992-45L8-JNGJ-4XU9-1YAT-EEA2]isarequestcode.

33
3. Convenient Features
❻ Viewing 3D ImagesTheprojectorprovides3DimagestoauserwearingcommerciallyavailableLCDshuttereyeglasses.
CAUTION
Health precautionsBeforeviewing,besuretoreadhealthcareprecautionsthatmaybefoundintheuser’smanualincludedwithyourLCDshuttereyeglassesoryour3DcompatiblecontentsuchasDVDs,videogames,computer’svideofilesandthelike.Toavoidanyadversesymptoms,heedthefollowing:• DonotuseLCDshuttereyeglassesforviewinganymaterialotherthan3Dimages.• Allowadistanceof2m/7feetorgreaterbetweenthescreenandauser.Viewing3Dimagesfromtooclosea
distance can strain your eyes.• Avoidviewing3Dimagesforaprolongedperiodoftime.Takeabreakof15minutesorlongeraftereveryhour
ofviewing.• Ifyouoranymemberofyourfamilyhasahistoryoflight-sensitiveseizures,consultadoctorbeforeviewing3D
images.• Whileviewing3Dimages,ifyougetsicksuchasnausea,dizziness,queasiness,headache,eyestrain,blurry
vision,convulsions,andnumbness,stopviewingthem.Ifsymptomsstillpersist,consultadoctor.• View3Dimagesfromthefrontofthescreen.Viewingfromananglemaycausefatigueoreyestrain.
LCD shutter eyeglasses (recommended)
• UsecommerciallyavailableDLP®LinkorothermethodcompatibleLCDshuttereyeglasses.
Steps for viewing 3D images on the projector1. Connecttheprojectortoyourvideoequipment.
2. Turnontheprojector,displaytheon-screenmenu,andthenselect[ON]forthe3Dmode.
Fortheoperatingproceduretoturnonthe3Dmode,referto“On-screenmenufor3Dimages”onthefollowingpage.
3. Play your 3D compatible content and use the projector to display the image.
4. PutonyourLCDshuttereyeglassestoview3Dimages.
Also refer to the user’s manual accompanied with your LCD shutter eyeglasses for more information.
On-screenmenufor3DimagesFollowthestepstodisplaythe3Dmenu.1. Press the MENU button.
The on-screen menu will be displayed.
2. Press the ▷ button twice.
The [SETUP] menu will be displayed.
3. Press the ▽ button once, and then press the ▷ button five times.
34
3. Convenient Features
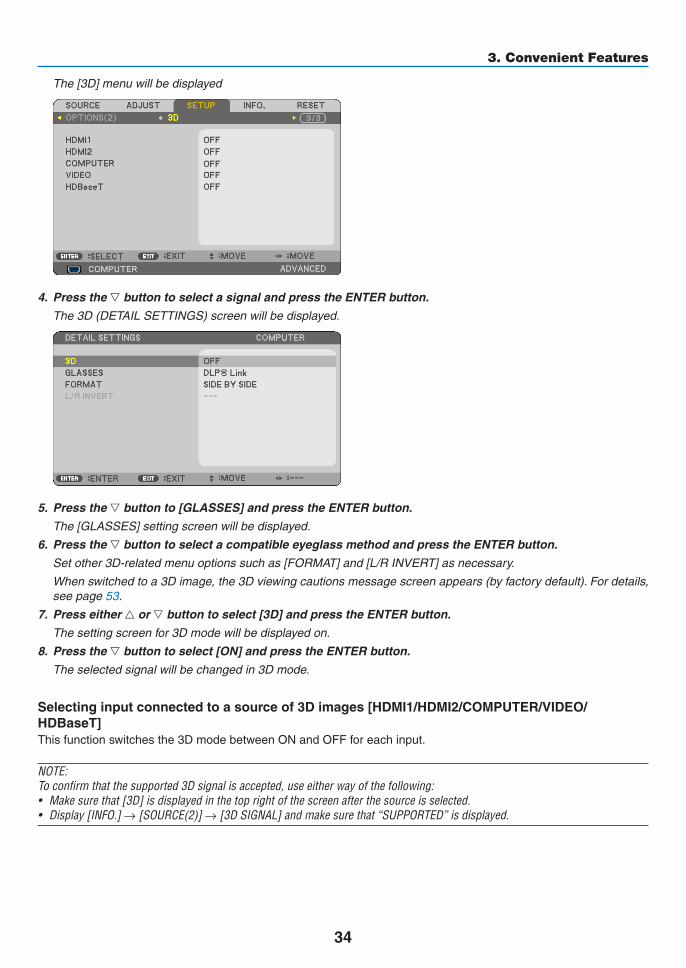
The [3D] menu will be displayed
4. Press the ▽ button to select a signal and press the ENTER button.
The3D(DETAILSETTINGS)screenwillbedisplayed.
5. Press the ▽buttonto[GLASSES]andpresstheENTERbutton.
The [GLASSES] setting screen will be displayed.
6. Press the ▽ button to select a compatible eyeglass method and press the ENTER button.
Setother3D-relatedmenuoptionssuchas[FORMAT]and[L/RINVERT]asnecessary.
When switched to a 3D image, the 3D viewing cautions message screen appears (by factory default). For details, see page 53.
7. Press either △ or ▽buttontoselect[3D]andpresstheENTERbutton.
The setting screen for 3D mode will be displayed on.
8. Press the ▽buttontoselect[ON]andpresstheENTERbutton.
The selected signal will be changed in 3D mode.
Selectinginputconnectedtoasourceof3Dimages[HDMI1/HDMI2/COMPUTER/VIDEO/HDBaseT]Thisfunctionswitchesthe3DmodebetweenONandOFFforeachinput.
NOTE:Toconfirmthatthesupported3Dsignalisaccepted,useeitherwayofthefollowing:• Makesurethat[3D]isdisplayedinthetoprightofthescreenafterthesourceisselected.• Display[INFO.]→[SOURCE(2)]→[3DSIGNAL]andmakesurethat“SUPPORTED”isdisplayed.
35
3. Convenient Features
Toview3Dimages,seepage33.Select[HDMI1],[HDMI2],[COMPUTER],[VIDEO],or[HDBaseT].
NOTE:• Themaximumdistanceforviewing3Dimagesis10m/394inchesfromthescreensurfaceunderthefollowingrestrictions:
- Brightnessontheprojector:2000lumensorgreater- Screengain:1- Viewingposition:Facingstraighttowardsthescreencenter- Outsidelight:None- LCDshuttereyeglasses:DLP®Linkcompatible3Deyeglasses
• If3DcontentisplayedbackonyourcomputerandtheperformanceispooritmaybecausedbytheCPUorgraphicschip.Inthiscaseyoumayhavedifficultyseeingthe3Dimagesastheywereintended.Checktoseeifyourcomputermeetstherequirementsprovidedinyouruser’smanualincludedwithyour3Dcontent.
• TheDLP®LinkcompatibleLCDshuttereyeglassesallowyoutoview3Dimagesbyreceivingsynchsignals,whichareincludedinlefteyeandrighteyeimages,reflectedfromthescreen.Dependingonenvironmentsorconditionssuchastheambientbright-ness,screensizeorviewingdistance,theLCDshuttereyeglassesmayfailtoreceivesynchsignals,causingpoor3Dimages.
• Whenthe3Dmodeisenabled,theKeystonecorrectionrangewillbenarrower.• Whenthe3Dmodeisenabled,thefollowingsettingsareinvalid. [WALLCOLOR],[PRESET],[REFERENCE],[COLORTEMPERATURE]• Refertothe[SOURCE(2)]screenunderthe[INFO.]menuforinformationonwhethertheinputsignalis3Dcompatible.• Signalsotherthanthoselistedin“CompatibleInputSignalList”onpage126willbeoutofrangeorwillbedisplayedin2D.
Using a 3D emitterThisprojectorcanbeusedtowatchvideosin3Dusingcommercially-availableactiveshutter-type3Deyewear.Inordertosynchronizethe3Dvideoandeyewear,acommercially-available3Demitterneedstobeconnectedtotheprojector(ontheprojectorside).The3Deyewearreceivesinformationfromthe3Demitterandperformsopeningandclosingontheleftandright.
3D eyewear and 3D emitter preparationsPleaseuseanactiveshutter-type3DeyewearthatconformswiththeVESAstandard.Acommercially-availableRFtypemadebyXpandisrecommended.
3D eyewear ������������ Xpand X105-RF-X23D emitter �������������� Xpand AD025-RF-X1
Connectyour3Demittertothe3DSYNCterminaloftheprojector.
NOTE:• Useanactiveshutter3Deyewear(compliancewithVESA)• ChecktheoperatingconditionsdescribedintheusermanualoftheBlu-rayplayer.• PleaseconnecttheDINterminalofthe3Demittertothe3DSYNCoftheprojector.• The3Deyewearallowsvideostobeviewedin3Dbyreceivingsynchronizedopticalsignalsoutputfromthe3Demitter.Asaresult,
the3Dimagequalitymaybeaffectedbyconditionssuchasthebrightnessofthesurroundings,screensize,viewingdistance,etc.
• Whenplayinga3Dvideosoftwareonacomputer,the3DimagequalitymaybeaffectedifthecomputerCPUandgraphicschipperformancearelow.Pleasechecktherequiredoperatingenvironmentofthecomputerthatisstatedintheoperatingmanualattachedtothe3Dvideosoftware.
36
3. Convenient Features
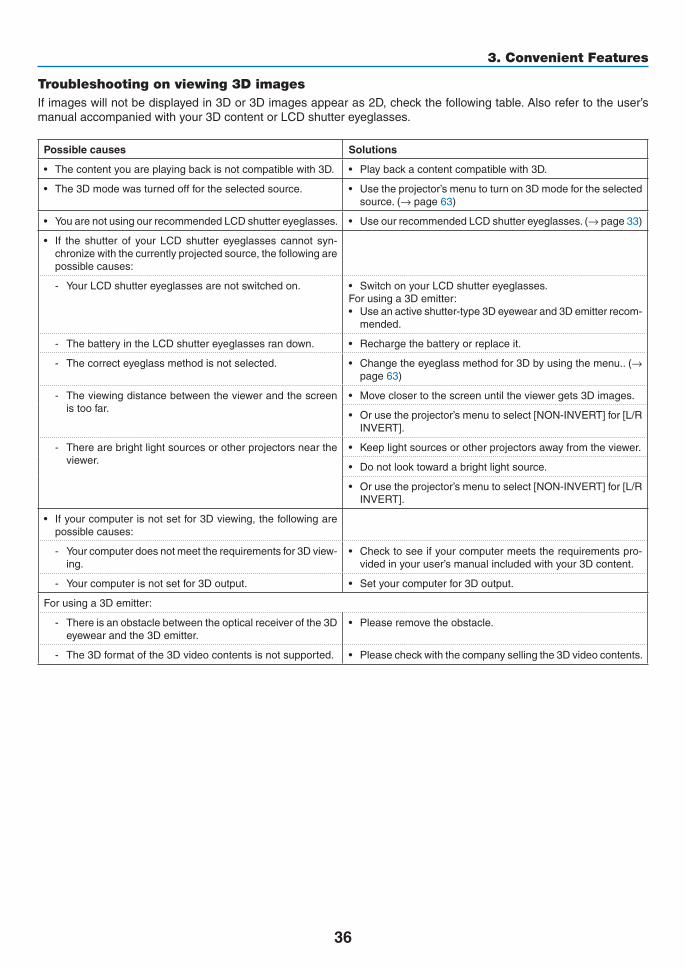
Troubleshooting on viewing 3D imagesIfimageswillnotbedisplayedin3Dor3Dimagesappearas2D,checkthefollowingtable.Alsorefertotheuser’smanualaccompaniedwithyour3DcontentorLCDshuttereyeglasses.
Possiblecauses Solutions
• Thecontentyouareplayingbackisnotcompatiblewith3D. • Playbackacontentcompatiblewith3D.
• The3Dmodewasturnedofffortheselectedsource. • Usetheprojector’smenutoturnon3Dmodefortheselectedsource.(→page63)
• YouarenotusingourrecommendedLCDshuttereyeglasses. • UseourrecommendedLCDshuttereyeglasses.(→page33)
• If the shutter of your LCD shutter eyeglasses cannot syn-chronizewiththecurrentlyprojectedsource,thefollowingarepossible causes:
- YourLCDshuttereyeglassesarenotswitchedon. • SwitchonyourLCDshuttereyeglasses.Forusinga3Demitter:• Useanactiveshutter-type3Deyewearand3Demitterrecom-
mended.
- ThebatteryintheLCDshuttereyeglassesrandown. • Rechargethebatteryorreplaceit.
- Thecorrecteyeglassmethodisnotselected. • Changetheeyeglassmethodfor3Dbyusingthemenu..(→ page63)
- Theviewingdistancebetweentheviewerandthescreenis too far.
• Moveclosertothescreenuntiltheviewergets3Dimages.
• Orusetheprojector’smenutoselect[NON-INVERT]for[L/RINVERT].
- Therearebrightlightsourcesorotherprojectorsneartheviewer.
• Keeplightsourcesorotherprojectorsawayfromtheviewer.
• Donotlooktowardabrightlightsource.
• Orusetheprojector’smenutoselect[NON-INVERT]for[L/RINVERT].
• Ifyourcomputerisnotsetfor3Dviewing,thefollowingarepossible causes:
- Yourcomputerdoesnotmeettherequirementsfor3Dview-ing.
• Checktoseeifyourcomputermeetstherequirementspro-videdinyouruser’smanualincludedwithyour3Dcontent.
- Yourcomputerisnotsetfor3Doutput. • Setyourcomputerfor3Doutput.
Forusinga3Demitter:
- Thereisanobstaclebetweentheopticalreceiverofthe3Deyewearandthe3Demitter.
• Pleaseremovetheobstacle.
- The3Dformatofthe3Dvideocontentsisnotsupported. • Pleasecheckwiththecompanysellingthe3Dvideocontents.
37
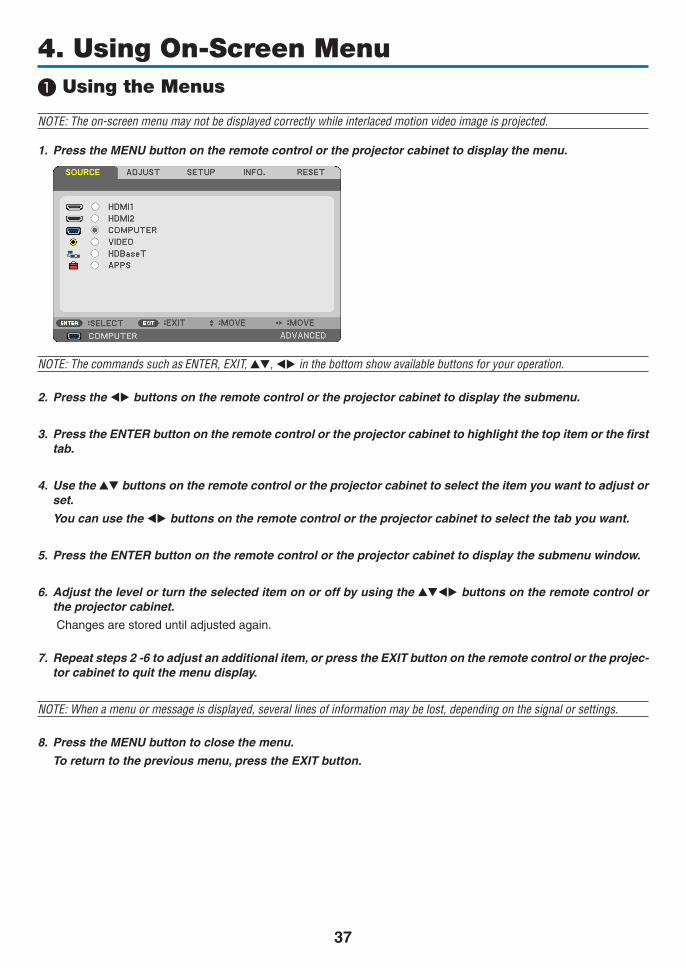
4. Using On-Screen Menu❶ Using the Menus
NOTE:Theon-screenmenumaynotbedisplayedcorrectlywhileinterlacedmotionvideoimageisprojected.
1. Press the MENU button on the remote control or the projector cabinet to display the menu.
NOTE:ThecommandssuchasENTER,EXIT,▲▼,◀▶inthebottomshowavailablebuttonsforyouroperation.
2. Press the ◀▶ buttons on the remote control or the projector cabinet to display the submenu.
3. Press the ENTER button on the remote control or the projector cabinet to highlight the top item or the first tab.
4. Use the ▲▼ buttons on the remote control or the projector cabinet to select the item you want to adjust or set.
You can use the ◀▶ buttons on the remote control or the projector cabinet to select the tab you want.
5. Press the ENTER button on the remote control or the projector cabinet to display the submenu window.
6. Adjust the level or turn the selected item on or off by using the ▲▼◀▶ buttons on the remote control or the projector cabinet.
Changesarestoreduntiladjustedagain.
7. Repeat steps 2 -6 to adjust an additional item, or press the EXIT button on the remote control or the projec-torcabinettoquitthemenudisplay.
NOTE:Whenamenuormessageisdisplayed,severallinesofinformationmaybelost,dependingonthesignalorsettings.
8. Press the MENU button to close the menu.
To return to the previous menu, press the EXIT button.
38
4. Using On-Screen Menu
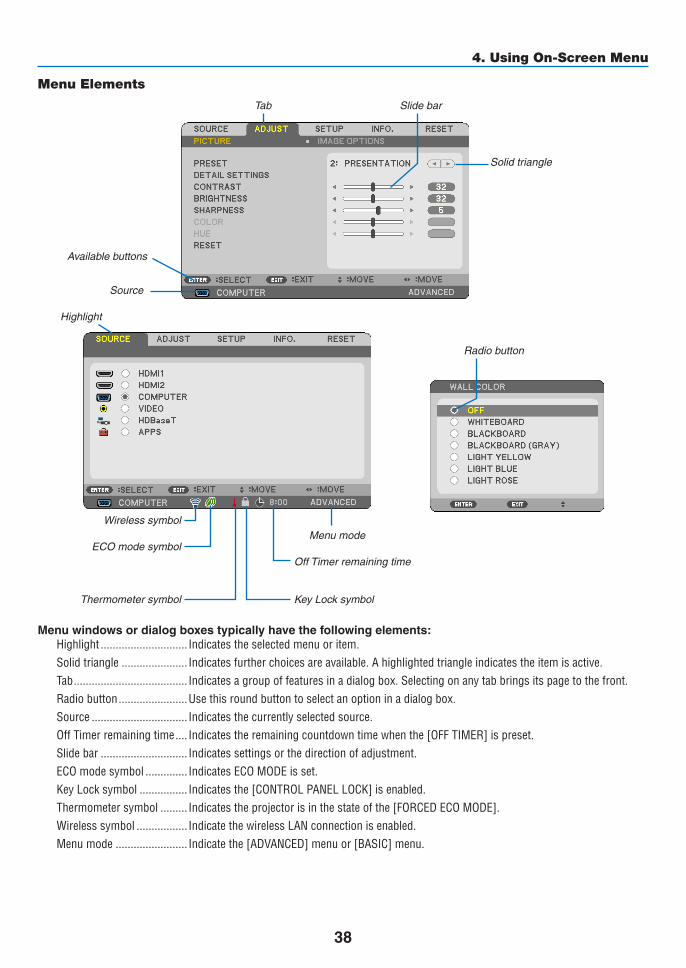
Menu Elements
Slide bar
Solid triangle
Tab
Radio button
ECO mode symbol
Wireless symbol
Menuwindowsordialogboxestypicallyhavethefollowingelements:Highlight ����������������������������� Indicates the selected menu or item� Solid triangle ���������������������� Indicates further choices are available� A highlighted triangle indicates the item is active� Tab �������������������������������������� Indicates a group of features in a dialog box� Selecting on any tab brings its page to the front�Radio button �����������������������Use this round button to select an option in a dialog box�Source �������������������������������� Indicates the currently selected source�Off Timer remaining time ���� Indicates the remaining countdown time when the [OFF TIMER] is preset�Slide bar ����������������������������� Indicates settings or the direction of adjustment�ECO mode symbol �������������� Indicates ECO MODE is set�Key Lock symbol ���������������� Indicates the [CONTROL PANEL LOCK] is enabled�Thermometer symbol ��������� Indicates the projector is in the state of the [FORCED ECO MODE]�Wireless symbol ����������������� Indicate the wireless LAN connection is enabled�Menu mode ������������������������ Indicate the [ADVANCED] menu or [BASIC] menu�
Source
Available buttons
Thermometer symbol KeyLocksymbol
Off Timer remaining time
Menu mode
Highlight
39
4. Using On-Screen Menu
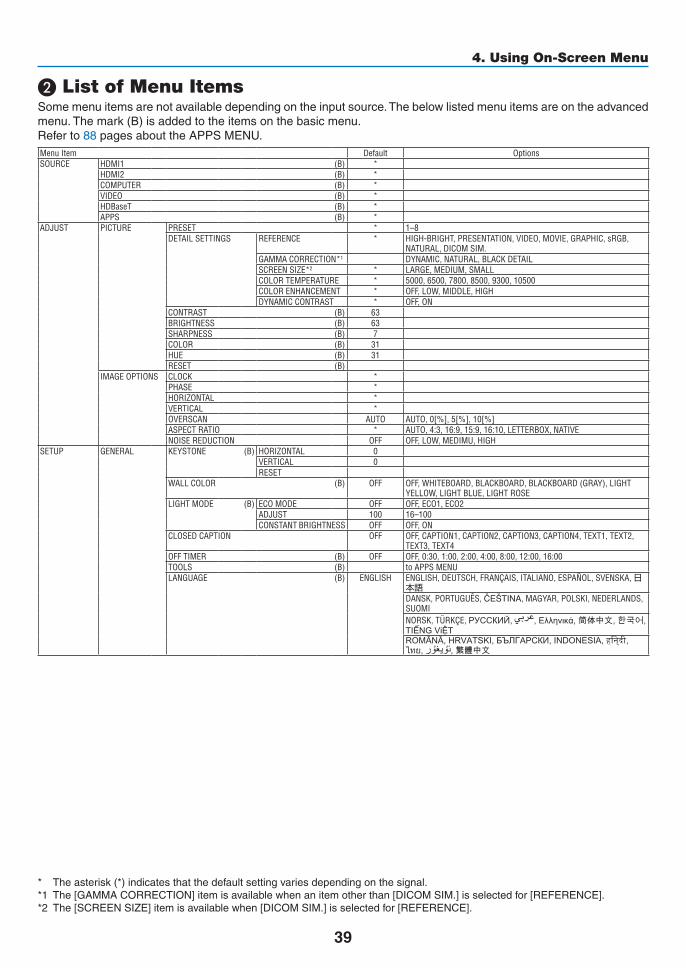
❷ List of Menu ItemsSomemenuitemsarenotavailabledependingontheinputsource.Thebelowlistedmenuitemsareontheadvancedmenu.Themark(B) is added to the items on the basic menu.Referto88pagesabouttheAPPSMENU.Menu Item Default OptionsSOURCE HDMI1 (B) *
HDMI2 (B) *COMPUTER (B) *VIDEO (B) *HDBaseT (B) *APPS (B) *
ADJUST PICTURE PRESET * 1–8DETAIL SETTINGS REFERENCE * HIGH-BRIGHT, PRESENTATION, VIDEO, MOVIE, GRAPHIC, sRGB,
NATURAL, DICOM SIM�GAMMA CORRECTION*1 DYNAMIC, NATURAL, BLACK DETAILSCREEN SIZE*2 * LARGE, MEDIUM, SMALLCOLOR TEMPERATURE * 5000, 6500, 7800, 8500, 9300, 10500COLOR ENHANCEMENT * OFF, LOW, MIDDLE, HIGHDYNAMIC CONTRAST * OFF, ON
CONTRAST (B) 63BRIGHTNESS (B) 63SHARPNESS (B) 7COLOR (B) 31HUE (B) 31RESET (B)
IMAGE OPTIONS CLOCK *PHASE *HORIZONTAL *VERTICAL *OVERSCAN AUTO AUTO, 0[%], 5[%], 10[%]ASPECT RATIO * AUTO, 4:3, 16:9, 15:9, 16:10, LETTERBOX, NATIVENOISE REDUCTION OFF OFF, LOW, MEDIMU, HIGH
SETUP GENERAL KEYSTONE (B) HORIZONTAL 0VERTICAL 0RESET
WALL COLOR (B) OFF OFF, WHITEBOARD, BLACKBOARD, BLACKBOARD (GRAY), LIGHT YELLOW, LIGHT BLUE, LIGHT ROSE
LIGHT MODE (B) ECO MODE OFF OFF, ECO1, ECO2ADJUST 100 16–100CONSTANT BRIGHTNESS OFF OFF, ON
CLOSED CAPTION OFF OFF, CAPTION1, CAPTION2, CAPTION3, CAPTION4, TEXT1, TEXT2, TEXT3, TEXT4
OFF TIMER (B) OFF OFF, 0:30, 1:00, 2:00, 4:00, 8:00, 12:00, 16:00TOOLS (B) to APPS MENULANGUAGE (B) ENGLISH ENGLISH, DEUTSCH, FRANÇAIS, ITALIANO, ESPAÑOL, SVENSKA, 日
本語DANSK, PORTUGUÊS, ČEŠTINA, MAGYAR, POLSKI, NEDERLANDS, SUOMINORSK, TÜRKÇE, РУССКИЙ, , Ελληνικά, 简体中文, 한국어, TIẾNG ViỆTROMÂNĂ, HRVATSKI, БЪЛГАРСКИ, INDONESIA, हिन्दी, ไทย, , 繁體中文
* Theasterisk(*)indicatesthatthedefaultsettingvariesdependingonthesignal.*1 The[GAMMACORRECTION]itemisavailablewhenanitemotherthan[DICOMSIM.]isselectedfor[REFERENCE].*2 The[SCREENSIZE]itemisavailablewhen[DICOMSIM.]isselectedfor[REFERENCE].
40
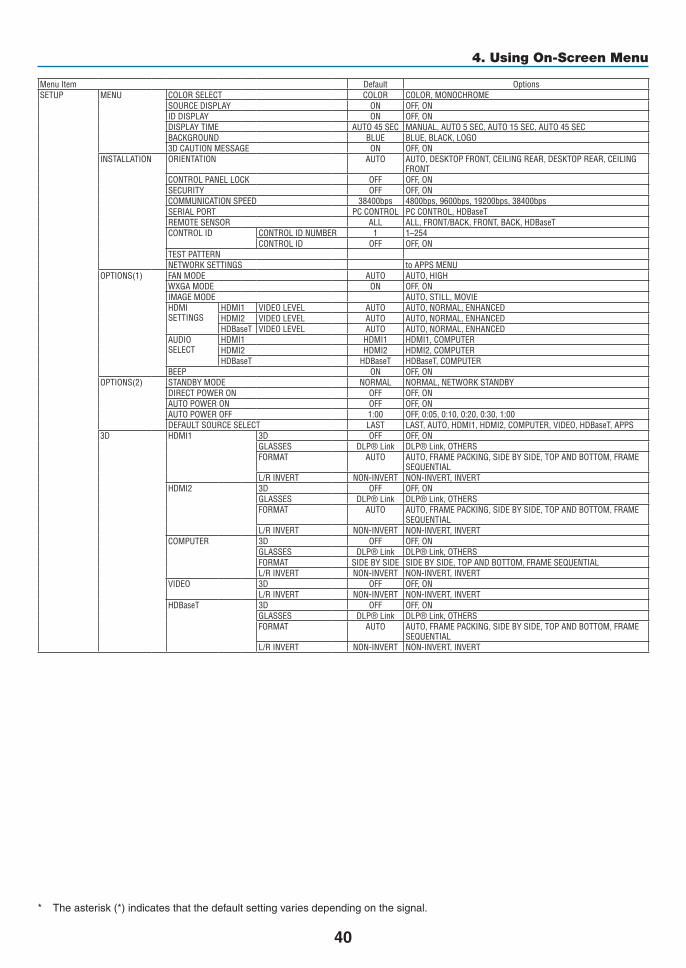
4. Using On-Screen Menu
Menu Item Default OptionsSETUP MENU COLOR SELECT COLOR COLOR, MONOCHROME
SOURCE DISPLAY ON OFF, ONID DISPLAY ON OFF, ONDISPLAY TIME AUTO 45 SEC MANUAL, AUTO 5 SEC, AUTO 15 SEC, AUTO 45 SECBACKGROUND BLUE BLUE, BLACK, LOGO3D CAUTION MESSAGE ON OFF, ON
INSTALLATION ORIENTATION AUTO AUTO, DESKTOP FRONT, CEILING REAR, DESKTOP REAR, CEILING FRONT
CONTROL PANEL LOCK OFF OFF, ONSECURITY OFF OFF, ONCOMMUNICATION SPEED 38400bps 4800bps, 9600bps, 19200bps, 38400bpsSERIAL PORT PC CONTROL PC CONTROL, HDBaseTREMOTE SENSOR ALL ALL, FRONT/BACK, FRONT, BACK, HDBaseTCONTROL ID CONTROL ID NUMBER 1 1–254
CONTROL ID OFF OFF, ONTEST PATTERNNETWORK SETTINGS to APPS MENU
OPTIONS(1) FAN MODE AUTO AUTO, HIGHWXGA MODE ON OFF, ONIMAGE MODE AUTO, STILL, MOVIEHDMI SETTINGS
HDMI1 VIDEO LEVEL AUTO AUTO, NORMAL, ENHANCEDHDMI2 VIDEO LEVEL AUTO AUTO, NORMAL, ENHANCEDHDBaseT VIDEO LEVEL AUTO AUTO, NORMAL, ENHANCED
AUDIO SELECT
HDMI1 HDMI1 HDMI1, COMPUTERHDMI2 HDMI2 HDMI2, COMPUTERHDBaseT HDBaseT HDBaseT, COMPUTER
BEEP ON OFF, ONOPTIONS(2) STANDBY MODE NORMAL NORMAL, NETWORK STANDBY
DIRECT POWER ON OFF OFF, ONAUTO POWER ON OFF OFF, ONAUTO POWER OFF 1:00 OFF, 0:05, 0:10, 0:20, 0:30, 1:00DEFAULT SOURCE SELECT LAST LAST, AUTO, HDMI1, HDMI2, COMPUTER, VIDEO, HDBaseT, APPS
3D HDMI1 3D OFF OFF, ONGLASSES DLP® Link DLP® Link, OTHERSFORMAT AUTO AUTO, FRAME PACKING, SIDE BY SIDE, TOP AND BOTTOM, FRAME
SEQUENTIALL/R INVERT NON-INVERT NON-INVERT, INVERT
HDMI2 3D OFF OFF, ONGLASSES DLP® Link DLP® Link, OTHERSFORMAT AUTO AUTO, FRAME PACKING, SIDE BY SIDE, TOP AND BOTTOM, FRAME
SEQUENTIALL/R INVERT NON-INVERT NON-INVERT, INVERT
COMPUTER 3D OFF OFF, ONGLASSES DLP® Link DLP® Link, OTHERSFORMAT SIDE BY SIDE SIDE BY SIDE, TOP AND BOTTOM, FRAME SEQUENTIALL/R INVERT NON-INVERT NON-INVERT, INVERT
VIDEO 3D OFF OFF, ONL/R INVERT NON-INVERT NON-INVERT, INVERT
HDBaseT 3D OFF OFF, ONGLASSES DLP® Link DLP® Link, OTHERSFORMAT AUTO AUTO, FRAME PACKING, SIDE BY SIDE, TOP AND BOTTOM, FRAME
SEQUENTIALL/R INVERT NON-INVERT NON-INVERT, INVERT
* Theasterisk(*)indicatesthatthedefaultsettingvariesdependingonthesignal.
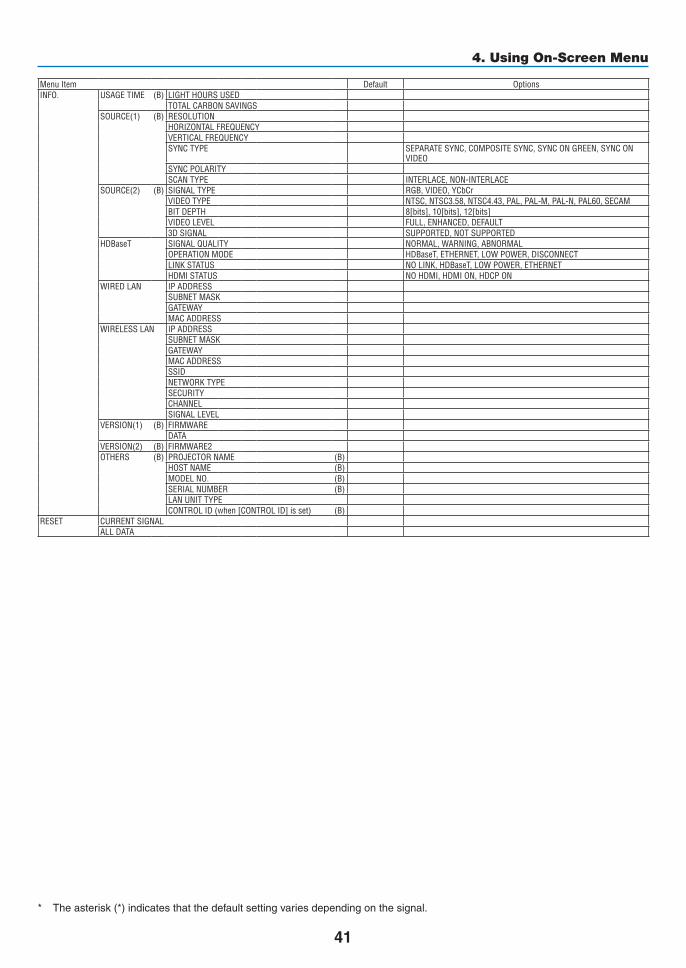
41
4. Using On-Screen Menu
Menu Item Default OptionsINFO� USAGE TIME (B) LIGHT HOURS USED
TOTAL CARBON SAVINGSSOURCE(1) (B) RESOLUTION
HORIZONTAL FREQUENCYVERTICAL FREQUENCYSYNC TYPE SEPARATE SYNC, COMPOSITE SYNC, SYNC ON GREEN, SYNC ON
VIDEOSYNC POLARITYSCAN TYPE INTERLACE, NON-INTERLACE
SOURCE(2) (B) SIGNAL TYPE RGB, VIDEO, YCbCrVIDEO TYPE NTSC, NTSC3�58, NTSC4�43, PAL, PAL-M, PAL-N, PAL60, SECAMBIT DEPTH 8[bits], 10[bits], 12[bits]VIDEO LEVEL FULL, ENHANCED, DEFAULT3D SIGNAL SUPPORTED, NOT SUPPORTED
HDBaseT SIGNAL QUALITY NORMAL, WARNING, ABNORMALOPERATION MODE HDBaseT, ETHERNET, LOW POWER, DISCONNECTLINK STATUS NO LINK, HDBaseT, LOW POWER, ETHERNETHDMI STATUS NO HDMI, HDMI ON, HDCP ON
WIRED LAN IP ADDRESSSUBNET MASKGATEWAYMAC ADDRESS
WIRELESS LAN IP ADDRESSSUBNET MASKGATEWAYMAC ADDRESSSSIDNETWORK TYPESECURITYCHANNELSIGNAL LEVEL
VERSION(1) (B) FIRMWAREDATA
VERSION(2) (B) FIRMWARE2OTHERS (B) PROJECTOR NAME (B)
HOST NAME (B)MODEL NO� (B)SERIAL NUMBER (B)LAN UNIT TYPECONTROL ID (when [CONTROL ID] is set) (B)
RESET CURRENT SIGNALALL DATA
* Theasterisk(*)indicatesthatthedefaultsettingvariesdependingonthesignal.
42
4. Using On-Screen Menu
❸ Menu Descriptions & Functions [SOURCE]
HDMI1 and HDMI2SelectstheHDMIcompatibleequipmentconnectedtoyourHDMI1INorHDMI2INterminal.
COMPUTERSelectsthecomputerconnectedtoyourCOMPUTERinputterminalsignal.NOTE:WhenthecomponentinputsignalisconnectedtotheCOMPUTERINterminal,select[COMPUTER].
VIDEOSelectswhatisconnectedtoyourVIDEOinput-VCR,DVDplayerordocumentcamera.
HDBaseTProjectsthesignaltransmittedfromtheterminalssupportedHDBaseT.(→page80, 81)
APPSDisplaytheAPPSMENUorthefunctionintheAPPSMENUthatwasusedlasttime.
43
4. Using On-Screen Menu
❹ Menu Descriptions & Functions [ADJUST][PICTURE]
[PRESET]Thisfunctionallowsyoutoselectoptimizedsettingsforyourprojectedimage.Youcanadjustneutraltintforyellow,cyanormagenta.Thereareeightfactorypresetsoptimizedforvarioustypesofimages.Youcanalsouse[DETAILSETTINGS]tosetuseradjustablesettingstocustomizeeachgammaorcolor.Yoursettingscanbestoredin[PRESET1]to[PRESET8].
HIGH-BRIGHT �������� Recommended for use in a brightly lit room�PRESENTATION ����� Recommended for making a presentation using a PowerPoint file�VIDEO �������������������� Recommended for typical TV program viewing�MOVIE ������������������� Recommended for movies�GRAPHIC ��������������� Recommended for graphics�sRGB ��������������������� Standard color valuesNATURAL ��������������� Well-balanced setting of brightness and color�DICOM SIM� ���������� Recommended for DICOM simulation format�
NOTE:• The[DICOMSIM.]optionisfortraining/referenceonlyandshouldnotbeusedforactualdiagnosis.• DICOMstandsforDigitalImagingandCommunicationsinMedicine.ItisastandarddevelopedbytheAmericanCollegeofRadiol-
ogy(ACR)andtheNationalElectricalManufacturersAssociation(NEMA). Thestandardspecifieshowdigitalimagedatacanbemovedfromsystemtosystem.
44
4. Using On-Screen Menu
[DETAILSETTINGS]
StoringYourCustomizedSettings[REFERENCE]Thisfunctionallowsyoutostoreyourcustomizedsettingsin[PRESET1]to[PRESET8].First,selectabasepresetmodefrom[REFERENCE],thenset[GAMMACORRECTION]and[COLORTEMPERATURE].
HIGH-BRIGHT �������� Recommended for use in a brightly lit room�PRESENTATION ����� Recommended for making a presentation using a PowerPoint file�VIDEO �������������������� Recommended for typical TV program viewing�MOVIE ������������������� Recommended for movies�GRAPHIC ��������������� Recommended for graphics�sRGB ��������������������� Standard color values�NATURAL ��������������� Well-balanced setting of brightness and color�DICOM SIM� ���������� Recommended for DICOM simulation format�
SelectingGammaCorrectionMode[GAMMACORRECTION]Eachmodeisrecommendedfor:
DYNAMIC �������������� Creates a high-contrast picture�NATURAL ��������������� Natural reproduction of the picture�BLACK DETAIL ������� Emphasizes detail in dark areas of the picture�
NOTE:Thisfunctionisnotavailablewhen[DICOMSIM.]isselectedfor[DETAILSETTINGS].
SelectingScreenSizeforDICOMSIM[SCREENSIZE]Thisfunctionwillperformgammacorrectionappropriateforthescreensize.
LARGE ������������������� For screen size of 110"MEDIUM ���������������� For screen size of 90"SMALL ������������������� For screen size of 70"
NOTE:Thisfunctionisavailableonlywhen[DICOMSIM.]isselectedfor[DETAILSETTINGS].
AdjustingColorTemperature[COLORTEMPERATURE]Thisoptionallowsyoutoselectthecolortemperatureofyourchoice.
NOTE:When[PRESENTATION]or[HIGH-BRIGHT]isselectedin[REFERENCE],thisfunctionisnotavailable.
EnhancingtheColor[COLORENHANCEMENT]Thisallowsyoutoadjustthecolordensityoftheimage.Thecoloroftheimagewillbecomedeeperintheorderof"LOW","MEDIUM",AND"HIGH"asthedisplayedimagewillbecomedarker.With"OFF"selected,theCOLORENHANCEMENTfunctionwillnotwork.
NOTE:Thisfunctionisavailableonlywhen[PRESENTATION]isselected[REFERENCE].
AdjustingBrightnessandContrast[DYNAMICCONTRAST]If[ON]isselected,themostoptimalcontrastratioisusedaccordingtothepicture.
NOTE:• The[DYNMICCONTRAST]itemcannotbeselectedinthefollowingeithercase:
- When[ECO1]or[ECO2]isselectedfor[ECOMODE].- When[CONSTANTBRIGHTNESS]isenabled.
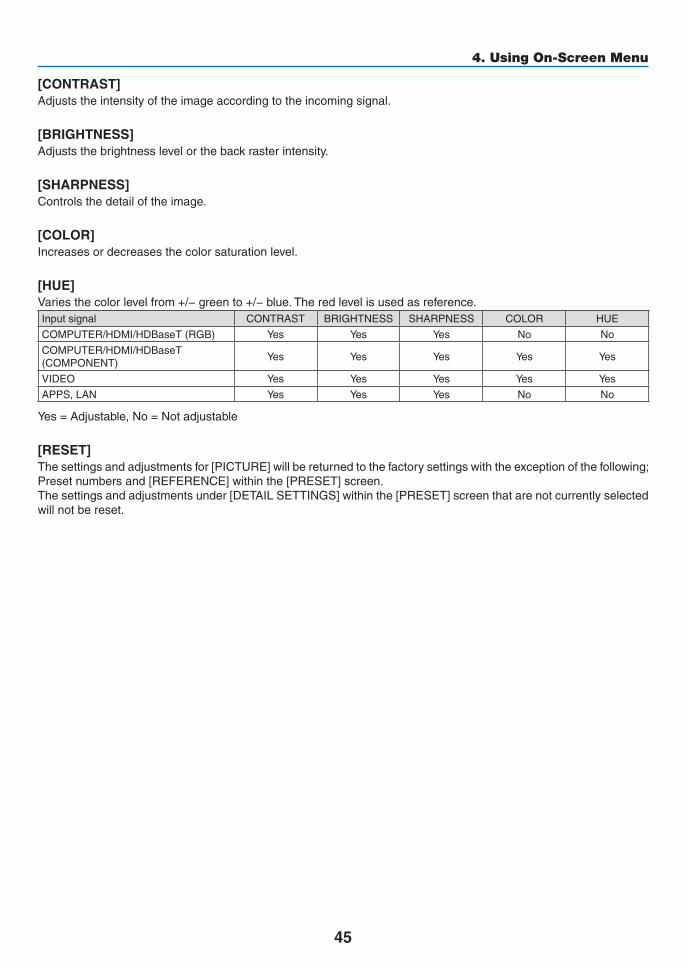
45
4. Using On-Screen Menu
[CONTRAST]Adjuststheintensityoftheimageaccordingtotheincomingsignal.
[BRIGHTNESS]Adjuststhebrightnesslevelorthebackrasterintensity.
[SHARPNESS]Controlsthedetailoftheimage.
[COLOR]Increasesordecreasesthecolorsaturationlevel.
[HUE]Variesthecolorlevelfrom+/−greento+/−blue.Theredlevelisusedasreference.Inputsignal CONTRAST BRIGHTNESS SHARPNESS COLOR HUE
COMPUTER/HDMI/HDBaseT(RGB) Yes Yes Yes No No
COMPUTER/HDMI/HDBaseT(COMPONENT)
Yes Yes Yes Yes Yes
VIDEO Yes Yes Yes Yes Yes
APPS,LAN Yes Yes Yes No No
Yes=Adjustable,No=Notadjustable
[RESET]Thesettingsandadjustmentsfor[PICTURE]willbereturnedtothefactorysettingswiththeexceptionofthefollowing;Presetnumbersand[REFERENCE]withinthe[PRESET]screen.Thesettingsandadjustmentsunder[DETAILSETTINGS]withinthe[PRESET]screenthatarenotcurrentlyselectedwill not be reset.
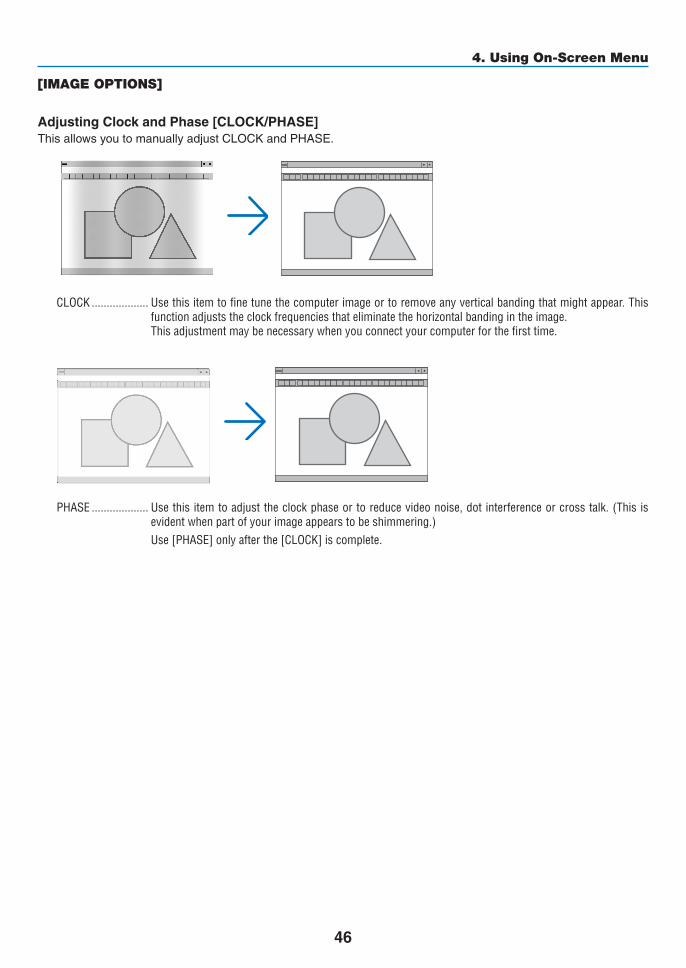
46
4. Using On-Screen Menu
[IMAGE OPTIONS]
AdjustingClockandPhase[CLOCK/PHASE]ThisallowsyoutomanuallyadjustCLOCKandPHASE.
CLOCK ������������������� Use this item to fine tune the computer image or to remove any vertical banding that might appear� This function adjusts the clock frequencies that eliminate the horizontal banding in the image�This adjustment may be necessary when you connect your computer for the first time�
PHASE ������������������� Use this item to adjust the clock phase or to reduce video noise, dot interference or cross talk� (This is evident when part of your image appears to be shimmering�)Use [PHASE] only after the [CLOCK] is complete�
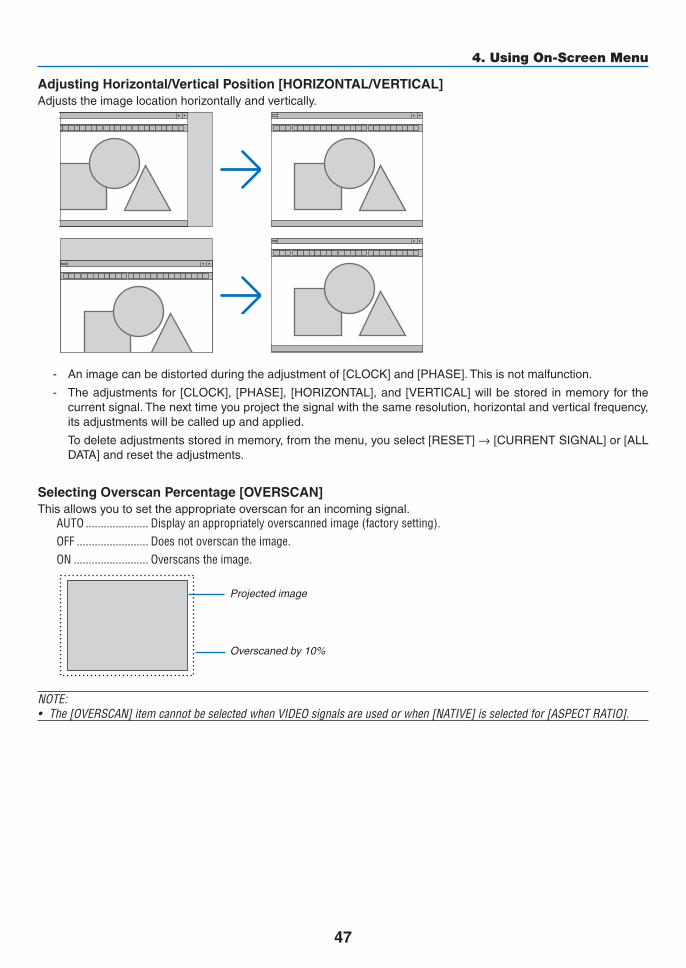
47
4. Using On-Screen Menu
AdjustingHorizontal/VerticalPosition[HORIZONTAL/VERTICAL]Adjuststheimagelocationhorizontallyandvertically.
- Animagecanbedistortedduringtheadjustmentof[CLOCK]and[PHASE].Thisisnotmalfunction.
- Theadjustments for [CLOCK], [PHASE], [HORIZONTAL],and[VERTICAL]willbestored inmemoryfor thecurrentsignal.Thenexttimeyouprojectthesignalwiththesameresolution,horizontalandverticalfrequency,its adjustments will be called up and applied.
Todeleteadjustmentsstoredinmemory,fromthemenu,youselect[RESET]→[CURRENTSIGNAL]or[ALLDATA]andresettheadjustments.
SelectingOverscanPercentage[OVERSCAN]Thisallowsyoutosettheappropriateoverscanforanincomingsignal.
AUTO ��������������������� Display an appropriately overscanned image (factory setting)�OFF ������������������������ Does not overscan the image�ON ������������������������� Overscans the image�
Projected image
Overscaned by 10%
NOTE:• The[OVERSCAN]itemcannotbeselectedwhenVIDEOsignalsareusedorwhen[NATIVE]isselectedfor[ASPECTRATIO].
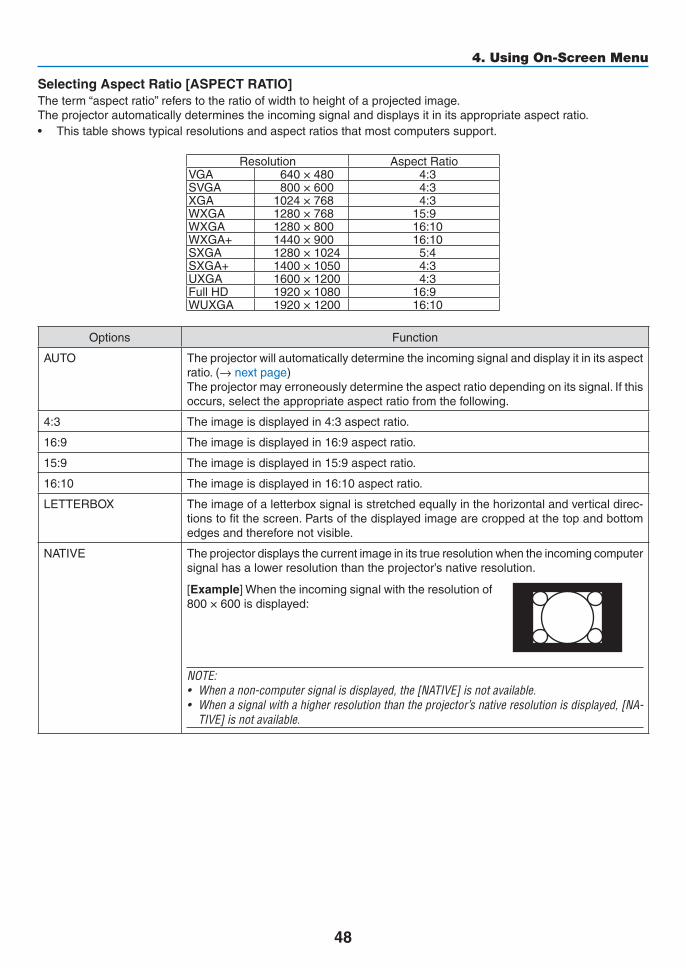
48
4. Using On-Screen Menu
SelectingAspectRatio[ASPECTRATIO]Theterm“aspectratio”referstotheratioofwidthtoheightofaprojectedimage.Theprojectorautomaticallydeterminestheincomingsignalanddisplaysitinitsappropriateaspectratio.• Thistableshowstypicalresolutionsandaspectratiosthatmostcomputerssupport.
Resolution AspectRatioVGA 640×480 4:3SVGA 800×600 4:3XGA 1024×768 4:3WXGA 1280×768 15:9WXGA 1280×800 16:10WXGA+ 1440×900 16:10SXGA 1280×1024 5:4SXGA+ 1400×1050 4:3UXGA 1600×1200 4:3FullHD 1920×1080 16:9WUXGA 1920×1200 16:10
Options Function
AUTO Theprojectorwillautomaticallydeterminetheincomingsignalanddisplayitinitsaspectratio.(→ nextpage)Theprojectormayerroneouslydeterminetheaspectratiodependingonitssignal.Ifthisoccurs,selecttheappropriateaspectratiofromthefollowing.
4:3 Theimageisdisplayedin4:3aspectratio.
16:9 Theimageisdisplayedin16:9aspectratio.
15:9 Theimageisdisplayedin15:9aspectratio.
16:10 Theimageisdisplayedin16:10aspectratio.
LETTERBOX Theimageofaletterboxsignalisstretchedequallyinthehorizontalandverticaldirec-tionstofitthescreen.Partsofthedisplayedimagearecroppedatthetopandbottomedgesandthereforenotvisible.
NATIVE Theprojectordisplaysthecurrentimageinitstrueresolutionwhentheincomingcomputersignalhasalowerresolutionthantheprojector’snativeresolution.
[Example]Whentheincomingsignalwiththeresolutionof800×600isdisplayed:
NOTE:• Whenanon-computersignalisdisplayed,the[NATIVE]isnotavailable.• Whenasignalwithahigherresolutionthantheprojector’snativeresolutionisdisplayed,[NA-
TIVE]isnotavailable.
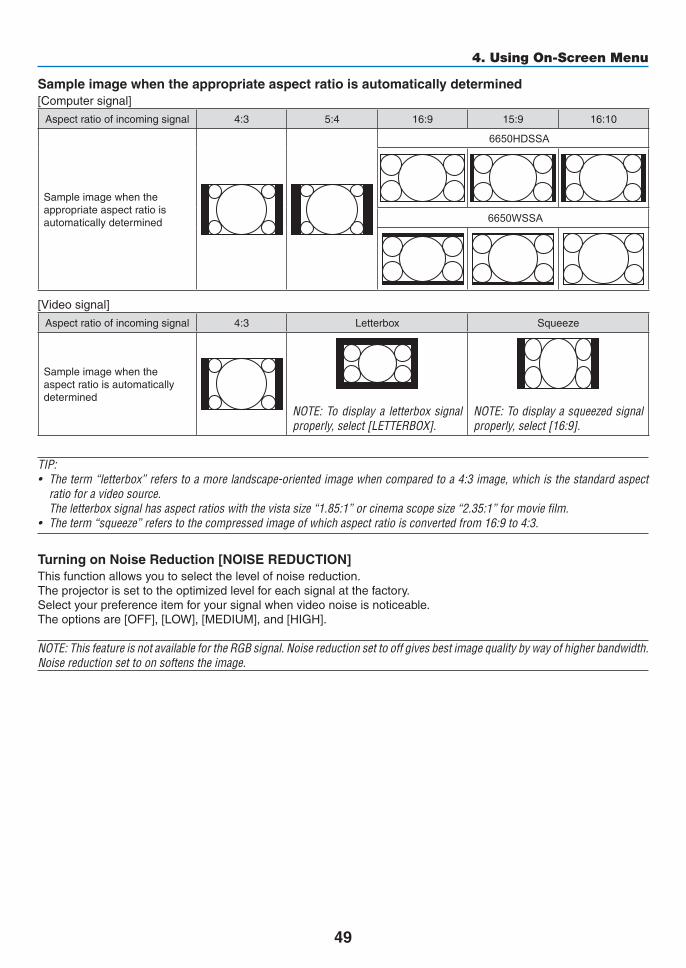
49
4. Using On-Screen Menu
Sample image when the appropriate aspect ratio is automatically determined[Computersignal]
Aspectratioofincomingsignal 4:3 5:4 16:9 15:9 16:10
Sampleimagewhentheappropriate aspect ratio is automatically determined
6650HDSSA
6650WSSA
[Videosignal]
Aspectratioofincomingsignal 4:3 Letterbox Squeeze
Sampleimagewhentheaspect ratio is automatically determined
NOTE:Todisplaya letterboxsignalproperly,select[LETTERBOX].
NOTE:Todisplayasqueezedsignalproperly,select[16:9].
TIP:• Theterm“letterbox”referstoamorelandscape-orientedimagewhencomparedtoa4:3image,whichisthestandardaspect
ratioforavideosource. Theletterboxsignalhasaspectratioswiththevistasize“1.85:1”orcinemascopesize“2.35:1”formoviefilm.• Theterm“squeeze”referstothecompressedimageofwhichaspectratioisconvertedfrom16:9to4:3.
TurningonNoiseReduction[NOISEREDUCTION]Thisfunctionallowsyoutoselectthelevelofnoisereduction.Theprojectorissettotheoptimizedlevelforeachsignalatthefactory.Selectyourpreferenceitemforyoursignalwhenvideonoiseisnoticeable.Theoptionsare[OFF],[LOW],[MEDIUM],and[HIGH].
NOTE:ThisfeatureisnotavailablefortheRGBsignal.Noisereductionsettooffgivesbestimagequalitybywayofhigherbandwidth.Noisereductionsettoonsoftenstheimage.
50
4. Using On-Screen Menu
❺ Menu Descriptions & Functions [SETUP]
[GENERAL]
CorrectingKeystoneDistortionManually[KEYSTONE]Youcancorrecthorizontalorverticalkeystonemanually.[HORIZONTAL]and[VERTICAL](simultaneouslyadjustable)correction can be selected.
NOTE:• Someitemsarenotavailablewhenoneitemisactivated.Unavailableitemsareshowningrey.• Tochangefromoneitemtoanotheritem,resetthefirstitem.• Adjustmentvalueswillbeoverwritten.Theywillnotbedeletedevenwhentheprojectoristurnedoff.• Using[KEYSTONE]correctioncancausetheimagetobeslightlyblurredbecausethecorrectionismadeelectronically.
HORIZONTAL ��������� Corrects horizontal keystone distortion� (→ page 21)VERTICAL �������������� Corrects vertical keystone distortion� (→ page 21)RESET �������������������� Returns all the above items to the factory preset values�
TIP:• Themaximumadjustmentrangewith[KEYSTONE]correctionis±25°inthehorizontaldirection,±30°intheverticaldirection.
- Dependingoninputsignal,theadjustablerangemaybenarrower.
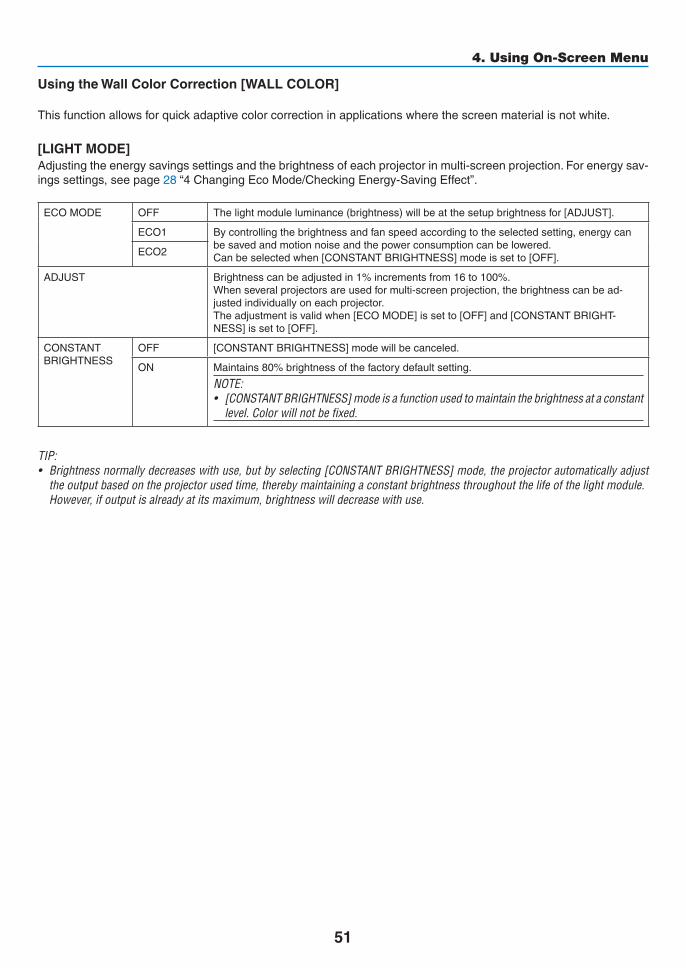
51
4. Using On-Screen Menu
UsingtheWallColorCorrection[WALLCOLOR]
Thisfunctionallowsforquickadaptivecolorcorrectioninapplicationswherethescreenmaterialisnotwhite.
[LIGHTMODE]Adjustingtheenergysavingssettingsandthebrightnessofeachprojectorinmulti-screenprojection.Forenergysav-ingssettings,seepage28“4ChangingEcoMode/CheckingEnergy-SavingEffect”.
ECOMODE OFF Thelightmoduleluminance(brightness)willbeatthesetupbrightnessfor[ADJUST].
ECO1 Bycontrollingthebrightnessandfanspeedaccordingtotheselectedsetting,energycanbe saved and motion noise and the power consumption can be lowered.Canbeselectedwhen[CONSTANTBRIGHTNESS]modeissetto[OFF].ECO2
ADJUST Brightnesscanbeadjustedin1%incrementsfrom16to100%.Whenseveralprojectorsareusedformulti-screenprojection,thebrightnesscanbead-justed individually on each projector.Theadjustmentisvalidwhen[ECOMODE]issetto[OFF]and[CONSTANTBRIGHT-NESS]issetto[OFF].
CONSTANTBRIGHTNESS
OFF [CONSTANTBRIGHTNESS]modewillbecanceled.
ON Maintains80%brightnessofthefactorydefaultsetting.
NOTE:• [CONSTANTBRIGHTNESS]modeisafunctionusedtomaintainthebrightnessataconstant
level.Colorwillnotbefixed.
TIP:• Brightnessnormallydecreaseswithuse,butbyselecting[CONSTANTBRIGHTNESS]mode,theprojectorautomaticallyadjust
theoutputbasedontheprojectorusedtime,therebymaintainingaconstantbrightnessthroughoutthelifeofthelightmodule. However,ifoutputisalreadyatitsmaximum,brightnesswilldecreasewithuse.

52
4. Using On-Screen Menu
SettingClosedCaption[CLOSEDCAPTION]ThisoptionsetsseveralclosedcaptionmodesthatallowtexttobesuperimposedontheprojectedimageofVideoorS-Video.
OFF ������������������������ This exits the closed caption mode�CAPTION 1-4 ��������� Text is superimposed�TEXT 1-4 ���������������� Text is displayed�
NOTE:• Theclosedcaptionisnotavailableunderthefollowingconditions:
- whenmessagesormenusaredisplayed.- whenanimageismagnified,frozen,ormuted.
• Portionsofsuperimposedtextorclosedcaptionmaybetruncated.Ifthathappens,trytoplacethesuperimposedtextorclosedcaptionwithinthescreen.
• Theprojectordoesnotsupportoptionalextendedcharactersforclosedcaptioning.
UsingOffTimer[OFFTIMER]1. Select your desired time between 30 minutes and 16 hours: OFF, 0:30, 1:00, 2:00, 4:00, 8:00, 12:00, 16:00.
2. Press the ENTER button on the remote control.
3. The remaining time starts counting down.
4. The projector will turn off after the countdown is complete.
NOTE:• Tocancelthepresettime,set[OFF]forthepresettimeorturnoffthepower.• Whentheremainingtimereaches3minutesbeforetheprojectoristurnedoff,the[THEPROJECTORWILLTURNOFFWITHIN3
MINUTES]messagewillbedisplayedonthebottomofthescreen.
Displaythetoolsmenu[TOOLS]Thisfunctiondisplaythetoolsmenu.(→page91)
SelectingMenuLanguage[LANGUAGE]Youcanchooseoneof30languagesforon-screeninstructions.
NOTE:Yoursettingwillnotbeaffectedevenwhen[RESET]isdonefromthemenu.
53
4. Using On-Screen Menu
[MENU]
SelectingMenuColor[COLORSELECT]Youcanchoosebetweentwooptionsformenucolor:COLORandMONOCHROME.
TurningOn/OffSourceDisplay[SOURCEDISPLAY]ThisoptionturnsonoroffinputnamedisplaysuchasHDMI1,HDMI2,COMPUTER,VIDEO,HDBaseT,APPS,tobedisplayedonthetoprightofthescreen.Whennoinputsignalispresent,theno-signalguidancepromptingyoutocheckforanavailableinputwillbedisplayedatthecenterofthescreen.Whenthe[APPS]itemisselectedfor[SOURCE],theno-signalguidancewillnotbedisplayed.
TurningON/OFFControlID[IDDISPLAY]ID DISPLAY ����������� This option turns on or off the ID number which is displayed when the ID SET button on the remote control
is pressed�
SelectingMenuDisplayTime[DISPLAYTIME]Thisoptionallowsyoutoselecthowlongtheprojectorwaitsafterthelasttouchofabuttontoturnoffthemenu.Thepresetchoicesare[MANUAL],[AUTO5SEC],[AUTO15SEC],and[AUTO45SEC].The[AUTO45SEC]isthefac-tory preset.
SelectingaColororLogoforBackground[BACKGROUND]Usethisfeaturetodisplayablue/blackscreenorlogowhennosignalisavailable.Thedefaultbackgroundis[BLUE].NOTE:• Ifthe[LOGO]itemisselectedfor[BACKGROUND]withthe[HDBaseT]sourceselected,the[BLUE]itemwillbeselectedregard-
lessofitsselection.• When[SOURCEDISPLAY]isturnedon,theno-signalguidancepromptingyoutocheckforanavailableinputwillbedisplayed
atthecenterofthescreenregardlessofitsselection.• Yoursettingwillnotbeaffectedevenwhen[RESET]isdonefromthemenu.
[3DCAUTIONMESSAGE]Thisselectswhethertodisplayacautionmessageornotwhenswitchingtoa3Dvideo.ThedefaultconditionwhenshippedfromthefactoryisON.
OFF ������������������������ The 3D caution message screen will not be displayed�ON ������������������������� The 3D caution message screen will be displayed when switching to a 3D video�Press the ENTER button to
cancel the message�
• Themessagewilldisappearautomaticallyafter60secondsorwhenotherbuttonsarepressed.If itdisappearsautomatically,the3Dcautionmessagewillbedisplayedagainwhenswitchingtoa3Dvideo.
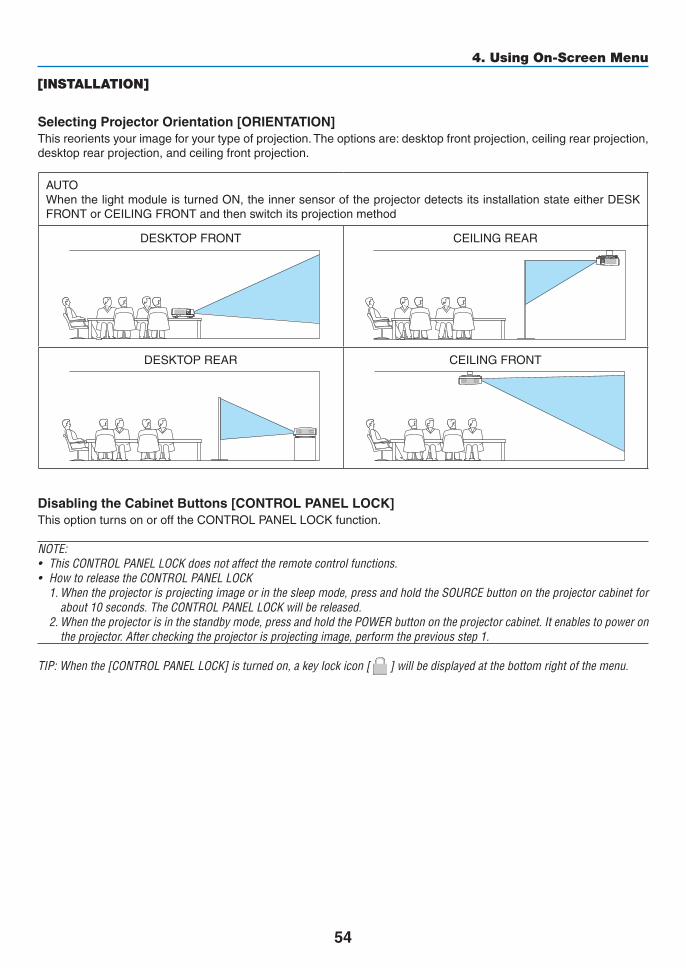
54
4. Using On-Screen Menu
[INSTALLATION]
SelectingProjectorOrientation[ORIENTATION]Thisreorientsyourimageforyourtypeofprojection.Theoptionsare:desktopfrontprojection,ceilingrearprojection,desktoprearprojection,andceilingfrontprojection.
AUTOWhenthelightmoduleisturnedON,theinnersensoroftheprojectordetectsitsinstallationstateeitherDESKFRONTorCEILINGFRONTandthenswitchitsprojectionmethod
DESKTOPFRONT CEILINGREAR
DESKTOPREAR CEILINGFRONT
DisablingtheCabinetButtons[CONTROLPANELLOCK]ThisoptionturnsonorofftheCONTROLPANELLOCKfunction.
NOTE:• ThisCONTROLPANELLOCKdoesnotaffecttheremotecontrolfunctions.• HowtoreleasetheCONTROLPANELLOCK
1.Whentheprojectorisprojectingimageorinthesleepmode,pressandholdtheSOURCEbuttonontheprojectorcabinetforabout10seconds.TheCONTROLPANELLOCKwillbereleased.
2.Whentheprojectorisinthestandbymode,pressandholdthePOWERbuttonontheprojectorcabinet.Itenablestopowerontheprojector.Aftercheckingtheprojectorisprojectingimage,performthepreviousstep1.
TIP:Whenthe[CONTROLPANELLOCK]isturnedon,akeylockicon[ ]willbedisplayedatthebottomrightofthemenu.
55
4. Using On-Screen Menu
EnablingSecurity[SECURITY]ThisfeatureturnsonorofftheSECURITYfunction.Unlessthecorrectkeywordisentered,theprojectorcannotprojectanimage.(→page30)
NOTE:Yoursettingwillnotbeaffectedevenwhen[RESET]isdonefromthemenu.
SelectingCommunicationSpeed[COMMUNICATIONSPEED]ThisfeaturesetsthebaudrateofthePCControlport(D-Sub9P).Itsupportsdataratesfrom4800to38400bps.Thedefaultis38400bps.Selecttheappropriatebaudrateforyourequipmenttobeconnected(dependingontheequip-ment,alowerbaudratemayberecommendedforlongcableruns).
NOTE:Yourselectedcommunicationspeedwillnotbeaffectedevenwhen[RESET]isdonefromthemenu.
Selectingtheserialport[SERIALPORT]ThissetswhichterminalontheprojectorwillreceivetheserialcontrolsignalswhenoperatingtheprojectorbyremotecontrolfromacommerciallyavailableHDBaseTtransmitter(controlsignalsforturningthepoweronandoff,etc.).Thereisnoneedtomakethissettingifnotoperatingtheprojectorbyremotecontrol(onlysendingvideoandaudio).
PC CONTROL ��������� Control signals (RS232C serial communications) are received at the PC CONTROL terminal�HDBaseT ���������������� The video/audio and control signals (RS232C serial communications) are received at the Ethernet/HDBaseT
port�
NOTE:• When[HDBaseT]isset,theprojectorgoesintotheSLEEPmoderegardlessthesettingforthestandbymode(→page60)on
theon-screenmenuis[NORMAL]or[NETWORKSTANDBY].Basedonthis,theprojectorcanbepoweredONbyanHDBaseTtransmissiondevicethatisconnectedtotheprojectorwhentheprojectorisinthestandbymode.However,thestandbymodesettingcannotbechangedwhen[HDBaseT]isset.
•While[HDBaseT]issetfortheSERIALPORT,powerconsumptioninthestandbymodebecomesnottosatisfytheenergysavingregulation.
TIP:• WhencontrollingtheprojectorusingtheLANport,thisworkswitheithersetting.
TurningOnorOffRemoteSensor[REMOTESENSOR]Settheremotecontrolsensorsontheprojector’sfrontandrearpanelsandtheHDBaseTremotecontrolsensor.Theoptionsare:ALL,FRONT/BACK,FRONT,BACK,andHDBaseT.
TIP:• Iftheremotecontrolsystemdoesnotfunctionwhendirectsunlightorstrongilluminationstrikestheremotecontrolsensorof
theprojector,changeanotheroption.• Theremotecontrolsensoronthebackoftheprojectorcannotbeusedwhentheseparatelysoldcablecoverismountedonthe
projector.
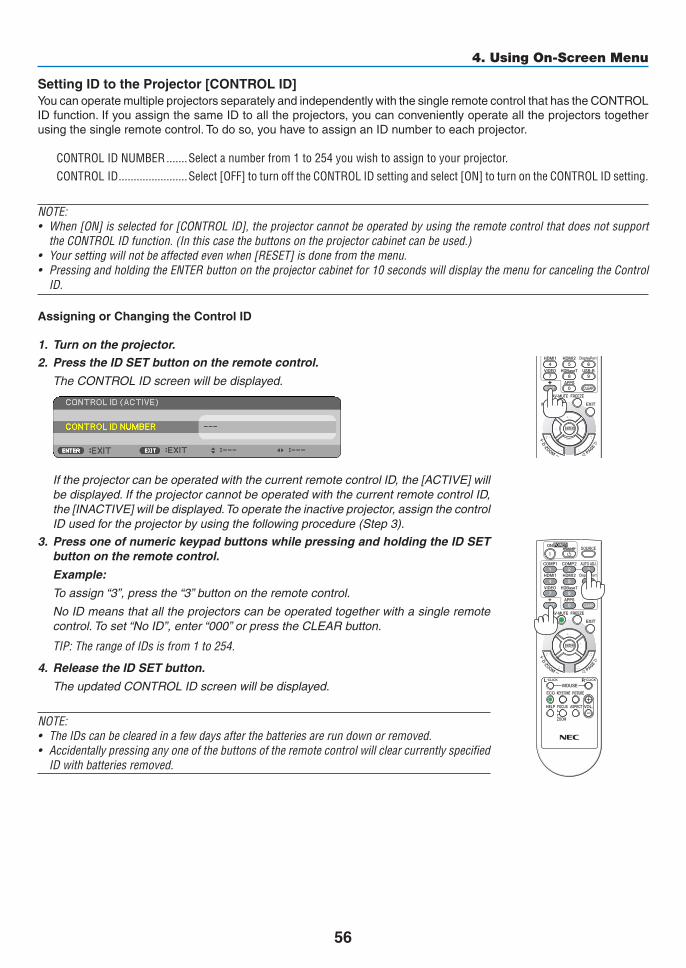
56
4. Using On-Screen Menu
SettingIDtotheProjector[CONTROLID]YoucanoperatemultipleprojectorsseparatelyandindependentlywiththesingleremotecontrolthathastheCONTROLIDfunction.IfyouassignthesameIDtoalltheprojectors,youcanconvenientlyoperatealltheprojectorstogetherusingthesingleremotecontrol.Todoso,youhavetoassignanIDnumbertoeachprojector.
CONTROL ID NUMBER �������Select a number from 1 to 254 you wish to assign to your projector�CONTROL ID �����������������������Select [OFF] to turn off the CONTROL ID setting and select [ON] to turn on the CONTROL ID setting�
NOTE:• When[ON]isselectedfor[CONTROLID],theprojectorcannotbeoperatedbyusingtheremotecontrolthatdoesnotsupport
theCONTROLIDfunction.(Inthiscasethebuttonsontheprojectorcabinetcanbeused.)• Yoursettingwillnotbeaffectedevenwhen[RESET]isdonefromthemenu.• PressingandholdingtheENTERbuttonontheprojectorcabinetfor10secondswilldisplaythemenuforcancelingtheControl
ID.
Assigning or Changing the Control ID
1. Turn on the projector.
2. Press the ID SET button on the remote control.
TheCONTROLIDscreenwillbedisplayed.
IftheprojectorcanbeoperatedwiththecurrentremotecontrolID,the[ACTIVE]willbedisplayed.IftheprojectorcannotbeoperatedwiththecurrentremotecontrolID,the[INACTIVE]willbedisplayed.Tooperatetheinactiveprojector,assignthecontrolIDusedfortheprojectorbyusingthefollowingprocedure(Step3).
+
3. Press one of numeric keypad buttons while pressing and holding the ID SET button on the remote control.
Example:
Toassign“3”,pressthe“3”buttonontheremotecontrol.
NoIDmeansthatalltheprojectorscanbeoperatedtogetherwithasingleremotecontrol.Toset“NoID”,enter“000”orpresstheCLEARbutton.
TIP:TherangeofIDsisfrom1to254.
4. Release the ID SET button.
TheupdatedCONTROLIDscreenwillbedisplayed.
NOTE:• TheIDscanbeclearedinafewdaysafterthebatteriesarerundownorremoved.• Accidentallypressinganyoneofthebuttonsoftheremotecontrolwillclearcurrentlyspecified
IDwithbatteriesremoved.

57
4. Using On-Screen Menu
UsingTestPattern[TESTPATTERN]Displaysthetestpatternforadjustingdistortiononthescreenandthefocusatthetimeoftheprojectorsetup.Oncethe[TESTPATTERN]ontheonscreenmenuisselected,thepatternforadjustmentwillbedisplayedon.Ifyoufinddistortiononthepattern,adjusttheprojectorinstallationangleorcorrectdistortionbypressingtheKEYSTONEbuttonontheremote.Ifthefocusadjustmentisrequired,controlthefocuslever.RecommendtoperformthefocusadjustmentafterleavingtheprojectorunderthestatetheTESTPATTERNhasbeenprojectedforover30minutes.PressEXITbutton to close the test pattern and return to the menu.
Settingthenetwork[NETWORKSETTINGS]Thisfunctiondisplaythenetworksettingsmenu.(→page90)
58
4. Using On-Screen Menu
[OPTIONS(1)]
SelectingFanMode[FANMODE]FanModeisusedtosetthespeedoftheinternalcoolingfan.
AUTO ��������������������� The built-in fans automatically run at a variable speed according to the internal temperature�HIGH ���������������������� The built-in fans run at a high speed� Select this option when using the projector at altitudes approximately
5500 feet/1700 meters or higher�
NOTE:• ItisrecommendedthatyouselectHighspeedmodeifyouusetheprojectornon-stopforconsecutivedays.• Set[FANMODE]to[HIGH]whenusingtheprojectorataltitudesapproximately5500feet/1700metersorhigher.• Usingtheprojectorataltitudesapproximately5500feet/1700metersorhigherwithoutsettingto[HIGH]cancausetheprojector
tooverheatandtheprotectorcouldshutdown.Ifthishappens,waitacoupleminutesandturnontheprojector.• Usingtheprojectorataltitudesapproximately5500feet/1700metersorhighercanshortenthelifeofopticalcomponentssuch
asthelightmodule.• Yoursettingwillnotbeaffectedevenwhen[RESET]isdonefromthemenu.
EnablingorDisablingWXGAMode[WXGAMODE]Selecting[ON]willgiveprioritytoWXGA(1280×768)/WUXGA(1920×1200)signalsinrecognizinganinputsignal.When[WXGAMODE]issetto[ON],XGA(1024×768)/UXGA(1600×1200)signalsmaynotberecognized.Inthiscase,select[OFF].
NOTE:• The[ON]isselectedatthetimeofshipment.
SelectingStillImageModeorMovieMode[IMAGEMODE]Thisfunctionallowsyoutoselectthestillimagemodeorthemoviemode.
NOTE:• Thismodemaynotbeavailabledependingoninputsignal.

59
4. Using On-Screen Menu
SettingHDMI1,HDMI2,orHDBaseT[HDMISETTINGS]MakethesettingsforeachvideolevelwhenconnectingHDMIequipmentandEthernet/HDBaseTterminal.
VIDEO LEVEL ��������� Select [AUTO] to automatically detect video level� If automatic detection may not work well, select [NOR-MAL] to disable the [ENHANCED] feature of your HDMI equipment or select [ENHANCED] to improve image contrast and increase detail in the dark areas�
SettingAudio[AUDIOSELECT]MakethesettingsforeachaudiolevelwhenconnectingHDMIequipmentandEthernet/HDBaseTterminal.Selectbetweeneachequipmentandcomputer.
HDMI1, HDMI2 ����������� Select [HDMI1] or [HDMI2] to switch the HDMI 1 IN or HDMI 2 IN digital audio signal or select [COMPUTER] to switch the COMPUTER input audio signal�
HDBaseT ���������������� Select [HDBaseT] or [COMPUTER] to switch the source connected to the network�
EnablingKeySoundandErrorSound[BEEP]Thisfeatureturnsonoroffthebuttonsoundoralarmwhenanerroroccursorthefollowingoperationsareperformed.
-Displayingthemainmenu
-Switchingsources
-Resettingdatabyusing[RESET]
-PressingPOWERONorSTANDBYbutton
60
4. Using On-Screen Menu
[OPTIONS(2)]
SelectingPower-savingin[STANDBYMODE]Theprojectorhastwostandbymodes:[NORMAL]and[NETWORKSTANDBY].TheNORMALmodeisthemodethatallowsyoutoputtheprojectorinthepower-savingconditionwhichconsumeslesspowerthantheNETWORKSTANDBYmode.
NORMAL �����������������������POWER indicator: Red light/STATUS indicator: OffWhen [NORMAL] is selected, only the following buttons and feature will work:POWER button on the projector cabinet and the remote control, powering on from PC Control com-mand, and AUTO POWER ON�
NETWORK STANDBY ����POWER indicator: Orange light/STATUS indicator: OffWhen [NETWORK STANDBY] is selected, the projector can be turned on over a wired LAN/wireless LAN connection and only the following buttons, terminals, and features will work:POWER button on the projector cabinet and the remote control, powering on from PC Control command, AUTO POWER ON, Operation by User Supportware, Network service, Program Timer�
Important:• When[NETWORKSTANDBY]hasbeensetfor[STANDBYMODE]andtheLANhasbeeninlink-downconditionfor3minutes,
[STANDBYMODE]willtransitinto[NORMAL]automaticallyforthepurposetosavetheconsumptionpower.• When[NETWORKSTANDBY]isselected,[AUTOPOWEROFF]willturningreyandbedisabledand[0:10]willbeselectedauto-
maticallyfor[AUTOPOWEROFF].• Inthebelowconditions,settingofthe[STANDBYMODE]isdisabledandtheprojectorwillgointotheSLEEPmode*.
* Sleepmoderefersthemodewithoutfunctionalrestrictionsbythe[STANDBYMODE].PowerconsumptionintheSLEEPmodeisrelativelyhigherthanthe[NETWORKSTANDBY]mode.TheStatusindicatorturnsoninGreen.
When[STANDBYMODE]→[NETWORKSTANDBY]isselected- When[NETWORKSERVICE]→[AMXSETTINGS]→[ENABLE]isselected- When[NETWORKSERVICE]→[CRESTRONSETTINGS]→[CRESTRONCONTROL]→[ENABLE]isselected- When[NETWORKSETTINGS]→[WIRELESSLAN]→Exceptfor[DISABLE]andmountingthewirelessLANunittotheprojector- Whenthesignalisinputtothecomputer,HDMI1INorHDMI2INterminals
TIP:• Evenwhen[NORMAL]isselectedfor[STANDBYMODE],poweronoroffcanbedonebyusingthePCCONTROLport.• ThepowerconsumptioninthestandbymodewillnotbeincludedincalculatingCO2emissionreduction.• Yoursettingwillnotbeaffectedevenwhen[RESET]isdonefromthemenu.
EnablingDirectPowerOn[DIRECTPOWERON]Turnstheprojectoronautomaticallywhenthepowercordisinsertedintoanactivepoweroutlet.ThiseliminatestheneedtoalwaysusethePOWERbuttonontheremotecontrolorprojectorcabinet.

61
4. Using On-Screen Menu
TurningOntheProjectorByApplyingComputerSignal[AUTOPOWERON]WhentheprojectorisinStandbymode,applyingacomputerorHDMIsignalfromacomputerconnectedtotheCOM-PUTERINinput,HDMI1,orHDMI2inputwillpowerontheprojectorandsimultaneouslyprojecttheimage.ThisfunctionalityeliminatestheneedtoalwaysusethePOWERbuttonontheremotecontrolortheprojectorcabinetto power on the projector.Tousethisfunction,firstconnectacomputertotheprojectorandtheprojectortoanactiveACinput.
NOTE:• Disconnectingacomputersignalfromthecomputerwillnotpowerofftheprojector.Werecommendusingthisfunctionincom-
binationoftheAUTOPOWEROFFfunction.• Thisfunctionwillnotbeavailableunderthefollowingconditions:
- whenacomponentsignalisappliedtotheCOMPUTERINterminal- whenaSynconGreenRGBsignalorcompositesyncsignalisapplied
• ToenabletheAUTOPOWERONafterchangingtothesleepmodeturningofftheprojector,wait5secondsandinputacomputerorHDMIsignal.
IfacomputerorHDMIsignalisstillpresentwhentheprojectoristurnedoff,theAUTOPOWERONwillnotworkandtheprojectorremainsinstandbymode.
EnablingPowerManagement[AUTOPOWEROFF]Theprojectorhaspowermanagementfunctions.Toreducepowerconsumption,thepowermanagementfunctions(1and2)arefactorypresetasshownbelow.TocontroltheprojectorfromanexternaldeviceviaaLANorserialcableconnection,usetheon-screenmenutochangethesettingsfor1and2.
1. STANDBY MODE (Factory preset: NORMAL)
To control the projector from an external device, select [NETWORK STANDBY] for [STANDBY MODE].
NOTE:• When[NORMAL]isselectedfor[STANDBYMODE],thefollowingterminalsandfunctionswillnotwork: MONITOROUT(COMP.)terminal,AUDIOOUTterminal,LANfunctions,MailAlertfunction,DDC/CI(VirtualRemoteTool)
2. AUTO POWER OFF (Factory preset: 1 hour)
To control the projector from an external device, select [OFF] for [AUTO POWER OFF].
NOTE:• When[1:00]isselectedfor[AUTOPOWEROFF],youcanenabletheprojectortoautomaticallyturnoffin60minutesifthereis
nosignalreceivedbyanyinputorifnooperationisperformed.
62
4. Using On-Screen Menu
SelectingDefaultSource[DEFAULTSOURCESELECT]Youcansettheprojectortodefaulttoanyoneofitsinputseachtimetheprojectoristurnedon.
LAST ���������������������� Sets the projector to default to the previous or last active input each time the projector is turned on�AUTO ��������������������� Searches for an active source in order of [HDMI1] → [HDMI2] → [COMPUTER] → [VIDEO] → [HDBaseT]
→ [APPS] and displays the first found source�HDMI1 ������������������� Displays the digital source from the HDMI 1 IN terminal every time the projector is turned on� HDMI2 ������������������� Displays the digital source from the HDMI 2 IN terminal every time the projector is turned on� COMPUTER ����������� Displays the computer signal from the COMPUTER IN terminal every time the projector is turned on�VIDEO �������������������� Displays the Video source from the VIDEO IN terminal every time the projector is turned on�HDBaseT ���������������� Projects the signal transmitted from the terminals supported HDBaseT�APPS ��������������������� Display the APPS MENU�
NOTE:• [APPS]cannotbedetectedwhen[AUTO]isselected.ForprojectingimagefromAPPS,select[APPS]or[LAST].
63
4. Using On-Screen Menu
[3D]
Selectinginputconnectedtoasourceof3Dimages[HDMI1/HDMI2/COMPUTER/VIDEO/HDBaseT]
[3D]Thisfunctionswitchesthe3DmodebetweenONandOFFforeachinput.
ON ������������������������� Turns on the 3D mode for the selected input�
NOTE:Toconfirmthatthesupported3Dsignalisaccepted,useeitherwayofthefollowing:• Makesurethat[3D]isdisplayedinthetoprightofthescreenafterthesourceisselected.• Display[INFO.]→[SOURCE(2)]→[3DSIGNAL]andmakesurethat“SUPPORTED”isdisplayed.
OFF ������������������������ Turns off the 3D mode for the selected input�
[GLASSES]Select3Dglassesmethod.
DLP® Link �������������� For 3D eyeglasses (ones manufactured by XPAND are recommended) or DLP® Link compatible LCD shutter eyeglasses�
Others �������������������� For other LCD shutter eyeglasses such as IR or wired LCD shutter types�
NOTE:• WhenusingcrystalshutterglassesotherthanthoseusingtheDLP®Linkmethod,itmaynotbepossibletosynchronize,depend-
ingontheglasses.• ThisfunctionwillnotworkforVIDEOsource.
[FORMAT]Sets3Dformat.
AUTO ����������������������������Automatically selects the appropriate format� The supported format is HDMI 3D only�FRAME PACKING ����������Selects this format for the FRAME PACKING 3D image� FRAM PACKING is a format that stores the left
and right eye images without compression�SIDE BY SIDE ���������������Selects this format for the SIDE BY SIDE 3D image� SIDE BY SIDE is a format that stores the left and
right eye images displayed horizontally� Only the half of the horizontal resolution is supported TOP AND BOTTOM �������Selects this format for the TOP AND BOTTOM 3D image� TOP AND BOTTOM is a format that stores the
left and right eye images displayed vertically� Only the half of the vertical resolution is supported�FRAME SEQUENTIAL ����Selects this format for the FRAME SEQUENTIAL 3D image� FRAME SEQUENTIAL is a format that displays
the left and right eye images alternately�
NOTE:• ThisfunctionwillnotworkforVIDEOsource.• When3Dsignalsareinput,operationisonlypossiblewhen[GLASSES]issetto“DLP®Link”.

64
4. Using On-Screen Menu
[L/RINVERT]Changethesettingifyouhavedifficultyseeing3Dimages.
NON-INVERT ��������� Normal setting�INVERT ������������������ Changes the order of displaying the images for left eye and right eye�
NOTE:• When[L/RINVERT]cannotbeoperated,the[L/RINVERT]screenwillnotbedisplayedevenwhentheremotecontrol’svideo
buttonispressed.

65
4. Using On-Screen Menu
❻ Menu Descriptions & Functions [INFO.]Displaysthestatusofthecurrentsignalandlightmoduleusage.Thisitemhasninepages.Theinformationincludedis as follows:
TIP:PressingtheHELPbuttonontheremotecontrolwillshowthe[INFO.]menuitems.
[USAGE TIME][LIGHTHOURSUSED](H)[TOTALCARBONSAVINGS](kg-CO2)
• [TOTALCARBONSAVINGS]
Thisdisplaystheestimatedcarbonsavinginformationinkg.Thecarbonfootprintfactorinthecarbonsavingcal-culationisbasedontheOECD(2008Edition).(→page29)
[SOURCE(1)][RESOLUTION] [HORIZONTALFREQUENCY][VERTICALFREQUENCY] [SYNCTYPE][SYNCPOLARITY] [SCANTYPE]
[SOURCE(2)][SIGNALTYPE] [VIDEOTYPE][BITDEPTH] [VIDEOLEVEL][3DSIGNAL]
[HDBaseT][SIGNALQUALITY] [OPERATIONMODE][LINKSTATUS] [HDMISTATUS]
[WIRED LAN][IPADDRESS] [SUBNETMASK][GATEWAY] [MACADDRESS]
[WIRELESS LAN][IPADDRESS] [SUBNETMASK][GATEWAY] [MACADDRESS][SSID] [NETWORKTYPE][SECURITY] [CHANNEL][SIGNALLEVEL]
[VERSION(1)][FIRMWARE]Version [DATA]Version
[VERSION(2)][FIRMWARE2]Version
[OTHERS][PROJECTORNAME] [HOSTNAME][MODELNO.] [SERIALNUMBER][LANUNITTYPE] [CONTROLID](when[CONTROLID]isset)

66
4. Using On-Screen Menu
❼ Menu Descriptions & Functions [RESET]
Returning to Factory Default [RESET]TheRESETfeatureallowsyoutochangeadjustmentsandsettingstothefactorypresetfora(all)source(s)exceptthefollowing:
[CURRENTSIGNAL]Resetstheadjustmentsforthecurrentsignaltothefactorypresetlevels.Theitemsthatcanberesetare:[PRESET],[CONTRAST],[BRIGHTNESS],[COLOR],[HUE],[SHARPNESS],[AS-PECTRATIO],[HORIZONTAL],[VERTICAL],[CLOCK],[PHASE],and[OVERSCAN].
[ALLDATA]Resetalltheadjustmentsandsettingsforallthesignalstothefactorypreset.AllitemscanberesetEXCEPT[LANGUAGE],[BACKGROUND],[ORIENTATION],[SERIALPORT],[SECURITY],[COMMUNICATIONSPEED],[CONTROLID],[STANDBYMODE],[FANMODE],[LIGHTHOURSUSED],[TOTALCARBONSAVINGS],[PROJECTORNAME],[WIREDLAN],[WIRELESSLAN],[MultiPresenter],[NETWORKSER-VICE],[DATE&TIME],[ADMINISTRATORMODE],and[REMOTEDESKTOPCONNECTION].
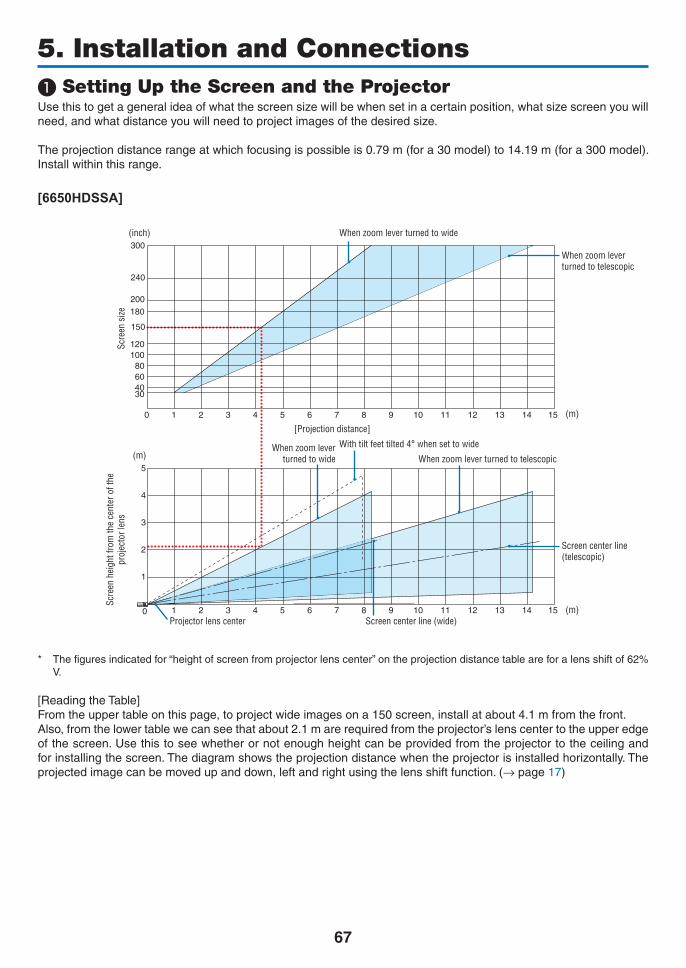
67
❶ Setting Up the Screen and the ProjectorUsethistogetageneralideaofwhatthescreensizewillbewhensetinacertainposition,whatsizescreenyouwillneed,andwhatdistanceyouwillneedtoprojectimagesofthedesiredsize.
Theprojectiondistancerangeatwhichfocusingispossibleis0.79m(fora30model)to14.19m(fora300model).Installwithinthisrange.
[6650HDSSA]
0 1 2 3 4 5 6 7 8 9 10 11 12 13 14 15
12 13 14 150
1
2
3
4
5
1 2 3 4 5 6 7 8 9 10 11
4030
6080
100120
150
180200
240
300(inch)
(m)
Scre
en s
izeSc
reen
hei
ght f
rom
the
cent
er o
f the
pr
ojec
tor l
ens
[Projection distance]
When zoom lever turned to wide
With tilt feet tilted 4° when set to wide
When zoom lever turned to telescopic
When zoom lever turned to telescopic
Screen center line (telescopic)
When zoom lever turned to wide
Projector lens center Screen center line (wide)(m)
(m)
* Thefiguresindicatedfor“heightofscreenfromprojectorlenscenter”ontheprojectiondistancetableareforalensshiftof62%V.
[ReadingtheTable]Fromtheuppertableonthispage,toprojectwideimagesona150screen,installatabout4.1mfromthefront.Also,fromthelowertablewecanseethatabout2.1marerequiredfromtheprojector’slenscentertotheupperedgeofthescreen.Usethistoseewhetherornotenoughheightcanbeprovidedfromtheprojectortotheceilingandforinstallingthescreen.Thediagramshowstheprojectiondistancewhentheprojectorisinstalledhorizontally.Theprojectedimagecanbemovedupanddown,leftandrightusingthelensshiftfunction.(→page17)
5. Installation and Connections
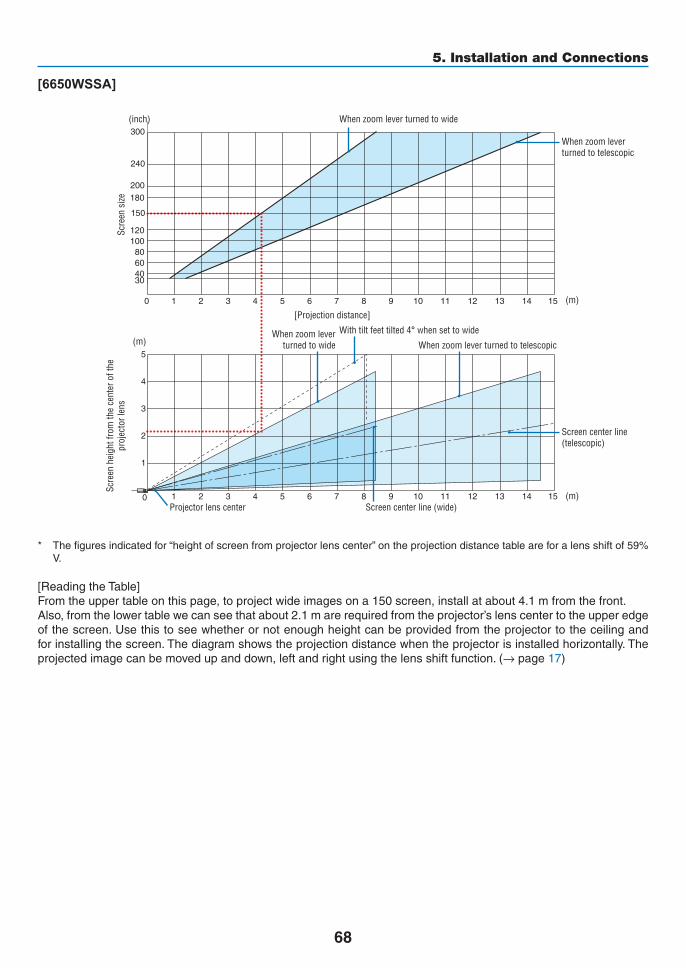
68
5. Installation and Connections
[6650WSSA]
0 1 2 3 4 5 6 7 8 9 10 11 12 13 14 15
12 13 14 150
1
2
3
4
5
1 2 3 4 5 6 7 8 9 10 11
4030
6080
100120
150
180200
240
300(inch)
(m)
Scre
en s
izeSc
reen
hei
ght f
rom
the
cent
er o
f the
pr
ojec
tor l
ens
[Projection distance]
When zoom lever turned to wide
With tilt feet tilted 4° when set to wide
When zoom lever turned to telescopic
When zoom lever turned to telescopic
Screen center line (telescopic)
When zoom lever turned to wide
Projector lens center Screen center line (wide)(m)
(m)
* Thefiguresindicatedfor“heightofscreenfromprojectorlenscenter”ontheprojectiondistancetableareforalensshiftof59%V.
[ReadingtheTable]Fromtheuppertableonthispage,toprojectwideimagesona150screen,installatabout4.1mfromthefront.Also,fromthelowertablewecanseethatabout2.1marerequiredfromtheprojector’slenscentertotheupperedgeofthescreen.Usethistoseewhetherornotenoughheightcanbeprovidedfromtheprojectortotheceilingandforinstallingthescreen.Thediagramshowstheprojectiondistancewhentheprojectorisinstalledhorizontally.Theprojectedimagecanbemovedupanddown,leftandrightusingthelensshiftfunction.(→page17)
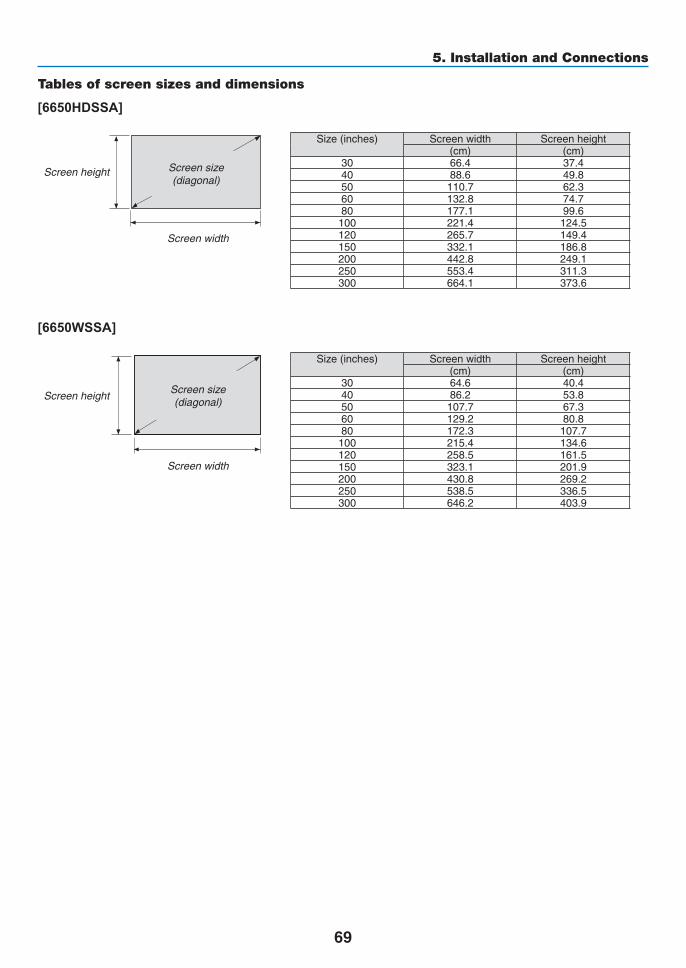
69
5. Installation and Connections
Tables of screen sizes and dimensions
[6650HDSSA]
Screen height
Screen width
Screen size (diagonal)
Size(inches) Screenwidth Screenheight(cm) (cm)
30 66.4 37.440 88.6 49.850 110.7 62.360 132.8 74.780 177.1 99.6100 221.4 124.5120 265.7 149.4150 332.1 186.8200 442.8 249.1250 553.4 311.3300 664.1 373.6
[6650WSSA]
Screen height
Screen width
Screen size (diagonal)
Size(inches) Screenwidth Screenheight(cm) (cm)
30 64.6 40.440 86.2 53.850 107.7 67.360 129.2 80.880 172.3 107.7100 215.4 134.6120 258.5 161.5150 323.1 201.9200 430.8 269.2250 538.5 336.5300 646.2 403.9
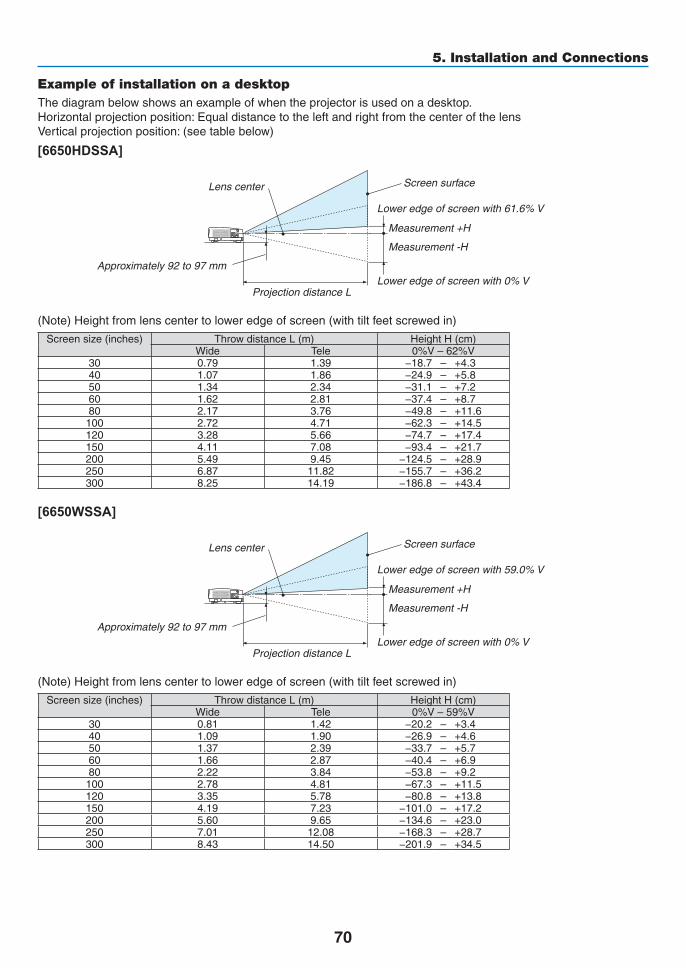
70
5. Installation and Connections
Example of installation on a desktopThediagrambelowshowsanexampleofwhentheprojectorisusedonadesktop.Horizontalprojectionposition:EqualdistancetotheleftandrightfromthecenterofthelensVerticalprojectionposition:(seetablebelow)
[6650HDSSA]
Screen surface
Lower edge of screen with 61.6% V
Measurement +H
Measurement -H
Lower edge of screen with 0% V
Lens center
Approximately 92 to 97 mm
Projection distance L
(Note)Heightfromlenscentertoloweredgeofscreen(withtiltfeetscrewedin)
Screensize(inches) ThrowdistanceL(m) HeightH(cm)Wide Tele 0%V–62%V
30 0.79 1.39 −18.7 – +4.340 1.07 1.86 −24.9 – +5.850 1.34 2.34 −31.1 – +7.260 1.62 2.81 −37.4 – +8.780 2.17 3.76 −49.8 – +11.6100 2.72 4.71 −62.3 – +14.5120 3.28 5.66 −74.7 – +17.4150 4.11 7.08 −93.4 – +21.7200 5.49 9.45 −124.5 – +28.9250 6.87 11.82 −155.7 – +36.2300 8.25 14.19 −186.8 – +43.4
[6650WSSA]
Screen surface
Lower edge of screen with 59.0% V
Measurement +H
Measurement -H
Lower edge of screen with 0% V
Lens center
Approximately 92 to 97 mm
Projection distance L
(Note)Heightfromlenscentertoloweredgeofscreen(withtiltfeetscrewedin)
Screensize(inches) ThrowdistanceL(m) HeightH(cm)Wide Tele 0%V–59%V
30 0.81 1.42 −20.2 – +3.440 1.09 1.90 −26.9 – +4.650 1.37 2.39 −33.7 – +5.760 1.66 2.87 −40.4 – +6.980 2.22 3.84 −53.8 – +9.2100 2.78 4.81 −67.3 – +11.5120 3.35 5.78 −80.8 – +13.8150 4.19 7.23 −101.0 – +17.2200 5.60 9.65 −134.6 – +23.0250 7.01 12.08 −168.3 – +28.7300 8.43 14.50 −201.9 – +34.5
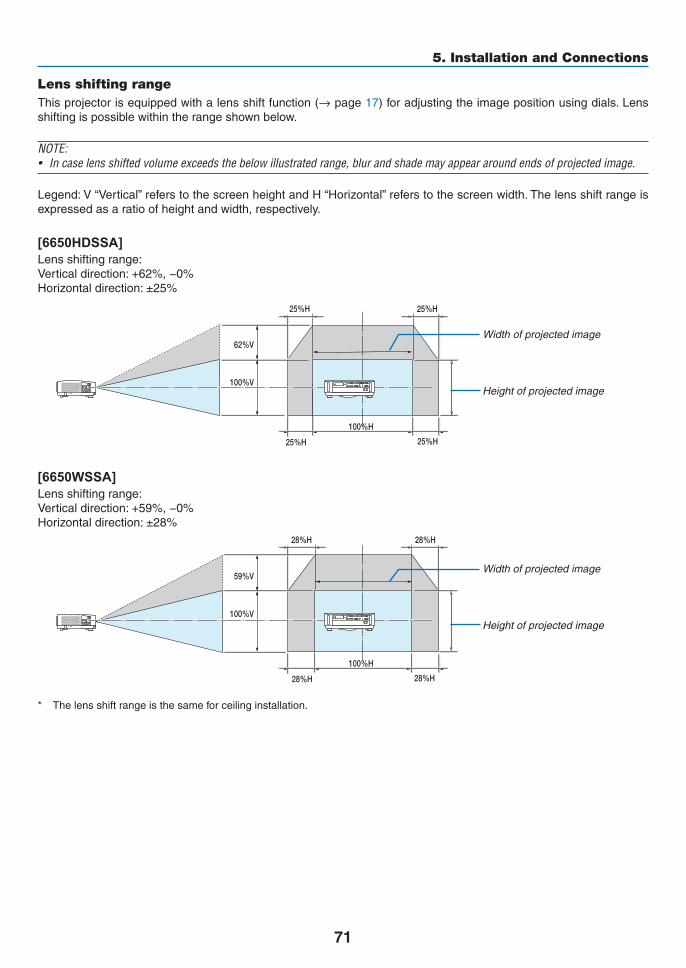
71
5. Installation and Connections
Lens shifting rangeThisprojectorisequippedwithalensshiftfunction(→page17)foradjustingtheimagepositionusingdials.Lensshiftingispossiblewithintherangeshownbelow.
NOTE:• Incaselensshiftedvolumeexceedsthebelowillustratedrange,blurandshademayappeararoundendsofprojectedimage.
Legend:V“Vertical”referstothescreenheightandH“Horizontal”referstothescreenwidth.Thelensshiftrangeisexpressedasaratioofheightandwidth,respectively.
[6650HDSSA]Lensshiftingrange:Verticaldirection:+62%,−0%Horizontaldirection:±25%
100%V
62%V
100%H
25%H 25%H
25%H 25%H
Height of projected image
Width of projected image
[6650WSSA]Lensshiftingrange:Verticaldirection:+59%,−0%Horizontaldirection:±28%
100%V
59%V
100%H
28%H 28%H
28%H 28%H
Height of projected image
Width of projected image
* Thelensshiftrangeisthesameforceilinginstallation.
72
5. Installation and Connections
(Example)Whenusingtoprojectona150"screen
[6650HDSSA]Accordingtothe“Tableofscreensizesanddimensions”(→page70),H=130.8"/332.1cm,V=73.6"/186.8cm.Adjustment range in thevertical direction: theprojected imagecanbemovedupwards0.62×73.6"/186.8cm≈ 45.3"/115cm(whenthelensisatthecenterposition).Adjustmentrangeinthehorizontaldirection:theprojectedimagecanbemovedtotheleft0.25×130.8"/332.1cm≈ 32.7"/83cm,totherightapproximately32.7"/83cm.
[6650WSSA]Accordingtothe“Tableofscreensizesanddimensions”(→page70),H=127.3"/323.1cm,V=79.5"/201.9cm.Adjustment range in thevertical direction: theprojected imagecanbemovedupwards0.59×79.5"/201.9cm≈ 46.9"/119cm(whenthelensisatthecenterposition).Adjustmentrangeinthehorizontaldirection:theprojectedimagecanbemovedtotheleft0.28×127.3"/323.1cm≈ 35.4"/90cm,totherightapproximately35.4"/90cm.
* Figuresdifferbyseveral%becausethecalculationisapproximate.
WARNING* Installingyourprojectorontheceilingmustbedonebyaqualifiedtechnician.Contactyourdealerformore
information.* Donotattempttoinstalltheprojectoryourself.• Onlyuseyourprojectoronasolid, levelsurface.Iftheprojectorfallstotheground,youcanbeinjuredandthe
projectorseverelydamaged.• Donotusetheprojectorwheretemperaturesvarygreatly.Theprojectormustbeusedattemperaturesbetween
41°F(5°C)and104°F(40°C)(Ecomodeselectedautomaticallyat95°Fto104°F/35°Cto40°C).• Donotexposetheprojectortomoisture,dust,orsmoke.Thiswillharmthescreenimage.• Ensurethatyouhaveadequateventilationaroundyourprojectorsoheatcandissipate.Donotcovertheventson
the side or the front of the projector.
Reflecting the ImageUsingamirrortoreflectyourprojector’simageenablesyoutoenjoyamuchlargerimagewhenasmallerspaceisrequired.Contactyourdealerifyouneedamirrorsystem.Ifyou’reusingamirrorsystemandyourimageisinverted,usetheMENUand▲▼◀▶ buttons on your projector cabinet or your remote control to correct the orienta-tion.(→page54)
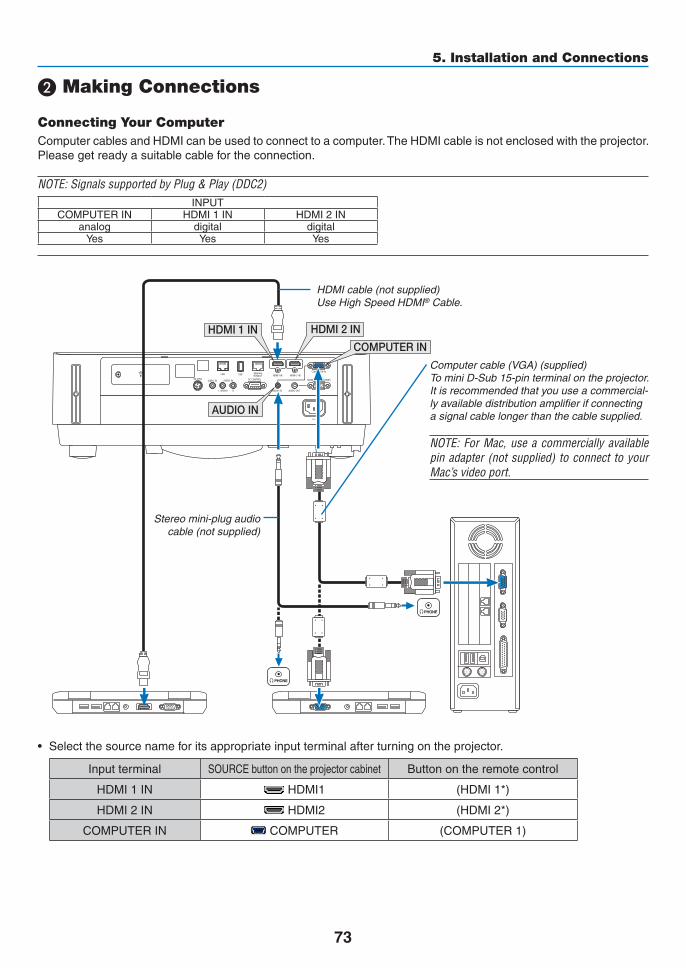
73
5. Installation and Connections
❷ Making Connections
Connecting Your ComputerComputercablesandHDMIcanbeusedtoconnecttoacomputer.TheHDMIcableisnotenclosedwiththeprojector.Pleasegetreadyasuitablecablefortheconnection.
NOTE:SignalssupportedbyPlug&Play(DDC2)INPUT
COMPUTERIN HDMI1IN HDMI2INanalog digital digital
Yes Yes Yes
HDMI 1 IN HDMI 2 IN
COMPUTER IN
AUDIO IN
Computer cable (VGA) (supplied)To mini D-Sub 15-pin terminal on the projector. Itisrecommendedthatyouuseacommercial-ly available distribution amplifier if connecting a signal cable longer than the cable supplied.
NOTE:ForMac,useacommerciallyavailablepinadapter(notsupplied) toconnect toyourMac’svideoport.
Stereo mini-plug audio cable (not supplied)
HDMIcable(notsupplied)UseHighSpeedHDMI® Cable.
• Selectthesourcenameforitsappropriateinputterminalafterturningontheprojector.
Inputterminal SOURCEbuttonontheprojectorcabinet Buttonontheremotecontrol
HDMI1IN HDMI1 (HDMI1*)
HDMI2IN HDMI2 (HDMI2*)
COMPUTERIN COMPUTER (COMPUTER1)

74
5. Installation and Connections
NOTE:TheprojectorisnotcompatiblewithvideodecodedoutputsoftheNECISS-6020 switcher.
NOTE:AnimagemaynotbedisplayedcorrectlywhenaVideosourceisplayedbackviaacommerciallyavailablescanconverter.Thisisbecausetheprojectorwillprocessavideosignalasacomputersignalatthedefaultsetting.Inthatcase,dothefollowing.* Whenanimageisdisplayedwiththelowerandupperblackportionofthescreenoradarkimageisnotdisplayedcorrectly: ProjectanimagetofillthescreenandthenpresstheAUTOADJ.buttonontheremotecontrolortheprojectorcabinet.Enabling the computer’s external displayDisplayinganimageonthenotebookPC’sscreendoesnotnecessarilymeanitoutputsasignaltotheprojector.WhenusingaPCcompatiblelaptop,acombinationoffunctionkeyswillenable/disabletheexternaldisplay.Usually,thecombinationofthe“Fn”keyalongwithoneofthe12functionkeysgetstheexternaldisplaytocomeonoroff.Forexample,NEClaptopsuseFn+F3,whileDelllaptopsuseFn+F8keycombinationstotogglethroughexternaldisplayselections.
CautionswhenusingaDVIsignal• WhenthecomputerhasaDVIoutputterminal,useacommerciallyavailableconvertercabletoconnectthecomputer
totheprojector’sHDMI1INorHDMI2INterminal(onlydigitalvideosignalscanbeinput).
HDMI 1 IN HDMI 2 IN
AUDIO IN
NOTE:WhenViewingaDVIDigitalSignal• Turnoffthepowerofthecomputerandprojectorbeforeconnecting.• Whenavideodeckisconnectedviaascanconverter,etc.,thedisplaymaynotbecorrectduringfast-forwardingandrewinding.• UseaDVI-to-HDMIcablecompliantwithDDWG(DigitalDisplayWorkingGroup)DVI(DigitalVisualInterface)revision1.0stan-
dard. Thecableshouldbewithin197"/5mlong.• TurnofftheprojectorandthePCbeforeconnectingtheDVI-to-HDMIcable.• ToprojectaDVIdigitalsignal:Connectthecables,turntheprojectoron,thenselecttheHDMIinput.Finally,turnonyourPC. Failuretodosomaynotactivatethedigitaloutputofthegraphicscardresultinginnopicturebeingdisplayed.Shouldthishappen,
restartyourPC.• DonotdisconnecttheDVI-to-HDMIcablewhiletheprojector isrunning.If thesignalcablehasbeendisconnectedandthen
reconnected,animagemaynotbecorrectlydisplayed.Shouldthishappen,restartyourPC.• TheCOMPUTERvideoinputterminalssupportWindowsPlugandPlay.• AMacsignaladapter(commerciallyavailable)mayberequiredtoconnectaMaccomputer.
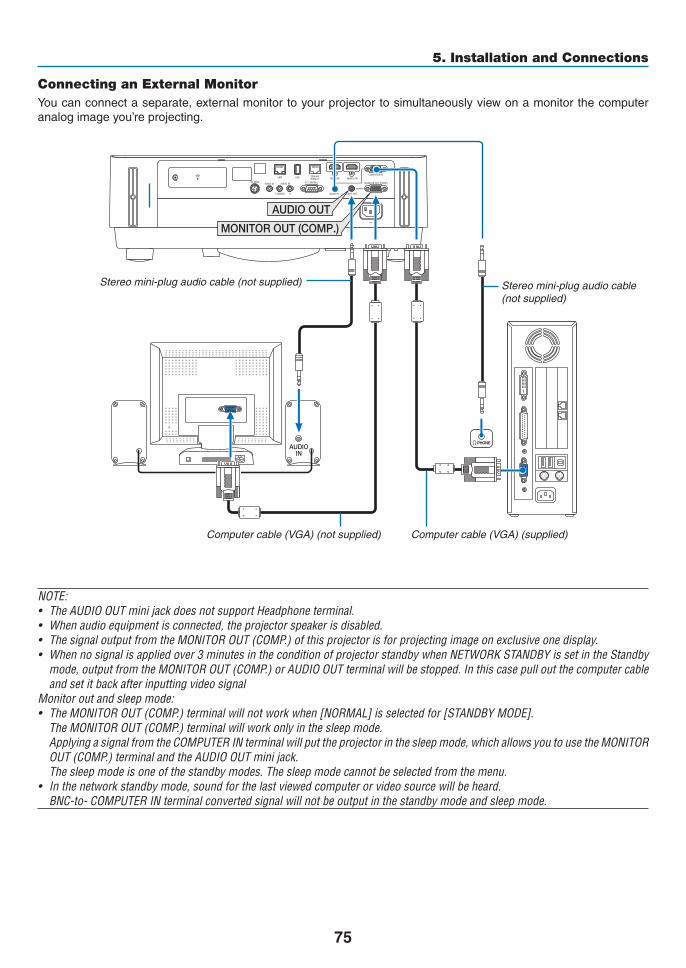
75
5. Installation and Connections
Connecting an External MonitorYoucanconnectaseparate,externalmonitortoyourprojectortosimultaneouslyviewonamonitorthecomputeranalogimageyou’reprojecting.
AUDIO OUT
MONITOR OUT (COMP.)
Computer cable (VGA) (supplied)
Stereo mini-plug audio cable (not supplied) Stereo mini-plug audio cable (not supplied)
Computer cable (VGA) (not supplied)
NOTE:• TheAUDIOOUTminijackdoesnotsupportHeadphoneterminal.• Whenaudioequipmentisconnected,theprojectorspeakerisdisabled.• ThesignaloutputfromtheMONITOROUT(COMP.)ofthisprojectorisforprojectingimageonexclusiveonedisplay.• Whennosignalisappliedover3minutesintheconditionofprojectorstandbywhenNETWORKSTANDBYissetintheStandby
mode,outputfromtheMONITOROUT(COMP.)orAUDIOOUTterminalwillbestopped.Inthiscasepulloutthecomputercableandsetitbackafterinputtingvideosignal
Monitoroutandsleepmode:• TheMONITOROUT(COMP.)terminalwillnotworkwhen[NORMAL]isselectedfor[STANDBYMODE]. TheMONITOROUT(COMP.)terminalwillworkonlyinthesleepmode. ApplyingasignalfromtheCOMPUTERINterminalwillputtheprojectorinthesleepmode,whichallowsyoutousetheMONITOR
OUT(COMP.)terminalandtheAUDIOOUTminijack. Thesleepmodeisoneofthestandbymodes.Thesleepmodecannotbeselectedfromthemenu.• Inthenetworkstandbymode,soundforthelastviewedcomputerorvideosourcewillbeheard. BNC-to-COMPUTERINterminalconvertedsignalwillnotbeoutputinthestandbymodeandsleepmode.

76
5. Installation and Connections
Connecting Your DVD Player or Other AV EquipmentConnectingVideoInput
VIDEO IN
AUDIO IN
Audio cable (not supplied)Video cable (not supplied)
Audio cable (not supplied)
Audio equipment
• Selectthesourcenameforitsappropriateinputterminalafterturningontheprojector.
InputterminalSOURCEbuttonontheprojector
cabinetButtonontheremotecontrol
VIDEOIN VIDEO (VIDEO)
NOTE:RefertoyourVCRowner’smanualformoreinformationaboutyourequipment’svideooutputrequirements.
NOTE:AnimagemaynotbedisplayedcorrectlywhenaVideosourceisplayedbackinfast-forwardorfast-rewindviaascanconverter.
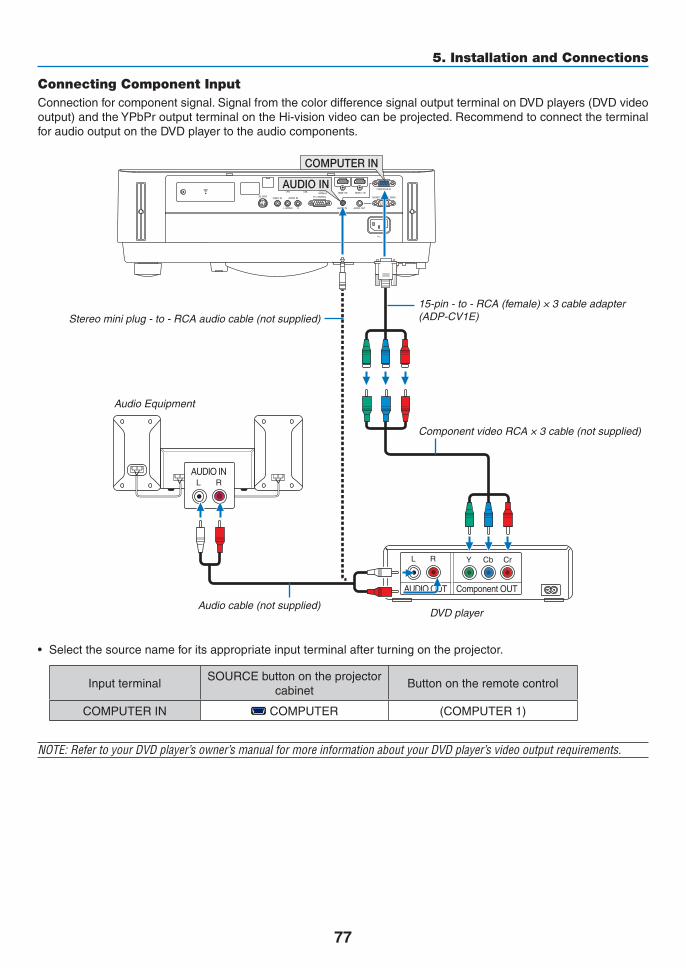
77
5. Installation and Connections
Connecting Component InputConnectionforcomponentsignal.SignalfromthecolordifferencesignaloutputterminalonDVDplayers(DVDvideooutput)andtheYPbProutputterminalontheHi-visionvideocanbeprojected.RecommendtoconnecttheterminalforaudiooutputontheDVDplayertotheaudiocomponents.
COMPUTER IN
AUDIO IN
15-pin - to - RCA (female) × 3 cable adapter (ADP-CV1E)Stereo mini plug - to - RCA audio cable (not supplied)
Component video RCA × 3 cable (not supplied)
Audio cable (not supplied)DVD player
Audio Equipment
• Selectthesourcenameforitsappropriateinputterminalafterturningontheprojector.
InputterminalSOURCEbuttonontheprojector
cabinetButtonontheremotecontrol
COMPUTERIN COMPUTER (COMPUTER1)
NOTE:RefertoyourDVDplayer’sowner’smanualformoreinformationaboutyourDVDplayer’svideooutputrequirements.
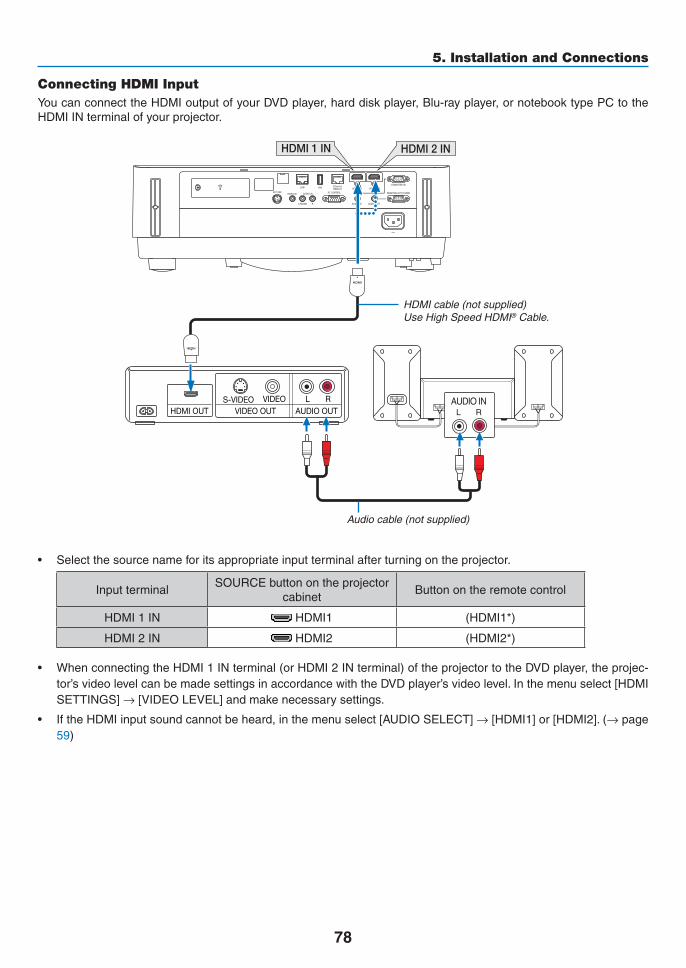
78
5. Installation and Connections
Connecting HDMI InputYoucanconnecttheHDMIoutputofyourDVDplayer,harddiskplayer,Blu-rayplayer,ornotebooktypePCtotheHDMIINterminalofyourprojector.
HDMI 1 IN HDMI 2 IN
HDMIcable(notsupplied)UseHighSpeedHDMI® Cable.
Audio cable (not supplied)
• Selectthesourcenameforitsappropriateinputterminalafterturningontheprojector.
InputterminalSOURCEbuttonontheprojector
cabinetButtonontheremotecontrol
HDMI1IN HDMI1 (HDMI1*)
HDMI2IN HDMI2 (HDMI2*)
• WhenconnectingtheHDMI1INterminal(orHDMI2INterminal)oftheprojectortotheDVDplayer,theprojec-tor’svideolevelcanbemadesettingsinaccordancewiththeDVDplayer’svideolevel.Inthemenuselect[HDMISETTINGS]→[VIDEOLEVEL]andmakenecessarysettings.
• IftheHDMIinputsoundcannotbeheard,inthemenuselect[AUDIOSELECT]→[HDMI1]or[HDMI2].(→page59)
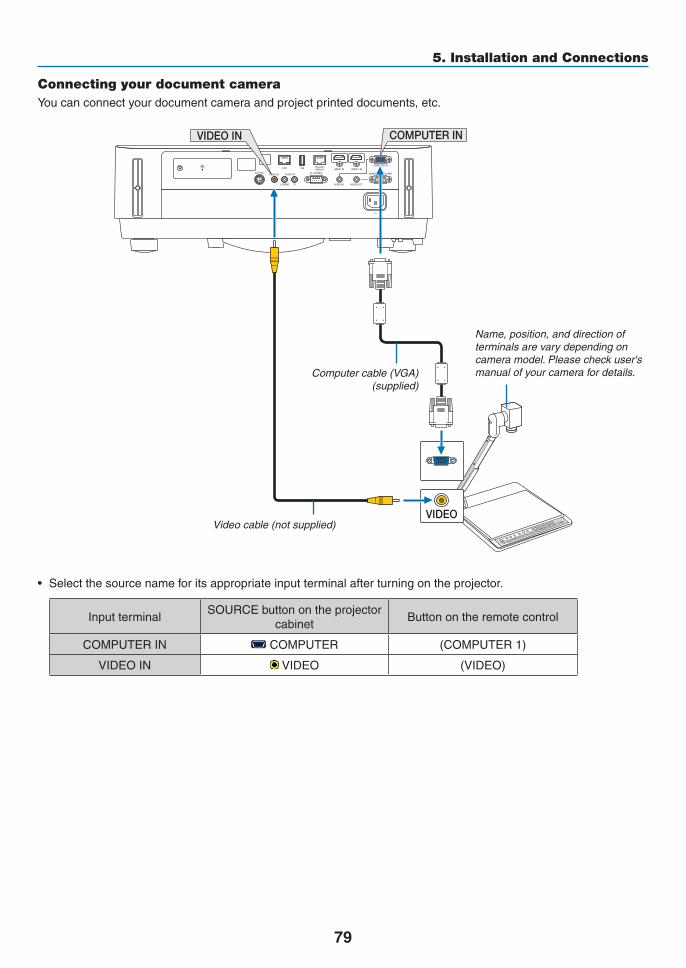
79
5. Installation and Connections
Connecting your document cameraYoucanconnectyourdocumentcameraandprojectprinteddocuments,etc.
COMPUTER INVIDEO IN
Name, position, and direction of terminals are vary depending on cameramodel.Pleasecheckuser'smanual of your camera for details.Computer cable (VGA)
(supplied)
Video cable (not supplied)
• Selectthesourcenameforitsappropriateinputterminalafterturningontheprojector.
InputterminalSOURCEbuttonontheprojector
cabinetButtonontheremotecontrol
COMPUTERIN COMPUTER (COMPUTER1)
VIDEOIN VIDEO (VIDEO)
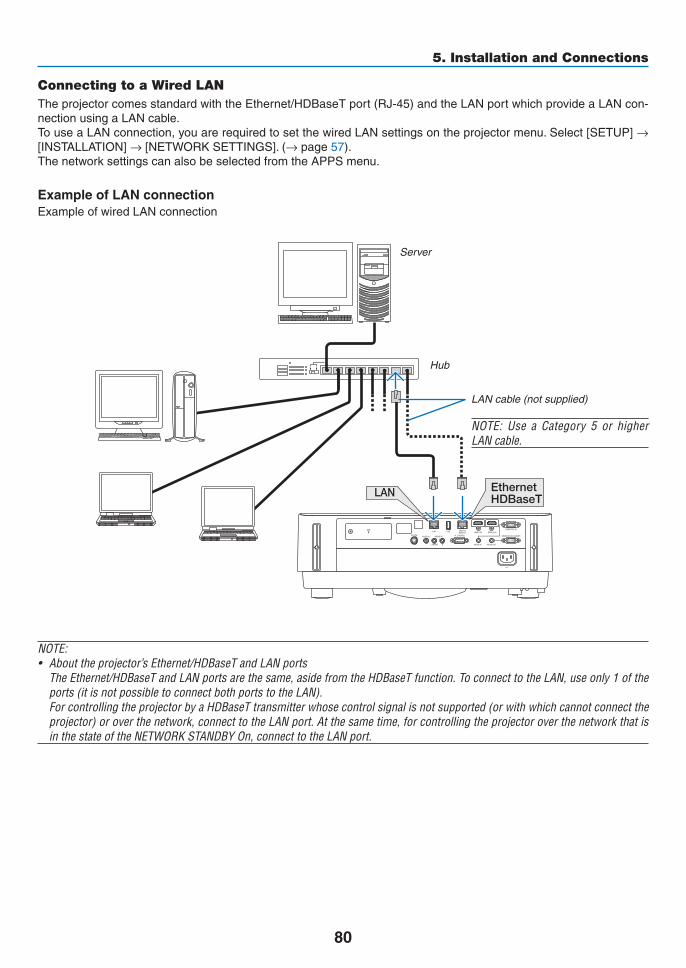
80
5. Installation and Connections
Connecting to a Wired LANTheprojectorcomesstandardwiththeEthernet/HDBaseTport(RJ-45)andtheLANportwhichprovideaLANcon-nectionusingaLANcable.TouseaLANconnection,youarerequiredtosetthewiredLANsettingsontheprojectormenu.Select[SETUP]→ [INSTALLATION]→[NETWORKSETTINGS].(→page57).ThenetworksettingscanalsobeselectedfromtheAPPSmenu.
ExampleofLANconnectionExampleofwiredLANconnection
EthernetHDBaseT
Server
Hub
LAN cable (not supplied)
NOTE: Use a Category 5 or higherLANcable.
NOTE:• Abouttheprojector’sEthernet/HDBaseTandLANports TheEthernet/HDBaseTandLANportsarethesame,asidefromtheHDBaseTfunction.ToconnecttotheLAN,useonly1ofthe
ports(itisnotpossibletoconnectbothportstotheLAN). ForcontrollingtheprojectorbyaHDBaseTtransmitterwhosecontrolsignalisnotsupported(orwithwhichcannotconnectthe
projector)oroverthenetwork,connecttotheLANport.Atthesametime,forcontrollingtheprojectoroverthenetworkthatisinthestateoftheNETWORKSTANDBYOn,connecttotheLANport.
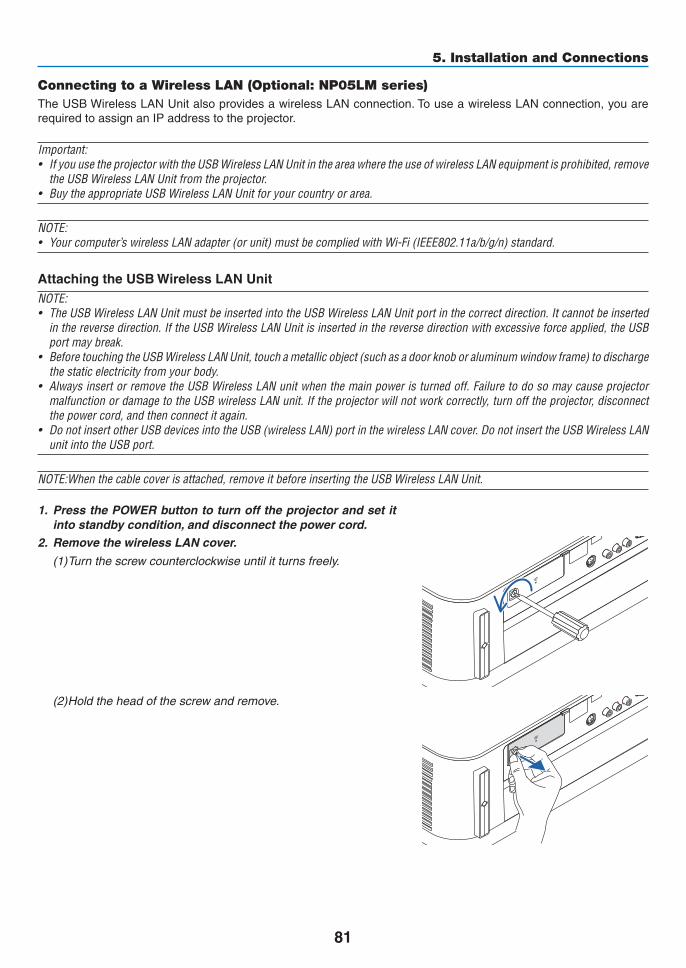
81
5. Installation and Connections
Connecting to a Wireless LAN (Optional: NP05LM series)TheUSBWirelessLANUnitalsoprovidesawirelessLANconnection.TouseawirelessLANconnection,youarerequiredtoassignanIPaddresstotheprojector.
Important:• IfyouusetheprojectorwiththeUSBWirelessLANUnitintheareawheretheuseofwirelessLANequipmentisprohibited,remove
theUSBWirelessLANUnitfromtheprojector.• BuytheappropriateUSBWirelessLANUnitforyourcountryorarea.
NOTE:• Yourcomputer’swirelessLANadapter(orunit)mustbecompliedwithWi-Fi(IEEE802.11a/b/g/n)standard.
AttachingtheUSBWirelessLANUnitNOTE:• TheUSBWirelessLANUnitmustbeinsertedintotheUSBWirelessLANUnitportinthecorrectdirection.Itcannotbeinserted
inthereversedirection.IftheUSBWirelessLANUnitisinsertedinthereversedirectionwithexcessiveforceapplied,theUSBportmaybreak.
• BeforetouchingtheUSBWirelessLANUnit,touchametallicobject(suchasadoorknoboraluminumwindowframe)todischargethestaticelectricityfromyourbody.
• AlwaysinsertorremovetheUSBWirelessLANunitwhenthemainpoweristurnedoff.FailuretodosomaycauseprojectormalfunctionordamagetotheUSBwirelessLANunit.Iftheprojectorwillnotworkcorrectly,turnofftheprojector,disconnectthepowercord,andthenconnectitagain.
• DonotinsertotherUSBdevicesintotheUSB(wirelessLAN)portinthewirelessLANcover.DonotinserttheUSBWirelessLANunitintotheUSBport.
NOTE:Whenthecablecoverisattached,removeitbeforeinsertingtheUSBWirelessLANUnit.
1. Press the POWER button to turn off the projector and set it into standby condition, and disconnect the power cord.
2. Remove the wireless LAN cover.
(1)Turnthescrewcounterclockwiseuntilitturnsfreely.
(2) Hold the head of the screw and remove.
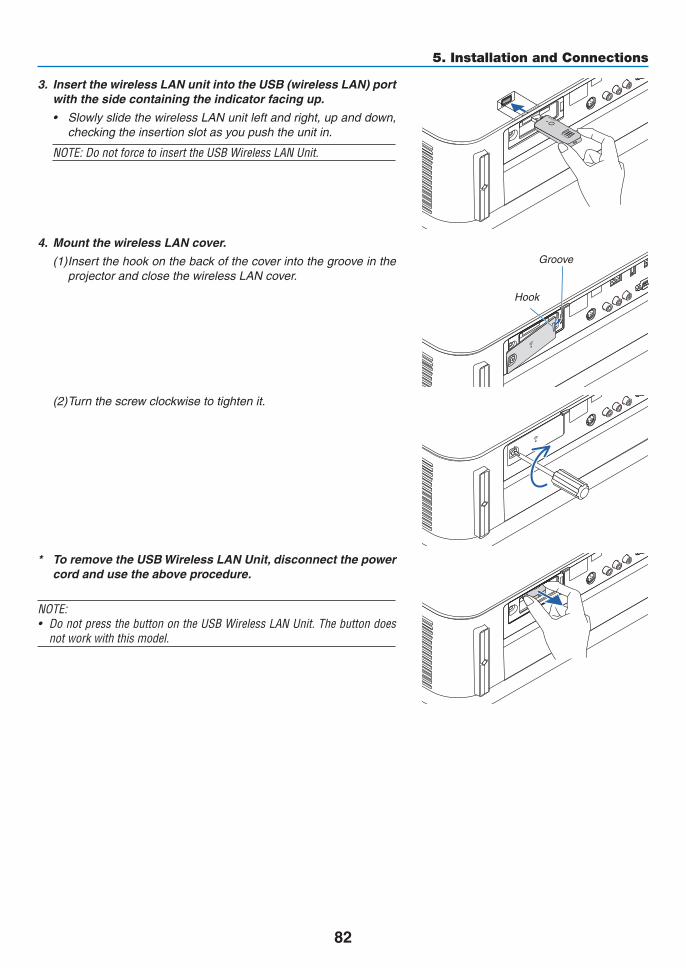
82
5. Installation and Connections
3. Insert the wireless LAN unit into the USB (wireless LAN) port with the side containing the indicator facing up.
• SlowlyslidethewirelessLANunitleftandright,upanddown,checkingtheinsertionslotasyoupushtheunitin.
NOTE:DonotforcetoinserttheUSBWirelessLANUnit.
4. Mount the wireless LAN cover.
(1)Insertthehookonthebackofthecoverintothegrooveintheprojector and close the wireless LAN cover.
Groove
Hook
(2)Turnthescrewclockwisetotightenit.
* To remove the USB Wireless LAN Unit, disconnect the power cord and use the above procedure.
NOTE:• DonotpressthebuttonontheUSBWirelessLANUnit.Thebuttondoes
notworkwiththismodel.
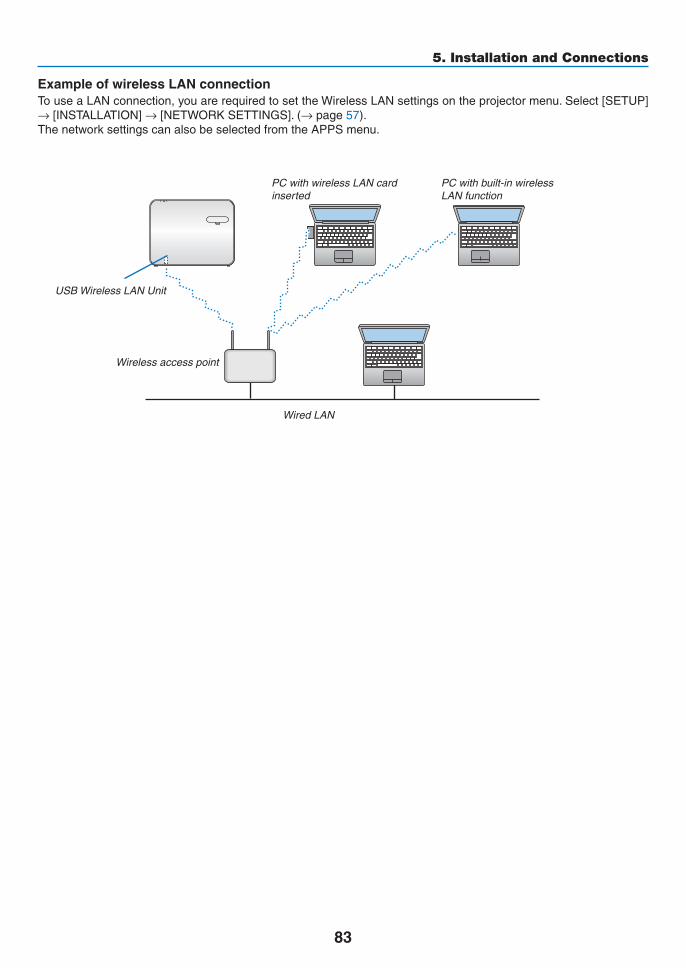
83
5. Installation and Connections
ExampleofwirelessLANconnectionTouseaLANconnection,youarerequiredtosettheWirelessLANsettingsontheprojectormenu.Select[SETUP]→[INSTALLATION]→[NETWORKSETTINGS].(→page57).ThenetworksettingscanalsobeselectedfromtheAPPSmenu.
PC with wireless LAN card inserted
PC with built-in wireless LAN function
Wired LAN
Wireless access point
USB Wireless LAN Unit
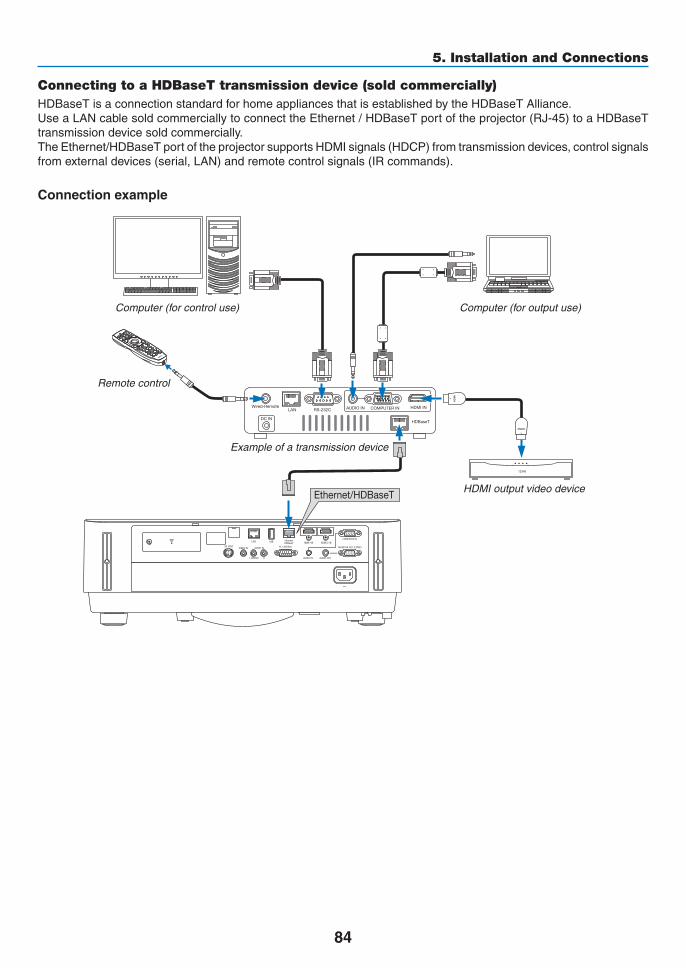
84
5. Installation and Connections
Connecting to a HDBaseT transmission device (sold commercially)HDBaseTisaconnectionstandardforhomeappliancesthatisestablishedbytheHDBaseTAlliance.UseaLANcablesoldcommerciallytoconnecttheEthernet/HDBaseTportoftheprojector(RJ-45)toaHDBaseTtransmission device sold commercially.TheEthernet/HDBaseTportoftheprojectorsupportsHDMIsignals(HDCP)fromtransmissiondevices,controlsignalsfromexternaldevices(serial,LAN)andremotecontrolsignals(IRcommands).
Connection example
Ethernet/HDBaseT
Computer (for control use) Computer (for output use)
Example of a transmission device
Remote control
HDMIoutputvideodevice

85
5. Installation and Connections
NOTE:• Pleaseuseashieldedtwistedpair(STP)cableofCategory5eorhigherfortheLANcable(soldcommercially).• ThemaximumtransmissiondistanceovertheLANcableis100m.• Pleasedonotuseothertransmissionequipmentbetweentheprojectorandtransmissionequipment.Thepicturequalitymaybe
deterioratedasaresult.• ThisprojectorisnotguaranteedtoworkwithallHDBaseTtransmissiondevicessoldcommercially.
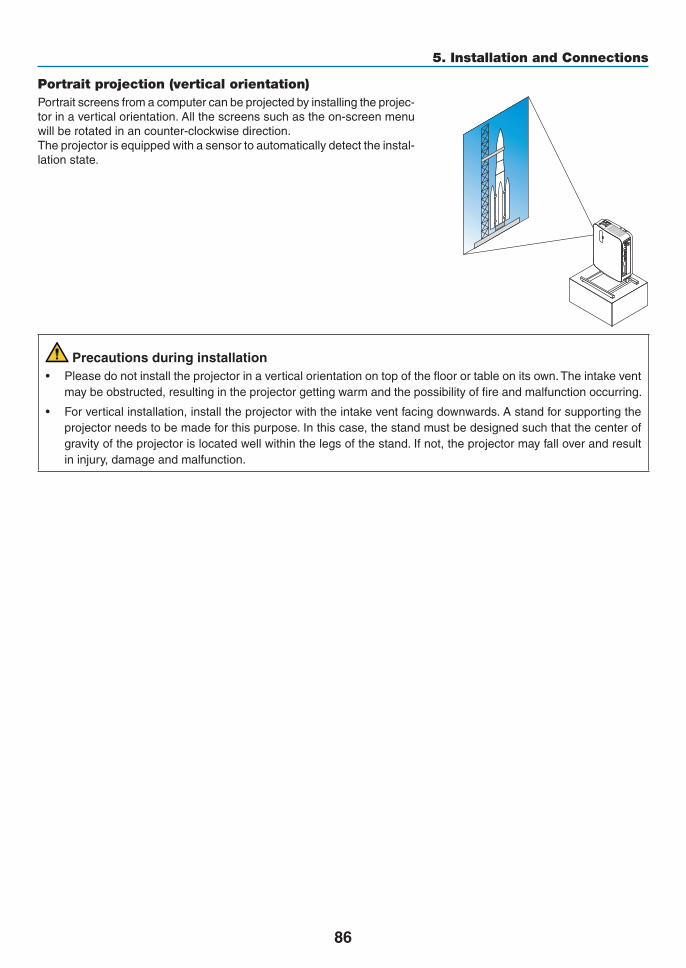
86
5. Installation and Connections
Portrait projection (vertical orientation)Portraitscreensfromacomputercanbeprojectedbyinstallingtheprojec-torinaverticalorientation.Allthescreenssuchastheon-screenmenuwillberotatedinancounter-clockwisedirection.Theprojectorisequippedwithasensortoautomaticallydetecttheinstal-lation state.
Precautionsduringinstallation• Pleasedonotinstalltheprojectorinaverticalorientationontopofthefloorortableonitsown.Theintakevent
maybeobstructed,resultingintheprojectorgettingwarmandthepossibilityoffireandmalfunctionoccurring.
• Forverticalinstallation,installtheprojectorwiththeintakeventfacingdownwards.Astandforsupportingtheprojectorneedstobemadeforthispurpose.Inthiscase,thestandmustbedesignedsuchthatthecenterofgravityoftheprojectorislocatedwellwithinthelegsofthestand.Ifnot,theprojectormayfalloverandresultininjury,damageandmalfunction.
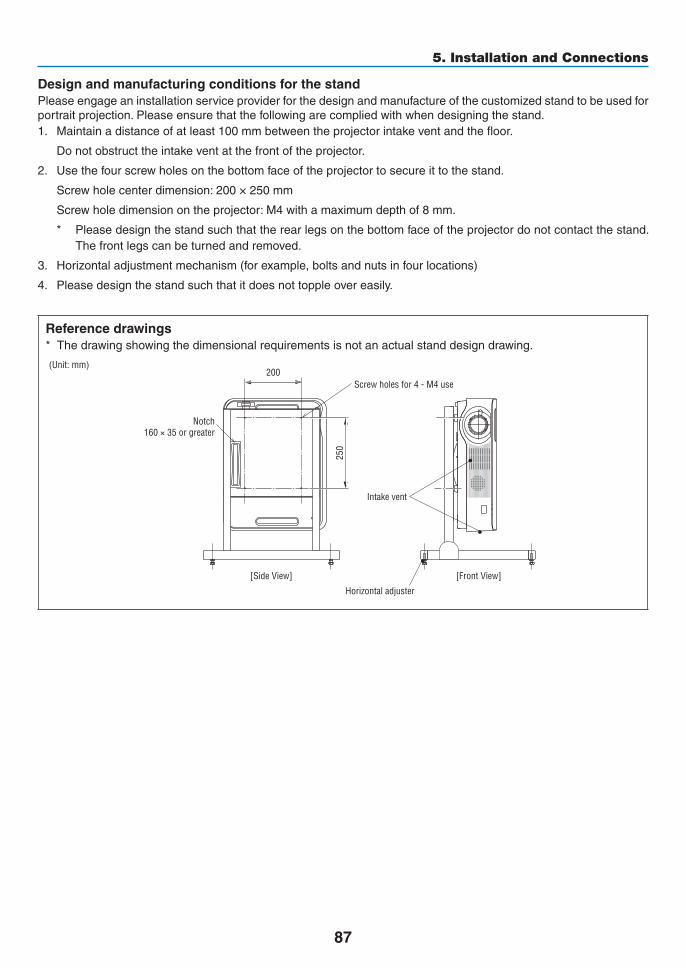
87
5. Installation and Connections
DesignandmanufacturingconditionsforthestandPleaseengageaninstallationserviceproviderforthedesignandmanufactureofthecustomizedstandtobeusedforportraitprojection.Pleaseensurethatthefollowingarecompliedwithwhendesigningthestand.1. Maintainadistanceofatleast100mmbetweentheprojectorintakeventandthefloor.
Donotobstructtheintakeventatthefrontoftheprojector.
2. Use the four screw holes on the bottom face of the projector to secure it to the stand.
Screwholecenterdimension:200×250mm
Screwholedimensionontheprojector:M4withamaximumdepthof8mm.
* Pleasedesignthestandsuchthattherearlegsonthebottomfaceoftheprojectordonotcontactthestand.Thefrontlegscanbeturnedandremoved.
3. Horizontaladjustmentmechanism(forexample,boltsandnutsinfourlocations)
4. Pleasedesignthestandsuchthatitdoesnottoppleovereasily.
Referencedrawings* Thedrawingshowingthedimensionalrequirementsisnotanactualstanddesigndrawing.
[Side View] [Front View]
Screw holes for 4 - M4 use
Notch160 × 35 or greater
200
Horizontal adjuster
(Unit: mm)
250
Intake vent
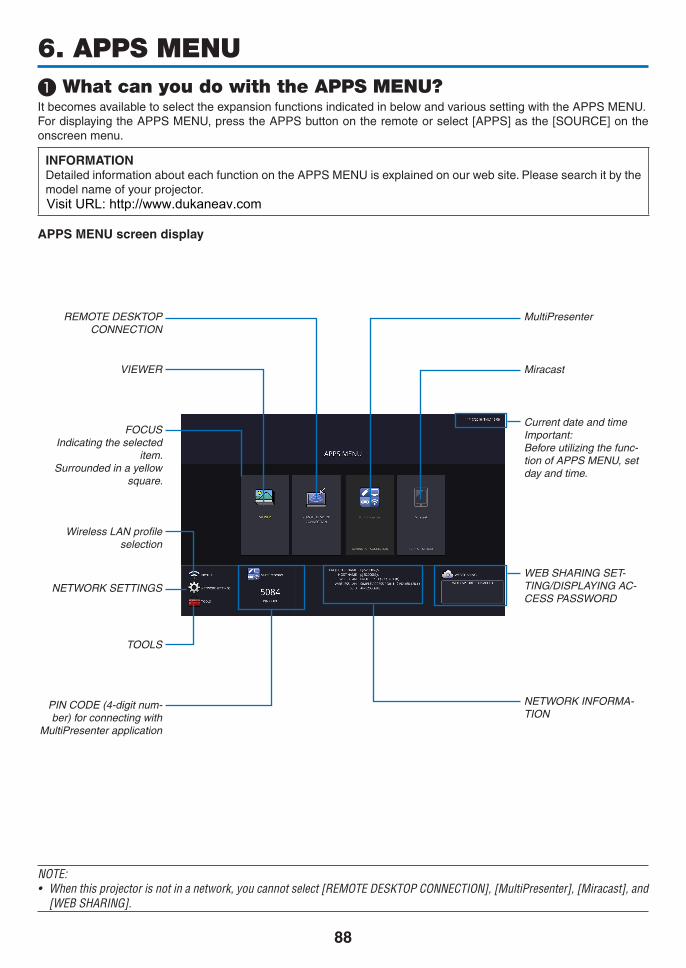
88
6. APPS MENU❶ What can you do with the APPS MENU?ItbecomesavailabletoselecttheexpansionfunctionsindicatedinbelowandvarioussettingwiththeAPPSMENU.FordisplayingtheAPPSMENU,presstheAPPSbuttonontheremoteorselect[APPS]asthe[SOURCE]ontheonscreen menu.
INFORMATIONDetailedinformationabouteachfunctionontheAPPSMENUisexplainedonourwebsite.Pleasesearchitbythemodel name of your projector.
APPSMENUscreendisplay
Current date and timeImportant:Before utilizing the func-tion of APPS MENU, set day and time.
WEBSHARINGSET-TING/DISPLAYINGAC-CESS PASSWORD
MultiPresenter
Miracast
NETWORKINFORMA-TION
REMOTE DESKTOP CONNECTION
VIEWER
FOCUSIndicatingtheselected
item.Surrounded in a yellow
square.
Wireless LAN profile selection
NETWORKSETTINGS
TOOLS
PINCODE(4-digitnum-ber) for connecting with
MultiPresenter application
NOTE:• Whenthisprojectorisnotinanetwork,youcannotselect[REMOTEDESKTOPCONNECTION],[MultiPresenter],[Miracast],and
[WEBSHARING].
Visit URL: http://www.dukaneav.com
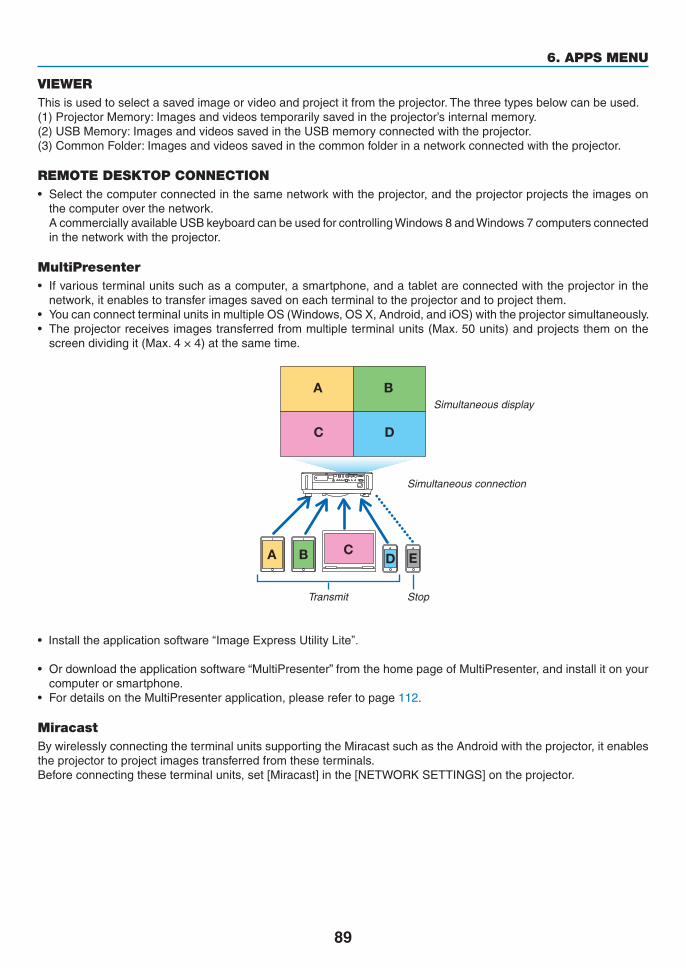
89
6. APPS MENU
VIEWERThisisusedtoselectasavedimageorvideoandprojectitfromtheprojector.Thethreetypesbelowcanbeused.(1)ProjectorMemory:Imagesandvideostemporarilysavedintheprojector’sinternalmemory.(2)USBMemory:ImagesandvideossavedintheUSBmemoryconnectedwiththeprojector.(3)CommonFolder:Imagesandvideossavedinthecommonfolderinanetworkconnectedwiththeprojector.
REMOTE DESKTOP CONNECTION• Selectthecomputerconnectedinthesamenetworkwiththeprojector,andtheprojectorprojectstheimageson
thecomputeroverthenetwork. AcommerciallyavailableUSBkeyboardcanbeusedforcontrollingWindows8andWindows7computersconnected
inthenetworkwiththeprojector.
MultiPresenter• Ifvariousterminalunitssuchasacomputer,asmartphone,andatabletareconnectedwiththeprojectorinthe
network,itenablestotransferimagessavedoneachterminaltotheprojectorandtoprojectthem.• YoucanconnectterminalunitsinmultipleOS(Windows,OSX,Android,andiOS)withtheprojectorsimultaneously.• Theprojectorreceivesimagestransferredfrommultipleterminalunits(Max.50units)andprojectsthemonthe
screendividingit(Max.4×4)atthesametime.
BA CD E
A B
C D
Transmit Stop
Simultaneous connection
Simultaneous display
• Install the application software “Image Express Utility Lite”.
• Ordownloadtheapplicationsoftware“MultiPresenter”fromthehomepageofMultiPresenter,andinstallitonyourcomputer or smartphone.
• FordetailsontheMultiPresenterapplication,pleaserefertopage112.
MiracastBywirelesslyconnectingtheterminalunitssupportingtheMiracastsuchastheAndroidwiththeprojector,itenablestheprojectortoprojectimagestransferredfromtheseterminals.Beforeconnectingtheseterminalunits,set[Miracast]inthe[NETWORKSETTINGS]ontheprojector.
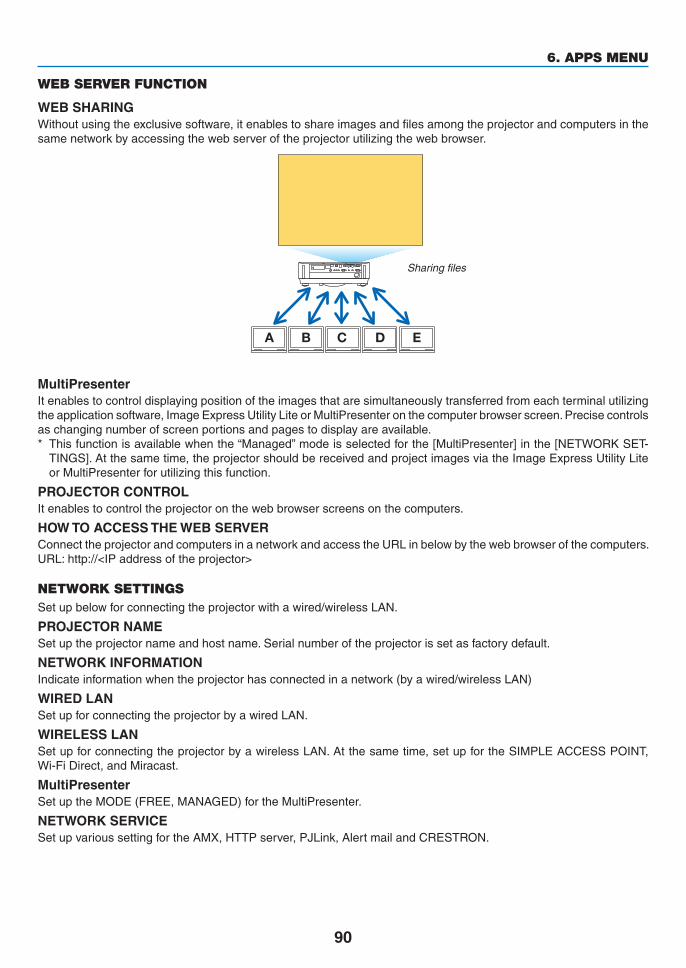
90
6. APPS MENU
WEB SERVER FUNCTION
WEBSHARINGWithoutusingtheexclusivesoftware,itenablestoshareimagesandfilesamongtheprojectorandcomputersinthesamenetworkbyaccessingthewebserveroftheprojectorutilizingthewebbrowser.
BA C D E
Sharing files
MultiPresenterItenablestocontroldisplayingpositionoftheimagesthataresimultaneouslytransferredfromeachterminalutilizingtheapplicationsoftware,ImageExpressUtilityLiteorMultiPresenteronthecomputerbrowserscreen.Precisecontrolsaschangingnumberofscreenportionsandpagestodisplayareavailable.* Thisfunctionisavailablewhenthe“Managed”modeisselectedforthe[MultiPresenter]inthe[NETWORKSET-
TINGS].Atthesametime,theprojectorshouldbereceivedandprojectimagesviatheImageExpressUtilityLiteorMultiPresenterforutilizingthisfunction.
PROJECTORCONTROLItenablestocontroltheprojectoronthewebbrowserscreensonthecomputers.
HOWTOACCESSTHEWEBSERVERConnecttheprojectorandcomputersinanetworkandaccesstheURLinbelowbythewebbrowserofthecomputers.URL:http://<IPaddressoftheprojector>
NETWORK SETTINGSSetupbelowforconnectingtheprojectorwithawired/wirelessLAN.
PROJECTORNAMESetuptheprojectornameandhostname.Serialnumberoftheprojectorissetasfactorydefault.
NETWORKINFORMATIONIndicateinformationwhentheprojectorhasconnectedinanetwork(byawired/wirelessLAN)
WIRED LANSetupforconnectingtheprojectorbyawiredLAN.
WIRELESS LANSetupforconnectingtheprojectorbyawirelessLAN.Atthesametime,setupfortheSIMPLEACCESSPOINT,Wi-FiDirect,andMiracast.
MultiPresenterSetuptheMODE(FREE,MANAGED)fortheMultiPresenter.
NETWORKSERVICESetupvarioussettingfortheAMX,HTTPserver,PJLink,AlertmailandCRESTRON.
91
6. APPS MENU
TOOLSSetupforvariousfeaturesasthemouse,programtimer,dayandtime,administratormodeanddefaultAPP.
MOUSEAcommerciallyavailableUSBmousecanbeusedforoperatingtheAPPSMENU.Performthesetupforusingit.
PROGRAMTIMEROncedayandtimeissetup,changingtheprojector’sconditioninpoweringON/standby,switchinginputsignals,andswitchingECOmodecanbeautomaticallyperformed.
DATEANDTIMEDeterminetimezoneandsummertimeofyourareaandsetupcurrentdateandtime.
ADMINISTRATORMODESelecting themenumodeof theprojector,enable/disable tosaveallsetupvaluesof theprojector,andsetupapassword for the administrator mode.
DEFAULTAPPWhenaterminalotherthanthe“APPS”terminalisselectedandyouswitchtothe“APPS”terminal,thefunctionse-lected as the default application is launched automatically.Whentheprojectoristurnedonintheconditionofbeingselectedthe“APPS”terminal,theapplicationselectedinthe[DEFAULTAPP]willbestartedautomatically.
92
7. User Supportware❶ The five utility software is available for downloadNamesandFeaturesofBundledSoftwarePrograms
Nameofsoftwareprogram Features
ImageExpressUtilityLiteImageExpressUtilityLiteforMac
• Thisisasoftwareprogramusedtoprojectyourcomputer’sscreenoverthewired/wirelessnetwork.Thecomputercable(VGA)isnotrequired.(→page93)
• ThissoftwareprogramcanbeusedtocontrolthepowerON/OFFandsourceselection of the projector from your computer.
• TheGeometricCorrectionTool(GCT)functionallowsyoutocorrectdistortionofimagesprojectedonacurvedwall.(→page98)
* “GCT”functionisnotsupportedbyMac.
Nameofsoftwareprogram Features
PCControlUtilityPro4PCControlUtilityPro5(forMacOS)
ThisisasoftwareprogramusedtooperatetheprojectorfromthecomputerwhenthecomputerandtheprojectorareconnectedwithLAN(wiredorwireless)oraserialcable.(→page101)
Nameofsoftwareprogram Features
VirtualRemoteTool(Windowsonly)
ThisisasoftwareprogramusedtocontrolthepowerON/OFFandsourceselec-tionoftheprojectorfromyourcomputerbyusingthesuppliedcomputercable(VGA)andothers.(→page106)Onlyviaserialconnectionitisalsousedtosendanimagetotheprojectorandregisteritasthelogodataoftheprojector.Afterregisteringit,youcanlockthelogotopreventitfromchanging.
NOTE:• ImageExpressUtilityLitedoesnotsupport“MeetingMode”inImageExpressUtility2.0suppliedwithourothermodels.
Download Service and Operating EnvironmentPleasevisitourwebsiteaboutoperatingenvironmentanddownloadserviceforeachsoftware:VisitURL:Download-Projector→Software&Driver
http://www.dukaneav.com

93
7. User Supportware
❷ Projecting Your Computer’s Screen Image from the Projector over a LAN (Image Express Utility Lite) UsingImageExpressUtilityLiteallowsyoutosendthecomputer’sscreenimagetotheprojectoroverawiredorwirelessLAN.ImageExpressUtilityLiteisaprogramcompatiblewithWindows.ImageExpressUtilityLiteforMacisaprogramcompatiblewithOSX.(→page97)ThissectionwillshowyouanoutlineabouthowtoconnecttheprojectortoaLANandtouseImageExpressUtilityLite.FortheoperationofImageExpressUtilityLite,seethehelpofImageExpressUtilityLite.
Step1:installImageExpressUtilityLiteonthecomputer.Step2:ConnecttheprojectortoaLAN.Step3:StartImageExpressUtilityLite.
TIP:• ImageExpressUtilityLite(forWindows)canbestartedfrommostcommerciallyavailableremovablemediasuchasUSBmemory
devicesorSDcardswithouttheneedtoinstallonyourcomputer.(→page96)
What You can Do with Image Express Utility Lite
Imagetransmission(forWindowsandOSX)• Thescreenofyourcomputercanbesenttotheprojectorviaawiredorwirelessnetworkwithoutacomputercable
(VGA).
Audiotransfercapability(forWindowsonly)• ImageExpressUtilityLiteallowsyoutosendthecomputer'sscreenimageandaudiototheprojectoroverwired/
wirelessLANconnection.
• Audiotransfercapabilityisavailableonlywhenthecomputerconnectswiththeprojectorinpeer-to-peernetwork.
GeometricCorrectionTool[GCT](forWindowsonly)See“❸ProjectinganImagefromanAngle(GeometricCorrectionToolinImageExpressUtilityLite)”.(→page98)
94
7. User Supportware
Using on Windows
Step 1: install Image Express Utility Lite on the computer.
NOTE:• Toinstalloruninstalltheprogram,theWindowsuseraccountmusthave“Administrator”privilege.• Exitallrunningprogramsbeforeinstallation.Ifanotherprogramisrunning,theinstallationmaynotbecompleted.• ImageExpressUtilityLitewillbeinstalledtothesystemdriveofyourcomputer. Ifthemessage“Thereisnotenoughfreespaceondestination”isdisplayed,freeupenoughspace(about100MB)toinstallthe
program.
1.To obtain links for the software go to the Dukane product website and look at the projector model downloads.
TIP:Ifthemenuwindowwillnotbedisplayed,trythefollowingprocedure.ForWindows7:1.Download the file and then right click to OPEN.
The menu window will be displayed.
2. Click“InstallingImageExpressUtilityLite”onthemenuwindow.
The installation will start.
“ENDUSERLICENSEAGREEMENT”screenwillbedisplayed.
Read“ENDUSERLICENSEAGREEMENT”carefully
3. Ifyouagree,click“Iagree.”andthenclick“Next”.
• Followtheinstructionsontheinstallerscreenstocompletetheinstallation.
• Whentheinstallationiscomplete,youwillreturntothemenuwindow.
When the installation is complete, a completion message will be displayed.
4. Click“OK”.
This completes the installation.
TIP:•UninstallingImageExpressUtilityLiteTouninstallImageExpressUtilityLite,dothesameproceduresstatedasin“UninstallingVirtualRemoteTool”.Read“VirtualRemoteTool”as“ImageExpressUtilityLite”(→page109)
Visit URL: http://www.dukaneav.com
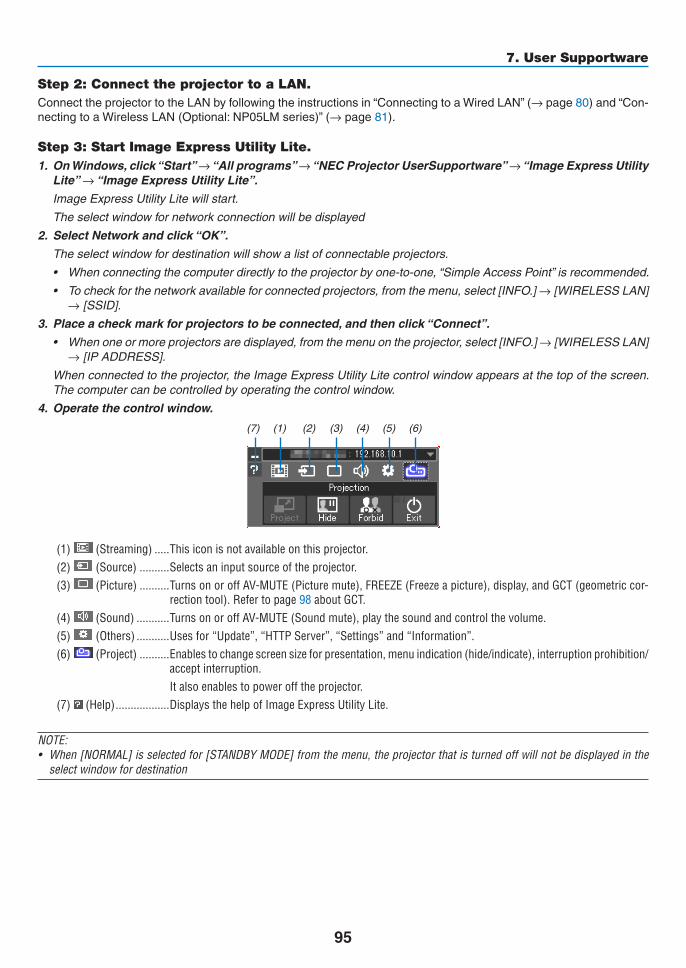
95
7. User Supportware
Step 2: Connect the projector to a LAN.ConnecttheprojectortotheLANbyfollowingtheinstructionsin“ConnectingtoaWiredLAN”(→page80)and“Con-nectingtoaWirelessLAN(Optional:NP05LMseries)”(→page81).
Step 3: Start Image Express Utility Lite.1. OnWindows,click“Start”→“Allprograms”→“NECProjectorUserSupportware”→“ImageExpressUtility
Lite”→“ImageExpressUtilityLite”.
ImageExpressUtilityLitewillstart.
Theselectwindowfornetworkconnectionwillbedisplayed
2. SelectNetworkandclick“OK”.
The select window for destination will show a list of connectable projectors.
• Whenconnectingthecomputerdirectlytotheprojectorbyone-to-one,“SimpleAccessPoint”isrecommended.
• Tocheckforthenetworkavailableforconnectedprojectors,fromthemenu,select[INFO.]→[WIRELESSLAN]→[SSID].
3. Placeacheckmarkforprojectorstobeconnected,andthenclick“Connect”.
• Whenoneormoreprojectorsaredisplayed,fromthemenuontheprojector,select[INFO.]→[WIRELESSLAN]→[IPADDRESS].
Whenconnectedtotheprojector,theImageExpressUtilityLitecontrolwindowappearsatthetopofthescreen.The computer can be controlled by operating the control window.
4. Operate the control window.
(1) (2) (3) (4) (5) (6)(7)
(1) (Streaming) �����This icon is not available on this projector�(2) (Source) ����������Selects an input source of the projector� (3) (Picture) ����������Turns on or off AV-MUTE (Picture mute), FREEZE (Freeze a picture), display, and GCT (geometric cor-
rection tool)� Refer to page 98 about GCT�(4) (Sound) �����������Turns on or off AV-MUTE (Sound mute), play the sound and control the volume�(5) (Others) �����������Uses for “Update”, “HTTP Server”, “Settings” and “Information”�(6) (Project) ����������Enables to change screen size for presentation, menu indication (hide/indicate), interruption prohibition/
accept interruption�It also enables to power off the projector�
(7) (Help) ������������������Displays the help of Image Express Utility Lite�
NOTE:• When[NORMAL]isselectedfor[STANDBYMODE]fromthemenu,theprojectorthatisturnedoffwillnotbedisplayedinthe
selectwindowfordestination
96
7. User Supportware
TIP:Viewingthe“Help”fileofImageExpressUtilityLite• DisplayingtheHelpfileofImageExpressUtilityLitewhileitisrunning.
Clickthe[?](help)icononthecontrolwindow.
The Help screen will be displayed.
• DisplayingtheHelpfileofGCTwhileitisrunning.
Click“Help”→“Help”ontheeditwindow.
The Help screen will be displayed.
• DisplayingthehelpfileusingtheStartMenu.
Click“Start”→“Allprograms”or“Programs”→“NECProjectorUserSupportware”→“ImageExpressUtilityLite”→“ImageExpressUtilityLiteHelp”.
The Help screen will be displayed.
Starting Image Express Utility Lite from a USB Memory or SD CardImageExpressUtilityLitecanbestartedfromcommerciallyavailableremovablemediasuchUSBmemoryorSDcardsifitiscopiedbeforehand.ThiswilleliminatethetroubleofinstallingImageExpressUtilityLitetoyourcomputer.1. CopyImageExpressUtilityLitetoremovablemedia.
Copyallthefoldersandfiles(totalsizeapprox.7MB)fromthe“IEU_Lite(removable-media)”folderto the root directory of your removable media.
2. Insert your removable media into your computer.
The“AutoPlay”screenwillbedisplayedonyourcomputer.
TIP:• Ifthe“AutoPlay”screenisnotdisplayed,openthefolderfrom“Computer”(“MyComputer”forWindowsXP).
3. Click“Openfoldertoviewfiles”
TheIEU_Lite.exe,otherfolder,andfileswillbedisplayed.
4. Double-clickthe“IEU_Lite.exe”( ) icon.
ImageExpressUtilityLitewillstart.
97
7. User Supportware
Using on Mac
Step 1: Install Image Express Utility Lite for Mac on the computer1.To obtain links for the software go to the Dukane product website and look at the projector model downloads.
Step 2: Connect the projector to a LANConnecttheprojectortotheLANbyfollowingtheinstructionsin“ConnectingtoaWiredLAN”(→page80)and“Con-nectingtoaWirelessLAN(Optional:NP05LMseries)”(→page81).
Step 3: Start Image Express Utility Lite for Mac1. Open your Applications folder on OS X.
2. Double-clickthe“ImageExpressUtilityLite”folder.
3. Double-clickthe“ImageExpressUtilityLite”icon.
WhenImageExpressUtilityLiteforMacstarts,theselectwindowfordestinationwillbedisplayed.
• At thefirst timeofstartup,“ENDUSERLICENSEAGREEMENT”screenwillbedisplayedbeforetheselectwindow for destination is displayed.
Read“ENDUSERLICENSEAGREEMENT”andselect“Iacceptthetermsinthelicenseagreement”,andclick“OK”.
4. Selectaprojectortobeconnected,andthenclick“Connect”.
Yourdesktopscreenwillbedisplayedontheprojector.
TIP:ViewingtheHelpofImageExpressUtilityLiteforMac• Fromthemenubar,click“Help”→“ImageExpressUtilityLiteHelp”whileImageExpressUtilityforMacis
running.
The Help screen will be displayed
Uninstallingasoftwareprogram1. Putthe“ImageExpressUtilityLite”foldertotheTrashicon.
2. Put the configuration file of Image Express Utility Lite for Mac to the Trash icon.
• TheconfigurationfileofImageExpressUtilityLiteforMacislocatedin“/Users/<yourusername>/Library/Prefer-ences/jp.necds.Image_Express_Utility_Lite.plist”.
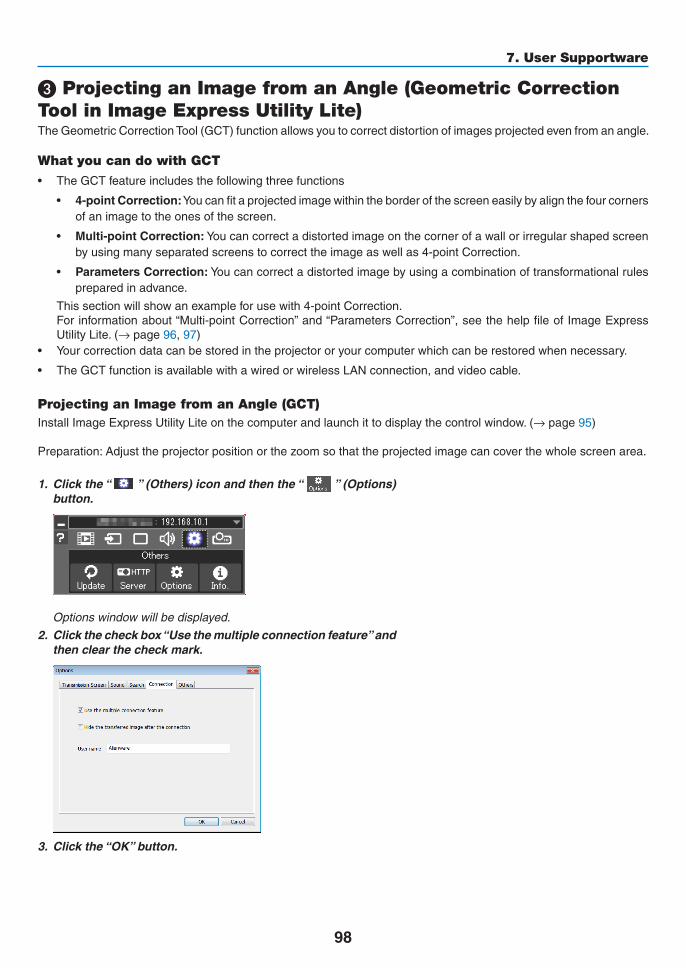
98
7. User Supportware
❸ Projecting an Image from an Angle (Geometric Correction Tool in Image Express Utility Lite)TheGeometricCorrectionTool(GCT)functionallowsyoutocorrectdistortionofimagesprojectedevenfromanangle.
What you can do with GCT
• TheGCTfeatureincludesthefollowingthreefunctions
• 4-pointCorrection:Youcanfitaprojectedimagewithintheborderofthescreeneasilybyalignthefourcornersofanimagetotheonesofthescreen.
• Multi-pointCorrection:Youcancorrectadistortedimageonthecornerofawallorirregularshapedscreenbyusingmanyseparatedscreenstocorrecttheimageaswellas4-pointCorrection.
• ParametersCorrection:Youcancorrectadistortedimagebyusingacombinationoftransformationalrulesprepared in advance.
Thissectionwillshowanexampleforusewith4-pointCorrection.Forinformationabout“Multi-pointCorrection”and“ParametersCorrection”,seethehelpfileofImageExpressUtilityLite.(→page96, 97)
• Yourcorrectiondatacanbestoredintheprojectororyourcomputerwhichcanberestoredwhennecessary.
• TheGCTfunctionisavailablewithawiredorwirelessLANconnection,andvideocable.
Projecting an Image from an Angle (GCT)InstallImageExpressUtilityLiteonthecomputerandlaunchittodisplaythecontrolwindow.(→page95)
Preparation:Adjusttheprojectorpositionorthezoomsothattheprojectedimagecancoverthewholescreenarea.
1. Clickthe“ ”(Others)iconandthenthe“ ”(Options)button.
Options window will be displayed.
2. Clickthecheckbox“Usethemultipleconnectionfeature”andthen clear the check mark.
3. Clickthe“OK”button.
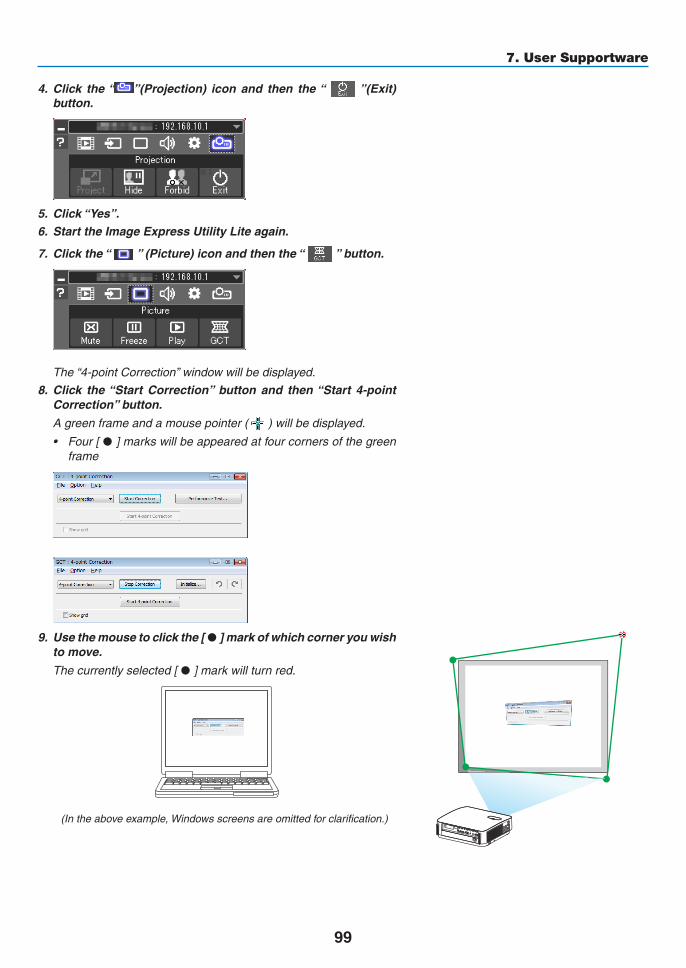
99
7. User Supportware
4. Click the“ ”(Projection) icon and then the“ ”(Exit)button.
5. Click“Yes”.
6. Start the Image Express Utility Lite again.
7. Clickthe“ ”(Picture)iconandthenthe“ ”button.
The“4-pointCorrection”windowwillbedisplayed.
8. Click the“Start Correction” button and then“Start 4-pointCorrection”button.
A green frame and a mouse pointer ( ) will be displayed.
• Four[•]markswillbeappearedatfourcornersofthegreenframe
9. Usethemousetoclickthe[•]markofwhichcorneryouwishto move.
The currently selected [ •]markwillturnred.
(Intheaboveexample,Windowsscreensareomittedforclarification.)
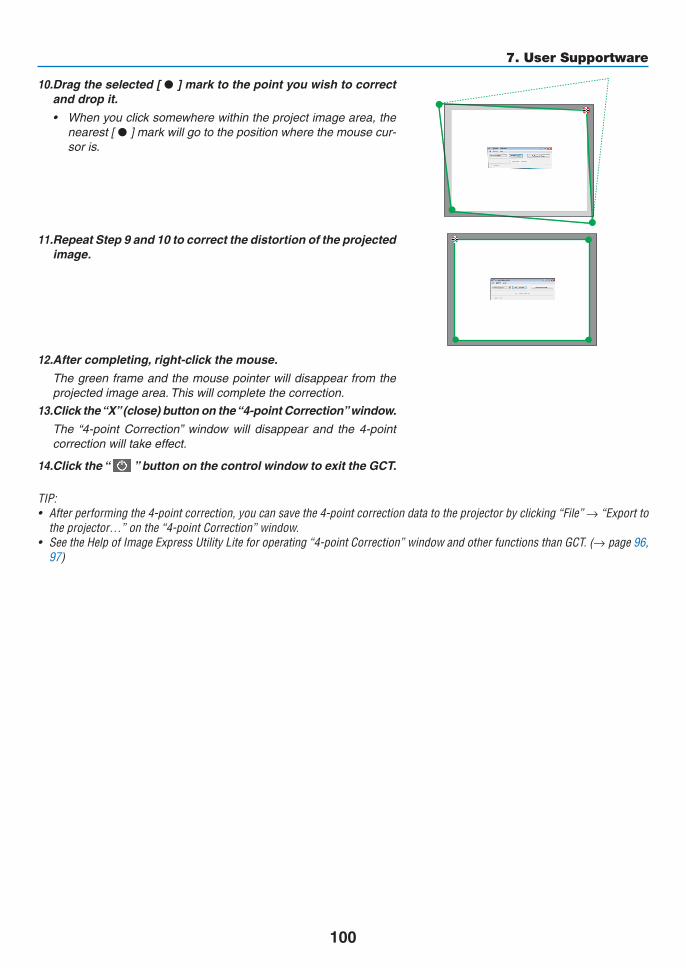
100
7. User Supportware
10.Dragtheselected[•]marktothepointyouwishtocorrectand drop it.
• Whenyouclicksomewherewithintheprojectimagearea,thenearest [ •]markwillgotothepositionwherethemousecur-sor is.
11. Repeat Step 9 and 10 to correct the distortion of the projected image.
12. After completing, right-click the mouse.
The green frame and the mouse pointer will disappear from the projected image area. This will complete the correction.
13.Clickthe“X”(close)buttononthe“4-pointCorrection”window.
The “4-point Correction” window will disappear and the 4-pointcorrectionwilltakeeffect.
14.Clickthe“ ”buttononthecontrolwindowtoexittheGCT.
TIP:• Afterperformingthe4-pointcorrection,youcansavethe4-pointcorrectiondatatotheprojectorbyclicking“File”→“Exportto
theprojector…”onthe“4-pointCorrection”window.• SeetheHelpofImageExpressUtilityLiteforoperating“4-pointCorrection”windowandotherfunctionsthanGCT.(→page96,
97)
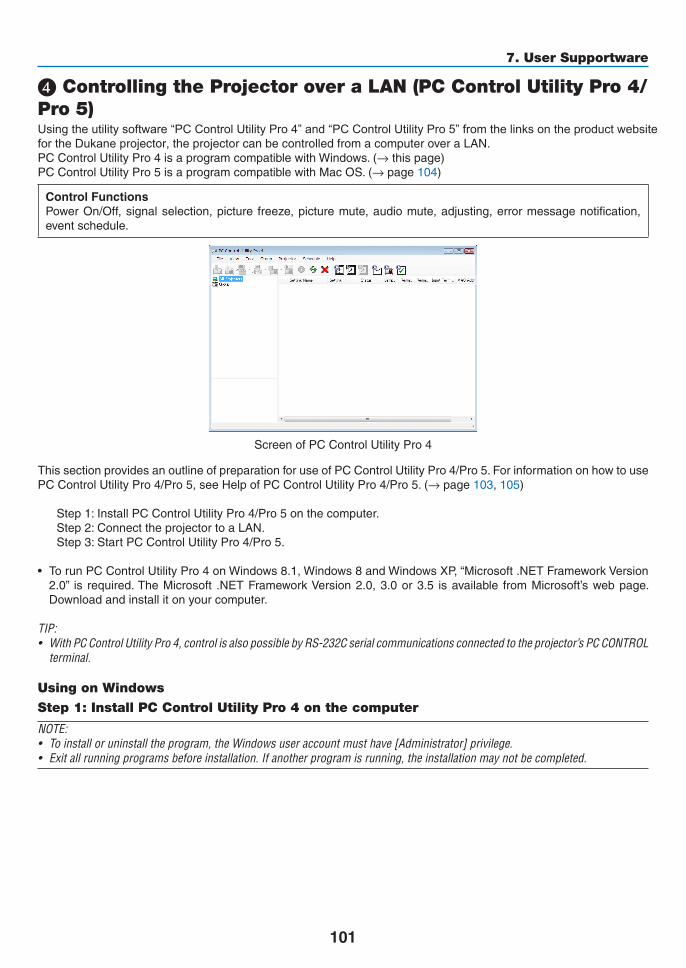
101
7. User Supportware
❹ Controlling the Projector over a LAN (PC Control Utility Pro 4/Pro 5)Using the utility software “PC Control Utility Pro 4” and “PC Control Utility Pro 5” from the links on the product websitefor the Dukane projector,theprojectorcanbecontrolledfromacomputeroveraLAN.PCControlUtilityPro4isaprogramcompatiblewithWindows.(→thispage)PCControlUtilityPro5isaprogramcompatiblewithMacOS.(→page104)
Control FunctionsPowerOn/Off,signalselection,picture freeze,picturemute,audiomute,adjusting,errormessagenotification,event schedule.
ScreenofPCControlUtilityPro4
ThissectionprovidesanoutlineofpreparationforuseofPCControlUtilityPro4/Pro5.ForinformationonhowtousePCControlUtilityPro4/Pro5,seeHelpofPCControlUtilityPro4/Pro5.(→page103, 105)
Step1:InstallPCControlUtilityPro4/Pro5onthecomputer.Step2:ConnecttheprojectortoaLAN.Step3:StartPCControlUtilityPro4/Pro5.
• TorunPCControlUtilityPro4onWindows8.1,Windows8andWindowsXP,“Microsoft.NETFrameworkVersion2.0” is required.TheMicrosoft .NETFrameworkVersion2.0,3.0or3.5 isavailable fromMicrosoft’swebpage.Downloadandinstallitonyourcomputer.
TIP:• WithPCControlUtilityPro4,controlisalsopossiblebyRS-232Cserialcommunicationsconnectedtotheprojector’sPCCONTROL
terminal.
Using on Windows
Step 1: Install PC Control Utility Pro 4 on the computer
NOTE:• Toinstalloruninstalltheprogram,theWindowsuseraccountmusthave[Administrator]privilege.• Exitallrunningprogramsbeforeinstallation.Ifanotherprogramisrunning,theinstallationmaynotbecompleted.
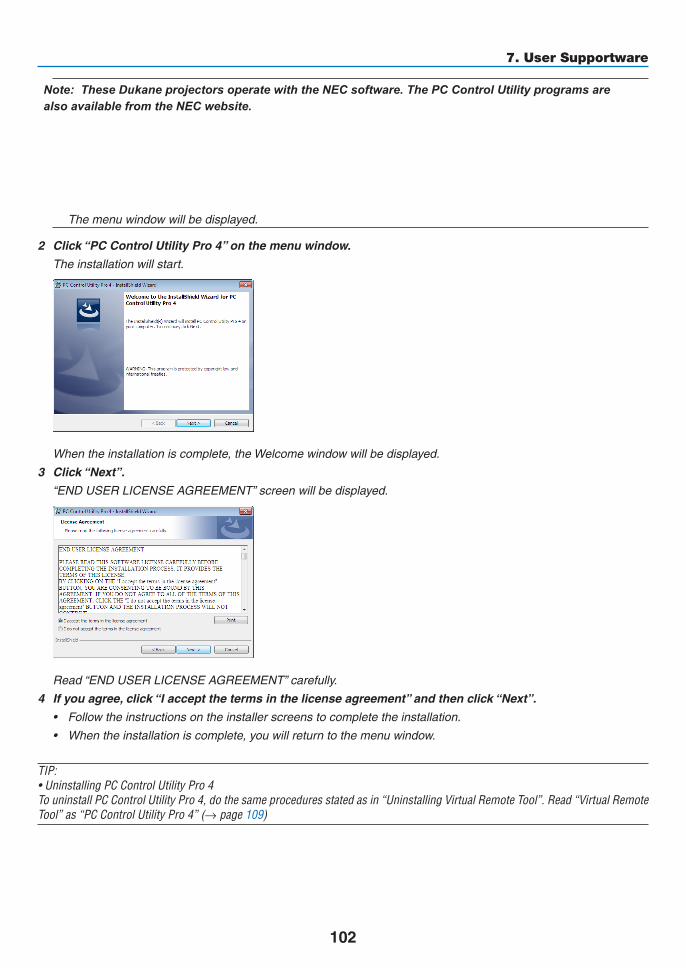
102
7. User Supportware
Note: These Dukane projectors operate with the NEC software. The PC Control Utility programs are also available from the NEC website.
The menu window will be displayed.
2 Click“PCControlUtilityPro4”onthemenuwindow.
The installation will start.
When the installation is complete, the Welcome window will be displayed.
3 Click“Next”.
“ENDUSERLICENSEAGREEMENT”screenwillbedisplayed.
Read“ENDUSERLICENSEAGREEMENT”carefully.
4 Ifyouagree,click“Iacceptthetermsinthelicenseagreement”andthenclick“Next”.
• Followtheinstructionsontheinstallerscreenstocompletetheinstallation.
• Whentheinstallationiscomplete,youwillreturntothemenuwindow.
TIP:•UninstallingPCControlUtilityPro4TouninstallPCControlUtilityPro4,dothesameproceduresstatedasin“UninstallingVirtualRemoteTool”.Read“VirtualRemoteTool”as“PCControlUtilityPro4”(→page109)
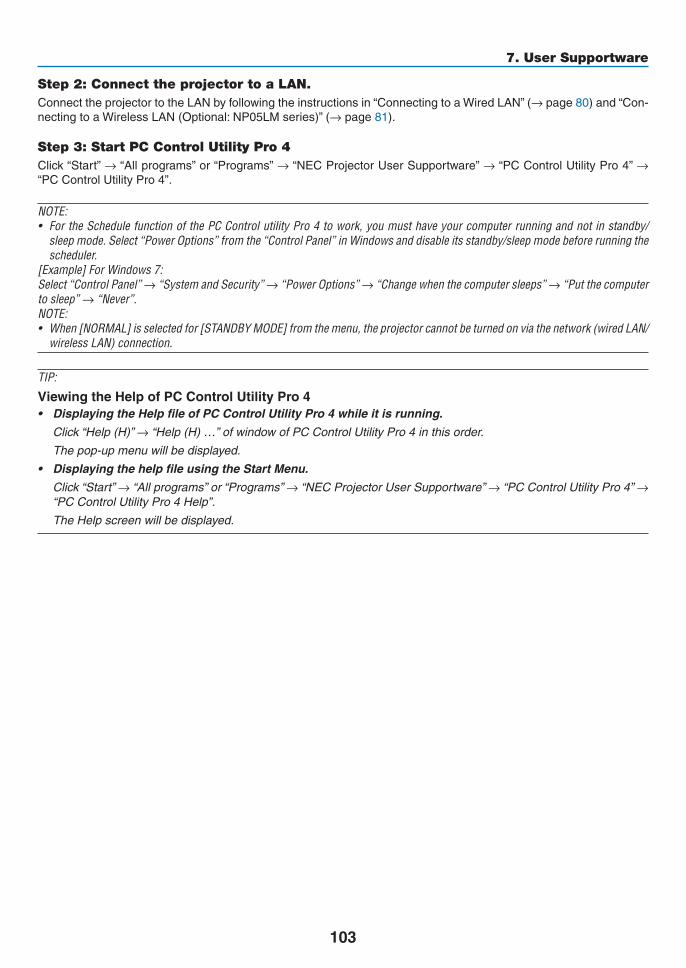
103
7. User Supportware
Step 2: Connect the projector to a LAN.ConnecttheprojectortotheLANbyfollowingtheinstructionsin“ConnectingtoaWiredLAN”(→page80)and“Con-nectingtoaWirelessLAN(Optional:NP05LMseries)”(→page81).
Step 3: Start PC Control Utility Pro 4Click“Start”→“Allprograms”or“Programs”→“NECProjectorUserSupportware”→“PCControlUtilityPro4”→ “PCControlUtilityPro4”.
NOTE:• FortheSchedulefunctionofthePCControlutilityPro4towork,youmusthaveyourcomputerrunningandnotinstandby/
sleepmode.Select“PowerOptions”fromthe“ControlPanel”inWindowsanddisableitsstandby/sleepmodebeforerunningthescheduler.
[Example]ForWindows7:Select“ControlPanel”→“SystemandSecurity”→“PowerOptions”→“Changewhenthecomputersleeps”→“Putthecomputertosleep”→“Never”.NOTE:• When[NORMAL]isselectedfor[STANDBYMODE]fromthemenu,theprojectorcannotbeturnedonviathenetwork(wiredLAN/
wirelessLAN)connection.
TIP:
ViewingtheHelpofPCControlUtilityPro4• DisplayingtheHelpfileofPCControlUtilityPro4whileitisrunning.
Click“Help(H)”→“Help(H)…”ofwindowofPCControlUtilityPro4inthisorder.
The pop-up menu will be displayed.
• DisplayingthehelpfileusingtheStartMenu.
Click“Start”→“Allprograms”or“Programs”→“NECProjectorUserSupportware”→“PCControlUtilityPro4”→ “PCControlUtilityPro4Help”.
The Help screen will be displayed.
104
7. User Supportware
Using on Mac
Step 1: Install PC Control Utility Pro 5 on the computer1.To obtain links for the software go to the Dukane product website and look at the projector model downloads.
3. Double-clickthe“MacOSX”folder.
4. Double-click“PCControlUtilityPro5.pkg”.
The installer will start.
5. Click“Next”.
“ENDUSERLICENSEAGREEMENT”screenwillbedisplayed.
6. Read“ENDUSERLICENSEAGREEMENT”andclick“Next”.
The confirmation window will be displayed
7. Click“Iacceptthetermsinthelicenseagreement”.
Follow the instructions on the installer screens to complete the installation.
Step 2: Connect the projector to a LANConnecttheprojectortotheLANbyfollowingtheinstructionsin“ConnectingtoaWiredLAN”(→page80)and“Con-nectingtoaWirelessLAN(Optional:NP05LMseries)”(→page81).
Step 3: Start PC Control Utility Pro 51. Open your Applications folder in OS X.
2. Clickthe“PCControlUtilityPro5”folder.
3. Clickthe“PCControlUtilityPro5”icon.
PC Control Utility Pro 5 will start.
NOTE:• FortheSchedulefunctionofthePCControlutilityPro5towork,youmusthaveyourcomputerrunningandnotinsleepmode.
Select“EnergySaver”fromthe“SystemPreferences”inMacanddisableitssleepmodebeforerunningthescheduler.• When[NORMAL]isselectedfor[STANDBYMODE]fromthemenu,theprojectorcannotbeturnedonviathenetwork(wiredLAN/
wirelessLAN)connection.
105
7. User Supportware
TIP:
Uninstallingasoftwareprogram1. Putthe“PCControlUtilityPro5”foldertotheTrashicon.
2. PuttheconfigurationfileofPCControlUtilityPro5totheTrashicon.
• TheconfigurationfileofPCControlUtilityPro5islocatedin“/Users/<yourusername>/ApplicationData/NECProjectorUserSupportware/PCControlUtilityPro5”.
ViewingtheHelpofPCControlUtilityPro5•DisplayingtheHelpfileofPCControlUtilityPro5whileitisrunning.• Fromthemenubar,click“Help”→“Help”inthisorder.
The Help screen will be displayed.
•DisplayingtheHelpusingtheDock1. Open“Application”folderinOSX.
2. Clickthe“PCControlUtilityPro5”folder.
3. Clickthe“PCControlUtilityPro5Help”icon.
The Help screen will be displayed.
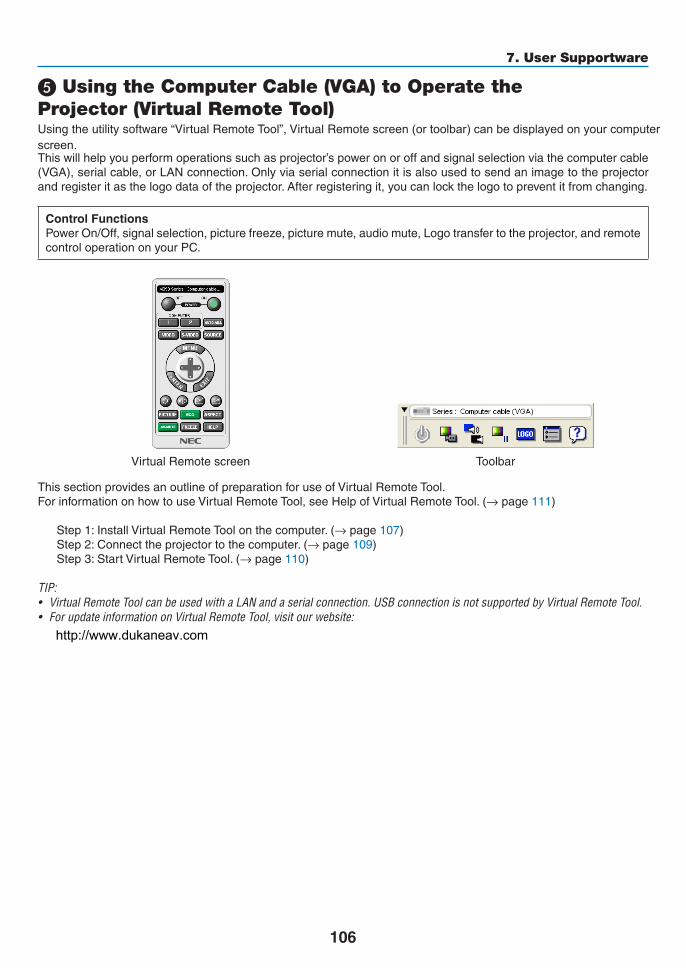
106
7. User Supportware
❺ Using the Computer Cable (VGA) to Operate the Projector (Virtual Remote Tool)Usingtheutilitysoftware“VirtualRemoteTool”,VirtualRemote screen (or toolbar) can be displayed on your computerscreen.Thiswillhelpyouperformoperationssuchasprojector’spoweronoroffandsignalselectionviathecomputercable(VGA),serialcable,orLANconnection.Onlyviaserialconnectionitisalsousedtosendanimagetotheprojectorandregisteritasthelogodataoftheprojector.Afterregisteringit,youcanlockthelogotopreventitfromchanging.
Control FunctionsPowerOn/Off,signalselection,picturefreeze,picturemute,audiomute,Logotransfertotheprojector,andremotecontroloperationonyourPC.
VirtualRemotescreen Toolbar
ThissectionprovidesanoutlineofpreparationforuseofVirtualRemoteTool.ForinformationonhowtouseVirtualRemoteTool,seeHelpofVirtualRemoteTool.(→page111)
Step1:InstallVirtualRemoteToolonthecomputer.(→page107)Step2:Connecttheprojectortothecomputer.(→page109)Step3:StartVirtualRemoteTool.(→page110)
TIP:• VirtualRemoteToolcanbeusedwithaLANandaserialconnection.USBconnectionisnotsupportedbyVirtualRemoteTool.• ForupdateinformationonVirtualRemoteTool,visitourwebsite: http://www.dukaneav.com
107
7. User Supportware
NOTE:• When[COMPUTER]isselectedfromyoursourceselection,theVirtualRemotescreenorthetoolbarwillbedisplayedaswellas
yourcomputerscreen.• Usethesuppliedcomputercable(VGA)toconnecttheCOMPUTERINterminaldirectlywiththemonitoroutputterminalofthe
computertouseVirtualRemoteTool. Usingaswitcherorothercablesthanthesuppliedcomputercable(VGA)maycausefailureinsignalcommunication. VGAcableterminal: PinNos.12and15arerequiredforDDC/CI.• VirtualRemoteToolmaynotworkdependingonyourcomputer’sspecificationsandversionofgraphicadaptersordrivers.• TorunVirtualRemoteToolonWindows8.1andWindows8,“Microsoft.NETFrameworkVersion2.0”isrequired.TheMicrosoft
.NETFrameworkVersion2.0,3.0or3.5isavailablefromMicrosoft’swebpage.Downloadandinstallitonyourcomputer.• Logodata(graphics)thatcanbesenttotheprojectorwithVirtualRemoteToolhasthefollowingrestrictions: (Onlyviaserialconnection)
- Filesize:Lessthan768KB- Imagesize(resolution):
Horizontal1920×vertical1080dotsorlessHorizontal1280×vertical800dotsorless
TIP:• Theprojector’sCOMPUTER IN terminal supportsDDC/CI (DisplayDataChannelCommand Interface).DDC/CI is a standard
interfaceforbidirectionalcommunicationbetweendisplay/projectorandcomputer.• WiththeVirtualRemoteTool,controlispossiblewithbothnetwork(wired/wirelessLAN)andserialconnections.
Step 1: Install Virtual Remote Tool on the computer
NOTE:• ToinstallVirtualRemoteTool,theWindowsuseraccountmusthave“Administrator”privilege.• ExitallrunningprogramsbeforeinstallingVirtualRemoteTool.Ifanotherprogramisrunning,theinstallationmaynotbecom-
pleted.
1To obtain links for the software go to the Dukane product website and look at the projector model downloads.
6650WSSA:6650HDSSA:
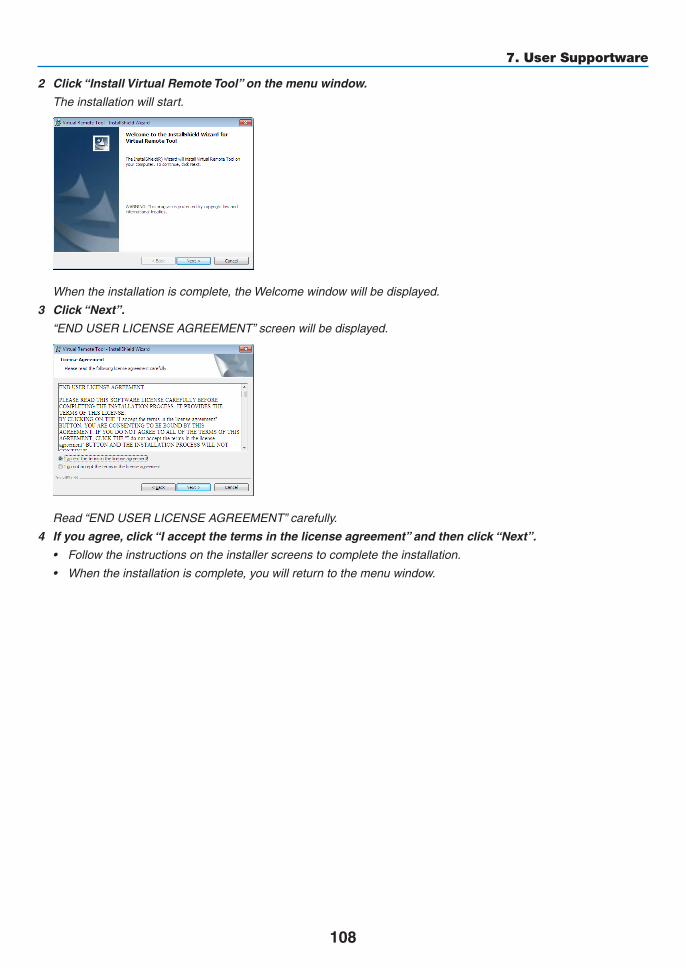
108
7. User Supportware
2 Click“InstallVirtualRemoteTool”onthemenuwindow.
The installation will start.
When the installation is complete, the Welcome window will be displayed.
3 Click“Next”.
“ENDUSERLICENSEAGREEMENT”screenwillbedisplayed.
Read“ENDUSERLICENSEAGREEMENT”carefully.
4 Ifyouagree,click“Iacceptthetermsinthelicenseagreement”andthenclick“Next”.
• Followtheinstructionsontheinstallerscreenstocompletetheinstallation.
• Whentheinstallationiscomplete,youwillreturntothemenuwindow.

109
7. User Supportware
TIP:
UninstallingVirtualRemoteToolPreparation:ExitVirtualRemoteToolbeforeuninstalling.TouninstallVirtualRemoteTool,theWindowsuseraccountmusthave“Administrator” privilege (Windows8.1,Windows8,Windows7andWindowsVista) or “ComputerAdministrator”privilege(WindowsXP).
•ForWindows8.1,Windows8,Windows7andWindowsVista1 Click“Start”andthen“ControlPanel”.
The Control Panel window will be displayed.
2 Click“Uninstallaprogram”under“Programs”
The“ProgramsandFeatures”windowwillbedisplayed.
3 SelectVirtualRemoteToolandclickit.
4 Click“Uninstall/Change”or“Uninstall”.
•Whenthe“UserAccountControl”windowsisdisplayed,click“Continue”.
Follow the instructions on the screens to complete the uninstallation.
Step 2: Connect the projector to the computer1 Usethesuppliedcomputercable(VGA)toconnecttheCOMPUTERINterminaloftheprojectordirectly
with the monitor output terminal of the computer.
2 ConnectthesuppliedpowercordtotheACINoftheprojectorandthewalloutlet.
The projector is in the standby condition.
COMPUTER IN
ACInput
Supplied computer cable (VGA)
→ To wall outlet
Power cord (supplied)
TIP:• WhenVirtualRemoteToolstartsforthefirsttime,“EasySetup”windowwillbedisplayedtonavigateyourconnections.
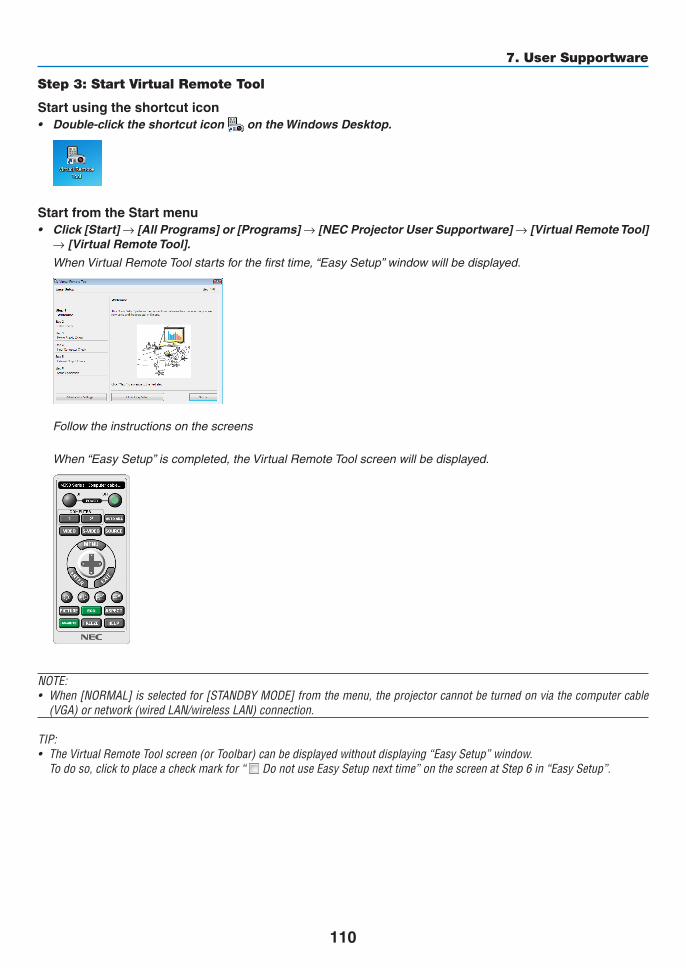
110
7. User Supportware
Step 3: Start Virtual Remote Tool
Start using the shortcut icon• Double-clicktheshortcuticon on the Windows Desktop.
StartfromtheStartmenu• Click[Start]→[AllPrograms]or[Programs]→[NECProjectorUserSupportware]→[VirtualRemoteTool]
→[VirtualRemoteTool].
WhenVirtualRemoteToolstartsforthefirsttime,“EasySetup”windowwillbedisplayed.
Follow the instructions on the screens
When“EasySetup”iscompleted,theVirtualRemoteToolscreenwillbedisplayed.
NOTE:• When[NORMAL]isselectedfor[STANDBYMODE]fromthemenu,theprojectorcannotbeturnedonviathecomputercable
(VGA)ornetwork(wiredLAN/wirelessLAN)connection.
TIP:• TheVirtualRemoteToolscreen(orToolbar)canbedisplayedwithoutdisplaying“EasySetup”window. Todoso,clicktoplaceacheckmarkfor“ DonotuseEasySetupnexttime”onthescreenatStep6in“EasySetup”.

111
7. User Supportware
ExitingVirtualRemoteTool1 ClicktheVirtualRemoteToolicon on the Taskbar.
The pop-up menu will be displayed.
2 Click“Exit”.
The Virtual Remote Tool will be closed.
ViewingthehelpfileofVirtualRemoteTool•Displayingthehelpfileusingthetaskbar1 ClicktheVirtualRemoteToolicon onthetaskbarwhenVirtualRemoteToolisrunning.
The pop-up menu will be displayed.
2. Click“Help”.
The Help screen will be displayed.
•DisplayingthehelpfileusingtheStartMenu.1. Click“Start”→“Allprograms”or“Programs”→“NECProjectorUserSupportware”→“VirtualRemote
Tool”→andthen“VirtualRemoteToolHelp”inthisorder.
The Help screen will be displayed.
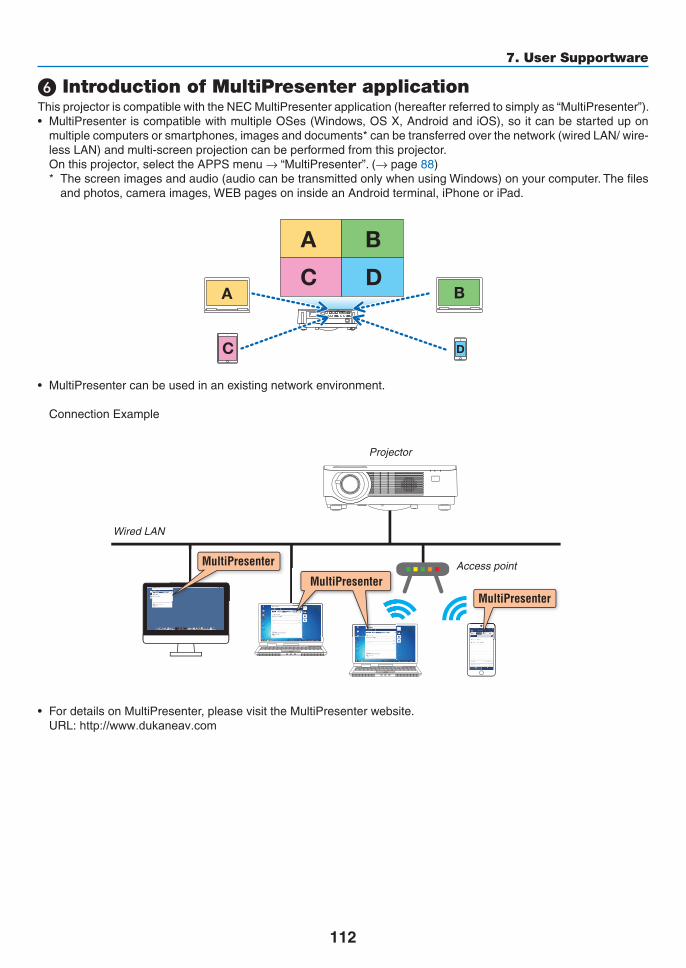
112
7. User Supportware
❻ Introduction of MultiPresenter applicationThisprojectoriscompatiblewiththeNECMultiPresenterapplication(hereafterreferredtosimplyas“MultiPresenter”).• MultiPresenteriscompatiblewithmultipleOSes(Windows,OSX,AndroidandiOS),soitcanbestartedupon
multiplecomputersorsmartphones,imagesanddocuments*canbetransferredoverthenetwork(wiredLAN/wire-lessLAN)andmulti-screenprojectioncanbeperformedfromthisprojector.
Onthisprojector,selecttheAPPSmenu→“MultiPresenter”.(→page88)* Thescreenimagesandaudio(audiocanbetransmittedonlywhenusingWindows)onyourcomputer.Thefiles
andphotos,cameraimages,WEBpagesoninsideanAndroidterminal,iPhoneoriPad.
• MultiPresentercanbeusedinanexistingnetworkenvironment.
ConnectionExample
MultiPresenterMultiPresenter
MultiPresenter
Projector
Wired LAN
Access point
• FordetailsonMultiPresenter,pleasevisittheMultiPresenterwebsite. URL: http://www.dukaneav.com
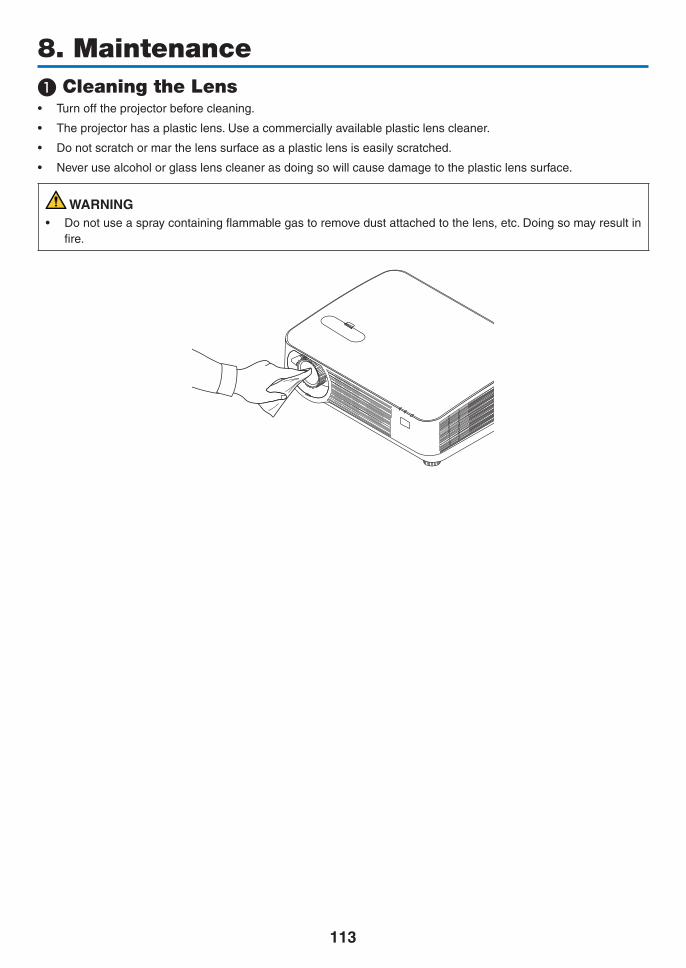
113
8. Maintenance❶ Cleaning the Lens• Turnofftheprojectorbeforecleaning.
• Theprojectorhasaplasticlens.Useacommerciallyavailableplasticlenscleaner.
• Donotscratchormarthelenssurfaceasaplasticlensiseasilyscratched.
• Neverusealcoholorglasslenscleanerasdoingsowillcausedamagetotheplasticlenssurface.
WARNING• Donotuseaspraycontainingflammablegastoremovedustattachedtothelens,etc.Doingsomayresultin
fire.
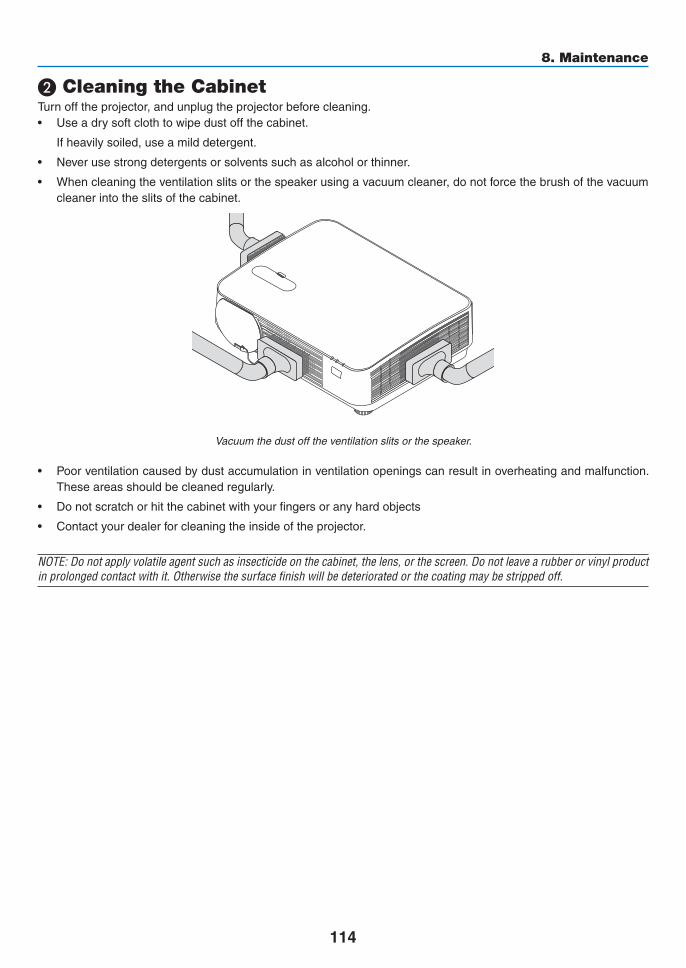
114
8. Maintenance
❷ Cleaning the CabinetTurnofftheprojector,andunplugtheprojectorbeforecleaning.• Useadrysoftclothtowipedustoffthecabinet.
Ifheavilysoiled,useamilddetergent.
• Neverusestrongdetergentsorsolventssuchasalcoholorthinner.
• Whencleaningtheventilationslitsorthespeakerusingavacuumcleaner,donotforcethebrushofthevacuumcleaner into the slits of the cabinet.
Vacuumthedustofftheventilationslitsorthespeaker.
• Poorventilationcausedbydustaccumulationinventilationopeningscanresultinoverheatingandmalfunction.Theseareasshouldbecleanedregularly.
• Donotscratchorhitthecabinetwithyourfingersoranyhardobjects
• Contactyourdealerforcleaningtheinsideoftheprojector.
NOTE:Donotapplyvolatileagentsuchasinsecticideonthecabinet,thelens,orthescreen.Donotleavearubberorvinylproductinprolongedcontactwithit.Otherwisethesurfacefinishwillbedeterioratedorthecoatingmaybestrippedoff.
115
9. Appendix❶ TroubleshootingThissectionhelpsyouresolveproblemsyoumayencounterwhilesettinguporusingtheprojector.Indicator MessagesPOWERIndicator
Indicator Condition ProjectorCondition NoteOff The main power is off –
Blinking light
Blue 0�5 sec On,0�5 sec Off
The projector is getting ready to turn on� Wait for a moment�
2�5 sec On,0�5 sec Off
Off Timer is enabled� Program timer (off time enabled)
–
Orange (short flashes) Cooling Wait for a momentOrange (long flashes) Program timer (on time enabled)
Steady light
Blue The projector is turned on� –Orange In Standby condition [NETWORK STAND-
BY] is selected for [STANDBY MODE]–
Red In Standby condition [NORMAL] is selected for [STANDBY MODE]
–
STATUS IndicatorIndicator Condition ProjectorCondition Note
Off Normal or Standby –Blinking light
Red 2 cycle (0�5 sec On, 0�5 sec Off)
Temperature error The projector is overheated� Move the projector to a cooler location�
3 cycle (0�5 sec On, 0�5 sec Off)
Power error Power unit is not working properly� Contact your dealer�
4 cycle (0�5 sec On, 0�5 sec Off)
Fan error Fans will not work correctly�
6 cycle (0�5 sec On, 0�5 sec Off)
Light source error Ask your dealer or service personnel for repair�
Orange 1 cycle (0�5 sec On, 2�5 sec Off)
Network conflict Both the built-in wired LAN and the wireless LAN cannot be connected to the same network at the same time�To use both built-in wired LAN and wireless LAN at the same time, connect them to different networks�NOTE: In theStandbycondition, thestatus indicatoron the cabinet does not blink in orange even if thenetworkconflicts
Steady light
Green Sleep mode* –Orange CONTROL PANEL LOCK is on� You have pressed cabinet button when Control Panel
Lock is on�CONTROL ID error Remote control ID and projector ID are not matched�
* Thesleepmodereferstothemodeinwhichtherestrictionstofunctionsduetothe[STANDBYMODE]settingshavebeenelimi-nated.
LIGHT IndicatorIndicator Condition ProjectorCondition Note
Off No trouble or [ECO MODE] is set to [OFF]� –Steady light
Green [ECO MODE] is set to [ECO1] or [ECO2] –

116
9. Appendix
Over-TemperatureProtectionIf theprojector insidetemperaturegetstoohigh, the lightmoduleswillbeturnedoffautomaticallyandthestatusindicatorwillstarttoblink(2-cycleOnandOFF).Shouldthishappen,dothefollowing:• Unplugthepowercordafterthecoolingfansstop.• Movetheprojectortoacoolerlocationiftheroomwhereyouarepresentingisparticularlytoowarm.• Cleantheventsiftheyarecloggedwithdust.• Waitabout60minutesuntiltheinsideoftheprojectorbecomescoolenough.
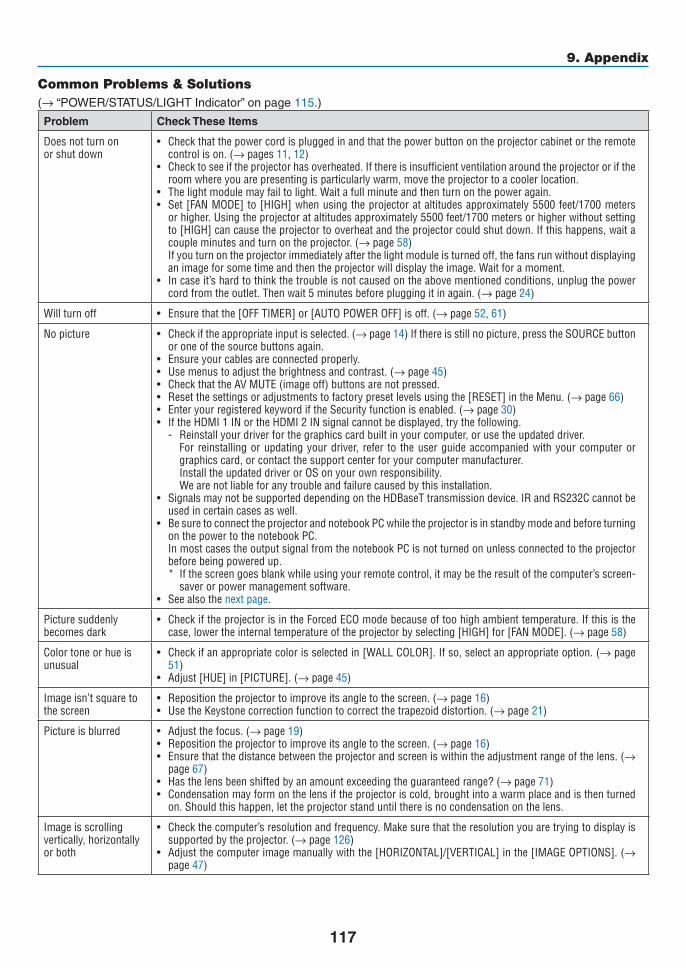
117
9. Appendix
Common Problems & Solutions(→“POWER/STATUS/LIGHTIndicator”onpage115.)
Problem CheckTheseItems
Does not turn onor shut down
• Checkthatthepowercordispluggedinandthatthepowerbuttonontheprojectorcabinetortheremotecontrol is on� (→ pages 11, 12)
• Checktoseeiftheprojectorhasoverheated.Ifthereisinsufficientventilationaroundtheprojectororiftheroom where you are presenting is particularly warm, move the projector to a cooler location�
• Thelightmodulemayfailtolight.Waitafullminuteandthenturnonthepoweragain.• Set[FANMODE]to[HIGH]whenusingtheprojectorataltitudesapproximately5500feet/1700meters
or higher� Using the projector at altitudes approximately 5500 feet/1700 meters or higher without setting to [HIGH] can cause the projector to overheat and the projector could shut down� If this happens, wait a couple minutes and turn on the projector� (→ page 58)
If you turn on the projector immediately after the light module is turned off, the fans run without displaying an image for some time and then the projector will display the image� Wait for a moment�
• Incaseit’shardtothinkthetroubleisnotcausedontheabovementionedconditions,unplugthepowercord from the outlet� Then wait 5 minutes before plugging it in again� (→ page 24)
Will turn off • Ensurethatthe[OFFTIMER]or[AUTOPOWEROFF]isoff.(→ page 52, 61)
No picture • Checkiftheappropriateinputisselected.(→ page 14) If there is still no picture, press the SOURCE button or one of the source buttons again�
• Ensureyourcablesareconnectedproperly.• Usemenustoadjustthebrightnessandcontrast.(→ page 45)• CheckthattheAVMUTE(imageoff)buttonsarenotpressed.• Resetthesettingsoradjustmentstofactorypresetlevelsusingthe[RESET]intheMenu.(→ page 66)• EnteryourregisteredkeywordiftheSecurityfunctionisenabled.(→ page 30)• IftheHDMI1INortheHDMI2INsignalcannotbedisplayed,trythefollowing.
- Reinstall your driver for the graphics card built in your computer, or use the updated driver� For reinstalling or updating your driver, refer to the user guide accompanied with your computer or
graphics card, or contact the support center for your computer manufacturer� Install the updated driver or OS on your own responsibility� We are not liable for any trouble and failure caused by this installation�
• SignalsmaynotbesupporteddependingontheHDBaseTtransmissiondevice.IRandRS232Ccannotbeused in certain cases as well�
• BesuretoconnecttheprojectorandnotebookPCwhiletheprojectorisinstandbymodeandbeforeturningon the power to the notebook PC�
In most cases the output signal from the notebook PC is not turned on unless connected to the projector before being powered up�* Ifthescreengoesblankwhileusingyourremotecontrol,itmaybetheresultofthecomputer’sscreen-
saver or power management software�• Seealsothenext page�
Picture suddenly becomes dark
• CheckiftheprojectorisintheForcedECOmodebecauseoftoohighambienttemperature.Ifthisisthecase, lower the internal temperature of the projector by selecting [HIGH] for [FAN MODE]� (→ page 58)
Color tone or hue is unusual
• Checkifanappropriatecolorisselectedin[WALLCOLOR].Ifso,selectanappropriateoption.(→ page 51)
• Adjust[HUE]in[PICTURE].(→ page 45)
Imageisn’tsquaretothe screen
• Repositiontheprojectortoimproveitsangletothescreen.(→ page 16)• UsetheKeystonecorrectionfunctiontocorrectthetrapezoiddistortion.(→ page 21)
Picture is blurred • Adjustthefocus.(→ page 19)• Repositiontheprojectortoimproveitsangletothescreen.(→ page 16)• Ensurethatthedistancebetweentheprojectorandscreeniswithintheadjustmentrangeofthelens.(→
page 67)• Hasthelensbeenshiftedbyanamountexceedingtheguaranteedrange?(→ page 71)• Condensationmayformonthelensiftheprojectoriscold,broughtintoawarmplaceandisthenturned
on� Should this happen, let the projector stand until there is no condensation on the lens�
Image is scrolling vertically, horizontally or both
• Checkthecomputer’sresolutionandfrequency.Makesurethattheresolutionyouaretryingtodisplayissupported by the projector� (→ page 126)
• Adjustthecomputerimagemanuallywiththe[HORIZONTAL]/[VERTICAL]inthe[IMAGEOPTIONS].(→ page 47)
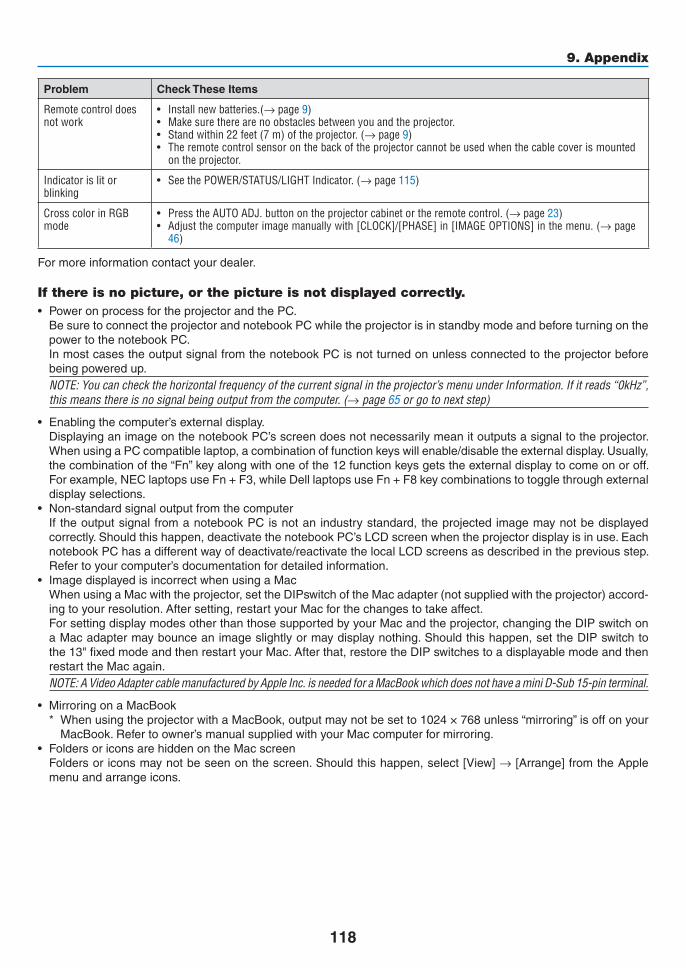
118
9. Appendix
Problem CheckTheseItems
Remote control does not work
• Installnewbatteries.(→ page 9)• Makesuretherearenoobstaclesbetweenyouandtheprojector.• Standwithin22feet(7m)oftheprojector.(→ page 9)• Theremotecontrolsensoronthebackoftheprojectorcannotbeusedwhenthecablecoverismounted
on the projector�
Indicator is lit or blinking
• SeethePOWER/STATUS/LIGHTIndicator.(→ page 115)
Cross color in RGB mode
• PresstheAUTOADJ.buttonontheprojectorcabinetortheremotecontrol.(→ page 23)• Adjustthecomputerimagemanuallywith[CLOCK]/[PHASE]in[IMAGEOPTIONS]inthemenu.(→ page
46)
Formoreinformationcontactyourdealer.
If there is no picture, or the picture is not displayed correctly.• PoweronprocessfortheprojectorandthePC. BesuretoconnecttheprojectorandnotebookPCwhiletheprojectorisinstandbymodeandbeforeturningonthe
powertothenotebookPC. InmostcasestheoutputsignalfromthenotebookPCisnotturnedonunlessconnectedtotheprojectorbefore
beingpoweredup.NOTE:Youcancheckthehorizontalfrequencyofthecurrentsignalintheprojector’smenuunderInformation.Ifitreads“0kHz”,thismeansthereisnosignalbeingoutputfromthecomputer.(→page65orgotonextstep)
• Enablingthecomputer’sexternaldisplay. DisplayinganimageonthenotebookPC’sscreendoesnotnecessarilymeanitoutputsasignaltotheprojector.
WhenusingaPCcompatiblelaptop,acombinationoffunctionkeyswillenable/disabletheexternaldisplay.Usually,thecombinationofthe“Fn”keyalongwithoneofthe12functionkeysgetstheexternaldisplaytocomeonoroff.Forexample,NEClaptopsuseFn+F3,whileDelllaptopsuseFn+F8keycombinationstotogglethroughexternaldisplay selections.
• Non-standardsignaloutputfromthecomputer If theoutputsignalfromanotebookPCisnotanindustrystandard,theprojectedimagemaynotbedisplayed
correctly.Shouldthishappen,deactivatethenotebookPC’sLCDscreenwhentheprojectordisplayisinuse.EachnotebookPChasadifferentwayofdeactivate/reactivatethelocalLCDscreensasdescribedinthepreviousstep.Refertoyourcomputer’sdocumentationfordetailedinformation.
• ImagedisplayedisincorrectwhenusingaMac WhenusingaMacwiththeprojector,settheDIPswitchoftheMacadapter(notsuppliedwiththeprojector)accord-
ingtoyourresolution.Aftersetting,restartyourMacforthechangestotakeaffect. ForsettingdisplaymodesotherthanthosesupportedbyyourMacandtheprojector,changingtheDIPswitchon
aMacadaptermaybounceanimageslightlyormaydisplaynothing.Shouldthishappen,settheDIPswitchtothe13"fixedmodeandthenrestartyourMac.Afterthat,restoretheDIPswitchestoadisplayablemodeandthenrestarttheMacagain.NOTE:AVideoAdaptercablemanufacturedbyAppleInc.isneededforaMacBookwhichdoesnothaveaminiD-Sub15-pinterminal.
• MirroringonaMacBook* WhenusingtheprojectorwithaMacBook,outputmaynotbesetto1024×768unless“mirroring”isoffonyour
MacBook.Refertoowner’smanualsuppliedwithyourMaccomputerformirroring.• FoldersoriconsarehiddenontheMacscreen Foldersoriconsmaynotbeseenonthescreen.Shouldthishappen,select[View]→[Arrange]fromtheApple
menuandarrangeicons.
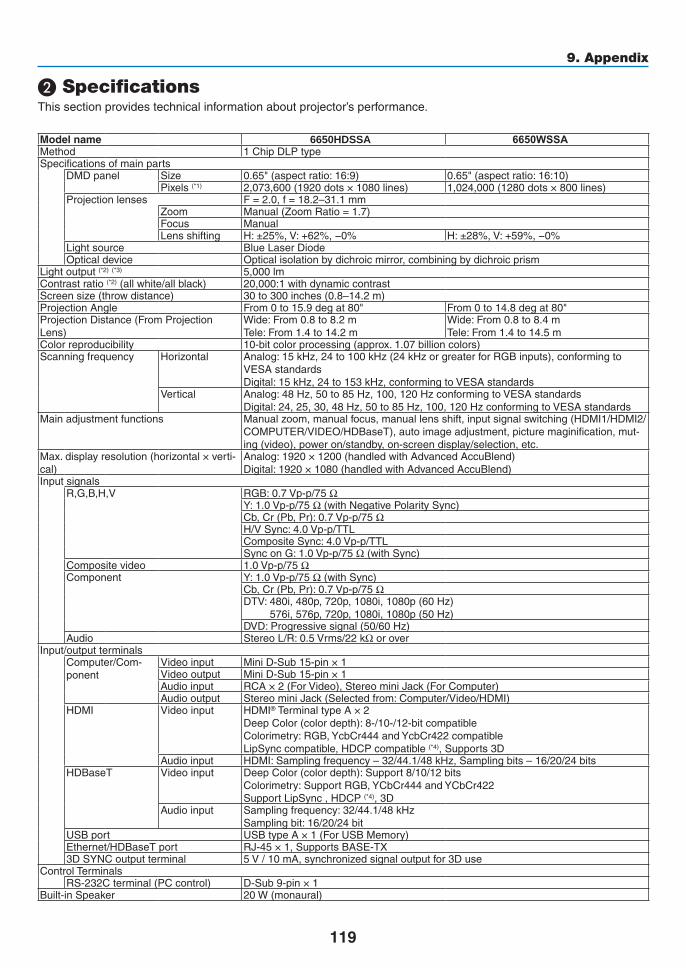
119
9. Appendix
❷ SpecificationsThissectionprovidestechnicalinformationaboutprojector’sperformance.
Modelname 6650HDSSA2 6650WSSA2Method 1ChipDLPtypeSpecificationsofmainparts
DMDpanel Size 0.65"(aspectratio:16:9) 0.65"(aspectratio:16:10)Pixels(*1) 2,073,600(1920dots×1080lines) 1,024,000(1280dots×800lines)
Projection lenses F=2.0,f=18.2–31.1mmZoom Manual(ZoomRatio=1.7)Focus ManualLensshifting H:±25%,V:+62%,−0% H:±28%,V:+59%,−0%
Lightsource BlueLaserDiodeOpticaldevice Opticalisolationbydichroicmirror,combiningbydichroicprism
Lightoutput(*2) (*3) 5,000 lmContrastratio(*2)(allwhite/allblack) 20,000:1 with dynamic contrastScreensize(throwdistance) 30to300inches(0.8–14.2m)ProjectionAngle From0to15.9degat80" From0to14.8degat80"ProjectionDistance(FromProjectionLens)
Wide:From0.8to8.2mTele:From1.4to14.2m
Wide:From0.8to8.4mTele:From1.4to14.5m
Colorreproducibility 10-bitcolorprocessing(approx.1.07billioncolors)Scanningfrequency Horizontal Analog:15kHz,24to100kHz(24kHzorgreaterforRGBinputs),conformingto
VESAstandardsDigital:15kHz,24to153kHz,conformingtoVESAstandards
Vertical Analog:48Hz,50to85Hz,100,120HzconformingtoVESAstandardsDigital:24,25,30,48Hz,50to85Hz,100,120HzconformingtoVESAstandards
Main adjustment functions Manualzoom,manualfocus,manuallensshift,inputsignalswitching(HDMI1/HDMI2/COMPUTER/VIDEO/HDBaseT),autoimageadjustment,picturemaginification,mut-ing(video),poweron/standby,on-screendisplay/selection,etc.
Max.displayresolution(horizontal×verti-cal)
Analog:1920×1200(handledwithAdvancedAccuBlend)Digital:1920×1080(handledwithAdvancedAccuBlend)
InputsignalsR,G,B,H,V RGB:0.7Vp-p/75Ω
Y:1.0Vp-p/75Ω(withNegativePolaritySync)Cb,Cr(Pb,Pr):0.7Vp-p/75ΩH/VSync:4.0Vp-p/TTLCompositeSync:4.0Vp-p/TTLSynconG:1.0Vp-p/75Ω(withSync)
Compositevideo 1.0 Vp-p/75 ΩComponent Y:1.0Vp-p/75Ω(withSync)
Cb,Cr(Pb,Pr):0.7Vp-p/75ΩDTV:480i,480p,720p,1080i,1080p(60Hz)
576i,576p,720p,1080i,1080p(50Hz)DVD:Progressivesignal(50/60Hz)
Audio StereoL/R:0.5Vrms/22kΩ or overInput/outputterminals
Computer/Com-ponent
Video input MiniD-Sub15-pin×1Video output MiniD-Sub15-pin×1Audioinput RCA×2(ForVideo),StereominiJack(ForComputer)Audiooutput StereominiJack(Selectedfrom:Computer/Video/HDMI)
HDMI Video input HDMI®TerminaltypeA×2DeepColor(colordepth):8-/10-/12-bitcompatibleColorimetry:RGB,YcbCr444andYcbCr422compatibleLipSynccompatible,HDCPcompatible(*4),Supports3D
Audioinput HDMI:Samplingfrequency–32/44.1/48kHz,Samplingbits–16/20/24bitsHDBaseT Video input DeepColor(colordepth):Support8/10/12bits
Colorimetry:SupportRGB,YCbCr444andYCbCr422SupportLipSync,HDCP(*4),3D
Audioinput Samplingfrequency:32/44.1/48kHzSamplingbit:16/20/24bit
USBport USBtypeA×1(ForUSBMemory)Ethernet/HDBaseTport RJ-45×1,SupportsBASE-TX3DSYNCoutputterminal 5V/10mA,synchronizedsignaloutputfor3Duse
ControlTerminalsRS-232Cterminal(PCcontrol) D-Sub9-pin×1
Built-inSpeaker 20W(monaural)
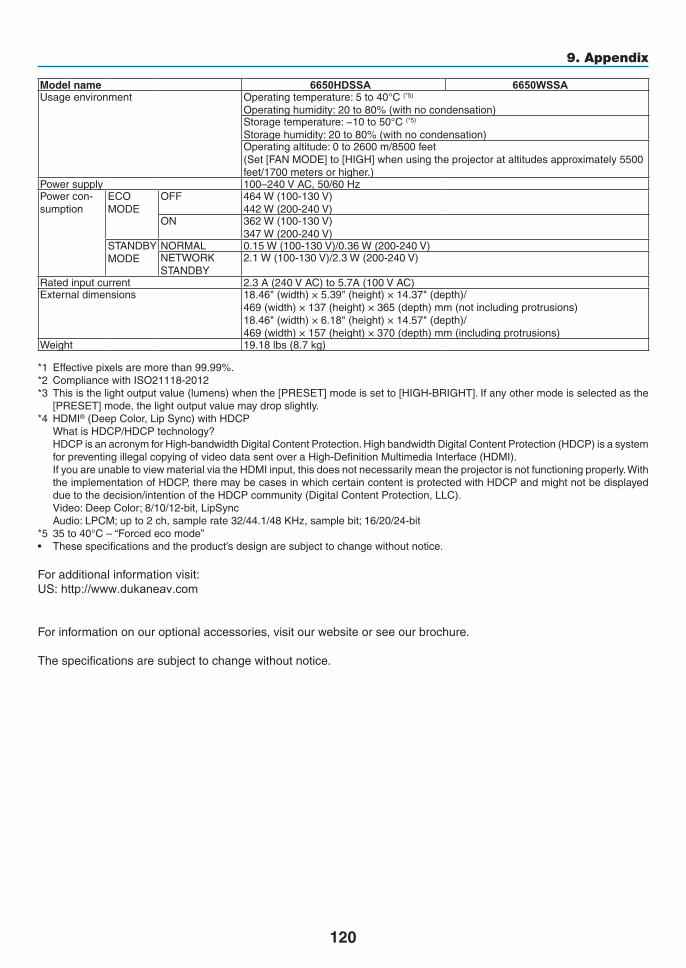
120
9. Appendix
Modelname 6650HDSSA 6650WSSAUsageenvironment Operatingtemperature:5to40°C(*5)
Operatinghumidity:20to80%(withnocondensation)Storagetemperature:−10to50°C(*5)
Storagehumidity:20to80%(withnocondensation)Operatingaltitude:0to2600m/8500feet(Set[FANMODE]to[HIGH]whenusingtheprojectorataltitudesapproximately5500feet/1700metersorhigher.)
Power supply 100–240VAC,50/60HzPower con-sumption
ECOMODE
OFF 464W(100-130V)442W(200-240V)
ON 362W(100-130V)347W(200-240V)
STANDBYMODE
NORMAL 0.15W(100-130V)/0.36W(200-240V)NETWORKSTANDBY
2.1W(100-130V)/2.3W(200-240V)
Ratedinputcurrent 2.3A(240VAC)to5.7A(100VAC)Externaldimensions 18.46"(width)×5.39"(height)×14.37"(depth)/
469(width)×137(height)×365(depth)mm(notincludingprotrusions)18.46"(width)×6.18"(height)×14.57"(depth)/469(width)×157(height)×370(depth)mm(includingprotrusions)
Weight 19.18lbs(8.7kg)
*1 Effectivepixelsaremorethan99.99%.*2 CompliancewithISO21118-2012*3 Thisisthelightoutputvalue(lumens)whenthe[PRESET]modeissetto[HIGH-BRIGHT].Ifanyothermodeisselectedasthe
[PRESET]mode,thelightoutputvaluemaydropslightly.*4 HDMI®(DeepColor,LipSync)withHDCP WhatisHDCP/HDCPtechnology? HDCPisanacronymforHigh-bandwidthDigitalContentProtection.HighbandwidthDigitalContentProtection(HDCP)isasystem
forpreventingillegalcopyingofvideodatasentoveraHigh-DefinitionMultimediaInterface(HDMI). IfyouareunabletoviewmaterialviatheHDMIinput,thisdoesnotnecessarilymeantheprojectorisnotfunctioningproperly.With
theimplementationofHDCP,theremaybecasesinwhichcertaincontentisprotectedwithHDCPandmightnotbedisplayedduetothedecision/intentionoftheHDCPcommunity(DigitalContentProtection,LLC).
Video:DeepColor;8/10/12-bit,LipSync Audio:LPCM;upto2ch,samplerate32/44.1/48KHz,samplebit;16/20/24-bit*5 35to40°C–“Forcedecomode”• Thesespecificationsandtheproduct’sdesignaresubjecttochangewithoutnotice.
Foradditionalinformationvisit:US: http://www.dukaneav.com
Forinformationonouroptionalaccessories,visitourwebsiteorseeourbrochure.
Thespecificationsaresubjecttochangewithoutnotice.
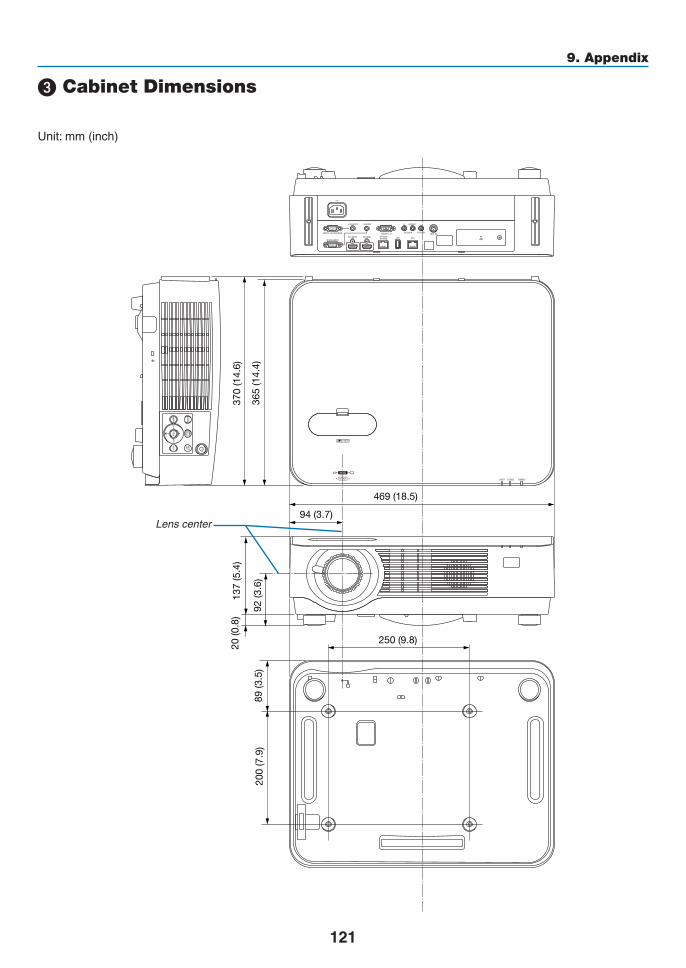
121
9. Appendix
469 (18.5)
94 (3.7)
250 (9.8)
365
(14.
4)20
0 (7
.9)
89 (3
.5)
92 (3
.6)
20 (0
.8)
137
(5.4
)37
0 (1
4.6)
❸ Cabinet Dimensions
Unit:mm(inch)
Lens center
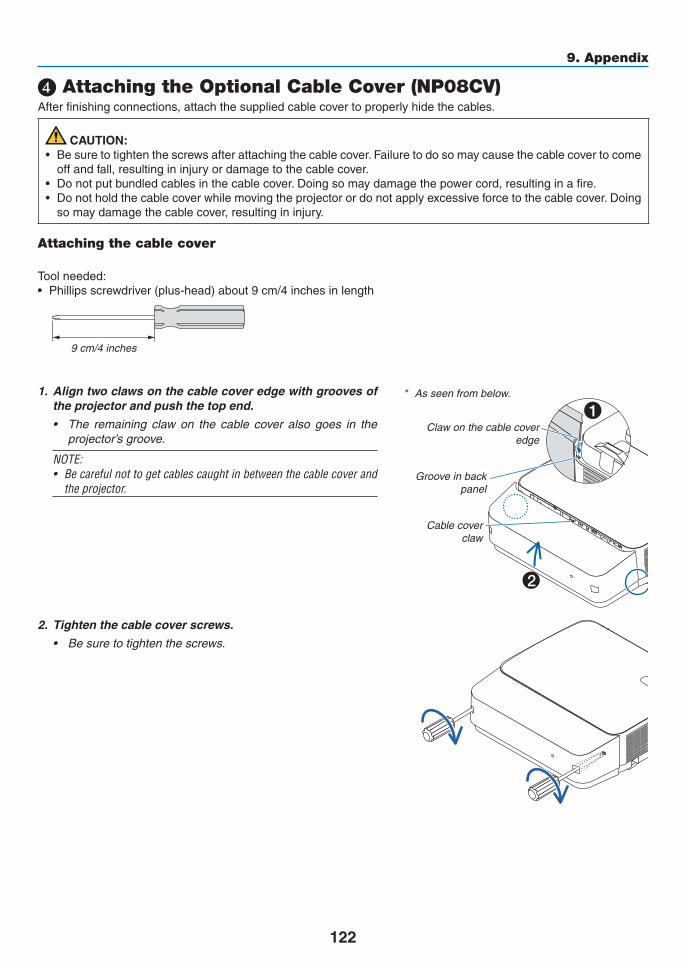
122
9. Appendix
❹ Attaching the Optional Cable Cover (NP08CV)Afterfinishingconnections,attachthesuppliedcablecovertoproperlyhidethecables.
CAUTION:• Besuretotightenthescrewsafterattachingthecablecover.Failuretodosomaycausethecablecovertocome
offandfall,resultingininjuryordamagetothecablecover.• Donotputbundledcablesinthecablecover.Doingsomaydamagethepowercord,resultinginafire.• Donotholdthecablecoverwhilemovingtheprojectorordonotapplyexcessiveforcetothecablecover.Doing
somaydamagethecablecover,resultingininjury.
Attaching the cable cover
Toolneeded:• Phillipsscrewdriver(plus-head)about9cm/4inchesinlength
9 cm/4 inches
1. Align two claws on the cable cover edge with grooves of the projector and push the top end.
• The remaining claw on the cable cover also goes in theprojector’s groove.
NOTE:• Becarefulnottogetcablescaughtinbetweenthecablecoverand
theprojector.
1
2
* As seen from below.
Claw on the cable cover edge
Grooveinbackpanel
Cable cover claw
2. Tighten the cable cover screws.
• Besuretotightenthescrews.
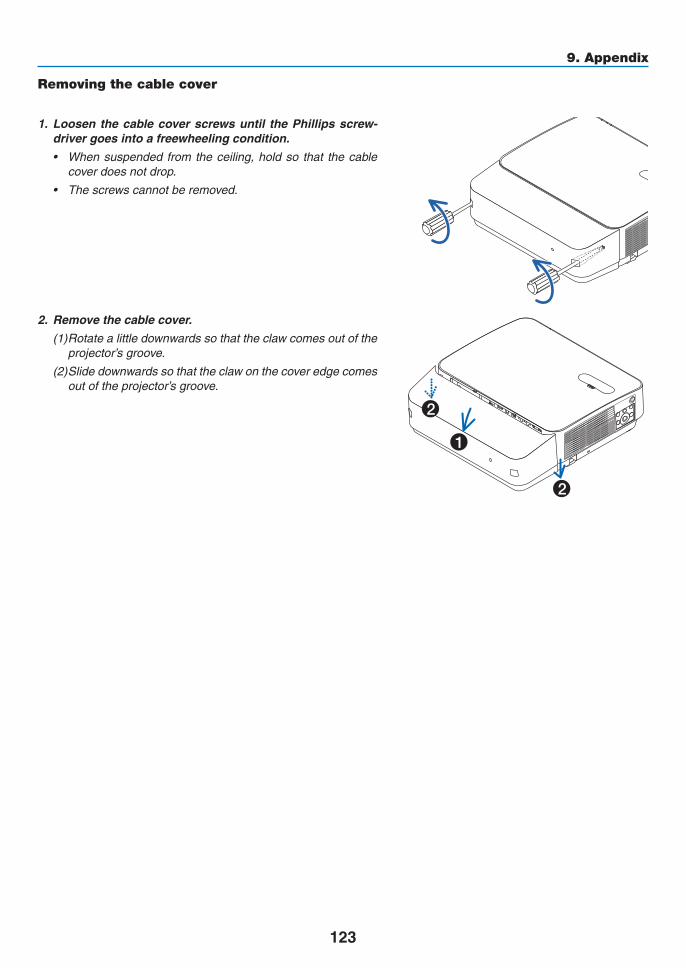
123
9. Appendix
Removing the cable cover
1. Loosen the cable cover screws until the Phillips screw-driver goes into a freewheeling condition.
• Whensuspended fromtheceiling,holdso that thecablecover does not drop.
• Thescrewscannotberemoved.
2. Remove the cable cover.
(1) Rotate a little downwards so that the claw comes out of the projector’s groove.
(2) Slide downwards so that the claw on the cover edge comes out of the projector’s groove.
2
1
2
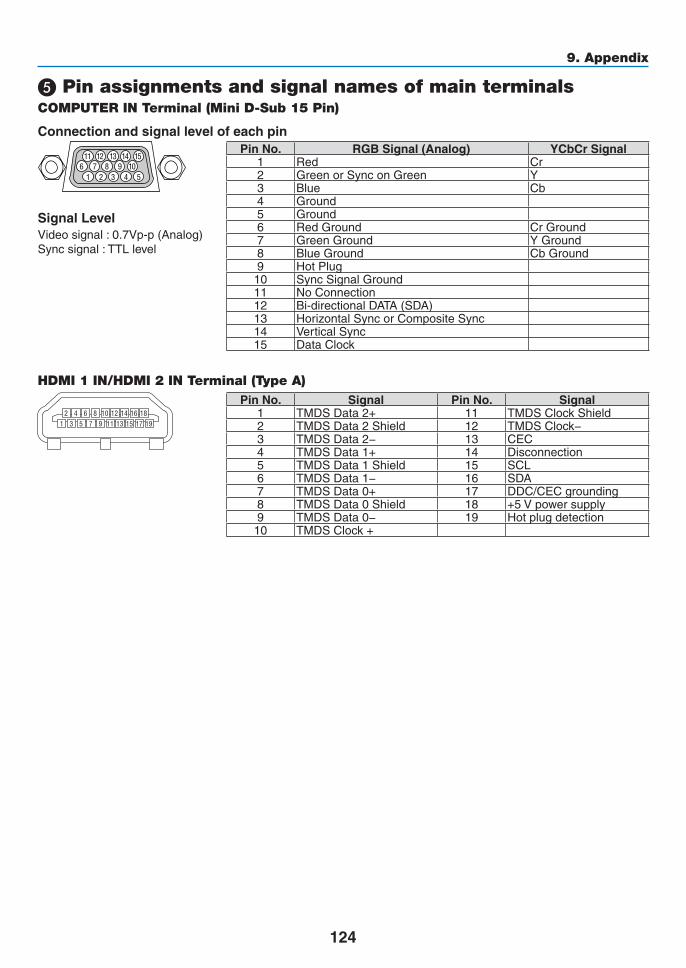
124
9. Appendix
❺ Pin assignments and signal names of main terminalsCOMPUTER IN Terminal (Mini D-Sub 15 Pin)
Connectionandsignallevelofeachpin
51 42 310
11 12 13 14 156 97 8
Signal LevelVideosignal:0.7Vp-p(Analog)Syncsignal:TTLlevel
PinNo. RGBSignal(Analog) YCbCr Signal1 Red Cr2 GreenorSynconGreen Y3 Blue Cb4 Ground5 Ground6 RedGround CrGround7 GreenGround YGround8 BlueGround CbGround9 HotPlug10 SyncSignalGround11 NoConnection12 Bi-directionalDATA(SDA)13 HorizontalSyncorCompositeSync14 VerticalSync15 DataClock
HDMI 1 IN/HDMI 2 IN Terminal (Type A)
1 3 5 7 9 11 13 15 17 192 4 6 8 10 12 14 16 18
PinNo. Signal PinNo. Signal1 TMDSData2+ 11 TMDSClockShield2 TMDSData2Shield 12 TMDSClock−3 TMDSData2− 13 CEC4 TMDSData1+ 14 Disconnection5 TMDSData1Shield 15 SCL6 TMDSData1− 16 SDA7 TMDSData0+ 17 DDC/CECgrounding8 TMDSData0Shield 18 +5Vpowersupply9 TMDSData0− 19 Hotplugdetection10 TMDSClock+
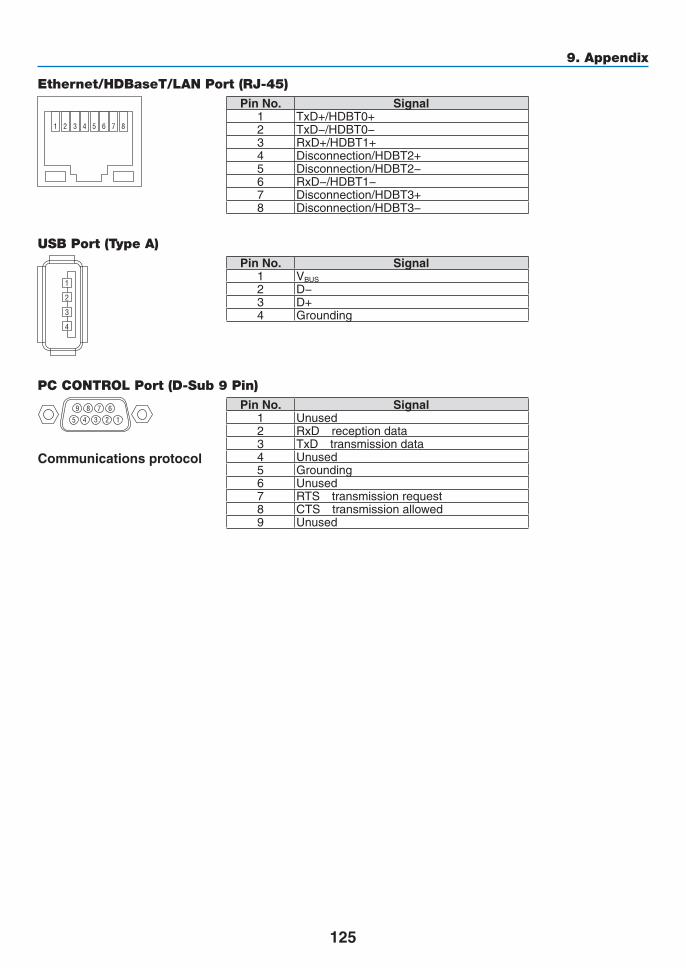
125
9. Appendix
Ethernet/HDBaseT/LAN Port (RJ-45)
1 2 3 4 5 6 7 8
PinNo. Signal1 TxD+/HDBT0+2 TxD−/HDBT0−3 RxD+/HDBT1+4 Disconnection/HDBT2+5 Disconnection/HDBT2−6 RxD−/HDBT1−7 Disconnection/HDBT3+8 Disconnection/HDBT3−
USB Port (Type A)
1
3
2
4
PinNo. Signal1 VBUS
2 D−3 D+4 Grounding
PC CONTROL Port (D-Sub 9 Pin)
12345
6789
Communications protocol
PinNo. Signal1 Unused2 RxD receptiondata3 TxD transmissiondata4 Unused5 Grounding6 Unused7 RTS transmissionrequest8 CTS transmissionallowed9 Unused
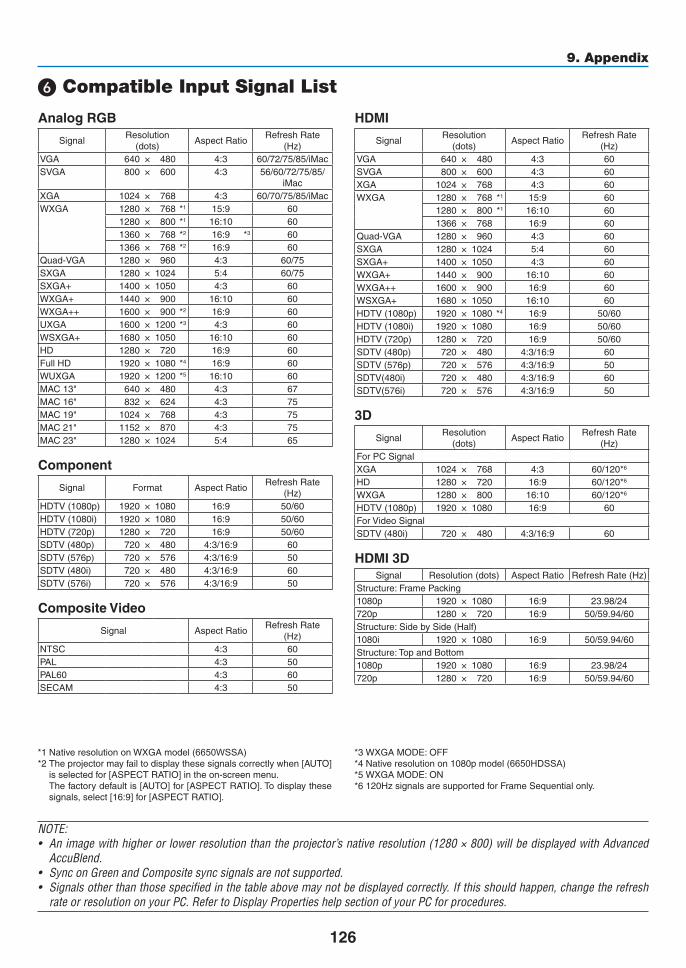
126
9. Appendix
HDMI
SignalResolution
(dots)AspectRatio
RefreshRate(Hz)
VGA 640 × 480 4:3 60SVGA 800 × 600 4:3 60XGA 1024 × 768 4:3 60WXGA 1280 × 768 *1 15:9 60
1280 × 800 *1 16:10 601366 × 768 16:9 60
Quad-VGA 1280 × 960 4:3 60SXGA 1280 × 1024 5:4 60SXGA+ 1400 × 1050 4:3 60WXGA+ 1440 × 900 16:10 60WXGA++ 1600 × 900 16:9 60WSXGA+ 1680 × 1050 16:10 60HDTV(1080p) 1920 × 1080 *4 16:9 50/60HDTV(1080i) 1920 × 1080 16:9 50/60HDTV(720p) 1280 × 720 16:9 50/60SDTV(480p) 720 × 480 4:3/16:9 60SDTV(576p) 720 × 576 4:3/16:9 50SDTV(480i) 720 × 480 4:3/16:9 60SDTV(576i) 720 × 576 4:3/16:9 50
3D
SignalResolution
(dots)AspectRatio
RefreshRate(Hz)
ForPCSignalXGA 1024 × 768 4:3 60/120*6
HD 1280 × 720 16:9 60/120*6
WXGA 1280 × 800 16:10 60/120*6
HDTV(1080p) 1920 × 1080 16:9 60ForVideoSignalSDTV(480i) 720 × 480 4:3/16:9 60
HDMI3DSignal Resolution(dots) AspectRatio RefreshRate(Hz)
Structure:FramePacking1080p 1920 × 1080 16:9 23.98/24720p 1280 × 720 16:9 50/59.94/60Structure:SidebySide(Half)1080i 1920 × 1080 16:9 50/59.94/60Structure:TopandBottom1080p 1920 × 1080 16:9 23.98/24720p 1280 × 720 16:9 50/59.94/60
❻ Compatible Input Signal List
AnalogRGB
SignalResolution
(dots)AspectRatio
RefreshRate(Hz)
VGA 640 × 480 4:3 60/72/75/85/iMacSVGA 800 × 600 4:3 56/60/72/75/85/
iMacXGA 1024 × 768 4:3 60/70/75/85/iMacWXGA 1280 × 768 *1 15:9 60
1280 × 800 *1 16:10 601360 × 768 *2 16:9 *3 601366 × 768 *2 16:9 60
Quad-VGA 1280 × 960 4:3 60/75SXGA 1280 × 1024 5:4 60/75SXGA+ 1400 × 1050 4:3 60WXGA+ 1440 × 900 16:10 60WXGA++ 1600 × 900 *2 16:9 60UXGA 1600 × 1200 *3 4:3 60WSXGA+ 1680 × 1050 16:10 60HD 1280 × 720 16:9 60FullHD 1920 × 1080 *4 16:9 60WUXGA 1920 × 1200 *5 16:10 60MAC13" 640 × 480 4:3 67MAC16" 832 × 624 4:3 75MAC19" 1024 × 768 4:3 75MAC21" 1152 × 870 4:3 75MAC23" 1280 × 1024 5:4 65
Component
Signal Format AspectRatioRefreshRate
(Hz)HDTV(1080p) 1920 × 1080 16:9 50/60HDTV(1080i) 1920 × 1080 16:9 50/60HDTV(720p) 1280 × 720 16:9 50/60SDTV(480p) 720 × 480 4:3/16:9 60SDTV(576p) 720 × 576 4:3/16:9 50SDTV(480i) 720 × 480 4:3/16:9 60SDTV(576i) 720 × 576 4:3/16:9 50
CompositeVideo
Signal AspectRatioRefreshRate
(Hz)NTSC 4:3 60PAL 4:3 50PAL60 4:3 60SECAM 4:3 50
*1NativeresolutiononWXGAmodel(6650WSSA)*2Theprojectormayfailtodisplaythesesignalscorrectlywhen[AUTO]
isselectedfor[ASPECTRATIO]intheon-screenmenu. Thefactorydefaultis[AUTO]for[ASPECTRATIO].Todisplaythese
signals,select[16:9]for[ASPECTRATIO].
*3WXGAMODE:OFF*4Nativeresolutionon1080pmodel(6650HDSSA)*5WXGAMODE:ON*6120HzsignalsaresupportedforFrameSequentialonly.
NOTE:• Animagewithhigherorlowerresolutionthantheprojector’snativeresolution(1280×800)willbedisplayedwithAdvanced
AccuBlend.• SynconGreenandCompositesyncsignalsarenotsupported.• Signalsotherthanthosespecifiedinthetableabovemaynotbedisplayedcorrectly.Ifthisshouldhappen,changetherefresh
rateorresolutiononyourPC.RefertoDisplayPropertieshelpsectionofyourPCforprocedures.
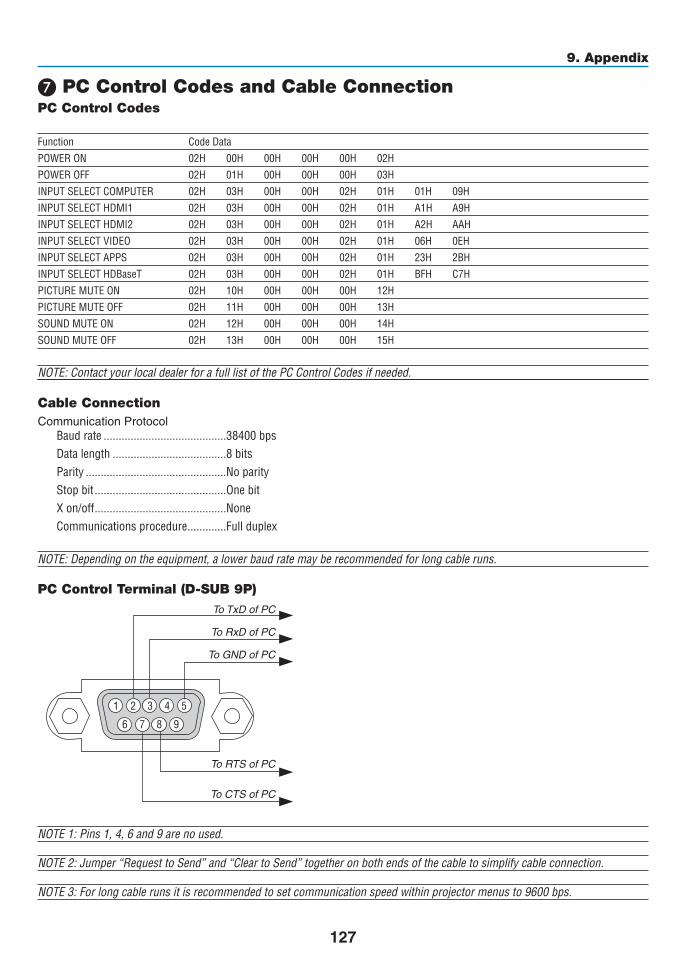
127
9. Appendix
❼ PC Control Codes and Cable ConnectionPC Control Codes
Function Code Data
POWER ON 02H 00H 00H 00H 00H 02H
POWER OFF 02H 01H 00H 00H 00H 03H
INPUT SELECT COMPUTER 02H 03H 00H 00H 02H 01H 01H 09H
INPUT SELECT HDMI1 02H 03H 00H 00H 02H 01H A1H A9H
INPUT SELECT HDMI2 02H 03H 00H 00H 02H 01H A2H AAH
INPUT SELECT VIDEO 02H 03H 00H 00H 02H 01H 06H 0EH
INPUT SELECT APPS 02H 03H 00H 00H 02H 01H 23H 2BH
INPUT SELECT HDBaseT 02H 03H 00H 00H 02H 01H BFH C7H
PICTURE MUTE ON 02H 10H 00H 00H 00H 12H
PICTURE MUTE OFF 02H 11H 00H 00H 00H 13H
SOUND MUTE ON 02H 12H 00H 00H 00H 14H
SOUND MUTE OFF 02H 13H 00H 00H 00H 15H
NOTE:ContactyourlocaldealerforafulllistofthePCControlCodesifneeded.
Cable ConnectionCommunicationProtocol
Baud rate �����������������������������������������38400 bpsData length ��������������������������������������8 bitsParity �����������������������������������������������No parityStop bit ��������������������������������������������One bitX on/off ��������������������������������������������NoneCommunications procedure �������������Full duplex
NOTE:Dependingontheequipment,alowerbaudratemayberecommendedforlongcableruns.
PC Control Terminal (D-SUB 9P)
1 52 43
6 7 98
To GND of PC
To RxD of PC
To TxD of PC
To RTS of PC
To CTS of PC
NOTE1:Pins1,4,6and9arenoused.
NOTE2:Jumper“RequesttoSend”and“CleartoSend”togetheronbothendsofthecabletosimplifycableconnection.
NOTE3:Forlongcablerunsitisrecommendedtosetcommunicationspeedwithinprojectormenusto9600bps.
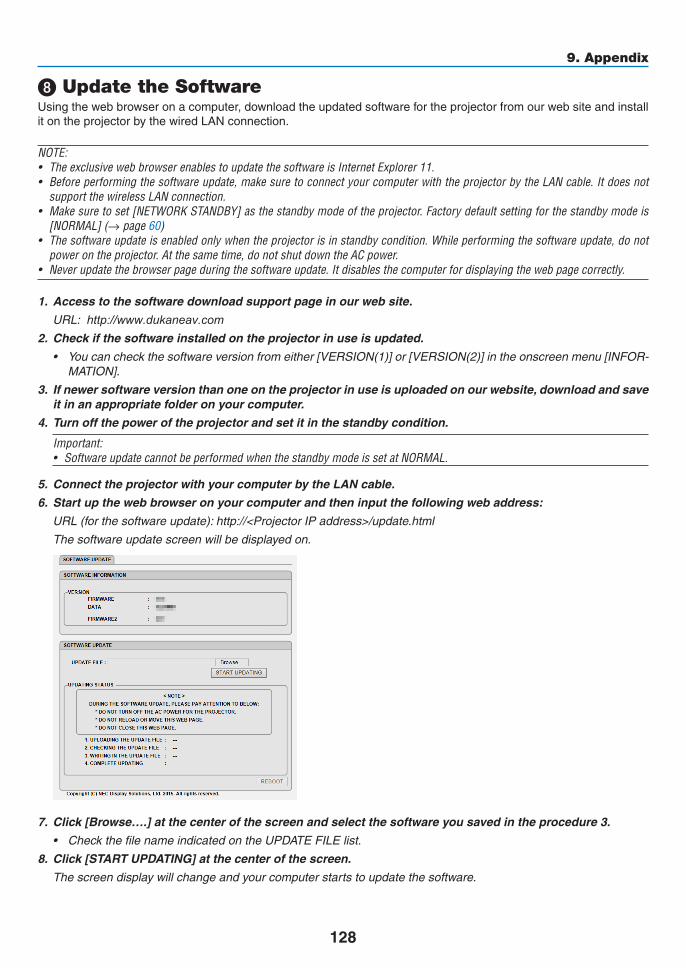
128
9. Appendix
❽ Update the SoftwareUsingthewebbrowseronacomputer,downloadtheupdatedsoftwarefortheprojectorfromourwebsiteandinstallitontheprojectorbythewiredLANconnection.
NOTE:• TheexclusivewebbrowserenablestoupdatethesoftwareisInternetExplorer11.• Beforeperformingthesoftwareupdate,makesuretoconnectyourcomputerwiththeprojectorbytheLANcable.Itdoesnot
supportthewirelessLANconnection.• Makesuretoset[NETWORKSTANDBY]asthestandbymodeoftheprojector.Factorydefaultsettingforthestandbymodeis
[NORMAL](→page60)• Thesoftwareupdateisenabledonlywhentheprojectorisinstandbycondition.Whileperformingthesoftwareupdate,donot
powerontheprojector.Atthesametime,donotshutdowntheACpower.• Neverupdatethebrowserpageduringthesoftwareupdate.Itdisablesthecomputerfordisplayingthewebpagecorrectly.
1. Access to the software download support page in our web site.
URL: http://www.dukaneav.com
2. Checkifthesoftwareinstalledontheprojectorinuseisupdated.
• Youcancheckthesoftwareversionfromeither[VERSION(1)]or[VERSION(2)]intheonscreenmenu[INFOR-MATION].
3. If newer software version than one on the projector in use is uploaded on our website, download and save it in an appropriate folder on your computer.
4. Turn off the power of the projector and set it in the standby condition.
Important:• SoftwareupdatecannotbeperformedwhenthestandbymodeissetatNORMAL.
5. ConnecttheprojectorwithyourcomputerbytheLANcable.
6. Start up the web browser on your computer and then input the following web address:
URL(forthesoftwareupdate):http://<ProjectorIPaddress>/update.html
The software update screen will be displayed on.
7. Click[Browse….]atthecenterofthescreenandselectthesoftwareyousavedintheprocedure3.
• CheckthefilenameindicatedontheUPDATEFILElist.
8. Click[STARTUPDATING]atthecenterofthescreen.
The screen display will change and your computer starts to update the software.
129
9. Appendix
NOTE:• Duringthesoftwareupdate,payattentiontothefollows:
- DonotturnofftheACPowerfortheprojector.- Donotreloadormovethewebpage.- Donotclosethewebpage.
• Whensoftwareupdateiscompletedproperly,thebelowwillbedisplayedon:
1. UPLOADINGTHEUPDATEFILE:COMPLETED
2. CHECKINGTHEUPDATEFILE:COMPLETED
3. WRITINGINTHEUPDATEFILE:COMPLETED
4. COMPLETEUPDATING:PLEASEREBOOT.
9. Click[REBOOT]attherightbottomofthescreen.
The software update is completed and the projector will go into the standby mode.
NOTE:• Ifanerroroccursduringthesoftwareupdate,anerrorcodeinbelowwillbedisplayedinthe“UPDATINGSTATUS”column. 2001:Failedtouploadthefile. 2007:Theuploadedfileistoolarge. 2011:Theuploadedfileisbroken. 2012:Theuploadedfileisbroken. 4001:ReceivednosignaloftheHTTPtransmission. Theerrorcodesotherthanabovemaybedisplayed. Ifanerrorisfoundduringthesoftwareupdate,turnontheprojectorandupdatethefileagain. Whenthesoftwareupdateisnotcompletedproperlyevenifyoutriedtoupdateseveraltimes,pleaseconsultyourdealer.
Note: The Dukane models described in this document are manufactured by NEC and use the same firmware, software programs, control code, and accessory parts. The equivalent Dukane to NEC models are 6650WSSA (NP-P502WL-2 ) and 6650HDSSA ( NP-P502HL-2).
130
9. Appendix
❾ Troubleshooting Check ListBeforecontactingyourdealerorservicepersonnel,checkthefollowinglisttobesurerepairsareneededalsobyreferringtothe“Troubleshooting”sectioninyouruser’smanual.Thischecklistbelowwillhelpussolveyourproblemmoreefficiently.* Printthispageandthenextpageforyourcheck.
Frequency of occurrence □ always □sometimes(Howoften?_____________________) □other(__________________)
Power□ No power (POWER indicator does not light blue)� See also “Status
Indicator (STATUS)”�□ Powercord’splugisfullyinsertedintothewalloutlet.□ Main power switch is pressed to the ON position�□ No power even though you press and hold the POWER button�
□ Shut down during operation�□ Powercord’splugisfullyinsertedintothewalloutlet.□ [AUTO POWER OFF] is turned off (only models with the [AUTO
POWER OFF] function)�□ [OFF TIMER] is turned off (only models with the [OFF TIMER]
function)�
Video and Audio□ No image is displayed from your PC or video equipment to the
projector�□ Still no image even though you connect the projector to the PC
first, then start the PC�□ EnablingyournotebookPC’ssignaloutputtotheprojector.
• Acombinationoffunctionkeyswillenable/disabletheexter-naldisplay.Usually,thecombinationofthe“Fn”keyalongwithoneofthe12functionkeysturnstheexternaldisplayonoroff.
□ No image (blue or black background, no display)�□ Still no image even though you press the AUTO ADJUST button�□ Still no image even though you carry out [RESET] in the
projector’smenu.□ Signalcable’splugisfullyinsertedintotheinputterminal□ A message appears on the screen�
(_____________________________________________)□ The source connected to the projector is active and available�□ Still no image even though you adjust the brightness and/or
the contrast�□ Inputsource’sresolutionandfrequencyaresupportedbythe
projector�□ Image is too dark�
□ Remains unchanged even though you adjust the brightness and/or the contrast�
□ Image is distorted�□ Image appears to be trapezoidal (unchanged even though you
carry out the [KEYSTONE] adjustment)�
□ Parts of the image are lost�□ Still unchanged even though you press the AUTO ADJUST
button�□ Still unchanged even though you carry out [RESET] in the
projector’smenu.□ Image is shifted in the vertical or horizontal direction�
□ Horizontal and vertical positions are correctly adjusted on a computer signal�
□ Inputsource’sresolutionandfrequencyaresupportedbytheprojector�
□ Some pixels are lost�□ Image is flickering�
□ Still unchanged even though you press the AUTO ADJUST button�
□ Still unchanged even though you carry out [RESET] in the projector’smenu.
□ Image shows flickering or color drift on a computer signal�□ Still unchanged even though you change [FAN MODE] from
[HIGH] to [AUTO]�□ Image appears blurry or out of focus�
□ Stillunchangedeventhoughyoucheckedthesignal’sresolutiononPCandchangedittoprojector’snativeresolution.
□ Still unchanged even though you adjusted the focus�□ No sound�
□ Audio cable is correctly connected to the audio input of the projector�
□ Still unchanged even though you adjusted the volume level�□ AUDIO OUT is connected to your audio equipment (only models
with the AUDIO OUT terminal)�
Other□ Remote control does not work�
□ No obstacles between the sensor of the projector and the remote control�
□ Projector is placed near a fluorescent light that can disturb the infrared remote controls�
□ ID for the projector and for the remote are same�
□ Buttons on the projector cabinet do not work (only models with the [CONTROL PANEL LOCK] function)□ [CONTROL PANEL LOCK] is not turned on or is disabled in
the menu�□ Still unchanged even though you press and hold the SOURCE
button over 10 seconds�
131
9. Appendix
In the space below please describe your problem in detail.
Information on application and environment where your projector is used
Installation environment
Screen size: inchScreen type: □ White matte □ Beads □ Polarization
□ Wide angle □ High contrastThrow distance: feet/inch/mOrientation: □ Ceiling mount □ DesktopPower outlet connection:□ Connected directly to wall outlet□ Connected to power cord extender or other (the
numberofconnectedequipment______________)□ Connected to a power cord reel or other (the number
ofconnectedequipment______________)
Computer
Manufacturer:
Model number:
Notebook PC □ / Desktop □
Native resolution:
Refresh rate:
Video adapter:
Other:
Videoequipment
VCR, DVD player, Video camera, Video game or other
Manufacturer:
Model number:Signal cable
standardorothermanufacturer’scable?Model number: Length: inch/m
Distribution amplifierModel number:
SwitcherModel number:
AdapterModel number:
Projector PC
DVD player
Projector
Model number:Serial No�:Date of purchase:Light module operating time (hours):ECO MODE: □ OFF □ ECO1 □ ECO2Information on input signal:
Horizontal synch frequency [ ] kHzVertical synch frequency [ ] HzSynch polarity H □ (+) □ (−) V □ (+) □ (−)Synch type □ Separate □ Composite □ Sync on Green
STATUS Indicator:Steady light □ Orange □ GreenFlashing light [ ] cycles
Remote control model number:

132
9. Appendix
❿ TCO CertificationSomemodelsinthisproductfamilyareTCOcertified.AllTCOcertifiedmodelshavetheTCOmarkonthemarkingplate(onthebottomoftheproduct).ToseealistofourTCOcertifiedprojectorsandtheirTCOCertification(inEnglishonly),visitourwebsiteat: http://www.dukaneav.com.TheTCOcertification,designedbyTCODevelopment,isaninternationalenvironmentalandergonomicsstandardforITequipment.InsomecaseswemaypostalistofTCOcertifiedmodelsonourwebsitebeforetheTCOmarkisplacedontheproduct.Thisdifferenceintimingisrelatedtothedatecertificationisreceivedcomparedwiththeprojectorsmanufacturingdate.

133
9. Appendix
⓫ REGISTER YOUR PROJECTOR!
Please take time to register your new projector. This will insure an active warranty and your Peace of Mind program.
DUKANE CORP AV SERVICE DEPT2900 Dukane DriveSt Charles, IL 60174800-676-2487 / 630-762-4032Fax [email protected]

DUKANE CORP AV SERVICE DEPT2900 Dukane DriveSt Charles, IL 60174800-676-2487 / 630-762-4032Fax [email protected]
6650WSSA_6650HDSSA_User Manual_v00