Embed Size (px)
Citation preview
Proof for Editing 07/25/08
Proof for Editing 07/25/08
INTRODUCTION
Indications for use The Percussionaire® IPV®/IMPULSATOR® is indicated for the mobilization and raising of endobronchial secretions, bronchodilation, reducing mucosal edema and the resolution of diffuse patchy atelectasis in all patient populations. Potential effects of IPV®/IMPULSATOR® The IPV®/IMPULSATOR® have inherent risks similar to all positive pressure breathing devices. These risks include but are not limited to under/over ventilation, under/over humidification, pneumothorax, and pneumomediastinum, PIE, pneumoperitoneum, and hemoptysis. Individuals attempting to operate the IPV®/IMPULSATOR® must understand warnings and cautions contained in user’s guide and manual to prevent bodily injury or equipment failure. Cautions If IPV®/IMPULSATOR® is used on a patient with an indwelling airway (i.e. endotracheal or tracheotomy tube), a clinician must be present so that a one to one relationship exists. This device enhances secretion clearance. Patients must be assessed pre and post treatment for a reduced vital capacity/FRC or the need for assistance in clearing airway secretions. A patient cannot breathe through an obstructed airway! If an artificial airway is in place a special gated aerosol generator must be used to relieve any transient/unwanted pressure rises.
NOTE: UNLESS OTHERWISE SPECIFIED IPV® REFERS TO ALL Percussionaire® Corporation Intrapulmonary Percussive Ventilation devices.
Proof for Editing 07/25/08
CLINICAL LIMITATIONS/RESTRICTIONS: Use of IPV® Percussionators is limited to individuals who have received proper training in their use. IF YOU HAVE NOT RECEIVED PROPER TRAINING, DO NOT USE THIS EQUIPMENT. The use of standard therapeutic IPV® Percussionators will be restricted to a mouthpiece only. Under no circumstances will a standard IPV® breathing head with a gated aerosol generator be used with other than a mouthpiece (with a lip seal only). Whenever any patient is receiving IPV® therapy without a mouthpiece, a qualified clinician must be directly administering the protocol while employing an aerosol generator with a sleeved pressure relieving valve. Impaction pressures and Frequencies will be initiated on a conservative schedule.
Proof for Editing 07/25/08
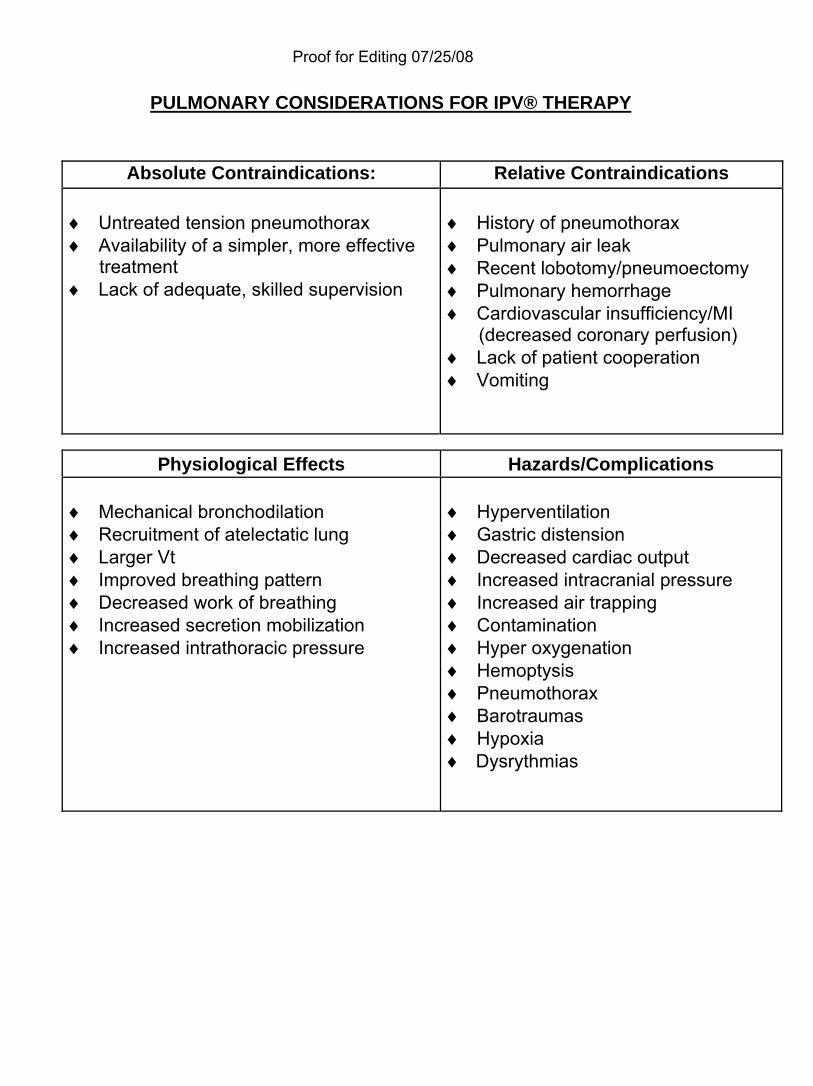
PULMONARY CONSIDERATIONS FOR IPV® THERAPY
Absolute Contraindications: Relative Contraindications ♦ Untreated tension pneumothorax ♦ Availability of a simpler, more effective
treatment ♦ Lack of adequate, skilled supervision
♦ History of pneumothorax ♦ Pulmonary air leak ♦ Recent lobotomy/pneumoectomy
♦ Pulmonary hemorrhage ♦ Cardiovascular insufficiency/MI (decreased coronary perfusion) ♦ Lack of patient cooperation ♦ Vomiting
Physiological Effects Hazards/Complications
♦ Mechanical bronchodilation ♦ Recruitment of atelectatic lung ♦ Larger Vt ♦ Improved breathing pattern ♦ Decreased work of breathing ♦ Increased secretion mobilization ♦ Increased intrathoracic pressure
♦ Hyperventilation ♦ Gastric distension ♦ Decreased cardiac output ♦ Increased intracranial pressure ♦ Increased air trapping ♦ Contamination ♦ Hyper oxygenation ♦ Hemoptysis ♦ Pneumothorax ♦ Barotraumas ♦ Hypoxia ♦ Dysrythmias
Proof for Editing 07/25/08
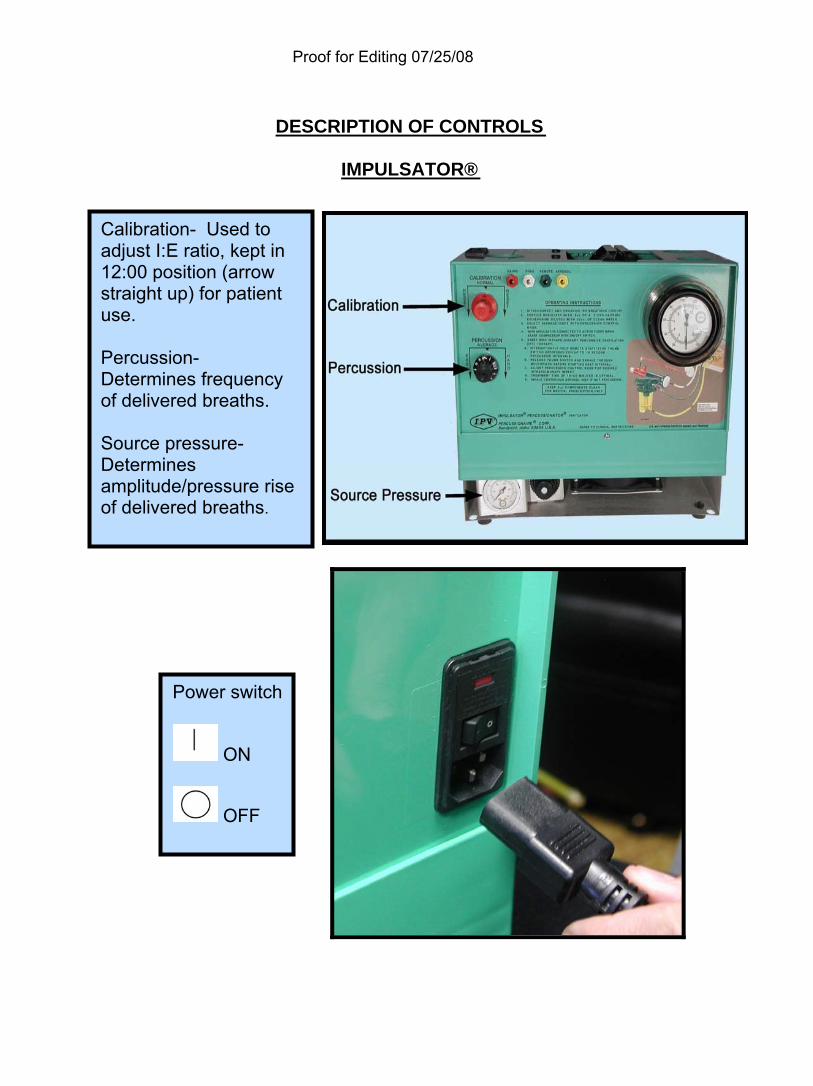
DESCRIPTION OF CONTROLS
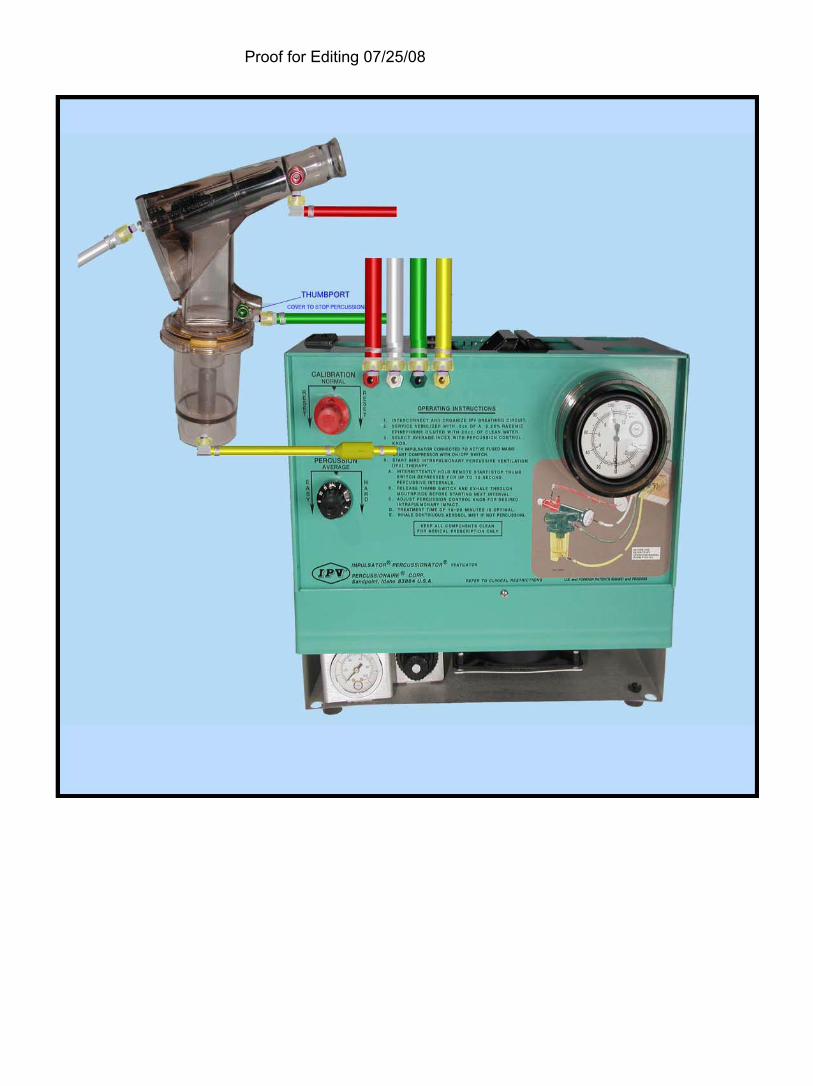
IMPULSATOR®
Power switch
ON
OFF
Calibration- Used to adjust I:E ratio, kept in 12:00 position (arrow straight up) for patient use. Percussion- Determines frequency of delivered breaths. Source pressure- Determines amplitude/pressure rise of delivered breaths.
Proof for Editing 07/25/08
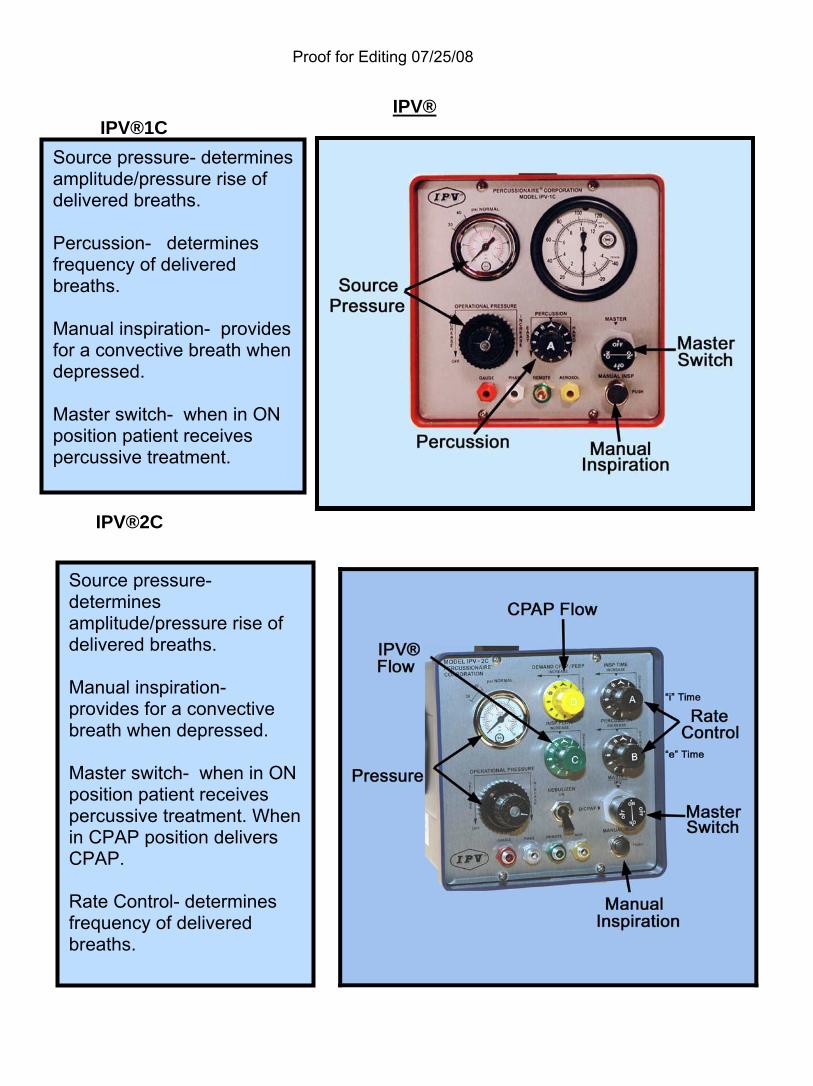
IPV® IPV®1C
IPV®2C
Source pressure- determines amplitude/pressure rise of delivered breaths. Percussion- determines frequency of delivered breaths. Manual inspiration- provides for a convective breath when depressed. Master switch- when in ON position patient receives percussive treatment.
Source pressure- determines amplitude/pressure rise of delivered breaths. Manual inspiration- provides for a convective breath when depressed. Master switch- when in ON position patient receives percussive treatment. When in CPAP position delivers CPAP. Rate Control- determines frequency of delivered breaths.
Proof for Editing 07/25/08
Proof for Editing 07/25/08
PERCUSSIONAIRE® IPV® PROTOCOL PURPOSE: The purpose is to provide a protocol for IPV® therapy that will enhance secretion removal, reduce mucosal edema, reduce bronchoconstriction and improve blood the gas interface by improving V/Q mismatch. POLICY: The IPV® Protocol will be initiated on patients by a written order from the physician. After the physician has written an order, a qualified RCP will: ♦ Evaluate the patient upon receipt of the physicians order. EQUIPMENT: ♦ IMPULSATOR®/ IPV®1-C/IPV®2-C ♦ IPV® Breathing circuit ♦ Tissues and/or basin for collecting expectorated sputum ♦ Suction equipment for patients unable to clear secretions ♦ Gloves, goggles, gown and mask as indicated in the Body Substance Isolation system Policy, for caregiver protection ♦ Stethoscope for auscultation ♦ 50 psi/3.2 bar gas source or an approved wall outlet 115ac/60Hz (USA); 220ac/50Hz (Foreign). OVERVIEW: The RCP will perform a patient assessment, identify any contraindications or hazards, and apply IPV® protocol. DESCRIPTION: IPV® is a form of bronchial hygiene therapy, administered to the airways by a pneumatic device. The patient uses a non-compliant physiological interface called the Phasitron® that delivers high flow mini-bursts of air into the lungs at rates from 100-300 times each minute. During the delivery of percussive bursts of air into the lungs, a continued wedge pressure is maintained, while a high velocity flow opens the airways and enhances intrabronchial secretion mobilization. A dense aerosol mist is delivered to the lungs during therapeutic percussion, which serves to reduce the adhesive and cohesive forces of retained airway secretions. During the therapeutic percussive interval there is a cyclical intrapulmonary exchange of respiratory gases which serve to flush out carbon dioxide and renew oxygen.
Proof for Editing 07/25/08
GUIDELINES AND WARNINGS:
The responsible physician should be contacted if: ♦ The RCP is unable to determine appropriate care upon initial evaluation. ♦ The patient demonstrates an adverse response. ♦ There is failure to achieve therapeutic objectives within time frames ♦ All therapies will be administered in compliance with approved RT policies for
that procedure.
JUSTIFICATION OF DC: Patients on the IPV® Protocol will be discontinued when secretion clearance is < than 5cc per treatment for a 24hr period and post therapy chest exam demonstrates absence of retained secretions. RE-EVALUATION: Patients will be re-evaluated every 24hrs while on IPV® protocol and will be re-evaluated 24hrs after treatment has been discontinued to assure that an acute change has not occurred. SECRETION CLEARENCE PROCEDURE
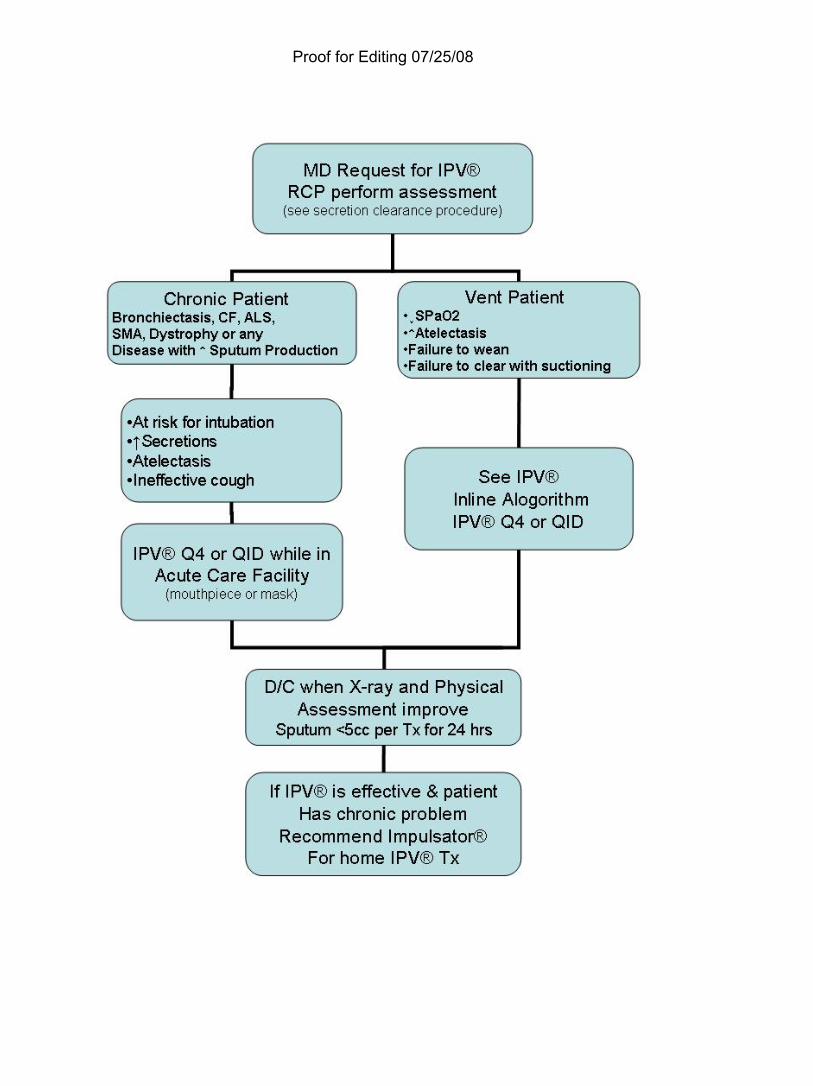
MD request for IPV® RCP evaluator to perform assessment Determine if patient meets criteria for IPV®.
1. Criteria for IPV®:
♦ Cystic Fibrosis, Bronchiectasis, or cavitating lung disease with sputum production Protocol: Patients with increased sputum, an effective cough and / or failure to clear secretions with suctioning
2. All patients, who are not “candidates for the IPV® Protocol” will proceed to the Secretion Management Protocol.
♦ Communicate the patients care plan with MD / Nursing ♦ Initiate therapy based on assessment and protocol algorithm. ♦ When the patient has been discontinued from the IPV® Protocol, they will
be instructed on standard incentive spirometry. ♦ RCP to re-evaluate patient every 24hr while on IPV® Protocol ♦ Discontinue therapy when outcomes are achieved ♦ Follow up re-evaluation 24hrs post discontinued IPV® Protocol to assure
that an acute change has not occurred.
Proof for Editing 07/25/08
IPV® 1C/IMPULSATOR® THERAPY PROCEDURE
(Non-artificial airway)
1. Introduce yourself and explain procedure to patient.
2. Connect to proper power source: A. IPV®: 50 psi/3.2 bar gas source. Make sure master switch is in off
position. B. IMPULSATOR®: 115Vac/60Hz (USA); 220Vac/50Hz (Foreign).Make
sure rocker switch is in off position.
3. Patient should be in an upright comfortable position if possible. A. Patient should be assessed for a minimum of breath sounds, heart
rate, respiratory rate or follow institution guidelines.
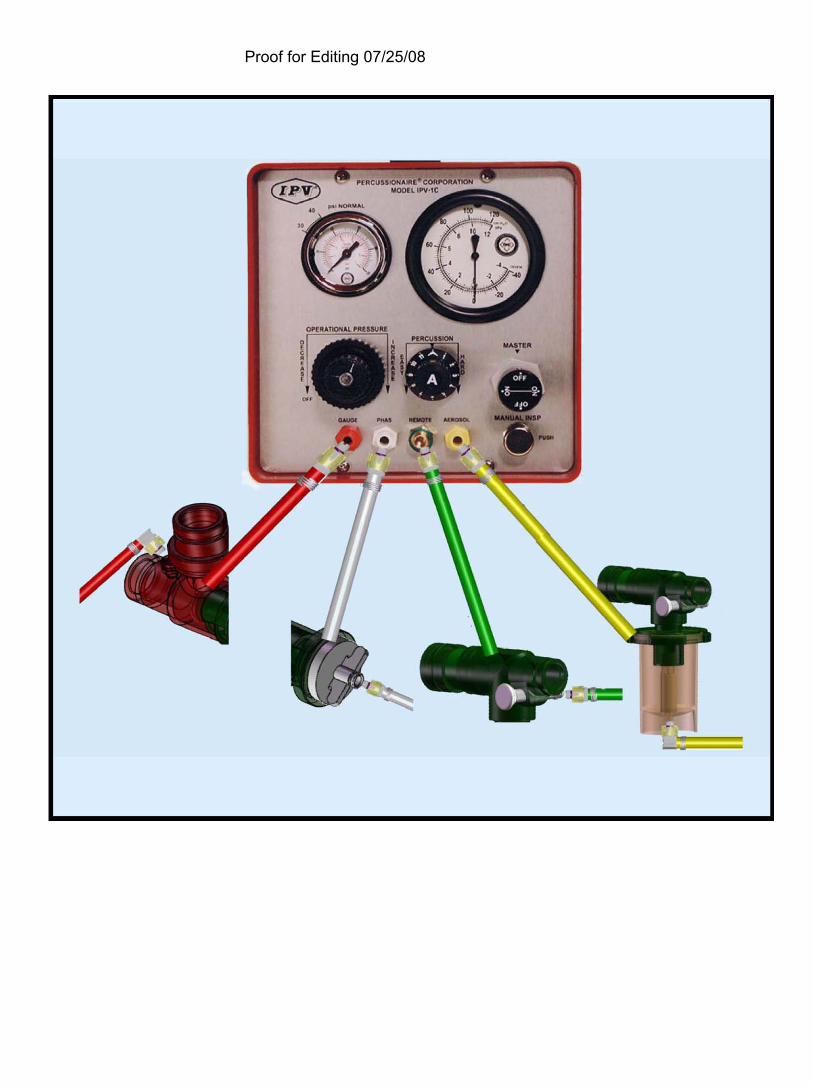
4. Short end of harness assembly should be connected to IPV®/IMPULSATOR® unit using correct color-coding. (See Page 29, 30)
5. Long end of harness assembly should be connected to Phasitron® and nebulizer using correct color-coding. (See Page 29, 30)
6. Fill nebulizer with prescribed medications and dilute to 15 to 20 ccs. Assemble Phasitron® to nebulizer. (See Page 31)
7. Rotate frequency control knob full counterclockwise to the easy position.
8. Rotate source pressure control knob for an operating pressure of 20-25 psi. A. IPV®: Source/ Operational pressure control knob is located inside the
housing behind door panel or on the front panel. B. IMPULSATOR®: Source pressure control knob is located at the
bottom left of unit as it is facing you. NOTE: The rocker switch in the rear of the unit must be switched on before pressure can be adjusted.
9. Have patient breathe aerosol for approximately 1 to 2 minutes.
10. When patient is comfortable with breathing the aerosol have them depress
the push button on the manual remote switch located on the nebulizer. (See Page 32) Percussions will begin.
Proof for Editing 07/25/08
11. Patient is instructed to inhale and exhale through the percussions, this is the beginning of the “active breathing” cycle. Objective is to perform active breathing for duration of 15-20 min treatment or for as long as possible. A. This “active breathing” cycle should last at least 10-15 seconds to allow
for equilibration of pressures. B. The patient should be instructed to keep lips and cheeks splinted to
avoid air and pressure loss.
12. If the patient cannot understand instructions the therapist must choose the correct interface to deliver the treatment
13. Breaks between the “active breathing” should be as often as necessary for expectoration or therapist directed coughing. The patient is instructed to continue breathing the aerosol if resting between “active breathing “ cycles.
14. During the treatment, which should be about 15-20 minutes in length, the entire percussion frequency should be scanned (easy-hard) in order to mobilize secretions in the different time constants of the lung. A. Source Pressure should be adjusted for effective internal percussions
by assessing “chest wiggle”/chest wall movement, auscultation and patient comfort.
15. Treatment should continue until all medication is delivered.
A. Additional diluents may be added if necessary.
16. When treatment is complete unit should be turned off (bleed off internal pressure in IPV®). Breathing head should be dismantled and stored/cleaned for future use.

Proof for Editing 07/25/08
IPV® INLINE ALOGORITHM
Proof for Editing 07/25/08
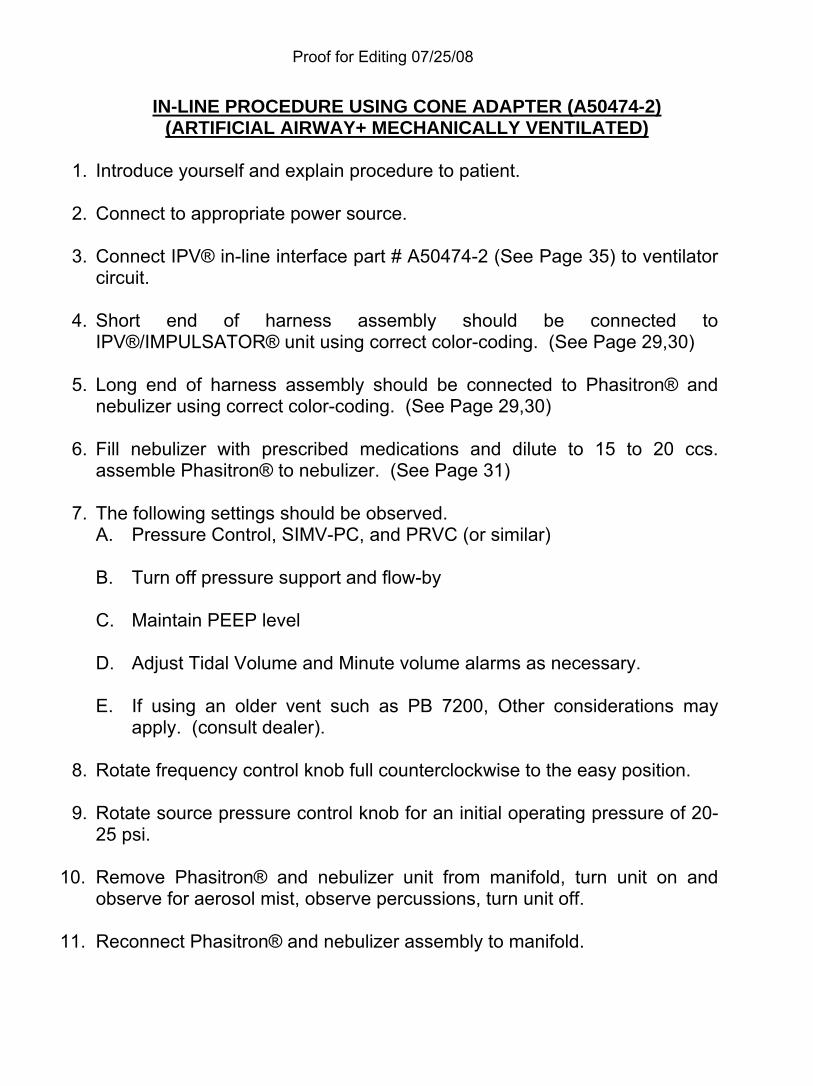
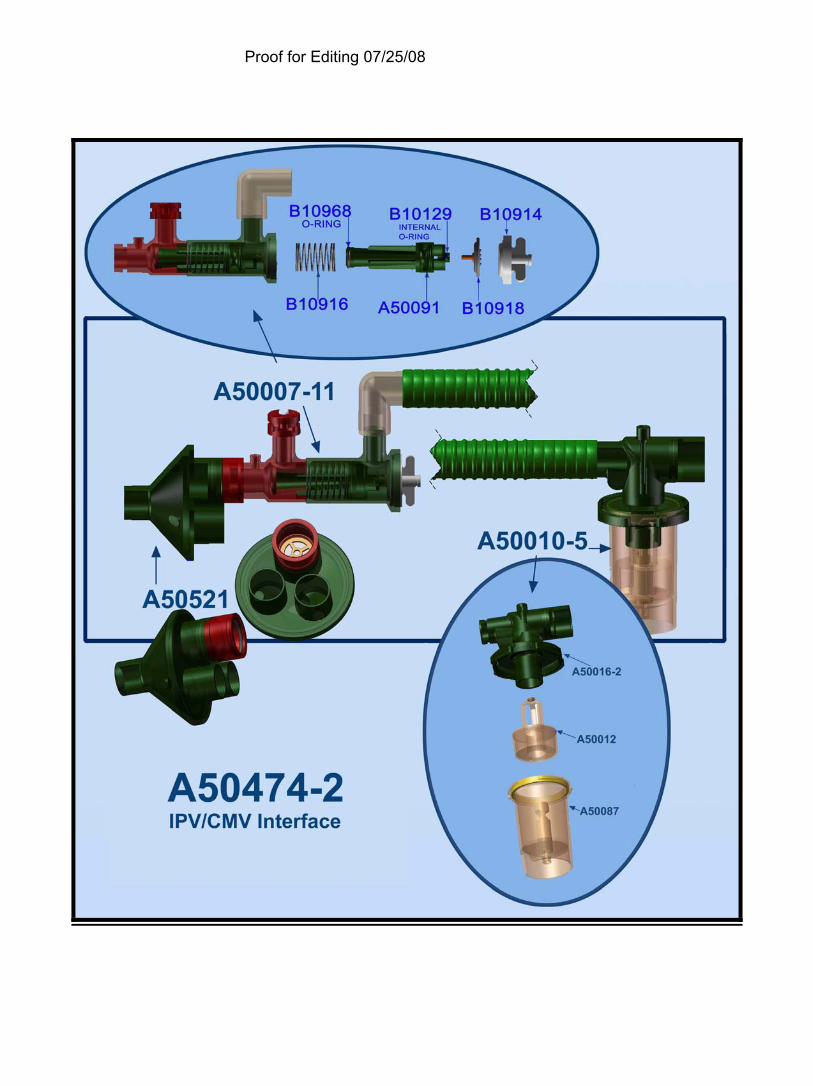
IN-LINE PROCEDURE USING CONE ADAPTER (A50474-2) (ARTIFICIAL AIRWAY+ MECHANICALLY VENTILATED)
1. Introduce yourself and explain procedure to patient.
2. Connect to appropriate power source.
3. Connect IPV® in-line interface part # A50474-2 (See Page 35) to ventilator
circuit.
4. Short end of harness assembly should be connected to IPV®/IMPULSATOR® unit using correct color-coding. (See Page 29,30)
5. Long end of harness assembly should be connected to Phasitron® and nebulizer using correct color-coding. (See Page 29,30)
6. Fill nebulizer with prescribed medications and dilute to 15 to 20 ccs. assemble Phasitron® to nebulizer. (See Page 31)
7. The following settings should be observed. A. Pressure Control, SIMV-PC, and PRVC (or similar) B. Turn off pressure support and flow-by C. Maintain PEEP level D. Adjust Tidal Volume and Minute volume alarms as necessary. E. If using an older vent such as PB 7200, Other considerations may
apply. (consult dealer).
8. Rotate frequency control knob full counterclockwise to the easy position.
9. Rotate source pressure control knob for an initial operating pressure of 20-25 psi.
10. Remove Phasitron® and nebulizer unit from manifold, turn unit on and observe for aerosol mist, observe percussions, turn unit off.
11. Reconnect Phasitron® and nebulizer assembly to manifold.
Proof for Editing 07/25/08
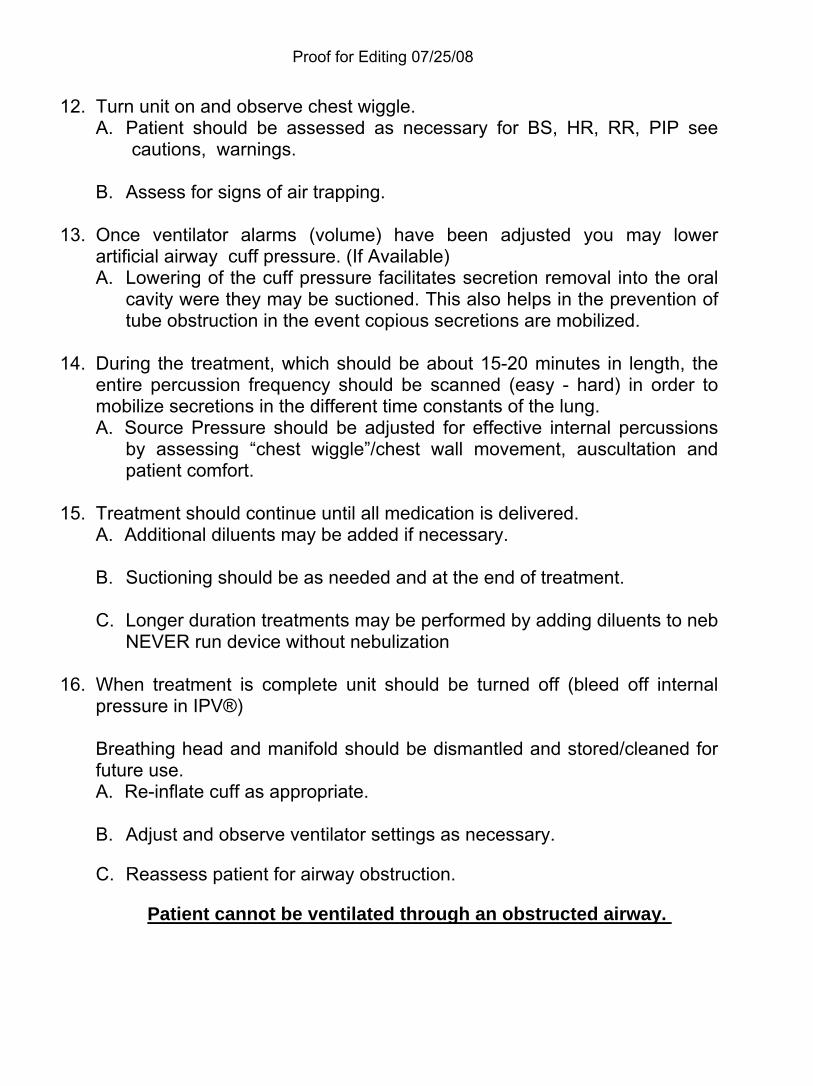
12. Turn unit on and observe chest wiggle. A. Patient should be assessed as necessary for BS, HR, RR, PIP see
cautions, warnings.
B. Assess for signs of air trapping.
13. Once ventilator alarms (volume) have been adjusted you may lower artificial airway cuff pressure. (If Available) A. Lowering of the cuff pressure facilitates secretion removal into the oral
cavity were they may be suctioned. This also helps in the prevention of tube obstruction in the event copious secretions are mobilized.
14. During the treatment, which should be about 15-20 minutes in length, the
entire percussion frequency should be scanned (easy - hard) in order to mobilize secretions in the different time constants of the lung. A. Source Pressure should be adjusted for effective internal percussions
by assessing “chest wiggle”/chest wall movement, auscultation and patient comfort.
15. Treatment should continue until all medication is delivered.
A. Additional diluents may be added if necessary.
B. Suctioning should be as needed and at the end of treatment.
C. Longer duration treatments may be performed by adding diluents to neb NEVER run device without nebulization
16. When treatment is complete unit should be turned off (bleed off internal
pressure in IPV®)
Breathing head and manifold should be dismantled and stored/cleaned for future use. A. Re-inflate cuff as appropriate.
B. Adjust and observe ventilator settings as necessary. C. Reassess patient for airway obstruction.
Patient cannot be ventilated through an obstructed airway.
Proof for Editing 07/25/08
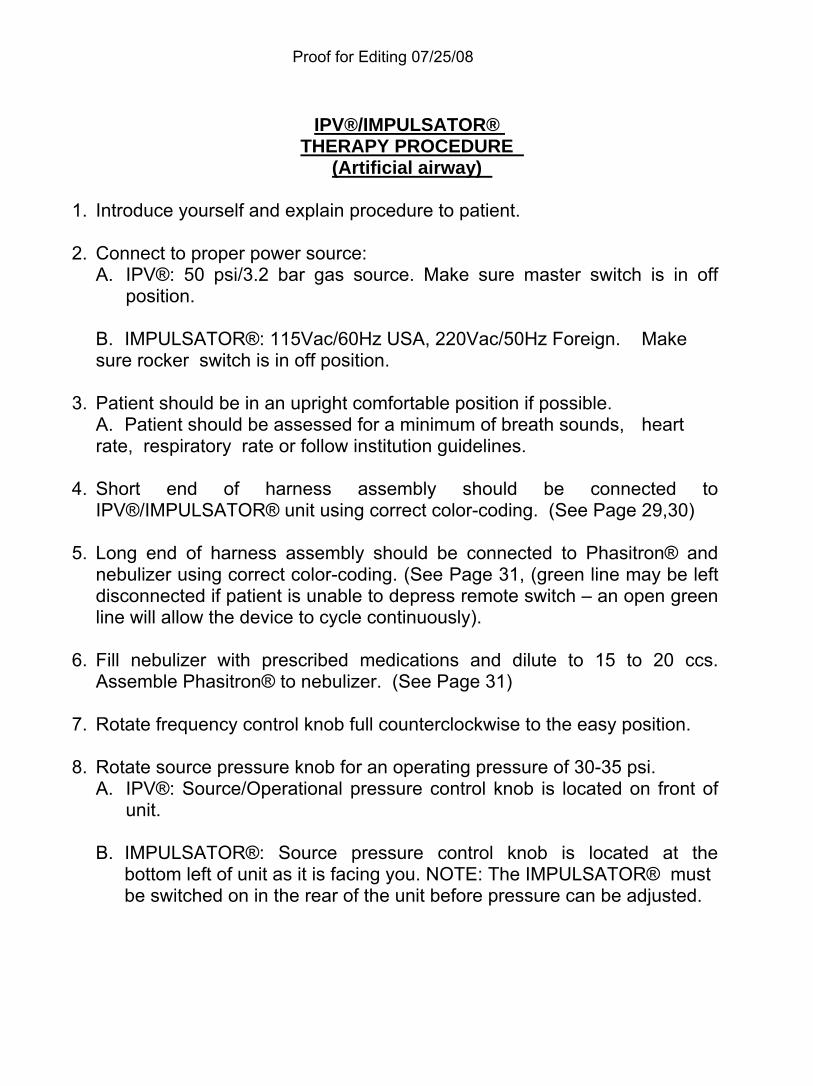
IPV®/IMPULSATOR®
THERAPY PROCEDURE (Artificial airway)
1. Introduce yourself and explain procedure to patient.
2. Connect to proper power source:
A. IPV®: 50 psi/3.2 bar gas source. Make sure master switch is in off position.
B. IMPULSATOR®: 115Vac/60Hz USA, 220Vac/50Hz Foreign. Make sure rocker switch is in off position.
3. Patient should be in an upright comfortable position if possible. A. Patient should be assessed for a minimum of breath sounds, heart rate, respiratory rate or follow institution guidelines.
4. Short end of harness assembly should be connected to IPV®/IMPULSATOR® unit using correct color-coding. (See Page 29,30)
5. Long end of harness assembly should be connected to Phasitron® and nebulizer using correct color-coding. (See Page 31, (green line may be left disconnected if patient is unable to depress remote switch – an open green line will allow the device to cycle continuously).
6. Fill nebulizer with prescribed medications and dilute to 15 to 20 ccs. Assemble Phasitron® to nebulizer. (See Page 31)
7. Rotate frequency control knob full counterclockwise to the easy position.
8. Rotate source pressure knob for an operating pressure of 30-35 psi. A. IPV®: Source/Operational pressure control knob is located on front of
unit.
B. IMPULSATOR®: Source pressure control knob is located at the bottom left of unit as it is facing you. NOTE: The IMPULSATOR® must be switched on in the rear of the unit before pressure can be adjusted.

Proof for Editing 07/25/08
9. Attach Phasitron® to artificial airway making sure of patient comfort. 50 mls
of wide bore tubing may be used with a 15mm universal adapter. A. Initiate percussion immediately: observe chest wiggle. When patient is
comfortable with breathing the aerosol have them if capable or the therapist depress the push button on the manual remote switch located on nebulizer. (See Page 32)Percussions will begin.
10. Patient is instructed to inhale and exhale through the percussions, this is
the beginning of the “active breathing” cycle. A. This “active breathing” cycle should last at least 10-15 seconds to allow
for equilibration of pressures. B. If applicable the patients cuff should be deflated for the facilitation of
secretions into the oral airway. C. Observe SpO2 throughout, if a drop occurs increase rate by rotating
percussion knob counterclockwise toward easy.
11. If the patient cannot understand instructions the therapist must deliver treatment. A. Suction as needed.
12. During the treatment, which should be about 15-20 minutes in length, the entire percussion frequency should be scanned (easy-hard) in order to mobilize secretions in the different time constants of the lung. A. Source Pressure should be adjusted for effective internal percussions
by assessing “chest wiggle”/chest wall movement, auscultation and patient comfort.
13. Treatment should continue until all medication is delivered.
A. Additional diluents may be added if necessary.
14. When treatment is complete unit should be turned off (bleed off internal pressure in IPV®) breathing head should be dismantled and stored/cleaned for future use. A. Re-inflate cuff to pre treatment level. B. Reassess patient, this procedure may result in mobilization of copious
secretions, suction and evaluate.
A patient cannot breathe through an obstructed airway.
Proof for Editing 07/25/08
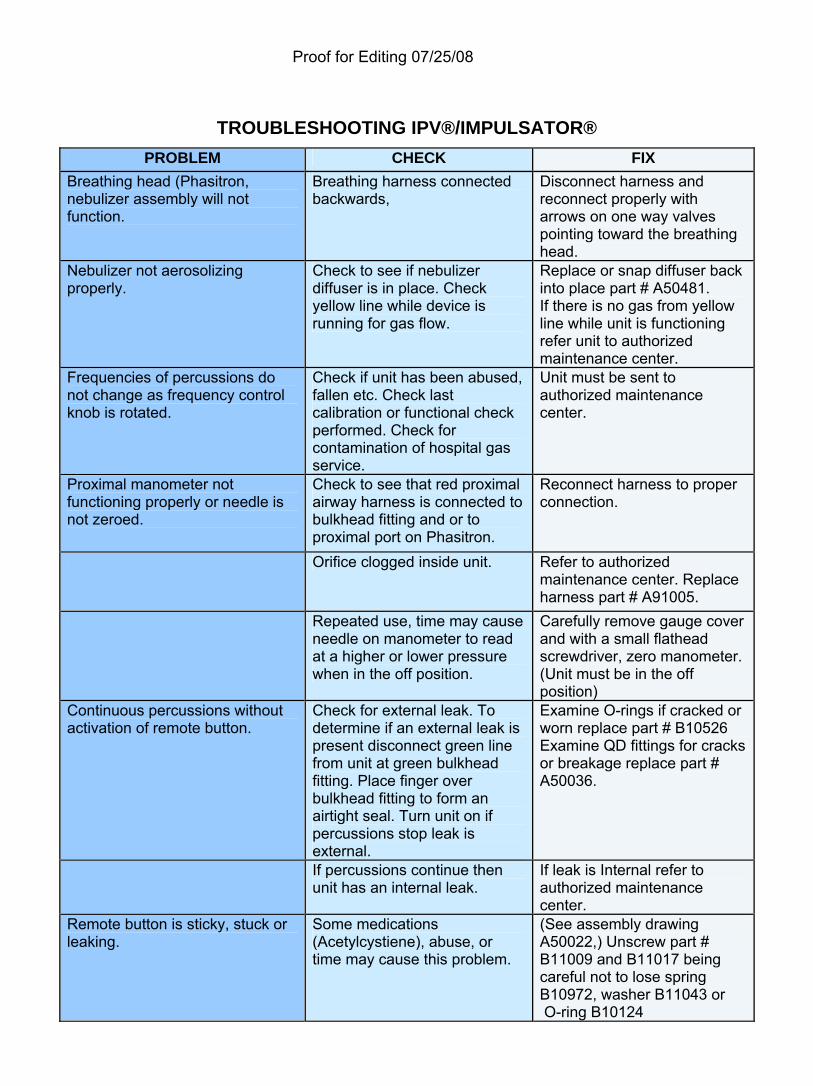
TROUBLESHOOTING IPV®/IMPULSATOR®
PROBLEM CHECK FIX Breathing head (Phasitron, nebulizer assembly will not function.
Breathing harness connected backwards,
Disconnect harness and reconnect properly with arrows on one way valves pointing toward the breathing head.
Nebulizer not aerosolizing properly.
Check to see if nebulizer diffuser is in place. Check yellow line while device is running for gas flow.
Replace or snap diffuser back into place part # A50481. If there is no gas from yellow line while unit is functioning refer unit to authorized maintenance center.
Frequencies of percussions do not change as frequency control knob is rotated.
Check if unit has been abused, fallen etc. Check last calibration or functional check performed. Check for contamination of hospital gas service.
Unit must be sent to authorized maintenance center.
Proximal manometer not functioning properly or needle is not zeroed.
Check to see that red proximal airway harness is connected to bulkhead fitting and or to proximal port on Phasitron.
Reconnect harness to proper connection.
Orifice clogged inside unit. Refer to authorized maintenance center. Replace harness part # A91005.
Repeated use, time may cause needle on manometer to read at a higher or lower pressure when in the off position.
Carefully remove gauge cover and with a small flathead screwdriver, zero manometer. (Unit must be in the off position)
Continuous percussions without activation of remote button.
Check for external leak. To determine if an external leak is present disconnect green line from unit at green bulkhead fitting. Place finger over bulkhead fitting to form an airtight seal. Turn unit on if percussions stop leak is external.
Examine O-rings if cracked or worn replace part # B10526 Examine QD fittings for cracks or breakage replace part # A50036.
If percussions continue then unit has an internal leak.
If leak is Internal refer to authorized maintenance center.
Remote button is sticky, stuck or leaking.
Some medications (Acetylcystiene), abuse, or time may cause this problem.
(See assembly drawing A50022,) Unscrew part # B11009 and B11017 being careful not to lose spring B10972, washer B11043 or O-ring B10124
Proof for Editing 07/25/08
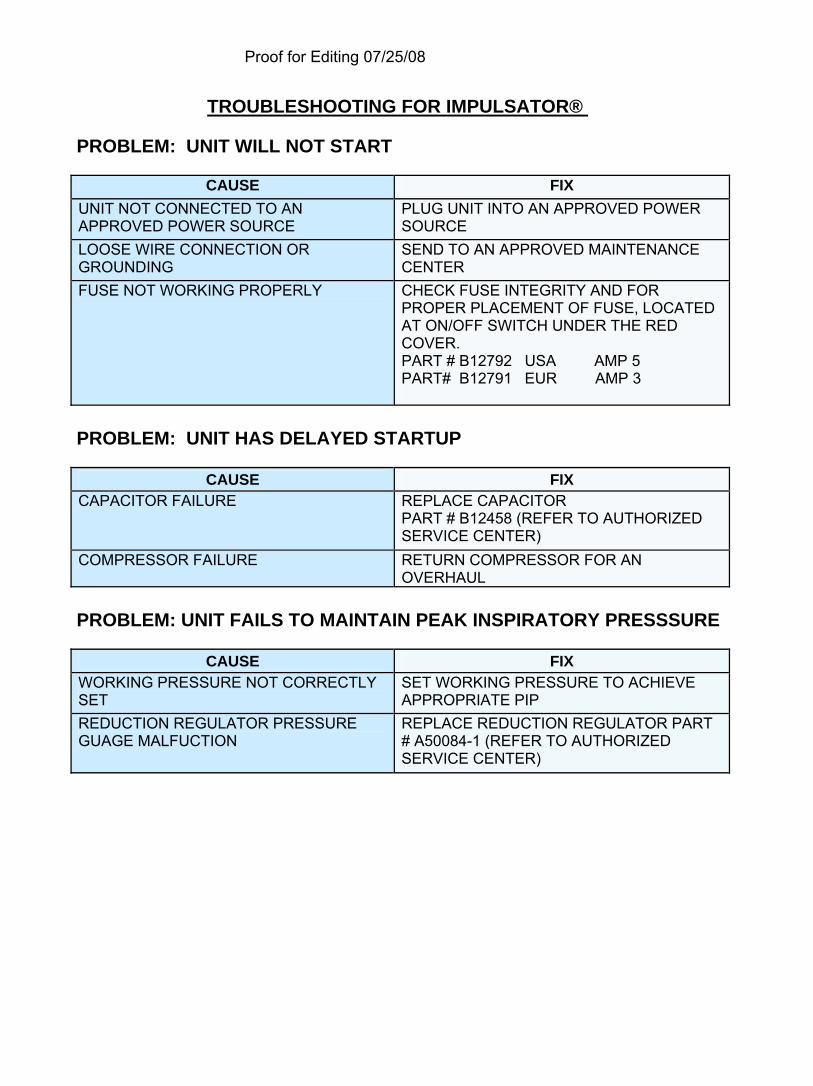
TROUBLESHOOTING FOR IMPULSATOR®
PROBLEM: UNIT WILL NOT START
CAUSE FIX UNIT NOT CONNECTED TO AN APPROVED POWER SOURCE
PLUG UNIT INTO AN APPROVED POWER SOURCE
LOOSE WIRE CONNECTION OR GROUNDING
SEND TO AN APPROVED MAINTENANCE CENTER
FUSE NOT WORKING PROPERLY CHECK FUSE INTEGRITY AND FOR PROPER PLACEMENT OF FUSE, LOCATED AT ON/OFF SWITCH UNDER THE RED COVER. PART # B12792 USA AMP 5 PART# B12791 EUR AMP 3
PROBLEM: UNIT HAS DELAYED STARTUP
CAUSE FIX
CAPACITOR FAILURE REPLACE CAPACITOR PART # B12458 (REFER TO AUTHORIZED SERVICE CENTER)
COMPRESSOR FAILURE RETURN COMPRESSOR FOR AN OVERHAUL
PROBLEM: UNIT FAILS TO MAINTAIN PEAK INSPIRATORY PRESSSURE
CAUSE FIX
WORKING PRESSURE NOT CORRECTLY SET
SET WORKING PRESSURE TO ACHIEVE APPROPRIATE PIP
REDUCTION REGULATOR PRESSURE GUAGE MALFUCTION
REPLACE REDUCTION REGULATOR PART # A50084-1 (REFER TO AUTHORIZED SERVICE CENTER)
Proof for Editing 07/25/08
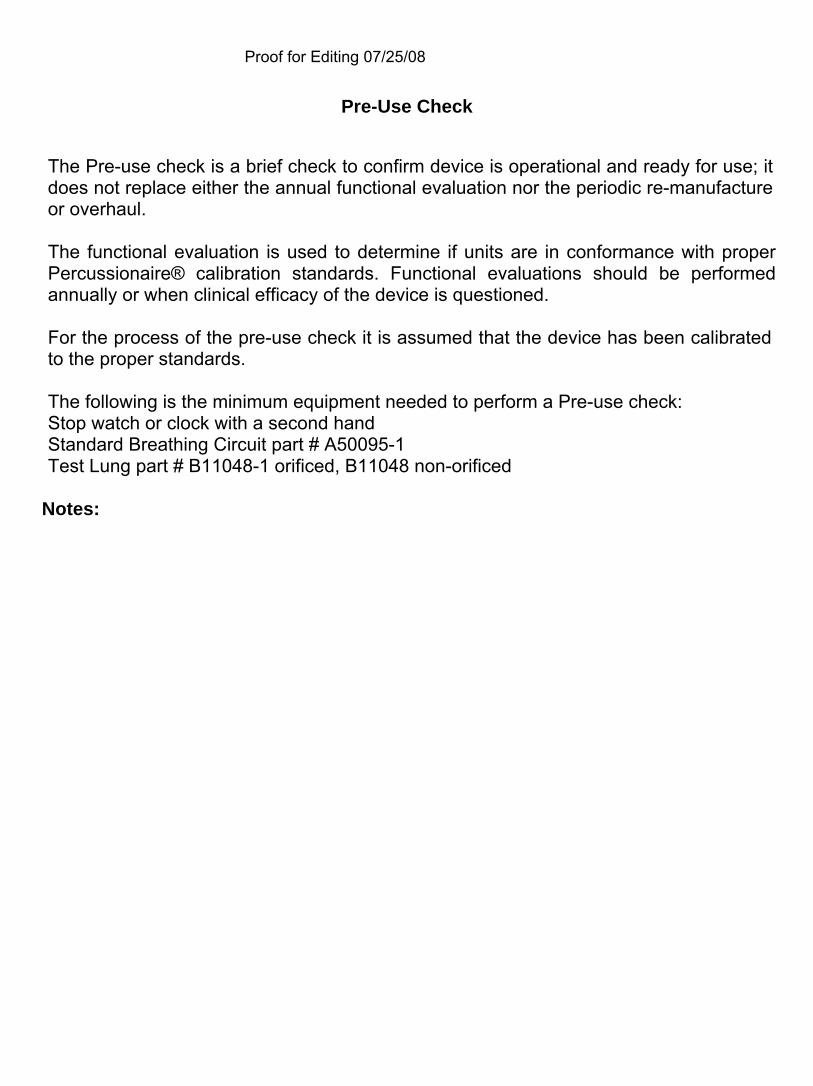
Pre-Use Check
The Pre-use check is a brief check to confirm device is operational and ready for use; it does not replace either the annual functional evaluation nor the periodic re-manufacture or overhaul. The functional evaluation is used to determine if units are in conformance with proper Percussionaire® calibration standards. Functional evaluations should be performed annually or when clinical efficacy of the device is questioned. For the process of the pre-use check it is assumed that the device has been calibrated to the proper standards. The following is the minimum equipment needed to perform a Pre-use check: Stop watch or clock with a second hand Standard Breathing Circuit part # A50095-1 Test Lung part # B11048-1 orificed, B11048 non-orificed
Notes:
Proof for Editing 07/25/08
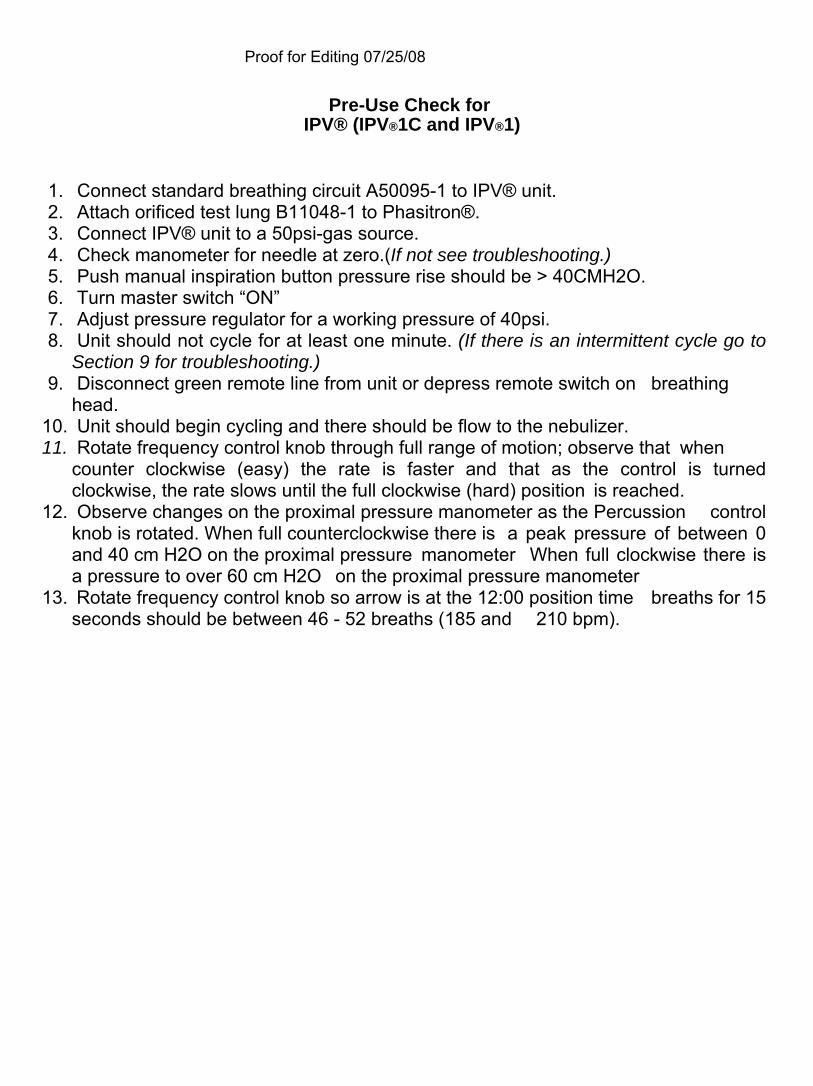
Pre-Use Check for IPV® (IPV®1C and IPV®1)
1. Connect standard breathing circuit A50095-1 to IPV® unit. 2. Attach orificed test lung B11048-1 to Phasitron®. 3. Connect IPV® unit to a 50psi-gas source. 4. Check manometer for needle at zero.(If not see troubleshooting.) 5. Push manual inspiration button pressure rise should be > 40CMH2O. 6. Turn master switch “ON” 7. Adjust pressure regulator for a working pressure of 40psi. 8. Unit should not cycle for at least one minute. (If there is an intermittent cycle go to
Section 9 for troubleshooting.) 9. Disconnect green remote line from unit or depress remote switch on breathing
head. 10. Unit should begin cycling and there should be flow to the nebulizer. 11. Rotate frequency control knob through full range of motion; observe that when
counter clockwise (easy) the rate is faster and that as the control is turned clockwise, the rate slows until the full clockwise (hard) position is reached.
12. Observe changes on the proximal pressure manometer as the Percussion control knob is rotated. When full counterclockwise there is a peak pressure of between 0 and 40 cm H2O on the proximal pressure manometer When full clockwise there is a pressure to over 60 cm H2O on the proximal pressure manometer
13. Rotate frequency control knob so arrow is at the 12:00 position time breaths for 15 seconds should be between 46 - 52 breaths (185 and 210 bpm).
Proof for Editing 07/25/08
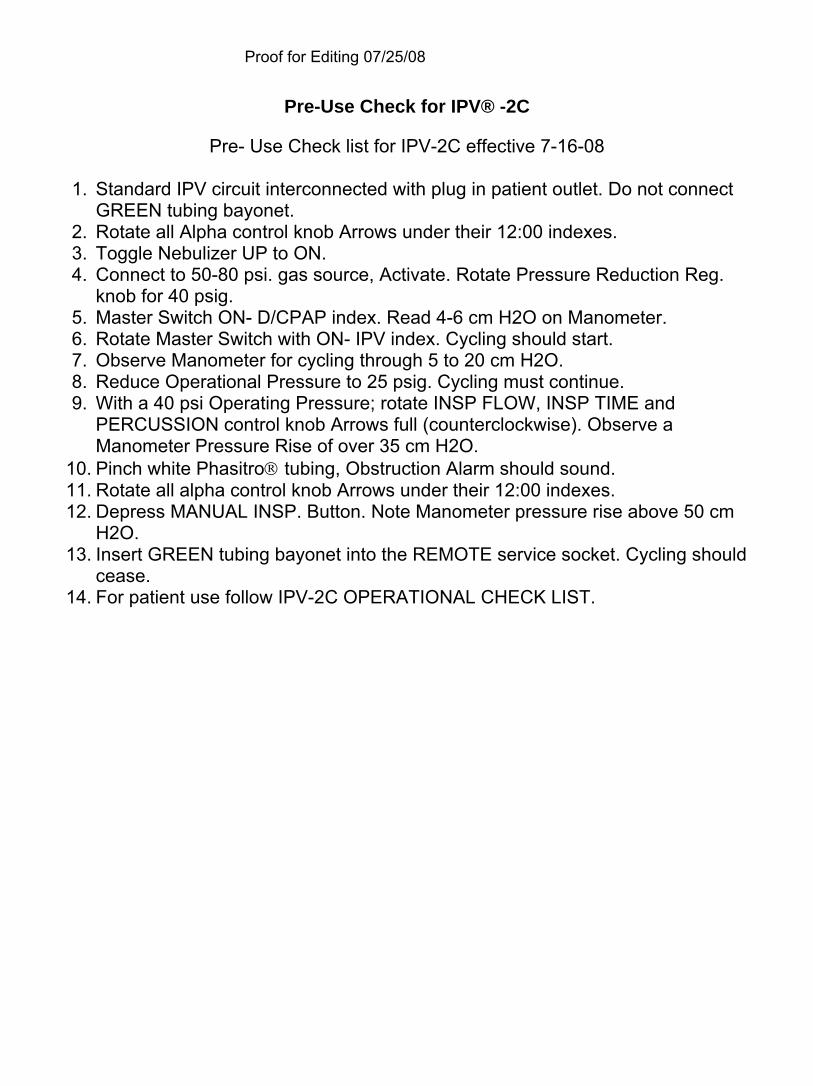
Pre-Use Check for IPV® -2C
Pre- Use Check list for IPV-2C effective 7-16-08
1. Standard IPV circuit interconnected with plug in patient outlet. Do not connect GREEN tubing bayonet.
2. Rotate all Alpha control knob Arrows under their 12:00 indexes. 3. Toggle Nebulizer UP to ON. 4. Connect to 50-80 psi. gas source, Activate. Rotate Pressure Reduction Reg.
knob for 40 psig. 5. Master Switch ON- D/CPAP index. Read 4-6 cm H2O on Manometer. 6. Rotate Master Switch with ON- IPV index. Cycling should start. 7. Observe Manometer for cycling through 5 to 20 cm H2O. 8. Reduce Operational Pressure to 25 psig. Cycling must continue. 9. With a 40 psi Operating Pressure; rotate INSP FLOW, INSP TIME and
PERCUSSION control knob Arrows full (counterclockwise). Observe a Manometer Pressure Rise of over 35 cm H2O.
10. Pinch white Phasitro® tubing, Obstruction Alarm should sound. 11. Rotate all alpha control knob Arrows under their 12:00 indexes. 12. Depress MANUAL INSP. Button. Note Manometer pressure rise above 50 cm
H2O. 13. Insert GREEN tubing bayonet into the REMOTE service socket. Cycling should
cease. 14. For patient use follow IPV-2C OPERATIONAL CHECK LIST.
Proof for Editing 07/25/08
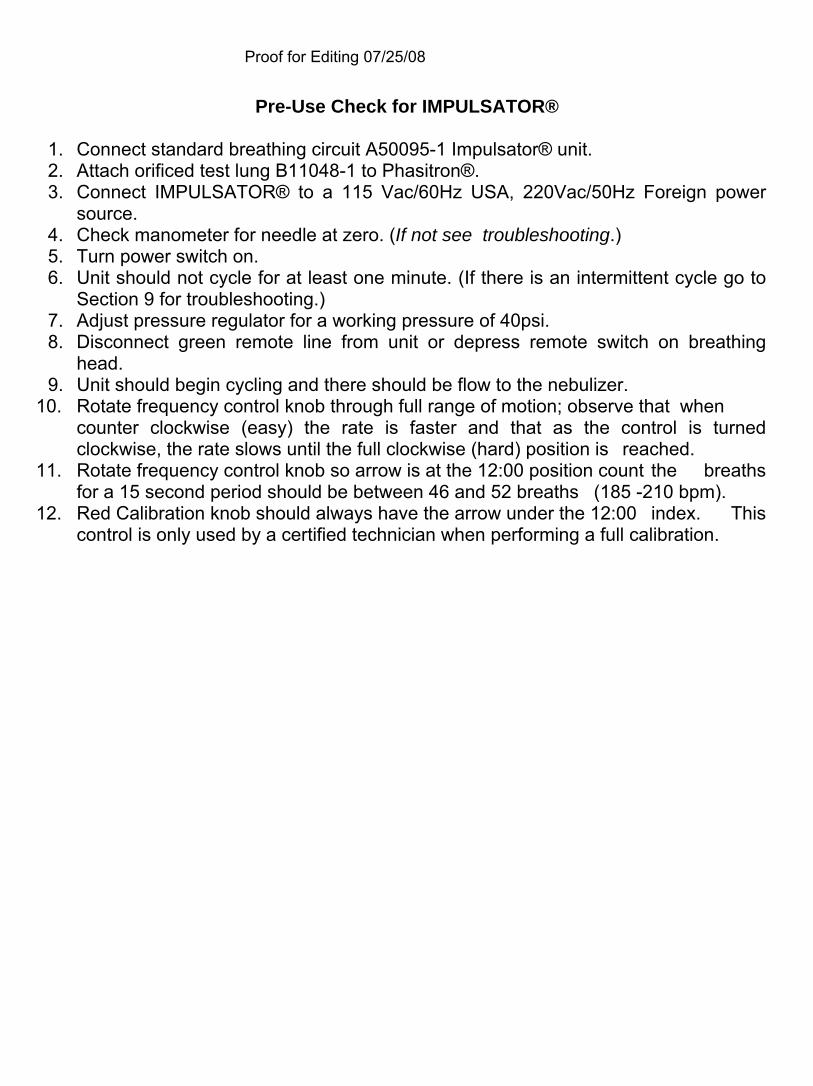
Pre-Use Check for IMPULSATOR®
1. Connect standard breathing circuit A50095-1 Impulsator® unit. 2. Attach orificed test lung B11048-1 to Phasitron®. 3. Connect IMPULSATOR® to a 115 Vac/60Hz USA, 220Vac/50Hz Foreign power source. 4. Check manometer for needle at zero. (If not see troubleshooting.) 5. Turn power switch on. 6. Unit should not cycle for at least one minute. (If there is an intermittent cycle go to Section 9 for troubleshooting.) 7. Adjust pressure regulator for a working pressure of 40psi. 8. Disconnect green remote line from unit or depress remote switch on breathing head. 9. Unit should begin cycling and there should be flow to the nebulizer.
10. Rotate frequency control knob through full range of motion; observe that when counter clockwise (easy) the rate is faster and that as the control is turned clockwise, the rate slows until the full clockwise (hard) position is reached.
11. Rotate frequency control knob so arrow is at the 12:00 position count the breaths for a 15 second period should be between 46 and 52 breaths (185 -210 bpm).
12. Red Calibration knob should always have the arrow under the 12:00 index. This control is only used by a certified technician when performing a full calibration.
Proof for Editing 07/25/08
PERCUSSIONAIRE® CORPORATION CLEANING PROCEDURES These cleaning procedures supersede all others prior to January 29, 2007.
PERCUSSIONAIRE® EQUIPMENT All new Percussionaire® products are packaged clean. They should not be considered sterile or decontaminated. Prior to use it is recommended that breathing circuit components be disassembled and sterilized/decontaminated. STERRAD® 100S Percussionaire® Corporation recommends the Sterrad® 110S sterilization system. Follow instructions below for how to disassemble Percussionaire® breathing circuits. Wash and dry all parts completely Process through Sterrad® Sterilizer at a standard cycle with a 35% (2.080 Mg H2O/Liter) concentration. Reassemble circuit.
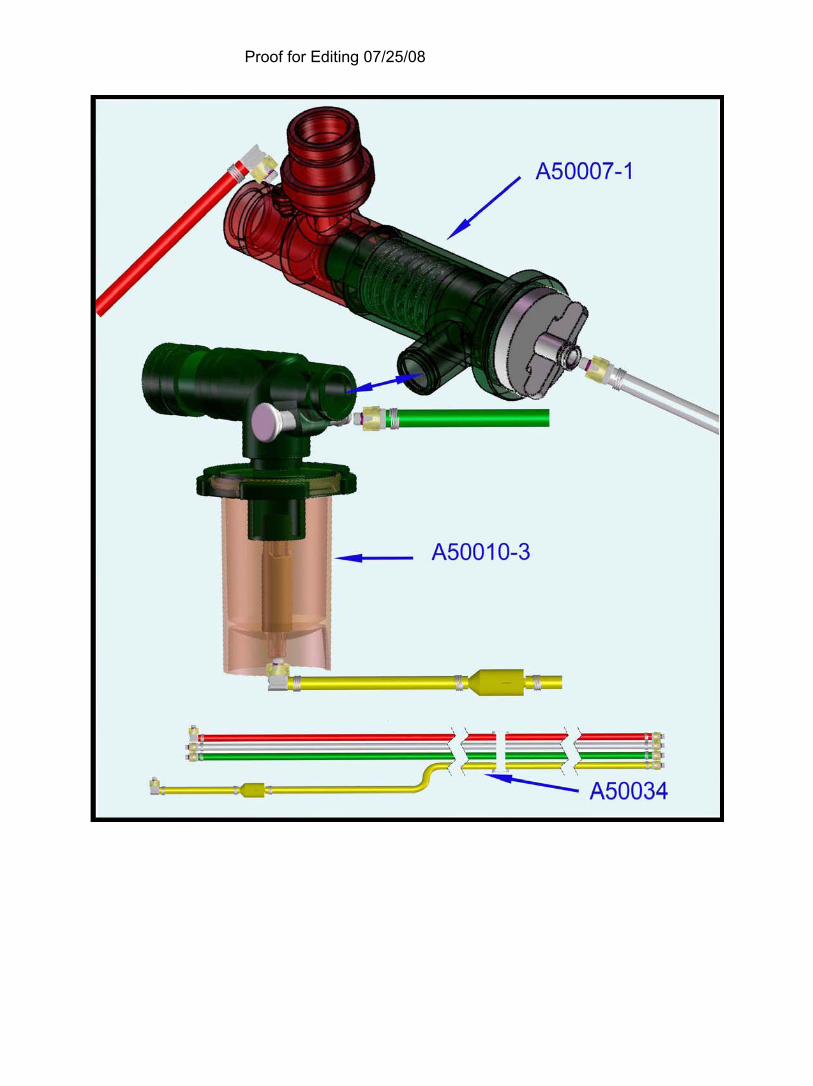
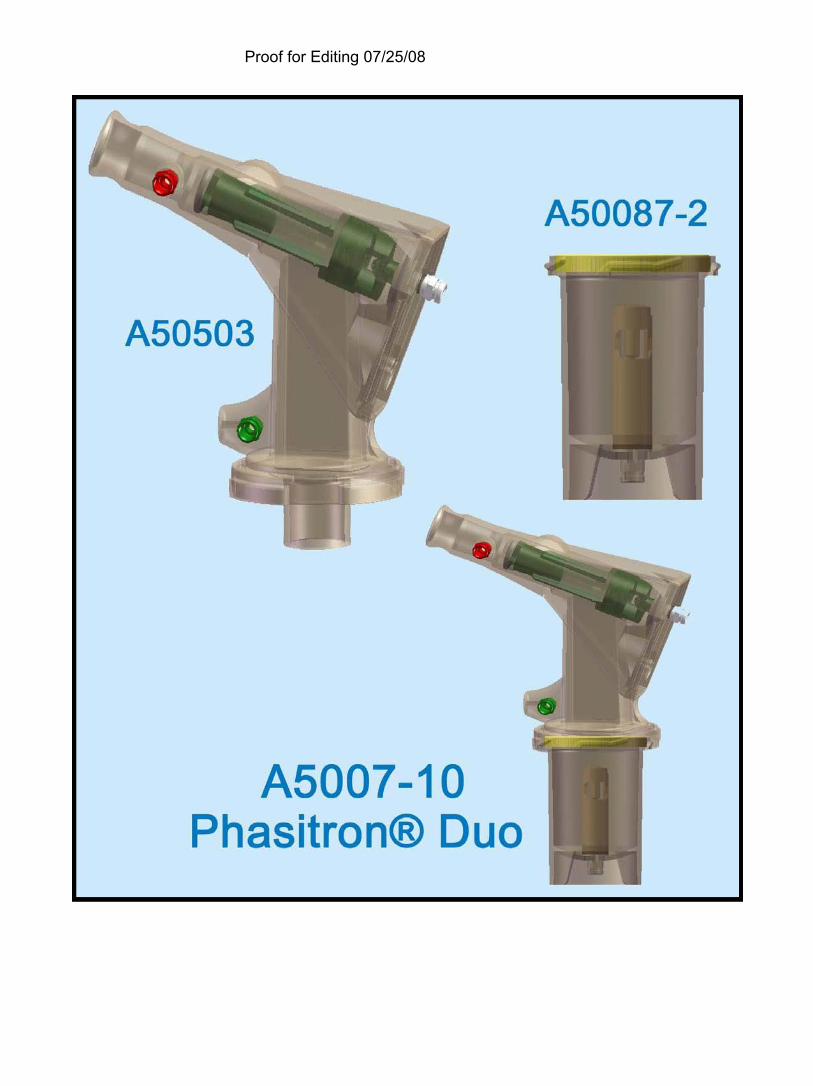
Other techniques The decision to use other decontamination techniques should be based on the following parameters: These parts can withstand temperatures < 280 Fahrenheit (137.8 Celsius): Standard Phasitron® part # A50007, A50007-1 Aerosol Generator part # A50010, A50010-1, A50010-3, A50010-5 These parts can withstand temperatures < 140 Fahrenheit (60 Celsius) Phasitron® Duo part # A50007-10 Interface tubing assembly part # A50034
Percussionaire® units are not immersible.
SURFACE AREAS The IPV®/IMPULSATOR® units should be wiped down between patient uses with an institutional approved disinfectant. Disinfectant solution should not be sprayed directly onto the IPV®/IMPULSATOR® unit. The solution should be sprayed onto a cloth then the cloth used to wipe the unit down.
Proof for Editing 07/25/08
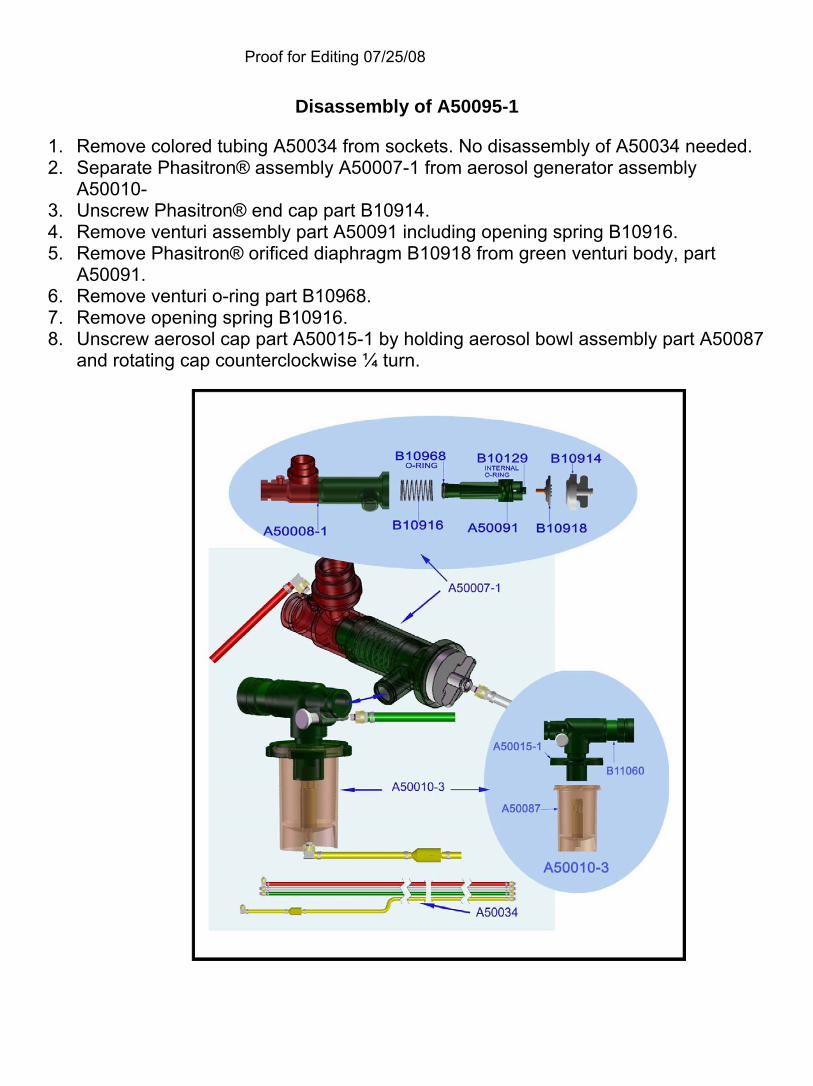
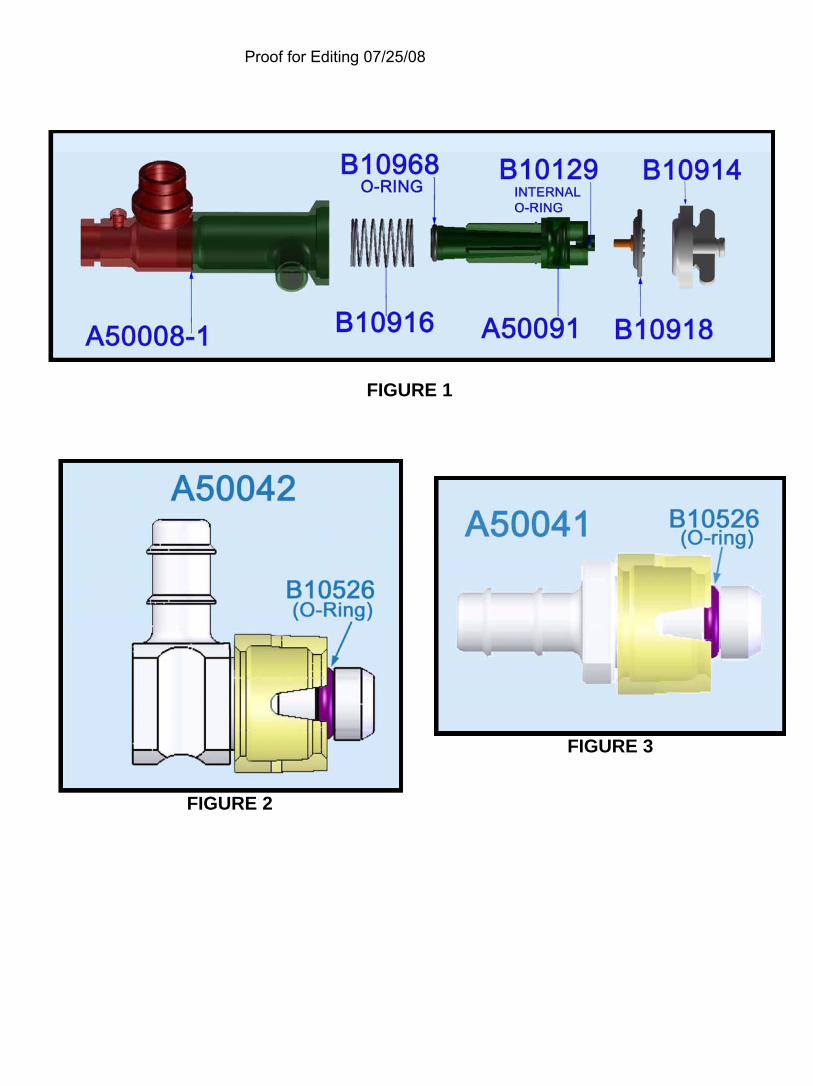
Disassembly of A50095-1 1. Remove colored tubing A50034 from sockets. No disassembly of A50034 needed. 2. Separate Phasitron® assembly A50007-1 from aerosol generator assembly A50010- 3. Unscrew Phasitron® end cap part B10914. 4. Remove venturi assembly part A50091 including opening spring B10916. 5. Remove Phasitron® orificed diaphragm B10918 from green venturi body, part A50091. 6. Remove venturi o-ring part B10968. 7. Remove opening spring B10916. 8. Unscrew aerosol cap part A50015-1 by holding aerosol bowl assembly part A50087 and rotating cap counterclockwise ¼ turn.
Proof for Editing 07/25/08
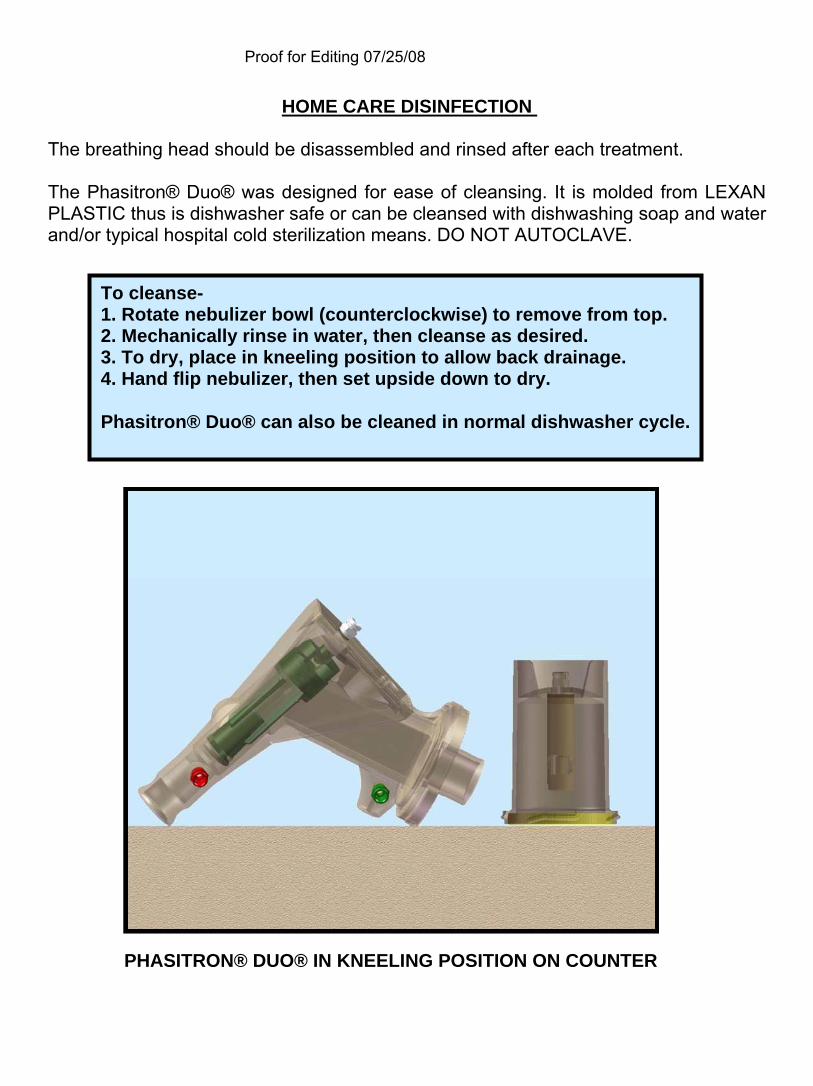
HOME CARE DISINFECTION The breathing head should be disassembled and rinsed after each treatment. The Phasitron® Duo® was designed for ease of cleansing. It is molded from LEXAN PLASTIC thus is dishwasher safe or can be cleansed with dishwashing soap and water and/or typical hospital cold sterilization means. DO NOT AUTOCLAVE. To cleanse- 1. Rotate nebulizer bowl (counterclockwise) to remove from top. 2. Mechanically rinse in water, then cleanse as desired. 3. To dry, place in kneeling position to allow back drainage. 4. Hand flip nebulizer, then set upside down to dry. Phasitron® Duo® can also be cleaned in normal dishwasher cycle.
PHASITRON® DUO® IN KNEELING POSITION ON COUNTER
Proof for Editing 07/25/08
MAINTENANCE/OVERHAUL PROCEDURE
Devices should be checked by an authorized maintenance center anytime clinical efficacy is not as expected. If units are kept clean and water free a three year life span between mandatory overhauls is a reasonable expectation. Units returned for maintenance and repair must be handled by a Percussionaire® distributor, and must have an RGA #. Authorized maintenance centers for the IPV®/ IMPULSATOR® units: Percussionaire® Corporation Bird Air lodge 1655 Glengary Bay Rd. Sandpoint, ID 83860 (208) 263-2549 ROUTINE MAINTENANCE/FUNCTONAL EVALUATION A functional evaluation should be performed annually or when unit calibration is suspect. In case of disconnection or broken fittings please refer to authorized maintenance center for calibration/repair. The inlet filter for the IMPULSATOR® units should be checked quarterly by removing protective cap at top of unit and inspecting filters the two filters should changed as necessary. Black filter: Part # B12450 Felt filter: Part # B12585
Proof for Editing 07/25/08
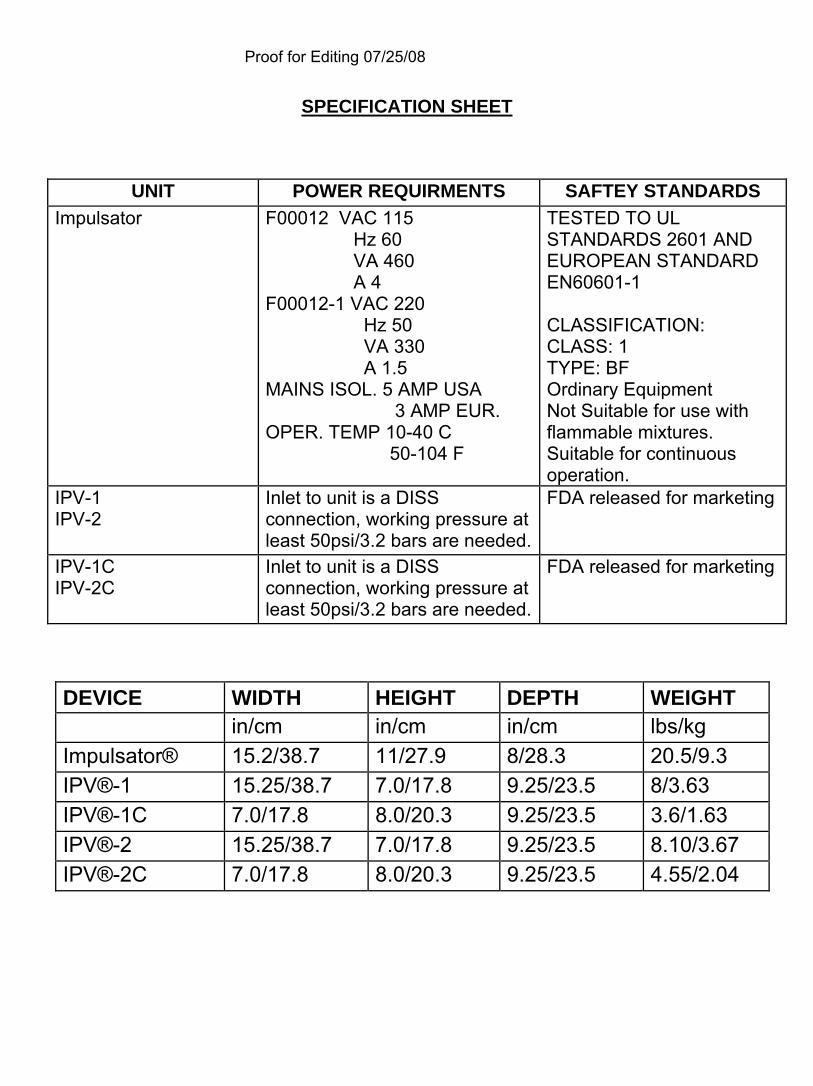
SPECIFICATION SHEET
UNIT POWER REQUIRMENTS SAFTEY STANDARDS Impulsator F00012 VAC 115 TESTED TO UL
Hz 60 STANDARDS 2601 AND VA 460 EUROPEAN STANDARD A 4 EN60601-1 F00012-1 VAC 220 Hz 50 CLASSIFICATION: VA 330 CLASS: 1 A 1.5 TYPE: BF MAINS ISOL. 5 AMP USA Ordinary Equipment 3 AMP EUR. Not Suitable for use with OPER. TEMP 10-40 C flammable mixtures. 50-104 F Suitable for continuous
operation. IPV-1 IPV-2
Inlet to unit is a DISS FDA released for marketing connection, working pressure at least 50psi/3.2 bars are needed.
IPV-1C IPV-2C
Inlet to unit is a DISS FDA released for marketing connection, working pressure at least 50psi/3.2 bars are needed.
DEVICE WIDTH HEIGHT DEPTH WEIGHT in/cm in/cm in/cm lbs/kg Impulsator® 15.2/38.7 11/27.9 8/28.3 20.5/9.3 IPV®-1 15.25/38.7 7.0/17.8 9.25/23.5 8/3.63 IPV®-1C 7.0/17.8 8.0/20.3 9.25/23.5 3.6/1.63 IPV®-2 15.25/38.7 7.0/17.8 9.25/23.5 8.10/3.67 IPV®-2C 7.0/17.8 8.0/20.3 9.25/23.5 4.55/2.04
Proof for Editing 07/25/08
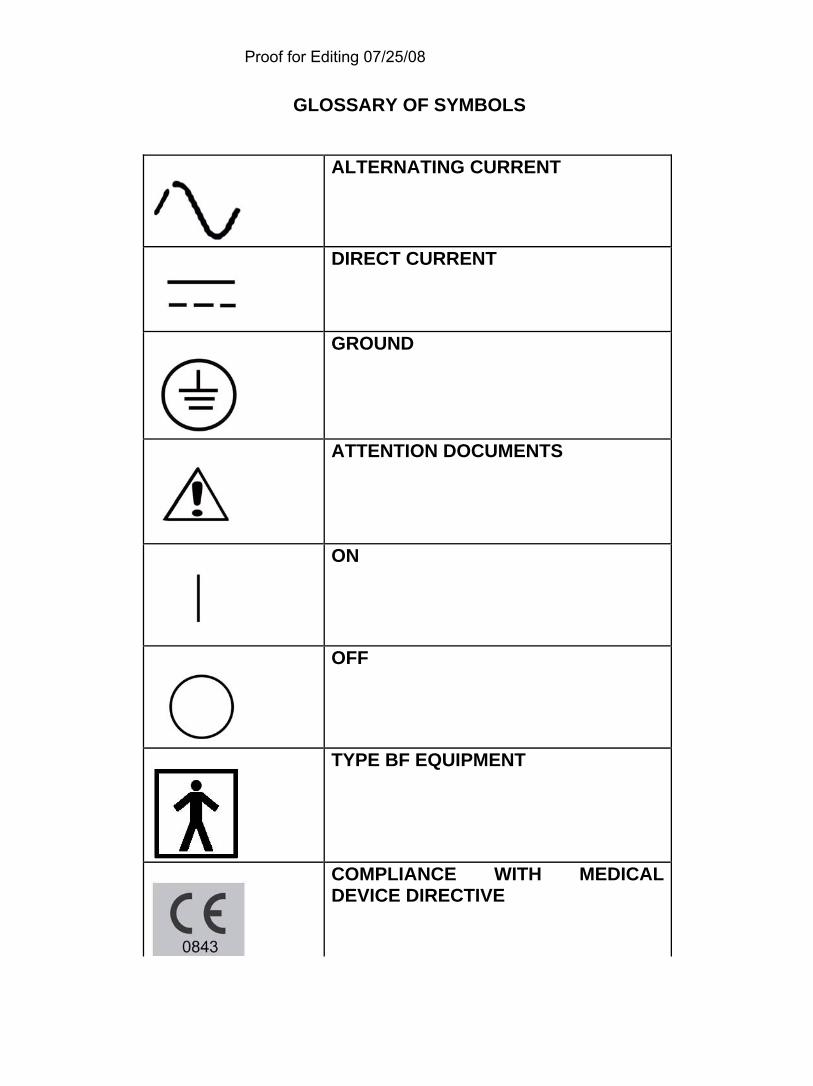
GLOSSARY OF SYMBOLS
ALTERNATING CURRENT
DIRECT CURRENT
GROUND
ATTENTION DOCUMENTS
ON
OFF TYPE BF EQUIPMENT
COMPLIANCE WITH MEDICAL DEVICE DIRECTIVE
Proof for Editing 07/25/08
Proof for Editing 07/25/08
Proof for Editing 07/25/08
Proof for Editing 07/25/08
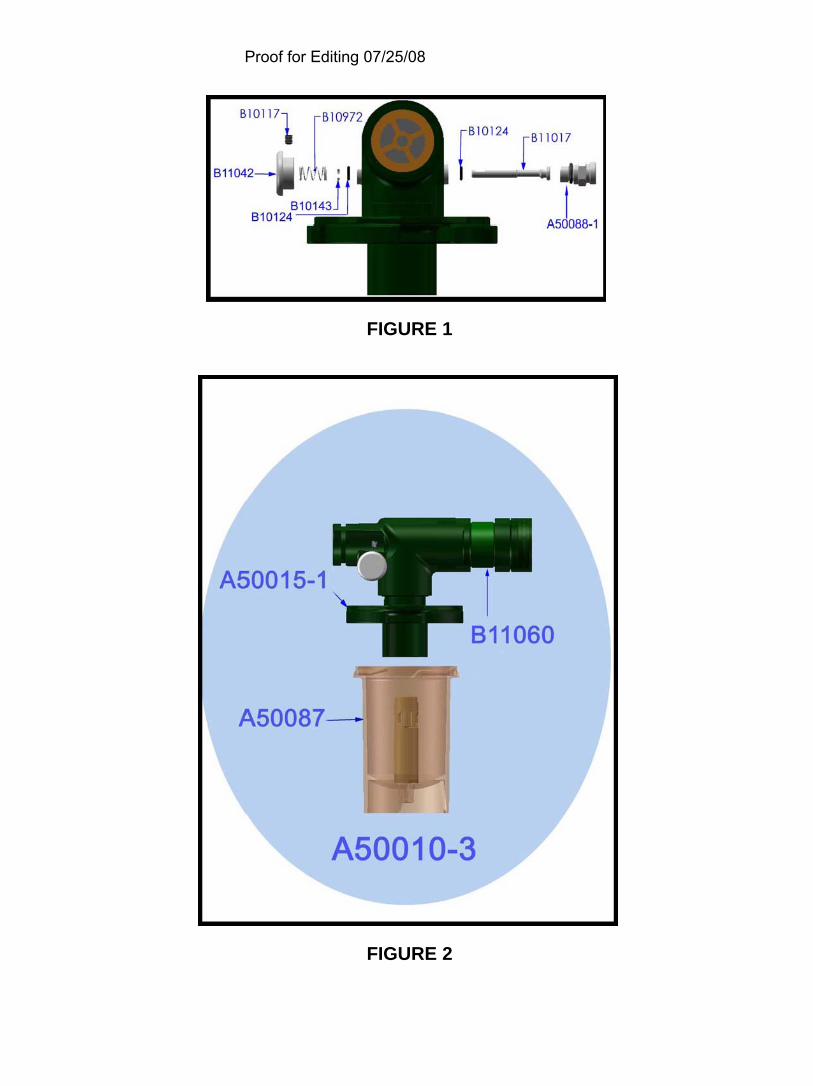
FIGURE 1
FIGURE 2
Proof for Editing 07/25/08
Proof for Editing 07/25/08
FIGURE 1
FIGURE 3
FIGURE 2
Proof for Editing 07/25/08
Proof for Editing 07/25/08
SHIPPING/STORAGE PROCEDURE PACKAGING AND SHIPPING When the IPV®/IMPULSATOR® are shipped for repair or maintenance the following shipping and packaging instructions are to be followed: 1. Call 800-850-7250 or 208-263-2549 for a return goods authorization number (RGA #). Units must be identified by serial number. 2. The device(s) must be disinfected and cleaned. 3. The device(s) must be placed in a large plastic bag to protect from packaging and other foreign materials. 4. Packaging material must be placed around all sides and top and bottom of unit in sufficient amount to protect device from damage during transportation to the designated facility. 5. A packaging slip must accompany device with information including RGA #, Customer’s name and purchase order number, device serial number, details of work requested, shipping address, and phone number. 6. Box must be securely closed and sealed with appropriate labels on the outside of box (including RGA #). 7. During shipping the unit should be kept dry and maintained at temperatures between -40°C to +40°C. STORAGE The IPV®/IMPULSATOR® should be stored in a clean environment and covered when not in use. Temperature should be maintained between -40°C to +40°C. Humidity range is 0-95% non-condensation.
HANDLING PROCEDURE DISPOSAL OF EQUIPMENT At the end of useful life of the IPV®/IMPULSATOR®, disposal should be in accordance with local, state, federal and international laws. The unit may also be packaged according to instructions found within this manual and shipped to authorized maintenance centers below for disposal.
Percussionaire® Corporation 1655 Glengary Bay Rd
Sandpoint ID 83864 Phone (208) 263-2549
Fax (208) 263-0577