Embed Size (px)
Citation preview
PTZ Control Center Operations Manual
Introduction PTZ Control Center is an application software that runs on Windows.
By running this software on a Windows PC, you can remotely operate the Panasonic cameras present on the network in a very easy manner.
Main features Following are the main features of this software.
1. It allows remote operation of cameras
You can perform the following operations on Panasonic cameras.
・Pan/Tilt the camera by clicking/touching the screen
By clicking/touching the camera screen that is displayed, you can directly specify the movement position of the camera and perform Pan/Tilt operations.
・Pan/Tilt/Zoom the camera with range specification on screen
Specify an area on the camera screen displayed to Pan/Tilt/Zoom so that the specified area is displayed in a full screen.
・Pan/Tilt/Zoom the camera with buttons/slider
You can use the buttons/slider GUI of the software to perform Pan/Tilt/Zoom operations of the camera.
・Pan/Tilt/Zoom the camera using a keyboard/game controller
You can Pan/Tilt/Zoom the camera from a keyboard or game controller connected to the PC.
・Register/Call/Delete a preset for the camera
You can register, call, and delete the Pan/Tilt/Zoom position preset of the camera.
・Image quality adjustment of the camera
You can adjust Focus/Iris/Gain/WB/Shutter/ND Filter of the camera.
・Start/Stop SD card recording of the camera
You can Start/Stop recording of a camera that has the SD card recording function.
2. You can simultaneously operate multiple cameras
2
You can simultaneously perform the following operations on multiple Panasonic cameras.
・Pan/Tilt/Zoom the camera with buttons/slider
・Register/Call/Delete a preset for the camera
・Image quality adjustment of the camera (Focus, Iris only)
3. Multiple camera types are supported
The following three camera types are supported.
・PTZ camera + Control assist camera AW-HEA10
Image of the PTZ camera is displayed on the top screen and image of the control assist camera AW-HEA10 is displayed on the bottom screen, and PTZ operation is performed.
・PTZ camera + Panorama still image
Image of PTZ camera is displayed on the top screen and panorama still image considering the usage environment is displayed on the bottom screen, and PTZ operation is performed.
You can create the panorama still image by using the PTZ camera.
・Standalone PTZ camera
You can display the image of PTZ camera only and perform PTZ operation.
4. Display of H.264 streaming images from camera
You can have full screen display of H.264 streaming images from the PTZ camera.
5. It allows network setting of cameras
You can automatically detect the cameras present on the network and perform network settings.
6. It allows function restrictions by each user
You can set function restrictions such as the cameras that can be accessed are restricted by each user.
7. It allows migration of setting data
You can copy the setting data of this software between multiple PCs.
8. Support for touch panel operation
This software supports touch panel based operation. You can perform operations described with “click” in this manual as touch operations.
Operating environment
The following environment is required for using this software.
●OS
Windows 7 32bit/64bit
Windows 8.1 32bit/64bit
Windows 10 32bit/64bit
●PC
CPU: Core i5-2520M 2.50GHz and above

3
Memory: 4GB and above
Display: 1280×960 and above (1920×1080 and above is recommended)
The following cameras are supported by this software.
●Panasonic Network supported cameras
PTZ camera
・AW-UE150/155
・AW-HE130/AW-HN130
・AW-HR140
・AW-UE70/AW-UN70
・AW-HE40/70/65, AW-HN40/70/65
Control Assist Camera
・AW-HEA10
POVCAM
・AG-UMR20/AG-UCK20
・AG-MDR25/AG-MDC20
<Note>
・Please update the firmware to the latest version before using the camera. You may download the firmware from the following website.
http://pro-av.panasonic.net/en/
Description given in this file • Illustrations and screens given in this file may differ from the actual items.
• In this file, a personal computer is mentioned as "PC."
Registrations and registered trademarks • Microsoft, Windows, and Internet Explorer are the registered trademarks of Microsoft Corporation
of the United States.
• Intel and Intel Core i5 are the registered trademarks of Intel Corporation or its subsidiaries in the United States and other countries.
• In addition, names, company names, product names, etc. mentioned in this document are the trademarks or the registered trademarks of the respective company. In the document, TM and the mark are not clearly specified.
4
Software information concerning this product 1. This product includes software developed by the OpenSSL Project for use in the OpenSSL Toolkit (http://www.openssl.org/).
2. Software licensed in accordance with the OpenBSD License is included in this software.
3. Software licensed in accordance with the BSD License is included in this software.
--------------------------------------------------------------------------------
By downloading, copying, installing or using the software you agree to this license.
If you do not agree to this license, do not download, install,
copy or use the software.
License Agreement
For Open Source Computer Vision Library
(3-clause BSD License)
Redistribution and use in source and binary forms, with or without modification,
are permitted provided that the following conditions are met:
* Redistributions of source code must retain the above copyright notice,
this list of conditions and the following disclaimer.
* Redistributions in binary form must reproduce the above copyright notice,
this list of conditions and the following disclaimer in the documentation
and/or other materials provided with the distribution.
* Neither the names of the copyright holders nor the names of the contributors
may be used to endorse or promote products derived from this software
without specific prior written permission.
This software is provided by the copyright holders and contributors "as is" and
any express or implied warranties, including, but not limited to, the implied
warranties of merchantability and fitness for a particular purpose are disclaimed.
In no event shall copyright holders or contributors be liable for any direct,

5
indirect, incidental, special, exemplary, or consequential damages
(including, but not limited to, procurement of substitute goods or services;
loss of use, data, or profits; or business interruption) however caused
and on any theory of liability, whether in contract, strict liability,
or tort (including negligence or otherwise) arising in any way out of
the use of this software, even if advised of the possibility of such damage.
6
Default Settings 1 (Camera Settings)
Please set the camera before using the software.
The following three camera types are supported.
・PTZ Camera + AW-HEA10
Image of the PTZ camera is displayed on the top screen and image of the control assist camera AW-HEA10 is displayed on the bottom screen, and PTZ operation is performed.
・PTZ Camera + Image
Image of PTZ camera is displayed on the top screen and panorama still image considering the usage environment is displayed on the bottom screen, and PTZ operation is performed. Panorama still image can be created by using PTZ camera.
・PTZ Camera
You can display the image of PTZ camera only and perform PTZ operation.
Details required to be set differ depending on the Camera Type. Procedure for each Camera Type is explained here.
Setting of PTZ Camera + AW-HEA10
・Camera setting procedure
1. Login to the software.
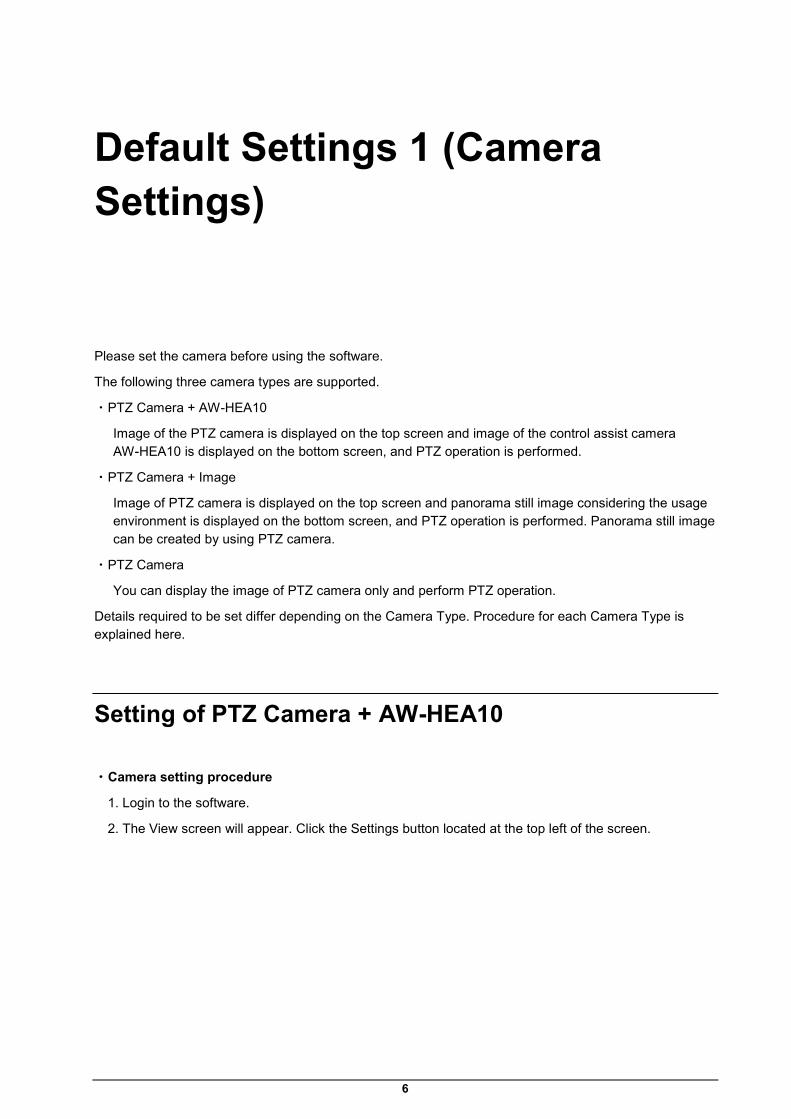
2. The View screen will appear. Click the Settings button located at the top left of the screen.
7
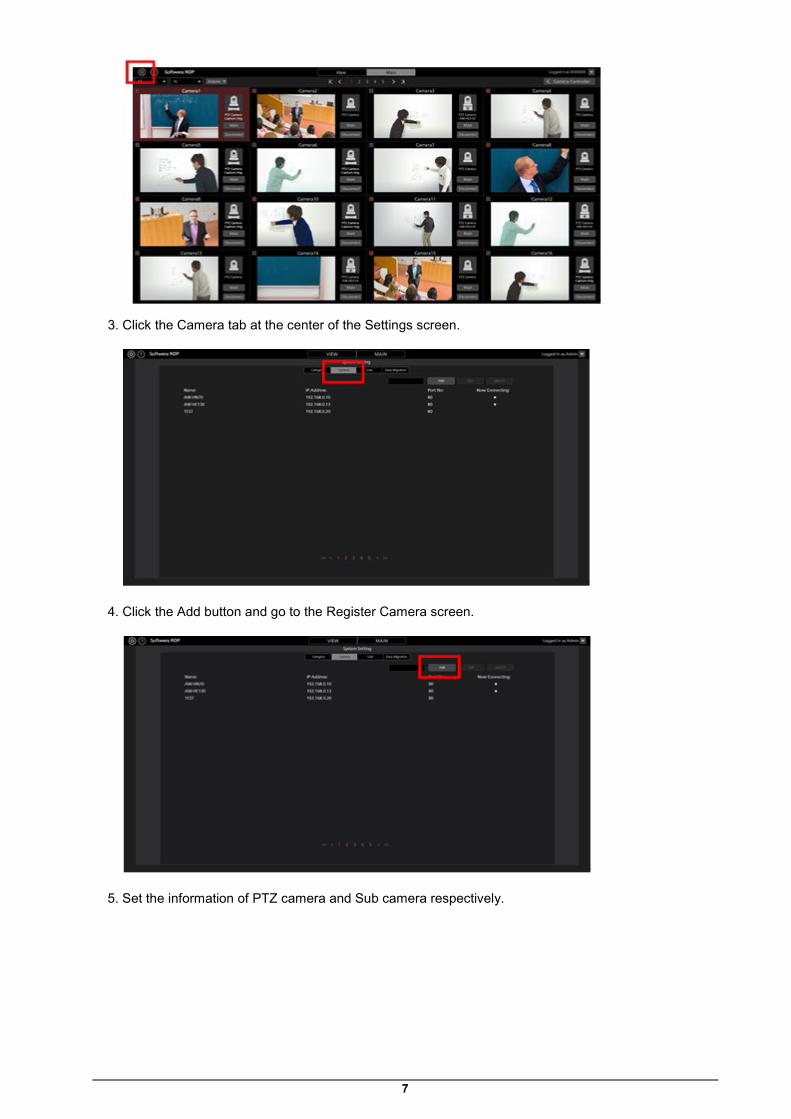
3. Click the Camera tab at the center of the Settings screen.
4. Click the Add button and go to the Register Camera screen.
5. Set the information of PTZ camera and Sub camera respectively.
8
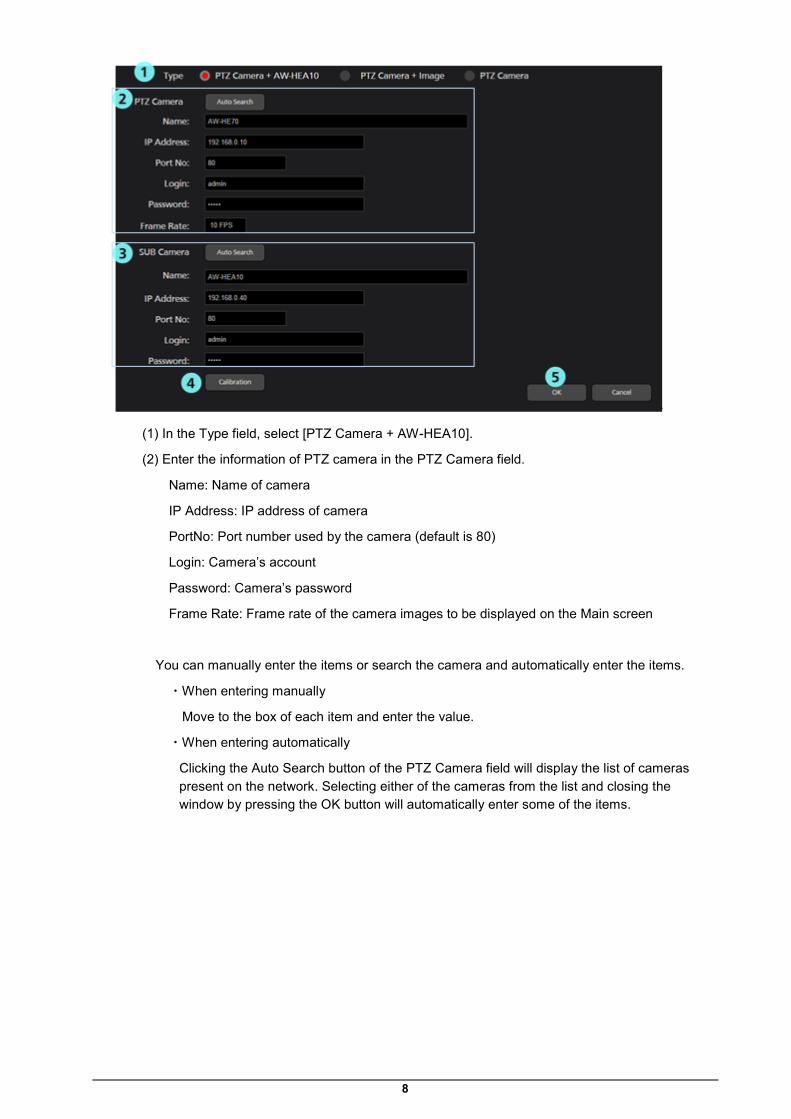
(1) In the Type field, select [PTZ Camera + AW-HEA10].
(2) Enter the information of PTZ camera in the PTZ Camera field.
Name: Name of camera
IP Address: IP address of camera
PortNo: Port number used by the camera (default is 80)
Login: Camera’s account
Password: Camera’s password
Frame Rate: Frame rate of the camera images to be displayed on the Main screen
You can manually enter the items or search the camera and automatically enter the items.
・When entering manually
Move to the box of each item and enter the value.
・When entering automatically
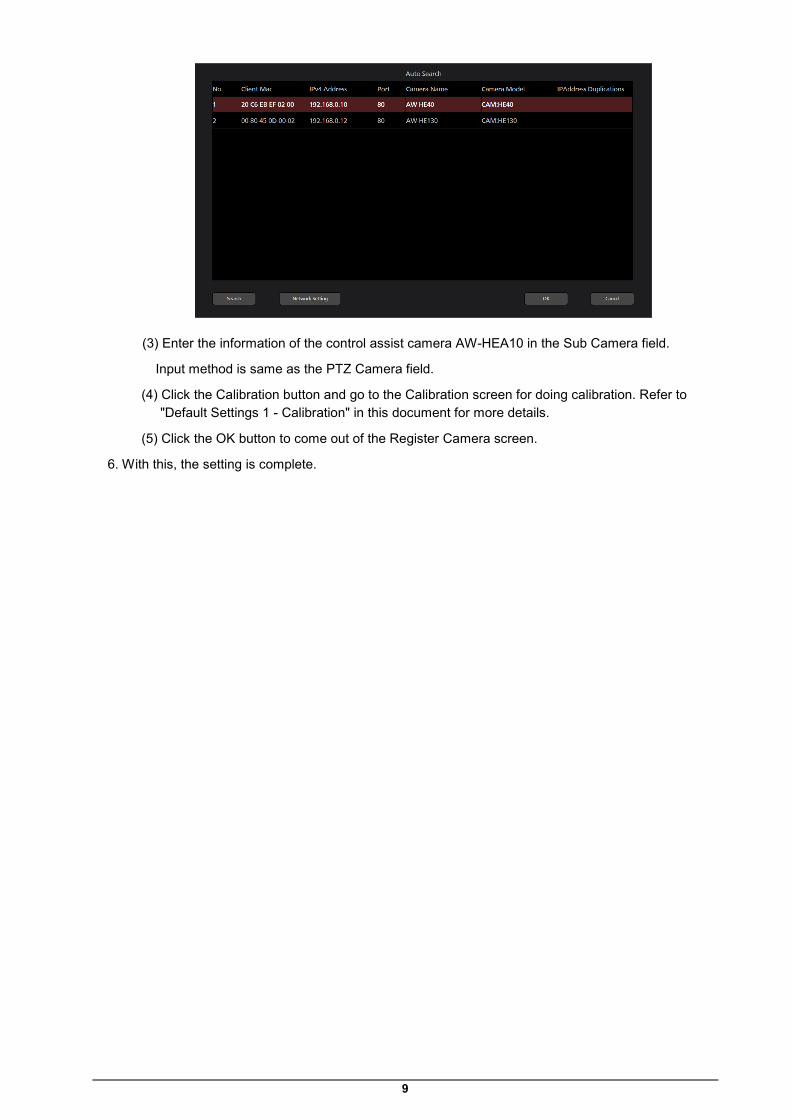
Clicking the Auto Search button of the PTZ Camera field will display the list of cameras present on the network. Selecting either of the cameras from the list and closing the window by pressing the OK button will automatically enter some of the items.
9
(3) Enter the information of the control assist camera AW-HEA10 in the Sub Camera field.
Input method is same as the PTZ Camera field.
(4) Click the Calibration button and go to the Calibration screen for doing calibration. Refer to "Default Settings 1 - Calibration" in this document for more details.
(5) Click the OK button to come out of the Register Camera screen.
6. With this, the setting is complete.
10
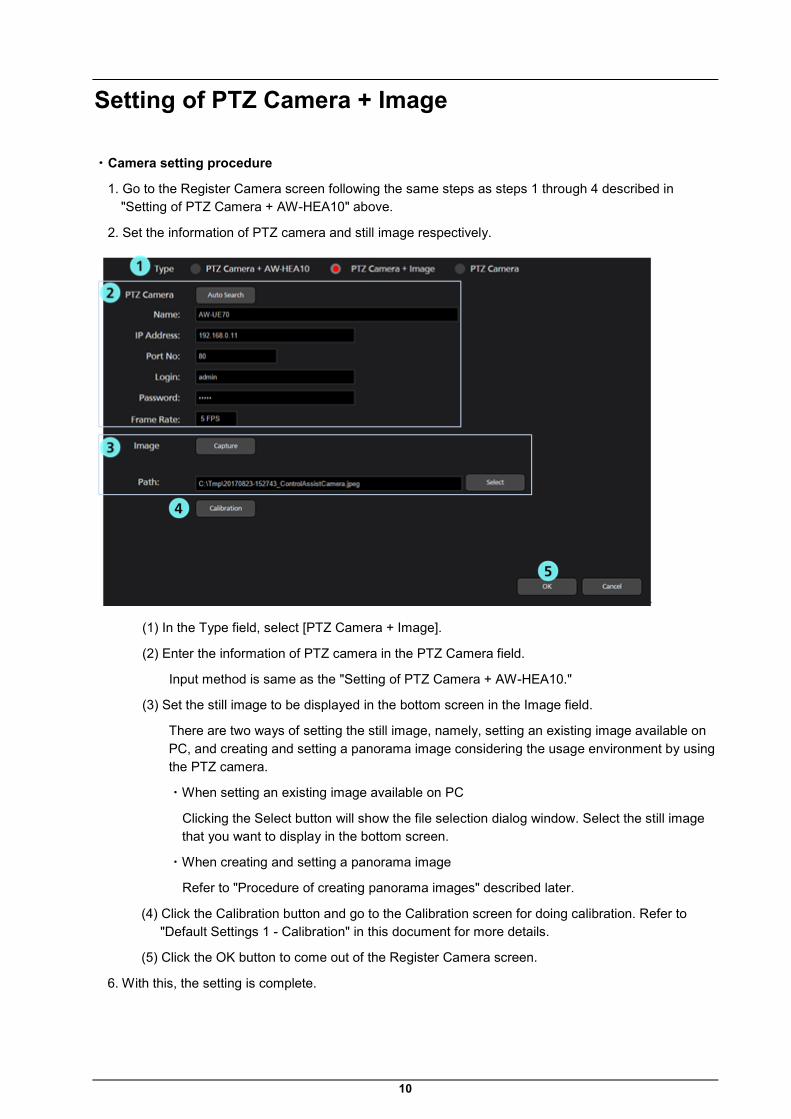
Setting of PTZ Camera + Image
・Camera setting procedure
1. Go to the Register Camera screen following the same steps as steps 1 through 4 described in "Setting of PTZ Camera + AW-HEA10" above.
2. Set the information of PTZ camera and still image respectively.
(1) In the Type field, select [PTZ Camera + Image].
(2) Enter the information of PTZ camera in the PTZ Camera field.
Input method is same as the "Setting of PTZ Camera + AW-HEA10."
(3) Set the still image to be displayed in the bottom screen in the Image field.
There are two ways of setting the still image, namely, setting an existing image available on PC, and creating and setting a panorama image considering the usage environment by using the PTZ camera.
・When setting an existing image available on PC
Clicking the Select button will show the file selection dialog window. Select the still image that you want to display in the bottom screen.
・When creating and setting a panorama image
Refer to "Procedure of creating panorama images" described later.
(4) Click the Calibration button and go to the Calibration screen for doing calibration. Refer to "Default Settings 1 - Calibration" in this document for more details.
(5) Click the OK button to come out of the Register Camera screen.
6. With this, the setting is complete.
11
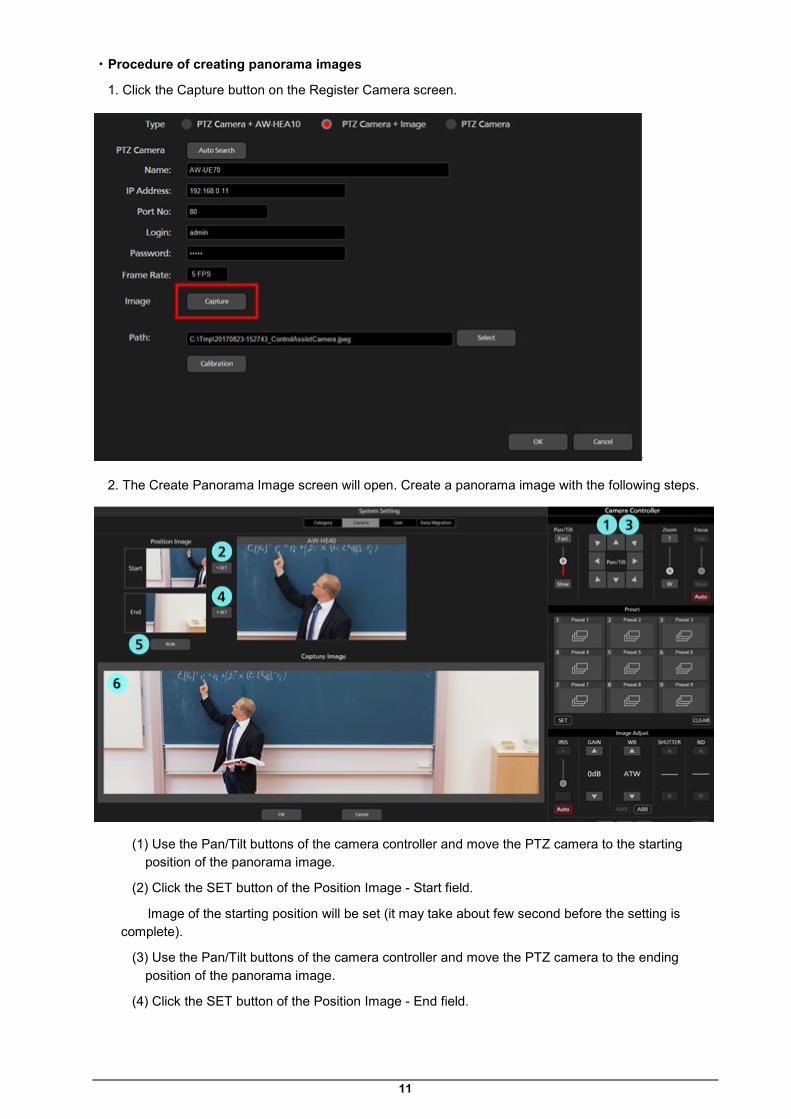
・Procedure of creating panorama images
1. Click the Capture button on the Register Camera screen.
2. The Create Panorama Image screen will open. Create a panorama image with the following steps.
(1) Use the Pan/Tilt buttons of the camera controller and move the PTZ camera to the starting position of the panorama image.
(2) Click the SET button of the Position Image - Start field.
Image of the starting position will be set (it may take about few second before the setting is complete).
(3) Use the Pan/Tilt buttons of the camera controller and move the PTZ camera to the ending position of the panorama image.
(4) Click the SET button of the Position Image - End field.
12
Image of the ending position will be set (it may take about few second before the setting is complete).
(5) Clicking the RUN button located at the bottom of the Position Image field will automatically move the PTZ camera from the starting position until the ending position you set, and panorama image will be created.
(6) Once creation of the panorama image is complete, the panorama image created will appear in the Capture Image field.
3. Click the OK button at the bottom of the screen to come out of the Create Panorama Image screen.
File of the panorama image you created will be automatically set in the Image - Path field of the Register Camera screen.
<Note>
・Check the following points when the panorama image is not created correctly.
- When there is a moving object between the starting position and the ending position, remove this object and recreate the image.
- Recreate the image after changing the starting position and the ending position.
Setting of PTZ Camera 1. Go to the Register Camera screen following the same steps as steps 1 through 4 described in
"Setting of PTZ Camera + AW-HEA10" above.
2. Enter the information of PTZ camera.
(1) In the Type field, select [PTZ Camera].
(2) Enter the information of PTZ camera in the PTZ Camera field.
Input method is same as the "Setting of PTZ Camera + AW-HEA10."

13
(3) Click the OK button to come out of the Register Camera screen.
3. With this, the setting is complete.
14
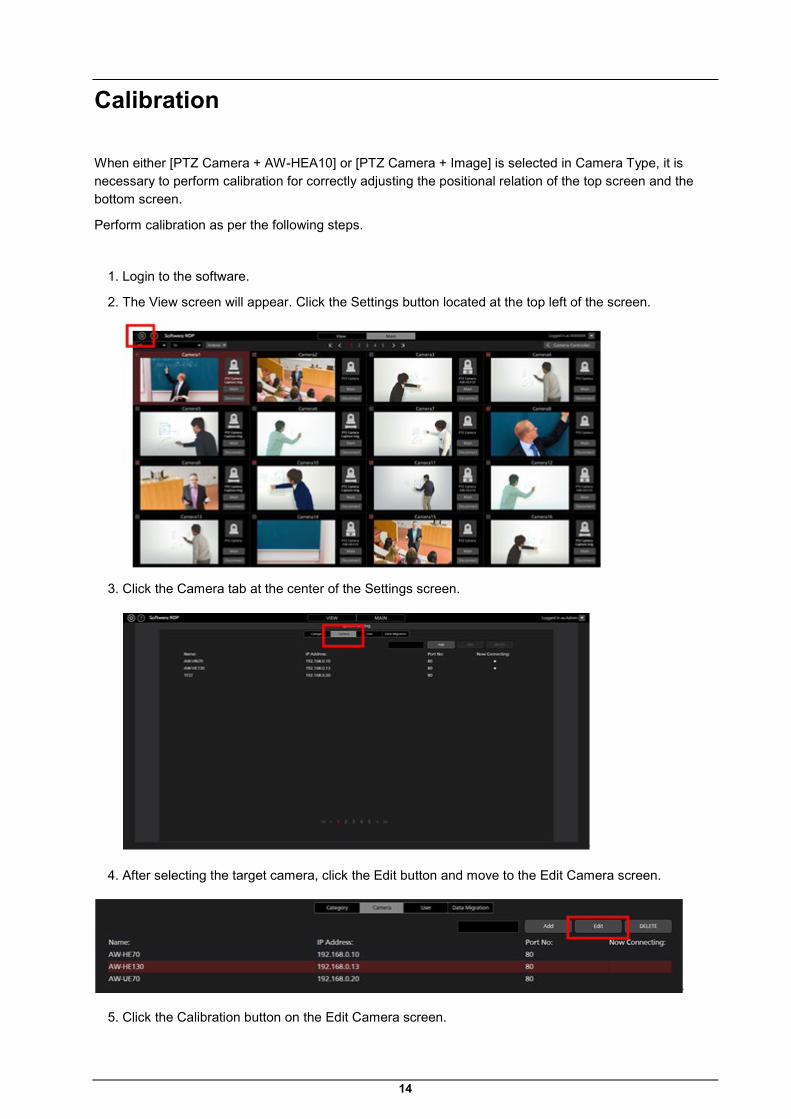
Calibration
When either [PTZ Camera + AW-HEA10] or [PTZ Camera + Image] is selected in Camera Type, it is necessary to perform calibration for correctly adjusting the positional relation of the top screen and the bottom screen.
Perform calibration as per the following steps.
1. Login to the software.
2. The View screen will appear. Click the Settings button located at the top left of the screen.
3. Click the Camera tab at the center of the Settings screen.
4. After selecting the target camera, click the Edit button and move to the Edit Camera screen.
5. Click the Calibration button on the Edit Camera screen.
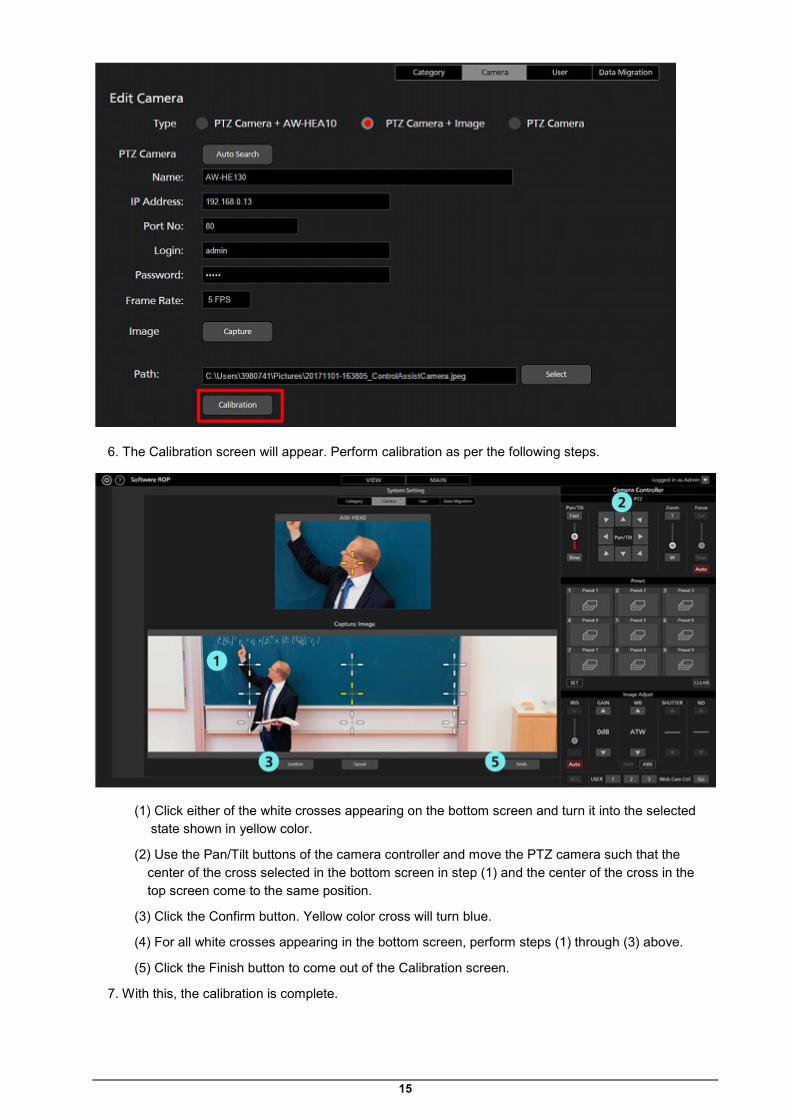
15
6. The Calibration screen will appear. Perform calibration as per the following steps.
(1) Click either of the white crosses appearing on the bottom screen and turn it into the selected state shown in yellow color.
(2) Use the Pan/Tilt buttons of the camera controller and move the PTZ camera such that the center of the cross selected in the bottom screen in step (1) and the center of the cross in the top screen come to the same position.
(3) Click the Confirm button. Yellow color cross will turn blue.
(4) For all white crosses appearing in the bottom screen, perform steps (1) through (3) above.
(5) Click the Finish button to come out of the Calibration screen.
7. With this, the calibration is complete.

16
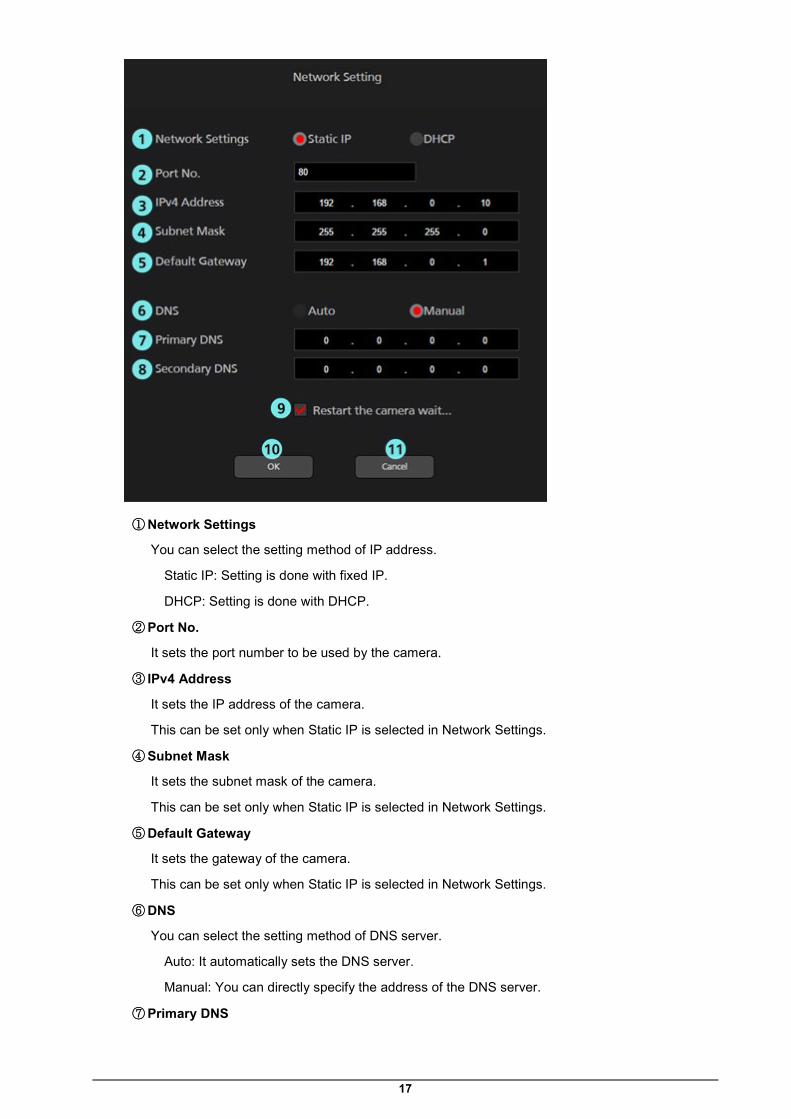
Changing network settings
You can change the network settings of the camera from the software.
You can make settings as per the following steps.
1. Go to the Edit Camera screen following the same steps as steps 1 through 4 of "Default Settings 1 - Calibration."
2. Click the Auto Search button on the Edit Camera screen.
3. List of cameras present on the network will appear.
Select the cameras to be set and click the Network Setting button.
4. The Network Settings screen will open. Changing each item and clicking the OK button will change the network settings of the camera.
17
① Network Settings
You can select the setting method of IP address.
Static IP: Setting is done with fixed IP.
DHCP: Setting is done with DHCP.
② Port No.
It sets the port number to be used by the camera.
③ IPv4 Address
It sets the IP address of the camera.
This can be set only when Static IP is selected in Network Settings.
④ Subnet Mask
It sets the subnet mask of the camera.
This can be set only when Static IP is selected in Network Settings.
⑤ Default Gateway
It sets the gateway of the camera.
This can be set only when Static IP is selected in Network Settings.
⑥ DNS
You can select the setting method of DNS server.
Auto: It automatically sets the DNS server.
Manual: You can directly specify the address of the DNS server.
⑦ Primary DNS
18
It sets the address of the primary DNS.
This can be set only when Manual is selected in DNS.
⑧ Secondary DNS
It sets the address of the secondary DNS.
This can be set only when Manual is selected in DNS.
⑨ Restart the camera wait
When this box is checked and when the setting is changed by clicking the OK button, the camera will standby until the setting is completed.
⑩ OK button
It will apply the settings and close the screen.
⑪ Cancel button
It will cancel the settings and close the screen.
<Note>
・When EasyIpSetup software and this software are used at the same time, network setting from this software is not available.
19
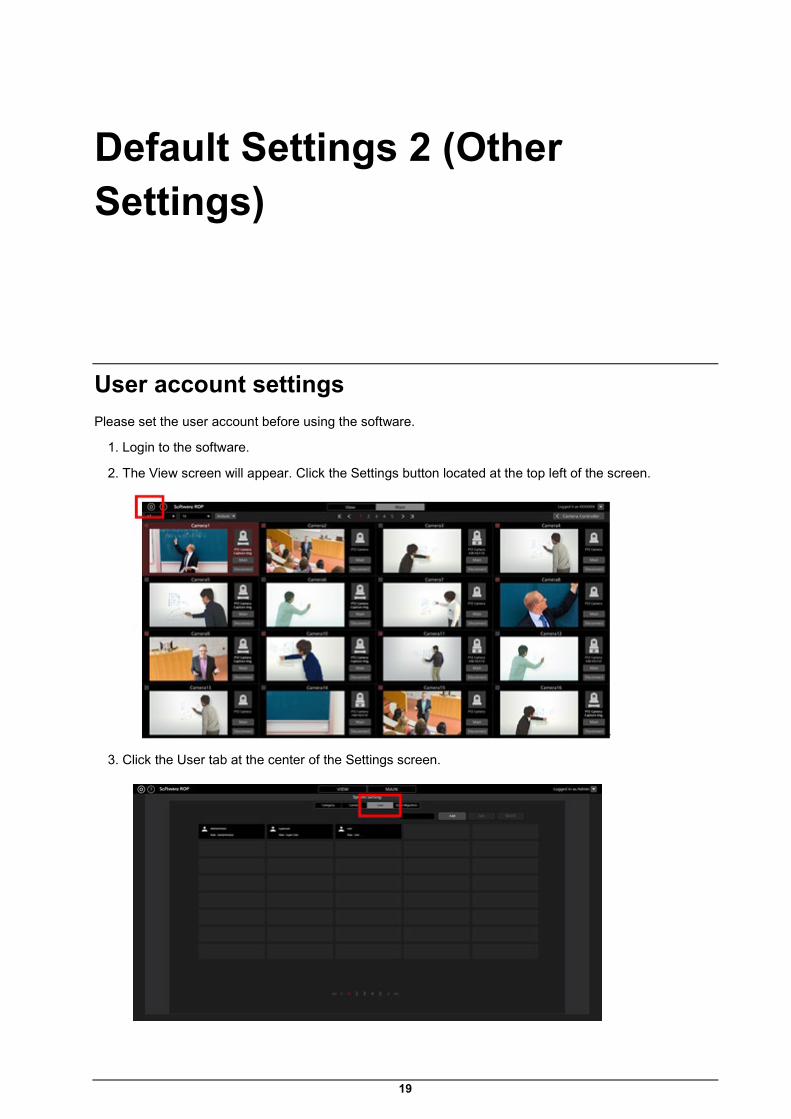
Default Settings 2 (Other Settings)
User account settings Please set the user account before using the software.
1. Login to the software.
2. The View screen will appear. Click the Settings button located at the top left of the screen.
3. Click the User tab at the center of the Settings screen.
20
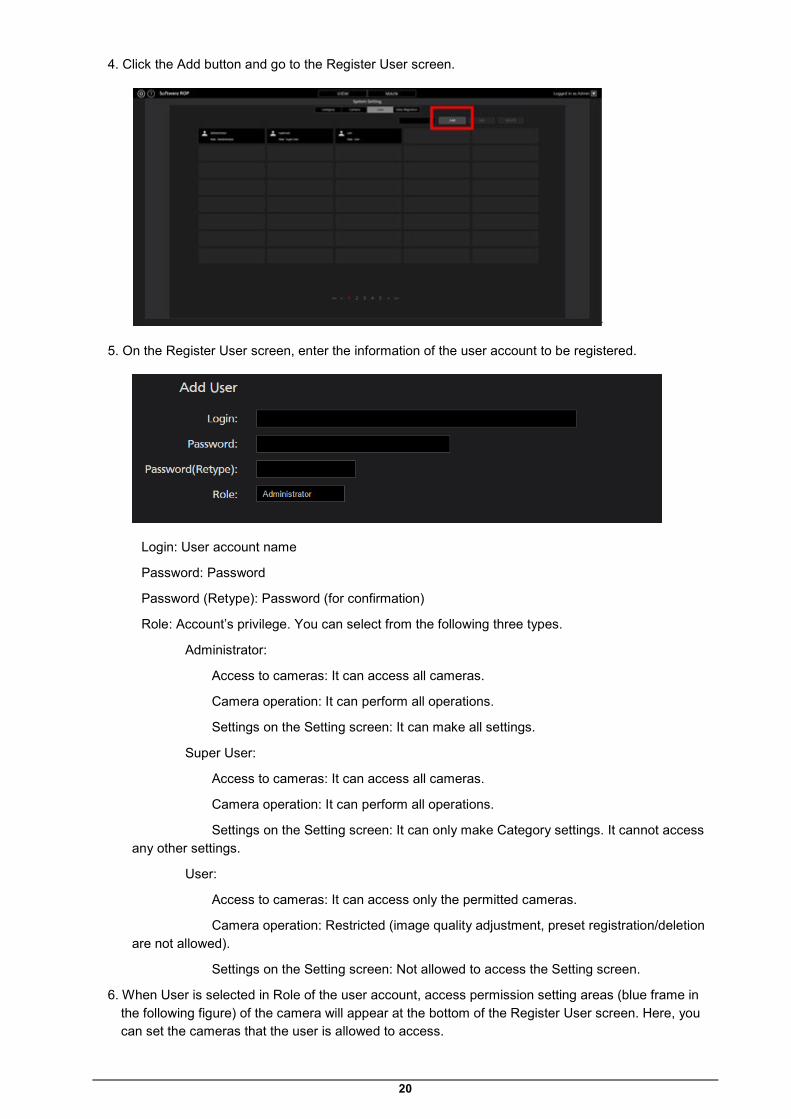
4. Click the Add button and go to the Register User screen.
5. On the Register User screen, enter the information of the user account to be registered.
Login: User account name
Password: Password
Password (Retype): Password (for confirmation)
Role: Account’s privilege. You can select from the following three types.
Administrator:
Access to cameras: It can access all cameras.
Camera operation: It can perform all operations.
Settings on the Setting screen: It can make all settings.
Super User:
Access to cameras: It can access all cameras.
Camera operation: It can perform all operations.
Settings on the Setting screen: It can only make Category settings. It cannot access any other settings.
User:
Access to cameras: It can access only the permitted cameras.
Camera operation: Restricted (image quality adjustment, preset registration/deletion are not allowed).
Settings on the Setting screen: Not allowed to access the Setting screen.
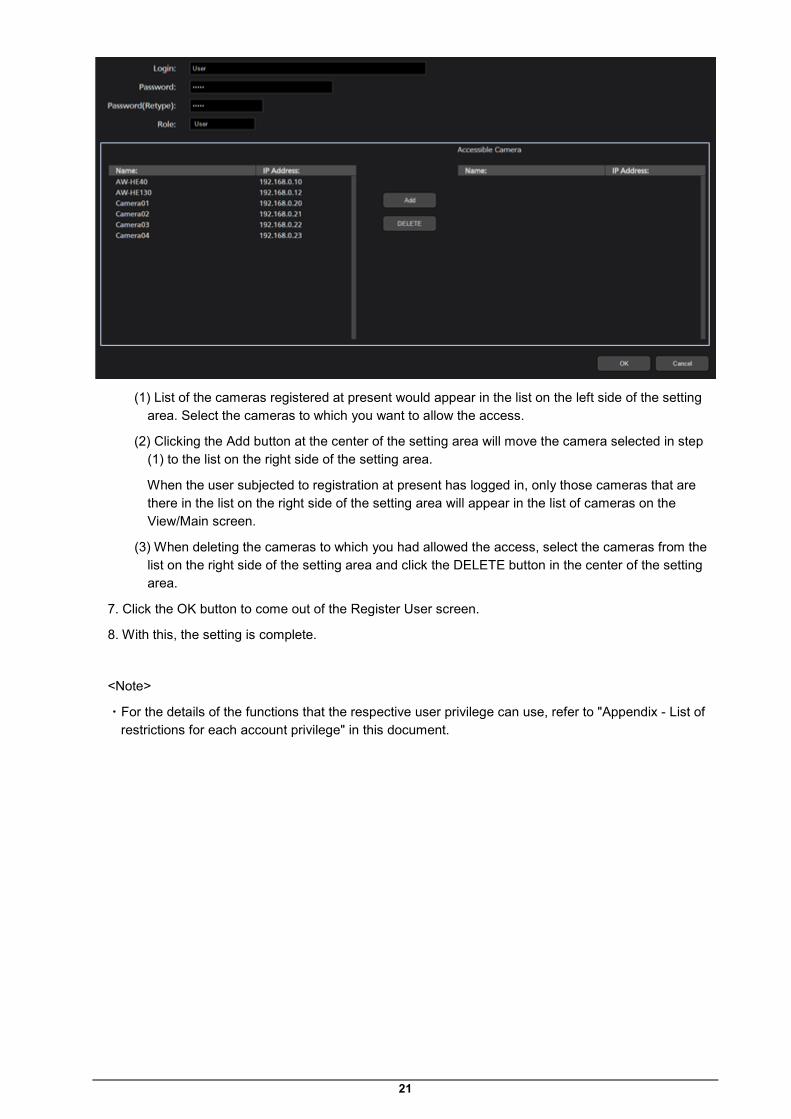
6. When User is selected in Role of the user account, access permission setting areas (blue frame in the following figure) of the camera will appear at the bottom of the Register User screen. Here, you can set the cameras that the user is allowed to access.
21
(1) List of the cameras registered at present would appear in the list on the left side of the setting area. Select the cameras to which you want to allow the access.
(2) Clicking the Add button at the center of the setting area will move the camera selected in step (1) to the list on the right side of the setting area.
When the user subjected to registration at present has logged in, only those cameras that are there in the list on the right side of the setting area will appear in the list of cameras on the View/Main screen.
(3) When deleting the cameras to which you had allowed the access, select the cameras from the list on the right side of the setting area and click the DELETE button in the center of the setting area.
7. Click the OK button to come out of the Register User screen.
8. With this, the setting is complete.
<Note>
・For the details of the functions that the respective user privilege can use, refer to "Appendix - List of restrictions for each account privilege" in this document.
22
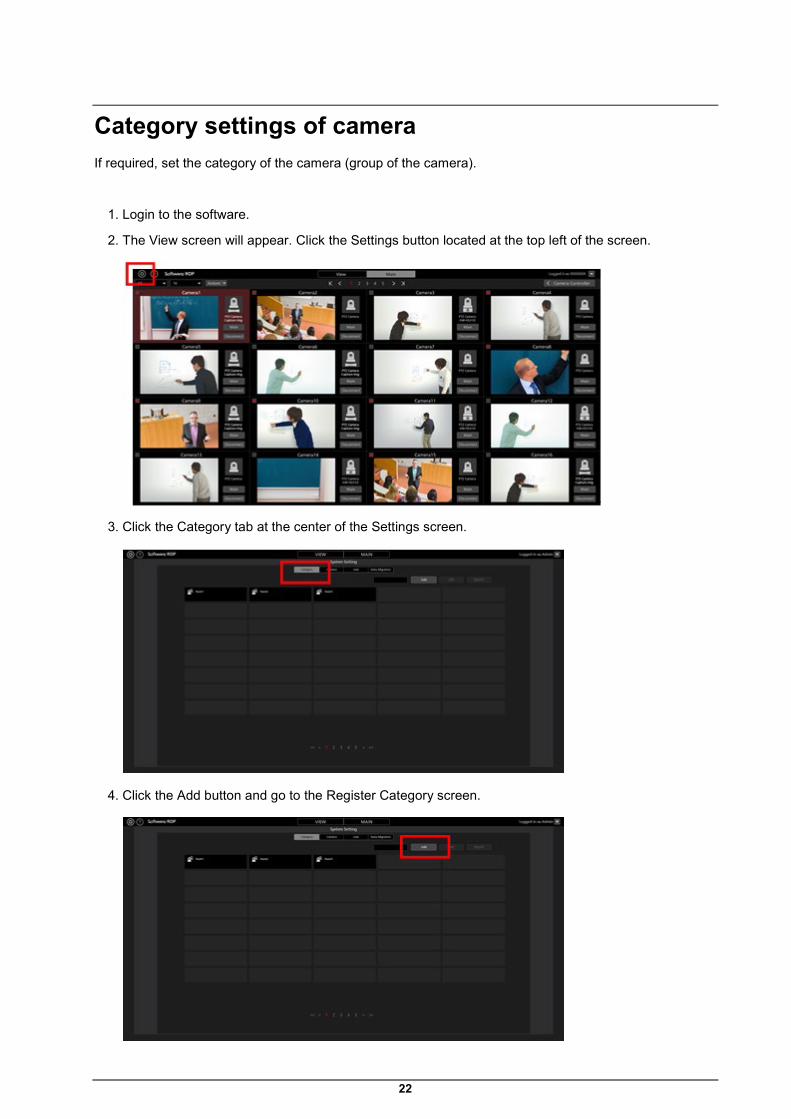
Category settings of camera If required, set the category of the camera (group of the camera).
1. Login to the software.
2. The View screen will appear. Click the Settings button located at the top left of the screen.
3. Click the Category tab at the center of the Settings screen.
4. Click the Add button and go to the Register Category screen.
23
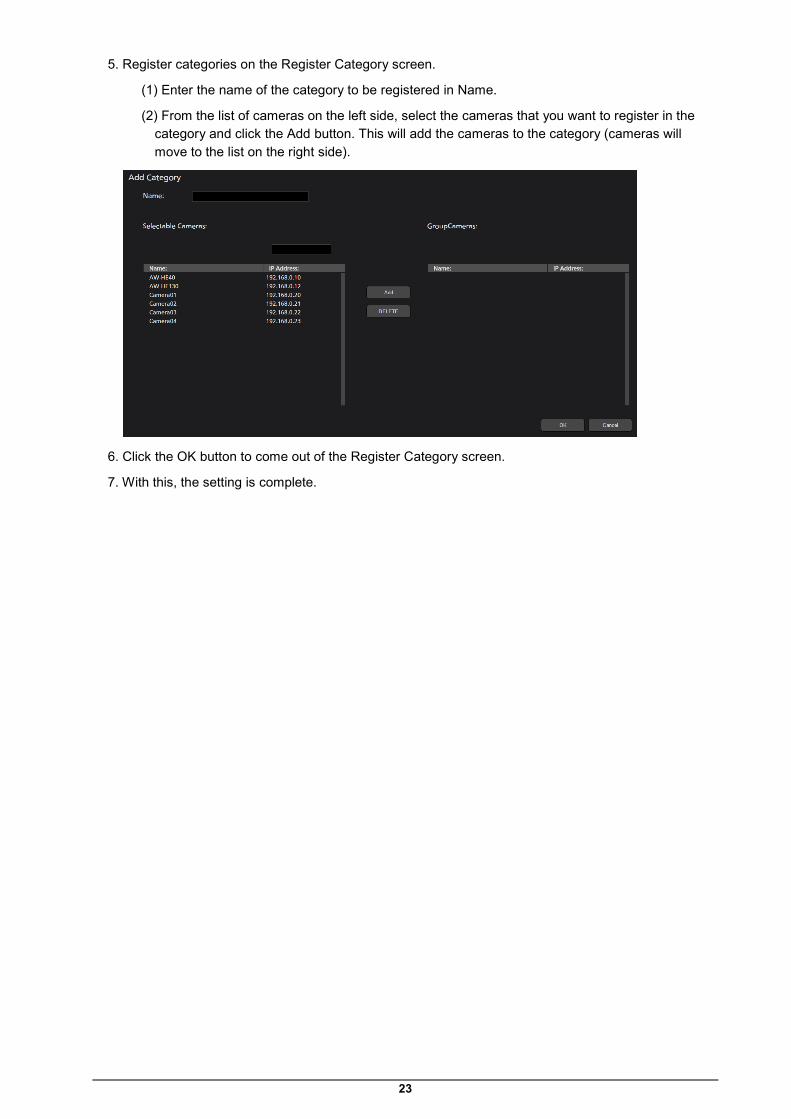
5. Register categories on the Register Category screen.
(1) Enter the name of the category to be registered in Name.
(2) From the list of cameras on the left side, select the cameras that you want to register in the category and click the Add button. This will add the cameras to the category (cameras will move to the list on the right side).
6. Click the OK button to come out of the Register Category screen.
7. With this, the setting is complete.
24
Description of screens
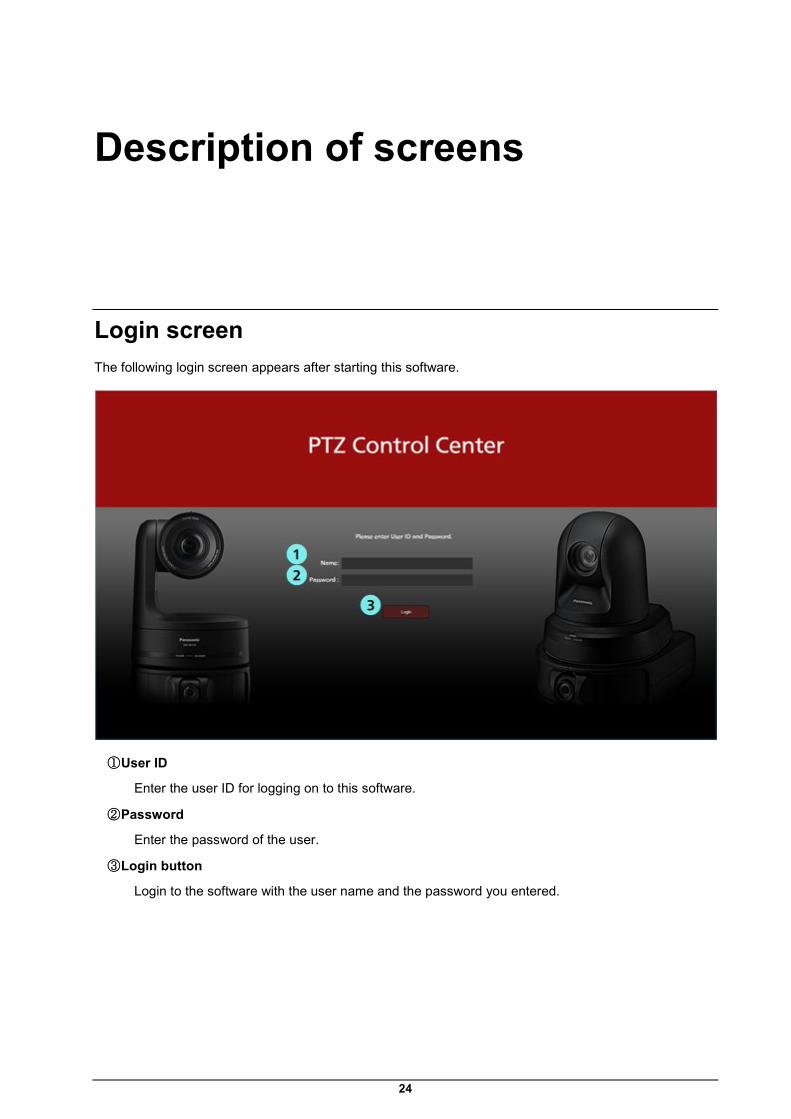
Login screen The following login screen appears after starting this software.
① User ID
Enter the user ID for logging on to this software.
② Password
Enter the password of the user.
③ Login button
Login to the software with the user name and the password you entered.

25
View screen The following View screen appears after logging on the software.
On the View screen, list of the registered cameras will appear with information such as thumbnail.
The View screen is made of the following four areas.
・View/Main common part
・Camera list display control part/Camera list display
・Camera controller (when display is ON)
View screen (Camera controller display OFF)
View screen (Camera controller display ON)
26
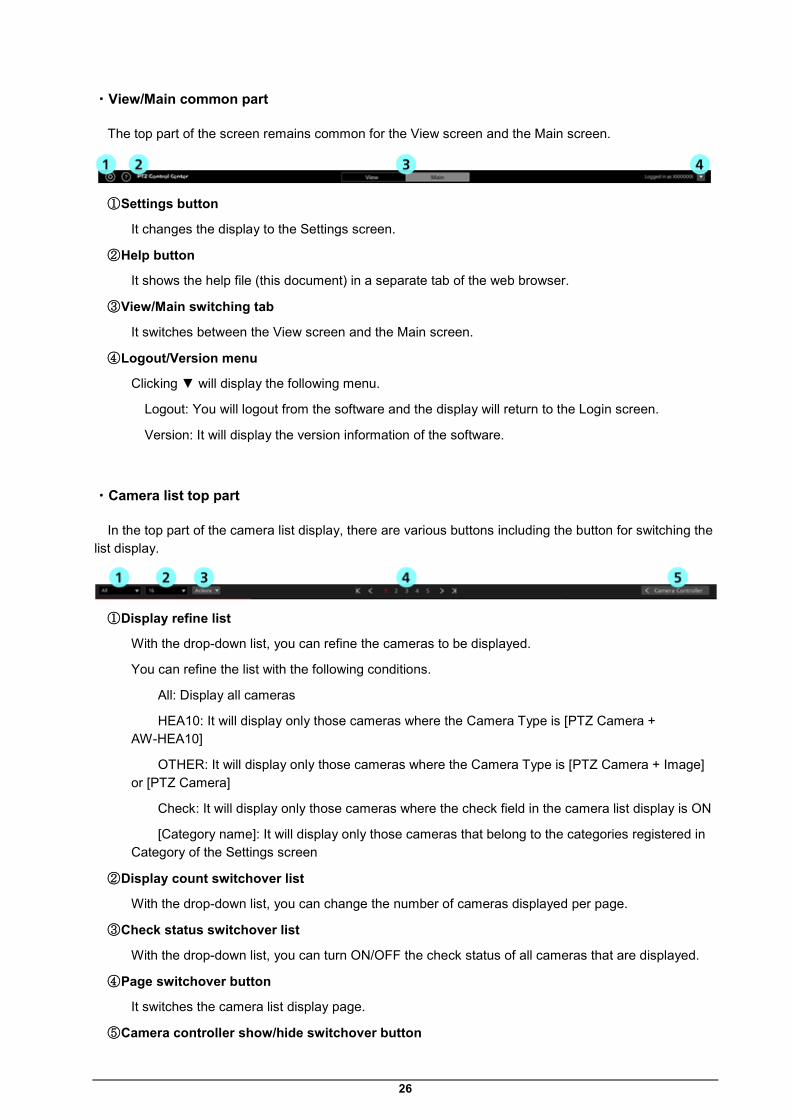
・View/Main common part
The top part of the screen remains common for the View screen and the Main screen.
① Settings button
It changes the display to the Settings screen.
② Help button
It shows the help file (this document) in a separate tab of the web browser.
③ View/Main switching tab
It switches between the View screen and the Main screen.
④ Logout/Version menu
Clicking ▼ will display the following menu.
Logout: You will logout from the software and the display will return to the Login screen.
Version: It will display the version information of the software.
・Camera list top part
In the top part of the camera list display, there are various buttons including the button for switching the list display.
① Display refine list
With the drop-down list, you can refine the cameras to be displayed.
You can refine the list with the following conditions.
All: Display all cameras
HEA10: It will display only those cameras where the Camera Type is [PTZ Camera + AW-HEA10]
OTHER: It will display only those cameras where the Camera Type is [PTZ Camera + Image] or [PTZ Camera]
Check: It will display only those cameras where the check field in the camera list display is ON
[Category name]: It will display only those cameras that belong to the categories registered in Category of the Settings screen
② Display count switchover list
With the drop-down list, you can change the number of cameras displayed per page.
③ Check status switchover list
With the drop-down list, you can turn ON/OFF the check status of all cameras that are displayed.
④ Page switchover button
It switches the camera list display page.
⑤ Camera controller show/hide switchover button
27
You can switch between show/hide the camera controller.
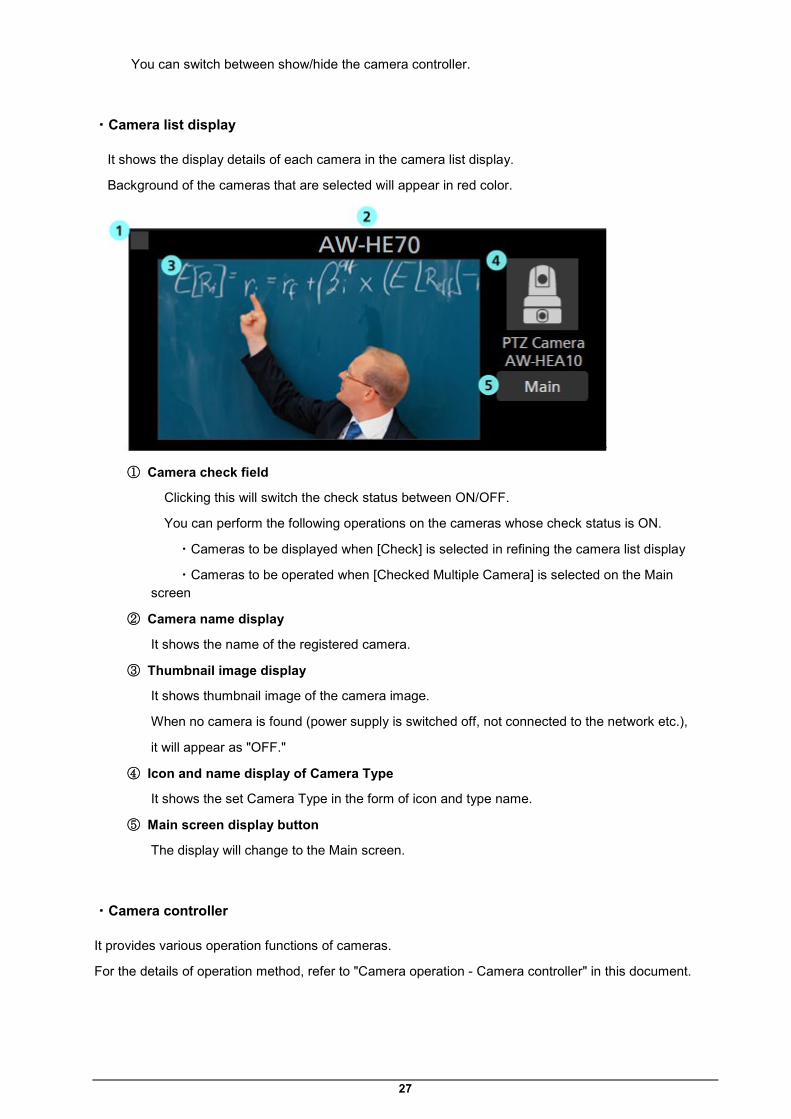
・Camera list display
It shows the display details of each camera in the camera list display.
Background of the cameras that are selected will appear in red color.
① Camera check field
Clicking this will switch the check status between ON/OFF.
You can perform the following operations on the cameras whose check status is ON.
・Cameras to be displayed when [Check] is selected in refining the camera list display
・Cameras to be operated when [Checked Multiple Camera] is selected on the Main screen
② Camera name display
It shows the name of the registered camera.
③ Thumbnail image display
It shows thumbnail image of the camera image.
When no camera is found (power supply is switched off, not connected to the network etc.),
it will appear as "OFF."
④ Icon and name display of Camera Type
It shows the set Camera Type in the form of icon and type name.
⑤ Main screen display button
The display will change to the Main screen.
・Camera controller
It provides various operation functions of cameras.
For the details of operation method, refer to "Camera operation - Camera controller" in this document.
28
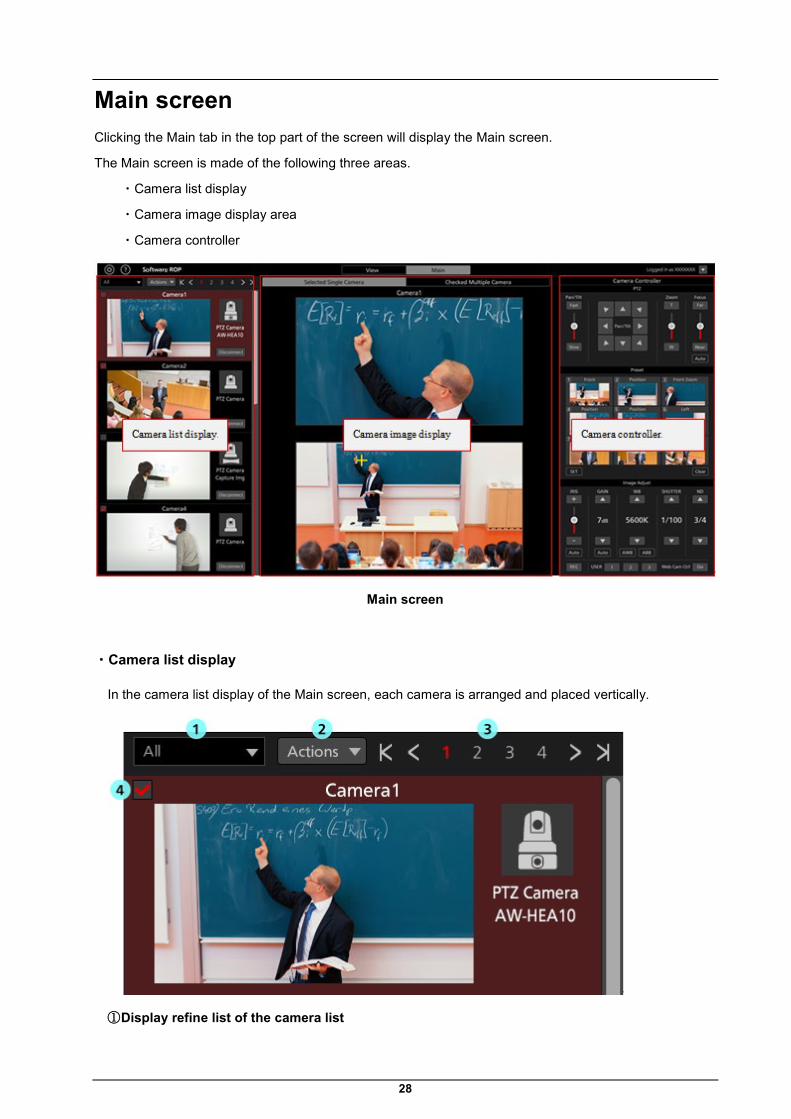
Main screen Clicking the Main tab in the top part of the screen will display the Main screen.
The Main screen is made of the following three areas.
・Camera list display
・Camera image display area
・Camera controller
Main screen
・Camera list display
In the camera list display of the Main screen, each camera is arranged and placed vertically.
① Display refine list of the camera list
29
With the drop-down list, you can refine the cameras to be displayed.
Its function is same as that of the View screen.
② Check status switchover list
From the drop down list, you can turn ON/OFF the check status of all cameras that are displayed.
③ Page switchover button
It switches the camera list display page.
④ Camera list display
It shows the status of each camera.
It is same as that in the View screen except that the Main button is not there.
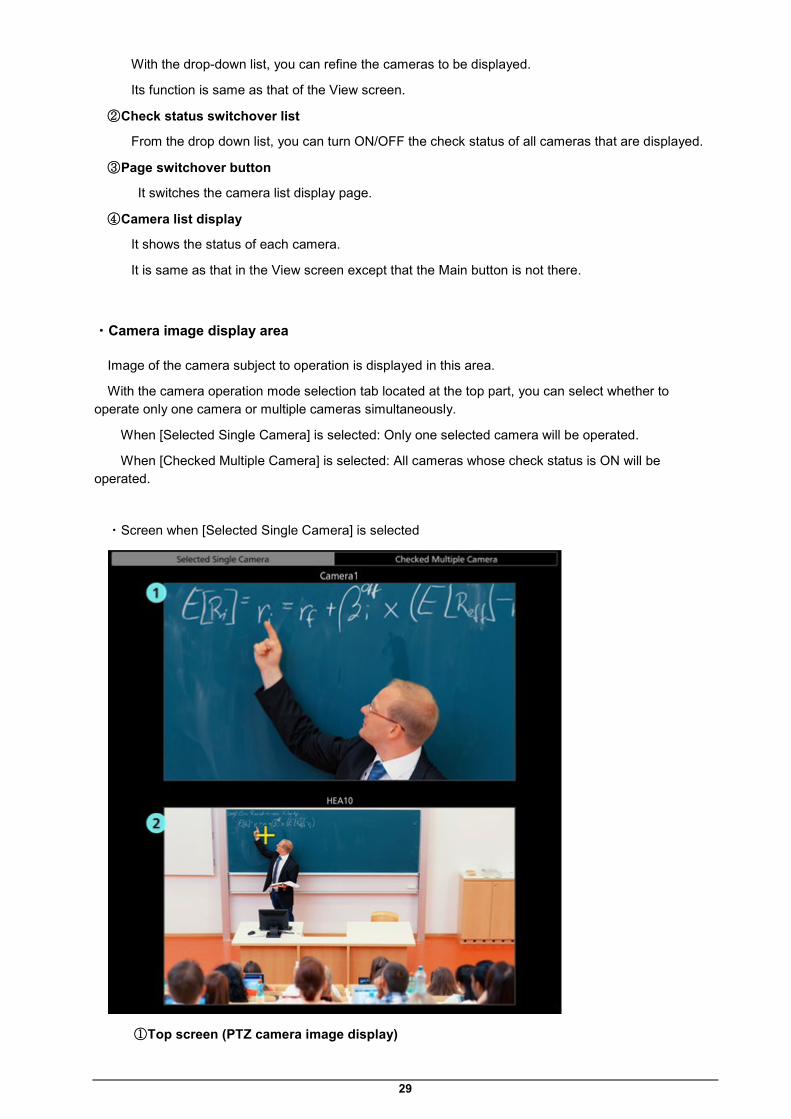
・Camera image display area
Image of the camera subject to operation is displayed in this area.
With the camera operation mode selection tab located at the top part, you can select whether to operate only one camera or multiple cameras simultaneously.
When [Selected Single Camera] is selected: Only one selected camera will be operated.
When [Checked Multiple Camera] is selected: All cameras whose check status is ON will be operated.
・Screen when [Selected Single Camera] is selected
① Top screen (PTZ camera image display)
30
Image of the PTZ camera selected in the camera list display will appear.
Clicking on the camera image will move the PTZ camera such that the clicked position comes at the center of the image.
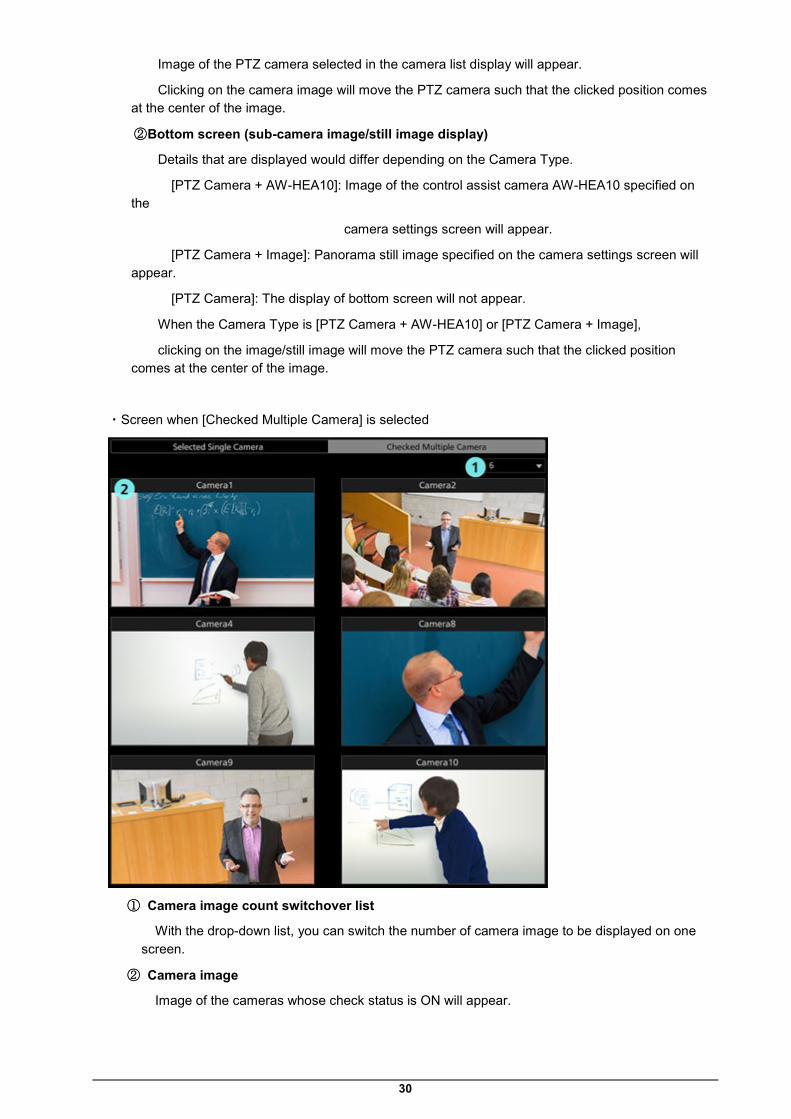
② Bottom screen (sub-camera image/still image display)
Details that are displayed would differ depending on the Camera Type.
[PTZ Camera + AW-HEA10]: Image of the control assist camera AW-HEA10 specified on the
camera settings screen will appear.
[PTZ Camera + Image]: Panorama still image specified on the camera settings screen will appear.
[PTZ Camera]: The display of bottom screen will not appear.
When the Camera Type is [PTZ Camera + AW-HEA10] or [PTZ Camera + Image],
clicking on the image/still image will move the PTZ camera such that the clicked position comes at the center of the image.
・Screen when [Checked Multiple Camera] is selected
① Camera image count switchover list
With the drop-down list, you can switch the number of camera image to be displayed on one screen.
② Camera image
Image of the cameras whose check status is ON will appear.

31
・Camera controller
Its function is same as that of the View screen.
32
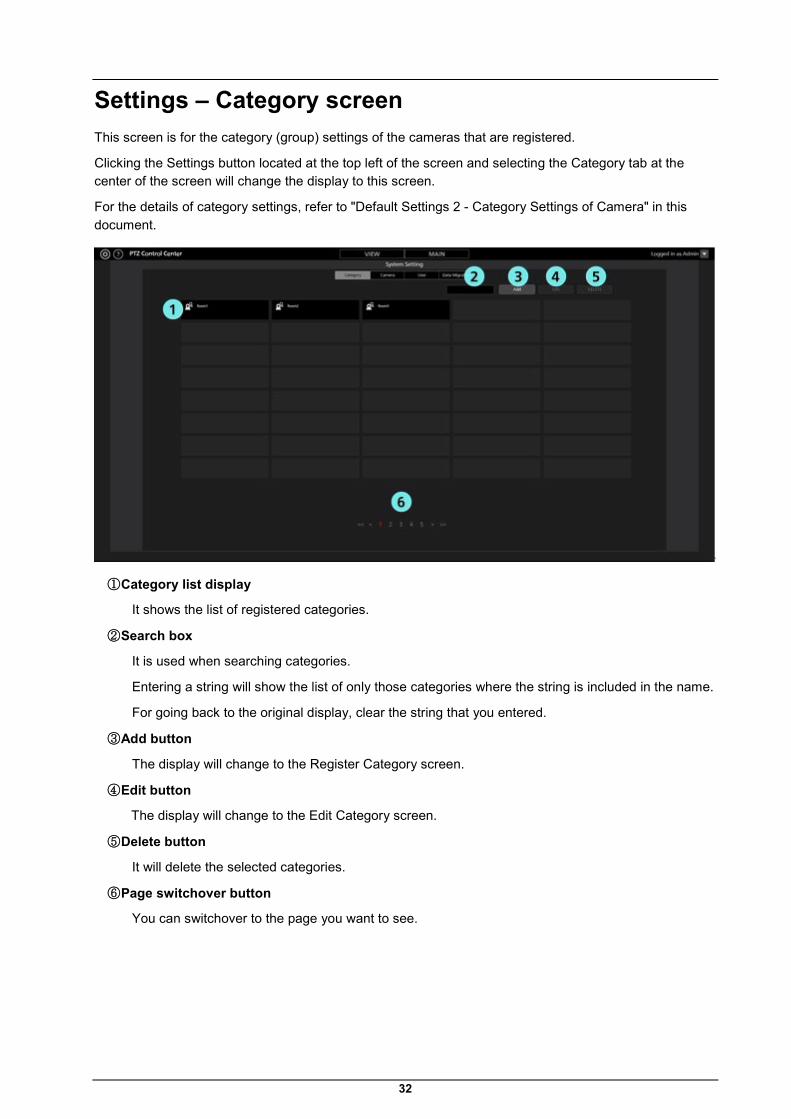
Settings – Category screen This screen is for the category (group) settings of the cameras that are registered.
Clicking the Settings button located at the top left of the screen and selecting the Category tab at the center of the screen will change the display to this screen.
For the details of category settings, refer to "Default Settings 2 - Category Settings of Camera" in this document.
① Category list display
It shows the list of registered categories.
② Search box
It is used when searching categories.
Entering a string will show the list of only those categories where the string is included in the name.
For going back to the original display, clear the string that you entered.
③ Add button
The display will change to the Register Category screen.
④ Edit button
The display will change to the Edit Category screen.
⑤ Delete button
It will delete the selected categories.
⑥ Page switchover button
You can switchover to the page you want to see.
33
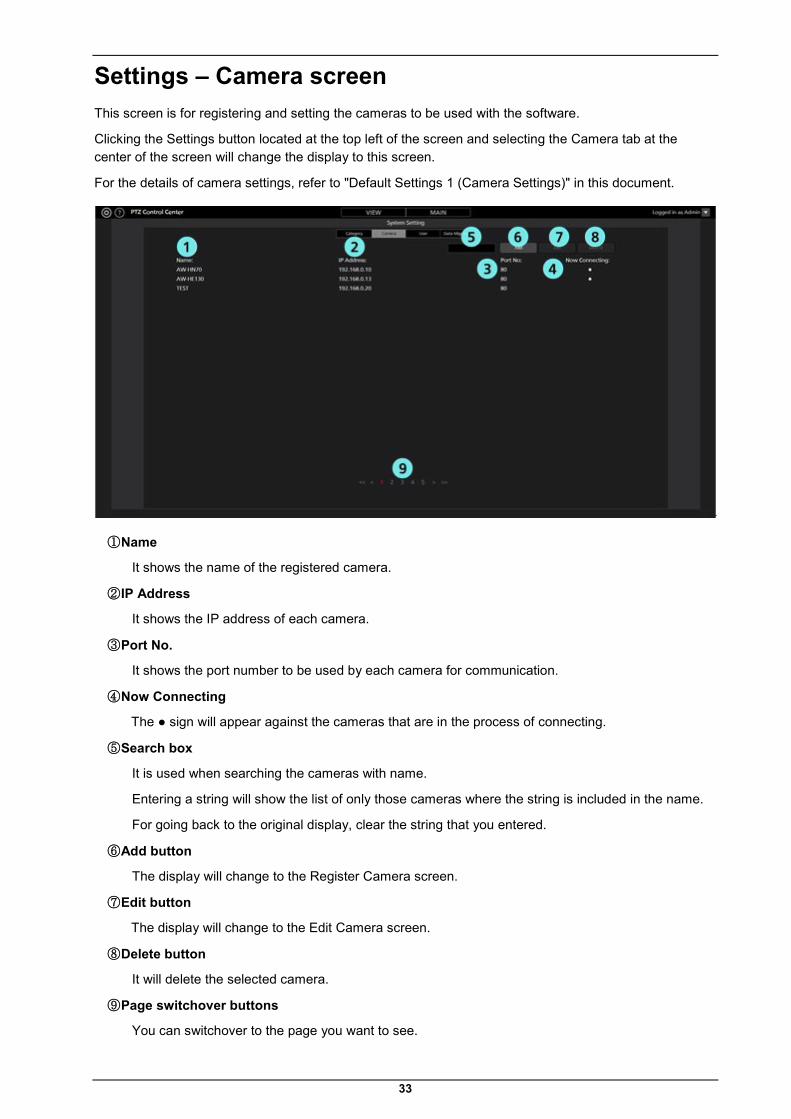
Settings – Camera screen This screen is for registering and setting the cameras to be used with the software.
Clicking the Settings button located at the top left of the screen and selecting the Camera tab at the center of the screen will change the display to this screen.
For the details of camera settings, refer to "Default Settings 1 (Camera Settings)" in this document.
① Name
It shows the name of the registered camera.
② IP Address
It shows the IP address of each camera.
③ Port No.
It shows the port number to be used by each camera for communication.
④ Now Connecting
The ● sign will appear against the cameras that are in the process of connecting.
⑤ Search box
It is used when searching the cameras with name.
Entering a string will show the list of only those cameras where the string is included in the name.
For going back to the original display, clear the string that you entered.
⑥ Add button
The display will change to the Register Camera screen.
⑦ Edit button
The display will change to the Edit Camera screen.
⑧ Delete button
It will delete the selected camera.
⑨ Page switchover buttons
You can switchover to the page you want to see.
34
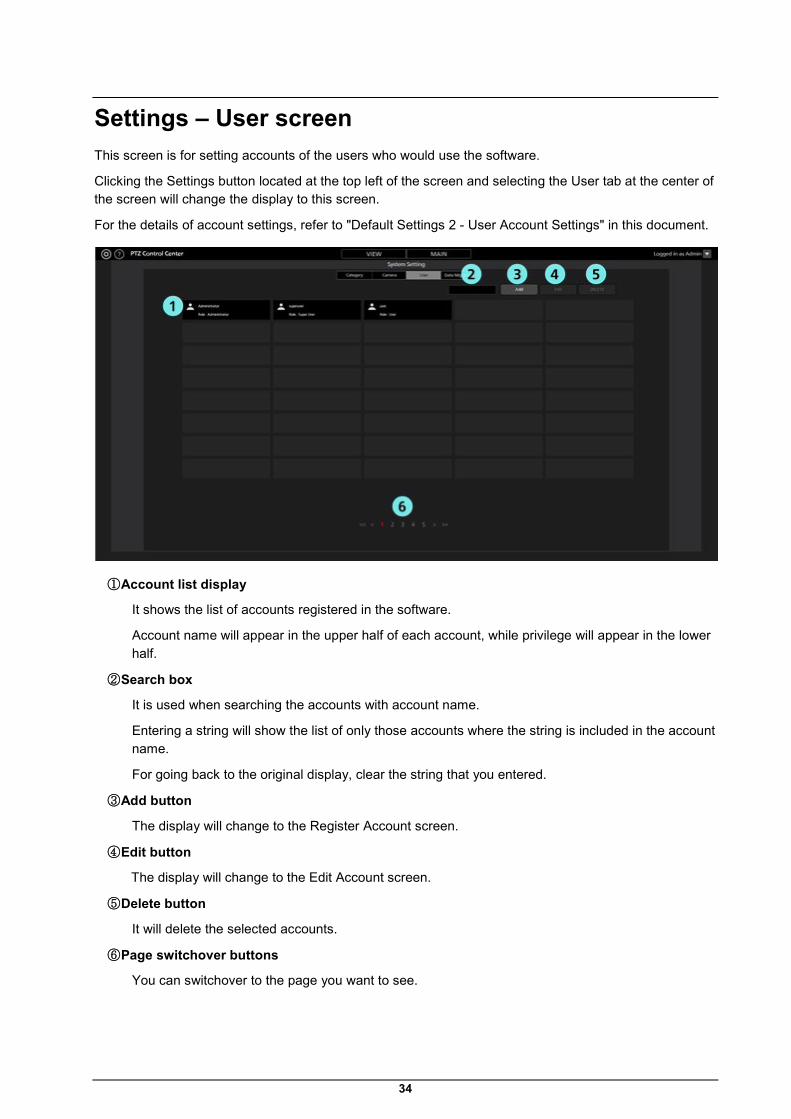
Settings – User screen This screen is for setting accounts of the users who would use the software.
Clicking the Settings button located at the top left of the screen and selecting the User tab at the center of the screen will change the display to this screen.
For the details of account settings, refer to "Default Settings 2 - User Account Settings" in this document.
① Account list display
It shows the list of accounts registered in the software.
Account name will appear in the upper half of each account, while privilege will appear in the lower half.
② Search box
It is used when searching the accounts with account name.
Entering a string will show the list of only those accounts where the string is included in the account name.
For going back to the original display, clear the string that you entered.
③ Add button
The display will change to the Register Account screen.
④ Edit button
The display will change to the Edit Account screen.
⑤ Delete button
It will delete the selected accounts.
⑥ Page switchover buttons
You can switchover to the page you want to see.

35
Settings – Data Migration Screen This screen is for copying the setting data between the software programs running on another PC.
Clicking the Settings button located at the top left of the screen and selecting the Data Migration tab at the center of the screen will change the display to this screen.
For the details of copying the settings data, refer to "Copying the settings data" in this document.
① Import Setting Data field
This is used when importing setting data from other PC.
② Export Setting Data field
This is used when exporting setting data to other PC.

36
Settings - System Screen This screen is for configuring operations from a keyboard or game controller connected to the PC.
Click the Settings in the top left of the screen and then select the System tab in the middle of the screen to get to this screen.
① Keyboard operation settings field
This sets whether to enable or disable PTZ camera operation from the keyboard.
② Game controller zoom operation settings field
You can select from three operation methods for PTZ camera zoom using the joystick of a game controller.
For the details, refer to “Operation of cameras” → “Operating the Camera with a Game Controller” in this document.
37
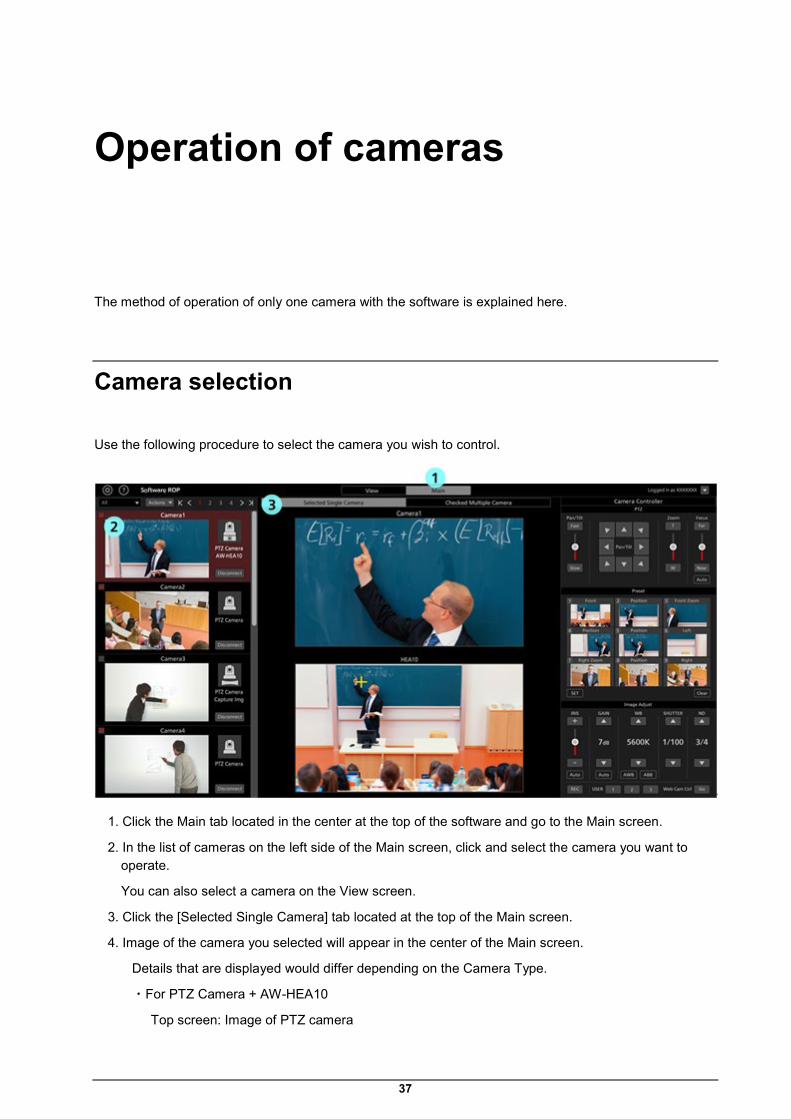
Operation of cameras
The method of operation of only one camera with the software is explained here.
Camera selection
Use the following procedure to select the camera you wish to control.
1. Click the Main tab located in the center at the top of the software and go to the Main screen.
2. In the list of cameras on the left side of the Main screen, click and select the camera you want to operate.
You can also select a camera on the View screen.
3. Click the [Selected Single Camera] tab located at the top of the Main screen.
4. Image of the camera you selected will appear in the center of the Main screen.
Details that are displayed would differ depending on the Camera Type.
・For PTZ Camera + AW-HEA10
Top screen: Image of PTZ camera
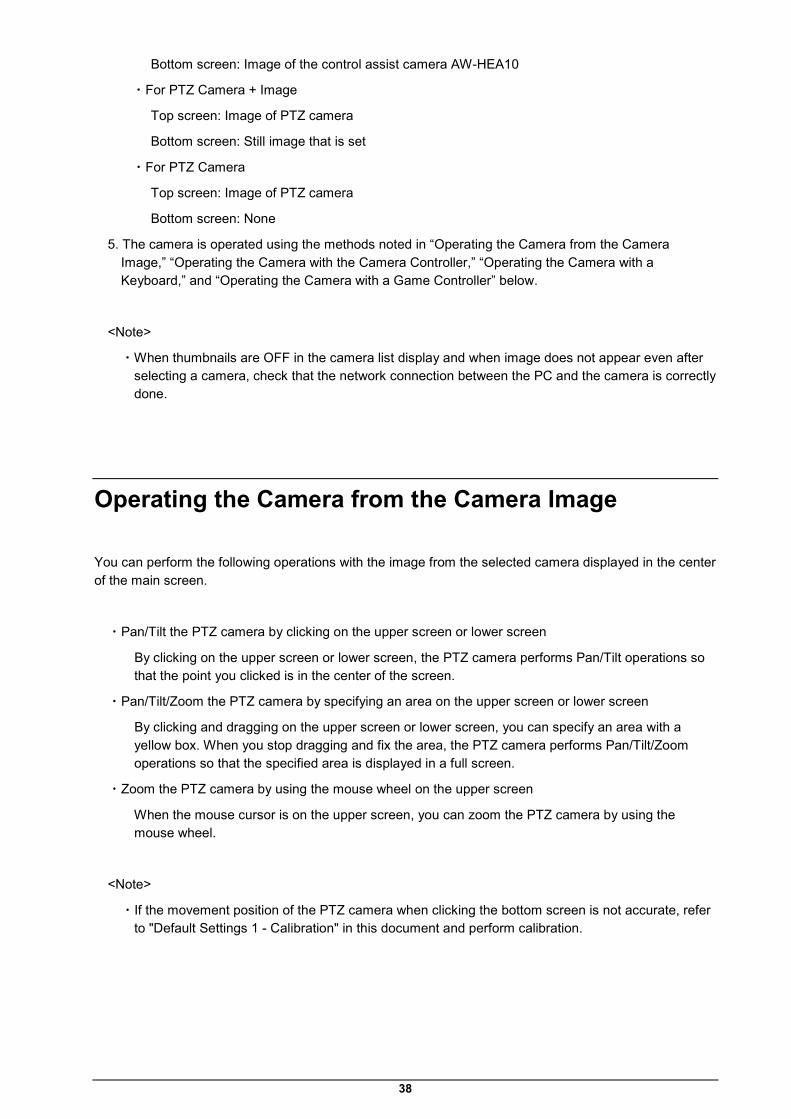
38
Bottom screen: Image of the control assist camera AW-HEA10
・For PTZ Camera + Image
Top screen: Image of PTZ camera
Bottom screen: Still image that is set
・For PTZ Camera
Top screen: Image of PTZ camera
Bottom screen: None
5. The camera is operated using the methods noted in “Operating the Camera from the Camera Image,” “Operating the Camera with the Camera Controller,” “Operating the Camera with a Keyboard,” and “Operating the Camera with a Game Controller” below.
<Note>
・When thumbnails are OFF in the camera list display and when image does not appear even after selecting a camera, check that the network connection between the PC and the camera is correctly done.
Operating the Camera from the Camera Image
You can perform the following operations with the image from the selected camera displayed in the center of the main screen.
・Pan/Tilt the PTZ camera by clicking on the upper screen or lower screen
By clicking on the upper screen or lower screen, the PTZ camera performs Pan/Tilt operations so that the point you clicked is in the center of the screen.
・Pan/Tilt/Zoom the PTZ camera by specifying an area on the upper screen or lower screen
By clicking and dragging on the upper screen or lower screen, you can specify an area with a yellow box. When you stop dragging and fix the area, the PTZ camera performs Pan/Tilt/Zoom operations so that the specified area is displayed in a full screen.
・Zoom the PTZ camera by using the mouse wheel on the upper screen
When the mouse cursor is on the upper screen, you can zoom the PTZ camera by using the mouse wheel.
<Note>
・If the movement position of the PTZ camera when clicking the bottom screen is not accurate, refer to "Default Settings 1 - Calibration" in this document and perform calibration.
39
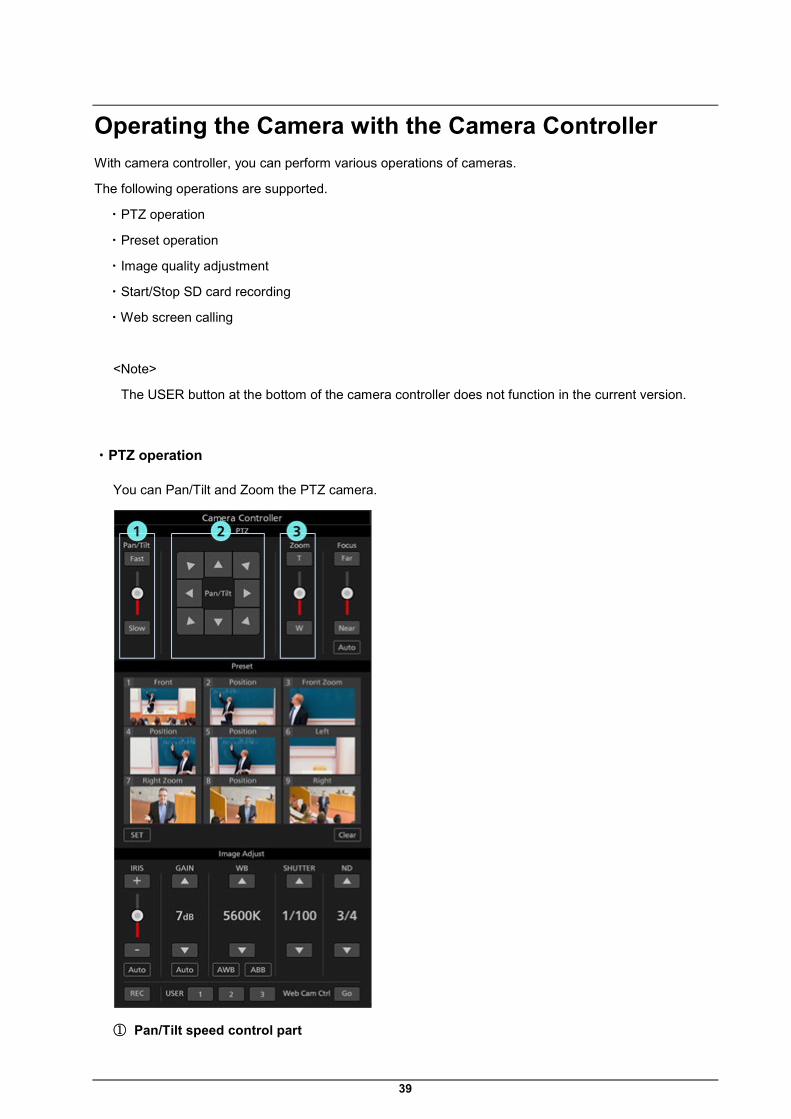
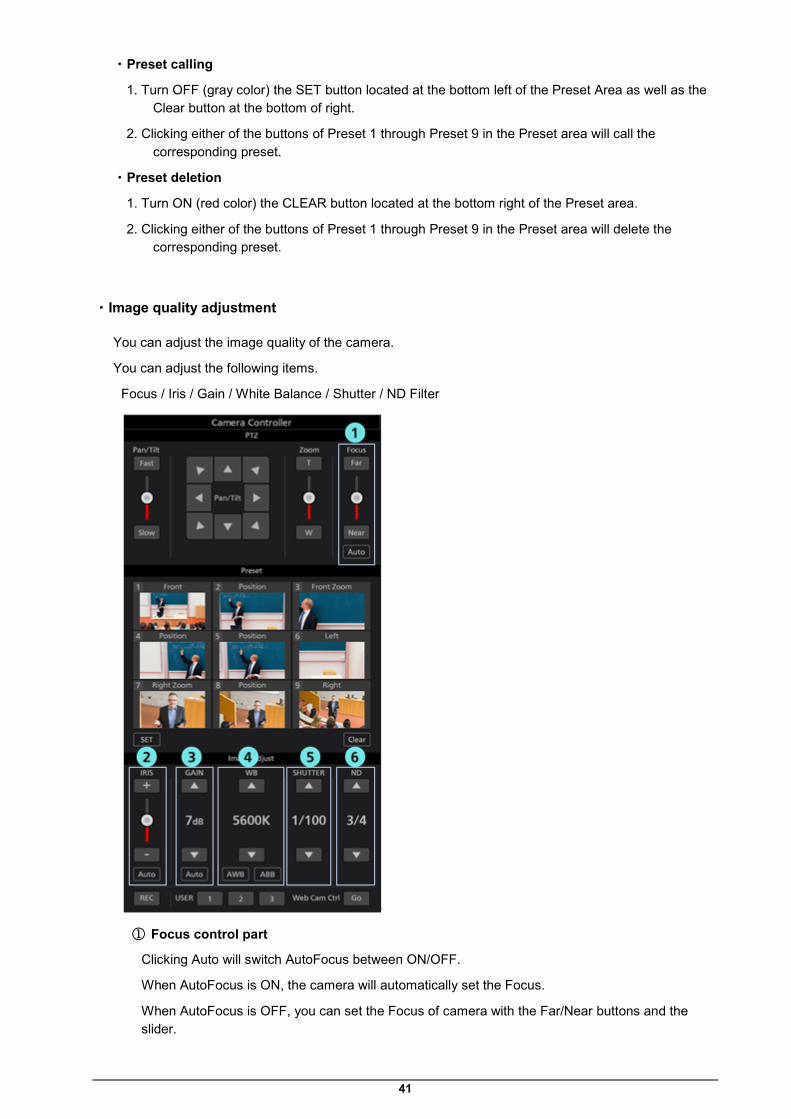
Operating the Camera with the Camera Controller With camera controller, you can perform various operations of cameras.
The following operations are supported.
・PTZ operation
・Preset operation
・Image quality adjustment
・Start/Stop SD card recording
・Web screen calling
<Note>
The USER button at the bottom of the camera controller does not function in the current version.
・PTZ operation
You can Pan/Tilt and Zoom the PTZ camera.
① Pan/Tilt speed control part
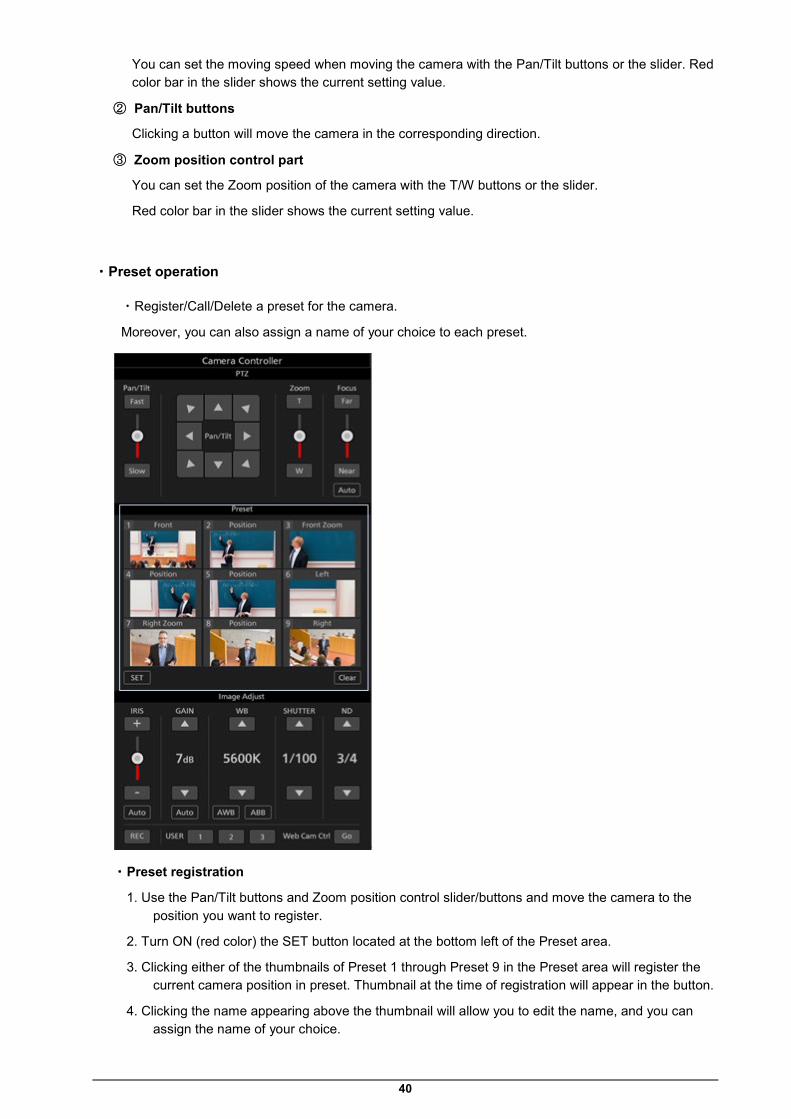
40
You can set the moving speed when moving the camera with the Pan/Tilt buttons or the slider. Red color bar in the slider shows the current setting value.
② Pan/Tilt buttons
Clicking a button will move the camera in the corresponding direction.
③ Zoom position control part
You can set the Zoom position of the camera with the T/W buttons or the slider.
Red color bar in the slider shows the current setting value.
・Preset operation
・Register/Call/Delete a preset for the camera.
Moreover, you can also assign a name of your choice to each preset.
・Preset registration
1. Use the Pan/Tilt buttons and Zoom position control slider/buttons and move the camera to the position you want to register.
2. Turn ON (red color) the SET button located at the bottom left of the Preset area.
3. Clicking either of the thumbnails of Preset 1 through Preset 9 in the Preset area will register the current camera position in preset. Thumbnail at the time of registration will appear in the button.
4. Clicking the name appearing above the thumbnail will allow you to edit the name, and you can assign the name of your choice.
41
・Preset calling
1. Turn OFF (gray color) the SET button located at the bottom left of the Preset Area as well as the Clear button at the bottom of right.
2. Clicking either of the buttons of Preset 1 through Preset 9 in the Preset area will call the corresponding preset.
・Preset deletion
1. Turn ON (red color) the CLEAR button located at the bottom right of the Preset area.
2. Clicking either of the buttons of Preset 1 through Preset 9 in the Preset area will delete the corresponding preset.
・Image quality adjustment
You can adjust the image quality of the camera.
You can adjust the following items.
Focus / Iris / Gain / White Balance / Shutter / ND Filter
① Focus control part
Clicking Auto will switch AutoFocus between ON/OFF.
When AutoFocus is ON, the camera will automatically set the Focus.
When AutoFocus is OFF, you can set the Focus of camera with the Far/Near buttons and the slider.
42
② Iris control part
Clicking Auto will switch AutoIris between ON/OFF.
When AutoIris is ON, the camera will automatically set the Iris.
When AutoIris is OFF, you can set the Iris of camera with the +/− buttons and the slider.
③ Gain control part
You can set the Gain of the camera with the up/down buttons.
④ White Balance control part
You can set the white balance mode of the camera with the up/down buttons.
By clicking the AWB button, the camera will automatically adjust white balance.
By clicking the ABB button, the camera will automatically adjust black balance.
⑤ Shutter control part
You can set the Shutter of the camera with the up/down buttons.
⑥ ND Filter part
You can set the ND Filter of the camera with the up/down buttons.
<Note>
・You may not be able to adjust some of the items depending on the combination of camera type and operating mode. Refer to the operations manual of each camera for more details.
・Start/Stop SD card recording
You can Start/Stop recording of a camera that has the SD card recording function.
Clicking the REC button located at the bottom left of camera controller with the camera in the recordable state will switch between recording start/stop at every click. When the camera is recording, the REC button will turn red, and when the recording is stopped, the REC button will turn gray.
・Web screen calling
You can call the Web screen of the camera.
Clicking the Go button located at the bottom right of camera controller will open the Web Cam Management screen of the camera in the web browser.
<Note>
・A part of the Web Cam Management screen of the camera may not appear properly depending on the web browser you are using.
43
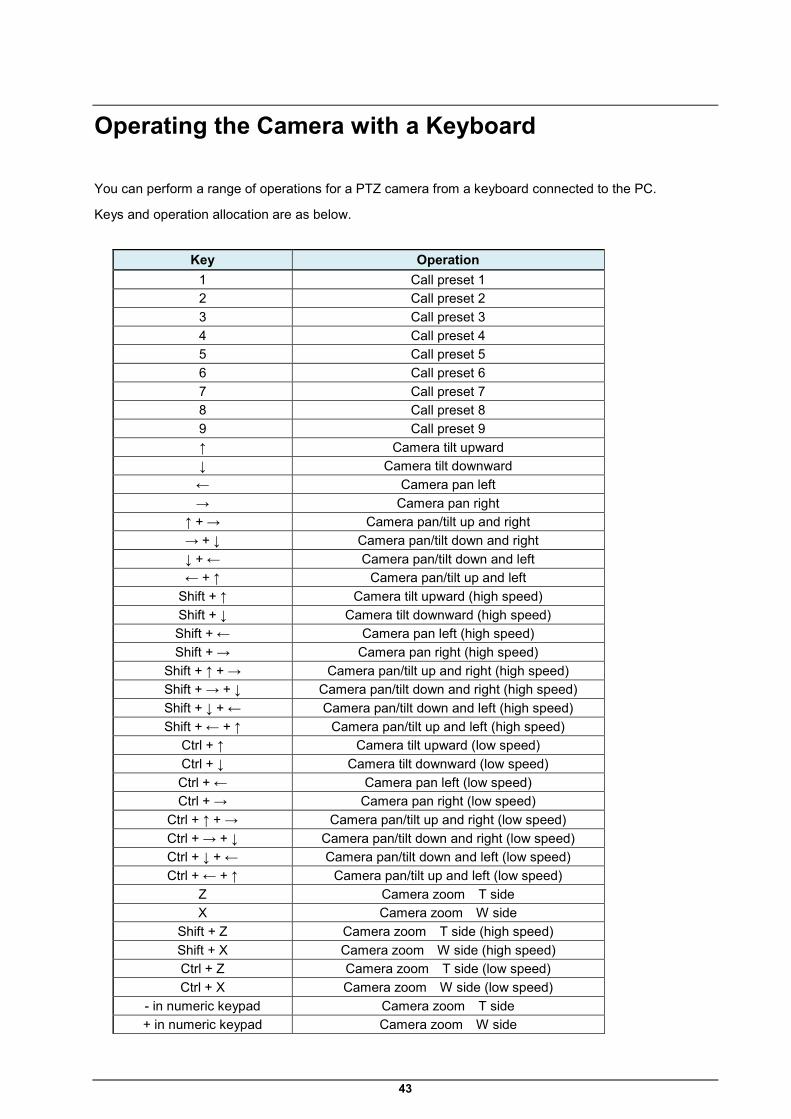
Operating the Camera with a Keyboard
You can perform a range of operations for a PTZ camera from a keyboard connected to the PC.
Keys and operation allocation are as below.
Key Operation
1 Call preset 1 2 Call preset 2 3 Call preset 3 4 Call preset 4 5 Call preset 5 6 Call preset 6 7 Call preset 7 8 Call preset 8 9 Call preset 9 ↑ Camera tilt upward ↓ Camera tilt downward ← Camera pan left → Camera pan right
↑ + → Camera pan/tilt up and right → + ↓ Camera pan/tilt down and right ↓ + ← Camera pan/tilt down and left ← + ↑ Camera pan/tilt up and left
Shift + ↑ Camera tilt upward (high speed) Shift + ↓ Camera tilt downward (high speed) Shift + ← Camera pan left (high speed) Shift + → Camera pan right (high speed)
Shift + ↑ + → Camera pan/tilt up and right (high speed) Shift + → + ↓ Camera pan/tilt down and right (high speed) Shift + ↓ + ← Camera pan/tilt down and left (high speed) Shift + ← + ↑ Camera pan/tilt up and left (high speed)
Ctrl + ↑ Camera tilt upward (low speed) Ctrl + ↓ Camera tilt downward (low speed) Ctrl + ← Camera pan left (low speed) Ctrl + → Camera pan right (low speed)
Ctrl + ↑ + → Camera pan/tilt up and right (low speed) Ctrl + → + ↓ Camera pan/tilt down and right (low speed) Ctrl + ↓ + ← Camera pan/tilt down and left (low speed) Ctrl + ← + ↑ Camera pan/tilt up and left (low speed)
Z Camera zoom T side X Camera zoom W side
Shift + Z Camera zoom T side (high speed) Shift + X Camera zoom W side (high speed) Ctrl + Z Camera zoom T side (low speed) Ctrl + X Camera zoom W side (low speed)
- in numeric keypad Camera zoom T side + in numeric keypad Camera zoom W side
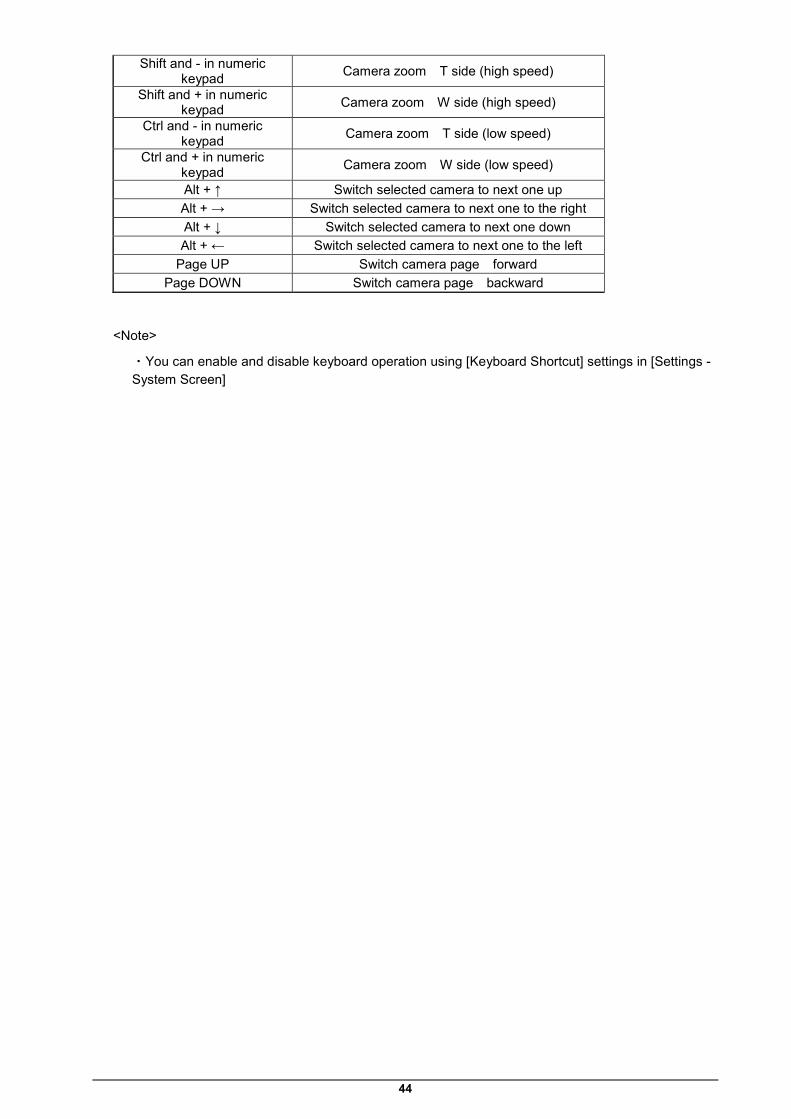
44
Shift and - in numeric keypad Camera zoom T side (high speed)
Shift and + in numeric keypad Camera zoom W side (high speed)
Ctrl and - in numeric keypad Camera zoom T side (low speed)
Ctrl and + in numeric keypad Camera zoom W side (low speed)
Alt + ↑ Switch selected camera to next one up Alt + → Switch selected camera to next one to the right Alt + ↓ Switch selected camera to next one down Alt + ← Switch selected camera to next one to the left
Page UP Switch camera page forward Page DOWN Switch camera page backward
<Note>
・You can enable and disable keyboard operation using [Keyboard Shortcut] settings in [Settings - System Screen]

45
Operating the Camera with a Game Controller
You can perform various PTZ camera operations from a game controller connected to the PC.
The operations supported are as follows.
・ Camera Pan/Tilt/Zoom
・ Preset call
・ Switch selected camera
The allocation of operations to each axis/button on controllers is as below.
X axis: Camera pan
Y axis: Camera tilt
Z axis: Camera pan/tilt speed change
Rotate: Camera zoom (the rotation axis to be used can be set on the System screen)
Button: Camera preset call according to button number
Hat switch: Switch selected camera
The number of rotation axes that game controllers have and the allocation to the joystick varies depending on game controller, so three variations for camera zoom operation settings are available.
If you are unable to perform camera zoom operations with the game controller you are using, change the TYPE in the Joystick Zoom Control setting on the Settings - System Screen to another setting.
<Note>
・You can check the axes, rotation, and button numbers allocated to the sticks and buttons of game controllers on the properties screen displayed by selecting Windows [Devices and Printers], right clicking on the controller icon, and selecting [Game Controller Settings] → [Properties].
・Please use Game Controller with DirectInput compatible products. If a game controller is switchable between Xinput and DirectInput, chose DirectInput.
・This software is not guaranteed to work on all game controllers
Please see the download website for this software to check which game controllers are confirmed to work.
46
Display of H.264 streaming images from camera
You can have full screen display of H.264 streaming images from the PTZ camera selected for operation.
The resolution and frame rate of H.264 streaming images displayed depend on the H.264 streaming settings for PTZ cameras.
The order of priority for H.264 streaming used for display is H.264 (1) → H.264 (2) → H.264 (3) → H.264 (4).
Please set one of the H.264 streams as follows on the PTZ camera web screen beforehand.
・H.264 transmission
Set one or more from H.264 (1) - H.264 (4) to On
・Image capture size
Specify one of the resolutions below.
3840x2160 / 1920x1080 / 1280x720 / 640x360 / 320x180
・Transmission priority
Set in frame rate
・Frame rate
Specify one of the frame rates below.
60fps / 50fps / 30fps / 25fps / 24fps / 15fps / 12.5fps / 5fps
To display H.264 streaming images, follow the procedure below.
1. Select a camera using the procedure in [Camera Selection] above to display the images from that camera on the main screen.
2. Double click the PTZ camera image displayed on the upper screen.
3. The H.264 streaming images from the PTZ camera are displayed full screen on the PC’s primary display.
4. To end the display of H.264 streaming images, double click again or press ESC or Enter on the keyboard.
47
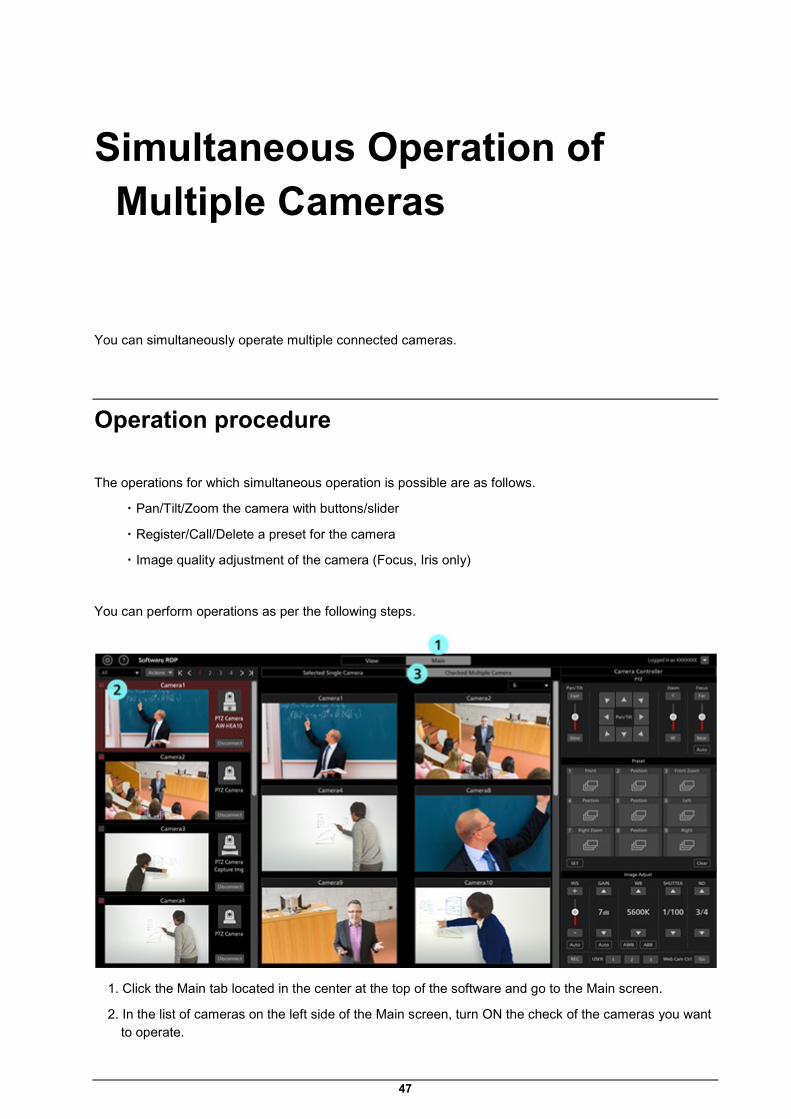
Simultaneous Operation of Multiple Cameras
You can simultaneously operate multiple connected cameras.
Operation procedure
The operations for which simultaneous operation is possible are as follows.
・Pan/Tilt/Zoom the camera with buttons/slider
・Register/Call/Delete a preset for the camera
・Image quality adjustment of the camera (Focus, Iris only)
You can perform operations as per the following steps.
1. Click the Main tab located in the center at the top of the software and go to the Main screen.
2. In the list of cameras on the left side of the Main screen, turn ON the check of the cameras you want to operate.

48
You can also check on the View screen.
3. Click the [Checked Multiple Camera] tab located at the top of the Main screen.
4. Image of the cameras selected for operation will appear in the center of the Main screen.
5. Operate the camera with one of the following methods.
The operation methods are the same as when using one camera. For the details, refer to the items in “Operation of cameras” in this document.
・Operate the camera using the camera controller in this software
・Operate the camera using a keyboard connected to the PC
・Operate the camera using a game controller connected to the PC
<Note>
・When thumbnails are OFF in the camera list display and when image does not appear even after selecting a camera, check that the network connection between the PC and the camera is correctly done.
・Cameras that are in the selected state in the camera list display can be operated irrespective of the check status.
49
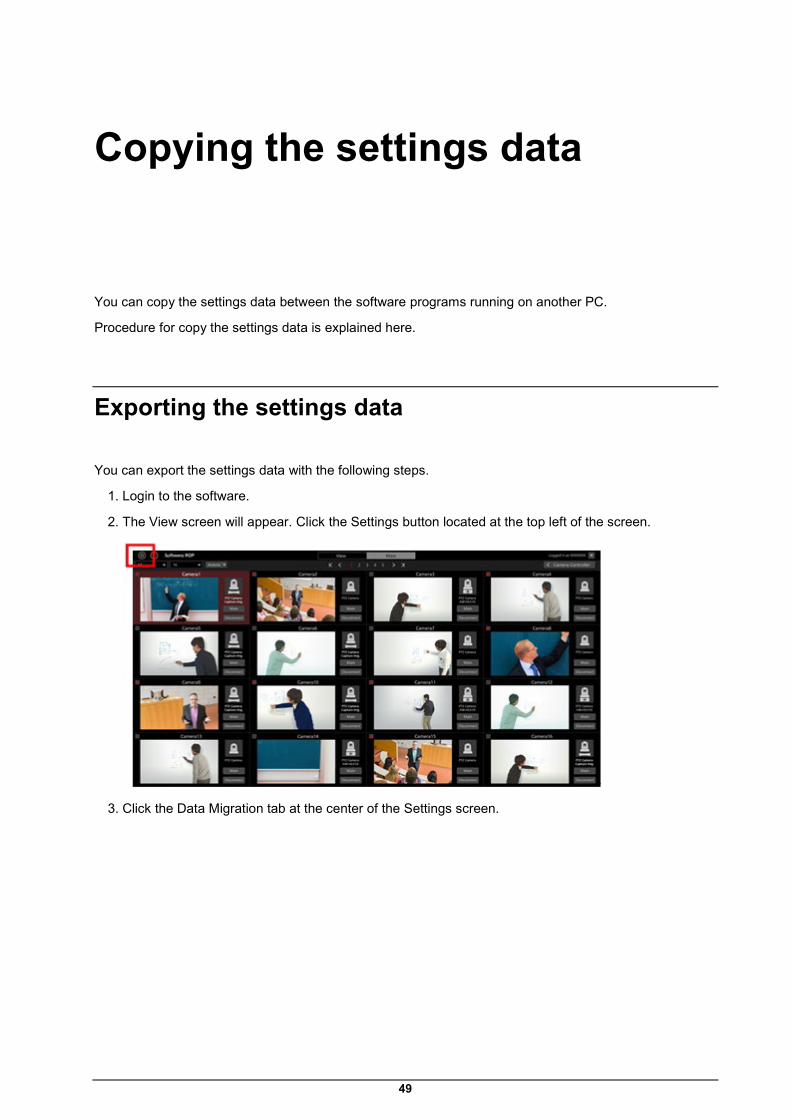
Copying the settings data
You can copy the settings data between the software programs running on another PC.
Procedure for copy the settings data is explained here.
Exporting the settings data
You can export the settings data with the following steps.
1. Login to the software.
2. The View screen will appear. Click the Settings button located at the top left of the screen.
3. Click the Data Migration tab at the center of the Settings screen.
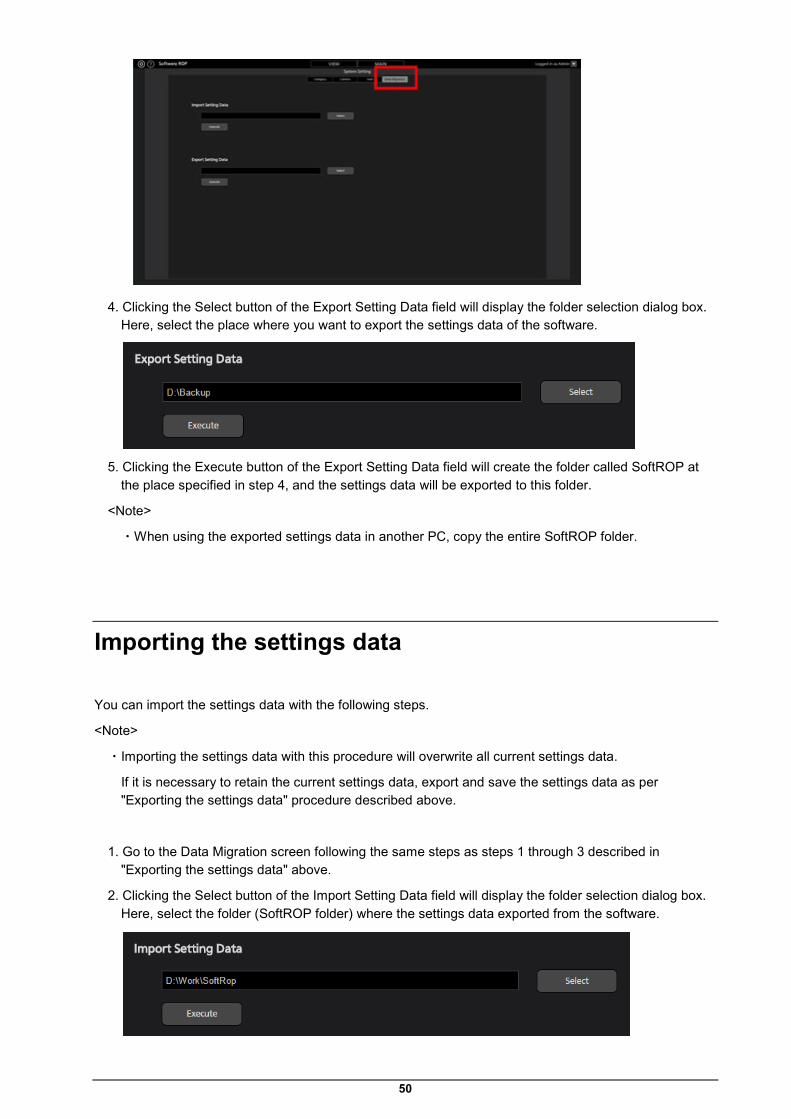
50
4. Clicking the Select button of the Export Setting Data field will display the folder selection dialog box. Here, select the place where you want to export the settings data of the software.
5. Clicking the Execute button of the Export Setting Data field will create the folder called SoftROP at
the place specified in step 4, and the settings data will be exported to this folder.
<Note>
・When using the exported settings data in another PC, copy the entire SoftROP folder.
Importing the settings data
You can import the settings data with the following steps.
<Note>
・Importing the settings data with this procedure will overwrite all current settings data.
If it is necessary to retain the current settings data, export and save the settings data as per "Exporting the settings data" procedure described above.
1. Go to the Data Migration screen following the same steps as steps 1 through 3 described in "Exporting the settings data" above.
2. Clicking the Select button of the Import Setting Data field will display the folder selection dialog box. Here, select the folder (SoftROP folder) where the settings data exported from the software.
51
3. Clicking the Execute button of the Import Setting Data field will show the confirmation message.
Clicking YES will import the settings data and it will overwrite all current settings data.
4. After import of the settings data is complete, a confirmation message asking for restarting the software will appear.
Clicking YES will automatically restart the software.
5. Once the software restarts, import of the settings data will complete.
52
Appendix
List of restrictions for each account privilege
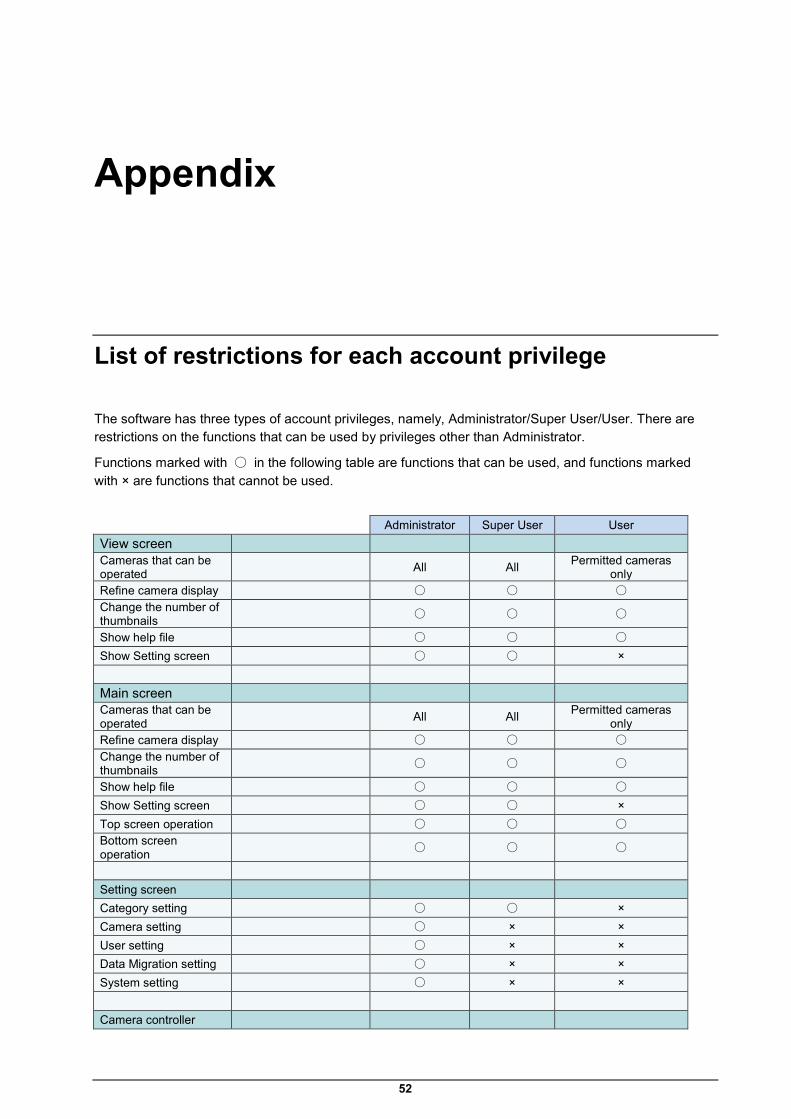
The software has three types of account privileges, namely, Administrator/Super User/User. There are restrictions on the functions that can be used by privileges other than Administrator.
Functions marked with 〇 in the following table are functions that can be used, and functions marked with × are functions that cannot be used.
Administrator Super User User View screen Cameras that can be operated All All Permitted cameras
only Refine camera display 〇 〇 〇 Change the number of thumbnails 〇 〇 〇
Show help file 〇 〇 〇 Show Setting screen 〇 〇 × Main screen Cameras that can be operated All All Permitted cameras
only Refine camera display 〇 〇 〇 Change the number of thumbnails 〇 〇 〇
Show help file 〇 〇 〇 Show Setting screen 〇 〇 × Top screen operation 〇 〇 〇 Bottom screen operation 〇 〇 〇
Setting screen Category setting 〇 〇 × Camera setting 〇 × × User setting 〇 × × Data Migration setting 〇 × × System setting 〇 × × Camera controller
53
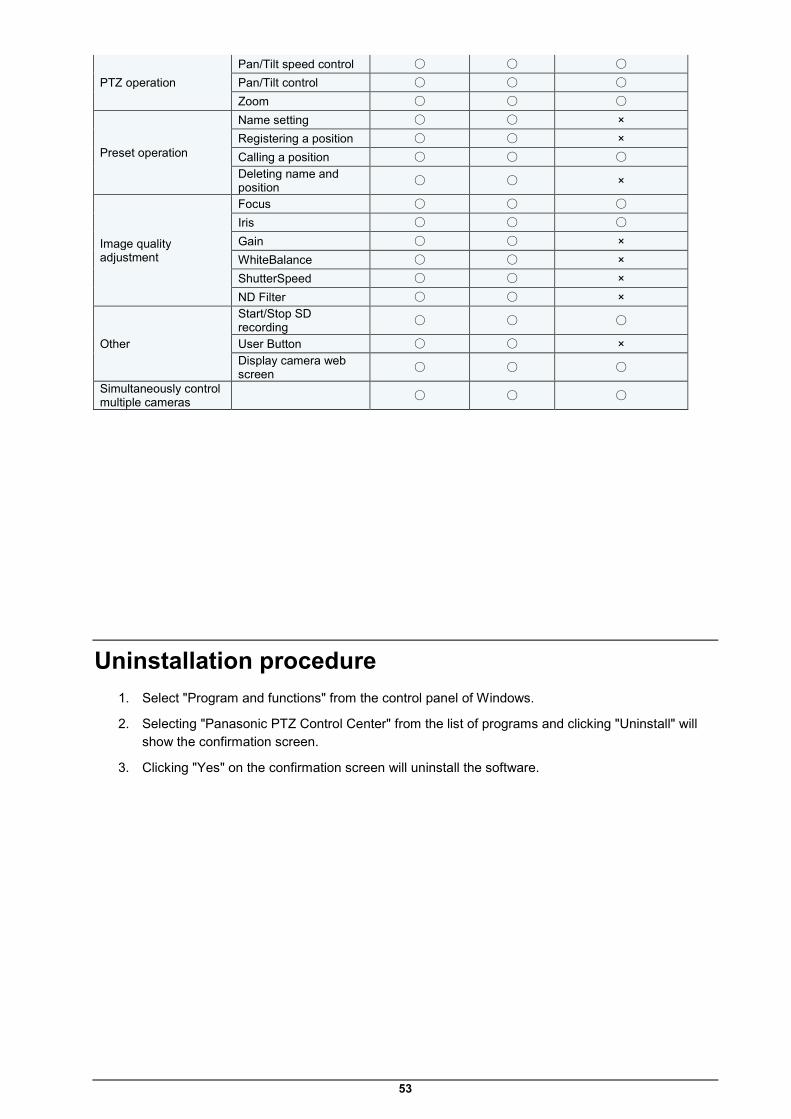
PTZ operation Pan/Tilt speed control 〇 〇 〇 Pan/Tilt control 〇 〇 〇 Zoom 〇 〇 〇
Preset operation
Name setting 〇 〇 × Registering a position 〇 〇 × Calling a position 〇 〇 〇 Deleting name and position 〇 〇 ×
Image quality adjustment
Focus 〇 〇 〇 Iris 〇 〇 〇 Gain 〇 〇 × WhiteBalance 〇 〇 × ShutterSpeed 〇 〇 × ND Filter 〇 〇 ×
Other
Start/Stop SD recording 〇 〇 〇
User Button 〇 〇 × Display camera web screen 〇 〇 〇
Simultaneously control multiple cameras 〇 〇 〇
Uninstallation procedure 1. Select "Program and functions" from the control panel of Windows.
2. Selecting "Panasonic PTZ Control Center" from the list of programs and clicking "Uninstall" will show the confirmation screen.
3. Clicking "Yes" on the confirmation screen will uninstall the software.