Embed Size (px)
Citation preview
Public GIS Viewer User Guide
DECEMBER 2020
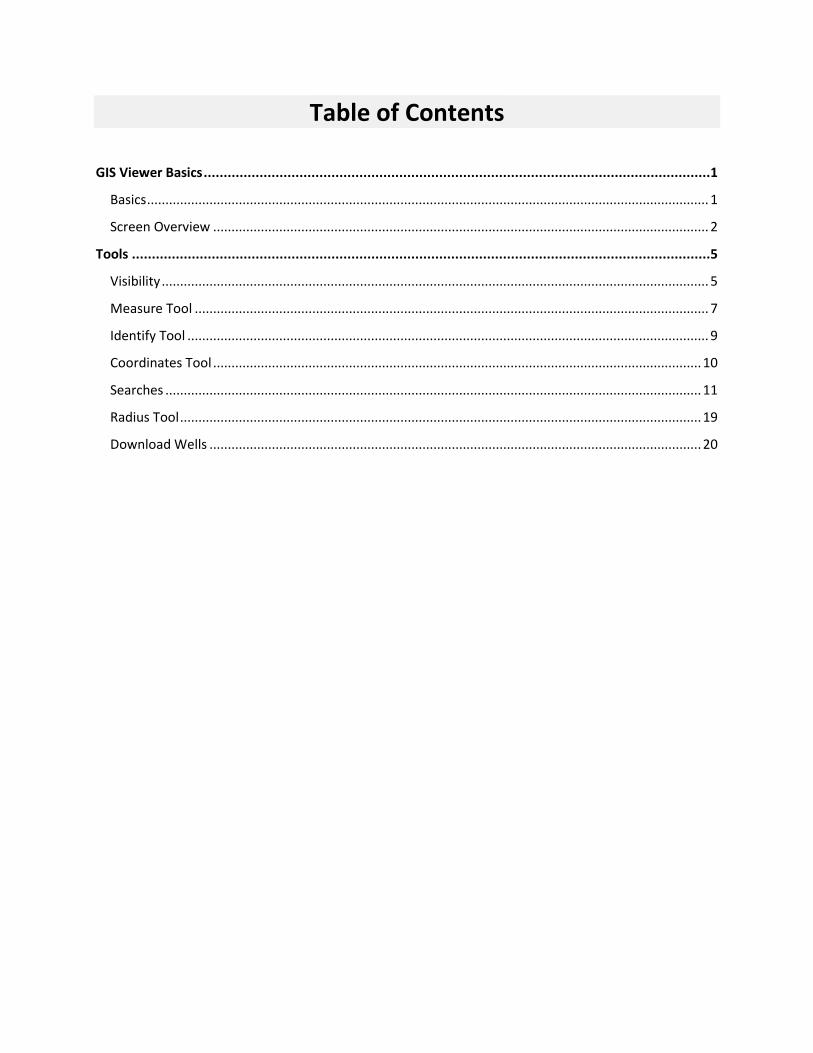
Table of Contents
GIS Viewer Basics ...............................................................................................................................1
Basics ......................................................................................................................................................... 1
Screen Overview ....................................................................................................................................... 2
Tools .................................................................................................................................................5
Visibility ..................................................................................................................................................... 5
Measure Tool ............................................................................................................................................ 7
Identify Tool .............................................................................................................................................. 9
Coordinates Tool ..................................................................................................................................... 10
Searches .................................................................................................................................................. 11
Radius Tool .............................................................................................................................................. 19
Download Wells ...................................................................................................................................... 20
1
GIS Viewer Basics
Basics
The GIS Viewer allows you to view information about wells, pipelines, surveys, LPG/CNG/LNG, Operator Cleanup Program, Voluntary Cleanup Program, Brownfield Response Program, Commercial Waste Disposal sites, Discharge Permits and related features in a map view.
The default view when you open the GIS Viewer is a state map with the Oil/Gas Districts layer visible. The Oil/Gas Districts layer displays the Railroad Commission's Oil and Gas Division district boundaries and numbers in green. You can view additional layers, such as AED districts, by customizing the visibility.
TIP: For the best viewing results, see the Browser Recommendations below.
Browser Recommendations
1. Mozilla Firefox 73.0+ and Google Chrome 80.0+ are recommended for the best viewing results.
2. Internet Explorer 11.0 and below are not recommended.
3. JavaScript must be enabled.
4. Pop-up blocking in your browser must be disabled.
TIP: To verify that pop-up blocking is disabled on your computer, use our Pop-up Blocker Test.
2
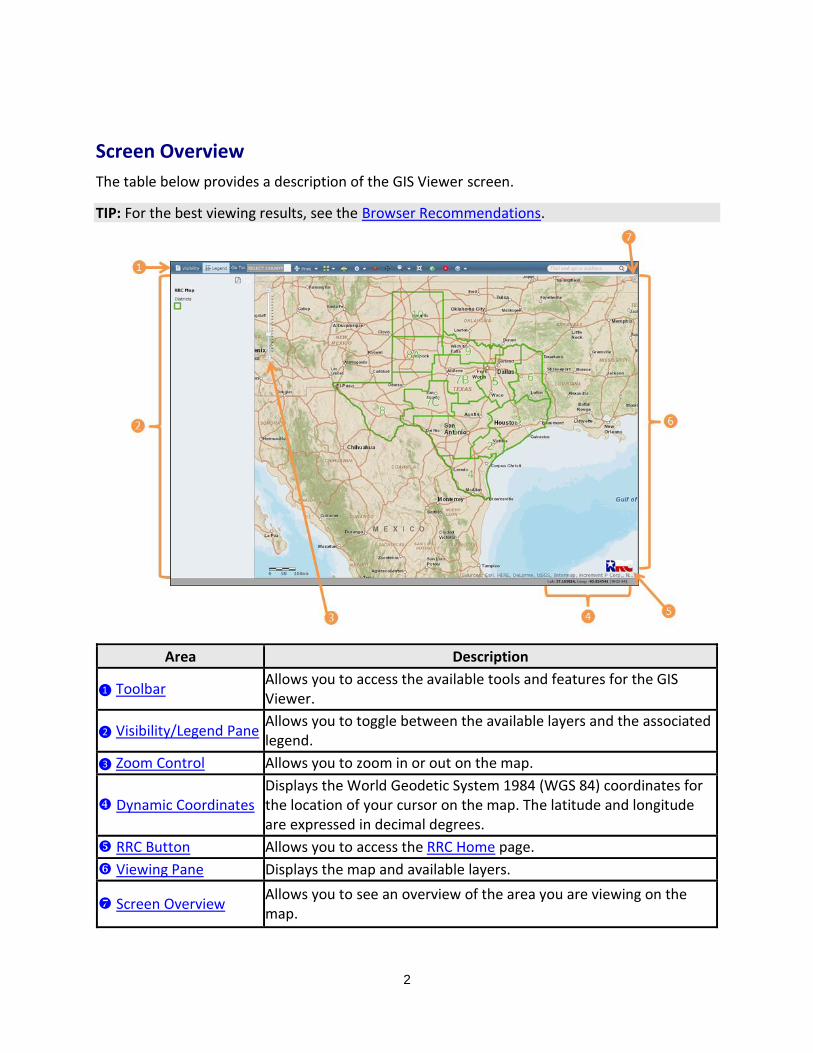
Screen Overview
The table below provides a description of the GIS Viewer screen.
TIP: For the best viewing results, see the Browser Recommendations.
Area Description
❶ ToolbarAllows you to access the available tools and features for the GIS Viewer.
❷ Visibility/Legend PaneAllows you to toggle between the available layers and the associated legend.
❸ Zoom Control Allows you to zoom in or out on the map.
Dynamic Coordinates
Displays the World Geodetic System 1984 (WGS 84) coordinates for the location of your cursor on the map. The latitude and longitude are expressed in decimal degrees.
RRC Button Allows you to access the RRC Home page.
Viewing Pane Displays the map and available layers.
Screen Overview Allows you to see an overview of the area you are viewing on the map.
3
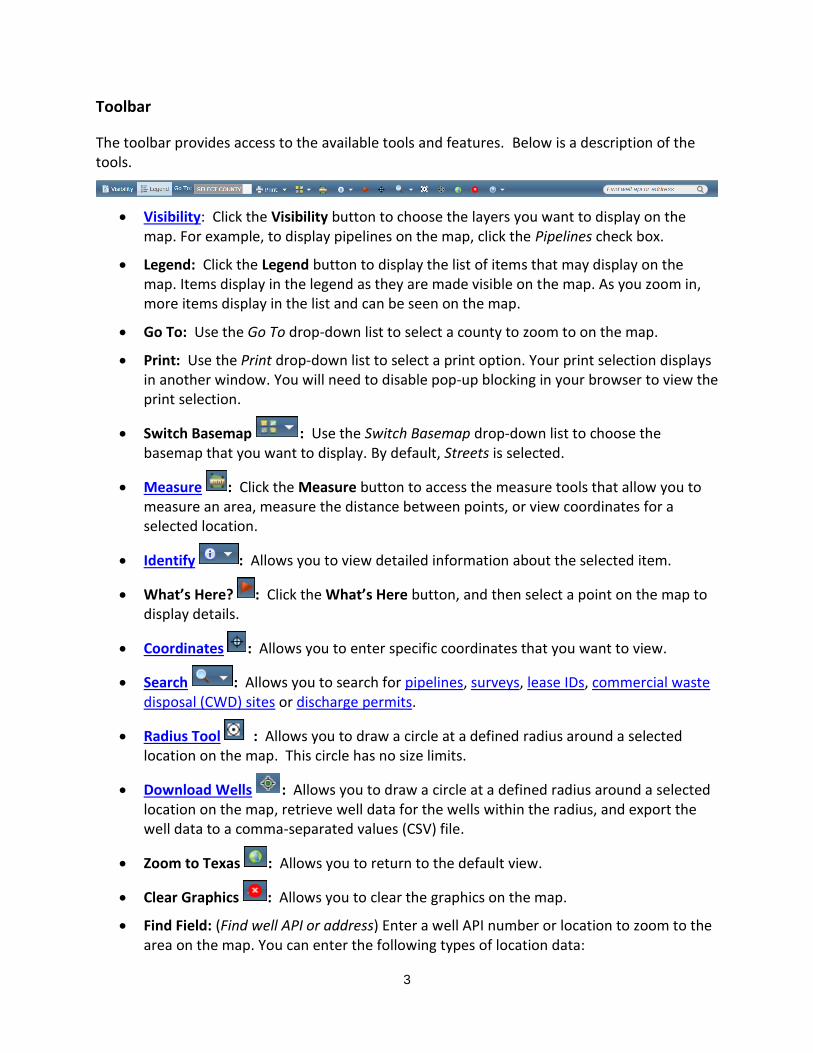
Toolbar
The toolbar provides access to the available tools and features. Below is a description of the tools.
• Visibility: Click the Visibility button to choose the layers you want to display on the map. For example, to display pipelines on the map, click the Pipelines check box.
• Legend: Click the Legend button to display the list of items that may display on the map. Items display in the legend as they are made visible on the map. As you zoom in, more items display in the list and can be seen on the map.
• Go To: Use the Go To drop-down list to select a county to zoom to on the map.
• Print: Use the Print drop-down list to select a print option. Your print selection displays in another window. You will need to disable pop-up blocking in your browser to view the print selection.
• Switch Basemap : Use the Switch Basemap drop-down list to choose the basemap that you want to display. By default, Streets is selected.
• Measure : Click the Measure button to access the measure tools that allow you to measure an area, measure the distance between points, or view coordinates for a selected location.
• Identify : Allows you to view detailed information about the selected item.
• What’s Here? : Click the What’s Here button, and then select a point on the map to display details.
• Coordinates : Allows you to enter specific coordinates that you want to view.
• Search : Allows you to search for pipelines, surveys, lease IDs, commercial waste disposal (CWD) sites or discharge permits.
• Radius Tool : Allows you to draw a circle at a defined radius around a selected location on the map. This circle has no size limits.
• Download Wells : Allows you to draw a circle at a defined radius around a selected location on the map, retrieve well data for the wells within the radius, and export the well data to a comma-separated values (CSV) file.
• Zoom to Texas : Allows you to return to the default view.
• Clear Graphics : Allows you to clear the graphics on the map.
• Find Field: (Find well API or address) Enter a well API number or location to zoom to the area on the map. You can enter the following types of location data:
4
o Street addresses
o Points of interest (e.g., malls and museums)
o Places (e.g., cities and counties)
o Postal codes
o X/Y coordinates (e.g., -97.732, 30.267)
NOTE: When using X/Y coordinates, enter in the longitude, latitude format. The longitude and latitude must be separated by a comma, space, or semicolon.
• Help : Allows you to access GIS Viewer help resources, including web help, a user guide, a glossary, FAQs, and a data sources table.
Visibility/Legend Pane
Allows you to view the legend for the icons that display on the map. To access a printable
version of the legend, click the Printable Legend (PDF) icon. You can click the Visibility button to select which layers you want to display.
Zoom Control
Allows you to zoom in or out on the map. You can also use the scroll wheel on your mouse to zoom in and out. To zoom in to a specific location, double-click the location on the map.
Dynamic Coordinates
Place your cursor over any location in the map to view the WGS 84 coordinates.
RRC Button
Click the RRC button to open the RRC Home Page in a separate tab.
Viewing Pane
Displays the map and overlays that you have selected. As you zoom in, more information displays on the map.
Screen Overview
Click the arrow to see an overview window that represents the area currently displayed on the map. You can pan the map by clicking and dragging the black box.
5
Tools
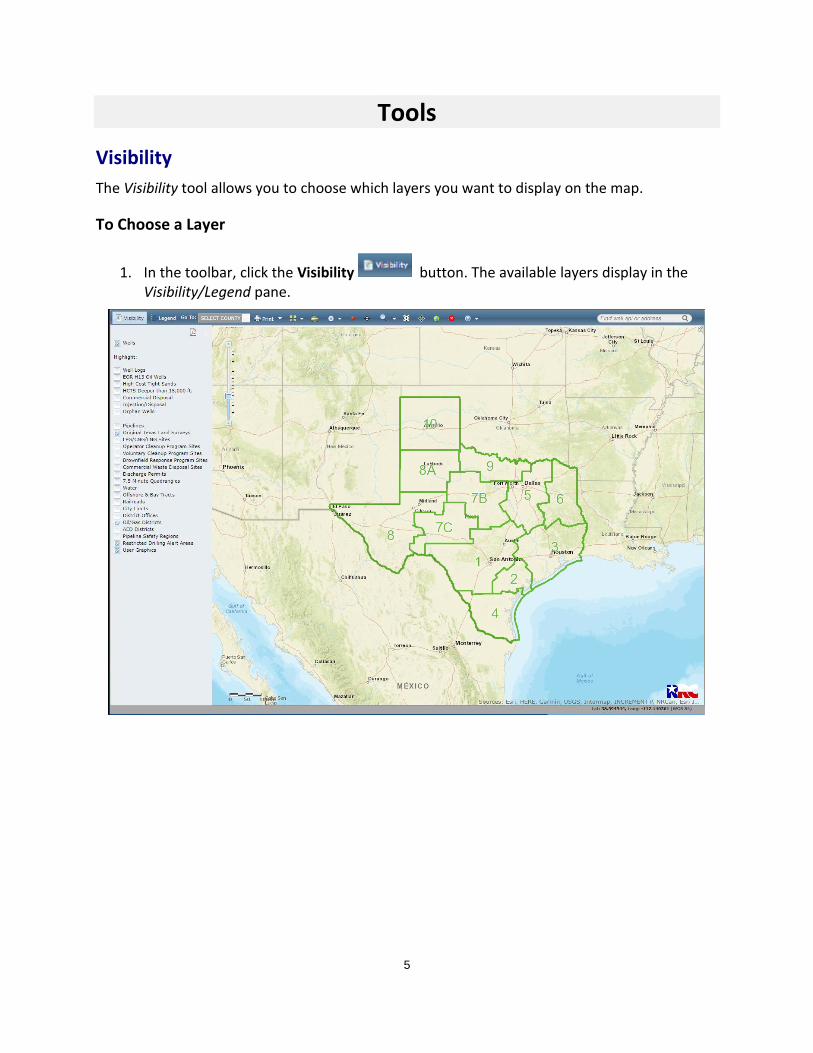
Visibility
The Visibility tool allows you to choose which layers you want to display on the map.
To Choose a Layer
1. In the toolbar, click the Visibility button. The available layers display in the Visibility/Legend pane.
6
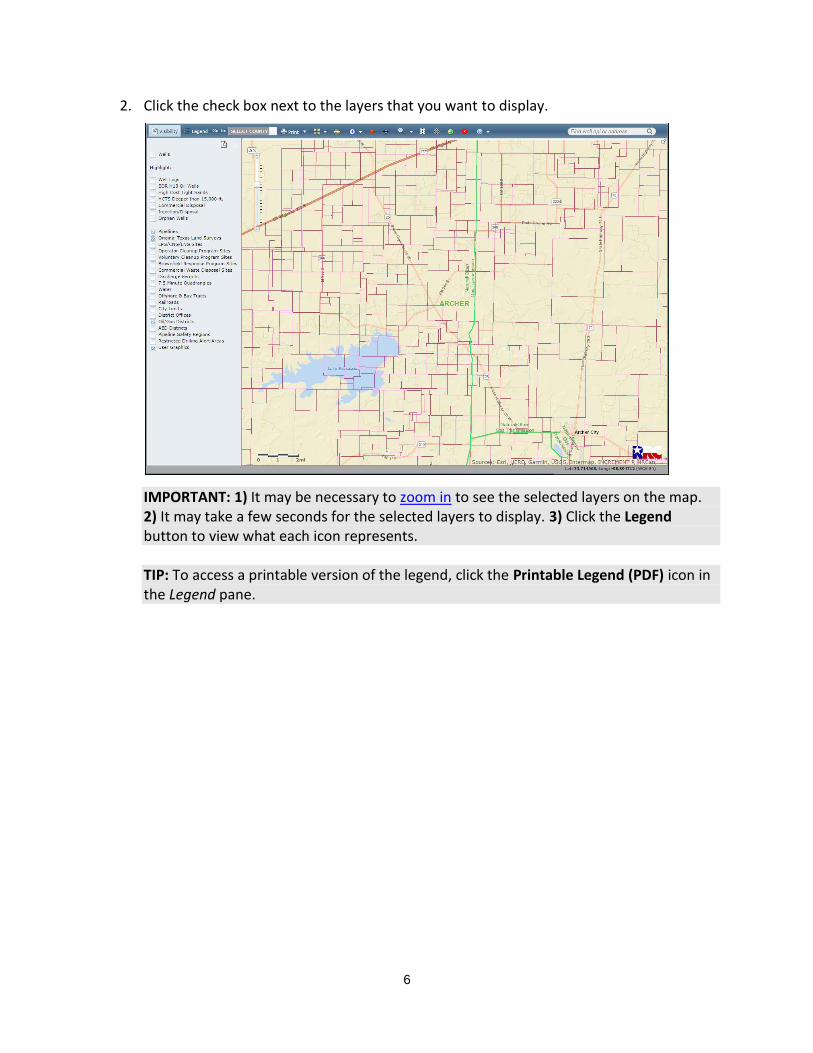
2. Click the check box next to the layers that you want to display.
IMPORTANT: 1) It may be necessary to zoom in to see the selected layers on the map. 2) It may take a few seconds for the selected layers to display. 3) Click the Legend button to view what each icon represents.
TIP: To access a printable version of the legend, click the Printable Legend (PDF) icon in the Legend pane.
7
Measure Tool
The Measure tool allows you to measure area and distance between selected points and to view the WGS 84 coordinates of a selected location.
Measuring an Area
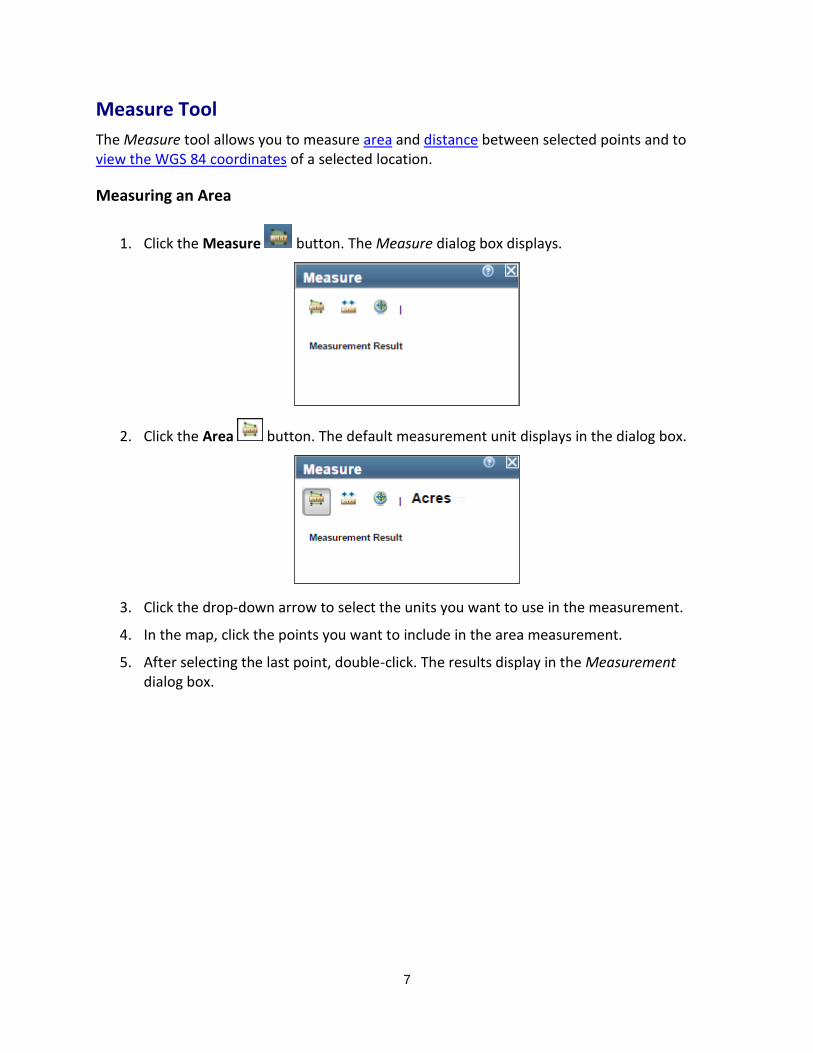
1. Click the Measure button. The Measure dialog box displays.
2. Click the Area button. The default measurement unit displays in the dialog box.
3. Click the drop-down arrow to select the units you want to use in the measurement.
4. In the map, click the points you want to include in the area measurement.
5. After selecting the last point, double-click. The results display in the Measurement dialog box.
8
Measuring Distance
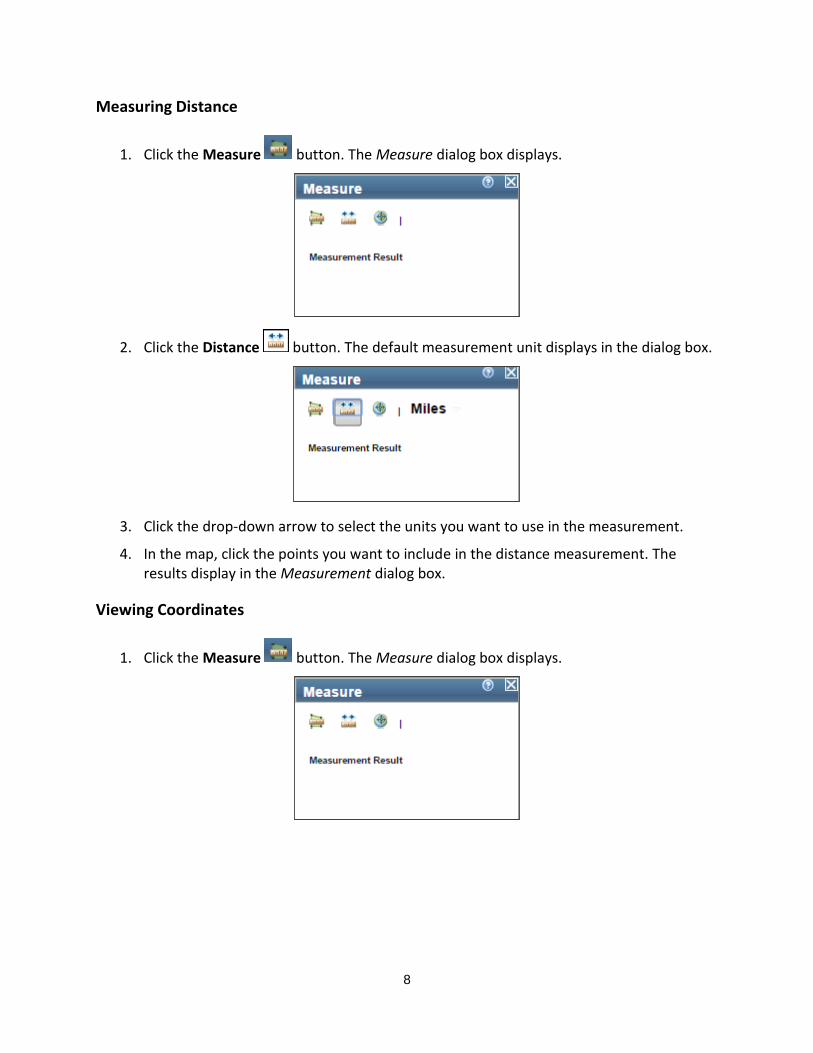
1. Click the Measure button. The Measure dialog box displays.
2. Click the Distance button. The default measurement unit displays in the dialog box.
3. Click the drop-down arrow to select the units you want to use in the measurement.
4. In the map, click the points you want to include in the distance measurement. The results display in the Measurement dialog box.
Viewing Coordinates
1. Click the Measure button. The Measure dialog box displays.
9
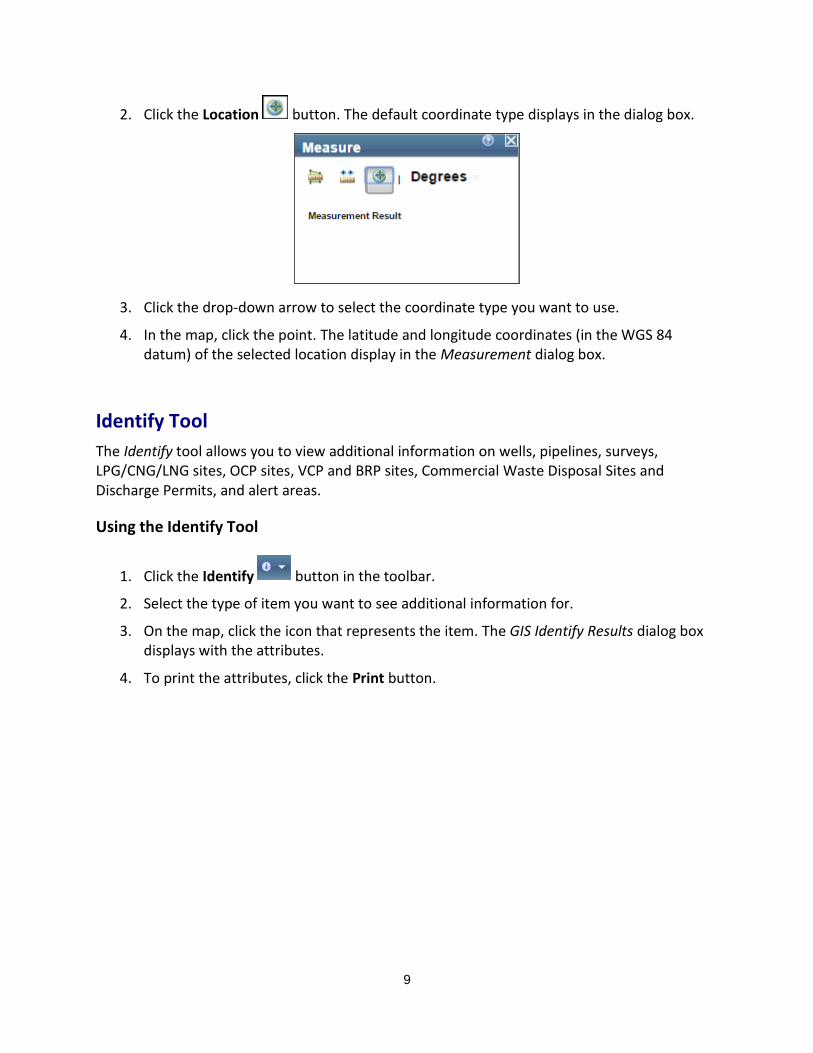
2. Click the Location button. The default coordinate type displays in the dialog box.
3. Click the drop-down arrow to select the coordinate type you want to use.
4. In the map, click the point. The latitude and longitude coordinates (in the WGS 84 datum) of the selected location display in the Measurement dialog box.
Identify Tool
The Identify tool allows you to view additional information on wells, pipelines, surveys, LPG/CNG/LNG sites, OCP sites, VCP and BRP sites, Commercial Waste Disposal Sites and Discharge Permits, and alert areas.
Using the Identify Tool
1. Click the Identify button in the toolbar.
2. Select the type of item you want to see additional information for.
3. On the map, click the icon that represents the item. The GIS Identify Results dialog box displays with the attributes.
4. To print the attributes, click the Print button.
10
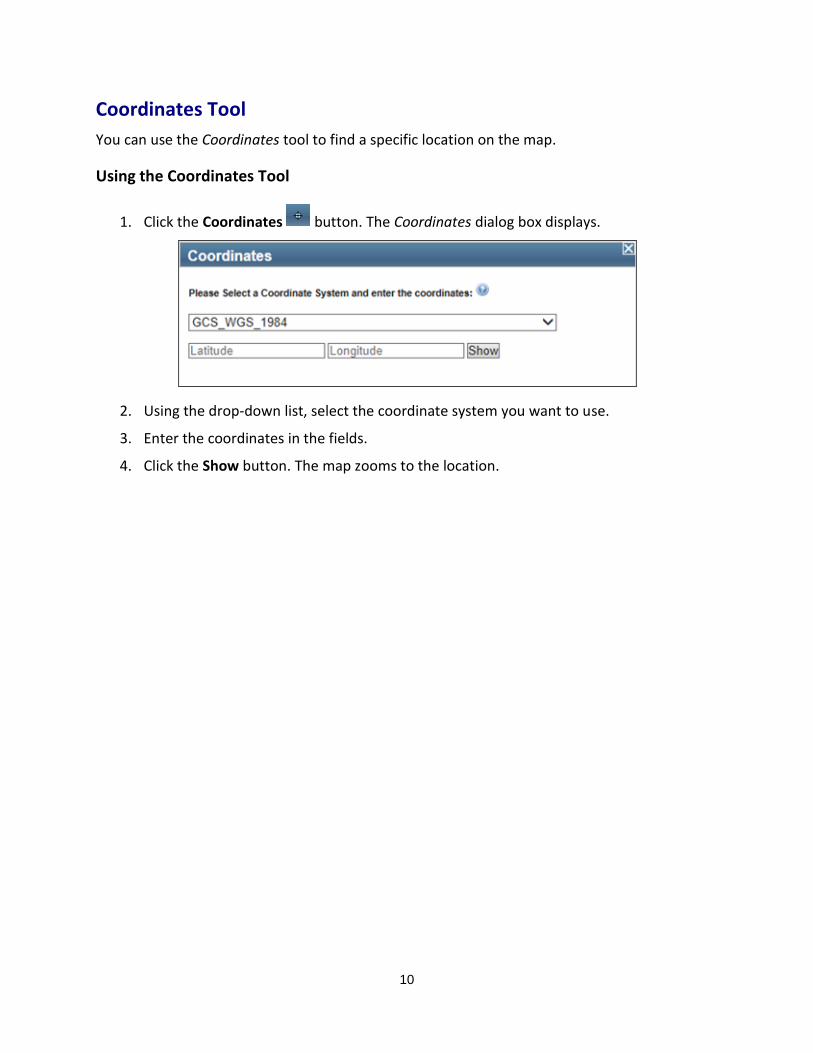
Coordinates Tool
You can use the Coordinates tool to find a specific location on the map.
Using the Coordinates Tool
1. Click the Coordinates button. The Coordinates dialog box displays.
2. Using the drop-down list, select the coordinate system you want to use.
3. Enter the coordinates in the fields.
4. Click the Show button. The map zooms to the location.
11
Searches
You can use the Search tool to search for pipelines, surveys, lease IDs, commercial waste disposal (CWD) sites or discharge permits.
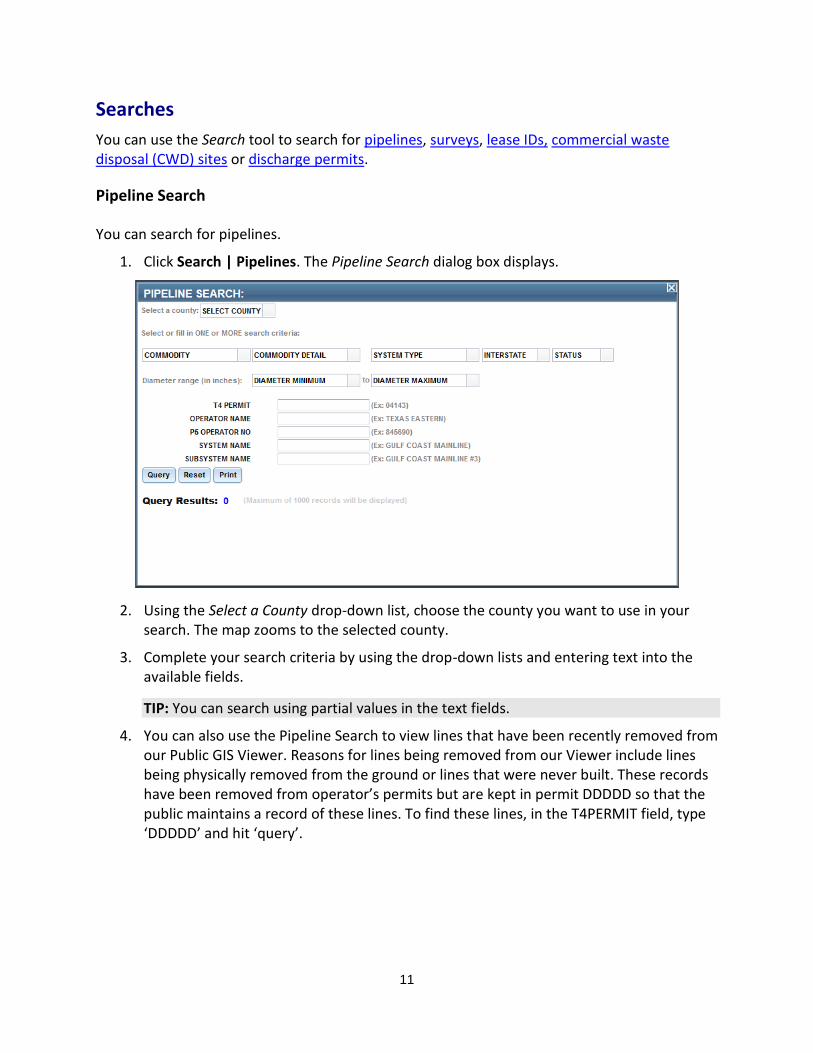
Pipeline Search
You can search for pipelines.
1. Click Search | Pipelines. The Pipeline Search dialog box displays.
2. Using the Select a County drop-down list, choose the county you want to use in your search. The map zooms to the selected county.
3. Complete your search criteria by using the drop-down lists and entering text into the available fields.
TIP: You can search using partial values in the text fields.
4. You can also use the Pipeline Search to view lines that have been recently removed from our Public GIS Viewer. Reasons for lines being removed from our Viewer include lines being physically removed from the ground or lines that were never built. These records have been removed from operator’s permits but are kept in permit DDDDD so that the public maintains a record of these lines. To find these lines, in the T4PERMIT field, type ‘DDDDD’ and hit ‘query’.
12
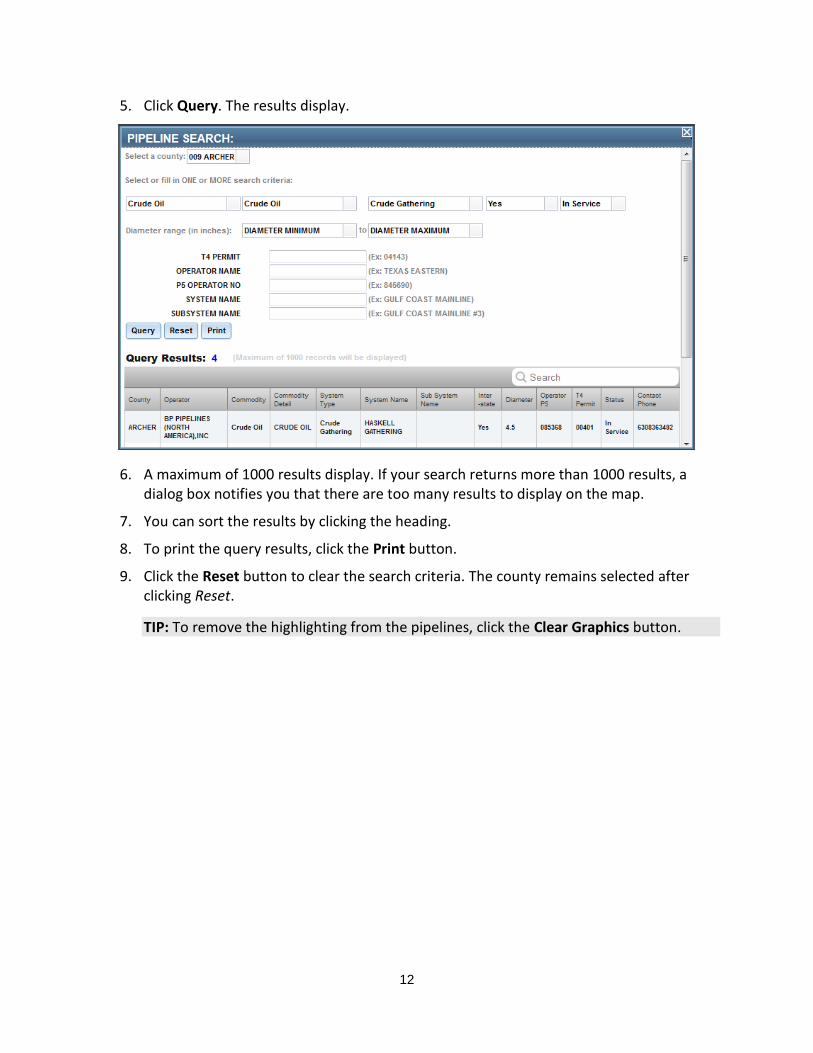
5. Click Query. The results display.
6. A maximum of 1000 results display. If your search returns more than 1000 results, a dialog box notifies you that there are too many results to display on the map.
7. You can sort the results by clicking the heading.
8. To print the query results, click the Print button.
9. Click the Reset button to clear the search criteria. The county remains selected after clicking Reset.
TIP: To remove the highlighting from the pipelines, click the Clear Graphics button.
13
Surveys Search
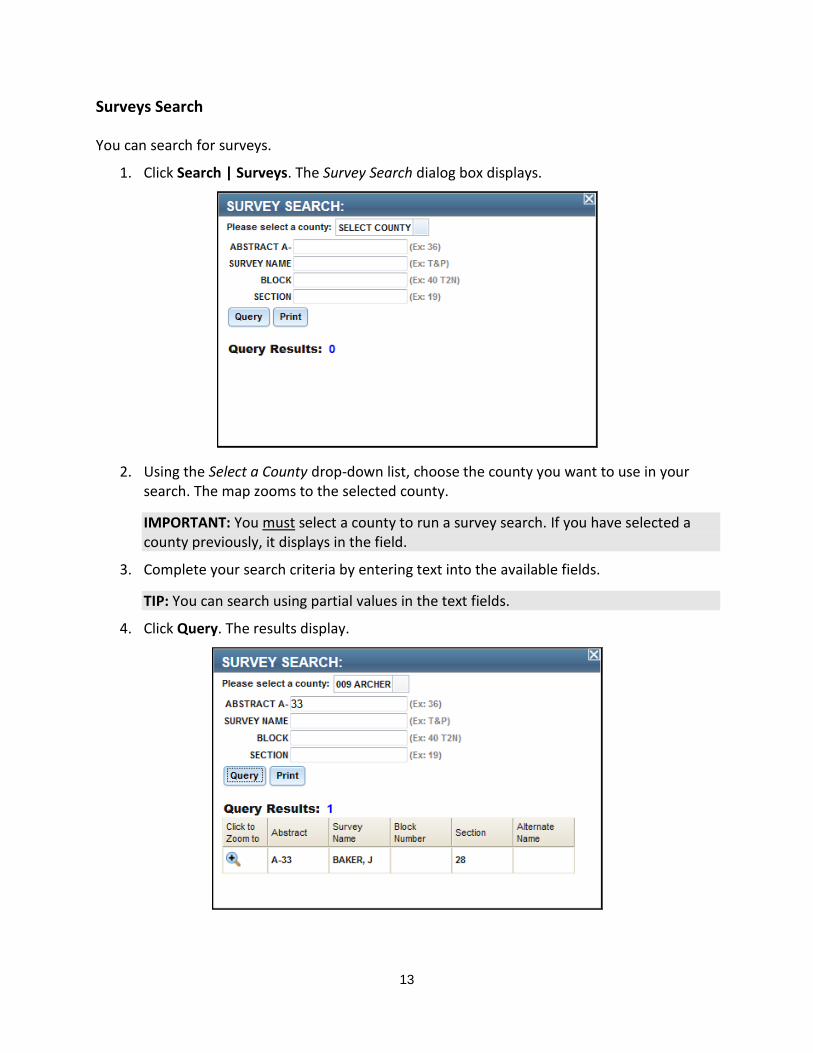
You can search for surveys.
1. Click Search | Surveys. The Survey Search dialog box displays.
2. Using the Select a County drop-down list, choose the county you want to use in your search. The map zooms to the selected county.
IMPORTANT: You must select a county to run a survey search. If you have selected a county previously, it displays in the field.
3. Complete your search criteria by entering text into the available fields.
TIP: You can search using partial values in the text fields.
4. Click Query. The results display.
14
NOTE: A maximum of 300 results can display. If your search returns more than 300 results, a dialog box requests that you refine your search criteria to limit the number of search results.
5. To print the query results, click the Print button.
TIP: To remove the highlighting from the survey boundaries, click the Clear Graphics button.
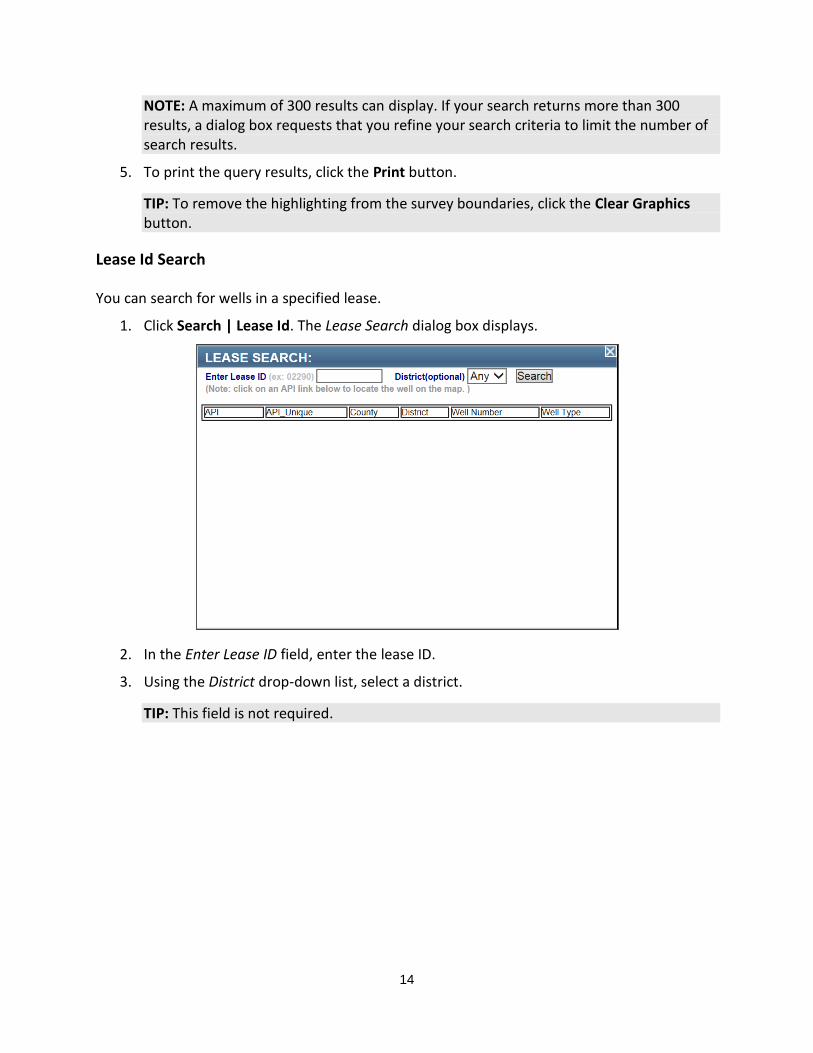
Lease Id Search
You can search for wells in a specified lease.
1. Click Search | Lease Id. The Lease Search dialog box displays.
2. In the Enter Lease ID field, enter the lease ID.
3. Using the District drop-down list, select a district.
TIP: This field is not required.
15
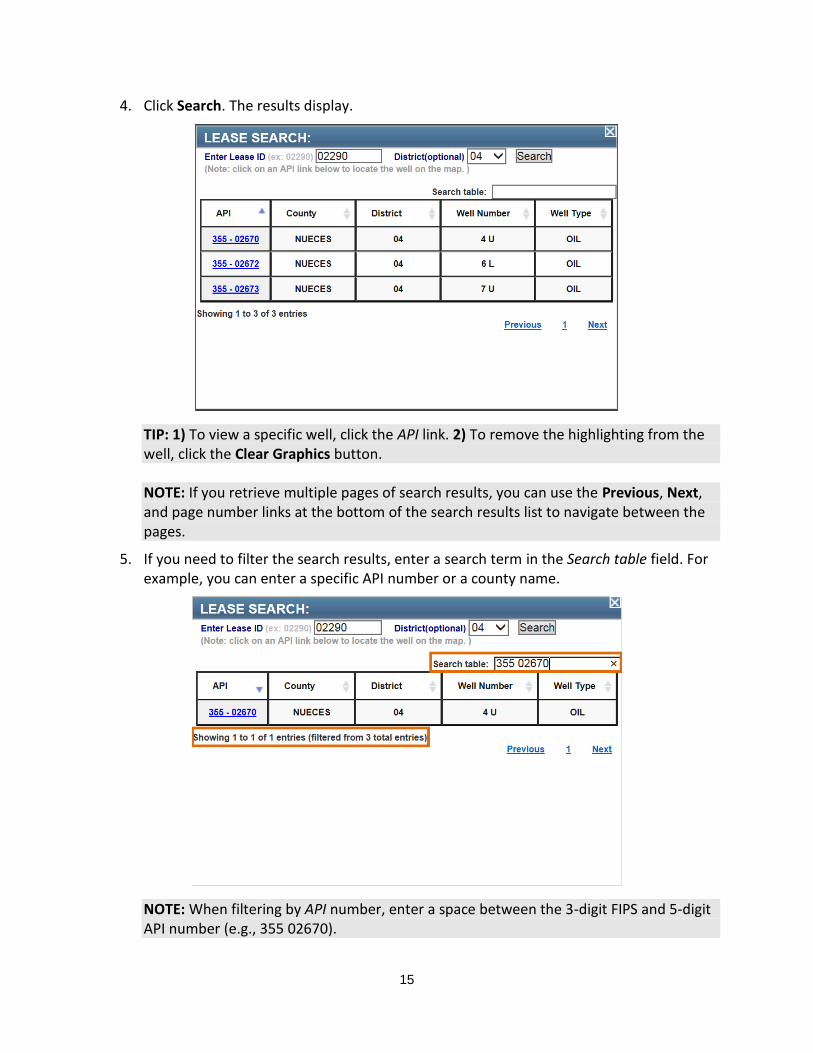
4. Click Search. The results display.
TIP: 1) To view a specific well, click the API link. 2) To remove the highlighting from the well, click the Clear Graphics button.
NOTE: If you retrieve multiple pages of search results, you can use the Previous, Next, and page number links at the bottom of the search results list to navigate between the pages.
5. If you need to filter the search results, enter a search term in the Search table field. For example, you can enter a specific API number or a county name.
NOTE: When filtering by API number, enter a space between the 3-digit FIPS and 5-digit API number (e.g., 355 02670).

16
6. If you need to sort the search results by a specific column, click the sort arrows in the column header.
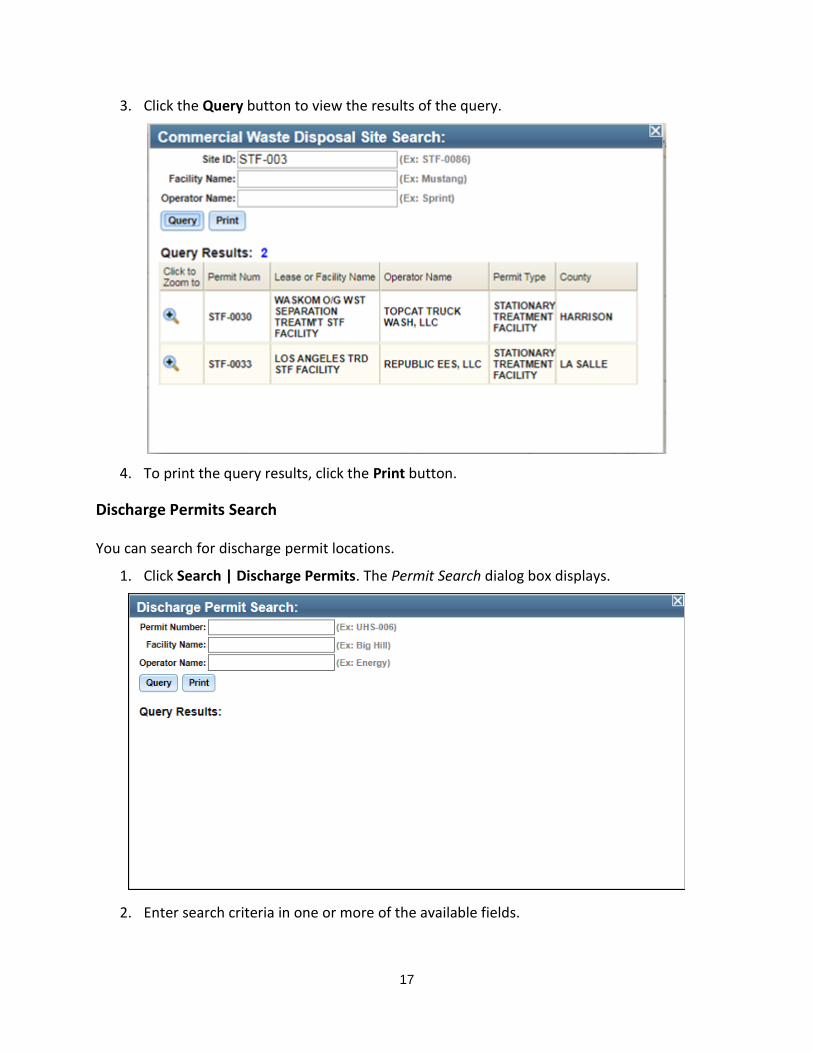
Commercial Waste Disposal Site Search
You can search for specific disposal sites.
1. Click Search | CWD Sites. The Site Search dialog box displays.
2. Enter search criteria in one or more of the available fields.
• In the Site ID field, enter a complete or partial Site ID name to locate a specific site.
• In the Facility Name field, enter a complete or partial Facility Name to locate a specific site.
• In the Operator Name field, enter a complete or partial Operator Name to locate sites owned by a specific operator.
TIP: Only one field is required to perform a search but providing more information will narrow-down the results.
17
3. Click the Query button to view the results of the query.
4. To print the query results, click the Print button.
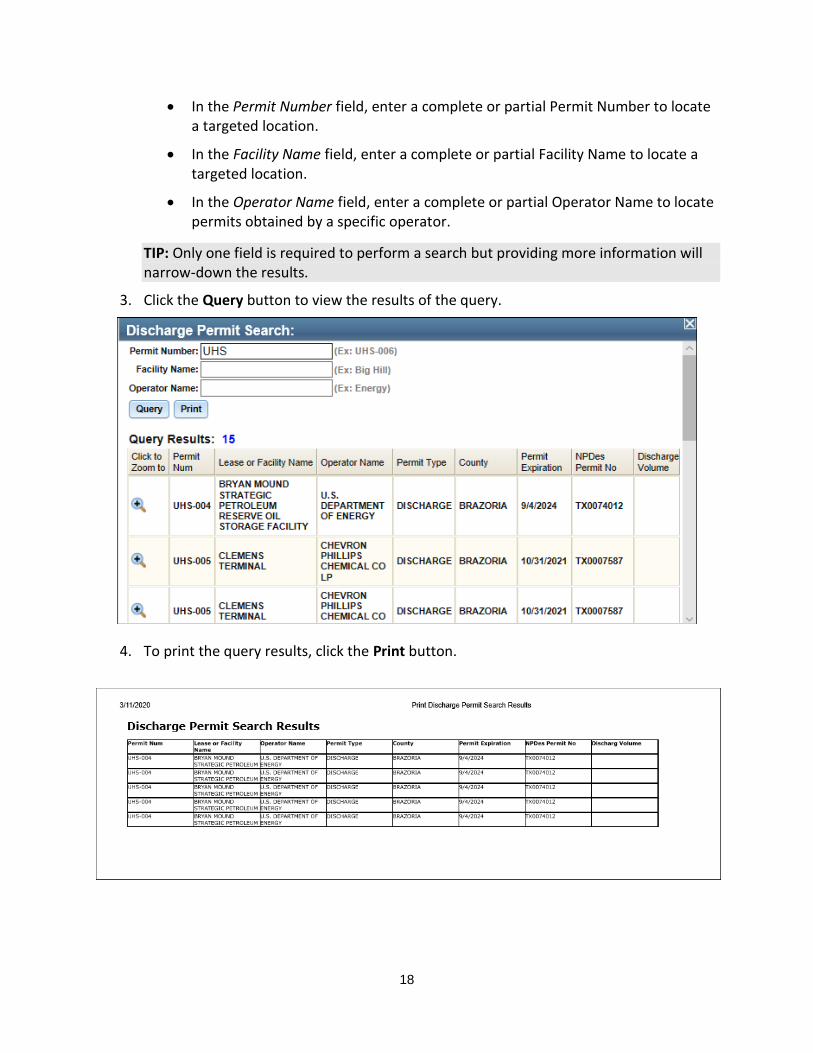
Discharge Permits Search
You can search for discharge permit locations.
1. Click Search | Discharge Permits. The Permit Search dialog box displays.
2. Enter search criteria in one or more of the available fields.
18
• In the Permit Number field, enter a complete or partial Permit Number to locate a targeted location.
• In the Facility Name field, enter a complete or partial Facility Name to locate a targeted location.
• In the Operator Name field, enter a complete or partial Operator Name to locate permits obtained by a specific operator.
TIP: Only one field is required to perform a search but providing more information will narrow-down the results.
3. Click the Query button to view the results of the query.
4. To print the query results, click the Print button.
19
Radius Tool
The Radius tool allows you to create a circle at a defined radius around a specific point on the map.
Using the Radius Tool
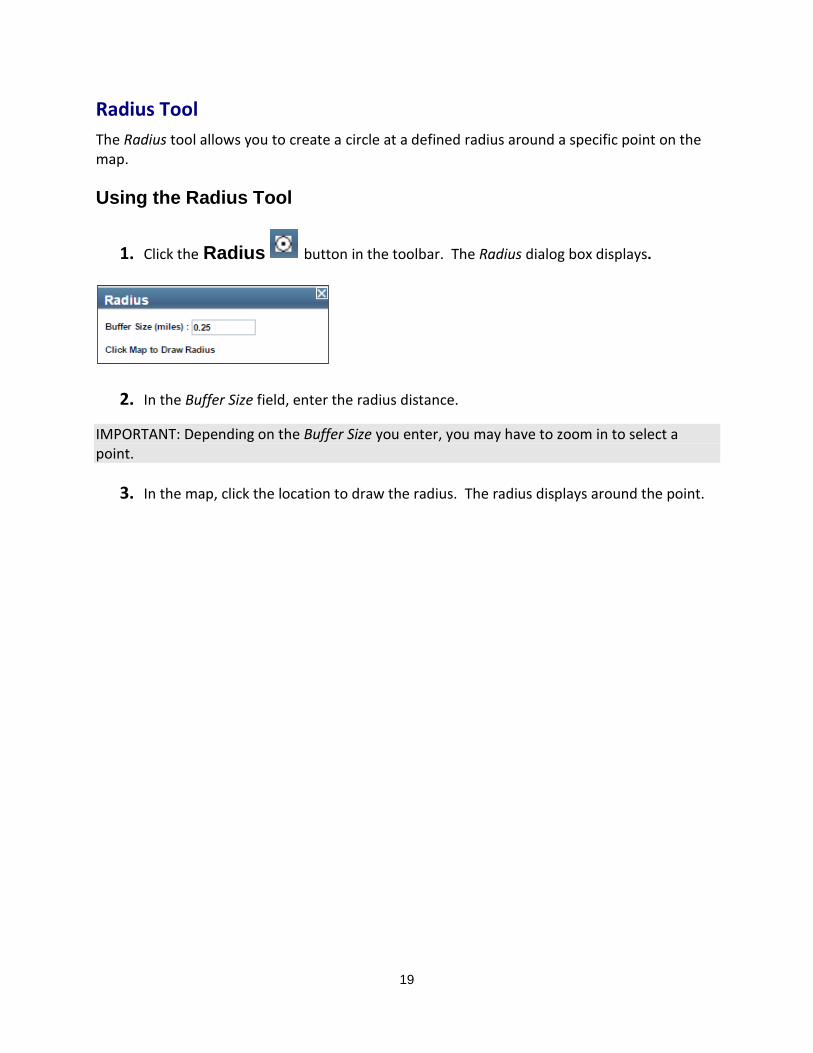
1. Click the Radius button in the toolbar. The Radius dialog box displays.
2. In the Buffer Size field, enter the radius distance.
IMPORTANT: Depending on the Buffer Size you enter, you may have to zoom in to select a point.
3. In the map, click the location to draw the radius. The radius displays around the point.
20
Download Wells
The Download Wells tool allows you to create a circle at a defined radius around a specific point on the map and export information related to the wells within that circle to a comma separated values (CSV) file.
NOTE: The Download Wells tool can export information for up to 1000 wells that within the circle.
Using the Download Wells Tool
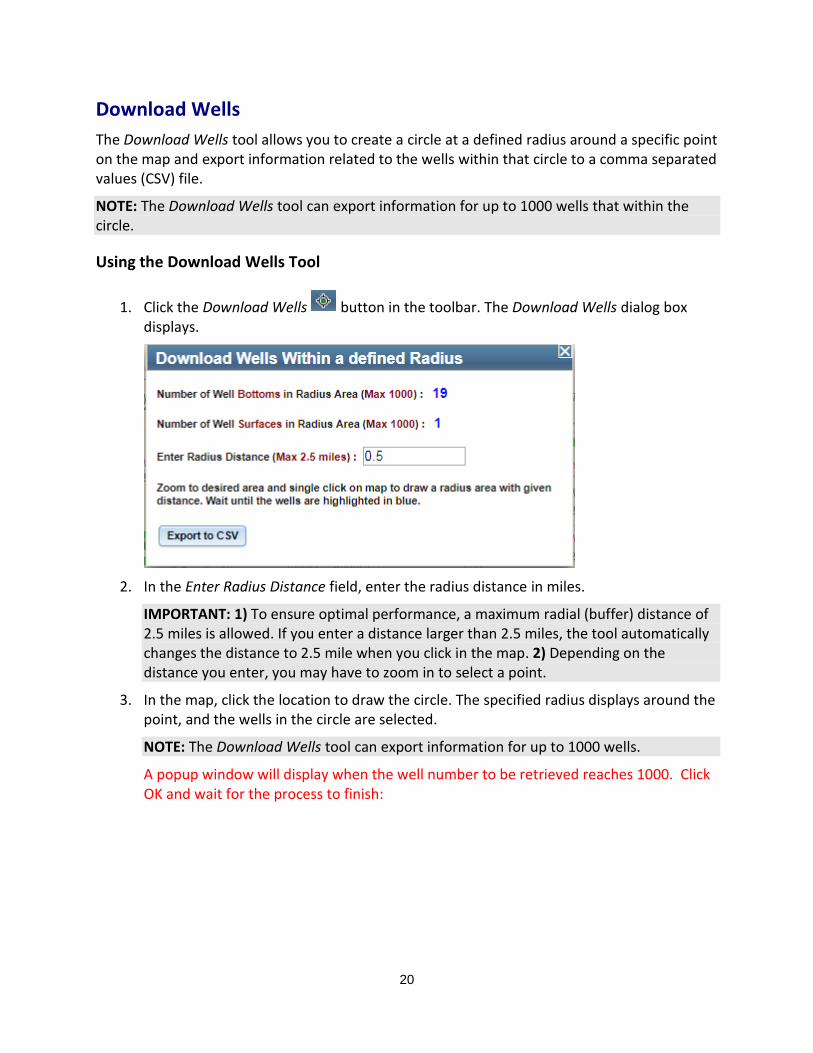
1. Click the Download Wells button in the toolbar. The Download Wells dialog box displays.
2. In the Enter Radius Distance field, enter the radius distance in miles.
IMPORTANT: 1) To ensure optimal performance, a maximum radial (buffer) distance of 2.5 miles is allowed. If you enter a distance larger than 2.5 miles, the tool automatically changes the distance to 2.5 mile when you click in the map. 2) Depending on the distance you enter, you may have to zoom in to select a point.
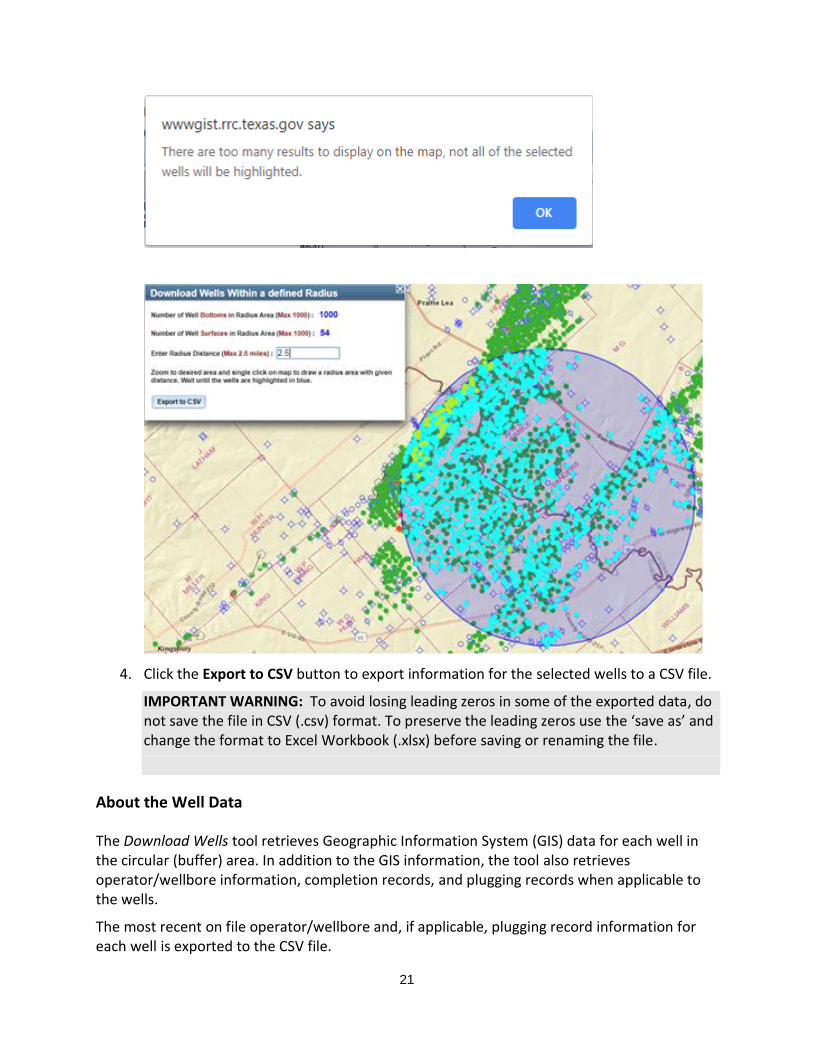
3. In the map, click the location to draw the circle. The specified radius displays around the point, and the wells in the circle are selected.
NOTE: The Download Wells tool can export information for up to 1000 wells.
A popup window will display when the well number to be retrieved reaches 1000. Click OK and wait for the process to finish:
21
4. Click the Export to CSV button to export information for the selected wells to a CSV file.
IMPORTANT WARNING: To avoid losing leading zeros in some of the exported data, do not save the file in CSV (.csv) format. To preserve the leading zeros use the ‘save as’ and change the format to Excel Workbook (.xlsx) before saving or renaming the file.
About the Well Data
The Download Wells tool retrieves Geographic Information System (GIS) data for each well in the circular (buffer) area. In addition to the GIS information, the tool also retrieves operator/wellbore information, completion records, and plugging records when applicable to the wells.
The most recent on file operator/wellbore and, if applicable, plugging record information for each well is exported to the CSV file.

22
All completion records are retrieved for each of the wells. Each completion record has its own row in the CSV file which also contains the most recent operator/wellbore information and, if applicable, plugging record.
DISCLAIMER: A “data set” is any set of information electronically generated or stored by Railroad Commission of Texas (Commission) systems, including, but not limited to, the Commission’s Geographic Information System, Online Research Query System, or Mainframe System.
The data sets contained in the Public GIS Viewers were generated from the Commission’s Geographic Information System. These data sets are provided as a public service for informational purposes only. They are not intended to be used as an authoritative public record for any geographic location and have no legal force or effect. Organizations and individual users are responsible for verifying the accuracy, completeness, currency, and/or suitability of these data sets themselves.
The Commission specifically disclaims any and all warranties, representations, or endorsements, express or implied, with regard to these data sets, including, but not limited to, the warranties of merchantability, fitness for a particular purpose, or non-infringement of privately-owned rights.