Embed Size (px)
Citation preview
Made in China, Shantou.
Assembly and operating instructions
安装和使用说明
取扱説明書
조립과 작동 방법
Montaj ve işletme kılavuzu
Инструкция по монтажу и эксплуатации
Ca
rre
ra
RC
Q
ua
dro
co
pte
r
C
A X
L# 3
7050
3002
0°
4
3
1
2
5
6
7
8
+
‒‒
+
RL RL
10 9
6 87
54
3
1
2a
Red = Charging Green = Ready
2b
3m 3m
2,4m
3 3
1
1
1
2
2
2
2
1
ON
4
5
11
2
undersidetop side
11/2014 · 1
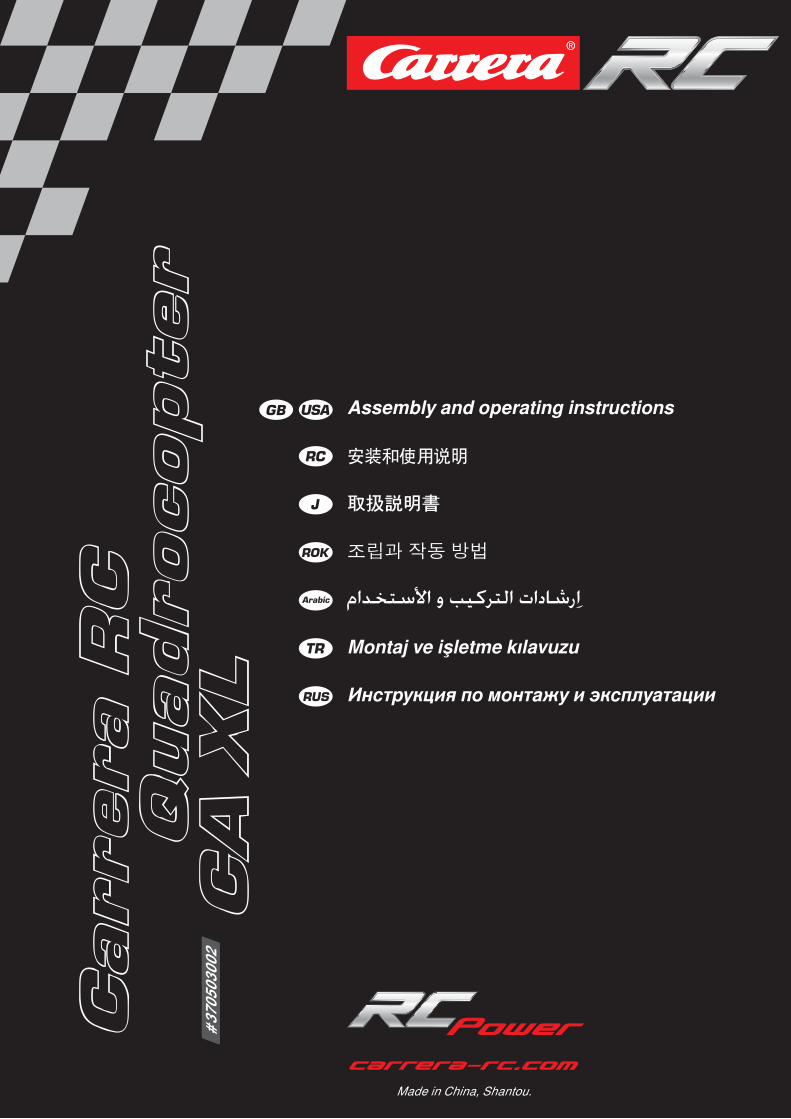
3,7V 650 mAh2,405 Wh LiPo
6x 1.5 V Mignon AA batteries
6x 1.5 V Mignon AA batteries
9
11
14
12
10
13a
13b
17 18
15 16
+ +
‒‒
RL
‒
+
RLRL
‒
+
L R
A
A
B
B
A
A
B
B
RL
3
Rotorblade Sideview angle of tilt REAR-ViewFRONT-View
4
ENG
LIS
H
Dear customer
Congratulation! You bought a Carrera RC Quadrocopter which has been manufactured according to today´s state-of-the-art technology. As it is our constant endeavour to develop and improve our products, we reserve the right to make modifications, either of a technical nature or with respect to features, materials and design, at any time, and without prior notice. For this reason, no claims will be ac-cepted for any slight deviations in your product from the data and illustrations contained in these instructions. These operating and assembly instructions are an integral part of the product. Non-observance of these operating instructions and the safety instructions they contain will render the guar-antee null and void. These instructions are to be kept for future reference and in the event that the product is passed on to a third party.
Guarantee conditions
Carrera products are technically advanced products (NO TOYS) which should be handled with care. It is im-portant to follow the directions given in the operating instructions. All components have been subjected to careful inspection (technical modifications and altera-tions to the model for the purpose of product improve-ment are reserved). Should any faults nevertheless occur, guarantee is as-sumed within the scope of the following conditions: In accordance with the following provisions, Stadlbauer Mar-keting + Vertrieb GmbH (hereinafter referred to as “manu-facturer”) warrants to the endconsumer (hereinafter referred to as “customer”) that the Carrera RC-model-Quadrocopter (hereinafter referred to as “product”) delivered to the cus-tomer shall be free from defects in material or workmanship for two years from the date of purchase (guarantee period). Such defects will, at the manufacturer´s option, either be repaired by the manufacturer or fixed by delivering new or refurbished parts free of charge. The warranty does not cover failure due to normal wear and tear, (e.g. to batteries, rotor blades, cabin covering, gear wheels etc.), or damage as a result of improper handling/misuse or unauthorised interference. Any other customer´s claims asserted against the manufacturer, especially action for damages, shall be excluded. The contractual and statutory rights of the customer against the seller (supplementary performance, rescission of the contract, abatement, compensation) which exist with the product not having been free from defects at the time of the passing of risk, shall remain unaffected by this warranty.
Claims from this special warranty shall only be valid if:• the defect reported has not arisen by damage caused by unintended use or misuse as specified in the instruction manual,• the failure of the product is not due to normal wear and tear • the product does not show any signs resulting from repairs
or other interferences carried out by workshops not having been authorised by the manufacturer,
• the product has only been operated with accessories au-thorised by the manufacturer and
• the product is sent in together with the original proof of purchase (invoice / receipt) and the completely filled in war-ranty card which has not been altered in any way.
Guarantee cards cannot be replaced.
Note for EU countries: Reference is hereby made to the seller’s statutory guarantee obligation, to the extent that this guarantee obligation is not restricted by the product guar-antee.The manufacturer shall bear the costs for sending in and returning the product.This warranty shall be valid to the extent aforementioned and under the above-named circumstances (including the sub-mittal of the original proof of purchase also in case of resale) for any future owner of the product.
Declaration of conformity
Stadlbauer Marketing + Vertrieb GmbH hereby declares that this model including the controller conforms with the fundamental requirements of the following EC directives: EC Directives 2009/48 and 2004/108/EC regarding electro-magnetic compatibility and the other relevant regulations of Directive 1999/5/EC (R&TTE).The original declaration of conformity can be requested from carrera-rc.com.
Warning!
WARNING! This toy contains small parts which can be swallowed and is therefore not suitable for children under 3 years of age.
WARNING! Danger of pinching during operation! Re-move all packaging materials and wire fastenings before handing the toy over to the child. For information and to answer any questions, please retain packaging, address and instructions in a safe place for future reference. Adult supervisors note: please check that the toy has been assembled in accordance with the instructions. Assembly should be carried out under the supervision of an adult.
A remote-controlled Quadrocopter is and is only suit-able for teenagers over the age of 12!This product is not intended for use by children without supervision of a parent. Flying the helicopter requires skill and children must be trained under the direct supervision of an adult. Read the user’s information together with your child Before the first use. Inappropriate use may result in severe injuries and/or damage to property. It has to be operated with care and caution and requires both mechanical and mental skills. The operating instructions contain notes on safety and technical regulations as well as information on maintaining and operating the product. It is indispensable to read these instructions thoroughly before the first usage. Only this helps to avoid accidents with inju-ries and damage. Hands, hair and loose clothing, including other objects such as pens and screwdrivers must be kept away from the pro-peller (rotor). Do not touch the rotating rotor. Especially take care that your hands DO NOT get close to the rotor blades! WARNING: Risk of eye injuries. Do not fly near your face to avoid injuries. As user of this product you are solely responsible for handling it safely in order to ensure that neither you nor other persons or their property suffer damages or are endangered.
• Never use your model with weak remote control batteries.• This toy is only designed to be used in a home environment
(house and garden).• Avoid busy areas. Always make sure that there is enough space. • Preferably do not use your model on an open street or in public areas in order not to endanger or hurt anyone. • WARNING: Do not start up and fly when persons,
a nimals or any obstructions are within the flying range of the Quadrocopter.
• Taking off and flying in the vicinity of overhead wires and pylons, railway lines, roads, swimming pools and other stretches of open water is strictly prohibited.
• Exactly observe the instructions and warnings for this product and for any possible additional equipment (battery charger, rechargeable batteries etc.) being used by you.• Should the Quadrocopter come into contact with any living thing or solid object, immediately return the gas control to zero, in other words the left-hand joystick must be at the stop at the bottom of the slide!• Make sure that all chemicals, small parts and electrical components are out of childrens´ reach.• Avoid any moisture as this might do damage to the elec- tronics.
• There is a risk to suffer severe injury or even death if you put parts of your model into your mouth or lick them. • WARNING: there is danger of strangulation if you hang the lanyard around your neck • Do not change or modify anything on the Quadrocopter.If you do not agree to these terms please immediately return the complete Quadrocopter model in new and unused condi-tion to the retailer.
Important information concerning Lithium Polymer re-chargeable batteriesLithium-Polymer (LiPo) rechargeable batteries are sig-nificantly more sensitive than traditional alkali- or NiMH-re-chargeable batteries normally used with radio control units. Therefore the instructions and warnings have to be observed in detail. In case of improper use of LiPo rechargeable batter-ies there is a danger of fire. Always follow the manufacturers´ instructions if you dispose of LiPo rechargeable batteries.
Regulations on disposal for waste electrical and elec-tronic equipment (WEEE)
This symbol, showing refuse bins with a cross through them, denotes that empty batteries, rechargeable batteries, button cells, recharge-
able battery packs, equipment batteries, disused electrical equipment, etc. should not be disposed of in domestic re-fuse, as they are harmful to the environment and health. Please help to preserve environment and health and talk to your children about the correct disposal of used batteries and disused electrical equipment. Batteries and disused electrical equipment should be handed in to the usual collec-tion points where they can be properly recycled. Do not mix dissimilar battery types or employ new and used batteries together. Empty batteries should be removed from the product. Do not recharge non-rechargeable batteries due to risk of explosion. WARNING! This charger respectively USB-adapter can be used by chil-dren aged from 8 years and above and persons with reduced physical, sensory or mental capabilities or lack of experience and knowledge if they have been given supervision or in-struction concerning use of the charger respectively USB-adapter in a safe way and understand the hazards involved. Children shall not play with the USB-adapter. Cleaning and user maintenance shall not be made by children unless they are older than 8 and supervised.Keep the charger respectively USB-adapter and its cord out of reach of children less than 8 years. Never leave the battery unattended while it is charging Exhausted batter-ies are to be removed from the toy. Rechargeable batteries should be removed from the product before charging. Supply terminal are not to be short-circuited. Only use the batteries recommended or equivalent types. If in regular use the charger must be examined for damage to the cord, plug, covers and all other parts. If any signs of damage are found the charger may only be used again after repair work has been completed. The external flexible cable or cord of this charger cannot be replaced: If the cord is dam-aged the charger shall be scrapped.
Guidelines and warnings for the use of LiPo recharge-able batteries • You have to charge the attached 3.7 V 650 mAh/2,405 Wh
LiPo rechargeable battery in a safe place and at a safe distance to flammable material.
• Never leave the battery unattended while it is charging • After a flight, the rechargeable battery has to cool down to
the ambient air temperature before charging it.• You must always use the corresponding LiPo charging unit
(USB cable / remote control). In case of non-compliance with these directions there is a danger of fire resulting in a health risk and/or damage to property. NEVER use any other battery charger.
• Should the rechargeable battery swell or deform while dis-charging or recharging, you have to immediately stop charg-ing or discharging the battery. Take the battery out as quickly and carefully as possible and place it in a safe and open area offside any inflammable material and watch it for at least 15 minutes. In case you continue charging or discharging a bat-tery which has already started to swell or deform there is a danger of fire! Even in case of slight deforming or ballooning the rechargeable battery has to be taken out of operation.
• Store the rechargeable battery at ambient temperature in a dry place.
5
ENG
LIS
H
• Always recharge the battery immediately after use to prevent its becoming deep discharged. Please make sure to allow a pause of about 20 minutes between finishing the flight and recharging the battery. Recharge the battery occasionally (suggested every 2-3 months). Failure to treat the battery as described above can lead to its becoming defective.
• When transporting or temporarily storing the rechargeable battery the temperature should be between 5-50°C. If pos-sible, do not store the battery or the model in a car and do not expose it to direct sunlight. In case the battery is broiled it can be damaged or catch fire.
Note: If the battery voltage/output is low you will recognise that a considerable trim and/or controlling is necessary to avoid that the Quadrocopter starts trundling. This usually occurs before reaching a battery voltage of 3 V and it is a good moment to end the flight.
Contents of package
1 1 x Quadrocopter
1 x Controller 1 x USB charging cable 1x Rechargeable Battery 1x Lanyard 1 x Set of replacement parts 6 x 1.5 V Mignon AA batteries (non-rechargeable)
Recharging the LiPo rechargeable battery
Make sure you only charge the LiPo rechargeable battery supplied with the LiPo charging unit also supplied (USB ca-ble and remote control). If you try to charge the rechargeable battery with a different LiPo battery charger or any other bat-tery charger, this might cause serious damage. Please care-fully read the previous chapter with warnings and guidelines on the usage of rechargeable batteries before proceeding. Supply terminals are not to be short-circuited.You can charge the rechargeable battery fitted in the Quadrocop-ter with its USB charging cable from a USB port on a computer:
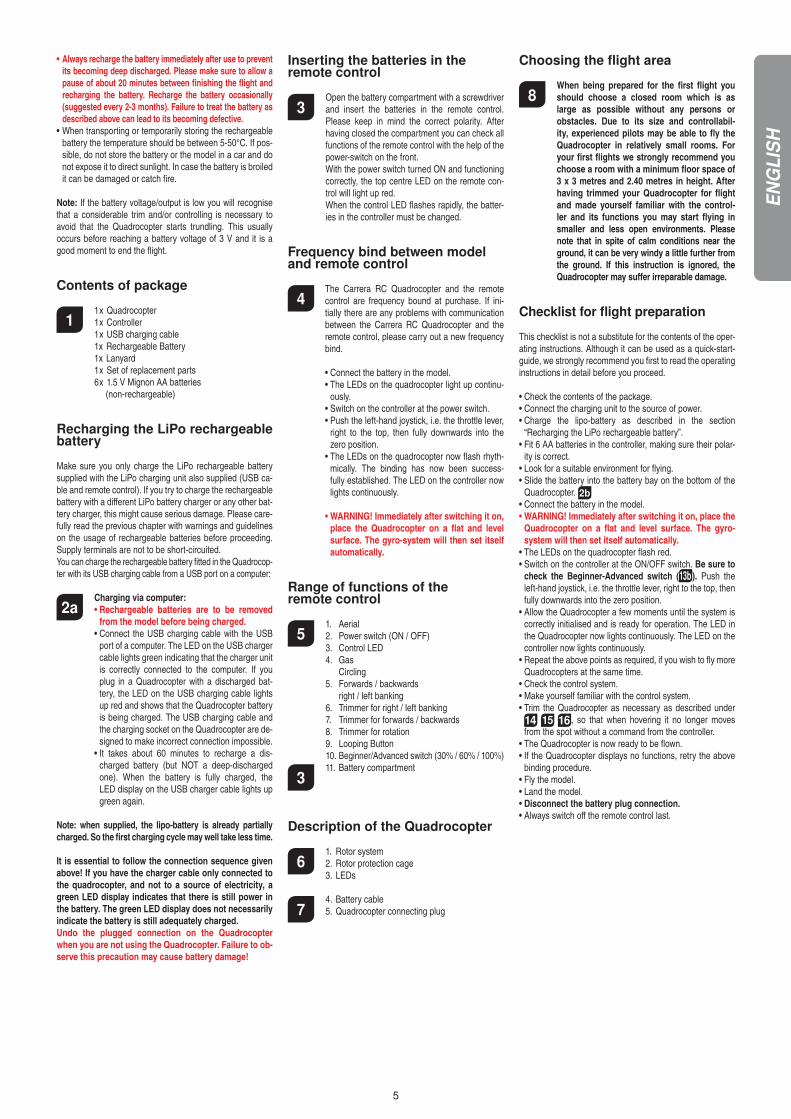
2a Charging via computer:
• Rechargeable batteries are to be removed from the model before being charged.
• Connect the USB charging cable with the USB port of a computer. The LED on the USB charger cable lights green indicating that the charger unit is correctly connected to the computer. If you plug in a Quadrocopter with a discharged bat-tery, the LED on the USB charging cable lights up red and shows that the Quadrocopter battery is being charged. The USB charging cable and the charging socket on the Quadrocopter are de-signed to make incorrect connection impossible.
• It takes about 60 minutes to recharge a dis-charged battery (but NOT a deep-discharged one). When the battery is fully charged, the LED display on the USB charger cable lights up green again.
Note: when supplied, the lipo-battery is already partially charged. So the first charging cycle may well take less time.
It is essential to follow the connection sequence given above! If you have the charger cable only connected to the quadrocopter, and not to a source of electricity, a green LED display indicates that there is still power in the battery. The green LED display does not necessarily indicate the battery is still adequately charged. Undo the plugged connection on the Quadrocopter when you are not using the Quadrocopter. Failure to ob-serve this precaution may cause battery damage!
Inserting the batteries in theremote control
3 Open the battery compartment with a screwdriver
and insert the batteries in the remote control. Please keep in mind the correct polarity. After having closed the compartment you can check all functions of the remote control with the help of the power-switch on the front.
With the power switch turned ON and functioning correctly, the top centre LED on the remote con-trol will light up red.
When the control LED flashes rapidly, the batter-ies in the controller must be changed.
Frequency bind between model and remote control
4 The Carrera RC Quadrocopter and the remote
control are frequency bound at purchase. If ini-tially there are any problems with communication between the Carrera RC Quadrocopter and the remote control, please carry out a new frequency bind.
• Connect the battery in the model. • The LEDs on the quadrocopter light up continu-
ously. • Switch on the controller at the power switch. • Push the left-hand joystick, i.e. the throttle lever,
right to the top, then fully downwards into the zero position.
• The LEDs on the quadrocopter now flash rhyth-mically. The binding has now been success-fully established. The LED on the controller now lights continuously.
• WARNING! Immediately after switching it on, place the Quadrocopter on a flat and level surface. The gyro-system will then set itself automatically.
Range of functions of the remote control
5 1. Aerial
2. Power switch (ON / OFF) 3. Control LED 4. Gas Circling 5. Forwards / backwards right / left banking 6. Trimmer for right / left banking 7. Trimmer for forwards / backwards 8. Trimmer for rotation 9. Looping Button 10. Beginner/Advanced switch (30% / 60% / 100%)
3 11. Battery compartment
Description of the Quadrocopter
6 1. Rotor system
2. Rotor protection cage 3. LEDs
7 4. Battery cable
5. Quadrocopter connecting plug
Choosing the flight area
8 When being prepared for the first flight you
should choose a closed room which is as large as possible without any persons or obstacles. Due to its size and controllabil-ity, experienced pilots may be able to fly the Quadrocopter in relatively small rooms. For your first flights we strongly recommend you choose a room with a minimum floor space of 3 x 3 metres and 2.40 metres in height. After having trimmed your Quadrocopter for flight and made yourself familiar with the control-ler and its functions you may start flying in smaller and less open environments. Please note that in spite of calm conditions near the ground, it can be very windy a little further from the ground. If this instruction is ignored, the Quadrocopter may suffer irreparable damage.
Checklist for flight preparation
This checklist is not a substitute for the contents of the oper-ating instructions. Although it can be used as a quick-start-guide, we strongly recommend you first to read the operating instructions in detail before you proceed.
• Check the contents of the package.• Connect the charging unit to the source of power.• Charge the lipo-battery as described in the section
“Recharging the LiPo rechargeable battery”.• Fit 6 AA batteries in the controller, making sure their polar-
ity is correct.• Look for a suitable environment for flying.• Slide the battery into the battery bay on the bottom of the
Quadrocopter. 2b • Connect the battery in the model.• WARNING! Immediately after switching it on, place the
Quadrocopter on a flat and level surface. The gyro-system will then set itself automatically.
• The LEDs on the quadrocopter flash red.• Switch on the controller at the ON/OFF switch. Be sure to
check the Beginner-Advanced switch (13b ). Push the left-hand joystick, i.e. the throttle lever, right to the top, then fully downwards into the zero position.
• Allow the Quadrocopter a few moments until the system is correctly initialised and is ready for operation. The LED in the Quadrocopter now lights continuously. The LED on the controller now lights continuously.
• Repeat the above points as required, if you wish to fly more Quadrocopters at the same time.
• Check the control system.• Make yourself familiar with the control system.• Trim the Quadrocopter as necessary as described under
1614 15 , so that when hovering it no longer moves from the spot without a command from the controller.
• The Quadrocopter is now ready to be flown.• If the Quadrocopter displays no functions, retry the above
binding procedure.• Fly the model.• Land the model.• Disconnect the battery plug connection.• Always switch off the remote control last.
6
ENG
LIS
H
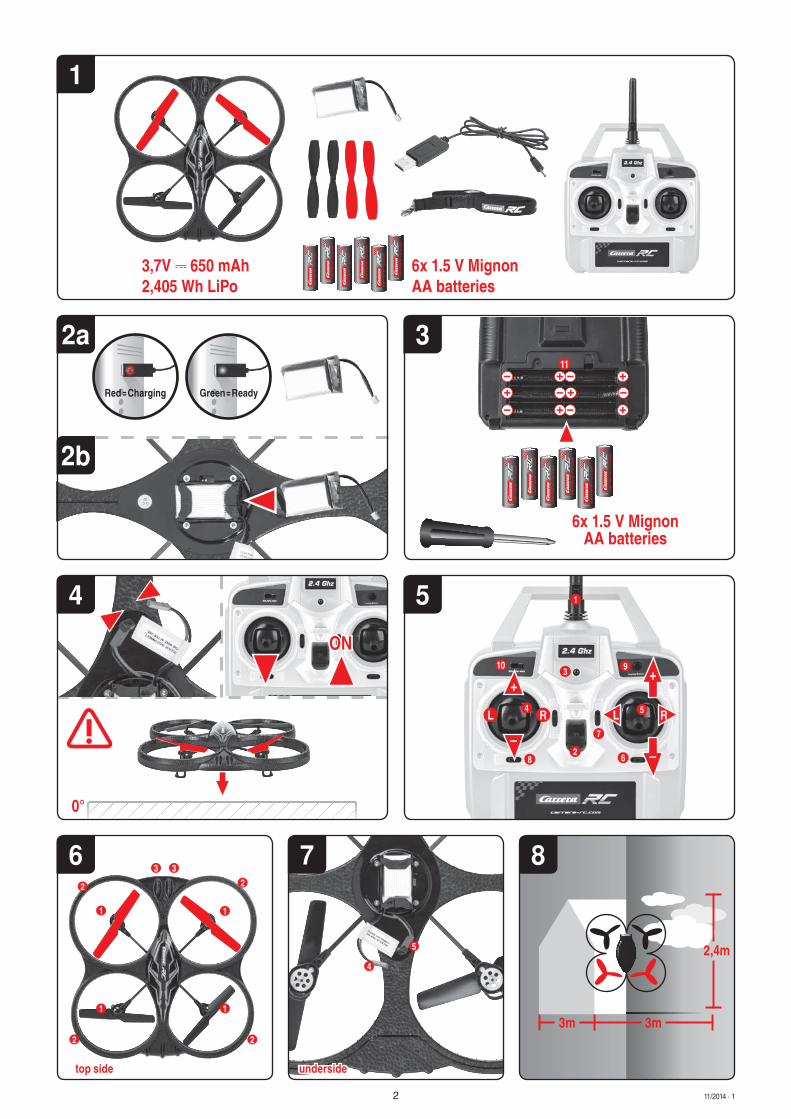
Flying the 4-channel Quadrocopter
NOTE! Take care particularly in the first few flights to move the lever on the controller very gently and not over-hurriedly. As a rule, only very small movements of the respective levers are necessary to carry out the desired control commands!
If you notice that the Quadrocopter moves forwards or to the side without your touching the respective lever, please adjust the trim of the Quadrocopter as described in ( 1614 15 ).
9 +/- Gas (up / down)
To start or to fly higher, push the gas lever on the left cautiously forwards. To land or fly lower, push the gas lever on the left cautiously backwards.
10 To make the Quadrocopter circle to the left or the
right on the spot, move the lever on the left cau-tiously to the left or the right.
11 To fly the Quadrocopter to the left or the right,
push the lever on the right cautiously to the left or the right.
12 To fly the Quadrocopter forwards or backwards,
push the lever on the right cautiously forwards or backwards.
Looping function
WARNING! ONLY FOR EXPERIENCED PILOTS!
13a When you press the looping button, an audi-
ble signal sounds until you move the right-hand joystick either up or down, or right or left. The Quadrocopter then carries out the loop or roll in the respective direction. Before you do this, make sure you have ample room on all sides (about 2.5 m – 8‘).
Beginner/Advanced switch
WARNING! 100 % IS ONLY FOR EXPERIENCED PILOTS!
13b 30 % = beginner mode
Signal sounds once on switching over. Looping the loop and rollovers are possible as explained in 13a .
60 % = medium mode The quadrocopter reacts more sensitively than
in 30 % mode. Signal sounds twice on switching over. Looping the loop and rollovers are possible as explained in 13a .
100 % = advanced mode -> 3D mode. The Quadrocopter reacts very sensitively to joy-
stick movements. Signal sounds three times on switching over.
Trimming the Quadrocopter
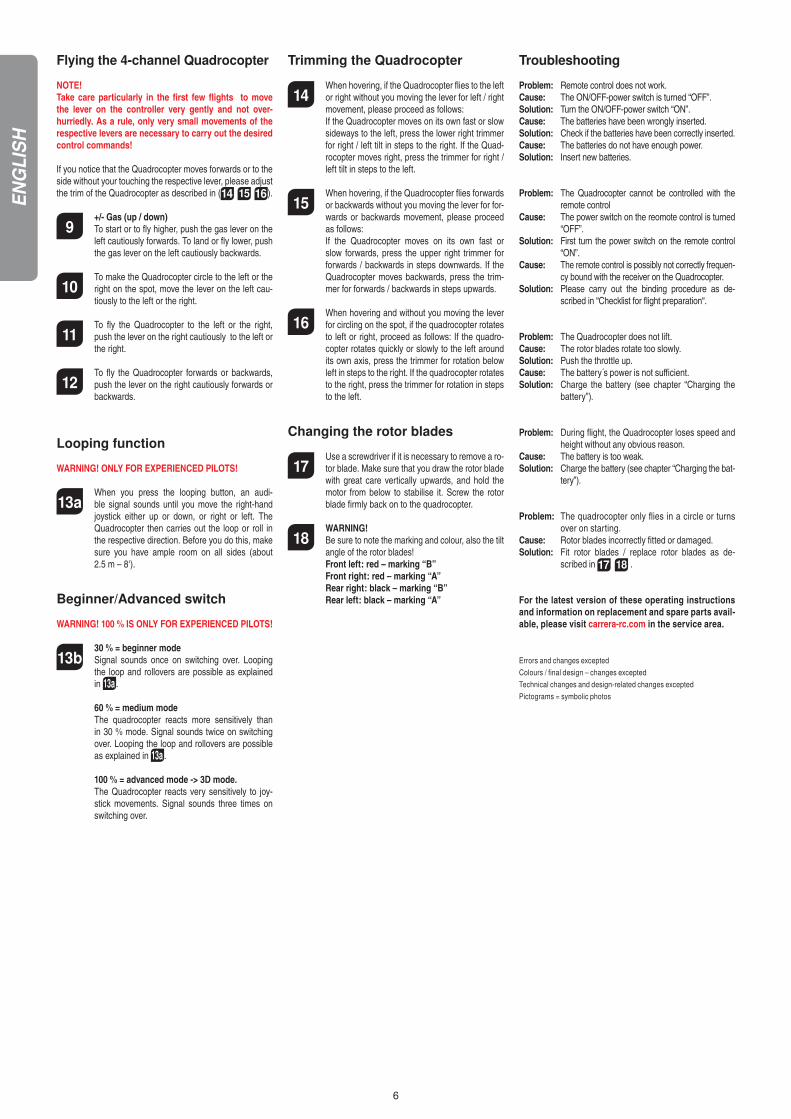
14 When hovering, if the Quadrocopter flies to the left
or right without you moving the lever for left / right movement, please proceed as follows:
If the Quadrocopter moves on its own fast or slow sideways to the left, press the lower right trimmer for right / left tilt in steps to the right. If the Quad-rocopter moves right, press the trimmer for right / left tilt in steps to the left.
15 When hovering, if the Quadrocopter flies forwards
or backwards without you moving the lever for for-wards or backwards movement, please proceed as follows:
If the Quadrocopter moves on its own fast or slow forwards, press the upper right trimmer for forwards / backwards in steps downwards. If the Quadrocopter moves backwards, press the trim-mer for forwards / backwards in steps upwards.
16 When hovering and without you moving the lever
for circling on the spot, if the quadrocopter rotates to left or right, proceed as follows: If the quadro-copter rotates quickly or slowly to the left around its own axis, press the trimmer for rotation below left in steps to the right. If the quadrocopter rotates to the right, press the trimmer for rotation in steps to the left.
Changing the rotor blades
17 Use a screwdriver if it is necessary to remove a ro-
tor blade. Make sure that you draw the rotor blade with great care vertically upwards, and hold the motor from below to stabilise it. Screw the rotor blade firmly back on to the quadrocopter.
18 WARNING!
Be sure to note the marking and colour, also the tilt angle of the rotor blades!
Front left: red – marking “B” Front right: red – marking “A” Rear right: black – marking “B” Rear left: black – marking “A”
Troubleshooting Problem: Remote control does not work.Cause: The ON/OFF-power switch is turned “OFF”.Solution: Turn the ON/OFF-power switch “ON”.Cause: The batteries have been wrongly inserted.Solution: Check if the batteries have been correctly inserted.Cause: The batteries do not have enough power.Solution: Insert new batteries.
Problem: The Quadrocopter cannot be controlled with the remote control
Cause: The power switch on the reomote control is turned “OFF”.
Solution: First turn the power switch on the remote control “ON”.
Cause: The remote control is possibly not correctly frequen-cy bound with the receiver on the Quadrocopter.
Solution: Please carry out the binding procedure as de-scribed in “Checklist for flight preparation“.
Problem: The Quadrocopter does not lift.Cause: The rotor blades rotate too slowly.Solution: Push the throttle up.Cause: The battery´s power is not sufficient.Solution: Charge the battery (see chapter “Charging the
battery”).
Problem: During flight, the Quadrocopter loses speed and height without any obvious reason.
Cause: The battery is too weak.Solution: Charge the battery (see chapter “Charging the bat-
tery”).
Problem: The quadrocopter only flies in a circle or turns over on starting.
Cause: Rotor blades incorrectly fitted or damaged.Solution: Fit rotor blades / replace rotor blades as de-
scribed in 17 18 .
For the latest version of these operating instructions and information on replacement and spare parts avail-able, please visit carrera-rc.com in the service area.
Errors and changes exceptedColours / final design – changes exceptedTechnical changes and design-related changes exceptedPictograms = symbolic photos