Embed Size (px)
Citation preview
Quick Recovery of Microsoft SQL Server 2005 databases
using VERITAS Storage Foundation 4.3 for Windows on HP Integrity servers white paper
Executive summary............................................................................................................................... 3 VERITAS Storage Foundation for Windows ............................................................................................. 3
FlashSnap ....................................................................................................................................... 3 FastResync ...................................................................................................................................... 4 SQL Server Virtual Device Interface .................................................................................................... 4
Test environment overview .................................................................................................................... 4 Hardware components ..................................................................................................................... 4 Software components ....................................................................................................................... 5
Quick Recovery configuration ............................................................................................................... 6 Installing and configuring software components ................................................................................... 6 Configuring the Enterprise Virtual Array.............................................................................................. 6 Configuring SQL Server storage......................................................................................................... 6
Creating a dynamic disk group...................................................................................................... 7 Creating dynamic volumes for the database and transaction logs....................................................... 7 Creating a new database.............................................................................................................. 7
Creating the initial snapshot backup set .............................................................................................. 8 Vxsnapsql overview...................................................................................................................... 8 Creating the snapshot mirrors ........................................................................................................ 8 Creating the snapshot backup set ................................................................................................... 9
Refreshing the snapshot backup set .................................................................................................. 10 Reattaching the split-mirror snapshots............................................................................................ 10 Creating the refreshed snapshot backup set................................................................................... 10
Recovering a SQL Server database...................................................................................................... 11 To recover a database to the time of the snapshot backup set .......................................................... 12 To perform an automatic roll-forward recovery to the point of failure ................................................ 12 To restore to a specified point in time, with manual replay of transaction logs ................................... 13
Performance tests and results............................................................................................................... 13 Test procedure ............................................................................................................................... 14
Initiating the test run.................................................................................................................... 14 Creating the snapshot ................................................................................................................. 14 Corrupting the database ............................................................................................................. 14
Recovering the database ............................................................................................................. 14 Performance test results ................................................................................................................... 15
Summary .......................................................................................................................................... 16 Appendix A—Troubleshooting tips....................................................................................................... 17 Appendix B—Performance test detail ................................................................................................... 18
Object: Processor........................................................................................................................... 18 Object: Memory ............................................................................................................................ 19 Object: System .............................................................................................................................. 20 Object: Logical disk ....................................................................................................................... 21 Object: Server ............................................................................................................................... 22 Object: SQL Server Buffer Manager ................................................................................................. 22 Object: SQL Server Database.......................................................................................................... 23 Object: SQL Server Transactions...................................................................................................... 23
For more information.......................................................................................................................... 24
Executive summary This white paper describes how to rapidly recover Microsoft® SQL Server 2005 environments. The solution is based on the Quick Recovery feature of VERITAS Storage Foundation for Windows® 4.3 coupled with supporting technology from Microsoft and HP.
Quick Recovery enables on-host, disk-based snapshots to be created. These snapshots contain a complete copy of the state of the database at a given point in time including the database itself, associated metadata, and transaction logs. The snapshots are created without shutting down the application and can be used as a substitute for current production volumes if corruption or database loss occurs. This process provides a means of recovery that is significantly faster than restoration from standard backup media, although it does not replace the need for standard datacenter backup procedures.
This paper documents the installation, configuration, and testing of the solution. Throughout, a sample database “Schools” is used to illustrate these activities. In addition to functional tests, basic performance tests were also performed to verify the speed at which recovery can be accomplished. The tests results showed that SQL Server databases can be recovered and brought back online within a minute of an outage.
Testing was performed on a platform consisting of an HP Integrity rx4640 server, an HP StorageWorks 6000 Enterprise Virtual Array (EVA6000), and supporting components.
Readers are assumed to have a basic knowledge of the Windows and SQL Server environments.
VERITAS Storage Foundation for Windows Formerly known as VERITAS Volume Manager for Windows, VERITAS Storage Foundation for Windows (VSFW) with the Quick Recovery feature extends the capabilities of disk management in Windows, allowing snapshot images of SQL Server data to be taken while database services remain online and available. These snapshot images can then be used, if needed, to recover SQL Server environments quickly.
The Quick Recovery solution is based on the Vxsnapsql command line utility in VSFW, which is in turn built on three key underlying software technologies:
• VERITAS FlashSnap • VERITAS FastResync • Microsoft SQL Server Virtual Device Interface
FlashSnap FlashSnap enables the creation of on-host point-in-time copies of volumes using a multi-step process made up of a number of discrete commands:
• Snap Start—Creates a snapshot mirror and attaches it to the original volume. • Snap Shot—Detaches the snapshot mirror from the original volume. The snapshot mirror is an exact
duplicate of the original volume at the point in time when the snapshot command is executed. • Snap Back—Reattaches the snapshot volume to the original volume. The volumes can then be
resynchronized using either the original volume or the snapshot volume (the usual case) as the source.
• Snap Clear—Inverts the Start command, permanently removing the association between the snapshot volume and the original volume.
• Snap Abort—Aborts the snapshot operation after a Snap Start or Snap Back command is issued. Snap Abort also permanently removes the snapshot mirror from the volume and releases its space.
3
FastResync FastResync optimizes the resynchronization of the snapshot volume and the original volume by keeping track of changed blocks in an original volume after a snapshot is detached, for instance, by way of a Snap Shot command. This avoids potentially time-consuming full replication of the volumes.
SQL Server Virtual Device Interface VSFW integrates with the Microsoft SQL Server Virtual Device Interface (VDI) to perform snapshot operations on SQL Server database volumes while the database is online and available. VDI quiesces the database for the short period of time (during which time the write requests are queued) required to create the snapshot and then immediately resumes it, thus allowing snapshots to be taken while the database application remains active. Multiple split-mirror snapshot volumes are detached simultaneously so that all snapshot volumes associated with the SQL Server database are created at exactly the same point in time. Together with the metadata (.xml) file that is also created, these snapshots form a snapshot backup set of the database.
Test environment overview In addition to VSFW, the following hardware and software components were used in the testing.
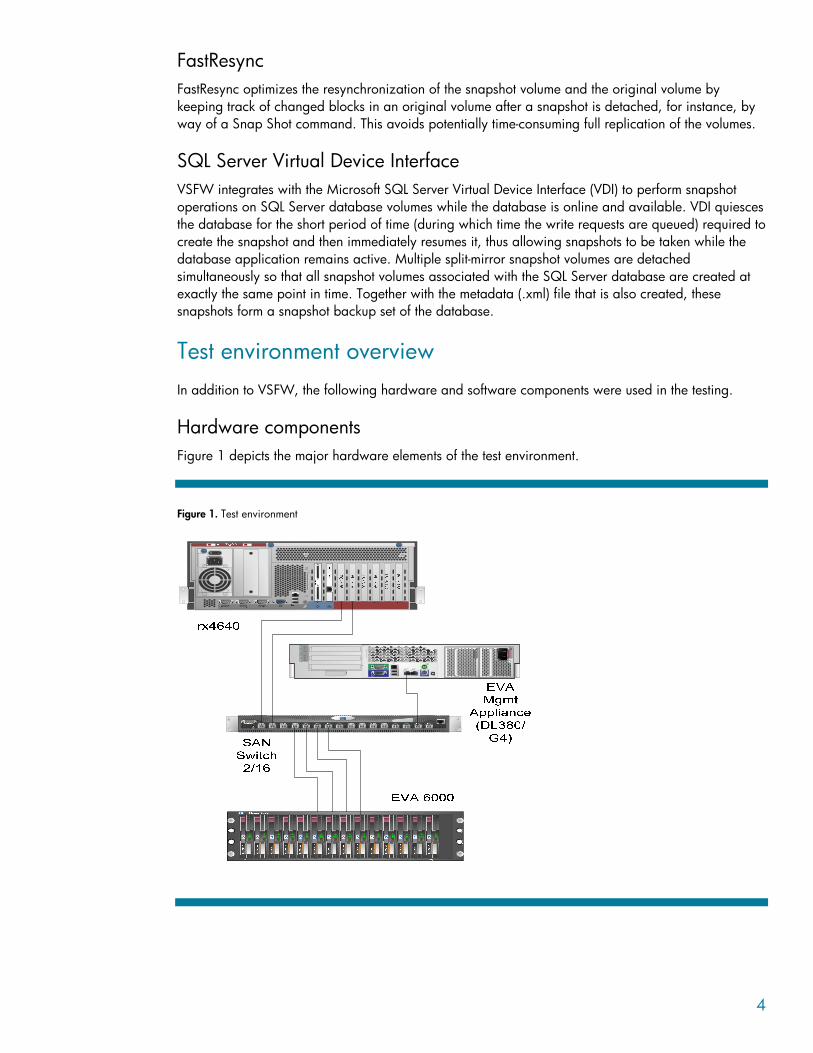
Hardware components Figure 1 depicts the major hardware elements of the test environment.
Figure 1. Test environment
3
2
S C S I P o r t 1
iL O
2 1
U ID
P C I -X
4
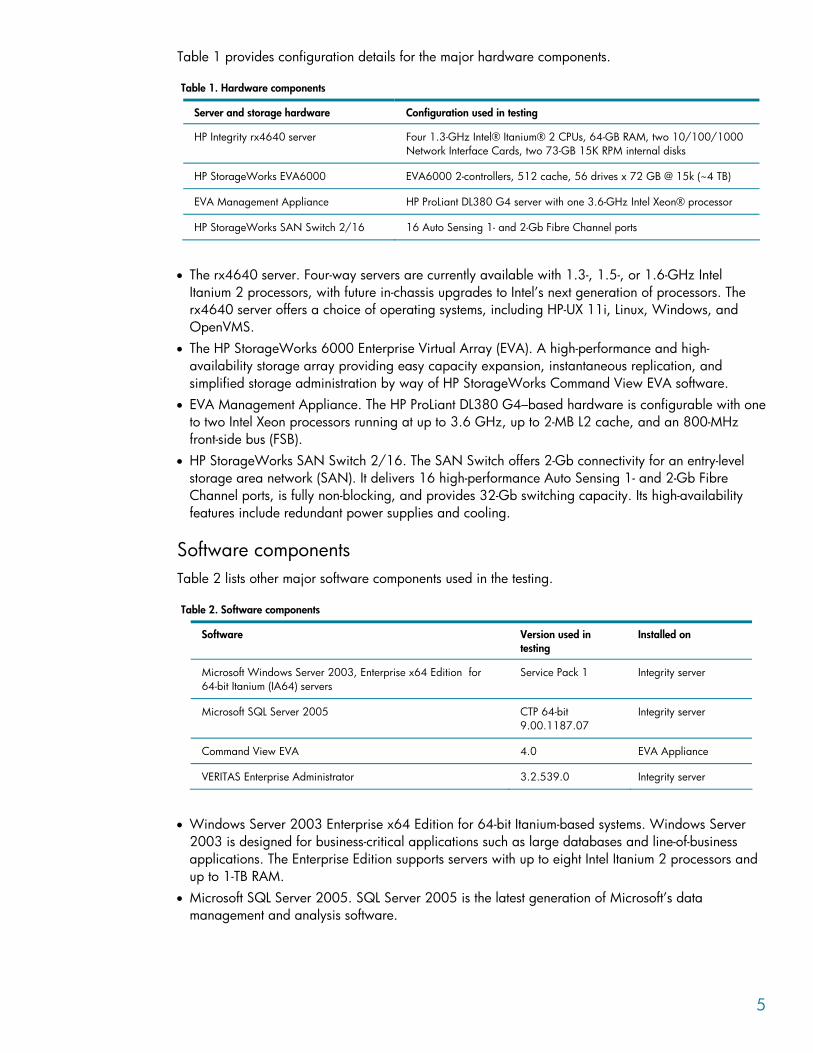
Table 1 provides configuration details for the major hardware components.
Table 1. Hardware components
Server and storage hardware Configuration used in testing
HP Integrity rx4640 server Four 1.3-GHz Intel® Itanium® 2 CPUs, 64-GB RAM, two 10/100/1000 Network Interface Cards, two 73-GB 15K RPM internal disks
HP StorageWorks EVA6000 EVA6000 2-controllers, 512 cache, 56 drives x 72 GB @ 15k (~4 TB)
EVA Management Appliance HP ProLiant DL380 G4 server with one 3.6-GHz Intel Xeon® processor
HP StorageWorks SAN Switch 2/16 16 Auto Sensing 1- and 2-Gb Fibre Channel ports
• The rx4640 server. Four-way servers are currently available with 1.3-, 1.5-, or 1.6-GHz Intel Itanium 2 processors, with future in-chassis upgrades to Intel’s next generation of processors. The rx4640 server offers a choice of operating systems, including HP-UX 11i, Linux, Windows, and OpenVMS.
• The HP StorageWorks 6000 Enterprise Virtual Array (EVA). A high-performance and high-availability storage array providing easy capacity expansion, instantaneous replication, and simplified storage administration by way of HP StorageWorks Command View EVA software.
• EVA Management Appliance. The HP ProLiant DL380 G4–based hardware is configurable with one to two Intel Xeon processors running at up to 3.6 GHz, up to 2-MB L2 cache, and an 800-MHz front-side bus (FSB).
• HP StorageWorks SAN Switch 2/16. The SAN Switch offers 2-Gb connectivity for an entry-level storage area network (SAN). It delivers 16 high-performance Auto Sensing 1- and 2-Gb Fibre Channel ports, is fully non-blocking, and provides 32-Gb switching capacity. Its high-availability features include redundant power supplies and cooling.
Software components Table 2 lists other major software components used in the testing.
Table 2. Software components
Software Version used in testing
Installed on
Microsoft Windows Server 2003, Enterprise x64 Edition for 64-bit Itanium (IA64) servers
Service Pack 1 Integrity server
Microsoft SQL Server 2005 CTP 64-bit 9.00.1187.07
Integrity server
Command View EVA 4.0 EVA Appliance
VERITAS Enterprise Administrator 3.2.539.0 Integrity server
• Windows Server 2003 Enterprise x64 Edition for 64-bit Itanium-based systems. Windows Server 2003 is designed for business-critical applications such as large databases and line-of-business applications. The Enterprise Edition supports servers with up to eight Intel Itanium 2 processors and up to 1-TB RAM.
• Microsoft SQL Server 2005. SQL Server 2005 is the latest generation of Microsoft’s data management and analysis software.
5
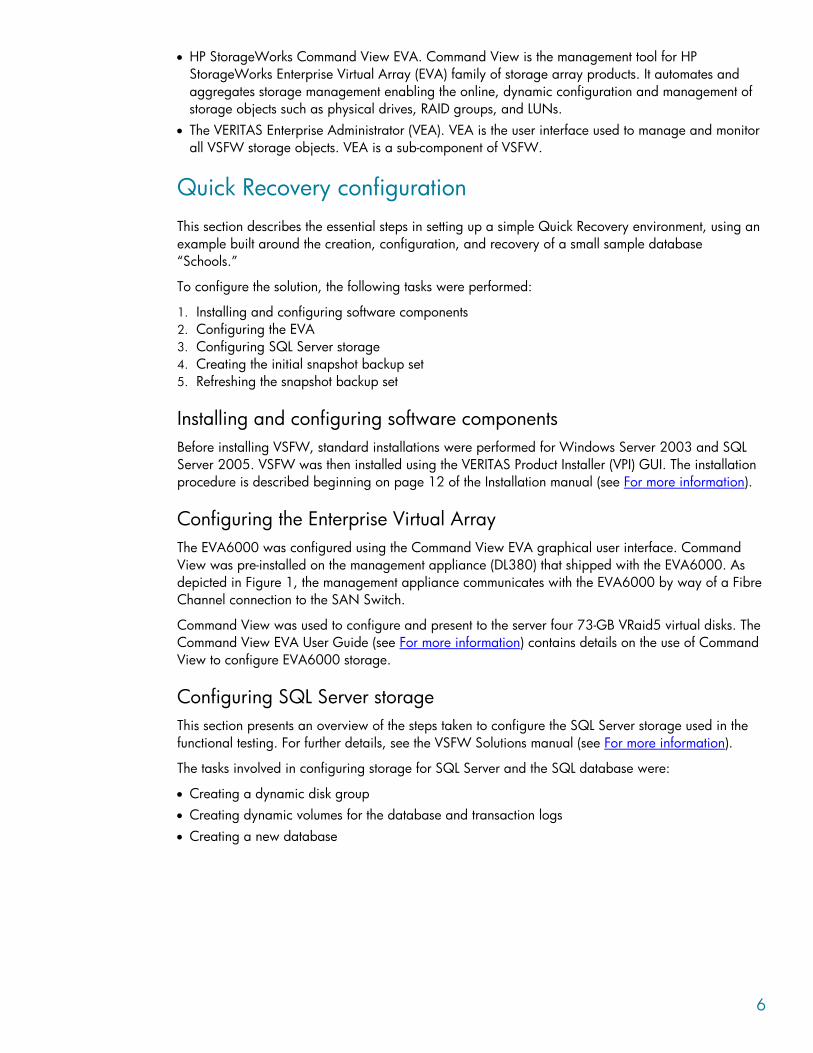
• HP StorageWorks Command View EVA. Command View is the management tool for HP StorageWorks Enterprise Virtual Array (EVA) family of storage array products. It automates and aggregates storage management enabling the online, dynamic configuration and management of storage objects such as physical drives, RAID groups, and LUNs.
• The VERITAS Enterprise Administrator (VEA). VEA is the user interface used to manage and monitor all VSFW storage objects. VEA is a sub-component of VSFW.
Quick Recovery configuration This section describes the essential steps in setting up a simple Quick Recovery environment, using an example built around the creation, configuration, and recovery of a small sample database “Schools.”
To configure the solution, the following tasks were performed:
1. Installing and configuring software components 2. Configuring the EVA 3. Configuring SQL Server storage 4. Creating the initial snapshot backup set 5. Refreshing the snapshot backup set
Installing and configuring software components Before installing VSFW, standard installations were performed for Windows Server 2003 and SQL Server 2005. VSFW was then installed using the VERITAS Product Installer (VPI) GUI. The installation procedure is described beginning on page 12 of the Installation manual (see For more information).
Configuring the Enterprise Virtual Array The EVA6000 was configured using the Command View EVA graphical user interface. Command View was pre-installed on the management appliance (DL380) that shipped with the EVA6000. As depicted in Figure 1, the management appliance communicates with the EVA6000 by way of a Fibre Channel connection to the SAN Switch.
Command View was used to configure and present to the server four 73-GB VRaid5 virtual disks. The Command View EVA User Guide (see For more information) contains details on the use of Command View to configure EVA6000 storage.
Configuring SQL Server storage This section presents an overview of the steps taken to configure the SQL Server storage used in the functional testing. For further details, see the VSFW Solutions manual (see For more information).
The tasks involved in configuring storage for SQL Server and the SQL database were:
• Creating a dynamic disk group • Creating dynamic volumes for the database and transaction logs • Creating a new database
6
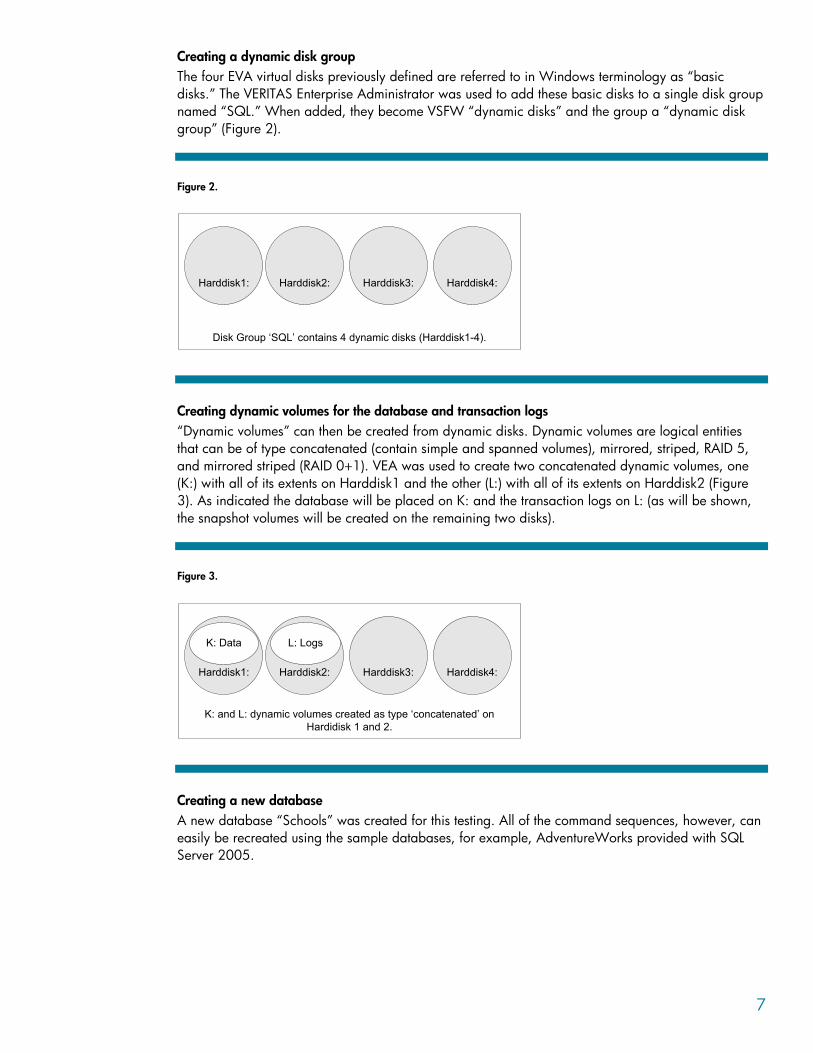
Creating a dynamic disk group The four EVA virtual disks previously defined are referred to in Windows terminology as “basic disks.” The VERITAS Enterprise Administrator was used to add these basic disks to a single disk group named “SQL.” When added, they become VSFW “dynamic disks” and the group a “dynamic disk group” (Figure 2).
Figure 2.
Disk Group ‘SQL’ contains 4 dynamic disks (Harddisk1-4).
Harddisk1: Harddisk2: Harddisk3: Harddisk4:
Creating dynamic volumes for the database and transaction logs “Dynamic volumes” can then be created from dynamic disks. Dynamic volumes are logical entities that can be of type concatenated (contain simple and spanned volumes), mirrored, striped, RAID 5, and mirrored striped (RAID 0+1). VEA was used to create two concatenated dynamic volumes, one (K:) with all of its extents on Harddisk1 and the other (L:) with all of its extents on Harddisk2 (Figure 3). As indicated the database will be placed on K: and the transaction logs on L: (as will be shown, the snapshot volumes will be created on the remaining two disks).
Figure 3.
K: and L: dynamic volumes created as type ‘concatenated’ on Hardidisk 1 and 2.
Harddisk1:
K: Data
Harddisk2:
L: Logs
Harddisk3: Harddisk4:
Creating a new database A new database “Schools” was created for this testing. All of the command sequences, however, can easily be recreated using the sample databases, for example, AdventureWorks provided with SQL Server 2005.
7
Creating the initial snapshot backup set For this and subsequent configuration steps, the Quick Recovery vxsnapsql command line utility will be used.
Vxsnapsql overview Vxsnapsql is a command line utility included with the VSFW Flashsnap option for creating snapshots of SQL databases. Vxsnapsql is integrated with VDI to quiesce SQL before a snapshot is created. Snapshots are done at the database level and produce a snapshot backup set containing a mirror copy of all volumes associated with the database plus some associated metadata.
Vxsnapsql has the following keywords:
• Start—Creates snapshot mirrors on the specified disks. • Create—Creates a simultaneous snapshot of all the database volumes. • Restore—Restores a corrupted database using the snapshot backup set. • Reattach—Reattaches and resynchronizes an existing snapshot backup set to the original database
volumes.
A full description of the options and operands available for any given keyword can be obtained by typing the following command: vxsnapsql <keyword> -? The tasks necessary for creating the initial snapshot backup set are:
• Creating the snapshot mirrors • Creating the snapshot backup set
Creating the snapshot mirrors The “vxsnapsql start” command creates a snapshot mirror on the dynamic volumes specified for each data volume and log volume associated with the SQL Server database listed in the “component=” operand. The snapshot mirrors remain synchronized (“attached”) with the original volumes until the “vxsnapsql create” command is issued. The following example shows the start command being issued on the Schools database.
Note Two issues were encountered during the testing that relate to the issuance of the start command. These issues and their resolutions are documented in Appendix A—Troubleshooting tips.
8

>vxsnapsql start component=Schools Harddisk3 Harddisk4 Snapstart successful created new plex with name Logs-02 Names of the Disk are.... Harddisk3 Snapstart successful created new plex with name Data-02 Names of the Disk are.... Harddisk4 The operation was completed successfully
Note ”plex” is alternative terminology for the new instance of the original dynamic volume.
Creating the snapshot backup set The “vxsnapsql create” command will create a snapshot backup set containing the contents of the original volumes at the time the command is issued, in other words, a “point in time” copy. In the following example a backup set is created for the Schools database which will contain:
• The snapshot volume of the Data volume, mounted on S: • The snapshot volume of the Log volume, mounted on T:
Note The –x option is used to name an .xml metadata file generated by the create command to store snapshot information, which will be used in the restore operation to quickly recover the SQL database.
>vxsnapsql -x c:\snap1.xml create component=Schools source=k:/driveletter=s source=l:/driveletter=t Snapshot SQL database[Schools] volumes... Snapshot of all specified volumes successful. The snapshot Volume names are... \Device\HarddiskDmVolumes\SQL\SnapVolume01 DriveLetter s assigned to the volume \Device\HarddiskDmVolumes\SQL\SnapVolume02 DriveLetter t assigned to the volume Saving the Snapshot Backup set information to c:\snap1.xml... The operation was completed successfully
9
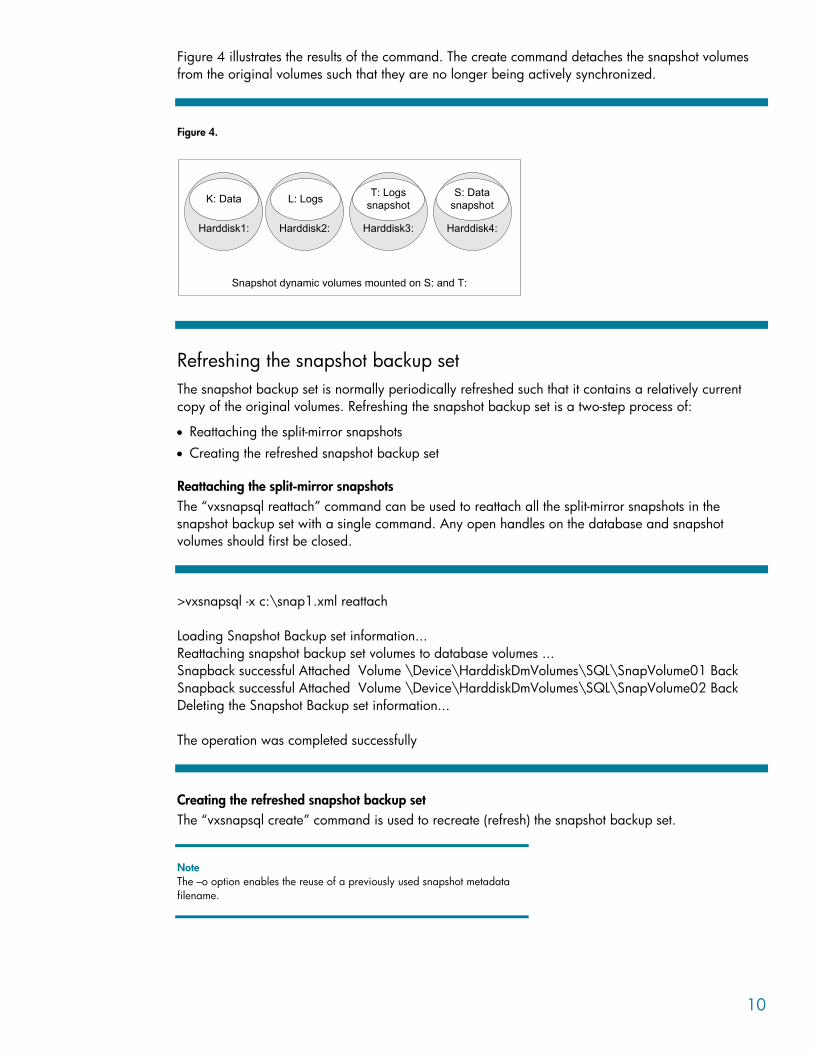
Figure 4 illustrates the results of the command. The create command detaches the snapshot volumes from the original volumes such that they are no longer being actively synchronized.
Figure 4.
Snapshot dynamic volumes mounted on S: and T:
Harddisk1:
K: Data
Harddisk2:
L: Logs
Harddisk3:
T: Logs snapshot
Harddisk4:
S: Data snapshot
Refreshing the snapshot backup set The snapshot backup set is normally periodically refreshed such that it contains a relatively current copy of the original volumes. Refreshing the snapshot backup set is a two-step process of:
• Reattaching the split-mirror snapshots • Creating the refreshed snapshot backup set
Reattaching the split-mirror snapshots The “vxsnapsql reattach” command can be used to reattach all the split-mirror snapshots in the snapshot backup set with a single command. Any open handles on the database and snapshot volumes should first be closed.
>vxsnapsql -x c:\snap1.xml reattach Loading Snapshot Backup set information... Reattaching snapshot backup set volumes to database volumes ... Snapback successful Attached Volume \Device\HarddiskDmVolumes\SQL\SnapVolume01 Back Snapback successful Attached Volume \Device\HarddiskDmVolumes\SQL\SnapVolume02 Back Deleting the Snapshot Backup set information... The operation was completed successfully
Creating the refreshed snapshot backup set The “vxsnapsql create” command is used to recreate (refresh) the snapshot backup set.
Note The –o option enables the reuse of a previously used snapshot metadata filename.
10
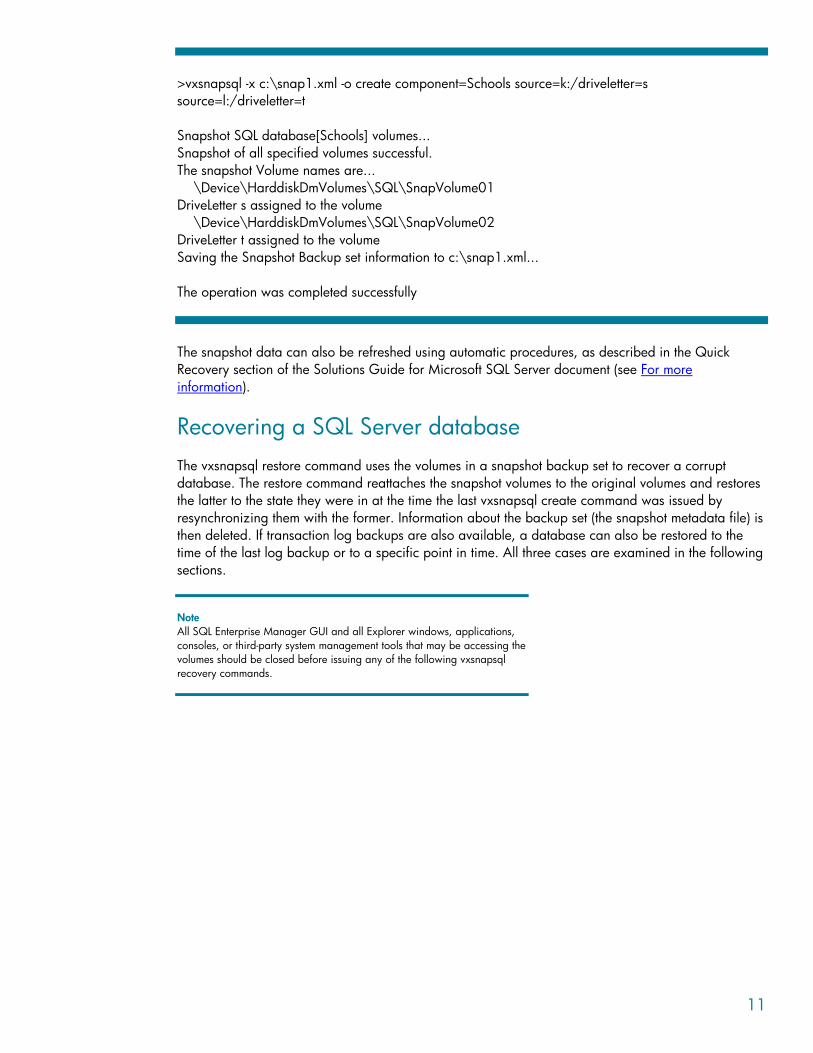
>vxsnapsql -x c:\snap1.xml -o create component=Schools source=k:/driveletter=s source=l:/driveletter=t Snapshot SQL database[Schools] volumes... Snapshot of all specified volumes successful. The snapshot Volume names are... \Device\HarddiskDmVolumes\SQL\SnapVolume01 DriveLetter s assigned to the volume \Device\HarddiskDmVolumes\SQL\SnapVolume02 DriveLetter t assigned to the volume Saving the Snapshot Backup set information to c:\snap1.xml... The operation was completed successfully
The snapshot data can also be refreshed using automatic procedures, as described in the Quick Recovery section of the Solutions Guide for Microsoft SQL Server document (see For more information).
Recovering a SQL Server database The vxsnapsql restore command uses the volumes in a snapshot backup set to recover a corrupt database. The restore command reattaches the snapshot volumes to the original volumes and restores the latter to the state they were in at the time the last vxsnapsql create command was issued by resynchronizing them with the former. Information about the backup set (the snapshot metadata file) is then deleted. If transaction log backups are also available, a database can also be restored to the time of the last log backup or to a specific point in time. All three cases are examined in the following sections.
Note All SQL Enterprise Manager GUI and all Explorer windows, applications, consoles, or third-party system management tools that may be accessing the volumes should be closed before issuing any of the following vxsnapsql recovery commands.
11
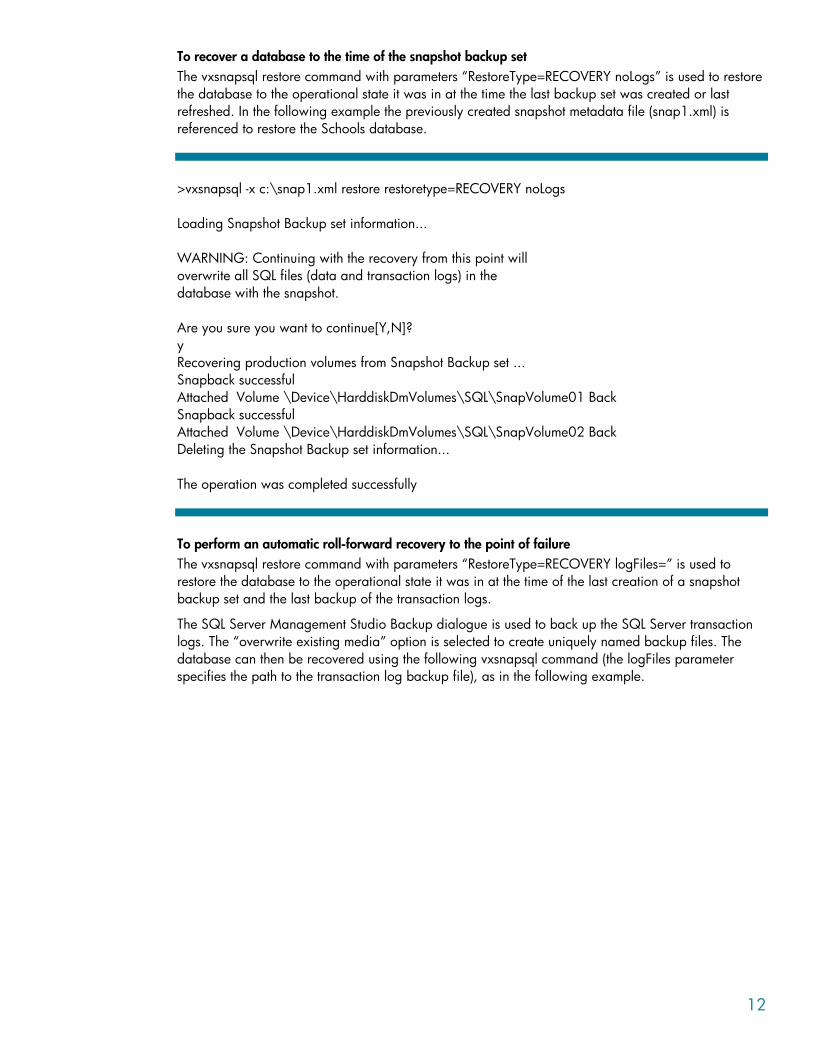
To recover a database to the time of the snapshot backup set The vxsnapsql restore command with parameters “RestoreType=RECOVERY noLogs” is used to restore the database to the operational state it was in at the time the last backup set was created or last refreshed. In the following example the previously created snapshot metadata file (snap1.xml) is referenced to restore the Schools database.
>vxsnapsql -x c:\snap1.xml restore restoretype=RECOVERY noLogs Loading Snapshot Backup set information... WARNING: Continuing with the recovery from this point will overwrite all SQL files (data and transaction logs) in the database with the snapshot. Are you sure you want to continue[Y,N]? y Recovering production volumes from Snapshot Backup set ... Snapback successful Attached Volume \Device\HarddiskDmVolumes\SQL\SnapVolume01 Back Snapback successful Attached Volume \Device\HarddiskDmVolumes\SQL\SnapVolume02 Back Deleting the Snapshot Backup set information... The operation was completed successfully
To perform an automatic roll-forward recovery to the point of failure The vxsnapsql restore command with parameters “RestoreType=RECOVERY logFiles=” is used to restore the database to the operational state it was in at the time of the last creation of a snapshot backup set and the last backup of the transaction logs.
The SQL Server Management Studio Backup dialogue is used to back up the SQL Server transaction logs. The “overwrite existing media” option is selected to create uniquely named backup files. The database can then be recovered using the following vxsnapsql command (the logFiles parameter specifies the path to the transaction log backup file), as in the following example.
12
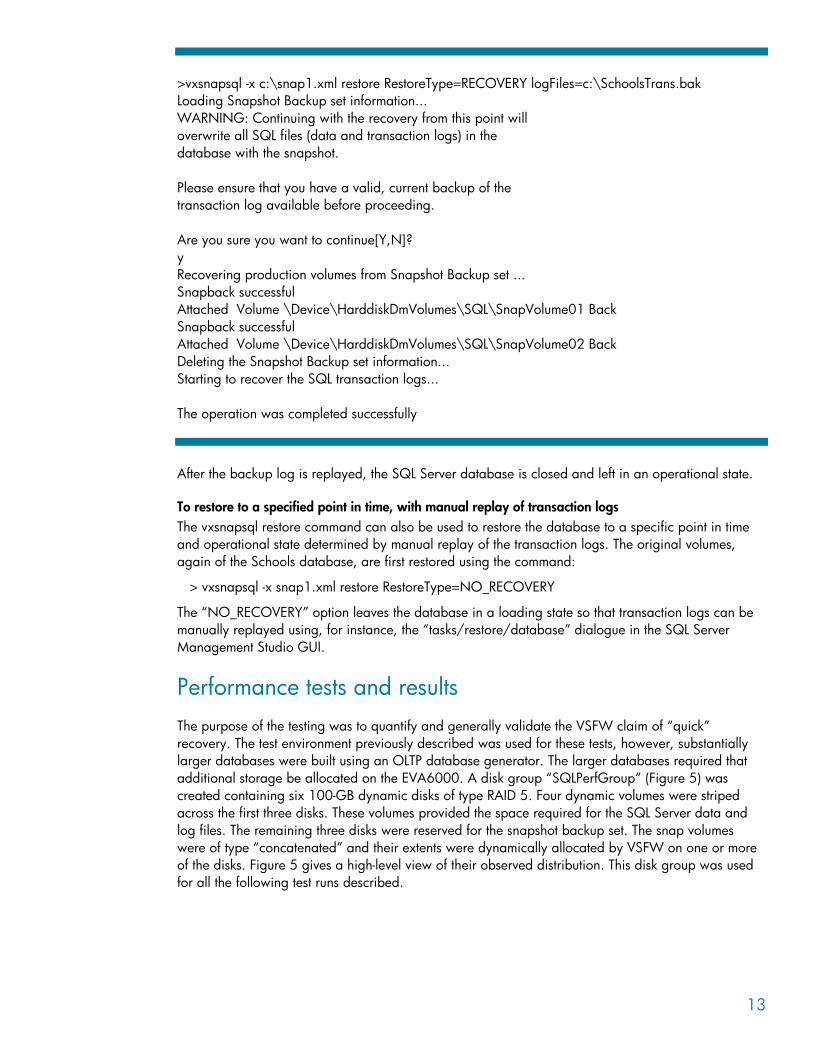
>vxsnapsql -x c:\snap1.xml restore RestoreType=RECOVERY logFiles=c:\SchoolsTrans.bak Loading Snapshot Backup set information... WARNING: Continuing with the recovery from this point will overwrite all SQL files (data and transaction logs) in the database with the snapshot. Please ensure that you have a valid, current backup of the transaction log available before proceeding. Are you sure you want to continue[Y,N]? y Recovering production volumes from Snapshot Backup set ... Snapback successful Attached Volume \Device\HarddiskDmVolumes\SQL\SnapVolume01 Back Snapback successful Attached Volume \Device\HarddiskDmVolumes\SQL\SnapVolume02 Back Deleting the Snapshot Backup set information... Starting to recover the SQL transaction logs... The operation was completed successfully
After the backup log is replayed, the SQL Server database is closed and left in an operational state.
To restore to a specified point in time, with manual replay of transaction logs The vxsnapsql restore command can also be used to restore the database to a specific point in time and operational state determined by manual replay of the transaction logs. The original volumes, again of the Schools database, are first restored using the command:
> vxsnapsql -x snap1.xml restore RestoreType=NO_RECOVERY
The “NO_RECOVERY” option leaves the database in a loading state so that transaction logs can be manually replayed using, for instance, the “tasks/restore/database” dialogue in the SQL Server Management Studio GUI.
Performance tests and results The purpose of the testing was to quantify and generally validate the VSFW claim of “quick” recovery. The test environment previously described was used for these tests, however, substantially larger databases were built using an OLTP database generator. The larger databases required that additional storage be allocated on the EVA6000. A disk group “SQLPerfGroup” (Figure 5) was created containing six 100-GB dynamic disks of type RAID 5. Four dynamic volumes were striped across the first three disks. These volumes provided the space required for the SQL Server data and log files. The remaining three disks were reserved for the snapshot backup set. The snap volumes were of type “concatenated” and their extents were dynamically allocated by VSFW on one or more of the disks. Figure 5 gives a high-level view of their observed distribution. This disk group was used for all the following test runs described.
13
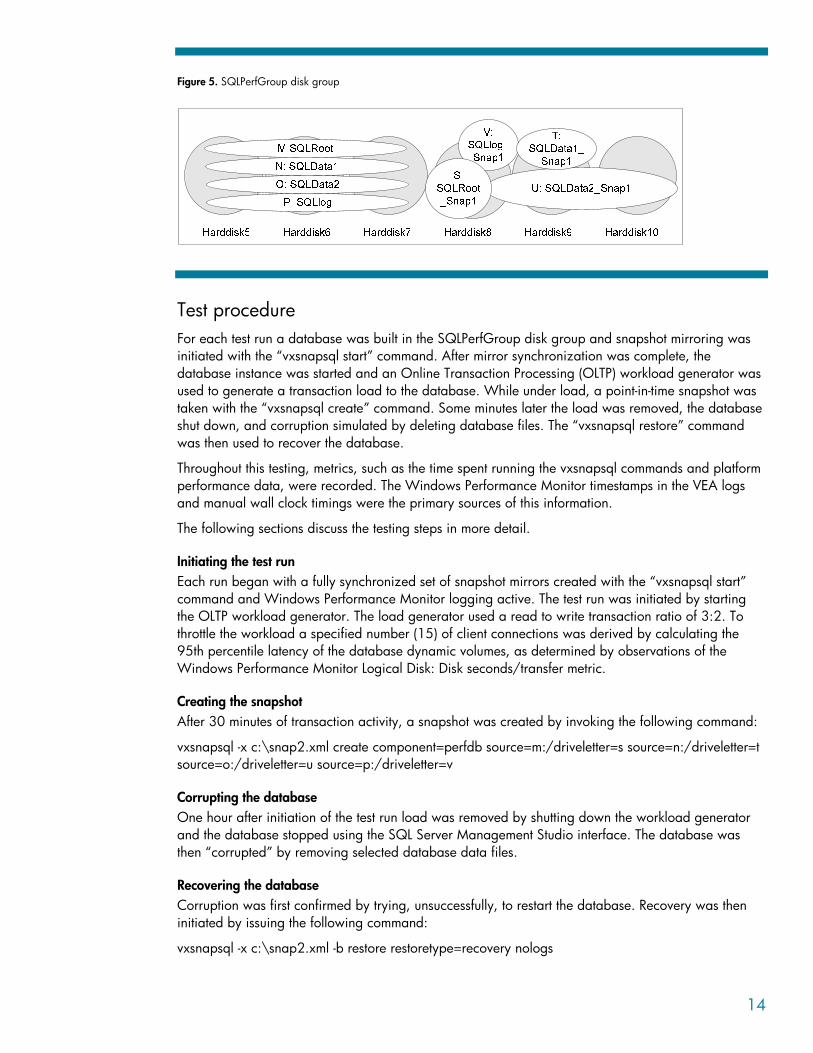
Figure 5. SQLPerfGroup disk group
Test procedure For each test run a database was built in the SQLPerfGroup disk group and snapshot mirroring was initiated with the “vxsnapsql start” command. After mirror synchronization was complete, the database instance was started and an Online Transaction Processing (OLTP) workload generator was used to generate a transaction load to the database. While under load, a point-in-time snapshot was taken with the “vxsnapsql create” command. Some minutes later the load was removed, the database shut down, and corruption simulated by deleting database files. The “vxsnapsql restore” command was then used to recover the database.
Throughout this testing, metrics, such as the time spent running the vxsnapsql commands and platform performance data, were recorded. The Windows Performance Monitor timestamps in the VEA logs and manual wall clock timings were the primary sources of this information.
The following sections discuss the testing steps in more detail.
Initiating the test run Each run began with a fully synchronized set of snapshot mirrors created with the “vxsnapsql start” command and Windows Performance Monitor logging active. The test run was initiated by starting the OLTP workload generator. The load generator used a read to write transaction ratio of 3:2. To throttle the workload a specified number (15) of client connections was derived by calculating the 95th percentile latency of the database dynamic volumes, as determined by observations of the Windows Performance Monitor Logical Disk: Disk seconds/transfer metric.
Creating the snapshot After 30 minutes of transaction activity, a snapshot was created by invoking the following command:
vxsnapsql -x c:\snap2.xml create component=perfdb source=m:/driveletter=s source=n:/driveletter=t source=o:/driveletter=u source=p:/driveletter=v
Corrupting the database One hour after initiation of the test run load was removed by shutting down the workload generator and the database stopped using the SQL Server Management Studio interface. The database was then “corrupted” by removing selected database data files.
Recovering the database Corruption was first confirmed by trying, unsuccessfully, to restart the database. Recovery was then initiated by issuing the following command:
vxsnapsql -x c:\snap2.xml -b restore restoretype=recovery nologs
14
The -b option puts the mirror resynchronization operation in the processing background. Running this operation in the background is the recommended method of getting the database back online quickly. In this scenario VSFW mounts the snapshot as the new production volume (replacing the original volume) so that the application returns to production quickly. Resynchronization still has to take place, and the time required will depend on the quantity of data to be resynchronized. If the entire original volume is lost or has been corrupted, then resynchronization will be of the entire volume. Of course, while resynchronization is occurring, new snapshots cannot be created. This processing makes use of the FastResync feature previously described.
Note To isolate the performance of the Quick Recovery feature no attempt was made to apply SQL Server transaction logs in the recovery of the database.
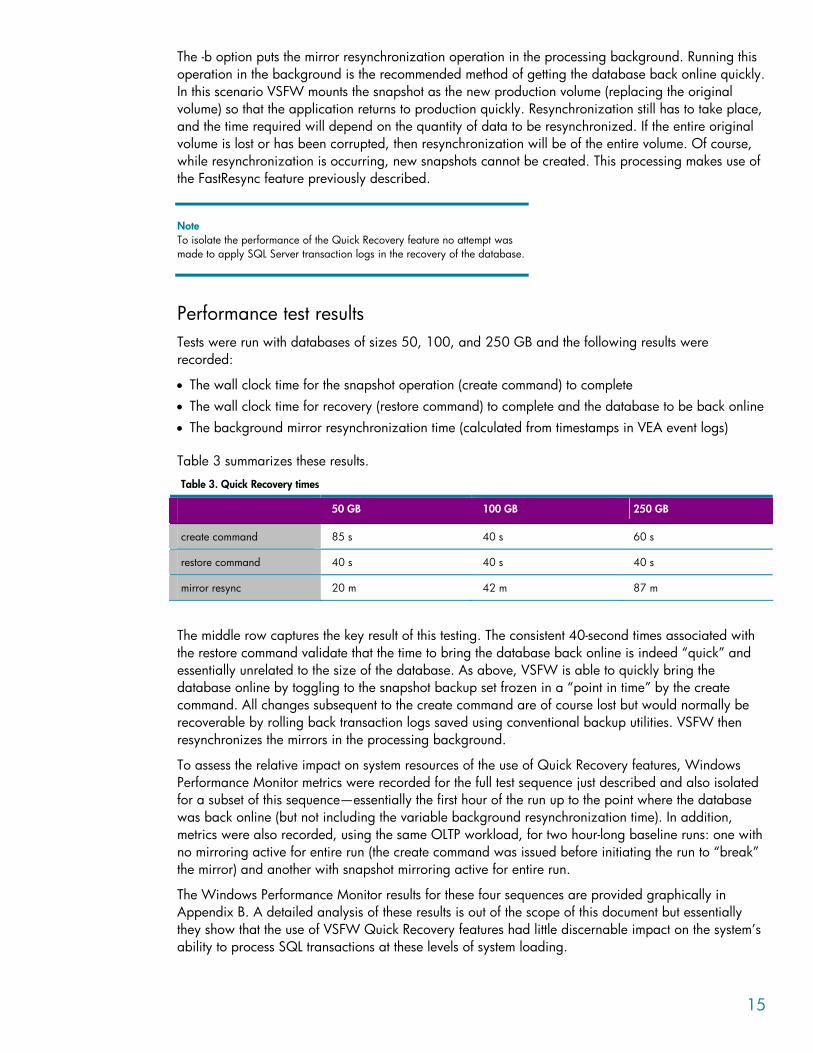
Performance test results Tests were run with databases of sizes 50, 100, and 250 GB and the following results were recorded:
• The wall clock time for the snapshot operation (create command) to complete • The wall clock time for recovery (restore command) to complete and the database to be back online • The background mirror resynchronization time (calculated from timestamps in VEA event logs)
Table 3 summarizes these results.
Table 3. Quick Recovery times
50 GB 100 GB 250 GB
create command 85 s 40 s 60 s
restore command 40 s 40 s 40 s
mirror resync 20 m 42 m 87 m
The middle row captures the key result of this testing. The consistent 40-second times associated with the restore command validate that the time to bring the database back online is indeed “quick” and essentially unrelated to the size of the database. As above, VSFW is able to quickly bring the database online by toggling to the snapshot backup set frozen in a “point in time” by the create command. All changes subsequent to the create command are of course lost but would normally be recoverable by rolling back transaction logs saved using conventional backup utilities. VSFW then resynchronizes the mirrors in the processing background.
To assess the relative impact on system resources of the use of Quick Recovery features, Windows Performance Monitor metrics were recorded for the full test sequence just described and also isolated for a subset of this sequence—essentially the first hour of the run up to the point where the database was back online (but not including the variable background resynchronization time). In addition, metrics were also recorded, using the same OLTP workload, for two hour-long baseline runs: one with no mirroring active for entire run (the create command was issued before initiating the run to “break” the mirror) and another with snapshot mirroring active for entire run.
The Windows Performance Monitor results for these four sequences are provided graphically in Appendix B. A detailed analysis of these results is out of the scope of this document but essentially they show that the use of VSFW Quick Recovery features had little discernable impact on the system’s ability to process SQL transactions at these levels of system loading.
15

Summary VERITAS Storage Foundations for Windows is easy to install, configure, and administer. Specialized Quick Recovery features, based on point-in-time, disk-based storage snapshots, provide rapid and flexible recovery of Microsoft SQL Server environments, promoting maximum application availability with minimal incremental system resource utilization.
16
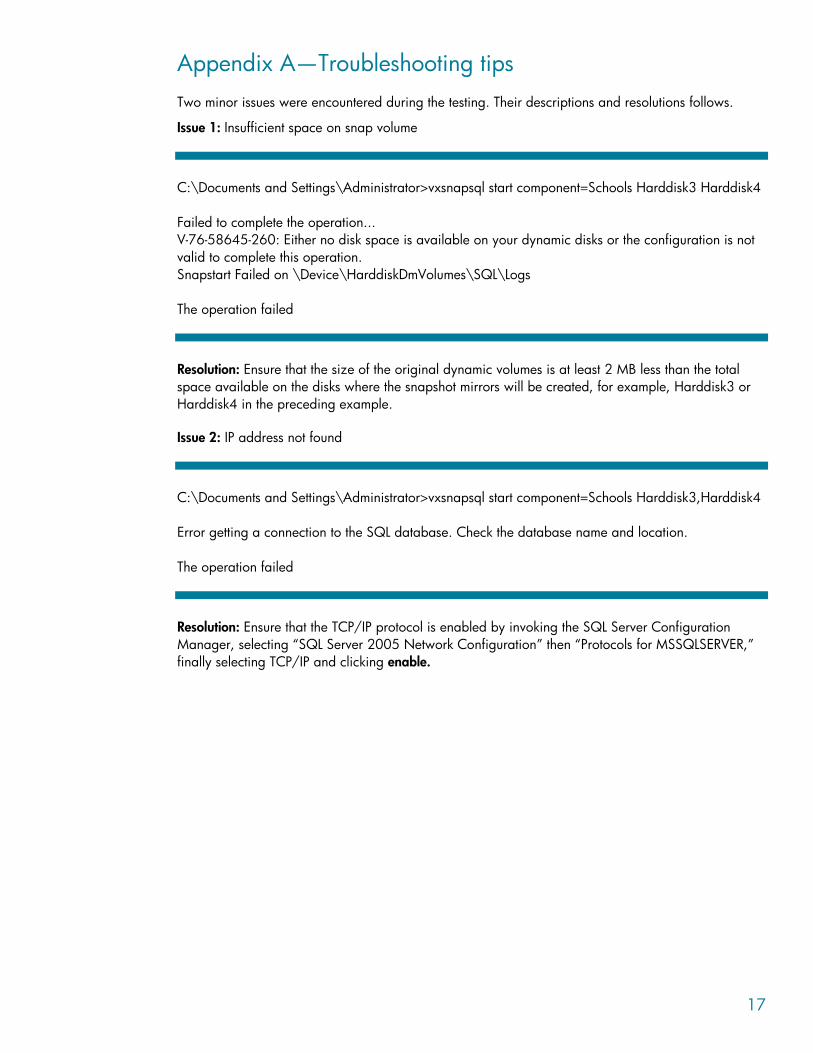
Appendix A—Troubleshooting tips Two minor issues were encountered during the testing. Their descriptions and resolutions follows.
Issue 1: Insufficient space on snap volume
C:\Documents and Settings\Administrator>vxsnapsql start component=Schools Harddisk3 Harddisk4 Failed to complete the operation... V-76-58645-260: Either no disk space is available on your dynamic disks or the configuration is not valid to complete this operation. Snapstart Failed on \Device\HarddiskDmVolumes\SQL\Logs The operation failed
Resolution: Ensure that the size of the original dynamic volumes is at least 2 MB less than the total space available on the disks where the snapshot mirrors will be created, for example, Harddisk3 or Harddisk4 in the preceding example.
Issue 2: IP address not found
C:\Documents and Settings\Administrator>vxsnapsql start component=Schools Harddisk3,Harddisk4 Error getting a connection to the SQL database. Check the database name and location. The operation failed
Resolution: Ensure that the TCP/IP protocol is enabled by invoking the SQL Server Configuration Manager, selecting “SQL Server 2005 Network Configuration” then “Protocols for MSSQLSERVER,” finally selecting TCP/IP and clicking enable.
17
Appendix B—Performance test detail
Note Metric descriptions are taken from Microsoft online documentation found at http://technet2.microsoft.com/WindowsServer/en/default.mspx
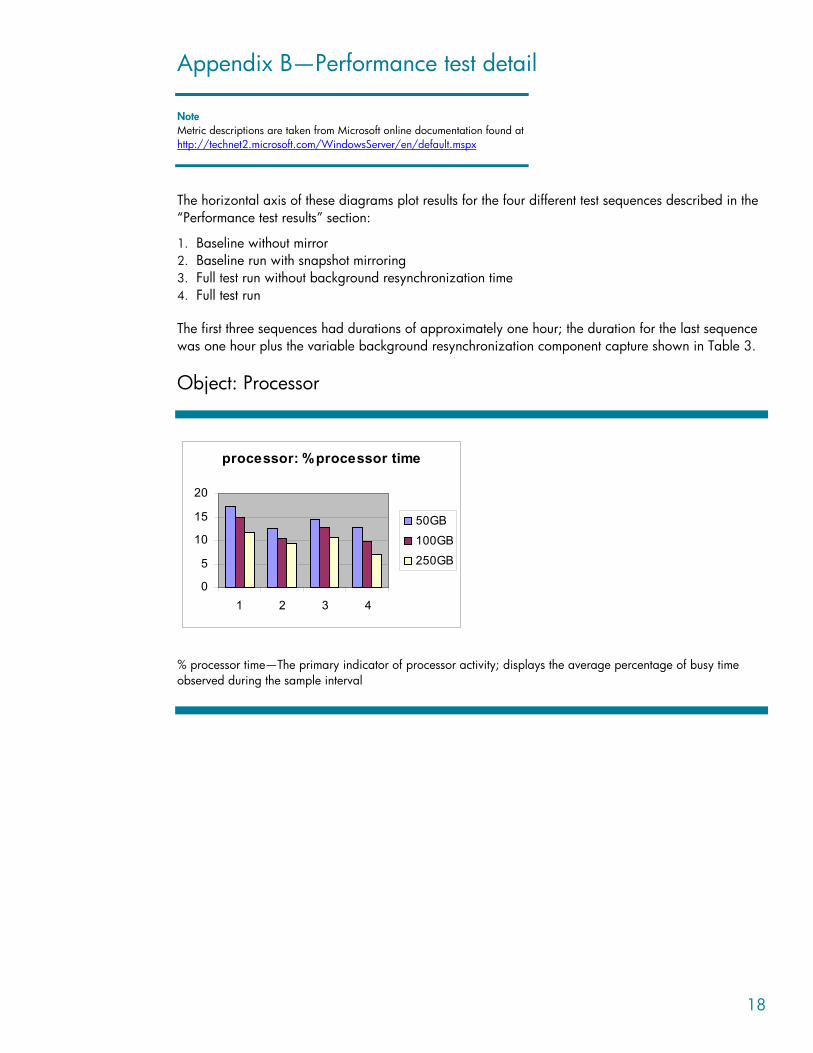
The horizontal axis of these diagrams plot results for the four different test sequences described in the “Performance test results” section:
1. Baseline without mirror 2. Baseline run with snapshot mirroring 3. Full test run without background resynchronization time 4. Full test run
The first three sequences had durations of approximately one hour; the duration for the last sequence was one hour plus the variable background resynchronization component capture shown in Table 3.
Object: Processor
processor: % processor time
0
5
10
15
20
1 2 3 4
50GB
100GB
250GB
% processor time—The primary indicator of processor activity; displays the average percentage of busy time observed during the sample interval
18
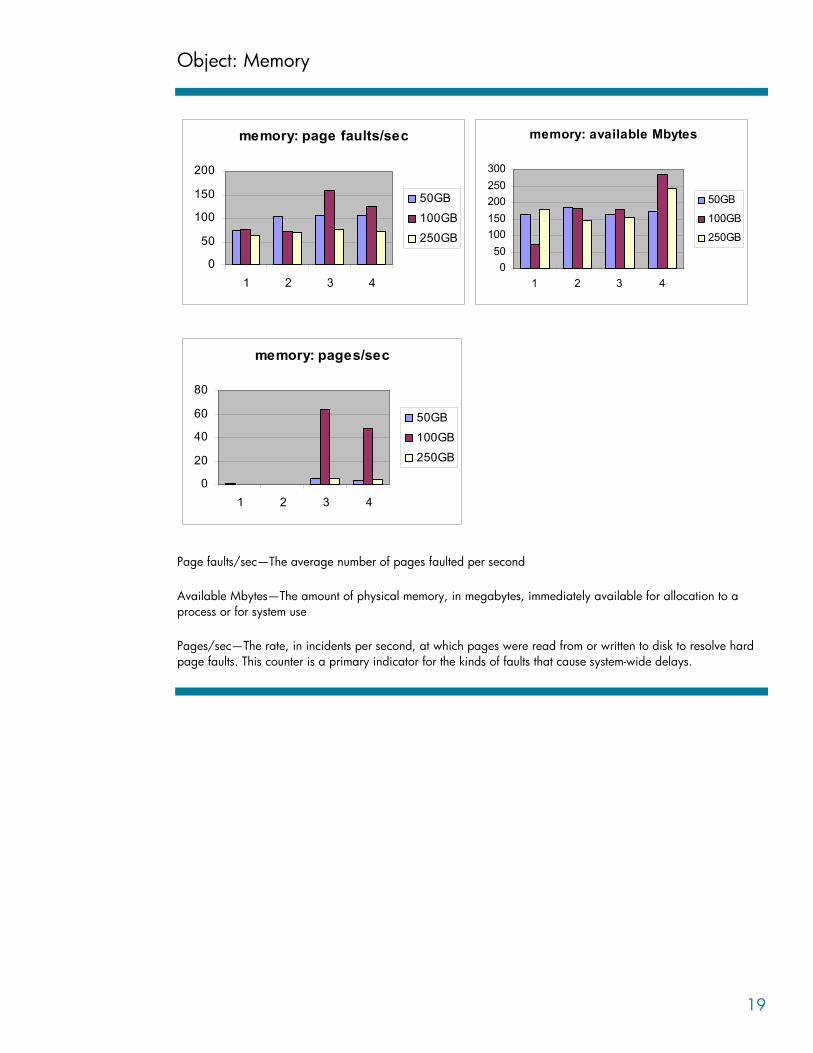
Object: Memory
memory: page faults/sec
0
50
100
150
200
1 2 3 4
50GB
100GB
250GB
memory: available Mbytes
050
100150200250300
1 2 3 4
50GB
100GB
250GB
memory: pages/sec
0
20
40
60
80
1 2 3 4
50GB
100GB
250GB
Page faults/sec—The average number of pages faulted per second
Available Mbytes—The amount of physical memory, in megabytes, immediately available for allocation to a process or for system use
Pages/sec—The rate, in incidents per second, at which pages were read from or written to disk to resolve hard page faults. This counter is a primary indicator for the kinds of faults that cause system-wide delays.
19
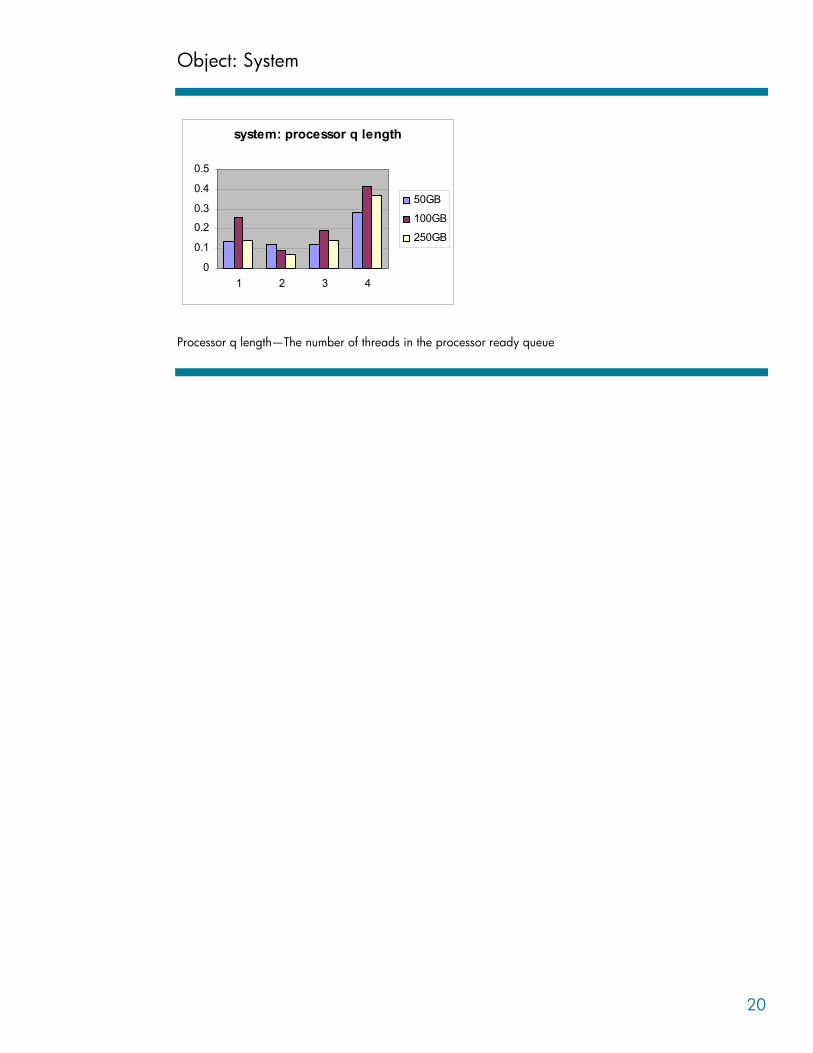
Object: System
system: processor q length
0
0.1
0.2
0.3
0.4
0.5
1 2 3 4
50GB
100GB
250GB
Processor q length—The number of threads in the processor ready queue
20
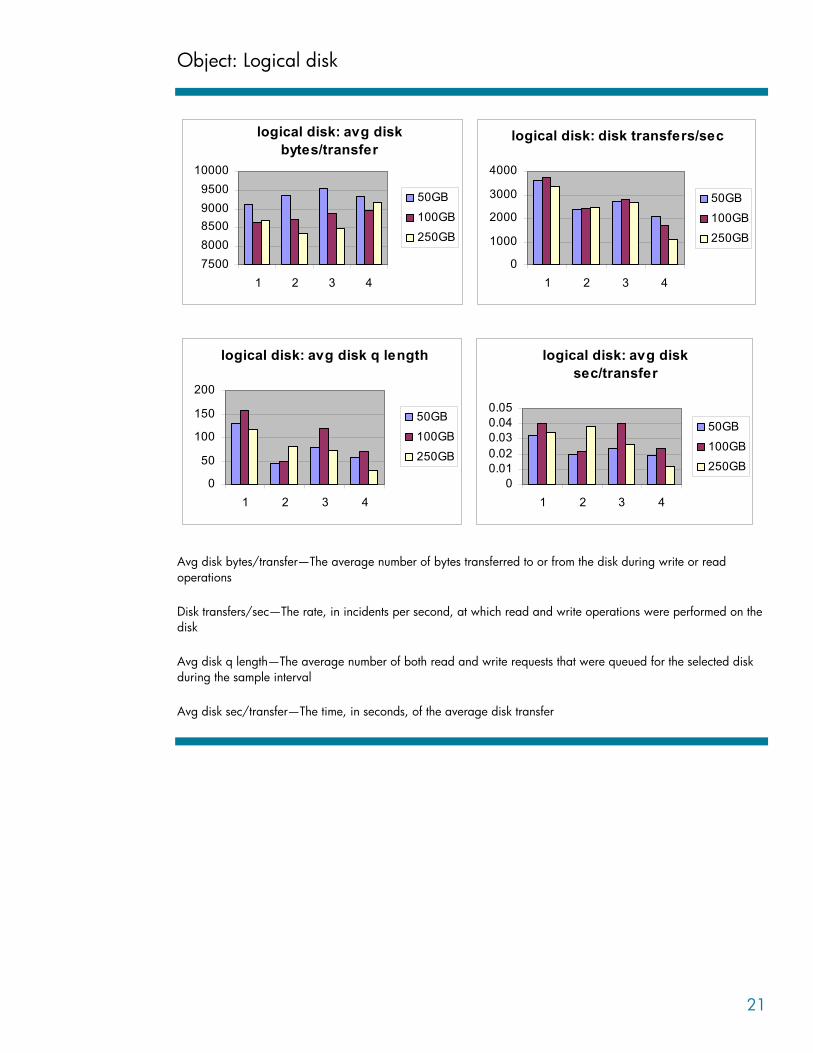
Object: Logical disk
logical disk: avg disk bytes/transfer
75008000850090009500
10000
1 2 3 4
50GB
100GB
250GB
logical disk: disk transfers/sec
0
1000
2000
3000
4000
1 2 3 4
50GB
100GB
250GB
logical disk: avg disk q length
0
50
100
150
200
1 2 3 4
50GB
100GB
250GB
logical disk: avg disk sec/transfer
00.010.020.030.040.05
1 2 3 4
50GB
100GB250GB
Avg disk bytes/transfer—The average number of bytes transferred to or from the disk during write or read operations
Disk transfers/sec—The rate, in incidents per second, at which read and write operations were performed on the disk
Avg disk q length—The average number of both read and write requests that were queued for the selected disk during the sample interval
Avg disk sec/transfer—The time, in seconds, of the average disk transfer
21
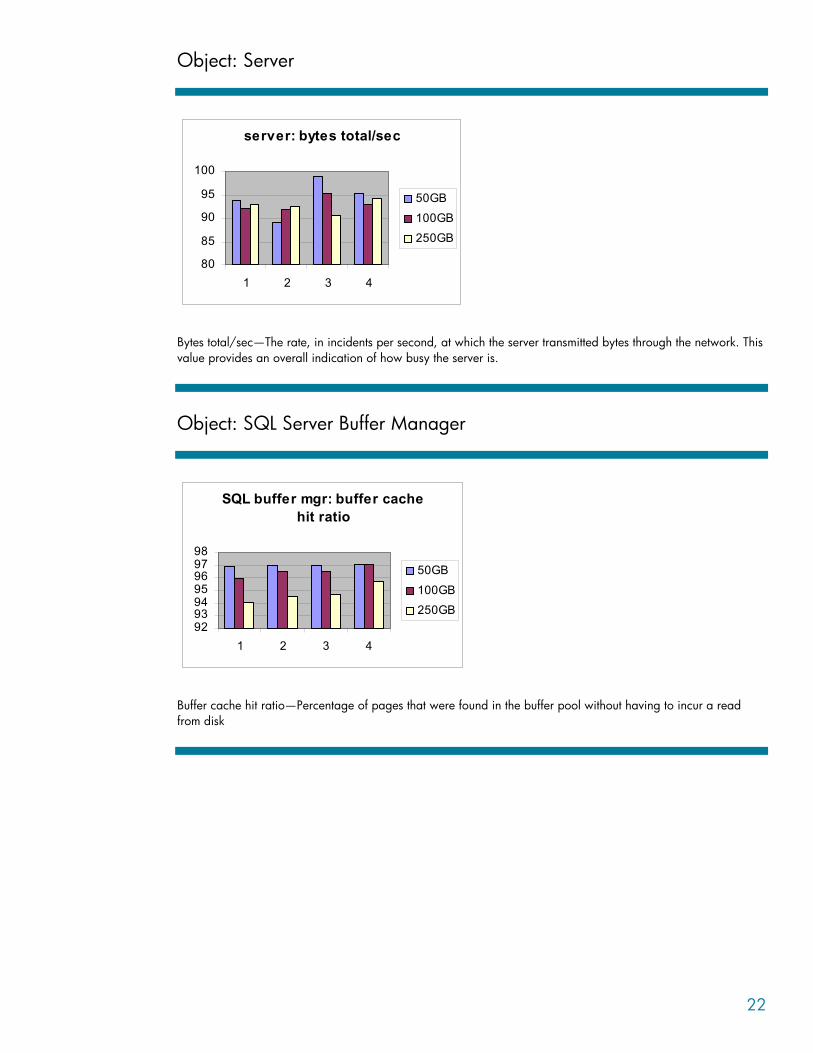
Object: Server
server: bytes total/sec
80
85
90
95
100
1 2 3 4
50GB
100GB
250GB
Bytes total/sec—The rate, in incidents per second, at which the server transmitted bytes through the network. This value provides an overall indication of how busy the server is.
Object: SQL Server Buffer Manager
SQL buffer mgr: buffer cache hit ratio
92939495969798
1 2 3 4
50GB
100GB250GB
Buffer cache hit ratio—Percentage of pages that were found in the buffer pool without having to incur a read from disk
22
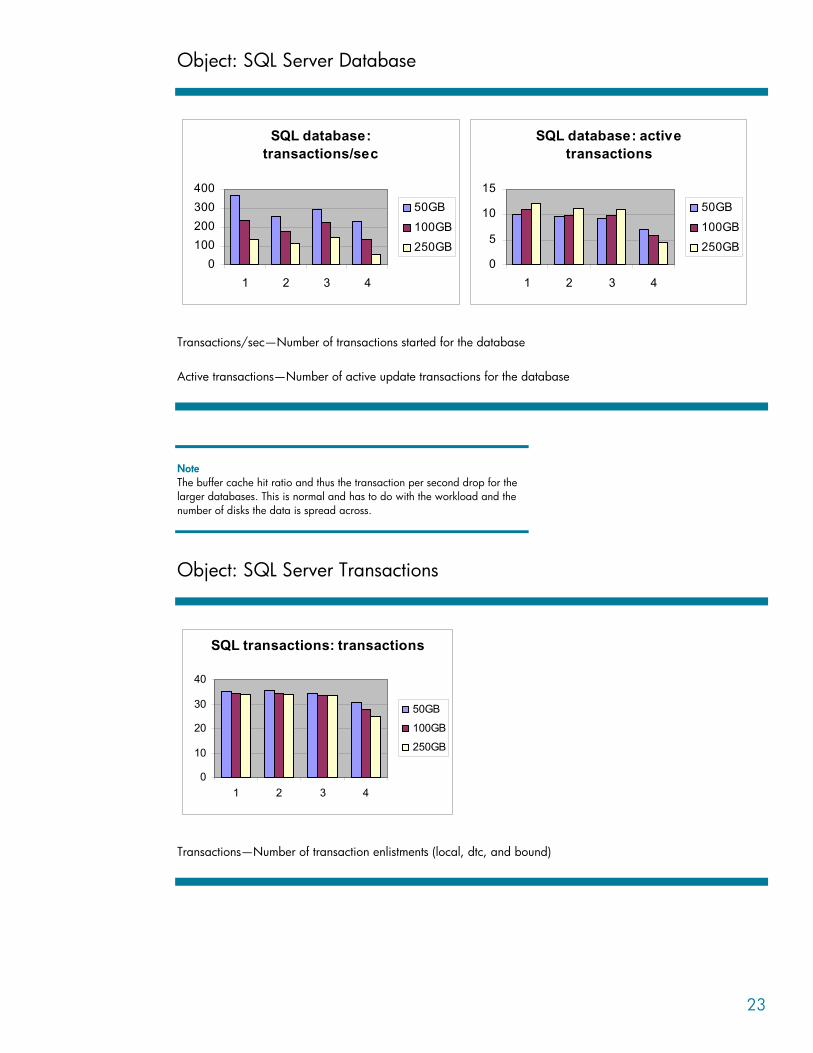
Object: SQL Server Database
SQL database: transactions/sec
0100200300400
1 2 3 4
50GB
100GB250GB
SQL database: active transactions
0
5
10
15
1 2 3 4
50GB
100GB250GB
Transactions/sec—Number of transactions started for the database
Active transactions—Number of active update transactions for the database
Note The buffer cache hit ratio and thus the transaction per second drop for the larger databases. This is normal and has to do with the workload and the number of disks the data is spread across.
Object: SQL Server Transactions
SQL transactions: transactions
0
10
20
30
40
1 2 3 4
50GB
100GB
250GB
Transactions—Number of transaction enlistments (local, dtc, and bound)
23

For more information • VERITAS Storage Foundation (tm) 4.3 and Storage Foundation HA 4.3 for Windows—Installation
and Upgrade Guide http://seer.support.veritas.com/docs/277576.htm
• VERITAS Storage Foundation (tm) 4.3 and Storage Foundation HA 4.3 for Windows—Solutions Guide for Microsoft SQL Server http://seer.support.veritas.com/docs/277585.htm
• HP Storage Solutions for Microsoft SQL Server http://www.hp.com/go/hpcft
• HP StorageWorks Command View EVA installation guide (August 2005) http://www.hp.com/go/storage/
• HP StorageWorks Command View EVA user guide (August 2005) http://www.hp.com/go/storage/
• HP ActiveAnswers http://www.hp.com/solutions/activeanswers
© 2006 Hewlett-Packard Development Company, L.P. The information contained herein is subject to change without notice. The only warranties for HP products andservices are set forth in the express warranty statements accompanying such products and services. Nothing herein should be construed as constituting an additional warranty. HP shall not be liable for technical or editorial errors or omissions contained herein.Intel, Xeon, and Itanium are trademarks or registered trademarks of Intel Corporation or its subsidiaries in the United States and other countries. Microsoft and Windows are U.S. registered trademarks of Microsoft Corporation. Linux is a U.S. registered trademark of Linus Torvalds.
4AA0-3714ENW, January 2006