Embed Size (px)
Citation preview
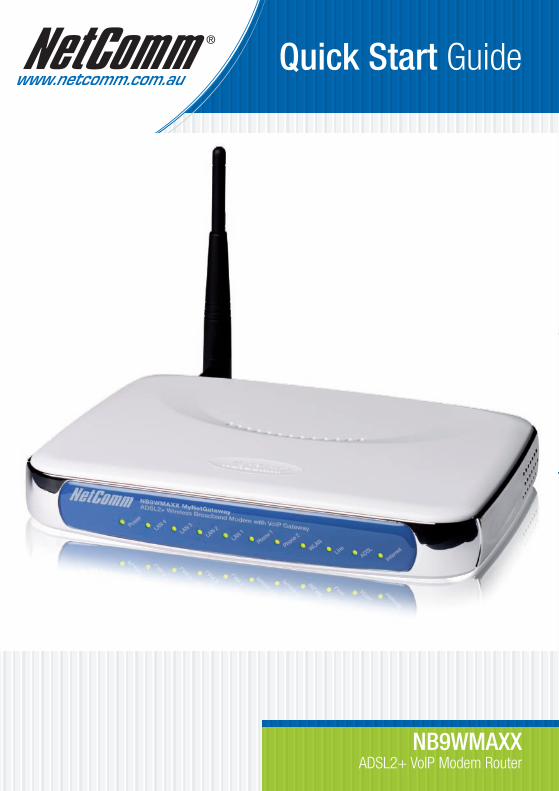
Quick Start Guide
NB9WMAXXADSL2+ VoIP Modem Router
NB9WMAXX Quick Start Guide YML891 Rev1� www.netcomm.com.au
VERY IMPORTANT NOTE:
1. The NB9WMAXX is equipped with an automatic ‘back-up’ telephone line which will connect you to the emergency operator when 000 is dialled on the handset. For this feature to function correctly, you need a functioning telephone line and that line needs to be correctly connected to the NB9WMAXX’s line port. NetComm will not be liable to any person for any expenses, losses, damages or costs if the emergency operator cannot be reached for any reason beyond NetComm’s control, including but not limited to the non-existent or incorrect connection of the telephone line to the NB9WMAXX; faults in line cords, plugs or other cabling/exchange faults; lightning strikes disabling the NB9WMAXX line circuits; the user disabling the LifeLine support in the NB9WMAXX advanced features; problems with the user’s handset or damage caused to the NB9WMAXX by it; the user not having a valid account with the telephone service providers for a regular telephone service; and the ‘000’ service being congested or not operational.
2. NetComm will not be liable to any person for any expenses, losses, damages or costs from a user inadvertently using the PSTN Service to make calls.
The NB9WMAXX ships with different dial tones enabled to provide the user notice when a call is being placed using your VoIP provider or not. On picking up the handset, if a stutter tone is heard this is normal and means the call will proceed via your VoIP Service Provider.
If an Australian dial tone is heard, your VoIP service is not available. Calls will be made out via the PSTN port and be billed by your PSTN provider at possibly more expensive rates.
Please note that documentation and features of this product are subject to change, please visit the support downloads section of the NetComm website - http://www.netcomm.com.au/Support/index.php to obtain the latest versions of these documents. Alternatively you can visit the NetComm Knowledge Base for answers to common questions – http://kb.netcomm.com.au/kb/
YML891 Rev1 NB9WMAXXNB9WMAXX Quick Start Guidewww.netcomm.com.au �
SECTION 1 OVERVIEWThank you for purchasing the NetComm NB9WMAXX ADSL2+ VoIP Router. NetComm is proud to introduce this entirely new class of all-in-one device incorporating ADSL2+, VoIP and Wireless in a single compact unit. The NB9WMAXX is truly a ‘broadband communications gateway’ that, when attached to the appropriate ISP services, will enable multiple broadband communications streams to run concurrently into your home or office. Data and voice services can be delivered and distributed to multiple PCs at the same time, while the data packets can be managed via ‘Quality of Service’ (QoS) controls to ensure that priority is given to voice traffic, or to the traffic of your choice.
The VoIP ‘terminal adaptor’ capability enables you to connect existing telephones to the device to make inexpensive or free VoIP phone calls to any destination, while simultaneously providing internet connectivity for multiple computers.
Let’s look at some of the capabilities offered by the NB9WMAXX in brief:
ADSL Broadband
The NB9WMAXX offers the next generation of broadband ADSL technology with ADSL2/2+, which boosts ADSL’s performance significantly, improves interoperability, and supports new applications, services and deployment conditions.
VoIP (Voice over Internet Protocol)
The NB9WMAXX connects one or two analogue telephones to a VoIP service as well as providing a pass through connection for your existing landline. The two Phone (FXS) ports even allow two separate VoIP numbers with a VoIP Service Provider (VSP). The PSTN Line (FXO) port provides telephone back-up should your VSP, ADSL service or power to the NB9WMAXX fail.
Wireless
In addition to fast, standard 802.11g-based wireless, the NB9WMAXX incorporates Broadcom’s state-of-the-art XPress technology* to radically improve the performance of wirelessly-connected devices.
* Your wireless device must have a suitable wireless card to take advantage of these technologies.
QoS
With the addition of bandwidth-hungry applications to the SOHO/Home network the NB9WMAXX has not overlooked one of the most important features for a home Internet gateway – Quality of Service (QoS) The QoS implementation in the NB9WMAXX is extremely sophisticated allowing you to prioritise data on your network according to rules you make.
NB9WMAXX Quick Start Guide YML891 Rev1� www.netcomm.com.au
NB9WMAXX Package ContentsYour NB9WMAXX contains the following items:
• NB9WMAXX ADSL2+ Modem Router
• 15VDC 1.6 Amps power supply
• RJ-11 ADSL Line connection cable
• RJ-45 10/100 Ethernet cable
• User Guide (on CD)
• Quick Start Guide
Selected terminology used in this manualPOTS A telephone line used for a standard phone-line and service will be referred to as POTS (=Plain Old Telephone Service)
Pass-through Line The line that connects the NB9WMAXX to a POTS line may be referred to as a pass-through line
RJ11 Telephone cables may be referred to as RJ11 which is the format of the connection plug used for telephones
Ethernet Local area network traffic will be carried by standard Category 5 cable referred to as Ethernet
RJ45 Ethernet cables may also be referred to as ‘RJ45’ which is the format of the connection plug used for network devices
LAN Local Area Network
WLAN Wireless Local Area Network
VSP VoIP Service provider
Do I need a micro filter?Micro filters are used to prevent interference between phones and fax machines, and your ADSL service. If your ADSL-enabled phone line is being used with any equipment other than your ADSL Modem then you will need to use one Micro filter for each phone device in use. Telephones and/or facsimiles in other rooms that are using the same line will also require Microfilters. A suitable Microfilter can be purchased from NetComm or your Service Provider, if required.
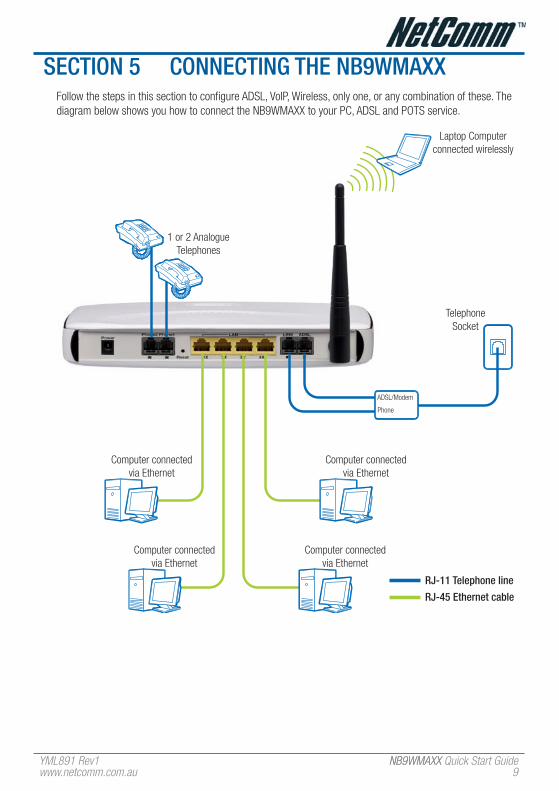
Multi-purpose Gateways and In-line SplittersThe multi-purpose ADSL/VoIP gateway uses a different micro filter configuration to an ADSL modem/router. With the NB9WMAXX, an in-line splitter is placed between a telephone outlet and the NB9WMAXX. One RJ11 cable is then connected from the splitter’s PhONE port to the NB9WMAXX LINE port. Another is connected from the splitters ADSL or MODEM port to the NB9WMAXX ADSL port. This is to allow the ‘pass-through’ line to connect via the POTS if necessary. (See diagram on page 9)
YML891 Rev1 NB9WMAXXNB9WMAXX Quick Start Guidewww.netcomm.com.au �
SECTION 2 MINIMuM SYSTEM REQuIREMENTS:Different aspects of the NB9WMAXX have different requirements, so let’s look at them in turn. We’ll start with your computer, which ought to match the following requirements if you are to enjoy the benefits of a high-speed ADSL connection and use of VoIP and Wireless Networking.
PC Requirements:
• Any computer running Windows 98/2000/Me/XP/Vista or Macintosh OSX
• Ethernet or Wireless Network card
• CD-ROM drive
• Web browser e.g.• Internet Explorer 5.1 (or better)• Netscape Navigator • Mozilla FireFox 1.0.4
ADSL Requirement:
• ADSL broadband connection to an ISP (Internet Service Provider)
• ADSL In-line Splitter/Filter (Please refer to Do I need a micro filter? for more information)Note: Connection at ADSL� or �+ rate depends on the service offered by your ISP; the device will operate at standard ADSL rates in the absence of the � or �+ service. Consult your ISP for details.
VoIP Requirements:
• One or two telephone handsets for VoIP serviceNote: The NB9WMAXX serves as an Analogue Terminal Adaptor so any touch-tone phone may be used for VoIP services.
• Account with a VoIP Service Provider (VSP) including relevant account details
Wireless Requirements:
• Wireless Network Interface Card (NIC) for each intended computer
NB9WMAXX Quick Start Guide YML891 Rev1� www.netcomm.com.au
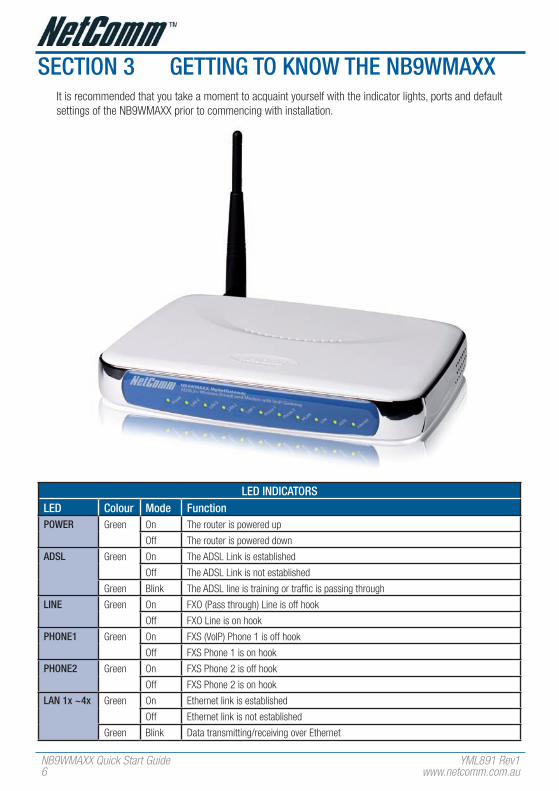
SECTION 3 GETTING TO KNOW ThE NB9WMAXXIt is recommended that you take a moment to acquaint yourself with the indicator lights, ports and default settings of the NB9WMAXX prior to commencing with installation.
LED INDICATORSLED Colour Mode FunctionPOWER Green On The router is powered up
Off The router is powered down
ADSL Green On The ADSL Link is established
Off The ADSL Link is not established
Green Blink The ADSL line is training or traffic is passing through
LINE Green On FXO (Pass through) Line is off hook
Off FXO Line is on hook
PhONE1 Green On FXS (VoIP) Phone 1 is off hook
Off FXS Phone 1 is on hook
PhONE2 Green On FXS Phone 2 is off hook
Off FXS Phone 2 is on hook
LAN 1x ~4x Green On Ethernet link is established
Off Ethernet link is not established
Green Blink Data transmitting/receiving over Ethernet
YML891 Rev1 NB9WMAXXNB9WMAXX Quick Start Guidewww.netcomm.com.au �
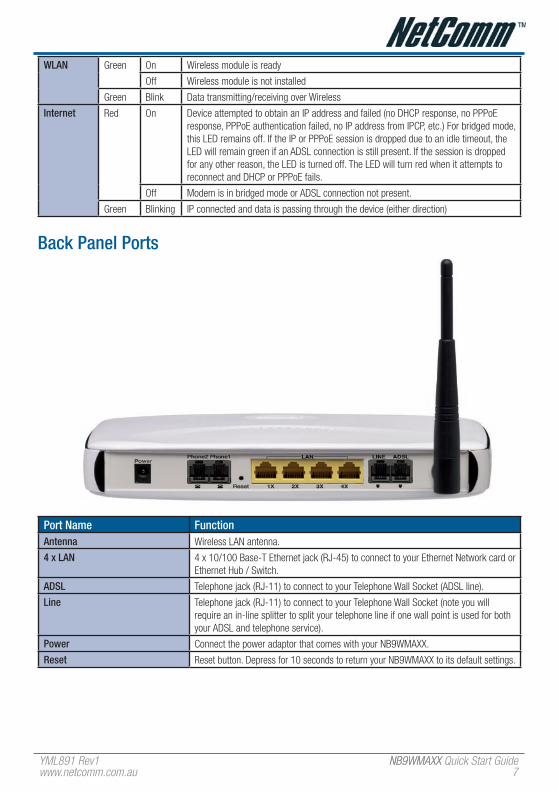
WLAN Green On Wireless module is ready
Off Wireless module is not installed
Green Blink Data transmitting/receiving over Wireless
Internet Red On Device attempted to obtain an IP address and failed (no DHCP response, no PPPoE response, PPPoE authentication failed, no IP address from IPCP, etc.) For bridged mode, this LED remains off. If the IP or PPPoE session is dropped due to an idle timeout, the LED will remain green if an ADSL connection is still present. If the session is dropped for any other reason, the LED is turned off. The LED will turn red when it attempts to reconnect and DHCP or PPPoE fails.
Off Modem is in bridged mode or ADSL connection not present.
Green Blinking IP connected and data is passing through the device (either direction)
Back Panel Ports
Port Name FunctionAntenna Wireless LAN antenna.
4 x LAN 4 x 10/100 Base-T Ethernet jack (RJ-45) to connect to your Ethernet Network card or Ethernet Hub / Switch.
ADSL Telephone jack (RJ-11) to connect to your Telephone Wall Socket (ADSL line).
Line Telephone jack (RJ-11) to connect to your Telephone Wall Socket (note you will require an in-line splitter to split your telephone line if one wall point is used for both your ADSL and telephone service).
Power Connect the power adaptor that comes with your NB9WMAXX.
Reset Reset button. Depress for 10 seconds to return your NB9WMAXX to its default settings.
NB9WMAXX Quick Start Guide YML891 Rev18 www.netcomm.com.au
SECTION 4 DEFAuLT SETTINGSThe following are the default LAN (Local Area Network) and WAN (Wide Area Network).
LAN (Management)
• Static IP Address: 192.168.1.1;
• Subnet Mask: 255.255.255.0;
• Default Gateway: blank;
WAN (Internet)
• Empty: Once you have run through ‘ADSL Quick Setup’ you will have a saved WAN connection;
• Default connection type: PPPoE (most common for Australian ISPs);
• VPI / VCI: 8 / 35;
Modem Access
• Username: admin
• Password: admin
Restore Factory Default SettingRestore Factory Defaults will reset the NB9WMAXX to its factory default configuration.Occasions may present themselves where you need to restore the factory defaults on your NB9WMAXX such as:
• You have lost your username and password and are unable to login to your NB9WMAXX’s web configuration page;
• You have purchased your NB9WMAXX from someone else and need to reconfigure the device to work with your ISP;
• You are asked to perform a factory reset by NetComm Support staff
In order to restore your NB9WMAXX to its factory default settings, please follow these steps:
• Ensure that your NB9WMAXX is powered on (for at least 10 seconds);
• Use a paper clip or a pencil tip to depress the reset button for ten seconds and release. At this point, the reset is in progress. Do not power off the unit at this point;
• When indicator lights return to steady green, reset is complete. The default settings are now restored. The entire process takes about 45 seconds to complete;
• Once you have reset your NB9WMAXX to its default settings you will be able to access the device’s configuration web interface using http://192.168.1.1 with username ‘admin’ and password ‘admin’;
YML891 Rev1 NB9WMAXXNB9WMAXX Quick Start Guidewww.netcomm.com.au 9
SECTION 5 CONNECTING ThE NB9WMAXX Follow the steps in this section to configure ADSL, VoIP, Wireless, only one, or any combination of these. The diagram below shows you how to connect the NB9WMAXX to your PC, ADSL and POTS service.
Phone
ADSL/Modem
1 or 2 Analogue Telephones
Laptop Computer connected wirelessly
Computer connected via Ethernet
Computer connected via Ethernet
Computer connected via Ethernet
Computer connected via Ethernet
RJ-11 Telephone line
RJ-45 Ethernet cable
Telephone Socket
NB9WMAXX Quick Start Guide YML891 Rev110 www.netcomm.com.au
5.1 Connecting the CablesNote: If you wish to link to the NB9W wirelessly at the outset, see Establishing a Wireless Connection below.
1. Connect your PC using Ethernet cable to one of the LAN ports of your NB9WMAXX;
2. Connect the POTS pass-through line ;i. Connect telephone wall-socket to port on in-line splitter called LINE;ii. Connect one end of an RJ11 (telephone) cable to PhONE port of the in-line splitter and connect the
other end to the LINE port on NB9WMAXX;
3. Connect the ADSL service - connect one end of a second RJ11 (telephone) cable to the ADSL/Modem port of the in-line splitter and connect the other end to the ADSL port of the NB9WMAXX;
4. Connect the power cable to the Power socket and plug into a power source;
5. Switch your NB9WMAXX on at the powerpoint;
6. Switch on your PC.
Make sure the LAN LED (light) on your NB9WMAXX is on, which indicates that network function is active.
Note that the pass-through service is provided as a back-up and that calls made through this line are not the same VoIP calls and will be subject to normal telecommunications charges.
The next section explains how to establish your ADSL connection to the Internet.
YML891 Rev1 NB9WMAXXNB9WMAXX Quick Start Guidewww.netcomm.com.au 11
5.2 Establishing an ADSL connection via PPPoEHaving physically connected your NB9WMAXX, the next step is to establish your ADSL connection to the Internet, via your ISP.
Nearly all Australian ISPs connect their clients via a standard method called PPPoE (Point-to-Point Protocol over Ethernet). Your NB9WMAXX has a ‘Quick Setup’ page configured for easy access via PPPoE, so all you need to do is enter the Username and Password issued by your ISP, click the ‘Save & Reboot’ button and connection will follow. This sequence will be explained here.
Note: If you are not using a PPPoE connection type, please consult the User Guide (on CD) for details on changing your connection type. If unsure, follow the steps in this section first.
At this point you must have your NB9WMAXX connected according to Section 5.1, with your PC connected to the NB9WMAXX via Ethernet cable (or wireless link for NB9W only). You must also have your ISP-supplied username and password on hand.
1. For Windows users, insert the accompanying CD into your CD-ROM drive. An autorun screen should appear. Click the ‘Configure NB9WMAXX’ button;Note: If you do not have a CD-ROM or are running a non-Windows OS, you can access the NB9WMAXX Configuration page by opening a web browser and entering http://19�.1�8.1.1 into the Address / Location field. If you are not able to access the login screen by this means, go to the section titled ‘Computer Hardware Configuration’ in the User Guide (on CD) for instructions and come back here when this is completed. Otherwise, proceed to next.
2. Enter the username ‘admin’ and password ‘admin’ and click ‘OK’;
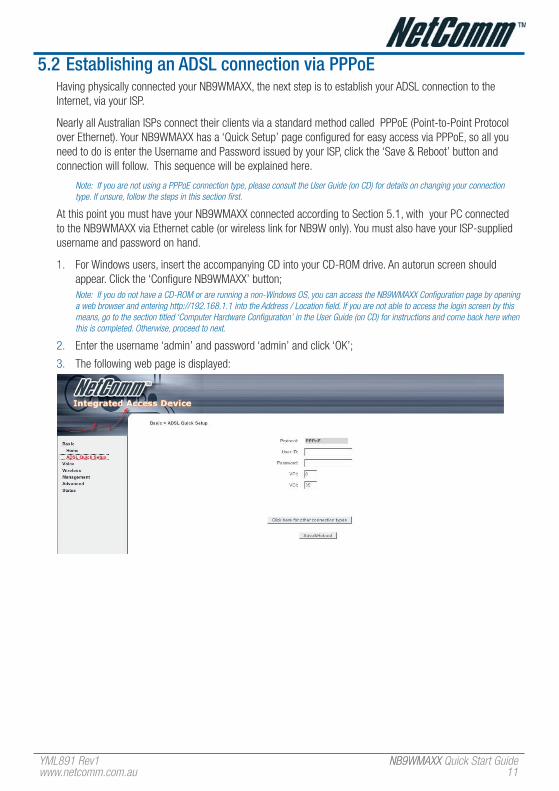
3. The following web page is displayed:
NB9WMAXX Quick Start Guide YML891 Rev11� www.netcomm.com.au
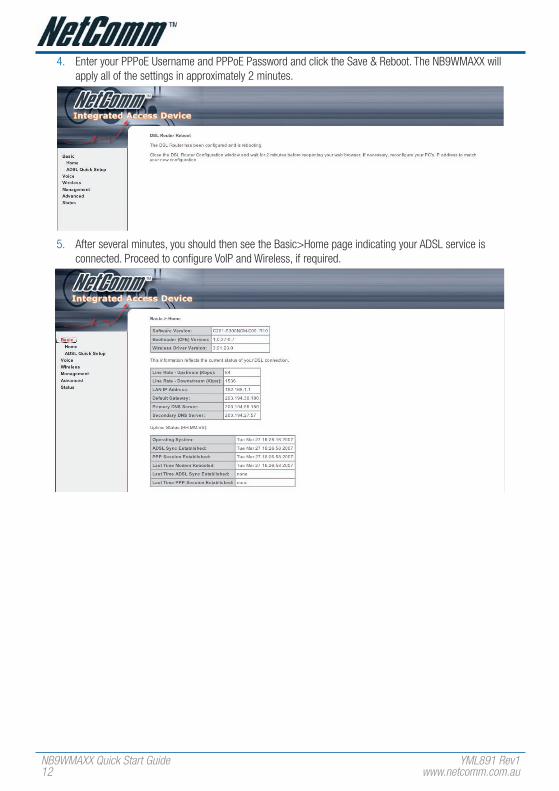
4. Enter your PPPoE Username and PPPoE Password and click the Save & Reboot. The NB9WMAXX will apply all of the settings in approximately 2 minutes.
5. After several minutes, you should then see the Basic>Home page indicating your ADSL service is connected. Proceed to configure VoIP and Wireless, if required.
YML891 Rev1 NB9WMAXXNB9WMAXX Quick Start Guidewww.netcomm.com.au 1�
5.3 Establishing your Wireless ConnectionWireless networking provides an alternative connection to using Ethernet cable. Wireless access is enabled by default on your NB9WMAXX with the following default settings:
• Wireless network name (SSID): ‘wireless’;
• Security: WEP (64-bit) HEX key: ‘a1b2c3d4e5’;Note: For advanced wireless settings of your NB9W refer to the User Guide included on your NB9WMAXX CD ROM.
If you have a wireless Ethernet card on your PC, you can connect to your NB9W by following these steps:
1. Connect the NB9WMAXX as in the diagram on page 9;
2. Enable the wireless connectivity of your PC;
3. Search for available wireless networks;
4. The default name (SSID) of the NB9W’s wireless network, ‘wireless’, will appear;
5. Connect to the SSID ‘wireless’ and when prompted, enter the default HEX password which is A1B2C3D4E5;
6. Proceed with ‘Establishing an ADSL connection via PPPoE’ above.
NB9WMAXX Quick Start Guide YML891 Rev11� www.netcomm.com.au
5.4 Setting up your VoIP accountOnce you have successfully connected to the Internet you are ready to setup your VoIP account to start making telephone calls over the Internet. This section will deal with setting up a single VoIP account with standard settings.
Note: Make sure you get all your necessary VoIP account details from your VSP (VoIP Service Provider) before you begin. These details are not your ADSL User Name and Password.
Your VoIP checklist includes:
• VoIP/DID Phone Number;• VoIP account username (known as ‘Auth. ID’ in your NB9WMAXX);• VoIP account password (known as ‘Auth. Password’ in your NB9WMAXX);• SIP Proxy Server IP address;• SIP Proxy Port;• SIP Proxy Domain;• Register Expire Time.
Once you have the above settings (crucial ones being VoIP/DID Phone Number, Auth. ID, Auth. Password and SIP proxy) you are ready to start setting up your VoIP service on your NB9WMAXX.
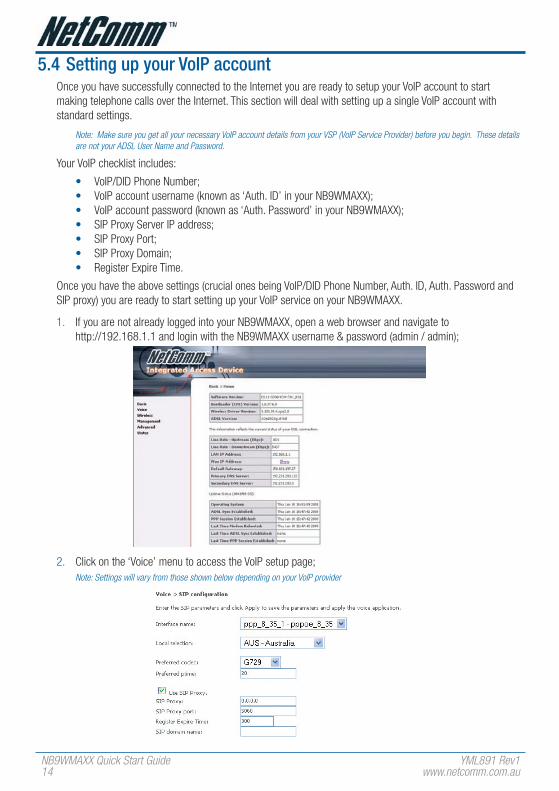
1. If you are not already logged into your NB9WMAXX, open a web browser and navigate to http://192.168.1.1 and login with the NB9WMAXX username & password (admin / admin);
2. Click on the ‘Voice’ menu to access the VoIP setup page; Note: Settings will vary from those shown below depending on your VoIP provider
YML891 Rev1 NB9WMAXXNB9WMAXX Quick Start Guidewww.netcomm.com.au 1�
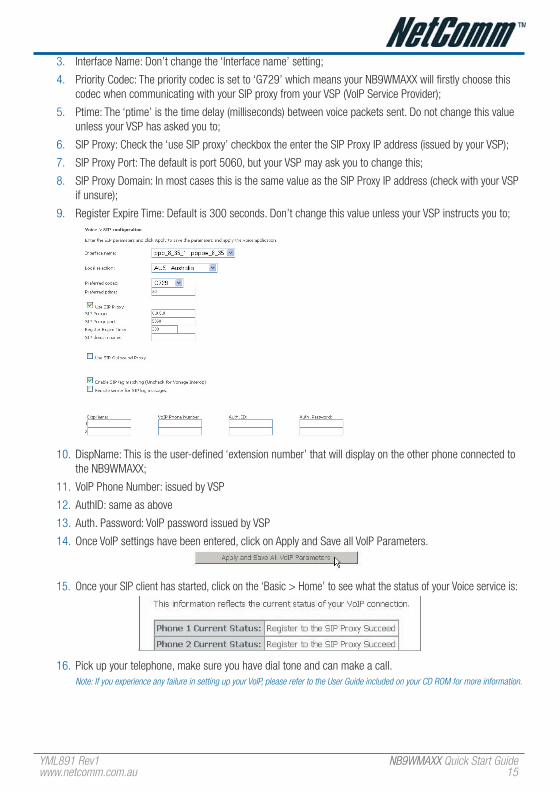
3. Interface Name: Don’t change the ‘Interface name’ setting;
4. Priority Codec: The priority codec is set to ‘G729’ which means your NB9WMAXX will firstly choose this codec when communicating with your SIP proxy from your VSP (VoIP Service Provider);
5. Ptime: The ‘ptime’ is the time delay (milliseconds) between voice packets sent. Do not change this value unless your VSP has asked you to;
6. SIP Proxy: Check the ‘use SIP proxy’ checkbox the enter the SIP Proxy IP address (issued by your VSP);
7. SIP Proxy Port: The default is port 5060, but your VSP may ask you to change this;
8. SIP Proxy Domain: In most cases this is the same value as the SIP Proxy IP address (check with your VSP if unsure);
9. Register Expire Time: Default is 300 seconds. Don’t change this value unless your VSP instructs you to;
10. DispName: This is the user-defined ‘extension number’ that will display on the other phone connected to the NB9WMAXX;
11. VoIP Phone Number: issued by VSP
12. AuthID: same as above
13. Auth. Password: VoIP password issued by VSP
14. Once VoIP settings have been entered, click on Apply and Save all VoIP Parameters.
15. Once your SIP client has started, click on the ‘Basic > Home’ to see what the status of your Voice service is:
16. Pick up your telephone, make sure you have dial tone and can make a call.Note: If you experience any failure in setting up your VoIP, please refer to the User Guide included on your CD ROM for more information.
NB9WMAXX Quick Start Guide YML891 Rev11� www.netcomm.com.au
Product WarrantyNetComm products have a standard 12 months warranty from date of purchase. However some products have an extended warranty option, via registering your product online at the NetComm website www.netcomm.com.au. Refer to the User Guide for complete product warranty conditions, limitations of warranty and other legal and regulatory information.
Contact InformationIf you have any technical difficulties with your product, please do not hesitate to contact NetComm’s Customer Support Department.
Email: [email protected]
www.netcomm.com.auNote: NetComm Technical Support for this product only covers the basic installation and features outlined in the Quick Start Guide. For further information regarding the advanced features of this product, please refer to the configuring sections in the User Guide or contact a Network Specialist.
NetComm Limited ABN 85 002 490 486
PO Box 1200, Lane Cove NSW 2066 AustraliaE – [email protected] W – www.netcomm.com.au