Embed Size (px)
Citation preview
71
5 Quizzes
Feedback on performance is a critical part of a learning environment, and assessment is one of the most important activities in education. As educators, we can’t tell what’s going on inside the heads of students, so we need a way for them to demonstrate what they understand and what they don’t. A well-designed test, even a multiple-choice test, can give you critical information about student performance. If the feedback is rapid enough, it can also be a critical tool for students to gauge their own performance and help them become more successful.
Moodle’s quiz module is one of the most complex pieces of the system. The community has added a large number of options and tools to the quiz engine, making it extremely flexible. You can create quizzes with different question types, randomly generate quizzes from pools of questions, allow students to retake quizzes multiple times, and have the computer score it all.
These features open up a number of strategies that usually aren’t practical with paper-based testing. It’s hard enough to score one batch of quizzes, and nearly impossible to score it 10 times for each student. When the computer does the work for you, it’s easy to give students a chance to practice taking a test or give frequent small quizzes. We’ll
72 Chapter 5: Quizzes
explore how to apply these advantages later in the chapter. For now, let’s get started building your first Moodle quiz.
How to Create a QuizMoodle quizzes have two major components: the quiz body and the question pools. Think of the quiz bodies as a container for various types of questions pulled from the question pools. The body is what students see when they take the assessment. It also defines how the students interact with the quiz. The questions in a quiz body can be of any type, chosen manually or at random, and displayed in a set order or a random order. The question pools can contain questions arranged in a manner that makes sense to you. You can create pools based on chapters, weeks in the semester, important concepts, or any other organizational scheme. Pools can be reused in multiple quizzes, shared between classes, and moved between systems.
To start, we need to create a body for our first quiz.
Creating the Quiz Body When you create the quiz body, you are creating a container for the questions and setting the rules for interacting with the quiz.
To create a quiz body:
1. Click Turn Editing Mode On. 2. Select Quiz from the add menu in the content section where you want to place the
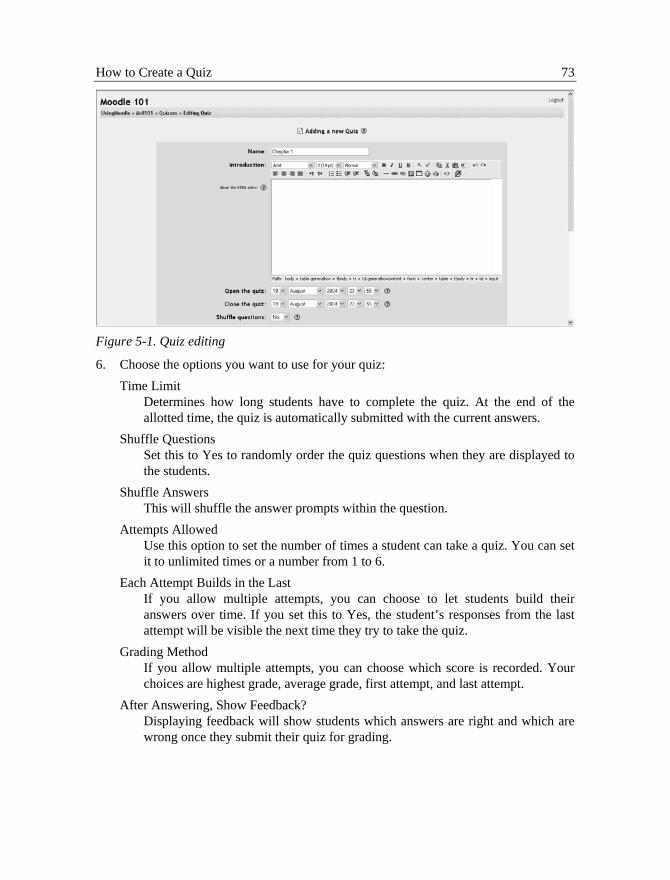
link to a quiz. 3. In the Quiz editing page, shown in Figure 5-1, give the quiz a descriptive name.
We’ll call this first quiz “Chapter 1.” 4. Write an introduction for the quiz. Be sure to include any special instructions for
taking the quiz, such as the number of attempts allowed or scoring rules. 5. Choose opening and closing dates for the quiz.
Warning: The default opening and closing dates are the same, and are set to the time you create the quiz. Be sure to change at least the closing date to some point in the future, or your students won’t be able to take the quiz at all.
How to Create a Quiz 73
Figure 5-1. Quiz editing
6. Choose the options you want to use for your quiz: Time Limit
Determines how long students have to complete the quiz. At the end of the allotted time, the quiz is automatically submitted with the current answers.
Shuffle Questions Set this to Yes to randomly order the quiz questions when they are displayed to the students.
Shuffle Answers This will shuffle the answer prompts within the question.
Attempts Allowed Use this option to set the number of times a student can take a quiz. You can set it to unlimited times or a number from 1 to 6.
Each Attempt Builds in the Last If you allow multiple attempts, you can choose to let students build their answers over time. If you set this to Yes, the student’s responses from the last attempt will be visible the next time they try to take the quiz.
Grading Method If you allow multiple attempts, you can choose which score is recorded. Your choices are highest grade, average grade, first attempt, and last attempt.
After Answering, Show Feedback? Displaying feedback will show students which answers are right and which are wrong once they submit their quiz for grading.
74 Chapter 5: Quizzes
In Feedback, Show Correct Answers? If you display feedback, you can also choose to show the students the correct answers.
Allow Review This option will allow students to review past quizzes after they have submitted them for grading and seen the feedback.
Maximum Grade Use this menu to set the highest possible score for your quiz. This is the point total recorded in the grade book. If your questions have more points than the maximum, they will contribute proportionally to the max grade.
Require Password You can set a password for the quiz that students will need to enter before they can take the quiz. You can use this to restrict who takes a quiz and when they take it.
Require Network Address This option restricts access to the test to certain IP address ranges. If you want to require students to take a test from a certain lab on campus, set the network address range to cover the networks in the lab. For example, if you want to require access from computers with an IP range of 10.10.10.0 to 10.10.10.50, you would enter 10.10.10.0/50. To allow access from all computers in a subnet (say, on the campus), enter the partial address you want to use.
7. Click the Continue button.
Once you click the Continue button, you’ll see the second editing screen where you will write and select questions to include in the quiz body.
Creating Questions for a Quiz You can create your quiz questions in the question-editing section. Here, you’ll create and categorize your quiz questions and add them to the quiz body you just created.
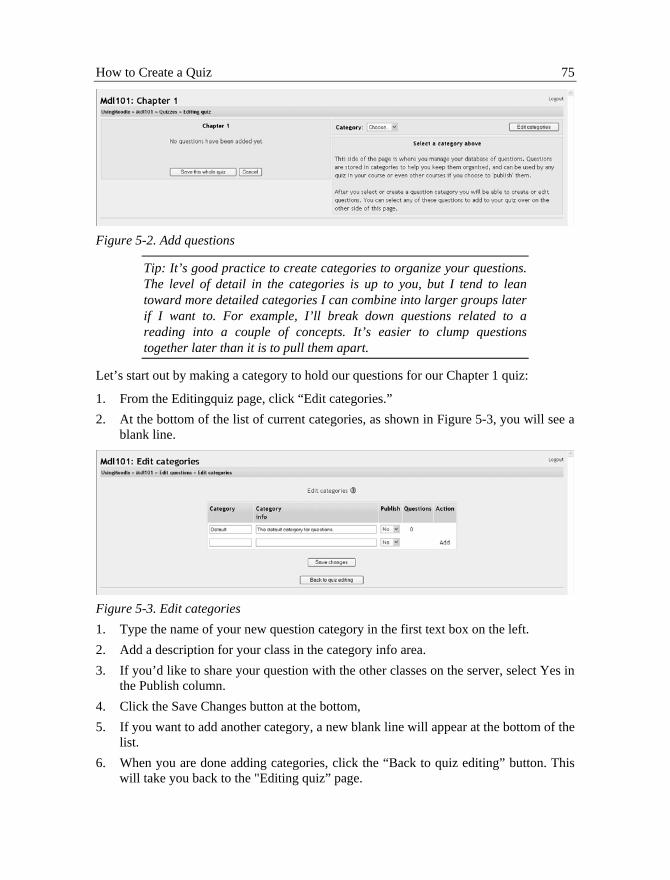
On the left side of the screen, as shown in Figure 5-2, you’ll see a block where the questions you’ve added to the current quiz are displayed. Since this is a new quiz, there are no questions there, and Moodle tells us this.
On the right side of the screen, you’ll see a category selection menu labeled “Category” and a button labeled “Edit categories.” Categories are used to organize your quiz questions for your course, and they can be a container for sharing questions between courses. By default, there is one category, called Default. If you click on the category menu, you’ll see it as an option.
How to Create a Quiz 75
Figure 5-2. Add questions
Tip: It’s good practice to create categories to organize your questions. The level of detail in the categories is up to you, but I tend to lean toward more detailed categories I can combine into larger groups later if I want to. For example, I’ll break down questions related to a reading into a couple of concepts. It’s easier to clump questions together later than it is to pull them apart.
Let’s start out by making a category to hold our questions for our Chapter 1 quiz:
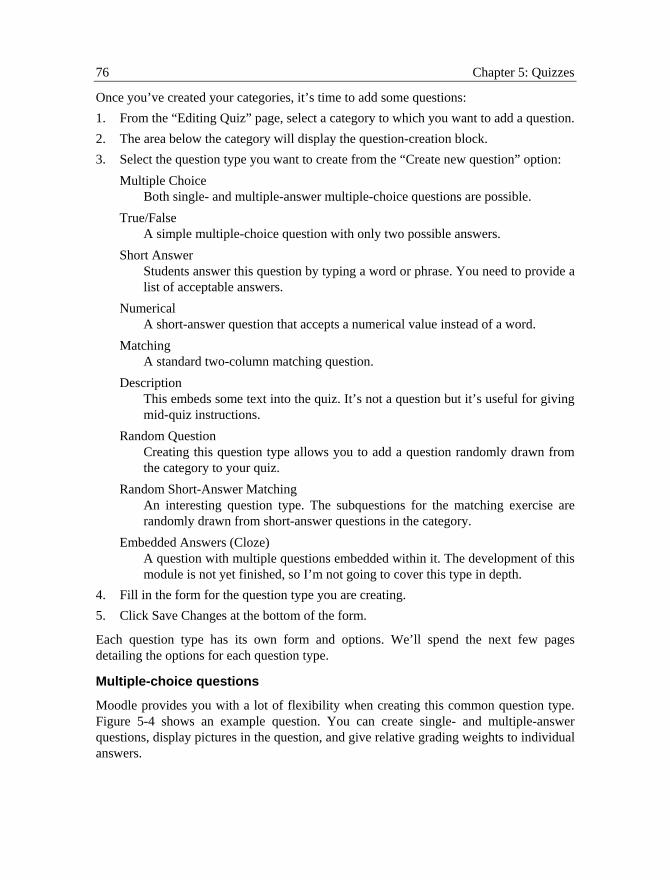
1. From the Editingquiz page, click “Edit categories.” 2. At the bottom of the list of current categories, as shown in Figure 5-3, you will see a
blank line.
Figure 5-3. Edit categories 1. Type the name of your new question category in the first text box on the left. 2. Add a description for your class in the category info area. 3. If you’d like to share your question with the other classes on the server, select Yes in
the Publish column. 4. Click the Save Changes button at the bottom, 5. If you want to add another category, a new blank line will appear at the bottom of the
list. 6. When you are done adding categories, click the “Back to quiz editing” button. This
will take you back to the "Editing quiz” page.
76 Chapter 5: Quizzes
Once you’ve created your categories, it’s time to add some questions: 1. From the “Editing Quiz” page, select a category to which you want to add a question. 2. The area below the category will display the question-creation block. 3. Select the question type you want to create from the “Create new question” option:
Multiple Choice Both single- and multiple-answer multiple-choice questions are possible.
True/False A simple multiple-choice question with only two possible answers.
Short Answer Students answer this question by typing a word or phrase. You need to provide a list of acceptable answers.
Numerical A short-answer question that accepts a numerical value instead of a word.
Matching A standard two-column matching question.
Description This embeds some text into the quiz. It’s not a question but it’s useful for giving mid-quiz instructions.
Random Question Creating this question type allows you to add a question randomly drawn from the category to your quiz.
Random Short-Answer Matching An interesting question type. The subquestions for the matching exercise are randomly drawn from short-answer questions in the category.
Embedded Answers (Cloze) A question with multiple questions embedded within it. The development of this module is not yet finished, so I’m not going to cover this type in depth.
4. Fill in the form for the question type you are creating. 5. Click Save Changes at the bottom of the form.
Each question type has its own form and options. We’ll spend the next few pages detailing the options for each question type.
Multiple-choice questions
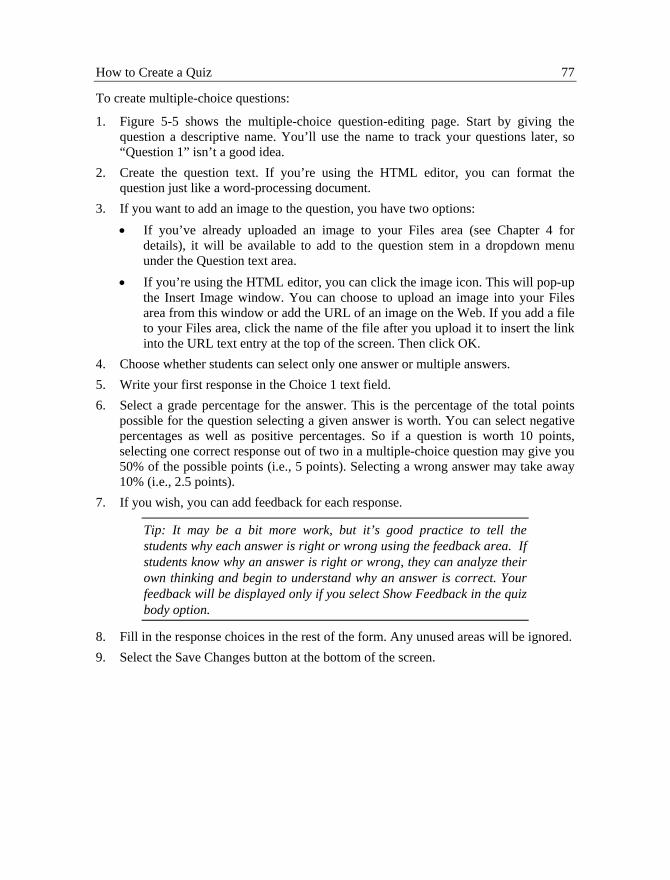
Moodle provides you with a lot of flexibility when creating this common question type. Figure 5-4 shows an example question. You can create single- and multiple-answer questions, display pictures in the question, and give relative grading weights to individual answers.
How to Create a Quiz 77
To create multiple-choice questions:
1. Figure 5-5 shows the multiple-choice question-editing page. Start by giving the question a descriptive name. You’ll use the name to track your questions later, so “Question 1” isn’t a good idea.
2. Create the question text. If you’re using the HTML editor, you can format the question just like a word-processing document.
3. If you want to add an image to the question, you have two options: • If you’ve already uploaded an image to your Files area (see Chapter 4 for
details), it will be available to add to the question stem in a dropdown menu under the Question text area.
• If you’re using the HTML editor, you can click the image icon. This will pop-up the Insert Image window. You can choose to upload an image into your Files area from this window or add the URL of an image on the Web. If you add a file to your Files area, click the name of the file after you upload it to insert the link into the URL text entry at the top of the screen. Then click OK.
4. Choose whether students can select only one answer or multiple answers. 5. Write your first response in the Choice 1 text field. 6. Select a grade percentage for the answer. This is the percentage of the total points
possible for the question selecting a given answer is worth. You can select negative percentages as well as positive percentages. So if a question is worth 10 points, selecting one correct response out of two in a multiple-choice question may give you 50% of the possible points (i.e., 5 points). Selecting a wrong answer may take away 10% (i.e., 2.5 points).
7. If you wish, you can add feedback for each response.
Tip: It may be a bit more work, but it’s good practice to tell the students why each answer is right or wrong using the feedback area. If students know why an answer is right or wrong, they can analyze their own thinking and begin to understand why an answer is correct. Your feedback will be displayed only if you select Show Feedback in the quiz body option.
8. Fill in the response choices in the rest of the form. Any unused areas will be ignored. 9. Select the Save Changes button at the bottom of the screen.
78 Chapter 5: Quizzes
Figure 5-4. A multiple-choice question
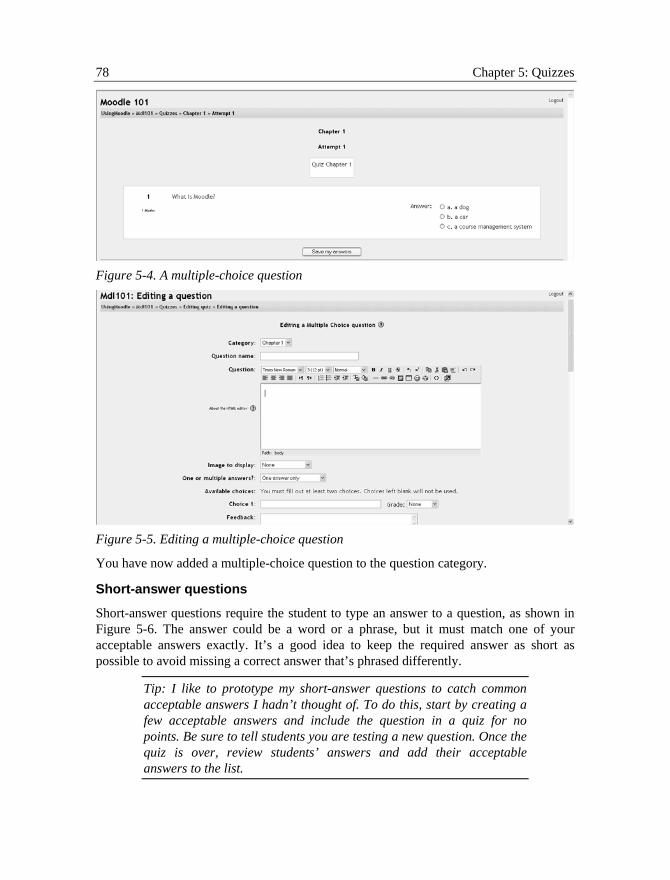
Figure 5-5. Editing a multiple-choice question
You have now added a multiple-choice question to the question category.
Short-answer questions
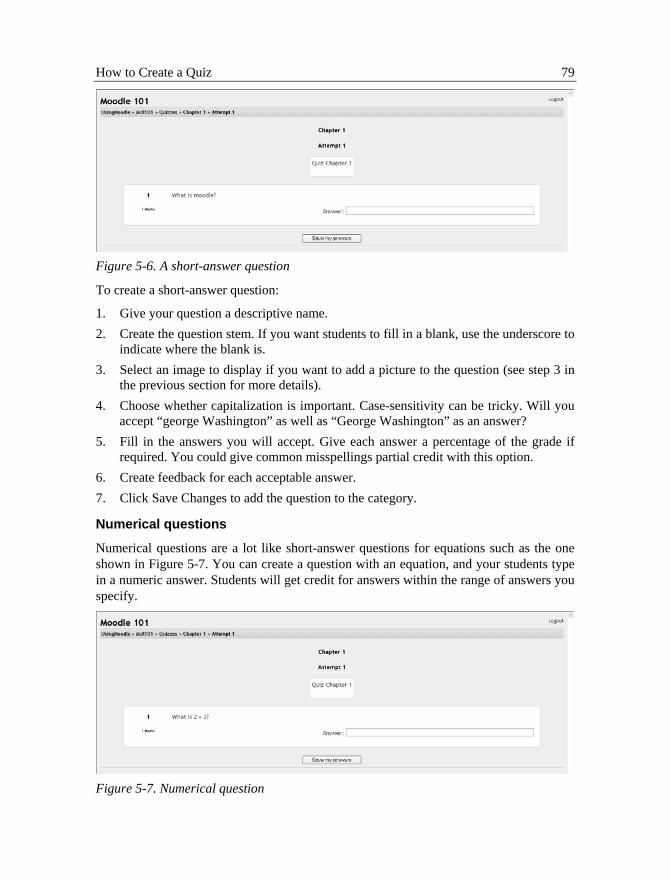
Short-answer questions require the student to type an answer to a question, as shown in Figure 5-6. The answer could be a word or a phrase, but it must match one of your acceptable answers exactly. It’s a good idea to keep the required answer as short as possible to avoid missing a correct answer that’s phrased differently.
Tip: I like to prototype my short-answer questions to catch common acceptable answers I hadn’t thought of. To do this, start by creating a few acceptable answers and include the question in a quiz for no points. Be sure to tell students you are testing a new question. Once the quiz is over, review students’ answers and add their acceptable answers to the list.
How to Create a Quiz 79
Figure 5-6. A short-answer question
To create a short-answer question:
1. Give your question a descriptive name. 2. Create the question stem. If you want students to fill in a blank, use the underscore to
indicate where the blank is. 3. Select an image to display if you want to add a picture to the question (see step 3 in
the previous section for more details). 4. Choose whether capitalization is important. Case-sensitivity can be tricky. Will you
accept “george Washington” as well as “George Washington” as an answer? 5. Fill in the answers you will accept. Give each answer a percentage of the grade if
required. You could give common misspellings partial credit with this option. 6. Create feedback for each acceptable answer. 7. Click Save Changes to add the question to the category.
Numerical questions
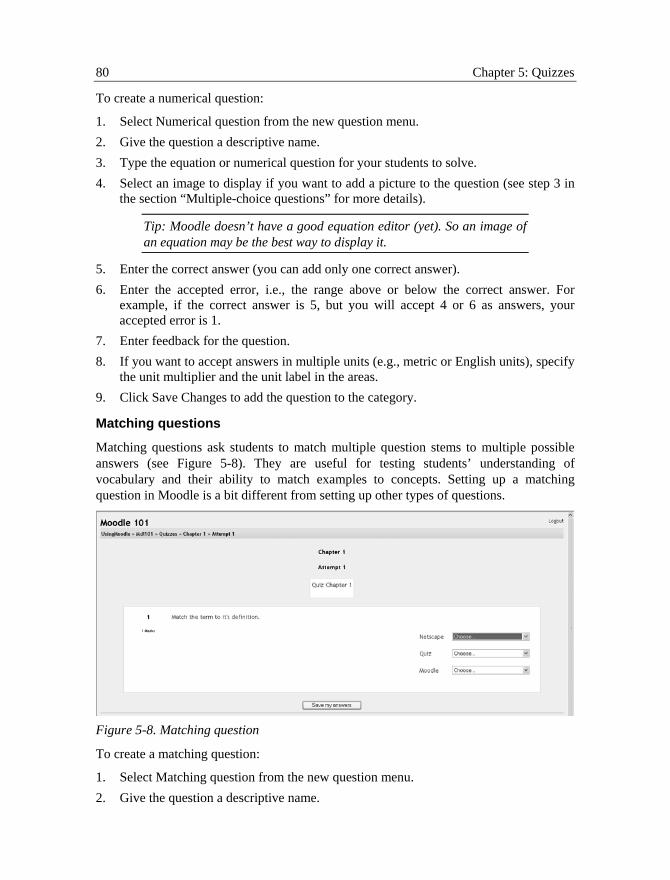
Numerical questions are a lot like short-answer questions for equations such as the one shown in Figure 5-7. You can create a question with an equation, and your students type in a numeric answer. Students will get credit for answers within the range of answers you specify.
Figure 5-7. Numerical question
80 Chapter 5: Quizzes
To create a numerical question:
1. Select Numerical question from the new question menu. 2. Give the question a descriptive name. 3. Type the equation or numerical question for your students to solve. 4. Select an image to display if you want to add a picture to the question (see step 3 in
the section “Multiple-choice questions” for more details).
Tip: Moodle doesn’t have a good equation editor (yet). So an image of an equation may be the best way to display it.
5. Enter the correct answer (you can add only one correct answer). 6. Enter the accepted error, i.e., the range above or below the correct answer. For
example, if the correct answer is 5, but you will accept 4 or 6 as answers, your accepted error is 1.
7. Enter feedback for the question. 8. If you want to accept answers in multiple units (e.g., metric or English units), specify
the unit multiplier and the unit label in the areas. 9. Click Save Changes to add the question to the category.
Matching questions
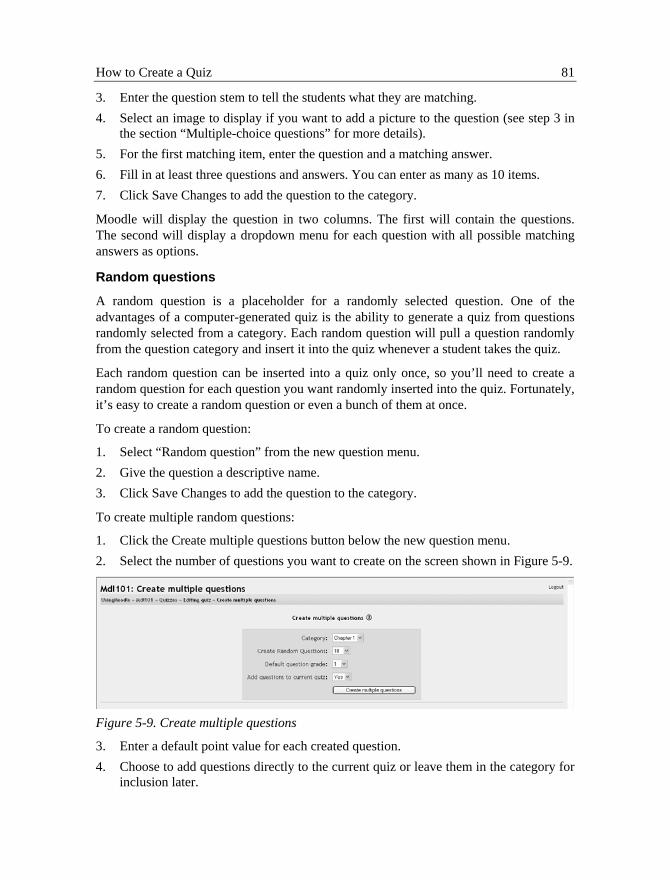
Matching questions ask students to match multiple question stems to multiple possible answers (see Figure 5-8). They are useful for testing students’ understanding of vocabulary and their ability to match examples to concepts. Setting up a matching question in Moodle is a bit different from setting up other types of questions.
Figure 5-8. Matching question
To create a matching question:
1. Select Matching question from the new question menu. 2. Give the question a descriptive name.
How to Create a Quiz 81
3. Enter the question stem to tell the students what they are matching. 4. Select an image to display if you want to add a picture to the question (see step 3 in
the section “Multiple-choice questions” for more details). 5. For the first matching item, enter the question and a matching answer. 6. Fill in at least three questions and answers. You can enter as many as 10 items. 7. Click Save Changes to add the question to the category.
Moodle will display the question in two columns. The first will contain the questions. The second will display a dropdown menu for each question with all possible matching answers as options.
Random questions
A random question is a placeholder for a randomly selected question. One of the advantages of a computer-generated quiz is the ability to generate a quiz from questions randomly selected from a category. Each random question will pull a question randomly from the question category and insert it into the quiz whenever a student takes the quiz.
Each random question can be inserted into a quiz only once, so you’ll need to create a random question for each question you want randomly inserted into the quiz. Fortunately, it’s easy to create a random question or even a bunch of them at once.
To create a random question:
1. Select “Random question” from the new question menu. 2. Give the question a descriptive name. 3. Click Save Changes to add the question to the category.
To create multiple random questions:
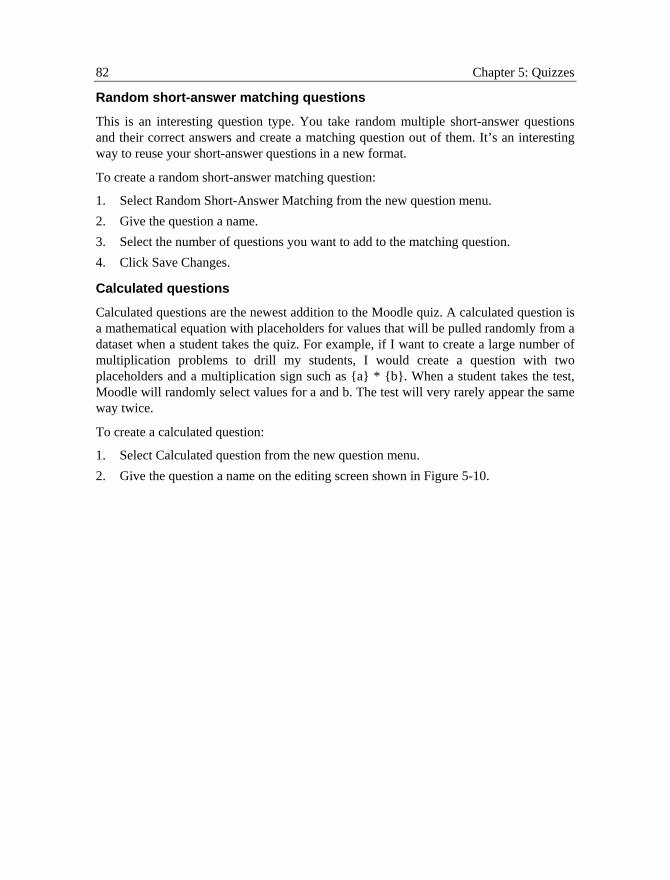
1. Click the Create multiple questions button below the new question menu. 2. Select the number of questions you want to create on the screen shown in Figure 5-9.
Figure 5-9. Create multiple questions
3. Enter a default point value for each created question. 4. Choose to add questions directly to the current quiz or leave them in the category for
inclusion later.
82 Chapter 5: Quizzes
Random short-answer matching questions
This is an interesting question type. You take random multiple short-answer questions and their correct answers and create a matching question out of them. It’s an interesting way to reuse your short-answer questions in a new format.
To create a random short-answer matching question:
1. Select Random Short-Answer Matching from the new question menu. 2. Give the question a name. 3. Select the number of questions you want to add to the matching question. 4. Click Save Changes.
Calculated questions
Calculated questions are the newest addition to the Moodle quiz. A calculated question is a mathematical equation with placeholders for values that will be pulled randomly from a dataset when a student takes the quiz. For example, if I want to create a large number of multiplication problems to drill my students, I would create a question with two placeholders and a multiplication sign such as {a} * {b}. When a student takes the test, Moodle will randomly select values for a and b. The test will very rarely appear the same way twice.
To create a calculated question:
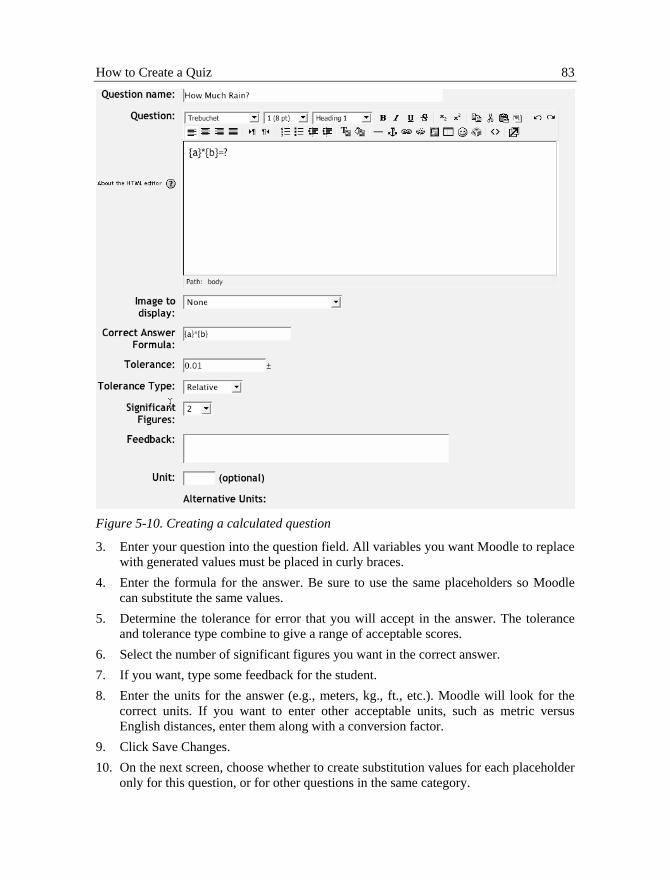
1. Select Calculated question from the new question menu. 2. Give the question a name on the editing screen shown in Figure 5-10.
How to Create a Quiz 83
Figure 5-10. Creating a calculated question
3. Enter your question into the question field. All variables you want Moodle to replace with generated values must be placed in curly braces.
4. Enter the formula for the answer. Be sure to use the same placeholders so Moodle can substitute the same values.
5. Determine the tolerance for error that you will accept in the answer. The tolerance and tolerance type combine to give a range of acceptable scores.
6. Select the number of significant figures you want in the correct answer. 7. If you want, type some feedback for the student. 8. Enter the units for the answer (e.g., meters, kg., ft., etc.). Moodle will look for the
correct units. If you want to enter other acceptable units, such as metric versus English distances, enter them along with a conversion factor.
9. Click Save Changes. 10. On the next screen, choose whether to create substitution values for each placeholder
only for this question, or for other questions in the same category.
84 Chapter 5: Quizzes
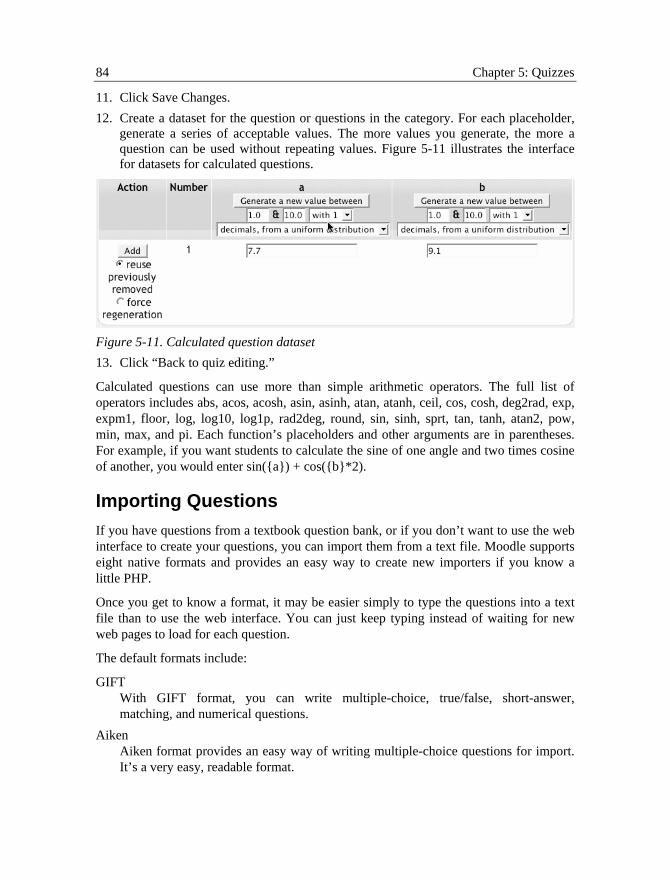
11. Click Save Changes. 12. Create a dataset for the question or questions in the category. For each placeholder,
generate a series of acceptable values. The more values you generate, the more a question can be used without repeating values. Figure 5-11 illustrates the interface for datasets for calculated questions.
Figure 5-11. Calculated question dataset 13. Click “Back to quiz editing.”
Calculated questions can use more than simple arithmetic operators. The full list of operators includes abs, acos, acosh, asin, asinh, atan, atanh, ceil, cos, cosh, deg2rad, exp, expm1, floor, log, log10, log1p, rad2deg, round, sin, sinh, sprt, tan, tanh, atan2, pow, min, max, and pi. Each function’s placeholders and other arguments are in parentheses. For example, if you want students to calculate the sine of one angle and two times cosine of another, you would enter sin({a}) + cos({b}*2).
Importing Questions If you have questions from a textbook question bank, or if you don’t want to use the web interface to create your questions, you can import them from a text file. Moodle supports eight native formats and provides an easy way to create new importers if you know a little PHP.
Once you get to know a format, it may be easier simply to type the questions into a text file than to use the web interface. You can just keep typing instead of waiting for new web pages to load for each question.
The default formats include:
GIFT With GIFT format, you can write multiple-choice, true/false, short-answer, matching, and numerical questions.
Aiken Aiken format provides an easy way of writing multiple-choice questions for import. It’s a very easy, readable format.
How to Create a Quiz 85
Missing-word If you’re going to write a lot of missing-word multiple-choice questions, the missing-word format is an easy way to create them.
AON This is the same as the missing-word format, except it creates matching questions from the multiple choice questions.
Blackboard If you’re converting from Blackboard to Moodle, you can export your course and import the question pools into Moodle using the Blackboard format.
WebCT Currently, the WebCT format supports only the importing of multiple-choice and short-answer questions.
Course Test Manager This format enables you to import questions from the Course Test Manager from Course Technology.
Embedded answers (Cloze) The Cloze format is a multiple-answer question with embedded answers. These questions can be a bit tricky to develop, but they are a unique way of asking questions.
Click the help button next to the Import File button for more details about each format.
Adding Questions to a Quiz Once you’ve created your questions, you’ll need to add them to the quiz.
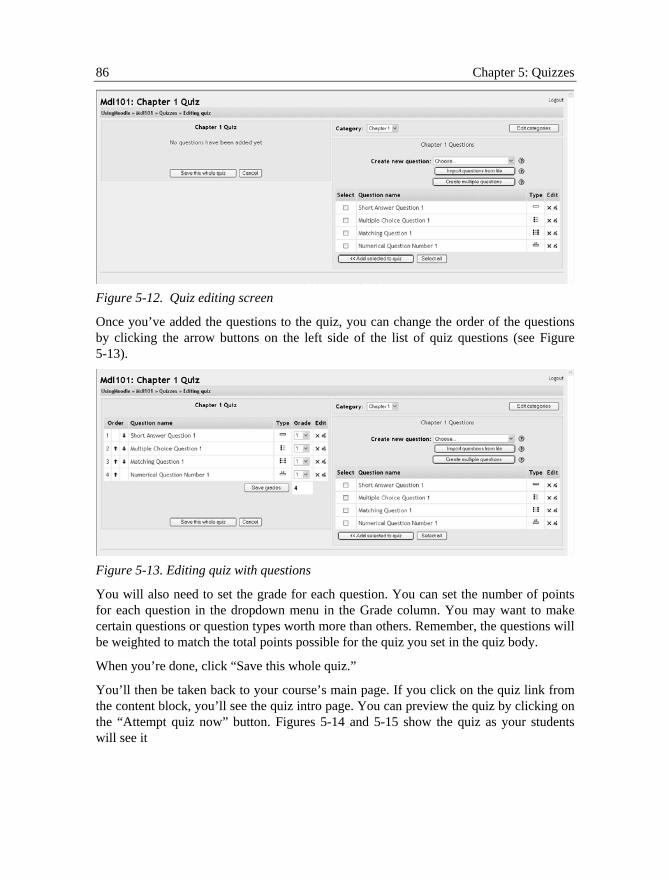
The buttons at the bottom of the question are used to add questions to the quiz. You can select individual questions using the checkboxes on the left of the question list. Select the individual questions and click the “Add selected to quiz” button at the bottom of the list, as shown in Figure 5-12.
If you want to add all of the questions you created to the quiz, click the “Select all” button and then click the “Add selected to quiz” button.
Once you’ve added a question to the quiz, it appears on the left side of the screen in the quiz question list. The question is still selectable on the right, but you can add it to the quiz only once. If you select the question in the category list again and add it to the quiz, nothing will happen.
86 Chapter 5: Quizzes
Figure 5-12. Quiz editing screen
Once you’ve added the questions to the quiz, you can change the order of the questions by clicking the arrow buttons on the left side of the list of quiz questions (see Figure 5-13).
Figure 5-13. Editing quiz with questions
You will also need to set the grade for each question. You can set the number of points for each question in the dropdown menu in the Grade column. You may want to make certain questions or question types worth more than others. Remember, the questions will be weighted to match the total points possible for the quiz you set in the quiz body.
When you’re done, click “Save this whole quiz.”
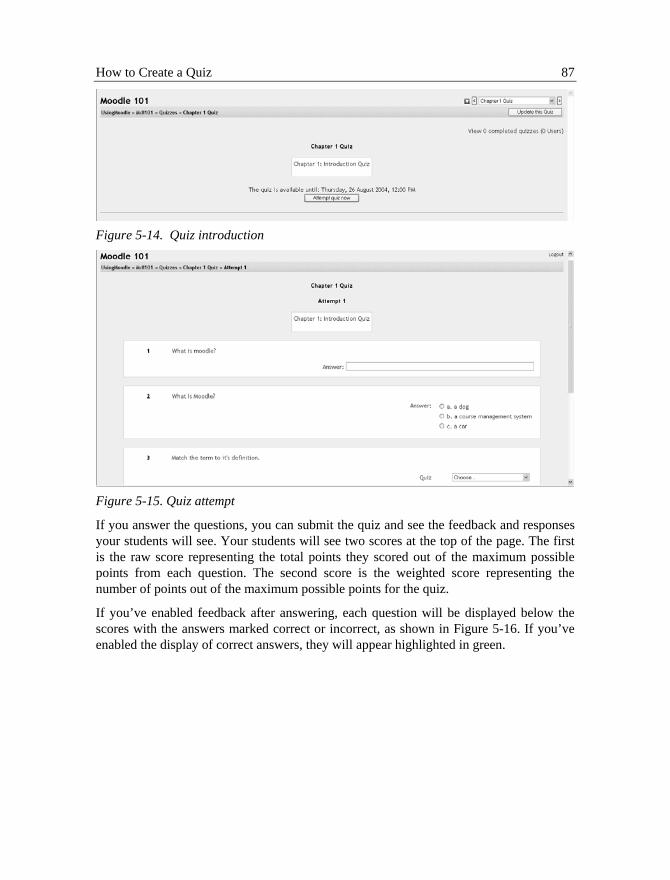
You’ll then be taken back to your course’s main page. If you click on the quiz link from the content block, you’ll see the quiz intro page. You can preview the quiz by clicking on the “Attempt quiz now” button. Figures 5-14 and 5-15 show the quiz as your students will see it
How to Create a Quiz 87
Figure 5-14. Quiz introduction
Figure 5-15. Quiz attempt
If you answer the questions, you can submit the quiz and see the feedback and responses your students will see. Your students will see two scores at the top of the page. The first is the raw score representing the total points they scored out of the maximum possible points from each question. The second score is the weighted score representing the number of points out of the maximum possible points for the quiz.
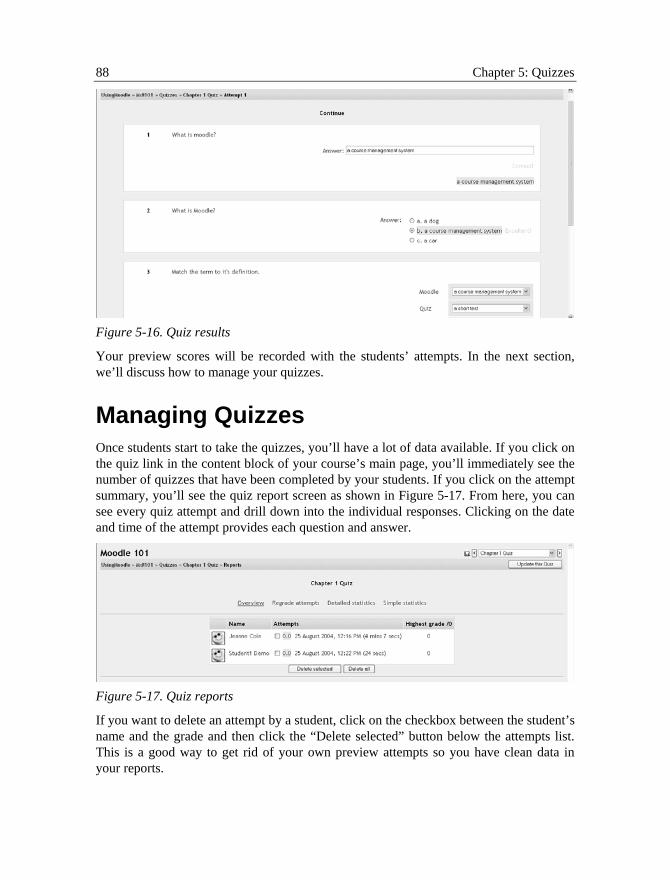
If you’ve enabled feedback after answering, each question will be displayed below the scores with the answers marked correct or incorrect, as shown in Figure 5-16. If you’ve enabled the display of correct answers, they will appear highlighted in green.
88 Chapter 5: Quizzes
Figure 5-16. Quiz results
Your preview scores will be recorded with the students’ attempts. In the next section, we’ll discuss how to manage your quizzes.
Managing Quizzes Once students start to take the quizzes, you’ll have a lot of data available. If you click on the quiz link in the content block of your course’s main page, you’ll immediately see the number of quizzes that have been completed by your students. If you click on the attempt summary, you’ll see the quiz report screen as shown in Figure 5-17. From here, you can see every quiz attempt and drill down into the individual responses. Clicking on the date and time of the attempt provides each question and answer.
Figure 5-17. Quiz reports
If you want to delete an attempt by a student, click on the checkbox between the student’s name and the grade and then click the “Delete selected” button below the attempts list. This is a good way to get rid of your own preview attempts so you have clean data in your reports.
Managing Quizzes 89
Above the attempts list, there are four links to aggregate reports. These reports are a great way to monitor your students’ performance. The first link, Overview, links to the list of completed attempts you saw when you first clicked on the completed quiz link.
The next link, “Regrade attempts,” will recalculate the quiz grades if you have changed the possible number of points for the quiz or a question.
The next two reports give you detailed statistics about the quiz results. The first table displays the responses to each question individually. You will only see the results of the non-randomly selected questions. The random questions will appear as blanks in the table. The report also displays incorrect or partially correct responses. Correct responses are displayed as a double dash, except for numerical and short-answer questions. The reports for these two question types always display the student’s answer. This report gives you an easy way to tell at a glance where students are having problems.
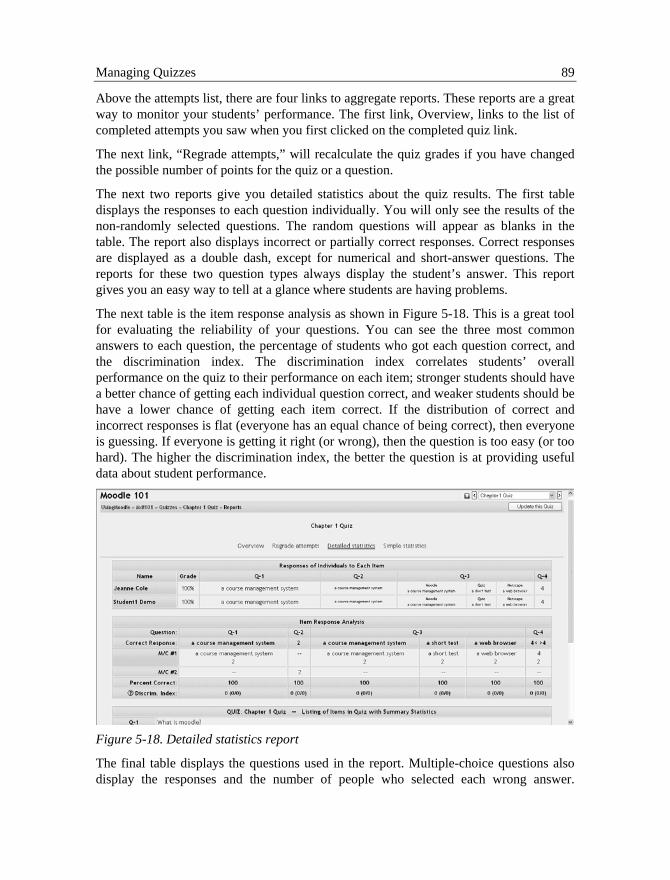
The next table is the item response analysis as shown in Figure 5-18. This is a great tool for evaluating the reliability of your questions. You can see the three most common answers to each question, the percentage of students who got each question correct, and the discrimination index. The discrimination index correlates students’ overall performance on the quiz to their performance on each item; stronger students should have a better chance of getting each individual question correct, and weaker students should be have a lower chance of getting each item correct. If the distribution of correct and incorrect responses is flat (everyone has an equal chance of being correct), then everyone is guessing. If everyone is getting it right (or wrong), then the question is too easy (or too hard). The higher the discrimination index, the better the question is at providing useful data about student performance.
Figure 5-18. Detailed statistics report
The final table displays the questions used in the report. Multiple-choice questions also display the responses and the number of people who selected each wrong answer.
90 Chapter 5: Quizzes
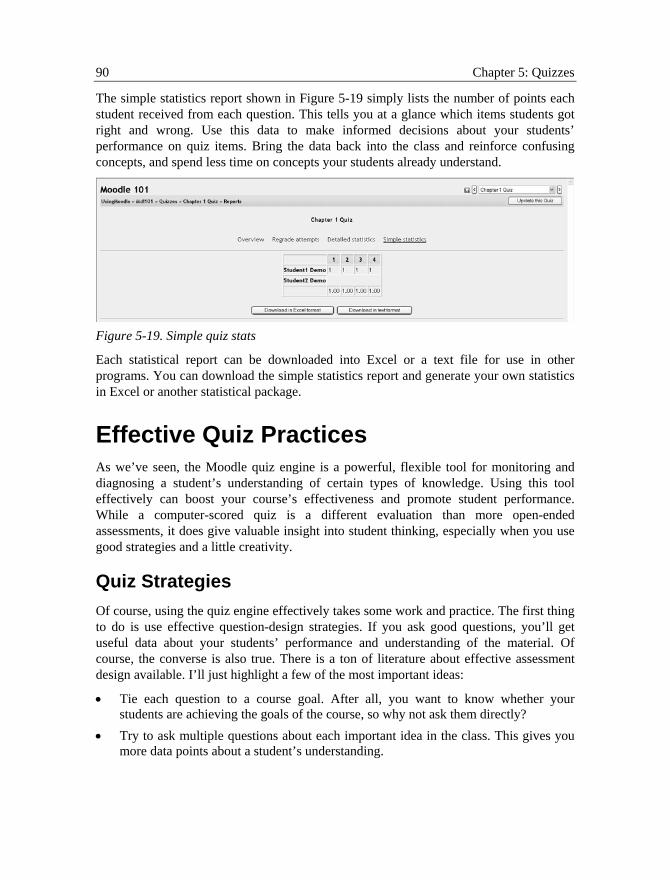
The simple statistics report shown in Figure 5-19 simply lists the number of points each student received from each question. This tells you at a glance which items students got right and wrong. Use this data to make informed decisions about your students’ performance on quiz items. Bring the data back into the class and reinforce confusing concepts, and spend less time on concepts your students already understand.
Figure 5-19. Simple quiz stats
Each statistical report can be downloaded into Excel or a text file for use in other programs. You can download the simple statistics report and generate your own statistics in Excel or another statistical package.
Effective Quiz Practices As we’ve seen, the Moodle quiz engine is a powerful, flexible tool for monitoring and diagnosing a student’s understanding of certain types of knowledge. Using this tool effectively can boost your course’s effectiveness and promote student performance. While a computer-scored quiz is a different evaluation than more open-ended assessments, it does give valuable insight into student thinking, especially when you use good strategies and a little creativity.
Quiz Strategies Of course, using the quiz engine effectively takes some work and practice. The first thing to do is use effective question-design strategies. If you ask good questions, you’ll get useful data about your students’ performance and understanding of the material. Of course, the converse is also true. There is a ton of literature about effective assessment design available. I’ll just highlight a few of the most important ideas:
• Tie each question to a course goal. After all, you want to know whether your students are achieving the goals of the course, so why not ask them directly?
• Try to ask multiple questions about each important idea in the class. This gives you more data points about a student’s understanding.
Effective Quiz Practices 91
• When writing a multiple-choice question, be sure each wrong answer represents a common misconception. This will help you diagnose student thinking and eliminate easy guessing.
• Write questions requiring your students to think at different levels. Include recall questions, comprehension questions, and application and analysis questions. You can determine where students are having problems in their thinking. Can they recall the material but not apply it?
• Test your questions. After you’ve established an initial question bank, use the system reports to determine which questions are useful and which aren’t. As you write new questions, give them a lower point value and throw in a few to establish their reliability.
Once you have a few well-written test banks, be sure to use the quiz reports and statistics to monitor your classes’ performance. The detailed reports and statistics are valuable tools for measuring your students’ understanding of the material.
Creative Quiz Uses With the Moodle quiz engine, it’s easier to utilize educationally sound assessment strategies that would be too difficult to implement with paper and pencil. Most people think of tests as an infrequent, high-stakes activity, e.g., mid-terms and finals. Better strategies involve frequent, low-stakes assessments you and your students can use to guide their performance during the course of the semester.
Creating a series of mini-tests gives you a very flexible system for gauging performance and keeping students engaged in the class. Here are a few ideas for quick quizzes you can use as part of a larger assessment strategy.
Chapter checks
Getting students to complete reading assignments has to be one of the hardest motivational tasks in education. Reading is critical to understanding most material and fundamental to success in many classes. The problem for most students is there is no immediate punishment for procrastinating on a reading assignment. If you haven’t done the reading for a class discussion, you can either keep quiet or, as I used to do occasionally, wing it by skimming in class. If you have a lecture course, there’s almost no need to do the reading since the lecturer usually covers most of the material in class anyway.
Creating a mini-test for each reading assignment solves a number of problems. First, it encourages students to do the reading so they can do well on the quiz. Second, it gives the students feedback on how well they understood the reading assignment. Third, it gives you data about which aspects of the reading students found confusing, and which they have already mastered so you can refocus your class activities.
92 Chapter 5: Quizzes
For a reading mini-test, I would recommend setting a limited time quiz students can take only once. Because it’s a low-stakes activity, you want students to use for self-assessment, I would also display feedback and correct answers. If you’re concerned about students sharing answers after they’ve taken the quiz, randomize the question and answer order. If you have a test bank, make some of the questions random as well. As an additional assignment, students should write down one question about a question they got wrong and bring it to class.
Test practice
They key to effective practice is to have a realistic practice environment. Many students worry about tests, especially high-stakes tests, because they have no idea what to expect. What question format will you use? How detailed will the questions be? What should they study?
You can help alleviate test anxiety by creating a practice test students can take to help answer these questions. These tests are usually based on old questions similar to the upcoming test questions. Using last years final as an example test will force you to write new questions every year. This is a good idea anyway, since you can be sure someone has a copy of last year’s test and are sharing it with others.
To set up a practice test, I’d create a zero-point test with questions from the year before in random order with random answers. I would also allow students to take the test as many times as they’d like so they can test themselves as much as they need. Display feedback, but not correct answers so it presents more of a challenge.
Data gathering
As an expert, you know a lot about your field. Your challenge as a teacher is to translate your knowledge for a novice who doesn’t share your conceptual understanding or experience. An example or lecture you think is brilliant may leave your students completely confused. It can be hard to tell what students really understand and what’s leaving them baffled.
A data-gathering quiz is similar to a chapter check, but it takes place after a class meeting or lecture. Your goal is to quickly get some feedback on your students’ understanding of a lecture. What did they really understand? What do you need to spend more time on? I’ve found many instructors have trouble gauging what students find difficult, and what the students find so easy they are bored by it.
Setting up a post-class, data-gathering quiz is similar to creating a chapter check. Set the quiz for a limited time, such as a day or two before the next meeting. Allow your students to take it once and display feedback and correct answers.
Effective Quiz Practices 93
Quiz Security and CheatingOf course, online testing also presents another chance for the cheaters in your classes to try to game the system. Most online quizzes are meant to be taken at home, or at least outside of class. Students can download the questions and print them out. They can take the tests with other students, or while reading their textbooks.
Fortunately, you can counter many of these strategies, making them more trouble than they are worth to students. Let’s look at a few strategies for countering most cheating schemes:
Printing and sharing questions If you display feedback and correct answers, students can print the results page and share it with their friends. Or they can simply print the questions themselves directly from the quiz. The key to discouraging this behavior is to randomize the question order and answer order. It makes the printouts a lot less useful. Creating larger question banks and giving tests with random subsets is also an effective strategy. If students can print only a small number of questions at a time, they will need to view the test again and again, and then sort the questions to eliminate duplicates.
Using the textbook Students will frequently look up the answer to questions in the textbook or a reading. If you are giving a chapter-check quiz, then this is what you want them to do. Otherwise, you need to come up with creative ways to make the textbook less directly useful. Timed quizzes are the single most effective tool for eliminating this strategy. If you include enough questions and make the time to take the quiz short enough, students won’t have time to look up all the answers. I usually allot about 30 seconds per multiple-choice question. If they answer them faster and have time to look up some answers afterward, I figure they knew enough to deserve the option of looking up an answer or two.
Warning: Assume there will be printed copies of your questions available to students who want them. Most instructors don’t realize students frequently have copies of old paper-based tests, and delivering a test electronicly is another way for students to get copies of the questions. I know one professor who had over 1,100 questions in his online test bank. At the end of the semester, he confiscated a printout from a student. It had every question with the correct answer, neatly formatted and divided by textbook chapter. We decided if students wanted to memorize 1,100 questions to the level where they could answer a small number of them displayed at random, then they would have learned more than if they had just studied. Of course, we used timed quizzes and other strategies to minimize using the printout as a reference manual.
94 Chapter 5: Quizzes
Asking students to apply their knowledge to novel situations can also make a difference. Synthesis and application questions can’t be looked up. Students have to understand the material and apply it creatively to answer the questions. So while they may take the time to review the text, they will still need to understand what they’ve read to successfully answer the question.
Working with friends If your students are on the same campus, they may meet in a lab and try to take the quiz together. This strategy is easily thwarted with random question order, random answer order, and random questions pulled from a test bank. If my screen doesn’t look like yours, then it’s harder for us to quickly answer all of the questions. A timed quiz also makes it harder for the two of us to cheat if we have different questions and only a short amount of time to answer.
Have someone else take the test The old adage goes, “On the Internet, no one knows you’re a dog.” And no one knows who is actually taking the test. Students will sometimes pay classmates, or others who have taken the course in the past, to take online quizzes for them. There are two ways to counter this strategy. One, have an occasional proctored exam where students need to show ID. If they haven’t taken the quizzes or done the work until then, they will do poorly on the proctored exam. Second, to eliminate current classmates from taking each other’s quizzes, make them available only for a short time. You could require everyone to take the test within a two- to four-hour block. If the test is properly randomized, it will be very difficult to take it more than once during the testing period. The test-taker will worry about his own grade first, then about his employer’s grade.
Obviously, there are many strategies students can use to cheat. While it would be naïve to assume there isn’t cheating, the vast majority of your students want to succeed on their own merits. The anonymity of the online environment may open up new avenues for the cheaters, but it’s not really much different from your face-to-face classes. A few people will go to great lengths to cheat, but most will be honest as long as it’s not too easy to get away with it. A few precautions will eliminate most of the cheaters, and the classic strategies will work for the others.