Embed Size (px)
Citation preview

Date: May 8th, 2017
Rapise® | Mobile Device Testing
Quick Start Guide
Page 1 of 16 © Copyright 2006-2017, Inflectra Corporation This document contains Inflectra proprietary information
Contents
Introduction ......................................... 1
Purpose ............................................... 2
1) Setting up Appium and the Android
SDK ...................................................... 2
2) Configure the Mobile Profile ......... 5
3) Using the Mobile Spy ..................... 8
4) Recording and Playing a Test ..... 10
Example ............................................. 14
Introduction
Rapise® is a next generation software test
automation tool that leverages the power of
open architecture to improve application quality
and reduce time to market.
This guide provides a quick step-by-step tutorial
for using Rapise for testing applications on
mobile devices (e.g. Apple iOS and Android).
For further information on using Rapise for
automated testing in general, please refer to
Rapise Quick Start Guide or the more
comprehensive Rapise User Manual.
Page 2 of 16 © Copyright 2006-2017, Inflectra Corporation This document contains Inflectra proprietary information
Purpose
Rapise lets you record and play automated tests against native applications on a variety of mobile devices using either Apple iOS or Android. Rapise gives you the flexibility to test your applications on either real or simulated devices. This tutorial is a simple example of using Rapise to record and playback a simple test against a sample Android application running on the Android Simulator on your local PC. It does not require any physical mobile devices and only uses the PC that you have already installed Rapise on. (There is other documentation that describes the full range of mobile testing options)
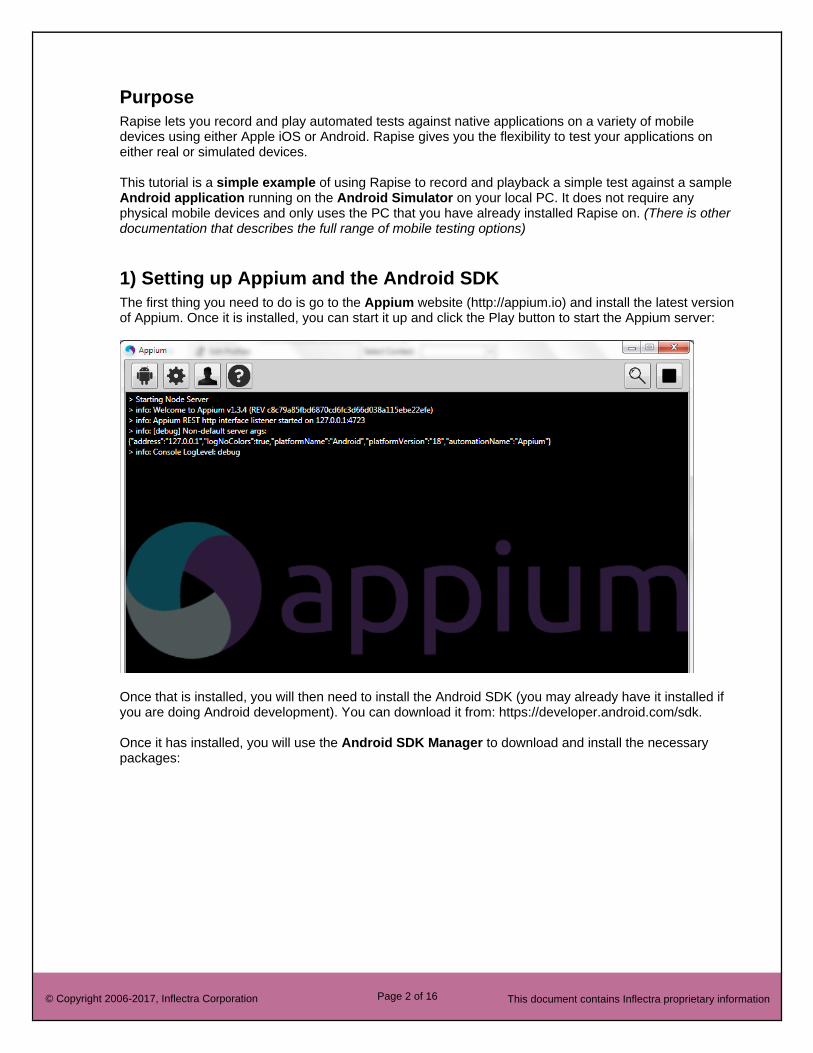
1) Setting up Appium and the Android SDK
The first thing you need to do is go to the Appium website (http://appium.io) and install the latest version of Appium. Once it is installed, you can start it up and click the Play button to start the Appium server:
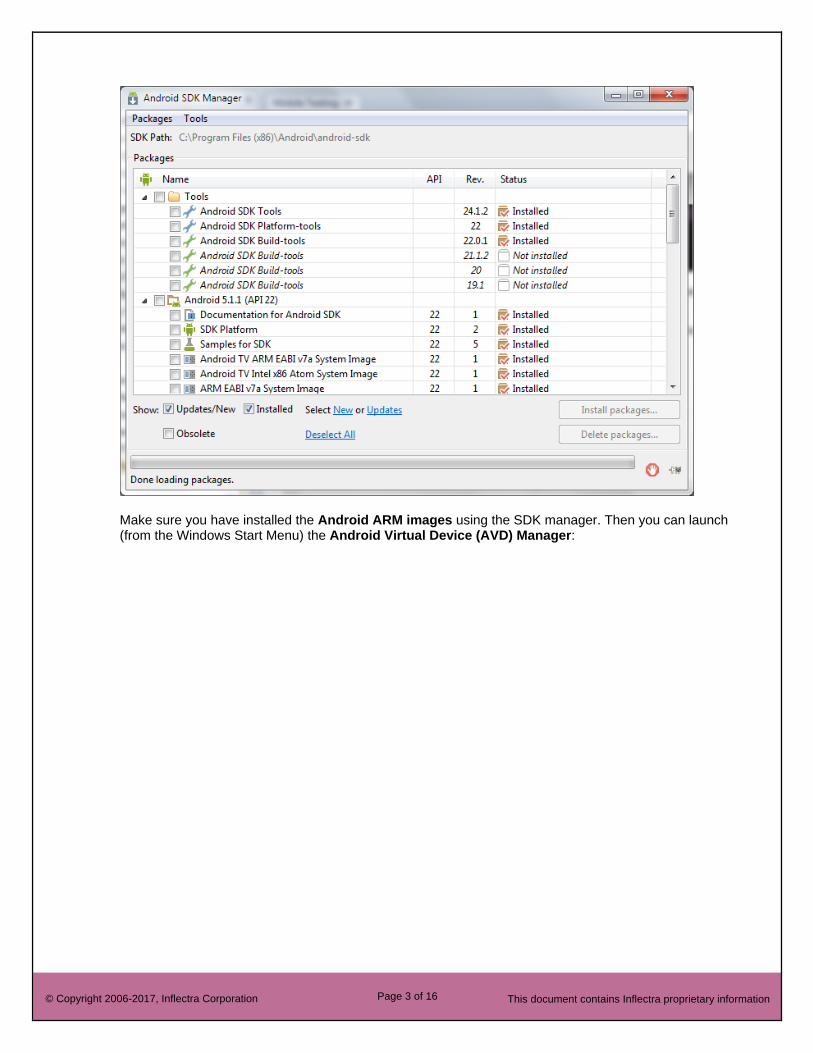
Once that is installed, you will then need to install the Android SDK (you may already have it installed if you are doing Android development). You can download it from: https://developer.android.com/sdk. Once it has installed, you will use the Android SDK Manager to download and install the necessary packages:
Page 3 of 16 © Copyright 2006-2017, Inflectra Corporation This document contains Inflectra proprietary information
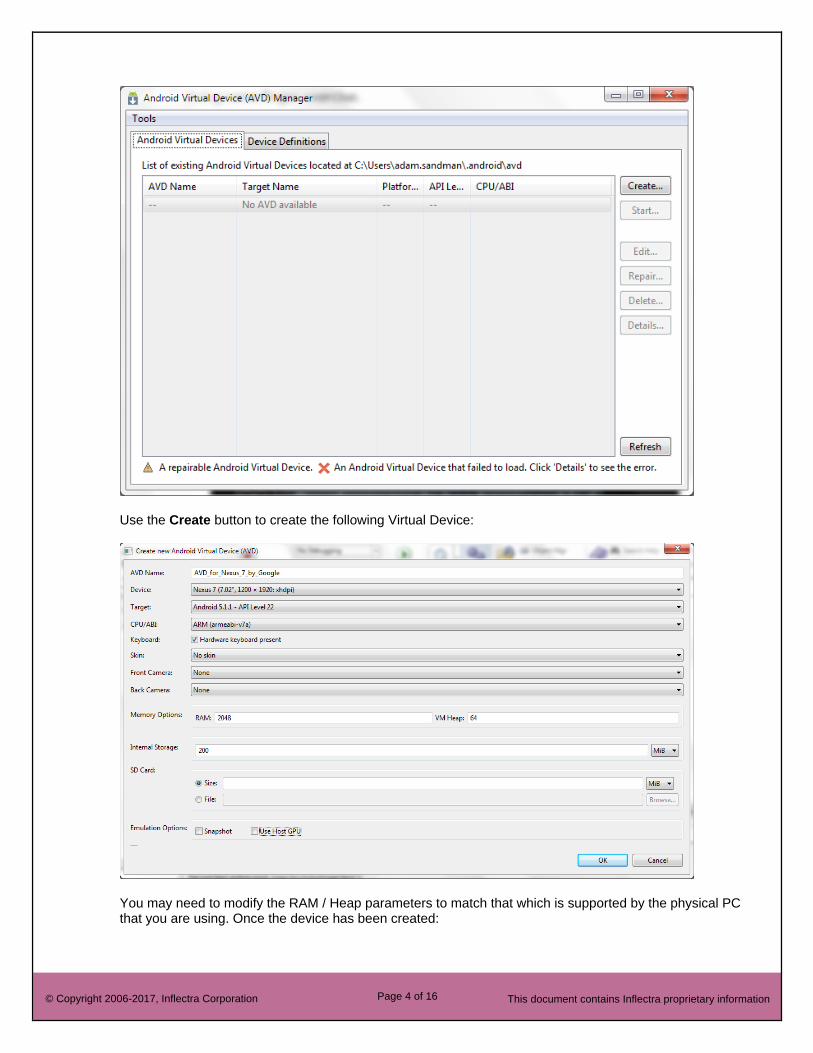
Make sure you have installed the Android ARM images using the SDK manager. Then you can launch (from the Windows Start Menu) the Android Virtual Device (AVD) Manager:
Page 4 of 16 © Copyright 2006-2017, Inflectra Corporation This document contains Inflectra proprietary information
Use the Create button to create the following Virtual Device:
You may need to modify the RAM / Heap parameters to match that which is supported by the physical PC that you are using. Once the device has been created:
Page 5 of 16 © Copyright 2006-2017, Inflectra Corporation This document contains Inflectra proprietary information
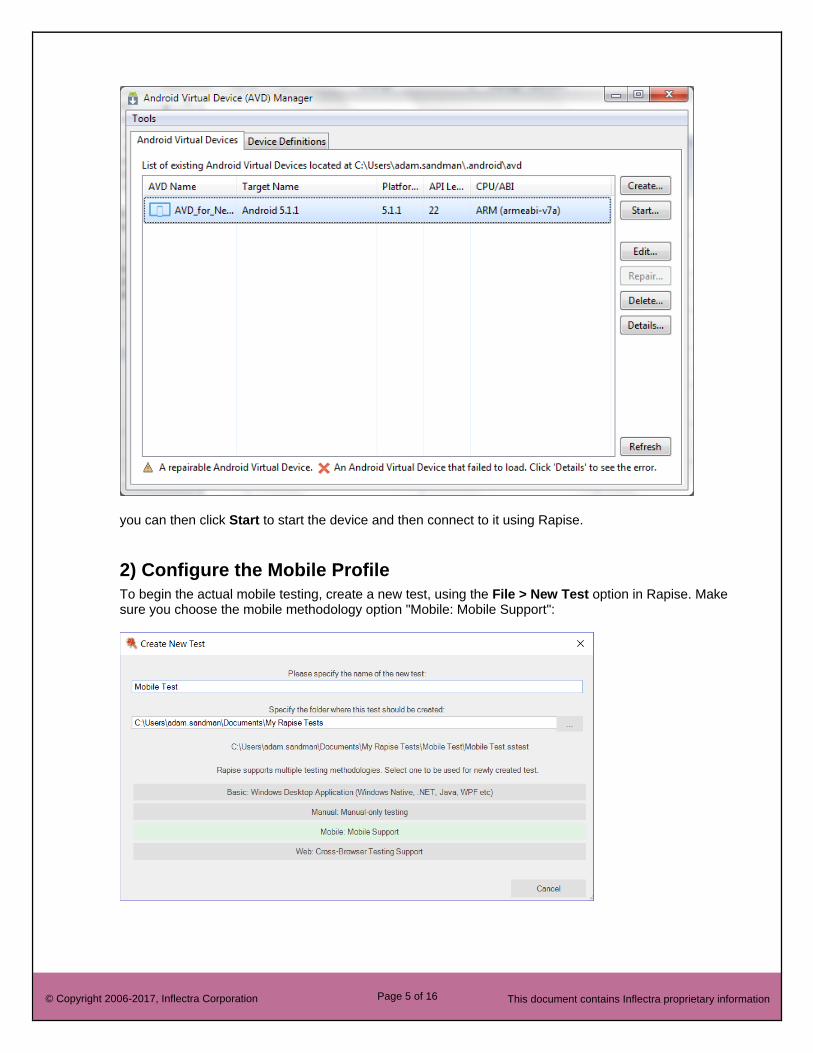
you can then click Start to start the device and then connect to it using Rapise.
2) Configure the Mobile Profile
To begin the actual mobile testing, create a new test, using the File > New Test option in Rapise. Make sure you choose the mobile methodology option "Mobile: Mobile Support":
Page 6 of 16 © Copyright 2006-2017, Inflectra Corporation This document contains Inflectra proprietary information
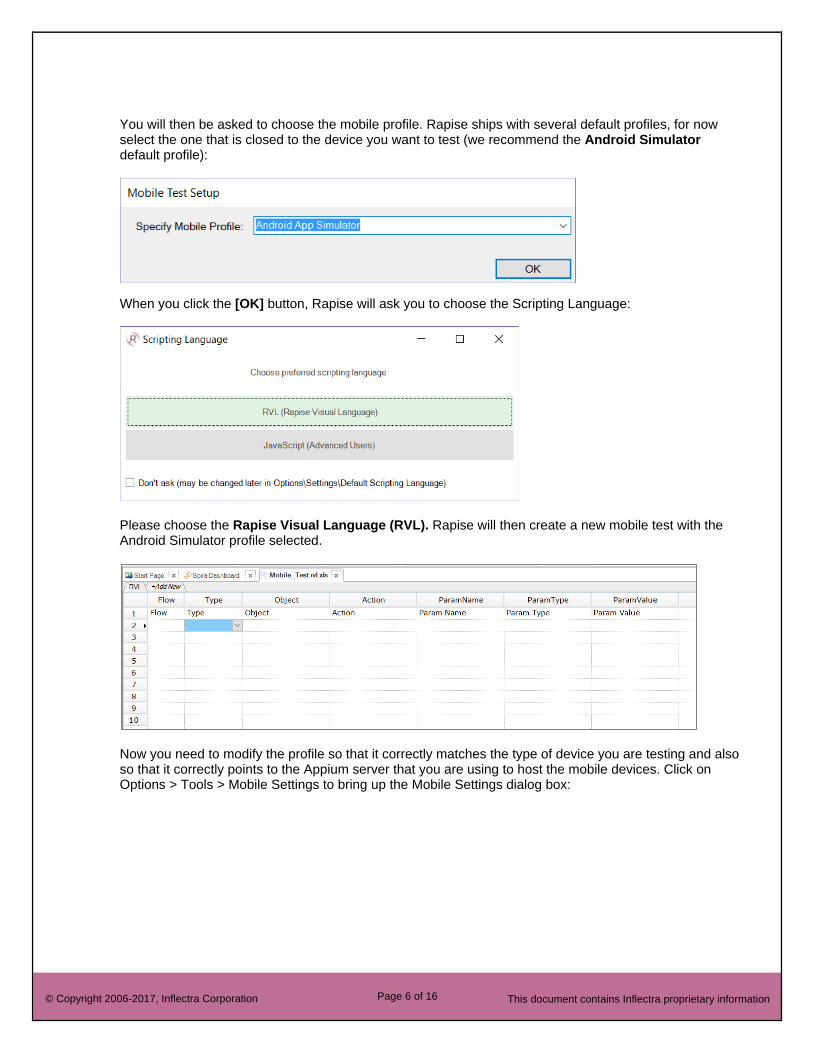
You will then be asked to choose the mobile profile. Rapise ships with several default profiles, for now select the one that is closed to the device you want to test (we recommend the Android Simulator default profile):
When you click the [OK] button, Rapise will ask you to choose the Scripting Language:
Please choose the Rapise Visual Language (RVL). Rapise will then create a new mobile test with the Android Simulator profile selected.
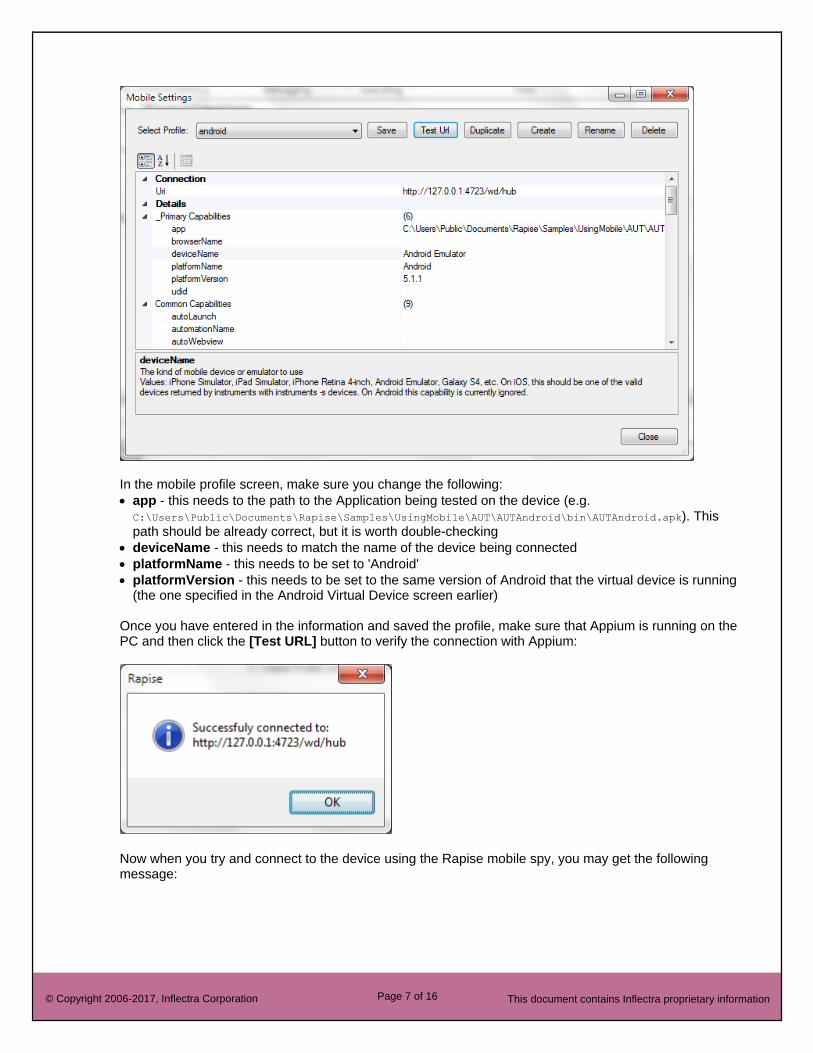
Now you need to modify the profile so that it correctly matches the type of device you are testing and also so that it correctly points to the Appium server that you are using to host the mobile devices. Click on Options > Tools > Mobile Settings to bring up the Mobile Settings dialog box:
Page 7 of 16 © Copyright 2006-2017, Inflectra Corporation This document contains Inflectra proprietary information
In the mobile profile screen, make sure you change the following:
• app - this needs to the path to the Application being tested on the device (e.g.
C:\Users\Public\Documents\Rapise\Samples\UsingMobile\AUT\AUTAndroid\bin\AUTAndroid.apk). This path should be already correct, but it is worth double-checking
• deviceName - this needs to match the name of the device being connected
• platformName - this needs to be set to 'Android'
• platformVersion - this needs to be set to the same version of Android that the virtual device is running (the one specified in the Android Virtual Device screen earlier)
Once you have entered in the information and saved the profile, make sure that Appium is running on the PC and then click the [Test URL] button to verify the connection with Appium:
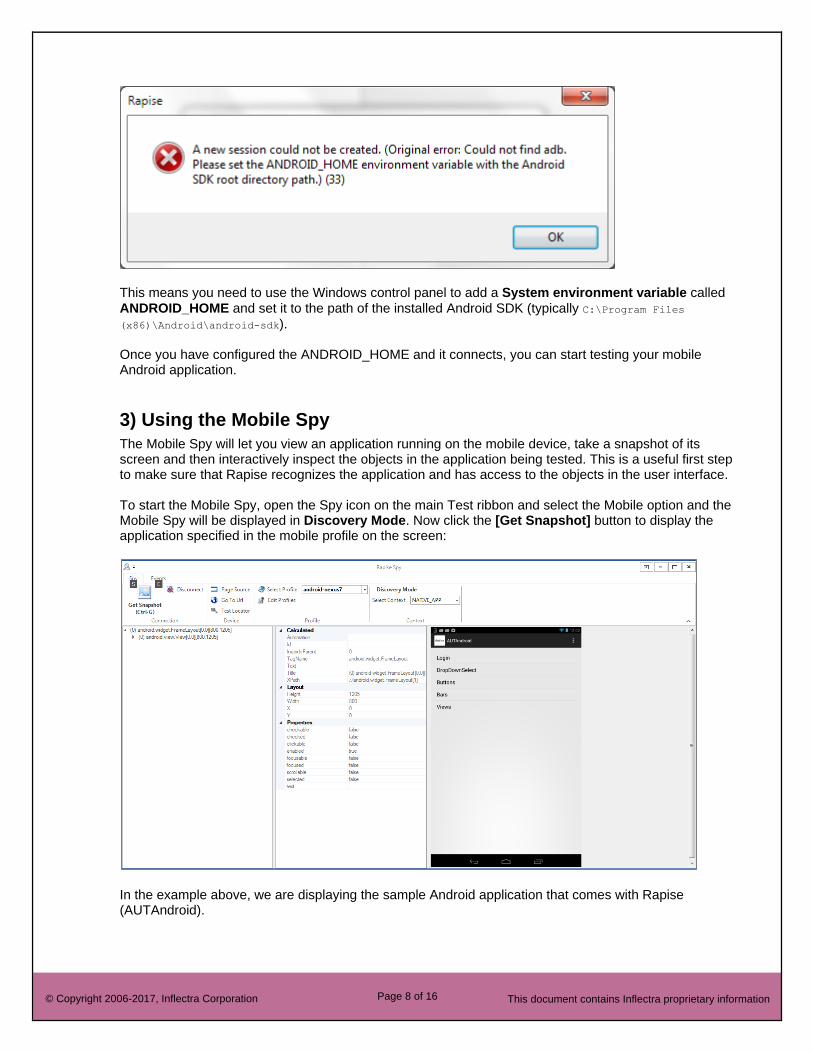
Now when you try and connect to the device using the Rapise mobile spy, you may get the following message:
Page 8 of 16 © Copyright 2006-2017, Inflectra Corporation This document contains Inflectra proprietary information
This means you need to use the Windows control panel to add a System environment variable called
ANDROID_HOME and set it to the path of the installed Android SDK (typically C:\Program Files
(x86)\Android\android-sdk). Once you have configured the ANDROID_HOME and it connects, you can start testing your mobile Android application.
3) Using the Mobile Spy
The Mobile Spy will let you view an application running on the mobile device, take a snapshot of its screen and then interactively inspect the objects in the application being tested. This is a useful first step to make sure that Rapise recognizes the application and has access to the objects in the user interface. To start the Mobile Spy, open the Spy icon on the main Test ribbon and select the Mobile option and the Mobile Spy will be displayed in Discovery Mode. Now click the [Get Snapshot] button to display the application specified in the mobile profile on the screen:
In the example above, we are displaying the sample Android application that comes with Rapise (AUTAndroid).
Page 9 of 16 © Copyright 2006-2017, Inflectra Corporation This document contains Inflectra proprietary information
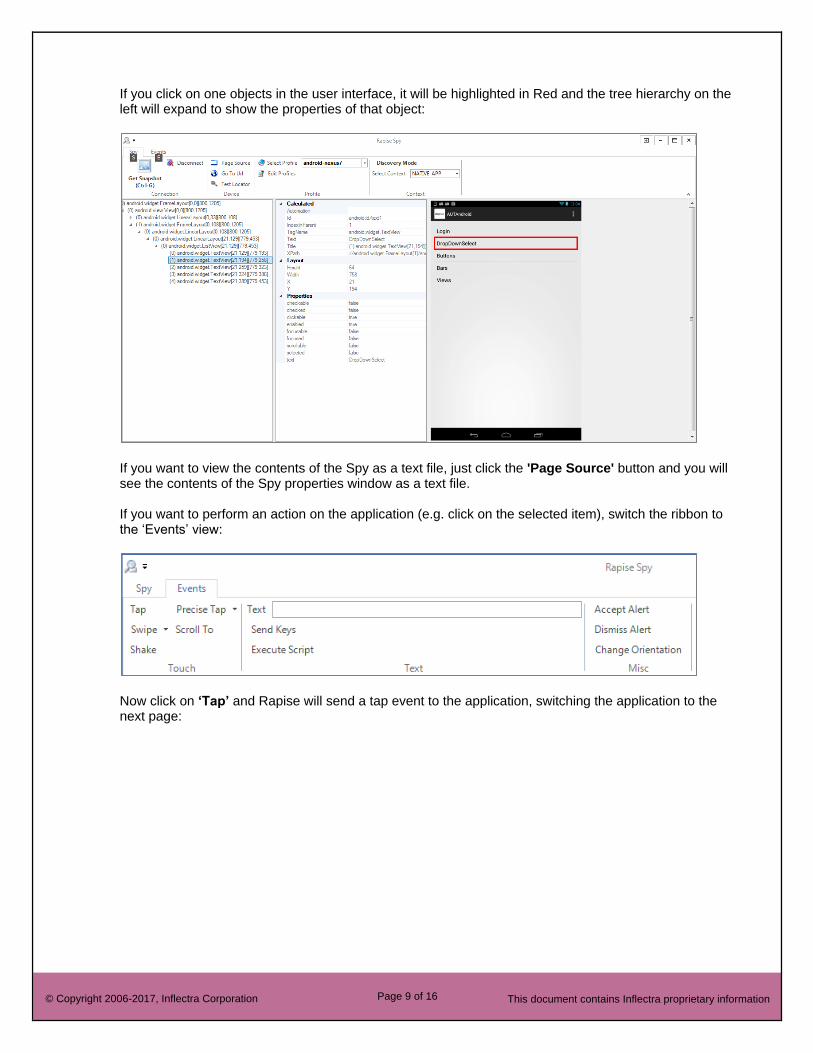
If you click on one objects in the user interface, it will be highlighted in Red and the tree hierarchy on the left will expand to show the properties of that object:
If you want to view the contents of the Spy as a text file, just click the 'Page Source' button and you will see the contents of the Spy properties window as a text file. If you want to perform an action on the application (e.g. click on the selected item), switch the ribbon to the ‘Events’ view:
Now click on ‘Tap’ and Rapise will send a tap event to the application, switching the application to the next page:

Page 10 of 16 © Copyright 2006-2017, Inflectra Corporation This document contains Inflectra proprietary information
For more details on the different mobile events and how they work, please refer to the main Rapise manual. Assuming that you can see your application in the Spy and that the objects can be inspected and interacted with (similar to that shown above) you can now begin the process of testing your mobile application. Click on Disconnect to end your Spy session and close the Rapise Spy dialog. You will now will be returned back to your test script.
4) Recording and Playing a Test
With the new Rapise mobile test script open, click on the Record/Learn button in Rapise and that will display the recording activity dialog:
Now click on either the [Spy] or [Pick Object] button (they both do the same thing for mobile testing) and the Rapise Mobile Spy will be displayed in Recording Mode:
Page 11 of 16 © Copyright 2006-2017, Inflectra Corporation This document contains Inflectra proprietary information
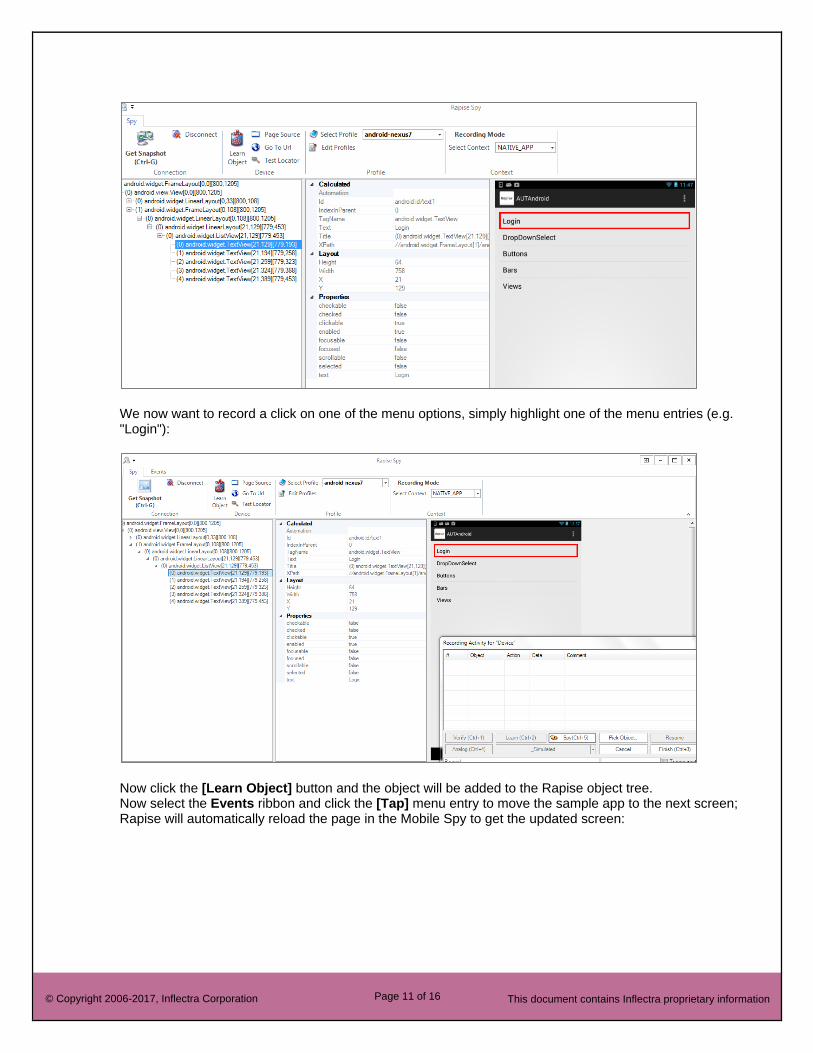
We now want to record a click on one of the menu options, simply highlight one of the menu entries (e.g. "Login"):
Now click the [Learn Object] button and the object will be added to the Rapise object tree. Now select the Events ribbon and click the [Tap] menu entry to move the sample app to the next screen; Rapise will automatically reload the page in the Mobile Spy to get the updated screen:
Page 12 of 16 © Copyright 2006-2017, Inflectra Corporation This document contains Inflectra proprietary information
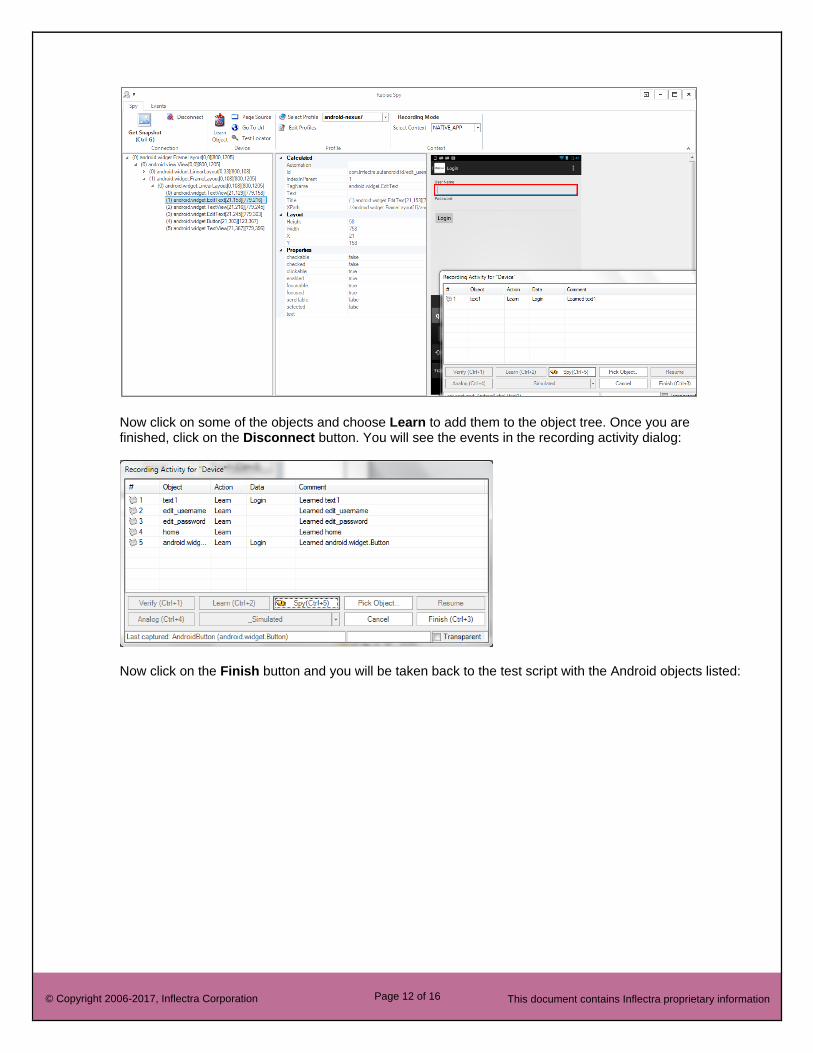
Now click on some of the objects and choose Learn to add them to the object tree. Once you are finished, click on the Disconnect button. You will see the events in the recording activity dialog:
Now click on the Finish button and you will be taken back to the test script with the Android objects listed:
Page 13 of 16 © Copyright 2006-2017, Inflectra Corporation This document contains Inflectra proprietary information
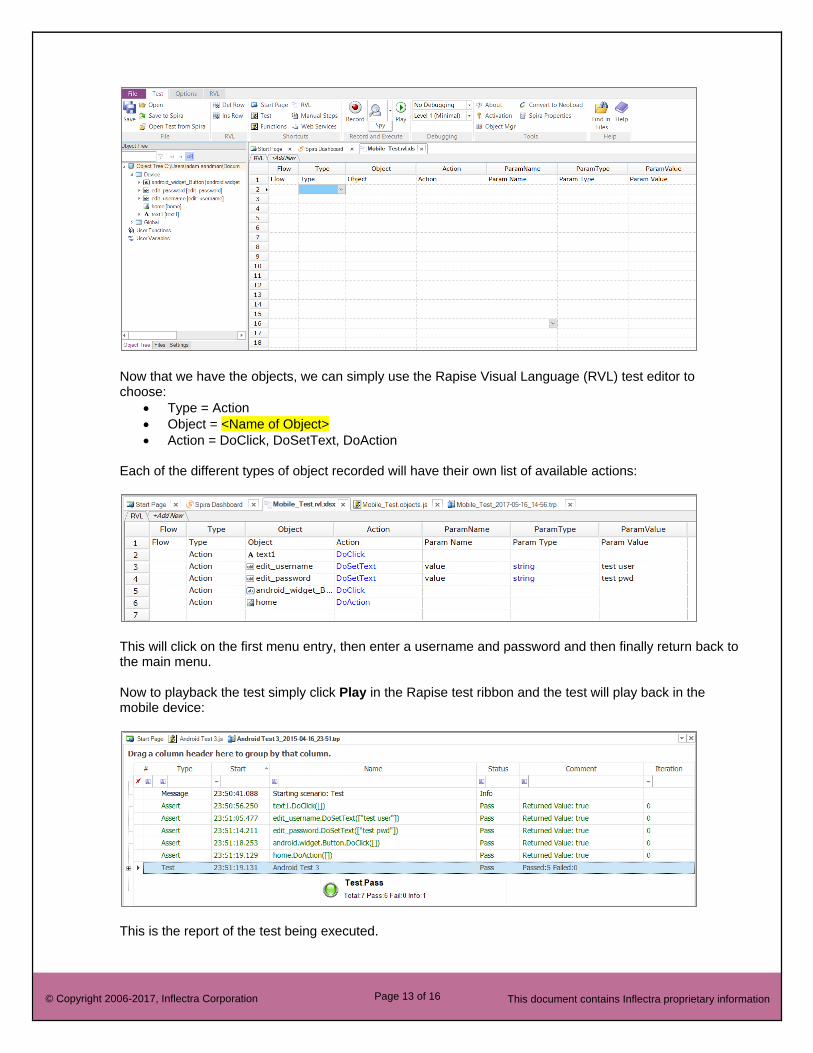
Now that we have the objects, we can simply use the Rapise Visual Language (RVL) test editor to choose:
• Type = Action
• Object = <Name of Object>
• Action = DoClick, DoSetText, DoAction Each of the different types of object recorded will have their own list of available actions:
This will click on the first menu entry, then enter a username and password and then finally return back to the main menu. Now to playback the test simply click Play in the Rapise test ribbon and the test will play back in the mobile device:
This is the report of the test being executed.
Page 14 of 16 © Copyright 2006-2017, Inflectra Corporation This document contains Inflectra proprietary information
Example
You can find the Android sample tests and sample Application (called AUTAndroid) in your Rapise installation at the following locations: Sample Android Tests:
• C:\Users\Public\Documents\Rapise\Samples\UsingMobile\AppAndroid (testing a native App)
• C:\Users\Public\Documents\Rapise\Samples\UsingMobile\WebAndroid (testing a web app) Sample Application (AUTAndroid)
• C:\Users\Public\Documents\Rapise\Samples\UsingMobile\AUT\AUTAndroid (we supply the sample application as both a compiled .apk binary and an Android Studio Java project with source code)
Page 15 of 16 © Copyright 2006-2017, Inflectra Corporation This document contains Inflectra proprietary information
Legal Notices
This publication is provided as is without warranty of any kind, either express or implied, including, but not
limited to, the implied warranties of merchantability, fitness for a particular purpose, or non-infringement.
This publication could include technical inaccuracies or typographical errors. Changes are periodically
added to the information contained herein; these changes will be incorporated in new editions of the
publication. Inflectra Corporation may make improvements and/or changes in the product(s) and/or
program(s) and/or service(s) described in this publication at any time.
The sections in this guide that discuss internet web security are provided as suggestions and guidelines.
Internet security is constantly evolving field, and our suggestions are no substitute for an up-to-date
understanding of the vulnerabilities inherent in deploying internet or web applications, and Inflectra cannot
be held liable for any losses due to breaches of security, compromise of data or other cyber-attacks that
may result from following our recommendations.
SpiraTest®, SpiraPlan®, SpiraTeam®, Rapise® and Inflectra® are either trademarks or registered
trademarks of Inflectra Corporation in the United States of America and other countries. Microsoft®,
Windows®, Explorer® and Microsoft Project® are registered trademarks of Microsoft Corporation. All other
trademarks and product names are property of their respective holders.
Please send comments and questions to:
Technical Publications
Inflectra Corporation
8121 Georgia Ave, Suite 504
Silver Spring, MD 20910-4957
U.S.A.