Embed Size (px)
Citation preview

Raspberry Pi Pokemon FinderCreated by Ruiz Brothers
Last updated on 2016-09-13 03:09:36 AM UTC
2445566
8899
111113131314
15151616
1818181920202122222324242526
Guide Contents
Guide ContentsOverview
Reverse Lure Module!How Does It Work?Warning, Warning, Warning!!PartsTools and Supplies
SoftwarePrepare Pi ZeroInstall packagesInstall Pokemon Go APITime to configure!Test it outCircuit Diagram
Circuit DiagramWired Connections5V Power
3D PrintingSlice SettingsTolerancesCNC Milling Acrylic
Wiring LEDsPrepping LEDsGround WiresTinning WiresLED Ground WireRepeat LED Ground WiresPrep Signal WiresWire SignalWired LEDsInstalling LEDsInstalled LEDsConnecting Ground WiresWiring ResistorConnecting Resistor
© Adafruit Industries https://learn.adafruit.com/pi-zero-pokemon-lure-module Page 2 of 33
27282829
303031323233
Heatshrink ConnectionsAssembled LEDsTinning GPIOConnect LEDs to GPIO
AssembleInstall Antenna into CaseInstall PiInstalling CoverInstalled CoverRaspberry Pi Lure Module Case
© Adafruit Industries https://learn.adafruit.com/pi-zero-pokemon-lure-module Page 3 of 33
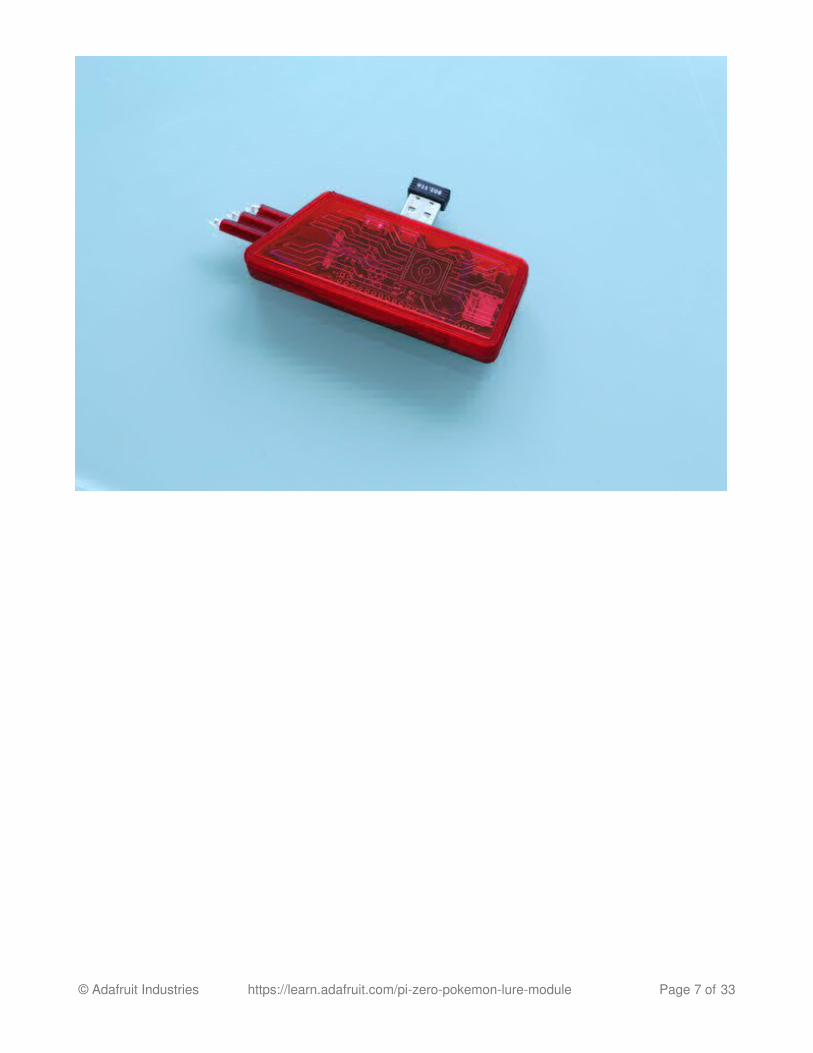
Overview
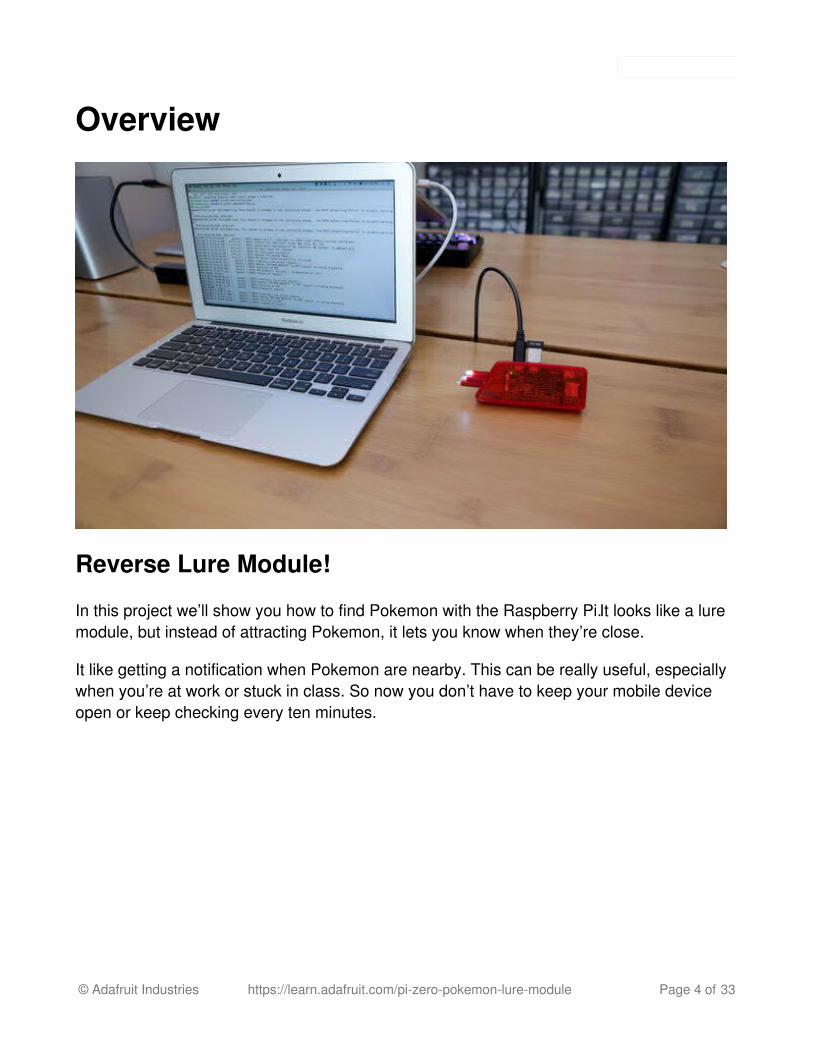
Reverse Lure Module!
In this project we’ll show you how to find Pokemon with the Raspberry Pi. It looks like a luremodule, but instead of attracting Pokemon, it lets you know when they’re close.
It like getting a notification when Pokemon are nearby. This can be really useful, especiallywhen you’re at work or stuck in class. So now you don’t have to keep your mobile deviceopen or keep checking every ten minutes.
© Adafruit Industries https://learn.adafruit.com/pi-zero-pokemon-lure-module Page 4 of 33
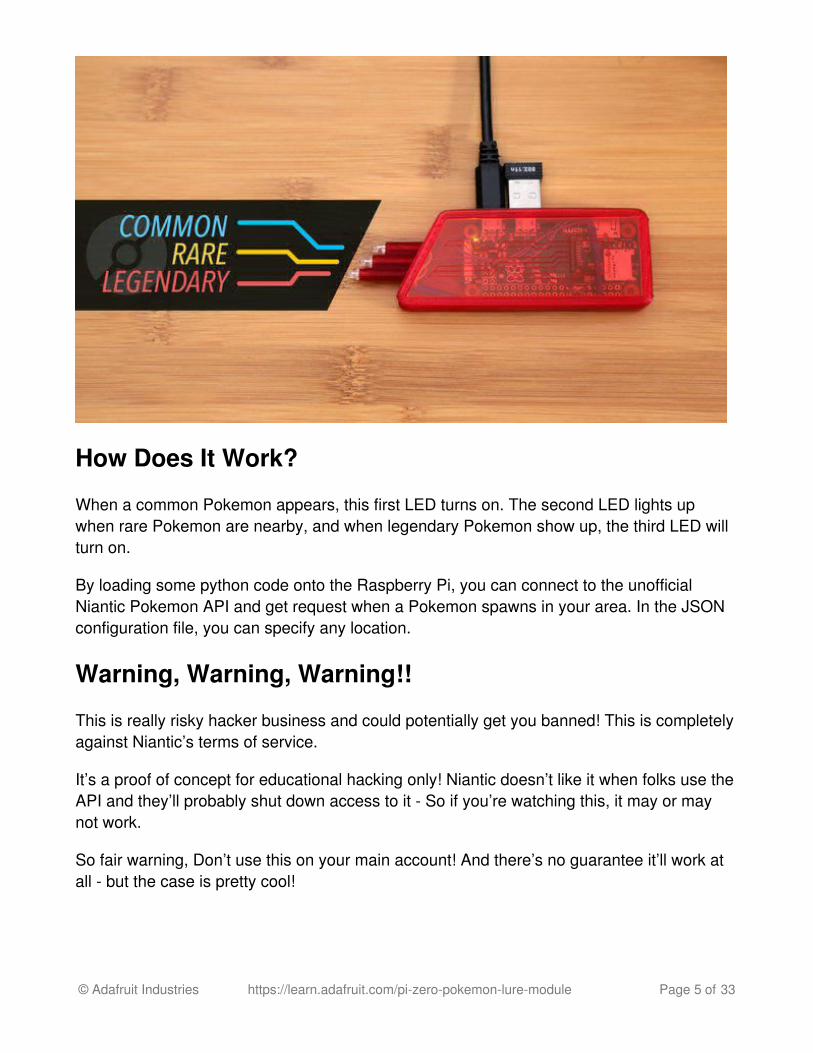
How Does It Work?
When a common Pokemon appears, this first LED turns on. The second LED lights upwhen rare Pokemon are nearby, and when legendary Pokemon show up, the third LED willturn on.
By loading some python code onto the Raspberry Pi, you can connect to the unofficialNiantic Pokemon API and get request when a Pokemon spawns in your area. In the JSONconfiguration file, you can specify any location.
Warning, Warning, Warning!!
This is really risky hacker business and could potentially get you banned! This is completelyagainst Niantic’s terms of service.
It’s a proof of concept for educational hacking only! Niantic doesn’t like it when folks use theAPI and they’ll probably shut down access to it - So if you’re watching this, it may or maynot work.
So fair warning, Don’t use this on your main account! And there’s no guarantee it’ll work atall - but the case is pretty cool!
© Adafruit Industries https://learn.adafruit.com/pi-zero-pokemon-lure-module Page 5 of 33
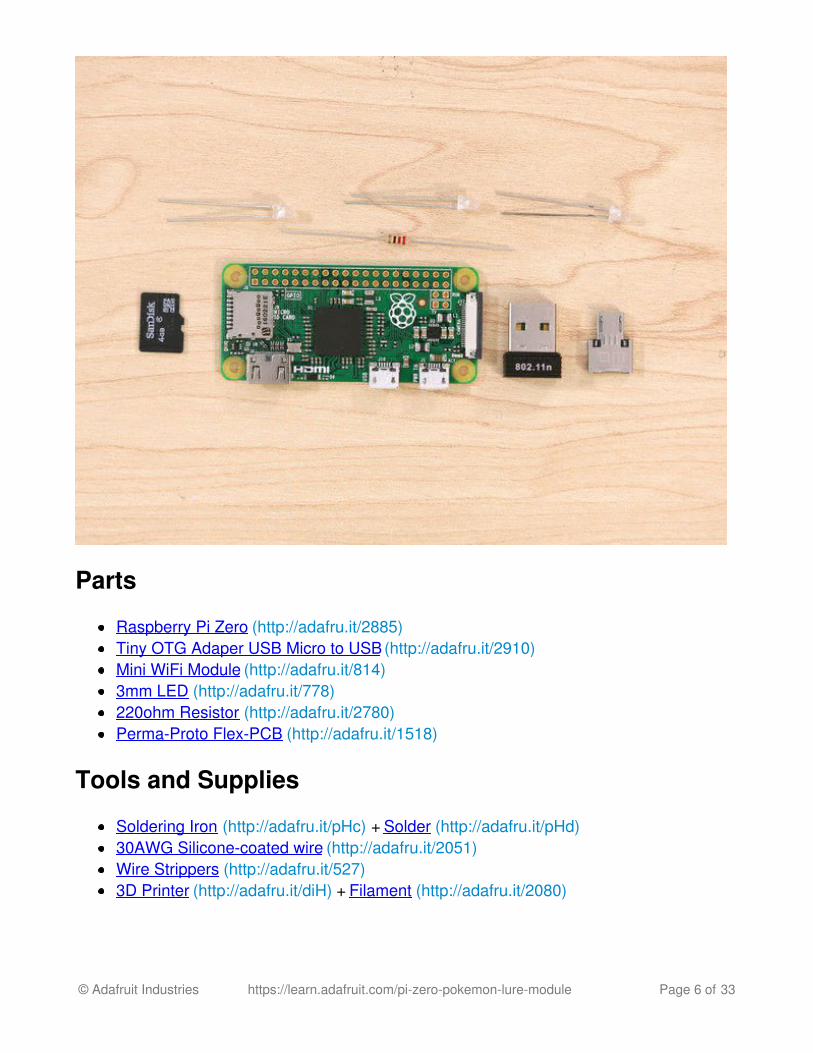
Parts
Raspberry Pi Zero (http://adafru.it/2885)Tiny OTG Adaper USB Micro to USB (http://adafru.it/2910)Mini WiFi Module (http://adafru.it/814)3mm LED (http://adafru.it/778)220ohm Resistor (http://adafru.it/2780)Perma-Proto Flex-PCB (http://adafru.it/1518)
Tools and Supplies
Soldering Iron (http://adafru.it/pHc) + Solder (http://adafru.it/pHd)30AWG Silicone-coated wire (http://adafru.it/2051)Wire Strippers (http://adafru.it/527)3D Printer (http://adafru.it/diH) + Filament (http://adafru.it/2080)
© Adafruit Industries https://learn.adafruit.com/pi-zero-pokemon-lure-module Page 6 of 33
© Adafruit Industries https://learn.adafruit.com/pi-zero-pokemon-lure-module Page 7 of 33
SoftwareNot only can you make this lovely Lure-like case, you can make the Pi Zero act as areverse-Lure, a Pokemon Finder! By loading some python software into the Pi, you canconnect to the unofficial Niantic Pokemon API and determine when a Pokemon spawns inyour area.
Thanks to James for the writeup!
WARNING! WARNING! WARNING!
Connecting to Niantic's servers and using the API is completely against the terms ofservice. It's a fun hack but is not authorized by Niantic and can cause the account used tobe soft-banned or perhaps even perma-banned!
Do not use your main account!
Also, Niantic doesn't particularly like it when people use the API and they are very likely toshut access to it (again) soon!
This code may not work past when this was written on August 11, 2016. There is noguarantee or support or expectation that this will work at all!
WARNING! WARNING! WARNING!This is not a beginner Raspberry Pi tutorial, we assume familiarity with Linux! Check out ourother Pi tutorials for getting startedCode on Githubhttp://adafru.it/pPE
Prepare Pi ZeroStart by loading up Jessie Lite on your Raspberry Pi (http://adafru.it/pHe)
You'll also need to log into a shell on your Pi Zero, we prefer using a USB consolecable (http://adafru.it/pHf) but you can also connect a keyboard and use HDMI or connect anethernet adapter and ssh to raspberrypi.local
Either way, get your Pi Zero up and running and you are logged in. Expand Filesystemfrom within sudo raspi-config. Reboot with the WiFi adapter connected to the USB OTG port
© Adafruit Industries https://learn.adafruit.com/pi-zero-pokemon-lure-module Page 8 of 33
Then set up the WiFi adapter, we prefer to do it this way (http://adafru.it/dDN) but there'sother techniques, just do whatever you like to get the Pi Zero on the network.
Reboot and make sure you can ping raspberrypi.org successfully
Install packagesOnce networking is working, run the following at the shell to install pkgs:
sudo apt-get update
sudo apt-get install git python python-pip python-dev
sudo pip install --upgrade pip
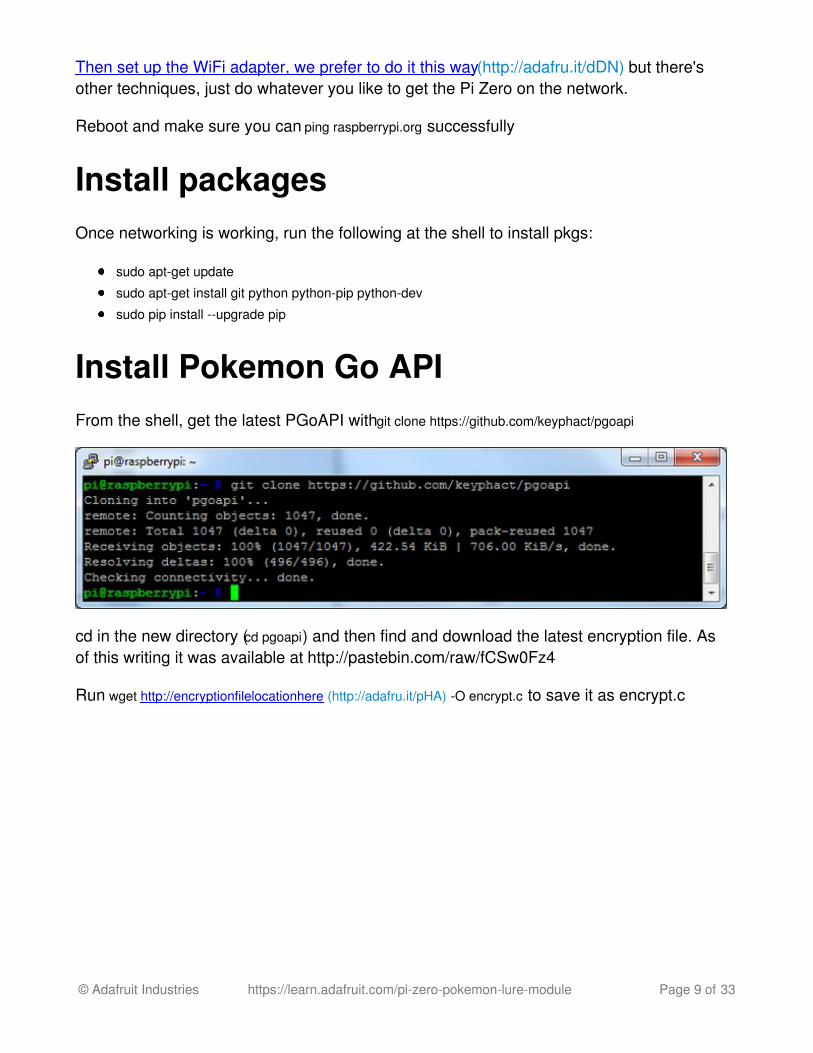
Install Pokemon Go APIFrom the shell, get the latest PGoAPI with git clone https://github.com/keyphact/pgoapi
cd in the new directory (cd pgoapi) and then find and download the latest encryption file. Asof this writing it was available at http://pastebin.com/raw/fCSw0Fz4
Run wget http://encryptionfilelocationhere (http://adafru.it/pHA) -O encrypt.c to save it as encrypt.c
© Adafruit Industries https://learn.adafruit.com/pi-zero-pokemon-lure-module Page 9 of 33
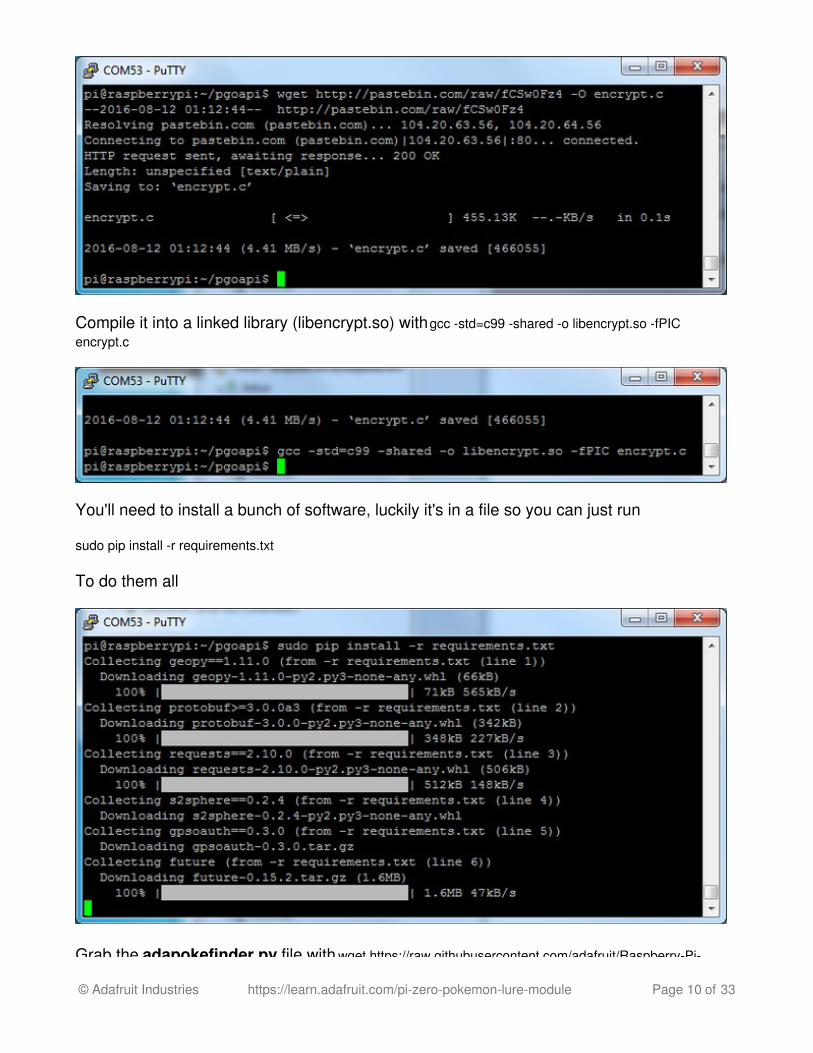
Compile it into a linked library (libencrypt.so) with gcc -std=c99 -shared -o libencrypt.so -fPICencrypt.c
You'll need to install a bunch of software, luckily it's in a file so you can just run
sudo pip install -r requirements.txt
To do them all
Grab the adapokefinder.py file with wget https://raw.githubusercontent.com/adafruit/Raspberry-Pi-
© Adafruit Industries https://learn.adafruit.com/pi-zero-pokemon-lure-module Page 10 of 33
Grab the adapokefinder.py file with wget https://raw.githubusercontent.com/adafruit/Raspberry-Pi-Pokemon-Detector/master/adapokefinder.py -O adapokefinder.py
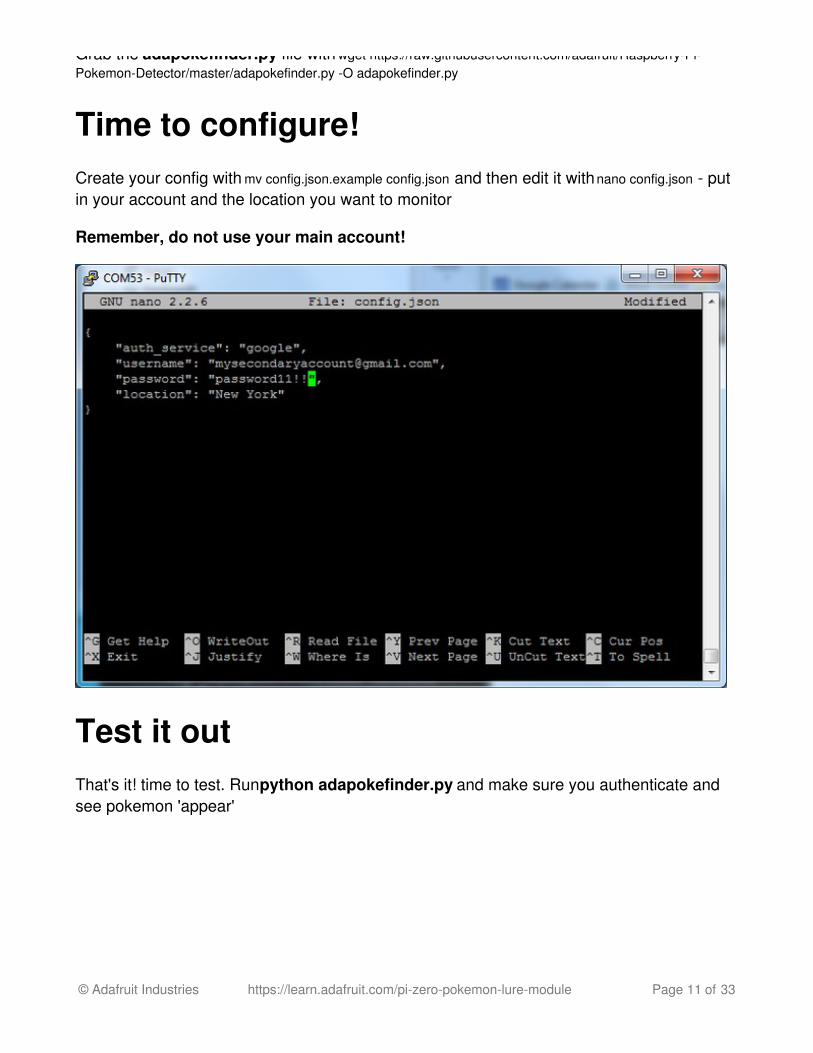
Time to configure!Create your config with mv config.json.example config.json and then edit it with nano config.json - putin your account and the location you want to monitor
Remember, do not use your main account!
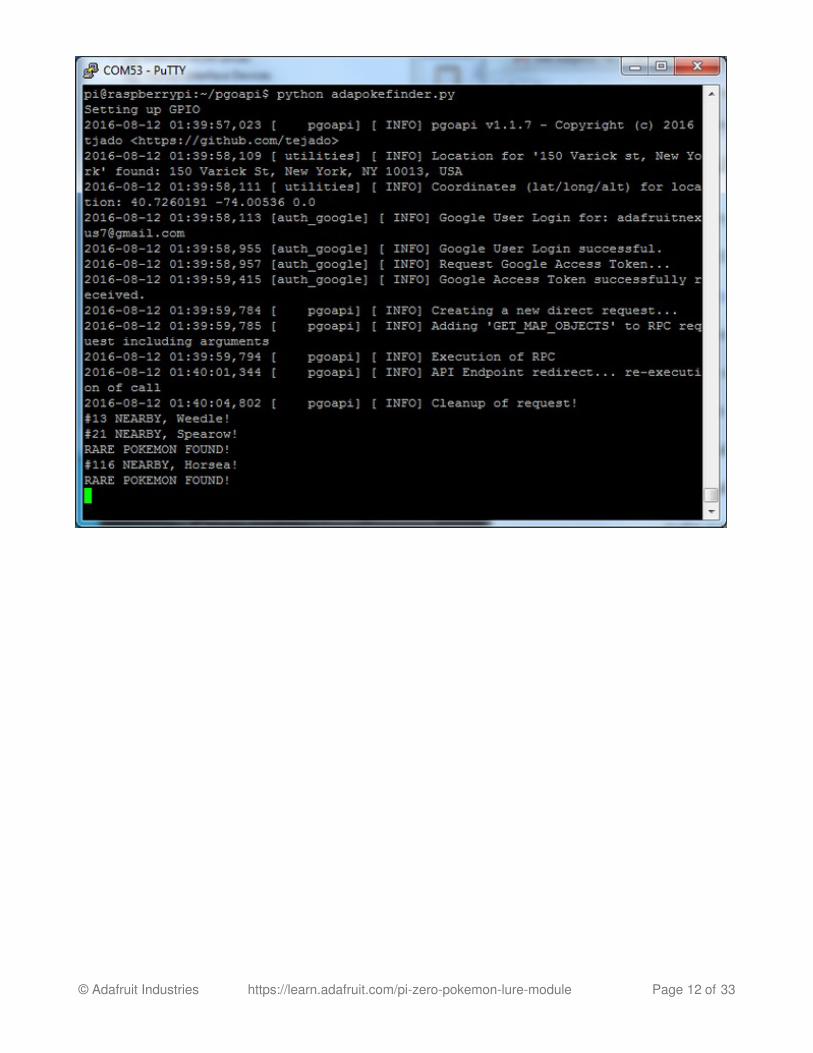
Test it outThat's it! time to test. Run python adapokefinder.py and make sure you authenticate andsee pokemon 'appear'
© Adafruit Industries https://learn.adafruit.com/pi-zero-pokemon-lure-module Page 11 of 33
© Adafruit Industries https://learn.adafruit.com/pi-zero-pokemon-lure-module Page 12 of 33
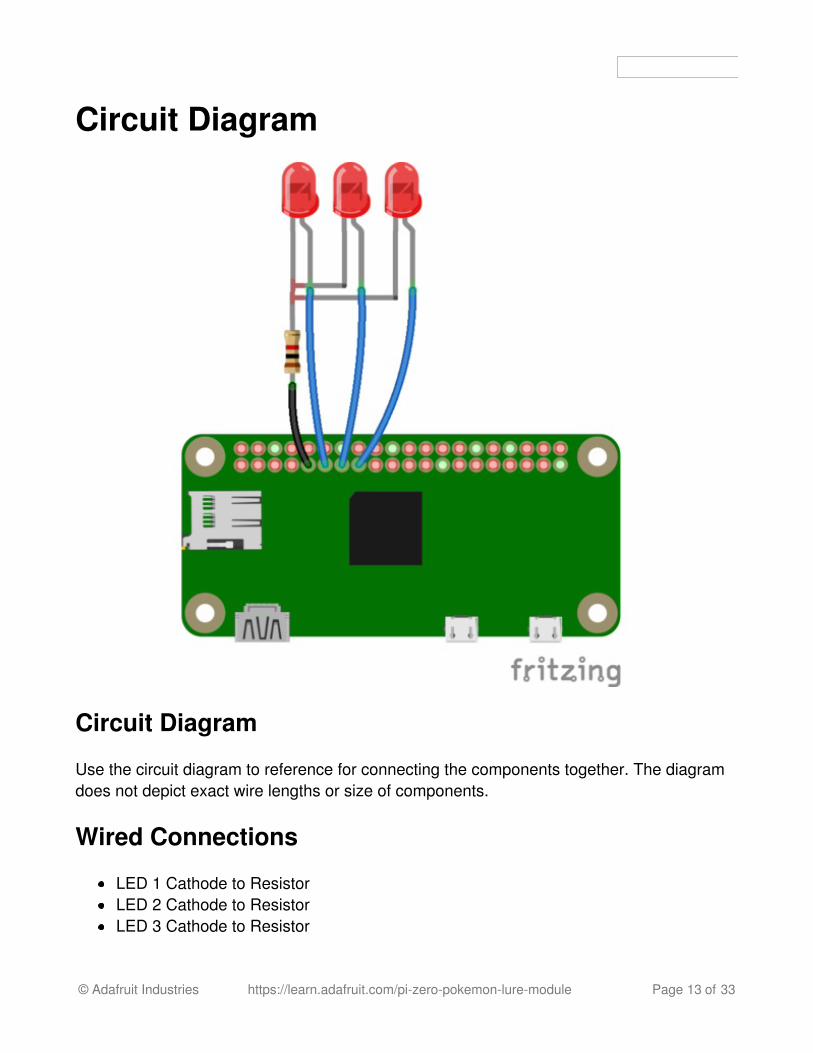
Circuit Diagram
Circuit Diagram
Use the circuit diagram to reference for connecting the components together. The diagramdoes not depict exact wire lengths or size of components.
Wired Connections
LED 1 Cathode to ResistorLED 2 Cathode to ResistorLED 3 Cathode to Resistor
© Adafruit Industries https://learn.adafruit.com/pi-zero-pokemon-lure-module Page 13 of 33
LED 1 Anode to GPIO 17LED 2 Anode to GPIO 22LED 3 Anode to GPIO 27
5V Power
To power the Raspberry Pi, you'll need a 5V power supply (http://adafru.it/1994) / walladapter. The Pi needs 5V power via a microUSB cable. This project is not meant to beportable.
© Adafruit Industries https://learn.adafruit.com/pi-zero-pokemon-lure-module Page 14 of 33
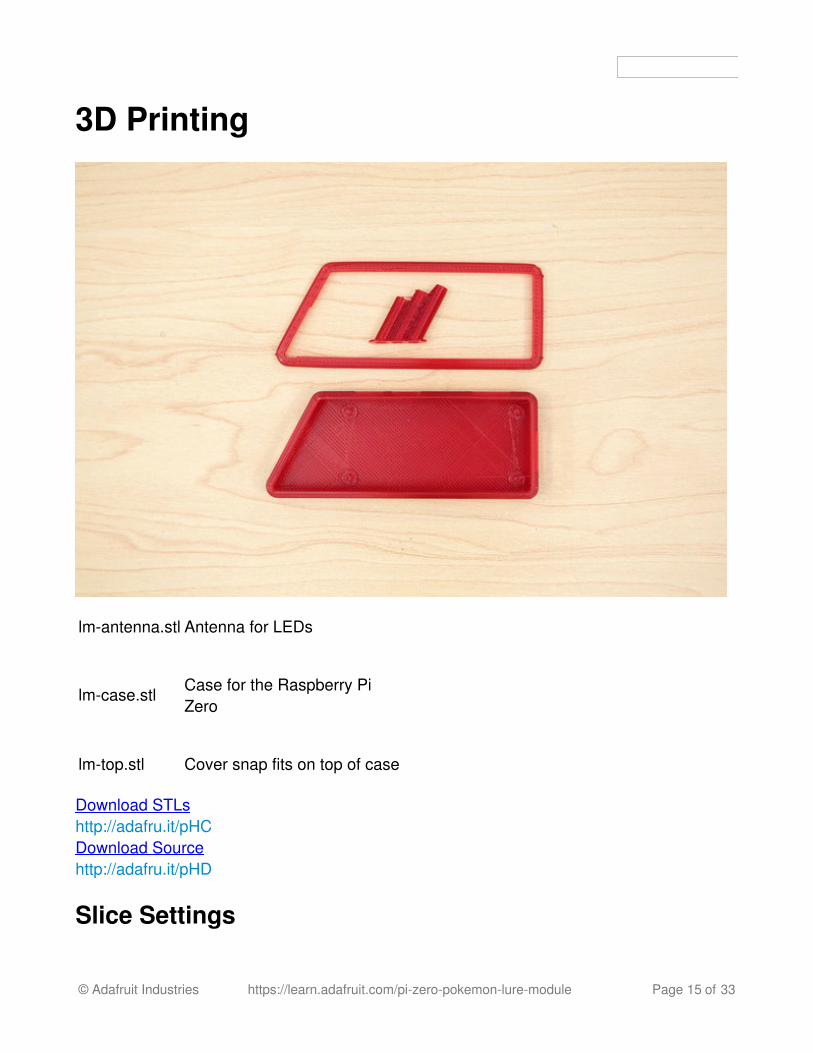
3D Printing
lm-antenna.stl Antenna for LEDs
lm-case.stlCase for the Raspberry PiZero
lm-top.stl Cover snap fits on top of case
Download STLshttp://adafru.it/pHCDownload Sourcehttp://adafru.it/pHD
Slice Settings
© Adafruit Industries https://learn.adafruit.com/pi-zero-pokemon-lure-module Page 15 of 33
Below are some recommended slice settings. We used simplify3D to slice these parts andgenerate the gcode. These parts were printed on a Sigma BCN3D using a .4mm nozzle and1.75mm filament.
.2mm layer height220C extruder / 65c bed20% infill4 top/bottom layers2 shells / parameters60mm/s printing speed with 120mm/s travel
Tolerances
The top cover should have a friction fit to the case, but you might find it difficult to snaptogether. Tolerances will differ depending on the 3D printer. If you find the pieces are tootight, you may need to use a filing tool on the edges to loosen up the tolerances.
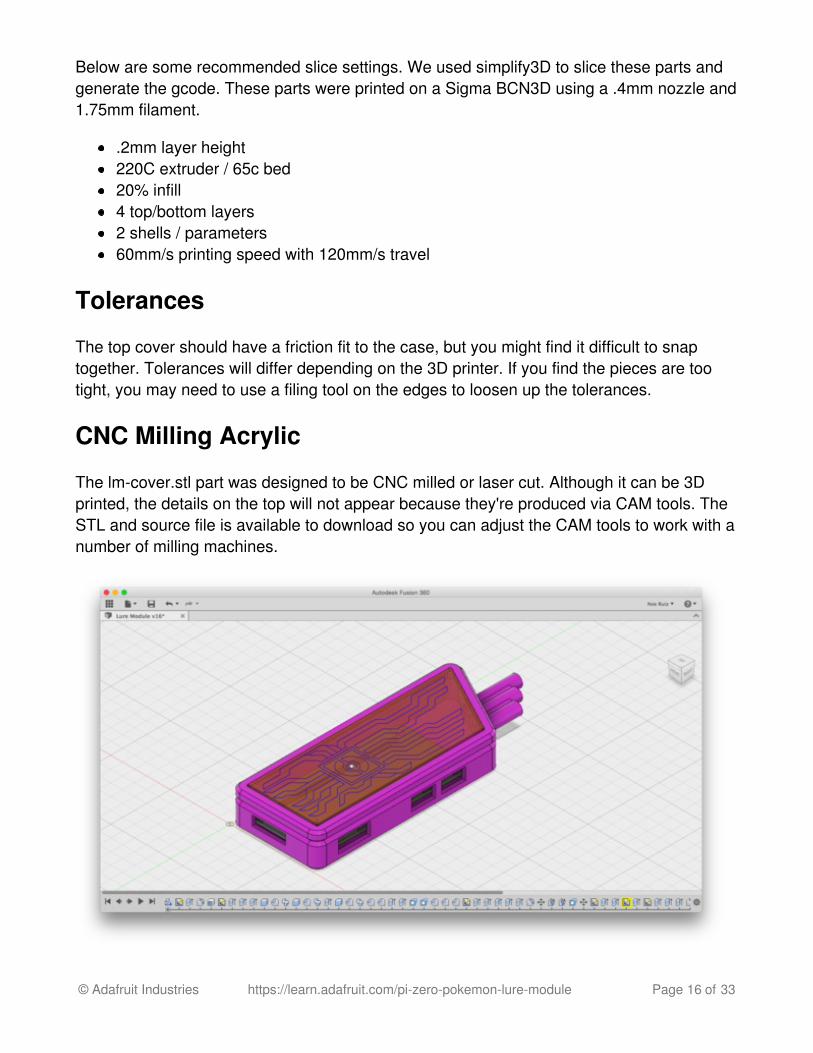
CNC Milling Acrylic
The lm-cover.stl part was designed to be CNC milled or laser cut. Although it can be 3Dprinted, the details on the top will not appear because they're produced via CAM tools. TheSTL and source file is available to download so you can adjust the CAM tools to work with anumber of milling machines.
© Adafruit Industries https://learn.adafruit.com/pi-zero-pokemon-lure-module Page 16 of 33

© Adafruit Industries https://learn.adafruit.com/pi-zero-pokemon-lure-module Page 17 of 33
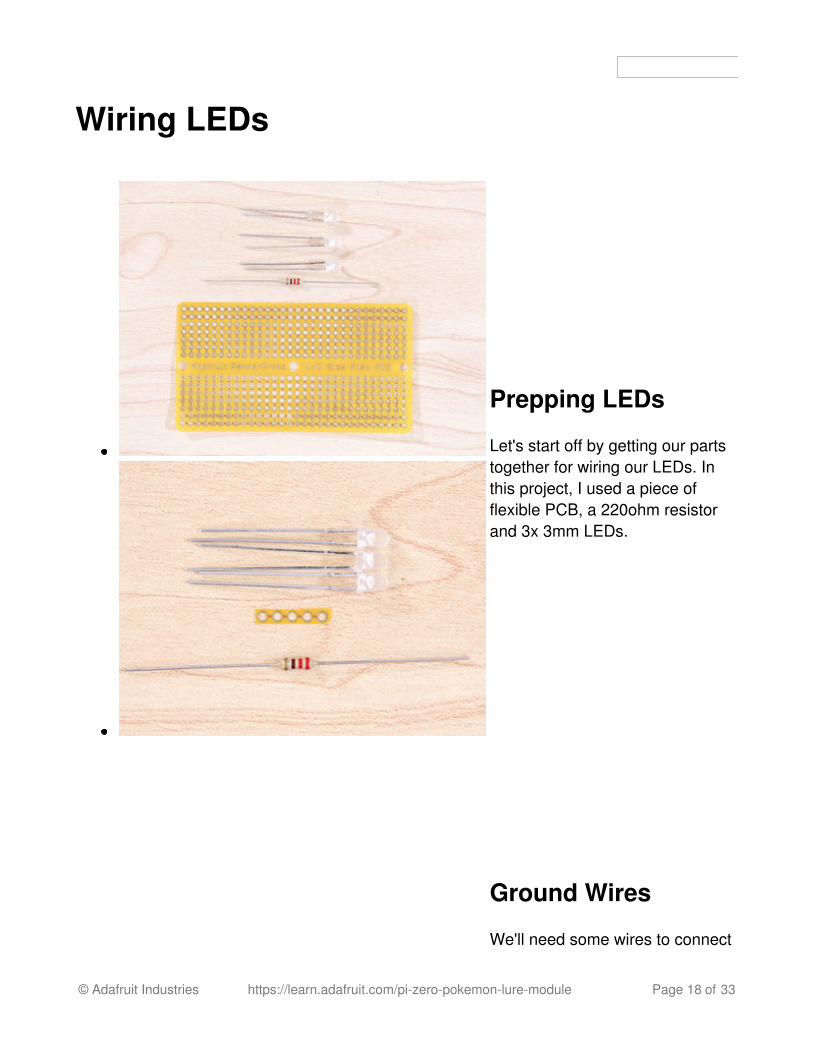
Wiring LEDs
Prepping LEDs
Let's start off by getting our partstogether for wiring our LEDs. Inthis project, I used a piece offlexible PCB, a 220ohm resistorand 3x 3mm LEDs.
Ground Wires
We'll need some wires to connect
© Adafruit Industries https://learn.adafruit.com/pi-zero-pokemon-lure-module Page 18 of 33
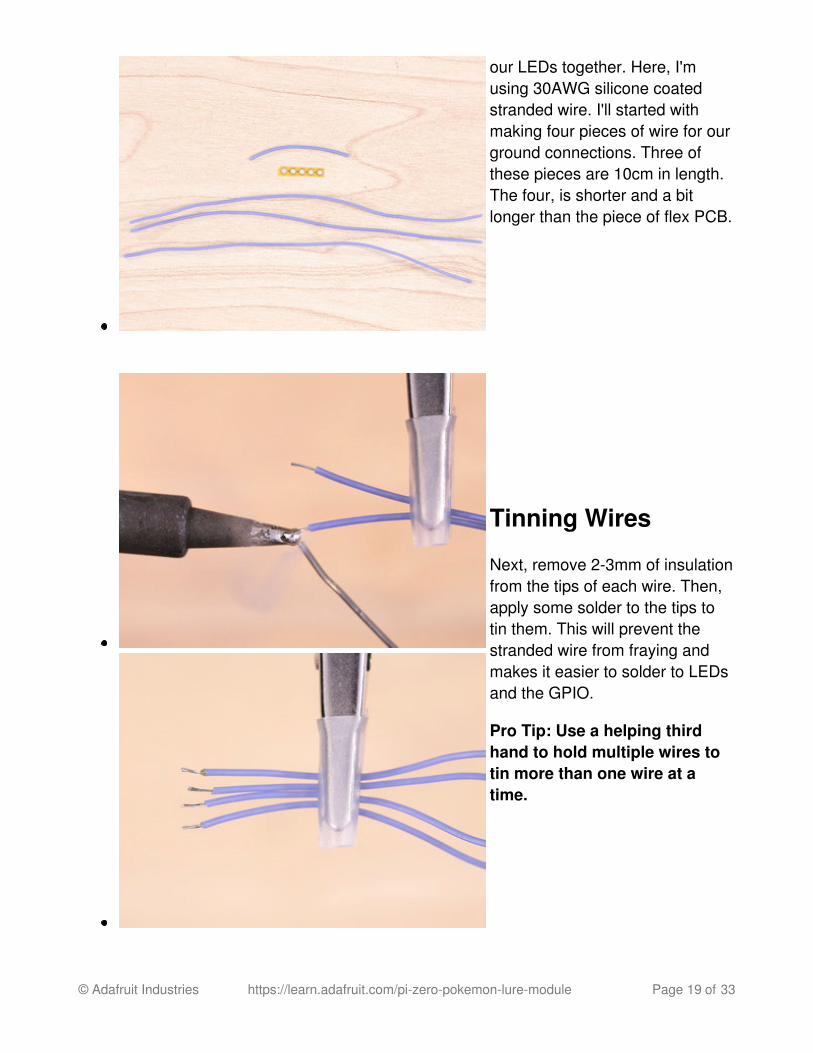
our LEDs together. Here, I'musing 30AWG silicone coatedstranded wire. I'll started withmaking four pieces of wire for ourground connections. Three ofthese pieces are 10cm in length.The four, is shorter and a bitlonger than the piece of flex PCB.
Tinning Wires
Next, remove 2-3mm of insulationfrom the tips of each wire. Then,apply some solder to the tips totin them. This will prevent thestranded wire from fraying andmakes it easier to solder to LEDsand the GPIO.
Pro Tip: Use a helping thirdhand to hold multiple wires totin more than one wire at atime.
© Adafruit Industries https://learn.adafruit.com/pi-zero-pokemon-lure-module Page 19 of 33
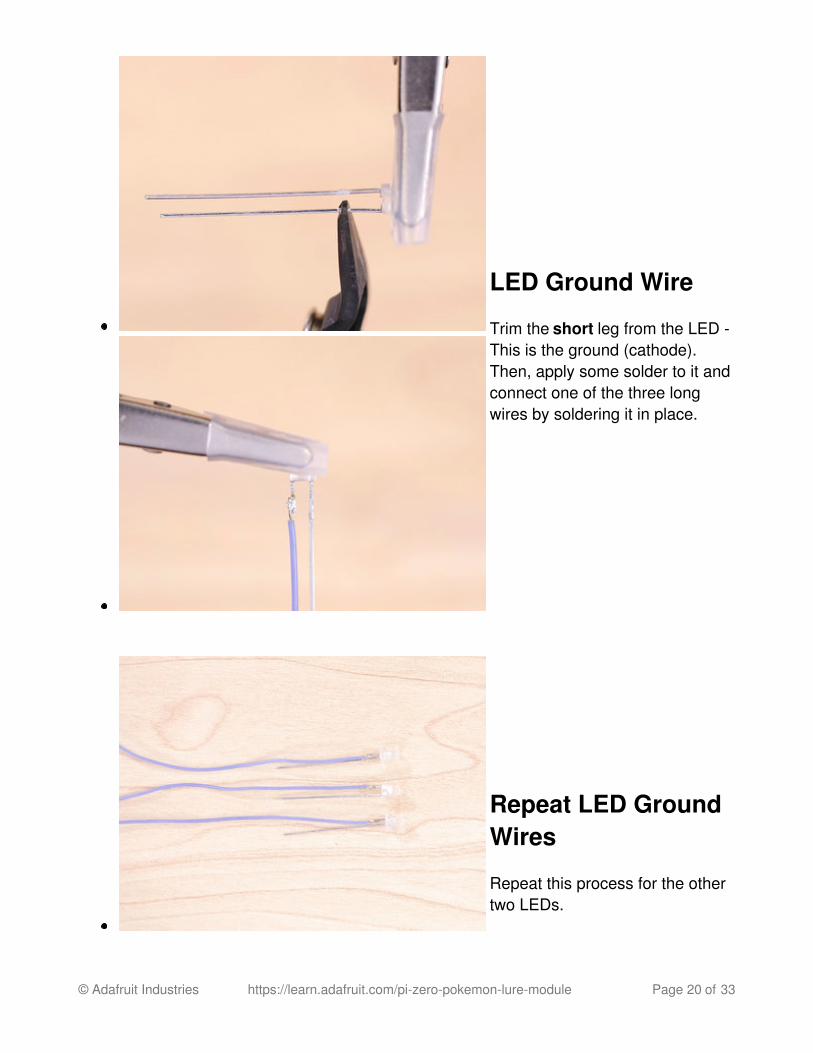
LED Ground Wire
Trim the short leg from the LED -This is the ground (cathode).Then, apply some solder to it andconnect one of the three longwires by soldering it in place.
Repeat LED GroundWires
Repeat this process for the othertwo LEDs.
© Adafruit Industries https://learn.adafruit.com/pi-zero-pokemon-lure-module Page 20 of 33
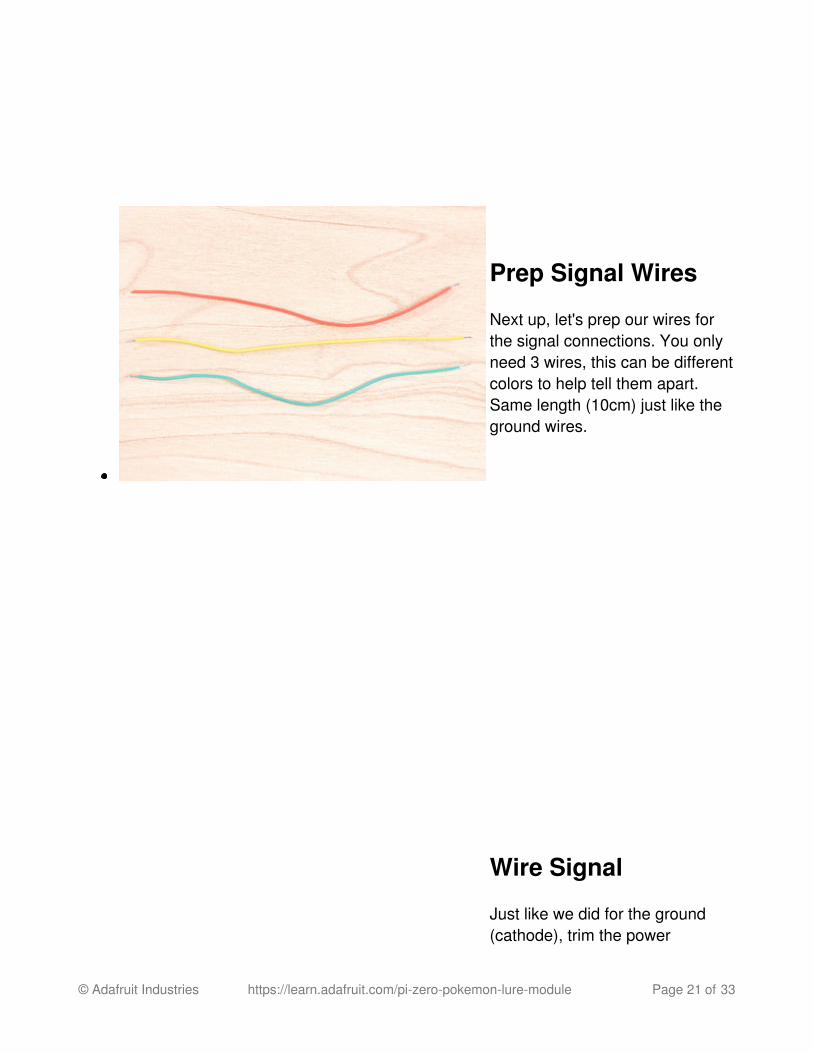
Prep Signal Wires
Next up, let's prep our wires forthe signal connections. You onlyneed 3 wires, this can be differentcolors to help tell them apart.Same length (10cm) just like theground wires.
Wire Signal
Just like we did for the ground(cathode), trim the power
© Adafruit Industries https://learn.adafruit.com/pi-zero-pokemon-lure-module Page 21 of 33
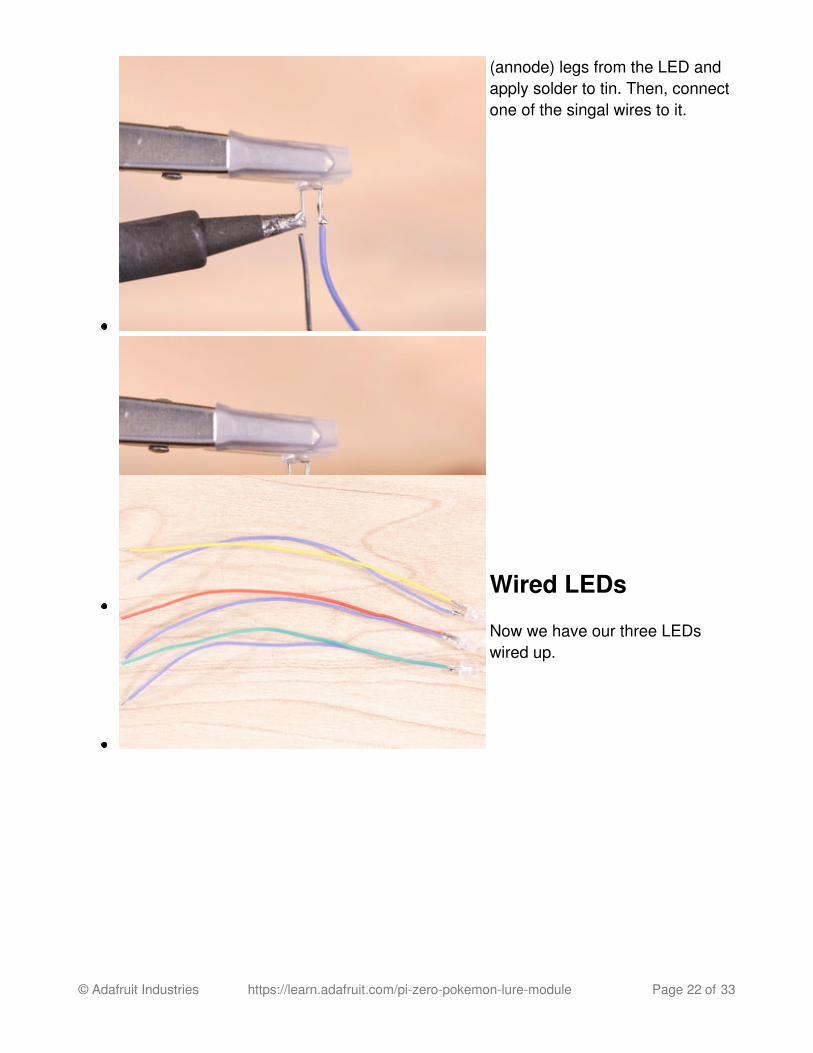
(annode) legs from the LED andapply solder to tin. Then, connectone of the singal wires to it.
Wired LEDs
Now we have our three LEDswired up.
© Adafruit Industries https://learn.adafruit.com/pi-zero-pokemon-lure-module Page 22 of 33
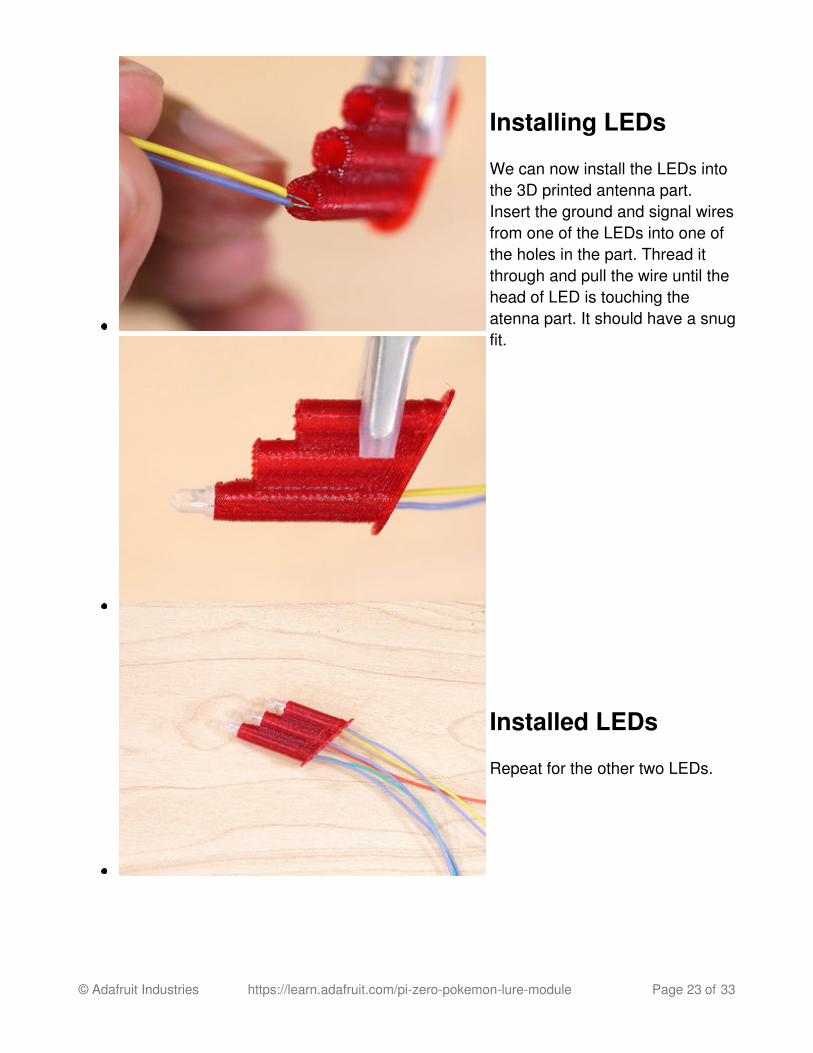
Installing LEDs
We can now install the LEDs intothe 3D printed antenna part.Insert the ground and signal wiresfrom one of the LEDs into one ofthe holes in the part. Thread itthrough and pull the wire until thehead of LED is touching theatenna part. It should have a snugfit.
Installed LEDs
Repeat for the other two LEDs.
© Adafruit Industries https://learn.adafruit.com/pi-zero-pokemon-lure-module Page 23 of 33
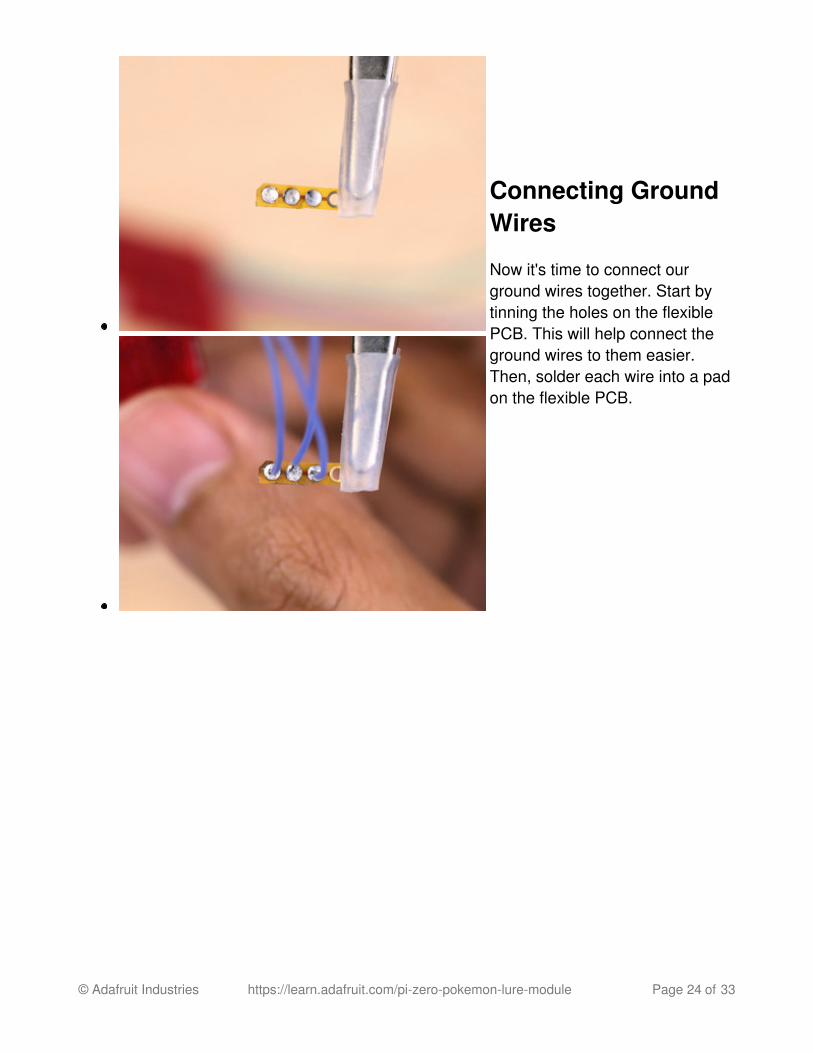
Connecting GroundWires
Now it's time to connect ourground wires together. Start bytinning the holes on the flexiblePCB. This will help connect theground wires to them easier.Then, solder each wire into a padon the flexible PCB.
© Adafruit Industries https://learn.adafruit.com/pi-zero-pokemon-lure-module Page 24 of 33
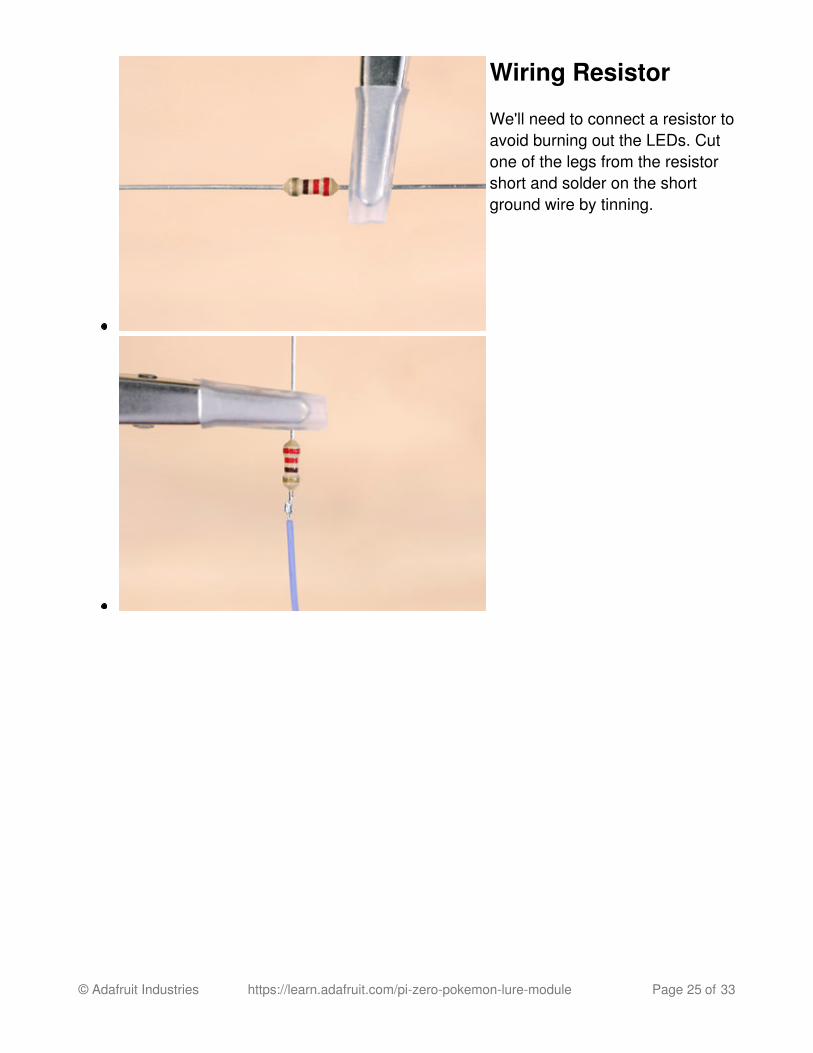
Wiring Resistor
We'll need to connect a resistor toavoid burning out the LEDs. Cutone of the legs from the resistorshort and solder on the shortground wire by tinning.
© Adafruit Industries https://learn.adafruit.com/pi-zero-pokemon-lure-module Page 25 of 33
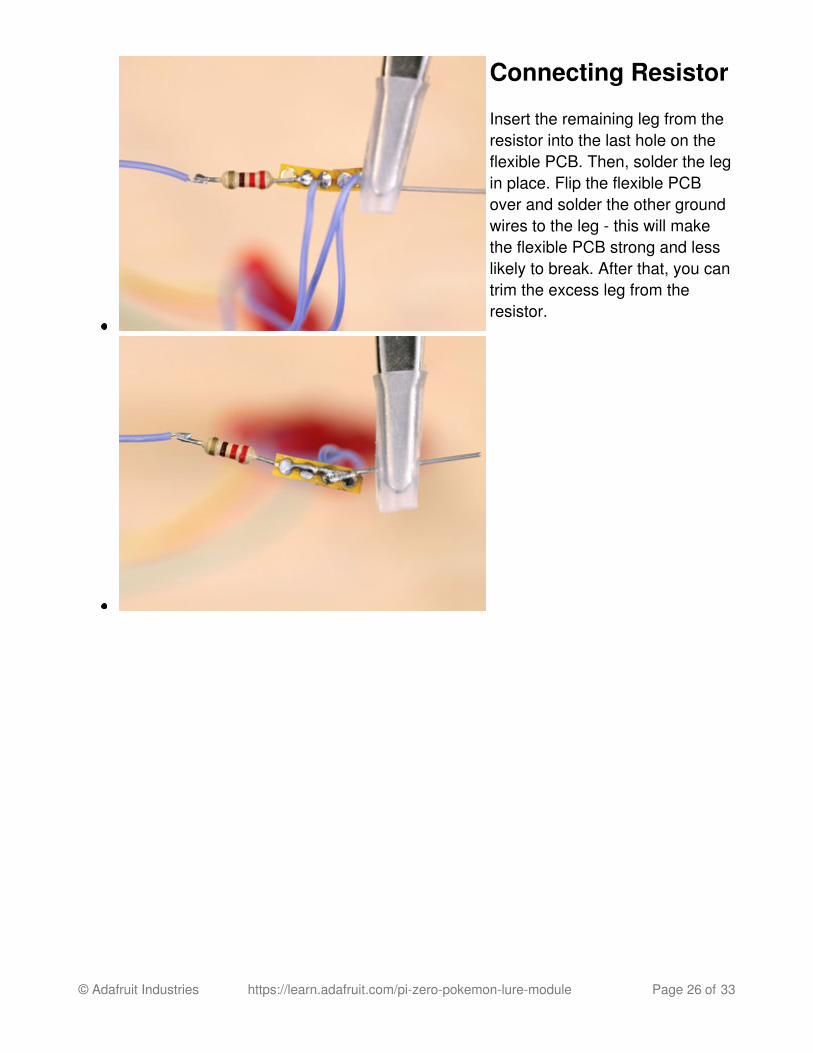
Connecting Resistor
Insert the remaining leg from theresistor into the last hole on theflexible PCB. Then, solder the legin place. Flip the flexible PCBover and solder the other groundwires to the leg - this will makethe flexible PCB strong and lesslikely to break. After that, you cantrim the excess leg from theresistor.
© Adafruit Industries https://learn.adafruit.com/pi-zero-pokemon-lure-module Page 26 of 33
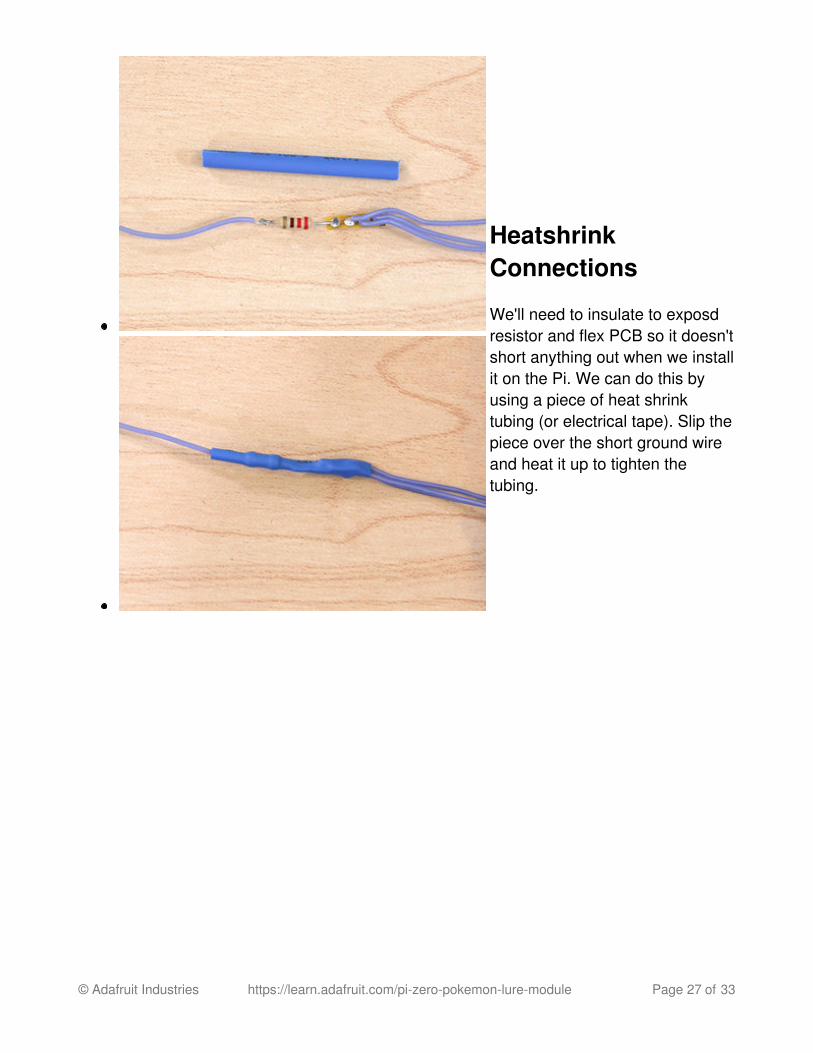
HeatshrinkConnections
We'll need to insulate to exposdresistor and flex PCB so it doesn'tshort anything out when we installit on the Pi. We can do this byusing a piece of heat shrinktubing (or electrical tape). Slip thepiece over the short ground wireand heat it up to tighten thetubing.
© Adafruit Industries https://learn.adafruit.com/pi-zero-pokemon-lure-module Page 27 of 33
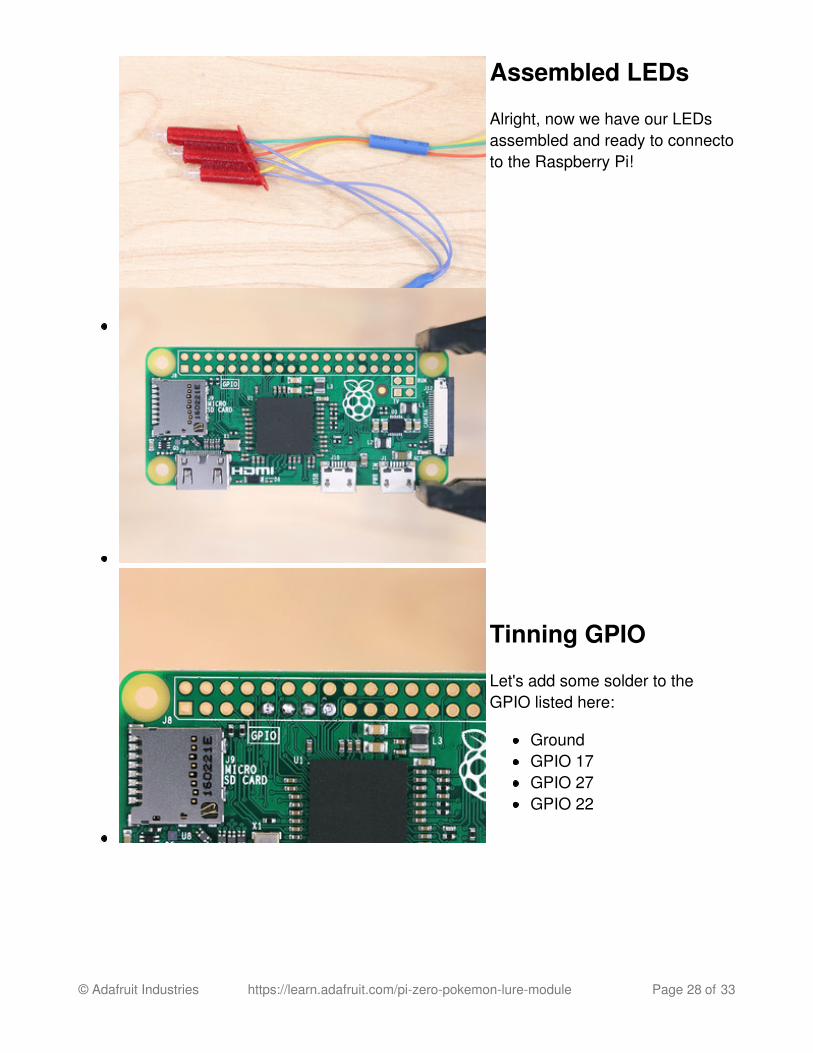
Assembled LEDs
Alright, now we have our LEDsassembled and ready to connectoto the Raspberry Pi!
Tinning GPIO
Let's add some solder to theGPIO listed here:
GroundGPIO 17GPIO 27GPIO 22
© Adafruit Industries https://learn.adafruit.com/pi-zero-pokemon-lure-module Page 28 of 33
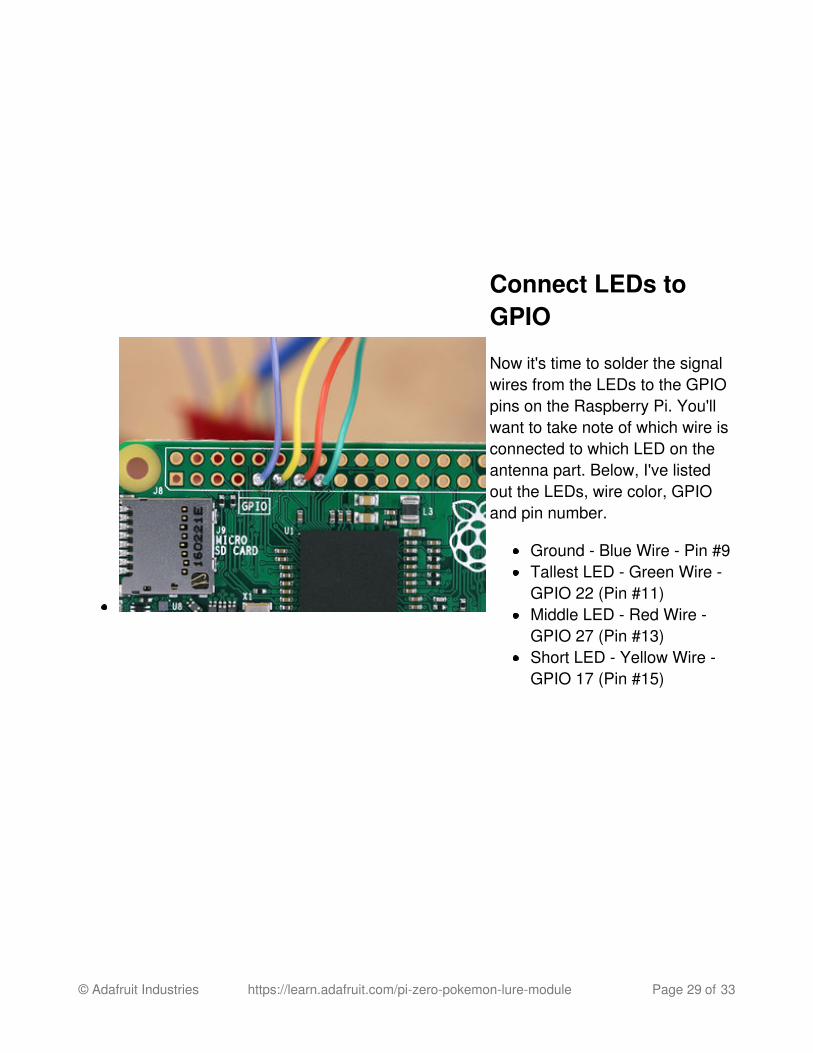
Connect LEDs toGPIO
Now it's time to solder the signalwires from the LEDs to the GPIOpins on the Raspberry Pi. You'llwant to take note of which wire isconnected to which LED on theantenna part. Below, I've listedout the LEDs, wire color, GPIOand pin number.
Ground - Blue Wire - Pin #9Tallest LED - Green Wire -GPIO 22 (Pin #11)Middle LED - Red Wire -GPIO 27 (Pin #13)Short LED - Yellow Wire -GPIO 17 (Pin #15)
© Adafruit Industries https://learn.adafruit.com/pi-zero-pokemon-lure-module Page 29 of 33
Assemble
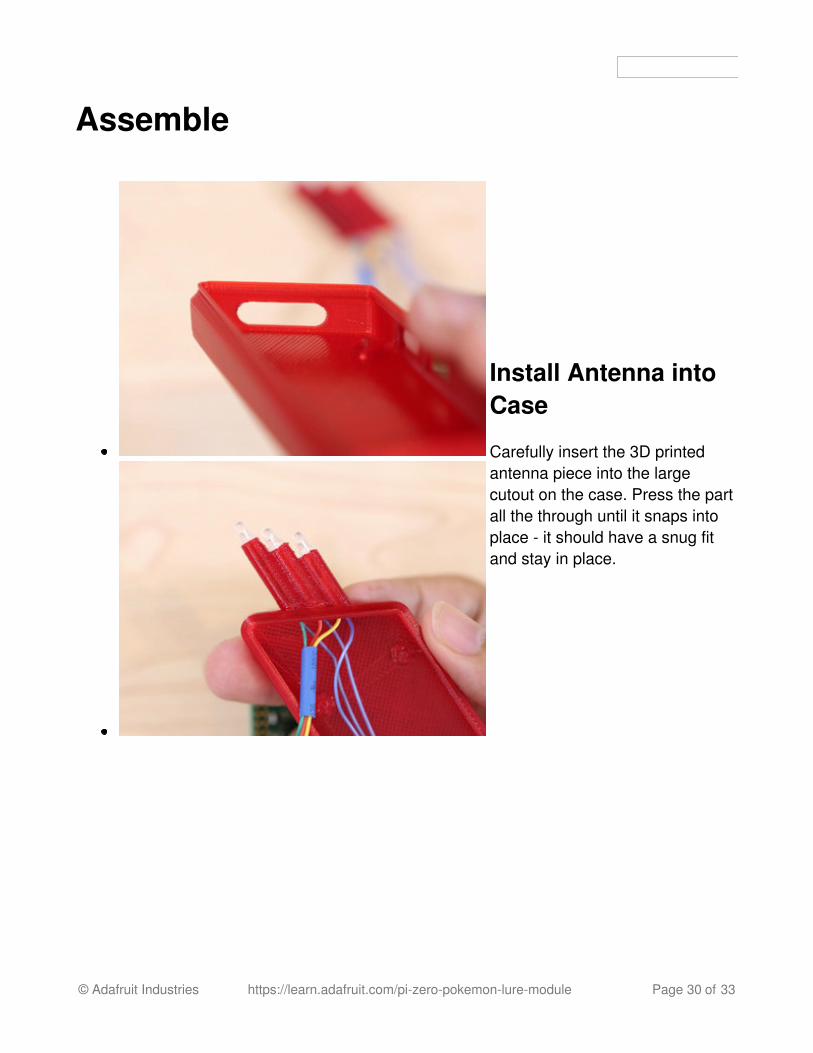
Install Antenna intoCase
Carefully insert the 3D printedantenna piece into the largecutout on the case. Press the partall the through until it snaps intoplace - it should have a snug fitand stay in place.
© Adafruit Industries https://learn.adafruit.com/pi-zero-pokemon-lure-module Page 30 of 33
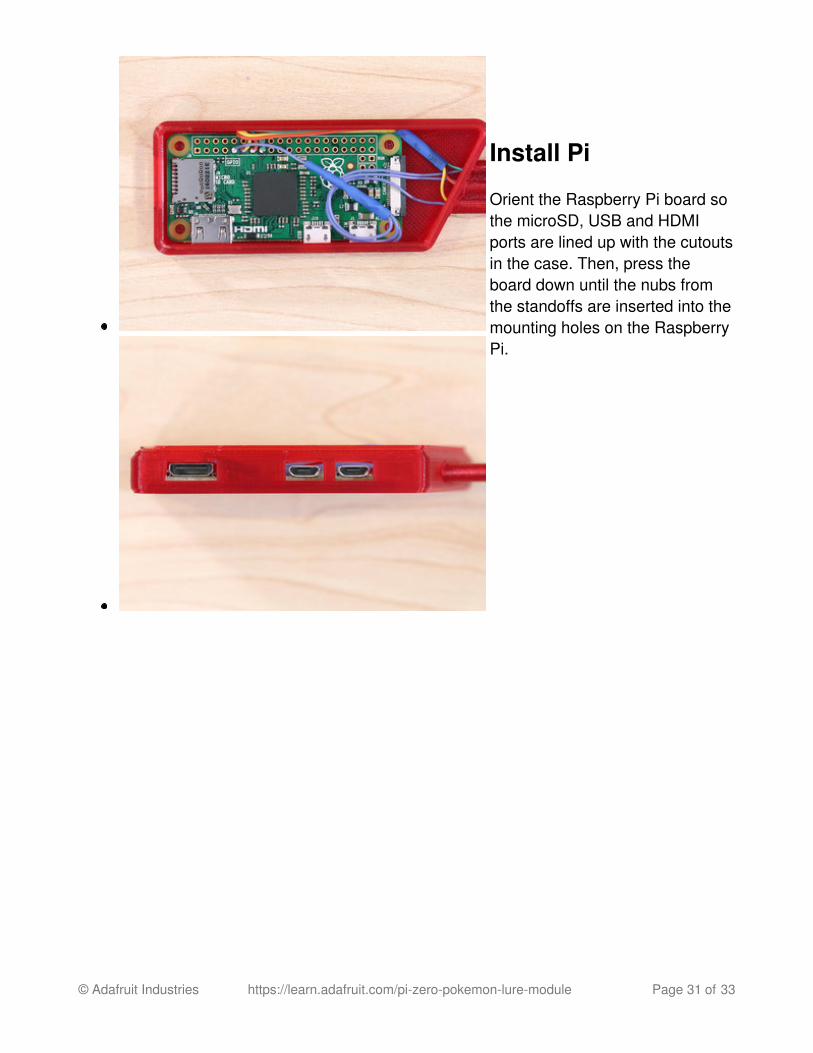
Install Pi
Orient the Raspberry Pi board sothe microSD, USB and HDMIports are lined up with the cutoutsin the case. Then, press theboard down until the nubs fromthe standoffs are inserted into themounting holes on the RaspberryPi.
© Adafruit Industries https://learn.adafruit.com/pi-zero-pokemon-lure-module Page 31 of 33
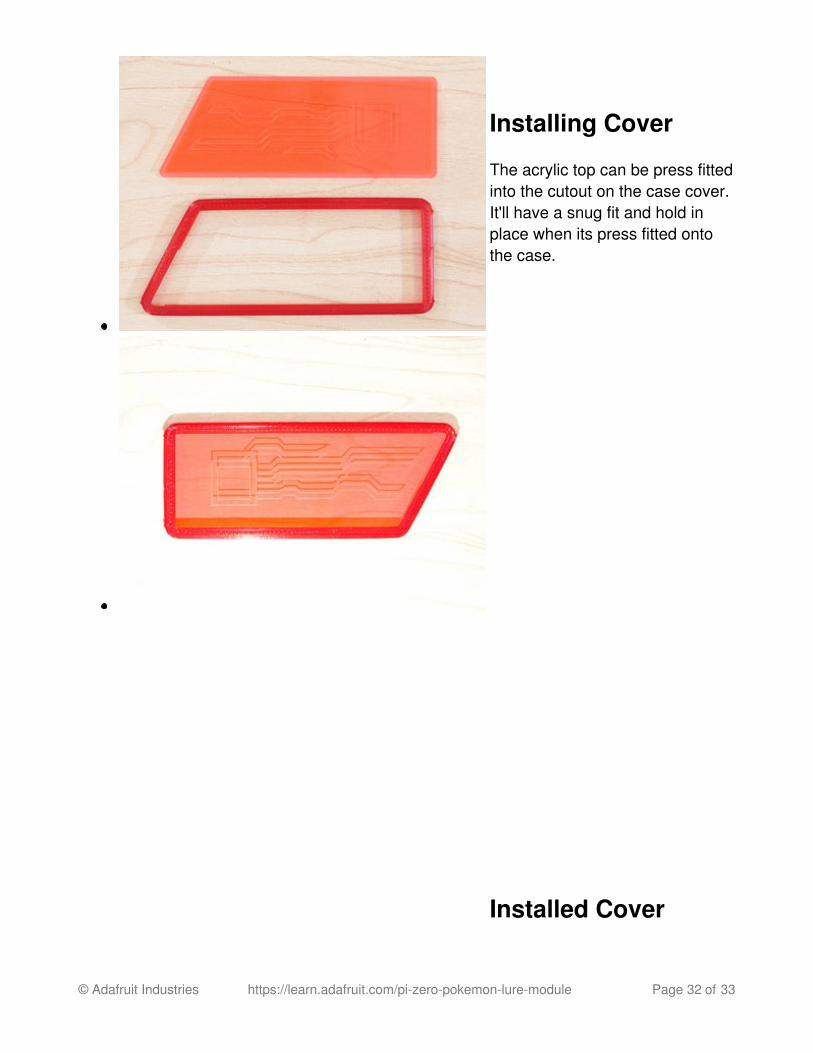
Installing Cover
The acrylic top can be press fittedinto the cutout on the case cover.It'll have a snug fit and hold inplace when its press fitted ontothe case.
Installed Cover
© Adafruit Industries https://learn.adafruit.com/pi-zero-pokemon-lure-module Page 32 of 33
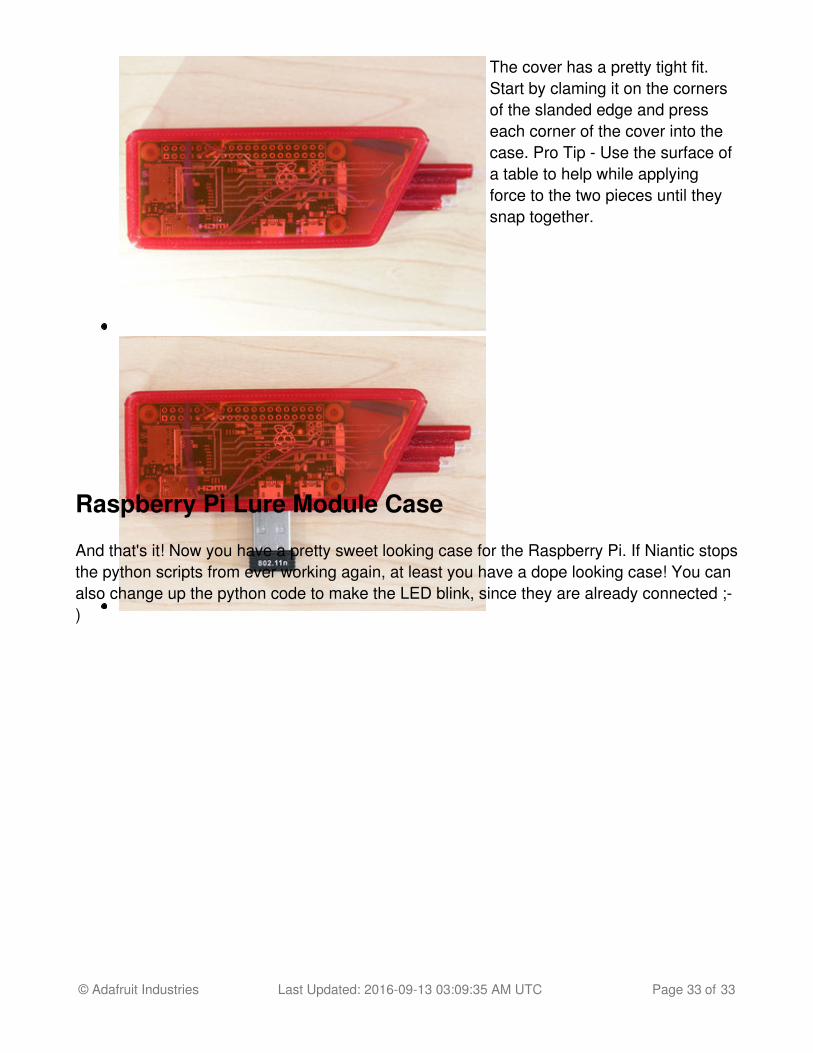
The cover has a pretty tight fit.Start by claming it on the cornersof the slanded edge and presseach corner of the cover into thecase. Pro Tip - Use the surface ofa table to help while applyingforce to the two pieces until theysnap together.
Raspberry Pi Lure Module Case
And that's it! Now you have a pretty sweet looking case for the Raspberry Pi. If Niantic stopsthe python scripts from ever working again, at least you have a dope looking case! You canalso change up the python code to make the LED blink, since they are already connected ;-)
© Adafruit Industries Last Updated: 2016-09-13 03:09:35 AM UTC Page 33 of 33