Embed Size (px)
Citation preview
Red Hat Virtualization 4.3
Virtual Machine Management Guide
Managing Virtual Machines in Red Hat Virtualization
Last Updated: 2020-03-10

Red Hat Virtualization 4.3 Virtual Machine Management Guide
Managing Virtual Machines in Red Hat Virtualization
Red Hat Virtualization Documentation TeamRed Hat Customer Content [email protected]
Legal Notice
Copyright © 2020 Red Hat, Inc.
The text of and illustrations in this document are licensed by Red Hat under a Creative CommonsAttribution–Share Alike 3.0 Unported license ("CC-BY-SA"). An explanation of CC-BY-SA isavailable athttp://creativecommons.org/licenses/by-sa/3.0/. In accordance with CC-BY-SA, if you distribute this document or an adaptation of it, you mustprovide the URL for the original version.
Red Hat, as the licensor of this document, waives the right to enforce, and agrees not to assert,Section 4d of CC-BY-SA to the fullest extent permitted by applicable law.
Red Hat, Red Hat Enterprise Linux, the Shadowman logo, the Red Hat logo, JBoss, OpenShift,Fedora, the Infinity logo, and RHCE are trademarks of Red Hat, Inc., registered in the United Statesand other countries.
Linux ® is the registered trademark of Linus Torvalds in the United States and other countries.
Java ® is a registered trademark of Oracle and/or its affiliates.
XFS ® is a trademark of Silicon Graphics International Corp. or its subsidiaries in the United Statesand/or other countries.
MySQL ® is a registered trademark of MySQL AB in the United States, the European Union andother countries.
Node.js ® is an official trademark of Joyent. Red Hat is not formally related to or endorsed by theofficial Joyent Node.js open source or commercial project.
The OpenStack ® Word Mark and OpenStack logo are either registered trademarks/service marksor trademarks/service marks of the OpenStack Foundation, in the United States and othercountries and are used with the OpenStack Foundation's permission. We are not affiliated with,endorsed or sponsored by the OpenStack Foundation, or the OpenStack community.
All other trademarks are the property of their respective owners.
Abstract
This guide describes the installation, configuration, and administration of virtual machines in RedHat Virtualization.
. . . . . . . . . . . . . . . . . . . . . . . . . . . . . . . . . . . . . . . . . . . . . . . . . . . . . . . . . . . . . . . . . . . . . . . . . . . . . . . . . . . . . . . . . . . . . . . . . . . . . . . . . . . . . . . . . . . . . . . . . . . . . . . . . . . . . . . . . . . . . . . . . . . . . . . . . . . . . . . . . . . . . . . . . . . . . . . . . . . . . . . . . . . . . . . . . . . . . . . . . . . . . . . . . . . . . . . . . . . . . . . . . . . . . . . . . . . . . . . . . . . . . . . . . . . . . . . . . . . . . . . . . . . . . . . . . . . . . . . .
. . . . . . . . . . . . . . . . . . . . . . . . . . . . . . . . . . . . . . . . . . . . . . . . . . . . . . . . . . . . . . . . . . . . . . . . . . . . . . . . . . . . . . . . . . . . . . . . . . . . . . . . . . . . . . . . . . . . . . . . . . . . . . . . . . . . . . . . . . . . . . . . . . . . . . . . . . . . . . . . . . . . . . . . . . . . . . . . . . . . . . . . . . . . . . . . . . . . . . . . . . . . . . . . . . . . . . . . . . . . . . . . . . . . . . . . . . . . . . . . . . . . . . . . . . . . . . . . . . . . . . . . . . . . . . . . . . . . . . . .
. . . . . . . . . . . . . . . . . . . . . . . . . . . . . . . . . . . . . . . . . . . . . . . . . . . . . . . . . . . . . . . . . . . . . . . . . . . . . . . . . . . . . . . . . . . . . . . . . . . . . . . . . . . . . . . . . . . . . . . . . . . . . . . . . . . . . . . . . . . . . . . . . . . . . . . . . . . . . . . . . . . . . . . . . . . . . . . . . . . . . . . . . . . . . . . . . . . . . . . . . . . . . . . . . . . . . . . . . . . . . . . . . . . . . . . . . . . . . . . . . . . . . . . . . . . . . . . . . . . . . . . . . . . . . . . . . . . . . . . .
. . . . . . . . . . . . . . . . . . . . . . . . . . . . . . . . . . . . . . . . . . . . . . . . . . . . . . . . . . . . . . . . . . . . . . . . . . . . . . . . . . . . . . . . . . . . . . . . . . . . . . . . . . . . . . . . . . . . . . . . . . . . . . . . . . . . . . . . . . . . . . . . . . . . . . . . . . . . . . . . . . . . . . . . . . . . . . . . . . . . . . . . . . . . . . . . . . . . . . . . . . . . . . . . . . . . . . . . . . . . . . . . . . . . . . . . . . . . . . . . . . . . . . . . . . . . . . . . . . . . . . . . . . . . . . . . . . . . . . . .
. . . . . . . . . . . . . . . . . . . . . . . . . . . . . . . . . . . . . . . . . . . . . . . . . . . . . . . . . . . . . . . . . . . . . . . . . . . . . . . . . . . . . . . . . . . . . . . . . . . . . . . . . . . . . . . . . . . . . . . . . . . . . . . . . . . . . . . . . . . . . . . . . . . . . . . . . . . . . . . . . . . . . . . . . . . . . . . . . . . . . . . . . . . . . . . . . . . . . . . . . . . . . . . . . . . . . . . . . . . . . . . . . . . . . . . . . . . . . . . . . . . . . . . . . . . . . . . . . . . . . . . . . . . . . . . . . . . . . . . .
. . . . . . . . . . . . . . . . . . . . . . . . . . . . . . . . . . . . . . . . . . . . . . . . . . . . . . . . . . . . . . . . . . . . . . . . . . . . . . . . . . . . . . . . . . . . . . . . . . . . . . . . . . . . . . . . . . . . . . . . . . . . . . . . . . . . . . . . . . . . . . . . . . . . . . . . . . . . . . . . . . . . . . . . . . . . . . . . . . . . . . . . . . . . . . . . . . . . . . . . . . . . . . . . . . . . . . . . . . . . . . . . . . . . . . . . . . . . . . . . . . . . . . . . . . . . . . . . . . . . . . . . . . . . . . . . . . . . . . . .
Table of Contents
CHAPTER 1. INTRODUCTION1.1. AUDIENCE1.2. SUPPORTED VIRTUAL MACHINE OPERATING SYSTEMS1.3. VIRTUAL MACHINE PERFORMANCE PARAMETERS1.4. INSTALLING SUPPORTING COMPONENTS ON CLIENT MACHINES
CHAPTER 2. INSTALLING RED HAT ENTERPRISE LINUX VIRTUAL MACHINES2.1. CREATING A VIRTUAL MACHINE2.2. STARTING THE VIRTUAL MACHINE2.3. ENABLING THE REQUIRED REPOSITORIES2.4. INSTALLING GUEST AGENTS AND DRIVERS
CHAPTER 3. INSTALLING WINDOWS VIRTUAL MACHINES3.1. CREATING A VIRTUAL MACHINE3.2. STARTING THE VIRTUAL MACHINE USING THE RUN ONCE OPTION3.3. INSTALLING GUEST AGENTS AND DRIVERS
CHAPTER 4. ADDITIONAL CONFIGURATION4.1. CONFIGURING OPERATING SYSTEMS WITH OSINFO4.2. CONFIGURING SINGLE SIGN-ON FOR VIRTUAL MACHINES4.3. CONFIGURING USB DEVICES4.4. CONFIGURING MULTIPLE MONITORS4.5. CONFIGURING CONSOLE OPTIONS4.6. CONFIGURING A WATCHDOG4.7. CONFIGURING VIRTUAL NUMA4.8. CONFIGURING RED HAT SATELLITE ERRATA MANAGEMENT FOR A VIRTUAL MACHINE4.9. CONFIGURING HEADLESS VIRTUAL MACHINES4.10. CONFIGURING HIGH PERFORMANCE VIRTUAL MACHINES, TEMPLATES, AND POOLS
CHAPTER 5. EDITING VIRTUAL MACHINES5.1. EDITING VIRTUAL MACHINE PROPERTIES5.2. NETWORK INTERFACES5.3. VIRTUAL DISKS5.4. VIRTUAL MEMORY5.5. HOT PLUGGING VCPUS5.6. PINNING A VIRTUAL MACHINE TO MULTIPLE HOSTS5.7. VIEWING VIRTUAL MACHINES PINNED TO A HOST5.8. CHANGING THE CD FOR A VIRTUAL MACHINE5.9. SMART CARD AUTHENTICATION
CHAPTER 6. ADMINISTRATIVE TASKS6.1. SHUTTING DOWN A VIRTUAL MACHINE6.2. SUSPENDING A VIRTUAL MACHINE6.3. REBOOTING A VIRTUAL MACHINE6.4. REMOVING A VIRTUAL MACHINE6.5. CLONING A VIRTUAL MACHINE6.6. UPDATING VIRTUAL MACHINE GUEST AGENTS AND DRIVERS6.7. VIEWING RED HAT SATELLITE ERRATA FOR A VIRTUAL MACHINE6.8. VIRTUAL MACHINES AND PERMISSIONS6.9. SNAPSHOTS6.10. HOST DEVICES6.11. AFFINITY GROUPS
44444
7781111
16161718
232323282930354041
4243
51515254585961
626263
656565656666666868727475
Table of Contents
1
. . . . . . . . . . . . . . . . . . . . . . . . . . . . . . . . . . . . . . . . . . . . . . . . . . . . . . . . . . . . . . . . . . . . . . . . . . . . . . . . . . . . . . . . . . . . . . . . . . . . . . . . . . . . . . . . . . . . . . . . . . . . . . . . . . . . . . . . . . . . . . . . . . . . . . . . . . . . . . . . . . . . . . . . . . . . . . . . . . . . . . . . . . . . . . . . . . . . . . . . . . . . . . . . . . . . . . . . . . . . . . . . . . . . . . . . . . . . . . . . . . . . . . . . . . . . . . . . . . . . . . . . . . . . . . . . . . . . . . . .
. . . . . . . . . . . . . . . . . . . . . . . . . . . . . . . . . . . . . . . . . . . . . . . . . . . . . . . . . . . . . . . . . . . . . . . . . . . . . . . . . . . . . . . . . . . . . . . . . . . . . . . . . . . . . . . . . . . . . . . . . . . . . . . . . . . . . . . . . . . . . . . . . . . . . . . . . . . . . . . . . . . . . . . . . . . . . . . . . . . . . . . . . . . . . . . . . . . . . . . . . . . . . . . . . . . . . . . . . . . . . . . . . . . . . . . . . . . . . . . . . . . . . . . . . . . . . . . . . . . . . . . . . . . . . . . . . . . . . . . .
. . . . . . . . . . . . . . . . . . . . . . . . . . . . . . . . . . . . . . . . . . . . . . . . . . . . . . . . . . . . . . . . . . . . . . . . . . . . . . . . . . . . . . . . . . . . . . . . . . . . . . . . . . . . . . . . . . . . . . . . . . . . . . . . . . . . . . . . . . . . . . . . . . . . . . . . . . . . . . . . . . . . . . . . . . . . . . . . . . . . . . . . . . . . . . . . . . . . . . . . . . . . . . . . . . . . . . . . . . . . . . . . . . . . . . . . . . . . . . . . . . . . . . . . . . . . . . . . . . . . . . . . . . . . . . . . . . . . . . . .
6.12. AFFINITY LABELS6.13. EXPORTING AND IMPORTING VIRTUAL MACHINES AND TEMPLATES6.14. MIGRATING VIRTUAL MACHINES BETWEEN HOSTS6.15. IMPROVING UPTIME WITH VIRTUAL MACHINE HIGH AVAILABILITY6.16. OTHER VIRTUAL MACHINE TASKS
CHAPTER 7. TEMPLATES7.1. SEALING VIRTUAL MACHINES IN PREPARATION FOR DEPLOYMENT AS TEMPLATES7.2. CREATING A TEMPLATE7.3. EDITING A TEMPLATE7.4. DELETING A TEMPLATE7.5. EXPORTING TEMPLATES7.6. IMPORTING TEMPLATES7.7. TEMPLATES AND PERMISSIONS7.8. USING CLOUD-INIT TO AUTOMATE THE CONFIGURATION OF VIRTUAL MACHINES7.9. USING SYSPREP TO AUTOMATE THE CONFIGURATION OF VIRTUAL MACHINES7.10. CREATING A VIRTUAL MACHINE BASED ON A TEMPLATE7.11. CREATING A CLONED VIRTUAL MACHINE BASED ON A TEMPLATE
APPENDIX A. REFERENCE: SETTINGS IN ADMINISTRATION PORTAL AND VM PORTAL WINDOWSA.1. EXPLANATION OF SETTINGS IN THE NEW VIRTUAL MACHINE AND EDIT VIRTUAL MACHINE WINDOWS
A.2. EXPLANATION OF SETTINGS IN THE RUN ONCE WINDOWA.3. EXPLANATION OF SETTINGS IN THE NEW NETWORK INTERFACE AND EDIT NETWORK INTERFACEWINDOWSA.4. EXPLANATION OF SETTINGS IN THE NEW VIRTUAL DISK AND EDIT VIRTUAL DISK WINDOWSA.5. EXPLANATION OF SETTINGS IN THE NEW TEMPLATE WINDOW
APPENDIX B. VIRT-SYSPREP OPERATIONS
808296
103104
110110112113114114115117118122124124
126
126152
157159164
167
Red Hat Virtualization 4.3 Virtual Machine Management Guide
2

Table of Contents
3
CHAPTER 1. INTRODUCTIONA virtual machine is a software implementation of a computer. The Red Hat Virtualization environmentenables you to create virtual desktops and virtual servers.
Virtual machines consolidate computing tasks and workloads. In traditional computing environments,workloads usually run on individually administered and upgraded servers. Virtual machines reduce theamount of hardware and administration required to run the same computing tasks and workloads.
1.1. AUDIENCE
Most virtual machine tasks in Red Hat Virtualization can be performed in both the VM Portal andAdministration Portal. However, the user interface differs between each portal, and some administrativetasks require access to the Administration Portal. Tasks that can only be performed in the AdministrationPortal will be described as such in this book. Which portal you use, and which tasks you can perform ineach portal, is determined by your level of permissions. Virtual machine permissions are explained inSection 6.8, “Virtual Machines and Permissions” .
The VM Portal’s user interface is described in the Introduction to the VM Portal .
The Administration Portal’s user interface is described in the Introduction to the Administration Portal .
The creation and management of virtual machines through the Red Hat Virtualization REST API isdocumented in the REST API Guide .
1.2. SUPPORTED VIRTUAL MACHINE OPERATING SYSTEMS
For information on the operating systems that can be virtualized as guest operating systems in Red HatVirtualization, see https://access.redhat.com/articles/973163.
For information on customizing the operating systems, see Section 4.1, “Configuring Operating Systemswith osinfo”.
1.3. VIRTUAL MACHINE PERFORMANCE PARAMETERS
For information on the parameters that Red Hat Virtualization virtual machines can support, see RedHat Enterprise Linux technology capabilities and limits and Virtualization limits for Red HatVirtualization.
1.4. INSTALLING SUPPORTING COMPONENTS ON CLIENT MACHINES
1.4.1. Installing Console Components
A console is a graphical window that allows you to view the start up screen, shut down screen, anddesktop of a virtual machine, and to interact with that virtual machine in a similar way to a physicalmachine. In Red Hat Virtualization, the default application for opening a console to a virtual machine isRemote Viewer, which must be installed on the client machine prior to use.
1.4.1.1. Installing Remote Viewer on Red Hat Enterprise Linux
The Remote Viewer application provides users with a graphical console for connecting to virtualmachines. Once installed, it is called automatically when attempting to open a SPICE session with avirtual machine. Alternatively, it can also be used as a standalone application. Remote Viewer is included
Red Hat Virtualization 4.3 Virtual Machine Management Guide
4
in the virt-viewer package provided by the base Red Hat Enterprise Linux Workstation and Red HatEnterprise Linux Server repositories.
Installing Remote Viewer on Linux
1. Install the virt-viewer package:
# yum install virt-viewer
2. Restart your browser for the changes to take effect.
You can now connect to your virtual machines using either the SPICE protocol or the VNC protocol.
1.4.1.2. Installing Remote Viewer on Windows
The Remote Viewer application provides users with a graphical console for connecting to virtualmachines. Once installed, it is called automatically when attempting to open a SPICE session with avirtual machine. Alternatively, it can also be used as a standalone application.
Installing Remote Viewer on Windows
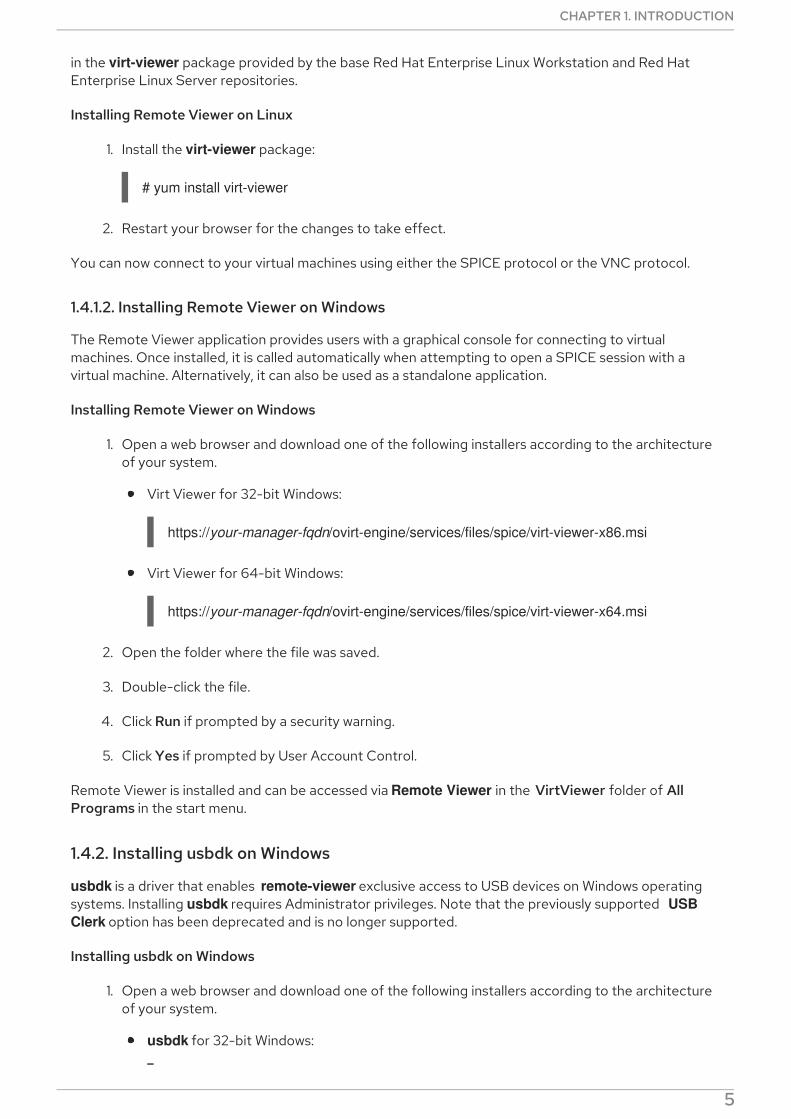
1. Open a web browser and download one of the following installers according to the architectureof your system.
Virt Viewer for 32-bit Windows:
https://your-manager-fqdn/ovirt-engine/services/files/spice/virt-viewer-x86.msi
Virt Viewer for 64-bit Windows:
https://your-manager-fqdn/ovirt-engine/services/files/spice/virt-viewer-x64.msi
2. Open the folder where the file was saved.
3. Double-click the file.
4. Click Run if prompted by a security warning.
5. Click Yes if prompted by User Account Control.
Remote Viewer is installed and can be accessed via Remote Viewer in the VirtViewer folder of AllPrograms in the start menu.
1.4.2. Installing usbdk on Windows
usbdk is a driver that enables remote-viewer exclusive access to USB devices on Windows operatingsystems. Installing usbdk requires Administrator privileges. Note that the previously supported USB Clerk option has been deprecated and is no longer supported.
Installing usbdk on Windows
1. Open a web browser and download one of the following installers according to the architectureof your system.
usbdk for 32-bit Windows:
CHAPTER 1. INTRODUCTION
5

https://[your manager’s address]/ovirt-engine/services/files/spice/usbdk-x86.msi
usbdk for 64-bit Windows:
https://[your manager’s address]/ovirt-engine/services/files/spice/usbdk-x64.msi
2. Open the folder where the file was saved.
3. Double-click the file.
4. Click Run if prompted by a security warning.
5. Click Yes if prompted by User Account Control.
Red Hat Virtualization 4.3 Virtual Machine Management Guide
6
CHAPTER 2. INSTALLING RED HAT ENTERPRISE LINUXVIRTUAL MACHINES
Installing a Red Hat Enterprise Linux virtual machine involves the following key steps:
1. Create a virtual machine. You must add a virtual disk for storage, and a network interface toconnect the virtual machine to the network.
2. Start the virtual machine and install an operating system. See your operating system’sdocumentation for instructions.
Red Hat Enterprise Linux 6: https://access.redhat.com/documentation/en-us/red_hat_enterprise_linux/6/html/Installation_Guide/index.html
Red Hat Enterprise Linux 7: https://access.redhat.com/documentation/en-us/red_hat_enterprise_linux/7/html/Installation_Guide/index.html
Red Hat Enterprise Linux Atomic Host 7: https://access.redhat.com/documentation/en-us/red-hat-enterprise-linux-atomic-host/7/html-single/installation-and-configuration-guide/
Red Hat Enterprise Linux 8: https://access.redhat.com/documentation/en-us/red_hat_enterprise_linux/8/html/performing_a_standard_rhel_installation/index
3. Enable the required repositories for your operating system.
4. Install guest agents and drivers for additional virtual machine functionality.
2.1. CREATING A VIRTUAL MACHINE
Create a new virtual machine and configure the required settings.
Procedure
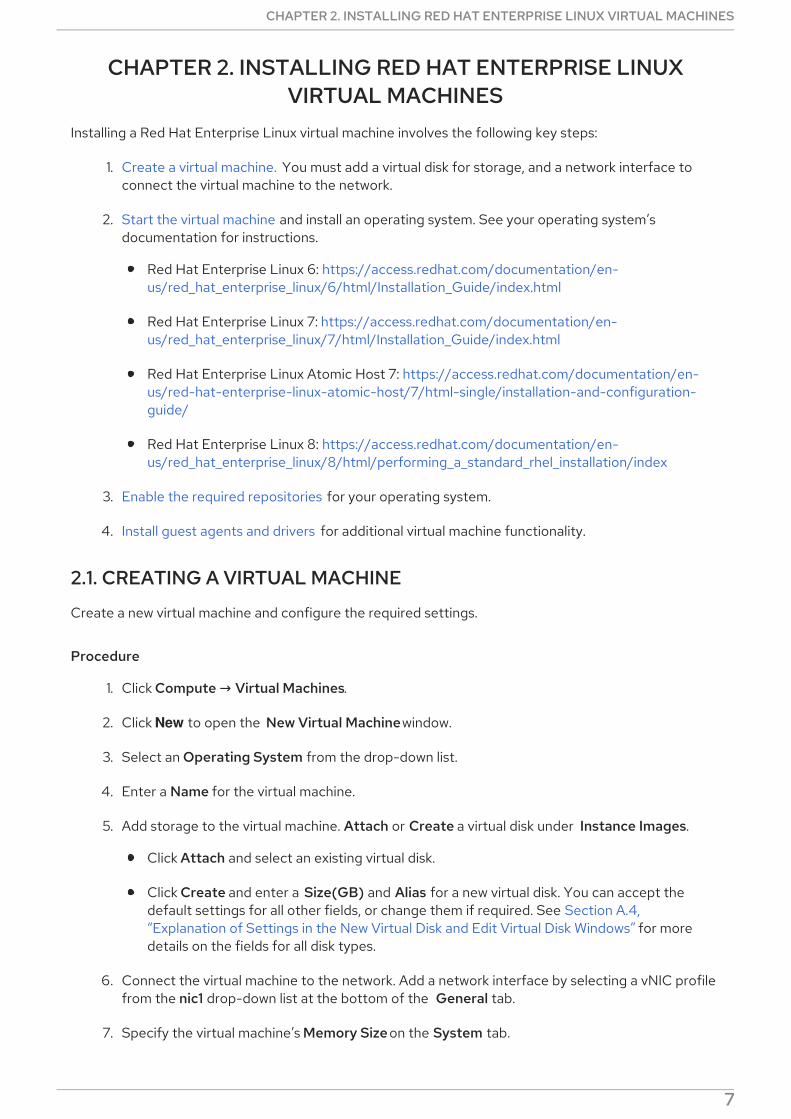
1. Click Compute → Virtual Machines.
2. Click New to open the New Virtual Machine window.
3. Select an Operating System from the drop-down list.
4. Enter a Name for the virtual machine.
5. Add storage to the virtual machine. Attach or Create a virtual disk under Instance Images.
Click Attach and select an existing virtual disk.
Click Create and enter a Size(GB) and Alias for a new virtual disk. You can accept thedefault settings for all other fields, or change them if required. See Section A.4,“Explanation of Settings in the New Virtual Disk and Edit Virtual Disk Windows” for moredetails on the fields for all disk types.
6. Connect the virtual machine to the network. Add a network interface by selecting a vNIC profilefrom the nic1 drop-down list at the bottom of the General tab.
7. Specify the virtual machine’s Memory Size on the System tab.
CHAPTER 2. INSTALLING RED HAT ENTERPRISE LINUX VIRTUAL MACHINES
7
8. Choose the First Device that the virtual machine will boot from on the Boot Options tab.
9. You can accept the default settings for all other fields, or change them if required. For moredetails on all fields in the New Virtual Machine window, see Section A.1, “Explanation ofSettings in the New Virtual Machine and Edit Virtual Machine Windows”.
10. Click OK.
The new virtual machine is created and displays in the list of virtual machines with a status of Down.Before you can use this virtual machine, you must install an operating system and register with theContent Delivery Network.
2.2. STARTING THE VIRTUAL MACHINE
2.2.1. Starting a Virtual Machine
Starting Virtual Machines
1. Click Compute → Virtual Machines and select a virtual machine with a status of Down.
2. Click Run.
The Status of the virtual machine changes to Up, and the operating system installation begins. Open aconsole to the virtual machine if one does not open automatically.
NOTE
A virtual machine will not start on a host that the CPU is overloaded on. By default, ahost’s CPU is considered overloaded if it has a load of more than 80% for 5 minutes butthese values can be changed using scheduling policies. See Scheduling Policies in theAdministration Guide for more information.
2.2.2. Opening a Console to a Virtual Machine
Use Remote Viewer to connect to a virtual machine.
Connecting to Virtual Machines
1. Install Remote Viewer if it is not already installed. See Section 1.4.1, “Installing ConsoleComponents”.
2. Click Compute → Virtual Machines and select a virtual machine.
3. Click Console. A console.vv file will be downloaded.
4. Click on the file and a console window will automatically open for the virtual machine.
NOTE
You can configure the system to automatically connect to a virtual machine. SeeSection 2.2.4, “Automatically Connecting to a Virtual Machine” .
2.2.3. Opening a Serial Console to a Virtual Machine
You can access a virtual machine’s serial console from the command line instead of opening a console
Red Hat Virtualization 4.3 Virtual Machine Management Guide
8
You can access a virtual machine’s serial console from the command line instead of opening a consolefrom the Administration Portal or the VM Portal. The serial console is emulated through VirtIO channels,using SSH and key pairs. The Manager acts as a proxy for the connection, provides information aboutvirtual machine placement, and stores the authentication keys. You can add public keys for each userfrom either the Administration Portal or the VM Portal. You can access serial consoles for only thosevirtual machines for which you have appropriate permissions.
IMPORTANT
To access the serial console of a virtual machine, the user must have UserVmManager,SuperUser, or UserInstanceManager permission on that virtual machine. Thesepermissions must be explicitly defined for each user. It is not enough to assign thesepermissions to Everyone.
The serial console is accessed through TCP port 2222 on the Manager. This port is opened during engine-setup on new installations. To change the port, see ovirt-vmconsole/README.
Using a serial console requires configuring the firewall rules. For more information, see: * Rule "M3" inthe Red Hat Virtualization Manager Firewall Requirements * Rule "H2" in the Host Firewall Requirements
The serial console relies on the ovirt-vmconsole package and the ovirt-vmconsole-proxy on theManager, and the ovirt-vmconsole package and the ovirt-vmconsole-host package on thevirtualization hosts. These packages are installed by default on new installations. To install the packageson existing installations, reinstall the host. See Reinstalling Hosts in the Administration Guide.
Enabling a Virtual Machine’s Serial Console
1. On the virtual machine whose serial console you are accessing, add the following lines to/etc/default/grub:
GRUB_CMDLINE_LINUX_DEFAULT="console=tty0 console=ttyS0,115200n8"GRUB_TERMINAL="console serial"GRUB_SERIAL_COMMAND="serial --speed=115200 --unit=0 --word=8 --parity=no --stop=1"
NOTE
GRUB_CMDLINE_LINUX_DEFAULT applies this configuration only to thedefault menu entry. Use GRUB_CMDLINE_LINUX to apply the configuration toall the menu entries.
If these lines already exist in /etc/default/grub, update them. Do not duplicatethem.
2. Rebuild /boot/grub2/grub.cfg:
BIOS-based machines:
# grub2-mkconfig -o /boot/grub2/grub.cfg
UEFI-based machines:
# grub2-mkconfig -o /boot/efi/EFI/redhat/grub.cfg
See GRUB 2 over a Serial Console in the Red Hat Enterprise Linux 7 System Administrator’s
CHAPTER 2. INSTALLING RED HAT ENTERPRISE LINUX VIRTUAL MACHINES
9
See GRUB 2 over a Serial Console in the Red Hat Enterprise Linux 7 System Administrator’sGuide for details.
3. On the client machine from which you are accessing the virtual machine serial console, generatean SSH key pair. The Manager supports standard SSH key types, for example, an RSA key:
# ssh-keygen -t rsa -b 2048 -C "user@domain" -f .ssh/serialconsolekey
This command generates a public key and a private key.
4. In the Administration Portal or the VM Portal, click the name of the signed-in user on the headerbar and click Options to open the Edit Options window.
5. In the User’s Public Key text field, paste the public key of the client machine that will be used toaccess the serial console.
6. Click Compute → Virtual Machines and select a virtual machine.
7. Click Edit.
8. In the Console tab of the Edit Virtual Machine window, select the Enable VirtIO serial consolecheck box.
Connecting to a Virtual Machine’s Serial Console
On the client machine, connect to the virtual machine’s serial console:
If a single virtual machine is available, this command connects the user to that virtual machine:
# ssh -t -p 2222 ovirt-vmconsole@Manager_FQDN -i .ssh/serialconsolekeyRed Hat Enterprise Linux Server release 6.7 (Santiago)Kernel 2.6.32-573.3.1.el6.x86_64 on an x86_64USER login:
If more than one virtual machine is available, this command lists the available virtual machinesand their IDs:
# ssh -t -p 2222 ovirt-vmconsole@Manager_FQDN -i .ssh/serialconsolekey list1. vm1 [vmid1]2. vm2 [vmid2]3. vm3 [vmid3]> 2Red Hat Enterprise Linux Server release 6.7 (Santiago)Kernel 2.6.32-573.3.1.el6.x86_64 on an x86_64USER login:
Enter the number of the machine to which you want to connect, and press Enter.
Alternatively, connect directly to a virtual machine using its unique identifier or its name:
# ssh -t -p 2222 ovirt-vmconsole@Manager_FQDN connect --vm-id vmid1
# ssh -t -p 2222 ovirt-vmconsole@Manager_FQDN connect --vm-name vm1
Disconnecting from a Virtual Machine’s Serial Console
Red Hat Virtualization 4.3 Virtual Machine Management Guide
10
Press any key followed by ~ . to close a serial console session.
If the serial console session is disconnected abnormally, a TCP timeout occurs. You will be unable toreconnect to the virtual machine’s serial console until the timeout period expires.
2.2.4. Automatically Connecting to a Virtual Machine
Once you have logged in, you can automatically connect to a single running virtual machine. This can beconfigured in the VM Portal.
Automatically Connecting to a Virtual Machine
1. In the Virtual Machines page, click the name of the virtual machine to go to the details view.
2. Click the pencil icon beside Console and set Connect automatically to ON.
The next time you log into the VM Portal, if you have only one running virtual machine, you willautomatically connect to that machine.
2.3. ENABLING THE REQUIRED REPOSITORIES
To install packages signed by Red Hat you must register the target system to the Content DeliveryNetwork. Then, use an entitlement from your subscription pool and enable the required repositories.
Enabling the Required Repositories Using Subscription Manager
1. Register your system with the Content Delivery Network, entering your Customer Portal username and password when prompted:
# subscription-manager register
2. Locate the relevant subscription pools and note down the pool identifiers:
# subscription-manager list --available
3. Use the pool identifiers to attach the required subscriptions:
# subscription-manager attach --pool=pool_id
4. When a system is attached to a subscription pool with multiple repositories, only the mainrepository is enabled by default. Others are available, but disabled. Enable any additionalrepositories:
# subscription-manager repos --enable=repository
5. Ensure that all packages currently installed are up to date:
# yum update
2.4. INSTALLING GUEST AGENTS AND DRIVERS
2.4.1. Red Hat Virtualization Guest Agents, Tools, and Drivers
The Red Hat Virtualization guest agents, tools, and drivers provide additional functionality for virtual
CHAPTER 2. INSTALLING RED HAT ENTERPRISE LINUX VIRTUAL MACHINES
11
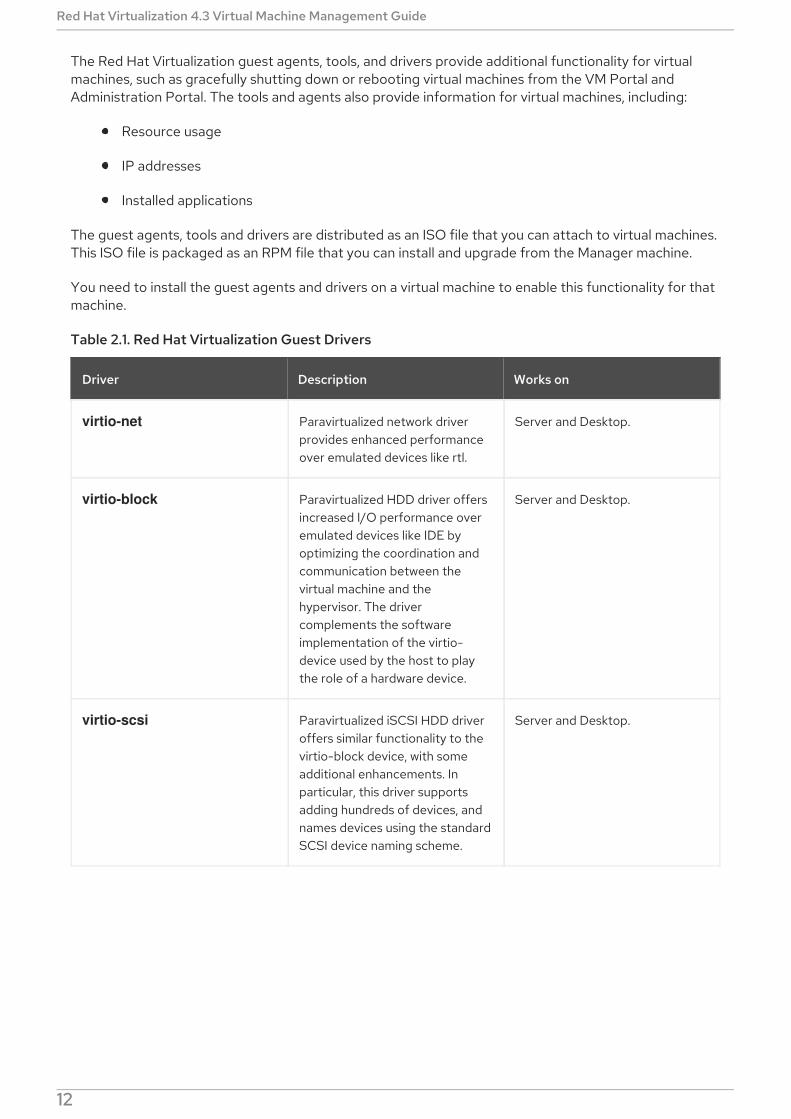
The Red Hat Virtualization guest agents, tools, and drivers provide additional functionality for virtualmachines, such as gracefully shutting down or rebooting virtual machines from the VM Portal andAdministration Portal. The tools and agents also provide information for virtual machines, including:
Resource usage
IP addresses
Installed applications
The guest agents, tools and drivers are distributed as an ISO file that you can attach to virtual machines.This ISO file is packaged as an RPM file that you can install and upgrade from the Manager machine.
You need to install the guest agents and drivers on a virtual machine to enable this functionality for thatmachine.
Table 2.1. Red Hat Virtualization Guest Drivers
Driver Description Works on
virtio-net Paravirtualized network driverprovides enhanced performanceover emulated devices like rtl.
Server and Desktop.
virtio-block Paravirtualized HDD driver offersincreased I/O performance overemulated devices like IDE byoptimizing the coordination andcommunication between thevirtual machine and thehypervisor. The drivercomplements the softwareimplementation of the virtio-device used by the host to playthe role of a hardware device.
Server and Desktop.
virtio-scsi Paravirtualized iSCSI HDD driveroffers similar functionality to thevirtio-block device, with someadditional enhancements. Inparticular, this driver supportsadding hundreds of devices, andnames devices using the standardSCSI device naming scheme.
Server and Desktop.
Red Hat Virtualization 4.3 Virtual Machine Management Guide
12
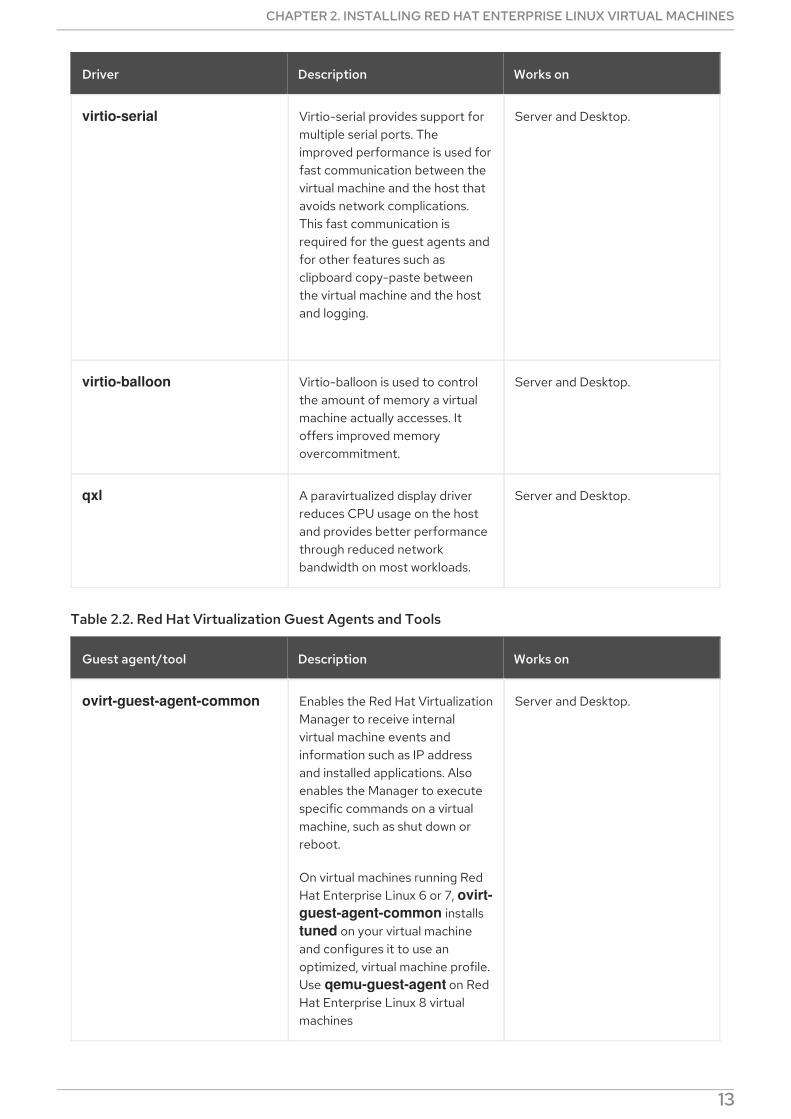
virtio-serial Virtio-serial provides support formultiple serial ports. Theimproved performance is used forfast communication between thevirtual machine and the host thatavoids network complications.This fast communication isrequired for the guest agents andfor other features such asclipboard copy-paste betweenthe virtual machine and the hostand logging.
Server and Desktop.
virtio-balloon Virtio-balloon is used to controlthe amount of memory a virtualmachine actually accesses. Itoffers improved memoryovercommitment.
Server and Desktop.
qxl A paravirtualized display driverreduces CPU usage on the hostand provides better performancethrough reduced networkbandwidth on most workloads.
Server and Desktop.
Driver Description Works on
Table 2.2. Red Hat Virtualization Guest Agents and Tools
Guest agent/tool Description Works on
ovirt-guest-agent-common Enables the Red Hat VirtualizationManager to receive internalvirtual machine events andinformation such as IP addressand installed applications. Alsoenables the Manager to executespecific commands on a virtualmachine, such as shut down orreboot.
On virtual machines running RedHat Enterprise Linux 6 or 7, ovirt-guest-agent-common installs tuned on your virtual machineand configures it to use anoptimized, virtual machine profile.Use qemu-guest-agent on RedHat Enterprise Linux 8 virtualmachines
Server and Desktop.
CHAPTER 2. INSTALLING RED HAT ENTERPRISE LINUX VIRTUAL MACHINES
13
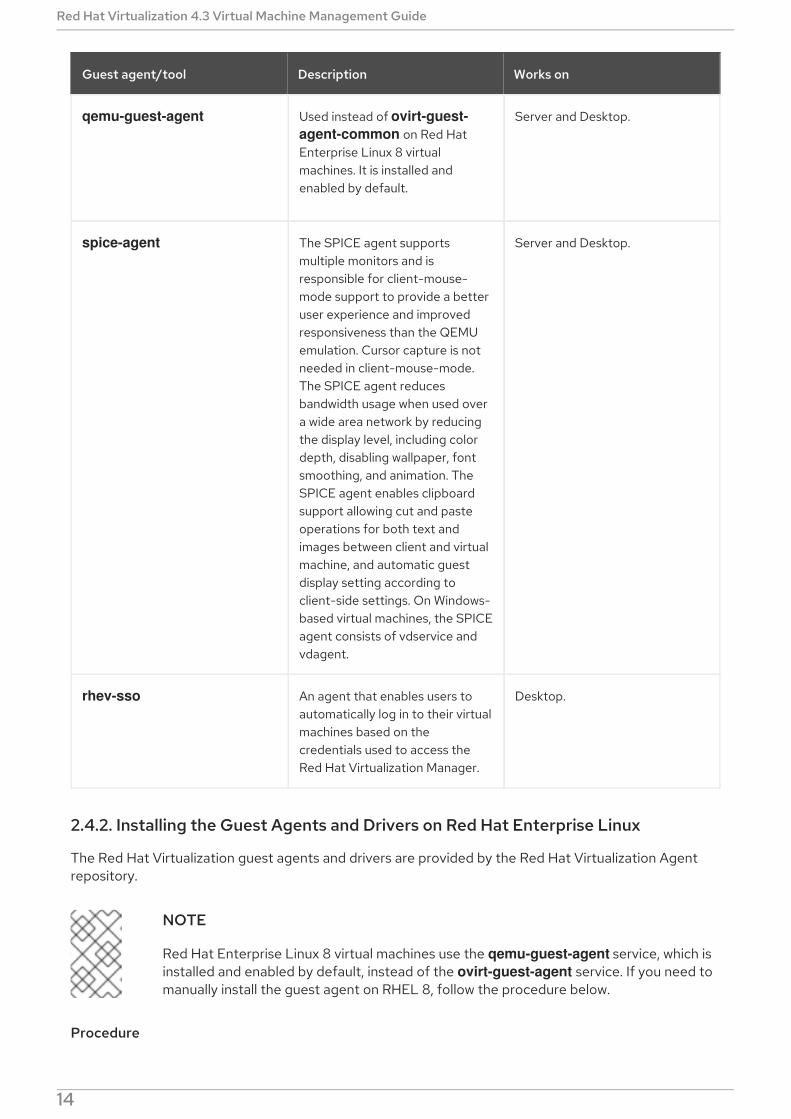
qemu-guest-agent Used instead of ovirt-guest-agent-common on Red HatEnterprise Linux 8 virtualmachines. It is installed andenabled by default.
Server and Desktop.
spice-agent The SPICE agent supportsmultiple monitors and isresponsible for client-mouse-mode support to provide a betteruser experience and improvedresponsiveness than the QEMUemulation. Cursor capture is notneeded in client-mouse-mode.The SPICE agent reducesbandwidth usage when used overa wide area network by reducingthe display level, including colordepth, disabling wallpaper, fontsmoothing, and animation. TheSPICE agent enables clipboardsupport allowing cut and pasteoperations for both text andimages between client and virtualmachine, and automatic guestdisplay setting according toclient-side settings. On Windows-based virtual machines, the SPICEagent consists of vdservice andvdagent.
Server and Desktop.
rhev-sso An agent that enables users toautomatically log in to their virtualmachines based on thecredentials used to access theRed Hat Virtualization Manager.
Desktop.
Guest agent/tool Description Works on
2.4.2. Installing the Guest Agents and Drivers on Red Hat Enterprise Linux
The Red Hat Virtualization guest agents and drivers are provided by the Red Hat Virtualization Agentrepository.
NOTE
Red Hat Enterprise Linux 8 virtual machines use the qemu-guest-agent service, which isinstalled and enabled by default, instead of the ovirt-guest-agent service. If you need tomanually install the guest agent on RHEL 8, follow the procedure below.
Procedure
Red Hat Virtualization 4.3 Virtual Machine Management Guide
14

1. Log in to the Red Hat Enterprise Linux virtual machine.
2. Enable the Red Hat Virtualization Agent repository:
For Red Hat Enterprise Linux 6
# subscription-manager repos --enable=rhel-6-server-rhv-4-agent-rpms
For Red Hat Enterprise Linux 7
# subscription-manager repos --enable=rhel-7-server-rh-common-rpms
For Red Hat Enterprise Linux 8
# subscription-manager repos --enable=rhel-8-for-x86_64-appstream-rpms
3. Install the guest agent and dependencies:
For Red Hat Enterprise Linux 6 or 7, install the ovirt guest agent:
# yum install ovirt-guest-agent-common
For Red Hat Enterprise Linux 8, install the qemu guest agent:
# yum install qemu-guest-agent
4. Start and enable the ovirt-guest-agent service:
For Red Hat Enterprise Linux 6
# service ovirt-guest-agent start# chkconfig ovirt-guest-agent on
For Red Hat Enterprise Linux 7
# systemctl start ovirt-guest-agent# systemctl enable ovirt-guest-agent
5. Start and enable the qemu-guest-agent service:
For Red Hat Enterprise Linux 6
# service qemu-ga start# chkconfig qemu-ga on
For Red Hat Enterprise Linux 7 or 8
# systemctl start qemu-guest-agent# systemctl enable qemu-guest-agent
The guest agent now passes usage information to the Red Hat Virtualization Manager. You canconfigure the guest agent in the /etc/ovirt-guest-agent.conf file.
CHAPTER 2. INSTALLING RED HAT ENTERPRISE LINUX VIRTUAL MACHINES
15
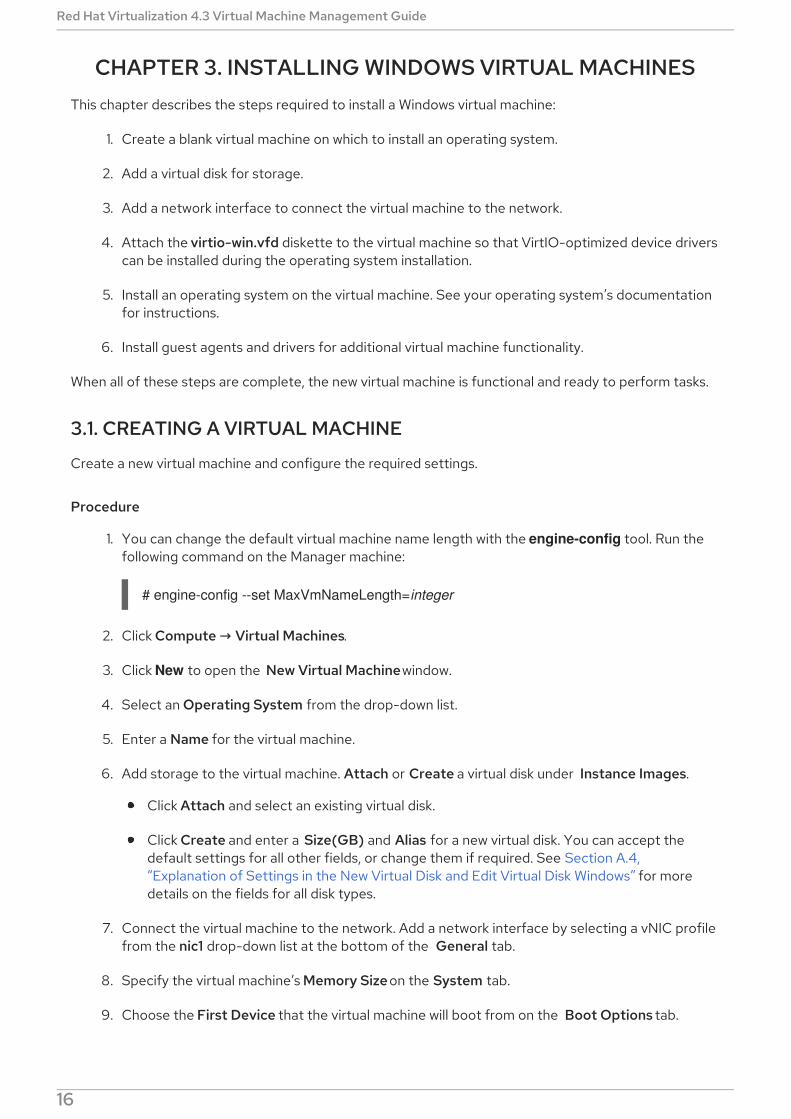
CHAPTER 3. INSTALLING WINDOWS VIRTUAL MACHINESThis chapter describes the steps required to install a Windows virtual machine:
1. Create a blank virtual machine on which to install an operating system.
2. Add a virtual disk for storage.
3. Add a network interface to connect the virtual machine to the network.
4. Attach the virtio-win.vfd diskette to the virtual machine so that VirtIO-optimized device driverscan be installed during the operating system installation.
5. Install an operating system on the virtual machine. See your operating system’s documentationfor instructions.
6. Install guest agents and drivers for additional virtual machine functionality.
When all of these steps are complete, the new virtual machine is functional and ready to perform tasks.
3.1. CREATING A VIRTUAL MACHINE
Create a new virtual machine and configure the required settings.
Procedure
1. You can change the default virtual machine name length with the engine-config tool. Run thefollowing command on the Manager machine:
# engine-config --set MaxVmNameLength=integer
2. Click Compute → Virtual Machines.
3. Click New to open the New Virtual Machine window.
4. Select an Operating System from the drop-down list.
5. Enter a Name for the virtual machine.
6. Add storage to the virtual machine. Attach or Create a virtual disk under Instance Images.
Click Attach and select an existing virtual disk.
Click Create and enter a Size(GB) and Alias for a new virtual disk. You can accept thedefault settings for all other fields, or change them if required. See Section A.4,“Explanation of Settings in the New Virtual Disk and Edit Virtual Disk Windows” for moredetails on the fields for all disk types.
7. Connect the virtual machine to the network. Add a network interface by selecting a vNIC profilefrom the nic1 drop-down list at the bottom of the General tab.
8. Specify the virtual machine’s Memory Size on the System tab.
9. Choose the First Device that the virtual machine will boot from on the Boot Options tab.
10. You can accept the default settings for all other fields, or change them if required. For more
Red Hat Virtualization 4.3 Virtual Machine Management Guide
16
10. You can accept the default settings for all other fields, or change them if required. For moredetails on all fields in the New Virtual Machine window, see Section A.1, “Explanation ofSettings in the New Virtual Machine and Edit Virtual Machine Windows”.
11. Click OK.
The new virtual machine is created and displays in the list of virtual machines with a status of Down.Before you can use this virtual machine, you must install an operating system and VirtIO-optimized diskand network drivers.
3.2. STARTING THE VIRTUAL MACHINE USING THE RUN ONCEOPTION
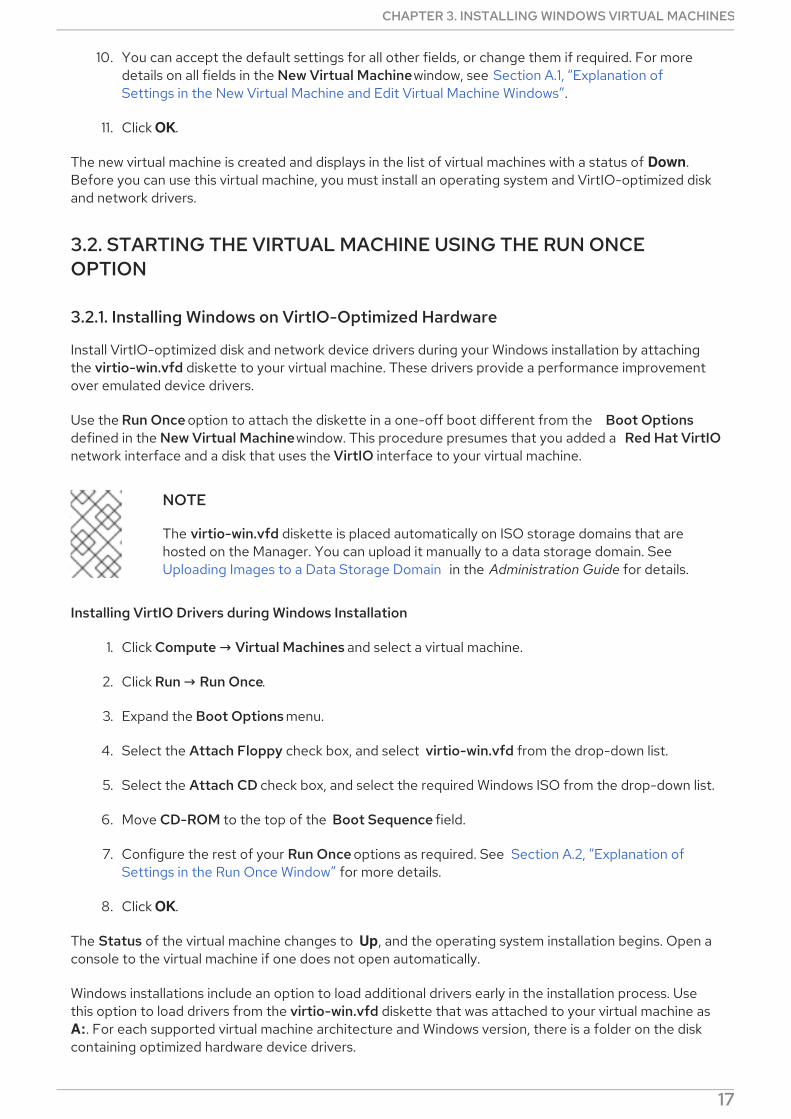
3.2.1. Installing Windows on VirtIO-Optimized Hardware
Install VirtIO-optimized disk and network device drivers during your Windows installation by attachingthe virtio-win.vfd diskette to your virtual machine. These drivers provide a performance improvementover emulated device drivers.
Use the Run Once option to attach the diskette in a one-off boot different from the Boot Optionsdefined in the New Virtual Machine window. This procedure presumes that you added a Red Hat VirtIOnetwork interface and a disk that uses the VirtIO interface to your virtual machine.
NOTE
The virtio-win.vfd diskette is placed automatically on ISO storage domains that arehosted on the Manager. You can upload it manually to a data storage domain. SeeUploading Images to a Data Storage Domain in the Administration Guide for details.
Installing VirtIO Drivers during Windows Installation
1. Click Compute → Virtual Machines and select a virtual machine.
2. Click Run → Run Once.
3. Expand the Boot Options menu.
4. Select the Attach Floppy check box, and select virtio-win.vfd from the drop-down list.
5. Select the Attach CD check box, and select the required Windows ISO from the drop-down list.
6. Move CD-ROM to the top of the Boot Sequence field.
7. Configure the rest of your Run Once options as required. See Section A.2, “Explanation ofSettings in the Run Once Window” for more details.
8. Click OK.
The Status of the virtual machine changes to Up, and the operating system installation begins. Open aconsole to the virtual machine if one does not open automatically.
Windows installations include an option to load additional drivers early in the installation process. Usethis option to load drivers from the virtio-win.vfd diskette that was attached to your virtual machine as A:. For each supported virtual machine architecture and Windows version, there is a folder on the diskcontaining optimized hardware device drivers.
CHAPTER 3. INSTALLING WINDOWS VIRTUAL MACHINES
17
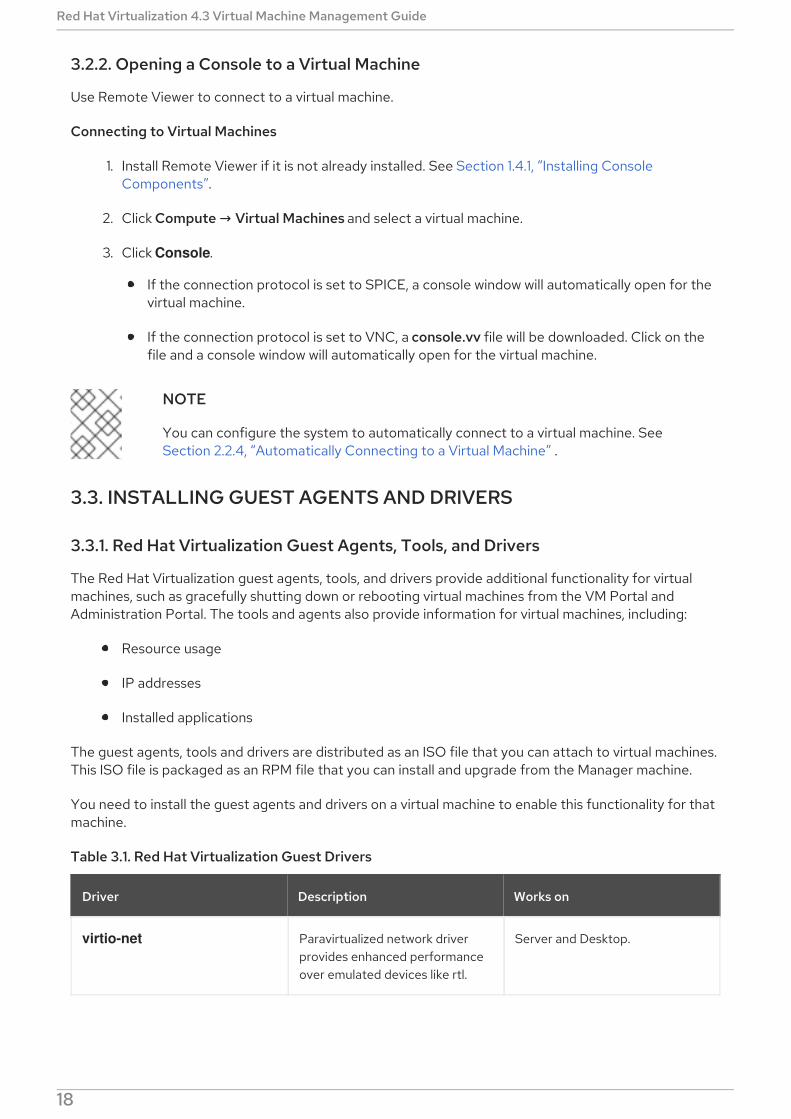
3.2.2. Opening a Console to a Virtual Machine
Use Remote Viewer to connect to a virtual machine.
Connecting to Virtual Machines
1. Install Remote Viewer if it is not already installed. See Section 1.4.1, “Installing ConsoleComponents”.
2. Click Compute → Virtual Machines and select a virtual machine.
3. Click Console.
If the connection protocol is set to SPICE, a console window will automatically open for thevirtual machine.
If the connection protocol is set to VNC, a console.vv file will be downloaded. Click on thefile and a console window will automatically open for the virtual machine.
NOTE
You can configure the system to automatically connect to a virtual machine. SeeSection 2.2.4, “Automatically Connecting to a Virtual Machine” .
3.3. INSTALLING GUEST AGENTS AND DRIVERS
3.3.1. Red Hat Virtualization Guest Agents, Tools, and Drivers
The Red Hat Virtualization guest agents, tools, and drivers provide additional functionality for virtualmachines, such as gracefully shutting down or rebooting virtual machines from the VM Portal andAdministration Portal. The tools and agents also provide information for virtual machines, including:
Resource usage
IP addresses
Installed applications
The guest agents, tools and drivers are distributed as an ISO file that you can attach to virtual machines.This ISO file is packaged as an RPM file that you can install and upgrade from the Manager machine.
You need to install the guest agents and drivers on a virtual machine to enable this functionality for thatmachine.
Table 3.1. Red Hat Virtualization Guest Drivers
Driver Description Works on
virtio-net Paravirtualized network driverprovides enhanced performanceover emulated devices like rtl.
Server and Desktop.
Red Hat Virtualization 4.3 Virtual Machine Management Guide
18
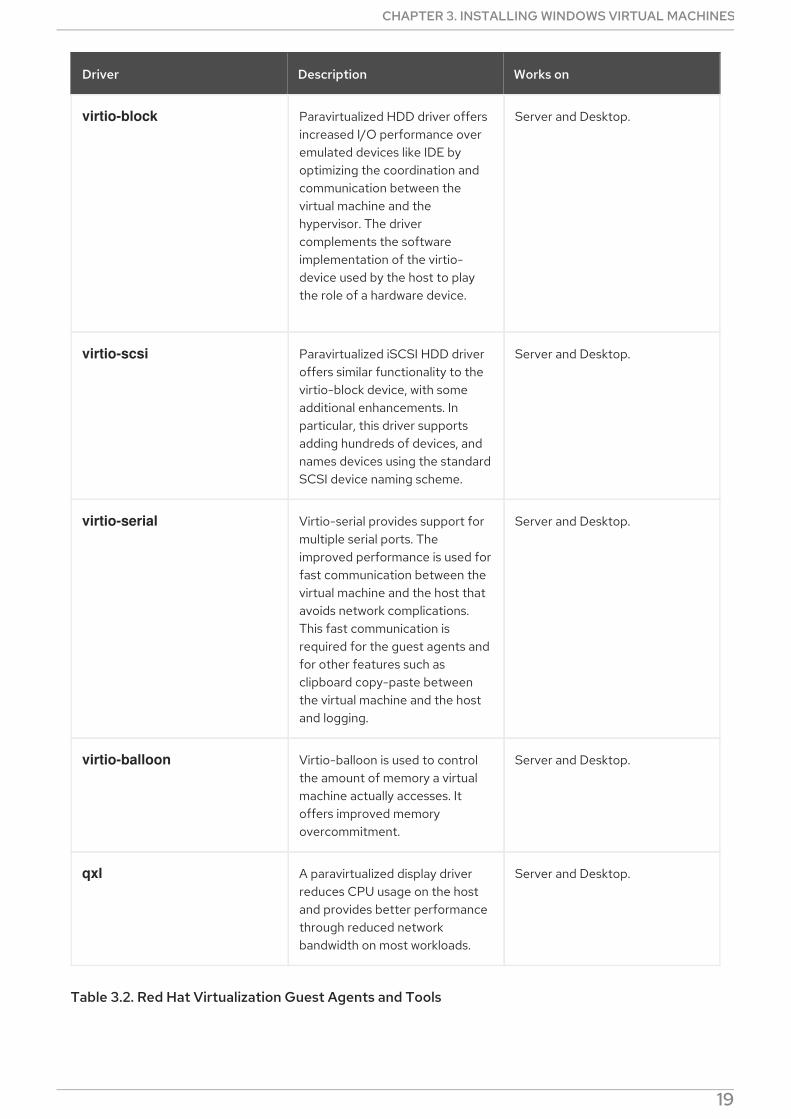
virtio-block Paravirtualized HDD driver offersincreased I/O performance overemulated devices like IDE byoptimizing the coordination andcommunication between thevirtual machine and thehypervisor. The drivercomplements the softwareimplementation of the virtio-device used by the host to playthe role of a hardware device.
Server and Desktop.
virtio-scsi Paravirtualized iSCSI HDD driveroffers similar functionality to thevirtio-block device, with someadditional enhancements. Inparticular, this driver supportsadding hundreds of devices, andnames devices using the standardSCSI device naming scheme.
Server and Desktop.
virtio-serial Virtio-serial provides support formultiple serial ports. Theimproved performance is used forfast communication between thevirtual machine and the host thatavoids network complications.This fast communication isrequired for the guest agents andfor other features such asclipboard copy-paste betweenthe virtual machine and the hostand logging.
Server and Desktop.
virtio-balloon Virtio-balloon is used to controlthe amount of memory a virtualmachine actually accesses. Itoffers improved memoryovercommitment.
Server and Desktop.
qxl A paravirtualized display driverreduces CPU usage on the hostand provides better performancethrough reduced networkbandwidth on most workloads.
Server and Desktop.
Driver Description Works on
Table 3.2. Red Hat Virtualization Guest Agents and Tools
CHAPTER 3. INSTALLING WINDOWS VIRTUAL MACHINES
19
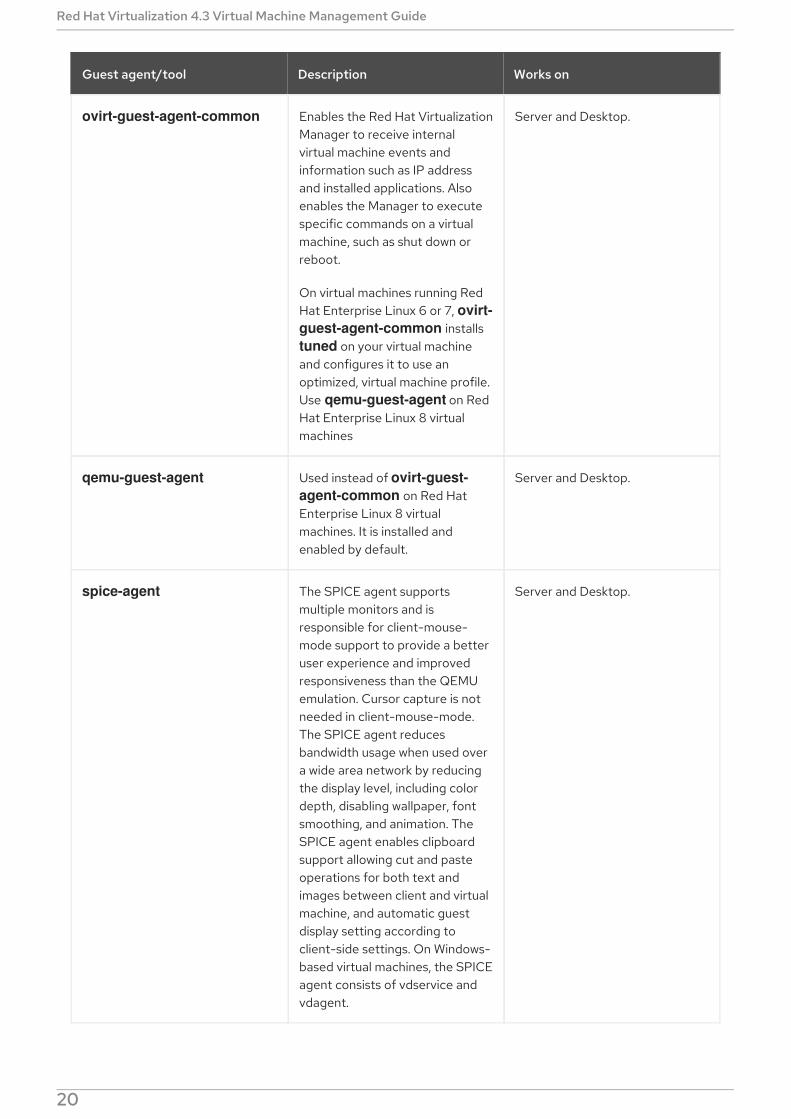
Guest agent/tool Description Works on
ovirt-guest-agent-common Enables the Red Hat VirtualizationManager to receive internalvirtual machine events andinformation such as IP addressand installed applications. Alsoenables the Manager to executespecific commands on a virtualmachine, such as shut down orreboot.
On virtual machines running RedHat Enterprise Linux 6 or 7, ovirt-guest-agent-common installs tuned on your virtual machineand configures it to use anoptimized, virtual machine profile.Use qemu-guest-agent on RedHat Enterprise Linux 8 virtualmachines
Server and Desktop.
qemu-guest-agent Used instead of ovirt-guest-agent-common on Red HatEnterprise Linux 8 virtualmachines. It is installed andenabled by default.
Server and Desktop.
spice-agent The SPICE agent supportsmultiple monitors and isresponsible for client-mouse-mode support to provide a betteruser experience and improvedresponsiveness than the QEMUemulation. Cursor capture is notneeded in client-mouse-mode.The SPICE agent reducesbandwidth usage when used overa wide area network by reducingthe display level, including colordepth, disabling wallpaper, fontsmoothing, and animation. TheSPICE agent enables clipboardsupport allowing cut and pasteoperations for both text andimages between client and virtualmachine, and automatic guestdisplay setting according toclient-side settings. On Windows-based virtual machines, the SPICEagent consists of vdservice andvdagent.
Server and Desktop.
Red Hat Virtualization 4.3 Virtual Machine Management Guide
20
rhev-sso An agent that enables users toautomatically log in to their virtualmachines based on thecredentials used to access theRed Hat Virtualization Manager.
Desktop.
Guest agent/tool Description Works on
3.3.2. Installing the Guest Agents, Tools, and Drivers on Windows
To install the guest agents, tools, and drivers on a Windows virtual machine:
1. On the Manager machine, install the rhv-guest-tools-iso package:
yum install rhv-guest-tools-iso*
After you install the package, the ISO file is located in /usr/share/rhv-guest-tools-iso/RHV-toolsSetup_version.iso on the Manager machine.
2. Upload RHV-toolsSetup_version.iso to a data storage domain. See Uploading Images to aData Storage Domain in the Administration Guide for details.
3. In the Administration or VM Portal, if the virtual machine is running, use the Change CD buttonto attach the RHV-toolsSetup_version.iso file to each of your virtual machines. If the virtualmachine is powered off, click the Run Once button and attach the ISO as a CD.
NOTE
If you install the guest agents and drivers from the command line or as part of adeployment tool such as Windows Deployment Services, you can append theoptions ISSILENTMODE and ISNOREBOOT to RHEV-toolsSetup.exe tosilently install the guest agents and drivers and prevent the machine on whichthey are installed from rebooting immediately after installation. You can rebootthe machine later, after the deployment process is complete.
D:\RHEV-toolsSetup.exe ISSILENTMODE ISNOREBOOT
4. Log in to the virtual machine.
5. Select the CD Drive containing the RHV-toolsSetup_version.iso file.
6. Double-click RHEV-toolsSetup.exe.
7. Click Next at the welcome screen.
8. Follow the prompts on the RHEV-Tools InstallShield Wizard window. Ensure all check boxes inthe list of components are selected.
9. Once installation is complete, select Yes, I want to restart my computer now and click Finishto apply the changes.
The guest agents and drivers now pass usage information to the Red Hat Virtualization Manager and
CHAPTER 3. INSTALLING WINDOWS VIRTUAL MACHINES
21
The guest agents and drivers now pass usage information to the Red Hat Virtualization Manager andallow you to access USB devices, single sign-on into virtual machines, and other functionality. The RedHat Virtualization guest agent runs as a service called RHEV Agent that you can configure using therhev-agent configuration file located in C:\Program Files\Redhat\RHEV\Drivers\Agent.
For information on updating the guest agents and drivers, see Section 6.6.2, “Updating the GuestAgents and Drivers on Windows”
3.3.3. Automating Guest Additions on Windows Guests with Red Hat VirtualizationApplication Provisioning Tool(APT)
Red Hat Virtualization Application Provisioning Tool (APT) is a Windows service that can be installed onWindows virtual machines and templates. When the APT service is installed and running on a virtualmachine, attached ISO files are automatically scanned. When the service recognizes a valid Red HatVirtualization guest tools ISO, and no other guest tools are installed, the APT service installs the guesttools. If guest tools are already installed, and the ISO image contains newer versions of the tools, theservice performs an automatic upgrade. This procedure assumes you have attached the rhev-tools-setup.iso ISO file to the virtual machine.
Installing the APT Service on Windows
1. Log in to the virtual machine.
2. Select the CD Drive containing the RHV-toolsSetup_version.iso file.
3. Double-click RHEV-Application Provisioning Tool.
4. Click Yes in the User Account Control window.
5. Once installation is complete, ensure the Start RHEV-apt Service check box is selected in theRHEV-Application Provisioning Tool InstallShield Wizard window, and click Finish to applythe changes.
Once the APT service has successfully installed or upgraded the guest tools on a virtual machine, thevirtual machine is automatically rebooted. This happens without confirmation from the user logged in tothe machine. The APT Service will also perform these operations when a virtual machine created from atemplate that has the APT Service already installed is booted for the first time.
NOTE
The RHEV-apt service can be stopped immediately after install by clearing the Start RHEV-apt Service check box. You can stop, start, or restart the service at any time usingthe Services window.
Red Hat Virtualization 4.3 Virtual Machine Management Guide
22
CHAPTER 4. ADDITIONAL CONFIGURATION
4.1. CONFIGURING OPERATING SYSTEMS WITH OSINFO
Red Hat Virtualization stores operating system configurations for virtual machines in /etc/ovirt-engine/osinfo.conf.d/00-defaults.properties. This file contains default values such as os.other.devices.display.protocols.value = spice/qxl,vnc/vga,vnc/qxl.
There are only a limited number of scenarios in which you would change these values:
Adding an operating system that does not appear in the list of supported guest operatingsystems
Adding a product key (for example, os.windows_10x64.productKey.value =)
Configuring the sysprep path for a Windows virtual machine (for example, os.windows_10x64.sysprepPath.value = ${ENGINE_USR}/conf/sysprep/sysprep.w10x64)
IMPORTANT
Do not edit the actual 00-defaults.properties file. Changes will be overwritten if youupgrade or restore the Manager.
Do not change values that come directly from the operating system or the Manager, suchas maximum memory size.
To change the operating system configurations, create an override file in /etc/ovirt-engine/osinfo.conf.d/. The file name must begin with a value greater than 00, so that the file appearsafter /etc/ovirt-engine/osinfo.conf.d/00-defaults.properties, and ends with the extension,.properties.
For example, 10-productkeys.properties overrides the default file, 00-defaults.properties. The lastfile in the file list has precedence over earlier files.
4.2. CONFIGURING SINGLE SIGN-ON FOR VIRTUAL MACHINES
Configuring single sign-on, also known as password delegation, allows you to automatically log in to avirtual machine using the credentials you use to log in to the VM Portal. Single sign-on can be used onboth Red Hat Enterprise Linux and Windows virtual machines.
NOTE
Single sign-on is not supported for virtual machines running Red Hat Enterprise Linux 8.0.
IMPORTANT
If single sign-on to the VM Portal is enabled, single sign-on to virtual machines will not bepossible. With single sign-on to the VM Portal enabled, the VM Portal does not need toaccept a password, thus the password cannot be delegated to sign in to virtual machines.
4.2.1. Configuring Single Sign-On for Red Hat Enterprise Linux Virtual MachinesUsing IPA (IdM)
CHAPTER 4. ADDITIONAL CONFIGURATION
23
To configure single sign-on for Red Hat Enterprise Linux virtual machines using GNOME and KDEgraphical desktop environments and IPA (IdM) servers, you must install the ovirt-guest-agent packageon the virtual machine and install the packages associated with your window manager.
IMPORTANT
The following procedure assumes that you have a working IPA configuration and that theIPA domain is already joined to the Manager. You must also ensure that the clocks on theManager, the virtual machine and the system on which IPA (IdM) is hosted aresynchronized using NTP.
Configuring Single Sign-On for Red Hat Enterprise Linux Virtual Machines
1. Log in to the Red Hat Enterprise Linux virtual machine.
2. Enable the repository:
For Red Hat Enterprise Linux 6:
# subscription-manager repos --enable=rhel-6-server-rhv-4-agent-rpms
For Red Hat Enterprise Linux 7:
# subscription-manager repos --enable=rhel-7-server-rh-common-rpms
3. Download and install the guest agent, single sign-on, and IPA packages:
# yum install ovirt-guest-agent-common ovirt-guest-agent-pam-module ovirt-guest-agent-gdm-plugin ipa-client
4. Run the following command and follow the prompts to configure ipa-client and join the virtualmachine to the domain:
# ipa-client-install --permit --mkhomedir
NOTE
In environments that use DNS obfuscation, this command should be:
# ipa-client-install --domain=FQDN --server==FQDN
5. For Red Hat Enterprise Linux 7.2 and later:
# authconfig --enablenis --update
NOTE
Red Hat Enterprise Linux 7.2 has a new version of the System Security ServicesDaemon (SSSD), which introduces configuration that is incompatible with theRed Hat Virtualization Manager guest agent single sign-on implementation. Thiscommand ensures that single sign-on works.
Red Hat Virtualization 4.3 Virtual Machine Management Guide
24
6. Fetch the details of an IPA user:
# getent passwd ipa-user
7. Record the IPA user’s UID and GID:
ipa-user:*:936600010:936600001::/home/ipa-user:/bin/sh
8. Create a home directory for the IPA user:
# mkdir /home/ipa-user
9. Assign ownership of the directory to the IPA user:
# chown 936600010:936600001 /home/ipa-user
Log in to the VM Portal using the user name and password of a user configured to use single sign-on andconnect to the console of the virtual machine. You will be logged in automatically.
4.2.2. Configuring Single Sign-On for Red Hat Enterprise Linux Virtual MachinesUsing Active Directory
To configure single sign-on for Red Hat Enterprise Linux virtual machines using GNOME and KDEgraphical desktop environments and Active Directory, you must install the ovirt-guest-agent packageon the virtual machine, install the packages associated with your window manager and join the virtualmachine to the domain.
IMPORTANT
The following procedure assumes that you have a working Active Directory configurationand that the Active Directory domain is already joined to the Manager. You must alsoensure that the clocks on the Manager, the virtual machine and the system on whichActive Directory is hosted are synchronized using NTP.
Configuring Single Sign-On for Red Hat Enterprise Linux Virtual Machines
1. Log in to the Red Hat Enterprise Linux virtual machine.
2. Enable the Red Hat Virtualization Agent repository:
For Red Hat Enterprise Linux 6
# subscription-manager repos --enable=rhel-6-server-rhv-4-agent-rpms
For Red Hat Enterprise Linux 7
# subscription-manager repos --enable=rhel-7-server-rh-common-rpms
3. Download and install the guest agent packages:
# yum install ovirt-guest-agent-common
CHAPTER 4. ADDITIONAL CONFIGURATION
25
4. Install the single sign-on packages:
# yum install ovirt-guest-agent-gdm-plugin
5. Install the Samba client packages:
# yum install samba-client samba-winbind samba-winbind-clients
6. On the virtual machine, modify the /etc/samba/smb.conf file to contain the following,replacing DOMAIN with the short domain name and REALM.LOCAL with the Active Directoryrealm:
[global] workgroup = DOMAIN realm = REALM.LOCAL log level = 2 syslog = 0 server string = Linux File Server security = ads log file = /var/log/samba/%m max log size = 50 printcap name = cups printing = cups winbind enum users = Yes winbind enum groups = Yes winbind use default domain = true winbind separator =
idmap uid = 1000000-2000000 idmap gid = 1000000-2000000template shell = /bin/bash
7. Join the virtual machine to the domain:
net ads join -U user_name
8. Start the winbind service and ensure it starts on boot:
For Red Hat Enterprise Linux 6
# service winbind start# chkconfig winbind on
For Red Hat Enterprise Linux 7
# systemctl start winbind.service# systemctl enable winbind.service
9. Verify that the system can communicate with Active Directory:
a. Verify that a trust relationship has been created:
# wbinfo -t
Red Hat Virtualization 4.3 Virtual Machine Management Guide
26
b. Verify that you can list users:
# wbinfo -u
c. Verify that you can list groups:
# wbinfo -g
10. Configure the NSS and PAM stack:
a. Open the Authentication Configuration window:
# authconfig-tui
b. Select the Use Winbind check box, select Next and press Enter.
c. Select the OK button and press Enter.
Log in to the VM Portal using the user name and password of a user configured to use single sign-on andconnect to the console of the virtual machine. You will be logged in automatically.
4.2.3. Configuring Single Sign-On for Windows Virtual Machines
To configure single sign-on for Windows virtual machines, the Windows guest agent must be installed onthe guest virtual machine. The RHEV Guest Tools ISO file provides this agent. If the RHEV-toolsSetup.iso image is not available in your ISO domain, contact your system administrator.
Configuring Single Sign-On for Windows Virtual Machines
1. Select the Windows virtual machine. Ensure the machine is powered up.
2. Click Change CD.
3. Select RHEV-toolsSetup.iso from the list of images.
4. Click OK.
5. Click Console and log in to the virtual machine.
6. On the virtual machine, locate the CD drive to access the contents of the guest tools ISO fileand launch RHEV-ToolsSetup.exe. After the tools have been installed, you will be prompted torestart the machine to apply the changes.
Log in to the VM Portal using the user name and password of a user configured to use single sign-on andconnect to the console of the virtual machine. You will be logged in automatically.
4.2.4. Disabling Single Sign-on for Virtual Machines
The following procedure explains how to disable single sign-on for a virtual machine.
Disabling Single Sign-On for Virtual Machines
1. Select a virtual machine and click Edit.
2. Click the Console tab.
CHAPTER 4. ADDITIONAL CONFIGURATION
27
3. Select the Disable Single Sign On check box.
4. Click OK.
4.3. CONFIGURING USB DEVICES
A virtual machine connected with the SPICE protocol can be configured to connect directly to USBdevices.
The USB device will only be redirected if the virtual machine is active, in focus and is run from the VMPortal. USB redirection can be manually enabled each time a device is plugged in or set to automaticallyredirect to active virtual machines in the Console Options window.
IMPORTANT
Note the distinction between the client machine and guest machine. The client is thehardware from which you access a guest. The guest is the virtual desktop or virtual serverwhich is accessed through the VM Portal or Administration Portal.
USB redirection Enabled mode allows KVM/SPICE USB redirection for Linux and Windows virtualmachines. Virtual (guest) machines require no guest-installed agents or drivers for native USB. On RedHat Enterprise Linux clients, all packages required for USB redirection are provided by the virt-viewerpackage. On Windows clients, you must also install the usbdk package. Enabled USB mode is supportedon the following clients and guests:
NOTE
If you have a 64-bit architecture PC, you must use the 64-bit version of Internet Explorerto install the 64-bit version of the USB driver. The USB redirection will not work if youinstall the 32-bit version on a 64-bit architecture. As long as you initially install the correctUSB type, you can access USB redirection from both 32- and 64-bit browsers.
4.3.1. Using USB Devices on a Windows Client
The usbdk driver must be installed on the Windows client for the USB device to be redirected to theguest. Ensure the version of usbdk matches the architecture of the client machine. For example, the64-bit version of usbdk must be installed on 64-bit Windows machines.
NOTE
USB redirection is only supported when you open the virtual machine from the VM Portal.
Using USB Devices on a Windows Client
1. When the usbdk driver is installed, select a virtual machine that has been configured to use theSPICE protocol.
2. Ensure USB support is set to Enabled:
a. Click Edit.
b. Click the Console tab.
c. Select Enabled from the USB Support drop-down list.
Red Hat Virtualization 4.3 Virtual Machine Management Guide
28
d. Click OK.
3. Click Console → Console Options.
4. Select the Enable USB Auto-Share check box and click OK.
5. Start the virtual machine from the VM Portal and click Console to connect to that virtualmachine.
6. Plug your USB device into the client machine to make it appear automatically on the guestmachine.
4.3.2. Using USB Devices on a Red Hat Enterprise Linux Client
The usbredir package enables USB redirection from Red Hat Enterprise Linux clients to virtualmachines. usbredir is a dependency of the virt-viewer package, and is automatically installed togetherwith that package.
NOTE
USB redirection is only supported when you open the virtual machine from the VM Portal.
Using USB devices on a Red Hat Enterprise Linux client
1. Click Compute → Virtual Machines and select a virtual machine that has been configured touse the SPICE protocol.
2. Ensure USB support is set to Enabled:
a. Click Edit.
b. Click the Console tab.
c. Select Enabled from the USB Support drop-down list.
d. Click OK.
3. Click Console → Console Options.
4. Select the Enable USB Auto-Share check box and click OK.
5. Start the virtual machine from the VM Portal and click Console to connect to that virtualmachine.
6. Plug your USB device into the client machine to make it appear automatically on the guestmachine.
4.4. CONFIGURING MULTIPLE MONITORS
4.4.1. Configuring Multiple Displays for Red Hat Enterprise Linux Virtual Machines
A maximum of four displays can be configured for a single Red Hat Enterprise Linux virtual machinewhen connecting to the virtual machine using the SPICE protocol.
1. Start a SPICE session with the virtual machine.
CHAPTER 4. ADDITIONAL CONFIGURATION
29

2. Open the View drop-down menu at the top of the SPICE client window.
3. Open the Display menu.
4. Click the name of a display to enable or disable that display.
NOTE
By default, Display 1 is the only display that is enabled on starting a SPICE session with avirtual machine. If no other displays are enabled, disabling this display will close thesession.
4.4.2. Configuring Multiple Displays for Windows Virtual Machines
A maximum of four displays can be configured for a single Windows virtual machine when connecting tothe virtual machine using the SPICE protocol.
1. Click Compute → Virtual Machines and select a virtual machine.
2. With the virtual machine in a powered-down state, click Edit.
3. Click the Console tab.
4. Select the number of displays from the Monitors drop-down list.
NOTE
This setting controls the maximum number of displays that can be enabled forthe virtual machine. While the virtual machine is running, additional displays canbe enabled up to this number.
5. Click OK.
6. Start a SPICE session with the virtual machine.
7. Open the View drop-down menu at the top of the SPICE client window.
8. Open the Display menu.
9. Click the name of a display to enable or disable that display.
NOTE
By default, Display 1 is the only display that is enabled on starting a SPICEsession with a virtual machine. If no other displays are enabled, disabling thisdisplay will close the session.
4.5. CONFIGURING CONSOLE OPTIONS
4.5.1. Console Options
Connection protocols are the underlying technology used to provide graphical consoles for virtualmachines and allow users to work with virtual machines in a similar way as they would with physicalmachines. Red Hat Virtualization currently supports the following connection protocols:
Red Hat Virtualization 4.3 Virtual Machine Management Guide
30
SPICE
Simple Protocol for Independent Computing Environments (SPICE) is the recommended connectionprotocol for both Linux virtual machines and Windows virtual machines. To open a console to a virtualmachine using SPICE, use Remote Viewer.
VNC
Virtual Network Computing (VNC) can be used to open consoles to both Linux virtual machines andWindows virtual machines. To open a console to a virtual machine using VNC, use Remote Viewer or aVNC client.
RDP
Remote Desktop Protocol (RDP) can only be used to open consoles to Windows virtual machines, and isonly available when you access a virtual machines from a Windows machine on which Remote Desktophas been installed. Before you can connect to a Windows virtual machine using RDP, you must set upremote sharing on the virtual machine and configure the firewall to allow remote desktop connections.
NOTE
SPICE is not currently supported on virtual machines running Windows 8. If a Windows 8virtual machine is configured to use the SPICE protocol, it will detect the absence of therequired SPICE drivers and automatically fall back to using RDP.
4.5.1.1. Accessing Console Options
You can configure several options for opening graphical consoles for virtual machines in theAdministration Portal.
Accessing Console Options
1. Click Compute → Virtual Machines and select a running virtual machine.
2. Click Console → Console Options.
NOTE
You can configure the connection protocols and video type in the Console tab of theEdit Virtual Machine window in the Administration Portal. Additional options specific toeach of the connection protocols, such as the keyboard layout when using the VNCconnection protocol, can be configured. See Section A.1.4, “Virtual Machine ConsoleSettings Explained” for more information.
4.5.1.2. SPICE Console Options
When the SPICE connection protocol is selected, the following options are available in the ConsoleOptions window.
SPICE Options
Map control-alt-del shortcut to ctrl+alt+end: Select this check box to map the Ctrl + Alt + Delkey combination to Ctrl + Alt + End inside the virtual machine.
Enable USB Auto-Share: Select this check box to automatically redirect USB devices to thevirtual machine. If this option is not selected, USB devices will connect to the client machine
CHAPTER 4. ADDITIONAL CONFIGURATION
31
instead of the guest virtual machine. To use the USB device on the guest machine, manuallyenable it in the SPICE client menu.
Open in Full Screen: Select this check box for the virtual machine console to automaticallyopen in full screen when you connect to the virtual machine. Press SHIFT + F11 to toggle fullscreen mode on or off.
Enable SPICE Proxy: Select this check box to enable the SPICE proxy.
4.5.1.3. VNC Console Options
When the VNC connection protocol is selected, the following options are available in the ConsoleOptions window.
Console Invocation
Native Client: When you connect to the console of the virtual machine, a file download dialogprovides you with a file that opens a console to the virtual machine via Remote Viewer.
noVNC: When you connect to the console of the virtual machine, a browser tab is opened thatacts as the console.
VNC Options
Map control-alt-delete shortcut to ctrl+alt+end: Select this check box to map the Ctrl + Alt + Del key combination to Ctrl + Alt + End inside the virtual machine.
4.5.1.4. RDP Console Options
When the RDP connection protocol is selected, the following options are available in the ConsoleOptions window.
Console Invocation
Auto: The Manager automatically selects the method for invoking the console.
Native client: When you connect to the console of the virtual machine, a file download dialogprovides you with a file that opens a console to the virtual machine via Remote Desktop.
RDP Options
Use Local Drives: Select this check box to make the drives on the client machine accessible onthe guest virtual machine.
4.5.2. Remote Viewer Options
4.5.2.1. Remote Viewer Options
When you specify the Native client console invocation option, you will connect to virtual machines usingRemote Viewer. The Remote Viewer window provides a number of options for interacting with the virtualmachine to which it is connected.
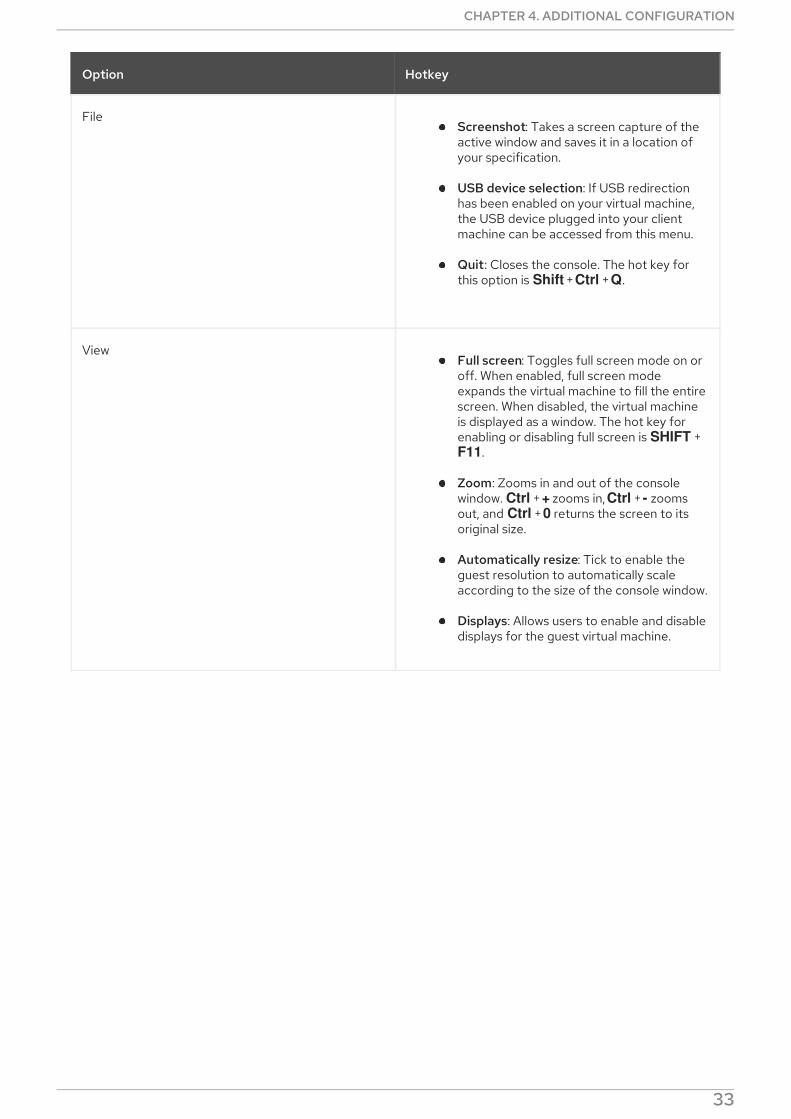
Table 4.1. Remote Viewer Options
Red Hat Virtualization 4.3 Virtual Machine Management Guide
32
Option Hotkey
FileScreenshot: Takes a screen capture of theactive window and saves it in a location ofyour specification.
USB device selection: If USB redirectionhas been enabled on your virtual machine,the USB device plugged into your clientmachine can be accessed from this menu.
Quit: Closes the console. The hot key forthis option is Shift + Ctrl + Q.
ViewFull screen: Toggles full screen mode on oroff. When enabled, full screen modeexpands the virtual machine to fill the entirescreen. When disabled, the virtual machineis displayed as a window. The hot key forenabling or disabling full screen is SHIFT + F11.
Zoom: Zooms in and out of the consolewindow. Ctrl + + zooms in, Ctrl + - zoomsout, and Ctrl + 0 returns the screen to itsoriginal size.
Automatically resize: Tick to enable theguest resolution to automatically scaleaccording to the size of the console window.
Displays: Allows users to enable and disabledisplays for the guest virtual machine.
CHAPTER 4. ADDITIONAL CONFIGURATION
33
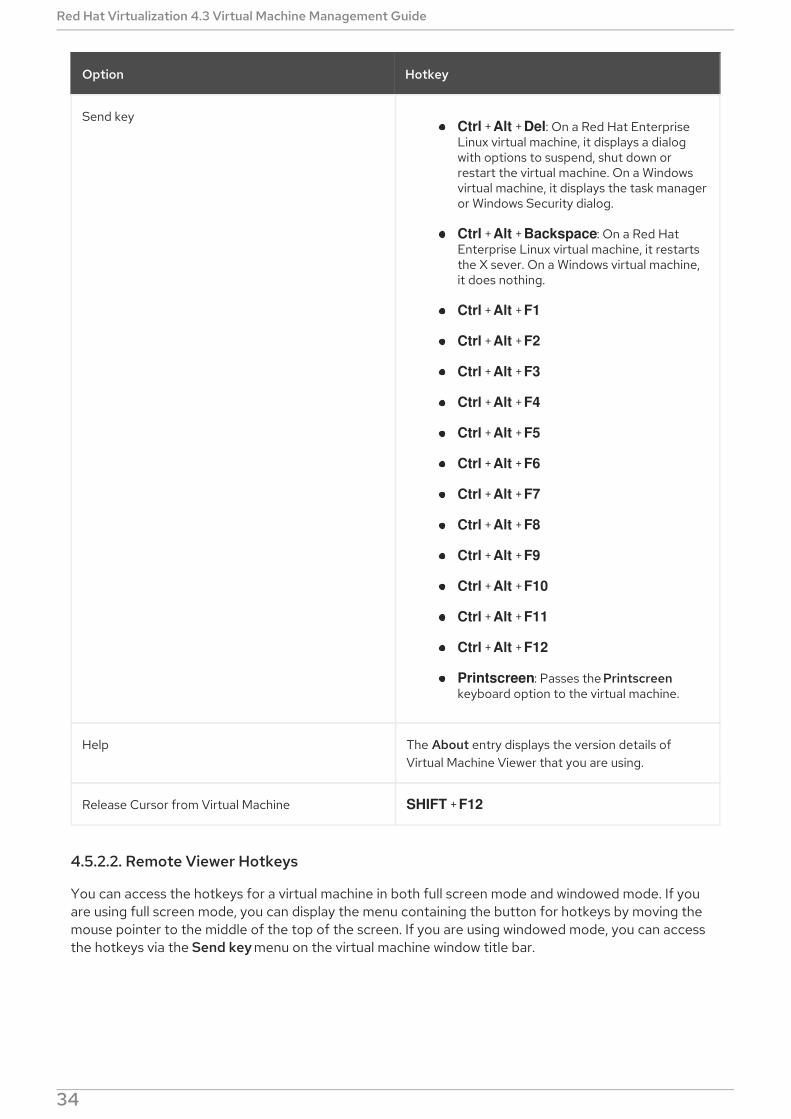
Send keyCtrl + Alt + Del: On a Red Hat EnterpriseLinux virtual machine, it displays a dialogwith options to suspend, shut down orrestart the virtual machine. On a Windowsvirtual machine, it displays the task manageror Windows Security dialog.
Ctrl + Alt + Backspace: On a Red HatEnterprise Linux virtual machine, it restartsthe X sever. On a Windows virtual machine,it does nothing.
Ctrl + Alt + F1
Ctrl + Alt + F2
Ctrl + Alt + F3
Ctrl + Alt + F4
Ctrl + Alt + F5
Ctrl + Alt + F6
Ctrl + Alt + F7
Ctrl + Alt + F8
Ctrl + Alt + F9
Ctrl + Alt + F10
Ctrl + Alt + F11
Ctrl + Alt + F12
Printscreen: Passes the Printscreenkeyboard option to the virtual machine.
Help The About entry displays the version details ofVirtual Machine Viewer that you are using.
Release Cursor from Virtual Machine SHIFT + F12
Option Hotkey
4.5.2.2. Remote Viewer Hotkeys
You can access the hotkeys for a virtual machine in both full screen mode and windowed mode. If youare using full screen mode, you can display the menu containing the button for hotkeys by moving themouse pointer to the middle of the top of the screen. If you are using windowed mode, you can accessthe hotkeys via the Send key menu on the virtual machine window title bar.
NOTE
Red Hat Virtualization 4.3 Virtual Machine Management Guide
34
NOTE
If vdagent is not running on the client machine, the mouse can become captured in avirtual machine window if it is used inside a virtual machine and the virtual machine is notin full screen. To unlock the mouse, press Shift + F12.
4.5.2.3. Manually Associating console.vv Files with Remote Viewer
If you are prompted to download a console.vv file when attempting to open a console to a virtualmachine using the native client console option, and Remote Viewer is already installed, then you canmanually associate console.vv files with Remote Viewer so that Remote Viewer can automatically usethose files to open consoles.
Manually Associating console.vv Files with Remote Viewer
1. Start the virtual machine.
2. Open the Console Options window:
In the Administration Portal, click Console → Console Options.
In the VM Portal, click the virtual machine name and click the pencil icon beside Console.
3. Change the console invocation method to Native client and click OK.
4. Attempt to open a console to the virtual machine, then click Save when prompted to open orsave the console.vv file.
5. Click the location on your local machine where you saved the file.
6. Double-click the console.vv file and select Select a program from a list of installed programswhen prompted.
7. In the Open with window, select Always use the selected program to open this kind of fileand click the Browse button.
8. Click the C:\Users_[user name]_\AppData\Local\virt-viewer\bin directory and selectremote-viewer.exe.
9. Click Open and then click OK.
When you use the native client console invocation option to open a console to a virtual machine, RemoteViewer will automatically use the console.vv file that the Red Hat Virtualization Manager provides toopen a console to that virtual machine without prompting you to select the application to use.
4.6. CONFIGURING A WATCHDOG
4.6.1. Adding a Watchdog Card to a Virtual Machine
You can add a watchdog card to a virtual machine to monitor the operating system’s responsiveness.
Adding Watchdog Cards to Virtual Machines
1. Click Compute → Virtual Machines and select a virtual machine.
2. Click Edit.
CHAPTER 4. ADDITIONAL CONFIGURATION
35
3. Click the High Availability tab.
4. Select the watchdog model to use from the Watchdog Model drop-down list.
5. Select an action from the Watchdog Action drop-down list. This is the action that the virtualmachine takes when the watchdog is triggered.
6. Click OK.
4.6.2. Installing a Watchdog
To activate a watchdog card attached to a virtual machine, you must install the watchdog package onthat virtual machine and start the watchdog service.
Installing Watchdogs
1. Log in to the virtual machine on which the watchdog card is attached.
2. Install the watchdog package and dependencies:
# yum install watchdog
3. Edit the /etc/watchdog.conf file and uncomment the following line:
watchdog-device = /dev/watchdog
4. Save the changes.
5. Start the watchdog service and ensure this service starts on boot:
Red Hat Enterprise Linux 6:
# service watchdog start# chkconfig watchdog on
Red Hat Enterprise Linux 7:
# systemctl start watchdog.service# systemctl enable watchdog.service
4.6.3. Confirming Watchdog Functionality
Confirm that a watchdog card has been attached to a virtual machine and that the watchdog service isactive.
WARNING
This procedure is provided for testing the functionality of watchdogs only and mustnot be run on production machines.
Red Hat Virtualization 4.3 Virtual Machine Management Guide
36
Confirming Watchdog Functionality
1. Log in to the virtual machine on which the watchdog card is attached.
2. Confirm that the watchdog card has been identified by the virtual machine:
# lspci | grep watchdog -i
3. Run one of the following commands to confirm that the watchdog is active:
Trigger a kernel panic:
# echo c > /proc/sysrq-trigger
Terminate the watchdog service:
# kill -9 pgrep watchdog
The watchdog timer can no longer be reset, so the watchdog counter reaches zero after a short periodof time. When the watchdog counter reaches zero, the action specified in the Watchdog Action drop-down menu for that virtual machine is performed.
4.6.4. Parameters for Watchdogs in watchdog.conf
The following is a list of options for configuring the watchdog service available in the/etc/watchdog.conf file. To configure an option, you must uncomment that option and restart the watchdog service after saving the changes.
NOTE
For a more detailed explanation of options for configuring the watchdog service andusing the watchdog command, see the watchdog man page.
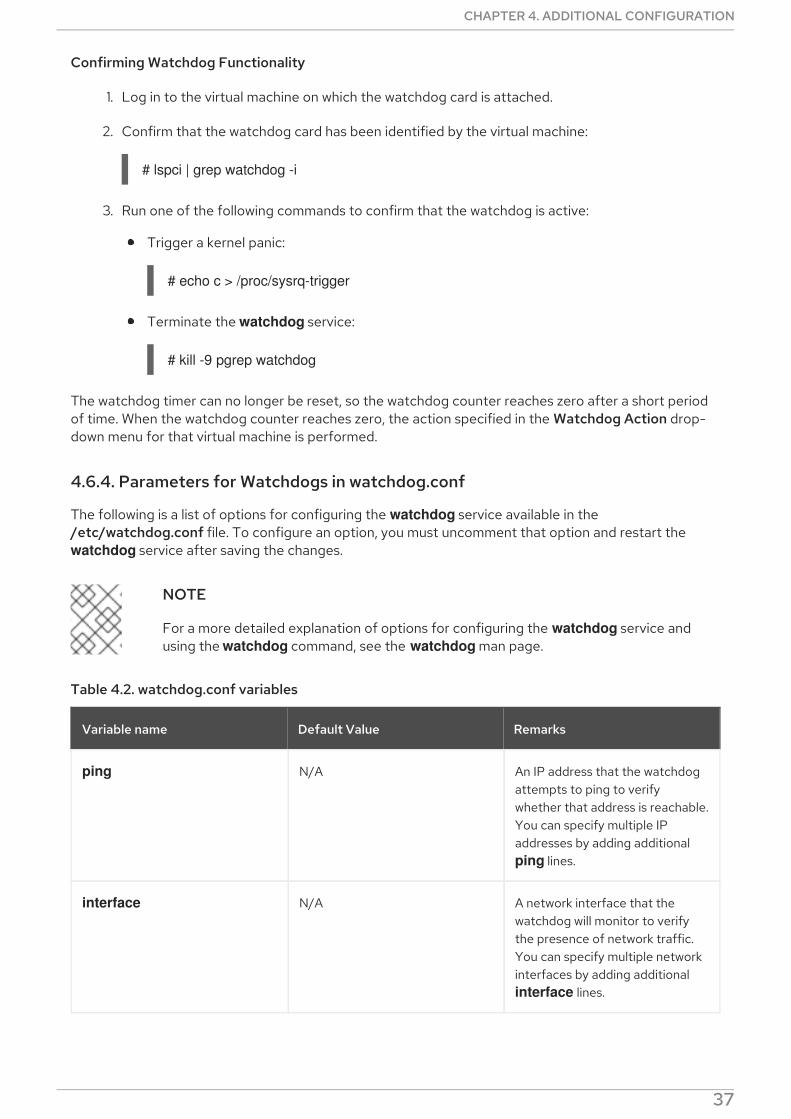
Table 4.2. watchdog.conf variables
Variable name Default Value Remarks
ping N/A An IP address that the watchdogattempts to ping to verifywhether that address is reachable.You can specify multiple IPaddresses by adding additional ping lines.
interface N/A A network interface that thewatchdog will monitor to verifythe presence of network traffic.You can specify multiple networkinterfaces by adding additional interface lines.
CHAPTER 4. ADDITIONAL CONFIGURATION
37
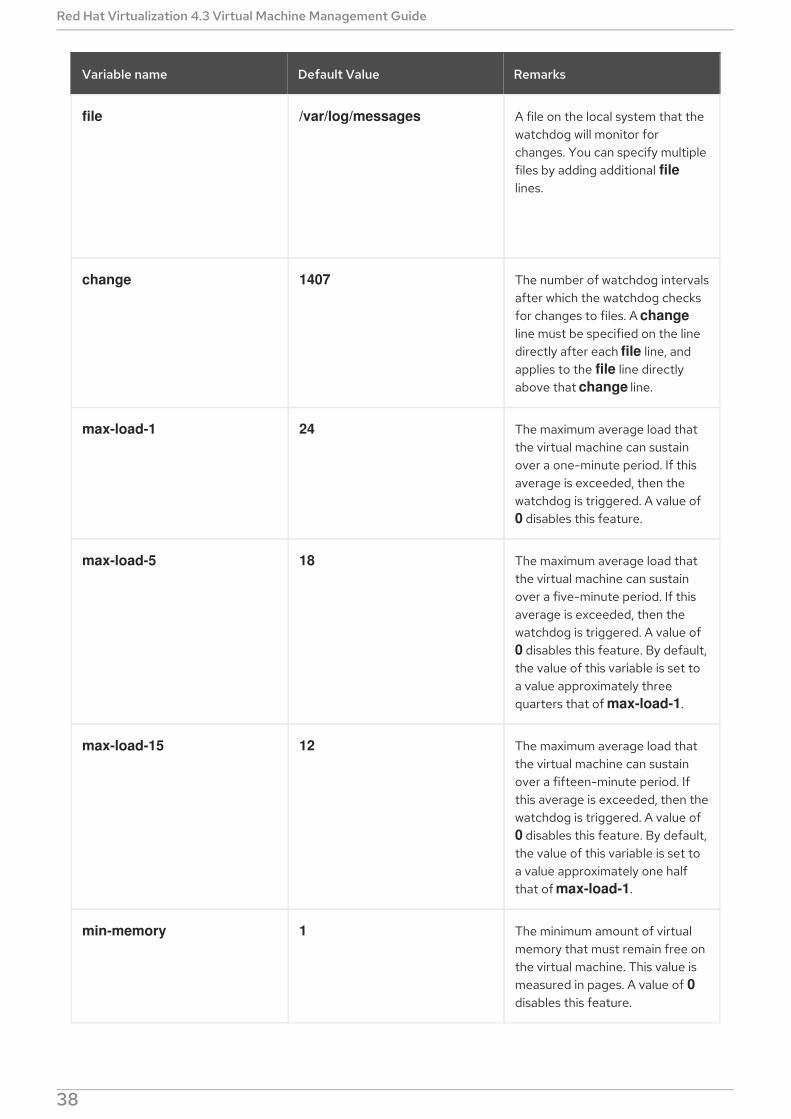
file /var/log/messages A file on the local system that thewatchdog will monitor forchanges. You can specify multiplefiles by adding additional filelines.
change 1407 The number of watchdog intervalsafter which the watchdog checksfor changes to files. A changeline must be specified on the linedirectly after each file line, andapplies to the file line directlyabove that change line.
max-load-1 24 The maximum average load thatthe virtual machine can sustainover a one-minute period. If thisaverage is exceeded, then thewatchdog is triggered. A value of 0 disables this feature.
max-load-5 18 The maximum average load thatthe virtual machine can sustainover a five-minute period. If thisaverage is exceeded, then thewatchdog is triggered. A value of 0 disables this feature. By default,the value of this variable is set toa value approximately threequarters that of max-load-1.
max-load-15 12 The maximum average load thatthe virtual machine can sustainover a fifteen-minute period. Ifthis average is exceeded, then thewatchdog is triggered. A value of 0 disables this feature. By default,the value of this variable is set toa value approximately one halfthat of max-load-1.
min-memory 1 The minimum amount of virtualmemory that must remain free onthe virtual machine. This value ismeasured in pages. A value of 0disables this feature.
Variable name Default Value Remarks
Red Hat Virtualization 4.3 Virtual Machine Management Guide
38
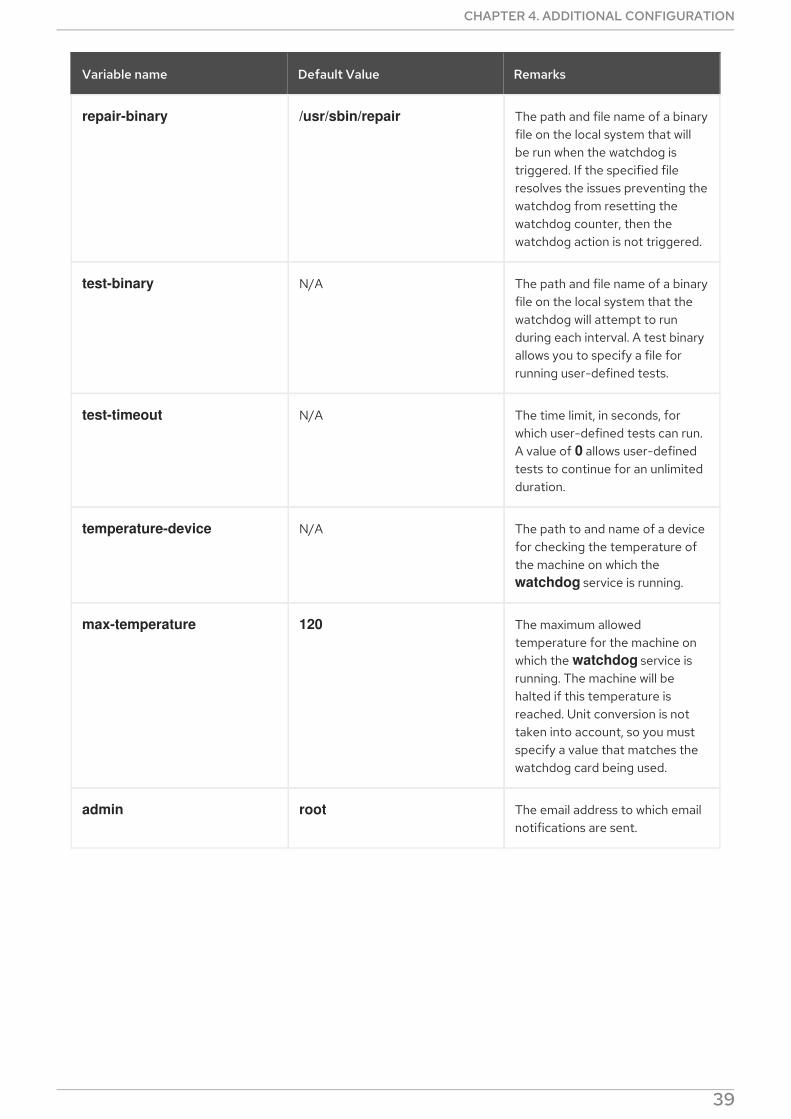
repair-binary /usr/sbin/repair The path and file name of a binaryfile on the local system that willbe run when the watchdog istriggered. If the specified fileresolves the issues preventing thewatchdog from resetting thewatchdog counter, then thewatchdog action is not triggered.
test-binary N/A The path and file name of a binaryfile on the local system that thewatchdog will attempt to runduring each interval. A test binaryallows you to specify a file forrunning user-defined tests.
test-timeout N/A The time limit, in seconds, forwhich user-defined tests can run.A value of 0 allows user-definedtests to continue for an unlimitedduration.
temperature-device N/A The path to and name of a devicefor checking the temperature ofthe machine on which the watchdog service is running.
max-temperature 120 The maximum allowedtemperature for the machine onwhich the watchdog service isrunning. The machine will behalted if this temperature isreached. Unit conversion is nottaken into account, so you mustspecify a value that matches thewatchdog card being used.
admin root The email address to which emailnotifications are sent.
Variable name Default Value Remarks
CHAPTER 4. ADDITIONAL CONFIGURATION
39
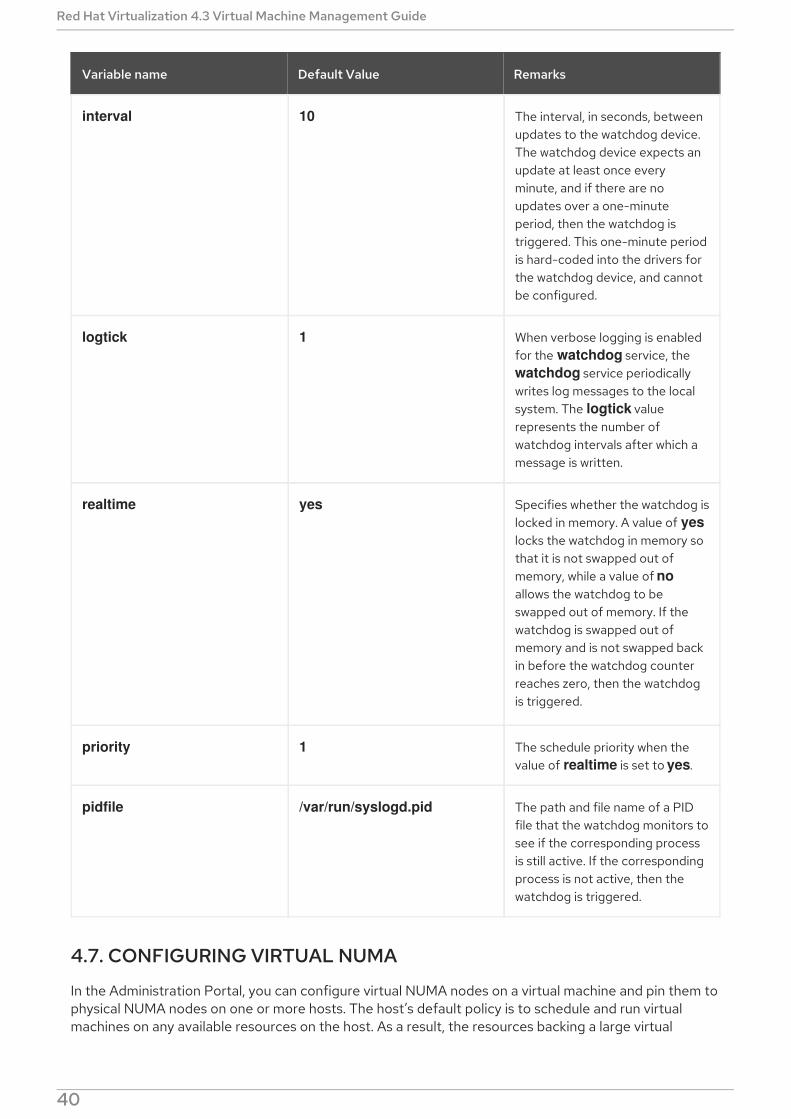
interval 10 The interval, in seconds, betweenupdates to the watchdog device.The watchdog device expects anupdate at least once everyminute, and if there are noupdates over a one-minuteperiod, then the watchdog istriggered. This one-minute periodis hard-coded into the drivers forthe watchdog device, and cannotbe configured.
logtick 1 When verbose logging is enabledfor the watchdog service, the watchdog service periodicallywrites log messages to the localsystem. The logtick valuerepresents the number ofwatchdog intervals after which amessage is written.
realtime yes Specifies whether the watchdog islocked in memory. A value of yeslocks the watchdog in memory sothat it is not swapped out ofmemory, while a value of noallows the watchdog to beswapped out of memory. If thewatchdog is swapped out ofmemory and is not swapped backin before the watchdog counterreaches zero, then the watchdogis triggered.
priority 1 The schedule priority when thevalue of realtime is set to yes.
pidfile /var/run/syslogd.pid The path and file name of a PIDfile that the watchdog monitors tosee if the corresponding processis still active. If the correspondingprocess is not active, then thewatchdog is triggered.
Variable name Default Value Remarks
4.7. CONFIGURING VIRTUAL NUMA
In the Administration Portal, you can configure virtual NUMA nodes on a virtual machine and pin them tophysical NUMA nodes on one or more hosts. The host’s default policy is to schedule and run virtualmachines on any available resources on the host. As a result, the resources backing a large virtual
Red Hat Virtualization 4.3 Virtual Machine Management Guide
40
machine that cannot fit within a single host socket could be spread out across multiple NUMA nodes.Over time these resources may be moved around, leading to poor and unpredictable performance.Configure and pin virtual NUMA nodes to avoid this outcome and improve performance.
Configuring virtual NUMA requires a NUMA-enabled host. To confirm whether NUMA is enabled on ahost, log in to the host and run numactl --hardware. The output of this command should show at leasttwo NUMA nodes. You can also view the host’s NUMA topology in the Administration Portal by selectingthe host from the Hosts tab and clicking NUMA Support. This button is only available when the selectedhost has at least two NUMA nodes.
NOTE
If you define NUMA Pinning, the default migration mode is Allow manual migration onlyby default.
Configuring Virtual NUMA
1. Click Compute → Virtual Machines and select a virtual machine.
2. Click Edit.
3. Click the Host tab.
4. Select the Specific Host(s) radio button and select the host(s) from the list. The selectedhost(s) must have at least two NUMA nodes.
5. Enter a number into the NUMA Node Count field to assign virtual NUMA nodes to the virtualmachine.
6. Select Strict, Preferred, or Interleave from the Tune Mode drop-down list. If the selectedmode is Preferred, the NUMA Node Count must be set to 1.
7. Click NUMA Pinning.
8. In the NUMA Topology window, click and drag virtual NUMA nodes from the box on the right tohost NUMA nodes on the left as required, and click OK.
9. Click OK.
NOTE
If you do not pin the virtual NUMA node to a host NUMA node, the system defaults to theNUMA node that contains the host device’s memory-mapped I/O (MMIO), provided thatthere are one or more host devices and all of those devices are from a single NUMA node.
4.8. CONFIGURING RED HAT SATELLITE ERRATA MANAGEMENT FORA VIRTUAL MACHINE
In the Administration Portal, you can configure a virtual machine to display the available errata. Thevirtual machine needs to be associated with a Red Hat Satellite server to show available errata.
Red Hat Virtualization 4.2 supports errata management with Red Hat Satellite 6.1.
The following prerequisites apply:
CHAPTER 4. ADDITIONAL CONFIGURATION
41
The host that the virtual machine runs on also needs to be configured to receive erratainformation from Satellite. See Configuring Satellite Errata Management for a Host in theAdministration Guide for more information.
The virtual machine must have the ovirt-guest-agent package installed. This package allows thevirtual machine to report its host name to the Red Hat Virtualization Manager. This allows theRed Hat Satellite server to identify the virtual machine as a content host and report theapplicable errata. For more information on installing the ovirt-guest-agent package see ] forRed Hat Enterprise Linux virtual machines andxref:Installing_the_Guest_Agents_and_Drivers_on_Windows[ for Windows virtual machines.
IMPORTANT
Virtual machines are identified in the Satellite server by their FQDN. This ensures that anexternal content host ID does not need to be maintained in Red Hat Virtualization.
Configuring Red Hat Satellite Errata Management
NOTE
The virtual machine must be registered to the Satellite server as a content host and havethe katello-agent package installed.
For more information on how to configure a host registration see Configuring a Host forRegistration in the Red Hat Satellite User Guide and for more information on how toregister a host and install the katello-agent package see Registration in the Red HatSatellite User Guide
1. Click Compute → Virtual Machines and select a virtual machine.
2. Click Edit.
3. Click the Foreman/Satellite tab.
4. Select the required Satellite server from the Provider drop-down list.
5. Click OK.
4.9. CONFIGURING HEADLESS VIRTUAL MACHINES
You can configure a headless virtual machine when it is not necessary to access the machine via agraphical console. This headless machine will run without graphical and video devices. This can be usefulin situations where the host has limited resources, or to comply with virtual machine usage requirementssuch as real-time virtual machines.
Headless virtual machines can be administered via a Serial Console, SSH, or any other service forcommand line access. Headless mode is applied via the Console tab when creating or editing virtualmachines and machine pools, and when editing templates. It is also available when creating or editinginstance types.
If you are creating a new headless virtual machine, you can use the Run Once window to access thevirtual machine via a graphical console for the first run only. See Section A.2, “Explanation of Settings inthe Run Once Window” for more details.
Prerequisites
Red Hat Virtualization 4.3 Virtual Machine Management Guide
42
If you are editing an existing virtual machine, and the Red Hat Virtualization guest agent has notbeen installed, note the machine’s IP prior to selecting Headless Mode.
Before running a virtual machine in headless mode, the GRUB configuration for this machinemust be set to console mode otherwise the guest operating system’s boot process will hang. Toset console mode, comment out the spashimage flag in the GRUB menu configuration file:
#splashimage=(hd0,0)/grub/splash.xpm.gz serial --unit=0 --speed=9600 --parity=no --stop=1 terminal --timeout=2 serial
NOTE
Restart the virtual machine if it is running when selecting the Headless Mode option.
Configuring a Headless Virtual Machine
1. Click Compute → Virtual Machines and select a virtual machine.
2. Click Edit.
3. Click the Console tab.
4. Select Headless Mode. All other fields in the Graphical Console section are disabled.
5. Optionally, select Enable VirtIO serial console to enable communicating with the virtualmachine via serial console. This is highly recommended.
6. Reboot the virtual machine if it is running. See Section 6.3, “Rebooting a Virtual Machine” .
4.10. CONFIGURING HIGH PERFORMANCE VIRTUAL MACHINES,TEMPLATES, AND POOLS
You can configure a virtual machine for high performance, so that it runs with performance metrics asclose to bare metal as possible. When you choose high performance optimization, the virtual machine isconfigured with a set of automatic, and recommended manual, settings for maximum efficiency.
The high performance option is only accessible in the Administration Portal, by selecting HighPerformance from the Optimized for dropdown list in the Edit or New virtual machine, template, orpool window. This option is not available in the VM Portal.
The high performance option is supported by Red Hat Virtualization 4.2 and later. Therefore, it is notavailable for earlier compatibility versions.
Virtual Machines
If you change the optimization mode of a running virtual machine to high performance, someconfiguration changes require restarting the virtual machine.
To change the optimization mode of a new or existing virtual machine to high performance, you mayneed to make manual changes to the cluster and to the pinned host configuration first.
A high performance virtual machine has certain limitations, because enhanced performance has a trade-off in decreased flexibility:
If pinning is set for CPU threads, IO threads, emulator threads, or NUMA nodes, according to the
CHAPTER 4. ADDITIONAL CONFIGURATION
43
If pinning is set for CPU threads, IO threads, emulator threads, or NUMA nodes, according to therecommended settings, only a subset of cluster hosts can be assigned to the high performancevirtual machine.
Many devices are automatically disabled, which limits the virtual machine’s usability.
Templates and Pools
High performance templates and pools are created and edited in the same way as virtual machines. If ahigh performance template or pool is used to create new virtual machines, those virtual machinesinherits this property and its configurations. Certain settings, however, are not inherited and must be setmanually:
CPU pinning
Virtual NUMA and NUMA pinning topology
IO and emulator threads pinning topology
Passthrough Host CPU
4.10.1. Creating a High Performance Virtual Machine, Template, or Pool
To create a high performance virtual machine, template, or pool:
1. In the New or Edit window, select High Performance from the Optimized for drop-downmenu.Selecting this option automatically performs certain configuration changes to this virtualmachine, which you can view by clicking different tabs. You can change them back to theiroriginal settings or override them. (See Automatic High Performance Configuration Settings fordetails.) If you change a setting, its latest value is saved.
2. Click OK.If you have not set any manual configurations, the High Performance Virtual Machine/PoolSettings screen describing the recommended manual configurations appears.
If you have set some of the manual configurations, the High Performance VirtualMachine/Pool Settings screen displays the settings you have not made.
If you have set all the recommended manual configurations, the High Performance VirtualMachine/Pool Settings screen does not appear.
3. If the High Performance Virtual Machine/Pool Settings screen appears, click Cancel to returnto the New or Edit window to perform the manual configurations. See Configuring theRecommended Manual Settings for details.Alternatively, click OK to ignore the recommendations. The result may be a drop in the level ofperformance.
4. Click OK.You can view the optimization type in the General tab of the details view of the virtual machine,pool, or template.
NOTE
Red Hat Virtualization 4.3 Virtual Machine Management Guide
44
NOTE
Certain configurations can override the high performance settings. For example, if youselect an instance type for a virtual machine before selecting High Performance fromthe Optimized for drop-down menu and performing the manual configuration, theinstance type configuration will not affect the high performance configuration. If,however, you select the instance type after the high performance configurations, youshould verify the final configuration in the different tabs to ensure that the highperformance configurations have not been overridden by the instance type.
The last-saved configuration usually takes priority.
4.10.1.1. Automatic High Performance Configuration Settings
The following table summarizes the automatic settings. The Enabled (Y/N) column indicatesconfigurations that are enabled or disabled. The Applies to column indicates the relevant resources:
VM - Virtual machine
T - Template
P - Pool
C - Cluster
Table 4.3. Automatic High Performance Configuration Settings
Setting Enabled (Y/N) Applies to
Headless Mode (Console tab) Y VM, T, P
USB Support (Console tab) N VM, T, P
Smartcard Enabled (Console tab) N VM, T, P
Soundcard Enabled (Console tab) N VM, T, P
Enable VirtIO serial console (Console tab) Y VM, T, P
Allow manual migration only (Host tab) Y VM, T, P
Pass-Through Host CPU (Host tab) Y VM, T, P
Highly Available [a] (High Availability tab) N VM, T, P
No-Watchdog (High Availability tab) N VM, T, P
Memory Balloon Device (Resource Allocation tab) N VM, T, P
IO Threads Enabled [b] (Resource Allocation tab) Y VM, T, P
CHAPTER 4. ADDITIONAL CONFIGURATION
45
Paravirtualized Random Number Generator PCI (virtio-rng)device (Random Generator tab)
Y VM, T, P
IO and emulator threads pinning topology Y VM, T
CPU cache layer 3 Y VM, T, P
[a] Highly Available is not automatically enabled. If you select it manually, high availability should be enabled forpinned hosts only.
[b] Number of IO threads = 1
Setting Enabled (Y/N) Applies to
4.10.1.2. IO and Emulator Threads Pinning Topology (Automatic Settings)
The IO and emulator threads pinning topology is a new configuration setting for Red Hat Virtualization4.2. It requires that IO threads, NUMA nodes, and NUMA pinning be enabled and set for the virtualmachine. Otherwise, a warning will appear in the engine log.
Pinning topology:
The first two CPUs of each NUMA node are pinned.
If all vCPUs fit into one NUMA node of the host:
The first two vCPUs are automatically reserved/pinned
The remaining vCPUs are available for manual vCPU pinning
If the virtual machine spans more than one NUMA node:
The first two CPUs of the NUMA node with the most pins are reserved/pinned
The remaining pinned NUMA node(s) are for vCPU pinning only
Pools do not support IO and emulator threads pinning.
WARNING
If a host CPU is pinned to both a vCPU and IO/emulator threads, a warning willappear in the log and you will be asked to consider changing the CPU pinningtopology to avoid this situation.
4.10.1.3. High Performance Icons
The following icons indicate the states of a high performance virtual machine in the Compute → Virtual
Red Hat Virtualization 4.3 Virtual Machine Management Guide
46
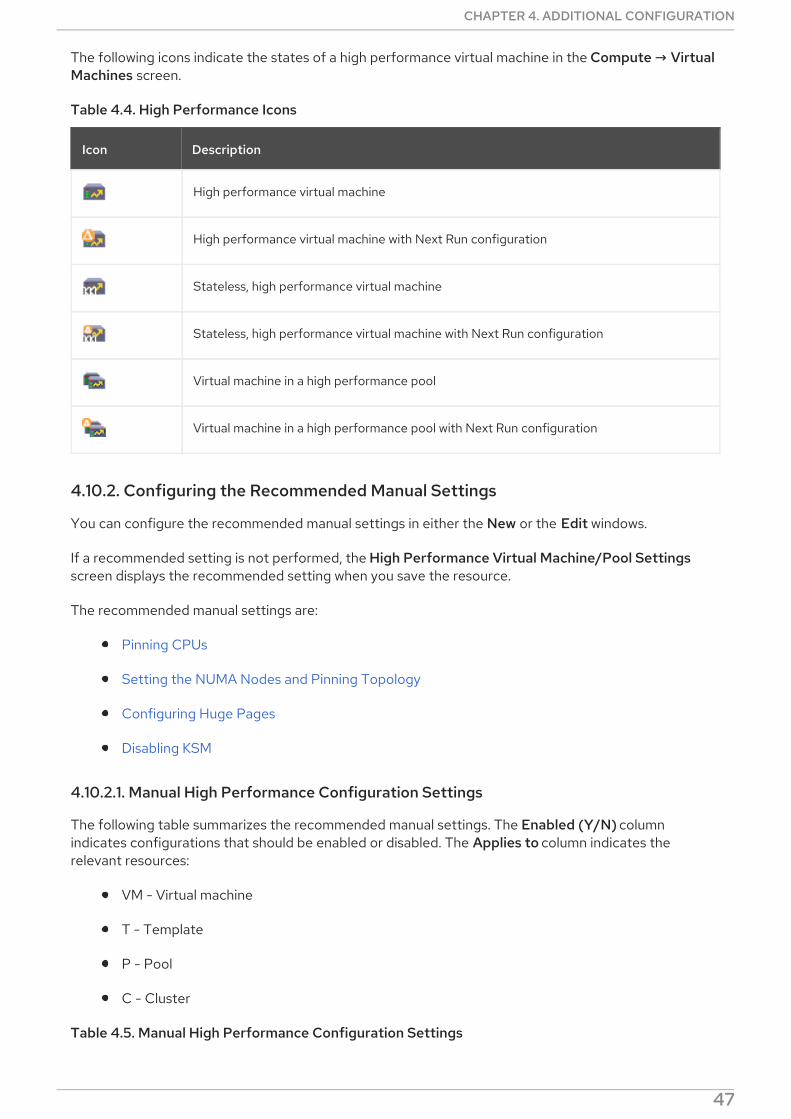
The following icons indicate the states of a high performance virtual machine in the Compute → VirtualMachines screen.
Table 4.4. High Performance Icons
Icon Description
High performance virtual machine
High performance virtual machine with Next Run configuration
Stateless, high performance virtual machine
Stateless, high performance virtual machine with Next Run configuration
Virtual machine in a high performance pool
Virtual machine in a high performance pool with Next Run configuration
4.10.2. Configuring the Recommended Manual Settings
You can configure the recommended manual settings in either the New or the Edit windows.
If a recommended setting is not performed, the High Performance Virtual Machine/Pool Settingsscreen displays the recommended setting when you save the resource.
The recommended manual settings are:
Pinning CPUs
Setting the NUMA Nodes and Pinning Topology
Configuring Huge Pages
Disabling KSM
4.10.2.1. Manual High Performance Configuration Settings
The following table summarizes the recommended manual settings. The Enabled (Y/N) columnindicates configurations that should be enabled or disabled. The Applies to column indicates therelevant resources:
VM - Virtual machine
T - Template
P - Pool
C - Cluster
Table 4.5. Manual High Performance Configuration Settings
CHAPTER 4. ADDITIONAL CONFIGURATION
47
Setting Enabled (Y/N) Applies to
NUMA Node Count (Host tab) Y VM
Tune Mode (Host tab) Y VM
NUMA Pinning (Host tab) Y VM
CPU Pinning topology (Resource Allocation tab) Y VM, P
hugepages (Custom Properties tab) Y VM, T, P
KSM (Optimization tab) N C
4.10.2.2. Pinning CPUs
To pin vCPUs to a specific host’s physical CPU:
1. In the Host tab, select the Specific Host(s) radio button.
2. In the Resource Allocation tab, enter the CPU Pinning Topology, verifying that theconfiguration fits the pinned host’s configuration. See Section A.1.7, “Virtual Machine ResourceAllocation Settings Explained” for information about the syntax of this field.
3. Verify that the virtual machine configuration is compatible with the host configuration:
A virtual machine’s number of sockets must not be greater than the host’s number ofsockets.
A virtual machine’s number of cores per virtual socket must not be greater than the host’snumber of cores.
CPU-intensive workloads perform best when the host and virtual machine expect the samecache usage. To achieve the best performance, a virtual machine’s number of threads percore must not be greater than that of the host.
IMPORTANT
CPU pinning has the following requirements:
If the host is NUMA-enabled, the host’s NUMA settings (memory and CPUs)must be considered because the virtual machine has to fit the host’s NUMAconfiguration.
The IO and emulator threads pinning topology must be considered.
CPU pinning can only be set for virtual machines and pools, but not fortemplates. Therefore, you must set CPU pinning manually whenever you create ahigh performance virtual machine or pool, even if they are based on a highperformance template.
4.10.2.3. Setting the NUMA Nodes and Pinning Topology
Red Hat Virtualization 4.3 Virtual Machine Management Guide
48
To set the NUMA nodes and pinning topology, you need a NUMA-enabled pinned host with at least twoNUMA nodes.
1. In the Host tab, select the NUMA Node Count and the Tune Mode from the drop-down lists.
2. Click NUMA Pinning.
3. In the NUMA Topology window, click and drag virtual NUMA nodes from the box on the right tothe host’s physical NUMA nodes on the left as required.
IMPORTANT
The number of declared virtual NUMA nodes and the NUMA pinning policy must take intoaccount:
The host’s NUMA settings (memory and CPUs)
The NUMA node in which the host devices are declared
The CPU pinning topology
The IO and emulator threads pinning topology
Huge page sizes
NUMA pinning can only be set for virtual machines, but not for pools ortemplates. You must set NUMA pinning manually when you create a highperformance virtual machine based on a template.
4.10.2.4. Configuring Huge Pages
Support for huge pages is a new configuration setting for RHV 4.2. Huge pages are pre-allocated when avirtual machine starts to run (dynamic allocation is disabled by default).
To configure huge pages:
1. In the Custom Properties tab, select hugepages from the custom properties list, which displaysPlease select a key… by default.
2. Enter the huge page size in KB.Red Hat recommends setting the huge page size to the largest size supported by the pinnedhost. The recommended size for x86_64 is 1 GB.
The huge page size has the following requirements:
The virtual machine’s huge page size must be the same size as the pinned host’s huge pagesize.
The virtual machine’s memory size must fit into the selected size of the pinned host’s freehuge pages.
The NUMA node size must be a multiple of the huge page’s selected size.
IMPORTANT
CHAPTER 4. ADDITIONAL CONFIGURATION
49
IMPORTANT
The following limitations apply:
Memory hotplug/unplug is disabled
The host’s memory resource is limited
4.10.2.5. Disabling KSM
To disable Kernel Same-page Merging (KSM) for the cluster:
1. Click Compute → Clusters and select the cluster.
2. Click Edit.
3. In the Optimization tab, uncheck the Enable KSM check box.
Red Hat Virtualization 4.3 Virtual Machine Management Guide
50
CHAPTER 5. EDITING VIRTUAL MACHINES
5.1. EDITING VIRTUAL MACHINE PROPERTIES
Changes to storage, operating system, or networking parameters can adversely affect the virtualmachine. Ensure that you have the correct details before attempting to make any changes. Virtualmachines can be edited while running, and some changes (listed in the procedure below) will be appliedimmediately. To apply all other changes, the virtual machine must be shut down and restarted.
NOTE
External virtual machines (marked with the prefix external) cannot be edited through theRed Hat Virtualization Manager.
Editing Virtual Machines
1. Click Compute → Virtual Machines.
2. Select the virtual machine to be edited.
3. Click Edit.
4. Change settings as required.Changes to the following settings are applied immediately:
Name
Description
Comment
Optimized for (Desktop/Server/High Performance)
Delete Protection
Network Interfaces
Memory Size (Edit this field to hot plug virtual memory. See Section 5.4.1, “Hot PluggingVirtual Memory”.)
Virtual Sockets (Edit this field to hot plug CPUs. See Section 5.5, “Hot Plugging vCPUs” .)
Use custom migration downtime
Highly Available
Priority for Run/Migration queue
Disable strict user checking
Icon
5. Click OK.
6. If the Next Start Configuration pop-up window appears, click OK.
CHAPTER 5. EDITING VIRTUAL MACHINES
51
Some changes are applied immediately. All other changes are applied when you shut down and restart
your virtual machine. Until then, the pending changes icon ( ) appears as a reminder to restart thevirtual machine.
5.2. NETWORK INTERFACES
5.2.1. Adding a New Network Interface
You can add multiple network interfaces to virtual machines. Doing so allows you to put your virtualmachine on multiple logical networks.
NOTE
You can create an overlay network for your virtual machines, isolated from the hosts, bydefining a logical network that is not attached to the physical interfaces of the host. Forexample, you can create a DMZ environment, in which the virtual machines communicateamong themselves over the bridge created in the host.
The overlay network uses OVN, which must be installed as an external network provider.See the Administration Guide for more information
Adding Network Interfaces to Virtual Machines
1. Click Compute → Virtual Machines.
2. Click a virtual machine name to go to the details view.
3. Click the Network Interfaces tab.
4. Click New.
5. Enter the Name of the network interface.
6. Select the Profile and the Type of network interface from the drop-down lists. The Profile andType drop-down lists are populated in accordance with the profiles and network types availableto the cluster and the network interface cards available to the virtual machine.
7. Select the Custom MAC address check box and enter a MAC address for the network interfacecard as required.
8. Click OK.
The new network interface is listed in the Network Interfaces tab in the details view of the virtualmachine. The Link State is set to Up by default when the network interface card is defined on thevirtual machine and connected to the network.
For more details on the fields in the New Network Interface window, see Section A.3, “Explanation ofSettings in the New Network Interface and Edit Network Interface Windows”.
5.2.2. Editing a Network Interface
In order to change any network settings, you must edit the network interface. This procedure can beperformed on virtual machines that are running, but some actions can be performed only on virtualmachines that are not running.
Red Hat Virtualization 4.3 Virtual Machine Management Guide
52
Editing Network Interfaces
1. Click Compute → Virtual Machines.
2. Click a virtual machine name to go to the details view.
3. Click the Network Interfaces tab and select the network interface to edit.
4. Click Edit.
5. Change settings as required. You can specify the Name, Profile, Type, and Custom MACaddress. See Section 5.2.1, “Adding a New Network Interface” .
6. Click OK.
5.2.3. Hot Plugging a Network Interface
You can hot plug network interfaces. Hot plugging means enabling and disabling devices while a virtualmachine is running.
NOTE
The guest operating system must support hot plugging network interfaces.
Hot Plugging Network Interfaces
1. Click Compute → Virtual Machines and select a virtual machine.
2. Click the virtual machine’s name to go to the details view.
3. Click the Network Interfaces tab and select the network interface to hot plug.
4. Click Edit.
5. Set the Card Status to Plugged to enable the network interface, or set it to Unplugged todisable the network interface.
6. Click OK.
5.2.4. Removing a Network Interface
Removing Network Interfaces
1. Click Compute → Virtual Machines.
2. Click a virtual machine name to go to the details view.
3. Click the Network Interfaces tab and select the network interface to remove.
4. Click Remove.
5. Click OK.
5.2.5. Blacklisting Network Interfaces
You can configure the ovirt-guest-agent on a virtual machine to ignore certain NICs. This prevents IP
CHAPTER 5. EDITING VIRTUAL MACHINES
53
You can configure the ovirt-guest-agent on a virtual machine to ignore certain NICs. This prevents IPaddresses associated with network interfaces created by certain software from appearing in reports.You must specify the name and number of the network interface you want to blacklist (for example, eth0, docker0).
IMPORTANT
You must blacklist NICs on the virtual machine before the guest agent is started for thefirst time.
Blacklisting Network Interfaces
1. In the /etc/ovirt-guest-agent.conf configuration file on the virtual machine, insert the followingline, with the NICs to be ignored separated by spaces:
ignored_nics = first_NIC_to_ignore second_NIC_to_ignore
2. Start the agent:
# systemctl start ovirt-guest-agent
NOTE
Some virtual machine operating systems automatically start the guest agent duringinstallation.
If your virtual machine’s operating system automatically starts the guest agent or if youneed to configure the blacklist on many virtual machines, use the configured virtualmachine as a template for creating additional virtual machines. See Section 7.2, “Creatinga Template” for details.
5.3. VIRTUAL DISKS
5.3.1. Adding a New Virtual Disk
You can add multiple virtual disks to a virtual machine.
Image is the default type of disk. You can also add a Direct LUN disk or a Cinder (OpenStack Volume)disk. Image disk creation is managed entirely by the Manager. Direct LUN disks require externallyprepared targets that already exist. Cinder disks require access to an instance of OpenStack Volumethat has been added to the Red Hat Virtualization environment using the External Providers window;see Adding an OpenStack Volume (Cinder) Instance for Storage Management for more information.Existing disks are either floating disks or shareable disks attached to virtual machines.
Adding Disks to Virtual Machines
1. Click Compute → Virtual Machines.
2. Click a virtual machine name to go to the details view.
3. Click the Disks tab.
4. Click New.
Red Hat Virtualization 4.3 Virtual Machine Management Guide
54
5. Use the appropriate radio buttons to switch between Image, Direct LUN, or Cinder.
6. Enter a Size(GB), Alias, and Description for the new disk.
7. Use the drop-down lists and check boxes to configure the disk. See Section A.4, “Explanation ofSettings in the New Virtual Disk and Edit Virtual Disk Windows” for more details on the fields forall disk types.
8. Click OK.
The new disk appears in the details view after a short time.
5.3.2. Attaching an Existing Disk to a Virtual Machine
Floating disks are disks that are not associated with any virtual machine.
Floating disks can minimize the amount of time required to set up virtual machines. Designating afloating disk as storage for a virtual machine makes it unnecessary to wait for disk preallocation at thetime of a virtual machine’s creation.
Floating disks can be attached to a single virtual machine, or to multiple virtual machines if the disk isshareable. Each virtual machine that uses the shared disk can use a different disk interface type.
Once a floating disk is attached to a virtual machine, the virtual machine can access it.
Attaching Virtual Disks to Virtual Machines
1. Click Compute → Virtual Machines.
2. Click a virtual machine name to go to the details view.
3. Click the Disks tab.
4. Click Attach.
5. Select one or more virtual disks from the list of available disks and select the required interfacefrom the Interface drop-down.
6. Click OK.
NOTE
No Quota resources are consumed by attaching virtual disks to, or detaching virtual disksfrom, virtual machines.
5.3.3. Extending the Available Size of a Virtual Disk
You can extend the available size of a virtual disk while the virtual disk is attached to a virtual machine.Resizing a virtual disk does not resize the underlying partitions or file systems on that virtual disk. Usethe fdisk utility to resize the partitions and file systems as required. See How to Resize a Partition usingfdisk for more information.
Extending the Available Size of Virtual Disks
1. Click Compute → Virtual Machines.
CHAPTER 5. EDITING VIRTUAL MACHINES
55
2. Click a virtual machine name to go to the details view.
3. Click the Disks tab and select the disk to edit.
4. Click Edit.
5. Enter a value in the Extend size by(GB) field.
6. Click OK.
The target disk’s status becomes locked for a short time, during which the drive is resized. When theresizing of the drive is complete, the status of the drive becomes OK.
5.3.4. Hot Plugging a Virtual Disk
You can hot plug virtual disks. Hot plugging means enabling or disabling devices while a virtual machineis running.
NOTE
The guest operating system must support hot plugging virtual disks.
Hot Plugging Virtual Disks
1. Click Compute → Virtual Machines.
2. Click a virtual machine name to go to the details view.
3. Click the Disks tab and select the virtual disk to hot plug.
4. Click More Actions ( ), then click Activate to enable the disk, or Deactivate to disable thedisk.
5. Click OK.
5.3.5. Removing a Virtual Disk from a Virtual Machine
Removing Virtual Disks From Virtual Machines
1. Click Compute → Virtual Machines.
2. Click a virtual machine name to go to the details view.
3. Click the Disks tab and select the virtual disk to remove.
4. Click More Actions ( ), then click Deactivate.
5. Click OK.
6. Click Remove.
7. Optionally, select the Remove Permanently check box to completely remove the virtual diskfrom the environment. If you do not select this option - for example, because the disk is a shareddisk - the virtual disk will remain in Storage → Disks.
Red Hat Virtualization 4.3 Virtual Machine Management Guide
56
8. Click OK.
If the disk was created as block storage, for example iSCSI, and the Wipe After Delete check box wasselected when creating the disk, you can view the log file on the host to confirm that the data has beenwiped after permanently removing the disk. See Settings to Wipe Virtual Disks After Deletion in theAdministration Guide.
If the disk was created as block storage, for example iSCSI, and the Discard After Delete check boxwas selected on the storage domain before the disk was removed, a blkdiscard command is called onthe logical volume when it is removed and the underlying storage is notified that the blocks are free. SeeSetting Discard After Delete for a Storage Domain in the Administration Guide. A blkdiscard is alsocalled on the logical volume when a virtual disk is removed if the virtual disk is attached to at least onevirtual machine with the Enable Discard check box selected.
5.3.6. Importing a Disk Image from an Imported Storage Domain
You can import floating virtual disks from an imported storage domain.
This procedure requires access to the Administration Portal.
NOTE
Only QEMU-compatible disks can be imported into the Manager.
Importing a Disk Image
1. Click Storage → Domains.
2. Click an imported storage domain to go to the details view.
3. Click Disk Import.
4. Select one or more disk images and click Import to open the Import Disk(s) window.
5. Select the appropriate Disk Profile for each disk.
6. Click OK to import the selected disks.
5.3.7. Importing an Unregistered Disk Image from an Imported Storage Domain
You can import floating virtual disks from a storage domain. Floating disks created outside of a Red HatVirtualization environment are not registered with the Manager. Scan the storage domain to identifyunregistered floating disks to be imported.
This procedure requires access to the Administration Portal.
NOTE
Only QEMU-compatible disks can be imported into the Manager.
Importing a Disk Image
1. Click Storage → Domains.
CHAPTER 5. EDITING VIRTUAL MACHINES
57
2. Click More Actions ( ), then click Scan Disks so that the Manager can identify unregistereddisks.
3. Select an unregistered disk name and click Disk Import.
4. Select one or more disk images and click Import to open the Import Disk(s) window.
5. Select the appropriate Disk Profile for each disk.
6. Click OK to import the selected disks.
5.4. VIRTUAL MEMORY
5.4.1. Hot Plugging Virtual Memory
You can hot plug virtual memory. Hot plugging means enabling or disabling devices while a virtualmachine is running. Each time memory is hot plugged, it appears as a new memory device in the VmDevices tab in the details view of the virtual machine, up to a maximum of 16 available slots. When thevirtual machine is restarted, these devices are cleared from the Vm Devices tab without reducing thevirtual machine’s memory, allowing you to hot plug more memory devices. If the hot plug fails (forexample, if there are no more available slots), the memory increase will be applied when the virtualmachine is restarted.
IMPORTANT
This feature is currently not supported for the self-hosted engine Manager virtualmachine.
Hot Plugging Virtual Memory
1. Click Compute → Virtual Machines and select a running virtual machine.
2. Click Edit.
3. Click the System tab.
4. Increase the Memory Size by entering the total amount required. Memory can be added inmultiples of 256 MB. By default, the maximum memory allowed for the virtual machine is set to4x the memory size specified. Though the value is changed in the user interface, the maximum
value is not hot plugged, and you will see the pending changes icon ( ). To avoid that, youcan change the maximum memory back to the original value.
5. Click OK.This action opens the Pending Virtual Machine changes window, as some values such asmaxMemorySizeMb and minAllocatedMem will not change until the virtual machine isrestarted. However, the hot plug action is triggered by the change to the Memory Size value,which can be applied immediately.
6. Click OK.
The virtual machine’s Defined Memory is updated in the General tab in the details view. You can seethe newly added memory device in the Vm Devices tab in the details view.
5.4.2. Hot Unplugging Virtual Memory
Red Hat Virtualization 4.3 Virtual Machine Management Guide
58
You can hot unplug virtual memory. Hot unplugging means disabling devices while a virtual machine isrunning.
IMPORTANT
Only memory added with hot plugging can be hot unplugged.
The virtual machine operating system must support memory hot unplugging.
The virtual machines must not have a memory balloon device enabled. Thisfeature is disabled by default.
All blocks of the hot-plugged memory must be set to online_movable in thevirtual machine’s device management rules. In virtual machines running up-to-date versions of Red Hat Enterprise Linux or CoreOS, this rule is set by default.For information on device management rules, consult the documentation for thevirtual machine’s operating system.
If any of these conditions are not met, the memory hot unplug action may fail or causeunexpected behavior.
Hot Unplugging Virtual Memory
1. Click Compute → Virtual Machines and select a running virtual machine.
2. Click the Vm Devices tab.
3. In the Hot Unplug column, click Hot Unplug beside the memory device to be removed.
4. Click OK in the Memory Hot Unplug window.
The Physical Memory Guaranteed value for the virtual machine is decremented automatically ifnecessary.
5.5. HOT PLUGGING VCPUS
You can hot plug vCPUs. Hot plugging means enabling or disabling devices while a virtual machine isrunning.
IMPORTANT
Hot unplugging a vCPU is only supported if the vCPU was previously hot plugged. Avirtual machine’s vCPUs cannot be hot unplugged to less vCPUs than it was originallycreated with.
The following prerequisites apply:
The virtual machine’s Operating System must be explicitly set in the New Virtual Machine orEdit Virtual Machine window.
The virtual machine’s operating system must support CPU hot plug. See the table below forsupport details.
Windows virtual machines must have the guest agents installed. See Section 3.3.2, “Installingthe Guest Agents, Tools, and Drivers on Windows”.
CHAPTER 5. EDITING VIRTUAL MACHINES
59
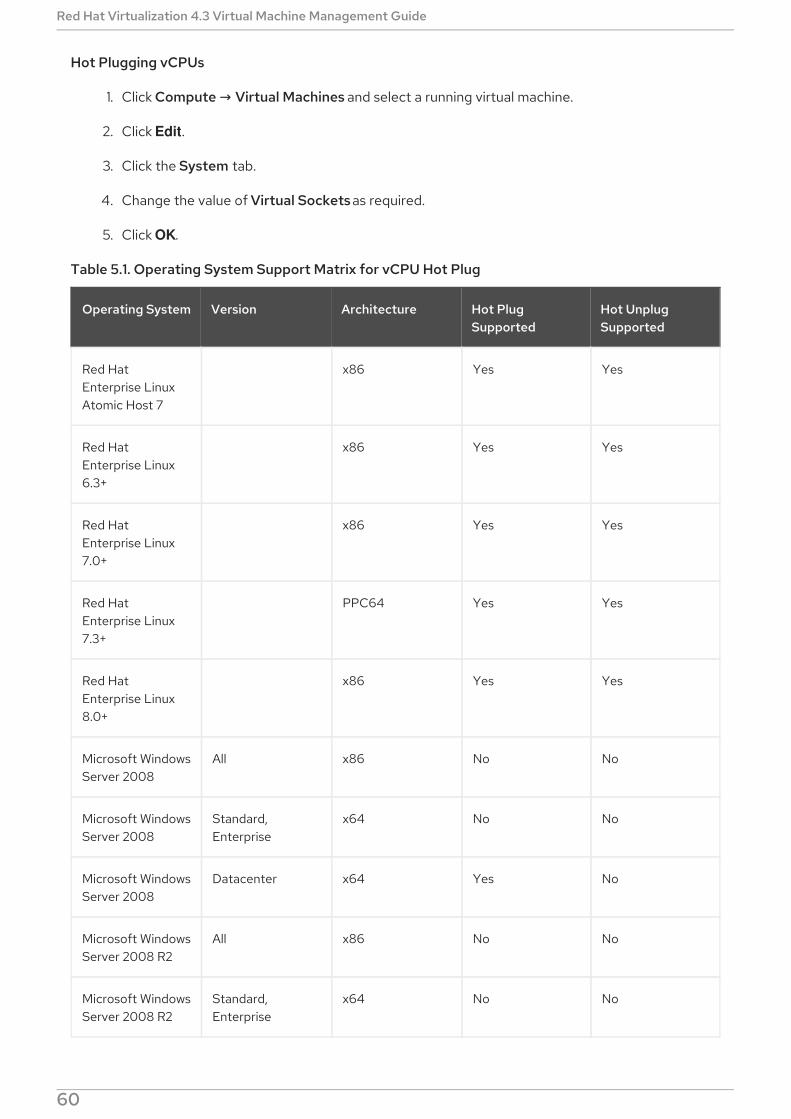
Hot Plugging vCPUs
1. Click Compute → Virtual Machines and select a running virtual machine.
2. Click Edit.
3. Click the System tab.
4. Change the value of Virtual Sockets as required.
5. Click OK.
Table 5.1. Operating System Support Matrix for vCPU Hot Plug
Operating System Version Architecture Hot PlugSupported
Hot UnplugSupported
Red HatEnterprise LinuxAtomic Host 7
x86 Yes Yes
Red HatEnterprise Linux6.3+
x86 Yes Yes
Red HatEnterprise Linux7.0+
x86 Yes Yes
Red HatEnterprise Linux7.3+
PPC64 Yes Yes
Red HatEnterprise Linux8.0+
x86 Yes Yes
Microsoft WindowsServer 2008
All x86 No No
Microsoft WindowsServer 2008
Standard,Enterprise
x64 No No
Microsoft WindowsServer 2008
Datacenter x64 Yes No
Microsoft WindowsServer 2008 R2
All x86 No No
Microsoft WindowsServer 2008 R2
Standard,Enterprise
x64 No No
Red Hat Virtualization 4.3 Virtual Machine Management Guide
60
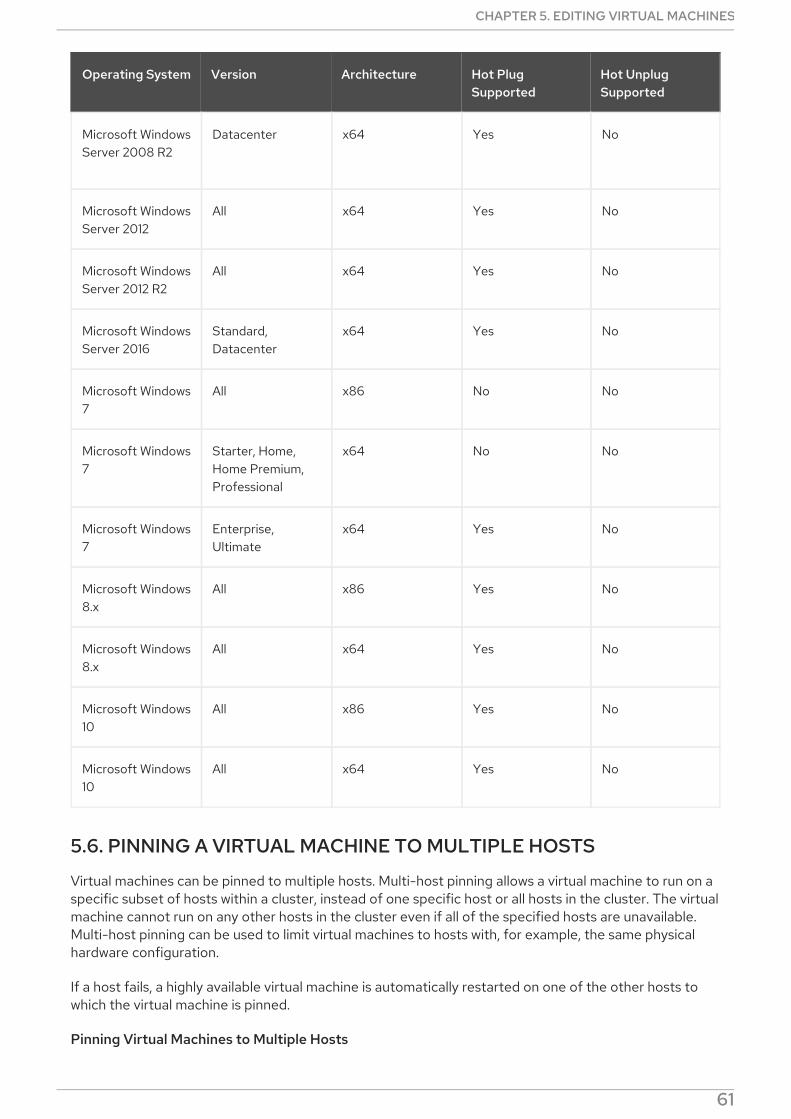
Microsoft WindowsServer 2008 R2
Datacenter x64 Yes No
Microsoft WindowsServer 2012
All x64 Yes No
Microsoft WindowsServer 2012 R2
All x64 Yes No
Microsoft WindowsServer 2016
Standard,Datacenter
x64 Yes No
Microsoft Windows7
All x86 No No
Microsoft Windows7
Starter, Home,Home Premium,Professional
x64 No No
Microsoft Windows7
Enterprise,Ultimate
x64 Yes No
Microsoft Windows8.x
All x86 Yes No
Microsoft Windows8.x
All x64 Yes No
Microsoft Windows10
All x86 Yes No
Microsoft Windows10
All x64 Yes No
Operating System Version Architecture Hot PlugSupported
Hot UnplugSupported
5.6. PINNING A VIRTUAL MACHINE TO MULTIPLE HOSTS
Virtual machines can be pinned to multiple hosts. Multi-host pinning allows a virtual machine to run on aspecific subset of hosts within a cluster, instead of one specific host or all hosts in the cluster. The virtualmachine cannot run on any other hosts in the cluster even if all of the specified hosts are unavailable.Multi-host pinning can be used to limit virtual machines to hosts with, for example, the same physicalhardware configuration.
If a host fails, a highly available virtual machine is automatically restarted on one of the other hosts towhich the virtual machine is pinned.
Pinning Virtual Machines to Multiple Hosts
CHAPTER 5. EDITING VIRTUAL MACHINES
61
1. Click Compute → Virtual Machines and select a virtual machine.
2. Click Edit.
3. Click the Host tab.
4. Select the Specific Host(s) radio button under Start Running On and select two or more hostsfrom the list.
5. Click the High Availability tab.
6. Select the Highly Available check box.
7. Select Low, Medium, or High from the Priority drop-down list. When migration is triggered, aqueue is created in which the high priority virtual machines are migrated first. If a cluster isrunning low on resources, only the high priority virtual machines are migrated.
8. Click OK.
5.7. VIEWING VIRTUAL MACHINES PINNED TO A HOST
You can view virtual machines pinned to a host even while the virtual machines are offline. Use thePinned to Host list to see which virtual machines will be affected and which virtual machines will requirea manual restart after the host becomes active again.
Viewing Virtual Machines Pinned to a Host
1. Click Compute → Hosts.
2. Click a host name to go to the details view.
3. Click the Virtual Machines tab.
4. Click Pinned to Host.
5.8. CHANGING THE CD FOR A VIRTUAL MACHINE
You can change the CD accessible to a virtual machine while that virtual machine is running, using ISOimages that have been uploaded to the data domain of the virtual machine’s cluster. See UploadingImages to a Data Storage Domain in the Administration Guide for details.
Changing the CD for a Virtual Machine
1. Click Compute → Virtual Machines and select a running virtual machine.
2. Click More Actions ( ), then click Change CD.
3. Select an option from the drop-down list:
Select an ISO file from the list to eject the CD currently accessible to the virtual machineand mount that ISO file as a CD.
Select [Eject] from the list to eject the CD currently accessible to the virtual machine.
4. Click OK.
Red Hat Virtualization 4.3 Virtual Machine Management Guide
62
5.9. SMART CARD AUTHENTICATION
Smart cards are an external hardware security feature, most commonly seen in credit cards, but alsoused by many businesses as authentication tokens. Smart cards can be used to protect Red HatVirtualization virtual machines.
Enabling Smart Cards
1. Ensure that the smart card hardware is plugged into the client machine and is installedaccording to manufacturer’s directions.
2. Click Compute → Virtual Machines and select a virtual machine.
3. Click Edit.
4. Click the Console tab and select the Smartcard enabled check box.
5. Click OK.
6. Connect to the running virtual machine by clicking the Console button. Smart cardauthentication is now passed from the client hardware to the virtual machine.
IMPORTANT
Important
If the Smart card hardware is not correctly installed, enabling the Smart card feature willresult in the virtual machine failing to load properly.
Disabling Smart Cards
1. Click Compute → Virtual Machines and select a virtual machine.
2. Click Edit.
3. Click the Console tab, and clear the Smartcard enabled check box.
4. Click OK.
Configuring Client Systems for Smart Card Sharing
1. Smart cards may require certain libraries in order to access their certificates. These librariesmust be visible to the NSS library, which spice-gtk uses to provide the smart card to the guest.NSS expects the libraries to provide the PKCS #11 interface.
2. Make sure that the module architecture matches `spice-gtk/remote-viewer’s architecture. Forinstance, if you have only the 32b PKCS #11 library available, you must install the 32b build ofvirt-viewer in order for smart cards to work.
Configuring RHEL Clients with CoolKey Smart Card Middleware
CoolKey Smart Card middleware is a part of Red Hat Enterprise Linux. Install the Smart card supportgroup. If the Smart Card Support group is installed on a Red Hat Enterprise Linux system, smart cardsare redirected to the guest when Smart Cards are enabled. The following command installs the Smart card support group:
CHAPTER 5. EDITING VIRTUAL MACHINES
63
# yum groupinstall "Smart card support"
Configuring RHEL Clients with Other Smart Card Middleware
Register the library in the system’s NSS database. Run the following command as root:
# modutil -dbdir /etc/pki/nssdb -add "module name" -libfile /path/to/library.so
Configuring Windows Clients
Red Hat does not provide PKCS #11 support to Windows clients. Libraries that provide PKCS #11 supportmust be obtained from third parties. When such libraries are obtained, register them by running thefollowing command as a user with elevated privileges:
modutil -dbdir %PROGRAMDATA%\pki\nssdb -add "module name" -libfile C:_\Path\to\module_.dll
Red Hat Virtualization 4.3 Virtual Machine Management Guide
64
CHAPTER 6. ADMINISTRATIVE TASKS
6.1. SHUTTING DOWN A VIRTUAL MACHINE
You can turn off a virtual machine using Shutdown or Power Off. Shutdown gracefully shuts down avirtual machine. Power Off executes a hard shutdown. A graceful shutdown is usually preferable to ahard shutdown.
NOTE
If an exclamation point appears next to the virtual machine, a snapshot deletion processhas failed, and you may not be able to restart the machine after shutting it down. Try todelete the snapshot again and ensure that the explanation mark disappears beforeshutting down the virtual machine. See Section 6.9.4, “Deleting a Snapshot” for moreinformation.
Procedure
1. Click Compute → Virtual Machines and select a running virtual machine.
2. Click Shutdown.
3. Optionally in the Administration Portal, enter a Reason for shutting down the virtual machine inthe Shut down Virtual Machine(s) confirmation window. This allows you to provide anexplanation for the shutdown, which will appear in the logs and when the virtual machine ispowered on again.
NOTE
The virtual machine shutdown Reason field will only appear if it has been enabledin the cluster settings. For more information, see Explanation of Settings andControls in the New Cluster and Edit Cluster Windows in the AdministrationGuide.
4. Click OK in the Shut down Virtual Machine(s) confirmation window.
If the virtual machine gracefully shuts down, the Status of the virtual machine changes to Down. If thevirtual machine does not gracefully shut down, click the down arrow next to Shutdown and then click Power Off to execute a hard shutdown.
6.2. SUSPENDING A VIRTUAL MACHINE
Suspending a virtual machine is equal to placing that virtual machine into Hibernate mode.
Suspending a Virtual Machine
1. Click Compute → Virtual Machines and select a running virtual machine.
2. Click Suspend.
The Status of the virtual machine changes to Suspended.
6.3. REBOOTING A VIRTUAL MACHINE
CHAPTER 6. ADMINISTRATIVE TASKS
65
Rebooting a Virtual Machine
1. Click Compute → Virtual Machines and select a running virtual machine.
2. Click Reboot.
3. Click OK in the Reboot Virtual Machine(s) confirmation window.
The Status of the virtual machine changes to Reboot In Progress before returning to Up.
6.4. REMOVING A VIRTUAL MACHINE
IMPORTANT
The Remove button is disabled while virtual machines are running; you must shut down avirtual machine before you can remove it.
Removing Virtual Machines
1. Click Compute → Virtual Machines and select the virtual machine to remove.
2. Click Remove.
3. Optionally, select the Remove Disk(s) check box to remove the virtual disks attached to thevirtual machine together with the virtual machine. If the Remove Disk(s) check box is cleared,then the virtual disks remain in the environment as floating disks.
4. Click OK.
6.5. CLONING A VIRTUAL MACHINE
You can clone virtual machines without having to create a template or a snapshot first.
IMPORTANT
The Clone VM button is disabled while virtual machines are running; you must shut downa virtual machine before you can clone it.
Cloning Virtual Machines
1. Click Compute → Virtual Machines and select the virtual machine to clone.
2. Click More Actions ( ), then click Clone VM.
3. Enter a Clone Name for the new virtual machine.
4. Click OK.
6.6. UPDATING VIRTUAL MACHINE GUEST AGENTS AND DRIVERS
The Red Hat Virtualization guest agents, tools, and drivers provide additional functionality for virtualmachines, such as gracefully shutting down or rebooting virtual machines from the VM Portal andAdministration Portal. The tools and agents also provide information for virtual machines, including:
Red Hat Virtualization 4.3 Virtual Machine Management Guide
66
Resource usage
IP addresses
Installed applications
The guest tools are distributed as an ISO file that you can attach to virtual machines. This ISO file ispackaged as an RPM file that you can install and update from the Manager machine.
6.6.1. Updating the Guest Agents and Drivers on Red Hat Enterprise Linux
Update the guest agents and drivers on your Red Hat Enterprise Linux virtual machines to use the latestversion.
Updating the Guest Agents and Drivers on Red Hat Enterprise Linux
1. Log in to the Red Hat Enterprise Linux virtual machine.
2. Update the ovirt-guest-agent-common package:
# yum update ovirt-guest-agent-common
3. Restart the service:
For Red Hat Enterprise Linux 6
# service ovirt-guest-agent restart
For Red Hat Enterprise Linux 7
# systemctl restart ovirt-guest-agent.service
6.6.2. Updating the Guest Agents and Drivers on Windows
Updating the Guest Agents, Tools, and Drivers on Windows
1. On the Red Hat Virtualization Manager machine, update the Red Hat Virtualization Guest Toolspackage to the latest version:
# yum update -y rhv-guest-tools-iso*
The ISO file is located in /usr/share/rhv-guest-tools-iso/RHV-toolsSetup_version.iso on theManager machine.
2. If the APT service is enabled on virtual machines, the updated ISO files are automaticallyattached. Otherwise, upload RHV-toolsSetup_version.iso to a data domain. See UploadingImages to a Data Storage Domain in the Administration Guide for details.
3. In the Administration or VM Portal, if the virtual machine is running, use the Change CD drop-down list to attach the RHV-toolsSetup_version.iso file to each of your virtual machines. If thevirtual machine is powered off, click the Run Once button and attach the ISO as a CD.
4. Log in to the virtual machine.
5. Select the CD Drive containing the RHV-toolsSetup_version.iso file.
CHAPTER 6. ADMINISTRATIVE TASKS
67
6. Double-click RHEV-toolsSetup.exe.
7. Click Next at the welcome screen.
8. Follow the prompts on the RHEV-Tools InstallShield Wizard window. Ensure all check boxes inthe list of components are selected.
9. Once installation is complete, select Yes, I want to restart my computer now and click Finishto apply the changes.
6.7. VIEWING RED HAT SATELLITE ERRATA FOR A VIRTUAL MACHINE
Errata for each virtual machine can be viewed after the Red Hat Virtualization virtual machine has beenconfigured to receive errata information from the Red Hat Satellite server.
For more information on configuring a virtual machine to display available errata see Section 4.8,“Configuring Red Hat Satellite Errata Management for a Virtual Machine”
Viewing Red Hat Satellite Errata
1. Click Compute → Virtual Machines.
2. Click the virtual machine’s name to go to the details view.
3. Click Errata.
6.8. VIRTUAL MACHINES AND PERMISSIONS
6.8.1. Managing System Permissions for a Virtual Machine
As the SuperUser, the system administrator manages all aspects of the Administration Portal. Morespecific administrative roles can be assigned to other users. These restricted administrator roles areuseful for granting a user administrative privileges that limit them to a specific resource. For example, aDataCenterAdmin role has administrator privileges only for the assigned data center with the exceptionof the storage for that data center, and a ClusterAdmin has administrator privileges only for theassigned cluster.
A UserVmManager is a system administration role for virtual machines in a data center. This role can beapplied to specific virtual machines, to a data center, or to the whole virtualized environment; this isuseful to allow different users to manage certain virtual resources.
The user virtual machine administrator role permits the following actions:
Create, edit, and remove virtual machines.
Run, suspend, shutdown, and stop virtual machines.
NOTE
You can only assign roles and permissions to existing users.
Many end users are concerned solely with the virtual machine resources of the virtualized environment.As a result, Red Hat Virtualization provides several user roles which enable the user to manage virtualmachines specifically, but not other resources in the data center.
Red Hat Virtualization 4.3 Virtual Machine Management Guide
68
6.8.2. Virtual Machine Administrator Roles Explained
The table below describes the administrator roles and privileges applicable to virtual machineadministration.
Table 6.1. Red Hat Virtualization System Administrator Roles
Role Privileges Notes
DataCenterAdmin Data Center Administrator Possesses administrativepermissions for all objectsunderneath a specific data centerexcept for storage.
ClusterAdmin Cluster Administrator Possesses administrativepermissions for all objectsunderneath a specific cluster.
NetworkAdmin Network Administrator Possesses administrativepermissions for all operations on aspecific logical network. Canconfigure and manage networksattached to virtual machines. Toconfigure port mirroring on avirtual machine network, apply theNetworkAdmin role on thenetwork and theUserVmManager role on thevirtual machine.
6.8.3. Virtual Machine User Roles Explained
The table below describes the user roles and privileges applicable to virtual machine users. These rolesallow access to the VM Portal for managing and accessing virtual machines, but they do not confer anypermissions for the Administration Portal.
Table 6.2. Red Hat Virtualization System User Roles
Role Privileges Notes
UserRole Can access and use virtualmachines and pools.
Can log in to the VM Portal anduse virtual machines and pools.
CHAPTER 6. ADMINISTRATIVE TASKS
69
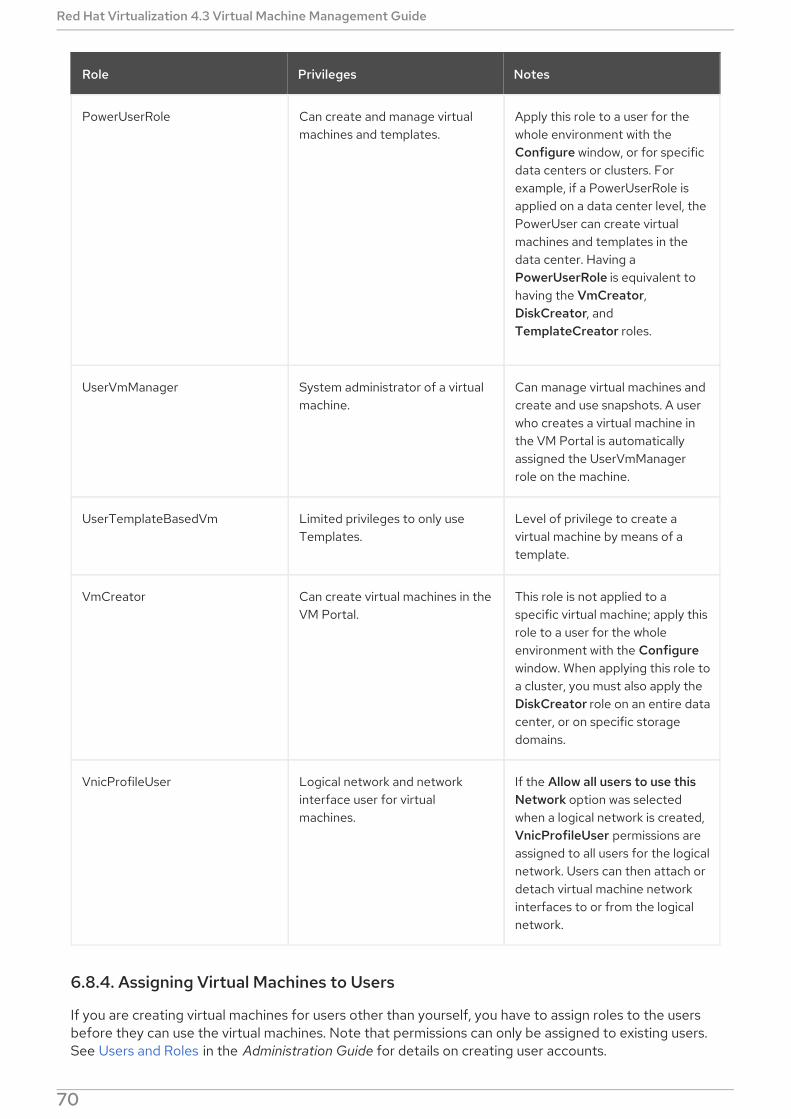
PowerUserRole Can create and manage virtualmachines and templates.
Apply this role to a user for thewhole environment with theConfigure window, or for specificdata centers or clusters. Forexample, if a PowerUserRole isapplied on a data center level, thePowerUser can create virtualmachines and templates in thedata center. Having aPowerUserRole is equivalent tohaving the VmCreator,DiskCreator, andTemplateCreator roles.
UserVmManager System administrator of a virtualmachine.
Can manage virtual machines andcreate and use snapshots. A userwho creates a virtual machine inthe VM Portal is automaticallyassigned the UserVmManagerrole on the machine.
UserTemplateBasedVm Limited privileges to only useTemplates.
Level of privilege to create avirtual machine by means of atemplate.
VmCreator Can create virtual machines in theVM Portal.
This role is not applied to aspecific virtual machine; apply thisrole to a user for the wholeenvironment with the Configurewindow. When applying this role toa cluster, you must also apply theDiskCreator role on an entire datacenter, or on specific storagedomains.
VnicProfileUser Logical network and networkinterface user for virtualmachines.
If the Allow all users to use thisNetwork option was selectedwhen a logical network is created,VnicProfileUser permissions areassigned to all users for the logicalnetwork. Users can then attach ordetach virtual machine networkinterfaces to or from the logicalnetwork.
Role Privileges Notes
6.8.4. Assigning Virtual Machines to Users
If you are creating virtual machines for users other than yourself, you have to assign roles to the usersbefore they can use the virtual machines. Note that permissions can only be assigned to existing users.See Users and Roles in the Administration Guide for details on creating user accounts.
Red Hat Virtualization 4.3 Virtual Machine Management Guide
70
The VM Portal supports three default roles: User, PowerUser and UserVmManager. However,customized roles can be configured via the Administration Portal. The default roles are described below.
A User can connect to and use virtual machines. This role is suitable for desktop end usersperforming day-to-day tasks.
A PowerUser can create virtual machines and view virtual resources. This role is suitable if youare an administrator or manager who needs to provide virtual resources for your employees.
A UserVmManager can edit and remove virtual machines, assign user permissions, usesnapshots and use templates. It is suitable if you need to make configuration changes to yourvirtual environment.
When you create a virtual machine, you automatically inherit UserVmManager privileges. This enablesyou to make changes to the virtual machine and assign permissions to the users you manage, or userswho are in your Identity Management (IdM) or RHDS group. See the Administration Guide for moreinformation.
Assigning Permissions to Users
1. Click Compute → Virtual Machines and select a virtual machine.
2. Click the virtual machine’s name to go to the details view.
3. Click the Permissions tab.
4. Click Add.
5. Enter a name, or user name, or part thereof in the Search text box, and click Go. A list ofpossible matches display in the results list.
6. Select the check box of the user to be assigned the permissions.
7. Select UserRole from the Role to Assign drop-down list.
8. Click OK.
The user’s name and role display in the list of users permitted to access this virtual machine.
NOTE
If a user is assigned permissions to only one virtual machine, single sign-on (SSO) can beconfigured for the virtual machine. With single sign-on enabled, when a user logs in to theVM Portal, and then connects to a virtual machine through, for example, a SPICE console,users are automatically logged in to the virtual machine and do not need to type in theuser name and password again. Single sign-on can be enabled or disabled on a per virtualmachine basis. See Section 4.2, “Configuring Single Sign-On for Virtual Machines” formore information on how to enable and disable single sign-on for virtual machines.
6.8.5. Removing Access to Virtual Machines from Users
Removing Access to Virtual Machines from Users
1. Click Compute → Virtual Machines.
2. Click the virtual machine’s name to go to the details view.
CHAPTER 6. ADMINISTRATIVE TASKS
71
3. Click Permissions.
4. Click Remove. A warning message displays, asking you to confirm removal of the selectedpermissions.
5. To proceed, click OK. To abort, click Cancel.
6.9. SNAPSHOTS
6.9.1. Creating a Snapshot of a Virtual Machine
A snapshot is a view of a virtual machine’s operating system and applications on any or all available disksat a given point in time. Take a snapshot of a virtual machine before you make a change to it that mayhave unintended consequences. You can use a snapshot to return a virtual machine to a previous state.
Creating a Snapshot of a Virtual Machine
1. Click Compute → Virtual Machines.
2. Click a virtual machine’s name to go to the details view.
3. Click the Snapshots tab and click Create.
4. Enter a description for the snapshot.
5. Select Disks to include using the check boxes.
NOTE
If no disks are selected, a partial snapshot of the virtual machine, without a disk, iscreated. You can preview this snapshot to view the configuration of the virtualmachine. Note that committing a partial snapshot will result in a virtual machinewithout a disk.
6. Select Save Memory to include a running virtual machine’s memory in the snapshot.
7. Click OK.
The virtual machine’s operating system and applications on the selected disk(s) are stored in a snapshotthat can be previewed or restored. The snapshot is created with a status of Locked, which changes to Ok. When you click on the snapshot, its details are shown on the General, Disks, Network Interfaces,and Installed Applications drop-down views in the Snapshots tab.
6.9.2. Using a Snapshot to Restore a Virtual Machine
A snapshot can be used to restore a virtual machine to its previous state.
Using Snapshots to Restore Virtual Machines
1. Click Compute → Virtual Machines and select a virtual machine.
2. Click the virtual machine’s name to go to the details view.
3. Click the Snapshots tab to list the available snapshots.
Red Hat Virtualization 4.3 Virtual Machine Management Guide
72
4. Select a snapshot to restore in the upper pane. The snapshot details display in the lower pane.
5. Click the Preview drop-down menu button and select Custom.
6. Use the check boxes to select the VM Configuration, Memory, and disk(s) you want to restore,then click OK. This allows you to create and restore from a customized snapshot using theconfiguration and disk(s) from multiple snapshots.The status of the snapshot changes to Preview Mode. The status of the virtual machine brieflychanges to Image Locked before returning to Down.
7. Shut down the virtual machine.
8. Start the virtual machine; it runs using the disk image of the snapshot.
9. Click Commit to permanently restore the virtual machine to the condition of the snapshot. Anysubsequent snapshots are erased.Alternatively, click the Undo button to deactivate the snapshot and return the virtual machineto its previous state.
6.9.3. Creating a Virtual Machine from a Snapshot
You can use a snapshot to create another virtual machine.
Creating a Virtual Machine from a Snapshot
1. Click Compute → Virtual Machines and select a virtual machine.
2. Click the virtual machine’s name to go to the details view.
3. Click the Snapshots tab to list the available snapshots.
4. Select a snapshot in the list displayed and click Clone.
5. Enter the Name of the virtual machine.
6. Click OK.
After a short time, the cloned virtual machine appears in the Virtual Machines tab in the navigationpane with a status of Image Locked. The virtual machine remains in this state until Red HatVirtualization completes the creation of the virtual machine. A virtual machine with a preallocated 20 GBhard drive takes about fifteen minutes to create. Sparsely-allocated virtual disks take less time to createthan do preallocated virtual disks.
When the virtual machine is ready to use, its status changes from Image Locked to Down in Compute→ Virtual Machines.
6.9.4. Deleting a Snapshot
You can delete a virtual machine snapshot and permanently remove it from your Red Hat Virtualizationenvironment. This operation is only supported on a running virtual machine.
IMPORTANT
CHAPTER 6. ADMINISTRATIVE TASKS
73
IMPORTANT
When you delete a snapshot from an image chain, there must be enough free space in thestorage domain to temporarily accommodate both the original volume and the newlymerged volume. Otherwise, snapshot deletion will fail and you will need to export and re-import the volume to remove snapshots. This is due to the data from the two volumesbeing merged in the resized volume and the resized volume growing to accommodate thetotal size of the two merged images.
If the snapshot being deleted is contained in a base image, the volumesubsequent to the volume containing the snapshot being deleted is extended toinclude the base volume.
If the snapshot being deleted is contained in a QCOW2 (thin provisioned), non-base image hosted on internal storage, the successor volume is extended toinclude the volume containing the snapshot being deleted.
Deleting a Snapshot
1. Click Compute → Virtual Machines.
2. Click the virtual machine’s name to go to the details view.
3. Click the Snapshots tab to list the snapshots for that virtual machine.
4. Select the snapshot to delete.
5. Click Delete.
6. Click OK.
NOTE
If the deletion fails, fix the underlying problem (for example, a failed host, an inaccessiblestorage device, or even a temporary network issue) and try again.
6.10. HOST DEVICES
6.10.1. Adding a Host Device to a Virtual Machine
Virtual machines can be directly attached to the host devices for improved performance if a compatiblehost has been configured for direct device assignment. Host devices are devices that are physicallyplugged into the host, including SCSI (for example tapes, disks, changers), PCI (for example NICs,GPUs, and HBAs), and USB (for example mice, cameras, and disks).
Adding Host Devices to a Virtual Machine
1. Click Compute → Virtual Machines.
2. Click a virtual machine’s name to go to the details view.
3. Click the Host Devices tab to list the host devices already attached to this virtual machine.A virtual machine can only have devices attached from the same host. If a virtual machine hasattached devices from one host, and you attach a device from another host, the attacheddevices from the previous host will be automatically removed.
Red Hat Virtualization 4.3 Virtual Machine Management Guide
74

Attaching host devices to a virtual machine requires the virtual machine to be in a Down state. Ifthe virtual machine is running, the changes will not take effect until after the virtual machine hasbeen shut down.
4. Click Add device to open the Add Host Devices window.
5. Use the Pinned Host drop-down menu to select a host.
6. Use the Capability drop-down menu to list the pci, scsi, or usb_device host devices.
7. Select the check boxes of the devices to attach to the virtual machine from the Available HostDevices pane and click the directional arrow button to transfer these devices to the HostDevices to be attached pane, creating a list of the devices to attach to the virtual machine.
8. When you have transferred all desired host devices to the Host Devices to be attached pane,click OK to attach these devices to the virtual machine and close the window.
These host devices will be attached to the virtual machine when the virtual machine is next powered on.
6.10.2. Removing Host Devices from a Virtual Machine
If you are removing all host devices directly attached to the virtual machine in order to add devices froma different host, you can instead add the devices from the desired host, which will automatically removeall of the devices already attached to the virtual machine.
Procedure
1. Click Compute → Virtual Machines.
2. Select a virtual machine to go to the details view.
3. Click the Host Devices tab to list the host devices attached to the virtual machine.
4. Select the host device to detach from the virtual machine, or hold Ctrl to select multipledevices, and click Remove device to open the Remove Host Device(s) window.
5. Click OK to confirm and detach these devices from the virtual machine.
6.10.3. Pinning a Virtual Machine to Another Host
You can use the Host Devices tab in the details view of a virtual machine to pin it to a specific host.
If the virtual machine has any host devices attached to it, pinning it to another host automaticallyremoves the host devices from the virtual machine.
Pinning a Virtual Machine to a Host
1. Click a virtual machine name and click the Host Devices tab.
2. Click Pin to another host to open the Pin VM to Host window.
3. Use the Host drop-down menu to select a host.
4. Click OK to pin the virtual machine to the selected host.
6.11. AFFINITY GROUPS
CHAPTER 6. ADMINISTRATIVE TASKS
75
Affinity groups help you determine where selected virtual machines run in relation to each other andspecified hosts. This capability helps manage workload scenarios such as licensing requirements, high-availability workloads, and disaster recovery.
The VM Affinity Rule
When you create an affinity group, you select the virtual machines that belong to the group. To definewhere these virtual machines can run in relation to each other , you enable a VM Affinity Rule: A positiverule tries to run the virtual machines together on a single host; a negative affinity rule tries to run thevirtual machines apart on separate hosts. If the rule cannot be fulfilled, the outcome depends onwhether the weight or filter module is enabled.
The Host Affinity Rule
Optionally, you can add hosts to the affinity group. To define where virtual machines in the group can runin relation to hosts in the group, you enable a Host Affinity Rule: A positive rule tries to run the virtualmachines on hosts in the affinity group; a negative affinity rule tries to run the virtual machines on hoststhat are not in the affinity group. If the rule cannot be fulfilled, the outcome depends on whether theweight or filter module is enabled.
The Default Weight Module
By default, both rules apply the weight module in the cluster’s scheduling policy. With the weightmodule, the scheduler attempts to fulfill a rule, but allows the virtual machines in the affinity group torun anyway if the rule cannot be fulfilled.
For example, with a positive VM Affinity Rule and the weight module enabled, the scheduler tries to runall of the affinity group’s virtual machines on a single host. However, if a single host does not havesufficient resources for this, the scheduler runs the virtual machines on multiple hosts.
For this module to work, the weight module section of the scheduling policies must contain the VmAffinityGroups and VmToHostsAffinityGroups keywords.
The Enforcing Option and Filter Module
Both rules have an Enforcing option which applies the filter module in the cluster’s scheduling policy.The filter module overrides the weight module. With the filter module enabled, the scheduler requiresthat a rule be fulfilled. If a rule cannot be fulfilled, the filter module prevents the virtual machines in theaffinity group from running.
For example, with a positive Host Affinity Rule and Enforcing enabled (the filter module enabled), thescheduler requires the affinity group’s virtual machines to run on hosts that are part of the affinitygroup. However, if those hosts are down, the scheduler does not run the virtual machines at all.
For this module to work, the filter module section of the scheduling policies must contain the VmAffinityGroups and VmToHostsAffinityGroups keywords.
Examples
To see how these rules and options can be used with one another, see Section 6.11.4, “Affinity GroupsExamples”.
Red Hat Virtualization 4.3 Virtual Machine Management Guide
76
WARNING
An affinity label is functionally the same as an affinity group with a positiveHost Affinity Rule and Enforcing enabled.
For affinity labels to work, the filter module section of the schedulingpolicies must contain Label.
If an affinity group and affinity label conflict with each other, the affectedvirtual machines do not run. To help prevent, troubleshoot, and resolveconflicts, see Section 6.11.5, “Affinity Groups Troubleshooting”.
IMPORTANT
Each rule is affected by the weight and filter modules in the cluster’s scheduling policy.
For the VM Affinity Rule rule to work, the scheduling policy must have the VmAffinityGroups keyword in its Weight module and Filter module sections.
For the Host Affinity Rule to work, the scheduling policy must have the VmToHostsAffinityGroups keyword in its Weight module and Filter modulesections.
For more information, see Scheduling Policies in the Administration Guide.
NOTE
Affinity groups apply to virtual machines on the cluster level. Moving a virtualmachine from one cluster to another removes it from the affinity groups in theoriginal cluster.
Virtual machines do not have to restart for the affinity group rules to take effect.
6.11.1. Creating an Affinity Group
You can create new affinity groups in the Administration Portal.
Creating Affinity Groups
1. Click Compute → Virtual Machines and select a virtual machine.
2. Click the virtual machine’s name to go to the details view.
3. Click the Affinity Groups tab.
4. Click New.
5. Enter a Name and Description for the affinity group.
6. From the VM Affinity Rule drop-down, select Positive to apply positive affinity or Negative toapply negative affinity. Select Disable to disable the affinity rule.
CHAPTER 6. ADMINISTRATIVE TASKS
77
7. Select the Enforcing check box to apply hard enforcement, or ensure this check box is clearedto apply soft enforcement.
8. Use the drop-down list to select the virtual machines to be added to the affinity group. Use the+ and - buttons to add or remove additional virtual machines.
9. Click OK.
6.11.2. Editing an Affinity Group
Editing Affinity Groups
1. Click Compute → Virtual Machines and select a virtual machine.
2. Click the virtual machine’s name to go to the details view.
3. Click the Affinity Groups tab.
4. Click Edit.
5. Change the VM Affinity Rule drop-down and Enforcing check box to the preferred values anduse the + and - buttons to add or remove virtual machines to or from the affinity group.
6. Click OK.
6.11.3. Removing an Affinity Group
Removing Affinity Groups
1. Click Compute → Virtual Machines and select a virtual machine.
2. Click the virtual machine’s name to go to the details view.
3. Click the Affinity Groups tab.
4. Click Remove.
5. Click OK.
The affinity policy that applied to the virtual machines that were members of that affinity group nolonger applies.
6.11.4. Affinity Groups Examples
The following examples illustrate how to apply affinity rules for various scenarios, using the differentfeatures of the affinity group capability described in this chapter.
Example 6.1. High Availability
Dalia is the DevOps engineer for a startup. For high availability, a particular system’s two virtualmachines should run on separate hosts anywhere in the cluster.
Dalia creates an affinity group named "high availability" and does the following:
Adds the two virtual machines, VM01 and VM02, to the affinity group.
Red Hat Virtualization 4.3 Virtual Machine Management Guide
78
Sets VM Affinity to Negative so the virtual machines try to run on separate hosts.
Leaves Enforcing unchecked (disabled) so both virtual machines can continue running incase only one host is available during an outage.
Leaves the Hosts list empty so the virtual machines run on any host in the cluster.
Example 6.2. Performance
Sohni is a software developer who uses two virtual machines to build and test his software manytimes each day. There is heavy network traffic between these two virtual machines. Running themachines on the same host reduces both network traffic and the effects of network latency on thebuild and test process. Using high-specification hosts (faster CPUs, SSDs, and more memory)further accelerates this process.
Sohni creates an affinity group called "build and test" and does the following:
Adds VM01 and VM02, the build and test virtual machines, to the affinity group.
Adds the high-specification hosts, host03, host04, and host05, to the affinity group.
Sets VM affinity to Positive so the virtual machines try to run on the same host, reducingnetwork traffic and latency effects.
Sets Host affinity to Positive so the virtual machines try to run on the high specificationhosts, accelerating the process.
Leaves Enforcing unchecked (disabled) for both rules so the virtual machines can run if thehigh-specification hosts are not available.
Example 6.3. Licensing
Bandile, a software asset manager, helps his organization comply with the restrictive licensingrequirements of a 3D imaging software vendor. These terms require the virtual machines for itslicensing server, VM-LS, and imaging workstations, VM-WS#, to run on the same host. Additionally,the physical CPU-based licensing model requires that the workstations run on either of two GPU-equipped hosts, host-gpu-primary or host-gpu-backup .
To meet these requirements, Bandile creates an affinity group called "3D seismic imaging" and doesthe following:
Adds the previously mentioned virtual machines and hosts to the affinity group.
Sets VM affinity to Positive and selects Enforcing so the licensing server and workstationsmust run together on one of the hosts, not on multiple hosts.
Sets Host affinity to Positive and selects Enforcing so the virtual machines must run oneither of the GPU-equipped the hosts, not other hosts in the cluster.
6.11.5. Affinity Groups Troubleshooting
To help prevent problems with affinity groups
CHAPTER 6. ADMINISTRATIVE TASKS
79
Plan and document the scenarios and outcomes you expect when using affinity groups.
Verify and test the outcomes under a range of conditions.
Follow change management best practices.
Only use the Enforcing option if it is required.
If you observe problems with virtual machines not running
Verify that the cluster has a scheduling policy whose weight module and filter module sectionscontain VmAffinityGroups and VmToHostsAffinityGroups. For more information, seeExplanation of Settings in the New Scheduling Policy and Edit Scheduling Policy Window in theAdministration Guide.
Check for conflicts between affinity labels and affinity groups.
For possible conflicts between affinity labels and affinity groups
Understand that an affinity label is the equivalent of an affinity group with a Host affinity rulethat is Positive and has Enforcing enabled.
Understand that if an affinity label and affinity group conflict with each other, the intersectingset of virtual machines do not run.
Determine whether a conflict is possible:
Inspect the filter module section of the cluster’s scheduling policies. These must containboth a Label keyword and a VmAffinityGroups OR VmToHostsAffinityGroups keyword.Otherwise, a conflict is not possible. (The presence of VmAffinityGroups and VmToHostsAffinityGroups in the weight module section does not matter because Labelin a filter module section would override them.)
Inspect the affinity groups. They must contain a rule that has Enforcing enabled. Otherwise,a conflict is not possible.
If a conflict is possible, identify the set of virtual machines that might be involved:
Inspect the affinity labels and groups. Make a list of virtual machines that are members ofboth an affinity label and an affinity group with an Enforcing option enabled.
For each host and virtual machine in this intersecting set, analyze the conditions under whicha potential conflict occurs.
Determine whether the actual non-running virtual machines match the ones in the analysis.
Finally, restructure the affinity groups and affinity labels to help avoid unintended conflicts.
Verify that any changes produce the expected results under a range of conditions.
If you have overlapping affinity groups and affinity labels, it can be easier to view them in oneplace as affinity groups. Consider converting an affinity label into an equivalent affinity group,which has a Host affinity rule with Positive selected and Enforcing enabled.
6.12. AFFINITY LABELS
Red Hat Virtualization 4.3 Virtual Machine Management Guide
80
You can create and modify affinity labels in the Administration Portal.
Affinity labels are used to set hard (Enforced) positive affinity between virtual machines and hosts. Seethe Affinity Groups section for more information about affinity hardness and polarity.
Labels function identically to a hard positive affinity group, but simplify configuration in certain usecases. For example, if you have virtual machines that require specific host hardware, you can use affinitylabels to ensure that those virtual machines run on the required hosts. If you use software that islicense-limited to a certain number of physical machines, you can use affinity labels to ensure that virtualmachines running that software are limited to the required physical hosts.
WARNING
Affinity labels are a subset of affinity groups and can conflict with them. If there is aconflict, the virtual machine will not start.
6.12.1. Creating an Affinity Label
You can create affinity labels from the details view of a virtual machine, host, or cluster. This procedureuses the cluster details view.
Creating an Affinity Label
1. Click Compute → Clusters and select the appropriate cluster.
2. Click the cluster’s name to go to the details view.
3. Click the Affinity Labels tab.
4. Click New.
5. Enter a Name for the affinity label.
6. Use the drop-down lists to select the virtual machines and hosts to be associated with the label.Use the + button to add additional virtual machines and hosts.
7. Click OK.
6.12.2. Editing an Affinity Label
You can edit affinity labels from the details view of a virtual machine, host, or cluster. This procedureuses the cluster details view.
Editing an Affinity Label
1. Click Compute → Clusters and select the appropriate cluster.
2. Click the cluster’s name to go to the details view.
3. Click the Affinity Labels tab.
4. Select the label you want to edit.
CHAPTER 6. ADMINISTRATIVE TASKS
81
5. Click Edit.
6. Use the + and - buttons to add or remove virtual machines and hosts to or from the affinitylabel.
7. Click OK.
6.12.3. Removing an Affinity Label
You can remove affinity labels only from the details view of a cluster.
Removing an Affinity Label
1. Click Compute → Clusters and select the appropriate cluster.
2. Click the cluster’s name to go to the details view.
3. Click the Affinity Labels tab.
4. Select the label you want to remove.
5. Click Edit.
6. Use the - buttons to remove all virtual machines and hosts from the label.
7. Click OK.
8. Click Delete.
9. Click OK.
6.13. EXPORTING AND IMPORTING VIRTUAL MACHINES ANDTEMPLATES
NOTE
The export storage domain is deprecated. Storage data domains can be unattached froma data center and imported to another data center in the same environment, or in adifferent environment. Virtual machines, floating virtual disks, and templates can then beuploaded from the imported storage domain to the attached data center. See theImporting Existing Storage Domains section in the Red Hat Virtualization AdministrationGuide for information on importing storage domains.
You can export virtual machines and templates from, and import them to, data centers in the same ordifferent Red Hat Virtualization environment. You can export or import virtual machines by using anexport domain, a data domain, or by using a Red Hat Virtualization host.
When you export or import a virtual machine or template, properties including basic details such as thename and description, resource allocation, and high availability settings of that virtual machine ortemplate are preserved.
The permissions and user roles of virtual machines and templates are included in the OVF files, so thatwhen a storage domain is detached from one data center and attached to another, the virtual machinesand templates can be imported with their original permissions and user roles. In order for permissions to
Red Hat Virtualization 4.3 Virtual Machine Management Guide
82
be registered successfully, the users and roles related to the permissions of the virtual machines ortemplates must exist in the data center before the registration process.
You can also use the V2V feature to import virtual machines from other virtualization providers, such asRHEL 5 Xen or VMware, or import Windows virtual machines. V2V converts virtual machines so that theycan be hosted by Red Hat Virtualization. For more information on installing and using V2V, seeConverting Virtual Machines from Other Hypervisors to KVM with virt-v2v .
IMPORTANT
Virtual machines must be shut down before being exported or imported.
6.13.1. Exporting a Virtual Machine to the Export Domain
Export a virtual machine to the export domain so that it can be imported into a different data center.Before you begin, the export domain must be attached to the data center that contains the virtualmachine to be exported.
WARNING
The virtual machine must be shut down before being exported.
Exporting a Virtual Machine to the Export Domain
1. Click Compute → Virtual Machines and select a virtual machine.
2. Click More Actions ( ), then click Export to Export Domain.
3. Optionally, select the following check boxes in the Export Virtual Machine window:
Force Override: overrides existing images of the virtual machine on the export domain.
Collapse Snapshots: creates a single export volume per disk. This option removes snapshotrestore points and includes the template in a template-based virtual machine, and removesany dependencies a virtual machine has on a template. For a virtual machine that isdependent on a template, either select this option, export the template with the virtualmachine, or make sure the template exists in the destination data center.
NOTE
CHAPTER 6. ADMINISTRATIVE TASKS
83
NOTE
When you create a virtual machine from a template by clicking Compute →Templates and clicking New VM, you wll see two storage allocation optionsin the Storage Allocation section in the Resource Allocation tab:
If Clone is selected, the virtual machine is not dependent on thetemplate. The template does not have to exist in the destination datacenter.
If Thin is selected, the virtual machine is dependent on the template, sothe template must exist in the destination data center or be exportedwith the virtual machine. Alternatively, select the Collapse Snapshotscheck box to collapse the template disk and virtual disk into a single disk.
To check which option was selected, click a virtual machine’s name and clickthe General tab in the details view.
4. Click OK.
The export of the virtual machine begins. The virtual machine displays in Compute → Virtual Machineswith an Image Locked status while it is exported. Depending on the size of your virtual machine harddisk images, and your storage hardware, this can take up to an hour. Click the Events tab to viewprogress. When complete, the virtual machine has been exported to the export domain and displays inthe VM Import tab of the export domain’s details view.
6.13.2. Exporting a Virtual Machine to a Data Domain
You can export a virtual machine to a data domain to do any of the following:
Migrate the virtual machine or its clone to another data center.
Store a clone of the virtual machine as a backup.
WARNING
You cannot export a running virtual machine. Shut down the virtual machine beforeexporting it.
Prerequisite
The data domain is attached to a data center.
Procedure
1. Click Compute → Virtual Machines and select a virtual machine.
2. Click the Disks tab.
3. Select all disks belonging to the virtual machine.
Red Hat Virtualization 4.3 Virtual Machine Management Guide
84
4. Click More Actions ( ), then click Move.
5. Under Target, select the domain.
6. Click OK.
The disks migrate to the new domain.
NOTE
When you move a disk from one type of data domain another, the disk format changesaccordingly. For example, if the disk is on an NFS data domain, and it is in sparse format,then if you move the disk to an iSCSI domain its format changes to preallocated. This isdifferent from using an export domain, because an export domain is NFS.
6.13.3. Importing a Virtual Machine from the Export Domain
You have a virtual machine on an export domain. Before the virtual machine can be imported to a newdata center, the export domain must be attached to the destination data center.
Importing a Virtual Machine into the Destination Data Center
1. Click Storage → Domains and select the export domain. The export domain must have a statusof Active.
2. Click the export domain’s name to go to the details view.
3. Click the VM Import tab to list the available virtual machines to import.
4. Select one or more virtual machines to import and click Import.
5. Select the Target Cluster.
6. Select the Collapse Snapshots check box to remove snapshot restore points and includetemplates in template-based virtual machines.
7. Click the virtual machine to be imported and click on the Disks sub-tab. From this tab, you canuse the Allocation Policy and Storage Domain drop-down lists to select whether the disk usedby the virtual machine will be thinly provisioned or preallocated, and can also select the storagedomain on which the disk will be stored. An icon is also displayed to indicate which of the disks tobe imported acts as the boot disk for that virtual machine.
8. Click OK to import the virtual machines.The Import Virtual Machine Conflict window opens if the virtual machine exists in thevirtualized environment.
Choose one of the following radio buttons:
Don’t import
Import as cloned and enter a unique name for the virtual machine in the New Name field.
9. Optionally select the Apply to all check box to import all duplicated virtual machines with thesame suffix, and then enter a suffix in the Suffix to add to the cloned VMs field.
10. Click OK.
CHAPTER 6. ADMINISTRATIVE TASKS
85
IMPORTANT
During a single import operation, you can only import virtual machines that share thesame architecture. If any of the virtual machines to be imported have a differentarchitecture to that of the other virtual machines to be imported, a warning will displayand you will be prompted to change your selection so that only virtual machines with thesame architecture will be imported.
6.13.4. Importing a Virtual Machine from a VMware Provider
Import virtual machines from a VMware vCenter provider to your Red Hat Virtualization environment.You can import from a VMware provider by entering its details in the Import Virtual Machine(s) windowduring each import operation, or you can add the VMware provider as an external provider, and selectthe preconfigured provider during import operations. To add an external provider, see Adding a VMwareInstance as a Virtual Machine Provider.
Red Hat Virtualization uses V2V to import VMware virtual machines. For OVA files, the only disk formatRed Hat Virtualization supports is VMDK.
The virt-v2v package must be installed on at least one host (referred to in this procedure as the proxyhost). The virt-v2v package is available by default on Red Hat Virtualization Hosts (RHVH) and isinstalled on Red Hat Enterprise Linux hosts as a dependency of VDSM when added to the Red HatVirtualization environment. Red Hat Enterprise Linux hosts must be Red Hat Enterprise Linux 7.2 or later.
NOTE
The virt-v2v package is not available on the ppc64le architecture and these hosts cannotbe used as proxy hosts.
WARNING
The virtual machine must be shut down before being imported. Starting the virtualmachine through VMware during the import process can result in data corruption.
IMPORTANT
An import operation can only include virtual machines that share the same architecture. Ifany virtual machine to be imported has a different architecture, a warning will display andyou will be prompted to change your selection to include only virtual machines with thesame architecture.
NOTE
If the import fails, refer to the relevant log file in /var/log/vdsm/import/ and to/var/log/vdsm/vdsm.log on the proxy host for details.
Importing a Virtual Machine from VMware
1. Click Compute → Virtual Machines.
Red Hat Virtualization 4.3 Virtual Machine Management Guide
86
2. Click More Actions ( ), then click Import to open the Import Virtual Machine(s) window.
3. Select VMware from the Source list.
4. If you have configured a VMware provider as an external provider, select it from the ExternalProvider list. Verify that the provider credentials are correct. If you did not specify a destinationdata center or proxy host when configuring the external provider, select those options now.
5. If you have not configured a VMware provider, or want to import from a new VMware provider,provide the following details:
a. Select from the list the Data Center in which the virtual machine will be available.
b. Enter the IP address or fully qualified domain name of the VMware vCenter instance in thevCenter field.
c. Enter the IP address or fully qualified domain name of the host from which the virtualmachines will be imported in the ESXi field.
d. Enter the name of the data center and the cluster in which the specified ESXi host resides inthe Data Center field.
e. If you have exchanged the SSL certificate between the ESXi host and the Manager, leaveVerify server’s SSL certificate checked to verify the ESXi host’s certificate. If not, uncheckthe option.
f. Enter the Username and Password for the VMware vCenter instance. The user must haveaccess to the VMware data center and ESXi host on which the virtual machines reside.
g. Select a host in the chosen data center with virt-v2v installed to serve as the Proxy Hostduring virtual machine import operations. This host must also be able to connect to thenetwork of the VMware vCenter external provider.
6. Click Load to list the virtual machines on the VMware provider that can be imported.
7. Select one or more virtual machines from the Virtual Machines on Source list, and use thearrows to move them to the Virtual Machines to Import list. Click Next.
NOTE
If a virtual machine’s network device uses the driver type e1000 or rtl8139, thevirtual machine will use the same driver type after it has been imported to RedHat Virtualization.
If required, you can change the driver type to VirtIO manually after the import.To change the driver type after a virtual machine has been imported, seeSection 5.2.2, “Editing a Network Interface” . If the network device uses drivertypes other than e1000 or rtl8139, the driver type is changed to VirtIOautomatically during the import. The Attach VirtIO-drivers option allows theVirtIO drivers to be injected to the imported virtual machine files so that whenthe driver is changed to VirtIO, the device will be properly detected by theoperating system.
8. Select the Cluster in which the virtual machines will reside.
9. Select a CPU Profile for the virtual machines.
CHAPTER 6. ADMINISTRATIVE TASKS
87
10. Select the Collapse Snapshots check box to remove snapshot restore points and includetemplates in template-based virtual machines.
11. Select the Clone check box to change the virtual machine name and MAC addresses, and cloneall disks, removing all snapshots. If a virtual machine appears with a warning symbol beside itsname or has a tick in the VM in System column, you must clone the virtual machine and changeits name.
12. Click on each virtual machine to be imported and click on the Disks sub-tab. Use the AllocationPolicy and Storage Domain lists to select whether the disk used by the virtual machine will bethinly provisioned or preallocated, and select the storage domain on which the disk will bestored. An icon is also displayed to indicate which of the disks to be imported acts as the bootdisk for that virtual machine.
13. If you selected the Clone check box, change the name of the virtual machine in the Generalsub-tab.
14. Click OK to import the virtual machines.
The CPU type of the virtual machine must be the same as the CPU type of the cluster into which it isbeing imported. To view the cluster’s CPU Type in the Administration Portal:
1. Click Compute → Clusters.
2. Select a cluster.
3. Click Edit.
4. Click the General tab.
If the CPU type of the virtual machine is different, configure the imported virtual machine’s CPU type:
1. Click Compute → Virtual Machines.
2. Select the virtual machine.
3. Click Edit.
4. Click the System tab.
5. Click the Advanced Parameters arrow.
6. Specify the Custom CPU Type and click OK.
6.13.5. Exporting a Virtual Machine to a Host
You can export a virtual machine to a specific path or mounted NFS shared storage on a host in the RedHat Virtualization data center. The export will produce an Open Virtual Appliance (OVA) package.
WARNING
The virtual machine must be shut down before being exported.
Red Hat Virtualization 4.3 Virtual Machine Management Guide
88

Exporting a Virtual Machine to a Host
1. Click Compute → Virtual Machines and select a virtual machine.
2. Click More Actions ( ), then click Export to OVA.
3. Select the host from the Host drop-down list.
4. Enter the absolute path to the export directory in the Directory field, including the trailing slash.For example: /images2/ova/
5. Optionally change the default name of the file in the Name field.
6. Click OK
The status of the export can be viewed in the Events tab.
6.13.6. Importing a Virtual Machine from a Host
Import an Open Virtual Appliance (OVA) file into your Red Hat Virtualization environment. You canimport the file from any Red Hat Virtualization Host in the data center.
IMPORTANT
Currently, only Red Hat Virtualization and VMware OVAs can be imported. KVM and Xenare not supported.
The import process uses virt-v2v. Only virtual machines running operating systemscompatible with virt-v2v can be successfully imported. For a current list of compatibleoperating systems, see https://access.redhat.com/articles/1351473.
Importing an OVA File
1. Copy the OVA file to a host in your cluster, in a file system location such as var/tmp.
NOTE
The location can be a local directory or a remote nfs mount, as long as it hassufficient space and is accessible to the qemu user (UID 36).
2. Ensure that the OVA file has permissions allowing read/write access to the qemu user (UID 36)and the kvm group (GID 36):
# chown 36:36 path_to_OVA_file/file.OVA
3. Click Compute → Virtual Machines.
4. Click More Actions ( ), then click Import to open the Import Virtual Machine(s) window.
a. Select Virtual Appliance (OVA) from the Source list.
b. Select a host from the Host list.
c. In the Path field, specify the absolute path of the OVA file.
CHAPTER 6. ADMINISTRATIVE TASKS
89
d. Click Load to list the virtual machine to be imported.
e. Select the virtual machine from the Virtual Machines on Source list, and use the arrows tomove it to the Virtual Machines to Import list.
5. Click Next.
a. Select the Storage Domain for the virtual machine.
b. Select the Target Cluster where the virtual machines will reside.
c. Select the CPU Profile for the virtual machines.
d. Select the Allocation Policy for the virtual machines.
e. Optionally, select the Attach VirtIO-Drivers check box and select the appropriate imageon the list to add VirtIO drivers.
f. Select the Allocation Policy for the virtual machines.
g. Select the virtual machine, and on the General tab select the Operating System.
h. On the Network Interfaces tab, select the Network Name and Profile Name.
i. Click the Disks tab to view the Alias, Virtual Size, and Actual Size of the virtual machine.
6. Click OK to import the virtual machines.
6.13.7. Importing a Virtual Machine from a RHEL 5 Xen Host
Import virtual machines from Xen on Red Hat Enterprise Linux 5 to your Red Hat Virtualizationenvironment. Red Hat Virtualization uses V2V to import QCOW2 or raw virtual machine disk formats.
The virt-v2v package must be installed on at least one host (referred to in this procedure as the proxyhost). The virt-v2v package is available by default on Red Hat Virtualization Hosts (RHVH) and isinstalled on Red Hat Enterprise Linux hosts as a dependency of VDSM when added to the Red HatVirtualization environment. Red Hat Enterprise Linux hosts must be Red Hat Enterprise Linux 7.2 or later.
WARNING
If you are importing a Windows virtual machine from a RHEL 5 Xen host and you areusing VirtIO devices, install the VirtIO drivers before importing the virtual machine.If the drivers are not installed, the virtual machine may not boot after import.
The VirtIO drivers can be installed from the virtio-win.iso or the RHV-toolsSetup_version.iso. See Section 3.3.2, “Installing the Guest Agents, Tools, andDrivers on Windows” for details.
If you are not using VirtIO drivers, review the configuration of the virutal machinebefore first boot to ensure that VirtIO devices are not being used.
NOTE
Red Hat Virtualization 4.3 Virtual Machine Management Guide
90
NOTE
The virt-v2v package is not available on the ppc64le architecture and these hosts cannotbe used as proxy hosts.
IMPORTANT
An import operation can only include virtual machines that share the same architecture. Ifany virtual machine to be imported has a different architecture, a warning will display andyou will be prompted to change your selection to include only virtual machines with thesame architecture.
NOTE
If the import fails, refer to the relevant log file in /var/log/vdsm/import/ and to/var/log/vdsm/vdsm.log on the proxy host for details.
Importing a Virtual Machine from RHEL 5 Xen
1. Shut down the virtual machine. Starting the virtual machine through Xen during the importprocess can result in data corruption.
2. Enable public key authentication between the proxy host and the RHEL 5 Xen host:
a. Log in to the proxy host and generate SSH keys for the vdsm user.
# sudo -u vdsm ssh-keygen
b. Copy the vdsm user’s public key to the RHEL 5 Xen host.
# sudo -u vdsm ssh-copy-id [email protected]
c. Log in to the RHEL 5 Xen host to verify that the login works correctly.
# sudo -u vdsm ssh [email protected]
3. Log in to the Administration Portal.
4. Click Compute → Virtual Machines.
5. Click More Actions ( ), then click Import to open the Import Virtual Machine(s) window.
6. Select the Data Center that contains the proxy host.
7. Select XEN (via RHEL) from the Source drop-down list.
8. Optionally, select a RHEL 5 Xen External Provider from the drop-down list. The URI will be pre-filled with the correct URI. See Adding a RHEL 5 Xen Host as a Virtual Machine Provider in theAdministration Guide for more information.
9. Enter the URI of the RHEL 5 Xen host. The required format is pre-filled; you must replace <hostname> with the host name of the RHEL 5 Xen host.
10. Select the proxy host from the Proxy Host drop-down list.
CHAPTER 6. ADMINISTRATIVE TASKS
91
11. Click Load to list the virtual machines on the RHEL 5 Xen host that can be imported.
12. Select one or more virtual machines from the Virtual Machines on Source list, and use thearrows to move them to the Virtual Machines to Import list.
NOTE
Due to current limitations, Xen virtual machines with block devices do not appearin the Virtual Machines on Source list. They must be imported manually. SeeImporting a Block-Based Virtual Machine from a RHEL 5 Xen Host .
13. Click Next.
14. Select the Cluster in which the virtual machines will reside.
15. Select a CPU Profile for the virtual machines.
16. Use the Allocation Policy and Storage Domain lists to select whether the disk used by thevirtual machine will be thinly provisioned or preallocated, and select the storage domain onwhich the disk will be stored.
NOTE
The target storage domain must be a file-based domain. Due to currentlimitations, specifying a block-based domain causes the V2V operation to fail.
17. If a virtual machine appears with a warning symbol beside its name, or has a tick in the VM inSystem column, select the Clone check box to clone the virtual machine.
NOTE
Cloning a virtual machine changes its name and MAC addresses and clones all ofits disks, removing all snapshots.
18. Click OK to import the virtual machines.
The CPU type of the virtual machine must be the same as the CPU type of the cluster into which it isbeing imported. To view the cluster’s CPU Type in the Administration Portal:
1. Click Compute → Clusters.
2. Select a cluster.
3. Click Edit.
4. Click the General tab.
If the CPU type of the virtual machine is different, configure the imported virtual machine’s CPU type:
1. Click Compute → Virtual Machines.
2. Select the virtual machine.
3. Click Edit.
Red Hat Virtualization 4.3 Virtual Machine Management Guide
92
4. Click the System tab.
5. Click the Advanced Parameters arrow.
6. Specify the Custom CPU Type and click OK.
Importing a Block-Based Virtual Machine from a RHEL 5 Xen Host
1. Enable public key authentication between the proxy host and the RHEL 5 Xen host:
a. Log in to the proxy host and generate SSH keys for the vdsm user.
# sudo -u vdsm ssh-keygen
b. Copy the vdsm user’s public key to the RHEL 5 Xen host.
# sudo -u vdsm ssh-copy-id [email protected]
c. Log in to the RHEL 5 Xen host to verify that the login works correctly.
# sudo -u vdsm ssh [email protected]
2. Attach an export domain. See Attaching an Existing Export Domain to a Data Center in theAdministration Guide for details.
3. On the proxy host, copy the virtual machine from the RHEL 5 Xen host:
# virt-v2v-copy-to-local -ic xen+ssh://[email protected] vmname
4. Convert the virtual machine to libvirt XML and move the file to your export domain:
# virt-v2v -i libvirtxml vmname.xml -o rhev -of raw -os storage.example.com:/exportdomain
5. In the Administration Portal, click Storage → Domains, click the export domain’s name, and clickthe VM Import tab in the details view to verify that the virtual machine is in your export domain.
6. Import the virtual machine into the destination data domain. See Section 6.13.3, “Importing aVirtual Machine from the Export Domain” for details.
6.13.8. Importing a Virtual Machine from a KVM Host
Import virtual machines from KVM to your Red Hat Virtualization environment. Red Hat Virtualizationconverts KVM virtual machines to the correct format before they are imported. You must enable publickey authentication between the KVM host and at least one host in the destination data center (this hostis referred to in the following procedure as the proxy host).
CHAPTER 6. ADMINISTRATIVE TASKS
93

WARNING
The virtual machine must be shut down before being imported. Starting the virtualmachine through KVM during the import process can result in data corruption.
IMPORTANT
An import operation can only include virtual machines that share the same architecture. Ifany virtual machine to be imported has a different architecture, a warning will display andyou will be prompted to change your selection to include only virtual machines with thesame architecture.
NOTE
If the import fails, refer to the relevant log file in /var/log/vdsm/import/ and to/var/log/vdsm/vdsm.log on the proxy host for details.
Importing a Virtual Machine from KVM
1. Enable public key authentication between the proxy host and the KVM host:
a. Log in to the proxy host and generate SSH keys for the vdsm user.
# sudo -u vdsm ssh-keygen
b. Copy the vdsm user’s public key to the KVM host. The proxy host’s known_hosts file willalso be updated to include the host key of the KVM host.
# sudo -u vdsm ssh-copy-id [email protected]
c. Log in to the KVM host to verify that the login works correctly.
# sudo -u vdsm ssh [email protected]
2. Log in to the Administration Portal.
3. Click Compute → Virtual Machines.
4. Click More Actions ( ), then click Import to open the Import Virtual Machine(s) window.
5. Select the Data Center that contains the proxy host.
6. Select KVM (via Libvirt) from the Source drop-down list.
7. Optionally, select a KVM provider External Provider from the drop-down list. The URI will bepre-filled with the correct URI. See Adding a KVM Host as a Virtual Machine Provider in theAdministration Guide for more information.
8. Enter the URI of the KVM host in the following format:
Red Hat Virtualization 4.3 Virtual Machine Management Guide
94
qemu+ssh://[email protected]/system
9. Keep the Requires Authentication check box selected.
10. Enter root in the Username field.
11. Enter the Password of the KVM host’s root user.
12. Select the Proxy Host from the drop-down list.
13. Click Load to list the virtual machines on the KVM host that can be imported.
14. Select one or more virtual machines from the Virtual Machines on Source list, and use thearrows to move them to the Virtual Machines to Import list.
15. Click Next.
16. Select the Cluster in which the virtual machines will reside.
17. Select a CPU Profile for the virtual machines.
18. Optionally, select the Collapse Snapshots check box to remove snapshot restore points andinclude templates in template-based virtual machines.
19. Optionally, select the Clone check box to change the virtual machine name and MACaddresses, and clone all disks, removing all snapshots. If a virtual machine appears with a warningsymbol beside its name or has a tick in the VM in System column, you must clone the virtualmachine and change its name.
20. Click on each virtual machine to be imported and click on the Disks sub-tab. Use the AllocationPolicy and Storage Domain lists to select whether the disk used by the virtual machine will bethin provisioned or preallocated, and select the storage domain on which the disk will be stored.An icon is also displayed to indicate which of the disks to be imported acts as the boot disk forthat virtual machine. See Virtual Disk Storage Allocation Policies in the Technical Reference formore information.
NOTE
The target storage domain must be a file-based domain. Due to currentlimitations, specifying a block-based domain causes the operation to fail.
21. If you selected the Clone check box, change the name of the virtual machine in the General tab.
22. Click OK to import the virtual machines.
The CPU type of the virtual machine must be the same as the CPU type of the cluster into which it isbeing imported. To view the cluster’s CPU Type in the Administration Portal:
1. Click Compute → Clusters.
2. Select a cluster.
3. Click Edit.
4. Click the General tab.
CHAPTER 6. ADMINISTRATIVE TASKS
95
If the CPU type of the virtual machine is different, configure the imported virtual machine’s CPU type:
1. Click Compute → Virtual Machines.
2. Select the virtual machine.
3. Click Edit.
4. Click the System tab.
5. Click the Advanced Parameters arrow.
6. Specify the Custom CPU Type and click OK.
6.13.9. Importing a Red Hat KVM Guest Image
You can import a Red Hat-provided KVM virtual machine image. This image is a virtual machinesnapshot with a preconfigured instance of Red Hat Enterprise Linux installed.
You can configure this image with the cloud-init tool, and use it to provision new virtual machines. Thiseliminates the need to install and configure the operating system and provides virtual machines that areready for use.
Importing a Red Hat KVM Guest Image
1. Download the most recent KVM virtual machine image from the Download Red Hat EnterpriseLinux list, in the Product Software tab.
2. Upload the virtual machine image using the Manager or the REST API. See Uploading a DiskImage to a Storage Domain in the Administration Guide.
3. Create a new virtual machine and attach the uploaded disk image to it. See Section 2.1,“Creating a Virtual Machine”.
4. Optionally, use cloud-init to configure the virtual machine. See Section 7.8, “Using Cloud-Init toAutomate the Configuration of Virtual Machines” for details.
5. Optionally, create a template from the virtual machine. You can generate new virtual machinesfrom this template. See Chapter 7, Templates for information about creating templates andgenerating virtual machines from templates.
6.14. MIGRATING VIRTUAL MACHINES BETWEEN HOSTS
Live migration provides the ability to move a running virtual machine between physical hosts with nointerruption to service. The virtual machine remains powered on and user applications continue to runwhile the virtual machine is relocated to a new physical host. In the background, the virtual machine’sRAM is copied from the source host to the destination host. Storage and network connectivity are notaltered.
NOTE
A virtual machine that is using a vGPU cannot be migrated to a different host.
6.14.1. Live Migration Prerequisites
NOTE
Red Hat Virtualization 4.3 Virtual Machine Management Guide
96

NOTE
This is one in a series of topics that show how to set up and configure SR-IOV on Red HatVirtualization. For more information, see Setting Up and Configuring SR-IOV
You can use live migration to seamlessly move virtual machines to support a number of commonmaintenance tasks. Your Red Hat Virtualization environment must be correctly configured to supportlive migration well in advance of using it.
At a minimum, the following prerequisites must be met to enable successful live migration of virtualmachines:
The source and destination hosts are members of the same cluster, ensuring CPU compatibilitybetween them.
NOTE
Live migrating virtual machines between different clusters is generally not recommended.
The source and destination hosts' status is Up.
The source and destination hosts have access to the same virtual networks and VLANs.
The source and destination hosts have access to the data storage domain on which the virtualmachine resides.
The destination host has sufficient CPU capacity to support the virtual machine’s requirements.
The destination host has sufficient unused RAM to support the virtual machine’s requirements.
The migrating virtual machine does not have the cache!=none custom property set.
Live migration is performed using the management network and involves transferring large amounts ofdata between hosts. Concurrent migrations have the potential to saturate the management network.For best performance, Red Hat recommends creating separate logical networks for management,storage, display, and virtual machine data to minimize the risk of network saturation.
Configuring Virtual Machines with SR-IOV-Enabled vNICs to Reduce Network Outageduring Migration
Virtual machines with vNICs that are directly connected to a virtual function (VF) of an SR-IOV-enabledhost NIC can be further configured to reduce network outage during live migration:
Ensure that the destination host has an available VF.
Set the Passthrough and Migratable options in the passthrough vNIC’s profile. See EnablingPassthrough on a vNIC Profile in the Administration Guide.
Enable hotplugging for the virtual machine’s network interface.
Ensure that the virtual machine has a backup VirtIO vNIC, in addition to the passthrough vNIC,to maintain the virtual machine’s network connection during migration.
Set the VirtIO vNIC’s No Network Filter option before configuring the bond. See Explanation ofSettings in the VM Interface Profile Window in the Administration Guide.
CHAPTER 6. ADMINISTRATIVE TASKS
97
Add both vNICs as slaves under an active-backup bond on the virtual machine, with thepassthrough vNIC as the primary interface.The bond and vNIC profiles can have one of the following configurations:
Recommended: The bond is not configured with fail_over_mac=active and the VF vNIC isthe primary slave.Disable the VirtIO vNIC profile’s MAC-spoofing filter to ensure that traffic passing throughthe VirtIO vNIC is not dropped because it uses the VF vNIC MAC address. See ApplyingNetwork Filtering in the RHEL 7 Virtualization Deployment and Administration Guide .
The bond is configured with fail_over_mac=active.This failover policy ensures that the MAC address of the bond is always the MAC address ofthe active slave. During failover, the virtual machine’s MAC address changes, with a slightdisruption in traffic.
6.14.2. Optimizing Live Migration
Live virtual machine migration can be a resource-intensive operation. The following two options can beset globally for every virtual machine in the environment, at the cluster level, or at the individual virtualmachine level to optimize live migration.
The Auto Converge migrations option allows you to set whether auto-convergence is used during livemigration of virtual machines. Large virtual machines with high workloads can dirty memory more quicklythan the transfer rate achieved during live migration, and prevent the migration from converging. Auto-convergence capabilities in QEMU allow you to force convergence of virtual machine migrations. QEMUautomatically detects a lack of convergence and triggers a throttle-down of the vCPUs on the virtualmachine.
The Enable migration compression option allows you to set whether migration compression is usedduring live migration of the virtual machine. This feature uses Xor Binary Zero Run-Length-Encoding toreduce virtual machine downtime and total live migration time for virtual machines running memorywrite-intensive workloads or for any application with a sparse memory update pattern.
Both options are disabled globally by default.
Configuring Auto-convergence and Migration Compression for Virtual Machine Migration
1. Configure the optimization settings at the global level:
a. Enable auto-convergence at the global level:
# engine-config -s DefaultAutoConvergence=True
b. Enable migration compression at the global level:
# engine-config -s DefaultMigrationCompression=True
c. Restart the ovirt-engine service to apply the changes:
# systemctl restart ovirt-engine.service
2. Configure the optimization settings at the cluster level:
a. Click Compute → Clusters and select a cluster.
Red Hat Virtualization 4.3 Virtual Machine Management Guide
98
b. Click Edit.
c. Click the Migration Policy tab.
d. From the Auto Converge migrations list, select Inherit from global setting, AutoConverge, or Don’t Auto Converge.
e. From the Enable migration compression list, select Inherit from global setting,Compress, or Don’t Compress.
f. Click OK.
3. Configure the optimization settings at the virtual machine level:
a. Click Compute → Virtual Machines and select a virtual machine.
b. Click Edit.
c. Click the Host tab.
d. From the Auto Converge migrations list, select Inherit from cluster setting, AutoConverge, or Don’t Auto Converge.
e. From the Enable migration compression list, select Inherit from cluster setting,Compress, or Don’t Compress.
f. Click OK.
6.14.3. Guest Agent Hooks
Hooks are scripts that trigger activity within a virtual machine when key events occur:
Before migration
After migration
Before hibernation
After hibernation
The hooks configuration base directory is /etc/ovirt-guest-agent/hooks.d on Linux systems and C:\Program Files\Redhat\RHEV\Drivers\Agent on Windows systems.
Each event has a corresponding subdirectory: before_migration and after_migration, before_hibernation and after_hibernation. All files or symbolic links in that directory will be executed.
The executing user on Linux systems is ovirtagent. If the script needs root permissions, the elevationmust be executed by the creator of the hook script.
The executing user on Windows systems is the System Service user.
6.14.4. Automatic Virtual Machine Migration
Red Hat Virtualization Manager automatically initiates live migration of all virtual machines running on ahost when the host is moved into maintenance mode. The destination host for each virtual machine isassessed as the virtual machine is migrated, in order to spread the load across the cluster.
From version 4.3, all virtual machines defined with manual or automatic migration modes are migrated
CHAPTER 6. ADMINISTRATIVE TASKS
99
From version 4.3, all virtual machines defined with manual or automatic migration modes are migratedwhen the host is moved into maintenance mode. However, for high performance and/or pinned virtualmachines, a Maintenance Host window is displayed, asking you to confirm the action because theperformance on the target host may be less than the performance on the current host.
The Manager automatically initiates live migration of virtual machines in order to maintain load-balancing or power-saving levels in line with scheduling policy. Specify the scheduling policy that bestsuits the needs of your environment. You can also disable automatic, or even manual, live migration ofspecific virtual machines where required.
If your virtual machines are configured for high performance, and/or if they have been pinned (bysetting Passthrough Host CPU, CPU Pinning, or NUMA Pinning), the migration mode is set to Allowmanual migration only. However, this can be changed to Allow Manual and Automatic mode ifrequired. Special care should be taken when changing the default migration setting so that it does notresult in a virtual machine migrating to a host that does not support high performance or pinning.
6.14.5. Preventing Automatic Migration of a Virtual Machine
Red Hat Virtualization Manager allows you to disable automatic migration of virtual machines. You canalso disable manual migration of virtual machines by setting the virtual machine to run only on a specifichost.
The ability to disable automatic migration and require a virtual machine to run on a particular host isuseful when using application high availability products, such as Red Hat High Availability or ClusterSuite.
Preventing Automatic Migration of Virtual Machines
1. Click Compute → Virtual Machines and select a virtual machine.
2. Click Edit.
3. Click the Host tab.
4. In the Start Running On section, select Any Host in Cluster or Specific Host(s), which enablesyou to select multiple hosts.
WARNING
Explicitly assigning a virtual machine to a specific host and disablingmigration are mutually exclusive with Red Hat Virtualization high availability.
IMPORTANT
If the virtual machine has host devices directly attached to it, and a different hostis specified, the host devices from the previous host will be automaticallyremoved from the virtual machine.
5. Select Allow manual migration only or Do not allow migration from the Migration Optionsdrop-down list.
Red Hat Virtualization 4.3 Virtual Machine Management Guide
100
6. Optionally, select the Use custom migration downtime check box and specify a value inmilliseconds.
7. Click OK.
6.14.6. Manually Migrating Virtual Machines
A running virtual machine can be live migrated to any host within its designated host cluster. Livemigration of virtual machines does not cause any service interruption. Migrating virtual machines to adifferent host is especially useful if the load on a particular host is too high. For live migrationprerequisites, see Section 6.14.1, “Live Migration Prerequisites” .
For high performance virtual machines and/or virtual machines defined with Pass-Through Host CPU,CPU Pinning, or NUMA Pinning, the default migration mode is Manual. Select Select HostAutomatically so that the virtual machine migrates to the host that offers the best performance.
NOTE
When you place a host into maintenance mode, the virtual machines running on that hostare automatically migrated to other hosts in the same cluster. You do not need tomanually migrate these virtual machines.
NOTE
Live migrating virtual machines between different clusters is generally not recommended.The currently only supported use case is documented athttps://access.redhat.com/articles/1390733.
Manually Migrating Virtual Machines
1. Click Compute → Virtual Machines and select a running virtual machine.
2. Click Migrate.
3. Use the radio buttons to select whether to Select Host Automatically or to Select DestinationHost, specifying the host using the drop-down list.
NOTE
When the Select Host Automatically option is selected, the system determinesthe host to which the virtual machine is migrated according to the load balancingand power management rules set up in the scheduling policy.
4. Click OK.
During migration, progress is shown in the Migration progress bar. Once migration is complete the Hostcolumn will update to display the host the virtual machine has been migrated to.
6.14.7. Setting Migration Priority
Red Hat Virtualization Manager queues concurrent requests for migration of virtual machines off of agiven host. The load balancing process runs every minute. Hosts already involved in a migration eventare not included in the migration cycle until their migration event has completed. When there is a
CHAPTER 6. ADMINISTRATIVE TASKS
101

migration request in the queue and available hosts in the cluster to action it, a migration event istriggered in line with the load balancing policy for the cluster.
You can influence the ordering of the migration queue by setting the priority of each virtual machine; forexample, setting mission critical virtual machines to migrate before others. Migrations will be ordered bypriority; virtual machines with the highest priority will be migrated first.
Setting Migration Priority
1. Click Compute → Virtual Machines and select a virtual machine.
2. Click Edit.
3. Select the High Availability tab.
4. Select Low, Medium, or High from the Priority drop-down list.
5. Click OK.
6.14.8. Canceling Ongoing Virtual Machine Migrations
A virtual machine migration is taking longer than you expected. You’d like to be sure where all virtualmachines are running before you make any changes to your environment.
Canceling Ongoing Virtual Machine Migrations
1. Select the migrating virtual machine. It is displayed in Compute → Virtual Machines with astatus of Migrating from.
2. Click More Actions ( ), then click Cancel Migration.
The virtual machine status returns from Migrating from to Up.
6.14.9. Event and Log Notification upon Automatic Migration of Highly AvailableVirtual Servers
When a virtual server is automatically migrated because of the high availability function, the details of anautomatic migration are documented in the Events tab and in the engine log to aid in troubleshooting,as illustrated in the following examples:
Example 6.4. Notification in the Events Tab of the Administration Portal
Highly Available Virtual_Machine_Name failed. It will be restarted automatically.
Virtual_Machine_Name was restarted on Host Host_Name
Example 6.5. Notification in the Manager engine.log
This log can be found on the Red Hat Virtualization Manager at /var/log/ovirt-engine/engine.log:
Failed to start Highly Available VM. Attempting to restart. VM Name: Virtual_Machine_Name, VMId:_Virtual_Machine_ID_Number_
Red Hat Virtualization 4.3 Virtual Machine Management Guide
102
6.15. IMPROVING UPTIME WITH VIRTUAL MACHINE HIGHAVAILABILITY
6.15.1. What is High Availability?
High availability is recommended for virtual machines running critical workloads. A highly available virtualmachine is automatically restarted, either on its original host or another host in the cluster, if its processis interrupted, such as in the following scenarios:
A host becomes non-operational due to hardware failure.
A host is put into maintenance mode for scheduled downtime.
A host becomes unavailable because it has lost communication with an external storageresource.
A highly available virtual machine is not restarted if it is shut down cleanly, such as in the followingscenarios:
The virtual machine is shut down from within the guest.
The virtual machine is shut down from the Manager.
The host is shut down by an administrator without being put in maintenance mode first.
With storage domains V4 or later, virtual machines have the additional capability to acquire a lease on aspecial volume on the storage, enabling a virtual machine to start on another host even if the originalhost loses power. The functionality also prevents the virtual machine from being started on twodifferent hosts, which may lead to corruption of the virtual machine disks.
With high availability, interruption to service is minimal because virtual machines are restarted withinseconds with no user intervention required. High availability keeps your resources balanced by restartingguests on a host with low current resource utilization, or based on any workload balancing or powersaving policies that you configure. This ensures that there is sufficient capacity to restart virtualmachines at all times.
High Availability and Storage I/O Errors
If a storage I/O error occurs, the virtual machine is paused. You can define how the host handles highlyavailable virtual machines after the connection with the storage domain is reestablished; they can eitherbe resumed, ungracefully shut down, or remain paused. For more information about these options, seeSection A.1.6, “Virtual Machine High Availability Settings Explained” .
6.15.2. High Availability Considerations
A highly available host requires a power management device and fencing parameters. In addition, for avirtual machine to be highly available when its host becomes non-operational, it needs to be started onanother available host in the cluster. To enable the migration of highly available virtual machines:
Power management must be configured for the hosts running the highly available virtualmachines.
The host running the highly available virtual machine must be part of a cluster which has otheravailable hosts.
The destination host must be running.
CHAPTER 6. ADMINISTRATIVE TASKS
103

The source and destination host must have access to the data domain on which the virtualmachine resides.
The source and destination host must have access to the same virtual networks and VLANs.
There must be enough CPUs on the destination host that are not in use to support the virtualmachine’s requirements.
There must be enough RAM on the destination host that is not in use to support the virtualmachine’s requirements.
6.15.3. Configuring a Highly Available Virtual Machine
High availability must be configured individually for each virtual machine.
Configuring a Highly Available Virtual Machine
1. Click Compute → Virtual Machines and select a virtual machine.
2. Click Edit.
3. Click the High Availability tab.
4. Select the Highly Available check box to enable high availability for the virtual machine.
5. Select the storage domain to hold the virtual machine lease, or select No VM Lease to disablethe functionality, from the Target Storage Domain for VM Lease drop-down list. SeeSection 6.15.1, “What is High Availability?” for more information about virtual machine leases.
IMPORTANT
This functionality is only available on storage domains that are V4 or later.
6. Select AUTO_RESUME, LEAVE_PAUSED, or KILL from the Resume Behavior drop-down list.If you defined a virtual machine lease, KILL is the only option available. For more informationsee Section A.1.6, “Virtual Machine High Availability Settings Explained” .
7. Select Low, Medium, or High from the Priority drop-down list. When migration is triggered, aqueue is created in which the high priority virtual machines are migrated first. If a cluster isrunning low on resources, only the high priority virtual machines are migrated.
8. Click OK.
6.16. OTHER VIRTUAL MACHINE TASKS
6.16.1. Enabling SAP Monitoring
Enable SAP monitoring on a virtual machine through the Administration Portal.
Enabling SAP Monitoring on Virtual Machines
1. Click Compute → Virtual Machines and select a virtual machine.
2. Click Edit.
Red Hat Virtualization 4.3 Virtual Machine Management Guide
104
3. Click the Custom Properties tab.
4. Select sap_agent from the drop-down list. Ensure the secondary drop-down menu is set toTrue.If previous properties have been set, select the plus sign to add a new property rule and select sap_agent.
5. Click OK.
6.16.2. Configuring Red Hat Enterprise Linux 5.4 and later Virtual Machines to useSPICE
SPICE is a remote display protocol designed for virtual environments, which enables you to view avirtualized desktop or server. SPICE delivers a high quality user experience, keeps CPU consumption low,and supports high quality video streaming.
Using SPICE on a Linux machine significantly improves the movement of the mouse cursor on theconsole of the virtual machine. To use SPICE, the X-Windows system requires additional QXL drivers.The QXL drivers are provided with Red Hat Enterprise Linux 5.4 and later. Earlier versions are notsupported. Installing SPICE on a virtual machine running Red Hat Enterprise Linux significantly improvesthe performance of the graphical user interface.
NOTE
Typically, this is most useful for virtual machines where the user requires the use of thegraphical user interface. System administrators who are creating virtual servers mayprefer not to configure SPICE if their use of the graphical user interface is minimal.
6.16.2.1. Installing and Configuring QXL Drivers
You must manually install QXL drivers on virtual machines running Red Hat Enterprise Linux 5.4 or later.This is unnecessary for virtual machines running Red Hat Enterprise Linux 6 or Red Hat Enterprise Linux7 as the QXL drivers are installed by default.
Installing QXL Drivers
1. Log in to a Red Hat Enterprise Linux virtual machine.
2. Install the QXL drivers:
# yum install xorg-x11-drv-qxl
You can configure QXL drivers using either a graphical interface or the command line. Perform only oneof the following procedures.
Configuring QXL drivers in GNOME
1. Click System.
2. Click Administration.
3. Click Display.
4. Click the Hardware tab.
CHAPTER 6. ADMINISTRATIVE TASKS
105
5. Click Video Cards Configure.
6. Select qxl and click OK.
7. Restart X-Windows by logging out of the virtual machine and logging back in.
Configuring QXL drivers on the command line
1. Back up /etc/X11/xorg.conf:
# cp /etc/X11/xorg.conf /etc/X11/xorg.conf.$$.backup
2. Make the following change to the Device section of /etc/X11/xorg.conf:
Section "Device"Identifier "Videocard0"Driver "qxl"Endsection
6.16.2.2. Configuring a Virtual Machine’s Tablet and Mouse to use SPICE
Edit the /etc/X11/xorg.conf file to enable SPICE for your virtual machine’s tablet devices.
Configuring a Virtual Machine’s Tablet and Mouse to use SPICE
1. Verify that the tablet device is available on your guest:
# /sbin/lsusb -v | grep 'QEMU USB Tablet'
If there is no output from the command, do not continue configuring the tablet.
2. Back up /etc/X11/xorg.conf:
# cp /etc/X11/xorg.conf /etc/X11/xorg.conf.$$.backup
3. Make the following changes to /etc/X11/xorg.conf:
Section "ServerLayout"Identifier "single head configuration"Screen 0 "Screen0" 0 0InputDevice "Keyboard0" "CoreKeyboard"InputDevice "Tablet" "SendCoreEvents"InputDevice "Mouse" "CorePointer"EndSection
Section "InputDevice"Identifier "Mouse"Driver "void"#Option "Device" "/dev/input/mice"#Option "Emulate3Buttons" "yes"EndSection
Section "InputDevice"Identifier "Tablet"
Red Hat Virtualization 4.3 Virtual Machine Management Guide
106
Driver "evdev"Option "Device" "/dev/input/event2"Option "CorePointer" "true"EndSection
4. Log out and log back into the virtual machine to restart X-Windows.
6.16.3. KVM Virtual Machine Timing Management
Virtualization poses various challenges for virtual machine time keeping. Virtual machines which use theTime Stamp Counter (TSC) as a clock source may suffer timing issues as some CPUs do not have aconstant Time Stamp Counter. Virtual machines running without accurate timekeeping can have seriousaffects on some networked applications as your virtual machine will run faster or slower than the actualtime.
KVM works around this issue by providing virtual machines with a paravirtualized clock. The KVM pvclock provides a stable source of timing for KVM guests that support it.
Presently, only Red Hat Enterprise Linux 5.4 and later virtual machines fully support the paravirtualizedclock.
Virtual machines can have several problems caused by inaccurate clocks and counters:
Clocks can fall out of synchronization with the actual time which invalidates sessions and affectsnetworks.
Virtual machines with slower clocks may have issues migrating.
These problems exist on other virtualization platforms and timing should always be tested.
IMPORTANT
The Network Time Protocol (NTP) daemon should be running on the host and the virtualmachines. Enable the ntpd service and add it to the default startup sequence:
For Red Hat Enterprise Linux 6
# service ntpd start# chkconfig ntpd on
For Red Hat Enterprise Linux 7
# systemctl start ntpd.service# systemctl enable ntpd.service
Using the ntpd service should minimize the affects of clock skew in all cases.
The NTP servers you are trying to use must be operational and accessible to your hostsand virtual machines.
Determining if your CPU has the constant Time Stamp Counter
Your CPU has a constant Time Stamp Counter if the constant_tsc flag is present. To determine if yourCPU has the constant_tsc flag run the following command:
CHAPTER 6. ADMINISTRATIVE TASKS
107
$ cat /proc/cpuinfo | grep constant_tsc
If any output is given your CPU has the constant_tsc bit. If no output is given follow the instructionsbelow.
Configuring hosts without a constant Time Stamp Counter
Systems without constant time stamp counters require additional configuration. Power managementfeatures interfere with accurate time keeping and must be disabled for virtual machines to accuratelykeep time with KVM.
IMPORTANT
These instructions are for AMD revision F CPUs only.
If the CPU lacks the constant_tsc bit, disable all power management features ( BZ#513138). Eachsystem has several timers it uses to keep time. The TSC is not stable on the host, which is sometimescaused by cpufreq changes, deep C state, or migration to a host with a faster TSC. Deep C sleep statescan stop the TSC. To prevent the kernel using deep C states append “processor.max_cstate=1” to thekernel boot options in the grub.conf file on the host:
term Red Hat Enterprise Linux Server (2.6.18-159.el5) root (hd0,0) kernel /vmlinuz-2.6.18-159.el5 ro root=/dev/VolGroup00/LogVol00 rhgb quiet processor.max_cstate=1
Disable cpufreq (only necessary on hosts without the constant_tsc) by editing the /etc/sysconfig/cpuspeed configuration file and change the MIN_SPEED and MAX_SPEED variablesto the highest frequency available. Valid limits can be found in the /sys/devices/system/cpu/cpu/cpufreq/scaling_available_frequencies files.
Using the engine-config tool to receive alerts when hosts drift out of sync.
You can use the engine-config tool to configure alerts when your hosts drift out of sync.
There are 2 relevant parameters for time drift on hosts: EnableHostTimeDrift and HostTimeDriftInSec. EnableHostTimeDrift, with a default value of false, can be enabled to receive alertnotifications of host time drift. The HostTimeDriftInSec parameter is used to set the maximumallowable drift before alerts start being sent.
Alerts are sent once per hour per host.
Using the paravirtualized clock with Red Hat Enterprise Linux virtual machines
For certain Red Hat Enterprise Linux virtual machines, additional kernel parameters are required. Theseparameters can be set by appending them to the end of the /kernel line in the /boot/grub/grub.conf fileof the virtual machine.
NOTE
The process of configuring kernel parameters can be automated using the ktunepackage
The ktune package provides an interactive Bourne shell script, fix_clock_drift.sh. When run as the
Red Hat Virtualization 4.3 Virtual Machine Management Guide
108
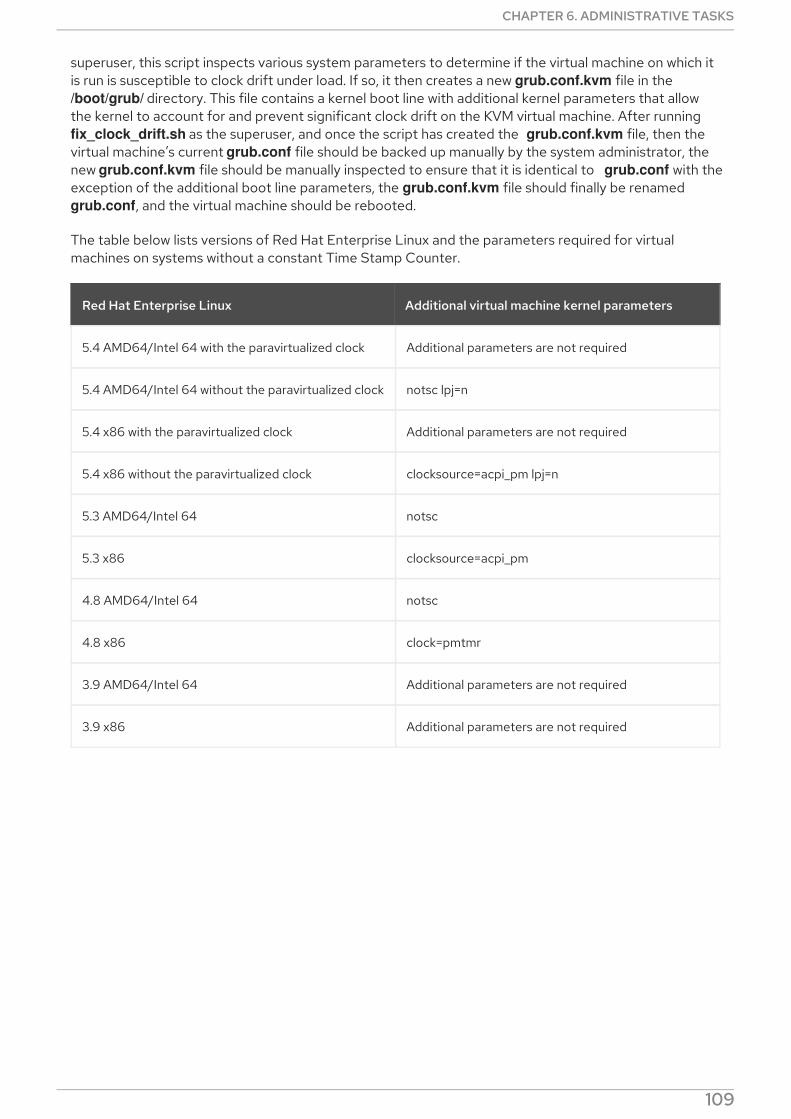
superuser, this script inspects various system parameters to determine if the virtual machine on which itis run is susceptible to clock drift under load. If so, it then creates a new grub.conf.kvm file in the /boot/grub/ directory. This file contains a kernel boot line with additional kernel parameters that allowthe kernel to account for and prevent significant clock drift on the KVM virtual machine. After running fix_clock_drift.sh as the superuser, and once the script has created the grub.conf.kvm file, then thevirtual machine’s current grub.conf file should be backed up manually by the system administrator, thenew grub.conf.kvm file should be manually inspected to ensure that it is identical to grub.conf with theexception of the additional boot line parameters, the grub.conf.kvm file should finally be renamed grub.conf, and the virtual machine should be rebooted.
The table below lists versions of Red Hat Enterprise Linux and the parameters required for virtualmachines on systems without a constant Time Stamp Counter.
Red Hat Enterprise Linux Additional virtual machine kernel parameters
5.4 AMD64/Intel 64 with the paravirtualized clock Additional parameters are not required
5.4 AMD64/Intel 64 without the paravirtualized clock notsc lpj=n
5.4 x86 with the paravirtualized clock Additional parameters are not required
5.4 x86 without the paravirtualized clock clocksource=acpi_pm lpj=n
5.3 AMD64/Intel 64 notsc
5.3 x86 clocksource=acpi_pm
4.8 AMD64/Intel 64 notsc
4.8 x86 clock=pmtmr
3.9 AMD64/Intel 64 Additional parameters are not required
3.9 x86 Additional parameters are not required
CHAPTER 6. ADMINISTRATIVE TASKS
109

CHAPTER 7. TEMPLATESA template is a copy of a virtual machine that you can use to simplify the subsequent, repeated creationof similar virtual machines. Templates capture the configuration of software, configuration of hardware,and the software installed on the virtual machine on which the template is based. The virtual machine onwhich a template is based is known as the source virtual machine.
When you create a template based on a virtual machine, a read-only copy of the virtual machine’s disk iscreated. This read-only disk becomes the base disk image of the new template, and of any virtualmachines created based on the template. As such, the template cannot be deleted while any virtualmachines created based on the template exist in the environment.
Virtual machines created based on a template use the same NIC type and driver as the original virtualmachine, but are assigned separate, unique MAC addresses.
You can create a virtual machine directly from Compute → Templates, as well as from Compute →Virtual Machines. In Compute → Templates, select the required template and click New VM. For moreinformation on selecting the settings and controls for the new virtual machine see Section A.1.1, “VirtualMachine General Settings Explained”.
7.1. SEALING VIRTUAL MACHINES IN PREPARATION FORDEPLOYMENT AS TEMPLATES
This section describes procedures for sealing Linux and Windows virtual machines. Sealing is the processof removing all system-specific details from a virtual machine before creating a template based on thatvirtual machine. Sealing is necessary to prevent the same details from appearing on multiple virtualmachines created based on the same template. It is also necessary to ensure the functionality of otherfeatures, such as predictable vNIC order.
7.1.1. Sealing a Linux Virtual Machine for Deployment as a Template
To seal a Linux virtual machine during the template creation process, select the Seal Template checkbox in the New Template window. See Section 7.2, “Creating a Template” for details.
NOTE
You cannot create a sealed virtual machine template based on a RHEL 8.0 virtualmachine in Red Hat Virtualization 4.3, because of the following limitations:
libguestfs tools on Red Hat Enterprise Linux 7 do not support modifying Red HatEnterprise Linux 8 disk images because of additional XFS functionality added inRed Hat Enterprise Linux 8.
Red Hat Virtualization 4.3 does not support hypervisors based on Red HatEnterprise Linux 8.0
7.1.2. Sealing a Windows Virtual Machine for Deployment as a Template
A template created for Windows virtual machines must be generalized (sealed) before being used todeploy virtual machines. This ensures that machine-specific settings are not reproduced in the template.
Sysprep is used to seal Windows templates before use. Sysprep generates a complete unattendedinstallation answer file. Default values for several Windows operating systems are available in the/usr/share/ovirt-engine/conf/sysprep/ directory. These files act as templates for Sysprep. The fields
Red Hat Virtualization 4.3 Virtual Machine Management Guide
110
in these files can be copied, pasted, and altered as required. This definition will override any valuesentered into the Initial Run fields of the Edit Virtual Machine window.
The Sysprep file can be edited to affect various aspects of the Windows virtual machines created fromthe template that the Sysprep file is attached to. These include the provisioning of Windows, setting upthe required domain membership, configuring the hostname, and setting the security policy.
Replacement strings can be used to substitute values provided in the default files in the/usr/share/ovirt-engine/conf/sysprep/ directory. For example, "<Domain><![CDATA[$JoinDomain$]]></Domain>" can be used to indicate the domain to join.
7.1.2.1. Prerequisites for Sealing a Windows Virtual Machine
IMPORTANT
Do not reboot the virtual machine while Sysprep is running.
Before starting Sysprep, verify that the following settings are configured:
The Windows virtual machine parameters have been correctly defined.
If not, click Edit in Compute → Virtual Machines and enter the required information in theOperating System and Cluster fields.
The correct product key has been defined in an override file on the Manager.
The override file must be created under /etc/ovirt-engine/osinfo.conf.d/, have a filename that puts itafter /etc/ovirt-engine/osinfo.conf.d/00-defaults.properties, and ends in .properties. For example,/etc/ovirt-engine/osinfo.conf.d/10-productkeys.properties. The last file will have precedence andoverride any other previous file.
If not, copy the default values for your Windows operating system from /etc/ovirt-engine/osinfo.conf.d/00-defaults.properties into the override file, and input your values in the productKey.value and sysprepPath.value fields.
Example 7.1. Windows 7 Default Configuration Values
# Windows7(11, OsType.Windows, false),falseos.windows_7.id.value = 11os.windows_7.name.value = Windows 7os.windows_7.derivedFrom.value = windows_xpos.windows_7.sysprepPath.value = ${ENGINE_USR}/conf/sysprep/sysprep.w7os.windows_7.productKey.value =os.windows_7.devices.audio.value = ich6os.windows_7.devices.diskInterfaces.value.3.3 = IDE, VirtIO_SCSI, VirtIOos.windows_7.devices.diskInterfaces.value.3.4 = IDE, VirtIO_SCSI, VirtIOos.windows_7.devices.diskInterfaces.value.3.5 = IDE, VirtIO_SCSI, VirtIOos.windows_7.isTimezoneTypeInteger.value = false
7.1.2.2. Sealing a Windows 7, Windows 2008, or Windows 2012 Virtual Machine forDeployment as Template
Seal a Windows 7, Windows 2008, or Windows 2012 virtual machine before creating a template to use to
CHAPTER 7. TEMPLATES
111
Seal a Windows 7, Windows 2008, or Windows 2012 virtual machine before creating a template to use todeploy virtual machines.
Sealing a Windows 7, Windows 2008, or Windows 2012 Virtual Machine for Deployment as aTemplate
1. On the Windows virtual machine, launch Sysprep fromC:\Windows\System32\sysprep\sysprep.exe.
2. Enter the following information into Sysprep:
Under System Cleanup Action, select Enter System Out-of-Box-Experience (OOBE).
Select the Generalize check box if you need to change the computer’s systemidentification number (SID).
Under Shutdown Options, select Shutdown.
3. Click OK to complete the sealing process; the virtual machine shuts down automatically uponcompletion.
The Windows 7, Windows 2008, or Windows 2012 virtual machine is sealed and ready to create atemplate to use for deploying virtual machines.
7.2. CREATING A TEMPLATE
Create a template from an existing virtual machine to use as a blueprint for creating additional virtualmachines.
NOTE
You cannot create a sealed virtual machine template based on a RHEL 8.0 virtualmachine in Red Hat Virtualization 4.3, because of the following limitations:
libguestfs tools on Red Hat Enterprise Linux 7 do not support modifying Red HatEnterprise Linux 8 disk images because of additional XFS functionality added inRed Hat Enterprise Linux 8.
Red Hat Virtualization 4.3 does not support hypervisors based on Red HatEnterprise Linux 8.0
When you create a template, you specify the format of the disk to be raw or QCOW2:
QCOW2 disks are thin provisioned.
Raw disks on file storage are thin provisioned.
Raw disks on block storage are preallocated.
Creating a Template
1. Click Compute → Virtual Machines and select the source virtual machine.
2. Ensure the virtual machine is powered down and has a status of Down.
Red Hat Virtualization 4.3 Virtual Machine Management Guide
112
3. Click More Actions ( ), then click Make Template. For more details on all fields in the NewTemplate window, see Section A.5, “Explanation of Settings in the New Template Window” .
4. Enter a Name, Description, and Comment for the template.
5. Select the cluster with which to associate the template from the Cluster drop-down list. Bydefault, this is the same as that of the source virtual machine.
6. Optionally, select a CPU profile for the template from the CPU Profile drop-down list.
7. Optionally, select the Create as a Template Sub-Version check box, select a Root Template,and enter a Sub-Version Name to create the new template as a sub-template of an existingtemplate.
8. In the Disks Allocation section, enter an alias for the disk in the Alias text field. Select the diskformat in the Format drop-down, the storage domain on which to store the disk from theTarget drop-down, and the disk profile in the Disk Profile drop-down. By default, these are thesame as those of the source virtual machine.
9. Select the Allow all users to access this Template check box to make the template public.
10. Select the Copy VM permissions check box to copy the permissions of the source virtualmachine to the template.
11. Select the Seal Template check box (Linux only) to seal the template.
NOTE
Sealing, which uses the virt-sysprep command, removes system-specific detailsfrom a virtual machine before creating a template based on that virtual machine.This prevents the original virtual machine’s details from appearing in subsequentvirtual machines that are created using the same template. It also ensures thefunctionality of other features, such as predictable vNIC order. See Appendix B, virt-sysprep Operations for more information.
12. Click OK.
The virtual machine displays a status of Image Locked while the template is being created. The processof creating a template may take up to an hour depending on the size of the virtual disk and thecapabilities of your storage hardware. When complete, the template is added to the Templates tab. Youcan now create new virtual machines based on the template.
NOTE
When a template is made, the virtual machine is copied so that both the existing virtualmachine and its template are usable after template creation.
7.3. EDITING A TEMPLATE
Once a template has been created, its properties can be edited. Because a template is a copy of a virtualmachine, the options available when editing a template are identical to those in the Edit Virtual Machinewindow.
Editing a Template
CHAPTER 7. TEMPLATES
113
1. Click Compute → Templates and select a template.
2. Click Edit.
3. Change the necessary properties. Click Show Advanced Options and edit the template’ssettings as required. The settings that appear in the Edit Template window are identical tothose in the Edit Virtual Machine window, but with the relevant fields only. See Section A.1,“Explanation of Settings in the New Virtual Machine and Edit Virtual Machine Windows” fordetails.
4. Click OK.
7.4. DELETING A TEMPLATE
If you have used a template to create a virtual machine using the thin provisioning storage allocationoption, the template cannot be deleted as the virtual machine needs it to continue running. However,cloned virtual machines do not depend on the template they were cloned from and the template can bedeleted.
Deleting a Template
1. Click Compute → Templates and select a template.
2. Click Remove.
3. Click OK.
7.5. EXPORTING TEMPLATES
7.5.1. Migrating Templates to the Export Domain
NOTE
The export storage domain is deprecated. Storage data domains can be unattached froma data center and imported to another data center in the same environment, or in adifferent environment. Virtual machines, floating virtual disks, and templates can then beuploaded from the imported storage domain to the attached data center. See theImporting Existing Storage Domains section in the Red Hat Virtualization AdministrationGuide for information on importing storage domains.
Export templates into the export domain to move them to another data domain, either in the same RedHat Virtualization environment, or another one. This procedure requires access to the AdministrationPortal.
Exporting Individual Templates to the Export Domain
1. Click Compute → Templates and select a template.
2. Click Export.
3. Select the Force Override check box to replace any earlier version of the template on theexport domain.
4. Click OK to begin exporting the template; this may take up to an hour, depending on the virtual
Red Hat Virtualization 4.3 Virtual Machine Management Guide
114
4. Click OK to begin exporting the template; this may take up to an hour, depending on the virtualdisk size and your storage hardware.
Repeat these steps until the export domain contains all the templates to migrate before you start theimport process.
1. Click Storage → Domains and select the export domain.
2. Click the domain name to see the details view.
3. Click the Template Import tab to view all exported templates in the export domain.
7.5.2. Copying a Template’s Virtual Hard Disk
If you are moving a virtual machine that was created from a template with the thin provisioning storageallocation option selected, the template’s disks must be copied to the same storage domain as that ofthe virtual disk. This procedure requires access to the Administration Portal.
Copying a Virtual Hard Disk
1. Click Storage → Disks.
2. Select the template disk(s) to copy.
3. Click Copy.
4. Select the Target data domain from the drop-down list(s).
5. Click OK.
A copy of the template’s virtual hard disk has been created, either on the same, or a different, storagedomain. If you were copying a template disk in preparation for moving a virtual hard disk, you can nowmove the virtual hard disk.
7.6. IMPORTING TEMPLATES
7.6.1. Importing a Template into a Data Center
NOTE
The export storage domain is deprecated. Storage data domains can be unattached froma data center and imported to another data center in the same environment, or in adifferent environment. Virtual machines, floating virtual disks, and templates can then beuploaded from the imported storage domain to the attached data center. See theImporting Existing Storage Domains section in the Red Hat Virtualization AdministrationGuide for information on importing storage domains.
Import templates from a newly attached export domain. This procedure requires access to theAdministration Portal.
Importing a Template into a Data Center
1. Click Storage → Domains and select the newly attached export domain.
2. Click the domain name to go to the details view.
CHAPTER 7. TEMPLATES
115

3. Click the Template Import tab and select a template.
4. Click Import.
5. Use the drop-down lists to select the Target Cluster and CPU Profile.
6. Select the template to view its details, then click the Disks tab and select the Storage Domainto import the template into.
7. Click OK.
8. If the Import Template Conflict window appears, enter a New Name for the template, or selectthe Apply to all check box and enter a Suffix to add to the cloned Templates. Click OK.
9. Click Close.
The template is imported into the destination data center. This can take up to an hour, depending onyour storage hardware. You can view the import progress in the Events tab.
Once the importing process is complete, the templates will be visible in Compute → Templates. Thetemplates can create new virtual machines, or run existing imported virtual machines based on thattemplate.
7.6.2. Importing a Virtual Disk from an OpenStack Image Service as a Template
Virtual disks managed by an OpenStack Image Service can be imported into the Red Hat VirtualizationManager if that OpenStack Image Service has been added to the Manager as an external provider. Thisprocedure requires access to the Administration Portal.
1. Click Storage → Domains and select the OpenStack Image Service domain.
2. Click the storage domain name to go to the details view.
3. Click the Images tab and select the image to import.
4. Click Import.
NOTE
If you are importing an image from a Glance storage domain, you have the optionof specifying the template name.
5. Select the Data Center into which the virtual disk will be imported.
6. Select the storage domain in which the virtual disk will be stored from the Domain Name drop-down list.
7. Optionally, select a Quota to apply to the virtual disk.
8. Select the Import as Template check box.
9. Select the Cluster in which the virtual disk will be made available as a template.
10. Click OK.
The image is imported as a template and is displayed in the Templates tab. You can now create virtual
Red Hat Virtualization 4.3 Virtual Machine Management Guide
116
The image is imported as a template and is displayed in the Templates tab. You can now create virtualmachines based on the template.
7.7. TEMPLATES AND PERMISSIONS
7.7.1. Managing System Permissions for a Template
As the SuperUser, the system administrator manages all aspects of the Administration Portal. Morespecific administrative roles can be assigned to other users. These restricted administrator roles areuseful for granting a user administrative privileges that limit them to a specific resource. For example, aDataCenterAdmin role has administrator privileges only for the assigned data center with the exceptionof the storage for that data center, and a ClusterAdmin has administrator privileges only for theassigned cluster.
A template administrator is a system administration role for templates in a data center. This role can beapplied to specific virtual machines, to a data center, or to the whole virtualized environment; this isuseful to allow different users to manage certain virtual resources.
The template administrator role permits the following actions:
Create, edit, export, and remove associated templates.
Import and export templates.
NOTE
You can only assign roles and permissions to existing users.
7.7.2. Template Administrator Roles Explained
The table below describes the administrator roles and privileges applicable to template administration.
Table 7.1. Red Hat Virtualization System Administrator Roles
Role Privileges Notes
TemplateAdmin Can perform all operations ontemplates.
Has privileges to create, deleteand configure a template’sstorage domain and networkdetails, and to move templatesbetween domains.
NetworkAdmin Network Administrator Can configure and managenetworks attached to templates.
7.7.3. Assigning an Administrator or User Role to a Resource
Assign administrator or user roles to resources to allow users to access or manage that resource.
Assigning a Role to a Resource
1. Use the resource tabs, tree mode, or the search function to find and select the resource in theresults list.
CHAPTER 7. TEMPLATES
117
2. Click the resource’s name to go to the details view.
3. Click the Permissions tab to list the assigned users, the user’s role, and the inheritedpermissions for the selected resource.
4. Click Add.
5. Enter the name or user name of an existing user into the Search text box and click Go. Select auser from the resulting list of possible matches.
6. Select a role from the Role to Assign: drop-down list.
7. Click OK.
You have assigned a role to a user; the user now has the inherited permissions of that role enabled forthat resource.
7.7.4. Removing an Administrator or User Role from a Resource
Remove an administrator or user role from a resource; the user loses the inherited permissionsassociated with the role for that resource.
Removing a Role from a Resource
1. Use the resource tabs, tree mode, or the search function to find and select the resource in theresults list.
2. Click the resource’s name to go to the details view.
3. Click the Permissions tab to list the assigned users, the user’s role, and the inheritedpermissions for the selected resource.
4. Select the user to remove from the resource.
5. Click Remove. The Remove Permission window opens to confirm permissions removal.
6. Click OK.
You have removed the user’s role, and the associated permissions, from the resource.
7.8. USING CLOUD-INIT TO AUTOMATE THE CONFIGURATION OFVIRTUAL MACHINES
Cloud-Init is a tool for automating the initial setup of virtual machines such as configuring the host name,network interfaces, and authorized keys. It can be used when provisioning virtual machines that havebeen deployed based on a template to avoid conflicts on the network.
To use this tool, the cloud-init package must first be installed on the virtual machine. Once installed, theCloud-Init service starts during the boot process to search for instructions on what to configure. You canthen use options in the Run Once window to provide these instructions one time only, or options in theNew Virtual Machine, Edit Virtual Machine and Edit Template windows to provide these instructionsevery time the virtual machine starts.
NOTE
Alternatively, you can configure Cloud-Init with Ansible, Python, Java, or Ruby.
Red Hat Virtualization 4.3 Virtual Machine Management Guide
118
7.8.1. Cloud-Init Use Case Scenarios
Cloud-Init can be used to automate the configuration of virtual machines in a variety of scenarios.Several common scenarios are as follows:
Virtual Machines Created Based on TemplatesYou can use the Cloud-Init options in the Initial Run section of the Run Once window toinitialize a virtual machine that was created based on a template. This allows you to customizethe virtual machine the first time that virtual machine is started.
Virtual Machine TemplatesYou can use the Use Cloud-Init/Sysprep options in the Initial Run tab of the Edit Templatewindow to specify options for customizing virtual machines created based on that template.
Virtual Machine PoolsYou can use the Use Cloud-Init/Sysprep options in the Initial Run tab of the New Pool windowto specify options for customizing virtual machines taken from that virtual machine pool. Thisallows you to specify a set of standard settings that will be applied every time a virtual machineis taken from that virtual machine pool. You can inherit or override the options specified for thetemplate on which the virtual machine is based, or specify options for the virtual machine poolitself.
7.8.2. Installing Cloud-Init
This procedure describes how to install Cloud-Init on a virtual machine. Once Cloud-Init is installed, youcan create a template based on this virtual machine. Virtual machines created based on this templatecan leverage Cloud-Init functions, such as configuring the host name, time zone, root password,authorized keys, network interfaces, DNS service, etc on boot.
Installing Cloud-Init
1. Log in to the virtual machine.
2. Enable the repositories:
For Red Hat Enterprise Linux 6:
# subscription-manager repos \ --enable=rhel-6-server-rpms \ --enable=rhel-6-server-rh-common-rpms
For Red Hat Enterprise Linux 7:
# subscription-manager repos \ --enable=rhel-7-server-rpms \ --enable=rhel-7-server-rh-common-rpms
3. Install the cloud-init package and dependencies:
# yum install cloud-init
7.8.3. Using Cloud-Init to Prepare a Template
As long as the cloud-init package is installed on a Linux virtual machine, you can use the virtual machineto make a cloud-init enabled template. Specify a set of standard settings to be included in a template as
CHAPTER 7. TEMPLATES
119
described in the following procedure or, alternatively, skip the Cloud-Init settings steps and configurethem when creating a virtual machine based on this template.
NOTE
While the following procedure outlines how to use Cloud-Init when preparing a template,the same settings are also available in the New Virtual Machine, Edit Template, and RunOnce windows.
Using Cloud-Init to Prepare a Template
1. Click Compute → Templates and select a template.
2. Click Edit.
3. Click Show Advanced Options
4. Click the Initial Run tab and select the Use Cloud-Init/Sysprep check box.
5. Enter a host name in the VM Hostname text field.
6. Select the Configure Time Zone check box and select a time zone from the Time Zone drop-down list.
7. Expand the Authentication section.
Select the Use already configured password check box to use the existing credentials, orclear that check box and enter a root password in the Password and Verify Password textfields to specify a new root password.
Enter any SSH keys to be added to the authorized hosts file on the virtual machine in theSSH Authorized Keys text area.
Select the Regenerate SSH Keys check box to regenerate SSH keys for the virtualmachine.
8. Expand the Networks section.
Enter any DNS servers in the DNS Servers text field.
Enter any DNS search domains in the DNS Search Domains text field.
Select the In-guest Network Interface check box and use the + Add new and - Renoveselected buttons to add or remove network interfaces to or from the virtual machine.
IMPORTANT
You must specify the correct network interface name and number (forexample, eth0, eno3, enp0s). Otherwise, the virtual machine’s interfaceconnection will be up, but it will not have the cloud-init networkconfiguration.
9. Expand the Custom Script section and enter any custom scripts in the Custom Script textarea.
10. Click OK.
Red Hat Virtualization 4.3 Virtual Machine Management Guide
120
You can now provision new virtual machines using this template.
7.8.4. Using Cloud-Init to Initialize a Virtual Machine
Use Cloud-Init to automate the initial configuration of a Linux virtual machine. You can use the Cloud-Init fields to configure a virtual machine’s host name, time zone, root password, authorized keys, networkinterfaces, and DNS service. You can also specify a custom script, a script in YAML format, to run onboot. The custom script allows for additional Cloud-Init configuration that is supported by Cloud-Init butnot available in the Cloud-Init fields. For more information on custom script examples, see Cloud configexamples.
Using Cloud-Init to Initialize a Virtual Machine
This procedure starts a virtual machine with a set of Cloud-Init settings. If the relevant settings areincluded in the template the virtual machine is based on, review the settings, make changes whereappropriate, and click OK to start the virtual machine.
1. Click Compute → Virtual Machines and select a virtual machine.
2. Click the Run drop-down button and select Run Once.
3. Expand the Initial Run section and select the Cloud-Init check box.
4. Enter a host name in the VM Hostname text field.
5. Select the Configure Time Zone check box and select a time zone from the Time Zone drop-down menu.
6. Select the Use already configured password check box to use the existing credentials, or clearthat check box and enter a root password in the Password and Verify Password text fields tospecify a new root password.
7. Enter any SSH keys to be added to the authorized hosts file on the virtual machine in the SSHAuthorized Keys text area.
8. Select the Regenerate SSH Keys check box to regenerate SSH keys for the virtual machine.
9. Enter any DNS servers in the DNS Servers text field.
10. Enter any DNS search domains in the DNS Search Domains text field.
11. Select the Network check box and use the + and - buttons to add or remove network interfacesto or from the virtual machine.
IMPORTANT
You must specify the correct network interface name and number (for example, eth0, eno3, enp0s). Otherwise, the virtual machine’s interface connection will beup, but the cloud-init network configuration will not be defined in it.
12. Enter a custom script in the Custom Script text area. Make sure the values specified in thescript are appropriate. Otherwise, the action will fail.
13. Click OK.
NOTE
CHAPTER 7. TEMPLATES
121
NOTE
To check if a virtual machine has Cloud-Init installed, select a virtual machine and click theApplications sub-tab. Only shown if the guest agent is installed.
7.9. USING SYSPREP TO AUTOMATE THE CONFIGURATION OFVIRTUAL MACHINES
Sysprep is a tool used to automate the setup of Windows virtual machines, for example, configuring hostnames, network interfaces, authorized keys, set up users, or to connect to Active Directory. Sysprep isinstalled with every version of Windows.
Red Hat Virtualization enhances Sysprep by exploiting virtualization technology to deploy virtualworkstations based on a single template. Red Hat Virtualization builds a tailored auto-answer file foreach virtual workstation.
Sysprep generates a complete unattended installation answer file. Default values for several Windowsoperating systems are available in the /usr/share/ovirt-engine/conf/sysprep/ directory. You can alsocreate a custom Sysprep file and reference it from the the osinfo file in the /etc/ovirt-engine/osinfo.conf.d/ directory. These files act as templates for Sysprep. The fields in these files canbe copied and edited as required. This definition will override any values entered into the Initial Runfields of the Edit Virtual Machine window.
You can create a custom sysprep file when creating a pool of Windows virtual machines, toaccommodate various operating systems and domains. See Creating a Virtual Machine Pool in theAdministration Guide for details.
The override file must be created under /etc/ovirt-engine/osinfo.conf.d/, have a filename that puts itafter /etc/ovirt-engine/osinfo.conf.d/00-defaults.properties, and ends in .properties. For example,/etc/ovirt-engine/osinfo.conf.d/10-productkeys.properties. The last file will have precedence andoverride any other previous file.
Copy the default values for your Windows operating system from /etc/ovirt-engine/osinfo.conf.d/00-defaults.properties into the override file, and input your values in the productKey.value and sysprepPath.value fields.
Example 7.2. Windows 7 Default Configuration Values
# Windows7(11, OsType.Windows, false),falseos.windows_7.id.value = 11os.windows_7.name.value = Windows 7os.windows_7.derivedFrom.value = windows_xpos.windows_7.sysprepPath.value = ${ENGINE_USR}/conf/sysprep/sysprep.w7os.windows_7.productKey.value =os.windows_7.devices.audio.value = ich6os.windows_7.devices.diskInterfaces.value.3.3 = IDE, VirtIO_SCSI, VirtIOos.windows_7.devices.diskInterfaces.value.3.4 = IDE, VirtIO_SCSI, VirtIOos.windows_7.devices.diskInterfaces.value.3.5 = IDE, VirtIO_SCSI, VirtIOos.windows_7.isTimezoneTypeInteger.value = false
7.9.1. Configuring Sysprep on a Template
You can use this procedure to specify a set of standard Sysprep settings to include in the template,
Red Hat Virtualization 4.3 Virtual Machine Management Guide
122
You can use this procedure to specify a set of standard Sysprep settings to include in the template,alternatively you can configure the Sysprep settings when creating a virtual machine based on thistemplate.
Replacement strings can be used to substitute values provided in the default files in the/usr/share/ovirt-engine/conf/sysprep/ directory. For example, "<Domain><![CDATA[$JoinDomain$]]></Domain>" can be used to indicate the domain to join.
IMPORTANT
Do not reboot the virtual machine while Sysprep is running.
Prerequisites
The Windows virtual machine parameters have been correctly defined.If not, click Compute → Virtual Machines, click Edit, and enter the required information in theOperating System and Cluster fields.
The correct product key has been defined in an override file on the Manager.
Using Sysprep to Prepare a Template
1. Build the Windows virtual machine with the required patches and software.
2. Seal the Windows virtual machine. See Section 7.1, “Sealing Virtual Machines in Preparation forDeployment as Templates”
3. Create a template based on the Windows virtual machine. See Section 7.2, “Creating aTemplate”
4. Update the Sysprep file with a text editor if additional changes are required.
You can now provision new virtual machines using this template.
7.9.2. Using Sysprep to Initialize a Virtual Machine
Use Sysprep to automate the initial configuration of a Windows virtual machine. You can use theSysprep fields to configure a virtual machine’s host name, time zone, root password, authorized keys,network interfaces, and DNS service.
Using Sysprep to Initialize a Virtual Machine
This procedure starts a virtual machine with a set of Sysprep settings. If the relevant settings areincluded in the template the virtual machine is based on, review the settings and make changes whererequired.
1. Create a new Windows virtual machine based on a template of the required Windows virtualmachine. See Section 7.10, “Creating a Virtual Machine Based on a Template” .
2. Click Compute → Virtual Machines and select the virtual machine.
3. Click the Run drop-down button and select Run Once.
4. Expand the Boot Options section, select the Attach Floppy check box, and select the[sysprep] option.
5. Select the Attach CD check box and select the required Windows ISO from the drop-down list.
CHAPTER 7. TEMPLATES
123
6. Move the CD-ROM to the top of the Boot Sequence field.
7. Configure any further Run Once options as required. See Section A.2, “Explanation of Settingsin the Run Once Window” for more details.
8. Click OK.
7.10. CREATING A VIRTUAL MACHINE BASED ON A TEMPLATE
Create a virtual machine from a template to enable the virtual machines to be pre-configured with anoperating system, network interfaces, applications and other resources.
NOTE
Virtual machines created from a template depend on that template. This means that youcannot remove a template from the Manager if a virtual machine was created from thattemplate. However, you can clone a virtual machine from a template to remove thedependency on that template. See Section 7.11, “Creating a Cloned Virtual MachineBased on a Template” for more information.
Creating a Virtual Machine Based on a Template
1. Click Compute → Virtual Machines.
2. Click New.
3. Select the Cluster on which the virtual machine will run.
4. Select a template from the Template list.
5. Enter a Name, Description, and any Comments, and accept the default values inherited fromthe template in the rest of the fields. You can change them if needed.
6. Click the Resource Allocation tab.
7. Select the Thin or Clone radio button in the Storage Allocation area. If you select Thin, thedisk format is QCOW2. If you select Clone, select either QCOW2 or Raw for disk format.
8. Use the Target drop-down list to select the storage domain on which the virtual machine’svirtual disk will be stored.
9. Click OK.
The virtual machine is displayed in the Virtual Machines tab.
7.11. CREATING A CLONED VIRTUAL MACHINE BASED ON ATEMPLATE
Cloned virtual machines are based on templates and inherit the settings of the template. A clonedvirtual machine does not depend on the template on which it was based after it has been created. Thismeans the template can be deleted if no other dependencies exist.
NOTE
Red Hat Virtualization 4.3 Virtual Machine Management Guide
124
NOTE
If you clone a virtual machine from a template, the name of the template on which thatvirtual machine was based is displayed in the General tab of the Edit Virtual Machinewindow for that virtual machine. If you change the name of that template, the name ofthe template in the General tab will also be updated. However, if you delete the templatefrom the Manager, the original name of that template will be displayed instead.
Cloning a Virtual Machine Based on a Template
1. Click Compute → Virtual Machines.
2. Click New.
3. Select the Cluster on which the virtual machine will run.
4. Select a template from the Based on Template drop-down menu.
5. Enter a Name, Description and any Comments. You can accept the default values inheritedfrom the template in the rest of the fields, or change them if required.
6. Click the Resource Allocation tab.
7. Select the Clone radio button in the Storage Allocation area.
8. Select the disk format from the Format drop-down list. This affects the speed of the cloneoperation and the amount of disk space the new virtual machine initially requires.
QCOW2 (Default)
Faster clone operation
Optimized use of storage capacity
Disk space allocated only as required
Raw
Slower clone operation
Optimized virtual machine read and write operations
All disk space requested in the template is allocated at the time of the clone operation
9. Use the Target drop-down menu to select the storage domain on which the virtual machine’svirtual disk will be stored.
10. Click OK.
NOTE
Cloning a virtual machine may take some time. A new copy of the template’s disk must becreated. During this time, the virtual machine’s status is first Image Locked, then Down.
The virtual machine is created and displayed in the Virtual Machines tab. You can now assign users to it,and can begin using it when the clone operation is complete.
CHAPTER 7. TEMPLATES
125
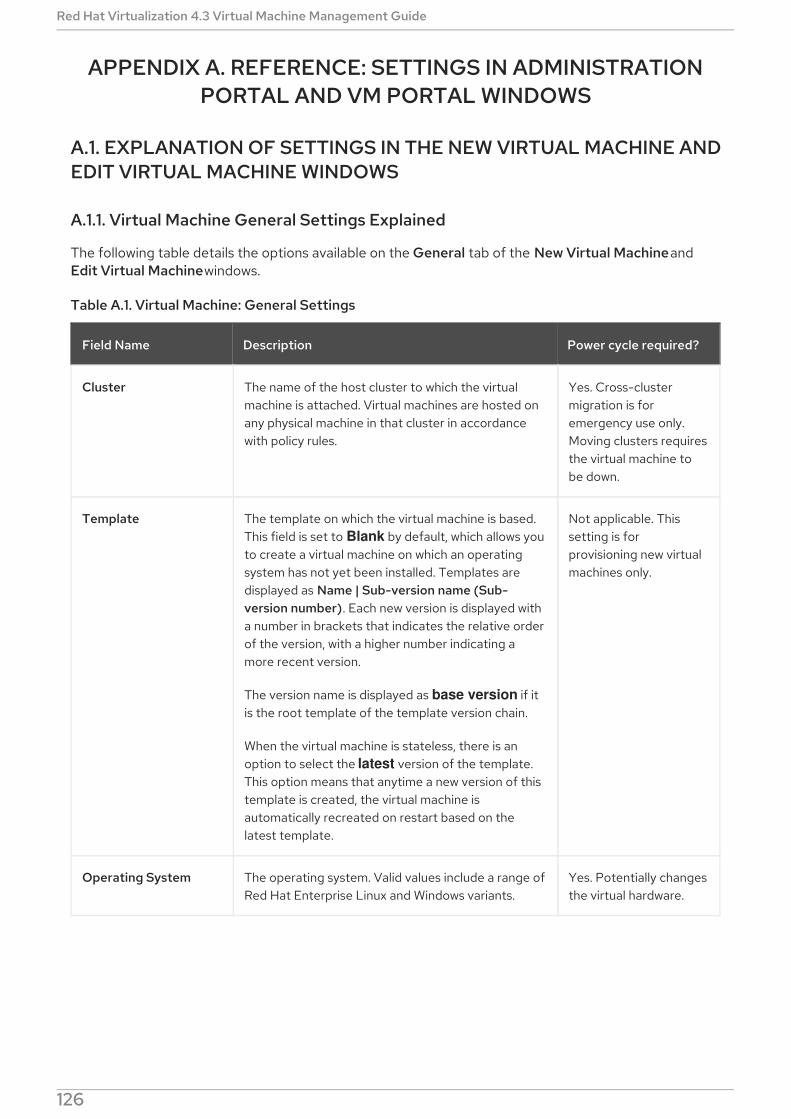
APPENDIX A. REFERENCE: SETTINGS IN ADMINISTRATIONPORTAL AND VM PORTAL WINDOWS
A.1. EXPLANATION OF SETTINGS IN THE NEW VIRTUAL MACHINE ANDEDIT VIRTUAL MACHINE WINDOWS
A.1.1. Virtual Machine General Settings Explained
The following table details the options available on the General tab of the New Virtual Machine andEdit Virtual Machine windows.
Table A.1. Virtual Machine: General Settings
Field Name Description Power cycle required?
Cluster The name of the host cluster to which the virtualmachine is attached. Virtual machines are hosted onany physical machine in that cluster in accordancewith policy rules.
Yes. Cross-clustermigration is foremergency use only.Moving clusters requiresthe virtual machine tobe down.
Template The template on which the virtual machine is based.This field is set to Blank by default, which allows youto create a virtual machine on which an operatingsystem has not yet been installed. Templates aredisplayed as Name | Sub-version name (Sub-version number). Each new version is displayed witha number in brackets that indicates the relative orderof the version, with a higher number indicating amore recent version.
The version name is displayed as base version if itis the root template of the template version chain.
When the virtual machine is stateless, there is anoption to select the latest version of the template.This option means that anytime a new version of thistemplate is created, the virtual machine isautomatically recreated on restart based on thelatest template.
Not applicable. Thissetting is forprovisioning new virtualmachines only.
Operating System The operating system. Valid values include a range ofRed Hat Enterprise Linux and Windows variants.
Yes. Potentially changesthe virtual hardware.
Red Hat Virtualization 4.3 Virtual Machine Management Guide
126
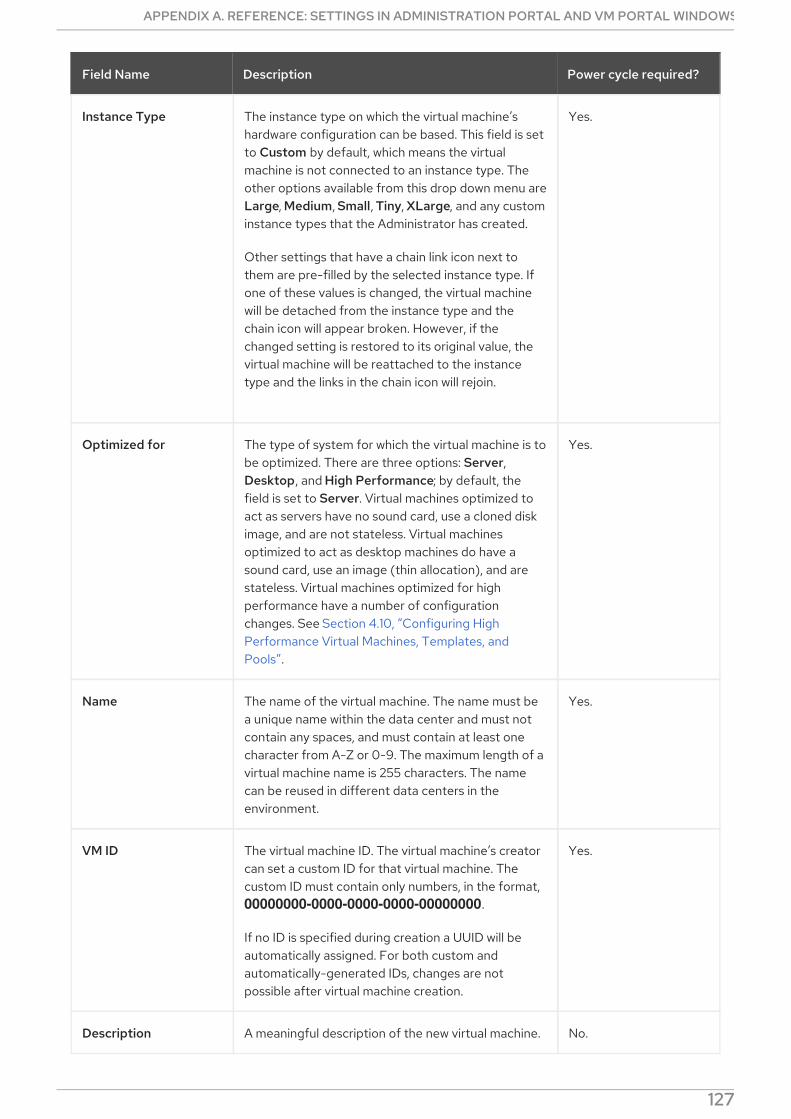
Instance Type The instance type on which the virtual machine’shardware configuration can be based. This field is setto Custom by default, which means the virtualmachine is not connected to an instance type. Theother options available from this drop down menu areLarge, Medium, Small, Tiny, XLarge, and any custominstance types that the Administrator has created.
Other settings that have a chain link icon next tothem are pre-filled by the selected instance type. Ifone of these values is changed, the virtual machinewill be detached from the instance type and thechain icon will appear broken. However, if thechanged setting is restored to its original value, thevirtual machine will be reattached to the instancetype and the links in the chain icon will rejoin.
Yes.
Optimized for The type of system for which the virtual machine is tobe optimized. There are three options: Server,Desktop, and High Performance; by default, thefield is set to Server. Virtual machines optimized toact as servers have no sound card, use a cloned diskimage, and are not stateless. Virtual machinesoptimized to act as desktop machines do have asound card, use an image (thin allocation), and arestateless. Virtual machines optimized for highperformance have a number of configurationchanges. See Section 4.10, “Configuring HighPerformance Virtual Machines, Templates, andPools”.
Yes.
Name The name of the virtual machine. The name must bea unique name within the data center and must notcontain any spaces, and must contain at least onecharacter from A-Z or 0-9. The maximum length of avirtual machine name is 255 characters. The namecan be reused in different data centers in theenvironment.
Yes.
VM ID The virtual machine ID. The virtual machine’s creatorcan set a custom ID for that virtual machine. Thecustom ID must contain only numbers, in the format, 00000000-0000-0000-0000-00000000.
If no ID is specified during creation a UUID will beautomatically assigned. For both custom andautomatically-generated IDs, changes are notpossible after virtual machine creation.
Yes.
Description A meaningful description of the new virtual machine. No.
Field Name Description Power cycle required?
APPENDIX A. REFERENCE: SETTINGS IN ADMINISTRATION PORTAL AND VM PORTAL WINDOWS
127
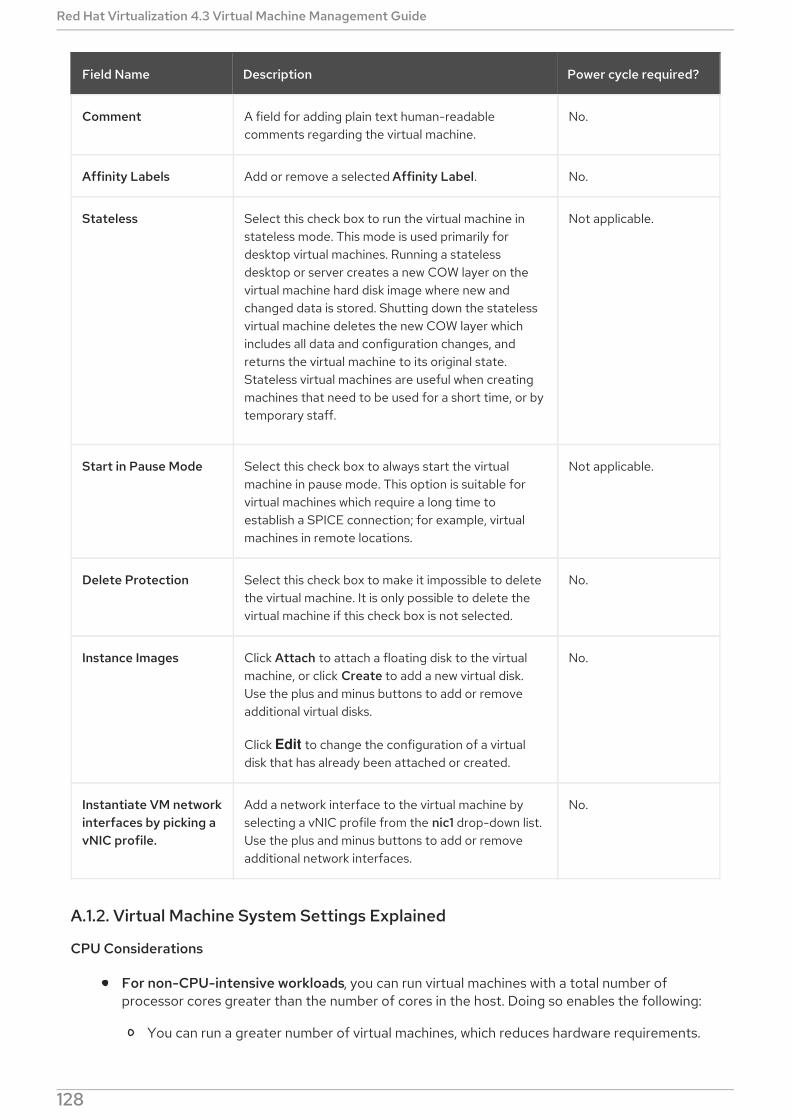
Comment A field for adding plain text human-readablecomments regarding the virtual machine.
No.
Affinity Labels Add or remove a selected Affinity Label. No.
Stateless Select this check box to run the virtual machine instateless mode. This mode is used primarily fordesktop virtual machines. Running a statelessdesktop or server creates a new COW layer on thevirtual machine hard disk image where new andchanged data is stored. Shutting down the statelessvirtual machine deletes the new COW layer whichincludes all data and configuration changes, andreturns the virtual machine to its original state.Stateless virtual machines are useful when creatingmachines that need to be used for a short time, or bytemporary staff.
Not applicable.
Start in Pause Mode Select this check box to always start the virtualmachine in pause mode. This option is suitable forvirtual machines which require a long time toestablish a SPICE connection; for example, virtualmachines in remote locations.
Not applicable.
Delete Protection Select this check box to make it impossible to deletethe virtual machine. It is only possible to delete thevirtual machine if this check box is not selected.
No.
Instance Images Click Attach to attach a floating disk to the virtualmachine, or click Create to add a new virtual disk.Use the plus and minus buttons to add or removeadditional virtual disks.
Click Edit to change the configuration of a virtualdisk that has already been attached or created.
No.
Instantiate VM networkinterfaces by picking avNIC profile.
Add a network interface to the virtual machine byselecting a vNIC profile from the nic1 drop-down list.Use the plus and minus buttons to add or removeadditional network interfaces.
No.
Field Name Description Power cycle required?
A.1.2. Virtual Machine System Settings Explained
CPU Considerations
For non-CPU-intensive workloads, you can run virtual machines with a total number ofprocessor cores greater than the number of cores in the host. Doing so enables the following:
You can run a greater number of virtual machines, which reduces hardware requirements.
You can configure virtual machines with CPU topologies that are otherwise not possible,
Red Hat Virtualization 4.3 Virtual Machine Management Guide
128
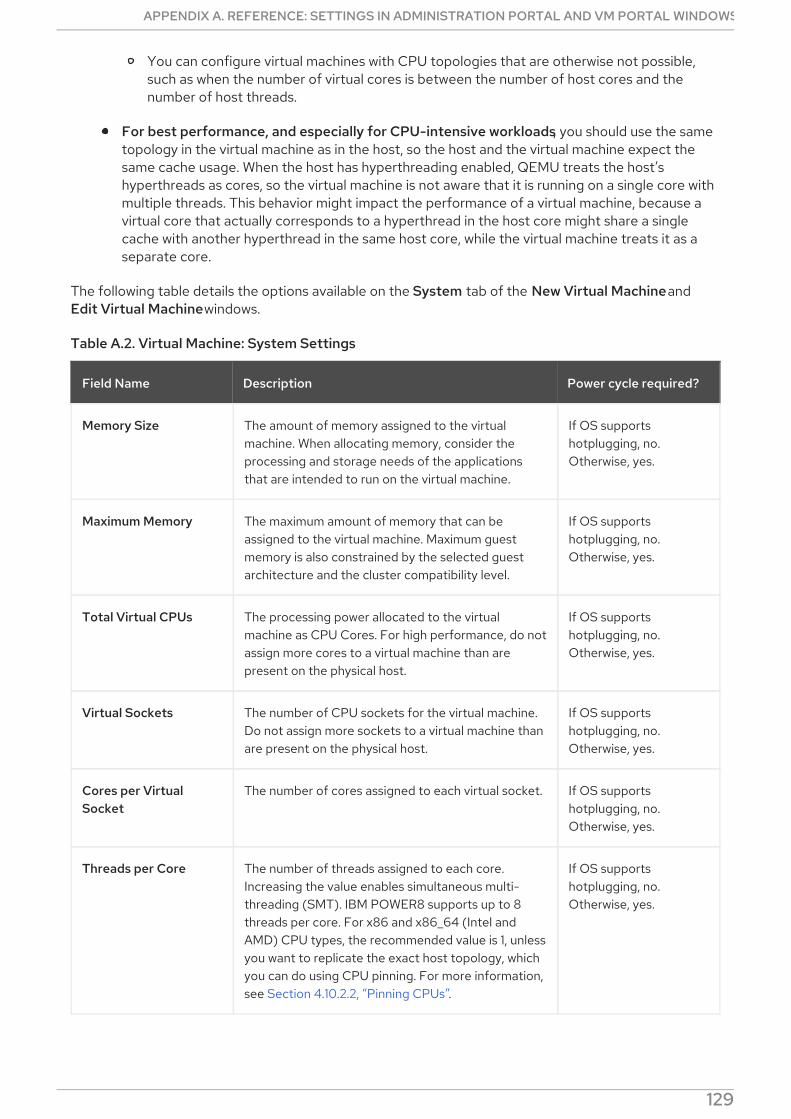
You can configure virtual machines with CPU topologies that are otherwise not possible,such as when the number of virtual cores is between the number of host cores and thenumber of host threads.
For best performance, and especially for CPU-intensive workloads, you should use the sametopology in the virtual machine as in the host, so the host and the virtual machine expect thesame cache usage. When the host has hyperthreading enabled, QEMU treats the host’shyperthreads as cores, so the virtual machine is not aware that it is running on a single core withmultiple threads. This behavior might impact the performance of a virtual machine, because avirtual core that actually corresponds to a hyperthread in the host core might share a singlecache with another hyperthread in the same host core, while the virtual machine treats it as aseparate core.
The following table details the options available on the System tab of the New Virtual Machine andEdit Virtual Machine windows.
Table A.2. Virtual Machine: System Settings
Field Name Description Power cycle required?
Memory Size The amount of memory assigned to the virtualmachine. When allocating memory, consider theprocessing and storage needs of the applicationsthat are intended to run on the virtual machine.
If OS supportshotplugging, no.Otherwise, yes.
Maximum Memory The maximum amount of memory that can beassigned to the virtual machine. Maximum guestmemory is also constrained by the selected guestarchitecture and the cluster compatibility level.
If OS supportshotplugging, no.Otherwise, yes.
Total Virtual CPUs The processing power allocated to the virtualmachine as CPU Cores. For high performance, do notassign more cores to a virtual machine than arepresent on the physical host.
If OS supportshotplugging, no.Otherwise, yes.
Virtual Sockets The number of CPU sockets for the virtual machine.Do not assign more sockets to a virtual machine thanare present on the physical host.
If OS supportshotplugging, no.Otherwise, yes.
Cores per VirtualSocket
The number of cores assigned to each virtual socket. If OS supportshotplugging, no.Otherwise, yes.
Threads per Core The number of threads assigned to each core.Increasing the value enables simultaneous multi-threading (SMT). IBM POWER8 supports up to 8threads per core. For x86 and x86_64 (Intel andAMD) CPU types, the recommended value is 1, unlessyou want to replicate the exact host topology, whichyou can do using CPU pinning. For more information,see Section 4.10.2.2, “Pinning CPUs”.
If OS supportshotplugging, no.Otherwise, yes.
APPENDIX A. REFERENCE: SETTINGS IN ADMINISTRATION PORTAL AND VM PORTAL WINDOWS
129
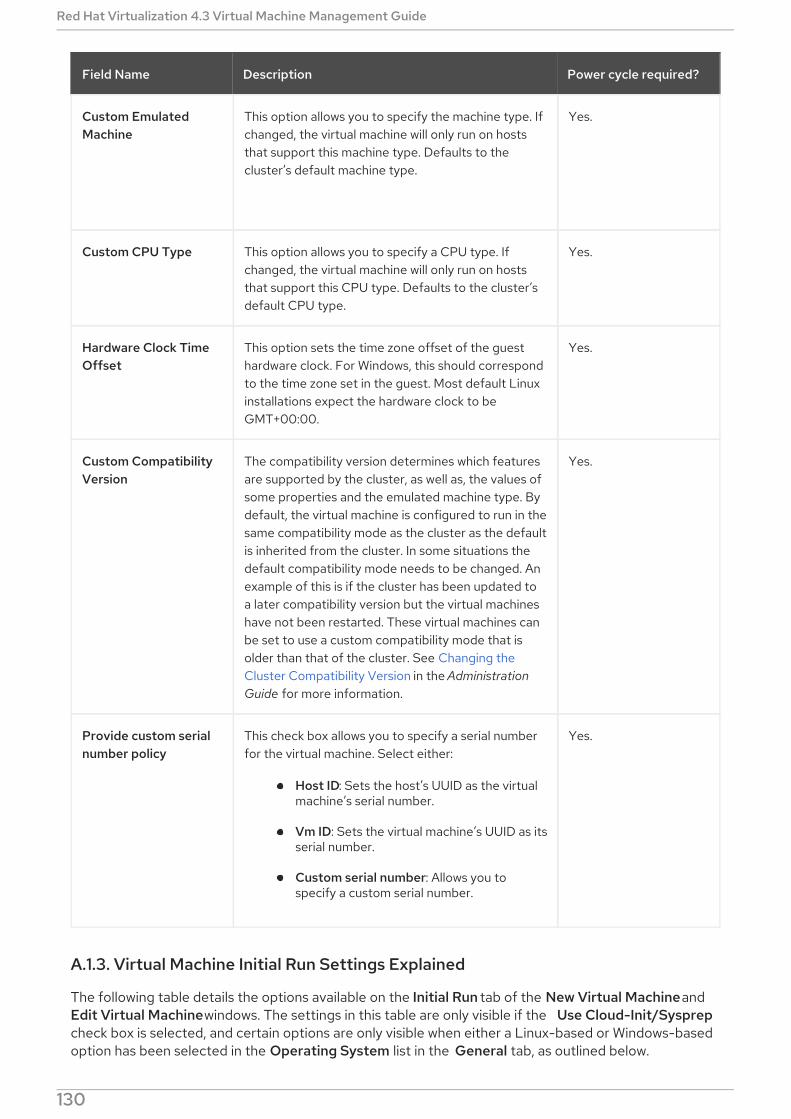
Custom EmulatedMachine
This option allows you to specify the machine type. Ifchanged, the virtual machine will only run on hoststhat support this machine type. Defaults to thecluster’s default machine type.
Yes.
Custom CPU Type This option allows you to specify a CPU type. Ifchanged, the virtual machine will only run on hoststhat support this CPU type. Defaults to the cluster’sdefault CPU type.
Yes.
Hardware Clock TimeOffset
This option sets the time zone offset of the guesthardware clock. For Windows, this should correspondto the time zone set in the guest. Most default Linuxinstallations expect the hardware clock to beGMT+00:00.
Yes.
Custom CompatibilityVersion
The compatibility version determines which featuresare supported by the cluster, as well as, the values ofsome properties and the emulated machine type. Bydefault, the virtual machine is configured to run in thesame compatibility mode as the cluster as the defaultis inherited from the cluster. In some situations thedefault compatibility mode needs to be changed. Anexample of this is if the cluster has been updated toa later compatibility version but the virtual machineshave not been restarted. These virtual machines canbe set to use a custom compatibility mode that isolder than that of the cluster. See Changing theCluster Compatibility Version in the AdministrationGuide for more information.
Yes.
Provide custom serialnumber policy
This check box allows you to specify a serial numberfor the virtual machine. Select either:
Host ID: Sets the host’s UUID as the virtualmachine’s serial number.
Vm ID: Sets the virtual machine’s UUID as itsserial number.
Custom serial number: Allows you tospecify a custom serial number.
Yes.
Field Name Description Power cycle required?
A.1.3. Virtual Machine Initial Run Settings Explained
The following table details the options available on the Initial Run tab of the New Virtual Machine andEdit Virtual Machine windows. The settings in this table are only visible if the Use Cloud-Init/Sysprepcheck box is selected, and certain options are only visible when either a Linux-based or Windows-basedoption has been selected in the Operating System list in the General tab, as outlined below.
Red Hat Virtualization 4.3 Virtual Machine Management Guide
130

NOTE
This table does not include information on whether a power cycle is required because thesettings apply to the virtual machine’s initial run; the virtual machine is not running whenyou configure these settings.
Table A.3. Virtual Machine: Initial Run Settings
Field Name Operating System Description
Use Cloud-Init/Sysprep
Linux, Windows This check box toggles whether Cloud-Init orSysprep will be used to initialize the virtual machine.
VM Hostname Linux, Windows The host name of the virtual machine.
Domain Windows The Active Directory domain to which the virtualmachine belongs.
Organization Name Windows The name of the organization to which the virtualmachine belongs. This option corresponds to the textfield for setting the organization name displayedwhen a machine running Windows is started for thefirst time.
Active Directory OU Windows The organizational unit in the Active Directorydomain to which the virtual machine belongs.
Configure Time Zone Linux, Windows The time zone for the virtual machine. Select thischeck box and select a time zone from the TimeZone list.
Admin Password Windows The administrative user password for the virtualmachine. Click the disclosure arrow to display thesettings for this option.
Use already configured password: Thischeck box is automatically selected afteryou specify an initial administrative userpassword. You must clear this check box toenable the Admin Password and VerifyAdmin Password fields and specify a newpassword.
Admin Password: The administrative userpassword for the virtual machine. Enter thepassword in this text field and the VerifyAdmin Password text field to verify thepassword.
APPENDIX A. REFERENCE: SETTINGS IN ADMINISTRATION PORTAL AND VM PORTAL WINDOWS
131
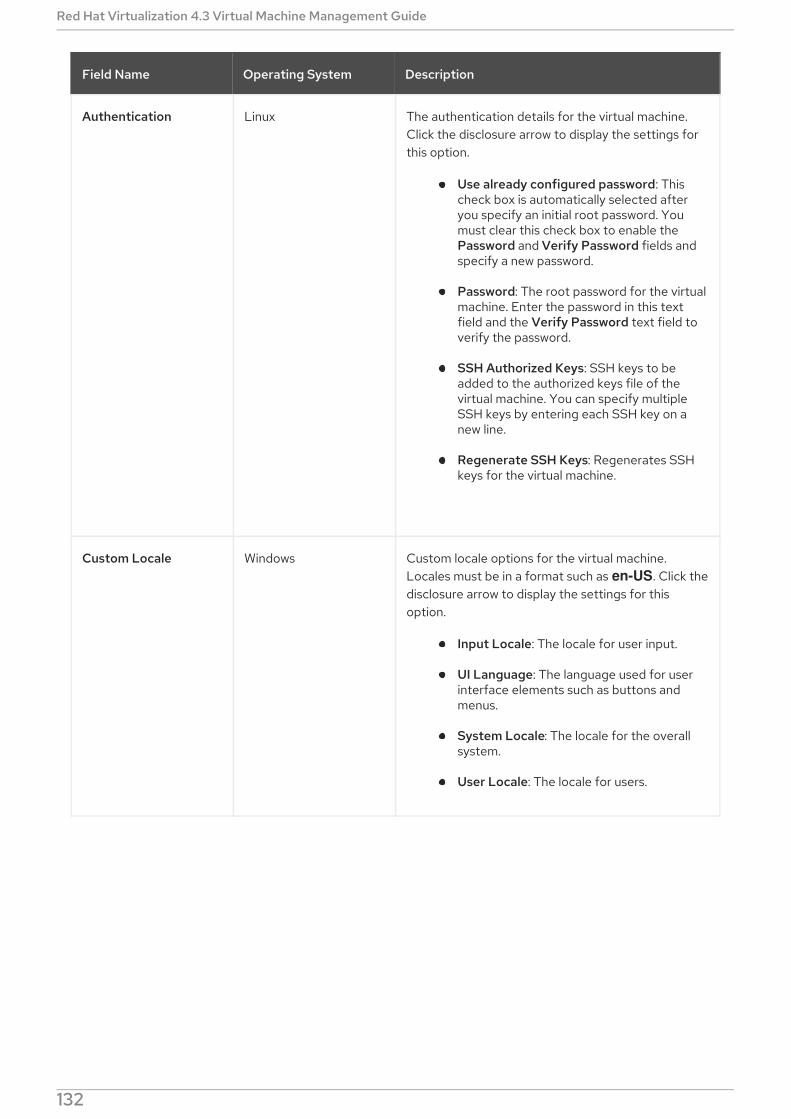
Authentication Linux The authentication details for the virtual machine.Click the disclosure arrow to display the settings forthis option.
Use already configured password: Thischeck box is automatically selected afteryou specify an initial root password. Youmust clear this check box to enable thePassword and Verify Password fields andspecify a new password.
Password: The root password for the virtualmachine. Enter the password in this textfield and the Verify Password text field toverify the password.
SSH Authorized Keys: SSH keys to beadded to the authorized keys file of thevirtual machine. You can specify multipleSSH keys by entering each SSH key on anew line.
Regenerate SSH Keys: Regenerates SSHkeys for the virtual machine.
Custom Locale Windows Custom locale options for the virtual machine.Locales must be in a format such as en-US. Click thedisclosure arrow to display the settings for thisoption.
Input Locale: The locale for user input.
UI Language: The language used for userinterface elements such as buttons andmenus.
System Locale: The locale for the overallsystem.
User Locale: The locale for users.
Field Name Operating System Description
Red Hat Virtualization 4.3 Virtual Machine Management Guide
132
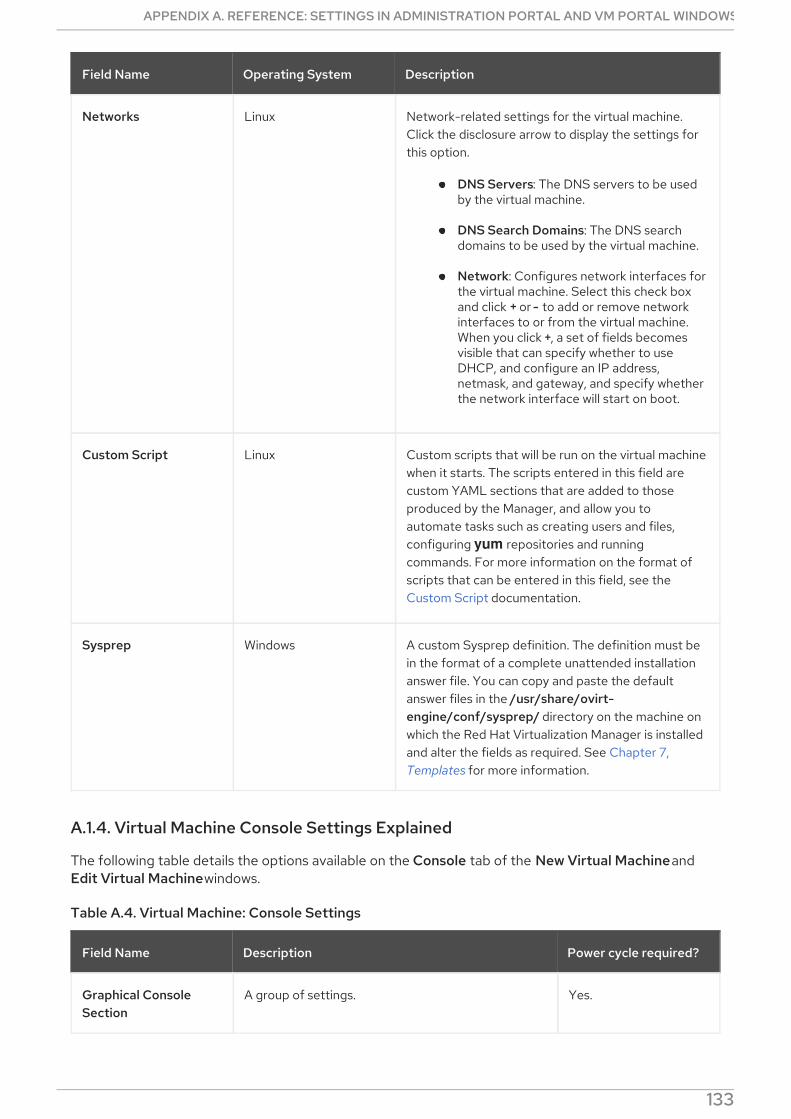
Networks Linux Network-related settings for the virtual machine.Click the disclosure arrow to display the settings forthis option.
DNS Servers: The DNS servers to be usedby the virtual machine.
DNS Search Domains: The DNS searchdomains to be used by the virtual machine.
Network: Configures network interfaces forthe virtual machine. Select this check boxand click + or - to add or remove networkinterfaces to or from the virtual machine.When you click +, a set of fields becomesvisible that can specify whether to useDHCP, and configure an IP address,netmask, and gateway, and specify whetherthe network interface will start on boot.
Custom Script Linux Custom scripts that will be run on the virtual machinewhen it starts. The scripts entered in this field arecustom YAML sections that are added to thoseproduced by the Manager, and allow you toautomate tasks such as creating users and files,configuring yum repositories and runningcommands. For more information on the format ofscripts that can be entered in this field, see theCustom Script documentation.
Sysprep Windows A custom Sysprep definition. The definition must bein the format of a complete unattended installationanswer file. You can copy and paste the defaultanswer files in the /usr/share/ovirt-engine/conf/sysprep/ directory on the machine onwhich the Red Hat Virtualization Manager is installedand alter the fields as required. See Chapter 7,Templates for more information.
Field Name Operating System Description
A.1.4. Virtual Machine Console Settings Explained
The following table details the options available on the Console tab of the New Virtual Machine andEdit Virtual Machine windows.
Table A.4. Virtual Machine: Console Settings
Field Name Description Power cycle required?
Graphical ConsoleSection
A group of settings. Yes.
APPENDIX A. REFERENCE: SETTINGS IN ADMINISTRATION PORTAL AND VM PORTAL WINDOWS
133
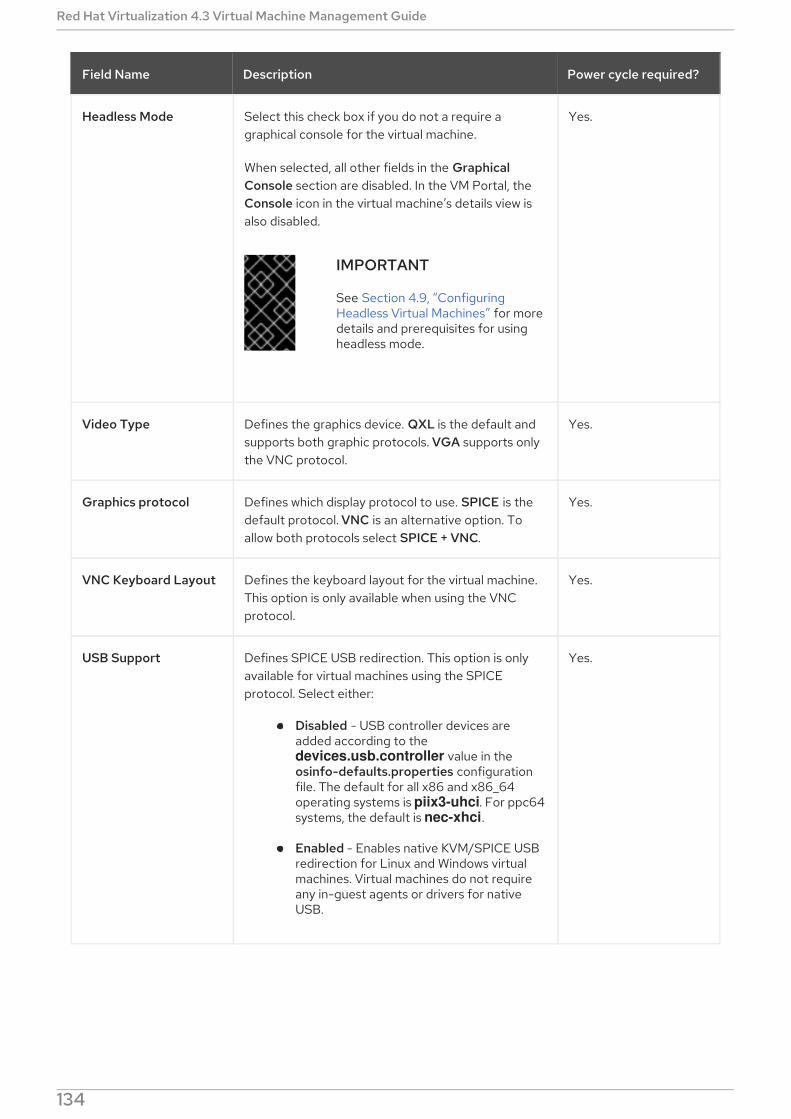
Headless Mode Select this check box if you do not a require agraphical console for the virtual machine.
When selected, all other fields in the GraphicalConsole section are disabled. In the VM Portal, theConsole icon in the virtual machine’s details view isalso disabled.
IMPORTANT
See Section 4.9, “ConfiguringHeadless Virtual Machines” for moredetails and prerequisites for usingheadless mode.
Yes.
Video Type Defines the graphics device. QXL is the default andsupports both graphic protocols. VGA supports onlythe VNC protocol.
Yes.
Graphics protocol Defines which display protocol to use. SPICE is thedefault protocol. VNC is an alternative option. Toallow both protocols select SPICE + VNC.
Yes.
VNC Keyboard Layout Defines the keyboard layout for the virtual machine.This option is only available when using the VNCprotocol.
Yes.
USB Support Defines SPICE USB redirection. This option is onlyavailable for virtual machines using the SPICEprotocol. Select either:
Disabled - USB controller devices areadded according to the devices.usb.controller value in theosinfo-defaults.properties configurationfile. The default for all x86 and x86_64operating systems is piix3-uhci. For ppc64systems, the default is nec-xhci.
Enabled - Enables native KVM/SPICE USBredirection for Linux and Windows virtualmachines. Virtual machines do not requireany in-guest agents or drivers for nativeUSB.
Yes.
Field Name Description Power cycle required?
Red Hat Virtualization 4.3 Virtual Machine Management Guide
134
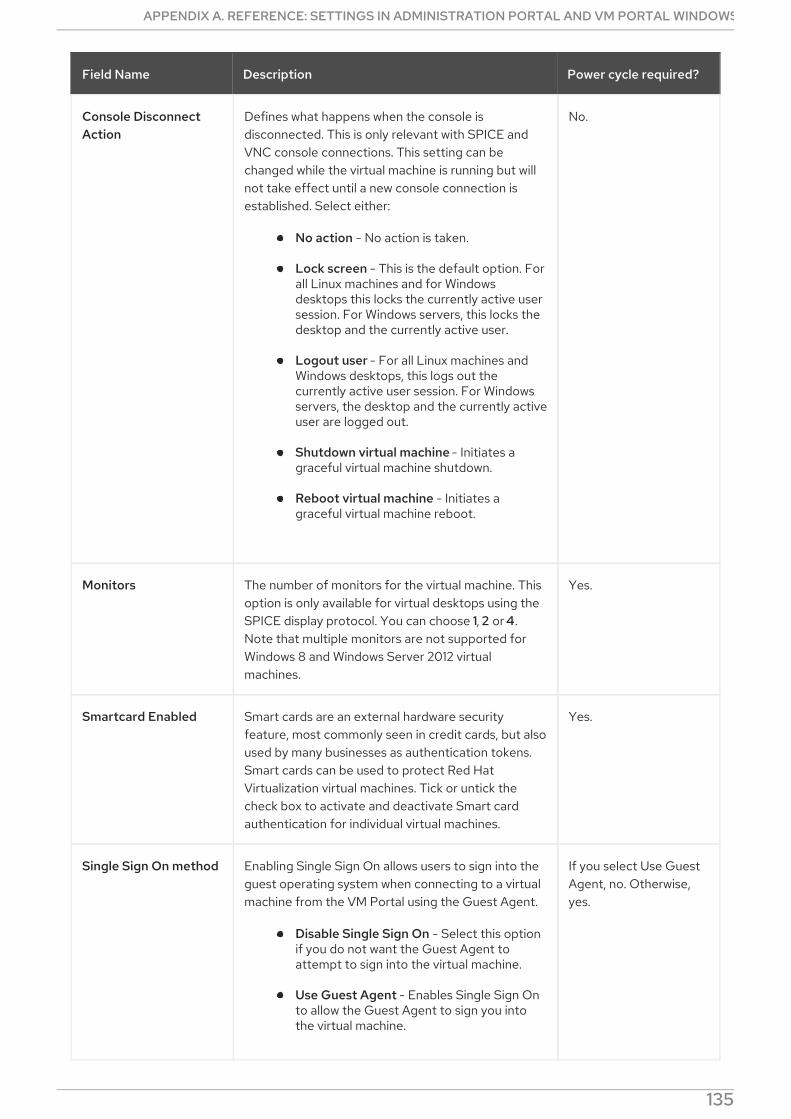
Console DisconnectAction
Defines what happens when the console isdisconnected. This is only relevant with SPICE andVNC console connections. This setting can bechanged while the virtual machine is running but willnot take effect until a new console connection isestablished. Select either:
No action - No action is taken.
Lock screen - This is the default option. Forall Linux machines and for Windowsdesktops this locks the currently active usersession. For Windows servers, this locks thedesktop and the currently active user.
Logout user - For all Linux machines andWindows desktops, this logs out thecurrently active user session. For Windowsservers, the desktop and the currently activeuser are logged out.
Shutdown virtual machine - Initiates agraceful virtual machine shutdown.
Reboot virtual machine - Initiates agraceful virtual machine reboot.
No.
Monitors The number of monitors for the virtual machine. Thisoption is only available for virtual desktops using theSPICE display protocol. You can choose 1, 2 or 4.Note that multiple monitors are not supported forWindows 8 and Windows Server 2012 virtualmachines.
Yes.
Smartcard Enabled Smart cards are an external hardware securityfeature, most commonly seen in credit cards, but alsoused by many businesses as authentication tokens.Smart cards can be used to protect Red HatVirtualization virtual machines. Tick or untick thecheck box to activate and deactivate Smart cardauthentication for individual virtual machines.
Yes.
Single Sign On method Enabling Single Sign On allows users to sign into theguest operating system when connecting to a virtualmachine from the VM Portal using the Guest Agent.
Disable Single Sign On - Select this optionif you do not want the Guest Agent toattempt to sign into the virtual machine.
Use Guest Agent - Enables Single Sign Onto allow the Guest Agent to sign you intothe virtual machine.
If you select Use GuestAgent, no. Otherwise,yes.
Field Name Description Power cycle required?
APPENDIX A. REFERENCE: SETTINGS IN ADMINISTRATION PORTAL AND VM PORTAL WINDOWS
135
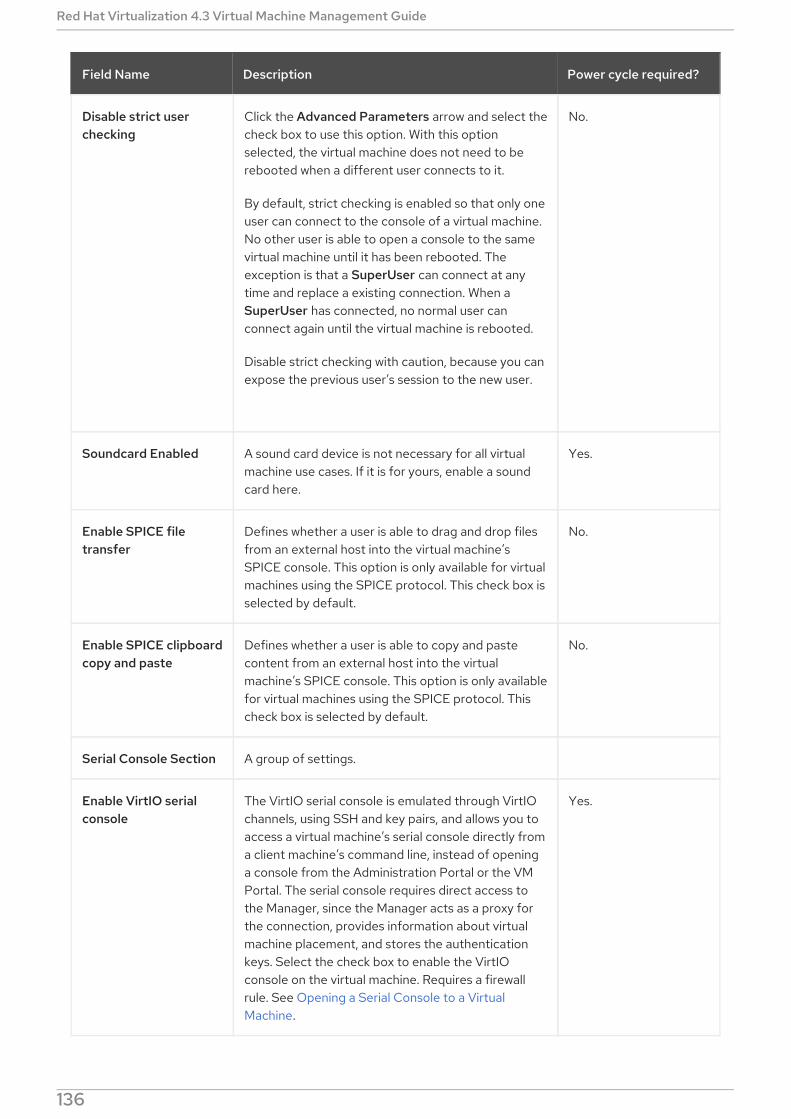
Disable strict userchecking
Click the Advanced Parameters arrow and select thecheck box to use this option. With this optionselected, the virtual machine does not need to berebooted when a different user connects to it.
By default, strict checking is enabled so that only oneuser can connect to the console of a virtual machine.No other user is able to open a console to the samevirtual machine until it has been rebooted. Theexception is that a SuperUser can connect at anytime and replace a existing connection. When aSuperUser has connected, no normal user canconnect again until the virtual machine is rebooted.
Disable strict checking with caution, because you canexpose the previous user’s session to the new user.
No.
Soundcard Enabled A sound card device is not necessary for all virtualmachine use cases. If it is for yours, enable a soundcard here.
Yes.
Enable SPICE filetransfer
Defines whether a user is able to drag and drop filesfrom an external host into the virtual machine’sSPICE console. This option is only available for virtualmachines using the SPICE protocol. This check box isselected by default.
No.
Enable SPICE clipboardcopy and paste
Defines whether a user is able to copy and pastecontent from an external host into the virtualmachine’s SPICE console. This option is only availablefor virtual machines using the SPICE protocol. Thischeck box is selected by default.
No.
Serial Console Section A group of settings.
Enable VirtIO serialconsole
The VirtIO serial console is emulated through VirtIOchannels, using SSH and key pairs, and allows you toaccess a virtual machine’s serial console directly froma client machine’s command line, instead of openinga console from the Administration Portal or the VMPortal. The serial console requires direct access tothe Manager, since the Manager acts as a proxy forthe connection, provides information about virtualmachine placement, and stores the authenticationkeys. Select the check box to enable the VirtIOconsole on the virtual machine. Requires a firewallrule. See Opening a Serial Console to a VirtualMachine.
Yes.
Field Name Description Power cycle required?
Red Hat Virtualization 4.3 Virtual Machine Management Guide
136
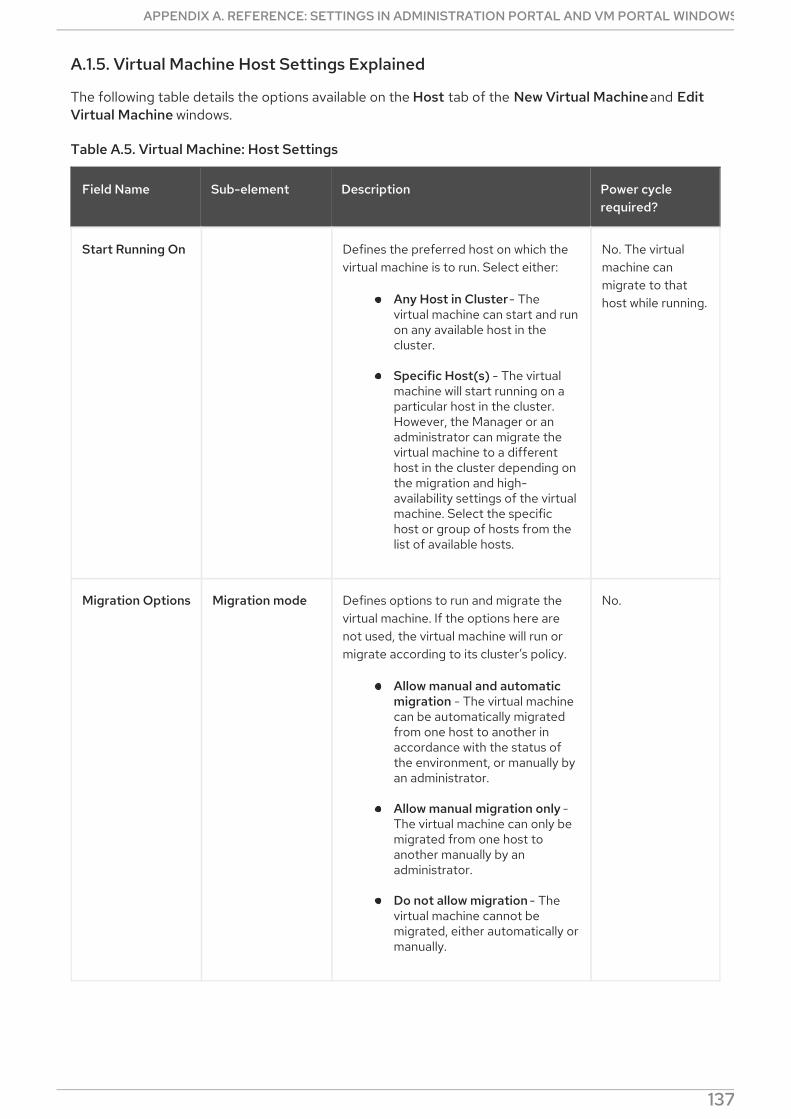
A.1.5. Virtual Machine Host Settings Explained
The following table details the options available on the Host tab of the New Virtual Machine and EditVirtual Machine windows.
Table A.5. Virtual Machine: Host Settings
Field Name Sub-element Description Power cyclerequired?
Start Running On Defines the preferred host on which thevirtual machine is to run. Select either:
Any Host in Cluster - Thevirtual machine can start and runon any available host in thecluster.
Specific Host(s) - The virtualmachine will start running on aparticular host in the cluster.However, the Manager or anadministrator can migrate thevirtual machine to a differenthost in the cluster depending onthe migration and high-availability settings of the virtualmachine. Select the specifichost or group of hosts from thelist of available hosts.
No. The virtualmachine canmigrate to thathost while running.
Migration Options Migration mode Defines options to run and migrate thevirtual machine. If the options here arenot used, the virtual machine will run ormigrate according to its cluster’s policy.
Allow manual and automaticmigration - The virtual machinecan be automatically migratedfrom one host to another inaccordance with the status ofthe environment, or manually byan administrator.
Allow manual migration only -The virtual machine can only bemigrated from one host toanother manually by anadministrator.
Do not allow migration - Thevirtual machine cannot bemigrated, either automatically ormanually.
No.
APPENDIX A. REFERENCE: SETTINGS IN ADMINISTRATION PORTAL AND VM PORTAL WINDOWS
137
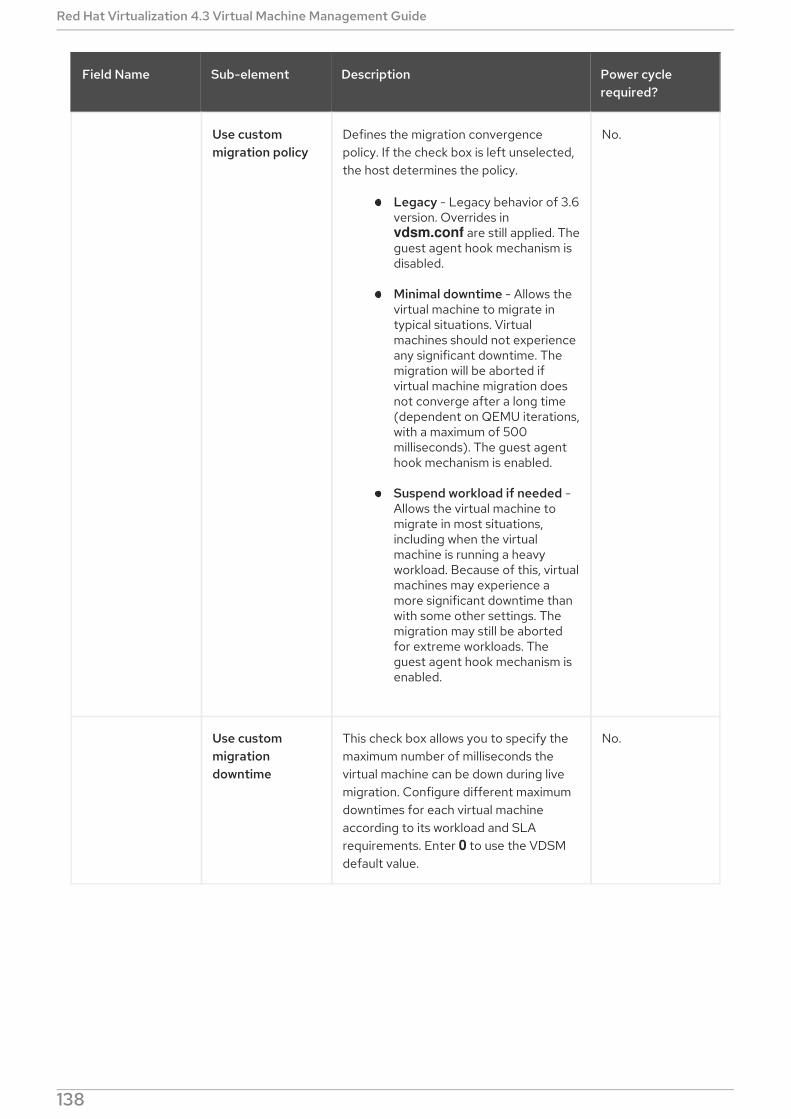
Use custommigration policy
Defines the migration convergencepolicy. If the check box is left unselected,the host determines the policy.
Legacy - Legacy behavior of 3.6version. Overrides in vdsm.conf are still applied. Theguest agent hook mechanism isdisabled.
Minimal downtime - Allows thevirtual machine to migrate intypical situations. Virtualmachines should not experienceany significant downtime. Themigration will be aborted ifvirtual machine migration doesnot converge after a long time(dependent on QEMU iterations,with a maximum of 500milliseconds). The guest agenthook mechanism is enabled.
Suspend workload if needed -Allows the virtual machine tomigrate in most situations,including when the virtualmachine is running a heavyworkload. Because of this, virtualmachines may experience amore significant downtime thanwith some other settings. Themigration may still be abortedfor extreme workloads. Theguest agent hook mechanism isenabled.
No.
Use custommigrationdowntime
This check box allows you to specify themaximum number of milliseconds thevirtual machine can be down during livemigration. Configure different maximumdowntimes for each virtual machineaccording to its workload and SLArequirements. Enter 0 to use the VDSMdefault value.
No.
Field Name Sub-element Description Power cyclerequired?
Red Hat Virtualization 4.3 Virtual Machine Management Guide
138
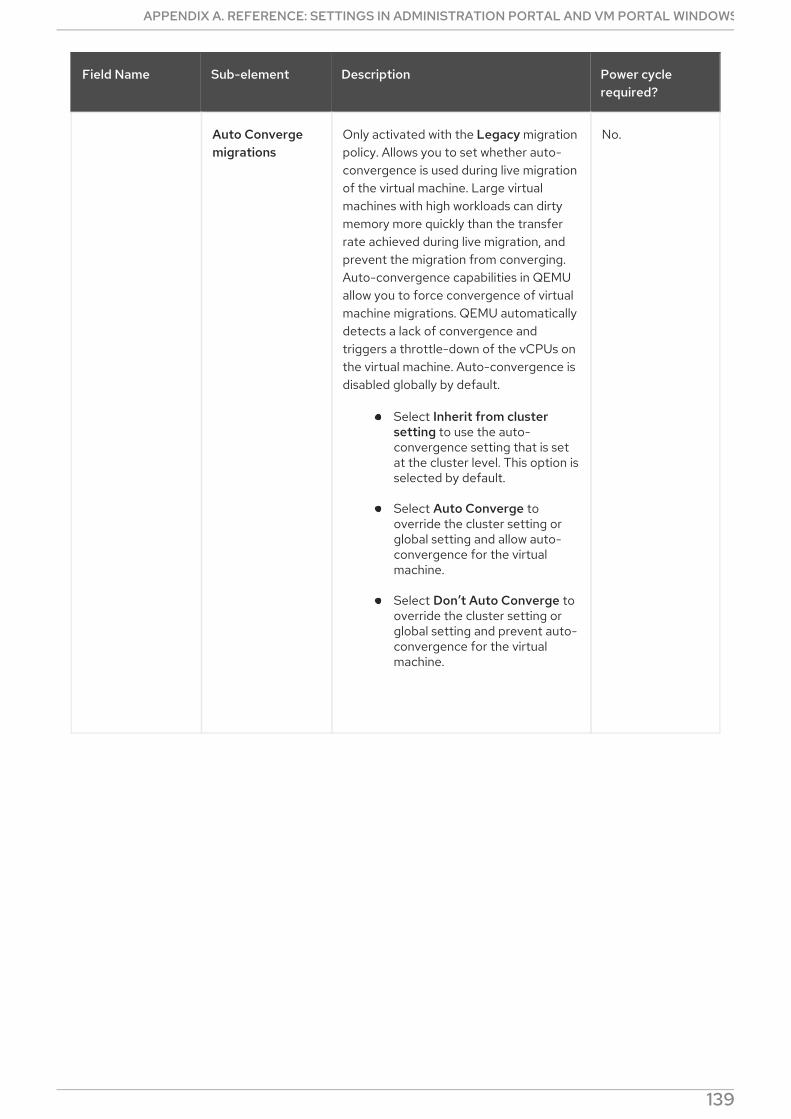
Auto Convergemigrations
Only activated with the Legacy migrationpolicy. Allows you to set whether auto-convergence is used during live migrationof the virtual machine. Large virtualmachines with high workloads can dirtymemory more quickly than the transferrate achieved during live migration, andprevent the migration from converging.Auto-convergence capabilities in QEMUallow you to force convergence of virtualmachine migrations. QEMU automaticallydetects a lack of convergence andtriggers a throttle-down of the vCPUs onthe virtual machine. Auto-convergence isdisabled globally by default.
Select Inherit from clustersetting to use the auto-convergence setting that is setat the cluster level. This option isselected by default.
Select Auto Converge tooverride the cluster setting orglobal setting and allow auto-convergence for the virtualmachine.
Select Don’t Auto Converge tooverride the cluster setting orglobal setting and prevent auto-convergence for the virtualmachine.
No.
Field Name Sub-element Description Power cyclerequired?
APPENDIX A. REFERENCE: SETTINGS IN ADMINISTRATION PORTAL AND VM PORTAL WINDOWS
139
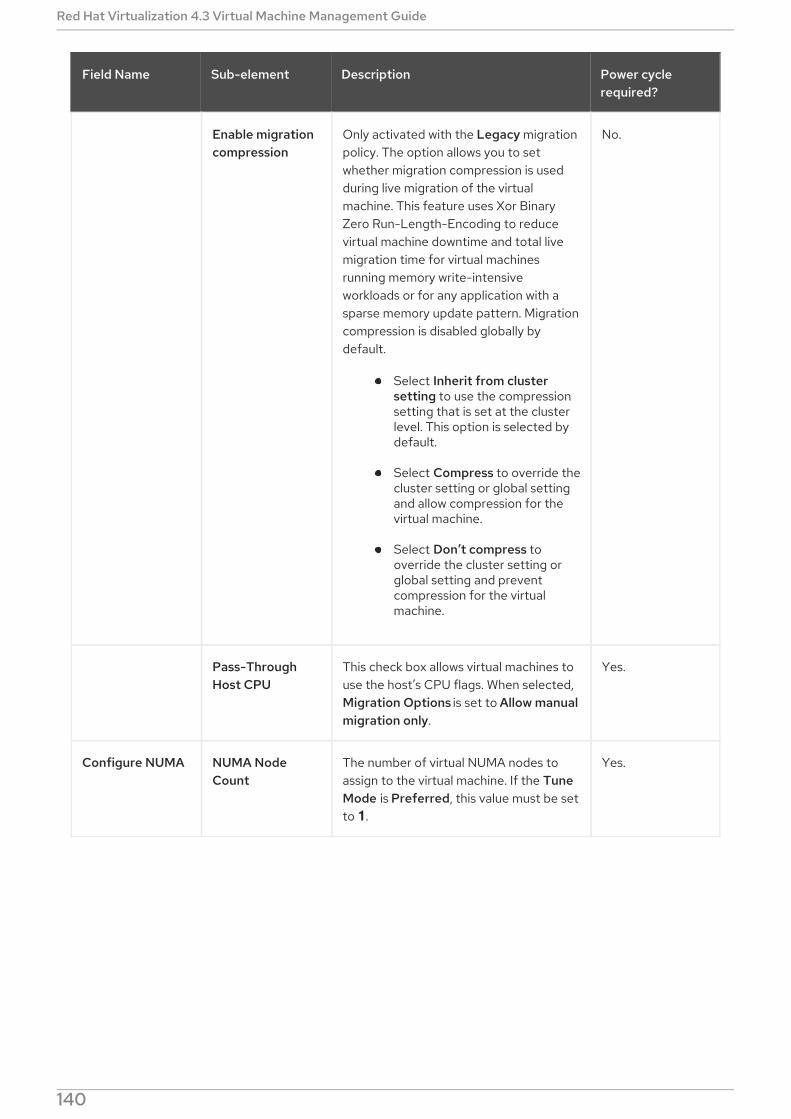
Enable migrationcompression
Only activated with the Legacy migrationpolicy. The option allows you to setwhether migration compression is usedduring live migration of the virtualmachine. This feature uses Xor BinaryZero Run-Length-Encoding to reducevirtual machine downtime and total livemigration time for virtual machinesrunning memory write-intensiveworkloads or for any application with asparse memory update pattern. Migrationcompression is disabled globally bydefault.
Select Inherit from clustersetting to use the compressionsetting that is set at the clusterlevel. This option is selected bydefault.
Select Compress to override thecluster setting or global settingand allow compression for thevirtual machine.
Select Don’t compress tooverride the cluster setting orglobal setting and preventcompression for the virtualmachine.
No.
Pass-ThroughHost CPU
This check box allows virtual machines touse the host’s CPU flags. When selected,Migration Options is set to Allow manualmigration only.
Yes.
Configure NUMA NUMA NodeCount
The number of virtual NUMA nodes toassign to the virtual machine. If the TuneMode is Preferred, this value must be setto 1.
Yes.
Field Name Sub-element Description Power cyclerequired?
Red Hat Virtualization 4.3 Virtual Machine Management Guide
140
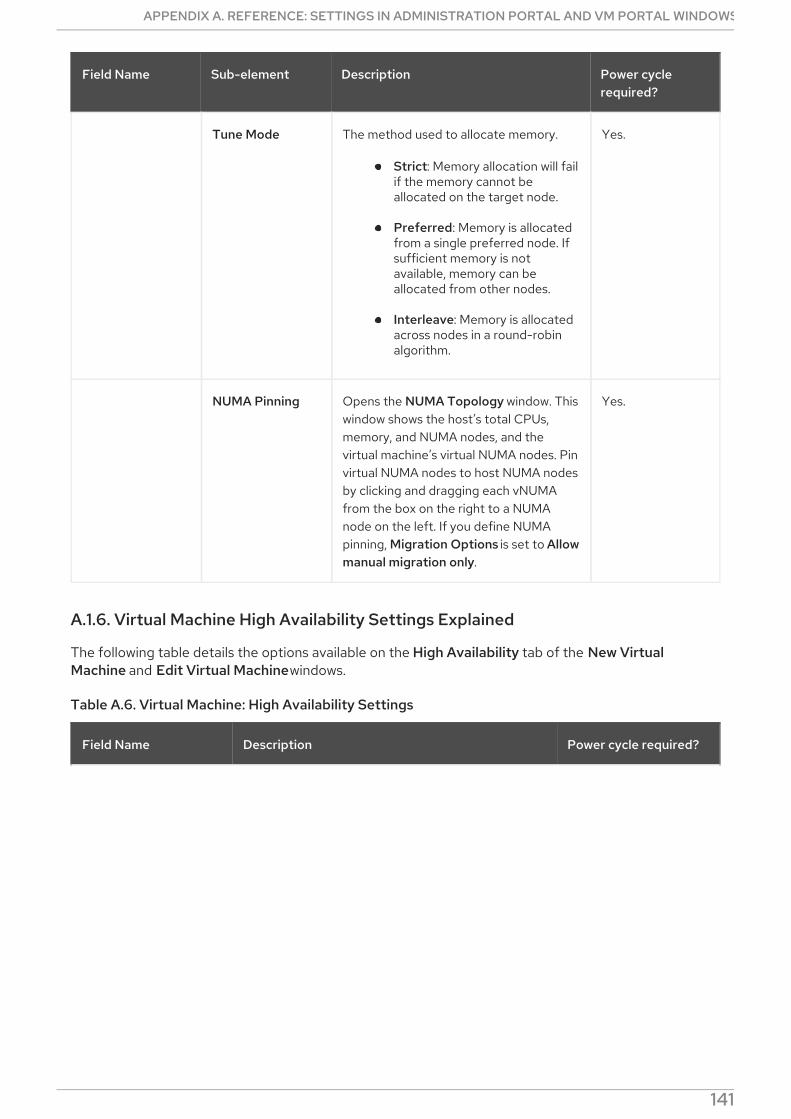
Tune Mode The method used to allocate memory.
Strict: Memory allocation will failif the memory cannot beallocated on the target node.
Preferred: Memory is allocatedfrom a single preferred node. Ifsufficient memory is notavailable, memory can beallocated from other nodes.
Interleave: Memory is allocatedacross nodes in a round-robinalgorithm.
Yes.
NUMA Pinning Opens the NUMA Topology window. Thiswindow shows the host’s total CPUs,memory, and NUMA nodes, and thevirtual machine’s virtual NUMA nodes. Pinvirtual NUMA nodes to host NUMA nodesby clicking and dragging each vNUMAfrom the box on the right to a NUMAnode on the left. If you define NUMApinning, Migration Options is set to Allowmanual migration only.
Yes.
Field Name Sub-element Description Power cyclerequired?
A.1.6. Virtual Machine High Availability Settings Explained
The following table details the options available on the High Availability tab of the New VirtualMachine and Edit Virtual Machine windows.
Table A.6. Virtual Machine: High Availability Settings
Field Name Description Power cycle required?
APPENDIX A. REFERENCE: SETTINGS IN ADMINISTRATION PORTAL AND VM PORTAL WINDOWS
141
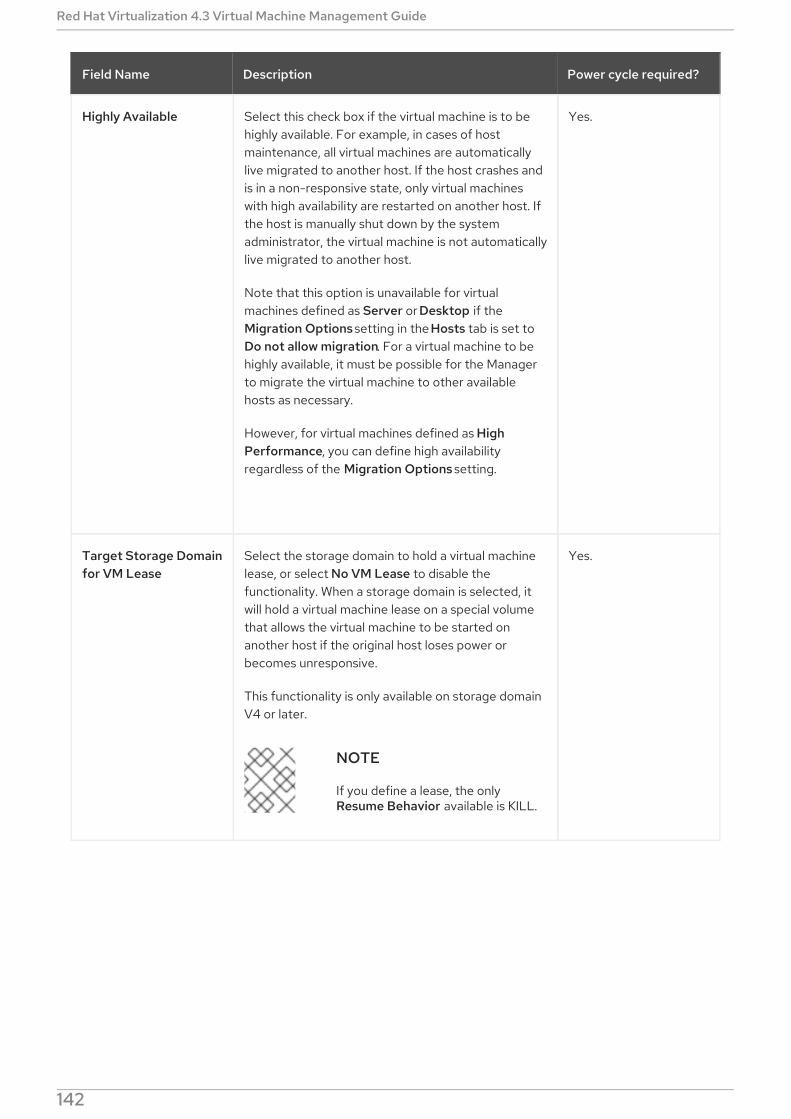
Highly Available Select this check box if the virtual machine is to behighly available. For example, in cases of hostmaintenance, all virtual machines are automaticallylive migrated to another host. If the host crashes andis in a non-responsive state, only virtual machineswith high availability are restarted on another host. Ifthe host is manually shut down by the systemadministrator, the virtual machine is not automaticallylive migrated to another host.
Note that this option is unavailable for virtualmachines defined as Server or Desktop if theMigration Options setting in the Hosts tab is set toDo not allow migration. For a virtual machine to behighly available, it must be possible for the Managerto migrate the virtual machine to other availablehosts as necessary.
However, for virtual machines defined as HighPerformance, you can define high availabilityregardless of the Migration Options setting.
Yes.
Target Storage Domainfor VM Lease
Select the storage domain to hold a virtual machinelease, or select No VM Lease to disable thefunctionality. When a storage domain is selected, itwill hold a virtual machine lease on a special volumethat allows the virtual machine to be started onanother host if the original host loses power orbecomes unresponsive.
This functionality is only available on storage domainV4 or later.
NOTE
If you define a lease, the onlyResume Behavior available is KILL.
Yes.
Field Name Description Power cycle required?
Red Hat Virtualization 4.3 Virtual Machine Management Guide
142
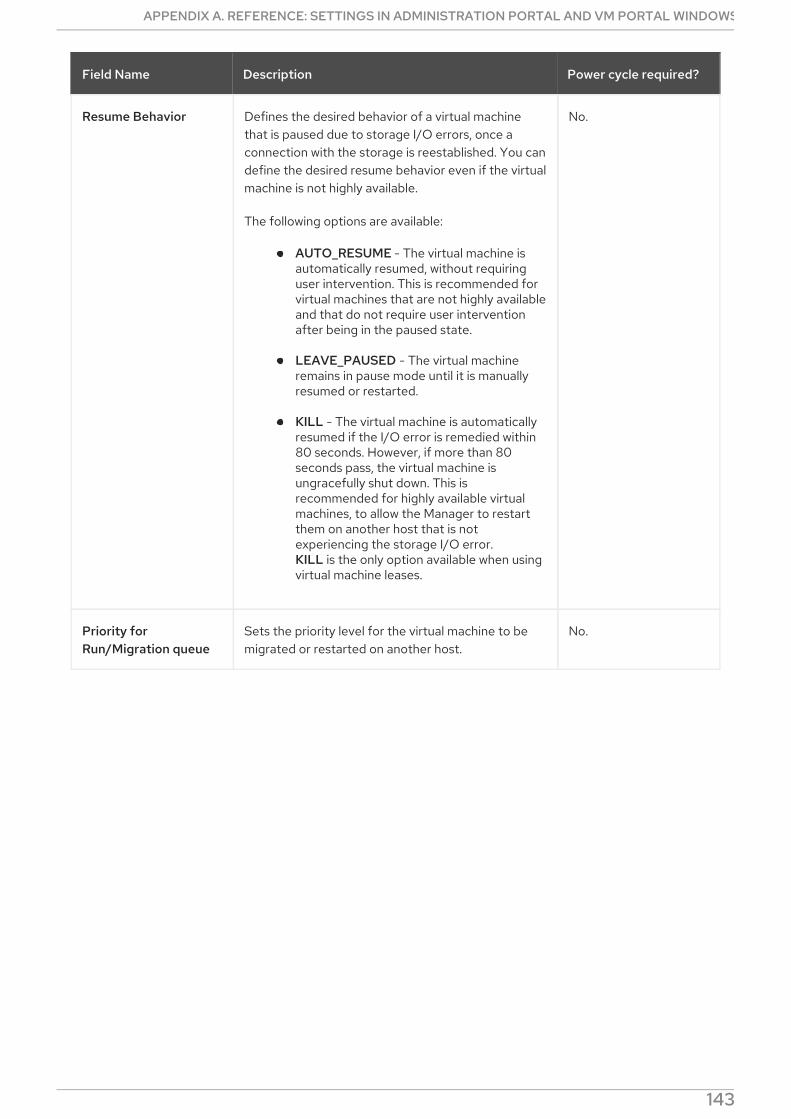
Resume Behavior Defines the desired behavior of a virtual machinethat is paused due to storage I/O errors, once aconnection with the storage is reestablished. You candefine the desired resume behavior even if the virtualmachine is not highly available.
The following options are available:
AUTO_RESUME - The virtual machine isautomatically resumed, without requiringuser intervention. This is recommended forvirtual machines that are not highly availableand that do not require user interventionafter being in the paused state.
LEAVE_PAUSED - The virtual machineremains in pause mode until it is manuallyresumed or restarted.
KILL - The virtual machine is automaticallyresumed if the I/O error is remedied within80 seconds. However, if more than 80seconds pass, the virtual machine isungracefully shut down. This isrecommended for highly available virtualmachines, to allow the Manager to restartthem on another host that is notexperiencing the storage I/O error.KILL is the only option available when usingvirtual machine leases.
No.
Priority forRun/Migration queue
Sets the priority level for the virtual machine to bemigrated or restarted on another host.
No.
Field Name Description Power cycle required?
APPENDIX A. REFERENCE: SETTINGS IN ADMINISTRATION PORTAL AND VM PORTAL WINDOWS
143
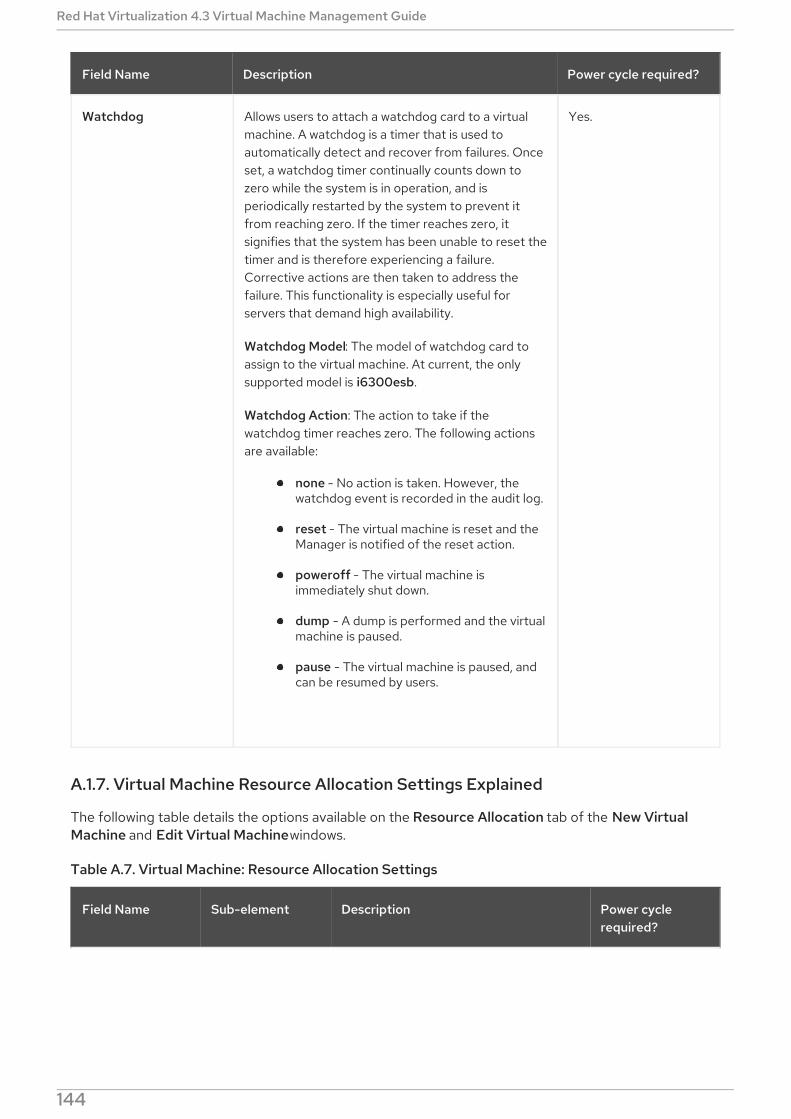
Watchdog Allows users to attach a watchdog card to a virtualmachine. A watchdog is a timer that is used toautomatically detect and recover from failures. Onceset, a watchdog timer continually counts down tozero while the system is in operation, and isperiodically restarted by the system to prevent itfrom reaching zero. If the timer reaches zero, itsignifies that the system has been unable to reset thetimer and is therefore experiencing a failure.Corrective actions are then taken to address thefailure. This functionality is especially useful forservers that demand high availability.
Watchdog Model: The model of watchdog card toassign to the virtual machine. At current, the onlysupported model is i6300esb.
Watchdog Action: The action to take if thewatchdog timer reaches zero. The following actionsare available:
none - No action is taken. However, thewatchdog event is recorded in the audit log.
reset - The virtual machine is reset and theManager is notified of the reset action.
poweroff - The virtual machine isimmediately shut down.
dump - A dump is performed and the virtualmachine is paused.
pause - The virtual machine is paused, andcan be resumed by users.
Yes.
Field Name Description Power cycle required?
A.1.7. Virtual Machine Resource Allocation Settings Explained
The following table details the options available on the Resource Allocation tab of the New VirtualMachine and Edit Virtual Machine windows.
Table A.7. Virtual Machine: Resource Allocation Settings
Field Name Sub-element Description Power cyclerequired?
Red Hat Virtualization 4.3 Virtual Machine Management Guide
144
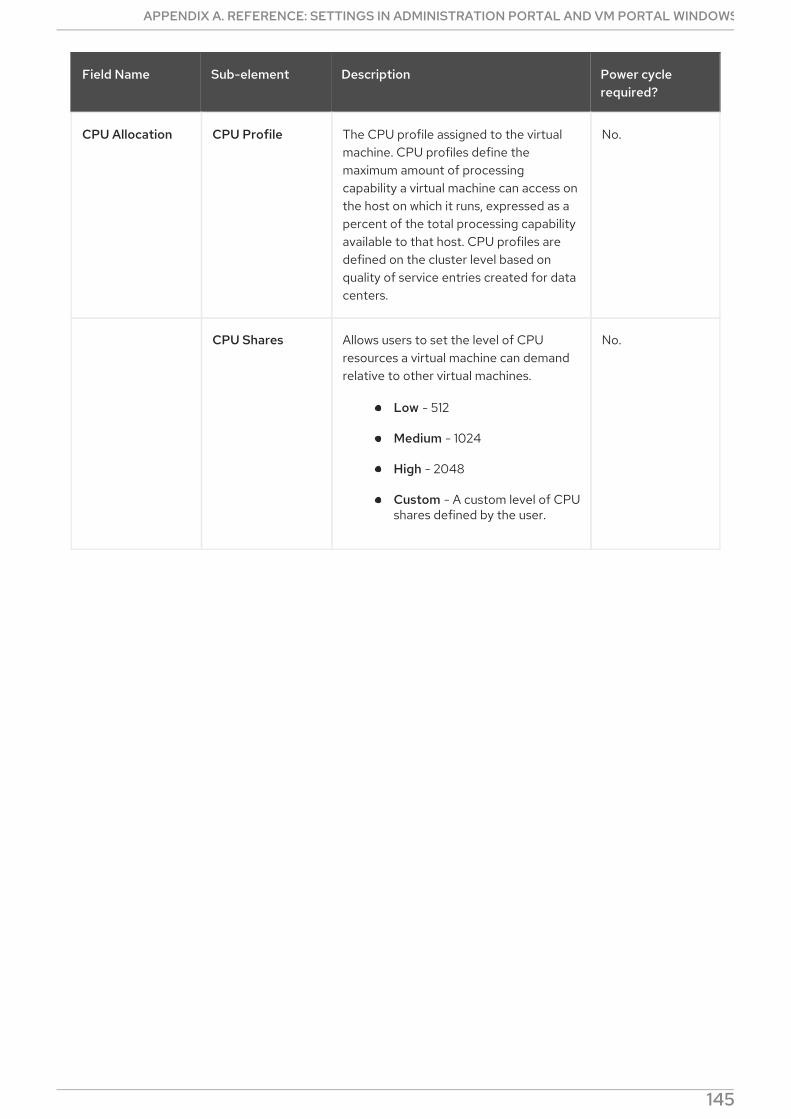
CPU Allocation CPU Profile The CPU profile assigned to the virtualmachine. CPU profiles define themaximum amount of processingcapability a virtual machine can access onthe host on which it runs, expressed as apercent of the total processing capabilityavailable to that host. CPU profiles aredefined on the cluster level based onquality of service entries created for datacenters.
No.
CPU Shares Allows users to set the level of CPUresources a virtual machine can demandrelative to other virtual machines.
Low - 512
Medium - 1024
High - 2048
Custom - A custom level of CPUshares defined by the user.
No.
Field Name Sub-element Description Power cyclerequired?
APPENDIX A. REFERENCE: SETTINGS IN ADMINISTRATION PORTAL AND VM PORTAL WINDOWS
145
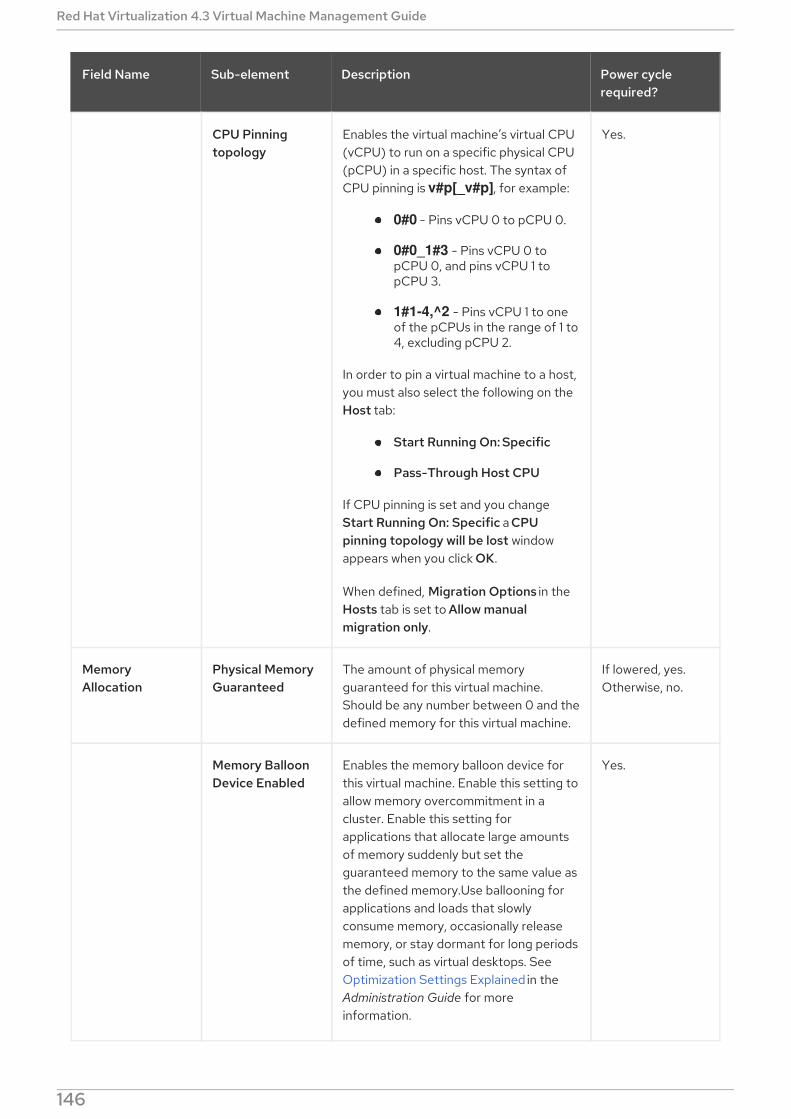
CPU Pinningtopology
Enables the virtual machine’s virtual CPU(vCPU) to run on a specific physical CPU(pCPU) in a specific host. The syntax ofCPU pinning is v#p[_v#p], for example:
0#0 - Pins vCPU 0 to pCPU 0.
0#0_1#3 - Pins vCPU 0 topCPU 0, and pins vCPU 1 topCPU 3.
1#1-4,^2 - Pins vCPU 1 to oneof the pCPUs in the range of 1 to4, excluding pCPU 2.
In order to pin a virtual machine to a host,you must also select the following on theHost tab:
Start Running On: Specific
Pass-Through Host CPU
If CPU pinning is set and you changeStart Running On: Specific a CPUpinning topology will be lost windowappears when you click OK.
When defined, Migration Options in theHosts tab is set to Allow manualmigration only.
Yes.
MemoryAllocation
Physical MemoryGuaranteed
The amount of physical memoryguaranteed for this virtual machine.Should be any number between 0 and thedefined memory for this virtual machine.
If lowered, yes.Otherwise, no.
Memory BalloonDevice Enabled
Enables the memory balloon device forthis virtual machine. Enable this setting toallow memory overcommitment in acluster. Enable this setting forapplications that allocate large amountsof memory suddenly but set theguaranteed memory to the same value asthe defined memory.Use ballooning forapplications and loads that slowlyconsume memory, occasionally releasememory, or stay dormant for long periodsof time, such as virtual desktops. SeeOptimization Settings Explained in theAdministration Guide for moreinformation.
Yes.
Field Name Sub-element Description Power cyclerequired?
Red Hat Virtualization 4.3 Virtual Machine Management Guide
146
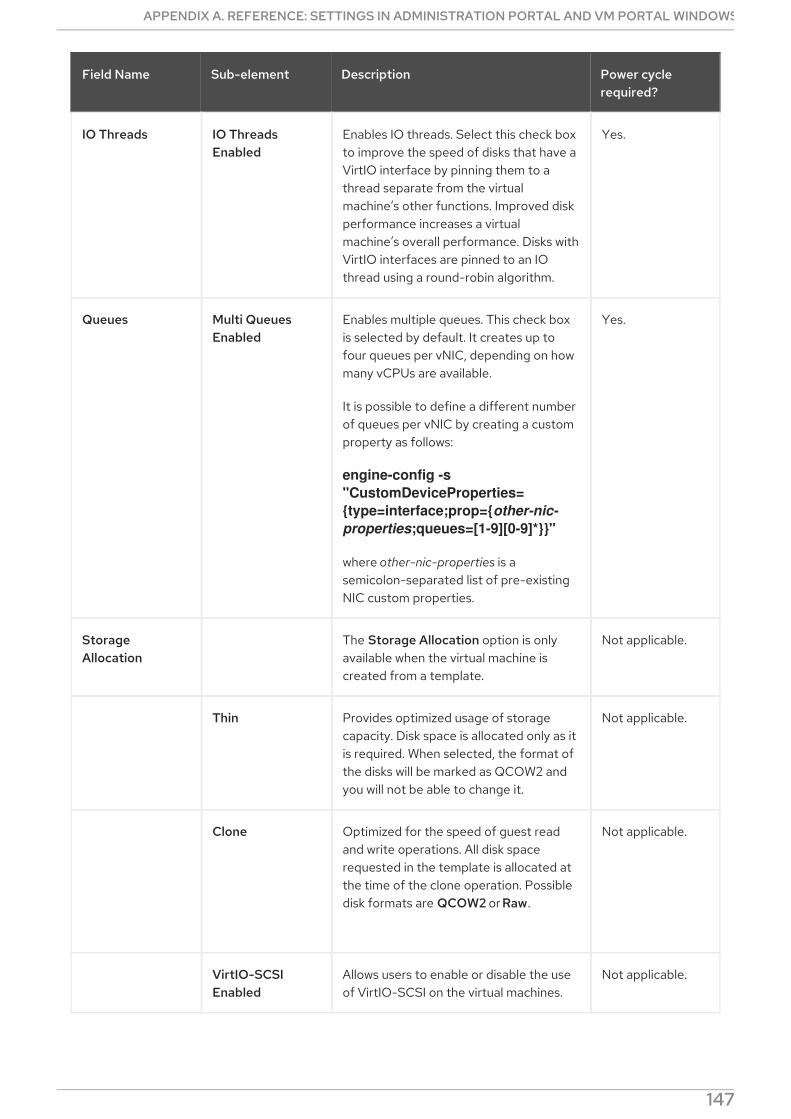
IO Threads IO ThreadsEnabled
Enables IO threads. Select this check boxto improve the speed of disks that have aVirtIO interface by pinning them to athread separate from the virtualmachine’s other functions. Improved diskperformance increases a virtualmachine’s overall performance. Disks withVirtIO interfaces are pinned to an IOthread using a round-robin algorithm.
Yes.
Queues Multi QueuesEnabled
Enables multiple queues. This check boxis selected by default. It creates up tofour queues per vNIC, depending on howmany vCPUs are available.
It is possible to define a different numberof queues per vNIC by creating a customproperty as follows:
engine-config -s "CustomDeviceProperties={type=interface;prop={other-nic-properties;queues=[1-9][0-9]*}}"
where other-nic-properties is asemicolon-separated list of pre-existingNIC custom properties.
Yes.
StorageAllocation
The Storage Allocation option is onlyavailable when the virtual machine iscreated from a template.
Not applicable.
Thin Provides optimized usage of storagecapacity. Disk space is allocated only as itis required. When selected, the format ofthe disks will be marked as QCOW2 andyou will not be able to change it.
Not applicable.
Clone Optimized for the speed of guest readand write operations. All disk spacerequested in the template is allocated atthe time of the clone operation. Possibledisk formats are QCOW2 or Raw.
Not applicable.
VirtIO-SCSIEnabled
Allows users to enable or disable the useof VirtIO-SCSI on the virtual machines.
Not applicable.
Field Name Sub-element Description Power cyclerequired?
APPENDIX A. REFERENCE: SETTINGS IN ADMINISTRATION PORTAL AND VM PORTAL WINDOWS
147
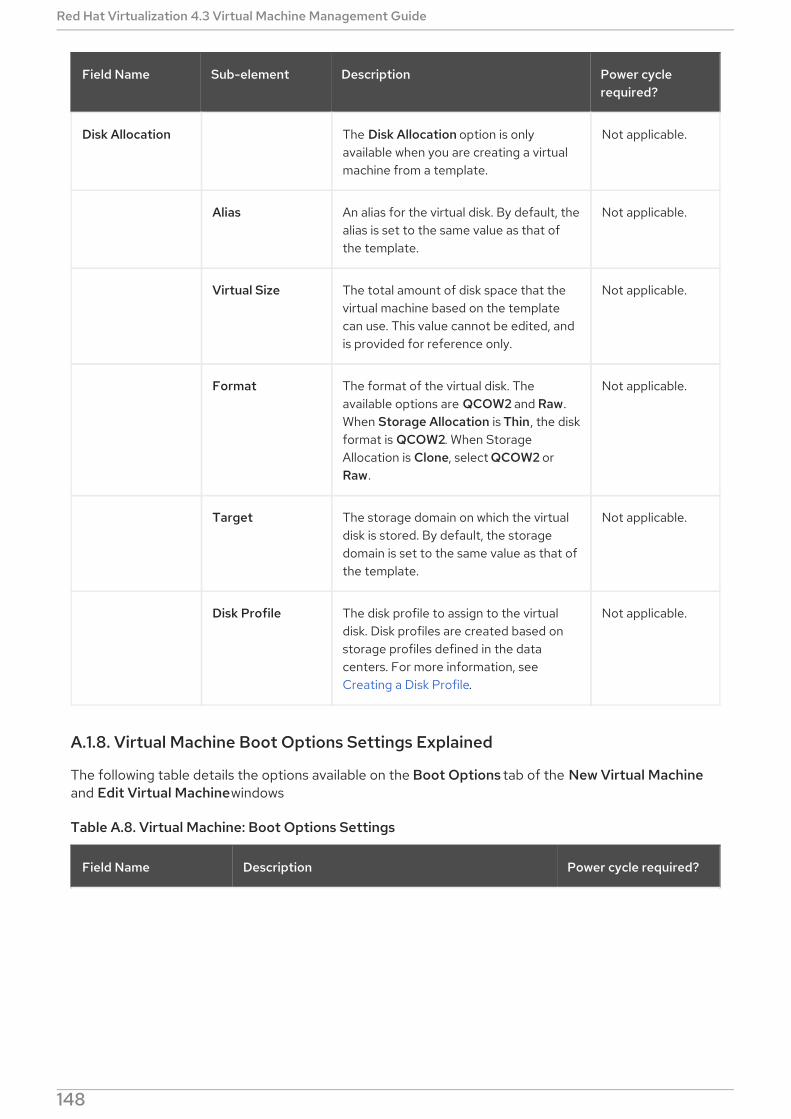
Disk Allocation The Disk Allocation option is onlyavailable when you are creating a virtualmachine from a template.
Not applicable.
Alias An alias for the virtual disk. By default, thealias is set to the same value as that ofthe template.
Not applicable.
Virtual Size The total amount of disk space that thevirtual machine based on the templatecan use. This value cannot be edited, andis provided for reference only.
Not applicable.
Format The format of the virtual disk. Theavailable options are QCOW2 and Raw.When Storage Allocation is Thin, the diskformat is QCOW2. When StorageAllocation is Clone, select QCOW2 orRaw.
Not applicable.
Target The storage domain on which the virtualdisk is stored. By default, the storagedomain is set to the same value as that ofthe template.
Not applicable.
Disk Profile The disk profile to assign to the virtualdisk. Disk profiles are created based onstorage profiles defined in the datacenters. For more information, seeCreating a Disk Profile.
Not applicable.
Field Name Sub-element Description Power cyclerequired?
A.1.8. Virtual Machine Boot Options Settings Explained
The following table details the options available on the Boot Options tab of the New Virtual Machineand Edit Virtual Machine windows
Table A.8. Virtual Machine: Boot Options Settings
Field Name Description Power cycle required?
Red Hat Virtualization 4.3 Virtual Machine Management Guide
148
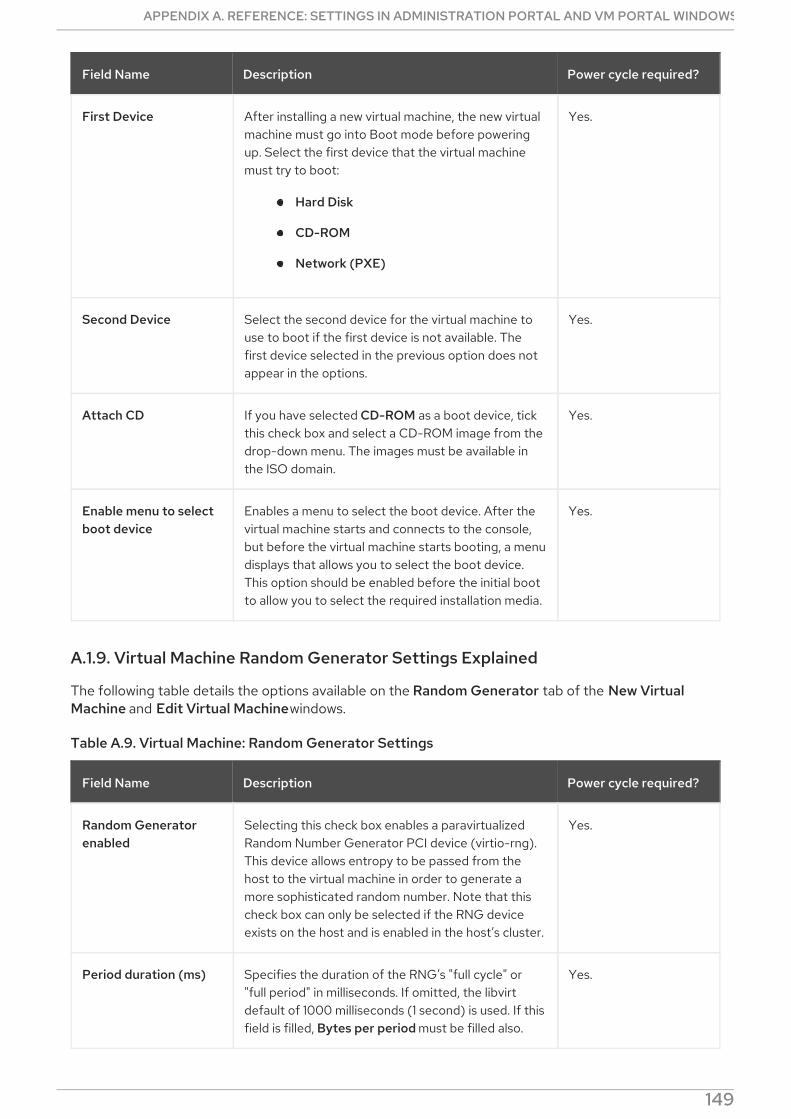
First Device After installing a new virtual machine, the new virtualmachine must go into Boot mode before poweringup. Select the first device that the virtual machinemust try to boot:
Hard Disk
CD-ROM
Network (PXE)
Yes.
Second Device Select the second device for the virtual machine touse to boot if the first device is not available. Thefirst device selected in the previous option does notappear in the options.
Yes.
Attach CD If you have selected CD-ROM as a boot device, tickthis check box and select a CD-ROM image from thedrop-down menu. The images must be available inthe ISO domain.
Yes.
Enable menu to selectboot device
Enables a menu to select the boot device. After thevirtual machine starts and connects to the console,but before the virtual machine starts booting, a menudisplays that allows you to select the boot device.This option should be enabled before the initial bootto allow you to select the required installation media.
Yes.
Field Name Description Power cycle required?
A.1.9. Virtual Machine Random Generator Settings Explained
The following table details the options available on the Random Generator tab of the New VirtualMachine and Edit Virtual Machine windows.
Table A.9. Virtual Machine: Random Generator Settings
Field Name Description Power cycle required?
Random Generatorenabled
Selecting this check box enables a paravirtualizedRandom Number Generator PCI device (virtio-rng).This device allows entropy to be passed from thehost to the virtual machine in order to generate amore sophisticated random number. Note that thischeck box can only be selected if the RNG deviceexists on the host and is enabled in the host’s cluster.
Yes.
Period duration (ms) Specifies the duration of the RNG’s "full cycle" or"full period" in milliseconds. If omitted, the libvirtdefault of 1000 milliseconds (1 second) is used. If thisfield is filled, Bytes per period must be filled also.
Yes.
APPENDIX A. REFERENCE: SETTINGS IN ADMINISTRATION PORTAL AND VM PORTAL WINDOWS
149
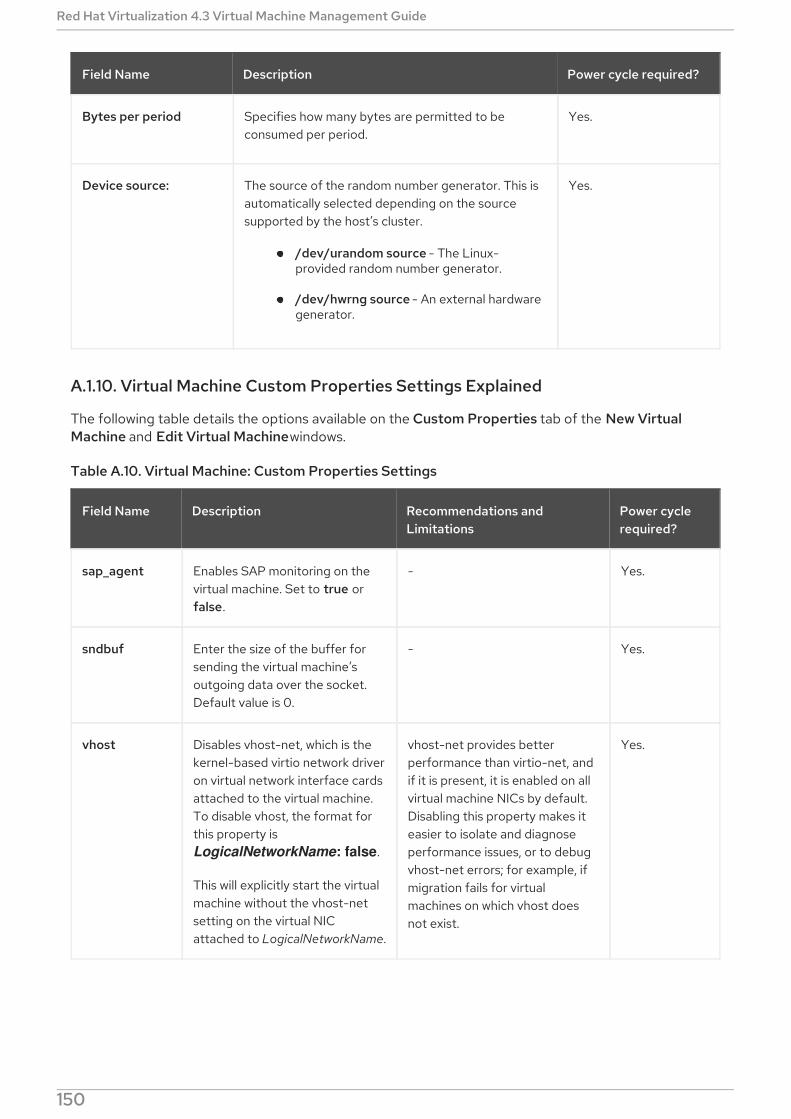
Bytes per period Specifies how many bytes are permitted to beconsumed per period.
Yes.
Device source: The source of the random number generator. This isautomatically selected depending on the sourcesupported by the host’s cluster.
/dev/urandom source - The Linux-provided random number generator.
/dev/hwrng source - An external hardwaregenerator.
Yes.
Field Name Description Power cycle required?
A.1.10. Virtual Machine Custom Properties Settings Explained
The following table details the options available on the Custom Properties tab of the New VirtualMachine and Edit Virtual Machine windows.
Table A.10. Virtual Machine: Custom Properties Settings
Field Name Description Recommendations andLimitations
Power cyclerequired?
sap_agent Enables SAP monitoring on thevirtual machine. Set to true orfalse.
- Yes.
sndbuf Enter the size of the buffer forsending the virtual machine’soutgoing data over the socket.Default value is 0.
- Yes.
vhost Disables vhost-net, which is thekernel-based virtio network driveron virtual network interface cardsattached to the virtual machine.To disable vhost, the format forthis property is LogicalNetworkName: false.
This will explicitly start the virtualmachine without the vhost-netsetting on the virtual NICattached to LogicalNetworkName.
vhost-net provides betterperformance than virtio-net, andif it is present, it is enabled on allvirtual machine NICs by default.Disabling this property makes iteasier to isolate and diagnoseperformance issues, or to debugvhost-net errors; for example, ifmigration fails for virtualmachines on which vhost doesnot exist.
Yes.
Red Hat Virtualization 4.3 Virtual Machine Management Guide
150
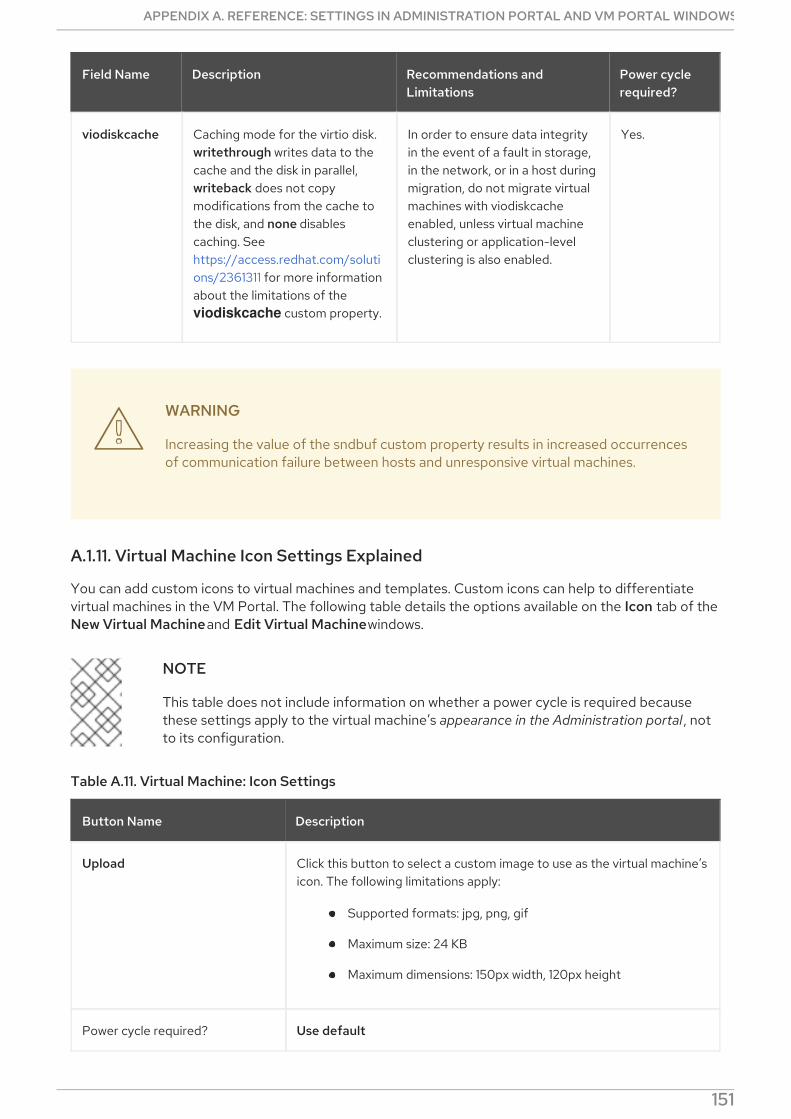
viodiskcache Caching mode for the virtio disk.writethrough writes data to thecache and the disk in parallel,writeback does not copymodifications from the cache tothe disk, and none disablescaching. Seehttps://access.redhat.com/solutions/2361311 for more informationabout the limitations of the viodiskcache custom property.
In order to ensure data integrityin the event of a fault in storage,in the network, or in a host duringmigration, do not migrate virtualmachines with viodiskcacheenabled, unless virtual machineclustering or application-levelclustering is also enabled.
Yes.
Field Name Description Recommendations andLimitations
Power cyclerequired?
WARNING
Increasing the value of the sndbuf custom property results in increased occurrencesof communication failure between hosts and unresponsive virtual machines.
A.1.11. Virtual Machine Icon Settings Explained
You can add custom icons to virtual machines and templates. Custom icons can help to differentiatevirtual machines in the VM Portal. The following table details the options available on the Icon tab of theNew Virtual Machine and Edit Virtual Machine windows.
NOTE
This table does not include information on whether a power cycle is required becausethese settings apply to the virtual machine’s appearance in the Administration portal , notto its configuration.
Table A.11. Virtual Machine: Icon Settings
Button Name Description
Upload Click this button to select a custom image to use as the virtual machine’sicon. The following limitations apply:
Supported formats: jpg, png, gif
Maximum size: 24 KB
Maximum dimensions: 150px width, 120px height
Power cycle required? Use default
APPENDIX A. REFERENCE: SETTINGS IN ADMINISTRATION PORTAL AND VM PORTAL WINDOWS
151
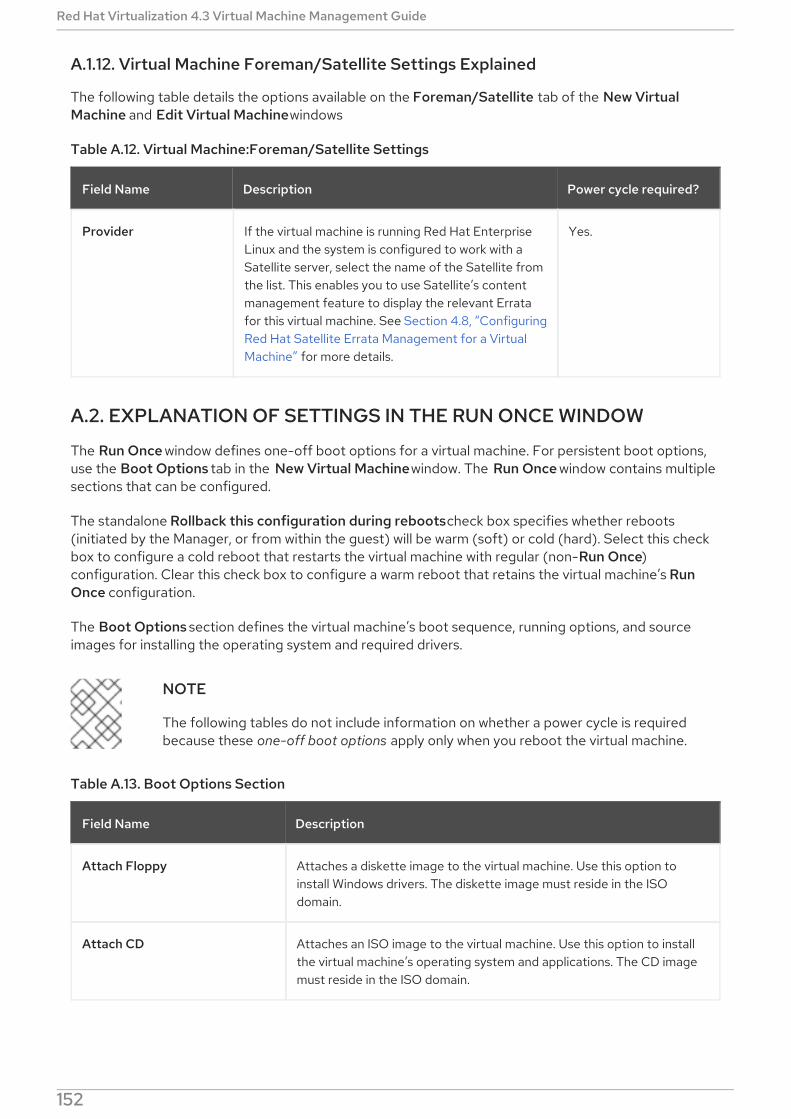
A.1.12. Virtual Machine Foreman/Satellite Settings Explained
The following table details the options available on the Foreman/Satellite tab of the New VirtualMachine and Edit Virtual Machine windows
Table A.12. Virtual Machine:Foreman/Satellite Settings
Field Name Description Power cycle required?
Provider If the virtual machine is running Red Hat EnterpriseLinux and the system is configured to work with aSatellite server, select the name of the Satellite fromthe list. This enables you to use Satellite’s contentmanagement feature to display the relevant Erratafor this virtual machine. See Section 4.8, “ConfiguringRed Hat Satellite Errata Management for a VirtualMachine” for more details.
Yes.
A.2. EXPLANATION OF SETTINGS IN THE RUN ONCE WINDOW
The Run Once window defines one-off boot options for a virtual machine. For persistent boot options,use the Boot Options tab in the New Virtual Machine window. The Run Once window contains multiplesections that can be configured.
The standalone Rollback this configuration during reboots check box specifies whether reboots(initiated by the Manager, or from within the guest) will be warm (soft) or cold (hard). Select this checkbox to configure a cold reboot that restarts the virtual machine with regular (non-Run Once)configuration. Clear this check box to configure a warm reboot that retains the virtual machine’s RunOnce configuration.
The Boot Options section defines the virtual machine’s boot sequence, running options, and sourceimages for installing the operating system and required drivers.
NOTE
The following tables do not include information on whether a power cycle is requiredbecause these one-off boot options apply only when you reboot the virtual machine.
Table A.13. Boot Options Section
Field Name Description
Attach Floppy Attaches a diskette image to the virtual machine. Use this option toinstall Windows drivers. The diskette image must reside in the ISOdomain.
Attach CD Attaches an ISO image to the virtual machine. Use this option to installthe virtual machine’s operating system and applications. The CD imagemust reside in the ISO domain.
Red Hat Virtualization 4.3 Virtual Machine Management Guide
152
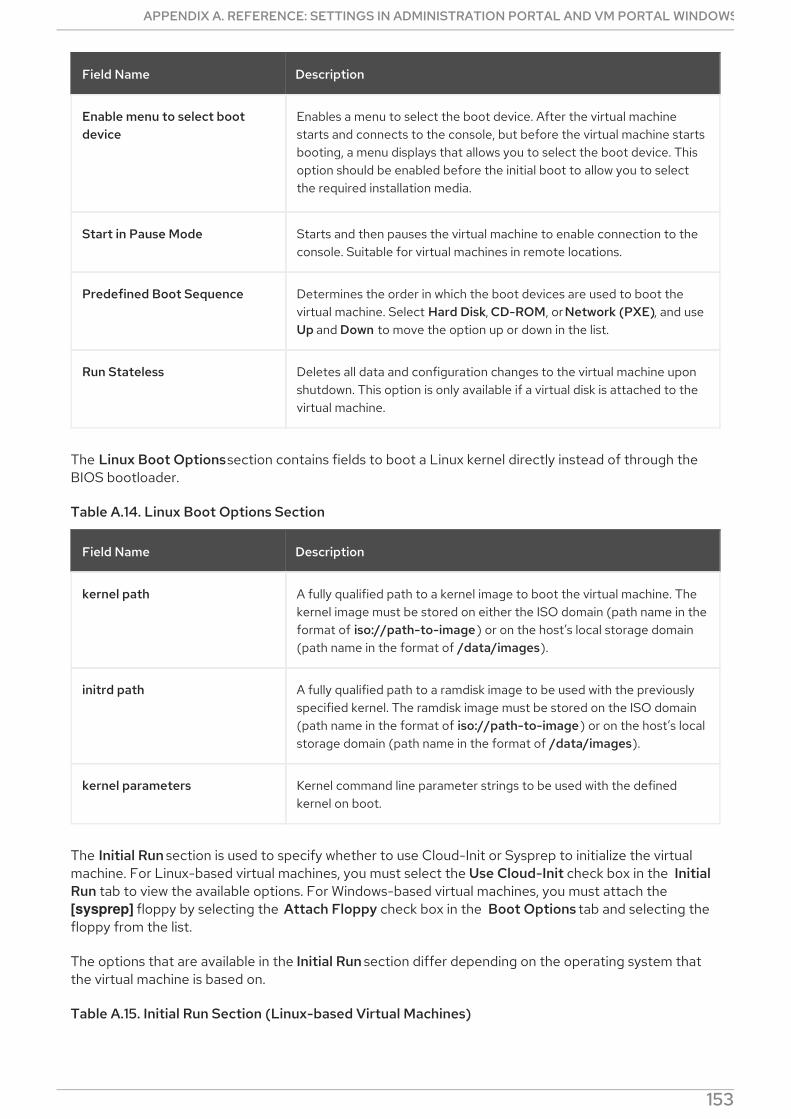
Enable menu to select bootdevice
Enables a menu to select the boot device. After the virtual machinestarts and connects to the console, but before the virtual machine startsbooting, a menu displays that allows you to select the boot device. Thisoption should be enabled before the initial boot to allow you to selectthe required installation media.
Start in Pause Mode Starts and then pauses the virtual machine to enable connection to theconsole. Suitable for virtual machines in remote locations.
Predefined Boot Sequence Determines the order in which the boot devices are used to boot thevirtual machine. Select Hard Disk, CD-ROM, or Network (PXE), and useUp and Down to move the option up or down in the list.
Run Stateless Deletes all data and configuration changes to the virtual machine uponshutdown. This option is only available if a virtual disk is attached to thevirtual machine.
Field Name Description
The Linux Boot Options section contains fields to boot a Linux kernel directly instead of through theBIOS bootloader.
Table A.14. Linux Boot Options Section
Field Name Description
kernel path A fully qualified path to a kernel image to boot the virtual machine. Thekernel image must be stored on either the ISO domain (path name in theformat of iso://path-to-image) or on the host’s local storage domain(path name in the format of /data/images).
initrd path A fully qualified path to a ramdisk image to be used with the previouslyspecified kernel. The ramdisk image must be stored on the ISO domain(path name in the format of iso://path-to-image) or on the host’s localstorage domain (path name in the format of /data/images).
kernel parameters Kernel command line parameter strings to be used with the definedkernel on boot.
The Initial Run section is used to specify whether to use Cloud-Init or Sysprep to initialize the virtualmachine. For Linux-based virtual machines, you must select the Use Cloud-Init check box in the InitialRun tab to view the available options. For Windows-based virtual machines, you must attach the [sysprep] floppy by selecting the Attach Floppy check box in the Boot Options tab and selecting thefloppy from the list.
The options that are available in the Initial Run section differ depending on the operating system thatthe virtual machine is based on.
Table A.15. Initial Run Section (Linux-based Virtual Machines)
APPENDIX A. REFERENCE: SETTINGS IN ADMINISTRATION PORTAL AND VM PORTAL WINDOWS
153
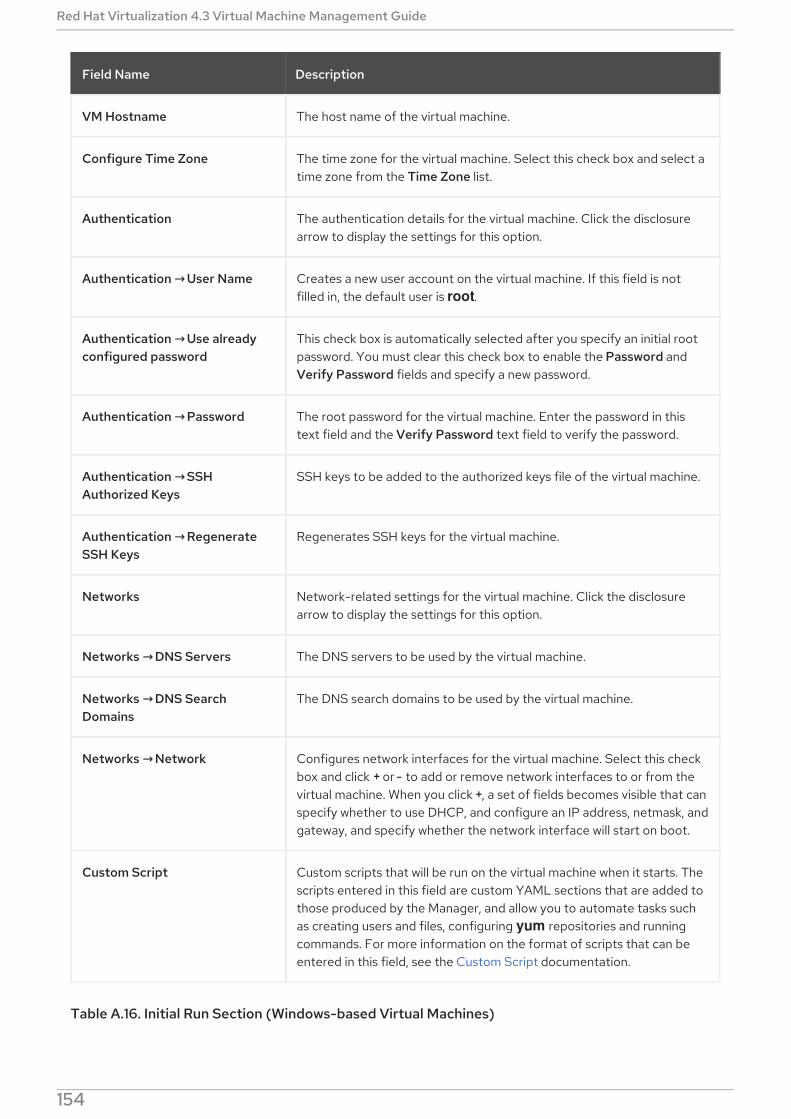
Field Name Description
VM Hostname The host name of the virtual machine.
Configure Time Zone The time zone for the virtual machine. Select this check box and select atime zone from the Time Zone list.
Authentication The authentication details for the virtual machine. Click the disclosurearrow to display the settings for this option.
Authentication → User Name Creates a new user account on the virtual machine. If this field is notfilled in, the default user is root.
Authentication → Use alreadyconfigured password
This check box is automatically selected after you specify an initial rootpassword. You must clear this check box to enable the Password andVerify Password fields and specify a new password.
Authentication → Password The root password for the virtual machine. Enter the password in thistext field and the Verify Password text field to verify the password.
Authentication → SSHAuthorized Keys
SSH keys to be added to the authorized keys file of the virtual machine.
Authentication → RegenerateSSH Keys
Regenerates SSH keys for the virtual machine.
Networks Network-related settings for the virtual machine. Click the disclosurearrow to display the settings for this option.
Networks → DNS Servers The DNS servers to be used by the virtual machine.
Networks → DNS SearchDomains
The DNS search domains to be used by the virtual machine.
Networks → Network Configures network interfaces for the virtual machine. Select this checkbox and click + or - to add or remove network interfaces to or from thevirtual machine. When you click +, a set of fields becomes visible that canspecify whether to use DHCP, and configure an IP address, netmask, andgateway, and specify whether the network interface will start on boot.
Custom Script Custom scripts that will be run on the virtual machine when it starts. Thescripts entered in this field are custom YAML sections that are added tothose produced by the Manager, and allow you to automate tasks suchas creating users and files, configuring yum repositories and runningcommands. For more information on the format of scripts that can beentered in this field, see the Custom Script documentation.
Table A.16. Initial Run Section (Windows-based Virtual Machines)
Red Hat Virtualization 4.3 Virtual Machine Management Guide
154
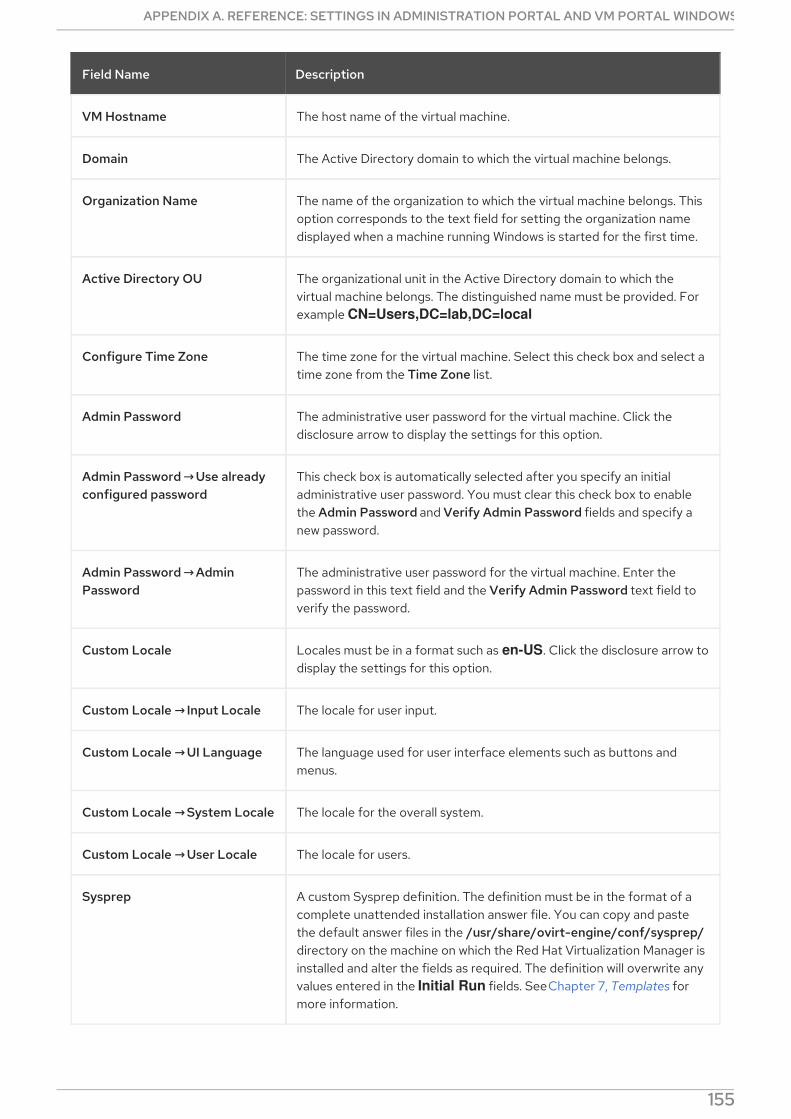
Field Name Description
VM Hostname The host name of the virtual machine.
Domain The Active Directory domain to which the virtual machine belongs.
Organization Name The name of the organization to which the virtual machine belongs. Thisoption corresponds to the text field for setting the organization namedisplayed when a machine running Windows is started for the first time.
Active Directory OU The organizational unit in the Active Directory domain to which thevirtual machine belongs. The distinguished name must be provided. Forexample CN=Users,DC=lab,DC=local
Configure Time Zone The time zone for the virtual machine. Select this check box and select atime zone from the Time Zone list.
Admin Password The administrative user password for the virtual machine. Click thedisclosure arrow to display the settings for this option.
Admin Password → Use alreadyconfigured password
This check box is automatically selected after you specify an initialadministrative user password. You must clear this check box to enablethe Admin Password and Verify Admin Password fields and specify anew password.
Admin Password → AdminPassword
The administrative user password for the virtual machine. Enter thepassword in this text field and the Verify Admin Password text field toverify the password.
Custom Locale Locales must be in a format such as en-US. Click the disclosure arrow todisplay the settings for this option.
Custom Locale → Input Locale The locale for user input.
Custom Locale → UI Language The language used for user interface elements such as buttons andmenus.
Custom Locale → System Locale The locale for the overall system.
Custom Locale → User Locale The locale for users.
Sysprep A custom Sysprep definition. The definition must be in the format of acomplete unattended installation answer file. You can copy and pastethe default answer files in the /usr/share/ovirt-engine/conf/sysprep/directory on the machine on which the Red Hat Virtualization Manager isinstalled and alter the fields as required. The definition will overwrite anyvalues entered in the Initial Run fields. See Chapter 7, Templates formore information.
APPENDIX A. REFERENCE: SETTINGS IN ADMINISTRATION PORTAL AND VM PORTAL WINDOWS
155
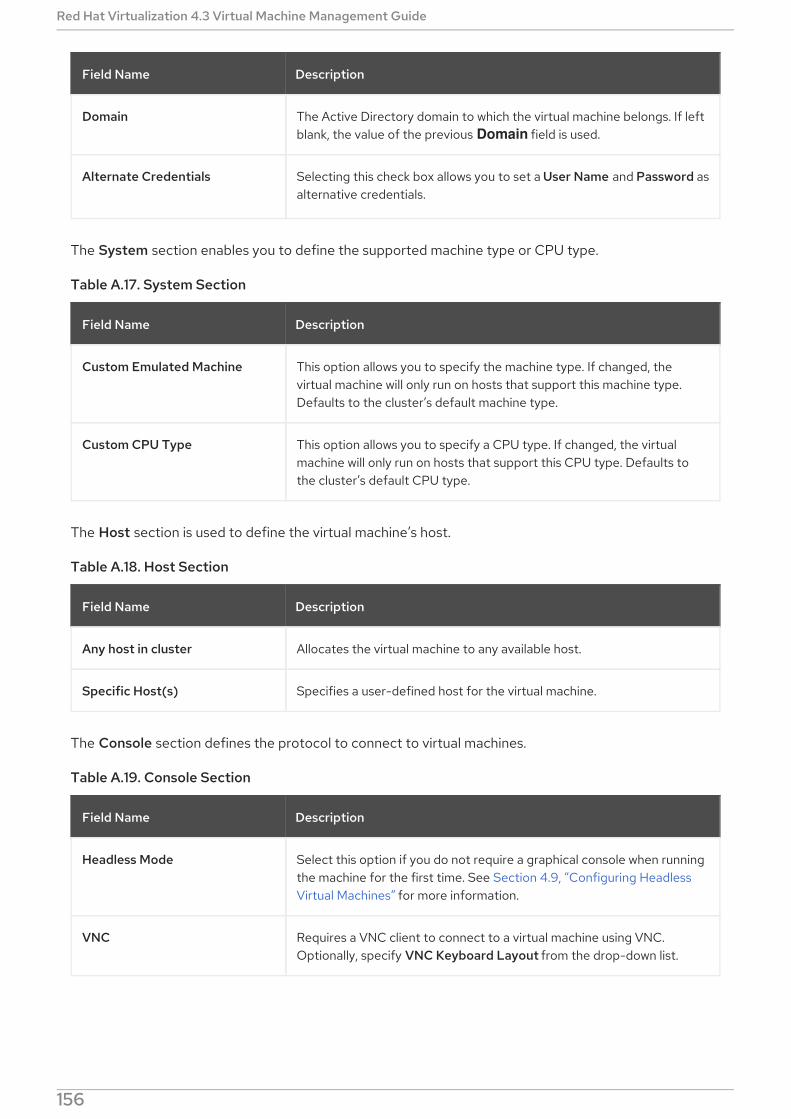
Domain The Active Directory domain to which the virtual machine belongs. If leftblank, the value of the previous Domain field is used.
Alternate Credentials Selecting this check box allows you to set a User Name and Password asalternative credentials.
Field Name Description
The System section enables you to define the supported machine type or CPU type.
Table A.17. System Section
Field Name Description
Custom Emulated Machine This option allows you to specify the machine type. If changed, thevirtual machine will only run on hosts that support this machine type.Defaults to the cluster’s default machine type.
Custom CPU Type This option allows you to specify a CPU type. If changed, the virtualmachine will only run on hosts that support this CPU type. Defaults tothe cluster’s default CPU type.
The Host section is used to define the virtual machine’s host.
Table A.18. Host Section
Field Name Description
Any host in cluster Allocates the virtual machine to any available host.
Specific Host(s) Specifies a user-defined host for the virtual machine.
The Console section defines the protocol to connect to virtual machines.
Table A.19. Console Section
Field Name Description
Headless Mode Select this option if you do not require a graphical console when runningthe machine for the first time. See Section 4.9, “Configuring HeadlessVirtual Machines” for more information.
VNC Requires a VNC client to connect to a virtual machine using VNC.Optionally, specify VNC Keyboard Layout from the drop-down list.
Red Hat Virtualization 4.3 Virtual Machine Management Guide
156
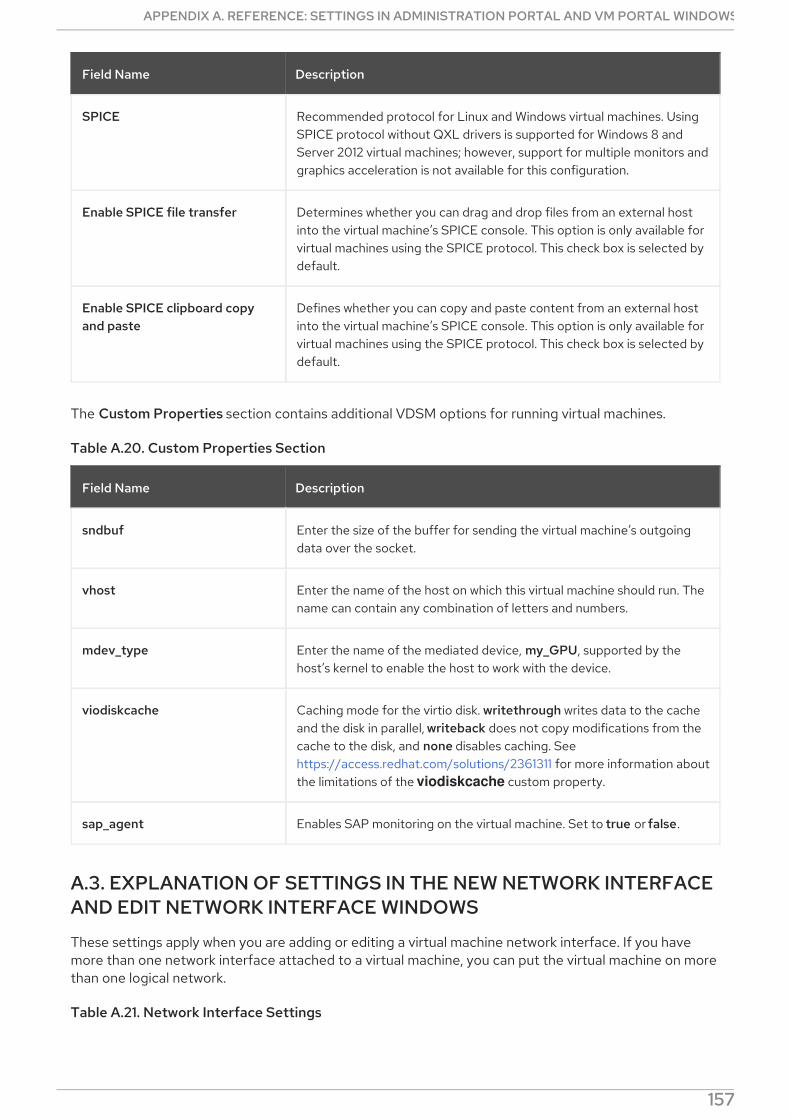
SPICE Recommended protocol for Linux and Windows virtual machines. UsingSPICE protocol without QXL drivers is supported for Windows 8 andServer 2012 virtual machines; however, support for multiple monitors andgraphics acceleration is not available for this configuration.
Enable SPICE file transfer Determines whether you can drag and drop files from an external hostinto the virtual machine’s SPICE console. This option is only available forvirtual machines using the SPICE protocol. This check box is selected bydefault.
Enable SPICE clipboard copyand paste
Defines whether you can copy and paste content from an external hostinto the virtual machine’s SPICE console. This option is only available forvirtual machines using the SPICE protocol. This check box is selected bydefault.
Field Name Description
The Custom Properties section contains additional VDSM options for running virtual machines.
Table A.20. Custom Properties Section
Field Name Description
sndbuf Enter the size of the buffer for sending the virtual machine’s outgoingdata over the socket.
vhost Enter the name of the host on which this virtual machine should run. Thename can contain any combination of letters and numbers.
mdev_type Enter the name of the mediated device, my_GPU, supported by thehost’s kernel to enable the host to work with the device.
viodiskcache Caching mode for the virtio disk. writethrough writes data to the cacheand the disk in parallel, writeback does not copy modifications from thecache to the disk, and none disables caching. Seehttps://access.redhat.com/solutions/2361311 for more information aboutthe limitations of the viodiskcache custom property.
sap_agent Enables SAP monitoring on the virtual machine. Set to true or false.
A.3. EXPLANATION OF SETTINGS IN THE NEW NETWORK INTERFACEAND EDIT NETWORK INTERFACE WINDOWS
These settings apply when you are adding or editing a virtual machine network interface. If you havemore than one network interface attached to a virtual machine, you can put the virtual machine on morethan one logical network.
Table A.21. Network Interface Settings
APPENDIX A. REFERENCE: SETTINGS IN ADMINISTRATION PORTAL AND VM PORTAL WINDOWS
157
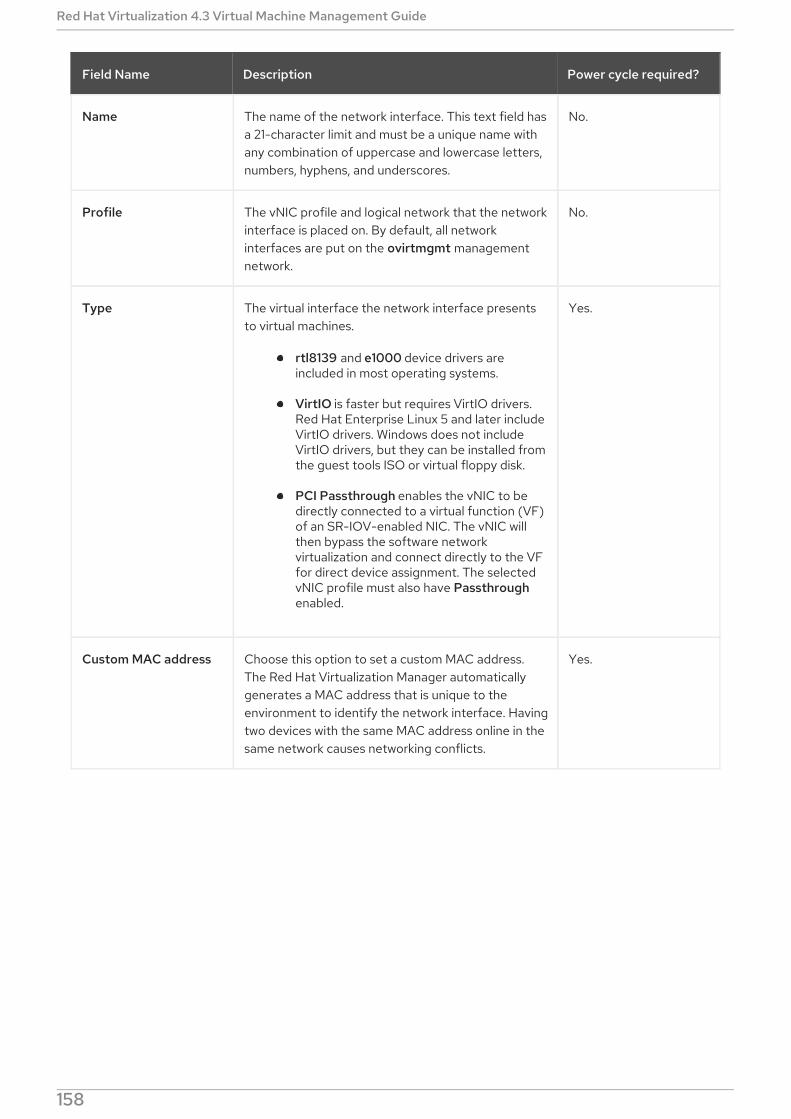
Field Name Description Power cycle required?
Name The name of the network interface. This text field hasa 21-character limit and must be a unique name withany combination of uppercase and lowercase letters,numbers, hyphens, and underscores.
No.
Profile The vNIC profile and logical network that the networkinterface is placed on. By default, all networkinterfaces are put on the ovirtmgmt managementnetwork.
No.
Type The virtual interface the network interface presentsto virtual machines.
rtl8139 and e1000 device drivers areincluded in most operating systems.
VirtIO is faster but requires VirtIO drivers.Red Hat Enterprise Linux 5 and later includeVirtIO drivers. Windows does not includeVirtIO drivers, but they can be installed fromthe guest tools ISO or virtual floppy disk.
PCI Passthrough enables the vNIC to bedirectly connected to a virtual function (VF)of an SR-IOV-enabled NIC. The vNIC willthen bypass the software networkvirtualization and connect directly to the VFfor direct device assignment. The selectedvNIC profile must also have Passthroughenabled.
Yes.
Custom MAC address Choose this option to set a custom MAC address.The Red Hat Virtualization Manager automaticallygenerates a MAC address that is unique to theenvironment to identify the network interface. Havingtwo devices with the same MAC address online in thesame network causes networking conflicts.
Yes.
Red Hat Virtualization 4.3 Virtual Machine Management Guide
158
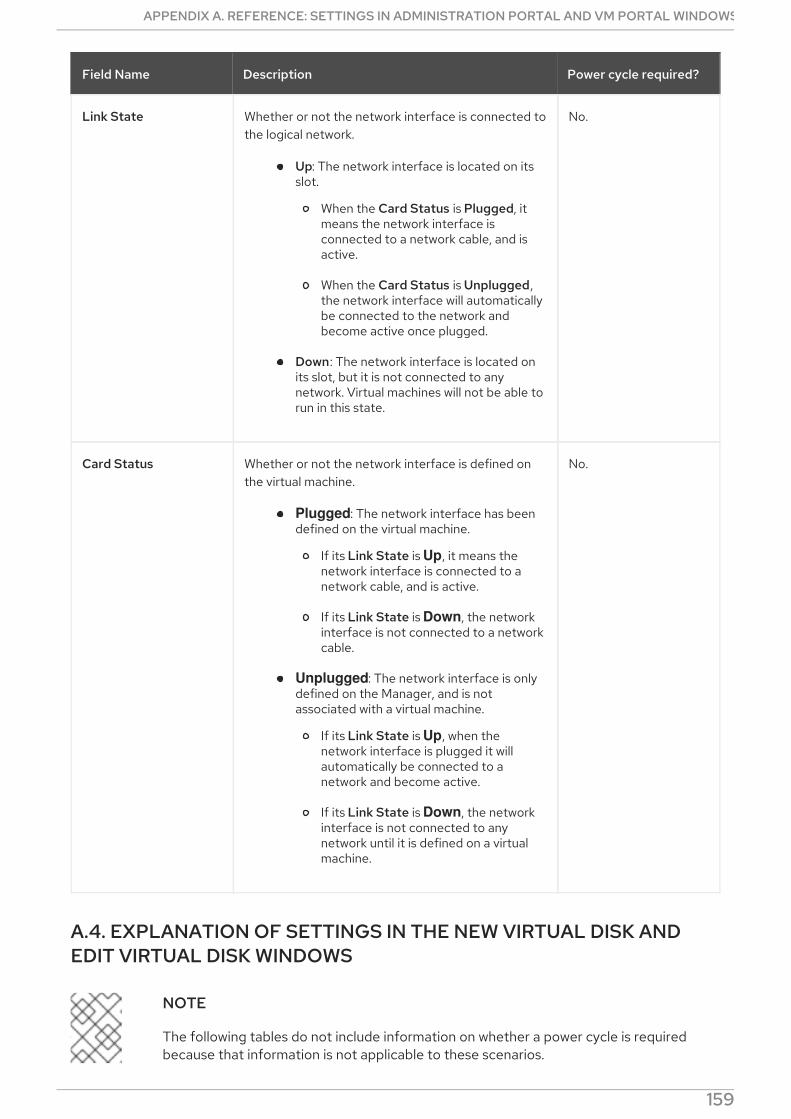
Link State Whether or not the network interface is connected tothe logical network.
Up: The network interface is located on itsslot.
When the Card Status is Plugged, itmeans the network interface isconnected to a network cable, and isactive.
When the Card Status is Unplugged,the network interface will automaticallybe connected to the network andbecome active once plugged.
Down: The network interface is located onits slot, but it is not connected to anynetwork. Virtual machines will not be able torun in this state.
No.
Card Status Whether or not the network interface is defined onthe virtual machine.
Plugged: The network interface has beendefined on the virtual machine.
If its Link State is Up, it means thenetwork interface is connected to anetwork cable, and is active.
If its Link State is Down, the networkinterface is not connected to a networkcable.
Unplugged: The network interface is onlydefined on the Manager, and is notassociated with a virtual machine.
If its Link State is Up, when thenetwork interface is plugged it willautomatically be connected to anetwork and become active.
If its Link State is Down, the networkinterface is not connected to anynetwork until it is defined on a virtualmachine.
No.
Field Name Description Power cycle required?
A.4. EXPLANATION OF SETTINGS IN THE NEW VIRTUAL DISK ANDEDIT VIRTUAL DISK WINDOWS
NOTE
The following tables do not include information on whether a power cycle is requiredbecause that information is not applicable to these scenarios.
APPENDIX A. REFERENCE: SETTINGS IN ADMINISTRATION PORTAL AND VM PORTAL WINDOWS
159
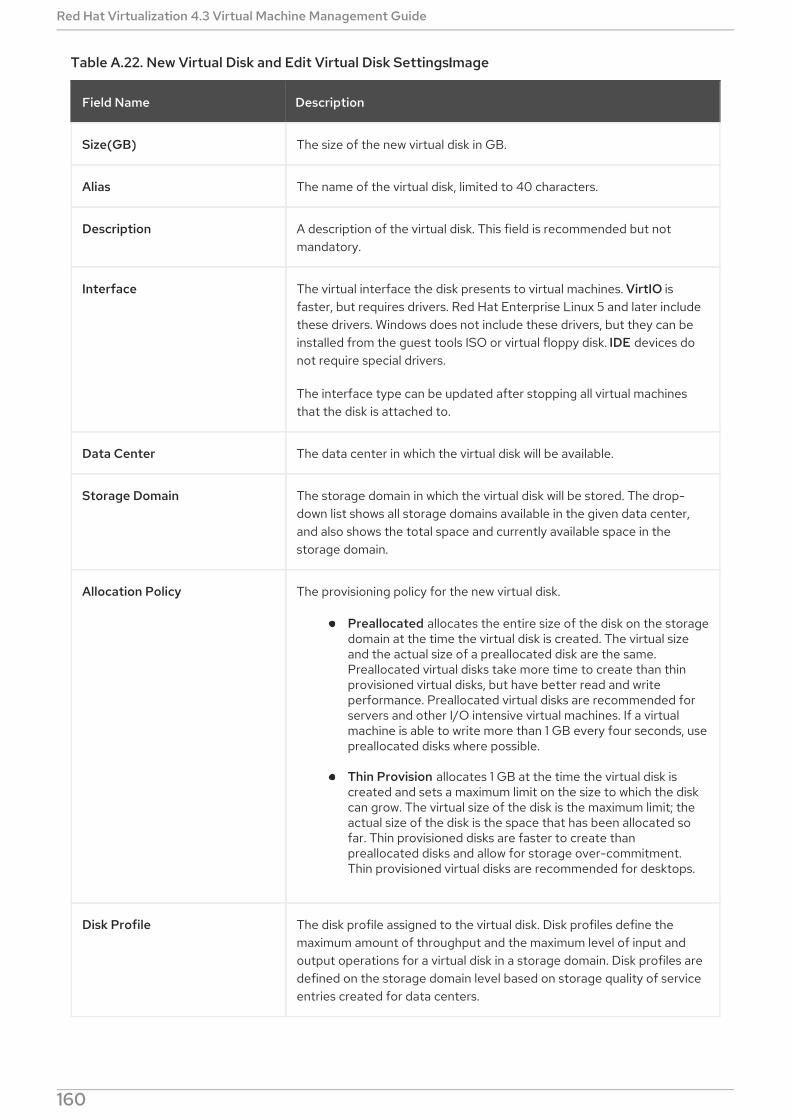
Table A.22. New Virtual Disk and Edit Virtual Disk Settings: Image
Field Name Description
Size(GB) The size of the new virtual disk in GB.
Alias The name of the virtual disk, limited to 40 characters.
Description A description of the virtual disk. This field is recommended but notmandatory.
Interface The virtual interface the disk presents to virtual machines. VirtIO isfaster, but requires drivers. Red Hat Enterprise Linux 5 and later includethese drivers. Windows does not include these drivers, but they can beinstalled from the guest tools ISO or virtual floppy disk. IDE devices donot require special drivers.
The interface type can be updated after stopping all virtual machinesthat the disk is attached to.
Data Center The data center in which the virtual disk will be available.
Storage Domain The storage domain in which the virtual disk will be stored. The drop-down list shows all storage domains available in the given data center,and also shows the total space and currently available space in thestorage domain.
Allocation Policy The provisioning policy for the new virtual disk.
Preallocated allocates the entire size of the disk on the storagedomain at the time the virtual disk is created. The virtual sizeand the actual size of a preallocated disk are the same.Preallocated virtual disks take more time to create than thinprovisioned virtual disks, but have better read and writeperformance. Preallocated virtual disks are recommended forservers and other I/O intensive virtual machines. If a virtualmachine is able to write more than 1 GB every four seconds, usepreallocated disks where possible.
Thin Provision allocates 1 GB at the time the virtual disk iscreated and sets a maximum limit on the size to which the diskcan grow. The virtual size of the disk is the maximum limit; theactual size of the disk is the space that has been allocated sofar. Thin provisioned disks are faster to create thanpreallocated disks and allow for storage over-commitment.Thin provisioned virtual disks are recommended for desktops.
Disk Profile The disk profile assigned to the virtual disk. Disk profiles define themaximum amount of throughput and the maximum level of input andoutput operations for a virtual disk in a storage domain. Disk profiles aredefined on the storage domain level based on storage quality of serviceentries created for data centers.
Red Hat Virtualization 4.3 Virtual Machine Management Guide
160
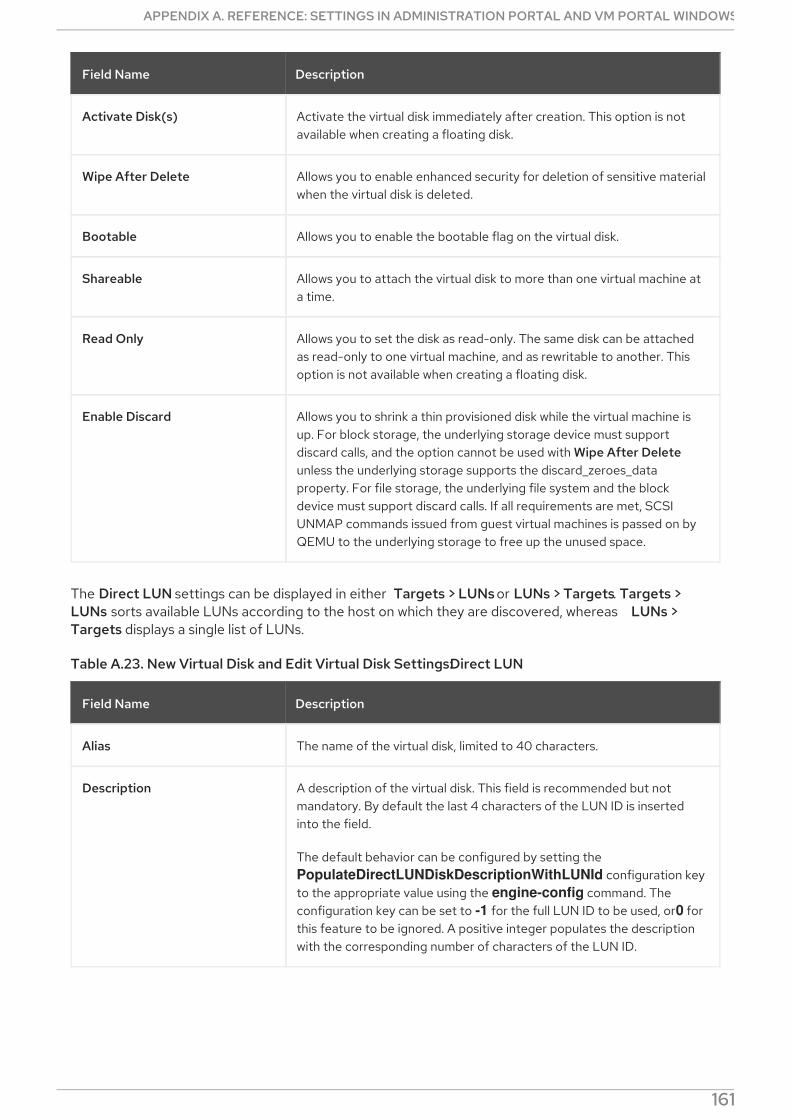
Activate Disk(s) Activate the virtual disk immediately after creation. This option is notavailable when creating a floating disk.
Wipe After Delete Allows you to enable enhanced security for deletion of sensitive materialwhen the virtual disk is deleted.
Bootable Allows you to enable the bootable flag on the virtual disk.
Shareable Allows you to attach the virtual disk to more than one virtual machine ata time.
Read Only Allows you to set the disk as read-only. The same disk can be attachedas read-only to one virtual machine, and as rewritable to another. Thisoption is not available when creating a floating disk.
Enable Discard Allows you to shrink a thin provisioned disk while the virtual machine isup. For block storage, the underlying storage device must supportdiscard calls, and the option cannot be used with Wipe After Deleteunless the underlying storage supports the discard_zeroes_dataproperty. For file storage, the underlying file system and the blockdevice must support discard calls. If all requirements are met, SCSIUNMAP commands issued from guest virtual machines is passed on byQEMU to the underlying storage to free up the unused space.
Field Name Description
The Direct LUN settings can be displayed in either Targets > LUNs or LUNs > Targets. Targets >LUNs sorts available LUNs according to the host on which they are discovered, whereas LUNs >Targets displays a single list of LUNs.
Table A.23. New Virtual Disk and Edit Virtual Disk Settings: Direct LUN
Field Name Description
Alias The name of the virtual disk, limited to 40 characters.
Description A description of the virtual disk. This field is recommended but notmandatory. By default the last 4 characters of the LUN ID is insertedinto the field.
The default behavior can be configured by setting the PopulateDirectLUNDiskDescriptionWithLUNId configuration keyto the appropriate value using the engine-config command. Theconfiguration key can be set to -1 for the full LUN ID to be used, or 0 forthis feature to be ignored. A positive integer populates the descriptionwith the corresponding number of characters of the LUN ID.
APPENDIX A. REFERENCE: SETTINGS IN ADMINISTRATION PORTAL AND VM PORTAL WINDOWS
161
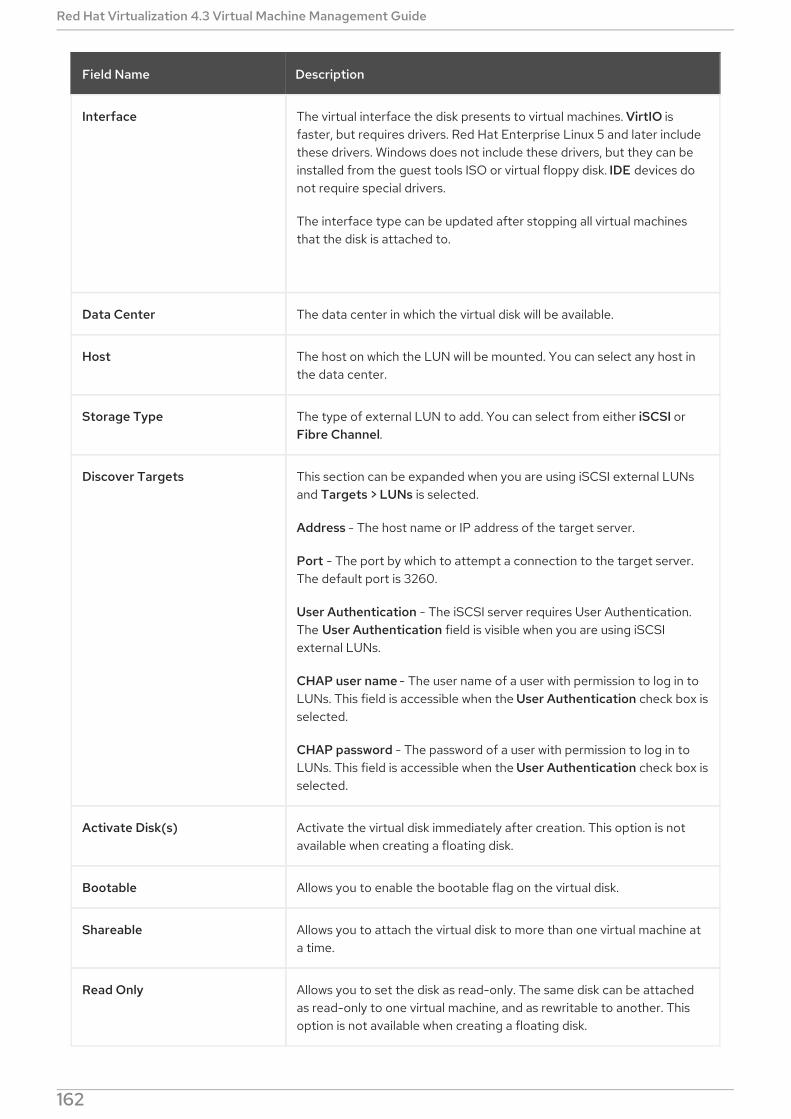
Interface The virtual interface the disk presents to virtual machines. VirtIO isfaster, but requires drivers. Red Hat Enterprise Linux 5 and later includethese drivers. Windows does not include these drivers, but they can beinstalled from the guest tools ISO or virtual floppy disk. IDE devices donot require special drivers.
The interface type can be updated after stopping all virtual machinesthat the disk is attached to.
Data Center The data center in which the virtual disk will be available.
Host The host on which the LUN will be mounted. You can select any host inthe data center.
Storage Type The type of external LUN to add. You can select from either iSCSI orFibre Channel.
Discover Targets This section can be expanded when you are using iSCSI external LUNsand Targets > LUNs is selected.
Address - The host name or IP address of the target server.
Port - The port by which to attempt a connection to the target server.The default port is 3260.
User Authentication - The iSCSI server requires User Authentication.The User Authentication field is visible when you are using iSCSIexternal LUNs.
CHAP user name - The user name of a user with permission to log in toLUNs. This field is accessible when the User Authentication check box isselected.
CHAP password - The password of a user with permission to log in toLUNs. This field is accessible when the User Authentication check box isselected.
Activate Disk(s) Activate the virtual disk immediately after creation. This option is notavailable when creating a floating disk.
Bootable Allows you to enable the bootable flag on the virtual disk.
Shareable Allows you to attach the virtual disk to more than one virtual machine ata time.
Read Only Allows you to set the disk as read-only. The same disk can be attachedas read-only to one virtual machine, and as rewritable to another. Thisoption is not available when creating a floating disk.
Field Name Description
Red Hat Virtualization 4.3 Virtual Machine Management Guide
162

Enable Discard Allows you to shrink a thin provisioned disk while the virtual machine isup. With this option enabled, SCSI UNMAP commands issued from guestvirtual machines is passed on by QEMU to the underlying storage to freeup the unused space.
Enable SCSI Pass-Through Available when the Interface is set to VirtIO-SCSI. Selecting this checkbox enables passthrough of a physical SCSI device to the virtual disk. AVirtIO-SCSI interface with SCSI passthrough enabled automaticallyincludes SCSI discard support. Read Only is not supported when thischeck box is selected.
When this check box is not selected, the virtual disk uses an emulatedSCSI device. Read Only is supported on emulated VirtIO-SCSI disks.
Allow Privileged SCSI I/O Available when the Enable SCSI Pass-Through check box is selected.Selecting this check box enables unfiltered SCSI Generic I/O (SG_IO)access, allowing privileged SG_IO commands on the disk. This is requiredfor persistent reservations.
Using SCSI Reservation Available when the Enable SCSI Pass-Through and Allow PrivilegedSCSI I/O check boxes are selected. Selecting this check box disablesmigration for any virtual machine using this disk, to prevent virtualmachines that are using SCSI reservation from losing access to the disk.
Field Name Description
Fill in the fields in the Discover Targets section and click Discover to discover the target server. Youcan then click the Login All button to list the available LUNs on the target server and, using the radiobuttons next to each LUN, select the LUN to add.
Using LUNs directly as virtual machine hard disk images removes a layer of abstraction between yourvirtual machines and their data.
The following considerations must be made when using a direct LUN as a virtual machine hard diskimage:
Live storage migration of direct LUN hard disk images is not supported.
Direct LUN disks are not included in virtual machine exports.
Direct LUN disks are not included in virtual machine snapshots.
The Cinder settings form will be disabled if there are no available OpenStack Volume storage domainson which you have permissions to create a disk in the relevant Data Center. Cinder disks require accessto an instance of OpenStack Volume that has been added to the Red Hat Virtualization environmentusing the External Providers window; see Adding an OpenStack Volume (Cinder) Instance for StorageManagement for more information.
Table A.24. New Virtual Disk and Edit Virtual Disk Settings: Cinder
APPENDIX A. REFERENCE: SETTINGS IN ADMINISTRATION PORTAL AND VM PORTAL WINDOWS
163
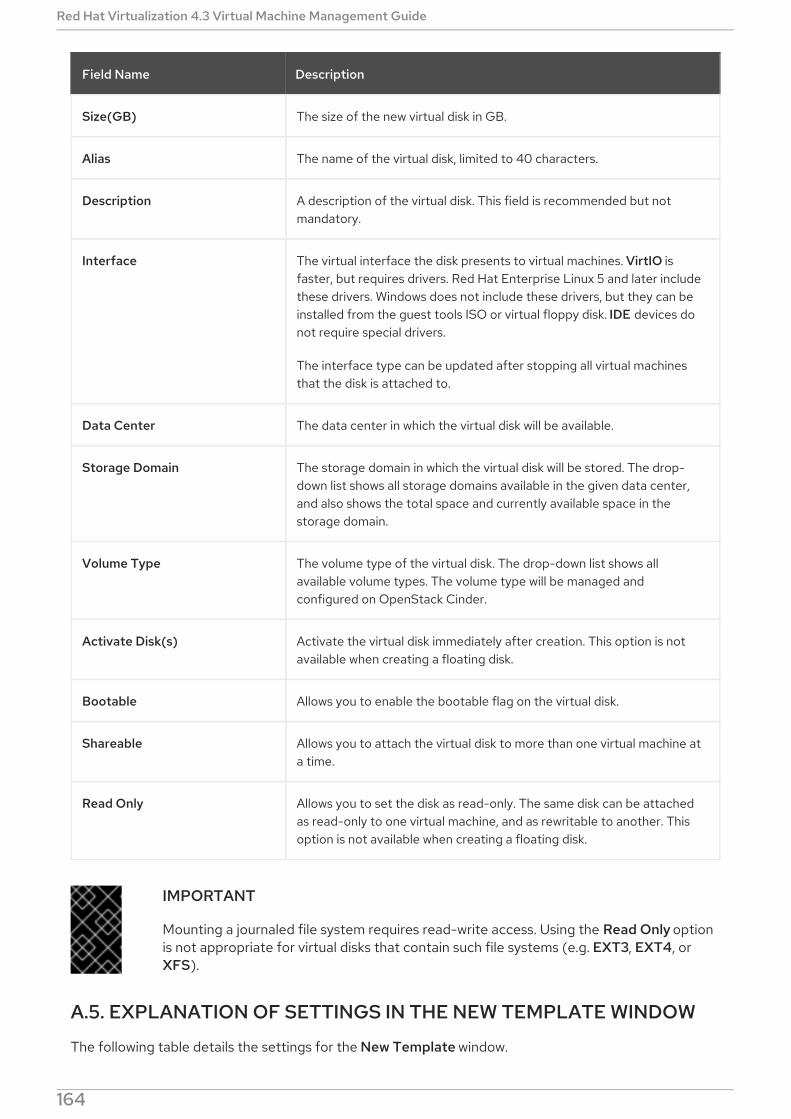
Field Name Description
Size(GB) The size of the new virtual disk in GB.
Alias The name of the virtual disk, limited to 40 characters.
Description A description of the virtual disk. This field is recommended but notmandatory.
Interface The virtual interface the disk presents to virtual machines. VirtIO isfaster, but requires drivers. Red Hat Enterprise Linux 5 and later includethese drivers. Windows does not include these drivers, but they can beinstalled from the guest tools ISO or virtual floppy disk. IDE devices donot require special drivers.
The interface type can be updated after stopping all virtual machinesthat the disk is attached to.
Data Center The data center in which the virtual disk will be available.
Storage Domain The storage domain in which the virtual disk will be stored. The drop-down list shows all storage domains available in the given data center,and also shows the total space and currently available space in thestorage domain.
Volume Type The volume type of the virtual disk. The drop-down list shows allavailable volume types. The volume type will be managed andconfigured on OpenStack Cinder.
Activate Disk(s) Activate the virtual disk immediately after creation. This option is notavailable when creating a floating disk.
Bootable Allows you to enable the bootable flag on the virtual disk.
Shareable Allows you to attach the virtual disk to more than one virtual machine ata time.
Read Only Allows you to set the disk as read-only. The same disk can be attachedas read-only to one virtual machine, and as rewritable to another. Thisoption is not available when creating a floating disk.
IMPORTANT
Mounting a journaled file system requires read-write access. Using the Read Only optionis not appropriate for virtual disks that contain such file systems (e.g. EXT3, EXT4, orXFS).
A.5. EXPLANATION OF SETTINGS IN THE NEW TEMPLATE WINDOW
The following table details the settings for the New Template window.
Red Hat Virtualization 4.3 Virtual Machine Management Guide
164
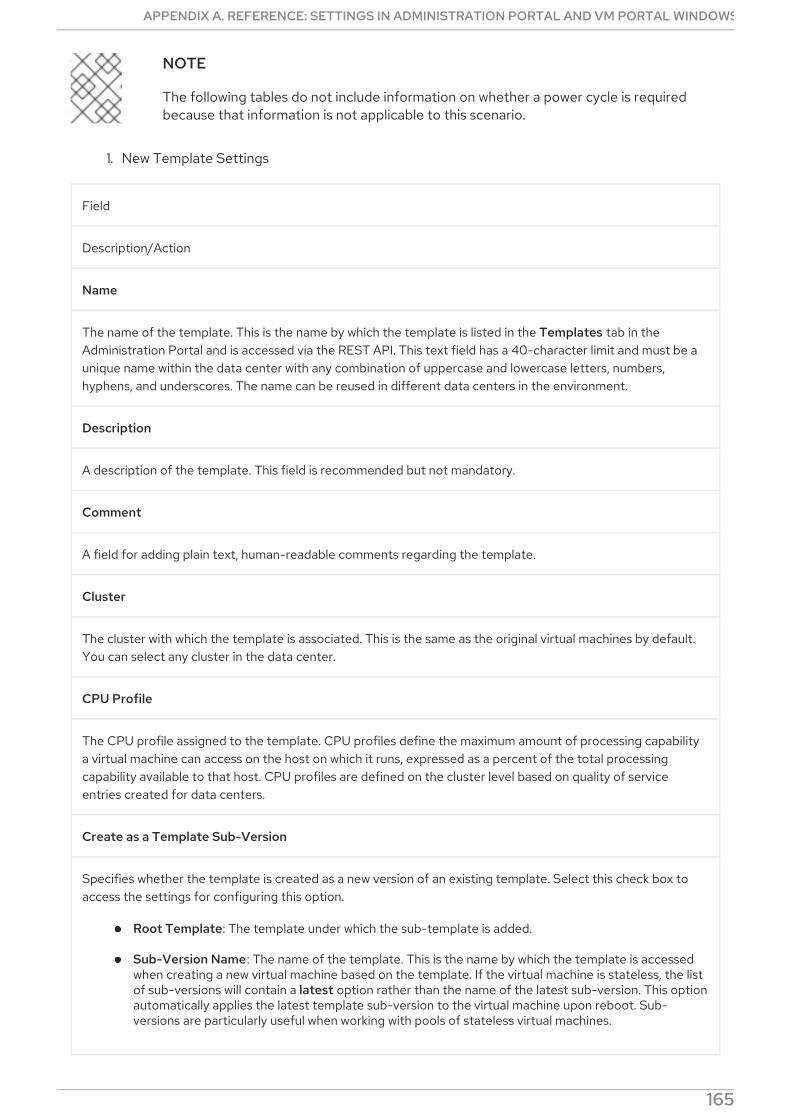
NOTE
The following tables do not include information on whether a power cycle is requiredbecause that information is not applicable to this scenario.
1. New Template Settings
Field
Description/Action
Name
The name of the template. This is the name by which the template is listed in the Templates tab in theAdministration Portal and is accessed via the REST API. This text field has a 40-character limit and must be aunique name within the data center with any combination of uppercase and lowercase letters, numbers,hyphens, and underscores. The name can be reused in different data centers in the environment.
Description
A description of the template. This field is recommended but not mandatory.
Comment
A field for adding plain text, human-readable comments regarding the template.
Cluster
The cluster with which the template is associated. This is the same as the original virtual machines by default.You can select any cluster in the data center.
CPU Profile
The CPU profile assigned to the template. CPU profiles define the maximum amount of processing capabilitya virtual machine can access on the host on which it runs, expressed as a percent of the total processingcapability available to that host. CPU profiles are defined on the cluster level based on quality of serviceentries created for data centers.
Create as a Template Sub-Version
Specifies whether the template is created as a new version of an existing template. Select this check box toaccess the settings for configuring this option.
Root Template: The template under which the sub-template is added.
Sub-Version Name: The name of the template. This is the name by which the template is accessedwhen creating a new virtual machine based on the template. If the virtual machine is stateless, the listof sub-versions will contain a latest option rather than the name of the latest sub-version. This optionautomatically applies the latest template sub-version to the virtual machine upon reboot. Sub-versions are particularly useful when working with pools of stateless virtual machines.
APPENDIX A. REFERENCE: SETTINGS IN ADMINISTRATION PORTAL AND VM PORTAL WINDOWS
165

Disks Allocation
Alias - An alias for the virtual disk used by the template. By default, the alias is set to the same value as that ofthe source virtual machine.
Virtual Size - The total amount of disk space that a virtual machine based on the template can use. This valuecannot be edited, and is provided for reference only. This value corresponds with the size, in GB, that wasspecified when the disk was created or edited.
Format - The format of the virtual disk used by the template. The available options are QCOW2 and Raw. Bydefault, the format is set to Raw.
Target - The storage domain on which the virtual disk used by the template is stored. By default, the storagedomain is set to the same value as that of the source virtual machine. You can select any storage domain in thecluster.
Disk Profile - The disk profile to assign to the virtual disk used by the template. Disk profiles are createdbased on storage profiles defined in the data centers. For more information, see Creating a Disk Profile.
Allow all users to access this Template
Specifies whether a template is public or private. A public template can be accessed by all users, whereas aprivate template can only be accessed by users with the TemplateAdmin or SuperUser roles.
Copy VM permissions
Copies explicit permissions that have been set on the source virtual machine to the template.
Seal Template (Linux only)
Specifies whether a template is sealed. 'Sealing' is an operation that erases all machine-specific configurationsfrom a filesystem, including SSH keys, UDEV rules, MAC addresses, system ID, and hostname. This settingprevents a virtual machine based on this template from inheriting the configuration of the source virtualmachine.
Red Hat Virtualization 4.3 Virtual Machine Management Guide
166
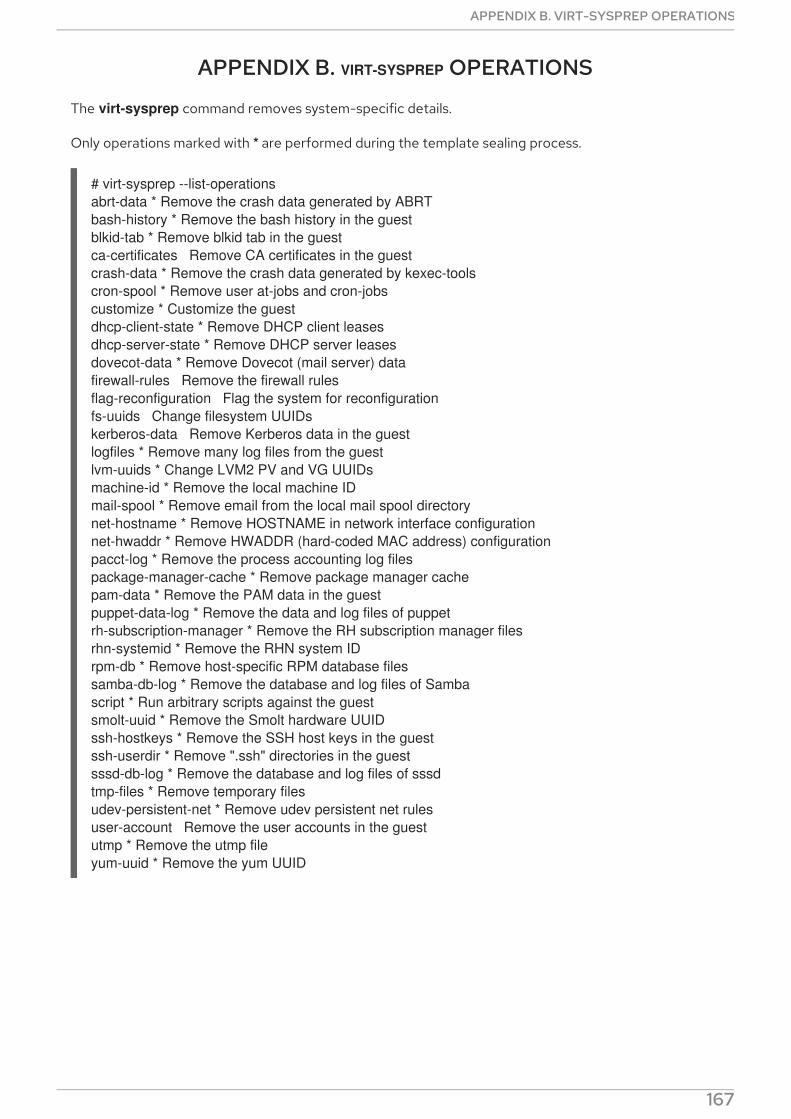
APPENDIX B. VIRT-SYSPREP OPERATIONS
The virt-sysprep command removes system-specific details.
Only operations marked with * are performed during the template sealing process.
# virt-sysprep --list-operationsabrt-data * Remove the crash data generated by ABRTbash-history * Remove the bash history in the guestblkid-tab * Remove blkid tab in the guestca-certificates Remove CA certificates in the guestcrash-data * Remove the crash data generated by kexec-toolscron-spool * Remove user at-jobs and cron-jobscustomize * Customize the guestdhcp-client-state * Remove DHCP client leasesdhcp-server-state * Remove DHCP server leasesdovecot-data * Remove Dovecot (mail server) datafirewall-rules Remove the firewall rulesflag-reconfiguration Flag the system for reconfigurationfs-uuids Change filesystem UUIDskerberos-data Remove Kerberos data in the guestlogfiles * Remove many log files from the guestlvm-uuids * Change LVM2 PV and VG UUIDsmachine-id * Remove the local machine IDmail-spool * Remove email from the local mail spool directorynet-hostname * Remove HOSTNAME in network interface configurationnet-hwaddr * Remove HWADDR (hard-coded MAC address) configurationpacct-log * Remove the process accounting log filespackage-manager-cache * Remove package manager cachepam-data * Remove the PAM data in the guestpuppet-data-log * Remove the data and log files of puppetrh-subscription-manager * Remove the RH subscription manager filesrhn-systemid * Remove the RHN system IDrpm-db * Remove host-specific RPM database filessamba-db-log * Remove the database and log files of Sambascript * Run arbitrary scripts against the guestsmolt-uuid * Remove the Smolt hardware UUIDssh-hostkeys * Remove the SSH host keys in the guestssh-userdir * Remove ".ssh" directories in the guestsssd-db-log * Remove the database and log files of sssdtmp-files * Remove temporary filesudev-persistent-net * Remove udev persistent net rulesuser-account Remove the user accounts in the guestutmp * Remove the utmp fileyum-uuid * Remove the yum UUID
APPENDIX B. VIRT-SYSPREP OPERATIONS
167


![Red Hat CloudForms 4.1 Support Matrix · 2017. 5. 8. · Red Hat Enterprise Virtualization 3.3 and above [a] Yes Red Hat Virtualization 4.0 [a] Yes Red Hat OpenStack Platform 6.0](https://img.pdfslide.net/doc/110x75/60367560534a4d483e55ba2b/red-hat-cloudforms-41-support-matrix-2017-5-8-red-hat-enterprise-virtualization.jpg)