Embed Size (px)
Citation preview
KOMPERNASS GMBH · BURGSTRASSE 21 · D-44867 BOCHUMwww.kompernass.com
ID-Nr.: KH6500-06/08-V1
KH 6500
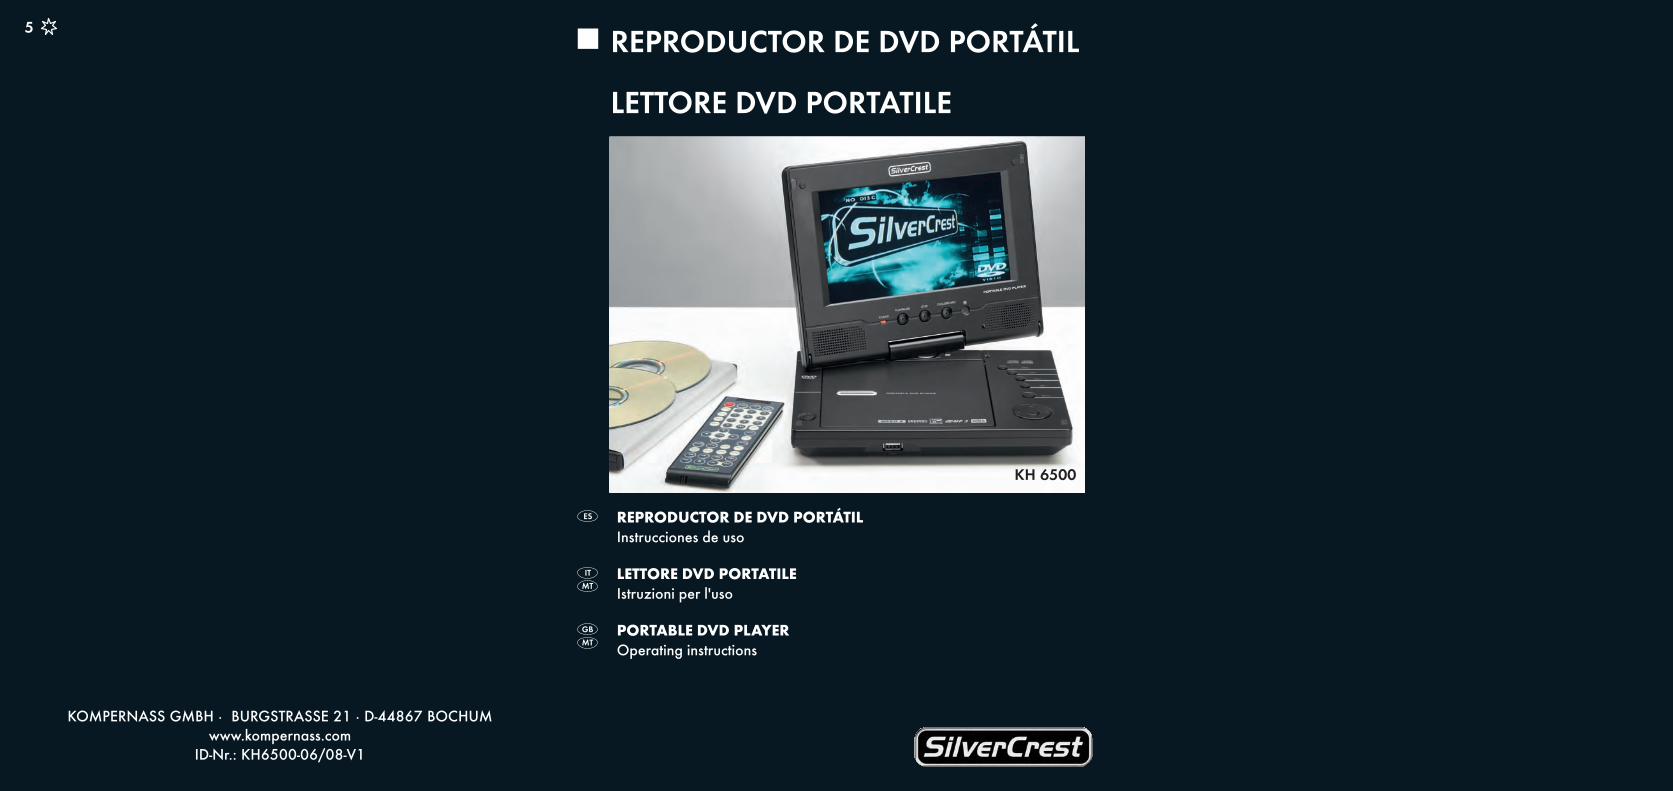
REPRODUCTOR DE DVD PORTÁTIL
LETTORE DVD PORTATILE
REPRODUCTOR DE DVD PORTÁTILInstrucciones de uso
LETTORE DVD PORTATILEIstruzioni per l'uso
PORTABLE DVD PLAYEROperating instructions
5
CV_KH6500_AR23388_LB5.qxd 01.08.2008 11:58 Uhr Seite 1
q
A
w
e
r
tyuio
s
df
g
h
j
k
l
;
2)
B
C
2! 2@ 2# 2$ 2%
a
KH 6500 2^D E
F
G
H
I
J
K
2& 2*
3$ 3%
3^ 3&
3* 3(
4) 4!
4*
4(
4^
4&
4$
4%
4@
4#
5^
5&
2(
3)
3!
3@
3#
5%
5$
5#
5@
5!
5)
5*
CV_KH6500_AR23388_LB5.qxd 01.08.2008 11:58 Uhr Seite 4
- 1 -
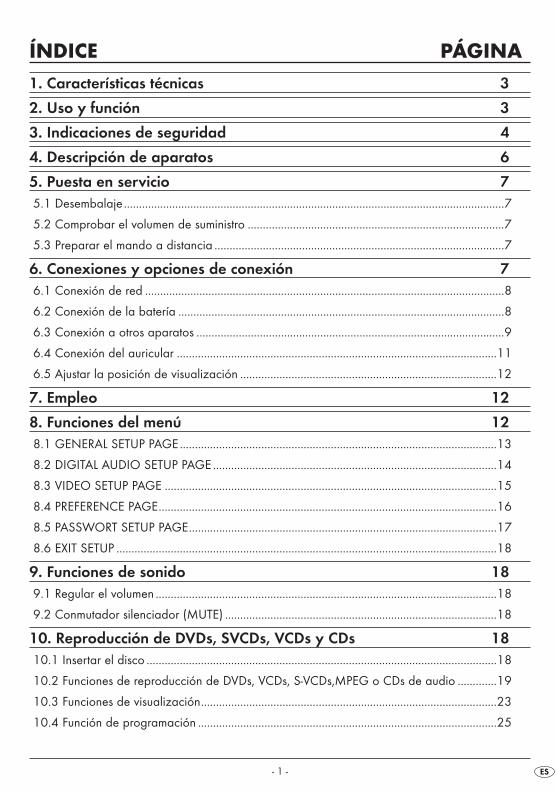
ÍNDICE PÁGINA1. Características técnicas 3
2. Uso y función 3
3. Indicaciones de seguridad 4
4. Descripción de aparatos 6
5. Puesta en servicio 75.1 Desembalaje..............................................................................................................................7
5.2 Comprobar el volumen de suministro .....................................................................................7
5.3 Preparar el mando a distancia ................................................................................................7
6. Conexiones y opciones de conexión 76.1 Conexión de red .......................................................................................................................8
6.2 Conexión de la batería ............................................................................................................8
6.3 Conexión a otros aparatos ......................................................................................................9
6.4 Conexión del auricular ..........................................................................................................11
6.5 Ajustar la posición de visualización .....................................................................................12
7. Empleo 12
8. Funciones del menú 128.1 GENERAL SETUP PAGE.........................................................................................................13
8.2 DIGITAL AUDIO SETUP PAGE ..............................................................................................14
8.3 VIDEO SETUP PAGE ..............................................................................................................15
8.4 PREFERENCE PAGE................................................................................................................16
8.5 PASSWORT SETUP PAGE......................................................................................................17
8.6 EXIT SETUP ..............................................................................................................................18
9. Funciones de sonido 189.1 Regular el volumen .................................................................................................................18
9.2 Conmutador silenciador (MUTE) ..........................................................................................18
10. Reproducción de DVDs, SVCDs, VCDs y CDs 1810.1 Insertar el disco ....................................................................................................................18
10.2 Funciones de reproducción de DVDs, VCDs, S-VCDs,MPEG o CDs de audio .............19
10.3 Funciones de visualización..................................................................................................23
10.4 Función de programación ...................................................................................................25
IB_KH6500_AR23388_LB5 01.08.2008 13:14 Uhr Seite 1
- 2 -
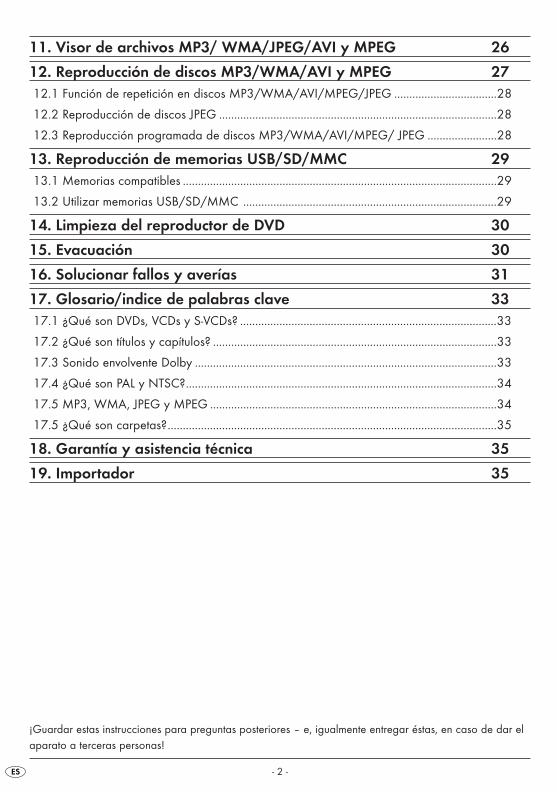
11. Visor de archivos MP3/ WMA/JPEG/AVI y MPEG 26
12. Reproducción de discos MP3/WMA/AVI y MPEG 2712.1 Función de repetición en discos MP3/WMA/AVI/MPEG/JPEG ..................................28
12.2 Reproducción de discos JPEG ............................................................................................28
12.3 Reproducción programada de discos MP3/WMA/AVI/MPEG/ JPEG .......................28
13. Reproducción de memorias USB/SD/MMC 2913.1 Memorias compatibles ........................................................................................................29
13.2 Utilizar memorias USB/SD/MMC ....................................................................................29
14. Limpieza del reproductor de DVD 30
15. Evacuación 30
16. Solucionar fallos y averías 31
17. Glosario/indice de palabras clave 3317.1 ¿Qué son DVDs, VCDs y S-VCDs? .....................................................................................33
17.2 ¿Qué son títulos y capítulos? ..............................................................................................33
17.3 Sonido envolvente Dolby ....................................................................................................33
17.4 ¿Qué son PAL y NTSC?.......................................................................................................34
17.5 MP3, WMA, JPEG y MPEG ...............................................................................................34
17.5 ¿Qué son carpetas?.............................................................................................................35
18. Garantía y asistencia técnica 35
19. Importador 35
¡Guardar estas instrucciones para preguntas posteriores – e, igualmente entregar éstas, en caso de dar elaparato a terceras personas!
IB_KH6500_AR23388_LB5 01.08.2008 13:14 Uhr Seite 2
- 3 -
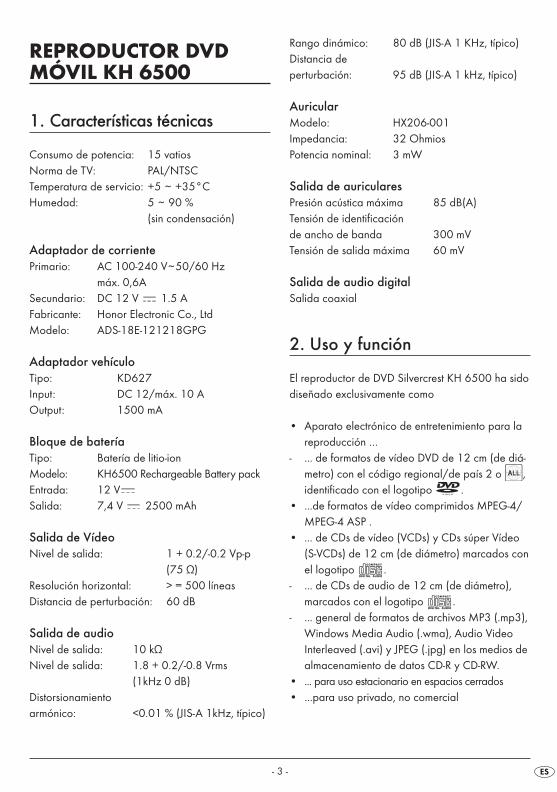
REPRODUCTOR DVDMÓVIL KH 6500
1. Características técnicas
Consumo de potencia: 15 vatiosNorma de TV: PAL/NTSCTemperatura de servicio: +5 ~ +35°CHumedad: 5 ~ 90 %
(sin condensación)
Adaptador de corrientePrimario: AC 100-240 V~50/60 Hz
máx. 0,6ASecundario: DC 12 V 1.5 AFabricante: Honor Electronic Co., LtdModelo: ADS-18E-121218GPG
Adaptador vehículoTipo: KD627Input: DC 12/máx. 10 A Output: 1500 mA
Bloque de bateríaTipo: Batería de litio-ionModelo: KH6500 Rechargeable Battery packEntrada: 12 VSalida: 7,4 V 2500 mAh
Salida de Vídeo Nivel de salida: 1 + 0.2/-0.2 Vp-p
(75 Ω) Resolución horizontal: > = 500 líneas Distancia de perturbación: 60 dB
Salida de audio Nivel de salida: 10 kΩNivel de salida: 1.8 + 0.2/-0.8 Vrms
(1kHz 0 dB) Distorsionamiento armónico: <0.01 % (JIS-A 1kHz, típico)
Rango dinámico: 80 dB (JIS-A 1 KHz, típico) Distancia de perturbación: 95 dB (JIS-A 1 kHz, típico)
AuricularModelo: HX206-001Impedancia: 32 OhmiosPotencia nominal: 3 mW
Salida de auriculares Presión acústica máxima 85 dB(A)Tensión de identificación de ancho de banda 300 mVTensión de salida máxima 60 mV
Salida de audio digitalSalida coaxial
2. Uso y función
El reproductor de DVD Silvercrest KH 6500 ha sidodiseñado exclusivamente como
• Aparato electrónico de entretenimiento para lareproducción …
- ... de formatos de vídeo DVD de 12 cm (de diá-metro) con el código regional/de país 2 o ,identificado con el logotipo .
• ...de formatos de vídeo comprimidos MPEG-4/MPEG-4 ASP .
• ... de CDs de vídeo (VCDs) y CDs súper Vídeo(S-VCDs) de 12 cm (de diámetro) marcados conel logotipo .
- ... de CDs de audio de 12 cm (de diámetro),marcados con el logotipo .
- ... general de formatos de archivos MP3 (.mp3),Windows Media Audio (.wma), Audio VideoInterleaved (.avi) y JPEG (.jpg) en los medios dealmacenamiento de datos CD-R y CD-RW.
• ... para uso estacionario en espacios cerrados• ...para uso privado, no comercial
IB_KH6500_AR23388_LB5 01.08.2008 13:14 Uhr Seite 3
- 4 -
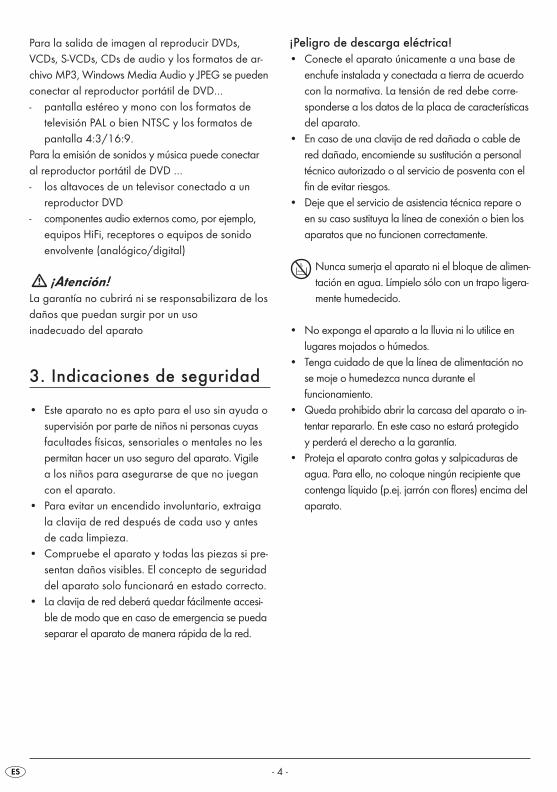
Para la salida de imagen al reproducir DVDs,VCDs, S-VCDs, CDs de audio y los formatos de ar-chivo MP3, Windows Media Audio y JPEG se puedenconectar al reproductor portátil de DVD…- pantalla estéreo y mono con los formatos de
televisión PAL o bien NTSC y los formatos depantalla 4:3/16:9.
Para la emisión de sonidos y música puede conectaral reproductor portátil de DVD …- los altavoces de un televisor conectado a un
reproductor DVD- componentes audio externos como, por ejemplo,
equipos HiFi, receptores o equipos de sonido envolvente (analógico/digital)
¡Atención!La garantía no cubrirá ni se responsabilizara de losdaños que puedan surgir por un uso inadecuado del aparato
3. Indicaciones de seguridad
• Este aparato no es apto para el uso sin ayuda osupervisión por parte de niños ni personas cuyasfacultades físicas, sensoriales o mentales no lespermitan hacer un uso seguro del aparato. Vigile a los niños para asegurarse de que no juegancon el aparato.
• Para evitar un encendido involuntario, extraigala clavija de red después de cada uso y antesde cada limpieza.
• Compruebe el aparato y todas las piezas si pre-sentan daños visibles. El concepto de seguridad del aparato solo funcionará en estado correcto.
• La clavija de red deberá quedar fácilmente accesi-ble de modo que en caso de emergencia se puedaseparar el aparato de manera rápida de la red.
¡Peligro de descarga eléctrica!• Conecte el aparato únicamente a una base de
enchufe instalada y conectada a tierra de acuerdocon la normativa. La tensión de red debe corre-sponderse a los datos de la placa de característicasdel aparato.
• En caso de una clavija de red dañada o cable dered dañado, encomiende su sustitución a personaltécnico autorizado o al servicio de posventa con elfin de evitar riesgos.
• Deje que el servicio de asistencia técnica repare oen su caso sustituya la línea de conexión o bien losaparatos que no funcionen correctamente.
Nunca sumerja el aparato ni el bloque de alimen-tación en agua. Límpielo sólo con un trapo ligera-mente humedecido.
• No exponga el aparato a la lluvia ni lo utilice en lugares mojados o húmedos.
• Tenga cuidado de que la línea de alimentación nose moje o humedezca nunca durante el funcionamiento.
• Queda prohibido abrir la carcasa del aparato o in-tentar repararlo. En este caso no estará protegido y perderá el derecho a la garantía.
• Proteja el aparato contra gotas y salpicaduras deagua. Para ello, no coloque ningún recipiente quecontenga líquido (p.ej. jarrón con flores) encima delaparato.
IB_KH6500_AR23388_LB5 01.08.2008 13:14 Uhr Seite 4

- 5 -
¡Riesgo de incendio!• No utilice el aparato en la proximidad de
superficies calientes.• No coloque el aparato en lugares donde quede
expuesto directamente a la radiación solar. De otromodo podría sobrecalentarse y dañarse de forma irreparable.
• No deje nunca el aparato desatendido durante sufuncionamiento.
• Nunca cubra la rejilla de ventilación del aparatomientras que este encendido.
• No coloque encima del aparato objetos que pue-dan provocar fuego como por ej. velas.
¡Peligro de lesiones! • Mantenga los niños alejados de la línea de conexi-
ón y del aparato. Los niños a veces menosprecianlos riesgos que pueden tener los aparatos eléctricos.
• Procure un asiento estable del aparato.• En caso de que se caiga el aparato o esté dañado,
no deberá ponerlo de nuevo en funcionamiento.Deje que compruebe el aparato personal espe-cialista cualificado y en su caso que lo repare.
• Los niños no deben tener acceso a las pilas. Losniños pueden meterse las pilas en la boca yatragantarse.
¡Peligro! ¡Radiación láser!!Este aparato está provisto de un "láser de clase 1".• No abra nunca el aparato. • No intente reparar el aparato. • En el interior del aparato hay una radiación láser
invisible. No exponga a la luz el haz láser.
Indicación: Ciertas pinturas de muebles agresivas pueden dañ-ar los pies de goma del aparato. Coloque el aparatosobre una superficie antideslizante.
¡Tormentas!En caso de tormentas se pueden dañar los aparatosconectados a la red eléctrica. Extraiga por ello encaso de tormenta la clavija de red de la base deenchufe.
Indicaciones acerca de tensiones de choque(EFT /proceso de paso eléctricos rápido):En caso de una función de fallo debido a procesosde paso eléctricos rápidos (tensión de choque), elproducto se ha de reposicionar, con el fin de resta-blecer el modo de funcionamiento normal. Posible-mente sea necesario retirar la alimentación de corrientey volver a conectarla. Las pilas (si disponibles) se debe-rán extraer y volver a colocar.
Nota acerca de la desconexión de la redEl interruptor de ENCENDIDO del aparato no lodesconecta completamente de la red eléctrica.Además, en el modo inactivo el aparato tambiénconsume corriente. Para desconectar el aparatocompletamente de la red es necesario extraer elbloque de alimentación de red de la base de enchufe.
Indicaciones para la manipulación de pilas/bateríasEl mando a distancia funciona con una pila y elaparato con una batería recargable. Tenga encuenta lo siguiente a la hora de manipular pilas/baterías:
¡Peligro de explosión!No tire las pilas/baterías al fuego. No vuelva a cargar las pilas.• Cargue sólo las pilas que estén claramente
identificadas como "recargables".• Cargue el bloque de batería suministrado sólo
con el reproductor portátil de DVD y el cable dered suministrado. No utilice ningún otro cargador o cable de red.
IB_KH6500_AR23388_LB5 01.08.2008 13:14 Uhr Seite 5
- 6 -
• No abra nunca las pilas/baterías, no suelde niderrita nunca las pilas/baterías. ¡Existe riesgo de explosión y de lesiones!
• Revise regularmente la pila/la batería. Las pi-las/ baterías gastadas pueden ocasionar dañosal aparato.
• Cuando no vaya a utilizar el aparato durante unperiodo prolongado, extraiga la pila/la batería.
• Utilice guantes de protección para tocar la pila/batería derramada.
• Limpie el compartimiento de pilas y los contac-tos de las pilas con un paño seco.
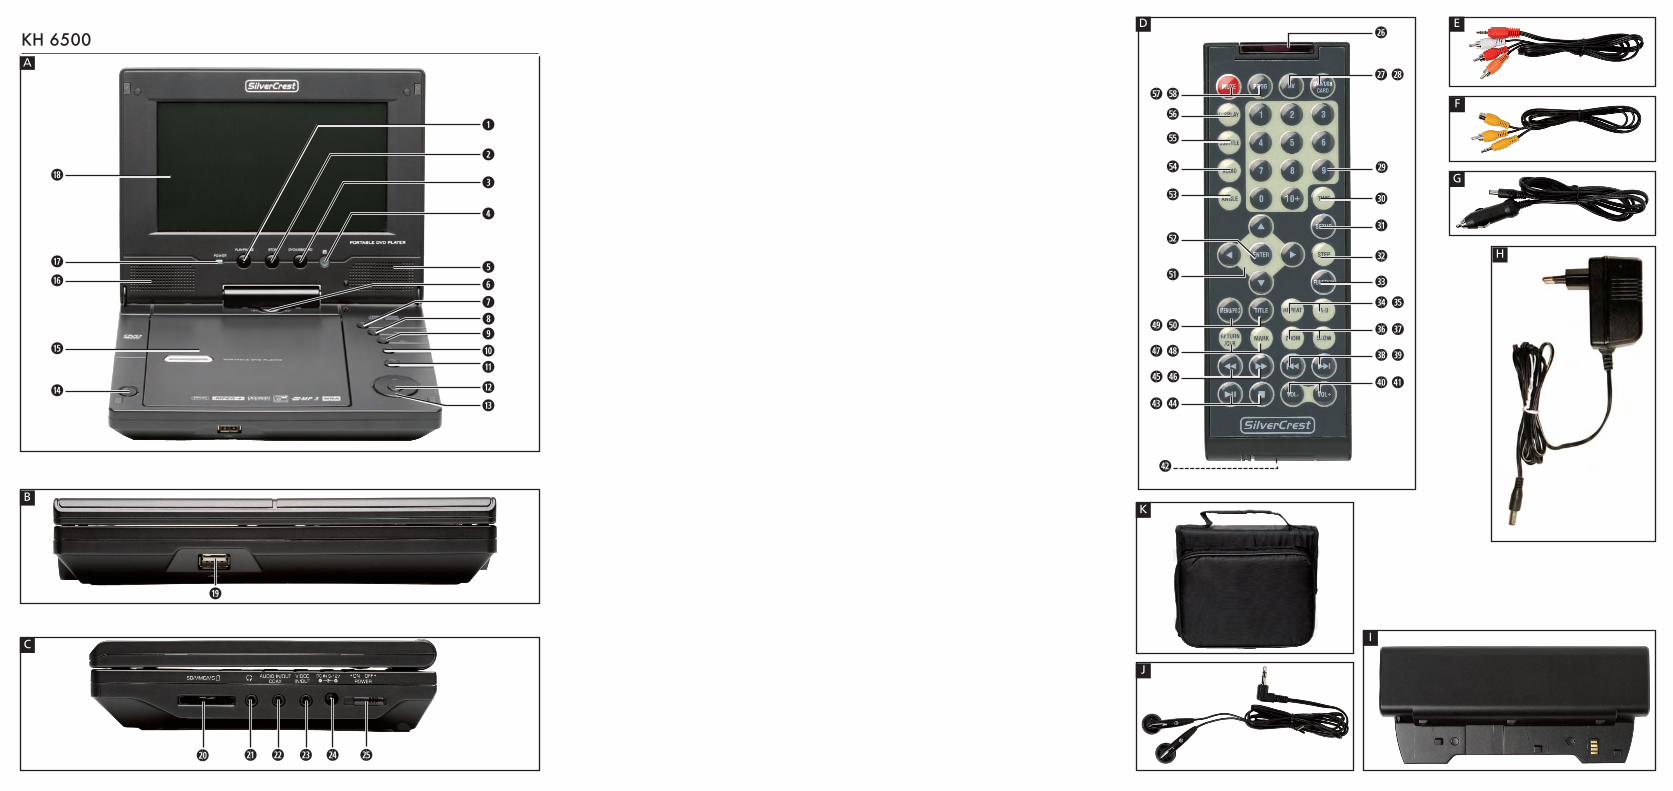
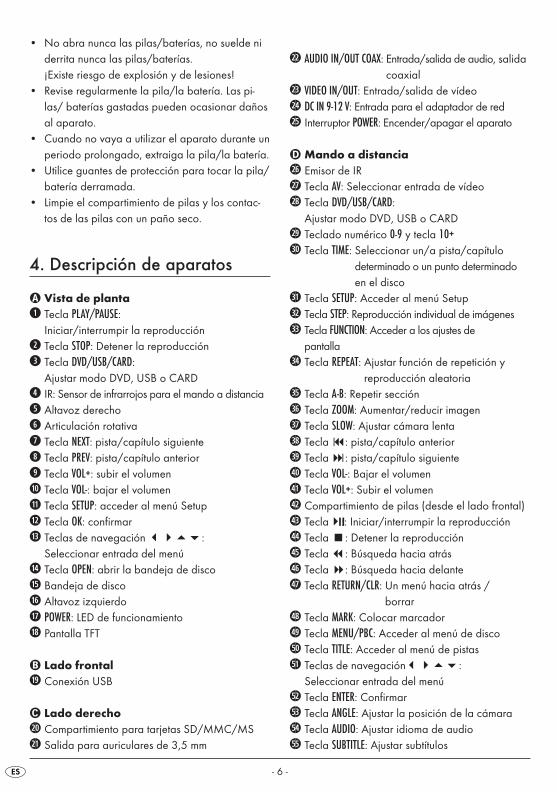
4. Descripción de aparatos
� Vista de plantaq Tecla PLAY/PAUSE:
Iniciar/interrumpir la reproducciónw Tecla STOP: Detener la reproduccióne Tecla DVD/USB/CARD:
Ajustar modo DVD, USB o CARDr IR: Sensor de infrarrojos para el mando a distanciat Altavoz derechoy Articulación rotativau Tecla NEXT: pista/capítulo siguientei Tecla PREV: pista/capítulo anterioro Tecla VOL+: subir el volumena Tecla VOL-: bajar el volumens Tecla SETUP: acceder al menú Setupd Tecla OK: confirmarf Teclas de navegación ����:
Seleccionar entrada del menúg Tecla OPEN: abrir la bandeja de discoh Bandeja de discoj Altavoz izquierdok POWER: LED de funcionamientol Pantalla TFT
� Lado frontal; Conexión USB
� Lado derecho2) Compartimiento para tarjetas SD/MMC/MS2! Salida para auriculares de 3,5 mm
2@ AUDIO IN/OUT COAX: Entrada/salida de audio, salidacoaxial
2# VIDEO IN/OUT: Entrada/salida de vídeo2$ DC IN 9-12 V: Entrada para el adaptador de red2% Interruptor POWER: Encender/apagar el aparato
� Mando a distancia2^ Emisor de IR2& Tecla AV: Seleccionar entrada de vídeo2* Tecla DVD/USB/CARD:
Ajustar modo DVD, USB o CARD2( Teclado numérico 0-9 y tecla 10+3) Tecla TIME: Seleccionar un/a pista/capítulo
determinado o un punto determinadoen el disco
3! Tecla SETUP: Acceder al menú Setup3@ Tecla STEP: Reproducción individual de imágenes3# Tecla FUNCTION: Acceder a los ajustes de
pantalla3$ Tecla REPEAT: Ajustar función de repetición y
reproducción aleatoria3% Tecla A-B: Repetir sección3^ Tecla ZOOM: Aumentar/reducir imagen3& Tecla SLOW: Ajustar cámara lenta3* Tecla �: pista/capítulo anterior3( Tecla �: pista/capítulo siguiente4) Tecla VOL-: Bajar el volumen4! Tecla VOL+: Subir el volumen4@ Compartimiento de pilas (desde el lado frontal)4# Tecla��:: Iniciar/interrumpir la reproducción4$ Tecla : Detener la reproducción4% Tecla : Búsqueda hacia atrás4^ Tecla �: Búsqueda hacia delante4& Tecla RETURN/CLR: Un menú hacia atrás /
borrar4* Tecla MARK: Colocar marcador4( Tecla MENU/PBC: Acceder al menú de disco5) Tecla TITLE: Acceder al menú de pistas5! Teclas de navegación����:
Seleccionar entrada del menú5@ Tecla ENTER: Confirmar5# Tecla ANGLE: Ajustar la posición de la cámara5$ Tecla AUDIO: Ajustar idioma de audio5% Tecla SUBTITLE: Ajustar subtítulos
IB_KH6500_AR23388_LB5 01.08.2008 13:14 Uhr Seite 6
- 7 -
5^ Tecla DISPLAY: Mostrar información de reproducción
5& Tecla MUTE: Desconectar sonido5* Tecla PROG: Programar el orden de reproducción
5. Puesta en servicio
5.1 Desembalaje1. Extraiga el reproductor de DVD y los accesorios
del embalaje.2. Retire todos los adhesivos, folios y medidas de
seguridad para el transporte
¡Atención!No deje que los niños jueguen con los plásticos. ¡Po-drían asfixiarse!
5.2 Comprobar el volumen de suministroAntes de realizar la puesta en servicio, comprobarque el volumen de suministro esté completo y queno haya sufrido daños.• Reproductor de DVD �• Mando a distancia con infrarrojos �• 1 pila para el mando a distancia,
3 V, tipo CR2025 (pila de botón)• Cable de audio RCA con 3 clavijas �• Cable RCA de vídeo con clavija y conector hembra
RCA �• Cable adaptador para el choche �• Bloque de alimentación de red • 1 bloque de batería • Auricular �• Bolsa de transporte y cinta de sujeción �• estas instrucciones de uso
5.3 Preparar el mando a distancia
Colocación de las pilasPara la primera puesta en servicio sólo deberá reti-rar los folios de protección que sobresalen del com-partimiento de pilas para preparar el mando a di-stancia para el funcionamiento.Proceda de la siguiente manera para un cambio posterior de las pilas:
1. Retire el compartimiento de pilas del mando a distancia.
2. Extraiga la pila usada e inserte una pila nuevadel tipo CR2025 (pila de botón) en el comparti-miento de pilas. Tenga en cuidado de respetarla polaridad correcta.
3. Vuelva a colocar el compartimiento de pilas enel mando a distancia.
Utilizar el mando a distancia• Dirija el mando a distancia hacia el sensor de
infrarrojos de la parte frontal del aparato.• Puede utilizar el mando a distancia a una distancia
del aparato de hasta aprox. 8 m.
6. Conexiones y opciones deconexión
Para utilizar el aparato deberá establecer tan sólola alimentación de corriente. Puede conectarlo auna base de enchufe, o utilizarlo con la batería o el adaptador de 12 V para el coche.Además, el aparato se puede conectar con otrosaparatos de entrada y salida:• con un televisor• con una grabadora de vídeo o DVD• con un receptor, como p. ej. un equipo estéreo• con un equipo Dolby-Digital
IB_KH6500_AR23388_LB5 01.08.2008 13:14 Uhr Seite 7
- 8 -
¡Atención!Compruebe que todos los aparatos estén apaga-dos antes de conectarlos. Conecte los aparatos a lared sólo después de haber realizado todas las co-nexiones.
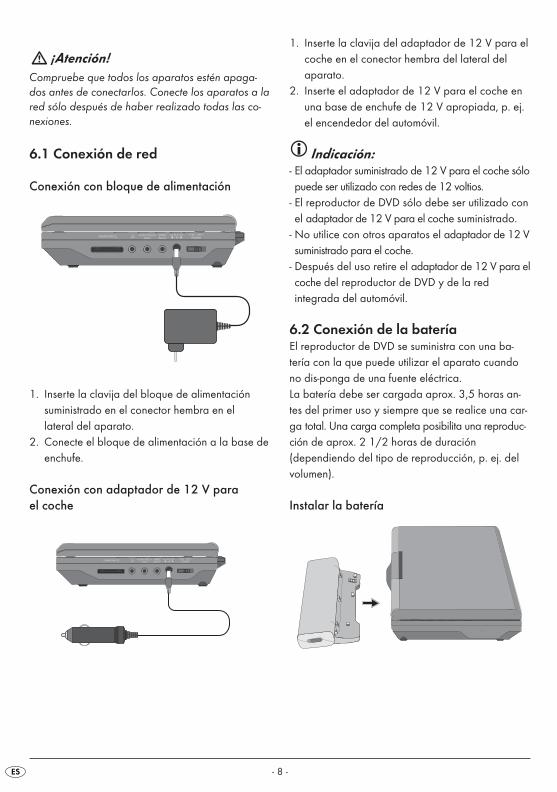
6.1 Conexión de red
Conexión con bloque de alimentación
1. Inserte la clavija del bloque de alimentación suministrado en el conector hembra en el lateral del aparato.
2. Conecte el bloque de alimentación a la base deenchufe.
Conexión con adaptador de 12 V para el coche
1. Inserte la clavija del adaptador de 12 V para elcoche en el conector hembra del lateral delaparato.
2. Inserte el adaptador de 12 V para el coche enuna base de enchufe de 12 V apropiada, p. ej.el encendedor del automóvil.
Indicación:- El adaptador suministrado de 12 V para el coche sólopuede ser utilizado con redes de 12 voltios.
- El reproductor de DVD sólo debe ser utilizado conel adaptador de 12 V para el coche suministrado.
- No utilice con otros aparatos el adaptador de 12 Vsuministrado para el coche.
- Después del uso retire el adaptador de 12 V para elcoche del reproductor de DVD y de la red integrada del automóvil.
6.2 Conexión de la bateríaEl reproductor de DVD se suministra con una ba-tería con la que puede utilizar el aparato cuandono dis-ponga de una fuente eléctrica.La batería debe ser cargada aprox. 3,5 horas an-tes del primer uso y siempre que se realice una car-ga total. Una carga completa posibilita una reproduc-ción de aprox. 2 1/2 horas de duración(dependiendo del tipo de reproducción, p. ej. delvolumen).
Instalar la batería
IB_KH6500_AR23388_LB5 01.08.2008 13:14 Uhr Seite 8
- 9 -
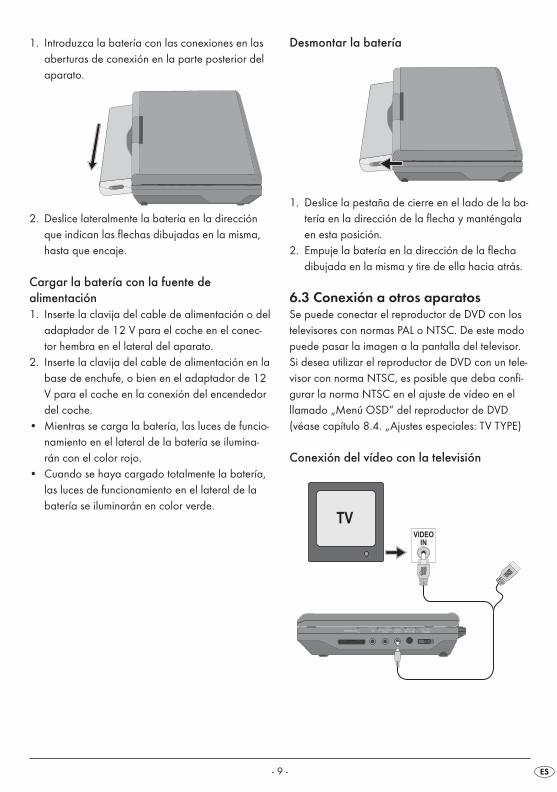
1. Introduzca la batería con las conexiones en lasaberturas de conexión en la parte posterior delaparato.
2. Deslice lateralmente la batería en la direcciónque indican las flechas dibujadas en la misma,hasta que encaje.
Cargar la batería con la fuente de alimentación1. Inserte la clavija del cable de alimentación o del
adaptador de 12 V para el coche en el conec-tor hembra en el lateral del aparato.
2. Inserte la clavija del cable de alimentación en labase de enchufe, o bien en el adaptador de 12V para el coche en la conexión del encendedordel coche.
• Mientras se carga la batería, las luces de funcio-namiento en el lateral de la batería se ilumina-rán con el color rojo.
• Cuando se haya cargado totalmente la batería,las luces de funcionamiento en el lateral de labatería se iluminarán en color verde.
Desmontar la batería
1. Deslice la pestaña de cierre en el lado de la ba-tería en la dirección de la flecha y manténgalaen esta posición.
2. Empuje la batería en la dirección de la flecha dibujada en la misma y tire de ella hacia atrás.
6.3 Conexión a otros aparatosSe puede conectar el reproductor de DVD con lostelevisores con normas PAL o NTSC. De este modopuede pasar la imagen a la pantalla del televisor. Si desea utilizar el reproductor de DVD con un tele-visor con norma NTSC, es posible que deba confi-gurar la norma NTSC en el ajuste de vídeo en elllamado „Menú OSD“ del reproductor de DVD (véase capítulo 8.4. „Ajustes especiales: TV TYPE)
Conexión del vídeo con la televisión
IB_KH6500_AR23388_LB5 01.08.2008 13:14 Uhr Seite 9
- 10 -
1. Apague el reproductor de DVD y la televisión.2. Conecte el conector de los auriculares amarillo
del cable RCA para vídeo en el conector hem-bra del VIDEO IN/OUT del reproductor de DVD.
3. Conecte la clavija RCA del cable RCA de videoen la entrada de video correspondiente de la televisión.
Conexión de audio con la televisión o un equipo estéreo
1. Para pasar el sonido inserte el conector de losauriculares rojo del cable RCA de audio en elconector hembra de AUDIO IN/OUT COAX del repro-ductor de DVD.
2. Conecte las clavijas RCA blancas y rojas del cableRCA de audio en las entradas de audio corres-pondientes I/D del televisor o del equipo estéreo.
De este modo también puede conectar el reproduc-tor de DVD con una grabadora de vídeo o deDVD, para pasar la señal de video y audio del reproductor de DVD a estos aparatos.
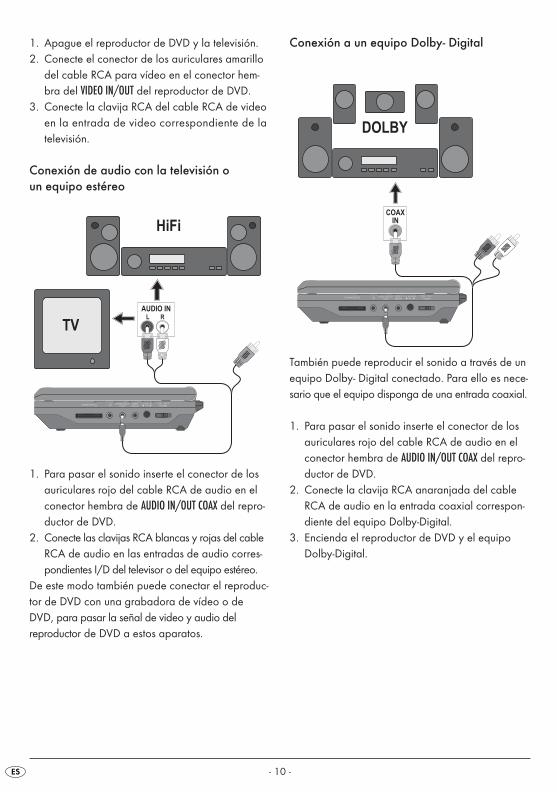
Conexión a un equipo Dolby- Digital
También puede reproducir el sonido a través de unequipo Dolby- Digital conectado. Para ello es nece-sario que el equipo disponga de una entrada coaxial.
1. Para pasar el sonido inserte el conector de losauriculares rojo del cable RCA de audio en elconector hembra de AUDIO IN/OUT COAX del repro-ductor de DVD.
2. Conecte la clavija RCA anaranjada del cableRCA de audio en la entrada coaxial correspon-diente del equipo Dolby-Digital.
3. Encienda el reproductor de DVD y el equipo Dolby-Digital.
IB_KH6500_AR23388_LB5 01.08.2008 13:14 Uhr Seite 10
- 11 -
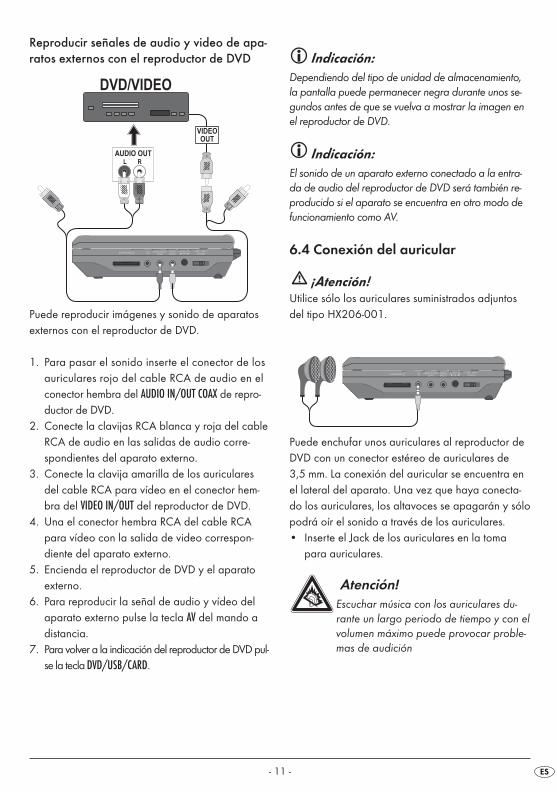
Reproducir señales de audio y video de apa-ratos externos con el reproductor de DVD
Puede reproducir imágenes y sonido de aparatosexternos con el reproductor de DVD.
1. Para pasar el sonido inserte el conector de los auriculares rojo del cable RCA de audio en el conector hembra del AUDIO IN/OUT COAX de repro-ductor de DVD.
2. Conecte la clavijas RCA blanca y roja del cableRCA de audio en las salidas de audio corre-spondientes del aparato externo.
3. Conecte la clavija amarilla de los auricularesdel cable RCA para vídeo en el conector hem-bra del VIDEO IN/OUT del reproductor de DVD.
4. Una el conector hembra RCA del cable RCApara vídeo con la salida de video correspon-diente del aparato externo.
5. Encienda el reproductor de DVD y el aparato externo.
6. Para reproducir la señal de audio y vídeo delaparato externo pulse la tecla AV del mando adistancia.
7. Para volver a la indicación del reproductor de DVD pul-se la tecla DVD/USB/CARD.
Indicación:Dependiendo del tipo de unidad de almacenamiento,la pantalla puede permanecer negra durante unos se-gundos antes de que se vuelva a mostrar la imagen enel reproductor de DVD.
Indicación:El sonido de un aparato externo conectado a la entra-da de audio del reproductor de DVD será también re-producido si el aparato se encuentra en otro modo defuncionamiento como AV.
6.4 Conexión del auricular
¡Atención!Utilice sólo los auriculares suministrados adjuntosdel tipo HX206-001.
Puede enchufar unos auriculares al reproductor deDVD con un conector estéreo de auriculares de3,5 mm. La conexión del auricular se encuentra enel lateral del aparato. Una vez que haya conecta-do los auriculares, los altavoces se apagarán y sólopodrá oír el sonido a través de los auriculares. • Inserte el Jack de los auriculares en la toma
para auriculares.
Atención!Escuchar música con los auriculares du-rante un largo periodo de tiempo y con elvolumen máximo puede provocar proble-mas de audición
IB_KH6500_AR23388_LB5 01.08.2008 13:14 Uhr Seite 11
- 12 -
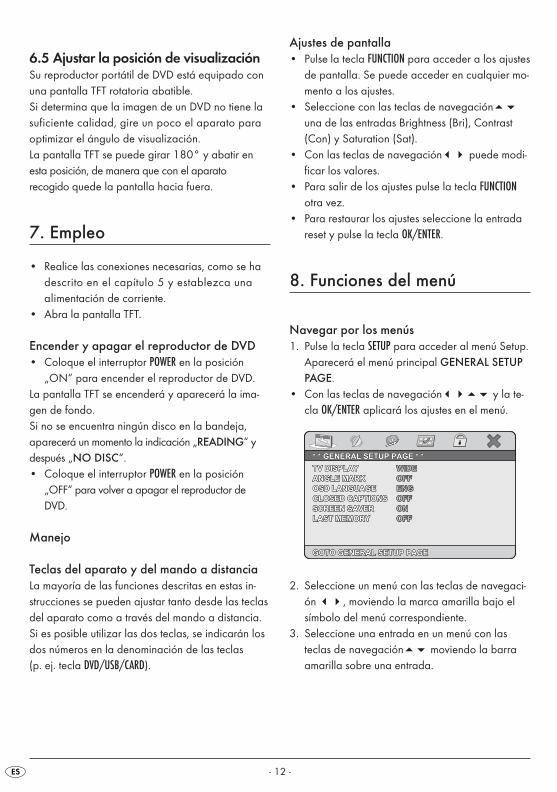
6.5 Ajustar la posición de visualizaciónSu reproductor portátil de DVD está equipado conuna pantalla TFT rotatoria abatible.Si determina que la imagen de un DVD no tiene lasuficiente calidad, gire un poco el aparato paraoptimizar el ángulo de visualización.La pantalla TFT se puede girar 180° y abatir enesta posición, de manera que con el aparato recogido quede la pantalla hacia fuera.
7. Empleo
• Realice las conexiones necesarias, como se hadescrito en el capítulo 5 y establezca una alimentación de corriente.
• Abra la pantalla TFT.
Encender y apagar el reproductor de DVD• Coloque el interruptor POWER en la posición
„ON“ para encender el reproductor de DVD.La pantalla TFT se encenderá y aparecerá la ima-gen de fondo.Si no se encuentra ningún disco en la bandeja,aparecerá un momento la indicación „READING“ y después „NO DISC“.• Coloque el interruptor POWER en la posición
„OFF“ para volver a apagar el reproductor deDVD.
Manejo
Teclas del aparato y del mando a distanciaLa mayoría de las funciones descritas en estas in-strucciones se pueden ajustar tanto desde las teclasdel aparato como a través del mando a distancia.Si es posible utilizar las dos teclas, se indicarán losdos números en la denominación de las teclas (p. ej. tecla DVD/USB/CARD).
Ajustes de pantalla• Pulse la tecla FUNCTION para acceder a los ajustes
de pantalla. Se puede acceder en cualquier mo-mento a los ajustes.
• Seleccione con las teclas de navegación��
una de las entradas Brightness (Bri), Contrast(Con) y Saturation (Sat).
• Con las teclas de navegación�� puede modi-ficar los valores.
• Para salir de los ajustes pulse la tecla FUNCTIONotra vez.
• Para restaurar los ajustes seleccione la entradareset y pulse la tecla OK/ENTER.
8. Funciones del menú
Navegar por los menús1. Pulse la tecla SETUP para acceder al menú Setup.
Aparecerá el menú principal GENERAL SETUPPAGE.
• Con las teclas de navegación���� y la te-cla OK/ENTER aplicará los ajustes en el menú.
2. Seleccione un menú con las teclas de navegaci-ón ��, moviendo la marca amarilla bajo elsímbolo del menú correspondiente.
3. Seleccione una entrada en un menú con las teclas de navegación�� moviendo la barraamarilla sobre una entrada.
TV DISPLAYTV DISPLAYTV DISPLAY
ANGLE MARKANGLE MARKANGLE MARK
OSD LANGUAGEOSD LANGUAGEOSD LANGUAGE
CLOSED CAPTIONSCLOSED CAPTIONSCLOSED CAPTIONS
SCREEN SAVERSCREEN SAVERSCREEN SAVER
LAST MEMORYLAST MEMORYLAST MEMORY
WIDEWIDEWIDE
OFFOFFOFF
ENGENGENG
OFFOFFOFF
ONONON
OFFOFFOFF
* * GENERAL SETUP PAGE * ** * GENERAL SETUP PAGE * ** * GENERAL SETUP PAGE * *
GOTO GENERAL SETUP PAGEGOTO GENERAL SETUP PAGEGOTO GENERAL SETUP PAGE
IB_KH6500_AR23388_LB5 01.08.2008 13:14 Uhr Seite 12
- 13 -
4. Cambiará al submenú de una entrada con la te-cla de navegación � y con la tecla de navega-ción � retrocederá de nuevo un nivel delmenú.
5. Para confirmar una selección pulse la teclaOK/ENTER.
• Todas las posibilidades de navegación en unmenú actual están representadas en el extremoinferior del menú.
• Para abandonar de nuevo el menú Setup, pre-sione la tecla SETUP o seleccione el último símbo-lo „EXIT SETUP“ y pulse la tecla OK/ENTER.
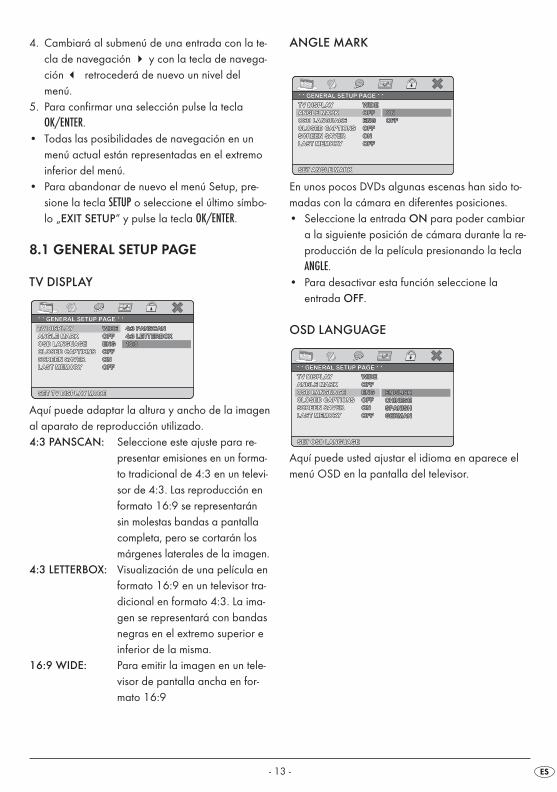
8.1 GENERAL SETUP PAGE
TV DISPLAY
Aquí puede adaptar la altura y ancho de la imagenal aparato de reproducción utilizado. 4:3 PANSCAN: Seleccione este ajuste para re-
presentar emisiones en un forma-to tradicional de 4:3 en un televi-sor de 4:3. Las reproducción enformato 16:9 se representaránsin molestas bandas a pantallacompleta, pero se cortarán losmárgenes laterales de la imagen.
4:3 LETTERBOX: Visualización de una película enformato 16:9 en un televisor tra-dicional en formato 4:3. La ima-gen se representará con bandasnegras en el extremo superior einferior de la misma.
16:9 WIDE: Para emitir la imagen en un tele-visor de pantalla ancha en for-mato 16:9
* * GENERAL SETUP PAGE * ** * GENERAL SETUP PAGE * ** * GENERAL SETUP PAGE * *
SET TV DISPLAY MODESET TV DISPLAY MODESET TV DISPLAY MODE
4:3 PANSCAN4:3 PANSCAN4:3 PANSCAN
4:3 LETTERBOX4:3 LETTERBOX4:3 LETTERBOX
16:916:916:9
TV DISPLAYTV DISPLAYTV DISPLAY
ANGLE MARKANGLE MARKANGLE MARK
OSD LANGUAGEOSD LANGUAGEOSD LANGUAGE
CLOSED CAPTIONSCLOSED CAPTIONSCLOSED CAPTIONS
SCREEN SAVERSCREEN SAVERSCREEN SAVER
LAST MEMORYLAST MEMORYLAST MEMORY
WIDEWIDEWIDE
OFFOFFOFF
ENGENGENG
OFFOFFOFF
ONONON
OFFOFFOFF
ANGLE MARK
En unos pocos DVDs algunas escenas han sido to-madas con la cámara en diferentes posiciones. • Seleccione la entrada ON para poder cambiar
a la siguiente posición de cámara durante la re-producción de la película presionando la teclaANGLE.
• Para desactivar esta función seleccione la entrada OFF.
OSD LANGUAGE
Aquí puede usted ajustar el idioma en aparece elmenú OSD en la pantalla del televisor.
CHINESECHINESECHINESE
SPANISHSPANISHSPANISH
GERMANGERMANGERMAN
SET OSD LANGUAGESET OSD LANGUAGESET OSD LANGUAGE
ENGLISHENGLISHENGLISH
* * GENERAL SETUP PAGE * ** * GENERAL SETUP PAGE * ** * GENERAL SETUP PAGE * *
TV DISPLAYTV DISPLAYTV DISPLAY
ANGLE MARKANGLE MARKANGLE MARK
OSD LANGUAGEOSD LANGUAGEOSD LANGUAGE
CLOSED CAPTIONSCLOSED CAPTIONSCLOSED CAPTIONS
SCREEN SAVERSCREEN SAVERSCREEN SAVER
LAST MEMORYLAST MEMORYLAST MEMORY
WIDEWIDEWIDE
OFFOFFOFF
ENGENGENG
OFFOFFOFF
ONONON
OFFOFFOFF
* * GENERAL SETUP PAGE * ** * GENERAL SETUP PAGE * ** * GENERAL SETUP PAGE * *
SET ANGLE MARKSET ANGLE MARKSET ANGLE MARK
ONONON
OFFOFFOFF
WIDEWIDEWIDE
OFFOFFOFF
ENGENGENG
OFFOFFOFF
ONONON
OFFOFFOFF
TV DISPLAYTV DISPLAYTV DISPLAY
ANGLE MARKANGLE MARKANGLE MARK
OSD LANGUAGEOSD LANGUAGEOSD LANGUAGE
CLOSED CAPTIONSCLOSED CAPTIONSCLOSED CAPTIONS
SCREEN SAVERSCREEN SAVERSCREEN SAVER
LAST MEMORYLAST MEMORYLAST MEMORY
IB_KH6500_AR23388_LB5 01.08.2008 13:14 Uhr Seite 13
- 14 -
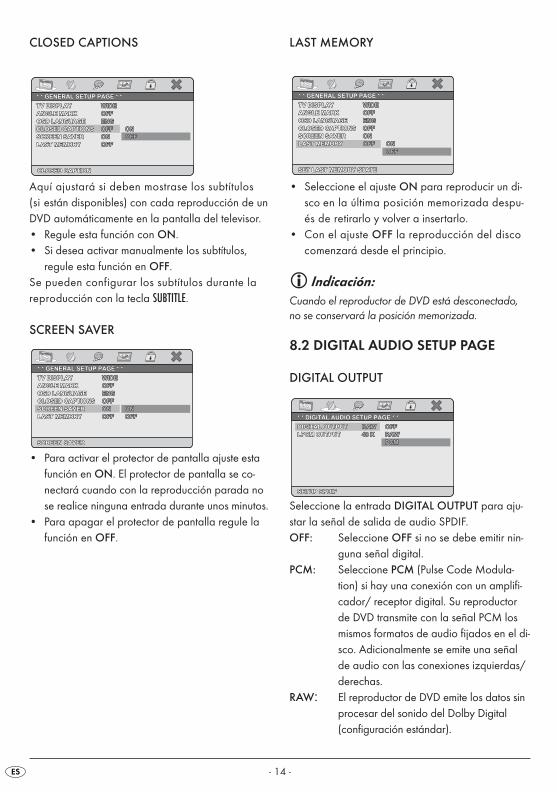
CLOSED CAPTIONS
Aquí ajustará si deben mostrase los subtítulos (si están disponibles) con cada reproducción de unDVD automáticamente en la pantalla del televisor. • Regule esta función con ON. • Si desea activar manualmente los subtítulos,
regule esta función en OFF. Se pueden configurar los subtítulos durante la reproducción con la tecla SUBTITLE.
SCREEN SAVER
• Para activar el protector de pantalla ajuste estafunción en ON. El protector de pantalla se co-nectará cuando con la reproducción parada nose realice ninguna entrada durante unos minutos.
• Para apagar el protector de pantalla regule lafunción en OFF.
ONONON
OFFOFFOFF
SCREEN SAVERSCREEN SAVERSCREEN SAVER
* * GENERAL SETUP PAGE * ** * GENERAL SETUP PAGE * ** * GENERAL SETUP PAGE * *
TV DISPLAYTV DISPLAYTV DISPLAY
ANGLE MARKANGLE MARKANGLE MARK
OSD LANGUAGEOSD LANGUAGEOSD LANGUAGE
CLOSED CAPTIONSCLOSED CAPTIONSCLOSED CAPTIONS
SCREEN SAVERSCREEN SAVERSCREEN SAVER
LAST MEMORYLAST MEMORYLAST MEMORY
WIDEWIDEWIDE
OFFOFFOFF
ENGENGENG
OFFOFFOFF
ONONON
OFFOFFOFF
CLOSED CAPTIONCLOSED CAPTIONCLOSED CAPTION
ONONON
OFFOFFOFF
* * GENERAL SETUP PAGE * ** * GENERAL SETUP PAGE * ** * GENERAL SETUP PAGE * *
TV DISPLAYTV DISPLAYTV DISPLAY
ANGLE MARKANGLE MARKANGLE MARK
OSD LANGUAGEOSD LANGUAGEOSD LANGUAGE
CLOSED CAPTIONSCLOSED CAPTIONSCLOSED CAPTIONS
SCREEN SAVERSCREEN SAVERSCREEN SAVER
LAST MEMORYLAST MEMORYLAST MEMORY
WIDEWIDEWIDE
OFFOFFOFF
ENGENGENG
OFFOFFOFF
ONONON
OFFOFFOFF
LAST MEMORY
• Seleccione el ajuste ON para reproducir un di-sco en la última posición memorizada despu-és de retirarlo y volver a insertarlo.
• Con el ajuste OFF la reproducción del discocomenzará desde el principio.
Indicación:Cuando el reproductor de DVD está desconectado,no se conservará la posición memorizada.
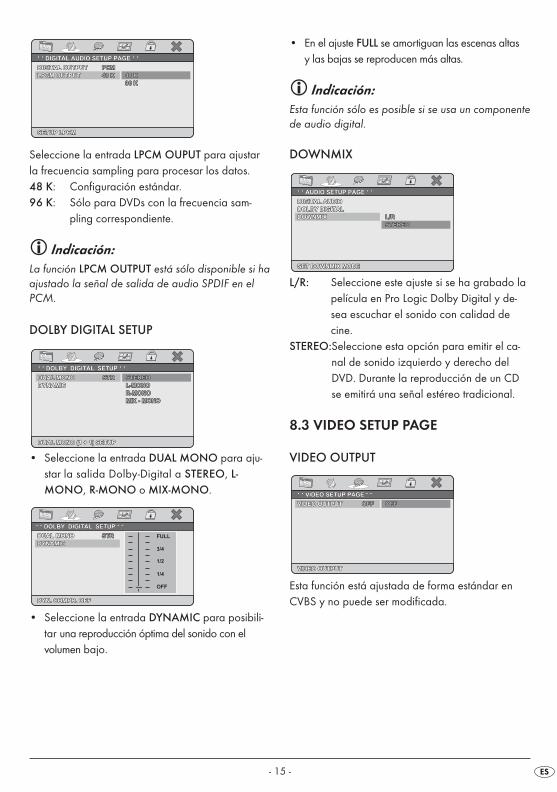
8.2 DIGITAL AUDIO SETUP PAGE
DIGITAL OUTPUT
Seleccione la entrada DIGITAL OUTPUT para aju-star la señal de salida de audio SPDIF.OFF: Seleccione OFF si no se debe emitir nin-
guna señal digital.PCM: Seleccione PCM (Pulse Code Modula-
tion) si hay una conexión con un amplifi-cador/ receptor digital. Su reproductorde DVD transmite con la señal PCM losmismos formatos de audio fijados en el di-sco. Adicionalmente se emite una señalde audio con las conexiones izquierdas/derechas.
RAW: El reproductor de DVD emite los datos sinprocesar del sonido del Dolby Digital (configuración estándar).
* * DIGITAL AUDIO SETUP PAGE * ** * DIGITAL AUDIO SETUP PAGE * ** * DIGITAL AUDIO SETUP PAGE * *
SETUP SPDIFSETUP SPDIFSETUP SPDIF
OFFOFFOFF
RAWRAWRAW
PCMPCMPCM
DIGITAL OUTPUTDIGITAL OUTPUTDIGITAL OUTPUT
LPCM OUTPUTLPCM OUTPUTLPCM OUTPUT
RAWRAWRAW
48 K48 K48 K
SET LAST MEMORY STATESET LAST MEMORY STATESET LAST MEMORY STATE
ONONON
OFFOFFOFF
* * GENERAL SETUP PAGE * ** * GENERAL SETUP PAGE * ** * GENERAL SETUP PAGE * *
TV DISPLAYTV DISPLAYTV DISPLAY
ANGLE MARKANGLE MARKANGLE MARK
OSD LANGUAGEOSD LANGUAGEOSD LANGUAGE
CLOSED CAPTIONSCLOSED CAPTIONSCLOSED CAPTIONS
SCREEN SAVERSCREEN SAVERSCREEN SAVER
LAST MEMORYLAST MEMORYLAST MEMORY
WIDEWIDEWIDE
OFFOFFOFF
ENGENGENG
OFFOFFOFF
ONONON
OFFOFFOFF
IB_KH6500_AR23388_LB5 01.08.2008 13:14 Uhr Seite 14
- 15 -
Seleccione la entrada LPCM OUPUT para ajustar la frecuencia sampling para procesar los datos.48 K: Configuración estándar.96 K: Sólo para DVDs con la frecuencia sam-
pling correspondiente.
Indicación:La función LPCM OUTPUT está sólo disponible si haajustado la señal de salida de audio SPDIF en elPCM.
DOLBY DIGITAL SETUP
• Seleccione la entrada DUAL MONO para aju-star la salida Dolby-Digital a STEREO, L-MONO, R-MONO o MIX-MONO.
• Seleccione la entrada DYNAMIC para posibili-tar una reproducción óptima del sonido con el volumen bajo.
DYN. COMPR. OFFDYN. COMPR. OFFDYN. COMPR. OFF
DUAL MONODUAL MONODUAL MONO
DYNAMICDYNAMICDYNAMIC
STRSTRSTR FULL
3/4
1/2
1/4
OFF
* * DOLBY DIGITAL SETUP * ** * DOLBY DIGITAL SETUP * ** * DOLBY DIGITAL SETUP * *
MIX - MONOMIX - MONOMIX - MONO
* * DOLBY DIGITAL SETUP * ** * DOLBY DIGITAL SETUP * ** * DOLBY DIGITAL SETUP * *
DUAL MONO (1 + 1) SETUPDUAL MONO (1 + 1) SETUPDUAL MONO (1 + 1) SETUP
STEREOSTEREOSTEREO
L-MONOL-MONOL-MONO
R-MONOR-MONOR-MONO
DUAL MONODUAL MONODUAL MONO
DYNAMICDYNAMICDYNAMIC
STRSTRSTR
* * * * * * DIGITAL AUDIO SETUP PAGEDIGITAL AUDIO SETUP PAGEDIGITAL AUDIO SETUP PAGE * * * * * *
SETUP LPCMSETUP LPCMSETUP LPCM
48 K48 K48 K
96 K96 K96 K
DIGITAL OUTPUTDIGITAL OUTPUTDIGITAL OUTPUT
LPCM OUTPUTLPCM OUTPUTLPCM OUTPUT
PCMPCMPCM
48 K48 K48 K
• En el ajuste FULL se amortiguan las escenas altas y las bajas se reproducen más altas.
Indicación:Esta función sólo es posible si se usa un componentede audio digital.
DOWNMIX
L/R: Seleccione este ajuste si se ha grabado lapelícula en Pro Logic Dolby Digital y de-sea escuchar el sonido con calidad decine.
STEREO:Seleccione esta opción para emitir el ca-nal de sonido izquierdo y derecho delDVD. Durante la reproducción de un CDse emitirá una señal estéreo tradicional.
8.3 VIDEO SETUP PAGE
VIDEO OUTPUT
Esta función está ajustada de forma estándar enCVBS y no puede ser modificada.
* * VIDEO SETUP PAGE * ** * VIDEO SETUP PAGE * ** * VIDEO SETUP PAGE * *
VIDEO OUTPUTVIDEO OUTPUTVIDEO OUTPUT
OFFOFFOFFVIDEO OUTPUTVIDEO OUTPUTVIDEO OUTPUT OFFOFFOFF
STEREOSTEREOSTEREO
* * AUDIO SETUP PAGE * ** * AUDIO SETUP PAGE * ** * AUDIO SETUP PAGE * *
SET DOWNMIX MODESET DOWNMIX MODESET DOWNMIX MODE
L/RL/RL/R
DIGITAL AUDIODIGITAL AUDIODIGITAL AUDIO
DOLBY DIGITALDOLBY DIGITALDOLBY DIGITAL
DOWNMIXDOWNMIXDOWNMIX
IB_KH6500_AR23388_LB5 01.08.2008 13:14 Uhr Seite 15
- 16 -
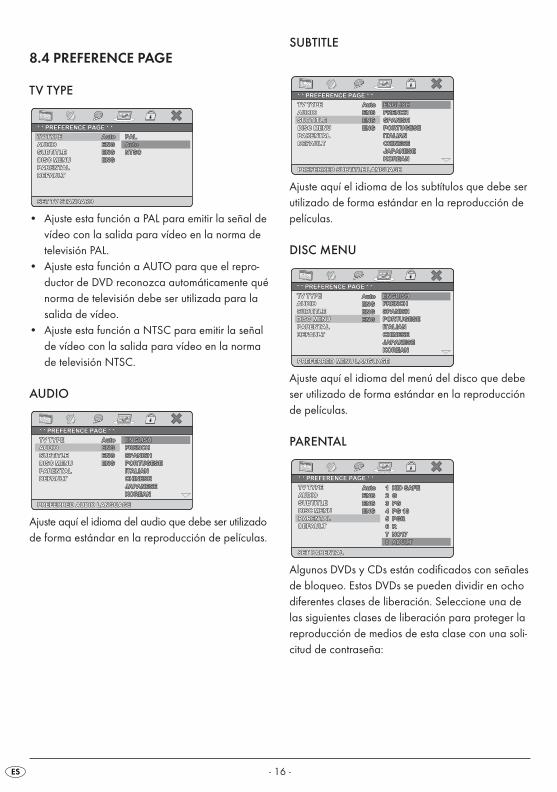
8.4 PREFERENCE PAGE
TV TYPE
• Ajuste esta función a PAL para emitir la señal devídeo con la salida para vídeo en la norma detelevisión PAL.
• Ajuste esta función a AUTO para que el repro-ductor de DVD reconozca automáticamente quénorma de televisión debe ser utilizada para lasalida de vídeo.
• Ajuste esta función a NTSC para emitir la señalde vídeo con la salida para vídeo en la normade televisión NTSC.
AUDIO
Ajuste aquí el idioma del audio que debe ser utilizadode forma estándar en la reproducción de películas.
PORTUGESEPORTUGESEPORTUGESE
ITALIANITALIANITALIAN
CHINESECHINESECHINESE
JAPANESEJAPANESEJAPANESE
KOREANKOREANKOREAN
PREFERRED AUDIO LANGUAGEPREFERRED AUDIO LANGUAGEPREFERRED AUDIO LANGUAGE
ENGLISHENGLISHENGLISH
FRENCHFRENCHFRENCH
SPANISHSPANISHSPANISH
AutoAutoAuto
ENGENGENG
ENGENGENG
ENGENGENG
* * PREFERENCE PAGE * ** * PREFERENCE PAGE * ** * PREFERENCE PAGE * *
TV TYPETV TYPETV TYPE
AUDIOAUDIOAUDIO
SUBTITLESUBTITLESUBTITLE
DISC MENUDISC MENUDISC MENU
PARENTALPARENTALPARENTAL
DEFAULTDEFAULTDEFAULT
* * PREFERENCE PAGE * ** * PREFERENCE PAGE * ** * PREFERENCE PAGE * *
SET TV STANDARDSET TV STANDARDSET TV STANDARD
PALPALPAL
AutoAutoAuto
NTSCNTSCNTSC
TV TYPETV TYPETV TYPE
AUDIOAUDIOAUDIO
SUBTITLESUBTITLESUBTITLE
DISC MENUDISC MENUDISC MENU
PARENTALPARENTALPARENTAL
DEFAULTDEFAULTDEFAULT
AutoAutoAuto
ENGENGENG
ENGENGENG
ENGENGENG
SUBTITLE
Ajuste aquí el idioma de los subtítulos que debe serutilizado de forma estándar en la reproducción depelículas.
DISC MENU
Ajuste aquí el idioma del menú del disco que debeser utilizado de forma estándar en la reproducciónde películas.
PARENTAL
Algunos DVDs y CDs están codificados con señalesde bloqueo. Estos DVDs se pueden dividir en ochodiferentes clases de liberación. Seleccione una delas siguientes clases de liberación para proteger lareproducción de medios de esta clase con una soli-citud de contraseña:
4 PG 134 PG 134 PG 13
5 PGR5 PGR5 PGR
6 R6 R6 R
7 NC177 NC177 NC17
8 ADULT8 ADULT8 ADULT
SET PARENTALSET PARENTALSET PARENTAL
1 KID SAFE1 KID SAFE1 KID SAFE
2 G2 G2 G
3 PG3 PG3 PG
AutoAutoAuto
ENGENGENG
ENGENGENG
ENGENGENG
* * PREFERENCE PAGE * ** * PREFERENCE PAGE * ** * PREFERENCE PAGE * *
TV TYPETV TYPETV TYPE
AUDIOAUDIOAUDIO
SUBTITLESUBTITLESUBTITLE
DISC MENUDISC MENUDISC MENU
PARENTALPARENTALPARENTAL
DEFAULTDEFAULTDEFAULT
PREFERRED MENU LANGUAGEPREFERRED MENU LANGUAGEPREFERRED MENU LANGUAGE
AutoAutoAuto
ENGENGENG
ENGENGENG
ENGENGENG PORTUGESEPORTUGESEPORTUGESE
ITALIANITALIANITALIAN
CHINESECHINESECHINESE
JAPANESEJAPANESEJAPANESE
KOREANKOREANKOREAN
ENGLISHENGLISHENGLISH
FRENCHFRENCHFRENCH
SPANISHSPANISHSPANISH
* * PREFERENCE PAGE * ** * PREFERENCE PAGE * ** * PREFERENCE PAGE * *
TV TYPETV TYPETV TYPE
AUDIOAUDIOAUDIO
SUBTITLESUBTITLESUBTITLE
DISC MENUDISC MENUDISC MENU
PARENTALPARENTALPARENTAL
DEFAULTDEFAULTDEFAULT
PREFERRED SUBTITLE LANGUAGEPREFERRED SUBTITLE LANGUAGEPREFERRED SUBTITLE LANGUAGE
AutoAutoAuto
ENGENGENG
ENGENGENG
ENGENGENG PORTUGESEPORTUGESEPORTUGESE
ITALIANITALIANITALIAN
CHINESECHINESECHINESE
JAPANESEJAPANESEJAPANESE
KOREANKOREANKOREAN
ENGLISHENGLISHENGLISH
FRENCHFRENCHFRENCH
SPANISHSPANISHSPANISH
* * PREFERENCE PAGE * ** * PREFERENCE PAGE * ** * PREFERENCE PAGE * *
TV TYPETV TYPETV TYPE
AUDIOAUDIOAUDIO
SUBTITLESUBTITLESUBTITLE
DISC MENUDISC MENUDISC MENU
PARENTALPARENTALPARENTAL
DEFAULTDEFAULTDEFAULT
IB_KH6500_AR23388_LB5 01.08.2008 13:14 Uhr Seite 16
- 17 -
8 ADULT: sólo adultos;7 NC 17: no apto para menores de 18
años;6 R: altamente recomendada la
supervisión paterna para jóve-nes de menos de 16 años;
5 PGR: recomendada la supervisión paterna para jóvenes de menosde 16 años;
4 PG 13: supervisión paterna altamenterecomendada; algunas escenasno son adecuadas para niños de menos de 12 años;
3 PG: supervisión paterna recomenda-da;
2 G.: para todos los grupos de edad;1 KID SAFE.: adecuado también para niños
pequeños.
EjemploSi se ha codificado un DVD p. ej. con la clase de li-beración 7 u 8 y usted ha ajustado una clase de li-beración del 1 al 6, se mostrará un mensaje y de-berá introducirse la contraseña. También pueden estar codificadas sólo partes delDVD, es decir, determinadas escenas de la película,con una o varias clases de liberación.• Para activar la liberación de edad seleccione
una clase de liberación e introduzca luego en la solicitud de contraseña su contraseña con elteclado numérico. La contraseña configurada defábrica es 888888.
• Confirme su entrada pulsando la tecla OK/ENTER.
Indicación:en el PASSWORD SETUP PAGE puede modificar lacontraseña configurada de fábrica y dar una nuevacontraseña para el bloqueo.
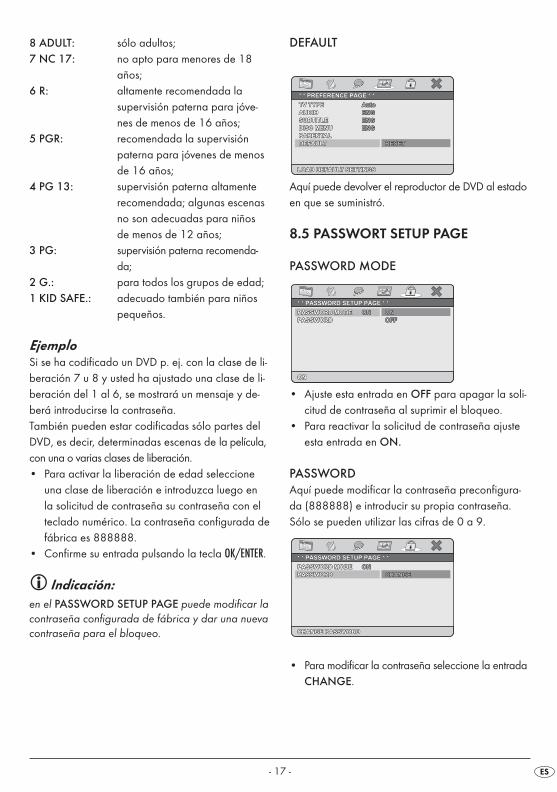
DEFAULT
Aquí puede devolver el reproductor de DVD al estadoen que se suministró.
8.5 PASSWORT SETUP PAGE
PASSWORD MODE
• Ajuste esta entrada en OFF para apagar la soli-citud de contraseña al suprimir el bloqueo.
• Para reactivar la solicitud de contraseña ajusteesta entrada en ON.
PASSWORDAquí puede modificar la contraseña preconfigura-da (888888) e introducir su propia contraseña.Sólo se pueden utilizar las cifras de 0 a 9.
• Para modificar la contraseña seleccione la entradaCHANGE.
* * PASSWORD SETUP PAGE * ** * PASSWORD SETUP PAGE * ** * PASSWORD SETUP PAGE * *
CHANGE PASSWORDCHANGE PASSWORDCHANGE PASSWORD
CHANGECHANGECHANGE
PASSWORD MODEPASSWORD MODEPASSWORD MODE
PASSWORDPASSWORDPASSWORD
ONONON
* * PASSWORD SETUP PAGE * ** * PASSWORD SETUP PAGE * ** * PASSWORD SETUP PAGE * *
ONONON
ONONON
OFFOFFOFF
PASSWORD MODEPASSWORD MODEPASSWORD MODE
PASSWORDPASSWORDPASSWORD
ONONON
RESETRESETRESET
LOAD DEFAULT SETTINGSLOAD DEFAULT SETTINGSLOAD DEFAULT SETTINGS
AutoAutoAuto
ENGENGENG
ENGENGENG
ENGENGENG
* * PREFERENCE PAGE * ** * PREFERENCE PAGE * ** * PREFERENCE PAGE * *
TV TYPETV TYPETV TYPE
AUDIOAUDIOAUDIO
SUBTITLESUBTITLESUBTITLE
DISC MENUDISC MENUDISC MENU
PARENTALPARENTALPARENTAL
DEFAULTDEFAULTDEFAULT
IB_KH6500_AR23388_LB5 01.08.2008 13:14 Uhr Seite 17
- 18 -
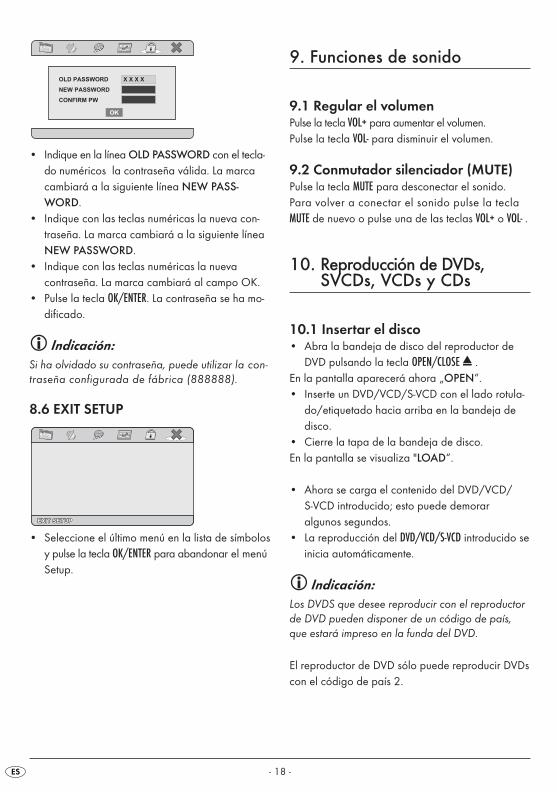
• Indique en la línea OLD PASSWORD con el tecla-do numéricos la contraseña válida. La marcacambiará a la siguiente línea NEW PASS-WORD.
• Indique con las teclas numéricas la nueva con-traseña. La marca cambiará a la siguiente líneaNEW PASSWORD.
• Indique con las teclas numéricas la nueva contraseña. La marca cambiará al campo OK.
• Pulse la tecla OK/ENTER. La contraseña se ha mo-dificado.
Indicación:Si ha olvidado su contraseña, puede utilizar la con-traseña configurada de fábrica (888888).
8.6 EXIT SETUP
• Seleccione el último menú en la lista de símbolosy pulse la tecla OK/ENTER para abandonar el menúSetup.
EXIT SETUPEXIT SETUPEXIT SETUP
X X X XOLD PASSWORD
NEW PASSWORD
CONFIRM PW
OK
9. Funciones de sonido
9.1 Regular el volumenPulse la tecla VOL+ para aumentar el volumen.Pulse la tecla VOL- para disminuir el volumen.
9.2 Conmutador silenciador (MUTE)Pulse la tecla MUTE para desconectar el sonido.Para volver a conectar el sonido pulse la teclaMUTE de nuevo o pulse una de las teclas VOL+ o VOL- .
10. Reproducción de DVDs,SVCDs, VCDs y CDs
10.1 Insertar el disco• Abra la bandeja de disco del reproductor de
DVD pulsando la tecla OPEN/CLOSE . En la pantalla aparecerá ahora „OPEN“.• Inserte un DVD/VCD/S-VCD con el lado rotula-
do/etiquetado hacia arriba en la bandeja de disco.
• Cierre la tapa de la bandeja de disco.En la pantalla se visualiza "LOAD“.
• Ahora se carga el contenido del DVD/VCD/S-VCD introducido; esto puede demorar algunos segundos.
• La reproducción del DVD/VCD/S-VCD introducido seinicia automáticamente.
Indicación:Los DVDS que desee reproducir con el reproductorde DVD pueden disponer de un código de país,que estará impreso en la funda del DVD.
El reproductor de DVD sólo puede reproducir DVDscon el código de país 2.
IB_KH6500_AR23388_LB5 01.08.2008 13:14 Uhr Seite 18
- 19 -
Si no hay ningún código de país indicado en la fun-da del DVD …• sino el símbolo , el DVD puede ser reprodu-
cido con el reproductor de DVD.• es posible que el DVD no pueda ser reproducido
con el reproductor de DVD. Compruébelo intent-ando reproducir el DVD.
Dependiendo del DVD/VCD/S-VCD introducido, esposible que el contenido del DVD/VCD/S-VCD nose reproduzca inmediatamente, pues aparecerá pri-mero un menú de selección en la pantalla del televisor.En este caso seleccione con las teclas de navegaci-ón ����el punto de menú con el que se iniciará la reproducción de la película. • Para iniciar la reproducción de la película…• pulse la tecla OK/ENTER o pulse la tecla
PLAY/PAUSE.
10.2 Funciones de reproducción deDVDs, VCDs, S-VCDs,MPEG oCDs de audio
Durante la lectura de un DVD/VCD/S-VCD se pue-den utilizar las siguientes funciones.
Detener la reproducción (pausa)Para activar la reproducción repetida:• pulse durante la reproducción la tecla;
PLAY/PAUSE. En la pantalla aparecerá la indicación „�“.En la pantalla visualiza ahora la imagen detenidade la escena actualmente detenida.• Para reanudar la reproducción de la película
pulse la tecla PLAY/PAUSE .
Interrumpir la reproducción (STOP)Para cancelar la reproducción del disco, pulse unavez la tecla Stop.
Función resumenSi cancela la reproducción del DVD/VCD/S-VCD insertado pulsando una sola vez la tecla STOP, el re-productor de DVD memoriza automáticamente el lu-gar en el cual se ha interrumpido la reproducción.Esta función se denomina "función resumen". En lapantalla se visualiza TO RESUME: PRESS PLAYBUTTON. En cuanto se pulsa de nuevo la teclaPLAY/PAUSE, continua la reproducción en el lugar me-morizado.Si pulsa la tecla STOP por segunda vez, la posiciónmemorizada en la cual ha interrumpido la repro-ducción, se borrará. En cuanto pulse de nuevo la te-cla PLAY/PAUSE comienza la reproducción delDVD/VCD/S-VCD insertado desde el principio.
Saltar al principio del capítulo (Skip)
Indicación:Esta función puede no estar disponible en todos losDVD/VCD/S-VCD. Si intenta realizar una función nodisponible aparecerá en la pantalla del televisor elsímbolo .
• Con las teclas SKIP� hacia delante y SKIP� ha-cia atrás puede saltar en la película delDVD/VCD/S-VCD insertado durante la repro-ducción al inicio del siguiente capítulo o ha-cia atrás al capítulo anterior
El capítulo seleccionado se reproduce inmediata-mente, sin necesidad de pulsar la tecla PLAY/PAUSE . Elnúmero del capítulo seleccionado aparece en el vi-sor del frontal del reproductor de DVD a la izquier-da del contador del tiempo de reproducción.
IB_KH6500_AR23388_LB5 01.08.2008 13:14 Uhr Seite 19
- 20 -
Introducción del número de título por mediode las teclas numéricas
Indicación:Esta función puede no estar disponible en todos losDVD/VCD/S-VCD. Si intenta realizar una función nodisponible aparecerá en la pantalla del televisor elsímbolo .
En vez de utilizar la función skip también puede seleccionar directamente las pistas contenidas en la película del DVD/VCD/S-VCD introducido en elreproductor indicando el número de pista medianteel teclado numérico de 0 a 9 del mando a dis-tan-cia.• Para la entrada de números de dos cifras pulse
primero la tecla 10+ e introduzca después conse-cutivamente las dos cifras del número.
• Pulse la tecla OK/ENTER del mando a distancia. Lareproducción de la pista correspondiente al nú-mero introducido empieza automáticamente.
Selección directa del capítulo o del tiempomediante la función de búsqueda (search)
Indicación:Estas funciones pueden no estar disponible en todoslos DVD/VCD/S-VCD. Si intenta realizar funcionesno disponibles aparecerá en la pantalla del televi-sor el símbolo .
Introducción de la posición temporal a través de la función de búsqueda
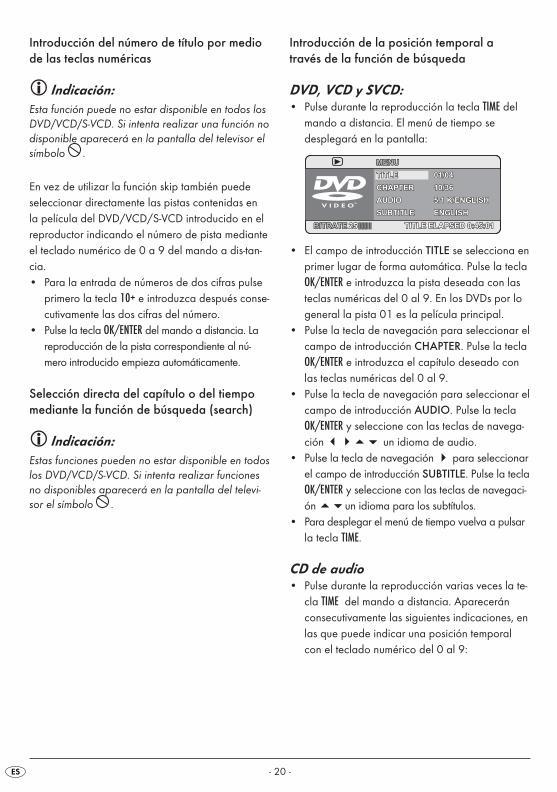
DVD, VCD y SVCD:• Pulse durante la reproducción la tecla TIME del
mando a distancia. El menú de tiempo se desplegará en la pantalla:
• El campo de introducción TITLE se selecciona enprimer lugar de forma automática. Pulse la teclaOK/ENTER e introduzca la pista deseada con lasteclas numéricas del 0 al 9. En los DVDs por logeneral la pista 01 es la película principal.
• Pulse la tecla de navegación para seleccionar elcampo de introducción CHAPTER. Pulse la teclaOK/ENTER e introduzca el capítulo deseado conlas teclas numéricas del 0 al 9.
• Pulse la tecla de navegación para seleccionar elcampo de introducción AUDIO. Pulse la teclaOK/ENTER y seleccione con las teclas de navega-ción ���� un idioma de audio.
• Pulse la tecla de navegación � para seleccionarel campo de introducción SUBTITLE. Pulse la teclaOK/ENTER y seleccione con las teclas de navegaci-ón ��un idioma para los subtítulos.
• Para desplegar el menú de tiempo vuelva a pulsarla tecla TIME.
CD de audio• Pulse durante la reproducción varias veces la te-
cla TIME del mando a distancia. Apareceránconsecutivamente las siguientes indicaciones, enlas que puede indicar una posición temporalcon el teclado numérico del 0 al 9:
CHAPTERCHAPTERCHAPTER
AUDIOAUDIOAUDIO
SUBTITLESUBTITLESUBTITLE
01/0401/0401/04
10/3610/3610/36
5.1 K/ENGLISH5.1 K/ENGLISH5.1 K/ENGLISH
ENGLISHENGLISHENGLISH
TITLE ELAPSED 0:45:01TITLE ELAPSED 0:45:01TITLE ELAPSED 0:45:01BITRATEBITRATEBITRATE 252525
MENUMENUMENU
TITLETITLETITLE
IB_KH6500_AR23388_LB5 01.08.2008 13:14 Uhr Seite 20
- 21 -
DISC GOTO: Indique aquí una posición tem-poral en el disco, desde la quedebe comenzar la reproducción.
TRACK GOTO: Indique aquí una posición tem-poral para la pista reproducidaactualmente, desde la que debecomenzar la reproducción.
GOTO TRACK: Indique aquí un número de pista, desde el que debe comenzar la reproducción.
CD de MPEGSELECT: Indique aquí un número de pista,
desde el que debe comenzar lareproducción.
GOTO: Indique aquí una posición tem-poral para la pista reproducidaactualmente, desde la que debecomenzar la reproducción.
Búsqueda avance/retroceso• Pulse la tecla SEARCH� o SEARCH para iniciar
durante la reproducción una búsqueda haciadelante/hacia atrás.
• Pulse la tecla SEARCH� o SEARCHvarias veces para aplicar las siguientes velocidadesde búsqueda:
Advertencia:Durante la búsqueda rápida no se reproduce el so-nido.
• Para continuar la reproducción de la película enel lugar seleccionado a velocidad normal, pulsedurante la búsqueda la tecla PLAY/PAUSE .
Función de cámara lenta (sólo DVD, VCD, SVCD)• Pulse la tecla SLOW para pasar de reproducción a
cámara lenta. Pulse la tecla SLOW varias vecespara aplicar las siguientes velocidades de cá-mara lenta:
Indicación:Durante la reproducción lenta, no se emite ningúnsonido.
• Para continuar la reproducción a velocidad normalpulse durante la reproducción lenta la tecla PLAY/ PAUSE.
Reproducción individual de imágenes (Step) (sólo DVD, VCD, SVCD)
Indicación:Estas funciones pueden no estar disponibles en to-dos los DVD/VCD/S-VCD. Si intenta realizar funcio-nes no disponibles aparecerá en la pantalla del te-levisor el símbolo .
• Pulse durante la reproducción la tecla STEP paradetener la reproducción. En la pantalla visualiza ahora la imagen deteni-da de la escena actualmente detenida.
• Cada nueva pulsación de la tecla STEP va saltan-do hacia delante la imagen detenida en unaimagen individual.
• Para continuar con la reproducción pulse la tecla PLAY/PAUSE .
IB_KH6500_AR23388_LB5 01.08.2008 13:14 Uhr Seite 21
- 22 -
Aumento de la imagen (zoom) (sólo DVD, VCD, SVCD, MPEG)
Indicación:Estas funciones pueden no estar disponibles en to-dos los DVD/VCD/S-VCD. Si intenta realizar fun-ciones no disponibles aparecerá en la pantalla deltelevisor el símbolo .
Durante la reproducción de un DVD/VCD/S-VCD introducido puede aumentar y reducir la imagen dela pantalla del televisor en tres niveles. • Pulse la varias veces la tecla ZOOM para aplicar
las siguientes ampliaciones o reducciones:
Con las teclas de navegación ���� se pue-de mover el segmento de la ampliación.
Posición de cámara (sólo DVD)
Indicación:Estas funciones pueden no estar disponibles en to-dos los DVD/VCD/S-VCD. Si intenta realizar funcio-nes no disponibles aparecerá en la pantalla del te-levisor el símbolo .
Algunas películas en DVD contienen capítulos filma-dos simultáneamente desde diferentes perspectivasde cámara. En las películas que disponen de estetipo de capítulos puede usted ver el mismo capítulodesde diferentes perspectivas.
• Para ello pulse durante la reproducción del DVDinsertado la tecla ANGLE del mando a distancia.Cada vez que pulse la tecla ANGLE se cambiaráa una de las perspectivas de cámara dis-poni-bles.
Función de repetición para DVDs, VCDs,SVCDs y CDs de audioCon la función de repetición puede…... en los DVDs: repetir las pistas, los capítulos o
todo el DVD.... en los VCD/S-VCD: reproducir repetidas pistas
sueltas o todo el VCD/S-VCD.... en los CDs de audio: repetir la reproducción de
pistas individuales o todo el CD.
Para activar la reproducción repetida…• Pulse durante la reproducción varias veces la
tecla REPEAT.
En la pantalla aparecerá el símbolo de repeticióncon una de las siguientes indicaciones:
CHAPTER Seleccione CHAPTER para repetir el capítulo actual hasta que se apa-gue la reproducción repetida o seinterrumpa la reproducción pulsan-do por segunda vez la tecla STOP .
TITLE Seleccione TITLE para repetir la pistaactual hasta que se apague la repro-ducción repetida o se interrumpa lareproducción pulsando por segundavez la tecla STOP.
ALL Seleccione ALL para repetir todaslas pistas del disco, es decir, todo eldisco hasta que se apague la repro-ducción repetida o se interrumpa lareproducción pulsando por segundavez la tecla STOP.
Display off Para apagar la reproducción repetidapulse durante la reproducción variasveces la tecla REPEAT, hasta que noaparezca ninguna advertencia enla pantalla.
IB_KH6500_AR23388_LB5 01.08.2008 13:14 Uhr Seite 22
- 23 -
Repetición de secuencias (A – B)Con esta función puede reproducir repetidamentecualquier secuencia del interior de un capítulo deldisco en reproducción.Para ello…• Pulse durante la reproducción la tecla A – B del
mando a distancia, en el momento en el que sereproduzca el inicio elegido de la secuencia. Enla pantalla aparecerá el símbolo de repetición
con la indicación A.• Vuelva a pulsar la tecla A – B, en el momento que
se reproduzca el final de la secuencia elegida. Ten-ga en cuenta que el inicio y el final de la secuen-cia deben estar dentro de un mismo capítulo.
En la pantalla aparecerá el símbolo de repeticióncon la indicación AB.
La reproducción repetida de la secuencia elegida se iniciará de inmediato sin necesidad de pulsar latecla PLAY/PAUSE. La secuencia se repetirá hasta queusted pulse de nuevo la tecla A – B para apagaresta función.
Función de marcadorDurante la reproducción de un DVD/VCD/S-VCDpuede colocar los llamados marcadores para vol-ver a ver más tarde algunos pasajes seleccionadosde una película. Puede colocar hasta 12 marcadores.1. Pulse durante la reproducción de una película la
tecla MARK del mando a distancia. En la pantallaaparecerá la siguiente indicación:
2. En cuanto se haya alcanzado el pasaje en elque desea colocar el marcador, pulse la teclaOK/ENTER. La pista y el capítulo en el que se en-cuentre la posición, así como la posición tem-poral exacta de este pasaje de la película semostrará con las horas, minutos y segundos en el marcador 1.
3. Si desea colocar otro marcador seleccione conlas teclas de navegación ���� un campolibre y pulse de nuevo la tecla OK/ENTER, en cuantose alcance el pasaje en el que desea colocar elmarcador.
4. Proceda de la misma manera para colocar másmarcadores. Una vez haya fijado los marcadoresdeseados, pulse la tecla MARK, para que se ocul-ten los marcadores seleccionados en la pantalla de su televisor.
5. Si después desea saltar los pasajes hasta llegara aquellos donde ha fijado los marcadores, pulsede nuevo la tecla MARK.
6. Seleccione con las teclas de navegación���� el marcador deseado.
7. Confirme la selección pulsando la teclaOK/ENTER. La reproducción de los capítulos se-leccionados empieza automáticamente desde elpunto en que colocó el marcador seleccionado.
8. Para eliminar los marcadores fijados pulse la tecla RETURN/CLR.
10.3 Funciones de visualización
Acceder al menú DVD
Indicación:Estas funciones pueden no estar disponibles en to-dos los DVD/VCD/S-VCD. Si intenta realizar fun-ciones no disponibles aparecerá en la pantalla deltelevisor el símbolo .
En muchas películas en DVD existe un menú principalen el disco que –además de la opción de reproducirla película principal– le permite por ejemplo…• seleccionar el idioma de los subtítulos y de la banda
sonora• seleccionar directamente los capítulos • reproducir material extra relacionado con la pelícu-
la (información sobre el contexto, "Making of", etc.)
IB_KH6500_AR23388_LB5 01.08.2008 13:14 Uhr Seite 23
- 24 -
A no ser que el DVD introducido no lo permita, puede desplegar el menú en la pantalla del televisor,pulsando la tecla MENU/PBC.Seleccione los puntos de menú pulsando las teclasde navegación ���� ; para confirmar la selección del punto de menú, pulse...• la tecla PLAY/PAUSE o• la tecla OK/ENTER.Para volver a la reproducción vuelva a pulsar la tecla MENU/PBC.
Indicación:Si ha interrumpido la reproducción pulsando dosveces la tecla STOP (parada de la reproducciónsin función resumen), no se puede acceder al menúprincipal del disco.
Control de playback (PBC) para VCDs/S-VCDsAlgunos VCD/S-VCD disponen de control de repro-ducción (Playback Control, abreviado "PBC"). Elcontrol de reproducción consiste en un menú princi-pal mediante el cual se pueden accionar las diversasfunciones del VCD/S-VCD. Si un VCD/S-VCD introducido en el reproductor deDVD dispone de PBC, primero debe activarlo parapoder visualizar el menú.Para activar el PBC…• Pulse durante la reproducción o con la reproducci-
ón interrumpida la tecla MENU/PBC. En la pantallaaparecerá la indicación PBC OFF.
• Pulse la tecla MENU/PBC de nuevo. En la pantallaaparecerá la indicación PBC ON. El PBC está aho-ra conectado, se puede desplegar el menú princi-pal del disco con la tecla RETURN/ CLR , MENU/PBC oTITLE .
Indicación:Si se conecta el PBC durante la reproducción deuna película, es posible que la reproducción se inter-rumpa y vuelva a iniciar desde el principio o con elmenú principal.
Control de subtítulos visibles u ocultos
Indicación:Esta función puede no estar disponible en todos losDVD/VCD/S-VCD. Si intenta realizar una función nodisponible aparecerá en la pantalla del televisor elsímbolo .
En caso de que el DVD/VCD/S-VCD disponga desubtítulos, estos se pueden visualizar en el televisordurante la reproducción accionando la teclaSUBTITLE. • La primera vez que pulse la tecla SUBTITLE apare-
cerán los subtítulos en la pantalla escritos en elprimer idioma disponible.
• Con cada pulsación adicional de la tecla SUBTIT-LE se muestran los idiomas restantes disponiblesen orden correlativo en la pantalla del televisor.
En la pantalla del televisor aparece el número delidioma de los subtítulos mostrados (por ejemplo"1/10" para el primero de los diez idiomas en queestán disponibles los subtítulos).• Una vez mostrado el último de los subtítulos de
idioma disponibles (p. ej. „10/10“ para el décimode los diez idiomas de subtítulo disponibles), podrádesconectar la función de subtítulo pulsando denuevo la tecla SUBTITLE. En la pantalla del televi-sor se mostrará OFF.
Modificación del idioma de la reproducción
Indicación:Esta función puede no estar disponible en todos losDVD/VCD/S-VCD. Si intenta realizar una función nodisponible aparecerá en la pantalla del televisor elsímbolo .
• En determinadas películas en DVD/VCD/S-VCDpuede elegir un idioma de emisión distinto duran-te la reproducción, pulsando la tecla AUDIO.
• Al pulsar la primera vez la tecla AUDIO se conec-tará el primer idioma de reproducción disponi-ble. Con cada pulsación adicional de la teclaLANGUAG se conectarán consecutivamente los de-más idiomas de reproducción disponibles.
IB_KH6500_AR23388_LB5 01.08.2008 13:14 Uhr Seite 24
- 25 -
En la pantalla del televisor se muestra el idioma ac-tivado en cada caso.
Mostrar información del disco
Indicación:Esta función puede no estar disponible en todos losDVD/VCD/S-VCD. Si intenta realizar una función nodisponible aparecerá en la pantalla del televisor elsímbolo .
Con esta función puede ver en la pantalla del televisordurante la reproducción toda la información dispo-nible sobre un DVD/VCD/S-VCD introducido en elreproductor de DVD.Para ello…• Durante la reproducción pulse varias veces la
tecla DISPLAY para mostrar consecutivamente la si-guiente información:
En los DVDs:• el número de pista actual/la cantidad total de
pistas• el número de capítulo actual/la cantidad total
de capítulos• el tiempo ya transcurrido de la reproducción en
horas, minutos y segundos (TITLE ELAPSED)• el tiempo hasta el fin de la película en horas,
segundos y minutos (TITLE REMAIN)• el tiempo ya transcurrido del capítulo en horas,
minutos y segundos (CHAPTER ELAPSED)• el tiempo hasta el fin del capítulo en horas,
segundos y minutos (CHAPTER REMAIN)
En VCDs/S-VCDs:• el número de pista actual/la cantidad total de
pistas• el tiempo ya reproducido de la pista actual del
VCD/SVCD en horas, minutos y segundos (SINGLE ELAPSED)
• el tiempo hasta el fin de la pista actual en horas,segundos y minutos (SINGLE REMAIN)
Con CDs de audio:• el número de pista actual/la cantidad total de
pistas• el tiempo total transcurrido• el tiempo ya reproducido de la pista actual del
CD en minutos y segundos (SINGLE ELAPSED)• el tiempo hasta el fin de la pista actual en minutos
y segundos (SINGLE REMAIN)• el tiempo total transcurrido del CD en minutos
y segundos (TOTAL ELAPSED)• el tiempo hasta el final del CD en minutos y
segundos (TOTAL REMAIN)• Para ocultar la información de disco vuelva a
pulsar la tecla DISPLAY.
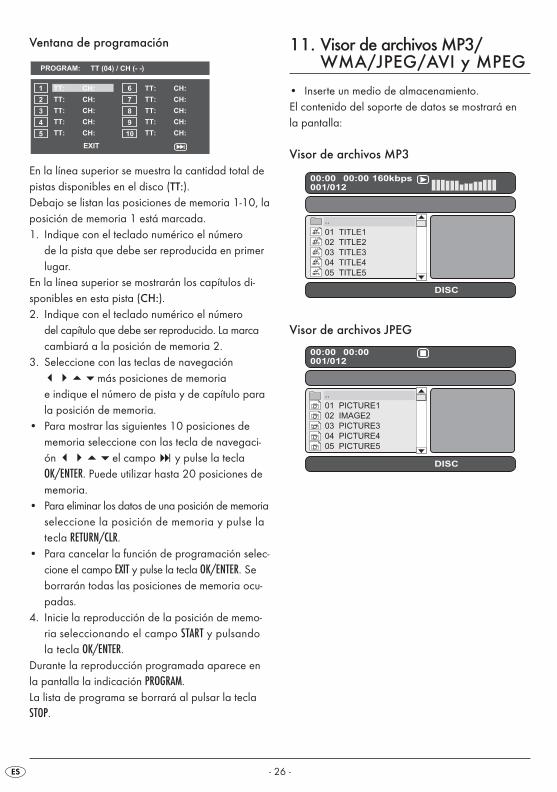
10.4 Función de programaciónPuede programar un orden de reproducción paralas pistas y capítulos disponibles en el disco DVD,VCD, o SVCD.Para ello pulse durante la reproducción la teclaPROG , para mostrar la siguiente ventana:
IB_KH6500_AR23388_LB5 01.08.2008 13:14 Uhr Seite 25
- 26 -
Ventana de programación
En la línea superior se muestra la cantidad total depistas disponibles en el disco (TT:).Debajo se listan las posiciones de memoria 1-10, laposición de memoria 1 está marcada.1. Indique con el teclado numérico el número
de la pista que debe ser reproducida en primerlugar.
En la línea superior se mostrarán los capítulos di-sponibles en esta pista (CH:).2. Indique con el teclado numérico el número
del capítulo que debe ser reproducido. La marcacambiará a la posición de memoria 2.
3. Seleccione con las teclas de navegación����más posiciones de memoria e indique el número de pista y de capítulo parala posición de memoria.
• Para mostrar las siguientes 10 posiciones de memoria seleccione con las tecla de navegaci-ón ����el campo � y pulse la teclaOK/ENTER. Puede utilizar hasta 20 posiciones dememoria.
• Para eliminar los datos de una posición de memoriaseleccione la posición de memoria y pulse latecla RETURN/CLR.
• Para cancelar la función de programación selec-cione el campo EXIT y pulse la tecla OK/ENTER. Seborrarán todas las posiciones de memoria ocu-padas.
4. Inicie la reproducción de la posición de memo-ria seleccionando el campo START y pulsandola tecla OK/ENTER.
Durante la reproducción programada aparece en la pantalla la indicación PROGRAM.La lista de programa se borrará al pulsar la teclaSTOP.
11. Visor de archivos MP3/WMA/JPEG/AVI y MPEG
• Inserte un medio de almacenamiento. El contenido del soporte de datos se mostrará en la pantalla:
Visor de archivos MP3
Visor de archivos JPEG
IB_KH6500_AR23388_LB5 01.08.2008 13:14 Uhr Seite 26
- 27 -
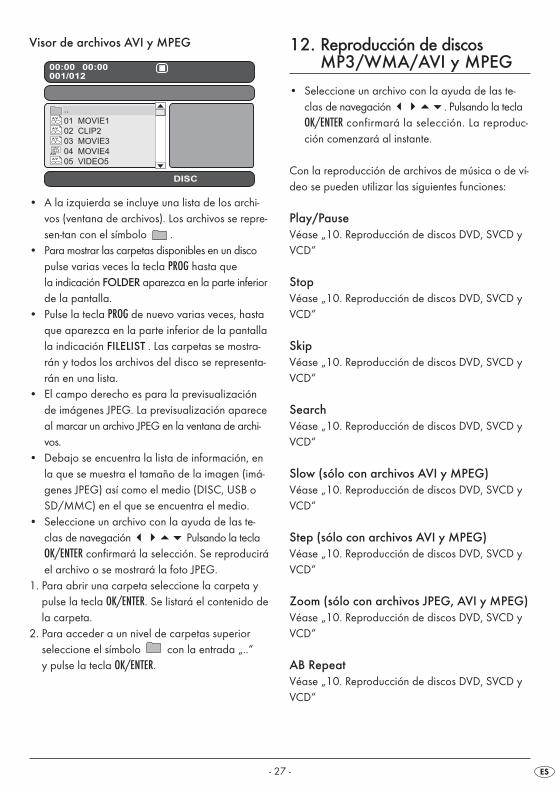
Visor de archivos AVI y MPEG
• A la izquierda se incluye una lista de los archi-vos (ventana de archivos). Los archivos se repre-sen-tan con el símbolo .
• Para mostrar las carpetas disponibles en un discopulse varias veces la tecla PROG hasta que la indicación FOLDER aparezca en la parte inferiorde la pantalla.
• Pulse la tecla PROG de nuevo varias veces, hastaque aparezca en la parte inferior de la pantallala indicación FILELIST . Las carpetas se mostra-rán y todos los archivos del disco se representa-rán en una lista.
• El campo derecho es para la previsualizaciónde imágenes JPEG. La previsualización apareceal marcar un archivo JPEG en la ventana de archi-vos.
• Debajo se encuentra la lista de información, enla que se muestra el tamaño de la imagen (imá-genes JPEG) así como el medio (DISC, USB oSD/MMC) en el que se encuentra el medio.
• Seleccione un archivo con la ayuda de las te-clas de navegación ���� Pulsando la teclaOK/ENTER confirmará la selección. Se reproduciráel archivo o se mostrará la foto JPEG.
1. Para abrir una carpeta seleccione la carpeta ypulse la tecla OK/ENTER. Se listará el contenido dela carpeta.
2. Para acceder a un nivel de carpetas superior seleccione el símbolo con la entrada „..“ y pulse la tecla OK/ENTER.
12. Reproducción de discosMP3/WMA/AVI y MPEG
• Seleccione un archivo con la ayuda de las te-clas de navegación ����. Pulsando la teclaOK/ENTER confirmará la selección. La reproduc-ción comenzará al instante.
Con la reproducción de archivos de música o de ví-deo se pueden utilizar las siguientes funciones:
Play/PauseVéase „10. Reproducción de discos DVD, SVCD yVCD“
StopVéase „10. Reproducción de discos DVD, SVCD yVCD“
SkipVéase „10. Reproducción de discos DVD, SVCD yVCD“
SearchVéase „10. Reproducción de discos DVD, SVCD yVCD“
Slow (sólo con archivos AVI y MPEG)Véase „10. Reproducción de discos DVD, SVCD yVCD“
Step (sólo con archivos AVI y MPEG)Véase „10. Reproducción de discos DVD, SVCD yVCD“
Zoom (sólo con archivos JPEG, AVI y MPEG)Véase „10. Reproducción de discos DVD, SVCD yVCD“
AB RepeatVéase „10. Reproducción de discos DVD, SVCD yVCD“
IB_KH6500_AR23388_LB5 01.08.2008 13:14 Uhr Seite 27
- 28 -
12.1 Función de repetición en discosMP3/WMA/AVI/MPEG/JPEG
Pulse durante la reproducción varias veces la teclaREPEAT para aplicar las siguientes funciones de repe-tición (la función ajustada aparece en la pantalla):REPEAT1 Repetición sin fin de la
pista/imagen actual.REP FOLDER Repetición de la carpeta actual.FOLDER Repetición de todas las
carpetas.SHUFFLE1 Reproducción aleatoria de todas
las pistas/imágenes.SHUFFLE2 Reproducción aleatoria de todas
las pistas/imágenes, en la quese reproducirán todas laspista/cada imagen sólo unavez.
ONCE Reproduce una vez la pista/ima-gen actual (función de repeticióndesconectada).
12.2 Reproducción de discos JPEG• Marque con las teclas de navegación ��una
imagen y pulse la tecla OK/ENTER o PLAY/PAUSE,para abrir la imagen.
La imagen se mostrará en la pantalla.A continuación cambiará la vista a la siguiente imagen disponible en el disco/en la carpeta.• Para mostrar la imagen actual durante más
tiempo pulse la tecla PLAY/PAUSE.• Para continuar con la reproducción pulse de
nuevo la tecla PLAY/PAUS.• Puede acceder directamente a una imagen
indicando el número de archivo de la imagencon el teclado numérico y confirmándolo luego con la tecla OK/ENTER .
• Con las teclas de navegación ���� pue-de rotar la imagen durante la reproducción enpasos de 90°.
• Pulse durante la reproducción la tecla STOP, paramostrar una vista en miniatura de todas las imá-genes de la carpeta/del disco. Se mostrarán 12vistas en miniatura por página.
• Seleccione con las teclas de navegación���� una imagen e inicie la reproducciónOK/ENTER o PLAY/PAUSE.
• Seleccione con las teclas de navegación���� una de las siguientes entradas de la lí-nea inferior de la pantalla y confírmelo conOK/ENTER:
Slide Show Inicia un pase de diapositivas delas imágenes de la carpeta/del disco
Menu Muestra las funciones de las teclasdisponibles para la reproducci-ón de JPEG. Pulse la tecla OK/EN-TER hasta que se oculte la vistageneral.
Prev cambia a la página anteriorNext cambia a la página siguiente
• Pulse la tecla MENU/PBC, para volver a cambiar a la lista de archivos.
12.3 Reproducción programada de discos MP3/WMA/AVI/MPEG/JPEG
Puede programar el orden de reproducción en elque las pistas de un disco deben ser reproducidas.• Cambie si es necesario a la lista de archivos
pulsando varias veces la tecla PROG, hasta quese muestre en la parte inferior de la pantallaFILE LIST.
• Seleccione con las teclas de navegación���� la pista que debe ser reproducida enprimer lugar.
• Pulse la tecla MARK, para incluir una pista en la li-sta de reproducción.
• Marque de esta manera el resto de las pistas einclúyalas en la lista de reproducción.
• Para mostrar la lista de reproducción pulse variasveces la tecla PROG, hasta que aparezca en laparte inferior de la pantalla la indicación PLAY-LIST.
IB_KH6500_AR23388_LB5 01.08.2008 13:14 Uhr Seite 28
- 29 -
• Inicie la reproducción de la lista de reproducci-ón marcando una pista y luego pulsando la te-cla PLAY/PAUSE o bien la tecla OK/ENTER .
• Para eliminar una pista de la lista de reproduc-ción, marque la pista y pulse la tecla MARK. El ti-tulo se borrará de la lista de reproducción.
13. Reproducción de memoriasUSB/SD/MMC
13.1 Memorias compatiblesPuede reproducir con su aparato archivos MP3/WMA/JPEG/AVI/MPEG de memorias USB (Uni-versal Serial Bus = almacenamiento universal paratransmisión de datos) como p. ej. un lápiz USB otarjetas de memoria Flash en formato SD/MMC.
Indicación:Debido a la multitud de medios de almacena-
miento disponibles no puede garantizarse la com-patibilidad con todos los medios de almacenamien-to actuales y futuros. ¡No conecte discos duros alaparato que dispongan de conexión USB! ¡Estopuede provocar la pérdida de datos!
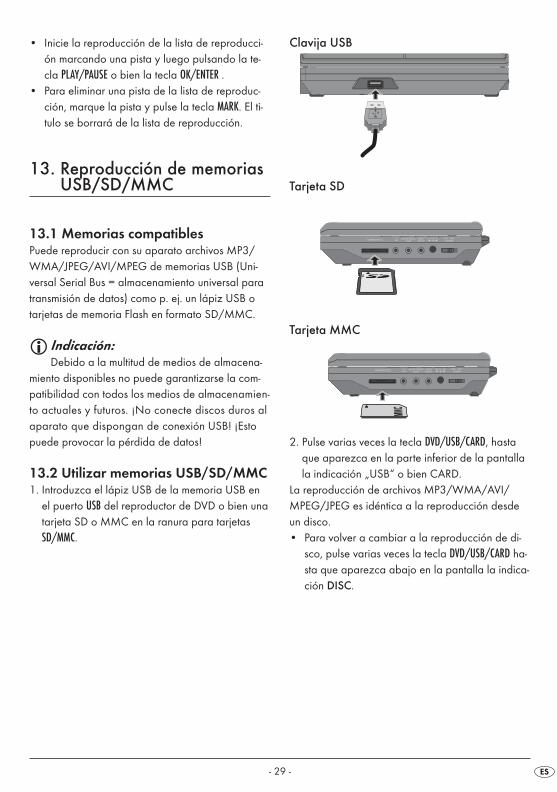
13.2 Utilizar memorias USB/SD/MMC 1. Introduzca el lápiz USB de la memoria USB en
el puerto USB del reproductor de DVD o bien unatarjeta SD o MMC en la ranura para tarjetasSD/MMC.
Clavija USB
Tarjeta SD
Tarjeta MMC
2. Pulse varias veces la tecla DVD/USB/CARD, hastaque aparezca en la parte inferior de la pantallala indicación „USB“ o bien CARD.
La reproducción de archivos MP3/WMA/AVI/MPEG/JPEG es idéntica a la reproducción desdeun disco. • Para volver a cambiar a la reproducción de di-
sco, pulse varias veces la tecla DVD/USB/CARD ha-sta que aparezca abajo en la pantalla la indica-ción DISC.
IB_KH6500_AR23388_LB5 01.08.2008 13:14 Uhr Seite 29
- 30 -
14. Limpieza del reproductorde DVD
• Limpie la carcasa del reproductor de DVD úni-camente con un paño ligeramente humedecidoen jabón suave. Procure que durante la limpiezano entre ningún líquido ni humedad al reproduc-tor de DVD.
• Limpie el interior de la bandeja de disco –si esnecesario– exclusivamente con un pincel limpioy seco (por ejemplo un pincel de limpiar objeti-vos, a la venta en establecimientos de fotografía).¡Nunca limpie el interior de la bandeja con líqui-dos!
¡Advertencia!¡Si penetra humedad en el reproductor de
DVD, existe riesgo de una descarga eléctrica! Ade-más el reproductor de DVD podría sufrir daños irre-parables.
15. Evacuación
En ningún caso deberá tirar el aparatoa la basura doméstica. Este productoestá sometido a la directiva europea2002/96/EC.
Elimine el aparato a través de una empresa de evacuación de basuras autorizada o por medio delcentro de evacuación de basuras municipal.Tenga en cuenta las normativas actuales en vigor.En caso de duda póngase en contacto con el centro de evacuación de basuras.
¡Evacuación de las pilas!Las pilas no deben evacuarse en la basura domésti-ca. Cada usuario está obligado por ley de evacuaro entregar las/os pilas/acumuladoresen un centro de recogida de su ayuntamiento/barrio o en el comercio. Esta obligación tiene el objetivo de que las pilas puedan eliminarse de for-ma ecológica. Devuelva las pilas/acumula-doressólo en estado sin carga.
El material de embalaje debe desecharsede forma respetuosa con el medio ambiente.
IB_KH6500_AR23388_LB5 01.08.2008 13:14 Uhr Seite 30
- 31 -
16. Solucionar fallos y averías
El display no muestra nada/el reproductorDVD no muestra ninguna función aunqueestaba conectadoA Compruebe que el cable de alimentación está
correctamente enchufado.B Compruebe si la base de enchufe en la que ha
insertado el cable de alimentación de la fuentede alimentación/del adaptador para el cochetiene corriente, conectando otro aparato comoprueba. Enchufe el cable de alimentación de lafuente de alimentación/del adaptador para elcoche, dado el caso, en una base de enchufe.
C Desconecte el reproductor de DVD, pulsando latecla "Power" y espere a continuación unos diezsegundos. A continuación vuelva a encender elreproductor de DVD pulsando la tecla POWER.
El display indica "No Disc" a pesar de quehay un disco insertadoA El disco está sucio, rayado o bien dañado.
Limpie el disco o inserte un disco distinto.B El código de países/regional del DVD/VCD/
S-VCD introducido no coincide con el código re-gional/de países del reproductor de DVD. En este caso el DVD/VCD/S-VCD no se puede re-producir con el reproductor de DVD.
El disco insertado no es reproducidoPuede haberse formado una película de agua decondensación sobre la lente de exploración del láser del reproductor de DVD. Esto puede ocurrirespecialmente si se ha sometido el reproductor deDVD a variaciones pronunciadas de temperatura.En este caso coloque el reproductor de DVD en unentorno seco y a una temperatura ambiente normal.En primer lugar si hay algún disco en la bandeja,extráigalo. A continuación deje conectado el repro-ductor de DVD por lo menos durante una hora sinutilizarlo, hasta que haya desaparecido la películade agua de condensación.
No hay imagen o sólo aparece en blanco ynegroA Compruebe que todos los cables de unión entre el
reproductor de DVD y el televisor (o el proyectorde vídeo) están bien conectados a las tomascorrespondientes.
B Compruebe si los ajustes del menú OSD sonadecuados para la variante de conexión con laque ha conectado el reproductor de DVD al te-levisor (o al proyector de vídeo).
C Revise con el manual de instrucciones del tele-vi-sor (o del proyector de vídeo) si son necesarios aju-stes adicionales en el televisor (o proyector de ví-deo) para usar el reproductor de DVD con él.
No hay sonidoA Compruebe si el reproductor de DVD está
conectado en modo silencia (tecla MUTE).B Compruebe que todos los cables de unión entre el
reproductor de DVD y los componentes de au-dio que se usen están bien conectados a las to-mas correspondientes.
C Compruebe si los ajustes del menú OSD sonadecuados para la variante de conexión con laque ha conectado los componentes de audio al re-productor de DVD.
D Revise con el manual de instrucciones del televi-sor si son necesarios ajustes adicionales en el te-levisor para usar el reproductor de DVD con él.
E Revise con el manual de instrucciones del com-ponente de audio que pueda haber conectadosi éste necesita ajustes adicionales para usarlocon el reproductor de DVD.
Sin imagen de 4:3 o bien 16:9 A Compruebe consultando el manual de instruc-
ciones del televisor acerca de que formato dis-pone el televisor.
B Verifique que los ajustes del menú OSD secorresponden al formato de pantalla disponible enel televisor.
IB_KH6500_AR23388_LB5 01.08.2008 13:14 Uhr Seite 31
- 32 -
El mando a distancia no funcionaA Revise si las pilas del mando a distancia están
colocadas con la polaridad correcta dentro del compartimento de pilas.
B Compruebe si las pilas del mando a distanciaestán gastadas y de ser necesario sustituya lasdos pilas.
C Asegúrese de que no haya ningún obstáculoentre el mando a distancia y el reproductor de DVD.
D Al usar el mando a distancia no se aleje más decinco metros del reproductor de DVD.
Idioma de reproducción/Idioma de subtítulono corresponde a los ajustes en el menúOSDEl idioma seleccionado en el menú OSD para la reproducción o los subtítulos no está disponible enel disco introducido.
Una o mas funciones no se pueden seleccionarLa función seleccionada puede no estar disponibleen todos los DVD/VCD/S-VCD. Si intenta realizaruna función no disponible aparecerá en la pantalladel televisor el símbolo .
No funciona ninguna tecla en el aparato oen el mando a distancia / otras funciones defalloA Apague el reproductor de DVD pulsando la
tecla POWER. Espere 10 segundos y pulse acontinuación de nuevo una sola vez la tecla "Power" en el reproductor de DVD.
B Si continúa apareciendo el fallo: devuelva el re-productor de DVD a la configuración estándar.
Contacte con uno de nuestros servicios de asistencia técnica concertados más próximos si…• las anomalías de funcionamiento no se solucio-
nan con las medidas aquí descritas o• se producen anomalías de funcionamiento distintas
a las indicadas
Consulte al respecto el capítulo 18. „Observa-ciones importantes sobre la garantía“.
17. Glosario/indice de palabras clave
17.1 ¿Qué son DVDs, VCDs y S-VCDs?
DVDsDVD es una abreviatura inglesa para. „Digital Ver-satile Disc“. Los DVD sirven para almacenar datosde audio y de vídeo; existen en los formatos de 8cm y de 12 cm (de diámetro). Los DVD ofrecen –gracias a su superior capacidad de grabación com-parados con los CD-R/CD-RW– una duración dereproducción de datos de audio y vídeo de hasta ocho horas.
VCDs/S-VCDsCon los nombres "CD de vídeo" (VCD) y "Súper CDde vídeo" (S-VCD) se designan dos procedimientosde almacenamiento comprimido –que por tantoahorran espacio– de películas en discos compac-tos. Los VCD y S-VCD existen en los formatos de 8cm y de 12 cm (de diámetro). Su capacidad de al-macenamiento es muy inferior a la de los DVD.Por ello sólo ofrecen una reproducción de datosde audio y vídeo de 20 minutos (formato de 8 cm)o 74 minutos (formato de 12 cm).Los VCD existen en dos versiones: • En los VCD/S-VCD de la versión 1.1 sólo se
pueden reproducir datos de audio y de vídeo.• En los VCD/S-VCD de la versión 2.0 se dispone
de funciones de control de reproducción (PBC).Además también se pueden reproducir imáge-
IB_KH6500_AR23388_LB5 01.08.2008 13:14 Uhr Seite 32
- 33 -
nes estáticas a alta resolución.
Playback Control (PBC)Los VCD/S-VCD de la versión 2.0 disponen de con-trol de reproducción (Playback Control, abreviado"PBC"). En estos VCD/S-VCD se dispone de un menú prin-cipal mediante el cual se pueden accionar las diversas funciones del disco.
17.2 ¿Qué son títulos y capítulos?Se llaman pistas a las unidades mayores de imageny sonido de los DVD; en muchos DVD la película(principal) tiene el número de pista 01. Para el ma-terial extra (p. ej. el trailer, información contextual,etc.) que contienen muchos DVD, se pueden utilizar otros números de pista.
Se llama capítulo a las unidades más pequeñas deimagen y sonido contenidas dentro de las pistas. Siel o los títulos de un DVD/VCD/S-VCD está subdivi-dido en capítulos, van asociados a estos númeroscon los cuales se puede seleccionar los capítulosdirectamente introduciendo estos números.Tenga en cuenta que no en todos los DVD…• la pista o las pistas están divididas en capítulos
(numerados).• Los capítulos se denominan también "escenas"
(por ejemplo en el menú principal de los DVD)
17.3 Sonido envolvente DolbyDolby Surround es un formato analógico de sonidocon el cual se utilizan los dos canales de una señalde sonido estéreo para llevar información de soni-do envolvente a los demás canales. Con un desco-dificador de Dolby Surround se vuelven a transfor-mar las señales en sonido o música que seconducen a los altavoces adicionales que se colocan por detrás de la posición del oyente.
Dolby PrologicA diferencia del formato de sonido Dolby Surround,con el Dolby Prologic se utiliza un canal más de laseñal estéreo; es lo que se llama canal central("center"). El correspondiente altavoz central se co-
loca entre los dos altavoces estéreo. Los tonos más gra-vesse conducen a un altavoces de bajos, el "subwoofer". El subwoofer puede colocarse en cualquier lugar de la sala; el motivo es que el oído humano apenasconsigue ubicar la procedencia de los tonos gravesque emite el subwoofer.
Dolby Digital (5.1)El Dolby Digital, también llamado AC3, es un formatode sonido digital con el cual se pueden transportarun máximo de seis canales de audio independientes.En la mayoría de los DVD actuales el sonido está almacenado en el formato "Dolby Digital 5.1"; el"5" de esta denominación "5.1" significa los tres canales delanteros y los dos canales traseros de sonido envolvente, el "1" es el canal de graves.
DTSDTS es una abreviatura inglesa para. „Digital TheatreSystem“ y define los formatos de sonido envolventemás habituales para DVDs. Al igual que el Dolby Digital 5.1 en el sistema DTS se utilizan tres canalesdelanteros y dos canales traseros de sonido envol-vente además de un canal de graves.
17.4 ¿Qué son PAL y NTSC?
PALPAL es una abreviatura inglesa para. „Phase AlternationLine“. PAL es la norma corriente y más común de tele-visión en color en Europa central y occidental (conla excepción de Francia, véase el término "SECAM").
NTSCNTSC es una abreviatura inglesa para. „NationalTelevision System Committee“. NTSC es una normade televisión en color utilizada sobre todo en losEE. UU. y en Japón.
IB_KH6500_AR23388_LB5 01.08.2008 13:14 Uhr Seite 33
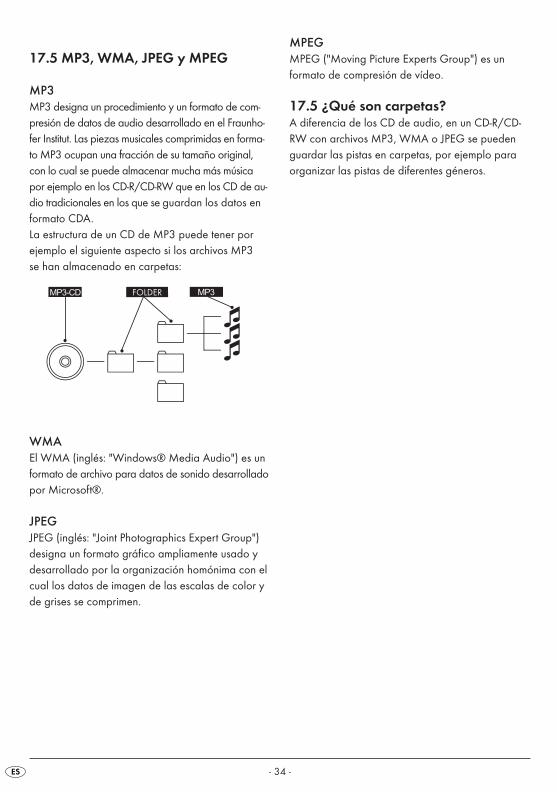
- 34 -
17.5 MP3, WMA, JPEG y MPEG
MP3MP3 designa un procedimiento y un formato de com-presión de datos de audio desarrollado en el Fraunho-fer Institut. Las piezas musicales comprimidas en forma-to MP3 ocupan una fracción de su tamaño original,con lo cual se puede almacenar mucha más músicapor ejemplo en los CD-R/CD-RW que en los CD de au-dio tradicionales en los que se guardan los datos enformato CDA.La estructura de un CD de MP3 puede tener porejemplo el siguiente aspecto si los archivos MP3 se han almacenado en carpetas:
WMAEl WMA (inglés: "Windows® Media Audio") es unformato de archivo para datos de sonido desarrolladopor Microsoft®.
JPEGJPEG (inglés: "Joint Photographics Expert Group")designa un formato gráfico ampliamente usado ydesarrollado por la organización homónima con elcual los datos de imagen de las escalas de color yde grises se comprimen.
ORDNER MP3MP3-CD
MPEGMPEG ("Moving Picture Experts Group") es un formato de compresión de vídeo.
17.5 ¿Qué son carpetas?A diferencia de los CD de audio, en un CD-R/CD-RW con archivos MP3, WMA o JPEG se puedenguardar las pistas en carpetas, por ejemplo para organizar las pistas de diferentes géneros.
FOLDER
IB_KH6500_AR23388_LB5 01.08.2008 13:14 Uhr Seite 34
- 35 -
18. Garantía y asistencia técnica
Con este aparato recibe usted 3 años de garantíadesde la fecha de compra. Si a pesar de nuestrosaltos estándares de calidad encuentra algún motivode queja respecto a este aparato, le rogamos quese ponga en contacto con nuestra línea directa deasistencia. Si no puede solucionarse telefónicamentesu problema, en este número de teléfono se le dará• un número de referencia (número RMA) y • una dirección a la cual puede enviar su produc-
to para seguir el proceso de garantía.En caso de enviarnos el producto le rogamos queadjunte una copia del tíquet de compra o factura. El aparato debe embalarse de forma segura parasu transporte y el número RMA debe estar bien visible.No podemos gestionar los envíos sin número RMA.
Indicación:La garantía sólo cubre los defectos de material o
fabricación.La garantía no cubre• las piezas de desgaste•los daños de piezas frágiles como los
interruptores o baterías.Este producto ha sido diseñado exclusivamentepara el uso particular y no para el uso industrial. En caso de manipulación indebida e incorrecta, usode la fuerza y en caso de abrir el aparato personasextrañas a nuestros centros de asistencia técnicaautorizados, la garantía pierde su validez. Esta ga-rantía no limita sus derechos de garantía estipuladospor ley.
19. Importador
KOMPERNASS GMBHBURGSTRASSE 21D-44867 BOCHUMwww.kompernass.com
IB_KH6500_AR23388_LB5 01.08.2008 13:14 Uhr Seite 35

- 36 - ✄
IB_KH6500_AR23388_LB5 01.08.2008 13:14 Uhr Seite 36
¡Cu
mp
limen
te e
ste
ap
art
ad
o e
n s
u t
ota
lida
d y
ad
jún
telo
al a
pa
rato
!
Escriba el remite de forma legible:
Apellido
Nombre
Dirección
CP/LOCALIDAD
País
Teléfono
Fecha / Firma
Descripción del fallo:
✄
Garantía
Kompernass Service EspañaTel.: 902/430758 Fax: 91/6652551e-mail: [email protected]
www.mysilvercrest.de
Para garantizar que el proceso dereparación será gratuito, póngaseen contacto con la línea directa deasistencia. Para ello tenga prepara-do el ticket de compra.
REPRODUCTOR DVD MÓVIL KH 6500
IB_KH6500_AR23388_LB5 01.08.2008 13:14 Uhr Seite 37

IB_KH6500_AR23388_LB5 01.08.2008 13:14 Uhr Seite 38
- 39 -
INDICE PAGINA1. Dati tecnici 41
2. Uso e funzionamento 41
3. Avvertenze di sicurezza 42
4. Descrizione dell'apparecchio: 44
5. Messa in funzione 455.1 Disimballaggio ........................................................................................................................45
5.2 Controllo della fornitura.........................................................................................................45
5.3 Preparazione del telecomando.............................................................................................45
6. Collegamenti e possibilità di collegamento 466.1 Collegamento alla rete ..........................................................................................................46
6.2 Collegamento accumulatore .................................................................................................46
6.3 Collegamento ad altri apparecchi........................................................................................47
6.4 Ingresso auricolari ..................................................................................................................49
6.5 Impostazione posizione di osservazione .............................................................................50
7. Uso 50
8. Funzioni di menu 508.1 GENERAL SETUP PAGE.........................................................................................................51
8.2 DIGITAL AUDIO SETUP PAGE ..............................................................................................52
8.3 VIDEO SETUP PAGE ..............................................................................................................53
8.4 PREFERENCE PAGE................................................................................................................53
8.5 PASSWORD SETUP PAGE.....................................................................................................55
8.6 EXIT SETUP ..............................................................................................................................56
9. Funzioni suono 569.1 Regolazione del volume ........................................................................................................56
9.2 Funzione MUTE.......................................................................................................................56
10. Riproduzione di DVD, SVCD, VCD e CD 5610.1 Inserimento del disco ...........................................................................................................56
10.2 Funzioni di riproduzione durante la riproduzione di DVD,VCD, S-VCD, MPEG- o CD audio .....................................................................................57
10.3 Funzioni display....................................................................................................................61
10.4 Funzione di programmazione.............................................................................................63
IB_KH6500_AR23388_LB5 01.08.2008 13:14 Uhr Seite 39
- 40 -
11. Visualizzazione di file MP3/WMA/ JPEG/AVI/MPEG 63
12. Riproduzione di dischi MP3/ WMA/AVI e MPEG 6412.1 Funzione di ripetizione per dischi MP3/ WMA/AVI/MPEG e JPEG............................65
12.2 Riproduzione di dischi JPEG ...............................................................................................65
12.3 Riproduzione programmata di dischi MP3/WMA/AVI/MPEG e JPEG .......................65
13. Riproduzione di supporti dati USB/SD/MMC 6613.1 Supporti dati compatibili .....................................................................................................66
13.2 Utilizzo di supporti dati USB/SD/MMC ..........................................................................66
14. Pulizia del lettore DVD 67
15. Smaltimento 67
16. Risoluzione di guasti ed errori 68
17. Glossario/Indice analitico 6917.1 Cosa sono DVD, VCD e S-VCD? ........................................................................................69
17.2 Cosa sono i titoli e i capitoli?..............................................................................................70
17.3 Dolby Surround ....................................................................................................................70
17.4 Cosa sono PAL e NTSC?.....................................................................................................70
17.5 MP3, WMA, JPEG e MPEG ...............................................................................................71
17.6 Cosa sono le cartelle?.........................................................................................................71
18. Garanzia e assistenza 71
Conservare le presenti istruzioni per consultarle in futuro; in caso di cessione dell'apparecchio a terzi, consegnare anche le istruzioni!
IB_KH6500_AR23388_LB5 01.08.2008 13:14 Uhr Seite 40
- 41 -
LETTORE DVD PORTATILEKH 6500
1. Dati tecnici
Potenza assorbita: 15 WattStandard televisivo: PAL/NTSCTemperatura di esercizio: +5 ~ +35°CUmidità: 5 ~ 90 %
(assenza di condensa)
AlimentatorePrimario: AC 100-240 V ~ 50/60 Hz
max. 0,6ASecondario: DC 12 V 1.5 ACostruttore: Honor Electronic Co., LtdModello: ADS-18E-121218GPG
Adattatore veicoloTipo: KD627Ingresso: DC 12 V/max. 10 A Uscita: 1500 mA
Blocco accumulatoreTipo: batteria litio-ioneModello: KH6500
batterie ricaricabiliIngresso: 12 VUscita: 7,4 V 2500 mAh
Uscita video Livello di uscita: 1 + 0.2/-0.2 Vp-p (75 Ω) Risoluzione orizzontale: > = 500 linee Rapporto segnale/disturbo: >60 dB
Uscita audio Impedenza: 10 kΩLivello di uscita: 1.8 + 0.2/-0.8 Vrms (1kHz 0 dB)Distorsione armonica: <0.01 %
(JIS-A 1kHz, valore medio)
Campo dinamico: >80 dB (JIS-A 1 KHz, valore medio)
Rapporto segnale/disturbo: >95 dB
(JIS-A 1 kHz, valore medio)
AuricolariModello: HX206-001Impedenza: 32 OhmPotenza nominale: 3 mW
Uscita cuffieValore max. pressione acustica 85 dB(A)Tensione di riconoscimento banda larga 300 mVValore max. tensione in uscita 60 mV
Uscita audio digitaleUscita coassiale
2. Uso e funzionamento
Il lettore DVD SilverCrest KH 6500 è realizzato esclusivamente• come apparecchio elettronico di intrattenimento
per la riproduzione …- ... di video DVD nei formati 12 cm (diametro)
con i codici nazione/regione 2 oppure ,contrassegnati dal logo
- ...di formati video MPEG-4/MPEG-4 ASP- ... di CD video (VCD) e super video (S-VCD)
nei formati 12 cm (diametro), contrassegnati dal logo
- ... di CD audio nei formati 12 cm (diametro),contrassegnati dal logo
- ... in generale dei formati file MP3 (.mp3), Windows Media Audio (.wma), Audio VideoInterleaved (.avi) e JPEG (.jpg) sui supporti dimemoria CD-R e CD-RW
• ... per l'uso stazionario in ambienti chiusi• ... per l'impiego privato, non commerciale
IB_KH6500_AR23388_LB5 01.08.2008 13:14 Uhr Seite 41
- 42 -
Per la visualizzazione di immagini durante la ripro-duzione di DVD, VCD, S-VCD, CD audio e formatifile MP3, Windows Media Audio e JPEG è possibilecollegare al lettore DVD portatile …- televisori stereo e mono con i formati video PAL
o NTSC e i formati immagine 4:3/16:9.Per la riproduzione di suoni o musica possono essereutilizzati e collegati al lettore DVD portatile …- altoparlanti di un televisore collegato al lettore
DVD- componenti audio esterni come impianti HiFi,
ricevitori o impianti Surround (analogico/digitale)
Attenzione!La nostra azienda declina ogni responsabilità perdanni derivanti da un uso non conforme dell'appa-recchio!
3. Avvertenze di sicurezza
• Questo apparecchio non è idoneo per personele cui capacità fisiche, sensoriali o psichicheimpediscano l'impiego sicuro dell'apparecchiosenza assistenza o sorveglianza. Sorvegliare ibambini per assicurarsi che non giochino con l'apparecchio.
• Per evitare un'accensione indesiderata, staccaresempre la presa dalla spina dopo ogni uso e primadi ogni pulizia.
• Controllare che l'apparecchio e tutte le sue partinon presentino danni visibili. La sicurezza dell'appa-recchio è garantita solo se esso è in perfetto stato.
• La spina deve essere sempre facilmente raggiun-gibile, in modo da poter scollegare rapidamentel'apparecchio dalla rete elettrica in caso diemergenza.
Pericolo di scossa elettrica!• Allacciare l'apparecchio solo ad una presa
installata in conformità alla normativa vigente ecollegata a terra. La tensione di rete devecorrispondere ai dati riportati sulla targhettadell'apparecchio.
• Fare sostituire immediatamente la spina o il cavodi rete danneggiato da personale specializzatoautorizzato o dal centro di assistenza ai clienti,per evitare possibili danni.
• Fare riparare o sostituire immediatamente dalservizio assistenza i cavi o gli apparecchi nonperfettamente funzionanti o danneggiati.
Non immergere mai l'apparecchio né l'alimen-tatore in acqua. Ripulirlo semplicemente conun panno leggermente inumidito.
• Non esporre l'apparecchio alla pioggia e nonutilizzarlo mai in ambienti umidi o bagnati.
• Impedire che il cavo di connessione alla reteelettrica si bagni o inumidisca durante l'uso.
• Non è consentito aprire o riparare l'alloggia-mento dell'apparecchio. Aprendolo ci si esponea pericoli e la garanzia decade.
• Proteggere l'apparecchio da spruzzi e gocced'acqua. Non collocare pertanto contenitori pienidi acqua (ad es. vasi di fiori) sull'apparecchio.
Pericolo d'incendio!• Non utilizzare l'apparecchio nelle vicinanze di
superfici surriscaldate.• Non posizionare l'apparecchio in luoghi diretta-
mente irradiati dal sole. In caso contrario, essopotrebbe surriscaldarsi e danneggiarsi irrepara-bilmente.
• Non lasciare mai l'apparecchio incustodito durante l'uso.
• Non coprire mai le aperture di aerazione dell'apparecchio acceso.
• Non posizionare sull'apparecchio possibili fonti d'incendio, come ad es. candele.
IB_KH6500_AR23388_LB5 01.08.2008 13:14 Uhr Seite 42
- 43 -
Pericolo di lesioni• Tenere i bambini lontani dal cavo di collegamento
e dall'apparecchio. I bambini spesso sottovalutano i rischi collegati all'uso di apparecchi elettrici.
• Provvedere a un posizionamento sicuro dell'appa-recchio.
• Se l'apparecchio ha subìto cadute o danni, nondeve più essere messo in funzione. L'apparecchiodev'essere sottoposto a controllo da parte di personale specializzato e, se necessario, riparato.
• Le pile devono essere tenute fuori dalla portatadei bambini. I bambini potrebbero mettere inbocca le pile e ingoiarle.
Pericolo! Emissione di raggi laser!L'apparecchio dispone di un "laser di classe 1".• Non aprire mai l'apparecchio. • Non tentare mai di riparare l'apparecchio. • All'interno dell'apparecchio è situata una fonte
invisibile di raggi laser. Non esporsi ai raggi laser.
Avvertenza: Alcune vernici aggressive per mobili possono corroderei piedini in gomma dell'apparecchio. Collocarel'apparecchio, se necessario, su una base antisdruc-ciolevole.
Temporale!In caso di temporale gli apparecchi collegati allarete elettrica potrebbero subire dei danni. In caso di temporali, quindi, staccare sempre la spina dallapresa.
Indicazioni su tensioni a impulsi (EFT / transitorielettrici veloci) e scariche elettrostatiche:In caso di malfunzionamento a seguito di transitorielettrici veloci (tensione a impulsi) o scariche elettro-statiche, il prodotto deve essere resettato per ri-pristinarne il normale funzionamento. Si consigliadi scollegare l'alimentazione elettrica e collegarladi nuovo.
Avvertenza sulla sospensione dellatensione di reteL'interruttore POWER di questo apparecchio non lo scollega completamente dalla rete di corrente.L'apparecchio, inoltre, assorbe corrente in modalità di standby. Per scollegare completamente l'appa-recchio dalla rete elettrica, è necessario staccare l'adattatore di rete dalla presa.
Avvertenze relative all'uso di pile/accumulatoreIl telecomando funziona con una pila mentre l'appa-recchio funziona con un accumulatore ricaricabile.Per il corretto uso delle pile/accumulatore osservarequanto segue:
Pericolo di esplosione!Non gettare le pile/accumulatore nel fuoco. Non ricaricare le pile.• Ricaricare solo le pile espressamente contrassegnate
come "ricaricabili".• Ricaricare quindi il blocco accumulatore esclusi-
vamente con il lettore DVD portatile e l'alimenta-tore in dotazione. Non utilizzare nessun altrocaricatore o alimentatore.
• Non aprire o saldare le pile/accumulatore. Pericolo di esplosione e lesioni!
• Controllare regolarmente la pila/accumulatore.Le pile/accumulatori che presentano fuoriuscitadi acidi possono causare danni all'apparecchio.
• In caso di inutilizzo prolungato dell'apparecchiorimuovere la pila/accumulatore.
• In caso di fuoriuscita di acido da una pila/accumulatore, indossare guanti di protezione.
• Pulire il vano pile e i contatti delle pile con unpanno asciutto.
IB_KH6500_AR23388_LB5 01.08.2008 13:14 Uhr Seite 43
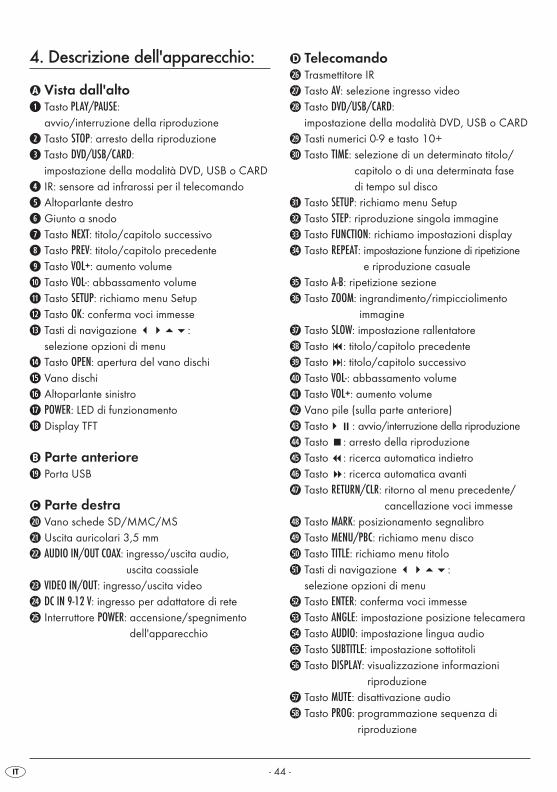
- 44 -
4. Descrizione dell'apparecchio:
� Vista dall'altoq Tasto PLAY/PAUSE:
avvio/interruzione della riproduzione
w Tasto STOP: arresto della riproduzione
e Tasto DVD/USB/CARD: impostazione della modalità DVD, USB o CARD
r IR: sensore ad infrarossi per il telecomando
t Altoparlante destro
y Giunto a snodo
u Tasto NEXT: titolo/capitolo successivo
i Tasto PREV: titolo/capitolo precedente
o Tasto VOL+: aumento volume
a Tasto VOL-: abbassamento volume
s Tasto SETUP: richiamo menu Setup
d Tasto OK: conferma voci immesse
f Tasti di navigazione ����: selezione opzioni di menu
g Tasto OPEN: apertura del vano dischi
h Vano dischi
j Altoparlante sinistro
k POWER: LED di funzionamento
l Display TFT
� Parte anteriore; Porta USB
� Parte destra2) Vano schede SD/MMC/MS
2! Uscita auricolari 3,5 mm
2@ AUDIO IN/OUT COAX: ingresso/uscita audio,uscita coassiale
2# VIDEO IN/OUT: ingresso/uscita video
2$ DC IN 9-12 V: ingresso per adattatore di rete
2% Interruttore POWER: accensione/spegnimento dell'apparecchio
� Telecomando2^ Trasmettitore IR
2& Tasto AV: selezione ingresso video
2* Tasto DVD/USB/CARD: impostazione della modalità DVD, USB o CARD
2( Tasti numerici 0-9 e tasto 10+
3) Tasto TIME: selezione di un determinato titolo/capitolo o di una determinata fase di tempo sul disco
3! Tasto SETUP: richiamo menu Setup
3@ Tasto STEP: riproduzione singola immagine
3# Tasto FUNCTION: richiamo impostazioni display
3$ Tasto REPEAT: impostazione funzione di ripetizionee riproduzione casuale
3% Tasto A-B: ripetizione sezione
3^ Tasto ZOOM: ingrandimento/rimpicciolimento immagine
3& Tasto SLOW: impostazione rallentatore
3* Tasto �: titolo/capitolo precedente
3( Tasto �: titolo/capitolo successivo
4) Tasto VOL-: abbassamento volume
4! Tasto VOL+: aumento volume
4@ Vano pile (sulla parte anteriore)
4# Tasto��: avvio/interruzione della riproduzione
4$ Tasto : arresto della riproduzione
4% Tasto : ricerca automatica indietro
4^ Tasto �: ricerca automatica avanti
4& Tasto RETURN/CLR: ritorno al menu precedente/cancellazione voci immesse
4* Tasto MARK: posizionamento segnalibro
4( Tasto MENU/PBC: richiamo menu disco
5) Tasto TITLE: richiamo menu titolo
5! Tasti di navigazione ����: selezione opzioni di menu
5@ Tasto ENTER: conferma voci immesse
5# Tasto ANGLE: impostazione posizione telecamera
5$ Tasto AUDIO: impostazione lingua audio
5% Tasto SUBTITLE: impostazione sottotitoli
5^ Tasto DISPLAY: visualizzazione informazioni riproduzione
5& Tasto MUTE: disattivazione audio
5* Tasto PROG: programmazione sequenza di riproduzione
IB_KH6500_AR23388_LB5 01.08.2008 13:14 Uhr Seite 44
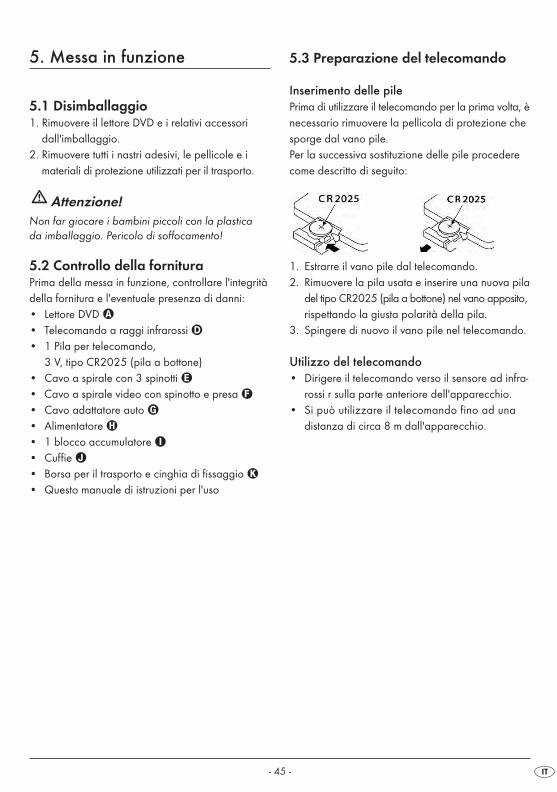
- 45 -
5. Messa in funzione
5.1 Disimballaggio1. Rimuovere il lettore DVD e i relativi accessori
dall'imballaggio.2. Rimuovere tutti i nastri adesivi, le pellicole e i
materiali di protezione utilizzati per il trasporto.
Attenzione!Non far giocare i bambini piccoli con la plastica da imballaggio. Pericolo di soffocamento!
5.2 Controllo della fornituraPrima della messa in funzione, controllare l'integritàdella fornitura e l'eventuale presenza di danni:• Lettore DVD �• Telecomando a raggi infrarossi �• 1 Pila per telecomando,
3 V, tipo CR2025 (pila a bottone)• Cavo a spirale con 3 spinotti �• Cavo a spirale video con spinotto e presa �• Cavo adattatore auto �
• Alimentatore • 1 blocco accumulatore • Cuffie �• Borsa per il trasporto e cinghia di fissaggio �• Questo manuale di istruzioni per l'uso
5.3 Preparazione del telecomando
Inserimento delle pilePrima di utilizzare il telecomando per la prima volta, ènecessario rimuovere la pellicola di protezione chesporge dal vano pile.Per la successiva sostituzione delle pile procederecome descritto di seguito:
1. Estrarre il vano pile dal telecomando.2. Rimuovere la pila usata e inserire una nuova pila
del tipo CR2025 (pila a bottone) nel vano apposito,rispettando la giusta polarità della pila.
3. Spingere di nuovo il vano pile nel telecomando.
Utilizzo del telecomando• Dirigere il telecomando verso il sensore ad infra-
rossi r sulla parte anteriore dell'apparecchio.• Si può utilizzare il telecomando fino ad una
distanza di circa 8 m dall'apparecchio.
IB_KH6500_AR23388_LB5 01.08.2008 13:14 Uhr Seite 45
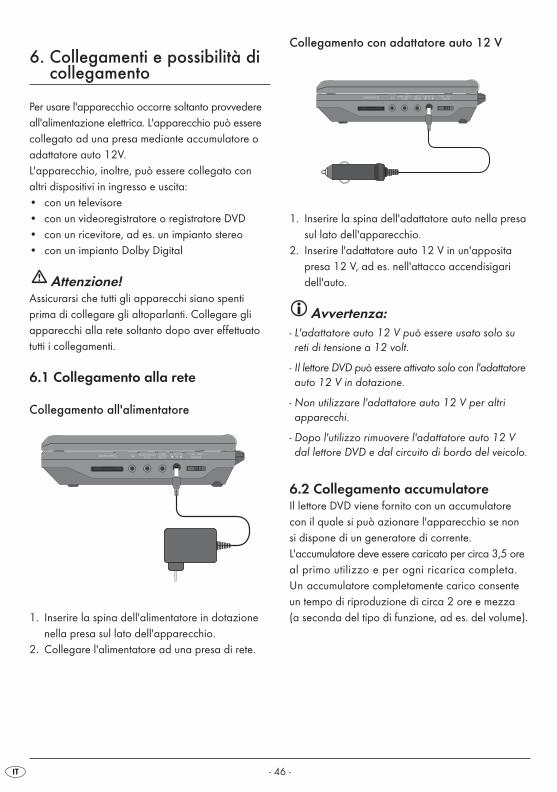
- 46 -
6. Collegamenti e possibilità dicollegamento
Per usare l'apparecchio occorre soltanto provvedereall'alimentazione elettrica. L'apparecchio può esserecollegato ad una presa mediante accumulatore oadattatore auto 12V.L'apparecchio, inoltre, può essere collegato con altri dispositivi in ingresso e uscita:• con un televisore• con un videoregistratore o registratore DVD• con un ricevitore, ad es. un impianto stereo• con un impianto Dolby Digital
Attenzione!Assicurarsi che tutti gli apparecchi siano spenti prima di collegare gli altoparlanti. Collegare gli apparecchi alla rete soltanto dopo aver effettuatotutti i collegamenti.
6.1 Collegamento alla rete
Collegamento all'alimentatore
1. Inserire la spina dell'alimentatore in dotazionenella presa sul lato dell'apparecchio.
2. Collegare l'alimentatore ad una presa di rete.
Collegamento con adattatore auto 12 V
1. Inserire la spina dell'adattatore auto nella presasul lato dell'apparecchio.
2. Inserire l'adattatore auto 12 V in un'appositapresa 12 V, ad es. nell'attacco accendisigari dell'auto.
Avvertenza:- L'adattatore auto 12 V può essere usato solo sureti di tensione a 12 volt.
- Il lettore DVD può essere attivato solo con l'adattatoreauto 12 V in dotazione.
- Non utilizzare l'adattatore auto 12 V per altri apparecchi.
- Dopo l'utilizzo rimuovere l'adattatore auto 12 Vdal lettore DVD e dal circuito di bordo del veicolo.
6.2 Collegamento accumulatoreIl lettore DVD viene fornito con un accumulatorecon il quale si può azionare l'apparecchio se non si dispone di un generatore di corrente.L'accumulatore deve essere caricato per circa 3,5 oreal primo utilizzo e per ogni ricarica completa.Un accumulatore completamente carico consenteun tempo di riproduzione di circa 2 ore e mezza (a seconda del tipo di funzione, ad es. del volume).
IB_KH6500_AR23388_LB5 01.08.2008 13:14 Uhr Seite 46

- 47 -
Montaggio accumulatore
1. Inserire l'accumulatore con gli appositi connettorinegli attacchi alloggiati sul retro dell'apparecchio.
2. Spingere l'accumulatore in direzione leggermentelaterale, come indicato dalla freccia, finché siavverte lo scatto.
Carica dell'accumulatore con l'alimentatore1. Inserire la spina dell'alimentatore o dell'adattatore
auto 12 V nella presa sul lato dell'apparecchio.2. Inserire la spina dell'alimentatore nella presa o
l'adattatore auto 12 V nell'attacco accendisigaridell'auto.
• La fase di ricarica dell'accumulatore viene segnalatadall'accensione della spia di funzionamento rossa.
• Quando l'accumulatore è completamente carico,si accende la spia di funzionamento verde sullaparte laterale dell'accumulatore.
Smontaggio accumulatore
1. Spingere la linguetta di bloccaggio sulla partelaterale dell'accumulatore in direzione della frecciae tenerla in questa posizione.
2. Tirare l'accumulatore in direzione opposta allafreccia raffigurata ed estrarlo quindi tirandolo indietro.
6.3 Collegamento ad altri apparecchiIl lettore DVD può essere collegato a televisori constandard PAL O NTSC. In questo modo è possibiletrasferire il display sul teleschermo. Se si desiderautilizzare il lettore DVD su un televisore con standardNTSC, si deve impostare nelle Impostazioni video, il cosiddetto "Menu OSD" del lettore DVD, lo standardtelevisivo NTSC (vedere capitolo 8.4. "Impostazionispeciali: TIPO TV").
Collegamento video con il televisore
1. Spegnere il lettore DVD e il televisore.2. Inserire lo spinotto jack giallo del cavo video a
spirale nella presa VIDEO IN/OUT del lettore DVD.
IB_KH6500_AR23388_LB5 01.08.2008 13:14 Uhr Seite 47
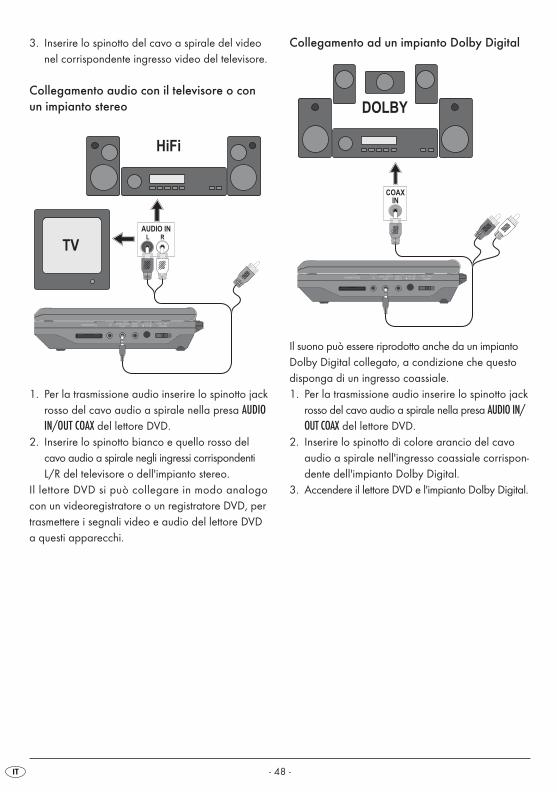
- 48 -
3. Inserire lo spinotto del cavo a spirale del videonel corrispondente ingresso video del televisore.
Collegamento audio con il televisore o conun impianto stereo
1. Per la trasmissione audio inserire lo spinotto jackrosso del cavo audio a spirale nella presa AUDIOIN/OUT COAX del lettore DVD.
2. Inserire lo spinotto bianco e quello rosso delcavo audio a spirale negli ingressi corrispondentiL/R del televisore o dell'impianto stereo.
Il lettore DVD si può collegare in modo analogocon un videoregistratore o un registratore DVD, pertrasmettere i segnali video e audio del lettore DVDa questi apparecchi.
Collegamento ad un impianto Dolby Digital
Il suono può essere riprodotto anche da un impiantoDolby Digital collegato, a condizione che questodisponga di un ingresso coassiale.1. Per la trasmissione audio inserire lo spinotto jack
rosso del cavo audio a spirale nella presa AUDIO IN/OUT COAX del lettore DVD.
2. Inserire lo spinotto di colore arancio del cavoaudio a spirale nell'ingresso coassiale corrispon-dente dell'impianto Dolby Digital.
3. Accendere il lettore DVD e l'impianto Dolby Digital.
IB_KH6500_AR23388_LB5 01.08.2008 13:14 Uhr Seite 48
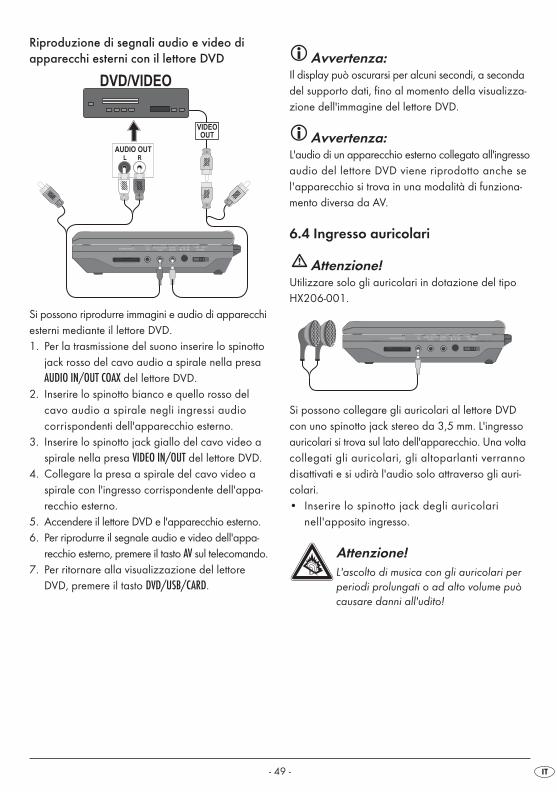
- 49 -
Riproduzione di segnali audio e video di apparecchi esterni con il lettore DVD
Si possono riprodurre immagini e audio di apparecchiesterni mediante il lettore DVD.1. Per la trasmissione del suono inserire lo spinotto
jack rosso del cavo audio a spirale nella presaAUDIO IN/OUT COAX del lettore DVD.
2. Inserire lo spinotto bianco e quello rosso delcavo audio a spirale negli ingressi audio corrispondenti dell'apparecchio esterno.
3. Inserire lo spinotto jack giallo del cavo video aspirale nella presa VIDEO IN/OUT del lettore DVD.
4. Collegare la presa a spirale del cavo video aspirale con l'ingresso corrispondente dell'appa-recchio esterno.
5. Accendere il lettore DVD e l'apparecchio esterno.6. Per riprodurre il segnale audio e video dell'appa-
recchio esterno, premere il tasto AV sul telecomando.7. Per ritornare alla visualizzazione del lettore
DVD, premere il tasto DVD/USB/CARD.
Avvertenza:Il display può oscurarsi per alcuni secondi, a secondadel supporto dati, fino al momento della visualizza-zione dell'immagine del lettore DVD.
Avvertenza:L'audio di un apparecchio esterno collegato all'ingressoaudio del lettore DVD viene riprodotto anche sel'apparecchio si trova in una modalità di funziona-mento diversa da AV.
6.4 Ingresso auricolari
Attenzione!Utilizzare solo gli auricolari in dotazione del tipoHX206-001.
Si possono collegare gli auricolari al lettore DVDcon uno spinotto jack stereo da 3,5 mm. L'ingressoauricolari si trova sul lato dell'apparecchio. Una voltacollegati gli auricolari, gli altoparlanti verrannodisattivati e si udirà l'audio solo attraverso gli auri-colari. • Inserire lo spinotto jack degli auricolari
nell'apposito ingresso.
Attenzione!L'ascolto di musica con gli auricolari perperiodi prolungati o ad alto volume puòcausare danni all'udito!
IB_KH6500_AR23388_LB5 01.08.2008 13:14 Uhr Seite 49
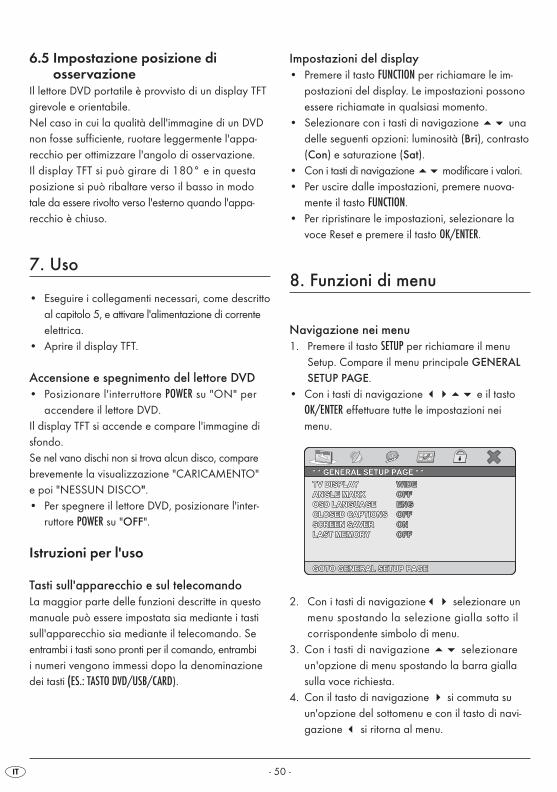
- 50 -
6.5 Impostazione posizione di osservazione
Il lettore DVD portatile è provvisto di un display TFTgirevole e orientabile.Nel caso in cui la qualità dell'immagine di un DVDnon fosse sufficiente, ruotare leggermente l'appa-recchio per ottimizzare l'angolo di osservazione.Il display TFT si può girare di 180° e in questaposizione si può ribaltare verso il basso in modotale da essere rivolto verso l'esterno quando l'appa-recchio è chiuso.
7. Uso
• Eseguire i collegamenti necessari, come descrittoal capitolo 5, e attivare l'alimentazione di correnteelettrica.
• Aprire il display TFT.
Accensione e spegnimento del lettore DVD• Posizionare l'interruttore POWER su "ON" per
accendere il lettore DVD.Il display TFT si accende e compare l'immagine disfondo.Se nel vano dischi non si trova alcun disco, comparebrevemente la visualizzazione "CARICAMENTO" e poi "NESSUN DISCO".• Per spegnere il lettore DVD, posizionare l'inter-
ruttore POWER su "OFF".
Istruzioni per l'uso
Tasti sull'apparecchio e sul telecomandoLa maggior parte delle funzioni descritte in questomanuale può essere impostata sia mediante i tastisull'apparecchio sia mediante il telecomando. Seentrambi i tasti sono pronti per il comando, entrambii numeri vengono immessi dopo la denominazionedei tasti (ES.: TASTO DVD/USB/CARD).
Impostazioni del display• Premere il tasto FUNCTION per richiamare le im-
postazioni del display. Le impostazioni possonoessere richiamate in qualsiasi momento.
• Selezionare con i tasti di navigazione �� unadelle seguenti opzioni: luminosità (Bri), contrasto(Con) e saturazione (Sat).
• Con i tasti di navigazione ��modificare i valori.• Per uscire dalle impostazioni, premere nuova-
mente il tasto FUNCTION.• Per ripristinare le impostazioni, selezionare la
voce Reset e premere il tasto OK/ENTER.
8. Funzioni di menu
Navigazione nei menu1. Premere il tasto SETUP per richiamare il menu
Setup. Compare il menu principale GENERALSETUP PAGE.
• Con i tasti di navigazione ���� e il tastoOK/ENTER effettuare tutte le impostazioni neimenu.
2. Con i tasti di navigazione�� selezionare unmenu spostando la selezione gialla sotto ilcorrispondente simbolo di menu.
3. Con i tasti di navigazione �� selezionareun'opzione di menu spostando la barra giallasulla voce richiesta.
4. Con il tasto di navigazione � si commuta su un'opzione del sottomenu e con il tasto di navi-gazione � si ritorna al menu.
TV DISPLAYTV DISPLAYTV DISPLAY
ANGLE MARKANGLE MARKANGLE MARK
OSD LANGUAGEOSD LANGUAGEOSD LANGUAGE
CLOSED CAPTIONSCLOSED CAPTIONSCLOSED CAPTIONS
SCREEN SAVERSCREEN SAVERSCREEN SAVER
LAST MEMORYLAST MEMORYLAST MEMORY
WIDEWIDEWIDE
OFFOFFOFF
ENGENGENG
OFFOFFOFF
ONONON
OFFOFFOFF
* * GENERAL SETUP PAGE * ** * GENERAL SETUP PAGE * ** * GENERAL SETUP PAGE * *
GOTO GENERAL SETUP PAGEGOTO GENERAL SETUP PAGEGOTO GENERAL SETUP PAGE
IB_KH6500_AR23388_LB5 01.08.2008 13:14 Uhr Seite 50
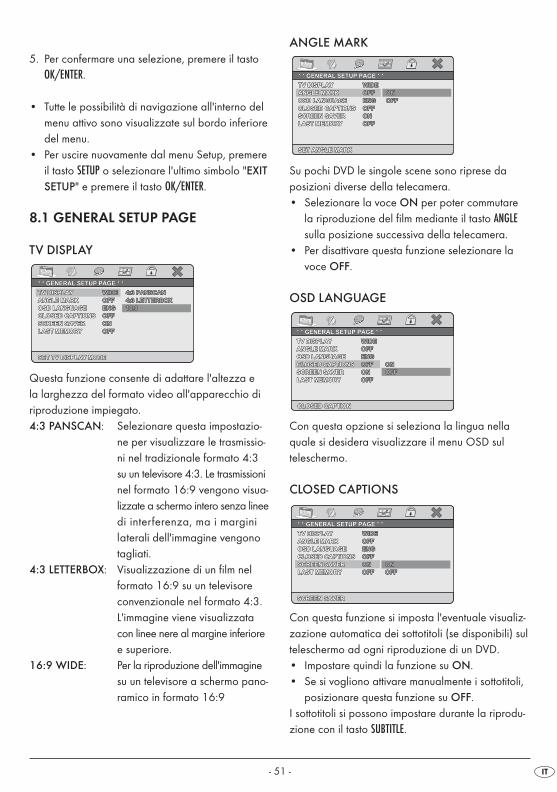
- 51 -
5. Per confermare una selezione, premere il tastoOK/ENTER.
• Tutte le possibilità di navigazione all'interno delmenu attivo sono visualizzate sul bordo inferioredel menu.
• Per uscire nuovamente dal menu Setup, premereil tasto SETUP o selezionare l'ultimo simbolo "EXITSETUP" e premere il tasto OK/ENTER.
8.1 GENERAL SETUP PAGE
TV DISPLAY
Questa funzione consente di adattare l'altezza e la larghezza del formato video all'apparecchio diriproduzione impiegato. 4:3 PANSCAN: Selezionare questa impostazio-
ne per visualizzare le trasmissio-ni nel tradizionale formato 4:3su un televisore 4:3. Le trasmissioninel formato 16:9 vengono visua-lizzate a schermo intero senza lineedi interferenza, ma i marginilaterali dell'immagine vengonotagliati.
4:3 LETTERBOX: Visualizzazione di un film nel formato 16:9 su un televisoreconvenzionale nel formato 4:3. L'immagine viene visualizzatacon linee nere al margine inferioree superiore.
16:9 WIDE: Per la riproduzione dell'immaginesu un televisore a schermo pano-ramico in formato 16:9
* * GENERAL SETUP PAGE * ** * GENERAL SETUP PAGE * ** * GENERAL SETUP PAGE * *
SET TV DISPLAY MODESET TV DISPLAY MODESET TV DISPLAY MODE
4:3 PANSCAN4:3 PANSCAN4:3 PANSCAN
4:3 LETTERBOX4:3 LETTERBOX4:3 LETTERBOX
16:916:916:9
TV DISPLAYTV DISPLAYTV DISPLAY
ANGLE MARKANGLE MARKANGLE MARK
OSD LANGUAGEOSD LANGUAGEOSD LANGUAGE
CLOSED CAPTIONSCLOSED CAPTIONSCLOSED CAPTIONS
SCREEN SAVERSCREEN SAVERSCREEN SAVER
LAST MEMORYLAST MEMORYLAST MEMORY
WIDEWIDEWIDE
OFFOFFOFF
ENGENGENG
OFFOFFOFF
ONONON
OFFOFFOFF
ANGLE MARK
Su pochi DVD le singole scene sono riprese da posizioni diverse della telecamera. • Selezionare la voce ON per poter commutare
la riproduzione del film mediante il tasto ANGLEsulla posizione successiva della telecamera.
• Per disattivare questa funzione selezionare lavoce OFF.
OSD LANGUAGE
Con questa opzione si seleziona la lingua nellaquale si desidera visualizzare il menu OSD sul teleschermo.
CLOSED CAPTIONS
Con questa funzione si imposta l'eventuale visualiz-zazione automatica dei sottotitoli (se disponibili) sulteleschermo ad ogni riproduzione di un DVD. • Impostare quindi la funzione su ON. • Se si vogliono attivare manualmente i sottotitoli,
posizionare questa funzione su OFF. I sottotitoli si possono impostare durante la riprodu-zione con il tasto SUBTITLE.
ONONON
OFFOFFOFF
SCREEN SAVERSCREEN SAVERSCREEN SAVER
* * GENERAL SETUP PAGE * ** * GENERAL SETUP PAGE * ** * GENERAL SETUP PAGE * *
TV DISPLAYTV DISPLAYTV DISPLAY
ANGLE MARKANGLE MARKANGLE MARK
OSD LANGUAGEOSD LANGUAGEOSD LANGUAGE
CLOSED CAPTIONSCLOSED CAPTIONSCLOSED CAPTIONS
SCREEN SAVERSCREEN SAVERSCREEN SAVER
LAST MEMORYLAST MEMORYLAST MEMORY
WIDEWIDEWIDE
OFFOFFOFF
ENGENGENG
OFFOFFOFF
ONONON
OFFOFFOFF
CLOSED CAPTIONCLOSED CAPTIONCLOSED CAPTION
ONONON
OFFOFFOFF
* * GENERAL SETUP PAGE * ** * GENERAL SETUP PAGE * ** * GENERAL SETUP PAGE * *
TV DISPLAYTV DISPLAYTV DISPLAY
ANGLE MARKANGLE MARKANGLE MARK
OSD LANGUAGEOSD LANGUAGEOSD LANGUAGE
CLOSED CAPTIONSCLOSED CAPTIONSCLOSED CAPTIONS
SCREEN SAVERSCREEN SAVERSCREEN SAVER
LAST MEMORYLAST MEMORYLAST MEMORY
WIDEWIDEWIDE
OFFOFFOFF
ENGENGENG
OFFOFFOFF
ONONON
OFFOFFOFF
* * GENERAL SETUP PAGE * ** * GENERAL SETUP PAGE * ** * GENERAL SETUP PAGE * *
SET ANGLE MARKSET ANGLE MARKSET ANGLE MARK
ONONON
OFFOFFOFF
WIDEWIDEWIDE
OFFOFFOFF
ENGENGENG
OFFOFFOFF
ONONON
OFFOFFOFF
TV DISPLAYTV DISPLAYTV DISPLAY
ANGLE MARKANGLE MARKANGLE MARK
OSD LANGUAGEOSD LANGUAGEOSD LANGUAGE
CLOSED CAPTIONSCLOSED CAPTIONSCLOSED CAPTIONS
SCREEN SAVERSCREEN SAVERSCREEN SAVER
LAST MEMORYLAST MEMORYLAST MEMORY
IB_KH6500_AR23388_LB5 01.08.2008 13:14 Uhr Seite 51
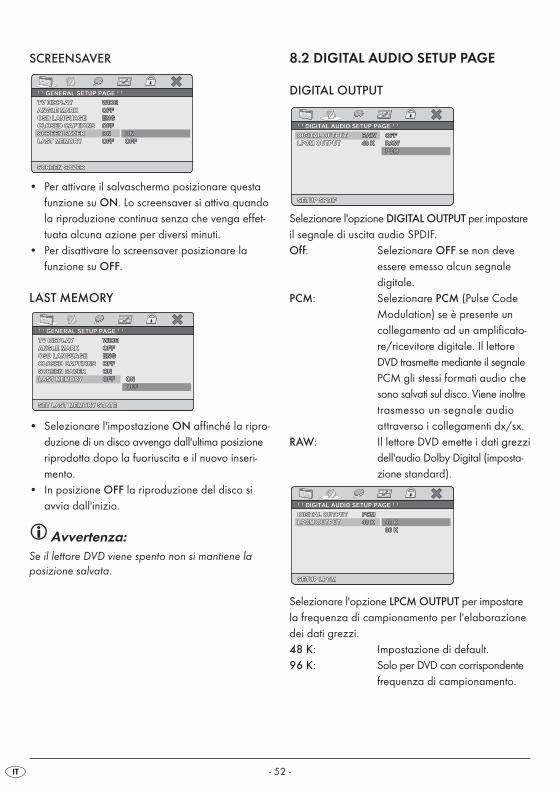
- 52 -
SCREENSAVER
• Per attivare il salvaschermo posizionare questafunzione su ON. Lo screensaver si attiva quandola riproduzione continua senza che venga effet-tuata alcuna azione per diversi minuti.
• Per disattivare lo screensaver posizionare la funzione su OFF.
LAST MEMORY
• Selezionare l'impostazione ON affinché la ripro-duzione di un disco avvenga dall'ultima posizioneriprodotta dopo la fuoriuscita e il nuovo inseri-mento.
• In posizione OFF la riproduzione del disco si avvia dall'inizio.
Avvertenza:Se il lettore DVD viene spento non si mantiene la posizione salvata.
SET LAST MEMORY STATESET LAST MEMORY STATESET LAST MEMORY STATE
ONONON
OFFOFFOFF
* * GENERAL SETUP PAGE * ** * GENERAL SETUP PAGE * ** * GENERAL SETUP PAGE * *
TV DISPLAYTV DISPLAYTV DISPLAY
ANGLE MARKANGLE MARKANGLE MARK
OSD LANGUAGEOSD LANGUAGEOSD LANGUAGE
CLOSED CAPTIONSCLOSED CAPTIONSCLOSED CAPTIONS
SCREEN SAVERSCREEN SAVERSCREEN SAVER
LAST MEMORYLAST MEMORYLAST MEMORY
WIDEWIDEWIDE
OFFOFFOFF
ENGENGENG
OFFOFFOFF
ONONON
OFFOFFOFF
ONONON
OFFOFFOFF
SCREEN SAVERSCREEN SAVERSCREEN SAVER
* * GENERAL SETUP PAGE * ** * GENERAL SETUP PAGE * ** * GENERAL SETUP PAGE * *
TV DISPLAYTV DISPLAYTV DISPLAY
ANGLE MARKANGLE MARKANGLE MARK
OSD LANGUAGEOSD LANGUAGEOSD LANGUAGE
CLOSED CAPTIONSCLOSED CAPTIONSCLOSED CAPTIONS
SCREEN SAVERSCREEN SAVERSCREEN SAVER
LAST MEMORYLAST MEMORYLAST MEMORY
WIDEWIDEWIDE
OFFOFFOFF
ENGENGENG
OFFOFFOFF
ONONON
OFFOFFOFF
8.2 DIGITAL AUDIO SETUP PAGE
DIGITAL OUTPUT
Selezionare l'opzione DIGITAL OUTPUT per impostareil segnale di uscita audio SPDIF.Off: Selezionare OFF se non deve
essere emesso alcun segnale digitale.
PCM: Selezionare PCM (Pulse CodeModulation) se è presente uncollegamento ad un amplificato-re/ricevitore digitale. Il lettoreDVD trasmette mediante il segnalePCM gli stessi formati audio chesono salvati sul disco. Viene inoltretrasmesso un segnale audio attraverso i collegamenti dx/sx.
RAW: Il lettore DVD emette i dati grezzidell'audio Dolby Digital (imposta-zione standard).
Selezionare l'opzione LPCM OUTPUT per impostarela frequenza di campionamento per l'elaborazionedei dati grezzi.48 K: Impostazione di default.96 K: Solo per DVD con corrispondente
frequenza di campionamento.
* * * * * * DIGITAL AUDIO SETUP PAGEDIGITAL AUDIO SETUP PAGEDIGITAL AUDIO SETUP PAGE * * * * * *
SETUP LPCMSETUP LPCMSETUP LPCM
48 K48 K48 K
96 K96 K96 K
DIGITAL OUTPUTDIGITAL OUTPUTDIGITAL OUTPUT
LPCM OUTPUTLPCM OUTPUTLPCM OUTPUT
PCMPCMPCM
48 K48 K48 K
* * DIGITAL AUDIO SETUP PAGE * ** * DIGITAL AUDIO SETUP PAGE * ** * DIGITAL AUDIO SETUP PAGE * *
SETUP SPDIFSETUP SPDIFSETUP SPDIF
OFFOFFOFF
RAWRAWRAW
PCMPCMPCM
DIGITAL OUTPUTDIGITAL OUTPUTDIGITAL OUTPUT
LPCM OUTPUTLPCM OUTPUTLPCM OUTPUT
RAWRAWRAW
48 K48 K48 K
IB_KH6500_AR23388_LB5 01.08.2008 13:14 Uhr Seite 52
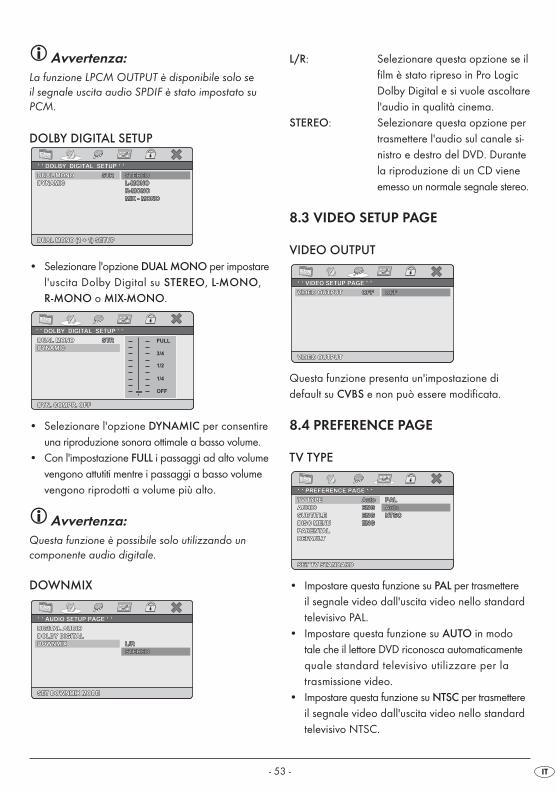
- 53 -
Avvertenza:La funzione LPCM OUTPUT è disponibile solo se il segnale uscita audio SPDIF è stato impostato suPCM.
DOLBY DIGITAL SETUP
• Selezionare l'opzione DUAL MONO per impostarel'uscita Dolby Digital su STEREO, L-MONO,R-MONO o MIX-MONO.
• Selezionare l'opzione DYNAMIC per consentireuna riproduzione sonora ottimale a basso volume.
• Con l'impostazione FULL i passaggi ad alto volumevengono attutiti mentre i passaggi a basso volumevengono riprodotti a volume più alto.
Avvertenza:Questa funzione è possibile solo utilizzando un componente audio digitale.
DOWNMIX
STEREOSTEREOSTEREO
* * AUDIO SETUP PAGE * ** * AUDIO SETUP PAGE * ** * AUDIO SETUP PAGE * *
SET DOWNMIX MODESET DOWNMIX MODESET DOWNMIX MODE
L/RL/RL/R
DIGITAL AUDIODIGITAL AUDIODIGITAL AUDIO
DOLBY DIGITALDOLBY DIGITALDOLBY DIGITAL
DOWNMIXDOWNMIXDOWNMIX
DYN. COMPR. OFFDYN. COMPR. OFFDYN. COMPR. OFF
DUAL MONODUAL MONODUAL MONO
DYNAMICDYNAMICDYNAMIC
STRSTRSTR FULL
3/4
1/2
1/4
OFF
* * DOLBY DIGITAL SETUP * ** * DOLBY DIGITAL SETUP * ** * DOLBY DIGITAL SETUP * *
MIX - MONOMIX - MONOMIX - MONO
* * DOLBY DIGITAL SETUP * ** * DOLBY DIGITAL SETUP * ** * DOLBY DIGITAL SETUP * *
DUAL MONO (1 + 1) SETUPDUAL MONO (1 + 1) SETUPDUAL MONO (1 + 1) SETUP
STEREOSTEREOSTEREO
L-MONOL-MONOL-MONO
R-MONOR-MONOR-MONO
DUAL MONODUAL MONODUAL MONO
DYNAMICDYNAMICDYNAMIC
STRSTRSTR
L/R: Selezionare questa opzione se ilfilm è stato ripreso in Pro LogicDolby Digital e si vuole ascoltarel'audio in qualità cinema.
STEREO: Selezionare questa opzione pertrasmettere l'audio sul canale si-nistro e destro del DVD. Durantela riproduzione di un CD vieneemesso un normale segnale stereo.
8.3 VIDEO SETUP PAGE
VIDEO OUTPUT
Questa funzione presenta un'impostazione di default su CVBS e non può essere modificata.
8.4 PREFERENCE PAGE
TV TYPE
• Impostare questa funzione su PAL per trasmettereil segnale video dall'uscita video nello standardtelevisivo PAL.
• Impostare questa funzione su AUTO in modotale che il lettore DVD riconosca automaticamentequale standard televisivo utilizzare per latrasmissione video.
• Impostare questa funzione su NTSC per trasmettereil segnale video dall'uscita video nello standardtelevisivo NTSC.
* * PREFERENCE PAGE * ** * PREFERENCE PAGE * ** * PREFERENCE PAGE * *
SET TV STANDARDSET TV STANDARDSET TV STANDARD
PALPALPAL
AutoAutoAuto
NTSCNTSCNTSC
TV TYPETV TYPETV TYPE
AUDIOAUDIOAUDIO
SUBTITLESUBTITLESUBTITLE
DISC MENUDISC MENUDISC MENU
PARENTALPARENTALPARENTAL
DEFAULTDEFAULTDEFAULT
AutoAutoAuto
ENGENGENG
ENGENGENG
ENGENGENG
* * VIDEO SETUP PAGE * ** * VIDEO SETUP PAGE * ** * VIDEO SETUP PAGE * *
VIDEO OUTPUTVIDEO OUTPUTVIDEO OUTPUT
OFFOFFOFFVIDEO OUTPUTVIDEO OUTPUTVIDEO OUTPUT OFFOFFOFF
IB_KH6500_AR23388_LB5 01.08.2008 13:14 Uhr Seite 53
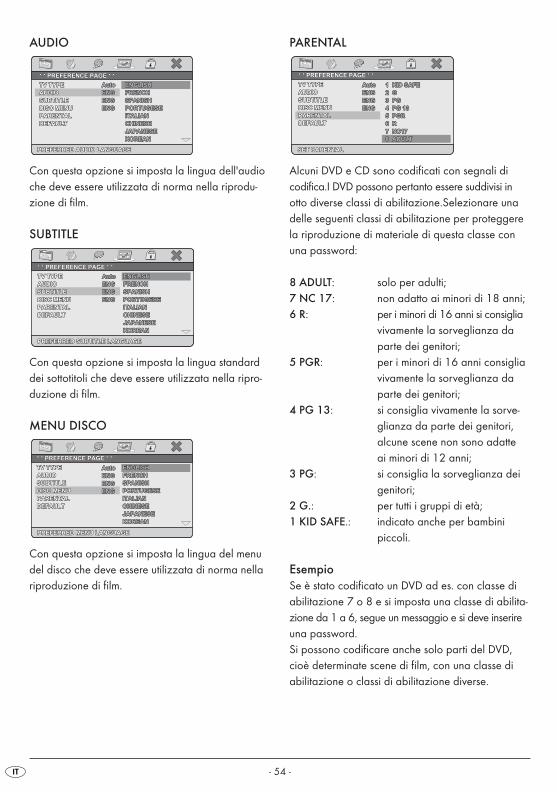
- 54 -
AUDIO
Con questa opzione si imposta la lingua dell'audioche deve essere utilizzata di norma nella riprodu-zione di film.
SUBTITLE
Con questa opzione si imposta la lingua standarddei sottotitoli che deve essere utilizzata nella ripro-duzione di film.
MENU DISCO
Con questa opzione si imposta la lingua del menudel disco che deve essere utilizzata di norma nellariproduzione di film.
PREFERRED MENU LANGUAGEPREFERRED MENU LANGUAGEPREFERRED MENU LANGUAGE
AutoAutoAuto
ENGENGENG
ENGENGENG
ENGENGENG PORTUGESEPORTUGESEPORTUGESE
ITALIANITALIANITALIAN
CHINESECHINESECHINESE
JAPANESEJAPANESEJAPANESE
KOREANKOREANKOREAN
ENGLISHENGLISHENGLISH
FRENCHFRENCHFRENCH
SPANISHSPANISHSPANISH
* * PREFERENCE PAGE * ** * PREFERENCE PAGE * ** * PREFERENCE PAGE * *
TV TYPETV TYPETV TYPE
AUDIOAUDIOAUDIO
SUBTITLESUBTITLESUBTITLE
DISC MENUDISC MENUDISC MENU
PARENTALPARENTALPARENTAL
DEFAULTDEFAULTDEFAULT
PREFERRED SUBTITLE LANGUAGEPREFERRED SUBTITLE LANGUAGEPREFERRED SUBTITLE LANGUAGE
AutoAutoAuto
ENGENGENG
ENGENGENG
ENGENGENG PORTUGESEPORTUGESEPORTUGESE
ITALIANITALIANITALIAN
CHINESECHINESECHINESE
JAPANESEJAPANESEJAPANESE
KOREANKOREANKOREAN
ENGLISHENGLISHENGLISH
FRENCHFRENCHFRENCH
SPANISHSPANISHSPANISH
* * PREFERENCE PAGE * ** * PREFERENCE PAGE * ** * PREFERENCE PAGE * *
TV TYPETV TYPETV TYPE
AUDIOAUDIOAUDIO
SUBTITLESUBTITLESUBTITLE
DISC MENUDISC MENUDISC MENU
PARENTALPARENTALPARENTAL
DEFAULTDEFAULTDEFAULT
PORTUGESEPORTUGESEPORTUGESE
ITALIANITALIANITALIAN
CHINESECHINESECHINESE
JAPANESEJAPANESEJAPANESE
KOREANKOREANKOREAN
PREFERRED AUDIO LANGUAGEPREFERRED AUDIO LANGUAGEPREFERRED AUDIO LANGUAGE
ENGLISHENGLISHENGLISH
FRENCHFRENCHFRENCH
SPANISHSPANISHSPANISH
AutoAutoAuto
ENGENGENG
ENGENGENG
ENGENGENG
* * PREFERENCE PAGE * ** * PREFERENCE PAGE * ** * PREFERENCE PAGE * *
TV TYPETV TYPETV TYPE
AUDIOAUDIOAUDIO
SUBTITLESUBTITLESUBTITLE
DISC MENUDISC MENUDISC MENU
PARENTALPARENTALPARENTAL
DEFAULTDEFAULTDEFAULT
PARENTAL
Alcuni DVD e CD sono codificati con segnali di codifica.I DVD possono pertanto essere suddivisi inotto diverse classi di abilitazione.Selezionare unadelle seguenti classi di abilitazione per proteggerela riproduzione di materiale di questa classe conuna password:
8 ADULT: solo per adulti;7 NC 17: non adatto ai minori di 18 anni;6 R: per i minori di 16 anni si consiglia
vivamente la sorveglianza daparte dei genitori;
5 PGR: per i minori di 16 anni consigliavivamente la sorveglianza daparte dei genitori;
4 PG 13: si consiglia vivamente la sorve-glianza da parte dei genitori, alcune scene non sono adatte ai minori di 12 anni;
3 PG: si consiglia la sorveglianza deigenitori;
2 G.: per tutti i gruppi di età;1 KID SAFE.: indicato anche per bambini
piccoli.
EsempioSe è stato codificato un DVD ad es. con classe diabilitazione 7 o 8 e si imposta una classe di abilita-zione da 1 a 6, segue un messaggio e si deve inserireuna password. Si possono codificare anche solo parti del DVD,cioè determinate scene di film, con una classe diabilitazione o classi di abilitazione diverse.
4 PG 134 PG 134 PG 13
5 PGR5 PGR5 PGR
6 R6 R6 R
7 NC177 NC177 NC17
8 ADULT8 ADULT8 ADULT
SET PARENTALSET PARENTALSET PARENTAL
1 KID SAFE1 KID SAFE1 KID SAFE
2 G2 G2 G
3 PG3 PG3 PG
AutoAutoAuto
ENGENGENG
ENGENGENG
ENGENGENG
* * PREFERENCE PAGE * ** * PREFERENCE PAGE * ** * PREFERENCE PAGE * *
TV TYPETV TYPETV TYPE
AUDIOAUDIOAUDIO
SUBTITLESUBTITLESUBTITLE
DISC MENUDISC MENUDISC MENU
PARENTALPARENTALPARENTAL
DEFAULTDEFAULTDEFAULT
IB_KH6500_AR23388_LB5 01.08.2008 13:14 Uhr Seite 54
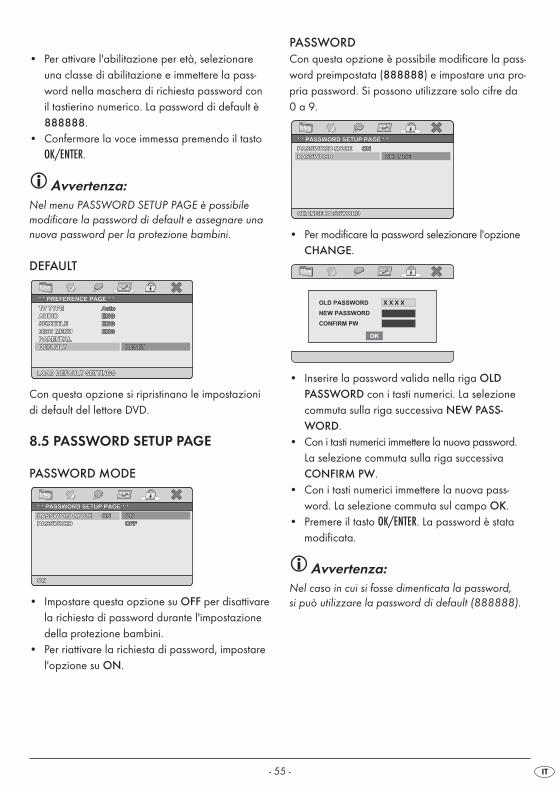
- 55 -
• Per attivare l'abilitazione per età, selezionareuna classe di abilitazione e immettere la pass-word nella maschera di richiesta password con il tastierino numerico. La password di default è888888.
• Confermare la voce immessa premendo il tastoOK/ENTER.
Avvertenza:Nel menu PASSWORD SETUP PAGE è possibile modificare la password di default e assegnare unanuova password per la protezione bambini.
DEFAULT
Con questa opzione si ripristinano le impostazionidi default del lettore DVD.
8.5 PASSWORD SETUP PAGE
PASSWORD MODE
• Impostare questa opzione su OFF per disattivarela richiesta di password durante l'impostazionedella protezione bambini.
• Per riattivare la richiesta di password, impostarel'opzione su ON.
* * PASSWORD SETUP PAGE * ** * PASSWORD SETUP PAGE * ** * PASSWORD SETUP PAGE * *
ONONON
ONONON
OFFOFFOFF
PASSWORD MODEPASSWORD MODEPASSWORD MODE
PASSWORDPASSWORDPASSWORD
ONONON
RESETRESETRESET
LOAD DEFAULT SETTINGSLOAD DEFAULT SETTINGSLOAD DEFAULT SETTINGS
AutoAutoAuto
ENGENGENG
ENGENGENG
ENGENGENG
* * PREFERENCE PAGE * ** * PREFERENCE PAGE * ** * PREFERENCE PAGE * *
TV TYPETV TYPETV TYPE
AUDIOAUDIOAUDIO
SUBTITLESUBTITLESUBTITLE
DISC MENUDISC MENUDISC MENU
PARENTALPARENTALPARENTAL
DEFAULTDEFAULTDEFAULT
PASSWORDCon questa opzione è possibile modificare la pass-word preimpostata (888888) e impostare una pro-pria password. Si possono utilizzare solo cifre da 0 a 9.
• Per modificare la password selezionare l'opzioneCHANGE.
• Inserire la password valida nella riga OLDPASSWORD con i tasti numerici. La selezionecommuta sulla riga successiva NEW PASS-WORD.
• Con i tasti numerici immettere la nuova password.La selezione commuta sulla riga successivaCONFIRM PW.
• Con i tasti numerici immettere la nuova pass-word. La selezione commuta sul campo OK.
• Premere il tasto OK/ENTER. La password è statamodificata.
Avvertenza:Nel caso in cui si fosse dimenticata la password, si può utilizzare la password di default (888888).
X X X XOLD PASSWORD
NEW PASSWORD
CONFIRM PW
OK
* * PASSWORD SETUP PAGE * ** * PASSWORD SETUP PAGE * ** * PASSWORD SETUP PAGE * *
CHANGE PASSWORDCHANGE PASSWORDCHANGE PASSWORD
CHANGECHANGECHANGE
PASSWORD MODEPASSWORD MODEPASSWORD MODE
PASSWORDPASSWORDPASSWORD
ONONON
IB_KH6500_AR23388_LB5 01.08.2008 13:14 Uhr Seite 55
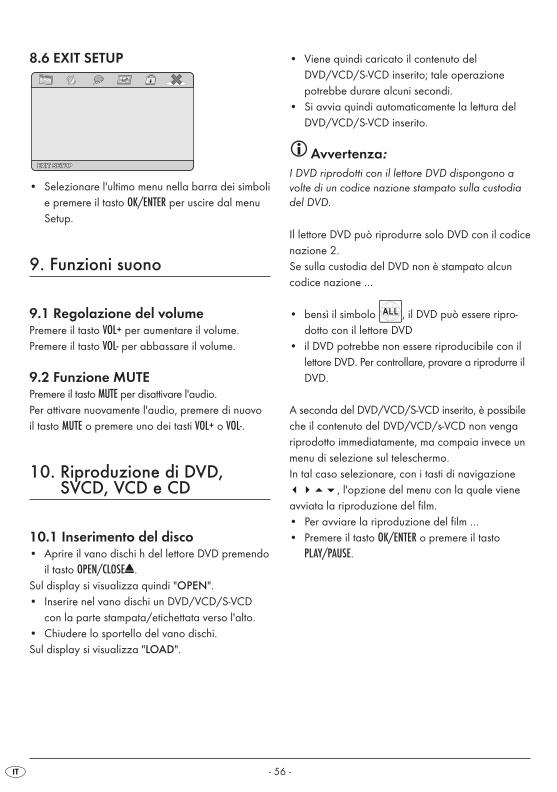
- 56 -
8.6 EXIT SETUP
• Selezionare l'ultimo menu nella barra dei simbolie premere il tasto OK/ENTER per uscire dal menuSetup.
9. Funzioni suono
9.1 Regolazione del volumePremere il tasto VOL+ per aumentare il volume.Premere il tasto VOL- per abbassare il volume.
9.2 Funzione MUTEPremere il tasto MUTE per disattivare l'audio.Per attivare nuovamente l'audio, premere di nuovo il tasto MUTE o premere uno dei tasti VOL+ o VOL-.
10. Riproduzione di DVD,SVCD, VCD e CD
10.1 Inserimento del disco• Aprire il vano dischi h del lettore DVD premendo
il tasto OPEN/CLOSE . Sul display si visualizza quindi "OPEN".• Inserire nel vano dischi un DVD/VCD/S-VCD
con la parte stampata/etichettata verso l'alto.• Chiudere lo sportello del vano dischi.Sul display si visualizza "LOAD".
EXIT SETUPEXIT SETUPEXIT SETUP
• Viene quindi caricato il contenuto delDVD/VCD/S-VCD inserito; tale operazione potrebbe durare alcuni secondi.
• Si avvia quindi automaticamente la lettura delDVD/VCD/S-VCD inserito.
Avvertenza:I DVD riprodotti con il lettore DVD dispongono avolte di un codice nazione stampato sulla custodiadel DVD.
Il lettore DVD può riprodurre solo DVD con il codicenazione 2.Se sulla custodia del DVD non è stampato alcun codice nazione …
• bensì il simbolo , il DVD può essere ripro-dotto con il lettore DVD
• il DVD potrebbe non essere riproducibile con illettore DVD. Per controllare, provare a riprodurre ilDVD.
A seconda del DVD/VCD/S-VCD inserito, è possibileche il contenuto del DVD/VCD/s-VCD non venga riprodotto immediatamente, ma compaia invece unmenu di selezione sul teleschermo.In tal caso selezionare, con i tasti di navigazione����, l'opzione del menu con la quale vieneavviata la riproduzione del film. • Per avviare la riproduzione del film …• Premere il tasto OK/ENTER o premere il tasto
PLAY/PAUSE.
IB_KH6500_AR23388_LB5 01.08.2008 13:14 Uhr Seite 56
- 57 -
10.2 Funzioni di riproduzione durantela riproduzione di DVD, VCD, S-VCD, MPEG- o CD audio
Durante la riproduzione di un DVD/VCD/S-VCD, è possibile utilizzare le seguenti funzioni del lettoredi DVD.
Arresto della riproduzione (PAUSE)Per arrestare la riproduzione …• Durante la riproduzione premere il tasto
PLAY/PAUSE. Sul display compare la visualizzazione"�".Sul display viene visualizzato il fotogramma dellascena appena interrotta.• Per proseguire con la riproduzione del film,
premere il tasto PLAY/PAUSE.
Interruzione della riproduzione (Stop)Per interrompere la riproduzione, premere il tastoSTOP.
Funzione "Resume"Se è stata interrotta la riproduzione del DVD/VCD/S-VCD inserito premendo una volta il tastoSTOP, il lettore di DVD memorizza automaticamenteil punto dell'interruzione. Questa funzione è chiamatafunzione "Resume". Sul display viene visualizzato il messaggio TO RESUME: PRESS PLAY BUTTON.Non appena si preme nuovamente il tasto PLAY/PAUSEla riproduzione prosegue dal punto memorizzato.Se si preme una seconda volta il tasto STOP, il puntomemorizzato nel quale si è interrotta la riproduzioneviene cancellato. Premendo nuovamente il tastoPLAY/PAUSE la riproduzione del DVD/VCD/S-VCD inserito ricomincia dall'inizio.
Ritorno all'inizio del capitolo (Skip)
Avvertenza:Questa funzione potrebbe non essere disponibileper tutti i DVD/VCD/S-VCD! Se si tenta di eseguireuna funzione non disponibile, sul teleschermo vienevisualizzato il simbolo .
• Durante la riproduzione con i tasti SKIP � inavanti e SKIP � indietro è possibile tornare avanzareall'inizio del capitolo successivo o tornare indietroal capitolo precedente all'interno del film delDVD/VCD/S-VCD inserito
Il capitolo rispettivamente selezionato viene ripro-dotto immediatamente, senza necessità di premereil tasto PLAY/PAUSE. Il numero del capitolo rispettiva-mente selezionato viene visualizzato nel display sulfronte del lettore di DVD a sinistra del tempo diriproduzione.
Immissione dei numeri dei titoli tramite tastinumerici
Avvertenza:Questa funzione potrebbe non essere disponibileper tutti i DVD/VCD/S-VCD! Se si tenta di eseguireuna funzione non disponibile, sul teleschermo vienevisualizzato il simbolo .
Invece di utilizzare la funzione Skip, il titolo all'internodi un film su un DVD/VCD/S-VCD inserito può essereindicato anche direttamente tramite l'immissione delrelativo numero da 0 a 9 mediante i tasti numericidel telecomando.• Per immettere numeri a due cifre premere prima
il tasto 10+ e immettere quindi in successioneentrambe le cifre del numero.
• Premere quindi il tasto OK/ENTER sul telecomando.La riproduzione del titolo con il numero inseritosi avvia automaticamente.
IB_KH6500_AR23388_LB5 01.08.2008 13:14 Uhr Seite 57

- 58 -
Selezione diretta dei capitoli o del tempo tramite la funzione di ricerca (Search)
Avvertenza:Queste funzioni potrebbero non essere disponibiliper tutti i DVD/VCD/S-VCD! Se si tenta di eseguireuna funzione non disponibile, sul teleschermo vienevisualizzato il simbolo .
Immissione della posizione tempo mediantela funzione di ricerca DVD, VCD e SVCD:• Durante la riproduzione premere il tasto TIME sul
telecomando. Il menu tempo viene visualizzatosul teleschermo:
• Il campo di immissione TITLE viene selezionatoautomaticamente per primo. Premere il tastoOK/ENTER e immettere il titolo desiderato con i tasti numerici da 0 fino a 9. Il titolo 01 nei DVD è di solito il film principale.
• Premere il tasto di navigazione � per selezionareil campo di immissione CHAPTER. Premere il tastoOK/ENTER e immettere il capitolo desiderato con i tasti numerici da 0 a 9.
• Premere il tasto di navigazione � per selezionareil campo di immissione AUDIO. Premere il tastoOK/ENTER e selezionare una lingua audio con iltasto di navigazione ���� .
• Premere il tasto di navigazione � per selezio-nare il campo di immissione SUBTITLE. Premereil tasto OK/ENTER e selezionare una lingua per isottotitoli con il tasto di navigazione ��.
• Per disinserire la funzione tempo premere nuova-mente il tasto TIME.
CHAPTERCHAPTERCHAPTER
AUDIOAUDIOAUDIO
SUBTITLESUBTITLESUBTITLE
01/0401/0401/04
10/3610/3610/36
5.1 K/ENGLISH5.1 K/ENGLISH5.1 K/ENGLISH
ENGLISHENGLISHENGLISH
TITLE ELAPSED 0:45:01TITLE ELAPSED 0:45:01TITLE ELAPSED 0:45:01BITRATEBITRATEBITRATE 252525
MENUMENUMENU
TITLETITLETITLE
CD audio• Durante la riproduzione premere più volte il tasto
TIME sul telecomando. Compaiono l'una dopo l'altra le seguenti visualizzazioni, nelle quali èpossibile immettere una posizione di tempo con i tasti numerici da 0 a 9:
DISC GOTO: Inserire la posizione di temponel disco del quale dovrebbe iniziare la riproduzione.
TRACK GOTO: Inserire un punto del titolo attual-mente riprodotto a partire dalquale dovrebbe iniziare la ripro-duzione.
GOTO TRACK: Inserire il numero di un titolo apartire dal quale dovrebbe ini-ziare la riproduzione.
MPEG-CDSELECT: Inserire il numero di titolo nel disco
del quale dovrebbe iniziare la riproduzione.
GOTO: Inserire un punto del titolo attual-mente riprodotto a partire dalquale dovrebbe iniziare la ripro-duzione.
Ricerca automatica indietro/avanti• Premere i tasti SEARCH� o SEARCH per avviare
una ricerca avanti/indietro durante la riprodu-zione.
• Premere ripetutamente i tasti SEARCH� o SEARCHper applicare le seguenti velocità di ricercaautomatica:
Avvertenza:Durante la ricerca non viene riprodotto alcun suono.
IB_KH6500_AR23388_LB5 01.08.2008 13:14 Uhr Seite 58
- 59 -
• Per proseguire la riproduzione del film dal puntoin cui si è interrotto a velocità normale, premereil tasto PLAY/PAUSE durante la ricerca.
Funzione rallentatore (solo DVD, VCD e SVCD)• Premere il tasto SLOW per impostare la riproduzione
rallentata. Premere ripetutamente il tasto SLOWper applicare le seguenti velocità rallentate:
Avvertenza:Durante la riproduzione rallentata non viene emessoalcun suono.
• Per proseguire la riproduzione a velocità normale,premere il tasto PLAY/PAUSE durante la riproduzionelenta.
Riproduzione di una singola immagine (Step)(solo DVD, VCD e SVCD)
Avvertenza:Queste funzioni potrebbero non essere disponibiliper tutti i DVD/VCD/S-VCD! Se si tenta di eseguireuna funzione non disponibile, sul teleschermo vienevisualizzato il simbolo .
• Durante la riproduzione premere il tasto STEP perarrestare la riproduzione. Sul display viene visua-lizzata l'immagine fissa della scena appenainterrotta.
• Ad ogni ulteriore pressione del tasto STEP lariproduzione continua ad avanzare di un'imma-gine per volta.
• Per proseguire la riproduzione premere il tastoPLAY/PAUSE.
Ingrandimento immagine (Zoom) (solo DVD, VCD, SVCD e MPEG)
Avvertenza:Queste funzioni potrebbero non essere disponibiliper tutti i DVD/VCD/S-VCD! Se si tenta di eseguireuna funzione non disponibile, sul teleschermo vienevisualizzato il simbolo .
Durante la riproduzione di un DVD/VCD/S-VCD inserito, è possibile ingrandire e rimpicciolire l'imma-gine sul teleschermo in tre fasi. • Premere ripetutamente il tasto ZOOM per applicare
i seguenti ingrandimenti o riduzioni:
Con i tasti di navigazione ���� è possibilespostare la sezione di immagine ingrandita.
Posizione telecamera (solo DVD)
Avvertenza:Queste funzioni potrebbero non essere disponibiliper tutti i DVD/VCD/S-VCD! Se si tenta di eseguireuna funzione non disponibile, sul teleschermo vienevisualizzato il simbolo .
Alcuni film su DVD contengono capitoli che sonostati ripresi contemporaneamente da prospettivedella telecamera diverse. I film che dispongono ditali capitoli possono visualizzare lo stesso capitoloda diverse prospettive.• Premere il tasto ANGLE sul telecomando durante
la riproduzione del DVD inserito. Ad ogni pres-sione del tasto ANGLE si passa a una prospettivadiversa disponibile della videocamera.
IB_KH6500_AR23388_LB5 01.08.2008 13:14 Uhr Seite 59
- 60 -
Funzione di ripetizione per DVD, VCD, SVCDe CD audioCon la funzione di ripetizione è possibile…... per i DVD ripetere a scelta i titoli, i capitoli o
l'intero DVD... per i VCD/S-VCD ripetere la riproduzione di
singoli titoli o di tutto il VCD/S-VCD... per i CD audio ripetere la riproduzione di
singoli titoli o di tutto il CDPer attivare la riproduzione ripetuta …• Durante la riproduzione premere ripetutamente
il tasto REPEAT. Sul display compare il simbolo Repeat con una delleseguenti opzioni :CHAPTER Selezionare CHAPTER per ripro-
durre il capitolo attualmente riprodotto tante volte fino alla disattivazione della riproduzioneripetuta o alla sua interruzionetramite doppia pressione del tastoSTOP.
TITLE Selezionare TITLE per riprodurreil titolo attualmente riprodottotante volte fino alla disattivazionedella riproduzione ripetuta oalla sua interruzione tramite ladoppia pressione del tasto STOP.
ALL Selezionare ALL per riprodurretutti i titoli disponibili sul disco,ovvero l'intero disco, tante voltefino alla disattivazione della ri-produzione ripetuta o alla suainterruzione tramite doppia pres-sione del tasto STOP.
Nessuna visualizzazione Per disattivare la riproduzione ri-
petuta, premere più volte il tastoREPEAT durante la riproduzionefinché non compare alcuna visualizzazione sul display.
Ripetizione sequenze (A - B)Con questa funzione è possibile riprodurre ripetuta-mente una sequenza a piacere all'interno di uncapitolo del disco attualmente riprodotto.Per farlo …• Durante la riproduzione, premere i tasti A – B del
telecomando non appena viene riprodotto l'ini-zio della sequenza desiderata. Sul teleschermocompare il simbolo Repeat con la visualizza-zione A.
• Premere di nuovo il tasto A – B non appena vieneriprodotta la fine della sequenza desiderata.Ricordare che l'inizio e la fine di una sequenzadevono trovarsi all'interno di un capitolo.
Sul teleschermo compare il simbolo Repeat con lavisualizzazione AB.La riproduzione ripetuta della sequenza selezionatacomincia immediatamente senza dover premere iltasto PLAY/PAUSE. La sequenza viene ripetuta fino aquando si preme di nuovo il tasto A – B per disattivarela funzione.
Funzione SegnalibroDurante la riproduzione di un DVD/VCD/S-VCD èpossibile posizionare i cosiddetti segnalibri per rive-dere in seguito dei passaggi selezionati di un film. È possibile impostare fino a 12 segnalibri.1. Durante la riproduzione di un film premere il tasto
MARK sul telecomando. Sul display compare laseguente visualizzazione:
2. Non appena si raggiunge il passaggio su cui sidesidera inserire un segnalibro, premere il tastoOK/ENTER. Titolo e capitolo nel quale si trova laposizione e la posizione temporale esatta diquesto passaggio all'interno del film vengonoora visualizzati in ore, minuti e secondi sottoSegnalibro 1.
3. Se si desidera posizionare un altro segnalibro,selezionare con i tasti di navigazione ����
un campo non occupato e premere nuovamenteil tasto OK/ENTER non appena si raggiunge ilpassaggio nel quale si desidera posizionare ilsecondo segnalibro.
IB_KH6500_AR23388_LB5 01.08.2008 13:14 Uhr Seite 60
- 61 -
4. Procedere allo stesso modo per impostare un altrosegnalibro. Una volta impostati tutti i segnalibridesiderati, premere il tasto MARK per disattivarela visualizzazione sul teleschermo.
5. Se si desidera in seguito saltare ai passaggi con-trassegnati dai segnalibri, premere il tasto MARK.
6. Selezionare con i tasti di navigazione ����
il segnalibro desiderato. 7. Confermare la selezione premendo il tasto OK/ENTER.
La riproduzione dei capitoli selezionati cominciaautomaticamente nel punto in cui è stato impostatoil segnalibro selezionato.
8. Per cancellare un segnalibro impostato premereil tasto RETURN/CLR.
10.3 Funzioni display
Richiamo del menu DVD (Menu)
Avvertenza:Queste funzioni potrebbero non essere disponibiliper tutti i DVD/VCD/S-VCD! Se si tenta di eseguireuna funzione non disponibile, sul teleschermo vienevisualizzato il simbolo .
In molti film su DVD è presente un menu principaleche, oltre all'opzione di riproduzione del film princi-pale, consente ad esempio …• la selezione della lingua per i sottotitoli e l'audio• la selezione diretta di capitoli • la riproduzione di materiale aggiuntivo (informa-
zioni di background, "Making of", ecc.)Questo menu, se presente sul DVD inserito nel lettoreDVD, può essere richiamato durante la riproduzionepremendo il tasto MENU/PBC.Selezionare le singole voci di menu premendo i tasti di navigazione ����; per confermare la voce di menu selezionata, premere …• il tasto PLAY/PAUSEo• il tasto OK/ENTER.Per tornare alla riproduzione premere nuovamenteil tasto MENU/PBC.
Avvertenza:Se si interrompe la riproduzione premendo due volteil tasto STOP (Stop riproduzione senza funzione Resume)non sarà possibile richiamare il menu principale suldisco.
Playback Control (PBC) per VCD/S-VCDAlcuni VCD/S-VCD dispongono di Playback Con-trol (sigla "PBC"). Il Playback Control definisce unmenu principale tramite cui è possibile controllarediverse funzioni del VCD/S-VCD. Se un VCD/S-VCD inserito nel lettore di DVD disponedi PBC, è necessario attivarlo prima di poter visua-lizzare il menu.Per attivare il PBC …• Durante la riproduzione o a riproduzione inter-
rotta premere il tasto MENU/PBC. Sul display com-pare il messaggio PBC OFF.
• Premere nuovamente il tasto MENU/PBC. Sul displaycompare il messaggio PBC ON. Il PBC è attivoed è possibile richiamare il menu principale deldisco con il tasto RETURN/CLR, MENU/PBC o TITLE .
Avvertenza:Se si attiva il PBC durante la riproduzione, è possi-bile che la riproduzione venga interrotta e ricomincidall'inizio o dal menu principale.
Attivazione/disattivazione sottotitoli
Avvertenza:questa funzione potrebbe non essere disponibileper tutti i DVD/VCD/S-VCD! Se si tenta di eseguireuna funzione non disponibile, sul teleschermo vienevisualizzato il simbolo .
IB_KH6500_AR23388_LB5 01.08.2008 13:14 Uhr Seite 61
- 62 -
Se il film sul DVD/VCD/S-VCD dispone di sottotitoli,è possibile visualizzarli sul teleschermo durante lariproduzione premendo il tasto SUBTITLE. • Premendo la prima volta il tasto SUBTITLE, sul
teleschermo verranno visualizzati i sottotitoli nella prima lingua disponibile.
• Ad ogni ulteriore pressione del tasto SUBTITLE, sul teleschermo verranno visualizzati in successionei sottotitoli nelle altre lingue disponibili.
Sul teleschermo viene mostrato il numero della linguadei sottotitoli correntemente visualizzati (ad es."1/10" per la prima di dieci lingue disponibili per i sottotitoli).• Una volta visualizzata la lingua dei sottotitoli
inserita (es.: "10/10" per la decima delle diecilingue sottotitolo disponibili), è possibile disatti-vare la funzione sottotitoli, premendo nuovamente iltasto SUBTITLE. Sul teleschermo verrà visualizzatoOff.
Modifica della lingua di riproduzione
Avvertenza:Questa funzione potrebbe non essere disponibileper tutti i DVD/VCD/S-VCD! Se si tenta di eseguireuna funzione non disponibile, sul teleschermo vienevisualizzato il simbolo .
• In alcuni film su DVD/VCD/S-VCD, durante la riproduzione è possibile selezionare un'altra linguadi riproduzione premendo il tasto AUDIO.
• Premendo la prima volta il tasto AUDIO viene atti-vata la prima lingua di riproduzione disponibile.A ogni ulteriore pressione del tasto AUDIO si atti-vano in successione le altre lingue di riproduzionedisponibili.
Sul teleschermo verrà visualizzata la lingua di ripro-duzione attivata.
Visualizzazione informazioni disco
Avvertenza:Questa funzione potrebbe non essere disponibileper tutti i DVD/VCD/S-VCD! Se si tenta di eseguireuna funzione non disponibile, sul teleschermo vienevisualizzato il simbolo .
Con questa funzione, durante la riproduzione èpossibile visualizzare sul teleschermo tutte le infor-mazioni disponibili in un DVD/VCD/S-VCD inseritonel lettore di DVD.Per farlo …• Durante la riproduzione premere ripetutamente
il tasto DISPLAY per visualizzare le seguenti infor-mazioni in successione:
Per i DVD:• il numero del titolo/il numero complessivo di titoli• il numero di capitolo/il numero complessivo di
capitoli• il tempo di riproduzione già trascorso in ore,
minuti e secondi (TITLE ELAPSED)• il tempo residuo di riproduzione del film in ore,
secondi e minuti (TITLE REMAIN)• il tempo di riproduzione già trascorso del capitolo
in ore, minuti e secondi (CHAPTER ELAPSED)• il tempo residuo fino alla fine del capitolo in ore,
secondi e minuti (CHAPTER REMAIN)
Nel caso di VCD/S-VCD:• il numero del titolo attualmente riprodotto/il
numero complessivo dei titoli• il tempo di riproduzione già trascorso del titolo
sul VCD/SVCD in ore, minuti e secondi (SINGLEELAPSED)
• il tempo residuo fino alla fine del titolo attualmenteriprodotto in ore, secondi e minuti (SINGLEREMAIN)
IB_KH6500_AR23388_LB5 01.08.2008 13:14 Uhr Seite 62
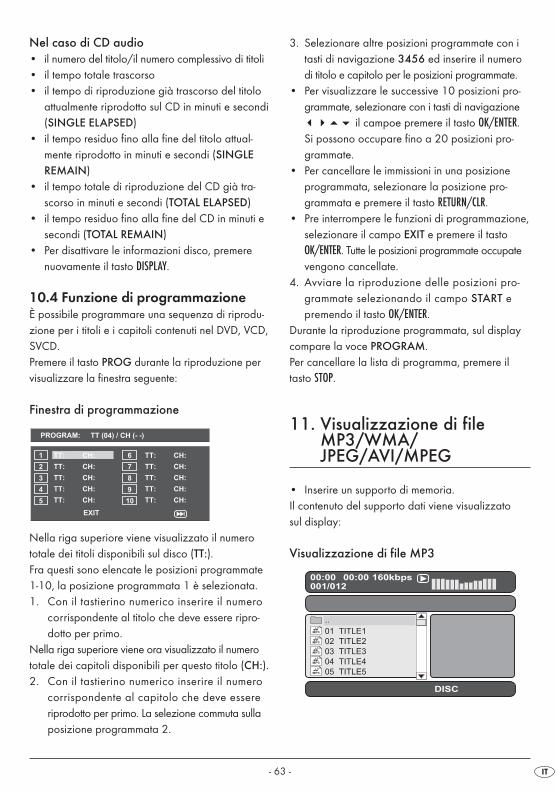
- 63 -
Nel caso di CD audio• il numero del titolo/il numero complessivo di titoli• il tempo totale trascorso• il tempo di riproduzione già trascorso del titolo
attualmente riprodotto sul CD in minuti e secondi(SINGLE ELAPSED)
• il tempo residuo fino alla fine del titolo attual-mente riprodotto in minuti e secondi (SINGLEREMAIN)
• il tempo totale di riproduzione del CD già tra-scorso in minuti e secondi (TOTAL ELAPSED)
• il tempo residuo fino alla fine del CD in minuti esecondi (TOTAL REMAIN)
• Per disattivare le informazioni disco, premere nuovamente il tasto DISPLAY.
10.4 Funzione di programmazioneÈ possibile programmare una sequenza di riprodu-zione per i titoli e i capitoli contenuti nel DVD, VCD,SVCD.Premere il tasto PROG durante la riproduzione pervisualizzare la finestra seguente:
Finestra di programmazione
Nella riga superiore viene visualizzato il numero totale dei titoli disponibili sul disco (TT:).Fra questi sono elencate le posizioni programmate1-10, la posizione programmata 1 è selezionata.1. Con il tastierino numerico inserire il numero
corrispondente al titolo che deve essere ripro-dotto per primo.
Nella riga superiore viene ora visualizzato il numerototale dei capitoli disponibili per questo titolo (CH:).2. Con il tastierino numerico inserire il numero
corrispondente al capitolo che deve essereriprodotto per primo. La selezione commuta sullaposizione programmata 2.
3. Selezionare altre posizioni programmate con itasti di navigazione 3456 ed inserire il numerodi titolo e capitolo per le posizioni programmate.
• Per visualizzare le successive 10 posizioni pro-grammate, selezionare con i tasti di navigazione���� il campoe premere il tasto OK/ENTER.Si possono occupare fino a 20 posizioni pro-grammate.
• Per cancellare le immissioni in una posizioneprogrammata, selezionare la posizione pro-grammata e premere il tasto RETURN/CLR.
• Pre interrompere le funzioni di programmazione,selezionare il campo EXIT e premere il tastoOK/ENTER. Tutte le posizioni programmate occupatevengono cancellate.
4. Avviare la riproduzione delle posizioni pro-grammate selezionando il campo START epremendo il tasto OK/ENTER.
Durante la riproduzione programmata, sul displaycompare la voce PROGRAM.Per cancellare la lista di programma, premere il tasto STOP.
11. Visualizzazione di fileMP3/WMA/JPEG/AVI/MPEG
• Inserire un supporto di memoria. Il contenuto del supporto dati viene visualizzato sul display:
Visualizzazione di file MP3
IB_KH6500_AR23388_LB5 01.08.2008 13:14 Uhr Seite 63
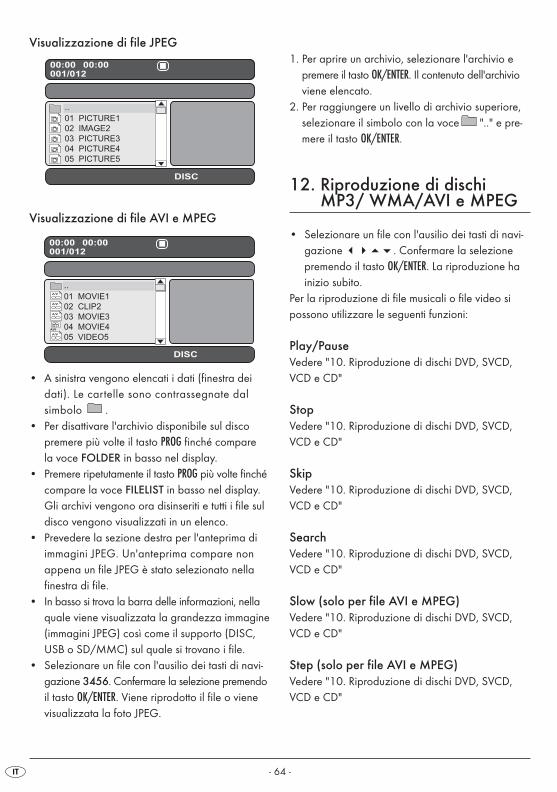
- 64 -
Visualizzazione di file JPEG
Visualizzazione di file AVI e MPEG
• A sinistra vengono elencati i dati (finestra deidati). Le cartelle sono contrassegnate dal simbolo .
• Per disattivare l'archivio disponibile sul disco premere più volte il tasto PROG finché compare la voce FOLDER in basso nel display.
• Premere ripetutamente il tasto PROG più volte finchécompare la voce FILELIST in basso nel display.Gli archivi vengono ora disinseriti e tutti i file suldisco vengono visualizzati in un elenco.
• Prevedere la sezione destra per l'anteprima diimmagini JPEG. Un'anteprima compare nonappena un file JPEG è stato selezionato nella finestra di file.
• In basso si trova la barra delle informazioni, nellaquale viene visualizzata la grandezza immagine(immagini JPEG) così come il supporto (DISC,USB o SD/MMC) sul quale si trovano i file.
• Selezionare un file con l'ausilio dei tasti di navi-gazione 3456. Confermare la selezione premendoil tasto OK/ENTER. Viene riprodotto il file o vienevisualizzata la foto JPEG.
1. Per aprire un archivio, selezionare l'archivio epremere il tasto OK/ENTER. Il contenuto dell'archivioviene elencato.
2. Per raggiungere un livello di archivio superiore,selezionare il simbolo con la voce ".." e pre-mere il tasto OK/ENTER.
12. Riproduzione di dischiMP3/ WMA/AVI e MPEG
• Selezionare un file con l'ausilio dei tasti di navi-gazione ����. Confermare la selezionepremendo il tasto OK/ENTER. La riproduzione hainizio subito.
Per la riproduzione di file musicali o file video sipossono utilizzare le seguenti funzioni:
Play/PauseVedere "10. Riproduzione di dischi DVD, SVCD,VCD e CD"
StopVedere "10. Riproduzione di dischi DVD, SVCD,VCD e CD"
SkipVedere "10. Riproduzione di dischi DVD, SVCD,VCD e CD"
SearchVedere "10. Riproduzione di dischi DVD, SVCD,VCD e CD"
Slow (solo per file AVI e MPEG)Vedere "10. Riproduzione di dischi DVD, SVCD,VCD e CD"
Step (solo per file AVI e MPEG)Vedere "10. Riproduzione di dischi DVD, SVCD,VCD e CD"
IB_KH6500_AR23388_LB5 01.08.2008 13:14 Uhr Seite 64
- 65 -
Zoom (solo per file JPEG, AVI e MPEG)Vedere "10. Riproduzione di dischi DVD, SVCD,VCD e CD"
AB RepeatVedere "10. Riproduzione di dischi DVD, SVCD,VCD e CD"
12.1 Funzione di ripetizione per dischiMP3/ WMA/AVI/MPEG e JPEG
Durante la riproduzione premere più volte il tastoREPEAT per applicare le seguenti funzioni di ripetizione(sul display compare la funzione impostata):REPEAT1 Ripetizione continua di titolo/
immagine attualmente riprodotti.REP FOLDER. Ripetizione della cartella attuale.FOLDER Ripetizione di tutti gli archivi.SHUFFLE1 Riproduzione casuale di tutti i
titoli/immagini.SHUFFLE2 Riproduzione casuale di tutti i
titoli/immagini, dove tutti i titoli/tutte le immagini sono riprodottisolo una volta.
ONCE Riproduzione una tantum del tito-lo/immagine (funzione di ripeti-zione off).
12.2 Riproduzione di dischi JPEG• Selezionare un'immagine con i tasti di naviga-
zione �� e premere il tasto OK/ENTER oPLAY/PAUSE per aprire l'immagine.
L'immagine viene visualizzata sul display.Poi avviene la commutazione all'immagine successivapresente sul disco/nella cartella.• Per visualizzare più a lungo l'immagine visualizzata
attualmente, premere il tasto PLAY/PAUSE.• Per proseguire la riproduzione, premere di nuovo
il tasto PLAY/PAUSE .
• Si può richiamare direttamente un'immagine immettendo il numero di file dell'immagine con i tasti numerici e quindi confermare con il tastoOK/ENTER.
• Con i tasti di navigazione ���� è possibileruotare l'immagine in stadi di 90° durante la ri-produzione.
• Premere il tasto STOP durante la riproduzione peravere una visualizzazione in miniatura di tutte leimmagini in archivio/sul disco. Possono esserevisualizzate fino a 12 miniature su ciascun lato.
• Selezionare un'immagine con i tasti di naviga-zione ���� e avviare la riproduzione conOK/ENTER o PLAY/PAUSE.
• Selezionare una delle seguenti opzioni dellariga inferiore del display con i tasti di navigazione���� e confermare con OK/ENTER.
Slide Show Avvio di una presentazione delleimmagini in archivio/sul disco
Menu Indica le funzioni dei tasti dispo-nibili per la riproduzione di fileJPEG. Premere il tasto OK/ENTERfinché questo menu scompare.
Prev per passare alla pagina prece-dente
Next per passare alla pagina successiva
• Premere il tasto MENU/PBC per ritornare all'elencofile.
12.3 Riproduzione programmata di dischi MP3/WMA/AVI/MPEG e JPEG
È possibile programmare una sequenza di riproduzionedei titoli di un disco.• Commutare sull'elenco file premendo più volte il
tasto PROG finché viene visualizzata sul displayl'opzione FILE LIST.
• Selezionare con i tasti di navigazione ����
il titolo che deve essere riprodotto per primo.• Premere il tasto MARK per salvare il titolo nell'elenco
di titoli da riprodurre.
IB_KH6500_AR23388_LB5 01.08.2008 13:14 Uhr Seite 65
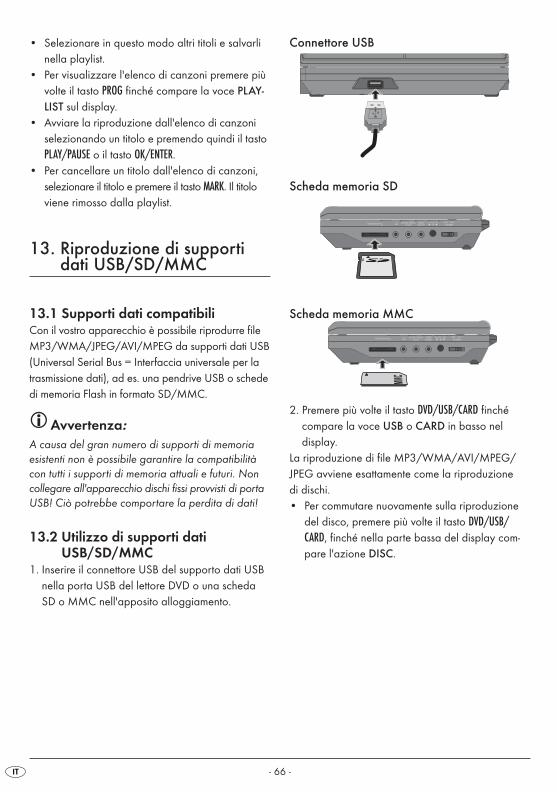
- 66 -
• Selezionare in questo modo altri titoli e salvarlinella playlist.
• Per visualizzare l'elenco di canzoni premere piùvolte il tasto PROG finché compare la voce PLAY-LIST sul display.
• Avviare la riproduzione dall'elenco di canzoniselezionando un titolo e premendo quindi il tastoPLAY/PAUSE o il tasto OK/ENTER.
• Per cancellare un titolo dall'elenco di canzoni,selezionare il titolo e premere il tasto MARK. Il titoloviene rimosso dalla playlist.
13. Riproduzione di supportidati USB/SD/MMC
13.1 Supporti dati compatibiliCon il vostro apparecchio è possibile riprodurre fileMP3/WMA/JPEG/AVI/MPEG da supporti dati USB(Universal Serial Bus = Interfaccia universale per latrasmissione dati), ad es. una pendrive USB o schededi memoria Flash in formato SD/MMC.
Avvertenza: A causa del gran numero di supporti di memoriaesistenti non è possibile garantire la compatibilitàcon tutti i supporti di memoria attuali e futuri. Noncollegare all'apparecchio dischi fissi provvisti di portaUSB! Ciò potrebbe comportare la perdita di dati!
13.2 Utilizzo di supporti datiUSB/SD/MMC
1. Inserire il connettore USB del supporto dati USBnella porta USB del lettore DVD o una schedaSD o MMC nell'apposito alloggiamento.
Connettore USB
Scheda memoria SD
Scheda memoria MMC
2. Premere più volte il tasto DVD/USB/CARD finchécompare la voce USB o CARD in basso nel display.
La riproduzione di file MP3/WMA/AVI/MPEG/JPEG avviene esattamente come la riproduzione di dischi. • Per commutare nuovamente sulla riproduzione
del disco, premere più volte il tasto DVD/USB/CARD, finché nella parte bassa del display com-pare l'azione DISC.
IB_KH6500_AR23388_LB5 01.08.2008 13:14 Uhr Seite 66
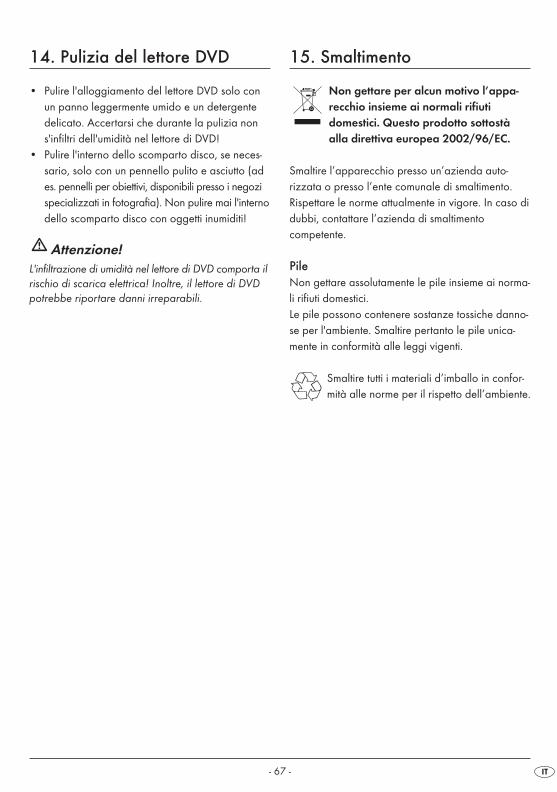
- 67 -
14. Pulizia del lettore DVD
• Pulire l'alloggiamento del lettore DVD solo conun panno leggermente umido e un detergentedelicato. Accertarsi che durante la pulizia non s'infiltri dell'umidità nel lettore di DVD!
• Pulire l'interno dello scomparto disco, se neces-sario, solo con un pennello pulito e asciutto (ades. pennelli per obiettivi, disponibili presso i negozispecializzati in fotografia). Non pulire mai l'internodello scomparto disco con oggetti inumiditi!
Attenzione!L'infiltrazione di umidità nel lettore di DVD comporta ilrischio di scarica elettrica! Inoltre, il lettore di DVDpotrebbe riportare danni irreparabili.
15. Smaltimento
Non gettare per alcun motivo l’appa-recchio insieme ai normali rifiuti domestici. Questo prodotto sottostàalla direttiva europea 2002/96/EC.
Smaltire l’apparecchio presso un’azienda auto-rizzata o presso l’ente comunale di smaltimento.Rispettare le norme attualmente in vigore. In caso didubbi, contattare l’azienda di smaltimento competente.
PileNon gettare assolutamente le pile insieme ai norma-li rifiuti domestici.Le pile possono contenere sostanze tossiche danno-se per l'ambiente. Smaltire pertanto le pile unica-mente in conformità alle leggi vigenti.
Smaltire tutti i materiali d’imballo in confor-mità alle norme per il rispetto dell’ambiente.
IB_KH6500_AR23388_LB5 01.08.2008 13:14 Uhr Seite 67
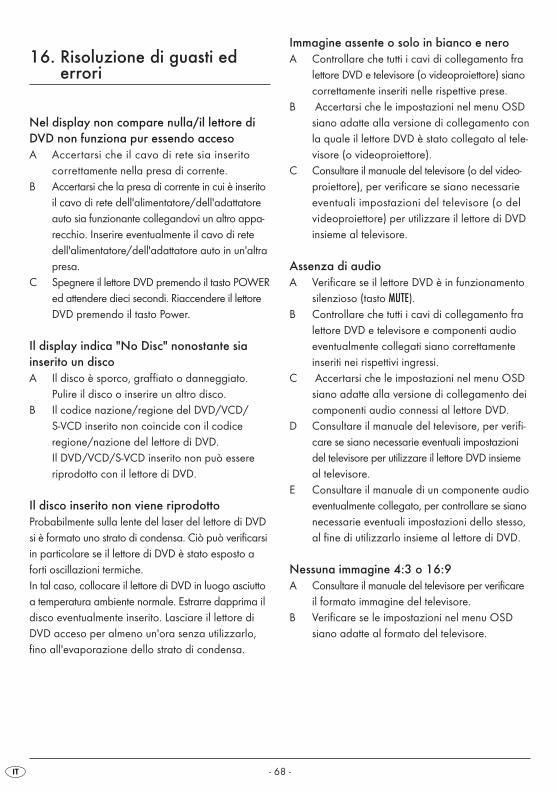
- 68 -
16. Risoluzione di guasti ederrori
Nel display non compare nulla/il lettore diDVD non funziona pur essendo accesoA Accertarsi che il cavo di rete sia inserito
correttamente nella presa di corrente.B Accertarsi che la presa di corrente in cui è inserito
il cavo di rete dell'alimentatore/dell'adattatoreauto sia funzionante collegandovi un altro appa-recchio. Inserire eventualmente il cavo di retedell'alimentatore/dell'adattatore auto in un'altrapresa.
C Spegnere il lettore DVD premendo il tasto POWERed attendere dieci secondi. Riaccendere il lettoreDVD premendo il tasto Power.
Il display indica "No Disc" nonostante sia inserito un discoA Il disco è sporco, graffiato o danneggiato.
Pulire il disco o inserire un altro disco.B Il codice nazione/regione del DVD/VCD/
S-VCD inserito non coincide con il codice regione/nazione del lettore di DVD.Il DVD/VCD/S-VCD inserito non può essere riprodotto con il lettore di DVD.
Il disco inserito non viene riprodottoProbabilmente sulla lente del laser del lettore di DVDsi è formato uno strato di condensa. Ciò può verificarsiin particolare se il lettore di DVD è stato esposto aforti oscillazioni termiche.In tal caso, collocare il lettore di DVD in luogo asciuttoa temperatura ambiente normale. Estrarre dapprima ildisco eventualmente inserito. Lasciare il lettore diDVD acceso per almeno un'ora senza utilizzarlo,fino all'evaporazione dello strato di condensa.
Immagine assente o solo in bianco e neroA Controllare che tutti i cavi di collegamento fra
lettore DVD e televisore (o videoproiettore) sianocorrettamente inseriti nelle rispettive prese.
B Accertarsi che le impostazioni nel menu OSDsiano adatte alla versione di collegamento conla quale il lettore DVD è stato collegato al tele-visore (o videoproiettore).
C Consultare il manuale del televisore (o del video-proiettore), per verificare se siano necessarieeventuali impostazioni del televisore (o delvideoproiettore) per utilizzare il lettore di DVDinsieme al televisore.
Assenza di audioA Verificare se il lettore DVD è in funzionamento
silenzioso (tasto MUTE).B Controllare che tutti i cavi di collegamento fra
lettore DVD e televisore e componenti audioeventualmente collegati siano correttamente inseriti nei rispettivi ingressi.
C Accertarsi che le impostazioni nel menu OSDsiano adatte alla versione di collegamento deicomponenti audio connessi al lettore DVD.
D Consultare il manuale del televisore, per verifi-care se siano necessarie eventuali impostazionidel televisore per utilizzare il lettore DVD insiemeal televisore.
E Consultare il manuale di un componente audioeventualmente collegato, per controllare se sianonecessarie eventuali impostazioni dello stesso,al fine di utilizzarlo insieme al lettore di DVD.
Nessuna immagine 4:3 o 16:9 A Consultare il manuale del televisore per verificare
il formato immagine del televisore.B Verificare se le impostazioni nel menu OSD
siano adatte al formato del televisore.
IB_KH6500_AR23388_LB5 01.08.2008 13:14 Uhr Seite 68
- 69 -
Il telecomando non funzionaA Controllare che le pile del telecomando siano
state inserite nel vano pile con la polaritàcorretta.
B Controllare lo stato di carica delle pile del telecomando e, se necessario, sostituirle.
C Assicurarsi che fra il telecomando e il lettoreDVD non siano presenti ostacoli.
D In caso di uso del telecomando, non allontanarsidi più di cinque metri dal lettore DVD.
La lingua di riproduzione/dei sottotitoli concorrisponde alle impostazioni del menu OSDLa lingua di riproduzione/dei sottotitoli impostatadal menu OSD non è disponibile nel disco inserito.
Una o più funzioni non sono attivabiliLa funzione selezionata probabilmente non è disponi-bile per tutti i DVD/VCD/S-VCD! Se si tenta di eseguireuna funzione non disponibile, sul teleschermo vienevisualizzato il simbolo .
Nessun tasto funzionante sull'apparecchio o sul telecomando/altre anomalie di funzionamentoA Spegnere il lettore DVD premendo il tasto POWER.
Attendere dieci secondi e premere quindi nuo-vamente il tasto POWER per riattivare il lettore DVD.
B Se il malfunzionamento persiste: riportare il lettoredi DVD alle impostazioni predefinite.
Contattare il nostro centro assistenza più vicino se …• i guasti funzionali indicati in precedenza non
possono essere eliminati come descritto o• compaiono guasti funzionali diversi da quelli
qui descrittiA tale scopo leggere il capitolo 18. "Garanziae assistenza".
17. Glossario/Indice analitico
17.1 Cosa sono DVD, VCD e S-VCD?
DVD:DVD è l'abbreviazione dell'inglese "Digital VersatileDisc". I DVD sono impiegati per memorizzare datiaudio e video; sono disponibili nei formati da 8 e12 cm (diametro). I DVD, grazie alla loro capacitàdi memorizzazione molto più elevata rispetto a CD-R/CD-RW, permettono di ottenere una durata di ripro-duzione dei dati audio e video memorizzati fino aotto ore.
VCD/S-VCD:Con "Video-CD" (VCD) e "Super Video-CD" (S-VCD) siindicano due procedimenti per la memorizzazionecompressa di film su CD, con un conseguente risparmiodi spazio. I VCD e S-VCD sono disponibili nei formatida 8 cm e 12 cm (diametro). La loro capacità dimemoria è molto più bassa di quella dei DVD. Essi offrono pertanto una durata di riproduzione deidati audio e video salvati di 20 minuti (formato da8 cm) e 74 minuti (formato da 12 cm).
I VCD sono disponibili in due versioni: • Con i VCD/S-VCD versione 1.1 possono essere
riprodotti solo dati audio e video.• Nei VCD/S-VCD versione 2.0 sono disponibili
funzioni PBC (Playback Control). Possono essereinoltre riprodotte immagini a risoluzione elevata.
Playback Control (PBC)I VCD/S-VCD versione 2.0 dispongono di PlaybackControl (abbreviato "PBC"). In tal caso, il VCD/S-VCDdispone di un menu principale che consente di con-trollare diverse funzioni del VCD/S-VCD.
IB_KH6500_AR23388_LB5 01.08.2008 13:14 Uhr Seite 69
- 70 -
17.2 Cosa sono i titoli e i capitoli?I titoli sono le unità più grandi di unità d'immagine esonoro su DVD; in molti DVD il film (principale) ha ilnumero di titolo 01. Per il materiale aggiuntivo (ades. trailer, informazioni di background, ecc.), presente inmolti DVD, possono essere utilizzati eventualmentealtri numeri di titoli.
I capitoli definiscono le unità di immagine e di audio successive ai titoli. Se il o i titoli di unDVD/VCD/S-VCD sono suddivisi in capitoli, a essisono assegnati dei numeri tramite la cui immissioneè possibile selezionare direttamente i capitoli.
Attenzione: non su tutti i DVD …• i titoli sono suddivisi in capitoli (numerati)• i capitoli vengono anche definiti "scene"
(ad es. nel menu principale dei DVD)
17.3 Dolby SurroundDolby Surround è un formato sonoro analogico nelquale i due canali di un segnale sonoro stereo vengonoutilizzati per trasmettere informazioni di suonostereofonico per altri canali. Con un decoder DolbySurround, i segnali vengono trasformati nuovamentein sonoro o musica e condotti a due altoparlantisupplementari collocati dietro la postazione di ascolto.
Dolby PrologicRispetto al formato sonoro Dolby Surround, nelcaso di Dolby Prologic viene impiegato un ulteriorecanale nel segnale stereo; si tratta del cosiddettocanale "Center". Il relativo altoparlante centraledeve essere collocato al centro tra gli altoparlantistereo. I toni più bassi sono condotti al relativo alto-parlante, il cosiddetto "subwoofer". Il subwooferpuò essere collocato in un luogo qualsiasi, poiché itoni bassi emessi dal subwoofer non vengono quasilocalizzati dall'udito umano.
Dolby Digital (5.1)Dolby Digital, definito anche AC3, è un formato sonoro digitale con cui si possono trasmettere fino a sei canali audio separati. Nella maggior partedei DVD attuali il sonoro è memorizzato nel cosiddettoformato "Dolby Digital 5.1"; il numero "5" nelladefinizione "5.1" sta per tre canali Surround ante-riori e due posteriori, il numero "1" per il canale dei toni bassi.
DTSDTS è l'abbreviazione dell'inglese "Digital TheatreSystem" e definisce uno dei formati Surround più comuni per DVD. Come Dolby Digital 5.1, DTS impiegatre canali Surround anteriori e due posteriori, nonchéun canale per i toni bassi.
17.4 Cosa sono PAL e NTSC?
PALPAL è l'abbreviazione dell'inglese "Phase AlternationLine". PAL è lo standard colore più usato in Europacentrale e occidentale (eccezione: Francia, v. parolachiave "SECAM").
NTSCNTSC è l'abbreviazione dell'inglese "National Tele-vision System Committee". NTSC è lo standardcolore impiegato soprattutto negli Stati Uniti e in Giappone.
IB_KH6500_AR23388_LB5 01.08.2008 13:14 Uhr Seite 70
- 71 -
17.5 MP3, WMA, JPEG e MPEG
MP3MP3 definisce un processo sviluppato dal FraunhoferInstitut o un formato per la compressione di dati audio.I brani musicali compressi in formato MP3 conservanosolo una frazione delle loro dimensioni originali,consentendo di salvare una quantità molto maggioredi musica su CD-R/CD-RW di quanto sia possibilesui normali CD audio, in cui i dati sono salvati informato CDA.La struttura di un CD MP3 può avere ad esempio il seguente aspetto se i file MP3 sono stati salvati in cartelle:
WMAWMA (inglese per "Windows® Media Audio") è un formato di file messo a punto da Microsoft®per i dati audio.
JPEGJPEG (ingl. per "Joint Photographics Expert Group")definisce un formato grafico molto diffuso, sviluppatodall'omonima azienda, in cui vengono compressidati di immagine a colori e a scale di grigio.
MPEGMPEG („Moving Picture Experts Group") indica unformato di videocompressione.
ORDNER MP3MP3-CD
17.6 Cosa sono le cartelle?Al contrario di quanto avviene per i CD audio, ibrani su un CD-R/CD-RW con file MP3, WMA oJPEG possono essere salvati in cartelle, ad esempioper disporre i brani in base al genere.
18. Garanzia e assistenza
Questo apparecchio è garantito per tre anni a partiredalla data di acquisto. Qualora, nonostante i nostrielevati standard di sicurezza, si rilevasse un motivodi reclamo relativo al presente apparecchio, contat-tare la nostra hotline di assistenza. Qualora fosseimpossibile elaborare la pratica di reclamo telefoni-camente, si riceverà• un numero di pratica (numero RMA) nonché • un indirizzo al quale inviare il prodotto per il
disbrigo delle pratiche di garanzia.
In caso di invio del prodotto, è necessario allegareuna copia della prova di acquisto (scontrino).L'apparecchio dev'essere imballato in modo idoneo al trasporto, con il numero di RMA ben visibile. Gli invii privi di numero RMA non potranno essere elaborati.
Avvertenza: La garanzia copre solo difetti del materiale o di fabbricazione.La garanzia non ha validità
• per le parti saldate
• per danni a parti fragili come interruttori o accumulatori.
Il prodotto è destinato esclusivamente all'uso domesticoe non a quello commerciale. La garanzia decade in caso di impiego improprio o manomissione, usodella forza e interventi non eseguiti dalla nostra filialedi assistenza autorizzata. Questa garanzia noncostituisce alcun limite ai diritti legali del consumatore.
FOLDER
IB_KH6500_AR23388_LB5 01.08.2008 13:14 Uhr Seite 71

- 72 -
19. Importatore
KOMPERNASS GMBHBURGSTRASSE 21D-44867 BOCHUMwww.kompernass.com
✄
IB_KH6500_AR23388_LB5 01.08.2008 13:14 Uhr Seite 72

Co
mp
ilare
co
mp
leta
men
te q
ues
to t
ag
lian
do
e a
lleg
arl
o a
ll'a
pp
are
cch
io!
Indicare chiaramente il mittente:
Cognome
Nome
Indirizzo
CAP/Località
Nazione
Telefono
Data/firma
Descrizione del guasto:
✄
Garanzia
Kompernass Service ItaliaTel.: 0434/550833Fax: 0434/1851001e-mail: [email protected]
www.mysilvercrest.de
Per ottenere la certezza di una ri-parazione gratuita, mettersi in con-tatto con la nostra hotline di assis-tenza, inviando via fax o e-mail ilpresente modulo compilato e copiadello scontrino.
LETTORE DVD PORTATILEKH6500
IB_KH6500_AR23388_LB5 01.08.2008 13:15 Uhr Seite 73

IB_KH6500_AR23388_LB5 01.08.2008 13:15 Uhr Seite 74
- 75 -
CONTENT PAGE1. Technical Data 77
2. Applications and functions 77
3. Safety Instructions 78
4. Appliance description 80
5. Starting Up the Device 815.1 Unpacking ...............................................................................................................................81
5.2 Check the delivered contents ................................................................................................81
5.3 Preparing the remote control .................................................................................................81
6. Connections and connection potentials 826.1 Mains power connection .......................................................................................................82
6.2 Rechargeable battery connection.........................................................................................82
6.3 Connection to another device ...............................................................................................83
6.4 Headphone connection..........................................................................................................85
6.5 Setting the viewing position ...................................................................................................86
7. Use 86
8. Menu functions 868.1 GENERAL SETUP PAGE.........................................................................................................87
8.2 DIGITAL AUDIO SETUP PAGE ..............................................................................................88
8.3 VIDEO SETUP PAGE ..............................................................................................................89
8.4 PREFERENCE PAGE................................................................................................................89
8.5 PASSWORD SETUP PAGE.....................................................................................................90
8.6 EXIT SETUP ..............................................................................................................................91
9. Sound functions 919.1 To control the Volume.............................................................................................................91
9.2 Mute .........................................................................................................................................91
10. Playback of DVD, SVCD, VCD and CD discs 9110.1 Inserting the disc...................................................................................................................91
10.2 Playback functions when playing back DVDs, VCDs, S-VCDs, MPEG or Audio CDs .....................................................................92
10.3 Notice functions....................................................................................................................96
10.4 Programming function ..........................................................................................................98
IB_KH6500_AR23388_LB5 01.08.2008 13:15 Uhr Seite 75
- 76 -
11. Display of MP3/ WMA/JPEG/AVIand MPEG data 98
12. Playback of MP3/ WMA/AVI and MPEG discs 9912.1 Repeat function with MP3/ WMA/AVI/MPEG/JPEG discs ..........................................99
12.2 Replay of JPEG discs ........................................................................................................100
12.3 Programmed replay with MP3/WMA/AVI/MPEG/JPEG discs .................................100
13. Playback of USB/SD/MMC data mediums 10013.1 Compatible data mediums................................................................................................100
13.2 Using USB/SD/MMC data mediums .............................................................................101
14. Cleaning of the DVD player 101
15. Disposal 102
16. Troubleshooting 102
17. Glossary / Key Word Index 10417.1 What are DVDs, VCDs and S-VCDs? ..............................................................................104
17.2 What are Title and Chapter?............................................................................................104
17.3 Dolby Surround..................................................................................................................104
17.4 What are PAL and NTSC?................................................................................................105
17.5 MP3, WMA, JPEG and MPEG ........................................................................................105
17.6 What are files?...................................................................................................................105
18. Warranty & service 106
19. Importer 106
Read the operating instructions carefully before using the appliance for the first time and preserve this booklet for later reference. Pass the manual on to whomsoever might acquire the appliance at a later date.
IB_KH6500_AR23388_LB5 01.08.2008 13:15 Uhr Seite 76
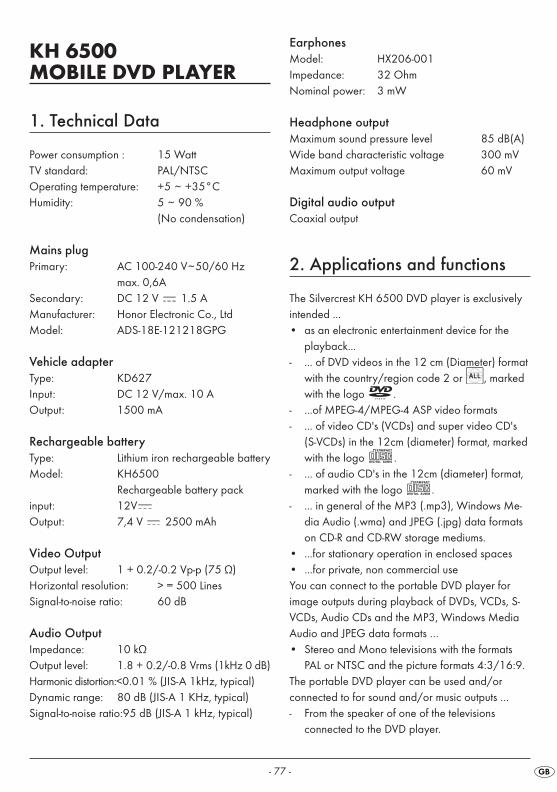
- 77 -
KH 6500 MOBILE DVD PLAYER
1. Technical Data
Power consumption : 15 WattTV standard: PAL/NTSCOperating temperature: +5 ~ +35°CHumidity: 5 ~ 90 %
(No condensation)
Mains plugPrimary: AC 100-240 V~50/60 Hz
max. 0,6ASecondary: DC 12 V 1.5 AManufacturer: Honor Electronic Co., LtdModel: ADS-18E-121218GPG
Vehicle adapterType: KD627Input: DC 12 V/max. 10 A Output: 1500 mA
Rechargeable batteryType: Lithium iron rechargeable batteryModel: KH6500
Rechargeable battery packinput: 12VOutput: 7,4 V 2500 mAh
Video OutputOutput level: 1 + 0.2/-0.2 Vp-p (75 Ω) Horizontal resolution: > = 500 Lines Signal-to-noise ratio: 60 dB
Audio Output Impedance: 10 kΩOutput level: 1.8 + 0.2/-0.8 Vrms (1kHz 0 dB)Harmonic distortion:<0.01 % (JIS-A 1kHz, typical)Dynamic range: 80 dB (JIS-A 1 KHz, typical) Signal-to-noise ratio:95 dB (JIS-A 1 kHz, typical)
EarphonesModel: HX206-001Impedance: 32 OhmNominal power: 3 mW
Headphone outputMaximum sound pressure level 85 dB(A)Wide band characteristic voltage 300 mVMaximum output voltage 60 mV
Digital audio outputCoaxial output
2. Applications and functions
The Silvercrest KH 6500 DVD player is exclusivelyintended ...• as an electronic entertainment device for the
playback...- ... of DVD videos in the 12 cm (Diameter) format
with the country/region code 2 or , markedwith the logo .
- ...of MPEG-4/MPEG-4 ASP video formats- ... of video CD's (VCDs) and super video CD's
(S-VCDs) in the 12cm (diameter) format, markedwith the logo .
- ... of audio CD's in the 12cm (diameter) format,marked with the logo .
- ... in general of the MP3 (.mp3), Windows Me-dia Audio (.wma) and JPEG (.jpg) data formatson CD-R and CD-RW storage mediums.
• ...for stationary operation in enclosed spaces• ...for private, non commercial useYou can connect to the portable DVD player forimage outputs during playback of DVDs, VCDs, S-VCDs, Audio CDs and the MP3, Windows MediaAudio and JPEG data formats …• Stereo and Mono televisions with the formats
PAL or NTSC and the picture formats 4:3/16:9.The portable DVD player can be used and/or connected to for sound and/or music outputs …- From the speaker of one of the televisions
connected to the DVD player.
IB_KH6500_AR23388_LB5 01.08.2008 13:15 Uhr Seite 77
- 78 -
from external audio components such as a HiFisystem, receiver or surround sound system (analogue/digital).
Attention!No liability/warranty will be assumed for damageresulting from improper use of the device!
3. Safety Instructions
• This device is not suitable for use by children orany other persons, whose physical,sensory ormental abilities, without assistance or supervi-sion, impedes the safe operation of the device. Children should be watched-over to ensure that they do not play with the appliance.
• To avoid unintentional switching on, disconnectthe power cord after use and before cleaning.
• Check the appliance and all parts for visible da-mage. The safety concept can work only if theappliance is in a faultless condition.
• The power plug must always be easily accessi-ble, so that the appliance can be quickly separa-ted from the mains in the event of an emergency.
Danger of electrical shocks• Connect the appliance only to correctly installed
and properly earthed power sockets. Ensure thatthe rating of the local power supply tallies com-pletely with the details given on the rating plateof the appliance.
• Arrange for defective power plugs and/or ca-bles to be replaced at once by qualified technici-ans or our Customer Service Department.
• Arrange for customer service to repair or replaceconnecting cables and/or appliances that arenot functioning properly or have been damaged.
Never submerge the device or the power cable inwater. Wipe it only with a slightly damp cloth.
• Do not expose the appliance to rain and neveruse it in a humid or wet environment.
• Make sure that the power cord never becomeswet during operation.
• You may not open the housing or repair the ap-pliance yourself. Should you do so, appliancesafety can no longer be assured and the warran-ty will become void.
• Protect the appliance against drip and spray wa-ter. Do not place any water-filled vessels (e.g.flower vases) on the appliance.
Risk of fire!• Do not use the appliance in the vicinity of hot
surfaces.• Do not keep the appliance in places exposed
to direct sunlight, otherwise it may overheat and become irreparably damaged.
• Do not leave the appliance unattended when inuse.
• Never cover the ventilation slots of the appliancewhile it is being used.
• Do not place any open sources of fire, like cand-les, on the device.
Injury hazard• Keep children away from the connecting cable
and the appliance. Children frequently under-estimate the dangers of electrical appliances.
• Ensure that the appliance stands with a safe andsecure positioning.
• Do not operate the appliance if it has sustaineda fall or is damaged. Arrange for the applianceto be checked and/or repaired by qualifiedtechnicians.
Keep batteries away from children. Children canput batteries into their mouths and swallow them.
Danger! Laser Beams!The appliance is fitted with a „Class 1 Laser
• Never open the device. • Never attempt to repair the device. • There is invisible laser radiation inside the devi-
ce. Do not expose yourself to the laser beam.
IB_KH6500_AR23388_LB5 01.08.2008 13:15 Uhr Seite 78
- 79 -
Note:Some aggressive furniture finishes can have a destructive influence on the device's rubber feet. Ifnecessary, place the device on a nonslip pad.
Thunderstorms!Equipment connected to a power supply can be da-maged during a thunderstorm. You should thereforealways pull the power plug from the power socketwhen there is a storm.
Notice regarding surge voltages (FEO/ fast electrical overloads):In a case of malfunction due to an electrical fasttransient (power surge) the product must be retur-ned to default settings in order to re-establish nor-mal operation. It is possible that the power supplywill have to be disconnected and then reconnectedagain. The batteries (if present) must be removedand then reinserted.
Notice regarding power disconnectionThe POWER switch does not completely disconnectthe appliance from the power network.Additionally,the appliance consumes electricity when in standbymode. In order to completely disconnect the devicefrom the power the power plug must be pulled outof the power socket
Notice regarding the handling of bat-teries/rechargeable battery packThe remote control is operated by batteries and the device by a rechargeable battery pack. For thehandling of batteries/rechargeable battery packsplease observe the following:
Risk of Explosion!Do not throw batteries/rechargeable battery packsinto a fire. Do not recharge non-rechargeable batte-ries.• Only charge batteries that are specifically mar-
ked "rechargeable".• Charge the supplied battery power pack exclusi-
vely with the portable DVD player and the supp-lied power supply unit. Do not use any othercharging device or power supply unit.
• Never open, solder or weld batteries/rechargk-able battery packs. The risk of explosions and injuries exist!
• Regularily check the batteries/rechargeable battery pack. Depleted batteries/rechargeablebattery packs can damage the device
• If you do not intend to use the device for a longtime then remove the batteries/rechargeable battery pack.
• Put on protective gloves when handling depletedbatteries/rechargeable battery packs.
• Clean the battery compartment and the batterycontacts with a dry cloth.
IB_KH6500_AR23388_LB5 01.08.2008 13:15 Uhr Seite 79
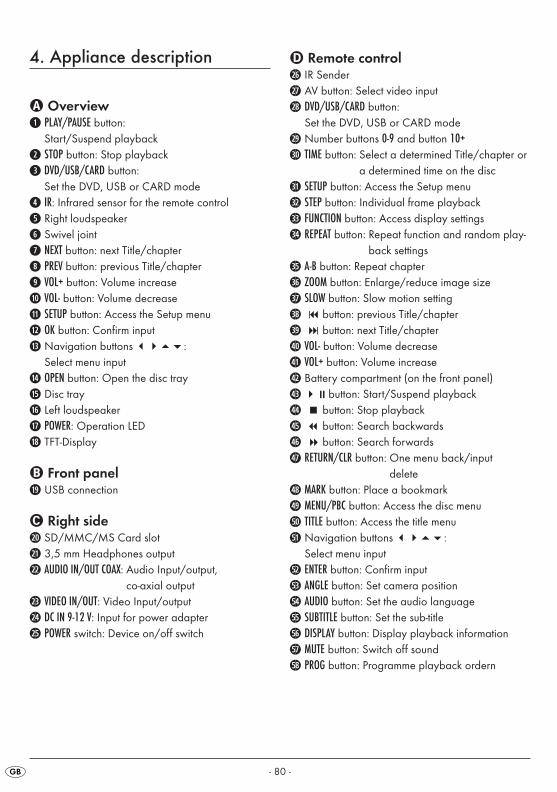
- 80 -
4. Appliance description
� Overviewq PLAY/PAUSE button:
Start/Suspend playback
w STOP button: Stop playback
e DVD/USB/CARD button:Set the DVD, USB or CARD mode
r IR: Infrared sensor for the remote control
t Right loudspeaker
y Swivel joint
u NEXT button: next Title/chapter
i PREV button: previous Title/chapter
o VOL+ button: Volume increase
a VOL- button: Volume decrease
s SETUP button: Access the Setup menu
d OK button: Confirm input
f Navigation buttons ����: Select menu input
g OPEN button: Open the disc tray
h Disc tray
j Left loudspeaker
k POWER: Operation LED
l TFT-Display
� Front panel; USB connection
� Right side2) SD/MMC/MS Card slot
2! 3,5 mm Headphones output
2@ AUDIO IN/OUT COAX: Audio Input/output, co-axial output
2# VIDEO IN/OUT: Video Input/output
2$ DC IN 9-12 V: Input for power adapter
2% POWER switch: Device on/off switch
� Remote control2^ IR Sender
2& AV button: Select video input
2* DVD/USB/CARD button: Set the DVD, USB or CARD mode
2( Number buttons 0-9 and button 10+3) TIME button: Select a determined Title/chapter or
a determined time on the disc
3! SETUP button: Access the Setup menu
3@ STEP button: Individual frame playback
3# FUNCTION button: Access display settings
3$ REPEAT button: Repeat function and random play-back settings
3% A-B button: Repeat chapter
3^ ZOOM button: Enlarge/reduce image size
3& SLOW button: Slow motion setting
3* � button: previous Title/chapter
3( � button: next Title/chapter
4) VOL- button: Volume decrease
4! VOL+ button: Volume increase
4@ Battery compartment (on the front panel)
4# ��button: Start/Suspend playback
4$ button: Stop playback
4% button: Search backwards
4^ � button: Search forwards
4& RETURN/CLR button: One menu back/input delete
4* MARK button: Place a bookmark
4( MENU/PBC button: Access the disc menu
5) TITLE button: Access the title menu
5! Navigation buttons ����: Select menu input
5@ ENTER button: Confirm input
5# ANGLE button: Set camera position
5$ AUDIO button: Set the audio language
5% SUBTITLE button: Set the sub-title
5^ DISPLAY button: Display playback information
5& MUTE button: Switch off sound
5* PROG button: Programme playback ordern
IB_KH6500_AR23388_LB5 01.08.2008 13:15 Uhr Seite 80
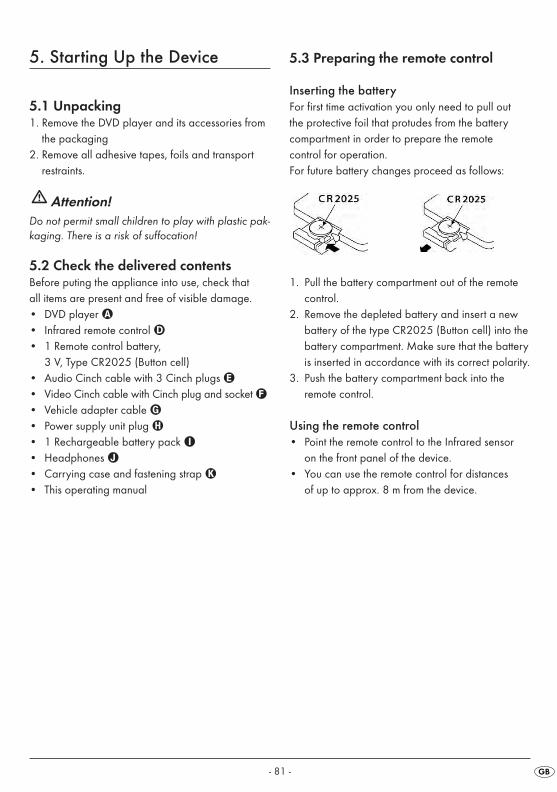
- 81 -
5. Starting Up the Device
5.1 Unpacking1. Remove the DVD player and its accessories from
the packaging2. Remove all adhesive tapes, foils and transport
restraints.
Attention!Do not permit small children to play with plastic pak-kaging. There is a risk of suffocation!
5.2 Check the delivered contentsBefore puting the appliance into use, check that all items are present and free of visible damage.• DVD player �• Infrared remote control �• 1 Remote control battery,
3 V, Type CR2025 (Button cell)• Audio Cinch cable with 3 Cinch plugs �• Video Cinch cable with Cinch plug and socket �• Vehicle adapter cable �• Power supply unit plug • 1 Rechargeable battery pack • Headphones �• Carrying case and fastening strap �• This operating manual
5.3 Preparing the remote control
Inserting the batteryFor first time activation you only need to pull out the protective foil that protudes from the batterycompartment in order to prepare the remote control for operation.For future battery changes proceed as follows:
1. Pull the battery compartment out of the remotecontrol.
2. Remove the depleted battery and insert a newbattery of the type CR2025 (Button cell) into thebattery compartment. Make sure that the batteryis inserted in accordance with its correct polarity.
3. Push the battery compartment back into the remote control.
Using the remote control• Point the remote control to the Infrared sensor
on the front panel of the device.• You can use the remote control for distances
of up to approx. 8 m from the device.
IB_KH6500_AR23388_LB5 01.08.2008 13:15 Uhr Seite 81

- 82 -
6. Connections and connectionpotentials
In order to use the device you need only to providea power supply. You can connect it to a power sok-ket via the rechargeable battery or you can run itwith the 12V vehicle adapter.In addition the device can be connected to other in-put and output devices:• with a television set• with a video or DVD recorder• with a receiver, also, for example, a stereo system• with a Dolby Digital system
Attention!Make sure that all devices are switched off beforeyou connect them. Do not plug the device into themains power until all connections have been made.
6.1 Mains power connection
Connection with the power supply unit
1. Plug the device plug of the supplied power sup-ply unit into the socket on the side of the device.
2. Plug the power supply unit into a power socket.
Connection with the 12V vehicle adapter
1. Plug the device plug of the 12V vehicle adapterinto the socket on the side of the device.
2. Plug the 12V vehicle adapter into a suitable socket, for example, the cigarette lighter connec-tion in the vehicle.
Note:- The supplied 12V vehicle adapter may only beused on 12V supply systems.
- The DVD player may only be operated with thesupplied 12V vehicle adapter.
- Do not use the supplied 12V vehicle adapter on ot-her devices.
- After use, remove the 12V vehicle adapter from theDVD player and from the vehicles power socket.
6.2 Rechargeable battery connectionThe DVD player is supplied with a rechargeable battery, with which you can operate the device if no power source is available.The rechargeable battery must be charged for ap-prox. 3.5 hours before the first use and for each fullcharge thereafter. A fully charged battery allows fora playback time of approx. 2 1/2 hours (dependingon the type of playback, for example, the volume).
IB_KH6500_AR23388_LB5 01.08.2008 13:15 Uhr Seite 82
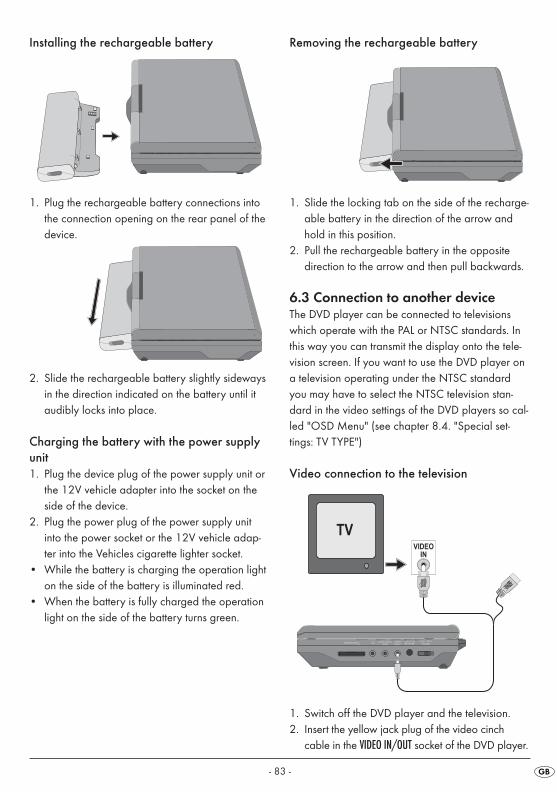
- 83 -
Installing the rechargeable battery
1. Plug the rechargeable battery connections intothe connection opening on the rear panel of thedevice.
2. Slide the rechargeable battery slightly sidewaysin the direction indicated on the battery until itaudibly locks into place.
Charging the battery with the power supplyunit1. Plug the device plug of the power supply unit or
the 12V vehicle adapter into the socket on theside of the device.
2. Plug the power plug of the power supply unitinto the power socket or the 12V vehicle adap-ter into the Vehicles cigarette lighter socket.
• While the battery is charging the operation lighton the side of the battery is illuminated red.
• When the battery is fully charged the operationlight on the side of the battery turns green.
Removing the rechargeable battery
1. Slide the locking tab on the side of the recharge-able battery in the direction of the arrow andhold in this position.
2. Pull the rechargeable battery in the opposite direction to the arrow and then pull backwards.
6.3 Connection to another deviceThe DVD player can be connected to televisionswhich operate with the PAL or NTSC standards. Inthis way you can transmit the display onto the tele-vision screen. If you want to use the DVD player ona television operating under the NTSC standardyou may have to select the NTSC television stan-dard in the video settings of the DVD players so cal-led "OSD Menu" (see chapter 8.4. "Special set-tings: TV TYPE")
Video connection to the television
1. Switch off the DVD player and the television.2. Insert the yellow jack plug of the video cinch
cable in the VIDEO IN/OUT socket of the DVD player.
IB_KH6500_AR23388_LB5 01.08.2008 13:15 Uhr Seite 83
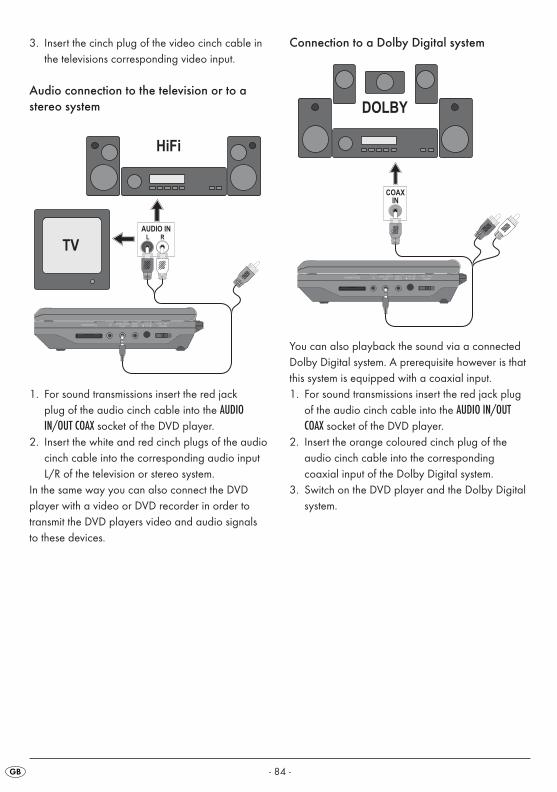
- 84 -
3. Insert the cinch plug of the video cinch cable inthe televisions corresponding video input.
Audio connection to the television or to a stereo system
1. For sound transmissions insert the red jack plug of the audio cinch cable into the AUDIOIN/OUT COAX socket of the DVD player.
2. Insert the white and red cinch plugs of the audiocinch cable into the corresponding audio inputL/R of the television or stereo system.
In the same way you can also connect the DVDplayer with a video or DVD recorder in order totransmit the DVD players video and audio signals to these devices.
Connection to a Dolby Digital system
You can also playback the sound via a connectedDolby Digital system. A prerequisite however is thatthis system is equipped with a coaxial input.1. For sound transmissions insert the red jack plug
of the audio cinch cable into the AUDIO IN/OUTCOAX socket of the DVD player.
2. Insert the orange coloured cinch plug of the audio cinch cable into the corresponding coaxial input of the Dolby Digital system.
3. Switch on the DVD player and the Dolby Digitalsystem.
IB_KH6500_AR23388_LB5 01.08.2008 13:15 Uhr Seite 84
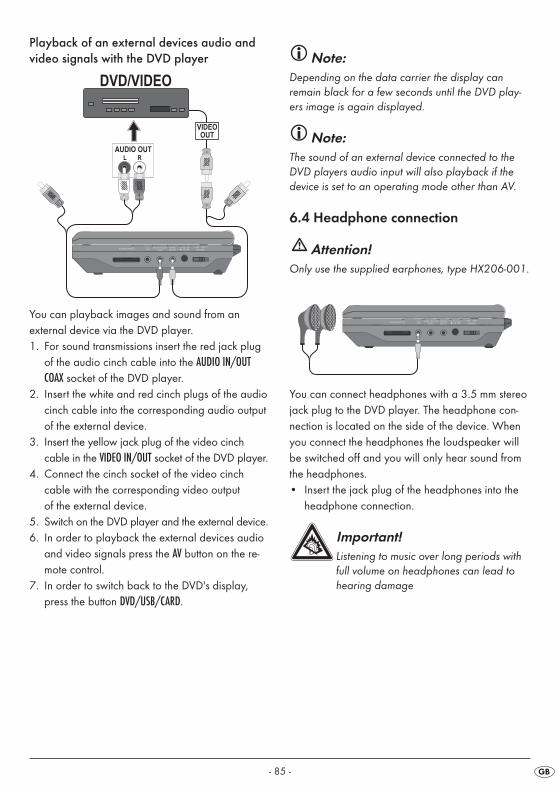
- 85 -
Playback of an external devices audio and video signals with the DVD player
You can playback images and sound from an external device via the DVD player.1. For sound transmissions insert the red jack plug
of the audio cinch cable into the AUDIO IN/OUTCOAX socket of the DVD player.
2. Insert the white and red cinch plugs of the audiocinch cable into the corresponding audio outputof the external device.
3. Insert the yellow jack plug of the video cinch cable in the VIDEO IN/OUT socket of the DVD player.
4. Connect the cinch socket of the video cinch cable with the corresponding video output of the external device.
5. Switch on the DVD player and the external device.6. In order to playback the external devices audio
and video signals press the AV button on the re-mote control.
7. In order to switch back to the DVD's display,press the button DVD/USB/CARD.
Note:Depending on the data carrier the display can remain black for a few seconds until the DVD play-ers image is again displayed.
Note:The sound of an external device connected to theDVD players audio input will also playback if thedevice is set to an operating mode other than AV.
6.4 Headphone connection
Attention!Only use the supplied earphones, type HX206-001.
You can connect headphones with a 3.5 mm stereojack plug to the DVD player. The headphone con-nection is located on the side of the device. Whenyou connect the headphones the loudspeaker willbe switched off and you will only hear sound fromthe headphones. • Insert the jack plug of the headphones into the
headphone connection.
Important!Listening to music over long periods withfull volume on headphones can lead tohearing damage
IB_KH6500_AR23388_LB5 01.08.2008 13:15 Uhr Seite 85
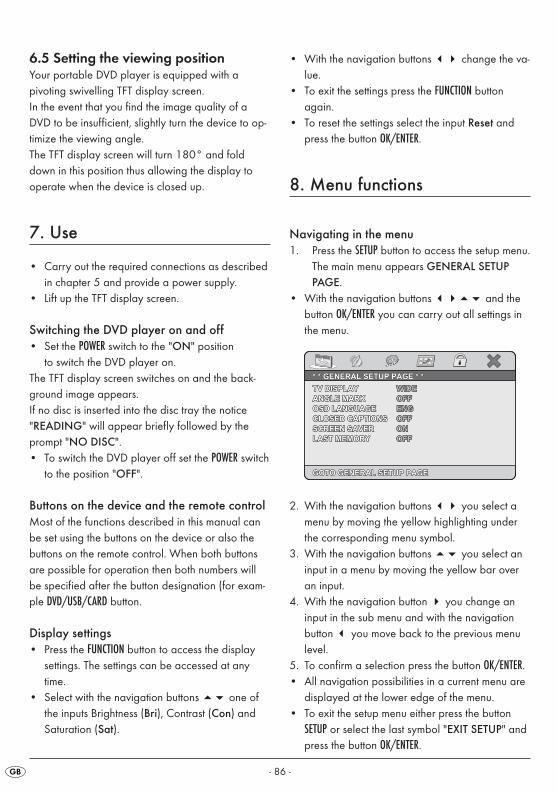
- 86 -
6.5 Setting the viewing positionYour portable DVD player is equipped with a pivoting swivelling TFT display screen.In the event that you find the image quality of aDVD to be insufficient, slightly turn the device to op-timize the viewing angle.The TFT display screen will turn 180° and folddown in this position thus allowing the display tooperate when the device is closed up.
7. Use
• Carry out the required connections as describedin chapter 5 and provide a power supply.
• Lift up the TFT display screen.
Switching the DVD player on and off• Set the POWER switch to the "ON" position
to switch the DVD player on.The TFT display screen switches on and the back-ground image appears.If no disc is inserted into the disc tray the notice"READING" will appear briefly followed by theprompt "NO DISC".• To switch the DVD player off set the POWER switch
to the position "OFF".
Buttons on the device and the remote controlMost of the functions described in this manual canbe set using the buttons on the device or also thebuttons on the remote control. When both buttonsare possible for operation then both numbers willbe specified after the button designation (for exam-ple DVD/USB/CARD button.
Display settings• Press the FUNCTION button to access the display
settings. The settings can be accessed at anytime.
• Select with the navigation buttons �� one ofthe inputs Brightness (Bri), Contrast (Con) andSaturation (Sat).
• With the navigation buttons �� change the va-lue.
• To exit the settings press the FUNCTION buttonagain.
• To reset the settings select the input Reset andpress the button OK/ENTER.
8. Menu functions
Navigating in the menu1. Press the SETUP button to access the setup menu.
The main menu appears GENERAL SETUPPAGE.
• With the navigation buttons ���� and thebutton OK/ENTER you can carry out all settings inthe menu.
2. With the navigation buttons �� you select amenu by moving the yellow highlighting underthe corresponding menu symbol.
3. With the navigation buttons �� you select aninput in a menu by moving the yellow bar overan input.
4. With the navigation button � you change an input in the sub menu and with the navigationbutton � you move back to the previous menulevel.
5. To confirm a selection press the button OK/ENTER.• All navigation possibilities in a current menu are
displayed at the lower edge of the menu.• To exit the setup menu either press the button
SETUP or select the last symbol "EXIT SETUP" andpress the button OK/ENTER.
TV DISPLAYTV DISPLAYTV DISPLAY
ANGLE MARKANGLE MARKANGLE MARK
OSD LANGUAGEOSD LANGUAGEOSD LANGUAGE
CLOSED CAPTIONSCLOSED CAPTIONSCLOSED CAPTIONS
SCREEN SAVERSCREEN SAVERSCREEN SAVER
LAST MEMORYLAST MEMORYLAST MEMORY
WIDEWIDEWIDE
OFFOFFOFF
ENGENGENG
OFFOFFOFF
ONONON
OFFOFFOFF
* * GENERAL SETUP PAGE * ** * GENERAL SETUP PAGE * ** * GENERAL SETUP PAGE * *
GOTO GENERAL SETUP PAGEGOTO GENERAL SETUP PAGEGOTO GENERAL SETUP PAGE
IB_KH6500_AR23388_LB5 01.08.2008 13:15 Uhr Seite 86

- 87 -
8.1 GENERAL SETUP PAGE
TV DISPLAY
Here you can match the vertical and horizontal ima-ge display to the playback device in use. 4:3 PANSCAN: Select this setting to display bro-
adcasts in the usual 4:3 formaton a 4:3 television set. Broad-casts in the 16:9 format will bedis-played in full screen withoutthe distracting bars although theside edges of the image will betrimmed.
4:3 LETTERBOX: Display of a film in 16:9 formaton a traditional 4:3 format tele-vision. The image is displayed withblack bars on the lower and upper edges of the screen.
16:9 WIDE: The output of the image on awide screen television in 16:9format
ANGLE MARK
On some DVDs particular scenes are recorded fromvarious camera positions. • Select the input ON in order to switch to the next
camera position by pressing the ANGLE button du-ring playback of the film.
• To deactivate this function select the input OFF.
* * GENERAL SETUP PAGE * ** * GENERAL SETUP PAGE * ** * GENERAL SETUP PAGE * *
SET ANGLE MARKSET ANGLE MARKSET ANGLE MARK
ONONON
OFFOFFOFF
WIDEWIDEWIDE
OFFOFFOFF
ENGENGENG
OFFOFFOFF
ONONON
OFFOFFOFF
TV DISPLAYTV DISPLAYTV DISPLAY
ANGLE MARKANGLE MARKANGLE MARK
OSD LANGUAGEOSD LANGUAGEOSD LANGUAGE
CLOSED CAPTIONSCLOSED CAPTIONSCLOSED CAPTIONS
SCREEN SAVERSCREEN SAVERSCREEN SAVER
LAST MEMORYLAST MEMORYLAST MEMORY
* * GENERAL SETUP PAGE * ** * GENERAL SETUP PAGE * ** * GENERAL SETUP PAGE * *
SET TV DISPLAY MODESET TV DISPLAY MODESET TV DISPLAY MODE
4:3 PANSCAN4:3 PANSCAN4:3 PANSCAN
4:3 LETTERBOX4:3 LETTERBOX4:3 LETTERBOX
16:916:916:9
TV DISPLAYTV DISPLAYTV DISPLAY
ANGLE MARKANGLE MARKANGLE MARK
OSD LANGUAGEOSD LANGUAGEOSD LANGUAGE
CLOSED CAPTIONSCLOSED CAPTIONSCLOSED CAPTIONS
SCREEN SAVERSCREEN SAVERSCREEN SAVER
LAST MEMORYLAST MEMORYLAST MEMORY
WIDEWIDEWIDE
OFFOFFOFF
ENGENGENG
OFFOFFOFF
ONONON
OFFOFFOFF
OSD LANGUAGE
Here you set the language, in which the OSD Menuwill be displayed on the television screen.
CLOSED CAPTIONS
You set this if by every playback of a DVD the subtit-le (if present) is to be automatically displayed onthe television screen. • For this purpose set the function to ON. • If you want to activate the subtitles manually set
this function to OFF. The subtitles can be set, during playback, with theSUBTITLE button.
SCREEN SAVER
• To activate the screen saver set this function toON. The screen saver will now switch on whenthe playback is stopped and no activity takesplace for several minutes.
• To switch the screen saver off set the function toOFF.
ONONON
OFFOFFOFF
SCREEN SAVERSCREEN SAVERSCREEN SAVER
* * GENERAL SETUP PAGE * ** * GENERAL SETUP PAGE * ** * GENERAL SETUP PAGE * *
TV DISPLAYTV DISPLAYTV DISPLAY
ANGLE MARKANGLE MARKANGLE MARK
OSD LANGUAGEOSD LANGUAGEOSD LANGUAGE
CLOSED CAPTIONSCLOSED CAPTIONSCLOSED CAPTIONS
SCREEN SAVERSCREEN SAVERSCREEN SAVER
LAST MEMORYLAST MEMORYLAST MEMORY
WIDEWIDEWIDE
OFFOFFOFF
ENGENGENG
OFFOFFOFF
ONONON
OFFOFFOFF
CLOSED CAPTIONCLOSED CAPTIONCLOSED CAPTION
ONONON
OFFOFFOFF
* * GENERAL SETUP PAGE * ** * GENERAL SETUP PAGE * ** * GENERAL SETUP PAGE * *
TV DISPLAYTV DISPLAYTV DISPLAY
ANGLE MARKANGLE MARKANGLE MARK
OSD LANGUAGEOSD LANGUAGEOSD LANGUAGE
CLOSED CAPTIONSCLOSED CAPTIONSCLOSED CAPTIONS
SCREEN SAVERSCREEN SAVERSCREEN SAVER
LAST MEMORYLAST MEMORYLAST MEMORY
WIDEWIDEWIDE
OFFOFFOFF
ENGENGENG
OFFOFFOFF
ONONON
OFFOFFOFF
CHINESECHINESECHINESE
SPANISHSPANISHSPANISH
GERMANGERMANGERMAN
SET OSD LANGUAGESET OSD LANGUAGESET OSD LANGUAGE
ENGLISHENGLISHENGLISH
* * GENERAL SETUP PAGE * ** * GENERAL SETUP PAGE * ** * GENERAL SETUP PAGE * *
TV DISPLAYTV DISPLAYTV DISPLAY
ANGLE MARKANGLE MARKANGLE MARK
OSD LANGUAGEOSD LANGUAGEOSD LANGUAGE
CLOSED CAPTIONSCLOSED CAPTIONSCLOSED CAPTIONS
SCREEN SAVERSCREEN SAVERSCREEN SAVER
LAST MEMORYLAST MEMORYLAST MEMORY
WIDEWIDEWIDE
OFFOFFOFF
ENGENGENG
OFFOFFOFF
ONONON
OFFOFFOFF
IB_KH6500_AR23388_LB5 01.08.2008 13:15 Uhr Seite 87
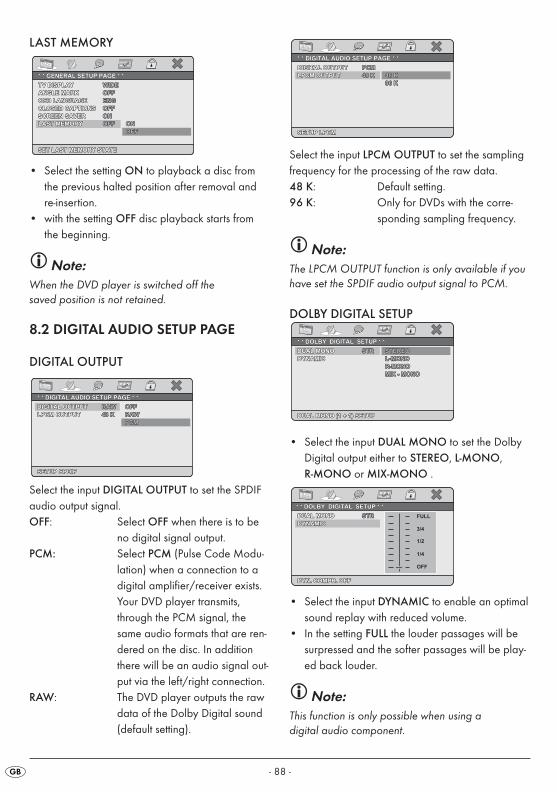
- 88 -
LAST MEMORY
• Select the setting ON to playback a disc from the previous halted position after removal andre-insertion.
• with the setting OFF disc playback starts fromthe beginning.
Note:When the DVD player is switched off the saved position is not retained.
8.2 DIGITAL AUDIO SETUP PAGE
DIGITAL OUTPUT
Select the input DIGITAL OUTPUT to set the SPDIFaudio output signal.OFF: Select OFF when there is to be
no digital signal output.PCM: Select PCM (Pulse Code Modu-
lation) when a connection to adigital amplifier/receiver exists.Your DVD player transmits,through the PCM signal, thesame audio formats that are ren-dered on the disc. In additionthere will be an audio signal out-put via the left/right connection.
RAW: The DVD player outputs the rawdata of the Dolby Digital sound(default setting).
* * DIGITAL AUDIO SETUP PAGE * ** * DIGITAL AUDIO SETUP PAGE * ** * DIGITAL AUDIO SETUP PAGE * *
SETUP SPDIFSETUP SPDIFSETUP SPDIF
OFFOFFOFF
RAWRAWRAW
PCMPCMPCM
DIGITAL OUTPUTDIGITAL OUTPUTDIGITAL OUTPUT
LPCM OUTPUTLPCM OUTPUTLPCM OUTPUT
RAWRAWRAW
48 K48 K48 K
SET LAST MEMORY STATESET LAST MEMORY STATESET LAST MEMORY STATE
ONONON
OFFOFFOFF
* * GENERAL SETUP PAGE * ** * GENERAL SETUP PAGE * ** * GENERAL SETUP PAGE * *
TV DISPLAYTV DISPLAYTV DISPLAY
ANGLE MARKANGLE MARKANGLE MARK
OSD LANGUAGEOSD LANGUAGEOSD LANGUAGE
CLOSED CAPTIONSCLOSED CAPTIONSCLOSED CAPTIONS
SCREEN SAVERSCREEN SAVERSCREEN SAVER
LAST MEMORYLAST MEMORYLAST MEMORY
WIDEWIDEWIDE
OFFOFFOFF
ENGENGENG
OFFOFFOFF
ONONON
OFFOFFOFF
Select the input LPCM OUTPUT to set the samplingfrequency for the processing of the raw data.48 K: Default setting.96 K: Only for DVDs with the corre-
sponding sampling frequency.
Note:The LPCM OUTPUT function is only available if youhave set the SPDIF audio output signal to PCM.
DOLBY DIGITAL SETUP
• Select the input DUAL MONO to set the Dolby Digital output either to STEREO, L-MONO, R-MONO or MIX-MONO .
• Select the input DYNAMIC to enable an optimalsound replay with reduced volume.
• In the setting FULL the louder passages will be surpressed and the softer passages will be play-ed back louder.
Note:This function is only possible when using a digital audio component.
DYN. COMPR. OFFDYN. COMPR. OFFDYN. COMPR. OFF
DUAL MONODUAL MONODUAL MONO
DYNAMICDYNAMICDYNAMIC
STRSTRSTR FULL
3/4
1/2
1/4
OFF
* * DOLBY DIGITAL SETUP * ** * DOLBY DIGITAL SETUP * ** * DOLBY DIGITAL SETUP * *
MIX - MONOMIX - MONOMIX - MONO
* * DOLBY DIGITAL SETUP * ** * DOLBY DIGITAL SETUP * ** * DOLBY DIGITAL SETUP * *
DUAL MONO (1 + 1) SETUPDUAL MONO (1 + 1) SETUPDUAL MONO (1 + 1) SETUP
STEREOSTEREOSTEREO
L-MONOL-MONOL-MONO
R-MONOR-MONOR-MONO
DUAL MONODUAL MONODUAL MONO
DYNAMICDYNAMICDYNAMIC
STRSTRSTR
* * * * * * DIGITAL AUDIO SETUP PAGEDIGITAL AUDIO SETUP PAGEDIGITAL AUDIO SETUP PAGE * * * * * *
SETUP LPCMSETUP LPCMSETUP LPCM
48 K48 K48 K
96 K96 K96 K
DIGITAL OUTPUTDIGITAL OUTPUTDIGITAL OUTPUT
LPCM OUTPUTLPCM OUTPUTLPCM OUTPUT
PCMPCMPCM
48 K48 K48 K
IB_KH6500_AR23388_LB5 01.08.2008 13:15 Uhr Seite 88
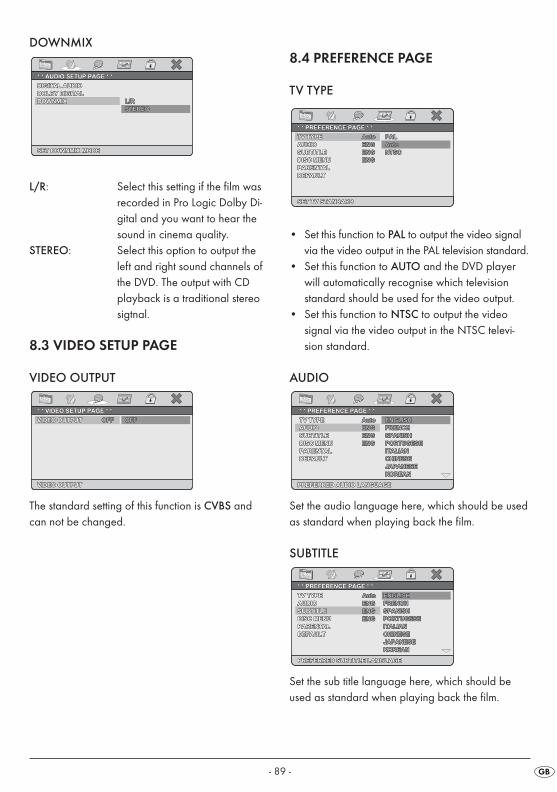
- 89 -
DOWNMIX
L/R: Select this setting if the film wasrecorded in Pro Logic Dolby Di-gital and you want to hear thesound in cinema quality.
STEREO: Select this option to output theleft and right sound channels ofthe DVD. The output with CDplayback is a traditional stereosigtnal.
8.3 VIDEO SETUP PAGE
VIDEO OUTPUT
The standard setting of this function is CVBS andcan not be changed.
* * VIDEO SETUP PAGE * ** * VIDEO SETUP PAGE * ** * VIDEO SETUP PAGE * *
VIDEO OUTPUTVIDEO OUTPUTVIDEO OUTPUT
OFFOFFOFFVIDEO OUTPUTVIDEO OUTPUTVIDEO OUTPUT OFFOFFOFF
STEREOSTEREOSTEREO
* * AUDIO SETUP PAGE * ** * AUDIO SETUP PAGE * ** * AUDIO SETUP PAGE * *
SET DOWNMIX MODESET DOWNMIX MODESET DOWNMIX MODE
L/RL/RL/R
DIGITAL AUDIODIGITAL AUDIODIGITAL AUDIO
DOLBY DIGITALDOLBY DIGITALDOLBY DIGITAL
DOWNMIXDOWNMIXDOWNMIX
8.4 PREFERENCE PAGE
TV TYPE
• Set this function to PAL to output the video signalvia the video output in the PAL television standard.
• Set this function to AUTO and the DVD player will automatically recognise which television standard should be used for the video output.
• Set this function to NTSC to output the video signal via the video output in the NTSC televi-sion standard.
AUDIO
Set the audio language here, which should be usedas standard when playing back the film.
SUBTITLE
Set the sub title language here, which should beused as standard when playing back the film.
PREFERRED SUBTITLE LANGUAGEPREFERRED SUBTITLE LANGUAGEPREFERRED SUBTITLE LANGUAGE
AutoAutoAuto
ENGENGENG
ENGENGENG
ENGENGENG PORTUGESEPORTUGESEPORTUGESE
ITALIANITALIANITALIAN
CHINESECHINESECHINESE
JAPANESEJAPANESEJAPANESE
KOREANKOREANKOREAN
ENGLISHENGLISHENGLISH
FRENCHFRENCHFRENCH
SPANISHSPANISHSPANISH
* * PREFERENCE PAGE * ** * PREFERENCE PAGE * ** * PREFERENCE PAGE * *
TV TYPETV TYPETV TYPE
AUDIOAUDIOAUDIO
SUBTITLESUBTITLESUBTITLE
DISC MENUDISC MENUDISC MENU
PARENTALPARENTALPARENTAL
DEFAULTDEFAULTDEFAULT
PORTUGESEPORTUGESEPORTUGESE
ITALIANITALIANITALIAN
CHINESECHINESECHINESE
JAPANESEJAPANESEJAPANESE
KOREANKOREANKOREAN
PREFERRED AUDIO LANGUAGEPREFERRED AUDIO LANGUAGEPREFERRED AUDIO LANGUAGE
ENGLISHENGLISHENGLISH
FRENCHFRENCHFRENCH
SPANISHSPANISHSPANISH
AutoAutoAuto
ENGENGENG
ENGENGENG
ENGENGENG
* * PREFERENCE PAGE * ** * PREFERENCE PAGE * ** * PREFERENCE PAGE * *
TV TYPETV TYPETV TYPE
AUDIOAUDIOAUDIO
SUBTITLESUBTITLESUBTITLE
DISC MENUDISC MENUDISC MENU
PARENTALPARENTALPARENTAL
DEFAULTDEFAULTDEFAULT
* * PREFERENCE PAGE * ** * PREFERENCE PAGE * ** * PREFERENCE PAGE * *
SET TV STANDARDSET TV STANDARDSET TV STANDARD
PALPALPAL
AutoAutoAuto
NTSCNTSCNTSC
TV TYPETV TYPETV TYPE
AUDIOAUDIOAUDIO
SUBTITLESUBTITLESUBTITLE
DISC MENUDISC MENUDISC MENU
PARENTALPARENTALPARENTAL
DEFAULTDEFAULTDEFAULT
AutoAutoAuto
ENGENGENG
ENGENGENG
ENGENGENG
IB_KH6500_AR23388_LB5 01.08.2008 13:15 Uhr Seite 89
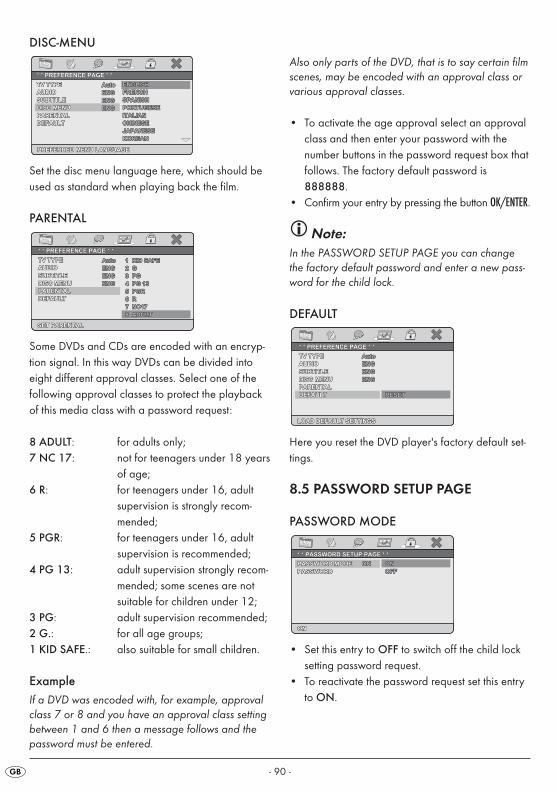
- 90 -
DISC-MENU
Set the disc menu language here, which should beused as standard when playing back the film.
PARENTAL
Some DVDs and CDs are encoded with an encryp-tion signal. In this way DVDs can be divided intoeight different approval classes. Select one of thefollowing approval classes to protect the playbackof this media class with a password request:
8 ADULT: for adults only;7 NC 17: not for teenagers under 18 years
of age;6 R: for teenagers under 16, adult
supervision is strongly recom-mended;
5 PGR: for teenagers under 16, adultsupervision is recommended;
4 PG 13: adult supervision strongly recom-mended; some scenes are not suitable for children under 12;
3 PG: adult supervision recommended;2 G.: for all age groups;1 KID SAFE.: also suitable for small children.
ExampleIf a DVD was encoded with, for example, approvalclass 7 or 8 and you have an approval class settingbetween 1 and 6 then a message follows and thepassword must be entered.
4 PG 134 PG 134 PG 13
5 PGR5 PGR5 PGR
6 R6 R6 R
7 NC177 NC177 NC17
8 ADULT8 ADULT8 ADULT
SET PARENTALSET PARENTALSET PARENTAL
1 KID SAFE1 KID SAFE1 KID SAFE
2 G2 G2 G
3 PG3 PG3 PG
AutoAutoAuto
ENGENGENG
ENGENGENG
ENGENGENG
* * PREFERENCE PAGE * ** * PREFERENCE PAGE * ** * PREFERENCE PAGE * *
TV TYPETV TYPETV TYPE
AUDIOAUDIOAUDIO
SUBTITLESUBTITLESUBTITLE
DISC MENUDISC MENUDISC MENU
PARENTALPARENTALPARENTAL
DEFAULTDEFAULTDEFAULT
PREFERRED MENU LANGUAGEPREFERRED MENU LANGUAGEPREFERRED MENU LANGUAGE
AutoAutoAuto
ENGENGENG
ENGENGENG
ENGENGENG PORTUGESEPORTUGESEPORTUGESE
ITALIANITALIANITALIAN
CHINESECHINESECHINESE
JAPANESEJAPANESEJAPANESE
KOREANKOREANKOREAN
ENGLISHENGLISHENGLISH
FRENCHFRENCHFRENCH
SPANISHSPANISHSPANISH
* * PREFERENCE PAGE * ** * PREFERENCE PAGE * ** * PREFERENCE PAGE * *
TV TYPETV TYPETV TYPE
AUDIOAUDIOAUDIO
SUBTITLESUBTITLESUBTITLE
DISC MENUDISC MENUDISC MENU
PARENTALPARENTALPARENTAL
DEFAULTDEFAULTDEFAULT
Also only parts of the DVD, that is to say certain filmscenes, may be encoded with an approval class orvarious approval classes.
• To activate the age approval select an approvalclass and then enter your password with thenumber buttons in the password request box thatfollows. The factory default password is888888.
• Confirm your entry by pressing the button OK/ENTER.
Note:In the PASSWORD SETUP PAGE you can changethe factory default password and enter a new pass-word for the child lock.
DEFAULT
Here you reset the DVD player's factory default set-tings.
8.5 PASSWORD SETUP PAGE
PASSWORD MODE
• Set this entry to OFF to switch off the child locksetting password request.
• To reactivate the password request set this entryto ON.
* * PASSWORD SETUP PAGE * ** * PASSWORD SETUP PAGE * ** * PASSWORD SETUP PAGE * *
ONONON
ONONON
OFFOFFOFF
PASSWORD MODEPASSWORD MODEPASSWORD MODE
PASSWORDPASSWORDPASSWORD
ONONON
RESETRESETRESET
LOAD DEFAULT SETTINGSLOAD DEFAULT SETTINGSLOAD DEFAULT SETTINGS
AutoAutoAuto
ENGENGENG
ENGENGENG
ENGENGENG
* * PREFERENCE PAGE * ** * PREFERENCE PAGE * ** * PREFERENCE PAGE * *
TV TYPETV TYPETV TYPE
AUDIOAUDIOAUDIO
SUBTITLESUBTITLESUBTITLE
DISC MENUDISC MENUDISC MENU
PARENTALPARENTALPARENTAL
DEFAULTDEFAULTDEFAULT
IB_KH6500_AR23388_LB5 01.08.2008 13:15 Uhr Seite 90
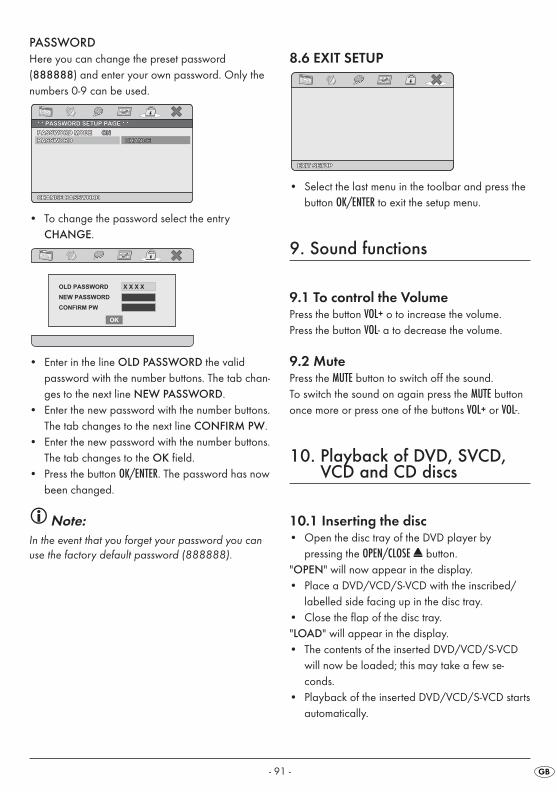
- 91 -
PASSWORDHere you can change the preset password(888888) and enter your own password. Only thenumbers 0-9 can be used.
• To change the password select the entry CHANGE.
• Enter in the line OLD PASSWORD the validpassword with the number buttons. The tab chan-ges to the next line NEW PASSWORD.
• Enter the new password with the number buttons.The tab changes to the next line CONFIRM PW.
• Enter the new password with the number buttons.The tab changes to the OK field.
• Press the button OK/ENTER. The password has nowbeen changed.
Note:In the event that you forget your password you canuse the factory default password (888888).
X X X XOLD PASSWORD
NEW PASSWORD
CONFIRM PW
OK
* * PASSWORD SETUP PAGE * ** * PASSWORD SETUP PAGE * ** * PASSWORD SETUP PAGE * *
CHANGE PASSWORDCHANGE PASSWORDCHANGE PASSWORD
CHANGECHANGECHANGE
PASSWORD MODEPASSWORD MODEPASSWORD MODE
PASSWORDPASSWORDPASSWORD
ONONON
8.6 EXIT SETUP
• Select the last menu in the toolbar and press thebutton OK/ENTER to exit the setup menu.
9. Sound functions
9.1 To control the VolumePress the button VOL+ o to increase the volume.Press the button VOL- a to decrease the volume.
9.2 MutePress the MUTE button to switch off the sound.To switch the sound on again press the MUTE buttononce more or press one of the buttons VOL+ or VOL-.
10. Playback of DVD, SVCD,VCD and CD discs
10.1 Inserting the disc• Open the disc tray of the DVD player by
pressing the OPEN/CLOSE button. "OPEN" will now appear in the display.• Place a DVD/VCD/S-VCD with the inscribed/
labelled side facing up in the disc tray.• Close the flap of the disc tray."LOAD" will appear in the display.• The contents of the inserted DVD/VCD/S-VCD
will now be loaded; this may take a few se-conds.
• Playback of the inserted DVD/VCD/S-VCD startsautomatically.
EXIT SETUPEXIT SETUPEXIT SETUP
IB_KH6500_AR23388_LB5 01.08.2008 13:15 Uhr Seite 91
- 92 -
Note:DVDs, that you want to playback with the DVD play-er may possibly have a country code, which is prin-ted on the DVD jacket.
The DVD player can only playback DVDs with thecountry code 2.
If no country code is printed on the jacket of aDVD...
• but instead the symbol then the DVD can beplayed back on the DVD player.
• the DVD may possibly not play back on the DVDplayer. You can check this by attempting to playback the DVD.
Depending on the inserted DVD/VCD/S-VCD it ispossible that the contents of the DVD/VCD/s-VCDwill not playback immediately, rather first a selec-tion menu appears on the television screen.In this case select with the Navigation buttons���� the menu item, which will start the play-back of the film. • To start the playback of the film...• Press the button OK/ENTER or press the button
PLAY/PAUSE.
10.2 Playback functions when playingback DVDs, VCDs, S-VCDs, MPEGor Audio CDs
During the playback of a DVD/VCD/S-VCD youcan use the following DVD player functions.
Pause playbackTo pause the playback:• During playback press the button; PLAY/PAUSE. The prompt "�" appears in the display.The display shows a freeze frame of the scene youhave just paused.• To continue with playback of the film press the
button PLAY/PAUSE.
Stop playbackTo stop playback press the button STOP.
Resume functionIf you stopped playback of the inserted DVD/VCD/S-VCD by pressing the STOP button once then theDVD player automatically saves the position, atwhich playback was stopped. This function is called"Resume function". The display will show TO RESU-ME: PRESS PLAY BUTTON. As soon as you pressthe PLAY/PAUSE button again playback will continuefrom the saved position.If you press the STOP button a second time the savedposition, at which you stopped playback is deleted.As soon as you press the PLAY/PAUSE button againplayback of the inserted DVD/VCD/S-VCD startsfrom the beginning.
Skip to beginning of chapter (SKIP)
Note:This function may not be available on allDVDs/VCDs/S-VCDs! If you attempt to carry out afunction that is not available the symbol will bedisplayed on the television screen.
• With the buttons SKIP� FORWARD and SKIP� BACKWARDS you can, during playback, skipwithin the film on the inserted DVD/VCD/S-VCDto the beginning of the next chapter or skip backto the previous chapter
The respectively selected chapter will immediatelyplayback without you having to press the PLAY/PAUSEbutton. The number of the respectively selectedchapter will be displayed on the front panel of theDVD player to the left of the played back so far time.
Entry of the title number via number keys
Note:This function may not be available on allDVDs/VCDs/S-VCDs! If you attempt to carry out afunction that is not available the symbol will bedisplayed on the television screen.
IB_KH6500_AR23388_LB5 01.08.2008 13:15 Uhr Seite 92
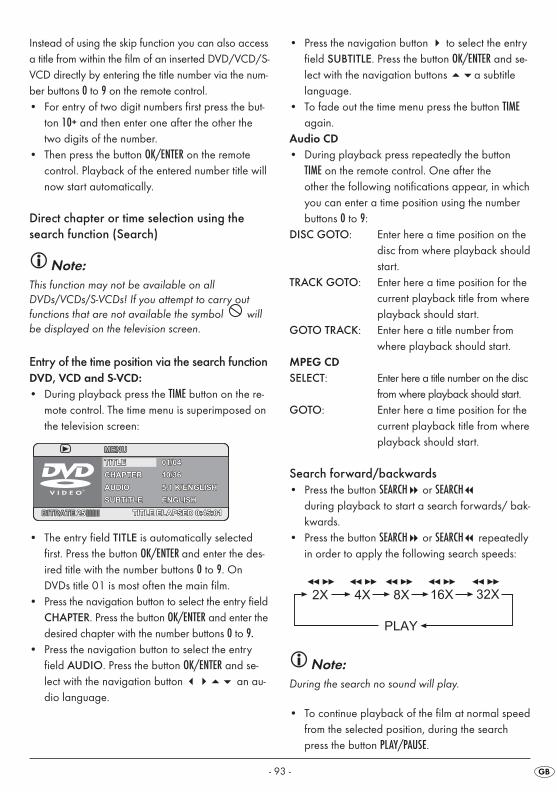
- 93 -
Instead of using the skip function you can also accessa title from within the film of an inserted DVD/VCD/S-VCD directly by entering the title number via the num-ber buttons 0 to 9 on the remote control.• For entry of two digit numbers first press the but-
ton 10+ and then enter one after the other thetwo digits of the number.
• Then press the button OK/ENTER on the remotecontrol. Playback of the entered number title willnow start automatically.
Direct chapter or time selection using the search function (Search)
Note:This function may not be available on allDVDs/VCDs/S-VCDs! If you attempt to carry outfunctions that are not available the symbol willbe displayed on the television screen.
Entry of the time position via the search functionDVD, VCD and S-VCD:• During playback press the TIME button on the re-
mote control. The time menu is superimposed onthe television screen:
• The entry field TITLE is automatically selectedfirst. Press the button OK/ENTER and enter the des-ired title with the number buttons 0 to 9. OnDVDs title 01 is most often the main film.
• Press the navigation button to select the entry fieldCHAPTER. Press the button OK/ENTER and enter thedesired chapter with the number buttons 0 to 9.
• Press the navigation button to select the entryfield AUDIO. Press the button OK/ENTER and se-lect with the navigation button ���� an au-dio language.
CHAPTERCHAPTERCHAPTER
AUDIOAUDIOAUDIO
SUBTITLESUBTITLESUBTITLE
01/0401/0401/04
10/3610/3610/36
5.1 K/ENGLISH5.1 K/ENGLISH5.1 K/ENGLISH
ENGLISHENGLISHENGLISH
TITLE ELAPSED 0:45:01TITLE ELAPSED 0:45:01TITLE ELAPSED 0:45:01BITRATEBITRATEBITRATE 252525
MENUMENUMENU
TITLETITLETITLE
• Press the navigation button � to select the entryfield SUBTITLE. Press the button OK/ENTER and se-lect with the navigation buttons ��a subtitlelanguage.
• To fade out the time menu press the button TIMEagain.
Audio CD• During playback press repeatedly the button
TIME on the remote control. One after the other the following notifications appear, in whichyou can enter a time position using the numberbuttons 0 to 9:
DISC GOTO: Enter here a time position on thedisc from where playback shouldstart.
TRACK GOTO: Enter here a time position for thecurrent playback title from whereplayback should start.
GOTO TRACK: Enter here a title number fromwhere playback should start.
MPEG CDSELECT: Enter here a title number on the disc
from where playback should start.GOTO: Enter here a time position for the
current playback title from whereplayback should start.
Search forward/backwards• Press the button SEARCH� or SEARCH
during playback to start a search forwards/ bak-kwards.
• Press the button SEARCH� or SEARCH repeatedlyin order to apply the following search speeds:
Note:During the search no sound will play.
• To continue playback of the film at normal speedfrom the selected position, during the searchpress the button PLAY/PAUSE.
IB_KH6500_AR23388_LB5 01.08.2008 13:15 Uhr Seite 93
- 94 -
Slow motion function (DVD, VCD, S-VCD only)• Press the button SLOW to set playback to slow mo-
tion. Press the button SLOW repeatedly to applythe following slow motion speeds:
Note:During slow motion playback no sound will be played.
• To continue playback at normal speed, duringslow motion playback press the buttonPLAY/PAUSE.
Frame by frame playback (Step)(DVD, VCD, S-VCD only)
Note:This function may not be available on allDVDs/VCDs/S-VCDs! If you attempt to carry outfunctions that are not available the symbol willbe displayed on the television screen.
• During playback press the button STEP to stopplayback. The display shows a freeze frame ofthe scene you have just paused.
• With each additional press of the button STEP thepaused image advances by one frame.
• To continue playback press the button PLAY/PAUSE.
Image enlargement (Zoom) (DVD, VCD, S-VCD and MPEG only)
Note:This function may not be available on allDVDs/VCDs/S-VCDs! If you attempt to carry outfunctions that are not available the symbol willbe displayed on the television screen.
During playback of an inserted DVD/VCD/S-VCDyou can enlarge and reduce the image on the tele-vision screen in three stages. • Press repeatedly the button ZOOM to apply the fol-
lowing enlargement and/or reduction:
With the navigation buttons ���� the sectionof the enlargement can be shunted.
Camera position (DVD only)
Note:This function may not be available on allDVDs/VCDs/S-VCDs! If you attempt to carry outfunctions that are not available the symbol willbe displayed on the television screen.
Many films on DVD contain chapters, which were recorded from different camera perspectives simul-taneously. With films that have such chapters availa-ble you can view the same chapter from differentperspectives.• For this, during playback of the inserted DVD,
press the button ANGLE on the remote control.Each press on the button ANGLE will switch to one of the available camera perspectives.
IB_KH6500_AR23388_LB5 01.08.2008 13:15 Uhr Seite 94
- 95 -
Repeat function for DVDs, VCDs, S-VCDs andAudio CDsWith the repeat function you can…... in the case of DVDs, selectively repeat title,
chapter or the entire DVD.... in the case of VCDs/S-VCDs individual titles
and/or the entire VCD/S-VCD repeatedly play-back.
... in the case of audio CDs, playback repeatedly a particular track and/or the entire CD.
To switch on the repeat playback …• During playback press repeatedly the button
REPEAT.The repeat symbol appears in the display withone of the following notifications:CHAPTER Select CHAPTER to continuously
repeat the current playbackchapter until playback repeat isswitched off or playback is stop-ped by pressing the button STOPtwice.
TITLE Select TITLE to continuously repe-at the current playback title untilplayback repeat is switched offor playback is stopped by pres-sing the button STOP twice.
ALL Select ALL to continuously repeatall available titles on the disc,thus the entire disc, until play-back repeat is switched off orplayback is stopped by pressingthe button STOP twice.
Display off To switch off repeat playbackpress the button REPEATrepeatedly during playback untilno more notifications appear inthe display.
Repeat sequence (A – B)With this function you can repeat playback of a favourite sequence within a chapter of the currentplayback disc.To do this …• During playback press the button A–B on the re-
mote control as soon as the desired sequencebegins to playback. On the television screen therepeat symbol appears with the notice A.
• Press the button A–B again as soon as the end ofthe desired sequence has played back. Bear inmind that the beginning and end of a sequencemust be located in the same chapter.
On the television screen the repeat symbol appears with the notice AB.Repeat playback of the selected sequence beginsimmediately without having to press the buttonPLAY/PAUSE. The sequence will continuously repeatuntil you press the button A–B again to switch off thefunction.
Bookmark functionDuring the playback of a DVD/VCD/S-VCD youcan place so called bookmarks in order to watch selected passages of a film again later. You can setup to 12 bookmarks.1. During playback of a film press the button MARK
on the remote control. In the display the follo-wing notice appears:
2. As soon as the passage, on which you want toplace a bookmark, is reached press the buttonOK/ENTER. The title and chapter, in which the posi-tion is located, as well as the exact time positionof this passage within the film will now be di-splayed in hours, minutes and seconds underbookmark 1.
3. If you want to place another bookmark then withthe navigation buttons ���� select an unoc-cupied field and press once again the buttonOK/ENTER as soon as the passage is reached, onwhich you want to place the second bookmark.
4. Proceed in the same manner to place furtherbookmarks. Once you have placed all the de-sired bookmarks press the button MARK to fadeout the bookmark menu from the screen.
IB_KH6500_AR23388_LB5 01.08.2008 13:15 Uhr Seite 95
- 96 -
5. Later if you want to skip to the passages, onwhich you have placed bookmarks press the button MARK again.
6. Select with the navigation buttons ���� thedesired bookmark.
7. Confirm the selection by pressing the buttonOK/ENTER. Playback of the selected chapter willnow start automatically from the location, onwhich you placed the selected bookmark.
8. To delete placed bookmarks press the button RETURN/CLR.
10.3 Notice functions
Activate the DVD menu (Menu)
Note:This function may not be available on allDVDs/VCDs/S-VCDs! If you attempt to carry outfunctions that are not available the symbol willbe displayed on the television screen.
With many films on DVD there is a main menu onthe disc that apart from the option of playing themain film enables you, for example...• to choose the language for subtitles and film
dialogue• to select direct from chapters • to playback the films bonus material (Back-
ground information, "Making of" etc.)If such a menu is present on the DVD that is insertedinto the DVD player then you can access it duringplayback by pressing the button MENU/PBC.You select particular menu items by pressing the navigation buttons ���� to confirm the selec-ted menu item press…• the button PLAY/PAUSEor• the button OK/ENTER.To return to playback press the button MENU/PBCagain.
Note:If you cancel playback by pressing the button"STOP" twice (Playback stop without Resume func-tion) activation of the main menu on the disc is notpossible.
Playback Control (PBC) with VCDs/S-VCDsMany VCDs/S-VCDs have Playback Control (inshort "PBC"). Playback Control indicates a mainmenu that allows operation of several functions ofthe VCD/S-VCD. If PCB is available on a VCD/S-VCD inserted in theDVD player you must first activate it in order to beable to superimpose the menu.To activate PBC …• During playback or when playback is stopped
press the button MENU/PBC. In the display the noti-ce PBC OFF appears.
• Press the button MENU/PBC again. In the displaythe notice PBC ON appears. PBC is now swit-ched on and the disc's main menu can be acces-sed with the buttons RETURN/CLR, MENU/PBC or TITLE.
Note:If you switch on PBC during playback then it is possible that playback will stop and start againfrom the beginning and/or with the main menu.
Superimpose/fade out subtitles
Note:This function may not be available on allDVDs/VCDs/S-VCDs! If you attempt to carry out afunction that is not available the symbol will bedisplayed on the television screen.
In the event that the film on the insertedDVD/VCD/S-VCD has subtitles available then youcan superimpose these on the television screen du-ring playback by pressing the button SUBTITLE. • With the first press of the button SUBTITLE the sub-
title of the first available language will be super-imposed on the television screen.
IB_KH6500_AR23388_LB5 01.08.2008 13:15 Uhr Seite 96
- 97 -
• With each further press of the button SUBTITLE thesubtitles in subsequent available languages, oneafter the other, will be superimposed on the tele-vision screen.
The number of the currently superimposed subtitlelanguage will be superimposed on the televisionscreen (i.e. "1/10" for the first of ten available sub-title languages).• When the last of the available subtitle languages
is superimposed (i.e. "10/10" for the tenth of tenavailable subtitle languages) then you canswitch off the subtitle function by pressing thebutton SUBTITLE again. OFF is superimposed onthe television screen.
Change playback language
Note:This function may not be available on allDVDs/VCDs/S-VCDs! If you attempt to carry out afunction that is not available the symbol will bedisplayed on the television screen.
• With many films on DVD/VCD/S-VCD you canselect another playback language during play-back by pressing the button AUDIO.
• With the first press of the button AUDIO the firstavailable playback language will be switchedon. With each further press of the button AUDIOthe subsequent available playback languages,one after the other, will be switched on.
The currently switched on playback language willbe superimposed on the television screen.
Superimpose disc information
Note:This function may not be available on allDVDs/VCDs/S-VCDs! If you attempt to carry out afunction that is not available the symbol will bedisplayed on the television screen.
With this function you can superimpose all the avail-able information from a DVD/VCD/S-VCD insertedinto the DVD player onto the television screen du-ring playback.To do this …• During playback press repeatedly the button
DISPLAY to superimpose, one after the other, thefollowing information:
In the case of DVDs:• the current title number/the total number of titles• the current chapter number/the total number of
chapters• the played back so far time in hours, minutes
and seconds (TITLE ELAPSED)• the time to the end of the film in hours, seconds
and minutes (TITLE REMAIN)• the played back so far time of the chapter in
hours, minutes and seconds (CHAPTER ELAPSED)• the time to the end of the chapter in hours,
seconds and minutes (CHAPTER REMAIN)
In the case of VCDs/S-VCDs:• the current title number/the total number of titles• the played so far time of the current playback
title on the VCD/SVCD in hours, minutes and seconds (SINGLE ELAPSED)
• the time to the end of the current playback title inhours, seconds and minutes (SINGLE REMAIN)
For audio CDs:• the current title number/the total number of titles• the total elapsed time• the played back so far time of the current play-
back track on the CD in minutes and seconds(SINGLE ELAPSED)
• the time to the end of the current playback trackin minutes and seconds (SINGLE REMAIN)
• the total played back time of the CD in minutesand seconds (TOTAL ELAPSED)
• the time to the end of the CD in minutes and seconds (TOTAL REMAIN)
• To fade out the disc information press the buttonDISPLAY again.
IB_KH6500_AR23388_LB5 01.08.2008 13:15 Uhr Seite 97
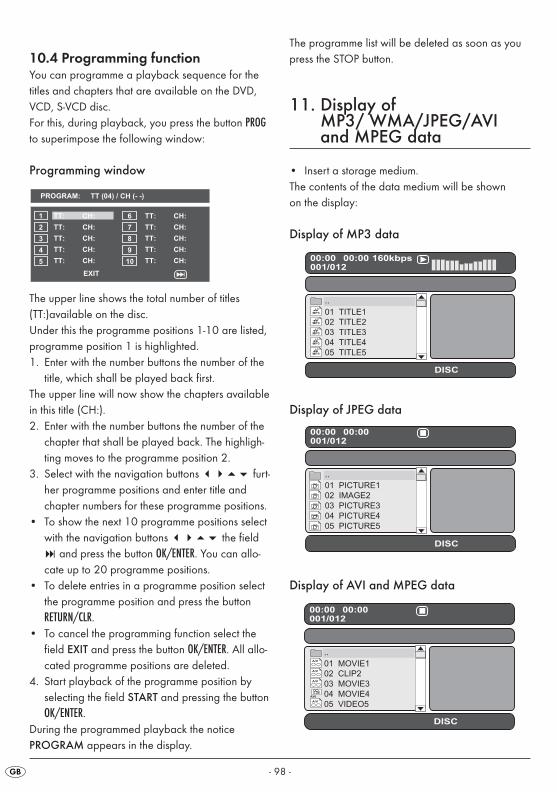
- 98 -
10.4 Programming functionYou can programme a playback sequence for the titles and chapters that are available on the DVD,VCD, S-VCD disc.For this, during playback, you press the button PROGto superimpose the following window:
Programming window
The upper line shows the total number of titles(TT:)available on the disc.Under this the programme positions 1-10 are listed,programme position 1 is highlighted.1. Enter with the number buttons the number of the
title, which shall be played back first.The upper line will now show the chapters availablein this title (CH:).2. Enter with the number buttons the number of the
chapter that shall be played back. The highligh-ting moves to the programme position 2.
3. Select with the navigation buttons ���� furt-her programme positions and enter title andchapter numbers for these programme positions.
• To show the next 10 programme positions selectwith the navigation buttons ���� the field� and press the button OK/ENTER. You can allo-cate up to 20 programme positions.
• To delete entries in a programme position selectthe programme position and press the button RETURN/CLR.
• To cancel the programming function select thefield EXIT and press the button OK/ENTER. All allo-cated programme positions are deleted.
4. Start playback of the programme position by selecting the field START and pressing the buttonOK/ENTER.
During the programmed playback the notice PROGRAM appears in the display.
The programme list will be deleted as soon as youpress the STOP button.
11. Display of MP3/ WMA/JPEG/AVIand MPEG data
• Insert a storage medium. The contents of the data medium will be shown on the display:
Display of MP3 data
Display of JPEG data
Display of AVI and MPEG data
IB_KH6500_AR23388_LB5 01.08.2008 13:15 Uhr Seite 98
- 99 -
• The data is listed on the left (Data window). Folders will be depicted with the symbol .
• To superimpose the folders available on the discpress repeatedly the button PROG until the notice FOLDER appears at the bottom of the display.
• Press the button PROG again repeatedly until thenotice FILELIST appears at the bottom of the di-splay. Folders will now be faded out and alldata on the disc is represented in a list.
• The area on the right is intended for the previe-wing of JPEG images. A preview appears assoon as you highlight a JPEG data in the datawindow.
• At the bottom is located the information bar, inwhich is displayed the image size (JPEG Image)as well as the medium (DISC, USB orSD/MMC), on which the data is located.
• Select a data with the help of the navigation buttons ����. By pressing the button OK/EN-TER confirm your selection. The data will be play-ed back and/or the JPEG Foto dis-played.
1. To open a folder, select the folder and press the button OK/ENTER. The contents of the folder willbe listed.
2. To reach a higher folder level select the symbolwith the entry ".." and press the button
OK/ENTER.
12. Playback of MP3/WMA/AVI and MPEG discs
• Select a data with the help of the navigation buttons ����. By pressing the button OK/EN-TER confirm your selection. Playback starts imme-diately.
With the playback of music or video data the follo-wing functions can be used:Play/PauseSee "10. Playback of DVD, S-VCD and VCD discs"StopSee "10. Playback of DVD, S-VCD and VCD discs"SkipSee "10. Playback of DVD, S-VCD and VCD discs"SearchSee "10. Playback of DVD, S-VCD and VCD discs"Slow (with AVI and MPEG data only)See "10. Playback of DVD, S-VCD and VCD discs"Step (with AVI and MPEG data only)See "10. Playback of DVD, S-VCD and VCD discs"Zoom (with JPEG-, AVI and MPEG data only)See "10. Playback of DVD, S-VCD and VCD discs"AB RepeatSee "10. Playback of DVD, S-VCD and VCD discs"
12.1 Repeat function with MP3/WMA/AVI/MPEG/JPEG discs
During playback press repeatedly the button REPEATto apply the following repeat functions (the set func-tion appears in the display):REPEAT1 Endless repeat of the current
title/image.REP FOLDER Repeat of the current folder.FOLDER Repeat all folders.SHUFFLE1 Random playback of all titles/
images.SHUFFLE2 Random playback of all titles/
Images whereby each title/Image will playback only once.
ONCE One time playback of the currenttitle/Image (Repeat function off).
IB_KH6500_AR23388_LB5 01.08.2008 13:15 Uhr Seite 99
- 100 -
12.2 Replay of JPEG discs • Highlight with the navigation buttons �� an
image and press the button OK/ENTER or PLAY/PAU-SE to open the image.
The image is shown on the displaySubsequently change the view to the next availableimage on the disc/in the folder.• To show the currently displayed image longer
press the button PLAY/PAUSE.• To continue playback press the button PLAY/PAUSE
again.• You can access an image direct by entering
the data number of the image with the numberbuttons and subsequently confirm with the button OK/ENTER.
• With the navigation buttons ���� you canrotate the image, during playback, in 90° steps.
• During playback press the button STOP to dislay aminiature view of all the images in the folder/onthe disc. 12 miniatures will be displayed oneach page.
• Select with the navigation buttons ���� animage and start playback with OK/ENTER orPLAY/PAUSE.
• Select with the navigation buttons ����
one of the following entries from the bottom di-splay line and confirm with OK/ENTER:
Slide Show Starts a slide show of the imagesin the folder/on the disc
Menu Shows the available button func-tions for JPEG playback. Pressthe button OK/ENTER until this sum-mery has faded out.
Prev changes to the previous pageNext changes to the next page• Press the button MENU/PBC , to change back to the
data list again
12.3 Programmed replay withMP3/WMA/AVI/MPEG/JPEGdiscs
You can programme a playback sequence, in whichthe titles on a disc shall be played back.• Switch, if necessary, to the data list by repeated-
ly pressing the button PROG until FILE LIST shows atthe bottom in the display.
• Select with the navigation buttons ����
the title that shall be played back first.• Press the button MARK to move the title to
the play list.• In the same manner highlight further titles and
move these to the play list.• To display the play list press repeatedly the
button PROG until the notice PLAYLISTappears at the bottom in the display.
• Start playback from the play list by highlighting a title and then press the button PLAY/PAUSEand/or the button OK/ENTER.
• To delete a title from the play list highlight the tit-le and press the button MARK. The title will be re-moved from the play list.
13. Playback of USB/SD/MMCdata mediums
13.1 Compatible data mediumsWith your device you can playback MP3/WMA/JPEG/AVI/MPEG data from USB data mediums(Universal Serial Bus = universal interface for datatransfer) like, for example, a USB Stick or Flash memory card in the SD/MMC format.
Note: Due to the vast number of available storage medi-ums there can be no guarantee of compatibility withall current and future storage mediums. Do NOTconnect to the device any hard discs that are equip-ped with a USB connection! This can result in theloss of data!
IB_KH6500_AR23388_LB5 01.08.2008 13:15 Uhr Seite 100
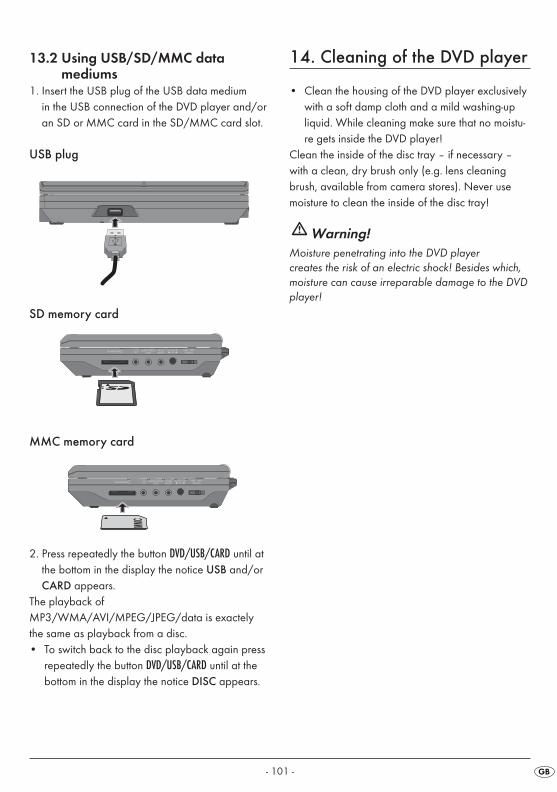
- 101 -
13.2 Using USB/SD/MMC data mediums
1. Insert the USB plug of the USB data medium in the USB connection of the DVD player and/oran SD or MMC card in the SD/MMC card slot.
USB plug
SD memory card
MMC memory card
2. Press repeatedly the button DVD/USB/CARD until atthe bottom in the display the notice USB and/orCARD appears.
The playback ofMP3/WMA/AVI/MPEG/JPEG/data is exactelythe same as playback from a disc. • To switch back to the disc playback again press
repeatedly the button DVD/USB/CARD until at thebottom in the display the notice DISC appears.
14. Cleaning of the DVD player
• Clean the housing of the DVD player exclusivelywith a soft damp cloth and a mild washing-up liquid. While cleaning make sure that no moistu-re gets inside the DVD player!
Clean the inside of the disc tray – if necessary –with a clean, dry brush only (e.g. lens cleaningbrush, available from camera stores). Never use moisture to clean the inside of the disc tray!
Warning!Moisture penetrating into the DVD player creates the risk of an electric shock! Besides which,moisture can cause irreparable damage to the DVDplayer!
IB_KH6500_AR23388_LB5 01.08.2008 13:15 Uhr Seite 101
- 102 -
15. Disposal
Do not dispose of the appliance in yournormal domestic waste. This product issubject to the European guideline2002/96/EC.
Dispose of the appliance through an approved dis-posal centre or at your community waste facility.Observe the currently applicable regulations. In case of doubt, please contact your waste disposalcentre.
Battery disposal!Batteries may not be disposed of with normal domestic waste. All consumers are statutorily obli-ged to dispose of batteries at the collection point intheir community/district or with the original supplier.The purpose of this obligation is to ensure that batteries can be disposed of in an environmentallyfriendly manner. Only dispose of batteries whenthey are fully discharged.
Dispose of all packaging materials in an environmentally friendly manner.
16. Troubleshooting
Display is blank/DVD player shows no functions even though it is switched onA Check to see that the power cord is properly
plugged into the power socket.B Check to see if the power socket, in which you
have plugged the power cord of the powersupply unit/vehicle adapter, is supplying po-wer by connecting to it another device. If ne-cessary plug the power cord of the power sup-ply unit/vehicle adapter into another powersocket.
C Switch off the DVD player by pressing the "Power" button and wait for ten seconds. Thenswitch the DVD player back on by pressing the"Power" button.
The display shows "No Disc" even though there is a disc insertedA The disc is dirty, scratched or damaged.
Clean the disc or insert another disc.B The Country/Region code on the inserted
DVD/VCD/S-VCD does not correspond to theCountry/Region code of the DVD player. Inthis case the DVD/VCD/S-VCD can not beplayed back with the DVD player.
Inserted disc will not playbackIt is possible that a layer of condensation has builtup on the DVD players laser scan lens. This can be the case especially if the DVD player has been subjected to strong temperature fluctuations.If this is the case place the DVD player in a dry en-vironment at normal room temperature. First removethe currently inserted disc from the disc tray. Sub-sequently allow the DVD player to sit switched onfor at least an hour without using it until the layer of condensation has dissipated.
IB_KH6500_AR23388_LB5 01.08.2008 13:15 Uhr Seite 102
- 103 -
No image or Black/White image onlyA Check to make sure that all connection cables
between the DVD player and the television (or Video projector) are firmly inserted into the corresponding sockets
B Check to make sure that the settings in the OSD menu match the connections variant, withwhich you have connected the DVD player tothe television (or Video projector).
C Check by means of the televisions (or Videoprojectors) operating instructions to see if set-tings to the television (or Video projector) maybe necessary in order to use the DVD playerwith the television.
No soundA Check to see if the DVD player is possibly
switched to mute (MUTE button).B Check to see that all connecting cables bet-
ween the DVD player and potentially connec-ted audio components are firmly plugged intothe corres-ponding sockets
C Check to make sure that the settings in the OSD menu match the connections variant, withwhich you have connected the audio compo-nent to the DVD player.
D Check by means of the televisions operating in-structions to see if settings to the television maybe necessary in order to use the DVD playerwith the television.
E Check by means of the operating instructionsfor a potential connected audio component ifsettings to it are necessary in order to use itwith the DVD player.
No 4:3 or 16:9 image A Check by means of the televisions operating in-
structions, which image formats the televisionhas at its disposal.
B Check to see if the settings in the OSD menumatch the available image format of the tele-vision.
Remote control not functioningA Check to make sure that the remote control
batteries have been inserted into the batterycompartment with the correct polarity.
B Check to see if the remote control batteries are exhausted and, if necessary, change bothbatteries.
C Make sure that there are no obstacles locatedbetween the remote control and the DVD player.
D Be situated no more than five meters from theDVD player when using the remote control.
Playback language/ Subtitle language donot correspond to the settings in the OSDmenuThe playback language/Subtitle language setting inthe OSD menu is not available on the inserted disc.
One or several functions can not be switchedonThe selected function may not be available on allDVDs/VCDs/S-VCDs! If you attempt to carry out afunction that is not available the symbol will bedisplayed on the television screen.
None of the buttons on the appliance or onthe remote control are functioning/other malfunctionsA Switch off the DVD player by pressing the
POWER button. Wait ten seconds, then pressthe "Power" button again once to switch theDVD player back on.
B If the malfunction is still present: Reset the DVD player to its default settings.
Contact one of our service partners in yourarea if …• the stated function defect can not be resolved
as described or• other functional defects arise.
For this see chapter 18. "Warranty & Service".
IB_KH6500_AR23388_LB5 01.08.2008 13:15 Uhr Seite 103
- 104 -
17. Glossary / Key Word Index
17.1 What are DVDs, VCDs and S-VCDs?
DVDsDVD is the abbreviation for "Digital Versatile Disc".DVDs are a storage medium for audio and videodata; they are available in 8 cm and 12 cm (Dia-meter) formats. Because of the much higher storagecapacity as compared to CD-Rs/CD-RWs DVDs canprovide a playback duration of up to eight hours forthe audio and video data stored on them.
VCDs/S-VCDs"Video CD" (VCD) and "Super Video CD" (S-VCD)are designations for two processes of compressedstorage, thus space saving, of films on CDs. VCDsand S-VCDs are available in 8 cm and 12 cm (Dia-meter) formats. Their storage capacity is a greatdeal lower than that of DVDs. For this reason theyonly offer a playback duration, for the saved audioand video data on them, of 20 minutes (8 cm for-mat) and/or 74 minutes (12 cm format).
VCDs are available in two versions: • With version 1.1 VCDs/S-VCDs only audio and
video data can be played back.• With version 2.0 VCDs/S-VCDs, PBC (Playback
Control) functions are available. In addition stillimages can be played back in a higher resolu-tion.
Playback Control (PBC)Version 2.0 VCDs/S-VCDs have Playback Control(in short "PBC") at their disposal. Then on the VCD/S-VCD a main menu is available, by which variousfunctions of the VCD/S-VCD are allowed to be ope-rated.
17.2 What are Title and Chapter?Title is the name given to the largest units of imageand sound units on DVDs; on many DVDs the(Main) film has the title number 01. For bonus mate-rial (i.e. Film trailer, background information etc.),that is available on many DVDs, other possible title numbers can be used.
Chapter is the name given to the next smaller imageand sound units beneath title. If the title or titles on a DVD/VCD/S-VCD are subdivided into chapters,they are assigned numbers that can be entered toselect the chapters directly.
Bear in mind that not on all DVDs …• are the DVD or the title divided into (numbered)
chapters• Chapters are also designated as "Scenes"
(i.e. in the main menu of DVDs)
17.3 Dolby SurroundDolby Surround is an analogue sound format, bywhich the two channels of a stereo sound signal are used in order to accommodate room sound information for further channels. With a Dolby Sur-round decoder the signals are again converted intosound and/or music and are fed to two additionalloudspeakers, which are to be situated behind the listening area.
Dolby PrologicIn comparison to Dolby Surround sound format,with Dolby Prologic an additional channel in the ste-reo signal is used; this is the so called "Centre"channel. The corresponding centre loudspeaker isto be situated in the middle between the stereoloudspeakers. The deepest sounds are fed to a bassloudspeaker, the so called "Subwoofer". The subwo-ofer can be placed in any desired location in theroom; the logic for this is that the bass sounds thatthe subwoofer puts out can scarcely be localizedexactely by the human ear
IB_KH6500_AR23388_LB5 01.08.2008 13:15 Uhr Seite 104

- 105 -
Dolby Digital (5.1)Dolby Digital, also designated as AC3, is a digitalsound format, by which up to six seperate audiochannels can be transported. With most of the current DVDs, the sound is stored in the so called"Dolby Digital 5.1" format; the "5" in the title "5.1"stands for three front and two rear surround soundchannels, the "1" for the bass sound chanel.
DTSDTS is the abbreviation for "Digital Theatre System"and refers to one of the most common surroundsound formats for DVDs. As with Dolby Digital 5.1,DTS uses three front and two rear surround soundchannels as well as a bass sound channel.
17.4 What are PAL and NTSC?
PALPAL is the abbreviation for "Phase Alternation Line".PAL is the mid and west Europe (Exception: France,see the heading "SECAM") customary and mostwide spread colour television standard.
NTSCNTSC is the abbreviation for "National TelevisionSystem Committee". NTSC is a colour television standard that is primarily used in the USA and Japan.
17.5 MP3, WMA, JPEG and MPEG
MP3MP3 denotes a process and/or format developedby the Fraunhofer Institute for the compression of audio data. In the MP3 format compressed musicpieces are only a fraction of their original size,which, for example, on CD-Rs/CD-RWs allows forstorage of a considerably greater volume of musicthan on commercially available audio CDs, onwhich audio data is stored in the CDA format.The structure of an MP3-CD can, for example, ap-pear as follows, if the MP3 data is stored in files:
WMAWMA ("Windows® Media Audio") is a data formatdeveloped by Microsoft® for audio data.
JPEGJPEG ("Joint Photographics Expert Group") denotesa wide spread graphic format, developed by the organization with the same name, with which imagedata of the colour and grey scales are compressed.
MPEGMPEG ("Moving Picture Experts Group") refers to a video compression format.
17.6 What are files?As opposed to audio CDs the title on a CD-R/CD-RW with MP3-, WMA- or JPEG data can be storedin files, for example, in order to file titles from diffe-rent genres.
ORDNER MP3MP3-CD FOLDER
IB_KH6500_AR23388_LB5 01.08.2008 13:15 Uhr Seite 105
- 106 -
18. Warranty & service
You receive a 3-year warranty on this device fromthe date of purchase. If, in spite of our high qualitystandards, you have reason to complain about thisdevice, please contact our service hotline.If it is not possible to deal with your complaint byphone, they will provide• a processing number (RMA number) and • an address where you can send your product
for repairs under the warranty.
If you send the device please enclose a copy of theproof of purchase (till receipt). The device must bepackaged securely for transport and the RMA num-ber must be directly visible. Shipments without anRMA number can not be processed.
Note:The warranty applies to material ormanufacturing faults.The warranty does not apply to• parts subject to wear and tear.• damage to breakable parts such as
switches and rechargeable batteries.
The product is only designed for private and notcommercial use. Improper handling and usage notin accordance with the intended purpose, use offorce and any interventions that are not carried outby our authorised service centre will render thewarranty null and void. This warranty does notaffect your legal rights.
19. Importer
KOMPERNASS GMBHBURGSTRASSE 21D-44867 BOCHUMwww.kompernass.com
✄
IB_KH6500_AR23388_LB5 01.08.2008 13:15 Uhr Seite 106

Fill
in t
his
sect
ion
and
su
bm
it it
wit
h th
e d
evic
e!
Sender, please write clearly:
Last name
First name
Street
Postcode/Place
Country
Telephone
Date/Signature
Description of fault:
✄
Warranty
DES LtdTel.: 0870/787-6177Fax:0870/787-6168e-mail: [email protected]
Irish ConnectionTel: 00353 (0) 87 99 62 077Fax:00353 18398056e-mail: [email protected]
www.mysilvercrest.de
In order to guarantee a cost free re-pair procedure please get in touchwith the service hotline. Make sureyou have your sales slip handy.
Portable DVD-Player KH 6500
IB_KH6500_AR23388_LB5 01.08.2008 13:15 Uhr Seite 107

IB_KH6500_AR23388_LB5 01.08.2008 13:15 Uhr Seite 108
- 109 -
INHALTSVERZEICHNIS SEITE1. Technische Daten 111
2. Verwendung und Funktion 111
3. Sicherheitshinweise 112
4. Gerätebeschreibung 114
5. Inbetriebnahme 1155.1 Auspacken.............................................................................................................................115
5.2 Lieferumfang prüfen .............................................................................................................115
5.3 Fernbedienung vorbereiten .................................................................................................115
6. Anschlüsse und Anschlussmöglichkeiten 1166.1 Netzanschluss .......................................................................................................................116
6.2 Akku Anschluss .....................................................................................................................116
6.3 Anschluss an weitere Geräte ..............................................................................................117
6.5 Blickposition einstellen .........................................................................................................120
7. Gebrauch 120
8. Menüfunktionen 1208.1 ALLGEMEINES SETUP-MENÜ ............................................................................................121
8.2 DIG. AUSGANG SETUP MENÜ........................................................................................122
8.3 VIDEO EINSTELLUNGEN ...................................................................................................123
8.4 SPEZIELLE EINSTELLUNGEN..............................................................................................123
8.5 PASSWORT EINSTELLUNGEN ..........................................................................................125
8.6 EINSTELLMENÜ VERLASSEN.............................................................................................126
9. Klangfunktionen 1269.1 Lautstärke regeln ..................................................................................................................126
9.2 Stummschaltung (MUTE)......................................................................................................126
10. Wiedergabe von DVD-, SVCD-, VCD- und CD-Disks 12610.1 Disk einlegen......................................................................................................................126
10.2 Wiedergabefunktionen beim Abspielen von DVDs, VCDs, S-VCDs, MPEG- oder Audio-CDs..............................................................127
10.3 Anzeigefunktionen .............................................................................................................131
10.4 Programmierfunktion..........................................................................................................133
IB_KH6500_AR23388_LB5 01.08.2008 13:15 Uhr Seite 109
- 110 -
11. Anzeige von MP3-/WMA-/ JPEG-/AVI-/MPEG-Dateien 133
12. Wiedergabe von MP3-/ WMA-/AVI- und MPEG Disks 13412.1 Wiederholfunktion bei MP3-/ WMA-/AVI-/MPEG- und JPEG Disks...........................135
12.2 Wiedergabe von JPEG-Disks ............................................................................................135
12.3 Programmierte Wiedergabe bei MP3-/WMA-/AVI-/MPEG- und JPEG Disks ...........135
13. Wiedergabe von USB/SD/MMC-Datenträgern 13613.1 Kompatible Datenträger....................................................................................................136
13.2 USB/SD/MMC Datenträger verwenden........................................................................136
14. Reinigung des DVD-Players 137
15. Entsorgen 137
16. Störungen und Fehler beheben 138
17. Glossar/Stichwortverzeichnis 13917.1 Was sind DVDs, VCDs und S-VCDs? ...............................................................................139
17.2 Was sind Titel und Kapitel? ..............................................................................................140
17.3 Dolby Surround..................................................................................................................140
17.4 Was sind PAL und NTSC?.................................................................................................140
17.5 MP3, WMA, JPEG und MPEG ........................................................................................140
17.6 Was sind Ordner? .............................................................................................................141
18. Garantie und Service 141
19. Importeur 142
Lesen Sie die Bedienungsanleitung vor der ersten Verwendung aufmerksam durch und heben Sie diese fürden späteren Gebrauch auf. Händigen Sie bei Weitergabe des Gerätes an Dritte auch die Anleitung aus.
IB_KH6500_AR23388_LB5 01.08.2008 13:15 Uhr Seite 110
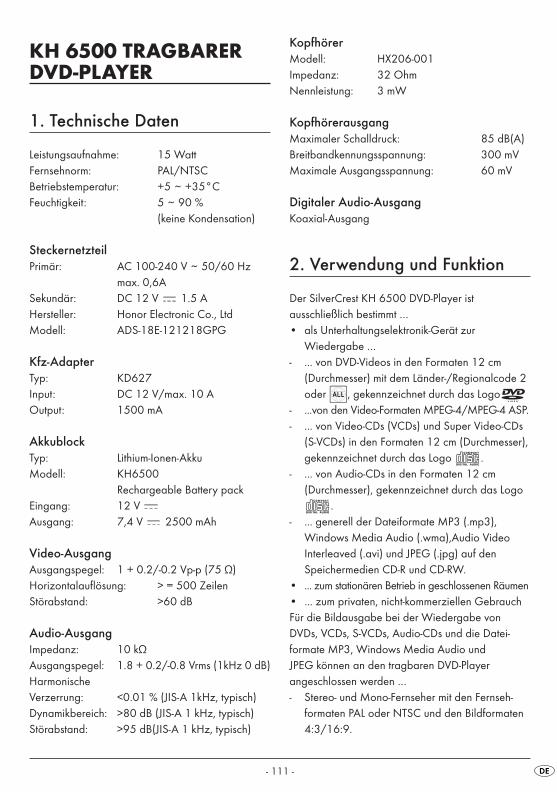
- 111 -
KH 6500 TRAGBARERDVD-PLAYER
1. Technische Daten
Leistungsaufnahme: 15 WattFernsehnorm: PAL/NTSCBetriebstemperatur: +5 ~ +35°CFeuchtigkeit: 5 ~ 90 %
(keine Kondensation)
SteckernetzteilPrimär: AC 100-240 V ~ 50/60 Hz
max. 0,6ASekundär: DC 12 V 1.5 AHersteller: Honor Electronic Co., LtdModell: ADS-18E-121218GPG
Kfz-AdapterTyp: KD627Input: DC 12 V/max. 10 A Output: 1500 mA
AkkublockTyp: Lithium-Ionen-AkkuModell: KH6500
Rechargeable Battery packEingang: 12 V Ausgang: 7,4 V 2500 mAh
Video-Ausgang Ausgangspegel: 1 + 0.2/-0.2 Vp-p (75 Ω) Horizontalauflösung: > = 500 Zeilen Störabstand: >60 dB
Audio-Ausgang Impedanz: 10 kΩAusgangspegel: 1.8 + 0.2/-0.8 Vrms (1kHz 0 dB)Harmonische Verzerrung: <0.01 % (JIS-A 1kHz, typisch)Dynamikbereich: >80 dB (JIS-A 1 kHz, typisch) Störabstand: >95 dB(JIS-A 1 kHz, typisch)
KopfhörerModell: HX206-001Impedanz: 32 OhmNennleistung: 3 mW
KopfhörerausgangMaximaler Schalldruck: 85 dB(A)Breitbandkennungsspannung: 300 mVMaximale Ausgangsspannung: 60 mV
Digitaler Audio-AusgangKoaxial-Ausgang
2. Verwendung und Funktion
Der SilverCrest KH 6500 DVD-Player ist ausschließlich bestimmt …• als Unterhaltungselektronik-Gerät zur
Wiedergabe …- ... von DVD-Videos in den Formaten 12 cm
(Durchmesser) mit dem Länder-/Regionalcode 2oder , gekennzeichnet durch das Logo
- ...von den Video-Formaten MPEG-4/MPEG-4 ASP.- ... von Video-CDs (VCDs) und Super Video-CDs
(S-VCDs) in den Formaten 12 cm (Durchmesser),gekennzeichnet durch das Logo .
- ... von Audio-CDs in den Formaten 12 cm(Durchmesser), gekennzeichnet durch das Logo
.- ... generell der Dateiformate MP3 (.mp3),
Windows Media Audio (.wma),Audio VideoInterleaved (.avi) und JPEG (.jpg) auf den Speichermedien CD-R und CD-RW.
• ... zum stationären Betrieb in geschlossenen Räumen• ... zum privaten, nicht-kommerziellen GebrauchFür die Bildausgabe bei der Wiedergabe vonDVDs, VCDs, S-VCDs, Audio-CDs und die Datei-formate MP3, Windows Media Audio und JPEG können an den tragbaren DVD-Player angeschlossen werden …- Stereo- und Mono-Fernseher mit den Fernseh-
formaten PAL oder NTSC und den Bildformaten4:3/16:9.
IB_KH6500_AR23388_LB5 01.08.2008 13:15 Uhr Seite 111
- 112 -
Für die Ausgabe von Ton bzw. Musik können benutzt bzw. an den tragbaren DVD-Player angeschlossen werden …- Lautsprecher eines an den DVD-Player
angeschlossenen Fernsehers- externe Audio-Komponenten wie HiFi-Anlagen,
Receiver oder Surround-Anlagen (analog/digital)
Achtung!Für Schäden, die aus nicht bestimmungsgemäßemGebrauch des Gerätes resultieren, wird keine Haftung/Gewährleistung übernommen!
3. Sicherheitshinweise
• Dieses Gerät ist nicht für Kinder oder andere Personen geeignet, deren physische, sensorischeoder geistige Fähigkeiten ohne Unterstützungoder Aufsicht eine sichere Nutzung des Gerätesverhindern. Kinder sollten beaufsichtigt werden,um sicher zu stellen, dass sie nicht mit dem Gerätspielen.
• Um ein unbeabsichtigtes Einschalten zu vermei-den, ziehen Sie nach jedem Gebrauch und vorjeder Reinigung den Netzstecker.
• Prüfen Sie das Gerät und alle Teile auf sichtbareSchäden. Nur in einwandfreiem Zustand kann dasSicherheitskonzept des Gerätes funktionieren.
• Der Netzstecker muss immer leicht zugänglichsein, so dass im Notfall das Gerät schnell vomStromnetz getrennt werden kann.
Gefahr durch elektrischen Schlag!• Schließen Sie das Gerät nur an eine vorschrifts-
mäßig installierte und geerdete Netzsteckdosean. Die Netzspannung muss mit den Angaben aufdem Typenschild des Gerätes übereinstimmen.
• Lassen Sie beschädigte Netzstecker oder Netz-kabel sofort von autorisiertem Fachpersonaloder dem Kundenservice austauschen, um Gefährdungen zu vermeiden.
• Lassen Sie Anschlussleitungen bzw. Geräte, dienicht einwandfrei funktionieren oder beschädigtwurden, sofort vom Kundendienst reparierenoder austauschen.
Tauchen Sie das Gerät und das Steckernetzteilniemals in Wasser ein. Wischen Sie es nur miteinem leicht feuchten Tuch ab.
• Setzen Sie das Gerät nicht dem Regen aus undbenutzen Sie es auch niemals in feuchter odernasser Umgebung.
• Achten Sie darauf, dass die Anschlussleitungwährend des Betriebs niemals nass oder feuchtwird.
• Sie dürfen das Gerätegehäuse nicht öffnen oderreparieren. In diesem Falle ist die Sicherheit nichtgegeben und die Gewährleistung erlischt.
• Schützen Sie das Gerät vor Tropf- und Spritzwasser.Stellen Sie deshalb keine mit Flüssigkeit gefülltenGegenstände (z. B. Blumenvasen) auf das Gerät.
Brandgefahr!• Benutzen Sie das Gerät nicht in der Nähe von
heißen Oberflächen.• Stellen Sie das Gerät nicht an Orten auf, die
direkter Sonnenstrahlung ausgesetzt sind. Andernfalls kann es überhitzen und irreparabelbeschädigt werden.
• Lassen Sie das Gerät während des Betriebs niemals unbeaufsichtigt.
• Decken Sie niemals die Lüftungsschlitze des Gerätes ab, wenn es eingeschaltet ist.
• Stellen Sie keine offenen Brandquellen, wie z.B.Kerzen auf das Gerät.
IB_KH6500_AR23388_LB5 01.08.2008 13:15 Uhr Seite 112
- 113 -
Verletzungsgefahr• Halten Sie Kinder von Anschlussleitung und
Gerät fern. Kinder unterschätzen häufig die Gefahren von Elektrogeräten.
• Sorgen Sie für einen sicheren Stand des Gerätes.• Falls das Gerät heruntergefallen oder beschä-
digt ist, dürfen Sie es nicht mehr in Betrieb nehmen. Lassen Sie das Gerät von qualifiziertemFachpersonal überprüfen und gegebenenfalls reparieren.
• Batterien dürfen nicht in die Hände von Kinderngelangen. Kinder könnten Batterien in den Mundnehmen und verschlucken.
Gefahr! Laserstrahlung!Das Gerät verfügt über einen „Klasse 1 Laser”.• Öffnen Sie niemals das Gerät. • Versuchen Sie nicht das Gerät zu reparieren. • Im Inneren des Gerätes liegt unsichtbare Laser-
strahlung vor. Setzen Sie sich nicht dem Laser-strahl aus
Hinweis: Einige aggressive Möbellacke können die Gummi-füße des Geräts angreifen. Stellen Sie das Gerätggf. auf eine rutschfeste Unterlage.
Gewitter!Bei einem Gewitter können am Stromnetz ange-schlossene Geräte Schaden nehmen. Ziehen Sie beiGewitter deshalb immer den Netzstecker aus derSteckdose.
Hinweis zu Stoßspannungen (EFT / elektrischer schneller Übergangsvorgang)und ESD elektrostatischen Entladungen:Im Falle einer Fehlfunktion aufgrund elektrischerschneller Übergangsvorgänge (Stoßspannung)bzw. elektrostatischer Entladungen muss das Produkt zurückgesetzt werden, um den normalen Betrieb wieder herzustellen. Möglicherweise mussdie Stromversorgung getrennt und wieder neu angeschlossen werden.
Hinweis zur NetztrennungDer POWER-Schalter dieses Gerätes trennt das Gerät nicht vollständig vom Stromnetz. Außerdemnimmt das Gerät im Standby-Betrieb Strom auf. Umdas Gerät vollständig vom Netz zu trennen, mussdas Steckernetzteil aus der Netzsteckdose gezogenwerden.
Hinweise zum Umgang mit Batterien/AkkusDie Fernbedienung wird mit einer Batterie bzw. dasGerät mit einem wiederaufladbarem Akku betrie-ben. Für den Umgang mit Batterien/Akkus beachtenSie bitte Folgendes:
Explosionsgefahr!Werfen Sie keine Batterien/Akkus ins Feuer. LadenSie Batterien nicht wieder auf.• Laden Sie nur Batterien wieder auf, die aus-
drücklich als "wiederaufladbar" gekennzeichnetsind.
• Laden Sie den mitgelieferten Blockakku aus-schließlich mit dem tragbaren DVD-Player unddem mitgelieferten Netzteil auf. Verwenden Siekeine anderen Ladegeräte oder Netzteile.
• Öffnen Sie die Batterien/Akkus niemals, lötenoder schweißen Sie Batterien/Akkus nie. Es besteht Explosions- und Verletzungsgefahr!
• Überprüfen Sie regelmäßig die Batterie/denAkku. Auslaufende Batterien/Akkus können Beschädigungen am Gerät verursachen.
• Wenn Sie das Gerät längere Zeit nicht benutzen, entnehmen Sie die Batterie/den Akku.
• Bei ausgelaufener Batterie/Akku, ziehen SieSchutzhandschuhe an.
• Reinigen Sie das Batteriefach und die Batterie-kontakte mit einem trockenen Tuch.
IB_KH6500_AR23388_LB5 01.08.2008 13:15 Uhr Seite 113
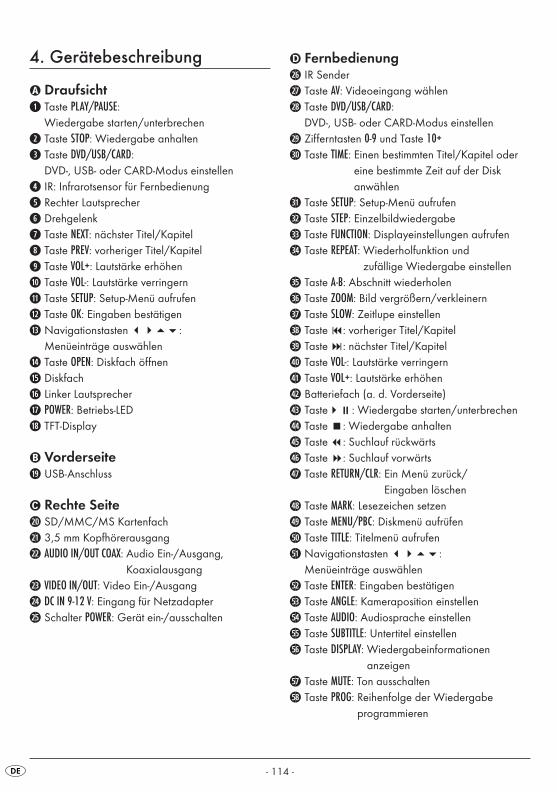
- 114 -
4. Gerätebeschreibung
� Draufsichtq Taste PLAY/PAUSE:
Wiedergabe starten/unterbrechen
w Taste STOP: Wiedergabe anhalten
e Taste DVD/USB/CARD: DVD-, USB- oder CARD-Modus einstellen
r IR: Infrarotsensor für Fernbedienung
t Rechter Lautsprecher
y Drehgelenk
u Taste NEXT: nächster Titel/Kapitel
i Taste PREV: vorheriger Titel/Kapitel
o Taste VOL+: Lautstärke erhöhen
a Taste VOL-: Lautstärke verringern
s Taste SETUP: Setup-Menü aufrufen
d Taste OK: Eingaben bestätigen
f Navigationstasten ����: Menüeinträge auswählen
g Taste OPEN: Diskfach öffnen
h Diskfach
j Linker Lautsprecher
k POWER: Betriebs-LED
l TFT-Display
� Vorderseite; USB-Anschluss
� Rechte Seite2) SD/MMC/MS Kartenfach
2! 3,5 mm Kopfhörerausgang
2@ AUDIO IN/OUT COAX: Audio Ein-/Ausgang,Koaxialausgang
2# VIDEO IN/OUT: Video Ein-/Ausgang
2$ DC IN 9-12 V: Eingang für Netzadapter
2% Schalter POWER: Gerät ein-/ausschalten
� Fernbedienung2^ IR Sender
2& Taste AV: Videoeingang wählen
2* Taste DVD/USB/CARD: DVD-, USB- oder CARD-Modus einstellen
2( Zifferntasten 0-9 und Taste 10+3) Taste TIME: Einen bestimmten Titel/Kapitel oder
eine bestimmte Zeit auf der Disk anwählen
3! Taste SETUP: Setup-Menü aufrufen
3@ Taste STEP: Einzelbildwiedergabe
3# Taste FUNCTION: Displayeinstellungen aufrufen
3$ Taste REPEAT: Wiederholfunktion und zufällige Wiedergabe einstellen
3% Taste A-B: Abschnitt wiederholen
3^ Taste ZOOM: Bild vergrößern/verkleinern
3& Taste SLOW: Zeitlupe einstellen
3* Taste �: vorheriger Titel/Kapitel
3( Taste �: nächster Titel/Kapitel
4) Taste VOL-: Lautstärke verringern
4! Taste VOL+: Lautstärke erhöhen
4@ Batteriefach (a. d. Vorderseite)
4# Taste��: Wiedergabe starten/unterbrechen
4$ Taste : Wiedergabe anhalten
4% Taste : Suchlauf rückwärts
4^ Taste �: Suchlauf vorwärts
4& Taste RETURN/CLR: Ein Menü zurück/Eingaben löschen
4* Taste MARK: Lesezeichen setzen
4( Taste MENU/PBC: Diskmenü aufrüfen
5) Taste TITLE: Titelmenü aufrufen
5! Navigationstasten ����: Menüeinträge auswählen
5@ Taste ENTER: Eingaben bestätigen
5# Taste ANGLE: Kameraposition einstellen
5$ Taste AUDIO: Audiosprache einstellen
5% Taste SUBTITLE: Untertitel einstellen
5^ Taste DISPLAY: Wiedergabeinformationen anzeigen
5& Taste MUTE: Ton ausschalten
5* Taste PROG: Reihenfolge der Wiedergabe programmieren
IB_KH6500_AR23388_LB5 01.08.2008 13:15 Uhr Seite 114
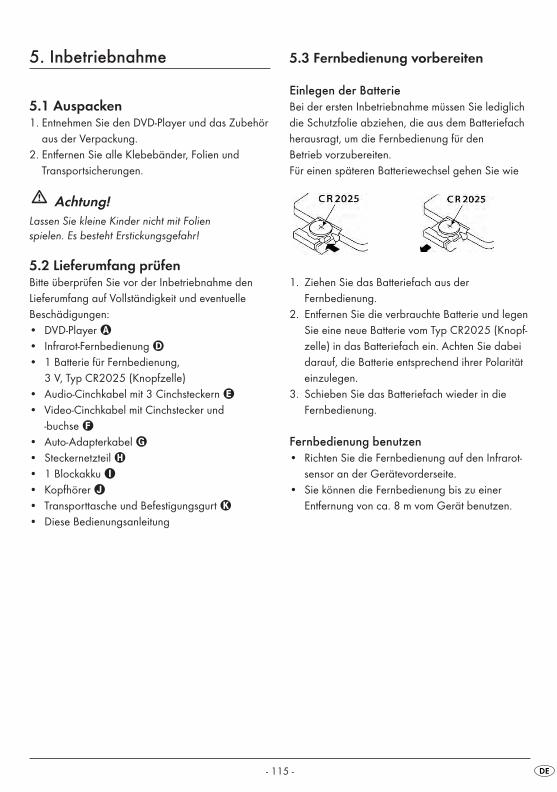
- 115 -
5. Inbetriebnahme
5.1 Auspacken1. Entnehmen Sie den DVD-Player und das Zubehör
aus der Verpackung.2. Entfernen Sie alle Klebebänder, Folien und
Transportsicherungen.
Achtung!Lassen Sie kleine Kinder nicht mit Folien spielen. Es besteht Erstickungsgefahr!
5.2 Lieferumfang prüfenBitte überprüfen Sie vor der Inbetriebnahme den Lieferumfang auf Vollständigkeit und eventuelle Beschädigungen:• DVD-Player �• Infrarot-Fernbedienung �• 1 Batterie für Fernbedienung,
3 V, Typ CR2025 (Knopfzelle)• Audio-Cinchkabel mit 3 Cinchsteckern �• Video-Cinchkabel mit Cinchstecker und
-buchse �• Auto-Adapterkabel �• Steckernetzteil • 1 Blockakku • Kopfhörer �• Transporttasche und Befestigungsgurt �• Diese Bedienungsanleitung
5.3 Fernbedienung vorbereiten
Einlegen der BatterieBei der ersten Inbetriebnahme müssen Sie lediglichdie Schutzfolie abziehen, die aus dem Batteriefachherausragt, um die Fernbedienung für den Betrieb vorzubereiten.Für einen späteren Batteriewechsel gehen Sie wie
1. Ziehen Sie das Batteriefach aus der Fernbedienung.
2. Entfernen Sie die verbrauchte Batterie und legenSie eine neue Batterie vom Typ CR2025 (Knopf-zelle) in das Batteriefach ein. Achten Sie dabeidarauf, die Batterie entsprechend ihrer Polaritäteinzulegen.
3. Schieben Sie das Batteriefach wieder in dieFernbedienung.
Fernbedienung benutzen• Richten Sie die Fernbedienung auf den Infrarot-
sensor an der Gerätevorderseite.• Sie können die Fernbedienung bis zu einer
Entfernung von ca. 8 m vom Gerät benutzen.
IB_KH6500_AR23388_LB5 01.08.2008 13:15 Uhr Seite 115
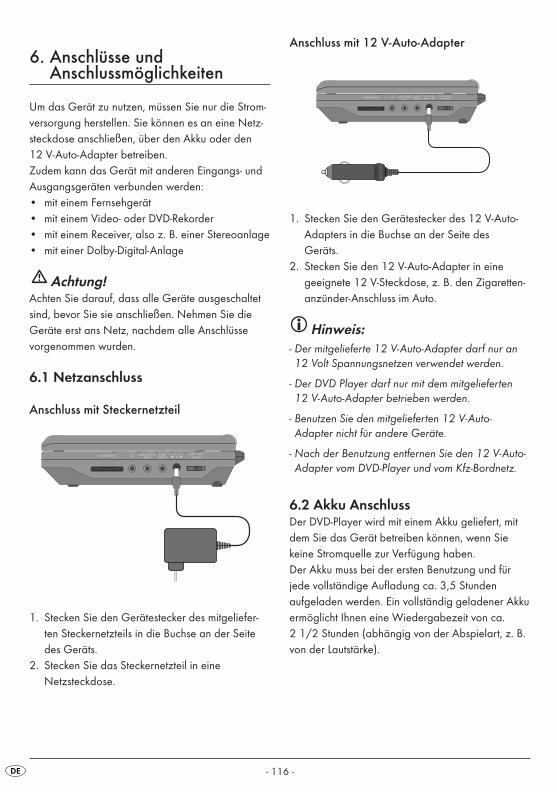
- 116 -
6. Anschlüsse undAnschlussmöglichkeiten
Um das Gerät zu nutzen, müssen Sie nur die Strom-versorgung herstellen. Sie können es an eine Netz-steckdose anschließen, über den Akku oder den 12 V-Auto-Adapter betreiben.Zudem kann das Gerät mit anderen Eingangs- undAusgangsgeräten verbunden werden:• mit einem Fernsehgerät• mit einem Video- oder DVD-Rekorder• mit einem Receiver, also z. B. einer Stereoanlage• mit einer Dolby-Digital-Anlage
Achtung!Achten Sie darauf, dass alle Geräte ausgeschaltetsind, bevor Sie sie anschließen. Nehmen Sie dieGeräte erst ans Netz, nachdem alle Anschlüsse vorgenommen wurden.
6.1 Netzanschluss
Anschluss mit Steckernetzteil
1. Stecken Sie den Gerätestecker des mitgeliefer-ten Steckernetzteils in die Buchse an der Seitedes Geräts.
2. Stecken Sie das Steckernetzteil in eine Netzsteckdose.
Anschluss mit 12 V-Auto-Adapter
1. Stecken Sie den Gerätestecker des 12 V-Auto-Adapters in die Buchse an der Seite des Geräts.
2. Stecken Sie den 12 V-Auto-Adapter in eine geeignete 12 V-Steckdose, z. B. den Zigaretten-anzünder-Anschluss im Auto.
Hinweis:- Der mitgelieferte 12 V-Auto-Adapter darf nur an12 Volt Spannungsnetzen verwendet werden.
- Der DVD Player darf nur mit dem mitgelieferten 12 V-Auto-Adapter betrieben werden.
- Benutzen Sie den mitgelieferten 12 V-Auto-Adapter nicht für andere Geräte.
- Nach der Benutzung entfernen Sie den 12 V-Auto-Adapter vom DVD-Player und vom Kfz-Bordnetz.
6.2 Akku AnschlussDer DVD-Player wird mit einem Akku geliefert, mitdem Sie das Gerät betreiben können, wenn Sie keine Stromquelle zur Verfügung haben.Der Akku muss bei der ersten Benutzung und fürjede vollständige Aufladung ca. 3,5 Stunden aufgeladen werden. Ein vollständig geladener Akkuermöglicht Ihnen eine Wiedergabezeit von ca. 2 1/2 Stunden (abhängig von der Abspielart, z. B.von der Lautstärke).
IB_KH6500_AR23388_LB5 01.08.2008 13:15 Uhr Seite 116
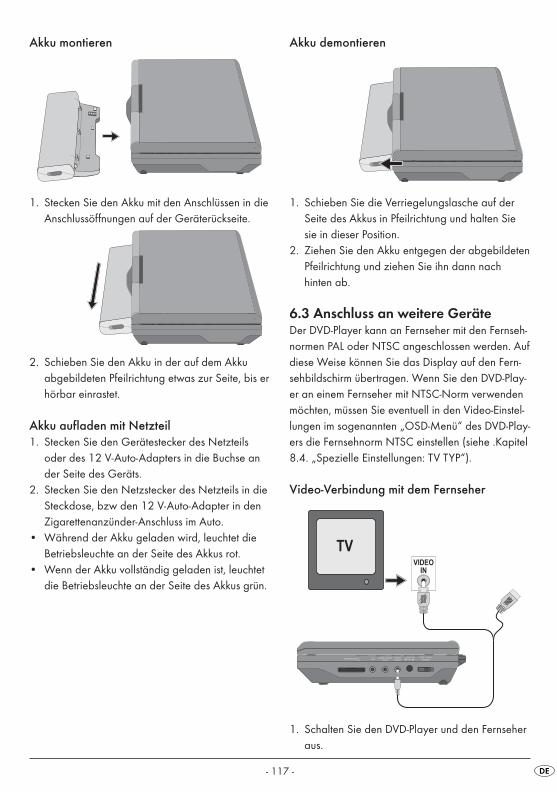
- 117 -
Akku montieren
1. Stecken Sie den Akku mit den Anschlüssen in dieAnschlussöffnungen auf der Geräterückseite.
2. Schieben Sie den Akku in der auf dem Akku abgebildeten Pfeilrichtung etwas zur Seite, bis erhörbar einrastet.
Akku aufladen mit Netzteil1. Stecken Sie den Gerätestecker des Netzteils
oder des 12 V-Auto-Adapters in die Buchse ander Seite des Geräts.
2. Stecken Sie den Netzstecker des Netzteils in dieSteckdose, bzw den 12 V-Auto-Adapter in denZigarettenanzünder-Anschluss im Auto.
• Während der Akku geladen wird, leuchtet dieBetriebsleuchte an der Seite des Akkus rot.
• Wenn der Akku vollständig geladen ist, leuchtetdie Betriebsleuchte an der Seite des Akkus grün.
Akku demontieren
1. Schieben Sie die Verriegelungslasche auf derSeite des Akkus in Pfeilrichtung und halten Siesie in dieser Position.
2. Ziehen Sie den Akku entgegen der abgebildetenPfeilrichtung und ziehen Sie ihn dann nach hinten ab.
6.3 Anschluss an weitere GeräteDer DVD-Player kann an Fernseher mit den Fernseh-normen PAL oder NTSC angeschlossen werden. Aufdiese Weise können Sie das Display auf den Fern-sehbildschirm übertragen. Wenn Sie den DVD-Play-er an einem Fernseher mit NTSC-Norm verwendenmöchten, müssen Sie eventuell in den Video-Einstel-lungen im sogenannten „OSD-Menü“ des DVD-Play-ers die Fernsehnorm NTSC einstellen (siehe .Kapitel8.4. „Spezielle Einstellungen: TV TYP“).
Video-Verbindung mit dem Fernseher
1. Schalten Sie den DVD-Player und den Fernseheraus.
IB_KH6500_AR23388_LB5 01.08.2008 13:15 Uhr Seite 117
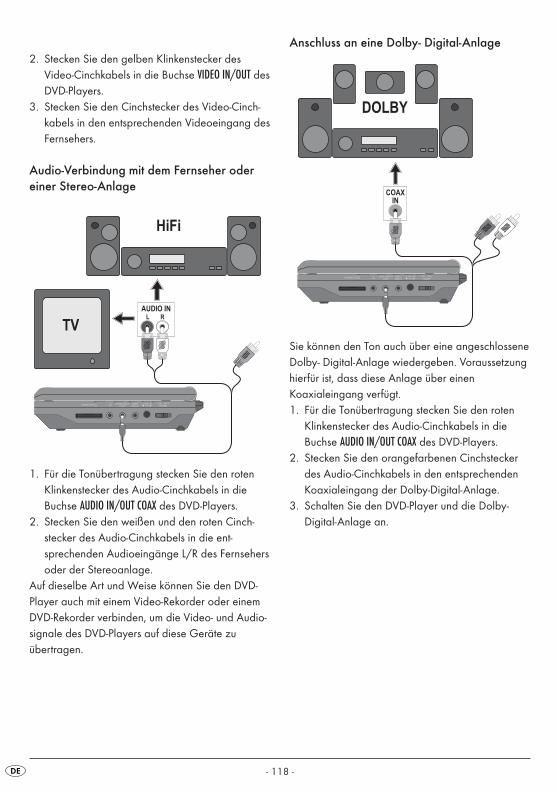
- 118 -
2. Stecken Sie den gelben Klinkenstecker des Video-Cinchkabels in die Buchse VIDEO IN/OUT desDVD-Players.
3. Stecken Sie den Cinchstecker des Video-Cinch-kabels in den entsprechenden Videoeingang desFernsehers.
Audio-Verbindung mit dem Fernseher oder einer Stereo-Anlage
1. Für die Tonübertragung stecken Sie den rotenKlinkenstecker des Audio-Cinchkabels in dieBuchse AUDIO IN/OUT COAX des DVD-Players.
2. Stecken Sie den weißen und den roten Cinch-stecker des Audio-Cinchkabels in die ent-sprechenden Audioeingänge L/R des Fernsehersoder der Stereoanlage.
Auf dieselbe Art und Weise können Sie den DVD-Player auch mit einem Video-Rekorder oder einemDVD-Rekorder verbinden, um die Video- und Audio-signale des DVD-Players auf diese Geräte zu übertragen.
Anschluss an eine Dolby- Digital-Anlage
Sie können den Ton auch über eine angeschlosseneDolby- Digital-Anlage wiedergeben. Voraussetzunghierfür ist, dass diese Anlage über einen Koaxialeingang verfügt.1. Für die Tonübertragung stecken Sie den roten
Klinkenstecker des Audio-Cinchkabels in dieBuchse AUDIO IN/OUT COAX des DVD-Players.
2. Stecken Sie den orangefarbenen Cinchsteckerdes Audio-Cinchkabels in den entsprechendenKoaxialeingang der Dolby-Digital-Anlage.
3. Schalten Sie den DVD-Player und die Dolby-Digital-Anlage an.
IB_KH6500_AR23388_LB5 01.08.2008 13:15 Uhr Seite 118

- 119 -
Audio- und Videosignale externer Geräte mitdem DVD-Player wiedergeben
Sie können Bild und Ton externer Geräte über denDVD-Player wiedergeben.1. Für die Tonübertragung stecken Sie den roten
Klinkenstecker des Audio-Cinchkabels in in dieBuchse AUDIO IN/OUT COAX des DVD-Players.
2. Stecken Sie den weißen und den roten Cinch-stecker des Audio-Cinchkabels in die entsprechenden Audioausgänge des externenGeräts.
3. Stecken Sie den gelben Klinkenstecker des Video-Cinchkabels in die Buchse VIDEO IN/OUT desDVD-Players.
4. Verbinden Sie die Cinchbuchse des Video-Cinch-kabels mit dem entsprechenden Videoausgangdes externen Geräts.
5. Schalten Sie den DVD-Player und das externeGerät ein.
6. Um Audio- und Videosignal des externen Gerätswiederzugeben, drücken Sie die Taste AV aufder Fernbedienung.
7. Um wieder zur Anzeige des DVD-Players zurückzuschalten, drücken Sie die TasteDVD/USB/CARD.
Hinweis:Das Display kann, je nach Datenträger, einige Sekunden schwarz bleiben, bis wieder das Bild desDVD-Players angezeigt wird.
Hinweis:Der Ton eines an den Audioeingang des DVD-Players angeschlossenen externen Gerätes wirdauch wiedergegeben, wenn sich das Gerät in eineranderen Betriebsart als AV befindet.
6.4 Kopfhöreranschluss
Achtung!Verwenden Sie nur die mitgelieferten Kopfhörervom Typ HX206-001.
Sie können einen Kopfhörer mit 3,5 mm-Stereo-Klinkenstecker an den DVD-Player anschließen. DerKopfhöreranschluss befindet sich auf der Seite desGeräts. Wenn Sie den Kopfhörer angeschlossen haben, werden die Lautsprecher abgeschaltet undSie hören den Ton nur noch über den Kopfhörer. • Stecken Sie den Klinkenstecker des Kopfhörers in
den Kopfhöreranschluss.
Achtung!Das Musikhören mit Kopfhörern über einen längeren Zeitraum und mit vollerLautstärke kann zu Gehörschäden führen
IB_KH6500_AR23388_LB5 01.08.2008 13:15 Uhr Seite 119
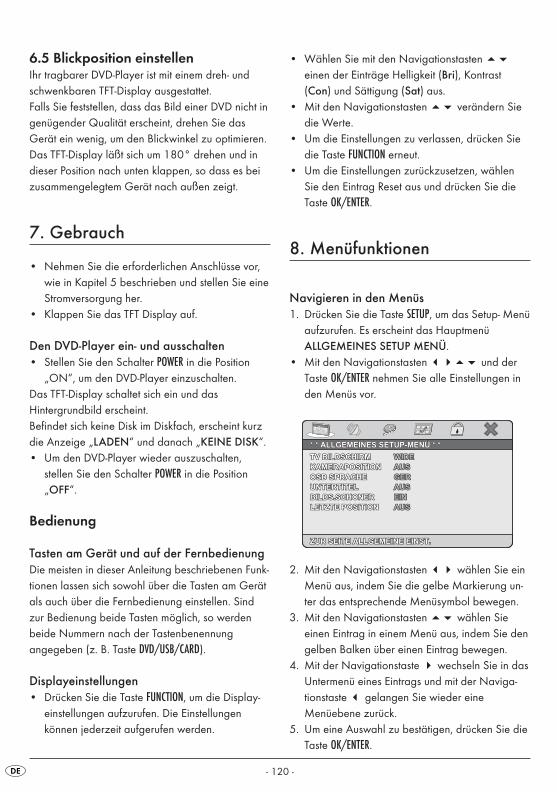
- 120 -
6.5 Blickposition einstellenIhr tragbarer DVD-Player ist mit einem dreh- undschwenkbaren TFT-Display ausgestattet.Falls Sie feststellen, dass das Bild einer DVD nicht ingenügender Qualität erscheint, drehen Sie das Gerät ein wenig, um den Blickwinkel zu optimieren.Das TFT-Display läßt sich um 180° drehen und indieser Position nach unten klappen, so dass es beizusammengelegtem Gerät nach außen zeigt.
7. Gebrauch
• Nehmen Sie die erforderlichen Anschlüsse vor,wie in Kapitel 5 beschrieben und stellen Sie eineStromversorgung her.
• Klappen Sie das TFT Display auf.
Den DVD-Player ein- und ausschalten• Stellen Sie den Schalter POWER in die Position
„ON“, um den DVD-Player einzuschalten.Das TFT-Display schaltet sich ein und das Hintergrundbild erscheint.Befindet sich keine Disk im Diskfach, erscheint kurzdie Anzeige „LADEN“ und danach „KEINE DISK“.• Um den DVD-Player wieder auszuschalten,
stellen Sie den Schalter POWER in die Position„OFF“.
Bedienung
Tasten am Gerät und auf der FernbedienungDie meisten in dieser Anleitung beschriebenen Funk-tionen lassen sich sowohl über die Tasten am Gerätals auch über die Fernbedienung einstellen. Sindzur Bedienung beide Tasten möglich, so werdenbeide Nummern nach der Tastenbenennung angegeben (z. B. Taste DVD/USB/CARD).
Displayeinstellungen• Drücken Sie die Taste FUNCTION, um die Display-
einstellungen aufzurufen. Die Einstellungen können jederzeit aufgerufen werden.
• Wählen Sie mit den Navigationstasten ��
einen der Einträge Helligkeit (Bri), Kontrast(Con) und Sättigung (Sat) aus.
• Mit den Navigationstasten �� verändern Siedie Werte.
• Um die Einstellungen zu verlassen, drücken Siedie Taste FUNCTION erneut.
• Um die Einstellungen zurückzusetzen, wählenSie den Eintrag Reset aus und drücken Sie dieTaste OK/ENTER.
8. Menüfunktionen
Navigieren in den Menüs1. Drücken Sie die Taste SETUP, um das Setup- Menü
aufzurufen. Es erscheint das Hauptmenü ALLGEMEINES SETUP MENÜ.
• Mit den Navigationstasten ���� und derTaste OK/ENTER nehmen Sie alle Einstellungen inden Menüs vor.
2. Mit den Navigationstasten �� wählen Sie einMenü aus, indem Sie die gelbe Markierung un-ter das entsprechende Menüsymbol bewegen.
3. Mit den Navigationstasten �� wählen Sie einen Eintrag in einem Menü aus, indem Sie dengelben Balken über einen Eintrag bewegen.
4. Mit der Navigationstaste � wechseln Sie in dasUntermenü eines Eintrags und mit der Naviga-tionstaste � gelangen Sie wieder eine Menüebene zurück.
5. Um eine Auswahl zu bestätigen, drücken Sie dieTaste OK/ENTER.
TV BILDSCHIRMTV BILDSCHIRMTV BILDSCHIRM
KAMERAPOSITIONKAMERAPOSITIONKAMERAPOSITION
OSD SPRACHEOSD SPRACHEOSD SPRACHE
UNTERTITELUNTERTITELUNTERTITEL
BILDS.SCHONERBILDS.SCHONERBILDS.SCHONER
LETZTE POSITIONLETZTE POSITIONLETZTE POSITION
WIDEWIDEWIDE
AUSAUSAUS
GERGERGER
AUSAUSAUS
EINEINEIN
AUSAUSAUS
* * ALLGEMEINES SETUP-MENÜ * ** * ALLGEMEINES SETUP-MENÜ * ** * ALLGEMEINES SETUP-MENÜ * *
ZUR SEITE ALLGEMEINE EINST.ZUR SEITE ALLGEMEINE EINST.ZUR SEITE ALLGEMEINE EINST.
IB_KH6500_AR23388_LB5 01.08.2008 13:15 Uhr Seite 120
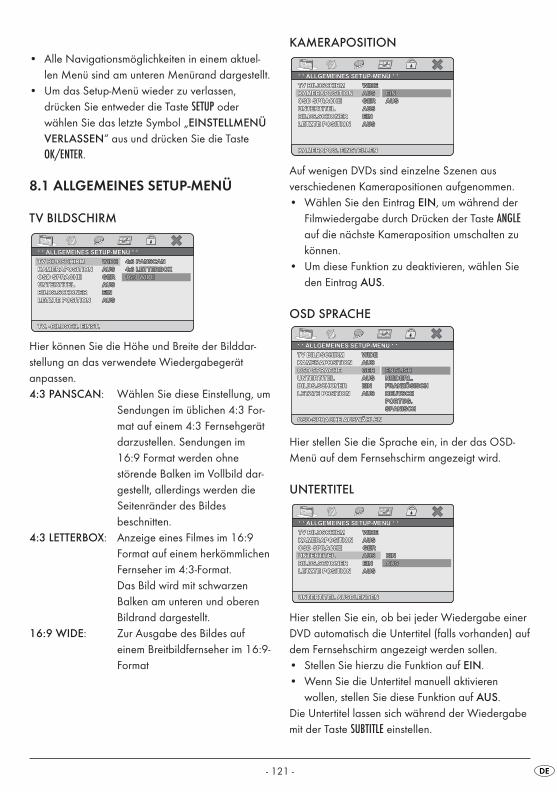
- 121 -
• Alle Navigationsmöglichkeiten in einem aktuel-len Menü sind am unteren Menürand dargestellt.
• Um das Setup-Menü wieder zu verlassen, drücken Sie entweder die Taste SETUP oder wählen Sie das letzte Symbol „EINSTELLMENÜVERLASSEN“ aus und drücken Sie die TasteOK/ENTER.
8.1 ALLGEMEINES SETUP-MENÜ
TV BILDSCHIRM
Hier können Sie die Höhe und Breite der Bilddar-stellung an das verwendete Wiedergabegerät anpassen. 4:3 PANSCAN: Wählen Sie diese Einstellung, um
Sendungen im üblichen 4:3 For-mat auf einem 4:3 Fernsehgerätdarzustellen. Sendungen im16:9 Format werden ohne störende Balken im Vollbild dar-gestellt, allerdings werden dieSeitenränder des Bildes beschnitten.
4:3 LETTERBOX: Anzeige eines Filmes im 16:9Format auf einem herkömmlichenFernseher im 4:3-Format. Das Bild wird mit schwarzen Balken am unteren und oberenBildrand dargestellt.
16:9 WIDE: Zur Ausgabe des Bildes auf einem Breitbildfernseher im 16:9-Format
* * ALLGEMEINES SETUP-MENÜ * ** * ALLGEMEINES SETUP-MENÜ * ** * ALLGEMEINES SETUP-MENÜ * *
TV. -BILDSCH. EINST.TV. -BILDSCH. EINST.TV. -BILDSCH. EINST.
4:3 PANSCAN4:3 PANSCAN4:3 PANSCAN
4:3 LETTERBOX4:3 LETTERBOX4:3 LETTERBOX
16:9 WIDE16:9 WIDE16:9 WIDE
TV BILDSCHIRMTV BILDSCHIRMTV BILDSCHIRM
KAMERAPOSITIONKAMERAPOSITIONKAMERAPOSITION
OSD SPRACHEOSD SPRACHEOSD SPRACHE
UNTERTITELUNTERTITELUNTERTITEL
BILDS.SCHONERBILDS.SCHONERBILDS.SCHONER
LETZTE POSITIONLETZTE POSITIONLETZTE POSITION
WIDEWIDEWIDE
AUSAUSAUS
GERGERGER
AUSAUSAUS
EINEINEIN
AUSAUSAUS
KAMERAPOSITION
Auf wenigen DVDs sind einzelne Szenen aus verschiedenen Kamerapositionen aufgenommen. • Wählen Sie den Eintrag EIN, um während der
Filmwiedergabe durch Drücken der Taste ANGLEauf die nächste Kameraposition umschalten zukönnen.
• Um diese Funktion zu deaktivieren, wählen Sieden Eintrag AUS.
OSD SPRACHE
Hier stellen Sie die Sprache ein, in der das OSD-Menü auf dem Fernsehschirm angezeigt wird.
UNTERTITEL
Hier stellen Sie ein, ob bei jeder Wiedergabe einerDVD automatisch die Untertitel (falls vorhanden) aufdem Fernsehschirm angezeigt werden sollen. • Stellen Sie hierzu die Funktion auf EIN. • Wenn Sie die Untertitel manuell aktivieren
wollen, stellen Sie diese Funktion auf AUS. Die Untertitel lassen sich während der Wiedergabemit der Taste SUBTITLE einstellen.
* * ALLGEMEINES SETUP-MENÜ * ** * ALLGEMEINES SETUP-MENÜ * ** * ALLGEMEINES SETUP-MENÜ * *
UNTERTITEL AUSBLENDENUNTERTITEL AUSBLENDENUNTERTITEL AUSBLENDEN
TV BILDSCHIRMTV BILDSCHIRMTV BILDSCHIRM
KAMERAPOSITIONKAMERAPOSITIONKAMERAPOSITION
OSD SPRACHEOSD SPRACHEOSD SPRACHE
UNTERTITELUNTERTITELUNTERTITEL
BILDS.SCHONERBILDS.SCHONERBILDS.SCHONER
LETZTE POSITIONLETZTE POSITIONLETZTE POSITION
WIDEWIDEWIDE
AUSAUSAUS
GERGERGER
AUSAUSAUS
EINEINEIN
AUSAUSAUS
EINEINEIN
AUSAUSAUS
NIEDERL.NIEDERL.NIEDERL.
FRANZÖSISCHFRANZÖSISCHFRANZÖSISCH
DEUTSCHDEUTSCHDEUTSCH
* * ALLGEMEINES SETUP-MENÜ * ** * ALLGEMEINES SETUP-MENÜ * ** * ALLGEMEINES SETUP-MENÜ * *
OSD-SPRACHE AUSWÄHLENOSD-SPRACHE AUSWÄHLENOSD-SPRACHE AUSWÄHLEN
ENGLISHENGLISHENGLISH
TV BILDSCHIRMTV BILDSCHIRMTV BILDSCHIRM
KAMERAPOSITIONKAMERAPOSITIONKAMERAPOSITION
OSD SPRACHEOSD SPRACHEOSD SPRACHE
UNTERTITELUNTERTITELUNTERTITEL
BILDS.SCHONERBILDS.SCHONERBILDS.SCHONER
LETZTE POSITIONLETZTE POSITIONLETZTE POSITION
WIDEWIDEWIDE
AUSAUSAUS
GERGERGER
AUSAUSAUS
EINEINEIN
AUSAUSAUS
SPANISCHSPANISCHSPANISCH
PORTUG.PORTUG.PORTUG.
* * ALLGEMEINES SETUP-MENÜ * ** * ALLGEMEINES SETUP-MENÜ * ** * ALLGEMEINES SETUP-MENÜ * *
KAMERAPOS. EINSTELLENKAMERAPOS. EINSTELLENKAMERAPOS. EINSTELLEN
EINEINEIN
AUSAUSAUS
TV BILDSCHIRMTV BILDSCHIRMTV BILDSCHIRM
KAMERAPOSITIONKAMERAPOSITIONKAMERAPOSITION
OSD SPRACHEOSD SPRACHEOSD SPRACHE
UNTERTITELUNTERTITELUNTERTITEL
BILDS.SCHONERBILDS.SCHONERBILDS.SCHONER
LETZTE POSITIONLETZTE POSITIONLETZTE POSITION
WIDEWIDEWIDE
AUSAUSAUS
GERGERGER
AUSAUSAUS
EINEINEIN
AUSAUSAUS
IB_KH6500_AR23388_LB5 01.08.2008 13:15 Uhr Seite 121
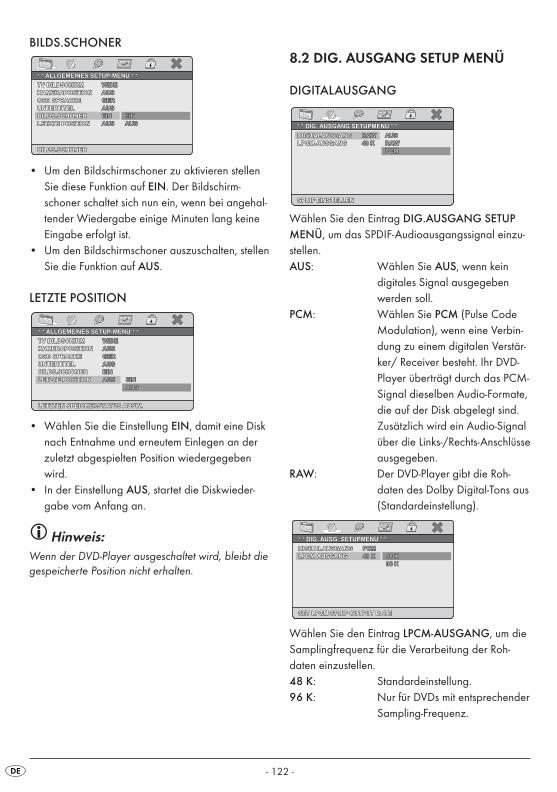
- 122 -
BILDS.SCHONER
• Um den Bildschirmschoner zu aktivieren stellenSie diese Funktion auf EIN. Der Bildschirm-schoner schaltet sich nun ein, wenn bei angehal-tender Wiedergabe einige Minuten lang keineEingabe erfolgt ist.
• Um den Bildschirmschoner auszuschalten, stellenSie die Funktion auf AUS.
LETZTE POSITION
• Wählen Sie die Einstellung EIN, damit eine Disknach Entnahme und erneutem Einlegen an derzuletzt abgespielten Position wiedergegebenwird.
• In der Einstellung AUS, startet die Diskwieder-gabe vom Anfang an.
Hinweis:Wenn der DVD-Player ausgeschaltet wird, bleibt diegespeicherte Position nicht erhalten.
* * ALLGEMEINES SETUP-MENÜ * ** * ALLGEMEINES SETUP-MENÜ * ** * ALLGEMEINES SETUP-MENÜ * *
LETZTEN SPEICHERSTATUS AUSW.LETZTEN SPEICHERSTATUS AUSW.LETZTEN SPEICHERSTATUS AUSW.
TV BILDSCHIRMTV BILDSCHIRMTV BILDSCHIRM
KAMERAPOSITIONKAMERAPOSITIONKAMERAPOSITION
OSD SPRACHEOSD SPRACHEOSD SPRACHE
UNTERTITELUNTERTITELUNTERTITEL
BILDS.SCHONERBILDS.SCHONERBILDS.SCHONER
LETZTE POSITIONLETZTE POSITIONLETZTE POSITION
WIDEWIDEWIDE
AUSAUSAUS
GERGERGER
AUSAUSAUS
EINEINEIN
AUSAUSAUS EINEINEIN
AUSAUSAUS
EINEINEIN
AUSAUSAUS
* * ALLGEMEINES SETUP-MENÜ * ** * ALLGEMEINES SETUP-MENÜ * ** * ALLGEMEINES SETUP-MENÜ * *
BILDS.SCHONERBILDS.SCHONERBILDS.SCHONER
TV BILDSCHIRMTV BILDSCHIRMTV BILDSCHIRM
KAMERAPOSITIONKAMERAPOSITIONKAMERAPOSITION
OSD SPRACHEOSD SPRACHEOSD SPRACHE
UNTERTITELUNTERTITELUNTERTITEL
BILDS.SCHONERBILDS.SCHONERBILDS.SCHONER
LETZTE POSITIONLETZTE POSITIONLETZTE POSITION
WIDEWIDEWIDE
AUSAUSAUS
GERGERGER
AUSAUSAUS
EINEINEIN
AUSAUSAUS
8.2 DIG. AUSGANG SETUP MENÜ
DIGITALAUSGANG
Wählen Sie den Eintrag DIG.AUSGANG SETUPMENÜ, um das SPDIF-Audioausgangssignal einzu-stellen.AUS: Wählen Sie AUS, wenn kein
digitales Signal ausgegebenwerden soll.
PCM: Wählen Sie PCM (Pulse CodeModulation), wenn eine Verbin-dung zu einem digitalen Verstär-ker/ Receiver besteht. Ihr DVD-Player überträgt durch das PCM-Signal dieselben Audio-Formate,die auf der Disk abgelegt sind.Zusätzlich wird ein Audio-Signalüber die Links-/Rechts-Anschlüsseausgegeben.
RAW: Der DVD-Player gibt die Roh-daten des Dolby Digital-Tons aus(Standardeinstellung).
Wählen Sie den Eintrag LPCM-AUSGANG, um dieSamplingfrequenz für die Verarbeitung der Roh-daten einzustellen.48 K: Standardeinstellung.96 K: Nur für DVDs mit entsprechender
Sampling-Frequenz.
* * DIG. AUSG. SETUPMENÜ * ** * DIG. AUSG. SETUPMENÜ * ** * DIG. AUSG. SETUPMENÜ * *
SET LPCM SPDIF OUTPUT RATESET LPCM SPDIF OUTPUT RATESET LPCM SPDIF OUTPUT RATE
48 K48 K48 K
96 K96 K96 K
DIGITALAUSGANGDIGITALAUSGANGDIGITALAUSGANG
LPCM AUSGANGLPCM AUSGANGLPCM AUSGANG
PCMPCMPCM
48 K48 K48 K
* * DIG. AUSGANG SETUPMENÜ * ** * DIG. AUSGANG SETUPMENÜ * ** * DIG. AUSGANG SETUPMENÜ * *
SPDIF EINSTELLENSPDIF EINSTELLENSPDIF EINSTELLEN
AUSAUSAUS
RAWRAWRAW
PCMPCMPCM
DIGITALAUSGANGDIGITALAUSGANGDIGITALAUSGANG
LPCM-AUSGANGLPCM-AUSGANGLPCM-AUSGANG
RAWRAWRAW
48 K48 K48 K
IB_KH6500_AR23388_LB5 01.08.2008 13:15 Uhr Seite 122

- 123 -
Hinweis:Die Funktion LPCM-AUSGANG ist nur verfügbar,wenn Sie das SPDIF-Audioausgangssignal auf PCMeingestellt haben.
DOLBY DIGITAL EINSTELLUNG
• Wählen Sie den Eintrag DUAL MONO, um denDolby-Digital-Ausgang entweder auf STEREO, L-MONO, R-MONO oder MIX-MONO einzu-stellen.
• Wählen Sie den Eintrag DYNAMIK, um eine optimale Tonwiedergabe bei geringer Lautstärkezu ermöglichen.
• In der Einstellung FULL werden die lauten Passa-gen gedämpft und die leisen Passagen lauterwiedergegeben.
Hinweis:Diese Funktion ist nur möglich bei Verwendung einerdigitalen Audio-Komponente.
DOWNMIX
STEREOSTEREOSTEREO
* * AUDIO EINSTELLUNGEN * ** * AUDIO EINSTELLUNGEN * ** * AUDIO EINSTELLUNGEN * *
DOWNMIX-MODUS AUSW.DOWNMIX-MODUS AUSW.DOWNMIX-MODUS AUSW.
L/RL/RL/R
DIGITAL AUDIO EINSTELLDIGITAL AUDIO EINSTELLDIGITAL AUDIO EINSTELL
SETUP DOLBY DIGITALSETUP DOLBY DIGITALSETUP DOLBY DIGITAL
DOWNMIXDOWNMIXDOWNMIX
DOLBY - DIGITAL - EINSTELLUNGDOLBY - DIGITAL - EINSTELLUNGDOLBY - DIGITAL - EINSTELLUNG
DYN. KOMPR. AUSSCHALTENDYN. KOMPR. AUSSCHALTENDYN. KOMPR. AUSSCHALTEN
DUAL MONODUAL MONODUAL MONO
DYNAMIKDYNAMIKDYNAMIK
STRSTRSTR FULL
3/4
1/2
1/4
OFF
MIX - MONOMIX - MONOMIX - MONO
DOLBY - DIGITAL - EINSTELLUNGDOLBY - DIGITAL - EINSTELLUNGDOLBY - DIGITAL - EINSTELLUNG
EINST. DOPPELTER MONO (1 + 1)EINST. DOPPELTER MONO (1 + 1)EINST. DOPPELTER MONO (1 + 1)
STEREOSTEREOSTEREO
L-MONOL-MONOL-MONO
R-MONOR-MONOR-MONO
DUAL MONODUAL MONODUAL MONO
DYNAMIKDYNAMIKDYNAMIK
STRSTRSTR
L/R: Wählen Sie diese Einstellung,wenn der Film in Pro Logic DolbyDigital aufgenommen wurde undSie den Ton in Kinoqualität hören möchten.
STEREO: Wählen Sie diese Option, um denlinken und rechten Tonkanal derDVD auszugeben. Bei der CD-Wiedergabe wird ein herkömm-liches Stereosignal ausgegeben.
8.3 VIDEO EINSTELLUNGEN
VIDEO AUSGANG
Diese Funktion ist standardmäßig auf CVBS einge-stellt und kann nicht verändert werden.
8.4 SPEZIELLE EINSTELLUNGEN
TV NORM
• Stellen Sie diese Funktion auf PAL, um das Vide-osignal über den Videoausgang in der Fernseh-norm PAL auszugeben.
• Stellen Sie diese Funktion auf AUTO, damit derDVD-Player automatisch erkennt, welche Fern-sehnorm für die Videoausgabe verwendet werden soll.
• Stellen Sie diese Funktion auf NTSC, um das Videosignal über den Videoausgang in der Fernsehnorm NTSC auszugeben.
* * SPEZIELLE EINSTELLUNGEN * ** * SPEZIELLE EINSTELLUNGEN * ** * SPEZIELLE EINSTELLUNGEN * *
TV NORM EINSTELLENTV NORM EINSTELLENTV NORM EINSTELLEN
PALPALPAL
AutoAutoAuto
NTSCNTSCNTSC
TV NORMTV NORMTV NORM
AUDIOAUDIOAUDIO
UNTERTITELUNTERTITELUNTERTITEL
DISK-MENÜDISK-MENÜDISK-MENÜ
KI. SICHERUNGKI. SICHERUNGKI. SICHERUNG
GRUNDEINST.GRUNDEINST.GRUNDEINST.
AutoAutoAuto
ENGENGENG
ENGENGENG
ENGENGENG
* * VIDEO EINSTELLUNGEN * ** * VIDEO EINSTELLUNGEN * ** * VIDEO EINSTELLUNGEN * *
VIDEO - AUSGANGVIDEO - AUSGANGVIDEO - AUSGANG
CVBSCVBSCVBSVIDEO - AUSGANGVIDEO - AUSGANGVIDEO - AUSGANG CVBSCVBSCVBS
IB_KH6500_AR23388_LB5 01.08.2008 13:15 Uhr Seite 123
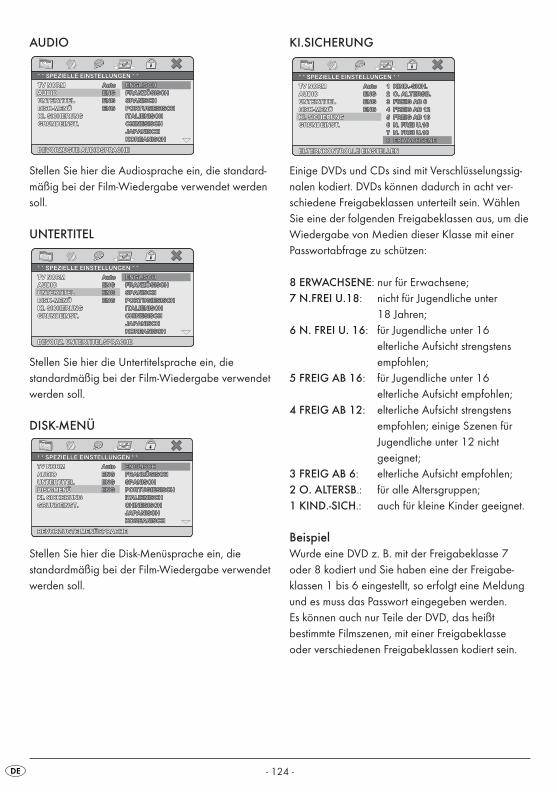
- 124 -
AUDIO
Stellen Sie hier die Audiosprache ein, die standard-mäßig bei der Film-Wiedergabe verwendet werdensoll.
UNTERTITEL
Stellen Sie hier die Untertitelsprache ein, die standardmäßig bei der Film-Wiedergabe verwendetwerden soll.
DISK-MENÜ
Stellen Sie hier die Disk-Menüsprache ein, die standardmäßig bei der Film-Wiedergabe verwendetwerden soll.
PORTUGIESISCHPORTUGIESISCHPORTUGIESISCH
ITALIENISCHITALIENISCHITALIENISCH
CHINESISCHCHINESISCHCHINESISCH
JAPANISCHJAPANISCHJAPANISCH
KOREANISCHKOREANISCHKOREANISCH
* * SPEZIELLE EINSTELLUNGEN * ** * SPEZIELLE EINSTELLUNGEN * ** * SPEZIELLE EINSTELLUNGEN * *
BEVORZUGTE MENÜSPRACHEBEVORZUGTE MENÜSPRACHEBEVORZUGTE MENÜSPRACHE
ENGLISCHENGLISCHENGLISCH
FRANZÖSISCHFRANZÖSISCHFRANZÖSISCH
SPANISCHSPANISCHSPANISCH
TV NORMTV NORMTV NORM
AUDIOAUDIOAUDIO
UNTERTITELUNTERTITELUNTERTITEL
DISK-MENÜDISK-MENÜDISK-MENÜ
KI. SICHERUNGKI. SICHERUNGKI. SICHERUNG
GRUNDEINST.GRUNDEINST.GRUNDEINST.
AutoAutoAuto
ENGENGENG
ENGENGENG
ENGENGENG
PORTUGIESISCHPORTUGIESISCHPORTUGIESISCH
ITALIENISCHITALIENISCHITALIENISCH
CHINESISCHCHINESISCHCHINESISCH
JAPANISCHJAPANISCHJAPANISCH
KOREANISCHKOREANISCHKOREANISCH
* * SPEZIELLE EINSTELLUNGEN * ** * SPEZIELLE EINSTELLUNGEN * ** * SPEZIELLE EINSTELLUNGEN * *
BEVORZ. UNTERTITELSPRACHEBEVORZ. UNTERTITELSPRACHEBEVORZ. UNTERTITELSPRACHE
ENGLISCHENGLISCHENGLISCH
FRANZÖSISCHFRANZÖSISCHFRANZÖSISCH
SPANISCHSPANISCHSPANISCH
TV NORMTV NORMTV NORM
AUDIOAUDIOAUDIO
UNTERTITELUNTERTITELUNTERTITEL
DISK-MENÜDISK-MENÜDISK-MENÜ
KI. SICHERUNGKI. SICHERUNGKI. SICHERUNG
GRUNDEINST.GRUNDEINST.GRUNDEINST.
AutoAutoAuto
ENGENGENG
ENGENGENG
ENGENGENG
PORTUGIESISCHPORTUGIESISCHPORTUGIESISCH
ITALIENISCHITALIENISCHITALIENISCH
CHINESISCHCHINESISCHCHINESISCH
JAPANISCHJAPANISCHJAPANISCH
KOREANISCHKOREANISCHKOREANISCH
* * SPEZIELLE EINSTELLUNGEN * ** * SPEZIELLE EINSTELLUNGEN * ** * SPEZIELLE EINSTELLUNGEN * *
BEVORZUGTE AUDIOSPRACHEBEVORZUGTE AUDIOSPRACHEBEVORZUGTE AUDIOSPRACHE
ENGLISCHENGLISCHENGLISCH
FRANZÖSISCHFRANZÖSISCHFRANZÖSISCH
SPANISCHSPANISCHSPANISCH
TV NORMTV NORMTV NORM
AUDIOAUDIOAUDIO
UNTERTITELUNTERTITELUNTERTITEL
DISK-MENÜDISK-MENÜDISK-MENÜ
KI. SICHERUNGKI. SICHERUNGKI. SICHERUNG
GRUNDEINST.GRUNDEINST.GRUNDEINST.
AutoAutoAuto
ENGENGENG
ENGENGENG
ENGENGENG
KI.SICHERUNG
Einige DVDs und CDs sind mit Verschlüsselungssig-nalen kodiert. DVDs können dadurch in acht ver-schiedene Freigabeklassen unterteilt sein. WählenSie eine der folgenden Freigabeklassen aus, um dieWiedergabe von Medien dieser Klasse mit einerPasswortabfrage zu schützen:
8 ERWACHSENE: nur für Erwachsene;7 N.FREI U.18: nicht für Jugendliche unter
18 Jahren;6 N. FREI U. 16: für Jugendliche unter 16
elterliche Aufsicht strengstensempfohlen;
5 FREIG AB 16: für Jugendliche unter 16 elterliche Aufsicht empfohlen;
4 FREIG AB 12: elterliche Aufsicht strengstensempfohlen; einige Szenen für Jugendliche unter 12 nicht geeignet;
3 FREIG AB 6: elterliche Aufsicht empfohlen;2 O. ALTERSB.: für alle Altersgruppen;1 KIND.-SICH.: auch für kleine Kinder geeignet.
BeispielWurde eine DVD z. B. mit der Freigabeklasse 7oder 8 kodiert und Sie haben eine der Freigabe-klassen 1 bis 6 eingestellt, so erfolgt eine Meldungund es muss das Passwort eingegeben werden. Es können auch nur Teile der DVD, das heißt bestimmte Filmszenen, mit einer Freigabeklasseoder verschiedenen Freigabeklassen kodiert sein.
4 FREIG AB 124 FREIG AB 124 FREIG AB 12
5 FREIG AB 165 FREIG AB 165 FREIG AB 16
6 N. FREI U.166 N. FREI U.166 N. FREI U.16
7 N. FREI U.187 N. FREI U.187 N. FREI U.18
8 ERWACHSENE8 ERWACHSENE8 ERWACHSENE
* * SPEZIELLE EINSTELLUNGEN * ** * SPEZIELLE EINSTELLUNGEN * ** * SPEZIELLE EINSTELLUNGEN * *
ELTERNKONTROLLE EINSTELLENELTERNKONTROLLE EINSTELLENELTERNKONTROLLE EINSTELLEN
1 KIND.-SICH.1 KIND.-SICH.1 KIND.-SICH.
2 O. ALTERSB.2 O. ALTERSB.2 O. ALTERSB.
3 FREIG AB 63 FREIG AB 63 FREIG AB 6
TV NORMTV NORMTV NORM
AUDIOAUDIOAUDIO
UNTERTITELUNTERTITELUNTERTITEL
DISK-MENÜDISK-MENÜDISK-MENÜ
KI. SICHERUNGKI. SICHERUNGKI. SICHERUNG
GRUNDEINST.GRUNDEINST.GRUNDEINST.
AutoAutoAuto
ENGENGENG
ENGENGENG
ENGENGENG
IB_KH6500_AR23388_LB5 01.08.2008 13:15 Uhr Seite 124
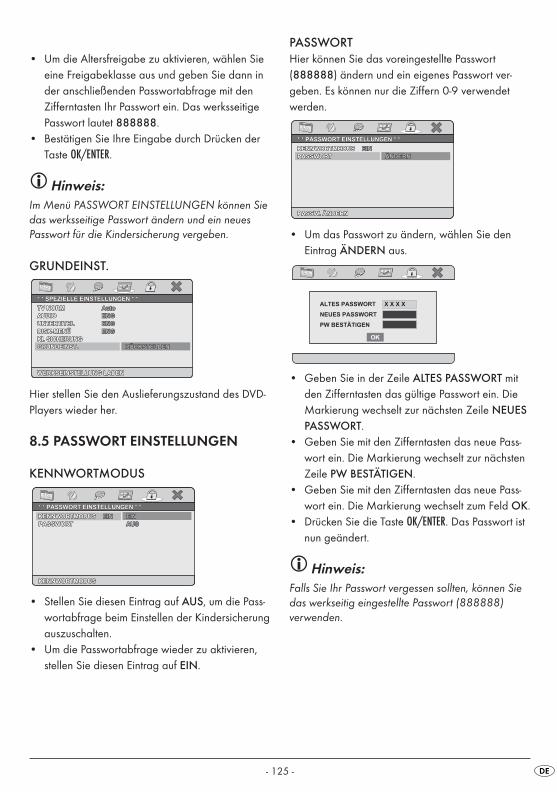
- 125 -
• Um die Altersfreigabe zu aktivieren, wählen Sieeine Freigabeklasse aus und geben Sie dann inder anschließenden Passwortabfrage mit den Zifferntasten Ihr Passwort ein. Das werksseitigePasswort lautet 888888.
• Bestätigen Sie Ihre Eingabe durch Drücken derTaste OK/ENTER.
Hinweis:Im Menü PASSWORT EINSTELLUNGEN können Siedas werksseitige Passwort ändern und ein neuesPasswort für die Kindersicherung vergeben.
GRUNDEINST.
Hier stellen Sie den Auslieferungszustand des DVD-Players wieder her.
8.5 PASSWORT EINSTELLUNGEN
KENNWORTMODUS
• Stellen Sie diesen Eintrag auf AUS, um die Pass-wortabfrage beim Einstellen der Kindersicherungauszuschalten.
• Um die Passwortabfrage wieder zu aktivieren,stellen Sie diesen Eintrag auf EIN.
* * PASSWORT EINSTELLUNGEN * ** * PASSWORT EINSTELLUNGEN * ** * PASSWORT EINSTELLUNGEN * *
KENNWORTMODUSKENNWORTMODUSKENNWORTMODUS
EINEINEIN
AUSAUSAUS
KENNWORTMODUSKENNWORTMODUSKENNWORTMODUS
PASSWORTPASSWORTPASSWORT
EINEINEIN
RÜCKSTELLENRÜCKSTELLENRÜCKSTELLEN
* * SPEZIELLE EINSTELLUNGEN * ** * SPEZIELLE EINSTELLUNGEN * ** * SPEZIELLE EINSTELLUNGEN * *
WERKSEINSTELLUNG LADENWERKSEINSTELLUNG LADENWERKSEINSTELLUNG LADEN
TV NORMTV NORMTV NORM
AUDIOAUDIOAUDIO
UNTERTITELUNTERTITELUNTERTITEL
DISK-MENÜDISK-MENÜDISK-MENÜ
KI. SICHERUNGKI. SICHERUNGKI. SICHERUNG
GRUNDEINST.GRUNDEINST.GRUNDEINST.
AutoAutoAuto
ENGENGENG
ENGENGENG
ENGENGENG
PASSWORTHier können Sie das voreingestellte Passwort(888888) ändern und ein eigenes Passwort ver-geben. Es können nur die Ziffern 0-9 verwendet werden.
• Um das Passwort zu ändern, wählen Sie den Eintrag ÄNDERN aus.
• Geben Sie in der Zeile ALTES PASSWORT mitden Zifferntasten das gültige Passwort ein. DieMarkierung wechselt zur nächsten Zeile NEUESPASSWORT.
• Geben Sie mit den Zifferntasten das neue Pass-wort ein. Die Markierung wechselt zur nächstenZeile PW BESTÄTIGEN.
• Geben Sie mit den Zifferntasten das neue Pass-wort ein. Die Markierung wechselt zum Feld OK.
• Drücken Sie die Taste OK/ENTER. Das Passwort istnun geändert.
Hinweis:Falls Sie Ihr Passwort vergessen sollten, können Siedas werkseitig eingestellte Passwort (888888) verwenden.
X X X XALTES PASSWORT
NEUES PASSWORT
PW BESTÄTIGEN
OK
* * PASSWORT EINSTELLUNGEN * ** * PASSWORT EINSTELLUNGEN * ** * PASSWORT EINSTELLUNGEN * *
PASSW. ÄNDERNPASSW. ÄNDERNPASSW. ÄNDERN
ÄNDERNÄNDERNÄNDERN
KENNWORTMODUSKENNWORTMODUSKENNWORTMODUS
PASSWORTPASSWORTPASSWORT
EINEINEIN
IB_KH6500_AR23388_LB5 01.08.2008 13:15 Uhr Seite 125
- 126 -
8.6 EINSTELLMENÜ VERLASSEN
• Wählen Sie das letzte Menü in der Symbolleisteaus und drücken Sie die Taste OK/ENTER, um dasSetup-Menü zu verlassen.
9. Klangfunktionen
9.1 Lautstärke regelnDrücken Sie die Taste VOL+, um die Lautstärke zu erhöhen.Drücken Sie die Taste VOL-, um die Lautstärke zu verringern.
9.2 Stummschaltung (MUTE)Drücken Sie die Taste MUTE, um den Ton auszu-schalten.Um den Ton wieder einzuschalten, drücken Sie dieTaste MUTE erneut oder drücken Sie eine der TastenVOL+ oder VOL-.
10. Wiedergabe von DVD-,SVCD-, VCD- und CD-Disks
10.1 Disk einlegen• Öffnen Sie das Diskfach h des DVD-Players, in-
dem Sie die Taste OPEN/CLOSE drücken. Im Display wird nun „ÖFFNEN“ angezeigt.• Legen Sie eine DVD/VCD/S-VCD mit der
beschrifteten/etikettierten Seite nach oben in das Diskfach ein.
• Schließen Sie die Klappe des Diskfachs.Im Display wird „LADEN“ angezeigt.
EINSTELLMENÜ VERLASSENEINSTELLMENÜ VERLASSENEINSTELLMENÜ VERLASSEN
• Der Inhalt der eingelegten DVD/VCD/S-VCDwird nun geladen; dies kann einige Sekundendauern.
• Die Wiedergabe der eingelegten DVD/VCD/S-VCD startet automatisch.
Hinweis:DVDs, die Sie mit dem DVD-Player wiedergebenmöchten, verfügen eventuell über einen Ländercode,der auf der DVD-Hülle eingedruckt ist.
Der DVD-Player kann nur DVDs mit dem Ländercode 2 wiedergeben.Wenn auf der Hülle einer DVD kein Ländercode eingedruckt ist …
• sondern das Symbol , so kann die DVD mitdem DVD-Player wiedergeben werden.
• so kann die DVD eventuell nicht mit dem DVD-Player wiedergegeben werden. Überprüfen Siedies, indem Sie versuchen, die DVD abzuspielen.
In Abhängigkeit von der eingelegten DVD/VCD/S-VCD ist es möglich, dass der Inhalt derDVD/VCD/s-VCD nicht sofort abgespielt wird, dazunächst ein Auswahlmenü auf dem Fernsehschirmerscheint.In diesem Fall wählen Sie mit den Navigationstasten���� den Menüpunkt, mit dem das Abspielendes Films gestartet wird. • Um das Abspielen des Films zu starten …• Drücken Sie die Taste OK/ENTER oder drücken Sie
die Taste PLAY/PAUSE.
IB_KH6500_AR23388_LB5 01.08.2008 13:15 Uhr Seite 126
- 127 -
10.2 Wiedergabefunktionen beim Abspielen von DVDs, VCDs, S-VCDs, MPEG- oder Audio-CDs
Während eine DVD/VCD/S-VCD wiedergebenwird, können Sie die folgenden Funktionen desDVD-Players benutzen.
Wiedergabe anhalten (PAUSE)Um die Wiedergabe anzuhalten …• Drücken Sie während der Wiedergabe die
Taste PLAY/PAUSE. Im Display erscheint die Anzeige „;“.Im Display sehen Sie das Standbild der gerade angehaltenen Szene.• Um die Wiedergabe des Films fortzusetzen,
drücken Sie die Taste PLAY/PAUSE.
Wiedergabe abbrechen (STOP)Um die Wiedergabe abzubrechen, drücken Sie dieTaste STOP.
Resume-FunktionWenn Sie die Wiedergabe der eingelegtenDVD/VCD/S-VCD durch einmaliges Drücken derTaste STOP abgebrochen haben, so speichert derDVD-Player automatisch die Stelle ab, an der Siedie Wiedergabe abgebrochen haben. Diese Funk-tion heißt „Resume-Funktion“. Im Display wird WEITER: TASTE PLAY DRÜCKEN angezeigt. Sobald Sie nun erneut die Taste PLAY/PAUSE drücken,wird die Wiedergabe der gespeicherten Stelle fortgesetzt.Wenn Sie die Taste STOP ein zweites Mal drücken,so wird die gespeicherte Stelle, an der Sie dieWiedergabe unterbrochen haben, gelöscht. SobaldSie erneut die Taste PLAY/PAUSE drücken, beginnt dieWiedergabe der eingelegten DVD/VCD/S-VCD amAnfang.
Springen zum Kapitelanfang (SKIP)
Hinweis:Diese Funktion ist eventuell nicht bei allenDVDs/VCDs/S-VCDs verfügbar! Wenn Sie versuchen, eine nicht verfügbare Funktion auszu-führen, wird das Symbol auf dem Fernsehschirm angezeigt.
• Mit den Tasten SKIP � vorwärts und SKIP �rückwärts können Sie innerhalb des Films auf dereingelegten DVD/VCD/S-VCD während derWiedergabe zum Anfang des nächsten Kapitelsoder rückwärts zum vorhergehenden Kapitelspringen
Das jeweils angewählte Kapitel wird sofort wieder-gegeben, ohne dass Sie die Taste PLAY/PAUSEdrücken müssen. Die Nummer des jeweils ange-wählten Kapitels wird im Display auf der Vorder-seite des DVD-Players links von der Abspielzeit angezeigt.
Eingabe der Titelnummer über Zahlentasten
Hinweis:Diese Funktion ist eventuell nicht bei allenDVDs/VCDs/S-VCDs verfügbar! Wenn Sie versuchen, eine nicht verfügbare Funktion auszu-führen, wird das Symbol auf dem Fernsehschirm angezeigt.
Statt mit der Skip-Funktion können Sie die Titel innerhalb des Films auf einer eingelegtenDVD/VCD/S-VCD auch direkt durch die Eingabeder Titelnummer über die Zahlentasten 0 bis 9 aufder Fernbedienung eingeben.• Für die Eingabe von zweistelligen Ziffern
drücken Sie zuerst die Taste 10+ und geben dannnacheinander die beiden Stellen der Ziffer ein.
• Drücken Sie dann die Taste OK/ENTER auf derFernbedienung. Die Wiedergabe des Titels mitder eingegebenen Nummer startet nun automatisch.
IB_KH6500_AR23388_LB5 01.08.2008 13:15 Uhr Seite 127
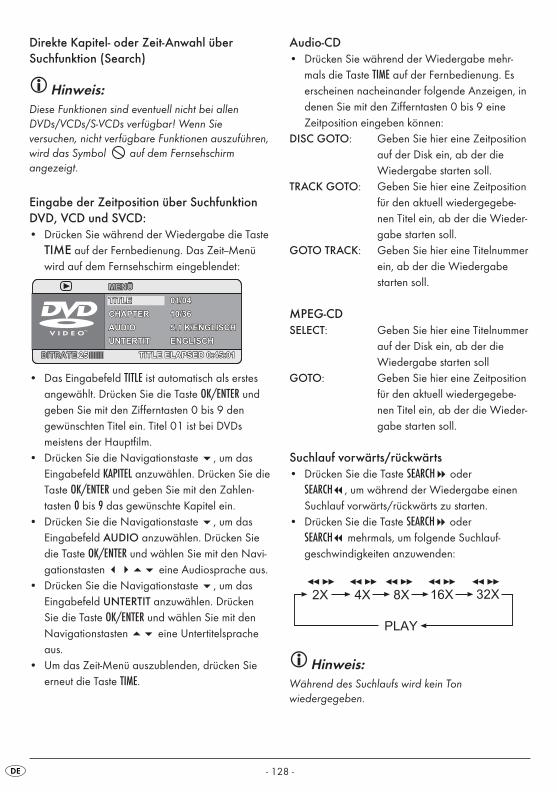
- 128 -
Direkte Kapitel- oder Zeit-Anwahl über Suchfunktion (Search)
Hinweis:Diese Funktionen sind eventuell nicht bei allenDVDs/VCDs/S-VCDs verfügbar! Wenn Sie versuchen, nicht verfügbare Funktionen auszuführen,wird das Symbol auf dem Fernsehschirm angezeigt.
Eingabe der Zeitposition über SuchfunktionDVD, VCD und SVCD:• Drücken Sie während der Wiedergabe die Taste
TIME auf der Fernbedienung. Das Zeit--Menüwird auf dem Fernsehschirm eingeblendet:
• Das Eingabefeld TITLE ist automatisch als erstesangewählt. Drücken Sie die Taste OK/ENTER undgeben Sie mit den Zifferntasten 0 bis 9 den gewünschten Titel ein. Titel 01 ist bei DVDs meistens der Hauptfilm.
• Drücken Sie die Navigationstaste �, um dasEingabefeld KAPITEL anzuwählen. Drücken Sie dieTaste OK/ENTER und geben Sie mit den Zahlen-tasten 0 bis 9 das gewünschte Kapitel ein.
• Drücken Sie die Navigationstaste �, um dasEingabefeld AUDIO anzuwählen. Drücken Siedie Taste OK/ENTER und wählen Sie mit den Navi-gationstasten ���� eine Audiosprache aus.
• Drücken Sie die Navigationstaste �, um dasEingabefeld UNTERTIT anzuwählen. DrückenSie die Taste OK/ENTER und wählen Sie mit denNavigationstasten �� eine Untertitelspracheaus.
• Um das Zeit-Menü auszublenden, drücken Sieerneut die Taste TIME.
CHAPTERCHAPTERCHAPTER
AUDIOAUDIOAUDIO
UNTERTITUNTERTITUNTERTIT
01/0401/0401/04
10/3610/3610/36
5.1 K/ENGLISCH5.1 K/ENGLISCH5.1 K/ENGLISCH
ENGLISCHENGLISCHENGLISCH
TITLE ELAPSED 0:45:01TITLE ELAPSED 0:45:01TITLE ELAPSED 0:45:01BITRATEBITRATEBITRATE 252525
MENÜMENÜMENÜ
TITLETITLETITLE
Audio-CD• Drücken Sie während der Wiedergabe mehr-
mals die Taste TIME auf der Fernbedienung. Es erscheinen nacheinander folgende Anzeigen, indenen Sie mit den Zifferntasten 0 bis 9 eine Zeitposition eingeben können:
DISC GOTO: Geben Sie hier eine Zeitpositionauf der Disk ein, ab der dieWiedergabe starten soll.
TRACK GOTO: Geben Sie hier eine Zeitpositionfür den aktuell wiedergegebe-nen Titel ein, ab der die Wieder-gabe starten soll.
GOTO TRACK: Geben Sie hier eine Titelnummerein, ab der die Wiedergabe starten soll.
MPEG-CDSELECT: Geben Sie hier eine Titelnummer
auf der Disk ein, ab der dieWiedergabe starten soll
GOTO: Geben Sie hier eine Zeitpositionfür den aktuell wiedergegebe-nen Titel ein, ab der die Wieder-gabe starten soll.
Suchlauf vorwärts/rückwärts• Drücken Sie die Taste SEARCH� oder
SEARCH, um während der Wiedergabe einenSuchlauf vorwärts/rückwärts zu starten.
• Drücken Sie die Taste SEARCH� oder SEARCH mehrmals, um folgende Suchlauf-geschwindigkeiten anzuwenden:
Hinweis:Während des Suchlaufs wird kein Ton wiedergegeben.
IB_KH6500_AR23388_LB5 01.08.2008 13:15 Uhr Seite 128
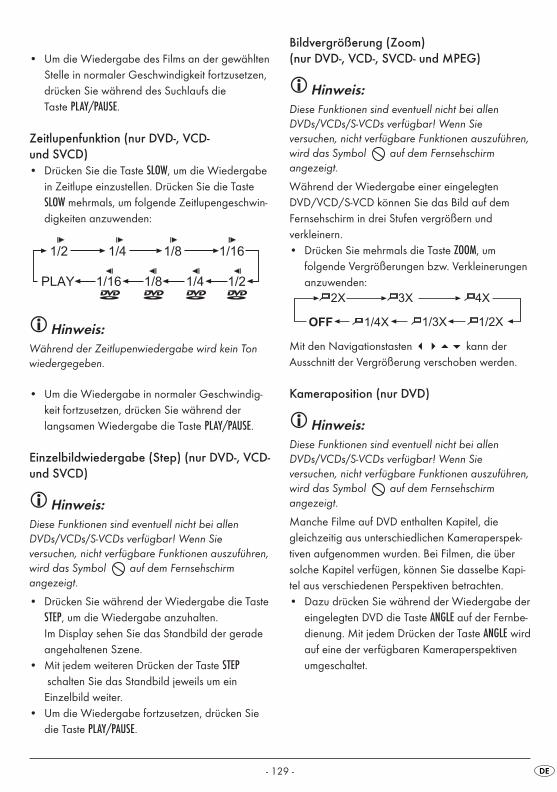
- 129 -
• Um die Wiedergabe des Films an der gewähltenStelle in normaler Geschwindigkeit fortzusetzen,drücken Sie während des Suchlaufs die Taste PLAY/PAUSE.
Zeitlupenfunktion (nur DVD-, VCD- und SVCD)• Drücken Sie die Taste SLOW, um die Wiedergabe
in Zeitlupe einzustellen. Drücken Sie die TasteSLOW mehrmals, um folgende Zeitlupengeschwin-digkeiten anzuwenden:
Hinweis:Während der Zeitlupenwiedergabe wird kein Tonwiedergegeben.
• Um die Wiedergabe in normaler Geschwindig-keit fortzusetzen, drücken Sie während der langsamen Wiedergabe die Taste PLAY/PAUSE.
Einzelbildwiedergabe (Step) (nur DVD-, VCD-und SVCD)
Hinweis:Diese Funktionen sind eventuell nicht bei allenDVDs/VCDs/S-VCDs verfügbar! Wenn Sie versuchen, nicht verfügbare Funktionen auszuführen,wird das Symbol auf dem Fernsehschirm angezeigt.
• Drücken Sie während der Wiedergabe die TasteSTEP, um die Wiedergabe anzuhalten.Im Display sehen Sie das Standbild der geradeangehaltenen Szene.
• Mit jedem weiteren Drücken der Taste STEPschalten Sie das Standbild jeweils um ein Einzelbild weiter.
• Um die Wiedergabe fortzusetzen, drücken Siedie Taste PLAY/PAUSE.
Bildvergrößerung (Zoom) (nur DVD-, VCD-, SVCD- und MPEG)
Hinweis:Diese Funktionen sind eventuell nicht bei allenDVDs/VCDs/S-VCDs verfügbar! Wenn Sie versuchen, nicht verfügbare Funktionen auszuführen,wird das Symbol auf dem Fernsehschirm angezeigt.
Während der Wiedergabe einer eingelegtenDVD/VCD/S-VCD können Sie das Bild auf demFernsehschirm in drei Stufen vergrößern und verkleinern. • Drücken Sie mehrmals die Taste ZOOM, um
folgende Vergrößerungen bzw. Verkleinerungenanzuwenden:
Mit den Navigationstasten ���� kann der Ausschnitt der Vergrößerung verschoben werden.
Kameraposition (nur DVD)
Hinweis:Diese Funktionen sind eventuell nicht bei allenDVDs/VCDs/S-VCDs verfügbar! Wenn Sie versuchen, nicht verfügbare Funktionen auszuführen,wird das Symbol auf dem Fernsehschirm angezeigt.
Manche Filme auf DVD enthalten Kapitel, diegleichzeitig aus unterschiedlichen Kameraperspek-tiven aufgenommen wurden. Bei Filmen, die übersolche Kapitel verfügen, können Sie dasselbe Kapi-tel aus verschiedenen Perspektiven betrachten.• Dazu drücken Sie während der Wiedergabe der
eingelegten DVD die Taste ANGLE auf der Fernbe-dienung. Mit jedem Drücken der Taste ANGLE wirdauf eine der verfügbaren Kameraperspektivenumgeschaltet.
IB_KH6500_AR23388_LB5 01.08.2008 13:15 Uhr Seite 129
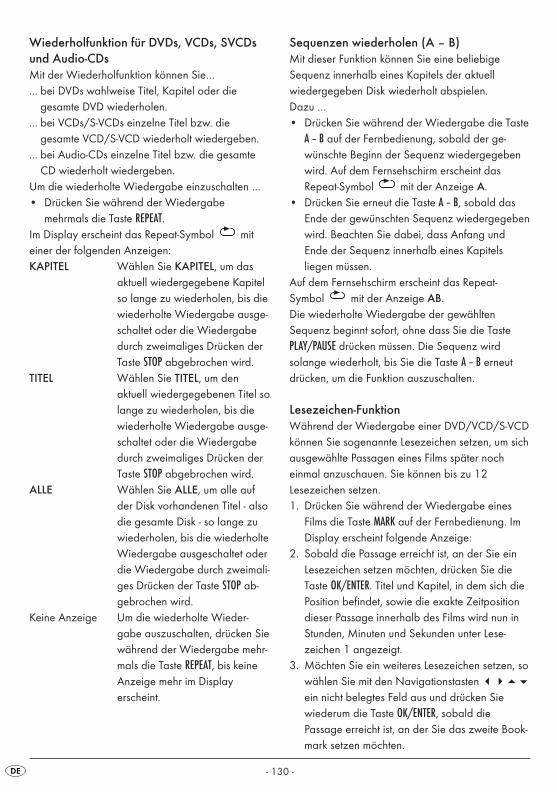
- 130 -
Wiederholfunktion für DVDs, VCDs, SVCDsund Audio-CDsMit der Wiederholfunktion können Sie…... bei DVDs wahlweise Titel, Kapitel oder die
gesamte DVD wiederholen.... bei VCDs/S-VCDs einzelne Titel bzw. die
gesamte VCD/S-VCD wiederholt wiedergeben.... bei Audio-CDs einzelne Titel bzw. die gesamte
CD wiederholt wiedergeben.Um die wiederholte Wiedergabe einzuschalten …• Drücken Sie während der Wiedergabe
mehrmals die Taste REPEAT. Im Display erscheint das Repeat-Symbol mit einer der folgenden Anzeigen:KAPITEL Wählen Sie KAPITEL, um das
aktuell wiedergegebene Kapitelso lange zu wiederholen, bis diewiederholte Wiedergabe ausge-schaltet oder die Wiedergabedurch zweimaliges Drücken derTaste STOP abgebrochen wird.
TITEL Wählen Sie TITEL, um den aktuell wiedergegebenen Titel solange zu wiederholen, bis diewiederholte Wiedergabe ausge-schaltet oder die Wiedergabedurch zweimaliges Drücken derTaste STOP abgebrochen wird.
ALLE Wählen Sie ALLE, um alle aufder Disk vorhandenen Titel - alsodie gesamte Disk - so lange zuwiederholen, bis die wiederholteWiedergabe ausgeschaltet oderdie Wiedergabe durch zweimali-ges Drücken der Taste STOP ab-gebrochen wird.
Keine Anzeige Um die wiederholte Wieder-gabe auszuschalten, drücken Siewährend der Wiedergabe mehr-mals die Taste REPEAT, bis keineAnzeige mehr im Display erscheint.
Sequenzen wiederholen (A – B)Mit dieser Funktion können Sie eine beliebige Sequenz innerhalb eines Kapitels der aktuellwiedergegeben Disk wiederholt abspielen.Dazu …• Drücken Sie während der Wiedergabe die Taste
A – B auf der Fernbedienung, sobald der ge-wünschte Beginn der Sequenz wiedergegebenwird. Auf dem Fernsehschirm erscheint das Repeat-Symbol mit der Anzeige A.
• Drücken Sie erneut die Taste A – B, sobald dasEnde der gewünschten Sequenz wiedergegebenwird. Beachten Sie dabei, dass Anfang undEnde der Sequenz innerhalb eines Kapitels liegen müssen.
Auf dem Fernsehschirm erscheint das Repeat-Symbol mit der Anzeige AB.Die wiederholte Wiedergabe der gewählten Sequenz beginnt sofort, ohne dass Sie die TastePLAY/PAUSE drücken müssen. Die Sequenz wird solange wiederholt, bis Sie die Taste A – B erneutdrücken, um die Funktion auszuschalten.
Lesezeichen-FunktionWährend der Wiedergabe einer DVD/VCD/S-VCDkönnen Sie sogenannte Lesezeichen setzen, um sichausgewählte Passagen eines Films später noch einmal anzuschauen. Sie können bis zu 12 Lesezeichen setzen.1. Drücken Sie während der Wiedergabe eines
Films die Taste MARK auf der Fernbedienung. ImDisplay erscheint folgende Anzeige:
2. Sobald die Passage erreicht ist, an der Sie einLesezeichen setzen möchten, drücken Sie dieTaste OK/ENTER. Titel und Kapitel, in dem sich diePosition befindet, sowie die exakte Zeitpositiondieser Passage innerhalb des Films wird nun inStunden, Minuten und Sekunden unter Lese-zeichen 1 angezeigt.
3. Möchten Sie ein weiteres Lesezeichen setzen, sowählen Sie mit den Navigationstasten ����
ein nicht belegtes Feld aus und drücken Siewiederum die Taste OK/ENTER, sobald die Passage erreicht ist, an der Sie das zweite Book-mark setzen möchten.
IB_KH6500_AR23388_LB5 01.08.2008 13:15 Uhr Seite 130

- 131 -
4. Gehen Sie ebenso vor, um weitere Lesezeichenzu setzen. Haben Sie alle gewünschten Lesezei-chen gesetzt, drücken Sie die Taste MARK, um dieAnzeige auf dem Fernsehschirm auszublenden.
5. Wenn Sie später zu den Passagen springenmöchten, an denen Sie die Lesezeichen gesetzthaben, drücken Sie erneut die Taste MARK.
6. Wählen Sie mit den Navigationstasten���� das gewünschte Lesezeichen aus.
7. Bestätigen Sie die Auswahl, durch Drücken derTaste OK/ENTER. Die Wiedergabe der gewähltenKapitel beginnt nun automatisch an der Stelle, ander Sie das gewählte Lesezeichen gesetzt haben.
8. Um gesetzte Lesezeichen zu löschen, drückenSie die Taste RETURN/CLR.
10.3 Anzeigefunktionen
DVD-Menü aufrufen (Menu)
Hinweis:Diese Funktionen sind eventuell nicht bei allenDVDs/VCDs/S-VCDs verfügbar! Wenn Sie versuchen, nicht verfügbare Funktionen auszuführen,wird das Symbol auf dem Fernsehschirm angezeigt.
Bei vielen Filmen auf DVD gibt es ein Hauptmenüauf der Disc, das Ihnen – neben der Option, denHauptfilm abzuspielen – zum Beispiel ermöglicht …• die Auswahl der Sprache für Untertitel und Filmton• das direkte Anwählen von Kapiteln • die Wiedergabe von Bonusmaterial zum Film
(Hintergrundinformationen, „Making of“ etc.)Falls ein solches Menü auf der in den DVD-Playereingelegten DVD vorhanden ist, so können Sie eswährend der Wiedergabe aufrufen, indem Sie dieTaste MENU/PBC drücken.Die einzelnen Menüpunkte wählen Sie durch Drü-cken der Navigationstasten ���� an; um dengewählten Menüpunkt zu bestätigen, drücken Sie …• die Taste PLAY/PAUSEoder• die Taste OK/ENTER.Um zur Wiedergabe zurückzukehren, drücken Sieerneut die Taste MENU/PBC.
Hinweis:Wenn Sie die Wiedergabe durch zweimaliges Drücken der Taste STOP (Wiedergabe-Stopp ohneResume-Funktion) abgebrochen haben, ist das Aufrufen des Hauptmenüs auf der Disc nicht möglich.
Playback Control (PBC) bei VCDs/S-VCDsManche VCDs/S-VCDs verfügen über PlaybackControl (kurz „PBC“). Playback Control bezeichnetein Hauptmenü, über das sich verschiedene Funktio-nen der VCD/S-VCD bedienen lassen. Wenn eine in den DVD-Player eingelegte VCD/S-VCD über PBC verfügt, so müssen Sie es zunächstaktivieren, um das Menü einblenden zu können.Um PBC zu aktivieren …• Drücken Sie während der Wiedergabe oder bei
abgebrochener Wiedergabe die Taste MENU/PBC.Im Display erscheint die Anzeige PBC AUS.
• Drücken Sie die Taste MENU/PBC erneut. Im Display erscheint die Anzeige PBC EIN. PBC istjetzt eingeschaltet das Hauptmenü der Disk kannmit den Tasten RETURN/CLR, MENU/PBC oder TITLEaufgerufen werden.
Hinweis:Wenn Sie PBC bei laufender Wiedergabe einschalten, so ist es möglich, dass die Wiedergabeabgebrochen wird und wieder am Anfang bzw. mitdem Hauptmenü beginnt.
Untertitel einblenden/ausblenden
Hinweis:Diese Funktion ist eventuell nicht bei allenDVDs/VCDs/S-VCDs verfügbar! Wenn Sie versuchen, eine nicht verfügbare Funktion auszuführen, wird das Symbol auf dem Fernsehschirm angezeigt.
IB_KH6500_AR23388_LB5 01.08.2008 13:15 Uhr Seite 131
- 132 -
Falls der Film auf der eingelegten DVD/VCD/S-VCD über Untertitel verfügt, so können Sie diesewährend der Wiedergabe auf dem Fernsehschirmeinblenden, indem Sie die Taste SUBTITLE drücken. • Beim ersten Drücken der Taste SUBTITLE werden
die Untertitel in der ersten verfügbaren Spracheauf dem Fernsehschirm eingeblendet.
• Mit jedem weiteren Drücken der Taste SUBTITLEwerden die Untertitel in weiteren verfügbarenSprachen nacheinander auf dem Fernsehschirmeingeblendet.
Auf dem Fernsehschirm wird die Nummer der aktuell eingeblendeten Untertitel-Sprache eingeblendet (z. B. „1/10“ für die erste von zehnverfügbaren Untertitel-Sprachen).• Wenn die letzte der verfügbaren Untertitel-
Sprachen eingeblendet ist (z. B. „10/10“ für diezehnte von zehn verfügbaren Untertitel-Sprachen), so können Sie die Untertitel-Funktionausschalten, indem Sie die Taste SUBTITLE erneutdrücken. Auf dem Fernsehschirm wird AUSeingeblendet.
Wiedergabe-Sprache ändern
Hinweis:Diese Funktion ist eventuell nicht bei allenDVDs/VCDs/S-VCDs verfügbar! Wenn Sie versuchen,eine nicht verfügbare Funktion auszuführen, wird dasSymbol auf dem Fernsehschirm angezeigt.
• Bei manchen Filmen auf DVD/VCD/S-VCD können Sie während der Wiedergabe eine andere Wiedergabe-Sprache auswählen, indemSie die Taste AUDIO drücken.
• Beim ersten Drücken der Taste AUDIO wird die erste verfügbare Wiedergabe-Sprache einge-schaltet. Mit jedem weiteren Drücken der TasteAUDIO werden die weiteren verfügbaren Wieder-gabe-Sprachen nacheinander eingeschaltet.
Auf dem Fernsehschirm wird die jeweils eingeschal-tete Wiedergabe-Sprache eingeblendet.
Disk-Informationen einblenden
Hinweis:Diese Funktion ist eventuell nicht bei allenDVDs/VCDs/S-VCDs verfügbar! Wenn Sie versuchen, eine nicht verfügbare Funktion auszuführen, wird das Symbol auf dem Fernsehschirm angezeigt.
Mit dieser Funktion können Sie sämtliche verfüg-baren Informationen zu einer in den DVD-Player eingelegten DVD/VCD/S-VCD während derWiedergabe auf dem Fernsehschirm einblenden.Dazu …• Drücken Sie während der Wiedergabe
mehrmals die Taste DISPLAY, um nacheinander diefolgenden Informationen einzublenden:
Bei DVDs:• die aktuelle Titelnummer/die Gesamtzahl der Titel• die aktuelle Kapitelnummer/die Gesamtzahl der
Kapitel• die bereits abgespielte Zeit in Stunden, Minuten
und Sekunden (TITLE ELAPSED)• die Zeit bis zum Ende des Films in Stunden,
Sekunden und Minuten (TITLE REMAIN)• die bereits abgespielte Zeit des Kapitels in
Stunden, Minuten und Sekunden (CHAPTER ELAPSED)
• die Zeit bis zum Ende des Kapitels in Stunden,Sekunden und Minuten (CHAPTER REMAIN)
Bei VCDs/S-VCDs:• die aktuelle Titelnummer/die Gesamtzahl der
Titel• die bereits abgespielte Zeit des aktuell
wiedergegebenen Titels auf der VCD/SVCD in Stunden, Minuten und Sekunden (SINGLE ELAPSED)
• die Zeit bis zum Ende des aktuell wiederge-gebenen Titels in Stunden, Sekunden und Minuten (SINGLE REMAIN)
IB_KH6500_AR23388_LB5 01.08.2008 13:15 Uhr Seite 132

- 133 -
Bei Audio-CDs• die aktuelle Titelnummer/die Gesamtzahl der Titel• die gesamt abgelaufene Zeit• die bereits abgespielte Zeit des aktuell
wiedergegebenen Titels auf der CD Minutenund Sekunden (SINGLE ELAPSED)
• die Zeit bis zum Ende des aktuell wiederge-gebenen Titels in Minuten und Sekunden (SINGLE REMAIN)
• die gesamt abgespielte Zeit der CD Minuten undSekunden (TOTAL ELAPSED)
• die Zeit bis zum Ende der CD in Minuten und Sekunden (TOTAL REMAIN)
• Um die Disc-Informationen auszublenden, drücken Sie die Taste DISPLAY erneut.
10.4 ProgrammierfunktionSie können eine Abspielreihenfolge für die auf derDVD-, VCD-, SVCD-Disk vorhandenen Titel und Kapitel programmieren.Drücken Sie dazu während der Wiedergabe dieTaste PROG, um das folgende Fenster einzublenden:
Programmier-Fenster
In der oberen Zeile wird die Gesamtzahl der aufder Disk vorhandenen Titel (TT:)angezeigt.Darunter sind die Programmplätze 1-10 aufgelistet,der Programmplatz 1 ist markiert.1. Geben Sie mit den Zifferntasten die Nummer
des Titels ein, der als erstes wiedergegeben werden soll.
In der oberen Zeile werden nun die in diesem Titelvorhandenen Kapitel angezeigt (CH:).2. Geben Sie mit den Zifferntasten die Nummer
des Kapitels ein, das wiedergegeben werdensoll. Die Markierung wechselt zum Programm-platz 2.
3. Wählen Sie mit den Navigationstasten���� weitere Programmplätze aus und geben Sie Titel- und Kapitelnummern für die Programmplätze ein.
• Um die nächsten 10 Programmplätze anzu-zeigen, wählen Sie mit den Navigationstasten���� das Feld � aus und drücken Sie dieTaste OK/ENTER. Sie können bis zu 20 Programm-plätze belegen.
• Um Eingaben in einem Programmplatz zu löschen, wählen Sie den Programmplatz aus unddrücken die Taste RETURN/CLR.
• Um die Programmierfunktion abzubrechen, wählen Sie das Feld ENDE aus und drücken Siedie Taste OK/ENTER. Alle belegten Programm-plätze werden gelöscht.
4. Starten Sie die Wiedergabe der Programm-plätze, indem Sie das Feld START auswählenund die Taste OK/ENTER drücken.
Während der programmierten Wiedergabe erscheint im Display die Anzeige PROGRAMM.Die Programmliste wird gelöscht, sobald Sie die Taste STOP drücken.
11. Anzeige von MP3-/WMA-/JPEG-/AVI-/MPEG-Dateien
• Legen Sie ein Speichermedium ein. Der Inhalt des Datenträgers wird auf dem Displayangezeigt:
Anzeige von MP3-Dateien
IB_KH6500_AR23388_LB5 01.08.2008 13:15 Uhr Seite 133
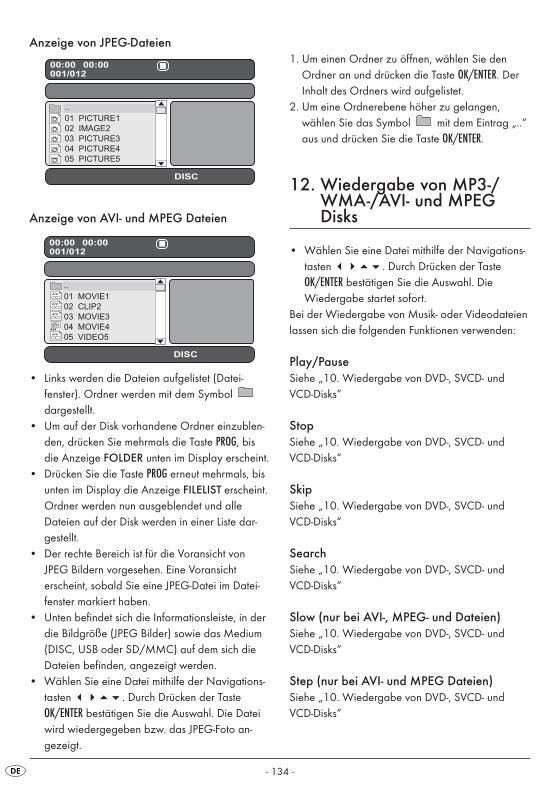
- 134 -
Anzeige von JPEG-Dateien
Anzeige von AVI- und MPEG Dateien
• Links werden die Dateien aufgelistet (Datei-fenster). Ordner werden mit dem Symbol dargestellt.
• Um auf der Disk vorhandene Ordner einzublen-den, drücken Sie mehrmals die Taste PROG, bisdie Anzeige FOLDER unten im Display erscheint.
• Drücken Sie die Taste PROG erneut mehrmals, bisunten im Display die Anzeige FILELIST erscheint.Ordner werden nun ausgeblendet und alle Dateien auf der Disk werden in einer Liste dar-gestellt.
• Der rechte Bereich ist für die Voransicht vonJPEG Bildern vorgesehen. Eine Voransicht erscheint, sobald Sie eine JPEG-Datei im Datei-fenster markiert haben.
• Unten befindet sich die Informationsleiste, in derdie Bildgröße (JPEG Bilder) sowie das Medium(DISC, USB oder SD/MMC) auf dem sich dieDateien befinden, angezeigt werden.
• Wählen Sie eine Datei mithilfe der Navigations-tasten ����. Durch Drücken der TasteOK/ENTER bestätigen Sie die Auswahl. Die Dateiwird wiedergegeben bzw. das JPEG-Foto an-gezeigt.
1. Um einen Ordner zu öffnen, wählen Sie denOrdner an und drücken die Taste OK/ENTER. DerInhalt des Ordners wird aufgelistet.
2. Um eine Ordnerebene höher zu gelangen, wählen Sie das Symbol mit dem Eintrag „..“aus und drücken Sie die Taste OK/ENTER.
12. Wiedergabe von MP3-/WMA-/AVI- und MPEGDisks
• Wählen Sie eine Datei mithilfe der Navigations-tasten ����. Durch Drücken der TasteOK/ENTER bestätigen Sie die Auswahl. DieWiedergabe startet sofort.
Bei der Wiedergabe von Musik- oder Videodateienlassen sich die folgenden Funktionen verwenden:
Play/PauseSiehe „10. Wiedergabe von DVD-, SVCD- undVCD-Disks“
StopSiehe „10. Wiedergabe von DVD-, SVCD- undVCD-Disks“
SkipSiehe „10. Wiedergabe von DVD-, SVCD- undVCD-Disks“
SearchSiehe „10. Wiedergabe von DVD-, SVCD- undVCD-Disks“
Slow (nur bei AVI-, MPEG- und Dateien)Siehe „10. Wiedergabe von DVD-, SVCD- undVCD-Disks“
Step (nur bei AVI- und MPEG Dateien)Siehe „10. Wiedergabe von DVD-, SVCD- undVCD-Disks“
IB_KH6500_AR23388_LB5 01.08.2008 13:15 Uhr Seite 134
- 135 -
Zoom (nur bei JPEG-, AVI- und MPEG Dateien)Siehe „10. Wiedergabe von DVD-, SVCD- undVCD-Disks“
AB RepeatSiehe „10. Wiedergabe von DVD-, SVCD- undVCD-Disks“
12.1 Wiederholfunktion bei MP3-/WMA-/AVI-/MPEG- und JPEG Disks
Drücken Sie während der Wiedergabe mehrmalsdie Taste REPEAT, um folgende Wiederholfunk-tionen anzuwenden (die eingestellte Funktion erscheint im Display):WIEDERH.1 Endloses Wiederholen des
aktuellen Titels/Bildes.ORDN.WIEDERH.Wiederholen des aktuellen
Ordners.ORDNER Wiederholen aller Ordner.ZUFALL1 Zufällige Wiedergabe aller
Titel/Bilder.ZUFALL2 Zufällige Wiedergabe aller
Titel/Bilder, wobei jeder Titel/jedes Bild nur einmal wieder-gegeben wird.
EINMAL Einmaliges Abspielen des aktuellen Titels/Bildes (Wiederholfunktion aus).
12.2 Wiedergabe von JPEG-Disks• Markieren Sie mit den Navigationstasten ��
ein Bild und drücken Sie die Taste OK/ENTER oderPLAY/PAUSE, um das Bild zu öffnen.
Das Bild wird auf dem Display angezeigt.Anschließend wechselt die Ansicht zum nächstenauf der Disk/im Ordner vorhandenen Bild.• Um das aktuell angezeigte Bild länger anzu-
zeigen, drücken Sie die Taste PLAY/PAUSE.• Um die Wiedergabe fortzusetzen, drücken Sie
die Taste PLAY/PAUSE erneut.
• Sie können ein Bild direkt aufrufen, indem Siedie Dateinummer des Bildes mit den Zifferntasteneingeben und anschließend mit der Taste OK/EN-TER bestätigen.
• Mit den Navigationstasten ���� könnenSie das Bild während der Wiedergabe in Schritten von 90° rotieren.
• Drücken Sie während der Wiedergabe die TasteSTOP, um eine Miniaturansicht aller Bilder im Ordner/auf der Disk anzuzeigen. Es werden je12 Miniaturen auf einer Seite angezeigt.
• Wählen Sie mit den Navigationstasten���� ein Bild aus und starten Sie dieWiedergabe mit OK/ENTER oder PLAY/PAUSE.
• Wählen Sie mit den Navigationstasten���� einen der folgenden Einträge aus derunteren Displayzeile aus und bestätigen Sie mitOK/ENTER.
Slide Show Startet eine Diashow der Bilderim Ordner/auf der Disk
Menu Zeigt die verfügbaren Tasten-funktionen für die JPEG-Wieder-gabe an. Drücken Sie die TasteOK/ENTER, bis diese Übersicht ausgeblendet wird.
Prev wechselt zur vorherigen SeiteNext wechselt zur nächsten Seite
• Drücken Sie die Taste MENU/PBC, um wieder zurDateiliste zu wechseln.
12.3 Programmierte Wiedergabe bei MP3-/WMA-/AVI-/MPEG-und JPEG Disks
Sie können eine Abspielreihenfolge programmieren,in der die Titel auf einer Disk wiedergegeben werden sollen.• Wechseln Sie gegebenfalls in die Dateiliste,
indem Sie mehrmals die Taste PROG drücken, bisunten im Display FILE LIST angezeigt wird.
• Wählen Sie mit den Navigationstasten���� den Titel aus, der als erstes wieder-gegeben werden soll.
IB_KH6500_AR23388_LB5 01.08.2008 13:15 Uhr Seite 135
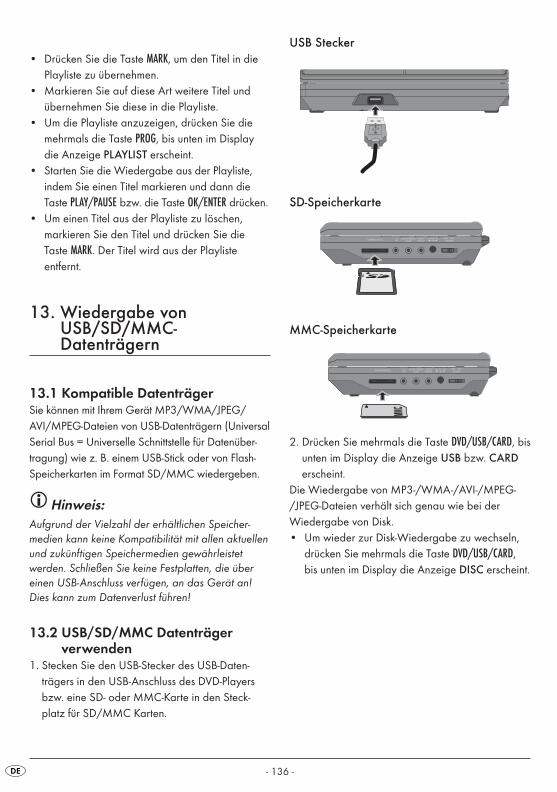
- 136 -
• Drücken Sie die Taste MARK, um den Titel in diePlayliste zu übernehmen.
• Markieren Sie auf diese Art weitere Titel undübernehmen Sie diese in die Playliste.
• Um die Playliste anzuzeigen, drücken Sie diemehrmals die Taste PROG, bis unten im Displaydie Anzeige PLAYLIST erscheint.
• Starten Sie die Wiedergabe aus der Playliste, indem Sie einen Titel markieren und dann die Taste PLAY/PAUSE bzw. die Taste OK/ENTER drücken.
• Um einen Titel aus der Playliste zu löschen, markieren Sie den Titel und drücken Sie die Taste MARK. Der Titel wird aus der Playliste entfernt.
13. Wiedergabe vonUSB/SD/MMC-Datenträgern
13.1 Kompatible DatenträgerSie können mit Ihrem Gerät MP3/WMA/JPEG/AVI/MPEG-Dateien von USB-Datenträgern (UniversalSerial Bus = Universelle Schnittstelle für Datenüber-tragung) wie z. B. einem USB-Stick oder von Flash-Speicherkarten im Format SD/MMC wiedergeben.
Hinweis: Aufgrund der Vielzahl der erhältlichen Speicher-medien kann keine Kompatibilität mit allen aktuellenund zukünftigen Speichermedien gewährleistet werden. Schließen Sie keine Festplatten, die über einen USB-Anschluss verfügen, an das Gerät an!Dies kann zum Datenverlust führen!
13.2 USB/SD/MMC Datenträger verwenden
1. Stecken Sie den USB-Stecker des USB-Daten-trägers in den USB-Anschluss des DVD-Playersbzw. eine SD- oder MMC-Karte in den Steck-platz für SD/MMC Karten.
USB Stecker
SD-Speicherkarte
MMC-Speicherkarte
2. Drücken Sie mehrmals die Taste DVD/USB/CARD, bisunten im Display die Anzeige USB bzw. CARDerscheint.
Die Wiedergabe von MP3-/WMA-/AVI-/MPEG-/JPEG-Dateien verhält sich genau wie bei derWiedergabe von Disk. • Um wieder zur Disk-Wiedergabe zu wechseln,
drücken Sie mehrmals die Taste DVD/USB/CARD,bis unten im Display die Anzeige DISC erscheint.
IB_KH6500_AR23388_LB5 01.08.2008 13:15 Uhr Seite 136
- 137 -
14. Reinigung des DVD-Players
• Reinigen Sie das Gehäuse des DVD-Players ausschließlich mit einem leicht feuchten Tuch undeinem milden Spülmittel. Achten Sie darauf, dassbei der Reinigung keine Feuchtigkeit in den DVD-Player gelangt!
• Säubern Sie das Innere der Disc-Schublade –falls nötig – ausschließlich mit einem sauberentrockenen Pinsel (z. B. Objektiv-Pinsel, erhältlichim Foto-Fachhandel). Säubern Sie das Innere derDisc-Schublade niemals feucht!
Warnung!Dringt Feuchtigkeit in den DVD-Player ein, bestehtdie Gefahr eines elektrischen Schlages! Außerdemkann der DVD-Player dabei irreparabel beschädigtwerden!
15. Entsorgen
Werfen Sie das Gerät keinesfalls in dennormalen Hausmüll. Dieses Produktunterliegt der europäischen Richtlinie2002/96/EG.
Entsorgen Sie das Gerät über einen zugelassenenEntsorgungsbetrieb oder über Ihre kommunale Entsorgungseinrichtung.Beachten Sie die aktuell geltenden Vorschriften. Setzen Sie sich im Zweifelsfall mit Ihrer Entsorgungs-einrichtung in Verbindung.
Batterien/Akkus entsorgenBatterien/Akkus dürfen nicht im Hausmüll entsorgtwerden. Jeder Verbraucher ist gesetzlich verpflich-tet, Batterien/Akkus bei einer Sammelstelle seinerGemeinde / seines Stadtteils oder im Handel abzu-geben.Diese Verpflichtung dient dazu, dass Batterien/Akkus einer umweltschonenden Entsorgung zuge-führt werden können. Geben Sie Batterien/Akkusnur im entladenen Zustand zurück.
Führen Sie alle Verpackungsmaterialien einer umweltgerechten Entsorgung zu.
IB_KH6500_AR23388_LB5 01.08.2008 13:15 Uhr Seite 137
- 138 -
16. Störungen und Fehler beheben
Display zeigt nichts an/DVD-Player zeigt keine Funktion, obwohl er eingeschaltet wurdeA Überprüfen Sie, ob das Netzkabel richtig in
die Steckdose eingesteckt ist.B Prüfen Sie, ob die Steckdose, in die Sie das
Netzkabel des Netzteils/des Auto-Adapters ein-gesteckt haben, Strom führt, indem Sie ein ande-res Gerät an sie anschließen. Stecken Sie dasNetzkabel des Netzteils/des Auto-Adapters gegebenenfalls in eine andere Steckdose ein.
C Schalten Sie den DVD-Player durch Drückender Taste POWER aus und warten Sie danachzehn Sekunden. Schalten Sie den DVD-Playeranschließend durch Drücken der Taste POWER wieder ein.
Display zeigt „Keine Disc“, obwohl eine Disceingelegt wurdeA Die Disc ist verschmutzt, verkratzt oder
beschädigt. Säubern Sie die Disc oder legenSie eine andere Disc ein.
B Der Länder-/Regionalcode der eingelegtenDVD/VCD/S-VCD stimmt nicht mit dem Regio-nal-/Ländercode des DVD-Players überein. DieDVD/VCD/S-VCD kann in diesem Fall nicht mitdem DVD-Player wiedergegeben werden.
Eingelegte Disc wird nicht wiedergegebenEventuell hat sich ein Kondenswasserfilm auf der Laser-Abtastlinse des DVD-Players gebildet. Das kanninsbesondere dann der Fall sein, wenn der DVD-Play-er starken Temperaturschwankungen ausgesetzt war.In diesem Fall stellen Sie den DVD-Player in einertrockenen Umgebung mit normaler Raumtemperaturauf. Entnehmen Sie zunächst eine eventuell einge-legte Disc aus der Disc-Schublade. Lassen Sie denDVD-Player anschließend mindestens eine Stundelang eingeschaltet, ohne ihn zu benutzen, bis derKondenswasserfilm sich zurückgebildet hat.
Kein Bild oder nur Schwarz/Weiß-BildA Überprüfen Sie, ob alle Verbindungskabel
zwischen DVD-Player und Fernseher (oder Video-Projektor) fest in die entsprechendenBuchsen eingesteckt sind
B Überprüfen Sie, ob die Einstellungen im OSD-Menü zu der Anschlussvariante passen, mit derSie den DVD-Player an den Fernseher (oderden Video-Projektor) angeschlossen haben.
C Prüfen Sie anhand der Bedienungsanleitungdes Fernsehers (oder des Video-Projektors), obeventuell Einstellungen am Fernseher (oder desVideo-Projektor) nötig sind, um den DVD-Playermit dem Fernseher zu benutzen.
Kein TonA Prüfen Sie, ob der DVD-Player eventuell stumm
geschaltet ist (Taste MUTE).B Überprüfen Sie, ob alle Verbindungskabel
zwischen DVD-Player und eventuell ange-schlossenen Audio-Komponenten fest in die entsprechenden Buchsen eingesteckt sind
C Überprüfen Sie, ob die Einstellungen im OSD-Menü zu der Anschlussvariante passen, mit derSie die Audio-Komponenten an den DVD-Player angeschlossen haben.
D Prüfen Sie anhand der Bedienungsanleitungdes Fernsehers, ob eventuell Einstellungen amFernseher nötig sind, um den DVD-Player mitdem Fernseher zu benutzen.
E Prüfen Sie anhand der Bedienungsanleitung einer eventuell angeschlossenen Audio-Kompo-nente, ob Einstellungen an dieser nötig sind,um sie mit dem DVD-Player zu benutzen.
Kein 4:3 oder 16:9-Bild A Prüfen Sie anhand der Bedienungsanleitung
des Fernsehers, über welches Bildformat derFernseher verfügt.
B Prüfen Sie, ob die Einstellungen im OSD-Menüzum verfügbaren Bildformat des Fernseherspassen.
IB_KH6500_AR23388_LB5 01.08.2008 13:15 Uhr Seite 138
- 139 -
Fernbedienung ohne FunktionA Prüfen Sie, ob die Batterien der Fernbedienung
mit der richtigen Polarität in das Batteriefacheingesetzt sind.
B Prüfen Sie, ob die Batterien der Fernbedienungverbraucht sind und wechseln Sie beide Batterien nötigenfalls aus.
C Stellen Sie sicher, dass sich keine Hindernissezwischen Fernbedienung und DVD-Player befinden.
D Entfernen Sie sich beim Benutzen der Fern-bedienung nicht mehr als fünf Meter vom DVD-Player.
Wiedergabe-Sprache/Untertitel-Sprache ent-spricht nicht den Einstellungen im OSD-MenüDie im OSD-Menü eingestellte Wiedergabe-Sprache/Untertitel-Sprache ist auf der eingelegtenDisc nicht verfügbar.
Eine oder mehrere Funktionen sind nicht einschaltbarDie gewählte Funktion ist eventuell nicht bei allenDVDs/VCDs/S-VCDs verfügbar. Wenn Sie versuchen,eine nicht verfügbare Funktion auszuführen, wird dasSymbol auf dem Fernsehschirm angezeigt.
Keine Taste am Gerät oder auf der Fernbe-dienung funktioniert/andere FehlfunktionenA Schalten Sie den DVD-Player durch Drücken der
Taste POWER aus. Warten Sie zehn Sekundenund drücken Sie dann die Taste POWER er-neut, um den DVD-Player wieder einzuschalten.
B Falls die Störung danach noch immer auftritt:Setzen Sie den DVD-Player auf die Standard-einstellungen zurück.
Wenden Sie sich an einen unserer Service-Partner in Ihrer Nähe, wenn …• sich die genannten Funktionsstörungen nicht wie
beschrieben beheben lassen oder• andere als die genannten Funktionsstörungen
auftretenSchauen Sie sich dazu das Kapitel 18. „Wichtige Garantiehinweise“ an.
17. Glossar/Stichwortverzeichnis
17.1 Was sind DVDs, VCDs und S-VCDs?
DVDsDVD ist die Abkürzung für engl. „Digital VersatileDisc“. DVDs dienen zum Speichern von Audio- undVideodaten; es gibt sie in den Formaten 8 cm und12 cm (Durchmesser). DVDs bieten - durch ihre umein Vielfaches höhere Speicherkapazität im Vergleich zu CD-Rs/CD-RWs - eine Wiedergabe-dauer der auf ihnen gespeicherten Audio- und Videodaten von bis zu acht Stunden.
VCDs/S-VCDsMit „Video-CD“ (VCD) und „Super Video-CD“ (S-VCD) werden zwei Verfahren zum komprimierten– also Platz sparenden – Speichern von Filmen aufCDs bezeichnet. VCDs und S-VCDs gibt es in denFormaten 8 cm und 12 cm (Durchmesser). Ihre Spei-cherkapazität ist um ein Vielfaches niedriger als dievon DVDs. Daher bieten sie nur eine Wiedergabe-dauer der auf ihnen gespeicherten Audio- und Videodaten von 20 Minuten (8 cm-Format) bzw. 74 Minuten (12 cm-Format).
VCDs gibt es in zwei Versionen: • Bei VCDs/S-VCDs der Version 1.1 können nur
Audio- und Videodaten wiedergegeben werden.
• Bei VCDs/S-VCDs der Version 2.0 stehen PBC(Playback Control)-Funktionen zur Verfügung.Zudem können auch Standbilder in hoher Auflösung wiedergegeben werden.
Playback Control (PBC)VCDs/S-VCDs der Version 2.0 verfügen über Play-back Control (kurz „PBC“). Dann ist auf der VCD/S-VCD ein Hauptmenü verfügbar, über das sich verschiedene Funktionen der VCD/S-VCD bedienenlassen.
IB_KH6500_AR23388_LB5 01.08.2008 13:15 Uhr Seite 139
- 140 -
17.2 Was sind Titel und Kapitel?Titel nennt man die größten Einheiten von Bild- undToneinheiten auf DVDs; bei vielen DVDs hat der(Haupt-) Film die Titelnummer 01. Für Bonusmaterial(z. B. Filmtrailer, Hintergrundinformationen etc.), dasauf vielen DVDs verfügbar ist, können eventuell weitere Titelnummern verwendet werden.
Kapitel nennt man die nächst kleineren Bild- und Toneinheiten unterhalb von Titeln. Wenn der oderdie Titel einer DVD/VCD/S-VCD in Kapitel unterteiltsind, so sind ihnen Nummern zugeordnet, durch deren Eingabe die Kapitel direkt angewählt werdenkönnen.
Beachten Sie, dass nicht auf allen DVDs …• der oder die Titel in (nummerierte) Kapitel
unterteilt sind• Kapitel auch als „Szenen“ bezeichnet werden
(z. B. im Hauptmenü von DVDs)
17.3 Dolby SurroundDolby Surround ist ein analoges Tonformat, bei demdie zwei Kanäle eines Stereo-Tonsignals verwendetwerden, um Raumklang-Informationen für weitereKanäle unterzubringen. Mit einem Dolby Surround-Decoder werden die Signale wieder in Ton bzw.Musik umgewandelt und an zwei zusätzliche Lautsprecher geleitet, die hinter dem Hörplatz aufzustellen sind.
Dolby PrologicIm Vergleich zum Dolby Surround-Tonformat wirdbei Dolby Prologic ein weiterer Kanal im Stereo-Signal verwendet; dies ist der sogenannte „Center“-Kanal. Der entsprechende Center-Lautsprecher istmittig zwischen den Stereo-Lautsprechern aufzu-stellen. Die tiefsten Töne werden an einen Tiefton-Lautsprecher, den sogenannten „Subwoofer“ geleitet. Der Subwoofer kann an einer beliebigenStelle im Raum aufgestellt werden; der Grund dafürist, dass die tiefen Töne, die der Subwoofer ausgibt,vom menschlichen Ohr kaum genau lokalisiert werden können.
Dolby Digital (5.1)Dolby Digital, auch als AC3 bezeichnet, ist ein digitales Tonformat, bei dem bis zu sechs getrennteAudio-Kanäle transportiert werden können. Bei denmeisten aktuellen DVDs ist der Ton im sogenannten„Dolby Digital 5.1“-Format gespeichert; die „5“ inder Bezeichnung „5.1“ steht für drei vordere undzwei hintere Surroundklang-Kanäle, die „1“ für denTieftonkanal.
DTSDTS ist die Abkürzung für engl. „Digital Theatre System“ und bezeichnet eines der gängigsten Surroundklang-Formate für DVDs. Ebenso wie beiDolby Digital 5.1 werden bei DTS drei vordere undzwei hintere Surroundklang-Kanäle sowie ein Tieftonkanal verwendet.
17.4 Was sind PAL und NTSC?
PALPAL ist die Abkürzung für engl. „Phase AlternationLine“. PAL ist die in Mittel- und West-Europa (Ausnahme: Frankreich, siehe Stichwort „SECAM“)übliche und dort am weitesten verbreitete Farb-Fernsehnorm.
NTSCNTSC ist die Abkürzung für engl. „National Television System Committee“. NTSC ist eine Farb-Fernsehnorm, die vor allem in den USA und inJapan verwendet wird.
17.5 MP3, WMA, JPEG und MPEG
MP3MP3 bezeichnet ein vom Fraunhofer Institut ent-wickeltes Verfahren bzw. Format zur Kompressionvon Audiodaten. Im MP3-Format komprimierte Musikstücke haben nur noch einen Bruchteil ihrer ursprünglichen Größe, wodurch sich z. B. auf CD-Rs/CD-RWs weitaus mehr Musik speichern lässt alsauf handelsüblichen Audio-CDs, auf denen Audio-daten im CDA-Format gespeichert werden.
IB_KH6500_AR23388_LB5 01.08.2008 13:15 Uhr Seite 140
- 141 -
Die Struktur einer MP3-CD kann beispielsweise wiefolgt aussehen, wenn die MP3-Dateien in Ordnerngespeichert wurden:
WMAWMA (engl. für „Windows® Media Audio“) ist einvon Microsoft® entwickeltes Dateiformat für Audiodaten.
JPEGJPEG (engl. für „Joint Photographics Expert Group“)bezeichnet ein von der gleichnamigen Organisationentwickeltes, weit verbreitetes Grafikformat, bei demBilddaten der Farb- und Grauskalen komprimiertwerden.
MPEGMPEG („Moving Picture Experts Group“) verweistauf ein Video-Kompressions-Format.
17.6 Was sind Ordner?Im Gegensatz zu Audio-CDs können die Titel auf einer CD-R/CD-RW mit MP3-, WMA- oder JPEG-Dateien in Ordnern gespeichert sein, zum Beispiel,um Titel aus unterschiedlichen Genres zu ordnen.
ORDNER MP3MP3-CD
18. Garantie und Service
Sie erhalten auf dieses Gerät 3 Jahre Garantie abKaufdatum. Sollten Sie trotz unserer hohen Quali-tätsstandards einen Grund zur Beanstandung diesesGerätes haben, so kontaktieren Sie bitte unsere Service-Hotline. Falls eine telefonische BearbeitungIhrer Beanstandung nicht möglich ist, erhalten Siedort• eine Bearbeitungsnummer (RMA-Nummer)
sowie • eine Adresse, an die Sie Ihr Produkt zur
Garantieabwicklung einsenden können.
Bitte legen Sie im Falle einer Einsendung eine Kopiedes Kaufbeleges (Kassenzettel) bei. Das Gerät musstransportsicher verpackt und die RMA-Nummer direkt ersichtlich sein. Einsendungen ohne RMA-Nummer können nicht bearbeitet werden.
Hinweis: Die Garantieleistung gilt nur für Material- oder Fabrikationsfehler.Die Garantieleistung gilt nicht
•für Verschleißteile
•für Beschädigungen an zerbrechlichen Teilen wie Schaltern oder Akkus.
Das Produkt ist lediglich für den privaten und nichtfür den gewerblichen Gebrauch bestimmt. Bei missbräuchlicher und unsachgemäßer Behandlung,Gewaltanwendung und bei Eingriffen, die nicht vonunserer autorisierten Service-Niederlassung vorge-nommen wurden, erlischt die Garantie. Ihre gesetz-lich festgelegten Gewährleistungsansprüche werden durch diese Garantie nicht eingeschränkt.
IB_KH6500_AR23388_LB5 01.08.2008 13:15 Uhr Seite 141

- 142 -
19. Importeur
KOMPERNASS GMBHBURGSTRASSE 21D-44867 BOCHUMwww.kompernass.com
✄
IB_KH6500_AR23388_LB5 01.08.2008 13:15 Uhr Seite 142
Die
sen
Ab
sch
nit
t vo
llstä
nd
ig a
usf
ülle
n u
nd
dem
Ger
ät b
eile
gen
!✄
Garantie
Schraven Service- und Dienstleistungs GmbHTel.: +49 (0) 180 5 008107
(14 Ct/Min. aus dem dt. Festnetzggf. abweichende Preise aus dem Mobilfunk)
Fax: +49 (0) 2832 3532e-mail: [email protected]
Kompernaß Service ÖsterreichRittenschober KGTel.: +43 (0) 7612 6260516Fax: +43 (0) 7612 626056e-mail: [email protected]
www.mysilvercrest.de
Um einen kostenlosen Reparaturab-lauf zu gewährleisten, setzen Siesich bitte mit der Service-Hotline inVerbindung. Halten Sie hierfür IhrenKassenbeleg bereit.
Tragbarer DVD-PlayerKH 6500
Absender bitte deutlich schreiben:
Name
Vorname
Straße
PLZ/Ort
Land
Telefon
Datum/Unterschrift
Fehlerbeschreibung:
IB_KH6500_AR23388_LB5 01.08.2008 13:15 Uhr Seite 143

IB_KH6500_AR23388_LB5 01.08.2008 13:15 Uhr Seite 144