Embed Size (px)
Citation preview
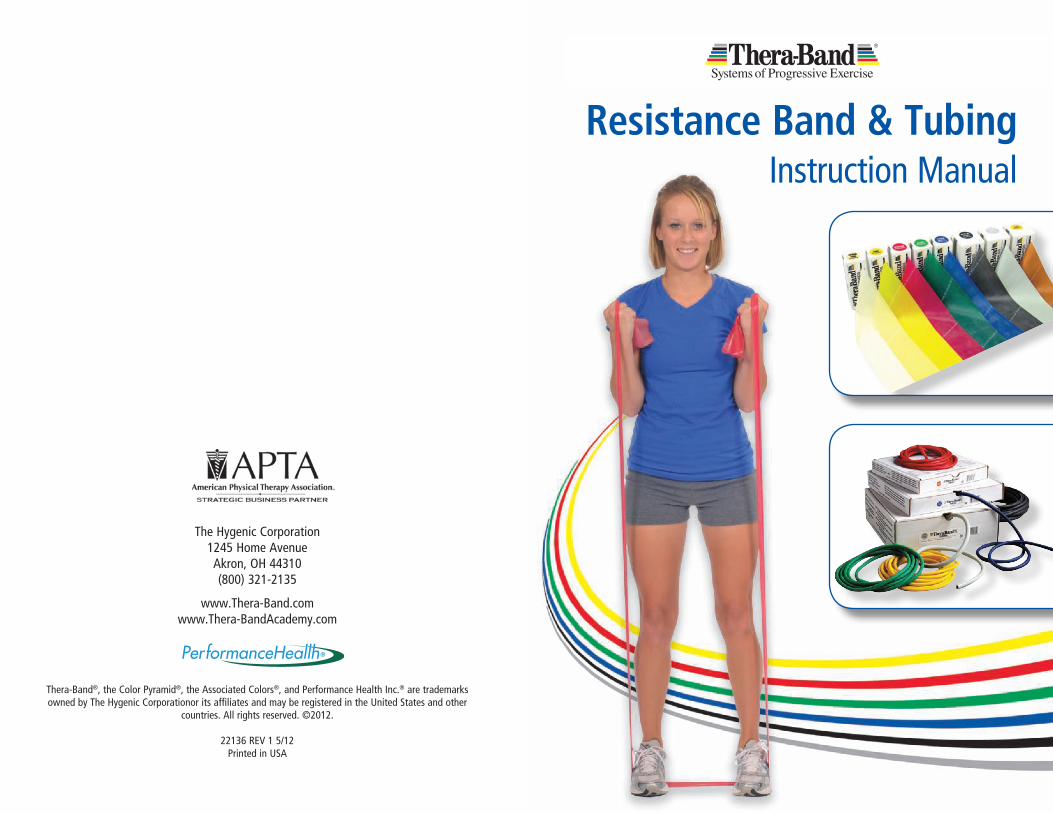
Resistance Band & Tubing Instruction Manual
The Hygenic Corporation 1245 Home Avenue Akron, OH 44310 (800) 321-2135
www.Thera-Band.com www.Thera-BandAcademy.com
Thera-Band®, the Color Pyramid®, the Associated Colors®, and Performance Health Inc.® are trademarks owned by The Hygenic Corporationor its affiliates and may be registered in the United States and other
countries. All rights reserved. ©2012.
22136 REV 1 5/12 Printed in USA
®
1
Table of Contents
Introduction . . . . . . . . . . . . . . . . . . . . . . . . . . . . . . . . . . . . . . . . . . .2
Information for Healthcare Professionals . . . . . . . . . . . . . . . . . .3
Information for Patients and Consumers . . . . . . . . . . . . . . . . . .4
Practical Exercise Tips . . . . . . . . . . . . . . . . . . . . . . . . . . . . . . . . .5
Caring for Elastic Bands and Tubing . . . . . . . . . . . . . . . . . . . . . .5
Directions for Handling, Connecting, and Securing Thera-Band® Resistance Bands and Tubing . . . . . . . . . . . . . . . .6
Exercise Resistance Pull Force Charts . . . . . . . . . . . . . . . . . . 11
Exercise Dosage . . . . . . . . . . . . . . . . . . . . . . . . . . . . . . . . . . . . . 13
Outcomes . . . . . . . . . . . . . . . . . . . . . . . . . . . . . . . . . . . . . . . . . . 14
Exercise List Summary . . . . . . . . . . . . . . . . . . . . . . . . . . . . . . . 15
Exercise Illustrations . . . . . . . . . . . . . . . . . . . . . . . . . . . . . . . . . 16
www .Thera-BandAcademy .com . . . . . . . . . . . . . . . . . . . . . . . . 40
Instruction Manual
Instruction Manual
2 3
Instruction Manual
Introduction
Recognized as the original system of progressive resistance for over 25 years, Thera-Band® elastic resistance has been proven to increase strength, mobility
and function, as well as reduce joint pain1, 2, 3. Evidence-based exercise programs utilizing Thera-Band bands and tubing rehabilitate injuries, improve the functional ability of older adults, improve athletic performance, and aid in treating many chronic diseases.
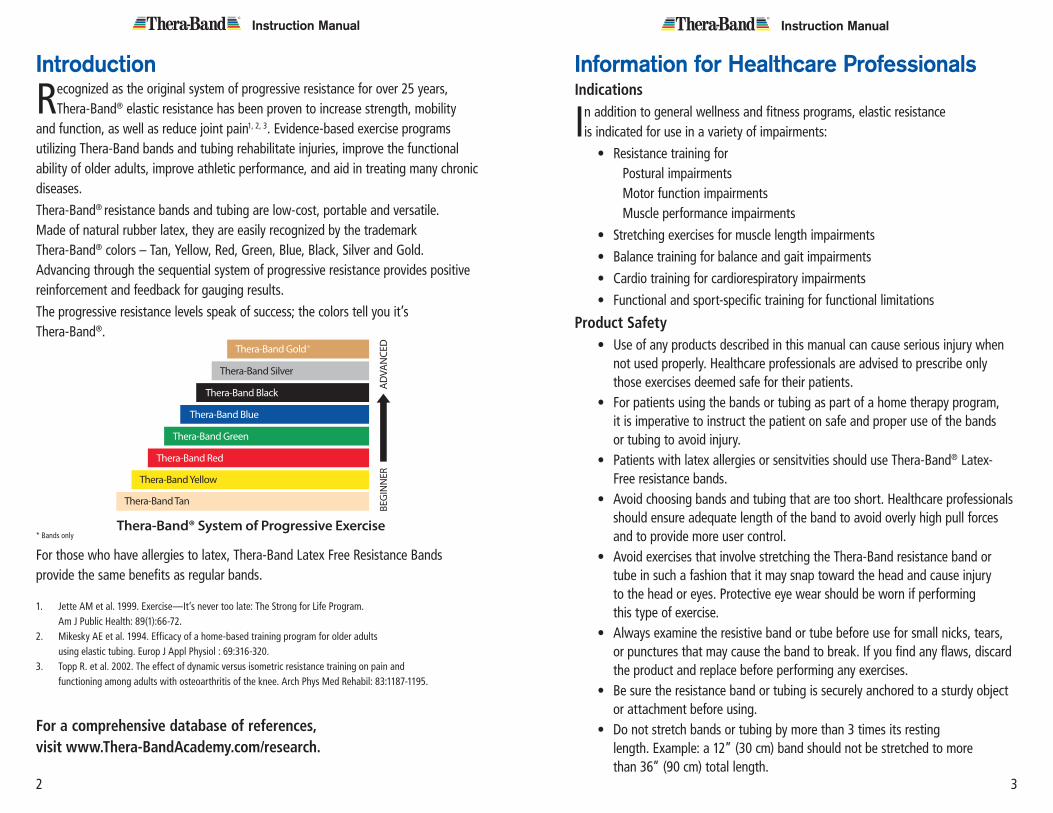
Thera-Band® resistance bands and tubing are low-cost, portable and versatile. Made of natural rubber latex, they are easily recognized by the trademark Thera-Band® colors – Tan, Yellow, Red, Green, Blue, Black, Silver and Gold. Advancing through the sequential system of progressive resistance provides positive reinforcement and feedback for gauging results.
The progressive resistance levels speak of success; the colors tell you it’s Thera-Band®.
* Bands only
For those who have allergies to latex, Thera-Band Latex Free Resistance Bands provide the same benefits as regular bands.
1. Jette AM et al. 1999. Exercise—It’s never too late: The Strong for Life Program. Am J Public Health: 89(1):66-72.2. Mikesky AE et al. 1994. Efficacy of a home-based training program for older adults using elastic tubing. Europ J Appl Physiol : 69:316-320.3. Topp R. et al. 2002. The effect of dynamic versus isometric resistance training on pain and functioning among adults with osteoarthritis of the knee. Arch Phys Med Rehabil: 83:1187-1195.
For a comprehensive database of references, visit www.Thera-BandAcademy.com/research.
Information for Healthcare ProfessionalsIndications
In addition to general wellness and fitness programs, elastic resistance is indicated for use in a variety of impairments:
• Resistance training for Postural impairments Motor function impairments Muscle performance impairments
• Stretching exercises for muscle length impairments
• Balance training for balance and gait impairments
• Cardio training for cardiorespiratory impairments
• Functional and sport-specific training for functional limitations
Product Safety • Use of any products described in this manual can cause serious injury when not used properly. Healthcare professionals are advised to prescribe only those exercises deemed safe for their patients. • For patients using the bands or tubing as part of a home therapy program, it is imperative to instruct the patient on safe and proper use of the bands or tubing to avoid injury. • Patients with latex allergies or sensitvities should use Thera-Band® Latex- Free resistance bands. • Avoid choosing bands and tubing that are too short. Healthcare professionals should ensure adequate length of the band to avoid overly high pull forces and to provide more user control. • Avoid exercises that involve stretching the Thera-Band resistance band or tube in such a fashion that it may snap toward the head and cause injury to the head or eyes. Protective eye wear should be worn if performing this type of exercise. • Always examine the resistive band or tube before use for small nicks, tears, or punctures that may cause the band to break. If you find any flaws, discard the product and replace before performing any exercises. • Be sure the resistance band or tubing is securely anchored to a sturdy object or attachment before using. • Do not stretch bands or tubing by more than 3 times its resting length. Example: a 12” (30 cm) band should not be stretched to more than 36” (90 cm) total length.
Instruction Manual
4 5
Instruction Manual
Information for Patients and ConsumersPrecautions • Always consult your physician before beginning an exercise program. • Your rehabilitation or exercise professional should help develop an individualized program to meet your needs and abilities. • Use of any products described in this manual can cause serious injury when not used properly. • Patients with latex allergies or sensitives should use Thera-Band® Latex-Free resistance bands. • Avoid exercises that involve stretching the Thera-Band resistance bands or tubing in such a fashion that they may snap toward the head and cause injury to the head or eyes. If these types of exercises are prescribed, protective eyeware should be worn. • Thera-Band resistance bands and tubing are not toys; consult a physician before allowing children to exercise. Do not permit children to use without proper supervision. • If you experience sharp pain, shortness of breath, dizziness or light- headedness with any of these exercises, stop immediately and contact your healthcare provider. • As with any exercise program, muscle soreness may be experienced over the first few days. If your pain should persist for more than 3 or 4 days, consult your physician or therapist. Do not exercise while experiencing pain. • Be sure the resistance band or tubing is securely anchored to a sturdy object or attachment before using. • Do not overstretch the resistance band or tube by more than 3 times its resting length. Example: a 12” (30 cm) band should not be stretched to more than 36” (90 cm) total length. • Protect the Thera-Band resistance band or tubing by keeping it away from sharp objects. Remove rings from the fingers before using the resistance bands or tubing. Be aware of long, sharp fingernails.
Practical Exercise Tips • With all exercises, posture and body alignment is critical. Keep the shoulders and hips aligned, tighten the abdominals, and relax the knees. Be sure to practice the safest posture possible by maintaining a natural spinal curve. • Use the band or tubing prescribed by your physician or therapist for the prescribed sets and repetitions. Rest between sets. • Include proper warm-up and cool-down activities with your elastic resistance training program. • Perform all exercises in a slow and controlled manner. At no time should you feel “out of control”; remember to control the band or tubing rather than allowing it to control you. Do not allow the band or tubing to snap back. • Avoid hyperextending or over-flexing joints when exercising. Don’t lock the joints. • Breathe evenly while performing your exercises. Exhale during the more difficult phase of the repetition. Don’t hold your breath. • For beginners, perform the exercises without the band or tubing until you are comfortable, then add resistance. Begin with 8 to 10 exercises that target major muscle groups. • Exercise with the level of band that was prescribed for you, or with a level that allows you to complete 2 to 3 sets of 10 to 15 repetitions with mild fatigue on the last set. • Progress to the next level band when you are able to easily complete the 3 sets of 10 to 15 repetitions.
Caring for Elastic Bands and Tubing • Always examine the resistance band or tubing before use for small nicks, tears, or punctures that may cause the band to break. If you find any flaws, discard the product and replace before performing any exercises. • Store all resistance bands and tubing out of direct sunlight and away from extreme temperatures. • After use in chlorinated water, rinse the bands or tubing with tap water and dry flat. • If the bands or tubing becomes sticky, clean with mild soap and water, dry flat, and then dust with talcum powder, baby powder or corn starch.
7
Instruction ManualInstruction Manual
6
Directions for Handling, Connecting, and Securing Thera-Band® Resistance Bands and TubingAlways examine your band or tubing before use; discard and replace if you notice any tears or nicks. Protect the eyes during exercises that may cause the band or tubing to snap back toward the head. Check routinely for evidence of wear of the band or tubing at connection points and replace the band if evidence is found.
Handling the BandsYour elastic band or tubing should be securely attached to your hand or foot before use to avoid slippage and possible injury. “Double wrapping” the band may help secure it to your hand or foot. Never exercise with the band or tubing unless it is secured properly.
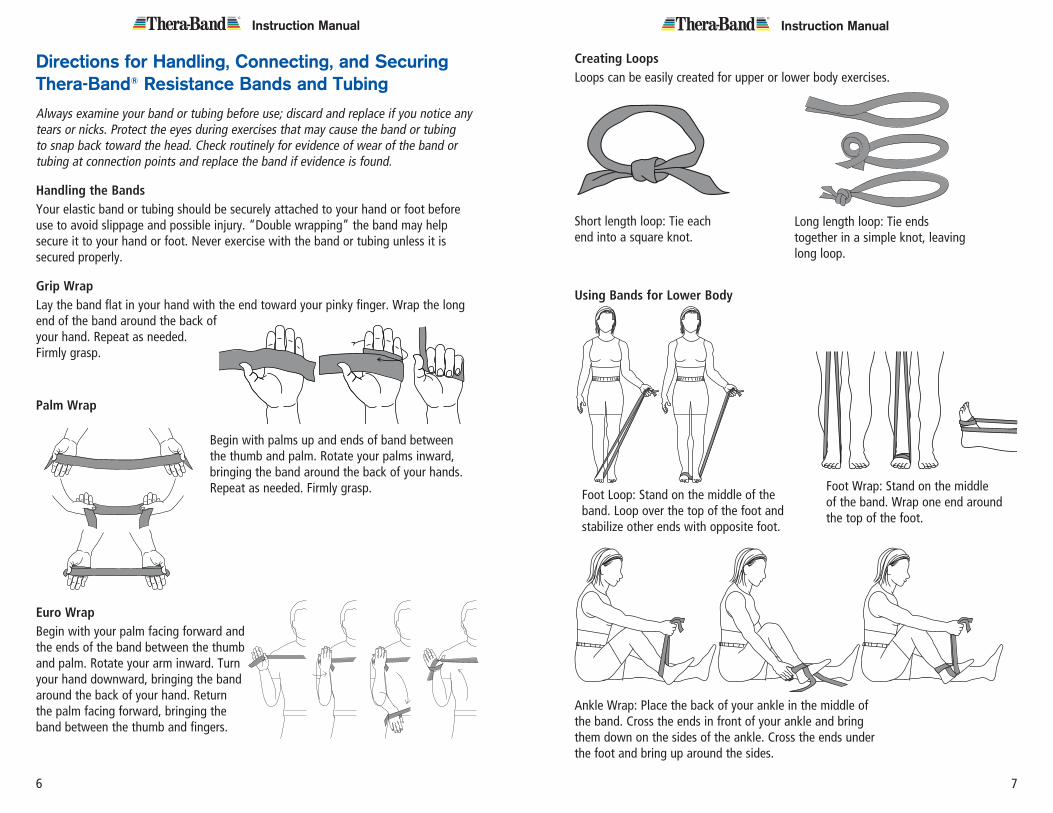
Grip WrapLay the band flat in your hand with the end toward your pinky finger. Wrap the long end of the band around the back of your hand. Repeat as needed. Firmly grasp.
Palm Wrap
Begin with palms up and ends of band between the thumb and palm. Rotate your palms inward, bringing the band around the back of your hands. Repeat as needed. Firmly grasp.
Euro WrapBegin with your palm facing forward and the ends of the band between the thumb and palm. Rotate your arm inward. Turn your hand downward, bringing the band around the back of your hand. Return the palm facing forward, bringing the band between the thumb and fingers.
Creating LoopsLoops can be easily created for upper or lower body exercises.
Using Bands for Lower Body
Short length loop: Tie each end into a square knot.
Long length loop: Tie ends together in a simple knot, leaving long loop.
Foot Loop: Stand on the middle of the band. Loop over the top of the foot and stabilize other ends with opposite foot.
Ankle Wrap: Place the back of your ankle in the middle of the band. Cross the ends in front of your ankle and bring them down on the sides of the ankle. Cross the ends under the foot and bring up around the sides.
Foot Wrap: Stand on the middle of the band. Wrap one end around the top of the foot.
9
Instruction Manual
8
Handling the Tubing
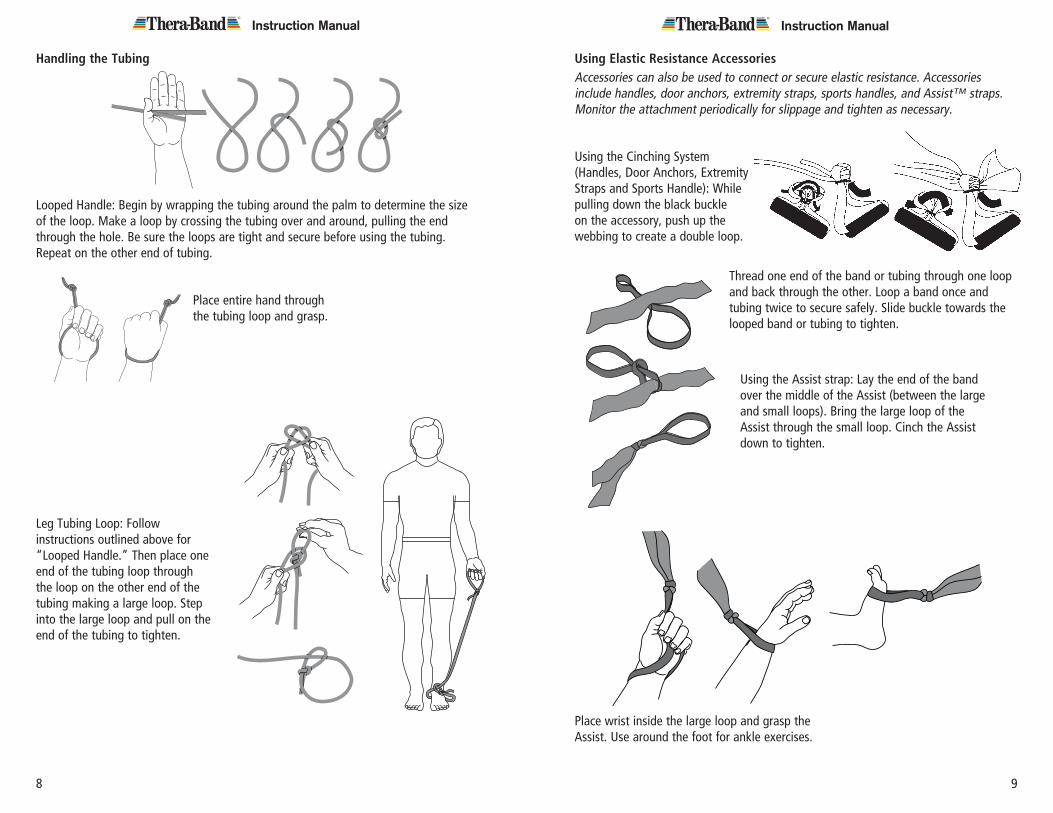
Looped Handle: Begin by wrapping the tubing around the palm to determine the size of the loop. Make a loop by crossing the tubing over and around, pulling the end through the hole. Be sure the loops are tight and secure before using the tubing. Repeat on the other end of tubing.
Place entire hand through the tubing loop and grasp.
Leg Tubing Loop: Follow instructions outlined above for “Looped Handle.” Then place one end of the tubing loop through the loop on the other end of the tubing making a large loop. Step into the large loop and pull on the end of the tubing to tighten.
Using Elastic Resistance AccessoriesAccessories can also be used to connect or secure elastic resistance. Accessories include handles, door anchors, extremity straps, sports handles, and Assist™ straps. Monitor the attachment periodically for slippage and tighten as necessary.
Using the Cinching System (Handles, Door Anchors, Extremity Straps and Sports Handle): While pulling down the black buckle on the accessory, push up the webbing to create a double loop.
Thread one end of the band or tubing through one loop and back through the other. Loop a band once and tubing twice to secure safely. Slide buckle towards the looped band or tubing to tighten.
Using the Assist strap: Lay the end of the band over the middle of the Assist (between the large and small loops). Bring the large loop of the Assist through the small loop. Cinch the Assist down to tighten.
Place wrist inside the large loop and grasp the Assist. Use around the foot for ankle exercises.
Instruction Manual
11
Instruction Manual
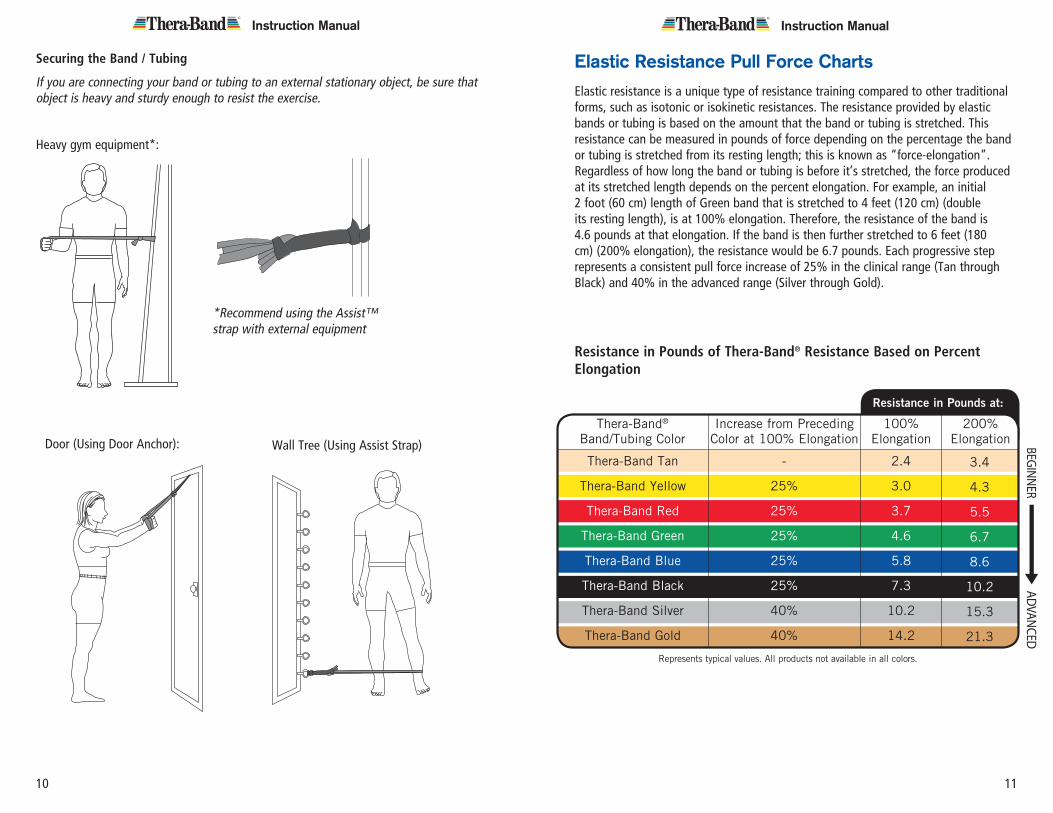
Elastic Resistance Pull Force ChartsElastic resistance is a unique type of resistance training compared to other traditional forms, such as isotonic or isokinetic resistances. The resistance provided by elastic bands or tubing is based on the amount that the band or tubing is stretched. This resistance can be measured in pounds of force depending on the percentage the band or tubing is stretched from its resting length; this is known as “force-elongation”. Regardless of how long the band or tubing is before it’s stretched, the force produced at its stretched length depends on the percent elongation. For example, an initial 2 foot (60 cm) length of Green band that is stretched to 4 feet (120 cm) (double its resting length), is at 100% elongation. Therefore, the resistance of the band is 4.6 pounds at that elongation. If the band is then further stretched to 6 feet (180 cm) (200% elongation), the resistance would be 6.7 pounds. Each progressive step represents a consistent pull force increase of 25% in the clinical range (Tan through Black) and 40% in the advanced range (Silver through Gold).
Resistance in Pounds of Thera-Band® Resistance Based on Percent Elongation
Instruction Manual
10
Securing the Band / Tubing
If you are connecting your band or tubing to an external stationary object, be sure that object is heavy and sturdy enough to resist the exercise.
Heavy gym equipment*:
*Recommend using the Assist™ strap with external equipment
Door (Using Door Anchor): Wall Tree (Using Assist Strap)
Represents typical values. All products not available in all colors.
Resistance in Pounds at:
Thera-Band® Band/Tubing Color
Increase from Preceding Color at 100% Elongation
100% Elongation
200% Elongation
Thera-Band Tan
Thera-Band Yellow
Thera-Band Red
Thera-Band Green
Thera-Band Blue
Thera-Band Black
Thera-Band Silver
Thera-Band Gold
-
25%
25%
25%
25%
25%
40%
40%
2.4
3.0
3.7
4.6
5.8
7.3
10.2
14.2
3.4
4.3
5.5
6.7
8.6
10.2
15.3
21.3
Instruction ManualInstruction Manual
12
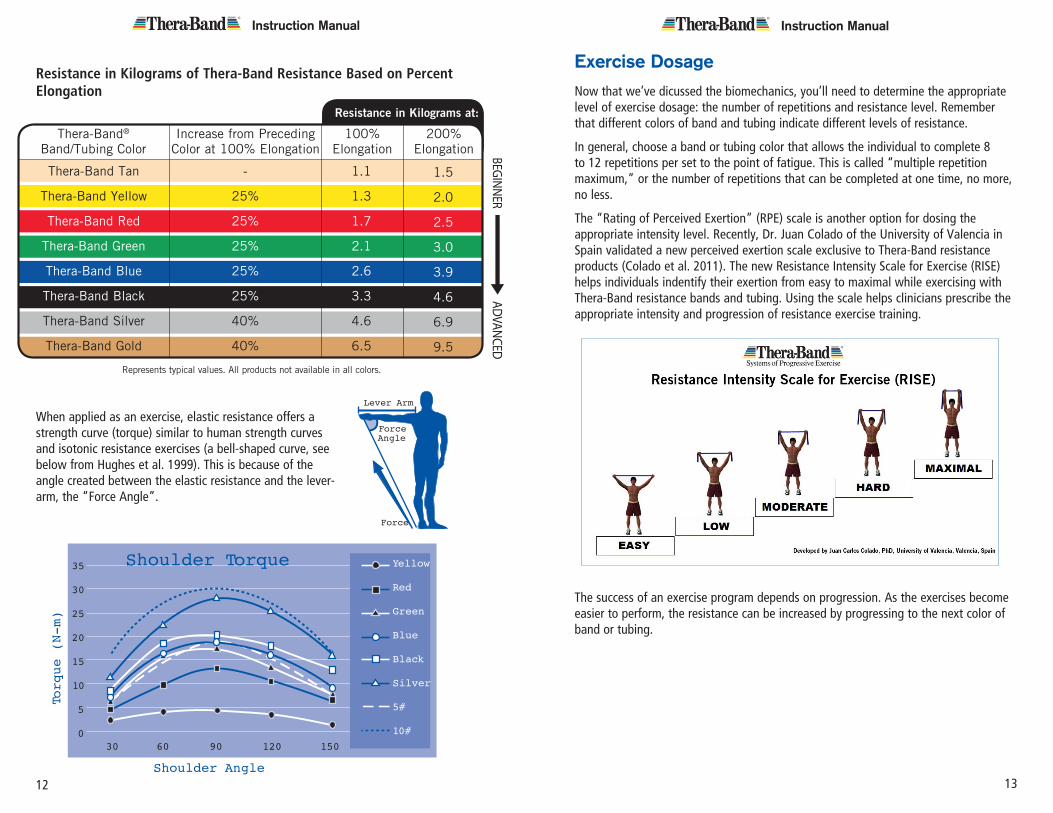
Resistance in Kilograms of Thera-Band Resistance Based on Percent Elongation
When applied as an exercise, elastic resistance offers a strength curve (torque) similar to human strength curves and isotonic resistance exercises (a bell-shaped curve, see below from Hughes et al. 1999). This is because of the angle created between the elastic resistance and the lever-arm, the “Force Angle”.
35
30
25
20
15
10
5
030 60 90 120 150
Yellow
Red
Green
Blue
Black
Silver
5#
10#
Shoulder Torque
Shoulder Angle
Torque (N-
m)
Lever Arm
ForceAngle
Force
35
30
25
20
15
10
5
030 60 90 120 150
Yellow
Red
Green
Blue
Black
Silver
5#
10#
Shoulder Torque
Shoulder Angle
Torque (N-m)
Lever Arm
ForceAngle
Force
Exercise DosageNow that we’ve dicussed the biomechanics, you’ll need to determine the appropriate level of exercise dosage: the number of repetitions and resistance level. Remember that different colors of band and tubing indicate different levels of resistance.
In general, choose a band or tubing color that allows the individual to complete 8 to 12 repetitions per set to the point of fatigue. This is called “multiple repetition maximum,” or the number of repetitions that can be completed at one time, no more, no less.
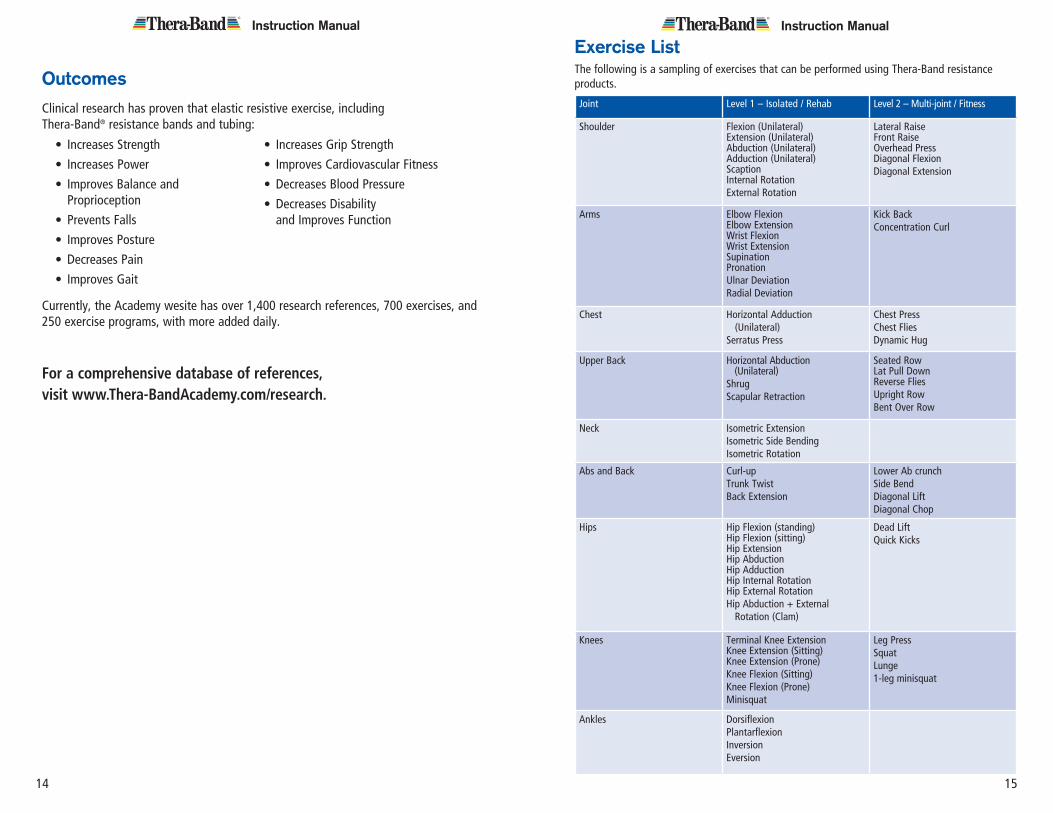
The “Rating of Perceived Exertion” (RPE) scale is another option for dosing the appropriate intensity level. Recently, Dr. Juan Colado of the University of Valencia in Spain validated a new perceived exertion scale exclusive to Thera-Band resistance products (Colado et al. 2011). The new Resistance Intensity Scale for Exercise (RISE) helps individuals indentify their exertion from easy to maximal while exercising with Thera-Band resistance bands and tubing. Using the scale helps clinicians prescribe the appropriate intensity and progression of resistance exercise training.
The success of an exercise program depends on progression. As the exercises become easier to perform, the resistance can be increased by progressing to the next color of band or tubing.
Represents typical values. All products not available in all colors.
Resistance in Kilograms at:
Thera-Band® Band/Tubing Color
Increase from Preceding Color at 100% Elongation
100% Elongation
200% Elongation
Thera-Band Tan
Thera-Band Yellow
Thera-Band Red
Thera-Band Green
Thera-Band Blue
Thera-Band Black
Thera-Band Silver
Thera-Band Gold
-
25%
25%
25%
25%
25%
40%
40%
1.1
1.3
1.7
2.1
2.6
3.3
4.6
6.5
1.5
2.0
2.5
3.0
3.9
4.6
6.9
9.5
13
15
Instruction ManualInstruction Manual
14
Joint Level 1 – Isolated / Rehab Level 2 – Multi-joint / Fitness
Shoulder Flexion (Unilateral)Extension (Unilateral)Abduction (Unilateral)Adduction (Unilateral)ScaptionInternal RotationExternal Rotation
Lateral RaiseFront RaiseOverhead PressDiagonal FlexionDiagonal Extension
Arms Elbow FlexionElbow ExtensionWrist FlexionWrist ExtensionSupinationPronationUlnar DeviationRadial Deviation
Kick BackConcentration Curl
Chest Horizontal Adduction (Unilateral)Serratus Press
Chest PressChest FliesDynamic Hug
Upper Back Horizontal Abduction (Unilateral)ShrugScapular Retraction
Seated RowLat Pull DownReverse FliesUpright RowBent Over Row
Neck Isometric ExtensionIsometric Side BendingIsometric Rotation
Abs and Back Curl-upTrunk TwistBack Extension
Lower Ab crunchSide BendDiagonal LiftDiagonal Chop
Hips Hip Flexion (standing)Hip Flexion (sitting)Hip ExtensionHip AbductionHip AdductionHip Internal RotationHip External RotationHip Abduction + External Rotation (Clam)
Dead LiftQuick Kicks
Knees Terminal Knee ExtensionKnee Extension (Sitting)Knee Extension (Prone)Knee Flexion (Sitting)Knee Flexion (Prone)Minisquat
Leg PressSquatLunge1-leg minisquat
Ankles DorsiflexionPlantarflexionInversionEversion
Exercise List The following is a sampling of exercises that can be performed using Thera-Band resistance products.Outcomes
Clinical research has proven that elastic resistive exercise, including Thera-Band® resistance bands and tubing:
• Increases Strength
• Increases Power
• Improves Balance and Proprioception
• Prevents Falls
• Improves Posture
• Decreases Pain
• Improves Gait
• Increases Grip Strength
• Improves Cardiovascular Fitness
• Decreases Blood Pressure
• Decreases Disability and Improves Function
Currently, the Academy wesite has over 1,400 research references, 700 exercises, and 250 exercise programs, with more added daily.
For a comprehensive database of references, visit www.Thera-BandAcademy.com/research.
17
Instruction Manual
16
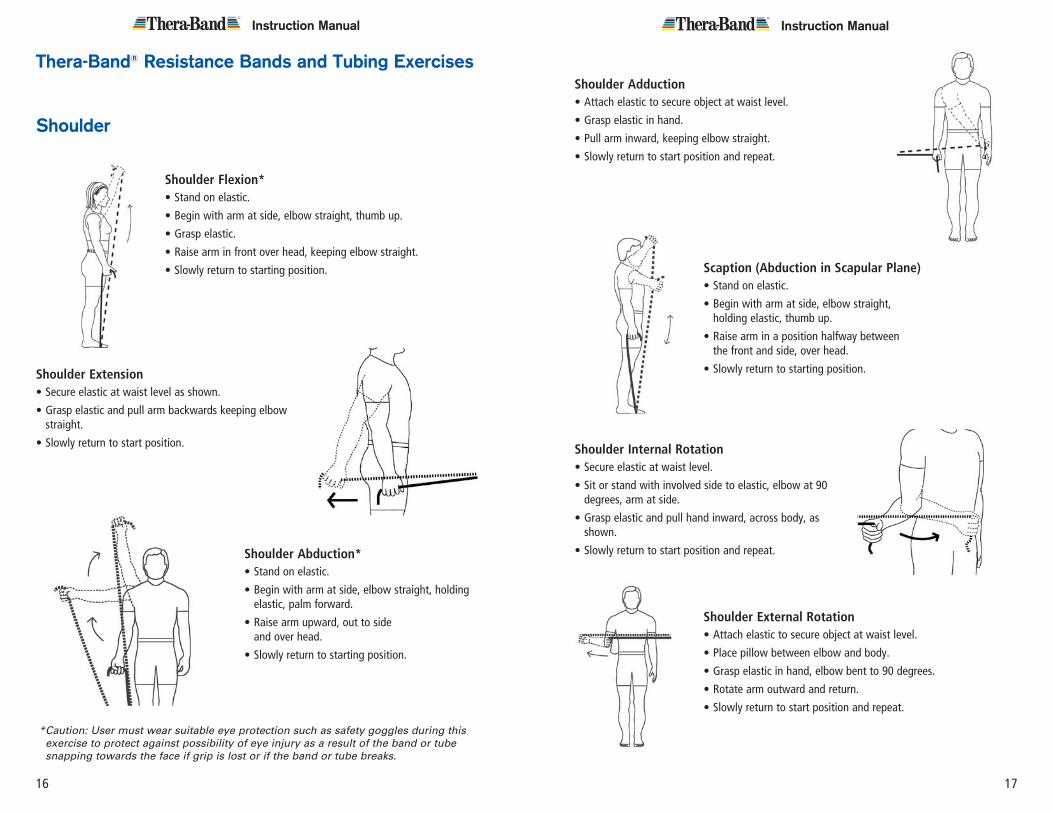
Shoulder Adduction • Attach elastic to secure object at waist level.
• Grasp elastic in hand.
• Pull arm inward, keeping elbow straight.
• Slowly return to start position and repeat.
Scaption (Abduction in Scapular Plane) • Stand on elastic.
• Begin with arm at side, elbow straight, holding elastic, thumb up.
• Raise arm in a position halfway between the front and side, over head.
• Slowly return to starting position.
Shoulder Internal Rotation• Secure elastic at waist level.
• Sit or stand with involved side to elastic, elbow at 90 degrees, arm at side.
• Grasp elastic and pull hand inward, across body, as shown.
• Slowly return to start position and repeat.
Shoulder External Rotation• Attach elastic to secure object at waist level.
• Place pillow between elbow and body.
• Grasp elastic in hand, elbow bent to 90 degrees.
• Rotate arm outward and return.
• Slowly return to start position and repeat.
Thera-Band® Resistance Bands and Tubing Exercises
Shoulder
Shoulder Flexion* • Stand on elastic.
• Begin with arm at side, elbow straight, thumb up.
• Grasp elastic.
• Raise arm in front over head, keeping elbow straight.
• Slowly return to starting position.
Shoulder Extension • Secure elastic at waist level as shown.
• Grasp elastic and pull arm backwards keeping elbow straight.
• Slowly return to start position.
Shoulder Abduction* • Stand on elastic.
• Begin with arm at side, elbow straight, holding elastic, palm forward.
• Raise arm upward, out to side and over head.
• Slowly return to starting position.
* Caution: User must wear suitable eye protection such as safety goggles during this exercise to protect against possibility of eye injury as a result of the band or tube snapping towards the face if grip is lost or if the band or tube breaks.
Instruction Manual
19
Instruction ManualInstruction Manual
18
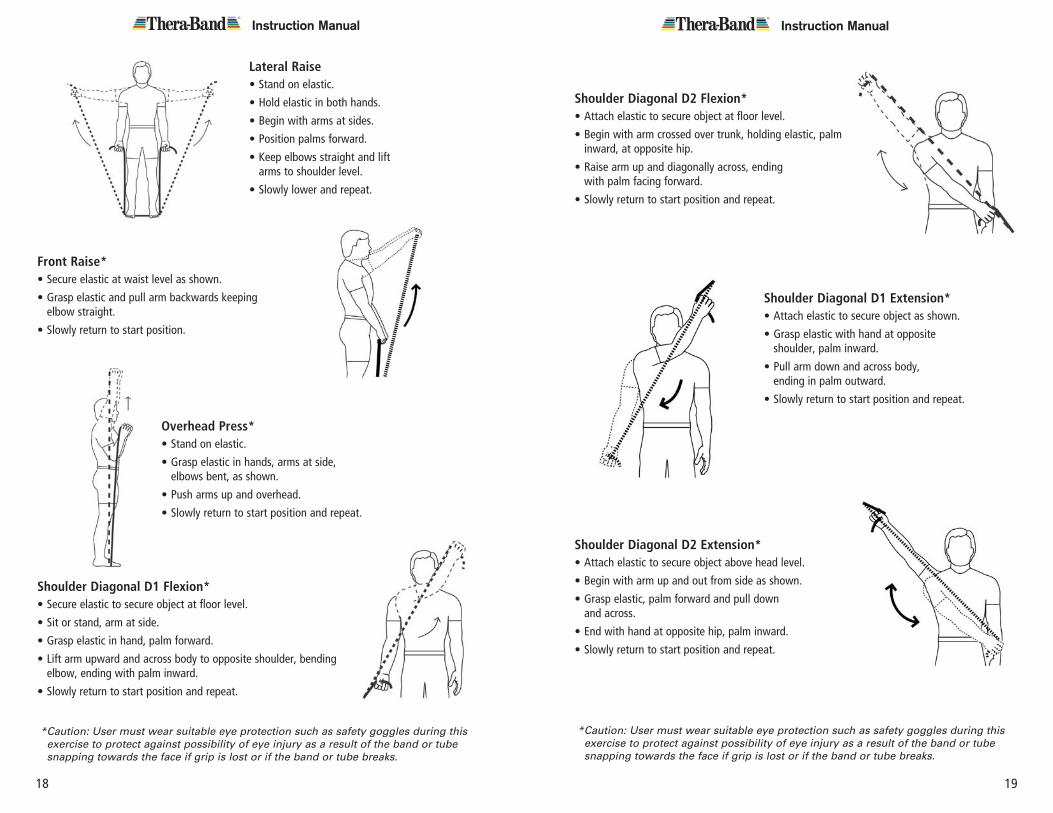
Shoulder Diagonal D2 Flexion*• Attach elastic to secure object at floor level.
• Begin with arm crossed over trunk, holding elastic, palm inward, at opposite hip.
• Raise arm up and diagonally across, ending with palm facing forward.
• Slowly return to start position and repeat.
Shoulder Diagonal D1 Extension*• Attach elastic to secure object as shown.
• Grasp elastic with hand at opposite shoulder, palm inward.
• Pull arm down and across body, ending in palm outward.
• Slowly return to start position and repeat.
Shoulder Diagonal D2 Extension*• Attach elastic to secure object above head level.
• Begin with arm up and out from side as shown.
• Grasp elastic, palm forward and pull down and across.
• End with hand at opposite hip, palm inward.
• Slowly return to start position and repeat.
* Caution: User must wear suitable eye protection such as safety goggles during this exercise to protect against possibility of eye injury as a result of the band or tube snapping towards the face if grip is lost or if the band or tube breaks.
Lateral Raise• Stand on elastic.
• Hold elastic in both hands.
• Begin with arms at sides.
• Position palms forward.
• Keep elbows straight and lift arms to shoulder level.
• Slowly lower and repeat.
Front Raise*• Secure elastic at waist level as shown.
• Grasp elastic and pull arm backwards keeping elbow straight.
• Slowly return to start position.
Overhead Press*• Stand on elastic.
• Grasp elastic in hands, arms at side, elbows bent, as shown.
• Push arms up and overhead.
• Slowly return to start position and repeat.
Shoulder Diagonal D1 Flexion*• Secure elastic to secure object at floor level.
• Sit or stand, arm at side.
• Grasp elastic in hand, palm forward.
• Lift arm upward and across body to opposite shoulder, bending elbow, ending with palm inward.
• Slowly return to start position and repeat.
* Caution: User must wear suitable eye protection such as safety goggles during this exercise to protect against possibility of eye injury as a result of the band or tube snapping towards the face if grip is lost or if the band or tube breaks.
21
Instruction ManualInstruction Manual
20
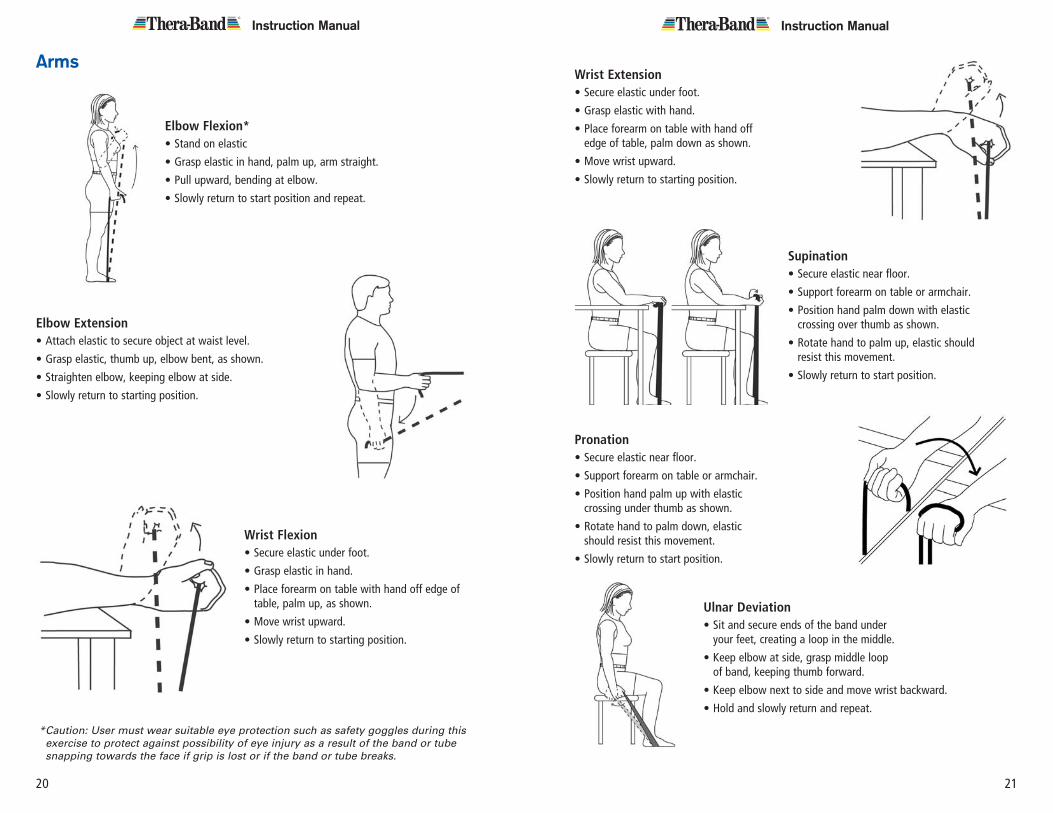
Wrist Extension• Secure elastic under foot.
• Grasp elastic with hand.
• Place forearm on table with hand off edge of table, palm down as shown.
• Move wrist upward.
• Slowly return to starting position.
Supination• Secure elastic near floor.
• Support forearm on table or armchair.
• Position hand palm down with elastic crossing over thumb as shown.
• Rotate hand to palm up, elastic should resist this movement.
• Slowly return to start position.
Pronation• Secure elastic near floor.
• Support forearm on table or armchair.
• Position hand palm up with elastic crossing under thumb as shown.
• Rotate hand to palm down, elastic should resist this movement.
• Slowly return to start position.
Ulnar Deviation• Sit and secure ends of the band under
your feet, creating a loop in the middle.
• Keep elbow at side, grasp middle loop of band, keeping thumb forward.
• Keep elbow next to side and move wrist backward.
• Hold and slowly return and repeat.
Elbow Flexion*• Stand on elastic
• Grasp elastic in hand, palm up, arm straight.
• Pull upward, bending at elbow.
• Slowly return to start position and repeat.
Elbow Extension• Attach elastic to secure object at waist level.
• Grasp elastic, thumb up, elbow bent, as shown.
• Straighten elbow, keeping elbow at side.
• Slowly return to starting position.
Wrist Flexion• Secure elastic under foot.
• Grasp elastic in hand.
• Place forearm on table with hand off edge of table, palm up, as shown.
• Move wrist upward.
• Slowly return to starting position.
Arms
* Caution: User must wear suitable eye protection such as safety goggles during this exercise to protect against possibility of eye injury as a result of the band or tube snapping towards the face if grip is lost or if the band or tube breaks.
23
Instruction ManualInstruction Manual
22
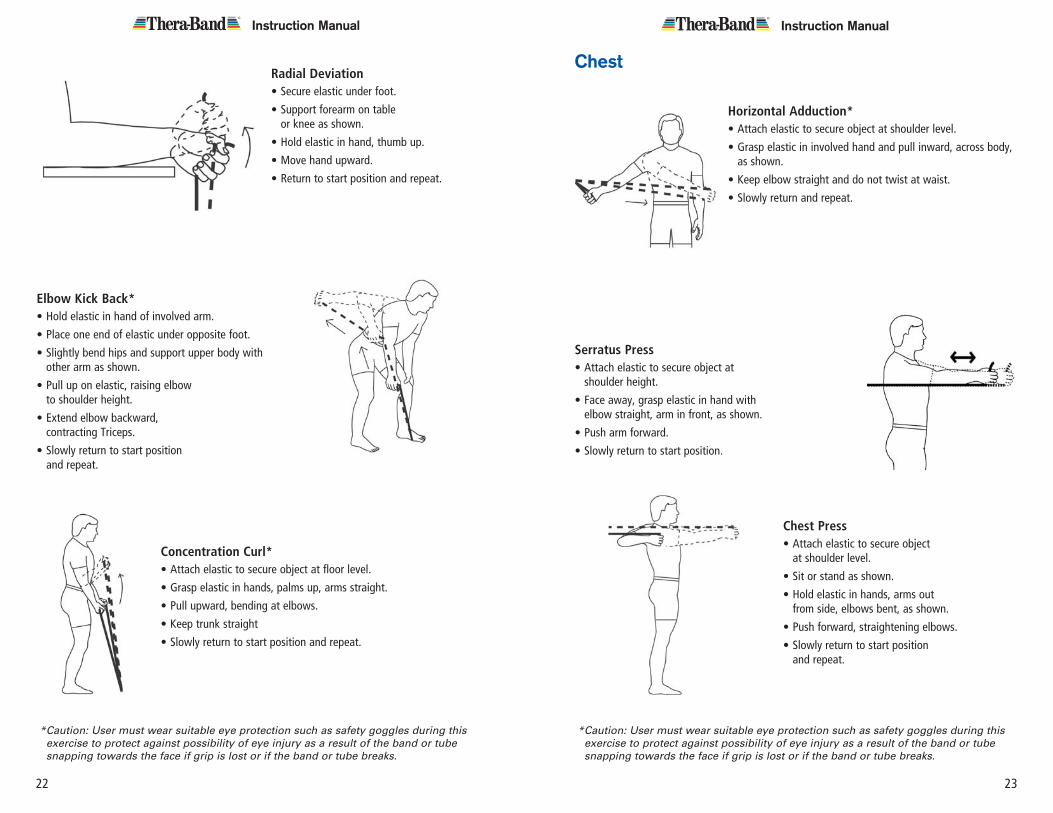
Chest
Horizontal Adduction* • Attach elastic to secure object at shoulder level.
• Grasp elastic in involved hand and pull inward, across body, as shown.
• Keep elbow straight and do not twist at waist.
• Slowly return and repeat.
Serratus Press• Attach elastic to secure object at
shoulder height.
• Face away, grasp elastic in hand with elbow straight, arm in front, as shown.
• Push arm forward.
• Slowly return to start position.
Chest Press• Attach elastic to secure object
at shoulder level.
• Sit or stand as shown.
• Hold elastic in hands, arms out from side, elbows bent, as shown.
• Push forward, straightening elbows.
• Slowly return to start position and repeat.
* Caution: User must wear suitable eye protection such as safety goggles during this exercise to protect against possibility of eye injury as a result of the band or tube snapping towards the face if grip is lost or if the band or tube breaks.
Radial Deviation• Secure elastic under foot.
• Support forearm on table or knee as shown.
• Hold elastic in hand, thumb up.
• Move hand upward.
• Return to start position and repeat.
Elbow Kick Back*• Hold elastic in hand of involved arm.
• Place one end of elastic under opposite foot.
• Slightly bend hips and support upper body with other arm as shown.
• Pull up on elastic, raising elbow to shoulder height.
• Extend elbow backward, contracting Triceps.
• Slowly return to start position and repeat.
Concentration Curl*• Attach elastic to secure object at floor level.
• Grasp elastic in hands, palms up, arms straight.
• Pull upward, bending at elbows.
• Keep trunk straight
• Slowly return to start position and repeat.
* Caution: User must wear suitable eye protection such as safety goggles during this exercise to protect against possibility of eye injury as a result of the band or tube snapping towards the face if grip is lost or if the band or tube breaks.
25
Instruction ManualInstruction Manual
24
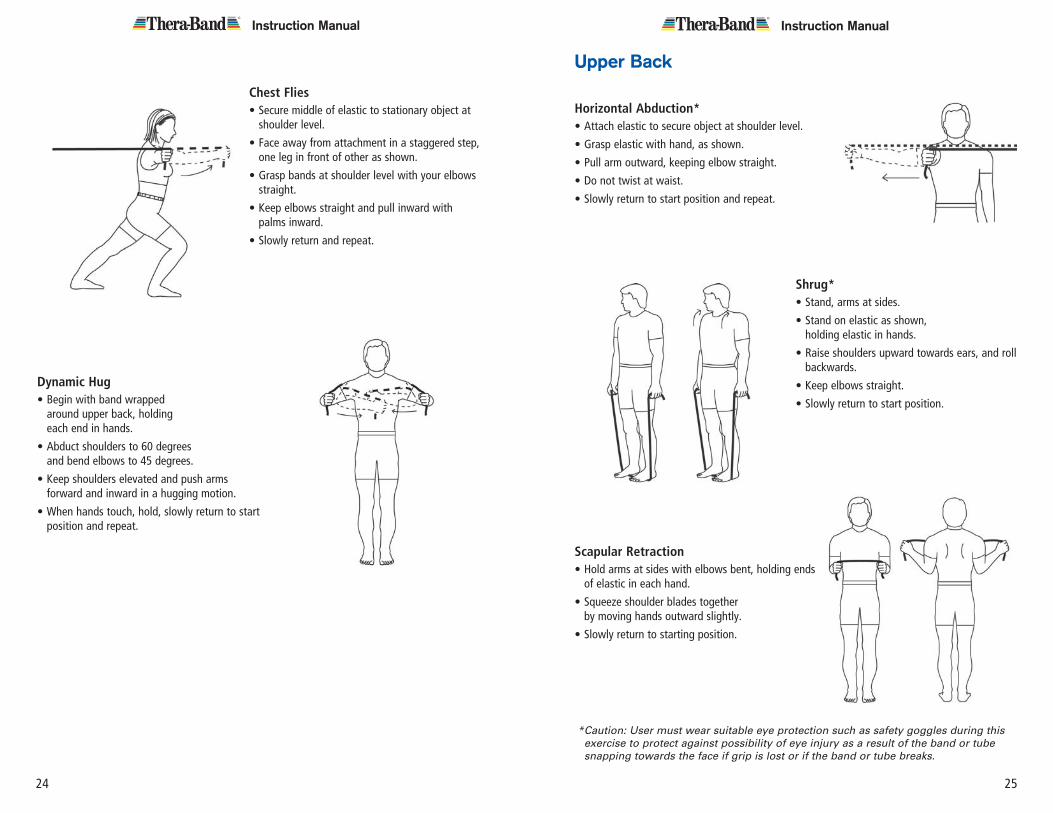
Shrug*• Stand, arms at sides.
• Stand on elastic as shown, holding elastic in hands.
• Raise shoulders upward towards ears, and roll backwards.
• Keep elbows straight.
• Slowly return to start position.
Scapular Retraction• Hold arms at sides with elbows bent, holding ends
of elastic in each hand.
• Squeeze shoulder blades together by moving hands outward slightly.
• Slowly return to starting position.
Upper Back
Horizontal Abduction* • Attach elastic to secure object at shoulder level.
• Grasp elastic with hand, as shown.
• Pull arm outward, keeping elbow straight.
• Do not twist at waist.
• Slowly return to start position and repeat.
* Caution: User must wear suitable eye protection such as safety goggles during this exercise to protect against possibility of eye injury as a result of the band or tube snapping towards the face if grip is lost or if the band or tube breaks.
Chest Flies• Secure middle of elastic to stationary object at
shoulder level.
• Face away from attachment in a staggered step, one leg in front of other as shown.
• Grasp bands at shoulder level with your elbows straight.
• Keep elbows straight and pull inward with palms inward.
• Slowly return and repeat.
Dynamic Hug• Begin with band wrapped
around upper back, holding each end in hands.
• Abduct shoulders to 60 degrees and bend elbows to 45 degrees.
• Keep shoulders elevated and push arms forward and inward in a hugging motion.
• When hands touch, hold, slowly return to start position and repeat.
Instruction ManualInstruction Manual
26
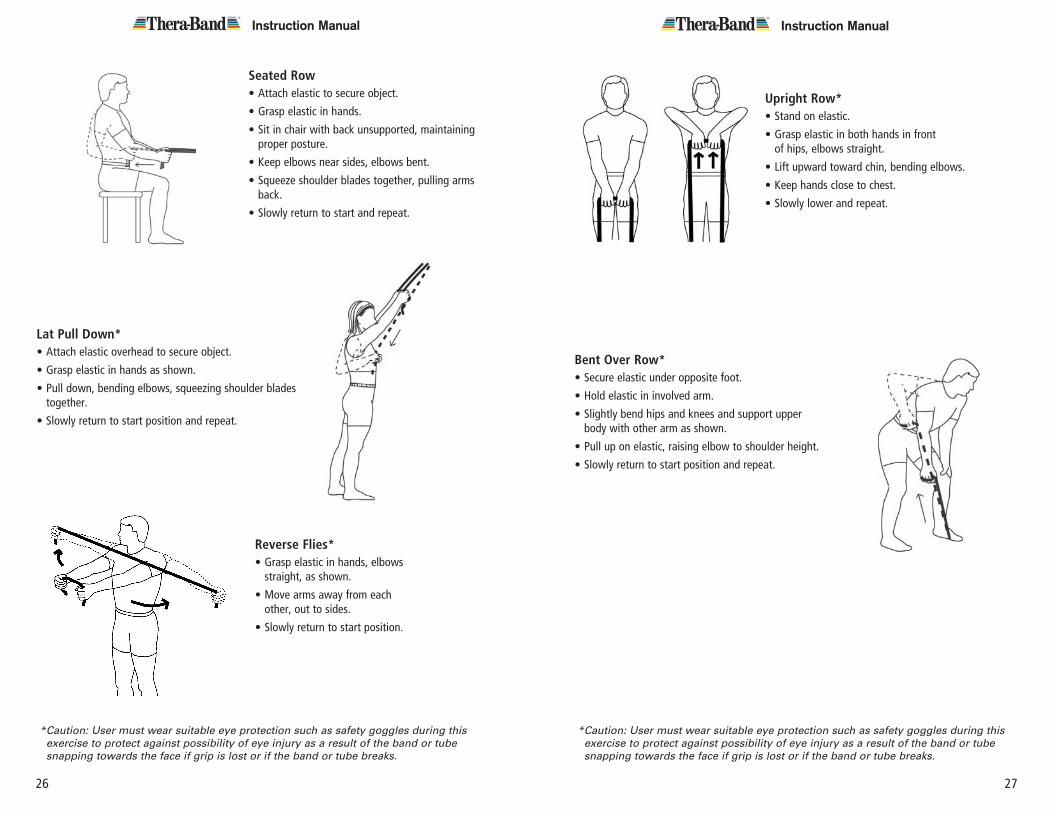
Bent Over Row*• Secure elastic under opposite foot.
• Hold elastic in involved arm.
• Slightly bend hips and knees and support upper body with other arm as shown.
• Pull up on elastic, raising elbow to shoulder height.
• Slowly return to start position and repeat.
Upright Row*• Stand on elastic.
• Grasp elastic in both hands in front of hips, elbows straight.
• Lift upward toward chin, bending elbows.
• Keep hands close to chest.
• Slowly lower and repeat.
* Caution: User must wear suitable eye protection such as safety goggles during this exercise to protect against possibility of eye injury as a result of the band or tube snapping towards the face if grip is lost or if the band or tube breaks.
Seated Row• Attach elastic to secure object.
• Grasp elastic in hands.
• Sit in chair with back unsupported, maintaining proper posture.
• Keep elbows near sides, elbows bent.
• Squeeze shoulder blades together, pulling arms back.
• Slowly return to start and repeat.
Reverse Flies*• Grasp elastic in hands, elbows
straight, as shown.
• Move arms away from each other, out to sides.
• Slowly return to start position.
Lat Pull Down*• Attach elastic overhead to secure object.
• Grasp elastic in hands as shown.
• Pull down, bending elbows, squeezing shoulder blades together.
• Slowly return to start position and repeat.
* Caution: User must wear suitable eye protection such as safety goggles during this exercise to protect against possibility of eye injury as a result of the band or tube snapping towards the face if grip is lost or if the band or tube breaks.
27
29
Instruction ManualInstruction Manual
28
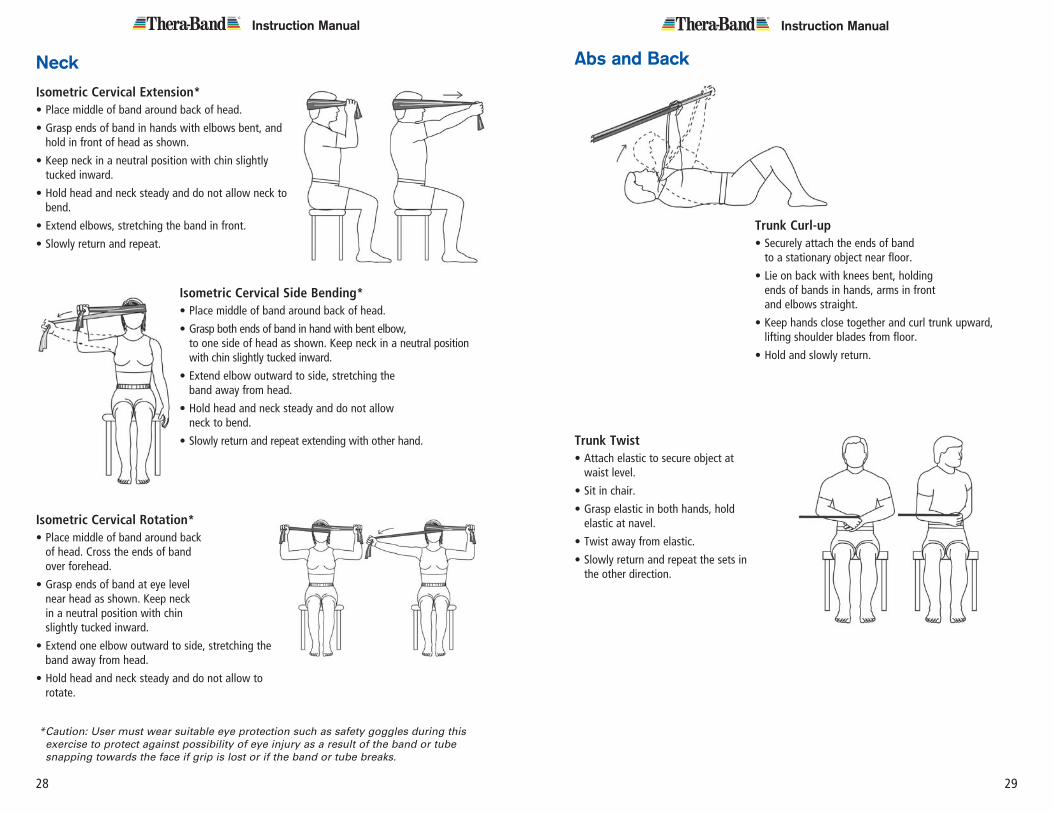
Trunk Curl-up• Securely attach the ends of band
to a stationary object near floor.
• Lie on back with knees bent, holding ends of bands in hands, arms in front and elbows straight.
• Keep hands close together and curl trunk upward, lifting shoulder blades from floor.
• Hold and slowly return.
Abs and Back
Trunk Twist• Attach elastic to secure object at
waist level.
• Sit in chair.
• Grasp elastic in both hands, hold elastic at navel.
• Twist away from elastic.
• Slowly return and repeat the sets in the other direction.
Isometric Cervical Side Bending*• Place middle of band around back of head.
• Grasp both ends of band in hand with bent elbow, to one side of head as shown. Keep neck in a neutral position with chin slightly tucked inward.
• Extend elbow outward to side, stretching the band away from head.
• Hold head and neck steady and do not allow neck to bend.
• Slowly return and repeat extending with other hand.
NeckIsometric Cervical Extension*• Place middle of band around back of head.
• Grasp ends of band in hands with elbows bent, and hold in front of head as shown.
• Keep neck in a neutral position with chin slightly tucked inward.
• Hold head and neck steady and do not allow neck to bend.
• Extend elbows, stretching the band in front.
• Slowly return and repeat.
* Caution: User must wear suitable eye protection such as safety goggles during this exercise to protect against possibility of eye injury as a result of the band or tube snapping towards the face if grip is lost or if the band or tube breaks.
Isometric Cervical Rotation*• Place middle of band around back
of head. Cross the ends of band over forehead.
• Grasp ends of band at eye level near head as shown. Keep neck in a neutral position with chin slightly tucked inward.
• Extend one elbow outward to side, stretching the band away from head.
• Hold head and neck steady and do not allow to rotate.
Instruction ManualInstruction Manual
30
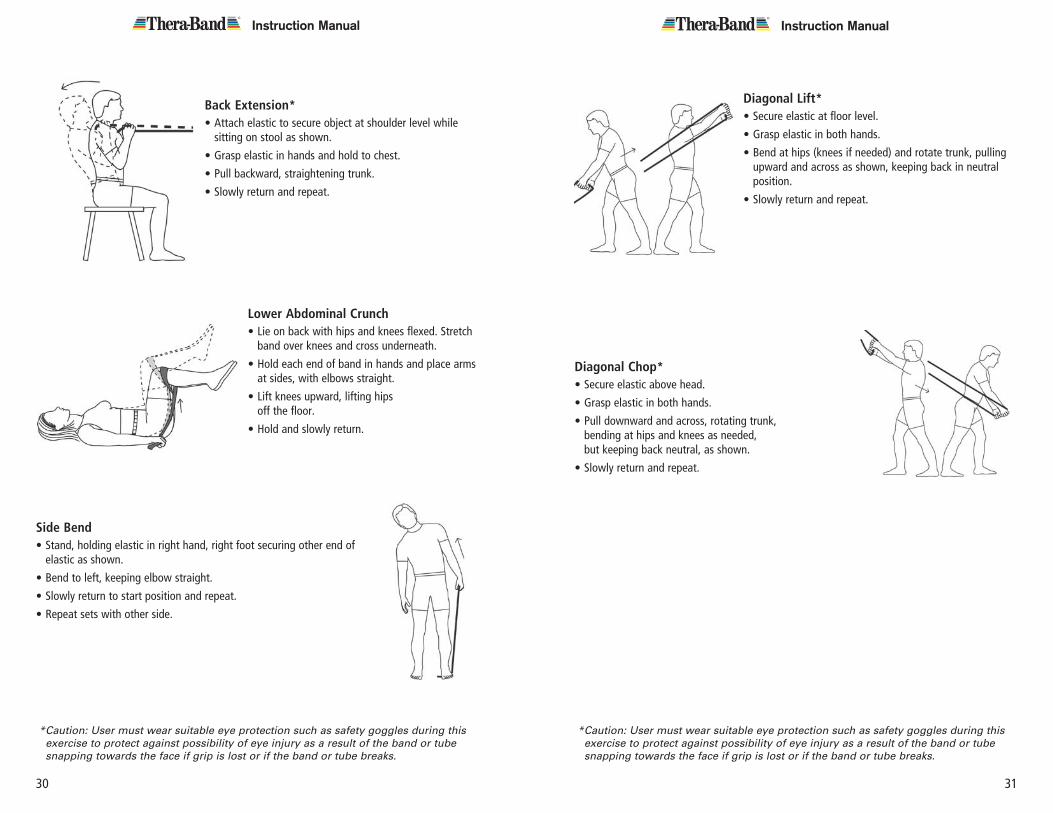
Diagonal Lift*• Secure elastic at floor level.
• Grasp elastic in both hands.
• Bend at hips (knees if needed) and rotate trunk, pulling upward and across as shown, keeping back in neutral position.
• Slowly return and repeat.
Diagonal Chop*• Secure elastic above head.
• Grasp elastic in both hands.
• Pull downward and across, rotating trunk, bending at hips and knees as needed, but keeping back neutral, as shown.
• Slowly return and repeat.
* Caution: User must wear suitable eye protection such as safety goggles during this exercise to protect against possibility of eye injury as a result of the band or tube snapping towards the face if grip is lost or if the band or tube breaks.
Back Extension*• Attach elastic to secure object at shoulder level while
sitting on stool as shown.
• Grasp elastic in hands and hold to chest.
• Pull backward, straightening trunk.
• Slowly return and repeat.
Lower Abdominal Crunch• Lie on back with hips and knees flexed. Stretch
band over knees and cross underneath.
• Hold each end of band in hands and place arms at sides, with elbows straight.
• Lift knees upward, lifting hips off the floor.
• Hold and slowly return.
* Caution: User must wear suitable eye protection such as safety goggles during this exercise to protect against possibility of eye injury as a result of the band or tube snapping towards the face if grip is lost or if the band or tube breaks.
Side Bend• Stand, holding elastic in right hand, right foot securing other end of
elastic as shown.
• Bend to left, keeping elbow straight.
• Slowly return to start position and repeat.
• Repeat sets with other side.
31
33
Instruction ManualInstruction Manual
32
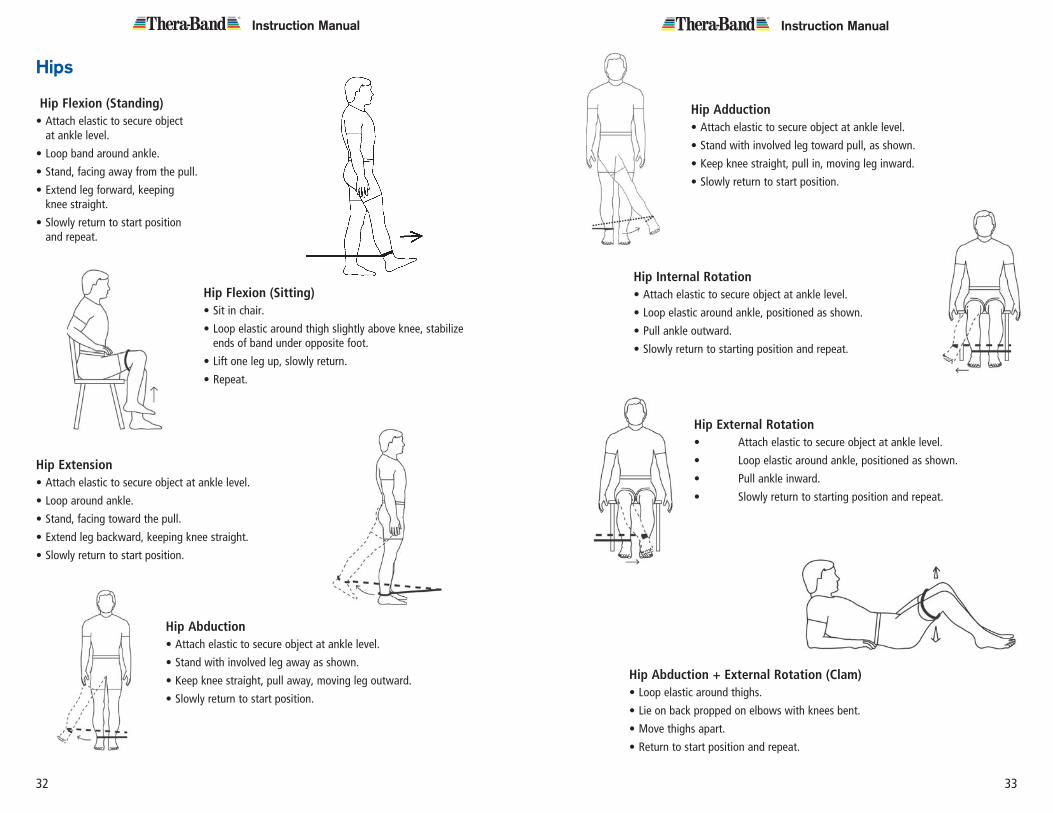
Hip Flexion (Standing)• Attach elastic to secure object
at ankle level.
• Loop band around ankle.
• Stand, facing away from the pull.
• Extend leg forward, keeping knee straight.
• Slowly return to start position and repeat.
Hip Flexion (Sitting)• Sit in chair.
• Loop elastic around thigh slightly above knee, stabilize ends of band under opposite foot.
• Lift one leg up, slowly return.
• Repeat.
Hip Extension• Attach elastic to secure object at ankle level.
• Loop around ankle.
• Stand, facing toward the pull.
• Extend leg backward, keeping knee straight.
• Slowly return to start position.
Hips
Hip Abduction• Attach elastic to secure object at ankle level.
• Stand with involved leg away as shown.
• Keep knee straight, pull away, moving leg outward.
• Slowly return to start position.
Hip Adduction• Attach elastic to secure object at ankle level.
• Stand with involved leg toward pull, as shown.
• Keep knee straight, pull in, moving leg inward.
• Slowly return to start position.
Hip Internal Rotation• Attach elastic to secure object at ankle level.
• Loop elastic around ankle, positioned as shown.
• Pull ankle outward.
• Slowly return to starting position and repeat.
Hip External Rotation• Attach elastic to secure object at ankle level.
• Loop elastic around ankle, positioned as shown.
• Pull ankle inward.
• Slowly return to starting position and repeat.
Hip Abduction + External Rotation (Clam)• Loop elastic around thighs.
• Lie on back propped on elbows with knees bent.
• Move thighs apart.
• Return to start position and repeat.
35
Instruction ManualInstruction Manual
34
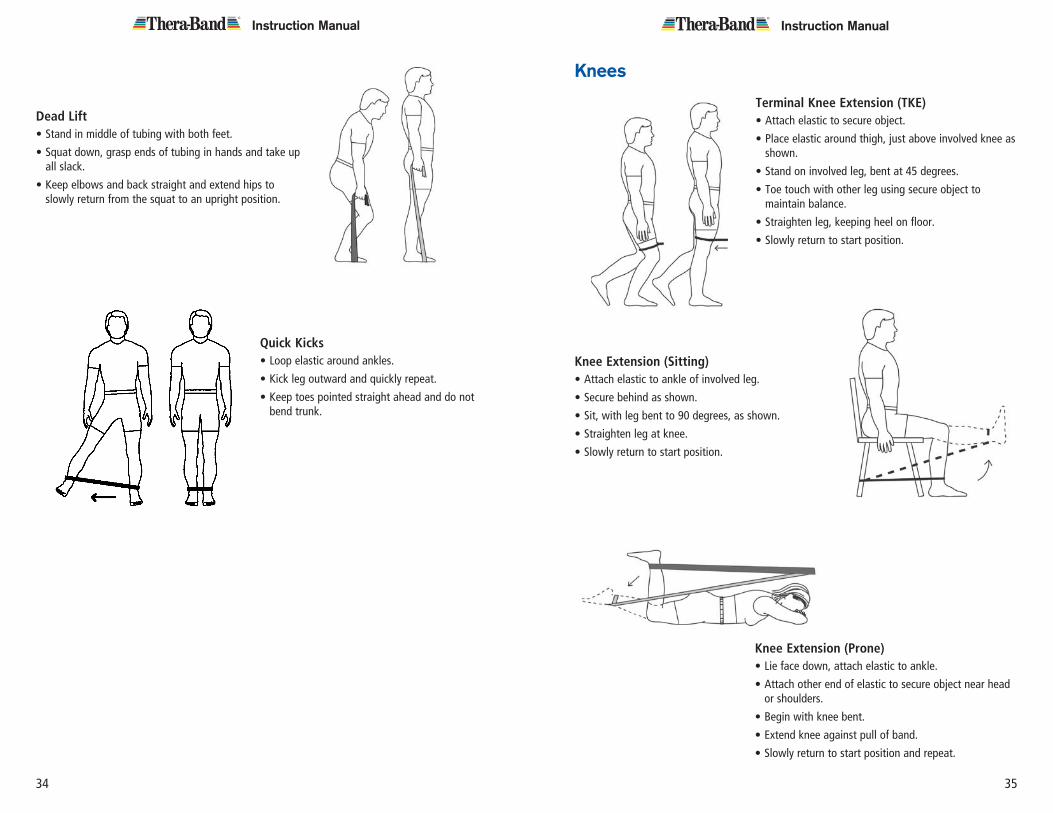
Dead Lift• Stand in middle of tubing with both feet.
• Squat down, grasp ends of tubing in hands and take up all slack.
• Keep elbows and back straight and extend hips to slowly return from the squat to an upright position.
Quick Kicks• Loop elastic around ankles.
• Kick leg outward and quickly repeat.
• Keep toes pointed straight ahead and do not bend trunk.
Knees
Terminal Knee Extension (TKE)• Attach elastic to secure object.
• Place elastic around thigh, just above involved knee as shown.
• Stand on involved leg, bent at 45 degrees.
• Toe touch with other leg using secure object to maintain balance.
• Straighten leg, keeping heel on floor.
• Slowly return to start position.
Knee Extension (Sitting)• Attach elastic to ankle of involved leg.
• Secure behind as shown.
• Sit, with leg bent to 90 degrees, as shown.
• Straighten leg at knee.
• Slowly return to start position.
Knee Extension (Prone)• Lie face down, attach elastic to ankle.
• Attach other end of elastic to secure object near head or shoulders.
• Begin with knee bent.
• Extend knee against pull of band.
• Slowly return to start position and repeat.
Instruction ManualInstruction Manual
36
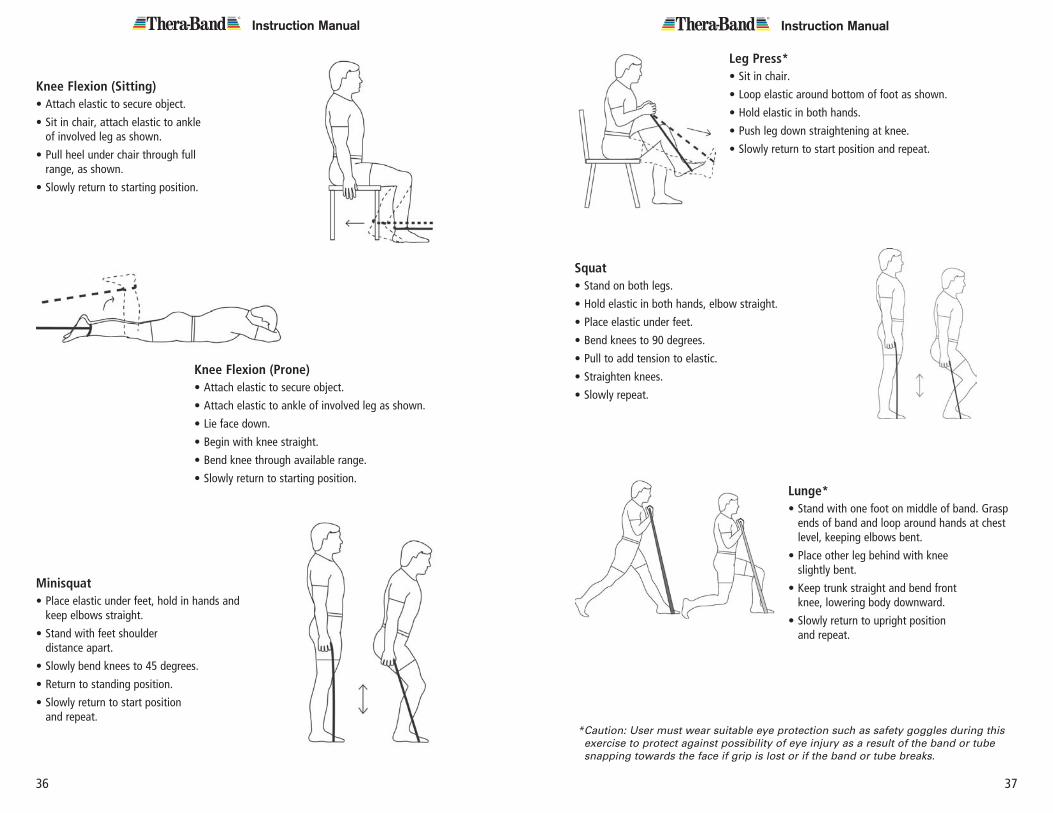
Knee Flexion (Sitting)• Attach elastic to secure object.
• Sit in chair, attach elastic to ankle of involved leg as shown.
• Pull heel under chair through full range, as shown.
• Slowly return to starting position.
Knee Flexion (Prone)• Attach elastic to secure object.
• Attach elastic to ankle of involved leg as shown.
• Lie face down.
• Begin with knee straight.
• Bend knee through available range.
• Slowly return to starting position.
Minisquat• Place elastic under feet, hold in hands and
keep elbows straight.
• Stand with feet shoulder distance apart.
• Slowly bend knees to 45 degrees.
• Return to standing position.
• Slowly return to start position and repeat.
Leg Press*• Sit in chair.
• Loop elastic around bottom of foot as shown.
• Hold elastic in both hands.
• Push leg down straightening at knee.
• Slowly return to start position and repeat.
Squat• Stand on both legs.
• Hold elastic in both hands, elbow straight.
• Place elastic under feet.
• Bend knees to 90 degrees.
• Pull to add tension to elastic.
• Straighten knees.
• Slowly repeat.
Lunge*• Stand with one foot on middle of band. Grasp
ends of band and loop around hands at chest level, keeping elbows bent.
• Place other leg behind with knee slightly bent.
• Keep trunk straight and bend front knee, lowering body downward.
• Slowly return to upright position and repeat.
* Caution: User must wear suitable eye protection such as safety goggles during this exercise to protect against possibility of eye injury as a result of the band or tube snapping towards the face if grip is lost or if the band or tube breaks.
37
39
Instruction Manual
38
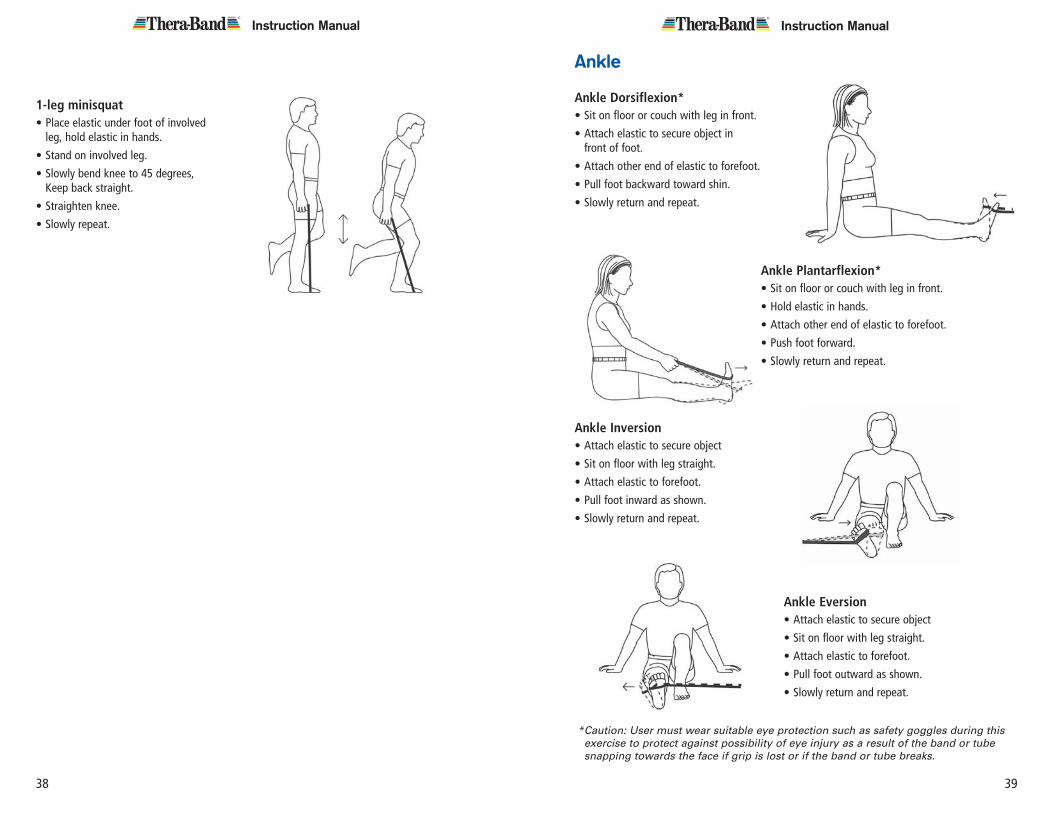
Ankle Dorsiflexion*• Sit on floor or couch with leg in front.
• Attach elastic to secure object in front of foot.
• Attach other end of elastic to forefoot.
• Pull foot backward toward shin.
• Slowly return and repeat.
Ankle Plantarflexion*• Sit on floor or couch with leg in front.
• Hold elastic in hands.
• Attach other end of elastic to forefoot.
• Push foot forward.
• Slowly return and repeat.
Ankle Inversion• Attach elastic to secure object
• Sit on floor with leg straight.
• Attach elastic to forefoot.
• Pull foot inward as shown.
• Slowly return and repeat.
Ankle
Ankle Eversion• Attach elastic to secure object
• Sit on floor with leg straight.
• Attach elastic to forefoot.
• Pull foot outward as shown.
• Slowly return and repeat.
* Caution: User must wear suitable eye protection such as safety goggles during this exercise to protect against possibility of eye injury as a result of the band or tube snapping towards the face if grip is lost or if the band or tube breaks.
1-leg minisquat• Place elastic under foot of involved
leg, hold elastic in hands.
• Stand on involved leg.
• Slowly bend knee to 45 degrees, Keep back straight.
• Straighten knee.
• Slowly repeat.
Instruction Manual

Instruction Manual
40
www .Thera-BandAcademy .comThe Thera-Band® Academy was formed by Hygenic Corporation in 1999 to support evidence-based practice. The Academy promotes and disseminates research, and provides education programs for Thera-Band products around the world. The mission of the Academy is to facilitate research, education and practice using the Thera-Band Systems of Progressive Exercise.
The Thera-Band Academy website, www.Thera-BandAcademy.com, was developed to link research to practice using an integrated, cross-referenced database allowing users to search for research, protocols, and exercise programs by a specific body part, disease, injury, sport or product. Today, Thera-Band Academy maintains the largest electronic database of research articles on Thera-Band products.
• Develop, save, print and electronically share customized exercise programs with your patient
• Search the most comprehensive database of research and references on elastic resistance
• Find evidence-based protocols and outcomes using Thera-Band products
• Find professional continuing education courses
• Stay up to date with the Thera-Band Academy Blog at http://blog.Thera-BandAcademy.com