Embed Size (px)
Citation preview

Responsive Application Design with
Kendo UI Builder for OpenEdge
Ricardo Perdigao, Solutions Architect
Jean Munro, Principal Sales Engineer
Carole Miller, Senior Sales Engineer
2 Responsive Application Design with Kendo UI Builder for OpenEdge
© 2016 Progress Software Corporation. All rights reserved.
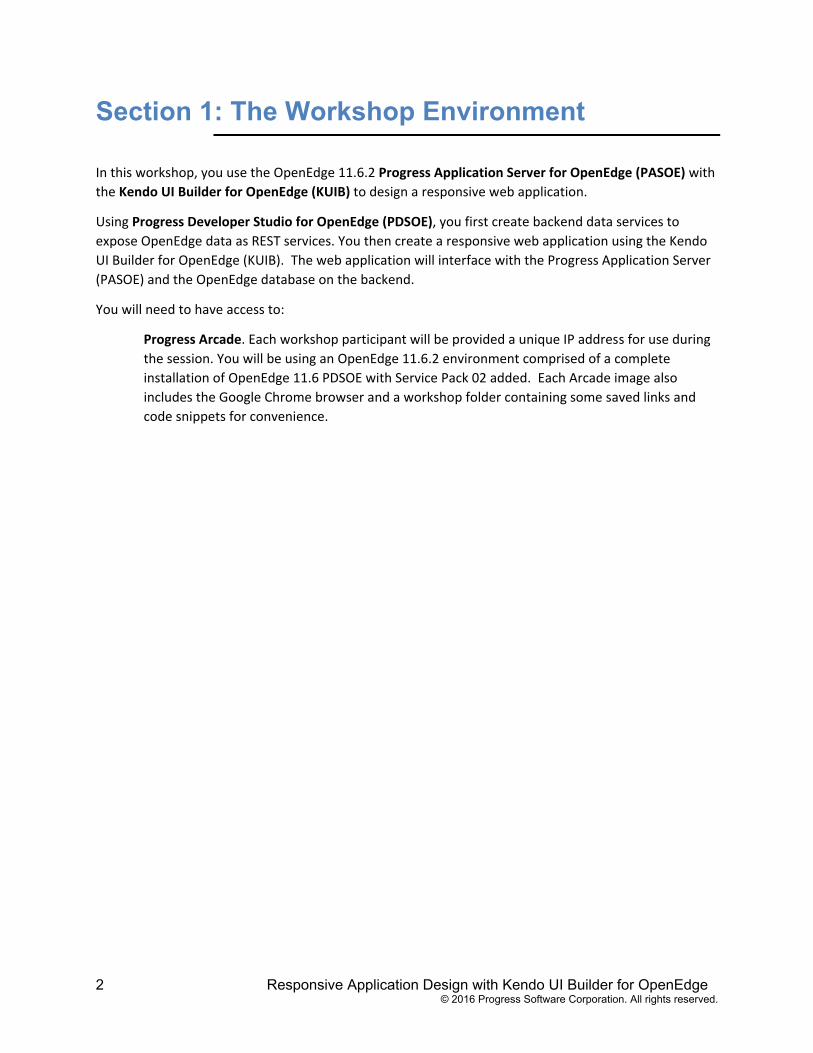
Section 1: The Workshop Environment
In this workshop, you use the OpenEdge 11.6.2 Progress Application Server for OpenEdge (PASOE) with
the Kendo UI Builder for OpenEdge (KUIB) to design a responsive web application.
Using Progress Developer Studio for OpenEdge (PDSOE), you first create backend data services to
expose OpenEdge data as REST services. You then create a responsive web application using the Kendo
UI Builder for OpenEdge (KUIB). The web application will interface with the Progress Application Server
(PASOE) and the OpenEdge database on the backend.
You will need to have access to:
Progress Arcade. Each workshop participant will be provided a unique IP address for use during
the session. You will be using an OpenEdge 11.6.2 environment comprised of a complete
installation of OpenEdge 11.6 PDSOE with Service Pack 02 added. Each Arcade image also
includes the Google Chrome browser and a workshop folder containing some saved links and
code snippets for convenience.
Responsive Application Design with Kendo UI Builder for OpenEdge 3 © 2016 Progress Software Corporation. All rights reserved.
Section 2: Configuring PDSOE
Virtual machines have been started on Progress Arcade for this workshop. The workshop host has
provided you with a unique DNS address for a virtual windows server running on Progress Arcade. The
first step is to connect to your workshop VM. Then you’ll create a database and configure PDSOE for the
workshop project.
Launching your PDSOE Demo machine
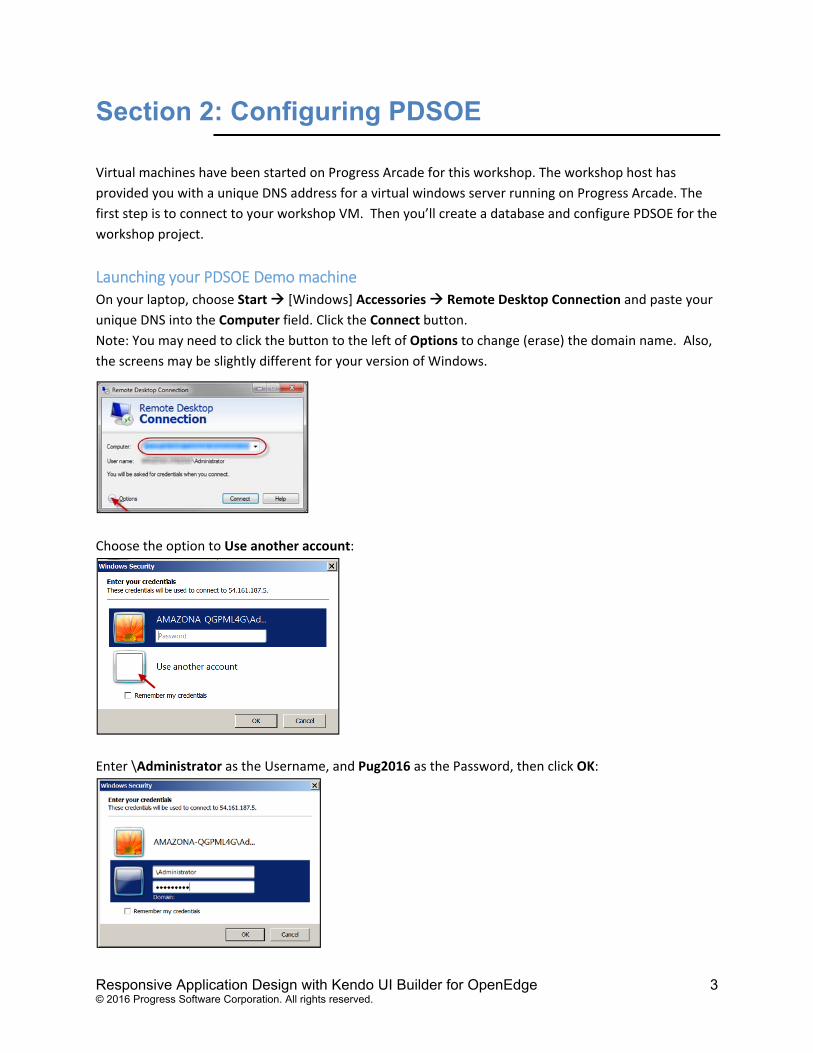
On your laptop, choose Start [Windows] Accessories Remote Desktop Connection and paste your
unique DNS into the Computer field. Click the Connect button.
Note: You may need to click the button to the left of Options to change (erase) the domain name. Also,
the screens may be slightly different for your version of Windows.
Choose the option to Use another account:
Enter \Administrator as the Username, and Pug2016 as the Password, then click OK:
4 Responsive Application Design with Kendo UI Builder for OpenEdge
© 2016 Progress Software Corporation. All rights reserved.
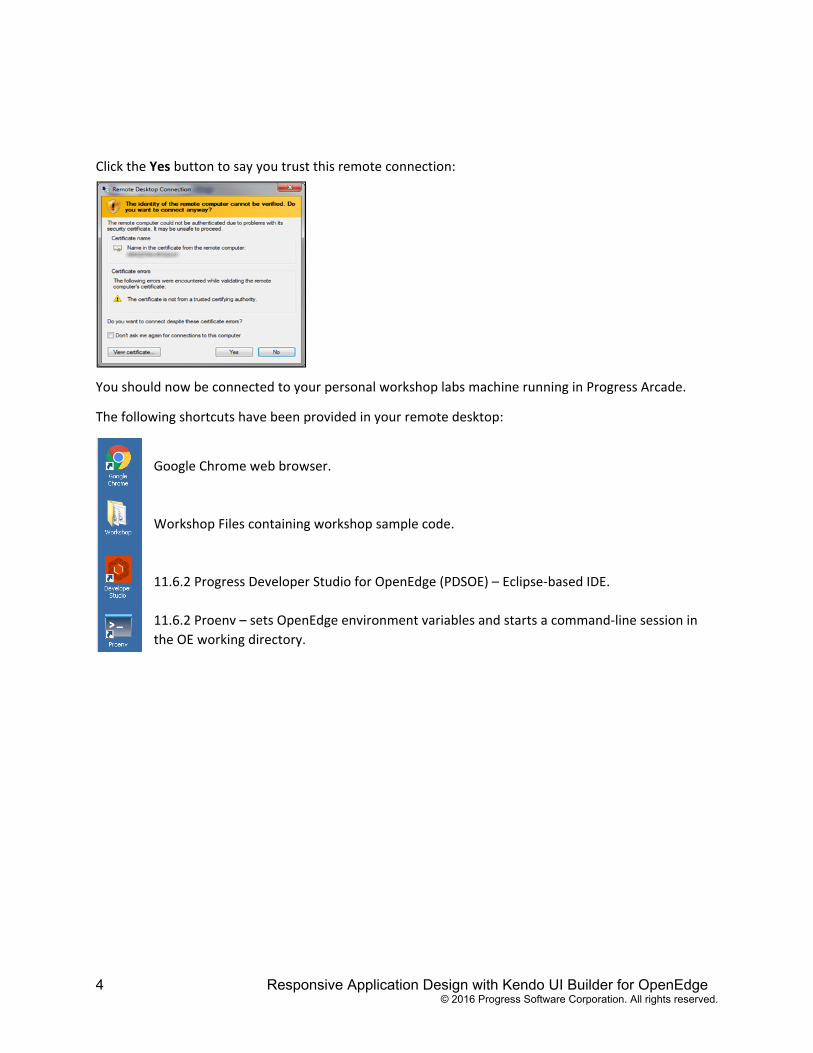
Click the Yes button to say you trust this remote connection:
You should now be connected to your personal workshop labs machine running in Progress Arcade.
The following shortcuts have been provided in your remote desktop:
Google Chrome web browser.
Workshop Files containing workshop sample code.
11.6.2 Progress Developer Studio for OpenEdge (PDSOE) – Eclipse‐based IDE.
11.6.2 Proenv – sets OpenEdge environment variables and starts a command‐line session in
the OE working directory.
Responsive Application Design with Kendo UI Builder for OpenEdge 5 © 2016 Progress Software Corporation. All rights reserved.
Configuring the Development Environment
Create Sports Database
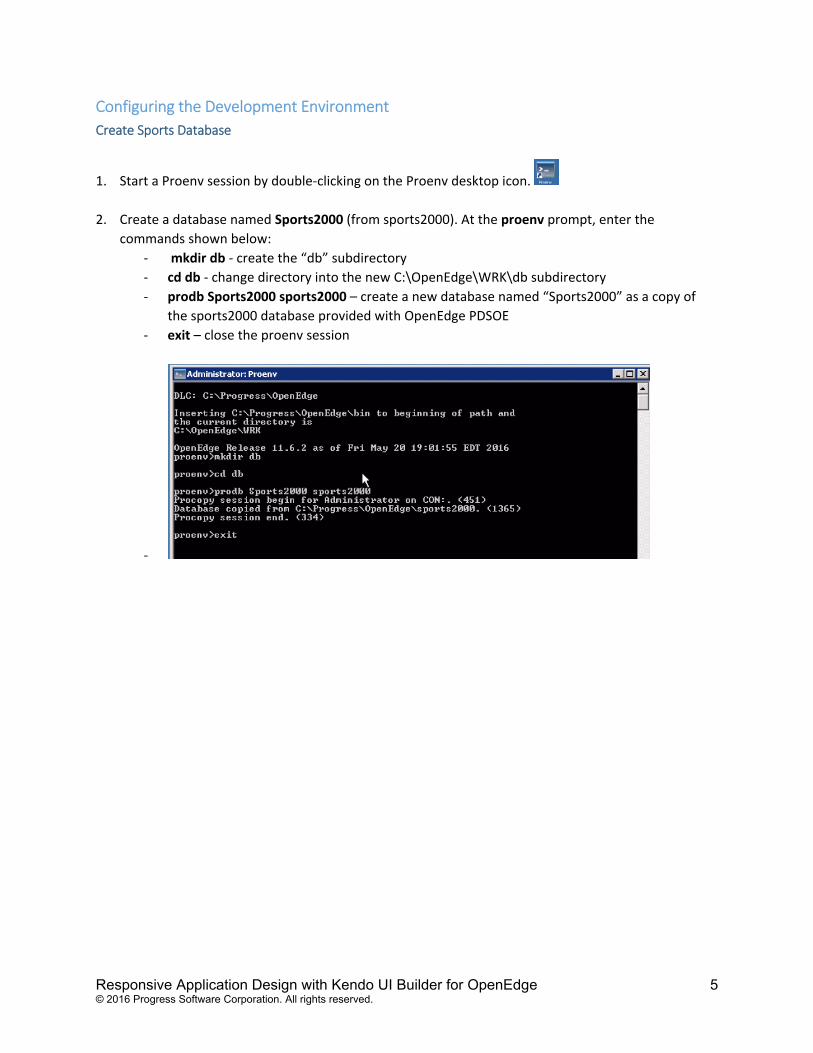
1. Start a Proenv session by double‐clicking on the Proenv desktop icon.
2. Create a database named Sports2000 (from sports2000). At the proenv prompt, enter the
commands shown below:
‐ mkdir db ‐ create the “db” subdirectory
‐ cd db ‐ change directory into the new C:\OpenEdge\WRK\db subdirectory
‐ prodb Sports2000 sports2000 – create a new database named “Sports2000” as a copy of
the sports2000 database provided with OpenEdge PDSOE
‐ exit – close the proenv session
‐
6 Responsive Application Design with Kendo UI Builder for OpenEdge
© 2016 Progress Software Corporation. All rights reserved.
Basic Configuration of PDSOE
3. Open Developer Studio:
Start‐>All Programs‐>Progress‐>OpenEdge 11.6 (64‐bit)>Developer Studio
or use the Desktop shortcut in your Arcade image .
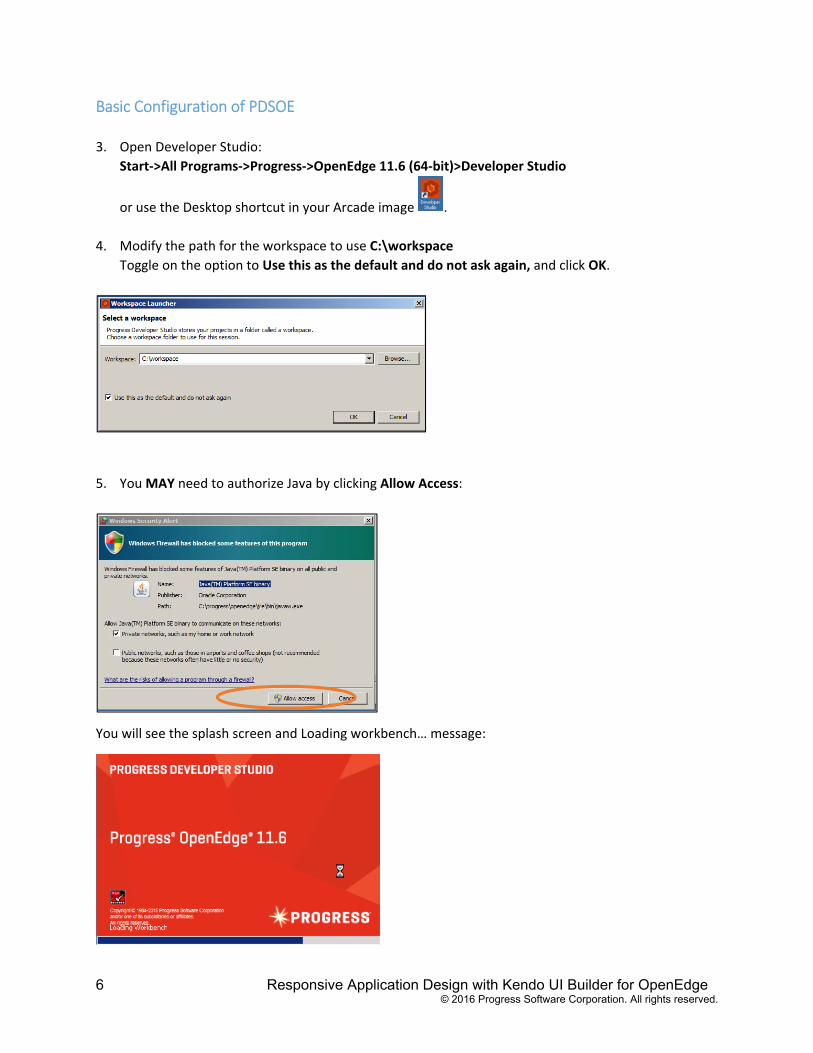
4. Modify the path for the workspace to use C:\workspace
Toggle on the option to Use this as the default and do not ask again, and click OK.
5. You MAY need to authorize Java by clicking Allow Access:
You will see the splash screen and Loading workbench… message:
Responsive Application Design with Kendo UI Builder for OpenEdge 7 © 2016 Progress Software Corporation. All rights reserved.
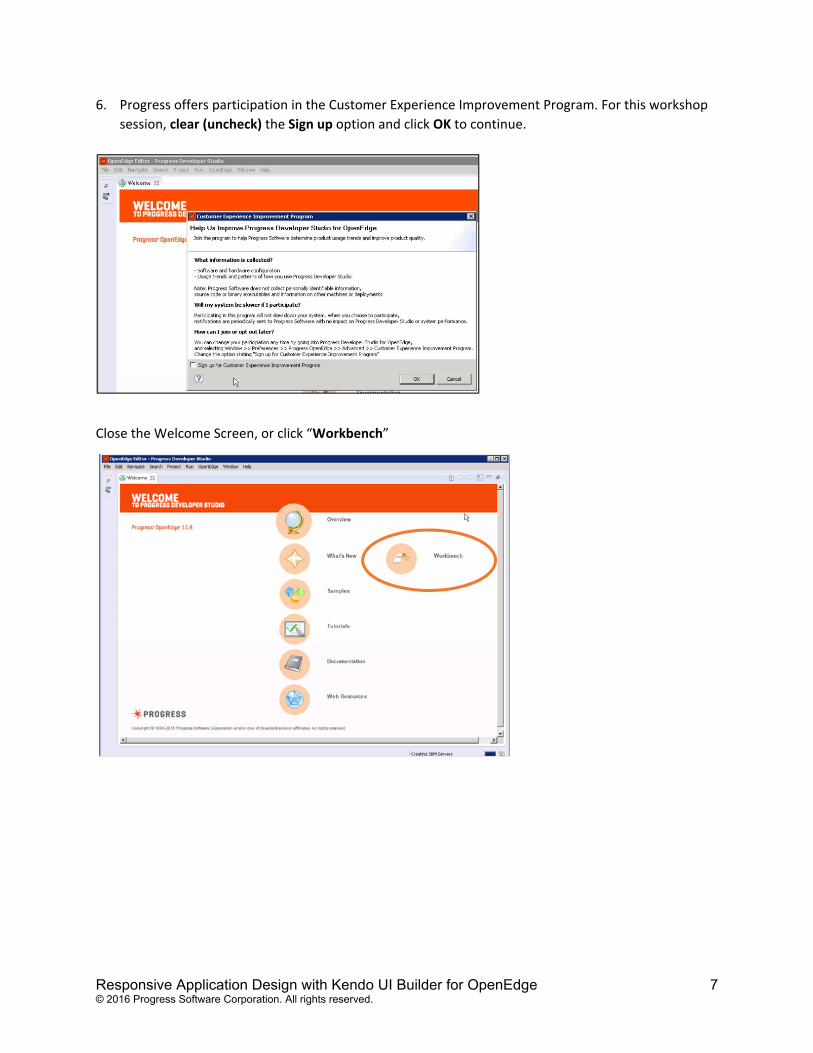
6. Progress offers participation in the Customer Experience Improvement Program. For this workshop
session, clear (uncheck) the Sign up option and click OK to continue.
Close the Welcome Screen, or click “Workbench”
8 Responsive Application Design with Kendo UI Builder for OpenEdge
© 2016 Progress Software Corporation. All rights reserved.
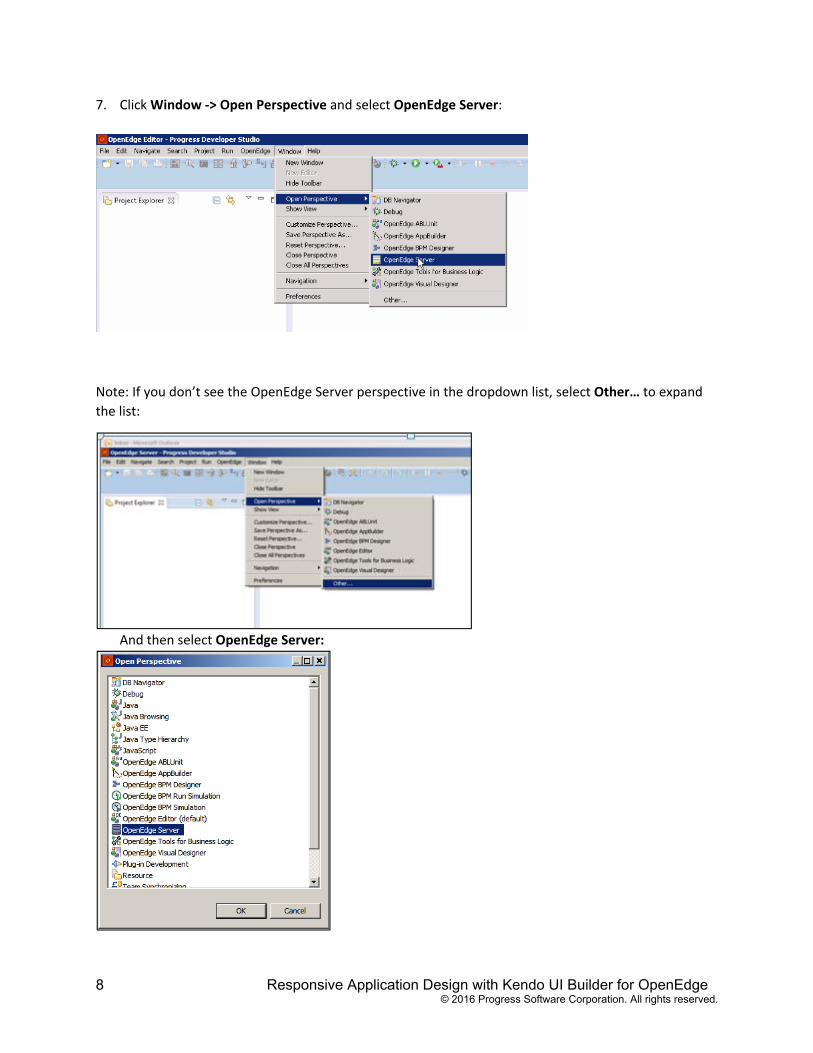
7. Click Window ‐> Open Perspective and select OpenEdge Server:
Note: If you don’t see the OpenEdge Server perspective in the dropdown list, select Other… to expand
the list:
And then select OpenEdge Server:
Responsive Application Design with Kendo UI Builder for OpenEdge 9 © 2016 Progress Software Corporation. All rights reserved.
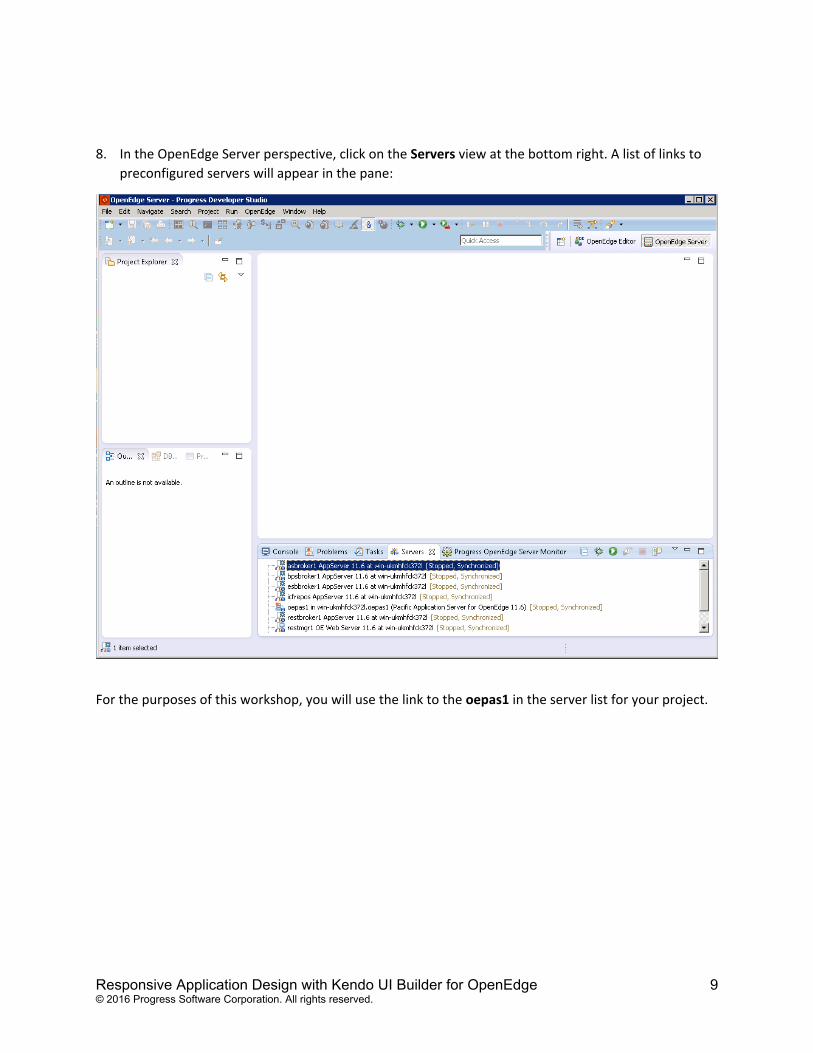
8. In the OpenEdge Server perspective, click on the Servers view at the bottom right. A list of links to
preconfigured servers will appear in the pane:
For the purposes of this workshop, you will use the link to the oepas1 in the server list for your project.
10 Responsive Application Design with Kendo UI Builder for OpenEdge
© 2016 Progress Software Corporation. All rights reserved.
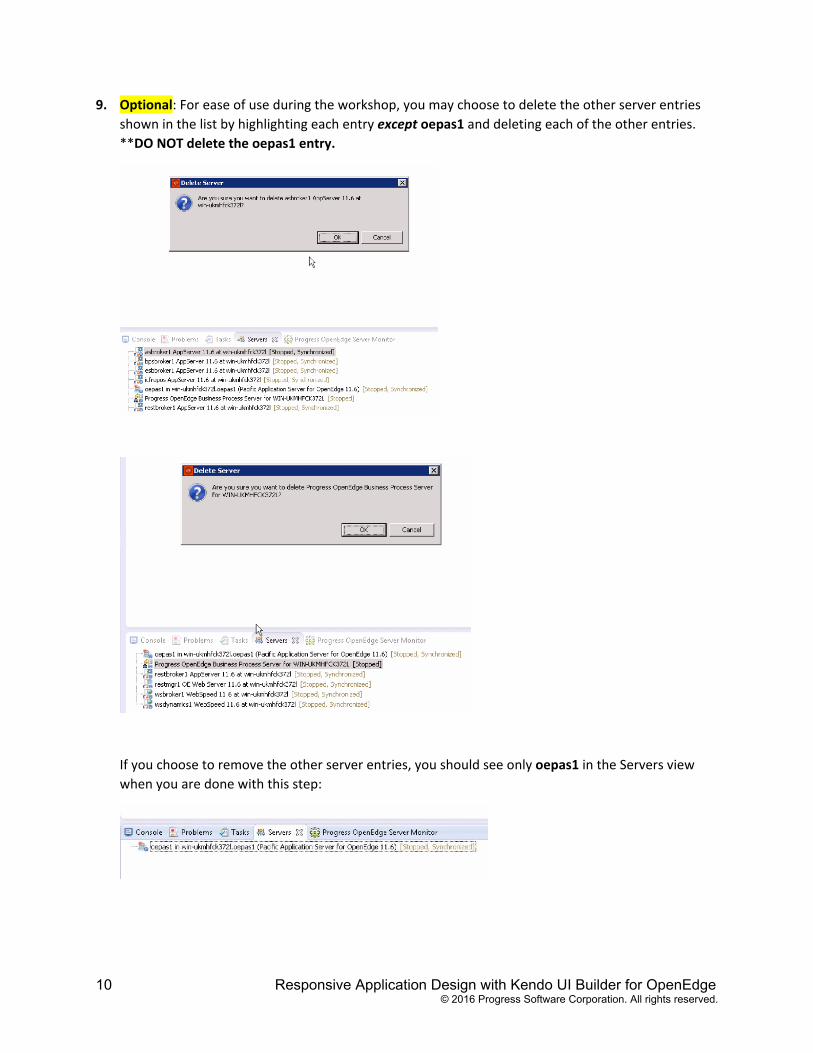
9. Optional: For ease of use during the workshop, you may choose to delete the other server entries
shown in the list by highlighting each entry except oepas1 and deleting each of the other entries.
**DO NOT delete the oepas1 entry.
If you choose to remove the other server entries, you should see only oepas1 in the Servers view
when you are done with this step:
Responsive Application Design with Kendo UI Builder for OpenEdge 11 © 2016 Progress Software Corporation. All rights reserved.
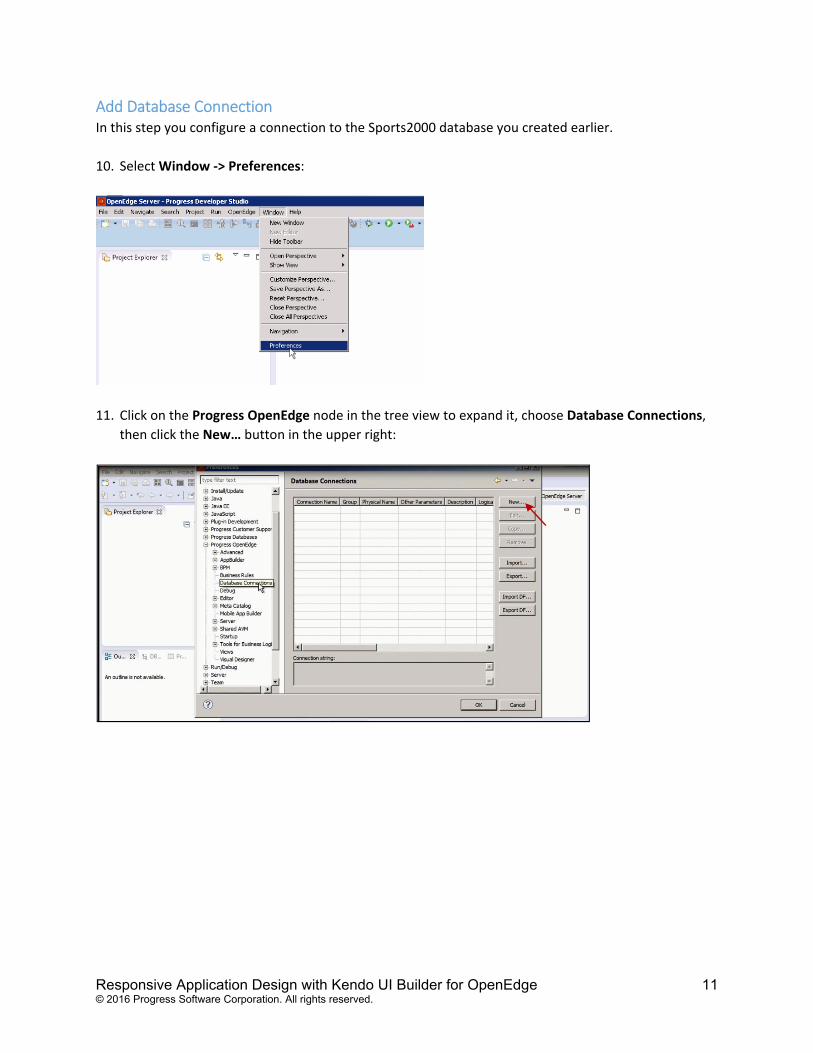
Add Database Connection In this step you configure a connection to the Sports2000 database you created earlier.
10. Select Window ‐> Preferences:
11. Click on the Progress OpenEdge node in the tree view to expand it, choose Database Connections, then click the New… button in the upper right:
12 Responsive Application Design with Kendo UI Builder for OpenEdge
© 2016 Progress Software Corporation. All rights reserved.
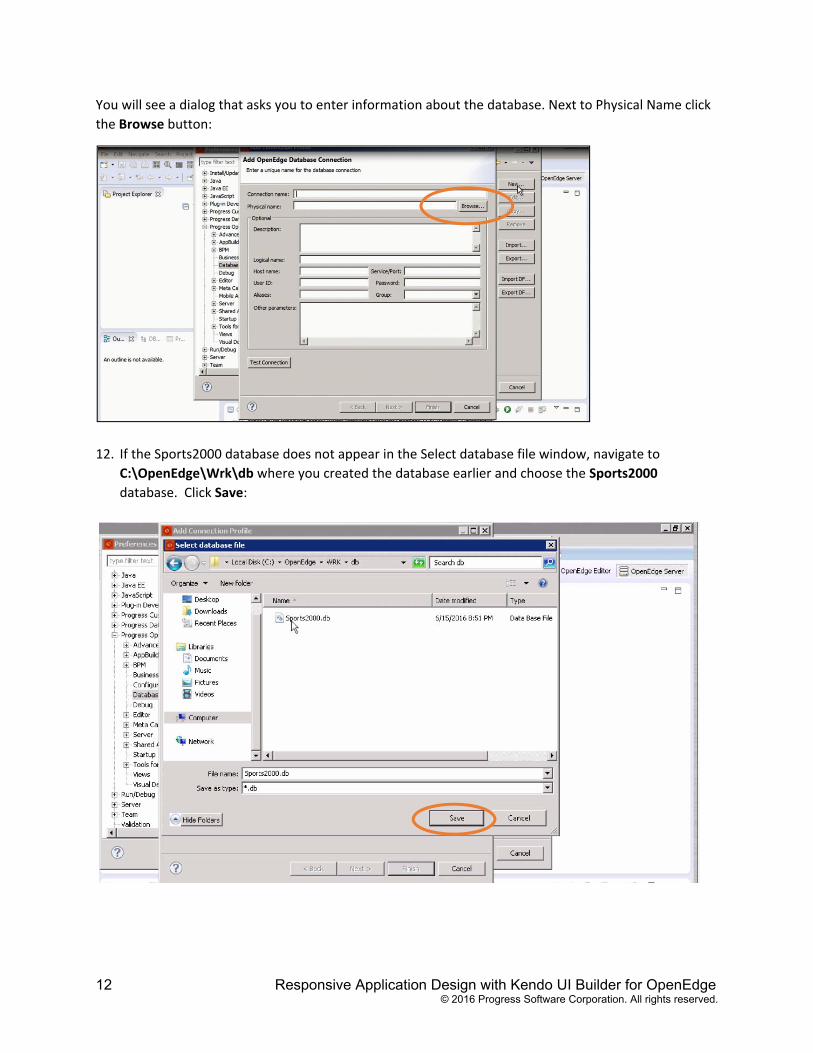
You will see a dialog that asks you to enter information about the database. Next to Physical Name click
the Browse button:
12. If the Sports2000 database does not appear in the Select database file window, navigate to C:\OpenEdge\Wrk\db where you created the database earlier and choose the Sports2000
database. Click Save:
Responsive Application Design with Kendo UI Builder for OpenEdge 13 © 2016 Progress Software Corporation. All rights reserved.
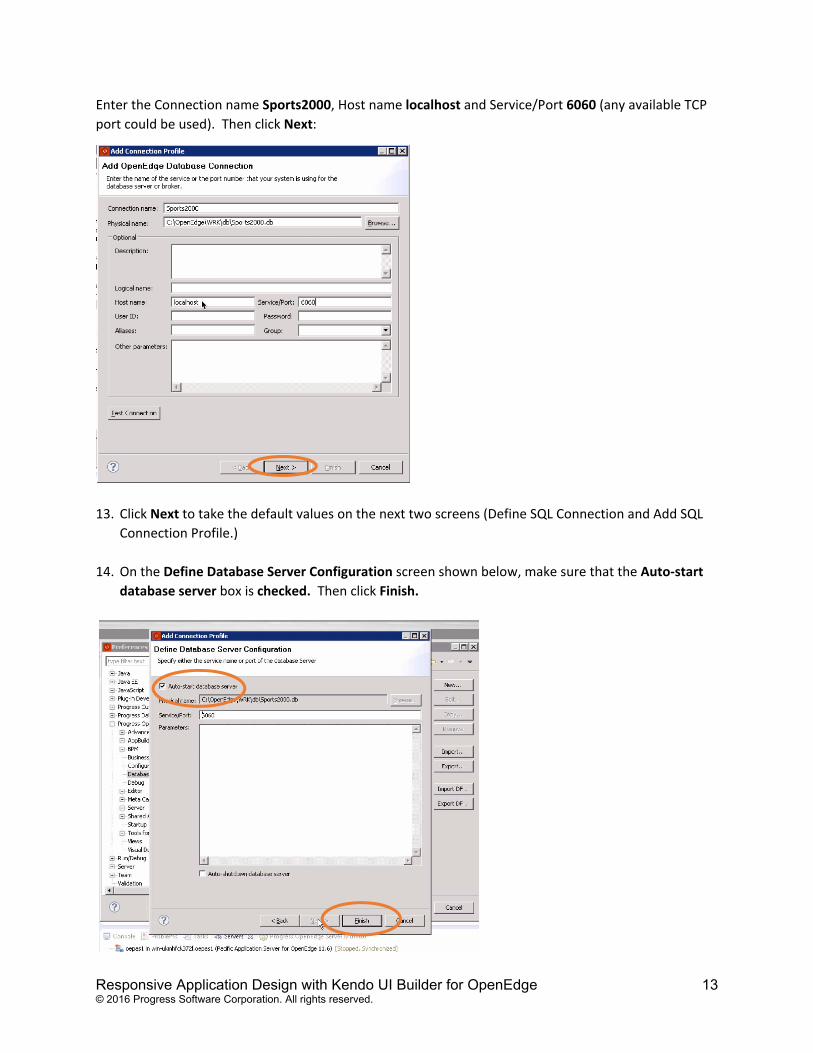
Enter the Connection name Sports2000, Host name localhost and Service/Port 6060 (any available TCP
port could be used). Then click Next:
13. Click Next to take the default values on the next two screens (Define SQL Connection and Add SQL Connection Profile.)
14. On the Define Database Server Configuration screen shown below, make sure that the Auto‐start
database server box is checked. Then click Finish.
14 Responsive Application Design with Kendo UI Builder for OpenEdge
© 2016 Progress Software Corporation. All rights reserved.
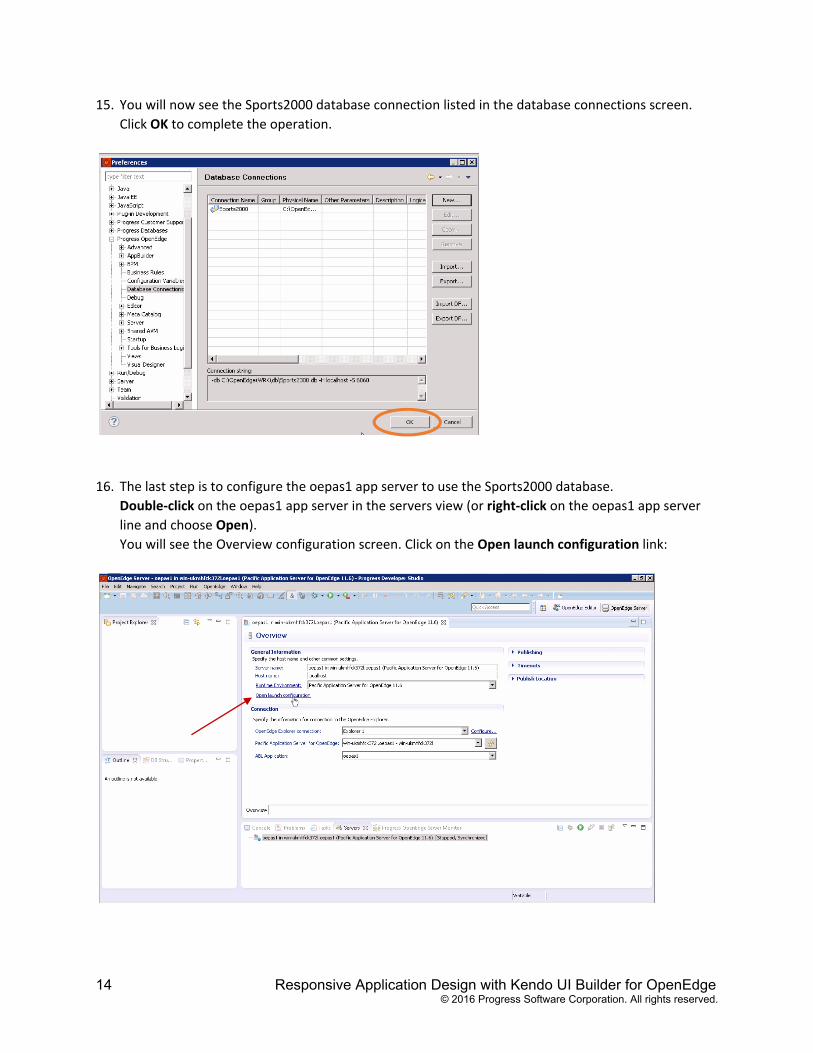
15. You will now see the Sports2000 database connection listed in the database connections screen. Click OK to complete the operation.
16. The last step is to configure the oepas1 app server to use the Sports2000 database. Double‐click on the oepas1 app server in the servers view (or right‐click on the oepas1 app server
line and choose Open).
You will see the Overview configuration screen. Click on the Open launch configuration link:
Responsive Application Design with Kendo UI Builder for OpenEdge 15 © 2016 Progress Software Corporation. All rights reserved.
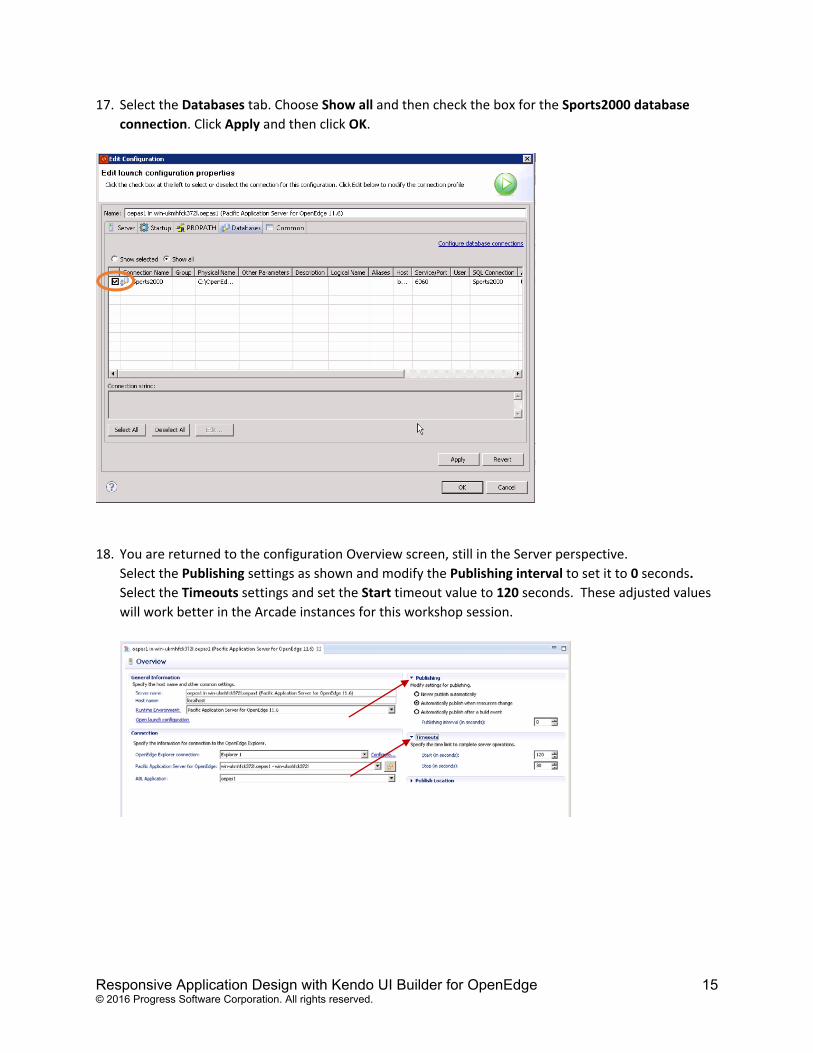
17. Select the Databases tab. Choose Show all and then check the box for the Sports2000 database
connection. Click Apply and then click OK.
18. You are returned to the configuration Overview screen, still in the Server perspective. Select the Publishing settings as shown and modify the Publishing interval to set it to 0 seconds.
Select the Timeouts settings and set the Start timeout value to 120 seconds. These adjusted values
will work better in the Arcade instances for this workshop session.
16 Responsive Application Design with Kendo UI Builder for OpenEdge
© 2016 Progress Software Corporation. All rights reserved.
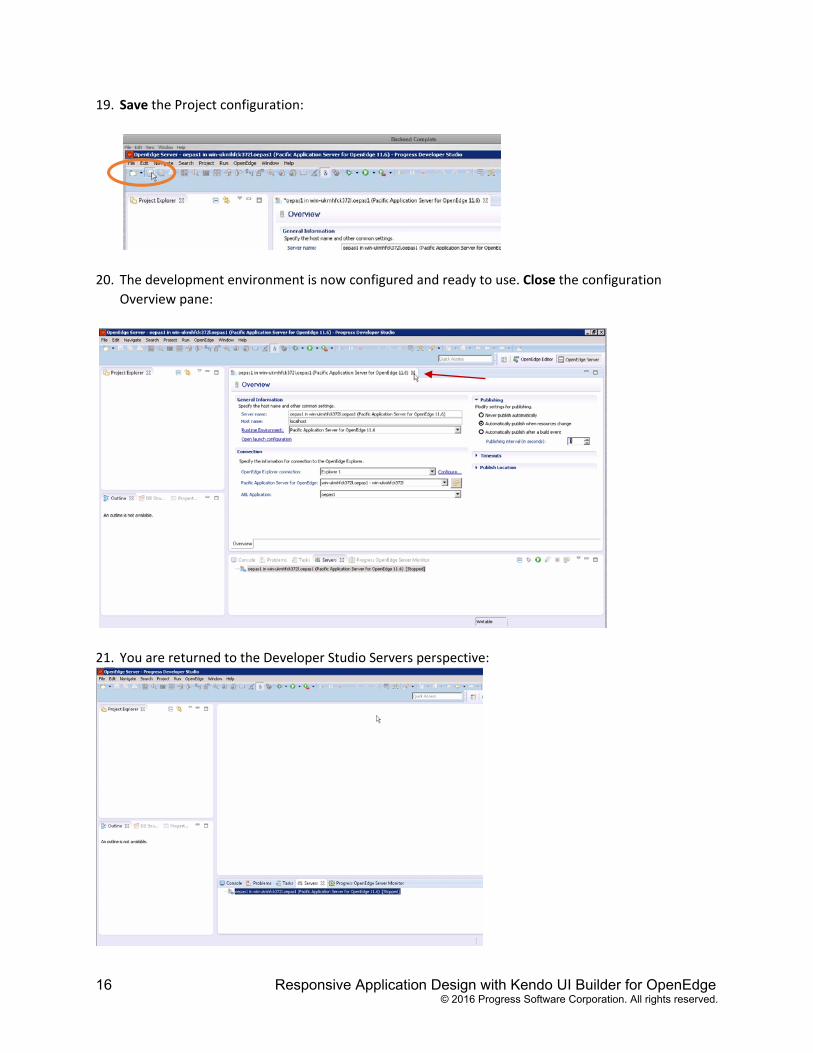
19. Save the Project configuration:
20. The development environment is now configured and ready to use. Close the configuration
Overview pane:
21. You are returned to the Developer Studio Servers perspective:
Responsive Application Design with Kendo UI Builder for OpenEdge 17 © 2016 Progress Software Corporation. All rights reserved.
Section 3: Exposing OpenEdge Data as REST with PASOE
Creating an ABL Web App Project
In this section you create a an ABL Web App Project. ABL Web App projects are configured to use
JavaScript Data Objects (JSDO). The ABL Web App project type, with its built‐in JSDO, simplifies the
process of exposing OpenEdge services as REST services.
Create the sports project
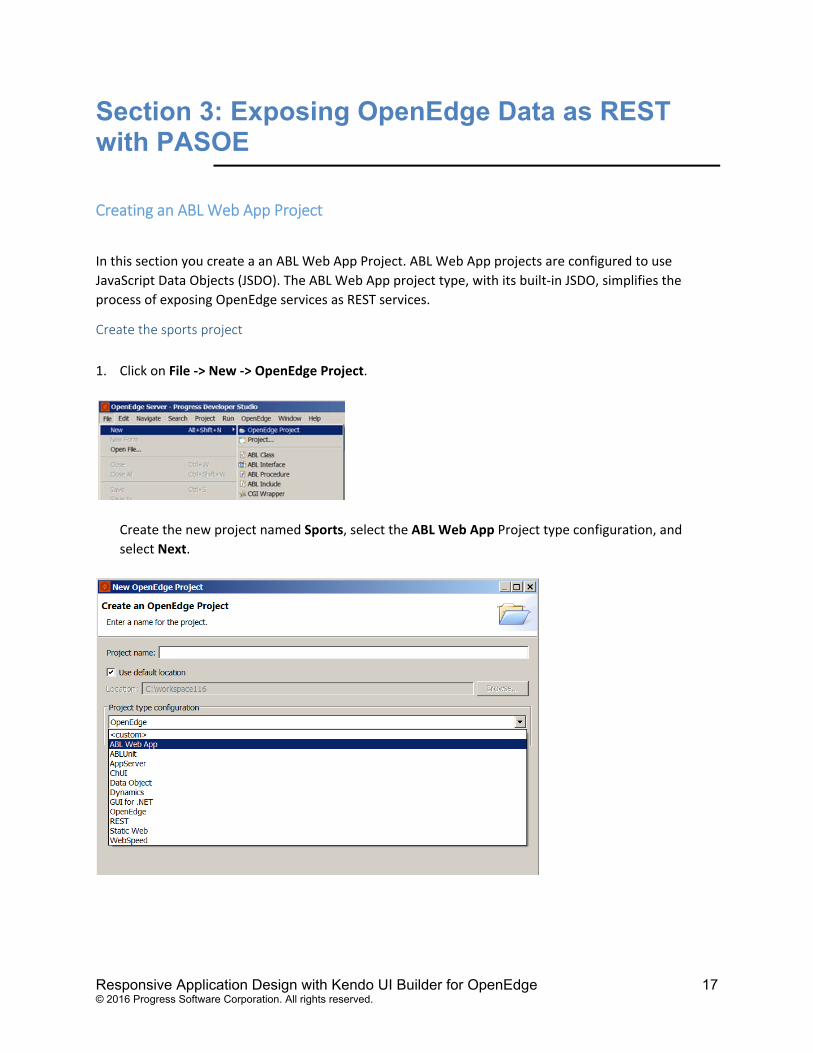
1. Click on File ‐> New ‐> OpenEdge Project.
Create the new project named Sports, select the ABL Web App Project type configuration, and
select Next.
18 Responsive Application Design with Kendo UI Builder for OpenEdge
© 2016 Progress Software Corporation. All rights reserved.
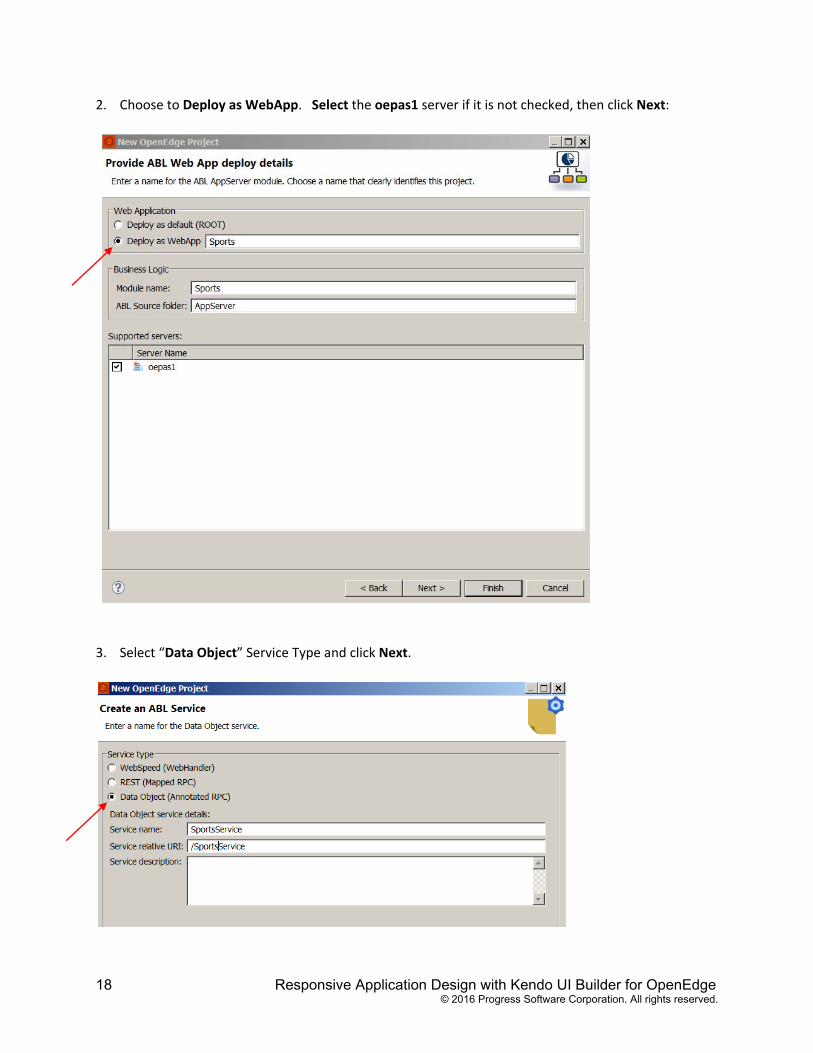
2. Choose to Deploy as WebApp. Select the oepas1 server if it is not checked, then click Next:
3. Select “Data Object” Service Type and click Next.
Responsive Application Design with Kendo UI Builder for OpenEdge 19 © 2016 Progress Software Corporation. All rights reserved.
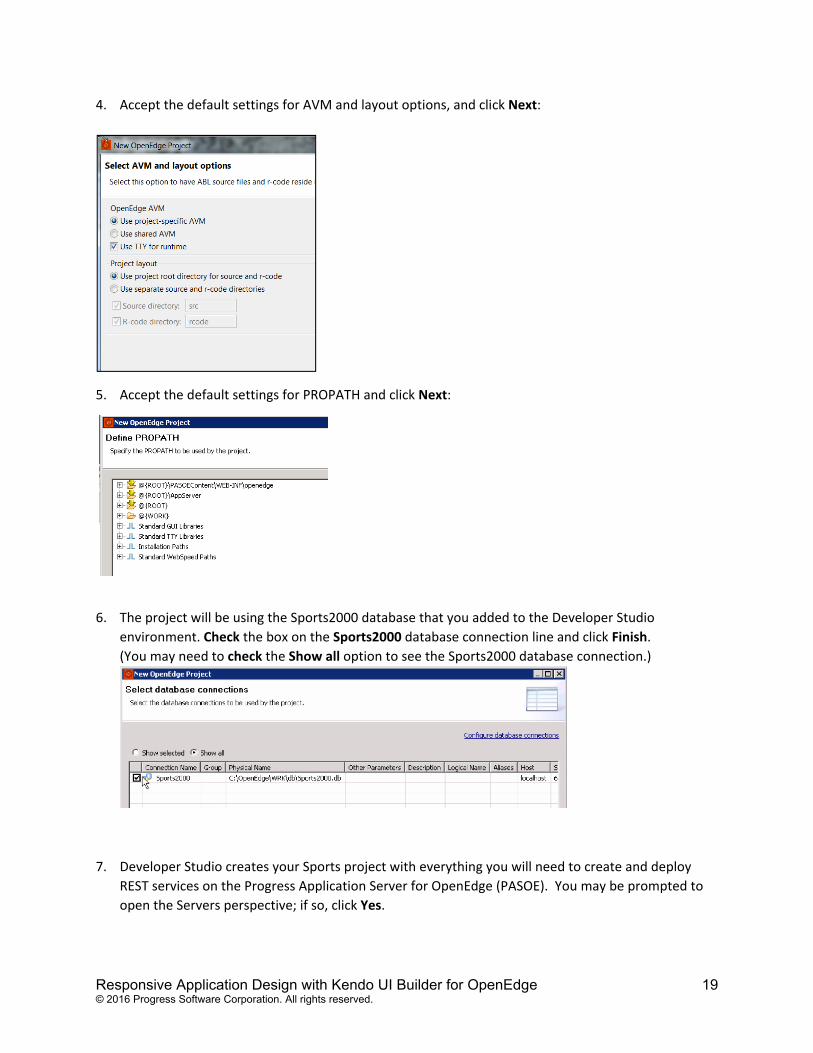
4. Accept the default settings for AVM and layout options, and click Next:
5. Accept the default settings for PROPATH and click Next:
6. The project will be using the Sports2000 database that you added to the Developer Studio
environment. Check the box on the Sports2000 database connection line and click Finish.
(You may need to check the Show all option to see the Sports2000 database connection.)
7. Developer Studio creates your Sports project with everything you will need to create and deploy
REST services on the Progress Application Server for OpenEdge (PASOE). You may be prompted to
open the Servers perspective; if so, click Yes.
20 Responsive Application Design with Kendo UI Builder for OpenEdge
© 2016 Progress Software Corporation. All rights reserved.
Creating a Business Entity to Expose Data
In this section you will create a Business Entity for the Customer table of the Sports2000 database. Later
you will expose this Business Entity via your REST service.
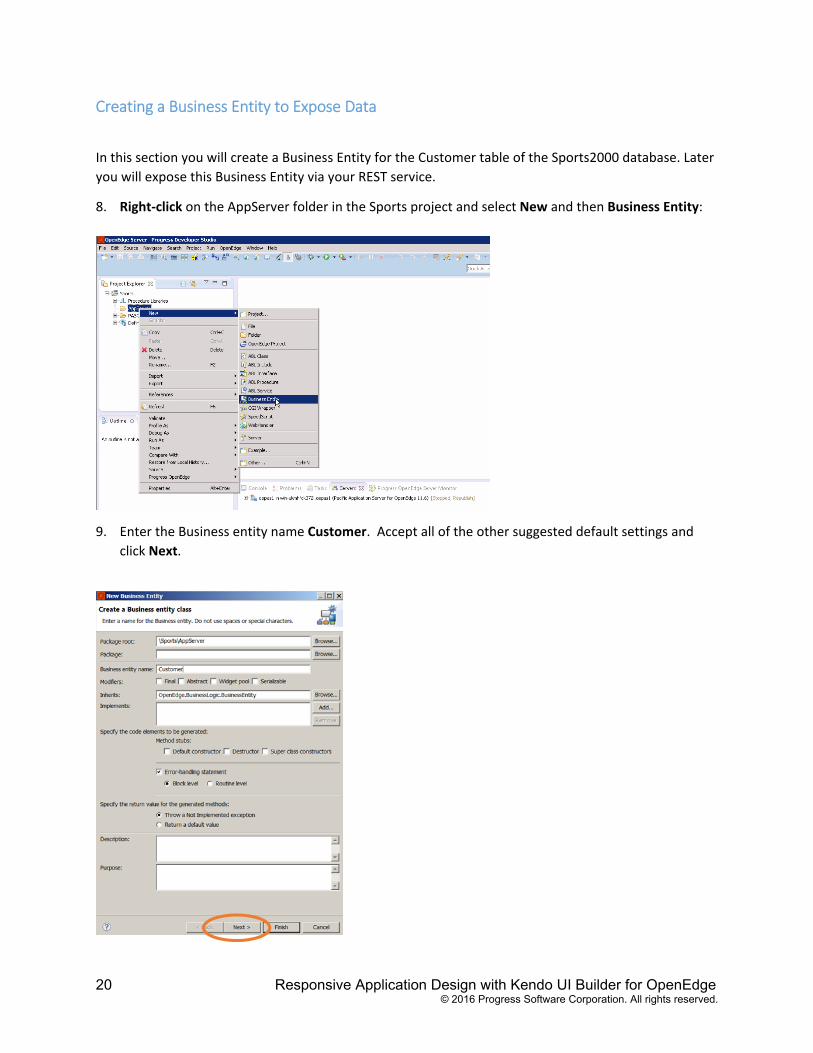
8. Right‐click on the AppServer folder in the Sports project and select New and then Business Entity:
9. Enter the Business entity name Customer. Accept all of the other suggested default settings and
click Next.

Responsive Application Design with Kendo UI Builder for OpenEdge 21 © 2016 Progress Software Corporation. All rights reserved.
10. In the top section of the Select schema file screen, you decide which operations to make available to
the REST services. Select CRUD and Submit (CRUD “Create, Read, Update, and Delete” with option
for Submit support. )
In the second section, you select either a database table or an include file that represents the
ProDataSet that you wish to enable for REST. For this workshop example, check Select database
table and choose the table named Customer, then click Finish.
22 Responsive Application Design with Kendo UI Builder for OpenEdge
© 2016 Progress Software Corporation. All rights reserved.
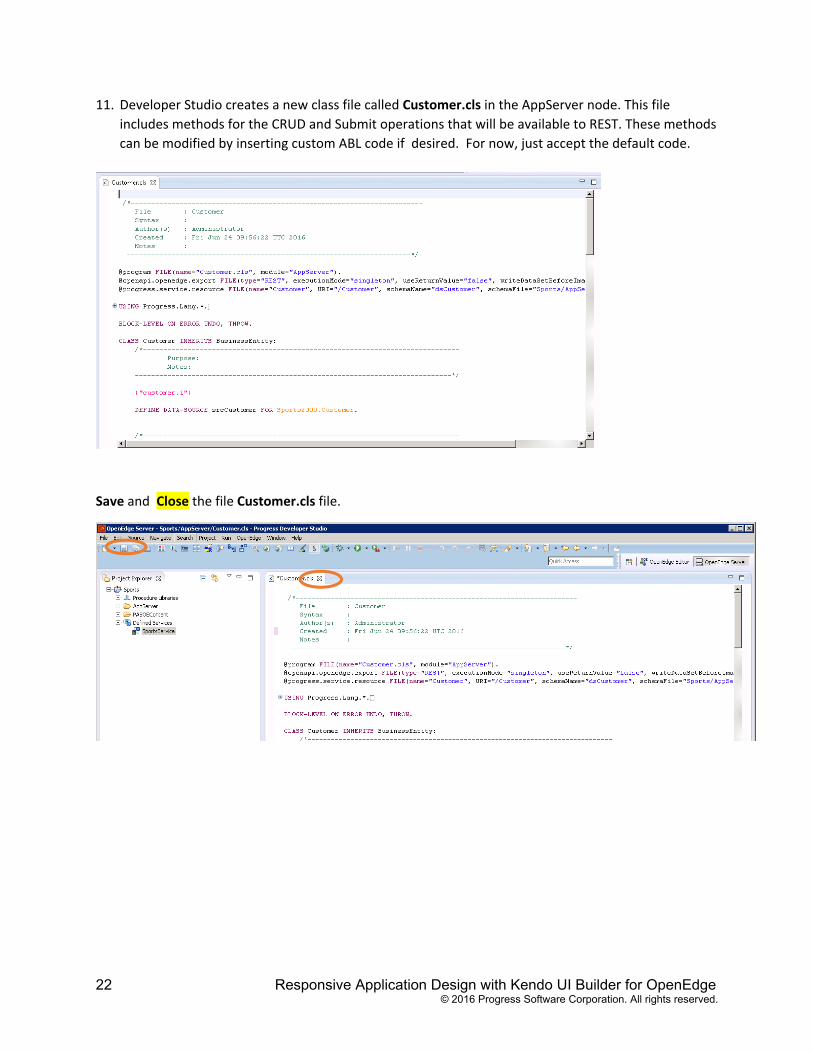
11. Developer Studio creates a new class file called Customer.cls in the AppServer node. This file
includes methods for the CRUD and Submit operations that will be available to REST. These methods
can be modified by inserting custom ABL code if desired. For now, just accept the default code.
Save and Close the file Customer.cls file.
Responsive Application Design with Kendo UI Builder for OpenEdge 23 © 2016 Progress Software Corporation. All rights reserved.
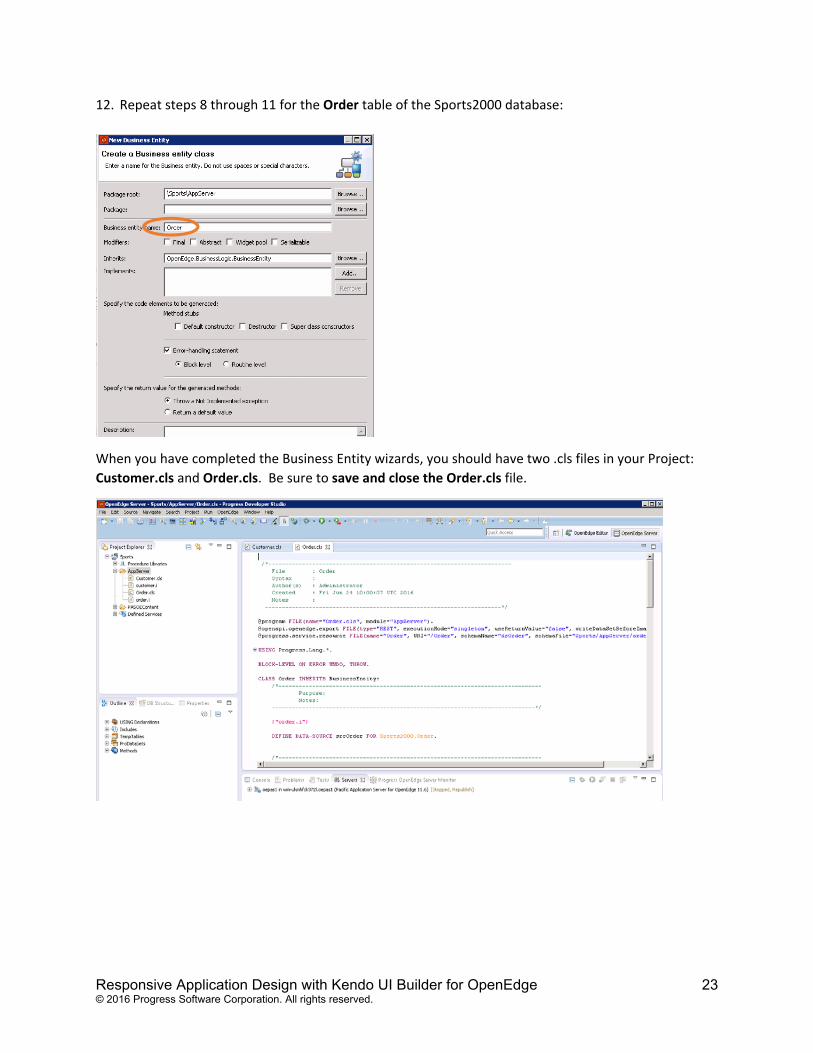
12. Repeat steps 8 through 11 for the Order table of the Sports2000 database:
When you have completed the Business Entity wizards, you should have two .cls files in your Project:
Customer.cls and Order.cls. Be sure to save and close the Order.cls file.
24 Responsive Application Design with Kendo UI Builder for OpenEdge
© 2016 Progress Software Corporation. All rights reserved.
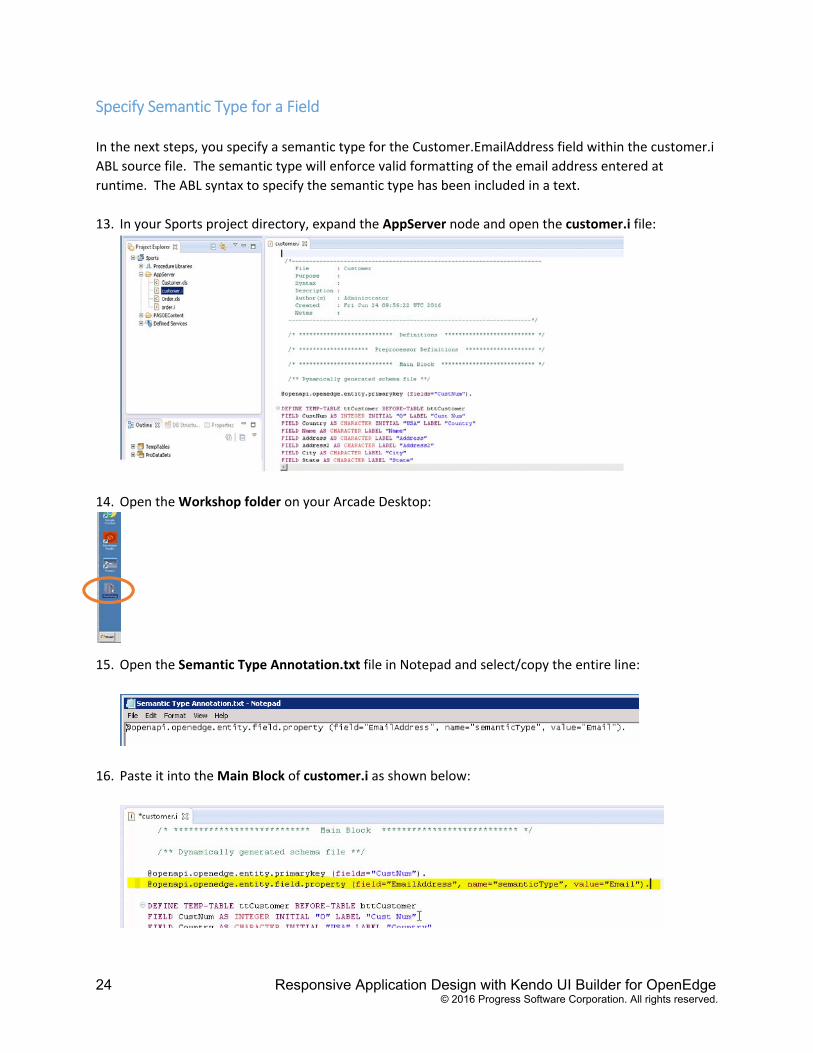
Specify Semantic Type for a Field
In the next steps, you specify a semantic type for the Customer.EmailAddress field within the customer.i
ABL source file. The semantic type will enforce valid formatting of the email address entered at
runtime. The ABL syntax to specify the semantic type has been included in a text.
13. In your Sports project directory, expand the AppServer node and open the customer.i file:
14. Open the Workshop folder on your Arcade Desktop:
15. Open the Semantic Type Annotation.txt file in Notepad and select/copy the entire line:
16. Paste it into the Main Block of customer.i as shown below:
Responsive Application Design with Kendo UI Builder for OpenEdge 25 © 2016 Progress Software Corporation. All rights reserved.
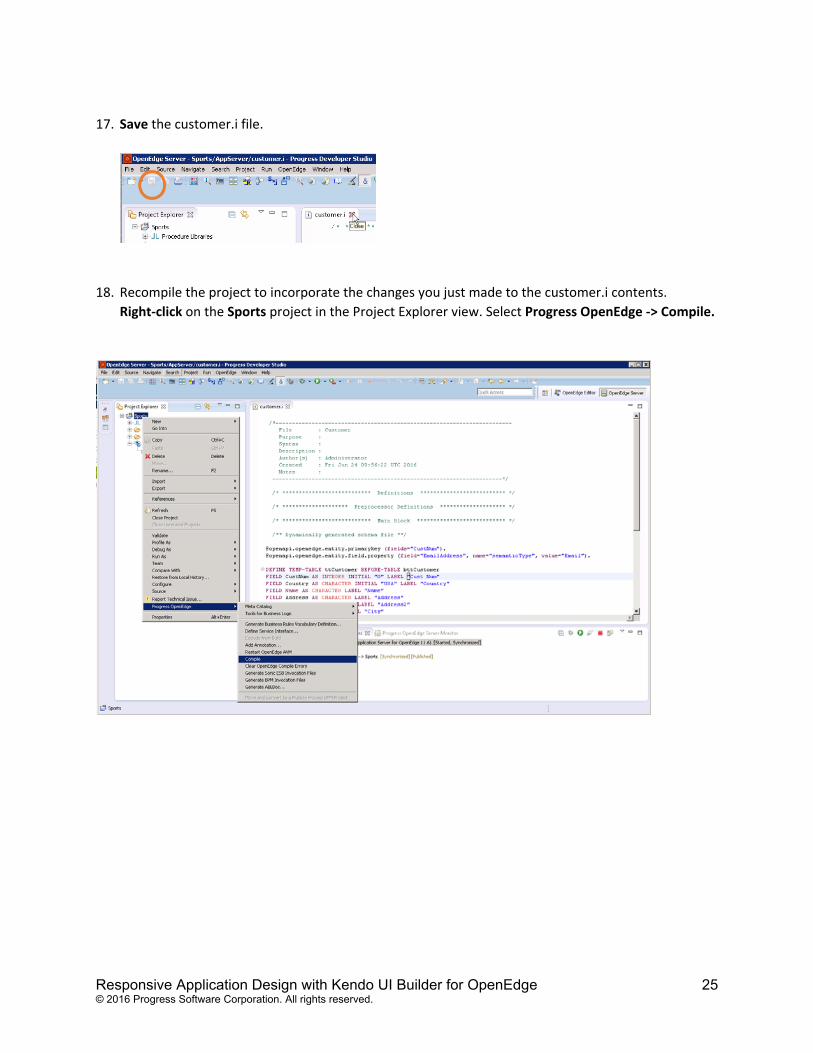
17. Save the customer.i file.
18. Recompile the project to incorporate the changes you just made to the customer.i contents.
Right‐click on the Sports project in the Project Explorer view. Select Progress OpenEdge ‐> Compile.
26 Responsive Application Design with Kendo UI Builder for OpenEdge
© 2016 Progress Software Corporation. All rights reserved.
Select the Resources to Make Available
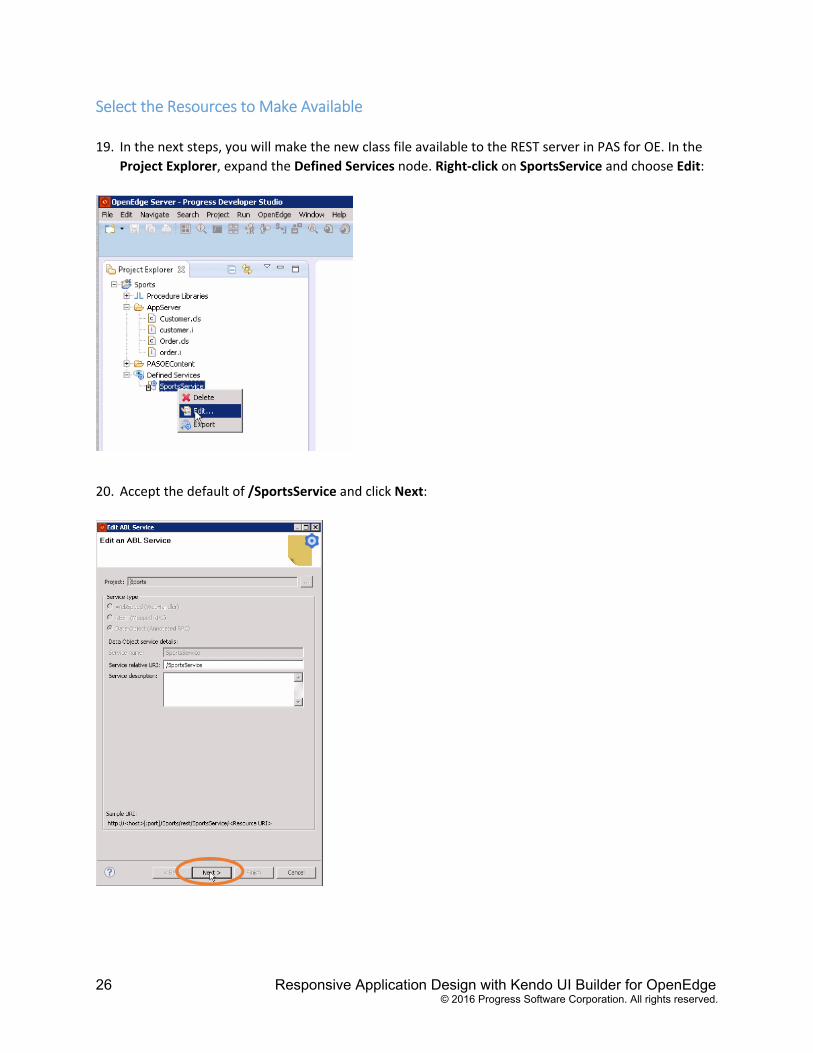
19. In the next steps, you will make the new class file available to the REST server in PAS for OE. In the
Project Explorer, expand the Defined Services node. Right‐click on SportsService and choose Edit:
20. Accept the default of /SportsService and click Next:
Responsive Application Design with Kendo UI Builder for OpenEdge 27 © 2016 Progress Software Corporation. All rights reserved.
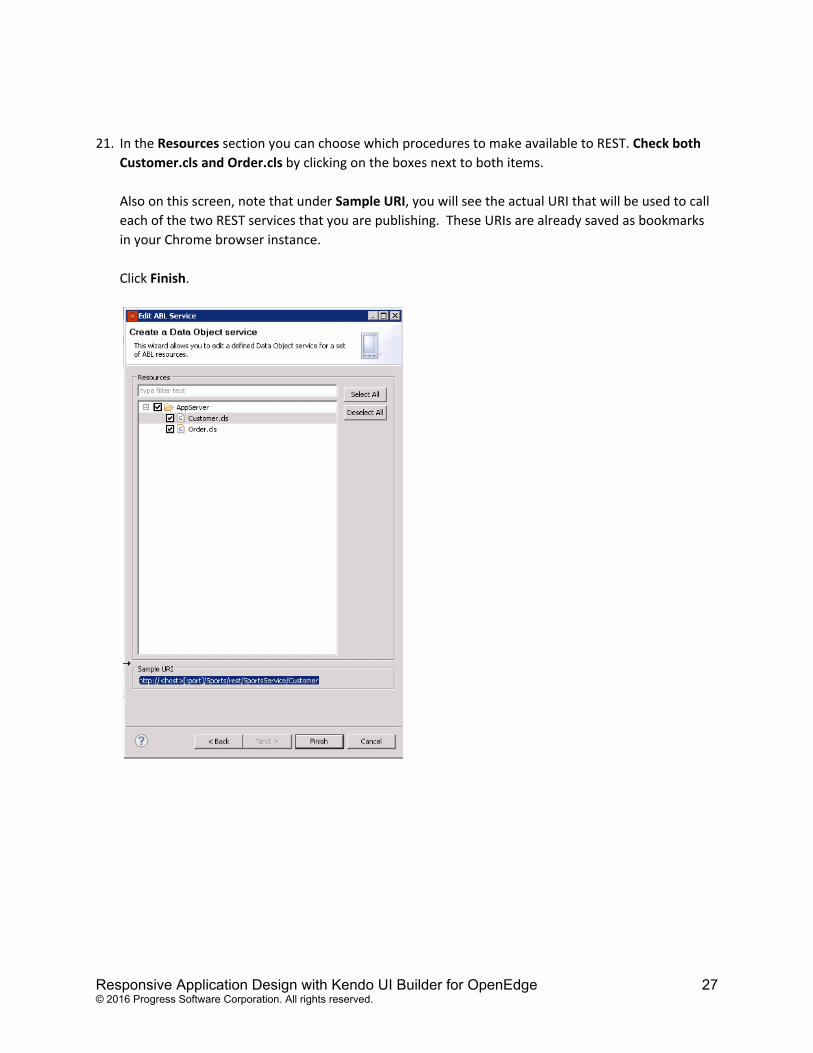
21. In the Resources section you can choose which procedures to make available to REST. Check both
Customer.cls and Order.cls by clicking on the boxes next to both items.
Also on this screen, note that under Sample URI, you will see the actual URI that will be used to call
each of the two REST services that you are publishing. These URIs are already saved as bookmarks
in your Chrome browser instance.
Click Finish.
28 Responsive Application Design with Kendo UI Builder for OpenEdge
© 2016 Progress Software Corporation. All rights reserved.
Deploying the REST service
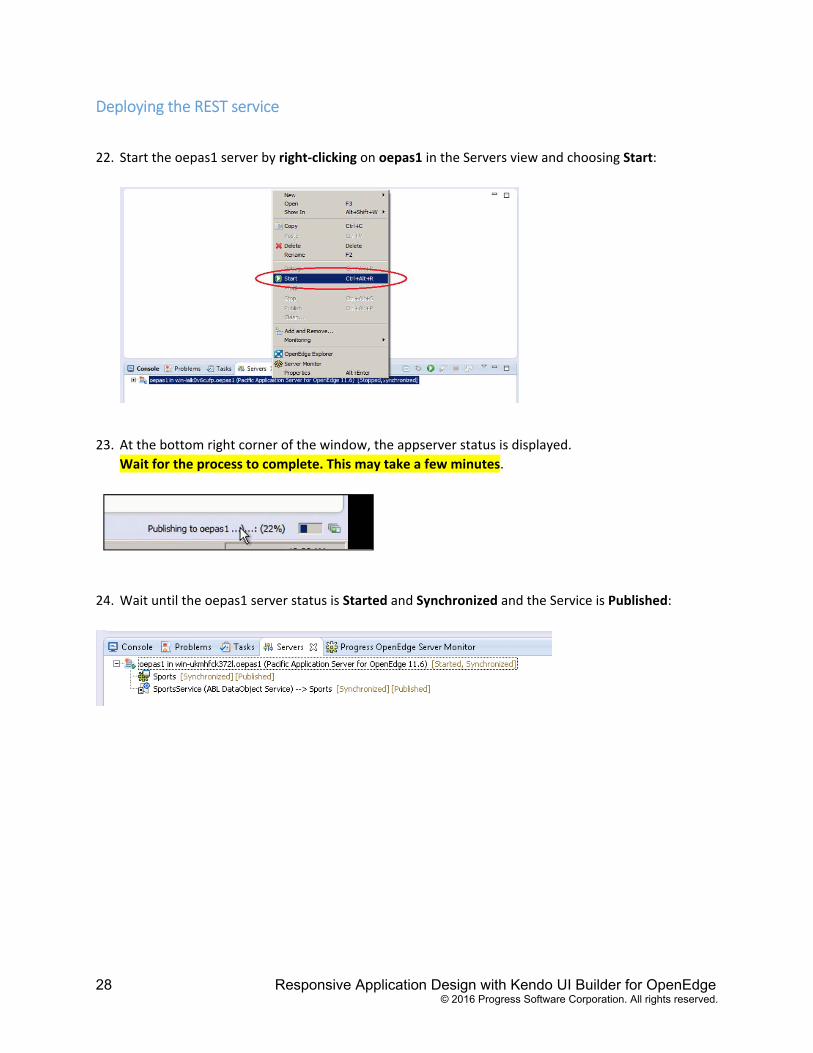
22. Start the oepas1 server by right‐clicking on oepas1 in the Servers view and choosing Start:
23. At the bottom right corner of the window, the appserver status is displayed.
Wait for the process to complete. This may take a few minutes.
24. Wait until the oepas1 server status is Started and Synchronized and the Service is Published:
Responsive Application Design with Kendo UI Builder for OpenEdge 29 © 2016 Progress Software Corporation. All rights reserved.
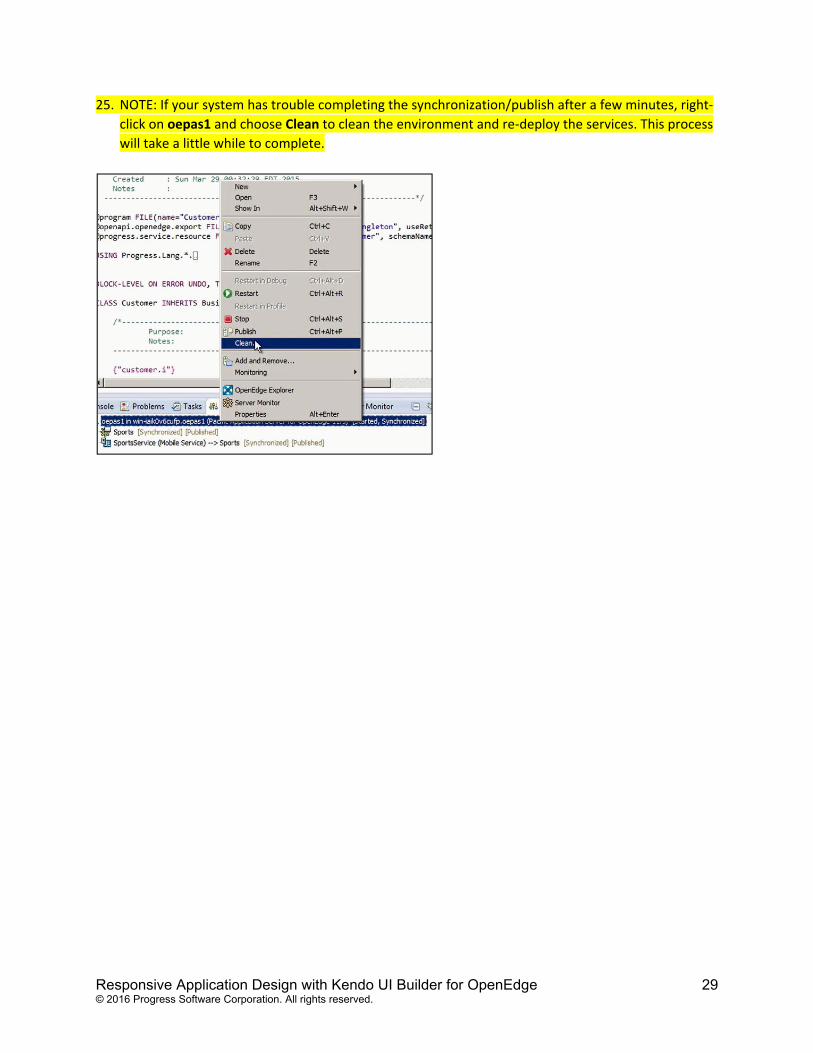
25. NOTE: If your system has trouble completing the synchronization/publish after a few minutes, right‐
click on oepas1 and choose Clean to clean the environment and re‐deploy the services. This process
will take a little while to complete.
30 Responsive Application Design with Kendo UI Builder for OpenEdge
© 2016 Progress Software Corporation. All rights reserved.
Testing the Service in the Browser (JSDO Service)
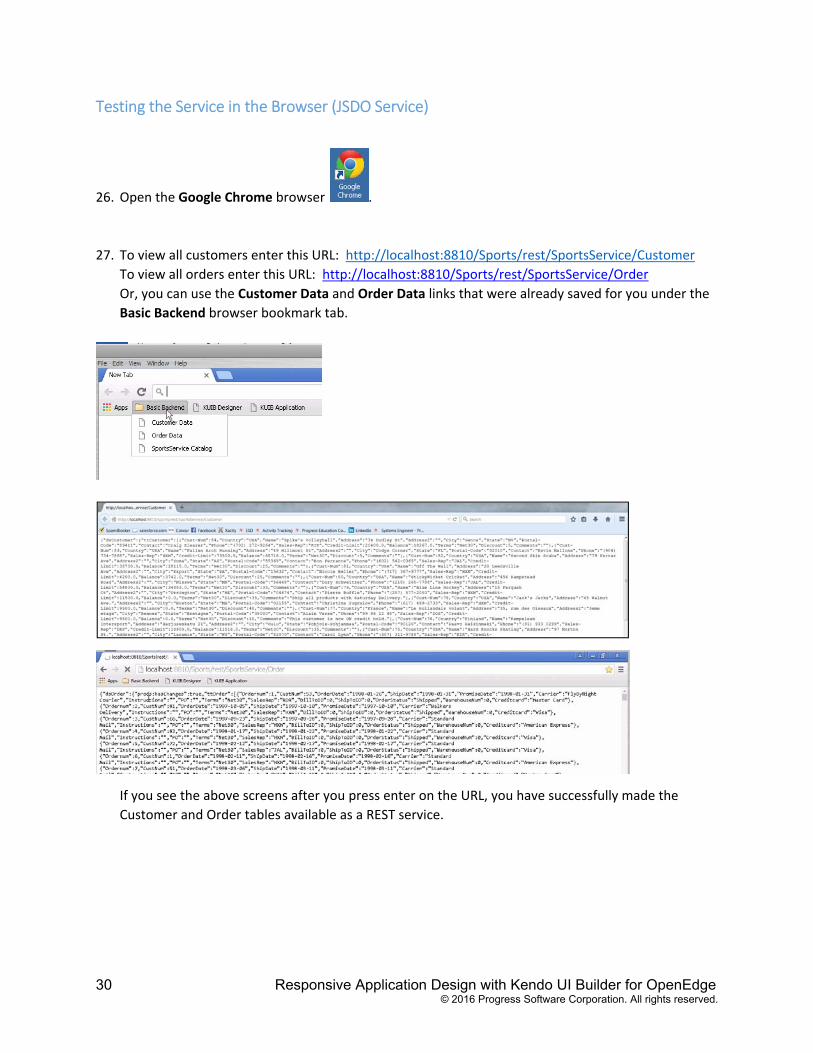
26. Open the Google Chrome browser .
27. To view all customers enter this URL: http://localhost:8810/Sports/rest/SportsService/Customer
To view all orders enter this URL: http://localhost:8810/Sports/rest/SportsService/Order
Or, you can use the Customer Data and Order Data links that were already saved for you under the
Basic Backend browser bookmark tab.
If you see the above screens after you press enter on the URL, you have successfully made the
Customer and Order tables available as a REST service.
Responsive Application Design with Kendo UI Builder for OpenEdge 31 © 2016 Progress Software Corporation. All rights reserved.
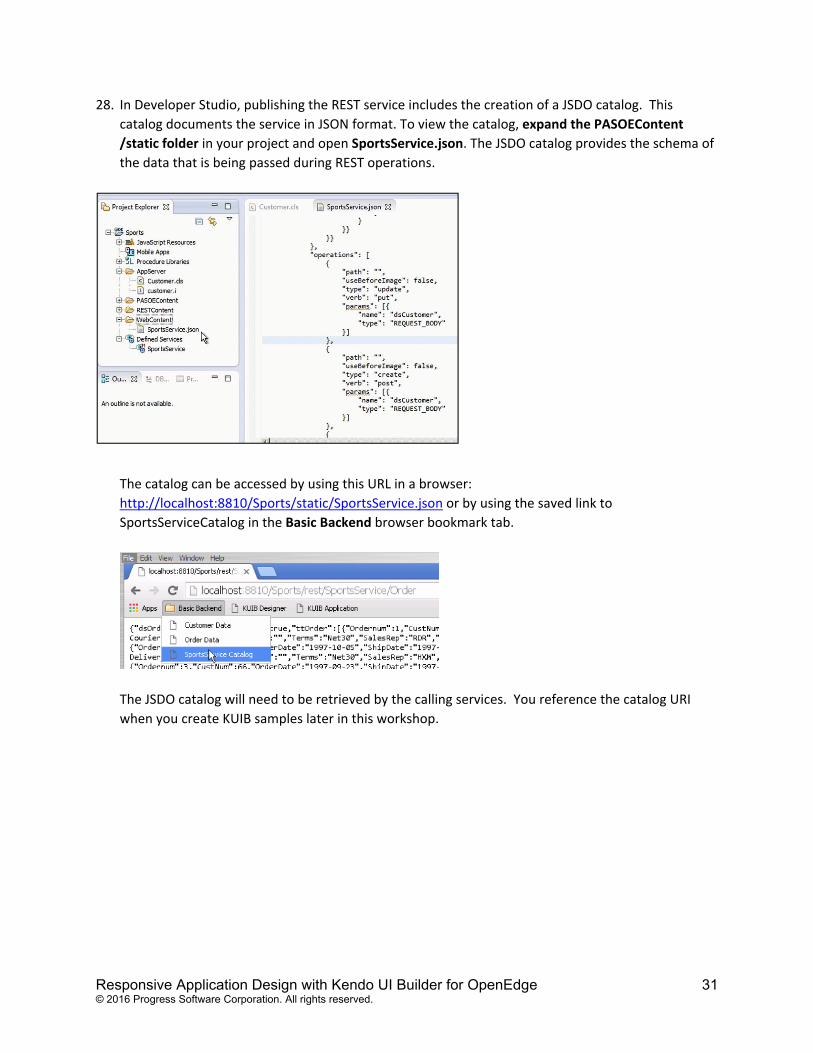
28. In Developer Studio, publishing the REST service includes the creation of a JSDO catalog. This catalog documents the service in JSON format. To view the catalog, expand the PASOEContent
/static folder in your project and open SportsService.json. The JSDO catalog provides the schema of
the data that is being passed during REST operations.
The catalog can be accessed by using this URL in a browser:
http://localhost:8810/Sports/static/SportsService.json or by using the saved link to
SportsServiceCatalog in the Basic Backend browser bookmark tab.
The JSDO catalog will need to be retrieved by the calling services. You reference the catalog URI
when you create KUIB samples later in this workshop.
32 Responsive Application Design with Kendo UI Builder for OpenEdge
© 2016 Progress Software Corporation. All rights reserved.
Section 4: Using OpenEdge Data with Kendo UI Builder for OpenEdge
In this section you use the exposed REST data from the preceding section as the datasource for a Kendo
UI responsive web application. You build the web application using the Kendo UI Builder for OpenEdge
(KUIB) that has been pre‐installed in your Arcade image.
Starting the Kendo UI Builder for OpenEdge (KUIB)
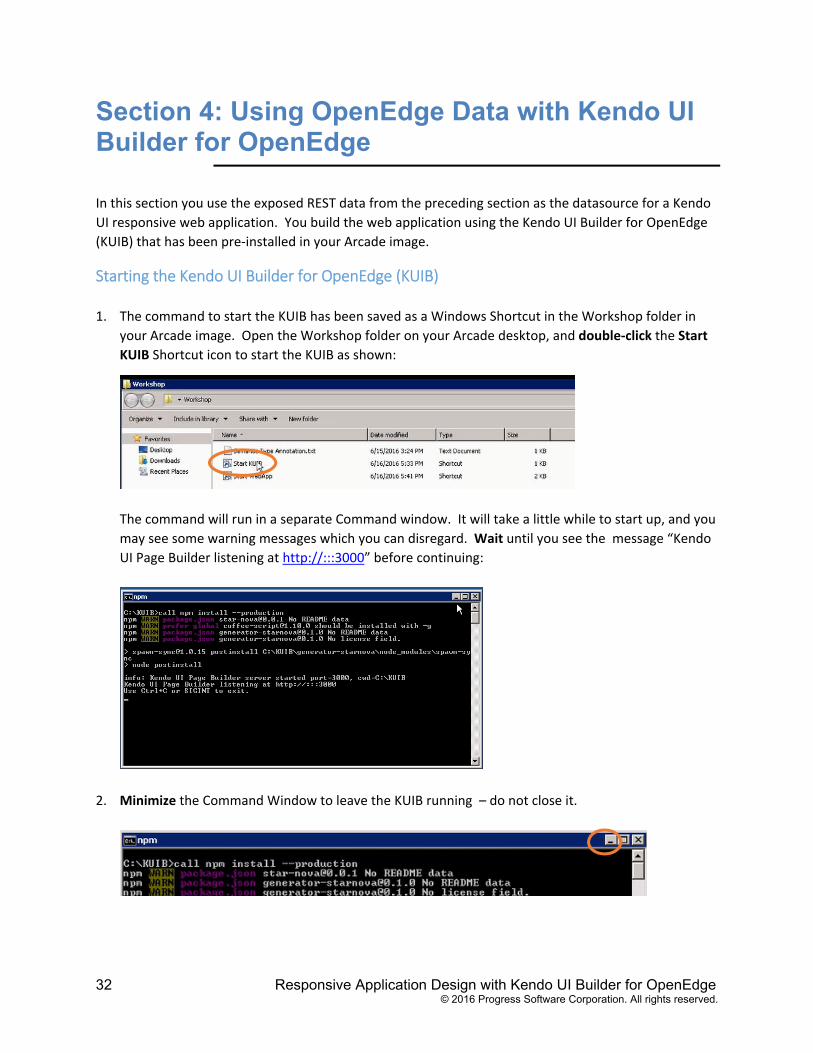
1. The command to start the KUIB has been saved as a Windows Shortcut in the Workshop folder in
your Arcade image. Open the Workshop folder on your Arcade desktop, and double‐click the Start
KUIB Shortcut icon to start the KUIB as shown:
The command will run in a separate Command window. It will take a little while to start up, and you
may see some warning messages which you can disregard. Wait until you see the message “Kendo
UI Page Builder listening at http://:::3000” before continuing:
2. Minimize the Command Window to leave the KUIB running – do not close it.
Responsive Application Design with Kendo UI Builder for OpenEdge 33 © 2016 Progress Software Corporation. All rights reserved.
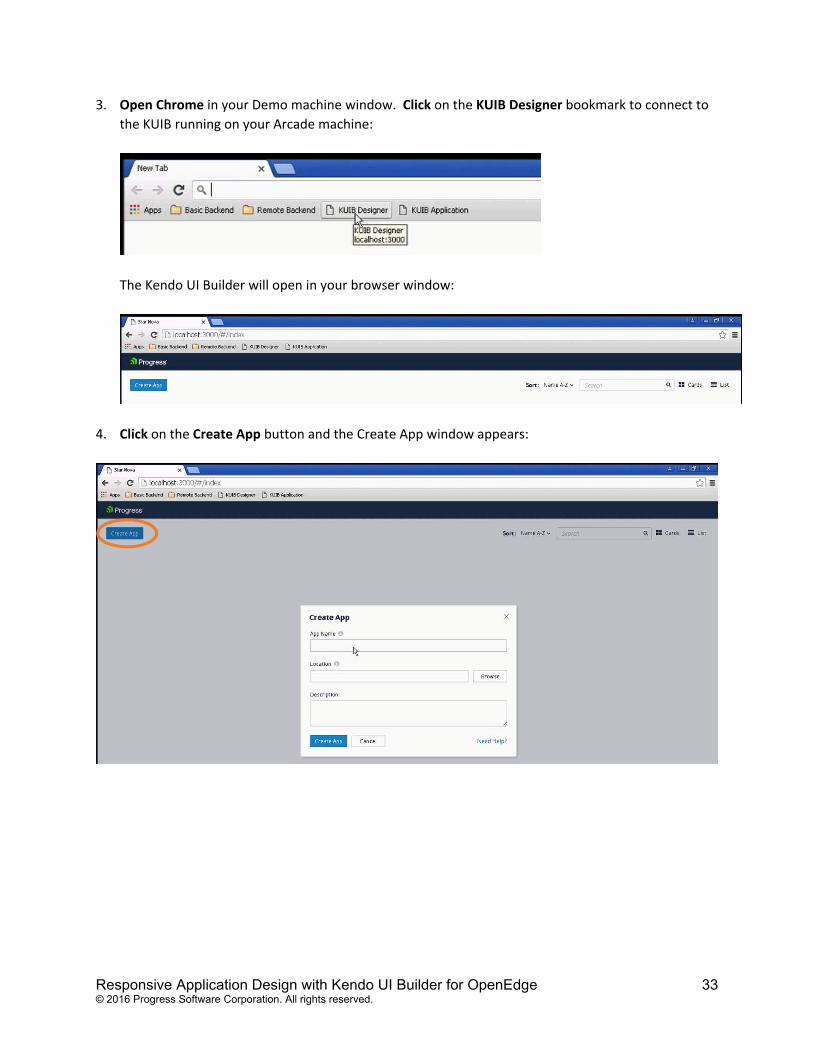
3. Open Chrome in your Demo machine window. Click on the KUIB Designer bookmark to connect to
the KUIB running on your Arcade machine:
The Kendo UI Builder will open in your browser window:
4. Click on the Create App button and the Create App window appears:
34 Responsive Application Design with Kendo UI Builder for OpenEdge
© 2016 Progress Software Corporation. All rights reserved.
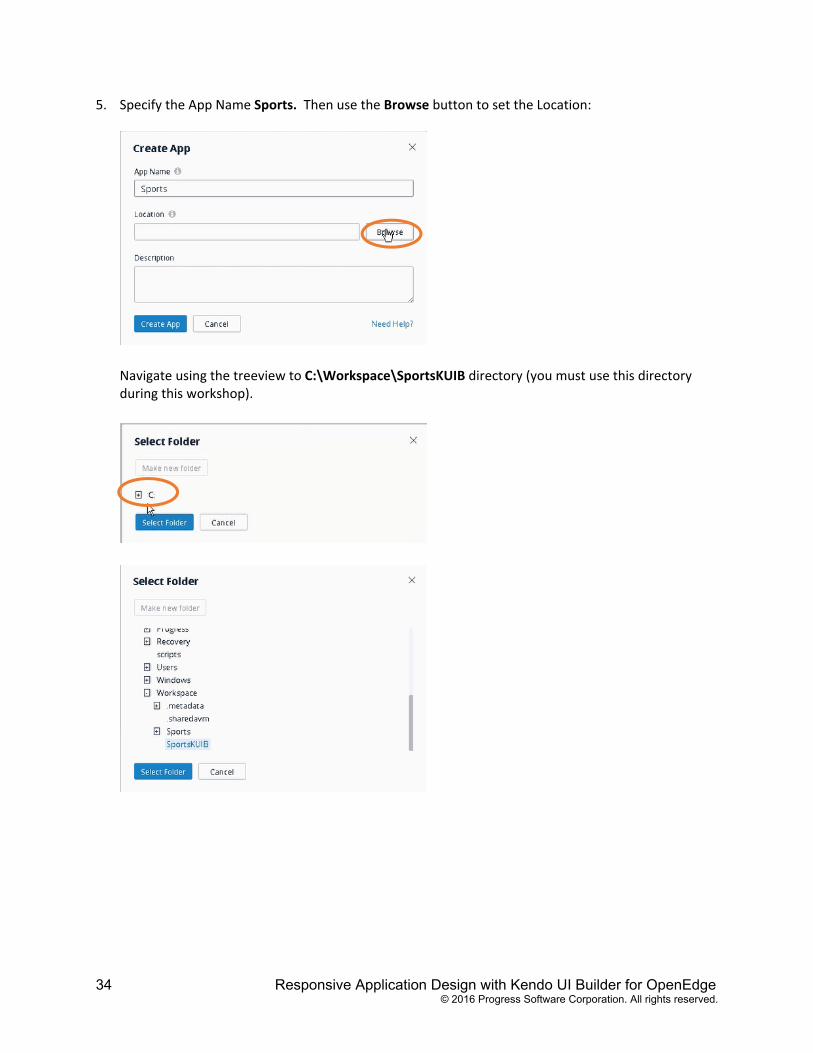
5. Specify the App Name Sports. Then use the Browse button to set the Location:
Navigate using the treeview to C:\Workspace\SportsKUIB directory (you must use this directory during this workshop).
Responsive Application Design with Kendo UI Builder for OpenEdge 35 © 2016 Progress Software Corporation. All rights reserved.
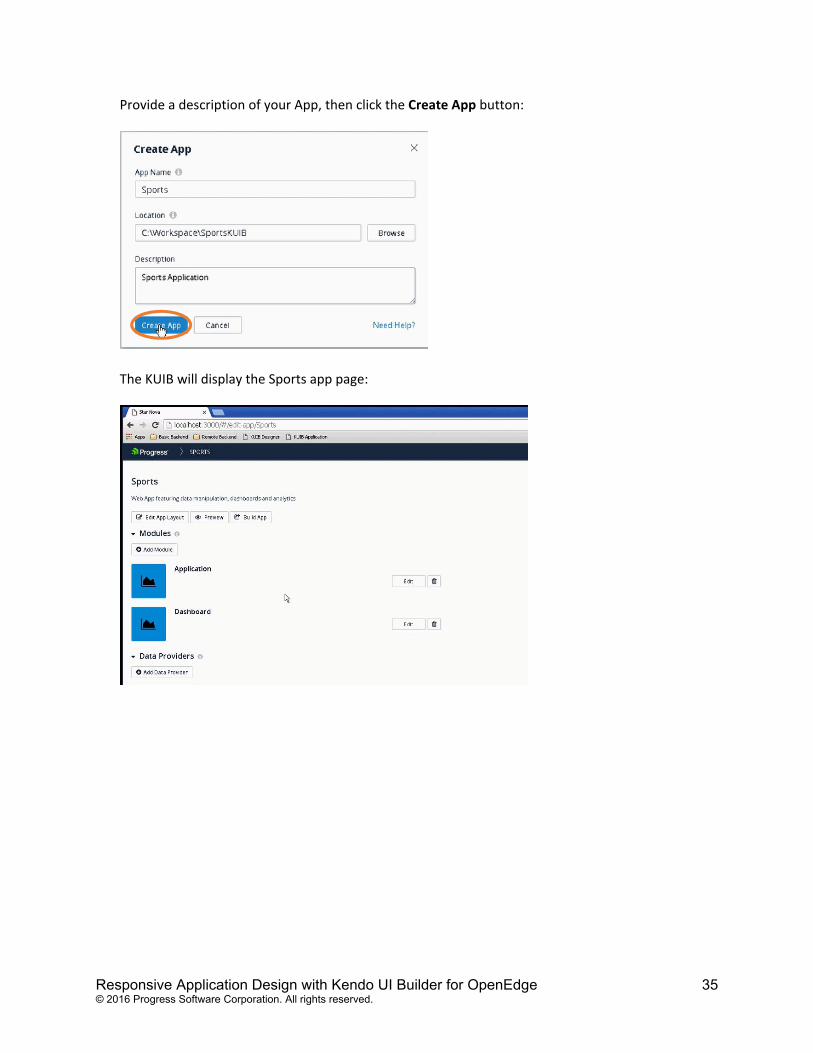
Provide a description of your App, then click the Create App button:
The KUIB will display the Sports app page:
36 Responsive Application Design with Kendo UI Builder for OpenEdge
© 2016 Progress Software Corporation. All rights reserved.
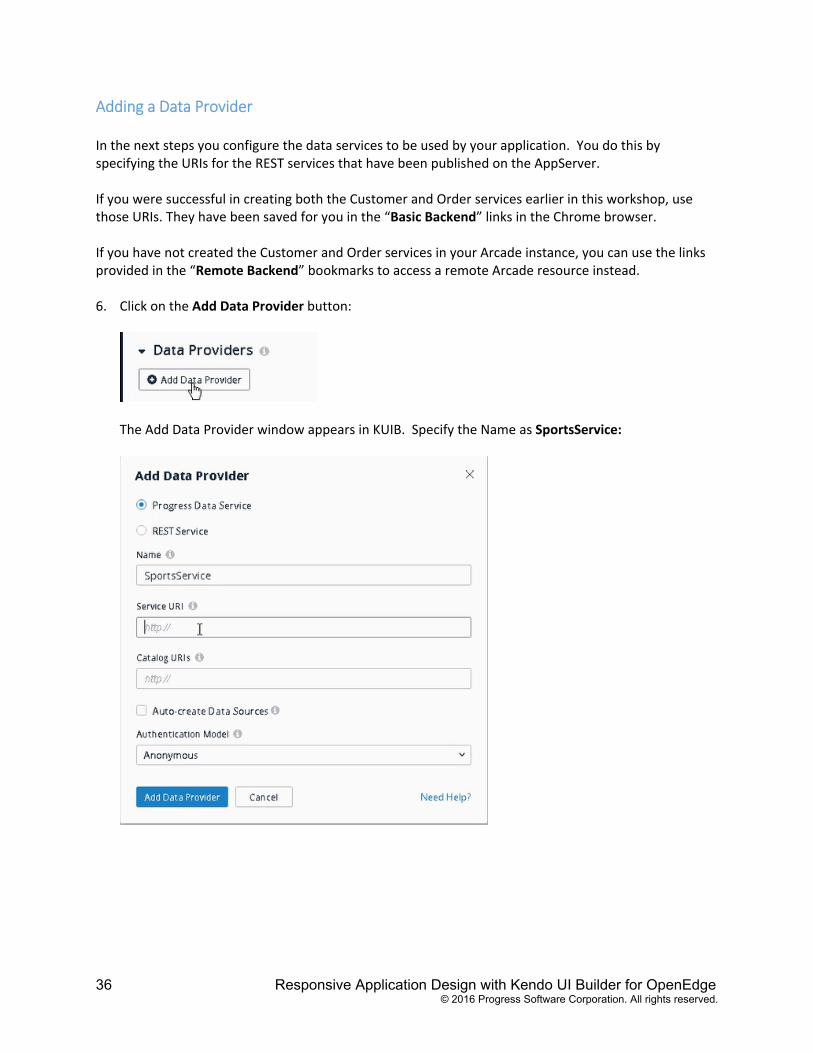
Adding a Data Provider In the next steps you configure the data services to be used by your application. You do this by specifying the URIs for the REST services that have been published on the AppServer. If you were successful in creating both the Customer and Order services earlier in this workshop, use those URIs. They have been saved for you in the “Basic Backend” links in the Chrome browser. If you have not created the Customer and Order services in your Arcade instance, you can use the links provided in the “Remote Backend” bookmarks to access a remote Arcade resource instead. 6. Click on the Add Data Provider button:
The Add Data Provider window appears in KUIB. Specify the Name as SportsService:
Responsive Application Design with Kendo UI Builder for OpenEdge 37 © 2016 Progress Software Corporation. All rights reserved.
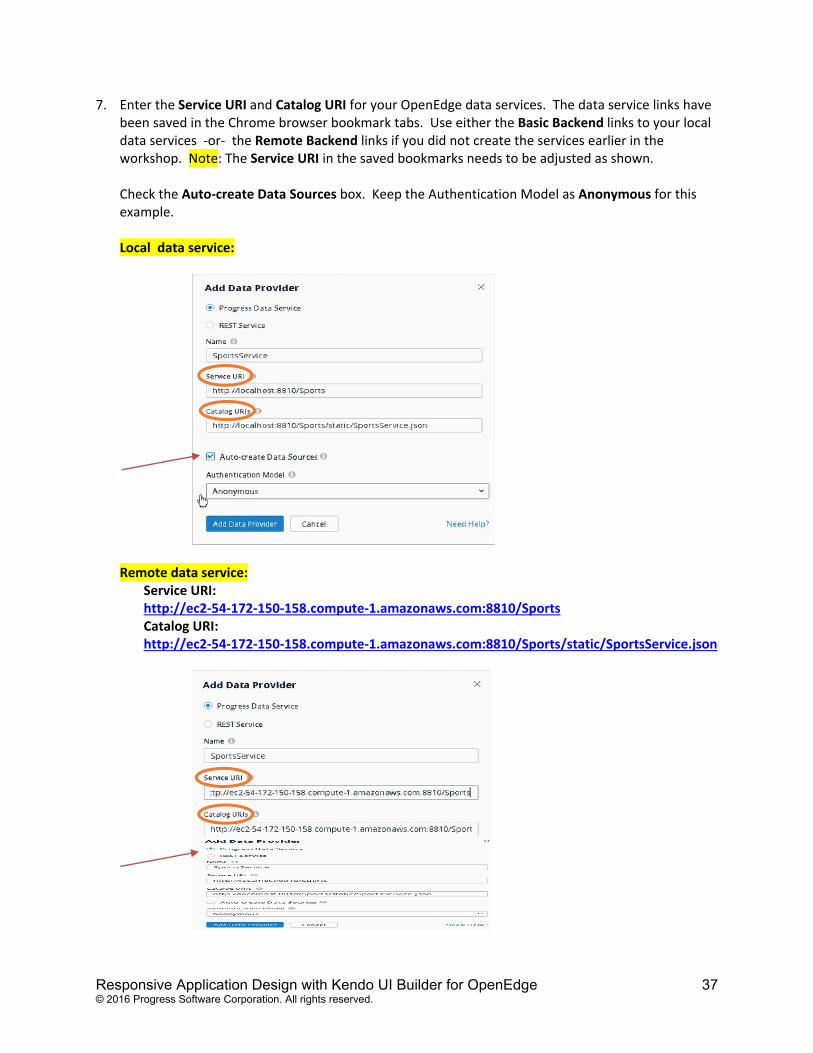
7. Enter the Service URI and Catalog URI for your OpenEdge data services. The data service links have been saved in the Chrome browser bookmark tabs. Use either the Basic Backend links to your local data services ‐or‐ the Remote Backend links if you did not create the services earlier in the workshop. Note: The Service URI in the saved bookmarks needs to be adjusted as shown. Check the Auto‐create Data Sources box. Keep the Authentication Model as Anonymous for this example. Local data service:
Remote data service:
Service URI: http://ec2‐54‐172‐150‐158.compute‐1.amazonaws.com:8810/Sports Catalog URI: http://ec2‐54‐172‐150‐158.compute‐1.amazonaws.com:8810/Sports/static/SportsService.json
38 Responsive Application Design with Kendo UI Builder for OpenEdge
© 2016 Progress Software Corporation. All rights reserved.
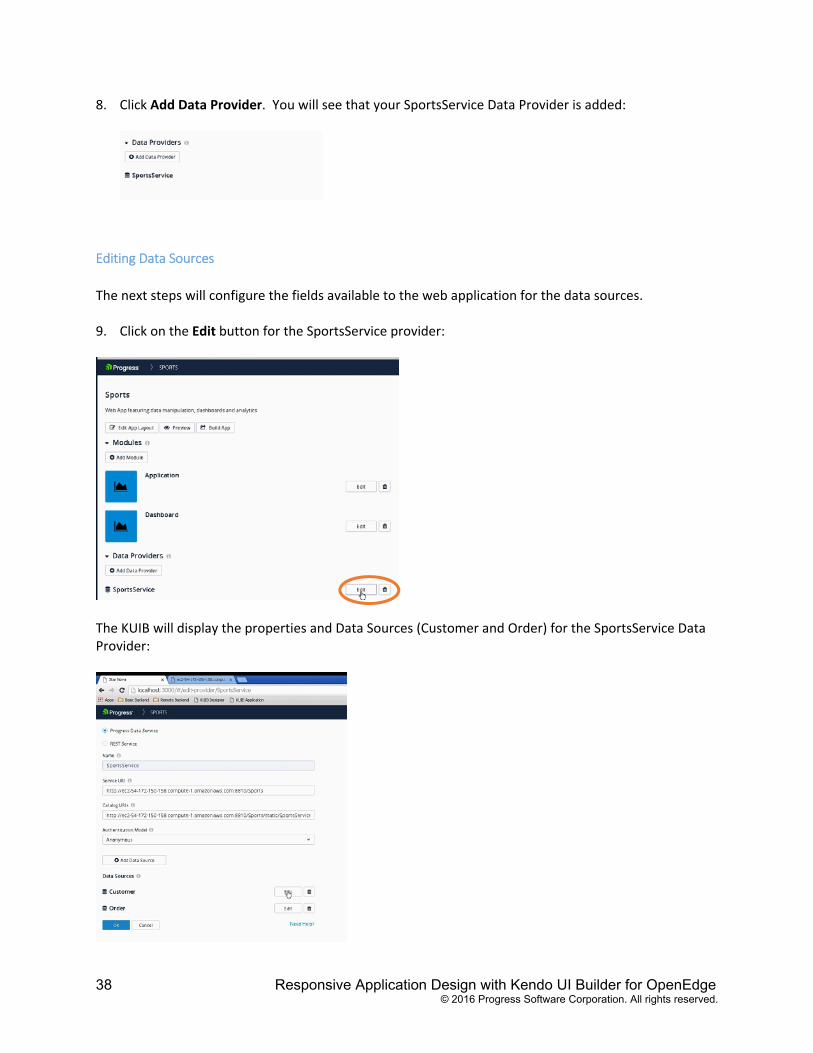
8. Click Add Data Provider. You will see that your SportsService Data Provider is added:
Editing Data Sources
The next steps will configure the fields available to the web application for the data sources. 9. Click on the Edit button for the SportsService provider:
The KUIB will display the properties and Data Sources (Customer and Order) for the SportsService Data Provider:
Responsive Application Design with Kendo UI Builder for OpenEdge 39 © 2016 Progress Software Corporation. All rights reserved.
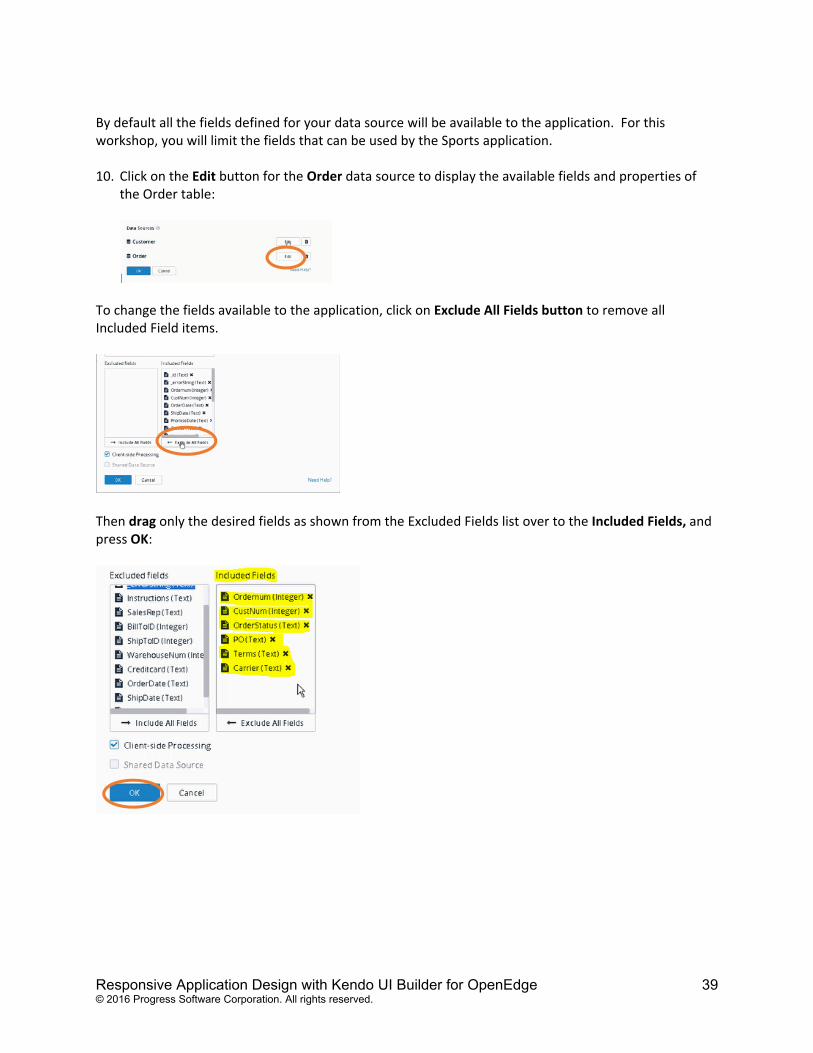
By default all the fields defined for your data source will be available to the application. For this workshop, you will limit the fields that can be used by the Sports application.
10. Click on the Edit button for the Order data source to display the available fields and properties of
the Order table:
To change the fields available to the application, click on Exclude All Fields button to remove all Included Field items.
Then drag only the desired fields as shown from the Excluded Fields list over to the Included Fields, and press OK:
40 Responsive Application Design with Kendo UI Builder for OpenEdge
© 2016 Progress Software Corporation. All rights reserved.
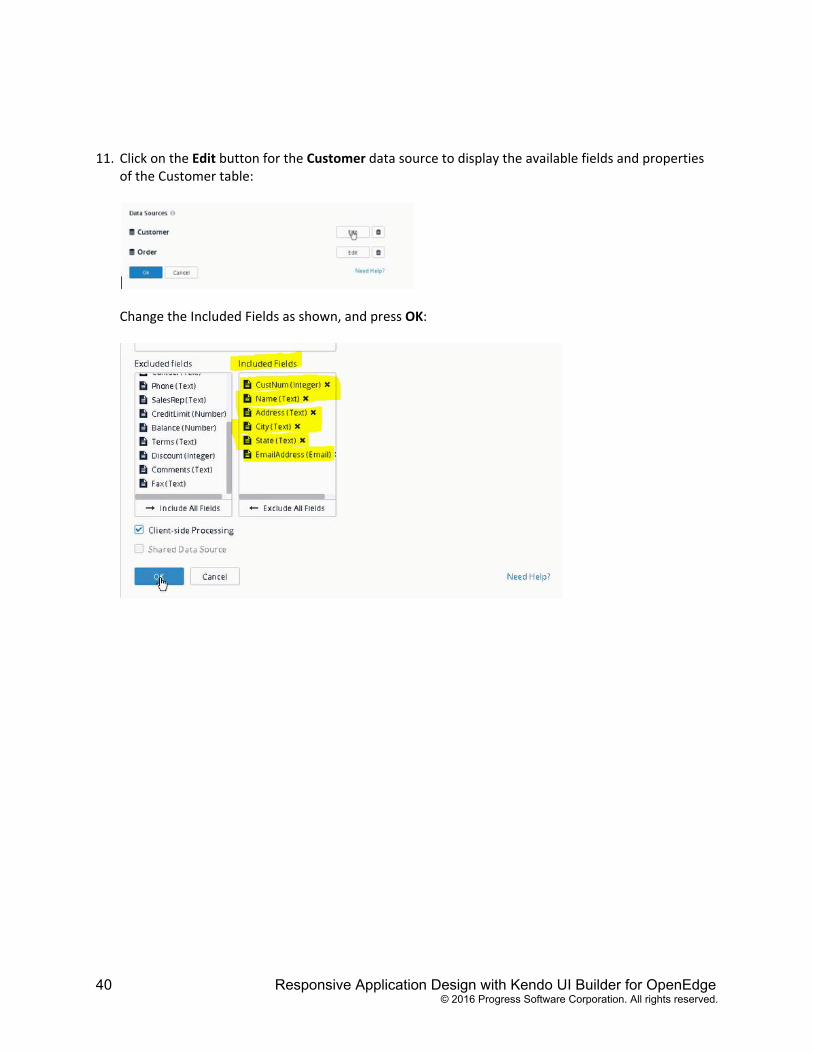
11. Click on the Edit button for the Customer data source to display the available fields and properties
of the Customer table:
Change the Included Fields as shown, and press OK:
Responsive Application Design with Kendo UI Builder for OpenEdge 41 © 2016 Progress Software Corporation. All rights reserved.
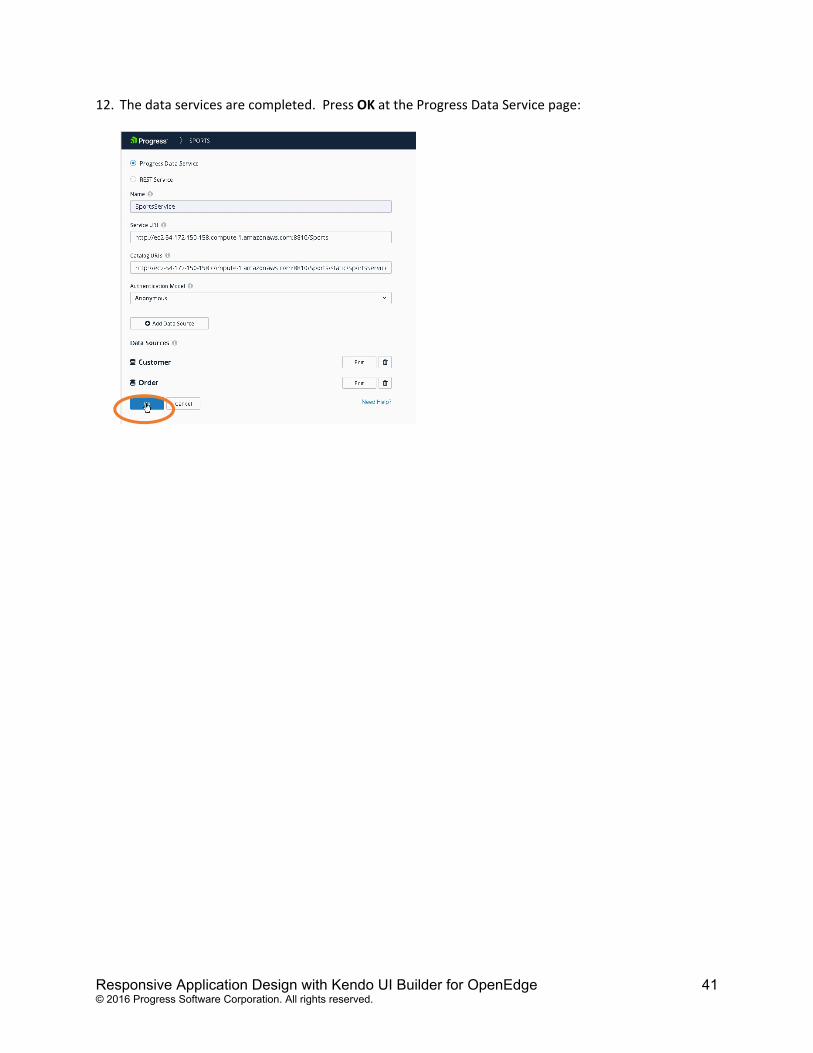
12. The data services are completed. Press OK at the Progress Data Service page:
42 Responsive Application Design with Kendo UI Builder for OpenEdge
© 2016 Progress Software Corporation. All rights reserved.
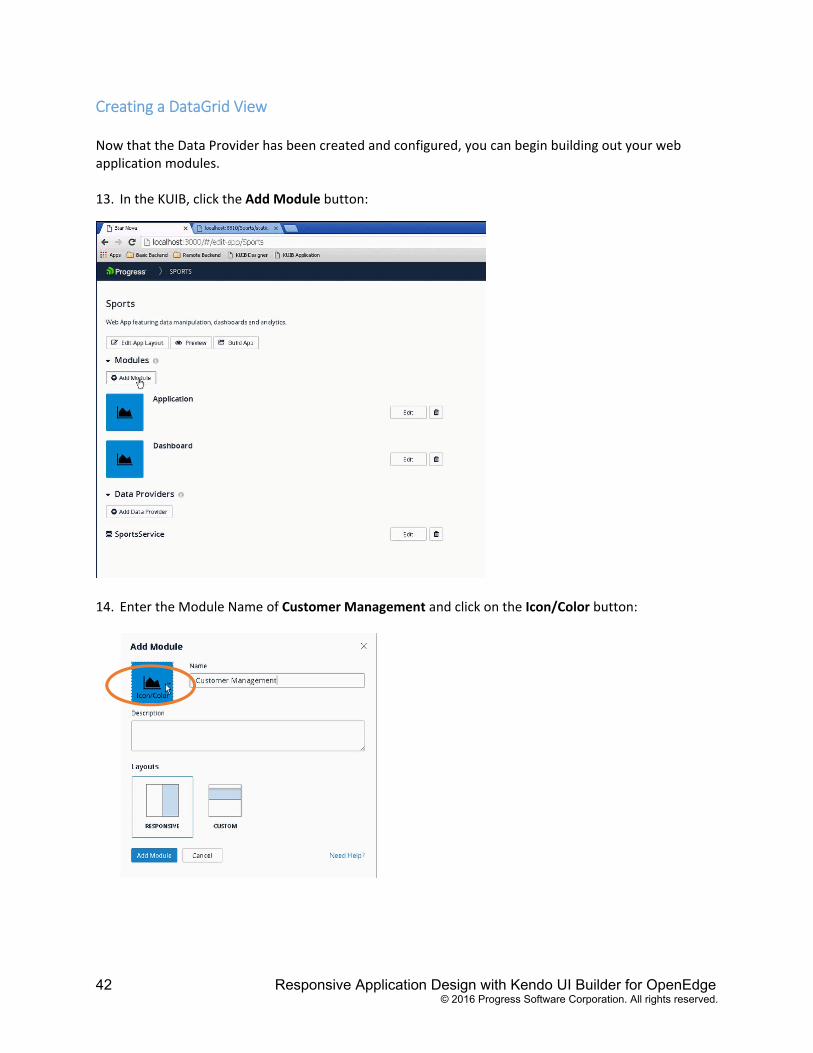
Creating a DataGrid View Now that the Data Provider has been created and configured, you can begin building out your web application modules. 13. In the KUIB, click the Add Module button:
14. Enter the Module Name of Customer Management and click on the Icon/Color button:

Responsive Application Design with Kendo UI Builder for OpenEdge 43 © 2016 Progress Software Corporation. All rights reserved.
15. Select the desired icon and color, and press Save, and then Add Module:
The new module appears in the Sports app page:
44 Responsive Application Design with Kendo UI Builder for OpenEdge
© 2016 Progress Software Corporation. All rights reserved.
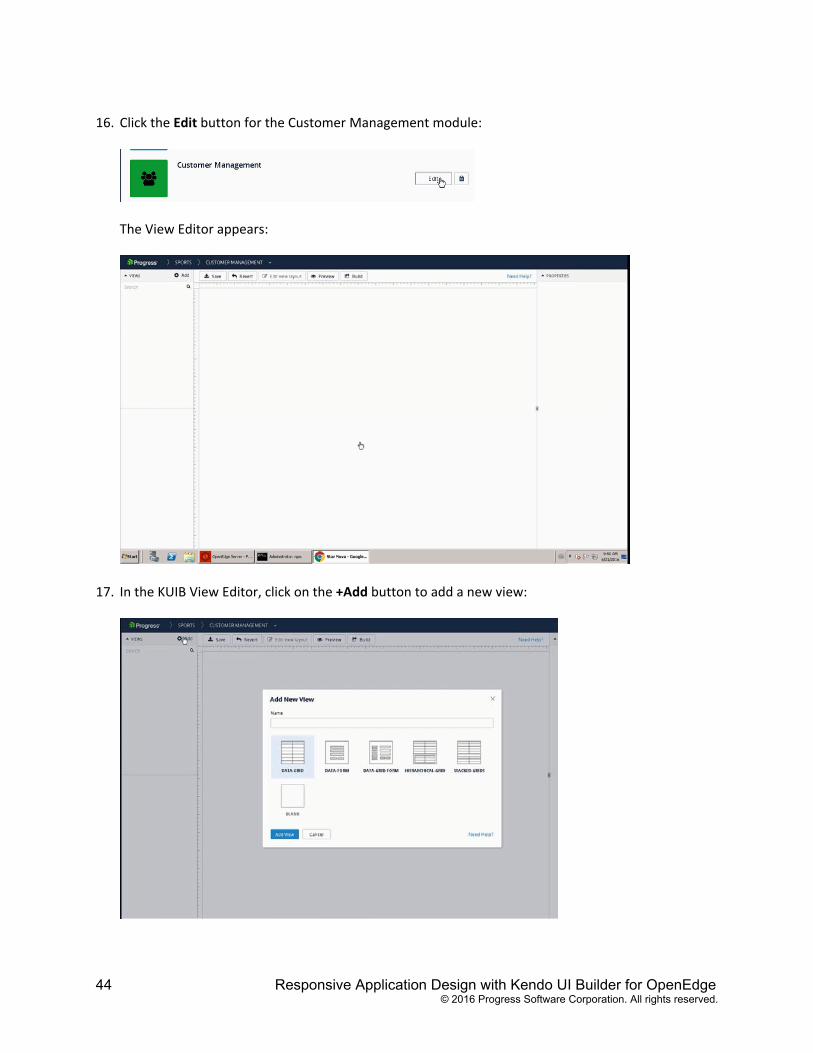
16. Click the Edit button for the Customer Management module:
The View Editor appears:
17. In the KUIB View Editor, click on the +Add button to add a new view:
Responsive Application Design with Kendo UI Builder for OpenEdge 45 © 2016 Progress Software Corporation. All rights reserved.
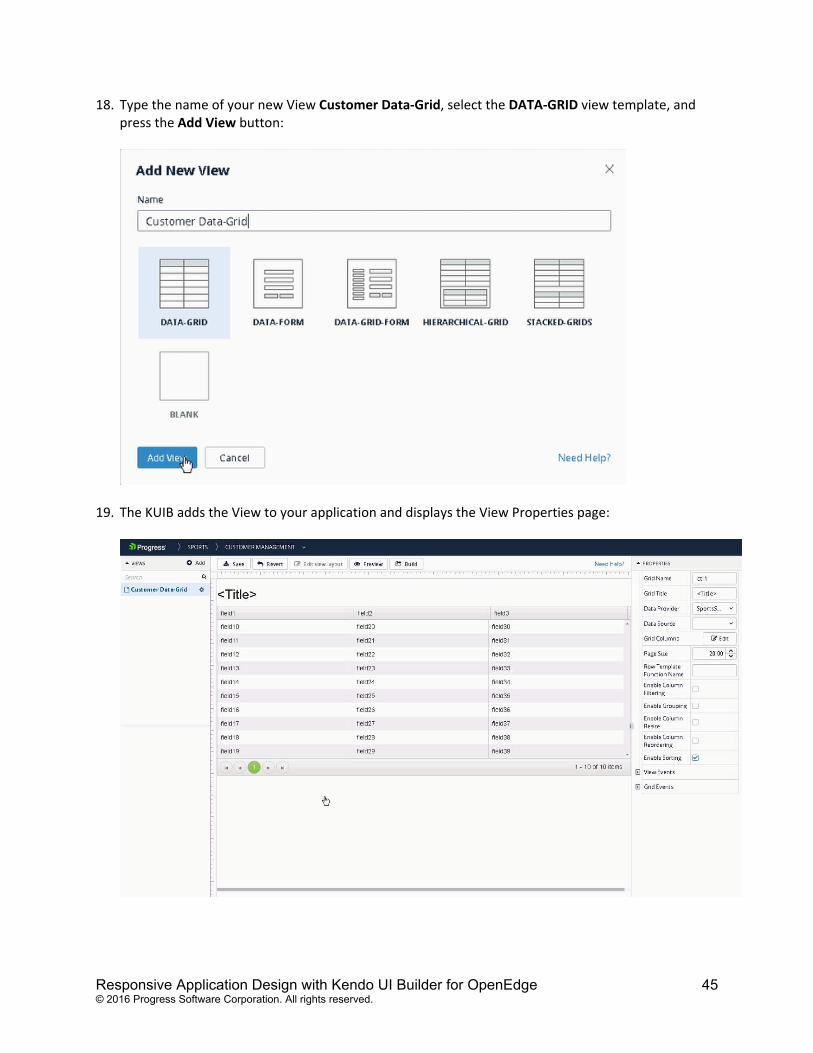
18. Type the name of your new View Customer Data‐Grid, select the DATA‐GRID view template, and press the Add View button:
19. The KUIB adds the View to your application and displays the View Properties page:
46 Responsive Application Design with Kendo UI Builder for OpenEdge
© 2016 Progress Software Corporation. All rights reserved.
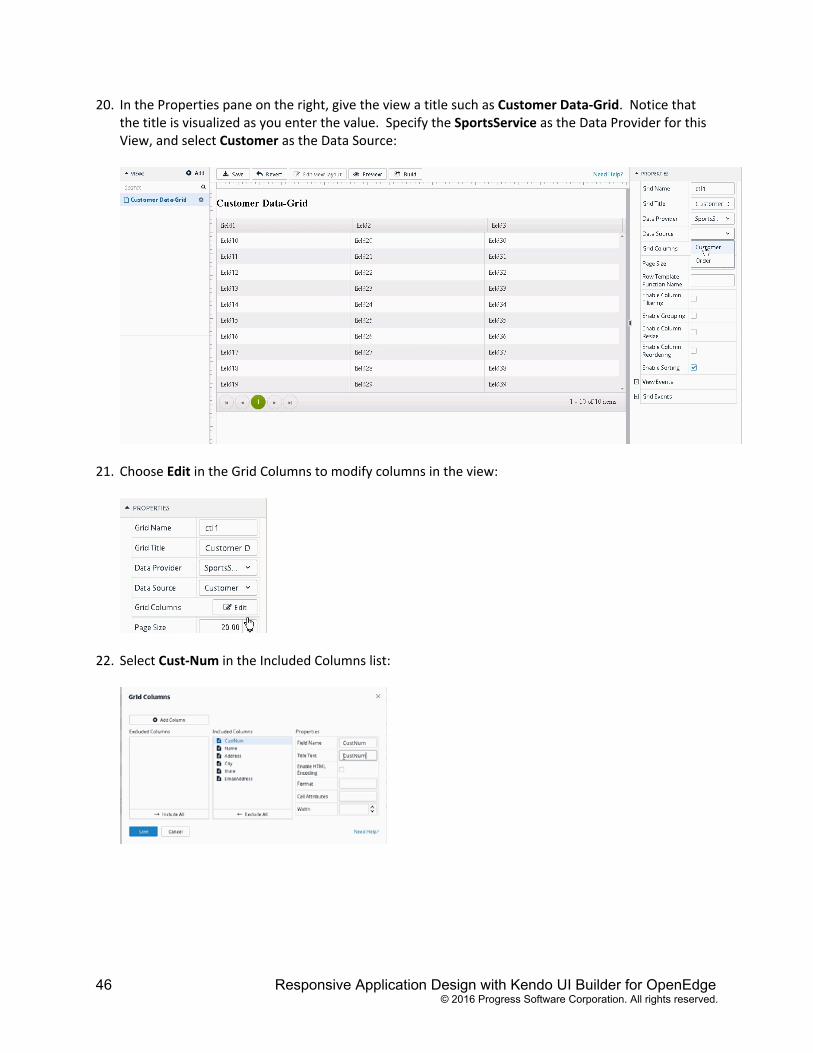
20. In the Properties pane on the right, give the view a title such as Customer Data‐Grid. Notice that the title is visualized as you enter the value. Specify the SportsService as the Data Provider for this View, and select Customer as the Data Source:
21. Choose Edit in the Grid Columns to modify columns in the view:
22. Select Cust‐Num in the Included Columns list:
Responsive Application Design with Kendo UI Builder for OpenEdge 47 © 2016 Progress Software Corporation. All rights reserved.
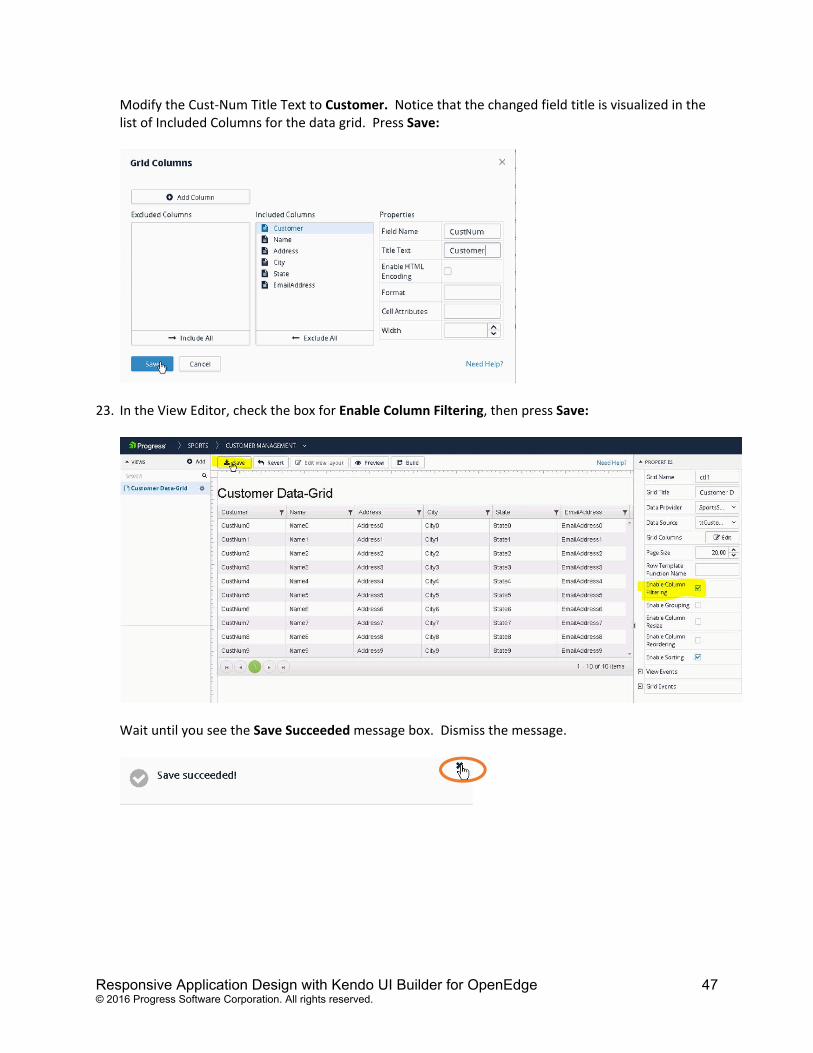
Modify the Cust‐Num Title Text to Customer. Notice that the changed field title is visualized in the list of Included Columns for the data grid. Press Save:
23. In the View Editor, check the box for Enable Column Filtering, then press Save:
Wait until you see the Save Succeeded message box. Dismiss the message.
48 Responsive Application Design with Kendo UI Builder for OpenEdge
© 2016 Progress Software Corporation. All rights reserved.
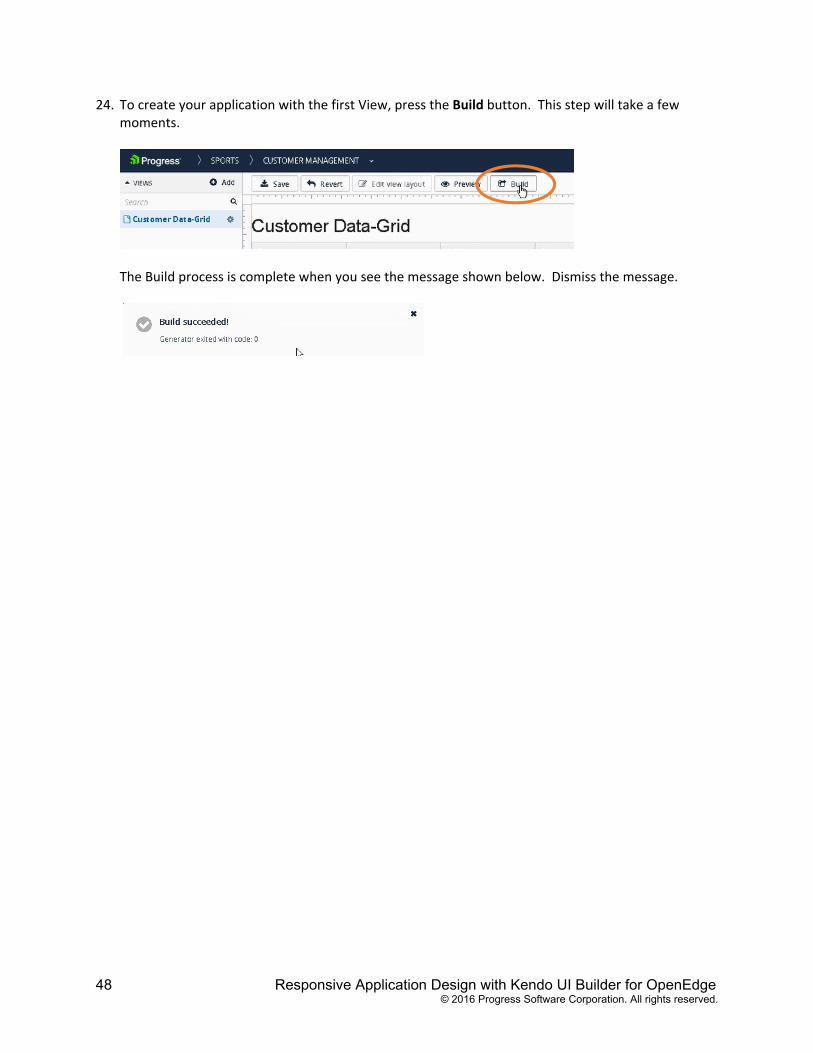
24. To create your application with the first View, press the Build button. This step will take a few moments.
The Build process is complete when you see the message shown below. Dismiss the message.
Responsive Application Design with Kendo UI Builder for OpenEdge 49 © 2016 Progress Software Corporation. All rights reserved.
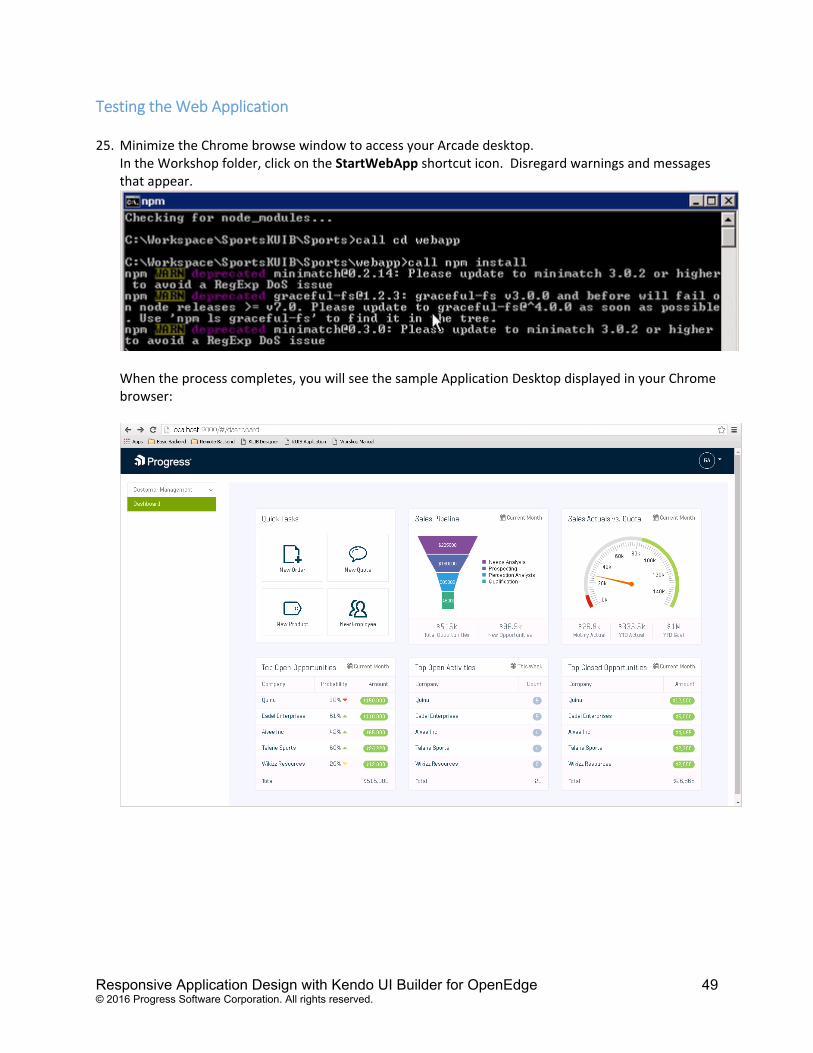
Testing the Web Application 25. Minimize the Chrome browse window to access your Arcade desktop.
In the Workshop folder, click on the StartWebApp shortcut icon. Disregard warnings and messages that appear.
When the process completes, you will see the sample Application Desktop displayed in your Chrome browser:
50 Responsive Application Design with Kendo UI Builder for OpenEdge
© 2016 Progress Software Corporation. All rights reserved.
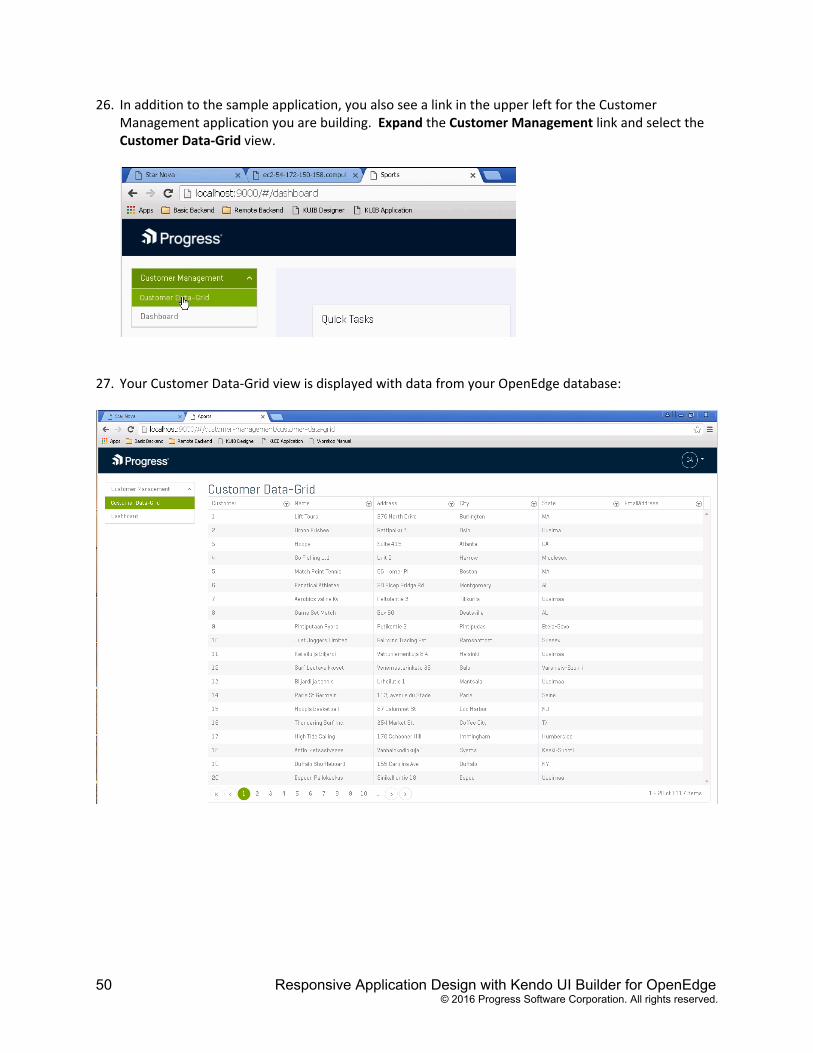
26. In addition to the sample application, you also see a link in the upper left for the Customer Management application you are building. Expand the Customer Management link and select the Customer Data‐Grid view.
27. Your Customer Data‐Grid view is displayed with data from your OpenEdge database:

Responsive Application Design with Kendo UI Builder for OpenEdge 51 © 2016 Progress Software Corporation. All rights reserved.
Modifying a View In this section you make a change to the Customer Data‐Grid view created earlier. 28. In the Chrome browser window, click on the tab labelled Star Nova to return to the KUIB designer
page:
29. Change the setting of the Page Size attribute to 15:
30. Press Save and then press Build to re‐generate your application. Wait for the completion message to appear and dismiss it.
31. Because your web application is already running, you don’t need to start it again. Simply click on the Sports tab in the Chrome browser window and refresh the page in the browser:
52 Responsive Application Design with Kendo UI Builder for OpenEdge
© 2016 Progress Software Corporation. All rights reserved.
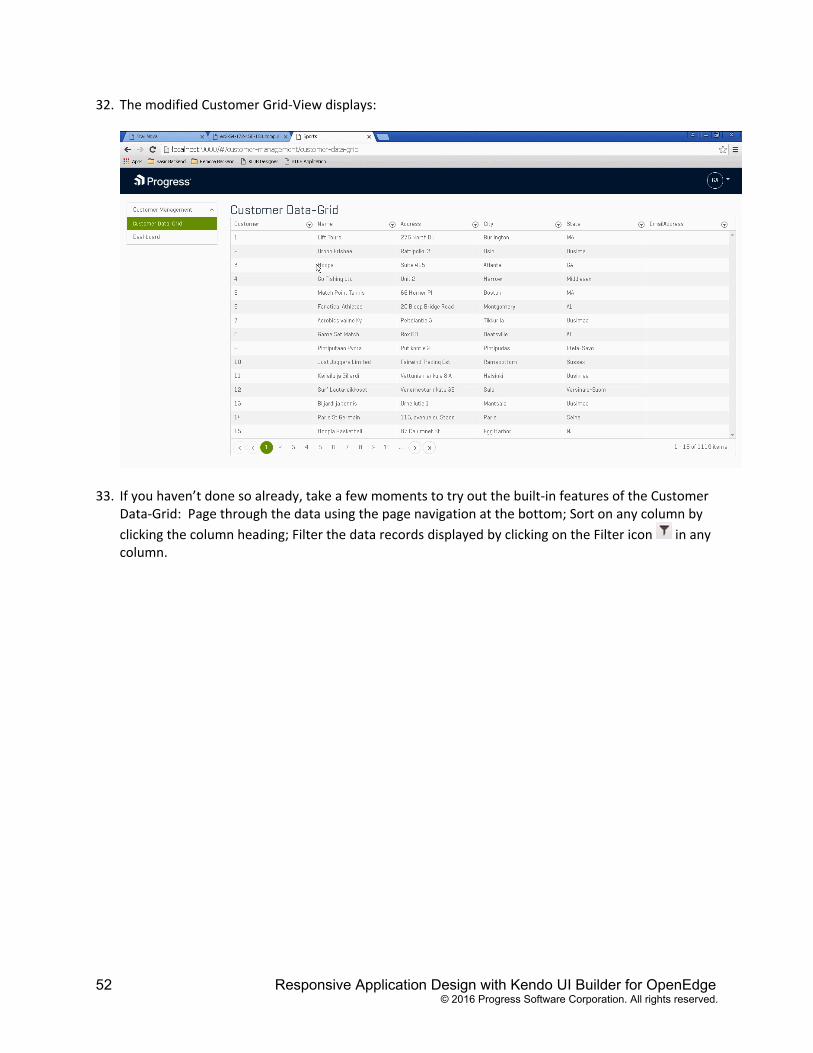
32. The modified Customer Grid‐View displays:
33. If you haven’t done so already, take a few moments to try out the built‐in features of the Customer Data‐Grid: Page through the data using the page navigation at the bottom; Sort on any column by
clicking the column heading; Filter the data records displayed by clicking on the Filter icon in any column.
Responsive Application Design with Kendo UI Builder for OpenEdge 53 © 2016 Progress Software Corporation. All rights reserved.
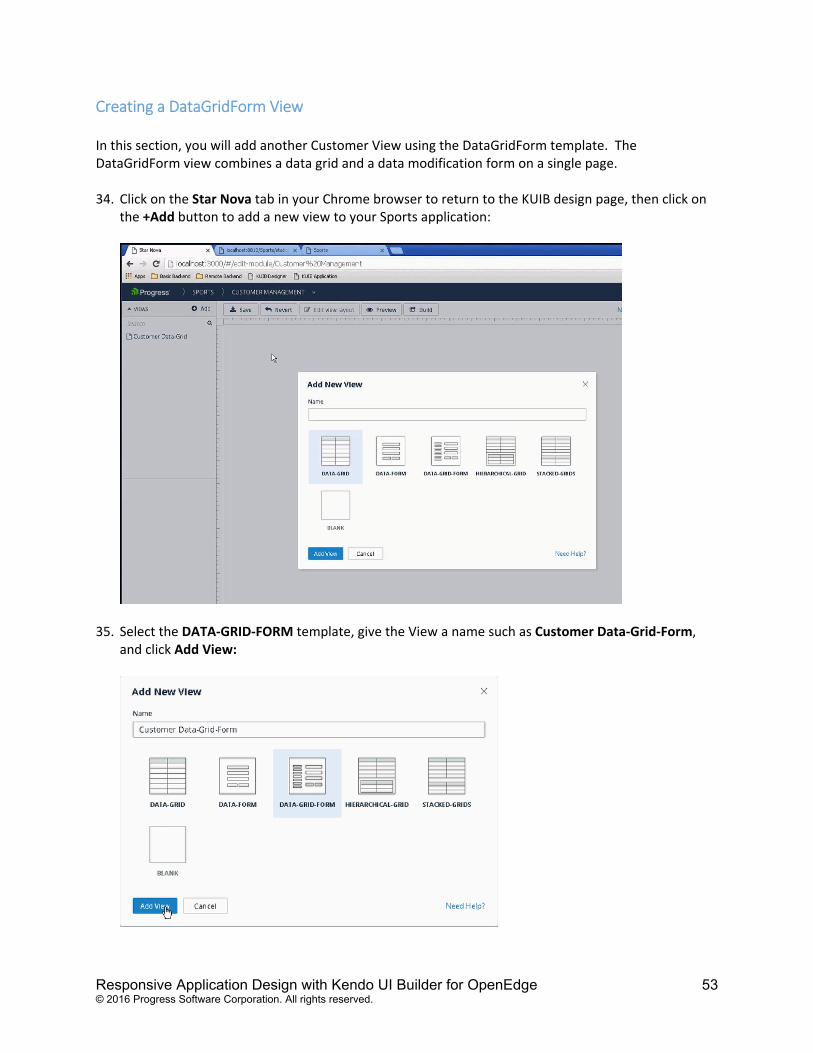
Creating a DataGridForm View In this section, you will add another Customer View using the DataGridForm template. The DataGridForm view combines a data grid and a data modification form on a single page. 34. Click on the Star Nova tab in your Chrome browser to return to the KUIB design page, then click on
the +Add button to add a new view to your Sports application:
35. Select the DATA‐GRID‐FORM template, give the View a name such as Customer Data‐Grid‐Form,
and click Add View:
54 Responsive Application Design with Kendo UI Builder for OpenEdge
© 2016 Progress Software Corporation. All rights reserved.
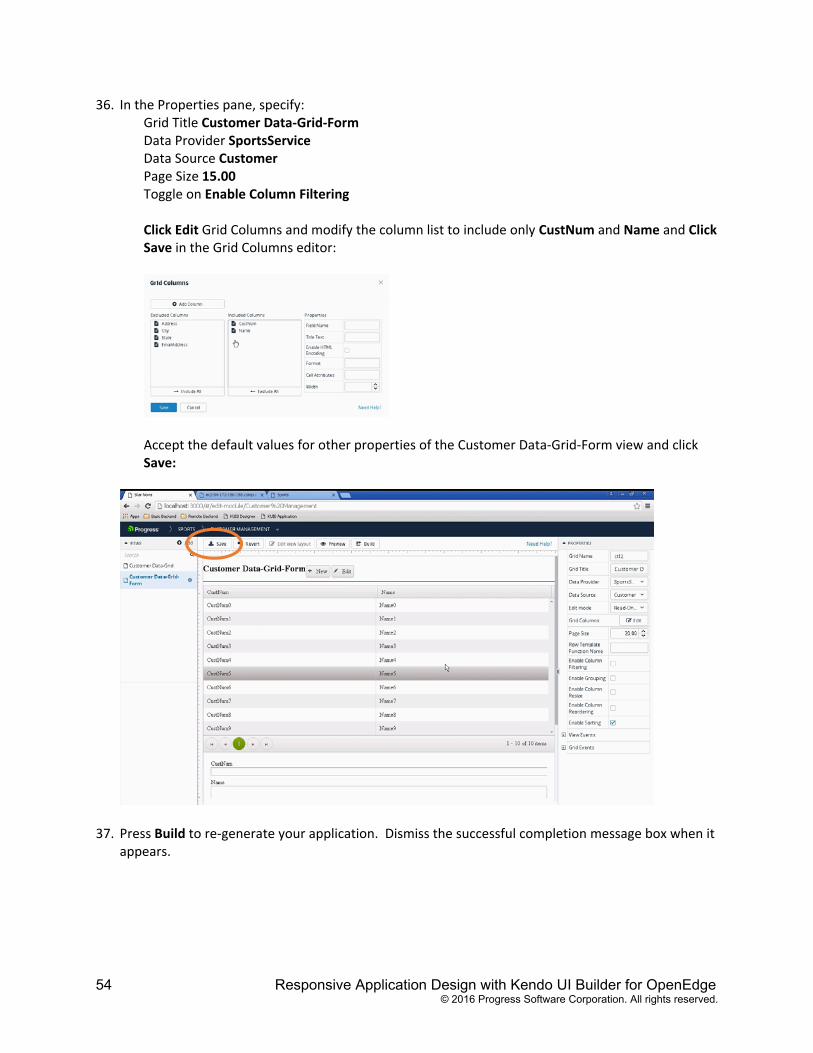
36. In the Properties pane, specify: Grid Title Customer Data‐Grid‐Form Data Provider SportsService Data Source Customer Page Size 15.00 Toggle on Enable Column Filtering Click Edit Grid Columns and modify the column list to include only CustNum and Name and Click Save in the Grid Columns editor:
Accept the default values for other properties of the Customer Data‐Grid‐Form view and click Save:
37. Press Build to re‐generate your application. Dismiss the successful completion message box when it
appears.
Responsive Application Design with Kendo UI Builder for OpenEdge 55 © 2016 Progress Software Corporation. All rights reserved.
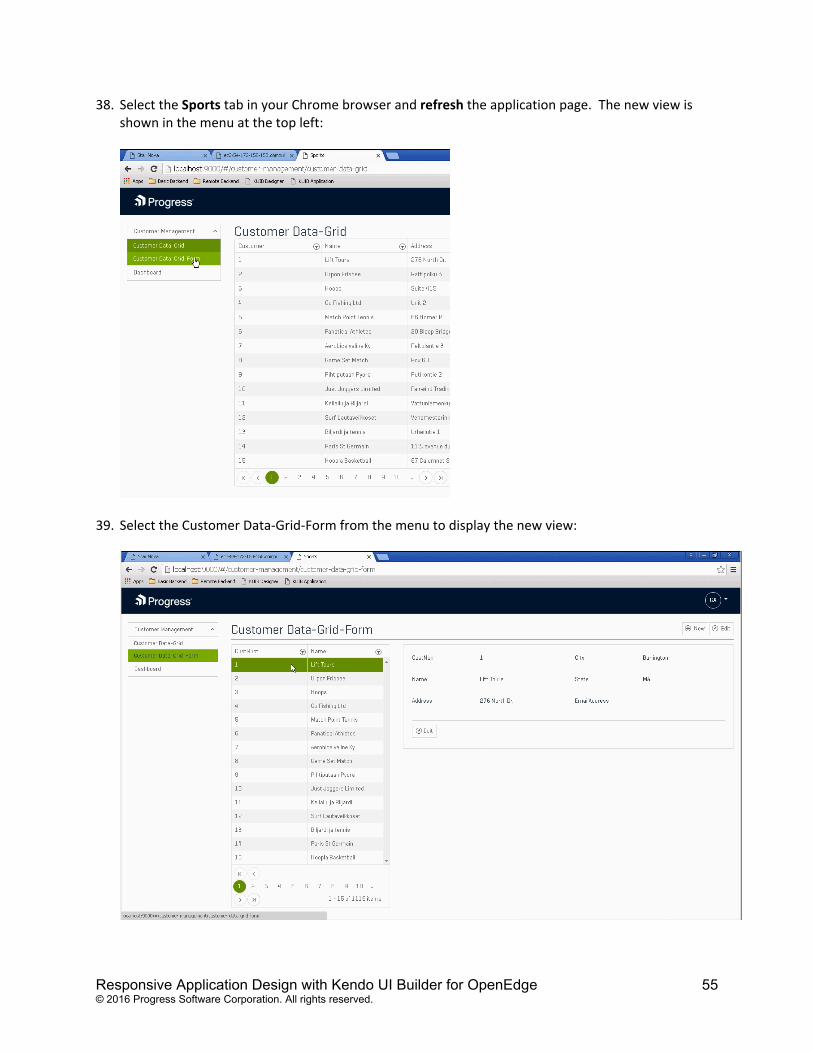
38. Select the Sports tab in your Chrome browser and refresh the application page. The new view is shown in the menu at the top left:
39. Select the Customer Data‐Grid‐Form from the menu to display the new view:

56 Responsive Application Design with Kendo UI Builder for OpenEdge
© 2016 Progress Software Corporation. All rights reserved.
40. With a Customer record highlighted, click the Edit button in the Form:
41. Notice that the EmailAddress entry field in the form prompts with the format required for the Customer.EmailAddress field based on the semantic data type you defined earlier for the Customer Data Source:
42. Enter an email address for the Customer and press Save.
43. To test the responsive sizing of this View, double‐click in the browse window title bar to resize the Chrome browser window, forcing the View to adjust to the change.
Responsive Application Design with Kendo UI Builder for OpenEdge 57 © 2016 Progress Software Corporation. All rights reserved.
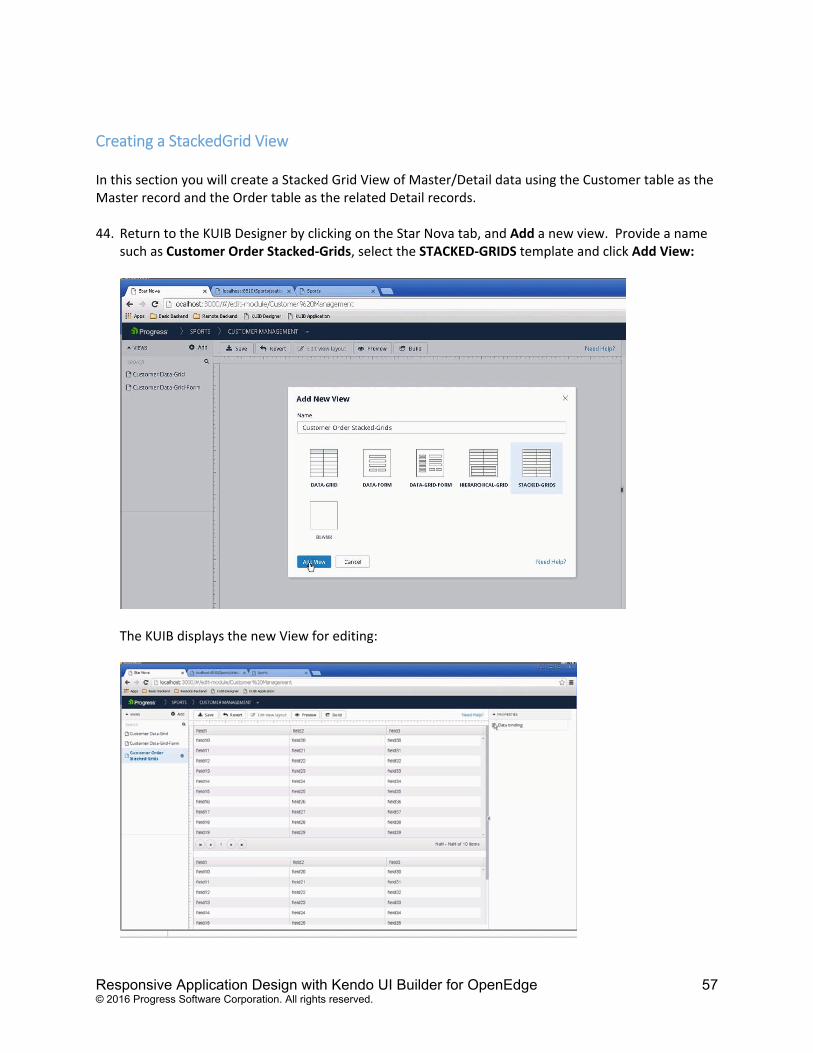
Creating a StackedGrid View In this section you will create a Stacked Grid View of Master/Detail data using the Customer table as the Master record and the Order table as the related Detail records. 44. Return to the KUIB Designer by clicking on the Star Nova tab, and Add a new view. Provide a name
such as Customer Order Stacked‐Grids, select the STACKED‐GRIDS template and click Add View:
The KUIB displays the new View for editing:
58 Responsive Application Design with Kendo UI Builder for OpenEdge
© 2016 Progress Software Corporation. All rights reserved.
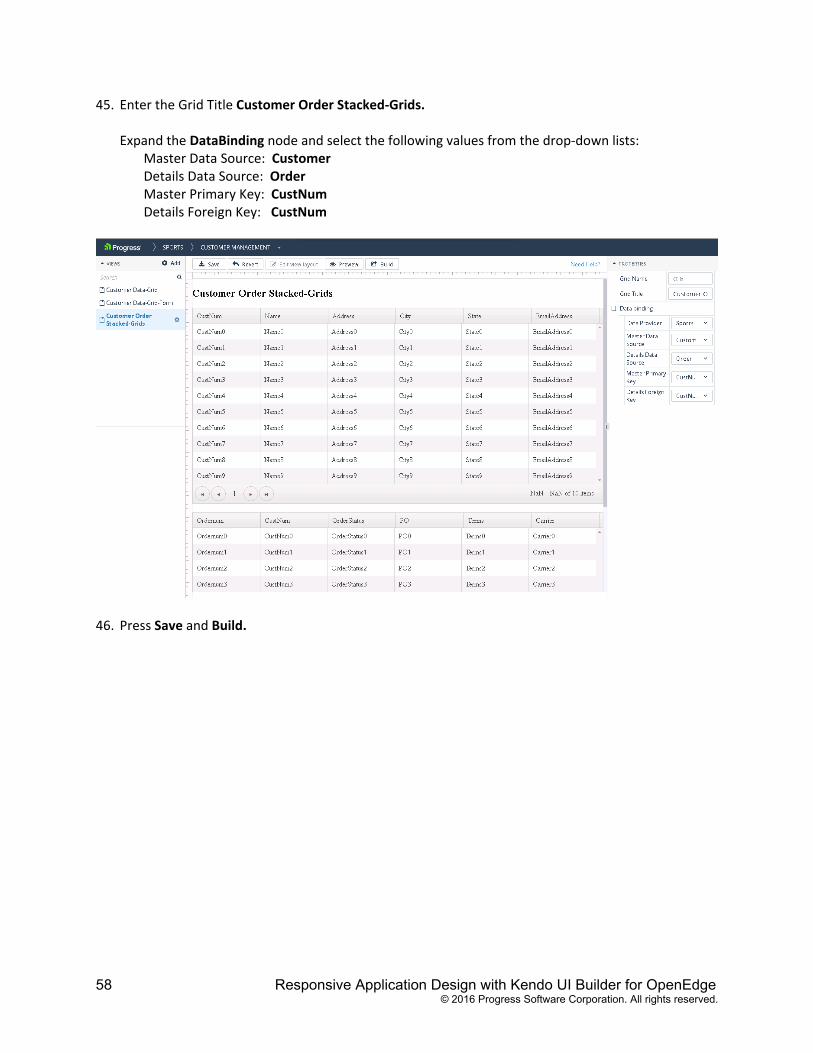
45. Enter the Grid Title Customer Order Stacked‐Grids. Expand the DataBinding node and select the following values from the drop‐down lists:
Master Data Source: Customer Details Data Source: Order Master Primary Key: CustNum Details Foreign Key: CustNum
46. Press Save and Build.
Responsive Application Design with Kendo UI Builder for OpenEdge 59 © 2016 Progress Software Corporation. All rights reserved.
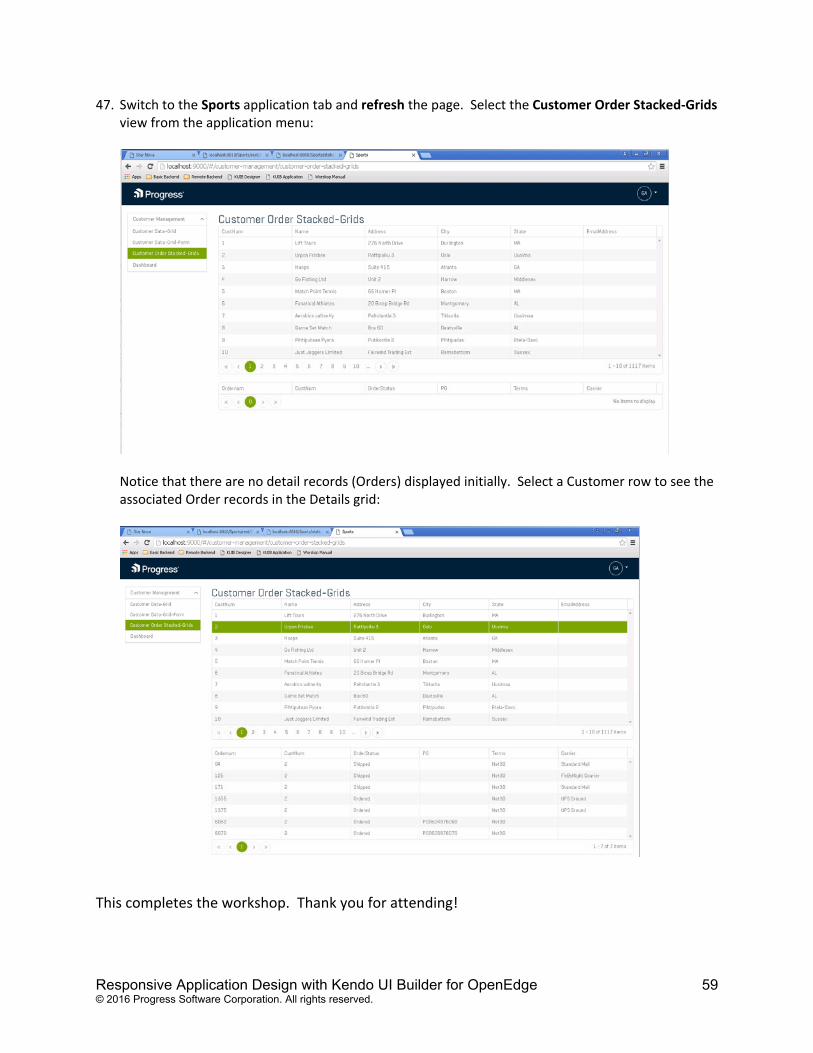
47. Switch to the Sports application tab and refresh the page. Select the Customer Order Stacked‐Grids view from the application menu:
Notice that there are no detail records (Orders) displayed initially. Select a Customer row to see the associated Order records in the Details grid:
This completes the workshop. Thank you for attending!