Embed Size (px)
Citation preview
RMX 1000 V1.1 Getting Started Guide
General Safety Precautions Follow these rules to ensure general safety: • Keep the area around the Polycom RMX 1000 unit clean and free of
clutter and well ventilated. • Decide on a suitable location for the equipment rack that will hold
the RMX 1000, ensuring that it is near a grounded power outlet. • Ensure that the leveling jacks on the bottom of the rack are fully
extended to the floor with the full weight of the rack resting on them. Always make sure the rack is stable before extending a com-ponent from the rack.
• In a single rack installation, attach stabilizers to the rack. In multi-ple rack installations, the racks should be coupled together.
• Use a regulating uninterruptable power supply (UPS) to protect the • RMX 1000 from power surges and voltage spikes, and to keep it
operating in case of a power failure. • Allow the power supply units to cool before touching them. • Always keep the rack’s trays and board’s closed when not servicing,
to maintain proper cooling.
1
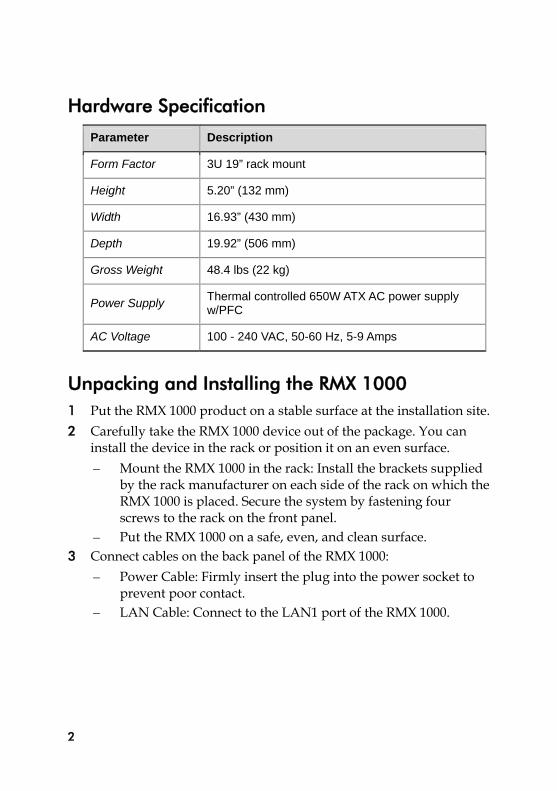
Hardware Specification
Parameter Description
Form Factor 3U 19” rack mount
Height 5.20” (132 mm)
Width 16.93” (430 mm)
Depth 19.92” (506 mm)
Gross Weight 48.4 lbs (22 kg)
Power Supply Thermal controlled 650W ATX AC power supply w/PFC
AC Voltage 100 - 240 VAC, 50-60 Hz, 5-9 Amps
Unpacking and Installing the RMX 1000 1 Put the RMX 1000 product on a stable surface at the installation site. 2 Carefully take the RMX 1000 device out of the package. You can
install the device in the rack or position it on an even surface. – Mount the RMX 1000 in the rack: Install the brackets supplied
by the rack manufacturer on each side of the rack on which the RMX 1000 is placed. Secure the system by fastening four screws to the rack on the front panel.
– Put the RMX 1000 on a safe, even, and clean surface. 3 Connect cables on the back panel of the RMX 1000:
– Power Cable: Firmly insert the plug into the power socket to prevent poor contact.
– LAN Cable: Connect to the LAN1 port of the RMX 1000.
2
Configuration Preparations
Obtaining Network Information
Before the first time configuration, obtain the following information from the network administrator. This helps you to configure the RMX 1000 in your local network: • The IP address, subnet mask, and default gateway IP address of the
RMX 1000 LAN port • (Optional) Gatekeeper address, and the H.323 prefix and E.164
number to be assigned to the RMX 1000
Obtaining Product Activation Key
Before using the RMX 1000, you need to register and activate the device. Follow the procedure below to obtain the product activation key. When you power on and log in to the RMX 1000 for the first time, the system displays the Product Activation dialog box, requesting you to enter a Product Activation Key. 1 Enter http://portal.polycom.com in the address bar of the browser
to access the login page of the Polycom resource center. 2 In the login box, enter your Email address and password, and then
click Sign In. If you are a new user, click the Register for an Ac-count link for registration.
3 Click Service & Support in the upper navigation bar on the inter-face. On the Service & Support page, click Product Activation in the left navigation bar.
3

4 Enter the Activate Your Product page. Enter the License Number
and Serial Number of the product in the Single License Number pane, and then click the Generate button. You can find the license num-ber and serial number of the product from the document provided with the RMX 1000. Record the activation key displayed in the Key Code field.
4
First Time Configuration
Connecting PC to RMX 1000
1 Connect your PC to the LAN1 port (the LAN1 port is enabled by default) of the RMX 1000 with a cross-over network cable, or con-nect your PC and RMX 1000 to the same switch in the LAN. Turn on the power switch at the RMX 1000.
2 Configure the IP address for your PC, which is in the same network segment as the IP address of the RMX 1000. The default IP address of the RMX 1000 before delivery is: – IP address of the LAN1 port - 192.168.1.254 – Subnet mask - 255.255.255.0 – Default gateway IP address - 192.168.1.1 You can also view the current address information of the product using the RMX 1000 Discover tool provided with the device. a. Run the RMX 1000Discover.exe file in the CD provided with
the product. b. Click the Discover button to display the current address
information of the device.
5
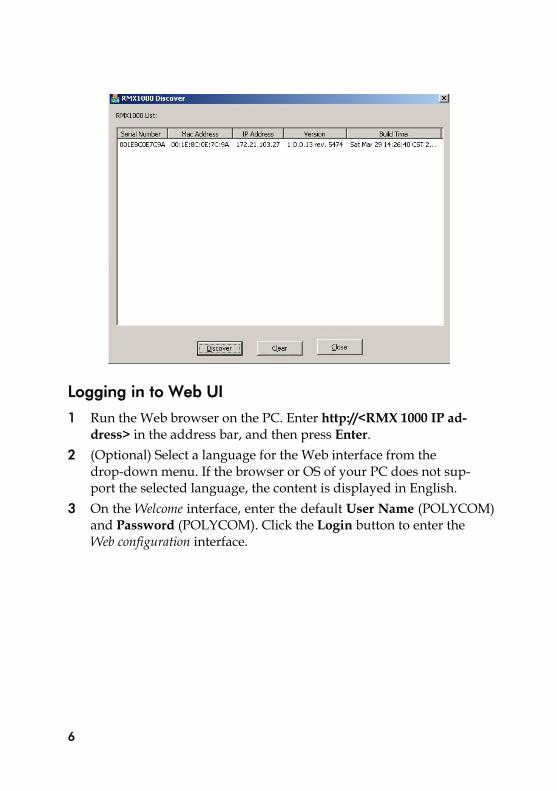
Logging in to Web UI
1 Run the Web browser on the PC. Enter http://<RMX 1000 IP ad-dress> in the address bar, and then press Enter.
2 (Optional) Select a language for the Web interface from the drop-down menu. If the browser or OS of your PC does not sup-port the selected language, the content is displayed in English.
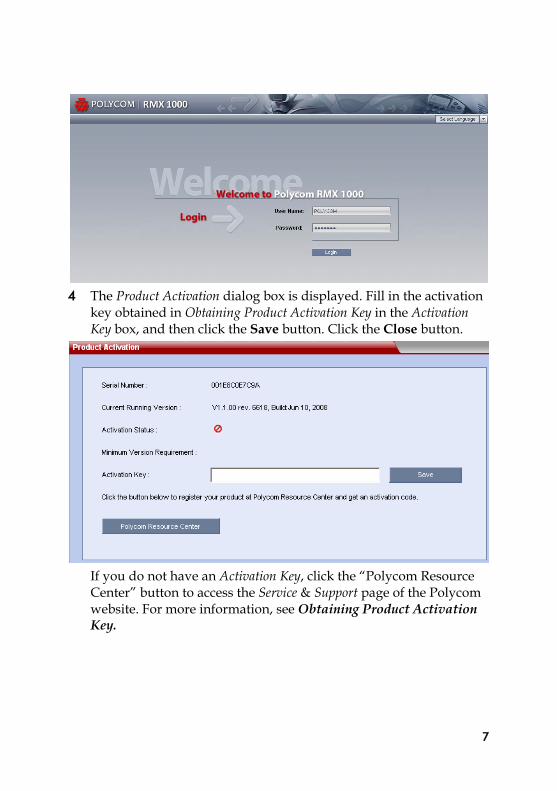
3 On the Welcome interface, enter the default User Name (POLYCOM) and Password (POLYCOM). Click the Login button to enter the Web configuration interface.
6
4 The Product Activation dialog box is displayed. Fill in the activation
key obtained in Obtaining Product Activation Key in the Activation Key box, and then click the Save button. Click the Close button.
If you do not have an Activation Key, click the “Polycom Resource Center” button to access the Service & Support page of the Polycom website. For more information, see Obtaining Product Activation Key.
7
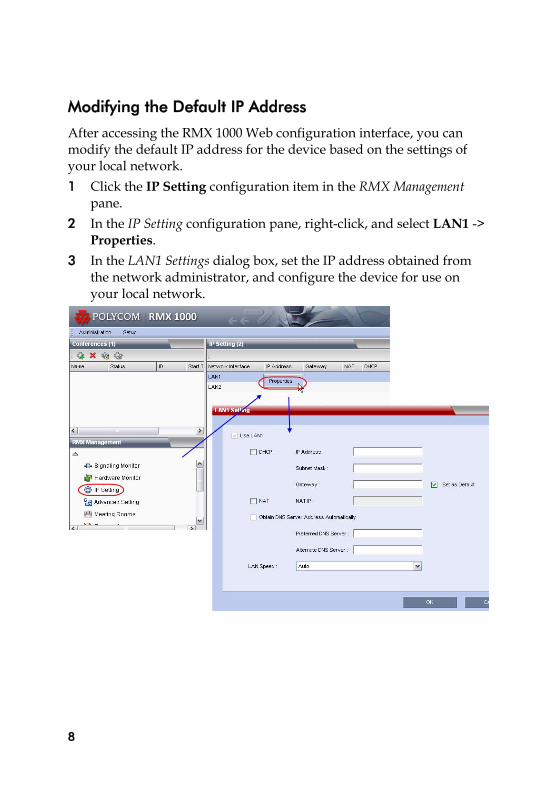
Modifying the Default IP Address
After accessing the RMX 1000 Web configuration interface, you can modify the default IP address for the device based on the settings of your local network. 1 Click the IP Setting configuration item in the RMX Management
pane. 2 In the IP Setting configuration pane, right-click, and select LAN1 ->
Properties. 3 In the LAN1 Settings dialog box, set the IP address obtained from
the network administrator, and configure the device for use on your local network.
8
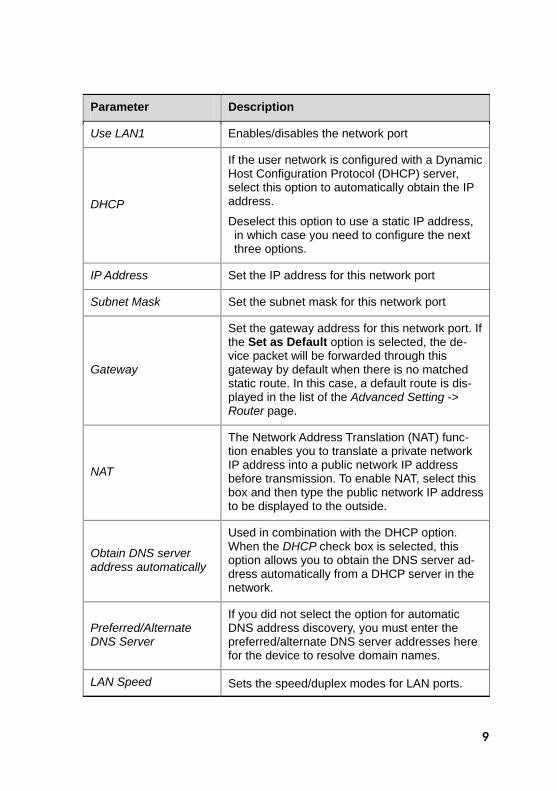
Parameter Description
Use LAN1 Enables/disables the network port
DHCP
If the user network is configured with a Dynamic Host Configuration Protocol (DHCP) server, select this option to automatically obtain the IP address.
Deselect this option to use a static IP address, in which case you need to configure the next three options.
IP Address Set the IP address for this network port
Subnet Mask Set the subnet mask for this network port
Gateway
Set the gateway address for this network port. If the Set as Default option is selected, the de-vice packet will be forwarded through this gateway by default when there is no matched static route. In this case, a default route is dis-played in the list of the Advanced Setting -> Router page.
NAT
The Network Address Translation (NAT) func-tion enables you to translate a private network IP address into a public network IP address before transmission. To enable NAT, select this box and then type the public network IP address to be displayed to the outside.
Obtain DNS server address automatically
Used in combination with the DHCP option. When the DHCP check box is selected, this option allows you to obtain the DNS server ad-dress automatically from a DHCP server in the network.
Preferred/Alternate DNS Server
If you did not select the option for automatic DNS address discovery, you must enter the preferred/alternate DNS server addresses here for the device to resolve domain names.
LAN Speed Sets the speed/duplex modes for LAN ports.
9
Parameter Description
Supported speed/duplex modes include 10/100M, Full Duplex or Half Duplex, and the 1000M Network mode. You can also select Auto to use Auto-Negotiation with the switch port.
Note: Contact the network administrator before setting LAN Speed, to ensure that the switch configuration is matched with the MCU port.
Advanced Setting (Optional)
If necessary, you can configure other network parameters according to the following procedure: 1 Click the Advanced Setting configuration item in the RMX Man-
agement pane. 2 In the Advanced Setting configuration pane, double-click the list
item or right-click and then select Properties. 3 Based on the network requirement, set the routing information in
the following dialog box.
10
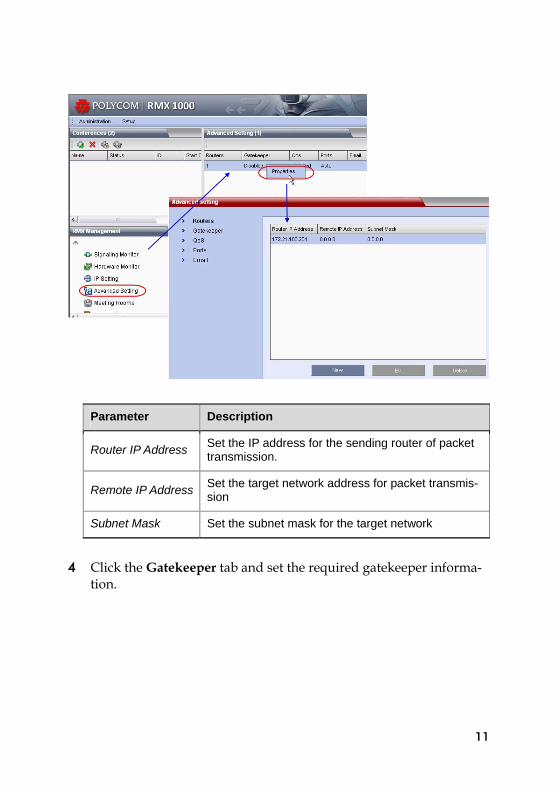
Parameter Description
Router IP Address Set the IP address for the sending router of packet transmission.
Remote IP Address Set the target network address for packet transmis-sion
Subnet Mask Set the subnet mask for the target network
4 Click the Gatekeeper tab and set the required gatekeeper informa-
tion.
11
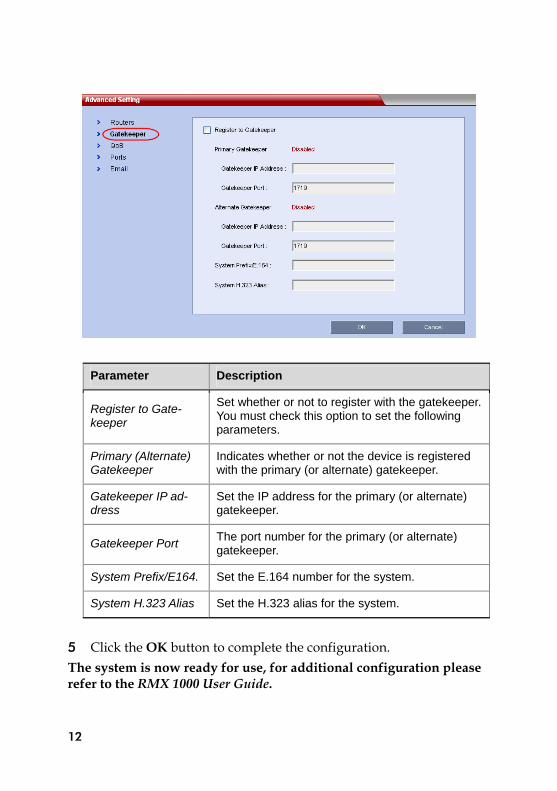
Parameter Description
Register to Gate-keeper
Set whether or not to register with the gatekeeper. You must check this option to set the following parameters.
Primary (Alternate) Gatekeeper
Indicates whether or not the device is registered with the primary (or alternate) gatekeeper.
Gatekeeper IP ad-dress
Set the IP address for the primary (or alternate) gatekeeper.
Gatekeeper Port The port number for the primary (or alternate) gatekeeper.
System Prefix/E164. Set the E.164 number for the system.
System H.323 Alias Set the H.323 alias for the system.
5 Click the OK button to complete the configuration. The system is now ready for use, for additional configuration please refer to the RMX 1000 User Guide.
12
RMX 1000 V1.1.1 Release Notes
What’s New in the 1.1.1 Release?
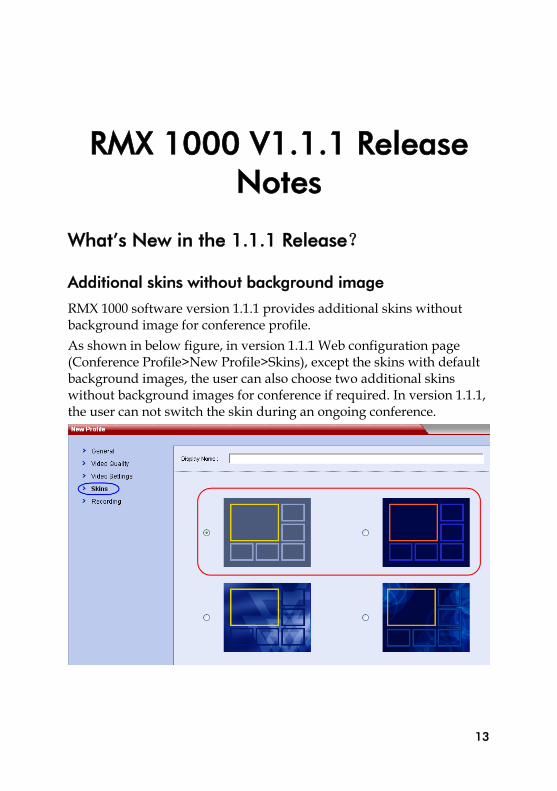
Additional skins without background image
RMX 1000 software version 1.1.1 provides additional skins without background image for conference profile. As shown in below figure, in version 1.1.1 Web configuration page (Conference Profile>New Profile>Skins), except the skins with default background images, the user can also choose two additional skins without background images for conference if required. In version 1.1.1, the user can not switch the skin during an ongoing conference.
13
CMA Desktop Interoperability
RMX 1000 software version 1.1.1 supports interoperating with Polycom CMA desktop, a software-based video client for communicating over video and sharing content.
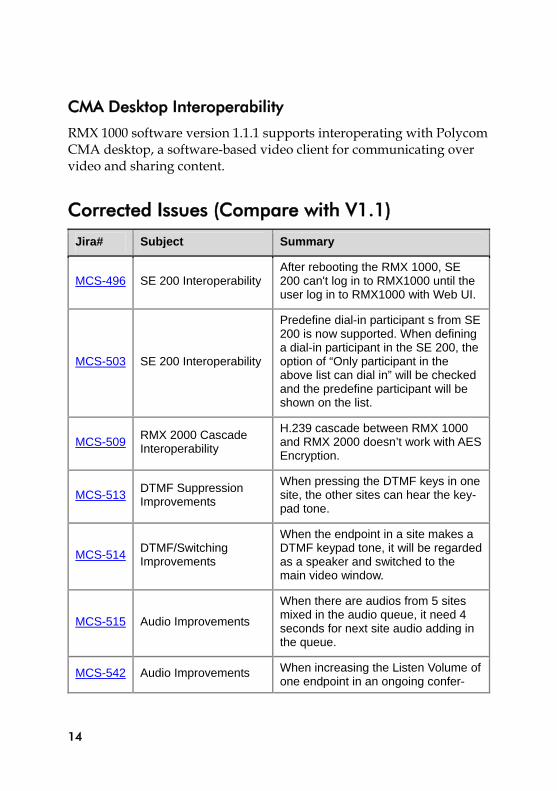
Corrected Issues (Compare with V1.1)
Jira# Subject Summary
MCS-496 SE 200 InteroperabilityAfter rebooting the RMX 1000, SE 200 can't log in to RMX1000 until the user log in to RMX1000 with Web UI.
MCS-503 SE 200 Interoperability
Predefine dial-in participant s from SE 200 is now supported. When defining a dial-in participant in the SE 200, the option of “Only participant in the above list can dial in” will be checked and the predefine participant will be shown on the list.
MCS-509 RMX 2000 Cascade Interoperability
H.239 cascade between RMX 1000 and RMX 2000 doesn’t work with AES Encryption.
MCS-513 DTMF Suppression Improvements
When pressing the DTMF keys in one site, the other sites can hear the key-pad tone.
MCS-514 DTMF/Switching Improvements
When the endpoint in a site makes a DTMF keypad tone, it will be regarded as a speaker and switched to the main video window.
MCS-515 Audio Improvements
When there are audios from 5 sites mixed in the audio queue, it need 4 seconds for next site audio adding in the queue.
MCS-542 Audio Improvements When increasing the Listen Volume of one endpoint in an ongoing confer-
14
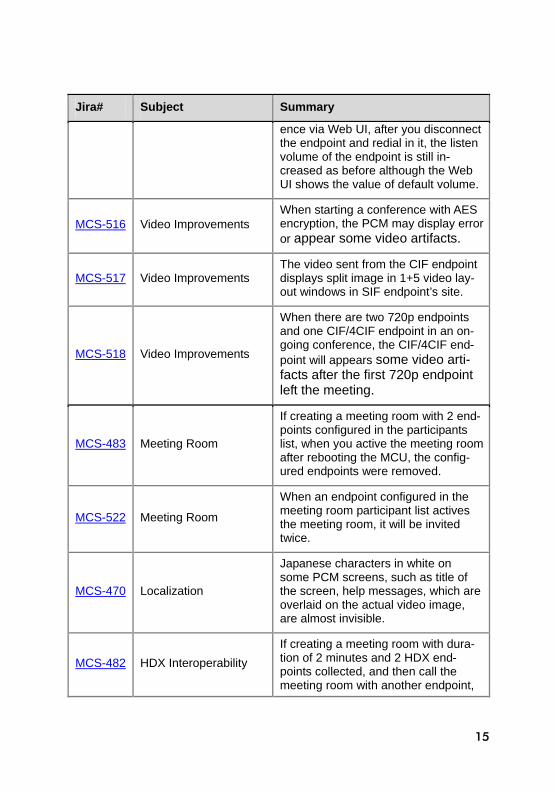
Jira# Subject Summary
ence via Web UI, after you disconnect the endpoint and redial in it, the listen volume of the endpoint is still in-creased as before although the Web UI shows the value of default volume.
MCS-516 Video Improvements When starting a conference with AES encryption, the PCM may display error or appear some video artifacts.
MCS-517 Video Improvements The video sent from the CIF endpoint displays split image in 1+5 video lay-out windows in SIF endpoint’s site.
MCS-518 Video Improvements
When there are two 720p endpoints and one CIF/4CIF endpoint in an on-going conference, the CIF/4CIF end-point will appears some video arti-facts after the first 720p endpoint left the meeting.
MCS-483 Meeting Room
If creating a meeting room with 2 end-points configured in the participants list, when you active the meeting room after rebooting the MCU, the config-ured endpoints were removed.
MCS-522 Meeting Room
When an endpoint configured in the meeting room participant list actives the meeting room, it will be invited twice.
MCS-470 Localization
Japanese characters in white on some PCM screens, such as title of the screen, help messages, which are overlaid on the actual video image, are almost invisible.
MCS-482 HDX Interoperability If creating a meeting room with dura-tion of 2 minutes and 2 HDX end-points collected, and then call the meeting room with another endpoint,
15
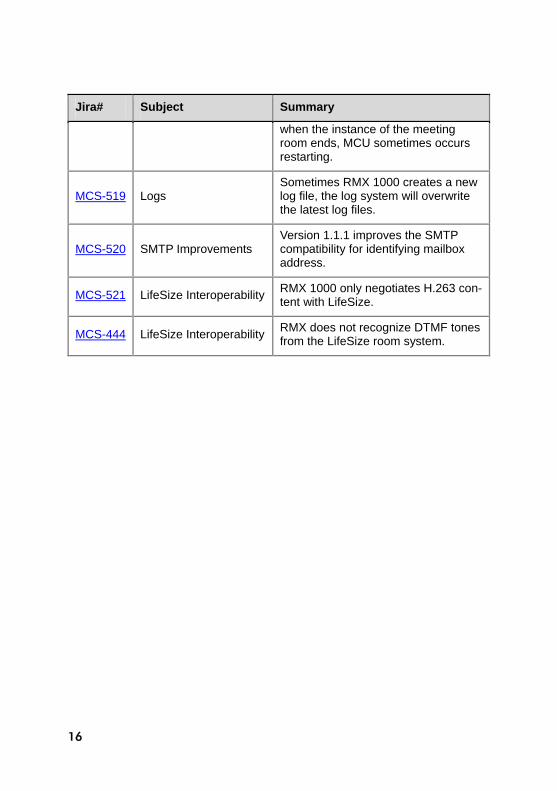
Jira# Subject Summary
when the instance of the meeting room ends, MCU sometimes occurs restarting.
MCS-519 Logs Sometimes RMX 1000 creates a new log file, the log system will overwrite the latest log files.
MCS-520 SMTP Improvements Version 1.1.1 improves the SMTP compatibility for identifying mailbox address.
MCS-521 LifeSize Interoperability RMX 1000 only negotiates H.263 con-tent with LifeSize.
MCS-444 LifeSize Interoperability RMX does not recognize DTMF tones from the LifeSize room system.
16
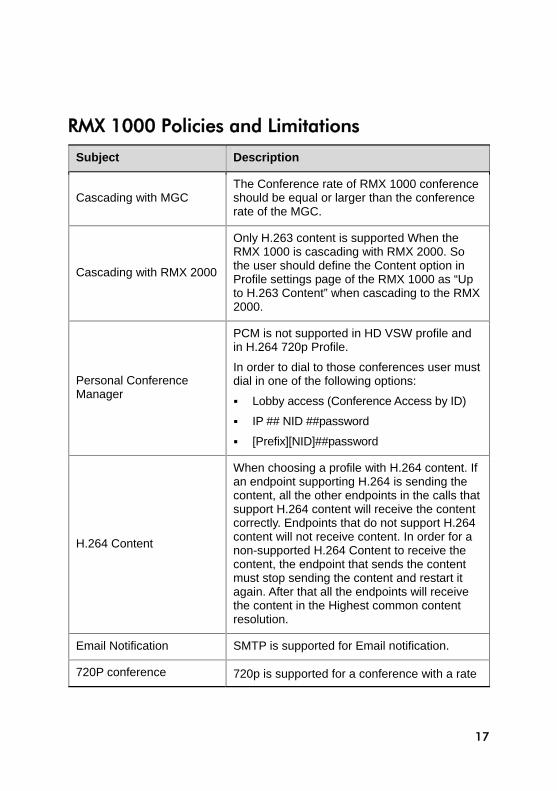
RMX 1000 Policies and Limitations
Subject Description
Cascading with MGC The Conference rate of RMX 1000 conference should be equal or larger than the conference rate of the MGC.
Cascading with RMX 2000
Only H.263 content is supported When the RMX 1000 is cascading with RMX 2000. So the user should define the Content option in Profile settings page of the RMX 1000 as “Up to H.263 Content” when cascading to the RMX 2000.
Personal Conference Manager
PCM is not supported in HD VSW profile and in H.264 720p Profile.
In order to dial to those conferences user must dial in one of the following options:
Lobby access (Conference Access by ID)
IP ## NID ##password
[Prefix][NID]##password
H.264 Content
When choosing a profile with H.264 content. If an endpoint supporting H.264 is sending the content, all the other endpoints in the calls that support H.264 content will receive the content correctly. Endpoints that do not support H.264 content will not receive content. In order for a non-supported H.264 Content to receive the content, the endpoint that sends the content must stop sending the content and restart it again. After that all the endpoints will receive the content in the Highest common content resolution.
Email Notification SMTP is supported for Email notification.
720P conference 720p is supported for a conference with a rate
17
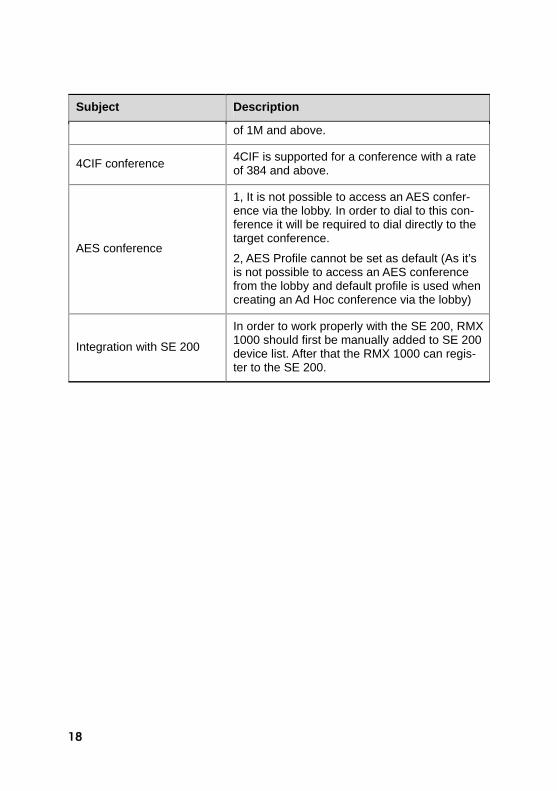
Subject Description
of 1M and above.
4CIF conference 4CIF is supported for a conference with a rate of 384 and above.
AES conference
1, It is not possible to access an AES confer-ence via the lobby. In order to dial to this con-ference it will be required to dial directly to the target conference.
2, AES Profile cannot be set as default (As it’s is not possible to access an AES conference from the lobby and default profile is used when creating an Ad Hoc conference via the lobby)
Integration with SE 200
In order to work properly with the SE 200, RMX 1000 should first be manually added to SE 200 device list. After that the RMX 1000 can regis-ter to the SE 200.
18

Pending issues
Jira# Subject Description
MCS-468 CDR name
If you set the conference name with Chinese/Japanese/Korean, when you download the CDR file to windows system, the file name may be cor-rupted.
MCS-458 Integration with SONY
Sony PCS-G70 and G50 can not transmit or receive H.239 content when connecting to RMX 1000.
MCS-439 Integration with VSX8000
RMX does not support 2SIF with the VSX8000.
MCS-411 Integration with Aethra VegaStar Gold Aethra VegaStar Gold is not supported.
MCS-408 Integration with TA 880 and 6000E
Tandberg 880 and 6000 E are not sup-ported.
MCS-402 Integration with TA Edge95 MXP
1920k Videoswitched HD confer-ence/HDX may receive ghosting and tiling video when Tandberg Edge95 MXP sends content.
19
![RMX 2000 Hardware Guide · Italiano [Italian]: Con la presente Polycom (UK) Ltd dichiara che questo Polycom RMX è conforme ai requisiti essenziali ed alle altre disposizioni pertinenti](https://img.pdfslide.net/doc/110x75/5c6c8d0c09d3f216708c6e4c/rmx-2000-hardware-guide-italiano-italian-con-la-presente-polycom-uk-ltd.jpg)