Embed Size (px)
DESCRIPTION
chess
Citation preview

First published in Sweden 2005 by Quality Chess Europe AB
Copyright © Esben Lund 2005
All rights reserved. No part of this publication may be reproduced, stored in a retrieval system or transmitted in any form or by any means, electronic, electrostatic, magnetic tape, photo coping, recording or otherwise, without prior permission of the publisher.
ISBN 91-975243-7-9
All sales or enquiries should be directed to Quality Chess Europe Vegagatan 18, SE-413 09 Gothenburg, Sweden tel: +46-31-24 47 90 fax: +46-31-24 47 14 e-mail: [email protected] website: www.qualitychessbooks.com
Edited by John Shaw & Jacob Aagaard Typeset: Ari Ziegler Proof reading: Danny Kristiansen Cover Design: Carole Dunlop Printed in Estonia by Tallinnna Raamatutriikikoja LLC

CONTENTS
Bibliography 4 Preface 5
Part 1: Theory
1. Theoretical Foundation 9 2. Fundamental Endgames 33
Part II: Practice
Introduction to Part II 51 3. The etJ c6 Catalan 53 4. Evaluation Exercises 71 5. The Scotch Endgame 77
Part III: Training
6. General Exercises 123 7. Solutions to Evaluation Exercises 133 8. Solutions to General Exercises 145
Indexes 171
Bibliography
Books
English tides Jonathan T isdall : Improve Your Chess Now, Everyman Chess 1 999. Mark Dvoretsky: Secrets of Chess Training, Batsford 1 994. (Republished as School of Chess Excellence 1, Olms 200 1 . ) Mikhail Shereshevsky: Endgame Strategy, Pergamon Press 1 98 5 . Mihail Marin: Learn from the Legends , Quality Chess 2004. Mihail Marin: Secrets of Chess Defence, Gambit 2003. Alexis Troitzky: Collection of Chess studies (with a Supplement on the Theory of the Endgame of two Knights against Pawns) , Olms 1 98 5 . Raetsky and Chetverik: The Catalan, Everyman Chess 2004.
German tides Alexei Suetin: Schachlehrbuch for Fortgeschrittene (Chess for advanced players) , Sportverlag 1 97 5 . Tschaturanga: Darstellungen und Quellen zur Geschichte des Schachspiels 13, Olms 1 98 1 . Mark Dvoretsky: Die Endspieluniversitdt, Chessgate 2002 (Also published as Dvoretsky's Endgame Manual - Russel 2003) . Gary Kasparov: Weltmeisterschaft 1985 (World Championship Match 1 985 ) , Walter Rau 1 986 . ]. Awerbach: Endspiele Springer gegen Laufer & Turm gegen Leichtjigur, Sportverlag 1 989 . J . Awerbach: Lehrbuch der Endspiele ll- Lduferendspiele & Springerendspiele, Sportverlag 1 960. Raetski and Tschetwerik: Die Katalanische Eroffoung, Schachverlag Kania 200 1 .
Magazines Skakbladet 5/2003: Bent Larsen: Slutspil (Endgames) . Schacknytt 6/2002 and 1 /2003: Mihail Marin: Tals Supertorn (Tal's Super Rooks) .
Bases Mega Database 2004 (Chessbase) .
Symbols
t Check :j: Mate
A strong move !! A brilliant move !? An interesting move ?! A dubious move ? A mistake ?? A blunder 1-0 White won Yz-Yz The game was drawn 0-1 Black won
+- White has a winning position ± White is better ;!; White is slightly better
The position is equal oo The position is unclear oo Compensation for the sacrificed
material + Black is slightly better + Black is better -+ Black has a winning position (x) x'th match game corr. Correspondence game
Preface
The subject of this book has interested me for a long time and still does . When I became a stronger player and started to get these positions in my own games, I began to think about the relationship between this material imbalance. Usually the two minor pieces are better, so how much compensation is needed for the rook side to stay in the game? It was around the time of my two games in the Theoretical Foundation that I began to think about the themes that I have formulated as "rules" or guidelines. I kept thinking about the issue and further games and analysis showed that these general guidelines are very helpful as thinking tools. It helped me to understand the positions better, and I hope that it will help you improve your chess as well. As a coach I see this work not only as a book, but also as a collection of training material.
The material selected for this book has been carefully chosen and most of i t has been tested in my training sessions. I would like to give special thanks to my pupils for their feedback on these exercises - it was, of course, very valuable for this book.
But I would above all like to thank my good friend Jacob Aagaard for making this book possible. I am very grateful for that, and I would also like to thank him for his critical reading of the book. I would also like to thank Rasmus 0stergaard, specifically for his comments on the Scotch Endgame. Thanks for the feedback and all the good advice.
Of the non-chessplayers who surround me, I would like to thank my brother Rune for his relaxed attitude towards less important things such as the daily duties in the kitchen.
Finally I want to thank my editor, John Shaw, for turning my draft into the book you now hold in your hands.
This book required a lot of my time, but I really enjoyed writing it and I hope you will enjoy studying it!
Esben Lund, Copenhagen December 2004.
Part I
Theory
Theoretical Foundation 9
Chapter 1 Theoretical Foundation
To begin with, I will make a statement that might seem like an oversimplification . The point is that it makes it easier to organize the material.
Of all the material written on the subject rook vs. two minor pieces, it seems that "older" material mainly concentrated on the material correlation between the rook and the two minor pieces, whereas the "modern" view takes a more dynamic approach. Let us start out with Berger's 1heorie und Praxis der Endspiele from 1 9 1 3 :
"A rook and two pawns are considered to equal two minor pieces ." (page 269)
So Berger writes directly that a rook and two pawns are the right equivalent for two minor pieces. He does not differentiate between two knights, two bishops, or bishop and knight.
He then gives an example of this configuration in a basic endgame from the 1 3th game of the Steinitz - Zukertort World Championship match of 1 886 . This endgame has some interesting features and will be studied in the chapter on Fundamental Endgames.
Another example of a material comparison is taken from Suetin's book Schachlehrbuch for Fortgeschrittene:
"The two minor pieces are usually stronger than the rook in the opening and during the middlegame, even if two pawns are added to the side with the rook."
As Suetin states , this is a guide rather than an absolute rule, but it also depends on how you define the endgame and the middlegame.
If you add a rook and queen to each side, is it then still an endgame, or have we entered middlegame territory? And does the number of pawns count for anything - how many pawns must be on the board to call it an endgame?
In my view, it is not so important how we categorize the positions, and working with many hundreds of positions has taught me that what counts - besides activity and other general features of the position - is the number of open files for the rooks in the position. This usually decides exactly how strong the rook is compared to the two minor pieces . Suetin, like Berger, does not differentiate between the three possible configurations of minor pieces. Later on the same page he writes:
"Despite this general guideline, such an exchange operation is desirable if the coordination of the minor pieces is disrupted, or if the opponent is left with lasting structural weaknesses in his position." (page 1 8 1 )
To expand on this , there can be exceptions to his guideline if the side with the two minor pieces lacks coordination (dynamic feature of the position) , or if he has pawn weaknesses (static feature) .
This point is interesting and shows that he is, of course, aware of the dynamics of the position . As a general theme Suetin sees the coordination of the pieces as perhaps the most important feature in his book.
Both Berger and Suetin give two pawns as possible compensation for rook vs. two minor pieces - to be fair to Suetin, he gives
1 0 Part 1: Theory
1 -2 pawns, which can be seen in the title of the section in his book: Two minor pieces vs . rook and pawn(s) .
Rook and one pawn is usually not enough compensation for a bishop and knight. But if we compare in simple material terms (knight or bishop=3 , rook=5) then material is equal with 6 points.
Many authors have pointed out that such a rigid comparison of pieces and pawns is unsatisfactory and everything depends on the position .
Of the above-mentioned authors, Jon Tisdall touches upon this subject, and he finds such materialistic evaluations inadequate unless they add a dynamic evaluation (and he is, of course, right) . The following quote is from his excellent book Improve Your Chess Now:
"I can remember that I had a very exaggerated sense of the power of two minor pieces against a rook and pawn. My education lacked an understanding of how much stronger the rook became in an ending, and I can clearly remember having to learn this by trial and error as a youngster."
And then he adds:
"This can be most drastically seen when a bishop and knight battle against rook and two pawns. Often this is decided in the favour of the pieces in a complicated middlegame. In an ending, a rook and two pawns tend to steamroll a bishop and a knight." (page 1 46)
The following quote from Mihail Marin's excellent book Learn from the Legends -Chess Champions at their Best concerns the same subject of how many pawns should be accepted as the right measure:
"In the middlegame the relative value of pawns is somewhat smaller and we could consider that two minor pieces should match a rook and two pawns. It is , however, appropriate to point out that such strict evaluations are not very reliable. Each position has to be estimated in accordance with the concrete structure and piece disposal ." (pages 1 1 9- 1 20)
Again the magical number of two pawns appears . . .
In his book Secrets of Chess Defence Marin suggests 1 Yz pawns to equalize material (page 1 28) . Comparing the different views is difficult (and interesting!) , and while I delve deeper into the discussion I will start out with two games from my own experience. I will refer to the more "modern" view while annotating these games:
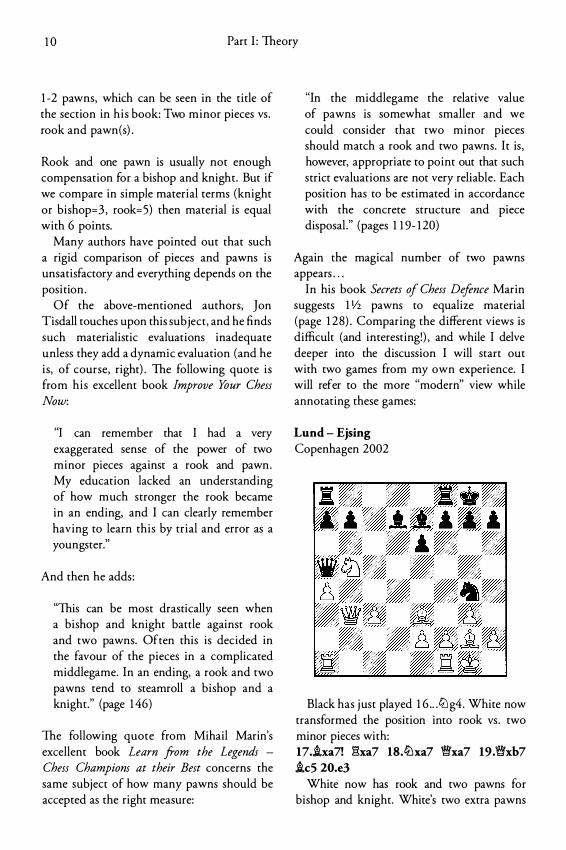
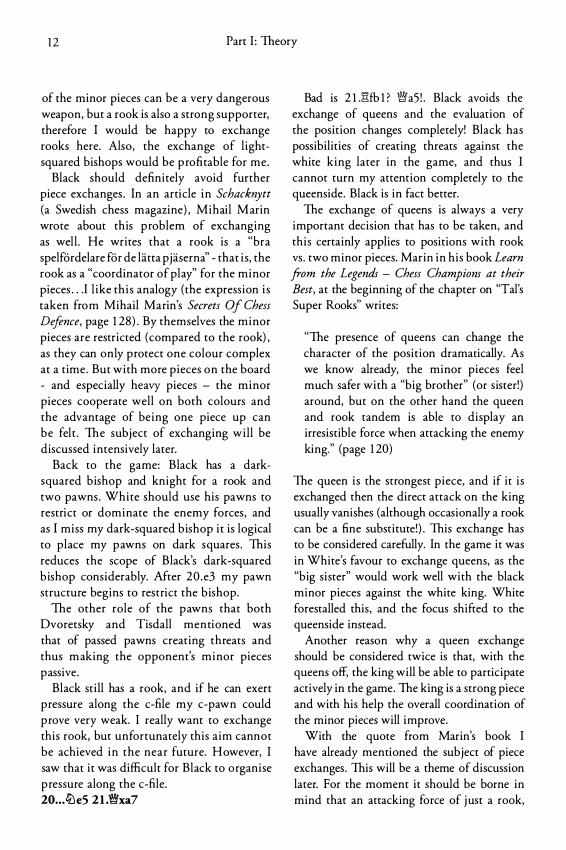
Lund - Ejsing Copenhagen 2002
Black has just played 1 6 . . .lt:lg4. White now transformed the position into rook vs . two minor pieces with: 17 . .ixa7! :i'!:xa7 18.ll:Jxa7 'l'tfxa7 19.'1'tfxb7 .ic5 20.e3
White now has rook and two pawns for bishop and knight. White's two extra pawns
Theoretical Foundation 1 1
on the queenside are passed, but at the same time they are also both isolated. We should note immediately that one of them is a rook's pawn, and knights have great problems with such pawns.
In his book Secrets of Chess Training, Mark Dvoretsky touches upon the subject of the value of a rook compared to two minor pieces in the chapter "The strongest piece is the rook!" The tide has nothing to do with the evaluation of rook vs. two minor pieces, but is no less than a chess joke (!) , as earlier in the same book he presented the reader with a position where the weaker side was able to construct a fortress with bishop and knight vs. queen. He gives an example of the rook being stronger than the two minor pieces, and hence the rook must be stronger than the queen!? Hmm. (By the way, Jacob Aagaard mentioned the book School of Chess Excellence I by Dvoretsky for a more recent reference on the subject. )
Anyway, this small chapter is quite instructive. Instead of the material balance - the question of the number of pawns -Dvoretsky focuses on the dynamic potential of the pieces . He points out that:
1) If the rook penetrates into the opponent's position , or
2) If he can create a passed pawn that restricts the minor pieces,
then the rook can prove no weaker than the two minor pieces.
Jon Tisdall also covers this subject in Improve Your Chess Now. In the chapter "Rook vs. knight and bishop" he writes more specifically about the role of pawns (yes , Jonathan does differentiate between the three possible minor piece configurations) :
"Pawns on the side of the outnumbered piece have two key roles . The first is to displace the enemy forces and drive them
away from active posts. The second is to play an active role themselves as passed pawns, and again this becomes more marked as the position simplifies and it becomes easier to push them, and to risk exposing the king more." (page 1 46)
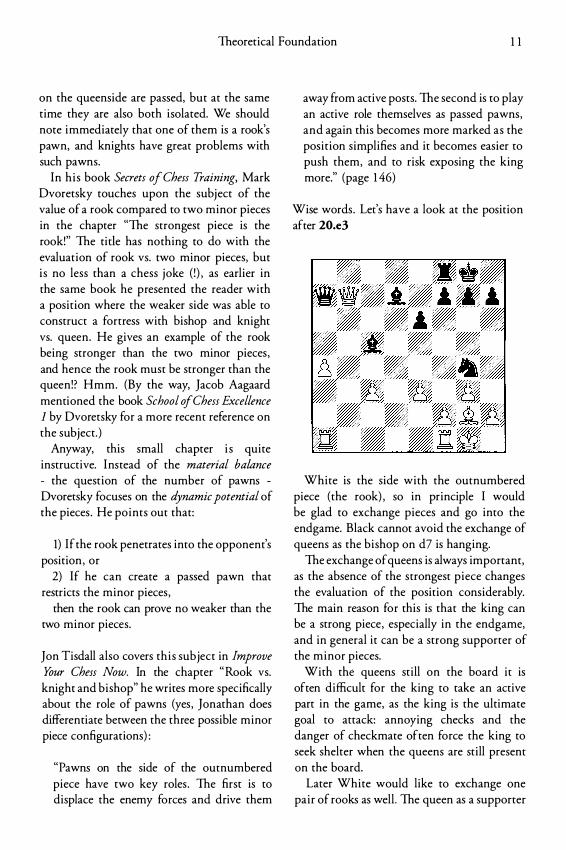
Wise words. Let's have a look at the position after 20.e3
White is the side with the outnumbered piece (the rook) , so in principle I would be glad to exchange pieces and go into the endgame. Black cannot avoid the exchange of queens as the bishop on d7 is hanging.
The exchange of queens is always important, as the absence of the strongest piece changes the evaluation of the position considerably. The main reason for this is that the king can be a strong piece, especially in the endgame, and in general it can be a strong supporter of the minor pieces.
With the queens still on the board it is often difficult for the king to take an active part in the game, as the king is the ultimate goal to attack: annoying checks and the danger of checkmate often force the king to seek shelter when the queens are still present on the board.
Later White would like to exchange one pair of rooks as well. The queen as a supporter
12 Part I : Theory
of the minor pieces can be a very dangerous weapon, but a rook is also a strong supporter, therefore I would be happy to exchange rooks here. Also, the exchange of lightsquared bishops would be p rofitable for me.
Black should definitely avoid further piece exchanges . In an article in Schacknytt (a Swedish chess magazine) , Mihail Marin wrote about this problem of exchanging as well . He writes that a rook is a "bra spelfordelare for de latta pjaserna" - that is, the rook as a "coordinator of play" for the minor pieces . . .I like this analogy (the expression is taken from Mihail Marin's Secrets OJ Chess Defence, page 1 28) . By themselves the minor pieces are restricted (compared to the rook) , as they can only protect one colour complex at a time. But with more pieces on the board - and especially heavy pieces - the minor pieces cooperate well on both colours and the advantage of being one piece up can be felt . The subject of exchanging will be discussed intensively later.
Back to the game: Black has a darksquared bishop and knight for a rook and two pawns . White should use his pawns to restrict or dominate the enemy forces, and as I miss my dark-squared bishop it is logical to place my pawns on dark squares . This reduces the scope of Black's dark-squared bishop considerably. Mter 20 .e3 my pawn structure begins to restrict the bishop.
The other role of the pawns that both Dvoretsky and Tisdall mentioned was that of passed pawns creating threats and thus making the opponent's minor pieces passive.
Black still has a rook, and if he can exert pressure along the c-file my c-pawn could prove very weak. I really want to exchange this rook, but unfortunately this aim cannot be achieved in the near future. However, I saw that it was difficult for Black to organise pressure along the c-file. 20 • • .lbe5 21 .'1Wxa7
Bad is 2 l .�fb 1 ? '!WaS ! . Black avoids the exchange of queens and the evaluation of the position changes completely! Black has possibilities of creating threats against the white king later in the game, and thus I cannot turn my attention completely to the queenside. Black is in fact better.
The exchange of queens is always a very important decision that has to be taken, and this certainly applies to positions with rook vs . two minor pieces. Marin in his book Learn from the Legends - Chess Champions at their Best, at the beginning of the chapter on "Tal's Super Rooks" writes:
"The presence of queens can change the character of the position dramatically. As we know already, the minor pieces feel much safer with a "big brother" (or sister!) around, but on the other hand the queen and rook tandem is able to display an irresistible force when attacking the enemy king." (page 1 20)
The queen is the strongest piece, and if it is exchanged then the direct attack on the king usually vanishes (although occasionally a rook can be a fine substitute!) . This exchange has to be considered carefully. In the game it was in White's favour to exchange queens, as the "big sister" would work well with the black minor pieces against the white king. White forestalled this, and the focus shifted to the queenside instead.
Another reason why a queen exchange should be considered twice is that, with the queens off, the king will be able to participate actively in the game. The king is a strong piece and with his help the overall coordination of the minor pieces will improve.
With the quote from Marin's book I have already mentioned the subject of piece exchanges . This will be a theme of discussion later. For the moment it should be borne in mind that an attacking force of j ust a rook,
Theoretical Foundation 1 3
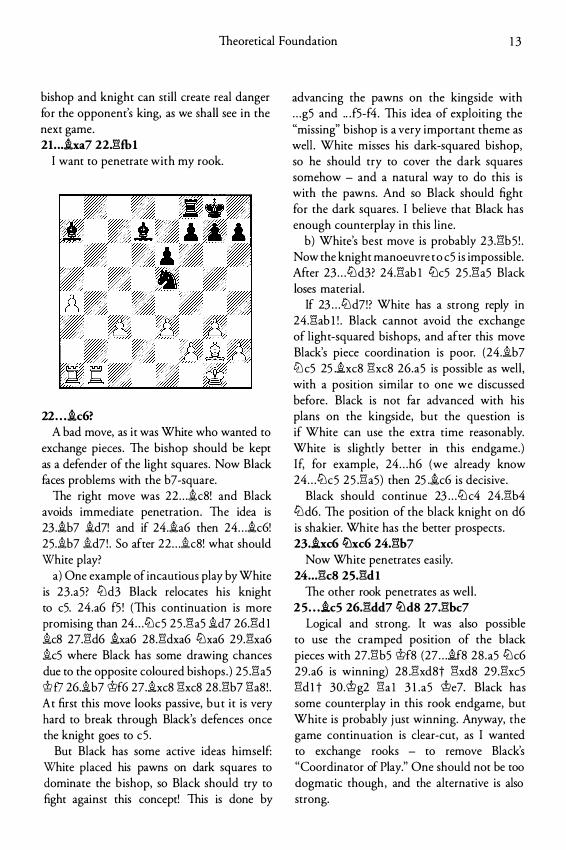
bishop and knight can still create real danger for the opponent's king, as we shall see in the next game. 2I. .. .ixa7 22.:atb1
I want to penetrate with my rook.
22 . . . .ic6? A bad move, as it was White who wanted to
exchange pieces . The bishop should be kept as a defender of the light squares . Now Black faces problems with the b7-square.
The right move was 22 . . . .ic8! and Black avoids immediate penetration. The idea is 23 . .ib7 .id7! and if 24 . .ia6 then 24 . . . .ic6! 25.ib7 id7! . So after 22 . . . ic8! what should White play?
a) One example of incautious play by White is 23.a5? 'Lld3 Black relocates his knight to c5. 24.a6 f5 ! (This continuation is more promising than 24 . . . 'Llc5 25 .l!a5 id7 26.l'i:d 1 ic8 27.l'i:d6 .ixa6 28.l'i:dxa6 'Llxa6 29.l'i:xa6 ic5 where Black has some drawing chances due to the opposite coloured bishops .) 25 .l!a5 i>f7 26.ib7 <j;Jf6 27.ixc8 l'i:xc8 28 .l'i:b7 l'i:a8! . At first this move looks passive, but it is very hard to break through Black's defences once the knight goes to c5 .
But Black has some active ideas himself: White placed his pawns on dark squares to dominate the bishop, so Black should try to fight against this concept! This is done by
advancing the pawns on the kingside with . . . g5 and .. . f5-f4. This idea of exploiting the "missing" bishop is a very important theme as well . White misses his dark-squared bishop, so he should try to cover the dark squares somehow - and a natural way to do this is with the pawns. And so Black should fight for the dark squares . I believe that Black has enough counterplay in this line.
b) White's best move is probably 23.l'i:b5 ! . Now the knight manoeuvre to c5 is impossible. After 23 . . . 'Ll d3? 24.l!ab 1 'Llc5 25 .l'i:a5 Black loses material .
If 23 . . . 'Ll d7!? White has a strong reply in 24.l!ab 1 ! . Black cannot avoid the exchange of light-squared bishops, and after this move Black's piece coordination is poor. (24.ib7 ctJc5 25 . .ixc8 l'i:xc8 26.a5 is possible as well , with a position similar to one we discussed before. Black is not far advanced with his plans on the kingside, but the question is if White can use the extra time reasonably. White is slightly better in this endgame.) If, for example, 24 . . . h6 (we already know 24 . . . 'Llc5 25 .l'i:a5) then 25 . .ic6 is decisive.
Black should continue 23 . . . 'Ll c4 24.l!b4 'Ll d6. The position of the black knight on d6 is shakier. White has the better prospects . 23 . .ixc6 tt:lxc6 24.:ab?
Now White penetrates easily. 24 .. . :acs 2S.:adt
The other rook penetrates as well . 25 . . . .ic5 26.l!dd7 tt:lds 27.:abc7
Logical and strong. It was also possible to use the cramped position of the black pieces with 27.l'i:b5 <j;Jfs (27 . . . .if8 28 .a5 'Llc6 29.a6 is winning) 28 .l'i:xd8t l'i:xd8 29.l'i:xc5 l'i:d l t 30.i>g2 l'i:a 1 3 l .a5 i>e7. Black has some counterplay in this rook endgame, but White is probably j ust winning. Anyway, the game continuation is clear-cut, as I wanted to exchange rooks - to remove Black's "Coordinator of Play." One should not be too dogmatic though, and the alternative is also strong.
1 4 Part 1: Theory
27 . . Jhc7 28.gxc7 .ib6 29J'k8 @£8 30J'�a8 @e7 3l .a5 .icS 32Jk8
Black is not allowed to play . . . l2lc6. By the way, note how restricted Black's bishop is . Now it has to give up control of a7. This moment in the game is the total triumph of White's strategy! 32 . . . .id6
32 . . . .ia7 33.:1'k7t drops the bishop. 33.a6 @d7 34J�xd8t 1-0
Black was rated about 2300, so even quite strong players are not comfortable with these strategic themes.
22 . . . .ic6? was a bad move and perhaps even the decisive mistake. After the game, Esben Ejsing thought that 16 . . . l2lg4 was the decisive mistake, allowing White to play 1 7 .ixa7. This is, of course, nonsense; maybe he was j ust frustrated about losing the game. In any case, this game proved to me that these themes are worth learning.
Now we have a game from the Copenhagen Championship 2002:
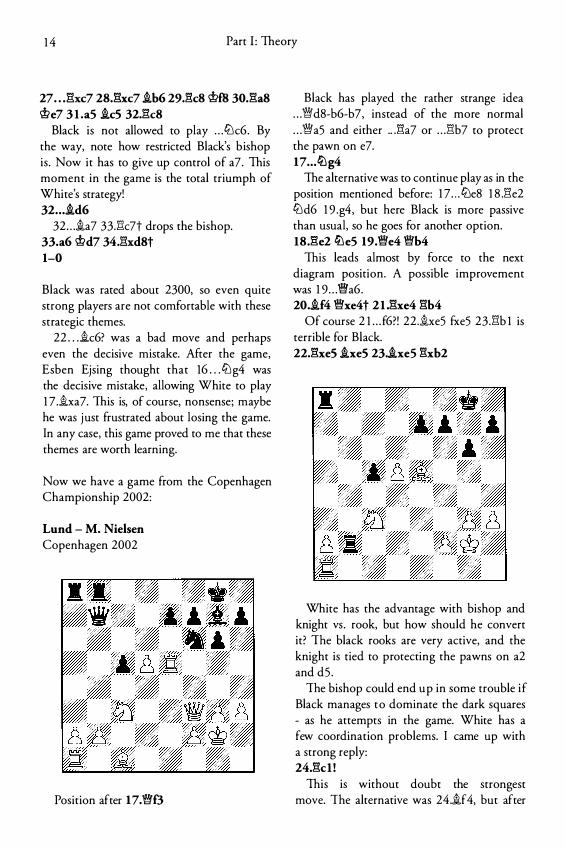
Lund - M. Nielsen Copenhagen 2002
Position after 17.\Wf3
Black has played the rather strange idea . . . \Wd8-b6-b7, instead of the more normal . . . \Wa5 and either .. .Eh7 or . . . gb7 to protect the pawn on e7. 17 . . . ltlg4
The alternative was to continue play as in the position mentioned before: 1 7 . . . l2le8 1 8 .ge2 l2ld6 1 9 .g4, but here Black is more passive than usual, so he goes for another option. 18.ge2 ltle5 19.'1We4 '1Wb4
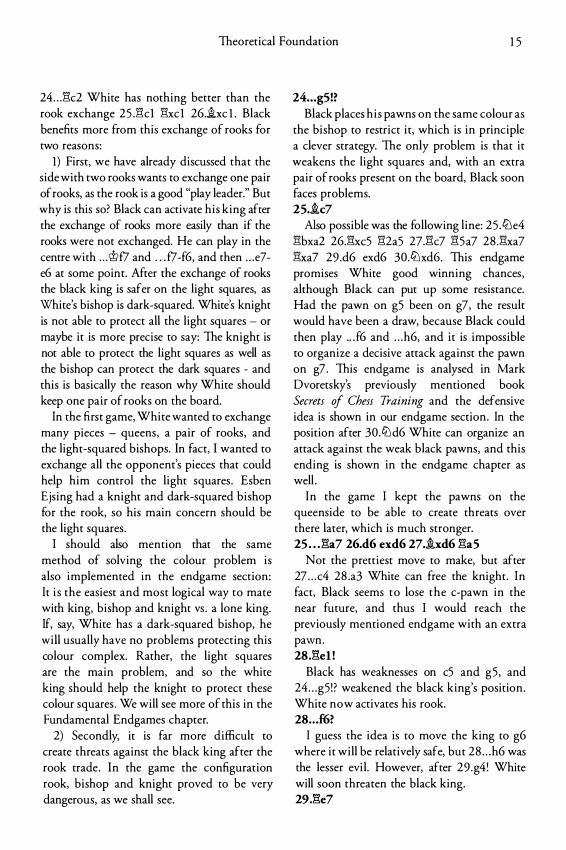
This leads almost by force to the next diagram position. A possible improvement was 1 9 . . . \Wa6. 20 . .if4 '1Wxe4t 2 1 .gxe4 gb4
Of course 2 1 . . . f6?! 22 .ixe5 fxe5 23.gb 1 is terrible for Black. 22.gxeS .ixeS 23 . .ixe5 gxb2
White has the advantage with bishop and knight vs . rook, but how should he convert it? The black rooks are very active, and the knight is tied to protecting the pawns on a2 and d5 .
The bishop could end up in some trouble i f Black manages to dominate the dark squares - as he attempts in the game. White has a few coordination problems. I came up with a strong reply: 24.gcl !
This is without doubt the strongest move. The alternative was 24 . .if4, but after
Theoretical Foundation 1 5
24 . . . Elc2 White has nothing better than the rook exchange 25 .Elcl Elxc l 26.�xc l . Black benefits more from this exchange of rooks for two reasons:
1) First, we have already discussed that the side with two rooks wants to exchange one pair of rooks, as the rook is a good "play leader." But why is this so? Black can activate his king after the exchange of rooks more easily than if the rooks were not exchanged. He can play in the centre with . . . <i>f7 and . . . f7-f6, and then . . . e7-e6 at some point. After the exchange of rooks the black king is safer on the light squares, as White's bishop is dark-squared. White's knight is not able to protect all the light squares - or maybe it is more precise to say: The knight is not able to protect the light squares as well as the bishop can protect the dark squares - and this is basically the reason why White should keep one pair of rooks on the board.
In the first game, White wanted to exchange many pieces - queens, a pair of rooks, and the light-squared bishops. In fact, I wanted to exchange all the opponent's pieces that could help him control the light squares . Esben Ejsing had a knight and dark-squared bishop for the rook, so his main concern should be the light squares .
I should also mention that the same method of solving the colour problem is also implemented in the endgame section: It is the easiest and most logical way to mate with king, bishop and knight vs . a lone king. If, say, White has a dark-squared bishop, he will usually have no problems protecting this colour complex. Rather, the light squares are the main problem, and so the white king should help the knight to protect these colour squares . We will see more of this in the Fundamental Endgames chapter.
2) Secondly, it is far more difficult to create threats against the black king after the rook trade. In the game the configuration rook, bishop and knight proved to be very dangerous, as we shall see.
24 . . . g5!? Black places his pawns on the same colour as
the bishop to restrict it, which is in principle a clever strategy. The only problem is that it weakens the light squares and, with an extra pair of rooks present on the board, Black soon faces problems. 25.�c7
Also possible was the following line: 25 .tLle4 Elbxa2 26.Elxc5 El2a5 27.Elc7 El5a7 28 .Elxa7 Elxa7 29.d6 exd6 30.tt:Jxd6. This endgame promises White good winning chances, although Black can put up some resistance. Had the pawn on g5 been on g7, the result would have been a draw, because Black could then play .. . f6 and . . . h6, and it is impossible to organize a decisive attack against the pawn on g7 . This endgame is analysed in Mark Dvoretsky's previously mentioned book Secrets of Chess Training and the defensive idea is shown in our endgame section. In the position after 30.tt:Jd6 White can organize an attack against the weak black pawns, and this ending is shown in the endgame chapter as well .
In the game I kept the pawns on the queenside to be able to create threats over there later, which is much stronger. 25 . . J:'!:a7 26.d6 exd6 27.�xd6 Ela5
Not the prettiest move to make, but after 27 . . . c4 28 .a3 White can free the knight. In fact, Black seems to lose the c-pawn in the near future, and thus I would reach the previously mentioned endgame with an extra pawn. 28J3el !
Black has weaknesses on c5 and g5 , and 24 . . . g5 ! ? weakened the black king's position. White now activates his rook. 28 . . • £6?
I guess the idea is to move the king to g6 where it will be relatively safe, but 28 . . . h6 was the lesser evil. However, after 29 .g4! White will soon threaten the black king. 29J3e7
1 6 Part 1: Theory
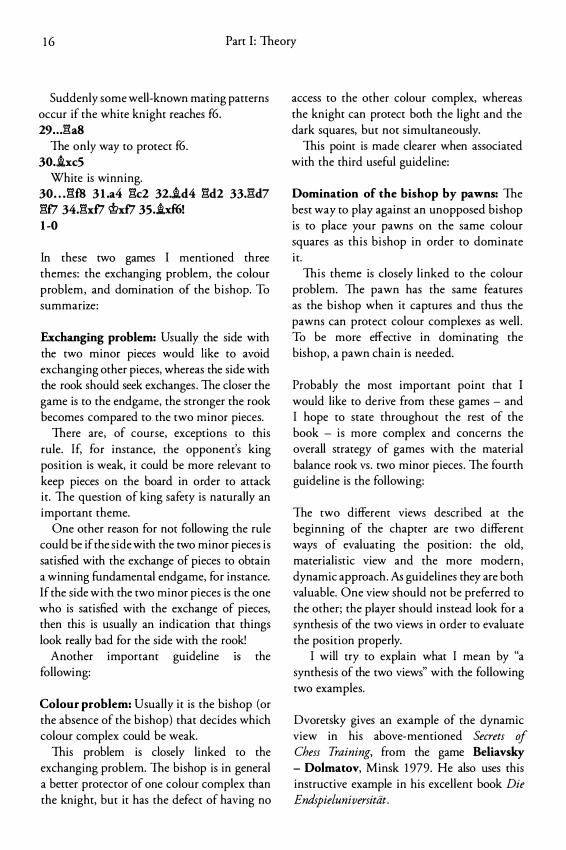
Suddenly some well-known mating patterns occur if the white knight reaches f6. 29 . . . gas
The only way to protect f6. 30.�xc5
White is winning. 30 . . . gf8 3 1 .a4 gc2 32 . .id4 gd2 33.gd7 gf7 34.gxf7 @xf7 35 . .ixf6! 1 -0
In these two games I mentioned three themes: the exchanging problem, the colour problem, and domination of the bishop. To summarize:
Exchanging problem: Usually the side with the two minor pieces would like to avoid exchanging other pieces, whereas the side with the rook should seek exchanges . The closer the game is to the endgame, the stronger the rook becomes compared to the two minor pieces.
There are, of course, exceptions to this rule. If, for instance, the opponent's king position is weak, it could be more relevant to keep pieces on the board in order to attack it. The question of king safety is naturally an important theme.
One other reason for not following the rule could be if the side with the two minor pieces is satisfied with the exchange of pieces to obtain a winning fundamental endgame, for instance. If the side with the two minor pieces is the one who is satisfied with the exchange of pieces, then this is usually an indication that things look really bad for the side with the rook!
Another important guideline IS the following:
Colour problem: Usually it is the bishop (or the absence of the bishop) that decides which colour complex could be weak.
This problem is closely linked to the exchanging problem. The bishop is in general a better protector of one colour complex than the knight, but it has the defect of having no
access to the other colour complex, whereas the knight can protect both the light and the dark squares, but not simultaneously.
This point is made clearer when associated with the third useful guideline:
Domination of the bishop by pawns: The best way to play against an unopposed bishop is to place your pawns on the same colour squares as this bishop in order to dominate it.
This theme is closely linked to the colour problem. The pawn has the same features as the bishop when it captures and thus the pawns can protect colour complexes as well . To be more effective in dominating the bishop, a pawn chain is needed.
Probably the most important point that I would like to derive from these games - and I hope to state throughout the rest of the book - is more complex and concerns the overall strategy of games with the material balance rook vs. two minor pieces . The fourth guideline is the following:
The two different views described at the beginning of the chapter are two different ways of evaluating the position : the old, materialistic view and the more modern , dynamic approach. As guidelines they are both valuable. One view should not be preferred to the other; the player should instead look for a synthesis of the two views in order to evaluate the position properly.
I will try to explain what I mean by "a synthesis of the two views" with the following two examples.
Dvoretsky gives an example of the dynamic view in his above-mentioned Secrets of Chess Training, from the game Beliavsky - Dolmatov, Minsk 1 979. He also uses this instructive example in his excellent book Die Endspieluniversitiit.
Theoretical Foundation 1 7
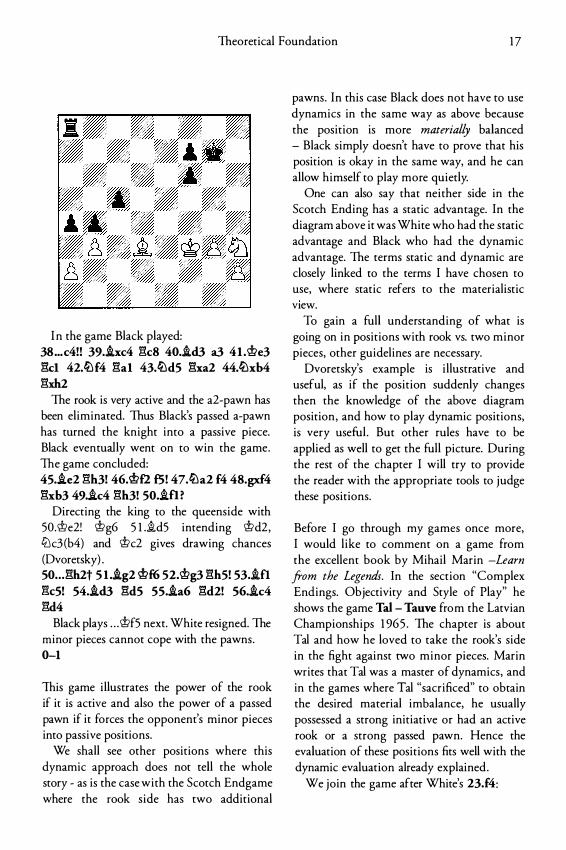
I n the game Black played: 38 ... c4!! 39.ixc4 �c8 40.id3 a3 4l .l!?e3 �cl 42.tbf4 �al 43.tbd5 �xa2 44.tbxb4 �:xh2
The rook is very active and the a2-pawn has been eliminated. Thus Black's passed a-pawn has turned the knight into a passive piece. Black eventually went on to win the game. The game concluded: 45.ie2 �h3! 46.1!?!2 £5! 47.tba2 f4 48.gxf4 �xb3 49.ic4 �h3! SO.ifl?
Directing the king to the queenside with 50.I!?e2! l!?g6 5 l .�d5 intending l!?d2, 1Llc3(b4) and l!?c2 gives drawing chances (Dvoretsky) . so • . . �h2t S l .ig2 1!?f6 sz.l!?g3 �h5! 53.�fl !'k5! 54.id3 �d5 55.ia6 �d2! 56.�c4 �d4
Black plays . . . l!?f5 next. White resigned. The minor pieces cannot cope with the pawns. 0-1
This game illustrates the power of the rook if it is active and also the power of a passed pawn if it forces the opponent's minor pieces into passive positions.
We shall see other positions where this dynamic approach does not tell the whole story - as is the case with the Scotch Endgame where the rook side has two additional
pawns. In this case Black does not have to use dynamics in the same way as above because the position is more materially balanced - Black simply doesn't have to prove that his position is okay in the same way, and he can allow himself to play more quietly.
One can also say that neither side in the Scotch Ending has a static advantage. In the diagram above it was White who had the static advantage and Black who had the dynamic advantage. The terms static and dynamic are closely linked to the terms I have chosen to use, where static refers to the materialistic VIeW.
To gain a full understanding of what is going on in positions with rook vs. two minor pieces, other guidelines are necessary.
Dvoretsky's example is illustrative and useful, as if the position suddenly changes then the knowledge of the above diagram position, and how to play dynamic positions, is very useful. But other rules have to be applied as well to get the full picture. During the rest of the chapter I will try to provide the reader with the appropriate tools to judge these positions.
Before I go through my games once more, I would like to comment on a game from the excellent book by Mihail Marin -Learn from the Legends. In the section "Complex Endings. Objectivity and Style of Play" he shows the game Tal - Tauve from the Latvian Championships 1 965 . The chapter is about Tal and how he loved to take the rook's side in the fight against two minor pieces. Marin writes that Tal was a master of dynamics, and in the games where Tal "sacrificed" to obtain the desired material imbalance, he usually possessed a strong initiative or had an active rook or a strong passed pawn. Hence the evaluation of these positions fits well with the dynamic evaluation already explained.
We join the game after White's 23.f4:
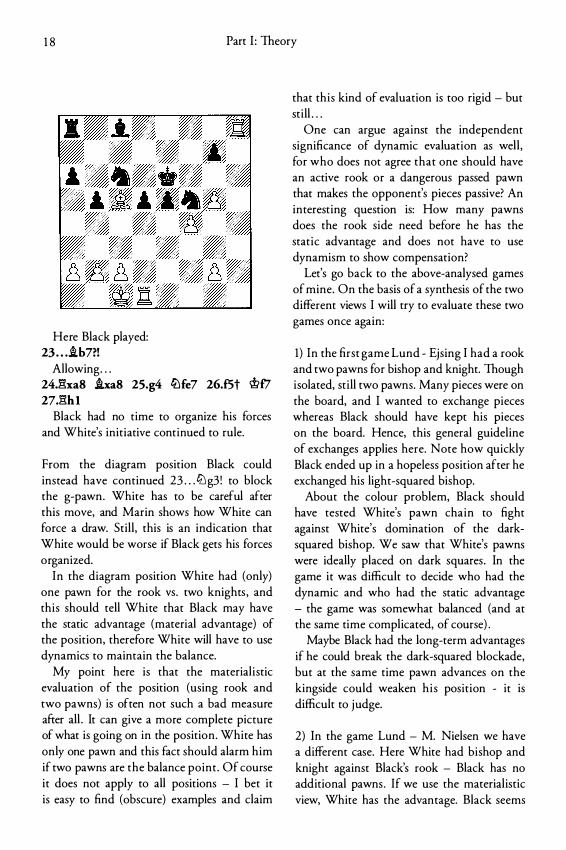
1 8 Part 1: Theory
Here Black played: 23 . . . .ib7?!
Allowing . . . 24J;xa8 .L.:a8 25.g4 ll:lfe7 26.f5t 'i!?f7 27.ghl
Black had no time to organize his forces and White's initiative continued to rule.
From the diagram position Black could instead have continued 23 . . . lLl g3! to block the g-pawn. White has to be careful after this move, and Marin shows how White can force a draw. Still , this is an indication that White would be worse if Black gets his forces organized.
In the diagram position White had (only) one pawn for the rook vs. two knights , and this should tell White that Black may have the static advantage (material advantage) of the position, therefore White will have to use dynamics to maintain the balance.
My point here is that the materialistic evaluation of the position (using rook and two pawns) is often not such a bad measure after all . It can give a more complete picture of what is going on in the position. White has only one pawn and this fact should alarm him if two pawns are the balance point . Of course it does not apply to all positions - I bet it is easy to find (obscure) examples and claim
that this kind of evaluation is too rigid - but still . . .
One can argue against the independent significance of dynamic evaluation as well , for who does not agree that one should have an active rook or a dangerous passed pawn that makes the opponent's pieces passive? An interesting question is: How many pawns does the rook side need before he has the static advantage and does not have to use dynamism to show compensation?
Let's go back to the above-analysed games of mine. On the basis of a synthesis of the two different views I will try to evaluate these two games once again:
1) In the first game Lund - Ejsing I had a rook and two pawns for bishop and knight. Though isolated, still two pawns. Many pieces were on the board, and I wanted to exchange pieces whereas Black should have kept his pieces on the board. Hence, this general guideline of exchanges applies here. Note how quickly Black ended up in a hopeless position after he exchanged his light-squared bishop.
About the colour problem, Black should have tested White's pawn chain to fight against White's domination of the darksquared bishop. We saw that White's pawns were ideally placed on dark squares . In the game it was difficult to decide who had the dynamic and who had the static advantage - the game was somewhat balanced (and at the same time complicated, of course) .
Maybe Black had the long-term advantages if he could break the dark-squared blockade, but at the same time pawn advances on the kingside could weaken his position - it is difficult to judge.
2) In the game Lund - M. Nielsen we have a different case. Here White had bishop and knight against Black's rook - Black has no additional pawns. If we use the materialistic view, White has the advantage. Black seems
Theoretical Foundation 1 9
to have n o dynamic compensation for his material deficit (his rooks are not very active and his passed c-pawn not particularly dangerous, at least Black's activity is no real threat to the activity ofWhite's minor pieces) and for that reason it seems that White is better in any case.
The game contains some interesting aspects though: White could have gone for the exchange of rooks as the resulting basic ending gives him good chances of a full point, but by far the strongest continuation was still that of the game: White avoided the exchange of rooks in accordance with the general guidelines . With one extra pair of rooks on the board Black could not play a lightsquared strategy and the configuration of rook, bishop and knight proved a dangerous mating machine .
I will proceed with the discussion of how many pawns should be added to the rook to obtain adequate compensation. I believe the next example is critical for the evaluation of many similar positions:
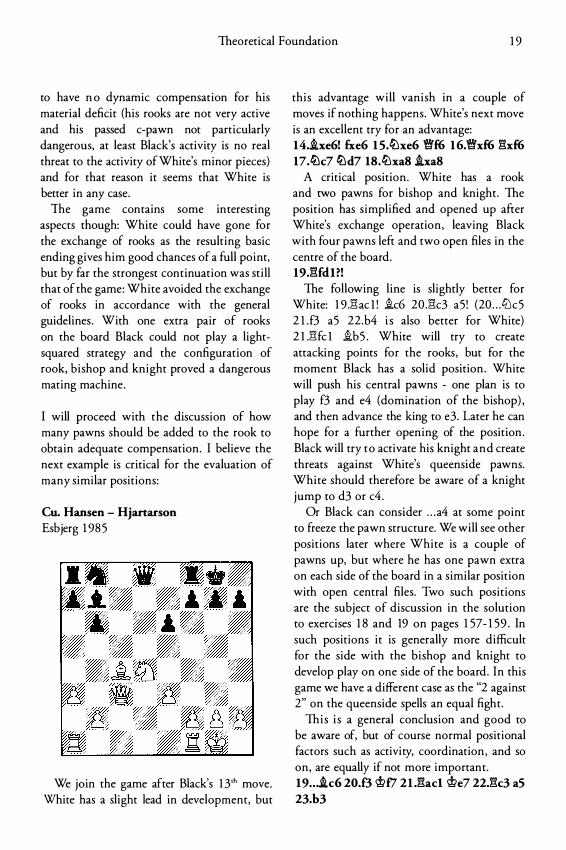
Cu. Hansen - Hjartarson Esbjerg 1 98 5
We join the game after Black's 1 3'h move. White has a slight lead in development, but
this advantage will vanish in a couple of moves if nothing happens. White's next move is an excellent try for an advantage: 14.�xe6! fxe6 1S.t2:he6 �f6 16.�xf6 �xf6 17.ttlc7 ttld7 18.tt:lxa8 .ixa8
A critical position. White has a rook and two pawns for bishop and knight. The position has simplified and opened up after White's exchange operation , leaving Black with four pawns left and two open files in the centre of the board. 19.�fdl?!
The following line is slightly better for White: 1 9.�ac l ! �c6 20.�c3 a5 ! (20 . . . ttJc5 2 l . f3 a5 22 .b4 i s also better for White) 2 l .�fc l �b5 . White will try to create attacking points for the rooks, but for the moment Black has a solid position . White will push his central pawns - one plan is to play f3 and e4 (domination of the bishop) , and then advance the king to e3. Later he can hope for a further opening of the position . Black will try to activate his knight and create threats against White's queenside pawns. White should therefore be aware of a knight jump to d3 or c4 .
Or Black can consider . . . a4 at some point to freeze the pawn structure. We will see other positions later where White is a couple of pawns up, but where he has one pawn extra on each side of the board in a similar position with open central files. Two such positions are the subject of discussion in the solution to exercises 1 8 and 19 on pages 1 57- 1 59. In such positions it is generally more difficult for the side with the bishop and knight to develop play on one side of the board. In this game we have a different case as the "2 against 2" on the queenside spells an equal fight.
This is a general conclusion and good to be aware of, but of course normal positional factors such as activity, coordination , and so on, are equally if not more important. 19 . . . .ic6 20.f3 <i>f7 21 .�acl <i>e7 22.�c3 aS 23.b3
20 Part 1: Theory
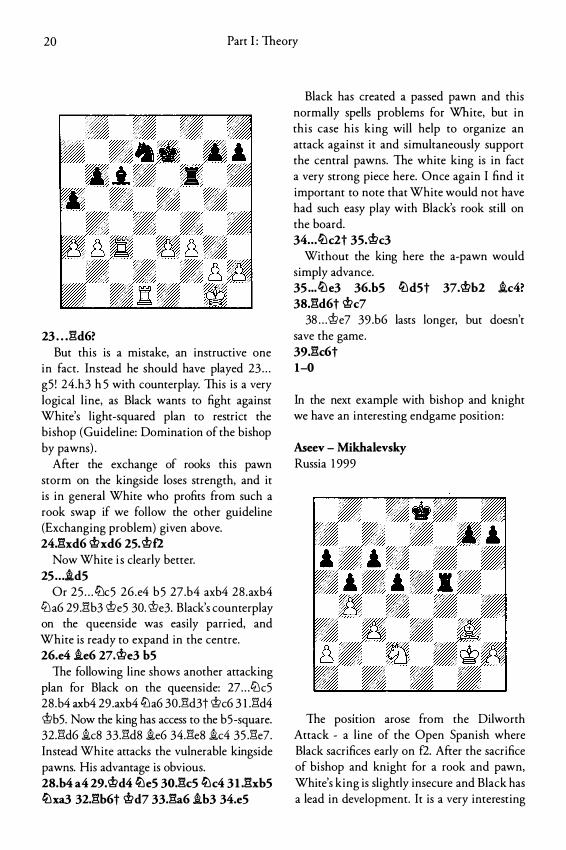
23 . . .:1�d6? But this is a mistake, an instructive one
in fact. Instead he should have played 23 . . . g5! 24.h3 h 5 with counterplay. This is a very logical line, as Black wants to fight against White's light-squared plan to restrict the bishop (Guideline: Domination of the bishop by pawns) .
After the exchange of rooks this pawn storm on the kingside loses strength, and it is in general White who profits from such a rook swap if we follow the other guideline (Exchanging problem) given above. 24J�xd6 lt>xd6 25. \t>f2
Now White is clearly better. 25 . . . i.d5
Or 25 . . . ltk5 26.e4 b5 27.b4 axb4 28.axb4 lt:l a6 29.:B:b3 'i!?e5 30. lt>e3. Black's counterplay on the queenside was easily parried, and White is ready to expand in the centre. 26.e4 .ie6 27.'i!?e3 b5
The following line shows another attacking plan for Black on the queenside: 27 . . . ltlc5 28.b4 axb4 29.axb4ltla6 30.:B:d3t 'i!?c6 3 l .:B:d4 'i!?b5. Now the king has access to the b5-square. 32.:B:d6 ic8 33.:B:d8 ie6 34.:B:e8 ic4 35 .:B:e7. Instead White attacks the vulnerable kingside pawns. His advantage is obvious. 28.b4 a4 29.'i!?d4 ltle5 30Jk5 ltlc4 3 1 .�xb5 lilxa3 32.�b6t lt>d7 33.�a6 .ib3 34.e5
Black has created a passed pawn and this normally spells problems for White, but in this case his king will help to organize an attack against it and simultaneously support the central pawns. The white king is in fact a very strong piece here. Once again I find it important to note that White would not have had such easy play with Black's rook still on the board. 34 • . • lilc2t 35.1t>c3
Without the king here the a-pawn would simply advance. 35 . • . lile3 36.b5 lild5t 37.1t>b2 .ic4? 38.�d6t lt>c7
38 . . . 'i!?e7 39.b6 lasts longer, but doesn't save the game. 39.�c6t 1-0
In the next example with bishop and knight we have an interesting endgame position:
Aseev - Mikhalevsky Russia 1 999
The position arose from the Dilworth Attack - a line of the Open Spanish where Black sacrifices early on f2. After the sacrifice of bishop and knight for a rook and pawn, White's king is slightly insecure and Black has a lead in development. It is a very interesting

Theoretical Foundation 2 1
line leading t o our desired imbalance, and Jon Tisdall used some games to describe the theme rook vs. two minor pieces (See Improve Your Chess Now, pages 1 50- 1 53) .
In the diagram position above Black has two extra pawns - one on each wing. But the placement of the pawns is not in his favour as he is weak on the dark squares. The pawn complex a6-b5-c6-d5 does not dominate the bishop and once White gets time to play his knight to b3 he will soon be able to attack Black's pawns. Therefore Black decided on the following pawn sacrifice: 28 . • • d4!
A very important move that fulfils two aims: Black's king is threatening to penetrate into White's camp via the d5-square - a light square, and 2) The d4-square is not accessible to White's pieces anymore. Especially White's knight would love to occupy the d4-square. After this excellent move it is Black who plays for an advantage. Without this move his position could turn out to be slightly inferior due to his queenside weaknesses - despite the fact that he has two pawns in addition to the rook. 29.cxd4
On 29 .tt'le4 Mikhalevsky suggests 29 . . . Eld5!? (29 . . . 'it>e7 30.cxd4 transposes to 29.cxd4). 29 .. . 'it>e7 30.c!ile4 'it>e6 31 .c!ilc3
White tries to protect the entry square d5, but the move is rather passive. Instead Mikhalevsky suggests 3 1 .tt'lc5t 'it>d5 32.ie5 ! ? when the position is about equal. 3l .. JU7
Black prepares . . . a5 to remove his weak a-pawn and to open up the position on the queenside. 32.a3
Mikhalevsky gives the following line as equal : 32 .a4!? bxa4 33.tt'lxa4 'it>d5 34.i.f2 Elb7 35.tt'lc5 Elxb4 36.tt'lxa6. White has many ways to neutralize Black's initiative, mainly because of Black's weak pawns. With correct play the game should end in a draw - in the
game Black gained some chances to play for a wm. 32 . . . g5
The idea is to play . . . g5-g4 and penetrate with the rook via the f3-square. Note that 32 . . . a5? ! immediately is less precise because the b5-pawn is left unprotected after 33.d5t! cxd5 34.tt'lxb5. White's passed pawn after 34 . . . axb4 35.axb4 Elb7 36.tt'ld4t 'it>d7 37.b5 causes trouble for Black. Suddenly it is White who plays for the full point. 33.h3 'it>f5!? 34.'it>f3
Mikhalevsky gives the following instructive line to show that White still has to play carefully to keep the balance: 34 .d5 cxd5 35.tt'lxd5 'it>e4! 36.tt'lc7 Elf6! 34 . . . 'it>g6t 35. 'it>g2
In the severe time-trouble, Aseev decides to keep the king on the kingside. 35 ... h5 36.c!l:le4 g4 37.hxg4 hxg4 38.c!ild2?!
Again a bit passive. White wants to stop Black's rook from penetrating, bur 38 .tt'lc5 was a better way to equalize. 38 ... 'it>f5 39.c!l:lb3 'it>e4 40.c!ilc5t 'it>xd4 41 .c!l:lxa6 go 42.c!l:lb8! 'it>d5 43.c!ild7
White eliminates Black's g-pawn. The remaining endgame with pawns on only one side of the board is a draw. 43 .. . gxa3 44.c!ilf6t 'it>c4
45.id6!
22 Part I : Theory
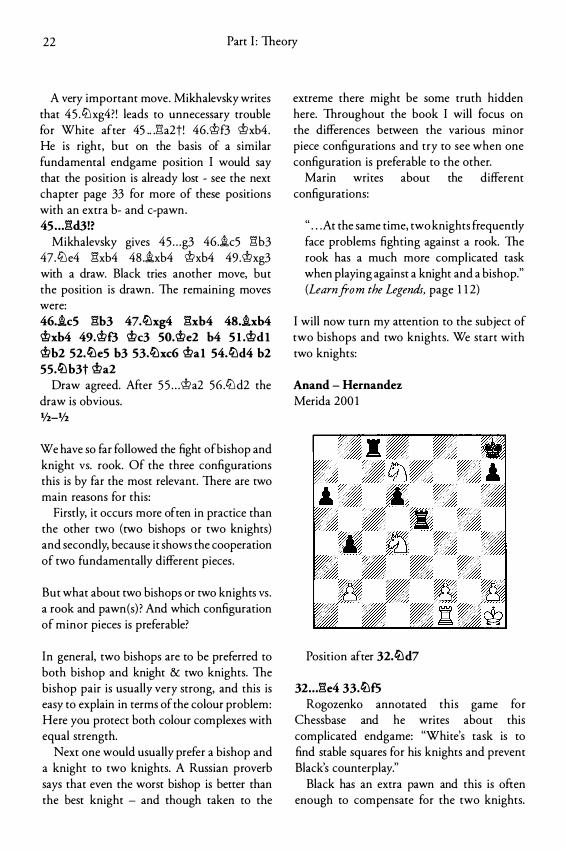
A very important move. Mikhalevsky writes that 45 .ctJxg4? ! leads to unnecessary trouble for White after 45 .. .:1'�a2t! 46.\ilf3 \ilxb4. He is right, but on the basis of a similar fundamental endgame position I would say that the position is already lost - see the next chapter page 33 for more of these positions with an extra b- and c-pawn. 4S . . J�d3!?
Mikhalevsky gives 45 . . . g3 46.�c5 l"1b3 47.ctJe4 l"1xb4 48 .�xb4 \ilxb4 49.\ilxg3 with a draw. Black tries another move, but the position is drawn. The remaining moves were: 46 . .ic5 gb3 47.ll:lxg4 gxb4 48 . .ixb4 \ilxb4 49.@f3 \ilc3 50.\ile2 b4 5 1 .\ildl \ilb2 52.lile5 b3 53.ll:lxc6 \ilal 54.ll:\d4 b2 5S.lilb3t \ila2
Draw agreed. After 5 5 . . . \ila2 56.ctJ d2 the draw is obvious. 1/2-1/2
We have so far followed the fight ofbishop and knight vs. rook. Of the three configurations this is by far the most relevant. There are two main reasons for this:
Firstly, it occurs more often in practice than the other two (two bishops or two knights) and secondly, because it shows the cooperation of two fundamentally different pieces .
But what about two bishops or two knights vs . a rook and pawn(s) ? And which configuration of minor pieces is preferable?
In general, two bishops are to be preferred to both bishop and knight & two knights. The bishop pair is usually very strong, and this is easy to explain in terms of the colour problem: Here you protect both colour complexes with equal strength.
Next one would usually prefer a bishop and a knight to two knights. A Russian proverb says that even the worst bishop is better than the best knight - and though taken to the
extreme there might be some truth hidden here. Throughout the book I will focus on the differences between the various minor piece configurations and try to see when one configuration is preferable to the other.
Marin writes about the different configurations:
" . . . At the same time, two knights frequently face problems fighting against a rook. The rook has a much more complicated task when playing against a knight and a bishop." (Learn from the Legends, page 1 1 2)
I will now turn my attention to the subject of two bishops and two knights. We start with two knights:
Anand - Hernandez Merida 200 1
Position after 32.lild7
32 . . . ge4 33.lilf5 Rogozenko annotated this game for
Chessbase and he writes about this complicated endgame: "White's task is to find stable squares for his knights and prevent Black's counterplay."
Black has an extra pawn and this is often enough to compensate for the two knights.
Theoretical Foundation 23
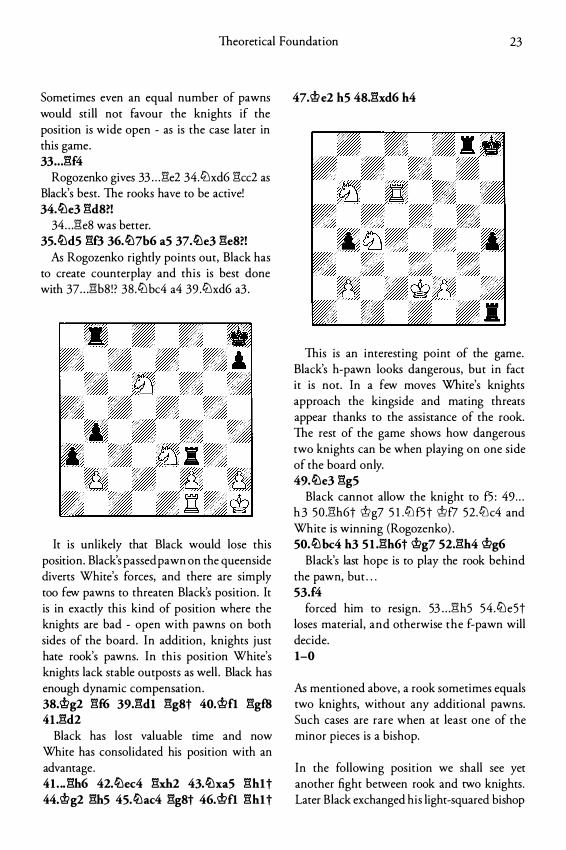
Sometimes even an equal number of pawns would still not favour the knights if the position is wide open - as is the case later in this game. 33 • . J�f4
Rogozenko gives 33 . . . �e2 34.tt:'lxd6 �cc2 as Black's best. The rooks have to be active! 34.tL:\e3 �d8?!
34 . . . �e8 was better. 35.tL:\d5 �f3 36.tL:\7b6 a5 37.tL:\e3 �e8?!
fu Rogozenko rightly points out, Black has to create counterplay and this is best done with 37 . . . �b8 ! ? 38 .tt:'lbc4 a4 39.tt:'lxd6 a3 .
It is unlikely that Black would lose this position. Black's passed pawn on the queenside diverts White's forces, and there are simply too few pawns to threaten Black's position. It is in exactly this kind of position where the knights are bad - open with pawns on both sides of the board. In addition, knights just hate rook's pawns. In this position White's knights lack stable outposts as well . Black has enough dynamic compensation . 38.'i!?g2 �f6 39.�dl �gSt 40.\!?fl �g£8 4I .�d2
Black has lost valuable time and now White has consolidated his position with an advantage. 41 . •• �h6 42.tL:\ec4 �xh2 43.tL:\xa5 �hl t 44.'i!?g2 �h5 45.tL:\ac4 �gSt 46.\!?fl �hl t
47.'i!?e2 h5 48.�xd6 h4
This is an interesting point of the game. Black's h-pawn looks dangerous, but in fact it is not. In a few moves White's knights approach the kingside and mating threats appear thanks to the assistance of the rook. The rest of the game shows how dangerous two knights can be when playing on one side of the board only. 49.tL:\e3 �g5
Black cannot allow the knight to fS : 49 . . . h 3 SO .l"lh6t <;t>g7 S l .tt:'lfSt <;t>f7 52.tt:'lc4 and White is winning (Rogozenko) . 50.tL:\bc4 h3 5 I .l::1h6t <;t>g7 52.l::1h4 <;t>g6
Black's last hope is to play the rook behind the pawn, but . . . 53.f4
forced him to resign. 53 . . . �h5 54 .tt:'le5t loses material , and otherwise the f-pawn will decide. 1-0
As mentioned above, a rook sometimes equals two knights, without any additional pawns. Such cases are rare when at least one of the minor pieces is a bishop.
In the following position we shall see yet another fight between rook and two knights. Later Black exchanged his light-squared bishop
24 Part I: Theory
for one of White's knights, and the endgame instead saw bishop and knight vs . rook:
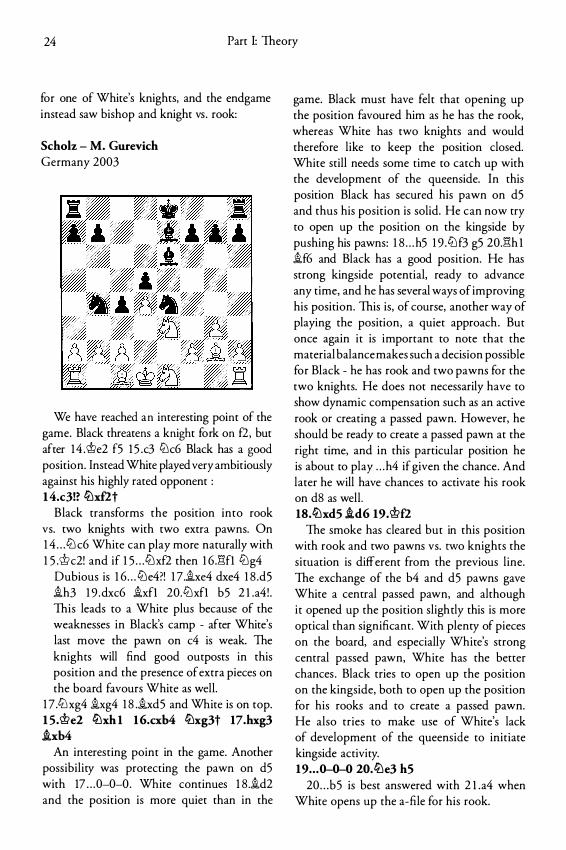
Scholz - M. Gurevich Germany 2003
We have reached an interesting point of the game. Black threatens a knight fork on f2, but after 14 .\t>e2 f5 1 5 .c3 tt:lc6 Black has a good position. Instead White played very ambitiously against his highly rated opponent : 14.c3!? tt:lxf2t
Black transforms the position into rook vs. two knights with two extra pawns. On 1 4 . . . tt:lc6 White can play more naturally with 1 5 .\t>c2! and if 1 5 . . . t/Jxf2 then 1 6 .Elfl tt:lg4
Dubious is 1 6 . . . t/Je4?! 1 7 .ixe4 dxe4 1 8.d5 ih3 1 9 .dxc6 ixfl 20.tt:lxfl b5 2 l .a4! . This leads to a White plus because of the weaknesses in Black's camp - after White's last move the pawn on c4 is weak. The knights will find good outposts in this position and the presence of extra pieces on the board favours White as well.
1 7 .lt:lxg4 ixg4 18 .ixd5 and White is on top. 15.\t>e2 tt:lxh 1 16.cxb4 tt:lxg3t 17.hxg3 .ixh4
An interesting point in the game. Another possibility was protecting the pawn on d5 with 17 . . . 0-0-0. White continues 1 8.id2 and the position is more quiet than in the
game. Black must have felt that opening up the position favoured him as he has the rook, whereas White has two knights and would therefore like to keep the position closed. White still needs some time to catch up with the development of the queenside. In this position Black has secured his pawn on d5 and thus his position is solid. He can now try to open up the position on the kingside by pushing his pawns: 1 8 . . . h5 1 9 .tt:lf3 g5 20.Elh l if6 and Black has a good position. He has strong kingside potential, ready to advance any time, and he has several ways of improving his position. This is, of course, another way of playing the position, a quiet approach . But once again it is important to note that the material balance makes such a decision possible for Black - he has rook and two pawns for the two knights. He does not necessarily have to show dynamic compensation such as an active rook or creating a passed pawn. However, he should be ready to create a passed pawn at the right time, and in this particular position he is about to play . . . h4 if given the chance. And later he will have chances to activate his rook on d8 as well . 18.tt:lxd5 id6 19.\t>£2
The smoke has cleared but in this position with rook and two pawns vs. two knights the situation is different from the previous line. The exchange of the b4 and d5 pawns gave White a central passed pawn, and although it opened up the position slightly this is more optical than significant. With plenty of pieces on the board, and especially White's strong central passed pawn, White has the better chances . Black tries to open up the position on the kingside, both to open up the position for his rooks and to create a passed pawn. He also tries to make use of White's lack of development of the queenside to initiate kingside activity. 19 . . . 0-0-0 20.tt:le3 hS
20 . . . b5 is best answered with 2 l .a4 when White opens up the a-file for his rook.
Theoretical Foundation 25
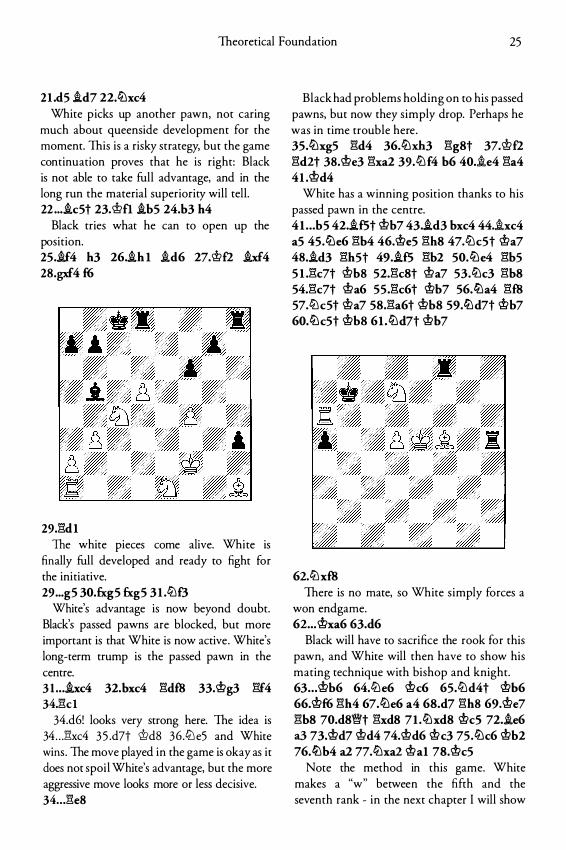
2I .d5 .id7 22.tLlxc4 White picks up another pawn, not caring
much about queenside development for the moment. This is a risky strategy, but the game continuation proves that he is right: Black is not able to take full advantage, and in the long run the material superiority will tell. 22 ... .ic5t 23.\t>fl .ib5 24.b3 h4
Black tries what he can to open up the position. 25 . .if4 h3 26 . .ihl .id6 27.\t>fl .ixf4 28.gxf4 f6
29J�dl The white pieces come alive. White is
finally full developed and ready to fight for the initiative. 29 ... g5 30.fxg5 fxg5 3I .ltlf3
White's advantage is now beyond doubt. Black's passed pawns are blocked, but more important is that White is now active. White's long-term trump is the passed pawn in the centre. 3I. . . .ixc4 32.bxc4 l:'!:df8 33.'it>g3 l:'!:f4 34.l:'!:cl
34.d6! looks very strong here. The idea is 34 . . . l:'!:xc4 3 5 .d7t 'it>d8 36 .tLle5 and White wins . The move played in the game is okay as it does not spoil White's advantage, but the more aggressive move looks more or less decisive. 34 ... l:'!:e8
Black had problems holding on to his passed pawns, but now they simply drop. Perhaps he was in time trouble here . 35.tLlxg5 l:'!:d4 36.tLlxh3 l:'!:g8t 37.\t>fl l:'!:d2t 38.'it>e3 l:'!:xa2 39.ltlf4 b6 40.i.e4 l:'!:a4 4I .'it>d4
White has a winning position thanks to his passed pawn in the centre. 41 . .. b5 42 . .if5t 'it>b7 43 . .id3 bxc4 44.i.xc4 a5 45.tLle6 l:'!:b4 46.'it>e5 l:'!:h8 47.ltlc5t 'it>a7 48 . .id3 l:'!:h5t 49 . .if5 l:'!:b2 50.tLle4 l:'!:b5 5 1 .l:'!:c7t 'it>b8 52.l:'!:c8t 'it>a7 53.tLlc3 l:'!:b8 54.l:'!:c7t 'it>a6 55.l:'!:c6t 'it>b7 56.ltla4 l:'!:f8 57.ltlc5t 'it>a7 58.l:'!:a6t 'it>bs 59.ltld7t 'it>b7 60.tLlc5t 'it>bs 6I .tLld7t 'it>b7
62.ltlxf8 There is no mate, so White simply forces a
won endgame. 62 ... 'it>xa6 63.d6
Black will have to sacrifice the rook for this pawn, and White will then have to show his mating technique with bishop and knight. 63 .. . 'it>b6 64.ltle6 'it>c6 65.ltld4t 'it>b6 66.'it>f6 l:'!:h4 67.tLle6 a4 68.d7 l:'!:h8 69.'it>e7 l:'!:b8 70.d8Wt l:'!:xd8 7I .tLlxd8 'it>cS 72 . .ie6 a3 73.'it>d7 'it>d4 74.'it>d6 'it>c3 75.tLlc6 'it>b2 76.ltlb4 a2 77.tLlxa2 'it>al 78.'it>c5
Note the method in this game. White makes a "w" between the fifth and the seventh rank - in the next chapter I will show
26 Part I: Theory
another version of how to mate with bishop and knight. The point is that with this knight manoeuvre White seeks to protect the dark squares on the back rank - in this case the squares c l ,e 1 and g l . 78 . . . Wb2 79.Wb4 Wc2 so.Wc4 Wd2 81 .Wd4 Wc2 sz.ti'lb4t Wb2 83.Wd3 Wal 84.Wc3 Wbl ss.lllc2 Wei 86 . .ia2 Wdl 87.lll d4 Wel 88.Wd3 Wfl 89.llle2 Wel 90.We3 Wdl 9L.ib3t li>el 92.lllf4 Wfl 93 . .ic2 Wel 94.lllg2t wfl 95.Wf3 Wgl 96 . .id3 i>h2 97.lll f4
The king is caught in the corner and White will mate in a few moves. 1-0
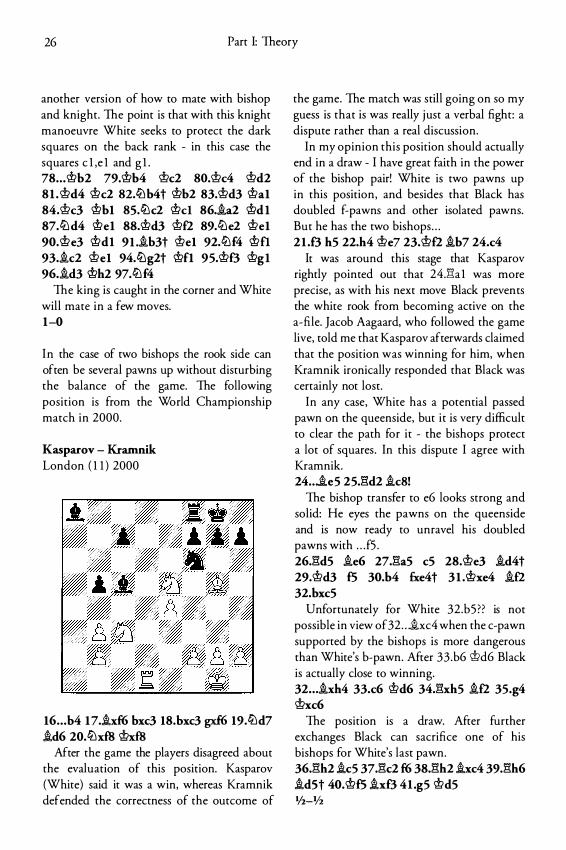
In the case of two bishops the rook side can often be several pawns up without disturbing the balance of the game. The following position is from the World Championship match in 2000.
Kasparov - Kramnik London ( 1 1 ) 2000
16 . . . b4 17 . .ixf6 bxc3 18.bxc3 gxf6 19.tlld7 .id6 20.tllxf8 WxfB
After the game the players disagreed about the evaluation of this position. Kasparov (White) said it was a win, whereas Kramnik defended the correctness of the outcome of
the game. The match was still going on so my guess is that is was really j ust a verbal fight: a dispute rather than a real discussion.
In my opinion this position should actually end in a draw - I have great faith in the power of the bishop pair! White is two pawns up in this position, and besides that Black has doubled f-pawns and other isolated pawns. But he has the two bishops . . . 21 .f3 h5 22.h4 We? 23.Wfl .ib7 24.c4
It was around this stage that Kasparov rightly pointed out that 24.2"1a 1 was more precise, as with his next move Black prevents the white rook from becoming active on the a-file. Jacob Aagaard, who followed the game live, told me that Kasparov afterwards claimed that the position was winning for him, when Kramnik ironically responded that Black was certainly not lost.
In any case, White has a potential passed pawn on the queenside, but it is very difficult to clear the path for it - the bishops protect a lot of squares . In this dispute I agree with Kramnik. 24 .. . .ie5 25.2"1d2 .icB!
The bishop transfer to e6 looks strong and solid: He eyes the pawns on the queenside and is now ready to unravel his doubled pawns with . . . f5 . 26.2"1d5 .ie6 27.2"1a5 c5 28.We3 .id4t 29.Wd3 f5 30.b4 fxe4t 3 1 .i>xe4 .ifl 32.bxc5
Unfortunately for White 32 .b5?? is not possible in view of32 . . . .ixc4 when the c-pawn supported by the bishops is more dangerous than White's b-pawn. After 33 .b6 Wd6 Black is actually close to winning. 32 • • . .ixh4 33.c6 Wd6 34.2"1xh5 .ifl 35.g4 Wxc6
The position is a draw. After further exchanges Black can sacrifice one of his bishops for White's last pawn. 36.2"1h2 .ic5 37.2"1c2 f6 38.2"1h2 .ixc4 39.2"1h6 .idSt 40.Wf5 .ixf3 41 .g5 Wd5 •!2-lfz
Theoretical Foundation 27
In this game the bishops fulfilled a purely defensive task, and thus the potential of the bishop pair did not really show. In positions where the bishops are able to play with more energy the rook side will usually have to show a lot of compensation to match the bishop pair: Either in material (a lot of pawns . . . ) or dynamic terms (active rook or passed pawns) . Usually far more than when playing against bishop and knight.
The following game shows some aspects of the bishops' potential in open positions:
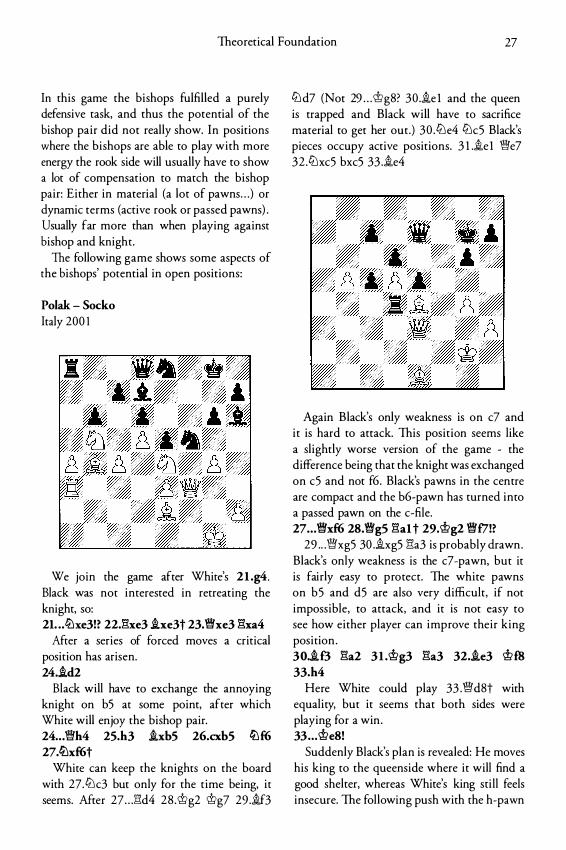
Polak - Socko Italy 200 1
We join the game after White's 21 .g4. Black was not interested in retreating the knight, so: 21. . .lthe3!? 22J�xe3 .ixe3t 23.Wfxe3 l:'!:xa4
After a series of forced moves a critical position has arisen. 24 . .id2
Black will have to exchange the annoying knight on b5 at some point, after which White will enjoy the bishop pair. 24 .. J�'h4 25.h3 .ixbS 26.cxb5 ltlf6 27.ltlxf6t
White can keep the knights on the board with 27.l2lc3 but only for the time being, it seems. Mter 27 . . . l:'!:d4 28 .cj;>g2 cj;>g7 29 . .if3
l2l d7 (Not 29 . . . cj;>g8? 30 . .ie l and the queen is trapped and Black will have to sacrifice material to get her out.) 30 .l2le4 l2lc5 Black's pieces occupy active positions. 3 l ..ie l Vfie7 32 .l2lxc5 bxc5 33 . .ie4
Again Black's only weakness is on c7 and it is hard to attack. This position seems like a slightly worse version of the game - the difference being that the knight was exchanged on c5 and not f6. Black's pawns in the centre are compact and the b6-pawn has turned into a passed pawn on the c-file. 27 .. . Wfxf6 28.Wfg5 l:'!:alt 29.cj;>g2 Wff7!?
29 .. ."Vfixg5 30 . .ixg5 E1a3 is probably drawn. Black's only weakness is the c7 -pawn, but it is fairly easy to protect. The white pawns on b5 and d5 are also very difficult, if not impossible, to attack, and it is not easy to see how either player can improve their king position . 30 . .if3 l:'!:a2 3I .cj;>g3 l:'!:a3 32 • .ie3 cj;>£8 33.h4
Here White could play 33 .\MfdSt with equality, but it seems that both sides were playing for a win . 33 . . ,cj;>e8!
Suddenly Black's plan is revealed: He moves his king to the queenside where it will find a good shelter, whereas White's king still feels insecure. The following push with the h-pawn
28 Part 1: Theory
is double-edged: It creates a weakness on g6, but the opening of the h-file could be another threat to the white king. 34.h5 'ifld7 35.hxg6 hxg6
The h-file has been opened, but it will be Black who benefits from it, mainly because of the exposed position of White's king. The g6 pawn is now weak, but Black's activity more than compensates for this after he transfers his king to safety on the queenside. 36.'iflg2
36.�e4 Wffl drops material for White. 36 ... 'iflc8 37.'iflg3 'iflb7
Black's king is safe, and he is ready to take advantage of White's weaknesses. Because White's light-squared bishop is needed to shelter its king, the b5-pawn is a target. 38.'iflg2 Wff8 39.'iflg3 j';bJ 40.'iflg2 Wff7 41 .�e4 j';b2t 42.'iflgl j';e2!
The pawn on g6 is indirectly protected. 43.�g2
43 .�xg6 �e l t ! (43 . . . 1Mfxg6 44.�xg6 �xe3 4 5 . <i> f2 gives White some chances of saving the game because of the g-pawn. Instead Black plays for an attack.) 44.'iflh2 Wffl and White will lose one of his b ishops in the near future. After 4 5 .�g2 j';e2 46 .!Mfe4 �e l 47.g5 j';xe3 48.Wlg4 White again pins his hopes on the g-pawn, but this time Black gets a better version of the endgame. 48 . . . �f2 49 .g6 �f4t 50 .�xf4 exf4 5 l .�h3 �e5! Th reatening to win the pawn with . . . �g5 . 5 2 .�e6 �g5 5 3 .�f7 ci>cS and once the king takes over the defence of the g7-square, the win is easy. 43 .. . j';el t 44.'iflh2 1Mfd7 4S.�f2 j';e2 46.'i!lg3 WfxbS 47.�fl
White still cannot take the g-pawn: 47.1Mfxg6 Wfb3t! 48.�f3 e4 47 . . . 1Mfb3t 48.'iflg2 j';a2 49.1Mfxg6 !MfxdSt
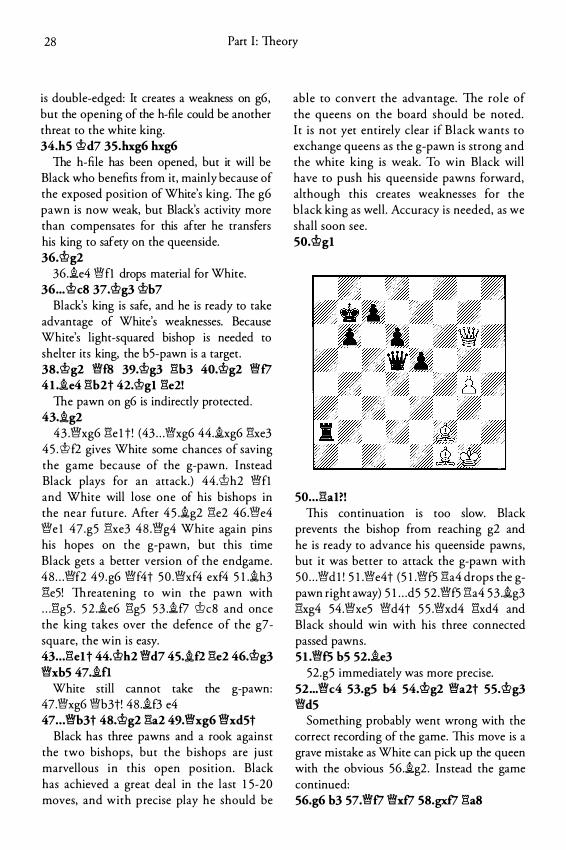
Black has three pawns and a rook against the two bishops, but the b ishops are j ust marvellous in this open position. Black has achieved a great deal in the last 1 5-20 moves, and with precise play he should be
able to convert the advantage. The role of the queens on the board should be noted. I t is not yet entirely clear if Black wants to exchange queens as the g-pawn is strong and the white king is weak. To win Black will have to push his queenside pawns forward, although this creates weaknesses for the black king as well. Accuracy is needed, as we shall soon see. SO.'i!lgl
so . . . j';ai?! This continuation is too slow. Black
prevents the bishop from reaching g2 and he is ready to advance his queenside pawns, but it was better to attack the g-pawn with 50 . . . 1Mfd l ! 5 1 .1Mfe4t (5 1 .1Mff5 �a4 drops the gpawn right away) 5 l . . . d5 52 .1Mff5 j';a4 53 .�g3 �xg4 54 .1Mfxe5 Wfd4t 5 5 .1Mfxd4 �xd4 and Black should win with his three connected passed pawns. 51 .1Mff5 bS 52.�e3
52.g5 immediately was more precise. 52 ... 1Mfc4 53.g5 b4 54.'i!lg2 Wfa2t SS.'iflg3 Wfd5
Something probably went wrong with the correct recording of the game. This move is a grave mistake as White can pick up the queen with the obvious 56 .�g2. Instead the game continued: 56.g6 b3 57.1Mff7 Wfxf7 58.gxf7 j';aS
Theoretical Foundation 29
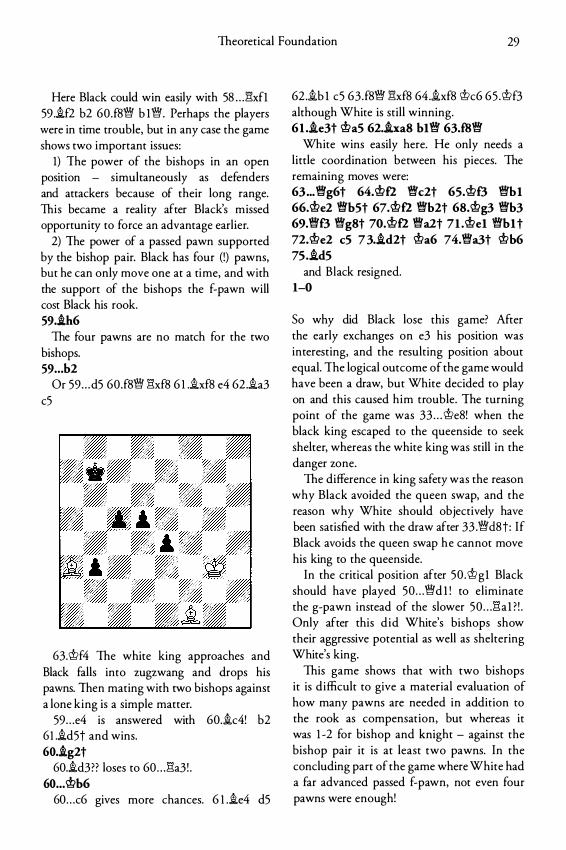
Here Black could win easily with 58 . . . l"i:xfl 59 .i.f2 b2 60.f8� b l�. Perhaps the players were in time trouble, but in any case the game shows two important issues:
1) The power of the bishops in an open position - simultaneously as defenders and attackers because of their long range. This became a reality after Black's missed opportunity to force an advantage earlier.
2) The power of a passed pawn supported by the bishop pair. Black has four (!) pawns, but he can only move one at a time, and with the support of the bishops the f-pawn will cost Black his rook. 59 . .ih6
The four pawns are no match for the two bishops. 59 . . . b2
Or 59 . . . d5 60.f8� l"i:xf8 6 1 .i.xf8 e4 62 .i.a3 c5
63.'it>f4 The white king approaches and Black falls into zugzwang and drops his pawns. Then mating with two bishops against a lone king is a simple matter.
59 . . . e4 is answered with 60.i.c4! b2 6I .i.d5t and wins. 60 . .ig2t
60.i.d3?? loses to 60 . . . l"i:a3 ! . 60 ... @b6
60 . . . c6 gives more chances. 6 I .i.e4 d5
62 .i.b l c5 63.f8� l"i:xf8 64.i.xf8 'it>c6 65 .'it>f3 although White is still winning. 61 ..ie3t @aS 62.ha8 bl� 63.f8�
White wins easily here. He only needs a little coordination between his pieces. The remaining moves were: 63 ... �g6t 64.@£2 �c2t 65.@f3 �bl 66.@e2 �b5t 67.@£2 �b2t 68.@g3 �b3 69.�f3 �g8t 70.@£2 �a2t 71 .@el �blt n.@e2 c5 73 . .id2t @a6 74.�a3t @b6 75 . .id5
and Black resigned. 1-0
So why did Black lose this game? After the early exchanges on e3 his position was interesting, and the resulting position about equal. The logical outcome of the game would have been a draw, but White decided to play on and this caused him trouble. The turning point of the game was 33 . . . 'it>e8! when the black king escaped to the queenside to seek shelter, whereas the white king was still in the danger zone.
The difference in king safety was the reason why Black avoided the queen swap, and the reason why White should objectively have been satisfied with the draw after 33 .�d8t: If Black avoids the queen swap he cannot move his king to the queenside.
In the critical position after 50 .'it>gl Black should have played 50 . . . �d l ! to eliminate the g-pawn instead of the slower 50 . . . l"i:al ? ! . Only after this d id White's bishops show their aggressive potential as well as sheltering White's king.
This game shows that with two bishops it is difficult to give a material evaluation of how many pawns are needed in addition to the rook as compensation, but whereas it was 1 -2 for bishop and knight - against the bishop pair it is at least two pawns. In the concluding part of the game where White had a far advanced passed f-pawn, not even four pawns were enough!
30 Part 1: Theory
In positions with two bishops or two knights only some of the four guidelines given earlier still apply - the rest may only help indirectly.
The exchanging problem still has its relevance as two knights and two bishops would love an extra rook just as much as the bishop and knight couple - we saw that in the example with two knights and a rook in the game Anand - Hernandez above. In comparison, the two bishops are the pairing least dependent on extra material (say, a rook) because they work so well together.
The colour problem loses some relevance. With two knights both colour complexes can be protected with equal strength or weakness - as one chooses to see it.
The two bishops work well together and their respective jobs do not interfere: They are both equally strong in protecting their colour complex. Apart from being a long-range piece, I believe that it is this that makes the bishop pair so strong.
Domination of the bishops by pawns -tricky, to say the least. Show me a pawn wall that works against both bishops. Good advice is to try to keep the ideal position of the pawns - which is beside each other (for instance the black pawn pair c5 and d5) . Nimzowitsch wrote in My System that if one of the pawns is moved forward, then the player has to be sure to have a "Plombeur" (tooth-filling) to repair the damage done by this pawn advance. If Black plays . . . d5-d4 then the king can fill in the hole on c4 by moving to d5. In any case the player will have to j udge every new position independently and decide which are the most important factors.
With two knights the material balance is probably 0- 1 pawns and with two bishops the number of pawns to compensate for the rook is at least two. This is, of course, a rough guide and in these two cases it makes more sense to look at the more dynamic features of the position such as activity and trying to create a passed pawn to make the minor
pieces passive. I suggest that the reader takes a critical approach to this question throughout the book and judges for him or herself - there will be plenty of opportunities to do so.
In a middlegame with pawns on both sides of the board the knights can often feel uncomfortable. If we use only the material measure of the position , then the rook side is often okay when fighting against two knights, even if there are no additional pawns as compensation. This fact will be evident in Chapter 3 on the tt:lc6 Catalan and also in the exercise section.
With two bishops sometimes more than two pawns is still not enough to compensate for the strength of the bishop pair, even in the endgame. The strength of the bishops will be demonstrated in the exercise section . Before moving on to the fundamental endgames, I would like to mention some transformations that can take place when playing positions with rook vs . two minor pieces:
Sacrificing back the rook for two minor pieces is always a possibility that should be considered - especially for the rook side if he has additional pawns. Two examples are Rublevsky - Nikolic from the chapter on the Scotch Endgame (see page 86) and Sloth -Palciauskas, corr. 200 1 from the tt:l c6 Catalan (the game is shown on page 63) .
If the rook side has additional pawns he can sometimes sacrifice the exchange. This will leave him a piece down, but he will perhaps gain a further pawn from this exchange or some other kind of compensation. Instructive examples can be found in the Scotch Endgame, for instance the game Dashko - Lugovoi, Russia 1 999, where Black already had two pawns prior to the piece sacrifice - see the following diagram:
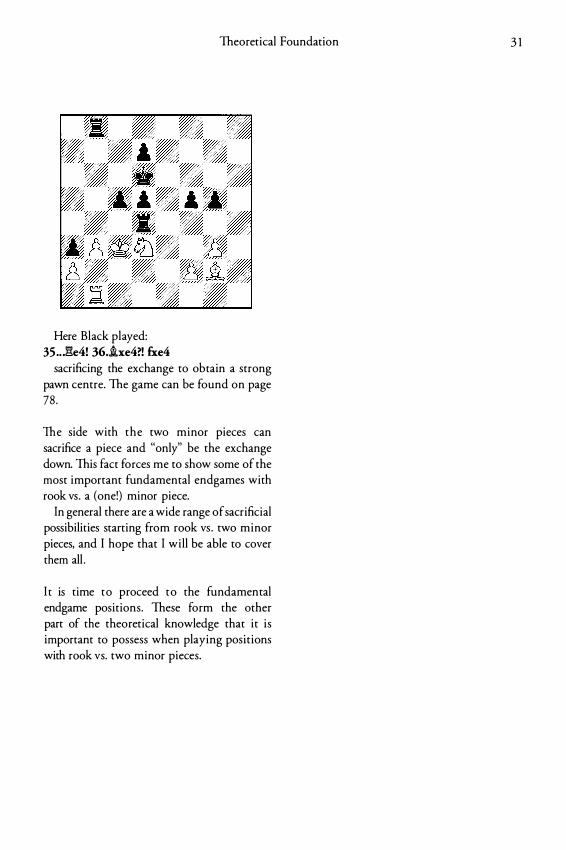
Theoretical Foundation
Here Black played: 35 . . J�e4! 36 . .ixe4?! fxe4
sacrificing the exchange to obtain a strong pawn centre. The game can be found on page 78 .
The side with the two minor pieces can sacrifice a piece and "only" be the exchange down. This fact forces me to show some of the most important fundamental endgames with rook vs. a (one!) minor piece.
In general there are a wide range of sacrificial possibilities starting from rook vs . two minor pieces, and I hope that I will be able to cover them all .
I t is time to proceed to the fundamental endgame positions. These form the other part of the theoretical knowledge that it is important to possess when playing positions with rook vs. two minor pieces.
3 1
Fundamental Endgames 33
Chapter 2 Fundamental Endgames
I could also have called this chapter Basic Endgames. The basic idea behind this chapter is to have a repertoire of fundamental endgames for comparison and judgement of more complicated positions. Armed with the appropriate knowledge it is possible to make the correct decisions at the board - should I or should I not exchange pieces and go for this ending?
First we shall see how king and rwo minor pieces mate the opponent's lone king, with no further material present on the board. The exception is king and rwo knights vs. king, where either side has to have an additional pawn to make mate possible.
However, I will mainly focus on mate with bishop and knight vs . a lone king, because exactly this configuration of minor pieces has relevance to the rule given in the Theoretical Foundation - on the colour problem.
The method explained here is very logical and consists of four stages . All four stages can be used for any of the three configurations. Here is the method:
a) In which corner is it possible to mate the king? b) Secure the king in the correct corner with one of the minor pieces. c) The other minor piece comes to help. d) The mating method.
This four-step procedure is not only very logical, but very practical as well. It is easy to understand and use during a game.
Before I turn to the mating methods, it is time to stop and think about what the value of the method given here is . Some might wonder what the deeper point is.
First, it is not as easy to mate with rwo minor pieces as people tend to think. When I ask people, sometimes even stronger players, if they can mate with bishop and knight, then a common reply is that it is easy - if you know how to do it! Many people do not know how to do it, or at least they don't have a method they follow.
Second, does it have relevance to the theme of rook vs. rwo minor pieces? Yes , very much so! In the case of bishop, knight and pawn vs. rook, if the weaker side has to give up his rook for the pawn, you must know how to mate with the material left on the board.
If you follow my line of thought in the method of mating a bare king with rwo minor pieces, you will discover the benefits when we move on to more complicated positions.
To mate with bishop and knight (and with rwo bishops or rwo knights as well) and with no other pieces on the board - you learn a lot about how such pieces coordinate with each other, how they cooperate. This will benefit the ambitious player when moving on to more complicated middlegame positions.
Bishop and knight is a difficult case, as here we must have cooperation berween rwo fundamentally different pieces, and this makes this mating configuration somehow the most interesting one. The bishop controls one colour complex (say, a dark-squared bishop) and so the knight has to control the other (light) half of the board. It is far easier for the bishop than for the knight to control a colour complex, therefore the king has to help the knight. This makes the knight look inferior to the bishop, and in some ways it is .
34 Part 1: Theory
Enough talk. Let's turn to the concrete method of how to mate a bare king:
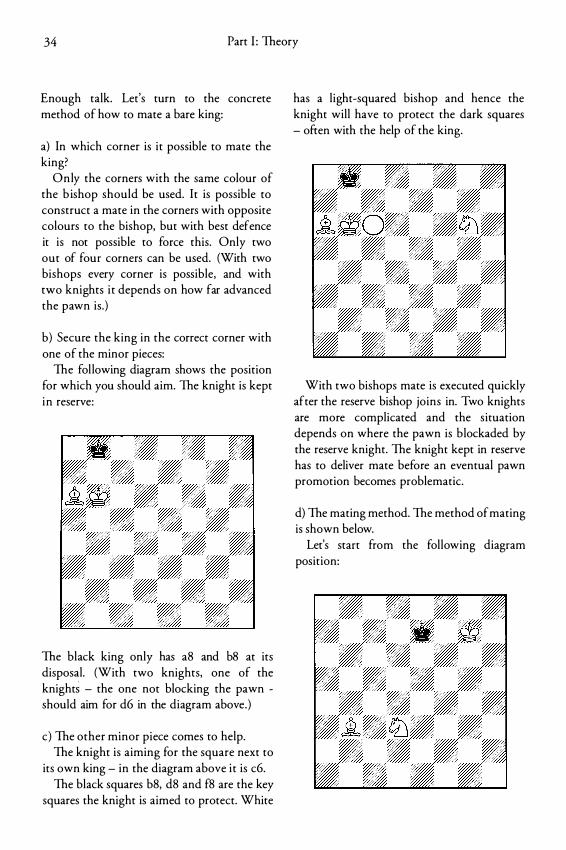
a) In which corner is it possible to mate the king?
Only the corners with the same colour of the b ishop should be used. It is possible to construct a mate in the corners with opposite colours to the bishop, but with best defence it is not possible to force this. Only two out of four corners can be used. (With two bishops every corner is possible, and with two knights i t depends on how far advanced the pawn is.)
b) Secure the king in the correct corner with one of the minor pieces:
The following diagram shows the position for which you should aim. The knight is kept in reserve:
The black king only has a8 and b8 at its disposal. (With two knights, one of the knights - the one not blocking the pawn -should aim for d6 in the diagram above.)
c) The other minor piece comes to help. The knight is aiming for the square next to
its own king - in the diagram above i t is c6. The black squares b8, d8 and f8 are the key
squares the knight is aimed to protect. White
has a light-squared bishop and hence the knight will have to protect the dark squares - often with the help of the king.
With two bishops mate is executed quickly after the reserve bishop joins in. Two knights are more complicated and the situation depends on where the pawn is blockaded by the reserve knight. The knight kept in reserve has to deliver mate before an eventual pawn promotion becomes problematic.
d) The mating method. The method of mating is shown below.
Let's start from the following diagram position:
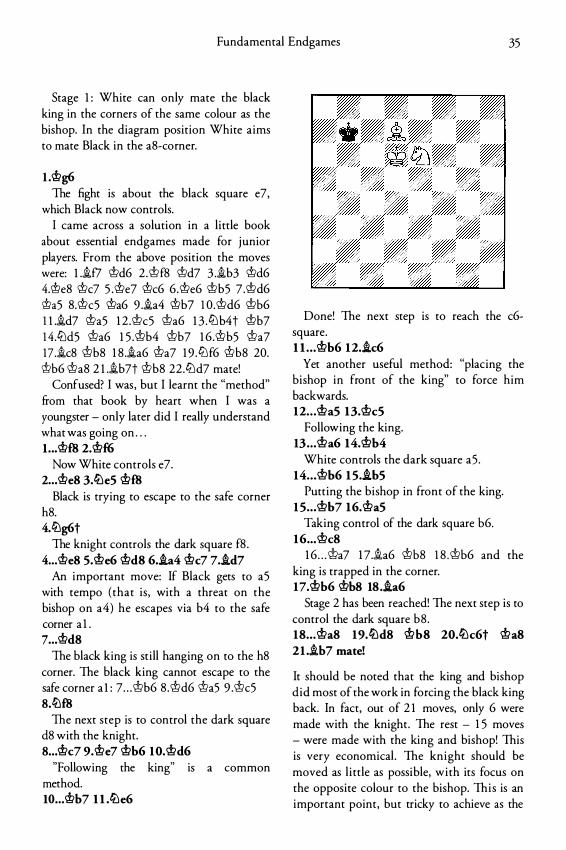
Fundamental Endgames 35
Stage 1 : White can only mate the black king in the corners of the same colour as the bishop. In the diagram position White aims to mate Black in the aS-corner.
I.<.!.>g6 The fight is about the black square e7,
which Black now controls. I came across a solution in a little book
about essential endgames made for junior players. From the above position the moves were: l .if7 �d6 2 .�fS �d7 3 .ib3 �d6 4.<.!.>eS �c7 5 .�e7 �c6 6.�e6 �b5 7.�d6 'kt>a5 S.�c5 �a6 9.ia4 �b7 1 0.�d6 �b6 1 l .id7 �a5 1 2 .�c5 �a6 1 3 .lLlb4t �b7 1 4.liJd5 i>a6 1 5 .i>b4 i>b7 1 6.i>b5 i>a7 17 .icS i>bS 1 S .ia6 i>a7 1 9.lLlf6 i>bS 20. 'kt>b6 mas 2 l .ib7t i>bs 22.liJd7 mate!
Confused? I was, but I learnt the "method" from that book by heart when I was a youngster - only later did I really understand what was going on . . . 1. • • <.!.>£8 2.<.!.>£6
Now White controls e7. 2 ... <.!.>e8 3.tlle5 <.!.>£8
Black is trying to escape to the safe corner hS. 4.tllg6t
The knight controls the dark square fS . 4 ... <.!.>e8 s.<.!.>e6 <.!.>ds 6 . .ia4 <.!.>c7 7 . .id7
An important move: If Black gets to a5 with tempo (that is , with a threat on the bishop on a4) he escapes via b4 to the safe corner a 1 . 7 ... <.!.>d8
The black king is still hanging on to the hS corner. The black king cannot escape to the safe corner a l : 7 . . . i>b6 S .i>d6 i>a5 9.i>c5 s.tl:l£8
The next step is to control the dark square dS with the knight. 8 ... <.f.>c7 9.<.f.>e7 <.!.>b6 10.<.!.>d6
"Following the king" is a common method. 10 ... <.!.>b7 l l .tlle6
Done! The next step is to reach the c6-square. l l . . . <.!.>b6 12 . .ic6
Yet another useful method: "placing the bishop in front of the king" to force him backwards. 12 . . . <.!.>a5 13.<.!.>c5
Following the king. 13 . . . <.!.>a6 14.<.!.>b4
White controls the dark square a5 . 14 . . . �b6 15 . .ih5
Putting the bishop in front of the king. 1 5 . . . �h7 16.<.!.>a5
Taking control of the dark square b6. 16 ... �c8
1 6 . . . i>a7 1 7.1a6 i>bS 1 S .�b6 and the king is trapped in the corner. 17.<.!.>b6 �b8 18 . .ia6
Stage 2 has been reached! The next step is to control the dark square bS . 18 . . . <.!.>a8 19.tl:ld8 <.!.>bs 20.tl:lc6t <.!.>as 21 .ib7 mate!
It should be noted that the king and bishop did most of the work in forcing the black king back. In fact, out of 2 1 moves, only 6 were made with the knight. The rest - 1 5 moves - were made with the king and bishop! This is very economical . The knight should be moved as little as possible, with its focus on the opposite colour to the bishop. This is an important point, but tricky to achieve as the
36 Part I : Theory
knight "changes colour" every time it moves. Young chess players really like to move the knight, but the king and bishop should do the hard work.
Fundamental endgames with pawns
Now we turn our attention to some basic endgames with rook vs. two minor pieces. Under normal circumstances it is not possible for either side to win the game when there are no pawns present on the board. We start out with one pawn and then advance to more pawns.
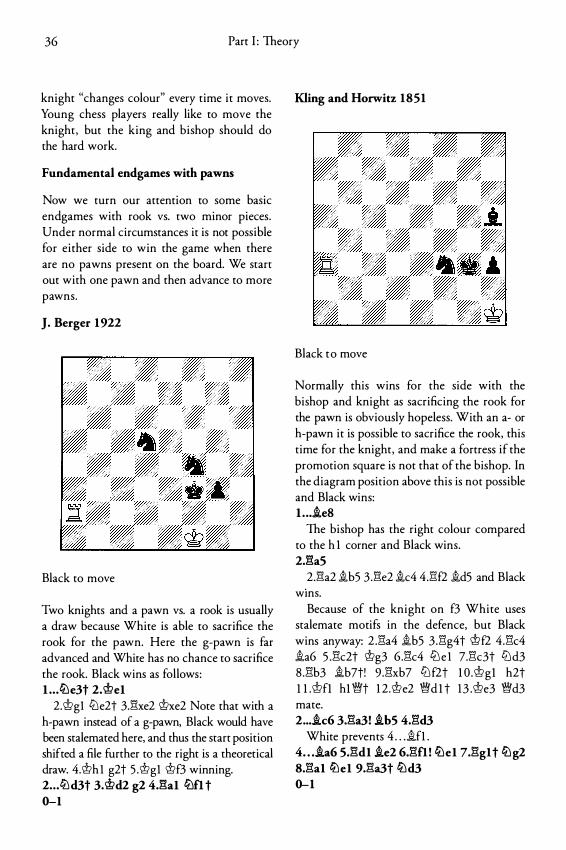
J. Berger 1922
Black to move
Two knights and a pawn vs. a rook is usually a draw because White is able to sacrifice the rook for the pawn. Here the g-pawn is far advanced and White has no chance to sacrifice the rook. Black wins as follows: l . . . ll:le3t 2.lt?e1
2.lt?gl li:le2t 3.�xe2 lt?xe2 Note that with a h-pawn instead of a g-pawn, Black would have been stalemated here, and thus the start position shifted a file further to the right is a theoretical draw. 4.lt?h l g2t s .lt?gl lt?f3 winning. 2 . . . ll:Jd3t 3.lt?d2 g2 4.�a1 ll:lfl t 0-1
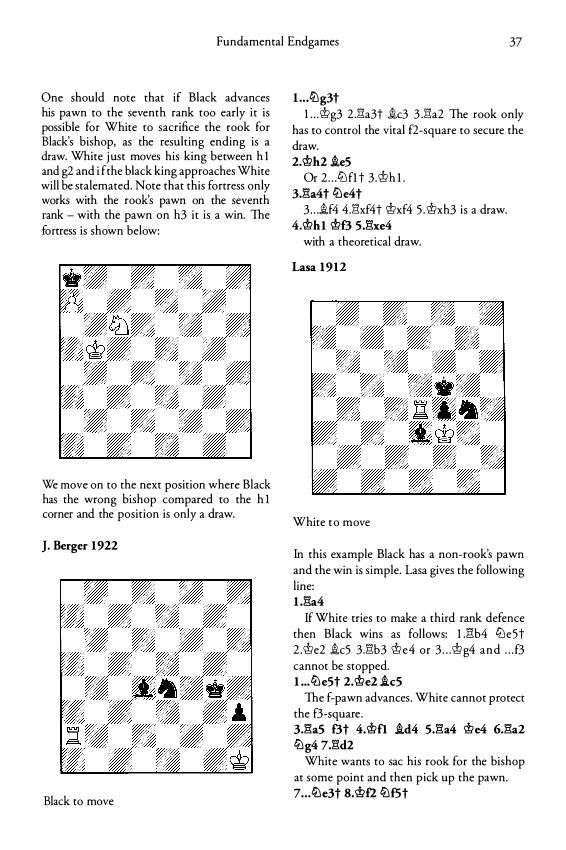
Kling and Horwitz 1851
Black to move
Normally this wins for the side with the bishop and knight as sacrificing the rook for the pawn is obviously hopeless. With an a- or h-pawn it is possible to sacrifice the rook, this time for the knight, and make a fortress if the promotion square is not that of the bishop. In the diagram position above this is not possible and Black wins: l . .. .ieS
The bishop has the right colour compared to the h 1 corner and Black wins. 2.�a5
2.�a2 .ib5 3 .�e2 .ic4 4.l"1f2 .idS and Black WinS.
Because of the knight on f3 White uses stalemate motifs in the defence, but Black wins anyway: 2 .l"1a4 .ib5 3 .l"1g4t mf2 4.!"1c4 .ia6 5 .l"1c2t lt?g3 6.!"1c4 li:l e l 7.l"1c3t '2ld3 8 .l"1b3 .ib7t! 9 .l"1xb7 '2l f2t l O .lt?gl h2t l l .lt?fl hl �t 1 2.lt?e2 �d l t 1 3 .lt?e3 �d3 mate. 2 ... .ic6 3.l"1a3! .ihS 4Jl:d3
White prevents 4 . . . .ifl . 4 . . . .ia6 S.l"1d1 .ie2 6.!"1fl! ll:le1 7.l"1g1 t ll:lg2 8.!"1a1 li:le1 9.l"1a3t ll:ld3 0-1
Fundamental Endgames 37
One should note that if Black advances his pawn to the seventh rank too early it is possible for White to sacrifice the rook for Black's bishop, as the resulting ending is a draw. White j ust moves his king between h l and g2 and i f the black king approaches White will be stalemated. Note that this fortress only works with the rook's pawn on the seventh rank - with the pawn on h3 it is a win. The fortress is shown below:
We move on to the next position where Black has the wrong bishop compared to the h 1 corner and the position is only a draw.
J. Berger 1922
Black to move
t ...<!l'lg3t l . . .i>g3 2 .2"1a3t .ic3 3 .2"1a2 The rook only
has to control the vital f2-square to secure the draw. 2.i>h2 .ie5
Or 2 . . . tt'l fl t 3 .i>h l . 3.2"1a4t tLle4t
3 . . . .if4 4.2"1xf4t i>xf4 5 . i>xh3 is a draw. 4.i>h1 i>£3 5.2"1xe4
with a theoretical draw.
Lasa 1912
White to move
In this example Black has a non-rook's pawn and the win is simple. Lasa gives the following line: 1 .2"1a4
If White tries to make a third rank defence then Black wins as follows: 1 .:!"1b4 tt'le5t 2 .i>e2 .ic5 3.2"1b3 i>e4 or 3 . . . i>g4 and . . . f3 cannot be stopped. 1 ... tLle5t 2.i>e2 .ic5
The f-pawn advances . White cannot protect the f3-square . 3.2"1a5 f3t 4. i>fl .id4 5.2"1a4 i>e4 6.2"1a2 tLlg4 7.2"1d2
White wants to sac his rook for the bishop at some point and then pick up the pawn. 7 . . . tLle3t 8.i>f2 tLlf5t
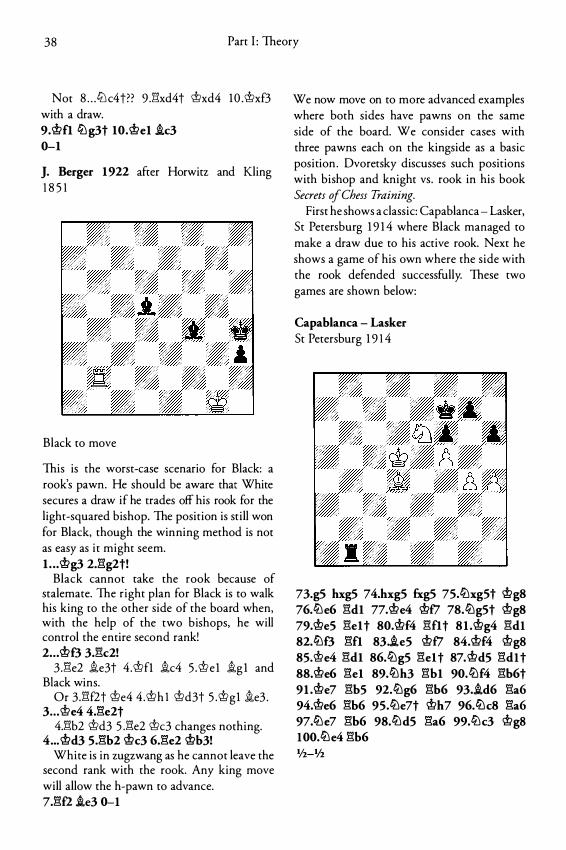
38 Part I : Theory
Not 8 . . . 'Ll c4t?? 9 J'hd4t �xd4 1 0 .�xf3 with a draw. 9.�fl tt:l g3t 10.�el .ic3 0-1
J. Berger 1922 after Horwitz and Kling 1 8 5 1
Black to move
This is the worst-case scenario for Black: a rook's pawn. He should be aware that White secures a draw if he trades off his rook for the light-squared bishop. The position is still won for Black, though the winning method is not as easy as it might seem. l . . .�g3 U�g2t!
Black cannot take the rook because of stalemate. The right plan for Black is to walk his king to the other side of the board when, with the help of the two bishops, he will control the entire second rank! 2 . . . �£3 3J3c2!
3.Ele2 .te3t 4.�fl .tc4 5 .�e1 .tg 1 and Black wins.
Or 3.Elf2t �e4 4 .�h 1 �d3t 5 .�g1 .te3 . 3 .. . �e4 4J3e2t
4.Elb2 �d3 5 .Ele2 �c3 changes nothing. 4 ... �d3 5.l3b2 �c3 6.l3e2 �b3!
White is in zugzwang as he cannot leave the second rank with the rook. Any king move will allow the h-pawn to advance. 7.l3f2 .ie3 0-1
We now move on to more advanced examples where both sides have pawns on the same side of the board. We consider cases with three pawns each on the kingside as a basic position . Dvoretsky discusses such positions with bishop and knight vs . rook in his book Secrets of Chess Training.
First he shows a classic: Capablanca - Lasker, St Petersburg 1 9 1 4 where Black managed to make a draw due to his active rook. Next he shows a game of his own where the side with the rook defended successfully. These two games are shown below:
Capablanca - Lasker St Petersburg 1 9 1 4
73.g5 hxg5 74.hxg5 fxg5 75.tt:lxg5t �g8 76.tll e6 l3d1 77.�e4 �f7 78.tt:lg5t �g8 79.�e5 l3e1t 80.@f4 l3flt 8I .@g4 l3d1 82.tllf3 l3fl 83 . .ie5 �f7 84.@f4 @gS 85. �e4 l3d1 86.tt:lg5 l3e1 t 87. @dS l3d1 t 88.@e6 l3e1 89.tllh3 l3b1 90.tt:lf4 l3b6t 9I .@e7 l3b5 92.tt:lg6 l3b6 93 . .id6 l3a6 94.@e6 l3b6 95.tt:le7t @h7 96.tll c8 l3a6 97.tt:le7 l3b6 98.tlld5 l3a6 99.tll c3 @gs 100.tll e4 l3b6 112-lh
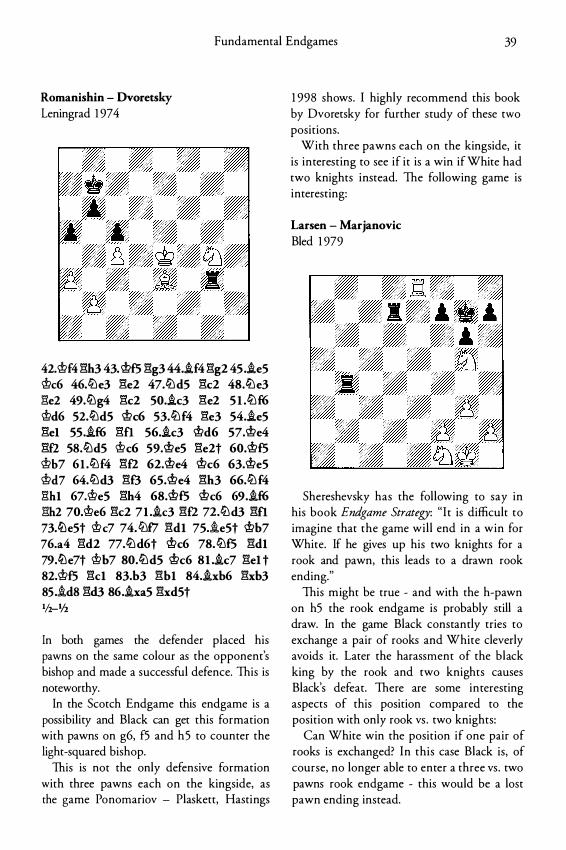
Fundamental Endgames 39
Romanishin - Dvoretsky Leningrad 1 97 4
42. �f4 gh3 43. �f5 gg3 44 . .if4 gg2 4S . .ie5 �c6 46)tJe3 ge2 47)tJd5 gc2 48 . .!i.Je3 ge2 49 . .!l\g4 gc2 SO . .ic3 ge2 S l ..!i.Jf6 �d6 52 . .!i.Jd5 �c6 53 . .!i.Jf4 ge3 54 . .ie5 gel SS . .if6 gfl 56 . .ic3 �d6 57.�e4 gf2 SB . .!i.JdS �c6 59.�e5 ge2t 60.�f5 �b7 61 .lt.Jf4 gf2 62.�e4 �c6 63.�e5 �d7 64.lt.Jd3 gf3 65.�e4 gh3 66.lt.Jf4 ghl 67.�e5 gh4 68.�f5 �c6 69 . .if6 gh2 70.�e6 gc2 7l ..ic3 gn. n . .!l\d3 gn 73.ttle5t �c7 74 . .!t.Jfi gdl 75.-ieSt �b7 76.a4 gd2 77 . .!i.Jd6t �c6 78 . .!l\f5 gdl 79.ttle7t �b7 80 . .!i.Jd5 �c6 8l ..ic7 gel t 82.�f5 gel 83.b3 gbl 84 . .ixb6 gxb3 85 . .id8 gd3 86 . .ixa5 gxdSt 1/2-112
In both games the defender placed his pawns on the same colour as the opponent's bishop and made a successful defence. This is noteworthy.
In the Scotch Endgame this endgame is a possibility and Black can get this formation with pawns on g6, f5 and h5 to counter the light-squared bishop.
This is not the only defensive formation with three pawns each on the kingside, as the game Ponomariov - Plaskett, Hastings
1 998 shows. I highly recommend this book by Dvoretsky for further study of these two positions.
With three pawns each on the kingside, it is interesting to see if it is a win if White had two knights instead. The following game is interesting:
Larsen - Marjanovic Bled 1 979
Shereshevsky has the following to say in his book Endgame Strategy: "It is difficult to imagine that the game wil l end in a win for White. If he gives up his two knights for a rook and pawn, this leads to a drawn rook ending."
This might be true - and with the h-pawn on h5 the rook endgame is probably still a draw. In the game Black constantly tries to exchange a pair of rooks and White cleverly avoids it. Later the harassment of the black king by the rook and two knights causes Black's defeat. There are some interesting aspects of this position compared to the position with only rook vs . two knights:
Can White win the position if one pair of rooks is exchanged? In this case Black is, of course, no longer able to enter a three vs . two pawns rook endgame - this would be a lost pawn ending instead.
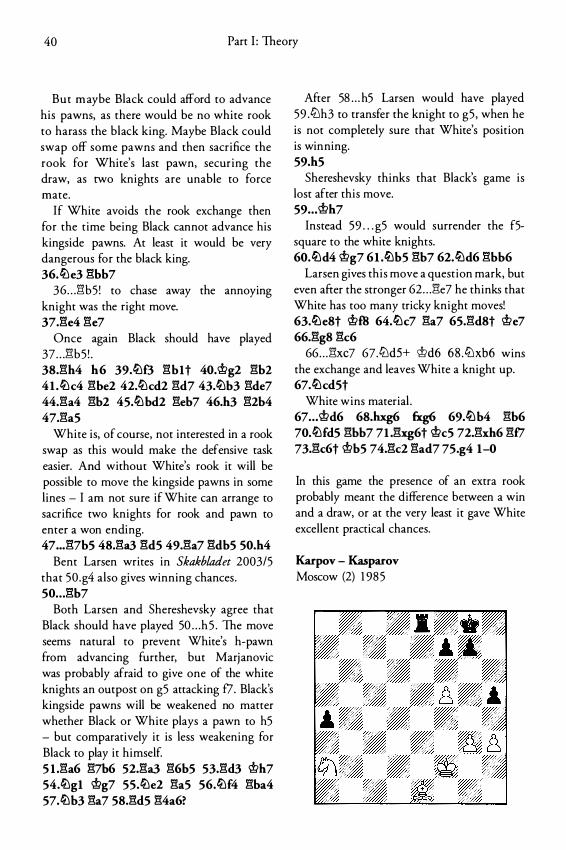
40 Part 1: Theory
But maybe Black could afford to advance his pawns, as there would be no white rook to harass the black king. Maybe Black could swap off some pawns and then sacrifice the rook for White's last pawn, securing the draw, as two knights are unable to force mate.
If White avoids the rook exchange then for the time being Black cannot advance his kingside pawns. At least it would be very dangerous for the black king. 36.ti)e3 �bb7
36 . . . 1"lb5 ! to chase away the annoying knight was the right move. 37.�e4 �e7
Once again Black should have played 37 . . . 1"lb5 ! . 38.�h4 h6 39.ti)f3 �bl t 40.@g2 �b2 41 .ti)c4 �be2 42.ti)cd2 �d7 4J.ti)b3 �de7 44.�a4 �b2 4S.ti)bd2 �eb7 46.h3 �2b4 47.�a5
White is, of course, not interested in a rook swap as this would make the defensive task easier. And without White's rook it will be possible to move the kingside pawns in some lines - I am not sure if White can arrange to sacrifice two knights for rook and pawn to enter a won ending. 47 • • . �7b5 48.�a3 �dS 49.�a7 �dbS SO.h4
Bent Larsen writes in Skakbladet 2003/5 that 50 .g4 also gives winning chances . so . . . �b7
Both Larsen and Shereshevsky agree that Black should have played 50 . . . h 5 . The move seems natural to prevent White's h-pawn from advancing further, but Marjanovic was probably afraid to give one of the white knights an outpost on g5 attacking f7. Black's kingside pawns will be weakened no matter whether Black or White plays a pawn to h5 - bur comparatively it is less weakening for Black to play it himself. S l .�a6 �7b6 52.�a3 �6b5 53.�d3 @h7 54.ti)gl @g7 SS.ti)e2 �aS 56.ti)f4 �ba4 57.ti)b3 �a7 58.�d5 �4a6?
After 58 . . . h5 Larsen would have played 59.l2'lh3 to transfer the knight to g5 , when he is not completely sure that White's position is winning. 59.h5
Shereshevsky thinks that Black's game is lost after this move. 59 . • • @h7
Instead 59 . . . g5 would surrender the f5-square to the white knights. 60.ti)d4 @g7 61 .ti)bS �b7 62.ti)d6 �bb6
Larsen gives this move a question mark, but even after the stronger 62 . . . 1"le7 he thinks that White has too many tricky knight moves! 63.ti)e8t @ffi 64.ti)c7 �a7 6S.�d8t @e? 66.�g8 �c6
66 . . . 1"lxc7 67.l2'ld5+ @d6 68 .l2'lxb6 wins the exchange and leaves White a knight up. 67.ti)cdSt
White wins material . 67 . . . @d6 68.hxg6 fxg6 69.ti)b4 �b6 70.ti)fd5 �bb7 71 .�xg6t @cS 72.�xh6 �f7 73.�c6t @bS 74.�c2 �ad7 7S.g4 1-0
In this game the presence of an extra rook probably meant the difference between a win and a draw, or at the very least it gave White excellent practical chances.
Karpov - Kasparov Moscow (2) 1 98 5
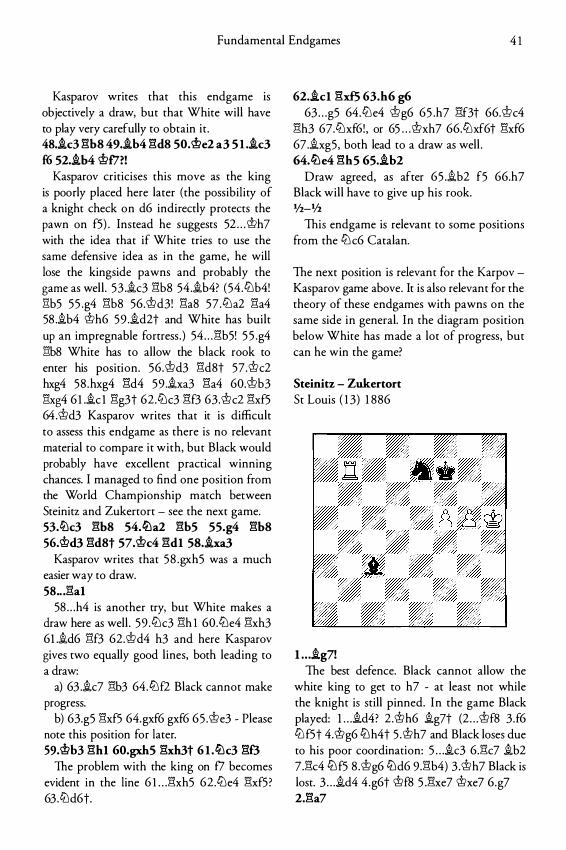
Fundamental Endgames 4 1
Kasparov writes that this endgame is objectively a draw, but that White will have to play very carefully to obtain it . 48.ic3 gbs 49.ih4 gds so.l!?e2 a3 5 I .ic3 f6 52.ib4 'i!?f7?!
Kasparov criticises this move as the king is poorly placed here later (the possibility of a knight check on d6 indirectly protects the pawn on f5) . Instead he suggests 52 . . . 'i!?h7 with the idea that if White tries to use the same defensive idea as in the game, he will lose the kingside pawns and probably the game as well . 53 .ic3 Elb8 54 .ib4? (54 .CiJb4! Elb5 55 .g4 Elb8 56.'i!?d3! Ela8 57 .CLla2 Ela4 58 .ib4 'i!?h6 59 .id2t and White has built up an impregnable fortress . ) 54 . . . Elb5! 5 5 .g4 2:b8 White has to allow the black rook to enter his position. 56 .'tt>d3 Eld8t 57 .'tt>c2 hxg4 58 .hxg4 gd4 59 .ixa3 ga4 60.'i!?b3 2:xg4 6 l .ic l Elg3t 62.CLlc3 Elf3 63.'tt>c2 Elxf5 64 .'tt>d3 Kasparov writes that it is difficult to assess this endgame as there is no relevant material to compare it with, but Black would probably have excellent practical winning chances. I managed to find one position from the World Championship match berween Steinitz and Zukertort - see the next game. 53.ltlc3 gbs 54.ttla2 ghs ss.g4 gbs 56.1!?d3 gdst 57.'i!?c4 gdl 58.ixa3
Kasparov writes that 58 .gxh5 was a much easier way to draw. 58 .. J�al
58 . . . h4 is another try, but White makes a draw here as well . 59 .CLlc3 Elh 1 60.CLle4 Elxh3 6l .id6 Elf3 62.'tt>d4 h3 and here Kasparov gives rwo equally good lines, both leading to a draw:
a) 63 .ic7 Elb3 64.lLlf2 Black cannot make progress.
b) 63.g5 Elxf5 64.gxf6 gxf6 65 .'tt>e3 - Please note this position for later. s9.'i!?h3 ghl Go.gxhs gxh3t 6 I .ltlc3 go
The problem with the king on f7 becomes evident in the line 6 I . . .Elxh5 62.CLle4 Elxf5 ? 63 .1tld6t.
62.icl gxfS 63.h6 g6 63 . . . g5 64.CiJe4 'tt>g6 65 .h7 Elf3t 66.'tt>c4
Elh3 67.CLlxf6! , or 65 . . . 'tt>xh7 66.CiJxf6t Elxf6 67.ixg5, both lead to a draw as well . 64.ltle4 ghs 65.ih2
Draw agreed, as after 65 .ib2 f5 66.h7 Black will have to give up his rook. lf2-1J2
This endgame is relevant to some positions from the CLl c6 Catalan.
The next position is relevant for the Karpov Kasparov game above. It is also relevant for the theory of these endgames with pawns on the same side in general. In the diagram position below White has made a lot of progress, but can he win the game?
Steinitz - Zukertort St Louis ( 1 3) 1 886
l . . . ig7! The best defence. Black cannot allow the
white king to get to h7 - at least not while the knight is still pinned. In the game Black played: I . . .id4? 2 .'tt>h6 ig7t (2 . . . 'tt>f8 3 .f6 CiJ f5t 4.'i!?g6 1tlh4t 5 .'tt>h7 and Black loses due to his poor coordination: 5 . . . ic3 6.Elc7 ib2 7 .Elc4 1tl f5 8 .'tt>g6 1tld6 9.Elb4) 3 .'tt>h7 Black is lost. 3 . . . id4 4.g6t 'tt>f8 5 .Elxe7 'tt>xe7 6.g7 2.ga7
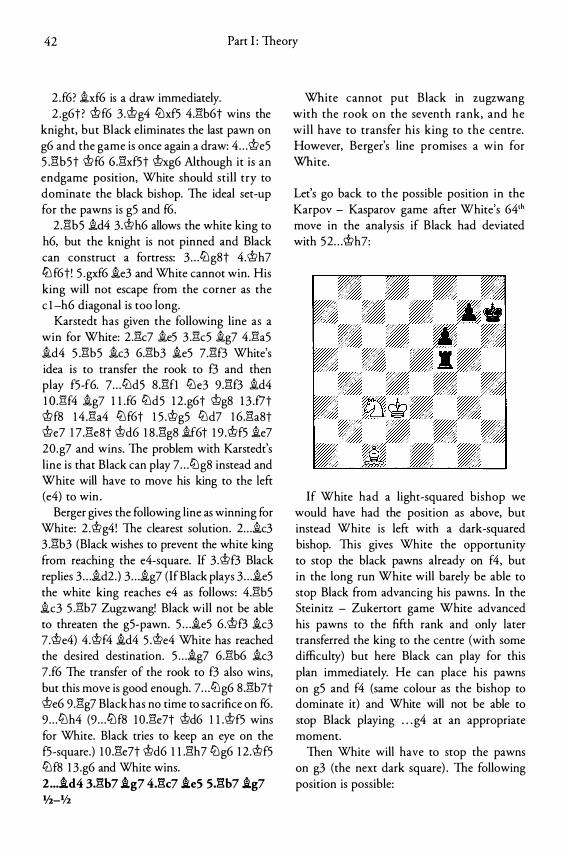
42 Part 1: Theory
2 .f6? �xf6 is a draw immediately. 2 .g6t ? <;fJf6 3 .<;fJg4 ttlxf5 4.E!b6t wins the
knight, but Black eliminates the last pawn on g6 and the game is once again a draw: 4 . . . <;fJe5 5 .l'!b5t <;fJf6 6.l'!xf5t c;!;>xg6 Although it is an endgame position, White should sti l l try to dominate the black bishop. The ideal set-up for the pawns is g5 and f6.
2 .l'!b5 �d4 3.c;!;>h6 allows the white king to h6, but the knight is not pinned and Black can construct a fortress: 3 . . . ttlg8t 4.<;fJh7 tt:l f6t! 5 .gxf6 �e3 and White cannot win. His king will not escape from the corner as the c l -h6 diagonal is too long.
Karstedt has given the following line as a win for White: 2 .l'!c7 �e5 3 .l'!c5 �g7 4.E!a5 �d4 5 .l'!b5 �c3 6.l'!b3 �e5 7.l'!f3 White's idea is to transfer the rook to f3 and then play f5-f6. 7 . . . ttld5 8.l'!fl ttle3 9.l'!f3 �d4 1 o .E!f4 �g7 I l .f6 tt:Jds I 2 .g6t c;:t>gs I 3 .f7t <;fJfs 1 4 .E!a4 tt:J f6t 1 5 .c;!;>g5 tt:Jd7 1 6.l'!a8t <;fJe? 1 7 .l'!e8t c;!;>d6 1 8 .l'!g8 �f6t 1 9 .c;!;>f5 �e7 20.g7 and wins. The problem with Karstedt's l ine is that Black can play 7 . . . tt:Jg8 instead and White will have to move his king to the left (e4) to win .
Berger gives the following line as winning for White: 2 .c;!;>g4! The clearest solution. 2 . . . �c3 3 .l'!b3 (Black wishes to prevent the white king from reaching the e4-square. If 3 .c;!;>f3 Black replies 3 . . . �d2.) 3 . . . �g7 (If Black plays 3 . . . �e5 the white king reaches e4 as follows: 4.E!b5 �c3 5 .l'!b7 Zugzwang! Black will not be able to threaten the g5-pawn. 5 . . . �e5 6.<;fJf3 �c3 7.c;!;>e4) 4.c;!;>f4 �d4 s .c;!;>e4 White has reached the desired destination. 5 . . . �g7 6.E!b6 �c3 7.f6 The transfer of the rook to f3 also wins, but this move is good enough. 7 . . . tt:Jg6 8 .l'!b7t c;!;>e6 9.l'!g7 Black has no time to sacrifice on f6. 9 . . . tt:Jh4 (9 . . . tt:Jf8 I O .l'!e7t c;!;>d6 1 I .c;!;>f5 wins for White. Black tries to keep an eye on the f5-square.) I O .l'!e7t c;!;>d6 l l .l'!h7 ttlg6 1 2.c;!;>f5 ttl f8 1 3 .g6 and White wins. 2 ... !d4 3.l'!b7 !g7 4.l'!c7 !e5 5J'�b7 i.g7 1/z-lfz
White cannot put Black in zugzwang with the rook on the seventh rank, and he wil l have to transfer his king to the centre. However, Berger's line promises a win for White.
Let's go back to the possible position in the Karpov - Kasparov game after White's 64'h move in the analysis if Black had deviated with 52 . . . c;!;>h7:
If White had a light-squared bishop we would have had the position as above, but instead White is left with a dark-squared bishop. This gives White the opportunity to stop the black pawns already on f4, but in the long run White will barely be able to stop Black from advancing his pawns. In the Steinitz - Zukertort game White advanced his pawns to the fifth rank and only later transferred the king to the centre (with some difficulty) but here Black can play for this plan immediately. He can place his pawns on g5 and f4 (same colour as the bishop to dominate it) and White will not be able to stop Black playing . . . g4 at an appropriate moment.
Then White will have to stop the pawns on g3 (the next dark square) . The following position is possible:
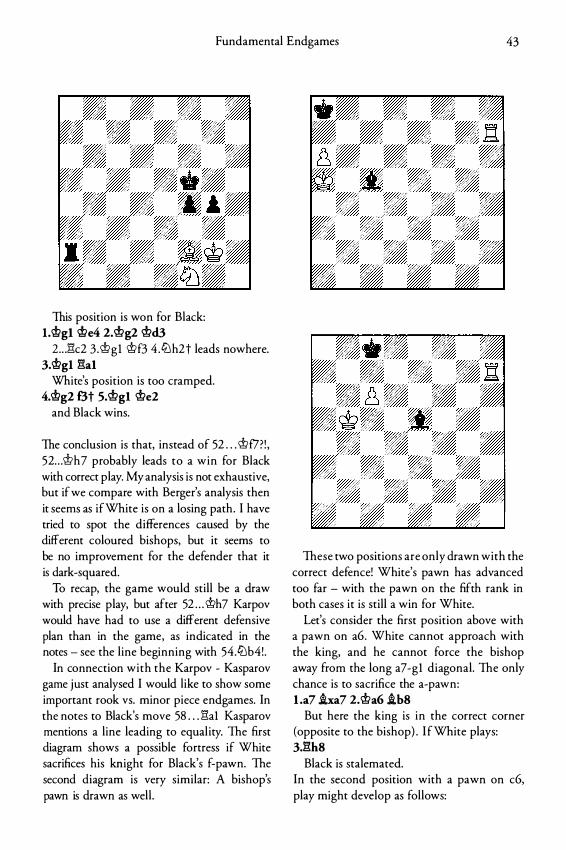
Fundamental Endgames 43
This position is won for Black: I.<.!;lgl c,!;le4 2.<.!;lg2 <.!;ld3
2. . .�c2 3 .@gl @f3 4 .li:Jh2t leads nowhere. 3.<.!;lgi �al
White's position is too cramped. 4.<.!;lg2 f.3t s.<.!;lgl <.!;le2
and Black wins.
The conclusion is that, instead of 52 . . . @f7?! , 52 . . . <.!;lh7 probably leads to a win for Black with correct play. My analysis is not exhaustive, but if we compare with Berger's analysis then it seems as if White is on a losing path. I have tried to spot the differences caused by the different coloured bishops, but it seems to be no improvement for the defender that it is dark-squared.
To recap, the game would still be a draw with precise play, but after 52 . . . @h7 Karpov would have had to use a different defensive plan than in the game, as indicated in the notes - see the line beginning with 54.li:lb4! .
In connection with the Karpov - Kasparov game just analysed I would like to show some important rook vs. minor piece endgames. In the notes to Black's move 58 . . . �al Kasparov mentions a line leading to equality. The first diagram shows a possible fortress if White sacrifices his knight for Black's f-pawn. The second diagram is very similar: A bishop's pawn is drawn as well .
These two positions are only drawn with the correct defence! White's pawn has advanced too far - with the pawn on the fifth rank in both cases it is still a win for White.
Let's consider the first position above with a pawn on a6. White cannot approach with the king, and he cannot force the bishop away from the long a7-gl diagonal. The only chance is to sacrifice the a-pawn: l .a7 .ixa7 2.@a6 .ibS
But here the king is in the correct corner (opposite to the bishop) . I fWhite plays: 3.l:�h8
Black is stalemated. In the second position with a pawn on c6, play might develop as follows:
44 Part 1: Theory
U�e7 .if4 2.�f7 .igS? If Black stays on the long diagonal with,
for instance 2 . . . �h2, the position is drawn. It is instructive to see what happens if Black plays carelessly though. With a bishop's pawn there is no win , in contrast to a knight's pawn, if White sacrifices the pawn: 3 .c7 cj;Jb7 If all the remaining pieces are moved one square to the left, then the position is won for White. The winning method is: 4 .�d7 (4.cj;Jc5 �g3 and White cannot make progress. The a7-g l diagonal is too long and White is unable to dominate the bishop.) 4 . . . �f4 5 . c81!9t cj;Jxc8 6 . cj;Jc6 but here the black king simply hides in the aS-corner: 6 . . . cj;Jb8! with a draw familiar from the position with a rook's pawn. 3.c7!
Now it works due to Black's . poor coordination . 3 . . . cj;Jb7 4.cj;Jcs .ih4 s.�g7
Black cannot prevent the king from reaching the d6-square.
s . . . .iei 5 . . . �f6 6 .cj;Jd6! .ixg7 7 .cj;Jd7 also wins.
6.cj;Jd6 .iaS 7.�f7 Black is in zugzwang. The a5-d8 diagonal
proves to be too short. 7 ... .ib6 8.c8'<!9t! cj;Jxc8 9.cj;Jc6 .idS 10.�£8
and White wins.
A knight's pawn on the sixth rank is not a draw (against a dark-squared bishop in this case) . White can sacrifice the pawn under favourable circumstances leading to the following position, which is won for White because the black king is trapped in the corner:
l . . . .igl If White were to move, then l .�d7 would
win as the threat of back rank mate wins the bishop. With his last move the bishop tries to hide behind the white king. 2.�fl
White cannot let the king out: 2 .�b7 cj{fg with a draw. 2 . . . .ih2 3.�f2 .ig3
3 . . . .igl 4 .�g2 forces the bishop out as well . 4.�g2! .id6
Note that both 4 . . . .ih4 5 .cj;Jh5t and 4 . . . .if4 5 .cj;lf5t drop the bishop. s.�d2 .ie7 6.�c2!
Not 6.E1d7? cj;lfg and the king escapes . 6 . . . .ib4 7.�c8t .i£8 8.�a8 cj;Jhs 9.�xf8 mate!
I would like to turn the reader's attention to the following positions: rook vs. bishop and rook vs. knight with two pawns each on the same side:
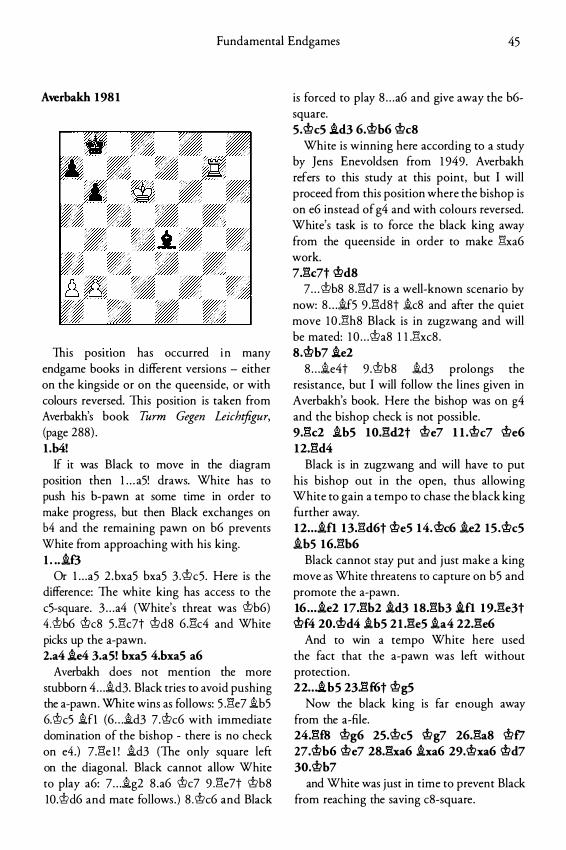
Fundamental Endgames 45
Averbakh 1981
This posmon has occurred i n many endgame books in different versions - either on the kingside or on the queenside, or with colours reversed. This position is taken from Averbakh's book Turm Gegen Leichtjigur, (page 288) . l .b4!
If it was Black to move in the diagram position then 1 . . . a5! draws. White has to push his b-pawn at some time in order to make progress, but then Black exchanges on b4 and the remaining pawn on b6 prevents White from approaching with his king. I. .. if3
Or l . . .a5 2 .bxa5 bxa5 3 .Wc5. Here is the difference: The white king has access to the c5-square. 3 . . . a4 (White's threat was Wb6) 4 .'tt>b6 Wc8 5 .!\c?t Wd8 6.!\c4 and White picks up the a-pawn. 2.a4 ie4 3.a5! bxa5 4.bxa5 a6
Averbakh does not mention the more stubborn 4 . . . id3. Black tries to avoid pushing the a-pawn. White wins as follows: 5 .!\e? ib5 6.'tt>c5 ifl (6 . . . 1d3 7.Wc6 with immediate domination of the bishop - there is no check on e4 .) 7.!\e l ! 1d3 (The only square left on the diagonal. Black cannot allow White to play a6: 7 . . . 1g2 8 .a6 We? 9 .!\e?t Wb8 10.'tt>d6 and mate follows. ) 8 .Wc6 and Black
is forced to play 8 . . . a6 and give away the b6-square. 5.Wc5 id3 6.�b6 �c8
White is winning here according to a study by Jens Enevoldsen from 1 949. Averbakh refers to this study at this point, bur I will proceed from this position where the bishop is on e6 instead of g4 and with colours reversed. White's task is to force the black king away from the queenside in order to make !lxa6 work. 7J'k7t �d8
7 . . . �b8 8 .!\d7 is a well-known scenario by now: 8 . . . 1f5 9 .!ld8t 1c8 and after the quiet move 1 0 .!\h8 Black is in zugzwang and will be mated: 1 0 . . . Wa8 1 1 .!lxc8 . 8.�b7 ie2
8 . . . 1e4t 9 .Wb8 1d3 prolongs the resistance, bur I will follow the l ines given in Averbakh's book. Here the bishop was on g4 and the bishop check is not possible. 9J'k2 ib5 10JM2t �e7 1 l .�c7 �e6 12J"�d4
Black is in zugzwang and will have to put his bishop out in the open, thus al lowing White to gain a tempo to chase the black king further away. 12 . . . .ifl 13.!ld6t �e5 14. �c6 .ie2 15. Wc5 .ib5 16.!lb6
Black cannot stay put and just make a king move as White threatens to capture on b5 and promote the a-pawn. 16 . . . .ie2 17J�b2 .id3 18J�b3 .ifl 19J�e3t �f4 20.<.!?d4 .ib5 2 1 .:!%e5 .ia4 22.:!%e6
And to win a tempo White here used the fact that the a-pawn was left without protection. 22 . . . .ib5 23.l��f6t �g5
Now the black king is far enough away from the a-file. 24.:!%£8 �g6 25. �c5 '.!?g7 26.:!%a8 �f7 27.�b6 �e7 28.:!%xa6 .ixa6 29.�xa6 �d7 30.�b7
and White was just in time to prevent Black from reaching the saving c8-square.
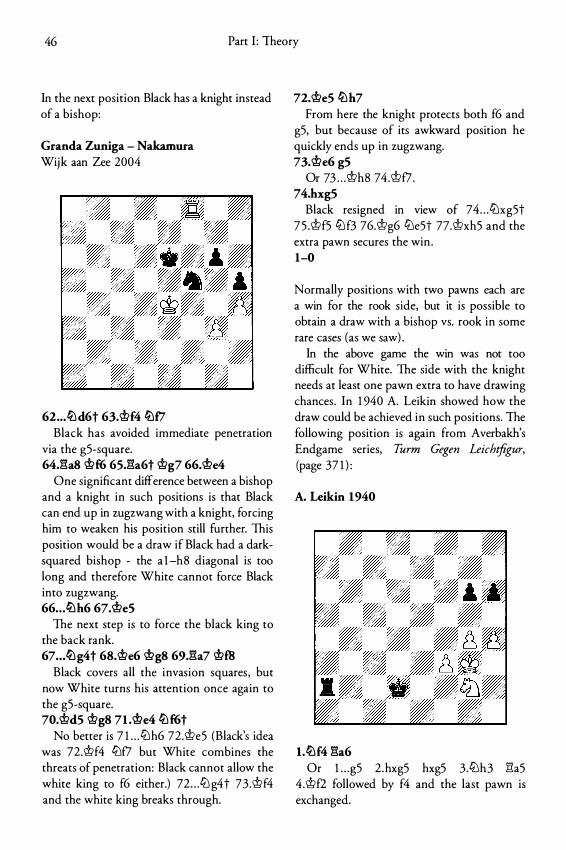
46 Part 1: Theory
In the next position Black has a knight instead of a bishop:
Granda Zuniga - Nakamura Wijk aan Zee 2004
62 ... ttld6t 63.�f4 ttlf7 Black has avoided immediate penetration
via the g5-square. 64.�a8 �f6 65.�a6t �g7 66.�e4
One significant difference between a bishop and a knight in such positions is that Black can end up in zugzwang with a knight, forcing him to weaken his position still further. This position would be a draw if Black had a darksquared bishop - the a l -h8 diagonal is too long and therefore White cannot force Black into zugzwang. 66 . . . ttlh6 67.�e5
The next step is to force the black king to the back rank. 67 • • • ttlg4t 68.�e6 �g8 69.�a7 �ffi
Black covers all the invasion squares , but now White turns his attention once again to the g5-square. 70.�d5 �g8 71 .�e4 ttlf6t
No better is 7 1 . . .ttlh6 72.'tt>e5 (Black's idea was 72.'tt>f4 ttlf7 but White combines the threats of penetration: Black cannot allow the white king to f6 either.) 72 . . . ttl g4t 73.'tt>f4 and the white king breaks through.
72.�e5 ttlh7 From here the knight protects both f6 and
g5, but because of its awkward position he quickly ends up in zugzwang. 73.'tt>e6 g5
Or 73 . . . 'tt>h8 74 .'tt>f7. 74.hxg5
Black resigned in view of 74 . . . ttlxg5t 75 .'tt>f5 ttl f3 76.'tt>g6 ttle5t 77.'tt>xh5 and the extra pawn secures the win . 1-0
Normally positions with two pawns each are a win for the rook side, but it is possible to obtain a draw with a bishop vs. rook in some rare cases (as we saw) .
In the above game the win was not too difficult for White. The side with the knight needs at least one pawn extra to have drawing chances. In 1 940 A. Leikin showed how the draw could be achieved in such positions. The following position is again from Averbakh's Endgame series, Turm Gegen Leichtjigur, (page 37 1 ) :
A. Leikin 1940
l .ttlf4 �a6 Or l . . .g5 2 .hxg5 hxg5 3 .ttlh3 j'!a5
4 .'tt>f2 followed by f4 and the last pawn is exchanged.
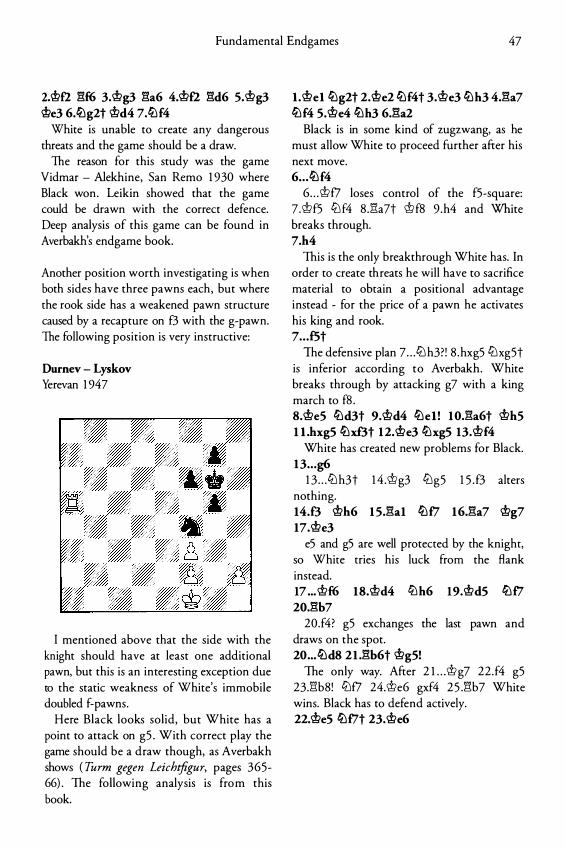
Fundamental Endgames 47
2.'it>f:2 l!f6 3.'it>g3 l!a6 4.'it>f:2 l!d6 s.'it>g3 'it>e3 6.ll:\g2t 'it>d4 7.tll f4
White is unable to create any dangerous threats and the game should be a draw.
The reason for this study was the game Vidmar - Alekhine, San Remo 1 930 where Black won. Leikin showed that the game could be drawn with the correct defence. Deep analysis of this game can be found in Averbakh's endgame book.
Another position worth investigating is when both sides have three pawns each, but where the rook side has a weakened pawn structure caused by a recapture on f3 with the g-pawn. The following position is very instructive:
Durnev - Lyskov Yerevan 1 947
I mentioned above that the side with the knight should have at least one additional pawn, but this is an interesting exception due to the static weakness of White's immobile doubled f-pawns.
Here Black looks solid, but White has a point to attack on g5 . With correct play the game should be a draw though, as Averbakh shows ( Turm gegen Leichtjigur, pages 365-66) . The following analysis is from this book.
l .'it>el tllg2t 2.'it>e2 tllf4t 3.'it>e3 tllh3 4.l!a7 tllf4 s.'it>e4 tllh3 6.l!a2
Black is in some kind of zugzwang, as he must allow White to proceed further after his next move. 6 . . . tll f4
6 . . . mf7 loses control of the f5-square: 7 .mf5 tt'l f4 8 .l!a7t mfs 9 .h4 and White breaks through. 7.h4
This is the only breakthrough White has. In order to create threats he will have to sacrifice material to obtain a positional advantage instead - for the price of a pawn he activates his king and rook. 7 . . . f5t
The defensive plan 7 . . . tt'l h3? ! 8 .hxg5 tt'lxg5t is inferior according to Averbakh. White breaks through by attacking g7 with a king march to f8 . 8.We5 tlld3t 9.Wd4 tll el ! 10.l!a6t 'it>h5 l l .hxg5 tllxf3t 12.We3 tllxg5 13.Wf4
White has created new problems for Black. 13 . . . g6
1 3 . . . tt'l h3t 1 4 .mg3 tt'lg5 1 5 . f3 alters nothing. 14.f3 Wh6 15.l!al tllf7 16.l!a7 Wg7 17.We3
e5 and g5 are well protected by the knight, so White tries his luck from the flank instead. 17 ... <bf6 18.Wd4 tllh6 19.Wd5 tllf7 20.l!b7
20.f4? g5 exchanges the last pawn and draws on the spot. 20 ... tlld8 21 .l!b6t 'it>g5!
The only way. After 2 l . . .mg7 22 .f4 g5 23.l!b8! tt'lf7 24.me6 gxf4 2 5 .:1l:b7 White wins. Black has to defend actively. 22.'it>e5 tllf7t 23.We6
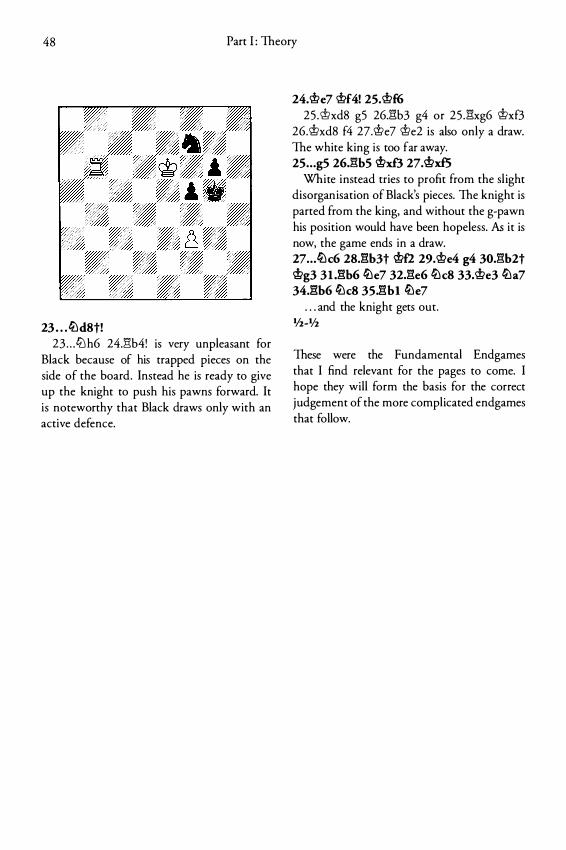
48 Part 1: Theory
23 . . . c!Lld8t! 23 . . . ltJ h6 24.E!:b4! is very unpleasant for
Black because of his trapped pieces on the side of the board. Instead he is ready to give up the knight to push his pawns forward. It is noteworthy that Black draws only with an active defence.
24. �e7 �f4! 25. �f6 25 .�xd8 g5 26.Ei:b3 g4 or 25 .Ei:xg6 i'xf3
26.i'xd8 f4 27.i'e7 i'e2 is also only a draw. The white king is too far away. 25 . . . g5 26J�b5 i'xf3 27.i'xf5
White instead tries to profit from the sl ight disorganisation of Black's pieces. The knight is parted from the king, and without the g-pawn his position would have been hopeless. As it is now, the game ends in a draw. 27 . . . c!Llc6 28.l'�h3t i'f2 29.�e4 g4 30J�h2t i'g3 3U�b6 c!Lle7 32J3e6 c!Llc8 33.�e3 c!Lla7 34.l'�b6 c!Llc8 35.l"�bl c!Lle7
. . . and the knight gets out. lfl-lfz
These were the Fundamental Endgames that I find relevant for the pages to come. I hope they will form the basis for the correct judgement of the more complicated endgames that follow.
Part II
Practice
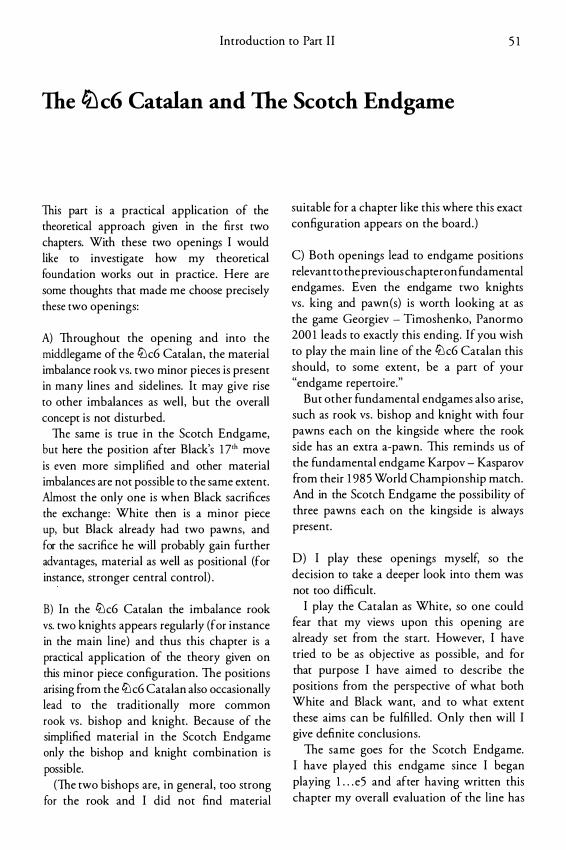
Introduction to Part I I 5 1
The ltlc6 Catalan and The Scotch Endgame
This part is a practical application of the theoretical approach given in the first two chapters. With these two openings I would like to investigate how my theoretical foundation works out in practice . Here are some thoughts that made me choose precisely these two openings:
A) Throughout the opening and into the middlegame of the ctJc6 Catalan, the material imbalance rook vs. two minor pieces is present in many lines and sidelines. It may give rise to other imbalances as well , but the overall concept is not disturbed.
The same is true in the Scotch Endgame, but here the position after Black's 1 7'h move is even more simplified and other material imbalances are not possible to the same extent. Almost the only one is when Black sacrifices the exchange: White then is a minor piece up, but Black already had two pawns, and for the sacrifice he will probably gain further advantages, material as well as positional (for instance, stronger central control) .
B) In the ctJc6 Catalan the imbalance rook vs. two knights appears regularly (for instance in the main l ine) and thus this chapter is a practical application of the theory given on this minor piece configuration. The positions arising from the ctJc6 Catalan also occasionally lead to the traditionally more common rook vs . bishop and knight. Because of the simplified material in the Scotch Endgame only the bishop and knight combination is possible.
(The two bishops are, in general , too strong for the rook and I did not find material
suitable for a chapter like this where this exact configuration appears on the board.)
C) Both openings lead to endgame positions relevant to the previous chapteron fundamental endgames. Even the endgame two knights vs . king and pawn(s) is worth looking at as the game Georgiev - Timoshenko, Panormo 200 1 leads to exactly this ending. If you wish to play the main line of the ctJ c6 Catalan this should, to some extent, be a part of your "endgame repertoire."
But other fundamental endgames also arise, such as rook vs . bishop and knight with four pawns each on the kingside where the rook side has an extra a-pawn. This reminds us of the fundamental endgame Karpov - Kasparov from their 1 98 5 World Championship match. And in the Scotch Endgame the possibility of three pawns each on the kingside is always present.
D) I play these openings myself, so the decision to take a deeper look into them was not too difficult.
I play the Catalan as White, so one could fear that my views upon this opening are already set from the start. However, I have tried to be as objective as possible, and for that purpose I have aimed to describe the positions from the perspective of what both White and Black want, and to what extent these aims can be fulfilled. Only then will I give definite conclusions.
The same goes for the Scotch Endgame. I have played this endgame since I began playing 1 . . . e5 and after having written this chapter my overall evaluation of the line has
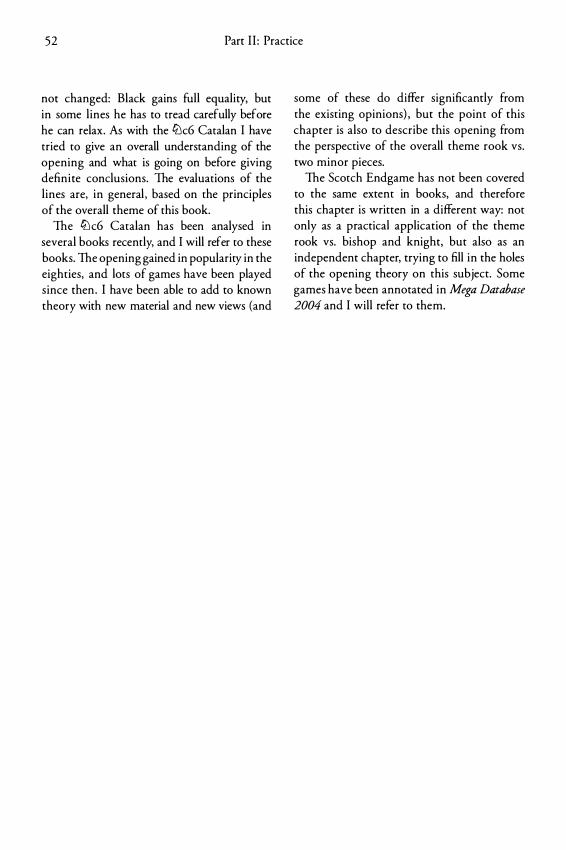
52 Part I I : Practice
not changed: Black gains full equality, but in some lines he has to tread carefully before he can relax. As with the ctJc6 Catalan I have tried to give an overall understanding of the opening and what is going on before giving definite conclusions. The evaluations of the lines are, in general , based on the principles of the overall theme of this book.
The ctJc6 Catalan has been analysed in several books recently, and I will refer to these books. The opening gained in popularity in the eighties, and lots of games have been played since then . I have been able to add to known theory with new material and new views (and
some of these do differ significantly from the existing opinions) , but the point of this chapter is also to describe this opening from the perspective of the overall theme rook vs. two minor pieces.
The Scotch Endgame has not been covered to the same extent in books, and therefore this chapter is written in a different way: not only as a practical application of the theme rook vs. bishop and knight, but also as an independent chapter, trying to fill in the holes of the opening theory on this subject. Some games have been annotated in Mega Database 2004 and I will refer to them.
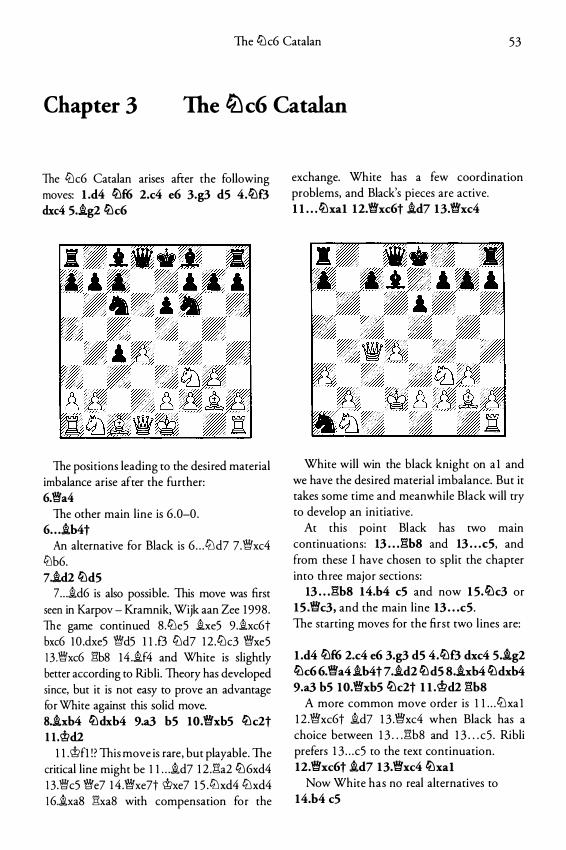
The li:Jc6 Catalan 53
Chapter 3 The tiJ c6 Catalan
The li:Jc6 Catalan arises after the following moves: l .d4 tl:\f6 2.c4 e6 3.g3 d5 4.tl:\f3 dxc4 5 . .ig2 tl:\c6
The positions leading to the desired material imbalance arise after the further: 6.ti'a4
The other main line is 6 .0-0. 6 . . . ib4t
An alternative for Black is 6 . . . ti:Jd7 7.Wxc4 1Llb6. 7.id2 tl:\d5
7 . . . id6 is also possible. This move was first seen in Karpov - Kramnik, Wijk aan Zee 1 998 . The game continued 8.ti:Je5 ixe5 9.ixc6t bxc6 I O .dxe5 Wd5 l l .f3 ti:Jd7 1 2 .ti:Jc3 Wxe5 1 3 .Wxc6 :1'1b8 14 .if4 and White is slightly better according to Ribli. Theory has developed since, but it is not easy to prove an advantage for White against this solid move. S.ixb4 tl:\dxb4 9.a3 b5 IO.�xb5 tl:\c2t II.'it>d2
l l .Wfl ! ? This move is rare, but playable. The critical line might be I I . . .id7 1 2 .:1'1a2 ti:J6xd4 1 3 .Wc5 We7 1 4 .�xe7t Wxe7 1 5 .ti:Jxd4 li:Jxd4 1 6.ixa8 :1'1xa8 with compensation for the
exchange. White has a few coordination problems, and Black's pieces are active. l l . . . tl:\xal 12.�xc6t .id7 13.�xc4
White will win the black knight on a l and we have the desired material imbalance. But it takes some time and meanwhile Black will try to develop an initiative.
At this point Black has two main continuations: 13 . . . :1'1b8 and 13 . . . c5, and from these I have chosen to split the chapter into three major sections:
13 . . . :1'1b8 14.b4 c5 and now 1 5.tl:\c3 or 15 .�c3, and the main line 13 . . . c5. The starting moves for the first two l ines are:
l .d4 tl:\f6 2.c4 e6 3.g3 d5 4.tl:\f3 dxc4 s . .tg2 tl:\c6 6.�a4.ih4t 7 . .id2 tl:\d5 8 • .ixb4 tl:\dxb4 9.a3 b5 IO.�xb5 tl:\c2t l l .c.t?d2 gbs
A more common move order is l l . . .li:Jxa l 1 2 .�xc6t id7 1 3 .�xc4 when Black has a choice between 1 3 . . . :1'1b8 and 1 3 . . . c5 . Ribli prefers 1 3 . . . c5 to the text continuation. 12.�xc6t .id7 13.�xc4 tl:\xal
Now White has no real alternatives to 14.b4 c5
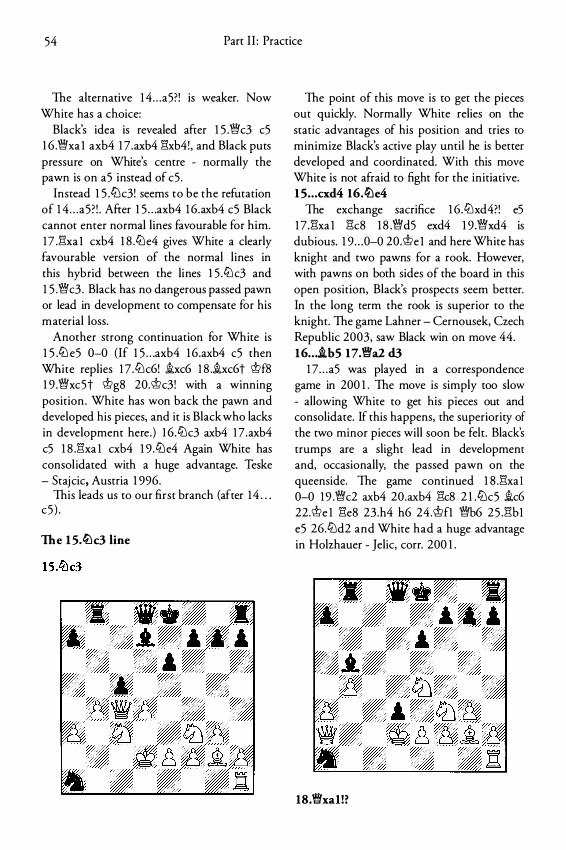
54 Part I I : Practice
The alternative 1 4 . . . a5? ! is weaker. Now White has a choice:
Black's idea is revealed after 1 5 .�c3 c5 1 6 .�xa 1 axb4 1 7.axb4 �xb4! , and Black puts pressure on White's centre - normally the pawn is on a5 instead of c5 .
Instead 1 5 .ttJc3! seems to be the refutation of 1 4 . . . a5? ! . After 1 5 . . . axb4 1 6.axb4 c5 Black cannot enter normal lines favourable for him. 1 7 .�xa 1 cxb4 1 8 .lt:le4 gives White a clearly favourable version of the normal lines in this hybrid between the lines 1 5 .lt:l c3 and 1 5 .�c3 . Black has no dangerous passed pawn or lead in development to compensate for his material loss.
Another strong continuation for White is 1 5 .lt:l e5 0-0 (If 1 5 . . . axb4 1 6.axb4 c5 then White replies 1 7 .lt:lc6! ixc6 1 8 .ixc6t 'it?f8 1 9 .�xc5t 'it?g8 20.'it?c3! with a winning position . White has won back the pawn and developed his pieces, and it is Black who lacks in development here.) 1 6 .lt:lc3 axb4 1 7 .axb4 c5 1 8 .�xa 1 cxb4 1 9 .lt:le4 Again White has consolidated with a huge advantage. Teske - Staj cic, Austria 1 996.
This leads us to our first branch (after 1 4 . . . c5 ) .
The 1 5.ll:\c3 line
The point of this move is to get the pieces out quickly. Normally White relies on the static advantages of his position and tries to minimize Black's active play until he is better developed and coordinated. With this move White is not afraid to fight for the initiative. 1 5 . . . cxd4 16.lL!e4
The exchange sacrifice 1 6.lt:lxd4?! e5 1 7.�xa 1 �c8 1 8 .�d5 exd4 1 9 .�xd4 is dubious. 1 9 . . . 0-0 20.'it?e 1 and here White has knight and two pawns for a rook. However, with pawns on both sides of the board in this open position, Black's prospects seem better. In the long term the rook is superior to the knight. The game Lahner - Cernousek, Czech Republic 2003, saw Black win on move 44. 16 . . . ib5 17.�a2 d3
1 7 . . . a5 was played in a correspondence game in 200 1 . The move is simply too slow - allowing White to get his pieces out and consolidate. If this happens, the superiority of the two minor pieces will soon be felt. Black's trumps are a slight lead in development and, occasionally, the passed pawn on the queenside. The game continued 1 8 .�xa 1 0-0 1 9 .�c2 axb4 20.axb4 �c8 2 l .ttJc5 ic6 22.'it?e 1 �e8 23.h4 h6 24.\t>fl �b6 25 .�b1 e5 26.lt:ld2 and White had a huge advantage in Holzhauer - Jelic, corr. 200 1 .
18.�xal!?
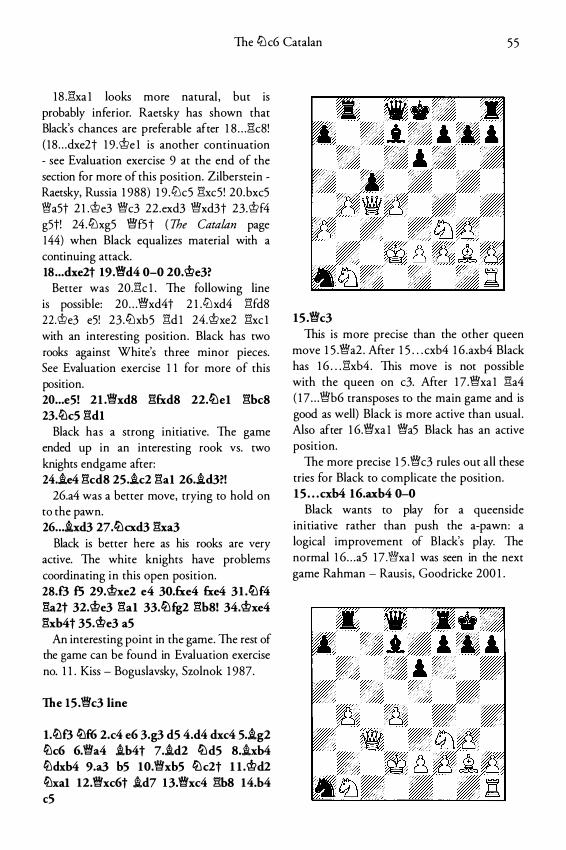
The li:l c6 Catalan 5 5
1 8 .E1xa 1 looks more natural , but is probably inferior. Raetsky has shown that Black's chances are preferable after 1 8 . . . E1c8! ( 1 8 . . . dxe2 t 1 9 . \t>e 1 is another continuation - see Evaluation exercise 9 at the end of the section for more of this position. Zilberstein -Raetsky, Russia 1 988) 1 9 .CLlc5 �hc5 ! 20.bxc5 i'9a5t 2 1 .\t>e3 '1Mfc3 22.exd3 'IM!xd3t 23.\t>f4 g5t! 24 .li:lxg5 1Mff5 t ( The Catalan page 144) when Black equalizes material with a continuing attack. 18 ... dxelt 19.1Mfd4 0-0 lO.We3?
Better was 20.E1c l . The following line is possible: 20 . . . 1Mfxd4t 2 l .CLlxd4 E1fd8 22 .\t>e3 e5! 23 .li:lxb5 :gd 1 24.\t>xe2 E1xc l with an interesting position . Black has two rooks against White's three minor pieces. See Evaluation exercise 1 1 for more of this position. 20 ... e5! 21 .'1Mfxd8 E1fxd8 22.lLlel gbc8 23.lLlc5 E1dl
Black has a strong initiative. The game ended up in an interesting rook vs. two knights endgame after: 24 . .ie4 E1cd8 25 . .ic2 E1al l6.id3?!
26.a4 was a better move, trying to hold on to the pawn. 26 ... 1xd3 l7.lLlcxd3 E1xa3
Black is better here as his rooks are very active. The white knights have problems coordinating in this open position. 28.f3 f5 29.Wxel e4 30.fxe4 fxe4 31 .lLlf4 !"'la2t 32.We3 gal 33.lLlfgl gb8! 34.Wxe4 !"'lxb4t 35.\t>e3 aS
An interesting point in the game. The rest of the game can be found in Evaluation exercise no. 1 1 . Kiss - Boguslavsky, Szolnok 1 987.
The 15.'1Mfc3 line
l.lLlf3 tl:)f6 l.c4 e6 3.g3 d5 4.d4 dxc4 s.igl .!Llc6 6.\Wa4 .ib4t 7 . .id2 lLldS 8 . .ixb4 .!Lldxb4 9.a3 b5 10.\WxbS lLlc2t 1 1 .\t>dl .!Llxal 12.1Mfxc6t .id7 13.1Mfxc4 gbs 14.b4 c5
15 .\Wc3 This is more precise than the other queen
move 1 5 .'1Mfa2 . After 1 5 . . . cxb4 1 6 .axb4 Black has 1 6 . . . E1xb4. This move is not possible with the queen on c3. After 1 7 .'1Mfxa 1 E1a4 ( 1 7 . . . 'IM!b6 transposes to the main game and is good as well) Black is more active than usual . Also after 1 6.1Mfxa 1 1Mfa5 Black has an active position.
The more precise 1 5 .1Mfc3 rules out all these tries for Black to complicate the position. 15 . . . cxb4 16.axb4 0-0
Black wants to play for a queenside ini tiative rather than push the a-pawn: a logical improvement of Black's play. The normal 1 6 . . . a5 1 7 .'\Mfxa 1 was seen in the next game Rahman - Rausis, Goodricke 200 1 .
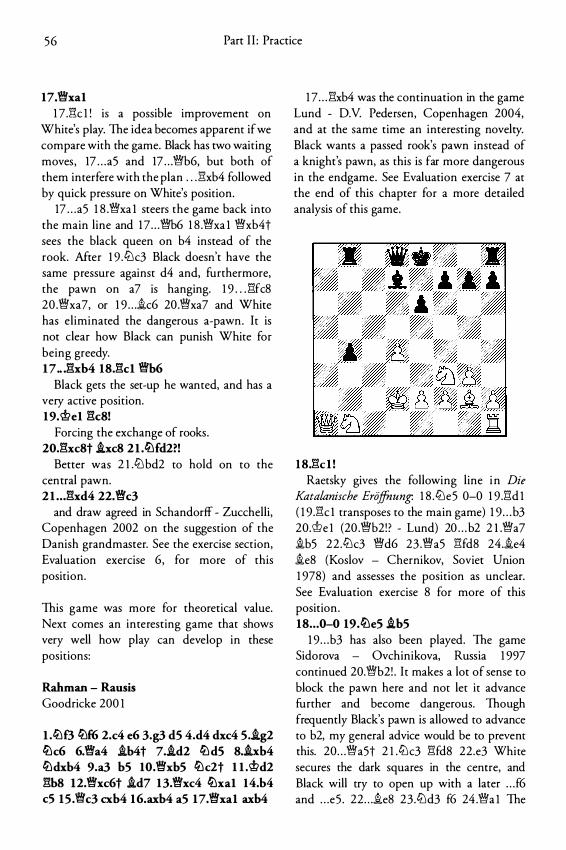
56 Part I I : Practice
17.'\!*l'xa1 1 7 .1''k 1 ! is a possible improvement on
White's play. The idea becomes apparent if we compare with the game. Black has two waiting moves, 17 . . . a5 and 17 . . . �b6, but both of them interfere with the plan . . J !xb4 followed by quick pressure on White's position.
17 . . . a5 1 8 .�xa 1 steers the game back into the main line and 1 7 . . . �b6 1 8 .�xa 1 �xb4t sees the black queen on b4 instead of the rook. After 1 9 .tiJc3 Black doesn't have the same pressure against d4 and, furthermore, the pawn on a7 is hanging. 1 9 . . . 1:1fc8 20 .�xa7, or 1 9 . . . .ic6 20 .�xa7 and White has eliminated the dangerous a-pawn. It is not clear how Black can punish White for being greedy. 17 .. J:�xb4 18.l:k1 V;Yb6
Black gets the set-up he wanted, and has a very active position. 19.'�e1 l:k8!
Forcing the exchange of rooks. 20.1:1xc8t .ixc8 2 1 .ttlfd2?!
Better was 2 l .tiJ bd2 to hold on to the central pawn. 2 1 .. J�xd4 22.�c3
and draw agreed in Schandorff - Zucchelli, Copenhagen 2002 on the suggestion of the Danish grandmaster. See the exercise section, Evaluation exercise 6, for more of this position.
This game was more for theoretical value. Next comes an interesting game that shows very well how play can develop in these positions:
Rahman - Rausis Goodricke 200 1
l .lil£3 ttlf6 2.c4 e6 3.g3 dS 4.d4 dxc4 S . .ig2 ttlc6 6.�a4 i.b4t 7 . .id2 ttldS 8.hb4 ttldxb4 9.a3 bS 10.�xb5 ttlc2t 1 1 .<i>d2 �b8 12.�xc6t i.d7 13.�xc4 ttlxa1 14.b4 cS 1S .V;Yc3 cxb4 16.axb4 aS 17.�xa1 axb4
1 7 . . . l:hb4 was the continuation in the game Lund - D.V. Pedersen, Copenhagen 2004, and at the same time an interesting novelty. Black wants a passed rook's pawn instead of a knight's pawn, as this is far more dangerous in the endgame. See Evaluation exercise 7 at the end of this chapter for a more detailed analysis of this game.
1 8Jkl ! Raetsky gives the following line i n Die
Katalanische Eroffnung: 1 8 .tLle5 0-0 1 9 .1:1d 1 ( 1 9 .�c l transposes to the main game) 1 9 . . . b3 20.c;iJe 1 (20 .�b2! ? - Lund) 20 . . . b2 2 l .�a7 .ib5 22 .tiJc3 �d6 23 .�a5 �fd8 24 . .ie4 .ie8 (Koslov - Chernikov, Soviet Union 1 978) and assesses the position as unclear. See Evaluation exercise 8 for more of this position . 18 . . . 0-0 19.ttle5 .ibS
1 9 . . . b3 has also been played. The game Sidorova - Ovchinikova, Russia 1 997 continued 20.�b2! . It makes a lot of sense to block the pawn here and not let it advance further and become dangerous. Though frequently Black's pawn is allowed to advance to b2, my general advice would be to prevent this. 20 . . . �a5t 2 1 .tLlc3 �fd8 22.e3 White secures the dark squares in the centre, and Black will try to open up with a later . . . f6 and . . . e5 . 22 . . . .ie8 23 .tiJd3 f6 24 .�a 1 The
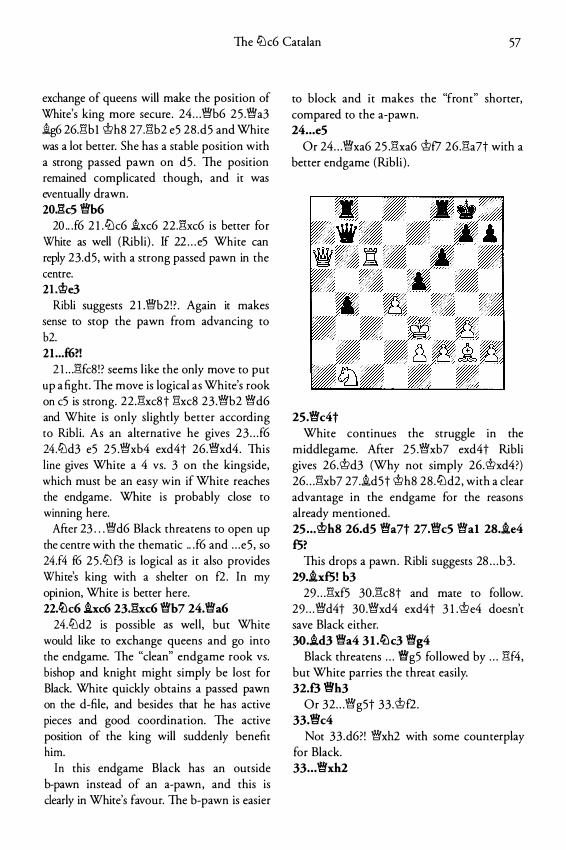
The li:lc6 Catalan 57
exchange of queens will make the position of White's king more secure . 24 . . . 1Mfb6 2 5 .1Mfa3 ig6 26.Elbl <;!;>h8 27.Elb2 e5 28 .d5 and White was a lot better. She has a stable position with a strong passed pawn on d5 . The position remained complicated though, and it was eventually drawn. 20.l::!c5 "11:lfb6
20 .. .f6 2 l .li:lc6 i.xc6 22.l'l:xc6 is better for White as well (Ribli) . If 22 . . . e5 White can reply 23.d5, with a strong passed pawn in the centre. 21.'�e3
Ribli suggests 2 1 .'1Mfb2! ? . Again it makes sense to stop the pawn from advancing to b2. 21 . .. £6?!
2 1 . . .Elfc8 ! ? seems l ike the only move to put up a fight. The move is logical as White's rook on c5 is strong. 22.Elxc8t Elxc8 23 .1Mfb2 1Mfd6 and White is only slightly better according to Ribli. As an alternative he gives 23 . . . f6 24 .'Lld3 e5 2 5 .1Mfxb4 exd4t 26.1Mfxd4. This line gives White a 4 vs. 3 on the kingside, which must be an easy win if White reaches the endgame. White is probably close to winning here.
After 23 . . . 1Mfd6 Black threatens to open up the centre with the thematic .. . f6 and . . . e5 , so 24.f4 f6 25 .'Llf3 is logical as it also provides White's king with a shelter on f2 . In my opinion, White is better here. 22.<�k6 1xc6 23.gxc6 "11:lfb7 24."11:lfa6
24.'Lld2 is possible as well, but White would like to exchange queens and go into the endgame. The "clean" endgame rook vs. bishop and knight might simply be lost for Black. White quickly obtains a passed pawn on the d-file, and besides that he has active pieces and good coordination. The active position of the king will suddenly benefit him.
In this endgame Black has an outside b-pawn instead of an a-pawn, and this is clearly in White's favour. The b-pawn is easier
to block and it makes the "front" shorter, compared to the a-pawn. 24 • • • e5
Or 24 . . . 1Mfxa6 25 .Elxa6 <;!;>f7 26.Ela7t with a better endgame (Ribli ) .
25.1Mfc4t White continues the struggle in the
middlegame. After 2 5 .1Mfxb7 exd4t Ribli gives 26.<;!;>d3 (Why not simply 26.<;!;>xd4?) 26 . . . Elxb7 27.i.d5t <;!;>h8 28 .li:ld2, with a clear advantage in the endgame for the reasons already mentioned. 25 • • . <;!;>hs 26.d5 1Mfa7t 27."11:lfc5 "\1:\lal 28.i.e4 f5?
This drops a pawn. Ribli suggests 28 . . . b3 . 29.i.xf5! b3
29 . . . Elxf5 30.Elc8t and mate to follow. 29 . . . 1Mfd4t 30 .1Mfxd4 exd4t 3 I .<;!;>e4 doesn't save Black either. 30 • .id3 1Mfa4 31 .ttlc3 1Mfg4
Black threatens . . . 1Mfg5 followed by . . . Elf4, but White parries the threat easily. 32.f3 "11:lth3
Or 32 . . . 1Mfg5t 33 .<;!;>f2. 33.e'c4
Not 33 .d6?! 1Mfxh2 with some counterplay for Black. 33 • • • 1Mfxh2
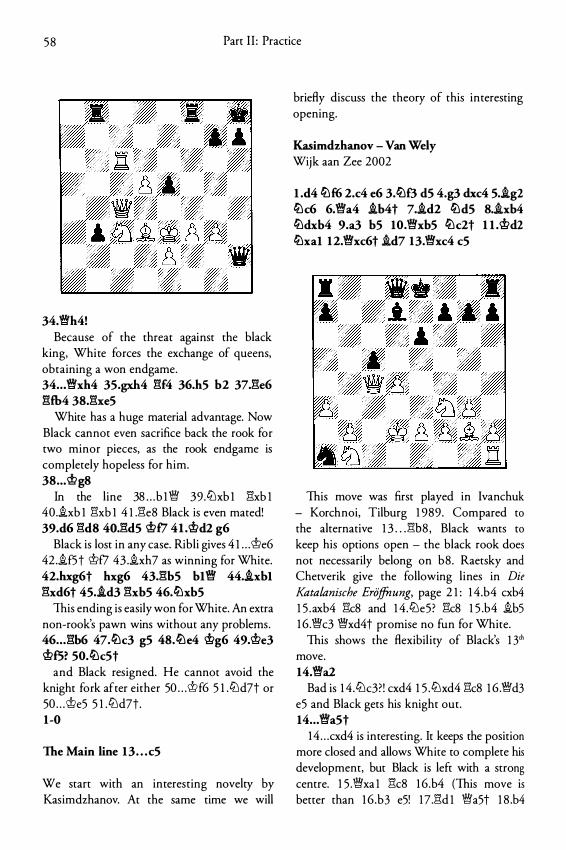
58 Part I I : Practice
34.'\!;Yh4! Because of the threat against the black
king, White forces the exchange of queens, obtaining a won endgame. 34 • • • '\!;Yxh4 35.gxh4 �f4 36.h5 b2 37.�e6 �fb4 38.�xe5
White has a huge material advantage. Now Black cannot even sacrifice back the rook for two minor pieces, as the rook endgame is completely hopeless for him. 38 .. . @g8
In the line 38 . . . b 1 1W 39.tt:lxb 1 E'i:xb 1 40.�xb 1 E'i:xb 1 4 l .E'i:e8 Black is even mated! 39.d6 gds 4o.gd5 @fi 4L@d2 g6
Black is lost in any case. Ribli gives 4 1 . . . @e6 42 .�f5 t @f7 43 .�xh7 as winning for White. 42.hxg6t hxg6 43.gb5 bl'\!;Y 44.i.xbl gxd6t 45.i.d3 gxb5 46.ttlxb5
This ending is easily won for White. An extra non-rook's pawn wins without any problems. 46 . . . Ei:b6 47.ttlc3 g5 48.ttle4 @g6 49.@e3 @f5? 50.ttlc5t
and Black resigned. He cannot avoid the knight fork after either 50 . . . <±>f6 5 1 .tt:ld7t or 50 . . . \t>e5 5 1 .tt:ld7t. 1-0
The Main line 13 . . . c5
We start with an interesting novelty by Kasimdzhanov. At the same time we will
briefly discuss the theory of this interesting opening.
Kasimdzhanov - Van Wely Wijk aan Zee 2002
l .d4 ttlf6 2.c4 e6 3.ttlf3 d5 4.g3 dxc4 5.i.g2 ttlc6 6.'\!;Ya4 i.b4t 7.i.d2 ttld5 S.i.xb4 ttldxb4 9.a3 b5 10.'\!;Yxb5 ttlc2t l l .@d2 ttlxal 12.'\!;Yxc6t i.d7 13.'\!;Yxc4 c5
This move was first played in lvanchuk - Korchnoi, Tilburg 1 989. Compared to the alternative 1 3 . . . Ei:b8 , Black wants to keep his options open - the black rook does not necessarily belong on b8 . Raetsky and Chetverik give the following lines in Die Katalanische Eriiffnung, page 2 1 : 1 4.b4 cxb4 1 5 .axb4 E'i:c8 and 1 4.tt:le5? E'i:c8 1 5 .b4 �b5 1 6.'\!;Yc3 '\!;Yxd4t promise no fun for White.
This shows the flexibil ity of Black's 1 3'h move. 14.'\!;Ya2
Bad is 1 4.tt:lc3? ! cxd4 1 5 .tt:lxd4 E'i:c8 1 6 .1Wd3 e5 and Black gets his knight out. 14 . . . '\!;Ya5t
1 4 . . . cxd4 is interesting. It keeps the position more closed and allows White to complete his development, but Black is left with a strong centre. 1 5 .'\!;Yxa 1 E'i:c8 1 6.b4 (This move is better than 1 6 .b3 e5! 1 7 .E'i:d 1 1Wa5t 1 8 .b4
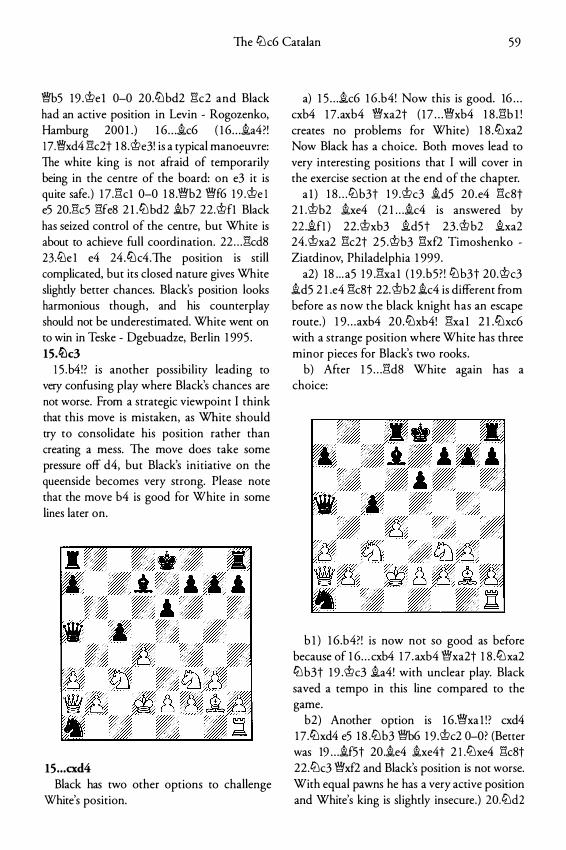
The l2lc6 Catalan 59
�b5 19 .'tt>e l 0-0 20.ctJbd2 :1'1c2 and Black had an active position in Levin - Rogozenko, Hamburg 200 1 .) 1 6 . . . ic6 ( 1 6 . . . ia4?! 1 7.�xd4 :1'1c2t 1 8 .'tt>e3! is a typical manoeuvre: The white king is not afraid of temporarily being in the centre of the board: on e3 it is quite safe.) 1 7 .:1'\cl 0-0 1 8 .�b2 �f6 1 9 .'tt>e 1 e5 20.:1'1c5 :1'\feS 2 l .CU bd2 ib7 22.'tt>fl Black has seized control of the centre, but White is about to achieve full coordination. 22 . . . :1'\cdS 23.lLle 1 e4 24 .CUc4.1he position is still complicated, but its closed nature gives White slightly better chances. Black's position looks harmonious though, and his counterplay should not be underestimated. White went on to win in Teske - Dgebuadze, Berlin 1 995 . 15.ti)c3
1 5 .b4! ? is another possibility leading to very confusing play where Black's chances are not worse. From a strategic viewpoint I think that this move is mistaken, as White should try to consolidate his position rather than creating a mess. The move does take some pressure off d4, but Black's initiative on the queenside becomes very strong. Please note that the move b4 is good for White in some lines later on.
15 . . . cxd4 Black has two other options to challenge
White's position.
a) 1 5 . . . ic6 1 6 .b4! Now this is good. 16 . . . cxb4 1 7.axb4 �xa2t ( 1 7 . . . �xb4 1 8 .:1'\b l ! creates no problems for White) 1 8 .CUxa2 Now Black has a choice. Both moves lead to very interesting positions that I will cover in the exercise section at the end of the chapter.
a l ) 1 8 . . . ctJ b3t 1 9 .'tt>c3 id5 20 .e4 :1'\cSt 2 l .'tt>b2 ixe4 (2 1 . . .ic4 is answered by 22 .ifl ) 22.'tt>xb3 id5t 23 .'tt>b2 ixa2 24.'tt>xa2 :1'1c2t 2 5 .'tt>b3 :1'1xf2 Timoshenko -Ziatdinov, Philadelphia 1 999.
a2) 18 . . . a5 1 9 .:1'1xa 1 ( 1 9 .b5? ! ctJ b3t 20.'tt>c3 id5 2 1 .e4 :1'\cSt 22. 'tt>b2 ic4 is different from before as now the black knight has an escape route.) 1 9 . . . axb4 20 .ctJxb4! :1'1xa1 2 l .CUxc6 with a strange position where White has three minor pieces for Black's two rooks.
b) After 1 5 . . . :1'\dS White again has a choice:
b 1 ) 1 6.b4?! is now not so good as before because of 1 6 . . . cxb4 1 7 .axb4 �xa2t 1 8 .CUxa2 CU b3t 1 9 .'tt>c3 ia4! with unclear play. Black saved a tempo in this line compared to the game.
b2) Another option is 1 6.�xa l ! ? cxd4 1 7.CUxd4 e5 1 8 .ctJb3 �b6 1 9 .'tt>c2 0-0? (Better was 19 . . . if5t 20.ie4 ixe4t 2 1 .lLlxe4 :1'\cSt 22.lLlc3 �xf2 and Black's position is not worse. With equal pawns he has a very active position and White's king is slightly insecure.) 20.tLld2
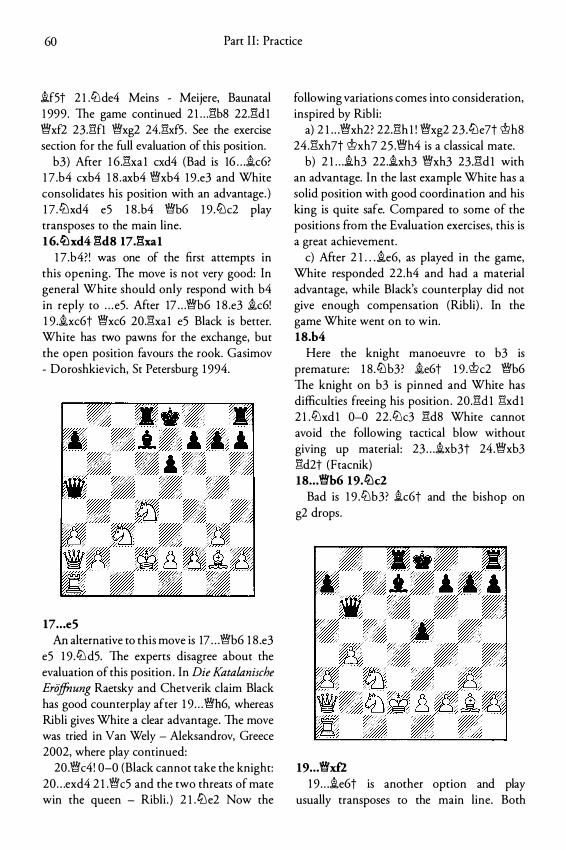
60 Part I I : Practice
if5t 2 l .ctJde4 Meins - Meijere, Baunatal 1 999. The game continued 2 l . . .Ei:b8 22.Ei:d 1 �xf2 23.Ei:fl �xg2 24.Ei:xf5 . See the exercise section for the full evaluation of this position.
b3) After 1 6.:!'1:xa 1 cxd4 (Bad is 16 . . . ic6? 1 7 .b4 cxb4 1 8 .axb4 �xb4 1 9 .e3 and White consolidates his position with an advantage. ) 1 7 .l/Jxd4 e5 1 8 .b4 �b6 1 9 .ctJc2 play transposes to the main line. 1 6.c!l:lxd4 �dB 17.Ei:xal
1 7 .b4? ! was one of the first attempts in this opening. The move is not very good: In general White should only respond with b4 in reply to . . . e5. After 17 . . . �b6 1 8 .e3 ic6! 1 9 .ixc6t �xc6 20.Ei:xa1 e5 Black is better. White has two pawns for the exchange, but the open position favours the rook. Gasimov - Doroshkievich, St Petersburg 1 994.
17 . . . e5 An alternative to this move is 17 . . . �b6 1 8 .e3
e5 1 9 . ctJ d5. The experts disagree about the evaluation of this position . In Die Katalanische Eriiffnung Raetsky and Chetverik claim Black has good counterplay after 1 9 . . . �h6, whereas Ribli gives White a clear advantage. The move was tried in Van Wely - Aleksandrov, Greece 2002, where play continued:
20 .�c4! 0-0 (Black cannot take the knight: 20 . . . exd4 2 1 .�c5 and the two threats of mate win the queen - Ribli . ) 2 l .CDe2 Now the
following variations comes into consideration, inspired by Ribli :
a) 2 l . . .�xh2? 22.Ei:h 1 ! �xg2 23 .CDe7t @h8 24.�xh7t @xh7 2 5 .�h4 is a classical mate.
b) 2 l . . .ih3 22 .ixh3 �xh3 23J:'1d 1 with an advantage. In the last example White has a solid position with good coordination and his king is quite safe. Compared to some of the positions from the Evaluation exercises, this is a great achievement.
c) After 2 1 . . .ie6, as played in the game, White responded 22.h4 and had a material advantage, while Black's counterplay did not give enough compensation (Ribli) . In the game White went on to win. 18.b4
Here the knight manoeuvre to b3 is premature: 1 8 .ctJb3? ie6t 1 9 .@c2 �b6 The knight on b3 is pinned and White has difficulties freeing his position . 20.Ei:d 1 �xd 1 2 1 .ctJxd 1 0-0 22 .ctJc3 :!'idS White cannot avoid the following tactical blow without giving up material : 23 . . . ixb3t 24.�xb3 Ei:d2t (Ftacnik) 18 . . . �b6 19.CDc2
Bad is 1 9 .ctJb3? ic6t and the bishop on g2 drops.
19 . . . �xf2 1 9 . . . ie6t is another option and play
usually transposes to the main line. Both
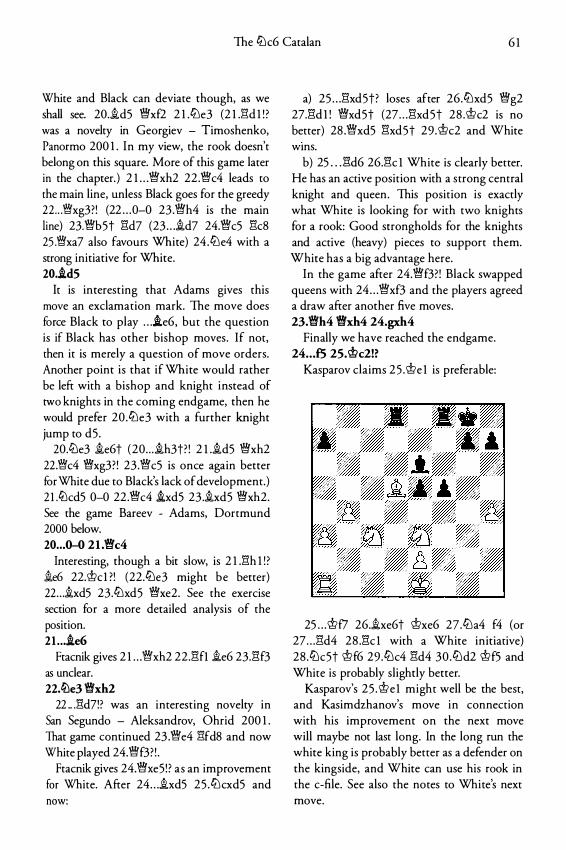
The tt:lc6 Catalan 6 1
White and Black can deviate though, as we shall see. 20.�d5 Wl'xf2 2 1 .tt:le3 (2 1 .2"1d 1 ! ? was a novelty in Georgiev - Timoshenko, Panormo 200 1 . In my view, the rook doesn't belong on this square. More of this game later in the chapter. ) 2 l . . .WI'xh2 22 .WI'c4 leads to the main line, unless Black goes for the greedy 22 . . .�xg3?! (22 . . . 0-0 23 .WI'h4 is the main line) 23.WI'b5t l"'d7 (23 . . . �d7 24.WI'c5 l"\c8 25 .�xa7 also favours White) 24 .tt:le4 with a strong initiative for White. 20 . .id5
It is interesting that Adams gives this move an exclamation mark. The move does force Black to play . . . .ie6, but the question is if Black has other bishop moves. If not, then it is merely a question of move orders. Another point is that if White would rather be left with a bishop and knight instead of two knights in the coming endgame, then he would prefer 20 .tt:le3 with a further knight jump to d5 .
20.tt:le3 �e6t (20 . . . �h3t? ! 2 l .�d5 Wl'xh2 22.�c4 Wl'xg3? ! 23 .WI'c5 is once again better for White due to Black's lack of development.) 2 1 .tt:lcd5 0-0 22 .WI'c4 .ixd5 23 .�xd5 Wl'xh2. See the game Bareev - Adams, Dortmund 2000 below. 20 . . . 0-0 21 .WI'c4
Interesting, though a bit slow, is 2 1 .2"\h 1 ! ? ie6 22.1!icl ?! (22.ti:Je3 might be better) 22 . . . ixd5 23.tt:lxd5 Wl'xe2. See the exercise section for a more detailed analysis of the position. 21 . . . .ie6
Ftacnik gives 2 1 . . . WI'xh2 22.2"\fl �e6 23.2"1f3 as unclear. 22.ttle3 'Wxh2
22 .. Ji:d7!? was an interesting novelty in San Segundo - Aleksandrov, Ohrid 200 1 . That game continued 23 .WI'e4 l"\fd8 and now White played 24.WI'f3? ! .
Ftacnik gives 24.'1.1<he5!? as an improvement for White. After 24 . . . �xd5 25 .tt:lcxd5 and now:
a) 25 . . . 2"\xd5t? loses after 26.tt:lxd5 Wl'g2 27.2"1d 1 ! Wl'xd5t (27 . . . 2"1xd5t 28 .<±>c2 is no better) 28 .WI'xd5 l"\xd5t 29 .<±>c2 and White WinS.
b) 25 . . . l"\d6 26.2"\c l White is clearly better. He has an active position with a strong central knight and queen. This position is exactly what White is looking for with two knights for a rook: Good strongholds for the knights and active (heavy) pieces to support them. White has a big advantage here.
In the game after 24.WI'f3? ! Black swapped queens with 24 . . . WI'xf3 and the players agreed a draw after another five moves. 23.'Wh4 'Wxh4 24.gxh4
Finally we have reached the endgame. 24 . . . £5 25.'it>c2!?
Kasparov claims 2 5 .<±>e l is preferable:
25 . . . <±>f7 26.�xe6t <±>xe6 27.tt:la4 f4 (or 27 . . . 2"1d4 28 .2"\c l with a White initiative) 28 .ti:Jc5t <±>f6 29 .ti:Jc4 l"\d4 30 .ti:Jd2 <±>f5 and White is probably slightly better.
Kasparov's 25 .<±>e1 might well be the best, and Kasimdzhanov's move in connection with his improvement on the next move will maybe not last long. In the long run the white king is probably better as a defender on the kingside, and White can use his rook in the c-file. See also the notes to White's next move.
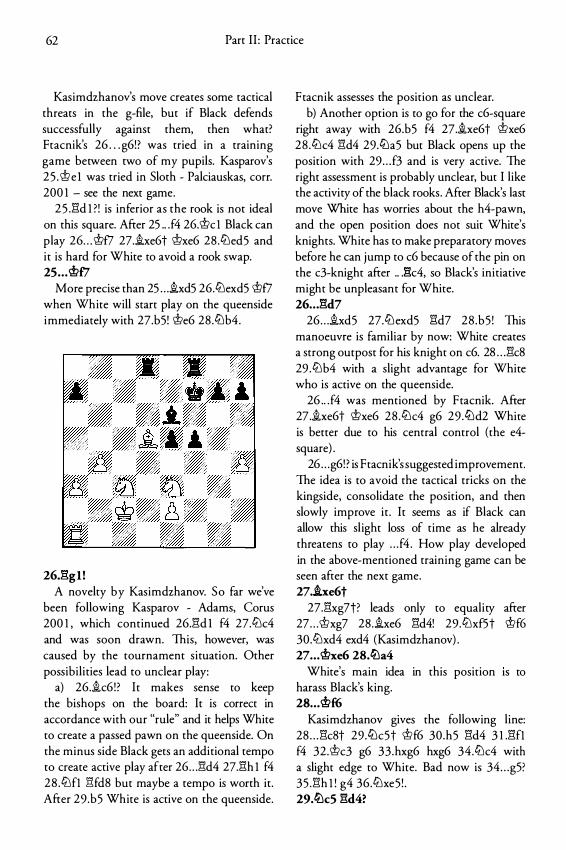
62 Part I I : Practice
Kasimdzhanov's move creates some tactical threats in the g-file, but if Black defends successfully against them, then what? Ftacnik's 26 . . . g6! ? was tried in a training game between two of my pupils. Kasparov's 25 .\tle 1 was tried in Sloth - Palciauskas, corr. 200 1 - see the next game.
2 5 .l"'d 1 ? ! is inferior as the rook is not ideal on this square. After 25 .. .f4 26.\tlc l Black can play 26 . . . \tl£7 27.ixe6t mxe6 28 .tt:led5 and it is hard for White to avoid a rook swap. 2s . . . mf7
More precise than 25 . . . ixd5 26.tt:lexd5 \tl£7 when White will start play on the queenside immediately with 27.b5! \tle6 28 .tt:lb4.
26J';gl ! A novelty by Kasimdzhanov. So far we've
been following Kasparov - Adams, Corus 200 1 , which continued 26.l"\d 1 f4 27.tt:lc4 and was soon drawn. This, however, was caused by the tournament situation. Other possibilities lead to unclear play:
a) 26 . .ic6 ! ? It makes sense to keep the bishops on the board: It is correct in accordance with our "rule" and it helps White to create a passed pawn on the queenside. On the minus side Black gets an additional tempo to create active play after 26 . . . l"\d4 27.l"'h 1 f4 28 .tt:lfl l"1fd8 but maybe a tempo is worth it. After 29 .b5 White is active on the queenside.
Ftacnik assesses the position as unclear. b) Another option is to go for the c6-square
right away with 26.b5 f4 27.ixe6t \tlxe6 28 .tt:lc4 l"\d4 29.ttla5 but Black opens up the position with 29 . . . f3 and is very active. The right assessment is probably unclear, but I like the activity of the black rooks. After Black's last move White has worries about the h4-pawn, and the open position does not suit White's knights. White has to make preparatory moves before he can jump to c6 because of the pin on the c3-knight after .. .l'k4, so Black's initiative might be unpleasant for White. 26 . . . l:!d7
26 . . . ixd5 27.tt:lexd5 l"'d7 28 .b5 ! This manoeuvre is familiar by now: White creates a strong outpost for his knight on c6. 28 . . . l"\c8 29 .tt:lb4 with a slight advantage for White who is active on the queenside.
26 .. . f4 was mentioned by Ftacnik. After 27 .ixe6t \tlxe6 28 .tt:lc4 g6 29 .ttld2 White is better due to his central control (the e4-square) .
26 . . . g6! ? is Ftacnik's suggested improvement. The idea is to avoid the tactical tricks on the kingside, consolidate the position, and then slowly improve it . It seems as if Black can allow this sl ight loss of time as he already threatens to play . . . f4 . How play developed in the above-mentioned training game can be seen after the next game. 27.he6t
27.l"\xg7t? leads only to equality after 27 . . . \tlxg7 28.ixe6 l"\d4! 29 .tt:lxf5t \tlf6 30.tt:lxd4 exd4 (Kasimdzhanov) . 27 . . . mxe6 28.t0a4
White's main idea in this position IS to harass Black's king. 2s . . . mf6
Kasimdzhanov gives the following line: 28 . . . l"\c8t 29 .ttlc5t \tlf6 30.h5 l"\d4 3 1 .l"\fl f4 32.\tlc3 g6 33 .hxg6 hxg6 34.tt:lc4 with a slight edge to White. Bad now is 34 . . . g5? 35 .l"\h l ! g4 36.tt:lxe5 ! . 29.t0c5 l:!d4?
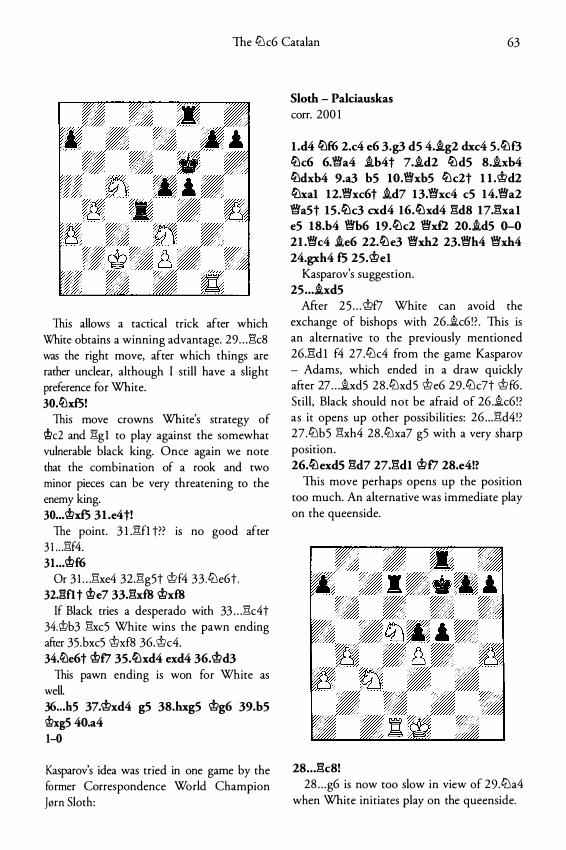
The liJ c6 Catalan 63
This allows a tactical trick after which White obtains a winning advantage. 29 . . . Ek8 was the right move, after which things are rather unclear, although I still have a slight preference for White. 30.ttlxf5!
This move crowns White's strategy of 'it>c2 and Elg l to play against the somewhat vulnerable black king. Once again we note that the combination of a rook and two minor pieces can be very threatening to the enemy king. 30 ... <!>xf5 31 .e4t!
The point. 3 l .Elfl t?? is no good after 3 l . . . Elf4. 31 . .. 'it>f6
Or 3 1 . . .Elxe4 32.Elg5t mf4 33 .liJe6t. 32.!"!fl t <!>e7 33.Elxf8 <!>xf8
If Black tries a desperado with 33 . . . Elc4t 34.c±>b3 Elxc5 White wins the pawn ending after 35.bxc5 mxf8 36.\t>c4. 34.ttle6t \t>f7 35.liJxd4 exd4 36.'it>d3
This pawn ending is won for White as well. 36 .. . h5 37.'it>xd4 g5 38.hxg5 'it>g6 39.b5 'it>xg5 40.a4 1-0
Kasparov's idea was tried in one game by the former Correspondence World Champion ]0rn Sloth:
Sloth - Paldauskas corr. 200 1
l .d4 ttlf6 2.c4 e6 3.g3 d5 4 . .ig2 dxc4 s.tl:lf3 ttlc6 6.Wfa4 .ib4t 7 . .id2 ttld5 8 . .ixb4 ttldxb4 9.a3 b5 IO.Wfxb5 tl:lc2t I I .'it>d2 ttlxal 12.Wfxc6t .id7 13.Wfxc4 c5 14.Wfa2 Wfa5t 15.ttlc3 cxd4 16.tl:lxd4 Eld8 17.Elxal e5 18.b4 Wfb6 19.ttlc2 Wfxfl 20 . .id5 0-0 2l .Wfc4 .ie6 22.ttle3 Wfxh2 23.Wfh4 Wfxh4 24.gxh4 f5 25.'it>el
Kasparov's suggestion. 25 ... .ixd5
After 2 5 . . . ®£7 White can avoid the exchange of bishops with 26 . .ic6! ? . This is an alternative to the previously mentioned 26.l"i:d l f4 27.liJc4 from the game Kasparov - Adams, which ended in a draw quickly after 27 . . . .ixd5 28 .liJxd5 me6 29 .liJc7t mf6. Still , Black should not be afraid of 26 . .ic6!? as it opens up other possibilities: 26 . . . Eld4!? 27 .liJb5 Elxh4 28 .liJxa7 g5 with a very sharp position . 26.tl:lexd5 Eld7 27.Eldl 'it>f7 28.e4!?
This move perhaps opens up the position too much. An alternative was immediate play on the queenside.
28 .. . Elc8! 28 . . . g6 is now too slow in view of 29.liJa4
when White initiates play on the queenside.
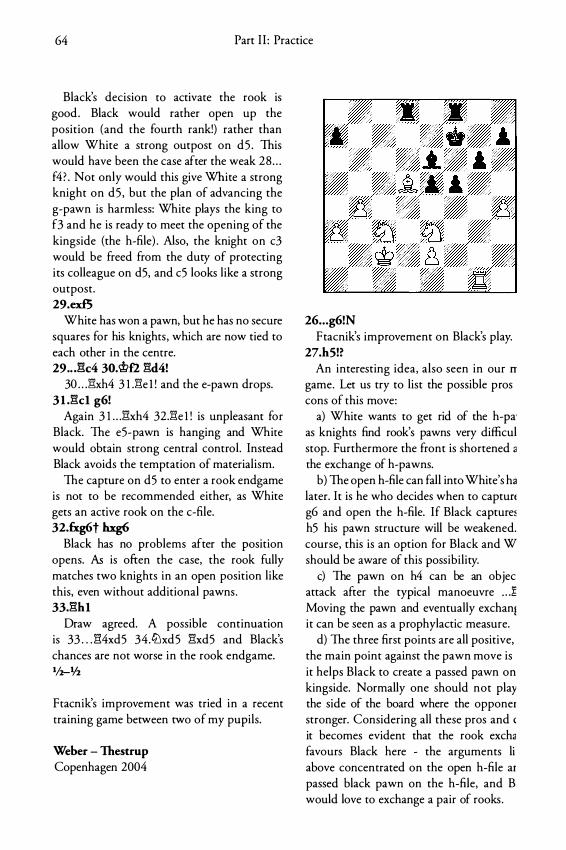
64 Part I I : Practice
Black's decision to activate the rook is good . Black would rather open up the position (and the fourth rank!) rather than allow White a strong outpost on d5 . This would have been the case after the weak 28 . . . f4? . Not only would this give White a strong knight on d5 , but the plan of advancing the g-pawn is harmless: White plays the king to f3 and he is ready to meet the opening of the kingside (the h-file) . Also, the knight on c3 would be freed from the duty of protecting its colleague on d5, and c5 looks like a strong outpost. 29.exf5
White has won a pawn, but he has no secure squares for his knights , which are now tied to each other in the centre. 29 .. Jk4 3o.wn gd4!
30 . . J�1xh4 3 1 .!'\e l ! and the e-pawn drops. 3 1 .gcl g6!
Again 3 1 . . .!'1xh4 32.!'\e 1 ! is unpleasant for Black. The e5-pawn is hanging and White would obtain strong central control. Instead Black avoids the temptation of materialism.
The capture on d5 to enter a rook endgame is not to be recommended either, as White gets an active rook on the c-file. 32.fxg6t hxg6
Black has no problems after the position opens. As is often the case, the rook fully matches two knights in an open position like this, even without additional pawns. 33.ghl
Draw agreed. A possible continuation is 33 . . . !'14xd5 34.ltJxd5 !'1xd5 and Black's chances are not worse in the rook endgame. 1/z-lf2
Ftacnik's improvement was tried in a recent training game between two of my pupils.
Weber - Thestrup Copenhagen 2004
26 .. . g6!N Ftacnik's improvement on Black's play.
27.h5!? An interesting idea, also seen in our rr
game. Let us try to list the possible pros cons of this move:
a) White wants to get rid of the h-pa· as knights find rook's pawns very difficul stop. Furthermore the front is shortened a the exchange of h-pawns.
b) The open h-file can fall into White's ha later. It is he who decides when to captun g6 and open the h-file. If Black capture� h5 his pawn structure will be weakened. course, this is an option for Black and W should be aware of this possibility.
c) The pawn on h4 can be an objec attack after the typical manoeuvre . . . != Moving the pawn and eventually exchan1 it can be seen as a prophylactic measure.
d) The three first points are all positive, the main point against the pawn move is it helps Black to create a passed pawn on kingside. Normally one should not play the side of the board where the opponer stronger. Considering all these pros and <
it becomes evident that the rook excha favours Black here - the arguments li above concentrated on the open h-file ar passed black pawn on the h-file, and B would love to exchange a pair of rooks .

The tt:lc6 Catalan 65
27 ... f4?! 27 . . . Ei:g8 ! is strong here. It seems that Black
has enough time to wait another move. He is one move away from strong counterplay with .. .f5-f4 - whereas White will have to use some time to advance his queenside majority. Black has time to make one more consolidating move, it seems. After the text move White is able to carty out an interesting exchanging operation. 28.hxg6t hxg6 29 • .ixe6t <.!;>xe6
30J'hg6t! <.!;>f7 3 1 .�a6 fxe3 32.�xa7t <.!;>e6 After a series of forced moves a critical
position has arisen. 33.b5?!
Not the best move as now Black can force the exchange of one pair of rooks. Yes - this rule is a general rule and can be applied in this position as well where White is an exchange down! White's rook is active and supports the advance of the queens ide pawns. Black's rooks, on the other hand, has problems finding an object to attack, and thus Black should seek the exchange of one pair of rooks. More precise was 33.a4 and after 33 . . . Ei:a8 34.Ei:h7 1"1h8 White plays 35 .Ei:xh8 Ei:xh8 36.a5 with better winning chances than in the game. 33 .. J"M6?
This weak move does not improve Black's position and allows White to push his pawns on the queenside without any difficulty.
Essential was 33 . . . Ei:a8! (a3 is hanging now!) 34.Ei:xa8 Ei:xa8 3 5 .<.!;>b3 <.!;>d6! 36.'i>b4 Ei:h8! This shows another drawback of b4-b5 as Black now wins the fight for c5. The endgame after 37.a4 l"i:h4t 38 .<;!;>b3 <.!;>c5 is even slightly better for him, although White should be able to hold the position. Please note the importance of the rook swap! 34.l"l:c7?!
More to the point was 34.a4, but White was better in any case and eventually won the game.
Bareev - Adams Dortmund 2000
l .d4 lilf6 2.c4 e6 3.g3 d5 4.lilf3 dxc4 5 • .ig2 lilc6 6.�a4 .ib4t 7 • .id2 lild5 8.hb4 lildxb4 9.a3 b5 10.�xb5 lilc2t l l .<.!;>d2 lilxal 12.�xc6t .id7 13.�xc4 c5 14.�a2 �a5t 15.lilc3 cxd4 16.lilxd4 �dB 17.�xal
17 . • • e5 1 7 . . . �c5 ! ? is an interesting move. This
almost forces White to sacrifice the exchange, and we have seen from other positions that Black often enjoys the long-term advantages of the rook even if White has two pawns for the knight. 1 8 .e3 e5 and now:
a) Kasimdzhanov - Aleksandrov, Jahorina 2003 saw the continuation 1 9 .�d5 �xd5 20.ixd5 {20 .'Llxd5 was better, to continue
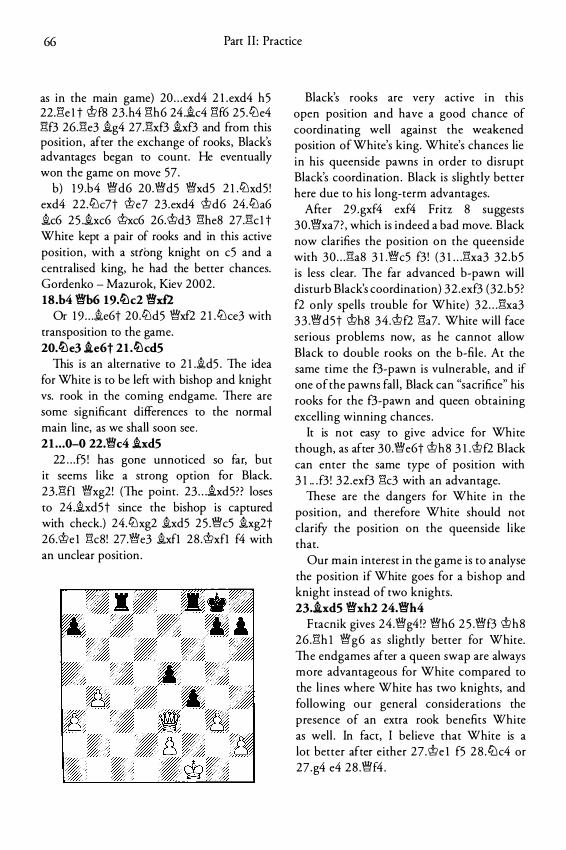
66 Part I I : Practice
as in the main game) 20 . . . exd4 2 l .exd4 h5 22.Ei:e I t <i>f8 23 .h4 Ei:h6 24 .ic4 Ei:f6 25 .tt:le4 Ei:f3 26.Ei:e3 ig4 27.Ei:xf3 ixf3 and from this position, after the exchange of rooks, Black's advantages began to count. He eventually won the game on move 57.
b) 1 9 .b4 '.Wd6 20.'1Wd5 '.Wxd5 2 1 .tt:lxd5 ! exd4 22 .tt:lc7t <i>e7 23.exd4 ci>d6 24.tt:la6 ic6 25 .ixc6 <i>xc6 26.<i>d3 Ei:he8 27.Ei:c l t White kept a pair of rooks and in this active position, with a sttong knight on c5 and a centralised king, he had the better chances. Gordenko - Mazurok, Kiev 2002. 18.b4 iWb6 19.ttk2 '\Wx£2
Or 1 9 . . . ie6t 20.tt:ld5 '.Wxf2 2 1 .tt:lce3 with transposition to the game. 20.c!i:\e3 .ie6t 21 .c!i:\cd5
This is an alternative to 2 l .id5 . The idea for White is to be left with bishop and knight vs. rook in the coming endgame. There are some significant differences to the normal main line, as we shall soon see . 21 . . .0-0 22.'1Wc4 .ixd5
22 . . .f5 ! has gone unnoticed so far, but it seems like a strong option for Black. 23 .Ei:fl '.Wxg2! (The point. 23 . . . ixd5? ? loses to 24.ixd5t since the bishop is captured with check.) 24.tt:lxg2 ixd5 2 5 .'1Wc5 ixg2t 26.<i>e l Ei:c8! 27.'1We3 ixfl 28 .<i>xfl f4 with an unclear position .
Black's rooks are very active in this open position and have a good chance of coordinating well against the weakened position of White's king. White's chances lie in his queenside pawns in order to disrupt Black's coordination . Black is slightly better here due to his long-term advantages.
After 29 .gxf4 exf4 Fritz 8 suggests 30 .iWxa7? , which is indeed a bad move. Black now clarifies the position on the queenside with 30 . . . Ei:a8 3 1 .'1Wc5 f3 ! (3 l . . .Ei:xa3 32 .b5 is less clear. The far advanced b-pawn will disturb Black's coordination) 32 .exf3 (32 .b5 ? f2 only spells trouble for White) 32 . . . Ei:xa3 33 .'1Wd5t <i>h8 34 .<i>f2 Ei:a7. White will face serious problems now, as he cannot allow Black to double rooks on the b-file. At the same time the f3-pawn is vulnerable, and if one of the pawns fall , Black can "sacrifice" his rooks for the f3-pawn and queen obtaining excelling winning chances .
It is not easy to give advice for White though, as after 30 .'1We6t <i>h8 3 l .<i>f2 Black can enter the same type of position with 3 l .. . f3 ! 32 .exf3 Ei:c3 with an advantage.
These are the dangers for White in the position, and therefore White should not clarify the position on the queenside l ike that.
Our main interest in the game is to analyse the position if White goes for a bishop and knight instead of two knights. 23 • .ixd5 iWxh2 24.iWh4
Ftacnik gives 24 .'1Wg4! ? '.Wh6 2 5 .'1Wf3 <i>h8 26.Ei:h 1 '.Wg6 as slightly better for White. The endgames after a queen swap are always more advantageous for White compared to the l ines where White has two knights, and following our general considerations the presence of an extra rook benefits White as well . In fact, I believe that White is a lot better after either 27 .<i>e l f5 2 8 . ttJ c4 or 27 .g4 e4 28 .'1Wf4 .
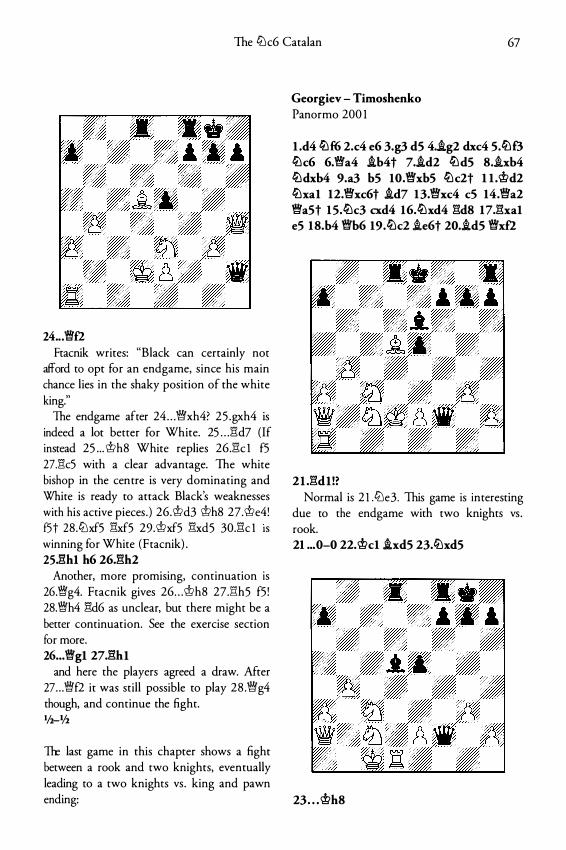
The tt:lc6 Catalan 67
24 .. .'�f2 Ftacnik writes: "Black can certainly not
afford to opt for an endgame, since his main chance lies in the shaky position of the white king."
The endgame after 24 . . . �xh4? 25 .gxh4 is indeed a lot better for White. 25 . . . Eid7 (If instead 25 . . . <i>h8 White replies 26.Eic l f5 27Jlc5 with a clear advantage. The white bishop in the centre is very dominating and White is ready to attack Black's weaknesses with his active pieces . ) 26.<i>d3 <i>h8 27.<i>e4! f5t 28.tt'lxf5 Elxf5 29.<i>xf5 Elxd5 30.Eic l 1s winning for White (Ftacnik) . 25.!::lhl h6 26J:!h2
Another, more promising, continuation is 26.�g4. Ftacnik gives 26 . . . <i>h8 27.Eih5 f5 ! 28.�h4 E!d6 as unclear, but there might be a better continuation. See the exercise section for more. 26 ... �gl 27J�hl
and here the players agreed a draw. After 27 . . . �f2 it was still possible to play 28 .�g4 though, and continue the fight. liz_ liz
The last game in this chapter shows a fight between a rook and two knights, eventually leading to a two knights vs . king and pawn ending:
Georgiev - Timoshenko Panormo 200 1
I .d4 c!L\f6 2.<:4 e6 3.g3 dS 4.i.g2 dxc4 S . .!l:\8 c!L\c6 6.�a4 i.b4t 7.i.d2 c!L\dS 8 . .ixb4 c!L\dxb4 9.a3 b5 lO.�xbS c!L\c2t l l .'tt>d2 c!L\xal 12.�xc6t i.d7 13.�xc4 cS 14.�a2 �aSt 15.c!L\c3 cxd4 16.c!L\xd4 E1d8 17.E1xal eS 18.b4 �b6 19.c!L\c2 .ie6t 20.i.d5 �xfl
2I .E1dl !? Normal is 2 l .tt'le3. This game is interesting
due to the endgame with two knights vs . rook. 21 ... 0-0 22.'tt>c1 i.xdS 23.c!L\xd5
23 . . . <i>h8
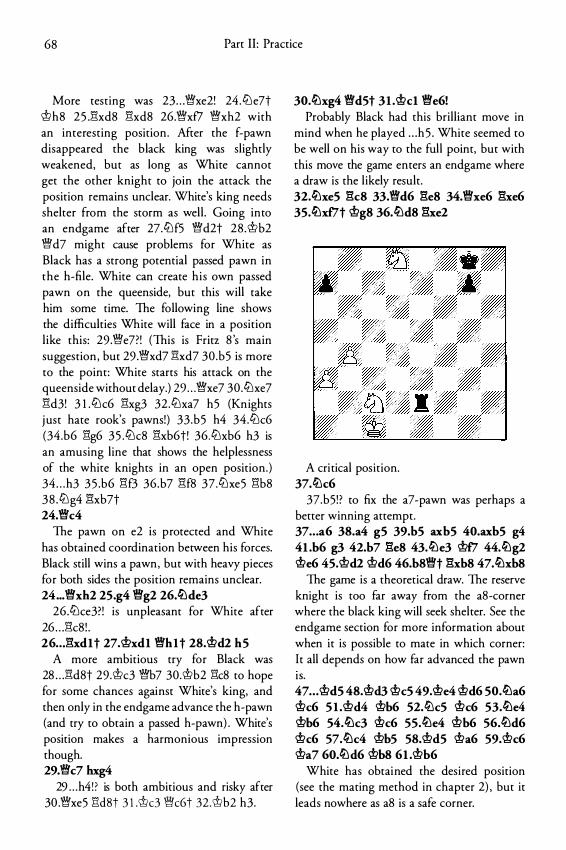
68 Part II : Practice
More testing was 23 . . . Wxe2! 24 .tt:le7t �h8 2 5 .Elxd8 Elxd8 26.Wxf7 Wxh2 with an interesting position. After the f-pawn disappeared the black king was slightly weakened, but as long as White cannot get the other knight to join the attack the position remains unclear. White's king needs shelter from the storm as well . Going into an endgame after 27.tt:lf5 Wd2t 28 .�b2 Wd7 might cause problems for White as Black has a strong potential passed pawn in the h-file. White can create his own passed pawn on the queenside, but this will take him some time. The following line shows the difficulties White will face in a position l ike this: 29 .We7?! (This is Fritz 8 's main suggestion , but 29 .Wxd7 Elxd7 30 .b5 is more to the point: White starts his attack on the queenside without delay.) 29 . . . Wxe7 30 .tt:lxe7 Eld3! 3 1 .tt:lc6 Elxg3 32 .tt:lxa7 h5 (Knights j ust hate rook's pawns!) 33 .b5 h4 34.tt:lc6 (34.b6 Elg6 3 5 .tt:lc8 Elxb6t! 36 .tt:lxb6 h3 is an amusing line that shows the helplessness of the white knights in an open position.) 34 . . . h3 3 5 .b6 Elf3 36.b7 Elf8 37 .tt:lxe5 Elb8 38 .tt:lg4 Elxb7t 24.�c4
The pawn on e2 is protected and White has obtained coordination between his forces. Black still wins a pawn, but with heavy pieces for both sides the position remains unclear. 24 ... Wxh2 25.g4 Wg2 26.ltlde3
26.tt:lce3?! is unpleasant for White after 26 . . . Elc8 ! . 26 . . J'!xdlt 27.�xdl Whit 28.�d2 hS
A more ambitious try for Black was 28 . . . Eld8t 29.�c3 Wb7 30.�b2 Elc8 to hope for some chances against White's king, and then only in the endgame advance the h-pawn (and try to obtain a passed h-pawn) . White's position makes a harmonious impression though. 29.�c7 hxg4
29 . . . h4! ? is both ambitious and risky after 30 .Wxe5 Eld8t 3 l .�c3 Wc6t 32 .�b2 h3.
30.ltlxg4 WdSt 3 l .�cl We6! Probably Black had this brilliant move in
mind when he played . . . h5 . White seemed to be well on his way to the full point, but with this move the game enters an endgame where a draw is the l ikely result. 32.ltlxe5 :Bc8 33.Wd6 :Be8 34.Wxe6 :Bxe6 35.ltlxf7t �g8 36.ltld8 :Bxe2
A critical position. 37.ltlc6
37.b5 ! ? to fix the a7-pawn was perhaps a better winning attempt. 37 .. . a6 38.a4 g5 39.b5 axb5 40.axb5 g4 4l .b6 g3 42.b7 :Be8 43.ltle3 �f7 44.ltlg2 �e6 45.�d2 �d6 46.b8Wt :Bxb8 47.ltlxb8
The game is a theoretical draw. The reserve knight is too far away from the aS-corner where the black king will seek shelter. See the endgame section for more information about when it is possible to mate in which corner: It all depends on how far advanced the pawn IS.
47 . . . �d5 48.�d3 �c5 49.�e4 �d6 50.ltla6 �c6 5 l .�d4 �b6 52.ltlc5 �c6 53.ltle4 �b6 54.ltlc3 �c6 55.ltle4 �b6 56.ltld6 �c6 57.ltlc4 �b5 58.�d5 �a6 59.�c6 �a7 60.ltld6 �b8 6l .�b6
White has obtained the desired position (see the mating method in chapter 2) , but it leads nowhere as a8 is a safe corner.
The lt:lc6 Catalan
6I...I!?a8 62.ttlc8 l!?bs 63.ttla7 �!?aS 64.l!?c6
and draw agreed. '12-%
That brings to a close the games that I have chosen to show in this chapter. I have tried to focus on the critical positions of the ti:Jc6 Catalan, and my hope is that they show how the material imbalance works in practice. To refine the reader's feeling for such positions, I have chosen another 1 1 positions for the following exercise section. The exercises deal with critical positions, or simply positions that I believe are instructive.
I should warn the reader at this stage: The conclusion to this chapter (page 74) contains some points from the solutions of these exercises, and therefore these exercises should be solved first to gain the full benefit of them.
69
Evaluation exercises 7 1
Chapter 4 Evaluation Exercises
1 . Timoshenko - Ziatdinov Philadelphia 1 999
Position after 2S . . . :Bxf2
Question: Try to evaluate the position after 26.:8:cl 0-0 27 . .ihl . What are the pros and cons of White and Black's position, and what are they trying to obtain? Who is better and why?
2. Timoshenko - Ziatdinov Philadelphia 1 999
Position after 21 .tt:lxc6
Question: Try to evaluate the posmon in general and on the basis of the fundamental positions discussed in the endgame chapter.
3. Meins - Meijere Baunatal 1 999
Position after 24.:8:xf5
Question: Try to evaluate the position in terms of material, activity and static vs. dynamic advantages.
4. Georgiev - Timoshenko Panormo 200 1
Position after 23 . . . �xe2
72 Part I I : Practice
Question: Try to evaluate this position in the same way as the previous exercise.
5. Bareev - Adams (line) Dortmund 2000
Position after 26 ... c;f;>hs
Question: In his analysis to the game Ftacnik gave 27. �h5 f5 ! 28 .�h4 �d6 etc. as being unclear. Is there a stronger continuation for White from the diagram position?
6. Lund - D.V. Pedersen Copenhagen 2004
Position after 23 • . . c;f;>e7
Question: The question here is simple, but the answer might be difficult: Can Black win this position? Clue: Compare this position with that of Karpov - Kasparov on page 40.
7. Schandorrf- Zuchelli Copenhagen 2002
Position after 22.�c3
Question: Try to evaluate the posmon on the basis of games already discussed. Who is better and why?
8. Kozlov - Chernikov Soviet Union 1 978
Position after 24 . . . i.e8
Question: Try to evaluate this complicated middlegame position in terms of material and the exchanging problem. What are White's plans? And what can Black pin his hopes on?
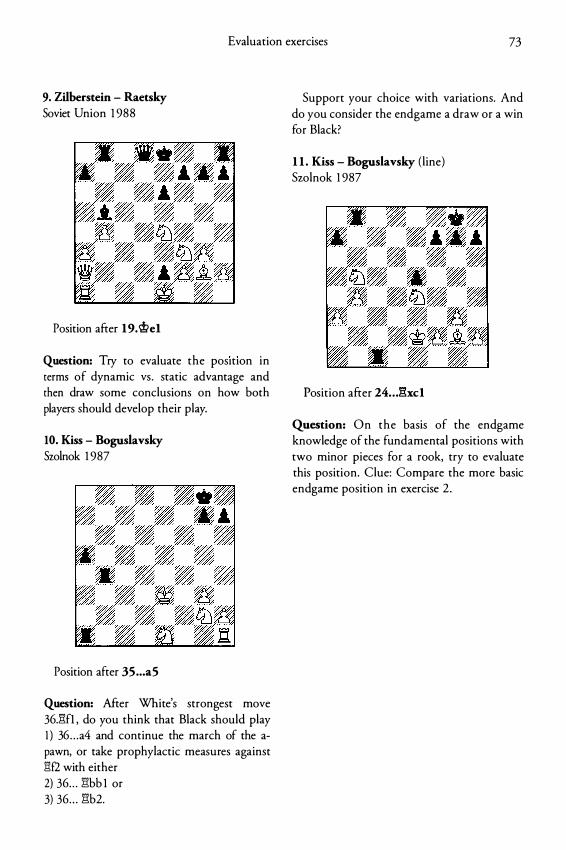
Evaluation exercises 73
9. Zilberstein - Raetsky Soviet Union 1 988
Position after 19.�el
Question: Try to evaluate the position in terms of dynamic vs . static advantage and then draw some conclusions on how both players should develop their play.
10. Kiss - Boguslavsky Szolnok 1 987
Position after 35 ... a5
Question: After White's strongest move 36.l"lfl , do you think that Black should play I ) 36 . . . a4 and continue the march of the apawn, or take prophylactic measures against l"lf2 with either 2) 36 . . . l"lbb 1 or 3) 36 . . . l'!b2.
Support your choice with variations. And do you consider the endgame a draw or a win for Black?
1 1 . Kiss - Boguslavsky (line) Szolnok 1 987
Position after 24 . . J�xcl
Question: On the basis of the endgame knowledge of the fundamental positions with two minor pieces for a rook, try to evaluate this position. Clue: Compare the more basic endgame position in exercise 2 .
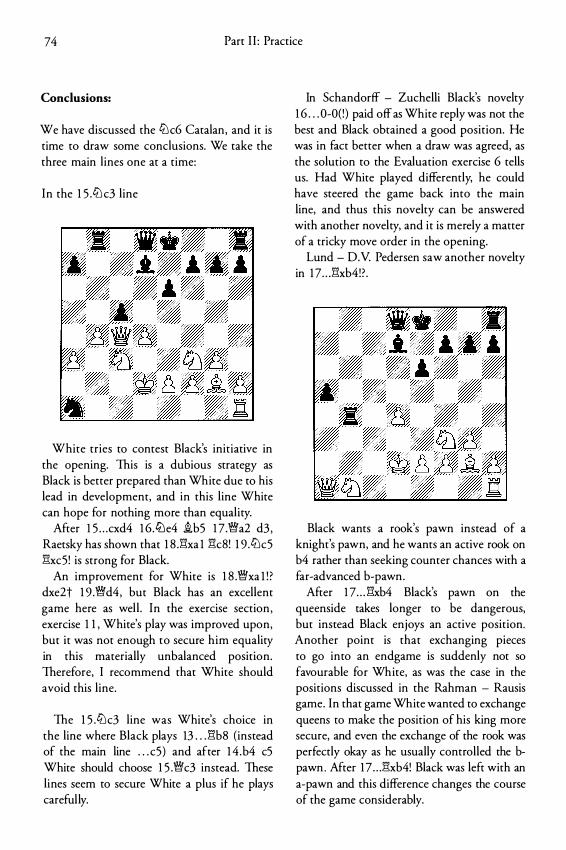
74 Part I I : Practice
Conclusions:
We have discussed the CLlc6 Catalan, and it is time to draw some conclusions. We take the three main lines one at a time:
In the 1 5 .CLl c3 line
White tries to contest Black's initiative in the opening. This is a dubious strategy as Black is better prepared than White due to his lead in development, and in this line White can hope for nothing more than equality.
After 1 5 . . . cxd4 1 6.ttle4 i.b5 1 7.�a2 d3 , Raetsky has shown that 1 8 .Ei:xa 1 Ei:c8! 1 9 .CLlc5 Ei:xc5 ! is strong for Black.
An improvement for White is 1 8 .�xa 1 ! ? dxe2t 1 9 .�d4, but Black has an excellent game here as well . In the exercise section , exercise 1 1 , White's play was improved upon, but it was not enough to secure him equality in this materially unbalanced position. Therefore, I recommend that White should avoid this line.
The 1 5 .CLlc3 line was White's choice in the line where Black plays 13 . . . Ei:b8 (instead of the main line . . . c5) and after 1 4 .b4 c5 White should choose 1 5 .�c3 instead. These lines seem to secure White a plus if he plays carefully.
In Schandorff - Zuchelli Black's novelty 1 6 . . . 0-0(!) paid off as White reply was not the best and Black obtained a good position. He was in fact better when a draw was agreed, as the solution to the Evaluation exercise 6 tells us. Had White played differently, he could have steered the game back into the main line, and rhus this novelty can be answered with another novelty, and it is merely a matter of a tricky move order in the opening.
Lund - D.V Pedersen saw another novelty in 1 7 . . . Ei:xb4!? .
Black wants a rook's pawn instead of a knight's pawn, and he wants an active rook on b4 rather than seeking counter chances with a far-advanced b-pawn.
After 1 7 . . . Ei:xb4 Black's pawn on the queenside rakes longer to be dangerous, but instead Black enjoys an active position. Another point is that exchanging pieces to go into an endgame is suddenly not so favourable for White, as was the case in the positions discussed in the Rahman - Rausis game. In that game White wanted to exchange queens to make the position of his king more secure, and even the exchange of the rook was perfectly okay as he usually controlled the bpawn . After 1 7 . . . Ei:xb4! Black was left with an a-pawn and this difference changes the course of the game considerably.

Evaluation exercises 75
White was not obliged to exchange pieces as happened in Lund - D.V. Pedersen, and White is still slightly better after 1 8 .Ek 1 ! as the analysis of the game shows. This is perhaps the critical continuation of this line.
In the main line 13 . . . c5
Black seems to obtain approximately equality, or at least good counter chances in very complicated endgame positions.
Kasimdzhanov's improvements on the 25 'h and 26'h moves will perhaps not last if Black plays Ftacnik's improvement and follows up with further refinements as shown in the training game Weber - Thestrup. The point is that Kasimdzhanov's continuation creates short-term threats, but if Black plays carefully, then what?
Kasparov's move 2 5 . <;t>e 1 might still be best, as the king is well placed on the kingside. The move was played in Sloth - Palciauskas, but here White's 28 .e4! ? was perhaps too early. White should have continued on the queenside instead, or tried to create outposts for his knights on either c5 or c6.
The game Bareev - Adams shows that the configuration bishop and knight vs. rook is better than two knights in this endgame. We also saw that White had a promising continuation in that game, had he
played Ftacnik's move 26 .�g4 and later the knight hop to f5 as shown in exercise 5 .
The move 2 l .tiJcd5 has only been played once so far. It seems as if Black keeps the balance (or even gets a slightly better position) with the strong move 22 . . . f5 ! , leading to a very complicated position with queen vs . two rooks.
If we look at the tLl c6 Catalan in terms of the four points given in the Theoretical Foundation, the conclusions are:
We have already discussed the exchanging problem intensively - during the games and also briefly above. Usually White would like to exchange queens, as his king is more insecure. White would in general like to keep his rook on the board, and this is in accordance with our guideline. We also saw cases where the fundamental endgame is clearly favourable for White when a rook swap simplifies the position into such an ending. (This was the case when Black had a b-pawn!)
With two knights - instead of bishop and knight - some of the rules presented in the Theoretical Foundation do not apply. Domination of the bishop is of course irrelevant, and to a certain extent the colour problem vanishes as well, as the knights can protect either colour complex equally well (or badly) .
In the 1 3 . . . l"lb8 line White usually secures the squares e3 and d4 in the centre. This makes sense because of his light-squared bishop on g2, bur Black will often succeed in exchanging this bishop off, and with his two knights and insecure king, White's strategy is merely to avoid the centre being opened up. A typical answer to . . . f7-f6 and . . . e6-e5 is d4-d5 also creating a passed pawn in the centre.
As I mentioned in the Theoretical Foundation, these guidelines apply mainly to the bishop and knight pairing. I also mentioned that with two knights merely counting pawns
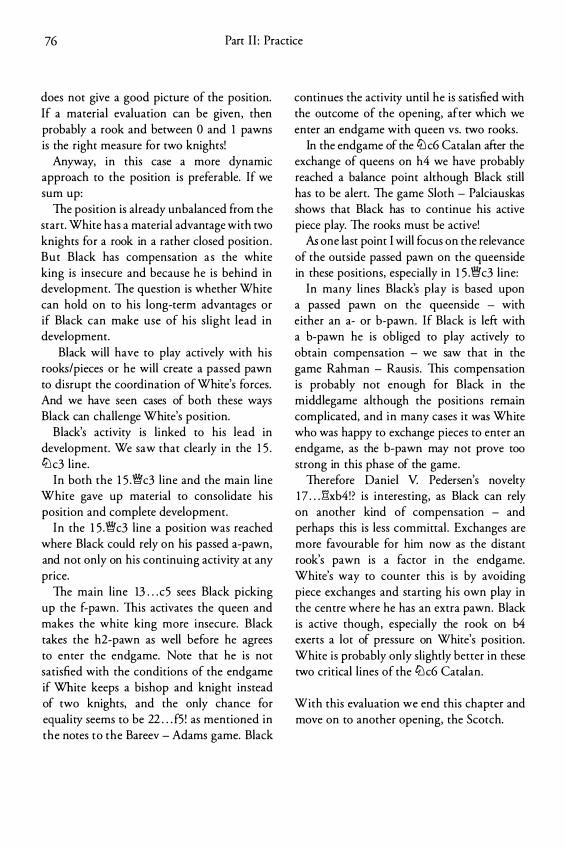
76 Part I I : Practice
does not give a good picture of the position. If a material evaluation can be given, then probably a rook and between 0 and 1 pawns is the right measure for two knights!
Anyway, in this case a more dynamic approach to the position is preferable. If we sum up:
The position is already unbalanced from the start. White has a material advantage with two knights for a rook in a rather closed position . But Black has compensation as the white king is insecure and because he is behind in development. The question is whether White can hold on to his long-term advantages or if Black can make use of his slight lead in development.
Black will have to play actively with his rooks/pieces or he will create a passed pawn to disrupt the coordination of White's forces. And we have seen cases of both these ways Black can challenge White's position.
Black's activity is linked to his lead in development. We saw that clearly in the 1 5 . lLl c3 line.
In both the 1 5 .�c3 line and the main line White gave up material to consolidate his position and complete development.
In the 1 5 .�c3 line a position was reached where Black could rely on his passed a-pawn, and not only on his continuing activity at any price.
The main line 13 . . . c5 sees Black picking up the f-pawn. This activates the queen and makes the white king more insecure. Black takes the h2-pawn as well before he agrees to enter the endgame. Note that he is not satisfied with the conditions of the endgame if White keeps a bishop and knight instead of two knights, and the only chance for equality seems to be 22 . . . f5 ! as mentioned in the notes to the Bareev - Adams game. Black
continues the activity until he is satisfied with the outcome of the opening, after which we enter an endgame with queen vs. two rooks.
In the endgame of the ltJ c6 Catalan after the exchange of queens on h4 we have probably reached a balance point although Black still has to be alert. The game Sloth - Palciauskas shows that Black has to continue his active piece play. The rooks must be active!
As one last point I will focus on the relevance of the outside passed pawn on the queenside in these positions, especially in 1 5 .�c3 line:
In many lines Black's play is based upon a passed pawn on the queenside - with either an a- or b-pawn. If Black is left with a b-pawn he is obliged to play actively to obtain compensation - we saw that in the game Rahman - Rausis. This compensation is probably not enough for Black in the middlegame although the positions remain complicated, and in many cases it was White who was happy to exchange pieces to enter an endgame, as the b-pawn may not prove too strong in this phase of the game.
Therefore Daniel V Pedersen's novelty 1 7 . . . Elxb4!? is interesting, as Black can rely on another kind of compensation - and perhaps this is less committal . Exchanges are more favourable for him now as the distant rook's pawn is a factor in the endgame. White's way to counter this is by avoiding piece exchanges and starting his own play in the centre where he has an extra pawn. Black is active though, especially the rook on b4 exerts a lot of pressure on White's position. White is probably only slightly better in these two critical lines of the ltJc6 Catalan.
With this evaluation we end this chapter and move on to another opening, the Scotch.
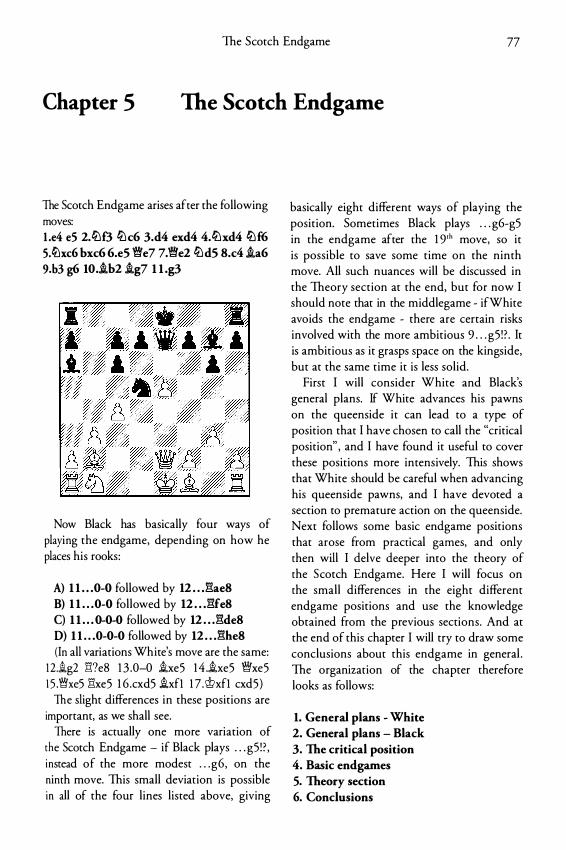
The Scotch Endgame 77
Chapter 5 The Scotch Endgame
The Scotch Endgame arises after the following moves: l .e4 e5 2.c!Llf3 c!Llc6 3.d4 exd4 4.c!Llxd4 c!Llf6 5.ttlxc6 bxc6 6.e5 "e!le7 7."e!le2 c!Lld5 8.c4 .ia6 9.b3 g6 lO • .ib2 .ig7 l l .g3
Now Black has basically four ways of playing the endgame, depending on how he places his rooks:
A) 1 1 . . .0-0 followed by 12 • . J'l:ae8 B) 1 1 . . .0-0 followed by 12 • • • gfe8 C) 1 1 . . • 0-0-0 followed by 12 • • . gde8 D) 1 1 . . .0-0-0 followed by 12 • . • ghe8 (In all variations White's move are the same:
1 2 .�g2 g?e8 1 3 .0-0 i.xe5 1 4 .i.xe5 �xe5 1 5 .Wxe5 gxe5 1 6 .cxd5 i.xfl l 7 .'it>xfl cxd5)
The slight differences in these positions are important, as we shall see.
There is actually one more variation of the Scotch Endgame - if Black plays . . . g5 ! ? , instead of the more modest . . . g6 , on the ninth move. This small deviation is possible in all of the four lines listed above, giving
basically eight different ways of playing the position. Sometimes Black plays . . . g6-g5 in the endgame after the 1 9'h move, so it is possible to save some time on the ninth move. All such nuances will be discussed in the Theory section at the end, but for now I should note that in the middlegame - ifWhite avoids the endgame - there are certain risks involved with the more ambitious 9 . . . g5 ! ? . It is ambitious as it grasps space on the kingside, but at the same time it is less solid.
First I will consider White and Black's general plans. If White advances his pawns on the queenside it can lead to a type of position that I have chosen to call the "critical position" , and I have found it useful to cover these positions more intensively. This shows that White should be careful when advancing his queenside pawns, and I have devoted a section to premature action on the queenside. Next follows some basic endgame positions that arose from practical games, and only then will I delve deeper into the theory of the Scotch Endgame. Here I will focus on the small differences in the eight different endgame positions and use the knowledge obtained from the previous sections. And at the end of this chapter I will try to draw some conclusions about this endgame in general . The organization of the chapter therefore looks as follows:
1. General plans - White 2. General plans - Black 3. The critical position 4. Basic endgames 5. Theory section 6. Conclusions
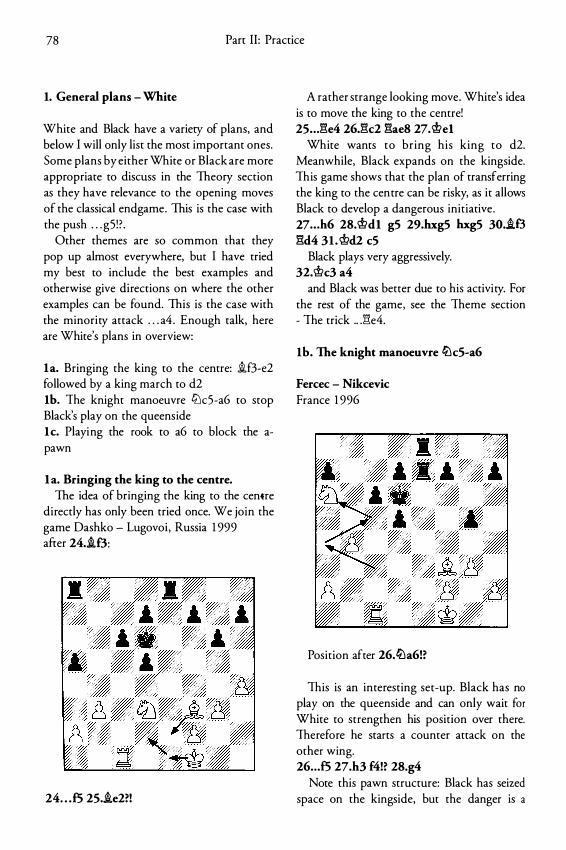
78 Part II: Practice
1. General plans - White
White and Black have a variety of plans, and below I will only list the most important ones. Some plans by either White or Black are more appropriate to discuss in the Theory section as they have relevance to the opening moves of the classical endgame. This is the case with the push . . . g5 ! ? .
Other themes are so common that they pop up almost everywhere, but I have tried my best to include the best examples and otherwise give directions on where the other examples can be found. This is the case with the minority attack . . . a4 . Enough talk, here are White's plans in overview:
la. Bringing the king to the centre: if3-e2 followed by a king march to d2 lb. The knight manoeuvre tt:lc5-a6 to stop Black's play on the queenside lc. Playing the rook to a6 to block the apawn
la. Bringing the king to the centre. The idea of bringing the king to the centre
directly has only been tried once. We join the game Dashko - Lugovoi , Russia 1 999 after 24 • .if3:
24 . . . f5 25 • .ie2?!
A rather strange looking move. White's idea is to move the king to the centre! 25 • • .l:!e4 26Jk2 l:!ae8 27.\t>el
White wants to bring his king to d2. Meanwhile, Black expands on the kingside. This game shows that the plan of transferring the king to the centre can be risky, as it allows Black to develop a dangerous initiative. 27 • • • h6 28.\t>dl gS 29.hxg5 hxgS 30 . .i8 l:!d4 31 . l!?d2 c5
Black plays very aggressively. 32.i>c3 a4
and Black was better due to his activity. For the rest of the game, see the Theme section - The trick .. J:!e4.
lb. The knight manoeuvre tl:lc5-a6
Fercec - Nikcevic France 1 996
Position after 26.tl:la6!?
This is an interesting set-up. Black has no play on the queenside and can only wait for White to strengthen his position over there. Therefore he starts a counter attack on the other wing. 26 .. . £5 27.h3 f4!? 28.g4
Note this pawn structure: Black has seized space on the kingside, but the danger is a
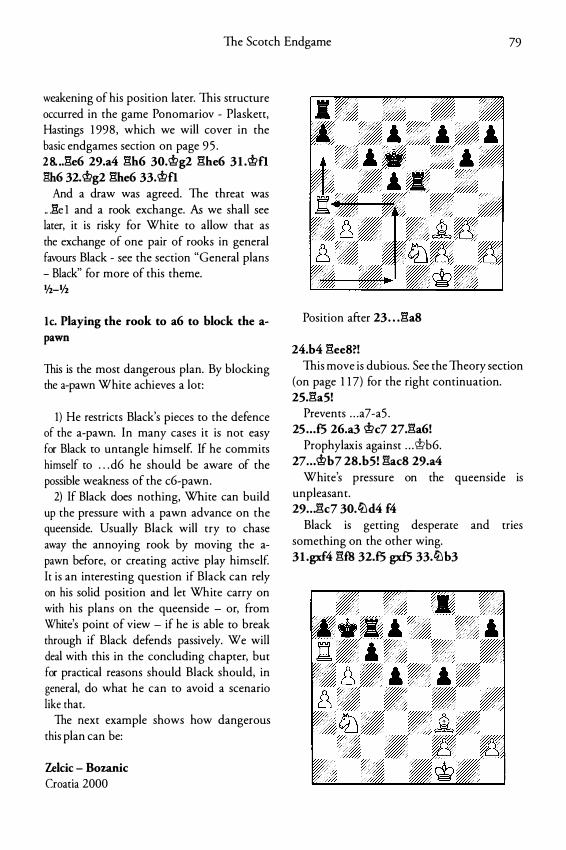
The Scotch Endgame 79
weakening of his position later. This structure occurred in the game Ponomariov - Plaskett, Hastings 1 998 , which we will cover in the basic endgames section on page 9 5 . 2 8 . . .l"�e6 29.a4 �h6 30.�g2 �he6 3l .�fl l"!h6 32. �g2 �he6 33. �fl
And a draw was agreed. The threat was .. .l':1e 1 and a rook exchange. As we shall see later, it is risky for White to allow that as the exchange of one pair of rooks in general favours Black - see the section "General plans - Black" for more of this theme. 'lz-1/z
lc. Playing the rook to a6 to block the apawn
This is the most dangerous plan. By blocking the a-pawn White achieves a lot:
1) He restricts Black's pieces to the defence of the a-pawn. In many cases it is not easy for Black to untangle himself. If he commits himself to . . . d6 he should be aware of the possible weakness of the c6-pawn.
2) If Black does nothing, White can build up the pressure with a pawn advance on the queenside. Usually Black will try to chase away the annoying rook by moving the apawn before, or creating active play himself. It is an interesting question if Black can rely on his solid position and let White carry on with his plans on the queenside - or, from White's point of view - if he is able to break through if Black defends passively. We will deal with this in the concluding chapter, but for practical reasons should Black should, in general, do what he can to avoid a scenario like that.
The next example shows how dangerous this plan can be:
Zelcic - Bozanic Croatia 2000
Position after 23 . . . �aS
24.b4 �ee8?! This move is dubious. See the Theory section
(on page 1 1 7) for the right continuation. 25.�a5!
Prevents . . . a7-a5 . 2S . . . f5 26.a3 �c7 27.�a6!
Prophylaxis against . . . �b6. 27 . . . �b7 28.b5! �ac8 29.a4
White's pressure on the queenside is unpleasant. 29 . . . �c7 30.ltld4 f4
Black is getting desperate and tries something on the other wing. 3l .gxf4 �f8 32.f5 gxf5 33.ltlb3
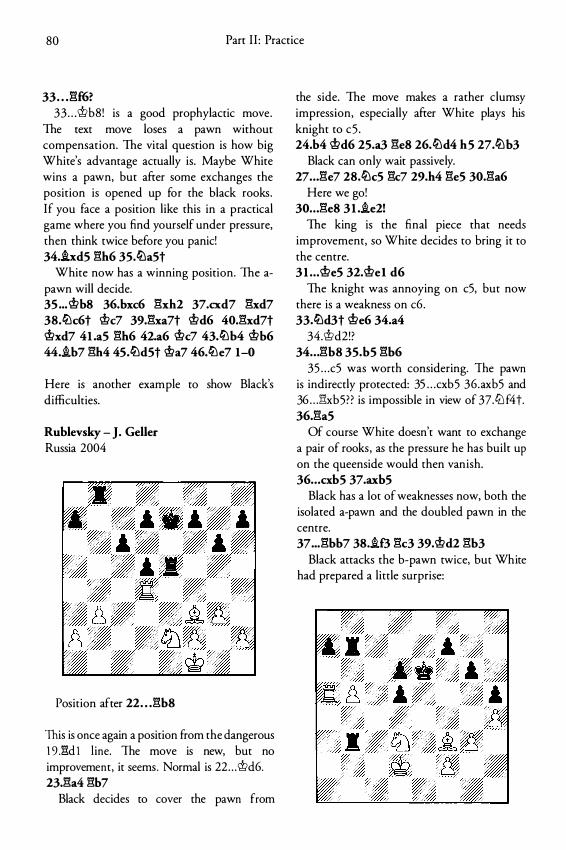
80 Part I I : Practice
33 . . JU6? 33 . . . '\t>b8! is a good prophylactic move.
The text move loses a pawn without compensation. The vital question is how big White's advantage actually is. Maybe White wins a pawn, but after some exchanges the position is opened up for the black rooks . If you face a position like this in a practical game where you find yourself under pressure, then think twice before you panic! 34.hd5 �h6 35.ttla5t
White now has a winning position. The apawn will decide. 35 ... 'i!?b8 36.bxc6 �xh2 37.cxd7 �xd7 38.ttlc6t 'i!?c7 39.�xa7t 'i!?d6 40.�xd7t 'i!?xd7 4I .a5 �h6 42.a6 'i!?c7 43.ttlb4 'i!?b6 44 . .ib7 �h4 45.ttld5t 'i!?a7 46.ttle7 1-0
Here is another example to show Black's difficulties.
Rublevsky - J. Geller Russia 2004
Position after 22 . . . �b8
This is once again a position from the dangerous 1 9 J'l:d I line. The move is new, bur no improvement, it seems. Normal is 22 . . . \t>d6. 23.�a4 �b7
Black decides to cover the pawn from
the side. The move makes a rather clumsy impression, especially after White plays his knight to c5 . 24.b4 'i!?d6 25.a3 �e8 26.ttld4 h5 27.ttlb3
Black can only wait passively. 27 .. . �e7 28.ttlc5 �c7 29.h4 �e5 30.�a6
Here we go! 30 . . . �e8 3 I ..ie2!
The king is the final piece that needs improvement, so White decides to bring it to the centre. 3I . . . 'i!?e5 32.'i!?el d6
The knight was annoying on c5, but now there is a weakness on c6 . 33.ttld3t 'i!?e6 34.a4
34.'\t>d2!? 34 . . . �b8 35.b5 �b6
35 . . . c5 was worth considering. The pawn is indirectly protected: 35 . . . cxb5 36 .axb5 and 36 . . . !'1xb5? ? is impossible in view of 37.tt'l f4t. 36.�a5
Of course White doesn't want to exchange a pair of rooks, as the pressure he has built up on the queenside would then vanish. 36 . . . cxb5 37.axb5
Black has a lot of weaknesses now, both the isolated a-pawn and the doubled pawn in the centre. 37 ... �bb7 38 . .if3 �c3 39.'i!?d2 �b3
Black attacks the b-pawn twice, but White had prepared a little surprise:
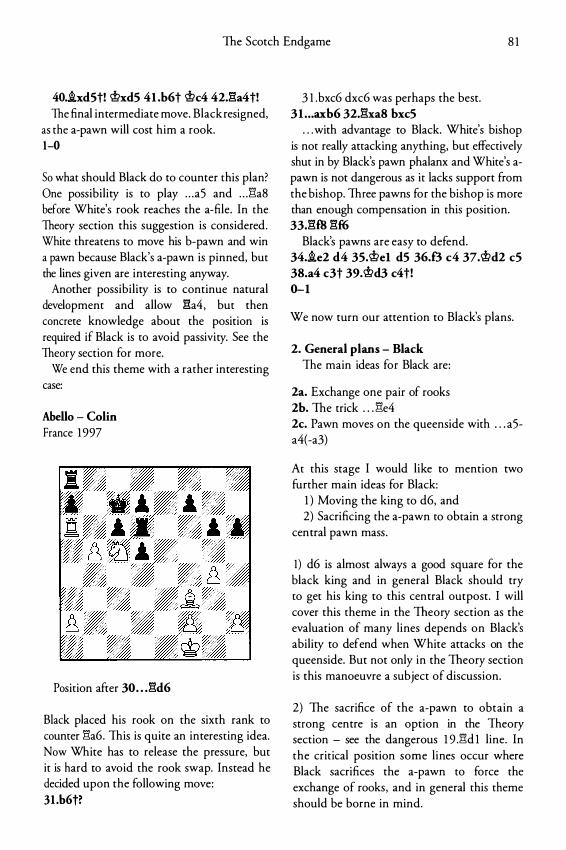
The Scotch Endgame 8 1
40.ixd5t! �xd5 4I .b6t �c4 42J3a4t! The final intermediate move. Black resigned,
as the a-pawn will cost him a rook. 1-0
So what should Black do to counter this plan? One possibility is to play . . . a5 and . . . 1"la8 before White's rook reaches the a-file. In the Theory section this suggestion is considered. White threatens to move his b-pawn and win a pawn because Black's a-pawn is pinned, but the lines given are interesting anyway.
Another possibility is to continue natural development and allow l3a4, but then concrete knowledge about the position is required if Black is to avoid passivity. See the Theory section for more.
We end this theme with a rather interesting case:
Abello - Colin France 1 997
Position after 30 . . . l3d6
Black placed his rook on the sixth rank to counter l3a6. This is quite an interesting idea. Now White has to release the pressure, but it is hard to avoid the rook swap. Instead he decided upon the following move: 31 .b6t?
3 1 .bxc6 dxc6 was perhaps the best. 31 . .. axb6 32.l3xa8 bxc5
. . . with advantage to Black. White's bishop is not really attacking anything, but effectively shut in by Black's pawn phalanx and White's apawn is not dangerous as it lacks support from the bishop. Three pawns for the bishop is more than enough compensation in this position. 33.l3ffi l3f6
Black's pawns are easy to defend. 34.ie2 d4 35.�el d5 36.8 c4 37.�d2 c5 38.a4 c3t 39.�d3 c4t! 0-1
We now turn our attention to Black's plans.
2. General plans - Black The main ideas for Black are:
2a. Exchange one pair of rooks 2b. The trick . . . l3e4 2c. Pawn moves on the queenside with . . . a5-a4(-a3)
At this stage I would like to mention two further main ideas for Black:
1 ) Moving the king to d6, and 2) Sacrificing the a-pawn to obtain a strong
central pawn mass .
1) d6 is almost always a good square for the black king and in general Black should try to get his king to this central outpost. I will cover this theme in the Theory section as the evaluation of many lines depends on Black's ability to defend when White attacks on the queenside. But not only in the Theory section is this manoeuvre a subject of discussion.
2) The sacrifice of the a-pawn to obtain a strong centre is an option in the Theory section - see the dangerous 1 9 .1"ld 1 line. In the critical position some lines occur where Black sacrifices the a-pawn to force the exchange of rooks, and in general this theme should be borne in mind.
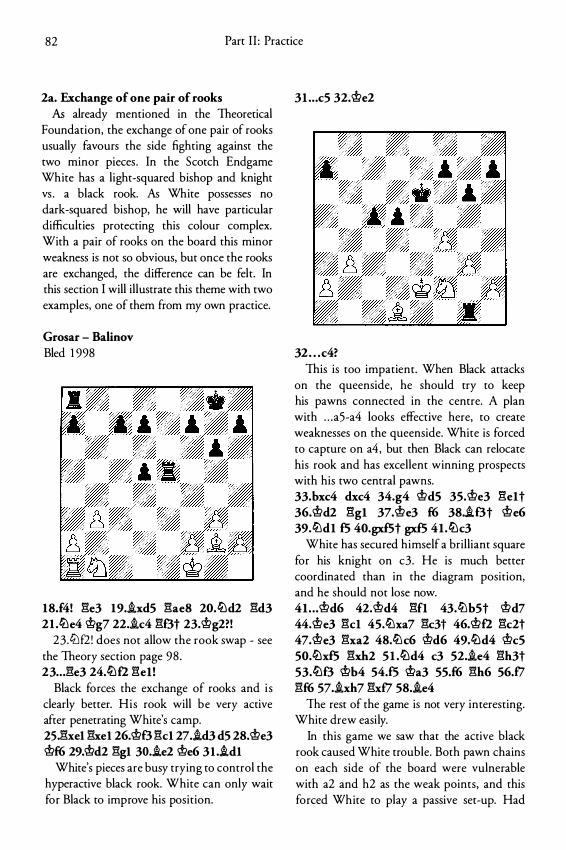
82 Part I I : Practice
2a. Exchange of one pair of rooks As already mentioned in the Theoretical
Foundation, the exchange of one pair of rooks usually favours the side fighting against the two minor pieces . In the Scotch Endgame White has a light-squared bishop and knight vs . a black rook. As White possesses no dark-squared bishop, he will have particular difficulties protecting this colour complex. With a pair of rooks on the board this minor weakness is not so obvious, but once the rooks are exchanged, the difference can be felt. In this section I will illustrate this theme with two examples, one of them from my own practice.
Grosar - Balinov Bled 1 998
18.f4! �e3 19 . .ixd5 �ae8 20.ll:ld2 �d3 21 .lLle4 'it>g7 22 . .ic4 �Bt 23.'it>g2?!
23 .tt'lf2! does not allow the rook swap - see the Theory section page 98 . 23 .. . �e3 24.ll:lf2 �ell
Black forces the exchange of rooks and i s clearly better. His rook will be very active after penetrating White's camp. 25.�xel �xel 26.'it>8 �cl 27 . .id3 d5 28.'it>e3 'it>f6 29.'it>d2 �gl 30 . .ie2 'it>e6 3l ..idl
White's pieces are busy trying to control the hyperactive black rook. White can only wait for Black to improve his position.
3l .. .c5 32.'it>e2
32 . . . c4? This is too impatient. When Black attacks
on the queenside, he should try to keep his pawns connected in the centre. A plan with . . . a5-a4 looks effective here, to create weaknesses on the queenside. White is forced to capture on a4 , but then Black can relocate his rook and has excellent winning prospects with his two central pawns. 33.bxc4 dxc4 34.g4 'it>d5 35.'it>e3 �elt 36.'it>d2 �gl 37.'it>e3 f6 38 . .i8t 'it>e6 39.ltldl f5 40.gxf5t gxf5 4I .lLlc3
White has secured himself a brilliant square for his knight on c3. He is much better coordinated than in the diagram position, and he should not lose now. 4I. . .'it>d6 42.'it>d4 �fl 43.ltlb5t 'it>d7 44.'it>e3 �cl 45.ltlxa7 �c3t 46.'it>f2 �c2t 47.'it>e3 �xa2 48.ltlc6 'it>d6 49.ll:ld4 'it>c5 50.ll:lxf5 �xh2 5 I .lLld4 c3 52 . .ie4 �h3t 53.ll:l8 'it>b4 54.£5 'it>a3 55.f6 �h6 56.f7 �f6 57 . .ixh7 �xf7 58 . .ie4
The rest of the game is not very interesting. White drew easily.
In this game we saw that the active black rook caused White trouble. Both pawn chains on each side of the board were vulnerable with a2 and h2 as the weak points, and this forced White to play a passive set-up. Had
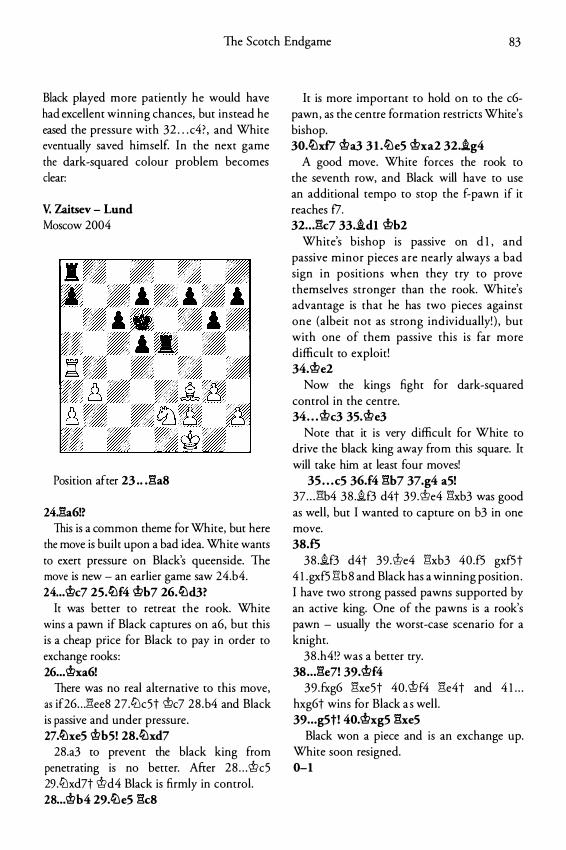
The Scorch Endgame 83
Black played more patiently he would have had excellent winning chances, but instead he eased the pressure with 32 . . . c4? , and White eventually saved himself. In the next game the dark-squared colour problem becomes dear:
V. Zaitsev - Lund Moscow 2004
Position after 23 • • J3a8
24.l3a6!? This is a common theme for White, but here
the move is built upon a bad idea. White wants to exert pressure on Black's queenside. The move is new - an earlier game saw 24.b4. 24 . • • 'i!?c7 2S.ll:lf4 <i;>b7 26.ll:ld3?
It was better to retreat the rook. White wins a pawn if Black captures on a6, but this is a cheap price for Black to pay in order to exchange rooks: 26 • • • 'i!?xa6!
There was no real alternative to this move, as if26 . . .:1'lee8 27.l2Jc5t <i;>c7 28 .b4 and Black is passive and under pressure. 27.lthe5 'i!?bS! 28.ll:lxd7
28.a3 to prevent the black king from penetrating is no better. After 28 . . . 'i!lc5 29 .tLlxd7t 'i!ld4 Black is firmly in control. 28 ... 'i!?b4 29.ll:le5 !3c8
It is more important to hold on to the c6-pawn, as the centre formation restricts White's bishop. 30.ll:lxf7 <i;>a3 3 1 .ll:le5 <i;>xa2 32.i.g4
A good move. White forces the rook to the seventh row, and Black will have to use an additional tempo to stop the f-pawn if it reaches f7. 32 . • • !3c7 33 • .idl <i;>b2
White's bishop is passive on d 1 , and passive minor pieces are nearly always a bad sign in positions when they try to prove themselves stronger than the rook. White's advantage is that he has two pieces against one (albeit not as strong individually! ) , but with one of them passive this is far more difficult to exploit! 34.<i;>e2
Now the kings fight for dark-squared control in the centre. 34 . • • <i;>c3 35. <i;>e3
Note that it is very difficult for White to drive the black king away from this square. It will take him at least four moves!
35 • • • c5 36.f4 !3b7 37.g4 aS! 37 . . . !3b4 38 .if3 d4t 39 .<;t>e4 !3xb3 was good as well, but I wanted to capture on b3 in one move. 38.f5
38 .if3 d4t 39 .'i!le4 :gxb3 40.f5 gxf5t 4 l .gxf5 :gbs and Black has a winning position . I have two strong passed pawns supported by an active king. One of the pawns is a rook's pawn - usually the worst-case scenario for a knight.
38 .h4!? was a better try. 38 • • • !3e7! 39.<i;>f4
39.fxg6 !3xe5t 40.'i!lf4 !3e4t and 4 1 . . . hxg6t wins for Black a s well . 39 • • • g5t! 40.<i;>xgS !3xe5
Black won a piece and is an exchange up. White soon resigned. 0-1
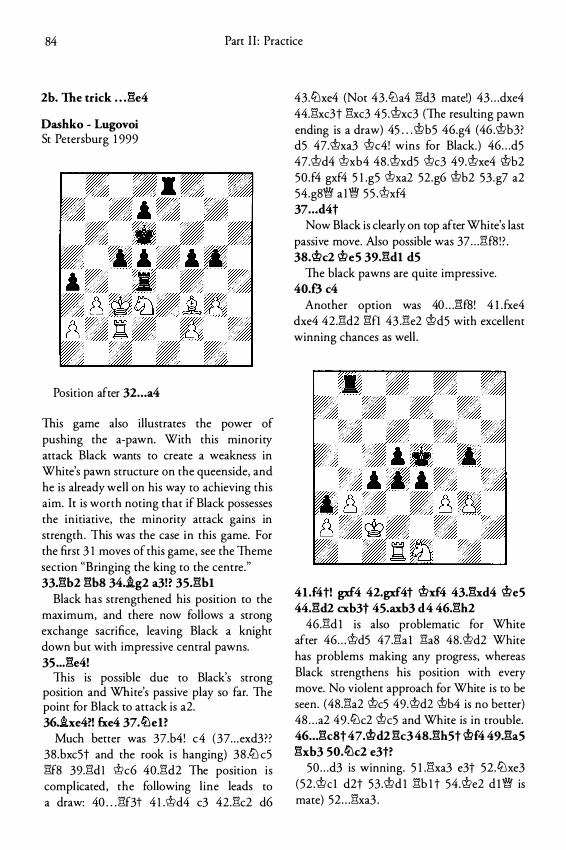
84 Part I I : Practice
2b. The trick . . . l:!e4
Dashko - Lugovoi St Petersburg 1 999
Position after 32 . . . a4
This game also illustrates the power of pushing the a-pawn. With this minority attack Black wants to create a weakness in White's pawn structure on the queenside, and he is already well on his way to achieving this aim. It is worth noting that if Black possesses the initiative, the minority attack gains in strength . This was the case in this game. For the first 3 1 moves of this game, see the Theme section "Bringing the king to the centre." 33.l:!b2 l:!b8 34.i.g2 a3!? 35.l:!bl
Black has strengthened his position to the maximum, and there now follows a strong exchange sacrifice, leaving Black a knight down but with impressive central pawns. 35 ... l:!e4!
This is possible due to Black's strong position and White's passive play so far. The point for Black to attack is a2. 36.ixe4?! fxe4 37.ltlel?
Much better was 37.b4! c4 (37 . . . exd3?? 38 .bxc5t and the rook i s hanging) 38 .li:J c5 l"lf8 39.l"ld 1 lt>c6 40.l"ld2 The position is complicated, the following l ine leads to a draw: 40 . . . l"lf3t 4 l .lt>d4 c3 42.l"lc2 d6
43.l2lxe4 {Not 43 .li:Ja4 l"ld3 mate!) 43 . . . dxe4 44.l"lxc3t l"lxc3 45 .lt>xc3 (The resulting pawn ending is a draw) 45 . . . lt>b5 46.g4 {46 .lt>b3? d5 47.@xa3 @c4! wins for Black.) 46 . . . d5 47.1t>d4 lt>xb4 48.1t>xd5 lt>c3 49.1t>xe4 lt>b2 50 .f4 gxf4 5 1 .g5 lt>xa2 52 .g6 lt>b2 53 .g7 a2 54.g8� a 1 � 5 5 .lt>xf4 37 . . • d4t
Now Black is clearly on top after White's last passive move. Also possible was 37 . . . l"lf8 ! ? . 38.®c2 'it>eS 39.l:!dl dS
The black pawns are quite impressive. 40.f3 c4
Another option was 40 . . . l:!ffi! 4 l .fxe4 dxe4 42.l"ld2 l"lfl 43 .l"le2 lt>d5 with excellent winning chances as well .
41 .f4t! gxf4 42.gxf4t 'it>x£4 43.l:!xd4 'it>eS 44.l:!d2 cxb3t 45.axb3 d4 46.l:!h2
46.l"ld 1 is also problematic for White after 46 . . . 1t>d5 47.l"la l l"la8 48.1t>d2 White has problems making any progress, whereas Black strengthens his position with every move. No violent approach for White is to be seen. {48.l"la2 @c5 49.@d2 @b4 is no better) 48 . . . a2 49 .l2lc2 1t>c5 and White is in trouble. 46 .. . l:!c8t 47. ®d2 l:!c3 48.l:!h5t ®f4 49.l:!a5 l:!xb3 SO.ltlc2 e3t?
50 . . . d3 is winning. 5 1 .l"lxa3 e3t 52 .l2lxe3 (52 .1t>cl d2t 53 .1t>d 1 l"lb 1 t 54.lt>e2 d l � is mate) 52 . . . l"lxa3 .
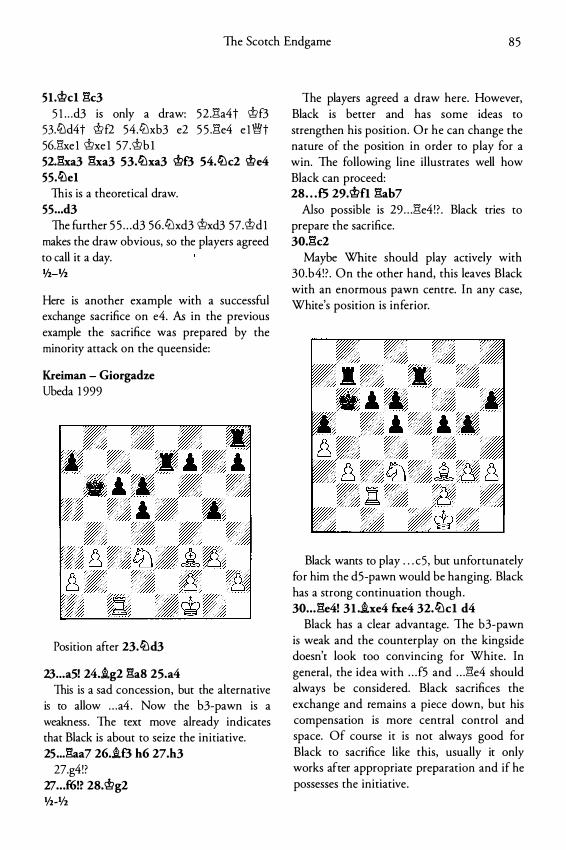
The Scotch Endgame 85
5I .It>d �k3 5 l . . .d3 is only a draw: 52.l"i:a4 t Wf3
53.ctJd4t Wf2 54.tt:lxb3 e2 5 5 .l"i:e4 e l 'Wt 56.l"i:xe l Wxe l 57.Wb l 52.l"i:xa3 l"i:xa3 53.ttlxa3 W£3 54.ttlc2 We4 55.ctJel
This is a theoretical draw. 55 . • • d3
The further 5 5 . . . d3 56.tt:lxd3 Wxd3 57.Wd l makes the draw obvious, so the players agreed to call it a day. V2-lf2
Here is another example with a successful exchange sacrifice on e4. As in the previous example the sacrifice was prepared by the minority attack on the queenside:
Kreiman - Giorgadze Ubeda 1 999
Position after 23.tt:ld3
23 • • • a5! 24 . .ig2 l"i:a8 25.a4 This is a sad concession, but the alternative
is to allow . . . a4 . Now the b3-pawn is a weakness . The text move already indicates that Black is about to seize the initiative. 25 • • • l"i:aa7 26 • .i8 h6 27.h3
27.g4!? 27 .. . f6!? 28.lt>g2 !f2-lf2
The players agreed a draw here. However, Black is better and has some ideas to strengthen his position. Or he can change the nature of the position in order to play for a win. The following line illustrates well how Black can proceed: 28 • • • £5 29.1t>fl gab7
Also possible is 29 . . . l"i:e4 ! ? . Black tries to prepare the sacrifice. 30.gc2
Maybe White should play actively with 30.b4!? . On the other hand, this leaves Black with an enormous pawn centre. In any case, White's position is inferior.
Black wants to play . . . c5 , but unfortunately for him the d5-pawn would be hanging. Black has a strong continuation though. 30 • • • ge4! 3 l ..ixe4 fxe4 32.tt:ld d4
Black has a clear advantage. The b3-pawn is weak and the counterplay on the kingside doesn't look too convincing for White. In general , the idea with . . . f5 and . . . l"i:e4 should always be considered. Black sacrifices the exchange and remains a piece down, but his compensation is more central control and space. Of course it is not always good for Black to sacrifice like this, usually it only works after appropriate preparation and if he possesses the initiative .
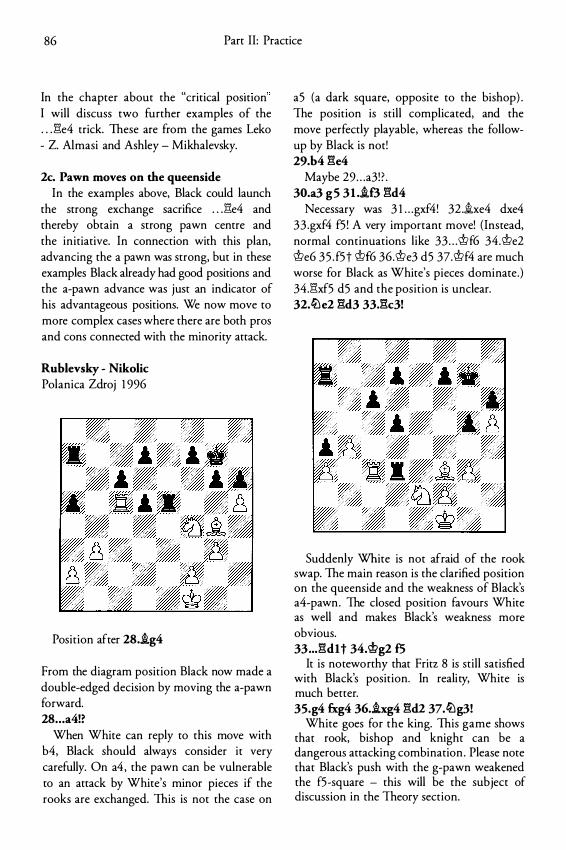
86 Part II: Practice
In the chapter about the "critical position I will discuss two further examples of the . . . �e4 trick. These are from the games Leko - Z. Almasi and Ashley - Mikhalevsky.
2c. Pawn moves on the queenside In the examples above, Black could launch
the strong exchange sacrifice . . . �e4 and thereby obtain a strong pawn centre and the initiative. In connection with this plan, advancing the a pawn was strong, but in these examples Black already had good positions and the a-pawn advance was just an indicator of his advantageous positions. We now move to more complex cases where there are both pros and cons connected with the minority attack.
Rublevsky - Nikolic Polanica Zdroj 1 996
Position after 28 • .ig4
From the diagram position Black now made a double-edged decision by moving the a-pawn forward. 28 .. . a4!?
When White can reply to this move with b4, Black should always consider it very carefully. On a4, the pawn can be vulnerable to an attack by White's minor pieces if the rooks are exchanged. This is not the case on
a5 (a dark square, opposite to the bishop) . The position is still complicated, and the move perfectly playable, whereas the followup by Black is not! 29.b4 ge4
Maybe 29 . . . a3! ? . 30.a3 g5 3 1 ..if3 gd4
Necessary was 3 1 . . . gxf4! 32 .ixe4 dxe4 33 .gxf4 f5 ! A very important move! (Instead, normal continuations like 33 . . . <i>f6 34.<i>e2 <i>e6 35 . f5t <i>f6 36.<i>e3 d5 37.<i>f4 are much worse for Black as White's pieces dominate .) 34.�xf5 d5 and the position is unclear. 32.lDe2 gd3 33.gc3!
Suddenly White is not afraid of the rook swap. The main reason is the clarified position on the queenside and the weakness of Black's a4-pawn. The closed position favours White as well and makes Black's weakness more obvious. 33 ... �dlt 34.<i>g2 f5
It is noteworthy that Fritz 8 is still satisfied with Black's position. In reality, White is much better. 35.g4 fx:g4 36.ixg4 gd2 37.lDg3!
White goes for the king. This game shows that rook, bishop and knight can be a dangerous attacking combination . Please note that Black's push with the g-pawn weakened the f5-square - this will be the subject of discussion in the Theory section.
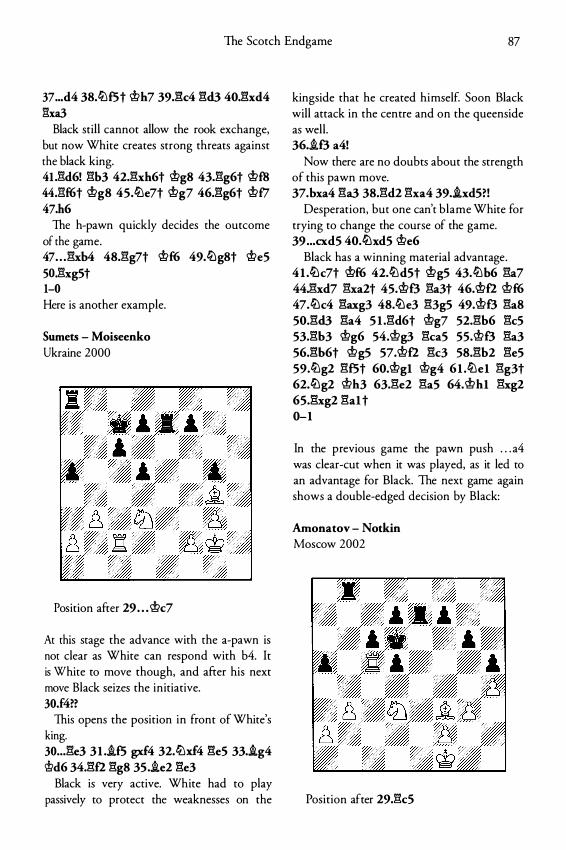
The Scotch Endgame 87
37 ... d4 38.ltlf5t �h7 39J:k4 �d3 40.�xd4 gxa3
Black still cannot allow the rook exchange, but now White creates strong threats against the black king. 41 .gd6! �b3 42.�xh6t �g8 43.�g6t �f8 44.l'U6t �g8 45.ltle7t �g7 46.�g6t �f7 47.h6
The h-pawn quickly decides the outcome of the game. 47 . . . �xb4 48.�g7t �f6 49.ll:lg8t �e5 so.gxg5t 1-0 Here is another example.
Sumets - Moiseenko Ukraine 2000
Position after 29 . . . �c7
At this stage the advance with the a-pawn is not clear as White can respond with b4. It is White to move though, and after his next move Black seizes the initiative. 30.f4??
This opens the position in front of White's king. 30 ... �e3 3 l ..if5 gxf4 32.ltlxf4 �e5 33.!g4 l!ld6 34.�f2 �g8 35.ie2 �e3
Black is very active. White had to play passively to protect the weaknesses on the
kingside that he created himself. Soon Black will attack in the centre and on the queenside as well. 36 • .if3 a4!
Now there are no doubts about the strength of this pawn move. 37.bxa4 �a3 38.�d2 �xa4 39.!xd5?!
Desperation, but one can't blame White for trying to change the course of the game. 39 ... cxd5 40.ll:lxd5 �e6
Black has a winning material advantage. 41 .ll:lc7t �f6 42.ltld5t �g5 43.ltlb6 �a7 44.�xd7 �xa2t 45.�f3 �a3t 46.�£2 �f6 47.ll:lc4 �axg3 48.ll:le3 �3g5 49.�f3 �a8 50.�d3 �a4 5 l .�d6t �g7 52.�b6 �c5 53.�h3 �g6 54.�g3 �caS 55.�f3 �a3 56.�h6t �g5 57.�f2 �c3 58.�b2 �e5 59.ltlg2 �f5t 60.�gl �g4 61 .ltle1 �g3t 62.ll:lg2 �h3 63.�e2 �a5 64.�h1 �xg2 65.�xg2 �a1 t 0-1
In the previous game the pawn push . . . a4 was clear-cut when it was played, as it led to an advantage for Black. The next game again shows a double-edged decision by Black:
Amonatov - Notkin Moscow 2002
Position after 29.�c5
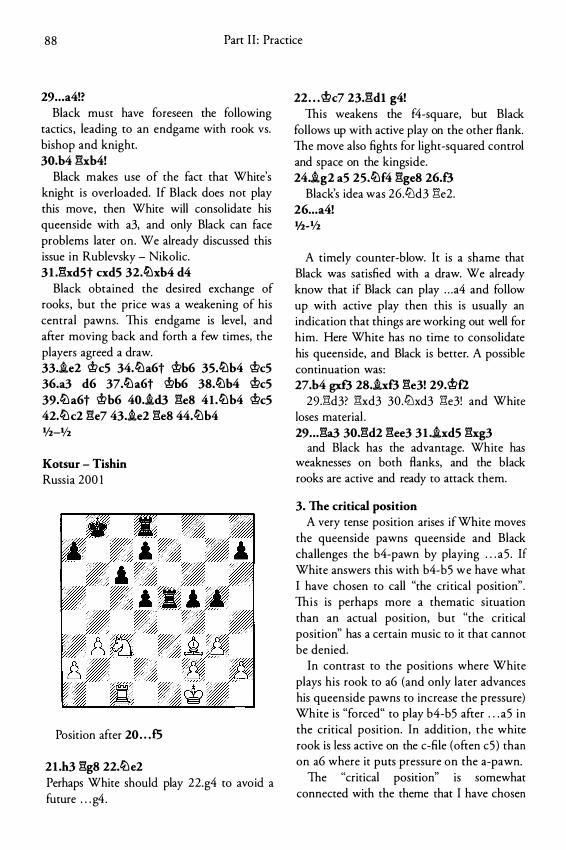
88 Part I I : Practice
29 . • . a4!? Black must have foreseen the following
tactics , leading to an endgame with rook vs. bishop and knight. 30.b4 �xb4!
Black makes use of the fact that White's knight is overloaded. If Black does not play this move, then White will consolidate his queenside with a3, and only Black can face problems later on. We already discussed this issue in Rublevsky - Nikolic. 31 .�xd5t cxdS 32.tt:lxb4 d4
Black obtained the desired exchange of rooks, but the price was a weakening of his central pawns. This endgame is level, and after moving back and forth a few times, the players agreed a draw. 33 . .ie2 �hs 34.tt:la6t lt>b6 35.tt:lb4 lt>cS 36.a3 d6 37.tt:la6t lt>b6 38.tt:lb4 lt>cS 39.tt:la6t lt>b6 40 . .id3 �e8 41 .tt:lb4 lt>cS 42.tt:lc2 �e7 43 . .ie2 �e8 44.tt:lb4 lfl-lfz
Kotsur - Tishin Russia 200 1
Position after 20 . . . fS
21 .h3 �g8 22.tt:le2 Perhaps White should play 22.g4 to avoid a future . . . g4 .
22 . . . 1t>c7 23.�dl g4! This weakens the f4-square, but Black
follows up with active play on the other flank. The move also fights for light-squared control and space on the kingside. 24 . .ig2 aS 2S.tt:lf4 �ge8 26.8
Black's idea was 26.liJd3 �e2. 26 ... a4! 1/z-lfz
A timely counter-blow. It is a shame that Black was satisfied with a draw. We already know that if Black can play . . . a4 and follow up with active play then this is usually an indication that things are working out well for him. Here White has no time to consolidate his queenside, and Black is better. A possible continuation was: 27.b4 gxf3 28 . .ixf3 �e3! 29.1t>f2
29.Ei:d3? Ei:xd3 30.liJxd3 Ei:e3! and White loses material . 29 .. . �a3 30.�d2 �ee3 3 1 ..ixd5 �xg3
and Black has the advantage. White has weaknesses on both flanks, and the black rooks are active and ready to attack them.
3. The critical position A very tense position arises if White moves
the queenside pawns queenside and Black challenges the b4-pawn by playing . . . a5 . If White answers this with b4-b5 we have what I have chosen to call "the critical position" . This is perhaps more a thematic situation than an actual position, but "the critical position" has a certain music to it that cannot be denied.
In contrast to the positions where White plays his rook to a6 (and only later advances his queenside pawns to increase the pressure) White is "forced" to play b4-b5 after . . . a5 in the critical position. In addition, the white rook is less active on the c-file (often c5) than on a6 where it puts pressure on the a-pawn.
The "critical posltlon" is somewhat connected with the theme that I have chosen
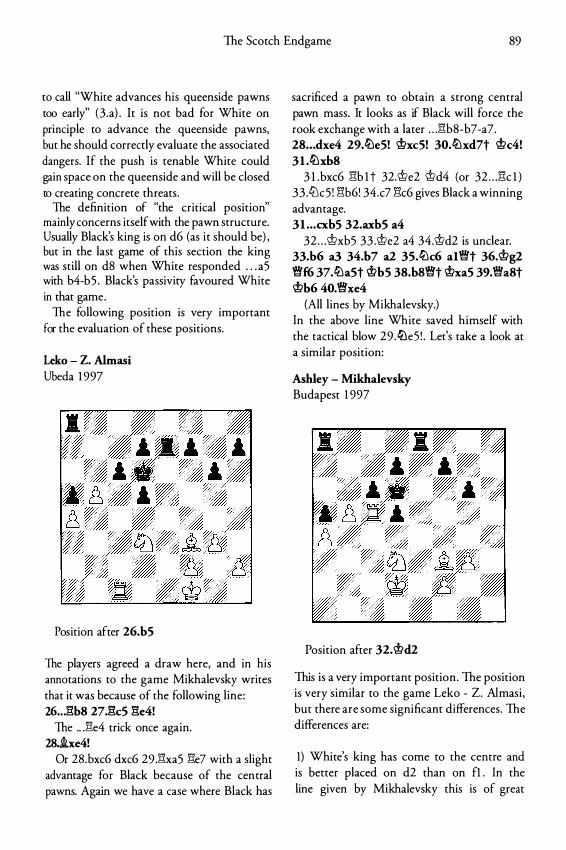
The Scotch Endgame 89
to call "White advances his queenside pawns too early" (3.a) . It is not bad for White on principle to advance the queenside pawns, but he should correctly evaluate the associated dangers. If the push is tenable White could gain space on the queenside and will be closed to creating concrete threats.
The definition of "the critical position" mainly concerns itself with the pawn structure. Usually Black's king is on d6 (as it should be) , but in the last game of this section the king was still on d8 when White responded . . . a5 with b4-b5 . Black's passivity favoured White in that game.
The following position is very important for the evaluation of these positions.
Leko - Z. Almasi Ubeda 1 997
Position after 26.b5
The players agreed a draw here, and in his annotations to the game Mikhalevsky writes that it was because of the following line: 26 • . .1"Ib8 27J�k5 1!e4!
The .. J"1e4 trick once again. 28.ixe4!
Or 28.bxc6 dxc6 29 .Ei:xa5 Ei:e7 with a slight advantage for Black because of the central pawns. Again we have a case where Black has
sacrificed a pawn to obtain a strong central pawn mass. It looks as if Black will force the rook exchange with a later . . . Ei:b8-b7-a7. 28 • • • dxe4 29.tt:le5! �xeS! 30.tt:lxd7t �c4! 3 1 .tt:lxb8
3 1 .bxc6 Ei:b 1 t 32.'i!le2 'i!ld4 (or 32 . . . Ei:c l ) 33 .ltJc5 ! Ei:b6! 34.c7 Ei:c6 gives Black a winning advantage. 31 . • • cxb5 32.axb5 a4
32 . . . 'i!lxb5 33 .'i!le2 a4 34.'i!ld2 is unclear. 33.b6 a3 34.b7 a2 35.tt:lc6 al�t 36.'i!lg2 �f6 37.tt:la5t 'i!lbS 38.b8�t 'i!lxaS 39.�a8t 'i!lb6 40.�xe4
(All lines by Mikhalevsky.) In the above line White saved himself with the tactical blow 29 .tt:le5 ! . Let's take a look at a similar position:
Ashley - Mikhalevsky Budapest 1 997
Position after 32.�d2
This is a very important position. The position is very similar to the game Leko - Z. Almasi, but there are some significant differences . The differences are:
1) White's king has come to the centre and is better placed on d2 than on fl . In the line given by Mikhalevsky this is of great
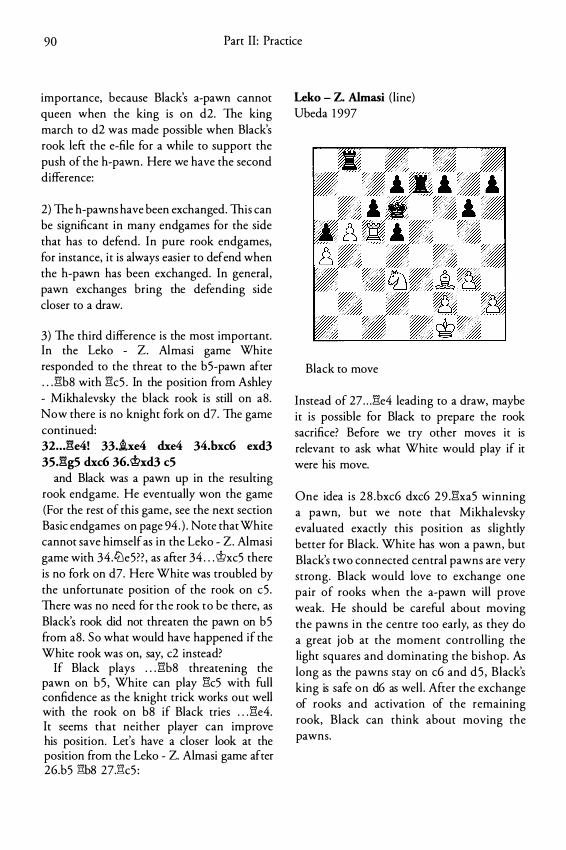
90 Part II : Practice
importance, because Black's a-pawn cannot queen when the king is on d2. The king march to d2 was made possible when Black's rook left the e-file for a while to support the push of the h-pawn. Here we have the second difference:
2) The h-pawns have been exchanged. This can be significant in many endgames for the side that has to defend. In pure rook endgames, for instance, it is always easier to defend when the h-pawn has been exchanged. In general , pawn exchanges bring the defending side closer to a draw.
3) The third difference is the most important. In the Leko - Z. Almasi game White responded to the threat to the b5-pawn after . . . l"lb8 with l"lc5 . In the position from Ashley - Mikhalevsky the black rook is still on a8. Now there is no knight fork on d7. The game continued: 32 . • J�e4! 33 • .ixe4 dxe4 34.bxc6 exd3 35.l"lg5 dxc6 36. �hd3 c5
and Black was a pawn up in the resulting rook endgame. He eventually won the game (For the rest of this game, see the next section Basic endgames on page 94 . ) . Note that White cannot save himself as in the Leko - Z. Almasi game with 34 .lt:Je5?? , as after 34 . . . Wxc5 there is no fork on d7. Here White was troubled by the unfortunate position of the rook on c5 . There was no need for the rook to be there, as Black's rook did not threaten the pawn on b5 from a8. So what would have happened if the White rook was on, say, c2 instead?
If Black plays . . . l"lb8 threatening the pawn on b5 , White can play l"lc5 with full confidence as the knight trick works out well with the rook on b8 if Black tries . . . l"le4. It seems that neither player can improve his position. Let's have a closer look at the position from the Leko - Z. Almasi game after 26.b5 l"lb8 27.l"lc5 :
Leko - Z. Almasi (line) Ubeda 1 997
Black to move
Instead of 27 . . . l"le4 leading to a draw, maybe it is possible for Black to prepare the rook sacrifice? Before we try other moves it is relevant to ask what White would play if it were his move.
One idea is 28 .bxc6 dxc6 29 .l"lxa5 winning a pawn, but we note that Mikhalevsky evaluated exactly this position as slightly better for Black. White has won a pawn, but Black's two connected central pawns are very strong. Black would love to exchange one pair of rooks when the a-pawn will prove weak. He should be careful about moving the pawns in the centre too early, as they do a great job at the moment controlling the light squares and dominating the bishop. As long as the pawns stay on c6 and d5 , Black's king is safe on d6 as well . After the exchange of rooks and activation of the remaining rook, Black can think about moving the pawns.
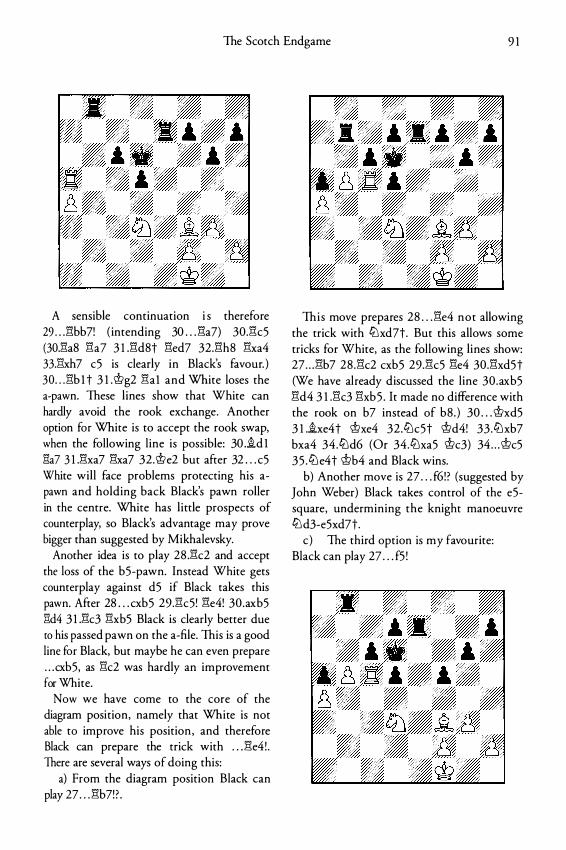
The Scotch Endgame 9 1
A sensible continuation i s therefore 29 . . .:l'\bb7! { intending 30 . . . Ela7) 30.Elc5 (30.Ela8 Ela7 3 1 .Eld8t Eled7 32.Elh8 Elxa4 33.Elxh7 c5 is clearly in Black's favour. ) 30 . . . Elb l t 3 1 .Wg2 Elal and White loses the a-pawn. These lines show that White can hardly avoid the rook exchange. Another option for White is to accept the rook swap, when the following line is possible: 30 . .id l l"la7 3 1 .Elxa7 Elxa7 32.We2 but after 32 . . . c5 White will face problems protecting his apawn and holding back Black's pawn roller in the centre. White has l ittle prospects of counterplay, so Black's advantage may prove bigger than suggested by Mikhalevsky.
Another idea is to play 28 .Elc2 and accept the loss of the b5-pawn. Instead White gets counterplay against d5 if Black takes this pawn. After 28 . . . cxb5 29.Elc5! Ele4! 30.axb5 l"\d4 3 1 .Elc3 Elxb5 Black is clearly better due to his passed pawn on the a-file. This is a good line for Black, but maybe he can even prepare . . . cxb5, as Elc2 was hardly an improvement for White.
Now we have come to the core of the diagram position, namely that White is not able to improve his position , and therefore Black can prepare the trick with . . . Ele4 ! . There are several ways of doing this:
a) From the diagram position Black can play 27 . . . Elb7! ? .
This move prepares 28 . . . Ele4 not allowing the trick with t2Jxd7t. But this allows some tricks for White, as the following lines show: 27 . . . Elb7 28 .Elc2 cxb5 29.Elc5 Ele4 30.Elxd5t (We have already discussed the line 30 .axb5 Eld4 3 l .Elc3 Elxb5 . It made no difference with the rook on b7 instead of b8 . ) 30 . . . Wxd5 3 1 ..ixe4t Wxe4 32 .tLlc5t Wd4! 33 .tLlxb7 bxa4 34 .t2Jd6 (Or 34.tLlxa5 Wc3) 34 . . . Wc5 35 .tLle4t Wb4 and Black wins.
b) Another move is 27 . . . f6! ? (suggested by John Weber) Black takes control of the e5-square, undermining the knight manoeuvre t2J d3-e5xd7t.
c) The third option is my favourite: Black can play 27 . . . f5 !
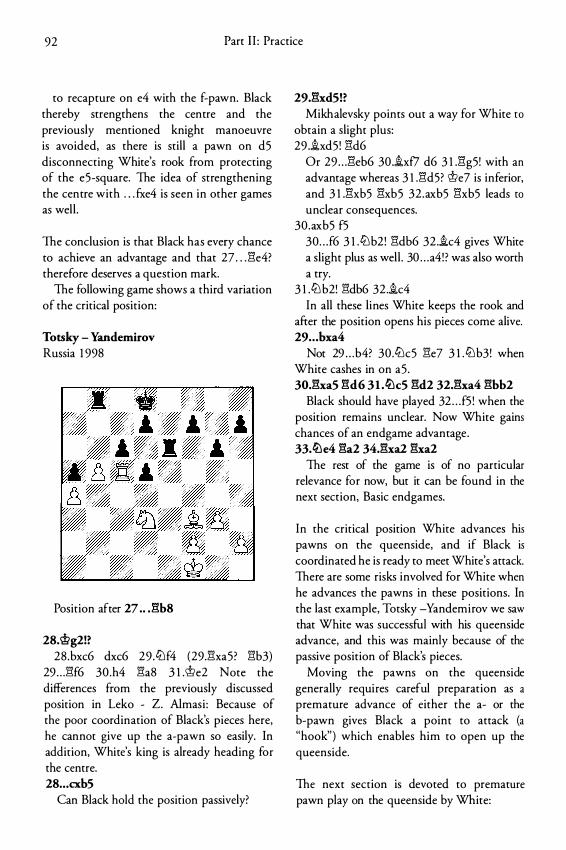
92 Part I I : Practice
to recapture on e4 with the f-pawn. Black thereby strengthens the centre and the previously mentioned knight manoeuvre is avoided, as there is still a pawn on d5 disconnecting White's rook from protecting of the e5-square. The idea of strengthening the centre with . . . fxe4 is seen in other games as well .
The conclusion is that Black has every chance to achieve an advantage and that 27 . . . l"&e4? therefore deserves a question mark.
The following game shows a third variation of the critical position:
Totsky - Yandemirov Russia 1 998
Position after 27 • • J�b8
28.c.t>g2!? 28.bxc6 dxc6 29 .tt'lf4 (29.l"&xa5? l"&b3)
29 . . . l"&f6 30.h4 l"&a8 3 l .@e2 Note the differences from the previously discussed position in Leko - Z. Almasi : Because of the poor coordination of Black's pieces here, he cannot give up the a-pawn so easily. In addition, White's king is already heading for the centre. 28 • • • cxb5
Can Black hold the position passively?
29J�xd5!? Mikhalevsky points out a way for White t o
obtain a slight plus: 29 .ixd5 ! l"&d6
Or 29 . . . l"&eb6 30 .ixf7 d6 3 l .l"&g5! with an advantage whereas 3 l .l"&d5? @e7 is inferior, and 3 l .l"&xb5 l"&xb5 32.axb5 l"&xb5 leads to
unclear consequences. 30.axb5 f5
30 . . . f6 3 l .tt'lb2! l"&db6 32 .ic4 gives White a slight plus as well . 30 . . . a4! ? was also worth a try.
3 l .tt'l b2! l"&db6 32 .ic4 In all these lines White keeps the rook and
after the position opens his pieces come alive. 29 • • • bxa4
Not 29 . . . b4? 30 .tt'lc5 l"&e7 3 l .tt'lb3! when White cashes in on a5 . 30J�xa5 �d6 31 .ttlc5 �d2 32.�xa4 �bb2
Black should have played 32 . . . f5 ! when the position remains unclear. Now White gains chances of an endgame advantage. 33.ttle4 �a2 34.�xa2 �xa2
The rest of the game is of no particular relevance for now, but it can be found in the next section, Basic endgames.
In the critical position White advances his pawns on the queenside, and if Black is coordinated he is ready to meet White's attack. There are some risks involved for White when he advances the pawns in these positions. In the last example, Totsky -Yandemirov we saw that White was successful with his queenside advance, and this was mainly because of the passive position of Black's pieces.
Moving the pawns on the queenside generally requires careful preparation as a premature advance of either the a- or the b-pawn gives Black a point to attack (a "hook") which enables him to open up the queenside.
The next section is devoted to premature pawn play on the queenside by White:
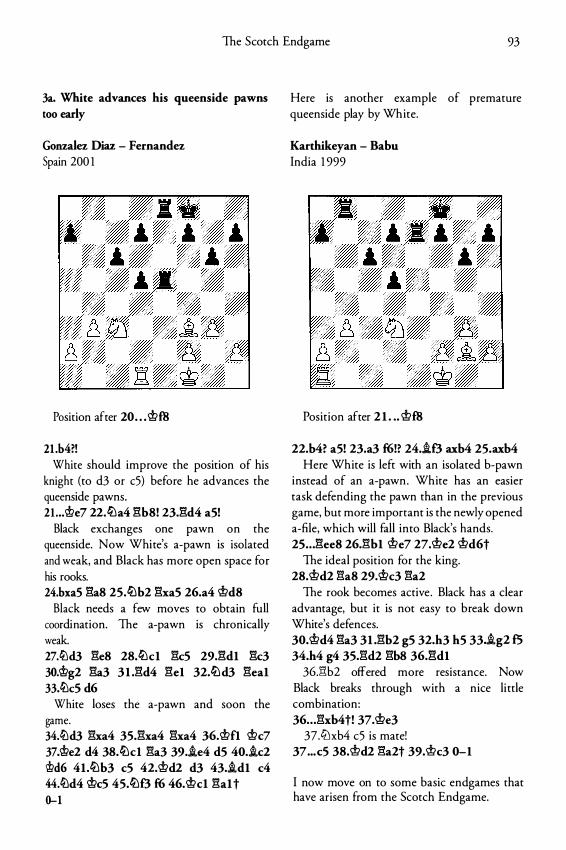
The Scotch Endgame 93
3a. White advances his queenside pawns too early
Gonzalez Diaz - Fernandez Spain 200 1
Position after 20 . . . �fB
21 .b4?! White should improve the position of his
knight (to d3 or c5) before he advances the queenside pawns. 2l . . .'�e7 22.lDa4 l:!b8! 23.l:!d4 aS!
Black exchanges one pawn on the queenside. Now White's a-pawn is isolated and weak, and Black has more open space for his rooks. 24.bxaS l:!a8 2S.lDb2 l:!xaS 26.a4 �d8
Black needs a few moves to obtain full coordination. The a-pawn is chronically weak. 27.lDd3 l:!e8 28.lDcl l:!cS 29.l:!d1 l:!c3 30.I!.>g2 l:!a3 31 .l:!d4 l:!e1 32.lDd3 l:!ea1 33.ti:lc5 d6
White loses the a-pawn and soon the game. 34.ti:ld3 l:!xa4 3S.l:!xa4 l:!xa4 36.�fl �c7 37.l!.>e2 d4 38.lDcl l:!a3 39 . .ie4 dS 40 . .ic2 lf?d6 41.lDb3 cS 42.�d2 d3 43 . .id1 c4 44.ti:Jd4 �cS 4S.lDf3 f6 46.�cl l:!a1 t 0-1
Here is another example of premature queenside play by White.
Karthikeyan - Babu India 1 999
Position after 2 1 . .. �£8
22.b4? aS! 23.a3 f6!? 24.if3 axb4 2S.axb4 Here White is left with an isolated b-pawn
instead of an a-pawn. White has an easier task defending the pawn than in the previous game, but more important is the newly opened a-file, which will fall into Black's hands. 2S . . . l:!ee8 26.1:!b1 �e7 27.�e2 �d6t
The ideal position for the king. 28.�d2 l:!a8 29.�c3 l:!a2
The rook becomes active . Black has a clear advantage, but it is not easy to break down White's defences. 30.�d4 l:!a3 31 .l:!b2 gS 32.h3 hS 33 • .ig2 f5 34.h4 g4 3S.l:!d2 l:!b8 36.1:!d1
36.Elb2 offered more resistance. Now Black breaks through with a nice li ttle combination: 36 . . . 1:!xb4t! 37.�e3
37.lDxb4 c5 is mate! 37 ... cS 38.�d2 Ela2t 39.�c3 0-1
I now move on to some basic endgames that have arisen from the Scotch Endgame.
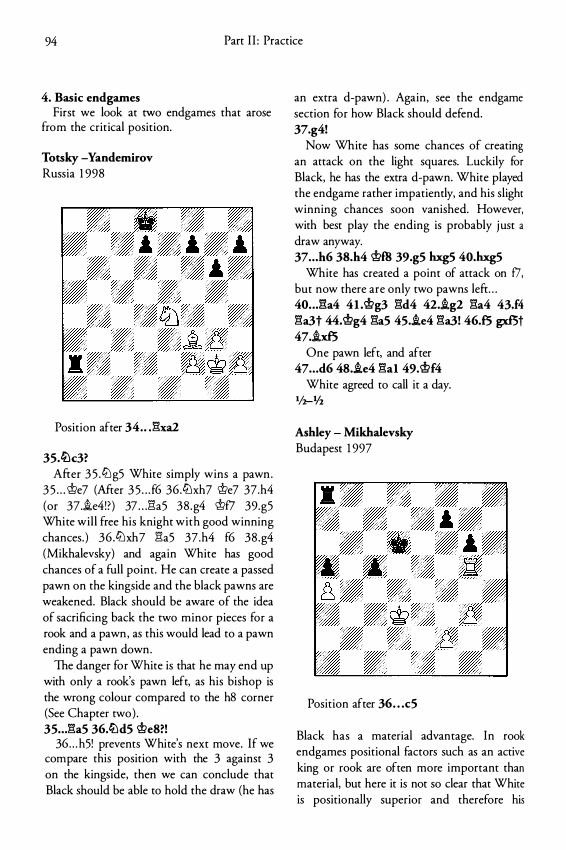
94 Part I I : Practice
4. Basic endgames First we look at two endgames that arose
from the critical position.
Totsky -Yandemirov Russia 1 998
Position after 34 . . Jha2
35.ltk3? After 3 5 .lLlg5 White simply wins a pawn .
3 5 . . . <±>e7 (Mter 3 5 . . . f6 36.ltJxh7 <±>e7 37.h4 (or 37.i.e4!?) 37 . . . ga5 38 .g4 <±>f7 39.g5 White wil l free his knight with good winning chances. ) 36 .lLlxh7 ga5 37.h4 f6 38 .g4 (Mikhalevsky) and again White has good chances of a full point. He can create a passed pawn on the kingside and the black pawns are weakened. Black should be aware of the idea of sacrificing back the two minor pieces for a rook and a pawn, as this would lead to a pawn ending a pawn down.
The danger for White is that he may end up with only a rook's pawn left, as his bishop is the wrong colour compared to the h8 corner (See Chapter two) . 35 . . .!'�a5 36.ll:\d5 <±>e8?!
36 . . . h5! prevents White's next move. If we compare this position with the 3 against 3 on the kingside, then we can conclude that Black should be able to hold the draw (he has
an extra d-pawn) . Again, see the endgame section for how Black should defend. 37.g4!
Now White has some chances of creating an attack on the light squares. Luckily for Black, he has the extra d-pawn. White played the endgame rather impatiently, and his slight winning chances soon vanished. However, with best play the ending is probably just a
draw anyway. 37 . . . h6 38.h4 <±>ffi 39.g5 hxg5 40.hxg5
White has created a point of attack on f7, but now there are only two pawns left . . . 40 . . J3a4 41.'i!l>g3 gd4 42 • .ig2 ga4 43.£4 ga3t 44. <i!;>g4 gas 45 • .ie4 ga3! 46.£5 gxf5t 47 . .ixf5
One pawn left, and after 47 .. . d6 48 • .ie4 gal 49.<i!;>f4
White agreed to call it a day. •!2-1/2
Ashley - Mikhalevsky Budapest 1 997
Position after 36 . . . <:5
Black has a material advantage. In rook endgames positional factors such as an active king or rook are often more important than material, but here it is not so clear that White is positionally superior and therefore his
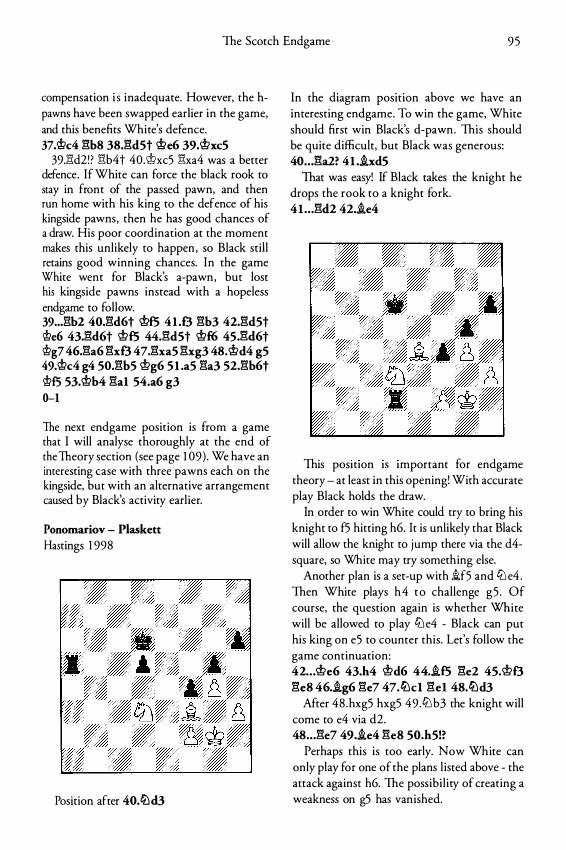
The Scotch Endgame 95
compensation i s inadequate. However, the hpawns have been swapped earlier in the game, and this benefits White's defence. 37.®c4 �b8 38.�d5t ®e6 39.�xc5
39.Eid2!? E\b4t 40.�xc5 Elxa4 was a better defence. If White can force the black rook to stay in front of the passed pawn, and then run home with his king to the defence of his kingside pawns, then he has good chances of a draw. His poor coordination at the moment makes this unlikely to happen , so Black still retains good winning chances. In the game White went for Black's a-pawn, but lost his kingside pawns instead with a hopeless endgame to follow. 39 ... Eib2 40J�d6t �£5 41 .0 �b3 42.�d5t l!le6 43J'M6t �£5 44J�d5t �f6 45JM6t l!lg? 46.�a6 �xO 47.�xa5 �xg3 48.�d4 g5 49.®c4 g4 50.�b5 �g6 5 1 .a5 �a3 52.�b6t @f5 53.�b4 �al 54.a6 g3 0-1
The next endgame position is from a game that I will analyse thoroughly at the end of the Theory section (see page 1 09) . We have an interesting case with three pawns each on the kingside, but with an alternative arrangement caused by Black's activity earlier.
Ponomariov - Plaskett Hastings 1 998
Position after 40.lLld3
In the diagram position above we have an interesting endgame. To win the game, White should first win Black's d-pawn. This should be quite difficult, but Black was generous: 40 .. . �a2? 41 . .ixd5
That was easy! If Black takes the knight he drops the rook to a knight fork. 41 . . . �d2 42 . .ie4
This posmon IS Important for endgame theory - at least in this opening! With accurate play Black holds the draw.
In order to win White could try to bring his knight to f5 hitting h6. It is unlikely that Black will allow the knight to jump there via the d4-square, so White may try something else.
Another plan is a set-up with 1f5 and ctJ e4 . Then White plays h4 to challenge g5 . Of course, the question again is whether White will be allowed to play l2l e4 - Black can put his king on e5 to counter this. Let's follow the game continuation: 42 . . . �e6 43.h4 �d6 44 . .if5 �e2 45. �a �e8 46 . .ig6 �e7 47.lLlc1 �el 48.lLld3
After 48 .hxg5 hxg5 49 .ctJ b3 the knight will come to e4 via d2. 48 .. . �e7 49 . .ie4 �e8 50.h5!?
Perhaps this is too early. Now White can only play for one of the plans l isted above - the attack against h6. The possibility of creating a weakness on g5 has vanished.
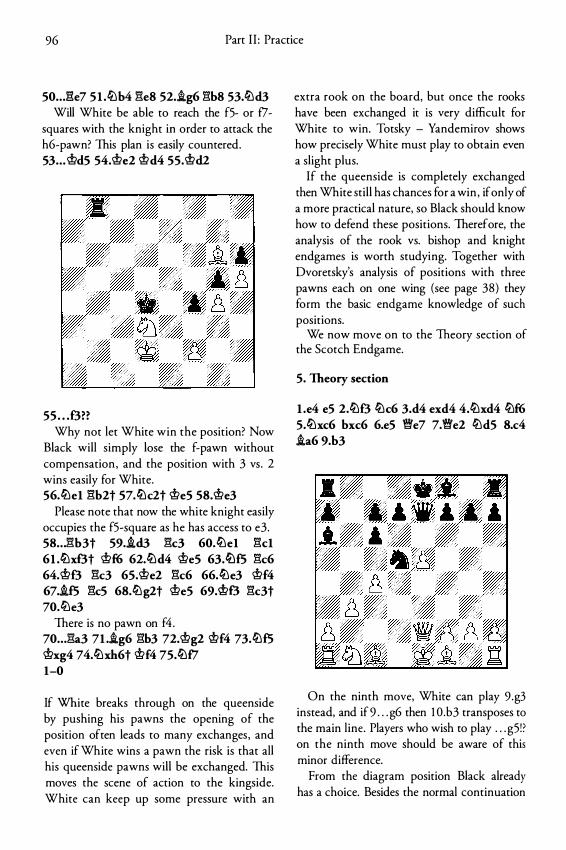
96 Part I I : Practice
50 . . .!'�e7 5 I .c!lJb4 ges 52.�g6 gbs 53.ttld3 Will White be able to reach the f5- or f7-
squares with the knight in order to attack the h6-pawn? This plan is easily countered. 53 . . . 'it>d5 54.'it>e2 'it>d4 55.'it>d2
55 . . . £3?? Why not let White win the position? Now
Black will simply lose the f-pawn without compensation , and the position with 3 vs . 2 wins easily for White. 56.ttlel gb2t 57.ttlc2t 'it>e5 58.'it>e3
Please note that now the white knight easily occupies the f5-square as he has access to e3. 58 . . . gb3t 59.�d3 gc3 60.ttlel gel 6I .ttlxf3t 'it>f6 62.ttld4 'it>e5 63.ttlf5 gc6 64.\t>£3 gc3 65.'it>e2 gc6 66.c!LJe3 'it>f4 67.�f5 gc5 68.ttlg2t 'it>e5 69.1!?£3 gc3t 70.ttle3
There is no pawn on f4 . 70 .. . ga3 7l .�g6 gb3 72.'it>g2 'it>f4 73.ttlf5 'it>xg4 74.ttlxh6t 'it>f4 75.ttlf7 1-0
If White breaks through on the queenside by pushing his pawns the opening of the position often leads to many exchanges, and even if White wins a pawn the risk is that all his queenside pawns will be exchanged. This moves the scene of action to the kingside. White can keep up some pressure with an
extra rook on the board, but once the rooks have been exchanged it is very difficult for White to win. Totsky - Yandemirov shows how precisely White must play to obtain even a slight plus.
If the queenside is completely exchanged then White still has chances for a win , if only of a more practical nature, so Black should know how to defend these positions. Therefore, the analysis of the rook vs. bishop and knight endgames is worth studying. Together with Dvoretsky's analysis of positions with three pawns each on one wing (see page 38) they form the basic endgame knowledge of such positions.
We now move on to the Theory section of the Scotch Endgame.
5. Theory section
l .e4 e5 2.ttlf3 ttlc6 3.d4 exd4 4.ttlxd4 ttlf6 5.ttlxc6 bxc6 6.e5 �e7 7.�e2 ttld5 8.c4 �a6 9.b3
On the ninth move, White can play 9 .g3 instead, and if 9 . . . g6 then 1 0.b3 transposes to the main line. Players who wish to play . . . g5!? on the ninth move should be aware of this minor difference.
From the diagram position Black already has a choice. Besides the normal continuation
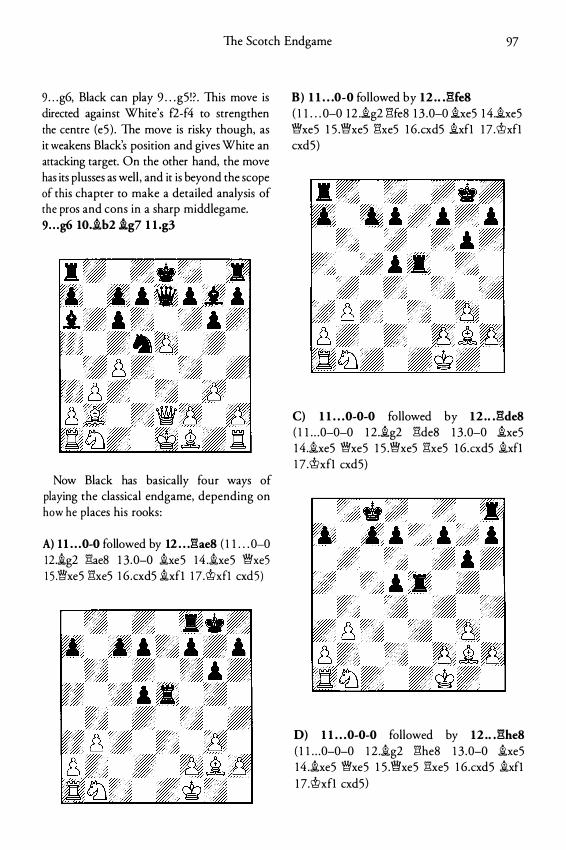
The Scotch Endgame 97
9 . . . g6, Black can play 9 . . . gS ! ? . This move is directed against White's f2-f4 to strengthen the centre (eS) . The move is risky though, as it weakens Black's position and gives White an attacking target. On the other hand, the move has its plusses as well , and it is beyond the scope of this chapter to make a detailed analysis of the pros and cons in a sharp middlegame. 9 . . . g6 10 . .ib2 i.g7 1 1 .g3
Now Black has basically four ways of playing the classical endgame, depending on how he places his rooks:
A) 1 1 . . . 0-0 followed by 12 . . J��ae8 ( 1 1 . . . 0-0 12 .�g2 �ae8 1 3 .0-0 �xeS 14 .�xeS lJj]xeS 1 S .lJj]xeS �xeS 1 6 .cxdS �xfl 1 7 .\t>xfl cxdS)
B) 1 1 . . . 0-0 followed by 12 . . JUe8 ( 1 1 . . . 0-0 1 2 .�g2 �fe8 1 3 .0-0 �xeS 1 4.�xe5 lJj]xeS l S .lJj]xeS �xeS 1 6.cxdS �xfl 1 7 .\t>xfl cxdS)
C) 1 1 . . . 0-0-0 followed by 12 . . J�de8 ( 1 1 . . .0-0-0 1 2 .�g2 )'!deS 1 3 .0-0 �xeS 1 4.�xe5 lJj]xeS 1 S .lJj]xeS �xeS 1 6.cxdS �xfl 1 7 .\t>xfl cxdS)
D) 1 1 . . . 0-0-0 followed by 12 .. J�he8 ( 1 1 . . .0-0-0 1 2 .�g2 )'!he8 1 3 .0-0 �xeS 14 .�xeS lJj]xeS 1 5 .1JjjxeS �xeS 1 6.cxdS �xfl 1 7 .'it>xfl cxdS)
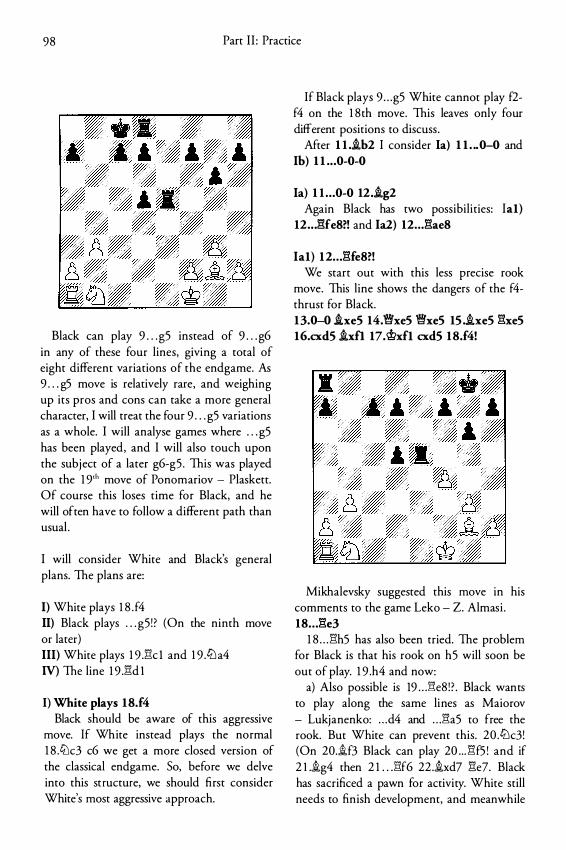
98 Part I I : Practice
Black can play 9 . . . g5 instead of 9 . . . g6 in any of these four lines, giving a total of eight different variations of the endgame. As 9 . . . g5 move is relatively rare, and weighing up its pros and cons can take a more general character, I will treat the four 9 . . . g5 variations as a whole. I will analyse games where . . . g5 has been played, and I will also touch upon the subject of a later g6-g5 . This was played on the 1 9'h move of Ponomariov - Plaskett. Of course this loses time for Black, and he will often have to follow a different path than usual .
I will consider White and Black's general plans. The plans are:
I) White plays 1 8 . f4 II) Black plays . . . g5 ! ? (On the ninth move or later) III) White plays 1 9 .:r'k l and 1 9 .ttJ a4 IV) The line 1 9 .:1'1d l
I) White plays 18.f4 Black should be aware of this aggressive
move. If White instead plays the normal 1 8 .ttJc3 c6 we get a more closed version of the classical endgame. So, before we delve into this st ructure, we should first consider White's most aggressive approach.
If Black plays 9 . . . g5 White cannot play f2-f4 on the 1 8th move. This leaves only four different positions to discuss .
After 1 I ..ib2 I consider Ia) 1 1 . .. 0-0 and Ib) 1 1 . . . 0-0-0
Ia) 1 1 . . . 0-0 12 . .ig2 Again Black has two possibilities: Ia1)
12 .. J�fe8?! and la2) 12 . . . :1'1ae8
Ia1) 12 . . . :1'1fe8?! We start out with this less precise rook
move. This line shows the dangers of the f4-thrust for Black. 13.0-0 !xeS 14.'�xeS '!!xeS 1S . .ixeS :r'\xeS 16.cxdS ixf1 17.®xfl cxdS 18.f4!
Mikhalevsky suggested this move in his comments to the game Leko - Z. Almasi . 18 . . . :1'1e3
1 8 . . . :1'1h5 has also been tried. The problem for Black is that his rook on h5 will soon be out of play. 1 9 .h4 and now:
a) Also possible is 19 . . . :1'1e8 ! ? . Black wants to play along the same lines as Maiorov - Lukjanenko: . . . d4 and . . . :1'1a5 to free the rook. But White can prevent this. 20 .ttJc3! (On 20.if3 Black can play 20 . . . :1'1f5 ! and if 2 I ..ig4 then 2 1 . . . :1'1f6 22 . .ixd7 :1'1e7. Black has sacrificed a pawn for activity. White still needs to finish development, and meanwhile
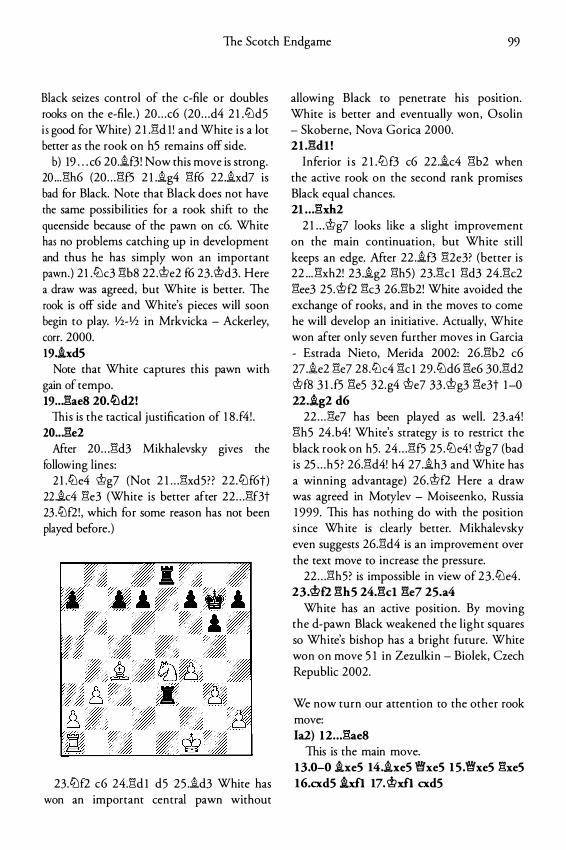
The Scotch Endgame 99
Black seizes control of the c-file or doubles rooks on the e-file. ) 20 . . . c6 (20 . . . d4 2 l .tt'ld5 i s good for White) 2 1 .Eld 1 ! and White i s a lot better as the rook on h5 remains off side.
b) 19 . . . c6 20.if3! Now this move is strong. 20 .. . Elh6 (20 . . . Elf5 2 1 .ig4 Elf6 22 .ixd7 is bad for Black. Note that Black does not have the same possibilities for a rook shift to the queenside because of the pawn on c6. White has no problems catching up in development and thus he has simply won an important pawn.) 2 l .tt'lc3 Elb8 22 .�e2 f6 23.�d3. Here a draw was agreed, but White is better. The rook is off side and White's pieces will soon begin to play. Yz-Yz in Mrkvicka - Ackerley, carr. 2000. 19.ixd5
Note that White captures this pawn with gain of tempo. 19 .. Jiae8 20.ll:\d2!
This is the tactical justification of 1 8 .f4 ! . 20 .. .13e2
After 20 . . . Eld3 Mikhalevsky gives the following lines:
2 l .tt'le4 �g7 (Not 2 1 . . .Elxd5? ? 22 .tt'lf6t) 22.ic4 Ele3 (White is better after 22 . . . Elf3t 23 .1Llf2! , which for some reason has not been played before.)
23.tt'lf2 c6 24.Eld 1 d5 25 .id3 White has won an important central pawn without
allowing Black to penetrate his position. White is better and eventually won, Osolin - Skoberne, Nova Gorica 2000. 21 .Eld1 !
Inferior i s 2 l .tt'l f3 c6 22 .ic4 Elb2 when the active rook on the second rank promises Black equal chances. 21 . . .13xh2
2 l . . .�g7 looks like a slight improvement on the main continuation, but White still keeps an edge. After 22 .if3 El2e3? (better is 22 . . . Elxh2! 23 .ig2 Elh5) 23.Elc l Eld3 24.Elc2 Elee3 25 .�f2 Elc3 26.Elb2! White avoided the exchange of rooks, and in the moves to come he will develop an initiative. Actually, White won after only seven further moves in Garcia - Estrada Nieto, Merida 2002: 26.Elb2 c6 27 .ie2 Ele7 28 .tt'lc4 Elc l 29 .tt'ld6 Ele6 30.Eld2 �f8 3 l . f5 Ele5 32.g4 �e7 33 .�g3 Ele3t 1 -0 22 . .ig2 d6
22 . . . Ele7 has been played as well. 23.a4! Elh5 24 .b4! White's strategy is to restrict the black rook on h5. 24 . . . Elf5 25 .tt'le4! �g7 (bad is 25 . . . h5 ? 26.Eld4! h4 27.ih3 and White has a winning advantage) 26.�f2 Here a draw was agreed in Morylev - Moiseenko, Russia 1 999. This has nothing do with the position s ince Wh ite is clearly better. Mikhalevsky even suggests 26.Eld4 is an improvement over the text move to increase the pressure.
22 . . . Elh5? is impossible in view of 23 .tt'le4. 23. �f.Z ElhS 24.Elcl Ele7 25.a4
White has an active position. By moving the d-pawn Black weakened the l ight squares so White's bishop has a bright future. White won on move 5 1 in Zezulkin - Bialek, Czech Republic 2002.
We now turn our attention to the other rook move: la2) 12 . . . Elae8
This is the main move. 13.0-0 .ixeS 14 . .ixe5 'IWxeS 15.\WxeS ElxeS 16.cxd5 i.xfl 17. �xfl cxdS
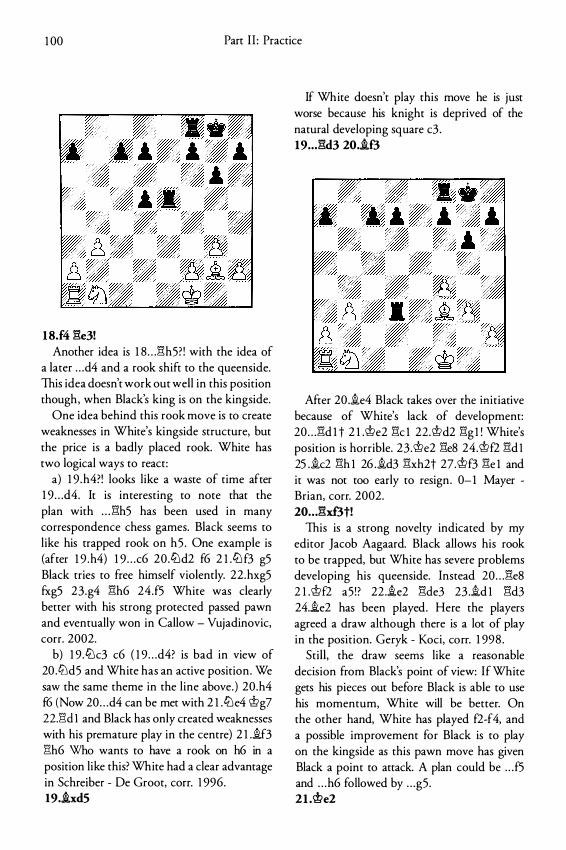
1 00 Parr I I : Practice
18.f4 ge3! Another idea is 1 8 . . . Elh5? ! with the idea of
a later . . . d4 and a rook shift to the queenside. This idea doesn't work out well in this position though, when Black's king is on the kingside.
One idea behind this rook move is to create weaknesses in White's kingside structure, but the price is a badly placed rook. White has two logical ways to react:
a) 1 9 .h4?! looks like a waste of time after 1 9 . . . d4. It is interesting to note that the plan with . . . Elh5 has been used in many correspondence chess games. Black seems to like his trapped rook on h5 . One example is (after 1 9 .h4) 1 9 . . . c6 20 .LLld2 f6 2 1 .LLl f3 g5 Black tries to free himself violently. 22 .hxg5 fxg5 23.g4 Elh6 24.f5 White was clearly better with his strong protected passed pawn and eventually won in Callow - Vujadinovic, corr. 2002.
b) 1 9 .LLlc3 c6 ( 1 9 . . . d4? is bad in view of 20 .LLld5 and White has an active position . We saw the same theme in the line above. ) 20.h4 f6 (Now 20 . . . d4 can be met with 2 1 .LLle4 �g7 22.1=\d 1 and Black has only created weaknesses with his premature play in the centre) 2 1 . .if3 1=\h6 Who wants to have a rook on h6 in a position like this? White had a clear advantage in Schreiber - De Groot, corr. 1 996. 19 . .ixd5
If White doesn't play this move he is just worse because his knight is deprived of the natural developing square c3 . 19 .. . gd3 20 . .if3
After 20 . .ie4 Black takes over the initiative because of White's lack of development: 20 . . . Eld 1 t 2 l .�e2 Elc l 22.�d2 Elg 1 ! White's position is horrible. 23 .�e2 Ele8 24.�f2 Eld 1 25 . .ic2 Elh 1 26 . .id3 Elxh2t 27.�f3 Ele 1 and it was not too early to resign . 0- 1 Mayer -Brian, corr. 2002. 20 . . . gxf3t!
This is a strong novelty indicated by my editor Jacob Aagaard. Black allows his rook to be trapped, but White has severe problems developing his queenside. Instead 20 . . . Ele8 2 1 . �f2 a5 ! ? 22 . .ie2 Elde3 23 . .id 1 Eld3 24.ie2 has been played. Here the players agreed a draw although there is a lot of play in the position. Geryk - Koci, carr. 1 998 .
Still, the draw seems like a reasonable decision from Black's point of view: If White gets his pieces out before Black is able to use his momentum, White will be better. On the other hand, White has played f2-f4, and a possible improvement for Black is to play on the kingside as this pawn move has given Black a point to attack. A plan could be . . . f5 and . . . h6 followed by . . . g5 . 2l .'tt>e2
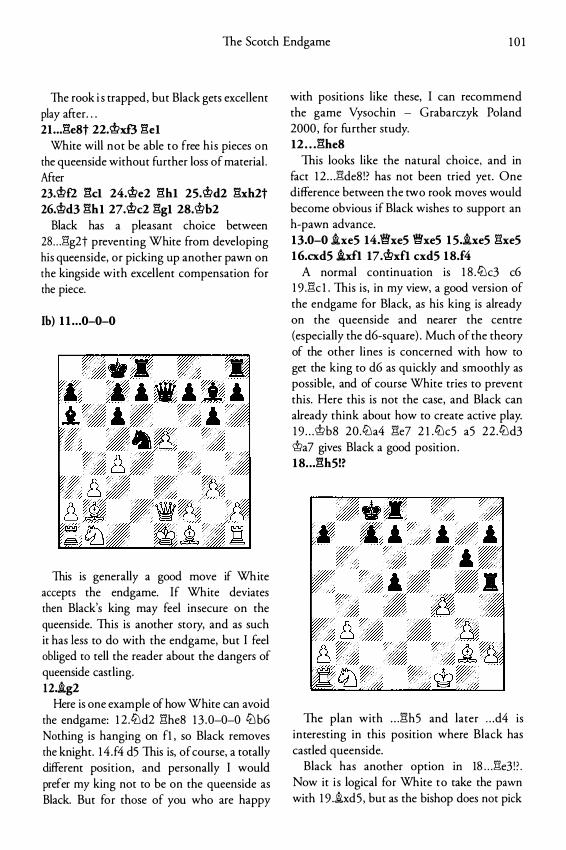
The Scorch Endgame 1 0 1
The rook i s trapped, but Black gets excellent play after. . . 21. .. l'!e8t 22.•;hf3 l'!el
White will not be able to free his pieces on the queenside without further loss of material . After 23.<!>fl :!kl 24.<!>e2 l'!hl 25.@d2 l'!xh2t 26.<!>d3 l'!hl 27.@c2 l'!gl 28.<!>b2
Black has a pleasant choice between 28 . . . Elg2t preventing White from developing his queenside, or picking up another pawn on the kingside with excellent compensation for the piece.
Ib) 1 1 . . .0-0-0
This is generally a good move if White accepts the endgame. If White deviates then Black's king may feel insecure on the queenside. This is another story, and as such it has less to do with the endgame, but I feel obliged to tell the reader about the dangers of queenside castling. 12.ig2
Here is one example of how White can avoid the endgame: 1 2 .ctJd2 l"i:he8 1 3 .0-0-0 Ci:J b6 Nothing is hanging on fl , so Black removes the knight. 1 4 .f4 d5 This is, of course, a totally different position, and personally I would prefer my king not to be on the queenside as Black. But for those of you who are happy
with positions like these, I can recommend the game Vysochin - Grabarczyk Poland 2000, for further study. 12 . . . l'!he8
This looks like the natural choice, and in fact 1 2 . . . Elde8 ! ? has not been tried yet. One difference between the two rook moves would become obvious if Black wishes to support an h-pawn advance. 13.0-0 ixe5 14.'1Wxe5 �xeS 1 5.ixe5 l'!xe5 16.cxd5 hfl. 17.<!>xfl cxd5 18.f4
A normal continuation is 1 8 .ctJc3 c6 1 9 .Elc 1 . This is, in my view, a good version of the endgame for Black, as his king is already on the queenside and nearer the centre (especially the d6-square) . Much of the theory of the other lines is concerned with how to get the king to d6 as quickly and smoothly as possible, and of course White tries to prevent this. Here this is not the case, and Black can already think about how to create active play. 1 9 . . . @b8 20 .Ci:Ja4 l"i:e7 2 l .ctJc5 a5 22 .ctJd3 @a? gives Black a good position . 18 . . J�h5!�
The plan with . . . l"i:h5 and later . . . d4 is interesting in this position where Black has castled queenside.
Black has another option in 18 . . . Ele3 ! ? . Now it i s logical for White to take the pawn with 1 9 .ixd5 , but as the bishop does not pick
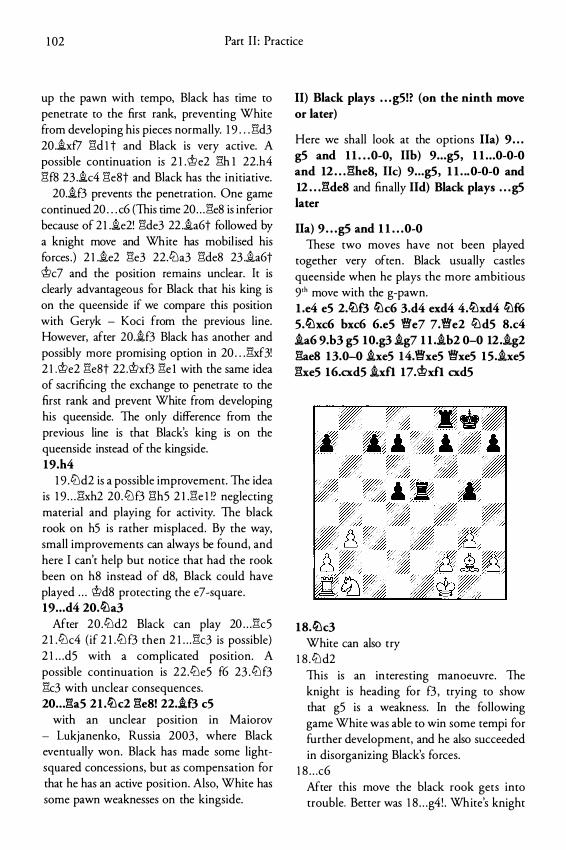
1 02 Part I I : Practice
up the pawn with tempo, Black has time to penetrate to the first rank, preventing White from developing his pieces normally. 1 9 . . . E1d3 20 .ixf7 E!d 1 t and Black is very active. A possible continuation is 2 I .'it>e2 E!h 1 22.h4 E!f8 23 .ic4 E!e8t and Black has the initiative.
20.if3 prevents the penetration. One game continued 20 . . . c6 (This time 20 . . . E!e8 is inferior because of 2 1 .ie2! E!de3 22 .ia6t followed by a knight move and White has mobil ised his forces .) 2 I ..ie2 E!e3 22.12la3 E!de8 23 .ia6t 'it>c7 and the position remains unclear. It is clearly advantageous for Black that his king is on the queenside if we compare this position with Geryk - Koci from the previous line. However, after 20.if3 Black has another and possibly more promising option in 20 . . . E!xf3! 2 1 .'it>e2 E!e8t 22 .'it>xf3 E!e 1 with the same idea of sacrificing the exchange to penetrate to the first rank and prevent White from developing his queenside. The only difference from the previous line is that Black's king is on the queenside instead of the kingside. 19.h4
1 9 .12ld2 is a possible improvement. The idea is 1 9 . . . E!xh2 20. 12l f3 E!h5 2 l .E!e 1 !? neglecting material and playing for activity. The black rook on h5 is rather misplaced. By the way, small improvements can always be found, and here I can't help but notice that had the rook been on h8 instead of d8, Black could have played . . . 'it>d8 protecting the e7 -square. 19 • • . d4 20.ltla3
After 20 .12ld2 Black can play 20 . . . E!c5 2 1 .12lc4 (if 2 1 .12l f3 then 2 l . . .E!c3 is possible) 2 1 . . . d5 with a complicated position. A possible continuation is 22 .12le5 f6 23 . 12l f3 E!c3 with unclear consequences. 20 . . .:1�a5 21 .ltlc2 E1e8! 22 . .if3 cS
with an unclear position in Maiorov - Lukjanenko, Russia 2003 , where Black eventually won. Black has made some lightsquared concessions, but as compensation for that he has an active position. Also, White has some pawn weaknesses on the kingside.
II) Black plays . . . gS!? (on the ninth move or later)
Here we shall look at the options Ila) 9 . . . gS and 1 1 . . . 0-0, lib) 9 . . . g5, 1 1 . . . 0-0-0 and 12 . . . E!he8, lie) 9 . . . g5, 1 1 . .. 0-0-0 and 12 . . J�de8 and finally lid) Black plays . . . gS later
Ila) 9 . . . g5 and 1 1 . . . 0-0 These two moves have not been played
together very often . Black usually castles queenside when he plays the more ambitious 9rh move with the g-pawn. l .e4 eS 2.ltlf3 ltlc6 3.d4 exd4 4.ltlxd4 ltlf6 S.tl:lxc6 bxc6 6.e5 �e7 7.�e2 tLldS 8.c4 ia6 9.b3 gS 10.g3 .ig7 1 1 ..ib2 0-0 12 • .ig2 E1ae8 13.0-0 .ixeS 14.�xe5 �xeS 15 . .ixe5 E1xe5 16.cxd5 .ixf1 17.'it>xfl cxdS
18.tl:lc3 White can also try
1 8 .12ld2 This is an in teresting manoeuvre. The knight is heading for f3 , trying to show that g5 is a weakness. In the following game White was able to win some tempi for further development, and he also succeeded in disorganizing Black's forces.
1 8 . . . c6 After this move the black rook gets into trouble. Better was 1 8 . . . g4! . White's knight
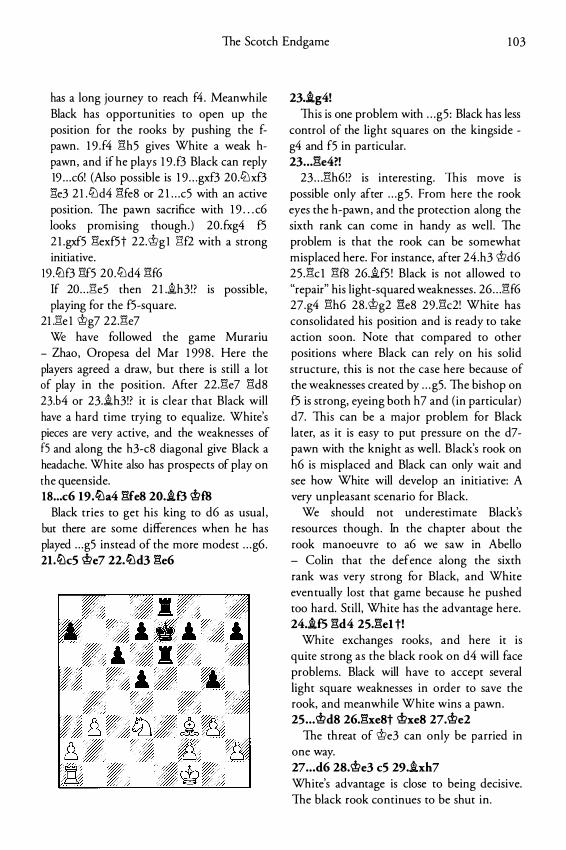
The Scotch Endgame 1 03
has a long journey to reach f4 . Meanwhile Black has opportunities to open up the position for the rooks by pushing the fpawn. 1 9 .f4 Elh5 gives White a weak hpawn, and if he plays 1 9 .f3 Black can reply 19 . . . c6! (Also possible is 1 9 . . . gxf3 20.'Ll xf3 E1e3 2 1 .'Lld4 Elfe8 or 2 l . . .c5 with an active position. The pawn sacrifice with 1 9 . . . c6 looks promising though. ) 20.fxg4 f5 2 l .gxf5 Elexf5t 22. <±>g I Elf2 with a strong initiative.
19 .'Llf3 Elf5 20 .'Lld4 Ei:f6 If 20 . . . E1e5 then 2 1 .�h3!? is possible, playing for the f5-square.
2l .Ei:e 1 <±>g7 22.Ele7 We have followed the game Murariu
- Zhao, Oropesa del Mar 1 998 . Here the players agreed a draw, but there is still a lot of play in the position. After 22.Ele7 Eld8 23.b4 or 23.�h3!? it is clear that Black will have a hard time trying to equalize. White's pieces are very active, and the weaknesses of fS and along the h3-c8 diagonal give Black a headache. White also has prospects of play on the queenside. 18 ... c6 19.ltla4 gfe8 20.�f3 'it>f8
Black tries to get his king to d6 as usual , but there are some differences when he has played . . . g5 instead of the more modest . . . g6 . 2l.ltlc5 'it>e7 22.ltld3 Ele6
23.�g4! This is one problem with . . . g5 : Black has less
control of the light squares on the kingside -g4 and f5 in particular. 23 . . J'�e4?!
23 . . . E\h6!? is interesting. This move is possible only after . . . g5 . From here the rook eyes the h-pawn, and the protection along the sixth rank can come in handy as well . The problem is that the rook can be somewhat misplaced here. For instance, after 24.h3 <i>d6 25 .Ei:c l Ei:f8 26.�f5 ! Black is not allowed to "repair" his light-squared weaknesses . 26 . . . E\f6 27.g4 E\h6 28 .<±>g2 Ei:e8 29.Elc2! White has consolidated his position and is ready to take action soon. Note that compared to other positions where Black can rely on his solid structure, this is not the case here because of the weaknesses created by . . . g5. The bishop on f5 is strong, eyeing both h7 and (in particular) d7. This can be a major problem for Black later, as it is easy to put pressure on the d7-pawn with the knight as well . Black's rook on h6 is misplaced and Black can only wait and see how White will develop an initiative: A very unpleasant scenario for Black.
We should not underestimate Black's resources though. In the chapter about the rook manoeuvre to a6 we saw in Abello - Colin that the defence along the sixth rank was very strong for Black, and White eventually lost that game because he pushed too hard. Still, White has the advantage here. 24.�f5 gd4 2S.gel t!
White exchanges rooks, and here it is quite strong as the black rook on d4 will face problems. Black will have to accept several light square weaknesses in order to save the rook, and meanwhile White wins a pawn. 2S . . . <±>d8 26,gxe8t <±>xeS 27.<±>e2
The threat of <±>e3 can only be parried in one way. 27 .. . d6 28.<±>e3 cS 29.ixh7 White's advantage is close to being decisive. The black rook continues to be shut in .
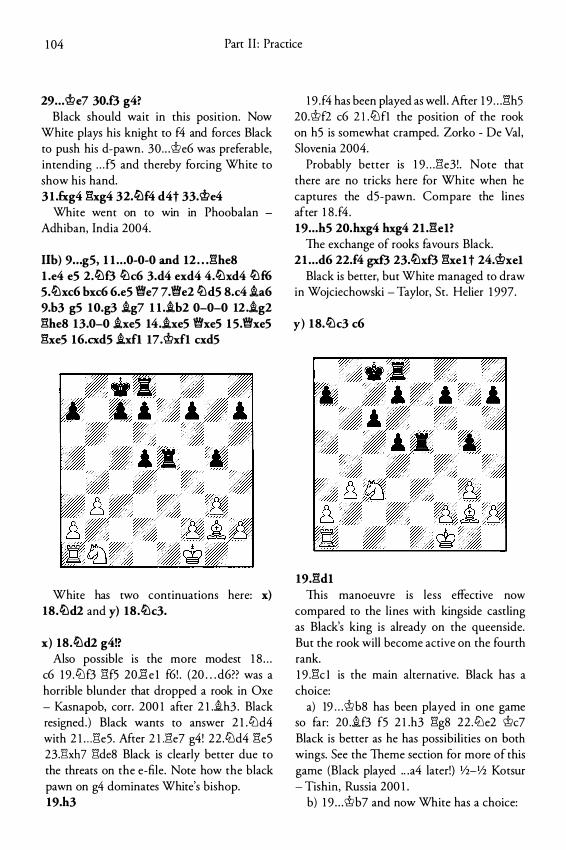
1 04 Part I I : Practice
29 . . . 'i!ie7 30.f3 g4? Black should wait in this position. Now
White plays his knight to f4 and forces Black to push his d-pawn. 30 o o .<41e6 was preferable, intending o o . f5 and thereby forcing White to show his hand. 3 1 .fxg4 �xg4 32.<!l:\f4 d4t 33.'i!ie4
White went on to win in Phoobalan -Adhiban, India 2004.
lib) 9 • • • g5, 1 1 . . . 0-0-0 and 12 . . . �he8 l .e4 e5 2.ll:lf3 ll:lc6 3.d4 exd4 4.ll:lxd4 ll:lf6 5.ll:lxc6 bxc6 6.e5 V!fe7 7.V!fe2 ll:ld5 8.c4 .ia6 9.b3 g5 10.g3 .ig7 l l ..ib2 0-0-0 12 . .ig2 �he8 13.0-0 .ixe5 14 . .ixe5 V!fxe5 1 5.V!fxe5 �xe5 16.cxd5 .ixfl l?.i>xfl cxd5
White has two continuations here: x) 18.ll:ld2 and y) 18.ll:lc3.
x) 18.ll:ld2 g4!? Also possible is the more modest 1 8 0 0 .
c6 1 9 .'Llf3 E:f5 20.l:� e 1 f6! . (20 . . . d6?? was a horrible blunder that dropped a rook in Oxe - Kasnapob, corr. 200 1 after 2 I ..ih3 . Black resigned. ) Black wants to answer 2 l .'Lld4 with 2 l . . .E1e5 . After 2 l .E1e7 g4! 22 .'Lld4 �e5 23.E1xh7 E1de8 Black is clearly better due to the threats on the e-file. Note how the black pawn on g4 dominates White's bishop. 19.h3
1 9 .f4 has been played as well . After 1 9 o o .E1h5 20.<41f2 c6 2 1 .'Llfl the position of the rook on h5 is somewhat cramped. Zorko - De Val, Slovenia 2004.
Probably better is 1 9 o o .E1e3! . Note that there are no tricks here for White when he captures the d5-pawn. Compare the lines after 1 8 . f4 . 19 . . . h5 20.hxg4 hxg4 21 .�el?
The exchange of rooks favours Black. 21 . . . d6 22.f4 gxf3 23.ll:lxf3 �xel t 24.<4lxel
Black is better, but White managed to draw in Wojciechowski - Taylor, St. Helier 1 997.
y) 18.ll:lc3 c6
19.�dl This manoeuvre is less effective now
compared to the lines with kingside castling as Black's king is already on the queenside. But the rook will become active on the fourth rank. 1 9 J�c l is the main alternative. Black has a choice:
a) 19 0 0 . <41 b8 has been played in one game so far: 20 . .if3 f5 2 1 .h3 �g8 22 .'Lle2 <41c7 Black is better as he has possibilities on both wings. See the Theme section for more of this game (Black played 00 .a4 later!) V2-V2 Kotsur - Tishin, Russia 200 1 .
b) 1 9 o o .<41b7 and now White has a choice:
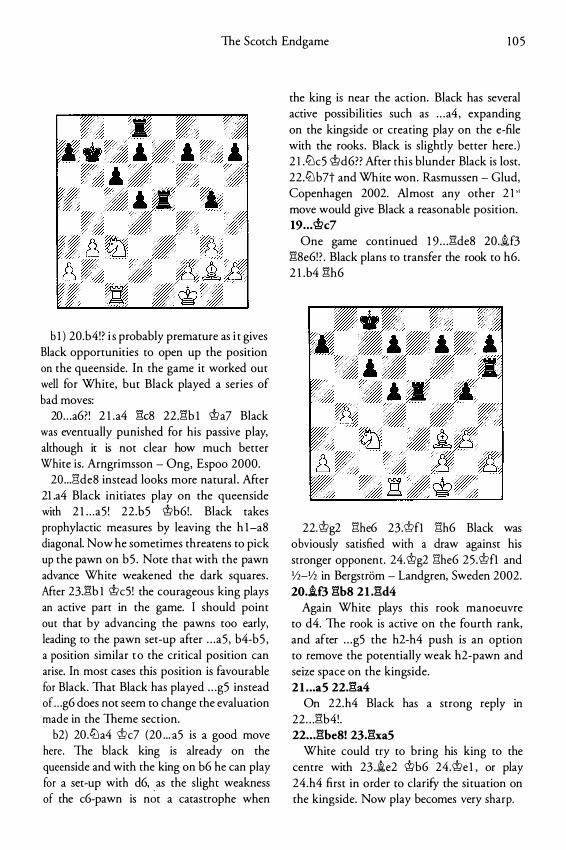
The Scotch Endgame 1 0 5
b l ) 20.b4!? i s probably premature as i t gives Black opportunities to open up the position on the queenside. In the game it worked out well for White, but Black played a series of bad moves:
20 . . . a6?! 2 l .a4 Ek8 22.E!b I Wa7 Black was eventually punished for his passive play, although it is not clear how much better White is. Arngrimsson - Ong, Espoo 2000.
20 . . . E!de8 instead looks more natural . After 2l .a4 Black initiates play on the queenside with 2 l . . .a5 ! 22 .b5 Wb6!. Black takes prophylactic measures by leaving the h l-aS diagonal. Now he sometimes threatens to pick up the pawn on b5 . Note that with the pawn advance White weakened the dark squares . After 23.E!b l Wc5! the courageous king plays an active part in the game. I should point out that by advancing the pawns too early, leading to the pawn set-up after . . . a5 , b4-b5 , a position similar t o the critical position can arise. In most cases this position is favourable for Black. That Black has played . . . g5 instead of . . . g6 does not seem to change the evaluation made in the Theme section.
b2) 20.l/Ja4 Wc7 (20 . . . a5 is a good move here. The black king is already on the queenside and with the king on b6 he can play for a set-up with d6, as the slight weakness of the c6-pawn is n�t a catastrophe when
the king is near the action. Black has several active possibili ties such as . . . a4 , expanding on the kingside or creating play on the e-file with the rooks. Black is slightly better here.) 2 1 .l/Jc5 Wd6?? After this blunder Black is lost. 22.l/J b7t and White won. Rasmussen - Glud, Copenhagen 2002. Almost any other 2 1 " move would give Black a reasonable position. 19 . . . Wc7
One game continued 1 9 . . . E!de8 20.if3 E!8e6! ? . Black plans to transfer the rook to h6. 2 l .b4 E!h6
22.'tt>g2 E!he6 23.Wfl E!h6 Black was obviously satisfied with a draw against his stronger opponent. 24.'tt>g2 E!he6 25 .'tt>fl and Yz-Yz in Bergstrom - Landgren, Sweden 2002. 20 . .if3 E!b8 2I .E!d4
Again White plays this rook manoeuvre to d4. The rook is active on the fourth rank, and after . . . g5 the h2-h4 push is an option to remove the potentially weak h2-pawn and seize space on the kingside. 21 . .. a5 22.E!a4
On 22.h4 Black has a strong reply in 22 . . . E!b4! . 22 . . . E!be8! 23.E!xa5
White could try to bring his king to the centre with 23 .1e2 Wb6 24.We l , or play 24.h4 first in order to clarify the situation on the kingside. Now play becomes very sharp.
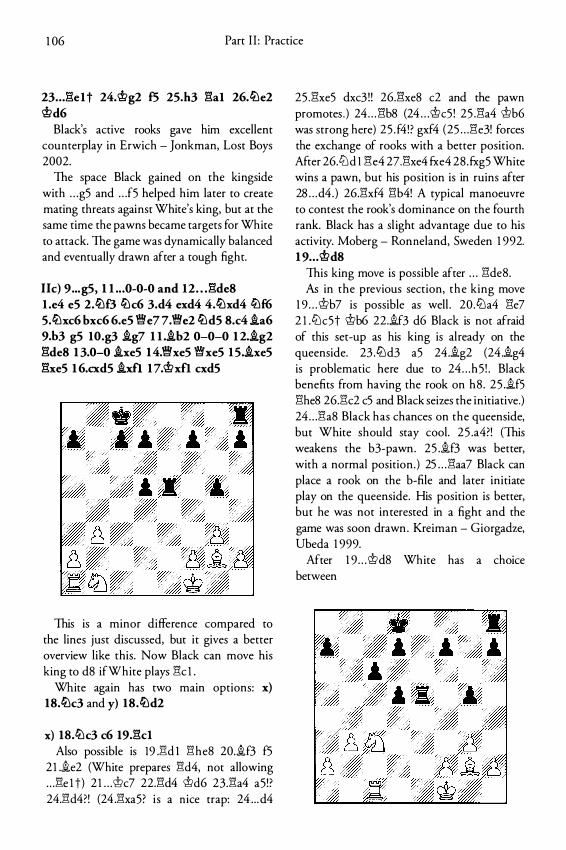
106 Part I I : Practice
23 . . J'�elt 24.'.!?g2 f5 25.h3 gal 26.tLle2 '.!?d6
Black's active rooks gave him excellent counterplay in Erwich - Jonkman, Lost Boys 2002.
The space Black gained on the kingside with . . . g5 and . . . f5 helped him later to create mating threats against White's king, bur at the same time the pawns became targets for White to attack. The game was dynamically balanced and eventually drawn after a tough fight.
lie) 9 ... g5, 11. . . 0-0-0 and 12. . .gde8 l .e4 eS 2.tLlf3 tLlc6 3.d4 exd4 4.tLlxd4 ttJf6 S.tLlxc6 bxc6 6.e5 ffe7 7.ffe2 tiJdS 8.c4 i.a6 9.h3 gS IO.g3 i.g7 I I .i.h2 0-0-0 12.i.g2 gde8 13.0-0 i.xeS 14.ffxe5 fixeS IS.i.xeS gxeS 16.cxd5 i.xf117.'.!?xfl cxdS
This is a minor difference compared to the lines just discussed, but it gives a better overview like this. Now Black can move his king to d8 if White plays f1c l .
White again has two main options: x) 18.tLlc3 andy) 18.tLld2
x) 18.tiJc3 c6 19J'kl Also possible is 19 .%1d 1 ghe8 20.i.f3 f5
2 l .ie2 (White prepares gd4, not allowing . . . ge l t) 2 l . . .'.!?c7 22.gd4 md6 23.ga4 a5 ! ? 24.gd4?! (24 .gxa5? is a n ice trap: 24 . . . d4
25 .gxe5 dxc3 ! ! 26.%1xe8 c2 and the pawn promotes . ) 24 . . . gb8 (24 . . . '.!?c5 ! 25 .f1a4 mb6 was strong here) 25 . f4! ? gxf4 (25 . . . ge3! forces the exchange of rooks with a better position. After 26.tLld 1 f1e4 27.gxe4 fxe4 28 .fxg5 White wins a pawn, but his position is in ruins after 28 . . . d4 .) 26.gxf4 gb4! A typical manoeuvre to contest the rook's dominance on the fourth rank. Black has a sl ight advantage due to his activity. Moberg - Ronneland, Sweden 1992. 19 . . . '.!?d8
This king move is possible after . . . gde8. As in the previous section, the king move
19 . . . '.!?b7 is possible as well . 20 .'i:la4 ge7 2 l .'i:lc5t '.!?b6 22.if3 d6 Black is not afraid of this set-up as his king is already on the queenside. 23 .'Lld3 a5 24.i.g2 (24 .i.g4 is problematic here due to 24 . . . h5 ! . Black benefits from having the rook on h8 . 25 .if5 ghe8 26.%1c2 c5 and Black seizes the initiative.) 24 . . . ga8 Black has chances on the queenside, bur White should stay cool. 25 .a4?! (This weakens the b3-pawn. 25 .i.f3 was better, with a normal position.) 25 . . . gaa7 Black can place a rook on the b-file and later initiate play on the queenside. His position is better, but he was not interested in a fight and the game was soon drawn . Kreiman - Giorgadze, Ubeda 1999.
After 19 . . . '.!?d8 White has a choice between
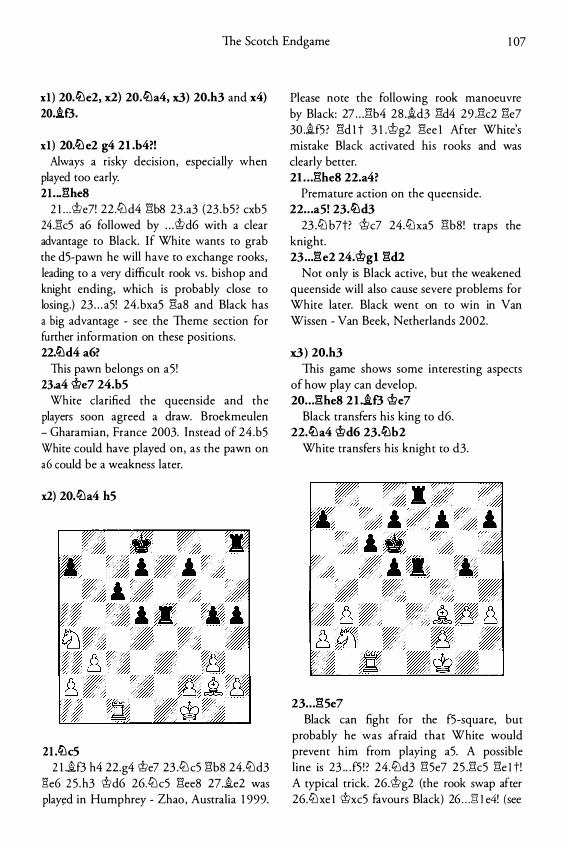
The Scotch Endgame 107
xl) 20.�e2, x2) 20.�a4, x3) 20.h3 and x4) 20.i8.
xl) 20.c!Lle2 g4 21.b4?! Always a risky decision, especially when
played too early. 21. .. !"ihe8
2J. . .cj;>e7! 22 .l2ld4 !"ib8 23.a3 (23 .b5? cxb5 24.!"ic5 a6 followed by . . . cj;>d6 with a clear advantage to Black. If White wants to grab the d5-pawn he will have to exchange rooks , leading to a very difficult rook vs . bishop and knight ending, which is probably close to losing.) 23 . . . a5! 24.bxa5 l"la8 and Black has a big advantage - see the Theme section for further information on these positions. 22.ttld4 a6?
This pawn belongs on a5 ! 23.a4 @e7 24.b5
White clarified the queenside and the players soon agreed a draw. Broekmeulen - Gharamian, France 2003. Instead of 24.b5 White could have played on, as the pawn on a6 could be a weakness later.
x2) 20.ttla4 hS
21.ttlc5 2I.if3 h4 22.g4 cj;>e7 23 .ti:lc5 l"lb8 24.ti:ld3
�e6 25 .h3 cj;>d6 26.ti:lc5 l"lee8 27.ie2 was play�d in Humphrey - Zhao, Australia 1999.
Please note the following rook manoeuvre by Black: 27 . . . l"lb4 28 .id3 l"ld4 29.l"lc2 l"le7 30 .if5 ? l"ld 1 t 3I.cj;Jg2 l"lee 1 After White's mistake Black activated his rooks and was clearly better. 21. . . l"lhe8 22.a4?
Premature action on the queenside. 22 . . . a5! 23.�d3
23 .ti:lb7t? cj;>c7 24.ti:lxa5 l"lb8! traps the knight. 23 ... !"ie2 24.@gl !"id2
Not only is Black active, but the weakened queenside will also cause severe problems for White later. Black went on to win in Van Wissen - Van Beek, Netherlands 2002.
x3) 20.h3 This game shows some interesting aspects
of how play can develop. 20 . . . !"ihe8 2 I .i8 @e7
Black transfers his king to d6. 22.�a4 @d6 23.�b2
White transfers his knight to d3.
23 . . . !"i5e7 Black can fight for the f5-square, but
probably he was afraid that White would prevent him from playing a5. A possible l ine is 23 .. . f5 ! ? 24.ti:ld3 l"l5e7 25 .l"lc5 l"le It! A typical trick. 26.cj;Jg2 (the rook swap after 26.ti:lxe I 'it>xc5 favours Black) 26 . . . l"ll e4! (see
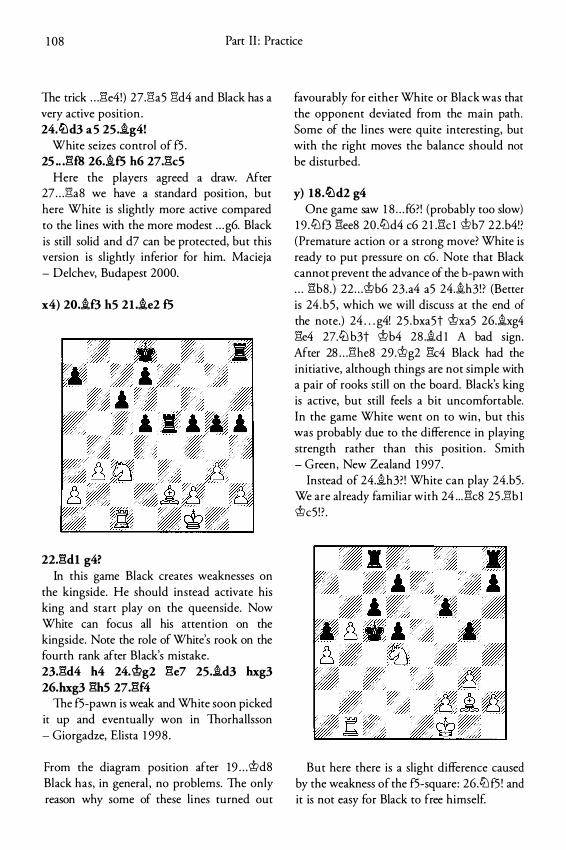
1 08 Part II: Practice
The trick . . J".le4!) 27.Ei:a5 Ei:d4 and Black has a very active position . 24.tlld3 aS 25.�g4!
White seizes control of f5 . 25 .. J�f8 26.�f5 h6 27J'k5
Here the players agreed a draw. After 27 . . . Ei:a8 we have a standard position, but here White is sl ightly more active compared to the l ines with the more modest . . . g6. Black is still solid and d7 can be protected, but this version is sl ightly inferior for him. Macieja - Delchev, Budapest 2000.
x4) 20 . .if3 hS 21 ..ie2 f5
22J�dl g4? In this game Black creates weaknesses on
the kingside. He should instead activate his king and start play on the queenside. Now White can focus all his attention on the kingside. Note the role of White's rook on the fourth rank after Black's mistake. 23J�d4 h4 24. ®g2 ge7 25 . .id3 hxg3 26.hxg3 ghs 27 .gf4
The f5-pawn is weak and White soon picked it up and eventually won in Thorhallsson - Giorgadze, Elista 1 998 .
From the diagram position after 19 . . . 't!i'd8 Black has, in general , no problems. The only reason why some of these lines turned out
favourably for either White or Black was that the opponent deviated from the main path. Some of the l ines were quite interesting, but with the right moves the balance should not be disturbed.
y) 18.tlld2 g4 One game saw 1 8 . . . f6? ! (probably too slow)
1 9 .lLlf3 Ei:ee8 20.lLld4 c6 2 l .Ei:c l 'tt>b7 22.b4!? (Premature action or a strong move? White is ready to put pressure on c6 . Note that Black cannot prevent the advance of the b-pawn with . . . Ei:b8. ) 22 . . . 't!i'b6 23.a4 aS 24.�h3!? (Better is 24 .b5 , which we will discuss at the end of the note.) 24 . . . g4! 25 .bxa5t 't!i'xa5 26.�xg4 Ei:e4 27.tLlb3t 't!i'b4 28 .�d l A bad sign . After 28 . . . ghe8 29.'tt>g2 Ei:c4 Black had the initiative, although things are not simple with a pair of rooks still on the board. Black's king is active, but still feels a bit uncomfortable. In the game White went on to win , but this was probably due to the difference in playing strength rather than this position . Smith - Green, New Zealand 1 997.
Instead of 24.�h3?! White can play 24.b5. We are al ready familiar with 24 . . . Ei:c8 25 .gb 1 'tt>c5 ! ? .
But here there is a slight difference caused by the weakness of the fS-square: 26.tLlf5 ! and it is not easy for Black to free himself.
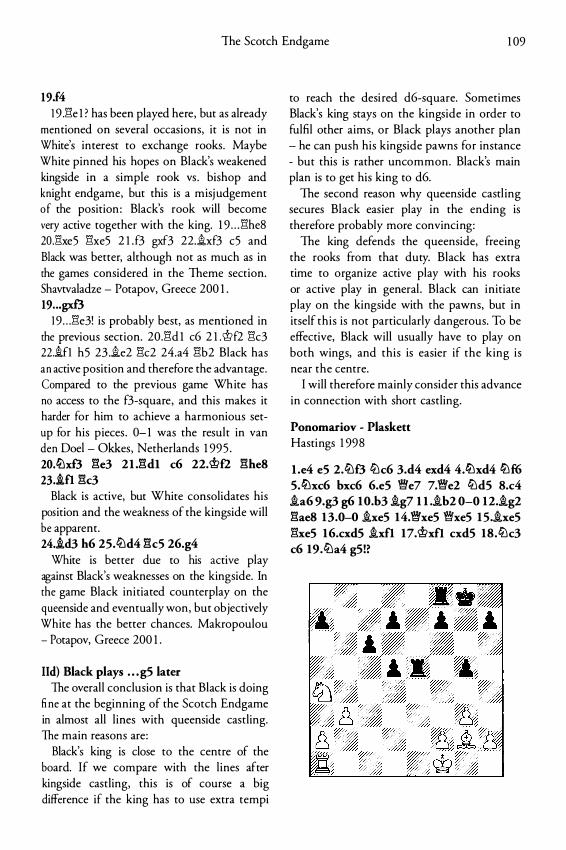
The Scotch Endgame 1 09
19.f4 1 9 .Ele I? has been played here, but as already
mentioned on several occasions, it is not in White's interest to exchange rooks. Maybe White pinned his hopes on Black's weakened kingside in a simple rook vs . bishop and knight endgame, but this is a misj udgement of the position: Black's rook will become very active together with the king. 1 9 . . . Elhe8 20.Elxe5 Elxe5 2 l . f3 gxf3 22.1xf3 c5 and Black was better, although not as much as in rhe games considered in the Theme section. Shavtvaladze - Potapov, Greece 200 1 . 19 . .. gxf3
1 9 . . . Ele3! is probably best, as mentioned in rhe previous section. 20.Eld 1 c6 2 1 . i>f2 Elc3 22.i.fl h5 23 .1e2 Elc2 24.a4 Elb2 Black has an active position and therefore the advantage. Compared to the previous game White has no access to the f3-square, and this makes it harder for him to achieve a harmonious setup for his pieces . 0- 1 was the result in van den Doe! - Okkes, Netherlands 1 995 . 20.li:lxf3 �e3 21 .�dl c6 22.i>fl �he8 23.i.fl �c3
Black is active, but White consolidates his position and the weakness of the kingside will be apparent. 24.id3 h6 25.ltld4 �cS 26.g4
White is better due to his active play against Black's weaknesses on the kingside. In rhe game Black initiated counterplay on the queenside and eventually won, but objectively White has the better chances. Makropoulou - Potapov, Greece 200 1 .
lid) Black p lays .•• gS later The overall conclusion is that Black is doing
fine at the beginning of the Scotch Endgame in almost all l ines with queenside castling. The main reasons are:
Black's king is close to the centre of the board. If we compare with the l ines after kingside castling, this is of course a big difference if the king has to use extra tempi
to reach the desi red d6-square. Sometimes Black's king stays on the kingside in order to fulfil other aims, or Black plays another plan - he can push his kingside pawns for instance - but this is rather uncommon. Black's main plan is to get his king to d6.
The second reason why queenside castl ing secures Black easier play in the ending is therefore probably more convincing:
The king defends the queenside, freeing the rooks from that duty. Black has extra time to organize active play with his rooks or active play in general . Black can initiate play on the kingside with the pawns, but in itself this is not particularly dangerous. To be effective, Black will usually have to play on both wings, and this is easier if the king is near the centre.
I will therefore mainly consider this advance in connection with short castling.
Ponomariov - Plaskett Hastings 1 998
l .e4 eS 2.ltlf3 ltlc6 3.d4 exd4 4.li:lxd4 li:lf6 S.li:lxc6 bxc6 6.e5 W/e7 7.W/e2 ltldS 8.c4 .ia6 9.g3 g6 10.b3 1g7 1 1 .1b2 0-0 12.1g2 �ae8 13.0-0 1xe5 14.W/xe5 WfxeS 15.1xe5 �xeS 16.cxd5 ixfl 17.i>xfl cxdS 18.ltlc3 c6 19.ltla4 gS!?
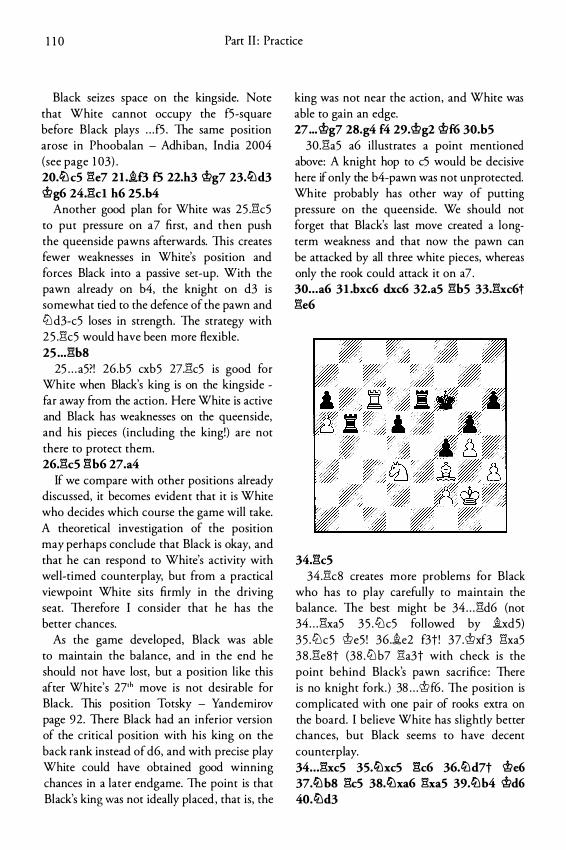
1 1 0 Part II : Practice
Black seizes space on the kingside. Note that White cannot occupy the f5-square before Black plays . . . fS . The same position arose in Phoobalan - Adhiban, India 2004 (see page 1 03) . 20.ltlc5 �e7 2I .if3 f5 22.h3 ®g7 23.tDd3 ®g6 24Jkl h6 2S.b4
Another good plan for White was 25 .l"lc5 to put pressure on a7 first, and then push the queenside pawns afterwards. This creates fewer weaknesses in White's position and forces Black into a passive set-up. With the pawn already on b4, the knight on d3 is somewhat tied to the defence of the pawn and CLl d3-c5 loses in strength. The strategy with 2 5 .l"lc5 would have been more flexible. 2S ... �b8
25 . . . a5?! 26.b5 cxb5 27.l"lc5 is good for White when Black's king is on the kingside -far away from the action. Here White is active and Black has weaknesses on the queenside, and his pieces (including the king!) are not there to protect them. 26.�c5 �b6 27.a4
If we compare with other positions already discussed, it becomes evident that it is White who decides which course the game will take. A theoretical investigation of the position may perhaps conclude that Black is okay, and that he can respond to White's activity with well-timed counterplay, but from a practical viewpoint White sits firmly in the driving seat. Therefore I consider that he has the better chances.
As the game developed, Black was able to maintain the balance, and in the end he should not have lost, but a position like this after White's 27'h move is not desirable for Black. This position Totsky - Yandemirov page 92. There Black had an inferior version of the critical position with his king on the back rank instead of d6, and with precise play White could have obtained good winning chances in a later endgame. The point is that Black's king was not ideally placed , that is, the
king was not near the action, and White was able to gain an edge. 27 ... ®g7 28.g4 f4 29.®g2 ®f6 30.b5
30.l"la5 a6 illustrates a point mentioned above: A knight hop to c5 would be decisive here if only the b4-pawn was not unprotected. White probably has other way of putting pressure on the queenside. We should not forget that Black's last move created a longterm weakness and that now the pawn can be attacked by all three white pieces, whereas only the rook could attack it on a7 . 30 .. . a6 3l .bxc6 dxc6 32.a5 �bS 33.�xc6t �e6
34J;cs 34.�c8 creates more problems for Black
who has to play carefully to maintain the balance. The best might be 34 . . . l"ld6 (not 34 . . . l"lxa5 3 5 . LLl c5 followed by �xdS) 35 .CLlc5 '1t>e5 ! 36 .�e2 f3t ! 37 .'1t>xf3 l"lxa5 38 .l"le8t (38 . CLl b7 l"la3t with check is the point behind Black's pawn sacrifice: There is no knight fork. ) 38 . . . '1t>f6 . The position is complicated with one pair of rooks extra on the board. I believe White has slightly better chances, but Black seems to have decent counterplay. 34 .. . �xc5 3S.tDxcS �c6 36.tDd7t ®e6 37.tDb8 �cS 38.tDxa6 �xaS 39.tDb4 ®d6 40.ttld3
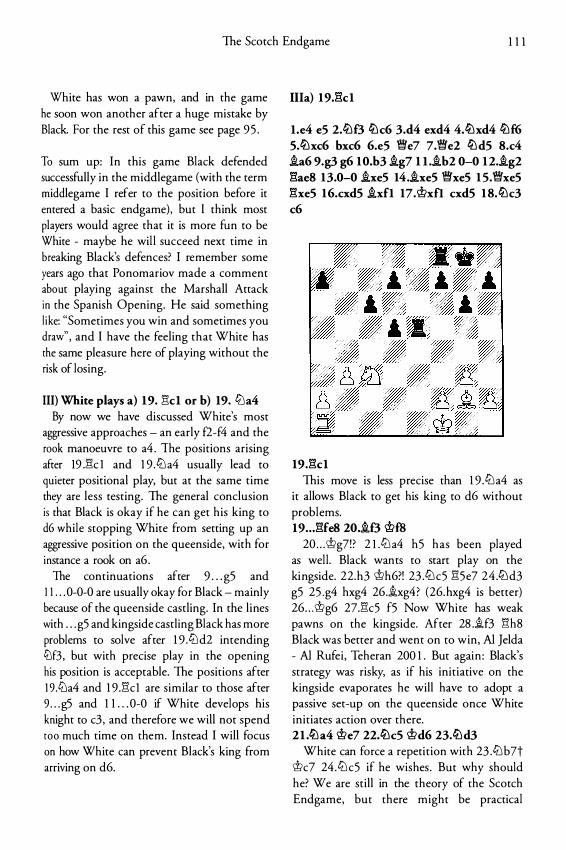
The Scotch Endgame I l l
White has won a pawn, and in the game he soon won another after a huge mistake by Black. For the rest of this game see page 9 5 .
To sum up: In this game Black defended successfully in the middlegame (with the term middlegame I refer to the position before it entered a basic endgame), but I think most players would agree that it is more fun to be White - maybe he will succeed next time in breaking Black's defences? I remember some years ago that Ponomariov made a comment about playing against the Marshall Attack in the Spanish Opening. He said something like: "Sometimes you win and sometimes you draw", and I have the feeling that White has the same pleasure here of playing without the risk of losing.
III) White p lays a) 19.l'!d or b) 19. ti:la4 By now we have discussed White's most
aggressive approaches - an early f2-f4 and the rook manoeuvre to a4 . The positions arising after 19 .l'!c l and I 9 . ti:l a4 usually lead to quieter positional play, but at the same time they are less testing. The general conclusion is that Black is okay if he can get his king to d6 while stopping White from setting up an aggressive position on the queenside, with for instance a rook on a6 .
The continuations after 9 . . . g5 and II . . . 0-0-0 are usually okay for Black - mainly because of the queens ide castling. In the l ines with . . . g5 and kingside castling Black has more problems to solve after 1 9 . ti:ld2 intending li:lf3 , but with precise play in the opening his position is acceptable. The positions after 19. ti:la4 and 1 9 .l'!cl are similar to those after 9 . . . g5 and II . . . 0-0 if White develops his knight to c3 , and therefore we will not spend too much time on them. Instead I will focus on how White can prevent Black's king from arriving on d6.
Ilia) 19J:'Id
l.e4 e5 2.ll:Jf3 ll:Jc6 3.d4 exd4 4.ll:Jxd4 ll:Jf6 s.ll:Jxc6 bxc6 6.e5 fie? 7.fie2 ll:Jd5 8.c4 .ia6 9.g3 g6 10.b3 .ig7 1 l ..ib2 0-0 12 • .ig2 l'!ae8 13.0-0 .ixe5 14 . .ixe5 fixeS 1 5.fixe5 l"'xe5 16.cxd5 .ixfl 17.mxfl cxdS 18.ll:Jc3 c6
19.l"'d This move is less precise than 1 9 . ti:la4 as
it allows Black to get his king to d6 without problems. 19 ••• l"'fe8 20 • .if3 mffi
20 . . . mg7!? 2 I . ti:la4 h5 has been played as well. Black wants to start play on the kingside. 22.h3 mh6?! 23 . ti:lc5 !'!5e7 24 .l2:Jd3 g5 25 .g4 hxg4 26 . .ixg4? (26.hxg4 is better) 26 . . . mg6 27.l'!c5 f5 Now White has weak pawns on the kingside. After 2S . .if3 l"'hS Black was better and went on to win, AI Jelda - AI Rufei, Teheran 200 I. But again : Black's strategy was risky, as if his initiative on the kingside evaporates he will have to adopt a passive set-up on the queenside once White initiates action over there. 21 .ll:Ja4 me? 22.ll:Jc5 md6 23.ll:Jd3
White can force a repetition with 23 . ll:Jb7t mc7 24 . ti:lc5 if he wishes . Bur why should he? We are still in the theory of the Scotch Endgame, but there might be practical
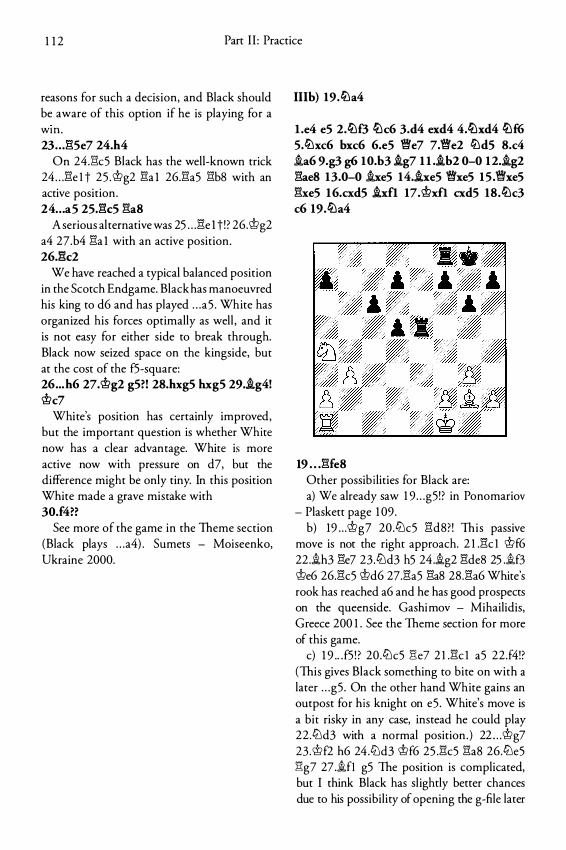
1 1 2 Part I I : Practice
reasons for such a decision, and Black should be aware of this option if he is playing for a wm.
23 . . J'�Se7 24.h4 On 24.l"k5 Black has the well-known trick
24 . . . Ei:e l t 25 .'it>g2 Ei:a 1 26.Ei:a5 Ei:b8 with an active position. 24 . . . a5 2SJ'k5 E:a8
A serious alternative was 25 . . . Ei:e 1 t ! ? 26.'it>g2 a4 27.b4 Ei:a 1 with an active position. 26.:Ek2
We have reached a typical balanced position in the Scotch Endgame. Black has manoeuvred his king to d6 and has played . . . a5 . White has organized his forces optimally as well , and it is not easy for either side to break through. Black now seized space on the kingside, but at the cost of the f5-sq uare: 26 ... h6 27.'it>g2 gS?! 28.hxg5 hxgS 29.i.g4! 'it>c7
White's position has certainly improved, but the important question is whether White now has a clear advantage. White is more active now with pressure on d7, but the difference might be only tiny. In this position White made a grave mistake with 30.f4??
See more of the game in the Theme section (Black plays . . . a4) . Sumets - Moiseenko, Ukraine 2000.
Illb) 19.tLla4
l .e4 eS 2.tLlf3 lL!c6 3.d4 exd4 4.lL!xd4 lL!f6 S.lLlxc6 bxc6 6.e5 V!fe7 7.V!fe2 lLldS 8.c4 .ia6 9.g3 g6 10.b3 i.g7 l l .i.b2 0-0 12.i.g2 Ei:ae8 13.0-0 .ixeS 14.i.xe5 V!fxeS lS .VffxeS E:xeS 16.cxd5 i.xfl 17.'it>xfl cxdS 18.tLlc3 c6 19.tLla4
19 . . .l'Ue8 Other possibilities for Black are: a) We already saw 1 9 . . . g5 ! ? in Ponomariov
- Plaskett page 1 09 . b) 19 . . . 'it>g7 20.ctJc5 Ei:d8? ! This passive
move is not the right approach. 2 l .Ei:c l 'it>f6 22 .ih3 Ei:e7 23.ctJd3 h5 24 .ig2 Ei:de8 25 . .if3 'it>e6 26.Ei:c5 'it>d6 27.Ei:a5 Ei:a8 28.Ei:a6 White's rook has reached a6 and he has good prospects on the queenside. Gashimov - Mihailidis, Greece 200 1 . See the Theme section for more of this game.
c) 1 9 .. . f5 ! ? 20.ctJc5 Ei:e7 2 l .Ei:c l a5 22.f4!? (This gives Black something to bite on with a
later . . . g5 . On the other hand White gains an outpost for his knight on e5 . White's move is a bit risky in any case, instead he could play 22.ctJd3 with a normal position . ) 22 . . . 'it>g7 23 .'it>f2 h6 24.lt:Jd3 'it>f6 25 .Ei:c5 Ei:a8 26.ctJe5 l"1g7 27 . .ifl g5 The position is complicated, but I think Black has sl ightly better chances due to his possibility of opening the g-file later
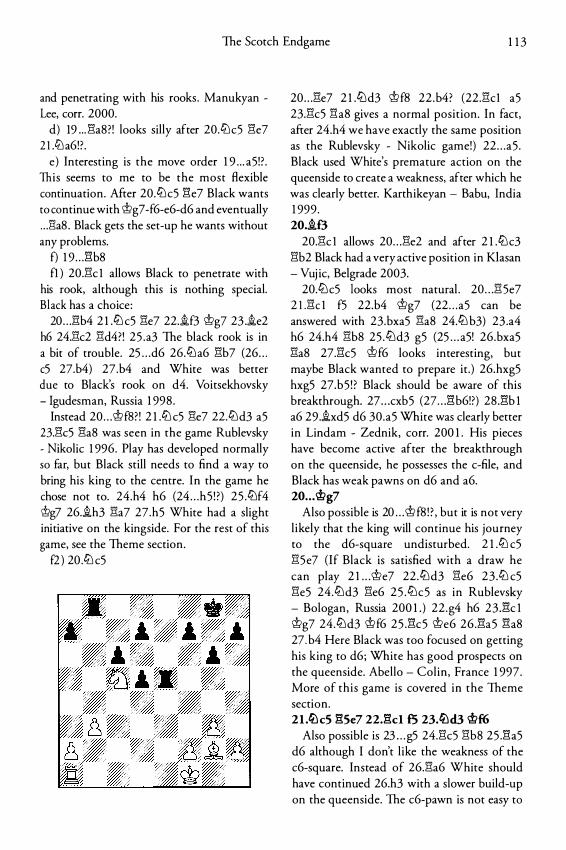
The Scotch Endgame 1 1 3
and penetrating with his rooks. Manukyan -Lee, corr. 2000.
d) 19 . . . l"laS ?! looks silly after 20.'Llc5 l"le7 2 1 .'Lla6!? .
e) Interesting is the move order 1 9 . . . a5 ! ? . This seems to me to be the most flexible continuation. After 20.'Llc5 l"le7 Black wants to continue with <i>g7 -f6-e6-d6 and eventually . . . !"laS . Black gets the set-up he wants without any problems.
f) 1 9 . . . l"lbS fl ) 20.l"lc l allows Black to penetrate with
his rook, although this is nothing special. Black has a choice:
20 . . . 8b4 2 1 .CDc5 l"le7 22.if3 <i>g7 23 .ie2 h6 24.l"lc2 l"ld4?! 25 .a3 The black rook is in a bit of trouble. 25 . . . d6 26.'Lla6 l"lb7 (26 . . . c5 27.b4) 27.b4 and White was better due to Black's rook on d4. Voitsekhovsky - Igudesman, Russia 1 99S .
Instead 20 . . . <i>fS? ! 2 1 .CDc5 l"le7 22.'Lld3 a5 23.l"lc5 l"laS was seen in the game Rublevsky - Nikolic 1 996. Play has developed normally so far, but Black still needs to find a way to bring his king to the centre. In the game he chose not to. 24.h4 h6 (24 . . . h5 ! ?) 25 .'Llf4 ffig7 26.ih3 l"la7 27.h5 White had a slight initiative on the kingside. For the rest of this game, see the Theme section.
f2) 20.'Llc5
20 . . . l"le7 2 1 .'Lld3 <i>fs 22 .b4? (22.l"lcl a5 23.l"lc5 !"laS gives a normal position. In fact, after 24.h4 we have exactly the same position as the Rublevsky - Nikolic game!) 22 . . . a5 . Black used White's premature action on the queenside to create a weakness, after which he was clearly better. Karthikeyan - Babu, India 1 999. 20 . .if3
20.l"lc l allows 20 . . . l"le2 and after 2 1 .CDc3 l"lb2 Black had a very active position in Klasan - Vuj ic, Belgrade 2003.
20.'Llc5 looks most natural . 20 . . . l"l 5e7 2 1 .l"lc l f5 22.b4 <i>g7 (22 . . . a5 can be answered with 23.bxa5 l"laS 24.'Llb3) 23 .a4 h6 24.h4 l"lbS 25 .'Lld3 g5 (25 . . . a5! 26.bxa5 l"laS 27.l"lc5 <i>f6 looks interesting, but maybe Black wanted to prepare it .) 26.hxg5 hxg5 27.b5 ! ? Black should be aware of this breakthrough. 27 . . . cxb5 (27 . . . l"lb6!?) 2S .l"lb 1 a6 29 .ixd5 d6 30.a5 White was clearly better in Lindam - Zednik, corr. 200 1 . His pieces have become active after the breakthrough on the queenside, he possesses the c-file, and Black has weak pawns on d6 and a6. 20 . . . <i>g7
Also possible is 20 . . . <i> fS ! ? , but it is not very l ikely that the king will continue his journey to the d6-square undisturbed. 2 1 .'Llc5 l"l5e7 ( If Black is satisfied with a draw he can play 2 l . . .<i>e7 22 .'Lld3 l"le6 23 .'Llc5 l"le5 24.'Lld3 l"le6 2 5 .'Llc5 as in Rublevsky - Bologan, Russia 200 1 . ) 22 .g4 h6 23 .l"lc l <i>g7 24.'Lld3 <i>f6 25 .l"lc5 <i>e6 26 .l"la5 l"laS 27.b4 Here Black was too focused on getting his king to d6; White has good prospects on the queenside. Abello - Colin, France 1 997. More of this game is covered in the Theme section. 21 .ti:lc5 l35e7 22.l3cl f5 23.ti:ld3 <i>f6
Also possible is 23 . . . g5 24.l"lc5 l"lbS 25 .l3a5 d6 although I don't l ike the weakness of the c6-square. Instead of 26.l"la6 White should have continued 26.h3 with a slower build-up on the queenside. The c6-pawn is not easy to
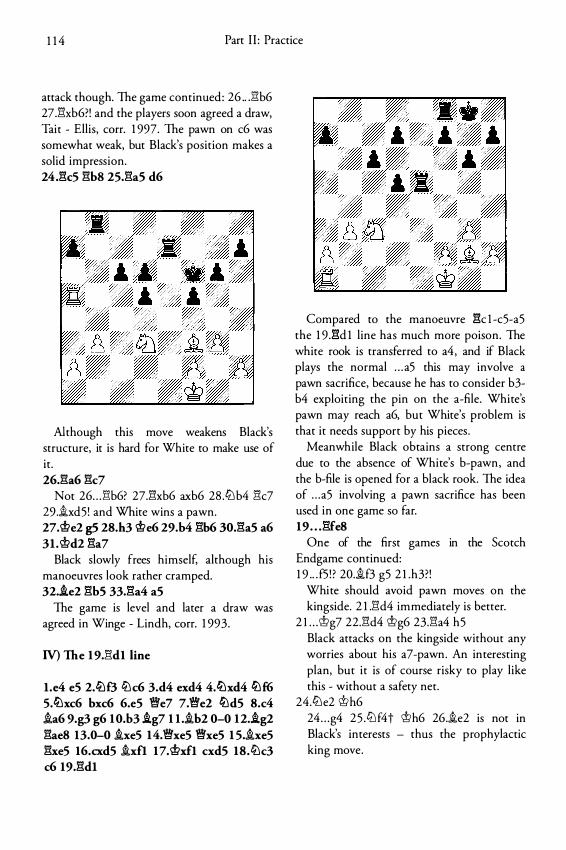
1 1 4 Part I I: Practice
attack though. The game continued: 26 .. J:'!:b6 27J:'!:xb6?! and the players soon agreed a draw, Tait - Ellis, carr. 1 997. The pawn on c6 was somewhat weak, but Black's position makes a solid impression. 24Jk5 ghs 25.gas d6
Although this move weakens Black's structure, it is hard for White to make use of it. 26,ga6 gc7
Not 26 . . . gb6? 27.1"lxb6 axb6 28 .ti:lb4 l"!:c7 29 .ixd5 ! and White wins a pawn. 27.1t>e2 g5 28.h3 1t>e6 29.h4 gb6 JO,gas a6 3I .It>d2 ga7
Black slowly frees himself, although his manoeuvres look rather cramped. 32.!e2 ghs 33,ga4 aS
The game is level and later a draw was agreed in Winge - Lindh, carr. 1 993 .
IV) The 19.1"ldl line
l.e4 eS 2.lbf3 ltlc6 3.d4 exd4 4.ll:lxd4 ll:lf6 S.ll:lxc6 bxc6 6.e5 '?!ffe7 7.'?!1e2 ll:ldS 8.c4 ia6 9.g3 g6 10.h3 !g7 1 I ..ib2 0-0 12.!g2 gae8 13.0-0 .ixeS 14.'?!1xe5 '?!ffxeS 1 5.ixe5 gxeS 16.cxd5 ixfl 17.1t>xfl cxdS 18.ltlc3 c6 19.gdl
Compared to the manoeuvre gc l -c5-a5 the 1 9 .gd 1 line has much more poison. The white rook is transferred to a4 , and if Black plays the normal . . . a5 this may involve a pawn sacrifice, because he has to consider b3-b4 exploiting the pin on the a-file. White's pawn may reach a6, but White's problem is that it needs support by his pieces .
Meanwhile Black obtains a strong centre due to the absence of White's b-pawn, and the b-file is opened for a black rook. The idea of . . . a5 involving a pawn sacrifice has been used in one game so far. 19 . . . gfe8
One of the first games in the Scotch Endgame continued: 1 9 .. . f5 ! ? 20.if3 g5 2 1 .h3? !
White should avoid pawn moves on the kingside. 2 1 .1"!:d4 immediately is better.
2 l . . .<:!fg7 22.1"!:d4 <:!?g6 23.1"!:a4 h5 Black attacks on the kingside without any worries about his a7-pawn. An interesting plan, but it is of course risky to play like this - without a safety net.
24.ti:le2 lt>h6 24 . . . g4 25 . ti:lf4t <:!?h6 26.ie2 is not in Black's interests - thus the prophylactic king move.
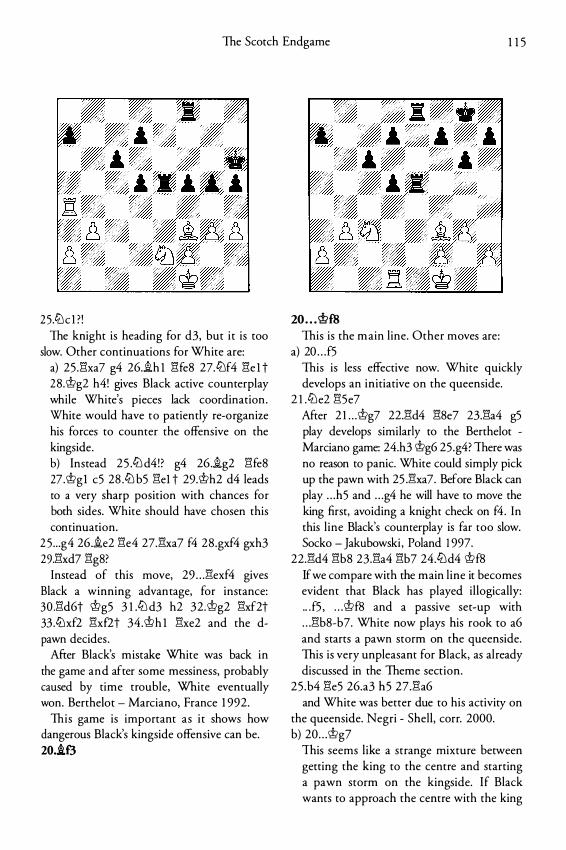
The Scotch Endgame 1 1 5
25.li:Jc l ? ! The knight is heading for d3, but i t is too
slow. Other continuations for White are: a) 25 .E1xa7 g4 26.ih 1 E1fe8 27.liJf4 E1e 1 t 28.Wg2 h4! gives Black active counterplay while White's pieces lack coordination . White would have to patiently re-organize his forces to counter the offensive on the kingside. b) Instead 25 .liJd4!? g4 26.ig2 E1fe8 27 .Wg1 c5 28 .liJb5 E1e1 t 29.Wh2 d4 leads to a very sharp position with chances for both sides. White should have chosen this continuation.
25 . . . g4 26.ie2 E1e4 27.E1xa7 f4 28 .gxf4 gxh3 29.E1xd7 E1g8?
Instead of this move, 29 . . . E1exf4 gives Black a winning advantage, for instance: 30.E1d6t i>g5 3 l .liJd3 h2 32.Wg2 E1xf2t 33 .li:lxf2 E1xf2t 34.Wh 1 E1xe2 and the dpawn decides.
After Black's mistake White was back in the game and after some messiness, probably caused by time trouble, White eventually won. Berthelot - Marciano, France 1 992.
This game is important as i t shows how dangerous Black's kingside offensive can be. 20.if3
2o . . . i>ffi This is the main line. Other moves are:
a) 20 . . . f5 This is less effective now. White quickly develops an initiative on the queenside.
2 l .li:Je2 E15e7 After 2 l . . .Wg7 22.E1d4 E18e7 23.E1a4 g5 play develops similarly to the Berthelot -Marciano game: 24.h3 Wg6 25 .g4? There was no reason to panic. White could simply pick up the pawn with 25 .E1xa7. Before Black can play . . . h5 and . . . g4 he will have to move the king first, avoiding a knight check on f4 . In this l ine Black's counterplay is far too slow. Socko - Jakubowski, Poland I 997.
22.E1d4 E1b8 23.E1a4 E1b7 24.liJd4 Wf8 If we compare with the main l ine it becomes evident that Black has played illogically: .. . f5 , . . . Wf8 and a passive set-up with . . . E1b8-b7. White now plays his rook to a6 and starts a pawn storm on the queenside. This is very unpleasant for Black, as already discussed in the Theme section.
25 .b4 E1e5 26.a3 h5 27.E1a6 and White was better due to his activity on
the queenside. Negri - Shell, corr. 2000. b) 20 . . . Wg7
This seems like a strange mixture between getting the king to the centre and starting a pawn storm on the kingside. If Black wants to approach the centre with the king
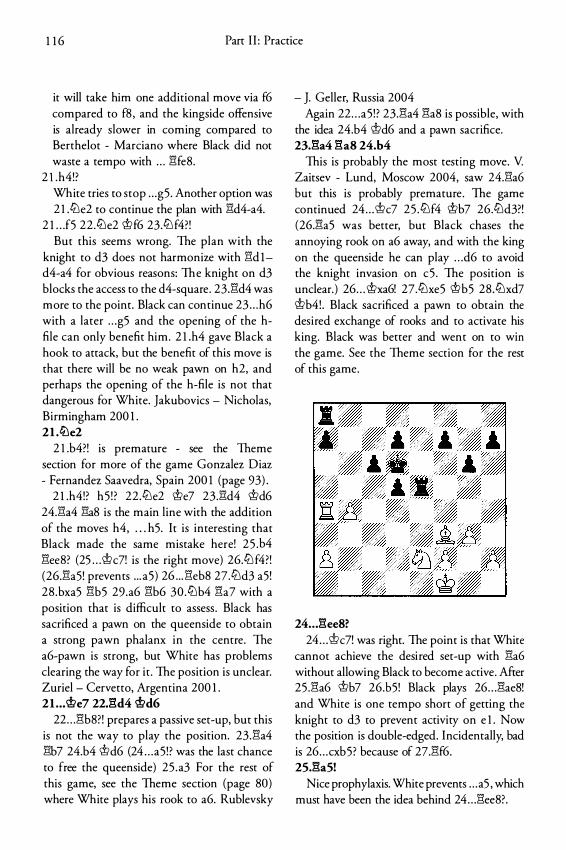
1 1 6 Part I I : Practice
it will take him one additional move via f6 compared to fS , and the kingside offensive is already slower in coming compared to Berthelot - Marciano where Black did not waste a tempo with . . . �feS.
21.h4!? White tries to stop . . . gS. Another option was 2 l .ctJe2 to continue the plan with �d4-a4.
2 1 . . . fS 22 .ctJe2 <j{f6 23.ctJ f4?! But this seems wrong. The plan with the
knight to d3 does not harmonize with �d 1-d4-a4 for obvious reasons: The knight on d3 blocks the access to the d4-square . 23.�d4 was more to the point. Black can continue 23 . . . h6 with a later . . . gS and the opening of the hfile can only benefit him. 2 1 .h4 gave Black a hook to attack, but the benefit of this move is that there will be no weak pawn on h2, and perhaps the opening of the h-file is not that dangerous for White. Jakubovics - Nicholas, Birmingham 200 1 . 21 .ltle2
2I.b4?! is premature - see the Theme section for more of the game Gonzalez Diaz - Fernandez Saavedra, Spain 200 1 (page 93) .
2 1 .h4!? hS ! ? 22.ctJe2 <j;Je7 23 .�d4 <j;Jd6 24.�a4 �aS is the main line with the addition of the moves h4, . . . hS. It is interesting that Black made the same mistake here! 2S .b4 �eeS? (2S . . . <j;Jc7! is the right move) 26.ctJ f4?! (26.�a5! prevents . . . aS) 26 . . . �ebS 27.ctJd3 aS! 2S .bxaS �bS 29.a6 �b6 30 .ctJb4 �a7 with a position that is difficult to assess . Black has sacrificed a pawn on the queenside to obtain a strong pawn phalanx in the centre. The a6-pawn is strong, but White has problems clearing the way for it . The position is unclear. Zuriel - Cervetto, Argentina 200 1 . 21 . .• �e7 22J'�d4 <j;Jd6
22 . . . �bS? ! prepares a passive set-up, but this is not the way to play the position. 23.�a4 �b7 24.b4 <j;Jd6 (24 . . . aS ! ? was the last chance to free the queenside) 2S .a3 For the rest of this game, see the Theme section (page SO) where White plays his rook to a6. Rublevsky
- J. Geller, Russia 2004 Again 22 . . . aS ! ? 23.�a4 �aS is possible, with
the idea 24.b4 <j;Jd6 and a pawn sacrifice. 23.�a4 �aS 24.b4
This is probably the most testing move. V Zaitsev - Lund, Moscow 2004, saw 24.�a6 but this is probably premature . The game continued 24 . . . <j;Jc7 2S .ctJf4 <j;Jb7 26.ctJd3?! (26.�aS was better, but Black chases the annoying rook on a6 away, and with the king on the queenside he can play . . . d6 to avoid the knight invasion on cS . The position is unclear. ) 26 . . . <j;Jxa6! 27.ctJxeS <j;JbS 2S .ctJxd7 <j;Jb4! . Black sacrificed a pawn to obtain the desired exchange of rooks and to activate his king. Black was better and went on to win the game. See the Theme section for the rest of this game.
24 . . . �ee8? 24 . . . <j;Jc7! was right. The point is that White
cannot achieve the desi red set-up with �a6 without allowing Black to become active. After 2S .�a6 <j;Jb7 26.bS! Black plays 26 . . . �aeS! and White is one tempo short of getting the knight to d3 to prevent activity on e l . Now the position is double-edged. Incidentally, bad is 26 . . . cxbS? because of 27.�f6. 25.�a5!
Nice prophylaxis. White prevents . . . aS , which must have been the idea behind 24 . . . �eeS?.

The Scotch Endgame 1 1 7
25 ... f5 26.a3 �c7 27.l'�a6! �b7 28.b5 White was on top in Zelcic - Bozanic,
Croatia 2000 and eventually won the game. See the Theme section for more of this game.
6. Conclusions After the Theory section it is time to draw
some conclusions about the Scotch Endgame. We should consider both if White can try to gain an advantage in the early stage of the game, and how he can play for an advantage later on.
At the beginning of the Scotch Endgame, from move 1 8 and until Black consolidates, Black needs to plan for meeting White's future activity on the queenside. Often it is important whether or not White can prevent Black from bringing his king to the desired d6-square. We have discussed several ways for Black to get his king to the centre, and with logical play this seems to be not too difficult to achieve. At the same time Black should be wary of an active white rook on the a-file (especially if the rook reaches a6) , and a timely . . . a5 should be considered.
Black has other ways of playing the position - one example was Berthelot - Marciano, where Black attacked on the kingside and did not worry too much about White's queenside play. This is a very dynamic approach to the position, and this game is important for the evaluation of this plan. So far nothing special has been found for White, but 2 1 .�d4 was clearly better than the weak 2 1 .h3? ! , after which Black had no problems. Black's plan is risky though: If Black does not break through on the kingside then he will be badly prepared to counter White's play on the queenside.
IfWhite and Black both obtain their 'ideal' positions, White with tt'ld3, if3, �c5 , and Black with 'it>d6, �e7, �a8 and a5 - how should the position be evaluated then? And how should play develop? This diagram from the game Sumets - Moiseenko, Ukraine 2000, helps to answer this question.
Position after 26.!�k2
A few moves later the position was transformed into the diagram below, where White has seized control of the important f5-square.
Position after 29 . .ig4
This position is a clear improvement for White compared to the previous diagram. But if i t is enough to seriously threaten Black's solid set-up is another question. I must say that I have my doubts. Black's position is sound in general , and he has many ways to generate counterplay.
In comparison, we saw that even in the lines where White had the chance to play �a6
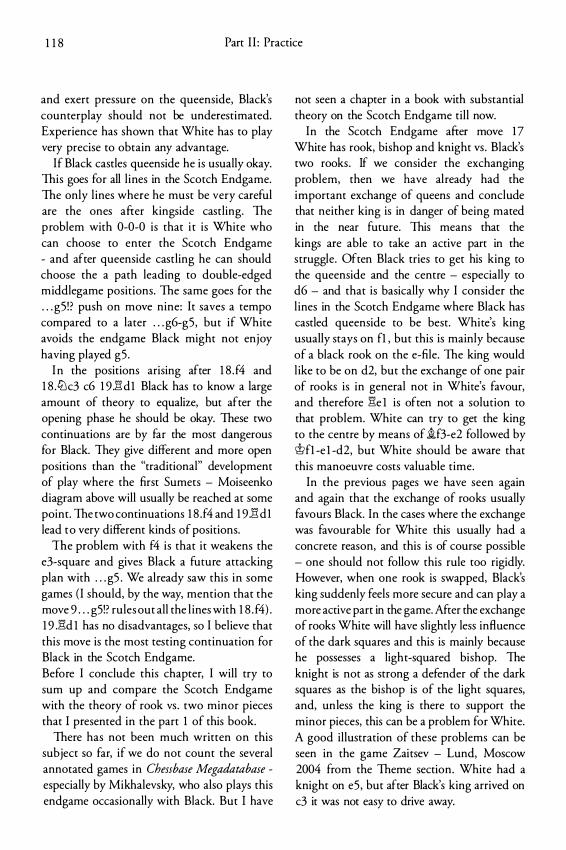
1 1 8 Part II: Practice
and exert pressure on the queenside, Black's counterplay should not be underestimated. Experience has shown that White has to play very precise to obtain any advantage.
If Black castles queenside he is usually okay. This goes for all l ines in the Scotch Endgame. The only l ines where he must be very careful are the ones after kingside castling. The problem with 0-0-0 is that i t is White who can choose to enter the Scotch Endgame - and after queenside castling he can should choose the a path leading to double-edged middlegame positions. The same goes for the . . . g5 ! ? push on move nine: It saves a tempo compared to a later . . . g6-g5 , but if White avoids the endgame Black might not enjoy having played g5 .
In the positions arising after 1 8 . f4 and 1 8 .tt:lc3 c6 1 9 .:1'\d1 Black has to know a large amount of theory to equalize, but after the opening phase he should be okay. These two continuations are by far the most dangerous for Black. They give different and more open positions than the "traditional" development of play where the first Sumets - Moiseenko diagram above will usually be reached at some point. The two continuations 1 8 .f4 and 1 9 .:1'\d1 lead to very different kinds of positions.
The problem with f4 is that it weakens the e3-square and gives Black a future attacking plan with . . . g5 . We already saw this in some games (I should, by the way, mention that the move 9 . . . g5!? rules out all the l ines with 1 8 . f4) . 1 9 . E!d 1 has no disadvantages, so I believe that this move is the most testing continuation for Black in the Scotch Endgame. Before I conclude this chapter, I will try to sum up and compare the Scotch Endgame with the theory of rook vs . two minor pieces that I presented in the part 1 of this book.
There has not been much written on this subject so far, if we do not count the several annotated games in Chessbase Megadatabase -
especially by Mikhalevsky, who also plays this endgame occasionally with Black. But I have
not seen a chapter in a book with substantial theory on the Scotch Endgame till now.
In the Scotch Endgame after move 1 7 White has rook, bishop and knight vs . Black's two rooks. If we consider the exchanging problem, then we have already had the important exchange of queens and conclude that neither king is in danger of being mated in the near future. This means that the kings are able to take an active part in the struggle. Often Black tries to get his king to the queenside and the centre - especially to d6 - and that is basically why I consider the l ines in the Scotch Endgame where Black has castled queenside to be best. White's king usually stays on f1 , but this is mainly because of a black rook on the e-file. The king would l ike to be on d2, but the exchange of one pair of rooks is in general not in White's favour, and therefore E!e 1 is often not a solution to that problem. White can try to get the king to the centre by means of if3-e2 followed by lt>fl -e 1 -d2, but White should be aware that this manoeuvre costs valuable time.
In the previous pages we have seen again and again that the exchange of rooks usually favours Black. In the cases where the exchange was favourable for White this usually had a concrete reason, and this is of course possible - one should not follow this rule too rigidly. However, when one rook is swapped, Black's king suddenly feels more secure and can play a more active part in the game. After the exchange of rooks White will have slightly less influence of the dark squares and this is mainly because he possesses a light-squared bishop. The knight is not as strong a defender of the dark squares as the bishop is of the light squares, and, unless the king is there to support the minor pieces, this can be a problem for White. A good illustration of these problems can be seen in the game Zaitsev - Lund, Moscow 2004 from the Theme section. White had a knight on e5 , but after Black's king arrived on c3 it was not easy to drive away.
The Scotch Endgame 1 1 9
If White manages to keep all of his remaining pieces on the board, then in some games it was possible for him to organize threats against Black's king. This was the case in the game Rublevsky - Nikolic, Russia 1 996 (page 86) where White's initiative won the h6-pawn and opened a route for White's hpawn. The game can be found in the Theme section as well .
From Black's point of view it makes sense to try to dominate White's bishop and fight for l ight squared control , and this is done in the Scorch Endgame mainly by the pawn centre formation d7-c6-d5 . Paradoxically this also fights for the dark squares , as a knight has to use a light square to arrack a dark square. Therefore d6 is an excellent square for his king if Black keeps the pawn chain intact.
Both players should be wary when the kingside pawns are pushed forward, especially Black's g-pawn . . . . g7-g5 is a way to seize space on the kingside for Black, bur the potential weakness of the f5-square should not be ignored. I have already drawn the reader's attention to the comparison of the two diagram positions above.
Again this "Domination rule" should not be implemented in practice without careful thought. Every game is different and demands a different solution to a given problem, but any justification for breaking this rule should be of a dynamic and not a static nature: If Black, for instance, wishes to play . . . d5-d4 he should be aware of the potential weaknesses of the light squares, bur the move might serve the purpose ofincreasing the rook's activity on the fifth rank, as frequently seen in the lines beginning with 1 8 . f4 Ei:h5 with a subsequent .. . d4 . A good way of thinking about such positions is that Black's compensation for weakening his structure is his activity, and rhus he should try to keep up the momentum. Still, there are cases where Black does not need to seek activity at any price, as his rwo extra pawns and solid structure often give him an
acceptable position . One needs to find the right balance here.
This leads me directly to perhaps the most important question concerning positions with rook vs . rwo minor pieces: how to accurately evaluate the position . In the Theoretical Foundation I have given a synthesis of the material and the dynamic view, and this can be used with advantage on this endgame. To give the reader a tool to j udge the positions with the right balance, the following method of seeing the Endgame in rwo stages can be used:
1 . In the first stage Black relies on his position in material terms. He does not have to prove his compensation by active means, and rwo pawns in addition to the rook for the rwo minor pieces is probably a good measure. Black can play along the l ines given in the Theory and Theme sections with confidence.
2. However, Black should be ready to a change the position at any stage of the game to more dynamic play where activity (and the creation of a passed pawn in some cases) counts. The point of this activity is to make at least one of the minor pieces passive - never forget that White has an extra piece, even though the rook is stronger than either minor piece individually. I think that the previously mentioned game Zaitsev - Lund is a good illustration of this theme: Black seized his chance, sacrificed a pawn to exchange rooks and became active. Had I not done this, I would have been worse.
Finally, I will once again rum the reader's attention to the general advice given by Dvoretsky, and the positions he analyses in his excellent books Secrets of Chess Strategy and Die Endspieluniversitat. They are very instructive for the practical player.
Part III
Training
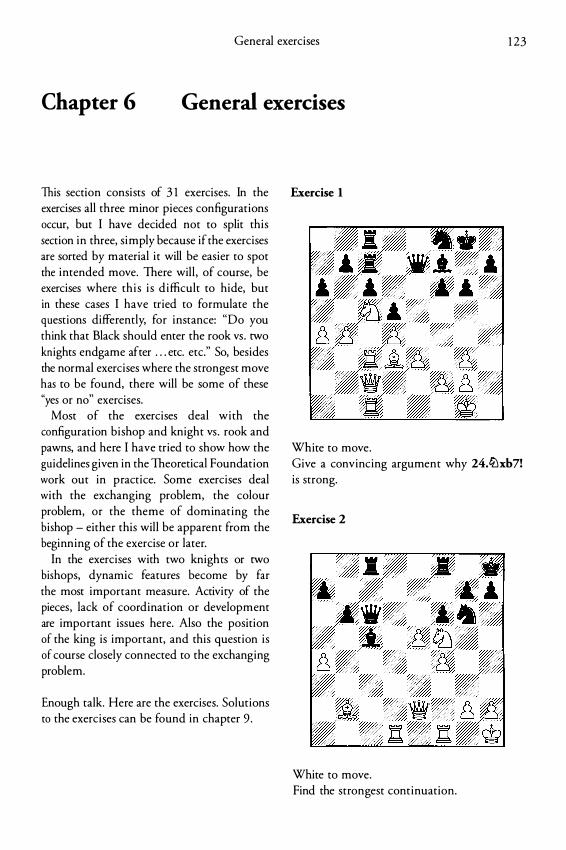
General exercises 1 23
Chapter 6 General exercises
This section consists of 3 1 exercises. In the exercises all three minor pieces configurations occur, but I have decided not to split this section in three, simply because if the exercises are sorted by material it will be easier to spot the intended move. There will , of course, be exercises where this is difficult to hide, but in these cases I have tried to formulate the questions differently, for instance: "Do you think that Black should enter the rook vs . two knights endgame after . . . etc. etc." So, besides the normal exercises where the strongest move has to be found, there will be some of these "yes or no" exercises.
Most of the exercises deal with the configuration bishop and knight vs . rook and pawns, and here I have tried to show how the guidelines given in the Theoretical Foundation work out in practice. Some exercises deal with the exchanging problem, the colour problem, or the theme of dominating the bishop - either this will be apparent from the beginning of the exercise or later.
In the exercises with two knights or two bishops, dynamic features become by far the most important measure. Activity of the pieces, lack of coordination or development are important issues here. Also the position of the king is important, and this question is of course closely connected to the exchanging problem.
Enough talk. Here are the exercises. Solutions to the exercises can be found in chapter 9 .
Exercise 1
White to move. Give a convincing argument why 24.ttlxb7! is strong.
Exercise 2
White to move. Find the strongest continuation.
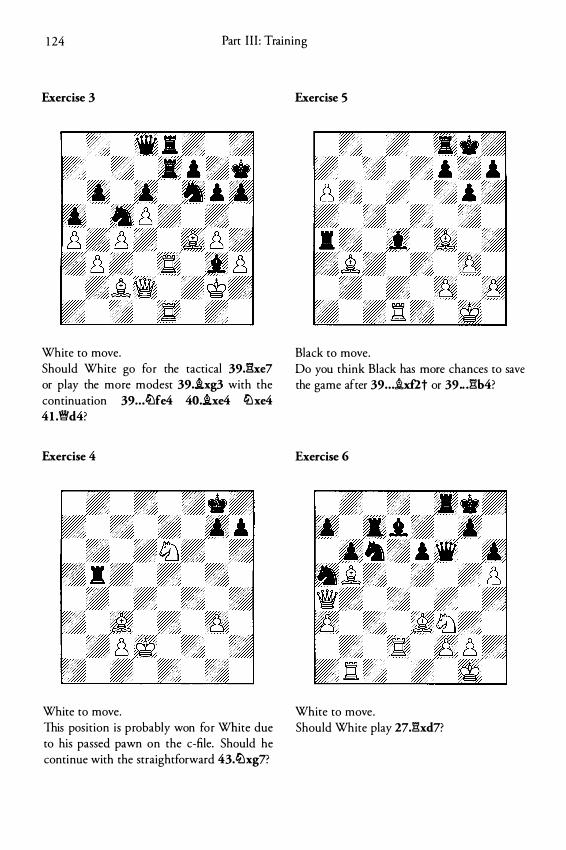
1 24 Part I I I : Training
Exercise 3
White to move. Should White go for the tactical 39.lhe7 or play the more modest 39.i.xg3 with the continuation 39 . . )iJfe4 40.i.xe4 c!tlxe4 41 .�d4?
Exercise 4
White to move. This position is probably won for White due to his passed pawn on the c-file. Should he continue with the straightforward 43.c!tlxg7?
Exercise 5
Black to move. Do you think Black has more chances to save the game after 39 . . . .ixf2t or 39 .. .l%b4?
Exercise 6
White to move. Should White play 27.l%xd7?
Exercise 7
White to move. Evaluate the endgame after 21 ..ixb6.
Exercise 8
White to move. Find the winning continuation .
General exercises 1 25
Exercise 9
Black to move. Should he play the exchanging operation 25 . . . ttlxb2 26J�lxh2 .ic3?
Exercise 10
White to move. What is the most logical continuation?
1 26
Exercise 1 1
Black to move. Should Black rake on h4?
Exercise 12
White to move. Should White go for 25.lt::Jdc5?
Part I I I : Training
Exercise 13
White to move. Should White play 1S . .!tJdb5?
Exercise 14
White to move. What should he play?
General exercises 1 27
Exercise 15
White t o move. Would you recommend 18.i.xb5?
Exercise 16
Black to move. White has just played 16.dxc5. Do you think Black should opt for 16 . . .lL\exf'l?
Exercise 17
White to move. Calculate the consequences of 21 .tL\xd5.
Exercise 18
White t o move. Evaluate the typical Panov-Botvinnik trick 21 .tL\xf7.
1 28 Part I I I : Training
Exercise 19
White to move. Should White play 22.�b3t?
Exercise 20
Black to move. Do you think 15 . . . tl:\xf2 is promising for Black?
Exercise 21
Black to move. Should he exchange queens?
Exercise 22
Black to play. Should Black play 25 . . . .ixb3?
Exercise 23
Black to move. Evaluate 2 1 . . .c!Lld4.
Exercise 24
Black to move. Find the strongest continuation.
General exercises
Exercise 25
White to move. How should he continue?
Exercise 26
Black to move. Evaluate 23 . . . axb3.
1 30 Part I I I : Training
Exercise 27
White to move. Calculate the l ines beginning with 12 • .txf7t. Do you think White should play this?
Exercise 28
Black to move. White's last move was 27 . .th4. How can Black seize the initiative?
Exercise 29
White to move. What should he play?
Exercise 30
White to move. Should he worry about the knight on e6?
General exercises
Exercise 3 1
Black t o move. How should he continue and how would you evaluate the position?
1 3 1
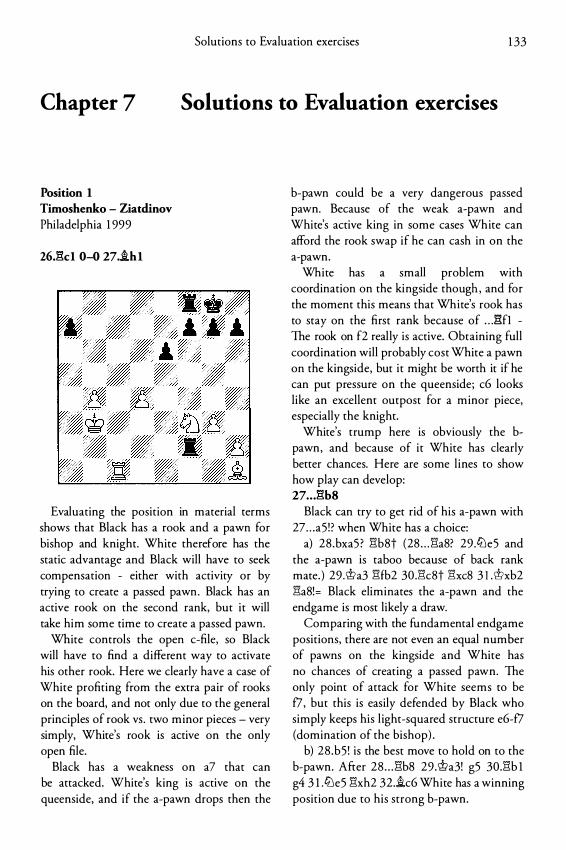
Solutions to Evaluation exercises 1 33
Chapter 7 Solutions to Evaluation exercises
Position 1 Timoshenko - Ziatdinov Philadelphia 1 999
26Jkl 0-0 27.i.hl
Evaluating the position in material terms shows that Black has a rook and a pawn for bishop and knight. White therefore has the static advantage and Black will have to seek compensation - either with activity or by trying to create a passed pawn. Black has an active rook on the second rank, but it will take him some time to create a passed pawn.
White controls the open c-file, so Black will have to find a different way to activate his other rook. Here we clearly have a case of White profiting from the extra pair of rooks on the board, and not only due to the general principles of rook vs . two minor pieces - very simply, White's rook is active on the only open file.
Black has a weakness on a7 that can be attacked. White's king is active on the queenside, and if the a-pawn drops then the
b-pawn could be a very dangerous passed pawn. Because of the weak a-pawn and White's active king in some cases White can afford the rook swap if he can cash in on the a-pawn.
White has a small problem with coordination on the kingside though , and for the moment this means that White's rook has to stay on the first rank because of . . . l'!fl -The rook on f2 real ly is active. Obtaining full coordination will probably cost White a pawn on the kingside, but it might be worth it if he can put pressure on the queenside; c6 looks like an excellent outpost for a minor piece, especially the knight.
White's trump here is obviously the bpawn, and because of it White has clearly better chances. Here are some l ines to show how play can develop: 27 . . . l'!b8
Black can try to get rid of his a-pawn with 27 . . . a5 ! ? when White has a choice:
a) 28 .bxa5 ? l"lb8t (28 . . . l"la8? 29 .lt:Je5 and the a-pawn is taboo because of back rank mate. ) 29 .'tt>a3 l"lfb2 30 .l"lc8t l"lxc8 31.'tt>xb2 l"la8!= Black eliminates the a-pawn and the endgame is most likely a draw.
Comparing with the fundamental endgame positions, there are not even an equal number of pawns on the kingside and White has no chances of creating a passed pawn. The only point of attack for White seems to be f7, but this is easily defended by Black who simply keeps his l ight-squared structure e6-f7 (domination of the bishop) .
b) 28 .b5 ! is the best move to hold on to the b-pawn. After 28 . . . l"lb8 29.'tt>a3! g5 30.l"lb 1 g4 3 1 .lt:Je5 l"lxh2 32.i.c6 White has a winning position due to his strong b-pawn.
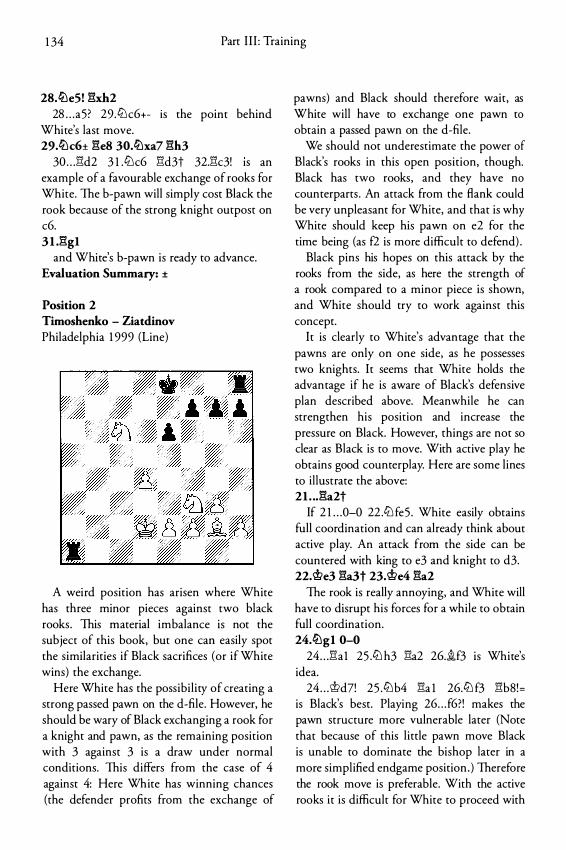
1 34 Part I I I : Training
28.ttle5! gxh2 28 . . . a5? 29 .li:lc6+- IS the point behind
White's last move. 29.ttlc6± ges 30.ttlxa7 gh3
30 . . . Eld2 3 1 .li:lc6 Eld3t 32.Elc3! 1s an example of a favourable exchange of rooks for White. The b-pawn will simply cost Black the rook because of the strong knight outpost on c6. 3 1 .ggl
and White's b-pawn is ready to advance. Evaluation Summary: ±
Position 2 Timoshenko - Ziatdinov Philadelphia 1 999 (Line)
A weird position has arisen where White has three minor pieces against two black rooks. This material imbalance is not the subject of this book, but one can easily spot the similarities if Black sacrifices (or if White wins) the exchange.
Here White has the possibil ity of creating a strong passed pawn on the d-file. However, he should be wary of Black exchanging a rook for a knight and pawn, as the remaining position with 3 against 3 is a draw under normal conditions. This differs from the case of 4 against 4: Here White has winning chances (the defender profits from the exchange of
pawns) and Black should therefore wait, as White will have to exchange one pawn to obtain a passed pawn on the d-file.
We should not underestimate the power of Black's rooks in this open position, though. Black has two rooks, and they have no counterparts . An attack from the flank could be very unpleasant for White, and that is why White should keep his pawn on e2 for the time being (as f2 is more difficult to defend) .
Black pins his hopes on this attack by the rooks from the side, as here the strength of a rook compared to a minor piece is shown, and White should try to work against this concept.
It is clearly to White's advantage that the pawns are only on one side, as he possesses two knights. It seems that White holds the advantage if he is aware of Black's defensive plan described above. Meanwhile he can strengthen his position and increase the pressure on Black. However, things are not so clear as Black is to move. With active play he obtains good counterplay. Here are some lines to illustrate the above: 21 . .. ga2t
If 2 1 . . .0-0 22 .li:lfe5 . White easily obtains full coordination and can already think about active play. An attack from the side can be countered with king to e3 and knight to d3. 22.�e3 ga3t 23.�e4 ga2
The rook is really annoying, and White will have to disrupt his forces for a while to obtain full coordination. 24.ttlgl 0-0
24 . . . Ela1 25 .li:lh3 Ela2 26.�f3 is White's idea.
24 . . . �d7! 25 .li:lb4 Ela 1 26.li:lf3 Elb8!= is Black's best. Playing 26 . . . f6?! makes the pawn structure more vulnerable later (Note that because of this l ittle pawn move Black is unable to dominate the bishop later in a more simplified endgame position . ) Therefore the rook move is preferable. With the active rooks it is difficult for White to proceed with
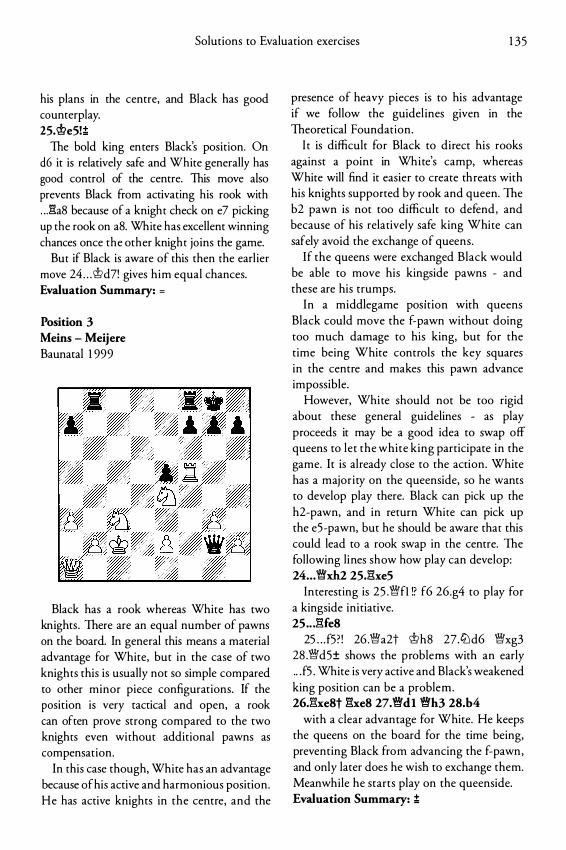
Solutions to Evaluation exercises 1 35
his plans in the centre, and Black has good counterplay. 25.cbe5!;!;
The bold king enters Black's position. On d6 it is relatively safe and White generally has good control of the centre. This move also prevents Black from activating his rook with . . . l3a8 because of a knight check on e7 picking up the rook on a8. White has excellent winning chances once the other knight joins the game.
But if Black is aware of this then the earl ier move 24 . . . 'tt>d7! gives him equal chances. Evaluation Summary: =
Position 3 Meins - Meijere Baunatal 1 999
Black has a rook whereas White has two knights . There are an equal number of pawns on the board. In general this means a material advantage for White, but in the case of two knights this is usually not so simple compared to other minor piece configurations. If the position is very tactical and open, a rook can often prove strong compared to the two knights even without additional pawns as compensation.
In this case though, White has an advantage because of his active and harmonious position. He has active knights in the centre, and the
presence of heavy pieces is to his advantage if we follow the guidel ines given in the Theoretical Foundation.
It is difficult for Black to direct his rooks against a point in White's camp, whereas White will find it easier to create threats with his knights supported by rook and queen. The b2 pawn is not too difficult to defend, and because of his relatively safe king White can safely avoid the exchange of queens.
If the queens were exchanged Black would be able to move his kingside pawns - and these are his trumps.
In a middlegame position with queens Black could move the f-pawn without doing too much damage to his king, bur for the time being White controls the key squares in the centre and makes this pawn advance impossible.
However, White should not be too rigid about these general guidelines - as play proceeds it may be a good idea to swap off queens to let the white king participate in the game. It is already close to the action. White has a majority on the queenside, so he wants to develop play there. Black can pick up the h2-pawn, and in return White can pick up the eS-pawn, but he should be aware that this could lead to a rook swap in the centre. The following lines show how play can develop: 24 .. . �xh2 25J'he5
Interesting is 25 .�fl !? f6 26.g4 to play for a kingside initiative. 25 .. J'Ue8
25 . . . f5? ! 26 .�a2t <i>h8 27.tt:ld6 �xg3 28 .�d5± shows the problems with an early .. . fS . White is very active and Black's weakened king position can be a problem. 26J�xe8t l3xe8 27.�dl �h3 28.b4
with a clear advantage for White. He keeps the queens on the board for the time being, preventing Black from advancing the f-pawn, and only later does he wish to exchange them. Meanwhile he starts play on the queenside. Evaluation Summary: ;!;
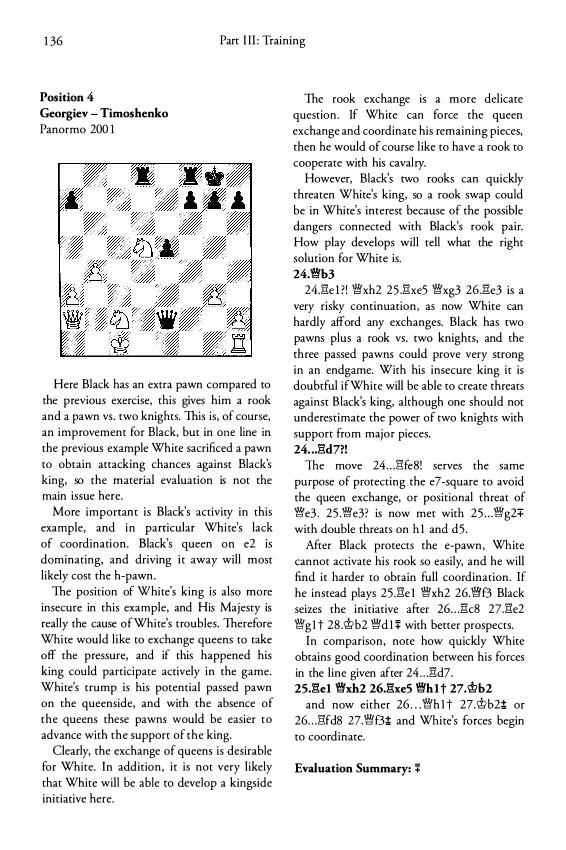
1 36 Part I II : Training
Position 4 Georgiev - Timoshenko Panormo 200 1
Here Black has an extra pawn compared to the previous exercise, this gives him a rook and a pawn vs . two knights. This is, of course, an improvement for Black, but in one line in the previous example White sacrificed a pawn to obtain attacking chances against Black's king, so the material evaluation is not the main issue here.
More important is Black's activity in this example, and in particular White's lack of coordination. Black's queen on e2 is dominating, and driving i t away will most likely cost the h-pawn.
The position of White's king is also more insecure in this example, and His Majesty is really the cause ofWhite's troubles. Therefore White would l ike to exchange queens to take off the pressure, and if this happened his king could participate actively in the game. White's trump is his potential passed pawn on the queenside, and with the absence of the queens these pawns would be easier to advance with the support of the king.
Clearly, the exchange of queens is desirable for White. In addition, it is not very likely that White will be able to develop a kingside initiative here.
The rook exchange is a more delicate question. If White can force the queen exchange and coordinate his remaining pieces, then he would of course l ike to have a rook to cooperate with his cavalry.
However, Black's two rooks can quickly threaten White's king, so a rook swap could be in White's interest because of the possible dangers connected with Black's rook pair. How play develops will tell what the right solution for White is. 24.�b3
24.1'l:e 1 ? ! �xh2 25 .1'l:xe5 �xg3 26.1'l:e3 is a very risky continuation, as now White can hardly afford any exchanges. Black has two pawns plus a rook vs. two knights, and the three passed pawns could prove very strong in an endgame. With his insecure king it is doubtful ifWhite will be able to create threats against Black's king, although one should not underestimate the power of two knights with support from major pieces. 24 . • J�d7?!
The move 24 . . . 1':\feS! serves the same purpose of protecting the e7 -square to avoid the queen exchange, or positional threat of �e3 . 25 .�e3? is now met with 25 . . . �g2+ with double threats on hI and d5 .
After Black protects the e-pawn, White cannot activate his rook so easily, and he will find it harder to obtain full coordination. If he instead plays 25 .1':\el �xh2 26.'�f3 Black seizes the initiative after 26 . . . 1'l:c8 27.1'l:e2 �g l t 28 .'i!lb2 �d l :j: with better prospects.
In comparison, note how quickly White obtains good coordination between his forces in the line given after 24 . . . 1'l:d7. 25J!el �xh2 26.1':\xeS �hl t 27.'it>b2
and now either 26 . . . �h l t 27.'i!lb2;!; or 26 . . . 1':\fdS 27.�f3;!; and White's forces begin to coordinate.
Evaluation Summary: :j:
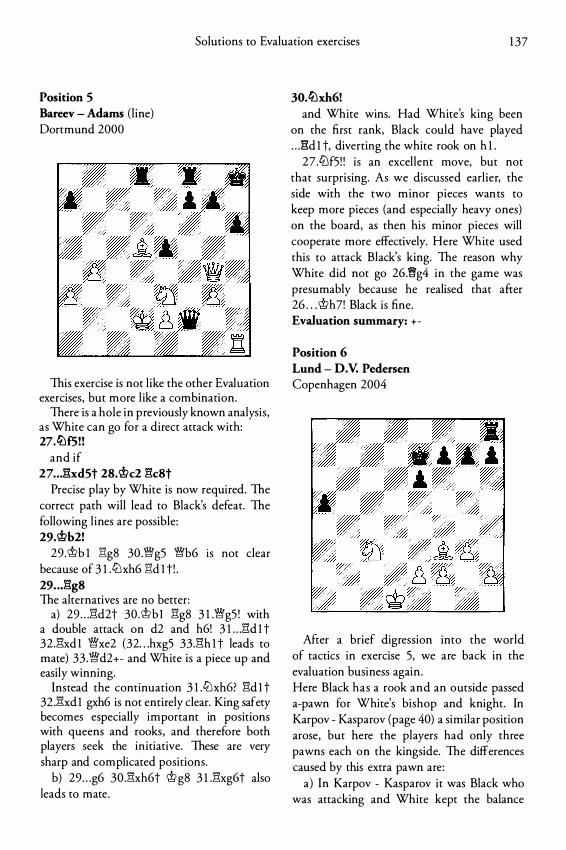
Solutions to Evaluation exercises 1 37
Position 5 Bareev - Adams (l ine) Dortmund 2000
This exercise is not l ike the other Evaluation exercises, but more l ike a combination.
There is a hole in previously known analysis, as White can go for a direct attack with: 27.ltlf5!!
and if 27 . . J!xd5t 28.®c2 �eSt
Precise play by White is now required. The correct path will lead to Black's defeat. The following l ines are possible: 29.®b2!
29.1!/b l l"1g8 30 .�g5 �b6 1s not clear because of 3 I .I!Jxh6 l"1d I t ! . 29 . . . �g8 The alternatives are no better:
a) 29 . . . l"1d2t 30.1!/ b l l"1g8 3 1 .�g5 ! with a double attack on d2 and h6! 3 1 . . .l"1d I t 32.l"1xd 1 �xe2 (32 . . . hxg5 33.l"1h 1 t leads to mate) 33 .�d2+- and White is a piece up and easily winning.
Instead the continuation 3 l .I!Jxh6? l"1d 1 t 32 .l"1xd I gxh6 is not entirely clear. King safety becomes especially important in positions with queens and rooks , and therefore both players seek the initiative. These are very sharp and complicated positions.
b) 29 . . . g6 30.l"1xh6t 'i!lg8 3 1 .l"1xg6t also leads to mate.
30.ltlxh6! and White wins. Had White's king been
on the first rank, Black could have played . . . l"1d 1 t, diverting the white rook on h 1 .
27.ltlf5 ! ! is an excellent move, but not that surprising. As we discussed earl ier, the side with the two minor pieces wants to keep more pieces (and especially heavy ones) on the board, as then his minor pieces will cooperate more effectively. Here White used this to attack Black's king. The reason why White did not go 26.eg4 in the game was presumably because he realised that after 26 . . . 'tt>h7! Black is fine. Evaluation summary: +-
Position 6 Lund - D.V. Pedersen Copenhagen 2004
After a brief digression into the world of tactics in exercise 5, we are back in the evaluation business again . Here Black has a rook and an outside passed a-pawn for White's bishop and knight. In Karpov - Kasparov (page 40) a similar position arose, but here the players had only three pawns each on the kingside. The differences caused by this extra pawn are:
a) In Karpov - Kasparov it was Black who was attacking and White kept the balance
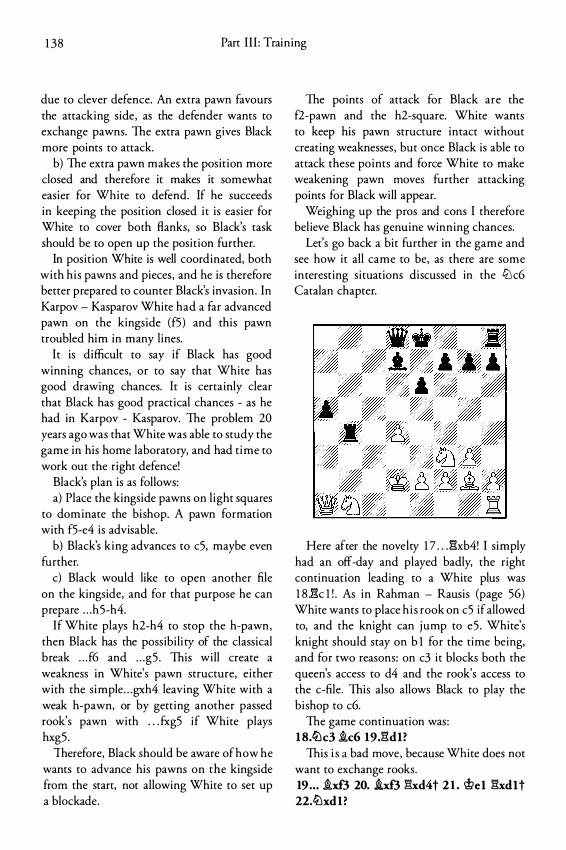
1 38 Part I I I : Training
due to clever defence. An extra pawn favours the attacking side, as the defender wants to exchange pawns. The extra pawn gives Black more points to attack.
b) The extra pawn makes the position more closed and therefore it makes it somewhat easier for White to defend. If he succeeds in keeping the position closed it is easier for White to cover both flanks, so Black's task should be to open up the position further.
In position White is well coordinated, both with his pawns and pieces , and he is therefore better prepared to counter Black's invasion . In Karpov - Kasparov White had a far advanced pawn on the kingside (f5) and this pawn troubled him in many lines.
It is difficult to say if Black has good winning chances, or to say that White has good drawing chances. It is certainly clear that Black has good practical chances - as he had in Karpov - Kasparov. The problem 20 years ago was that White was able to study the game in his home laboratory, and had time to work out the right defence!
Black's plan is as follows: a) Place the kingside pawns on light squares
to dominate the bishop. A pawn formation with f5-e4 is advisable.
b) Black's king advances to c5, maybe even further.
c) Black would like to open another file on the kingside, and for that purpose he can prepare . . . h5-h4.
If White plays h2-h4 to stop the h-pawn, then Black has the possibility of the classical break . . . f6 and . . . g5 . This will create a weakness in White's pawn structure, either with the simple . . . gxh4 leaving White with a weak h-pawn, or by getting another passed rook's pawn with . . . fxg5 if White plays hxg5.
Therefore, Black should be aware of how he wants to advance his pawns on the kingside from the start, not allowing White to set up a blockade.
The points of attack for Black are the f2-pawn and the h2-square. White wants to keep his pawn structure intact without creating weaknesses , but once Black is able to attack these points and force White to make weakening pawn moves further attacking points for Black will appear.
Weighing up the pros and cons I therefore believe Black has genuine winning chances.
Let's go back a bit further in the game and see how it all came to be, as there are some interesting situations discussed in the ct:l c6 Catalan chapter.
Here after the novelty 1 7 . . J 3xb4! I simply had an off-day and played badly, the right continuation leading to a White plus was 1 8 .l''k l ! . As in Rahman - Rausis (page 56) White wants to place his rook on c5 if allowed to, and the knight can jump to e5 . White's knight should stay on b 1 for the time being, and for two reasons: on c3 it blocks both the queen's access to d4 and the rook's access to the c-file. This also allows Black to play the bishop to c6.
The game continuation was: 18.ltk3 .ic6 19J'�dl?
This is a bad move, because White does not want to exchange rooks. 19 . . . .ixf3 20. ixf3 �xd4t 2 1 . 'tt>el �xdlt 22.ltlxdl?

Solutions to Evaluation exercises 1 39
With this move I decl ined a draw, thinking that I could get an attack started if I kept the queens on the board. Total rubbish. Now Black is better. I am not proud of the rest of the game, but i t does show exactly what can happen ifWhite trades off too many pieces in positions with a distant black a-pawn .
Instead 22. �xd 1 �xd 1 t 23. c;t>xd 1 c;t>eTf: would have led to the position in the exercise diagram discussed above.
From here on it was a massacre. 22 • . • 0-0 23.h4?! �b6 24.�b2
I realized my mistake and offer a queen exchange now. 24 • • • �d6! 25.�d2 �a6!+
But Black rightly evaluates that with the queens on the board White's king is insecure, and therefore cannot participate in the fight against the a-pawn. 26.ll:lc3 a4 27 • .ie4 a3 28.�c2 �aS
There was nothing wrong with the slower 28 . . . h6. 29 . .ixh7t c;t>hs 30 • .id3 l'kB 3L®d2 l3bs 32.®cm
The final mistake. White sti l l has some fighting chances after 32. c;t>d 1 a2 (perhaps it is better to keep up the pressure with 32 . . . �b2 ) 33 .�xa2 �xc3 34 .�c2 although Black is likely to win. 32 • . • l3b2-+
Black is winning. 33.�xb2 axb2t 34.®xb2 �b6t
and I soon resigned. Evaluation Summary: :t:
Position 7 Schandorrf- Zuchelli Copenhagen 2002
This position is similar to those previously discussed. There are a lot of pieces on the board - including queens - and here White has two knights to counter Black's rook and passed apawn. This can , of course, change if Black's bishop is exchanged for a white knight.
Two knights instead of bishop and knight must be inferior for White, as the knights have more difficulties in positions with pawns on both sides. And we al ready know from the previous game Lund - D.Y. Pedersen, even this superior minor piece configuration gives Black good winning chances if the position is simplified further.
White is in a typical dilemma now: he would l ike to keep pieces on the board, bur the presence of queens reduces the strength of his king as an active participant in the game. So the best solution must be to exchange queens and keep the bishops!
It becomes evident that White has problems in this position. It is difficult to suggest a really good plan, and to try to build up a kingside initiative would probably make Black laugh. Black therefore has a clear advantage and White will have a hard time defending this position. Evaluation summary: +
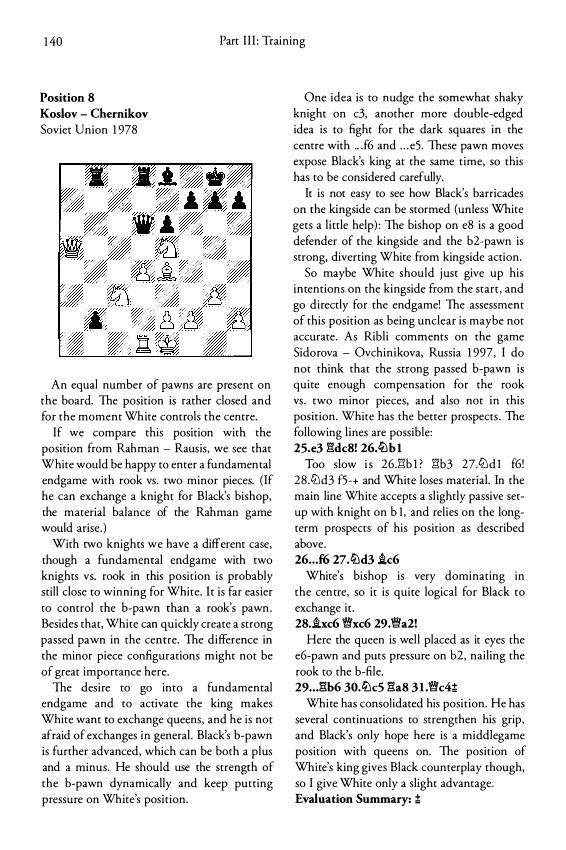
1 40 Part III : Training
Position 8 Koslov - Chernikov Soviet Union 1 978
An equal number of pawns are present on the board. The position is rather closed and for the moment White controls the centre.
If we compare this position with the position from Rahman - Rausis, we see that White would be happy to enter a fundamental endgame with rook vs . two minor pieces. (If he can exchange a knight for Black's bishop, the material balance of the Rahman game would arise. )
With two knights we have a different case, though a fundamental endgame with two knights vs. rook in this position is probably still close to winning for White. I t is far easier to control the b-pawn than a rook's pawn . Besides that, White can quickly create a strong passed pawn in the centre. The difference in the minor piece configurations might not be of great importance here.
The desire to go into a fundamental endgame and to activate the king makes White want to exchange queens, and he is not afraid of exchanges in general . Black's b-pawn is further advanced, which can be both a plus and a minus. He should use the strength of the b-pawn dynamically and keep putting pressure on White's position.
One idea is to nudge the somewhat shaky knight on c3, another more double-edged idea is to fight for the dark squares in the centre with .. . f6 and . . . e5. These pawn moves expose Black's king at the same time, so this has to be considered carefully.
It is not easy to see how Black's barricades on the kingside can be stormed (unless White gets a l ittle help) : The bishop on e8 is a good defender of the kingside and the b2-pawn is strong, diverting White from kingside action.
So maybe White should just give up his intentions on the kingside from the start, and go directly for the endgame! The assessment of this position as being unclear is maybe not accurate. As Ribli comments on the game Sidorova - Ovchinikova, Russia 1 997, I do not think that the strong passed b-pawn is quite enough compensation for the rook vs . two minor pieces, and also nor in this position. White has the better prospects . The following l ines are possible: 25.e3 1:!dc8! 26)l:lbl
Too slow i s 26.1:!b 1 ? l"i:b3 27.ttld l f6! 28 .tt:ld3 f5-+ and White loses material. In the main line White accepts a sl ightly passive setup with knight on b 1, and relies on the longterm prospects of his position as described above. 26 • . • £6 27.tt:ld3 ic6
White's bishop is very dominating in the centre, so it is quite logical for Black to exchange it. 28.ixc6 1Mfxc6 29.1Mfa2!
Here the queen is well placed as it eyes the e6-pawn and puts pressure on b2, nailing the rook to the b-file. 29 . • • 1:!b6 30.tt:lc5 1:!a8 3 1 .1Mfc4;!;
White has consolidated his position. He has several continuations to strengthen his grip, and Black's only hope here is a middlegame position with queens on. The position of White's king gives Black counterplay though, so I give White only a slight advantage. Evaluation Summary: ;!;
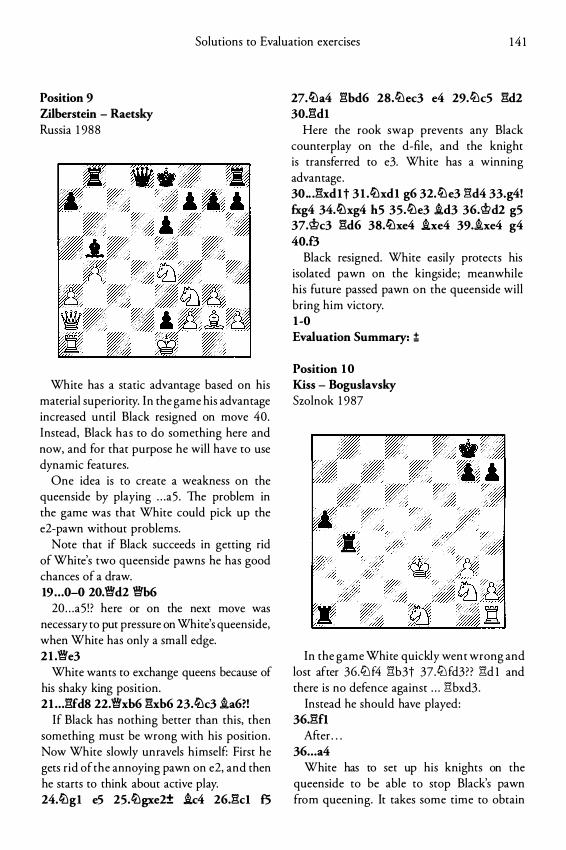
Solutions to Evaluation exercises 1 4 1
Position 9 Zilberstein - Raetsky Russia 1 988
White has a static advantage based on his material superiority. In the game his advantage increased until Black resigned on move 40. Instead, Black has to do something here and now, and for that purpose he will have to use dynamic features.
One idea is to create a weakness on the queenside by playing . . . a5 . The problem in the game was that White could pick up the e2-pawn without problems.
Note that if Black succeeds in getting rid of White's two queenside pawns he has good chances of a draw. 19 . . . o-o zo.edz ebG
20 . . . a5 ! ? here or on the next move was necessary to put pressure on White's queenside, when White has only a small edge. 21 .ee3
White wants to exchange queens because of his shaky king position. 21 . . . :Sfd8 22.exb6 :Sxb6 23.lt:lc3 i.a6?!
If Black has nothing better than this, then something must be wrong with his position. Now White slowly unravels himself: First he gets rid of the annoying pawn on e2, and then he starts to think about active play. 24.lt:lg1 eS 2S.lt:lgxe2± .ic4 26.:Scl f5
27.lt:la4 :Sbd6 28.ltlec3 e4 29.ltlc5 :Sd2 30.:Sd1
Here the rook swap prevents any Black counterplay on the d-file, and the knight is transferred to e3. White has a winning advantage. 30 .. J'�xd1 t 3 1 .lt:lxd1 g6 32.�e3 :Sd4 33.g4! fxg4 34.lt:lxg4 hS 35.�e3 i.d3 36.�d2 gS 37.�c3 :Sd6 38.lt:lxe4 .ixe4 39.�xe4 g4 40.f3
Black resigned. White easily protects his isolated pawn on the kingside; meanwhile his future passed pawn on the queenside will bring him victory. 1 -0 Evaluation Summary: ;!;
Position 10 Kiss - Boguslavsky Szolnok 1 987
In the game White quickly went wrong and lost after 36.tt:lf4 Elb3t 37.tt:lfd3? ? E\d 1 and there is no defence against . . . Elbxd3 .
Instead he should have played: 36.!'\fl
After . . . 36 .. . a4
White has to set up his knights on the queenside to be able to stop Black's pawn from queening. It takes some time to obtain

1 42 Part I I I : Training
such a set-up, if it is possible at all, and it is logical for Black to continue direct play while White is uncoordinated .
Another good option for Black is 36 . . J'!b2 after which i t is difficult for White to free his position. The only chance is 37.ltld3 , but this forces the exchange of rooks and after 37 . . . Elxfl 38 .ltlxb2 Ela1 39 .ltld3 a4 40 .ltlge 1 Ela2!-+ . White will lose his entire kingside or the a-pawn will cost him a knight.
Bad is 36 . . . Elbb 1 ? . White replies 37.Elf5 ! and now:
a) 37 . . . Elxe 1 t 38 .ltlxe 1 Elxe 1 t 39 .�f2! Ela 1 40.h4 a4 4 1 .Ela5= gives a well known theoretical position. If Black advances his pawn to a2 White keeps his king on g2 and h2, and Black's king cannot profitably escape from White's checks.
If Black places his pawn on a3 to secure his king a shelter on a2, then White has time to pick up the kingside pawns and this is enough to secure him a draw after he gives up his rook for Black's a-pawn.
It is important that Black's rook is forced to stay in front of the a-pawn - if it can be transferred to defending from the side there will be winning chances.
b) If instead 3 7 . . . a4 Black has lost some time and this gives White chances to organize himself after 38 .ltlc2 Ela2 39.Elc5 when White has real chances of saving the game. The following line is instructive: 39 . . . Elh 1 40.h4 Elb2 4I.ltlf4 Elb3t 42.�e4! Elxg3 43 .Elc8t �f7 44.Elc7t �e8 45 .ltld4! and White's activity gives him every chance to save the game. Note the cooperation of the rook and two knights (and the king as well) . Without a pair of rooks each this position would have been absolutely hopeless for White - both now and earlier. 37J��f2 a3-+ 38.ltk2 gb3t 39.�d4 gel
The a-pawn will cost White a knight. There is no salvation for White in a fundamental rook vs . knight endgame with two pawns each on the kingside - this is only possible in
some cases with rook vs. bishop. See chapter 2 for more of these positions. Evaluation Summary: - +
Position 1 1 Kiss - Boguslavsky (line) Szolnok 1 987
Compared to the position from exercise 2 there are pawns on both sides of the board in this exercise. Besides that, an equal number of pawns are present. Black has an extra pawn on the kingside whereas White has a majority on the queenside.
The rooks are good in this open position, but it seems that White's pieces are active as the knights are ready to occupy active outposts while the bishop exerts the usual "Catalan pressure" along the h 1-a8 diagonal.
However, concrete analysis tells us that White's position is actually critical due to the power of Black's rooks. Let's see:
We first notice that eliminating Black's a-pawn to make the front shorter fails: 25 .lLlxa7?? Elc7 and the knight is trapped.
Instead White should play: 25.li:lbd6 gds!
It is well known that two knights are hampered when protecting each other. If Black plays the more direct 25 . . . Ela1 26.ltlc4 Ela2t White has chances to defend. After
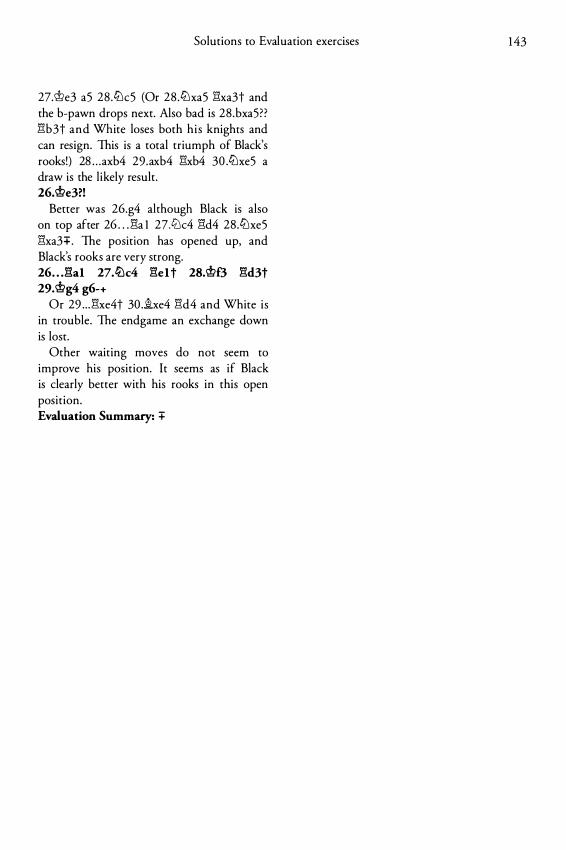
Solutions to Evaluation exercises
27.'it>e3 a5 28 .ctJc5 (Or 28 .ctJxa5 �xa3t and the b-pawn drops next. Also bad is 28 .bxa5? ? �b3t and White loses both h i s knights and can resign. This is a total triumph of Black's rooks!) 28 . . . axb4 29.axb4 �xb4 30.ctJxe5 a draw is the l ikely result. 26.'it>e3?!
Better was 26.g4 although Black is also on top after 26 . . . �al 27.l2Jc4 �d4 28.ctJxe5 �xa3+ . The position has opened up, and Black's rooks are very strong. 26 . . -l:�al 27.l2Jc4 1':1elt 28.'it>f3 �d3t 29.'it>g4 g6-+
Or 29 . . . �xe4t 30.�xe4 �d4 and White is in trouble. The endgame an exchange down is lost.
Other waiting moves do not seem to improve his position. It seems as if Black is clearly better with his rooks in this open position. Evaluation Summary: +
1 43
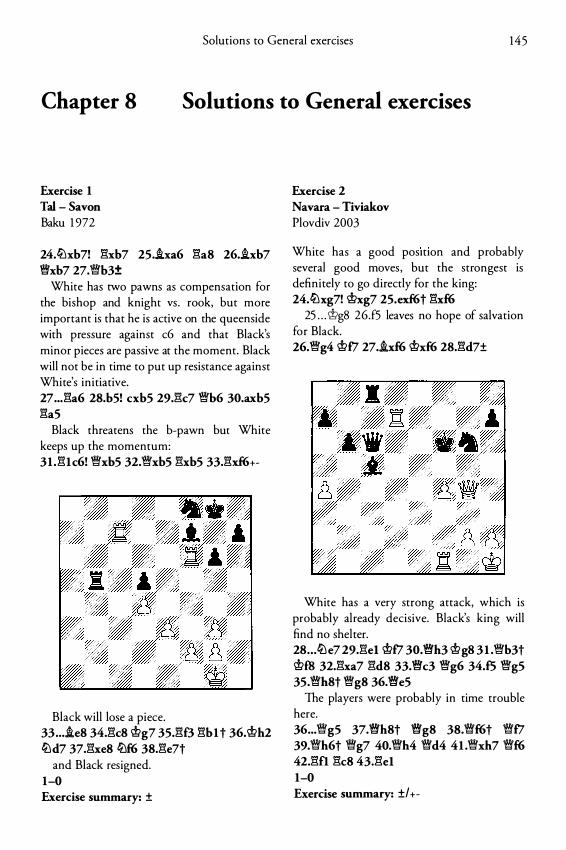
Solutions to General exercises 145
Chapter 8 Solutions to General exercises
Exercise 1 Tal - Savon Baku 1 972
24.�xb7! �xb7 25 . .ixa6 �aS 26 . .ixb7 �xb7 27.�b3±
White has two pawns as compensation for the bishop and knight vs . rook, but more important is that he is active on the queenside with pressure against c6 and that Black's minor pieces are passive at the moment. Black will not be in time to put up resistance against White's initiative. 27 ... �a6 28.b5! cxb5 29.�c7 �b6 30.axb5 �aS
Black threatens the b-pawn bur White keeps up the momentum: 31 .�1c6! �xb5 32.�xb5 �xb5 33.�xf6+-
Black will lose a piece. 33 ... .ie8 34.�c8 'i!;lg7 35.�f3 �b1 t 36.'i!;lh2 �d7 37.�xe8 �f6 38.�e7t
and Black resigned. 1-0 Exercise summary: ±
Exercise 2 Navara - Tiviakov Plovdiv 2003
White has a good pos1t1on and probably several good moves, but the strongest is definitely to go directly for the king: 24.�xg7! 'i!;lxg7 25.exf6t �xf6
25 . . . <;f:?g8 26.f5 leaves no hope of salvation for Black. 26.�g4 'i!;lfi 27 . .ixf6 'i!;lxf6 28.�d7±
White has a very strong attack, which is probably already decisive. Black's king will find no shelter. 28 . . . �e7 29.�e1 'i!;lfi 30.Wfh3 'i!;lgs 3 1 .�b3t 'i!;lf8 32.�xa7 �d8 33.Wfc3 �g6 34.£5 �g5 35.�h8t �g8 36.Wfe5
The players were probably in time trouble here. 36 ... �g5 37.Wfhst Wfgs 38.�f6t �fi 39.�h6t �g7 40.�h4 �d4 41 .�xh7 �f6 42.�fl �c8 43.�el 1-0 Exercise summary: ±1+-
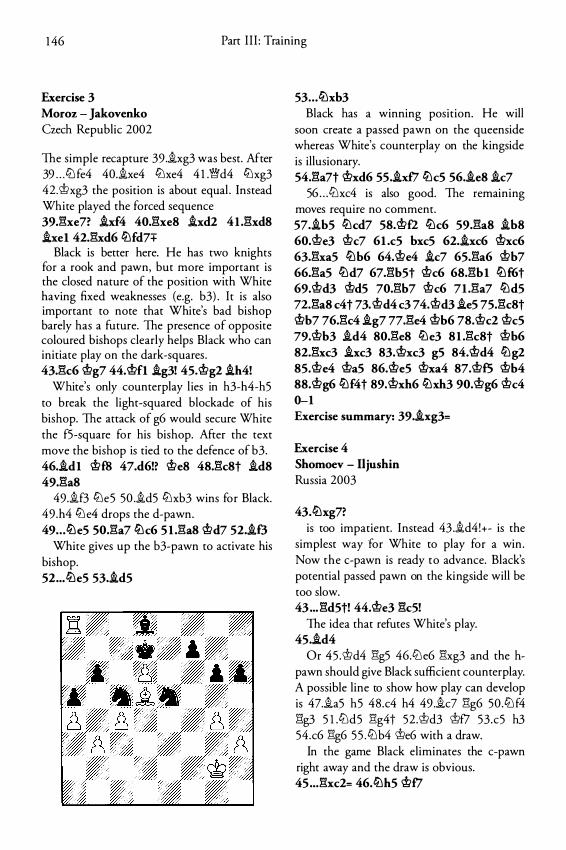
1 46 Part I I I : Training
Exercise 3 Moroz - Jakovenko Czech Republic 2002
The simple recapture 39 .ixg3 was best. After 39 . . . 1t:J fe4 40.ixe4 lt:Jxe4 4 1 .Wd4 lt:Jxg3 42.\tlxg3 the position is about equal . Instead White played the forced sequence 39J'�xe7? i.x£4 40.gxe8 i.xd2 41 .gxd8 ixel 42.gxd6 ttlfd7+
Black is better here. He has two knights for a rook and pawn, but more important is the closed nature of the position with White having fixed weaknesses (e.g. b3) . It is also important to note that White's bad bishop barely has a future. The presence of opposite coloured bishops clearly helps Black who can initiate play on the dark-squares . 43.gc6 �g7 44. �fl ig3! 45. �g2 ih4!
White's only counterplay l ies in h3-h4-h5 to break the light-squared blockade of his bishop. The attack of g6 would secure White the f5-square for his bishop. After the text move the bishop is tied to the defence of b3. 46.idl �f8 47.d6!? �e8 48.gcst ids 49.ga8
49.if3 lt:Je5 50 .id5 lt:Jxb3 wins for Black. 49 .h4 lt:J e4 drops the d-pawn. 49 . . . ttle5 so.ga7 ttlc6 S l .gas �d7 52.i.O
White gives up the b3-pawn to activate his bishop. 52 ... ttle5 53.id5
53 . . . ttlxb3 Black has a winning position. He will
soon create a passed pawn on the queenside whereas White's counterplay on the kingside is illusionary. 54.ga7t �xd6 55.ixf7 ttlc5 56.i.e8 ic7
56 . . . 1t:Jxc4 is also good. The remaining moves require no comment. 57.ib5 ttlcd7 58.�f2 ttlc6 59.ga8 ib8 60.�e3 �c7 61 .c5 bxc5 62.ixc6 �xc6 63.gxa5 ttlb6 64.�e4 ic7 65.ga6 �b7 66.ga5 ttld7 67.gb5t �c6 68.gbl ttlf6t 69.�d3 �dS 70.gb7 �c6 71 .ga7 ttld5 n.gas c4 t 73. �d4 c3 7 4. �d3 i.e5 75.gcst �b7 76.gc4 i.g7 77.ge4 �b6 78.�c2 �c5 79.�b3 i.d4 so.ges ttle3 8 1 .gcst �b6 82.gxc3 i.xc3 83.�xc3 g5 84.�d4 ttlg2 85.�e4 �a5 86.�e5 �xa4 87.�£5 �b4 88.�g6 ttlf4t 89.�xh6 ttlxh3 90.�g6 �c4 0-1 Exercise summary: 39.i.xg3=
Exercise 4 Shomoev - Iljushin Russia 2003
43.ttlxg7? is too impatient. Instead 43 .id4!+- is the
simplest way for White to play for a win . Now the c-pawn is ready to advance. Black's potential passed pawn on the kingside will be too slow. 43 ... gd5t! 44.�e3 gc5!
The idea that refutes White's play. 45.i.d4
Or 45 .\tld4 Elg5 46.1t:J e6 Elxg3 and the hpawn should give Black sufficient counterplay. A possible line to show how play can develop is 47.i.a5 h5 48 .c4 h4 49 .i.c7 Elg6 50 .It:J f4 l"lg3 5 l .it:Jd5 Elg4t 52 .\tld3 \tlf7 53 .c5 h3 54.c6 Elg6 5 5 . 1t:J b4 \tle6 with a draw.
In the game Black eliminates the c-pawn right away and the draw is obvious. 45 ... gxc2= 46.ttlh5 �f7
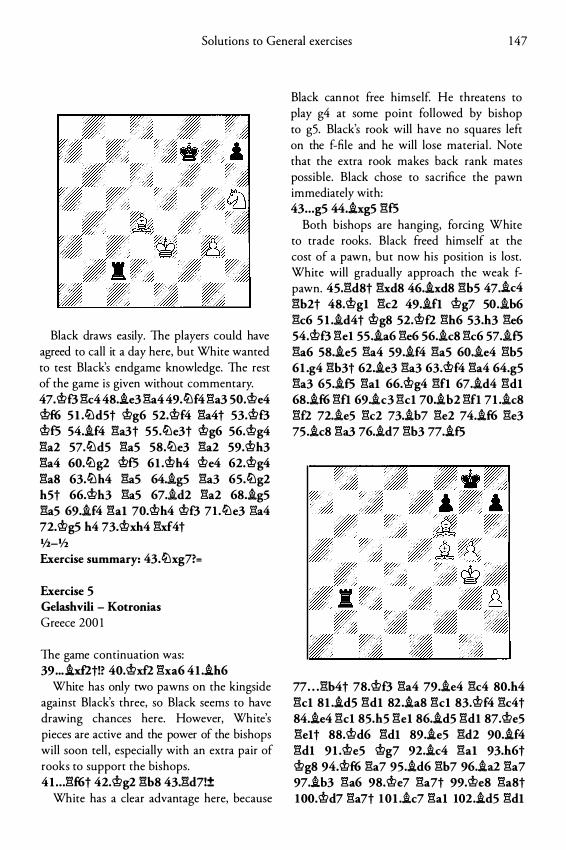
Solutions to General exercises 1 47
Black draws easily. The players could have agreed to call it a day here, but White wanted to test Black's endgame knowledge. The rest of the game is given without commentary. 47.�f3 l'!c448 . .ie3 l'!a449.ltlf4 l'!a3 SO.�e4 �f6 S l .llldSt �g6 52.�f4 l'!a4t 53.�f3 �fS S4 . .if4 l'!a3t SS.ltle3t �g6 56.�g4 l'!a2 57.ltld5 l'!aS 58.ltle3 l'!a2 59.�h3 l'!a4 60.ltlg2 �fS 61 .�h4 �e4 62.�g4 l'!a8 63.ltlh4 l'!aS 64.i.g5 l'!a3 65.ltlg2 hSt 66.�h3 l'!aS 67.i.d2 l'!a2 68 . .ig5 l'!aS 69 . .if4 l'!al 70.�h4 �f3 71 .ltle3 l'!a4 72.�g5 h4 73.�xh4 l'!xf4t 1/z-1/z Exercise summary: 43.ltlxg7?=
Exercise 5 Gelashvili - Kotronias Greece 200 1
The game continuation was: 39 ... .ixflt!? 40.�xf2 l'!xa6 4l ..ih6
White has only two pawns on the kingside against Black's three, so Black seems to have drawing chances here. However, White's pieces are active and the power of the bishops will soon tell , especially with an extra pair of rooks to support the bishops. 4l . . . l'!f6t 42.�g2 l'!b8 43.l'!d7!±
White has a clear advantage here, because
Black cannot free himself. He threatens to play g4 at some point followed by bishop to g5. Black's rook will have no squares left on the f-fi.le and he will lose material . Note that the extra rook makes back rank mates possible. Black chose to sacrifice the pawn immediately with: 43 .. . g5 44 . .ixg5 l'!fS
Both bishops are hanging, forcing White to trade rooks. Black freed himself at the cost of a pawn, but now his position is lost. White will gradually approach the weak fpawn. 4S.l'!d8t l'!xd8 46 . .ixd8 l'!bS 47 . .ic4 l'!b2t 48.�gl l'!c2 49 . .ifl �g7 SO . .ib6 l'!c6 S l .i.d4t �g8 52.�f2 l'!h6 53.h3 l'!e6 S4.�f3 l'!e1 5S . .ia6 l'!e6 56 . .ic8 l'!c6 57.i.f5 l'!a6 SS . .ieS l'!a4 59.i.f4 l'!aS 60.i.e4 l'!bS 6l .g4 l'!b3t 62 . .ie3 l'!a3 63.�f4 l'!a4 64.g5 l'!a3 6S.i.f5 l'!al 66.�g4 l'!fl 67 . .id4 l'!dl 68 . .if6 l'!fl 69 . .ic3 l'!cl 70 . .ib2 l'!fl 7l ..ic8 l'!f2 72.i.e5 l'!c2 73.ih7 l'!e2 74 . .if6 l'!e3 7S.i.c8 l'!a3 76.i.d7 l'!b3 77 . .if5
77 . . . l'!b4t 78.�f3 l'!a4 79 . .ie4 l'!c4 80.h4 l'!cl Sl ..idS l'!dl 82 . .ia8 l'!cl 83.�f4 l'!c4t 84 . .ie4 l'!cl SS.hS l'!e1 86 . .id5 l'!dl 87.�e5 l'!elt 88.�d6 l'!dl 89 . .ie5 l'!d2 90 . .if4 l'!dl 9l .�e5 �g7 92 . .ic4 l'!al 93.h6t �g8 94.�f6 l'!a7 9S . .id6 l'!b7 96 . .ia2 l'!a7 97 . .ih3 l'!a6 98.�e7 l'!a7t 99.�e8 l'!aSt 100.�d7 l'!a7t 10 l .i.c7 l'!al 102 . .id5 l'!dl
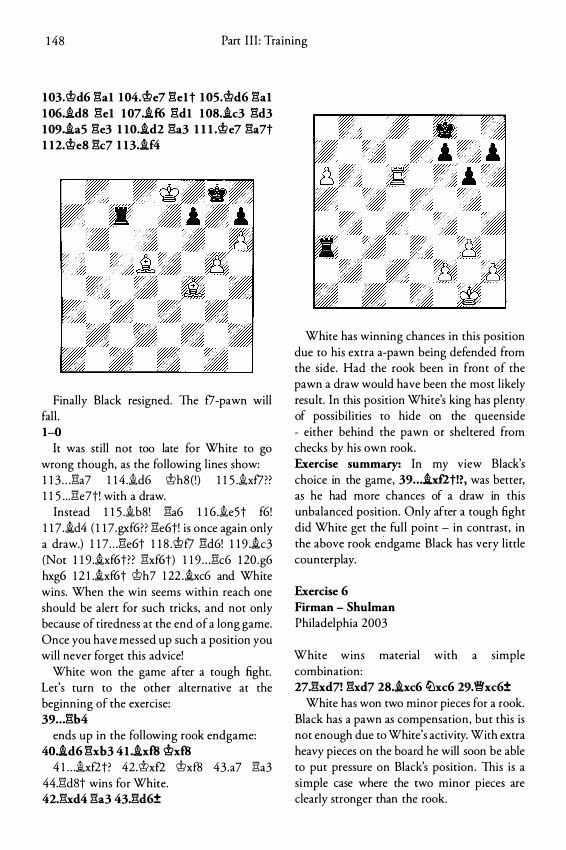
1 48 Part I I I : Training
103. ®d6 gal 104. ®e7 gel t 105. ®d6 gal 106 • .id8 gel 107 . .if6 gdl 108 . .ic3 gd3 109 • .ia5 ge3 1 10 . .id2 ga3 1 l l .®e7 ga7t 1 12.®e8 gc7 1 13 . .if4
Finally Black resigned. The f7 -pawn will fall . 1-0
It was still not too late for White to go wrong though, as the following l ines show: 1 1 3 . . . Ei:a7 1 1 4 . .id6 \t>h8 (!) 1 1 5 . .ixf7?? 1 1 5 . . . Ei:e7t! with a draw.
Instead 1 1 5 . .ib8! Ei:a6 1 1 6 . .ie5t f6! 1 1 7 . .id4 ( 1 1 7.gxf6?? Ei:e6t! is once again only a draw.) 1 1 7 . . . Ei:e6t 1 1 8 .\t>f7 Ei:d6! 1 1 9 . .ic3 (Not 1 1 9 . .ixf6t?? Ei:xf6t) 1 1 9 . . . Ei:c6 1 20.g6 hxg6 1 2 l ..ixf6t lt>h7 1 22 . .ixc6 and White wins. When the win seems within reach one should be alert for such tricks, and not only because of tiredness at the end of a long game. Once you have messed up such a position you will never forget this advice!
White won the game after a tough fight. Let's turn to the other alternative at the beginning of the exercise: 39 .. . gb4
ends up in the following rook endgame: 40 . .id6 gxb3 4l ..ixf8 ®x£8
4 1 . . ..ixf2t? 42.'it>xf2 'it>xf8 43.a7 Ei:a3 44.Ei:d8t wins for White. 42J�xd4 Ei:a3 43.gd6±
White has winning chances in this position due to his extra a-pawn being defended from the side. Had the rook been in front of the pawn a draw would have been the most likely result. In this position White's king has plenty of possibilities to hide on the queenside - either behind the pawn or sheltered from checks by his own rook. Exercise summary: In my view Black's choice in the game, 39 . . . .ixflt!?, was better, as he had more chances of a draw in this unbalanced position. Only after a tough fight did White get the full point - in contrast, in the above rook endgame Black has very little counterplay.
Exercise 6 Firman - Shulman Philadelphia 2003
White wms material with a simple combination: 27.gxd7! gxd7 28 . .ixc6 tiJxc6 29.�xc6±
White has won two minor pieces for a rook. Black has a pawn as compensation, but this is not enough due to White's activity. With extra heavy pieces on the board he will soon be able to put pressure on Black's position. This is a simple case where the two minor pieces are clearly stronger than the rook.
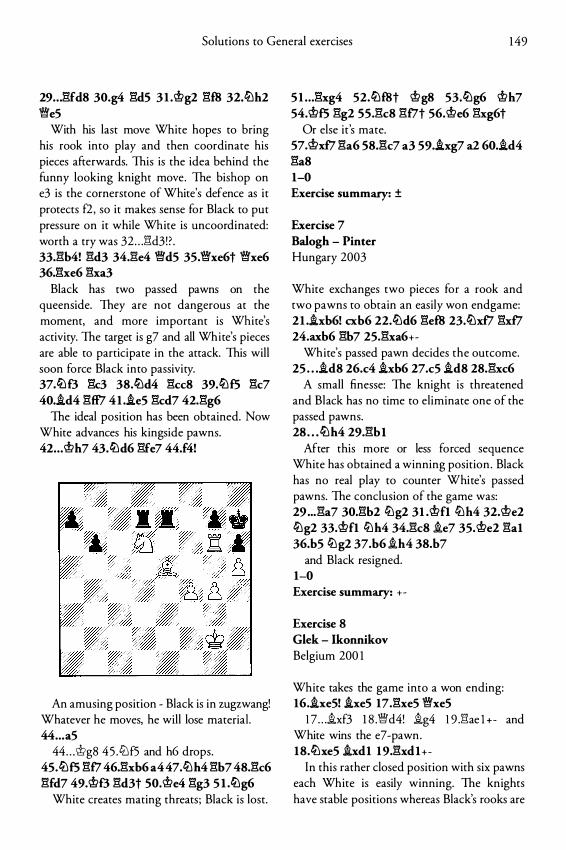
Solutions to General exercises 1 49
29 .. . gfds 30.g4 gds 3I .Wg2 g£8 32.<!Llh2 �e5
With his last move White hopes to bring his rook into play and then coordinate his pieces afterwards. This is the idea behind the funny looking knight move. The bishop on e3 is the cornerstone of White's defence as it protects f2 , so it makes sense for Black to put pressure on it while White is uncoordinated: worth a try was 32 . . . l"ld3! ? . 33,gh4! gd3 34J:�e4 �d5 35.�xe6t �xe6 36J!xe6 l!xa3
Black has two passed pawns on the queenside. They are not dangerous at the moment, and more important is White's activity. The target is g7 and all White's pieces are able to participate in the attack. This will soon force Black into passivity. 37)Ll8 gc3 3S.tl:ld4 l!ccS 39.tl:lf5 l!c7 40.id4 gff7 4I ..ie5 gcd7 42,gg6
The ideal position has been obtained. Now White advances his kingside pawns. 42 .. . Wh7 43.tl:ld6 gfe7 44.f4!
An amusing position - Black is in zugzwang! Whatever he moves, he will lose material. 44 ... a5
44 . . .<>�g8 45 .C/Jf5 and h6 drops. 45.c!Llf5 gf7 46,gxb6 a4 47.c!Llh4 gb7 4S,gc6 gfd7 49.W8 gd3t so.we4 gg3 5 Ltl:lg6
White creates mating threats ; Black is lost.
5 I . .. gxg4 52.tl:lf8t Wgs 53.tl:lg6 Wh7 54.Wf5 ggz ss.gcs gf7t 56.We6 gxg6t
Or else it's mate. 57.Wxf7 ga6 ss.gc7 a3 59 . .ixg7 a2 6o.id4 gas 1-0 Exercise summary: ±
Exercise 7 Balogh - Pinter Hungary 2003
White exchanges two pieces for a rook and two pawns to obtain an easily won endgame: 2I .ixb6! cxb6 22.c!Lld6 ge£8 23.c!Llxf7 gxf7 24.axb6 gb7 25,gxa6+-
White's passed pawn decides the outcome. 25 . . . idS 26.c4 ixb6 27.c5 idS 2S,gxc6
A small finesse: The knight is threatened and Black has no time to eliminate one of the passed pawns. 2S . . . c!Llh4 29.gbl
After this more or less forced sequence White has obtained a winning position . Black has no real play to counter White's passed pawns. The conclusion of the game was: 29 ... ga7 30.gb2 c!Llg2 3l .Wfl c!Llh4 32.We2 c!Llg2 33.Wfl c!Llh4 34.gcs .ie7 35.We2 gal 36.b5 c!Llg2 37.b6 .ih4 3S.b7
and Black resigned. 1-0 Exercise summary: + -
Exercise S Glek - Ikonnikov Belgium 200 1
White takes the game into a won ending: 16.ixe5! ixe5 17.l!xe5 '1Wxe5
1 7 . . . ixf3 1 8 .�d4! ig4 1 9 .l"lae l +- and White wins the e7-pawn. 1S.c!Llxe5 ixdl 19.gxdl+-
ln this rather closed position with six pawns each White is easily winning. The knights have stable positions whereas Black's rooks are
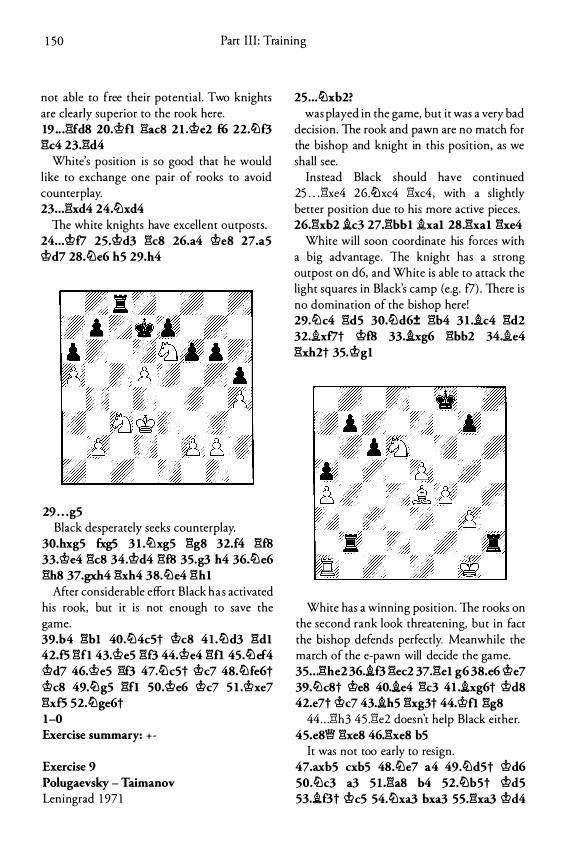
1 50 Part I I I : Training
not able to free their potential . Two knights are clearly superior to the rook here. 19 .. J:!fd8 20.\t>fl gac8 2 l .'it>e2 f6 22.ll:\f3 l:k4 23.gd4
White's position is so good that he would l ike to exchange one pair of rooks to avoid counterplay. 23 .. . gxd4 24.ll:\xd4
The white knights have excellent outposts. 24 .. . 'it>f7 25.'it>d3 gcs 26.a4 'it>e8 27.a5 'it>d7 28.ll:\e6 hS 29.h4
29 . . . g5 Black desperately seeks counterplay.
30.hxg5 fxgS 3 1 .ll:\xg5 ggs 32.f4 gf8 33.'it>e4 gcs 34.'it>d4 gf8 35.g3 h4 36.ll:\e6 ghs 37.gxh4 gxh4 38.ll:\e4 ghl
After considerable effort Black has activated his rook, but it is not enough to save the game. 39.b4 gbl 40.ll:\4c5t 'it>cs 4I .ll:\d3 gdl 42.£5 gfl 43.\t>eS gf3 44.'it>e4 gfl 45.ll:\ef4 'it>d7 46.\t>eS gf3 47.ll:\c5t 'it>c7 48.ll:\fe6t 'it>c8 49.ll:\g5 gfl SO.'it>e6 'it>c7 5 I .'it>xe7 gx5 52.ll:\ge6t 1-0 Exercise summary: + -
Exercise 9 Polugaevsky - Taimanov Leningrad 1 97 1
2S .. . ll:\xb2? was played in the game, but it was a very bad
decision. The rook and pawn are no match for the bishop and knight in this position, as we shall see.
Instead Black should have continued 25 . . . l:he4 26.ll:\xc4 l"lxc4, with a slightly better position due to his more active pieces. 26.gxb2 ic3 27.gbbl .ixal 28.gxal gxe4
White will soon coordinate his forces with a big advantage. The knight has a strong outpost on d6, and White is able to attack the light squares in Black's camp (e.g. f7) . There is no domination of the bishop here! 29.ll:\c4 gds 30.ll:\d6± gb4 3I .i.c4 gd2 32 . .ixf7t 'it>£8 33 . .ixg6 gbb2 34 . .ie4 gxh2t 35. 'it>gl
White has a winning position. The rooks on the second rank look threatening, but in fact the bishop defends perfectly. Meanwhile the march of the e-pawn will decide the game. 35 . . . ghe2 36.if3 gec2 37.gel g6 38.e6 'it>e7 39.ll:\c8t 'it>e8 40.ie4 gc3 4I .ixg6t 'it>d8 42.e7t 'it>c7 43.ihS gxg3t 44.\t>fl ggs
44 . . . l"lh3 45 .l"le2 doesn't help Black either. 45.e8� gxe8 46.gxe8 bS
It was not too early to resign. 47.axb5 cxbS 48.ll:\e7 a4 49.ll:\d5t 'it>d6 50.ll:\c3 a3 5 U!a8 b4 52.ll:\b5t 'it>dS 53.if3t 'it>cs 54.ll:\xa3 bxa3 ss.gxa3 'it>d4
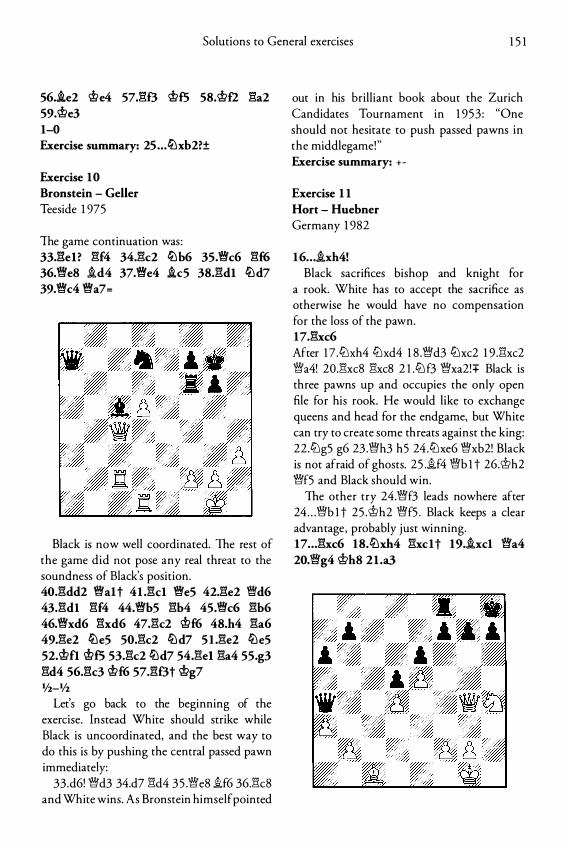
Solutions to General exercises 1 5 1
56 . .i.e2 \!;>e4 57J3f3 \!;>£5 58.\!;>fl 13a2 59.\!;>e3 1-0 Exercise summary: 25 . . . tLlxb2?±
Exercise 10 Bronstein - Geller Teeside 1 975
The game continuation was: 33.13el ? 13£4 34.13c2 tLlb6 35.�c6 13£6 36.'\WeS .id4 37.�e4 ic5 38.13d1 tLld7 39.�c4 �a7=
Black is now well coordinated. The rest of the game did not pose any real threat to the soundness of Black's position. 40.13dd2 �a1 t 41 .13cl �e5 42.13e2 �d6 43.13d1 13£4 44.�b5 13b4 45.�c6 13b6 46.�xd6 13xd6 47.13c2 \!;>f6 48.h4 13a6 49.13e2 tLle5 50.13c2 tLld7 5 1 .13e2 tLle5 52.\!;>fl \!;>£5 53.13c2 tLld7 54J�el 13a4 55.g3 13d4 56.13c3 \!;>f6 57.13f3t \!;>g? lfz-lfz
Let's go back to the beginning of the exercise. Instead White should strike while Black is uncoordinated, and the best way to do this is by pushing the central passed pawn immediately:
33.d6! Wd3 34.d7 13d4 3 5 .�e8 .if6 36.13c8 and White wins. As Bronstein himself pointed
out in his brill iant book about the Zurich Candidates Tournament in 1 953 : "One should not hesitate to push passed pawns in the middlegame!" Exercise summary: +-
Exercise 1 1 Hort - Huebner Germany 1 982
16 . . . .ixh4! Black sacrifices bishop and knight for
a rook. White has to accept the sacrifice as otherwise he would have no compensation for the loss of the pawn. 17.13xc6 After 1 7 .tt'lxh4 tt'lxd4 1 8 .Wd3 tt'lxc2 1 9 .Elxc2 �a4! 20.Elxc8 Elxc8 2 l .tt'l f3 Wxa2!+ Black is three pawns up and occupies the only open file for his rook. He would like to exchange queens and head for the endgame, but White can try to create some threats against the king: 22 .tt'lg5 g6 23 .'\Wh3 h5 24 .tt'lxe6 Wxb2! Black is not afraid of ghosts. 25 . .if4 '\Wb 1 t 26.\!;>h2 Wf5 and Black should win.
The other try 24.'1Wf3 leads nowhere after 24 . . . '\Wb l t 25 .�h2 '1Wf5 . Black keeps a clear advantage, probably just winning. 17 . . . 13xc6 18.tt'lxh4 Elxclt 19 . .ixcl '1Wa4 20.'\Wg4 \!;>h8 2 1 .a3
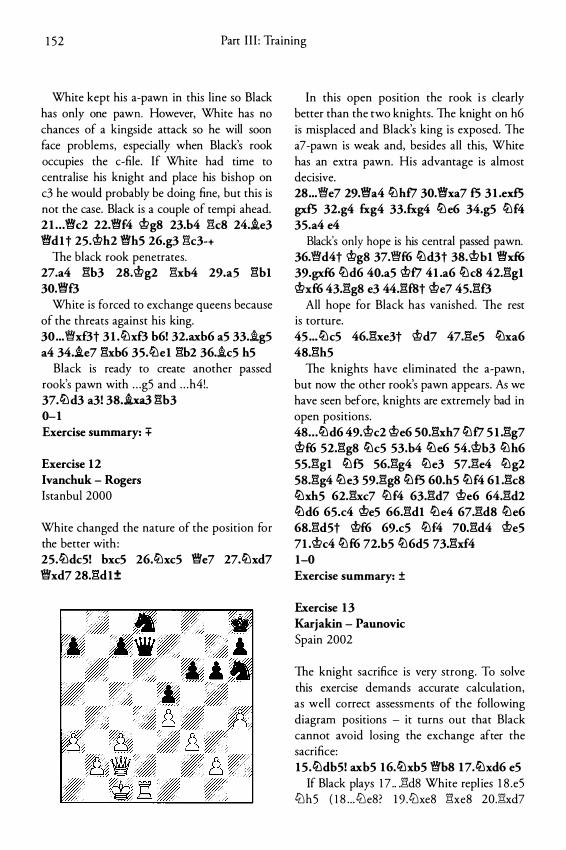
1 52 Part I I I : Training
White kept his a-pawn in this line so Black has only one pawn. However, White has no chances of a kingside attack so he will soon face problems, especially when Black's rook occupies the c-file. If White had time to centralise his knight and place his bishop on c3 he would probably be doing fine, but this is not the case. Black is a couple of tempi ahead. 2 1 . . . Wfc2 22.Wff4 Wg8 23.b4 1'k8 24.i.e3 Wfd1t 25.Wh2 Wfhs 26.g3 1'k3-+
The black rook penetrates. 27.a4 gb3 28.Wg2 gxb4 29.a5 gb1 30.Wff3
White is forced to exchange queens because of the threats against his king. 30 ... Wfxf3t 3 1 .lLlxf3 b6! 32.axb6 aS 33 . .ig5 a4 34.i.e7 gxb6 35.lLle1 gb2 36 . .ic5 h5
Black is ready to create another passed rook's pawn with . . . g5 and . . . h4!. 37.lLld3 a3! 38.ha3 gb3 0-1 Exercise summary: +
Exercise 12 lvanchuk - Rogers Istanbul 2000
White changed the nature of the position for the better with : 25.lLldc5! bxc5 26.lLlxc5 Wfe7 27.lLlxd7 Wfxd7 28,gd1±
In this open position the rook i s clearly better than the two knights. The knight on h6 is misplaced and Black's king is exposed. The a7 -pawn is weak and, besides all this, White has an extra pawn. His advantage is almost decisive. 28 ... Wfe7 29.Wfa4 lLlhf7 30.Wfxa7 f5 3 1 .exf5 gxf5 32.g4 fxg4 33.fxg4 lLle6 34.g5 lLlf4 35.a4 e4
Black's only hope is his central passed pawn. 36.Wfd4t wgs 37.Wff6 lLld3t 38.Wb1 Wfxf6 39.gxf6 lLld6 40.a5 Wf7 41 .a6 lLlc8 42.gg1 Wxf6 43.ggs e3 44.gf8t We7 45.gf3
All hope for Black has vanished. The rest is torture. 45 ... lLlc5 46.gxe3t Wd7 47.ge5 lLlxa6 48.gh5
The knights have eliminated the a-pawn, but now the other rook's pawn appears. As we have seen before, knights are extremely bad in open positions. 4s .. . lLld6 49. Wc2 We6 so.gxh7 lLlf7 5 1 .gg7 Wf6 52.ggs lLlc5 53.b4 lLle6 54.Wb3 lLlh6 55.gg1 lLlf5 56.gg4 lLle3 57.ge4 lLlg2 ss.gg4 lLle3 59.ggs lLlf5 60.h5 lLlf4 61 .gcs lLlxh5 62.gxc7 lLlf4 63.gd7 We6 64.gd2 lLld6 65.c4 We5 66.gd1 lLle4 67.gd8 lLle6 68.gd5t �f6 69.c5 lLlf4 70,gd4 We5 71 .�c4 lLlf6 72.b5 lLl6d5 73.gxf4 1-0 Exercise summary: ±
Exercise 13 Karjakin - Paunovic Spain 2002
The knight sacrifice is very strong. To solve this exercise demands accurate calculation, as well correct assessments of the following diagram positions - it turns out that Black cannot avoid losing the exchange after the sacrifice: 15.lLldb5! axb5 16.lLlxb5 W/b8 17.lLlxd6 e5
If Black plays 1 7 .. J�d8 White repl ies 1 8 .e5 LLlh5 ( 1 8 . . . LLle8? 1 9 .LLlxe8 !'!xeS 20.l'l:xd7
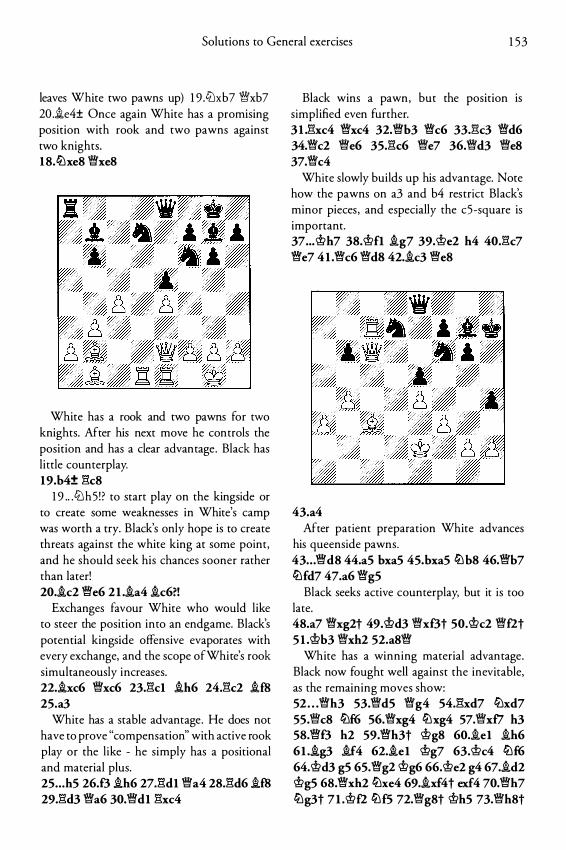
Solutions to General exercises 1 53
leaves White two pawns up) 1 9 .lthb7 �xb7 20 .1e4± Once again White has a promising position with rook and two pawns against two knights. 18.lLlxe8 �xeS
White has a rook and two pawns for two knights. After his next move he controls the position and has a clear advantage. Black has little counterplay. 19.b4± :1'1.c8
1 9 .. .CtJ h5 ! ? to start play on the kingside or to create some weaknesses in White's camp was worth a try. Black's only hope is to create threats against the white king at some point, and he should seek his chances sooner rather than later! 20.1c2 �e6 2 1 .1a4 1c6?!
Exchanges favour White who would l ike to steer the position into an endgame. Black's potential kingside offensive evaporates with every exchange, and the scope ofWhite's rook simultaneously increases. 22.1xc6 �xc6 23.:1'1.cl ih6 24.:1'1.c2 ifS 25.a3
White has a stable advantage. He does not have to prove "compensation" with active rook play or the l ike - he simply has a positional and material plus. 25 . . . h5 26.8 1h6 27.:1'1.dl �a4 28.:1'1.d6 1f8 29.:1'1.d3 �a6 30.�dl :1'1.xc4
Black wins a pawn, but the position is simplified even further. 31 .:1'1.xc4 �xc4 32.�b3 �c6 33.:1'1.c3 �d6 34.�c2 �e6 35.:1'1.c6 �e7 36.�d3 �e8 37.�c4
White slowly builds up his advantage. Note how the pawns on a3 and b4 restrict Black's minor pieces, and especially the c5-square is important. 3? ... @h7 3S.@fl ig7 39.@e2 h4 40.:1'1.c7 �e7 41 .�c6 �dB 42.1c3 �e8
43.a4 After patient preparation White advances
his queenside pawns. 43 . . . �d8 44.a5 bxa5 45.bxa5 lLlbS 46.�b7 lLlfd7 47.a6 �g5
Black seeks active counterplay, but it is too late. 48.a7 �xg2t 49.@d3 �xf3t 50.@c2 �f2t 5 1 .@b3 �xh2 52.a8�
White has a winning material advantage. Black now fought well against the inevitable, as the remaining moves show: 52 . . . �h3 53.�d5 �g4 54.:1'1.xd7 lLlxd7 55.�c8 lLlf6 56.�xg4 lLlxg4 57.�xf7 h3 58.�8 h2 59.�h3t @gS 60.1el 1h6 61 .1g3 if4 62.iel @g? 63.@c4 lLlf6 64.@d3 g5 65.�g2 @g6 66.@e2 g4 67.id2 @gS 68.�xh2 lLlxe4 69.ixf4t exf4 70.�h7 lLlg3t 7 1 .@f2 lLlf5 72.�g8t @hS 73.�h8t
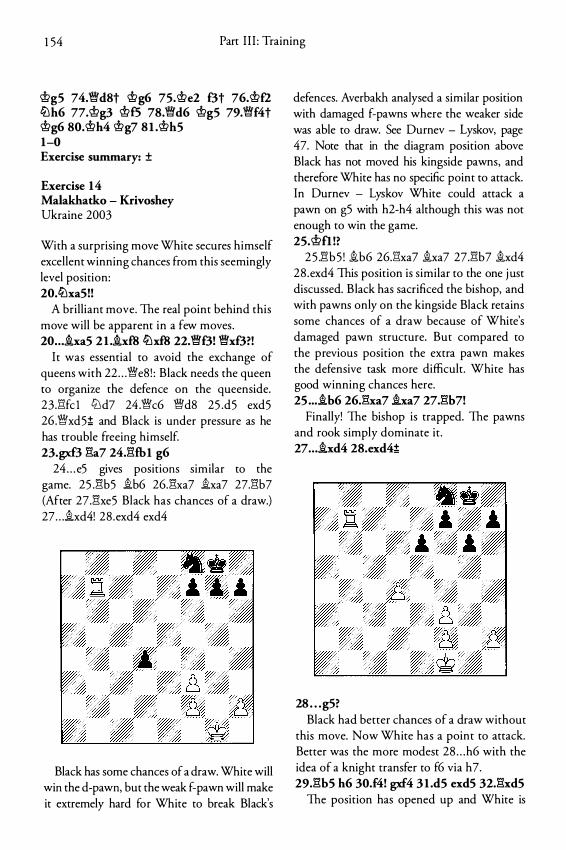
1 54 Part I I I : Training
@gS 74.�d8t @g6 7S.@e2 f3t 76.@fl ltlh6 77.@g3 @fS 78.�d6 @gS 79.�f4t @g6 80.@h4 @g7 S l .@hS 1-0 Exercise summary: ±
Exercise 14 Malakhatko - Krivoshey Ukraine 2003
With a surprising move White secures himself excellent winning chances from this seemingly level position: 20.ltlxa5!!
A brilliant move. The real point behind this move will be apparent in a few moves. 20 .. . �xa5 2 1 .�xf8 ltlxf8 22.�f3! �xf3?!
It was essential to avoid the exchange of queens with 22 . . . �e8 ! : Black needs the queen to organize the defence on the queenside. 23 .Ei:fc l ttl d7 24 .�c6 �d8 25 .d5 exd5 26 .�xd5;!; and Black is under pressure as he has trouble freeing himself. 23.gxf3 E1a7 24.E1fb1 g6
24 . . . e5 gives positions similar to the game. 25 .E1b5 �b6 26.E1xa7 �xa7 27.E1b7 (After 27.E1xe5 Black has chances of a draw.) 27 . . . �xd4! 28 .exd4 exd4
Black has some chances of a draw. White will win the d-pawn, but the weak f-pawn will make it extremely hard for White to break Black's
defences. Averbakh analysed a similar position with damaged f-pawns where the weaker side was able to draw. See Durnev - Lyskov, page 47. Note that in the diagram position above Black has not moved his kingside pawns, and therefore White has no specific point to attack. In Durnev - Lyskov White could attack a pawn on g5 with h2-h4 although this was not enough to win the game. 2S.@fl!?
2 5 .:1'1b5 ! �b6 26.Ei:xa7 !xa7 27J�b7 !xd4 28 .exd4 This position is similar to the one j ust discussed. Black has sacrificed the bishop, and with pawns only on the kingside Black retains some chances of a draw because of White's damaged pawn structure. But compared to the previous position the extra pawn makes the defensive task more difficult. White has good winning chances here. 2S ... ib6 26.E1xa7 !xa7 27.E1b7!
Finally! The bishop is trapped. The pawns and rook simply dominate it . 27 .. . �xd4 28.exd4;!;
28 . . . g5? Black had better chances of a draw without
this move. Now White has a point to attack. Better was the more modest 28 . . . h6 with the idea of a knight transfer to f6 via h7. 29.E1bS h6 30.f4! gxf4 3 1 .d5 exdS 32.E1xd5
The position has opened up and White is
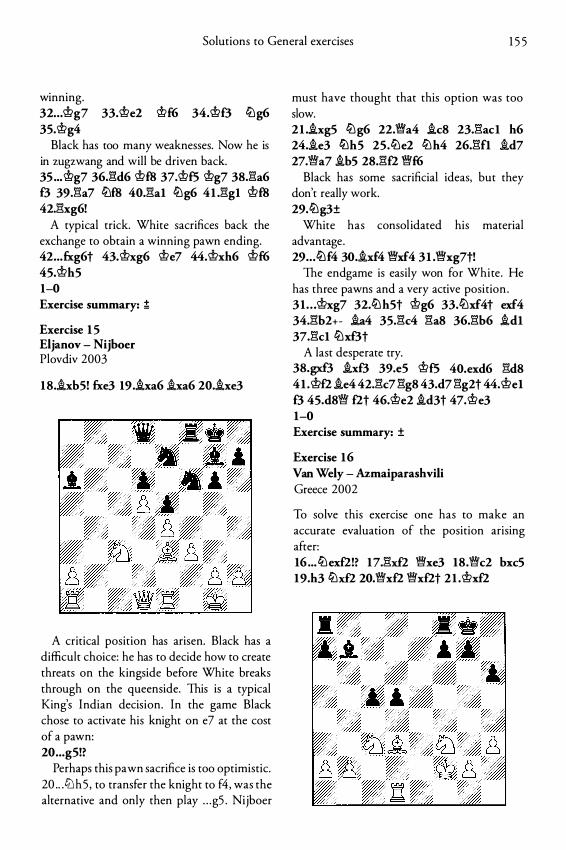
Solutions to General exercises 1 5 5
winning. 32 .. . 'it>g7 33.'it>e2 'it>f6 34.'it>f3 ltlg6 3S.'it>g4
Black has too many weaknesses. Now he is in zugzwang and will be driven back. 3S ... 'it>g7 36J:1d6 'it>f8 37.'it>f5 'it>g7 38J:'1a6 f3 39J''1a7 ltlf8 40.1"1al ltlg6 41 .1"1gl mf8 42.1"1xg6!
A typical trick. White sacrifices back the exchange to obtain a winning pawn ending. 42 ... fxg6t 43. 'it>xg6 'it>e7 44. 'it>xh6 'it>f6 4S.'it>h5 1-0 Exercise summary: ;l;
Exercise 1 5 Eljanov - Nijboer Plovdiv 2003
18 . .ixb5! fxe3 19 . .ixa6 .ixa6 20 . .ixe3
A critical position has arisen. Black has a difficult choice: he has to decide how to create threats on the kingside before White breaks through on the queenside. This is a typical King's Indian decision. In the game Black chose to activate his knight on e7 at the cost of a pawn: 20 ... g5!?
Perhaps this pawn sacrifice is too optimistic. 20 .. .ltJh5 , to transfer the knight to f4, was the alternative and only then play . . . g5 . Nijboer
must have thought that this option was too slow. 21 ..ixg5 ltlg6 22.'1Wa4 .ic8 23.1"1acl h6 24 . .ie3 lLlhS 25.ltle2 ltlh4 26.1"1fl .id7 27.Wf.a7 .ibS 28.1"1£2 Wf.f6
Black has some sacrificial ideas, but they don't really work. 29.ltlg3±
White has consol idated his material advantage. 29 .. . ltlf4 30 . .ixf4 Wf.xf4 3l .Wf.xg7t!
The endgame is easily won for White. He has three pawns and a very active position . 31 . . . 'it>xg7 32.ltlh5t 'it>g6 33.ltlxf4t exf4 34.1"1b2+- .ia4 35.1"1c4 1"1a8 36.1"1b6 .idl 37.1"1cl ltlxf3t
A last desperate try. 38.gxf3 .ixf3 39.e5 'it>fS 40.exd6 1"1d8 41 . mf2 .ie4 42.1"1c7 1"1g8 43.d7 1"1g2t 44. mel f3 4S.d8Wf. f2t 46.'it>e2 .id3t 47.'it>e3 1-0 Exercise summary: ±
Exercise 16 Van Wely - Azmaiparashvili Greece 2002
To solve this exercise one has to make an accurate evaluation of the position arising after: 16 ... ltlexf2!? 17.1"1xf2 Wf.xe3 18.Wf.c2 bxcS 19.h3 ltlxf2 20.Wf.xf2 Wf.xf2t 2 1 .'it>xf2
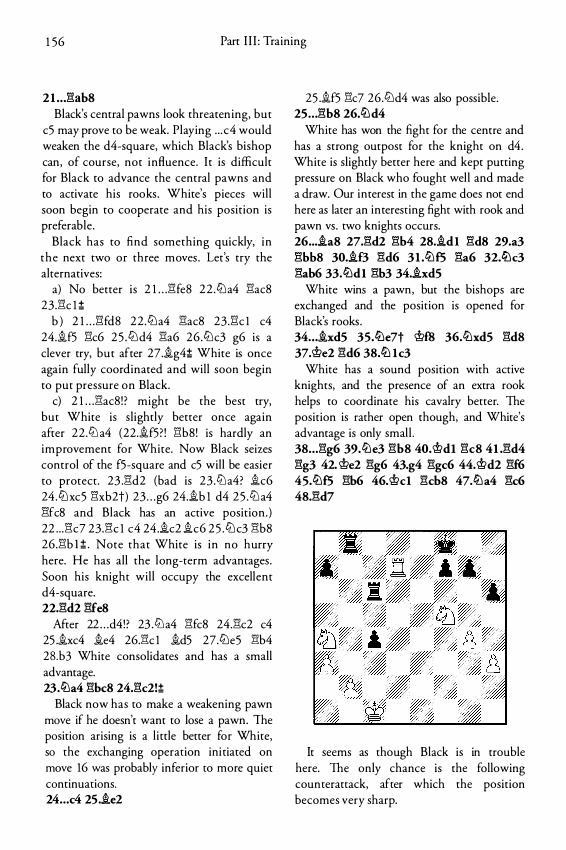
1 56 Parr I I I : Training
21 ..J:!:ab8 Black's central pawns look threaten ing, but
c5 may prove to be weak. Playing . . . c4 would weaken the d4-square, which Black's bishop can, of course, not influence. I t is difficult for Black to advance the central pawns and to activate his rooks . White's pieces will soon begin to cooperate and his position is preferable.
Black has to find something quickly, in the next two or three moves . Let's try the alternatives:
a) No better is 2 1 . . .l'l:fe8 22 .lt:la4 l'l:acS 23 .l'l:c l ;!;
b ) 2 1 . . .l'l:fd8 22 .lt:la4 l'l:acS 23 .l'l:c l c4 24.�f5 l'l:c6 2 5 . lt:l d4 l'l:a6 26 .lt:lc3 g6 is a clever try, but after 27 .�g4;!; White is once again fully coordinated and will soon begin to put pressure on Black.
c) 2 1 . . .l'l:ac8 ! ? might be the best try, but White is slightly better once again after 22 .lt:l a4 (22.�f5? ! l'l:bS! is hardly an improvement for White. Now Black seizes control of the f5-square and c5 will be easier to protect. 23 .l'l:d2 (bad is 23 .lt:la4? �c6 24 .lt:lxc5 l'l:xb2t) 23 . . . g6 24.�b 1 d4 2 5 . lt:l a4 l'l:fcS and Black has an active position . ) 22 . . . l'l:c7 23 .l'l:c l c4 24 .�c2 �c6 2 5 . lt:l c3 l'l:bS 26.l'l:b 1;!; . Note that White is in no hurry here. He has all the long-term advantages . Soon his knight will occupy the excellent d4-square. 22.l'l:d2 l'l:fe8
After 22 . . . d4! ? 23 .lt:la4 l'l:fcS 24.l'l:c2 c4 25 .�xc4 �e4 26.l'l:c l �d5 27.lt:le5 l'l:b4 28.b3 White consolidates and has a small advantage. 23.li:\a4 l'l:bc8 24.l'l:c2!;!;
Black now has to make a weakening pawn move if he doesn't want to lose a pawn. The position arising is a l ittle better for White, so the exchanging operation ini tiated on move 16 was probably inferior to more quiet continuations. 24 .. . c4 2S.ie2
25 .�f5 l'l:c7 26.lt:ld4 was also possible. 2s . . . :gbs 26.li:\d4
White has won the fight for the centre and has a strong outpost for the knight on d4. White is slightly better here and kept putting pressure on Black who fought well and made a draw. Our interest in the game does not end here as later an interesting fight with rook and pawn vs . two knights occurs. 26 ... ias 27.:gd2 :gb4 28.�dl :gds 29.a3 :gbb8 30.if3 :gd6 3I .li:\f5 :ga6 32.ltk3 :gab6 33.li:ldl :gb3 34.ixd5
White wins a pawn, but the bishops are exchanged and the position is opened for Black's rooks . 34 . • . �xd5 3S.li:le7t @ffi 36.li:\xd5 l'l:d8 37.@e2 l'l:d6 38.li:l lc3
White has a sound position with active knights, and the presence of an extra rook helps to coordinate his cavalry better. The position is rather open though, and White's advantage is only smal l . 38 . . . :gg6 39.li:\e3 l'l:b8 40.@dl l'l:c8 4l .:gd4 :gg3 42. @e2 :gg6 43.g4 :ggc6 44. @d2 :gf6 4S.li:\f5 l'l:b6 46.@cl l'l:cb8 47.li:la4 :gc6 48.:gd7
It seems as though Black is in trouble here. The only chance is the following counterattack, after which the position becomes very sharp.
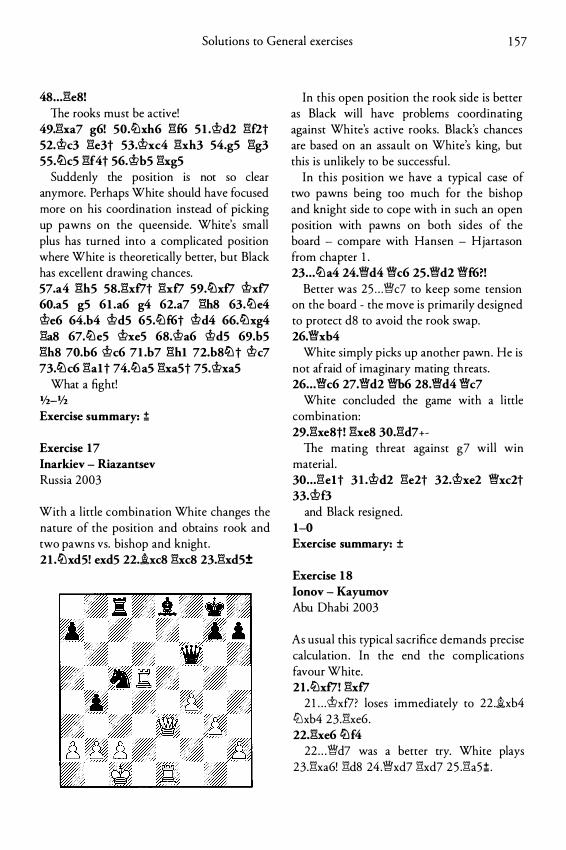
Solutions to General exercises 1 57
48 .. . E1e8! The rooks must be active!
49.E1xa7 g6! 50.itlxh6 E1f6 5 1 . <i>d2 E1f2t 52. <i>c3 E1e3t 53. <±>xc4 E1xh3 54.g5 E1g3 55.ttlc5 E1f4t 56.<i>b5 E1xg5
Suddenly the position is not so clear anymore. Perhaps White should have focused more on his coordination instead of picking up pawns on the queenside. White's small plus has turned into a complicated position where White is theoretically better, bur Black has excellent drawing chances. 57.a4 E1h5 58.E1xf7t E1xf7 59.ttlxf7 <i>xf7 60.a5 g5 61 .a6 g4 62.a7 E1h8 63.ttle4 <±>e6 64.b4 <i>d5 65.itlf6t <±>d4 66.ttlxg4 E1a8 67.ttle5 <±>xeS 68.<±>a6 <i>dS 69.b5 E1h8 70.b6 <i>c6 71 .b7 E1h1 72.b8ttlt <±>c7 73.ttlc6 E1a1 t 74.ttla5 E1xa5t 75.<i>xa5
What a fight! 112-lfz Exercise summary: ;!;
Exercise 17 lnarkiev - Riazantsev Russia 2003
With a l ittle combination White changes the nature of the position and obtains rook and two pawns vs. bishop and knight. 21 .ttlxd5! exd5 22.ixc8 E1xc8 23.E1xd5±
In this open position the rook side is better as Black will have problems coordinating against White's active rooks. Black's chances are based on an assault on White's king, but this is unlikely to be successful.
In this position we have a typical case of two pawns being too much for the bishop and knight side to cope with in such an open position with pawns on both sides of the board - compare with Hansen - Hjartason from chapter 1 . 23 .. . ttla4 24.�d4 �c6 25.�d2 �f6?!
Better was 25 . . . �c7 to keep some tension on the board - the move is primarily designed to protect d8 to avoid the rook swap. 26.�xb4
White simply picks up another pawn. He is not afraid of imaginary mating threats . 26 . . . �c6 27.�d2 �b6 28.�d4 �c7
White concluded the game with a l ittle combination: 29.E1xe8t! E1xe8 30.E1d7 + -
The mating threat against g7 will win material . 30 .. . E1e1 t 3 I .<i>d2 E1e2t 32.<i>xe2 �xc2t 33.<i>f3
and Black resigned. 1-0 Exercise summary: ±
Exercise 1 8 lonov - Kayumov Abu Dhabi 2003
As usual this typical sacrifice demands precise calculation . In the end the complications favour White. 2I .itlxf7! E1xf7
2 1 . . . <i>xf7? loses immediately to 22 .ixb4 ctJxb4 23.E1xe6 . 22.E1xe6 ttlf4
22 . . . �d7 was a better try. White plays 23.E1xa6! l'!d8 24 .�xd7 l'!xd7 25 .l'!a5 ! .
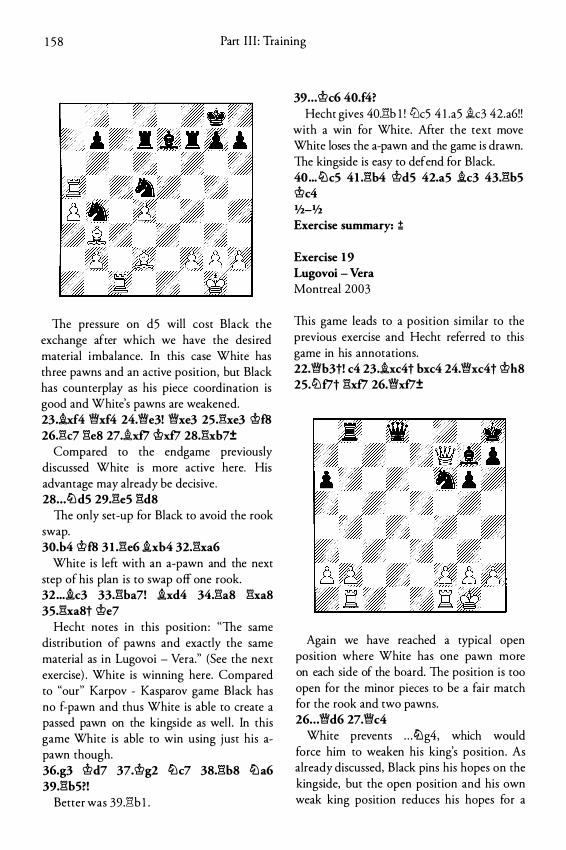
1 5 8 Part I I I : Training
The pressure on d5 will cost Black the exchange after which we have the desired material imbalance. In this case White has three pawns and an active position, but Black has counterplay as his piece coordination is good and White's pawns are weakened. 23 . .ixf4 'Wxf4 24.'We3! 'Wxe3 25J''1xe3 @f8 26Jk7 :Be8 27.-ixfl @xf7 28.:Bxh7±
Compared to the endgame previously discussed White is more active here. His advantage may already be decisive . 28 . . . lt:\d5 29.:!'\eS :Bd8
The only set-up for Black to avoid the rook swap. 30.b4 'it>f8 3l .:Be6 .ixb4 32.:Bxa6
White is left with an a-pawn and the next step of his plan is to swap off one rook. 32 ... .ic3 33.:Bha7! .ixd4 34.:Ba8 :Bxa8 35.:!'\xaSt 'it>e7
Hecht notes in this position : "The same distribution of pawns and exactly the same material as in Lugovoi - Vera." (See the next exercise) . White is winning here. Compared to "our" Karpov - Kasparov game Black has no f-pawn and thus White is able to create a passed pawn on the kingside as wel l . In this game White is able to win using just his apawn though. 36.g3 'it>d7 37.'it>g2 lt:\c7 38.:Bb8 lt:la6 39.:!'\hS?!
Better was 39 .:!'\b l .
39 .. . 'it>c6 40.f4? Hecht gives 40.Elb 1 ! CLlc5 4 l .a5 .ic3 42.a6! !
with a win for White. After the text move White loses the a-pawn and the game is drawn. The kingside is easy to defend for Black. 40 ... '2lc5 4I .:Bb4 'it>dS 42.a5 .ic3 43.:!'\hS 'it>c4 1!2-1/2
Exercise summary: ;!;
Exercise 19 Lugovoi - Vera Montreal 2003
This game leads to a position similar to the previous exercise and Hecht referred to this game in his annotations. 22.'Wh3t! c4 23 . .ixc4t bxc4 24.'Wxc4t 'it>h8 25.ltlf7t :Bxfl 26.'Wxf7±
Again we have reached a typical open position where White has one pawn more on each side of the board. The position is too open for the minor pieces to be a fair match for the rook and two pawns. 26 . . . 'Wd6 27.'Wc4
White prevents . . . tLlg4, which would force him to weaken his king's position. As already discussed, Black pins his hopes on the kingside, but the open position and his own weak king position reduces his hopes for a
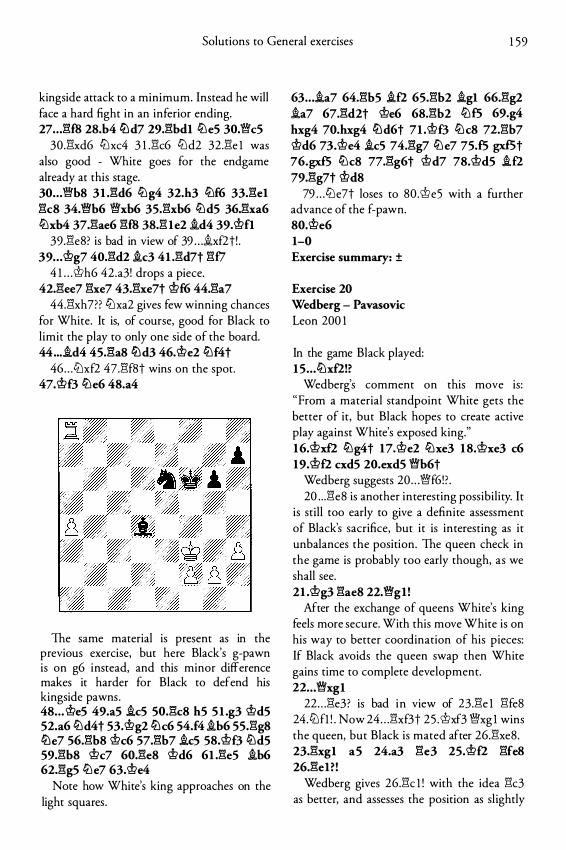
Solutions to General exercises 1 59
kingside attack to a minimum. Instead he will face a hard fight in an inferior ending. 27 . . J�ffi 28.b4 ttld7 29.�bdl tt:leS 30.1.Wc5
30.�xd6 ctJxc4 3 1 .�c6 ctJd2 32.�e 1 was also good - White goes for the endgame already at this stage. 30 . . .1.Wb8 3l .�d6 tt:lg4 32.h3 tt:lf6 33.�el �c8 34.Wfb6 Wl'xb6 3S.�xb6 tt:ldS 36.�xa6 tt:lxb4 37.�ae6 �ffi 38.� le2 .id4 39.'it>fl
39.�e8? is bad in view of 39 . . . .ixf2t! . 39 . . . 'it>g7 40.�d2 .ic3 4l .�d7t �fl
4 1 . . .'it>h6 42.a3! drops a piece. 42.�ee7 �xe7 43.�xe7t 'it>f6 44.�a7
44.�xh7?? ctJxa2 gives few winning chances for White. It is, of course, good for Black to l imit the play to only one side of the board. 44 ... .id4 4S.�a8 ttld3 46.'it>e2 tt:lf4t
46 . . . tt:Jxf2 47.�f8t wins on the spot. 47.'it>O tt:le6 48.a4
The same material is present as in the previous exercise, but here Black's g-pawn is on g6 instead, and this minor difference makes it harder for Black to defend his kingside pawns. 48 .. . 'it>e5 49.a5 .icS SO.�c8 hS S l .g3 'it>dS 52.a6 tt:ld4t 53.'it>g2 ttlc6 S4.f4 .ib6 SS.�g8 ttle7 56.�b8 'it>c6 57.�b7 .icS SB.'it>O tt:ldS 59.�b8 'it>c7 60.�e8 'it>d6 6l .�e5 .ib6 62.�g5 tt:le7 63.'it>e4
Note how White's king approaches on the light squares .
63 .. . .ia7 64.�b5 .i£2 6S.�b2 .igl 66.�g2 .ia7 67.�d2t 'it>e6 68.�b2 tt:lfS 69.g4 hxg4 70.hxg4 ttld6t 7l .'it>O tt:lcs n.�b7 'it>d6 73.'it>e4 .icS 74.�g7 tt:le7 7S.f5 gxfSt 76.gxf5 tt:lc8 77.�g6t 'it>d7 78.'it>d5 .i£2 79.�g7t 'it>d8
79 . . . l2le7t loses to 80 .'it>e5 with a further advance of the f-pawn. 80.'it>e6 1-0 Exercise summary: ±
Exercise 20 Wedberg - Pavasovic Leon 200 1
In the game Black played: lS . . . tt::lx£2!?
Wedberg's comment on this move is: "From a material standpoint White gets the better of it, but Black hopes to create active play against White's exposed king." 16.'it>xf2 tt:lg4t 17.'it>e2 tt:lxe3 18.'it>xe3 c6 19.'it>f2 cxdS 20.exd5 Wfb6t
Wedberg suggests 20 . . . Wff6! ? . 20 . . . �e8 is another interesting possibility. It
is still too early to give a definite assessment of Black's sacrifice, but it is interesting as it unbalances the position. The queen check in the game is probably too early though, as we shall see. 2l .'it>g3 �ae8 22.Wfgl!
After the exchange of queens White's king feels more secure. With this move White is on his way to better coordination of his pieces: If Black avoids the queen swap then White gains time to complete development. 22 .. . Wfxgl
22 . . . �e3 ? is bad in view of 23.�e 1 �fe8 24.lt:Jfl ! . Now 24 . . . �xf3t 25 .'it>xf3 Wfxg 1 wins the queen, but Black is mated after 26.�xe8. 23.�xgl aS 24.a3 �e3 25. 'it>£2 �feB 26.�el? !
Wedberg gives 26.�c l ! with the idea �c3 as better, and assesses the position as sl ightly
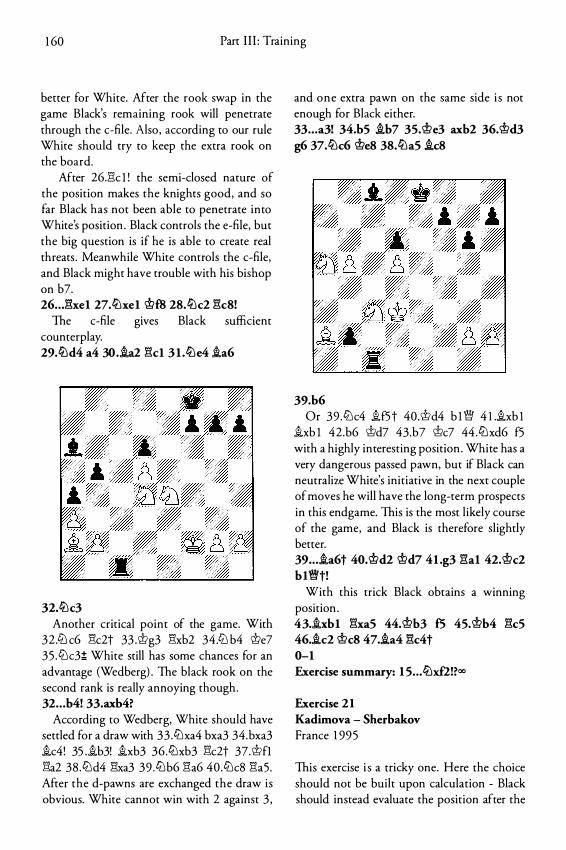
1 60 Part I I I : Training
better for White. After the rook swap in the game Black's remaining rook will penetrate through the c-file. Also , according to our rule White should try to keep the extra rook on the board.
After 26Jlc l ! the semi-closed nature of the position makes the knights good, and so far Black has not been able to penetrate into White's position . Black controls the e-file, but the big question is if he is able to create real threats . Meanwhile White controls the c-file, and Black might have trouble with his bishop on b7. 26 . . J�xe1 27.lilxe1 'it>f8 28.lilc2 1'=1c8!
The c-file gives Black sufficient counterplay. 29.lild4 a4 30 . .ia2 1'=1cl 3 1 .lile4 .ia6
32.lilc3 Another critical point of the game. With
32 .Ct'l c6 1'=1c2t 33 .'it>g3 1'=1xb2 34.Ct:l b4 'it>e7 35 .Ctlc3;!; White still has some chances for an advantage (Wedberg) . The black rook on the second rank is really annoying though. 32 . . . b4! 33.axb4?
According to Wedberg, White should have settled for a draw with 33 .Ctlxa4 bxa3 34.bxa3 .ic4! 35 . .ib3! .ixb3 36.Ct:lxb3 1'=1c2t 37.'it>fl 1'=1a2 38 .Ct:ld4 Elxa3 39 .Ct:lb6 Ela6 40.Ctlc8 Ela5. After the d-pawns are exchanged the draw is obvious. White cannot win with 2 against 3 ,
and one extra pawn on the same side i s not enough for Black either. 33 .. . a3! 34.b5 .ib7 3S.'it>e3 axb2 36.'it>d3 g6 37.lilc6 'it>e8 38.lila5 .ic8
39.b6 Or 39 .Ctlc4 .if5t 40.'it>d4 b l \W 4 I ..ixb l
.ixb l 42.b6 'it>d7 43.b7 'it>c7 44.Ct:lxd6 f5 with a highly interesting position . White has a very dangerous passed pawn, but if Black can neutralize White's initiative in the next couple of moves he will have the long-term prospects in this endgame. This is the most likely course of the game, and Black is therefore slightly better. 39 .. . .ia6t 40.'it>d2 'it>d7 41 .g3 1'=1a1 42.'it>c2 b11Mft!
With this trick Black obtains a winning position . 43 . .ixb1 1'=1xa5 44.'it>b3 f5 4S.'it>b4 1'=1c5 46 . .ic2 'it>c8 47 . .ia4 Elc4t 0-1 Exercise summary: 1 S . . . lilxf2!?oo
Exercise 2 1 Kadimova - Sherbakov France 1 99 5
This exercise i s a tricky one. Here the choice should not be built upon calculation - Black should instead evaluate the position after the
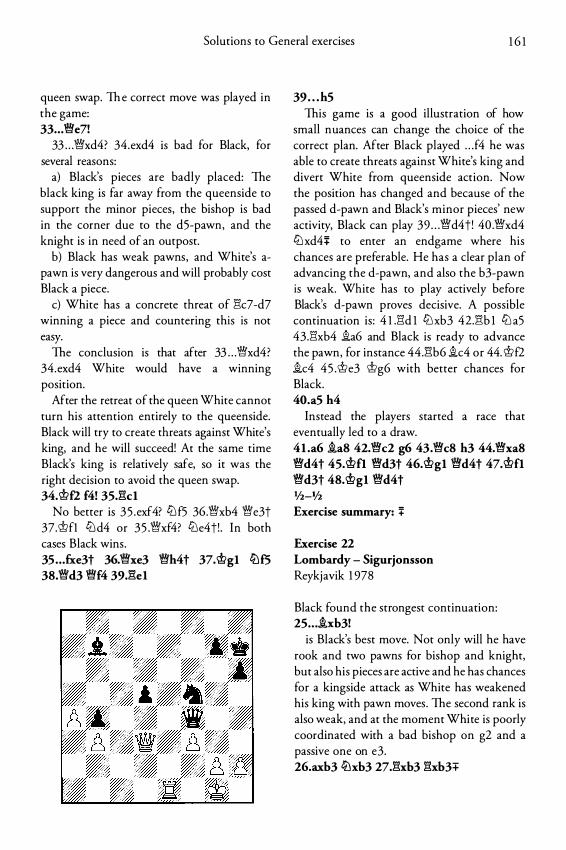
Solutions to General exercises 1 6 1
queen swap. Th e correct move was played in the game: 33 .. . Wle7!
33 . . . Wfxd4? 34.exd4 is bad for Black, for several reasons:
a) Black's pieces are badly placed: The black king is far away from the queenside to support the minor pieces, the bishop is bad in the corner due to the d5-pawn, and the knight is in need of an outpost.
b) Black has weak pawns, and White's apawn is very dangerous and will probably cost Black a piece.
c) White has a concrete threat of �c7-d7 winning a piece and countering this is not easy.
The conclusion is that after 33 . . . �xd4? 34.exd4 White would have a winning position.
After the retreat of the queen White cannot turn his attention entirely to the queenside. Black will try to create threats against White's king, and he will succeed! At the same time Black's king is relatively safe, so it was the right decision to avoid the queen swap. 34. 'it>fl f4! 35Jkl
No better is 3 5 .exf4? l/J f5 36.�xb4 �e3t 37.\t>fl l/J d4 or 35 .�xf4? l/Je4t! . In both cases Black wins. 35 . . . fxe3t 36.�xe3 Wfh4t 37.\t>gl fi)f5 38.�d3 Wlf4 39J�el
39 . . . h5 This game is a good illustration of how
small nuances can change the choice of the correct plan. After Black played . . . f4 he was able to create threats against White's king and divert White from queenside action. Now the position has changed and because of the passed d-pawn and Black's minor pieces' new activity, Black can play 39 . . . �d4t! 40 .�xd4 l2l xd4:j: to enter an endgame where his chances are preferable. He has a clear plan of advancing the d-pawn, and also the b3-pawn is weak. White has to play actively before Black's d-pawn proves decisive. A possible continuation is: 4 l .�d 1 l2l xb3 42.Elb 1 l2l a5 43.�xb4 �a6 and Black is ready to advance the pawn, for instance 44.�b6 �c4 or 44. 'it>f2 �c4 45 .We3 Wg6 with better chances for Black. 40.a5 h4
Instead the players started a race that eventually led to a draw. 41 .a6 �a8 42.Wfc2 g6 43.Wfc8 h3 44.Wfxa8 Wld4t 45.\t>fl Wld3t 46.\t>gl W!d4t 47.\t>fl Wld3t 48.\t>gl Wld4t lf2-11z Exercise summary: :j:
Exercise 22 Lombardy - Sigurjonsson Reykjavik 1 978
Black found the strongest continuation: 25 . . . hb3!
is Black's best move. Not only will he have rook and two pawns for bishop and knight, but also his pieces are active and he has chances for a kingside attack as White has weakened his king with pawn moves. The second rank is also weak, and at the moment White is poorly coordinated with a bad bishop on g2 and a passive one on e3. 26.axb3 tt:\xb3 27.�xb3 Elxb3+
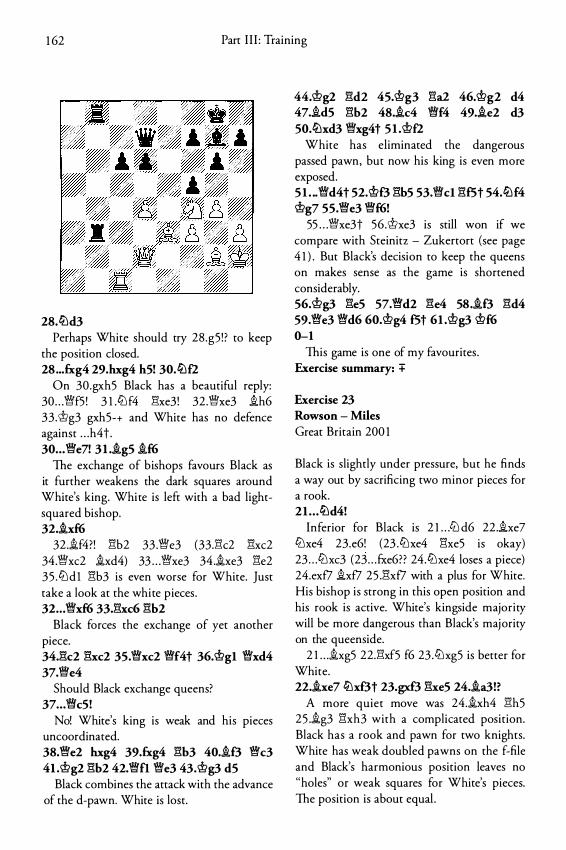
1 62 Part I I I : Training
28.ttld3 Perhaps White should try 28 .g5 ! ? to keep
the position closed. 28 ... fxg4 29.hxg4 h5! 30.tt:lf2
On 30.gxh5 Black has a beautiful reply: 30 . . . �f5 ! 3 1 .ttl f4 8:xe3 ! 32 .�xe3 ih6 33 .mg3 gxh5-+ and White has no defence against . . . h4t . 30 .. . �e7! 3 I .ig5 if6
The exchange of bishops favours Black as it further weakens the dark squares around White's king. White is left with a bad lightsquared bishop. 32 . .ixf6
32 .if4?! E1b2 33 .�e3 (33.8:c2 E1xc2 34.�xc2 ixd4) 33 . . . �xe3 34 .ixe3 E1e2 35 .'Lld1 E1b3 is even worse for White. Just take a look at the white pieces . 32 .. . �xf6 33.1%xc6 l%b2
Black forces the exchange of yet another piece. 34.1%c2 l%xc2 35.�xc2 '1Wf4t 36.mgl �xd4 37.'1We4
Should Black exchange queens? 37 .. . \Wc5!
No! White's king is weak and his pieces uncoordinated. 38.�e2 hxg4 39.fxg4 l%h3 40.if3 '1Wc3 4Lmg2 l%h2 42.�f1 �e3 43.mg3 d5
Black combines the attack with the advance of the d-pawn. White is lost.
44. mg2 1%dz 45. mg3 l%a2 46. mg2 d4 47.id5 l%h2 48.ic4 \Wf4 49.ie2 d3 50.tt:lxd3 �xg4t 5 I .@f2
White has eliminated the dangerous passed pawn, but now his king is even more exposed. 5 1 . .. �d4t 52.@f3 l%b5 53. \Wei 1%f5t 54.tt:lf4 mg? 55.�e3 �f6!
55 . . . �xe3t 56 .mxe3 is still won if we compare with Steinitz - Zukertort (see page 4 1 ) . But Black's decision to keep the queens on makes sense as the game is shortened considerably. 56.mg3 l%e5 57.�d2 l%e4 58 . .if3 1%d4 59.�e3 '1Wd6 6o.mg4 f5t 6I .mg3 mf6 0-1
This game is one of my favourites . Exercise summary: +
Exercise 23 Rowson - Miles Great Britain 200 1
Black is slightly under pressure, but he finds a way out by sacrificing two minor pieces for a rook. 21 . . .tt:ld4!
Inferior for Black is 2 l . . .Ct:l d6 22 .ixe7 'Llxe4 23.e6! (23 .'Llxe4 E1xe5 is okay) 23 . . . 'Llxc3 (23 . . . £Xe6?? 24.'Llxe4 loses a piece) 24.exf7 ixf7 25 .E1xf7 with a plus for White. His bishop is strong in this open position and his rook is active. White's kingside majority will be more dangerous than Black's majority on the queenside.
2 l . . .ixg5 22.8:xf5 f6 23 .tt:lxg5 is better for White. 22 . .ixe7 tilxf3t 23.gxf3 l%xe5 24 . .ia3!?
A more quiet move was 24.ixh4 E'lh5 25 .ig3 E1xh3 with a complicated position. Black has a rook and pawn for two knights. White has weak doubled pawns on the f-file and Black's harmonious position leaves no "holes" or weak squares for White's pieces. The position is about equal .
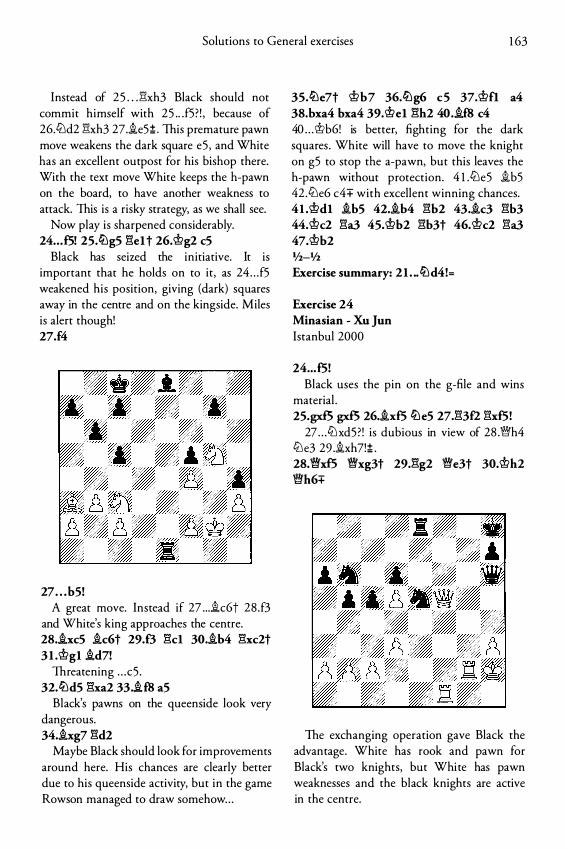
Solutions to General exercises 1 63
Instead of 25 . . . �xh3 Black should not commit himself with 25 .. . f5 ? ! , because of 26.4Jd2 �xh3 27.ie5;!; . This premature pawn move weakens the dark square e5 , and White has an excellent outpost for his bishop there. With the text move White keeps the h-pawn on the board, to have another weakness to attack. This is a risky strategy, as we shall see.
Now play is sharpened considerably. 24 . . . f5! 25.ttlg5 l:%elt 26.'it>g2 cS
Black has seized the initiative. It is important that he holds on to it, as 24 . . . f5 weakened his position, giving (dark) squares away in the centre and on the kingside. Miles is alert though! 27.f4
27 . . . b5! A great move. Instead if 27 . . . ic6t 28 .f3
and White's king approaches the centre. 28 . .ixc5 ic6t 29.£3 l:%cl 30.ib4 l:%xc2t 3 1 .'it>gl .id7!
Threatening . . . c5 . 32.ttld5 l:%xa2 33 . .if8 aS
Black's pawns on the queenside look very dangerous. 34.ixg7 1:%d2
Maybe Black should look for improvements around here. His chances are clearly better due to his queenside activity, but in the game Rowson managed to draw somehow . . .
35.ttle7t 'it>b7 36.ttlg6 cS 37.'it>fl a4 38.bxa4 bxa4 39. 'it>el l:%h2 40 . .if8 c4 40 . . . 'it>b6! is better, fighting for the dark squares . White will have to move the knight on g5 to stop the a-pawn, but this leaves the h-pawn without protection. 4 1 .4Je5 ib5 42 .4Je6 c4+ with excellent winning chances. 41 .'it>dl ihS 42 . .ih4 l:%b2 43.ic3 l:%b3 44. 'it>c2 l:%a3 45. 'it>b2 l:%h3t 46. 'it>c2 l:%a3 47.'it>b2 1/z-1/2 Exercise summary: 2 1 . .. ttld4!=
Exercise 24 Minasian - Xu Jun Istanbul 2000
24 ... f5! Black uses the pin on the g-file and wins
material . 25.gxf5 gxf5 26.ixf5 ttleS 27.1:%3fl l:%xf5!
27 . . . 4J xd5 ? ! is dubious in view of 28 .'1Wh4 4Je3 29 .ixh7!;!; . 28.'\WxfS '1Wxg3t 29.1:%g2 '1We3t 30.'it>h2 iWh6+
The exchanging operation gave Black the advantage. White has rook and pawn for Black's two knights, but White has pawn weaknesses and the black knights are active in the centre.

1 64 Part Ill : Training
31 .Wfe4 3 1 .Wff6t? Wfxf6 32.Eixf6 E\dS! is bad for
White who loses the d5-pawn. 31 . . . tl:\bd7 32.d4 cxd4 33.Wfxd4 tl:\f6 34.Wff4?!
White should have kept the tension in the position. Perhaps the players were in time trouble. 34 . . . Wfxf4t 35.Eixf4 tl:\xdS 36J''!fn tl:\e3 37.Eig3 tl:\dl
37 . . . lZ'l 5c4! 38.Eid2 tl:\xb2 39J"!xd6 Ela8 40.E\e6 tl:\bc4
Black has secured a strong outpost for his knight on c4, but the position was opened up after the exchange of pawns. 41 .h4 tL\ g6 42.Eig4 E\£8!
Black starts an attack against White's king. The presence of a rook makes this possible for Black. 43.Eixa6 tl:\geS 44.Eig3
The following line shows how dangerous rook and two knights can be: 44J'l:e4 Elf2t 45 .'it>g3 Elf3t 46.'it>h2 lZ'le3 47.'it>g1 Elfl t 4S.'it>h2 Elf2t 49 .'it>g1 Elg2t 50 .'it>h 1 lZ'l 5g4 and White loses material . 44 . . . tl:\d2 4S.'it>h3 tl:\fl 46J'k3 b4! 47.Eic5
47.Eib3 Elf2! gives rise to beautiful mating patterns, for instance: 48 .Eia8t 'it>g7 49 .l"'a7t (49.l"'g3t was necessary) 49 . . . 'it>h6 and mate on h2 soon.
47 ... Eig8! 48.1"!a8 48 .Eixe5 Elg3 mate!
48 ... E\xa8 49.Eixe5 E\xa2 SO.E\e4 Ela3t White resigned due to 5 1 .'it>g2 lZ'le3t and
52 . . . lZ'lxc2. 0-1 Exercise summary: +
Exercise 25 Browne - Van der Wiel Wijk aan Zee 1 983
24.i.xd5! 24.i.a5 lZ'lxc3 25 .ixc3 id6 is nothing
special for White. The text move secures him an advantage. 24 ... ixd5 2S.lZ'lxd5 c3
25 . . . Eixd5 26.E\xd5 �xb6 27.�xc4± leaves White's pawn structure intact. 26.bxc3 E\xdS 27.Eixd5 �xb6 28.a4±
White has rook and two pawns in this open position with pawns on both sides of the board. He is active and has clearly better chances . Black has no real counterplay because the open position favours the rook and he has no chance of creating a passed pawn. Black will have a hard time defending here. 28 . . . lt:'lc7 29.Eid7 WfcS 30.Wfe4 c!Lle6 3 1 .�b7 if6 32.Wfxa6 Wfxc3 33.Wfb5 idS 34.E\7d3

Solutions to General exercises 1 6 5
'Wc7 35.l:�d5 'Wc2 36.a5 'Wa2 37.'Wb4 fi.c7 38.'Wd2 'Wa4 39.'Wc3 E:a8 40.E:al 'Wh4
41 .h3 Black's kingside initiative is nothing special.
Meanwhile White is active and the a-pawn is dangerous . 41 . .. E:a7 42.a6 h6 43.'Wd3 g6 44.@fl 'Wf6 45.E:a2 fi.h6 46.E:d6 fi.c7 47.E:d5 fi.h6 48.E:d6 fi.c7 49.E:c6 'We5 50.E:d2 fi.a5 5 1 .E:dl
Black has defended well . It is not easy to break through as long as Black keeps pieces on the board. Now White unexpectedly gets a l i ttle help from Black. 5 1 . .. 'Wh2? 52.E:xe6! fxe6 53.'Wxg6t E:g7 54.'Wxe6t @hs 55.'Wxh6t @gs 56.'We6t @hs 57.'We8t @h7 58.'Wh5t @gs 59.'Wxa5
Black could resign here. 59 ... 'Wxg2t 60.@e2 E:£7 61 .E:d8t 1-0 Exercise summary: ±
Exercise 26 Roeder - Schneider Germany 1 987
Black obtains a winning position with the following combination : 23 .. . axh3! 24.ltlxc5 ltlxc4t 25.@e2 E:xd2t
26.E:xd2 ltlxd2 27.@xd2 bxa2 28.ltlxa2 b6 After this forced sequence Black has a
winning advantage. The rwo knights cannot match the rook and rwo passed pawns. 29.ltld3 @d6 30.ltlc3 E:a8 3 I .@c2 E:al?! 32.ltlcl
32 . . . h5?? Mter this move Black's rook is trapped.
Instead he should retreat his rook and try to open a second front on the kingside before he advances his queenside pawns. The following line is possible:
32 . . J'la8 33 .li:Jd3 b5 34.@b2 (34.g4 Elh8! and after . . . h5 Black will open a file on the kingside.) 34 . . . h5 35 .@c2 (3 5 .h4 g5! again opens up the position) 35 . . . Ela5 36.@b2 c5 37.@c2 c4 38 .li:Jb4 @cS 39 .li:Jcd5 f5 40 .f3 A weakness has been created. 40 . . . Ela4 4 l .i>c3 Ela3t 42.@c2 Elxf3-+ 33.ltl3a2!
Now it is Black who seeks the draw. 33 ... f5 34.f3 fxe4 35.fxe4 b4 36.@b2 E:xa2t 37.ltlxa2 @c5 38.i>b3 i>d4 39.ltlxb4 c5 40.ltld5 @xe4 4I .i>c4 @f3 42.@xc5 @g2 43.g4 h5 44.g5 @xh2 45.ltle7 @g3 46.ltlxg6 i>g4
and draw agreed. lf2-lf2
Exercise summary: - +
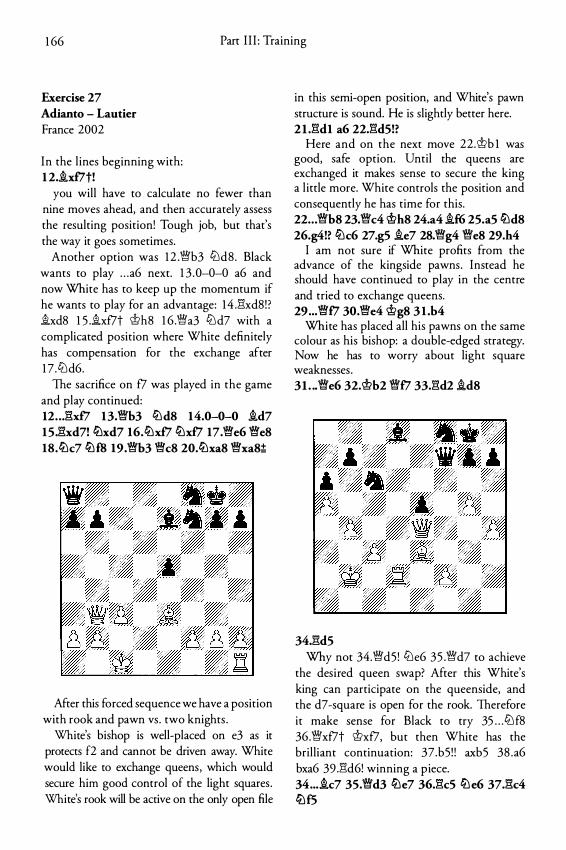
1 66 Part I I I : Training
Exercise 27 Adianto - Lautier France 2002
In the l ines beginning with: 1 2.�xf7t!
you will have to calculate no fewer than nine moves ahead, and then accurately assess the resulting position! Tough job, but that's the way it goes sometimes.
Another option was 1 2 .�b3 '2ld8. Black wants to play . . . a6 next. 1 3 .0-0-0 a6 and now White has to keep up the momentum if he wants to play for an advantage: 14 .l"lxd8 ! ? �xd8 1 5 .�xf7t lt>h8 1 6 .�a3 '2l d7 with a complicated position where White definitely has compensation for the exchange after 1 7 .'2ld6.
The sacrifice on f7 was played in the game and play continued: 12 . . J'�xf7 13.�b3 l!Jd8 14.0-0-0 �d7 15J''!:xd7! lLlxd7 16.l!Jxf7 l!Jxf7 17.�e6 �e8 18.lLlc7 lLlf8 19.�b3 �c8 20.lLlxa8 �xa8;l;
After this forced sequence we have a position with rook and pawn vs . two knights .
White's bishop is well-placed on e3 as it protects f2 and cannot be driven away. White would like to exchange queens, which would secure him good control of the light squares . White's rook will be active on the only open file
in this semi-open position, and White's pawn structure is sound. He is slightly better here. 2 1 .l"ldl a6 22.l"ld5!?
Here and on the next move 22.\t>b 1 was good, safe option. Until the queens are exchanged it makes sense to secure the king a l ittle more. White controls the position and consequently he has time for this. 22 .. . �b8 23.�c4 \t>h8 24.a4 �f6 25.a5 lLld8 26.g4!? l!Jc6 27.g5 �e7 28.�g4 �e8 29.h4
I am not sure if White profits from the advance of the kingside pawns. Instead he should have continued to play in the centre and tried to exchange queens. 29 ... �f7 30.�e4 lt>g8 3 1 .b4
White has placed all his pawns on the same colour as his bishop: a double-edged strategy. Now he has to worry about light square weaknesses . 31 . .. �e6 32.1t>b2 �f7 33.1"!:d2 �d8
34.l"ld5 Why not 34.�d5! '2le6 35 .�d7 to achieve
the desired queen swap? After this White's king can participate on the queenside, and the d7-square is open for the rook. Therefore it make sense for Black to try 35 . . . '2l f8 36 .�xf7t lt>xf7, but then White has the brilliant continuation: 37.b5 ! ! axb5 38 .a6 bxa6 39 .l"ld6! winning a p iece. 34 ... �c7 35.�d3 lLle7 36.l"lc5 lLle6 37J'k4 lLlfS
Solutions to General exercises 1 67
Suddenly Black has serious counterplay and the game was eventually drawn after a hard fight. 38 . .ib6 .id6 39J�k8t .if8 40J'!:b8 lt:Jxh4 41 .\We4 lt:Jg6 42J'!:xb7 \WeB 43J3a7 \Wb5 44.E:a8 li:Jgf4 45.E:c8 \Wfl 46.'1Wc2 li:Jd3t 47.1t>a2 e4 48 . .ie3 @f7 49.'1Wb3 '1We2t 50.It>a3 lt:Je5 5 L.id4 '1Wb5 52.E:xf8t @xf8 53.'1Wxe6 lt:Jc4t 54.1t>b3 lt:Jxa5t 55.1t>a3 lt:Jc4t 56.1t>b3 lt:Ja5t 57.1t>a3 lt:Jc4t 58.lt>b3 •/2-l/2 Exercise summary: ;!;
Exercise 28 Uhlmann - Timman Amsterdam 1 975
White's bishop is excellent on g5 and he should keep it there. Instead he played: 27 . .ih4?
White should have kept the pressure on e7 and not allowed Black to secure the dark squares . 27 . . • g5!
With the pressure off e7 Black can take over the initiative. 28 . .ig3 E:c8! 29.li:Jb5
Bad is 29 .'1Wxf5 ? E:xf5 30 .lLle6 l"ixd5 . 29 .. . a6 30.li:Jc3 h5!? 3 1 .E:el h4
The pawns on the kingside dominate the bishop. 32.\Wxf5 E:xf5 33 . .ifl E:cf8 34 . .ie3
34 . . . b5! Black opens up the position for his rooks .
The pawn push leads to favourable pawn exchanges for Black: After the d5-pawn drops, Black will be left with a central pawn armada. 35.axb5 axb5 36.lt:Je4 E:xd5 37.lt:Jxg5 c4 38.li:Jf3 b4 39 . .ifl e5
Black has too many pawns in the centre for White's liking. 40 . .ixh4 c3 41 .bxc3 bxc3 42.E:cl E:c8 43.\t>fl E:c4 44.lt>e2 E:e4t 45.1t>fl E:c4 46.lt>e2 E:e4t 47.1t>f'2 E:c5 48 . .ie7 E:c6 49 . .ixd6
The best practical chance. 49 .. . E:xd6 50.E:xc3 lt>g7 5 l .g4 @f6 52.E:c8 lt>e7 53.g5 E:d3 54.g6 lt>f6 55.E:c6t lt>g7 56.lt:Jg5 E:d2t 57.@£3 E:b4 58.1t>e3 E:a2
The rooks are very powerful in such an open position. 59.1t>d3 E:a3t 60.It>c2 E:g3 6l .li:Jf7 E:e4 62.li:Jd6 E:f4 63.1t>d2 E:xg6 64.E:c7t @f6
and White resigned. 0-1
Exercise summary: +
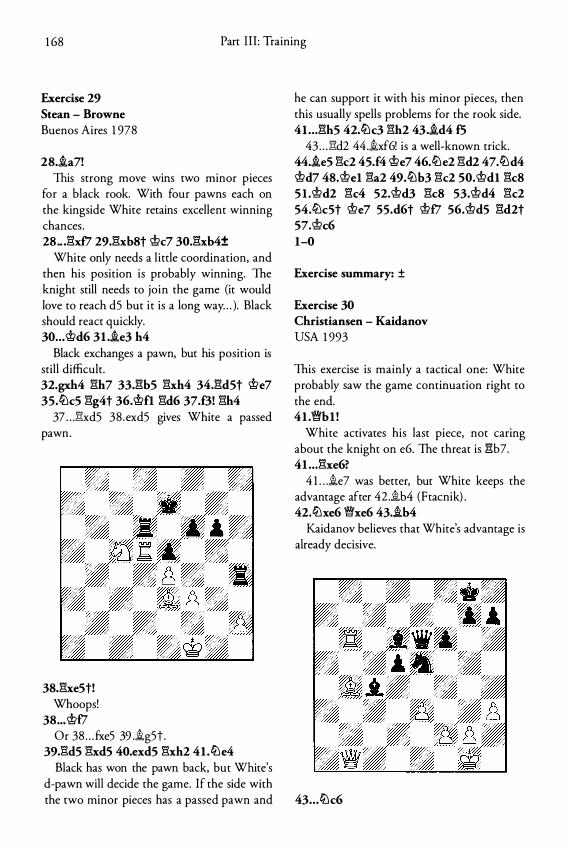
1 68 Part Ill : Training
Exercise 29 Stean - Browne Buenos Aires 1 978
28 . .ia7! This strong move wins two minor pieces
for a black rook. With four pawns each on the kingside White retains excellent winning chances . 28 .. J:1xf7 29.1':1xb8t @c7 30.1':1xb4±
White only needs a l ittle coordination, and then his position is probably winning. The knight still needs to join the game (it would love to reach d5 but i t is a long way . . . ). Black should react quickly. 30 .. . @d6 31 ..ie3 h4
Black exchanges a pawn, but his position is still difficult. 32.gxh4 :Bh7 33.1':1b5 :Bxh4 34.1':1d5t @e7 3S.ti:Jc5 :Bg4t 36.@fl :Bd6 37.f3! :Bh4
37 . . . 1':1xd5 38 .exd5 gives White a passed pawn.
38.1':1xe5t! Whoops!
38 ... @t7 Or 38 . . . fxe5 39 . .ig5t .
39J1.d5 :BxdS 40.exd5 :Bxh2 41 .ti:Je4 Black has won the pawn back, but White's
d-pawn will decide the game. If the side with the two minor pieces has a passed pawn and
he can support it with his minor pieces, then this usually spells problems for the rook side. 41 . .. 1':1h5 42.ti:Jc3 :Bh2 43 . .id4 f5
43 . . . 1':1d2 44 . .ixf6! is a well-known trick. 44 . .ie5 :Bc2 4S.f4 @e7 46.ti:Je2 :Bd2 47.ti:Jd4 @d7 48.@el :Ba2 49.ti:Jb3 :Bc2 so.@dl :Bc8 S l .@d2 :Bc4 52.@d3 :Bc8 53.@d4 :Bc2 54.ti:JcSt @e7 SS.d6t @t7 56.@dS 1':1d2t 57.@c6 1-0
Exercise summary: ±
Exercise 30 Christiansen - Kaidanov USA 1 993
This exercise is mainly a tactical one: White probably saw the game continuation right to the end. 41 .\Wbl !
White activates his last piece, not caring about the knight on e6. The threat is :Bb7. 41 ...1':1xe6?
4 1 . . . .ie7 was better, but White keeps the advantage after 42 .ib4 (Ftacnik) . 42.ti:Jxe6 '1Wxe6 43.ib4
Kaidanov believes that White's advantage is already decisive.
43 . . . ti:Jc6
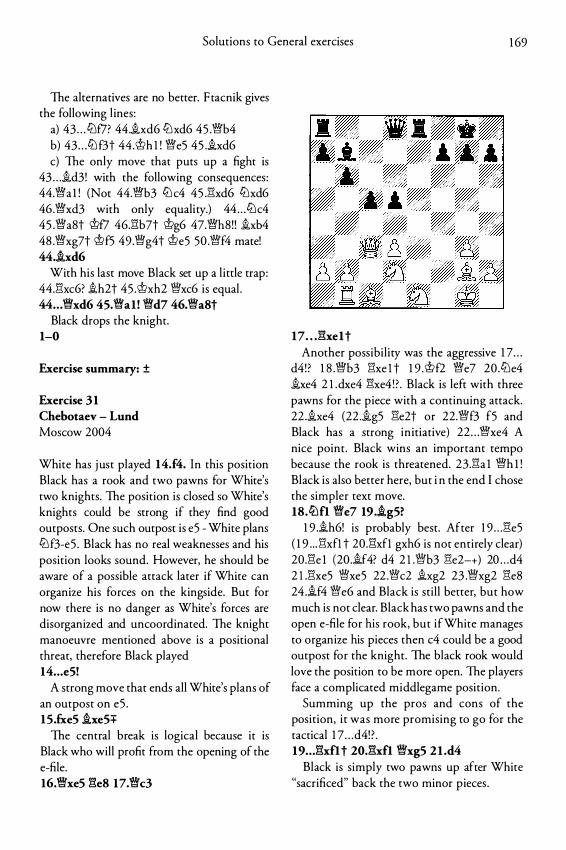
Solutions to General exercises 1 69
The alternatives are no better. F tacnik gives the following l ines:
a) 43 . . . 'i:lf7? 44 . .ixd6 'i:lxd6 45 .�b4 b) 43 . . . 'i:l f3t 44.�h 1 ! �e5 45 . .ixd6 c) The only move that puts up a fight is
43 . . . .id3! with the following consequences : 44.�a 1 ! (Not 44.�b3 'i:l c4 45 .Ei:xd6 'i:lxd6 46 .�xd3 with only equali ty.) 44 . . . 'i:lc4 45 .�a8t �f7 46.Ei:b7t �g6 47.�h8! ! .ixb4 48 .�xg7t �f5 49 .�g4t �e5 50 .�f4 mate! 44 . .ixd6
With his last move Black set up a l ittle trap: 44.Ei:xc6? .ih2t 45 .�xh2 �xc6 is equal . 44 .. . �xd6 45.�a1! �d7 46.�a8t
Black drops the knight. 1-0
Exercise summary: ±
Exercise 3 1 Chebotaev - Lund Moscow 2004
White has j ust played 14.f4. In this position Black has a rook and two pawns for White's two knights. The position is closed so White's knights could be strong if they find good outposts. One such outpost is e5 - White plans 'i:l f3-e5 . Black has no real weaknesses and his position looks sound. However, he should be aware of a possible attack later if White can organize his forces on the kingside. But for now there is no danger as White's forces are disorganized and uncoordinated. The knight manoeuvre mentioned above is a positional threat, therefore Black played 14 . . . e5!
A strong move that ends all White's plans of an outpost on e5 . 15.fxe5 .ixe5+
The central break is logical because it is Black who will profit from the opening of the e-file. 16.�xe5 Ei:e8 17.�c3
17 . . . Ei:xe1t Another possibil ity was the aggressive 1 7 . . .
d4! ? 1 8 .�b3 Ei:xe 1 t 1 9 .�f2 �e7 20.'i:le4 .ixe4 2 l .dxe4 Elxe4 ! ? . Black is left with three pawns for the piece with a continuing attack. 22 . .ixe4 (22 . .ig5 Ei:e2t or 22.�f3 f5 and Black has a strong initiative) 22 . . . �xe4 A nice point. Black wins an important tempo because the rook is threatened. 23.Ei:a 1 �h 1 ! Black is also better here, but i n the end I chose the simpler text move. 18.tt"lfl �e7 19 . .ig5?
1 9 . .ih6! is probably best. After 1 9 . . . Ei:e5 ( 1 9 . . . Ei:xfl t 20.Ei:xfl gxh6 is not entirely clear) 20.Ei:e 1 (20 . .if4? d4 2 l .�b3 Ei:e2-+) 20 . . . d4 2 l .Ei:xe5 �xe5 22 .�c2 .ixg2 23 .�xg2 Ei:e8 24 . .if4 �e6 and Black is still better, but how much is not clear. Black has two pawns and the open e-file for his rook, but ifWhite manages to organize his pieces then c4 could be a good outpost for the knight. The black rook would love the position to be more open. The players face a complicated middlegame position.
Summing up the pros and cons of the position, i t was more promising to go for the tactical 1 7 . . . d4! ? . 19 . . . Ei:xfl t 20.Ei:xfl �xg5 2 1 .d4
Black is simply two pawns up after White "sacrificed" back the two minor pieces .
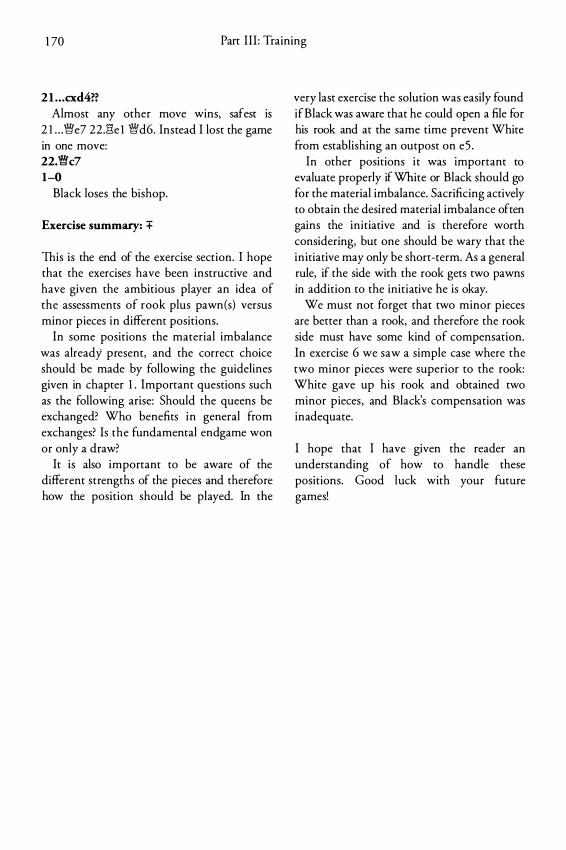
1 70 Part III : Training
2l . . . cxd4?? Almost any other move wins, safest is
2 l . . .�e7 22.l"le l �d6. Instead I lost the game in one move: 22.�c7 1-0
Black loses the bishop.
Exercise summary: +
This is the end of the exercise section. I hope that the exercises have been instructive and have given the ambitious player an idea of the assessments of rook plus pawn(s) versus minor pieces in different positions.
In some positions the material imbalance was already present, and the correct choice should be made by following the guidelines given in chapter 1 . Important questions such as the following arise: Should the queens be exchanged? Who benefits in general from exchanges? Is the fundamental endgame won or only a draw?
It is also important to be aware of the different strengths of the pieces and therefore how the position should be played. In the
very last exercise the solution was easily found if Black was aware that he could open a file for his rook and at the same time prevent White from establishing an outpost on e5 .
In other positions i t was important to evaluate properly if White or Black should go for the material imbalance. Sacrificing actively to obtain the desired material imbalance often gains the initiative and is therefore worth considering, but one should be wary that the initiative may only be short-term. As a general rule, if the side with the rook gets two pawns in addition to the initiative he is okay.
We must not forget that two minor pieces are better than a rook, and therefore the rook side must have some kind of compensation. In exercise 6 we saw a simple case where the two minor pieces were superior to the rook: White gave up his rook and obtained two minor pieces , and Black's compensation was inadequate.
I hope that I have given the reader an understanding of how to handle these positions. Good luck with your future games!
Indexes
Index of games
Abello - Colin 8 1 Amonatov - Notkin 87 Anand - Hernandez 22 Aseev - Mikhalevsky 20 Ashley - Mikhalevsky 89 Ashley - Mikhalevsky 94 Bareev - Adams 65 Beliavsky - Dolmatov 16 Capablanca - Lasker 38 Cu. Hansen - Hjartarson 1 9 Dashko - Lugovoi 30, 78 , 84 Durnev - Lyskov 4 7 Fercec - Nikcevic 78 Georgiev - Timoshenko 67 Gonzalez Diaz - Fernandez 93 Granda Zuniga - Nakamura 46 Grosar - Balinov 82 Karpov - Kasparov 40 Karthikeyan - Babu 93 Kasimdzhanov - Van Wely 58 Kasparov - Kramnik 26 Kotsur - Tishin 88
Index of Studies
Averbakh 45 J . Berger 36 , 37 , 38 Kling and Horwitz 36 Lasa 37 Leikin 46
Indexes
Kreiman - Giorgadze 8 5 Larsen - Marjanovic 3 9 Leko - Z. Almasi 89 Lund - Ejsing 1 0 Lund - M . Nielsen 1 4 Polak - Socko 27 Ponomariov - Plaskett 9 5 , 1 09 Rahman - Rausis 56 Romanishin - Dvoretsky 39 Rublevsky - J . Geller 80 Rublevsky - Nikolic 86 Scholz - M. Gurevich 24 Sloth - Palciauskas 63 Steinitz - Zukertort 4 1 Sumets - Moiseenko 87 Tal - Tauve 1 7 Totsky - Yandemirov 92 Totsky -Yandemirov 94 V. Zaitsev - Lund 83 Weber - Thestrup 64 Zelcic - Bozanic 79
1 7 1
1 72
Index of Exercises
Adianto - Laurier 1 66 Balogh - Pinter 1 49 Bareev - Adams 1 3 7 Bronstein - Geller 1 5 1 Browne - Van der Wiel 1 64 Chebotaev - Lund 1 69 Christiansen - Kaidanov 1 68 Eljanov - Nijboer 1 5 5 Firman - Shulman 1 48 Gelashvili - Kotronias 1 47 Georgiev - Timoshenko 1 36 Glek - Ikonnikov 1 49 Hort - Huebner 1 5 1 Inarkiev - Riazantsev 1 57 Ionov - Kayumov 1 57 Ivanchuk - Rogers 1 52 Kadimova - Sherbakov 1 60 Karjakin - Paunovic 1 52 Kiss - Boguslavsky 1 4 1 , 1 42
Indexes
Koslov - Chernikov 1 40 Lombardy - Sigurjonsson 1 6 1 Lugovoi - Vera 1 58 Lund - D.V. Pedersen 1 37 Malakhatko - Krivoshey 1 54 Meins - Meijere 1 35 Minasian - Xu Jun 1 63 Moroz - Jakovenko 1 46 Navara - Tiviakov 1 4 5 Polugaevsky - Taimanov 1 50 Roeder - Schneider 1 65 Rowson - Miles 1 62 Schandorrf - Zuchelli 1 39 Shomoev - Iljushin 1 46 Stean - Browne 1 68 Tal - Savon 1 4 5 Timoshenko - Ziatdinov 1 33 , 1 34 Uhlmann - Timman 1 67 Van Wely - Azmaiparashvili 1 5 5 Wedberg - Pavasovic 1 59
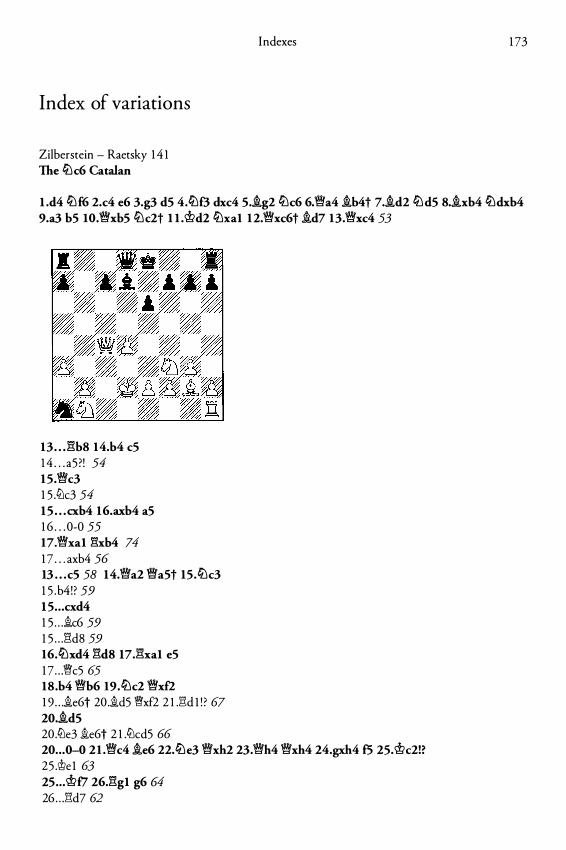
Index of variations
Zilberstein - Raetsky 1 4 1 The lLlc6 Catalan
Indexes 1 73
l .d4 lLlf6 2.c4 e6 3.g3 d5 4.lLlf3 dxc4 5.�g2 lLlc6 6.Wfa4 �b4t 7.�d2 lLl d5 8.�xb4 lLldxb4 9.a3 b5 lO.Wfxb5 lLlc2t l l .@d2 lLlxa1 12.Wfxc6t �d7 13.Wfxc4 53
13 . . J�b8 14.b4 c5 1 4 . . . a5 ? ! 54 15.Wfc3 1 5 .1i.k3 54 15 . . . cxb4 16.axb4 aS 1 6 . . . 0-0 55 17.Wfxal �xb4 74 1 7 . . . axb4 56 13 . . . c5 58 14.Wfa2 Wfa5t 15.lLlc3 1 5 .b4! ? 59 1 5 . . . cxd4 1 5 . . . ic6 59 1 5 . . . :i:l:d8 59 16.lLlxd4 :i:l:d8 17.:!:l:xal e5 1 7 . . . �c5 65 18 .b4 Wfb6 19.lLlc2 Wfxf2 1 9 . . . ie6t 20 .id5 �xf2 2 l .:i:l:d 1 ! ? 67 20.�d5 20.1tle3 ie6t 2 1 .1tlcd5 66 20 .. . 0-0 2 1 .Wfc4 �e6 22.lLle3 Wfxh2 23.Wfh4 Wfxh4 24.gxh4 f5 25.@c2!? 25 .rue 1 63 25 . . . @f7 26.:i:l:gl g6 64 26 . . . :!:l:d7 62
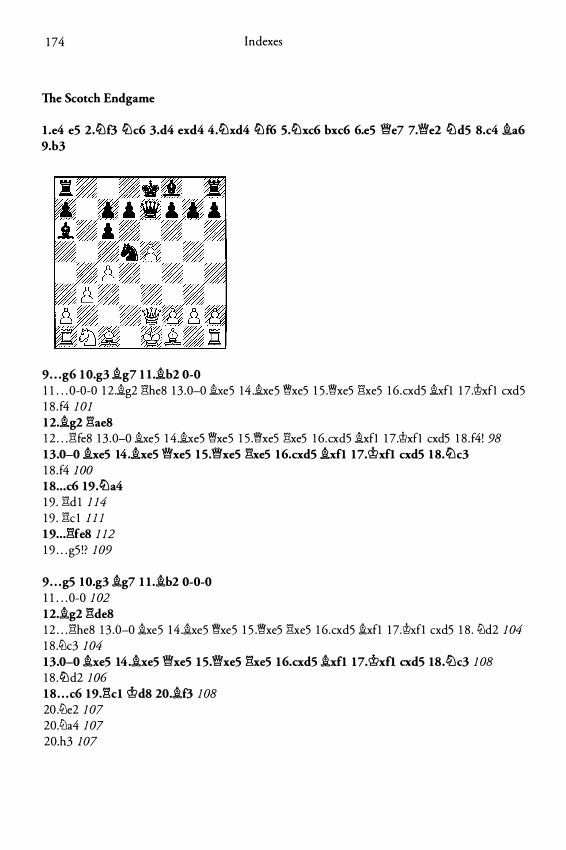
1 74 Indexes
The Scotch Endgame
l .e4 eS 2.lLlf3 lLlc6 3.d4 exd4 4.lLlxd4 lLlf6 s.lLlxc6 bxc6 6.eS fie? 7.fie2 lLldS 8.c4 .ia6 9.h3
9 . . . g6 1 0.g3 .ig7 1 I ..ih2 0-0 1 1 . . . 0-0-0 1 2 .�gH �he8 1 3 .0-0 �e5 14 .�xe5 'Wxe5 1 5 .'Wxe5 �xe5 1 6.cxd5 �f1 1 7.�xfl cxd5 1 8 . f4 1 01 12 . .ig2 �ae8 1 2 . . . �fe8 1 3 .0-0 �e5 1 4.�e5 'Wxe5 1 5 .'Wxe5 �xe5 1 6.cxd5 �xfl 1 7.�xfl cxd5 1 8 . f4! 98 13.0-0 .ixeS 14 . .ixeS fixeS l S.fixeS �xeS 16.cxdS .ixf1 17.'if1>xfl cxdS 18.lLlc3 1 8 . f4 100 18 . . . c6 19.lLla4 1 9 . �d 1 1 14 1 9 . �c l I l l 1 9 . . . �fe8 1 12 1 9 . . . g5 ! ? 109
9 . . . gS 10.g3 .ig7 l l . .ih2 0-0-0 1 1 . . . 0-0 1 02 12 . .ig2 �deS 1 2 . . . �he8 1 3 .0-0 �xe5 1 4 .�xe5 'Wxe5 1 5 .'Wxe5 �xe5 1 6.cxd5 �xf1 1 7.�xfl cxd5 1 8 . 12ld2 104 1 8 .12lc3 104 13.0-0 .ixeS 14 . .ixeS fixeS l S.fixeS �xeS 16.cxdS .ixf1 17.'if1>xfl cxdS 18.llJc3 1 08 1 8 .ltld2 106 18 . . . c6 19.�cl 'it>ds 20 . .if3 108 20 .12le2 107 20.IiJa4 107 20.h3 107
Books available from Quality Chess :
Mihail Marin: Learn fro m the Legends - Chess Champio ns at their Best
Romanian grandmaster Mihail Marin describes how eight of the greatest chess players ever used their superiority in different aspects of the game. The Legends are Rubinstein, Alekhine, Botvinnik, Tal , Petrosian, Fischer, Karpov and Korchnoi. Besides great chess well explained, every chapter contains a wonderful original cartoon of the players . (3 1 2 pages .) Europe: €26 .99 . UK: 1 7 .99 . US: $27.95 .
"Learn from the Legends i s outstanding and cannot be ignored. I t is wonderfully
balanced: original and personal, deep and clear, entertaining and instructive. I t must be a strong candidate for any existing book of the year award, and if it doesn't win any, someone should create a new award so that
the book's quali ty is properly acknowledged." - GM Jonathan Rowson,
New In Chess.
''An absolute gem of a book." - GM Paul Morwani, The Sco tsman.
" This book belongs on every serious
chess player's bookshelf."
- IM Steffen Ped-ersen.
Jacob Aagaard & John Shaw (editors) Experts vs. the Sicilian
In this book 1 0 experts ( 6 GMs and 4 IMs) give their recommendation for White against their own pet variations. This repertoire book recommends critical main l ines with high qual ity original material . Six of the ten experts have written books on the specific variation they cover. This book has also received excellent reviews . (288 pages . ) Europe: €23 .99 . UK: £ 1 5 .99 . US: $24.9 5 .
"Finally a repertoire book with balls!" - GM Lars Schandorff
"This is not a good, but a very good book, filled with interesting suggestions."
- World Championship finalist Nigel Short.
" . . . remarkable work. I highly recommend it for chess players everywhere."
- IM John Watson .
"Experts is a fantastic book. " IM Sam Collins - Chess Today.
" . . . wel l worth buying for every 1 .e4 player."
- GM Jonathan Rowson, New In Chess
"Super book . . . highly readable and highly recommendable."
- GM Simen Agdestein .
Edward Dearing - Challenging the Griinfeld
The young Scottish IM delivers a profound yet entertaining survey of the statistically most dangerous line against the Griinfeld Defence: the Modern Exchange Variation with S .Rb 1 . Dearing has achieved the very difficult balance between analytical depth and general explanation which is seldom achieved even by seasoned writers. Size: 24 1 x 1 69 mm. Pages: 208. April 2005
Europe: € 23.99. UK: £ 1 5 .99 . US : $24 .95 .
Forthcoming tides May-June 2005
Dorian Rogozenko Rogozenko - The Sicilian Sveshniko v Reloaded
Edward Dearing
Challenging the
G rU n feld
QUALITY CHESSBOOKS • I
The Sici l ian Sveshn ikov
loaded
In 2003 Dorian Rogozenko was hired by World Champion Ruslan Ponomariov to advise on the S icilian Sveshnikov for his championship match with Garry Kasparov. The match was cancelled, but now you can enjoy tutoring worthy of a World Champion in this highly topical opening.
QUALITY CHESSBOOK5 f I
Rogozenko is an experienced grandmaster and is well known in chess circles for his ability to explain opening theory to players of all levels. About 304 pages . Europe: €24 .99 . UK: £ 1 6 .99 . US: $25 .95 .
Tiger Hillarp Persson - Tiger's Mo dern Tiger Hillarp Persson
The Swedish Grandmaster explains his own ongtnal and highly combative ideas in the Modern Defence, an opening he has used to defeat world class grandmasters . Tiger has played his version of the Modern Defence for more than a decade, usually starting with the moves I . . . g6, 2 . . . Bg7, 3 . . . d6 and 4 . . . a6. About 224 pages. Europe: € 23 .99 . UK: £ 1 5 .99 . US : $24.9 5 .
Jan Pinski - The Benko Gambit QUAliTY CHESSBOOK5 1 I
Though still in his 20s IM Jan Pinski is already a renowned author and opening expert. Here he combines his usual high level of theoretical insight with a wonderful introduction on the typical decisions every player faces in this opening. About 1 60 pages. Europe: € 1 9 .99 . UK: £ 1 3 .99 . US: $ 1 9 . 95 .
All books are available a t www.qualitychessbooks .com QUALITY CHESSBOOKS • •