Embed Size (px)
Citation preview
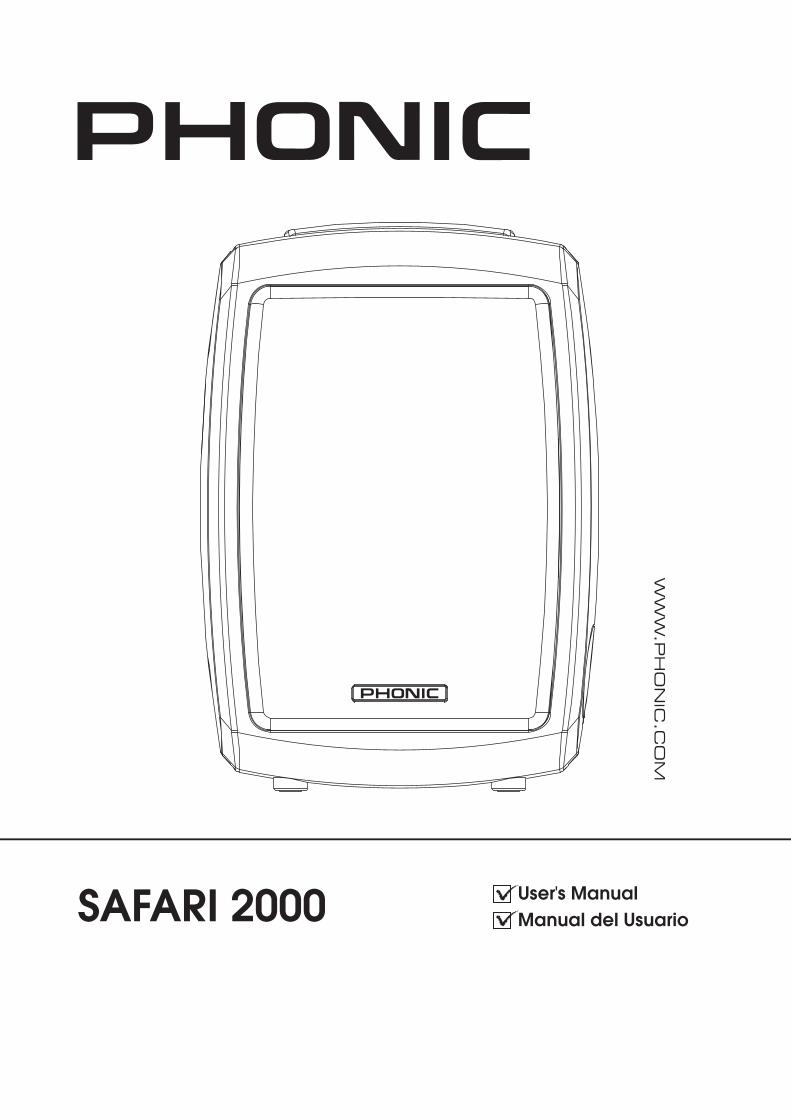
User's ManualManual del UsuarioSAFARI 2000
200 Watt All-In-One Portable PA SystemSistema PA Portable Todo en Uno 200 Watt
English Español
ENGLISH . . . . . . . . . . . . . . . . . . . . . . . . . . . . . . . . . . . . . I
ESPAÑOL . . . . . . . . . . . . . . . . . . . . . . . . . . . . . . . . . . . . . II
V1.0 05/25/2012
SAFARI 2000
English
3Safari 2000
Introduction 1
Advanced Electronics. Advanced Reliability 1
Features 1
Included Components 1
Optional Components 1
Front View 2
Rear View 2
Power-Related Instruction 3
Replacing the Batteries 3
Installing the WR-1 Safari Wireless Receiver Modules 4
Operating Safari’s Wireless System 4
Transmitter Components 5
Installation of Safari CD/USB or USBR-1 6
Specifications 8
Wireless Specifications 9
APPENDIX
Dimensions 1
CONTENTS
USER'S MANUAL
Phonic preserves the right to improve or alter any information within this document without prior notice
4
English
Safari 2000
1. Read these instructions before operating this apparatus.
2. Keep these instructions for future reference.
3. Heed all warnings to ensure safe operation.
4. Follow all instructions provided in this document.
5. Do not use this apparatus near water or in locations where condensation may occur.
6. Clean only with dry cloth. Do not use aerosol or liquid cleaners. Unplug this apparatus before cleaning.
7. Do not block any of the ventilation openings. Install in accordance with the manufacturer’s instructions.
8. Do not install near any heat sources such as radiators, heat registers, stoves, or other apparatus (including
.
9. Do not defeat the safety purpose of the polarized or grounding-type plug. A polarized plug has two blades with one wider than the other. A grounding type plug has two blades and a third grounding prong. The wide blade or the third prong is provided for your safety. If the provided plug does not into your outlet, consult an electrician for replacement of the obsolete outlet.
10. Protect the power cord from being walked on or pinched particularly at plug, convenience receptacles, and the point where they exit from the apparatus.
11. Only use attachments/accessories by the manufacturer.
12. Use only with a cart, stand, tripod, bracket, or table by the manufacturer, or sold with the apparatus. When a cart is used, use caution when moving the cart/apparatus combination to avoid injury from tip-over.
13. Unplug this apparatus during lighting storms or when unused for long periods of time.
14. Refer all servicing to service personnel. Servicing is required when the apparatus has been damaged in any way, such as power-supply cord or plug is damaged, liquid has been spilled or objects have fallen into the apparatus, the apparatus has been exposed to rain or moisture, does not operate normally, or has been dropped.
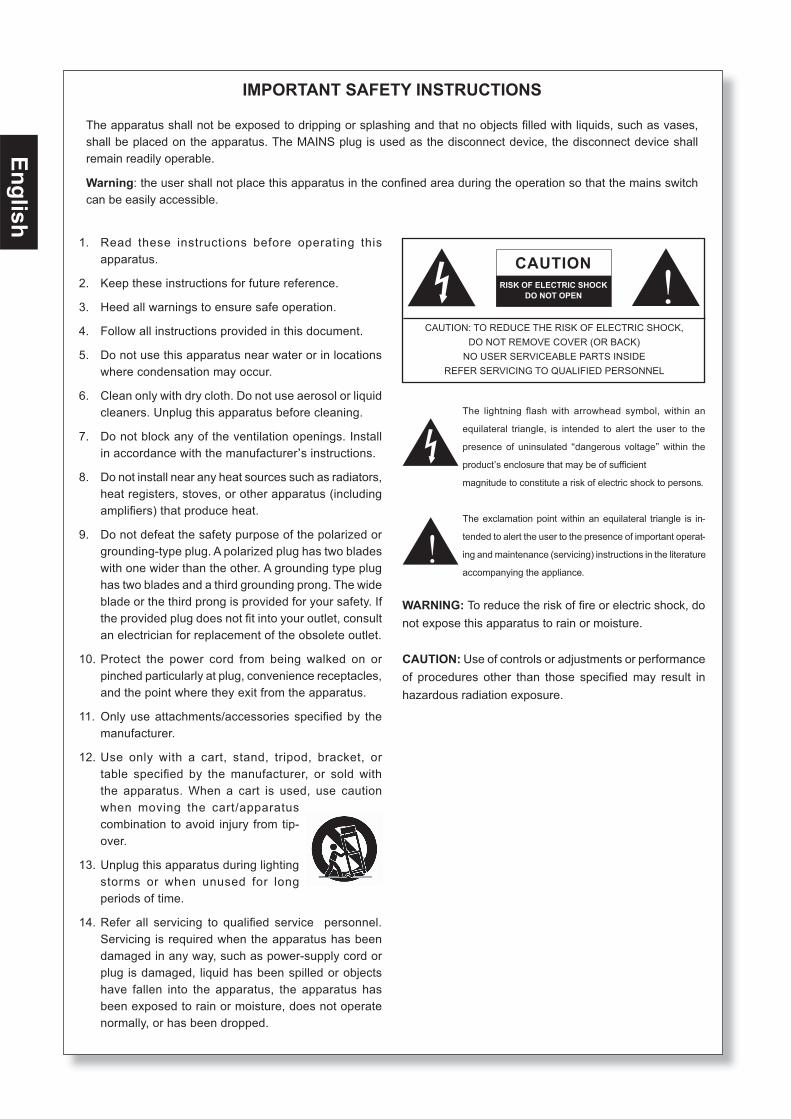
IMPORTANT SAFETY INSTRUCTIONS
CAUTION: TO REDUCE THE RISK OF ELECTRIC SHOCK,DO NOT REMOVE COVER (OR BACK)
NO USER SERVICEABLE PARTS INSIDEREFER SERVICING TO QUALIFIED PERSONNEL
The lightning flash with arrowhead symbol, within an
equilateral triangle, is intended to alert the user to the
presence of uninsulated “dangerous voltage” within the
product’
magnitude to constitute a risk of electric shock to persons.
The exclamation point within an equilateral triangle is in-
tended to alert the user to the presence of important operat-
ing and maintenance (servicing) instructions in the literature
accompanying the appliance.
WARNING: To reduce the risk of or electric shock, do not expose this apparatus to rain or moisture.
CAUTION: Use of controls or adjustments or performance of procedures other than those may result in hazardous radiation exposure.
The apparatus shall not be exposed to dripping or splashing and that no objects with liquids, such as vases, shall be placed on the apparatus. The MAINS plug is used as the disconnect device, the disconnect device shall remain readily operable.
Warning: the user shall not place this apparatus in the area during the operation so that the mains switch can be easily accessible.
CAUTIONRISK OF ELECTRIC SHOCK
DO NOT OPEN
English
1Safari 2000
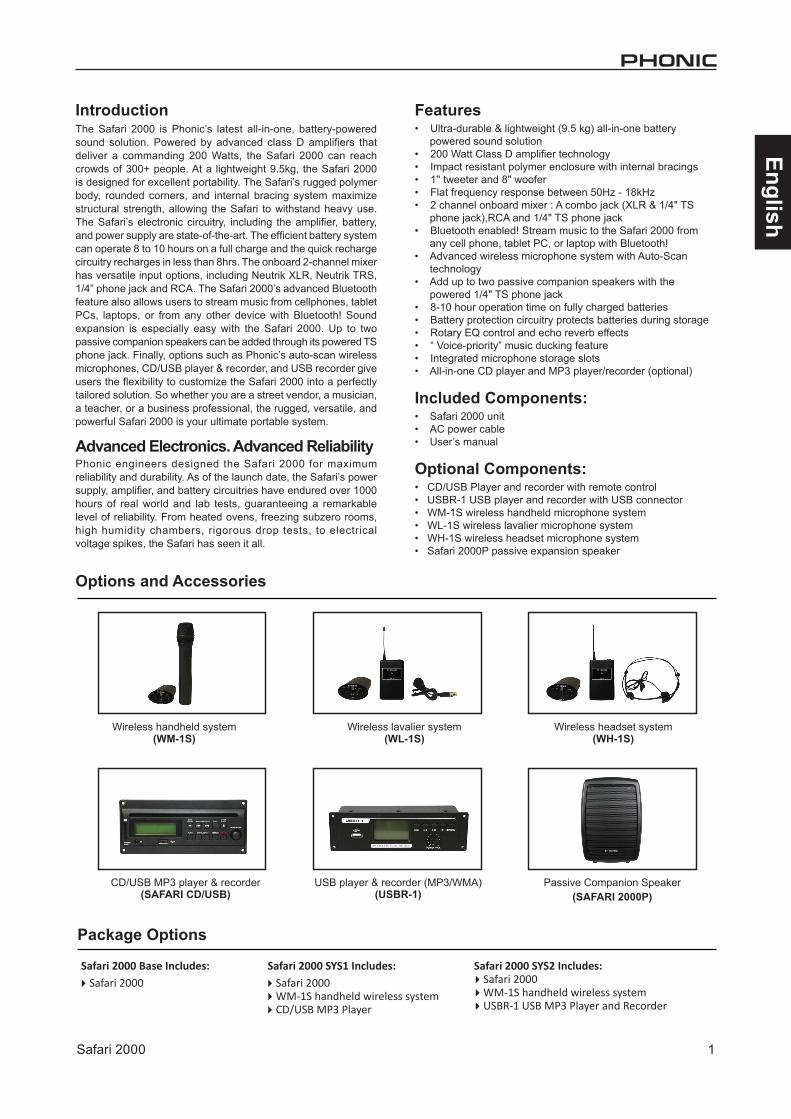
IntroductionThe Safari 2000 is Phonic’s latest all-in-one, battery-powered sound solution. Powered by advanced class D amplifiers that deliver a commanding 200 Watts, the Safari 2000 can reach crowds of 300+ people. At a lightweight 9.5kg, the Safari 2000 is designed for excellent portability. The Safari’s rugged polymer body, rounded corners, and internal bracing system maximize structural strength, allowing the Safari to withstand heavy use. The Safari’s electronic circuitry, including the amplifier, battery, and power supply are state-of-the-art. The efficient battery system can operate 8 to 10 hours on a full charge and the quick recharge circuitry recharges in less than 8hrs. The onboard 2-channel mixer has versatile input options, including Neutrik XLR, Neutrik TRS, 1/4” phone jack and RCA. The Safari 2000’s advanced Bluetooth feature also allows users to stream music from cellphones, tablet PCs, laptops, or from any other device with Bluetooth! Sound expansion is especially easy with the Safari 2000. Up to two passive companion speakers can be added through its powered TS phone jack. Finally, options such as Phonic’s auto-scan wireless microphones, CD/USB player & recorder, and USB recorder give users the flexibility to customize the Safari 2000 into a perfectly tailored solution. So whether you are a street vendor, a musician, a teacher, or a business professional, the rugged, versatile, and powerful Safari 2000 is your ultimate portable system.
Advanced Electronics. Advanced Reliability Phonic engineers designed the Safari 2000 for maximum reliability and durability. As of the launch date, the Safari’s power supply, amplifier, and battery circuitries have endured over 1000 hours of real world and lab tests, guaranteeing a remarkable level of reliability. From heated ovens, freezing subzero rooms, high humidity chambers, rigorous drop tests, to electrical voltage spikes, the Safari has seen it all.
Features• Ultra-durable & lightweight (9.5 kg) all-in-one battery
powered sound solution• 200 Watt Class D amplifier technology• Impact resistant polymer enclosure with internal bracings• 1'' tweeter and 8" woofer• Flat frequency response between 50Hz - 18kHz• 2 channel onboard mixer : A combo jack (XLR & 1/4" TS
phone jack),RCA and 1/4" TS phone jack• Bluetooth enabled! Stream music to the Safari 2000 from
any cell phone, tablet PC, or laptop with Bluetooth!• Advanced wireless microphone system with Auto-Scan
technology• Add up to two passive companion speakers with the
powered 1/4" TS phone jack• 8-10 hour operation time on fully charged batteries• Battery protection circuitry protects batteries during storage• Rotary EQ control and echo reverb effects• “ Voice-priority” music ducking feature• Integrated microphone storage slots• All-in-one CD player and MP3 player/recorder (optional)
Included Components:• Safari 2000 unit• AC power cable• User’s manual
Optional Components:• CD/USB Player and recorder with remote control• USBR-1 USB player and recorder with USB connector• WM-1S wireless handheld microphone system• WL-1S wireless lavalier microphone system• WH-1S wireless headset microphone system• Safari 2000P passive expansion speaker
Package Options
Safari 2000 Base Includes:
4Safari 2000Safari 2000 SYS1 Includes:
4Safari 20004WM-1S handheld wireless system4CD/USB MP3 Player
Safari 2000 SYS2 Includes:4Safari 20004WM-1S handheld wireless system4USBR-1 USB MP3 Player and Recorder
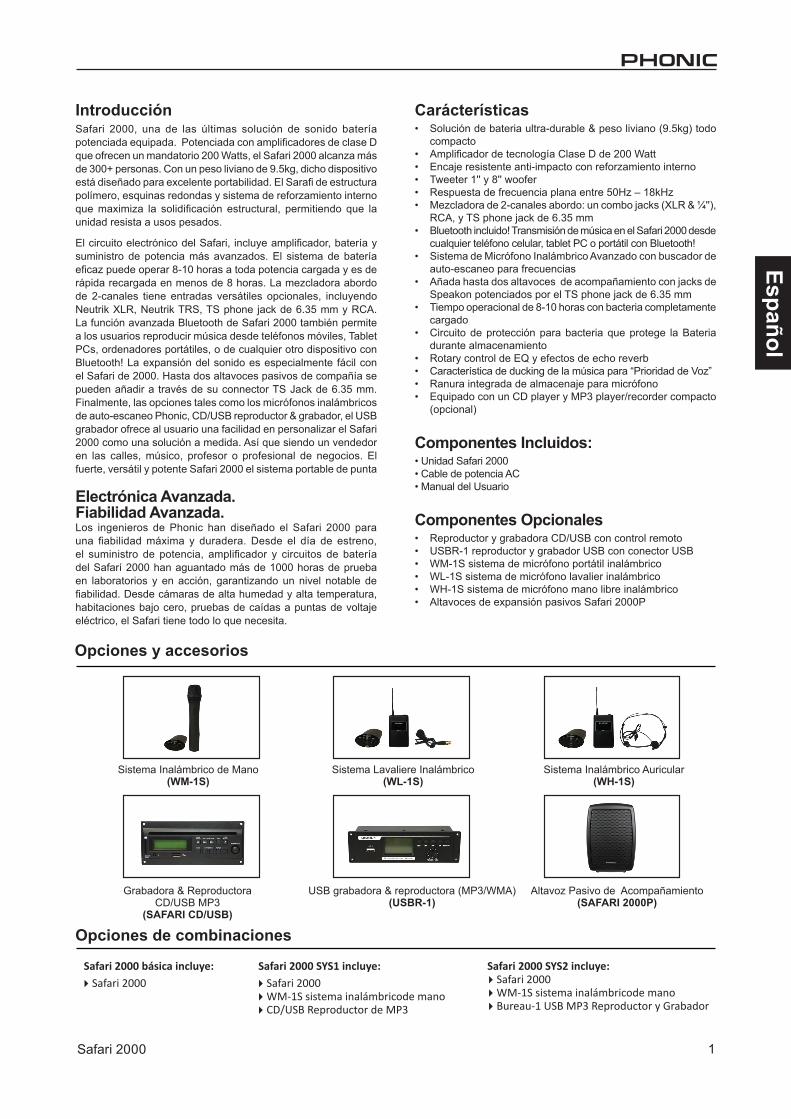
CD/USB MP3 player & recorder(SAFARI CD/USB)
Wireless handheld system(WM-1S)
Wireless lavalier system(WL-1S)
Wireless headset system(WH-1S)
Passive Companion Speaker(SAFARI 2000P)
USB player & recorder (MP3/WMA)(USBR-1)
Options and Accessories
2
English
Safari 2000
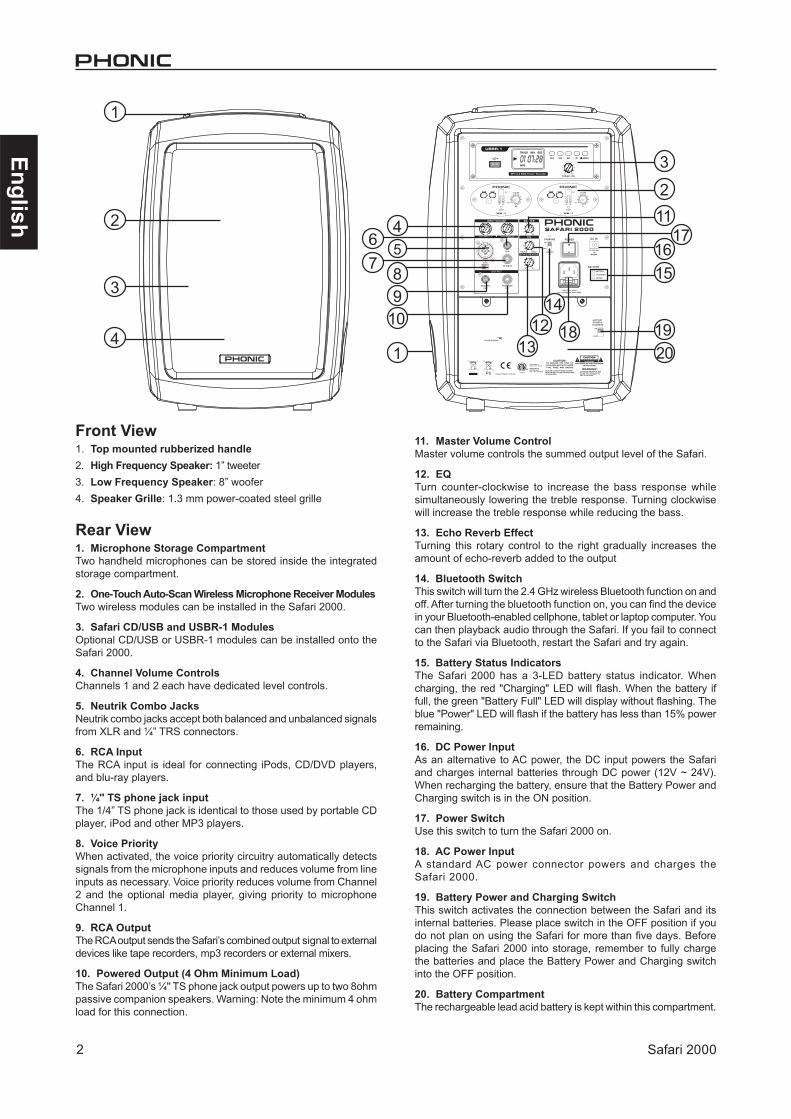
Front View1. Top mounted rubberized handle2. High Frequency Speaker: 1” tweeter3. Low Frequency Speaker: 8” woofer4. Speaker Grille: 1.3 mm power-coated steel grille
Rear View1. Microphone Storage CompartmentTwo handheld microphones can be stored inside the integrated storage compartment.
2. One-Touch Auto-Scan Wireless Microphone Receiver ModulesTwo wireless modules can be installed in the Safari 2000.
3. Safari CD/USB and USBR-1 Modules Optional CD/USB or USBR-1 modules can be installed onto the Safari 2000.
4. Channel Volume ControlsChannels 1 and 2 each have dedicated level controls.
5. Neutrik Combo JacksNeutrik combo jacks accept both balanced and unbalanced signals from XLR and ¼” TRS connectors.
6. RCA InputThe RCA input is ideal for connecting iPods, CD/DVD players, and blu-ray players.
7. ¼'' TS phone jack inputThe 1/4” TS phone jack is identical to those used by portable CD player, iPod and other MP3 players.
8. Voice PriorityWhen activated, the voice priority circuitry automatically detects signals from the microphone inputs and reduces volume from line inputs as necessary. Voice priority reduces volume from Channel 2 and the optional media player, giving priority to microphone Channel 1.
9. RCA OutputThe RCA output sends the Safari’s combined output signal to external devices like tape recorders, mp3 recorders or external mixers.
10. Powered Output (4 Ohm Minimum Load)The Safari 2000’s ¼'' TS phone jack output powers up to two 8ohm passive companion speakers. Warning: Note the minimum 4 ohm load for this connection.
11. Master Volume ControlMaster volume controls the summed output level of the Safari.
12. EQTurn counter-clockwise to increase the bass response while simultaneously lowering the treble response. Turning clockwise will increase the treble response while reducing the bass.
13. Echo Reverb EffectTurning this rotary control to the right gradually increases the amount of echo-reverb added to the output
14. Bluetooth SwitchThis switch will turn the 2.4 GHz wireless Bluetooth function on and off. After turning the bluetooth function on, you can find the device in your Bluetooth-enabled cellphone, tablet or laptop computer. You can then playback audio through the Safari. If you fail to connect to the Safari via Bluetooth, restart the Safari and try again.
15. Battery Status IndicatorsThe Safari 2000 has a 3-LED battery status indicator. When charging, the red "Charging" LED will flash. When the battery if full, the green "Battery Full" LED will display without flashing. The blue "Power" LED will flash if the battery has less than 15% power remaining.
16. DC Power InputAs an alternative to AC power, the DC input powers the Safari and charges internal batteries through DC power (12V ~ 24V). When recharging the battery, ensure that the Battery Power and Charging switch is in the ON position.
17. Power SwitchUse this switch to turn the Safari 2000 on.
18. AC Power InputA standard AC power connector powers and charges the Safari 2000.
19. Battery Power and Charging SwitchThis switch activates the connection between the Safari and its internal batteries. Please place switch in the OFF position if you do not plan on using the Safari for more than five days. Before placing the Safari 2000 into storage, remember to fully charge the batteries and place the Battery Power and Charging switch into the OFF position.
20. Battery CompartmentThe rechargeable lead acid battery is kept within this compartment.
1
1
467
5
89
10
211
17
1312 18
14
1615
1920
3
2
3
4
English
3Safari 2000
Power-Related InstructionAC Power The Safari’s universal switching power operates between 90VAC ~ 265 VAC. Connect the AC power cord and turn on power. AC power supplies electricity to unit itself as well as to the internal batteries. You may operate unit and charge the batteries simultaneously.
DC Power 12V ~ 24V There are 2 ways to use DC power -- through a DC adaptor or through the Safari’s internal DC batteries. On fully charged batteries, the Safari can operate continuously for 8 to 10 hours in standby mode (CD/USB player and two receivers are turned on).
Battery Status LEDs Note: To use the Safari’s internal batteries, ensure that the Battery Power and Charging switch is in the ON position. If the battery wires are disconnected or if the Battery Power and Charging switch is OFF, you may still use the unit in AC power mode.
The Safari 2000 has a 3-LED battery status indicator. When charging, the red “Charging” LED will flash. When the battery if full, the green “Battery Full” LED will display without flashing. The blue “Power” LED will flash if the battery has less than 15% power remaining.
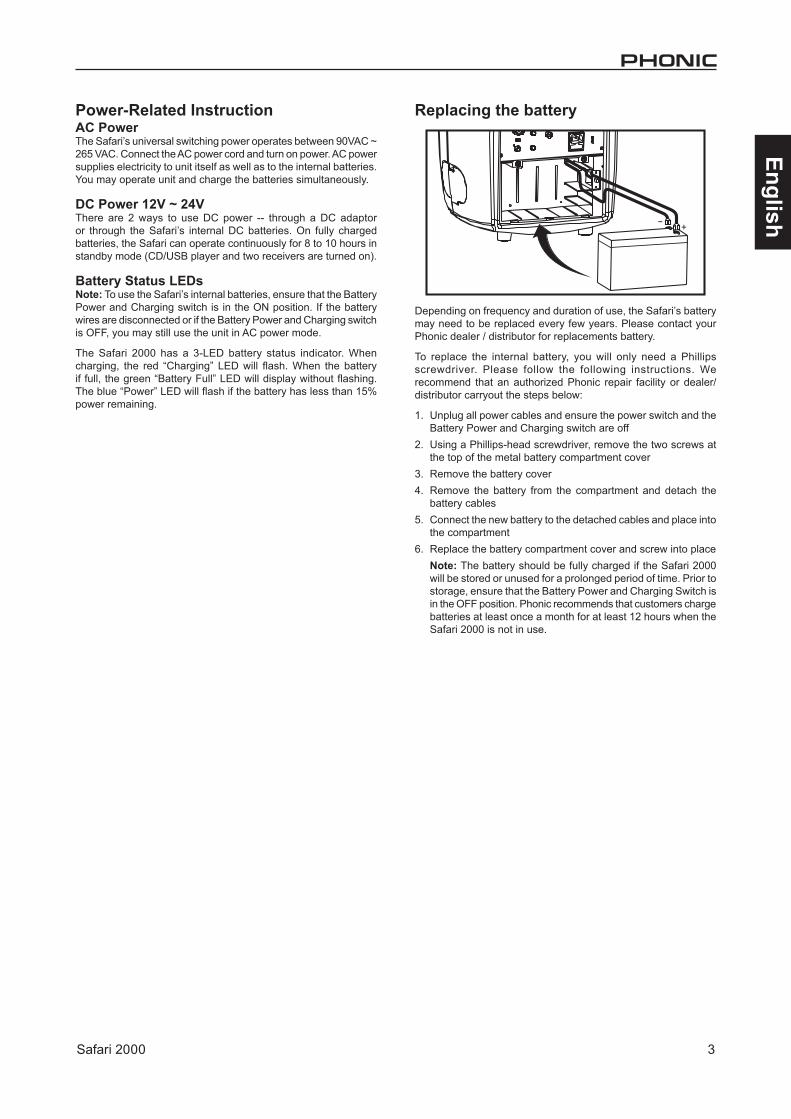
Replacing the battery
Depending on frequency and duration of use, the Safari’s battery may need to be replaced every few years. Please contact your Phonic dealer / distributor for replacements battery.
To replace the internal battery, you will only need a Phillips screwdriver. Please follow the following instructions. We recommend that an authorized Phonic repair facility or dealer/distributor carryout the steps below:
1. Unplug all power cables and ensure the power switch and the Battery Power and Charging switch are off
2. Using a Phillips-head screwdriver, remove the two screws at the top of the metal battery compartment cover
3. Remove the battery cover4. Remove the battery from the compartment and detach the
battery cables5. Connect the new battery to the detached cables and place into
the compartment6. Replace the battery compartment cover and screw into place
Note: The battery should be fully charged if the Safari 2000 will be stored or unused for a prolonged period of time. Prior to storage, ensure that the Battery Power and Charging Switch is in the OFF position. Phonic recommends that customers charge batteries at least once a month for at least 12 hours when the Safari 2000 is not in use.
+-
4
English
Safari 2000
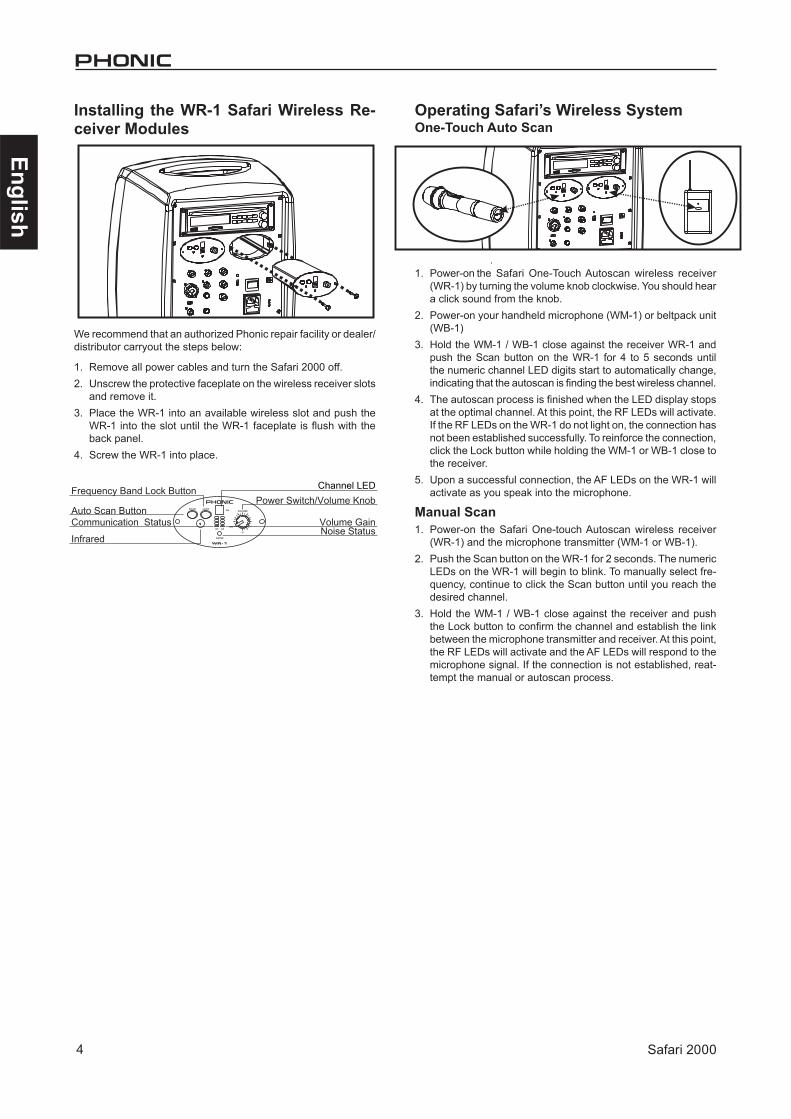
Installing the WR-1 Safari Wireless Re-ceiver Modules
We recommend that an authorized Phonic repair facility or dealer/distributor carryout the steps below:
1. Remove all power cables and turn the Safari 2000 off.2. Unscrew the protective faceplate on the wireless receiver slots
and remove it.3. Place the WR-1 into an available wireless slot and push the
WR-1 into the slot until the WR-1 faceplate is flush with the back panel.
4. Screw the WR-1 into place.
Power Switch/Volume Knob
Volume GainNoise Status
Communication Status Infrared
Auto Scan Button
Frequency Band Lock Button Channel LED
Operating Safari’s Wireless SystemOne-Touch Auto Scan
1. Power-on the Safari One-Touch Autoscan wireless receiver (WR-1) by turning the volume knob clockwise. You should hear a click sound from the knob.
2. Power-on your handheld microphone (WM-1) or beltpack unit (WB-1)
3. Hold the WM-1 / WB-1 close against the receiver WR-1 and push the Scan button on the WR-1 for 4 to 5 seconds until the numeric channel LED digits start to automatically change, indicating that the autoscan is finding the best wireless channel.
4. The autoscan process is finished when the LED display stops at the optimal channel. At this point, the RF LEDs will activate. If the RF LEDs on the WR-1 do not light on, the connection has not been established successfully. To reinforce the connection, click the Lock button while holding the WM-1 or WB-1 close to the receiver.
5. Upon a successful connection, the AF LEDs on the WR-1 will activate as you speak into the microphone.
Manual Scan1. Power-on the Safari One-touch Autoscan wireless receiver
(WR-1) and the microphone transmitter (WM-1 or WB-1).2. Push the Scan button on the WR-1 for 2 seconds. The numeric
LEDs on the WR-1 will begin to blink. To manually select fre-quency, continue to click the Scan button until you reach the desired channel.
3. Hold the WM-1 / WB-1 close against the receiver and push the Lock button to confirm the channel and establish the link between the microphone transmitter and receiver. At this point, the RF LEDs will activate and the AF LEDs will respond to the microphone signal. If the connection is not established, reat-tempt the manual or autoscan process.
English
5Safari 2000
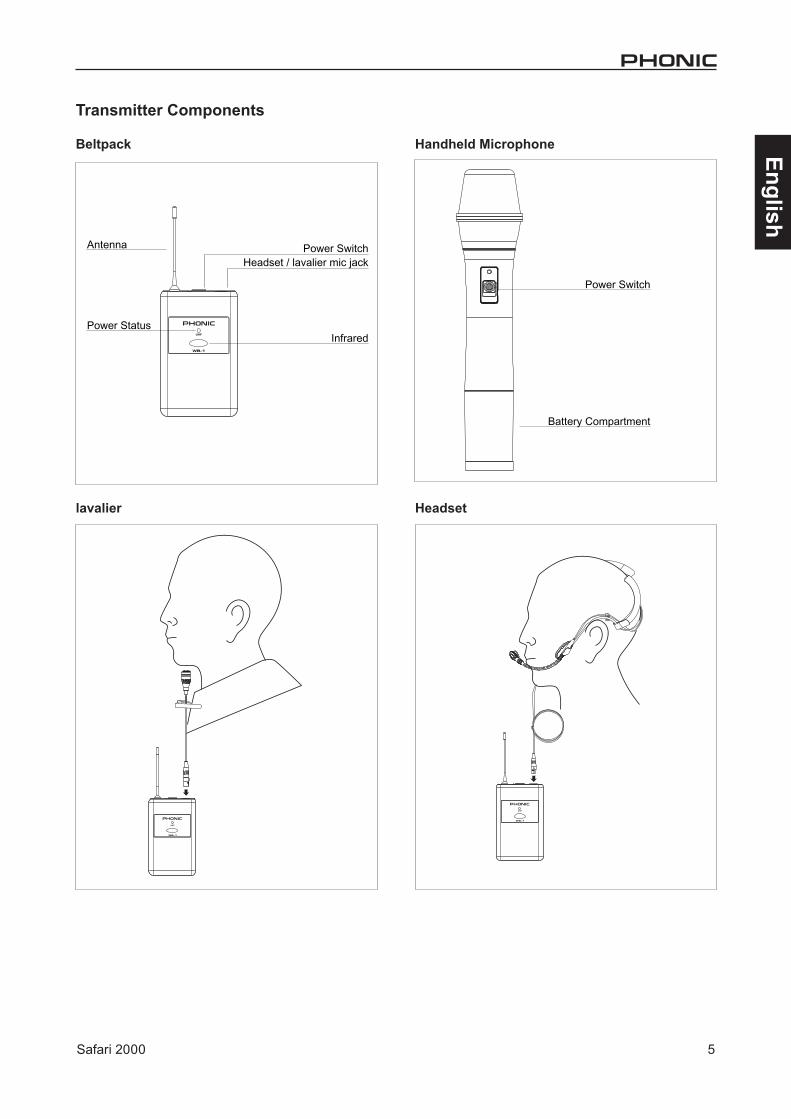
Transmitter Components
Beltpack Handheld Microphone
lavalier
WB-1
UHF
WB-1
UHF
Headset
WB-1
UHF
WB-1
UHF
Antenna Power SwitchHeadset / lavalier mic jack
Power StatusInfrared
Power Switch
Battery Compartment
6
English
Safari 2000
1 3
7 9 10 1112
1
89 12
13
1514
16
234567
13
5 64
8
2
10 11
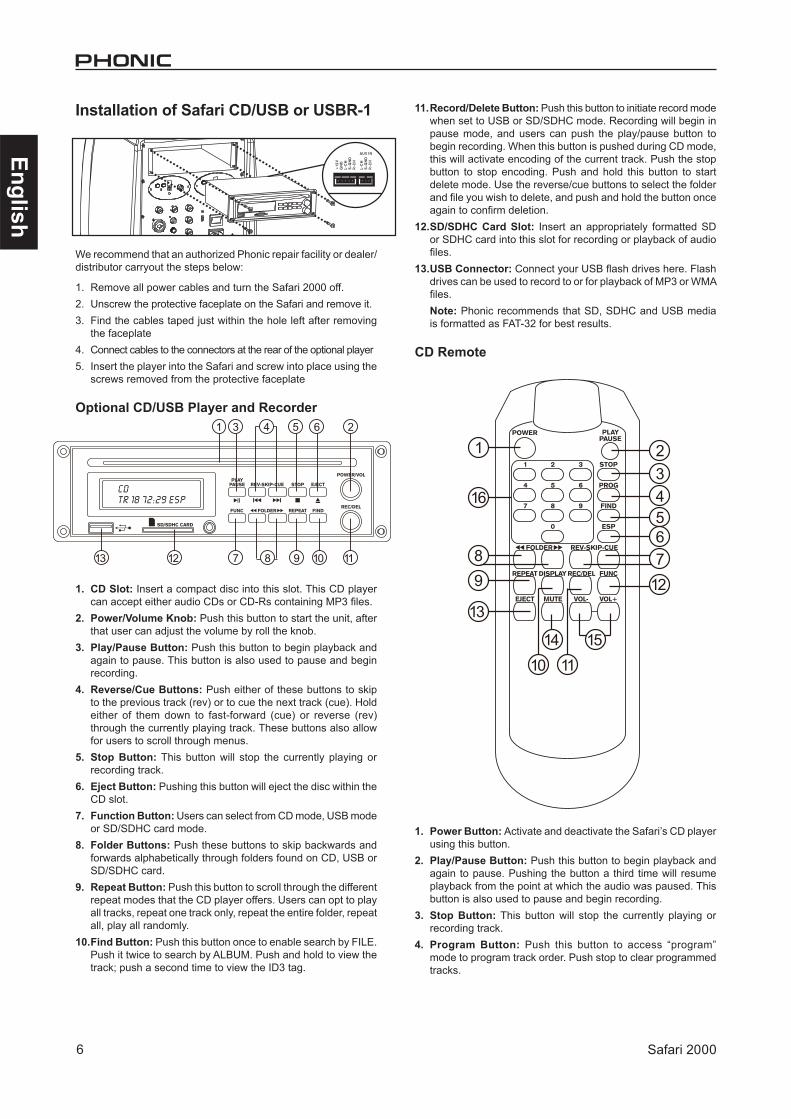
Installation of Safari CD/USB or USBR-1
We recommend that an authorized Phonic repair facility or dealer/distributor carryout the steps below:
1. Remove all power cables and turn the Safari 2000 off.2. Unscrew the protective faceplate on the Safari and remove it. 3. Find the cables taped just within the hole left after removing
the faceplate4. Connect cables to the connectors at the rear of the optional player5. Insert the player into the Safari and screw into place using the
screws removed from the protective faceplate
Optional CD/USB Player and Recorder
1. CD Slot: Insert a compact disc into this slot. This CD player can accept either audio CDs or CD-Rs containing MP3 files.
2. Power/Volume Knob: Push this button to start the unit, after that user can adjust the volume by roll the knob.
3. Play/Pause Button: Push this button to begin playback and again to pause. This button is also used to pause and begin recording.
4. Reverse/Cue Buttons: Push either of these buttons to skip to the previous track (rev) or to cue the next track (cue). Hold either of them down to fast-forward (cue) or reverse (rev) through the currently playing track. These buttons also allow for users to scroll through menus.
5. Stop Button: This button will stop the currently playing or recording track.
6. Eject Button: Pushing this button will eject the disc within the CD slot.
7. Function Button: Users can select from CD mode, USB mode or SD/SDHC card mode.
8. Folder Buttons: Push these buttons to skip backwards and forwards alphabetically through folders found on CD, USB or SD/SDHC card.
9. Repeat Button: Push this button to scroll through the different repeat modes that the CD player offers. Users can opt to play all tracks, repeat one track only, repeat the entire folder, repeat all, play all randomly.
10. Find Button: Push this button once to enable search by FILE. Push it twice to search by ALBUM. Push and hold to view the track; push a second time to view the ID3 tag.
11. Record/Delete Button: Push this button to initiate record mode when set to USB or SD/SDHC mode. Recording will begin in pause mode, and users can push the play/pause button to begin recording. When this button is pushed during CD mode, this will activate encoding of the current track. Push the stop button to stop encoding. Push and hold this button to start delete mode. Use the reverse/cue buttons to select the folder and file you wish to delete, and push and hold the button once again to confirm deletion.
12. SD/SDHC Card Slot: Insert an appropriately formatted SD or SDHC card into this slot for recording or playback of audio files.
13. USB Connector: Connect your USB flash drives here. Flash drives can be used to record to or for playback of MP3 or WMA files.Note: Phonic recommends that SD, SDHC and USB media is formatted as FAT-32 for best results.
CD Remote
1. Power Button: Activate and deactivate the Safari’s CD player using this button.
2. Play/Pause Button: Push this button to begin playback and again to pause. Pushing the button a third time will resume playback from the point at which the audio was paused. This button is also used to pause and begin recording.
3. Stop Button: This button will stop the currently playing or recording track.
4. Program Button: Push this button to access “program” mode to program track order. Push stop to clear programmed tracks.
1 3
7 9 10 1112
1
89 12
13
1514
16
234567
13
5 64
8
2
10 11
+12
VG
ND
L-C
HS
-GN
DR
-CH
L-C
HS
-GN
DR
-CH
AUX IN
English
7Safari 2000
2315 6
7
4
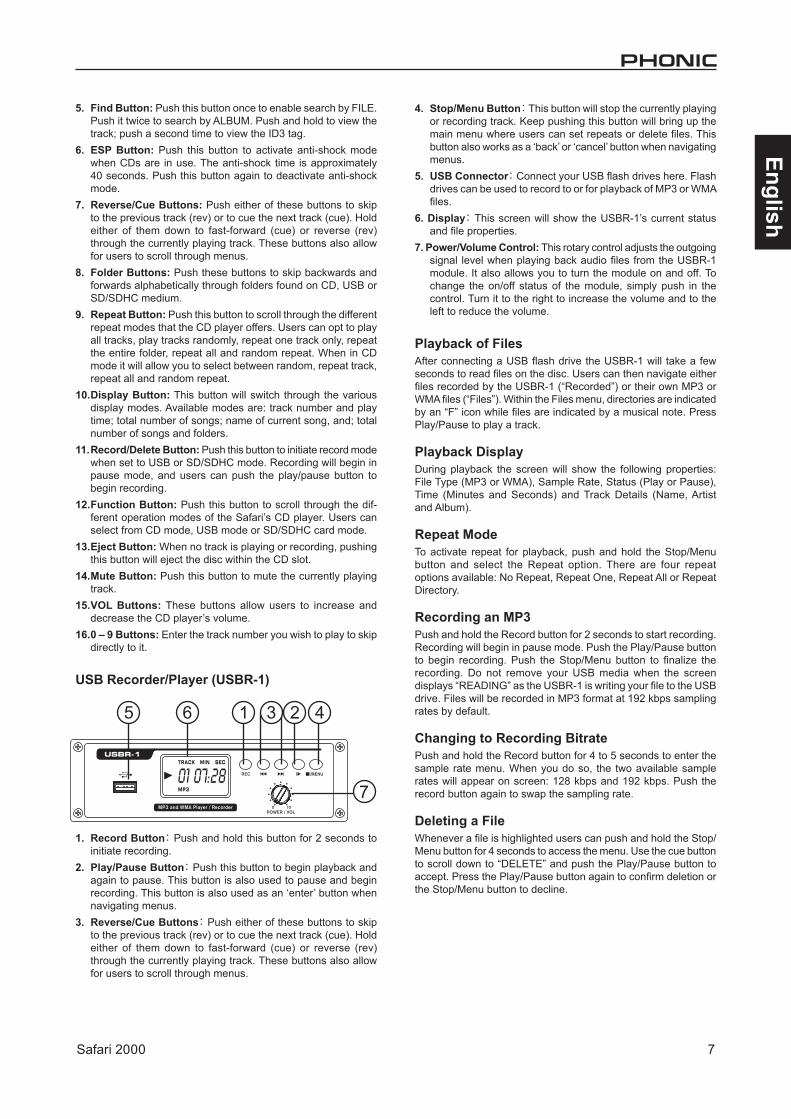
5. Find Button: Push this button once to enable search by FILE. Push it twice to search by ALBUM. Push and hold to view the track; push a second time to view the ID3 tag.
6. ESP Button: Push this button to activate anti-shock mode when CDs are in use. The anti-shock time is approximately 40 seconds. Push this button again to deactivate anti-shock mode.
7. Reverse/Cue Buttons: Push either of these buttons to skip to the previous track (rev) or to cue the next track (cue). Hold either of them down to fast-forward (cue) or reverse (rev) through the currently playing track. These buttons also allow for users to scroll through menus.
8. Folder Buttons: Push these buttons to skip backwards and forwards alphabetically through folders found on CD, USB or SD/SDHC medium.
9. Repeat Button: Push this button to scroll through the different repeat modes that the CD player offers. Users can opt to play all tracks, play tracks randomly, repeat one track only, repeat the entire folder, repeat all and random repeat. When in CD mode it will allow you to select between random, repeat track, repeat all and random repeat.
10. Display Button: This button will switch through the various display modes. Available modes are: track number and play time; total number of songs; name of current song, and; total number of songs and folders.
11. Record/Delete Button: Push this button to initiate record mode when set to USB or SD/SDHC mode. Recording will begin in pause mode, and users can push the play/pause button to begin recording.
12. Function Button: Push this button to scroll through the dif-ferent operation modes of the Safari’s CD player. Users can select from CD mode, USB mode or SD/SDHC card mode.
13. Eject Button: When no track is playing or recording, pushing this button will eject the disc within the CD slot.
14. Mute Button: Push this button to mute the currently playing track.
15. VOL Buttons: These buttons allow users to increase and decrease the CD player’s volume.
16. 0 – 9 Buttons: Enter the track number you wish to play to skip directly to it.
USB Recorder/Player (USBR-1)
1. Record Button: Push and hold this button for 2 seconds to initiate recording.
2. Play/Pause Button: Push this button to begin playback and again to pause. This button is also used to pause and begin recording. This button is also used as an ‘enter’ button when navigating menus.
3. Reverse/Cue Buttons: Push either of these buttons to skip to the previous track (rev) or to cue the next track (cue). Hold either of them down to fast-forward (cue) or reverse (rev) through the currently playing track. These buttons also allow for users to scroll through menus.
4. Stop/Menu Button: This button will stop the currently playing or recording track. Keep pushing this button will bring up the main menu where users can set repeats or delete files. This button also works as a ‘back’ or ‘cancel’ button when navigating menus.
5. USB Connector: Connect your USB flash drives here. Flash drives can be used to record to or for playback of MP3 or WMA files.
6. Display: This screen will show the USBR-1’s current status and file properties.
7. Power/Volume Control: This rotary control adjusts the outgoing signal level when playing back audio files from the USBR-1 module. It also allows you to turn the module on and off. To change the on/off status of the module, simply push in the control. Turn it to the right to increase the volume and to the left to reduce the volume.
Playback of FilesAfter connecting a USB flash drive the USBR-1 will take a few seconds to read files on the disc. Users can then navigate either files recorded by the USBR-1 (“Recorded”) or their own MP3 or WMA files (“Files”). Within the Files menu, directories are indicated by an “F” icon while files are indicated by a musical note. Press Play/Pause to play a track.
Playback DisplayDuring playback the screen will show the following properties: File Type (MP3 or WMA), Sample Rate, Status (Play or Pause), Time (Minutes and Seconds) and Track Details (Name, Artist and Album).
Repeat ModeTo activate repeat for playback, push and hold the Stop/Menu button and select the Repeat option. There are four repeat options available: No Repeat, Repeat One, Repeat All or Repeat Directory.
Recording an MP3Push and hold the Record button for 2 seconds to start recording. Recording will begin in pause mode. Push the Play/Pause button to begin recording. Push the Stop/Menu button to finalize the recording. Do not remove your USB media when the screen displays “READING” as the USBR-1 is writing your file to the USB drive. Files will be recorded in MP3 format at 192 kbps sampling rates by default.
Changing to Recording BitratePush and hold the Record button for 4 to 5 seconds to enter the sample rate menu. When you do so, the two available sample rates will appear on screen: 128 kbps and 192 kbps. Push the record button again to swap the sampling rate.
Deleting a FileWhenever a file is highlighted users can push and hold the Stop/Menu button for 4 seconds to access the menu. Use the cue button to scroll down to “DELETE” and push the Play/Pause button to accept. Press the Play/Pause button again to confirm deletion or the Stop/Menu button to decline.
8
English
Safari 2000
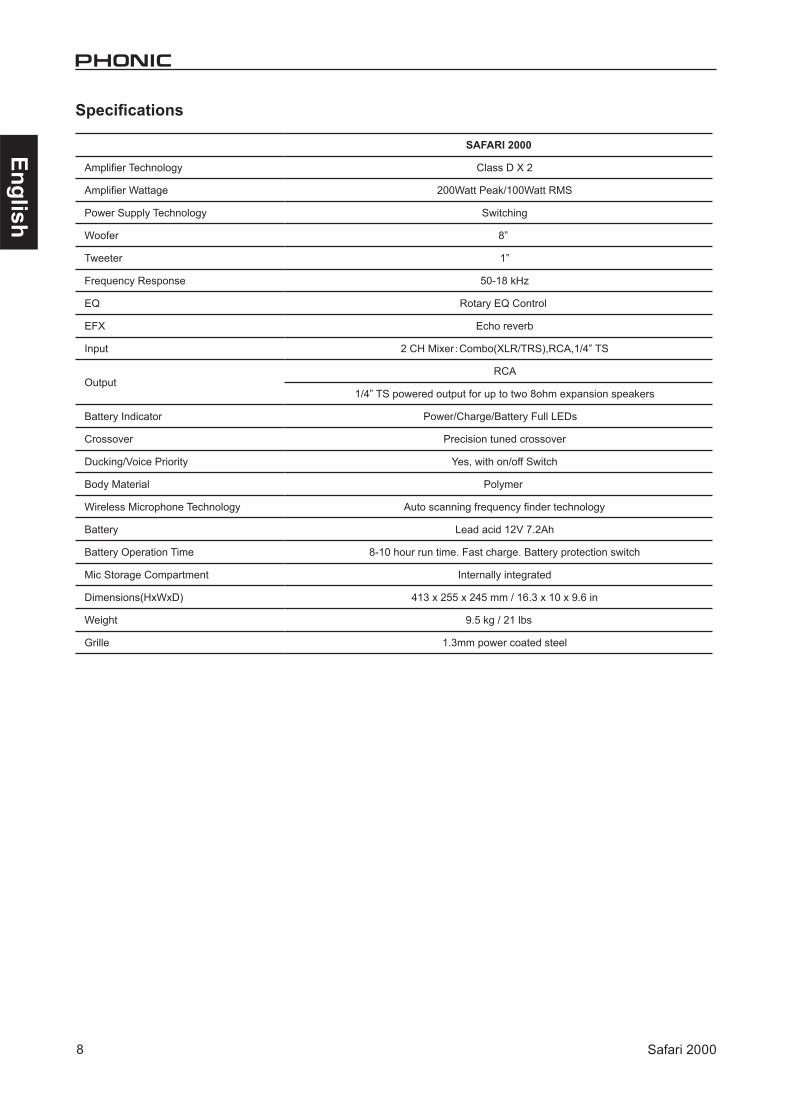
Specifications
SAFARl 2000
Amplifier Technology Class D X 2
Amplifier Wattage 200Watt Peak/100Watt RMS
Power Supply Technology Switching
Woofer 8”
Tweeter 1”
Frequency Response 50-18 kHz
EQ Rotary EQ Control
EFX Echo reverb
Input 2 CH Mixer:Combo(XLR/TRS),RCA,1/4” TS
Output RCA
1/4” TS powered output for up to two 8ohm expansion speakers
Battery Indicator Power/Charge/Battery Full LEDs
Crossover Precision tuned crossover
Ducking/Voice Priority Yes, with on/off Switch
Body Material Polymer
Wireless Microphone Technology Auto scanning frequency finder technology
Battery Lead acid 12V 7.2Ah
Battery Operation Time 8-10 hour run time. Fast charge. Battery protection switch
Mic Storage Compartment Internally integrated
Dimensions(HxWxD) 413 x 255 x 245 mm / 16.3 x 10 x 9.6 in
Weight 9.5 kg / 21 lbs
Grille 1.3mm power coated steel
English
9Safari 2000
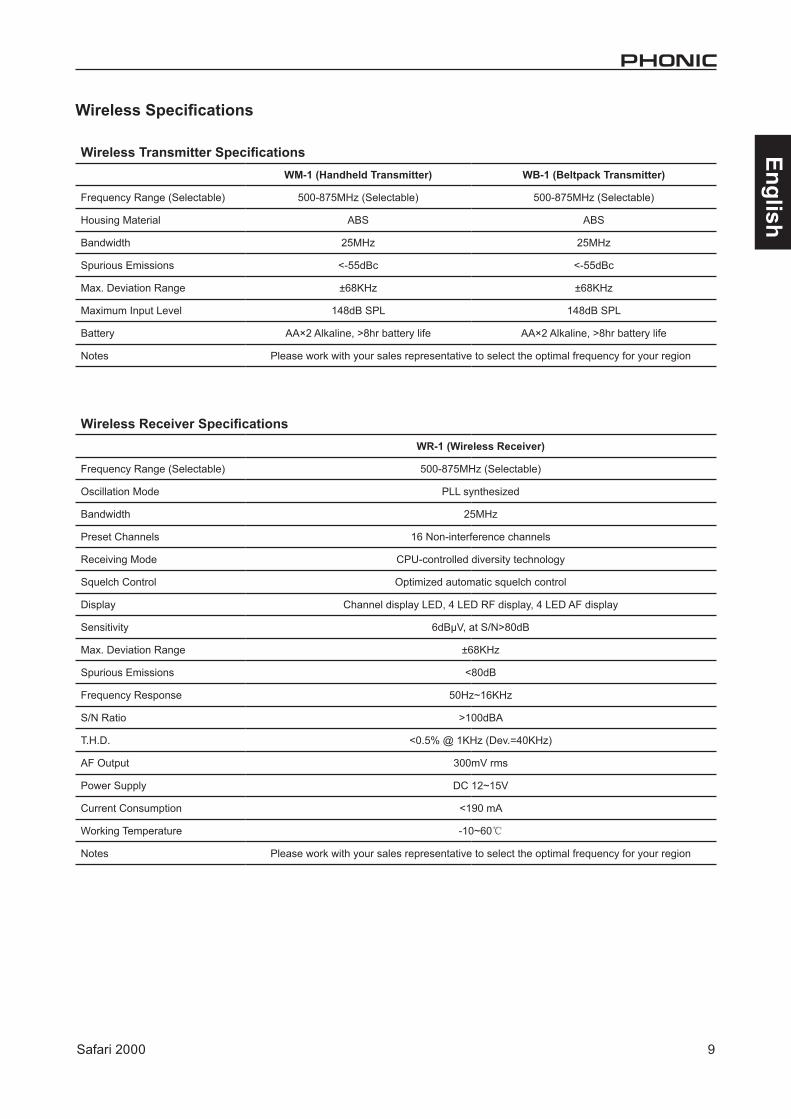
Wireless Specifications
Wireless Transmitter SpecificationsWM-1 (Handheld Transmitter) WB-1 (Beltpack Transmitter)
Frequency Range (Selectable) 500-875MHz (Selectable) 500-875MHz (Selectable)
Housing Material ABS ABS
Bandwidth 25MHz 25MHz
Spurious Emissions <-55dBc <-55dBc
Max. Deviation Range ±68KHz ±68KHz
Maximum Input Level 148dB SPL 148dB SPL
Battery AA×2 Alkaline, >8hr battery life AA×2 Alkaline, >8hr battery life
Notes Please work with your sales representative to select the optimal frequency for your region
Wireless Receiver SpecificationsWR-1 (Wireless Receiver)
Frequency Range (Selectable) 500-875MHz (Selectable)
Oscillation Mode PLL synthesized
Bandwidth 25MHz
Preset Channels 16 Non-interference channels
Receiving Mode CPU-controlled diversity technology
Squelch Control Optimized automatic squelch control
Display Channel display LED, 4 LED RF display, 4 LED AF display
Sensitivity 6dBμV, at S/N>80dB
Max. Deviation Range ±68KHz
Spurious Emissions <80dB
Frequency Response 50Hz~16KHz
S/N Ratio >100dBA
T.H.D. <0.5% @ 1KHz (Dev.=40KHz)
AF Output 300mV rms
Power Supply DC 12~15V
Current Consumption <190 mA
Working Temperature -10~60℃
Notes Please work with your sales representative to select the optimal frequency for your region
10
English
Safari 2000
SERVICE AND REPAIRFor replacement parts, service and repairs please contact the Phonic distributor in your country. Phonic does not release service manuals to consumers, and advice users to not attempt any self repairs, as doing so voids all warranties. You can locate a dealer near you at http://www.phonic.com/where/.
WARRANTY INFORMATIONPhonic stands behind every product we make with a no-hassles warranty. Warranty coverage may be extended, depending on your region. Phonic Corporation warrants this product for a minimum of one year from the original date of purchase against defects in material and workmanship under use as instructed by the user’s manual. Phonic, at its option, shall repair or replace the defective unit covered by this warranty. Please retain the dated sales receipt as evidence of the date of purchase. You will need it for any warranty service. No returns or repairs will be accepted without a proper RMA number (return merchandise authorization). In order to keep this warranty in effect, the product must have been handled and used as prescribed in the instructions accompanying this warranty. Any tampering of the product or attempts of self repair voids all warranty. This warranty does not cover any damage due to accident, misuse, abuse, or negligence. This warranty is valid only if the product was purchased new from an authorized Phonic dealer/distributor. For complete warranty policy information, please visit http://www.phonic.com/warranty/.
CUSTOMER SERVICE AND TECHNICAL SUPPORTWe encourage you to visit our online help at http://www.phonic.com/support/. There you can find answers to frequently asked questions, tech tips, driver downloads, returns instruction and other helpful information. We make every effort to answer your questions within one business day.
FCC Caution: To assure continued compliance, any changes or modifications not expressly approved by the party responsible for compliance could void the user's authority to operate this equipment. (Example - use only shielded interface cables when connecting to computer or peripheral devices). THIS DEVICE COMPLIES WITH PART 74 OF THE FCC RULES. This equipment complies with FCC RF radiation exposure limits set forth for an uncontrolled environment.
[email protected]://www.phonic.com
Español
11Safari 2000
CONTENIDO
Manual del Usuario
Phonic se reserva el derecho de mejorar o alterar cualquier información provista dentro de este documento sin previo aviso.
Introducción 1
Electrónica Avanzada. Fiabilidad Avanzada. 1
Carácterísticas 1
Componentes Incluidos 1
Componentes Opcionales 1
Vista Frontal 2
Vista Posterior 2
Energía-Instrucción Relacionada 3
Remplazando la Batería 3
Instalando los Módulos Recibidores Inalámbricos WR-1 del Safari 4
Operando el Sistema Operativo Inalámbrico del Safari 4
Operación 5
Instalación del Safari CD/USB o USBR-1 6
Especificaciones 8
Especificaciones Inalámbricos 9
APéNDICE
DIMENSIONES 1
12
Español
Safari 2000
Español
1Safari 2000
Safari 2000 básica incluye:
4Safari 2000Safari 2000 SYS1 incluye:
4Safari 20004WM-1S sistema inalámbricode mano4CD/USB Reproductor de MP3
Safari 2000 SYS2 incluye:4Safari 20004WM-1S sistema inalámbricode mano4Bureau-1 USB MP3 Reproductor y Grabador
IntroducciónSafari 2000, una de las últimas solución de sonido batería potenciada equipada. Potenciada con amplificadores de clase D que ofrecen un mandatorio 200 Watts, el Safari 2000 alcanza más de 300+ personas. Con un peso liviano de 9.5kg, dicho dispositivo está diseñado para excelente portabilidad. El Sarafi de estructura polímero, esquinas redondas y sistema de reforzamiento interno que maximiza la solidificación estructural, permitiendo que la unidad resista a usos pesados.
El circuito electrónico del Safari, incluye amplificador, batería y suministro de potencia más avanzados. El sistema de batería eficaz puede operar 8-10 horas a toda potencia cargada y es de rápida recargada en menos de 8 horas. La mezcladora abordo de 2-canales tiene entradas versátiles opcionales, incluyendo Neutrik XLR, Neutrik TRS, TS phone jack de 6.35 mm y RCA. La función avanzada Bluetooth de Safari 2000 también permite a los usuarios reproducir música desde teléfonos móviles, Tablet PCs, ordenadores portátiles, o de cualquier otro dispositivo con Bluetooth! La expansión del sonido es especialmente fácil con el Safari de 2000. Hasta dos altavoces pasivos de compañía se pueden añadir a través de su connector TS Jack de 6.35 mm. Finalmente, las opciones tales como los micrófonos inalámbricos de auto-escaneo Phonic, CD/USB reproductor & grabador, el USB grabador ofrece al usuario una facilidad en personalizar el Safari 2000 como una solución a medida. Así que siendo un vendedor en las calles, músico, profesor o profesional de negocios. El fuerte, versátil y potente Safari 2000 el sistema portable de punta
Electrónica Avanzada. Fiabilidad Avanzada.Los ingenieros de Phonic han diseñado el Safari 2000 para una fiabilidad máxima y duradera. Desde el día de estreno, el suministro de potencia, amplificador y circuitos de batería del Safarí 2000 han aguantado más de 1000 horas de prueba en laboratorios y en acción, garantizando un nivel notable de fiabilidad. Desde cámaras de alta humedad y alta temperatura, habitaciones bajo cero, pruebas de caídas a puntas de voltaje eléctrico, el Safari tiene todo lo que necesita.
Carácterísticas• Solución de bateria ultra-durable & peso liviano (9.5kg) todo
compacto • Amplificador de tecnología Clase D de 200 Watt • Encaje resistente anti-impacto con reforzamiento interno• Tweeter 1'' y 8'' woofer• Respuesta de frecuencia plana entre 50Hz – 18kHz• Mezcladora de 2-canales abordo: un combo jacks (XLR & ¼''),
RCA, y TS phone jack de 6.35 mm• Bluetooth incluido! Transmisión de música en el Safari 2000 desde
cualquier teléfono celular, tablet PC o portátil con Bluetooth!• Sistema de Micrófono Inalámbrico Avanzado con buscador de
auto-escaneo para frecuencias• Añada hasta dos altavoces de acompañamiento con jacks de
Speakon potenciados por el TS phone jack de 6.35 mm• Tiempo operacional de 8-10 horas con bacteria completamente
cargado• Circuito de protección para bacteria que protege la Bateria
durante almacenamiento• Rotary control de EQ y efectos de echo reverb• Característica de ducking de la música para “Prioridad de Voz”• Ranura integrada de almacenaje para micrófono• Equipado con un CD player y MP3 player/recorder compacto
(opcional)
Componentes Incluidos:• Unidad Safari 2000 • Cable de potencia AC • Manual del Usuario
Componentes Opcionales• Reproductor y grabadora CD/USB con control remoto• USBR-1 reproductor y grabador USB con conector USB• WM-1S sistema de micrófono portátil inalámbrico• WL-1S sistema de micrófono lavalier inalámbrico • WH-1S sistema de micrófono mano libre inalámbrico• Altavoces de expansión pasivos Safari 2000P
Opciones de combinaciones
Grabadora & Reproductora CD/USB MP3
(SAFARI CD/USB)
Sistema Inalámbrico de Mano(WM-1S)
Sistema Lavaliere Inalámbrico(WL-1S)
Sistema Inalámbrico Auricular(WH-1S)
Altavoz Pasivo de Acompañamiento(SAFARI 2000P)
USB grabadora & reproductora (MP3/WMA)(USBR-1)
Opciones y accesorios
2
Español
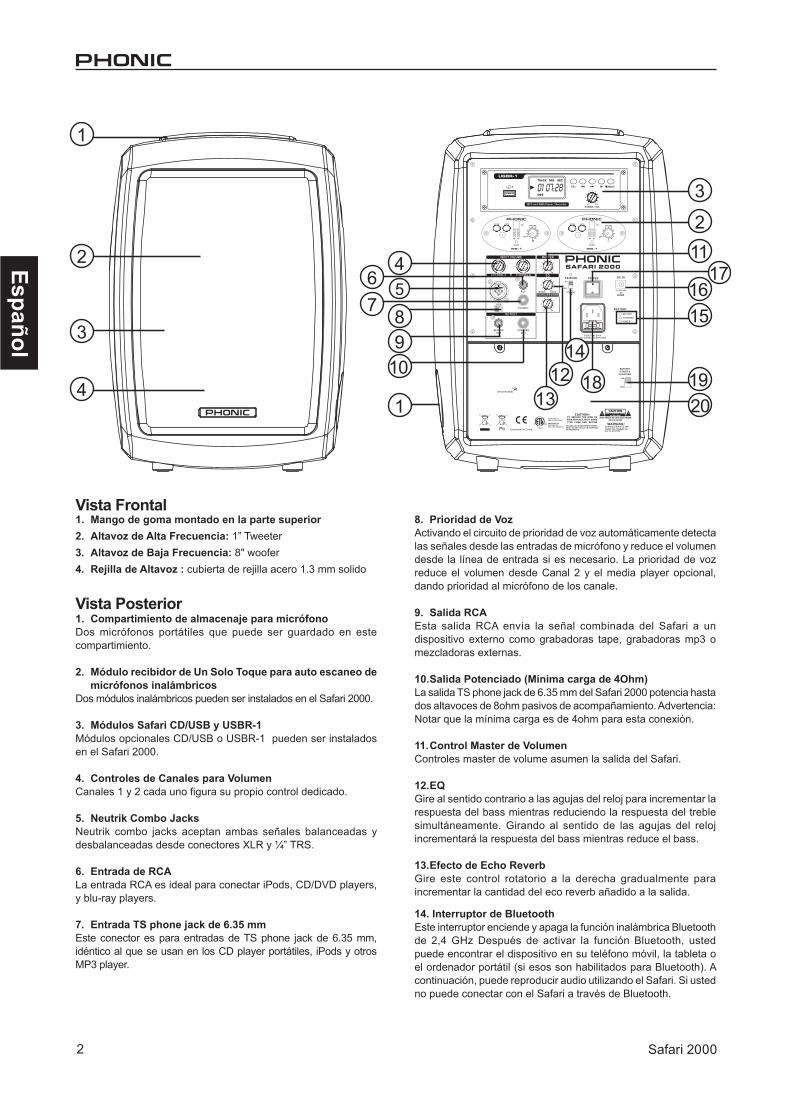
Safari 2000
Vista Frontal1. Mango de goma montado en la parte superior 2. Altavoz de Alta Frecuencia: 1” Tweeter3. Altavoz de Baja Frecuencia: 8" woofer 4. Rejilla de Altavoz : cubierta de rejilla acero 1.3 mm solido
Vista Posterior1. Compartimiento de almacenaje para micrófonoDos micrófonos portátiles que puede ser guardado en este compartimiento.
2. Módulo recibidor de Un Solo Toque para auto escaneo de micrófonos inalámbricos
Dos módulos inalámbricos pueden ser instalados en el Safari 2000. 3. Módulos Safari CD/USB y USBR-1 Módulos opcionales CD/USB o USBR-1 pueden ser instalados en el Safari 2000.
4. Controles de Canales para VolumenCanales 1 y 2 cada uno figura su propio control dedicado.
5. Neutrik Combo JacksNeutrik combo jacks aceptan ambas señales balanceadas y desbalanceadas desde conectores XLR y ¼” TRS.
6. Entrada de RCA La entrada RCA es ideal para conectar iPods, CD/DVD players, y blu-ray players.
7. Entrada TS phone jack de 6.35 mmEste conector es para entradas de TS phone jack de 6.35 mm, idéntico al que se usan en los CD player portátiles, iPods y otros MP3 player.
8. Prioridad de VozActivando el circuito de prioridad de voz automáticamente detecta las señales desde las entradas de micrófono y reduce el volumen desde la línea de entrada si es necesario. La prioridad de voz reduce el volumen desde Canal 2 y el media player opcional, dando prioridad al micrófono de los canale.
9. Salida RCA Esta salida RCA envía la señal combinada del Safari a un dispositivo externo como grabadoras tape, grabadoras mp3 o mezcladoras externas.
10. Salida Potenciado (Mínima carga de 4Ohm)La salida TS phone jack de 6.35 mm del Safari 2000 potencia hasta dos altavoces de 8ohm pasivos de acompañamiento. Advertencia: Notar que la mínima carga es de 4ohm para esta conexión.
11. Control Master de VolumenControles master de volume asumen la salida del Safari.
12. EQGire al sentido contrario a las agujas del reloj para incrementar la respuesta del bass mientras reduciendo la respuesta del treble simultáneamente. Girando al sentido de las agujas del reloj incrementará la respuesta del bass mientras reduce el bass.
13. Efecto de Echo Reverb Gire este control rotatorio a la derecha gradualmente para incrementar la cantidad del eco reverb añadido a la salida.
14. Interruptor de BluetoothEste interruptor enciende y apaga la función inalámbrica Bluetooth de 2,4 GHz Después de activar la función Bluetooth, usted puede encontrar el dispositivo en su teléfono móvil, la tableta o el ordenador portátil (si esos son habilitados para Bluetooth). A continuación, puede reproducir audio utilizando el Safari. Si usted no puede conectar con el Safari a través de Bluetooth.
1
1
467
5
89
10
211
17
1312 18
14
1615
1920
3
2
3
4
Español
3Safari 2000
15. Indicadores del Estado de la BateríaEl Safari 2000 dispone de un indicador de batería de 3-LED. Durante la carga, el LED rojo “de carga” parpadea. Cuando la batería está llena, el LED verde de “batería llena” mostrará sin parpadear. El azul LED “Power” parpadea si la batería tiene menos del 15% de energía restante.
16. Entrada de Potencia DC Como una alternativa a la potencia AC, la entrada de potencia DC del Safari y la carga de la batería interna mediante potencia DC (DC 12V - 24V).Cuando al re-cargar la batería, asegúrese que el interruptor de la potencia de batería y cargando este en posición de ON (encendido).
17. Interruptor de EngergíaUse este interruptor para activar el Safari 2000.
18. Entrada de potencia ACUn conector estándar de potencia AC suministra engería y carga el Safari 2000.
19. Potencia de Batería e Interruptor de CargaEste interruptor activa la conexión entre el Safari y la batería interna. Favor de mantener el interruptor en la posición OFF (apagado) cuando no requiera usar el Safarí por más de de cinco días. Antes de guardar el Safari 2000, recuerde en cargar por completo las baterías y tener el interruptor de potencia de batería y cargando en posición de OFF.
20. Compartimiento de Batería Battery CompartmentLas baterías recargable de plomo-ácido está guardada en este compartimiento.
Energía-Instrucción RelacionadaPotencia AC El interruptor de potencia universal del safari opera entre 90VAC ~ 265 VAC. Conecte el cable de energía AC y encienda la potencia. La engería AC suministra electricidad a la unidad misma así como a la batería interna. Usted podrá operar la unidad y cargar las baterías simultáneamente.
Potencia DC 12V - 24V Hay dos formas de uso de la potencia DC- mediante un adaptador DC o por las baterías internad DC del Safari. El Safari puede operar 8 a 10 horas en modo independiente (CD/USB player y dos recibidores son encendidos) .
LED del Estado para BateríaNota: Para usar las baterías internas del Safari, asegúrese que el interruptor de potencia de batería y cargando en posición de activado (ON). Si los cables de la batería están desconectado o si el interruptor de potencia de batería y cargando está en desactivado (OFF), si usted aun está usando el modo de potencia AC.
El Safari 2000 dispone de un indicador de la batería 3-LED de estado. Durante la carga, el rojo “de carga” LED parpadea. Cuando la batería está llena, el verde de “batería llena” LED mostrará sin parpadear. El azul “Power” LED parpadea si la batería tiene menos del 15% de energía restante.
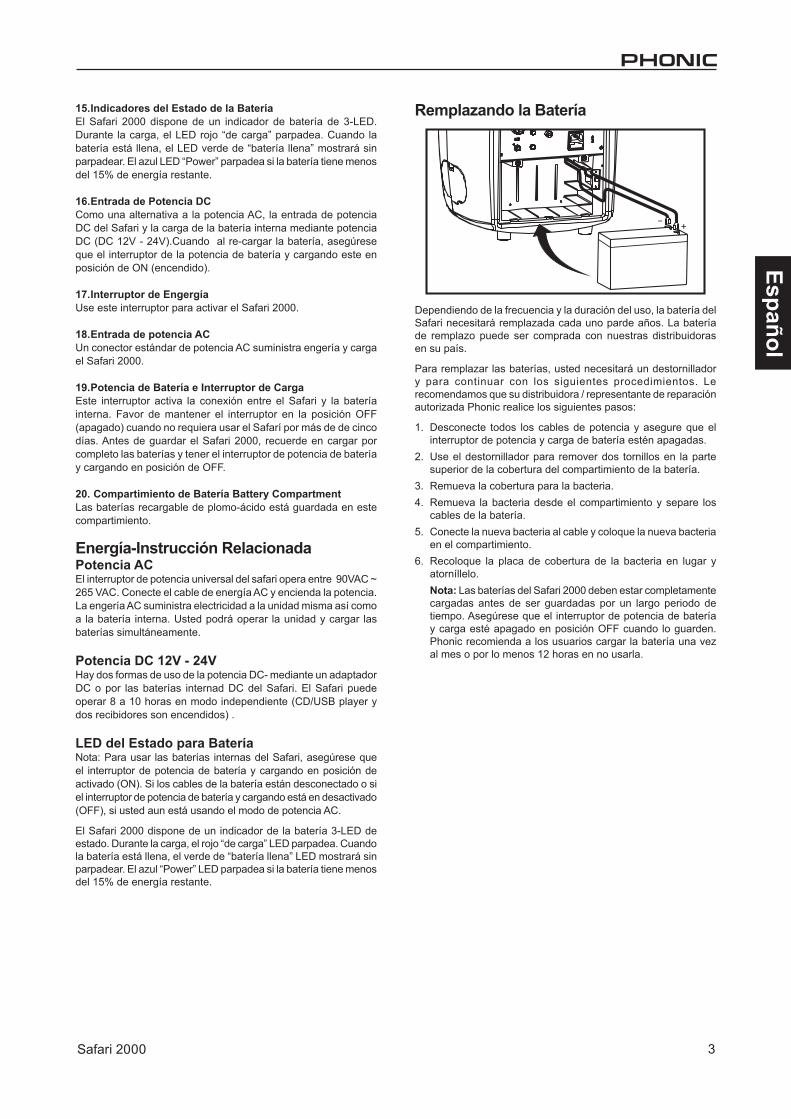
Remplazando la Batería
Dependiendo de la frecuencia y la duración del uso, la batería del Safari necesitará remplazada cada uno parde años. La batería de remplazo puede ser comprada con nuestras distribuidoras en su país.
Para remplazar las baterías, usted necesitará un destornillador y para continuar con los siguientes procedimientos. Le recomendamos que su distribuidora / representante de reparación autorizada Phonic realice los siguientes pasos:
1. Desconecte todos los cables de potencia y asegure que el interruptor de potencia y carga de batería estén apagadas.
2. Use el destornillador para remover dos tornillos en la parte superior de la cobertura del compartimiento de la batería.
3. Remueva la cobertura para la bacteria.4. Remueva la bacteria desde el compartimiento y separe los
cables de la batería.5. Conecte la nueva bacteria al cable y coloque la nueva bacteria
en el compartimiento.6. Recoloque la placa de cobertura de la bacteria en lugar y
atorníllelo. Nota: Las baterías del Safari 2000 deben estar completamente cargadas antes de ser guardadas por un largo periodo de tiempo. Asegúrese que el interruptor de potencia de batería y carga esté apagado en posición OFF cuando lo guarden. Phonic recomienda a los usuarios cargar la batería una vez al mes o por lo menos 12 horas en no usarla.
+-
4
Español
Safari 2000
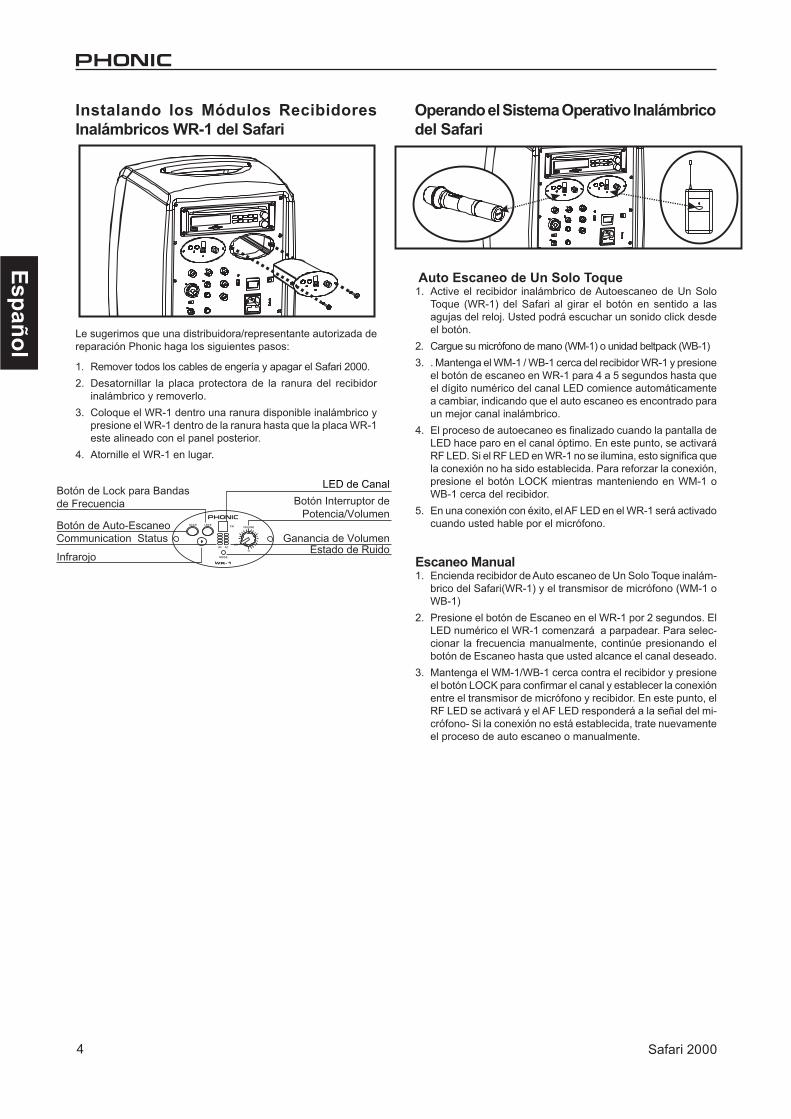
Instalando los Módulos Recibidores Inalámbricos WR-1 del Safari
Le sugerimos que una distribuidora/representante autorizada de reparación Phonic haga los siguientes pasos:
1. Remover todos los cables de engería y apagar el Safari 2000.2. Desatornillar la placa protectora de la ranura del recibidor
inalámbrico y removerlo.3. Coloque el WR-1 dentro una ranura disponible inalámbrico y
presione el WR-1 dentro de la ranura hasta que la placa WR-1 este alineado con el panel posterior.
4. Atornille el WR-1 en lugar.
Operando el Sistema Operativo Inalámbrico del Safari
Botón Interruptor dePotencia/Volumen
Ganancia de VolumenEstado de Ruido
Communication Status Infrarojo
Botón de Auto-Escaneo
Botón de Lock para Bandas de Frecuencia
LED de Canal
Auto Escaneo de Un Solo Toque1. Active el recibidor inalámbrico de Autoescaneo de Un Solo
Toque (WR-1) del Safari al girar el botón en sentido a las agujas del reloj. Usted podrá escuchar un sonido click desde el botón.
2. Cargue su micrófono de mano (WM-1) o unidad beltpack (WB-1)3. . Mantenga el WM-1 / WB-1 cerca del recibidor WR-1 y presione
el botón de escaneo en WR-1 para 4 a 5 segundos hasta que el dígito numérico del canal LED comience automáticamente a cambiar, indicando que el auto escaneo es encontrado para un mejor canal inalámbrico.
4. El proceso de autoecaneo es finalizado cuando la pantalla de LED hace paro en el canal óptimo. En este punto, se activará RF LED. Si el RF LED en WR-1 no se ilumina, esto significa que la conexión no ha sido establecida. Para reforzar la conexión, presione el botón LOCK mientras manteniendo en WM-1 o WB-1 cerca del recibidor.
5. En una conexión con éxito, el AF LED en el WR-1 será activado cuando usted hable por el micrófono.
Escaneo Manual1. Encienda recibidor de Auto escaneo de Un Solo Toque inalám-
brico del Safari(WR-1) y el transmisor de micrófono (WM-1 o WB-1)
2. Presione el botón de Escaneo en el WR-1 por 2 segundos. El LED numérico el WR-1 comenzará a parpadear. Para selec-cionar la frecuencia manualmente, continúe presionando el botón de Escaneo hasta que usted alcance el canal deseado.
3. Mantenga el WM-1/WB-1 cerca contra el recibidor y presione el botón LOCK para confirmar el canal y establecer la conexión entre el transmisor de micrófono y recibidor. En este punto, el RF LED se activará y el AF LED responderá a la señal del mi-crófono- Si la conexión no está establecida, trate nuevamente el proceso de auto escaneo o manualmente.
Español
5Safari 2000
Operación
Beltpack Handheld Microphone-Micrófono de Mano
lavalier
WB-1
UHF
WB-1
UHF
Headset-Auricular
WB-1
UHF
Estado de Potencia
Compartimiento de Batería
WB-1
UHF
Antena Interruptor de PotenciaJack mic lavalier/Auricular
Estado de PotenciaInfrarojo
6
Español
Safari 2000
Instalación del Safari CD/USB o USBR-1
Le recomendamos que una distribuidora / representante autorizado de Phonic realice los siguientes pasos:
1. Remueva todos los cables potenciados y desactive el Safari 2000.2. Destornille la placa protectora del Safari y remuévalo 3. Encuentre el cable pegado dentro del compartimiento despues
de remover la placa.4. Conecte el cable al conector en parte posterior del player
opcional.5. Inserte el player dentro del Safari y atornille en lugar usando
los tornillos que fueron removidos de la place protectora.
Reproductor CD/USB y Grabadorar Opcional
1. Ranura de CD: Inserte un disco compacto en esta ranura. Este CD player puede aceptar CD de audio, CD-R con archives de MP3.
2. Botón Power/Volume: Presione este botón para activar la unidad, después el usuario puede ajustar el volumen con girar el botón.
3. Botón Play/Pause: Presione este botón para comenzar a reproducir y presione nuevamente para pausar. Este botón es también usado para pausar antes de comenzar la grabación.
4. Botones de Reverse/Cue: Presione cualquiera de estos botones para saltar a la pista anterior (REV) o cue la pista siguiente (cue). Mantenga presionado cualquiera para adelanto rápido (cue) o reverso (rev) por medio de la pista actualmente en ejecución. Estos botones también permiten a los usuarios en navegar en los menús.
5. Botón Stop: Este botón hará paro a la pista corriente de re-producción y grabación.
6. Botón Eject: Presione este botón para expulsar el disco dentro de la ranura del CD.
7. Botón Function: Los usuarios pueden seleccionar desde el modo CD, USB o modo de tarjeta SD/SDHC.
8. Botones Folder: Presione estos botones para saltar atrás o adelantar alfabéticamente en los fólderes encontrados en CD, USB o tarjeta SD/SDHC.
9. Botones Repeat: Presione este botón para navegar en los diferentes modos de repetición que el CD player ofrece. Los usuarios pueden optar en reproducir todas las pistas, repetir una sola pista o repetir todo el folder, reproducir todo a lazar.
1 3
7 9 10 1112
1
89 12
13
1514
16
234567
13
5 64
8
2
10 11
1 3
7 9 10 1112
1
89 12
13
1514
16
234567
13
5 64
8
2
10 11
10. Botón Find: Presione este botón una vez para activar el bucador por FILE (archivo). Presione dos veces para buscar por ALBUM. Presione y manténgalo para visualizar la pista, presione por segunda vez para ver el tag ID3.
11. Botón Record/Delete: Presione este botón para inciciar el modo de grabación cuando esté configurado al USB o modo SD/SDHC. La grabación comenzará en modo de pausa, y los usu-arios podrán presionar el botón de play/pause para comenzar la grabación. Cuando este botón este presionado durante el modo CD, estará activa la codificación de la pista actual. Presione el botón de Stop para detener la codificación. Mantenga este botón presionado para comenzar el modo de eliminar (delete). Use los botones de reverse/cue para seleccionar el folder y file (archivo) que usted desea eliminar, y presione y manténgalo presionado otra vez para confirmar la eliminación.
12. Ranura de tarjeta SD/SDHC : Inserte una tarjeta formateada de SD o SDHC i en esta ranura para grabaciones o reproduc-ciones de audio archivos.
13. Conector USB: Conecte su USB flash drives aquí. Los Flash drives pueden ser usados para grabaciones o reproducciones de archivos MP3 o WMA.Nota: Phonic recomienda que la media SD, SDHC y USB este formateada en FAT-32 para mejores resultados.
CD Remoto
1. Botón de Power : Active y desactive el CD player del Safari usando este botón.
2. Botón de Play/Pause: Presione este botón para comenzar la reproducción y otra vez para pausar. Presione este botón por tercera vez para resumir la reproducción desde el punto donde el audio ha sido pausado. Este botón es también usado para pausar y comenzar a grabar.
3. Botón de Stop: Este botón hará paro de la pista que actual-mente está ejecutando o grabando.
4. Botón de Programa: Presione este botón para acceder el modo “programa” para programar la orden de la pista. Presione STOP para eliminar la pista de los programas.
+12
VG
ND
L-C
HS
-GN
DR
-CH
L-C
HS
-GN
DR
-CH
AUX IN
Español
7Safari 2000
5. Botón de Find: Presione este botón una vez para activar búsqueda por FILE (archivo). Presione dos veces para em-plear búsqueda por ALBUM. Presione y manténgalo en hold para visualizar la pista; presione una segunda vez para ver la etiqueta ID3.
6. Botón de ESP: Presione este botón para activar el modo de anti-shock cuando el CD esta en uso. El tiempo del anti-shock es aproximadamente de 40 segundos. Presione el dicho botón nuevamente para desactivar el modo de anti-shock.
7. Botón de Reverse/Cue: Presione uno de estos botones para saltar a la pista anterior (rev) o cue la pista siguiente (cue). Man-téngalo en Hold cualquiera de los en fast-forward (Adelanto-rápido) (cue) o reverso (rev) durante la pista actualmente en ejecución. Estos botones permiten a los usuarios en navegar por los menús.
8. Botón de Folder: Presione estos botones para saltar hacia detrás y adelantar en orden alfabético dentro del los folders en los CD, USB o SD/SDHC mediano.
9. Botón de Repeat: Presione este botón para navegar en los diferentes modos de repetición que el CD player ofrece. Los Usuarios pueden optar en activar todas las pistas, ejecutar pistas al azar, repetir una sola pista, repetir todo el folder completo, repetir todo y repetir al azar. Cuando este en el modo CD, le permitirá seleccionar entre al azar, repetir pista, repetir toda y repetir al azar.
10. Botón de Display: Este botón intercambiará en varios modos de pantalla. Los modos disponibles son: número de pista y tiempo de ejecución; total número de canciones; número de canciones corrientes, y un total de número de canciones y fólderes.
11. Botón de Record/Delete: Presione este botón para iniciar el modo de grabación cuando sea configurado al USB o modo SD/SDHC. La grabación comenzará en modo de pausa, y los usuarios podrán presionar el botón de play/pause para comenzar la grabación.
12. Botón de Function: Presione este botón para navegar en los diferentes modos de operación en el CD player del Safari. Los Usuarios pueden seleccionar desde el modo CD, USB o tarjeta SD/SDHC.
13. Botón de Eject: Cuando no hay pistas en ejecución o en gra-bación, presione este botón para expulsar el CD dentro de la ranura del CD.
14. Botón de Mute: Presione este botón para enmudecer la pista actualmente en ejecución.
15. Botones de VOL: Estos botones permiten a los usuarios en incrementar o decaer el volumen del reproductor CD.
16. Botones del 0 – 9: Ingrese el número de pista que usted desea ejecutar para saltar directamente a dicha pista.
Grabador / Reproductor USB (USBR-1)
1. Botón Record (Grabación)Presione y manténgalo presionado este botón por 2 segundos para iniciar la grabación.
2. Botón Play/Pause (Reproducción/Pausa)Presione este botón para comenzar la reproducción y presione otra vez para pausar. Este botón también se usa para pausar y comenzar el grabado. Dicho botón funciona como ¨Enter¨ al navegar los menús.
3. Botones Reverse/Cue (Reverso/Cue)Presione uno de estos botones para saltar a la pista anterior (rev) o cue la pista siguiente (cue). Manténgalo en Hold cualquiera de los en fast-forward (Adelanto-rápido) (cue) o reverso (rev) durante la pista actualmente en ejecución. Estos botones permiten a los usuarios en navegar por los menús.
4. Botón Stop/Menu (Detener/Menú)Este botón hará paro de la pista actualmente en ejecución o grabación. Mantenga este botón presionado y aparecerá el menú principal donde los usuarios pueden configurar las repeticiones o eliminar los archivos. Este botón también funciona como ¨back¨o¨¨cancelar¨ al navegar por los menús.
5. Conector USB Conecte su USB flash driver aquí. Este flash drive puede ser usado para hacer grabaciones o reproducciones de archivos MP3 o WM4.
6. PantallaEsta pantalla aparecerá el estado del USBR-1 actual y las propie-dades del archivo.
7.Control Potencia/Volumen Este control rotatorio ajusta el nivel de señal salida cuando al re-producir los audios archivos desde el módulo USBR-1. También le permite en activar y desactivar el módulo. Para cambiar el estado de on/off, simplemente presione este control. Gire hacia la derecha para incrementar el volumen y a la izquierda para decaerlo.
Reproducción de archivosDespués de conectar el USB flash drive, el USBR-1 tomará unos segundos para leer los archivos en el disco. Los usuarios pueden navegar los archivos grabados por el USBR-1(¨Recorded¨) o datos de su propio MP3 o WMA (¨Files¨). Dentro del menú Files, los directorios son indicados con un icono ¨F¨ y los archivos son indicados por una nota musical. Presione Play/Pausa para reproducir una pista.
Pantalla de reproducciónDurante la reproducción en esta pantalla aparecerá las siguien-tes propiedades: Tipo de archivo (MP3 o WMA), Frecuencia de Muestreo, Estado (Play o Pausa), Tiempo (Minutos y Segundos) y Detalles de Pistas (Nombre, Artista y Álbum).
Modo repeticiónPara activar repetir o reproducir presione y manténgalo en hold el botón de Stop/Menú y seleccione la opción de repetir. Hay cuatro opciones de repetir disponible: No repetir, repetir uno, repetir todo o repetir directorio.
Grabando un MP3Presione y mantenga el hold el botón de Record (grabación) por 2 segundos para comenzar la grabación. La grabación comenzará en modo de pausa. Presione el botón Play/Pausa para comen-zar la grabación. Presione el botón Stop/Menú para finalizar la grabación. No remueva su media USB cual la pantalla aparece "READING" (Leyendo) ya que el USBR-1 está escribiendo su archivo al USB drive. Los archivos serán grabados en formato MP3 a una bitrate de 192kHz predeterminado.
Cambiando la grabación de bitratePresione y mantenga el botón de Record por 4 a 5 segundos y entre al menú de frecuencia de muestreo. Dos frecuencias de muestreo aparecerán disponibles en la pantalla; 128kHz y 192kHz. Presione el botón record nuevamente para cambiar esta bitrate.
Eliminar un archivoCuando los archivos están resaltados, los usuarios pueden pre-sionar y mantener en hold el botón de Stop/Menú por 4 segundos para acceder el menú. Use el botón cue para navegar hacia abajo para ¨DELETE¨ (eliminar) y presione el botón Play/Pausa para aceptar. Presione el botón Play/Pausa otra vez para confirmar eliminación o el botón Stop/Menú para rechazar.
2315 6
7
4
8
Español
Safari 2000
Especificaciones
SAFARl 2000
Tecnología de Amplificador Clase D x 2
Voltaje de Amplificador 200 Watt Peak/100 Watt RMS @ 8 Ohms
Tecnología de Suministro de Poder Interruptor de
Woofer woofer 8"
Tweeter Trompeta 1"
Frecuencia de Respuesta (-6dB) 50-18 kHz
EQ Control EQ rotatorio
EFX Eco reverb
Entrada Mezcladora 2 CH: Combo (XLR/TRS),RCA, TS de 6.35 mm
Salida
RCA
Salida TS Alimentado TS de 6.35 mm potenciado para hasta dos altavoces de expansión de 8ohms
Indicador de Batería Power/Charge/Batería llena LEDs
Crossover Crossover entonada de presición
Reducción/Prioridad de Voz Si, con interruptores de on/off
Material de Estructura Polímero resistente
Tecnología de Micrófono Inalámbrico Tecnología de buscador para auto escaneo de frecuencia
Batería Batería de ácido plomo 12V 7.2Ah
Tiempo Operacinal de Batería 8-10 horas de ejecución. Rápida Recarga. Interruptor de protección para batería
Compartimiento de Alamcenaje de Mic Integrada intermamente
Dimensiones (Alt+An+P) 413x255x245 mm/16.3x10x9.6 in
Peso 9.5kg / 21lbs
Manilla 1.3mm Acero cubierto sólido
Español
9Safari 2000
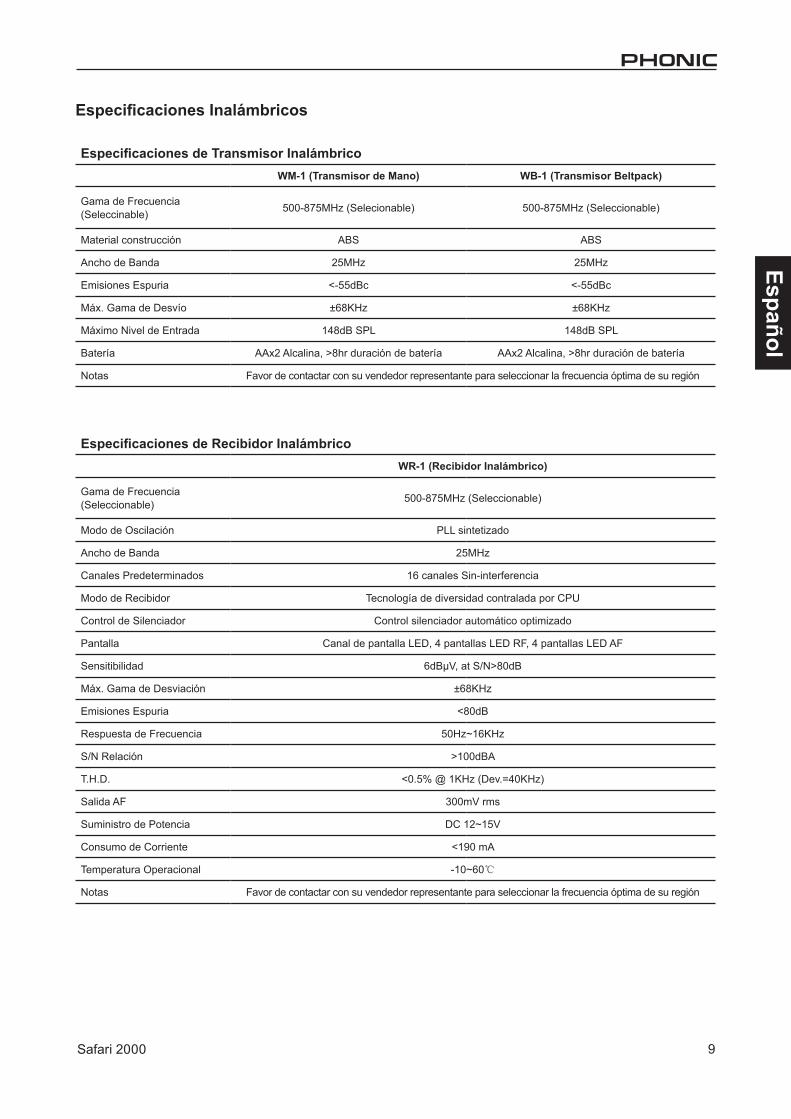
Especificaciones de Transmisor InalámbricoWM-1 (Transmisor de Mano) WB-1 (Transmisor Beltpack)
Gama de Frecuencia (Seleccinable) 500-875MHz (Selecionable) 500-875MHz (Seleccionable)
Material construcción ABS ABS
Ancho de Banda 25MHz 25MHz
Emisiones Espuria <-55dBc <-55dBc
Máx. Gama de Desvío ±68KHz ±68KHz
Máximo Nivel de Entrada 148dB SPL 148dB SPL
Batería AAx2 Alcalina, >8hr duración de batería AAx2 Alcalina, >8hr duración de batería
Notas Favor de contactar con su vendedor representante para seleccionar la frecuencia óptima de su región
Especificaciones de Recibidor InalámbricoWR-1 (Recibidor Inalámbrico)
Gama de Frecuencia (Seleccionable) 500-875MHz (Seleccionable)
Modo de Oscilación PLL sintetizado
Ancho de Banda 25MHz
Canales Predeterminados 16 canales Sin-interferencia
Modo de Recibidor Tecnología de diversidad contralada por CPU
Control de Silenciador Control silenciador automático optimizado
Pantalla Canal de pantalla LED, 4 pantallas LED RF, 4 pantallas LED AF
Sensitibilidad 6dBμV, at S/N>80dB
Máx. Gama de Desviación ±68KHz
Emisiones Espuria <80dB
Respuesta de Frecuencia 50Hz~16KHz
S/N Relación >100dBA
T.H.D. <0.5% @ 1KHz (Dev.=40KHz)
Salida AF 300mV rms
Suministro de Potencia DC 12~15V
Consumo de Corriente <190 mA
Temperatura Operacional -10~60℃
Notas Favor de contactar con su vendedor representante para seleccionar la frecuencia óptima de su región
Especificaciones Inalámbricos
10
Español
Safari 2000
SERVICIO Y REPARACIÓNPara refacciones de reemplazo y reparaciones, por favor póngase en contacto con nuestro distribuidor de Phonic en su país. Phonic no distribuye manuales de servicio directamente a los consumidores y, avisa a los usuarios que no intenten hacer cualquier reparación por si mismo, haciendo ésto invalidará todas las garantías del equipo. Puede encontrar un distribuidor cerca de usted en http://www.phonic.com/where/.
INFORMACIÓN DE LA GARANTIAPhonic respalda cada producto que hacemos con una garantía sin enredo. La cobertura de garantía podría ser ampliada dependiendo de su región. Phonic Corporation garantiza este producto por un mínimo de un año desde la fecha original de su compra, contra defectos en materiales y mano de obra bajo el uso que se instruya en el manual del usuario. Phonic, a su propia opinión, reparará o cambiará la unidad defectuosa que se encuentra dentro de esta garantía. Por favor, guarde los recibos de venta con la fecha de compra como evidencia de la fecha de compra. Va a necesitar este comprobante para cualquier servicio de garantía. No se aceptarán reparaciones o devoluciones sin un número RMA apropiado (return merchandise autorization). En orden de tener esta garantía válida, el producto deberá de haber sido manejado y utilizado como se describe en las instrucciones que acompañan esta garantía. Cualquier atentado hacia el producto o cualquier intento de repararlo por usted mismo, cancelará completamente esta garantía. Esta garantía no cubre daños ocasionados por accidentes, mal uso, abuso o negligencia. Esta garantía es válida solamente si el producto fue comprado nuevo de un representante/distribuidor autorizado de Phonic. Para la información completa acerca de la política de garantía, por favor visite http://www.phonic.com/warranty/.
SERVICIO AL CLIENTE Y SOPORTE TÉCNICOLe invitamos a que visite nuestro sistema de ayuda en línea en www.phonic.com/support/. Ahí podrá encontrar respuestas a las preguntas más frecuentes, consejos técnicos, descarga de drivers, instrucciones de devolución de equipos y más información de mucho interés. Nosotros haremos todo el esfuerzo para contestar sus preguntas lo antes posible.
FCC Caution: To assure continued compliance, any changes or modifications not expressly approved by the party responsible for compliance could void the user's authority to operate this equipment. (Example - use only shielded interface cables when connecting to computer or peripheral devices). THIS DEVICE COMPLIES WITH PART 74 OF THE FCC RULES. This equipment complies with FCC RF radiation exposure limits set forth for an uncontrolled environment.
[email protected]://www.phonic.com
1Safari 2000
Appendix A
péndice
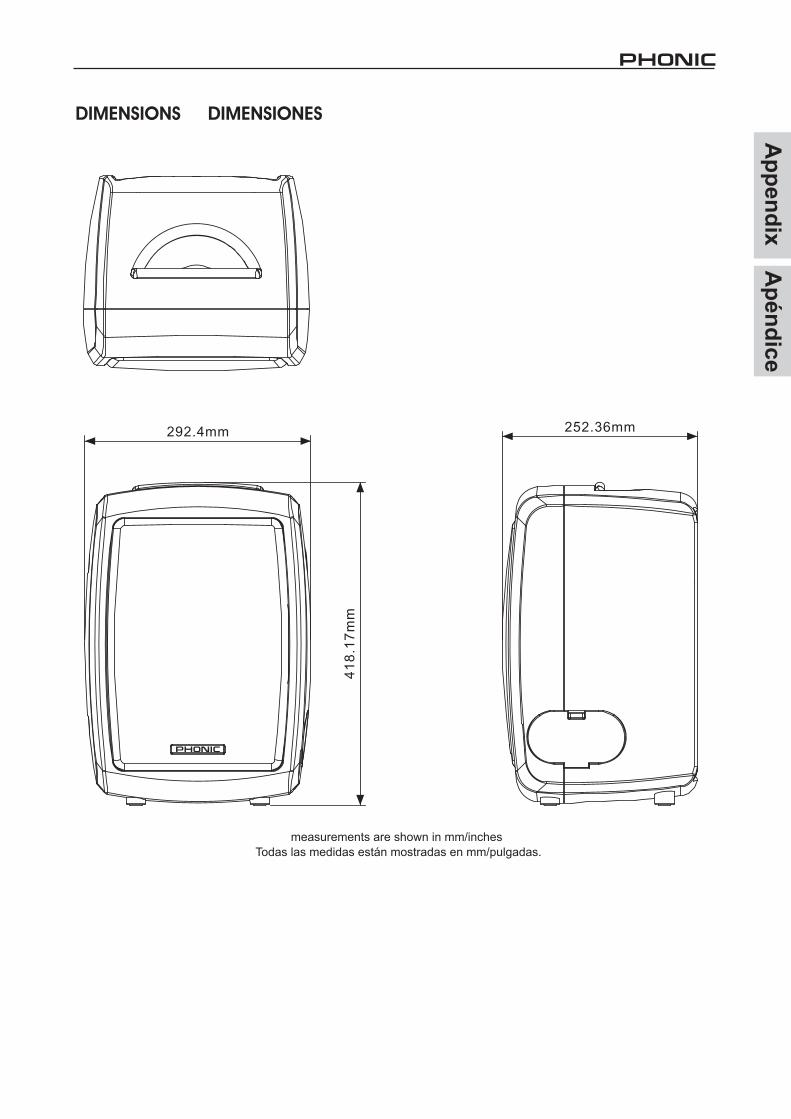
measurements are shown in mm/inches
DIMENSIONS DIMENSIONES
Todas las medidas están mostradas en mm/pulgadas.
292.4mm 252.36mm
418.
17m
m