Embed Size (px)
Citation preview
PUBLIC
SAP Jam Collaboration Administrator GuideDocument Version: May 2018 – 2018-05-17
SAP Jam Collaboration Administrator Guide 1805
Content
1 Overview. . . . . . . . . . . . . . . . . . . . . . . . . . . . . . . . . . . . . . . . . . . . . . . . . . . . . . . . . . . . . . . . . . . . . 61.1 About SAP Jam Collaboration. . . . . . . . . . . . . . . . . . . . . . . . . . . . . . . . . . . . . . . . . . . . . . . . . . . . . . .61.2 Other documentation. . . . . . . . . . . . . . . . . . . . . . . . . . . . . . . . . . . . . . . . . . . . . . . . . . . . . . . . . . . . 101.3 SAP Jam Collaboration security and compliance FAQ. . . . . . . . . . . . . . . . . . . . . . . . . . . . . . . . . . . . . 10
Personal data and privacy. . . . . . . . . . . . . . . . . . . . . . . . . . . . . . . . . . . . . . . . . . . . . . . . . . . . . . 121.4 SAP Jam integrated with SuccessFactors Platform. . . . . . . . . . . . . . . . . . . . . . . . . . . . . . . . . . . . . . . 141.5 Administrator types access. . . . . . . . . . . . . . . . . . . . . . . . . . . . . . . . . . . . . . . . . . . . . . . . . . . . . . . . 191.6 View your SAP Jam service general information. . . . . . . . . . . . . . . . . . . . . . . . . . . . . . . . . . . . . . . . . 231.7 Area Overview page. . . . . . . . . . . . . . . . . . . . . . . . . . . . . . . . . . . . . . . . . . . . . . . . . . . . . . . . . . . . . 241.8 Initial administrator tasks. . . . . . . . . . . . . . . . . . . . . . . . . . . . . . . . . . . . . . . . . . . . . . . . . . . . . . . . . 251.9 Single sign-on and deep linking. . . . . . . . . . . . . . . . . . . . . . . . . . . . . . . . . . . . . . . . . . . . . . . . . . . . . 25
2 Users. . . . . . . . . . . . . . . . . . . . . . . . . . . . . . . . . . . . . . . . . . . . . . . . . . . . . . . . . . . . . . . . . . . . . . .282.1 About user types. . . . . . . . . . . . . . . . . . . . . . . . . . . . . . . . . . . . . . . . . . . . . . . . . . . . . . . . . . . . . . . 282.2 Users and member lists. . . . . . . . . . . . . . . . . . . . . . . . . . . . . . . . . . . . . . . . . . . . . . . . . . . . . . . . . . 32
User privileges. . . . . . . . . . . . . . . . . . . . . . . . . . . . . . . . . . . . . . . . . . . . . . . . . . . . . . . . . . . . . . 32Create and manage member lists. . . . . . . . . . . . . . . . . . . . . . . . . . . . . . . . . . . . . . . . . . . . . . . . . 34Create and manage dynamic member lists. . . . . . . . . . . . . . . . . . . . . . . . . . . . . . . . . . . . . . . . . . 37Imported member lists. . . . . . . . . . . . . . . . . . . . . . . . . . . . . . . . . . . . . . . . . . . . . . . . . . . . . . . . 38
2.3 About notification emails. . . . . . . . . . . . . . . . . . . . . . . . . . . . . . . . . . . . . . . . . . . . . . . . . . . . . . . . . 392.4 Overview of extranet administration. . . . . . . . . . . . . . . . . . . . . . . . . . . . . . . . . . . . . . . . . . . . . . . . . 432.5 Extranet management. . . . . . . . . . . . . . . . . . . . . . . . . . . . . . . . . . . . . . . . . . . . . . . . . . . . . . . . . . . 442.6 Alias Accounts. . . . . . . . . . . . . . . . . . . . . . . . . . . . . . . . . . . . . . . . . . . . . . . . . . . . . . . . . . . . . . . . 462.7 IPS and IAS. . . . . . . . . . . . . . . . . . . . . . . . . . . . . . . . . . . . . . . . . . . . . . . . . . . . . . . . . . . . . . . . . . . 482.8 SCIM Provisioning. . . . . . . . . . . . . . . . . . . . . . . . . . . . . . . . . . . . . . . . . . . . . . . . . . . . . . . . . . . . . . 50
3 Administrative Areas. . . . . . . . . . . . . . . . . . . . . . . . . . . . . . . . . . . . . . . . . . . . . . . . . . . . . . . . . . . 583.1 February 2018 upgrade overview. . . . . . . . . . . . . . . . . . . . . . . . . . . . . . . . . . . . . . . . . . . . . . . . . . . .583.2 Area setup overview. . . . . . . . . . . . . . . . . . . . . . . . . . . . . . . . . . . . . . . . . . . . . . . . . . . . . . . . . . . . .593.3 Configure administrative areas. . . . . . . . . . . . . . . . . . . . . . . . . . . . . . . . . . . . . . . . . . . . . . . . . . . . . 593.4 Area membership. . . . . . . . . . . . . . . . . . . . . . . . . . . . . . . . . . . . . . . . . . . . . . . . . . . . . . . . . . . . . . 623.5 Switcher for home pages. . . . . . . . . . . . . . . . . . . . . . . . . . . . . . . . . . . . . . . . . . . . . . . . . . . . . . . . . 633.6 Customize the area home page. . . . . . . . . . . . . . . . . . . . . . . . . . . . . . . . . . . . . . . . . . . . . . . . . . . . . 643.7 Page content administrators. . . . . . . . . . . . . . . . . . . . . . . . . . . . . . . . . . . . . . . . . . . . . . . . . . . . . . . 673.8 Area dashboard. . . . . . . . . . . . . . . . . . . . . . . . . . . . . . . . . . . . . . . . . . . . . . . . . . . . . . . . . . . . . . . .693.9 Group templates. . . . . . . . . . . . . . . . . . . . . . . . . . . . . . . . . . . . . . . . . . . . . . . . . . . . . . . . . . . . . . . 693.10 Widgets for company and area home pages only. . . . . . . . . . . . . . . . . . . . . . . . . . . . . . . . . . . . . . . . .70
2 P U B L I CSAP Jam Collaboration Administrator Guide 1805
Content
Catalog search widget. . . . . . . . . . . . . . . . . . . . . . . . . . . . . . . . . . . . . . . . . . . . . . . . . . . . . . . . . 70Name widget. . . . . . . . . . . . . . . . . . . . . . . . . . . . . . . . . . . . . . . . . . . . . . . . . . . . . . . . . . . . . . . 73Notification widget. . . . . . . . . . . . . . . . . . . . . . . . . . . . . . . . . . . . . . . . . . . . . . . . . . . . . . . . . . . 73Recent items widget. . . . . . . . . . . . . . . . . . . . . . . . . . . . . . . . . . . . . . . . . . . . . . . . . . . . . . . . . . 74Recommendation widget. . . . . . . . . . . . . . . . . . . . . . . . . . . . . . . . . . . . . . . . . . . . . . . . . . . . . . . 75Rotating banner widget. . . . . . . . . . . . . . . . . . . . . . . . . . . . . . . . . . . . . . . . . . . . . . . . . . . . . . . . 75
3.11 Company and area branding. . . . . . . . . . . . . . . . . . . . . . . . . . . . . . . . . . . . . . . . . . . . . . . . . . . . . . . 78
4 Branding. . . . . . . . . . . . . . . . . . . . . . . . . . . . . . . . . . . . . . . . . . . . . . . . . . . . . . . . . . . . . . . . . . . . 804.1 Configure the Branding and Support options. . . . . . . . . . . . . . . . . . . . . . . . . . . . . . . . . . . . . . . . . . . 80
Best practices for custom headers. . . . . . . . . . . . . . . . . . . . . . . . . . . . . . . . . . . . . . . . . . . . . . . . 864.2 Default SAP Jam color branding. . . . . . . . . . . . . . . . . . . . . . . . . . . . . . . . . . . . . . . . . . . . . . . . . . . . 874.3 SAP Jam mobile app. . . . . . . . . . . . . . . . . . . . . . . . . . . . . . . . . . . . . . . . . . . . . . . . . . . . . . . . . . . . 904.4 Configure Email Templates options. . . . . . . . . . . . . . . . . . . . . . . . . . . . . . . . . . . . . . . . . . . . . . . . . . 914.5 QR Codes. . . . . . . . . . . . . . . . . . . . . . . . . . . . . . . . . . . . . . . . . . . . . . . . . . . . . . . . . . . . . . . . . . . . 944.6 Text replacement. . . . . . . . . . . . . . . . . . . . . . . . . . . . . . . . . . . . . . . . . . . . . . . . . . . . . . . . . . . . . . .94
5 Product Setup. . . . . . . . . . . . . . . . . . . . . . . . . . . . . . . . . . . . . . . . . . . . . . . . . . . . . . . . . . . . . . . . 965.1 Configure SAP Jam Collaboration Features. . . . . . . . . . . . . . . . . . . . . . . . . . . . . . . . . . . . . . . . . . . . 965.2 Customize the home page. . . . . . . . . . . . . . . . . . . . . . . . . . . . . . . . . . . . . . . . . . . . . . . . . . . . . . . .102
Announcement. . . . . . . . . . . . . . . . . . . . . . . . . . . . . . . . . . . . . . . . . . . . . . . . . . . . . . . . . . . . . 1085.3 Custom Profile administration. . . . . . . . . . . . . . . . . . . . . . . . . . . . . . . . . . . . . . . . . . . . . . . . . . . . . 1095.4 Configure Kudos options. . . . . . . . . . . . . . . . . . . . . . . . . . . . . . . . . . . . . . . . . . . . . . . . . . . . . . . . . 1135.5 Configure the Quick Tour. . . . . . . . . . . . . . . . . . . . . . . . . . . . . . . . . . . . . . . . . . . . . . . . . . . . . . . . . 1145.6 Hashtags administration. . . . . . . . . . . . . . . . . . . . . . . . . . . . . . . . . . . . . . . . . . . . . . . . . . . . . . . . . 1165.7 Knowledge base. . . . . . . . . . . . . . . . . . . . . . . . . . . . . . . . . . . . . . . . . . . . . . . . . . . . . . . . . . . . . . . 1165.8 Deprecation and removal of auto group feature. . . . . . . . . . . . . . . . . . . . . . . . . . . . . . . . . . . . . . . . . 1185.9 Groups management. . . . . . . . . . . . . . . . . . . . . . . . . . . . . . . . . . . . . . . . . . . . . . . . . . . . . . . . . . . 1195.10 Group templates administration. . . . . . . . . . . . . . . . . . . . . . . . . . . . . . . . . . . . . . . . . . . . . . . . . . . .1195.11 Content templates. . . . . . . . . . . . . . . . . . . . . . . . . . . . . . . . . . . . . . . . . . . . . . . . . . . . . . . . . . . . . 1235.12 Third Party Analytics. . . . . . . . . . . . . . . . . . . . . . . . . . . . . . . . . . . . . . . . . . . . . . . . . . . . . . . . . . . 1285.13 Site administration tasks. . . . . . . . . . . . . . . . . . . . . . . . . . . . . . . . . . . . . . . . . . . . . . . . . . . . . . . . 128
6 Integrations. . . . . . . . . . . . . . . . . . . . . . . . . . . . . . . . . . . . . . . . . . . . . . . . . . . . . . . . . . . . . . . . . 1306.1 Integrations overview. . . . . . . . . . . . . . . . . . . . . . . . . . . . . . . . . . . . . . . . . . . . . . . . . . . . . . . . . . . 1306.2 Integrate business records. . . . . . . . . . . . . . . . . . . . . . . . . . . . . . . . . . . . . . . . . . . . . . . . . . . . . . . 132
Develop a new or custom business records integration. . . . . . . . . . . . . . . . . . . . . . . . . . . . . . . . . 139Integrate SAP CRM. . . . . . . . . . . . . . . . . . . . . . . . . . . . . . . . . . . . . . . . . . . . . . . . . . . . . . . . . . 139Integrate SAP ECC (SD). . . . . . . . . . . . . . . . . . . . . . . . . . . . . . . . . . . . . . . . . . . . . . . . . . . . . . . 150Integrate SAP Hybris Cloud for Customer. . . . . . . . . . . . . . . . . . . . . . . . . . . . . . . . . . . . . . . . . . 164Integrate SAP SuccessFactors Learning. . . . . . . . . . . . . . . . . . . . . . . . . . . . . . . . . . . . . . . . . . . .165Configure a business record filter. . . . . . . . . . . . . . . . . . . . . . . . . . . . . . . . . . . . . . . . . . . . . . . . 174
SAP Jam Collaboration Administrator Guide 1805Content P U B L I C 3
Configure a business record sort order. . . . . . . . . . . . . . . . . . . . . . . . . . . . . . . . . . . . . . . . . . . . 176Configure access to business records in SAP Jam Collaboration. . . . . . . . . . . . . . . . . . . . . . . . . . .177
6.3 Access and Authorization overview. . . . . . . . . . . . . . . . . . . . . . . . . . . . . . . . . . . . . . . . . . . . . . . . . 178Add a Trusted Certificate Authority. . . . . . . . . . . . . . . . . . . . . . . . . . . . . . . . . . . . . . . . . . . . . . . 179Add an OAuth Client. . . . . . . . . . . . . . . . . . . . . . . . . . . . . . . . . . . . . . . . . . . . . . . . . . . . . . . . . .181Add a SAML Trusted IDP. . . . . . . . . . . . . . . . . . . . . . . . . . . . . . . . . . . . . . . . . . . . . . . . . . . . . . 184Configure SAP Jam Collaboration as a SAML Local Identity Provider. . . . . . . . . . . . . . . . . . . . . . . 187
6.4 Integrate an SAP S/4HANA application. . . . . . . . . . . . . . . . . . . . . . . . . . . . . . . . . . . . . . . . . . . . . . 188SAP S/4HANA Cloud for Professional Services. . . . . . . . . . . . . . . . . . . . . . . . . . . . . . . . . . . . . . .198
6.5 Integrate document repositories. . . . . . . . . . . . . . . . . . . . . . . . . . . . . . . . . . . . . . . . . . . . . . . . . . . 198Integrate SharePoint 2010 or 2013. . . . . . . . . . . . . . . . . . . . . . . . . . . . . . . . . . . . . . . . . . . . . . . 203Federate SAP Jam Collaboration search results into SharePoint searches. . . . . . . . . . . . . . . . . . . 206Integrate Alfresco One 4.2. . . . . . . . . . . . . . . . . . . . . . . . . . . . . . . . . . . . . . . . . . . . . . . . . . . . . 212Integrate SAP Extended ECM by OpenText. . . . . . . . . . . . . . . . . . . . . . . . . . . . . . . . . . . . . . . . . . 215Integrate Office 365 SharePoint Sites. . . . . . . . . . . . . . . . . . . . . . . . . . . . . . . . . . . . . . . . . . . . . 219Integrate SAP Document Center. . . . . . . . . . . . . . . . . . . . . . . . . . . . . . . . . . . . . . . . . . . . . . . . 223Integrate Box. . . . . . . . . . . . . . . . . . . . . . . . . . . . . . . . . . . . . . . . . . . . . . . . . . . . . . . . . . . . . . 227Integrate Google Drive. . . . . . . . . . . . . . . . . . . . . . . . . . . . . . . . . . . . . . . . . . . . . . . . . . . . . . . .229Troubleshoot CMIS Connections. . . . . . . . . . . . . . . . . . . . . . . . . . . . . . . . . . . . . . . . . . . . . . . . 230Access document repositories in SAP Jam Collaboration groups. . . . . . . . . . . . . . . . . . . . . . . . . . 231Access Office 365 Online Sites. . . . . . . . . . . . . . . . . . . . . . . . . . . . . . . . . . . . . . . . . . . . . . . . . . 232
6.6 OpenSocial Gadgets. . . . . . . . . . . . . . . . . . . . . . . . . . . . . . . . . . . . . . . . . . . . . . . . . . . . . . . . . . . .2336.7 Integrate SAP Jam with gamification vendors. . . . . . . . . . . . . . . . . . . . . . . . . . . . . . . . . . . . . . . . . . 2426.8 Mentoring and coaching groups. . . . . . . . . . . . . . . . . . . . . . . . . . . . . . . . . . . . . . . . . . . . . . . . . . . 2466.9 Use the Widget Builders. . . . . . . . . . . . . . . . . . . . . . . . . . . . . . . . . . . . . . . . . . . . . . . . . . . . . . . . . 246
Use the Feed Widget Builder. . . . . . . . . . . . . . . . . . . . . . . . . . . . . . . . . . . . . . . . . . . . . . . . . . . 246Use the Recommendations Widget Builder. . . . . . . . . . . . . . . . . . . . . . . . . . . . . . . . . . . . . . . . . 251Use the Share Widget Builder. . . . . . . . . . . . . . . . . . . . . . . . . . . . . . . . . . . . . . . . . . . . . . . . . . .254
6.10 Use the SAP Jam Collaboration API. . . . . . . . . . . . . . . . . . . . . . . . . . . . . . . . . . . . . . . . . . . . . . . . . 2566.11 Configure Global Assignment in Employee Central. . . . . . . . . . . . . . . . . . . . . . . . . . . . . . . . . . . . . . 2576.12 Configure a SAML Local Service Provider. . . . . . . . . . . . . . . . . . . . . . . . . . . . . . . . . . . . . . . . . . . . . 2646.13 Push notifications for webhooks. . . . . . . . . . . . . . . . . . . . . . . . . . . . . . . . . . . . . . . . . . . . . . . . . . . 2656.14 Zapier to SAP Jam Integration. . . . . . . . . . . . . . . . . . . . . . . . . . . . . . . . . . . . . . . . . . . . . . . . . . . . .2656.15 Microsoft® Skype for Business® integration. . . . . . . . . . . . . . . . . . . . . . . . . . . . . . . . . . . . . . . . . . . .267
7 Compliance and Security. . . . . . . . . . . . . . . . . . . . . . . . . . . . . . . . . . . . . . . . . . . . . . . . . . . . . . .2697.1 Configure an Extranet Terms of Service. . . . . . . . . . . . . . . . . . . . . . . . . . . . . . . . . . . . . . . . . . . . . . 2697.2 Configure a Custom Terms of Service. . . . . . . . . . . . . . . . . . . . . . . . . . . . . . . . . . . . . . . . . . . . . . . 2697.3 Configure Content Administration options. . . . . . . . . . . . . . . . . . . . . . . . . . . . . . . . . . . . . . . . . . . . 2717.4 Configure Compliance monitoring. . . . . . . . . . . . . . . . . . . . . . . . . . . . . . . . . . . . . . . . . . . . . . . . . . 2777.5 Configure Security options. . . . . . . . . . . . . . . . . . . . . . . . . . . . . . . . . . . . . . . . . . . . . . . . . . . . . . . 280
4 P U B L I CSAP Jam Collaboration Administrator Guide 1805
Content
8 Mobile. . . . . . . . . . . . . . . . . . . . . . . . . . . . . . . . . . . . . . . . . . . . . . . . . . . . . . . . . . . . . . . . . . . . . 2848.1 Configure the SAP Jam mobile app. . . . . . . . . . . . . . . . . . . . . . . . . . . . . . . . . . . . . . . . . . . . . . . . . 284
9 Analytics. . . . . . . . . . . . . . . . . . . . . . . . . . . . . . . . . . . . . . . . . . . . . . . . . . . . . . . . . . . . . . . . . . . 2889.1 Administrator reports. . . . . . . . . . . . . . . . . . . . . . . . . . . . . . . . . . . . . . . . . . . . . . . . . . . . . . . . . . 288
Activity Summary by Month or Week. . . . . . . . . . . . . . . . . . . . . . . . . . . . . . . . . . . . . . . . . . . . . 290Company Settings Changes. . . . . . . . . . . . . . . . . . . . . . . . . . . . . . . . . . . . . . . . . . . . . . . . . . . . 291Company User Detail. . . . . . . . . . . . . . . . . . . . . . . . . . . . . . . . . . . . . . . . . . . . . . . . . . . . . . . . 292Compliance. . . . . . . . . . . . . . . . . . . . . . . . . . . . . . . . . . . . . . . . . . . . . . . . . . . . . . . . . . . . . . . 293Content Views by Week or Month. . . . . . . . . . . . . . . . . . . . . . . . . . . . . . . . . . . . . . . . . . . . . . . . 294Contribution by Object by Week or Month. . . . . . . . . . . . . . . . . . . . . . . . . . . . . . . . . . . . . . . . . . 295Engagement. . . . . . . . . . . . . . . . . . . . . . . . . . . . . . . . . . . . . . . . . . . . . . . . . . . . . . . . . . . . . . . 297Expertise. . . . . . . . . . . . . . . . . . . . . . . . . . . . . . . . . . . . . . . . . . . . . . . . . . . . . . . . . . . . . . . . . 298Group Activity. . . . . . . . . . . . . . . . . . . . . . . . . . . . . . . . . . . . . . . . . . . . . . . . . . . . . . . . . . . . . 299Group Administrators. . . . . . . . . . . . . . . . . . . . . . . . . . . . . . . . . . . . . . . . . . . . . . . . . . . . . . . . 300Group Member Activity. . . . . . . . . . . . . . . . . . . . . . . . . . . . . . . . . . . . . . . . . . . . . . . . . . . . . . . 301Group Template Activity. . . . . . . . . . . . . . . . . . . . . . . . . . . . . . . . . . . . . . . . . . . . . . . . . . . . . . 302Kudos Detail. . . . . . . . . . . . . . . . . . . . . . . . . . . . . . . . . . . . . . . . . . . . . . . . . . . . . . . . . . . . . . .303Mobile Activation. . . . . . . . . . . . . . . . . . . . . . . . . . . . . . . . . . . . . . . . . . . . . . . . . . . . . . . . . . . 304SAP Jam Mobile Activation Detailed Report. . . . . . . . . . . . . . . . . . . . . . . . . . . . . . . . . . . . . . . . .305Terms of Service Compliance. . . . . . . . . . . . . . . . . . . . . . . . . . . . . . . . . . . . . . . . . . . . . . . . . . .306Top Disk Usage per Group or per User. . . . . . . . . . . . . . . . . . . . . . . . . . . . . . . . . . . . . . . . . . . . .307Top Disk Usage Per Group Per Message Thread. . . . . . . . . . . . . . . . . . . . . . . . . . . . . . . . . . . . . . 308User Contribution Activity. . . . . . . . . . . . . . . . . . . . . . . . . . . . . . . . . . . . . . . . . . . . . . . . . . . . . 309User Contribution by Week or Month. . . . . . . . . . . . . . . . . . . . . . . . . . . . . . . . . . . . . . . . . . . . . . 311User Page Views by Week or Month. . . . . . . . . . . . . . . . . . . . . . . . . . . . . . . . . . . . . . . . . . . . . . . 312
9.2 Dashboard. . . . . . . . . . . . . . . . . . . . . . . . . . . . . . . . . . . . . . . . . . . . . . . . . . . . . . . . . . . . . . . . . . .313
10 Extensions Catalog. . . . . . . . . . . . . . . . . . . . . . . . . . . . . . . . . . . . . . . . . . . . . . . . . . . . . . . . . . . 31710.1 Add extensions. . . . . . . . . . . . . . . . . . . . . . . . . . . . . . . . . . . . . . . . . . . . . . . . . . . . . . . . . . . . . . . .317
11 Get Support. . . . . . . . . . . . . . . . . . . . . . . . . . . . . . . . . . . . . . . . . . . . . . . . . . . . . . . . . . . . . . . . . 31911.1 Request support. . . . . . . . . . . . . . . . . . . . . . . . . . . . . . . . . . . . . . . . . . . . . . . . . . . . . . . . . . . . . . 319
SAP Jam Collaboration Administrator Guide 1805Content P U B L I C 5
1 Overview
1.1 About SAP Jam Collaboration
SAP Jam Collaboration is an enterprise social networking solution that allows you to bring your employees, partners, and customers together with the documents and application data necessary to enable effective, collaborative problem solving and decision making. These activities are organized in a structured form that provides intuitive access to content and discussions, while encouraging the pursuit of business-critical objectives, and while following established processes through SAP Jam "work patterns".
SAP Jam provides features such as the ability to create wikis and blogs, discussions on ideas, questions, and issues, and share images, videos, and documents—with document versioning—as well as providing tools to create and assign tasks, schedule meetings and calendar events, run polls, chat, and view and discuss data from external business-critical applications. These activities are organized within public or private groups that are internal to your organization or external to include customers and partners, and which can be based on templates designed to address specific issues, key business objectives, or services.
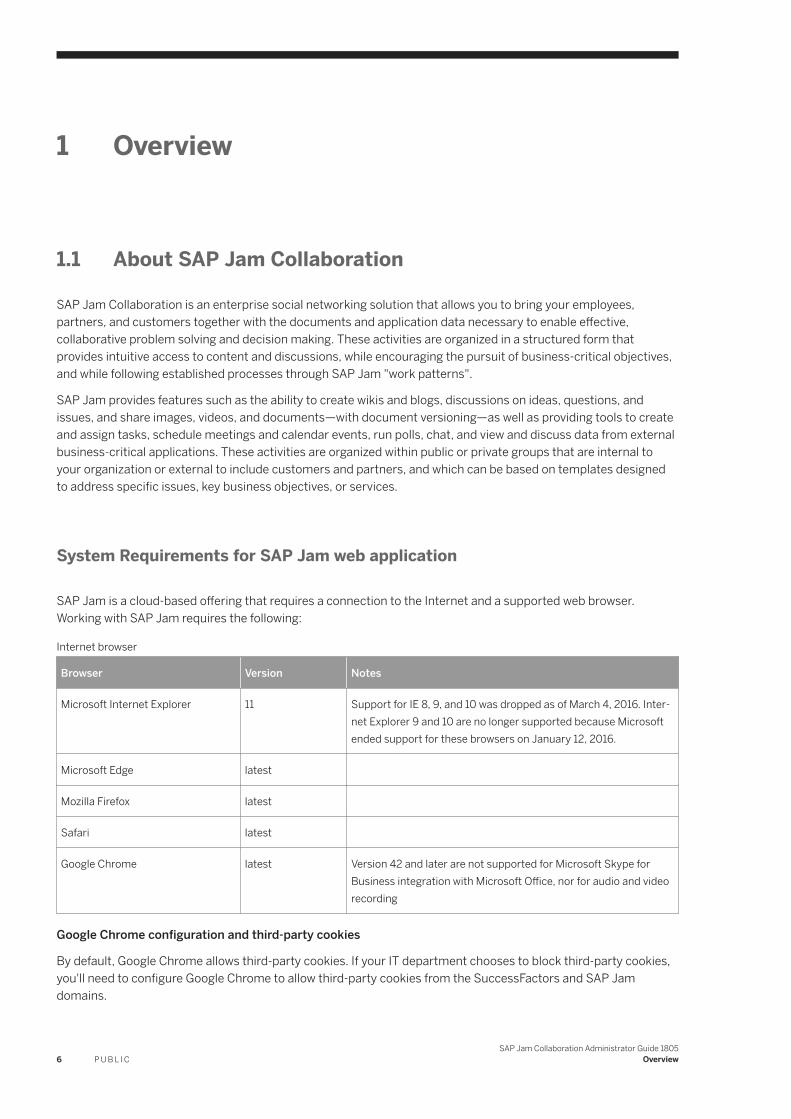
System Requirements for SAP Jam web application
SAP Jam is a cloud-based offering that requires a connection to the Internet and a supported web browser. Working with SAP Jam requires the following:
Internet browser
Browser Version Notes
Microsoft Internet Explorer 11 Support for IE 8, 9, and 10 was dropped as of March 4, 2016. Internet Explorer 9 and 10 are no longer supported because Microsoft ended support for these browsers on January 12, 2016.
Microsoft Edge latest
Mozilla Firefox latest
Safari latest
Google Chrome latest Version 42 and later are not supported for Microsoft Skype for Business integration with Microsoft Office, nor for audio and video recording
Google Chrome configuration and third-party cookies
By default, Google Chrome allows third-party cookies. If your IT department chooses to block third-party cookies, you'll need to configure Google Chrome to allow third-party cookies from the SuccessFactors and SAP Jam domains.
6 P U B L I CSAP Jam Collaboration Administrator Guide 1805
Overview

To allow third-party cookies
1. Open the Google Chrome browser and type the following in the address bar: chrome://settings/content/cookies
NoteThe toggle for Block third-party cookies will be set to enabled.
2. Scroll to the Allow section.3. Click Add and enter the SuccessFactors (*.successfactors.com, *.successfactors.eu, *.sapsf.com, *.sapsf.eu, or
*.sapsf.cn) and SAP Jam (*.sapjam.com or *.sapsf.cn) domains used by your SuccessFactors and SAP Jam company instances.
Allow third party cookies
Browser configurations
Configuration Requirements
Cache size ● 250 MB.● SAP Jam is a Web 2.0 application that uses caching heavily for static content. Do
not clear your organization's web proxy cache as this will significantly impact performance.
● Newer web pages must be enabled.
HTTP 1.1 and JavaScript ● Enable.
Browser session cookies (non-persistent)
● Enable for authentication purposes.
Pop-up windows ● Allow for SAP Jam domains.
SAP Jam Collaboration Administrator Guide 1805Overview P U B L I C 7
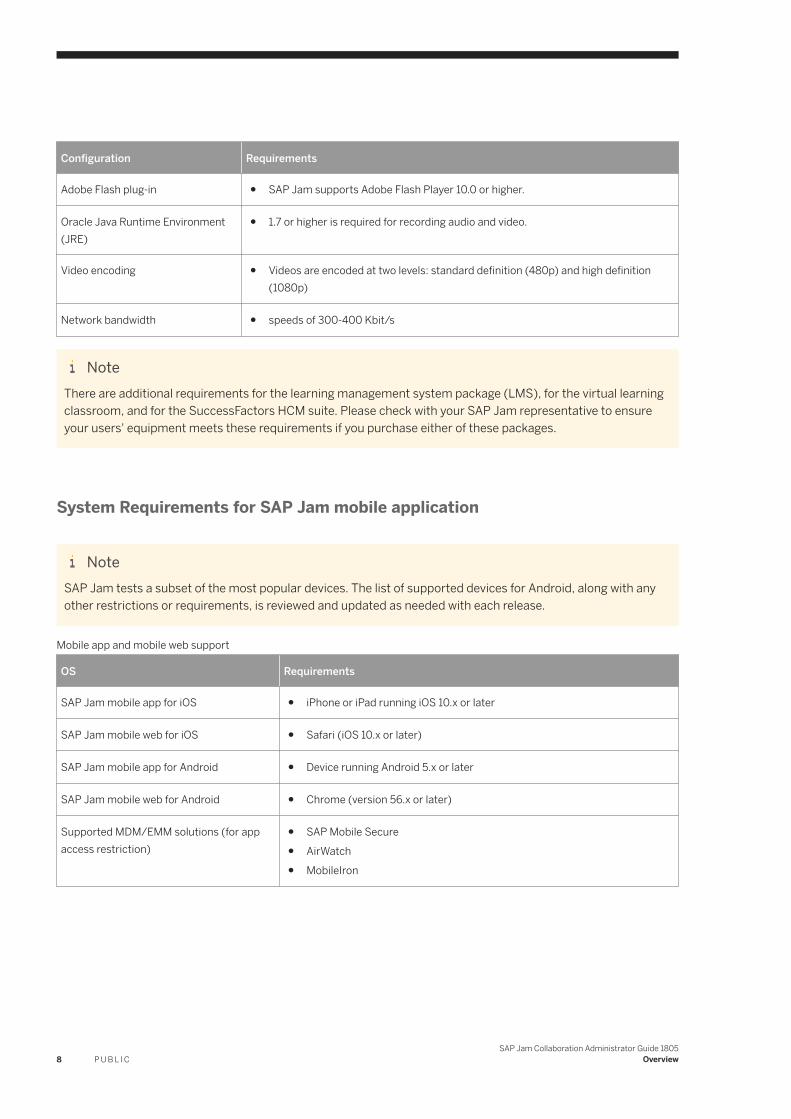
Configuration Requirements
Adobe Flash plug-in ● SAP Jam supports Adobe Flash Player 10.0 or higher.
Oracle Java Runtime Environment (JRE)
● 1.7 or higher is required for recording audio and video.
Video encoding ● Videos are encoded at two levels: standard definition (480p) and high definition (1080p)
Network bandwidth ● speeds of 300-400 Kbit/s
NoteThere are additional requirements for the learning management system package (LMS), for the virtual learning classroom, and for the SuccessFactors HCM suite. Please check with your SAP Jam representative to ensure your users' equipment meets these requirements if you purchase either of these packages.
System Requirements for SAP Jam mobile application
NoteSAP Jam tests a subset of the most popular devices. The list of supported devices for Android, along with any other restrictions or requirements, is reviewed and updated as needed with each release.
Mobile app and mobile web support
OS Requirements
SAP Jam mobile app for iOS ● iPhone or iPad running iOS 10.x or later
SAP Jam mobile web for iOS ● Safari (iOS 10.x or later)
SAP Jam mobile app for Android ● Device running Android 5.x or later
SAP Jam mobile web for Android ● Chrome (version 56.x or later)
Supported MDM/EMM solutions (for app access restriction)
● SAP Mobile Secure● AirWatch● MobileIron
8 P U B L I CSAP Jam Collaboration Administrator Guide 1805
Overview
Security and clickjacking prevention
When using one of the supported browsers listed in this topic to access SAP Jam, malicious attempts at user interface redressing known as "clickjacking" will be prevented. Unsupported browsers may not benefit from this security feature.
Exceptions to consider:
● If you have a custom integration with SAP Jam, please note that you may no longer be able to embed SAP Jam on your own website except through officially supported embed widgets (e.g., home feed widget).
● If a third-party website includes a hyperlink to SAP Jam content from within an embedded frame, that link will not work unless it you open it in a new browser tab or window.
In all other cases, hyperlinks from third-party websites to SAP Jam will continue to work as expected.
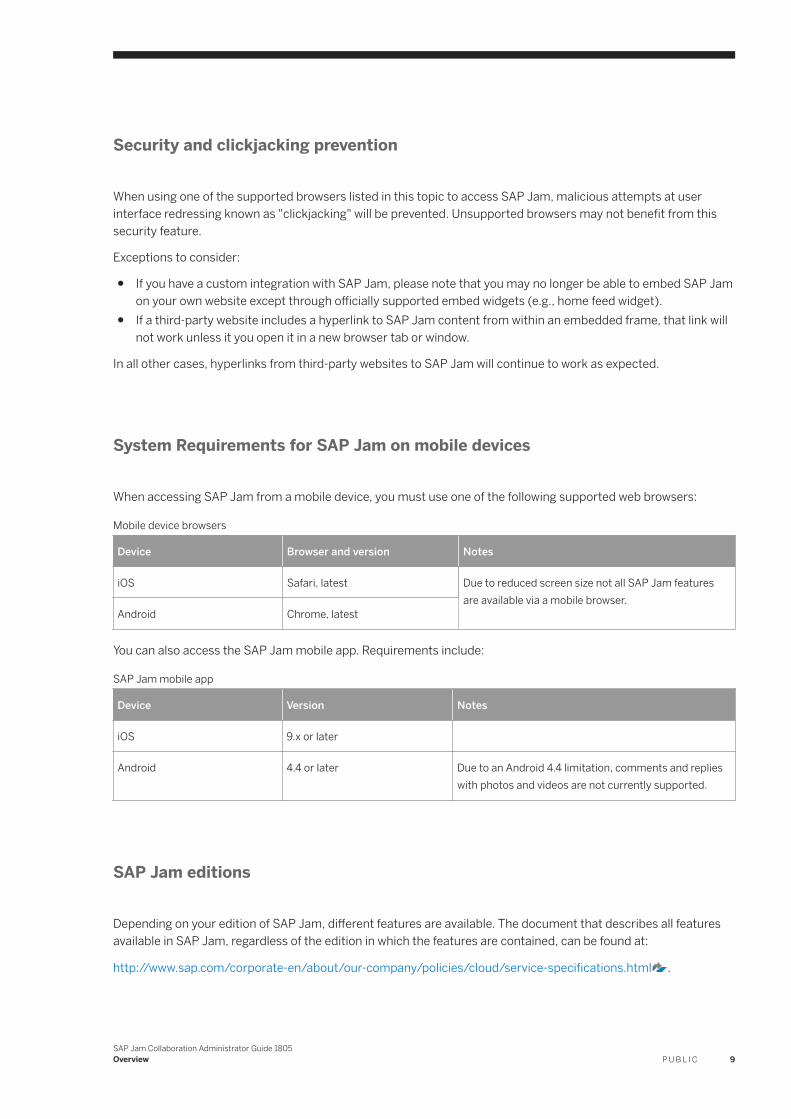
System Requirements for SAP Jam on mobile devices
When accessing SAP Jam from a mobile device, you must use one of the following supported web browsers:
Mobile device browsers
Device Browser and version Notes
iOS Safari, latest Due to reduced screen size not all SAP Jam features are available via a mobile browser.
Android Chrome, latest
You can also access the SAP Jam mobile app. Requirements include:
SAP Jam mobile app
Device Version Notes
iOS 9.x or later
Android 4.4 or later Due to an Android 4.4 limitation, comments and replies with photos and videos are not currently supported.
SAP Jam editions
Depending on your edition of SAP Jam, different features are available. The document that describes all features available in SAP Jam, regardless of the edition in which the features are contained, can be found at:
http://www.sap.com/corporate-en/about/our-company/policies/cloud/service-specifications.html .
SAP Jam Collaboration Administrator Guide 1805Overview P U B L I C 9

1.2 Other documentation
For integrated desktop features requiring some configuration and step by step instructions for setup and use, SAP provides the following documentation conveniently available on the SAP Jam Collaboration help portal.
To enable any client applications, please submit a request to the SAP Jam Support team.
SAP Jam Collaboration integrated desktop feature guides
I want to learn more about... Please see... Description
the desktop client for file synchronization
File Sync Client Reference Guide Procedures on how you can synchronize selected content from SAP Jam to your local file system, and from your local file system back to SAP Jam.
edit and synchronize my changes from my desktop applications directly into SAP Jam
SAP Jam Application Launcher for Microsoft® Windows® Reference Guide
System requirements and procedures for installation and use of the SAP Jam application launcher.
using enterprise social networks such as IBM Connections and Yammer while working with SAP Jam
SAP Jam Activity Hub for Microsoft® Windows® Reference Guide
Procedures for setup and steps on how to view third party collaborative tool feeds in one location without having to log in to view multiple applications at once.
working with the SAP Jam feed in Microsoft Office applications
SAP Jam for Microsoft Office integration Reference Guide
System requirements and procedures for installation and use of the SAP Jam ribbon in applications such as Microsoft Excel and Word.
publishing content of Microsoft Office Outlook e-mail back to SAP Jam groups
SAP Jam add-in for Microsoft® Office Outlook® Administration Guide and Release Notes
System requirements and procedures for installation and use of the SAP Jam plug-in to enable the SAP Jam ribbon in Outlook.
1.3 SAP Jam Collaboration security and compliance FAQ
This topic contains the answers to frequently asked questions, along with noteworthy information regarding security and compliance in SAP Jam Collaboration. Please also refer to the following topic, Personal data and privacy [page 12], to learn more about the functionalities that can help to comply with data privacy standards.
10 P U B L I CSAP Jam Collaboration Administrator Guide 1805
Overview
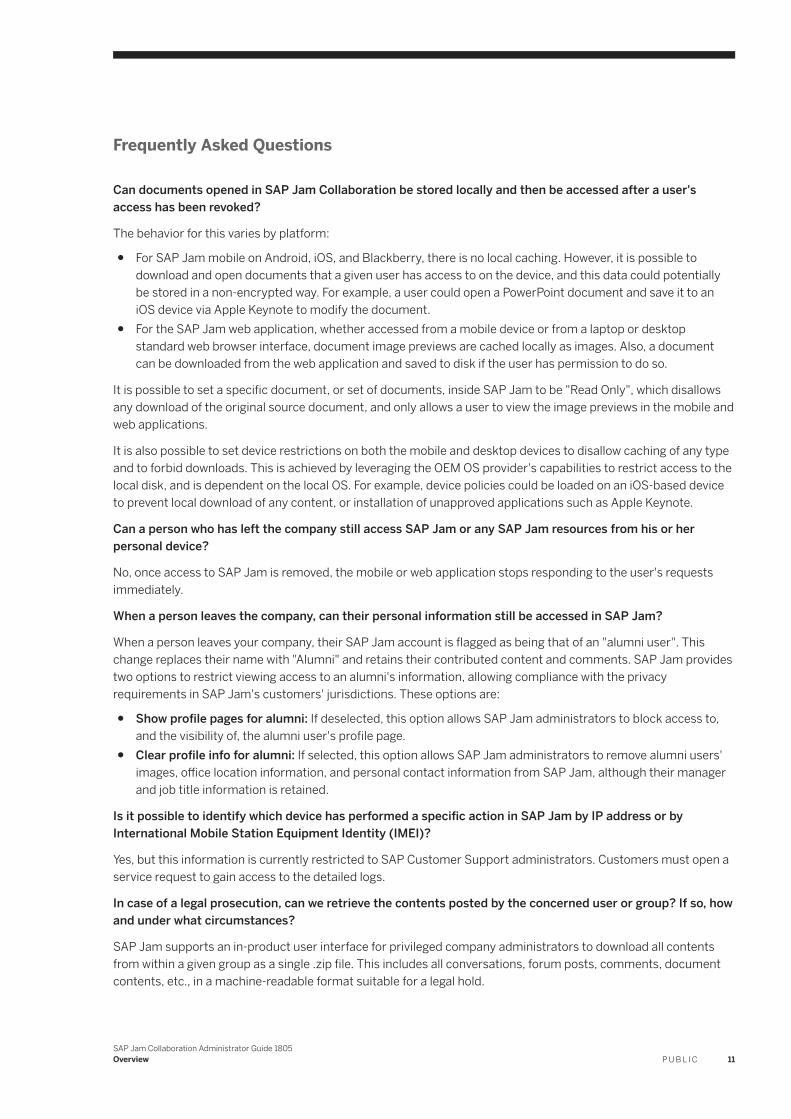
Frequently Asked Questions
Can documents opened in SAP Jam Collaboration be stored locally and then be accessed after a user's access has been revoked?
The behavior for this varies by platform:
● For SAP Jam mobile on Android, iOS, and Blackberry, there is no local caching. However, it is possible to download and open documents that a given user has access to on the device, and this data could potentially be stored in a non-encrypted way. For example, a user could open a PowerPoint document and save it to an iOS device via Apple Keynote to modify the document.
● For the SAP Jam web application, whether accessed from a mobile device or from a laptop or desktop standard web browser interface, document image previews are cached locally as images. Also, a document can be downloaded from the web application and saved to disk if the user has permission to do so.
It is possible to set a specific document, or set of documents, inside SAP Jam to be "Read Only", which disallows any download of the original source document, and only allows a user to view the image previews in the mobile and web applications.
It is also possible to set device restrictions on both the mobile and desktop devices to disallow caching of any type and to forbid downloads. This is achieved by leveraging the OEM OS provider's capabilities to restrict access to the local disk, and is dependent on the local OS. For example, device policies could be loaded on an iOS-based device to prevent local download of any content, or installation of unapproved applications such as Apple Keynote.
Can a person who has left the company still access SAP Jam or any SAP Jam resources from his or her personal device?
No, once access to SAP Jam is removed, the mobile or web application stops responding to the user's requests immediately.
When a person leaves the company, can their personal information still be accessed in SAP Jam?
When a person leaves your company, their SAP Jam account is flagged as being that of an "alumni user". This change replaces their name with "Alumni" and retains their contributed content and comments. SAP Jam provides two options to restrict viewing access to an alumni's information, allowing compliance with the privacy requirements in SAP Jam's customers' jurisdictions. These options are:
● Show profile pages for alumni: If deselected, this option allows SAP Jam administrators to block access to, and the visibility of, the alumni user's profile page.
● Clear profile info for alumni: If selected, this option allows SAP Jam administrators to remove alumni users' images, office location information, and personal contact information from SAP Jam, although their manager and job title information is retained.
Is it possible to identify which device has performed a specific action in SAP Jam by IP address or by International Mobile Station Equipment Identity (IMEI)?
Yes, but this information is currently restricted to SAP Customer Support administrators. Customers must open a service request to gain access to the detailed logs.
In case of a legal prosecution, can we retrieve the contents posted by the concerned user or group? If so, how and under what circumstances?
SAP Jam supports an in-product user interface for privileged company administrators to download all contents from within a given group as a single .zip file. This includes all conversations, forum posts, comments, document contents, etc., in a machine-readable format suitable for a legal hold.
SAP Jam Collaboration Administrator Guide 1805Overview P U B L I C 11
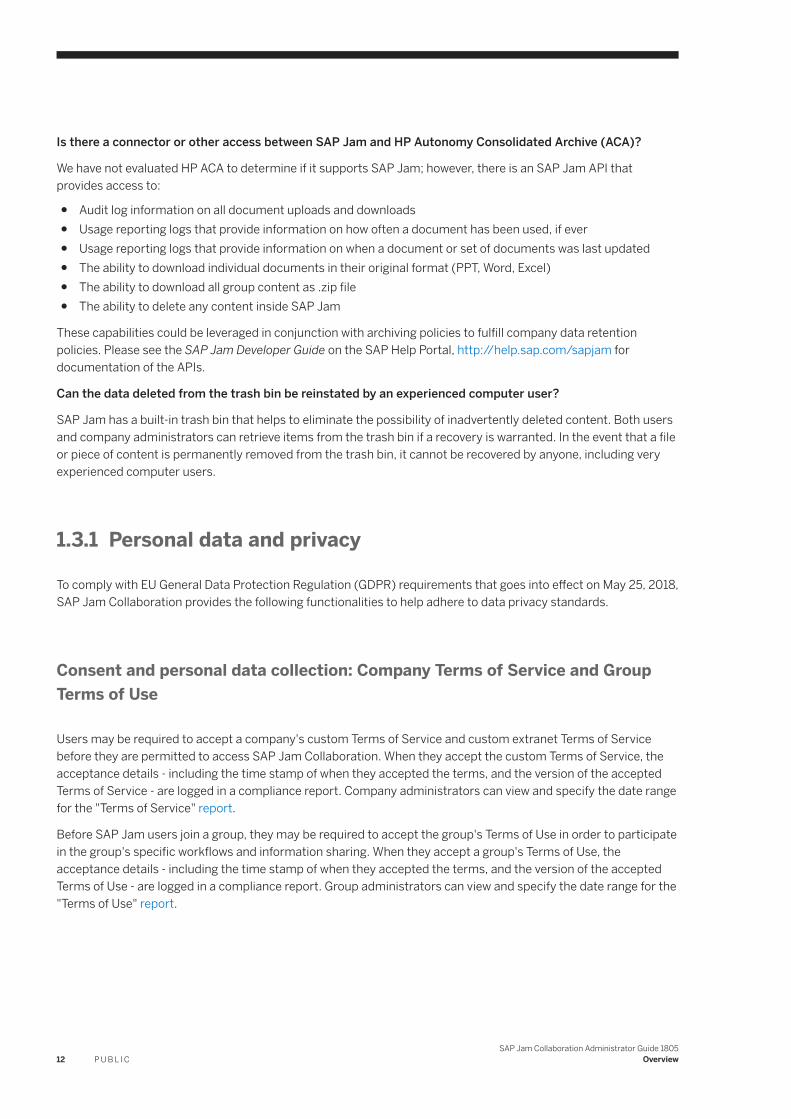
Is there a connector or other access between SAP Jam and HP Autonomy Consolidated Archive (ACA)?
We have not evaluated HP ACA to determine if it supports SAP Jam; however, there is an SAP Jam API that provides access to:
● Audit log information on all document uploads and downloads● Usage reporting logs that provide information on how often a document has been used, if ever● Usage reporting logs that provide information on when a document or set of documents was last updated● The ability to download individual documents in their original format (PPT, Word, Excel)● The ability to download all group content as .zip file● The ability to delete any content inside SAP Jam
These capabilities could be leveraged in conjunction with archiving policies to fulfill company data retention policies. Please see the SAP Jam Developer Guide on the SAP Help Portal, http://help.sap.com/sapjam for documentation of the APIs.
Can the data deleted from the trash bin be reinstated by an experienced computer user?
SAP Jam has a built-in trash bin that helps to eliminate the possibility of inadvertently deleted content. Both users and company administrators can retrieve items from the trash bin if a recovery is warranted. In the event that a file or piece of content is permanently removed from the trash bin, it cannot be recovered by anyone, including very experienced computer users.
1.3.1 Personal data and privacy
To comply with EU General Data Protection Regulation (GDPR) requirements that goes into effect on May 25, 2018, SAP Jam Collaboration provides the following functionalities to help adhere to data privacy standards.
Consent and personal data collection: Company Terms of Service and Group Terms of Use
Users may be required to accept a company's custom Terms of Service and custom extranet Terms of Service before they are permitted to access SAP Jam Collaboration. When they accept the custom Terms of Service, the acceptance details - including the time stamp of when they accepted the terms, and the version of the accepted Terms of Service - are logged in a compliance report. Company administrators can view and specify the date range for the "Terms of Service" report.
Before SAP Jam users join a group, they may be required to accept the group's Terms of Use in order to participate in the group's specific workflows and information sharing. When they accept a group's Terms of Use, the acceptance details - including the time stamp of when they accepted the terms, and the version of the accepted Terms of Use - are logged in a compliance report. Group administrators can view and specify the date range for the "Terms of Use" report.
12 P U B L I CSAP Jam Collaboration Administrator Guide 1805
Overview
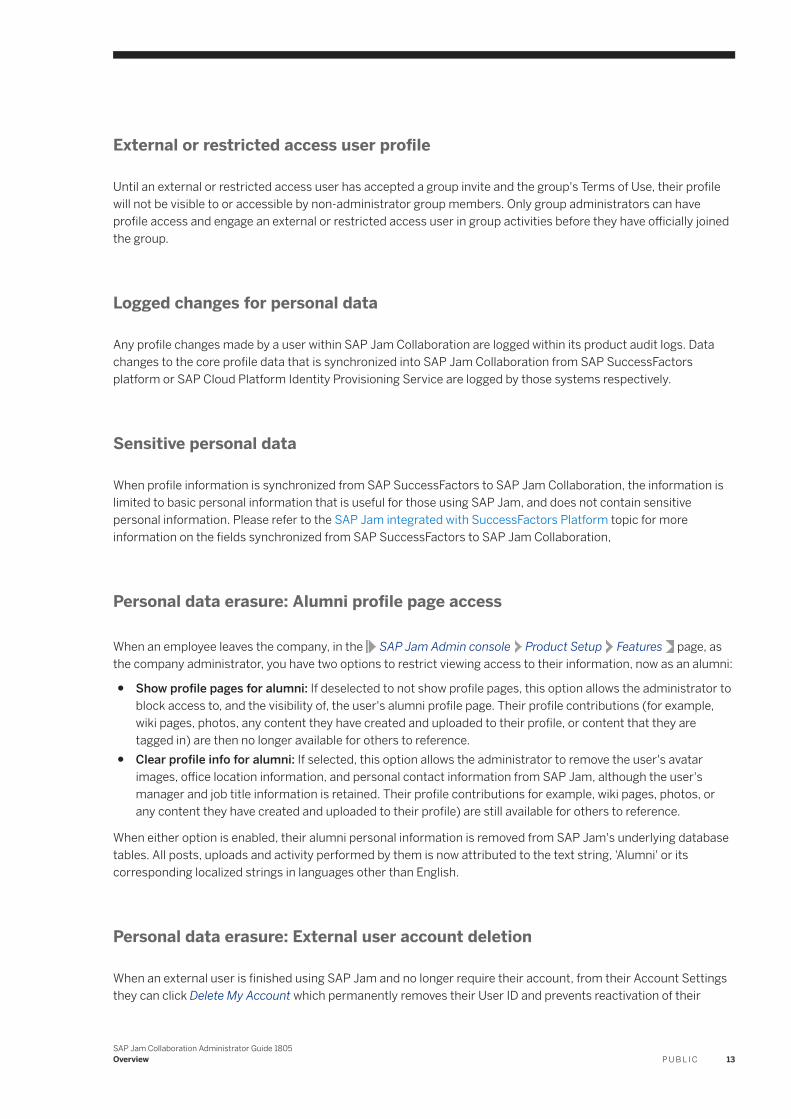
External or restricted access user profile
Until an external or restricted access user has accepted a group invite and the group's Terms of Use, their profile will not be visible to or accessible by non-administrator group members. Only group administrators can have profile access and engage an external or restricted access user in group activities before they have officially joined the group.
Logged changes for personal data
Any profile changes made by a user within SAP Jam Collaboration are logged within its product audit logs. Data changes to the core profile data that is synchronized into SAP Jam Collaboration from SAP SuccessFactors platform or SAP Cloud Platform Identity Provisioning Service are logged by those systems respectively.
Sensitive personal data
When profile information is synchronized from SAP SuccessFactors to SAP Jam Collaboration, the information is limited to basic personal information that is useful for those using SAP Jam, and does not contain sensitive personal information. Please refer to the SAP Jam integrated with SuccessFactors Platform topic for more information on the fields synchronized from SAP SuccessFactors to SAP Jam Collaboration,
Personal data erasure: Alumni profile page access
When an employee leaves the company, in the SAP Jam Admin console Product Setup Features page, as the company administrator, you have two options to restrict viewing access to their information, now as an alumni:
● Show profile pages for alumni: If deselected to not show profile pages, this option allows the administrator to block access to, and the visibility of, the user's alumni profile page. Their profile contributions (for example, wiki pages, photos, any content they have created and uploaded to their profile, or content that they are tagged in) are then no longer available for others to reference.
● Clear profile info for alumni: If selected, this option allows the administrator to remove the user's avatar images, office location information, and personal contact information from SAP Jam, although the user's manager and job title information is retained. Their profile contributions for example, wiki pages, photos, or any content they have created and uploaded to their profile) are still available for others to reference.
When either option is enabled, their alumni personal information is removed from SAP Jam's underlying database tables. All posts, uploads and activity performed by them is now attributed to the text string, 'Alumni' or its corresponding localized strings in languages other than English.
Personal data erasure: External user account deletion
When an external user is finished using SAP Jam and no longer require their account, from their Account Settings they can click Delete My Account which permanently removes their User ID and prevents reactivation of their
SAP Jam Collaboration Administrator Guide 1805Overview P U B L I C 13
account. For any work associated with their ID (for example, comments, content items), their name will be replaced with the label "Alumni".
If an external user chooses not to accept the custom Terms of Service, they can click Delete My Account on the Terms of Service dialog to log out and disable their account. This account cannot be recovered.
Profile data disclosure
Under Account Settings Profile Data Disclosure , a user can view a list of their personal data stored in SAP Jam. Disclosure details satisfy the compliance requirements for national and regional data privacy standards. Personal data from SuccessFactors Platform or SCIM (for example, e-mail addresses, phone numbers, location addresses) can also display on this page.
1.4 SAP Jam integrated with SuccessFactors Platform
When SAP Jam Collaboration instances are integrated with SuccessFactors Platform, user access to SAP Jam is granted by the company administrator through SuccessFactors platform administration settings using role-based permissions (RBP).
The default configuration for this integration provides all users configured with access through SuccessFactors platform with access to SAP Jam. However, a company administrator can override this default configuration and choose which roles, users, or groups of users receive access to SAP Jam. Single sign-on (SSO) is also available with this integration.
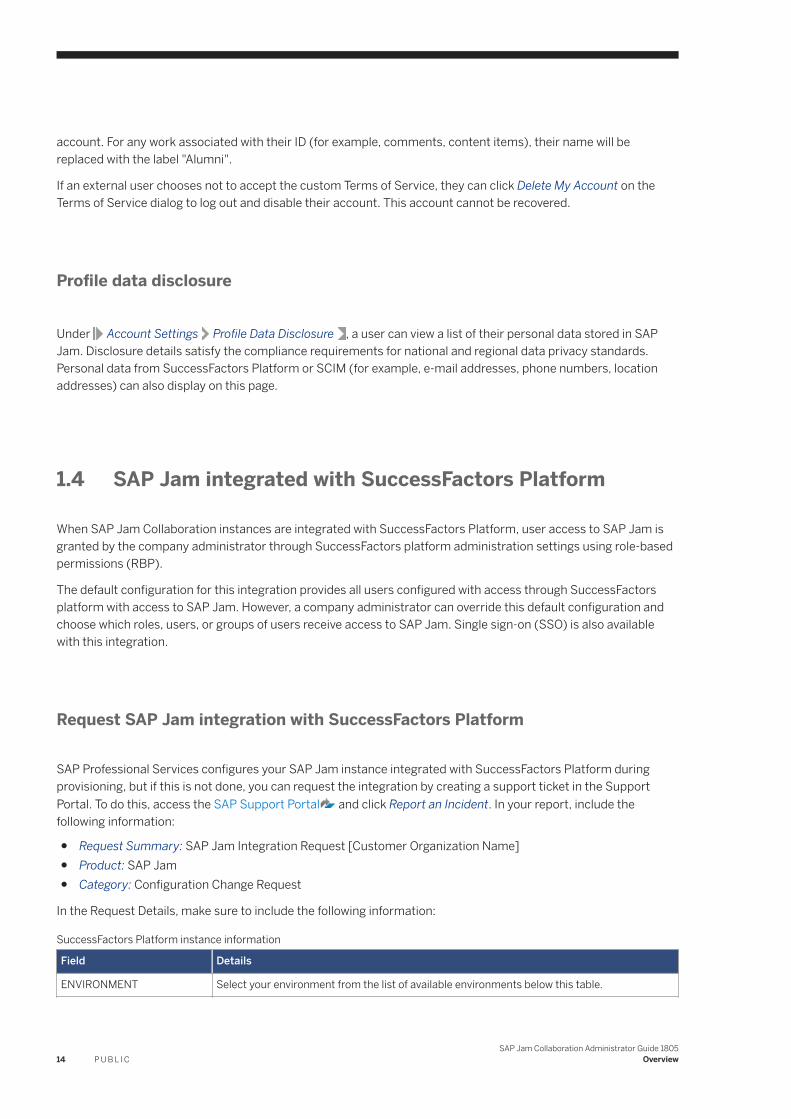
Request SAP Jam integration with SuccessFactors Platform
SAP Professional Services configures your SAP Jam instance integrated with SuccessFactors Platform during provisioning, but if this is not done, you can request the integration by creating a support ticket in the Support Portal. To do this, access the SAP Support Portal and click Report an Incident. In your report, include the following information:
● Request Summary: SAP Jam Integration Request [Customer Organization Name]● Product: SAP Jam● Category: Configuration Change Request
In the Request Details, make sure to include the following information:
SuccessFactors Platform instance information
Field Details
ENVIRONMENT Select your environment from the list of available environments below this table.
14 P U B L I CSAP Jam Collaboration Administrator Guide 1805
Overview
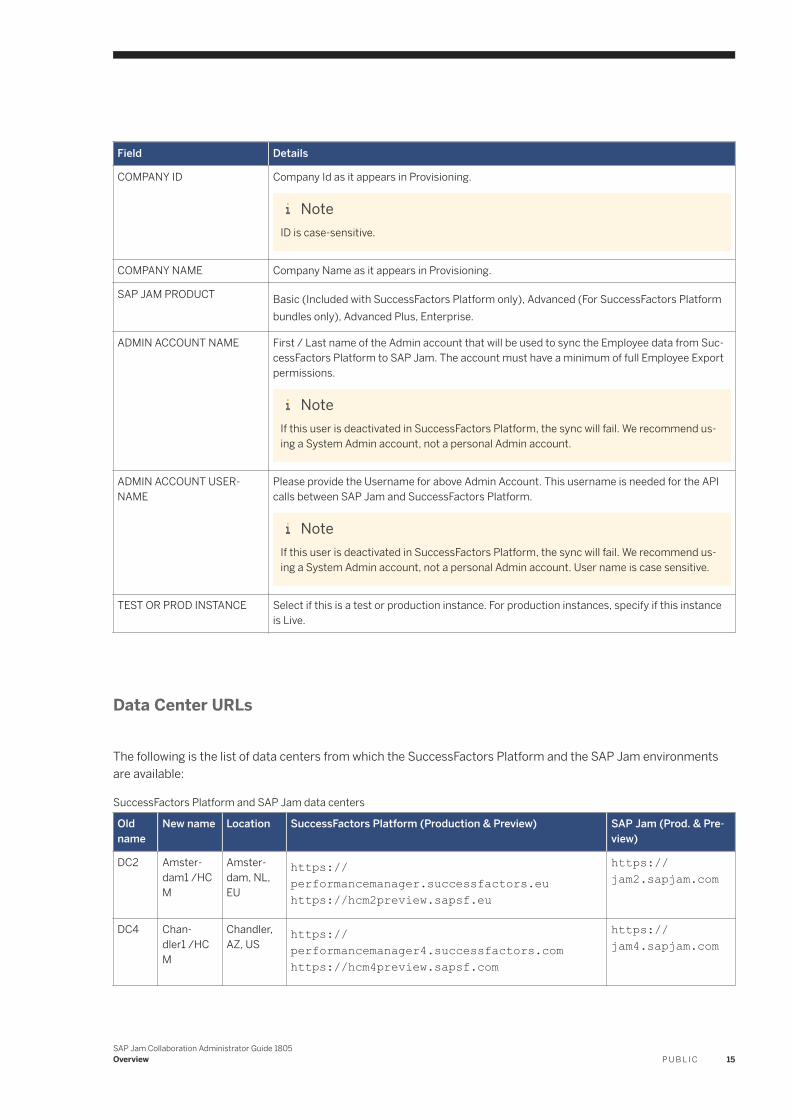
Field Details
COMPANY ID Company Id as it appears in Provisioning.
NoteID is case-sensitive.
COMPANY NAME Company Name as it appears in Provisioning.
SAP JAM PRODUCT Basic (Included with SuccessFactors Platform only), Advanced (For SuccessFactors Platform bundles only), Advanced Plus, Enterprise.
ADMIN ACCOUNT NAME First / Last name of the Admin account that will be used to sync the Employee data from SuccessFactors Platform to SAP Jam. The account must have a minimum of full Employee Export permissions.
NoteIf this user is deactivated in SuccessFactors Platform, the sync will fail. We recommend using a System Admin account, not a personal Admin account.
ADMIN ACCOUNT USERNAME
Please provide the Username for above Admin Account. This username is needed for the API calls between SAP Jam and SuccessFactors Platform.
NoteIf this user is deactivated in SuccessFactors Platform, the sync will fail. We recommend using a System Admin account, not a personal Admin account. User name is case sensitive.
TEST OR PROD INSTANCE Select if this is a test or production instance. For production instances, specify if this instance is Live.
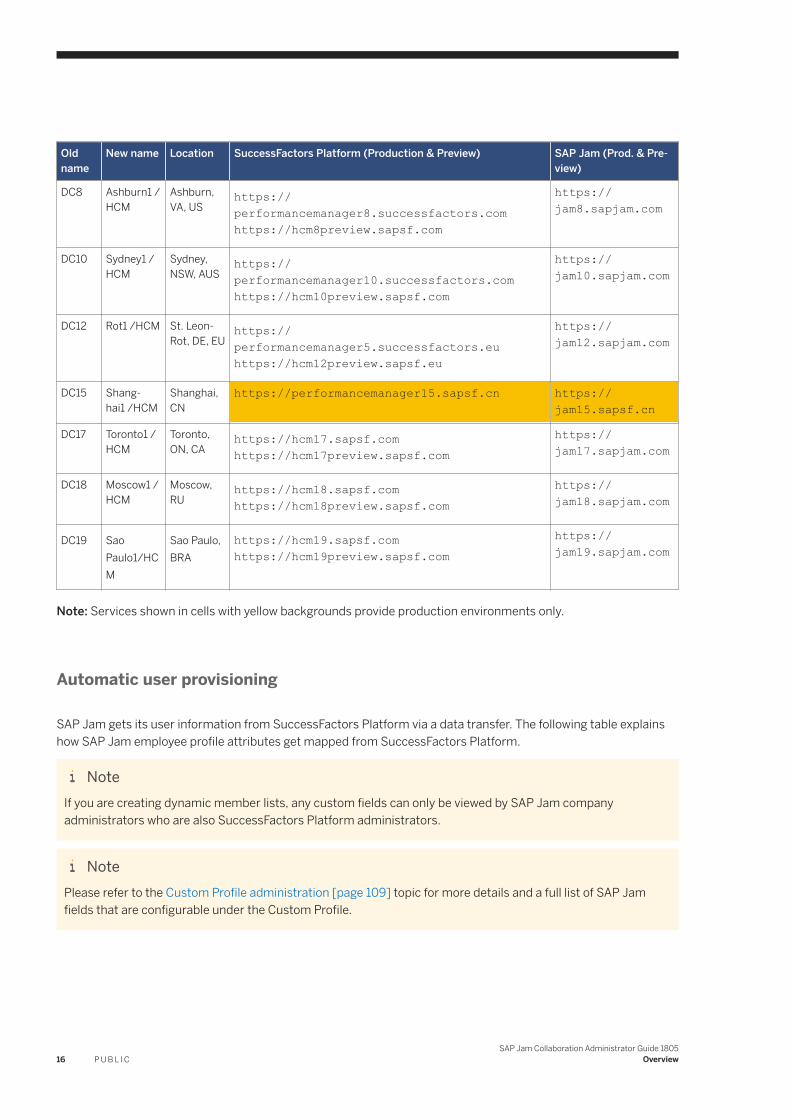
Data Center URLs
The following is the list of data centers from which the SuccessFactors Platform and the SAP Jam environments are available:
SuccessFactors Platform and SAP Jam data centers
Old name
New name Location SuccessFactors Platform (Production & Preview) SAP Jam (Prod. & Preview)
DC2 Amsterdam1 /HCM
Amsterdam, NL, EU
https://performancemanager.successfactors.euhttps://hcm2preview.sapsf.eu
https://jam2.sapjam.com
DC4 Chandler1 /HCM
Chandler, AZ, US
https://performancemanager4.successfactors.comhttps://hcm4preview.sapsf.com
https://jam4.sapjam.com
SAP Jam Collaboration Administrator Guide 1805Overview P U B L I C 15
Old name
New name Location SuccessFactors Platform (Production & Preview) SAP Jam (Prod. & Preview)
DC8 Ashburn1 /HCM
Ashburn, VA, US
https://performancemanager8.successfactors.comhttps://hcm8preview.sapsf.com
https://jam8.sapjam.com
DC10 Sydney1 /HCM
Sydney, NSW, AUS
https://performancemanager10.successfactors.comhttps://hcm10preview.sapsf.com
https://jam10.sapjam.com
DC12 Rot1 /HCM St. Leon-Rot, DE, EU
https://performancemanager5.successfactors.euhttps://hcm12preview.sapsf.eu
https://jam12.sapjam.com
DC15 Shanghai1 /HCM
Shanghai, CN
https://performancemanager15.sapsf.cn https://jam15.sapsf.cn
DC17 Toronto1 /HCM
Toronto, ON, CA
https://hcm17.sapsf.comhttps://hcm17preview.sapsf.com
https://jam17.sapjam.com
DC18 Moscow1 /HCM
Moscow, RU
https://hcm18.sapsf.comhttps://hcm18preview.sapsf.com
https://jam18.sapjam.com
DC19 Sao Paulo1/HCM
Sao Paulo, BRA
https://hcm19.sapsf.comhttps://hcm19preview.sapsf.com
https://jam19.sapjam.com
Note: Services shown in cells with yellow backgrounds provide production environments only.
Automatic user provisioning
SAP Jam gets its user information from SuccessFactors Platform via a data transfer. The following table explains how SAP Jam employee profile attributes get mapped from SuccessFactors Platform.
NoteIf you are creating dynamic member lists, any custom fields can only be viewed by SAP Jam company administrators who are also SuccessFactors Platform administrators.
NotePlease refer to the Custom Profile administration [page 109] topic for more details and a full list of SAP Jam fields that are configurable under the Custom Profile.
16 P U B L I CSAP Jam Collaboration Administrator Guide 1805
Overview
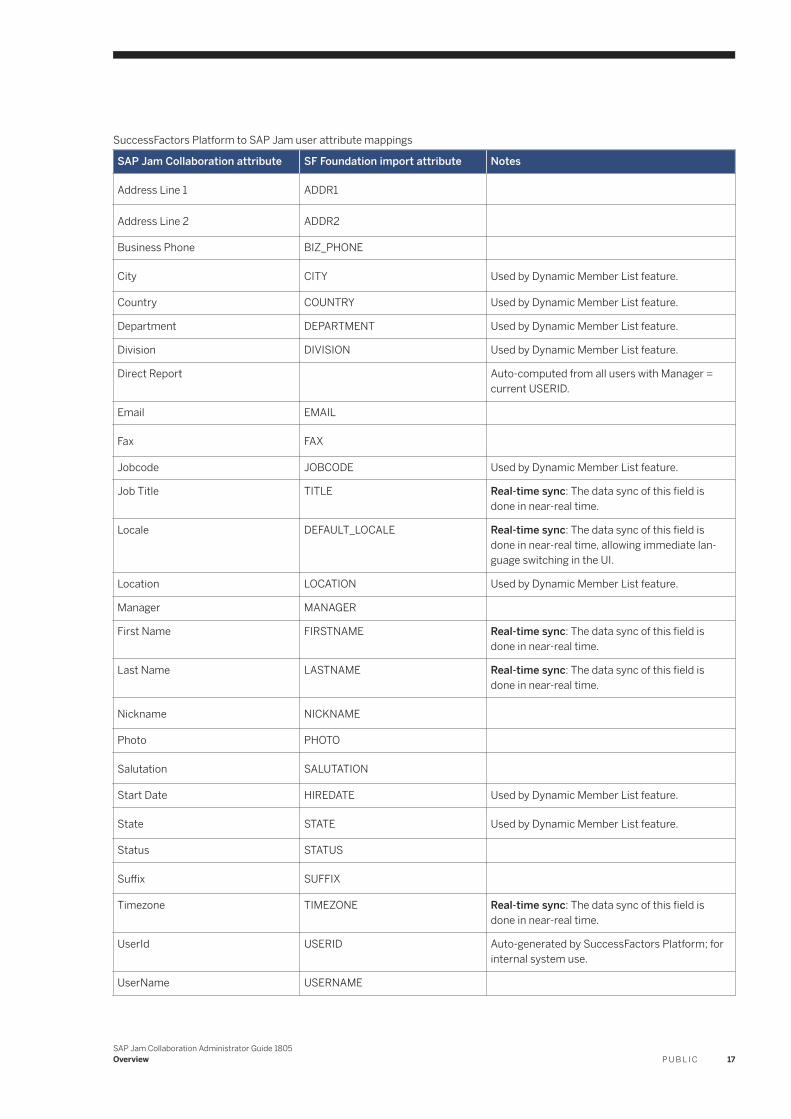
SuccessFactors Platform to SAP Jam user attribute mappings
SAP Jam Collaboration attribute SF Foundation import attribute Notes
Address Line 1 ADDR1
Address Line 2 ADDR2
Business Phone BIZ_PHONE
City CITY Used by Dynamic Member List feature.
Country COUNTRY Used by Dynamic Member List feature.
Department DEPARTMENT Used by Dynamic Member List feature.
Division DIVISION Used by Dynamic Member List feature.
Direct Report Auto-computed from all users with Manager = current USERID.
Email EMAIL
Fax FAX
Jobcode JOBCODE Used by Dynamic Member List feature.
Job Title TITLE Real-time sync: The data sync of this field is done in near-real time.
Locale DEFAULT_LOCALE Real-time sync: The data sync of this field is done in near-real time, allowing immediate language switching in the UI.
Location LOCATION Used by Dynamic Member List feature.
Manager MANAGER
First Name FIRSTNAME Real-time sync: The data sync of this field is done in near-real time.
Last Name LASTNAME Real-time sync: The data sync of this field is done in near-real time.
Nickname NICKNAME
Photo PHOTO
Salutation SALUTATION
Start Date HIREDATE Used by Dynamic Member List feature.
State STATE Used by Dynamic Member List feature.
Status STATUS
Suffix SUFFIX
Timezone TIMEZONE Real-time sync: The data sync of this field is done in near-real time.
UserId USERID Auto-generated by SuccessFactors Platform; for internal system use.
UserName USERNAME
SAP Jam Collaboration Administrator Guide 1805Overview P U B L I C 17
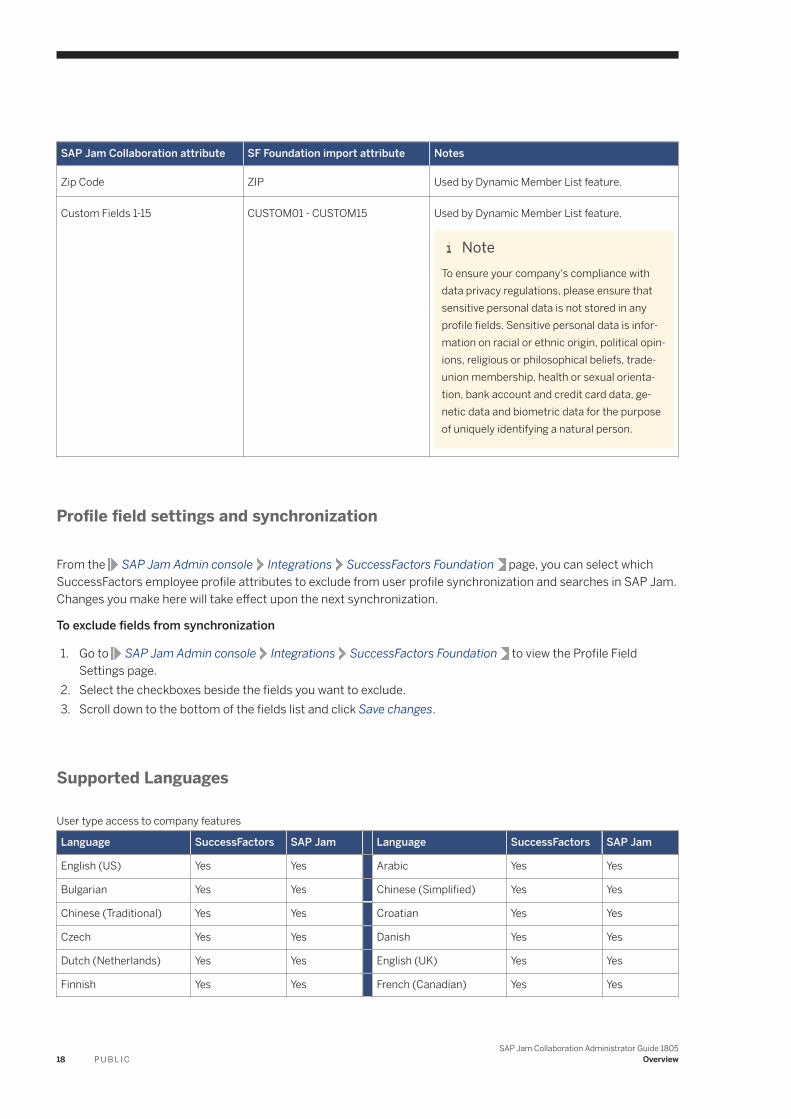
SAP Jam Collaboration attribute SF Foundation import attribute Notes
Zip Code ZIP Used by Dynamic Member List feature.
Custom Fields 1-15 CUSTOM01 - CUSTOM15 Used by Dynamic Member List feature.
NoteTo ensure your company's compliance with data privacy regulations, please ensure that sensitive personal data is not stored in any profile fields. Sensitive personal data is information on racial or ethnic origin, political opinions, religious or philosophical beliefs, trade-union membership, health or sexual orientation, bank account and credit card data, genetic data and biometric data for the purpose of uniquely identifying a natural person.
Profile field settings and synchronization
From the SAP Jam Admin console Integrations SuccessFactors Foundation page, you can select which SuccessFactors employee profile attributes to exclude from user profile synchronization and searches in SAP Jam. Changes you make here will take effect upon the next synchronization.
To exclude fields from synchronization
1. Go to SAP Jam Admin console Integrations SuccessFactors Foundation to view the Profile Field Settings page.
2. Select the checkboxes beside the fields you want to exclude.3. Scroll down to the bottom of the fields list and click Save changes.
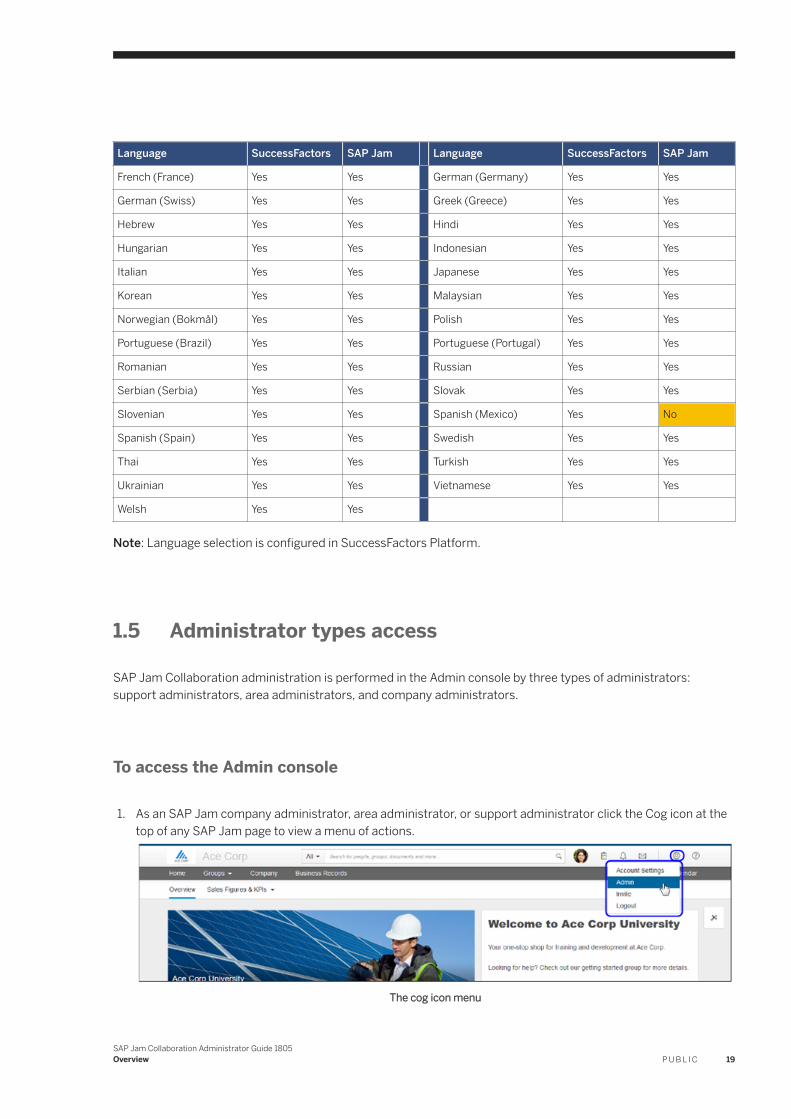
Supported Languages
User type access to company features
Language SuccessFactors SAP Jam Language SuccessFactors SAP Jam
English (US) Yes Yes Arabic Yes Yes
Bulgarian Yes Yes Chinese (Simplified) Yes Yes
Chinese (Traditional) Yes Yes Croatian Yes Yes
Czech Yes Yes Danish Yes Yes
Dutch (Netherlands) Yes Yes English (UK) Yes Yes
Finnish Yes Yes French (Canadian) Yes Yes
18 P U B L I CSAP Jam Collaboration Administrator Guide 1805
Overview
Language SuccessFactors SAP Jam Language SuccessFactors SAP Jam
French (France) Yes Yes German (Germany) Yes Yes
German (Swiss) Yes Yes Greek (Greece) Yes Yes
Hebrew Yes Yes Hindi Yes Yes
Hungarian Yes Yes Indonesian Yes Yes
Italian Yes Yes Japanese Yes Yes
Korean Yes Yes Malaysian Yes Yes
Norwegian (Bokmål) Yes Yes Polish Yes Yes
Portuguese (Brazil) Yes Yes Portuguese (Portugal) Yes Yes
Romanian Yes Yes Russian Yes Yes
Serbian (Serbia) Yes Yes Slovak Yes Yes
Slovenian Yes Yes Spanish (Mexico) Yes No
Spanish (Spain) Yes Yes Swedish Yes Yes
Thai Yes Yes Turkish Yes Yes
Ukrainian Yes Yes Vietnamese Yes Yes
Welsh Yes Yes
Note: Language selection is configured in SuccessFactors Platform.
1.5 Administrator types access
SAP Jam Collaboration administration is performed in the Admin console by three types of administrators: support administrators, area administrators, and company administrators.
To access the Admin console
1. As an SAP Jam company administrator, area administrator, or support administrator click the Cog icon at the top of any SAP Jam page to view a menu of actions.
The cog icon menu
SAP Jam Collaboration Administrator Guide 1805Overview P U B L I C 19
2. Select Admin from the menu.If you don't have support administrator, area administrator, or company administrator privileges, this option does not appear in the menu.
SAP Jam administrator types
There are five administrator types:
1. Group administrators are users that have created a group or who have been invited to be a group administrator. Group administrators have special privileges within the groups that they administer, but those privileges do not extend beyond those groups, so they are not relevant to the subjects discussed in this guide and their privileges do not include those shown in the following table. The capabilities of group administrators are fully documented in the SAP Jam Collaboration Group Administration Guide.
2. Support administrators can access a subset of the functionality available to a Company Administrator. With this role, Company Administrators can lessen their workload by giving Support Administrators access to many duties of SAP Jam administration. This also protects the stability of the SAP Jam service by limiting access to features that can have great impact on the functionality of the service to a smaller group of people who, though their focus on SAP Jam, become more knowledgeable about the effect of configuration changes.
3. Area administrators can manage areas, a designated space for subject matter experts to manage content and collaborate within their line of business. They can manage area membership and access a subset of the functionality available to a company administrator.
4. Page content administrators can be subject matter experts for an area or company. They can manage the content and design [page 67] of custom home pages. This responsibility can be delegated to these experts by company administrators who do not have time to manage various home pages or the domain knowledge to manage specific content that is otherwise well known to others.
5. Company administrators can access the full range of capabilities within the Admin console. This role allows you the most tools to change the look, feel, and functions of the SAP Jam service to suit the needs of your organization.
The privileges granted to the last three of these different administrator types are shown in the following tables.
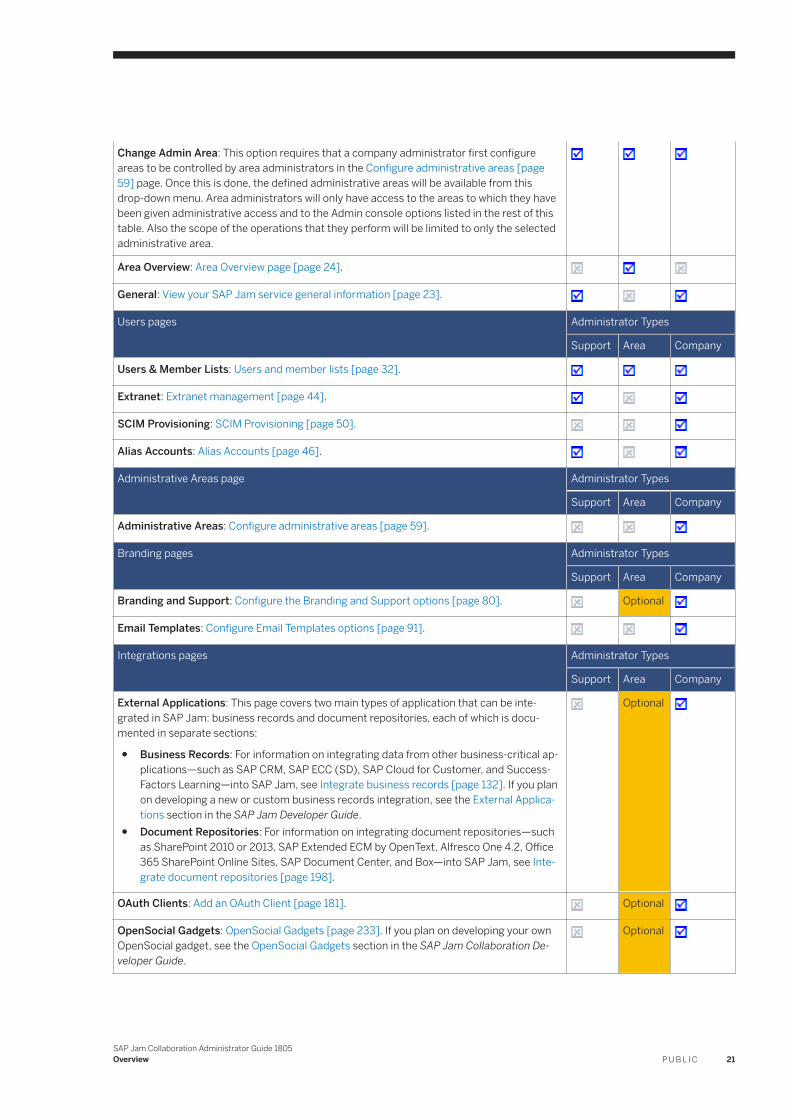
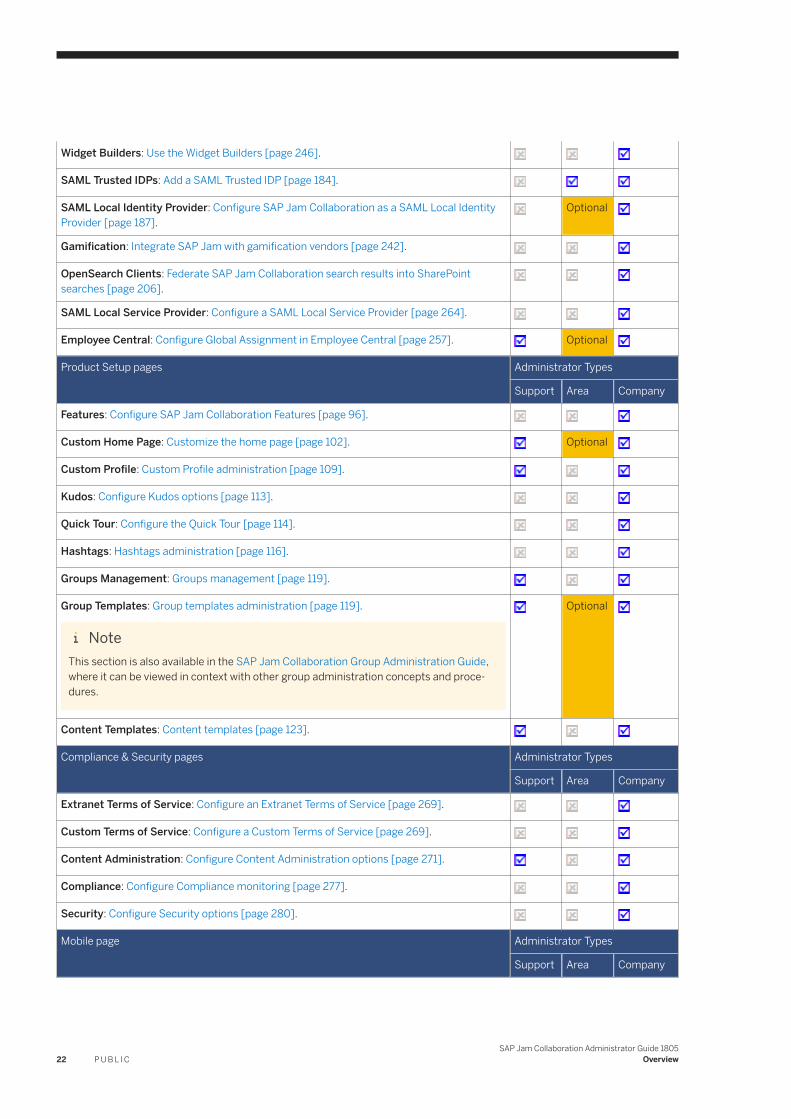
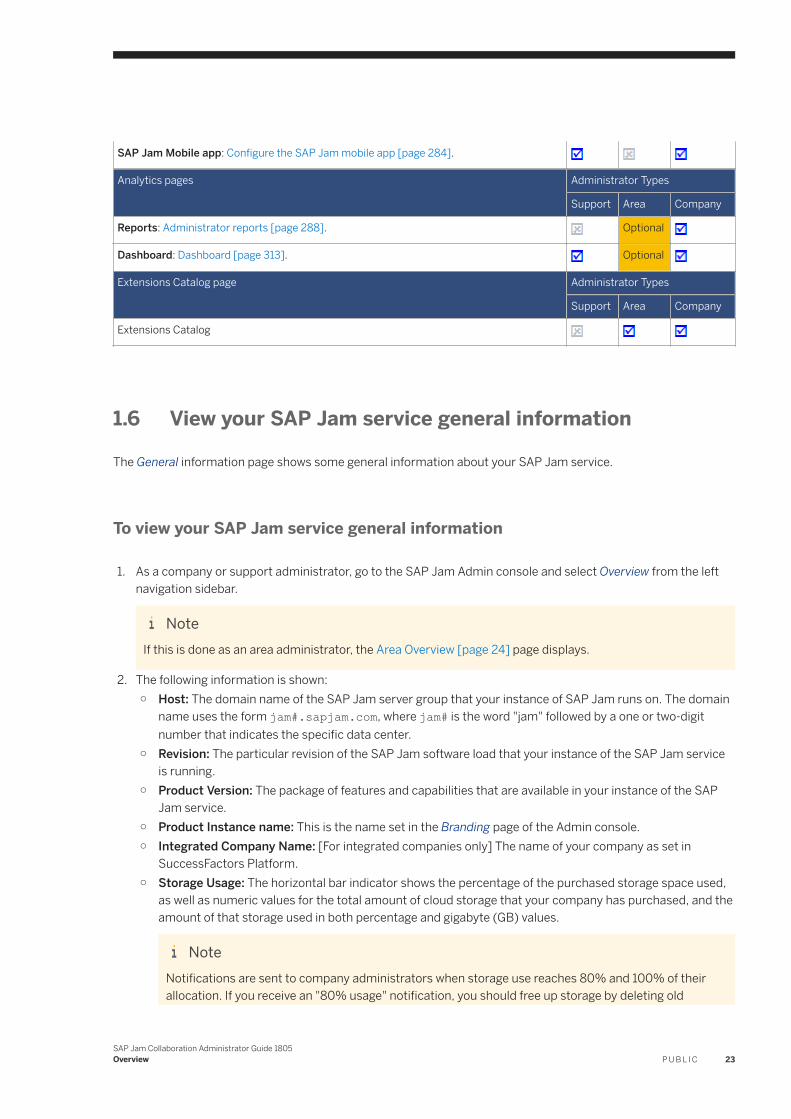
Administrator types' access to SAP Jam administration features
The following table shows the access privileges of support, area, and company administrators in the SAP Jam Admin console.
Administrator type access to Admin console pages
Admin console pages Administrator Types
Support Area Company
20 P U B L I CSAP Jam Collaboration Administrator Guide 1805
Overview
Change Admin Area: This option requires that a company administrator first configure areas to be controlled by area administrators in the Configure administrative areas [page 59] page. Once this is done, the defined administrative areas will be available from this drop-down menu. Area administrators will only have access to the areas to which they have been given administrative access and to the Admin console options listed in the rest of this table. Also the scope of the operations that they perform will be limited to only the selected administrative area.
Area Overview: Area Overview page [page 24].
General: View your SAP Jam service general information [page 23].
Users pages Administrator Types
Support Area Company
Users & Member Lists: Users and member lists [page 32].
Extranet: Extranet management [page 44].
SCIM Provisioning: SCIM Provisioning [page 50].
Alias Accounts: Alias Accounts [page 46].
Administrative Areas page Administrator Types
Support Area Company
Administrative Areas: Configure administrative areas [page 59].
Branding pages Administrator Types
Support Area Company
Branding and Support: Configure the Branding and Support options [page 80]. Optional
Email Templates: Configure Email Templates options [page 91].
Integrations pages Administrator Types
Support Area Company
External Applications: This page covers two main types of application that can be integrated in SAP Jam: business records and document repositories, each of which is documented in separate sections:
● Business Records: For information on integrating data from other business-critical applications—such as SAP CRM, SAP ECC (SD), SAP Cloud for Customer, and SuccessFactors Learning—into SAP Jam, see Integrate business records [page 132]. If you plan on developing a new or custom business records integration, see the External Applications section in the SAP Jam Developer Guide.
● Document Repositories: For information on integrating document repositories—such as SharePoint 2010 or 2013, SAP Extended ECM by OpenText, Alfresco One 4.2, Office 365 SharePoint Online Sites, SAP Document Center, and Box—into SAP Jam, see Integrate document repositories [page 198].
Optional
OAuth Clients: Add an OAuth Client [page 181]. Optional
OpenSocial Gadgets: OpenSocial Gadgets [page 233]. If you plan on developing your own OpenSocial gadget, see the OpenSocial Gadgets section in the SAP Jam Collaboration Developer Guide.
Optional
SAP Jam Collaboration Administrator Guide 1805Overview P U B L I C 21
Widget Builders: Use the Widget Builders [page 246].
SAML Trusted IDPs: Add a SAML Trusted IDP [page 184].
SAML Local Identity Provider: Configure SAP Jam Collaboration as a SAML Local Identity Provider [page 187].
Optional
Gamification: Integrate SAP Jam with gamification vendors [page 242].
OpenSearch Clients: Federate SAP Jam Collaboration search results into SharePoint searches [page 206].
SAML Local Service Provider: Configure a SAML Local Service Provider [page 264].
Employee Central: Configure Global Assignment in Employee Central [page 257]. Optional
Product Setup pages Administrator Types
Support Area Company
Features: Configure SAP Jam Collaboration Features [page 96].
Custom Home Page: Customize the home page [page 102]. Optional
Custom Profile: Custom Profile administration [page 109].
Kudos: Configure Kudos options [page 113].
Quick Tour: Configure the Quick Tour [page 114].
Hashtags: Hashtags administration [page 116].
Groups Management: Groups management [page 119].
Group Templates: Group templates administration [page 119].
NoteThis section is also available in the SAP Jam Collaboration Group Administration Guide, where it can be viewed in context with other group administration concepts and procedures.
Optional
Content Templates: Content templates [page 123].
Compliance & Security pages Administrator Types
Support Area Company
Extranet Terms of Service: Configure an Extranet Terms of Service [page 269].
Custom Terms of Service: Configure a Custom Terms of Service [page 269].
Content Administration: Configure Content Administration options [page 271].
Compliance: Configure Compliance monitoring [page 277].
Security: Configure Security options [page 280].
Mobile page Administrator Types
Support Area Company
22 P U B L I CSAP Jam Collaboration Administrator Guide 1805
Overview
SAP Jam Mobile app: Configure the SAP Jam mobile app [page 284].
Analytics pages Administrator Types
Support Area Company
Reports: Administrator reports [page 288]. Optional
Dashboard: Dashboard [page 313]. Optional
Extensions Catalog page Administrator Types
Support Area Company
Extensions Catalog
1.6 View your SAP Jam service general information
The General information page shows some general information about your SAP Jam service.
To view your SAP Jam service general information
1. As a company or support administrator, go to the SAP Jam Admin console and select Overview from the left navigation sidebar.
NoteIf this is done as an area administrator, the Area Overview [page 24] page displays.
2. The following information is shown:○ Host: The domain name of the SAP Jam server group that your instance of SAP Jam runs on. The domain
name uses the form jam#.sapjam.com, where jam# is the word "jam" followed by a one or two-digit number that indicates the specific data center.
○ Revision: The particular revision of the SAP Jam software load that your instance of the SAP Jam service is running.
○ Product Version: The package of features and capabilities that are available in your instance of the SAP Jam service.
○ Product Instance name: This is the name set in the Branding page of the Admin console.○ Integrated Company Name: [For integrated companies only] The name of your company as set in
SuccessFactors Platform.○ Storage Usage: The horizontal bar indicator shows the percentage of the purchased storage space used,
as well as numeric values for the total amount of cloud storage that your company has purchased, and the amount of that storage used in both percentage and gigabyte (GB) values.
NoteNotifications are sent to company administrators when storage use reaches 80% and 100% of their allocation. If you receive an "80% usage" notification, you should free up storage by deleting old
SAP Jam Collaboration Administrator Guide 1805Overview P U B L I C 23
content or contact your SAP Jam Support representative to purchase more storage space. If you receive a "100% usage" notification, your users will no longer be able to upload content. Repeated notifications, which are not configurable and cannot be disabled, will be sent every Wednesday until the situation is resolved. If your company has purchased additional storage space, an email notification will be sent when you have only 90% available storage space rather then 80%.
○ External User Licenses Purchased: The number of external user accounts that your SAP Jam service will support according to your contract.
○ External User Licenses Used: The number of external user accounts that your SAP Jam service is currently using.
NoteAn email notification is sent to company administrators when there are only 20 extranet accounts available.
Product news and updates
As a company administrator, you can opt in to receive SAP Jam product news and updates. If there is more than one company administrator for your organization, they will also be subscribed or unsubscribed based on your selection.
To subscribe all company administrators to receive product news and updates
1. Click the toggle beside Subscribe company admins to receive product news and updates to enable it.
1.7 Area Overview page
The Overview page for area administrators provides a set of links to the major operations that an area administrator can perform in their administrative areas.
To view the overview page
1. As an area administrator, go to the SAP Jam Admin console, choose your area from the drop-down menu if available and select Area Overview from the left sidebar.The Overview page for area administrators displays.
NoteIf this is done as a company administrator, the General [page 23] page displays.
2. The following options are shown, each of which is linked to the corresponding page in the Admin console:○ Group Templates: Click to view the Group Templates [page 119] section.○ External Applications: Click to view the External Applications [page 130] section.○ OpenSocial Gadgets: Click to view the OpenSocial Gadgets [page 233] section.○ Extensions Marketplace: Click to view the Extensions Marketplace [page 317] section.
24 P U B L I CSAP Jam Collaboration Administrator Guide 1805
Overview
1.8 Initial administrator tasksSome of the key tasks that you should complete include:
Task list
Task Description and reference
Determine who can create groups See the last option in the User Management section in Configure SAP Jam Collaboration Features [page 96]
Create member lists To apply profile-based dynamic member lists, see “Create and manage member lists” in the SAP Jam Group Administration Guide.
Apply your organization's branding to SAP Jam To set up SAP Jam with your organization's branding see Configure the Branding and Support options [page 80].
Set up a support group using the Help and Support template
One of the most effective tools in on-boarding your users is to create an SAP Jam Support group based on the Help and Support Template. To do this, see “Groups, group templates, and subgroups”, in the SAP Jam Group Administration Guide.
Set up internal and external Terms of Service See:
● Configure a Custom Terms of Service [page 269].● Configure an Extranet Terms of Service [page 269].
Set up custom help To set up custom help, you can specify a URL to the help location of either a group or another online source. To do this, see the last section, Help Settings, in Configure the Branding and Support options [page 80].
Set your SAP Jam support contact email address Go to the bottom of the Configure the Branding and Support options [page 80] page.
Generate company-wide reports For reports on user adoption of SAP Jam, and reports on users' behavior in SAP Jam, see Administrator reports [page 288]. Note that there are also reports available to Group Administrators: see “Run group reports” in the SAP Jam Group Administration Guide.
On-boarding Users Encourage your users to fill out all the information requested in the Quick Tour: fill out their profile, add their expertise, and install the SAP Jam mobile app on their mobile devices.
1.9 Single sign-on and deep linkingDeep linking occurs when a hypertext link points to a page on a web site other than its home page that involves some navigation into the structure of the web site.
For SAP Jam Collaboration, deep linking is dependent on the single sign-on (SSO) configuration, which is typically done by Professional Services upon implementation. This can be, for example, a standard SAML 2.0-based single
SAP Jam Collaboration Administrator Guide 1805Overview P U B L I C 25
log on. If SSO is configured correctly, most SAP Jam URLs should take the user directly to the indicated SAP Jam page after a series of redirects from SAP Jam to the company IDP and back to SAP Jam.
SAP Jam handling of deep linking
In normal SAP Jam usage, a user logs in and SAP Jam sets a cookie in the user's browser that indicates which company the user belongs to. When a user clicks on a deep link such as https://jam#.sapjam.com/groups/wall/0Hm4gyKS4qegqd2qkkl8Xf, SAP Jam looks for that cookie, but it might not be found if:
● The user is new to SAP Jam and hasn't logged in before.● The user's browser configuration is set to delete all cookies on shut down.● The user has manually deleted the required cookie or all cookies from their browser.
So, when a user clicks a deep link for a page within SAP Jam, it looks for the cookie that identifies which company a user belongs to. One of two things happen:
1. If SAP Jam finds the cookie, it will know which company the user belongs to and it will forward the user to their company-specific SSO page.
2. If SAP Jam cannot find the cookie, it will do one of two things:○ SAP Jam will determine which company the content belongs to by analyzing the URL. There are two
possible actions:1. If the URL is to a private internal group, SAP Jam forwards the user to that company's SSO page.2. If the URL is to an external group, a challenge is encountered because internal users (company
employees) and external users (guest members) are authenticated in different SSO log-in pages. To deal with this, SAP Jam presents a screen to the user, asking them if they are an employee of the company or if they are a guest:1. If they answer that they are an employee, they are forwarded to the employees' SSO log on page.2. If they answer that they are a guest, they are forwarded to the guests' SSO log on page.
○ If SAP Jam finds one of the very few URLs that it cannot determine what company the user belongs to, such as happens if the link is to a user's home page (which is always something like https://jam4.sapjam.com/auth/status), then there needs to have been extra information added to the URL to allow deep linking to work properly even in such a situation. For example:○ https://[jam4.sapjam.com]/c/[CompanyID.cubetree.biz].companyname.biz/auth/
status where:○ [jam4.sapjam.com] is your associated data center.○ and [CompanyID.cubetree.biz] is the assigned SAP Jam domain, which can be located via
the SAP Jam Admin Console > Compliance & Security > Security > System assigned domain field.
26 P U B L I CSAP Jam Collaboration Administrator Guide 1805
Overview
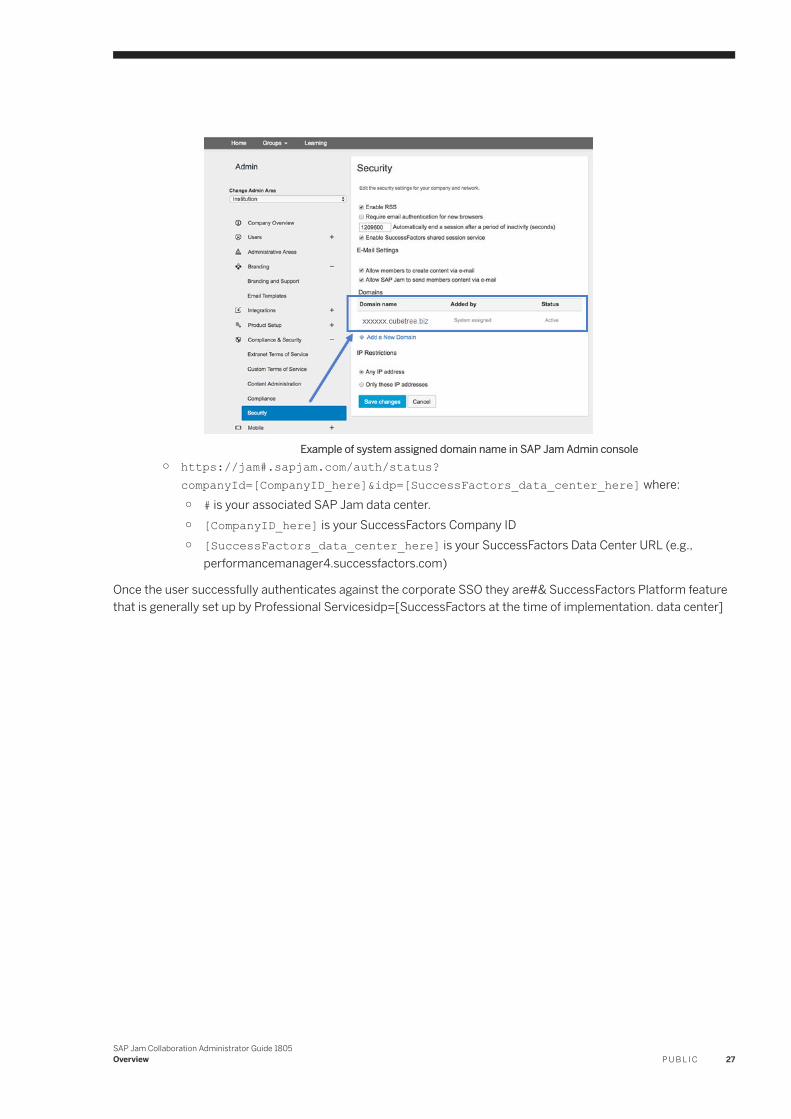
Example of system assigned domain name in SAP Jam Admin console○ https://jam#.sapjam.com/auth/status?
companyId=[CompanyID_here]&idp=[SuccessFactors_data_center_here] where:○ # is your associated SAP Jam data center.○ [CompanyID_here] is your SuccessFactors Company ID○ [SuccessFactors_data_center_here] is your SuccessFactors Data Center URL (e.g.,
performancemanager4.successfactors.com)
Once the user successfully authenticates against the corporate SSO they are#& SuccessFactors Platform feature that is generally set up by Professional Servicesidp=[SuccessFactors at the time of implementation. data center]
SAP Jam Collaboration Administrator Guide 1805Overview P U B L I C 27
2 Users
2.1 About user types
User account creation and management is done via SuccessFactors Platform or SAP Cloud Platform Identity Authentication.
Contact your SAP Jam representative if you require assistance to add or update the list of your users or the information about them.
User types
There are three types of user privileges:
1. External users, also known as "guest" users, are the most restricted. They are guests of your organization, given access to only the specific private external groups to which they have been invited, their home page, and user profile. They are allowed only limited information on, or interactions with, other users. They can only access the content within the groups to which they have been invited. Also, they require a different, lower-cost license type than internal users.
2. Restricted access users, are partially restricted users. They have feature and security permissions that limit their access to only the SAP Jam groups to which they have been invited, and to the content and people that are in those groups. This is a special case user configuration that is only enabled by making a special request to your support representative. On request, this user type is provisioned by SAP Jam Support. These users are managed in the SuccessFactors Platform, and they are identified to SAP Jam by having one of the SuccessFactors Platform custom profile fields of user information flagged.
NoteWhen the SuccessFactors Platform custom field that indicates a "restricted access user" is set, SAP Jam will recognize and treat the user as such. However, this setting has no effect on the behavior of other SuccessFactors applications or services, so your organization's administrators must configure equivalent restrictions in SuccessFactors Platform to restrict the access of your "restricted access users".
3. Full access users typically include all of the employees in your company. They typically have access to all enabled features except those that are limited to the members of a specific group or that require external accounts to view, as is the case with integrated business records from external applications.
The privileges granted to these different user types are shown in the following tables.
28 P U B L I CSAP Jam Collaboration Administrator Guide 1805
Users
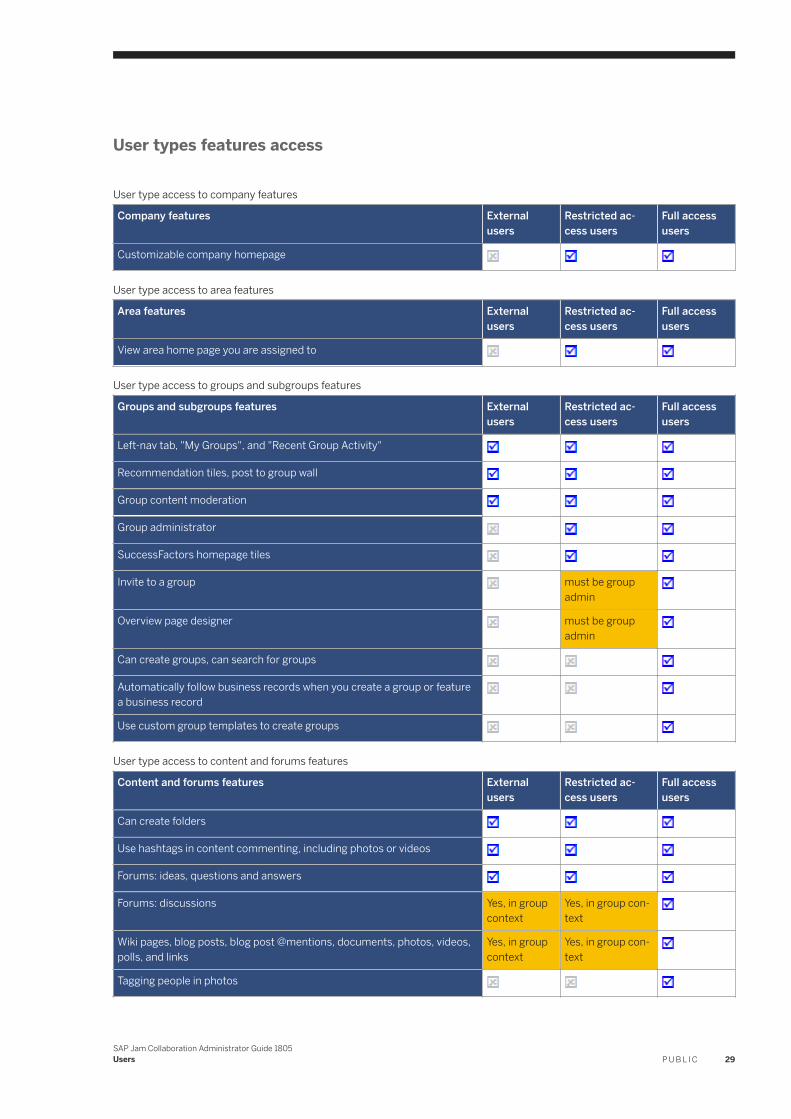
User types features access
User type access to company features
Company features External users
Restricted access users
Full access users
Customizable company homepage
User type access to area features
Area features External users
Restricted access users
Full access users
View area home page you are assigned to
User type access to groups and subgroups features
Groups and subgroups features External users
Restricted access users
Full access users
Left-nav tab, "My Groups", and "Recent Group Activity"
Recommendation tiles, post to group wall
Group content moderation
Group administrator
SuccessFactors homepage tiles
Invite to a group must be group admin
Overview page designer must be group admin
Can create groups, can search for groups
Automatically follow business records when you create a group or feature a business record
Use custom group templates to create groups
User type access to content and forums features
Content and forums features External users
Restricted access users
Full access users
Can create folders
Use hashtags in content commenting, including photos or videos
Forums: ideas, questions and answers
Forums: discussions Yes, in group context
Yes, in group context
Wiki pages, blog posts, blog post @mentions, documents, photos, videos, polls, and links
Yes, in group context
Yes, in group context
Tagging people in photos
SAP Jam Collaboration Administrator Guide 1805Users P U B L I C 29
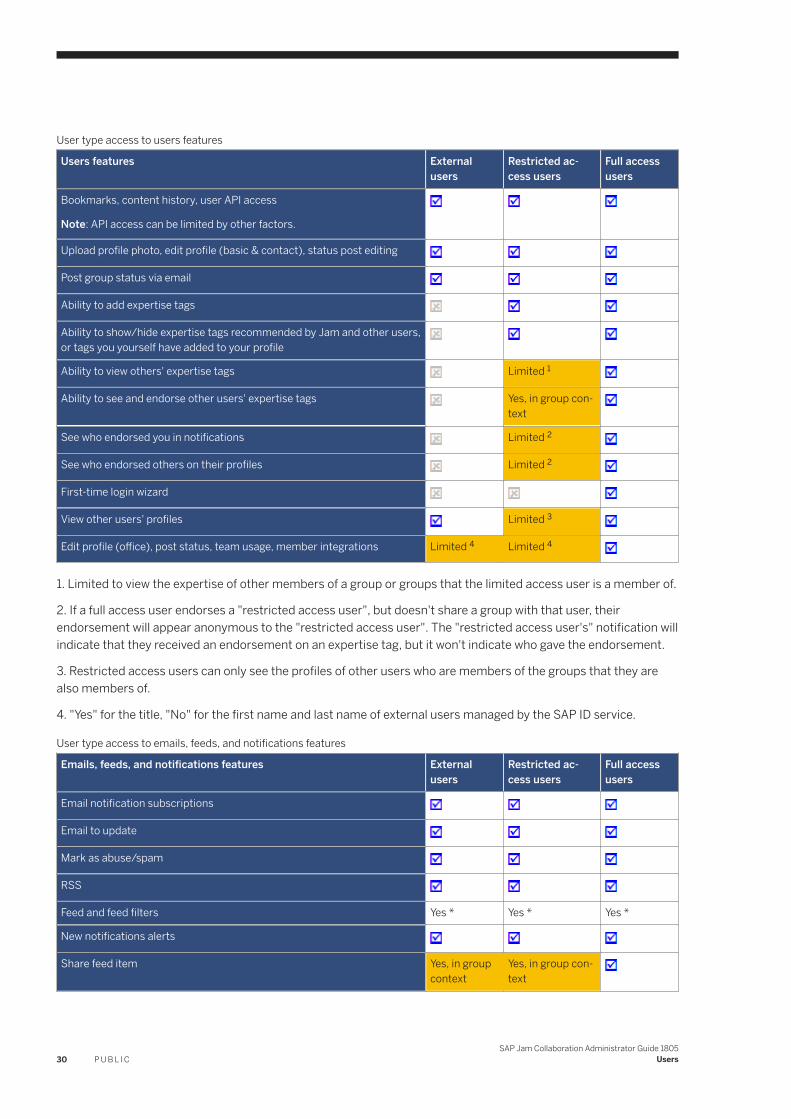
User type access to users features
Users features External users
Restricted access users
Full access users
Bookmarks, content history, user API access
Note: API access can be limited by other factors.
Upload profile photo, edit profile (basic & contact), status post editing
Post group status via email
Ability to add expertise tags
Ability to show/hide expertise tags recommended by Jam and other users, or tags you yourself have added to your profile
Ability to view others' expertise tags Limited 1
Ability to see and endorse other users' expertise tags Yes, in group context
See who endorsed you in notifications Limited 2
See who endorsed others on their profiles Limited 2
First-time login wizard
View other users' profiles Limited 3
Edit profile (office), post status, team usage, member integrations Limited 4 Limited 4
1. Limited to view the expertise of other members of a group or groups that the limited access user is a member of.
2. If a full access user endorses a "restricted access user", but doesn't share a group with that user, their endorsement will appear anonymous to the "restricted access user". The "restricted access user's" notification will indicate that they received an endorsement on an expertise tag, but it won't indicate who gave the endorsement.
3. Restricted access users can only see the profiles of other users who are members of the groups that they are also members of.
4. "Yes" for the title, "No" for the first name and last name of external users managed by the SAP ID service.
User type access to emails, feeds, and notifications features
Emails, feeds, and notifications features External users
Restricted access users
Full access users
Email notification subscriptions
Email to update
Mark as abuse/spam
RSS
Feed and feed filters Yes * Yes * Yes *
New notifications alerts
Share feed item Yes, in group context
Yes, in group context
30 P U B L I CSAP Jam Collaboration Administrator Guide 1805
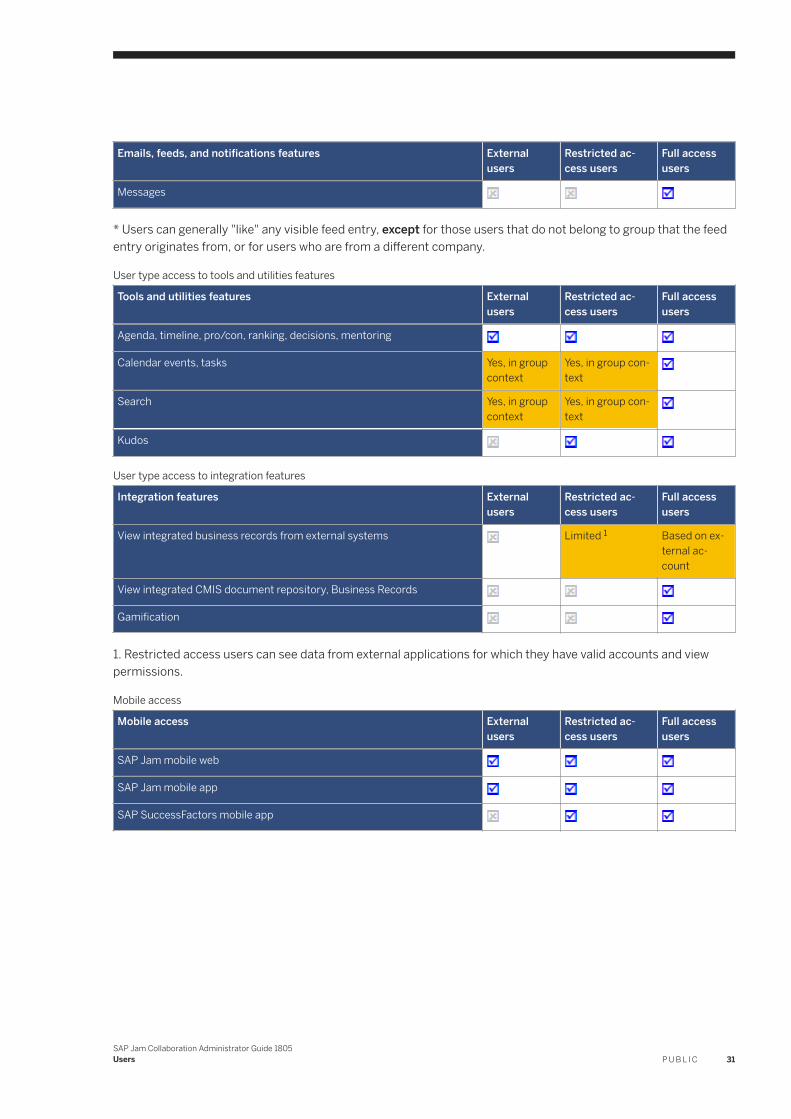
Users
Emails, feeds, and notifications features External users
Restricted access users
Full access users
Messages
* Users can generally "like" any visible feed entry, except for those users that do not belong to group that the feed entry originates from, or for users who are from a different company.
User type access to tools and utilities features
Tools and utilities features External users
Restricted access users
Full access users
Agenda, timeline, pro/con, ranking, decisions, mentoring
Calendar events, tasks Yes, in group context
Yes, in group context
Search Yes, in group context
Yes, in group context
Kudos
User type access to integration features
Integration features External users
Restricted access users
Full access users
View integrated business records from external systems Limited 1 Based on external account
View integrated CMIS document repository, Business Records
Gamification
1. Restricted access users can see data from external applications for which they have valid accounts and view permissions.
Mobile access
Mobile access External users
Restricted access users
Full access users
SAP Jam mobile web
SAP Jam mobile app
SAP SuccessFactors mobile app
SAP Jam Collaboration Administrator Guide 1805Users P U B L I C 31
2.2 Users and member lists
This section covers the various tasks that you can work with in the SAP Jam Collaboration Admin console User & Member Lists page.
You can do the following on the User & Member Lists page:
● On the Users tab, you can configure User privileges [page 32]:○ Grant administrator privileges to a user [page 32]○ Remove administrator privileges from a user [page 32]○ Disable a user account [page 33]
● On the Member Lists tab, you can Create and manage member lists [page 34]:○ Create a member list [page 34]○ Invite users to a group via a member list [page 36]
● On the Dynamic Member Lists tab, you can Create and manage dynamic member lists [page 37]:○ Create a dynamic member list [page 37]○ Invite users to a group via a member list [page 38]
2.2.1 User privileges
This section describes how you can grant administrator privileges to users, remove administrator status from users, and disable a user account.
Grant administrator privileges
To assign administrator privileges to a user
1. From the SAP Jam Admin console, select Users Users and Member Lists from the left side navigation.
2. From the Users tab, in the row for the user that you want to give administrator status to, click ActionEdit .
3. Under the Basic Profile Information section, from the Administrator Type drop-down menu, select Company Administrator or Support Administrator option, and then click Save changes.
Remove administrator privileges
To remove administrator privileges from a user
1. From the SAP Jam Admin console, select Users Users and Member Lists from the left side navigation.2. On the Users tab, go to the row for the user that you want to remove administrator privileges from, and click
Action Edit .
32 P U B L I CSAP Jam Collaboration Administrator Guide 1805
Users
3. Under the Basic Profile Information section, from the Administrator Type drop-down menu, select User from the Administrator Type drop-down menu, and then click Save changes.
Change an account to alumni
To disable a user account and set it to alumni status
1. From the SAP Jam Admin console, select Users Users and Member Lists from the left side navigation.
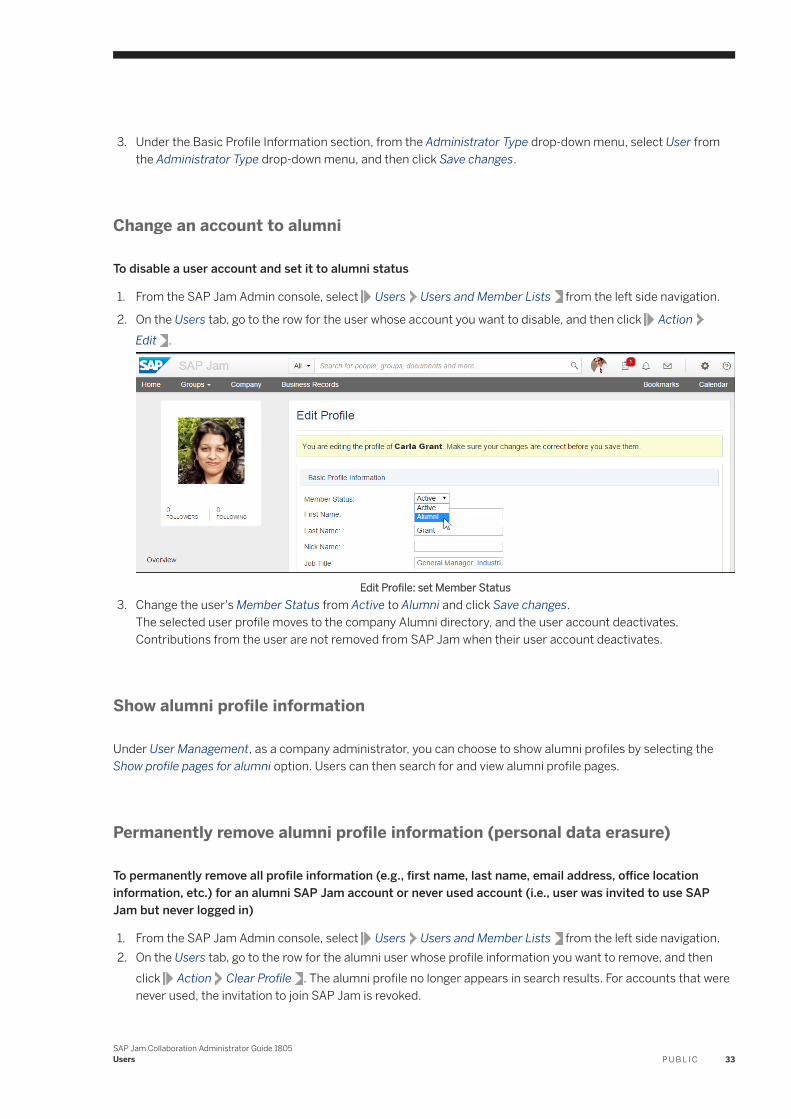
2. On the Users tab, go to the row for the user whose account you want to disable, and then click ActionEdit .
Edit Profile: set Member Status3. Change the user's Member Status from Active to Alumni and click Save changes.
The selected user profile moves to the company Alumni directory, and the user account deactivates.Contributions from the user are not removed from SAP Jam when their user account deactivates.
Show alumni profile information
Under User Management, as a company administrator, you can choose to show alumni profiles by selecting the Show profile pages for alumni option. Users can then search for and view alumni profile pages.
Permanently remove alumni profile information (personal data erasure)
To permanently remove all profile information (e.g., first name, last name, email address, office location information, etc.) for an alumni SAP Jam account or never used account (i.e., user was invited to use SAP Jam but never logged in)
1. From the SAP Jam Admin console, select Users Users and Member Lists from the left side navigation.2. On the Users tab, go to the row for the alumni user whose profile information you want to remove, and then
click Action Clear Profile . The alumni profile no longer appears in search results. For accounts that were never used, the invitation to join SAP Jam is revoked.
SAP Jam Collaboration Administrator Guide 1805Users P U B L I C 33
NoteAs a company administrator, you can delete the alumni user's content and feed items independently of the profile information.
2.2.1.1 Revoke application access
As a company administrator, when you need to remove application access from a user (e.g., due to off-boarding of an employee or contractor, reported lost or stolen device) you can revoke authorized applications from their user account.
To revoke application access
1. Go to the SAP Jam Admin Console Users and Member Lists Users tab .2. Click Edit on the user account.3. Click Revoke All Applications under the Authorized Applications section.
2.2.2 Create and manage member lists
Rather than invite individual users to a group, you can save time and use published member lists, a preset lists of users. In medium to large sized organizations, where you may not know all of the individuals in a department, geographical location, or who's working on a particular project, member lists allow you to invite lists of members created by others. Area administrators can also view, create, and edit member lists so that area members can use them for group invites. Member lists can be created by adding SAP Jam users individually, adding other existing member lists, pasting a list of comma-separated email addresses, or importing a CSV file of comma-separated email addresses.
Note● Groups that contain member lists cannot be moved to subgroups.● Groups members who were added via a list cannot choose to leave a group, however they can unfollow the
group feed as an alternative.● For the November 2016 release, auto groups begin conversion to regular groups. If they use profile-based
rules, then those rules apply to a corresponding dynamic member list.
On the Users and Member Lists page, you can create, edit, publish, or delete member lists.
Create a member list
To create a member list
1. Go to the SAP Jam Admin console and select Users Users and Member Lists from the left side navigation.
34 P U B L I CSAP Jam Collaboration Administrator Guide 1805
Users
2. Select the Member Lists tab and click Create New Member List.3. Click the auto-generated title (Untitled Member List) and enter a meaningful name for the member list.4. In the Add People to the Member List text box, create your member list by using one of the following methods:
○ Enter the user name into the Add People to the Member List text box. When you see the name in the drop-down auto-completion list, click their information to add them to the Pending Members table.
○ Paste a comma-separated list of email addresses into the Add People to the Member List text box, and press Enter to add all of the listed users to the Pending Members table.
○ Enter the name of another member list into the Add People to the Member List text box, and press Enter to add all of the listed users to the Pending Members table.
○ Click Import CSV to import a comma-separated list of email addresses for members. Then use your browser's upload feature to find and select the file on your hard drive. When the file is uploaded and processed, the listed users are added to the Pending Members table.
NoteIf you add an unknown email address, it's placed in the Errors tab. You can save a Member List that has errors, but you cannot publish it until you have edited and corrected the unrecognized email addresses.
5. To edit or remove users from your Member List, hover over a row of member information in any of the three listed members tabs (Pending Members, Published Members, or Errors)or click the Actions button to see the actions available for that member. The actions are either Remove (available in all three tabs) or Edit (only available in the Errors tab).
6. Select Private Member List if the list should only be accessed from the auto complete drop-down list by company administrators. If not selected, it remains a public member list that is available for anyone in the company to use. Private and public member lists are differentiated with an icon that precedes the name of the member list.
7. Click Publish if you are satisfied with the collection of members in the list, there are no errors, and you want to make the member list available for use.All users are moved into the Published Members tab.
8. Optionally, click Save to retain a list that you are not ready to make available for use.The Member Lists shown in the catalog displays one of the following Status and Availability combinations, which allows you to do any of the Actions in the drop-down list:○ Complete and Published: You can Edit or Delete the list.○ Complete and Unpublished: You can Edit, Publish Changes, Discard Changes, or Delete the list.○ Error and either Published or Unpublished: You can Edit, Discard Changes, or Delete the list.
9. On the Edit Member List page, you can:○ edit a member list (where you can add or remove people from the member list)○ publish a member list○ delete a member list○ discard changes.
Profile-based dynamic member lists
When profile changes occur that impacts a member list based on a particular profile rule (e.g., a specific job location serves as the membership rule, and a member no longer belongs to that location; someone new has joined the same job location), the updated member list includes or excludes members per the rule. Groups that
SAP Jam Collaboration Administrator Guide 1805Users P U B L I C 35
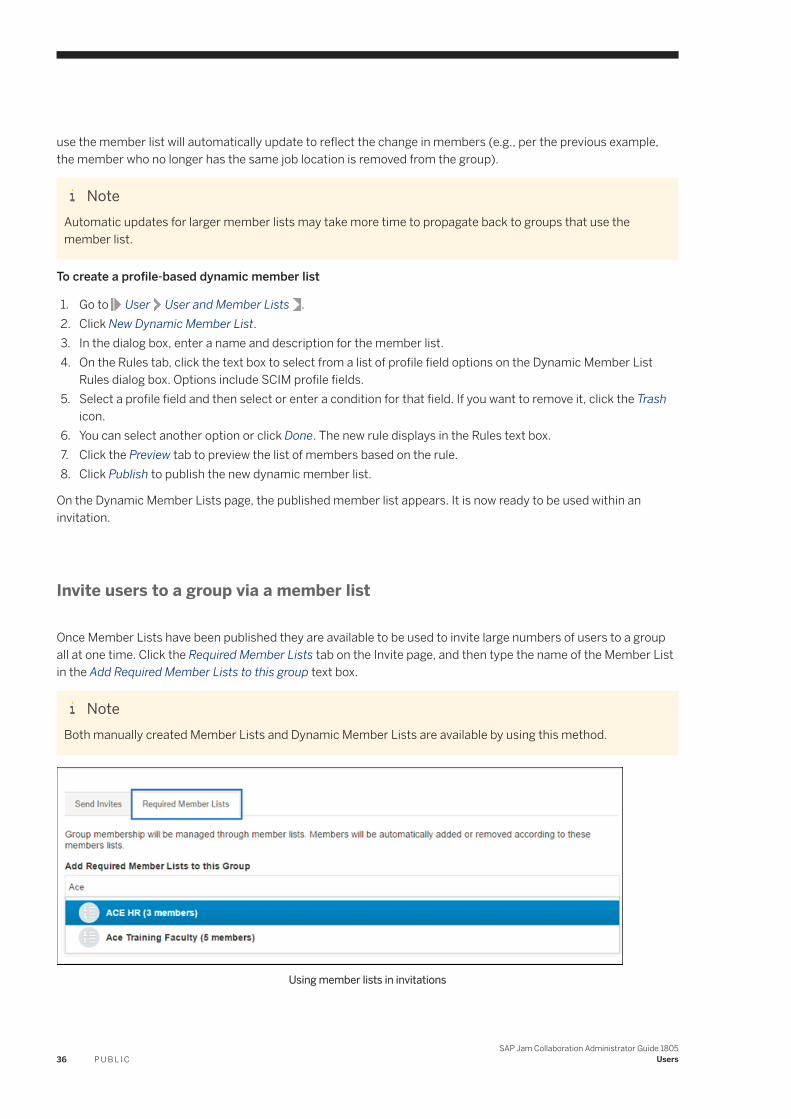
use the member list will automatically update to reflect the change in members (e.g., per the previous example, the member who no longer has the same job location is removed from the group).
NoteAutomatic updates for larger member lists may take more time to propagate back to groups that use the member list.
To create a profile-based dynamic member list
1. Go to User User and Member Lists .2. Click New Dynamic Member List.3. In the dialog box, enter a name and description for the member list.4. On the Rules tab, click the text box to select from a list of profile field options on the Dynamic Member List
Rules dialog box. Options include SCIM profile fields.5. Select a profile field and then select or enter a condition for that field. If you want to remove it, click the Trash
icon.6. You can select another option or click Done. The new rule displays in the Rules text box.7. Click the Preview tab to preview the list of members based on the rule.8. Click Publish to publish the new dynamic member list.
On the Dynamic Member Lists page, the published member list appears. It is now ready to be used within an invitation.
Invite users to a group via a member list
Once Member Lists have been published they are available to be used to invite large numbers of users to a group all at one time. Click the Required Member Lists tab on the Invite page, and then type the name of the Member List in the Add Required Member Lists to this group text box.
NoteBoth manually created Member Lists and Dynamic Member Lists are available by using this method.
Using member lists in invitations
36 P U B L I CSAP Jam Collaboration Administrator Guide 1805
Users
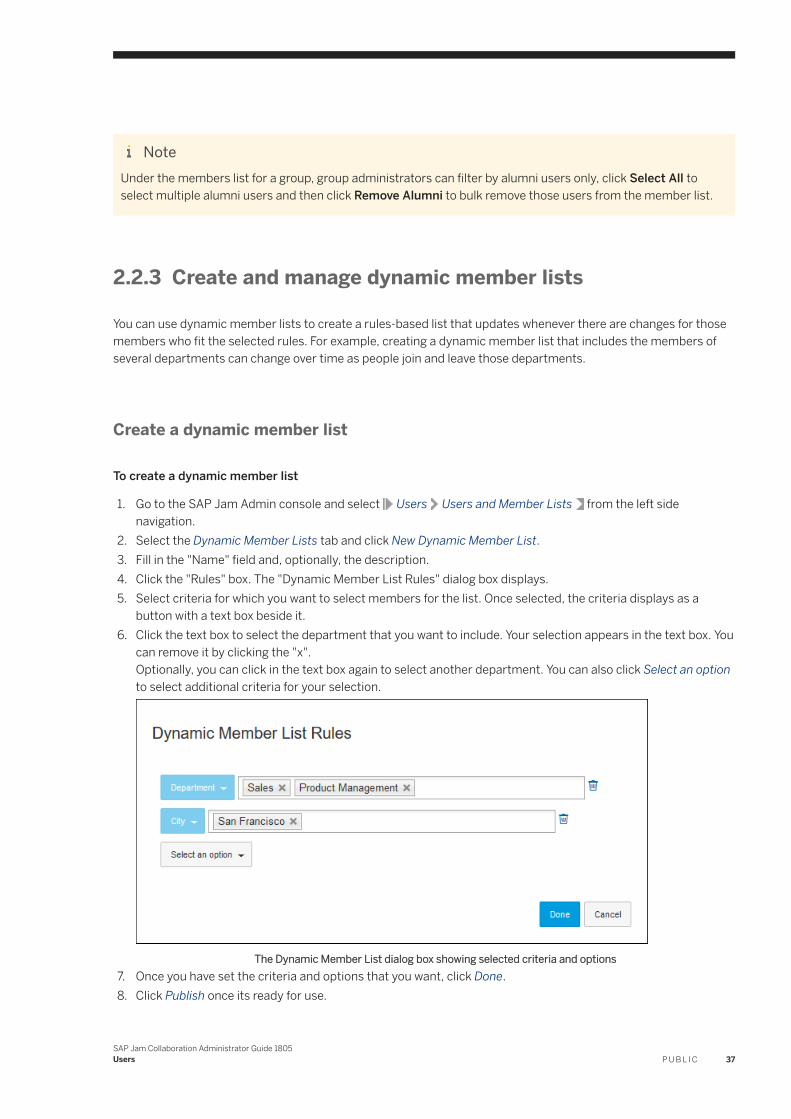
NoteUnder the members list for a group, group administrators can filter by alumni users only, click Select All to select multiple alumni users and then click Remove Alumni to bulk remove those users from the member list.
2.2.3 Create and manage dynamic member lists
You can use dynamic member lists to create a rules-based list that updates whenever there are changes for those members who fit the selected rules. For example, creating a dynamic member list that includes the members of several departments can change over time as people join and leave those departments.
Create a dynamic member list
To create a dynamic member list
1. Go to the SAP Jam Admin console and select Users Users and Member Lists from the left side navigation.
2. Select the Dynamic Member Lists tab and click New Dynamic Member List.3. Fill in the "Name" field and, optionally, the description.4. Click the "Rules" box. The "Dynamic Member List Rules" dialog box displays.5. Select criteria for which you want to select members for the list. Once selected, the criteria displays as a
button with a text box beside it.6. Click the text box to select the department that you want to include. Your selection appears in the text box. You
can remove it by clicking the "x".Optionally, you can click in the text box again to select another department. You can also click Select an option to select additional criteria for your selection.
The Dynamic Member List dialog box showing selected criteria and options7. Once you have set the criteria and options that you want, click Done.8. Click Publish once its ready for use.
SAP Jam Collaboration Administrator Guide 1805Users P U B L I C 37
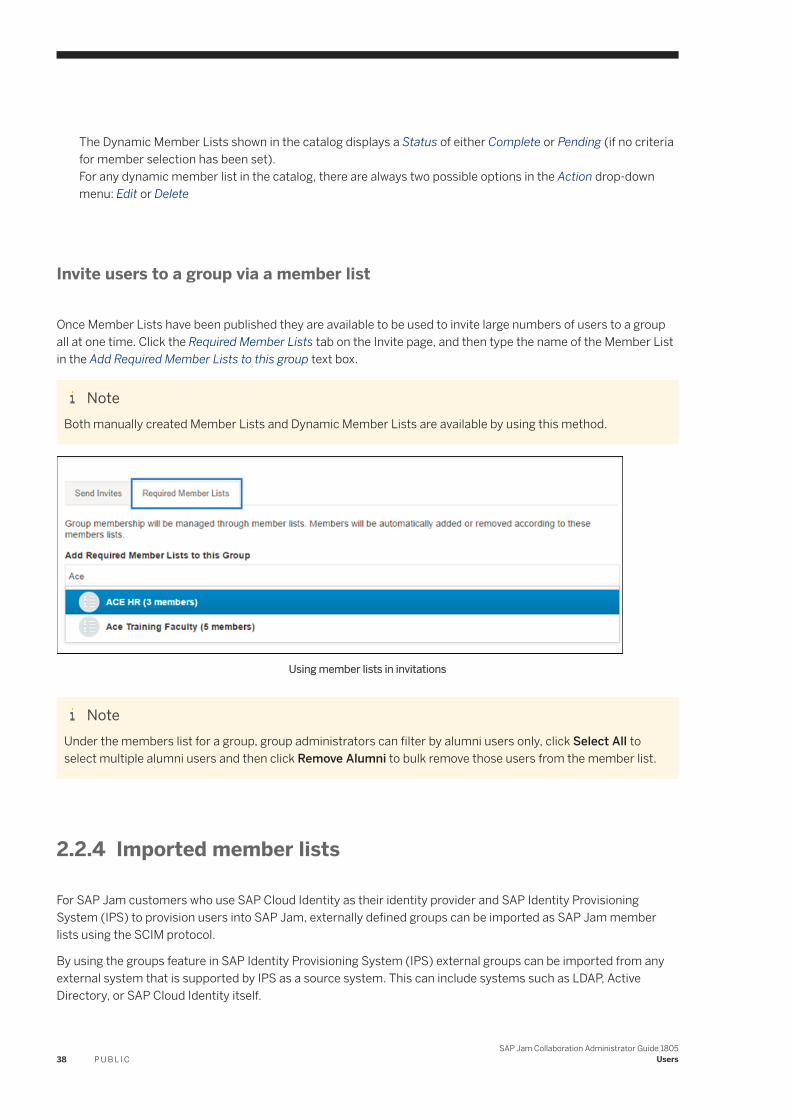
The Dynamic Member Lists shown in the catalog displays a Status of either Complete or Pending (if no criteria for member selection has been set).For any dynamic member list in the catalog, there are always two possible options in the Action drop-down menu: Edit or Delete
Invite users to a group via a member list
Once Member Lists have been published they are available to be used to invite large numbers of users to a group all at one time. Click the Required Member Lists tab on the Invite page, and then type the name of the Member List in the Add Required Member Lists to this group text box.
NoteBoth manually created Member Lists and Dynamic Member Lists are available by using this method.
Using member lists in invitations
NoteUnder the members list for a group, group administrators can filter by alumni users only, click Select All to select multiple alumni users and then click Remove Alumni to bulk remove those users from the member list.
2.2.4 Imported member lists
For SAP Jam customers who use SAP Cloud Identity as their identity provider and SAP Identity Provisioning System (IPS) to provision users into SAP Jam, externally defined groups can be imported as SAP Jam member lists using the SCIM protocol.
By using the groups feature in SAP Identity Provisioning System (IPS) external groups can be imported from any external system that is supported by IPS as a source system. This can include systems such as LDAP, Active Directory, or SAP Cloud Identity itself.
38 P U B L I CSAP Jam Collaboration Administrator Guide 1805
Users
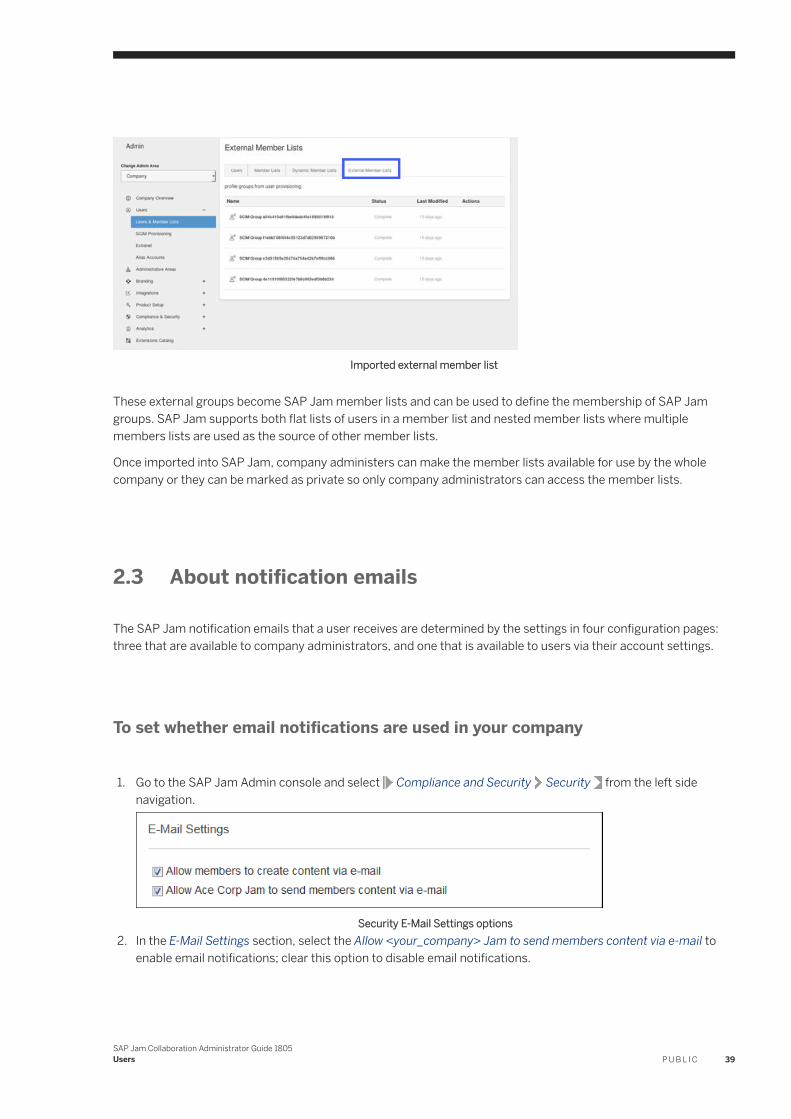
Imported external member list
These external groups become SAP Jam member lists and can be used to define the membership of SAP Jam groups. SAP Jam supports both flat lists of users in a member list and nested member lists where multiple members lists are used as the source of other member lists.
Once imported into SAP Jam, company administers can make the member lists available for use by the whole company or they can be marked as private so only company administrators can access the member lists.
2.3 About notification emails
The SAP Jam notification emails that a user receives are determined by the settings in four configuration pages: three that are available to company administrators, and one that is available to users via their account settings.
To set whether email notifications are used in your company
1. Go to the SAP Jam Admin console and select Compliance and Security Security from the left side navigation.
Security E-Mail Settings options2. In the E-Mail Settings section, select the Allow <your_company> Jam to send members content via e-mail to
enable email notifications; clear this option to disable email notifications.
SAP Jam Collaboration Administrator Guide 1805Users P U B L I C 39
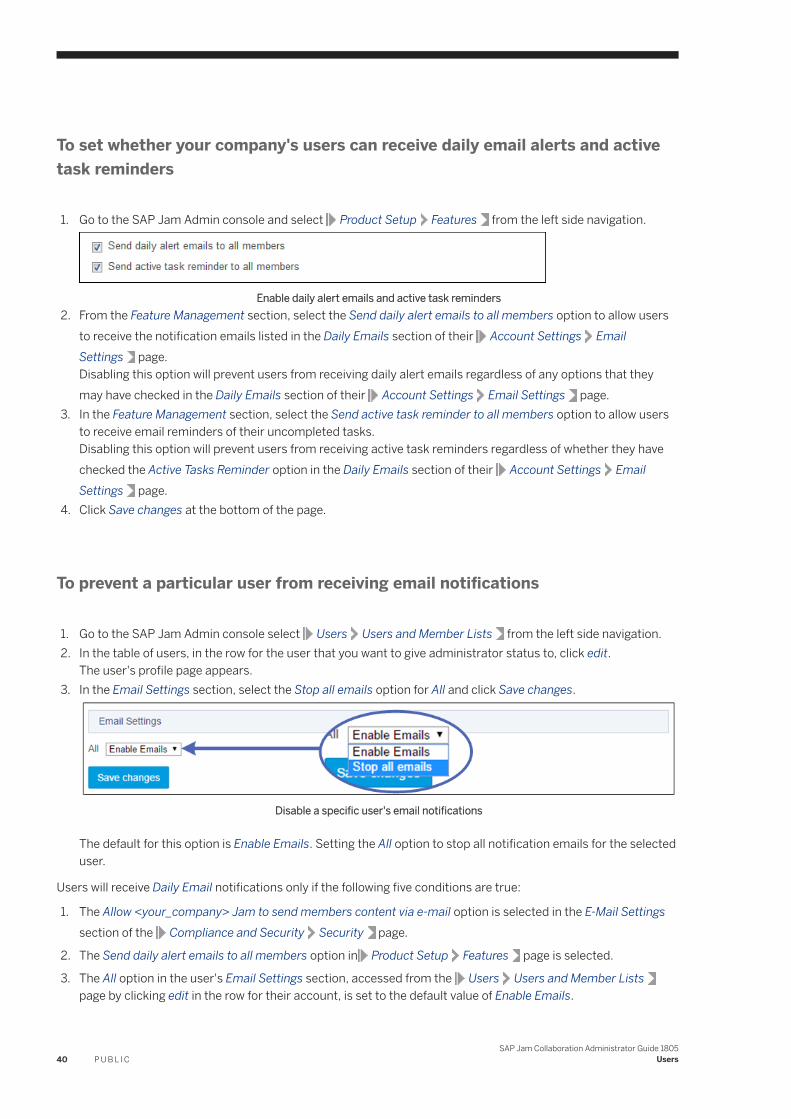
To set whether your company's users can receive daily email alerts and active task reminders
1. Go to the SAP Jam Admin console and select Product Setup Features from the left side navigation.
Enable daily alert emails and active task reminders2. From the Feature Management section, select the Send daily alert emails to all members option to allow users
to receive the notification emails listed in the Daily Emails section of their Account Settings Email Settings page.Disabling this option will prevent users from receiving daily alert emails regardless of any options that they may have checked in the Daily Emails section of their Account Settings Email Settings page.
3. In the Feature Management section, select the Send active task reminder to all members option to allow users to receive email reminders of their uncompleted tasks.Disabling this option will prevent users from receiving active task reminders regardless of whether they have checked the Active Tasks Reminder option in the Daily Emails section of their Account Settings Email Settings page.
4. Click Save changes at the bottom of the page.
To prevent a particular user from receiving email notifications
1. Go to the SAP Jam Admin console select Users Users and Member Lists from the left side navigation.2. In the table of users, in the row for the user that you want to give administrator status to, click edit.
The user's profile page appears.3. In the Email Settings section, select the Stop all emails option for All and click Save changes.
Disable a specific user's email notifications
The default for this option is Enable Emails. Setting the All option to stop all notification emails for the selected user.
Users will receive Daily Email notifications only if the following five conditions are true:
1. The Allow <your_company> Jam to send members content via e-mail option is selected in the E-Mail Settings section of the Compliance and Security Security page.
2. The Send daily alert emails to all members option in Product Setup Features page is selected.
3. The All option in the user's Email Settings section, accessed from the Users Users and Member Listspage by clicking edit in the row for their account, is set to the default value of Enable Emails.
40 P U B L I CSAP Jam Collaboration Administrator Guide 1805
Users
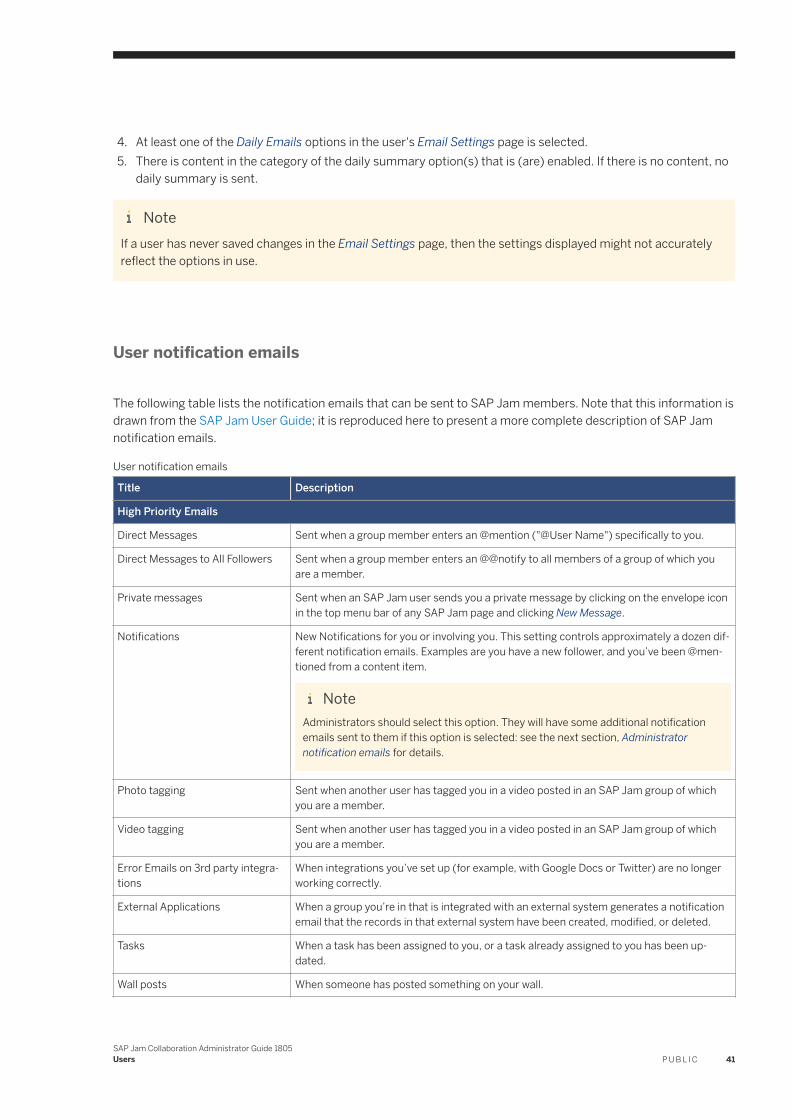
4. At least one of the Daily Emails options in the user's Email Settings page is selected.5. There is content in the category of the daily summary option(s) that is (are) enabled. If there is no content, no
daily summary is sent.
NoteIf a user has never saved changes in the Email Settings page, then the settings displayed might not accurately reflect the options in use.
User notification emails
The following table lists the notification emails that can be sent to SAP Jam members. Note that this information is drawn from the SAP Jam User Guide; it is reproduced here to present a more complete description of SAP Jam notification emails.
User notification emails
Title Description
High Priority Emails
Direct Messages Sent when a group member enters an @mention ("@User Name") specifically to you.
Direct Messages to All Followers Sent when a group member enters an @@notify to all members of a group of which you are a member.
Private messages Sent when an SAP Jam user sends you a private message by clicking on the envelope icon in the top menu bar of any SAP Jam page and clicking New Message.
Notifications New Notifications for you or involving you. This setting controls approximately a dozen different notification emails. Examples are you have a new follower, and you’ve been @mentioned from a content item.
NoteAdministrators should select this option. They will have some additional notification emails sent to them if this option is selected: see the next section, Administrator notification emails for details.
Photo tagging Sent when another user has tagged you in a video posted in an SAP Jam group of which you are a member.
Video tagging Sent when another user has tagged you in a video posted in an SAP Jam group of which you are a member.
Error Emails on 3rd party integrations
When integrations you’ve set up (for example, with Google Docs or Twitter) are no longer working correctly.
External Applications When a group you’re in that is integrated with an external system generates a notification email that the records in that external system have been created, modified, or deleted.
Tasks When a task has been assigned to you, or a task already assigned to you has been updated.
Wall posts When someone has posted something on your wall.
SAP Jam Collaboration Administrator Guide 1805Users P U B L I C 41
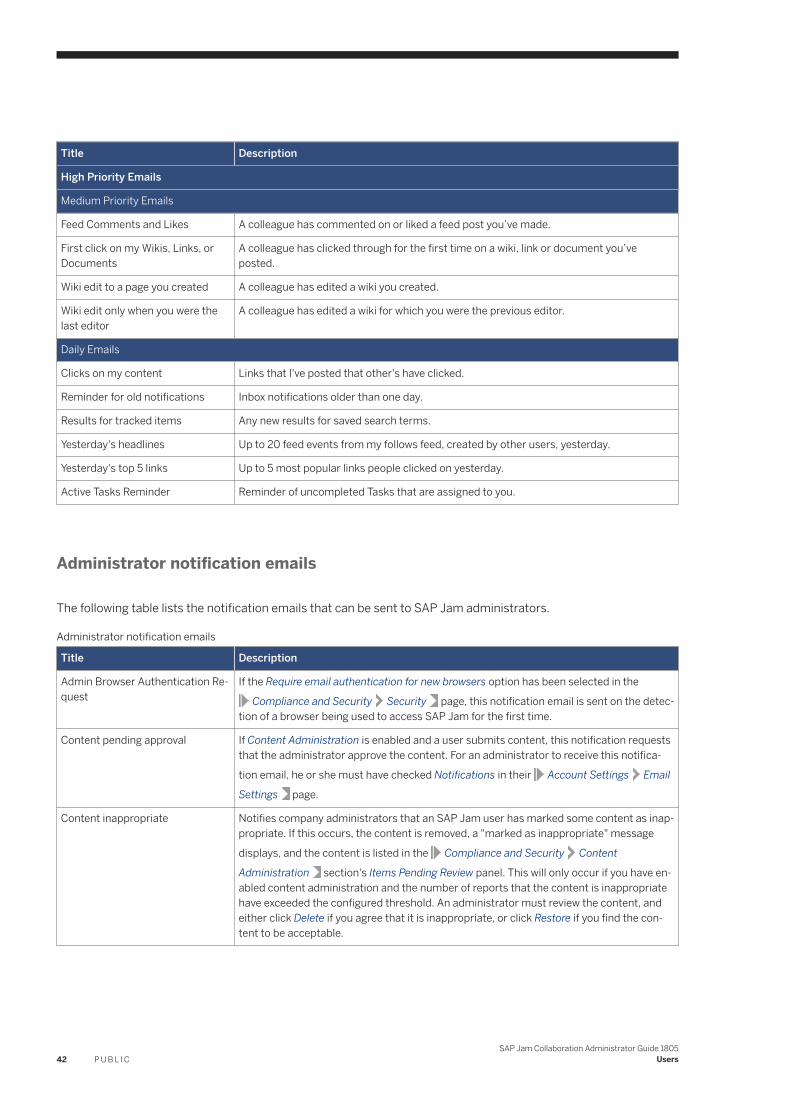
Title Description
High Priority Emails
Medium Priority Emails
Feed Comments and Likes A colleague has commented on or liked a feed post you’ve made.
First click on my Wikis, Links, or Documents
A colleague has clicked through for the first time on a wiki, link or document you’ve posted.
Wiki edit to a page you created A colleague has edited a wiki you created.
Wiki edit only when you were the last editor
A colleague has edited a wiki for which you were the previous editor.
Daily Emails
Clicks on my content Links that I've posted that other's have clicked.
Reminder for old notifications Inbox notifications older than one day.
Results for tracked items Any new results for saved search terms.
Yesterday's headlines Up to 20 feed events from my follows feed, created by other users, yesterday.
Yesterday's top 5 links Up to 5 most popular links people clicked on yesterday.
Active Tasks Reminder Reminder of uncompleted Tasks that are assigned to you.
Administrator notification emails
The following table lists the notification emails that can be sent to SAP Jam administrators.
Administrator notification emails
Title Description
Admin Browser Authentication Request
If the Require email authentication for new browsers option has been selected in the
Compliance and Security Security page, this notification email is sent on the detection of a browser being used to access SAP Jam for the first time.
Content pending approval If Content Administration is enabled and a user submits content, this notification requests that the administrator approve the content. For an administrator to receive this notifica-
tion email, he or she must have checked Notifications in their Account Settings Email
Settings page.
Content inappropriate Notifies company administrators that an SAP Jam user has marked some content as inappropriate. If this occurs, the content is removed, a "marked as inappropriate" message
displays, and the content is listed in the Compliance and Security Content
Administration section's Items Pending Review panel. This will only occur if you have enabled content administration and the number of reports that the content is inappropriate have exceeded the configured threshold. An administrator must review the content, and either click Delete if you agree that it is inappropriate, or click Restore if you find the content to be acceptable.
42 P U B L I CSAP Jam Collaboration Administrator Guide 1805
Users
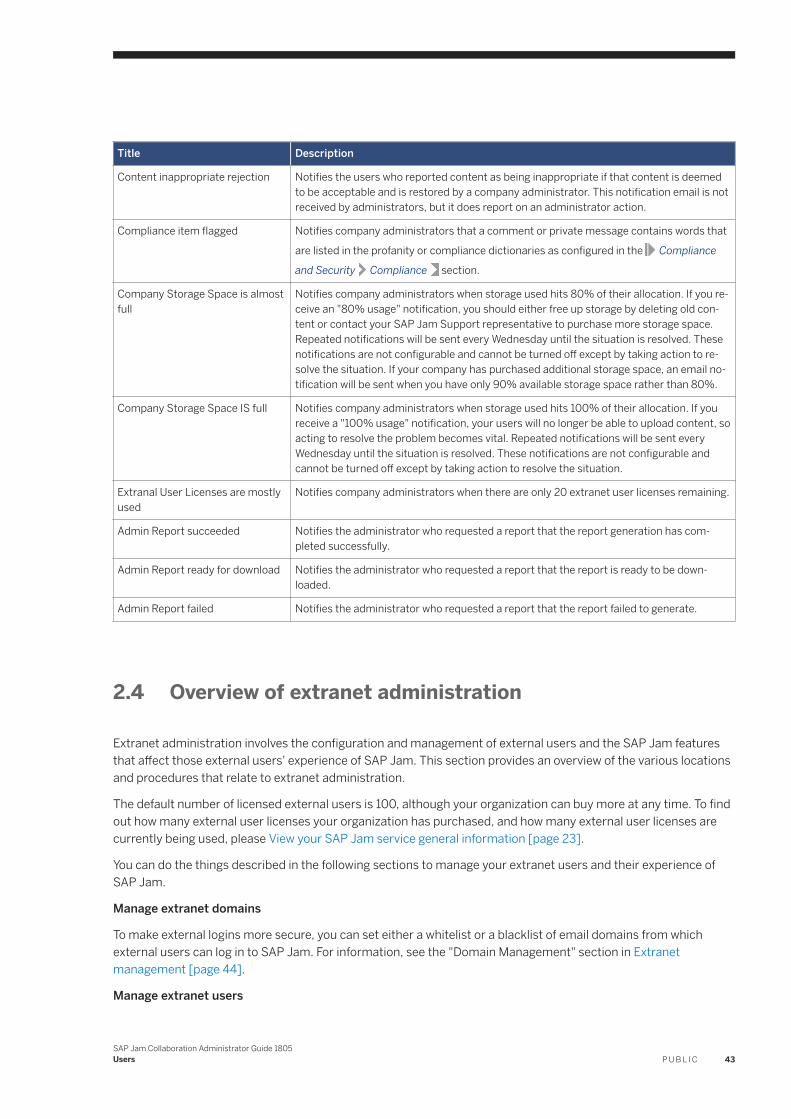
Title Description
Content inappropriate rejection Notifies the users who reported content as being inappropriate if that content is deemed to be acceptable and is restored by a company administrator. This notification email is not received by administrators, but it does report on an administrator action.
Compliance item flagged Notifies company administrators that a comment or private message contains words that
are listed in the profanity or compliance dictionaries as configured in the Compliance
and Security Compliance section.
Company Storage Space is almost full
Notifies company administrators when storage used hits 80% of their allocation. If you receive an "80% usage" notification, you should either free up storage by deleting old content or contact your SAP Jam Support representative to purchase more storage space. Repeated notifications will be sent every Wednesday until the situation is resolved. These notifications are not configurable and cannot be turned off except by taking action to resolve the situation. If your company has purchased additional storage space, an email notification will be sent when you have only 90% available storage space rather than 80%.
Company Storage Space IS full Notifies company administrators when storage used hits 100% of their allocation. If you receive a "100% usage" notification, your users will no longer be able to upload content, so acting to resolve the problem becomes vital. Repeated notifications will be sent every Wednesday until the situation is resolved. These notifications are not configurable and cannot be turned off except by taking action to resolve the situation.
Extranal User Licenses are mostly used
Notifies company administrators when there are only 20 extranet user licenses remaining.
Admin Report succeeded Notifies the administrator who requested a report that the report generation has completed successfully.
Admin Report ready for download Notifies the administrator who requested a report that the report is ready to be downloaded.
Admin Report failed Notifies the administrator who requested a report that the report failed to generate.
2.4 Overview of extranet administration
Extranet administration involves the configuration and management of external users and the SAP Jam features that affect those external users' experience of SAP Jam. This section provides an overview of the various locations and procedures that relate to extranet administration.
The default number of licensed external users is 100, although your organization can buy more at any time. To find out how many external user licenses your organization has purchased, and how many external user licenses are currently being used, please View your SAP Jam service general information [page 23].
You can do the things described in the following sections to manage your extranet users and their experience of SAP Jam.
Manage extranet domains
To make external logins more secure, you can set either a whitelist or a blacklist of email domains from which external users can log in to SAP Jam. For information, see the "Domain Management" section in Extranet management [page 44].
Manage extranet users
SAP Jam Collaboration Administrator Guide 1805Users P U B L I C 43

You can view a list of current and invited external users, see their status as external users, and Disable, Block, or Enable their access individually. For information, see the "Extranet users management" section of Extranet management [page 44].
Set the Extranet Log-On Introductory Text
When users are invited to External Groups, they receive a link to the Extranet log-in page. The login page, are presents external users with an introductory message. You can set the text of this message and the language or languages that it, or they, will be displayed in. For information, see step 6 in the procedure Configure the Branding and Support options [page 80].
Set the log-on background image and the help page for extranet users
You can set the background image shown in the login page for external users, and you can set whether they can view a custom help page. For information, see step 7 in the procedure Configure the Branding and Support options [page 80].
Set a customized Terms of Service agreement for your extranet users
You can set whether external users will be shown a "Terms of Service" agreement when they log in for the first time, and you can set the text of the terms of service agreement. For information, see the procedure Configure an Extranet Terms of Service [page 269].
Invite external users to an external group
To have external users access your organization's SAP Jam service, you can send them invitations to join one of your organization's external groups. For information on how to do this, see the procedure "Invite external participants to a group" in the "Users and groups" section of the SAP Jam Collaboration Group Administration Guide.
2.5 Extranet management
To make external logins more secure, you can set either a whitelist or a blacklist of the email domains from which external users can or cannot log in to your company's instance of SAP Jam.
Domain Management
To configure extranet settings
1. Go to the SAP Jam Admin console and select Users Extranet from the left navigation sidebar to view general information on your SAP Jam service.
2. In the Domain Management section, click the radio button for the type of list that you want to use.○ Select Use a blacklist if you want users from all email domains to be able to connect, except those that
you add to the text box. This is a less secure option, but it usually requires less work to maintain.○ Select Use a whitelist if you want users to be able to connect only if they have email addresses with
domains that match those that you add to the text box. This is a more secure option, but it requires that you make changes whenever your organization collaborates with different external companies or individuals.
44 P U B L I CSAP Jam Collaboration Administrator Guide 1805
Users
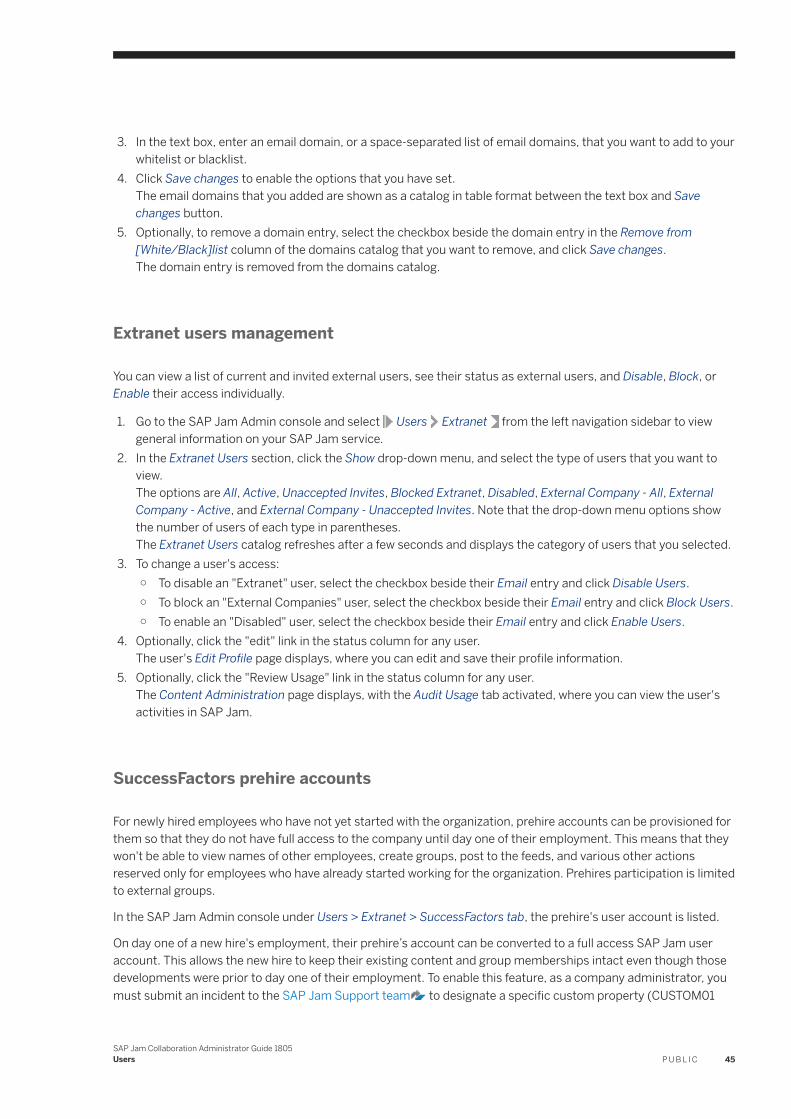
3. In the text box, enter an email domain, or a space-separated list of email domains, that you want to add to your whitelist or blacklist.
4. Click Save changes to enable the options that you have set.The email domains that you added are shown as a catalog in table format between the text box and Save changes button.
5. Optionally, to remove a domain entry, select the checkbox beside the domain entry in the Remove from [White/Black]list column of the domains catalog that you want to remove, and click Save changes.The domain entry is removed from the domains catalog.
Extranet users management
You can view a list of current and invited external users, see their status as external users, and Disable, Block, or Enable their access individually.
1. Go to the SAP Jam Admin console and select Users Extranet from the left navigation sidebar to view general information on your SAP Jam service.
2. In the Extranet Users section, click the Show drop-down menu, and select the type of users that you want to view.The options are All, Active, Unaccepted Invites, Blocked Extranet, Disabled, External Company - All, External Company - Active, and External Company - Unaccepted Invites. Note that the drop-down menu options show the number of users of each type in parentheses.The Extranet Users catalog refreshes after a few seconds and displays the category of users that you selected.
3. To change a user's access:○ To disable an "Extranet" user, select the checkbox beside their Email entry and click Disable Users.○ To block an "External Companies" user, select the checkbox beside their Email entry and click Block Users.○ To enable an "Disabled" user, select the checkbox beside their Email entry and click Enable Users.
4. Optionally, click the "edit" link in the status column for any user.The user's Edit Profile page displays, where you can edit and save their profile information.
5. Optionally, click the "Review Usage" link in the status column for any user.The Content Administration page displays, with the Audit Usage tab activated, where you can view the user's activities in SAP Jam.
SuccessFactors prehire accounts
For newly hired employees who have not yet started with the organization, prehire accounts can be provisioned for them so that they do not have full access to the company until day one of their employment. This means that they won't be able to view names of other employees, create groups, post to the feeds, and various other actions reserved only for employees who have already started working for the organization. Prehires participation is limited to external groups.
In the SAP Jam Admin console under Users > Extranet > SuccessFactors tab, the prehire's user account is listed.
On day one of a new hire's employment, their prehire’s account can be converted to a full access SAP Jam user account. This allows the new hire to keep their existing content and group memberships intact even though those developments were prior to day one of their employment. To enable this feature, as a company administrator, you must submit an incident to the SAP Jam Support team to designate a specific custom property (CUSTOM01
SAP Jam Collaboration Administrator Guide 1805Users P U B L I C 45
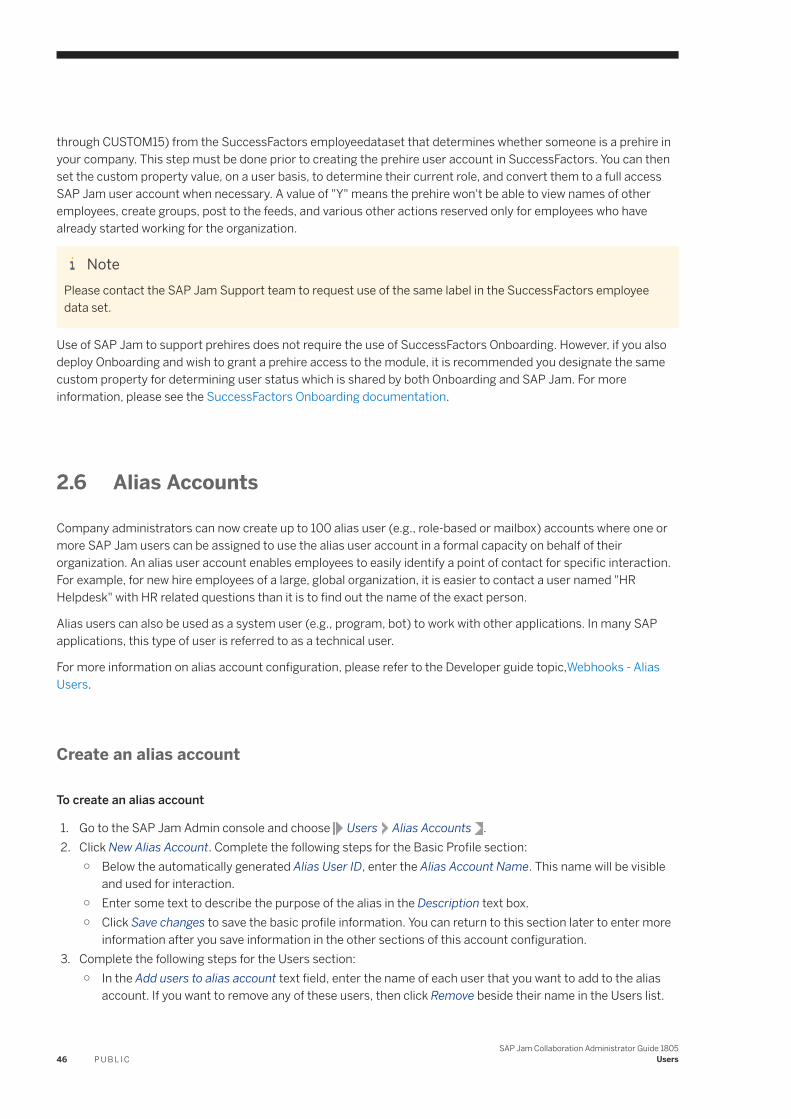
through CUSTOM15) from the SuccessFactors employeedataset that determines whether someone is a prehire in your company. This step must be done prior to creating the prehire user account in SuccessFactors. You can then set the custom property value, on a user basis, to determine their current role, and convert them to a full access SAP Jam user account when necessary. A value of "Y" means the prehire won't be able to view names of other employees, create groups, post to the feeds, and various other actions reserved only for employees who have already started working for the organization.
NotePlease contact the SAP Jam Support team to request use of the same label in the SuccessFactors employee data set.
Use of SAP Jam to support prehires does not require the use of SuccessFactors Onboarding. However, if you also deploy Onboarding and wish to grant a prehire access to the module, it is recommended you designate the same custom property for determining user status which is shared by both Onboarding and SAP Jam. For more information, please see the SuccessFactors Onboarding documentation.
2.6 Alias Accounts
Company administrators can now create up to 100 alias user (e.g., role-based or mailbox) accounts where one or more SAP Jam users can be assigned to use the alias user account in a formal capacity on behalf of their organization. An alias user account enables employees to easily identify a point of contact for specific interaction. For example, for new hire employees of a large, global organization, it is easier to contact a user named "HR Helpdesk" with HR related questions than it is to find out the name of the exact person.
Alias users can also be used as a system user (e.g., program, bot) to work with other applications. In many SAP applications, this type of user is referred to as a technical user.
For more information on alias account configuration, please refer to the Developer guide topic,Webhooks - Alias Users.
Create an alias account
To create an alias account
1. Go to the SAP Jam Admin console and choose Users Alias Accounts .2. Click New Alias Account. Complete the following steps for the Basic Profile section:
○ Below the automatically generated Alias User ID, enter the Alias Account Name. This name will be visible and used for interaction.
○ Enter some text to describe the purpose of the alias in the Description text box.○ Click Save changes to save the basic profile information. You can return to this section later to enter more
information after you save information in the other sections of this account configuration.3. Complete the following steps for the Users section:
○ In the Add users to alias account text field, enter the name of each user that you want to add to the alias account. If you want to remove any of these users, then click Remove beside their name in the Users list.
46 P U B L I CSAP Jam Collaboration Administrator Guide 1805
Users
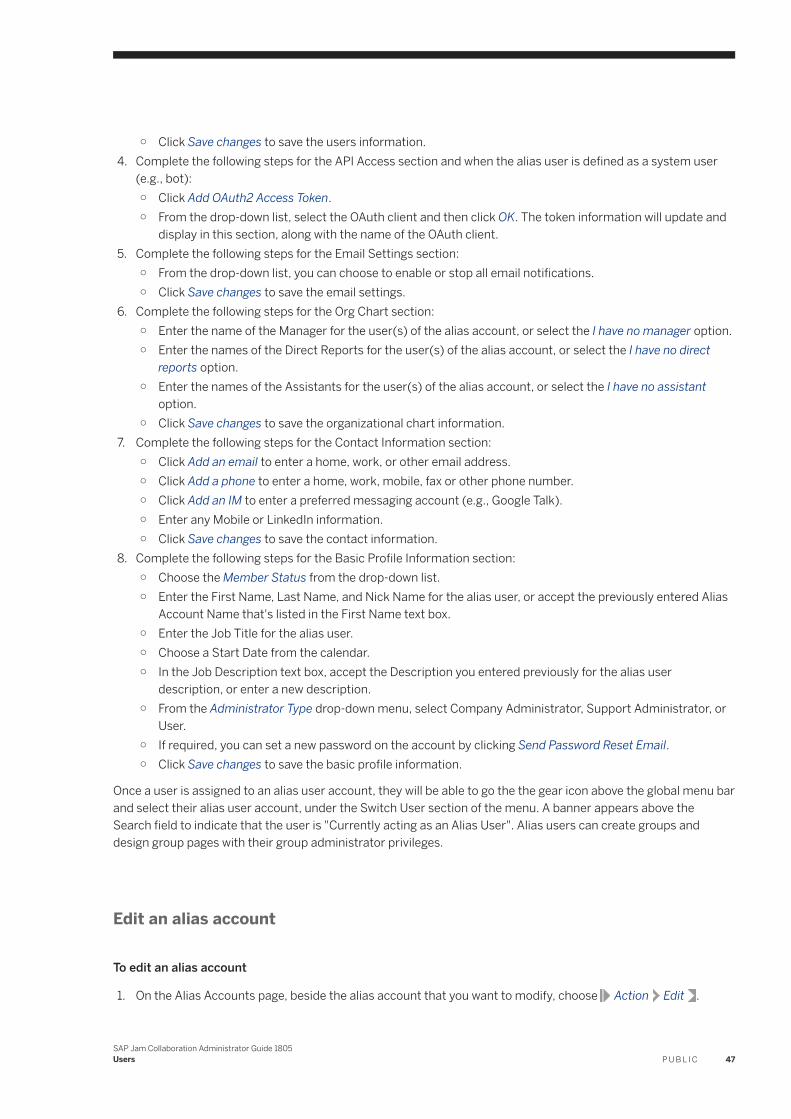
○ Click Save changes to save the users information.4. Complete the following steps for the API Access section and when the alias user is defined as a system user
(e.g., bot):○ Click Add OAuth2 Access Token.○ From the drop-down list, select the OAuth client and then click OK. The token information will update and
display in this section, along with the name of the OAuth client.5. Complete the following steps for the Email Settings section:
○ From the drop-down list, you can choose to enable or stop all email notifications.○ Click Save changes to save the email settings.
6. Complete the following steps for the Org Chart section:○ Enter the name of the Manager for the user(s) of the alias account, or select the I have no manager option.○ Enter the names of the Direct Reports for the user(s) of the alias account, or select the I have no direct
reports option.○ Enter the names of the Assistants for the user(s) of the alias account, or select the I have no assistant
option.○ Click Save changes to save the organizational chart information.
7. Complete the following steps for the Contact Information section:○ Click Add an email to enter a home, work, or other email address.○ Click Add a phone to enter a home, work, mobile, fax or other phone number.○ Click Add an IM to enter a preferred messaging account (e.g., Google Talk).○ Enter any Mobile or LinkedIn information.○ Click Save changes to save the contact information.
8. Complete the following steps for the Basic Profile Information section:○ Choose the Member Status from the drop-down list.○ Enter the First Name, Last Name, and Nick Name for the alias user, or accept the previously entered Alias
Account Name that's listed in the First Name text box.○ Enter the Job Title for the alias user.○ Choose a Start Date from the calendar.○ In the Job Description text box, accept the Description you entered previously for the alias user
description, or enter a new description.○ From the Administrator Type drop-down menu, select Company Administrator, Support Administrator, or
User.○ If required, you can set a new password on the account by clicking Send Password Reset Email.○ Click Save changes to save the basic profile information.
Once a user is assigned to an alias user account, they will be able to go the the gear icon above the global menu bar and select their alias user account, under the Switch User section of the menu. A banner appears above the Search field to indicate that the user is "Currently acting as an Alias User". Alias users can create groups and design group pages with their group administrator privileges.
Edit an alias account
To edit an alias account
1. On the Alias Accounts page, beside the alias account that you want to modify, choose Action Edit .
SAP Jam Collaboration Administrator Guide 1805Users P U B L I C 47
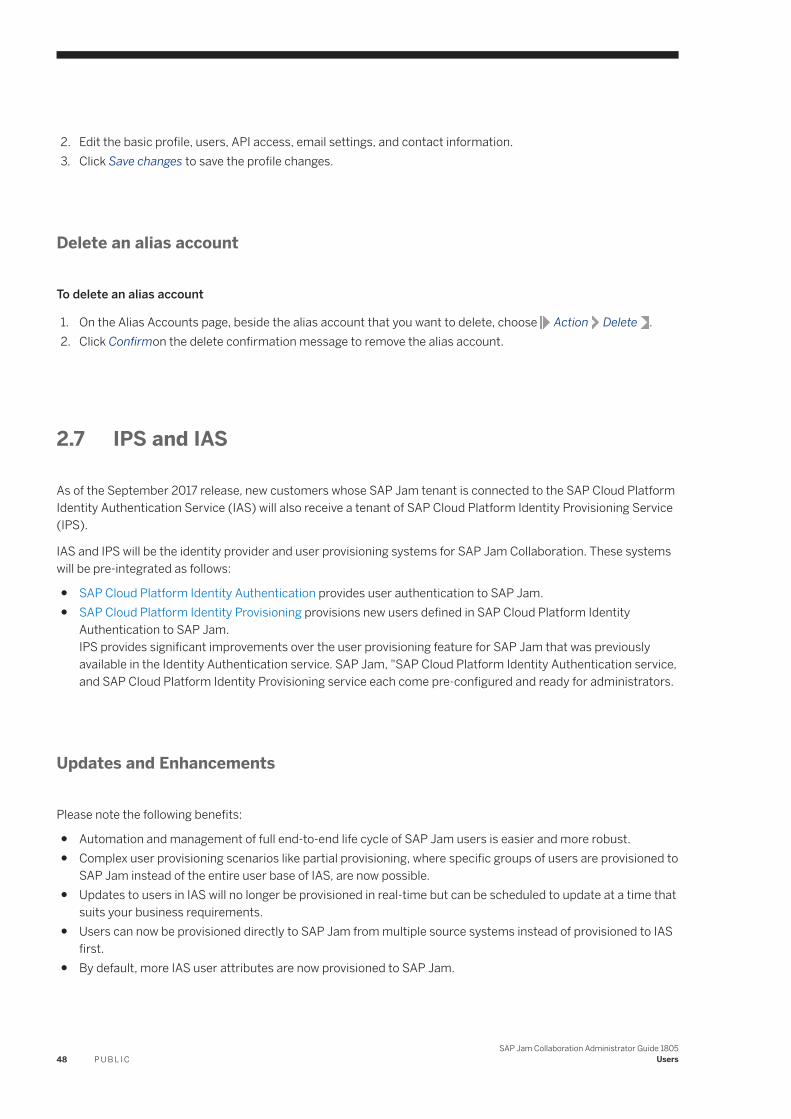
2. Edit the basic profile, users, API access, email settings, and contact information.3. Click Save changes to save the profile changes.
Delete an alias account
To delete an alias account
1. On the Alias Accounts page, beside the alias account that you want to delete, choose Action Delete .2. Click Confirmon the delete confirmation message to remove the alias account.
2.7 IPS and IAS
As of the September 2017 release, new customers whose SAP Jam tenant is connected to the SAP Cloud Platform Identity Authentication Service (IAS) will also receive a tenant of SAP Cloud Platform Identity Provisioning Service (IPS).
IAS and IPS will be the identity provider and user provisioning systems for SAP Jam Collaboration. These systems will be pre-integrated as follows:
● SAP Cloud Platform Identity Authentication provides user authentication to SAP Jam.● SAP Cloud Platform Identity Provisioning provisions new users defined in SAP Cloud Platform Identity
Authentication to SAP Jam.IPS provides significant improvements over the user provisioning feature for SAP Jam that was previously available in the Identity Authentication service. SAP Jam, "SAP Cloud Platform Identity Authentication service, and SAP Cloud Platform Identity Provisioning service each come pre-configured and ready for administrators.
Updates and Enhancements
Please note the following benefits:
● Automation and management of full end-to-end life cycle of SAP Jam users is easier and more robust.● Complex user provisioning scenarios like partial provisioning, where specific groups of users are provisioned to
SAP Jam instead of the entire user base of IAS, are now possible.● Updates to users in IAS will no longer be provisioned in real-time but can be scheduled to update at a time that
suits your business requirements.● Users can now be provisioned directly to SAP Jam from multiple source systems instead of provisioned to IAS
first.● By default, more IAS user attributes are now provisioned to SAP Jam.
48 P U B L I CSAP Jam Collaboration Administrator Guide 1805
Users
Access SAP Jam Collaboration system with IAS and IPS
To access SAP Jam Collaboration with IAS and IPS
1. After you receive an activation email for your SAP Cloud Platform Identity Authentication system, click the activation link in that email to activate your administration user for SAP Cloud Platform Identity Authentication. You must activate your SAP Cloud Platform Identity Authentication administrative user before you can access SAP Jam.
2. From the SAP Cloud Platform Identity Authentication console, launch and log on to SAP Jam Collaboration. This creates your first company administrator user in SAP Jam Collaboration.
3. Use the SAP Cloud Platform Identity Authentication and Identity Provisioning systems to provision and manage your users for SAP Jam Collaboration. You will receive an e-mail with a link to your Identity Provisioning tenant. When you activate the IPS service (from the cockpit), you become the main administrator of the service. By default, IPS is configured to provision all users in IAS and provision them to SAP Jam. This can be modified by visiting IPS to adjust the frequency and groups of users that are provisioned to SAP Jam.
IPS Default Configuration
IPS configurations consist of Source and Target systems and Transformations. In the default scenario pre-packaged with SAP Jam, the source system will be configured as SAP Cloud Platform Identity Authentication, and the destination system will be configured as SAP Jam. The SAP Jam target system will have a transformation associated with it. This maps the SCIM attributes in IAS to specific SCIM attributes in SAP Jam.
Typically, no further changes to the transformations are required by you, the administrator. A job is scheduled to run every 15 minutes to move users and user attribute changes from IAS to SAP Jam. For more information on the target system set up, please see the SAP Jam (target) topic in the SAP Cloud Platform Identity Provisioning Service document.
With this default scenario, every new user in IAS will be provisioned to SAP Jam.
Administrator Action Items
Administrators should configure how new users will be added to IAS so they can eventually be provisioned to SAP Jam.
NoteIt is possible to change the source system to something other than IAS. If changed, please be aware that SAP Jam still uses IAS for authentication. Users must still be able to login to IAS to access SAP Jam even if the source user system is not IAS.
Administrator permissions for SAP Jam
To provide additional users administration rights, go to the SAP Jam Admin console, and choose UsersUsers and Member Lists .
Administration permissions for IPS
SAP Jam Collaboration Administrator Guide 1805Users P U B L I C 49
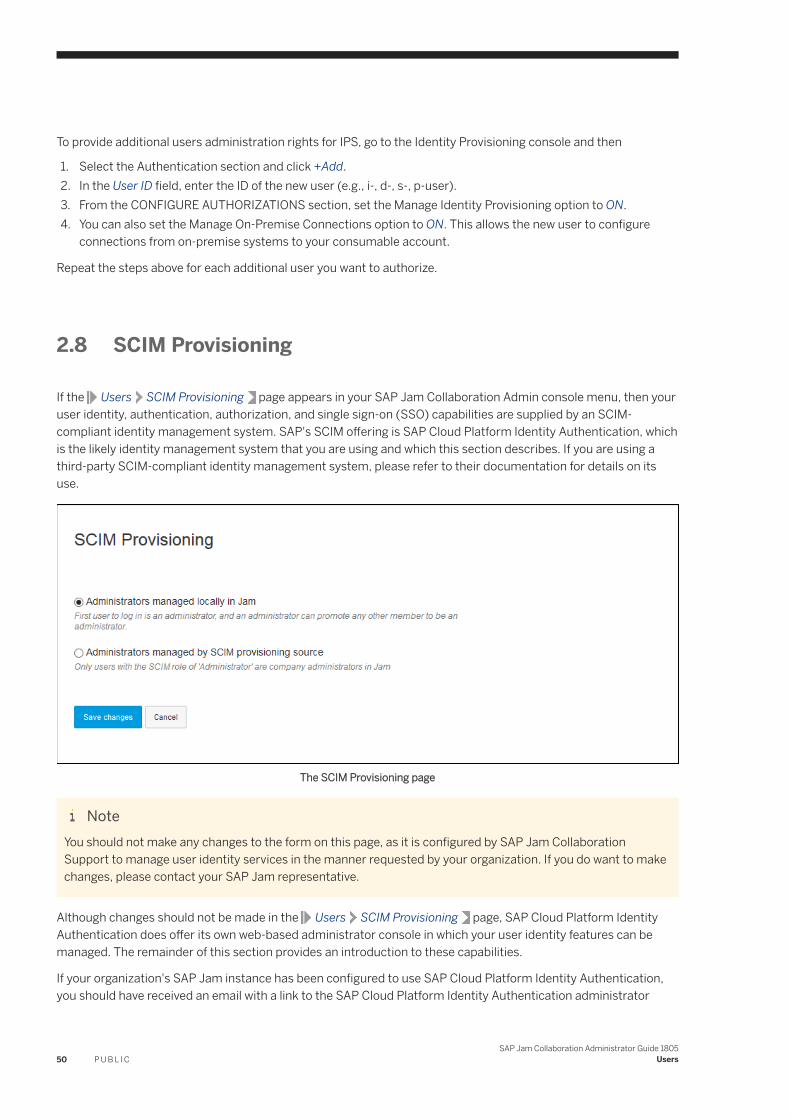
To provide additional users administration rights for IPS, go to the Identity Provisioning console and then
1. Select the Authentication section and click +Add.2. In the User ID field, enter the ID of the new user (e.g., i-, d-, s-, p-user).3. From the CONFIGURE AUTHORIZATIONS section, set the Manage Identity Provisioning option to ON.4. You can also set the Manage On-Premise Connections option to ON. This allows the new user to configure
connections from on-premise systems to your consumable account.
Repeat the steps above for each additional user you want to authorize.
2.8 SCIM Provisioning
If the Users SCIM Provisioning page appears in your SAP Jam Collaboration Admin console menu, then your user identity, authentication, authorization, and single sign-on (SSO) capabilities are supplied by an SCIM-compliant identity management system. SAP's SCIM offering is SAP Cloud Platform Identity Authentication, which is the likely identity management system that you are using and which this section describes. If you are using a third-party SCIM-compliant identity management system, please refer to their documentation for details on its use.
The SCIM Provisioning page
NoteYou should not make any changes to the form on this page, as it is configured by SAP Jam Collaboration Support to manage user identity services in the manner requested by your organization. If you do want to make changes, please contact your SAP Jam representative.
Although changes should not be made in the Users SCIM Provisioning page, SAP Cloud Platform Identity Authentication does offer its own web-based administrator console in which your user identity features can be managed. The remainder of this section provides an introduction to these capabilities.
If your organization's SAP Jam instance has been configured to use SAP Cloud Platform Identity Authentication, you should have received an email with a link to the SAP Cloud Platform Identity Authentication administrator
50 P U B L I CSAP Jam Collaboration Administrator Guide 1805
Users
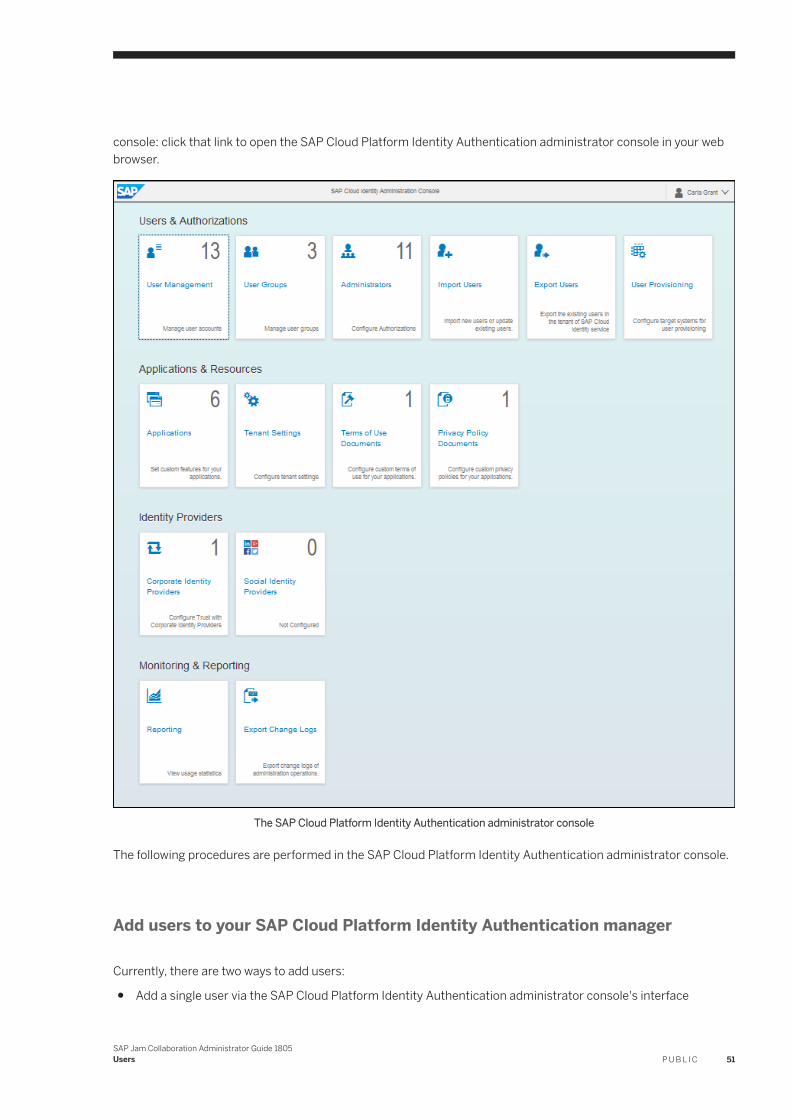
console: click that link to open the SAP Cloud Platform Identity Authentication administrator console in your web browser.
The SAP Cloud Platform Identity Authentication administrator console
The following procedures are performed in the SAP Cloud Platform Identity Authentication administrator console.
Add users to your SAP Cloud Platform Identity Authentication manager
Currently, there are two ways to add users:
● Add a single user via the SAP Cloud Platform Identity Authentication administrator console's interface
SAP Jam Collaboration Administrator Guide 1805Users P U B L I C 51
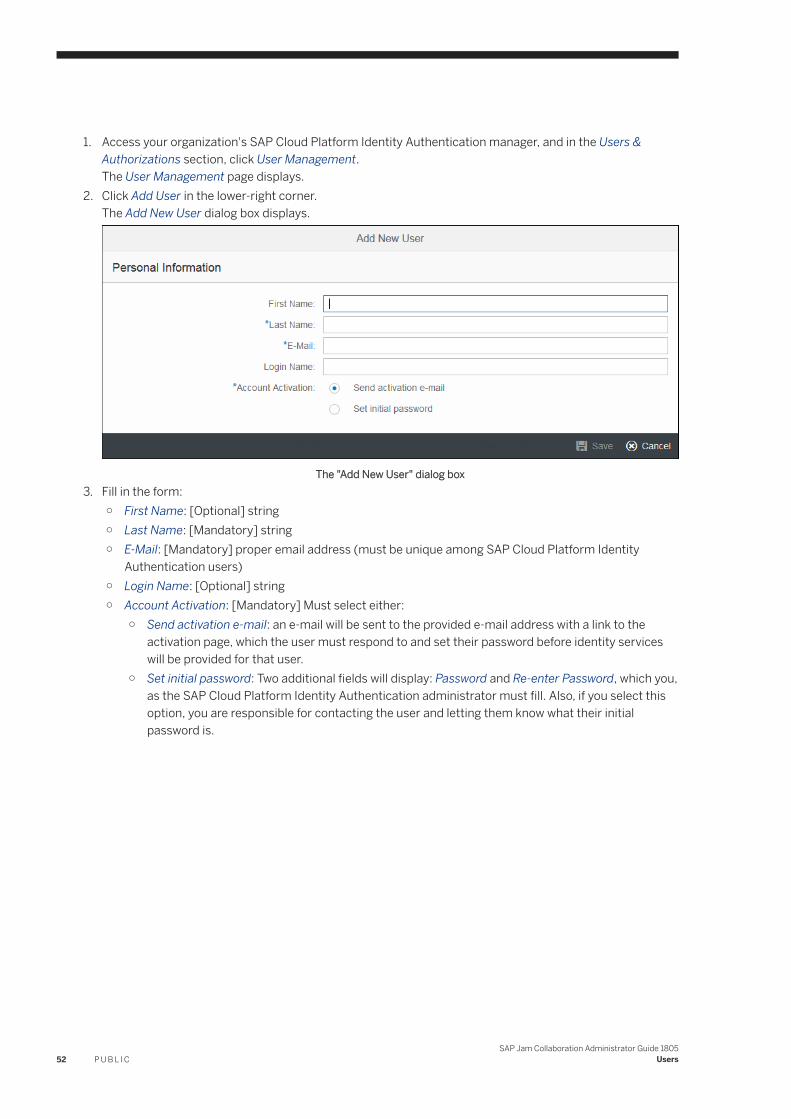
1. Access your organization's SAP Cloud Platform Identity Authentication manager, and in the Users & Authorizations section, click User Management.The User Management page displays.
2. Click Add User in the lower-right corner.The Add New User dialog box displays.
The "Add New User" dialog box3. Fill in the form:
○ First Name: [Optional] string○ Last Name: [Mandatory] string○ E-Mail: [Mandatory] proper email address (must be unique among SAP Cloud Platform Identity
Authentication users)○ Login Name: [Optional] string○ Account Activation: [Mandatory] Must select either:
○ Send activation e-mail: an e-mail will be sent to the provided e-mail address with a link to the activation page, which the user must respond to and set their password before identity services will be provided for that user.
○ Set initial password: Two additional fields will display: Password and Re-enter Password, which you, as the SAP Cloud Platform Identity Authentication administrator must fill. Also, if you select this option, you are responsible for contacting the user and letting them know what their initial password is.
52 P U B L I CSAP Jam Collaboration Administrator Guide 1805
Users
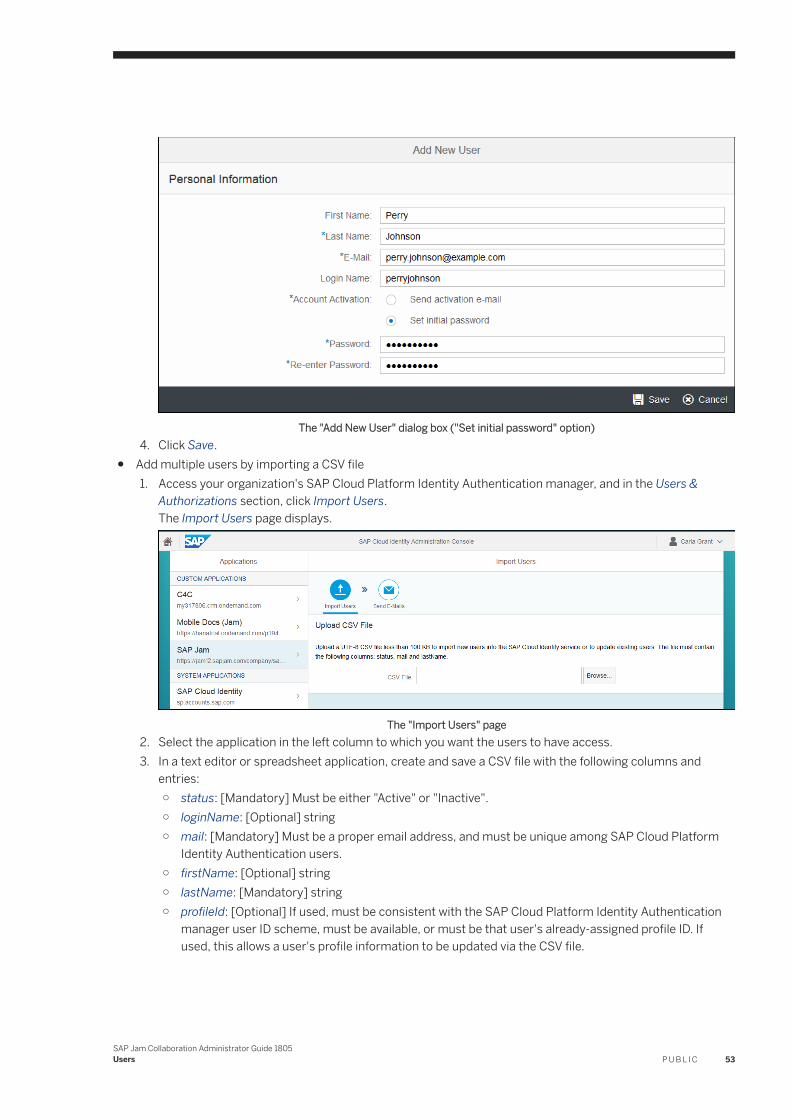
The "Add New User" dialog box ("Set initial password" option)4. Click Save.
● Add multiple users by importing a CSV file1. Access your organization's SAP Cloud Platform Identity Authentication manager, and in the Users &
Authorizations section, click Import Users.The Import Users page displays.
The "Import Users" page2. Select the application in the left column to which you want the users to have access.3. In a text editor or spreadsheet application, create and save a CSV file with the following columns and
entries:○ status: [Mandatory] Must be either "Active" or "Inactive".○ loginName: [Optional] string○ mail: [Mandatory] Must be a proper email address, and must be unique among SAP Cloud Platform
Identity Authentication users.○ firstName: [Optional] string○ lastName: [Mandatory] string○ profileId: [Optional] If used, must be consistent with the SAP Cloud Platform Identity Authentication
manager user ID scheme, must be available, or must be that user's already-assigned profile ID. If used, this allows a user's profile information to be updated via the CSV file.
SAP Jam Collaboration Administrator Guide 1805Users P U B L I C 53
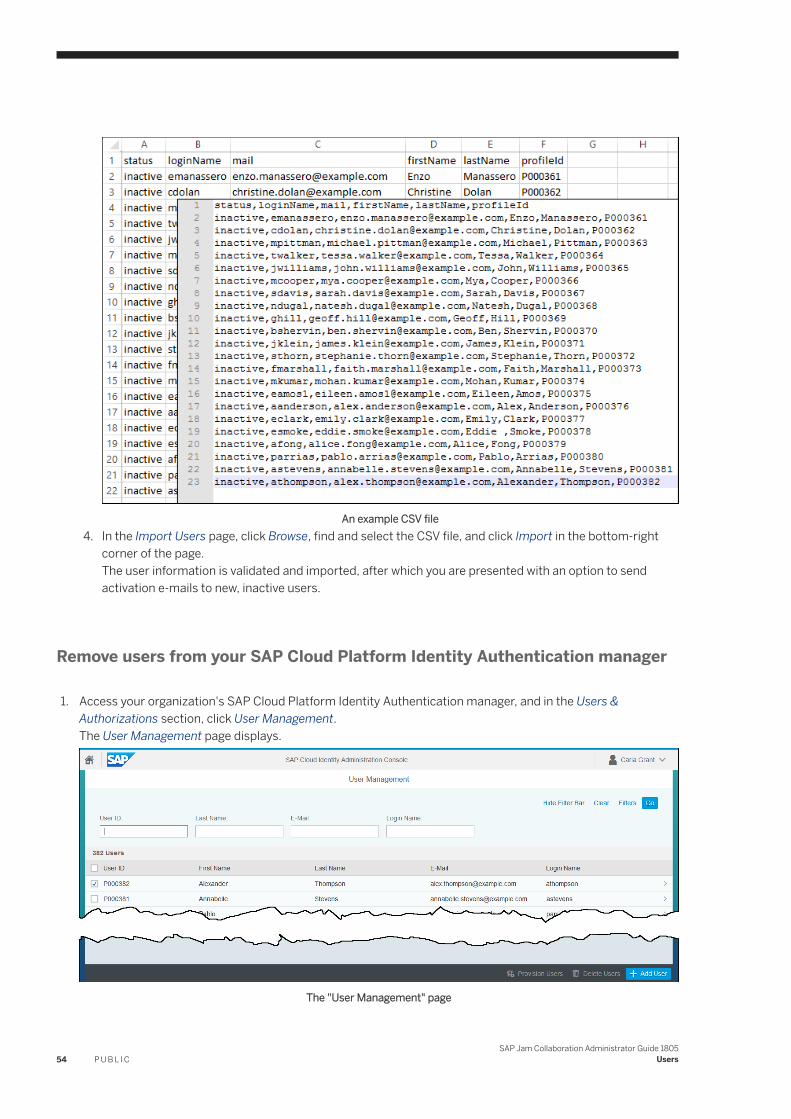
An example CSV file4. In the Import Users page, click Browse, find and select the CSV file, and click Import in the bottom-right
corner of the page.The user information is validated and imported, after which you are presented with an option to send activation e-mails to new, inactive users.
Remove users from your SAP Cloud Platform Identity Authentication manager
1. Access your organization's SAP Cloud Platform Identity Authentication manager, and in the Users & Authorizations section, click User Management.The User Management page displays.
The "User Management" page
54 P U B L I CSAP Jam Collaboration Administrator Guide 1805
Users
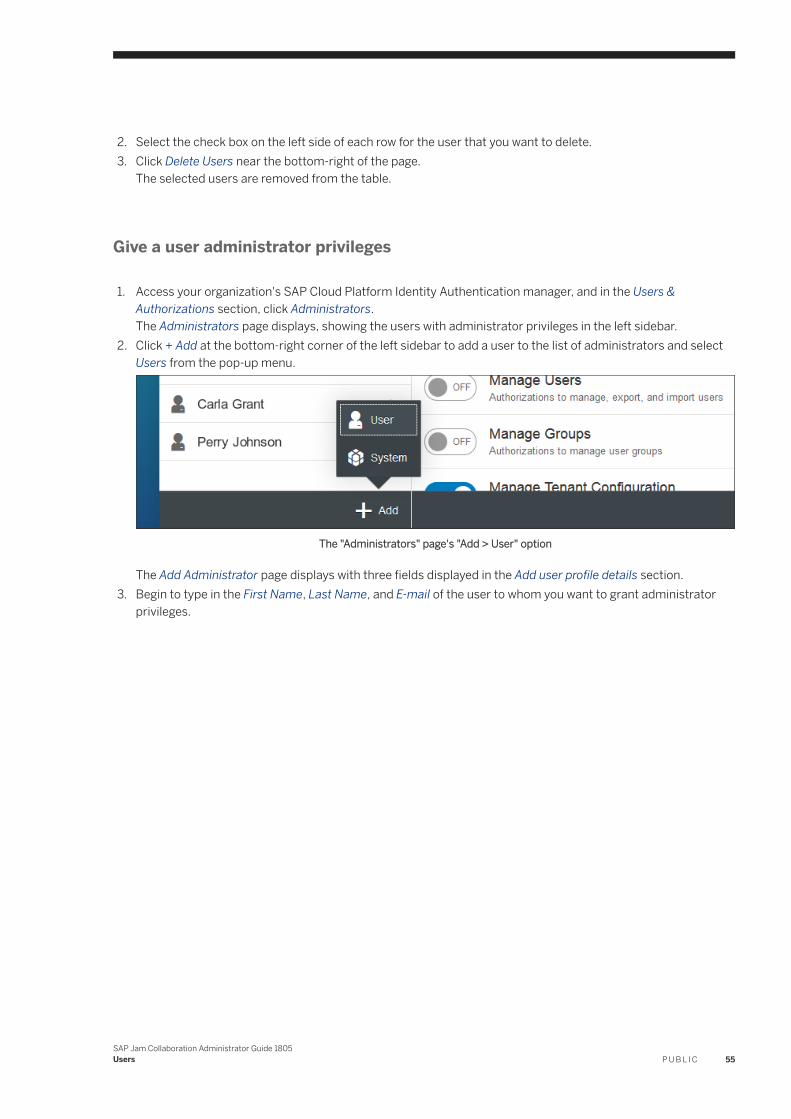
2. Select the check box on the left side of each row for the user that you want to delete.3. Click Delete Users near the bottom-right of the page.
The selected users are removed from the table.
Give a user administrator privileges
1. Access your organization's SAP Cloud Platform Identity Authentication manager, and in the Users & Authorizations section, click Administrators.The Administrators page displays, showing the users with administrator privileges in the left sidebar.
2. Click + Add at the bottom-right corner of the left sidebar to add a user to the list of administrators and select Users from the pop-up menu.
The "Administrators" page's "Add > User" option
The Add Administrator page displays with three fields displayed in the Add user profile details section.3. Begin to type in the First Name, Last Name, and E-mail of the user to whom you want to grant administrator
privileges.
SAP Jam Collaboration Administrator Guide 1805Users P U B L I C 55
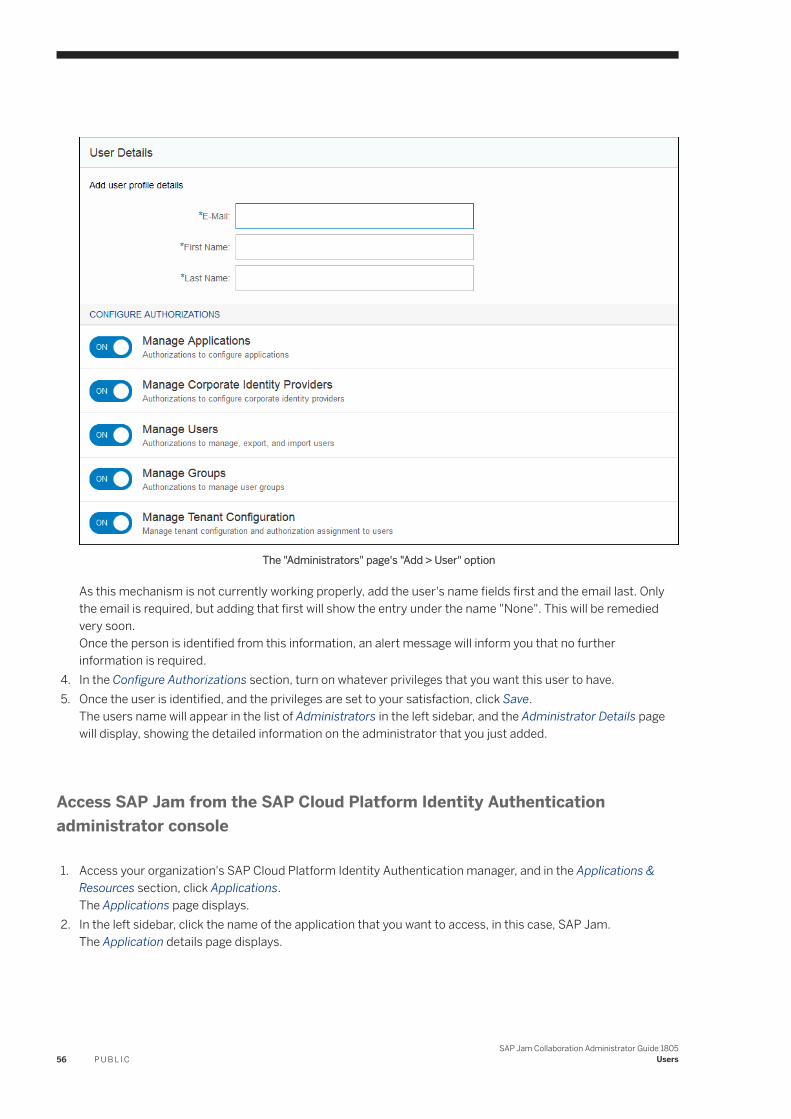
The "Administrators" page's "Add > User" option
As this mechanism is not currently working properly, add the user's name fields first and the email last. Only the email is required, but adding that first will show the entry under the name "None". This will be remedied very soon.Once the person is identified from this information, an alert message will inform you that no further information is required.
4. In the Configure Authorizations section, turn on whatever privileges that you want this user to have.5. Once the user is identified, and the privileges are set to your satisfaction, click Save.
The users name will appear in the list of Administrators in the left sidebar, and the Administrator Details page will display, showing the detailed information on the administrator that you just added.
Access SAP Jam from the SAP Cloud Platform Identity Authentication administrator console
1. Access your organization's SAP Cloud Platform Identity Authentication manager, and in the Applications & Resources section, click Applications.The Applications page displays.
2. In the left sidebar, click the name of the application that you want to access, in this case, SAP Jam.The Application details page displays.
56 P U B L I CSAP Jam Collaboration Administrator Guide 1805
Users
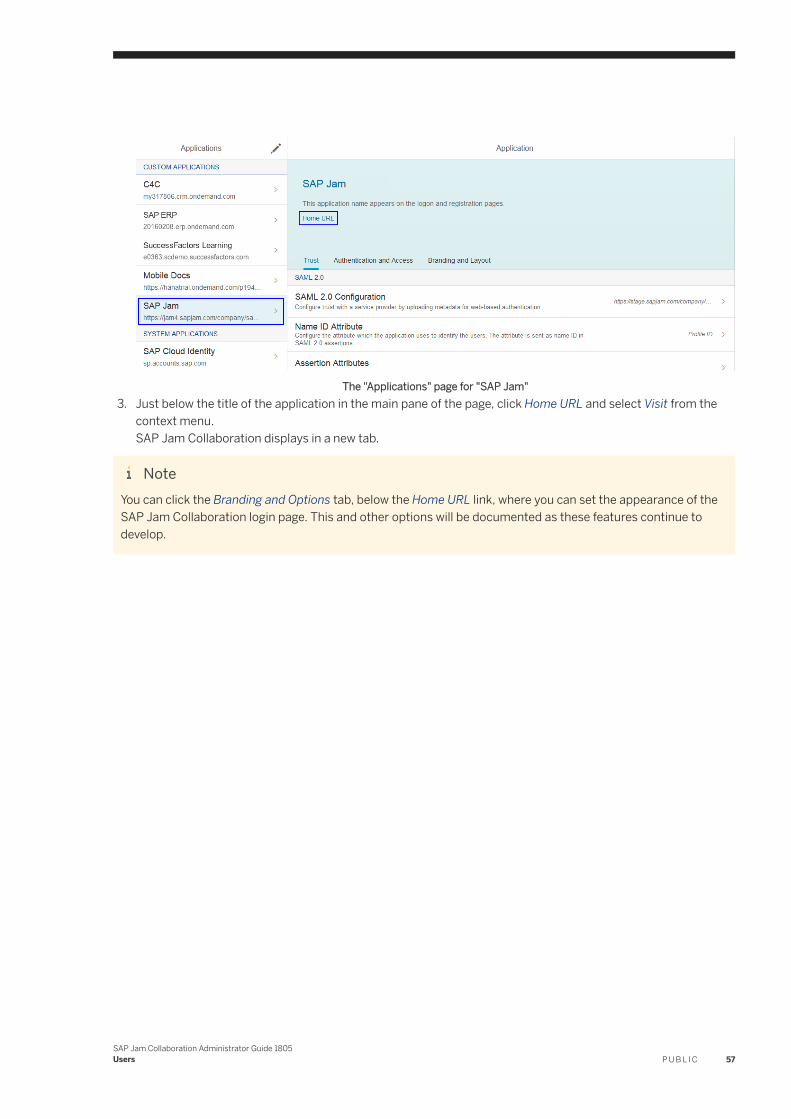
The "Applications" page for "SAP Jam"3. Just below the title of the application in the main pane of the page, click Home URL and select Visit from the
context menu.SAP Jam Collaboration displays in a new tab.
NoteYou can click the Branding and Options tab, below the Home URL link, where you can set the appearance of the SAP Jam Collaboration login page. This and other options will be documented as these features continue to develop.
SAP Jam Collaboration Administrator Guide 1805Users P U B L I C 57
3 Administrative Areas
3.1 February 2018 upgrade overview
Several feature improvements have been made to the management of administrative areas, area membership, and design of area home pages. Please see a summary of the highlights in this topic. For a comprehensive list of changes, refer to the February 2018 edition of the SAP Jam Collaboration What's New document. For this chapter, step-by-step instructions have been revised to explain how to work with the upgraded features.
How do the updates affect administrative areas?
On the SAP Jam Admin console Administrative Areas page, as a company administrator you can control the sequential display of area tabs on the home page for users with access to multiple areas. The number of main level pages for each area is also listed.
How do the updates affect area membership?
On the SAP Jam Admin console Administrative Areas page, as a company administrator creating an area, the assignment of an area group is no longer required to assign users to an area. Company or area administrators can now automatically add members individually or via a member list to an area.
How do the updates affect area home pages?
For any existing area home pages that you created, as an area administrator you must upgrade them before you can take advantage of specific enhancements in the February 2018 release. When you are ready, you must log in as a company administrator, go to the SAP Jam Admin console, choose Product Setup Custom Home Page , review the notice and then click Upgrade. The process only takes a few minutes. After you upgrade:
● company and area administrators can independently add as many home pages and rearrange them as needed.
● all your company and area home pages appears alongside each other on the menu tabs for easy access; users no longer need the switcher.
● the header section will no longer display on top of each area home page.
NoteThe upgrade operation applies to all home pages created for your company and areas. It is permanent and cannot be undone.
Introduction of new page content administrator role
Individual pages of an area home page or company home page can now be managed by users assigned with the new page content administrator [page 67] privilege.
58 P U B L I CSAP Jam Collaboration Administrator Guide 1805
Administrative Areas
3.2 Area setup overview
From start to finish, setup of an area requires the completion of tasks by a company and area administrator. Page content administrators may also be involved with area home page design.
Area setup tasks
The following is a task list you can use to help you set up an area. The order in which you complete the tasks is meant to be a guideline. Your organization may have different requirements are processes to follow which can affect some of the ordering.
Suggested order for area setup tasks
Task Task to be completed by
1. Create and manage an administrative area [page 59] Company administrator
2. Add user and assign area administrator privileges [page 62] Company administrator
3. Add user and assign page content administrator [page 67] privileges
Company or area administrator
4. Manage area home page [page 64] Area administrator
5. Design and publish area home pages [page 70] Area or page content administrator
6. Add non-administrator members to an area [page 62] Company or area administrator
3.3 Configure administrative areas
An area is a designated space for subject matter experts to manage content and collaborate within their line of business. Users who are designated area administrators have a small but significant subset of company administrator capabilities. Area admins relieve some responsibility from overloaded company administrators typically working in a single department (for example, IT) while allowing area members more control over their deployment and configuration of SAP Jam.
On the Administrative Areas page, company administrators can create areas within your organization's SAP Jam instance. Company and area administrators can manage area membership from the area's Users tab on the Users and Member Lists page in the SAP Jam Admin console.
Create an administrative area
To create an administrative area
SAP Jam Collaboration Administrator Guide 1805Administrative Areas P U B L I C 59
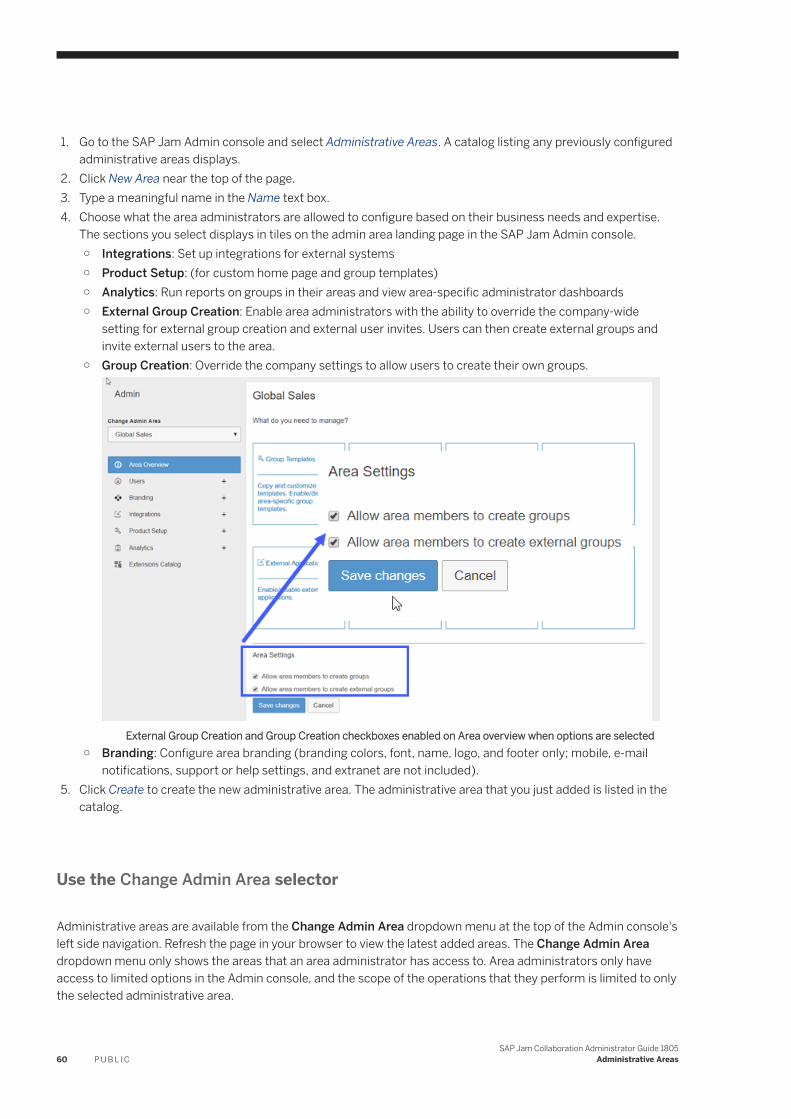
1. Go to the SAP Jam Admin console and select Administrative Areas. A catalog listing any previously configured administrative areas displays.
2. Click New Area near the top of the page.3. Type a meaningful name in the Name text box.4. Choose what the area administrators are allowed to configure based on their business needs and expertise.
The sections you select displays in tiles on the admin area landing page in the SAP Jam Admin console.○ Integrations: Set up integrations for external systems○ Product Setup: (for custom home page and group templates)○ Analytics: Run reports on groups in their areas and view area-specific administrator dashboards○ External Group Creation: Enable area administrators with the ability to override the company-wide
setting for external group creation and external user invites. Users can then create external groups and invite external users to the area.
○ Group Creation: Override the company settings to allow users to create their own groups.
External Group Creation and Group Creation checkboxes enabled on Area overview when options are selected○ Branding: Configure area branding (branding colors, font, name, logo, and footer only; mobile, e-mail
notifications, support or help settings, and extranet are not included).5. Click Create to create the new administrative area. The administrative area that you just added is listed in the
catalog.
Use the Change Admin Area selector
Administrative areas are available from the Change Admin Area dropdown menu at the top of the Admin console's left side navigation. Refresh the page in your browser to view the latest added areas. The Change Admin Area dropdown menu only shows the areas that an area administrator has access to. Area administrators only have access to limited options in the Admin console, and the scope of the operations that they perform is limited to only the selected administrative area.
60 P U B L I CSAP Jam Collaboration Administrator Guide 1805
Administrative Areas
Company administrators have access to both the entire company and to the full list of administrative areas configured for your instance of SAP Jam. If a company administrator selects an administrative area from the Change Admin Area dropdown menu, the Admin console section is limited to those available to an area administrator, and those options apply to only the selected administrative area. A company administrator can return to the full menu of Admin console options by selecting "Company" from the Change Admin Area dropdown menu. The scope of the operations is changed back to your organization's entire SAP Jam instance.
Edit an administrative area
To modify an already configured administrative area
1. In the Administrative Areas page, click Action in the row for the administrative area that you want to modify.2. Select Edit from the dropdown menu.3. Make the necessary changes to the Name or allowed configurations (for example, Integrations, Product Setup,
Analytics, and Branding).4. Click Update to save your changes.
Manage an administrative area
To perform administrative operations on an existing administrative area
1. From the Administrative Areas page, select Action in the row for the administrative area that you want to view.2. Select Go To Area. The Area Overview page displays. You can select Company in the Change Admin Area
selector to return to the company administrator view of the Admin console.
Manage tab sequence of area home page
When you click Home on the global menu bar, the custom company home pages are shown first from left to right. Any area home pages then display after the company home pages, also from left to right.
NoteNon administrative users who belong to multiple areas no longer require an area switcher to switch between area home pages. All area home pages can be accessed from the menu tabs where they display from left to right.
From the Administrative Areas page, you can change the area home page tab sequence by clicking and dragging any administrative area from top to bottom within the list to set the preferred tab order. Area home pages display in the default sequence of left to right, from oldest to most recently created area.
NoteOnly the number of main level published pages for each administrative area displays in the Number of Pages column.
SAP Jam Collaboration Administrator Guide 1805Administrative Areas P U B L I C 61
Delete an administrative area
To delete an existing administrative area
1. In the Administrative Areas page, click the Action button in the row for the administrative area that you want to delete.
2. Select Delete from the dropdown menu. A confirmation dialog box displays.3. Click Cancel to return to the Administrative Areas catalog without deleting the administrative area, or click
Delete to remove the administrative area.
3.4 Area membership
After an area is created, a company administrator can assign one or more administrators for the area. While the company administrator can add other users to the area, the assigned area administrators can also manage this task.
For existing areas created prior to the February 2018 release, as an area administrator or company administrator viewing the SAP Jam Admin console Users and Member Lists Users tab for the area, the same members that belonged to the area group are now in this Users list. You can now manage area membership from this page.
NoteWhile area membership is managed differently with the February 2018 release, there are no changes (for example, removals, additions) to the membership itself. Starting with this release, any member additions or removals within the former area group does not impact area membership.
Add member and assign area administrator privilege
As a company administrator, you can designate one or more users as area administrators.
To add a member and then assign area administrator privilege
1. In the SAP Jam Admin console, choose the area from the Change Admin Area dropdown menu.
2. Go to the Users Users and Member Lists page.3. On the Users tab, click Add Users.4. On the Add Users tab, enter the user name or e-mail address of the user you want to add to the area.5. Click Add to automatically them as an area member. The list of users on the Users tab refreshes to include the
person you added.6. On the row with their name, click the Action dropdown menu and choose Make Area Admin. The page updates
with their newly assigned admin type.
NoteYou can remove the area administrator privilege from a user by choosing Remove Area Admin in the Action dropdown menu.
62 P U B L I CSAP Jam Collaboration Administrator Guide 1805
Administrative Areas
Add members individually or through a member list
You can automatically add members to an area by adding individual users or member lists to an area.
To add members to an area
1. In the SAP Jam Admin console, choose the area from the Change Admin Area dropdown menu.
2. Go to the Users Users and Member Lists page.3. On the Users tab, click Add Users.4. On the Add Users tab, enter the user name or e-mail address of the users you want to add to the area. Or, click
the Required Member Lists tab and enter the member lists to add to the area.5. Click Add to automatically them as area members. The list of users on the Users tab refreshes to include
everyone you added.
NoteYou can remove area users and administrators from your area by choosing Remove From Area in the Action dropdown menu.
Sort and filter for area users list
On the Users tab, you can choose one of the following from the dropdown to sort through the lists of Users:
● All Members● Admins● Members● Member Lists
You can also refine the list of Users by entering part or all of their name in the Filter by name text box.
3.5 Switcher for home pages
Area administrators for multiple areas can click a home page switcher icon located above the Page Settings wand to switch between area home page views.
The home page switcher lets you quickly choose a home page to view and edit. You can:
● select a tab representing one of these user types: full access, restricted access, or external.● for that user type, select either Company or a specific area.
SAP Jam Collaboration Administrator Guide 1805Administrative Areas P U B L I C 63
3.6 Customize the area home page
An area home page can be managed by an area administrator. Using page designer widgets, the layout of the home page can be designed by an area or page content administrator. Once published, area members can view area home pages.
As an area or page content administrator, you can create, upload, and manage content for your area home page in a dedicated area repository.
NoteAfter an area administrator upgrades their area home pages with the February 2018 release enhancements for areas, an area home page no longer has a separate header and body section. The content previously created under the header section no longer displays. However, content previously created under the body section continues to display.
Enable, create, and edit the area home page
To enable and create the area home page
1. In the SAP Jam Admin console, choose the area from the Change Admin Area dropdown menu.
2. Choose Product Setup Custom Home Page . The area repository displays.3. Click Manage Home Page. The area home page displays in view mode.4. On the Page Settings wand, click the Pencil icon for Edit mode. The area home page is ready for editing.
NoteFor steps on configuring mobile settings and using preview mode when designing pages for optimal viewing on mobile devices, please refer to the Mobile settings and preview topic in the SAP Jam Group Administration Guide.
NoteWhen you click the Pencil icon from the Page Settings wand, your view switches to Edit mode for the area home page you are currently viewing. If you want to edit a different page, you must return to view mode and select that page first before switching to Edit mode.
5. On the Page Settings wand, the Home Page Content icon allows area and page content administrators to go directly to the area repository for content management. When clicked, the icon turns blue. You can click it again to return to the View mode for the home page.
64 P U B L I CSAP Jam Collaboration Administrator Guide 1805
Administrative Areas
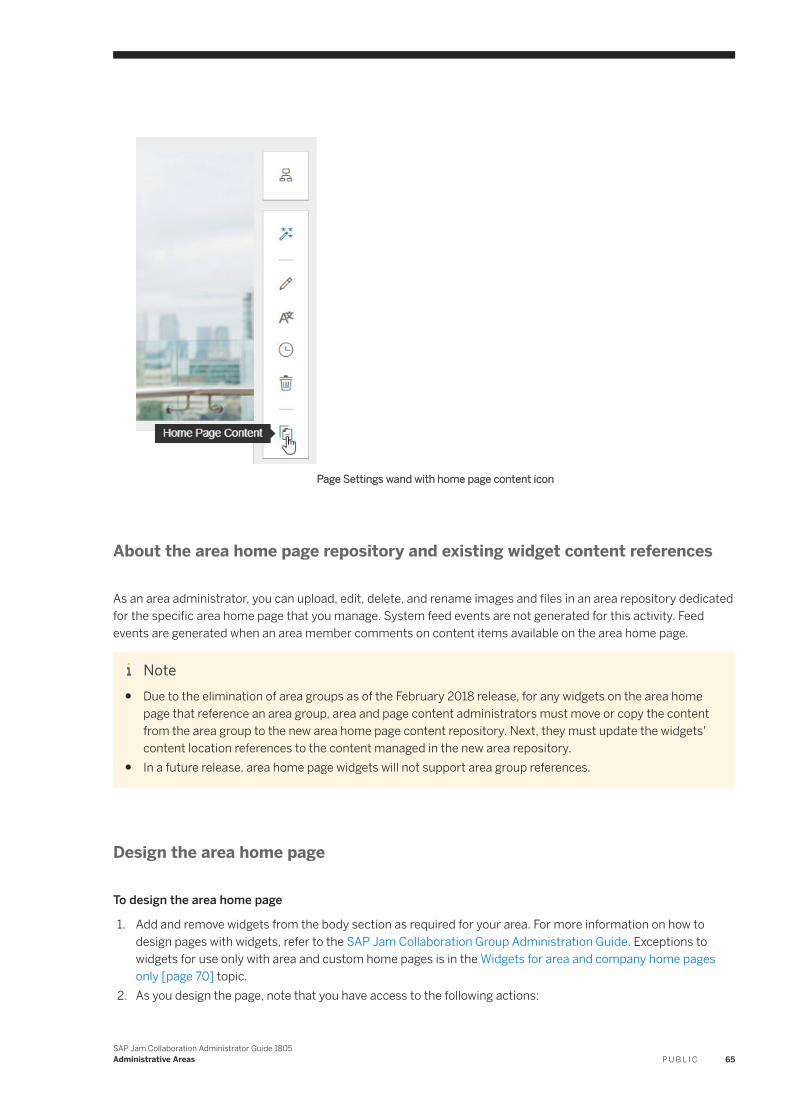
Page Settings wand with home page content icon
About the area home page repository and existing widget content references
As an area administrator, you can upload, edit, delete, and rename images and files in an area repository dedicated for the specific area home page that you manage. System feed events are not generated for this activity. Feed events are generated when an area member comments on content items available on the area home page.
Note● Due to the elimination of area groups as of the February 2018 release, for any widgets on the area home
page that reference an area group, area and page content administrators must move or copy the content from the area group to the new area home page content repository. Next, they must update the widgets' content location references to the content managed in the new area repository.
● In a future release, area home page widgets will not support area group references.
Design the area home page
To design the area home page
1. Add and remove widgets from the body section as required for your area. For more information on how to design pages with widgets, refer to the SAP Jam Collaboration Group Administration Guide. Exceptions to widgets for use only with area and custom home pages is in the Widgets for area and company home pages only [page 70] topic.
2. As you design the page, note that you have access to the following actions:
SAP Jam Collaboration Administrator Guide 1805Administrative Areas P U B L I C 65
○ Cancel: Exit the page designer without saving changes to the home page.○ Save Draft: Save the page design without setting it as your area's home page.○ Delete Draft: This action only appears if you have saved a draft home page and you have elected to edit it
again. Click to delete the draft version.○ Publish: Save the page design and use it as your area's home page. The read-only header section that is
managed by the company administrator is also included when you publish the area home page.
Reference content from area repository or public group
When designing the area home page, you may want to add images, multimedia, slides, or other content that already exists in SAP Jam. Depending on the widget, you can choose existing content from the area repository or from a public group.
To select existing SAP Jam content for a slideshow
1. After you add the slideshow widget to the body section, click Click here to choose a slideshow from this group.2. Browse through the area repository and choose the slide presentation.
To select existing SAP Jam content for a multimedia file
1. After you select the multimedia widget, click Choose existing multimedia.2. Browse through the area repository and choose the multimedia file.
To select existing SAP Jam content for a document or other file
1. After you select the content widget, click Select under "Home page and public group content."2. If you want to choose content that's available via the area repository, then leave the default Home Page
Content checkbox selected and browse to the area repository folder.3. To select content available in public group folders, clear the Home Page Content checkbox, select a group from
the dropdown list, and then browse for the group content folder.
To select existing SAP Jam content for an image
1. After you add the image widget, click click here to choose an image from home page content.2. Browse through the area repository and select an image.
Copy and move files
As an area administrator, you can copy or move all files from one area home page to another area home page or group that you can access. As a company administrator, you can also copy or move all files to a company home page.
Rearrange tabs
As an area administrator, in the Rearrange Tabs dialog, you can click and drag to move a first level menu tab to a second level menu tab, or from second to first, for custom area home pages. You can also move a second level menu tab to the second level of another area tab.
66 P U B L I CSAP Jam Collaboration Administrator Guide 1805
Administrative Areas
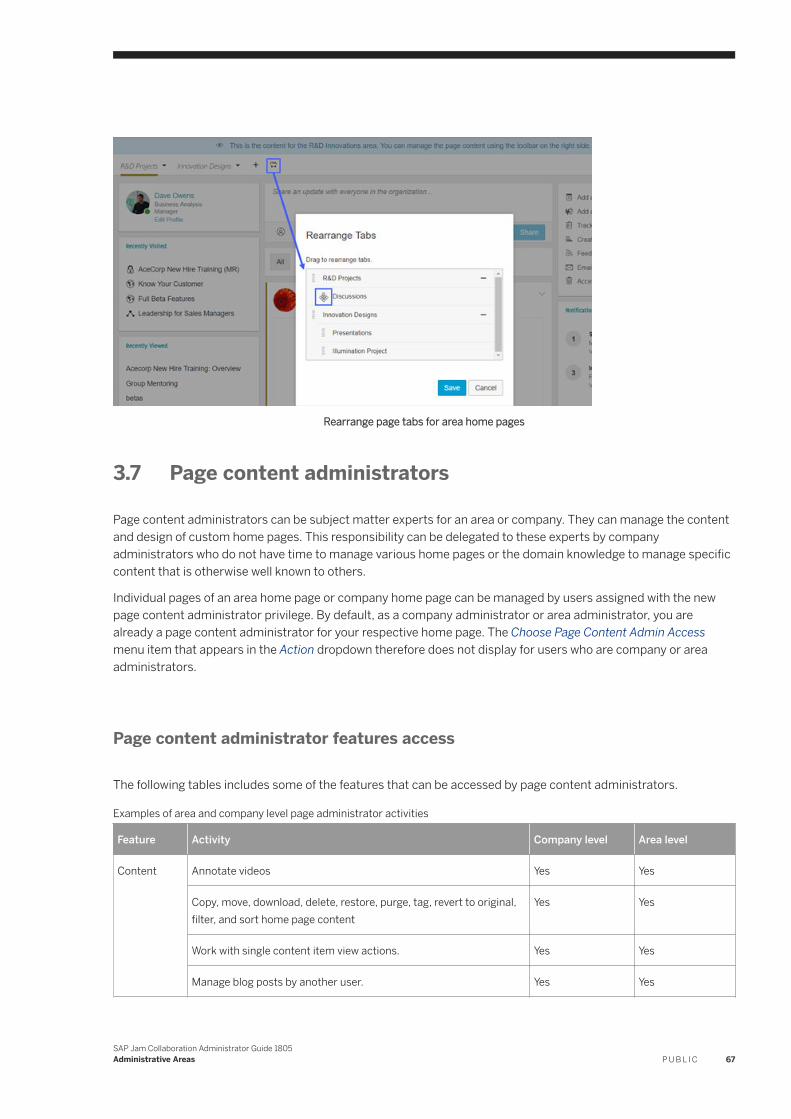
Rearrange page tabs for area home pages
3.7 Page content administrators
Page content administrators can be subject matter experts for an area or company. They can manage the content and design of custom home pages. This responsibility can be delegated to these experts by company administrators who do not have time to manage various home pages or the domain knowledge to manage specific content that is otherwise well known to others.
Individual pages of an area home page or company home page can be managed by users assigned with the new page content administrator privilege. By default, as a company administrator or area administrator, you are already a page content administrator for your respective home page. The Choose Page Content Admin Access menu item that appears in the Action dropdown therefore does not display for users who are company or area administrators.
Page content administrator features access
The following tables includes some of the features that can be accessed by page content administrators.
Examples of area and company level page administrator activities
Feature Activity Company level Area level
Content Annotate videos Yes Yes
Copy, move, download, delete, restore, purge, tag, revert to original, filter, and sort home page content
Yes Yes
Work with single content item view actions. Yes Yes
Manage blog posts by another user. Yes Yes
SAP Jam Collaboration Administrator Guide 1805Administrative Areas P U B L I C 67
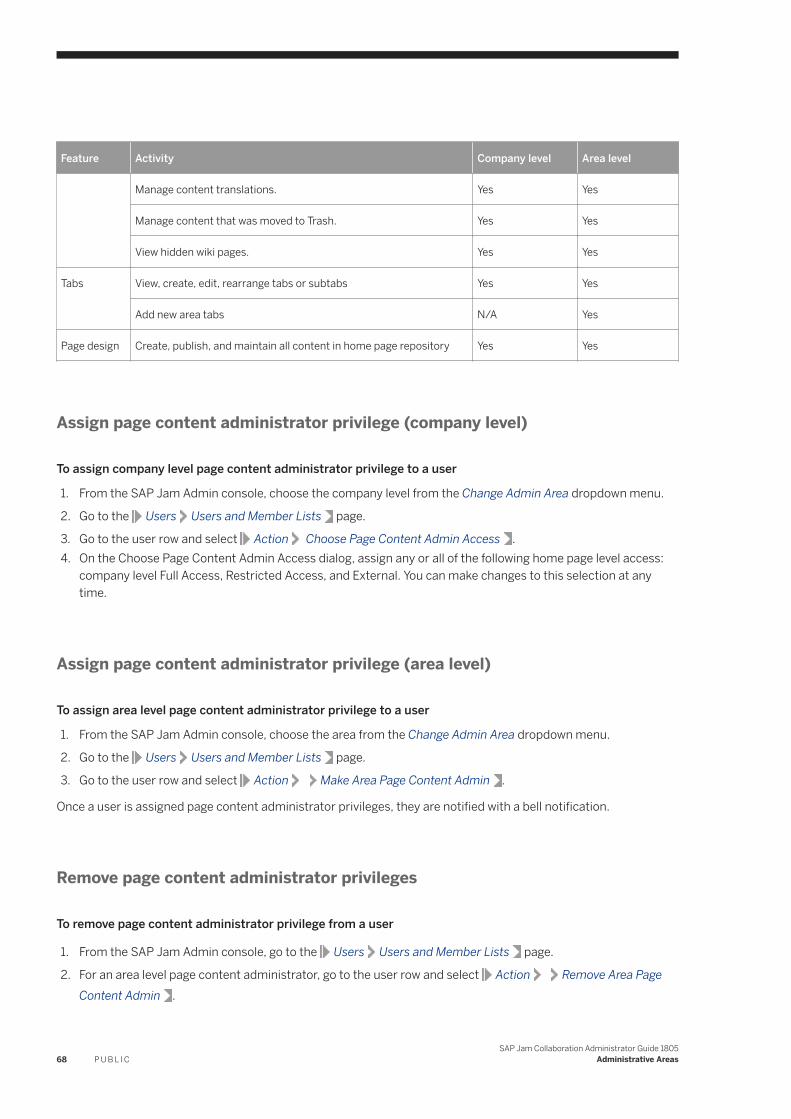
Feature Activity Company level Area level
Manage content translations. Yes Yes
Manage content that was moved to Trash. Yes Yes
View hidden wiki pages. Yes Yes
Tabs View, create, edit, rearrange tabs or subtabs Yes Yes
Add new area tabs N/A Yes
Page design Create, publish, and maintain all content in home page repository Yes Yes
Assign page content administrator privilege (company level)
To assign company level page content administrator privilege to a user
1. From the SAP Jam Admin console, choose the company level from the Change Admin Area dropdown menu.
2. Go to the Users Users and Member Lists page.
3. Go to the user row and select Action Choose Page Content Admin Access .4. On the Choose Page Content Admin Access dialog, assign any or all of the following home page level access:
company level Full Access, Restricted Access, and External. You can make changes to this selection at any time.
Assign page content administrator privilege (area level)
To assign area level page content administrator privilege to a user
1. From the SAP Jam Admin console, choose the area from the Change Admin Area dropdown menu.
2. Go to the Users Users and Member Lists page.
3. Go to the user row and select Action Make Area Page Content Admin .
Once a user is assigned page content administrator privileges, they are notified with a bell notification.
Remove page content administrator privileges
To remove page content administrator privilege from a user
1. From the SAP Jam Admin console, go to the Users Users and Member Lists page.
2. For an area level page content administrator, go to the user row and select Action Remove Area Page Content Admin .
68 P U B L I CSAP Jam Collaboration Administrator Guide 1805
Administrative Areas
3. For company level page content administrator, go to the user row and select Action Choose Page Content Admin Access and clear all checkboxes.
3.8 Area dashboard
The dashboard provides a visual display of user engagement statistics over a time frame of the previous four weeks.
For more information on what displays on a dashboard, see Dashboard [page 313]
To view the dashboard for an area
1. From the SAP Jam Admin console, on the Change Admin Area drop-down menu, select the area.
2. Select Analytics Dashboard3. The dashboard loads with statistics and graphs for login activity and groups. For the login activity and groups
sections, you can change the time frame from 4 weeks to the last 3, 6, or 12 months.
3.9 Group templates
Group templates contain a pre-defined layout of widgets and content that make it simpler for groups to create their own group pages.
For more information on creating group templates, see Group templates administration [page 119].
Manage group templates
To manage group templates for your area
1. From the SAP Jam Admin console, choose your area from the Change Admin Area drop-down menu.
2. Select Product Setup Group Templates .3. On the Group Template page, you can click the toggles to enable or disable group templates that are listed on
the Administrative Area Templates tab or the Company templates tab.4. To make a copy of an existing template for the purposes of customizing a new group template, from the
Actions drop-down menu, select Copy.
SAP Jam Collaboration Administrator Guide 1805Administrative Areas P U B L I C 69
3.10 Widgets for company and area home pages only
Widgets are containers for a variety of content types such as video, feeds, and photos. When you add a widget, you are specifying that a section, whether for group overview pages, custom company home pages, or custom area home pages, contain some particular content.
For more information on how to design pages with widgets, refer to the Widgets topic in the Group Administration Guide. It includes a list of widgets that can be used for group overview pages, company home pages and area home pages.
The widgets explained in this section are available for area and company administrators use only.
Social metric tracking
To help identify popular home page items by their level of participation or engagement, the number of views, likes and replies display within the Content, Rotating Banner, and video and audio content of Multimedia widgets. The author and last updated information, and number of views, likes, and replies now display within the Slideshow widget for home pages.
3.10.1 Catalog search widget
Company and area administrators can add a new catalog search widget to the company or area home page that allows company and area users to enter keywords to search SAP SuccessFactors Learning curricula, learning items, and scheduled offerings. The search results appear in a new Catalog window.
Catalog search widget (for SAP SuccessFactors Learning)
To include a catalog search widget
1. In edit mode for the custom area home page, click the Catalog search widget icon to open the widget dialog box.
70 P U B L I CSAP Jam Collaboration Administrator Guide 1805
Administrative Areas
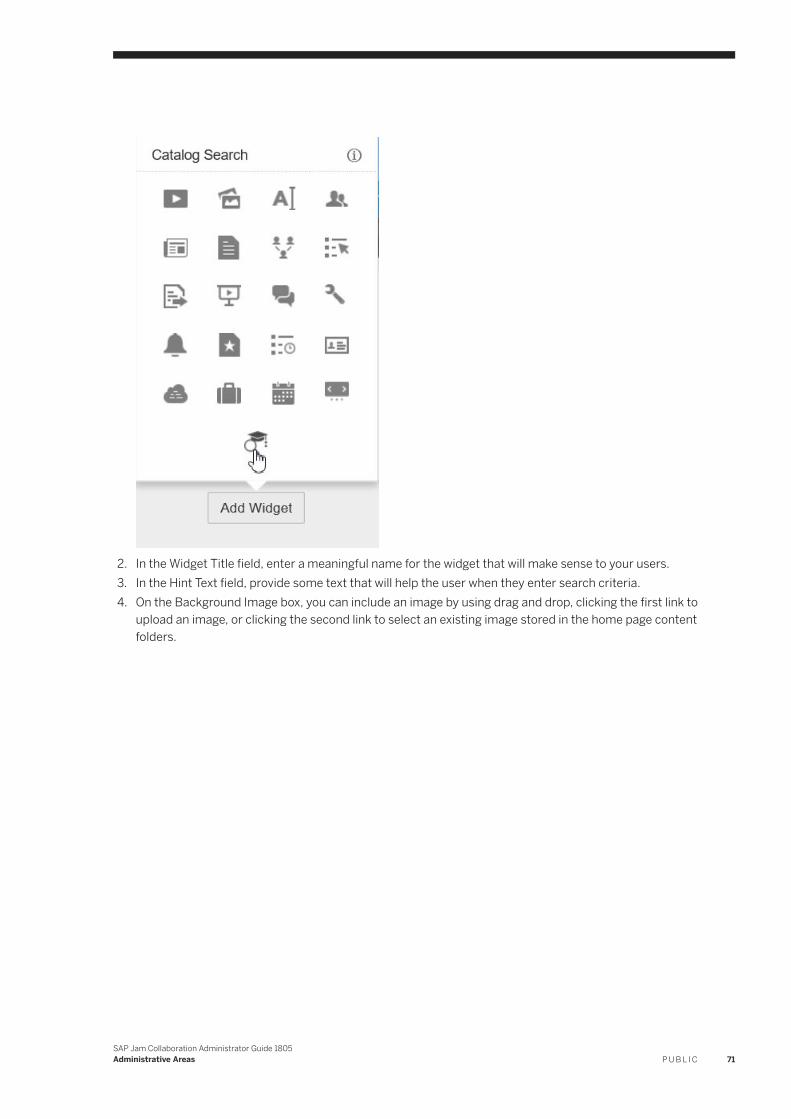
2. In the Widget Title field, enter a meaningful name for the widget that will make sense to your users.3. In the Hint Text field, provide some text that will help the user when they enter search criteria.4. On the Background Image box, you can include an image by using drag and drop, clicking the first link to
upload an image, or clicking the second link to select an existing image stored in the home page content folders.
SAP Jam Collaboration Administrator Guide 1805Administrative Areas P U B L I C 71
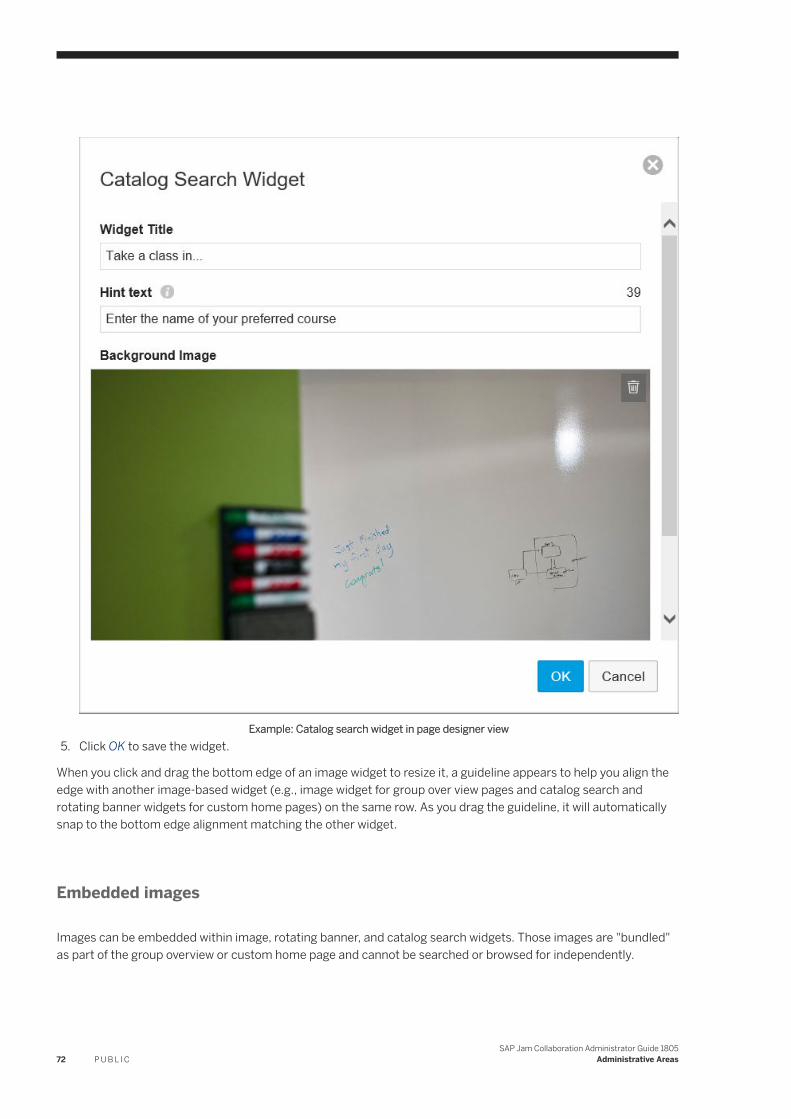
Example: Catalog search widget in page designer view5. Click OK to save the widget.
When you click and drag the bottom edge of an image widget to resize it, a guideline appears to help you align the edge with another image-based widget (e.g., image widget for group over view pages and catalog search and rotating banner widgets for custom home pages) on the same row. As you drag the guideline, it will automatically snap to the bottom edge alignment matching the other widget.
Embedded images
Images can be embedded within image, rotating banner, and catalog search widgets. Those images are "bundled" as part of the group overview or custom home page and cannot be searched or browsed for independently.
72 P U B L I CSAP Jam Collaboration Administrator Guide 1805
Administrative Areas
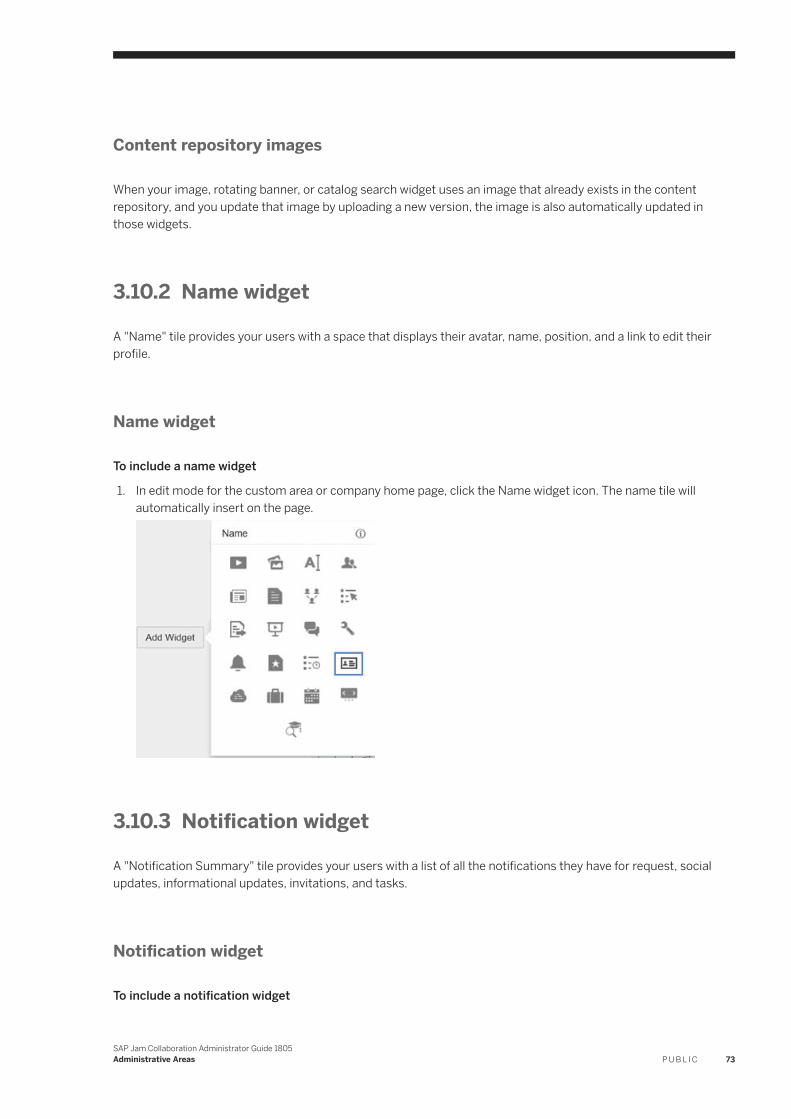
Content repository images
When your image, rotating banner, or catalog search widget uses an image that already exists in the content repository, and you update that image by uploading a new version, the image is also automatically updated in those widgets.
3.10.2 Name widget
A "Name" tile provides your users with a space that displays their avatar, name, position, and a link to edit their profile.
Name widget
To include a name widget
1. In edit mode for the custom area or company home page, click the Name widget icon. The name tile will automatically insert on the page.
3.10.3 Notification widget
A "Notification Summary" tile provides your users with a list of all the notifications they have for request, social updates, informational updates, invitations, and tasks.
Notification widget
To include a notification widget
SAP Jam Collaboration Administrator Guide 1805Administrative Areas P U B L I C 73
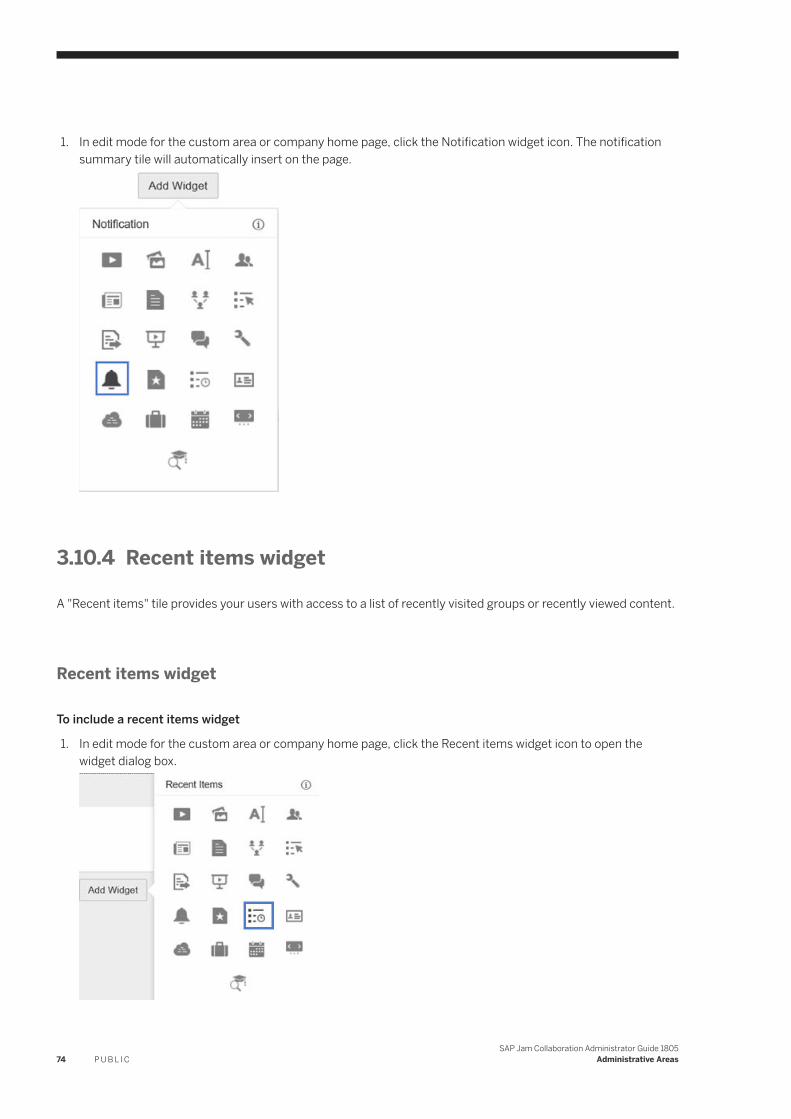
1. In edit mode for the custom area or company home page, click the Notification widget icon. The notification summary tile will automatically insert on the page.
3.10.4 Recent items widget
A "Recent items" tile provides your users with access to a list of recently visited groups or recently viewed content.
Recent items widget
To include a recent items widget
1. In edit mode for the custom area or company home page, click the Recent items widget icon to open the widget dialog box.
74 P U B L I CSAP Jam Collaboration Administrator Guide 1805
Administrative Areas
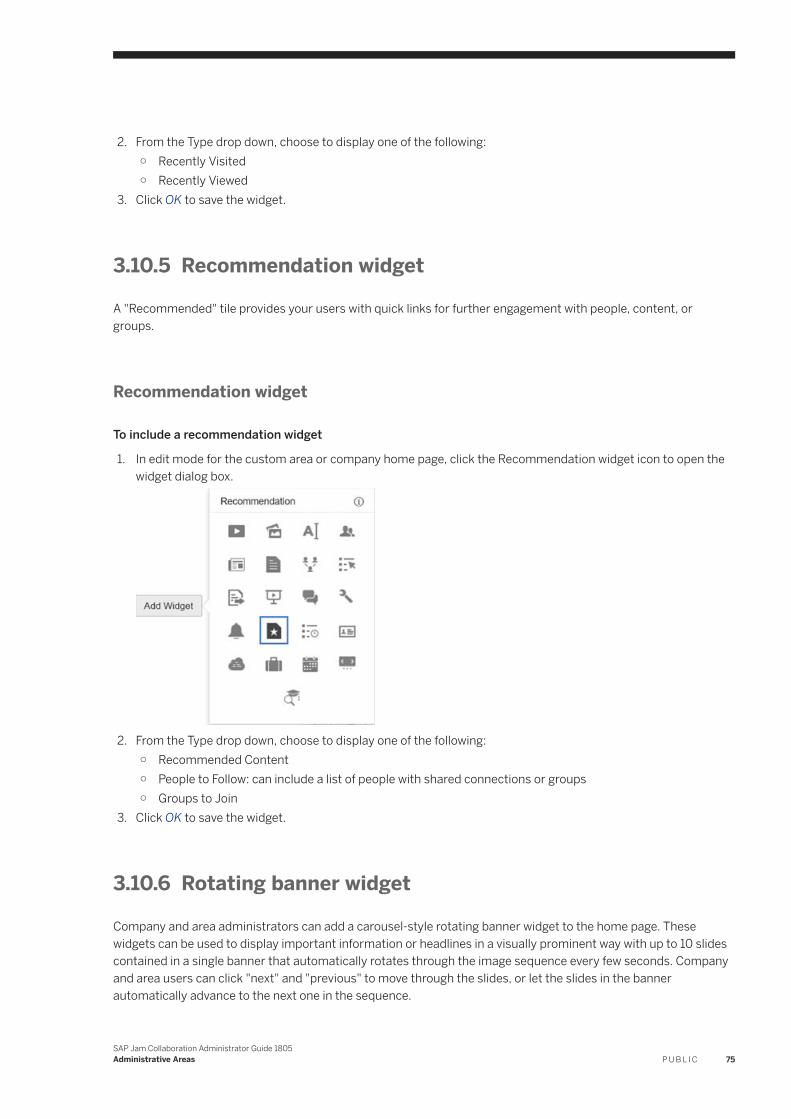
2. From the Type drop down, choose to display one of the following:○ Recently Visited○ Recently Viewed
3. Click OK to save the widget.
3.10.5 Recommendation widget
A "Recommended" tile provides your users with quick links for further engagement with people, content, or groups.
Recommendation widget
To include a recommendation widget
1. In edit mode for the custom area or company home page, click the Recommendation widget icon to open the widget dialog box.
2. From the Type drop down, choose to display one of the following:○ Recommended Content○ People to Follow: can include a list of people with shared connections or groups○ Groups to Join
3. Click OK to save the widget.
3.10.6 Rotating banner widget
Company and area administrators can add a carousel-style rotating banner widget to the home page. These widgets can be used to display important information or headlines in a visually prominent way with up to 10 slides contained in a single banner that automatically rotates through the image sequence every few seconds. Company and area users can click "next" and "previous" to move through the slides, or let the slides in the banner automatically advance to the next one in the sequence.
SAP Jam Collaboration Administrator Guide 1805Administrative Areas P U B L I C 75
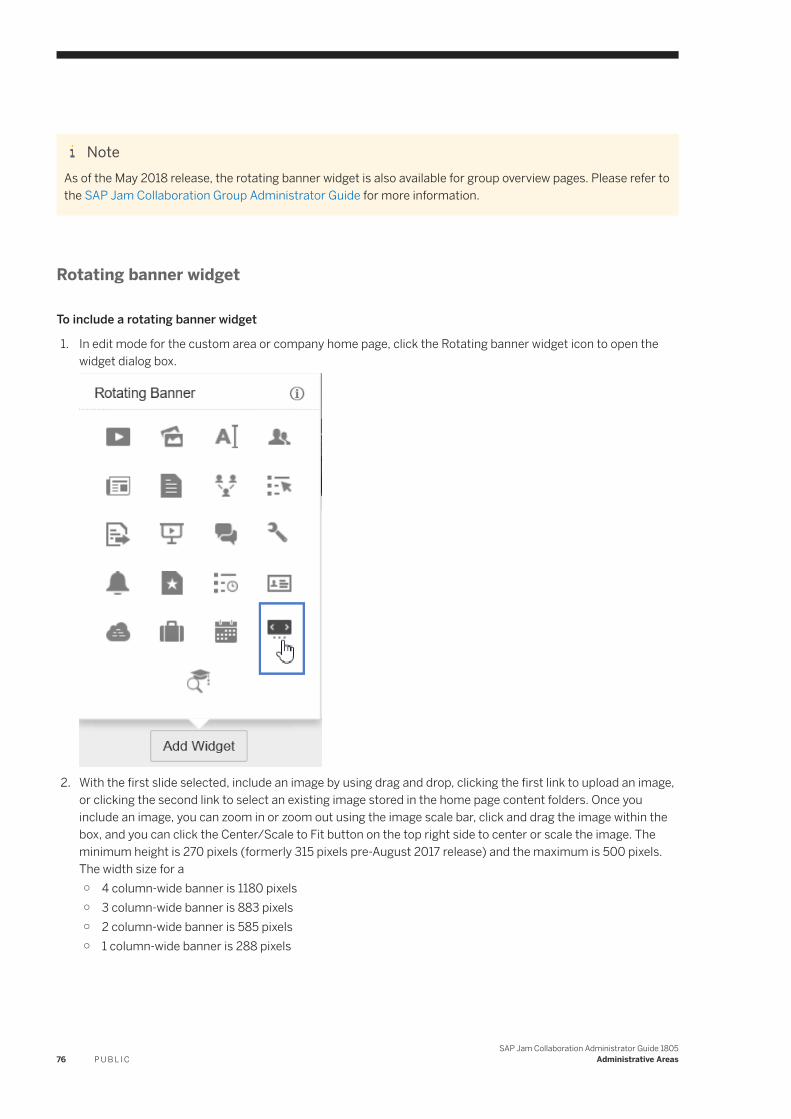
NoteAs of the May 2018 release, the rotating banner widget is also available for group overview pages. Please refer to the SAP Jam Collaboration Group Administrator Guide for more information.
Rotating banner widget
To include a rotating banner widget
1. In edit mode for the custom area or company home page, click the Rotating banner widget icon to open the widget dialog box.
2. With the first slide selected, include an image by using drag and drop, clicking the first link to upload an image, or clicking the second link to select an existing image stored in the home page content folders. Once you include an image, you can zoom in or zoom out using the image scale bar, click and drag the image within the box, and you can click the Center/Scale to Fit button on the top right side to center or scale the image. The minimum height is 270 pixels (formerly 315 pixels pre-August 2017 release) and the maximum is 500 pixels. The width size for a○ 4 column-wide banner is 1180 pixels○ 3 column-wide banner is 883 pixels○ 2 column-wide banner is 585 pixels○ 1 column-wide banner is 288 pixels
76 P U B L I CSAP Jam Collaboration Administrator Guide 1805
Administrative Areas
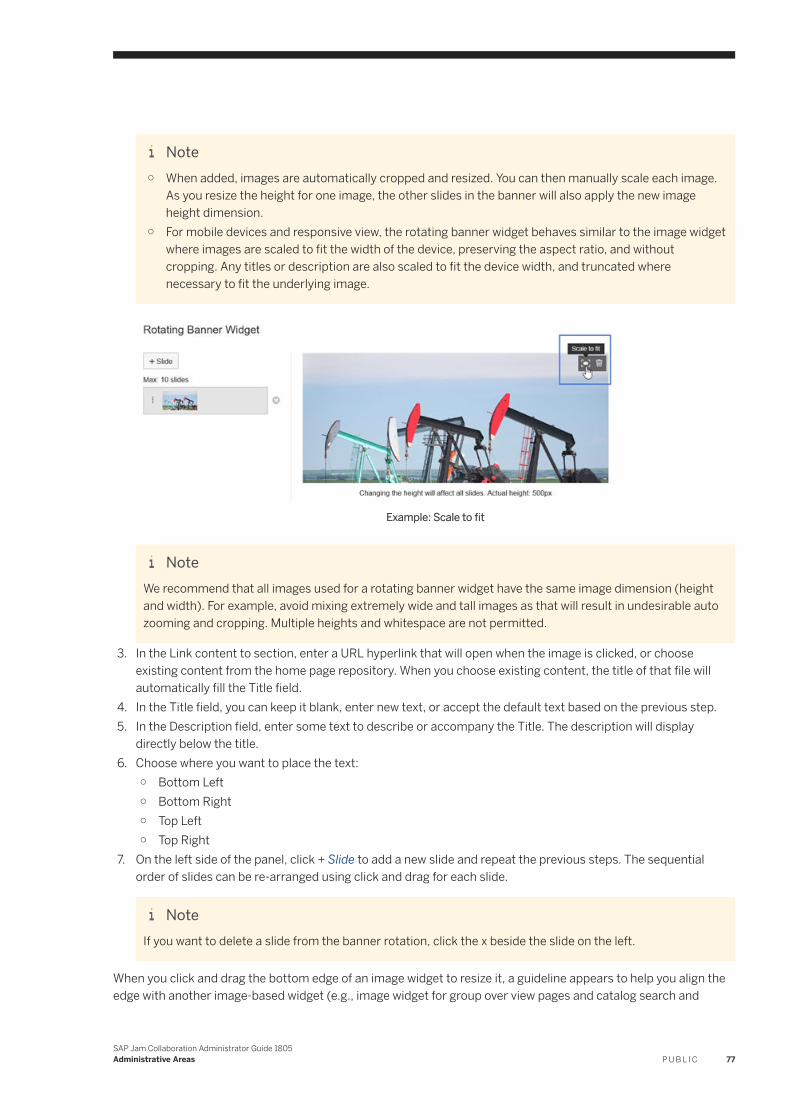
Note○ When added, images are automatically cropped and resized. You can then manually scale each image.
As you resize the height for one image, the other slides in the banner will also apply the new image height dimension.
○ For mobile devices and responsive view, the rotating banner widget behaves similar to the image widget where images are scaled to fit the width of the device, preserving the aspect ratio, and without cropping. Any titles or description are also scaled to fit the device width, and truncated where necessary to fit the underlying image.
Example: Scale to fit
NoteWe recommend that all images used for a rotating banner widget have the same image dimension (height and width). For example, avoid mixing extremely wide and tall images as that will result in undesirable auto zooming and cropping. Multiple heights and whitespace are not permitted.
3. In the Link content to section, enter a URL hyperlink that will open when the image is clicked, or choose existing content from the home page repository. When you choose existing content, the title of that file will automatically fill the Title field.
4. In the Title field, you can keep it blank, enter new text, or accept the default text based on the previous step.5. In the Description field, enter some text to describe or accompany the Title. The description will display
directly below the title.6. Choose where you want to place the text:
○ Bottom Left○ Bottom Right○ Top Left○ Top Right
7. On the left side of the panel, click + Slide to add a new slide and repeat the previous steps. The sequential order of slides can be re-arranged using click and drag for each slide.
NoteIf you want to delete a slide from the banner rotation, click the x beside the slide on the left.
When you click and drag the bottom edge of an image widget to resize it, a guideline appears to help you align the edge with another image-based widget (e.g., image widget for group over view pages and catalog search and
SAP Jam Collaboration Administrator Guide 1805Administrative Areas P U B L I C 77
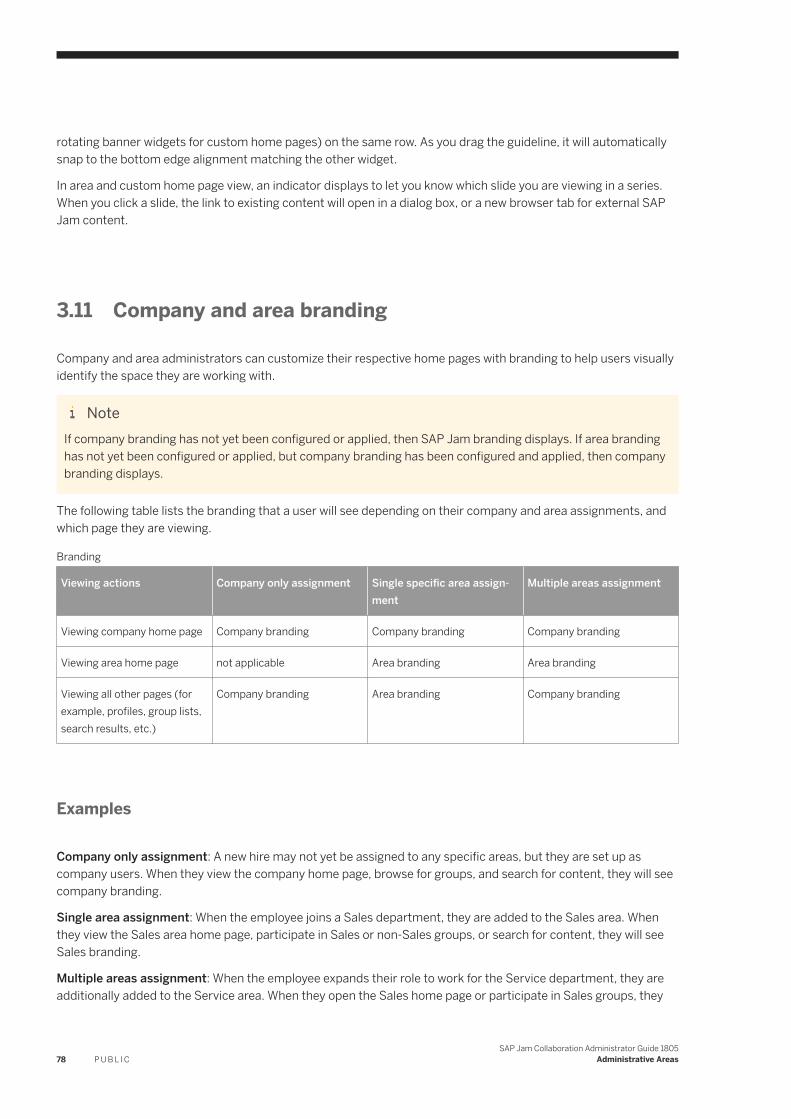
rotating banner widgets for custom home pages) on the same row. As you drag the guideline, it will automatically snap to the bottom edge alignment matching the other widget.
In area and custom home page view, an indicator displays to let you know which slide you are viewing in a series. When you click a slide, the link to existing content will open in a dialog box, or a new browser tab for external SAP Jam content.
3.11 Company and area branding
Company and area administrators can customize their respective home pages with branding to help users visually identify the space they are working with.
NoteIf company branding has not yet been configured or applied, then SAP Jam branding displays. If area branding has not yet been configured or applied, but company branding has been configured and applied, then company branding displays.
The following table lists the branding that a user will see depending on their company and area assignments, and which page they are viewing.
Branding
Viewing actions Company only assignment Single specific area assignment
Multiple areas assignment
Viewing company home page Company branding Company branding Company branding
Viewing area home page not applicable Area branding Area branding
Viewing all other pages (for example, profiles, group lists, search results, etc.)
Company branding Area branding Company branding
Examples
Company only assignment: A new hire may not yet be assigned to any specific areas, but they are set up as company users. When they view the company home page, browse for groups, and search for content, they will see company branding.
Single area assignment: When the employee joins a Sales department, they are added to the Sales area. When they view the Sales area home page, participate in Sales or non-Sales groups, or search for content, they will see Sales branding.
Multiple areas assignment: When the employee expands their role to work for the Service department, they are additionally added to the Service area. When they open the Sales home page or participate in Sales groups, they
78 P U B L I CSAP Jam Collaboration Administrator Guide 1805
Administrative Areas
will see the Sales branding. If they open the Service home page or participate in Service groups, they will see the Service branding. All other pages in SAP Jam will display company branding.
SAP Jam Collaboration Administrator Guide 1805Administrative Areas P U B L I C 79
4 Branding
4.1 Configure the Branding and Support options
There are many options available for customizing SAP Jam to align with company and area branding.
To configure style and support options for the SAP Jam web application
1. Go to the Admin console and select Branding Web from the left navigation menu.2. Click the Company tab to brand for company users, or click the Extranet tab for external users.
NoteThe Name field displays the name of your company as it was set in SuccessFactors Platform Provisioning. You cannot edit the string shown. The string does not appear anywhere in the SAP Jam Collaboration user interface.
3. On the Branding and Support page, you can set the following options:
Note○ Each color attribute now contains a color picker so administrators can choose a color rather than
manually entering the hexadecimal value.○ After making color changes, ensure that elements remain visible within the application.○ For each section, when you click the information icon, it shows which parts of the screen are affected by
the attributes within the SAP Jam Collaboration web experience.
80 P U B L I CSAP Jam Collaboration Administrator Guide 1805
Branding
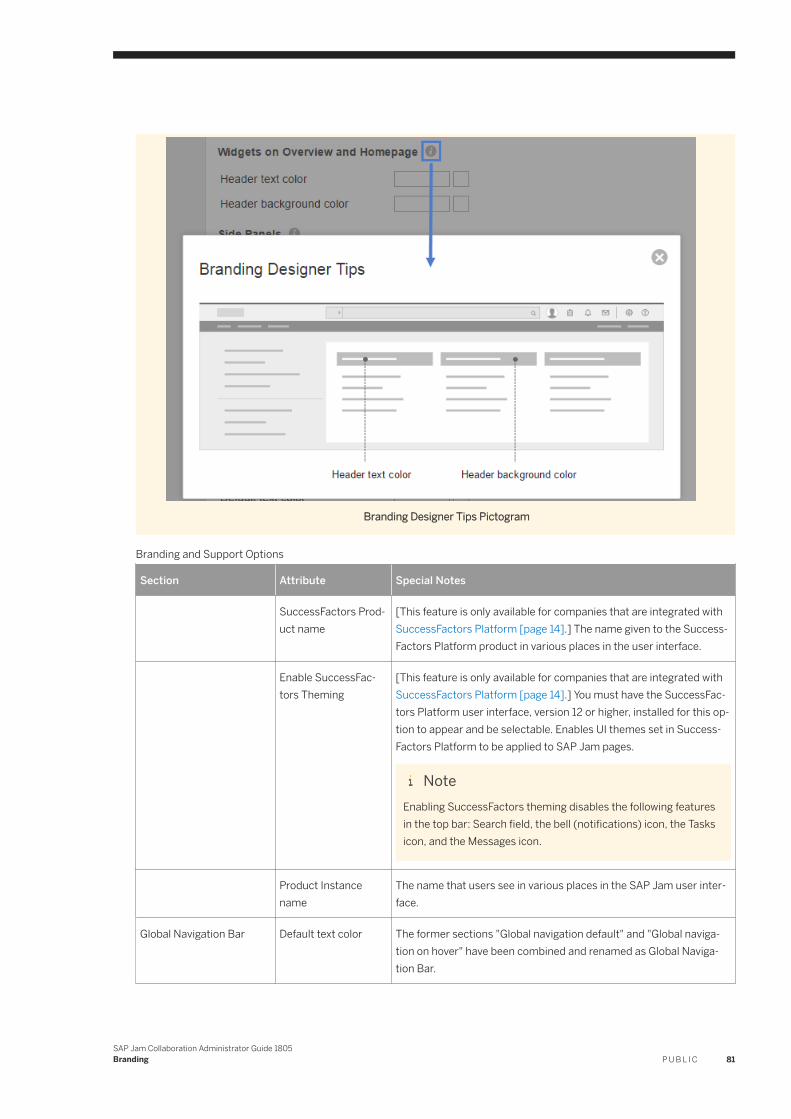
Branding Designer Tips Pictogram
Branding and Support Options
Section Attribute Special Notes
SuccessFactors Product name
[This feature is only available for companies that are integrated with SuccessFactors Platform [page 14].] The name given to the SuccessFactors Platform product in various places in the user interface.
Enable SuccessFactors Theming
[This feature is only available for companies that are integrated with SuccessFactors Platform [page 14].] You must have the SuccessFactors Platform user interface, version 12 or higher, installed for this option to appear and be selectable. Enables UI themes set in SuccessFactors Platform to be applied to SAP Jam pages.
NoteEnabling SuccessFactors theming disables the following features in the top bar: Search field, the bell (notifications) icon, the Tasks icon, and the Messages icon.
Product Instance name
The name that users see in various places in the SAP Jam user interface.
Global Navigation Bar Default text color The former sections "Global navigation default" and "Global navigation on hover" have been combined and renamed as Global Navigation Bar.
SAP Jam Collaboration Administrator Guide 1805Branding P U B L I C 81
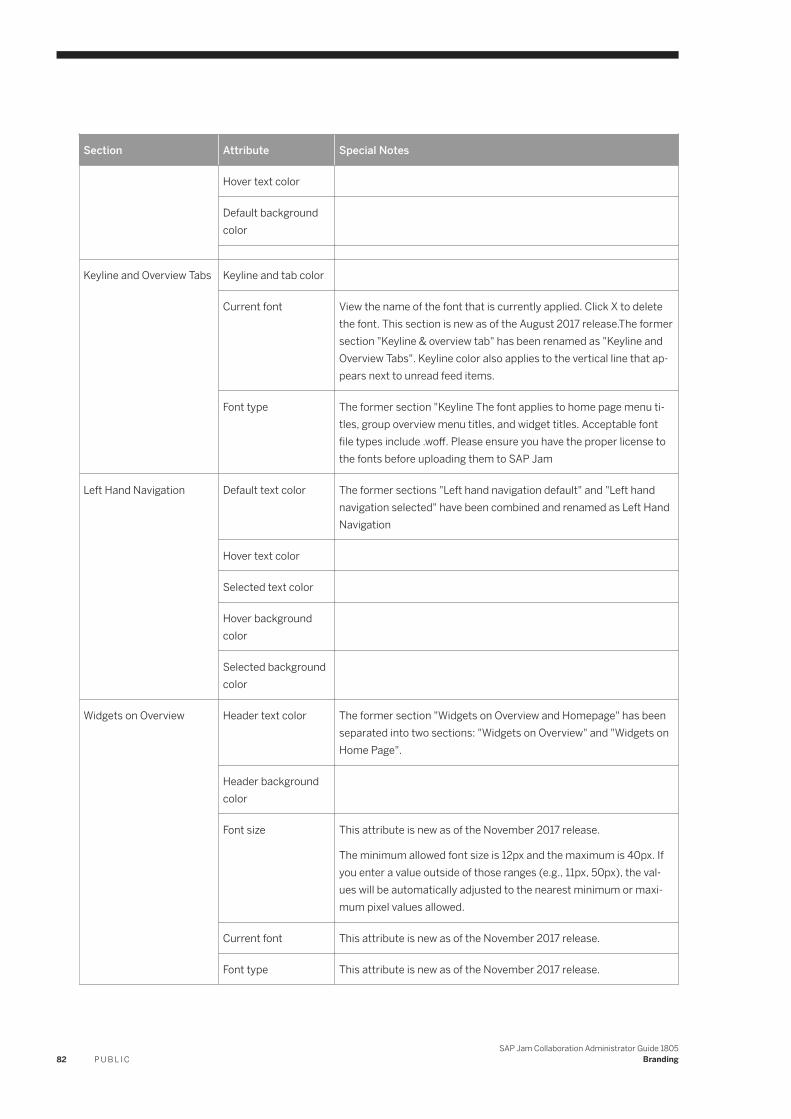
Section Attribute Special Notes
Hover text color
Default background color
Keyline and Overview Tabs Keyline and tab color
Current font View the name of the font that is currently applied. Click X to delete the font. This section is new as of the August 2017 release.The former section "Keyline & overview tab" has been renamed as "Keyline and Overview Tabs". Keyline color also applies to the vertical line that appears next to unread feed items.
Font type The former section "Keyline The font applies to home page menu titles, group overview menu titles, and widget titles. Acceptable font file types include .woff. Please ensure you have the proper license to the fonts before uploading them to SAP Jam
Left Hand Navigation Default text color The former sections "Left hand navigation default" and "Left hand navigation selected" have been combined and renamed as Left Hand Navigation
Hover text color
Selected text color
Hover background color
Selected background color
Widgets on Overview Header text color The former section "Widgets on Overview and Homepage" has been separated into two sections: "Widgets on Overview" and "Widgets on Home Page".
Header background color
Font size This attribute is new as of the November 2017 release.
The minimum allowed font size is 12px and the maximum is 40px. If you enter a value outside of those ranges (e.g., 11px, 50px), the values will be automatically adjusted to the nearest minimum or maximum pixel values allowed.
Current font This attribute is new as of the November 2017 release.
Font type This attribute is new as of the November 2017 release.
82 P U B L I CSAP Jam Collaboration Administrator Guide 1805
Branding
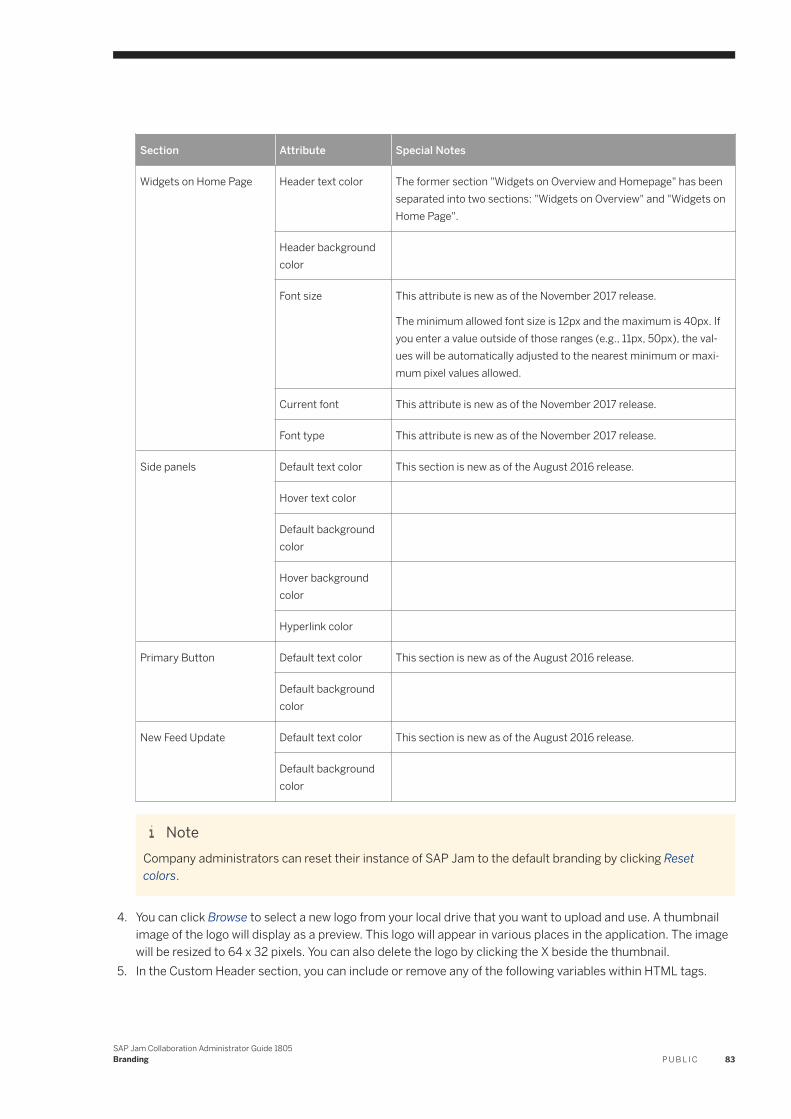
Section Attribute Special Notes
Widgets on Home Page Header text color The former section "Widgets on Overview and Homepage" has been separated into two sections: "Widgets on Overview" and "Widgets on Home Page".
Header background color
Font size This attribute is new as of the November 2017 release.
The minimum allowed font size is 12px and the maximum is 40px. If you enter a value outside of those ranges (e.g., 11px, 50px), the values will be automatically adjusted to the nearest minimum or maximum pixel values allowed.
Current font This attribute is new as of the November 2017 release.
Font type This attribute is new as of the November 2017 release.
Side panels Default text color This section is new as of the August 2016 release.
Hover text color
Default background color
Hover background color
Hyperlink color
Primary Button Default text color This section is new as of the August 2016 release.
Default background color
New Feed Update Default text color This section is new as of the August 2016 release.
Default background color
NoteCompany administrators can reset their instance of SAP Jam to the default branding by clicking Reset colors.
4. You can click Browse to select a new logo from your local drive that you want to upload and use. A thumbnail image of the logo will display as a preview. This logo will appear in various places in the application. The image will be resized to 64 x 32 pixels. You can also delete the logo by clicking the X beside the thumbnail.
5. In the Custom Header section, you can include or remove any of the following variables within HTML tags.
SAP Jam Collaboration Administrator Guide 1805Branding P U B L I C 83
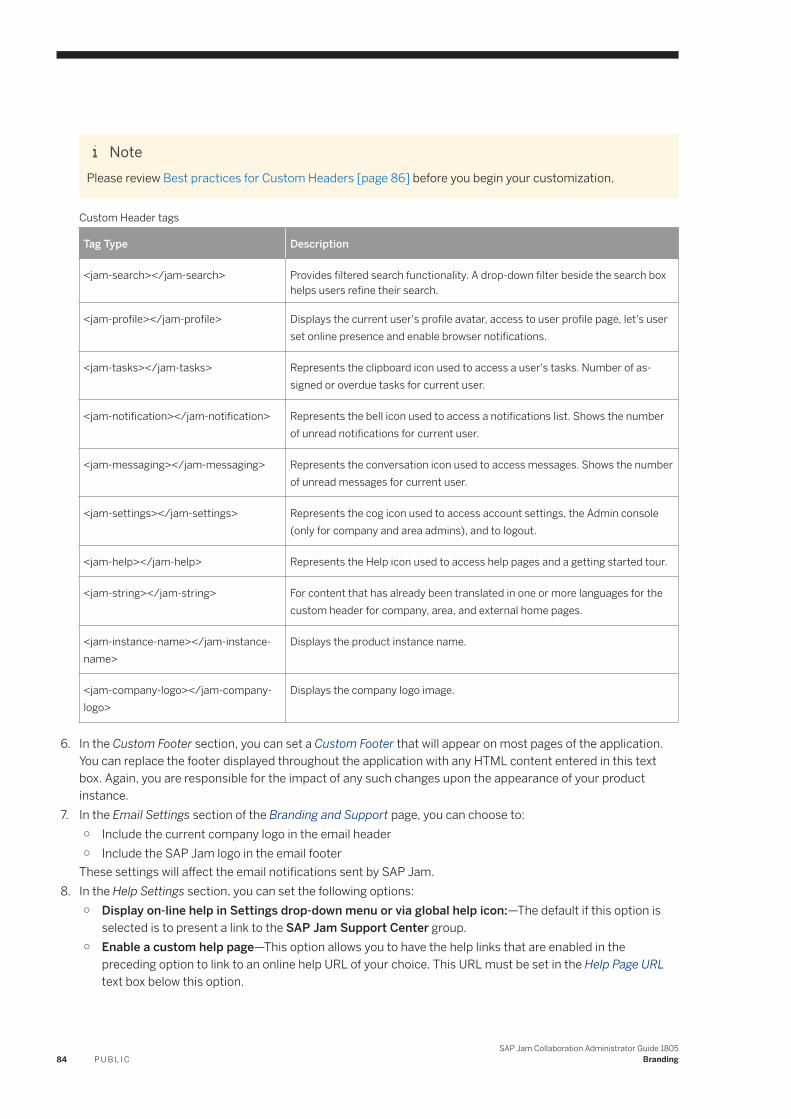
NotePlease review Best practices for Custom Headers [page 86] before you begin your customization.
Custom Header tags
Tag Type Description
<jam-search></jam-search> Provides filtered search functionality. A drop-down filter beside the search box helps users refine their search.
<jam-profile></jam-profile> Displays the current user's profile avatar, access to user profile page, let's user set online presence and enable browser notifications.
<jam-tasks></jam-tasks> Represents the clipboard icon used to access a user's tasks. Number of assigned or overdue tasks for current user.
<jam-notification></jam-notification> Represents the bell icon used to access a notifications list. Shows the number of unread notifications for current user.
<jam-messaging></jam-messaging> Represents the conversation icon used to access messages. Shows the number of unread messages for current user.
<jam-settings></jam-settings> Represents the cog icon used to access account settings, the Admin console (only for company and area admins), and to logout.
<jam-help></jam-help> Represents the Help icon used to access help pages and a getting started tour.
<jam-string></jam-string> For content that has already been translated in one or more languages for the custom header for company, area, and external home pages.
<jam-instance-name></jam-instance-name>
Displays the product instance name.
<jam-company-logo></jam-company-logo>
Displays the company logo image.
6. In the Custom Footer section, you can set a Custom Footer that will appear on most pages of the application.You can replace the footer displayed throughout the application with any HTML content entered in this text box. Again, you are responsible for the impact of any such changes upon the appearance of your product instance.
7. In the Email Settings section of the Branding and Support page, you can choose to:○ Include the current company logo in the email header○ Include the SAP Jam logo in the email footer
These settings will affect the email notifications sent by SAP Jam.8. In the Help Settings section, you can set the following options:
○ Display on-line help in Settings drop-down menu or via global help icon:—The default if this option is selected is to present a link to the SAP Jam Support Center group.
○ Enable a custom help page—This option allows you to have the help links that are enabled in the preceding option to link to an online help URL of your choice. This URL must be set in the Help Page URL text box below this option.
84 P U B L I CSAP Jam Collaboration Administrator Guide 1805
Branding
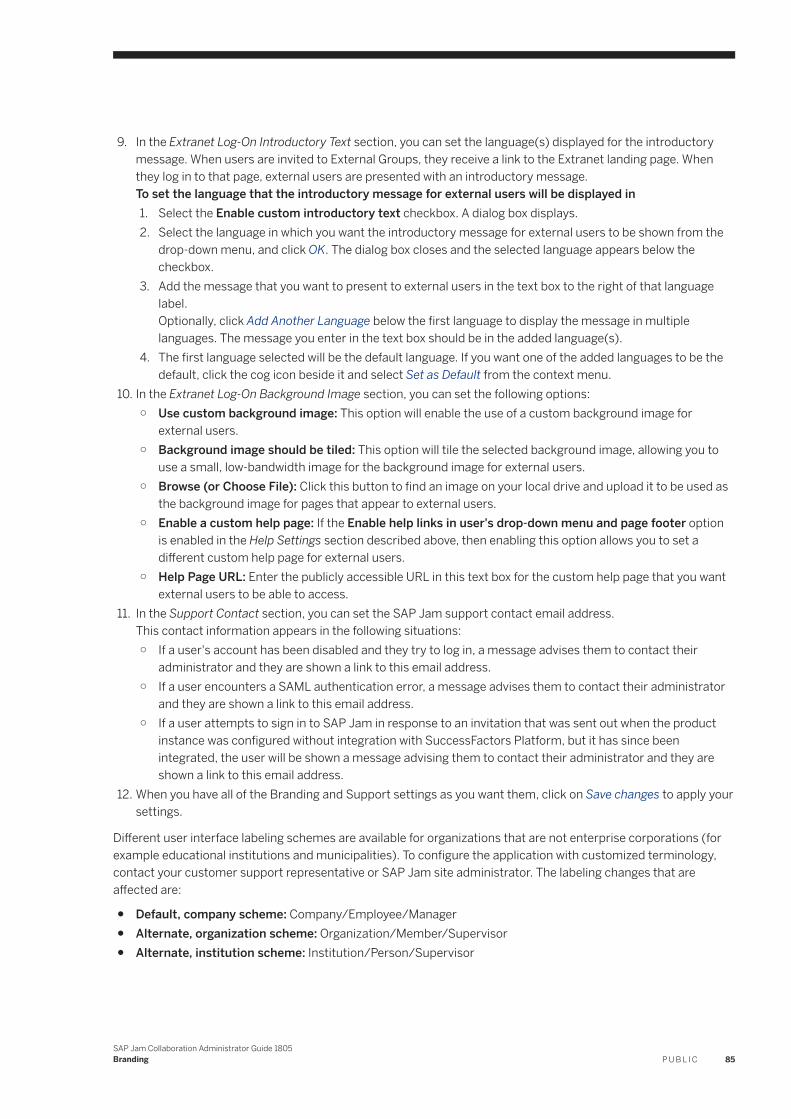
9. In the Extranet Log-On Introductory Text section, you can set the language(s) displayed for the introductory message. When users are invited to External Groups, they receive a link to the Extranet landing page. When they log in to that page, external users are presented with an introductory message.To set the language that the introductory message for external users will be displayed in1. Select the Enable custom introductory text checkbox. A dialog box displays.2. Select the language in which you want the introductory message for external users to be shown from the
drop-down menu, and click OK. The dialog box closes and the selected language appears below the checkbox.
3. Add the message that you want to present to external users in the text box to the right of that language label.Optionally, click Add Another Language below the first language to display the message in multiple languages. The message you enter in the text box should be in the added language(s).
4. The first language selected will be the default language. If you want one of the added languages to be the default, click the cog icon beside it and select Set as Default from the context menu.
10. In the Extranet Log-On Background Image section, you can set the following options:○ Use custom background image: This option will enable the use of a custom background image for
external users.○ Background image should be tiled: This option will tile the selected background image, allowing you to
use a small, low-bandwidth image for the background image for external users.○ Browse (or Choose File): Click this button to find an image on your local drive and upload it to be used as
the background image for pages that appear to external users.○ Enable a custom help page: If the Enable help links in user's drop-down menu and page footer option
is enabled in the Help Settings section described above, then enabling this option allows you to set a different custom help page for external users.
○ Help Page URL: Enter the publicly accessible URL in this text box for the custom help page that you want external users to be able to access.
11. In the Support Contact section, you can set the SAP Jam support contact email address.This contact information appears in the following situations:○ If a user's account has been disabled and they try to log in, a message advises them to contact their
administrator and they are shown a link to this email address.○ If a user encounters a SAML authentication error, a message advises them to contact their administrator
and they are shown a link to this email address.○ If a user attempts to sign in to SAP Jam in response to an invitation that was sent out when the product
instance was configured without integration with SuccessFactors Platform, but it has since been integrated, the user will be shown a message advising them to contact their administrator and they are shown a link to this email address.
12. When you have all of the Branding and Support settings as you want them, click on Save changes to apply your settings.
Different user interface labeling schemes are available for organizations that are not enterprise corporations (for example educational institutions and municipalities). To configure the application with customized terminology, contact your customer support representative or SAP Jam site administrator. The labeling changes that are affected are:
● Default, company scheme: Company/Employee/Manager● Alternate, organization scheme: Organization/Member/Supervisor● Alternate, institution scheme: Institution/Person/Supervisor
SAP Jam Collaboration Administrator Guide 1805Branding P U B L I C 85
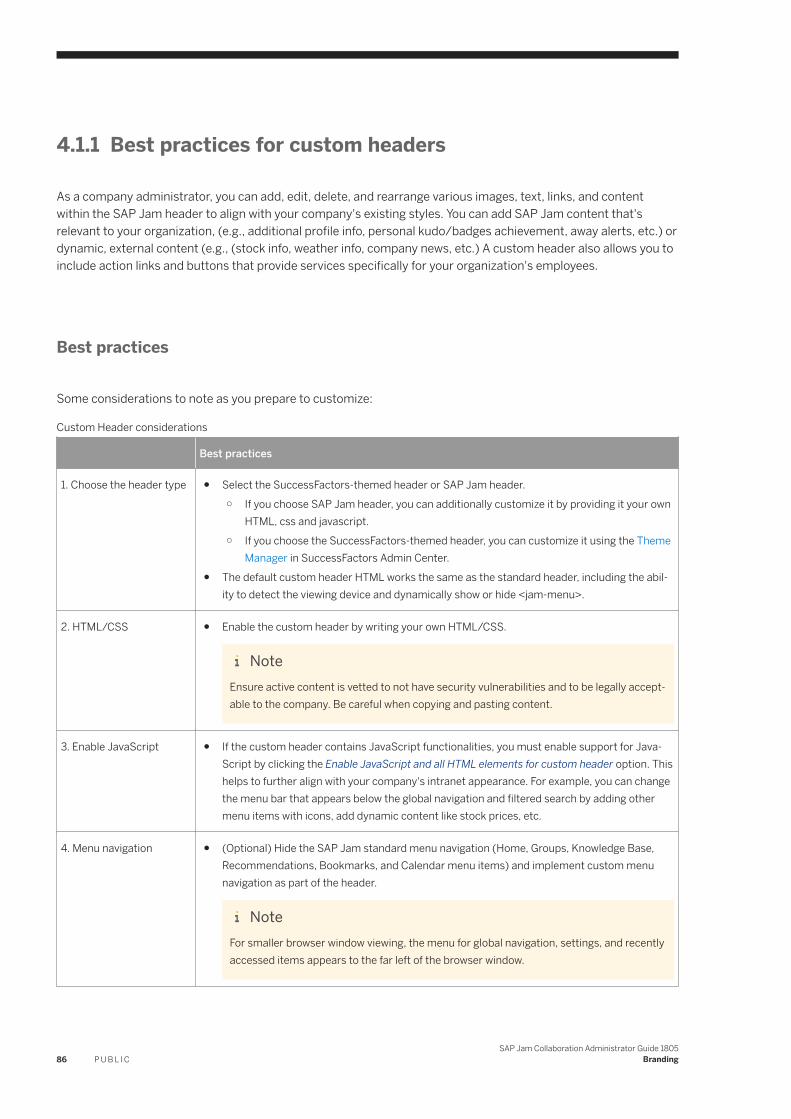
4.1.1 Best practices for custom headers
As a company administrator, you can add, edit, delete, and rearrange various images, text, links, and content within the SAP Jam header to align with your company's existing styles. You can add SAP Jam content that's relevant to your organization, (e.g., additional profile info, personal kudo/badges achievement, away alerts, etc.) or dynamic, external content (e.g., (stock info, weather info, company news, etc.) A custom header also allows you to include action links and buttons that provide services specifically for your organization's employees.
Best practices
Some considerations to note as you prepare to customize:
Custom Header considerations
Best practices
1. Choose the header type ● Select the SuccessFactors-themed header or SAP Jam header.○ If you choose SAP Jam header, you can additionally customize it by providing it your own
HTML, css and javascript.○ If you choose the SuccessFactors-themed header, you can customize it using the Theme
Manager in SuccessFactors Admin Center.● The default custom header HTML works the same as the standard header, including the abil
ity to detect the viewing device and dynamically show or hide <jam-menu>.
2. HTML/CSS ● Enable the custom header by writing your own HTML/CSS.
NoteEnsure active content is vetted to not have security vulnerabilities and to be legally acceptable to the company. Be careful when copying and pasting content.
3. Enable JavaScript ● If the custom header contains JavaScript functionalities, you must enable support for JavaScript by clicking the Enable JavaScript and all HTML elements for custom header option. This helps to further align with your company's intranet appearance. For example, you can change the menu bar that appears below the global navigation and filtered search by adding other menu items with icons, add dynamic content like stock prices, etc.
4. Menu navigation ● (Optional) Hide the SAP Jam standard menu navigation (Home, Groups, Knowledge Base, Recommendations, Bookmarks, and Calendar menu items) and implement custom menu navigation as part of the header.
NoteFor smaller browser window viewing, the menu for global navigation, settings, and recently accessed items appears to the far left of the browser window.
86 P U B L I CSAP Jam Collaboration Administrator Guide 1805
Branding
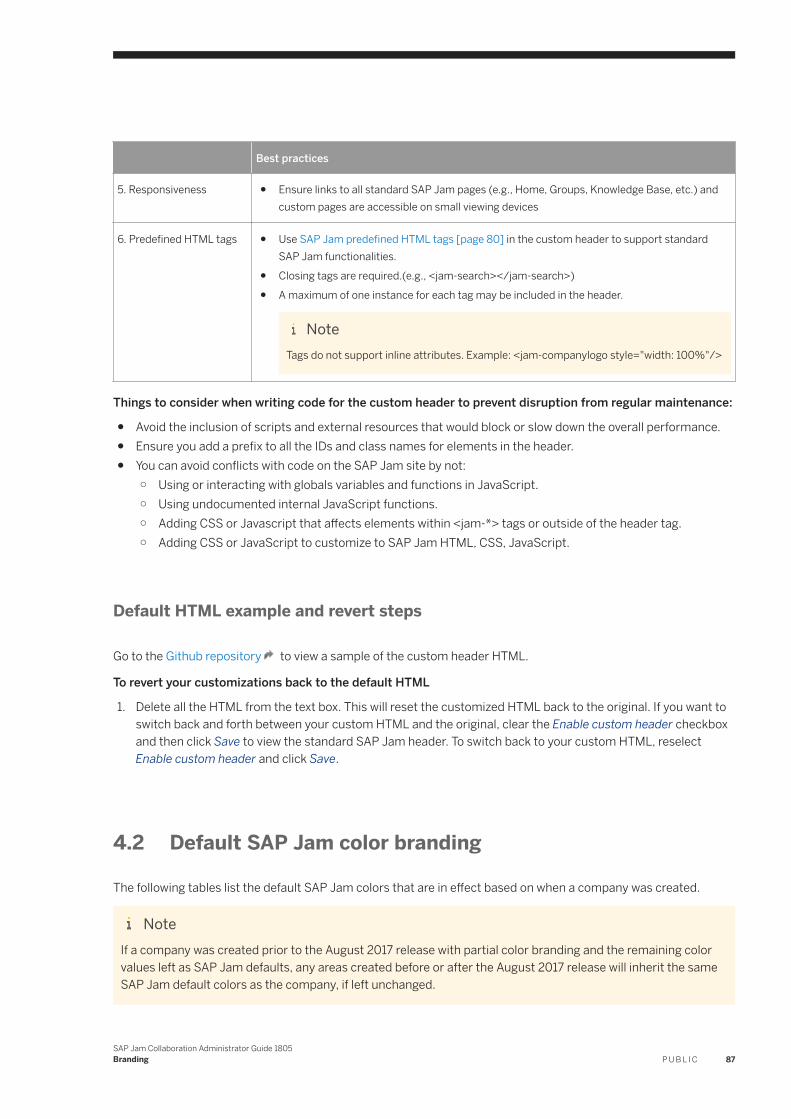
Best practices
5. Responsiveness ● Ensure links to all standard SAP Jam pages (e.g., Home, Groups, Knowledge Base, etc.) and custom pages are accessible on small viewing devices
6. Predefined HTML tags ● Use SAP Jam predefined HTML tags [page 80] in the custom header to support standard SAP Jam functionalities.
● Closing tags are required.(e.g., <jam-search></jam-search>)● A maximum of one instance for each tag may be included in the header.
NoteTags do not support inline attributes. Example: <jam-companylogo style="width: 100%"/>
Things to consider when writing code for the custom header to prevent disruption from regular maintenance:
● Avoid the inclusion of scripts and external resources that would block or slow down the overall performance.● Ensure you add a prefix to all the IDs and class names for elements in the header.● You can avoid conflicts with code on the SAP Jam site by not:
○ Using or interacting with globals variables and functions in JavaScript.○ Using undocumented internal JavaScript functions.○ Adding CSS or Javascript that affects elements within <jam-*> tags or outside of the header tag.○ Adding CSS or JavaScript to customize to SAP Jam HTML, CSS, JavaScript.
Default HTML example and revert steps
Go to the Github repository to view a sample of the custom header HTML.
To revert your customizations back to the default HTML
1. Delete all the HTML from the text box. This will reset the customized HTML back to the original. If you want to switch back and forth between your custom HTML and the original, clear the Enable custom header checkbox and then click Save to view the standard SAP Jam header. To switch back to your custom HTML, reselect Enable custom header and click Save.
4.2 Default SAP Jam color branding
The following tables list the default SAP Jam colors that are in effect based on when a company was created.
NoteIf a company was created prior to the August 2017 release with partial color branding and the remaining color values left as SAP Jam defaults, any areas created before or after the August 2017 release will inherit the same SAP Jam default colors as the company, if left unchanged.
SAP Jam Collaboration Administrator Guide 1805Branding P U B L I C 87
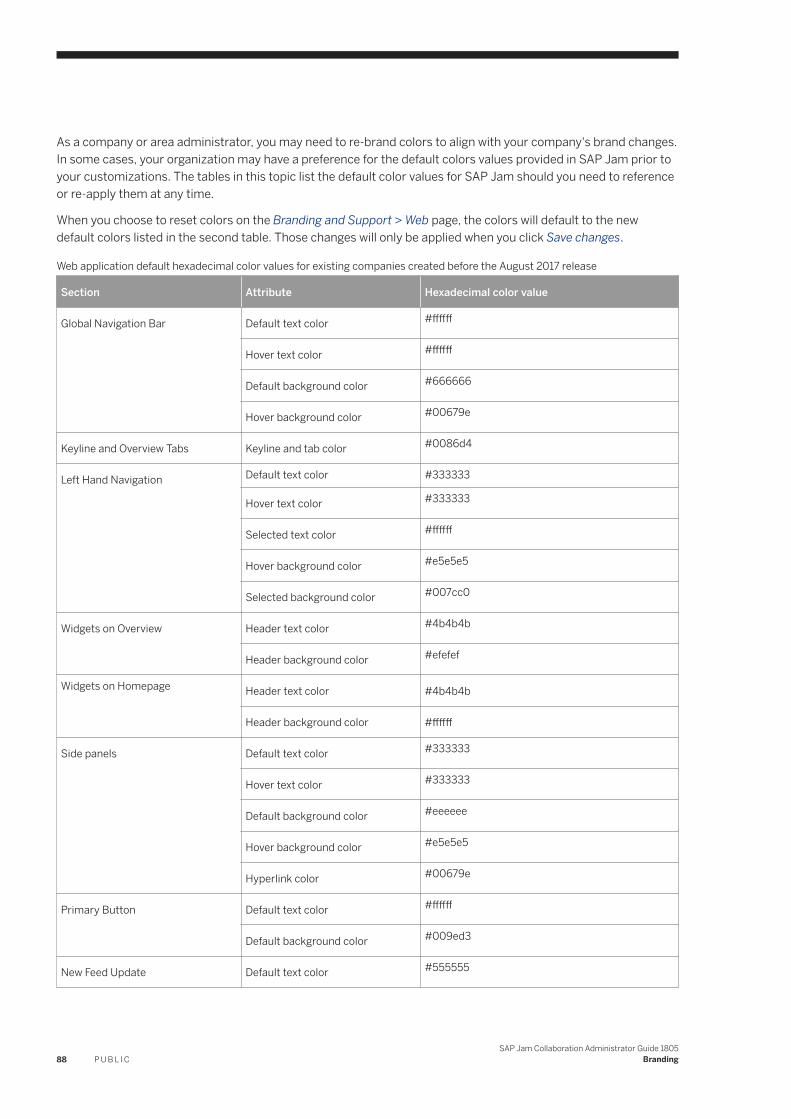
As a company or area administrator, you may need to re-brand colors to align with your company's brand changes. In some cases, your organization may have a preference for the default colors values provided in SAP Jam prior to your customizations. The tables in this topic list the default color values for SAP Jam should you need to reference or re-apply them at any time.
When you choose to reset colors on the Branding and Support > Web page, the colors will default to the new default colors listed in the second table. Those changes will only be applied when you click Save changes.
Web application default hexadecimal color values for existing companies created before the August 2017 release
Section Attribute Hexadecimal color value
Global Navigation Bar Default text color #ffffff
Hover text color #ffffff
Default background color #666666
Hover background color #00679e
Keyline and Overview Tabs Keyline and tab color #0086d4
Left Hand Navigation Default text color #333333
Hover text color #333333
Selected text color #ffffff
Hover background color #e5e5e5
Selected background color #007cc0
Widgets on Overview Header text color #4b4b4b
Header background color #efefef
Widgets on Homepage Header text color #4b4b4b
Header background color #ffffff
Side panels Default text color #333333
Hover text color #333333
Default background color #eeeeee
Hover background color #e5e5e5
Hyperlink color #00679e
Primary Button Default text color #ffffff
Default background color #009ed3
New Feed Update Default text color #555555
88 P U B L I CSAP Jam Collaboration Administrator Guide 1805
Branding
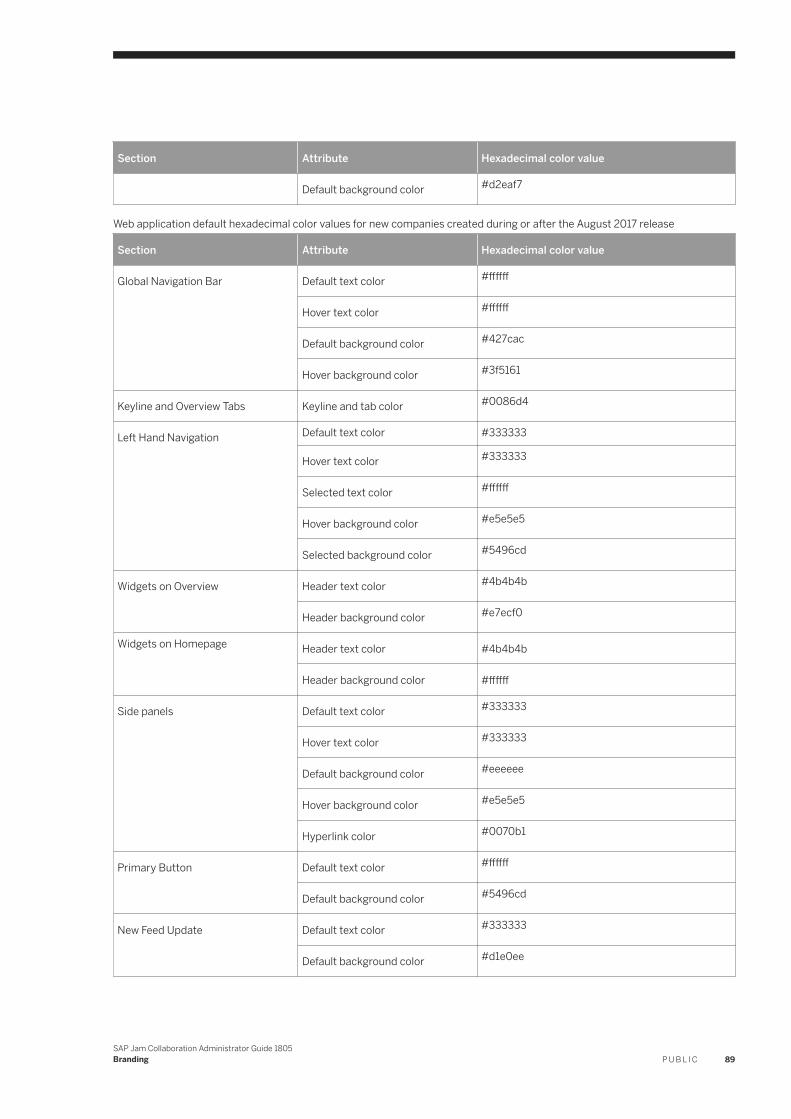
Section Attribute Hexadecimal color value
Default background color #d2eaf7
Web application default hexadecimal color values for new companies created during or after the August 2017 release
Section Attribute Hexadecimal color value
Global Navigation Bar Default text color #ffffff
Hover text color #ffffff
Default background color #427cac
Hover background color #3f5161
Keyline and Overview Tabs Keyline and tab color #0086d4
Left Hand Navigation Default text color #333333
Hover text color #333333
Selected text color #ffffff
Hover background color #e5e5e5
Selected background color #5496cd
Widgets on Overview Header text color #4b4b4b
Header background color #e7ecf0
Widgets on Homepage Header text color #4b4b4b
Header background color #ffffff
Side panels Default text color #333333
Hover text color #333333
Default background color #eeeeee
Hover background color #e5e5e5
Hyperlink color #0070b1
Primary Button Default text color #ffffff
Default background color #5496cd
New Feed Update Default text color #333333
Default background color #d1e0ee
SAP Jam Collaboration Administrator Guide 1805Branding P U B L I C 89
4.3 SAP Jam mobile app
Like the SAP Jam web app, you can also customize the key accent colors for the SAP Jam mobile app.
Brand the SAP Jam mobile app
To brand your company's SAP Jam mobile app experience with custom colors
1. Go to the SAP Jam Admin console and select Branding Mobile from the left navigation menu.2. Customize the following:
○ Main banner: Banner displays at the top of the screen.○ Main banner font color: Font for text used within the banner section.○ Accent color: Accent lines.○ Link color: Clickable links.○ Company banner: Select a branded image for company banner.
NoteLogos must have dimensions with width and height less than or equal to 1080 x 324 pixels.
○ Launch widget icon (Android only): The icon that a user can tap to open the mobile app on Android. The product instance name displays below the icon. Icon must be 512 x 512 pixels.
NoteThe Launch widget icon is not the same as the app icon; users will not see the launch widget icon in their Android App Drawer. Instead, if the SAP Jam Launcher Widget is added to their Android home screens, they will see the specified custom icon.
3. Click Save changes.
Reset colors
If you wish to reset the branding to the original SAP Jam default colors, click Reset colors. The colors will reset to the following SAP Jam mobile app defaults:
● Main banner: #427cac● Main banner font color: #ffffff● Accent color: #427cac● Link color: #0070b1
90 P U B L I CSAP Jam Collaboration Administrator Guide 1805
Branding
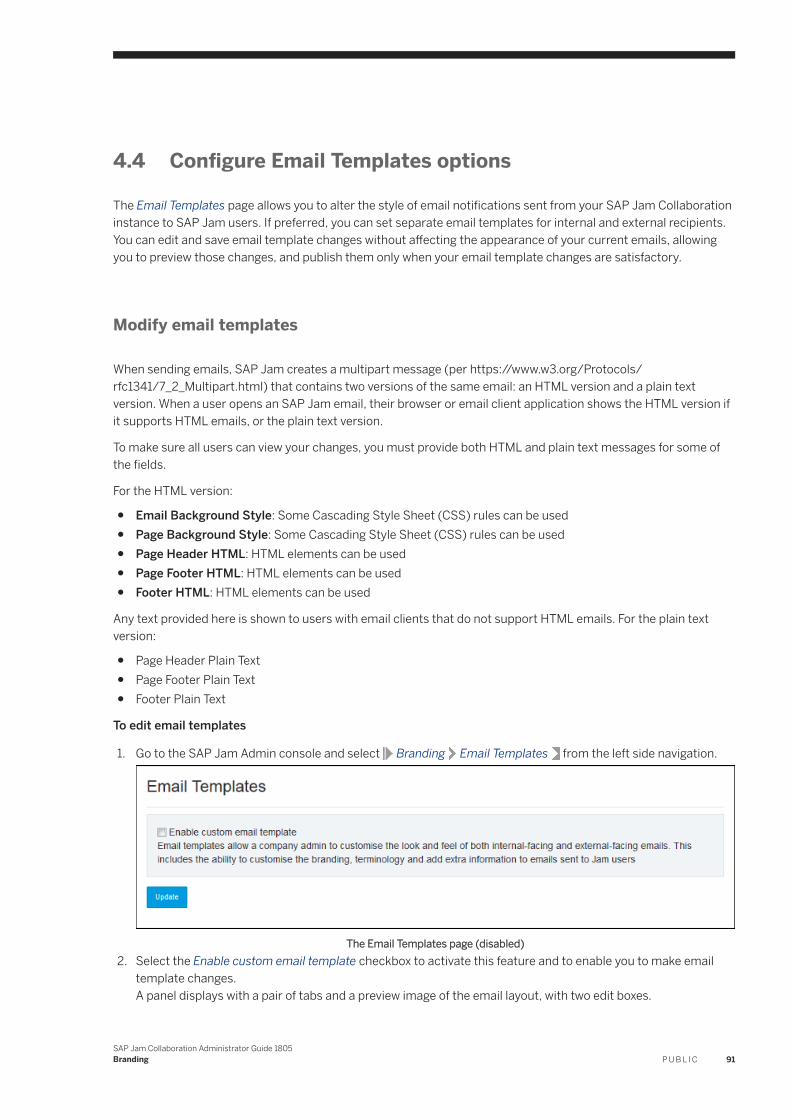
4.4 Configure Email Templates options
The Email Templates page allows you to alter the style of email notifications sent from your SAP Jam Collaboration instance to SAP Jam users. If preferred, you can set separate email templates for internal and external recipients. You can edit and save email template changes without affecting the appearance of your current emails, allowing you to preview those changes, and publish them only when your email template changes are satisfactory.
Modify email templates
When sending emails, SAP Jam creates a multipart message (per https://www.w3.org/Protocols/rfc1341/7_2_Multipart.html) that contains two versions of the same email: an HTML version and a plain text version. When a user opens an SAP Jam email, their browser or email client application shows the HTML version if it supports HTML emails, or the plain text version.
To make sure all users can view your changes, you must provide both HTML and plain text messages for some of the fields.
For the HTML version:
● Email Background Style: Some Cascading Style Sheet (CSS) rules can be used● Page Background Style: Some Cascading Style Sheet (CSS) rules can be used● Page Header HTML: HTML elements can be used● Page Footer HTML: HTML elements can be used● Footer HTML: HTML elements can be used
Any text provided here is shown to users with email clients that do not support HTML emails. For the plain text version:
● Page Header Plain Text● Page Footer Plain Text● Footer Plain Text
To edit email templates
1. Go to the SAP Jam Admin console and select Branding Email Templates from the left side navigation.
The Email Templates page (disabled)2. Select the Enable custom email template checkbox to activate this feature and to enable you to make email
template changes.A panel displays with a pair of tabs and a preview image of the email layout, with two edit boxes.
SAP Jam Collaboration Administrator Guide 1805Branding P U B L I C 91
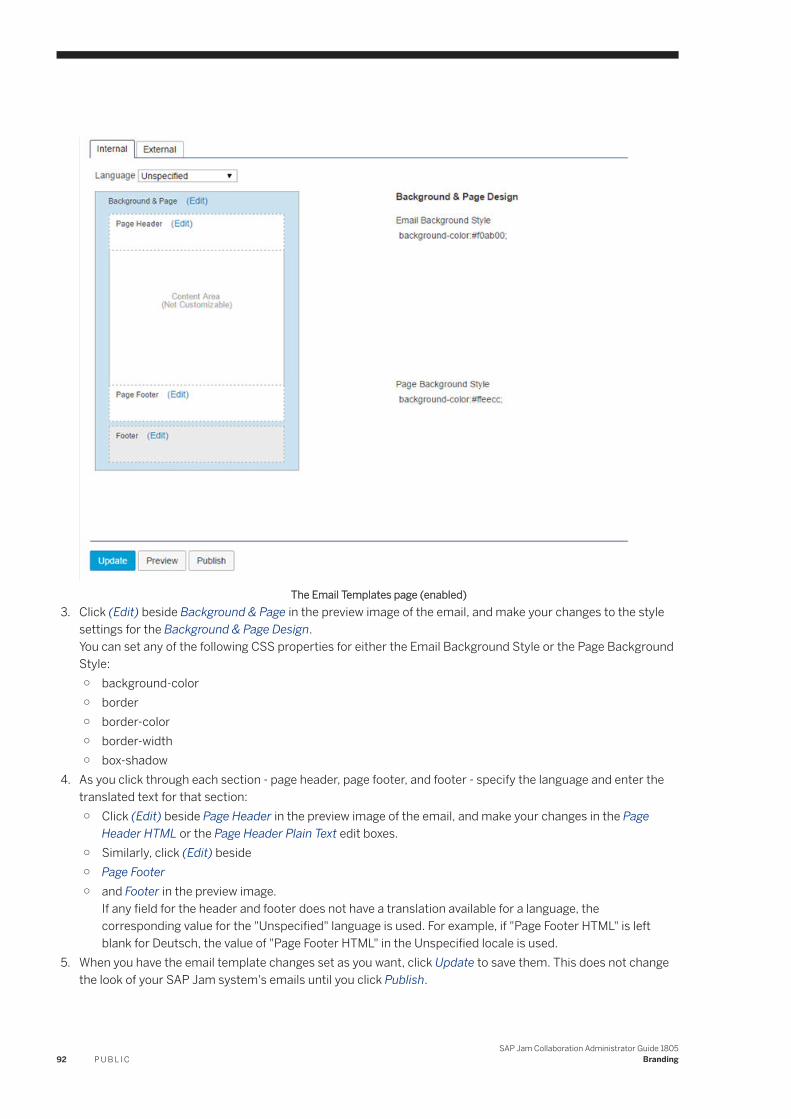
The Email Templates page (enabled)3. Click (Edit) beside Background & Page in the preview image of the email, and make your changes to the style
settings for the Background & Page Design.You can set any of the following CSS properties for either the Email Background Style or the Page Background Style:○ background-color○ border○ border-color○ border-width○ box-shadow
4. As you click through each section - page header, page footer, and footer - specify the language and enter the translated text for that section:○ Click (Edit) beside Page Header in the preview image of the email, and make your changes in the Page
Header HTML or the Page Header Plain Text edit boxes.○ Similarly, click (Edit) beside○ Page Footer○ and Footer in the preview image.
If any field for the header and footer does not have a translation available for a language, the corresponding value for the "Unspecified" language is used. For example, if "Page Footer HTML" is left blank for Deutsch, the value of "Page Footer HTML" in the Unspecified locale is used.
5. When you have the email template changes set as you want, click Update to save them. This does not change the look of your SAP Jam system's emails until you click Publish.
92 P U B L I CSAP Jam Collaboration Administrator Guide 1805
Branding
To preview your email template changes
1. To preview your changes, ensure that you have saved them by clicking Update.2. Once your changes have been saved, click Preview. A Send Email Template dialog box displays.3. In the text box, enter the email addresses of those who should preview the revisions. Multiple email addresses
can be entered by entering them in a comma-separated list.4. Click Send. Emails are sent to the specified recipients using your email template revisions.
To revert your email template changes
Once you save the changes that you have made to an email template by clicking Update, a notification panel appears between the Enable custom email template option and the template editing tabs, advising you that "The template is saved, but is not yet published".
Click Revert to Published Version if you decide to roll back your saved changes. The changes will be reverted, and the published email template settings are restored.
To publish your email template changes
Once you have reviewed your template changes, and you are ready to use them, click Publish, either below the template editing tabs, or above them.
To configure a different email template for external users
To set a different email template for external users, do the following:
1. Click on the External tab, and deselect the Same settings used for Internal Email Template checkbox. A preview image of the email layout and editable text boxes appears in the tab, like those in the Internal tab.
2. Make the changes that you want, just as you did for the Internal template.3. Save, preview, and publish the changes, just as you did for the Internal template.4. If you decide to return to using the same email template for email to both internal and external users, select
the Same settings used for Internal Email Template checkbox. The preview image of the email layout and the editable text boxes disappears in the tab, like those in the Internal tab.
NoteYou must click Publish to enable this change back to using the same template for emails from SAP Jam to internal and external users.
SAP Jam Collaboration Administrator Guide 1805Branding P U B L I C 93
To disable the use of email templates
If you decide that you no longer want to use customized email templates, clear the Enable custom email template checkbox.
The preview image of the email layout and the editable text boxes disappears from the page.
NoteYou must click Update to save this change.
4.5 QR Codes
The SAP Jam QR Code scanner supports SAP Jam specific QR codes or any other QR codes encoding a valid web URL. You can customize the SAP Jam QR code that's shared and used to join groups.
Brand the QR Codes
To brand your company QR Codes with custom colors
1. Go to the SAP Jam Admin console and select Branding QR Codes from the left navigation menu.2. Customize the following:
○ Foreground color: Choose a color that can be easily distinguished from the background.○ Background color: Choose a color that can be easily distinguished from the foreground.○ Logo: Click choose file to select a logo from your local machine.
○ NoteLogos must fit square size dimensions and have width and height less than or equal to 200 pixels.
3. Click Save changes.
4.6 Text replacement
You can now customize your company's instance of SAP Jam by changing any text, labels, menus, and messages that display on a standard web browser or mobile web browser.
These customizations must be submitted to the SAP Jam Support team for processing. For example, you can change all instances of the term "Kudo" that appear on profile pages, feed upates, action buttons, and other places in the user interface to "Recognition", which is more suitable for and understood by your users. If your request is on the list of pre-approved text, it will be fulfilled. Otherwise, it will be reviewed by the product team first and fulfilled upon approval.
94 P U B L I CSAP Jam Collaboration Administrator Guide 1805
Branding
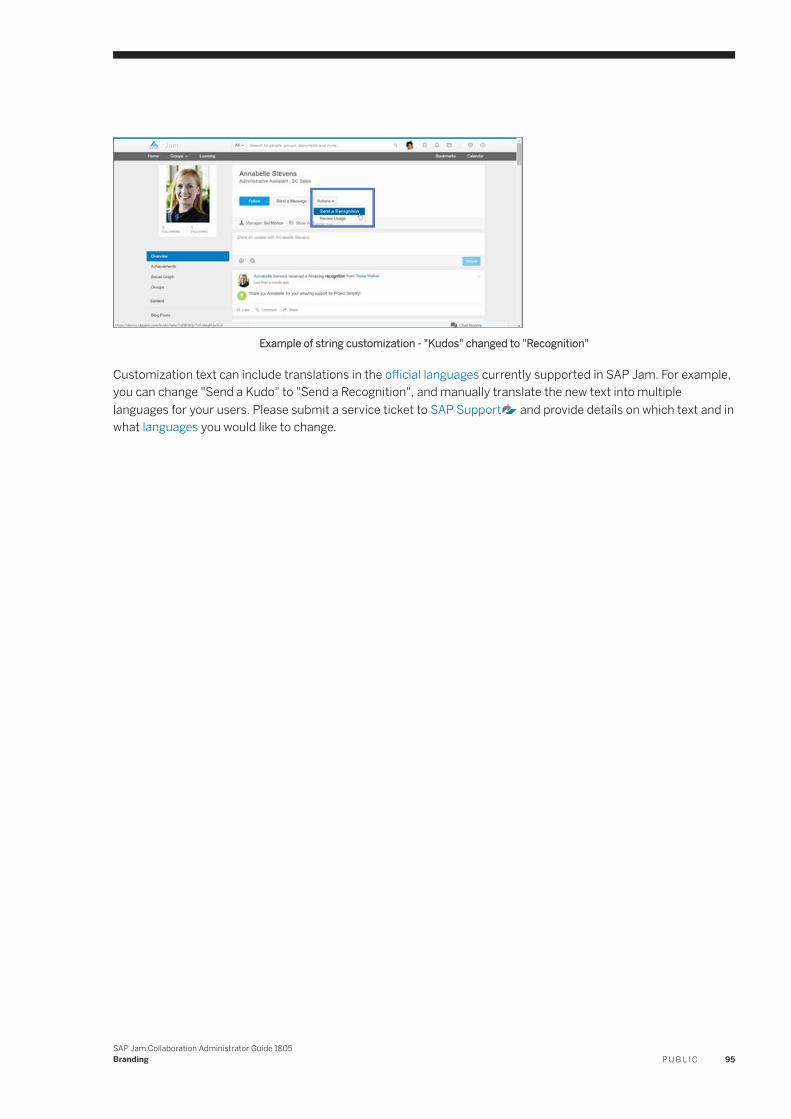
Example of string customization - "Kudos" changed to "Recognition"
Customization text can include translations in the official languages currently supported in SAP Jam. For example, you can change "Send a Kudo" to "Send a Recognition", and manually translate the new text into multiple languages for your users. Please submit a service ticket to SAP Support and provide details on which text and in what languages you would like to change.
SAP Jam Collaboration Administrator Guide 1805Branding P U B L I C 95
5 Product Setup
5.1 Configure SAP Jam Collaboration Features
The Product Setup Features page allows you to enable or disable many features and options.
To configure which features are available to company users
1. Go to the SAP Jam Admin console and select Product Setup Features from the left side navigation.2. Select any of the following:
Compliance options
Option Description
Enable Compliance Monitor Monitors the content posted to SAP Jam and flag items that contain terms that are listed in the Compliance Dictionary. See Configure Compliance monitoring [page 277] for details on managing this feature. Enabling the alert does not scan content retroactively, only from the date the alert is enabled. Disabling the alert permits users to post content to SAP Jam without flagging Compliance Dictionary violations. If content has already been scanned prior to disabling, flagged items remain
listed in the Compliance and Security Compliance Pending Flagged Itemstable.
Enable Profanity Monitor Monitors the content posted to SAP Jam and flag items that contain terms that are listed in the Profanity Dictionary. See Configure Compliance monitoring [page 277] for details on managing this feature. Enabling the alert does not scan content retroactively, only from the date the alert is enabled. Disabling the alert permits users to post profanities to SAP Jam without flagging Profanity Dictionary violations. If content has already been scanned prior to disabling, flagged items remain listed in the
Compliance and Security Compliance Pending Flagged Items table.
Enable Unscannable Filter Flags all items where content cannot be scanned (for example: images, videos, zip files). The attributes of these files such as filename, title and description are scanned by Compliance and Profanity filters. This filter does not scan content retroactively; it scans from the date this filter is enabled.
NoteTo restrict IP access, please contact your SAP Jam site administrator.
96 P U B L I CSAP Jam Collaboration Administrator Guide 1805
Product Setup
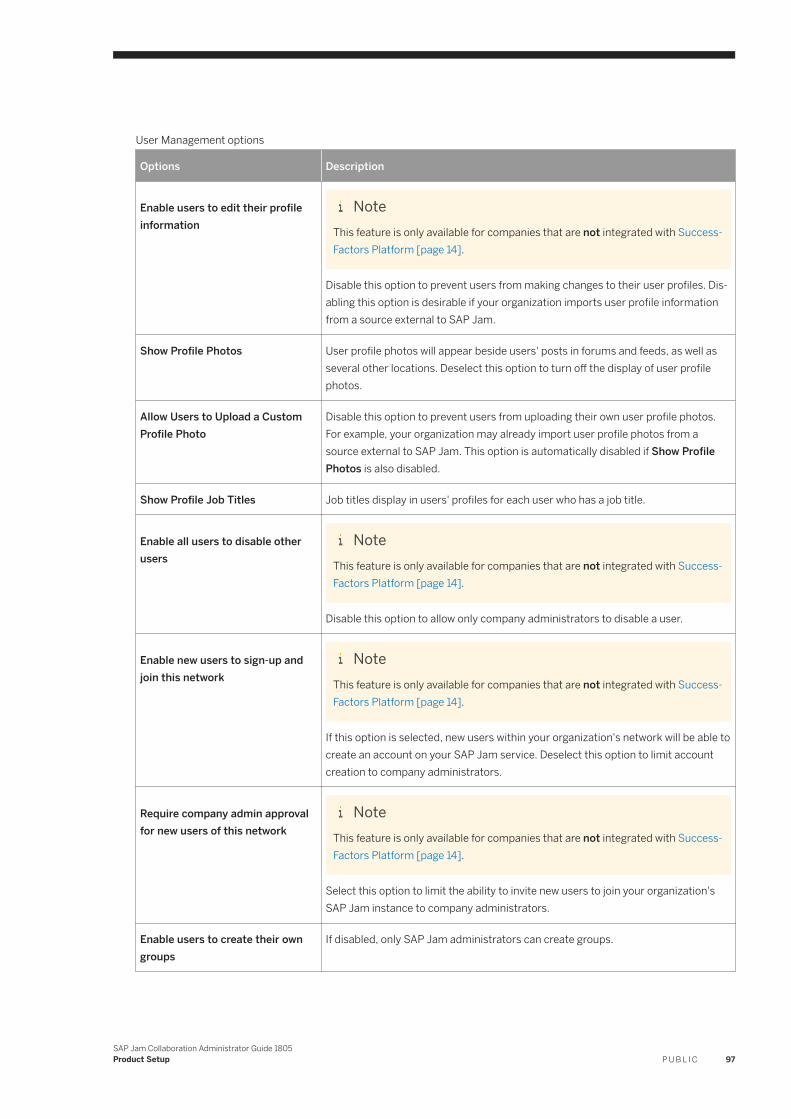
User Management options
Options Description
Enable users to edit their profile information
NoteThis feature is only available for companies that are not integrated with SuccessFactors Platform [page 14].
Disable this option to prevent users from making changes to their user profiles. Disabling this option is desirable if your organization imports user profile information from a source external to SAP Jam.
Show Profile Photos User profile photos will appear beside users' posts in forums and feeds, as well as several other locations. Deselect this option to turn off the display of user profile photos.
Allow Users to Upload a Custom Profile Photo
Disable this option to prevent users from uploading their own user profile photos. For example, your organization may already import user profile photos from a source external to SAP Jam. This option is automatically disabled if Show Profile Photos is also disabled.
Show Profile Job Titles Job titles display in users' profiles for each user who has a job title.
Enable all users to disable other users
NoteThis feature is only available for companies that are not integrated with SuccessFactors Platform [page 14].
Disable this option to allow only company administrators to disable a user.
Enable new users to sign-up and join this network
NoteThis feature is only available for companies that are not integrated with SuccessFactors Platform [page 14].
If this option is selected, new users within your organization's network will be able to create an account on your SAP Jam service. Deselect this option to limit account creation to company administrators.
Require company admin approval for new users of this network
NoteThis feature is only available for companies that are not integrated with SuccessFactors Platform [page 14].
Select this option to limit the ability to invite new users to join your organization's SAP Jam instance to company administrators.
Enable users to create their own groups
If disabled, only SAP Jam administrators can create groups.
SAP Jam Collaboration Administrator Guide 1805Product Setup P U B L I C 97
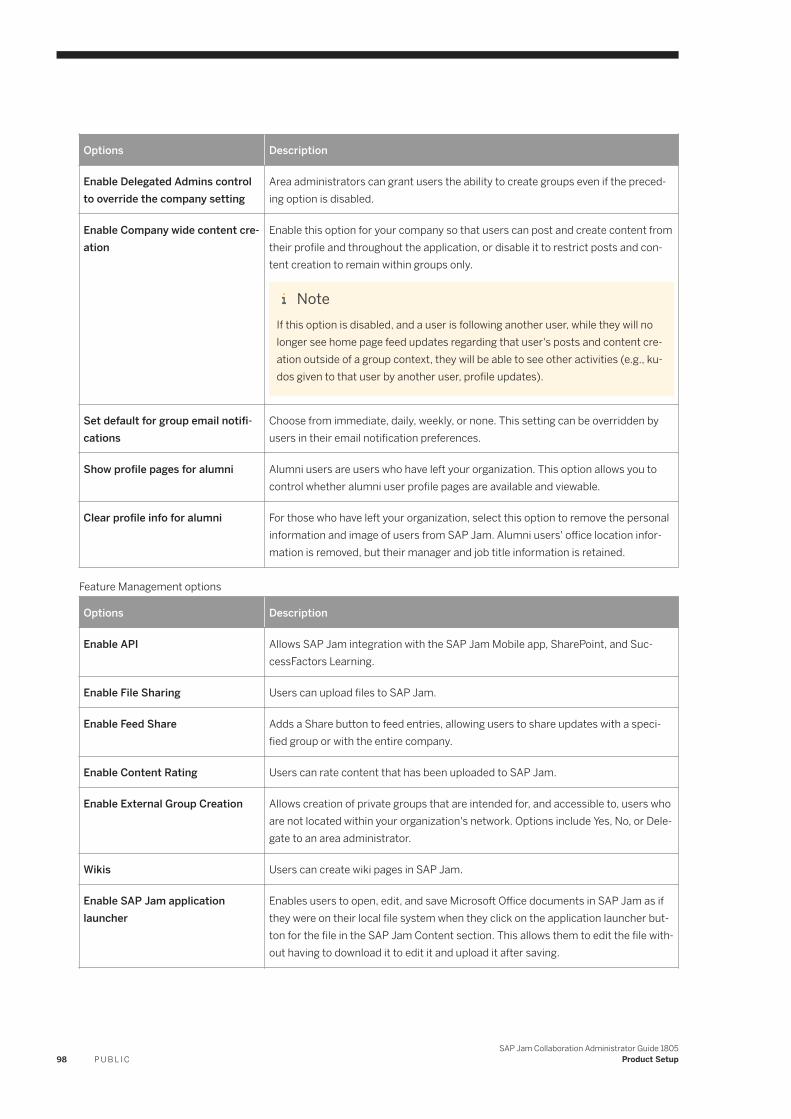
Options Description
Enable Delegated Admins control to override the company setting
Area administrators can grant users the ability to create groups even if the preceding option is disabled.
Enable Company wide content creation
Enable this option for your company so that users can post and create content from their profile and throughout the application, or disable it to restrict posts and content creation to remain within groups only.
NoteIf this option is disabled, and a user is following another user, while they will no longer see home page feed updates regarding that user's posts and content creation outside of a group context, they will be able to see other activities (e.g., kudos given to that user by another user, profile updates).
Set default for group email notifi-cations
Choose from immediate, daily, weekly, or none. This setting can be overridden by users in their email notification preferences.
Show profile pages for alumni Alumni users are users who have left your organization. This option allows you to control whether alumni user profile pages are available and viewable.
Clear profile info for alumni For those who have left your organization, select this option to remove the personal information and image of users from SAP Jam. Alumni users' office location information is removed, but their manager and job title information is retained.
Feature Management options
Options Description
Enable API Allows SAP Jam integration with the SAP Jam Mobile app, SharePoint, and SuccessFactors Learning.
Enable File Sharing Users can upload files to SAP Jam.
Enable Feed Share Adds a Share button to feed entries, allowing users to share updates with a specified group or with the entire company.
Enable Content Rating Users can rate content that has been uploaded to SAP Jam.
Enable External Group Creation Allows creation of private groups that are intended for, and accessible to, users who are not located within your organization's network. Options include Yes, No, or Delegate to an area administrator.
Wikis Users can create wiki pages in SAP Jam.
Enable SAP Jam application launcher
Enables users to open, edit, and save Microsoft Office documents in SAP Jam as if they were on their local file system when they click on the application launcher button for the file in the SAP Jam Content section. This allows them to edit the file without having to download it to edit it and upload it after saving.
98 P U B L I CSAP Jam Collaboration Administrator Guide 1805
Product Setup
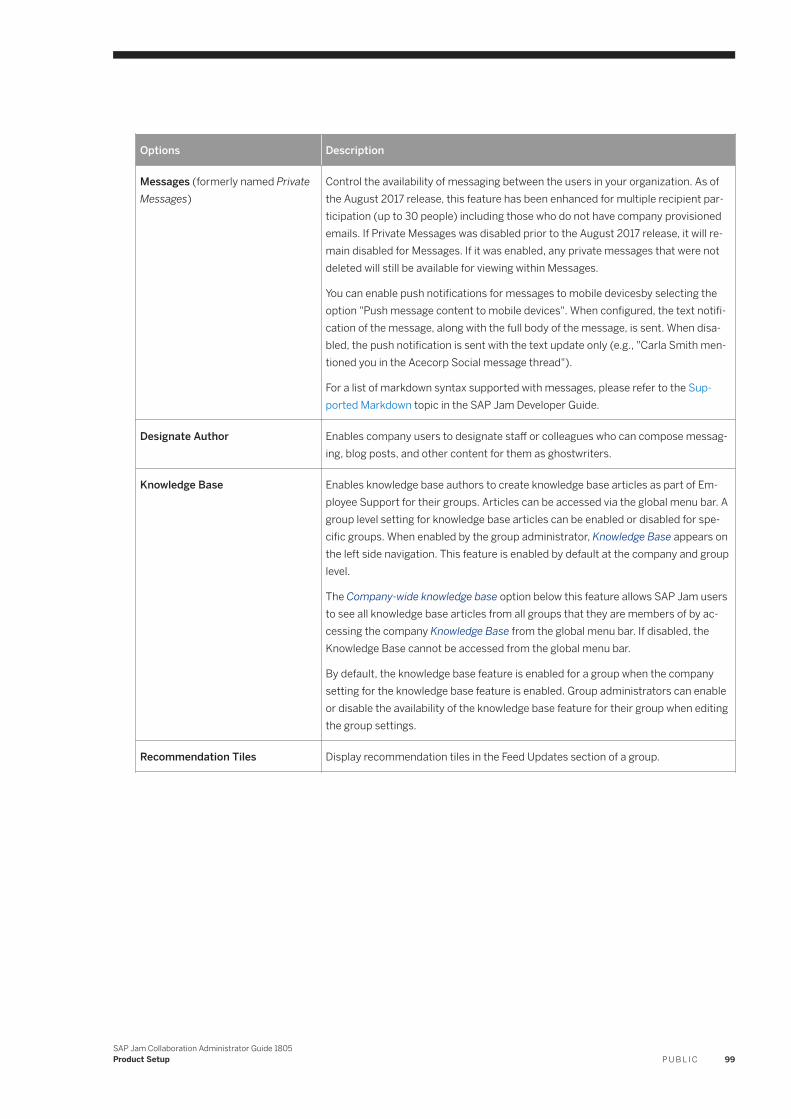
Options Description
Messages (formerly named Private Messages)
Control the availability of messaging between the users in your organization. As of the August 2017 release, this feature has been enhanced for multiple recipient participation (up to 30 people) including those who do not have company provisioned emails. If Private Messages was disabled prior to the August 2017 release, it will remain disabled for Messages. If it was enabled, any private messages that were not deleted will still be available for viewing within Messages.
You can enable push notifications for messages to mobile devicesby selecting the option "Push message content to mobile devices". When configured, the text notifi-cation of the message, along with the full body of the message, is sent. When disabled, the push notification is sent with the text update only (e.g., "Carla Smith mentioned you in the Acecorp Social message thread").
For a list of markdown syntax supported with messages, please refer to the Supported Markdown topic in the SAP Jam Developer Guide.
Designate Author Enables company users to designate staff or colleagues who can compose messaging, blog posts, and other content for them as ghostwriters.
Knowledge Base Enables knowledge base authors to create knowledge base articles as part of Employee Support for their groups. Articles can be accessed via the global menu bar. A group level setting for knowledge base articles can be enabled or disabled for specific groups. When enabled by the group administrator, Knowledge Base appears on the left side navigation. This feature is enabled by default at the company and group level.
The Company-wide knowledge base option below this feature allows SAP Jam users to see all knowledge base articles from all groups that they are members of by accessing the company Knowledge Base from the global menu bar. If disabled, the Knowledge Base cannot be accessed from the global menu bar.
By default, the knowledge base feature is enabled for a group when the company setting for the knowledge base feature is enabled. Group administrators can enable or disable the availability of the knowledge base feature for their group when editing the group settings.
Recommendation Tiles Display recommendation tiles in the Feed Updates section of a group.
SAP Jam Collaboration Administrator Guide 1805Product Setup P U B L I C 99
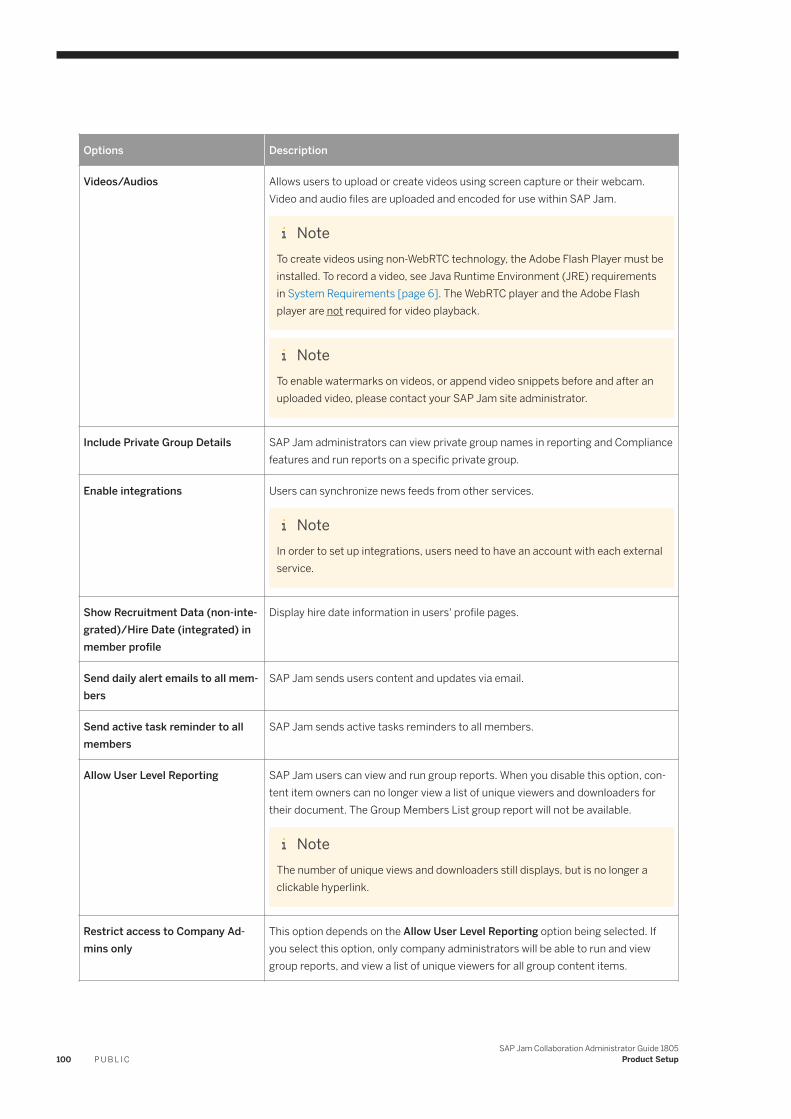
Options Description
Videos/Audios Allows users to upload or create videos using screen capture or their webcam. Video and audio files are uploaded and encoded for use within SAP Jam.
NoteTo create videos using non-WebRTC technology, the Adobe Flash Player must be installed. To record a video, see Java Runtime Environment (JRE) requirements in System Requirements [page 6]. The WebRTC player and the Adobe Flash player are not required for video playback.
NoteTo enable watermarks on videos, or append video snippets before and after an uploaded video, please contact your SAP Jam site administrator.
Include Private Group Details SAP Jam administrators can view private group names in reporting and Compliance features and run reports on a specific private group.
Enable integrations Users can synchronize news feeds from other services.
NoteIn order to set up integrations, users need to have an account with each external service.
Show Recruitment Data (non-integrated)/Hire Date (integrated) in member profile
Display hire date information in users' profile pages.
Send daily alert emails to all members
SAP Jam sends users content and updates via email.
Send active task reminder to all members
SAP Jam sends active tasks reminders to all members.
Allow User Level Reporting SAP Jam users can view and run group reports. When you disable this option, content item owners can no longer view a list of unique viewers and downloaders for their document. The Group Members List group report will not be available.
NoteThe number of unique views and downloaders still displays, but is no longer a clickable hyperlink.
Restrict access to Company Admins only
This option depends on the Allow User Level Reporting option being selected. If you select this option, only company administrators will be able to run and view group reports, and view a list of unique viewers for all group content items.
100 P U B L I CSAP Jam Collaboration Administrator Guide 1805
Product Setup
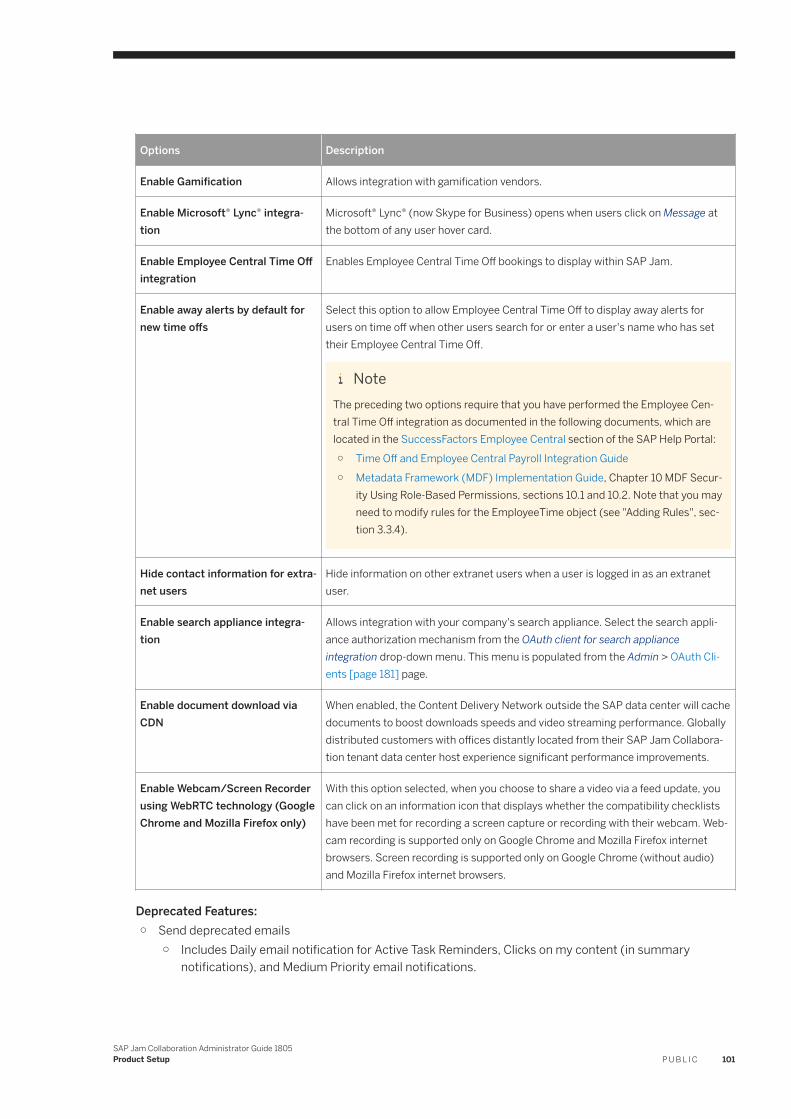
Options Description
Enable Gamification Allows integration with gamification vendors.
Enable Microsoft® Lync® integration
Microsoft® Lync® (now Skype for Business) opens when users click on Message at the bottom of any user hover card.
Enable Employee Central Time Off integration
Enables Employee Central Time Off bookings to display within SAP Jam.
Enable away alerts by default for new time offs
Select this option to allow Employee Central Time Off to display away alerts for users on time off when other users search for or enter a user's name who has set their Employee Central Time Off.
NoteThe preceding two options require that you have performed the Employee Central Time Off integration as documented in the following documents, which are located in the SuccessFactors Employee Central section of the SAP Help Portal:○ Time Off and Employee Central Payroll Integration Guide○ Metadata Framework (MDF) Implementation Guide, Chapter 10 MDF Secur
ity Using Role-Based Permissions, sections 10.1 and 10.2. Note that you may need to modify rules for the EmployeeTime object (see "Adding Rules", section 3.3.4).
Hide contact information for extranet users
Hide information on other extranet users when a user is logged in as an extranet user.
Enable search appliance integration
Allows integration with your company's search appliance. Select the search appliance authorization mechanism from the OAuth client for search appliance integration drop-down menu. This menu is populated from the Admin > OAuth Clients [page 181] page.
Enable document download via CDN
When enabled, the Content Delivery Network outside the SAP data center will cache documents to boost downloads speeds and video streaming performance. Globally distributed customers with offices distantly located from their SAP Jam Collaboration tenant data center host experience significant performance improvements.
Enable Webcam/Screen Recorder using WebRTC technology (Google Chrome and Mozilla Firefox only)
With this option selected, when you choose to share a video via a feed update, you can click on an information icon that displays whether the compatibility checklists have been met for recording a screen capture or recording with their webcam. Webcam recording is supported only on Google Chrome and Mozilla Firefox internet browsers. Screen recording is supported only on Google Chrome (without audio) and Mozilla Firefox internet browsers.
Deprecated Features:○ Send deprecated emails
○ Includes Daily email notification for Active Task Reminders, Clicks on my content (in summary notifications), and Medium Priority email notifications.
SAP Jam Collaboration Administrator Guide 1805Product Setup P U B L I C 101
NoteDeprecated features still work and are fully supported, however SAP reserves the right to remove these deprecated features in any future release.
3. When you have the feature availability and feature behavior options set to your satisfaction, click Save changes.
User configured features
Online presence and browser notifications can be set by the user via their profile avatar located to the right of the search bar above the global menu bar. When they click their avatar, they will be able to enable or disable browser notifications and set their presence to appear online (with green dot indicator) or appear offline. Further instructions for this user-configured setting are described in the SAP Jam Collaboration User Guide.
5.2 Customize the home page
Home pages are a way to better inform your users of company-wide information, announcements, and much more.You can create separate custom home page layouts for full access, restricted access, and external users. For full access users and external guests, you can also customize branding.
Anatomy of a home page
NoteAs of the February 2018 release, a company home page no longer has a separate header and body section. The content previously created under the two sections has been combined and now displays as a single page.
While home page design is similar to using the page designer to customize group overview pages, there are some notable differences:
● Custom home pages provide a four-column layout rather than the three columns of group overview pages. The width available for multi-column widgets should include the width for each column plus the gutters that have been spanned. For example, when using an image widget, keep the following recommended width sizes in mind to ensure highest viewing quality:○ image spanning width of one column: 288 pixels○ image spanning width of two columns: 585 pixels○ image spanning width of three columns: 883 pixels○ image spanning width of four columns: 1180 pixels
● The custom home page feed widget displays the company feed, not a group feed.● The custom home page people widget displays selected members only.● The custom home page action widget contains a smaller list of actions (add a blog post or wiki page, create a
poll, feed and email settings, and access trash).● An announcement [page 108] can be added to the top of the home page in its own section. Designed with one
or more widgets it can be used to communicate important news or events that must be shared company-wide.
102 P U B L I CSAP Jam Collaboration Administrator Guide 1805
Product Setup
NoteFor steps on configuring mobile settings and using preview mode when designing pages for optimal viewing on mobile devices, please refer to the Mobile settings and preview topic in the SAP Jam Group Administration Guide.
To create a custom home page
1. Go to the SAP Jam Admin console and select Product Setup Custom Home Page from the left side navigation. The Custom Home Page creation page displays.
2. Select the Full Access Users tab to design pages for your company users, or the External Users tab to design pages for external visitors who log in to SAP Jam.
NoteThe external users home page can be enabled or disabled. If disabled, a default home page displays.
3. To design the layout of your custom home page, click Manage Home Page.The page layout displays. When you click the Edit icon from the Page Settings wand, your view will switch to Edit mode for the home page you are currently viewing. For instructions on using the page designer, see chapter 3, Page designer, of the SAP Jam Group Administration Guide. See also the topics under Widgets for company and area home pages only [page 70] for more details.
NoteYou can enable the alignment of widgets by row when selecting the Optimize Page Layout option. The widgets with the smaller height dimensions in a row will automatically expand to align with the widget with the largest height dimension.
NoteThe new optimize layout options do not apply when trying to align widgets in a row containing feed and image widgets, namely because of their specific and typically larger height requirements.
Note○ When you click and drag the bottom edge of an image widget to resize it, a new guideline appears to
help you align the edge with another widget on the same row. As you drag the guideline, it will automatically snap to the bottom edge alignment matching the other widget.
○ The feed widget can display the home feed or company feed.
SAP Jam Collaboration Administrator Guide 1805Product Setup P U B L I C 103
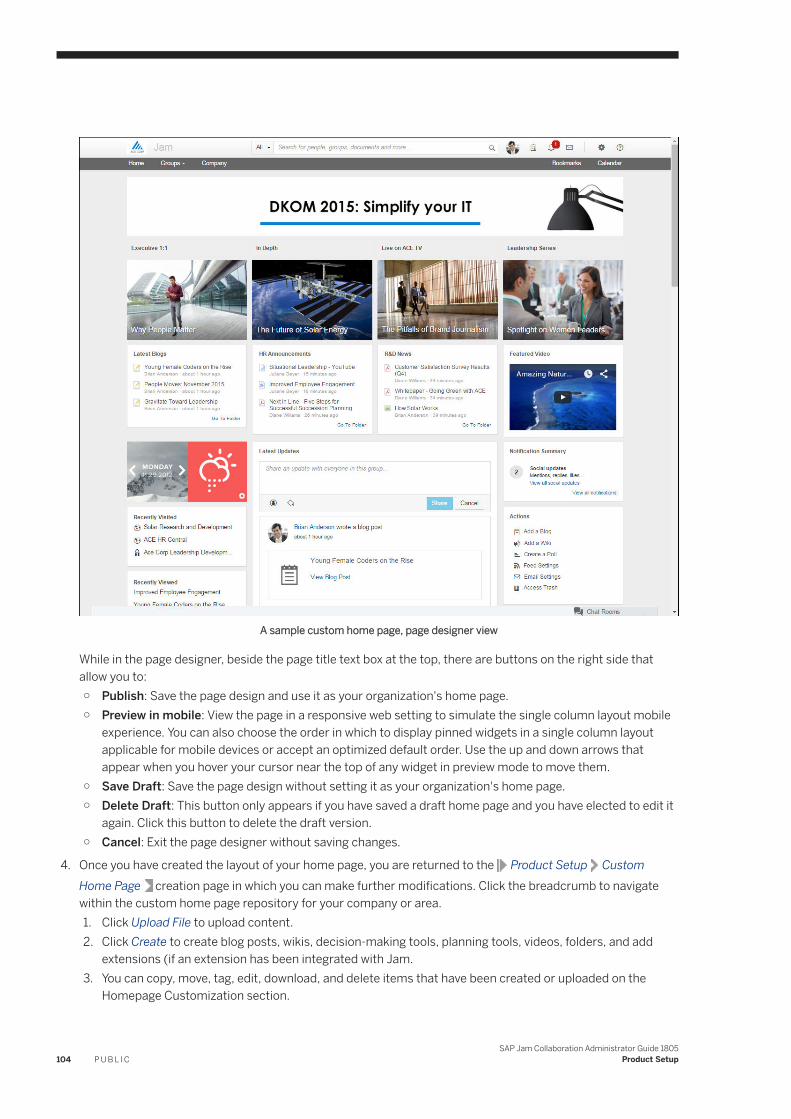
A sample custom home page, page designer view
While in the page designer, beside the page title text box at the top, there are buttons on the right side that allow you to:○ Publish: Save the page design and use it as your organization's home page.○ Preview in mobile: View the page in a responsive web setting to simulate the single column layout mobile
experience. You can also choose the order in which to display pinned widgets in a single column layout applicable for mobile devices or accept an optimized default order. Use the up and down arrows that appear when you hover your cursor near the top of any widget in preview mode to move them.
○ Save Draft: Save the page design without setting it as your organization's home page.○ Delete Draft: This button only appears if you have saved a draft home page and you have elected to edit it
again. Click this button to delete the draft version.○ Cancel: Exit the page designer without saving changes.
4. Once you have created the layout of your home page, you are returned to the Product Setup Custom Home Page creation page in which you can make further modifications. Click the breadcrumb to navigate within the custom home page repository for your company or area.1. Click Upload File to upload content.2. Click Create to create blog posts, wikis, decision-making tools, planning tools, videos, folders, and add
extensions (if an extension has been integrated with Jam.3. You can copy, move, tag, edit, download, and delete items that have been created or uploaded on the
Homepage Customization section.
104 P U B L I CSAP Jam Collaboration Administrator Guide 1805
Product Setup
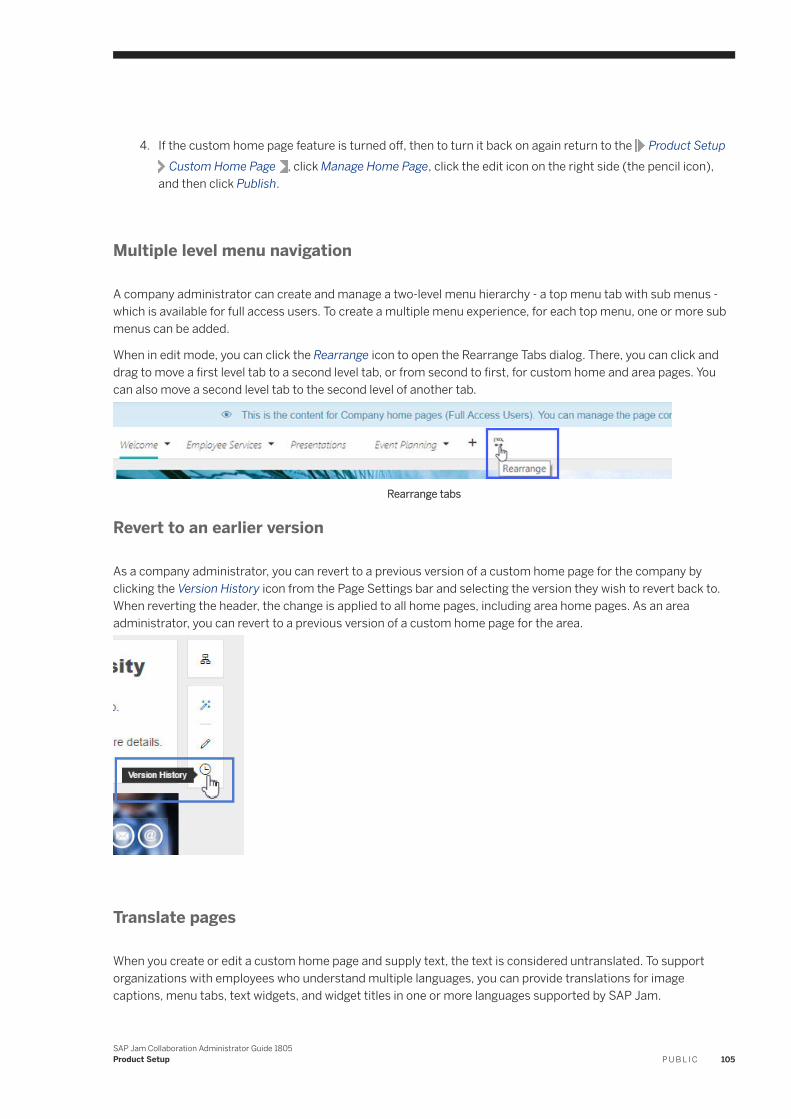
4. If the custom home page feature is turned off, then to turn it back on again return to the Product SetupCustom Home Page , click Manage Home Page, click the edit icon on the right side (the pencil icon),
and then click Publish.
Multiple level menu navigation
A company administrator can create and manage a two-level menu hierarchy - a top menu tab with sub menus - which is available for full access users. To create a multiple menu experience, for each top menu, one or more sub menus can be added.
When in edit mode, you can click the Rearrange icon to open the Rearrange Tabs dialog. There, you can click and drag to move a first level tab to a second level tab, or from second to first, for custom home and area pages. You can also move a second level tab to the second level of another tab.
Rearrange tabs
Revert to an earlier version
As a company administrator, you can revert to a previous version of a custom home page for the company by clicking the Version History icon from the Page Settings bar and selecting the version they wish to revert back to. When reverting the header, the change is applied to all home pages, including area home pages. As an area administrator, you can revert to a previous version of a custom home page for the area.
Translate pages
When you create or edit a custom home page and supply text, the text is considered untranslated. To support organizations with employees who understand multiple languages, you can provide translations for image captions, menu tabs, text widgets, and widget titles in one or more languages supported by SAP Jam.
SAP Jam Collaboration Administrator Guide 1805Product Setup P U B L I C 105
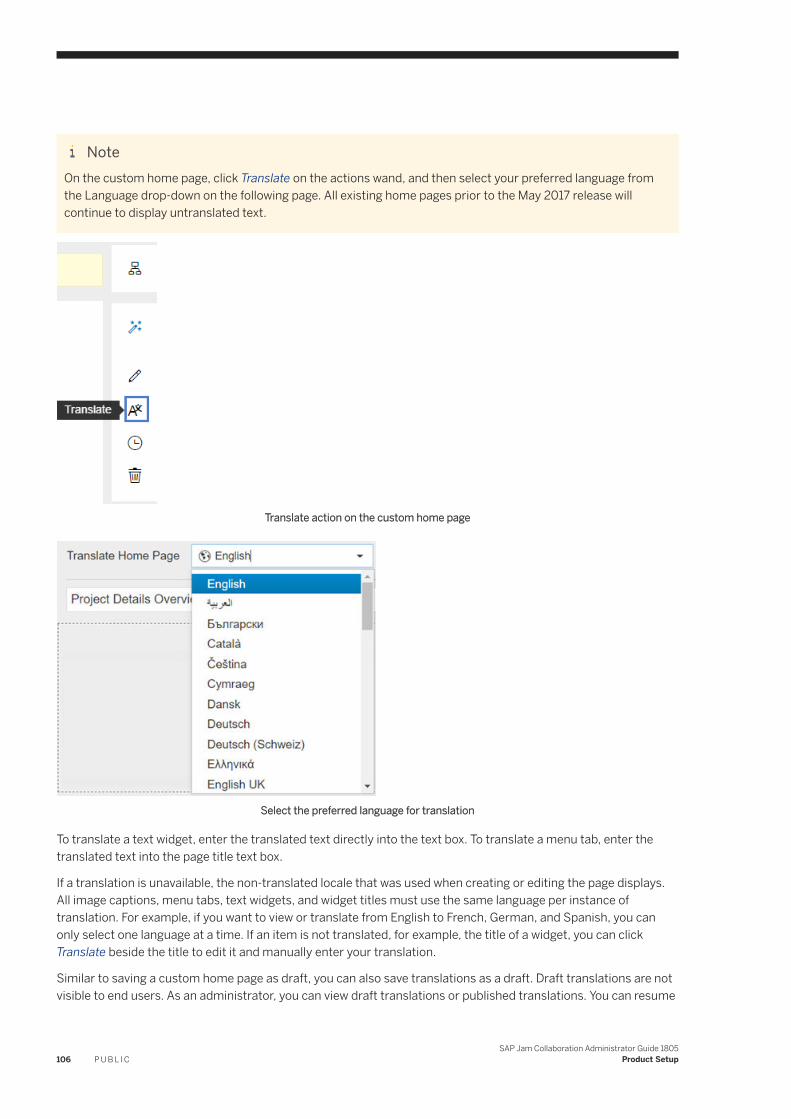
NoteOn the custom home page, click Translate on the actions wand, and then select your preferred language from the Language drop-down on the following page. All existing home pages prior to the May 2017 release will continue to display untranslated text.
Translate action on the custom home page
Select the preferred language for translation
To translate a text widget, enter the translated text directly into the text box. To translate a menu tab, enter the translated text into the page title text box.
If a translation is unavailable, the non-translated locale that was used when creating or editing the page displays. All image captions, menu tabs, text widgets, and widget titles must use the same language per instance of translation. For example, if you want to view or translate from English to French, German, and Spanish, you can only select one language at a time. If an item is not translated, for example, the title of a widget, you can click Translate beside the title to edit it and manually enter your translation.
Similar to saving a custom home page as draft, you can also save translations as a draft. Draft translations are not visible to end users. As an administrator, you can view draft translations or published translations. You can resume
106 P U B L I CSAP Jam Collaboration Administrator Guide 1805
Product Setup
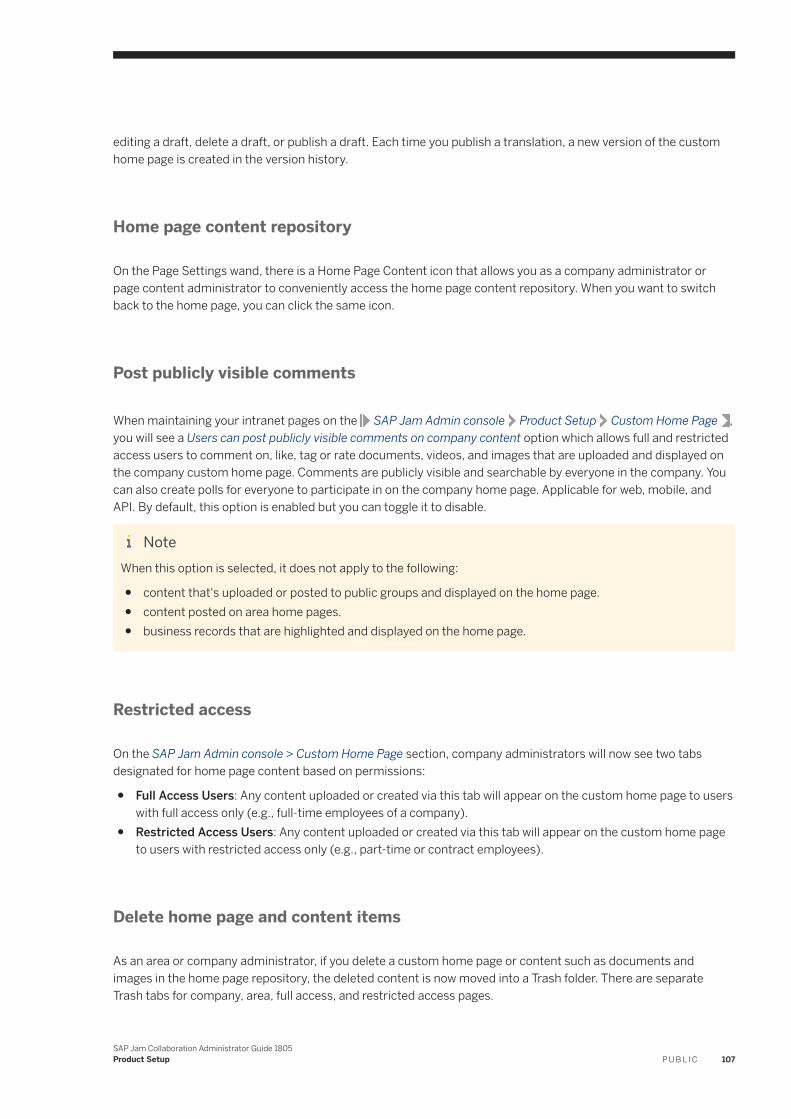
editing a draft, delete a draft, or publish a draft. Each time you publish a translation, a new version of the custom home page is created in the version history.
Home page content repository
On the Page Settings wand, there is a Home Page Content icon that allows you as a company administrator or page content administrator to conveniently access the home page content repository. When you want to switch back to the home page, you can click the same icon.
Post publicly visible comments
When maintaining your intranet pages on the SAP Jam Admin console Product Setup Custom Home Page , you will see a Users can post publicly visible comments on company content option which allows full and restricted access users to comment on, like, tag or rate documents, videos, and images that are uploaded and displayed on the company custom home page. Comments are publicly visible and searchable by everyone in the company. You can also create polls for everyone to participate in on the company home page. Applicable for web, mobile, and API. By default, this option is enabled but you can toggle it to disable.
NoteWhen this option is selected, it does not apply to the following:
● content that's uploaded or posted to public groups and displayed on the home page.● content posted on area home pages.● business records that are highlighted and displayed on the home page.
Restricted access
On the SAP Jam Admin console > Custom Home Page section, company administrators will now see two tabs designated for home page content based on permissions:
● Full Access Users: Any content uploaded or created via this tab will appear on the custom home page to users with full access only (e.g., full-time employees of a company).
● Restricted Access Users: Any content uploaded or created via this tab will appear on the custom home page to users with restricted access only (e.g., part-time or contract employees).
Delete home page and content items
As an area or company administrator, if you delete a custom home page or content such as documents and images in the home page repository, the deleted content is now moved into a Trash folder. There are separate Trash tabs for company, area, full access, and restricted access pages.
SAP Jam Collaboration Administrator Guide 1805Product Setup P U B L I C 107
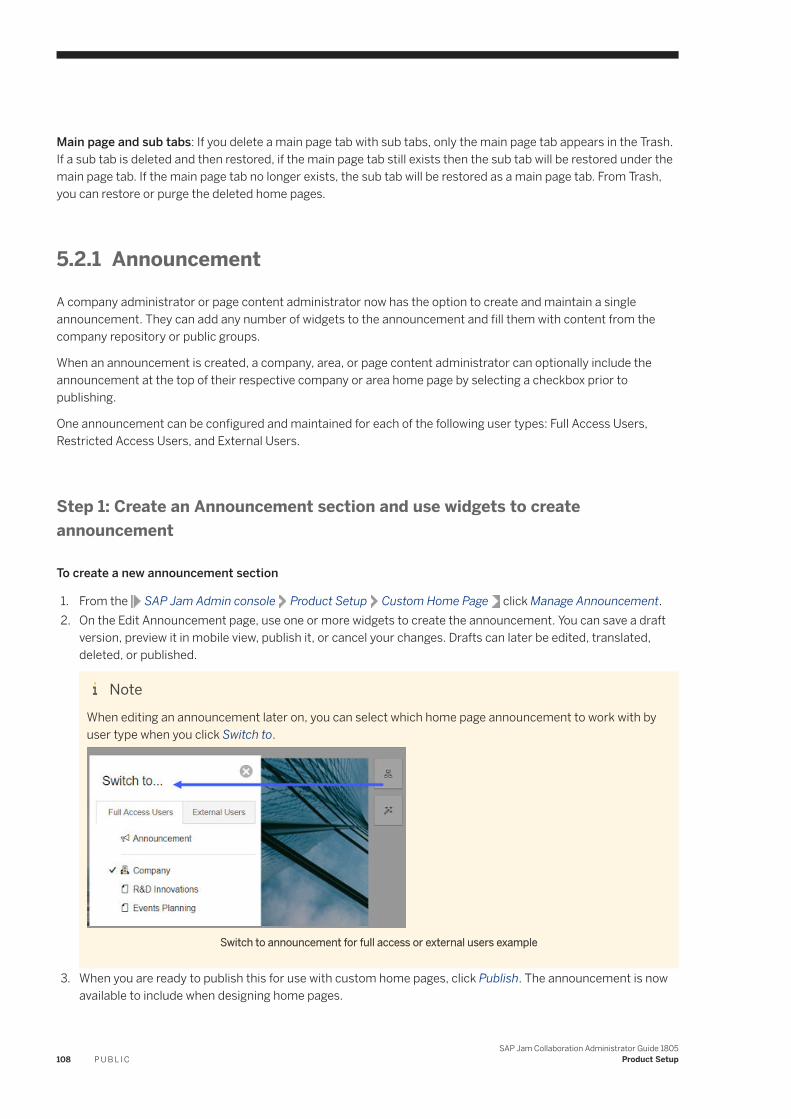
Main page and sub tabs: If you delete a main page tab with sub tabs, only the main page tab appears in the Trash. If a sub tab is deleted and then restored, if the main page tab still exists then the sub tab will be restored under the main page tab. If the main page tab no longer exists, the sub tab will be restored as a main page tab. From Trash, you can restore or purge the deleted home pages.
5.2.1 Announcement
A company administrator or page content administrator now has the option to create and maintain a single announcement. They can add any number of widgets to the announcement and fill them with content from the company repository or public groups.
When an announcement is created, a company, area, or page content administrator can optionally include the announcement at the top of their respective company or area home page by selecting a checkbox prior to publishing.
One announcement can be configured and maintained for each of the following user types: Full Access Users, Restricted Access Users, and External Users.
Step 1: Create an Announcement section and use widgets to create announcement
To create a new announcement section
1. From the SAP Jam Admin console Product Setup Custom Home Page click Manage Announcement.2. On the Edit Announcement page, use one or more widgets to create the announcement. You can save a draft
version, preview it in mobile view, publish it, or cancel your changes. Drafts can later be edited, translated, deleted, or published.
NoteWhen editing an announcement later on, you can select which home page announcement to work with by user type when you click Switch to.
Switch to announcement for full access or external users example
3. When you are ready to publish this for use with custom home pages, click Publish. The announcement is now available to include when designing home pages.
108 P U B L I CSAP Jam Collaboration Administrator Guide 1805
Product Setup
If an Announcement section is created but the announcement has yet to be added or published, when the Include Announcement checkbox is selected in page design mode, a message informs the page designer that the announcement itself has not been created yet. Once it is published, the announcement will display in the Announcement section.
Step 2. Include announcement
To include the announcement in a custom home page
1. From the SAP Jam Admin console Product Setup Custom Home Page click Manage Home Page.2. Above the body of the home page, you can select the Include Announcement checkbox. This displays the
announcement in edit mode. When you publish the home page, users will be able to see the announcement.
Delete an announcement
When you delete an announcement, it is not recoverable from Trash.
5.3 Custom Profile administration
The Product Setup Custom Profile page allows you to configure the profile page for all SAP Jam Collaboration users in your company.
As a company administrator, you can remove and re-order the profile sections by dragging and dropping them. The following fields are configurable:
● Country● Department● Division● Email● Job Code● Job Title● Job Description● Location● IM● Nationality● Phone Number● Start Date● User Id● Custom01-15● Any custom SAP Jam profile field
SAP Jam Collaboration Administrator Guide 1805Product Setup P U B L I C 109
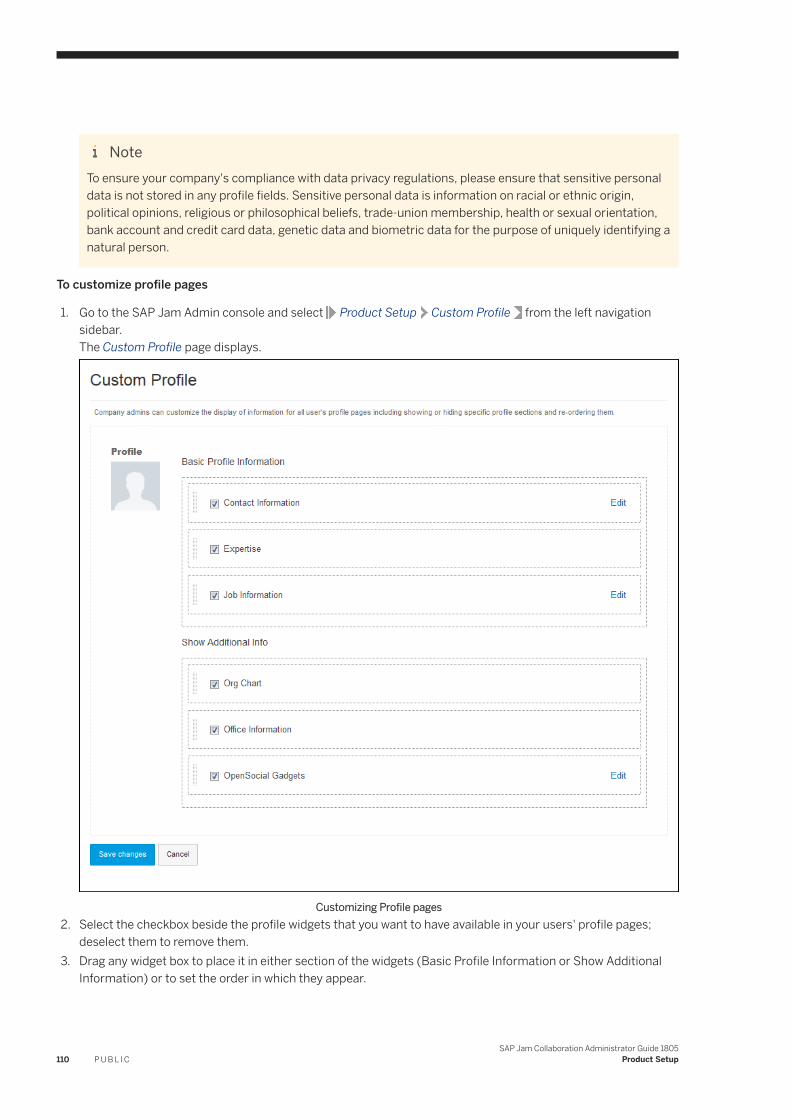
NoteTo ensure your company's compliance with data privacy regulations, please ensure that sensitive personal data is not stored in any profile fields. Sensitive personal data is information on racial or ethnic origin, political opinions, religious or philosophical beliefs, trade-union membership, health or sexual orientation, bank account and credit card data, genetic data and biometric data for the purpose of uniquely identifying a natural person.
To customize profile pages
1. Go to the SAP Jam Admin console and select Product Setup Custom Profile from the left navigation sidebar.The Custom Profile page displays.
Customizing Profile pages2. Select the checkbox beside the profile widgets that you want to have available in your users' profile pages;
deselect them to remove them.3. Drag any widget box to place it in either section of the widgets (Basic Profile Information or Show Additional
Information) or to set the order in which they appear.
110 P U B L I CSAP Jam Collaboration Administrator Guide 1805
Product Setup
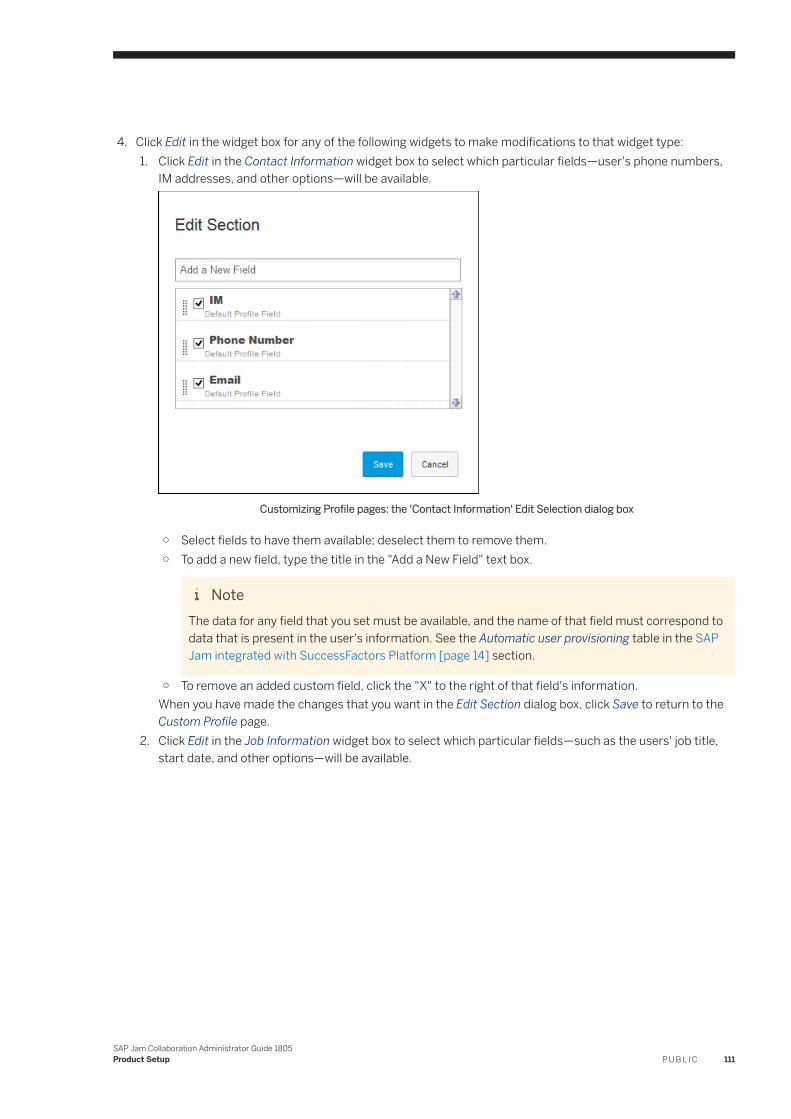
4. Click Edit in the widget box for any of the following widgets to make modifications to that widget type:1. Click Edit in the Contact Information widget box to select which particular fields—user's phone numbers,
IM addresses, and other options—will be available.
Customizing Profile pages: the 'Contact Information' Edit Selection dialog box
○ Select fields to have them available; deselect them to remove them.○ To add a new field, type the title in the "Add a New Field" text box.
NoteThe data for any field that you set must be available, and the name of that field must correspond to data that is present in the user's information. See the Automatic user provisioning table in the SAP Jam integrated with SuccessFactors Platform [page 14] section.
○ To remove an added custom field, click the "X" to the right of that field's information.When you have made the changes that you want in the Edit Section dialog box, click Save to return to the Custom Profile page.
2. Click Edit in the Job Information widget box to select which particular fields—such as the users' job title, start date, and other options—will be available.
SAP Jam Collaboration Administrator Guide 1805Product Setup P U B L I C 111

Customizing Profile pages: 'Job Information' Edit Selection dialog box
○ Select fields to have them available; deselect them to remove them.○ To add a new field, type the title in the "Add a New Field" text box.
NoteThe data for any field that you set must be available, and the name of that field must correspond to data that is present in the user's information. See the Automatic user provisioning table in the SAP Jam integrated with SuccessFactors Platform [page 14] section.
○ To remove an added custom field, click the "X" to the right of that field's information.When you have made the changes that you want in the Edit Section dialog box, click Save to return to the Custom Profile page.
3. OpenSocial Gadgets: Enable this option to show a configured OpenSocial Gadget in users' profiles.
Customizing Profile pages: custom profile Edit Selection dialog box
Note that OpenSocial Gadgets must have been previously configured, as described in the OpenSocial Gadgets section of the SAP Jam Collaboration Developer Guide.When you have made the changes that you want in the Edit Section dialog box, click Save to return to the Custom Profile page.
112 P U B L I CSAP Jam Collaboration Administrator Guide 1805
Product Setup
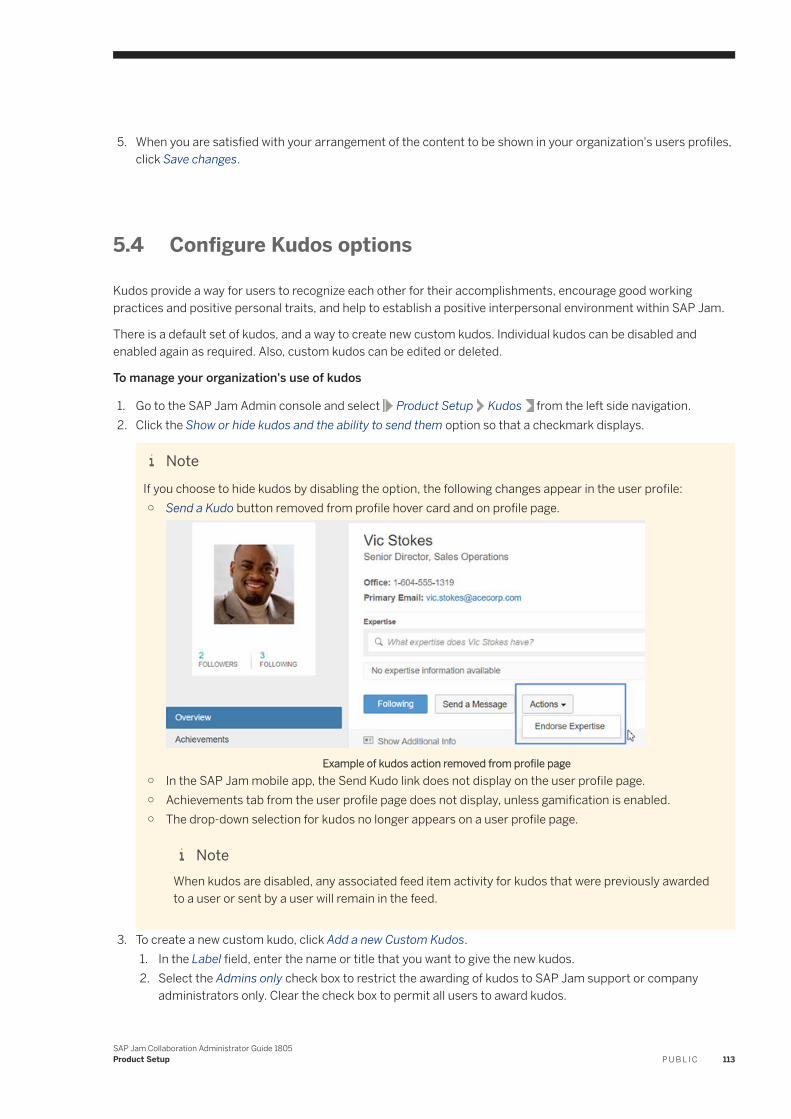
5. When you are satisfied with your arrangement of the content to be shown in your organization's users profiles, click Save changes.
5.4 Configure Kudos options
Kudos provide a way for users to recognize each other for their accomplishments, encourage good working practices and positive personal traits, and help to establish a positive interpersonal environment within SAP Jam.
There is a default set of kudos, and a way to create new custom kudos. Individual kudos can be disabled and enabled again as required. Also, custom kudos can be edited or deleted.
To manage your organization's use of kudos
1. Go to the SAP Jam Admin console and select Product Setup Kudos from the left side navigation.2. Click the Show or hide kudos and the ability to send them option so that a checkmark displays.
NoteIf you choose to hide kudos by disabling the option, the following changes appear in the user profile:○ Send a Kudo button removed from profile hover card and on profile page.
Example of kudos action removed from profile page○ In the SAP Jam mobile app, the Send Kudo link does not display on the user profile page.○ Achievements tab from the user profile page does not display, unless gamification is enabled.○ The drop-down selection for kudos no longer appears on a user profile page.
NoteWhen kudos are disabled, any associated feed item activity for kudos that were previously awarded to a user or sent by a user will remain in the feed.
3. To create a new custom kudo, click Add a new Custom Kudos.1. In the Label field, enter the name or title that you want to give the new kudos.2. Select the Admins only check box to restrict the awarding of kudos to SAP Jam support or company
administrators only. Clear the check box to permit all users to award kudos.
SAP Jam Collaboration Administrator Guide 1805Product Setup P U B L I C 113
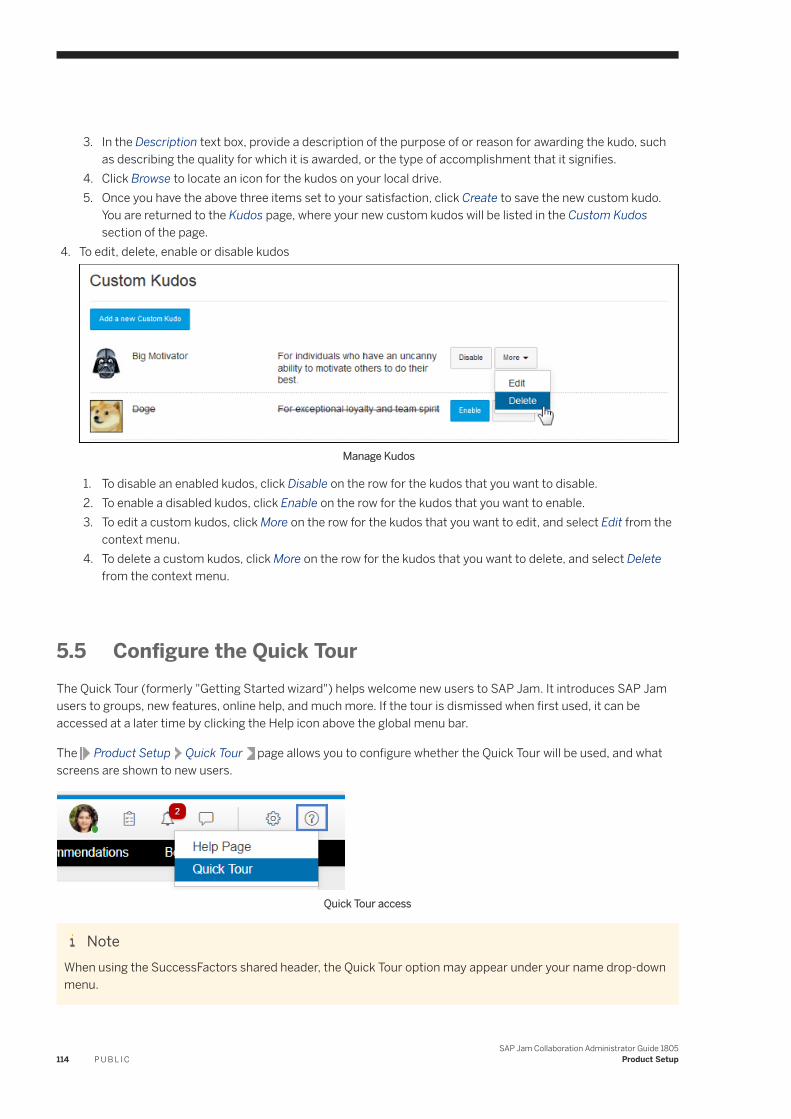
3. In the Description text box, provide a description of the purpose of or reason for awarding the kudo, such as describing the quality for which it is awarded, or the type of accomplishment that it signifies.
4. Click Browse to locate an icon for the kudos on your local drive.5. Once you have the above three items set to your satisfaction, click Create to save the new custom kudo.
You are returned to the Kudos page, where your new custom kudos will be listed in the Custom Kudos section of the page.
4. To edit, delete, enable or disable kudos
Manage Kudos
1. To disable an enabled kudos, click Disable on the row for the kudos that you want to disable.2. To enable a disabled kudos, click Enable on the row for the kudos that you want to enable.3. To edit a custom kudos, click More on the row for the kudos that you want to edit, and select Edit from the
context menu.4. To delete a custom kudos, click More on the row for the kudos that you want to delete, and select Delete
from the context menu.
5.5 Configure the Quick TourThe Quick Tour (formerly "Getting Started wizard") helps welcome new users to SAP Jam. It introduces SAP Jam users to groups, new features, online help, and much more. If the tour is dismissed when first used, it can be accessed at a later time by clicking the Help icon above the global menu bar.
The Product Setup Quick Tour page allows you to configure whether the Quick Tour will be used, and what screens are shown to new users.
Quick Tour access
NoteWhen using the SuccessFactors shared header, the Quick Tour option may appear under your name drop-down menu.
114 P U B L I CSAP Jam Collaboration Administrator Guide 1805
Product Setup
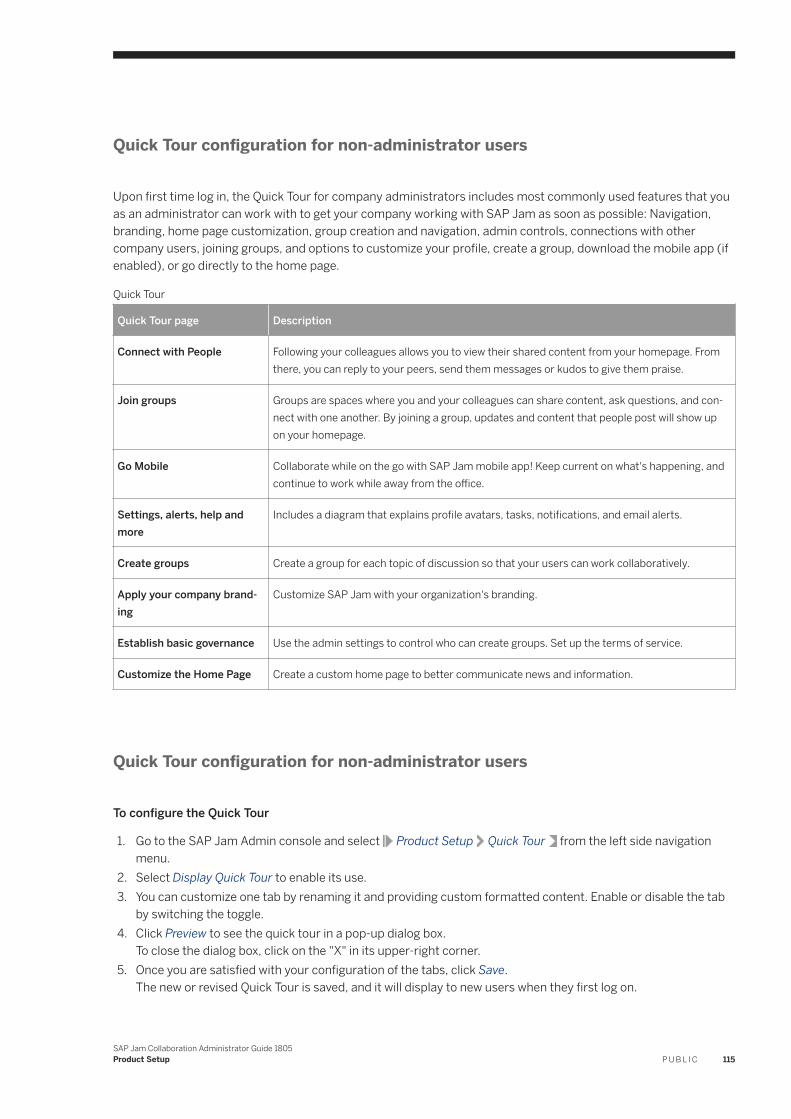
Quick Tour configuration for non-administrator users
Upon first time log in, the Quick Tour for company administrators includes most commonly used features that you as an administrator can work with to get your company working with SAP Jam as soon as possible: Navigation, branding, home page customization, group creation and navigation, admin controls, connections with other company users, joining groups, and options to customize your profile, create a group, download the mobile app (if enabled), or go directly to the home page.
Quick Tour
Quick Tour page Description
Connect with People Following your colleagues allows you to view their shared content from your homepage. From there, you can reply to your peers, send them messages or kudos to give them praise.
Join groups Groups are spaces where you and your colleagues can share content, ask questions, and connect with one another. By joining a group, updates and content that people post will show up on your homepage.
Go Mobile Collaborate while on the go with SAP Jam mobile app! Keep current on what's happening, and continue to work while away from the office.
Settings, alerts, help and more
Includes a diagram that explains profile avatars, tasks, notifications, and email alerts.
Create groups Create a group for each topic of discussion so that your users can work collaboratively.
Apply your company branding
Customize SAP Jam with your organization's branding.
Establish basic governance Use the admin settings to control who can create groups. Set up the terms of service.
Customize the Home Page Create a custom home page to better communicate news and information.
Quick Tour configuration for non-administrator users
To configure the Quick Tour
1. Go to the SAP Jam Admin console and select Product Setup Quick Tour from the left side navigation menu.
2. Select Display Quick Tour to enable its use.3. You can customize one tab by renaming it and providing custom formatted content. Enable or disable the tab
by switching the toggle.4. Click Preview to see the quick tour in a pop-up dialog box.
To close the dialog box, click on the "X" in its upper-right corner.5. Once you are satisfied with your configuration of the tabs, click Save.
The new or revised Quick Tour is saved, and it will display to new users when they first log on.
SAP Jam Collaboration Administrator Guide 1805Product Setup P U B L I C 115
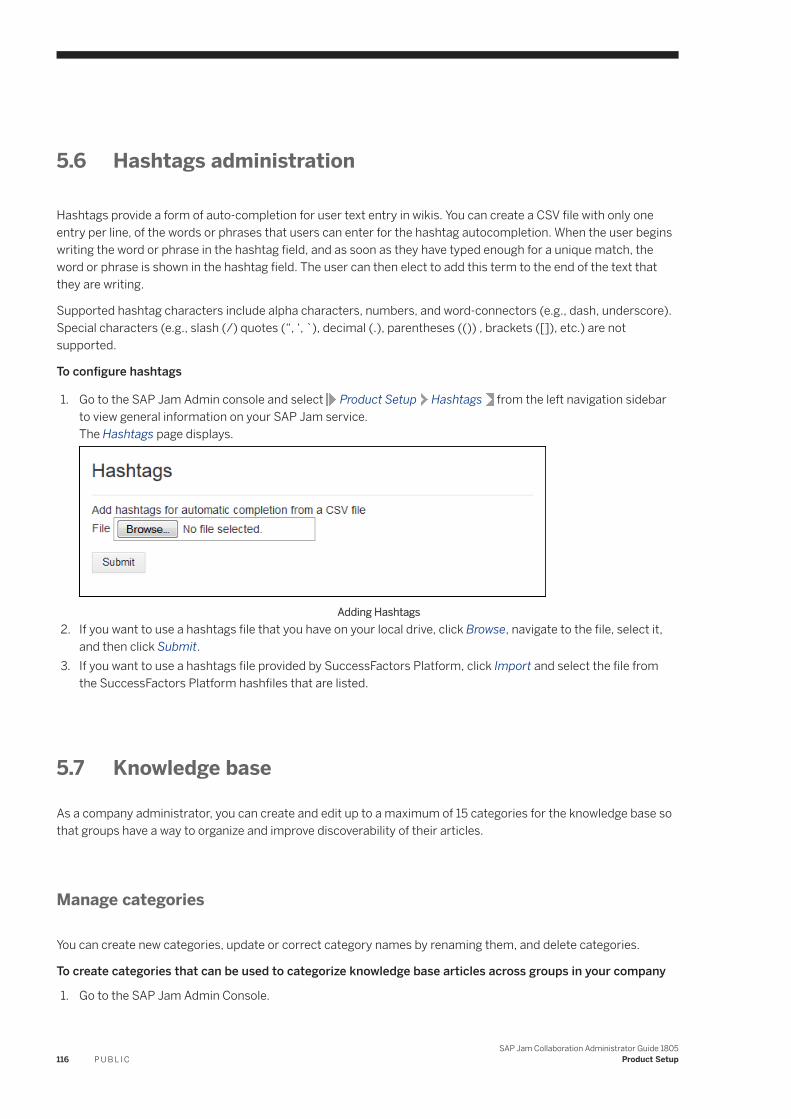
5.6 Hashtags administration
Hashtags provide a form of auto-completion for user text entry in wikis. You can create a CSV file with only one entry per line, of the words or phrases that users can enter for the hashtag autocompletion. When the user begins writing the word or phrase in the hashtag field, and as soon as they have typed enough for a unique match, the word or phrase is shown in the hashtag field. The user can then elect to add this term to the end of the text that they are writing.
Supported hashtag characters include alpha characters, numbers, and word-connectors (e.g., dash, underscore). Special characters (e.g., slash (/) quotes (“, ‘, `), decimal (.), parentheses (()) , brackets ([]), etc.) are not supported.
To configure hashtags
1. Go to the SAP Jam Admin console and select Product Setup Hashtags from the left navigation sidebar to view general information on your SAP Jam service.The Hashtags page displays.
Adding Hashtags2. If you want to use a hashtags file that you have on your local drive, click Browse, navigate to the file, select it,
and then click Submit.3. If you want to use a hashtags file provided by SuccessFactors Platform, click Import and select the file from
the SuccessFactors Platform hashfiles that are listed.
5.7 Knowledge base
As a company administrator, you can create and edit up to a maximum of 15 categories for the knowledge base so that groups have a way to organize and improve discoverability of their articles.
Manage categories
You can create new categories, update or correct category names by renaming them, and delete categories.
To create categories that can be used to categorize knowledge base articles across groups in your company
1. Go to the SAP Jam Admin Console.
116 P U B L I CSAP Jam Collaboration Administrator Guide 1805
Product Setup
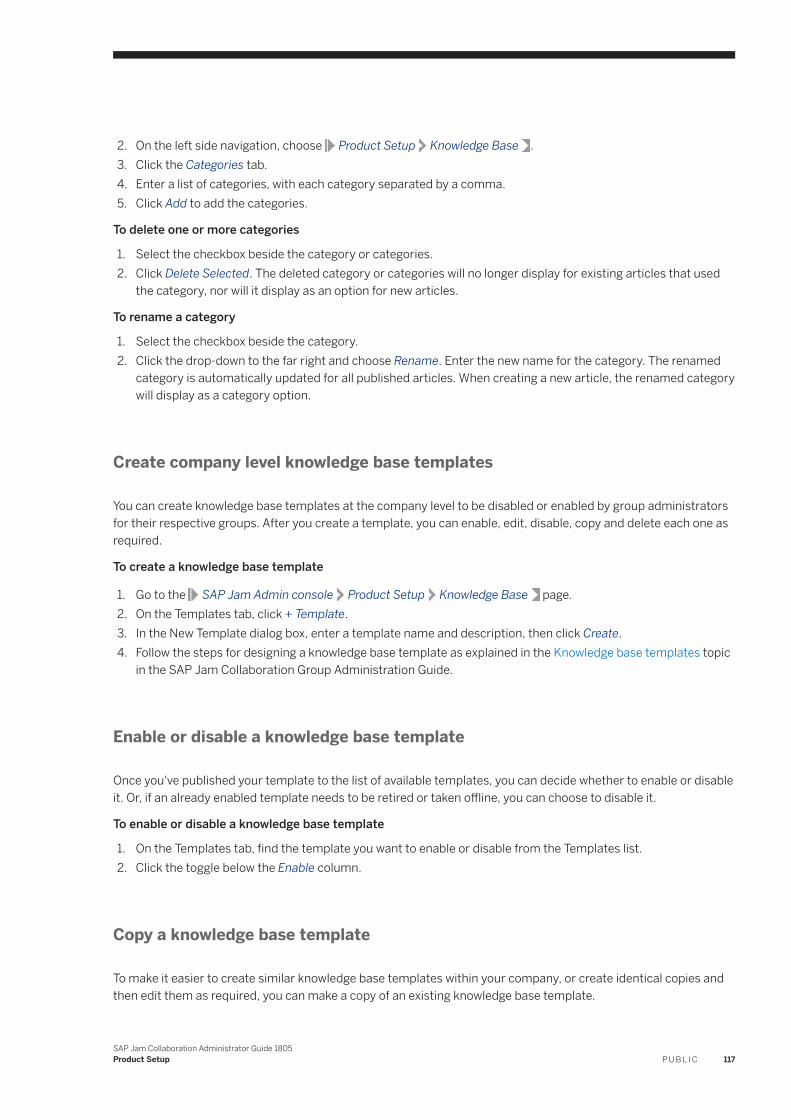
2. On the left side navigation, choose Product Setup Knowledge Base .3. Click the Categories tab.4. Enter a list of categories, with each category separated by a comma.5. Click Add to add the categories.
To delete one or more categories
1. Select the checkbox beside the category or categories.2. Click Delete Selected. The deleted category or categories will no longer display for existing articles that used
the category, nor will it display as an option for new articles.
To rename a category
1. Select the checkbox beside the category.2. Click the drop-down to the far right and choose Rename. Enter the new name for the category. The renamed
category is automatically updated for all published articles. When creating a new article, the renamed category will display as a category option.
Create company level knowledge base templates
You can create knowledge base templates at the company level to be disabled or enabled by group administrators for their respective groups. After you create a template, you can enable, edit, disable, copy and delete each one as required.
To create a knowledge base template
1. Go to the SAP Jam Admin console Product Setup Knowledge Base page.2. On the Templates tab, click + Template.3. In the New Template dialog box, enter a template name and description, then click Create.4. Follow the steps for designing a knowledge base template as explained in the Knowledge base templates topic
in the SAP Jam Collaboration Group Administration Guide.
Enable or disable a knowledge base template
Once you've published your template to the list of available templates, you can decide whether to enable or disable it. Or, if an already enabled template needs to be retired or taken offline, you can choose to disable it.
To enable or disable a knowledge base template
1. On the Templates tab, find the template you want to enable or disable from the Templates list.2. Click the toggle below the Enable column.
Copy a knowledge base template
To make it easier to create similar knowledge base templates within your company, or create identical copies and then edit them as required, you can make a copy of an existing knowledge base template.
SAP Jam Collaboration Administrator Guide 1805Product Setup P U B L I C 117

To copy an existing template
1. On the Templates tab, click the drop-down to the right of the enable and disable template toggle and choose Copy.
2. The copied template is listed below the original template. Make edits to the copy as needed.
Edit a knowledge base template
You can edit a knowledge base template by adding, removing, and rearranging fields, or adding, modifying, and removing options for checkboxes, radio buttons, and dropdowns. Changes to the template will be applied to existing articles only when the article is edited and saved. When a user edits an article that is based on a template that has been revised, they will see a message shown at the top of the article that says "The template for this article has been modified and may cause the article to display differently". When you edit a template that has at least one article created from it, you will see a message shown at the top of the template that says "Any changes made to this template will be applied to published articles once they are edited."
To edit a knowledge base template
1. On the Templates tab, find the template you want to edit from the Templates list.2. Click the drop-down to the right of the toggle and choose Edit.3. Make your changes and then click Publish.
Delete a company level knowledge base template
Although you can a delete custom template, if there are published articles based on the template, the template cannot be deleted.
NoteOnce deleted, the knowledge base template is permanently removed and cannot be restored.
To delete a knowledge base template
1. On the Templates tab, find the template you want to delete from the Templates list.2. Click the drop-down to the right of the toggle and choose Delete.3. On the confirmation dialog, click Delete.
5.8 Deprecation and removal of auto group feature
NoteThe Auto groups feature began deprecation as of the August 2016 release. It will be removed from the application by the general availability release date of Thursday, December 8, 2016. Auto groups will be migrated to the appropriate type of regular group. The rules used to govern their membership will be migrated into new
118 P U B L I CSAP Jam Collaboration Administrator Guide 1805
Product Setup

dynamic member lists where those lists will be applied to the group. If static member lists were used to manage the Auto group, then the new group type will continue to use those static member lists for membership management. Administrators can no longer create or edit auto groups.
5.9 Groups management
In the SAP Jam Admin console, as a company or support administrator, you can go to Product Setup Groups Management and access all groups on your company's instance of SAP Jam.
You can also conveniently manage groups where you are also the group administrator. This saves you time in navigating outside the Admin console; you can now access all the groups you administer from one page view.
From the Actions dropdown, you can click Manage Group Content to manage your group's content, forums, and knowledge base. You can also work with Administration specific tasks such as reports, group dashboard, content approvals, group settings, and group trash.
On the Groups I Administer tab, you can also click Create a Group to create a new group.
From the All Groups tab, you can click Enable Content Administration to allow company and support admins to access all groups and content on your company's instance of SAP Jam. You can then manage groups within an administrative area or the entire company.
5.10 Group templates administration
Group templates are used to replicate group content quickly and consistently. In addition to the set of pre-built templates that are available as a default set of "system group templates", SAP Jam supports the creation of "custom group templates" that can be optimized to meet your organization's business needs and requirements. Both system group templates and custom group templates can be made visible to, or hidden from, your users. Your organization's users can create new groups based on any visible templates, whether they are system or custom templates.
Company administrators can enable or disable pre-built group templates. When enabled, they are available to the entire company.
Area administrators can enable any pre-built template that has been disabled by the company administrator.
Manage group templates
1. Go to the SAP Jam Admin console and select Product Setup Group Templates from the left side navigation.The Group Templates page displays, showing a catalog of company templates.The catalog lists all group templates available to your organization. They display in alphabetical order by:
SAP Jam Collaboration Administrator Guide 1805Product Setup P U B L I C 119
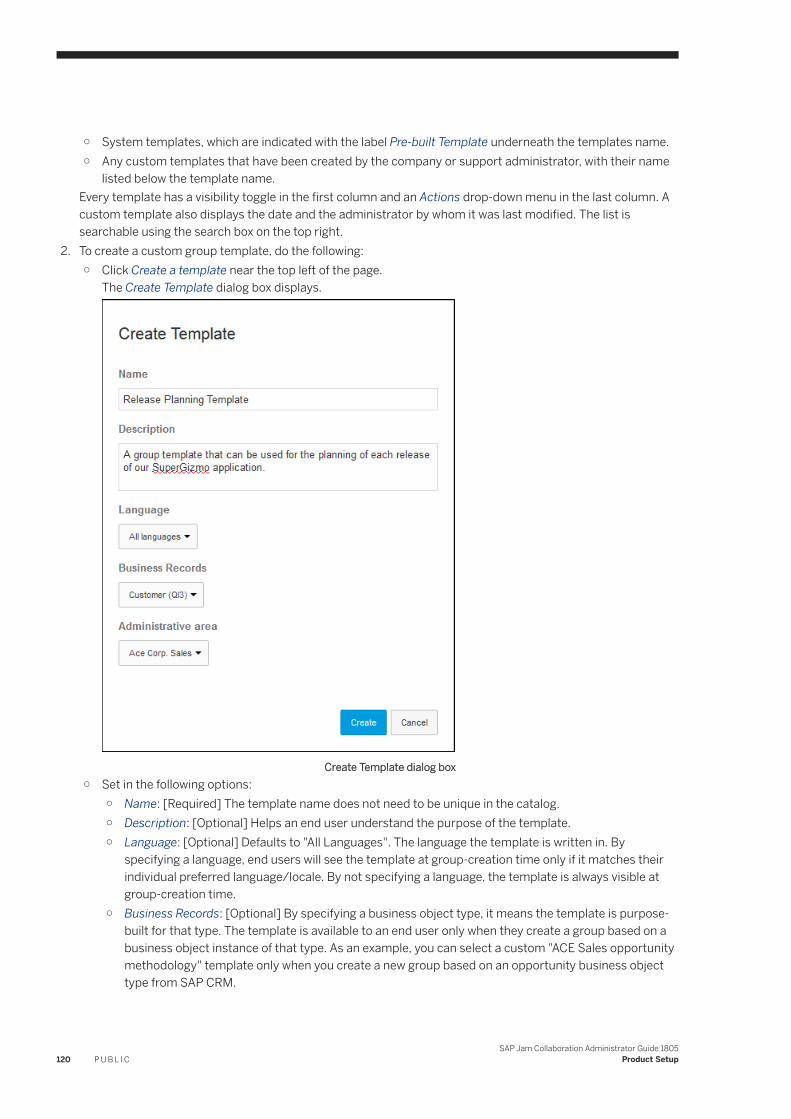
○ System templates, which are indicated with the label Pre-built Template underneath the templates name.○ Any custom templates that have been created by the company or support administrator, with their name
listed below the template name.Every template has a visibility toggle in the first column and an Actions drop-down menu in the last column. A custom template also displays the date and the administrator by whom it was last modified. The list is searchable using the search box on the top right.
2. To create a custom group template, do the following:○ Click Create a template near the top left of the page.
The Create Template dialog box displays.
Create Template dialog box○ Set in the following options:
○ Name: [Required] The template name does not need to be unique in the catalog.○ Description: [Optional] Helps an end user understand the purpose of the template.○ Language: [Optional] Defaults to "All Languages". The language the template is written in. By
specifying a language, end users will see the template at group-creation time only if it matches their individual preferred language/locale. By not specifying a language, the template is always visible at group-creation time.
○ Business Records: [Optional] By specifying a business object type, it means the template is purpose-built for that type. The template is available to an end user only when they create a group based on a business object instance of that type. As an example, you can select a custom "ACE Sales opportunity methodology" template only when you create a new group based on an opportunity business object type from SAP CRM.
120 P U B L I CSAP Jam Collaboration Administrator Guide 1805
Product Setup
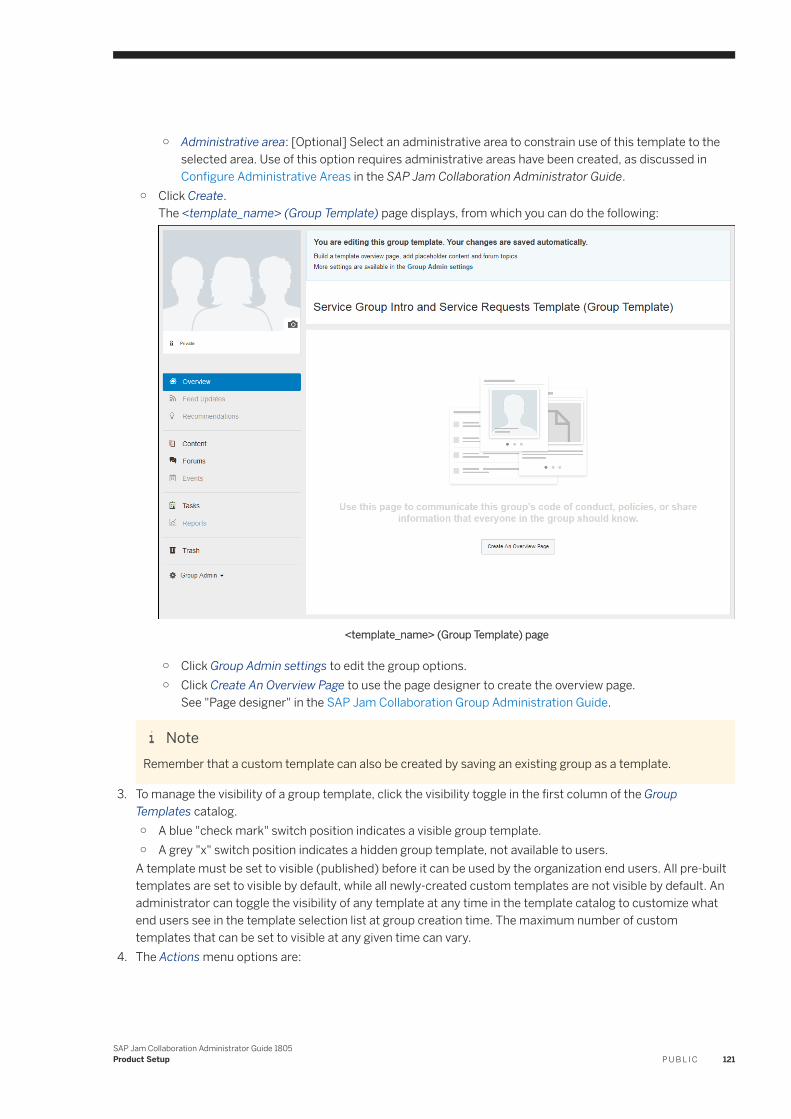
○ Administrative area: [Optional] Select an administrative area to constrain use of this template to the selected area. Use of this option requires administrative areas have been created, as discussed in Configure Administrative Areas in the SAP Jam Collaboration Administrator Guide.
○ Click Create.The <template_name> (Group Template) page displays, from which you can do the following:
<template_name> (Group Template) page
○ Click Group Admin settings to edit the group options.○ Click Create An Overview Page to use the page designer to create the overview page.
See "Page designer" in the SAP Jam Collaboration Group Administration Guide.
NoteRemember that a custom template can also be created by saving an existing group as a template.
3. To manage the visibility of a group template, click the visibility toggle in the first column of the Group Templates catalog.○ A blue "check mark" switch position indicates a visible group template.○ A grey "x" switch position indicates a hidden group template, not available to users.
A template must be set to visible (published) before it can be used by the organization end users. All pre-built templates are set to visible by default, while all newly-created custom templates are not visible by default. An administrator can toggle the visibility of any template at any time in the template catalog to customize what end users see in the template selection list at group creation time. The maximum number of custom templates that can be set to visible at any given time can vary.
4. The Actions menu options are:
SAP Jam Collaboration Administrator Guide 1805Product Setup P U B L I C 121
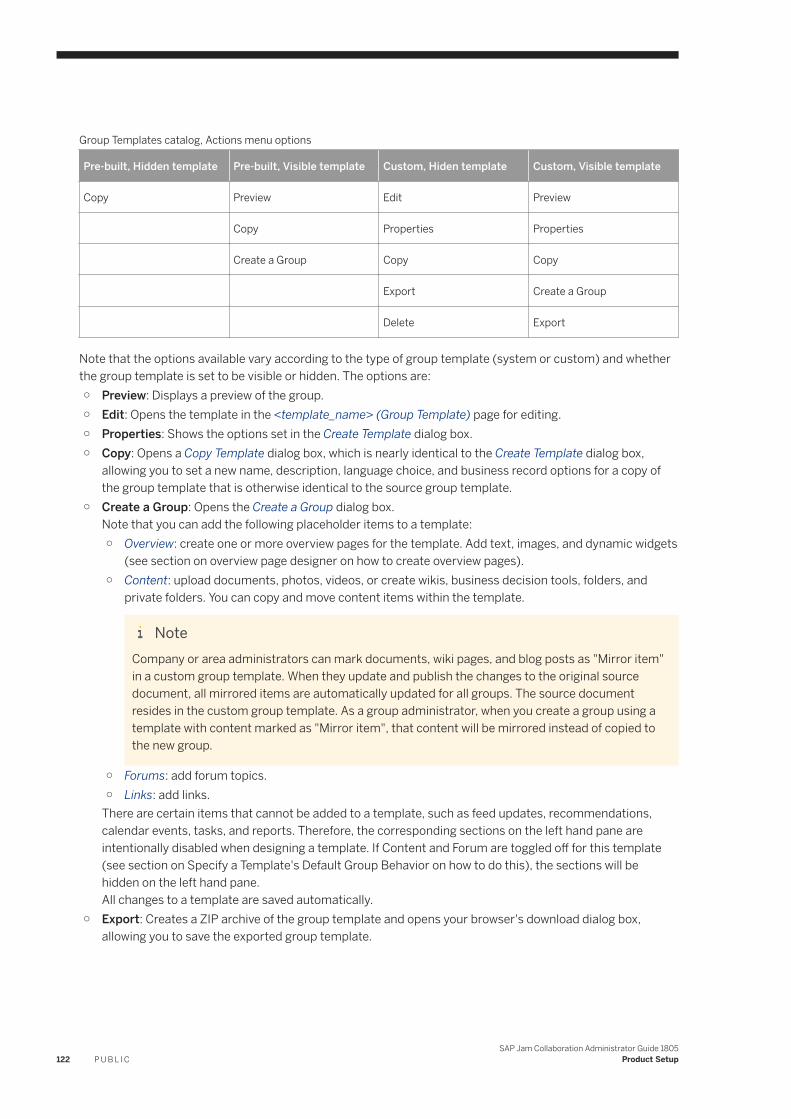
Group Templates catalog, Actions menu options
Pre-built, Hidden template Pre-built, Visible template Custom, Hiden template Custom, Visible template
Copy Preview Edit Preview
Copy Properties Properties
Create a Group Copy Copy
Export Create a Group
Delete Export
Note that the options available vary according to the type of group template (system or custom) and whether the group template is set to be visible or hidden. The options are:○ Preview: Displays a preview of the group.○ Edit: Opens the template in the <template_name> (Group Template) page for editing.○ Properties: Shows the options set in the Create Template dialog box.○ Copy: Opens a Copy Template dialog box, which is nearly identical to the Create Template dialog box,
allowing you to set a new name, description, language choice, and business record options for a copy of the group template that is otherwise identical to the source group template.
○ Create a Group: Opens the Create a Group dialog box.Note that you can add the following placeholder items to a template:○ Overview: create one or more overview pages for the template. Add text, images, and dynamic widgets
(see section on overview page designer on how to create overview pages).○ Content: upload documents, photos, videos, or create wikis, business decision tools, folders, and
private folders. You can copy and move content items within the template.
NoteCompany or area administrators can mark documents, wiki pages, and blog posts as "Mirror item" in a custom group template. When they update and publish the changes to the original source document, all mirrored items are automatically updated for all groups. The source document resides in the custom group template. As a group administrator, when you create a group using a template with content marked as "Mirror item", that content will be mirrored instead of copied to the new group.
○ Forums: add forum topics.○ Links: add links.
There are certain items that cannot be added to a template, such as feed updates, recommendations, calendar events, tasks, and reports. Therefore, the corresponding sections on the left hand pane are intentionally disabled when designing a template. If Content and Forum are toggled off for this template (see section on Specify a Template's Default Group Behavior on how to do this), the sections will be hidden on the left hand pane.All changes to a template are saved automatically.
○ Export: Creates a ZIP archive of the group template and opens your browser's download dialog box, allowing you to save the exported group template.
122 P U B L I CSAP Jam Collaboration Administrator Guide 1805
Product Setup
NoteThe export/import functionality is not designed for long-term/permanent, offline storage of custom templates. You may need to re-export and re-import a custom template in event there is a non-backwards compatible format, due to ongoing changes or improvements to templates made by the SAP Jam team.
Caution: Do not delete a custom template from the source environment until it is successfully imported into the target environment.
○ Delete: Opens a confirmation dialog box, providing you with the option to proceed with, or cancel, the deletion of the group template. Only templates that are set to invisible can be deleted. Warning: template deletion is permanent. It does not go into the personal Trash and is therefore non-recoverable.
5. To import a custom template, access the template catalog in the target company under Admin > Group Templates. Click Import a template, locate the zip file on your hard drive, and click Upload.An email notification is sent to the administrator performing the import when the process is complete at a later time. Any processing errors are noted in the email.
5.11 Content templates
The Product Setup Content Templates page allows you to create templates for content, similar to the "Corporate Communication Blog Post Template" and the "Knowledge Base Wiki Template" that come as pre-built content template with your instance of SAP Jam.
You can also upload images to the Content Template page. These templates are available to all of your users, allowing them to save time and to reuse partially constructed wiki and blog content or your organization's pre-approved graphics.
Create a wiki or blog content template
Creating a wiki or blog content template can save your organization's SAP Jam users a lot of time if they create lots of standard format pages, such as meeting minutes, design specifications, corporate communications of various types, knowledge base articles, how-to pages, and the like. The content users create from these templates will have all of the material that you add to the template, such as standardized page headings, including identifying images, section titles, and standard boilerplate text. Yet users will be able to modify any of this content if they need to do so.
1. Go to the SAP Jam Admin console and select Product Setup Content Templates from the left side navigation.The Content Templates page displays, showing a catalog of all content templates available to your users.
SAP Jam Collaboration Administrator Guide 1805Product Setup P U B L I C 123
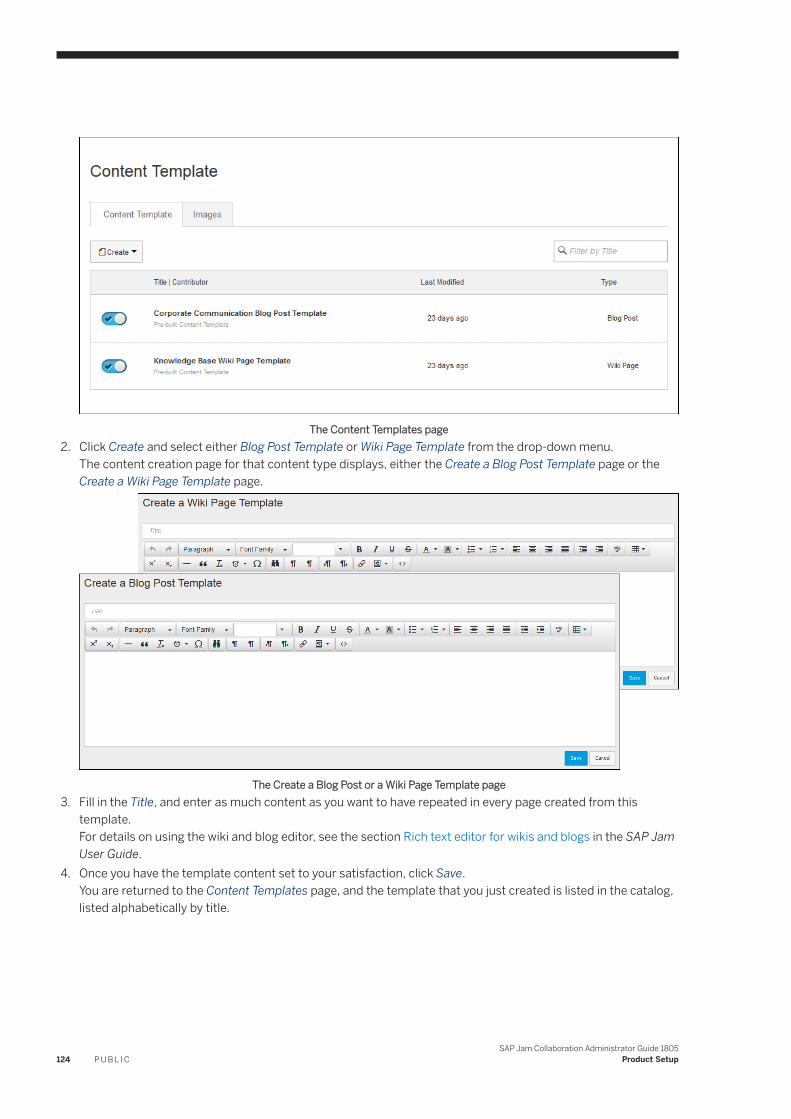
The Content Templates page2. Click Create and select either Blog Post Template or Wiki Page Template from the drop-down menu.
The content creation page for that content type displays, either the Create a Blog Post Template page or the Create a Wiki Page Template page.
The Create a Blog Post or a Wiki Page Template page3. Fill in the Title, and enter as much content as you want to have repeated in every page created from this
template.For details on using the wiki and blog editor, see the section Rich text editor for wikis and blogs in the SAP Jam User Guide.
4. Once you have the template content set to your satisfaction, click Save.You are returned to the Content Templates page, and the template that you just created is listed in the catalog, listed alphabetically by title.
124 P U B L I CSAP Jam Collaboration Administrator Guide 1805
Product Setup
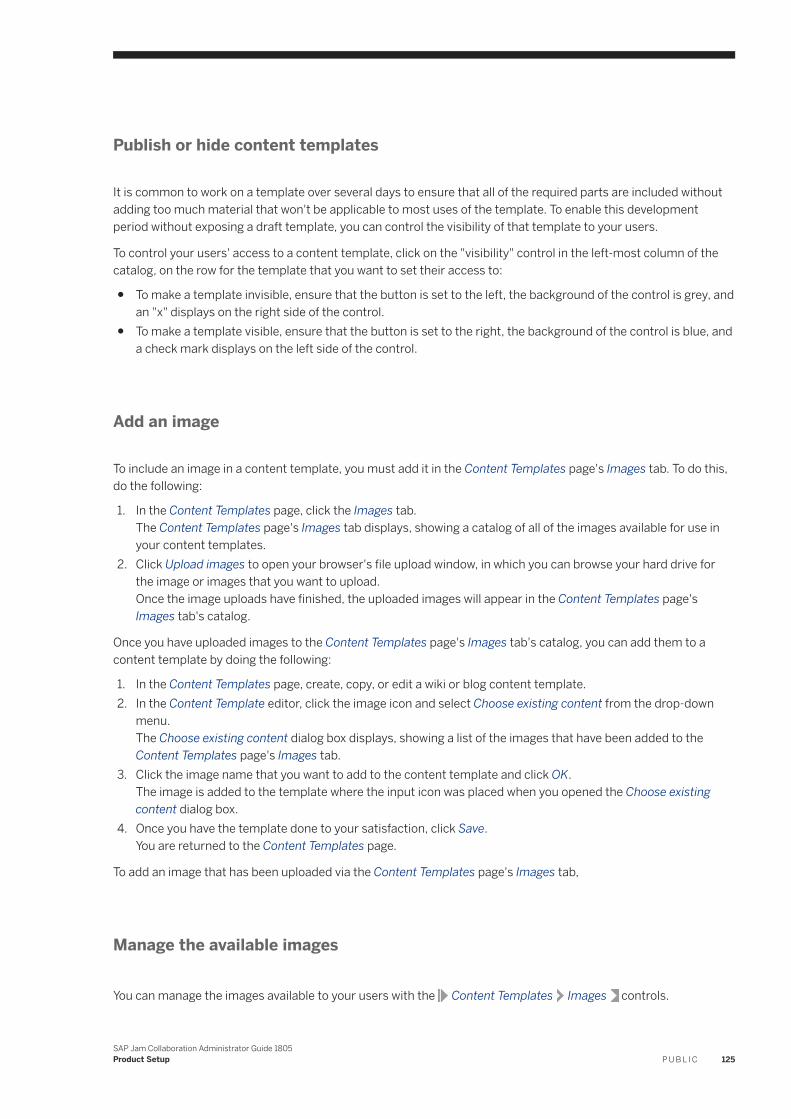
Publish or hide content templates
It is common to work on a template over several days to ensure that all of the required parts are included without adding too much material that won't be applicable to most uses of the template. To enable this development period without exposing a draft template, you can control the visibility of that template to your users.
To control your users' access to a content template, click on the "visibility" control in the left-most column of the catalog, on the row for the template that you want to set their access to:
● To make a template invisible, ensure that the button is set to the left, the background of the control is grey, and an "x" displays on the right side of the control.
● To make a template visible, ensure that the button is set to the right, the background of the control is blue, and a check mark displays on the left side of the control.
Add an image
To include an image in a content template, you must add it in the Content Templates page's Images tab. To do this, do the following:
1. In the Content Templates page, click the Images tab.The Content Templates page's Images tab displays, showing a catalog of all of the images available for use in your content templates.
2. Click Upload images to open your browser's file upload window, in which you can browse your hard drive for the image or images that you want to upload.Once the image uploads have finished, the uploaded images will appear in the Content Templates page's Images tab's catalog.
Once you have uploaded images to the Content Templates page's Images tab's catalog, you can add them to a content template by doing the following:
1. In the Content Templates page, create, copy, or edit a wiki or blog content template.2. In the Content Template editor, click the image icon and select Choose existing content from the drop-down
menu.The Choose existing content dialog box displays, showing a list of the images that have been added to the Content Templates page's Images tab.
3. Click the image name that you want to add to the content template and click OK.The image is added to the template where the input icon was placed when you opened the Choose existing content dialog box.
4. Once you have the template done to your satisfaction, click Save.You are returned to the Content Templates page.
To add an image that has been uploaded via the Content Templates page's Images tab,
Manage the available images
You can manage the images available to your users with the Content Templates Images controls.
SAP Jam Collaboration Administrator Guide 1805Product Setup P U B L I C 125
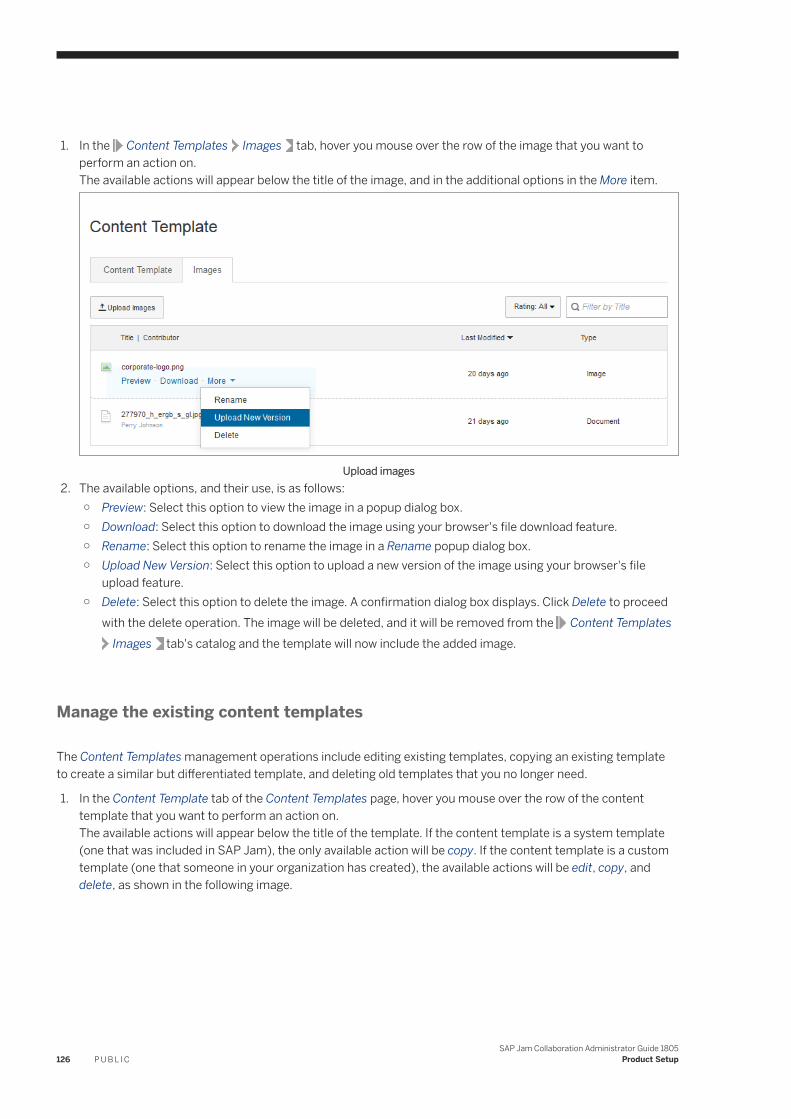
1. In the Content Templates Images tab, hover you mouse over the row of the image that you want to perform an action on.The available actions will appear below the title of the image, and in the additional options in the More item.
Upload images2. The available options, and their use, is as follows:
○ Preview: Select this option to view the image in a popup dialog box.○ Download: Select this option to download the image using your browser's file download feature.○ Rename: Select this option to rename the image in a Rename popup dialog box.○ Upload New Version: Select this option to upload a new version of the image using your browser's file
upload feature.○ Delete: Select this option to delete the image. A confirmation dialog box displays. Click Delete to proceed
with the delete operation. The image will be deleted, and it will be removed from the Content TemplatesImages tab's catalog and the template will now include the added image.
Manage the existing content templates
The Content Templates management operations include editing existing templates, copying an existing template to create a similar but differentiated template, and deleting old templates that you no longer need.
1. In the Content Template tab of the Content Templates page, hover you mouse over the row of the content template that you want to perform an action on.The available actions will appear below the title of the template. If the content template is a system template (one that was included in SAP Jam), the only available action will be copy. If the content template is a custom template (one that someone in your organization has created), the available actions will be edit, copy, and delete, as shown in the following image.
126 P U B L I CSAP Jam Collaboration Administrator Guide 1805
Product Setup
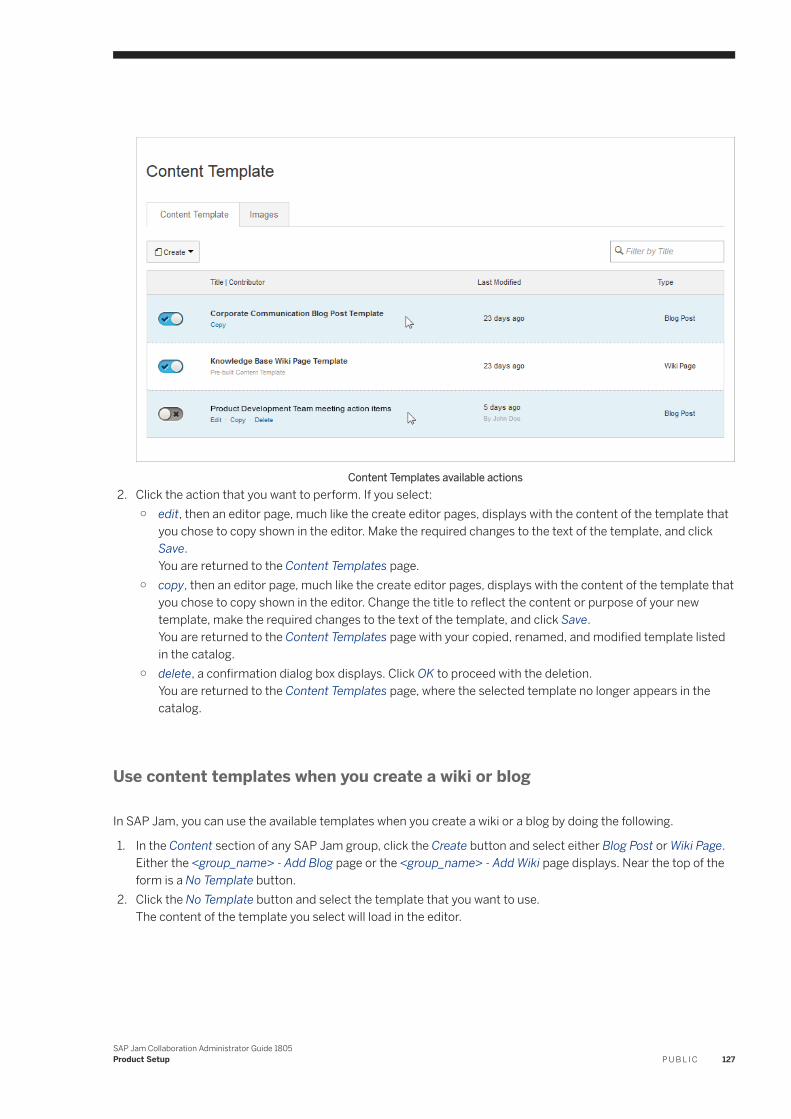
Content Templates available actions2. Click the action that you want to perform. If you select:
○ edit, then an editor page, much like the create editor pages, displays with the content of the template that you chose to copy shown in the editor. Make the required changes to the text of the template, and click Save.You are returned to the Content Templates page.
○ copy, then an editor page, much like the create editor pages, displays with the content of the template that you chose to copy shown in the editor. Change the title to reflect the content or purpose of your new template, make the required changes to the text of the template, and click Save.You are returned to the Content Templates page with your copied, renamed, and modified template listed in the catalog.
○ delete, a confirmation dialog box displays. Click OK to proceed with the deletion.You are returned to the Content Templates page, where the selected template no longer appears in the catalog.
Use content templates when you create a wiki or blog
In SAP Jam, you can use the available templates when you create a wiki or a blog by doing the following.
1. In the Content section of any SAP Jam group, click the Create button and select either Blog Post or Wiki Page.Either the <group_name> - Add Blog page or the <group_name> - Add Wiki page displays. Near the top of the form is a No Template button.
2. Click the No Template button and select the template that you want to use.The content of the template you select will load in the editor.
SAP Jam Collaboration Administrator Guide 1805Product Setup P U B L I C 127
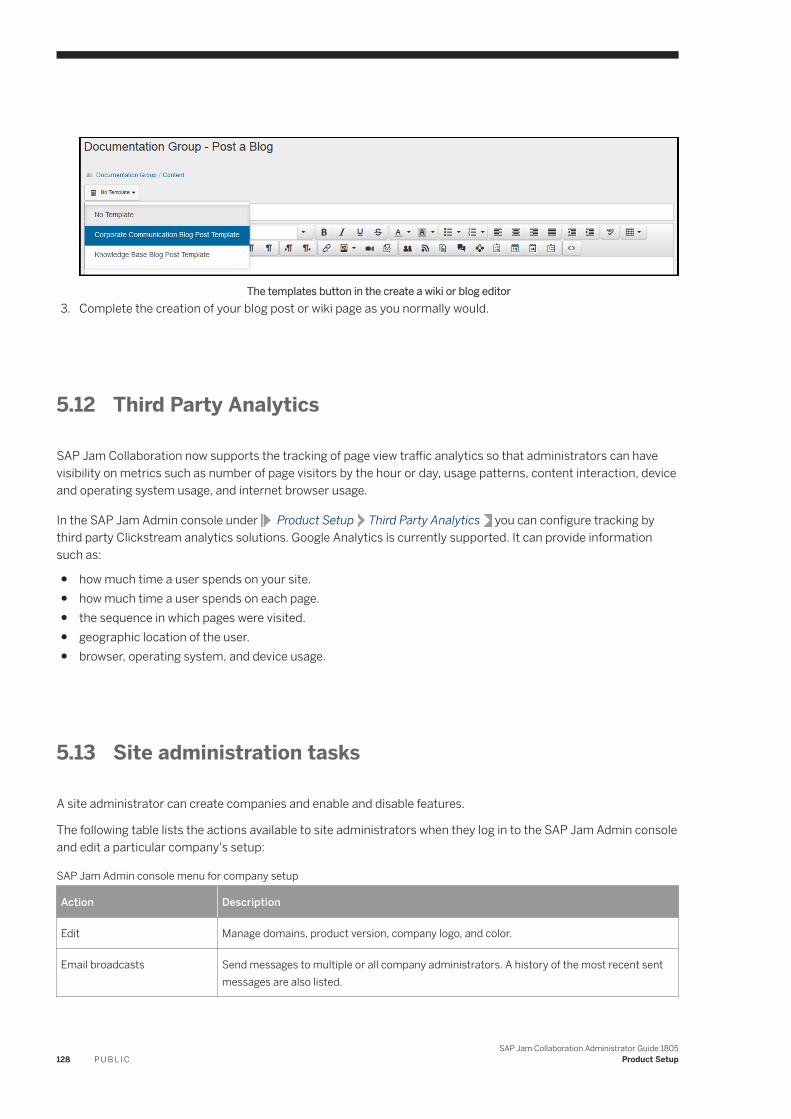
The templates button in the create a wiki or blog editor3. Complete the creation of your blog post or wiki page as you normally would.
5.12 Third Party Analytics
SAP Jam Collaboration now supports the tracking of page view traffic analytics so that administrators can have visibility on metrics such as number of page visitors by the hour or day, usage patterns, content interaction, device and operating system usage, and internet browser usage.
In the SAP Jam Admin console under Product Setup Third Party Analytics you can configure tracking by third party Clickstream analytics solutions. Google Analytics is currently supported. It can provide information such as:
● how much time a user spends on your site.● how much time a user spends on each page.● the sequence in which pages were visited.● geographic location of the user.● browser, operating system, and device usage.
5.13 Site administration tasks
A site administrator can create companies and enable and disable features.
The following table lists the actions available to site administrators when they log in to the SAP Jam Admin console and edit a particular company's setup:
SAP Jam Admin console menu for company setup
Action Description
Edit Manage domains, product version, company logo, and color.
Email broadcasts Send messages to multiple or all company administrators. A history of the most recent sent messages are also listed.
128 P U B L I CSAP Jam Collaboration Administrator Guide 1805
Product Setup
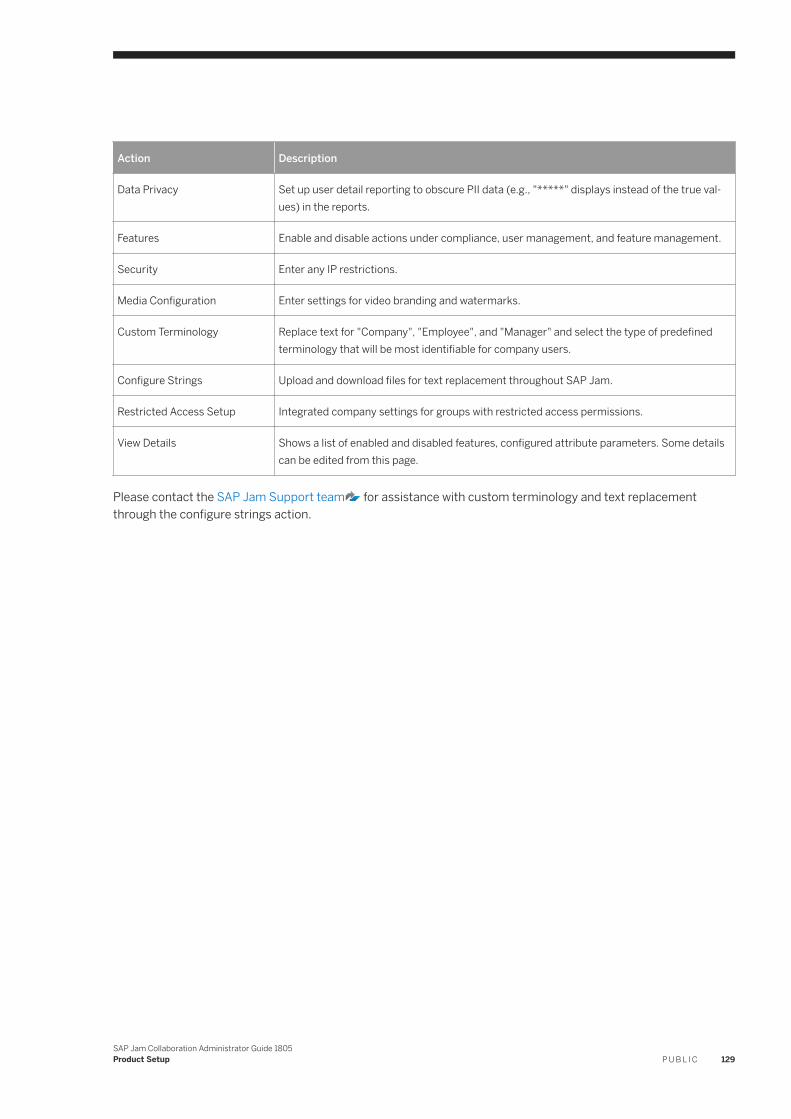
Action Description
Data Privacy Set up user detail reporting to obscure PII data (e.g., "*****" displays instead of the true values) in the reports.
Features Enable and disable actions under compliance, user management, and feature management.
Security Enter any IP restrictions.
Media Configuration Enter settings for video branding and watermarks.
Custom Terminology Replace text for "Company", "Employee", and "Manager" and select the type of predefined terminology that will be most identifiable for company users.
Configure Strings Upload and download files for text replacement throughout SAP Jam.
Restricted Access Setup Integrated company settings for groups with restricted access permissions.
View Details Shows a list of enabled and disabled features, configured attribute parameters. Some details can be edited from this page.
Please contact the SAP Jam Support team for assistance with custom terminology and text replacement through the configure strings action.
SAP Jam Collaboration Administrator Guide 1805Product Setup P U B L I C 129
6 Integrations
6.1 Integrations overview
This section describes how to integrate various applications with SAP Jam. There are three general types of integrations available:
● Business records integrations: Integrate data from business-critical applications referred to as business records.
● Document repositories integrations: Integrate repositories or libraries of documents.● Other SAP Jam integrations: There are also other types of integrations, including OpenSocial gadgets,
gamification, web widgets, or integrating SAP Jam features into other applications using the SAP Jam API.
SAP Jam business records integrations
● New or custom integrations: You can develop new or custom integrations by leveraging the OData API and OData Annotations from the external application. This approach requires some programming work. The mechanisms through which you can develop new or custom integrations are:○ Through the SAP NetWeaver Gateway (which can supply OData and user identity services for on-
premises applications).○ Through the SAP Cloud Platform (which can supply OData and user identity services for cloud-hosted
applications [SaaS]).○ By directly accessing the existing OData API and annotations of the external application.
For these new or custom integrations, some development work is required. The procedures for developing these integrations are discussed in the External Applications section of the SAP Jam Developer Guide.
● Pre-configured integrations: The most common business record integrations are available as ready-made configurations for which the OData Annotations file has already been developed. These integrations are documented in the Integrate business records [page 132] section, which includes instructions on how to:○ Integrate SAP CRM [page 139]○ Integrate SAP ECC (SD) [page 150]○ Integrate SAP Hybris Cloud for Customer [page 164]○ Integrate SAP SuccessFactors Learning [page 165]
● Configure access and authorization for integrated applications: To enable access between SAP Jam and these various external applications, one or more of the following access and authorization mechanisms must be configured:○ Add a Trusted Certificate Authority [page 179] for external applications (business records and document
repositories) if your organization uses unrecognized, self-signed SSL certificates.○ Add an OAuth Client [page 181] to configure an entry point used by external applications to request
authorizations from SAP Jam, which is required for the external application to initiate requests to the API.○ Add a SAML Trusted IDP [page 184] to set up a relationship that SAP Jam trusts to make authenticated
per-user requests from SAP Jam, for example, to display data from SAP Jam by using the API.
130 P U B L I CSAP Jam Collaboration Administrator Guide 1805
Integrations
○ Configure SAP Jam Collaboration as a SAML Local Identity Provider [page 187] for SAP Jam to act as the trusted SAML identity provider for external applications seeking single sign-on (SSO) user identity confirmation, which allows SAP Jam to make per-user requests of external application APIs.
SAP Jam document repository integrations
Integrate document repositories [page 198] from external applications to display the structured containers of those documents, and the documents that are contained in those structures, in SAP Jam. You can:
● Integrate SharePoint 2010 or 2013 [page 203]○ Note that for SharePoint 2013 & 2010 integrations, you can include SAP Jam documents in the searches
on SharePoint, as described in Federate SAP Jam Collaboration search results into SharePoint searches [page 206]. This option uses the SharePoint OpenSearch conformance.
● Integrate Alfresco One 4.2 [page 212]● Integrate SAP Extended ECM by OpenText [page 215]● Integrate SAP Document Center [page 223]● Integrate Box [page 227]● Integrate Office 365 SharePoint Sites [page 219]● Integrate Google Drive [page 229]
Other integrations
Other SAP Jam integrations that are available include:
● Add OpenSocial gadgets [page 233] to extend SAP Jam to interact with any software or service. Also see the OpenSocial gadgets section in the SAP Jam Developer Guide for information on how to develop an OpenSocial gadget.
● Integrate SAP Jam with gamification vendors [page 242] to help guide and reward new hires and existing employees to integrate SAP Jam into their work processes.
● Use the SAP Jam Widget Builders [page 246] to integrate several SAP Jam features into web pages. See the Embeddable widgets section in the SAP Jam Developer Guide.
● Use the SAP Jam API to integrate SAP Jam features into external applications. This documentation is in the SAP Jam Developer Guide.
● You can integrate SuccessFactors Employee Central Global Assignment group access, as explained in Configure Global Assignment in Employee Central [page 257].
● You can also integrate the SuccessFactors Human Capital Management (HCM) Suite Time Off and Employee Central Payroll data, although this integration is done in SuccessFactors Platform. The integration procedures are documented in the following documents, which are located in the SAP SuccessFactors HCM Suite Integration section of the SAP Help Portal:○ SAP SuccessFactors Employee Central Implementation Guide○ Metadata Framework (MDF) Implementation Guide, Chapter 10 MDF Security Using Role-Based
Permissions, sections 10.1 and 10.2. Note that you may need to modify rules for the EmployeeTime object (see "Adding Rules", section 3.3.4).
SAP Jam Collaboration Administrator Guide 1805Integrations P U B L I C 131
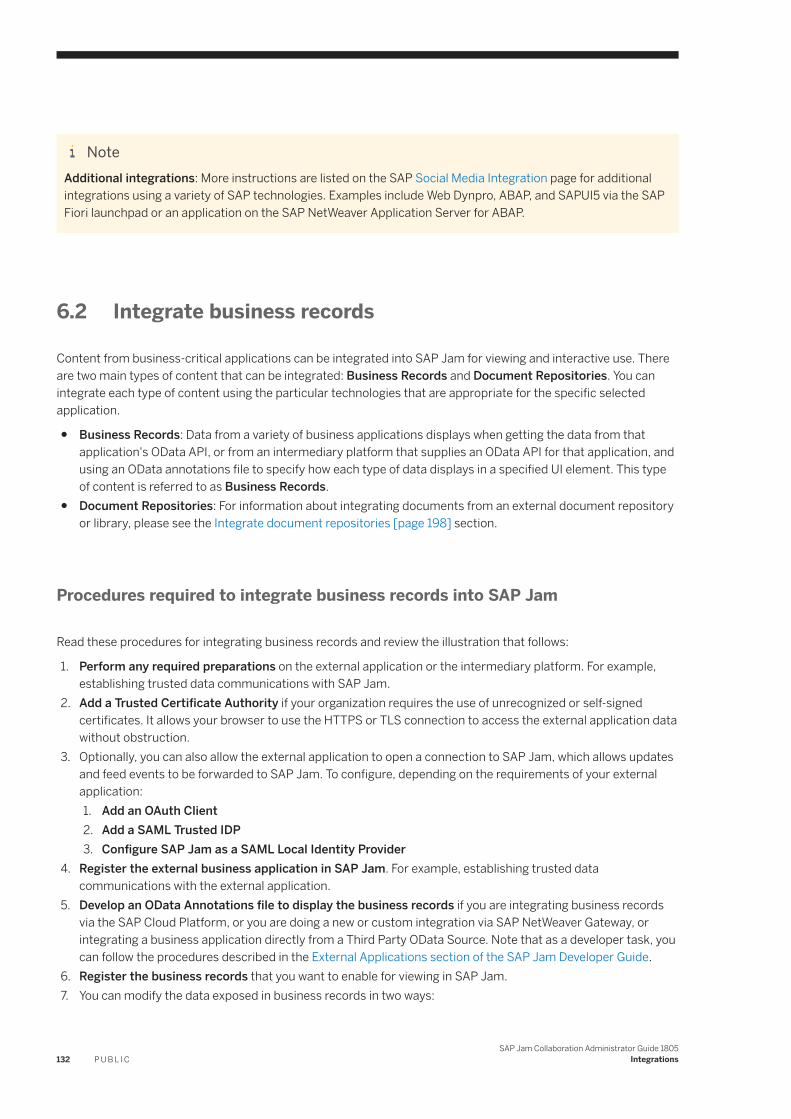
NoteAdditional integrations: More instructions are listed on the SAP Social Media Integration page for additional integrations using a variety of SAP technologies. Examples include Web Dynpro, ABAP, and SAPUI5 via the SAP Fiori launchpad or an application on the SAP NetWeaver Application Server for ABAP.
6.2 Integrate business records
Content from business-critical applications can be integrated into SAP Jam for viewing and interactive use. There are two main types of content that can be integrated: Business Records and Document Repositories. You can integrate each type of content using the particular technologies that are appropriate for the specific selected application.
● Business Records: Data from a variety of business applications displays when getting the data from that application's OData API, or from an intermediary platform that supplies an OData API for that application, and using an OData annotations file to specify how each type of data displays in a specified UI element. This type of content is referred to as Business Records.
● Document Repositories: For information about integrating documents from an external document repository or library, please see the Integrate document repositories [page 198] section.
Procedures required to integrate business records into SAP Jam
Read these procedures for integrating business records and review the illustration that follows:
1. Perform any required preparations on the external application or the intermediary platform. For example, establishing trusted data communications with SAP Jam.
2. Add a Trusted Certificate Authority if your organization requires the use of unrecognized or self-signed certificates. It allows your browser to use the HTTPS or TLS connection to access the external application data without obstruction.
3. Optionally, you can also allow the external application to open a connection to SAP Jam, which allows updates and feed events to be forwarded to SAP Jam. To configure, depending on the requirements of your external application:1. Add an OAuth Client2. Add a SAML Trusted IDP3. Configure SAP Jam as a SAML Local Identity Provider
4. Register the external business application in SAP Jam. For example, establishing trusted data communications with the external application.
5. Develop an OData Annotations file to display the business records if you are integrating business records via the SAP Cloud Platform, or you are doing a new or custom integration via SAP NetWeaver Gateway, or integrating a business application directly from a Third Party OData Source. Note that as a developer task, you can follow the procedures described in the External Applications section of the SAP Jam Developer Guide.
6. Register the business records that you want to enable for viewing in SAP Jam.7. You can modify the data exposed in business records in two ways:
132 P U B L I CSAP Jam Collaboration Administrator Guide 1805
Integrations
1. Add a filter to any business record to narrow the range of results displayed in a particular business record, allowing data for multiple business records to display in different groups.
2. Set a sort order for any business record, which determines the order in which the rows of information display in the business record.
Note that for SuccessFactors Learning, filters are pre-configured and cannot be modified, and a sort order is not relevant.
8. Add the business records to an SAP Jam group and your group members can view and discuss the external data in SAP Jam.
Work required to integrate business records
Organization and coverage of these procedures in the SAP Jam Administrator Guide
Procedure 1 (Perform any required preparations), procedure 4 (Register the external business application in SAP Jam), and procedure 6 (Register the business records) in the previous diagram are documented together in per-application integration pages, as these sections require considerable application-specific information, and they are most clearly dealt with by combining these instructions in the following sections:
● Integrate SAP CRM [page 139]● Integrate SAP ECC (SD) [page 150]● Integrate SAP Hybris Cloud for Customer [page 164]
SAP Jam Collaboration Administrator Guide 1805Integrations P U B L I C 133
● Integrate SAP SuccessFactors Learning [page 165]
The procedures for configuring access and authorization, which are procedure 2 (Add a Trusted Certificate Authority), procedure 3a (Add an OAuth Client), procedure 3b (Add a SAML Trusted IDP), and procedure 3c (Configure SAP Jam as a SAML Local Identity Provider) in the above diagram, are documented in separate sections as these steps are the same for all business records and document repositories integrations (although application-specific information is required in some fields). These procedures are documented in the following pages:
● Add a Trusted Certificate Authority [page 179] to configure access to web-based applications and services within your organization if unrecognized or self-signed certificates are used.
● Add an OAuth Client [page 181] to allow an external application to access the SAP Jam API.● Add a SAML Trusted IDP [page 184] to allow an external application to access SAP Jam user ID and
authorization information so that it displays only the material that a user is authorized to view when SAP Jam features are integrated into the external application.
● Configure SAP Jam Collaboration as a SAML Local Identity Provider [page 187] to allow SAP Jam Collaboration to access an external application's user ID and authorization information so that it displays only the material that a user is authorized to view when they view pages where integrated external application business records are displayed in SAP Jam.
Procedure 5 (Develop the business record's annotations file) is a development step that is only required if you are developing a new or custom integration, in which case you should be following the procedures described in the External Applications section of the SAP Jam Developer Guide.
With the specific business records added, you can also modify the data that displays in the business records for SAP CRM, SAP ECC (SD), and SAP Hybris Cloud for Customer. These configurations are not available for a SuccessFactors Learning integration in the following:
● procedure 7a Add a business record filter [page 174] This configuration allow you to narrow the range of results displayed in a particular business record, which permits finer-grained usage of the data across multiple business records that can be displayed in different SAP Jam groups.
● procedure 7b Add a business record sort order [page 176] This configuration determines the order in which the rows of information displays in the business record.
Users can now add business records to their groups as explained in procedure 8 (Add the business records to an SAP Jam group), which is described in the section:
● Configure access to business records in SAP Jam Collaboration [page 177]
A preview of the Admin UI screens and the information required to integrate External Applications
This section provides a quick preview of the SAP Jam Admin console pages in which the configuration procedures are performed, and the information that is required in those pages, for the integration steps described in the per-application integration pages listed above (procedures 4 and 6).
These SAP Jam Admin console pages and the required information to fill these forms are as follows:
● After the required configuration is done on the external application or intermediary platform, the external business application must be registered in the SAP Jam Admin console Integrations External
134 P U B L I CSAP Jam Collaboration Administrator Guide 1805
Integrations
Applications from the left side navigation, Add Application. Select the type of application that you want to integrate from the dropdown menu.
Register the external business application
The available options for adding a business records application are:○ SAP NetWeaver Gateway: Provides OData APIs and related services for on-premises applications. Use
this option to integrate the preconfigured applications:○ SAP CRM○ SAP ECC (SD)
○ SAP Hybris Cloud for Customer: Preconfigured integration of SAP Hybris Cloud for Customer only.○ SuccessFactors Learning: Preconfigured integration of SuccessFactors Learning only.○ SAP Cloud Platform and Third Party OData Source: Develop a new integration of an application
accessed by the SAP Cloud Platform or one that already has its own OData API. Please note that if you are developing a new or custom integration with a business records application, you should be following the procedures in the External Applications section of the SAP Jam Developer Guide.
As you select one of the above-listed business record integration options, a page displays with a form for the fields and options required to establish a trusted data exchange between SAP Jam and either the business application being integrated or the intermediary platform that is hosting the business application. There is some variation in the fields of information that are required for these different options, which are shown in the next table.
Business record: Add application forms and available fields
Add Business Record Application Options
SAP NetWeaver Gateway
SAP Cloud Platform
SAP Hybris Cloud for Customer
Third Party Data Source
SuccessFactors Learning
Name Yes Yes Yes Yes Yes
SAP Jam Collaboration Administrator Guide 1805Integrations P U B L I C 135
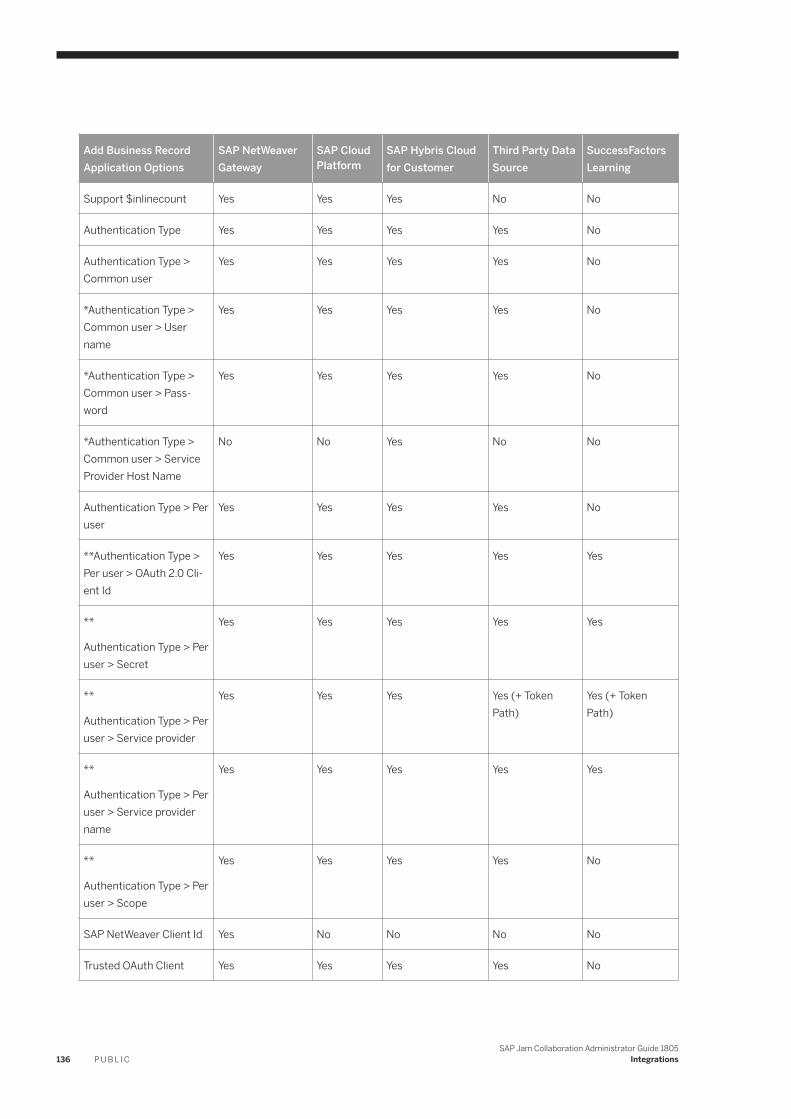
Add Business Record Application Options
SAP NetWeaver Gateway
SAP Cloud Platform
SAP Hybris Cloud for Customer
Third Party Data Source
SuccessFactors Learning
Support $inlinecount Yes Yes Yes No No
Authentication Type Yes Yes Yes Yes No
Authentication Type > Common user
Yes Yes Yes Yes No
*Authentication Type > Common user > User name
Yes Yes Yes Yes No
*Authentication Type > Common user > Password
Yes Yes Yes Yes No
*Authentication Type > Common user > Service Provider Host Name
No No Yes No No
Authentication Type > Per user
Yes Yes Yes Yes No
**Authentication Type > Per user > OAuth 2.0 Client Id
Yes Yes Yes Yes Yes
**
Authentication Type > Per user > Secret
Yes Yes Yes Yes Yes
**
Authentication Type > Per user > Service provider
Yes Yes Yes Yes (+ Token Path)
Yes (+ Token Path)
**
Authentication Type > Per user > Service provider name
Yes Yes Yes Yes Yes
**
Authentication Type > Per user > Scope
Yes Yes Yes Yes No
SAP NetWeaver Client Id Yes No No No No
Trusted OAuth Client Yes Yes Yes Yes No
136 P U B L I CSAP Jam Collaboration Administrator Guide 1805
Integrations
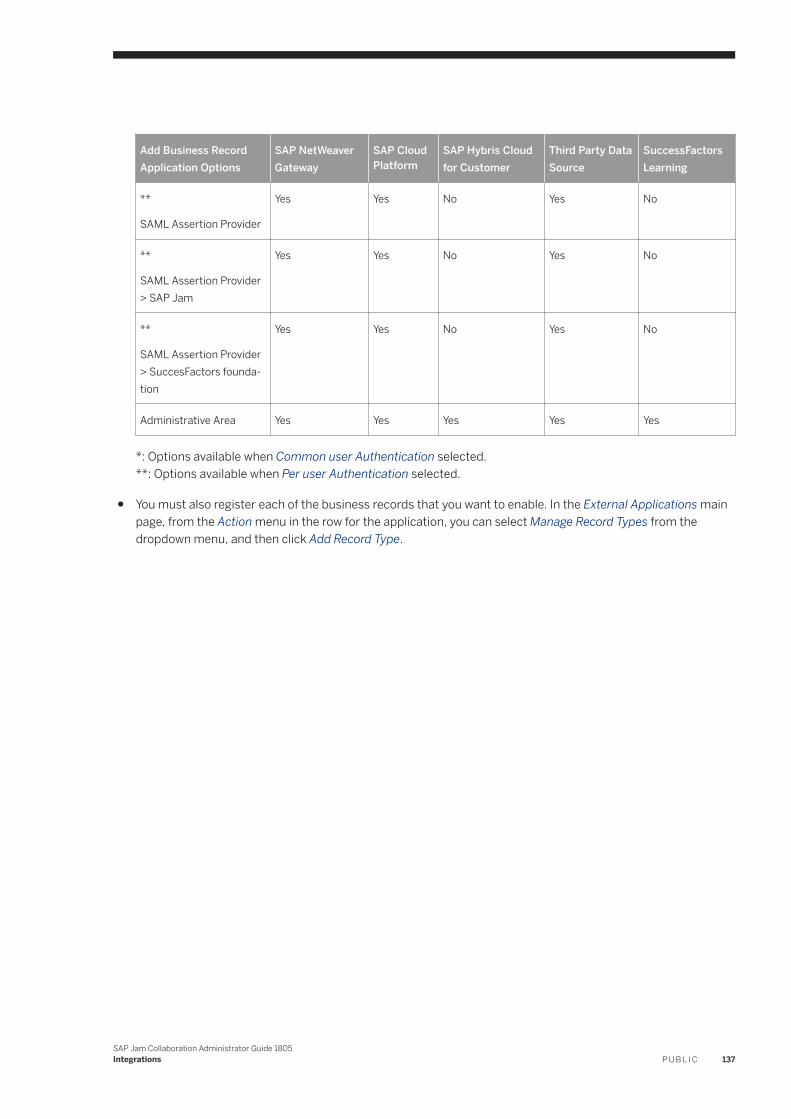
Add Business Record Application Options
SAP NetWeaver Gateway
SAP Cloud Platform
SAP Hybris Cloud for Customer
Third Party Data Source
SuccessFactors Learning
**
SAML Assertion Provider
Yes Yes No Yes No
**
SAML Assertion Provider > SAP Jam
Yes Yes No Yes No
**
SAML Assertion Provider > SuccesFactors foundation
Yes Yes No Yes No
Administrative Area Yes Yes Yes Yes Yes
*: Options available when Common user Authentication selected.**: Options available when Per user Authentication selected.
● You must also register each of the business records that you want to enable. In the External Applications main page, from the Action menu in the row for the application, you can select Manage Record Types from the dropdown menu, and then click Add Record Type.
SAP Jam Collaboration Administrator Guide 1805Integrations P U B L I C 137
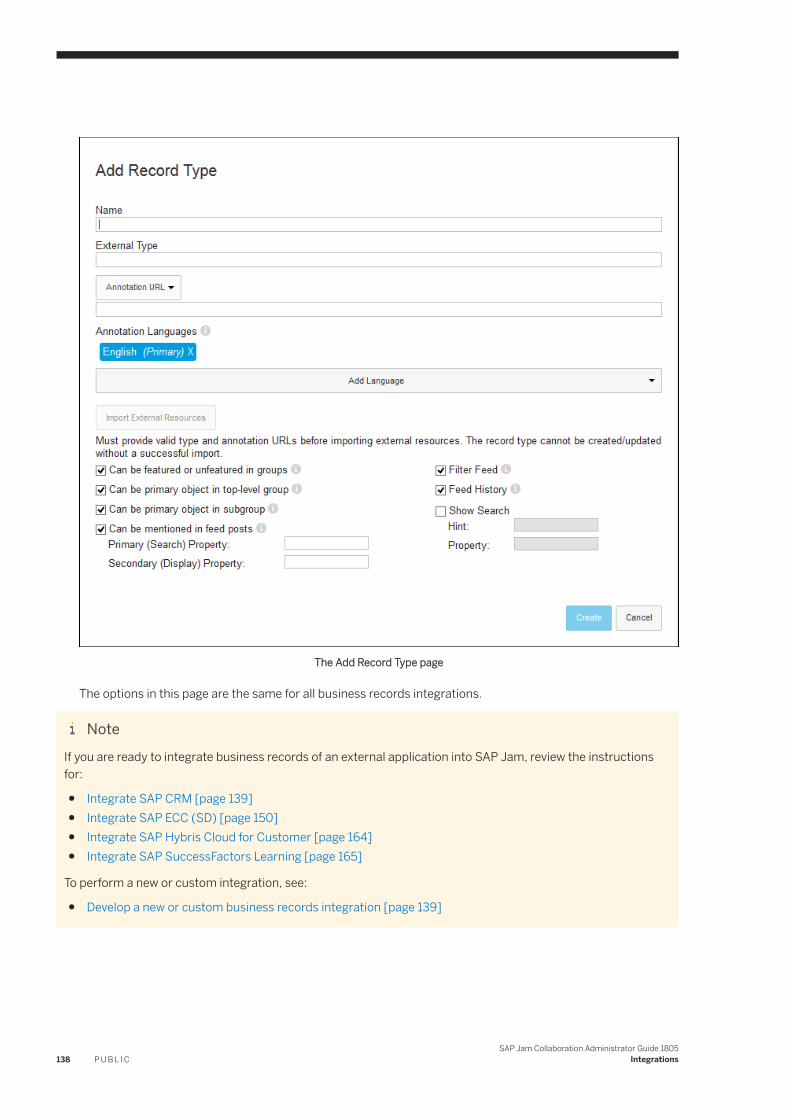
The Add Record Type page
The options in this page are the same for all business records integrations.
NoteIf you are ready to integrate business records of an external application into SAP Jam, review the instructions for:
● Integrate SAP CRM [page 139]● Integrate SAP ECC (SD) [page 150]● Integrate SAP Hybris Cloud for Customer [page 164]● Integrate SAP SuccessFactors Learning [page 165]
To perform a new or custom integration, see:
● Develop a new or custom business records integration [page 139]
138 P U B L I CSAP Jam Collaboration Administrator Guide 1805
Integrations
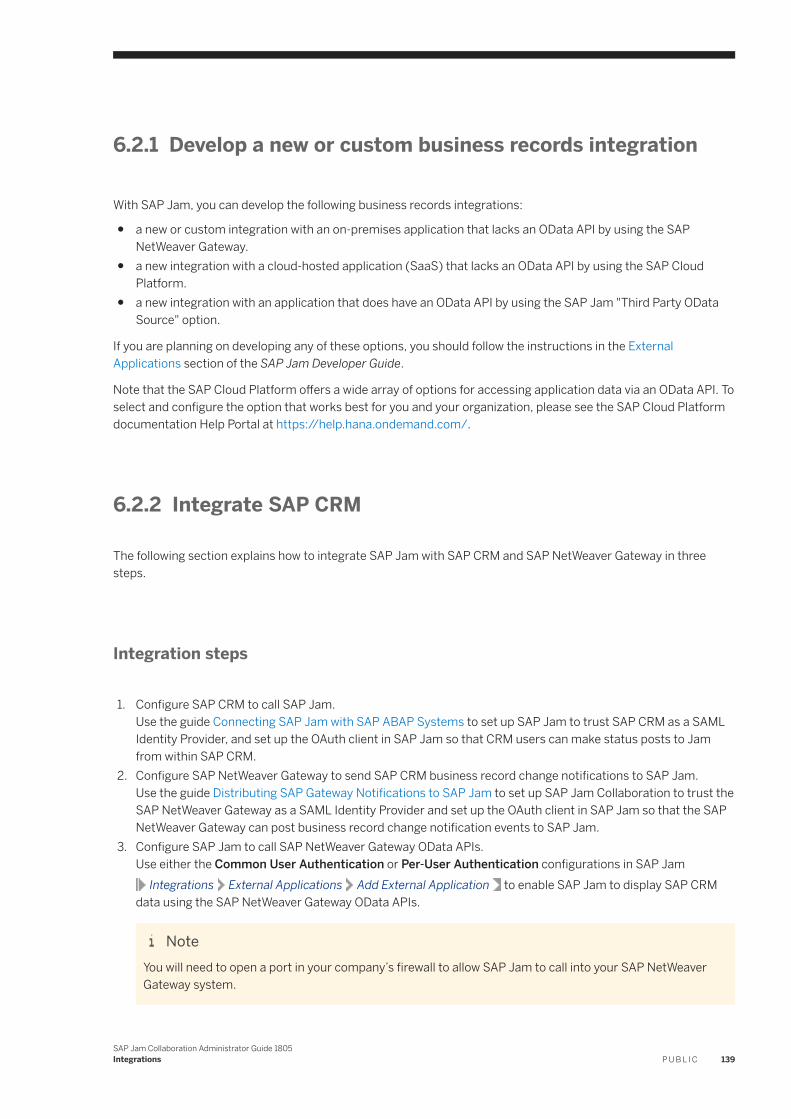
6.2.1 Develop a new or custom business records integration
With SAP Jam, you can develop the following business records integrations:
● a new or custom integration with an on-premises application that lacks an OData API by using the SAP NetWeaver Gateway.
● a new integration with a cloud-hosted application (SaaS) that lacks an OData API by using the SAP Cloud Platform.
● a new integration with an application that does have an OData API by using the SAP Jam "Third Party OData Source" option.
If you are planning on developing any of these options, you should follow the instructions in the External Applications section of the SAP Jam Developer Guide.
Note that the SAP Cloud Platform offers a wide array of options for accessing application data via an OData API. To select and configure the option that works best for you and your organization, please see the SAP Cloud Platform documentation Help Portal at https://help.hana.ondemand.com/.
6.2.2 Integrate SAP CRM
The following section explains how to integrate SAP Jam with SAP CRM and SAP NetWeaver Gateway in three steps.
Integration steps
1. Configure SAP CRM to call SAP Jam.Use the guide Connecting SAP Jam with SAP ABAP Systems to set up SAP Jam to trust SAP CRM as a SAML Identity Provider, and set up the OAuth client in SAP Jam so that CRM users can make status posts to Jam from within SAP CRM.
2. Configure SAP NetWeaver Gateway to send SAP CRM business record change notifications to SAP Jam.Use the guide Distributing SAP Gateway Notifications to SAP Jam to set up SAP Jam Collaboration to trust the SAP NetWeaver Gateway as a SAML Identity Provider and set up the OAuth client in SAP Jam so that the SAP NetWeaver Gateway can post business record change notification events to SAP Jam.
3. Configure SAP Jam to call SAP NetWeaver Gateway OData APIs.Use either the Common User Authentication or Per-User Authentication configurations in SAP Jam
Integrations External Applications Add External Application to enable SAP Jam to display SAP CRM data using the SAP NetWeaver Gateway OData APIs.
NoteYou will need to open a port in your company’s firewall to allow SAP Jam to call into your SAP NetWeaver Gateway system.
SAP Jam Collaboration Administrator Guide 1805Integrations P U B L I C 139
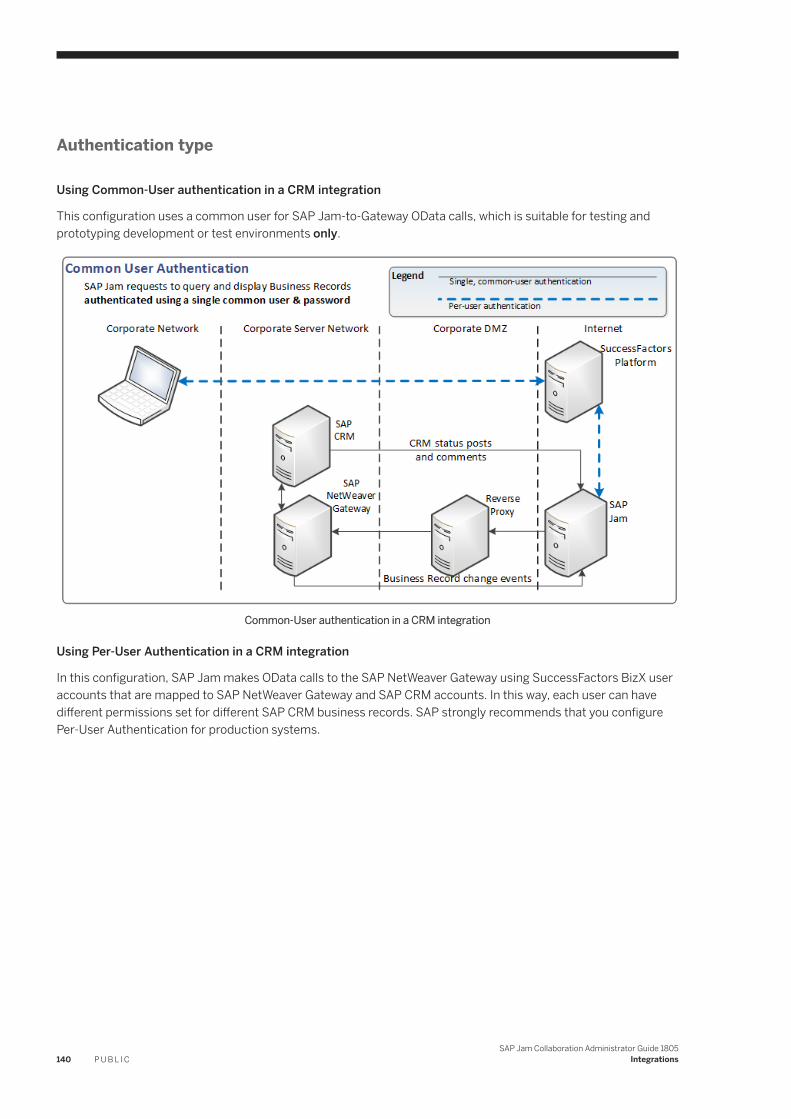
Authentication type
Using Common-User authentication in a CRM integration
This configuration uses a common user for SAP Jam-to-Gateway OData calls, which is suitable for testing and prototyping development or test environments only.
Common-User authentication in a CRM integration
Using Per-User Authentication in a CRM integration
In this configuration, SAP Jam makes OData calls to the SAP NetWeaver Gateway using SuccessFactors BizX user accounts that are mapped to SAP NetWeaver Gateway and SAP CRM accounts. In this way, each user can have different permissions set for different SAP CRM business records. SAP strongly recommends that you configure Per-User Authentication for production systems.
140 P U B L I CSAP Jam Collaboration Administrator Guide 1805
Integrations
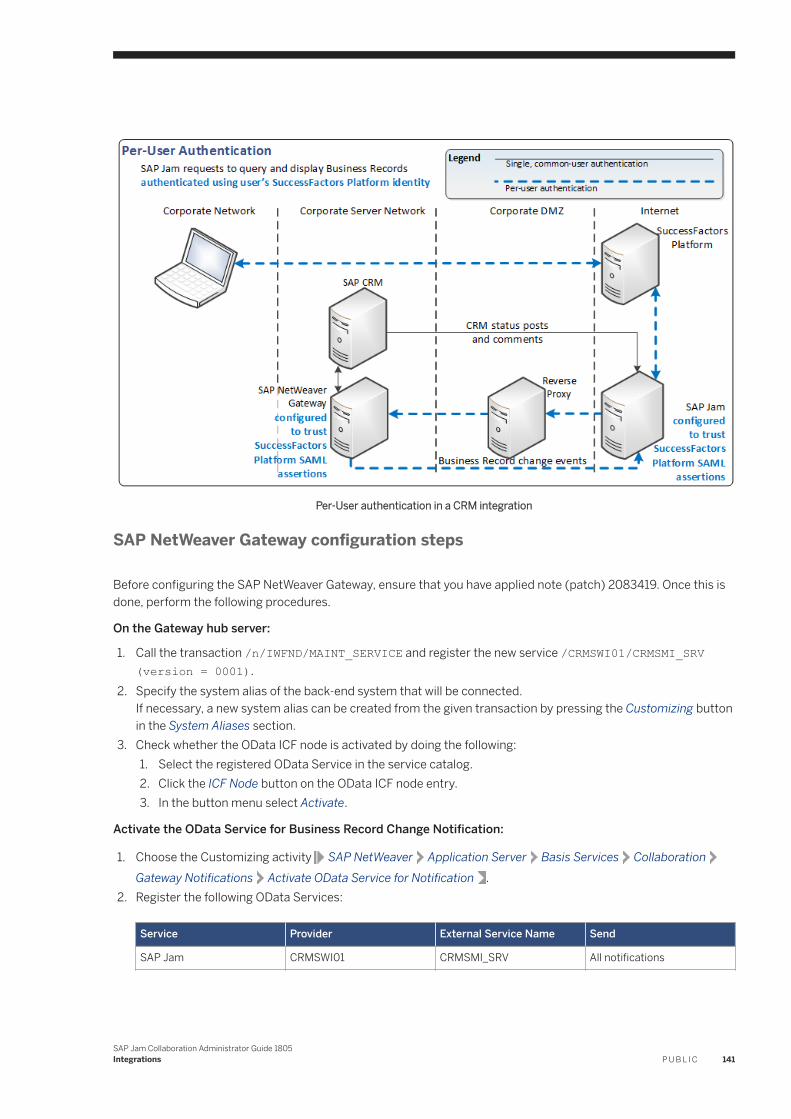
Per-User authentication in a CRM integration
SAP NetWeaver Gateway configuration steps
Before configuring the SAP NetWeaver Gateway, ensure that you have applied note (patch) 2083419. Once this is done, perform the following procedures.
On the Gateway hub server:
1. Call the transaction /n/IWFND/MAINT_SERVICE and register the new service /CRMSWI01/CRMSMI_SRV (version = 0001).
2. Specify the system alias of the back-end system that will be connected.If necessary, a new system alias can be created from the given transaction by pressing the Customizing button in the System Aliases section.
3. Check whether the OData ICF node is activated by doing the following:1. Select the registered OData Service in the service catalog.2. Click the ICF Node button on the OData ICF node entry.3. In the button menu select Activate.
Activate the OData Service for Business Record Change Notification:
1. Choose the Customizing activity SAP NetWeaver Application Server Basis Services CollaborationGateway Notifications Activate OData Service for Notification .
2. Register the following OData Services:
Service Provider External Service Name Send
SAP Jam CRMSWI01 CRMSMI_SRV All notifications
SAP Jam Collaboration Administrator Guide 1805Integrations P U B L I C 141
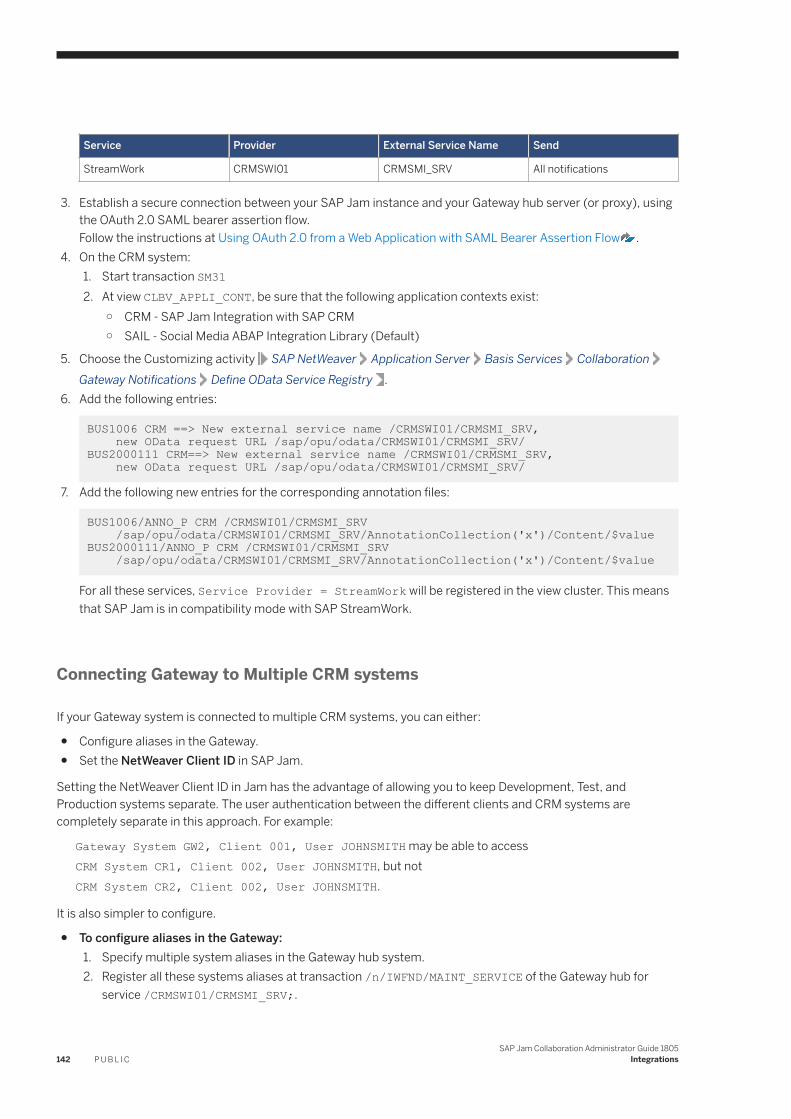
Service Provider External Service Name Send
StreamWork CRMSWI01 CRMSMI_SRV All notifications
3. Establish a secure connection between your SAP Jam instance and your Gateway hub server (or proxy), using the OAuth 2.0 SAML bearer assertion flow.Follow the instructions at Using OAuth 2.0 from a Web Application with SAML Bearer Assertion Flow .
4. On the CRM system:1. Start transaction SM312. At view CLBV_APPLI_CONT, be sure that the following application contexts exist:
○ CRM - SAP Jam Integration with SAP CRM○ SAIL - Social Media ABAP Integration Library (Default)
5. Choose the Customizing activity SAP NetWeaver Application Server Basis Services CollaborationGateway Notifications Define OData Service Registry .
6. Add the following entries:
BUS1006 CRM ==> New external service name /CRMSWI01/CRMSMI_SRV, new OData request URL /sap/opu/odata/CRMSWI01/CRMSMI_SRV/BUS2000111 CRM==> New external service name /CRMSWI01/CRMSMI_SRV, new OData request URL /sap/opu/odata/CRMSWI01/CRMSMI_SRV/
7. Add the following new entries for the corresponding annotation files:
BUS1006/ANNO_P CRM /CRMSWI01/CRMSMI_SRV /sap/opu/odata/CRMSWI01/CRMSMI_SRV/AnnotationCollection('x')/Content/$valueBUS2000111/ANNO_P CRM /CRMSWI01/CRMSMI_SRV /sap/opu/odata/CRMSWI01/CRMSMI_SRV/AnnotationCollection('x')/Content/$value
For all these services, Service Provider = StreamWork will be registered in the view cluster. This means that SAP Jam is in compatibility mode with SAP StreamWork.
Connecting Gateway to Multiple CRM systems
If your Gateway system is connected to multiple CRM systems, you can either:
● Configure aliases in the Gateway.● Set the NetWeaver Client ID in SAP Jam.
Setting the NetWeaver Client ID in Jam has the advantage of allowing you to keep Development, Test, and Production systems separate. The user authentication between the different clients and CRM systems are completely separate in this approach. For example:
Gateway System GW2, Client 001, User JOHNSMITH may be able to accessCRM System CR1, Client 002, User JOHNSMITH, but notCRM System CR2, Client 002, User JOHNSMITH.
It is also simpler to configure.
● To configure aliases in the Gateway:1. Specify multiple system aliases in the Gateway hub system.2. Register all these systems aliases at transaction /n/IWFND/MAINT_SERVICE of the Gateway hub for
service /CRMSWI01/CRMSMI_SRV;.
142 P U B L I CSAP Jam Collaboration Administrator Guide 1805
Integrations
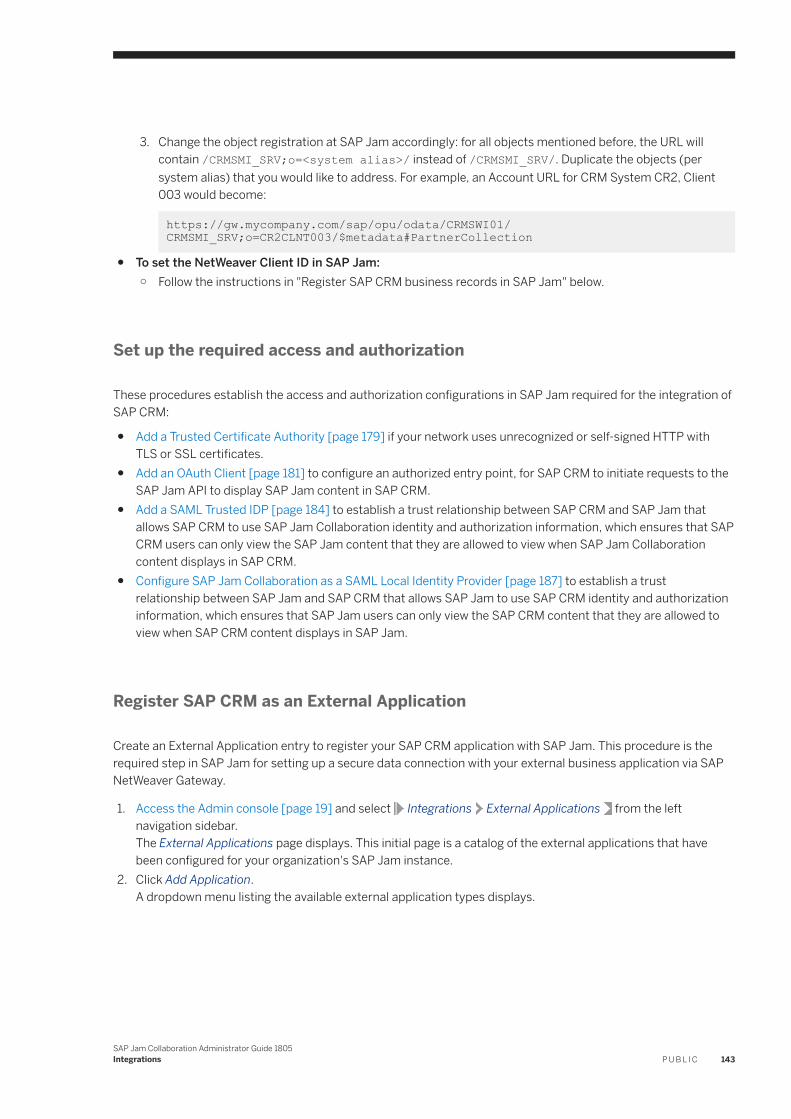
3. Change the object registration at SAP Jam accordingly: for all objects mentioned before, the URL will contain /CRMSMI_SRV;o=<system alias>/ instead of /CRMSMI_SRV/. Duplicate the objects (per system alias) that you would like to address. For example, an Account URL for CRM System CR2, Client 003 would become:
https://gw.mycompany.com/sap/opu/odata/CRMSWI01/CRMSMI_SRV;o=CR2CLNT003/$metadata#PartnerCollection
● To set the NetWeaver Client ID in SAP Jam:○ Follow the instructions in "Register SAP CRM business records in SAP Jam" below.
Set up the required access and authorization
These procedures establish the access and authorization configurations in SAP Jam required for the integration of SAP CRM:
● Add a Trusted Certificate Authority [page 179] if your network uses unrecognized or self-signed HTTP with TLS or SSL certificates.
● Add an OAuth Client [page 181] to configure an authorized entry point, for SAP CRM to initiate requests to the SAP Jam API to display SAP Jam content in SAP CRM.
● Add a SAML Trusted IDP [page 184] to establish a trust relationship between SAP CRM and SAP Jam that allows SAP CRM to use SAP Jam Collaboration identity and authorization information, which ensures that SAP CRM users can only view the SAP Jam content that they are allowed to view when SAP Jam Collaboration content displays in SAP CRM.
● Configure SAP Jam Collaboration as a SAML Local Identity Provider [page 187] to establish a trust relationship between SAP Jam and SAP CRM that allows SAP Jam to use SAP CRM identity and authorization information, which ensures that SAP Jam users can only view the SAP CRM content that they are allowed to view when SAP CRM content displays in SAP Jam.
Register SAP CRM as an External Application
Create an External Application entry to register your SAP CRM application with SAP Jam. This procedure is the required step in SAP Jam for setting up a secure data connection with your external business application via SAP NetWeaver Gateway.
1. Access the Admin console [page 19] and select Integrations External Applications from the left navigation sidebar.The External Applications page displays. This initial page is a catalog of the external applications that have been configured for your organization's SAP Jam instance.
2. Click Add Application.A dropdown menu listing the available external application types displays.
SAP Jam Collaboration Administrator Guide 1805Integrations P U B L I C 143
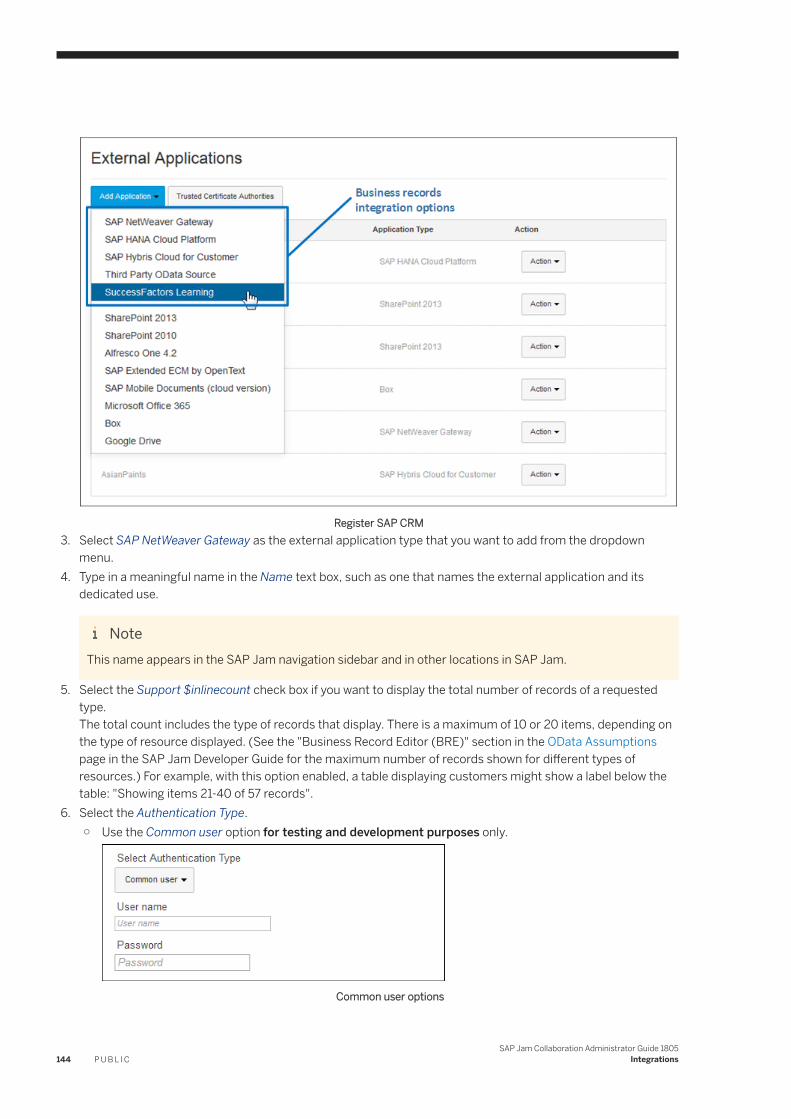
Register SAP CRM3. Select SAP NetWeaver Gateway as the external application type that you want to add from the dropdown
menu.4. Type in a meaningful name in the Name text box, such as one that names the external application and its
dedicated use.
NoteThis name appears in the SAP Jam navigation sidebar and in other locations in SAP Jam.
5. Select the Support $inlinecount check box if you want to display the total number of records of a requested type.The total count includes the type of records that display. There is a maximum of 10 or 20 items, depending on the type of resource displayed. (See the "Business Record Editor (BRE)" section in the OData Assumptions page in the SAP Jam Developer Guide for the maximum number of records shown for different types of resources.) For example, with this option enabled, a table displaying customers might show a label below the table: "Showing items 21-40 of 57 records".
6. Select the Authentication Type.○ Use the Common user option for testing and development purposes only.
Common user options
144 P U B L I CSAP Jam Collaboration Administrator Guide 1805
Integrations
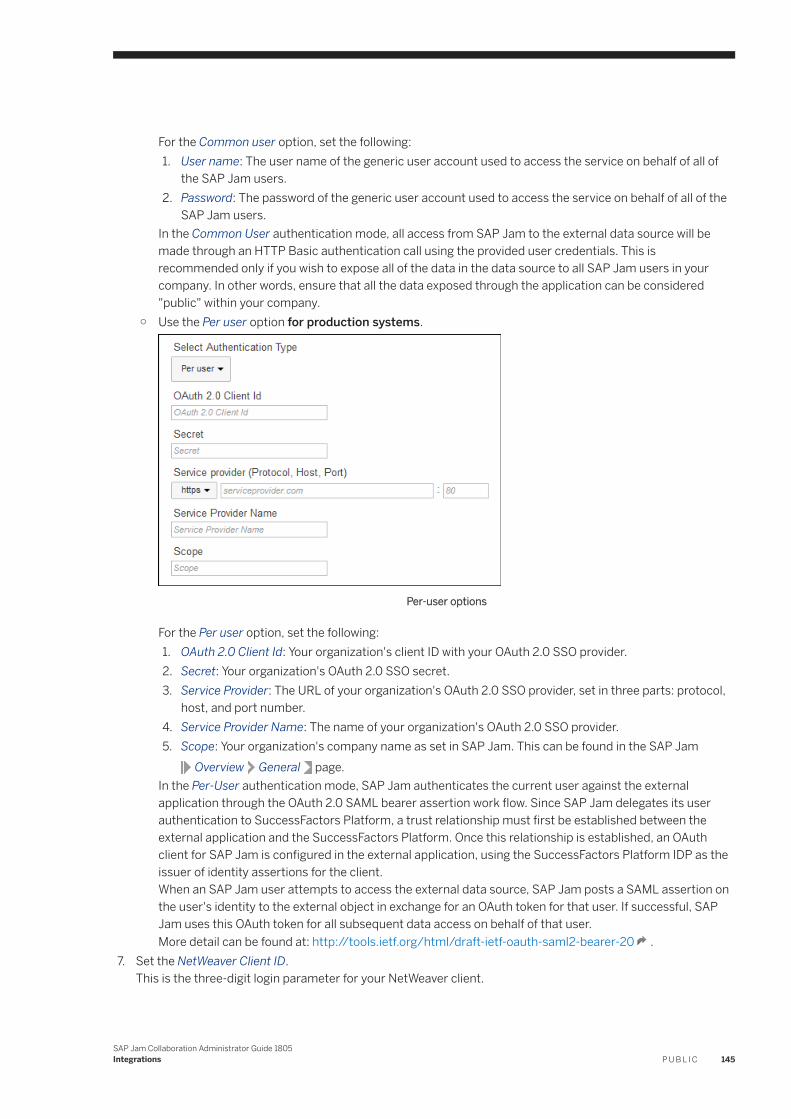
For the Common user option, set the following:1. User name: The user name of the generic user account used to access the service on behalf of all of
the SAP Jam users.2. Password: The password of the generic user account used to access the service on behalf of all of the
SAP Jam users.In the Common User authentication mode, all access from SAP Jam to the external data source will be made through an HTTP Basic authentication call using the provided user credentials. This is recommended only if you wish to expose all of the data in the data source to all SAP Jam users in your company. In other words, ensure that all the data exposed through the application can be considered "public" within your company.
○ Use the Per user option for production systems.
Per-user options
For the Per user option, set the following:1. OAuth 2.0 Client Id: Your organization's client ID with your OAuth 2.0 SSO provider.2. Secret: Your organization's OAuth 2.0 SSO secret.3. Service Provider: The URL of your organization's OAuth 2.0 SSO provider, set in three parts: protocol,
host, and port number.4. Service Provider Name: The name of your organization's OAuth 2.0 SSO provider.5. Scope: Your organization's company name as set in SAP Jam. This can be found in the SAP Jam
Overview General page.In the Per-User authentication mode, SAP Jam authenticates the current user against the external application through the OAuth 2.0 SAML bearer assertion work flow. Since SAP Jam delegates its user authentication to SuccessFactors Platform, a trust relationship must first be established between the external application and the SuccessFactors Platform. Once this relationship is established, an OAuth client for SAP Jam is configured in the external application, using the SuccessFactors Platform IDP as the issuer of identity assertions for the client.When an SAP Jam user attempts to access the external data source, SAP Jam posts a SAML assertion on the user's identity to the external object in exchange for an OAuth token for that user. If successful, SAP Jam uses this OAuth token for all subsequent data access on behalf of that user.More detail can be found at: http://tools.ietf.org/html/draft-ietf-oauth-saml2-bearer-20 .
7. Set the NetWeaver Client ID.This is the three-digit login parameter for your NetWeaver client.
SAP Jam Collaboration Administrator Guide 1805Integrations P U B L I C 145

The Add External Application dialog box, latter options8. Optionally, Select Trusted OAuth Client from the dropdown menu.
This is required if you want the external application, which supplies the business records, to be able to post feed updates in SAP Jam.
9. Select Enable global search for business records and related feed conversations if you want your users to be able to search all business records and their public feed comments from within SAP Jam.
10. Administrative Area: Select the area in which you want this external application to be available. The default is "Company", which makes it available to all groups.
11. Click Save.You are returned to the Integrations External Applications page, where the list of external applications that have been added displays, now including the external application that you have just registered.
Troubleshooting
If you only see the notification in SAP Jam, but no back-end data is rendered in the Quick View on mouse-over, you should check the error log (transaction /IWFND/ERROR_LOG) and the application log (transaction SLG1, application /IWFND/) of the connected Gateway hub system.
Register SAP CRM business records in SAP Jam Collaboration
Once you have completed the required configuration to access your external SAP CRM application from SAP Jam, you must configure it by adding the particular business records that you want to access.
To register business records:
1. In the Integrations External Applications section, click Action beside the OData application for which you want to add objects and select Manage Record Types from the context menu.The Manage Record Types screen displays for that application.
2. Click Add Record.The Manage Record Types screen displays for that application.
146 P U B L I CSAP Jam Collaboration Administrator Guide 1805
Integrations
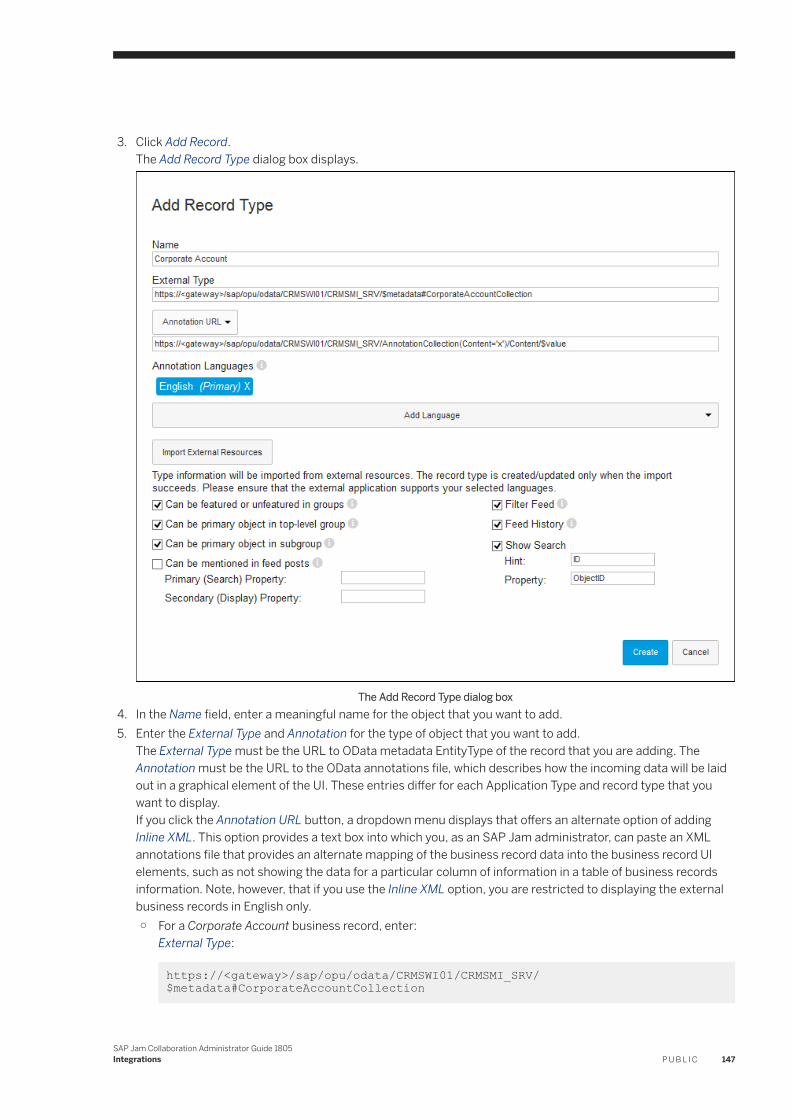
3. Click Add Record.The Add Record Type dialog box displays.
The Add Record Type dialog box4. In the Name field, enter a meaningful name for the object that you want to add.5. Enter the External Type and Annotation for the type of object that you want to add.
The External Type must be the URL to OData metadata EntityType of the record that you are adding. The Annotation must be the URL to the OData annotations file, which describes how the incoming data will be laid out in a graphical element of the UI. These entries differ for each Application Type and record type that you want to display.If you click the Annotation URL button, a dropdown menu displays that offers an alternate option of adding Inline XML. This option provides a text box into which you, as an SAP Jam administrator, can paste an XML annotations file that provides an alternate mapping of the business record data into the business record UI elements, such as not showing the data for a particular column of information in a table of business records information. Note, however, that if you use the Inline XML option, you are restricted to displaying the external business records in English only.○ For a Corporate Account business record, enter:
External Type:
https://<gateway>/sap/opu/odata/CRMSWI01/CRMSMI_SRV/$metadata#CorporateAccountCollection
SAP Jam Collaboration Administrator Guide 1805Integrations P U B L I C 147
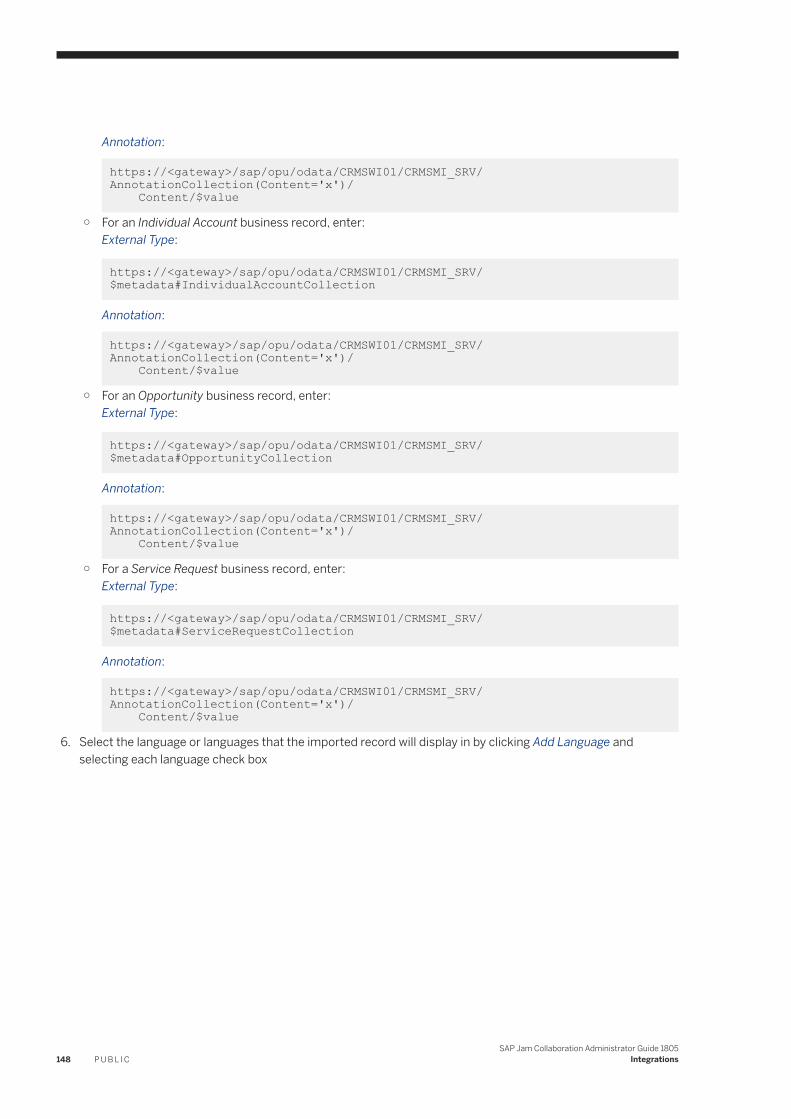
Annotation:
https://<gateway>/sap/opu/odata/CRMSWI01/CRMSMI_SRV/AnnotationCollection(Content='x')/ Content/$value
○ For an Individual Account business record, enter:External Type:
https://<gateway>/sap/opu/odata/CRMSWI01/CRMSMI_SRV/$metadata#IndividualAccountCollection
Annotation:
https://<gateway>/sap/opu/odata/CRMSWI01/CRMSMI_SRV/AnnotationCollection(Content='x')/ Content/$value
○ For an Opportunity business record, enter:External Type:
https://<gateway>/sap/opu/odata/CRMSWI01/CRMSMI_SRV/$metadata#OpportunityCollection
Annotation:
https://<gateway>/sap/opu/odata/CRMSWI01/CRMSMI_SRV/AnnotationCollection(Content='x')/ Content/$value
○ For a Service Request business record, enter:External Type:
https://<gateway>/sap/opu/odata/CRMSWI01/CRMSMI_SRV/$metadata#ServiceRequestCollection
Annotation:
https://<gateway>/sap/opu/odata/CRMSWI01/CRMSMI_SRV/AnnotationCollection(Content='x')/ Content/$value
6. Select the language or languages that the imported record will display in by clicking Add Language and selecting each language check box
148 P U B L I CSAP Jam Collaboration Administrator Guide 1805
Integrations
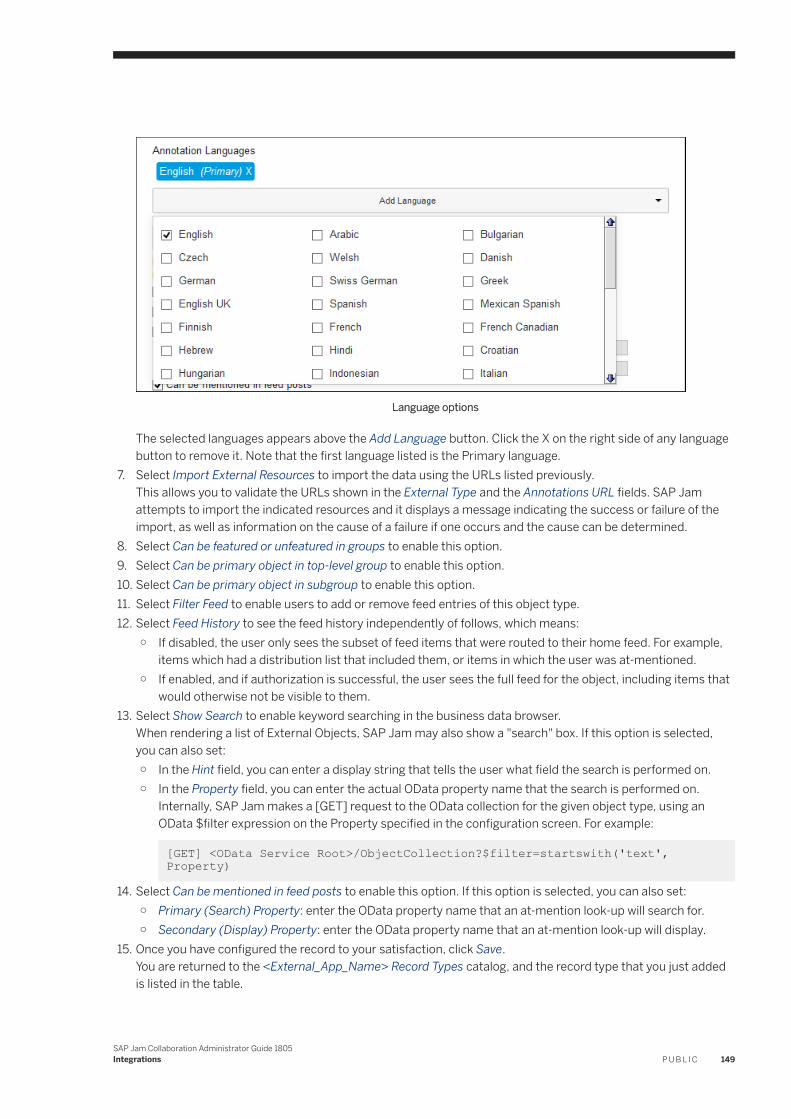
Language options
The selected languages appears above the Add Language button. Click the X on the right side of any language button to remove it. Note that the first language listed is the Primary language.
7. Select Import External Resources to import the data using the URLs listed previously.This allows you to validate the URLs shown in the External Type and the Annotations URL fields. SAP Jam attempts to import the indicated resources and it displays a message indicating the success or failure of the import, as well as information on the cause of a failure if one occurs and the cause can be determined.
8. Select Can be featured or unfeatured in groups to enable this option.9. Select Can be primary object in top-level group to enable this option.10. Select Can be primary object in subgroup to enable this option.11. Select Filter Feed to enable users to add or remove feed entries of this object type.12. Select Feed History to see the feed history independently of follows, which means:
○ If disabled, the user only sees the subset of feed items that were routed to their home feed. For example, items which had a distribution list that included them, or items in which the user was at-mentioned.
○ If enabled, and if authorization is successful, the user sees the full feed for the object, including items that would otherwise not be visible to them.
13. Select Show Search to enable keyword searching in the business data browser.When rendering a list of External Objects, SAP Jam may also show a "search" box. If this option is selected, you can also set:○ In the Hint field, you can enter a display string that tells the user what field the search is performed on.○ In the Property field, you can enter the actual OData property name that the search is performed on.
Internally, SAP Jam makes a [GET] request to the OData collection for the given object type, using an OData $filter expression on the Property specified in the configuration screen. For example:
[GET] <OData Service Root>/ObjectCollection?$filter=startswith('text', Property)
14. Select Can be mentioned in feed posts to enable this option. If this option is selected, you can also set:○ Primary (Search) Property: enter the OData property name that an at-mention look-up will search for.○ Secondary (Display) Property: enter the OData property name that an at-mention look-up will display.
15. Once you have configured the record to your satisfaction, click Save.You are returned to the <External_App_Name> Record Types catalog, and the record type that you just added is listed in the table.
SAP Jam Collaboration Administrator Guide 1805Integrations P U B L I C 149
NoteNext: You can now, optionally, add an External Application Object Filter [page 174] to narrow the range of data shown in a particular external application data object.
Optionally, you can now add an External Application Object Sort Order [page 176] to set the order in which the external data is arranged in a particular external application data object.
If you do not want or need to add Filters or Sort Fields to your External Application Objects, you can proceed to Configure access to business records in SAP Jam Collaboration [page 177].
6.2.3 Integrate SAP ECC (SD)
An SAP Jam integration with SAP Sales and Distribution (SD) allows you to integrate SD processes with SAP Jam (e.g., create a SAP Jam group from a business record overview page, follow updates to a SAP Jam group from within the SD GUI).
SAP NetWeaver Gateway services are used to send notifications about changes to SD business records to SAP Jam subscribers. SAP Jam subscribers receive these updates in SAP Jam Collaboration as feed entries.
This integration can, optionally, include an integration with SAP CRM. With this option, you must perform the SAP NetWeaver preparation procedures in Integrate SAP CRM [page 139] and the procedures on this page.
This section includes the following configuration tasks:
● Enabling subscriptions to the following SD-specific business records:○ Sales Orders○ Invoices○ Quotations○ Customers○ Outbound Deliveries
● Configuring the SD-specific ESJI_SD_SRV OData service to distribute SAP Gateway notifications for the supported business records.The SAIL configuration guide Distributing SAP Gateway Notifications to SAP Jam provides generic descriptions of the required tasks for configuring the Send Notifications scenario. You have to complete these tasks to distribute SAP Gateway notifications.Use the SD-specific information for the Send Notification scenario in SAP ECC SD when you complete the respective sections in the generic SAIL guide.
NoteYou must complete the configuration steps as described in the SAIL configuration guide Connecting SAP Jam with SAP ABAP Systems before continuing with these instructions.
150 P U B L I CSAP Jam Collaboration Administrator Guide 1805
Integrations

SAP ECC ERP with SAP CRM network overview
Required SAP Versions
● SAP ECC:○ EhP7 SP04 with Note 2009570○ EhP7 SP05 (RTC in July, 2014)○ EhP7 SP06 (RTC EO November, 2014)
● SAP Netweaver Gateway: The SAP ECC scenario has the same requirements as the SAP CRM scenario.● SAP CRM:
○ Software Component: CRMSWI01 CRM-BF-SW○ 2003000: Allows you to view Quotations in a CRM Corporate Account group; adds a link to ECC
Quotations from the CRM annotation○ SAP CRM Add-On:
1797033 Customizing Guide: Business Object Change Notification1835654 No notifications for address fields of corporate account1837380 Block BO Notifications on BO Org. Data Change
○ SAP CRM Add-On: Thing Inspector
1891369 Opportunity and Account OData Services for SAP Jam1928182 Service Request: OData Service for SAP Jam1941833 OData Service for SAP Jam integration: Corrections1988318 Exception occurred with request for individual and corporate account1938485 Globalization: Multiple Language Support for OData Service /CRMSWI01/CRMSMI_SRV/1989573 Missing properties at account entity types1972217 OData service /CRMSWI01/CRMSMI_SRV/ shall support the combination of OrderBy and Top
SAP Jam Collaboration Administrator Guide 1805Integrations P U B L I C 151
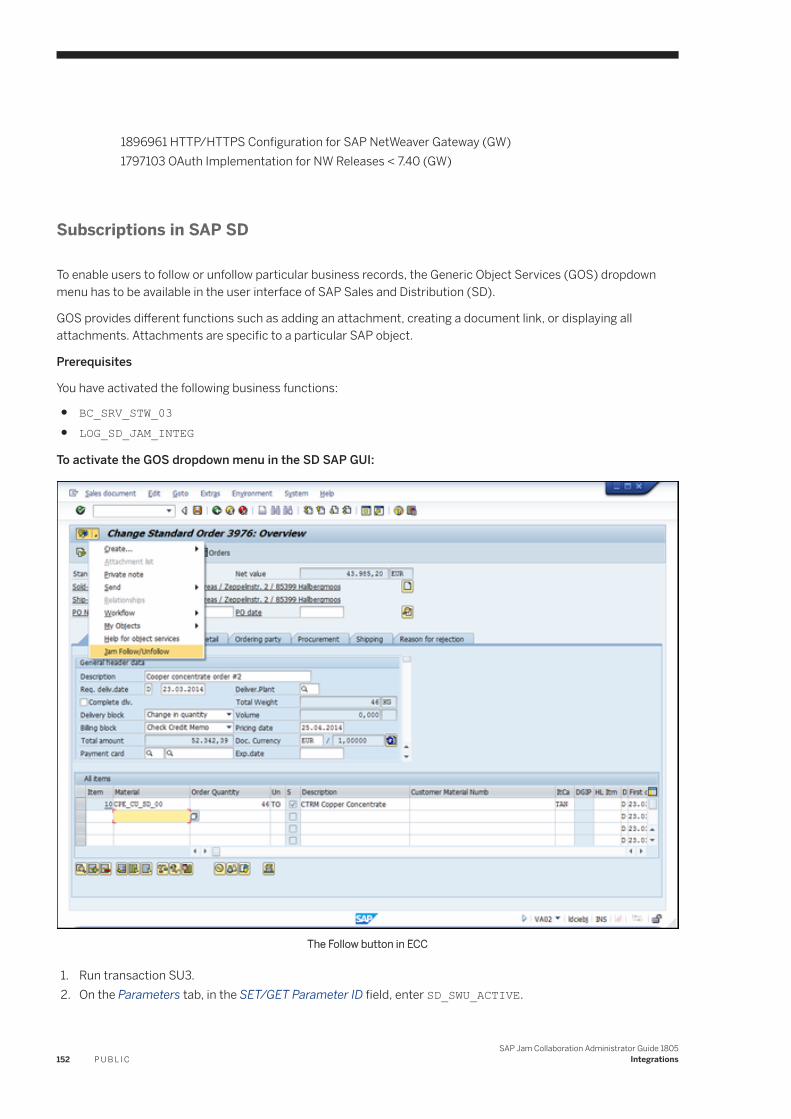
1896961 HTTP/HTTPS Configuration for SAP NetWeaver Gateway (GW)1797103 OAuth Implementation for NW Releases < 7.40 (GW)
Subscriptions in SAP SD
To enable users to follow or unfollow particular business records, the Generic Object Services (GOS) dropdown menu has to be available in the user interface of SAP Sales and Distribution (SD).
GOS provides different functions such as adding an attachment, creating a document link, or displaying all attachments. Attachments are specific to a particular SAP object.
Prerequisites
You have activated the following business functions:
● BC_SRV_STW_03● LOG_SD_JAM_INTEG
To activate the GOS dropdown menu in the SD SAP GUI:
The Follow button in ECC
1. Run transaction SU3.2. On the Parameters tab, in the SET/GET Parameter ID field, enter SD_SWU_ACTIVE.
152 P U B L I CSAP Jam Collaboration Administrator Guide 1805
Integrations
3. In the Parameter Value field, enter X or *.This activates the GOS button in the following SD transactions:○ Update Sales Order (VA02)/Display Sales Order (VA03)○ Update Invoice (vf02)/Display Invoice (vf03)○ Update Quotation (VA22)/Display Quotation (VA23)○ Update Customer (XD02)/Display Customer (XD03)○ Update Delivery (VL02n)/Display Delivery (VL03n)
Configuring the ESJI_SD_SRV OData Service on the SAP Gateway server
Configuration tasks on the SAP Gateway server for the Send Notifications scenario are described in chapter 3, Configuration of the SAP Gateway Server, of the SAIL configuration guide Distributing SAP Gateway Notifications to SAP Jam.
In this procedure, you register the ESJI_SD_SRV OData service in the Gateway system. This service is defined in, and delivered with, the back-end system add-on.
Use the values in the following procedure when completing section 3.7 Configuring OData Services of the SAIL guide.
To configure the ESJI_SD_SRV OData service
1. Log on to the Gateway server as an administrator.
2. In Customizing for SAP NetWeaver, choose Gateway OData Channel Administration General SettingsSAP NetWeaver Gateway to SAP System Activate and Maintain Services (or run transaction /IWFND/
MAINT_SERVICE).3. On the Activate and Maintain Services screen, select Add Service.4. On the Add Selected Services screen, enter the system alias name you created and press Enter.5. In the External Service Name column, select the service ESJI_SD_SRV.6. In the Add Service dialog, in the Creation Information group box, select a package.7. Press F3 (Back).8. Verify that OData ICF nodes are activated for all registered OData Services as follows:
○ In the service catalog, select the registered OData Service and, on the OData ICF node, select ICF Node.○ Select Activate and confirm the selection.
9. Save your entries.
SAIL on the SAP Gateway Server
Generic configuration tasks for configuring SAIL on the SAP Gateway server are described in chapter 4, Configuring SAIL on the SAP Gateway Server, of the SAIL configuration guide Distributing SAP Gateway Notifications to SAP Jam.
SAP Jam Collaboration Administrator Guide 1805Integrations P U B L I C 153
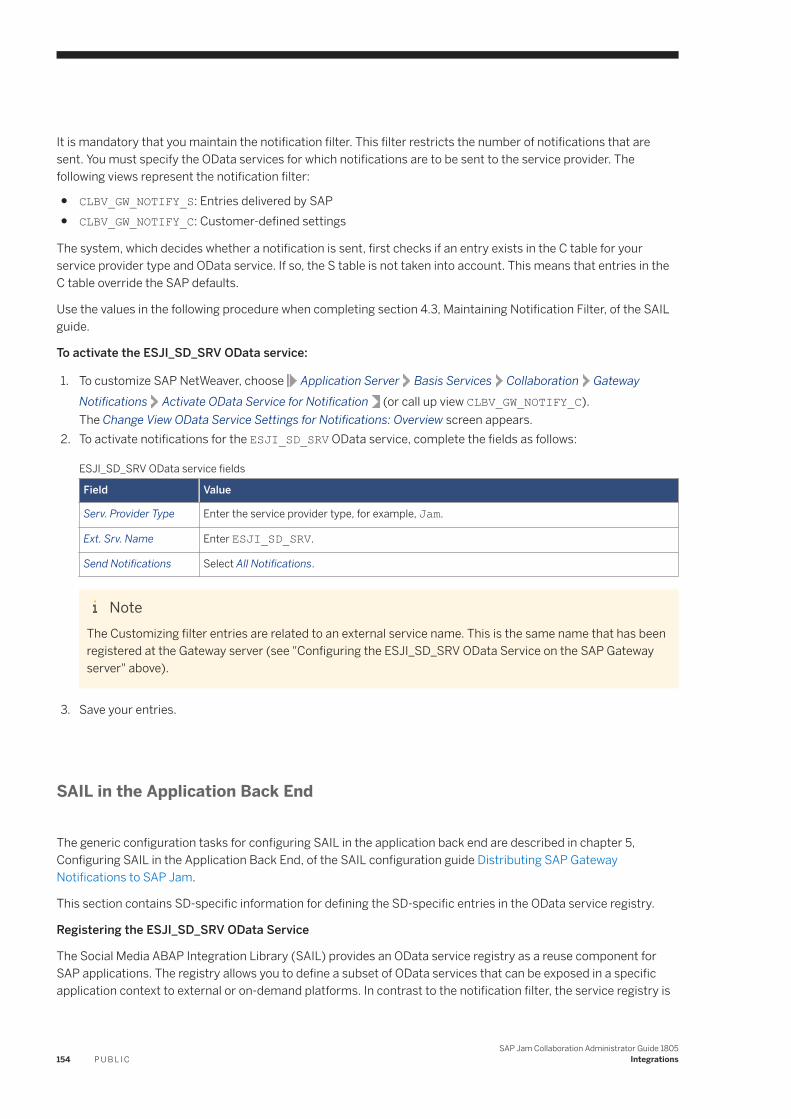
It is mandatory that you maintain the notification filter. This filter restricts the number of notifications that are sent. You must specify the OData services for which notifications are to be sent to the service provider. The following views represent the notification filter:
● CLBV_GW_NOTIFY_S: Entries delivered by SAP● CLBV_GW_NOTIFY_C: Customer-defined settings
The system, which decides whether a notification is sent, first checks if an entry exists in the C table for your service provider type and OData service. If so, the S table is not taken into account. This means that entries in the C table override the SAP defaults.
Use the values in the following procedure when completing section 4.3, Maintaining Notification Filter, of the SAIL guide.
To activate the ESJI_SD_SRV OData service:
1. To customize SAP NetWeaver, choose Application Server Basis Services Collaboration Gateway Notifications Activate OData Service for Notification (or call up view CLBV_GW_NOTIFY_C).The Change View OData Service Settings for Notifications: Overview screen appears.
2. To activate notifications for the ESJI_SD_SRV OData service, complete the fields as follows:
ESJI_SD_SRV OData service fields
Field Value
Serv. Provider Type Enter the service provider type, for example, Jam.
Ext. Srv. Name Enter ESJI_SD_SRV.
Send Notifications Select All Notifications.
NoteThe Customizing filter entries are related to an external service name. This is the same name that has been registered at the Gateway server (see "Configuring the ESJI_SD_SRV OData Service on the SAP Gateway server" above).
3. Save your entries.
SAIL in the Application Back End
The generic configuration tasks for configuring SAIL in the application back end are described in chapter 5, Configuring SAIL in the Application Back End, of the SAIL configuration guide Distributing SAP Gateway Notifications to SAP Jam.
This section contains SD-specific information for defining the SD-specific entries in the OData service registry.
Registering the ESJI_SD_SRV OData Service
The Social Media ABAP Integration Library (SAIL) provides an OData service registry as a reuse component for SAP applications. The registry allows you to define a subset of OData services that can be exposed in a specific application context to external or on-demand platforms. In contrast to the notification filter, the service registry is
154 P U B L I CSAP Jam Collaboration Administrator Guide 1805
Integrations
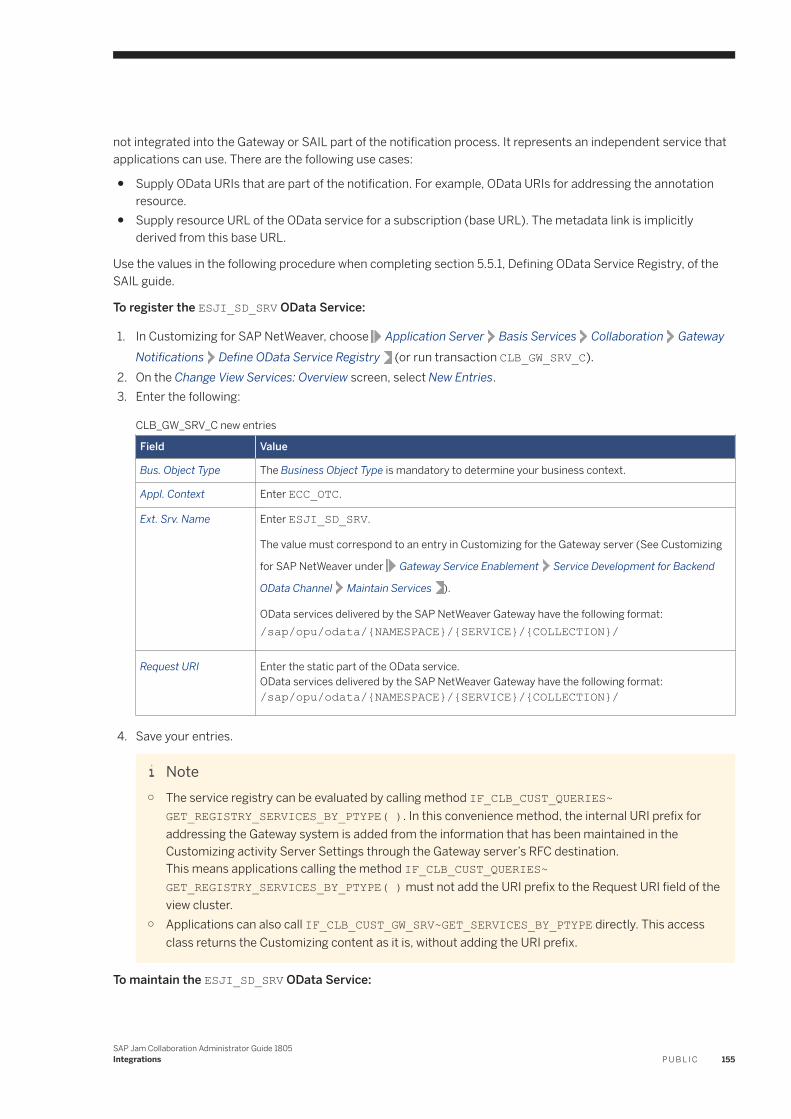
not integrated into the Gateway or SAIL part of the notification process. It represents an independent service that applications can use. There are the following use cases:
● Supply OData URIs that are part of the notification. For example, OData URIs for addressing the annotation resource.
● Supply resource URL of the OData service for a subscription (base URL). The metadata link is implicitly derived from this base URL.
Use the values in the following procedure when completing section 5.5.1, Defining OData Service Registry, of the SAIL guide.
To register the ESJI_SD_SRV OData Service:
1. In Customizing for SAP NetWeaver, choose Application Server Basis Services Collaboration Gateway Notifications Define OData Service Registry (or run transaction CLB_GW_SRV_C).
2. On the Change View Services: Overview screen, select New Entries.3. Enter the following:
CLB_GW_SRV_C new entries
Field Value
Bus. Object Type The Business Object Type is mandatory to determine your business context.
Appl. Context Enter ECC_OTC.
Ext. Srv. Name Enter ESJI_SD_SRV.
The value must correspond to an entry in Customizing for the Gateway server (See Customizing
for SAP NetWeaver under Gateway Service Enablement Service Development for Backend
OData Channel Maintain Services ).
OData services delivered by the SAP NetWeaver Gateway have the following format:/sap/opu/odata/{NAMESPACE}/{SERVICE}/{COLLECTION}/
Request URI Enter the static part of the OData service.OData services delivered by the SAP NetWeaver Gateway have the following format:/sap/opu/odata/{NAMESPACE}/{SERVICE}/{COLLECTION}/
4. Save your entries.
Note○ The service registry can be evaluated by calling method IF_CLB_CUST_QUERIES~
GET_REGISTRY_SERVICES_BY_PTYPE( ). In this convenience method, the internal URI prefix for addressing the Gateway system is added from the information that has been maintained in the Customizing activity Server Settings through the Gateway server’s RFC destination.This means applications calling the method IF_CLB_CUST_QUERIES~ GET_REGISTRY_SERVICES_BY_PTYPE( ) must not add the URI prefix to the Request URI field of the view cluster.
○ Applications can also call IF_CLB_CUST_GW_SRV~GET_SERVICES_BY_PTYPE directly. This access class returns the Customizing content as it is, without adding the URI prefix.
To maintain the ESJI_SD_SRV OData Service:
SAP Jam Collaboration Administrator Guide 1805Integrations P U B L I C 155
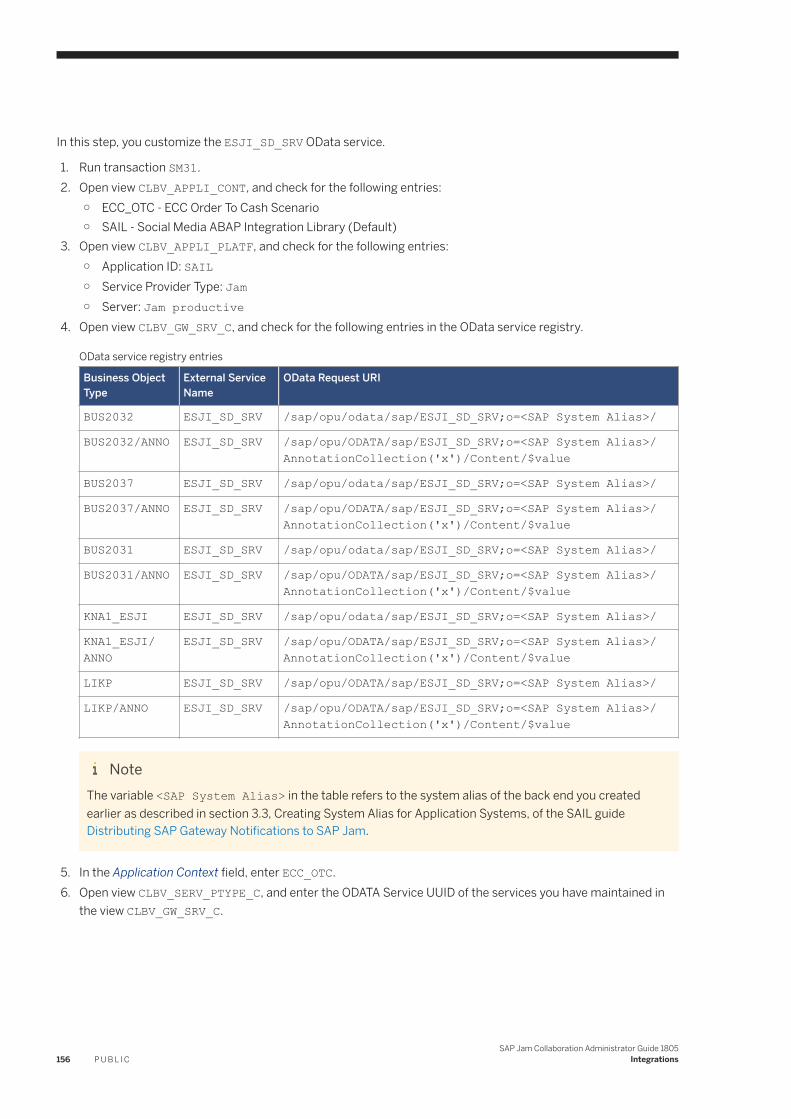
In this step, you customize the ESJI_SD_SRV OData service.
1. Run transaction SM31.2. Open view CLBV_APPLI_CONT, and check for the following entries:
○ ECC_OTC - ECC Order To Cash Scenario○ SAIL - Social Media ABAP Integration Library (Default)
3. Open view CLBV_APPLI_PLATF, and check for the following entries:○ Application ID: SAIL○ Service Provider Type: Jam○ Server: Jam productive
4. Open view CLBV_GW_SRV_C, and check for the following entries in the OData service registry.
OData service registry entries
Business Object Type
External Service Name
OData Request URI
BUS2032 ESJI_SD_SRV /sap/opu/odata/sap/ESJI_SD_SRV;o=<SAP System Alias>/
BUS2032/ANNO ESJI_SD_SRV /sap/opu/ODATA/sap/ESJI_SD_SRV;o=<SAP System Alias>/AnnotationCollection('x')/Content/$value
BUS2037 ESJI_SD_SRV /sap/opu/odata/sap/ESJI_SD_SRV;o=<SAP System Alias>/
BUS2037/ANNO ESJI_SD_SRV /sap/opu/ODATA/sap/ESJI_SD_SRV;o=<SAP System Alias>/AnnotationCollection('x')/Content/$value
BUS2031 ESJI_SD_SRV /sap/opu/odata/sap/ESJI_SD_SRV;o=<SAP System Alias>/
BUS2031/ANNO ESJI_SD_SRV /sap/opu/ODATA/sap/ESJI_SD_SRV;o=<SAP System Alias>/AnnotationCollection('x')/Content/$value
KNA1_ESJI ESJI_SD_SRV /sap/opu/odata/sap/ESJI_SD_SRV;o=<SAP System Alias>/
KNA1_ESJI/ANNO
ESJI_SD_SRV /sap/opu/ODATA/sap/ESJI_SD_SRV;o=<SAP System Alias>/AnnotationCollection('x')/Content/$value
LIKP ESJI_SD_SRV /sap/opu/ODATA/sap/ESJI_SD_SRV;o=<SAP System Alias>/
LIKP/ANNO ESJI_SD_SRV /sap/opu/ODATA/sap/ESJI_SD_SRV;o=<SAP System Alias>/AnnotationCollection('x')/Content/$value
NoteThe variable <SAP System Alias> in the table refers to the system alias of the back end you created earlier as described in section 3.3, Creating System Alias for Application Systems, of the SAIL guide Distributing SAP Gateway Notifications to SAP Jam.
5. In the Application Context field, enter ECC_OTC.6. Open view CLBV_SERV_PTYPE_C, and enter the ODATA Service UUID of the services you have maintained in
the view CLBV_GW_SRV_C.
156 P U B L I CSAP Jam Collaboration Administrator Guide 1805
Integrations
Note○ You can retrieve the OData Service UUID by double clicking on the entry maintained in view
CLBV_GW_SRV_C. You can copy the service UUID and register the service provider type as Jam for the services you have added in the view CLBV_GW_SRV_C.
○ Similarly, open view CLBV_SRV_PTYPE_S, and verify that the service provider is "Jam" for the services maintained in the view CLBV_GW_SRV_S.
Set up required access and authorization
These procedures establish the access and authorization configurations in SAP Jam that are required for the integration of SAP ECC (SD):
● Add a Trusted Certificate Authority [page 179] if your network uses unrecognized or self-signed HTTP with TLS or SSL certificates.
● Add an OAuth Client [page 181] to configure an authorized entry point for SAP ECC (SD) to initiate requests to the SAP Jam API in order to display SAP Jam content in SAP ECC (SD).
● Add a SAML Trusted IDP [page 184] to establish a trust relationship between SAP ECC (SD) and SAP Jam that allows SAP ECC (SD) to use SAP Jam identity and authorization information, which ensures that SAP ECC (SD) users can only view the SAP Jam content that they are allowed to view when SAP Jam content displays in SAP ECC (SD).
● Configure SAP Jam Collaboration as a SAML Local Identity Provider [page 187] to establish a trust relationship between SAP Jam and SAP ECC (SD) that allows SAP Jam Collaboration to use SAP ECC (SD) identity and authorization information, which ensures that SAP Jam users can only view the SAP ECC (SD) content that they are allowed to view when SAP ECC (SD) content displays in SAP Jam.
Register SAP ECC (SD) as an External Application in SAP Jam
Create an External Application entry to register your external SAP ECC (SD) application with SAP Jam. This procedure is the required step in SAP Jam for setting up a secure data connection with your external business application via the SAP NetWeaver Gateway.
1. Go to the SAP Jam Admin console and select Integrations External Applications from the left side navigation.The External Applications page displays. This initial page is a catalog of the external applications that have been configured for your organization's SAP Jam instance.
2. Click Add Application.
SAP Jam Collaboration Administrator Guide 1805Integrations P U B L I C 157
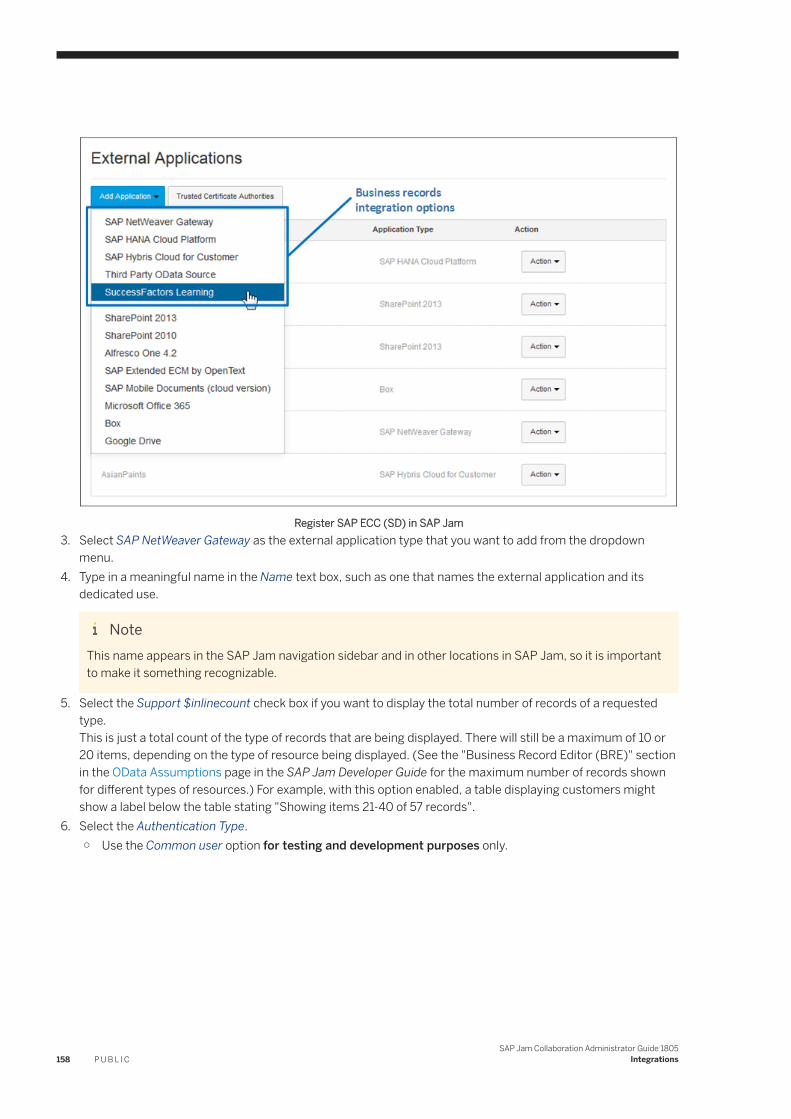
Register SAP ECC (SD) in SAP Jam3. Select SAP NetWeaver Gateway as the external application type that you want to add from the dropdown
menu.4. Type in a meaningful name in the Name text box, such as one that names the external application and its
dedicated use.
NoteThis name appears in the SAP Jam navigation sidebar and in other locations in SAP Jam, so it is important to make it something recognizable.
5. Select the Support $inlinecount check box if you want to display the total number of records of a requested type.This is just a total count of the type of records that are being displayed. There will still be a maximum of 10 or 20 items, depending on the type of resource being displayed. (See the "Business Record Editor (BRE)" section in the OData Assumptions page in the SAP Jam Developer Guide for the maximum number of records shown for different types of resources.) For example, with this option enabled, a table displaying customers might show a label below the table stating "Showing items 21-40 of 57 records".
6. Select the Authentication Type.○ Use the Common user option for testing and development purposes only.
158 P U B L I CSAP Jam Collaboration Administrator Guide 1805
Integrations
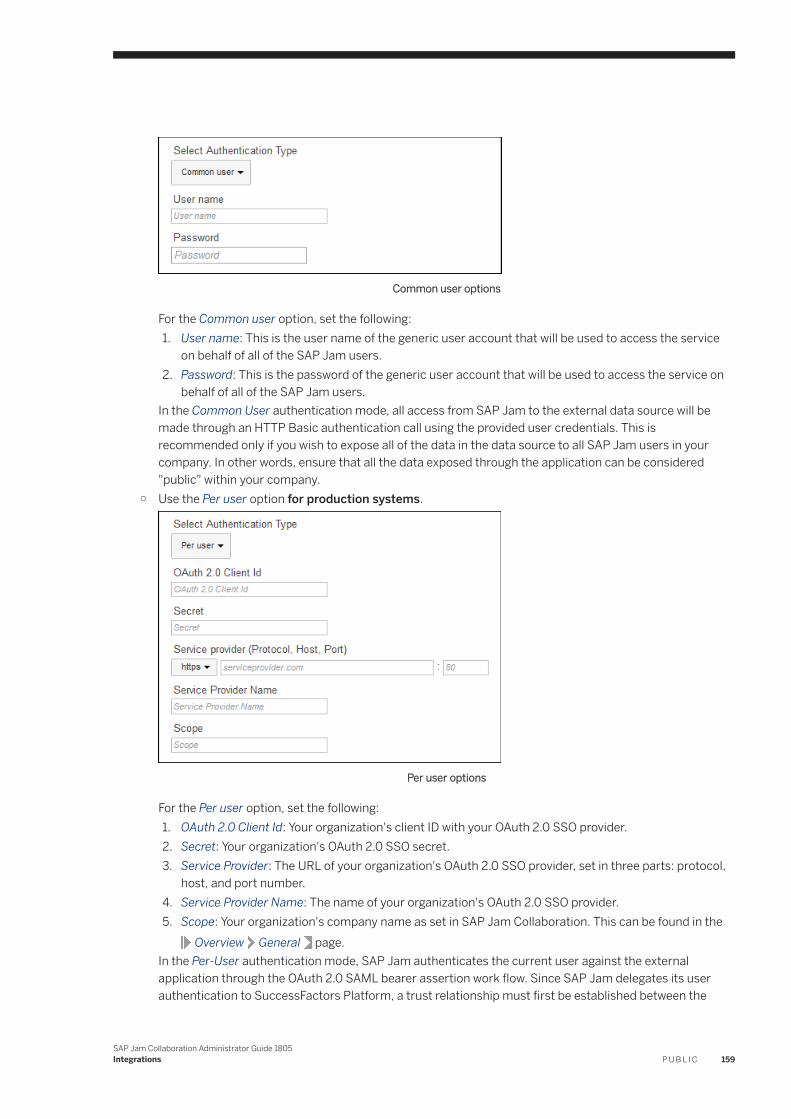
Common user options
For the Common user option, set the following:1. User name: This is the user name of the generic user account that will be used to access the service
on behalf of all of the SAP Jam users.2. Password: This is the password of the generic user account that will be used to access the service on
behalf of all of the SAP Jam users.In the Common User authentication mode, all access from SAP Jam to the external data source will be made through an HTTP Basic authentication call using the provided user credentials. This is recommended only if you wish to expose all of the data in the data source to all SAP Jam users in your company. In other words, ensure that all the data exposed through the application can be considered "public" within your company.
○ Use the Per user option for production systems.
Per user options
For the Per user option, set the following:1. OAuth 2.0 Client Id: Your organization's client ID with your OAuth 2.0 SSO provider.2. Secret: Your organization's OAuth 2.0 SSO secret.3. Service Provider: The URL of your organization's OAuth 2.0 SSO provider, set in three parts: protocol,
host, and port number.4. Service Provider Name: The name of your organization's OAuth 2.0 SSO provider.5. Scope: Your organization's company name as set in SAP Jam Collaboration. This can be found in the
Overview General page.In the Per-User authentication mode, SAP Jam authenticates the current user against the external application through the OAuth 2.0 SAML bearer assertion work flow. Since SAP Jam delegates its user authentication to SuccessFactors Platform, a trust relationship must first be established between the
SAP Jam Collaboration Administrator Guide 1805Integrations P U B L I C 159
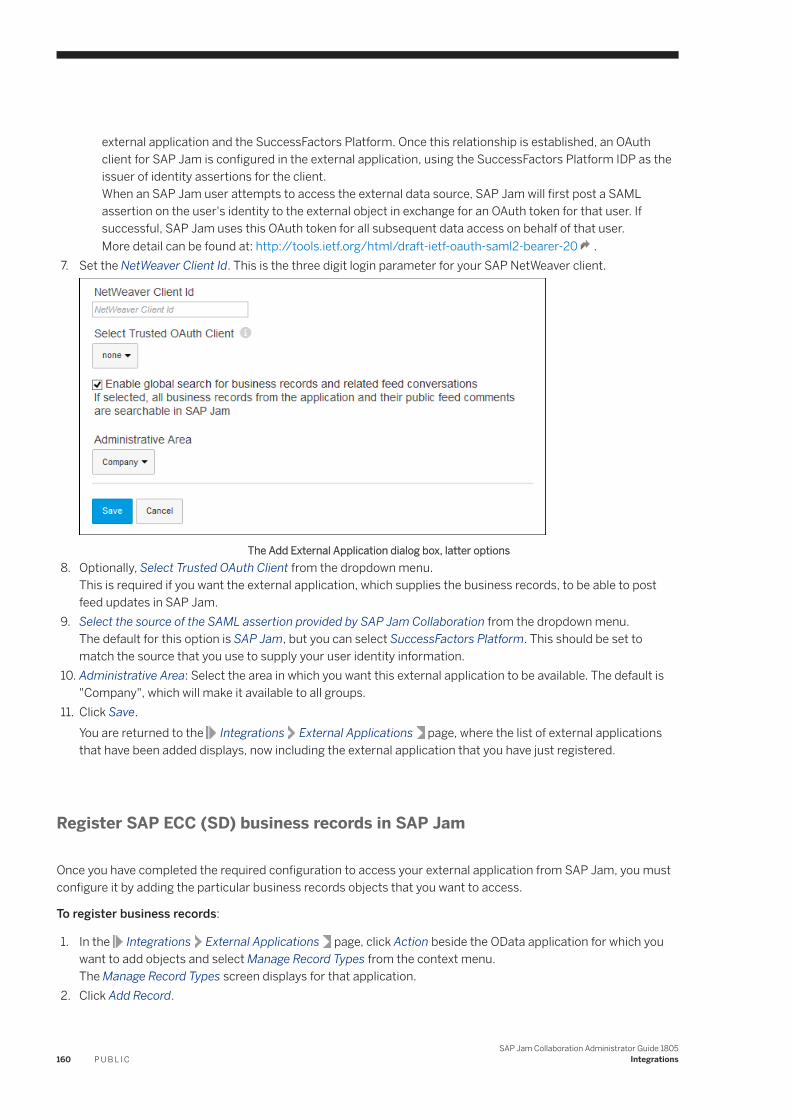
external application and the SuccessFactors Platform. Once this relationship is established, an OAuth client for SAP Jam is configured in the external application, using the SuccessFactors Platform IDP as the issuer of identity assertions for the client.When an SAP Jam user attempts to access the external data source, SAP Jam will first post a SAML assertion on the user's identity to the external object in exchange for an OAuth token for that user. If successful, SAP Jam uses this OAuth token for all subsequent data access on behalf of that user.More detail can be found at: http://tools.ietf.org/html/draft-ietf-oauth-saml2-bearer-20 .
7. Set the NetWeaver Client Id. This is the three digit login parameter for your SAP NetWeaver client.
The Add External Application dialog box, latter options8. Optionally, Select Trusted OAuth Client from the dropdown menu.
This is required if you want the external application, which supplies the business records, to be able to post feed updates in SAP Jam.
9. Select the source of the SAML assertion provided by SAP Jam Collaboration from the dropdown menu.The default for this option is SAP Jam, but you can select SuccessFactors Platform. This should be set to match the source that you use to supply your user identity information.
10. Administrative Area: Select the area in which you want this external application to be available. The default is "Company", which will make it available to all groups.
11. Click Save.You are returned to the Integrations External Applications page, where the list of external applications that have been added displays, now including the external application that you have just registered.
Register SAP ECC (SD) business records in SAP Jam
Once you have completed the required configuration to access your external application from SAP Jam, you must configure it by adding the particular business records objects that you want to access.
To register business records:
1. In the Integrations External Applications page, click Action beside the OData application for which you want to add objects and select Manage Record Types from the context menu.The Manage Record Types screen displays for that application.
2. Click Add Record.
160 P U B L I CSAP Jam Collaboration Administrator Guide 1805
Integrations
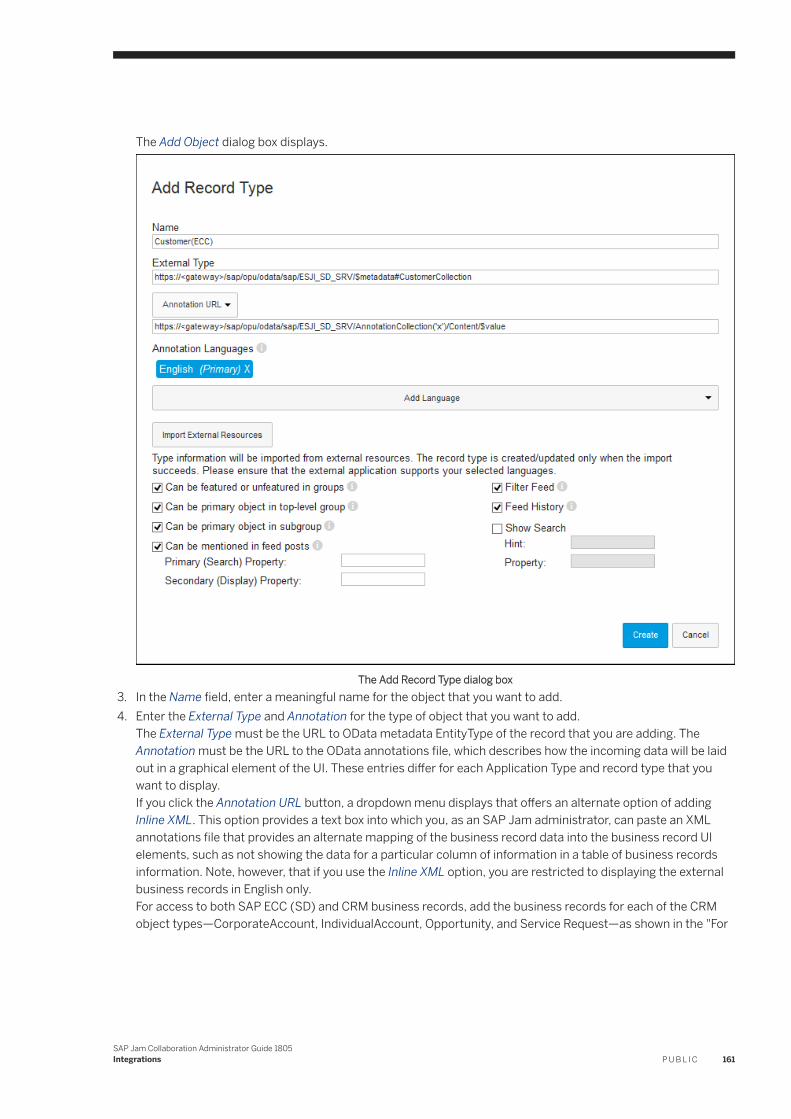
The Add Object dialog box displays.
The Add Record Type dialog box3. In the Name field, enter a meaningful name for the object that you want to add.4. Enter the External Type and Annotation for the type of object that you want to add.
The External Type must be the URL to OData metadata EntityType of the record that you are adding. The Annotation must be the URL to the OData annotations file, which describes how the incoming data will be laid out in a graphical element of the UI. These entries differ for each Application Type and record type that you want to display.If you click the Annotation URL button, a dropdown menu displays that offers an alternate option of adding Inline XML. This option provides a text box into which you, as an SAP Jam administrator, can paste an XML annotations file that provides an alternate mapping of the business record data into the business record UI elements, such as not showing the data for a particular column of information in a table of business records information. Note, however, that if you use the Inline XML option, you are restricted to displaying the external business records in English only.For access to both SAP ECC (SD) and CRM business records, add the business records for each of the CRM object types—CorporateAccount, IndividualAccount, Opportunity, and Service Request—as shown in the "For
SAP Jam Collaboration Administrator Guide 1805Integrations P U B L I C 161
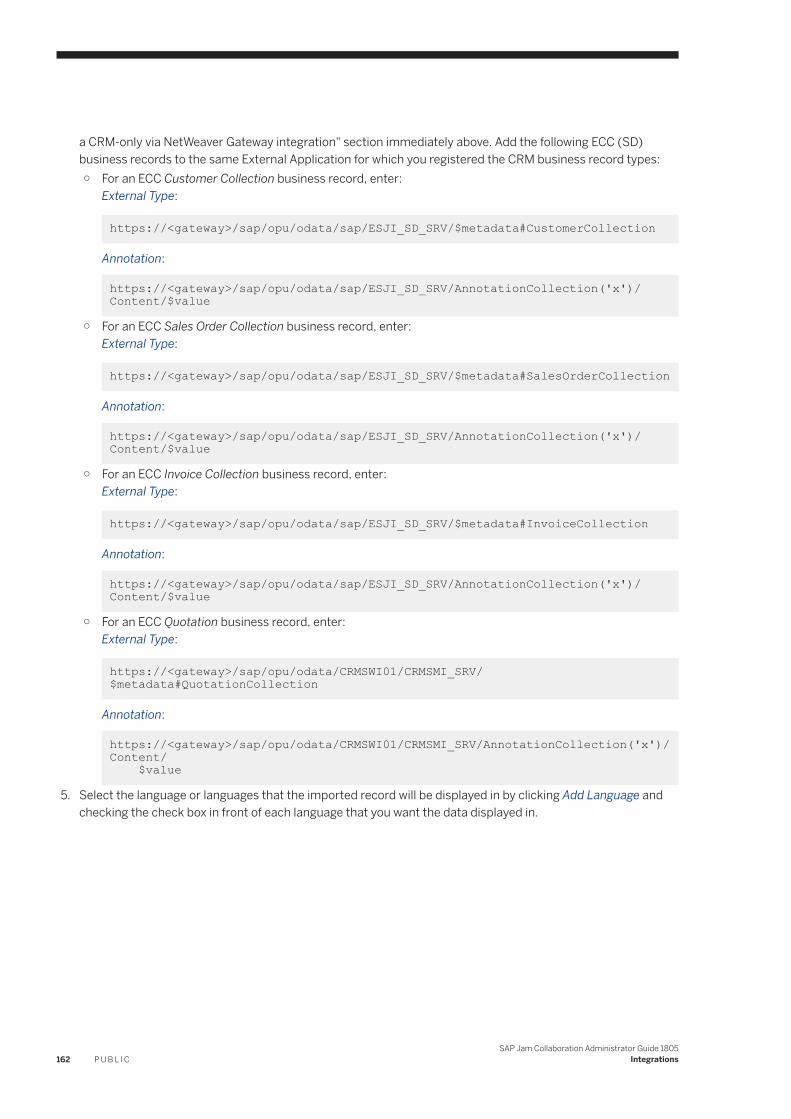
a CRM-only via NetWeaver Gateway integration" section immediately above. Add the following ECC (SD) business records to the same External Application for which you registered the CRM business record types:○ For an ECC Customer Collection business record, enter:
External Type:
https://<gateway>/sap/opu/odata/sap/ESJI_SD_SRV/$metadata#CustomerCollection
Annotation:
https://<gateway>/sap/opu/odata/sap/ESJI_SD_SRV/AnnotationCollection('x')/Content/$value
○ For an ECC Sales Order Collection business record, enter:External Type:
https://<gateway>/sap/opu/odata/sap/ESJI_SD_SRV/$metadata#SalesOrderCollection
Annotation:
https://<gateway>/sap/opu/odata/sap/ESJI_SD_SRV/AnnotationCollection('x')/Content/$value
○ For an ECC Invoice Collection business record, enter:External Type:
https://<gateway>/sap/opu/odata/sap/ESJI_SD_SRV/$metadata#InvoiceCollection
Annotation:
https://<gateway>/sap/opu/odata/sap/ESJI_SD_SRV/AnnotationCollection('x')/Content/$value
○ For an ECC Quotation business record, enter:External Type:
https://<gateway>/sap/opu/odata/CRMSWI01/CRMSMI_SRV/$metadata#QuotationCollection
Annotation:
https://<gateway>/sap/opu/odata/CRMSWI01/CRMSMI_SRV/AnnotationCollection('x')/Content/ $value
5. Select the language or languages that the imported record will be displayed in by clicking Add Language and checking the check box in front of each language that you want the data displayed in.
162 P U B L I CSAP Jam Collaboration Administrator Guide 1805
Integrations
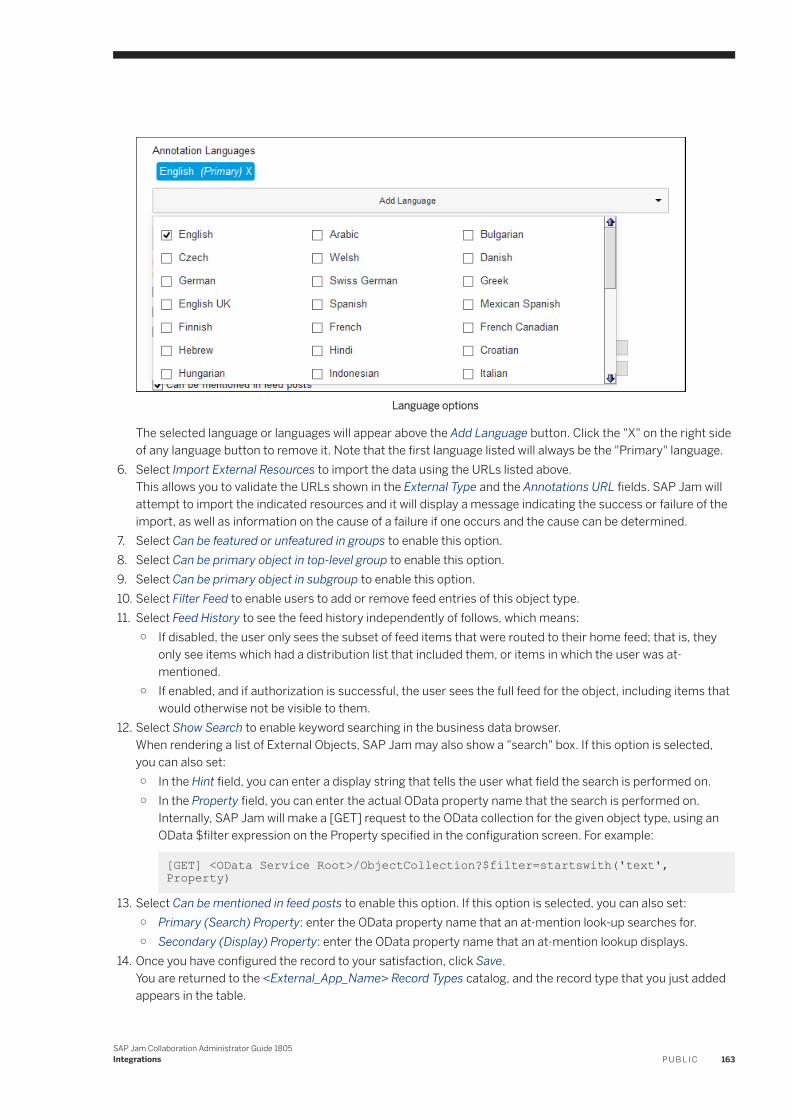
Language options
The selected language or languages will appear above the Add Language button. Click the "X" on the right side of any language button to remove it. Note that the first language listed will always be the "Primary" language.
6. Select Import External Resources to import the data using the URLs listed above.This allows you to validate the URLs shown in the External Type and the Annotations URL fields. SAP Jam will attempt to import the indicated resources and it will display a message indicating the success or failure of the import, as well as information on the cause of a failure if one occurs and the cause can be determined.
7. Select Can be featured or unfeatured in groups to enable this option.8. Select Can be primary object in top-level group to enable this option.9. Select Can be primary object in subgroup to enable this option.10. Select Filter Feed to enable users to add or remove feed entries of this object type.11. Select Feed History to see the feed history independently of follows, which means:
○ If disabled, the user only sees the subset of feed items that were routed to their home feed; that is, they only see items which had a distribution list that included them, or items in which the user was at-mentioned.
○ If enabled, and if authorization is successful, the user sees the full feed for the object, including items that would otherwise not be visible to them.
12. Select Show Search to enable keyword searching in the business data browser.When rendering a list of External Objects, SAP Jam may also show a "search" box. If this option is selected, you can also set:○ In the Hint field, you can enter a display string that tells the user what field the search is performed on.○ In the Property field, you can enter the actual OData property name that the search is performed on.
Internally, SAP Jam will make a [GET] request to the OData collection for the given object type, using an OData $filter expression on the Property specified in the configuration screen. For example:
[GET] <OData Service Root>/ObjectCollection?$filter=startswith('text', Property)
13. Select Can be mentioned in feed posts to enable this option. If this option is selected, you can also set:○ Primary (Search) Property: enter the OData property name that an at-mention look-up searches for.○ Secondary (Display) Property: enter the OData property name that an at-mention lookup displays.
14. Once you have configured the record to your satisfaction, click Save.You are returned to the <External_App_Name> Record Types catalog, and the record type that you just added appears in the table.
SAP Jam Collaboration Administrator Guide 1805Integrations P U B L I C 163
NoteNext: You can now, optionally, add an External Application Object Filter [page 174] to narrow the range of data shown in a particular external application data object.
Optionally, you can add an External Application Object Sort Order [page 176] to set the order in which the external data is arranged in a particular external application data object.
If you do not want to add Filters or Sort Fields to your External Application Objects, you can proceed to Configure access to business records in SAP Jam Collaboration [page 177].
6.2.4 Integrate SAP Hybris Cloud for Customer
SAP Jam integration with your SAP Hybris Cloud for Customer solution enables cross-application collaboration using the SAP Jam feed. It allows users to feature SAP Hybris Cloud for Customer accounts, opportunities, products, and service tickets in SAP Jam groups.
Prerequisites
SAP Jam: An SAP Jam tenant has been provisioned for your company, and you have been given administrator access. You know how your users were provisioned for your SAP Jam system.
SAP Hybris Cloud for Customer: Initial setup and configuration has been performed in tenant, as per the SAP Hybris Cloud for Customer Administrator Guide. You have administrator access and know how your users were provisioned for your SAP Hybris Cloud for Customer system.
Cross-system authentication: If user IDs or email addresses are identical in SAP Jam and SAP Hybris Cloud for Customer, you can use dynamic onboarding without explicit user mapping. If neither of these conditions are true, you cannot use dynamic onboarding; explicit user mapping is required.
While the SAP Hybris Cloud for Customer user ID is used as the logon user ID, the SAP Jam user ID is not. The SAP Jam user ID must be in uppercase and less than 40 characters for this integration to work without explicit user mapping.
With the user email address as the key identifier, SAP Hybris Cloud for Customer and SAP Jam use it for back end authentication during API calls. Users are not actually logging in with their email address.
Integration Steps: To integrate SAP Jam with SAP Hybris Cloud for Customer, please refer to the document Integration: SAP Hybris Cloud for Customer + SAP Jam, which can be found on the SAP Hybris Cloud for Customer help portal product page.
164 P U B L I CSAP Jam Collaboration Administrator Guide 1805
Integrations
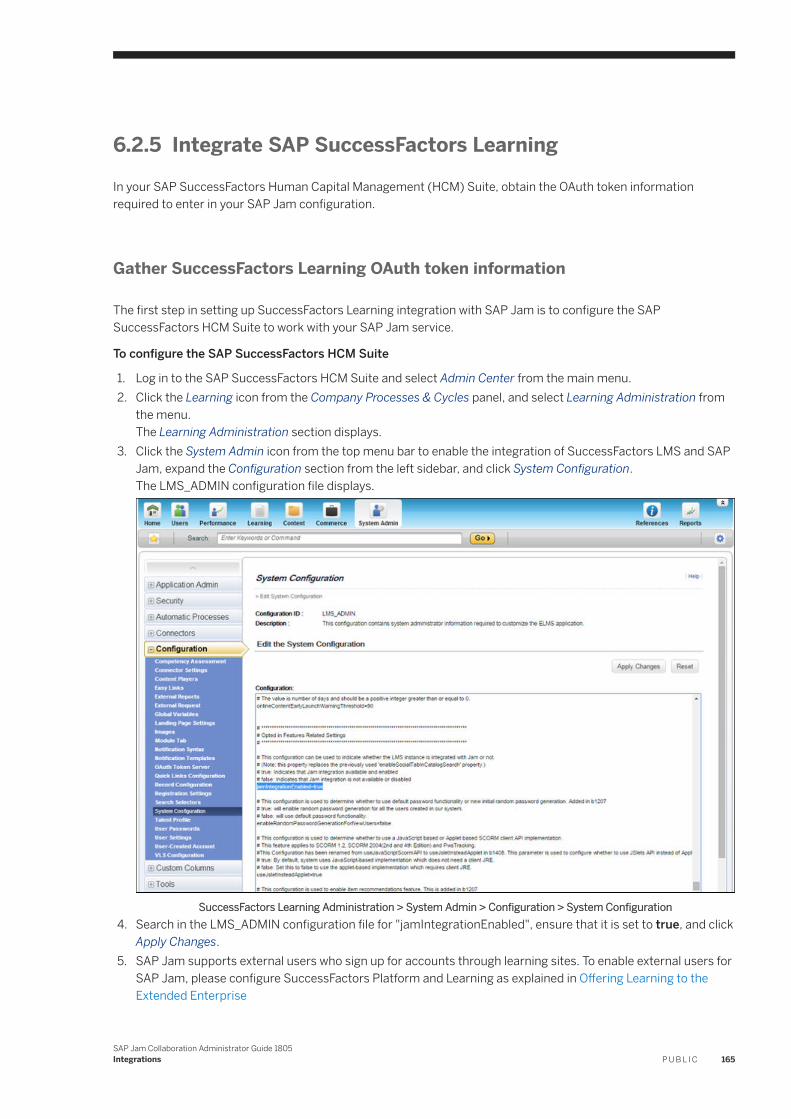
6.2.5 Integrate SAP SuccessFactors Learning
In your SAP SuccessFactors Human Capital Management (HCM) Suite, obtain the OAuth token information required to enter in your SAP Jam configuration.
Gather SuccessFactors Learning OAuth token information
The first step in setting up SuccessFactors Learning integration with SAP Jam is to configure the SAP SuccessFactors HCM Suite to work with your SAP Jam service.
To configure the SAP SuccessFactors HCM Suite
1. Log in to the SAP SuccessFactors HCM Suite and select Admin Center from the main menu.2. Click the Learning icon from the Company Processes & Cycles panel, and select Learning Administration from
the menu.The Learning Administration section displays.
3. Click the System Admin icon from the top menu bar to enable the integration of SuccessFactors LMS and SAP Jam, expand the Configuration section from the left sidebar, and click System Configuration.The LMS_ADMIN configuration file displays.
SuccessFactors Learning Administration > System Admin > Configuration > System Configuration4. Search in the LMS_ADMIN configuration file for "jamIntegrationEnabled", ensure that it is set to true, and click
Apply Changes.5. SAP Jam supports external users who sign up for accounts through learning sites. To enable external users for
SAP Jam, please configure SuccessFactors Platform and Learning as explained in Offering Learning to the Extended Enterprise
SAP Jam Collaboration Administrator Guide 1805Integrations P U B L I C 165
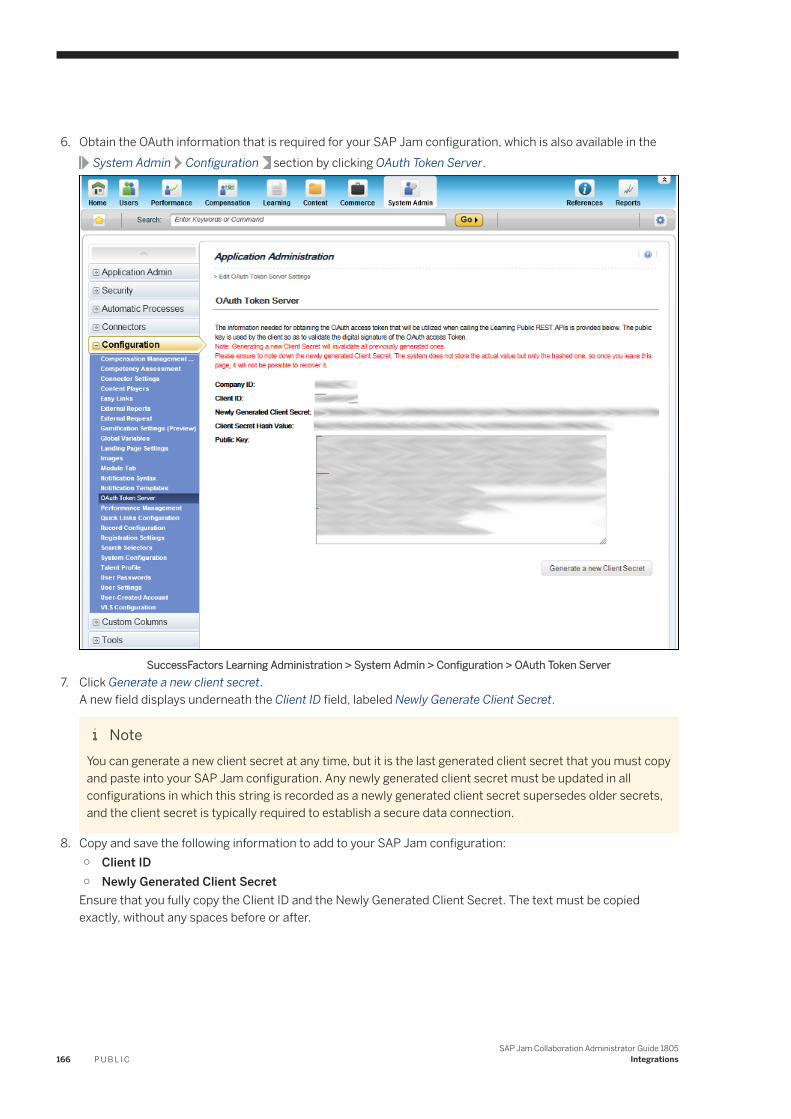
6. Obtain the OAuth information that is required for your SAP Jam configuration, which is also available in the System Admin Configuration section by clicking OAuth Token Server.
SuccessFactors Learning Administration > System Admin > Configuration > OAuth Token Server7. Click Generate a new client secret.
A new field displays underneath the Client ID field, labeled Newly Generate Client Secret.
NoteYou can generate a new client secret at any time, but it is the last generated client secret that you must copy and paste into your SAP Jam configuration. Any newly generated client secret must be updated in all configurations in which this string is recorded as a newly generated client secret supersedes older secrets, and the client secret is typically required to establish a secure data connection.
8. Copy and save the following information to add to your SAP Jam configuration:○ Client ID○ Newly Generated Client Secret
Ensure that you fully copy the Client ID and the Newly Generated Client Secret. The text must be copied exactly, without any spaces before or after.
166 P U B L I CSAP Jam Collaboration Administrator Guide 1805
Integrations
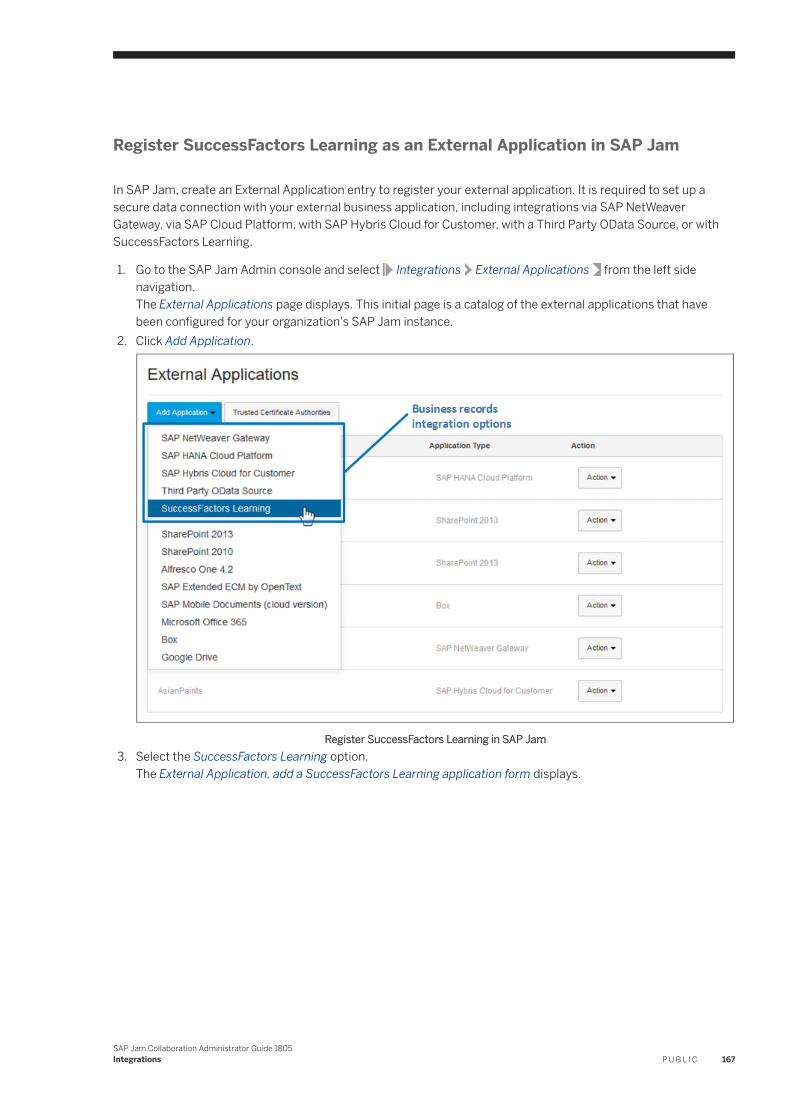
Register SuccessFactors Learning as an External Application in SAP Jam
In SAP Jam, create an External Application entry to register your external application. It is required to set up a secure data connection with your external business application, including integrations via SAP NetWeaver Gateway, via SAP Cloud Platform, with SAP Hybris Cloud for Customer, with a Third Party OData Source, or with SuccessFactors Learning.
1. Go to the SAP Jam Admin console and select Integrations External Applications from the left side navigation.The External Applications page displays. This initial page is a catalog of the external applications that have been configured for your organization's SAP Jam instance.
2. Click Add Application.
Register SuccessFactors Learning in SAP Jam3. Select the SuccessFactors Learning option.
The External Application, add a SuccessFactors Learning application form displays.
SAP Jam Collaboration Administrator Guide 1805Integrations P U B L I C 167
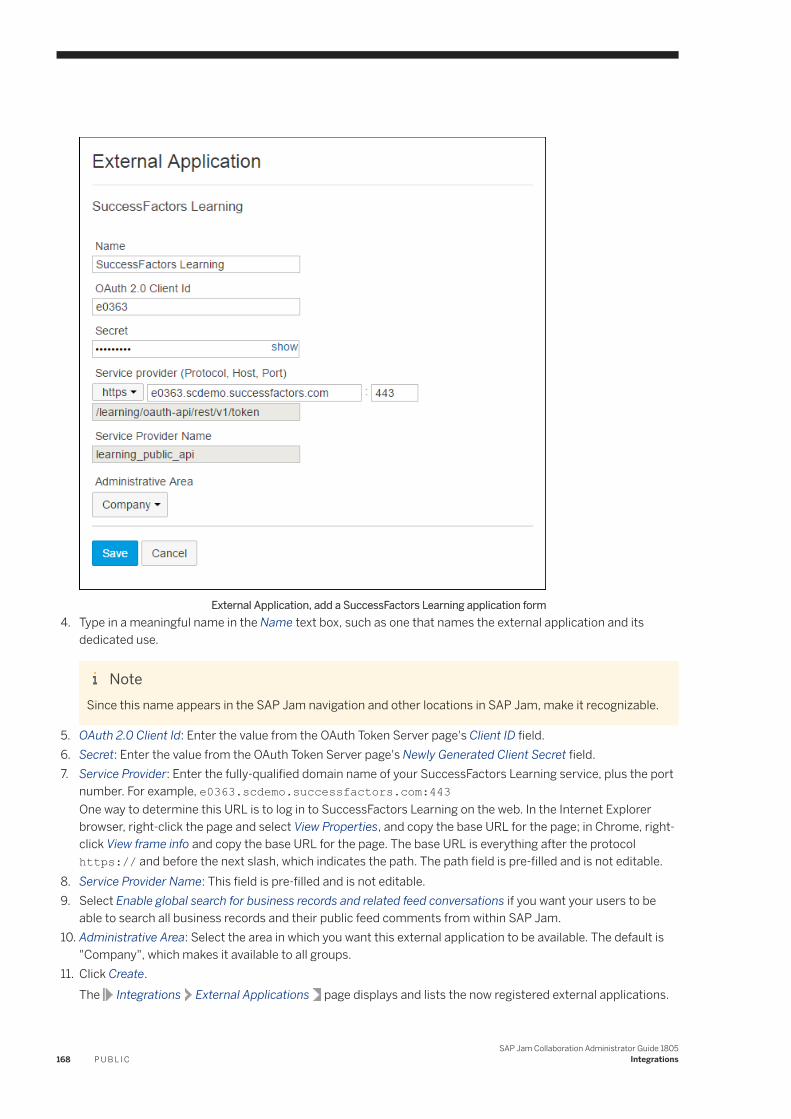
External Application, add a SuccessFactors Learning application form4. Type in a meaningful name in the Name text box, such as one that names the external application and its
dedicated use.
NoteSince this name appears in the SAP Jam navigation and other locations in SAP Jam, make it recognizable.
5. OAuth 2.0 Client Id: Enter the value from the OAuth Token Server page's Client ID field.6. Secret: Enter the value from the OAuth Token Server page's Newly Generated Client Secret field.7. Service Provider: Enter the fully-qualified domain name of your SuccessFactors Learning service, plus the port
number. For example, e0363.scdemo.successfactors.com:443One way to determine this URL is to log in to SuccessFactors Learning on the web. In the Internet Explorer browser, right-click the page and select View Properties, and copy the base URL for the page; in Chrome, right-click View frame info and copy the base URL for the page. The base URL is everything after the protocol https:// and before the next slash, which indicates the path. The path field is pre-filled and is not editable.
8. Service Provider Name: This field is pre-filled and is not editable.9. Select Enable global search for business records and related feed conversations if you want your users to be
able to search all business records and their public feed comments from within SAP Jam.10. Administrative Area: Select the area in which you want this external application to be available. The default is
"Company", which makes it available to all groups.11. Click Create.
The Integrations External Applications page displays and lists the now registered external applications.
168 P U B L I CSAP Jam Collaboration Administrator Guide 1805
Integrations
Add an OAuth Client
To authorize an external application to access the SAP Jam API, you must register the external application as an OAuth client in the Jam Admin OAuth Clients section of the SAP Jam Admin console.
Manage OAuth Clients
1. Go to the Admin console and select OAuth Clients from the left navigation sidebar. The Jam Admin OAuth Clients section is displayed. This page presents a catalog of previously configured OAuth Clients, with UI controls that allow you to View, Edit, or Delete existing OAuth Clients, or to add a new OAuth client (Add OAuth Client).
2. To add an OAuth client, click Add OAuth Client at the upper right corner of the page. The Register a new OAuth Client page displays.
3. Note the following:○ Name: You can keep the same name as you would have kept for your business record (for example, LMS or
Learning).○ Integration URL: The URL for your Learning administration. Obtain it by navigating to LMS admin from
BizX Admin Center LMS Admin and obtain the URL from the address bar.○ X509 Certificate: Obtain from the LMS side from the LMS OAuth settings under LMS admin settings.
Register the SuccessFactors Learning records in SAP Jam
After you complete the required configuration to access your external application from SAP Jam, configure it by adding the learning records that require access. For SuccessFactors Learning, there are four supported learning record types: Item, Curriculum, Scheduled Offering, and Curriculum Assignment.
To register business records
1. In the Integrations External Applications page, click Action beside the SuccessFactors Learning application for which you want to add objects and select Manage Record Types from the context menu.The Manage <company_name> Learning Record Types screen displays.
SAP Jam Collaboration Administrator Guide 1805Integrations P U B L I C 169
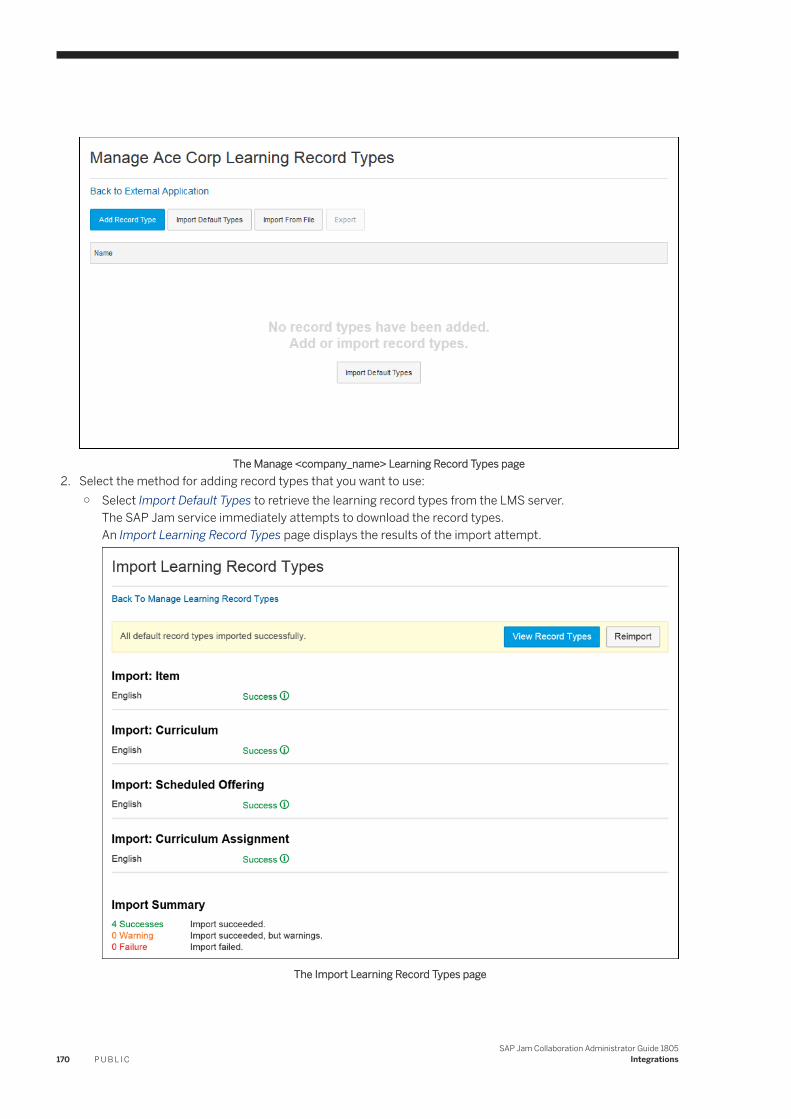
The Manage <company_name> Learning Record Types page2. Select the method for adding record types that you want to use:
○ Select Import Default Types to retrieve the learning record types from the LMS server.The SAP Jam service immediately attempts to download the record types.An Import Learning Record Types page displays the results of the import attempt.
The Import Learning Record Types page
170 P U B L I CSAP Jam Collaboration Administrator Guide 1805
Integrations
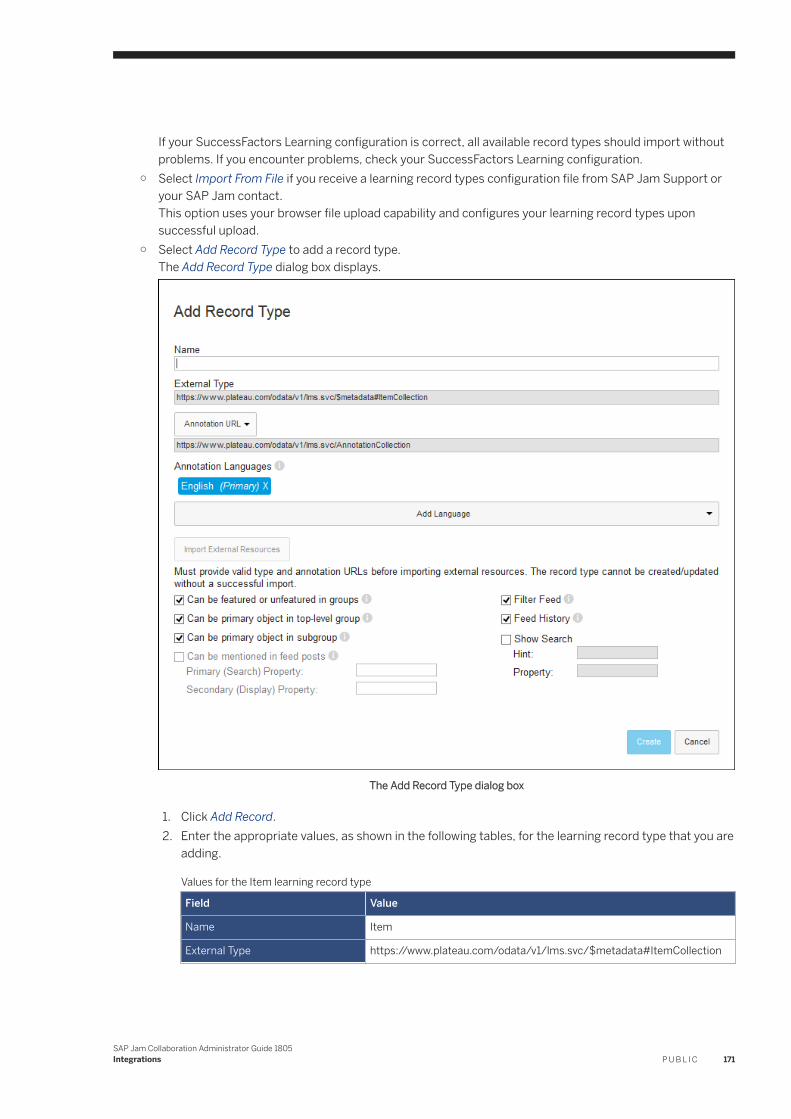
If your SuccessFactors Learning configuration is correct, all available record types should import without problems. If you encounter problems, check your SuccessFactors Learning configuration.
○ Select Import From File if you receive a learning record types configuration file from SAP Jam Support or your SAP Jam contact.This option uses your browser file upload capability and configures your learning record types upon successful upload.
○ Select Add Record Type to add a record type.The Add Record Type dialog box displays.
The Add Record Type dialog box
1. Click Add Record.2. Enter the appropriate values, as shown in the following tables, for the learning record type that you are
adding.
Values for the Item learning record type
Field Value
Name Item
External Type https://www.plateau.com/odata/v1/lms.svc/$metadata#ItemCollection
SAP Jam Collaboration Administrator Guide 1805Integrations P U B L I C 171

Field Value
Annotation URL https://www.plateau.com/odata/v1/lms.svc/AnnotationCollection
Can be featured or unfeatured in groups
true
Can be primary object in top-level group
true
Can be primary object in subgroup true
Filter Feed true
Feed History true
Show Search true
(Search) Hint Title
(Search) Property Title
Can be mentioned in feed posts true
Primary (Search) Property Title
Secondary (Display Property Description
Values for the Curriculum learning record type
Field Value
Name Curriculum
External Type https://www.plateau.com/odata/v1/lms.svc/$metadata#CurriculumCollection
Annotation URL https://www.plateau.com/odata/v1/lms.svc/AnnotationCollection
Can be featured or unfeatured in groups
true
Can be primary object in top-level group
true
Can be primary object in subgroup true
Filter Feed true
Feed History true
Show Search true
(Search) Hint Title
(Search) Property Title
Can be mentioned in feed posts true
Primary (Search) Property Title
Secondary (Display Property Description
172 P U B L I CSAP Jam Collaboration Administrator Guide 1805
Integrations
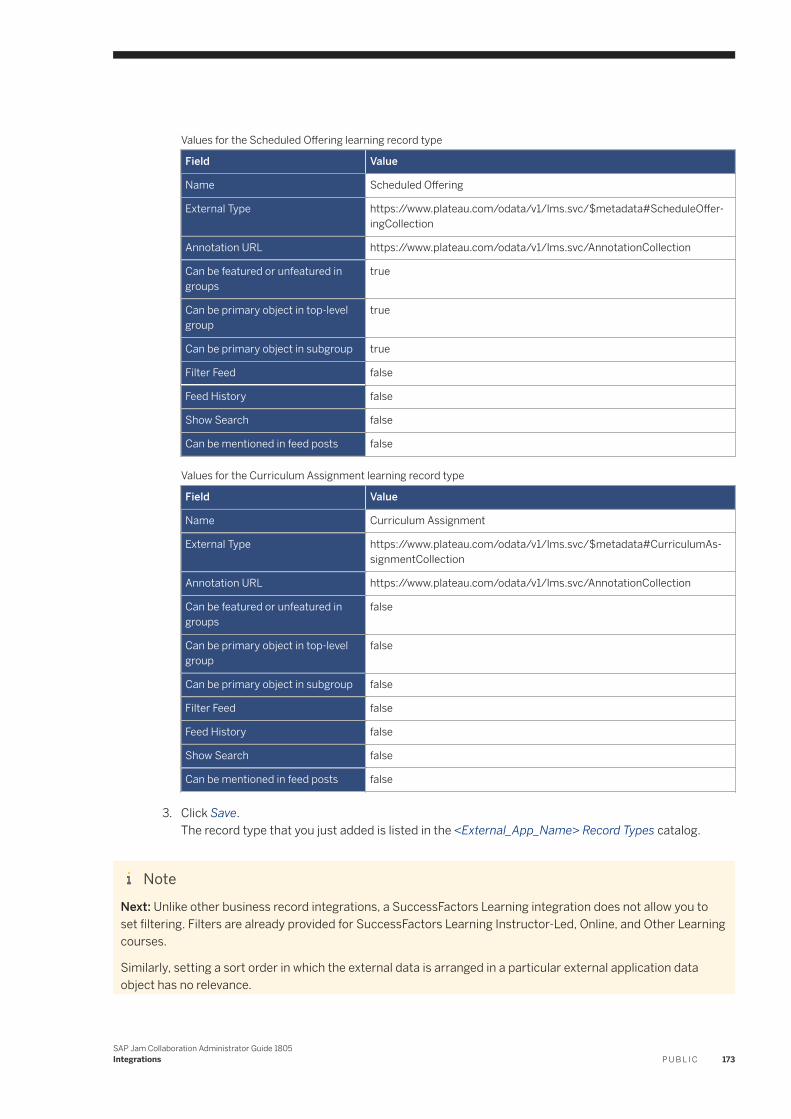
Values for the Scheduled Offering learning record type
Field Value
Name Scheduled Offering
External Type https://www.plateau.com/odata/v1/lms.svc/$metadata#ScheduleOffer-ingCollection
Annotation URL https://www.plateau.com/odata/v1/lms.svc/AnnotationCollection
Can be featured or unfeatured in groups
true
Can be primary object in top-level group
true
Can be primary object in subgroup true
Filter Feed false
Feed History false
Show Search false
Can be mentioned in feed posts false
Values for the Curriculum Assignment learning record type
Field Value
Name Curriculum Assignment
External Type https://www.plateau.com/odata/v1/lms.svc/$metadata#CurriculumAssignmentCollection
Annotation URL https://www.plateau.com/odata/v1/lms.svc/AnnotationCollection
Can be featured or unfeatured in groups
false
Can be primary object in top-level group
false
Can be primary object in subgroup false
Filter Feed false
Feed History false
Show Search false
Can be mentioned in feed posts false
3. Click Save.The record type that you just added is listed in the <External_App_Name> Record Types catalog.
NoteNext: Unlike other business record integrations, a SuccessFactors Learning integration does not allow you to set filtering. Filters are already provided for SuccessFactors Learning Instructor-Led, Online, and Other Learning courses.
Similarly, setting a sort order in which the external data is arranged in a particular external application data object has no relevance.
SAP Jam Collaboration Administrator Guide 1805Integrations P U B L I C 173
As you do not set Filters or Sort Fields for your External Application Objects, you should proceed to Configure access to business records in SAP Jam Collaboration [page 177].
NoteFor a curriculum, if the business record browser displays a hover card or attribute showing a "Value not found error" then you must return to the SAP SuccessFactors HCM Suite and select Admin Center from the main menu, and then add courses to the curriculum. If the curriculum is without courses, the LMS API returns an error.
For start to finish steps on configuring the integration to setting up a learning community, please see the Quick Start Guide for Integrated Learning Communities with SAP Jam Collaboration and SAP SuccessFactors Learning.
As a learning administrator, you can also integrate learning programs with SAP Jam groups and their content. For information on the SAP Jam tile available within the SAP SuccessFactors Learning Program, please refer to the Learning Program Jam Tile topic in the SuccessFactors Learning Administration Help.
6.2.6 Configure a business record filter
A business record filter narrows the range of data that displays in a business record.
You can configure several instances of the same business record, each displaying a different set of data from that business record and used in different groups. Some preconfigured External Application business records include predefined filters.
To add a business record filter:
1. Go to the SAP Jam Admin console and select Integrations External Applications page. Click Action beside the external application to which you want to add an external object filter, and select Manage Record Types from the menu.The Manage <External_Application> Record Types page displays.
2. Click Filters beside the object type to which you want to add a filter.The Manage <record_type> (<External_Application>) Filters page displays.
3. Click New Filter.The Manage <record_type> (<External_Application>) Filters page displays.
174 P U B L I CSAP Jam Collaboration Administrator Guide 1805
Integrations
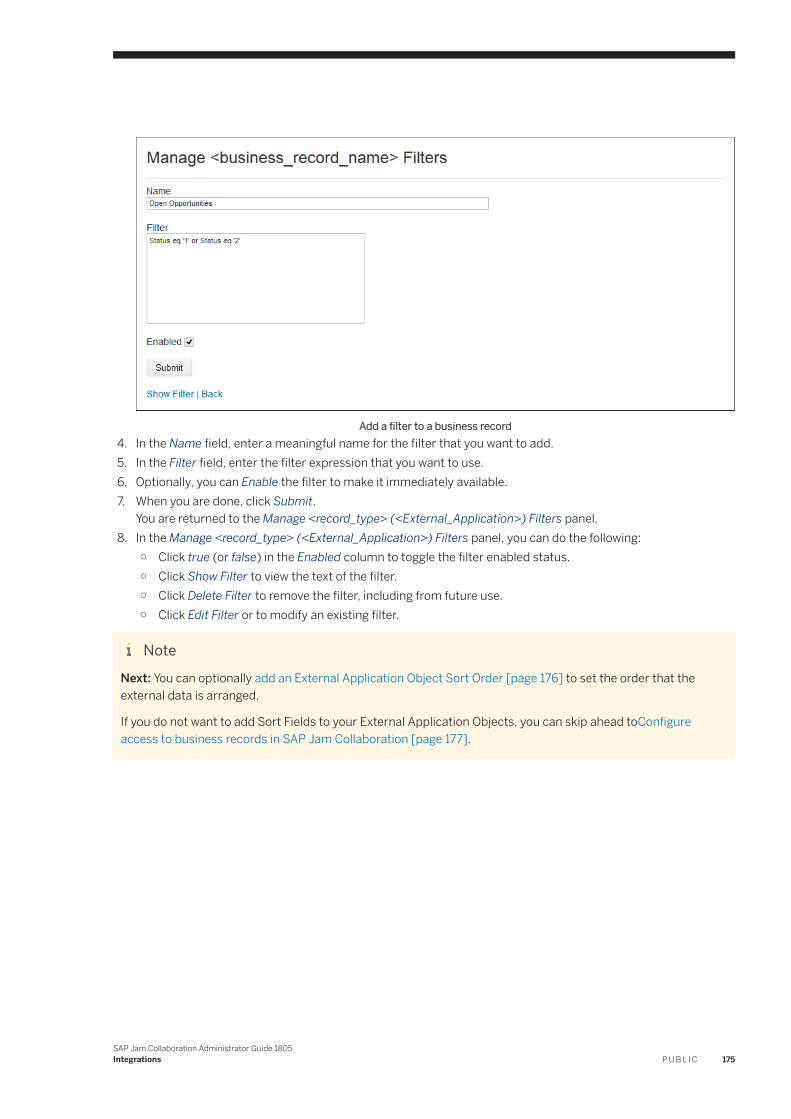
Add a filter to a business record4. In the Name field, enter a meaningful name for the filter that you want to add.5. In the Filter field, enter the filter expression that you want to use.6. Optionally, you can Enable the filter to make it immediately available.7. When you are done, click Submit.
You are returned to the Manage <record_type> (<External_Application>) Filters panel.8. In the Manage <record_type> (<External_Application>) Filters panel, you can do the following:
○ Click true (or false) in the Enabled column to toggle the filter enabled status.○ Click Show Filter to view the text of the filter.○ Click Delete Filter to remove the filter, including from future use.○ Click Edit Filter or to modify an existing filter.
NoteNext: You can optionally add an External Application Object Sort Order [page 176] to set the order that the external data is arranged.
If you do not want to add Sort Fields to your External Application Objects, you can skip ahead toConfigure access to business records in SAP Jam Collaboration [page 177].
SAP Jam Collaboration Administrator Guide 1805Integrations P U B L I C 175
6.2.7 Configure a business record sort order
Each business record type contains a set of attributes that can be selected as the criteria for sorting rows of data in SAP Jam.
About sort fields
Every field defined by an external OData provider can have a sortable attribute (true or false). This is in the OData metadata definition. For example: https://my318752.crm.ondemand.com/sap/byd/odata/v1/c4c.svc/$metadata#TaskCollection. If the attribute is not present, by default it’s sortable.
There are three possible sort lists:
1. All sortable fields: For example, the Task type has the following sortable fields: &Account,&AccountID,&AccountUUID,&ChangeOn,&CompletionDateTime,&CompletionPercent,&DueDateTime,&ETag,&ID,&ObjectID,&Owner,&OwnerUUID,&Priority,&PriorityText,&Processor,&ProcessorID,&ProcessorUUID,&ReportedDate,&StartDateTime,&Status,&StatusText,&Subject,&TypeCode,&TypeCodeText
2. Default sort fields: To use the default recommended set of sort fields, click Reset. Currently, this list impacts only the dropdown in the business record widget. The recommendations are provided by the external application OData annotation. For example, the recommended set for task can be &Account,&AccountID,&AccountUUID,&ChangeOn,&CompletionDateTime
3. Custom sort fields: You can override the default with your own set of fields by entering them into the Sort Fields box. This list impacts only the dropdown in the business record widget. For example, you can input ,&ChangeOn,&DueDateTime,&Owner
Sort order
To set a business record sort order
1. Go to the SAP Jam Admin console and select Integrations External Applications . Click Action beside the external application for which you want to set sort fields, and select Manage Record Types from the menu.The Manage <External_Application> Record Types page displays.
2. Click Sort Fields beside the object type to which you want to set the sort fields.The Edit Record Type dialog box displays.
176 P U B L I CSAP Jam Collaboration Administrator Guide 1805
Integrations
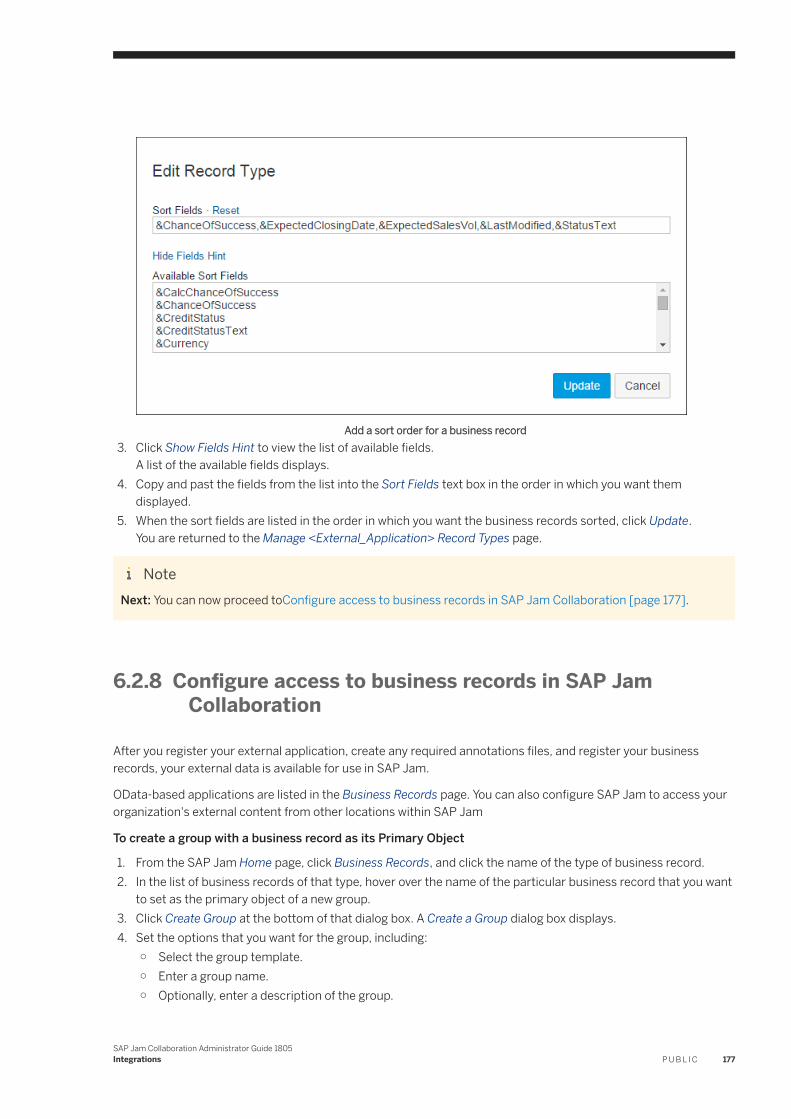
Add a sort order for a business record3. Click Show Fields Hint to view the list of available fields.
A list of the available fields displays.4. Copy and past the fields from the list into the Sort Fields text box in the order in which you want them
displayed.5. When the sort fields are listed in the order in which you want the business records sorted, click Update.
You are returned to the Manage <External_Application> Record Types page.
NoteNext: You can now proceed toConfigure access to business records in SAP Jam Collaboration [page 177].
6.2.8 Configure access to business records in SAP Jam Collaboration
After you register your external application, create any required annotations files, and register your business records, your external data is available for use in SAP Jam.
OData-based applications are listed in the Business Records page. You can also configure SAP Jam to access your organization's external content from other locations within SAP Jam
To create a group with a business record as its Primary Object
1. From the SAP Jam Home page, click Business Records, and click the name of the type of business record.2. In the list of business records of that type, hover over the name of the particular business record that you want
to set as the primary object of a new group.3. Click Create Group at the bottom of that dialog box. A Create a Group dialog box displays.4. Set the options that you want for the group, including:
○ Select the group template.○ Enter a group name.○ Optionally, enter a description of the group.
SAP Jam Collaboration Administrator Guide 1805Integrations P U B L I C 177
○ Click to select the Group Permissions.○ Click options beside the group permissions type for additional settings.○ Ensure that the Activate this group now checkbox is selected if you want to allow immediate use of the
group.○ Click Create to create the group.
To feature a business record in a group
1. From the SAP Jam Home page, click Business Records and then the name of the type of business record.2. From the list of business records, hover over the name of the business record that you want to set as the
primary object of a new group.3. Click Feature in... at the bottom of the actions dialog box. A Feature in another group dialog box displays.4. Enter the name of the group in which you want to feature the selected business record and click OK. The
selected business record is featured in the specified group.
To have a business record appear as being related to a Primary or Featured business record: This is done automatically, but it does require that the UI.LineItem Term has been developed.
Your Document Repository access configuration is now complete. Users can access the newly integrated business records from any of the above listed SAP Jam locations that you configured.
6.3 Access and Authorization overview
This section explains the technologies used to establish SAP Jam Collaboration integration access and authorization.
● Integrations External Applications Trusted Certificate Authorities : configure access to web-based applications and services within your organization if unrecognized or self-signed certificates are used.
● Integrations OAuth Clients : configure external application to access the SAP Jam API by configuring that external application as an OAuth Client.
● Integrations SAML Trusted IDP : configure an external application to access SAP Jam user ID and authorization information to display material that a user is authorized to view when SAP Jam features are integrated into the external application.
● Integrations SAML Local Identity Provider : configure SAP Jam to access an external application's user ID and authorization information to display material that a user is authorized to view when they view pages where the external application business records display in SAP Jam pages.
● Integrations SAML Trusted IDP : configure an external service as your primary user identity provider. This is a major configuration change that provides an alternative to using SuccessFactors Platform as the source of user authentication and authorization information.
178 P U B L I CSAP Jam Collaboration Administrator Guide 1805
Integrations
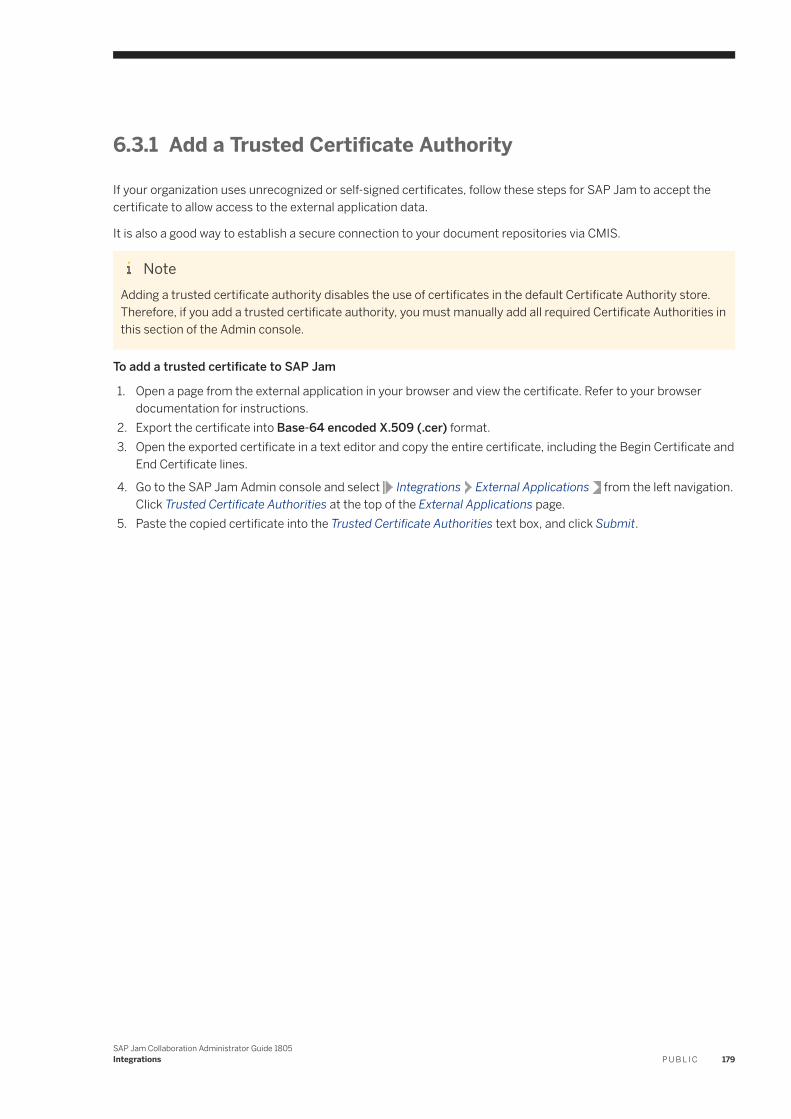
6.3.1 Add a Trusted Certificate Authority
If your organization uses unrecognized or self-signed certificates, follow these steps for SAP Jam to accept the certificate to allow access to the external application data.
It is also a good way to establish a secure connection to your document repositories via CMIS.
NoteAdding a trusted certificate authority disables the use of certificates in the default Certificate Authority store. Therefore, if you add a trusted certificate authority, you must manually add all required Certificate Authorities in this section of the Admin console.
To add a trusted certificate to SAP Jam
1. Open a page from the external application in your browser and view the certificate. Refer to your browser documentation for instructions.
2. Export the certificate into Base-64 encoded X.509 (.cer) format.3. Open the exported certificate in a text editor and copy the entire certificate, including the Begin Certificate and
End Certificate lines.
4. Go to the SAP Jam Admin console and select Integrations External Applications from the left navigation. Click Trusted Certificate Authorities at the top of the External Applications page.
5. Paste the copied certificate into the Trusted Certificate Authorities text box, and click Submit.
SAP Jam Collaboration Administrator Guide 1805Integrations P U B L I C 179
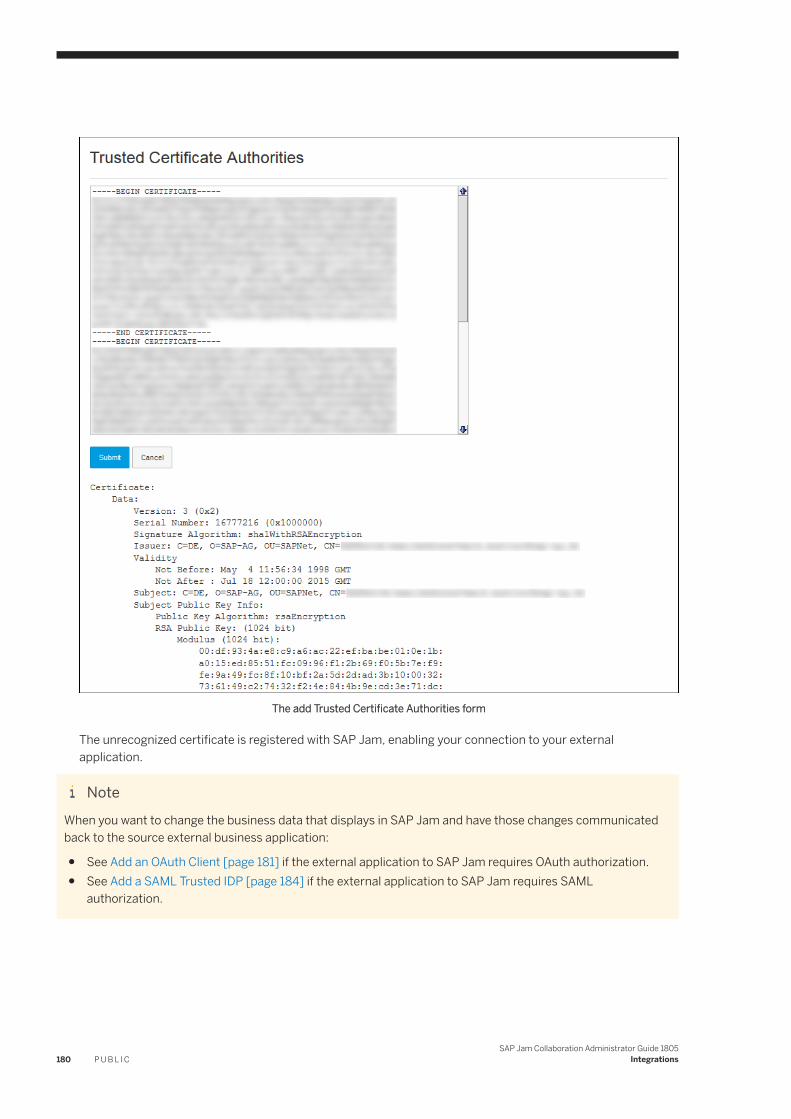
The add Trusted Certificate Authorities form
The unrecognized certificate is registered with SAP Jam, enabling your connection to your external application.
NoteWhen you want to change the business data that displays in SAP Jam and have those changes communicated back to the source external business application:
● See Add an OAuth Client [page 181] if the external application to SAP Jam requires OAuth authorization.● See Add a SAML Trusted IDP [page 184] if the external application to SAP Jam requires SAML
authorization.
180 P U B L I CSAP Jam Collaboration Administrator Guide 1805
Integrations
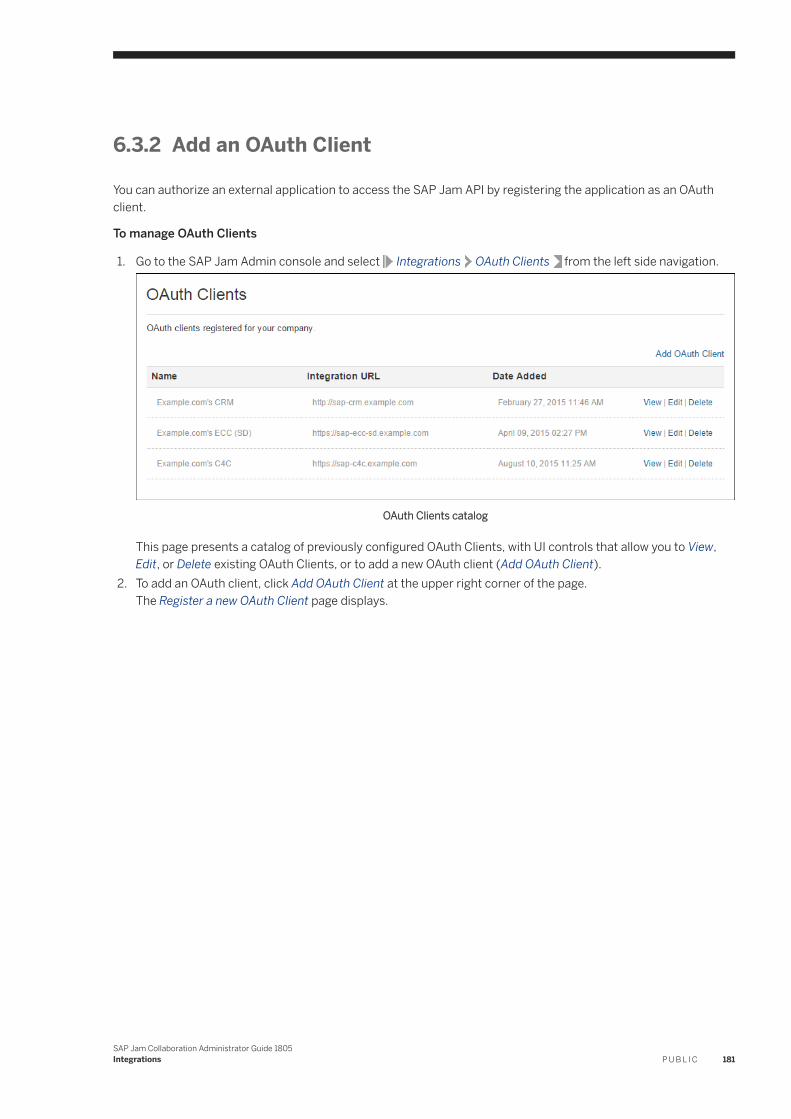
6.3.2 Add an OAuth Client
You can authorize an external application to access the SAP Jam API by registering the application as an OAuth client.
To manage OAuth Clients
1. Go to the SAP Jam Admin console and select Integrations OAuth Clients from the left side navigation.
OAuth Clients catalog
This page presents a catalog of previously configured OAuth Clients, with UI controls that allow you to View, Edit, or Delete existing OAuth Clients, or to add a new OAuth client (Add OAuth Client).
2. To add an OAuth client, click Add OAuth Client at the upper right corner of the page.The Register a new OAuth Client page displays.
SAP Jam Collaboration Administrator Guide 1805Integrations P U B L I C 181
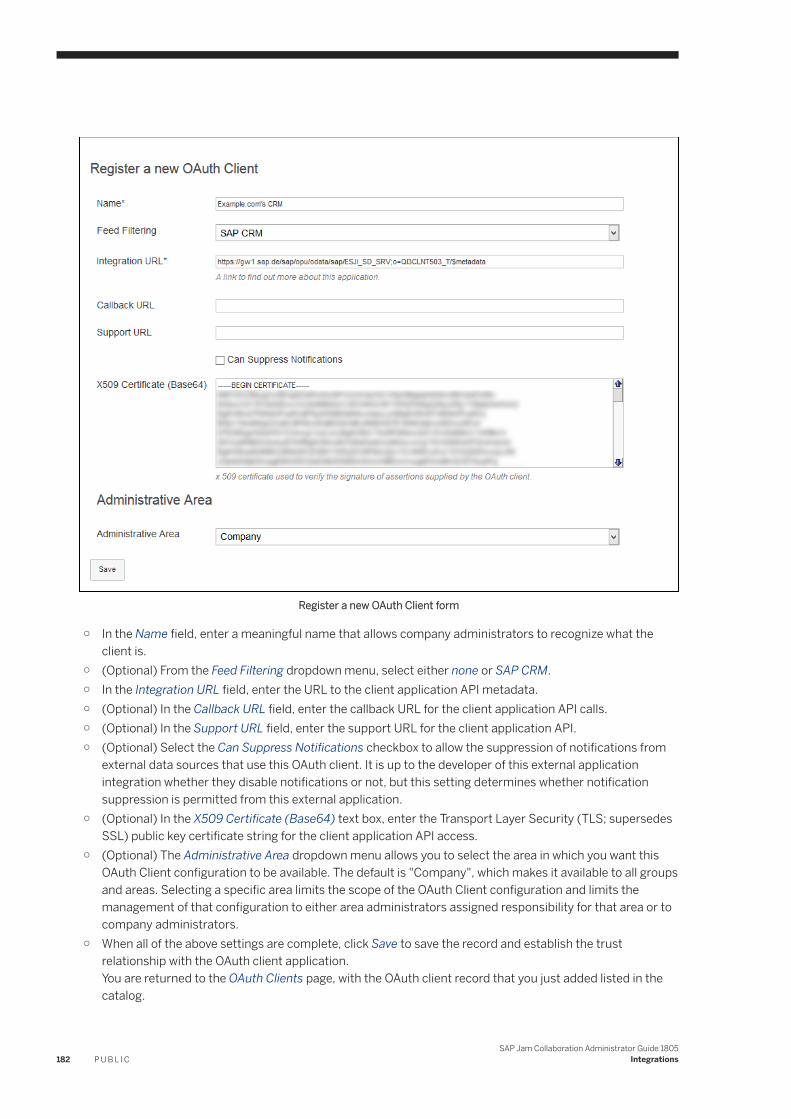
Register a new OAuth Client form
○ In the Name field, enter a meaningful name that allows company administrators to recognize what the client is.
○ (Optional) From the Feed Filtering dropdown menu, select either none or SAP CRM.○ In the Integration URL field, enter the URL to the client application API metadata.○ (Optional) In the Callback URL field, enter the callback URL for the client application API calls.○ (Optional) In the Support URL field, enter the support URL for the client application API.○ (Optional) Select the Can Suppress Notifications checkbox to allow the suppression of notifications from
external data sources that use this OAuth client. It is up to the developer of this external application integration whether they disable notifications or not, but this setting determines whether notification suppression is permitted from this external application.
○ (Optional) In the X509 Certificate (Base64) text box, enter the Transport Layer Security (TLS; supersedes SSL) public key certificate string for the client application API access.
○ (Optional) The Administrative Area dropdown menu allows you to select the area in which you want this OAuth Client configuration to be available. The default is "Company", which makes it available to all groups and areas. Selecting a specific area limits the scope of the OAuth Client configuration and limits the management of that configuration to either area administrators assigned responsibility for that area or to company administrators.
○ When all of the above settings are complete, click Save to save the record and establish the trust relationship with the OAuth client application.You are returned to the OAuth Clients page, with the OAuth client record that you just added listed in the catalog.
182 P U B L I CSAP Jam Collaboration Administrator Guide 1805
Integrations
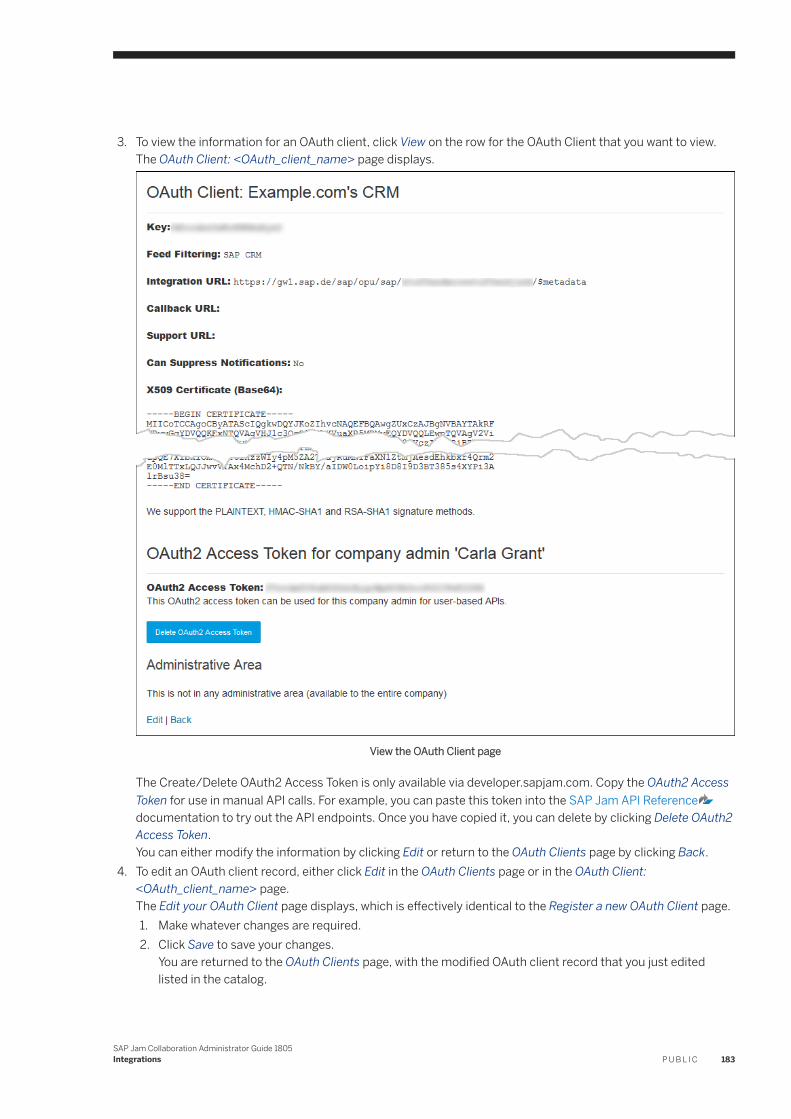
3. To view the information for an OAuth client, click View on the row for the OAuth Client that you want to view.The OAuth Client: <OAuth_client_name> page displays.
View the OAuth Client page
The Create/Delete OAuth2 Access Token is only available via developer.sapjam.com. Copy the OAuth2 Access Token for use in manual API calls. For example, you can paste this token into the SAP Jam API Referencedocumentation to try out the API endpoints. Once you have copied it, you can delete by clicking Delete OAuth2 Access Token.You can either modify the information by clicking Edit or return to the OAuth Clients page by clicking Back.
4. To edit an OAuth client record, either click Edit in the OAuth Clients page or in the OAuth Client: <OAuth_client_name> page.The Edit your OAuth Client page displays, which is effectively identical to the Register a new OAuth Client page.1. Make whatever changes are required.2. Click Save to save your changes.
You are returned to the OAuth Clients page, with the modified OAuth client record that you just edited listed in the catalog.
SAP Jam Collaboration Administrator Guide 1805Integrations P U B L I C 183
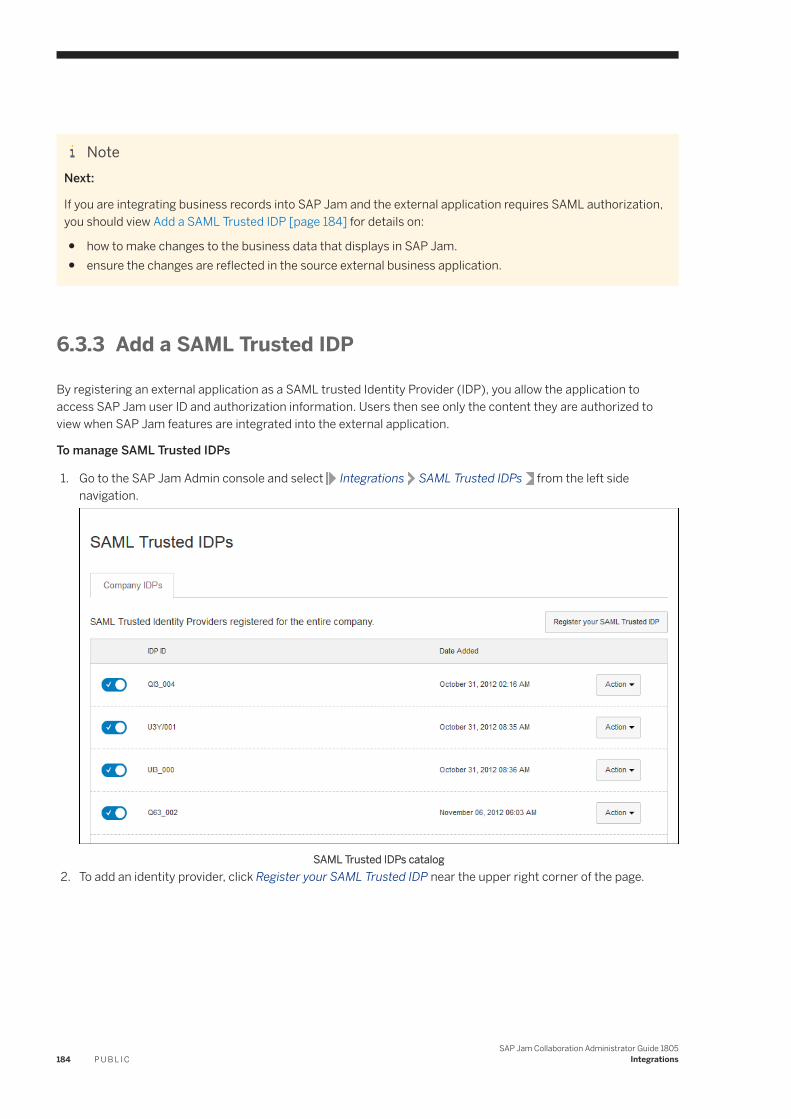
NoteNext:
If you are integrating business records into SAP Jam and the external application requires SAML authorization, you should view Add a SAML Trusted IDP [page 184] for details on:
● how to make changes to the business data that displays in SAP Jam.● ensure the changes are reflected in the source external business application.
6.3.3 Add a SAML Trusted IDP
By registering an external application as a SAML trusted Identity Provider (IDP), you allow the application to access SAP Jam user ID and authorization information. Users then see only the content they are authorized to view when SAP Jam features are integrated into the external application.
To manage SAML Trusted IDPs
1. Go to the SAP Jam Admin console and select Integrations SAML Trusted IDPs from the left side navigation.
SAML Trusted IDPs catalog2. To add an identity provider, click Register your SAML Trusted IDP near the upper right corner of the page.
184 P U B L I CSAP Jam Collaboration Administrator Guide 1805
Integrations
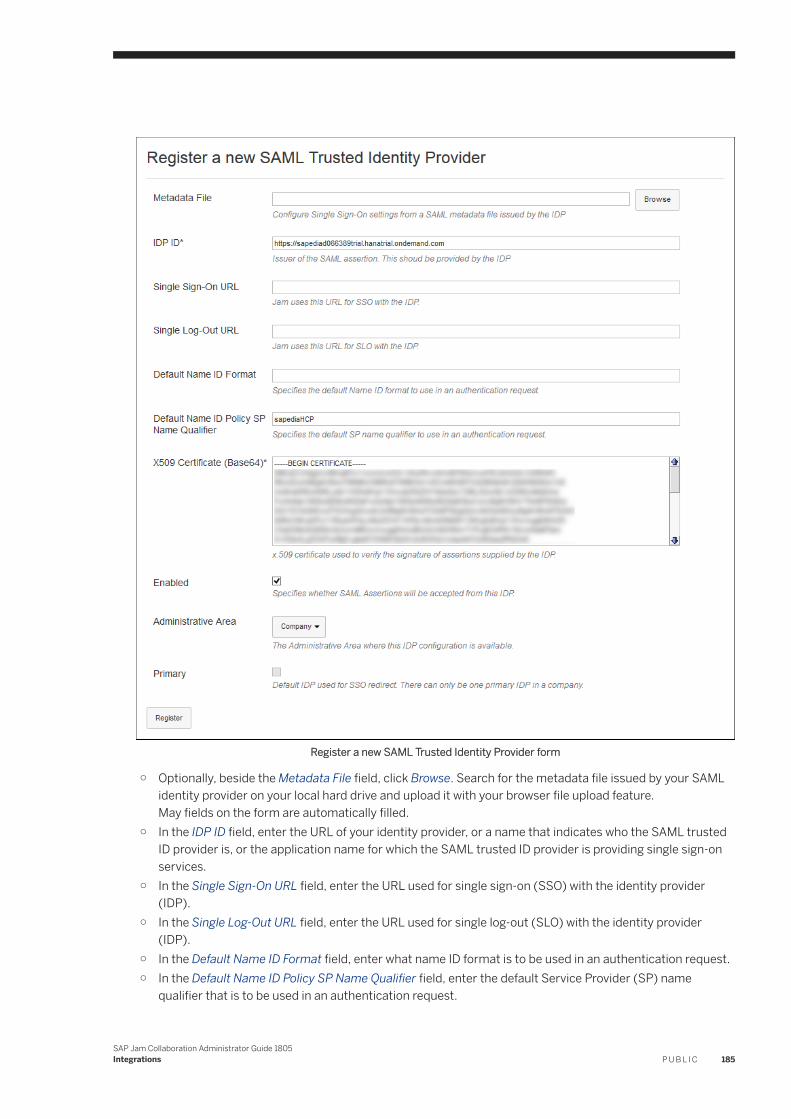
Register a new SAML Trusted Identity Provider form
○ Optionally, beside the Metadata File field, click Browse. Search for the metadata file issued by your SAML identity provider on your local hard drive and upload it with your browser file upload feature.May fields on the form are automatically filled.
○ In the IDP ID field, enter the URL of your identity provider, or a name that indicates who the SAML trusted ID provider is, or the application name for which the SAML trusted ID provider is providing single sign-on services.
○ In the Single Sign-On URL field, enter the URL used for single sign-on (SSO) with the identity provider (IDP).
○ In the Single Log-Out URL field, enter the URL used for single log-out (SLO) with the identity provider (IDP).
○ In the Default Name ID Format field, enter what name ID format is to be used in an authentication request.○ In the Default Name ID Policy SP Name Qualifier field, enter the default Service Provider (SP) name
qualifier that is to be used in an authentication request.
SAP Jam Collaboration Administrator Guide 1805Integrations P U B L I C 185
○ In the X509 Certificate (Base64) text box, enter the Transport Layer Security (TLS) public key certificate string for the client application's API access.
○ Optionally, select the Enabled checkbox to make this SAML trusted IDP immediately available.You can enable or disable the entry in the SAML Trusted IDPs page at any time.
○ The Administrative Area dropdown menu allows you to select the area in which you want this SAML Trusted IDP configuration to be available. The default is "Company", which makes it available to all groups and areas. Selecting a specific area limits the scope of the SAML Trusted IDP configuration and limits the management of that configuration to either area administrators assigned responsibility for that area or to company administrators.
○ Select the Primary checkbox to indicate that this SAML trusted identity provider should be the preferred provider. A secondary provider can be specified, which can be set to ensure access should the primary provider fail.
NoteThere can be only one primary IDP configured within your organization.○ Select whether the SAML Issuer ID is globally unique.○ Select “Company Specific” if:
○ Your organization uses a custom subdomain; or○ Your organization‘s IdP is connected to other SAP Jam instances.
○ Select “Global” if:○ Your organization is using the SAIL or SMI libraries for integration; or○ Your organization does not use a custom subdomain.
○ When all of the above settings are complete, click Save to save the record and establish the trust relationship with the SAML Trusted IDP.You are returned to the SAML Trusted IDPs page, with the SAML Trusted Identity Provider record that you just added listed in the catalog.
3. To enable or disable a SAML Trusted IDP, change the slider control in the left-most column of the row for the SAML Trusted Identity Provider for which you want to change its enabled status.○ A disabled SAML Trusted IDP appears gray and displays an "X" to the right of the button. Click the control
to enable the SAML Trusted IDP.○ An enabled SAML Trusted IDP appears blue and displays a checkmark to the left of the button. Click the
control to disable the SAML Trusted IDP.4. To view the information for a SAML Trusted Identity Provider, click Action in the right-most column of the row
for the SAML Trusted Identity Provider that you want to view in the table listing your organization's configured IDPs and select View from the menu.The SAML trusted IDP: <SAML_trusted_IDP_name> page displays, showing the details of this SAML trusted IDP configuration.You can either modify the information by clicking Edit or return to the SAML Trusted IDPs page by clicking Back.
5. To edit a configured SAML Trusted IDP, either click click Action in the right-most column of the row for the SAML Trusted Identity Provider that you want to view in the table listing your organization's configured IDPs and select Edit from the menu, or click Edit in the SAML trusted IDP: <SAML_trusted_IDP_name> page.The Edit your SAML Trusted Identity Provider page displays, which is effectively identical to the Register a new SAML Trusted Identity Provider page.1. Make whatever changes are required.2. Click Save to save your changes.
186 P U B L I CSAP Jam Collaboration Administrator Guide 1805
Integrations
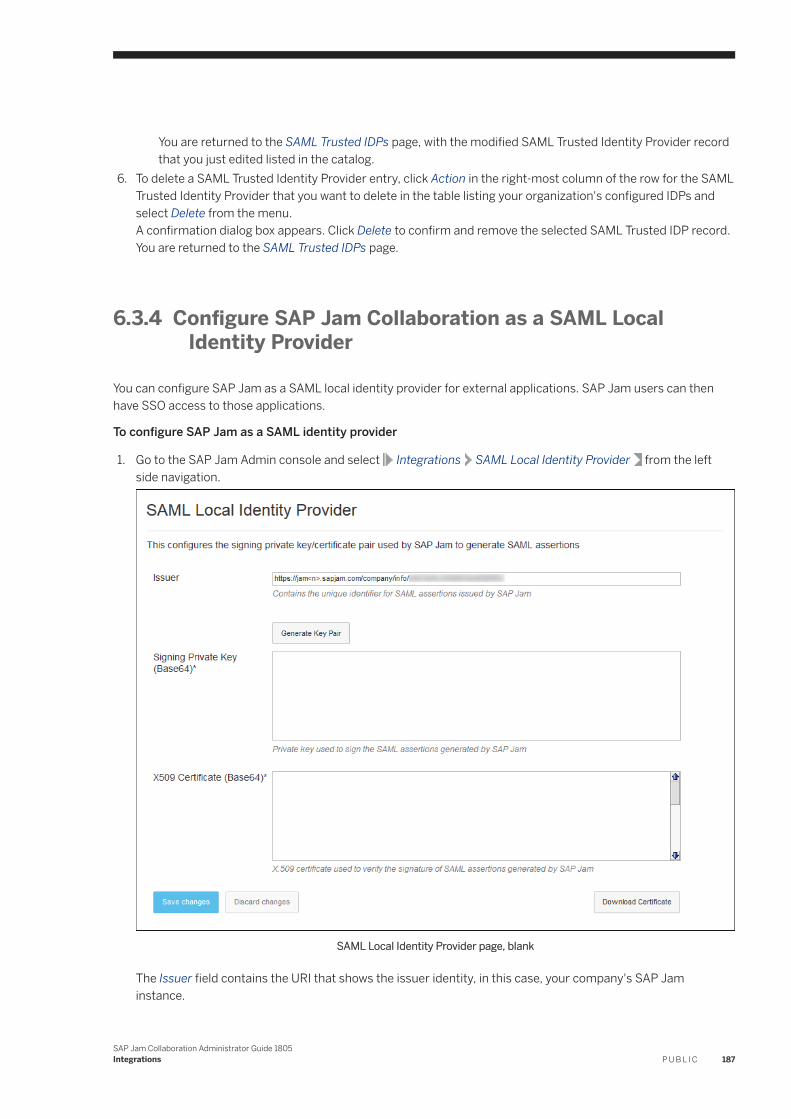
You are returned to the SAML Trusted IDPs page, with the modified SAML Trusted Identity Provider record that you just edited listed in the catalog.
6. To delete a SAML Trusted Identity Provider entry, click Action in the right-most column of the row for the SAML Trusted Identity Provider that you want to delete in the table listing your organization's configured IDPs and select Delete from the menu.A confirmation dialog box appears. Click Delete to confirm and remove the selected SAML Trusted IDP record.You are returned to the SAML Trusted IDPs page.
6.3.4 Configure SAP Jam Collaboration as a SAML Local Identity Provider
You can configure SAP Jam as a SAML local identity provider for external applications. SAP Jam users can then have SSO access to those applications.
To configure SAP Jam as a SAML identity provider
1. Go to the SAP Jam Admin console and select Integrations SAML Local Identity Provider from the left side navigation.
SAML Local Identity Provider page, blank
The Issuer field contains the URI that shows the issuer identity, in this case, your company's SAP Jam instance.
SAP Jam Collaboration Administrator Guide 1805Integrations P U B L I C 187
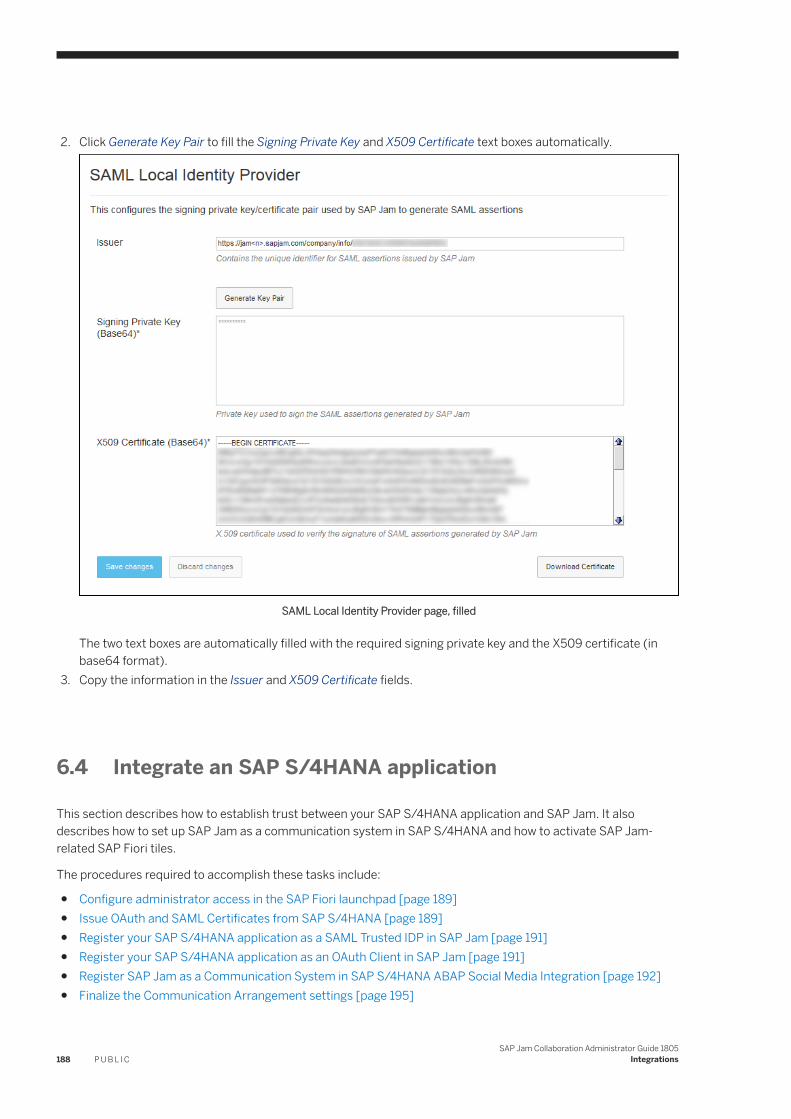
2. Click Generate Key Pair to fill the Signing Private Key and X509 Certificate text boxes automatically.
SAML Local Identity Provider page, filled
The two text boxes are automatically filled with the required signing private key and the X509 certificate (in base64 format).
3. Copy the information in the Issuer and X509 Certificate fields.
6.4 Integrate an SAP S/4HANA application
This section describes how to establish trust between your SAP S/4HANA application and SAP Jam. It also describes how to set up SAP Jam as a communication system in SAP S/4HANA and how to activate SAP Jam-related SAP Fiori tiles.
The procedures required to accomplish these tasks include:
● Configure administrator access in the SAP Fiori launchpad [page 189]● Issue OAuth and SAML Certificates from SAP S/4HANA [page 189]● Register your SAP S/4HANA application as a SAML Trusted IDP in SAP Jam [page 191]● Register your SAP S/4HANA application as an OAuth Client in SAP Jam [page 191]● Register SAP Jam as a Communication System in SAP S/4HANA ABAP Social Media Integration [page 192]● Finalize the Communication Arrangement settings [page 195]
188 P U B L I CSAP Jam Collaboration Administrator Guide 1805
Integrations
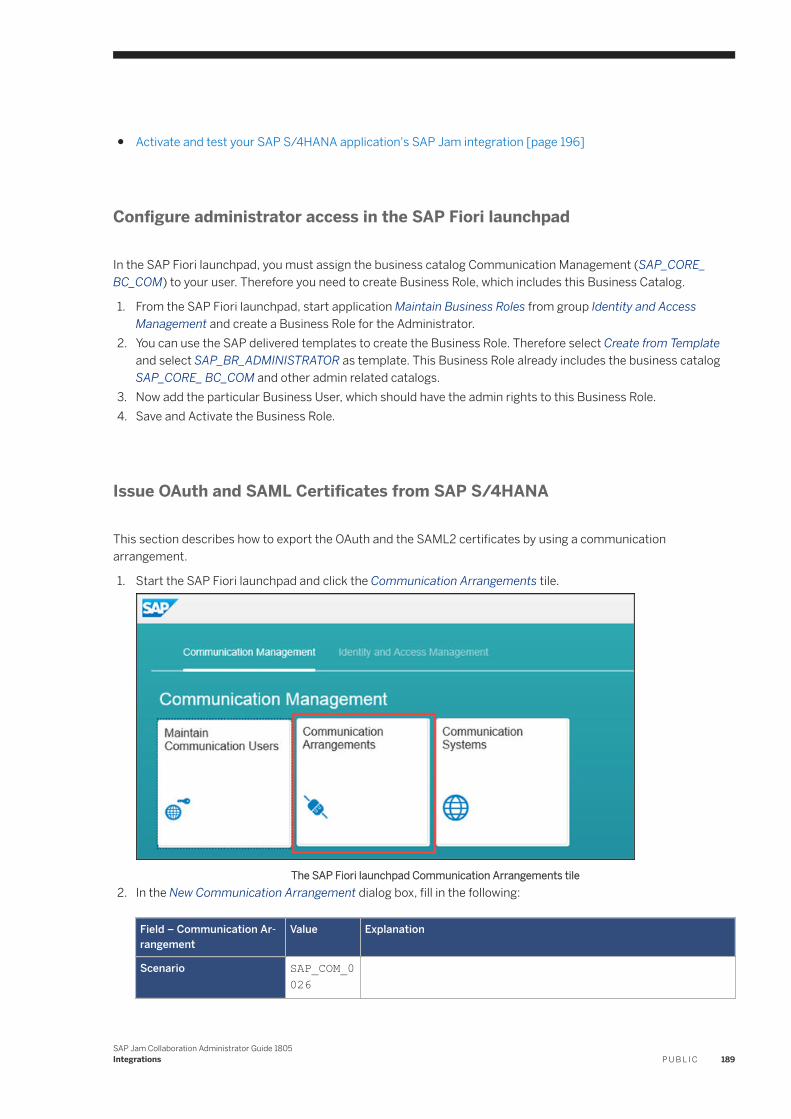
● Activate and test your SAP S/4HANA application's SAP Jam integration [page 196]
Configure administrator access in the SAP Fiori launchpad
In the SAP Fiori launchpad, you must assign the business catalog Communication Management (SAP_CORE_ BC_COM) to your user. Therefore you need to create Business Role, which includes this Business Catalog.
1. From the SAP Fiori launchpad, start application Maintain Business Roles from group Identity and Access Management and create a Business Role for the Administrator.
2. You can use the SAP delivered templates to create the Business Role. Therefore select Create from Template and select SAP_BR_ADMINISTRATOR as template. This Business Role already includes the business catalog SAP_CORE_ BC_COM and other admin related catalogs.
3. Now add the particular Business User, which should have the admin rights to this Business Role.4. Save and Activate the Business Role.
Issue OAuth and SAML Certificates from SAP S/4HANA
This section describes how to export the OAuth and the SAML2 certificates by using a communication arrangement.
1. Start the SAP Fiori launchpad and click the Communication Arrangements tile.
The SAP Fiori launchpad Communication Arrangements tile2. In the New Communication Arrangement dialog box, fill in the following:
Field – Communication Arrangement
Value Explanation
Scenario SAP_COM_0026
SAP Jam Collaboration Administrator Guide 1805Integrations P U B L I C 189
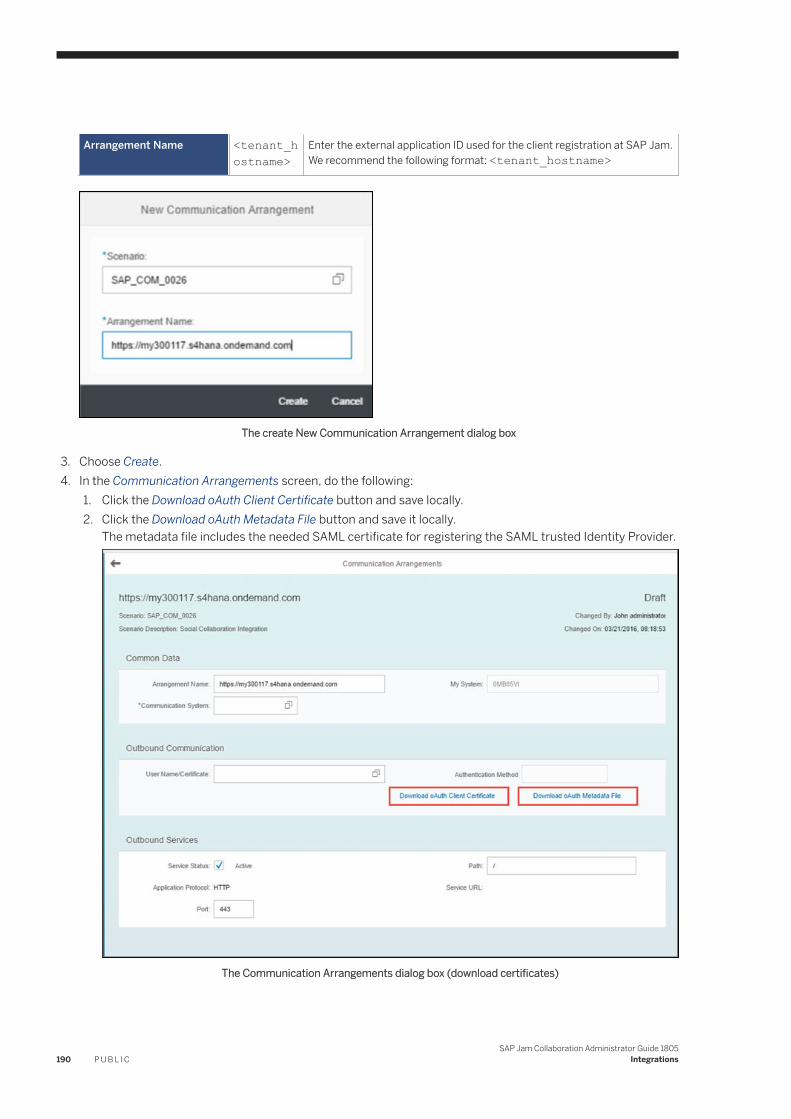
Arrangement Name <tenant_hostname>
Enter the external application ID used for the client registration at SAP Jam. We recommend the following format: <tenant_hostname>
The create New Communication Arrangement dialog box
3. Choose Create.4. In the Communication Arrangements screen, do the following:
1. Click the Download oAuth Client Certificate button and save locally.2. Click the Download oAuth Metadata File button and save it locally.
The metadata file includes the needed SAML certificate for registering the SAML trusted Identity Provider.
The Communication Arrangements dialog box (download certificates)
190 P U B L I CSAP Jam Collaboration Administrator Guide 1805
Integrations
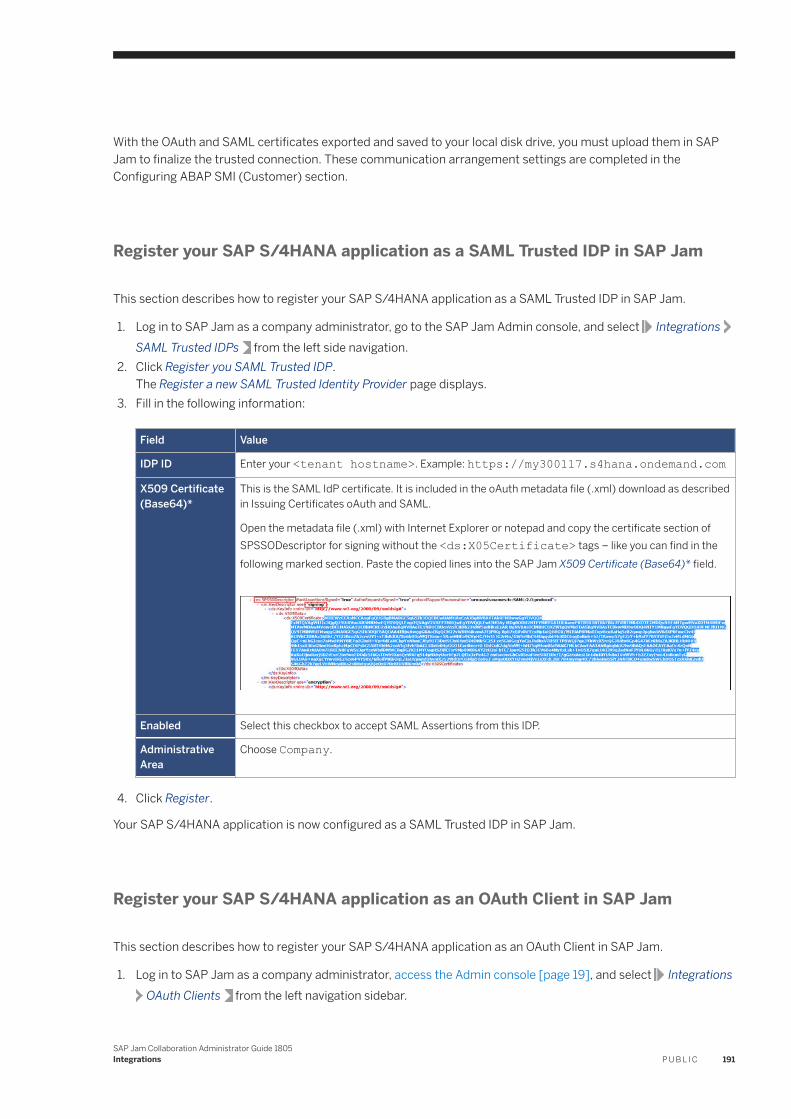
With the OAuth and SAML certificates exported and saved to your local disk drive, you must upload them in SAP Jam to finalize the trusted connection. These communication arrangement settings are completed in the Configuring ABAP SMI (Customer) section.
Register your SAP S/4HANA application as a SAML Trusted IDP in SAP Jam
This section describes how to register your SAP S/4HANA application as a SAML Trusted IDP in SAP Jam.
1. Log in to SAP Jam as a company administrator, go to the SAP Jam Admin console, and select IntegrationsSAML Trusted IDPs from the left side navigation.
2. Click Register you SAML Trusted IDP.The Register a new SAML Trusted Identity Provider page displays.
3. Fill in the following information:
Field Value
IDP ID Enter your <tenant hostname>. Example: https://my300117.s4hana.ondemand.com
X509 Certificate (Base64)*
This is the SAML IdP certificate. It is included in the oAuth metadata file (.xml) download as described in Issuing Certificates oAuth and SAML.
Open the metadata file (.xml) with Internet Explorer or notepad and copy the certificate section of SPSSODescriptor for signing without the <ds:X05Certificate> tags – like you can find in the following marked section. Paste the copied lines into the SAP Jam X509 Certificate (Base64)* field.
Enabled Select this checkbox to accept SAML Assertions from this IDP.
Administrative Area
Choose Company.
4. Click Register.
Your SAP S/4HANA application is now configured as a SAML Trusted IDP in SAP Jam.
Register your SAP S/4HANA application as an OAuth Client in SAP Jam
This section describes how to register your SAP S/4HANA application as an OAuth Client in SAP Jam.
1. Log in to SAP Jam as a company administrator, access the Admin console [page 19], and select IntegrationsOAuth Clients from the left navigation sidebar.
SAP Jam Collaboration Administrator Guide 1805Integrations P U B L I C 191
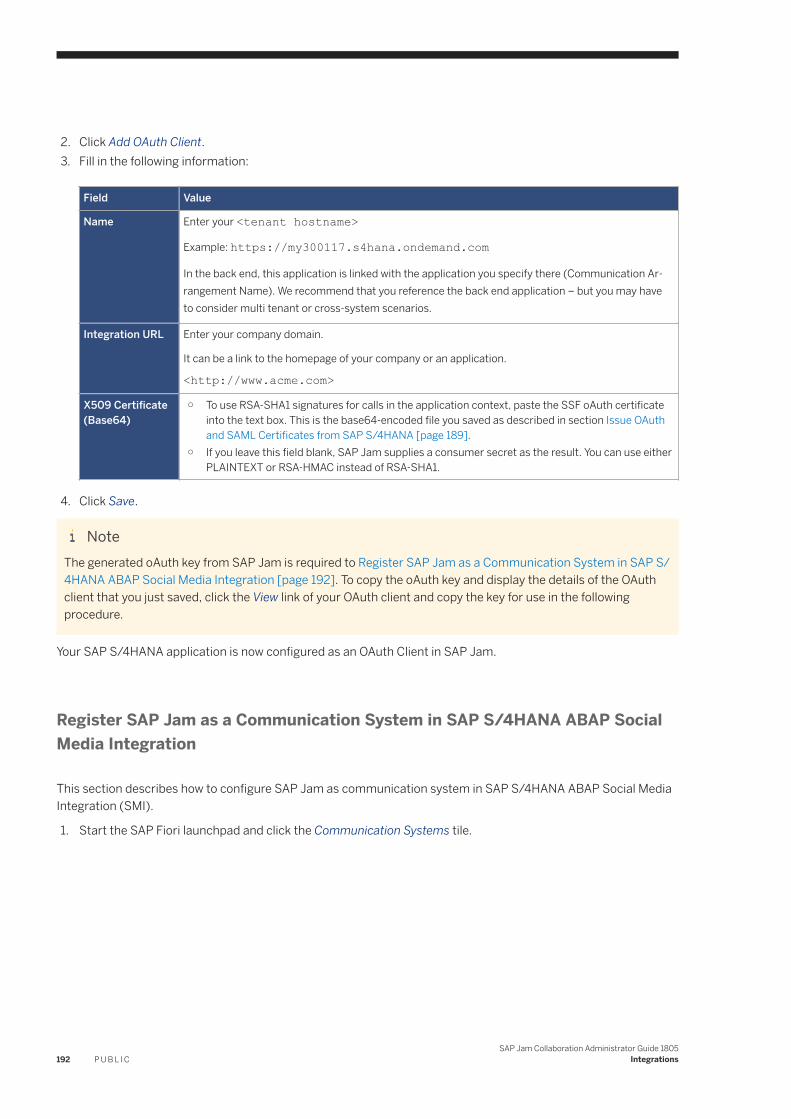
2. Click Add OAuth Client.3. Fill in the following information:
Field Value
Name Enter your <tenant hostname>
Example: https://my300117.s4hana.ondemand.com
In the back end, this application is linked with the application you specify there (Communication Arrangement Name). We recommend that you reference the back end application – but you may have to consider multi tenant or cross-system scenarios.
Integration URL Enter your company domain.
It can be a link to the homepage of your company or an application.
<http://www.acme.com>
X509 Certificate (Base64)
○ To use RSA-SHA1 signatures for calls in the application context, paste the SSF oAuth certificate into the text box. This is the base64-encoded file you saved as described in section Issue OAuth and SAML Certificates from SAP S/4HANA [page 189].
○ If you leave this field blank, SAP Jam supplies a consumer secret as the result. You can use either PLAINTEXT or RSA-HMAC instead of RSA-SHA1.
4. Click Save.
NoteThe generated oAuth key from SAP Jam is required to Register SAP Jam as a Communication System in SAP S/4HANA ABAP Social Media Integration [page 192]. To copy the oAuth key and display the details of the OAuth client that you just saved, click the View link of your OAuth client and copy the key for use in the following procedure.
Your SAP S/4HANA application is now configured as an OAuth Client in SAP Jam.
Register SAP Jam as a Communication System in SAP S/4HANA ABAP Social Media Integration
This section describes how to configure SAP Jam as communication system in SAP S/4HANA ABAP Social Media Integration (SMI).
1. Start the SAP Fiori launchpad and click the Communication Systems tile.
192 P U B L I CSAP Jam Collaboration Administrator Guide 1805
Integrations
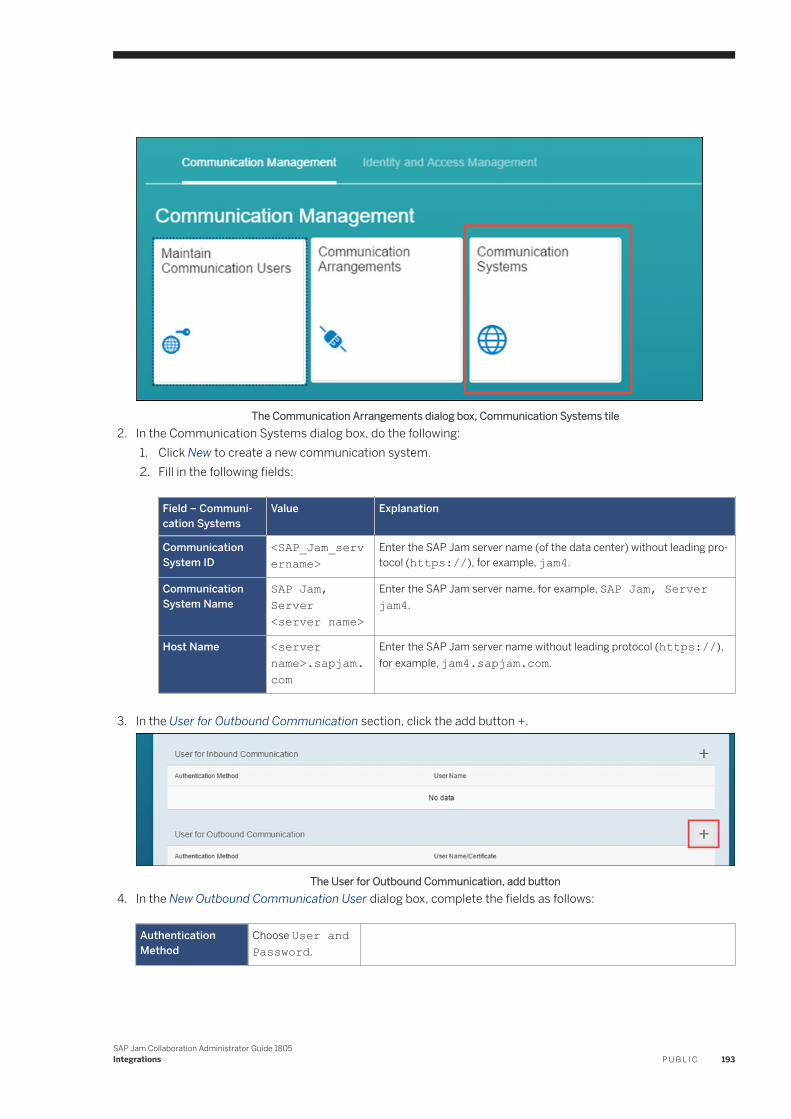
The Communication Arrangements dialog box, Communication Systems tile2. In the Communication Systems dialog box, do the following:
1. Click New to create a new communication system.2. Fill in the following fields:
Field – Communication Systems
Value Explanation
Communication System ID
<SAP_Jam_servername>
Enter the SAP Jam server name (of the data center) without leading protocol (https://), for example, jam4.
Communication System Name
SAP Jam, Server <server name>
Enter the SAP Jam server name, for example, SAP Jam, Server jam4.
Host Name <server name>.sapjam.com
Enter the SAP Jam server name without leading protocol (https://), for example, jam4.sapjam.com.
3. In the User for Outbound Communication section, click the add button +.
The User for Outbound Communication, add button4. In the New Outbound Communication User dialog box, complete the fields as follows:
Authentication Method
Choose User and Password.
SAP Jam Collaboration Administrator Guide 1805Integrations P U B L I C 193

Username Consumer
Password <key> Enter the key you retrieved from SAP Jam when the OAuth client was saved there.
The New Outbound Communication User dialog box
5. Click Create.6. Save your entries.
The create Communication System page
You have registered SAP Jam as a Communication System in SAP S/4HANA ABAP Social Media Integration.
194 P U B L I CSAP Jam Collaboration Administrator Guide 1805
Integrations
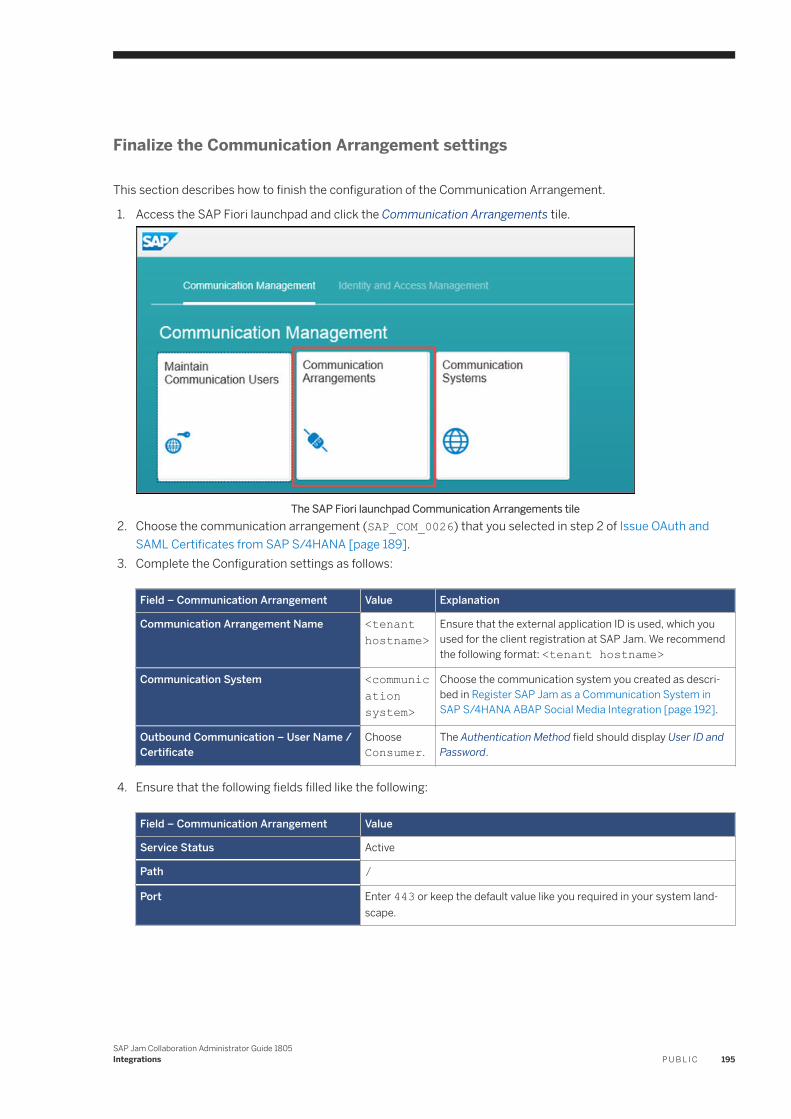
Finalize the Communication Arrangement settings
This section describes how to finish the configuration of the Communication Arrangement.
1. Access the SAP Fiori launchpad and click the Communication Arrangements tile.
The SAP Fiori launchpad Communication Arrangements tile2. Choose the communication arrangement (SAP_COM_0026) that you selected in step 2 of Issue OAuth and
SAML Certificates from SAP S/4HANA [page 189].3. Complete the Configuration settings as follows:
Field – Communication Arrangement Value Explanation
Communication Arrangement Name <tenant hostname>
Ensure that the external application ID is used, which you used for the client registration at SAP Jam. We recommend the following format: <tenant hostname>
Communication System <communication system>
Choose the communication system you created as described in Register SAP Jam as a Communication System in SAP S/4HANA ABAP Social Media Integration [page 192].
Outbound Communication – User Name / Certificate
Choose Consumer.
The Authentication Method field should display User ID and Password.
4. Ensure that the following fields filled like the following:
Field – Communication Arrangement Value
Service Status Active
Path /
Port Enter 443 or keep the default value like you required in your system landscape.
SAP Jam Collaboration Administrator Guide 1805Integrations P U B L I C 195
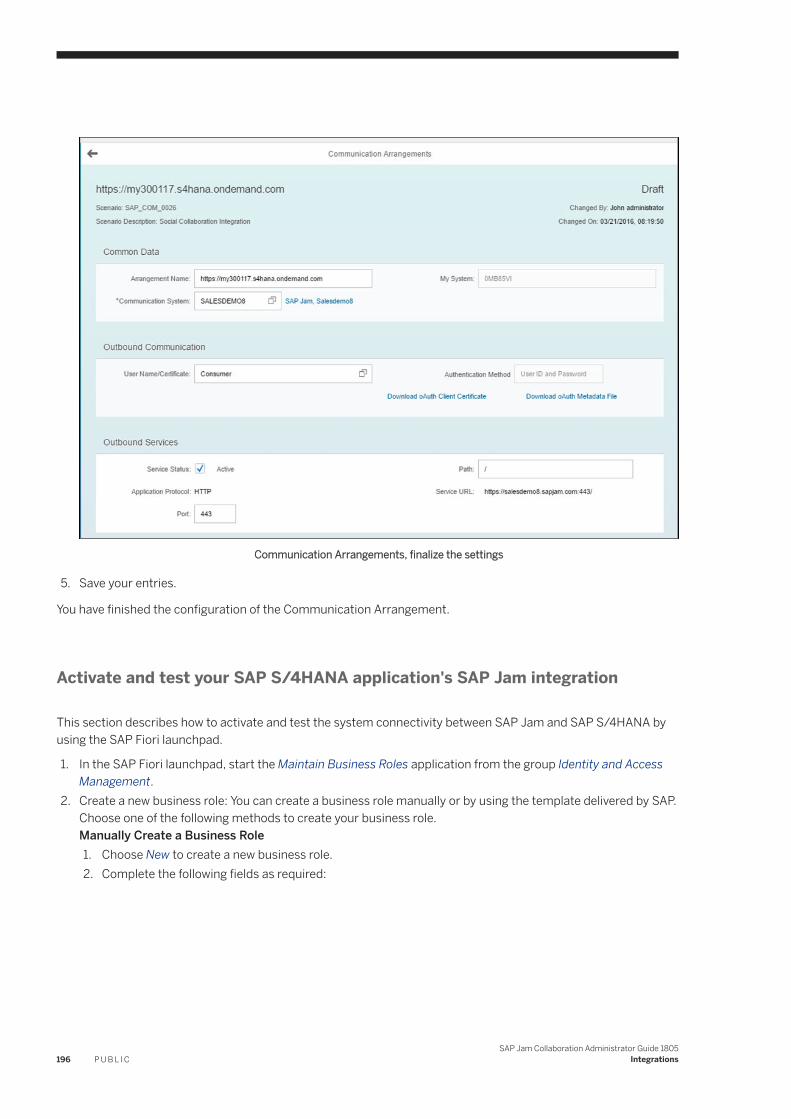
Communication Arrangements, finalize the settings
5. Save your entries.
You have finished the configuration of the Communication Arrangement.
Activate and test your SAP S/4HANA application's SAP Jam integration
This section describes how to activate and test the system connectivity between SAP Jam and SAP S/4HANA by using the SAP Fiori launchpad.
1. In the SAP Fiori launchpad, start the Maintain Business Roles application from the group Identity and Access Management.
2. Create a new business role: You can create a business role manually or by using the template delivered by SAP. Choose one of the following methods to create your business role.Manually Create a Business Role1. Choose New to create a new business role.2. Complete the following fields as required:
196 P U B L I CSAP Jam Collaboration Administrator Guide 1805
Integrations
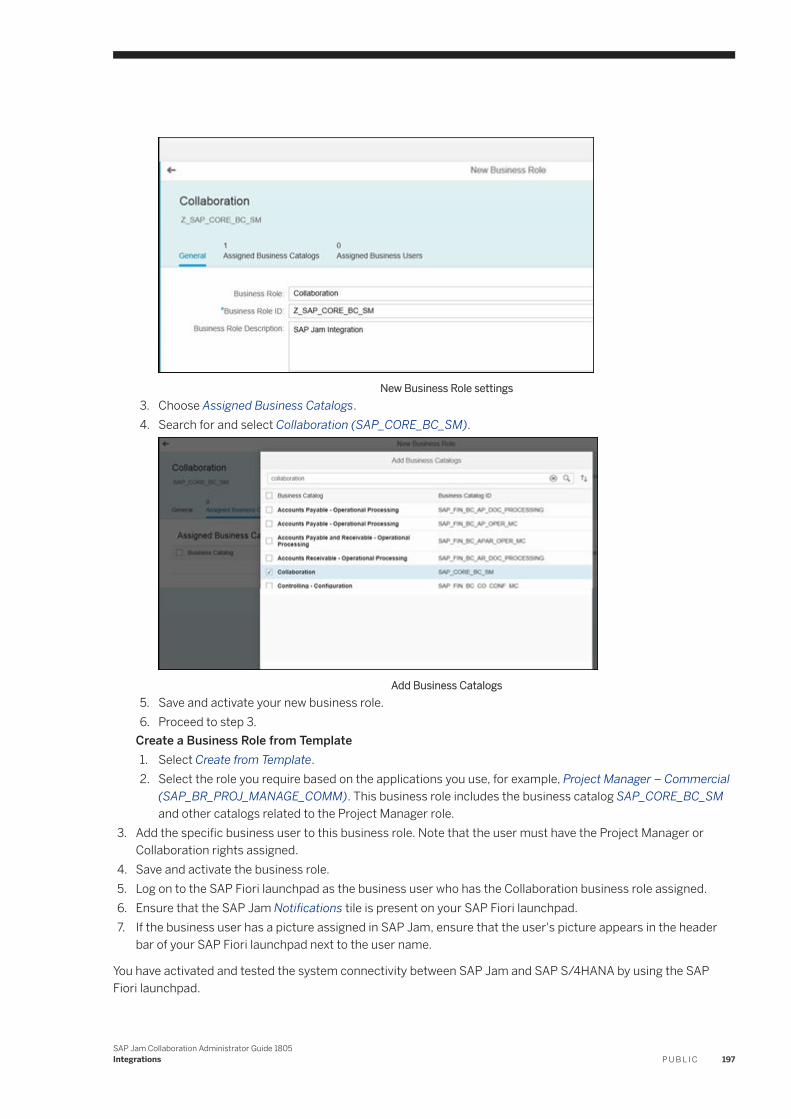
New Business Role settings3. Choose Assigned Business Catalogs.4. Search for and select Collaboration (SAP_CORE_BC_SM).
Add Business Catalogs5. Save and activate your new business role.6. Proceed to step 3.
Create a Business Role from Template1. Select Create from Template.2. Select the role you require based on the applications you use, for example, Project Manager – Commercial
(SAP_BR_PROJ_MANAGE_COMM). This business role includes the business catalog SAP_CORE_BC_SM and other catalogs related to the Project Manager role.
3. Add the specific business user to this business role. Note that the user must have the Project Manager or Collaboration rights assigned.
4. Save and activate the business role.5. Log on to the SAP Fiori launchpad as the business user who has the Collaboration business role assigned.6. Ensure that the SAP Jam Notifications tile is present on your SAP Fiori launchpad.7. If the business user has a picture assigned in SAP Jam, ensure that the user's picture appears in the header
bar of your SAP Fiori launchpad next to the user name.
You have activated and tested the system connectivity between SAP Jam and SAP S/4HANA by using the SAP Fiori launchpad.
SAP Jam Collaboration Administrator Guide 1805Integrations P U B L I C 197
6.4.1 SAP S/4HANA Cloud for Professional ServicesGroups created with the professional services project room template can support an extended project team with planning, implementation, and project rollout. Team members make resource decisions, gather to discuss project requirements, and capture decisions.
With SAP S/4HANA Cloud for Professional Services integration, when creating an SAP Jam group, group administrators can select an enhanced version of the Professional Services Project Room Template that provides contextual project information. The template includes business record widgets specific to projects on the Overview and Project Details pages.
NoteTo work with this integration, company administrator must first follow the configurations steps in the SAP Best Practices Social Collaboration Configuration Guides .
For more information, please see the What's New and Release Restrictions for the May 2017 release.
6.5 Integrate document repositoriesThe following integrations display the content of document repositories in SAP Jam:
● CMIS: Content Management Interoperability Services (CMIS) is an open standard that allows content management systems to interoperate across a network. CMIS-compatible document repositories include:○ SharePoint 2013○ SharePoint 2010○ Alfresco One 4.2○ SAP Extended ECM by OpenText○ SAP Document Center
CMIS-compatible document repositories can only be accessed by using a common user account for credentials.SAP Document Center is an exception because it requires per-user authentication and authorization. It is unique in supporting write-back to the external document repository.
● Office 365 SharePoint Online Sites: A non-CMIS integration that uses the Microsoft Azure cloud platform.Office 365 SharePoint Online Site libraries can only by accessed using per-user credentials.
● Box: A non-CMIS integration that provides access to your organization's Box account as a document repository.While Box supports sharing files of many types, it is the document files that are the focus of the Box integration.
● Google Drive: A non-CMIS integration that provides access to your organization's Google Drive account as a document repository.While Google Drive supports sharing files of many types, it is the document files that are the focus of the Google Drive integration.
NoteSAP Jam uses a common user account for credentials when accessing a CMIS repository, only read-only scenarios are supported. For example, uploading a document to a CMIS repository from SAP Jam is not
198 P U B L I CSAP Jam Collaboration Administrator Guide 1805
Integrations

supported. You must provide internet access to your CMIS repository for SAP Jam. To ensure that the configuration of this access is secure, SAP strongly advises that you take the following precautions:
● Ensure that you use an HTTPS with TLS connection.● Ensure that you Add a Trusted Certificate Authority [page 179] required to access the CMIS repository from
SAP Jam.● Configure a reverse proxy to provide SAP Jam with access to your document repository, and to deny access
from other clients.
Procedures required to integrate document repositories into SAP Jam
1. Perform any required preparations on the document repository application. It involves establishing trusted data communications with SAP Jam.
2. Add a Trusted Certificate Authority if your organization requires the use of unrecognized or self-signed certificates. It allows your browser to use the HTTPS and TLS connection required to access the document repository data without obstruction.
3. Register the document repository or library application in SAP Jam. It involves establishing trusted data communications with the external application.
4. Register the individual document repositories or libraries that you want to expose for viewing in SAP Jam.5. Optionally, federate SAP Jam documents search results into SharePoint searches.
NoteOnly available for SharePoint 2010 and 2013 integrations.
6. Add a document repository or library to an SAP Jam group so your group members can view and discuss the external documents in SAP Jam.
SAP Jam Collaboration Administrator Guide 1805Integrations P U B L I C 199
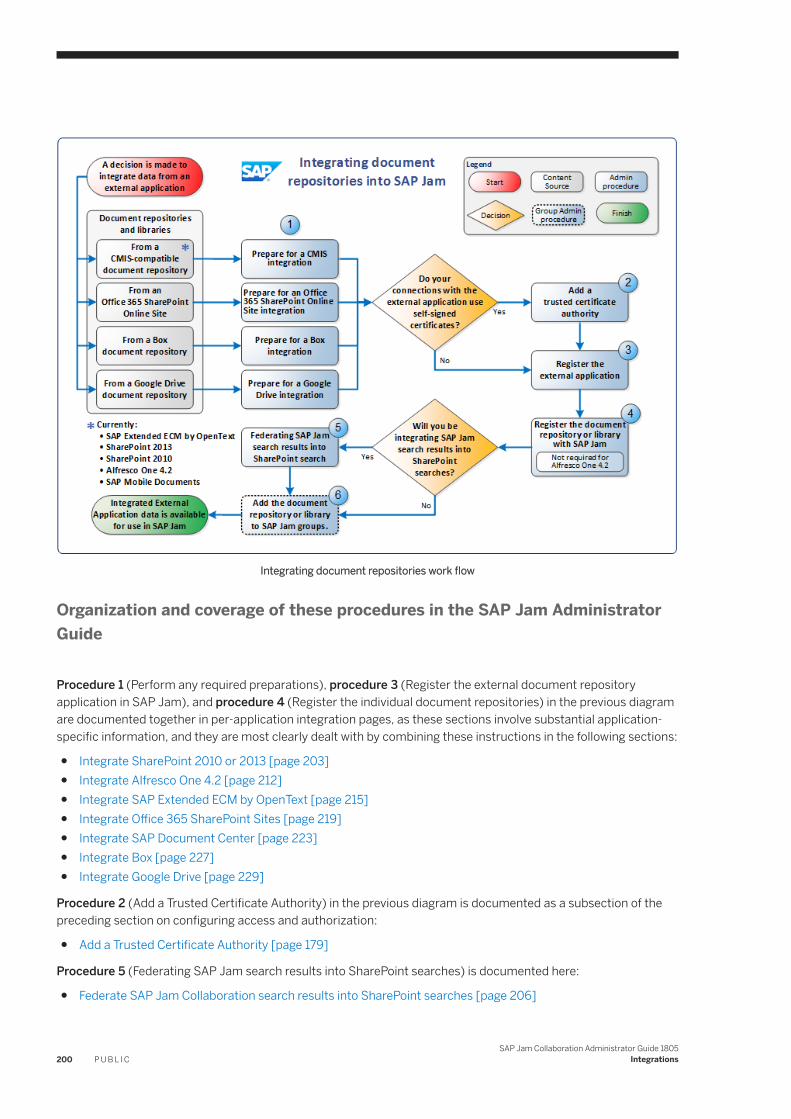
Integrating document repositories work flow
Organization and coverage of these procedures in the SAP Jam Administrator Guide
Procedure 1 (Perform any required preparations), procedure 3 (Register the external document repository application in SAP Jam), and procedure 4 (Register the individual document repositories) in the previous diagram are documented together in per-application integration pages, as these sections involve substantial application-specific information, and they are most clearly dealt with by combining these instructions in the following sections:
● Integrate SharePoint 2010 or 2013 [page 203]● Integrate Alfresco One 4.2 [page 212]● Integrate SAP Extended ECM by OpenText [page 215]● Integrate Office 365 SharePoint Sites [page 219]● Integrate SAP Document Center [page 223]● Integrate Box [page 227]● Integrate Google Drive [page 229]
Procedure 2 (Add a Trusted Certificate Authority) in the previous diagram is documented as a subsection of the preceding section on configuring access and authorization:
● Add a Trusted Certificate Authority [page 179]
Procedure 5 (Federating SAP Jam search results into SharePoint searches) is documented here:
● Federate SAP Jam Collaboration search results into SharePoint searches [page 206]
200 P U B L I CSAP Jam Collaboration Administrator Guide 1805
Integrations
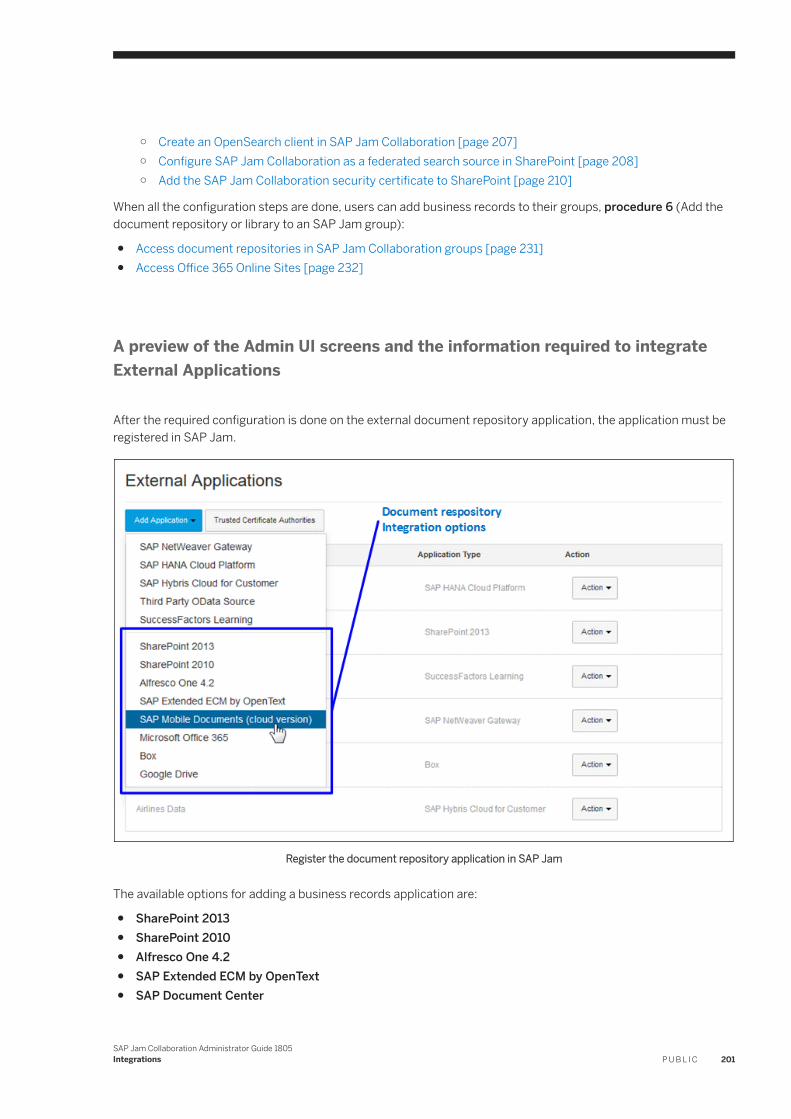
○ Create an OpenSearch client in SAP Jam Collaboration [page 207]○ Configure SAP Jam Collaboration as a federated search source in SharePoint [page 208]○ Add the SAP Jam Collaboration security certificate to SharePoint [page 210]
When all the configuration steps are done, users can add business records to their groups, procedure 6 (Add the document repository or library to an SAP Jam group):
● Access document repositories in SAP Jam Collaboration groups [page 231]● Access Office 365 Online Sites [page 232]
A preview of the Admin UI screens and the information required to integrate External Applications
After the required configuration is done on the external document repository application, the application must be registered in SAP Jam.
Register the document repository application in SAP Jam
The available options for adding a business records application are:
● SharePoint 2013● SharePoint 2010● Alfresco One 4.2● SAP Extended ECM by OpenText● SAP Document Center
SAP Jam Collaboration Administrator Guide 1805Integrations P U B L I C 201
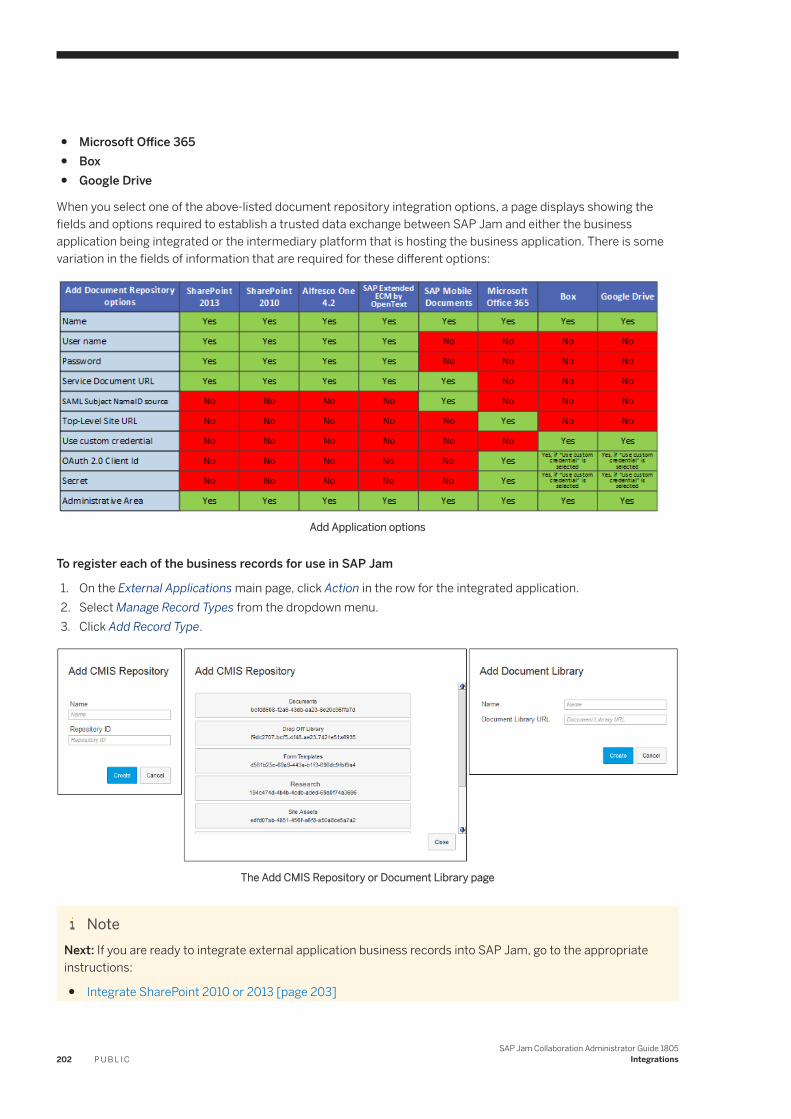
● Microsoft Office 365● Box● Google Drive
When you select one of the above-listed document repository integration options, a page displays showing the fields and options required to establish a trusted data exchange between SAP Jam and either the business application being integrated or the intermediary platform that is hosting the business application. There is some variation in the fields of information that are required for these different options:
Add Application options
To register each of the business records for use in SAP Jam
1. On the External Applications main page, click Action in the row for the integrated application.2. Select Manage Record Types from the dropdown menu.3. Click Add Record Type.
The Add CMIS Repository or Document Library page
NoteNext: If you are ready to integrate external application business records into SAP Jam, go to the appropriate instructions:
● Integrate SharePoint 2010 or 2013 [page 203]
202 P U B L I CSAP Jam Collaboration Administrator Guide 1805
Integrations
● Integrate Alfresco One 4.2 [page 212]● Integrate SAP Extended ECM by OpenText [page 215]● Integrate Office 365 SharePoint Sites [page 219]● Integrate SAP Document Center [page 223]● Integrate Box [page 227]● Integrate Google Drive [page 229]
6.5.1 Integrate SharePoint 2010 or 2013
Using the SAP Jam SharePoint Connector alternative
There is an alternate approach to integration to the advised SharePoint CMIS integration explained in this topic. You can also install and configure the SAP Jam SharePoint Connector on the SharePoint server. Both approaches require that configuration steps be performed in both SharePoint and SAP Jam, although installation is simpler for the CMIS integration.
The CMIS integration is more suitable for organizations using SharePoint as their document repository, and want SharePoint documents to be available in SAP Jam to facilitate discussions as an enterprise social networking application. Due to the suitability of CMIS integration, the SAP Jam SharePoint Connector is no longer actively developed.
To integrate SharePoint and SAP Jam using the SAP Jam SharePoint Connector, please contact your SAP Customer Support representative and request the SAP Jam SharePoint Connector installer and the SAP Jam SharePoint Connector Installation Guide.
Prepare for a SharePoint 2010 or 2013 integration
For SAP Jam to access your CMIS repository, internet access is required.
Common User authentication is used to access SharePoint document repositories. This means that all access from SAP Jam to the external data source is made through an HTTP Basic authentication call using these provided user credentials. It is recommended only if you wish to expose all of the data in the data source to all SAP Jam users in your company. In other words, ensure that all the data exposed through the application can be considered "public" within your company.
To ensure that the configuration of this access is secure, SAP strongly advises that you take the following precautions:
● Ensure that you use an HTTPS with TLS connection.● Ensure that you Add a Trusted Certificate Authority [page 179] required to access the CMIS repository to SAP
Jam.● Configure a reverse proxy to provide SAP Jam with access to your document repository, and to deny access
from other clients.
Your SharePoint farm administrator must set up at least one generic user account for SAP Jam to provide and control access to SharePoint documents. This common user must be included in the Access Control Lists for SharePoint document libraries, with read access rights. For SharePoint deployments behind the corporate firewall, your IT department must open a port in your corporate firewall to enable this integration.
SAP Jam Collaboration Administrator Guide 1805Integrations P U B L I C 203
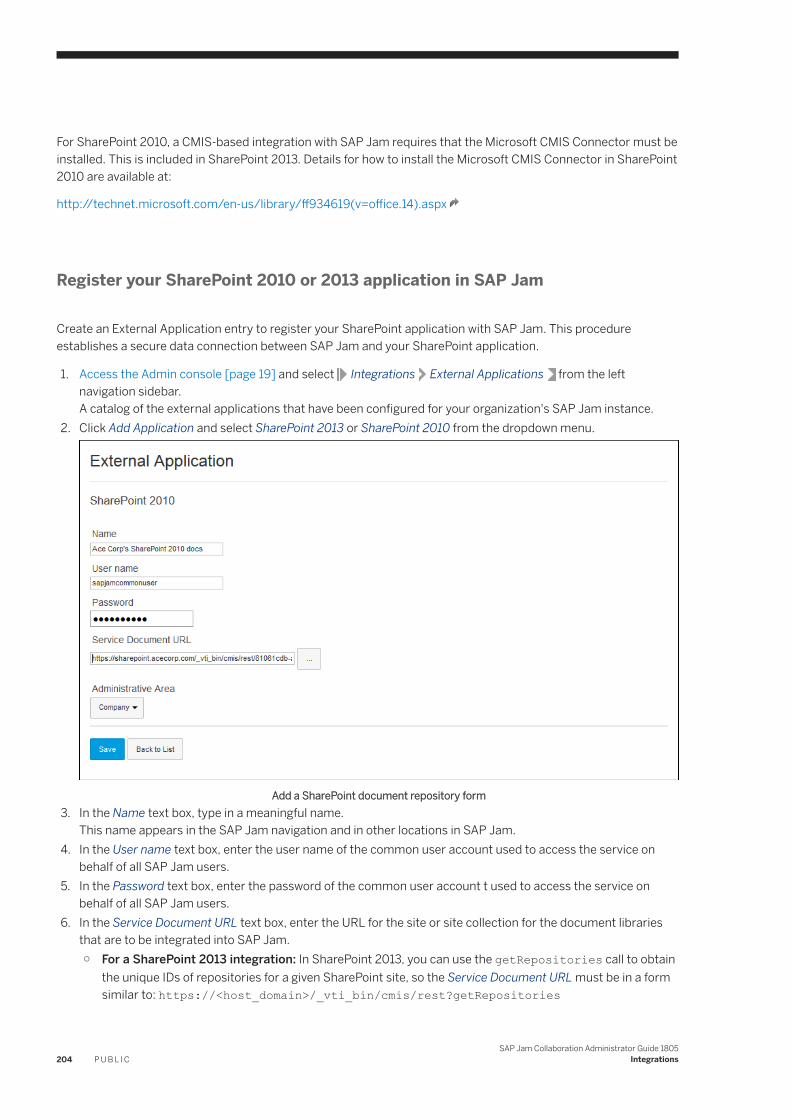
For SharePoint 2010, a CMIS-based integration with SAP Jam requires that the Microsoft CMIS Connector must be installed. This is included in SharePoint 2013. Details for how to install the Microsoft CMIS Connector in SharePoint 2010 are available at:
http://technet.microsoft.com/en-us/library/ff934619(v=office.14).aspx
Register your SharePoint 2010 or 2013 application in SAP Jam
Create an External Application entry to register your SharePoint application with SAP Jam. This procedure establishes a secure data connection between SAP Jam and your SharePoint application.
1. Access the Admin console [page 19] and select Integrations External Applications from the left navigation sidebar.A catalog of the external applications that have been configured for your organization's SAP Jam instance.
2. Click Add Application and select SharePoint 2013 or SharePoint 2010 from the dropdown menu.
Add a SharePoint document repository form3. In the Name text box, type in a meaningful name.
This name appears in the SAP Jam navigation and in other locations in SAP Jam.4. In the User name text box, enter the user name of the common user account used to access the service on
behalf of all SAP Jam users.5. In the Password text box, enter the password of the common user account t used to access the service on
behalf of all SAP Jam users.6. In the Service Document URL text box, enter the URL for the site or site collection for the document libraries
that are to be integrated into SAP Jam.○ For a SharePoint 2013 integration: In SharePoint 2013, you can use the getRepositories call to obtain
the unique IDs of repositories for a given SharePoint site, so the Service Document URL must be in a form similar to: https://<host_domain>/_vti_bin/cmis/rest?getRepositories
204 P U B L I CSAP Jam Collaboration Administrator Guide 1805
Integrations
○ For a SharePoint 2010 integration: Since SharePoint 2010 doesn't support getRepositories, the repository ID must be embedded in the URL, so the Service Document URL must be in a form similar to: https://<host_domain>/_vti_bin/cmis/rest/ab3c2eff-af65-4266-bf37-3fcfab2f3273?getRepositoryInfoTo get the repository GUID for a SharePoint 2010 integration, go to Site Settings Site Library and Lists in SharePoint, click the repository that you want, and note the GUID in the URL. This GUID must be set in all lower case in the Service Document URL.
NoteFor a SharePoint 2010 integration, you can click the ellipsis button to open a dialog box that aids in setting the URL in the correct format by presenting a componentized entry form.
7. Administrative Area: Select the area in which you want this document repository to be available. The default is "Company", making it available to all groups and areas.
8. Click Save.On the External Applications page, the list of external applications now displays, including the external application that you have just registered.
NoteIf your organization uses unrecognized or self-signed certificates for network access, or if you want to ensure a more secure connection to your document repository, you must add a Trusted Certificate Authority [page 179].
NoteAt this point, if you have any trouble establishing a connection between SAP Jam and your SharePoint server, you should work through Troubleshoot CMIS Connections [page 230].
Register the SharePoint document libraries
Once you have completed the required configuration to access your SharePoint application from SAP Jam, you must configure it by adding the specific document libraries that you want to access.
1. Go to the SAP Jam Admin console and select Integrations External Applications from the left side navigation.The External Applications page displays.
2. Click Action beside the SharePoint repository application for which you want to add access to document repositories and select Manage CMIS Repositories from the context menu.The <CMIS_service>: CMIS Repositories screen displays.
3. Click Add Repository and select either Use Custom Setting or Select from List.Depending on the control that you selected, one of the following dialog boxes displays:○ The Add CMIS Repository text entry dialog box○ The Add CMIS Repository list selection dialog box
SAP Jam Collaboration Administrator Guide 1805Integrations P U B L I C 205
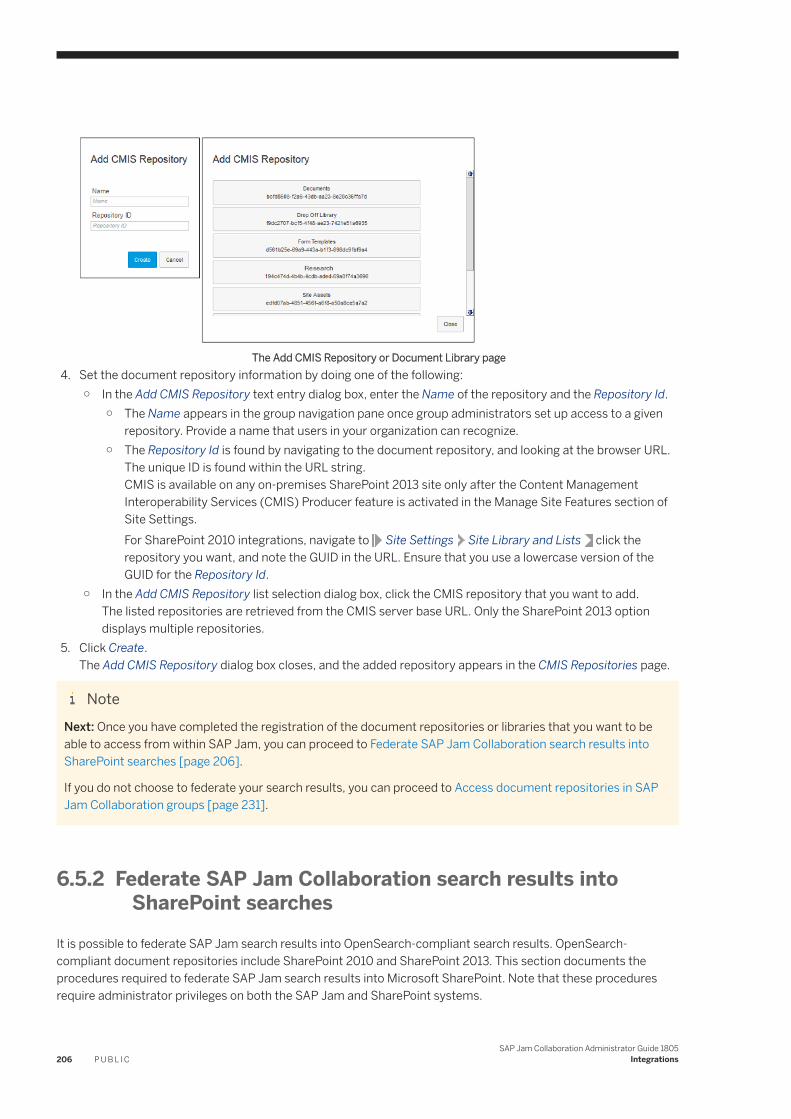
The Add CMIS Repository or Document Library page4. Set the document repository information by doing one of the following:
○ In the Add CMIS Repository text entry dialog box, enter the Name of the repository and the Repository Id.○ The Name appears in the group navigation pane once group administrators set up access to a given
repository. Provide a name that users in your organization can recognize.○ The Repository Id is found by navigating to the document repository, and looking at the browser URL.
The unique ID is found within the URL string.CMIS is available on any on-premises SharePoint 2013 site only after the Content Management Interoperability Services (CMIS) Producer feature is activated in the Manage Site Features section of Site Settings.For SharePoint 2010 integrations, navigate to Site Settings Site Library and Lists click the repository you want, and note the GUID in the URL. Ensure that you use a lowercase version of the GUID for the Repository Id.
○ In the Add CMIS Repository list selection dialog box, click the CMIS repository that you want to add.The listed repositories are retrieved from the CMIS server base URL. Only the SharePoint 2013 option displays multiple repositories.
5. Click Create.The Add CMIS Repository dialog box closes, and the added repository appears in the CMIS Repositories page.
NoteNext: Once you have completed the registration of the document repositories or libraries that you want to be able to access from within SAP Jam, you can proceed to Federate SAP Jam Collaboration search results into SharePoint searches [page 206].
If you do not choose to federate your search results, you can proceed to Access document repositories in SAP Jam Collaboration groups [page 231].
6.5.2 Federate SAP Jam Collaboration search results into SharePoint searches
It is possible to federate SAP Jam search results into OpenSearch-compliant search results. OpenSearch-compliant document repositories include SharePoint 2010 and SharePoint 2013. This section documents the procedures required to federate SAP Jam search results into Microsoft SharePoint. Note that these procedures require administrator privileges on both the SAP Jam and SharePoint systems.
206 P U B L I CSAP Jam Collaboration Administrator Guide 1805
Integrations

For more information on OpenSearch, see the OpenSearch web site .
NoteAuthentication of an OpenSearch client with SAP Jam is done through a company-wide, single user username and password; therefore, only the company-wide information available in SAP Jam public groups is available in the federated search results.
To federate SAP Jam search results into SharePoint searches, perform the three procedures explained in the next topics.
6.5.2.1 Create an OpenSearch client in SAP Jam Collaboration
The first task in setting up federated search with your Microsoft SharePoint server is to create an OpenSearch Client entry in SAP Jam.
1. Go to the SAP Jam Admin console and select Integrations OpenSearch Clients from the left side navigation.The OpenSearch Clients section displays, showing a catalog of the existing OpenSearch Clients, one client per row.
2. Click Add Client below the list of existing OpenSearch Clients.A new row is added below the existing OpenSearch Clients. It contains a set of three text boxes.
OpenSearch Clients catalog3. In the Description text box, enter a descriptive name for the client that you want to add, such as "SharePoint
2010 Documents".4. In the Password text box, enter the password that you want the SharePoint system to use to access the SAP
Jam OpenSearch data.
SAP Jam Collaboration Administrator Guide 1805Integrations P U B L I C 207
5. In the Confirm text box, re-enter the password that you entered in the previous step.Record this password for later use.
6. Click Save.The row with the new OpenSearch client information displays in the catalog with any existing OpenSearch clients. A random string is generated for the username which displays in the Username column of the OpenSearch Clients table.
7. Record the username string from the newly created OpenSearch client instance, along with the password that you set for use in SharePoint.
8. Click Download .osdx and save the file on your local drive.
NoteNext: You should now send the generated username, the password that you set, and the OSDX file that you downloaded to SharePoint administrator. Your organization canConfigure SAP Jam Collaboration as a federated search source in SharePoint [page 208].
6.5.2.2 Configure SAP Jam Collaboration as a federated search source in SharePoint
An SAP Jam administrator must provide a SharePoint administrator with the following before configuration:
● A generated username to use in the email address for access to the SAP Jam service's OpenSearch data.● The password for that user.● An OSDX file to use in configuring the SAP Jam service as a source for OpenSearch federated searches.
To configure SAP Jam as a Federated Search source in SharePoint
1. On your SharePoint server, as an administrator, open the Central Administration Application ManagementManage Service Applications Search Service Application Federated Locations page.
The SharePoint Federated Locations page displays.
208 P U B L I CSAP Jam Collaboration Administrator Guide 1805
Integrations
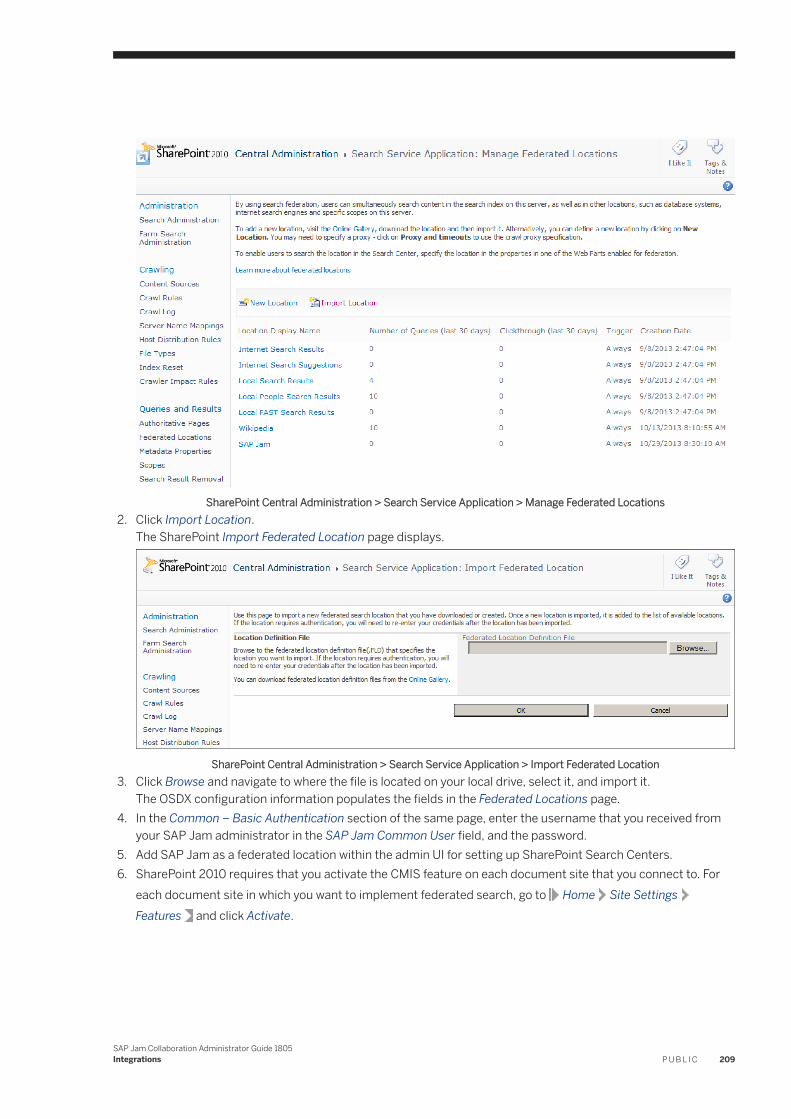
SharePoint Central Administration > Search Service Application > Manage Federated Locations2. Click Import Location.
The SharePoint Import Federated Location page displays.
SharePoint Central Administration > Search Service Application > Import Federated Location3. Click Browse and navigate to where the file is located on your local drive, select it, and import it.
The OSDX configuration information populates the fields in the Federated Locations page.4. In the Common – Basic Authentication section of the same page, enter the username that you received from
your SAP Jam administrator in the SAP Jam Common User field, and the password.5. Add SAP Jam as a federated location within the admin UI for setting up SharePoint Search Centers.6. SharePoint 2010 requires that you activate the CMIS feature on each document site that you connect to. For
each document site in which you want to implement federated search, go to Home Site SettingsFeatures and click Activate.
SAP Jam Collaboration Administrator Guide 1805Integrations P U B L I C 209
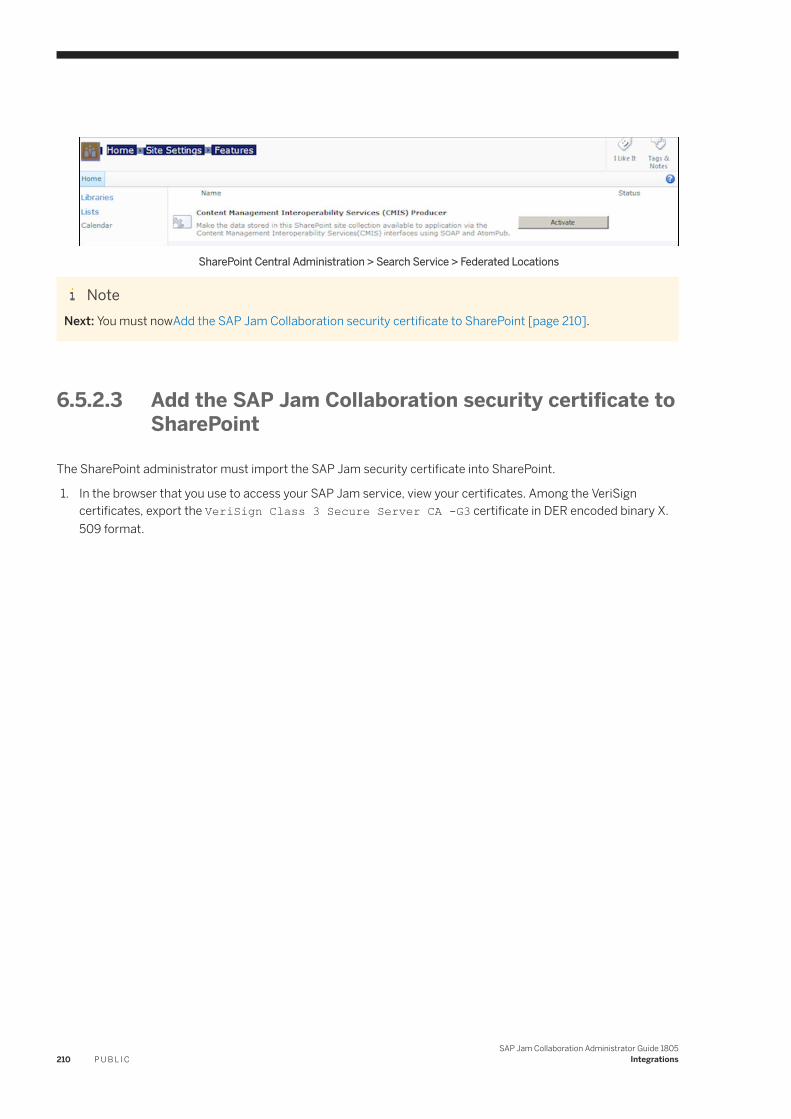
SharePoint Central Administration > Search Service > Federated Locations
NoteNext: You must nowAdd the SAP Jam Collaboration security certificate to SharePoint [page 210].
6.5.2.3 Add the SAP Jam Collaboration security certificate to SharePoint
The SharePoint administrator must import the SAP Jam security certificate into SharePoint.
1. In the browser that you use to access your SAP Jam service, view your certificates. Among the VeriSign certificates, export the VeriSign Class 3 Secure Server CA -G3 certificate in DER encoded binary X.509 format.
210 P U B L I CSAP Jam Collaboration Administrator Guide 1805
Integrations
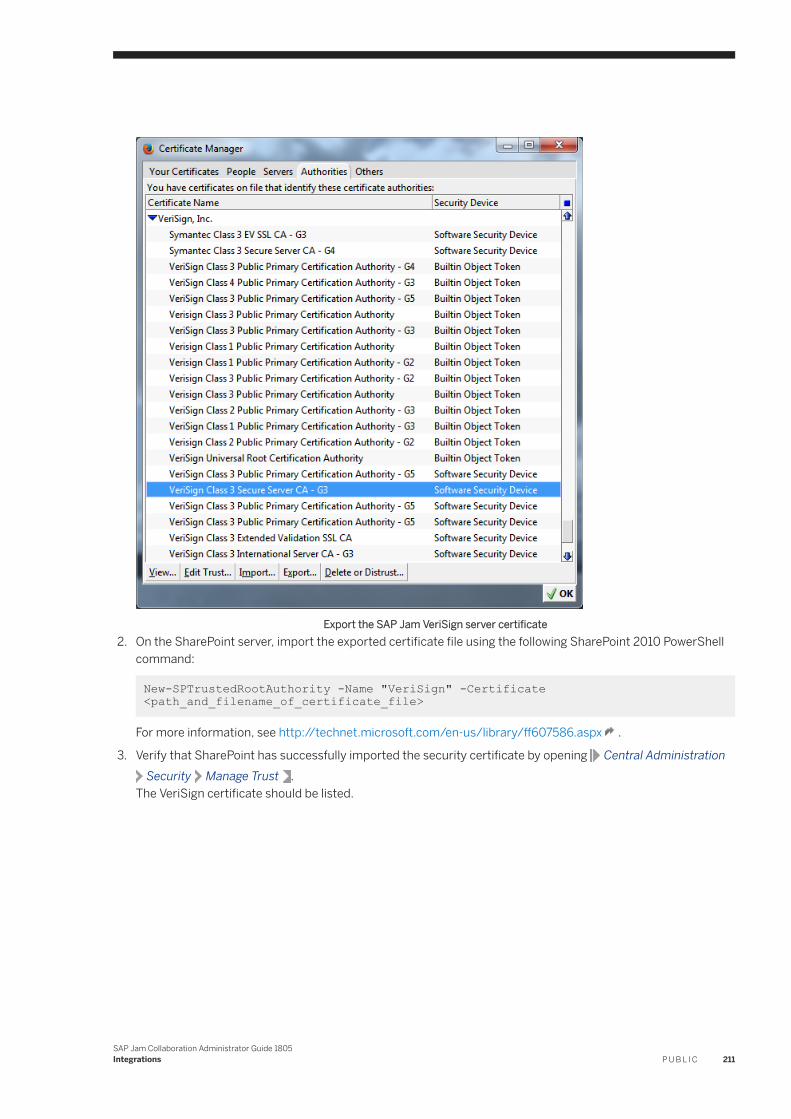
Export the SAP Jam VeriSign server certificate2. On the SharePoint server, import the exported certificate file using the following SharePoint 2010 PowerShell
command:
New-SPTrustedRootAuthority -Name "VeriSign" -Certificate <path_and_filename_of_certificate_file>
For more information, see http://technet.microsoft.com/en-us/library/ff607586.aspx .
3. Verify that SharePoint has successfully imported the security certificate by opening Central AdministrationSecurity Manage Trust .
The VeriSign certificate should be listed.
SAP Jam Collaboration Administrator Guide 1805Integrations P U B L I C 211
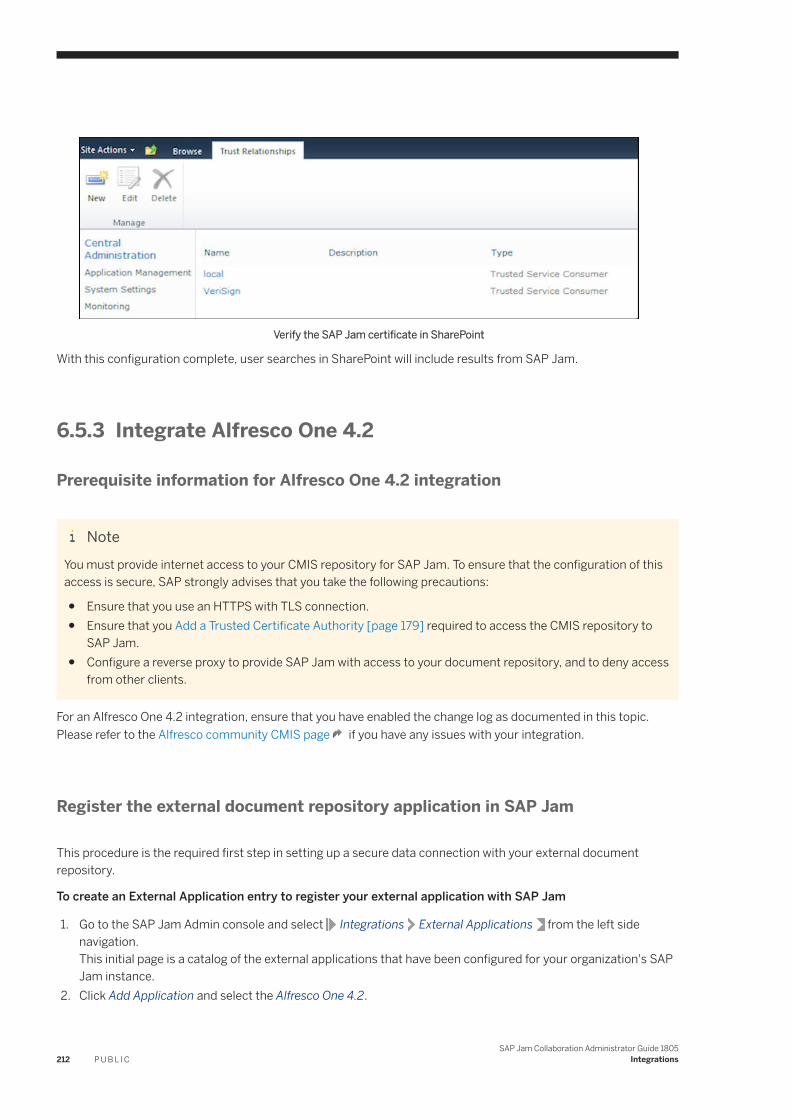
Verify the SAP Jam certificate in SharePoint
With this configuration complete, user searches in SharePoint will include results from SAP Jam.
6.5.3 Integrate Alfresco One 4.2
Prerequisite information for Alfresco One 4.2 integration
NoteYou must provide internet access to your CMIS repository for SAP Jam. To ensure that the configuration of this access is secure, SAP strongly advises that you take the following precautions:
● Ensure that you use an HTTPS with TLS connection.● Ensure that you Add a Trusted Certificate Authority [page 179] required to access the CMIS repository to
SAP Jam.● Configure a reverse proxy to provide SAP Jam with access to your document repository, and to deny access
from other clients.
For an Alfresco One 4.2 integration, ensure that you have enabled the change log as documented in this topic. Please refer to the Alfresco community CMIS page if you have any issues with your integration.
Register the external document repository application in SAP Jam
This procedure is the required first step in setting up a secure data connection with your external document repository.
To create an External Application entry to register your external application with SAP Jam
1. Go to the SAP Jam Admin console and select Integrations External Applications from the left side navigation.This initial page is a catalog of the external applications that have been configured for your organization's SAP Jam instance.
2. Click Add Application and select the Alfresco One 4.2.
212 P U B L I CSAP Jam Collaboration Administrator Guide 1805
Integrations
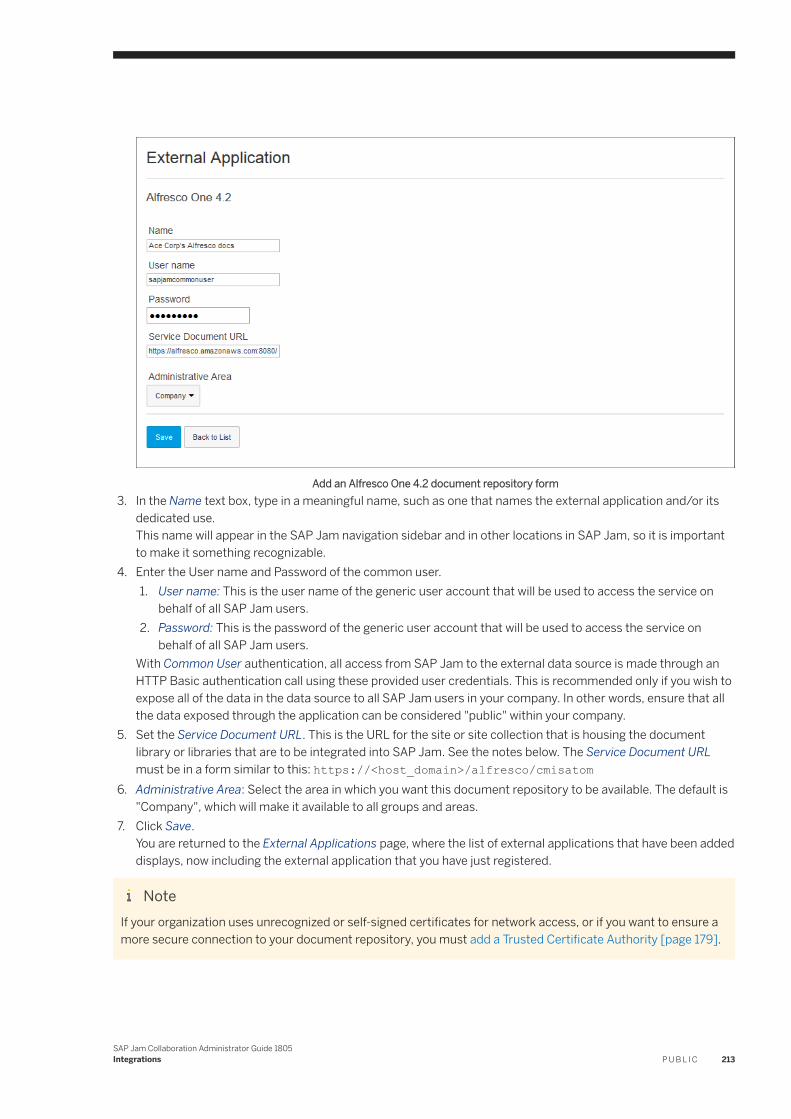
Add an Alfresco One 4.2 document repository form3. In the Name text box, type in a meaningful name, such as one that names the external application and/or its
dedicated use.This name will appear in the SAP Jam navigation sidebar and in other locations in SAP Jam, so it is important to make it something recognizable.
4. Enter the User name and Password of the common user.1. User name: This is the user name of the generic user account that will be used to access the service on
behalf of all SAP Jam users.2. Password: This is the password of the generic user account that will be used to access the service on
behalf of all SAP Jam users.With Common User authentication, all access from SAP Jam to the external data source is made through an HTTP Basic authentication call using these provided user credentials. This is recommended only if you wish to expose all of the data in the data source to all SAP Jam users in your company. In other words, ensure that all the data exposed through the application can be considered "public" within your company.
5. Set the Service Document URL. This is the URL for the site or site collection that is housing the document library or libraries that are to be integrated into SAP Jam. See the notes below. The Service Document URL must be in a form similar to this: https://<host_domain>/alfresco/cmisatom
6. Administrative Area: Select the area in which you want this document repository to be available. The default is "Company", which will make it available to all groups and areas.
7. Click Save.You are returned to the External Applications page, where the list of external applications that have been added displays, now including the external application that you have just registered.
NoteIf your organization uses unrecognized or self-signed certificates for network access, or if you want to ensure a more secure connection to your document repository, you must add a Trusted Certificate Authority [page 179].
SAP Jam Collaboration Administrator Guide 1805Integrations P U B L I C 213
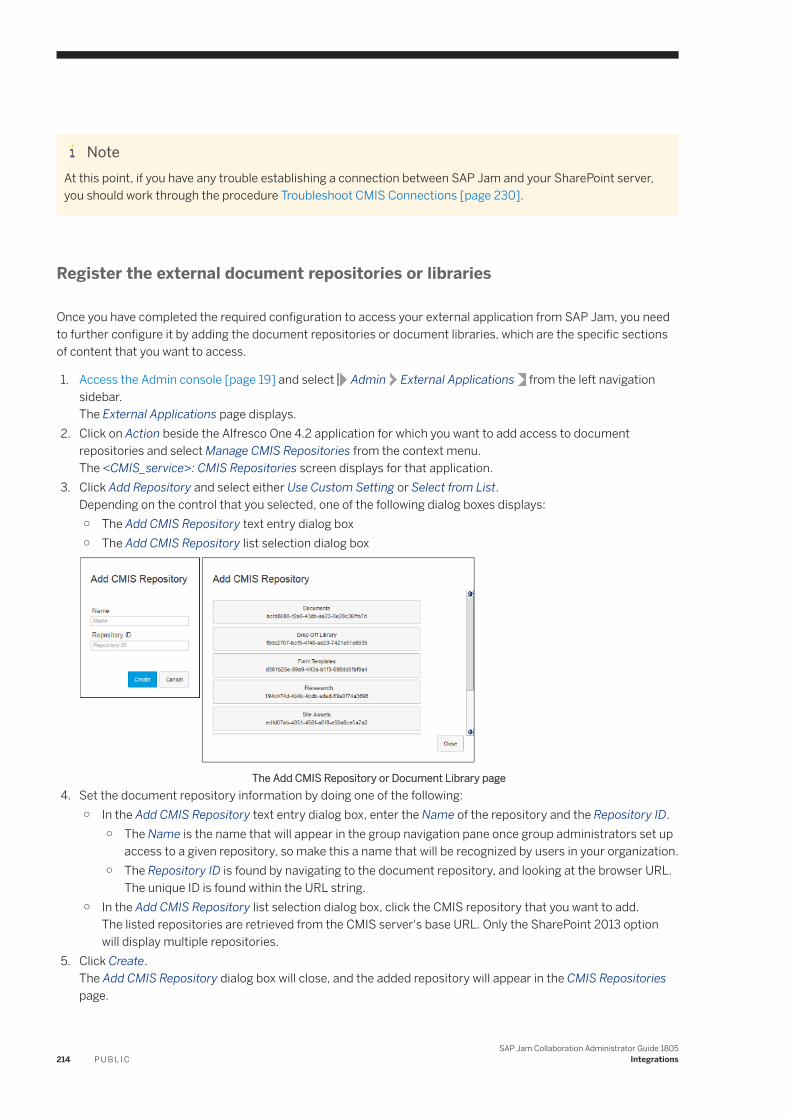
NoteAt this point, if you have any trouble establishing a connection between SAP Jam and your SharePoint server, you should work through the procedure Troubleshoot CMIS Connections [page 230].
Register the external document repositories or libraries
Once you have completed the required configuration to access your external application from SAP Jam, you need to further configure it by adding the document repositories or document libraries, which are the specific sections of content that you want to access.
1. Access the Admin console [page 19] and select Admin External Applications from the left navigation sidebar.The External Applications page displays.
2. Click on Action beside the Alfresco One 4.2 application for which you want to add access to document repositories and select Manage CMIS Repositories from the context menu.The <CMIS_service>: CMIS Repositories screen displays for that application.
3. Click Add Repository and select either Use Custom Setting or Select from List.Depending on the control that you selected, one of the following dialog boxes displays:○ The Add CMIS Repository text entry dialog box○ The Add CMIS Repository list selection dialog box
The Add CMIS Repository or Document Library page4. Set the document repository information by doing one of the following:
○ In the Add CMIS Repository text entry dialog box, enter the Name of the repository and the Repository ID.○ The Name is the name that will appear in the group navigation pane once group administrators set up
access to a given repository, so make this a name that will be recognized by users in your organization.○ The Repository ID is found by navigating to the document repository, and looking at the browser URL.
The unique ID is found within the URL string.○ In the Add CMIS Repository list selection dialog box, click the CMIS repository that you want to add.
The listed repositories are retrieved from the CMIS server's base URL. Only the SharePoint 2013 option will display multiple repositories.
5. Click Create.The Add CMIS Repository dialog box will close, and the added repository will appear in the CMIS Repositories page.
214 P U B L I CSAP Jam Collaboration Administrator Guide 1805
Integrations
NoteNext: Once you have completed the registration of the document repositories or libraries that you want to be able to access from within SAP Jam, you can proceed to Access document repositories in SAP Jam Collaboration groups [page 231].
6.5.4 Integrate SAP Extended ECM by OpenText
Prepare for an SAP Extended ECM by OpenText integration
Requirements
The following software, versions, and components must be installed to integrate SAP Enterprise Content Management document repositories with SAP Jam.
● Must be on a Windows or Linux based server.● Must have Oracle or SQLServer installed.● Must be SAP Extended ECM by OpenText 10.5, with the following components installed:
○ Deployment Scenarios○ Content Server○ Directory Services○ Client Software
○ Additional Product Groups
○ Services Enterprise Library Server
NoteYou must provide internet access to your CMIS repository for SAP Jam. To ensure that the configuration of this access is secure, SAP strongly advises that you take the following precautions:
● Ensure that you use an HTTPS with TLS connection.● Ensure that you Add a Trusted Certificate Authority [page 179] required to access the CMIS repository to
SAP Jam.● Configure a reverse proxy to provide SAP Jam with access to your document repository, and to deny access
from other clients.
NoteKnown Issue: Even a correct installation returns an HTTP 500 Status Message unless the required patches are installed. The following procedure guides you through the steps required to correct this issue.
Install the required patches and make the required configuration changes:
1. Download the required patch bundle.Download Update Installer 10.5.0 - 2014.2. Revision 1050.2014.02.37 .
2. Install the patch.
SAP Jam Collaboration Administrator Guide 1805Integrations P U B L I C 215
Follow the instructions at https://knowledge.opentext.com/knowledge/piroot/ar/v100500/ar-dwg/en/html/patchupdate-inst.htm , as the patch bundle requires you to change the Content Server connection settings in the Archive Server configuration.
3. Run localhost/OTCS/cs.exe and follow the prompts.4. Create a database user and database if required.5. Connect the Content Server to the database.
6. After logging into the Content Server, install the Enterprise Library in Content Server Administrator Install Modules .
7. Change the Member Service WSDL and Authentication Service WSDL in the OpenText Administration Client from "localhost" to the IP address of the server.
8. Open Directory Services Resources .1. Right-click on Content Server and select Edit.2. Click Next twice, and ensure that the URLs use IP address instead of localhost.
9. Enable SSL for the OTCS endpoint and Tomcat.
NoteOpenText's implementation of CMIS has the following restrictions:
● Only exact file name matches are supported in searches.● Search results may not be up-to-date. Results are only updated when the OpenText search indexing job is
run, which is controlled by the OpenText administrator.
Register the external document repository application in SAP Jam
Create an External Application entry to register your external application with SAP Jam. This procedure is the required first step in setting up a secure data connection with your external document repository.
1. Go to the SAP Jam Admin console and select Integrations External Applications from the left side navigation.This initial page is a catalog of the external applications that have been configured for your SAP Jam instance.
2. Click Add Application and select SAP Extended ECM by OpenText from the dropdown menu.
216 P U B L I CSAP Jam Collaboration Administrator Guide 1805
Integrations
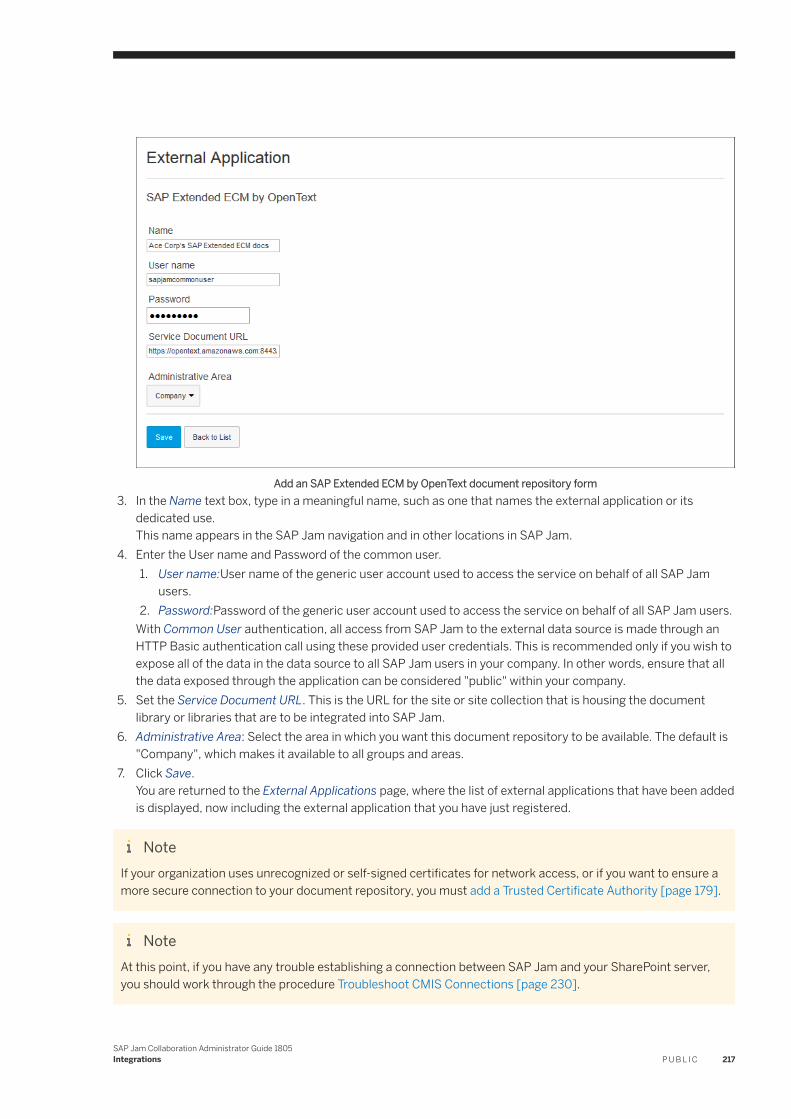
Add an SAP Extended ECM by OpenText document repository form3. In the Name text box, type in a meaningful name, such as one that names the external application or its
dedicated use.This name appears in the SAP Jam navigation and in other locations in SAP Jam.
4. Enter the User name and Password of the common user.1. User name:User name of the generic user account used to access the service on behalf of all SAP Jam
users.2. Password:Password of the generic user account used to access the service on behalf of all SAP Jam users.
With Common User authentication, all access from SAP Jam to the external data source is made through an HTTP Basic authentication call using these provided user credentials. This is recommended only if you wish to expose all of the data in the data source to all SAP Jam users in your company. In other words, ensure that all the data exposed through the application can be considered "public" within your company.
5. Set the Service Document URL. This is the URL for the site or site collection that is housing the document library or libraries that are to be integrated into SAP Jam.
6. Administrative Area: Select the area in which you want this document repository to be available. The default is "Company", which makes it available to all groups and areas.
7. Click Save.You are returned to the External Applications page, where the list of external applications that have been added is displayed, now including the external application that you have just registered.
NoteIf your organization uses unrecognized or self-signed certificates for network access, or if you want to ensure a more secure connection to your document repository, you must add a Trusted Certificate Authority [page 179].
NoteAt this point, if you have any trouble establishing a connection between SAP Jam and your SharePoint server, you should work through the procedure Troubleshoot CMIS Connections [page 230].
SAP Jam Collaboration Administrator Guide 1805Integrations P U B L I C 217

Register the external document repositories or libraries
Once you have completed the required configuration to access your external application from SAP Jam, you need to further configure it by adding the document repositories or document libraries, which are the specific sections of content that you want to access.
1. Go to the SAP Jam Admin console and select Integrations External Applications from the left side navigation.
2. Click on Action beside the SAP Extended ECM by OpenText application for which you want to add access to document repositories and select Manage CMIS Repositories from the menu.The <CMIS_service>: CMIS Repositories screen displays.
3. Click Add Repository and select either Use Custom Setting or Select from List.Depending on the control that you selected, one of the following dialog boxes displays:○ The Add CMIS Repository text entry dialog box○ The Add CMIS Repository list selection dialog box
The Add CMIS Repository or Document Library page4. Set the document repository or library information by doing one of the following:
○ In the Add CMIS Repository text entry dialog box, enter the Name of the repository and the Repository Id.○ The Name is the name that will appear in the group navigation pane once group administrators set up
access to a given repository, so make this a name that will be recognized by users in your organization.○ The Repository Id is found by navigating to the document repository, and looking at the browser URL.
The unique ID is found within the URL string.CMIS is available on any on-premises SharePoint 2013 site only after the Content Management Interoperability Services (CMIS) Producer feature is activated in the Manage Site Features section of Site Settings.
○ In the Add CMIS Repository list selection dialog box, click the CMIS repository that you want to add.The listed repositories are retrieved from the CMIS server's base URL. Only the SharePoint 2013 option will display multiple repositories.
5. Click Create.The Add CMIS Repository dialog box will close, and the added repository will appear in the CMIS Repositories page.
NoteNext: Once you have completed the registration of the document repositories or libraries that you want to be able to access from within SAP Jam, you can go to Access document repositories in SAP Jam Collaboration groups [page 231].
218 P U B L I CSAP Jam Collaboration Administrator Guide 1805
Integrations

6.5.5 Integrate Office 365 SharePoint Sites
Prepare for an Office 365 SharePoint Sites integration
This procedure involves configuring access to SAP Jam Collaboration in Microsoft Azure.
1. As your organization's Microsoft Azure administrator, log in to your Microsoft Azure account.2. Ensure that your Microsoft Office 365 Tenant is added as a Directory in your Microsoft Azure account.3. Under the Active Directory tab, click on your linked Microsoft Office 365 directory, click on Applications, and
click Add.A dialog box displays.
"What do you want to do?" dialog box4. Click Add an application my organization is developing.
The second screen of the dialog box displays.5. Enter the name of your application, select Web Application and/or Web API, and click the right-pointing arrow
to continue.The third screen of the dialog box displays.
6. In both the Sign-On URL and the APP ID URI fields, enter the URL of your SAP Jam service, and click the check mark in the lower-right corner of the dialog box.
App Properties dialog box
Your client application is created.7. Click Configure, and in the configuration options set the following values:
1. In the keys section, create a new key and set the desired duration (1 or 2 years). You will be able to update the key at any time.
SAP Jam Collaboration Administrator Guide 1805Integrations P U B L I C 219
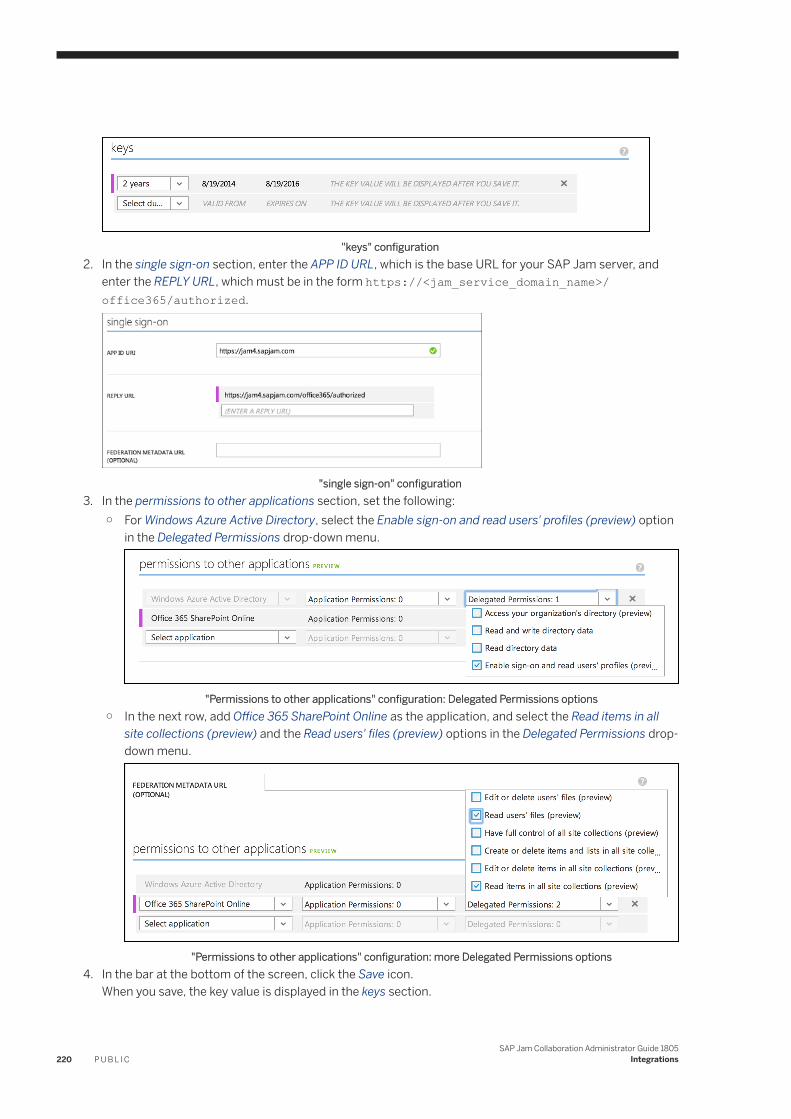
"keys" configuration2. In the single sign-on section, enter the APP ID URL, which is the base URL for your SAP Jam server, and
enter the REPLY URL, which must be in the form https://<jam_service_domain_name>/office365/authorized.
"single sign-on" configuration3. In the permissions to other applications section, set the following:
○ For Windows Azure Active Directory, select the Enable sign-on and read users' profiles (preview) option in the Delegated Permissions drop-down menu.
"Permissions to other applications" configuration: Delegated Permissions options○ In the next row, add Office 365 SharePoint Online as the application, and select the Read items in all
site collections (preview) and the Read users' files (preview) options in the Delegated Permissions drop-down menu.
"Permissions to other applications" configuration: more Delegated Permissions options4. In the bar at the bottom of the screen, click the Save icon.
When you save, the key value is displayed in the keys section.
220 P U B L I CSAP Jam Collaboration Administrator Guide 1805
Integrations
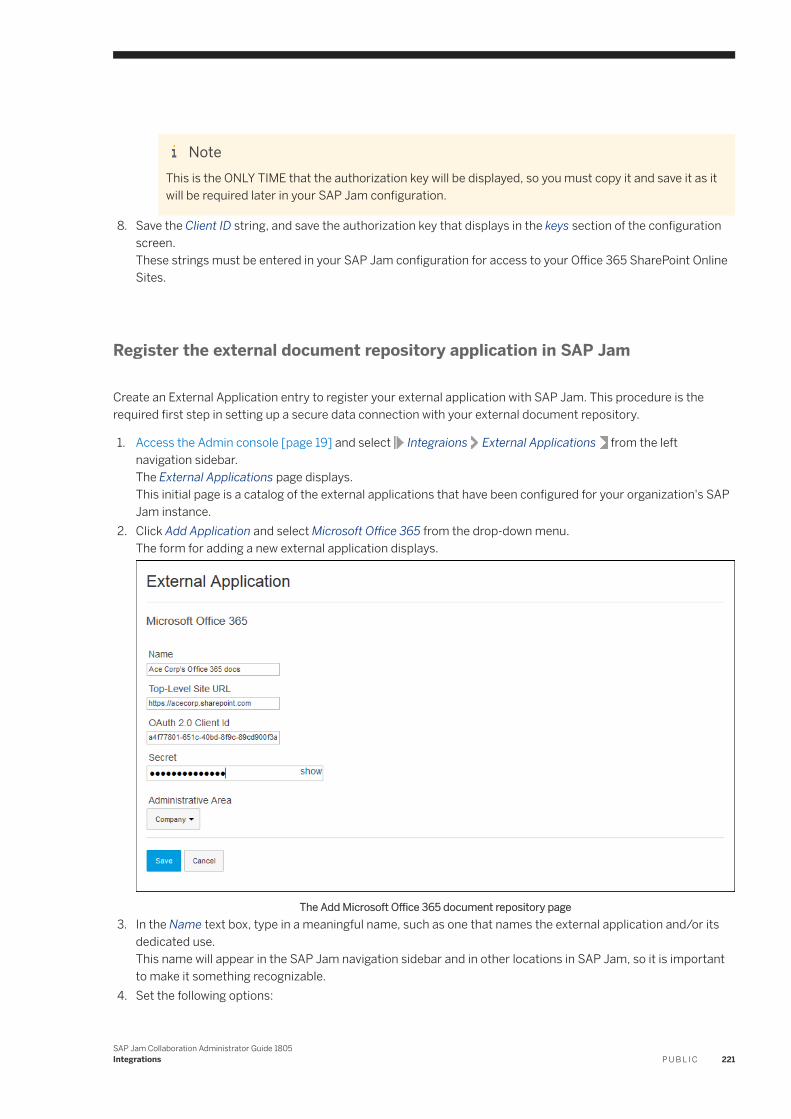
NoteThis is the ONLY TIME that the authorization key will be displayed, so you must copy it and save it as it will be required later in your SAP Jam configuration.
8. Save the Client ID string, and save the authorization key that displays in the keys section of the configuration screen.These strings must be entered in your SAP Jam configuration for access to your Office 365 SharePoint Online Sites.
Register the external document repository application in SAP Jam
Create an External Application entry to register your external application with SAP Jam. This procedure is the required first step in setting up a secure data connection with your external document repository.
1. Access the Admin console [page 19] and select Integraions External Applications from the left navigation sidebar.The External Applications page displays.This initial page is a catalog of the external applications that have been configured for your organization's SAP Jam instance.
2. Click Add Application and select Microsoft Office 365 from the drop-down menu.The form for adding a new external application displays.
The Add Microsoft Office 365 document repository page3. In the Name text box, type in a meaningful name, such as one that names the external application and/or its
dedicated use.This name will appear in the SAP Jam navigation sidebar and in other locations in SAP Jam, so it is important to make it something recognizable.
4. Set the following options:
SAP Jam Collaboration Administrator Guide 1805Integrations P U B L I C 221
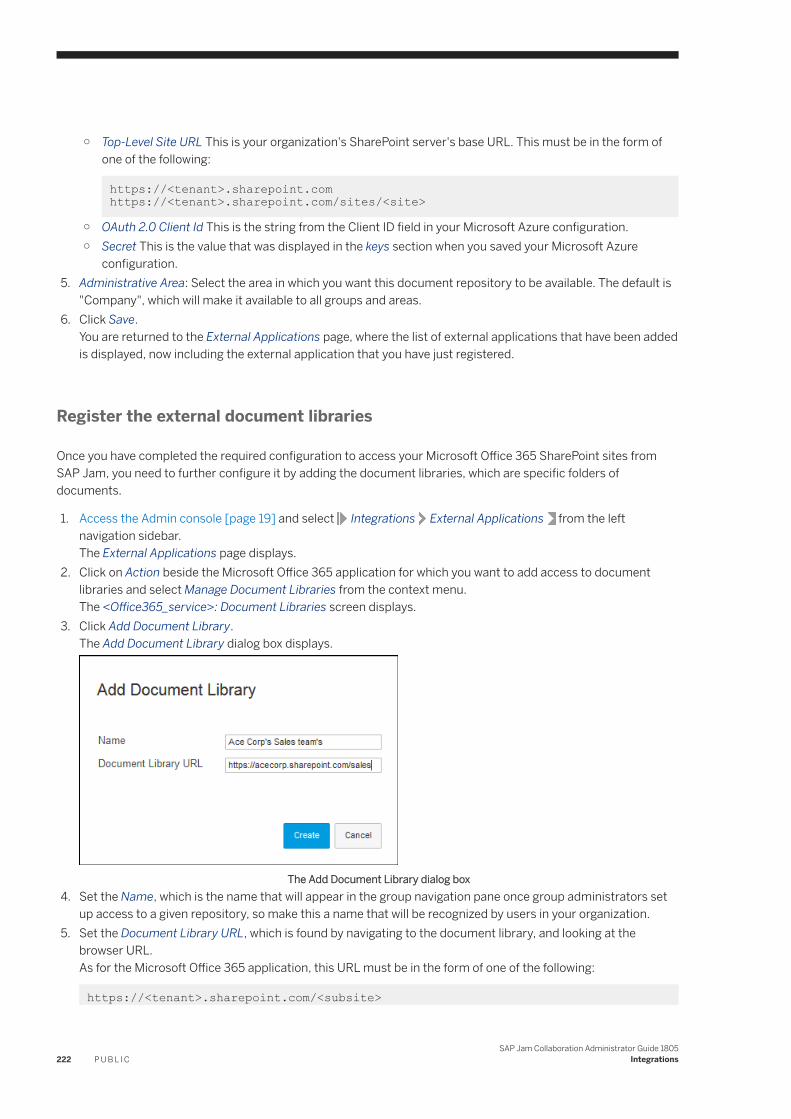
○ Top-Level Site URL This is your organization's SharePoint server's base URL. This must be in the form of one of the following:
https://<tenant>.sharepoint.com https://<tenant>.sharepoint.com/sites/<site>
○ OAuth 2.0 Client Id This is the string from the Client ID field in your Microsoft Azure configuration.○ Secret This is the value that was displayed in the keys section when you saved your Microsoft Azure
configuration.5. Administrative Area: Select the area in which you want this document repository to be available. The default is
"Company", which will make it available to all groups and areas.6. Click Save.
You are returned to the External Applications page, where the list of external applications that have been added is displayed, now including the external application that you have just registered.
Register the external document libraries
Once you have completed the required configuration to access your Microsoft Office 365 SharePoint sites from SAP Jam, you need to further configure it by adding the document libraries, which are specific folders of documents.
1. Access the Admin console [page 19] and select Integrations External Applications from the left navigation sidebar.The External Applications page displays.
2. Click on Action beside the Microsoft Office 365 application for which you want to add access to document libraries and select Manage Document Libraries from the context menu.The <Office365_service>: Document Libraries screen displays.
3. Click Add Document Library.The Add Document Library dialog box displays.
The Add Document Library dialog box4. Set the Name, which is the name that will appear in the group navigation pane once group administrators set
up access to a given repository, so make this a name that will be recognized by users in your organization.5. Set the Document Library URL, which is found by navigating to the document library, and looking at the
browser URL.As for the Microsoft Office 365 application, this URL must be in the form of one of the following:
https://<tenant>.sharepoint.com/<subsite>
222 P U B L I CSAP Jam Collaboration Administrator Guide 1805
Integrations
https://<tenant>.sharepoint.com/sites/<site>/<subsite>
6. Click Create.The Add Document Library dialog box will close, and the added library will appear in the Document Libraries page.
NoteNext: If your organization uses unrecognized or self-signed certificates for network access, or if you want to ensure a more secure connection to your document repository, you must now add a Trusted Certificate Authority [page 179], or you can proceed to Access Office 365 Online Sites [page 232].
6.5.6 Integrate SAP Document Center
Prepare for an SAP Document Center integration
To integrate SAP Document Center into SAP Jam
1. Configure trust between SAP Cloud Platform (hosting SAP Document Center) and SuccessFactors IDP by performing the procedures described in the SAP Cloud Platform, Extension Package for SuccessFactors Implementation Guide.
2. As an SAP Jam administrator, access the Admin console [page 19] and select Integrations SAML Local Identity Provider from the left navigation sidebar.The SAML Local Identity Provider page displays.
3. If the X509 Certificate field is empty, click Generate Key Pair near the bottom of the page.The key pair is generated. Click Save to store the generated keys for persistent use.
4. Copy the contents of both the Issuer field and the X509 Certificate field to add this information in the SAP Cloud Platform configuration.
5. Log in to the SAP Cloud Platform Cockpit, and select Trust in the left navigation menu.The Trust Management page displays.
SAP Jam Collaboration Administrator Guide 1805Integrations P U B L I C 223
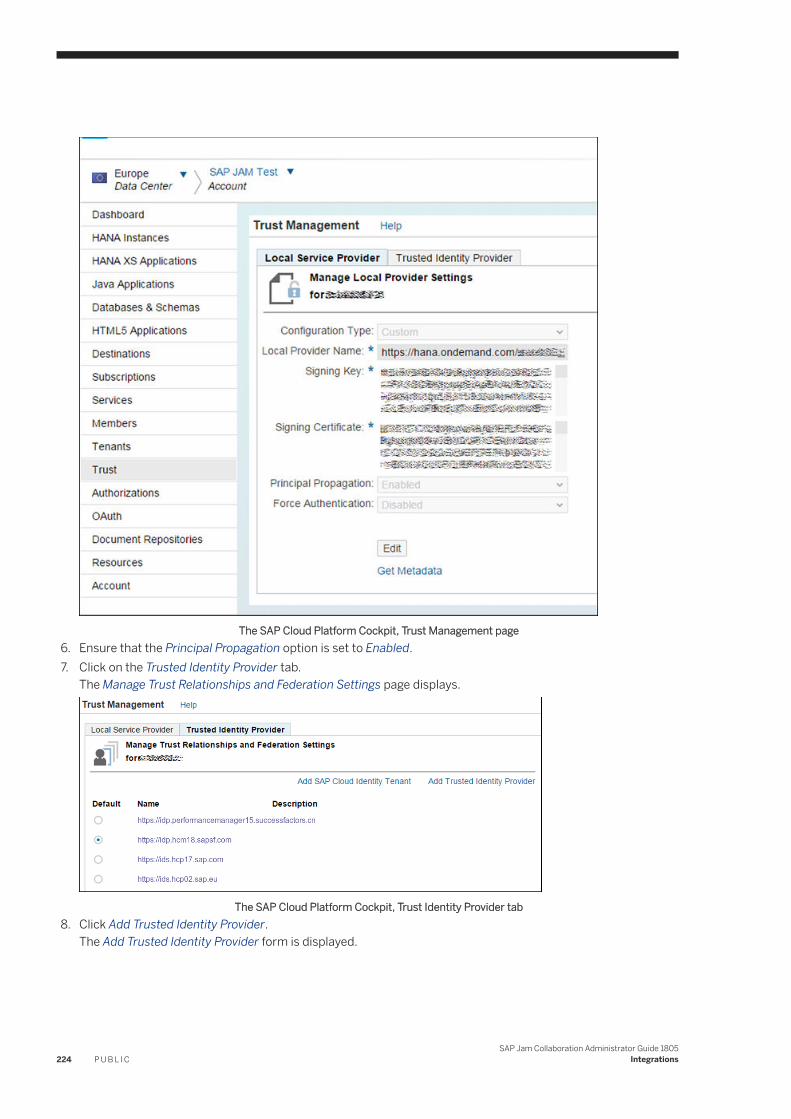
The SAP Cloud Platform Cockpit, Trust Management page6. Ensure that the Principal Propagation option is set to Enabled.7. Click on the Trusted Identity Provider tab.
The Manage Trust Relationships and Federation Settings page displays.
The SAP Cloud Platform Cockpit, Trust Identity Provider tab8. Click Add Trusted Identity Provider.
The Add Trusted Identity Provider form is displayed.
224 P U B L I CSAP Jam Collaboration Administrator Guide 1805
Integrations

The SAP Cloud Platform Cockpit, Add Trusted Identity Provider form9. In this form, do the following:
○ In the Name field, paste in the data that you copied from the Issuer field of the SAP Jam SAML Local Identity Provider page.
○ Set the "Assertion Consumer Service" field to "Application Root".○ In the Single Sign-on URL field, enter the URL of your SAP Jam service's SAML service, which should be in
the form https://<jam#>.sapjam.com/saml/saml_acs where <jam#> is the name of your SAP Jam data center.
○ Set the Single Sign-on Binding field to HTTP-POST.○ Set the Signature Algorithm field to SHA-1.○ In the Signing Certificate field, paste in the data that you copied from the X509 Certificate field of the SAP
Jam SAML Local Identity Provider page.○ Set the User ID Source field to subject.○ Select the Enabled check box.○ When you have all the fields set as required, click Save.
Do not set this new trusted IDP as the default. The default IDP should be the SuccessFactors Identity Provider (IDP) system which is used for login.
Register the external document repository application in SAP Jam
Create an External Application entry to register your external application with SAP Jam. This procedure is the required first step in setting up a secure data connection with your external document repository.
1. Access the Admin console [page 19] and select Integrations External Applications from the left navigation sidebar.
SAP Jam Collaboration Administrator Guide 1805Integrations P U B L I C 225
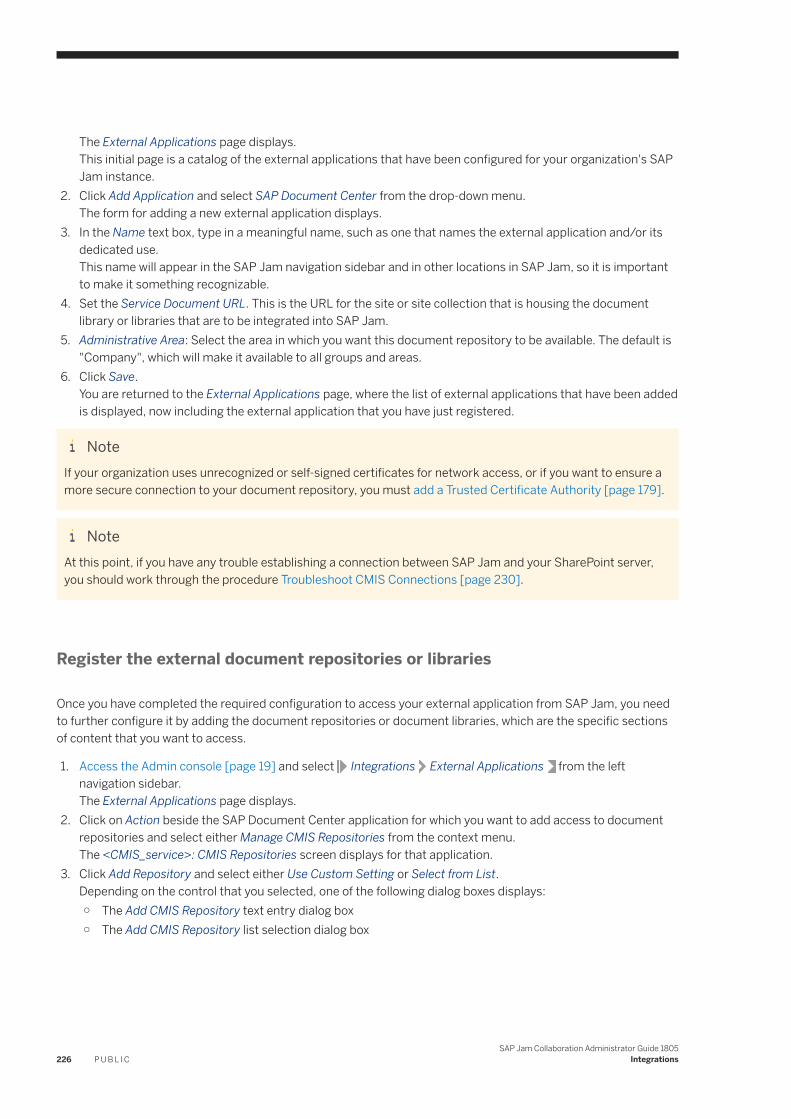
The External Applications page displays.This initial page is a catalog of the external applications that have been configured for your organization's SAP Jam instance.
2. Click Add Application and select SAP Document Center from the drop-down menu.The form for adding a new external application displays.
3. In the Name text box, type in a meaningful name, such as one that names the external application and/or its dedicated use.This name will appear in the SAP Jam navigation sidebar and in other locations in SAP Jam, so it is important to make it something recognizable.
4. Set the Service Document URL. This is the URL for the site or site collection that is housing the document library or libraries that are to be integrated into SAP Jam.
5. Administrative Area: Select the area in which you want this document repository to be available. The default is "Company", which will make it available to all groups and areas.
6. Click Save.You are returned to the External Applications page, where the list of external applications that have been added is displayed, now including the external application that you have just registered.
NoteIf your organization uses unrecognized or self-signed certificates for network access, or if you want to ensure a more secure connection to your document repository, you must add a Trusted Certificate Authority [page 179].
NoteAt this point, if you have any trouble establishing a connection between SAP Jam and your SharePoint server, you should work through the procedure Troubleshoot CMIS Connections [page 230].
Register the external document repositories or libraries
Once you have completed the required configuration to access your external application from SAP Jam, you need to further configure it by adding the document repositories or document libraries, which are the specific sections of content that you want to access.
1. Access the Admin console [page 19] and select Integrations External Applications from the left navigation sidebar.The External Applications page displays.
2. Click on Action beside the SAP Document Center application for which you want to add access to document repositories and select either Manage CMIS Repositories from the context menu.The <CMIS_service>: CMIS Repositories screen displays for that application.
3. Click Add Repository and select either Use Custom Setting or Select from List.Depending on the control that you selected, one of the following dialog boxes displays:○ The Add CMIS Repository text entry dialog box○ The Add CMIS Repository list selection dialog box
226 P U B L I CSAP Jam Collaboration Administrator Guide 1805
Integrations
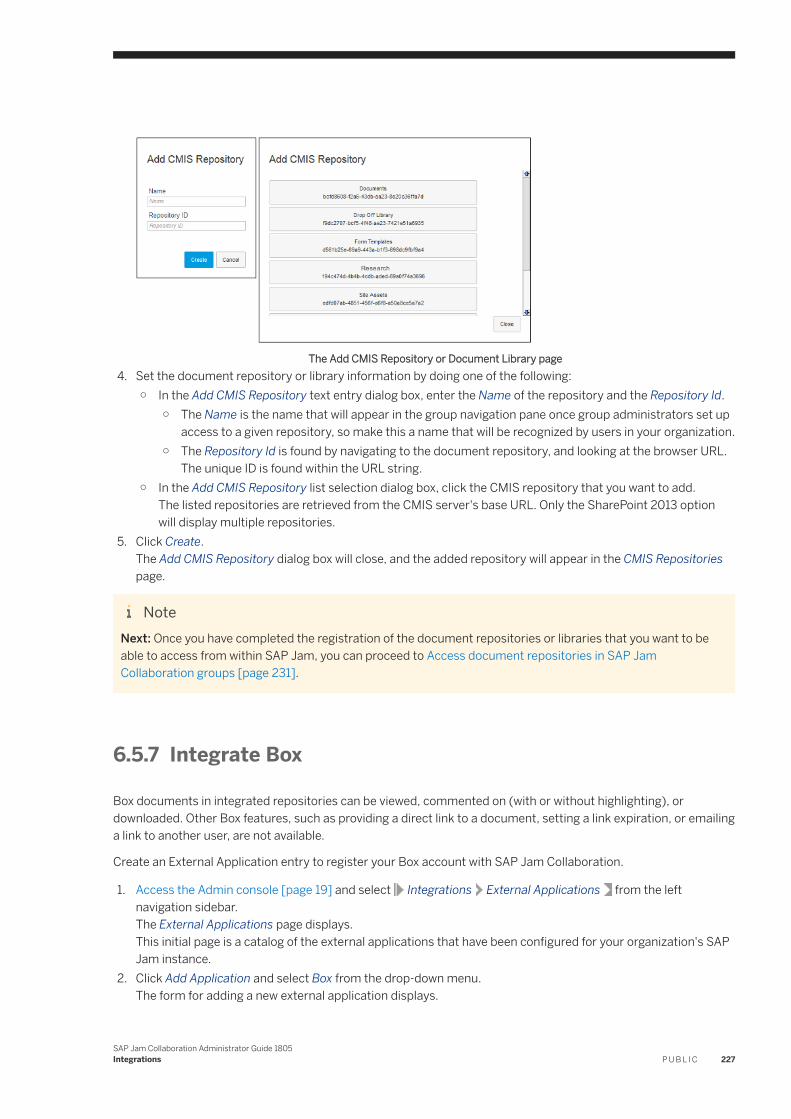
The Add CMIS Repository or Document Library page4. Set the document repository or library information by doing one of the following:
○ In the Add CMIS Repository text entry dialog box, enter the Name of the repository and the Repository Id.○ The Name is the name that will appear in the group navigation pane once group administrators set up
access to a given repository, so make this a name that will be recognized by users in your organization.○ The Repository Id is found by navigating to the document repository, and looking at the browser URL.
The unique ID is found within the URL string.○ In the Add CMIS Repository list selection dialog box, click the CMIS repository that you want to add.
The listed repositories are retrieved from the CMIS server's base URL. Only the SharePoint 2013 option will display multiple repositories.
5. Click Create.The Add CMIS Repository dialog box will close, and the added repository will appear in the CMIS Repositories page.
NoteNext: Once you have completed the registration of the document repositories or libraries that you want to be able to access from within SAP Jam, you can proceed to Access document repositories in SAP Jam Collaboration groups [page 231].
6.5.7 Integrate Box
Box documents in integrated repositories can be viewed, commented on (with or without highlighting), or downloaded. Other Box features, such as providing a direct link to a document, setting a link expiration, or emailing a link to another user, are not available.
Create an External Application entry to register your Box account with SAP Jam Collaboration.
1. Access the Admin console [page 19] and select Integrations External Applications from the left navigation sidebar.The External Applications page displays.This initial page is a catalog of the external applications that have been configured for your organization's SAP Jam instance.
2. Click Add Application and select Box from the drop-down menu.The form for adding a new external application displays.
SAP Jam Collaboration Administrator Guide 1805Integrations P U B L I C 227
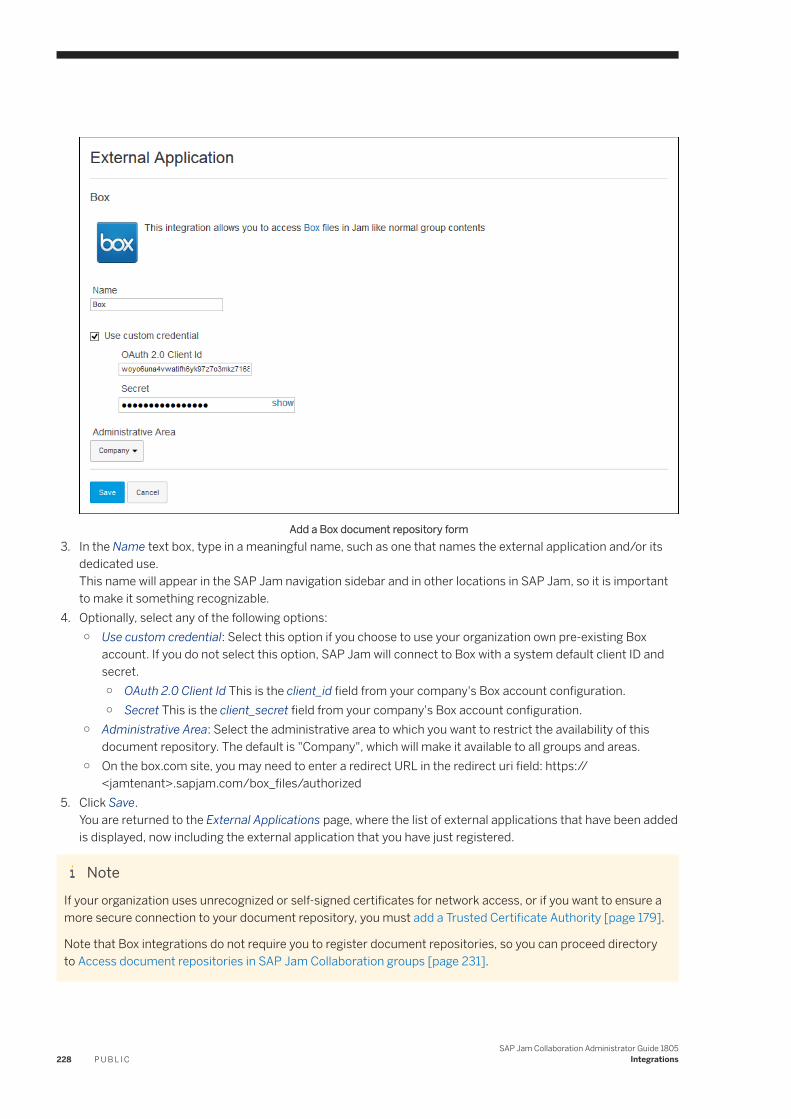
Add a Box document repository form3. In the Name text box, type in a meaningful name, such as one that names the external application and/or its
dedicated use.This name will appear in the SAP Jam navigation sidebar and in other locations in SAP Jam, so it is important to make it something recognizable.
4. Optionally, select any of the following options:○ Use custom credential: Select this option if you choose to use your organization own pre-existing Box
account. If you do not select this option, SAP Jam will connect to Box with a system default client ID and secret.○ OAuth 2.0 Client Id This is the client_id field from your company's Box account configuration.○ Secret This is the client_secret field from your company's Box account configuration.
○ Administrative Area: Select the administrative area to which you want to restrict the availability of this document repository. The default is "Company", which will make it available to all groups and areas.
○ On the box.com site, you may need to enter a redirect URL in the redirect uri field: https://<jamtenant>.sapjam.com/box_files/authorized
5. Click Save.You are returned to the External Applications page, where the list of external applications that have been added is displayed, now including the external application that you have just registered.
NoteIf your organization uses unrecognized or self-signed certificates for network access, or if you want to ensure a more secure connection to your document repository, you must add a Trusted Certificate Authority [page 179].
Note that Box integrations do not require you to register document repositories, so you can proceed directory to Access document repositories in SAP Jam Collaboration groups [page 231].
228 P U B L I CSAP Jam Collaboration Administrator Guide 1805
Integrations
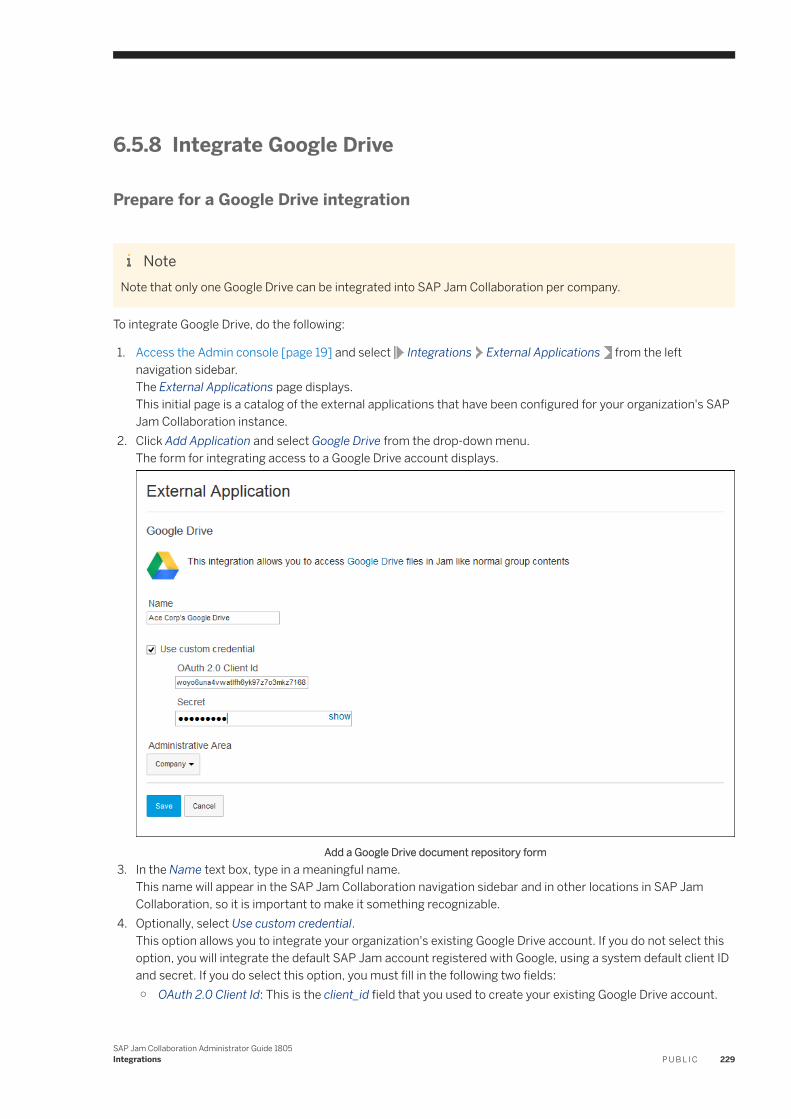
6.5.8 Integrate Google Drive
Prepare for a Google Drive integration
NoteNote that only one Google Drive can be integrated into SAP Jam Collaboration per company.
To integrate Google Drive, do the following:
1. Access the Admin console [page 19] and select Integrations External Applications from the left navigation sidebar.The External Applications page displays.This initial page is a catalog of the external applications that have been configured for your organization's SAP Jam Collaboration instance.
2. Click Add Application and select Google Drive from the drop-down menu.The form for integrating access to a Google Drive account displays.
Add a Google Drive document repository form3. In the Name text box, type in a meaningful name.
This name will appear in the SAP Jam Collaboration navigation sidebar and in other locations in SAP Jam Collaboration, so it is important to make it something recognizable.
4. Optionally, select Use custom credential.This option allows you to integrate your organization's existing Google Drive account. If you do not select this option, you will integrate the default SAP Jam account registered with Google, using a system default client ID and secret. If you do select this option, you must fill in the following two fields:○ OAuth 2.0 Client Id: This is the client_id field that you used to create your existing Google Drive account.
SAP Jam Collaboration Administrator Guide 1805Integrations P U B L I C 229
○ Secret: This is the client_secret that was provided when you created your existing Google Drive account.5. Administrative Area: Select the area in which you want this document repository to be available. The default is
"Company", which will make it available to all groups and areas.6. Click Save.
You are returned to the External Applications page, where the list of external applications that have been added displays, now including the Google Drive account that you just registered.
NoteIf your organization uses unrecognized or self-signed certificates for network access, or if you want to ensure a more secure connection to your document repository, you must add a Trusted Certificate Authority [page 179].
Note that Box integrations do not require you to register document repositories, so you can proceed directly to Access document repositories in SAP Jam Collaboration groups [page 231].
6.5.9 Troubleshoot CMIS Connections
The most common problem in establishing a connection between SAP Jam Collaboration and a CMIS document repository involves Transport Layer Security (TLS, a.k.a. SSL) public key certificates. This procedure describes how to identify this problem, and how to resolve it even if the optimum solution is not possible.
1. Download the open source tool to analyze your connection by going to http://chemistry.apache.org/java/download.html .Click Download beside OpenCMIS Workbench.
2. Install OpenCMIS Workbench and run it using the Service Document URL, User name, and Password that you set in the previous procedure.Form more information on using Apache's OpenCMIS Workbench, see Connecting to a repository in the Apache site documentation.
3. When the Workbench establishes a connection, click on the repository that you want to view in the Load Repositories area, and click Login.The CMIS Workbench information for the selected repository displays, as is shown in the following screencapture.
230 P U B L I CSAP Jam Collaboration Administrator Guide 1805
Integrations
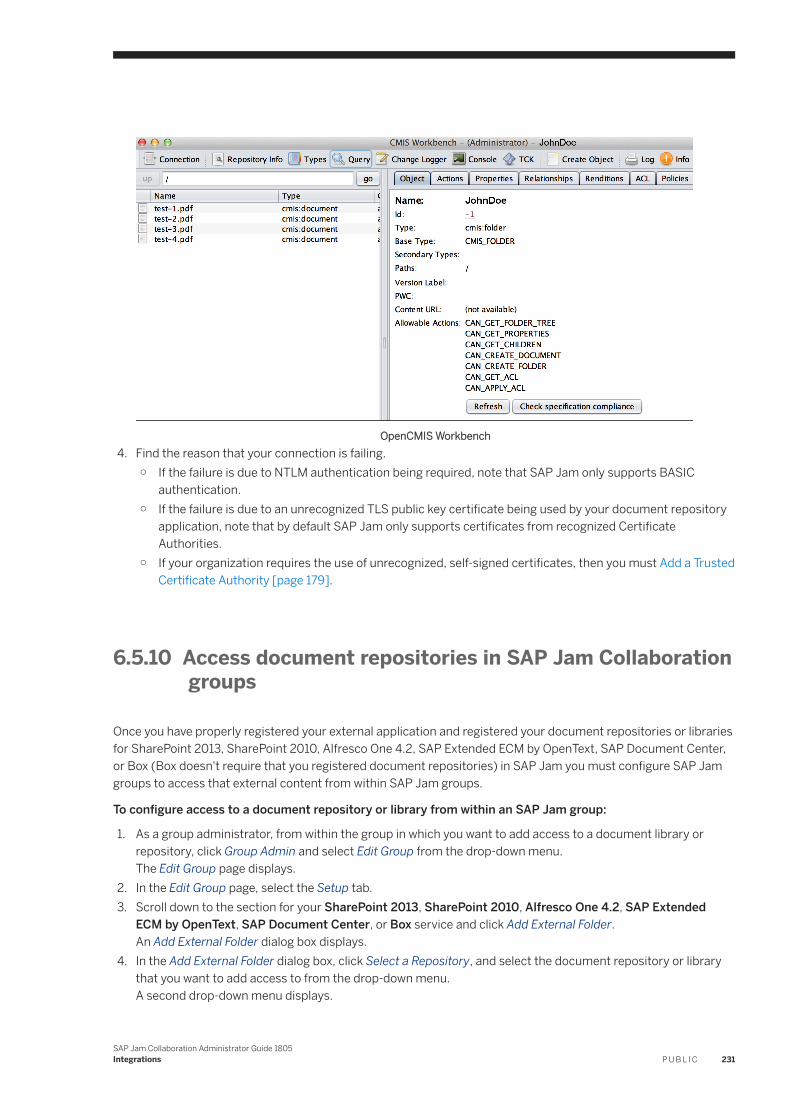
OpenCMIS Workbench4. Find the reason that your connection is failing.
○ If the failure is due to NTLM authentication being required, note that SAP Jam only supports BASIC authentication.
○ If the failure is due to an unrecognized TLS public key certificate being used by your document repository application, note that by default SAP Jam only supports certificates from recognized Certificate Authorities.
○ If your organization requires the use of unrecognized, self-signed certificates, then you must Add a Trusted Certificate Authority [page 179].
6.5.10 Access document repositories in SAP Jam Collaboration groups
Once you have properly registered your external application and registered your document repositories or libraries for SharePoint 2013, SharePoint 2010, Alfresco One 4.2, SAP Extended ECM by OpenText, SAP Document Center, or Box (Box doesn't require that you registered document repositories) in SAP Jam you must configure SAP Jam groups to access that external content from within SAP Jam groups.
To configure access to a document repository or library from within an SAP Jam group:
1. As a group administrator, from within the group in which you want to add access to a document library or repository, click Group Admin and select Edit Group from the drop-down menu.The Edit Group page displays.
2. In the Edit Group page, select the Setup tab.3. Scroll down to the section for your SharePoint 2013, SharePoint 2010, Alfresco One 4.2, SAP Extended
ECM by OpenText, SAP Document Center, or Box service and click Add External Folder.An Add External Folder dialog box displays.
4. In the Add External Folder dialog box, click Select a Repository, and select the document repository or library that you want to add access to from the drop-down menu.A second drop-down menu displays.
SAP Jam Collaboration Administrator Guide 1805Integrations P U B L I C 231
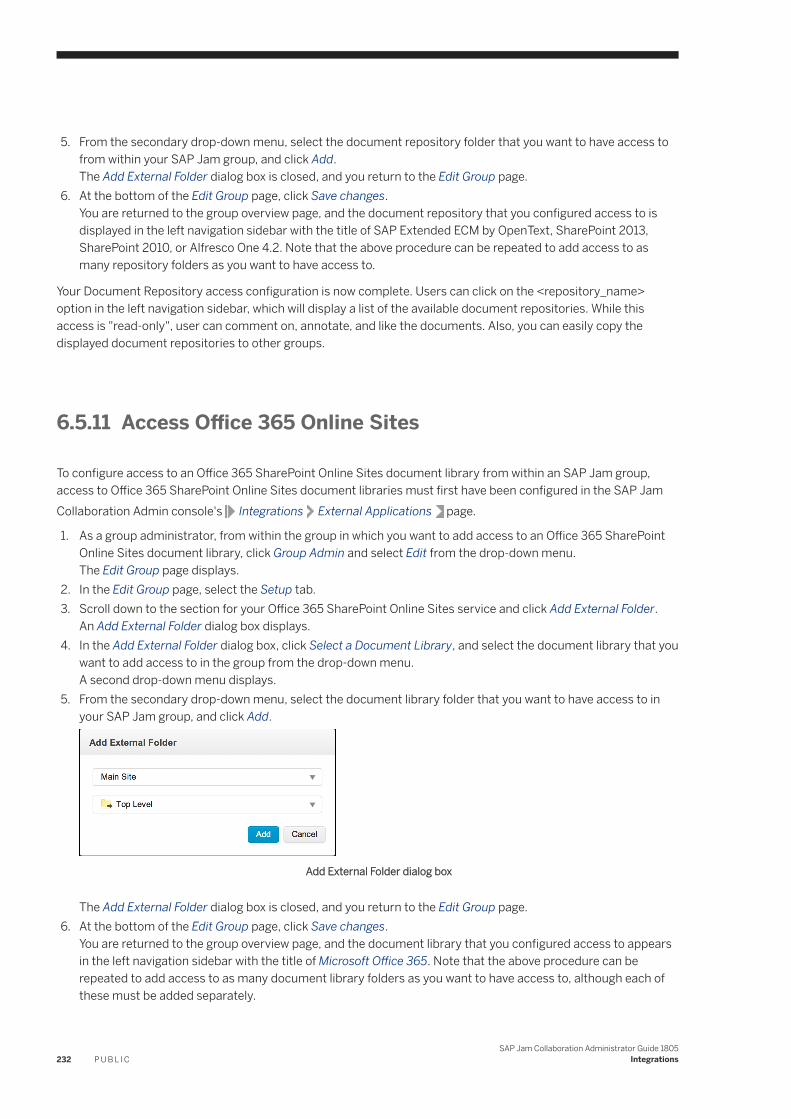
5. From the secondary drop-down menu, select the document repository folder that you want to have access to from within your SAP Jam group, and click Add.The Add External Folder dialog box is closed, and you return to the Edit Group page.
6. At the bottom of the Edit Group page, click Save changes.You are returned to the group overview page, and the document repository that you configured access to is displayed in the left navigation sidebar with the title of SAP Extended ECM by OpenText, SharePoint 2013, SharePoint 2010, or Alfresco One 4.2. Note that the above procedure can be repeated to add access to as many repository folders as you want to have access to.
Your Document Repository access configuration is now complete. Users can click on the <repository_name> option in the left navigation sidebar, which will display a list of the available document repositories. While this access is "read-only", user can comment on, annotate, and like the documents. Also, you can easily copy the displayed document repositories to other groups.
6.5.11 Access Office 365 Online Sites
To configure access to an Office 365 SharePoint Online Sites document library from within an SAP Jam group, access to Office 365 SharePoint Online Sites document libraries must first have been configured in the SAP Jam Collaboration Admin console's Integrations External Applications page.
1. As a group administrator, from within the group in which you want to add access to an Office 365 SharePoint Online Sites document library, click Group Admin and select Edit from the drop-down menu.The Edit Group page displays.
2. In the Edit Group page, select the Setup tab.3. Scroll down to the section for your Office 365 SharePoint Online Sites service and click Add External Folder.
An Add External Folder dialog box displays.4. In the Add External Folder dialog box, click Select a Document Library, and select the document library that you
want to add access to in the group from the drop-down menu.A second drop-down menu displays.
5. From the secondary drop-down menu, select the document library folder that you want to have access to in your SAP Jam group, and click Add.
Add External Folder dialog box
The Add External Folder dialog box is closed, and you return to the Edit Group page.6. At the bottom of the Edit Group page, click Save changes.
You are returned to the group overview page, and the document library that you configured access to appears in the left navigation sidebar with the title of Microsoft Office 365. Note that the above procedure can be repeated to add access to as many document library folders as you want to have access to, although each of these must be added separately.
232 P U B L I CSAP Jam Collaboration Administrator Guide 1805
Integrations
NoteEnsure that your Internet Explorer users have added the following sites to their list of Trusted Sites:
● https://login.microsoftonline.com● https://login.windows.net
To do this, have your users follow the Add or remove a site from a security zone instruction in the Security zones part of the page http://windows.microsoft.com/en-CA/internet-explorer/ie-security-privacy-settings#ie=ie-11
, in the Trusted sites option in the Security tab.
Your Microsoft Office 365 SharePoint Online Sites Document Library access configuration is now complete. Users can click on the Microsoft Office 365 option in the left navigation sidebar, which will display a list of the available Microsoft Office 365 document repositories. While this is "read-only" access, user can comment on, annotate, and like the documents. Also, you can easily copy the displayed document repositories to other groups.
6.6 OpenSocial Gadgets
OpenSocial gadgets provide a mechanism to extend the ability to interact with any software or service.
SAP Jam provides access to pre-built, third-party OpenSocial gadgets that are ready to use by simply enabling them. You can also download some existing OpenSocial gadgets from the SAP Jam Sample Code GitHub site's OpenSocial Gadgets section. There is also support for your organization to develop your own OpenSocial gadgets, and to make those available to your SAP Jam users. If you choose to develop your own OpenSocial gadget, please see the SAP Jam OpenSocial Gadgets section of the SAP Jam Developer Guide for information on developing an OpenSocial gadget. For information on how to add, enable, and manage OpenSocial gadgets, please see the following:
● Import an OpenSocial gadget configuration [page 233] explains how to upload a gadget configuration file.● Add an OpenSocial gadget [page 234] explains how to register a gadget that does not have a configuration file.● Enable an OpenSocial gadget [page 238] explains the various ways in which you can enable a gadget and it
provides An explanation of the warning that is displayed when you first enable a particular OpenSocial gadget [page 238].
● Manage OpenSocial gadgets [page 239] explains how to view, edit, or delete an OpenSocial gadget.
Import an OpenSocial gadget configuration
You can upload a gadget configuration file for any OpenSocial gadget that you download from the SAP Jam Sample Code GitHub site's OpenSocial Gadgets section. Gadget configuration files are the files that you get when you click on Export Gadget Configuration in a gadget's administration page.
To import an OpenSocial gadget's configuration file
1. From the Integrations OpenSocial Gadgets page, click Import Gadget Configuration near the top of the page.Your browser will open a file upload dialog box.
SAP Jam Collaboration Administrator Guide 1805Integrations P U B L I C 233
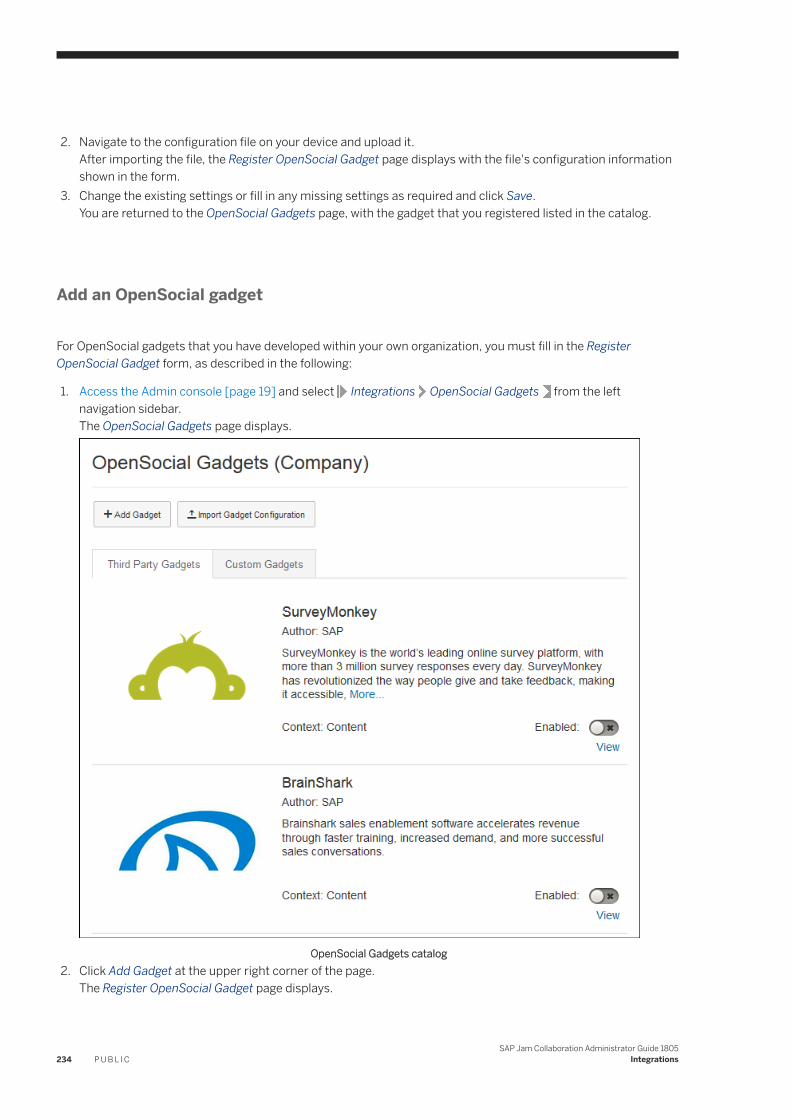
2. Navigate to the configuration file on your device and upload it.After importing the file, the Register OpenSocial Gadget page displays with the file's configuration information shown in the form.
3. Change the existing settings or fill in any missing settings as required and click Save.You are returned to the OpenSocial Gadgets page, with the gadget that you registered listed in the catalog.
Add an OpenSocial gadget
For OpenSocial gadgets that you have developed within your own organization, you must fill in the Register OpenSocial Gadget form, as described in the following:
1. Access the Admin console [page 19] and select Integrations OpenSocial Gadgets from the left navigation sidebar.The OpenSocial Gadgets page displays.
OpenSocial Gadgets catalog2. Click Add Gadget at the upper right corner of the page.
The Register OpenSocial Gadget page displays.
234 P U B L I CSAP Jam Collaboration Administrator Guide 1805
Integrations
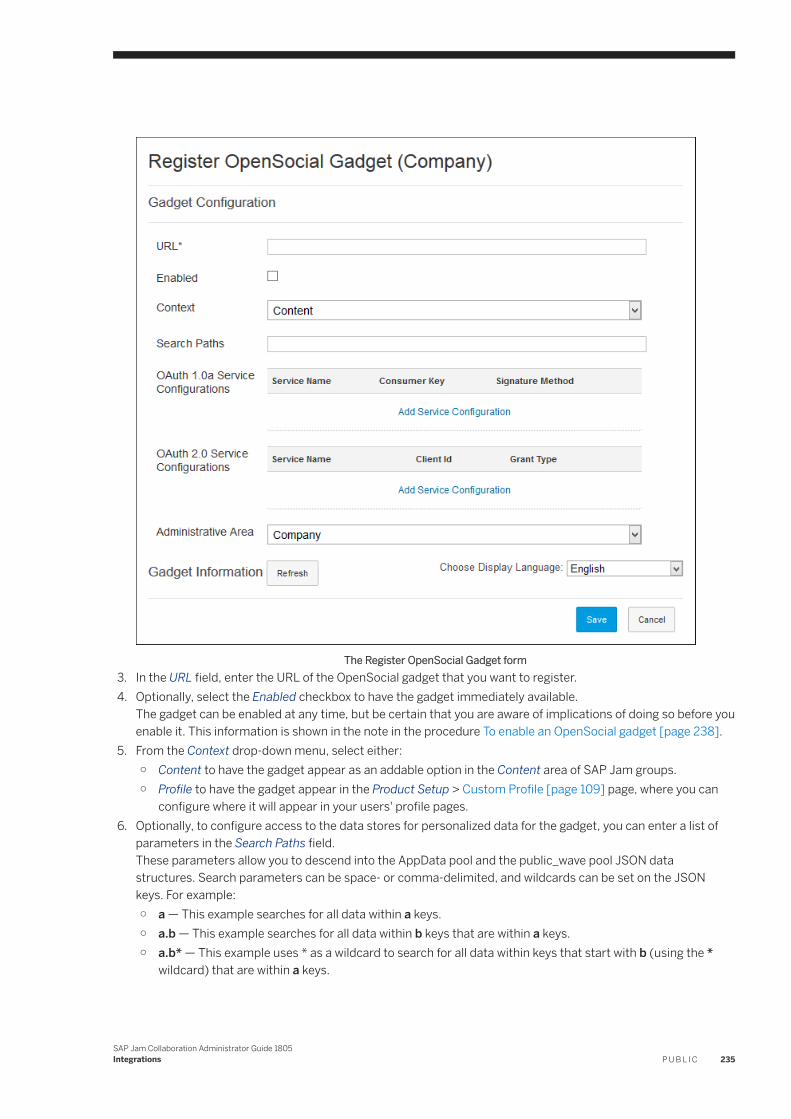
The Register OpenSocial Gadget form3. In the URL field, enter the URL of the OpenSocial gadget that you want to register.4. Optionally, select the Enabled checkbox to have the gadget immediately available.
The gadget can be enabled at any time, but be certain that you are aware of implications of doing so before you enable it. This information is shown in the note in the procedure To enable an OpenSocial gadget [page 238].
5. From the Context drop-down menu, select either:○ Content to have the gadget appear as an addable option in the Content area of SAP Jam groups.○ Profile to have the gadget appear in the Product Setup > Custom Profile [page 109] page, where you can
configure where it will appear in your users' profile pages.6. Optionally, to configure access to the data stores for personalized data for the gadget, you can enter a list of
parameters in the Search Paths field.These parameters allow you to descend into the AppData pool and the public_wave pool JSON data structures. Search parameters can be space- or comma-delimited, and wildcards can be set on the JSON keys. For example:○ a — This example searches for all data within a keys.○ a.b — This example searches for all data within b keys that are within a keys.○ a.b* — This example uses * as a wildcard to search for all data within keys that start with b (using the *
wildcard) that are within a keys.
SAP Jam Collaboration Administrator Guide 1805Integrations P U B L I C 235
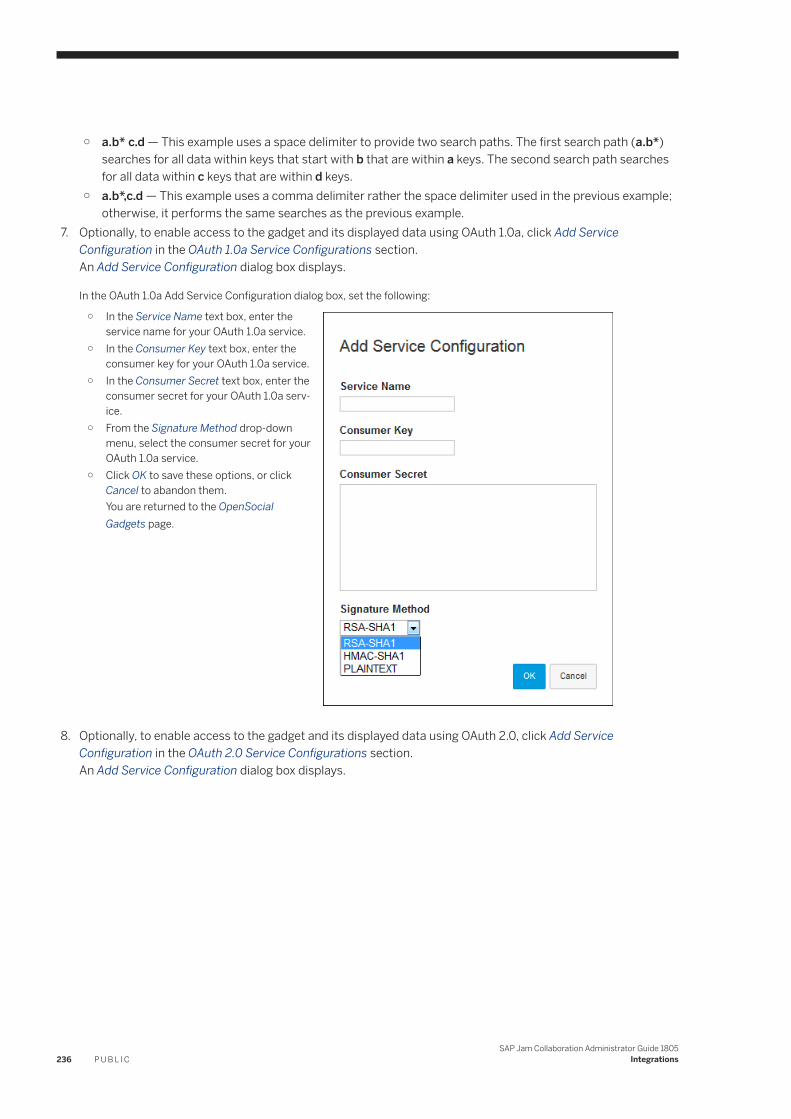
○ a.b* c.d — This example uses a space delimiter to provide two search paths. The first search path (a.b*) searches for all data within keys that start with b that are within a keys. The second search path searches for all data within c keys that are within d keys.
○ a.b*,c.d — This example uses a comma delimiter rather the space delimiter used in the previous example; otherwise, it performs the same searches as the previous example.
7. Optionally, to enable access to the gadget and its displayed data using OAuth 1.0a, click Add Service Configuration in the OAuth 1.0a Service Configurations section.An Add Service Configuration dialog box displays.
In the OAuth 1.0a Add Service Configuration dialog box, set the following:
○ In the Service Name text box, enter the service name for your OAuth 1.0a service.
○ In the Consumer Key text box, enter the consumer key for your OAuth 1.0a service.
○ In the Consumer Secret text box, enter the consumer secret for your OAuth 1.0a service.
○ From the Signature Method drop-down menu, select the consumer secret for your OAuth 1.0a service.
○ Click OK to save these options, or click Cancel to abandon them.You are returned to the OpenSocial Gadgets page.
8. Optionally, to enable access to the gadget and its displayed data using OAuth 2.0, click Add Service Configuration in the OAuth 2.0 Service Configurations section.An Add Service Configuration dialog box displays.
236 P U B L I CSAP Jam Collaboration Administrator Guide 1805
Integrations
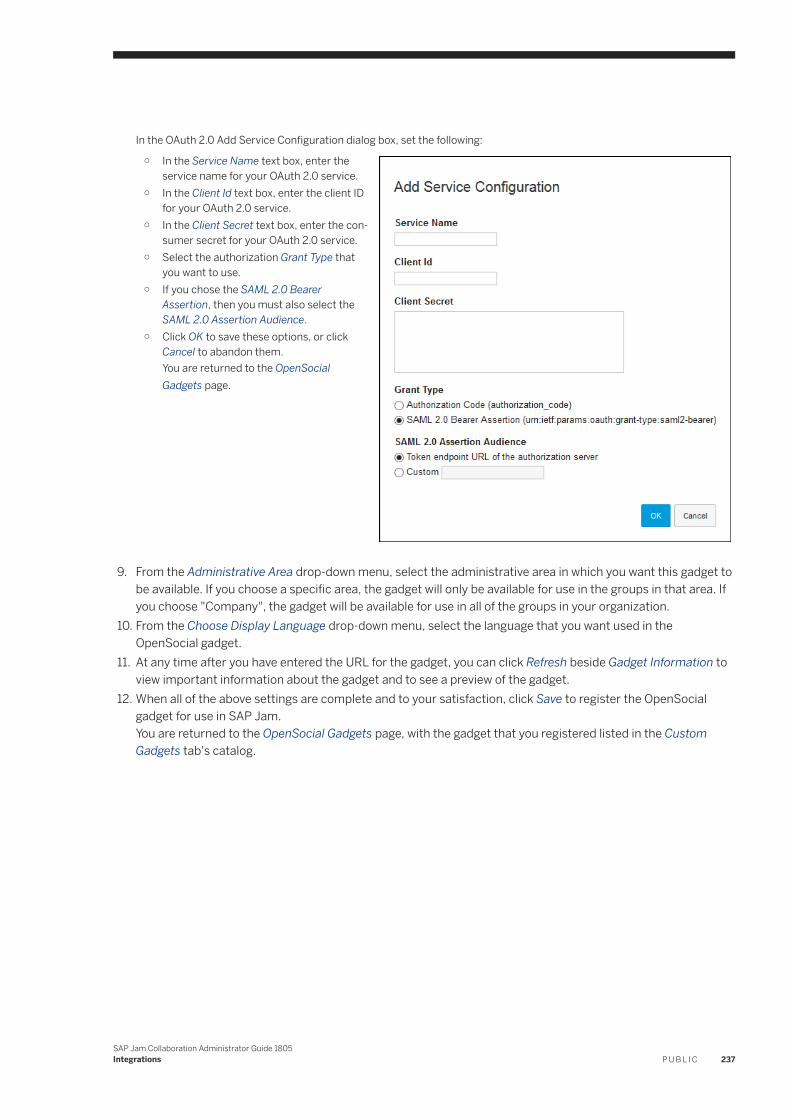
In the OAuth 2.0 Add Service Configuration dialog box, set the following:
○ In the Service Name text box, enter the service name for your OAuth 2.0 service.
○ In the Client Id text box, enter the client ID for your OAuth 2.0 service.
○ In the Client Secret text box, enter the consumer secret for your OAuth 2.0 service.
○ Select the authorization Grant Type that you want to use.
○ If you chose the SAML 2.0 Bearer Assertion, then you must also select the SAML 2.0 Assertion Audience.
○ Click OK to save these options, or click Cancel to abandon them.You are returned to the OpenSocial Gadgets page.
9. From the Administrative Area drop-down menu, select the administrative area in which you want this gadget to be available. If you choose a specific area, the gadget will only be available for use in the groups in that area. If you choose "Company", the gadget will be available for use in all of the groups in your organization.
10. From the Choose Display Language drop-down menu, select the language that you want used in the OpenSocial gadget.
11. At any time after you have entered the URL for the gadget, you can click Refresh beside Gadget Information to view important information about the gadget and to see a preview of the gadget.
12. When all of the above settings are complete and to your satisfaction, click Save to register the OpenSocial gadget for use in SAP Jam.You are returned to the OpenSocial Gadgets page, with the gadget that you registered listed in the Custom Gadgets tab's catalog.
SAP Jam Collaboration Administrator Guide 1805Integrations P U B L I C 237
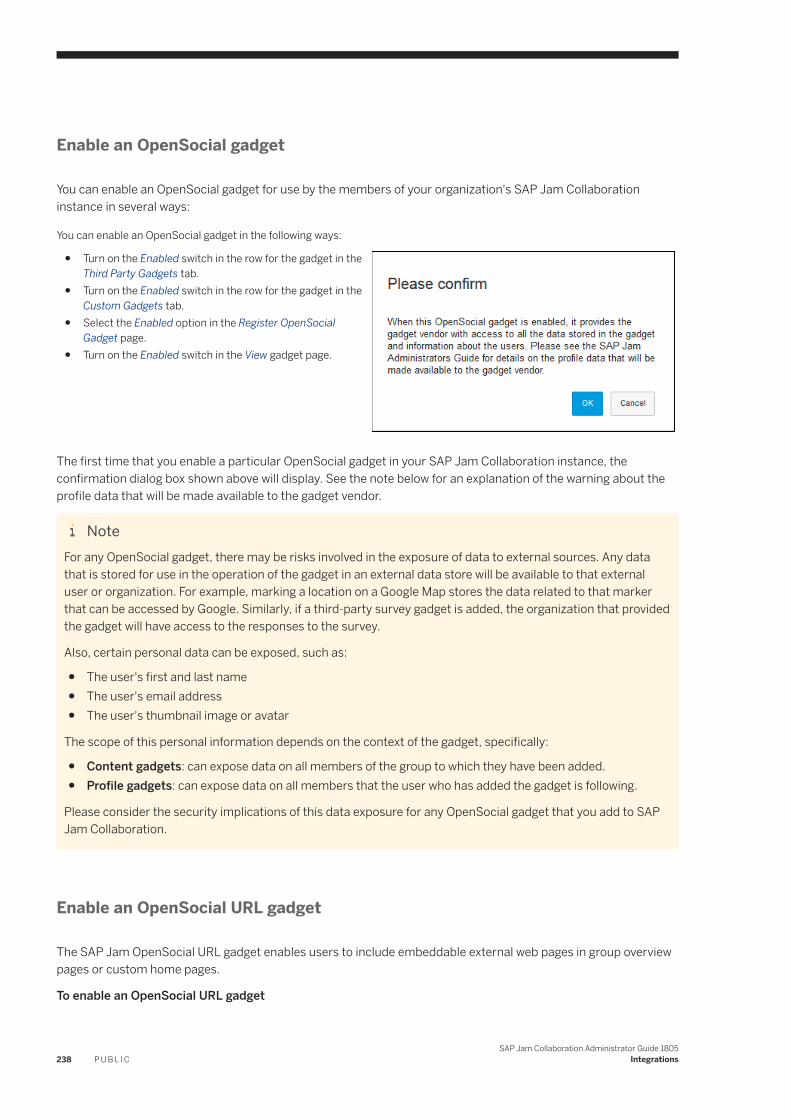
Enable an OpenSocial gadget
You can enable an OpenSocial gadget for use by the members of your organization's SAP Jam Collaboration instance in several ways:
You can enable an OpenSocial gadget in the following ways:
● Turn on the Enabled switch in the row for the gadget in the Third Party Gadgets tab.
● Turn on the Enabled switch in the row for the gadget in the Custom Gadgets tab.
● Select the Enabled option in the Register OpenSocial Gadget page.
● Turn on the Enabled switch in the View gadget page.
The first time that you enable a particular OpenSocial gadget in your SAP Jam Collaboration instance, the confirmation dialog box shown above will display. See the note below for an explanation of the warning about the profile data that will be made available to the gadget vendor.
NoteFor any OpenSocial gadget, there may be risks involved in the exposure of data to external sources. Any data that is stored for use in the operation of the gadget in an external data store will be available to that external user or organization. For example, marking a location on a Google Map stores the data related to that marker that can be accessed by Google. Similarly, if a third-party survey gadget is added, the organization that provided the gadget will have access to the responses to the survey.
Also, certain personal data can be exposed, such as:
● The user's first and last name● The user's email address● The user's thumbnail image or avatar
The scope of this personal information depends on the context of the gadget, specifically:
● Content gadgets: can expose data on all members of the group to which they have been added.● Profile gadgets: can expose data on all members that the user who has added the gadget is following.
Please consider the security implications of this data exposure for any OpenSocial gadget that you add to SAP Jam Collaboration.
Enable an OpenSocial URL gadget
The SAP Jam OpenSocial URL gadget enables users to include embeddable external web pages in group overview pages or custom home pages.
To enable an OpenSocial URL gadget
238 P U B L I CSAP Jam Collaboration Administrator Guide 1805
Integrations
1. On the OpenSocial Gadgets page, click the SAP Gadgets tab.2. Click the toggle to enable it. This gives the page designer of the group overview page or custom home page the
ability to include a secure URL within a widget on a SAP Jam page.
NoteThe URL or web page iframe info must be embeddable. Ensure that you test the URL or web page iframe to see if it can be embedded.
3. Click View below the toggle to set these parameters:○ Web address: Enter a secure URL beginning with https.○ Height (in pixels): Enter the pixel height for rendering the web page. For best results, test the pixel size that
best fits the page you want to embed.○ Enable or disable plugins/scripts to run within the URL gadget.○ Enable or disable “automatically load content of URL gadget” on the SAP Jam page that it’s hosted on.○ Allow plugins to run with extension (e.g., Adobe Flash Player, Java applets, etc.)○ Automatically load contents of extension.
4. Click Save to render the link.
Manage OpenSocial gadgets
To view the configuration of a gadget
To view the configuration of either a "Third Party Gadget" or a "Custom Gadget"
1. In either tab of the OpenSocial Gadgets page, click View on the row for the OpenSocial gadget whose configuration information you want to see.An OpenSocial Gadget: <gadget_name> page displays.
SAP Jam Collaboration Administrator Guide 1805Integrations P U B L I C 239
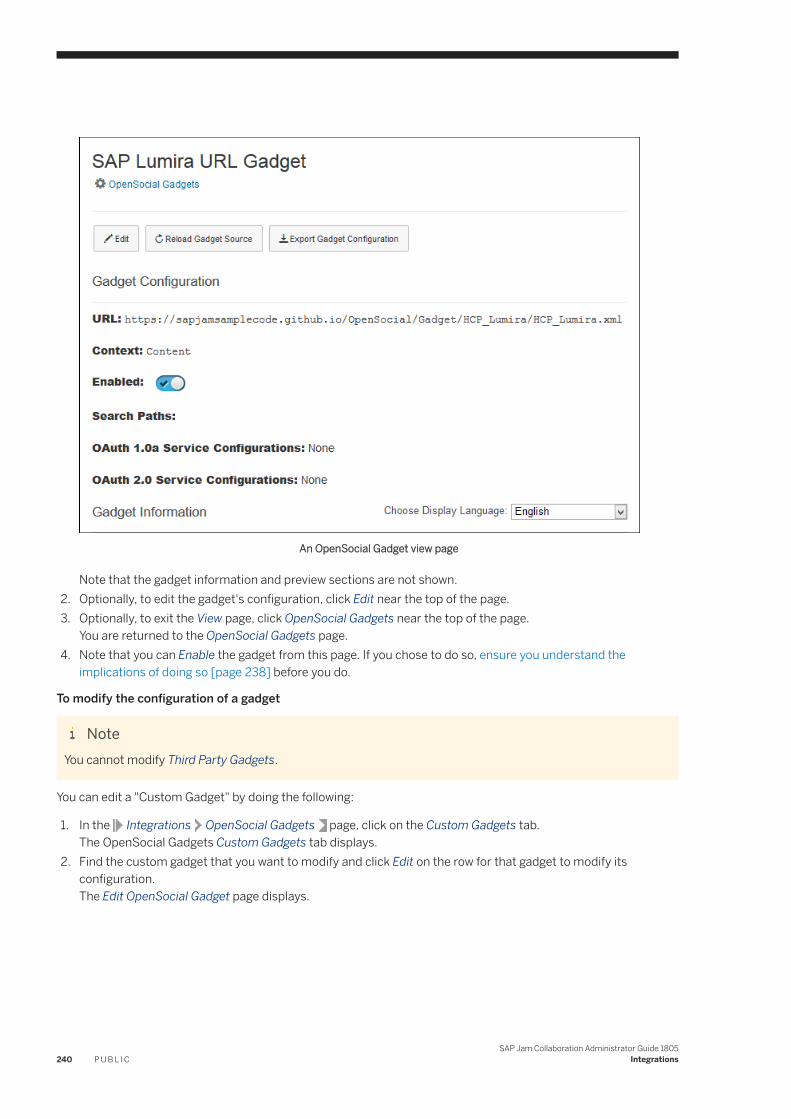
An OpenSocial Gadget view page
Note that the gadget information and preview sections are not shown.2. Optionally, to edit the gadget's configuration, click Edit near the top of the page.3. Optionally, to exit the View page, click OpenSocial Gadgets near the top of the page.
You are returned to the OpenSocial Gadgets page.4. Note that you can Enable the gadget from this page. If you chose to do so, ensure you understand the
implications of doing so [page 238] before you do.
To modify the configuration of a gadget
NoteYou cannot modify Third Party Gadgets.
You can edit a "Custom Gadget" by doing the following:
1. In the Integrations OpenSocial Gadgets page, click on the Custom Gadgets tab.The OpenSocial Gadgets Custom Gadgets tab displays.
2. Find the custom gadget that you want to modify and click Edit on the row for that gadget to modify its configuration.The Edit OpenSocial Gadget page displays.
240 P U B L I CSAP Jam Collaboration Administrator Guide 1805
Integrations
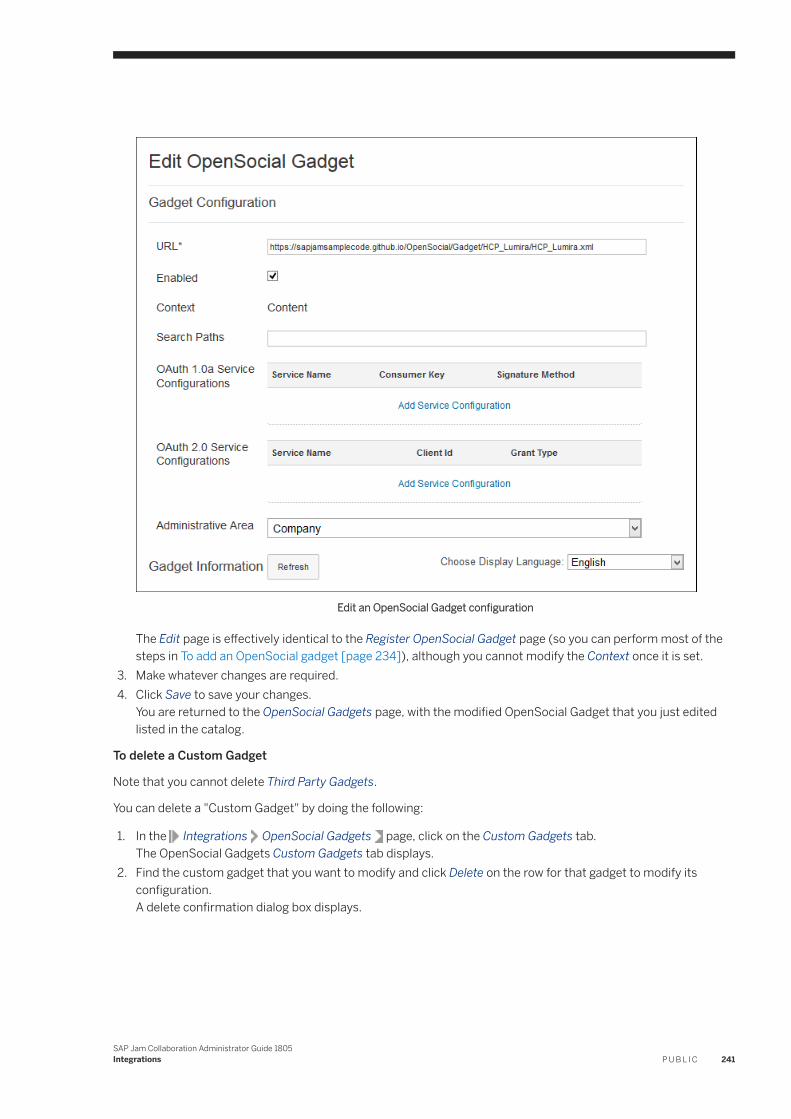
Edit an OpenSocial Gadget configuration
The Edit page is effectively identical to the Register OpenSocial Gadget page (so you can perform most of the steps in To add an OpenSocial gadget [page 234]), although you cannot modify the Context once it is set.
3. Make whatever changes are required.4. Click Save to save your changes.
You are returned to the OpenSocial Gadgets page, with the modified OpenSocial Gadget that you just edited listed in the catalog.
To delete a Custom Gadget
Note that you cannot delete Third Party Gadgets.
You can delete a "Custom Gadget" by doing the following:
1. In the Integrations OpenSocial Gadgets page, click on the Custom Gadgets tab.The OpenSocial Gadgets Custom Gadgets tab displays.
2. Find the custom gadget that you want to modify and click Delete on the row for that gadget to modify its configuration.A delete confirmation dialog box displays.
SAP Jam Collaboration Administrator Guide 1805Integrations P U B L I C 241
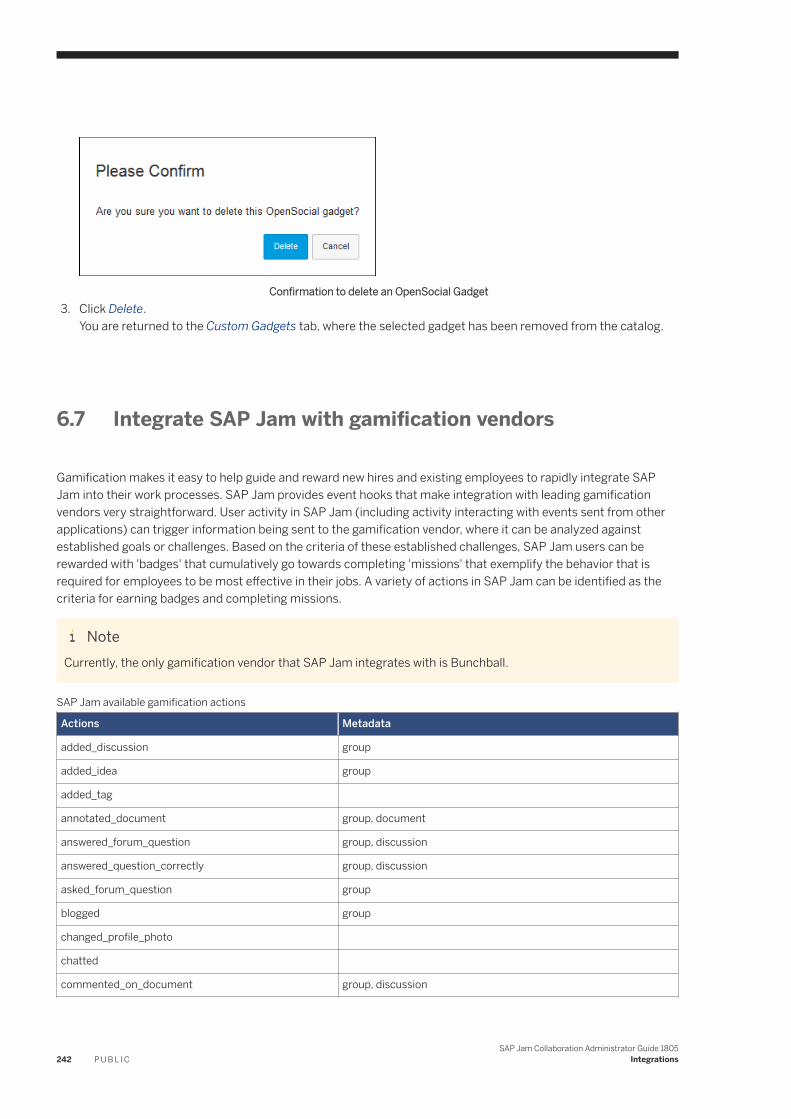
Confirmation to delete an OpenSocial Gadget3. Click Delete.
You are returned to the Custom Gadgets tab, where the selected gadget has been removed from the catalog.
6.7 Integrate SAP Jam with gamification vendors
Gamification makes it easy to help guide and reward new hires and existing employees to rapidly integrate SAP Jam into their work processes. SAP Jam provides event hooks that make integration with leading gamification vendors very straightforward. User activity in SAP Jam (including activity interacting with events sent from other applications) can trigger information being sent to the gamification vendor, where it can be analyzed against established goals or challenges. Based on the criteria of these established challenges, SAP Jam users can be rewarded with 'badges' that cumulatively go towards completing 'missions' that exemplify the behavior that is required for employees to be most effective in their jobs. A variety of actions in SAP Jam can be identified as the criteria for earning badges and completing missions.
NoteCurrently, the only gamification vendor that SAP Jam integrates with is Bunchball.
SAP Jam available gamification actions
Actions Metadata
added_discussion group
added_idea group
added_tag
annotated_document group, document
answered_forum_question group, discussion
answered_question_correctly group, discussion
asked_forum_question group
blogged group
changed_profile_photo
chatted
commented_on_document group, discussion
242 P U B L I CSAP Jam Collaboration Administrator Guide 1805
Integrations
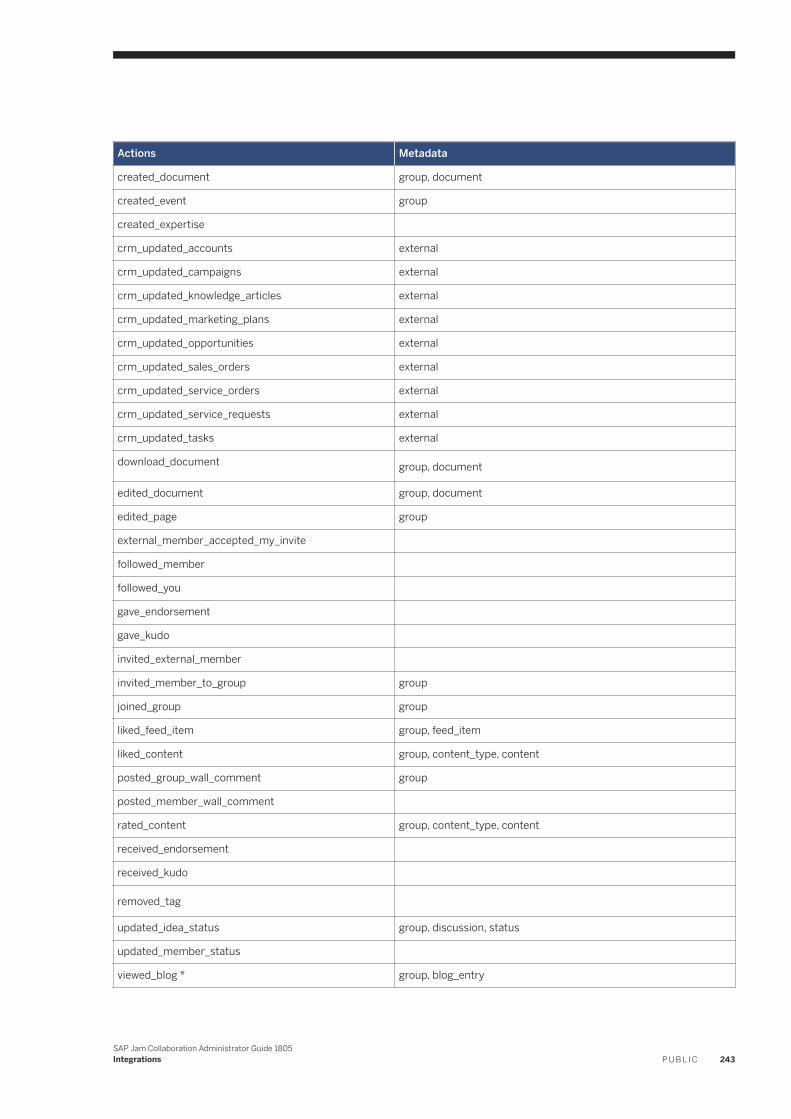
Actions Metadata
created_document group, document
created_event group
created_expertise
crm_updated_accounts external
crm_updated_campaigns external
crm_updated_knowledge_articles external
crm_updated_marketing_plans external
crm_updated_opportunities external
crm_updated_sales_orders external
crm_updated_service_orders external
crm_updated_service_requests external
crm_updated_tasks external
download_document group, document
edited_document group, document
edited_page group
external_member_accepted_my_invite
followed_member
followed_you
gave_endorsement
gave_kudo
invited_external_member
invited_member_to_group group
joined_group group
liked_feed_item group, feed_item
liked_content group, content_type, content
posted_group_wall_comment group
posted_member_wall_comment
rated_content group, content_type, content
received_endorsement
received_kudo
removed_tag
updated_idea_status group, discussion, status
updated_member_status
viewed_blog * group, blog_entry
SAP Jam Collaboration Administrator Guide 1805Integrations P U B L I C 243
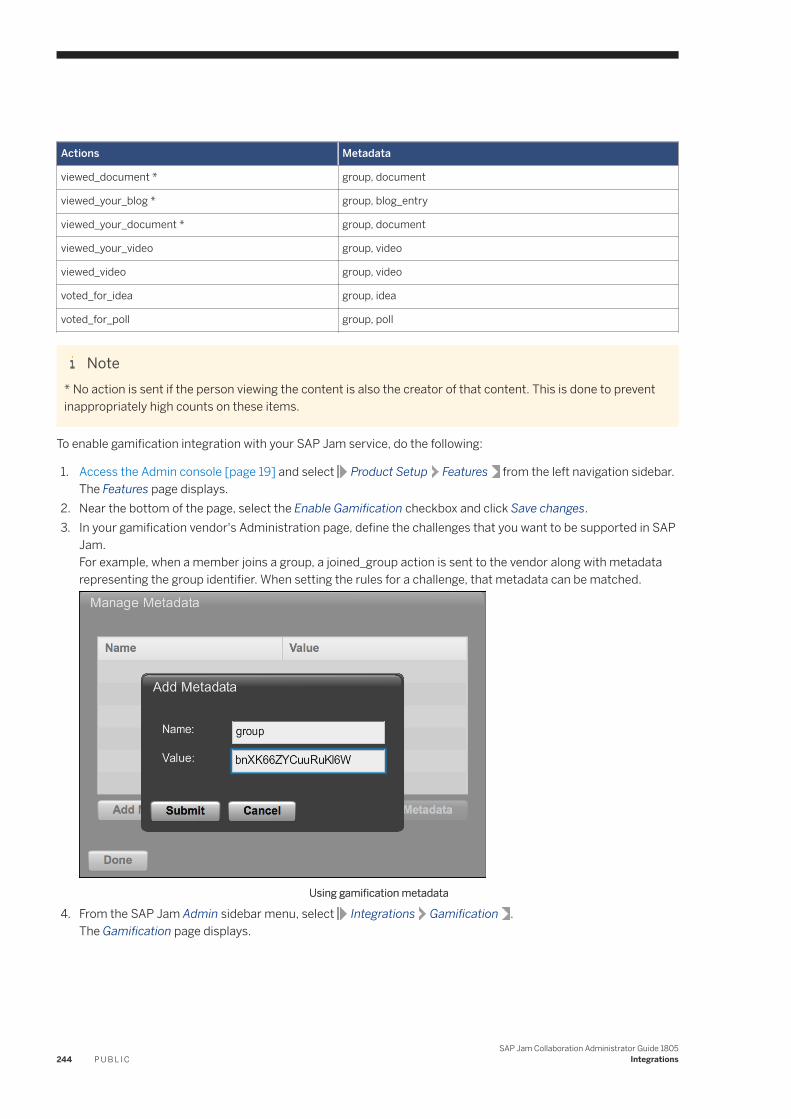
Actions Metadata
viewed_document * group, document
viewed_your_blog * group, blog_entry
viewed_your_document * group, document
viewed_your_video group, video
viewed_video group, video
voted_for_idea group, idea
voted_for_poll group, poll
Note* No action is sent if the person viewing the content is also the creator of that content. This is done to prevent inappropriately high counts on these items.
To enable gamification integration with your SAP Jam service, do the following:
1. Access the Admin console [page 19] and select Product Setup Features from the left navigation sidebar.The Features page displays.
2. Near the bottom of the page, select the Enable Gamification checkbox and click Save changes.3. In your gamification vendor's Administration page, define the challenges that you want to be supported in SAP
Jam.For example, when a member joins a group, a joined_group action is sent to the vendor along with metadata representing the group identifier. When setting the rules for a challenge, that metadata can be matched.
Using gamification metadata
4. From the SAP Jam Admin sidebar menu, select Integrations Gamification .The Gamification page displays.
244 P U B L I CSAP Jam Collaboration Administrator Guide 1805
Integrations
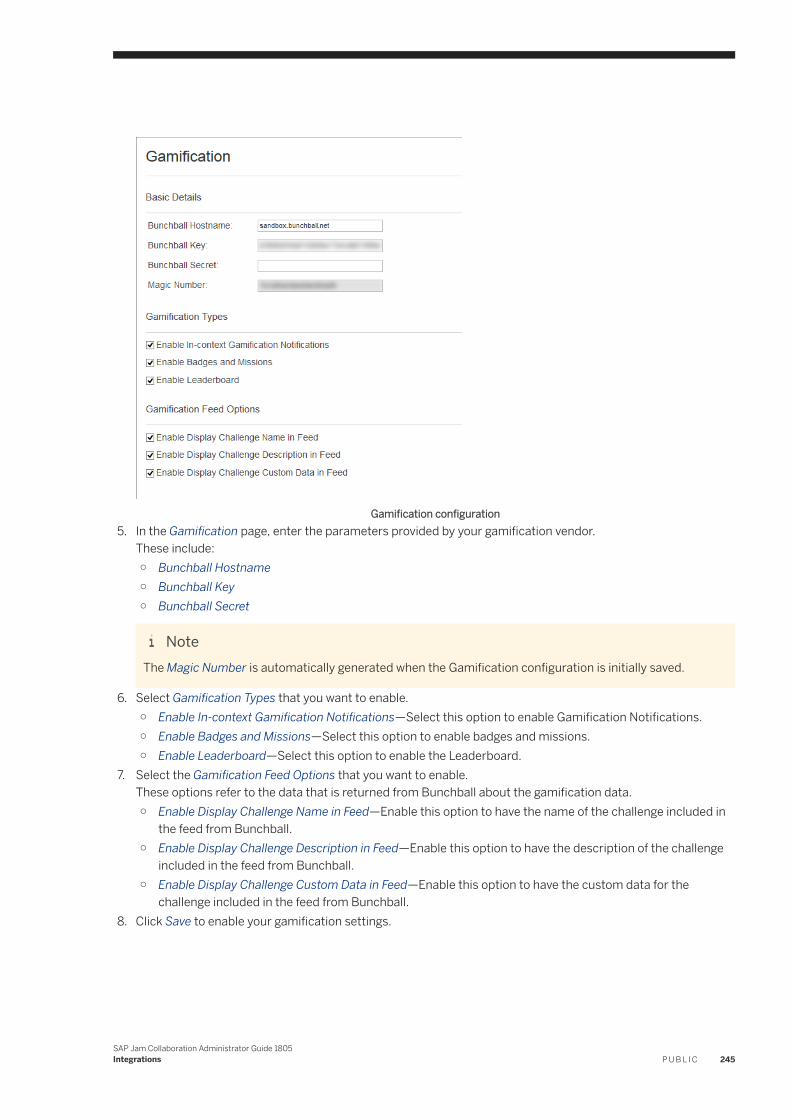
Gamification configuration5. In the Gamification page, enter the parameters provided by your gamification vendor.
These include:○ Bunchball Hostname○ Bunchball Key○ Bunchball Secret
NoteThe Magic Number is automatically generated when the Gamification configuration is initially saved.
6. Select Gamification Types that you want to enable.○ Enable In-context Gamification Notifications—Select this option to enable Gamification Notifications.○ Enable Badges and Missions—Select this option to enable badges and missions.○ Enable Leaderboard—Select this option to enable the Leaderboard.
7. Select the Gamification Feed Options that you want to enable.These options refer to the data that is returned from Bunchball about the gamification data.○ Enable Display Challenge Name in Feed—Enable this option to have the name of the challenge included in
the feed from Bunchball.○ Enable Display Challenge Description in Feed—Enable this option to have the description of the challenge
included in the feed from Bunchball.○ Enable Display Challenge Custom Data in Feed—Enable this option to have the custom data for the
challenge included in the feed from Bunchball.8. Click Save to enable your gamification settings.
SAP Jam Collaboration Administrator Guide 1805Integrations P U B L I C 245
6.8 Mentoring and coaching groups
Mentoring and coaching groups in SAP Jam help to improve employee engagement with easy customization, forums for discussions or questions and answers, embedded feed updates, and mentor profiles with listed areas of expertise.
With the SuccessFactors Succession and Development integration, you can create an SAP Jam group linked to a mentoring program created with SAP SuccessFactors Mentoring Program Tool.
Create a Mentoring Program with SAP Jam group
To create a mentoring program that integrates with an SAP Jam group
1. Refer to the steps for Creating Mentoring Programs in the SAP SuccessFactors Success and Development Mentoring Guide.
2. Ensure that you select the Create an SAP Jam group linked to this mentoring program option.
The mentors and mentees that are added to the mentoring program are also automatically invited to the SAP Jam group. They can view the group feed updates under the My Mentoring Programs page in the Development module. Mentoring program administrators are automatically promoted to group administrators of the SAP Jam group.
6.9 Use the Widget Builders
The SAP Jam Collaboration Admin console provides a tool for building three common types of widgets, which are complex HTML5 components that use a preset structure to present some common types of SAP Jam content in external web pages. The Widget Builder page currently provides the following widget builders:
● The Feed Widget Builder—Creates a highly customizable feed widget that can be used to embed one of five different types of SAP Jam feed in an external web page.
● The Recommendation Widget Builder—Creates a customizable recommendation widget that can be used to embed SAP Jam content, people, or groups recommendations in an external web page.
● The Share Widget Builder—Creates a share widget that can be embedded in any external web page to add a "share link" (like other social network share buttons), and which will post the containing page to either SAP Jam group or member feeds when clicked in the external web page.
6.9.1 Use the Feed Widget Builder
The Feed Widget Builder provides the easy creation of a highly customizable feed widget that can display many different types of SAP Jam Collaboration feed in an HTML page, with no requirement for knowing the JavaScript in which they are written.
246 P U B L I CSAP Jam Collaboration Administrator Guide 1805
Integrations
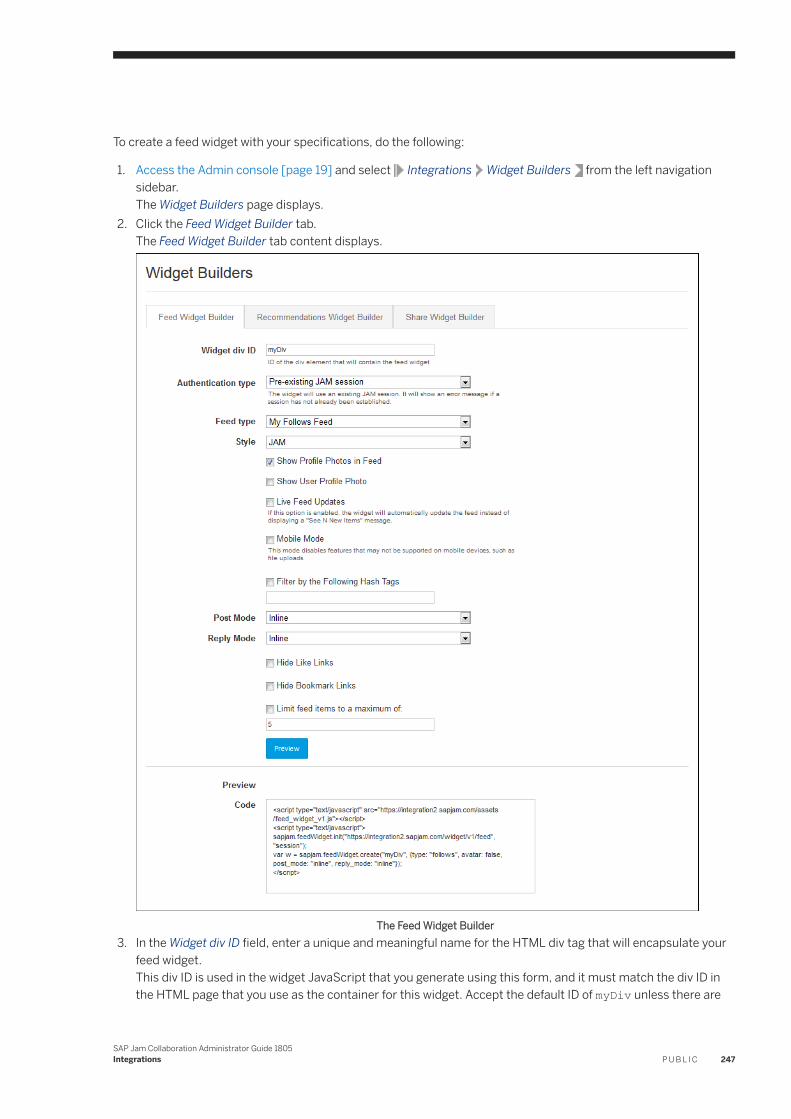
To create a feed widget with your specifications, do the following:
1. Access the Admin console [page 19] and select Integrations Widget Builders from the left navigation sidebar.The Widget Builders page displays.
2. Click the Feed Widget Builder tab.The Feed Widget Builder tab content displays.
The Feed Widget Builder3. In the Widget div ID field, enter a unique and meaningful name for the HTML div tag that will encapsulate your
feed widget.This div ID is used in the widget JavaScript that you generate using this form, and it must match the div ID in the HTML page that you use as the container for this widget. Accept the default ID of myDiv unless there are
SAP Jam Collaboration Administrator Guide 1805Integrations P U B L I C 247
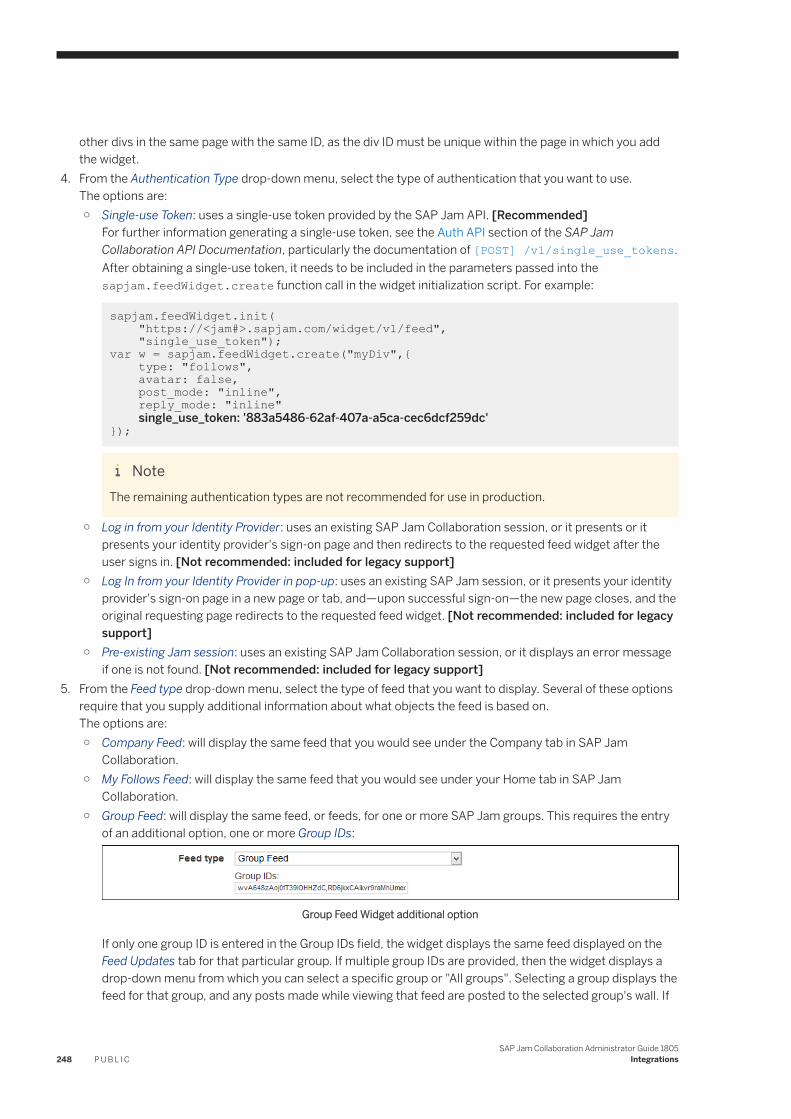
other divs in the same page with the same ID, as the div ID must be unique within the page in which you add the widget.
4. From the Authentication Type drop-down menu, select the type of authentication that you want to use.The options are:○ Single-use Token: uses a single-use token provided by the SAP Jam API. [Recommended]
For further information generating a single-use token, see the Auth API section of the SAP Jam Collaboration API Documentation, particularly the documentation of [POST] /v1/single_use_tokens.After obtaining a single-use token, it needs to be included in the parameters passed into the sapjam.feedWidget.create function call in the widget initialization script. For example:
sapjam.feedWidget.init( "https://<jam#>.sapjam.com/widget/v1/feed", "single_use_token");var w = sapjam.feedWidget.create("myDiv",{ type: "follows", avatar: false, post_mode: "inline", reply_mode: "inline" single_use_token: '883a5486-62af-407a-a5ca-cec6dcf259dc' });
NoteThe remaining authentication types are not recommended for use in production.
○ Log in from your Identity Provider: uses an existing SAP Jam Collaboration session, or it presents or it presents your identity provider's sign-on page and then redirects to the requested feed widget after the user signs in. [Not recommended: included for legacy support]
○ Log In from your Identity Provider in pop-up: uses an existing SAP Jam session, or it presents your identity provider's sign-on page in a new page or tab, and—upon successful sign-on—the new page closes, and the original requesting page redirects to the requested feed widget. [Not recommended: included for legacy support]
○ Pre-existing Jam session: uses an existing SAP Jam Collaboration session, or it displays an error message if one is not found. [Not recommended: included for legacy support]
5. From the Feed type drop-down menu, select the type of feed that you want to display. Several of these options require that you supply additional information about what objects the feed is based on.The options are:○ Company Feed: will display the same feed that you would see under the Company tab in SAP Jam
Collaboration.○ My Follows Feed: will display the same feed that you would see under your Home tab in SAP Jam
Collaboration.○ Group Feed: will display the same feed, or feeds, for one or more SAP Jam groups. This requires the entry
of an additional option, one or more Group IDs:
Group Feed Widget additional option
If only one group ID is entered in the Group IDs field, the widget displays the same feed displayed on the Feed Updates tab for that particular group. If multiple group IDs are provided, then the widget displays a drop-down menu from which you can select a specific group or "All groups". Selecting a group displays the feed for that group, and any posts made while viewing that feed are posted to the selected group's wall. If
248 P U B L I CSAP Jam Collaboration Administrator Guide 1805
Integrations
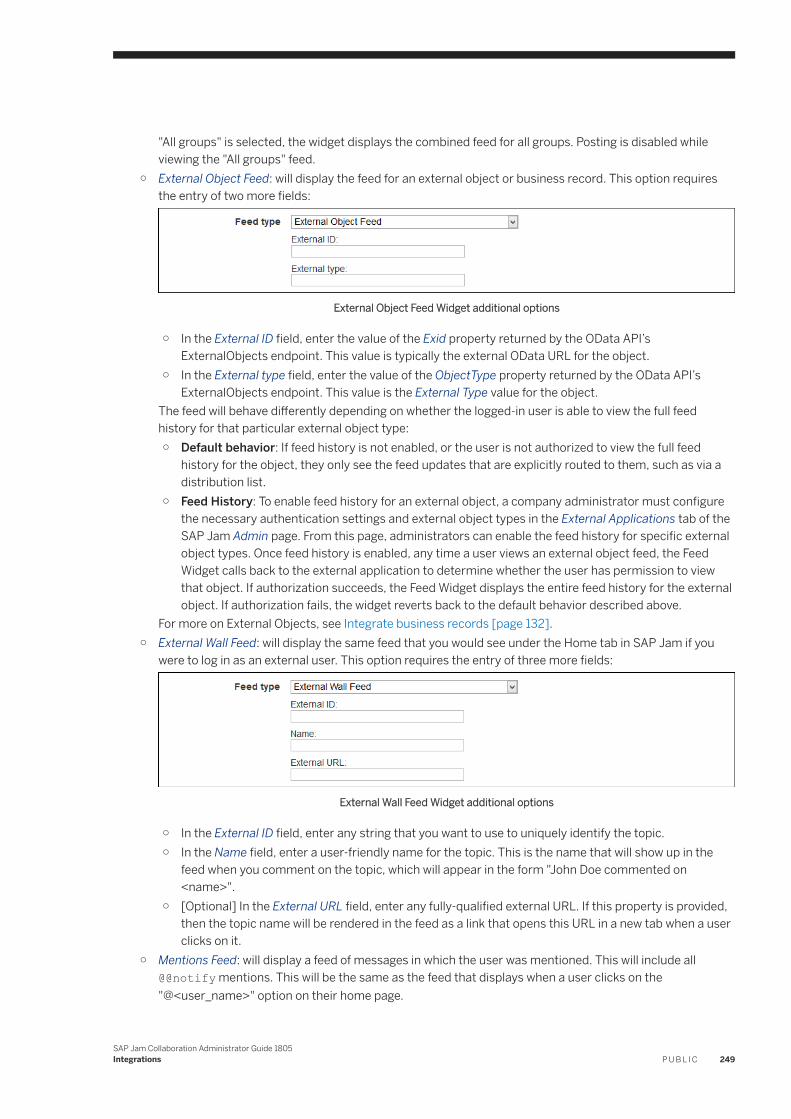
"All groups" is selected, the widget displays the combined feed for all groups. Posting is disabled while viewing the "All groups" feed.
○ External Object Feed: will display the feed for an external object or business record. This option requires the entry of two more fields:
External Object Feed Widget additional options
○ In the External ID field, enter the value of the Exid property returned by the OData API’s ExternalObjects endpoint. This value is typically the external OData URL for the object.
○ In the External type field, enter the value of the ObjectType property returned by the OData API’s ExternalObjects endpoint. This value is the External Type value for the object.
The feed will behave differently depending on whether the logged-in user is able to view the full feed history for that particular external object type:○ Default behavior: If feed history is not enabled, or the user is not authorized to view the full feed
history for the object, they only see the feed updates that are explicitly routed to them, such as via a distribution list.
○ Feed History: To enable feed history for an external object, a company administrator must configure the necessary authentication settings and external object types in the External Applications tab of the SAP Jam Admin page. From this page, administrators can enable the feed history for specific external object types. Once feed history is enabled, any time a user views an external object feed, the Feed Widget calls back to the external application to determine whether the user has permission to view that object. If authorization succeeds, the Feed Widget displays the entire feed history for the external object. If authorization fails, the widget reverts back to the default behavior described above.
For more on External Objects, see Integrate business records [page 132].○ External Wall Feed: will display the same feed that you would see under the Home tab in SAP Jam if you
were to log in as an external user. This option requires the entry of three more fields:
External Wall Feed Widget additional options
○ In the External ID field, enter any string that you want to use to uniquely identify the topic.○ In the Name field, enter a user-friendly name for the topic. This is the name that will show up in the
feed when you comment on the topic, which will appear in the form "John Doe commented on <name>".
○ [Optional] In the External URL field, enter any fully-qualified external URL. If this property is provided, then the topic name will be rendered in the feed as a link that opens this URL in a new tab when a user clicks on it.
○ Mentions Feed: will display a feed of messages in which the user was mentioned. This will include all @@notify mentions. This will be the same as the feed that displays when a user clicks on the "@<user_name>" option on their home page.
SAP Jam Collaboration Administrator Guide 1805Integrations P U B L I C 249
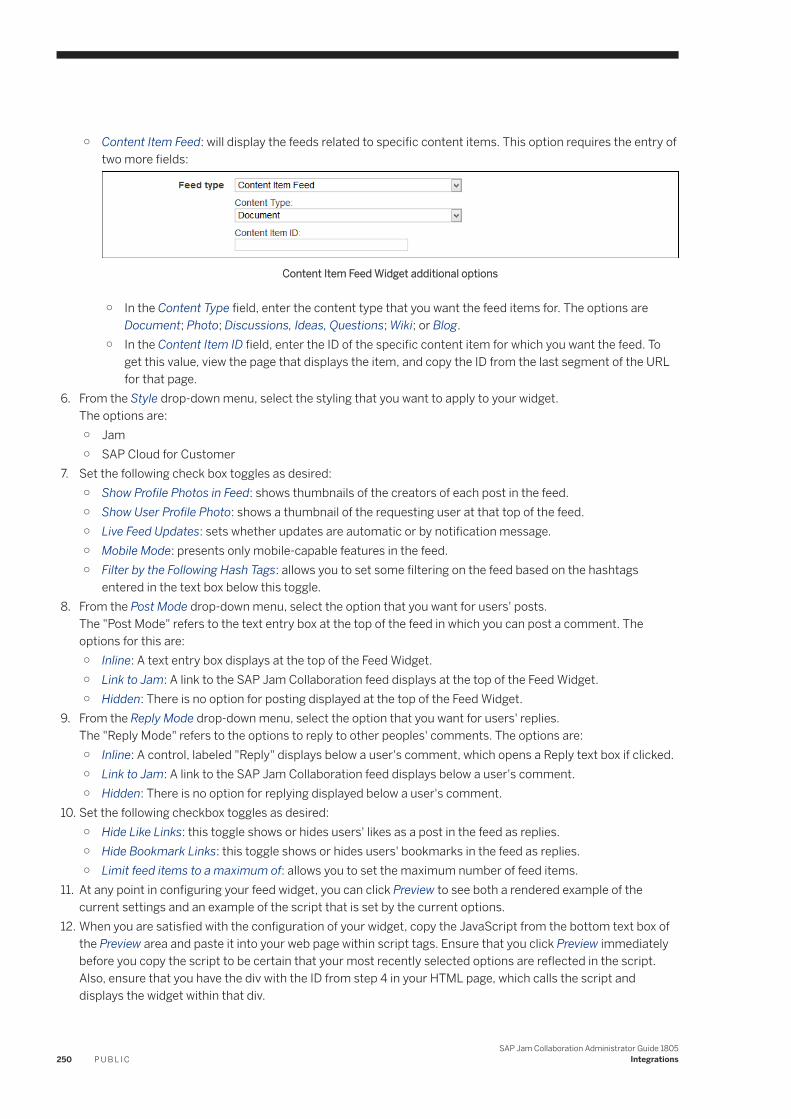
○ Content Item Feed: will display the feeds related to specific content items. This option requires the entry of two more fields:
Content Item Feed Widget additional options
○ In the Content Type field, enter the content type that you want the feed items for. The options are Document; Photo; Discussions, Ideas, Questions; Wiki; or Blog.
○ In the Content Item ID field, enter the ID of the specific content item for which you want the feed. To get this value, view the page that displays the item, and copy the ID from the last segment of the URL for that page.
6. From the Style drop-down menu, select the styling that you want to apply to your widget.The options are:○ Jam○ SAP Cloud for Customer
7. Set the following check box toggles as desired:○ Show Profile Photos in Feed: shows thumbnails of the creators of each post in the feed.○ Show User Profile Photo: shows a thumbnail of the requesting user at that top of the feed.○ Live Feed Updates: sets whether updates are automatic or by notification message.○ Mobile Mode: presents only mobile-capable features in the feed.○ Filter by the Following Hash Tags: allows you to set some filtering on the feed based on the hashtags
entered in the text box below this toggle.8. From the Post Mode drop-down menu, select the option that you want for users' posts.
The "Post Mode" refers to the text entry box at the top of the feed in which you can post a comment. The options for this are:○ Inline: A text entry box displays at the top of the Feed Widget.○ Link to Jam: A link to the SAP Jam Collaboration feed displays at the top of the Feed Widget.○ Hidden: There is no option for posting displayed at the top of the Feed Widget.
9. From the Reply Mode drop-down menu, select the option that you want for users' replies.The "Reply Mode" refers to the options to reply to other peoples' comments. The options are:○ Inline: A control, labeled "Reply" displays below a user's comment, which opens a Reply text box if clicked.○ Link to Jam: A link to the SAP Jam Collaboration feed displays below a user's comment.○ Hidden: There is no option for replying displayed below a user's comment.
10. Set the following checkbox toggles as desired:○ Hide Like Links: this toggle shows or hides users' likes as a post in the feed as replies.○ Hide Bookmark Links: this toggle shows or hides users' bookmarks in the feed as replies.○ Limit feed items to a maximum of: allows you to set the maximum number of feed items.
11. At any point in configuring your feed widget, you can click Preview to see both a rendered example of the current settings and an example of the script that is set by the current options.
12. When you are satisfied with the configuration of your widget, copy the JavaScript from the bottom text box of the Preview area and paste it into your web page within script tags. Ensure that you click Preview immediately before you copy the script to be certain that your most recently selected options are reflected in the script. Also, ensure that you have the div with the ID from step 4 in your HTML page, which calls the script and displays the widget within that div.
250 P U B L I CSAP Jam Collaboration Administrator Guide 1805
Integrations
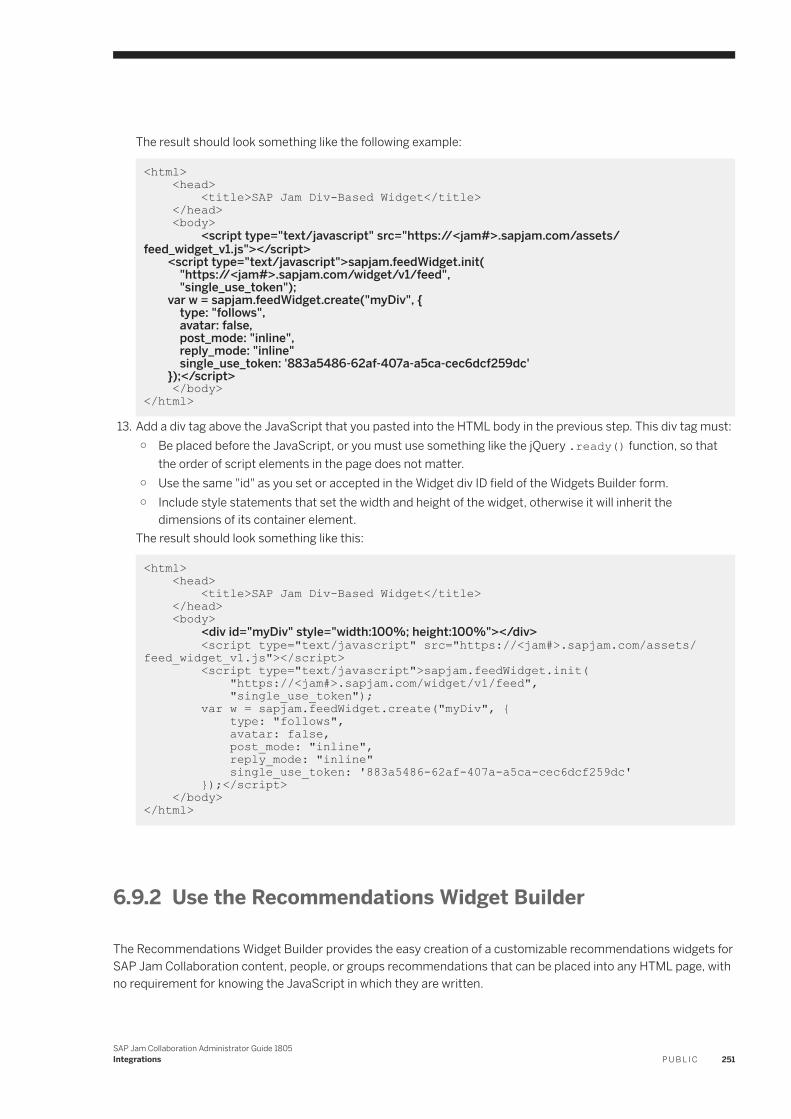
The result should look something like the following example:
<html> <head> <title>SAP Jam Div-Based Widget</title> </head> <body> <script type="text/javascript" src="https://<jam#>.sapjam.com/assets/feed_widget_v1.js"></script> <script type="text/javascript">sapjam.feedWidget.init( "https://<jam#>.sapjam.com/widget/v1/feed", "single_use_token"); var w = sapjam.feedWidget.create("myDiv", { type: "follows", avatar: false, post_mode: "inline", reply_mode: "inline" single_use_token: '883a5486-62af-407a-a5ca-cec6dcf259dc' });</script> </body> </html>
13. Add a div tag above the JavaScript that you pasted into the HTML body in the previous step. This div tag must:○ Be placed before the JavaScript, or you must use something like the jQuery .ready() function, so that
the order of script elements in the page does not matter.○ Use the same "id" as you set or accepted in the Widget div ID field of the Widgets Builder form.○ Include style statements that set the width and height of the widget, otherwise it will inherit the
dimensions of its container element.The result should look something like this:
<html> <head> <title>SAP Jam Div-Based Widget</title> </head> <body> <div id="myDiv" style="width:100%; height:100%"></div> <script type="text/javascript" src="https://<jam#>.sapjam.com/assets/feed_widget_v1.js"></script> <script type="text/javascript">sapjam.feedWidget.init( "https://<jam#>.sapjam.com/widget/v1/feed", "single_use_token"); var w = sapjam.feedWidget.create("myDiv", { type: "follows", avatar: false, post_mode: "inline", reply_mode: "inline" single_use_token: '883a5486-62af-407a-a5ca-cec6dcf259dc' });</script> </body> </html>
6.9.2 Use the Recommendations Widget Builder
The Recommendations Widget Builder provides the easy creation of a customizable recommendations widgets for SAP Jam Collaboration content, people, or groups recommendations that can be placed into any HTML page, with no requirement for knowing the JavaScript in which they are written.
SAP Jam Collaboration Administrator Guide 1805Integrations P U B L I C 251
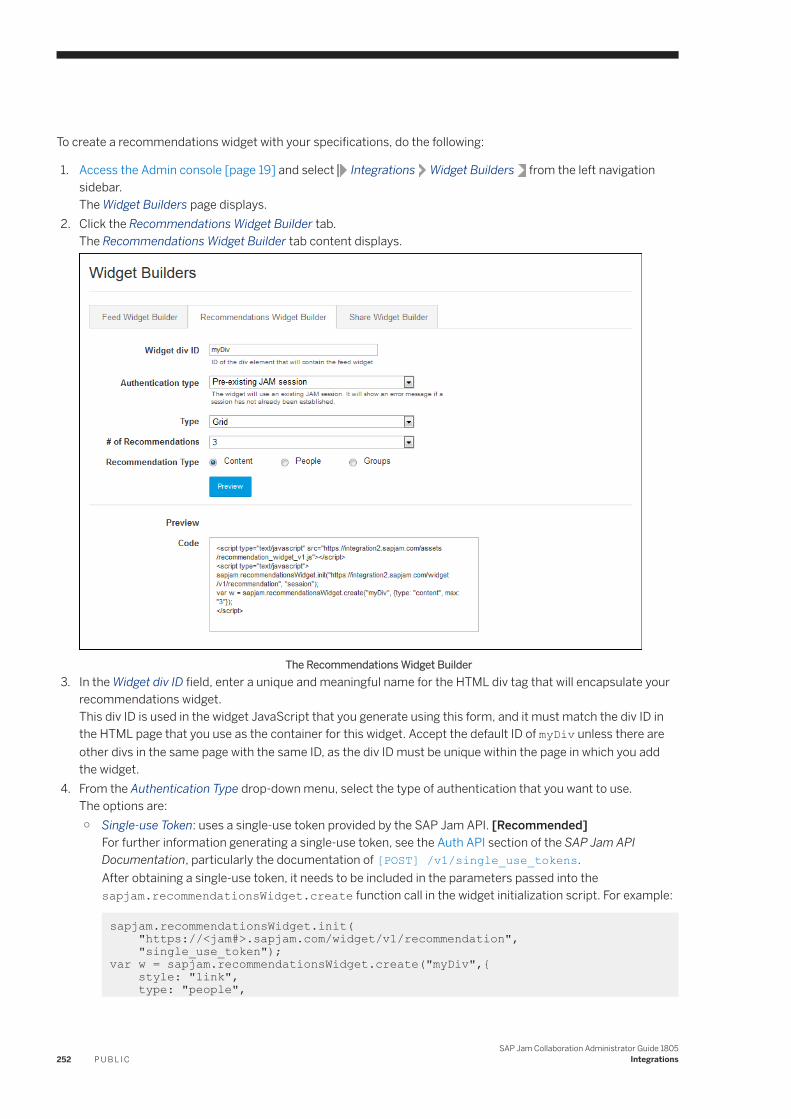
To create a recommendations widget with your specifications, do the following:
1. Access the Admin console [page 19] and select Integrations Widget Builders from the left navigation sidebar.The Widget Builders page displays.
2. Click the Recommendations Widget Builder tab.The Recommendations Widget Builder tab content displays.
The Recommendations Widget Builder3. In the Widget div ID field, enter a unique and meaningful name for the HTML div tag that will encapsulate your
recommendations widget.This div ID is used in the widget JavaScript that you generate using this form, and it must match the div ID in the HTML page that you use as the container for this widget. Accept the default ID of myDiv unless there are other divs in the same page with the same ID, as the div ID must be unique within the page in which you add the widget.
4. From the Authentication Type drop-down menu, select the type of authentication that you want to use.The options are:○ Single-use Token: uses a single-use token provided by the SAP Jam API. [Recommended]
For further information generating a single-use token, see the Auth API section of the SAP Jam API Documentation, particularly the documentation of [POST] /v1/single_use_tokens.After obtaining a single-use token, it needs to be included in the parameters passed into the sapjam.recommendationsWidget.create function call in the widget initialization script. For example:
sapjam.recommendationsWidget.init( "https://<jam#>.sapjam.com/widget/v1/recommendation", "single_use_token");var w = sapjam.recommendationsWidget.create("myDiv",{ style: "link", type: "people",
252 P U B L I CSAP Jam Collaboration Administrator Guide 1805
Integrations
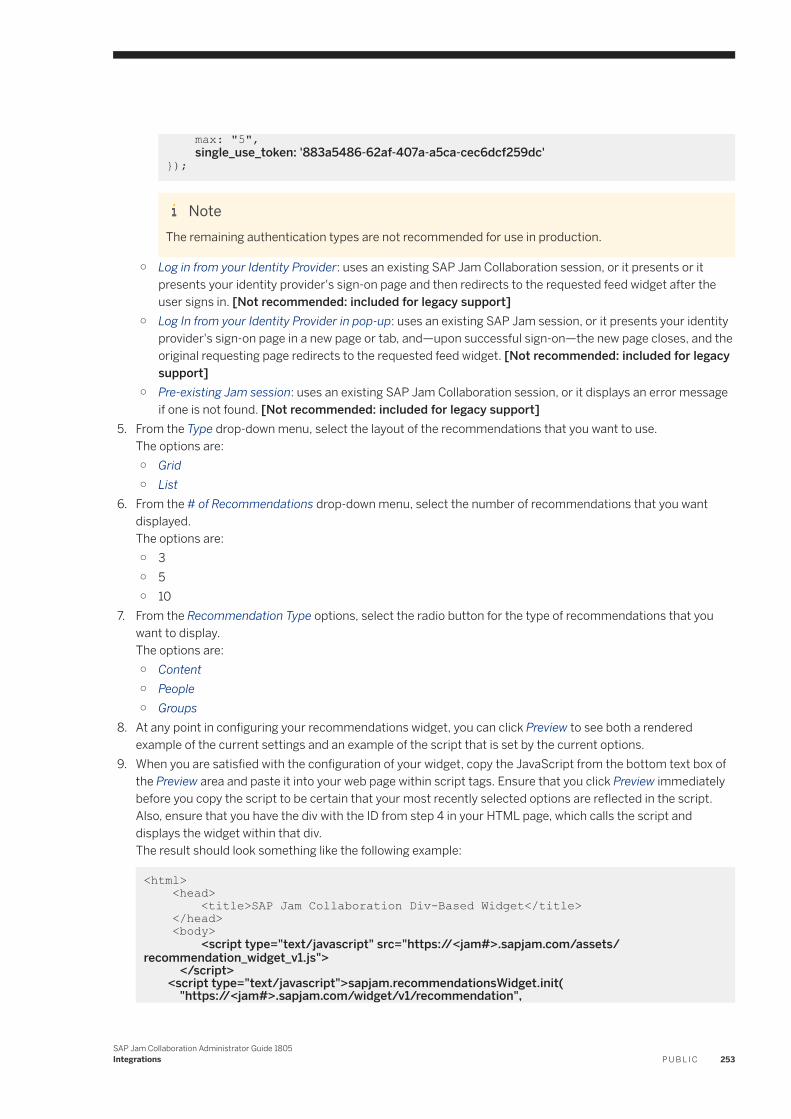
max: "5", single_use_token: '883a5486-62af-407a-a5ca-cec6dcf259dc' });
NoteThe remaining authentication types are not recommended for use in production.
○ Log in from your Identity Provider: uses an existing SAP Jam Collaboration session, or it presents or it presents your identity provider's sign-on page and then redirects to the requested feed widget after the user signs in. [Not recommended: included for legacy support]
○ Log In from your Identity Provider in pop-up: uses an existing SAP Jam session, or it presents your identity provider's sign-on page in a new page or tab, and—upon successful sign-on—the new page closes, and the original requesting page redirects to the requested feed widget. [Not recommended: included for legacy support]
○ Pre-existing Jam session: uses an existing SAP Jam Collaboration session, or it displays an error message if one is not found. [Not recommended: included for legacy support]
5. From the Type drop-down menu, select the layout of the recommendations that you want to use.The options are:○ Grid○ List
6. From the # of Recommendations drop-down menu, select the number of recommendations that you want displayed.The options are:○ 3○ 5○ 10
7. From the Recommendation Type options, select the radio button for the type of recommendations that you want to display.The options are:○ Content○ People○ Groups
8. At any point in configuring your recommendations widget, you can click Preview to see both a rendered example of the current settings and an example of the script that is set by the current options.
9. When you are satisfied with the configuration of your widget, copy the JavaScript from the bottom text box of the Preview area and paste it into your web page within script tags. Ensure that you click Preview immediately before you copy the script to be certain that your most recently selected options are reflected in the script. Also, ensure that you have the div with the ID from step 4 in your HTML page, which calls the script and displays the widget within that div.The result should look something like the following example:
<html> <head> <title>SAP Jam Collaboration Div-Based Widget</title> </head> <body> <script type="text/javascript" src="https://<jam#>.sapjam.com/assets/recommendation_widget_v1.js"> </script> <script type="text/javascript">sapjam.recommendationsWidget.init( "https://<jam#>.sapjam.com/widget/v1/recommendation",
SAP Jam Collaboration Administrator Guide 1805Integrations P U B L I C 253
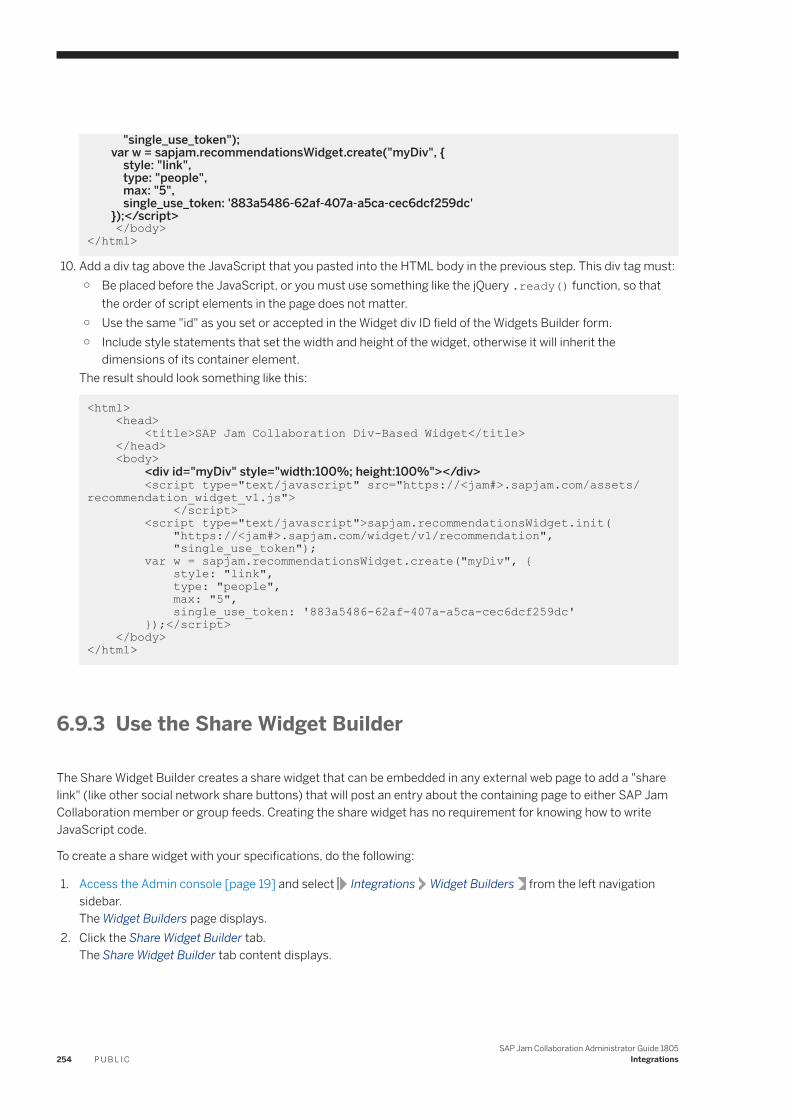
"single_use_token"); var w = sapjam.recommendationsWidget.create("myDiv", { style: "link", type: "people", max: "5", single_use_token: '883a5486-62af-407a-a5ca-cec6dcf259dc' });</script> </body> </html>
10. Add a div tag above the JavaScript that you pasted into the HTML body in the previous step. This div tag must:○ Be placed before the JavaScript, or you must use something like the jQuery .ready() function, so that
the order of script elements in the page does not matter.○ Use the same "id" as you set or accepted in the Widget div ID field of the Widgets Builder form.○ Include style statements that set the width and height of the widget, otherwise it will inherit the
dimensions of its container element.The result should look something like this:
<html> <head> <title>SAP Jam Collaboration Div-Based Widget</title> </head> <body> <div id="myDiv" style="width:100%; height:100%"></div> <script type="text/javascript" src="https://<jam#>.sapjam.com/assets/recommendation_widget_v1.js"> </script> <script type="text/javascript">sapjam.recommendationsWidget.init( "https://<jam#>.sapjam.com/widget/v1/recommendation", "single_use_token"); var w = sapjam.recommendationsWidget.create("myDiv", { style: "link", type: "people", max: "5", single_use_token: '883a5486-62af-407a-a5ca-cec6dcf259dc' });</script> </body> </html>
6.9.3 Use the Share Widget Builder
The Share Widget Builder creates a share widget that can be embedded in any external web page to add a "share link" (like other social network share buttons) that will post an entry about the containing page to either SAP Jam Collaboration member or group feeds. Creating the share widget has no requirement for knowing how to write JavaScript code.
To create a share widget with your specifications, do the following:
1. Access the Admin console [page 19] and select Integrations Widget Builders from the left navigation sidebar.The Widget Builders page displays.
2. Click the Share Widget Builder tab.The Share Widget Builder tab content displays.
254 P U B L I CSAP Jam Collaboration Administrator Guide 1805
Integrations
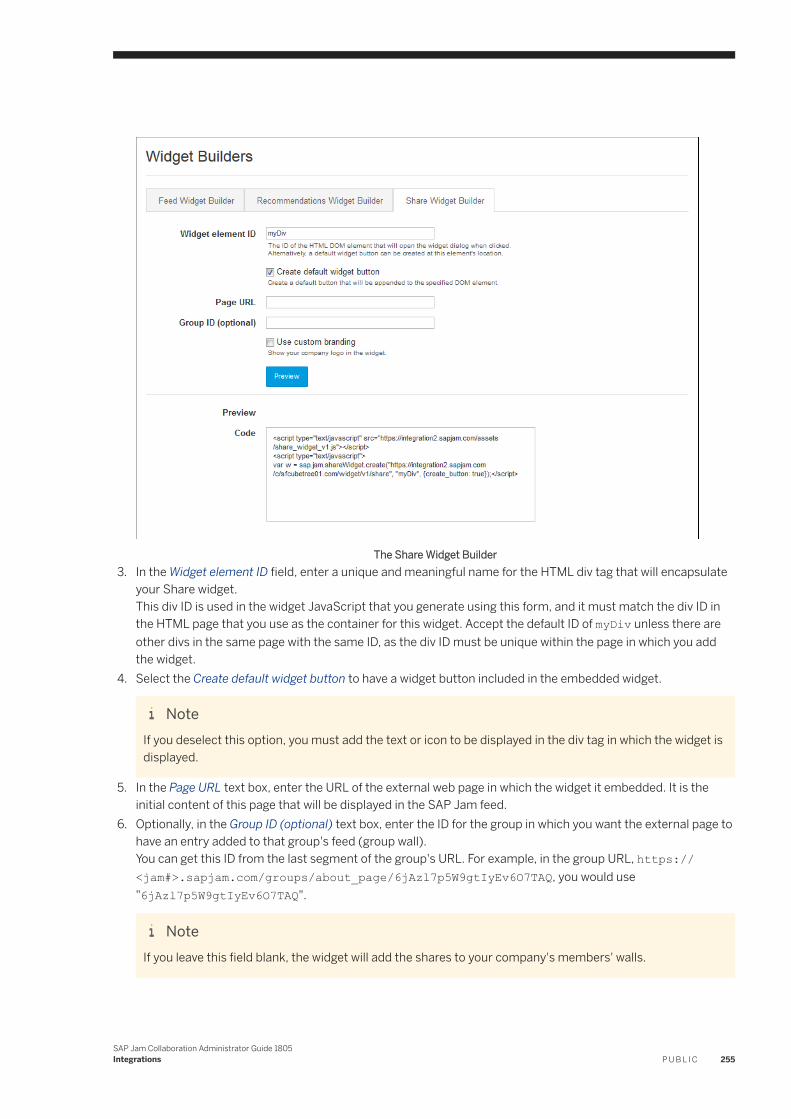
The Share Widget Builder3. In the Widget element ID field, enter a unique and meaningful name for the HTML div tag that will encapsulate
your Share widget.This div ID is used in the widget JavaScript that you generate using this form, and it must match the div ID in the HTML page that you use as the container for this widget. Accept the default ID of myDiv unless there are other divs in the same page with the same ID, as the div ID must be unique within the page in which you add the widget.
4. Select the Create default widget button to have a widget button included in the embedded widget.
NoteIf you deselect this option, you must add the text or icon to be displayed in the div tag in which the widget is displayed.
5. In the Page URL text box, enter the URL of the external web page in which the widget it embedded. It is the initial content of this page that will be displayed in the SAP Jam feed.
6. Optionally, in the Group ID (optional) text box, enter the ID for the group in which you want the external page to have an entry added to that group's feed (group wall).You can get this ID from the last segment of the group's URL. For example, in the group URL, https://<jam#>.sapjam.com/groups/about_page/6jAzl7p5W9gtIyEv6O7TAQ, you would use "6jAzl7p5W9gtIyEv6O7TAQ".
NoteIf you leave this field blank, the widget will add the shares to your company's members' walls.
SAP Jam Collaboration Administrator Guide 1805Integrations P U B L I C 255
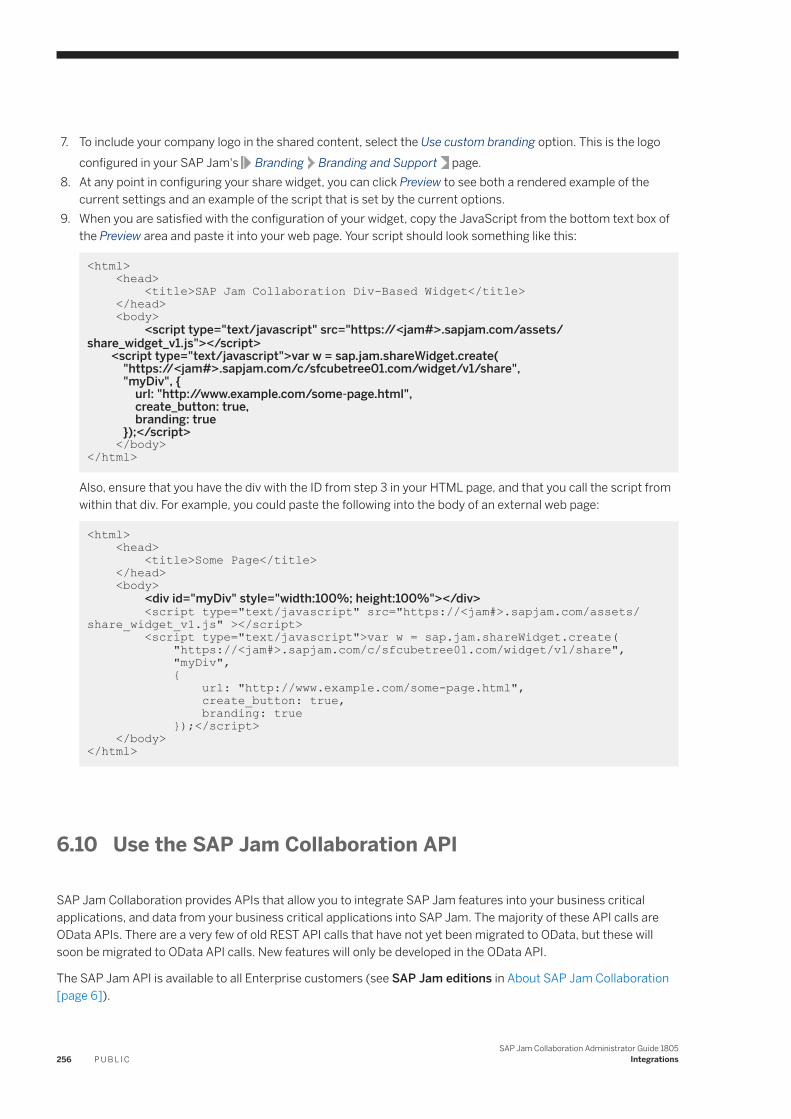
7. To include your company logo in the shared content, select the Use custom branding option. This is the logo configured in your SAP Jam's Branding Branding and Support page.
8. At any point in configuring your share widget, you can click Preview to see both a rendered example of the current settings and an example of the script that is set by the current options.
9. When you are satisfied with the configuration of your widget, copy the JavaScript from the bottom text box of the Preview area and paste it into your web page. Your script should look something like this:
<html> <head> <title>SAP Jam Collaboration Div-Based Widget</title> </head> <body> <script type="text/javascript" src="https://<jam#>.sapjam.com/assets/share_widget_v1.js"></script> <script type="text/javascript">var w = sap.jam.shareWidget.create( "https://<jam#>.sapjam.com/c/sfcubetree01.com/widget/v1/share", "myDiv", { url: "http://www.example.com/some-page.html", create_button: true, branding: true });</script> </body> </html>
Also, ensure that you have the div with the ID from step 3 in your HTML page, and that you call the script from within that div. For example, you could paste the following into the body of an external web page:
<html> <head> <title>Some Page</title> </head> <body> <div id="myDiv" style="width:100%; height:100%"></div> <script type="text/javascript" src="https://<jam#>.sapjam.com/assets/share_widget_v1.js" ></script> <script type="text/javascript">var w = sap.jam.shareWidget.create( "https://<jam#>.sapjam.com/c/sfcubetree01.com/widget/v1/share", "myDiv", { url: "http://www.example.com/some-page.html", create_button: true, branding: true });</script> </body> </html>
6.10 Use the SAP Jam Collaboration API
SAP Jam Collaboration provides APIs that allow you to integrate SAP Jam features into your business critical applications, and data from your business critical applications into SAP Jam. The majority of these API calls are OData APIs. There are a very few of old REST API calls that have not yet been migrated to OData, but these will soon be migrated to OData API calls. New features will only be developed in the OData API.
The SAP Jam API is available to all Enterprise customers (see SAP Jam editions in About SAP Jam Collaboration [page 6]).
256 P U B L I CSAP Jam Collaboration Administrator Guide 1805
Integrations
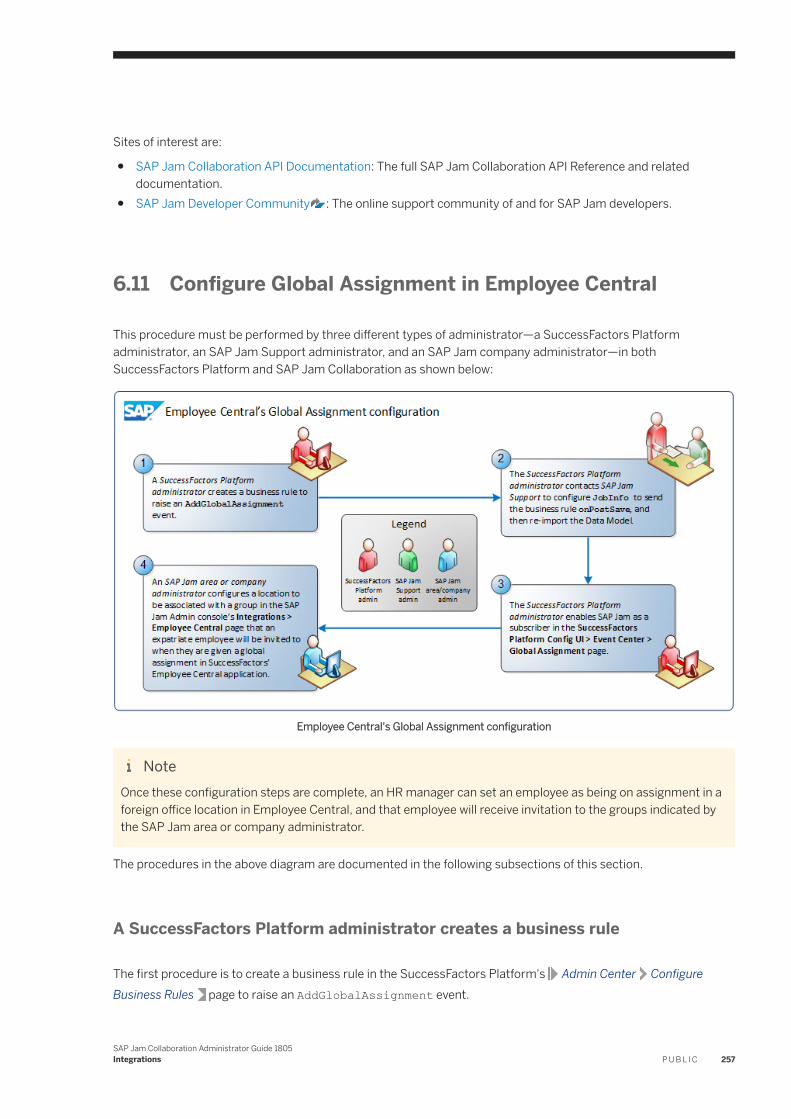
Sites of interest are:
● SAP Jam Collaboration API Documentation: The full SAP Jam Collaboration API Reference and related documentation.
● SAP Jam Developer Community : The online support community of and for SAP Jam developers.
6.11 Configure Global Assignment in Employee Central
This procedure must be performed by three different types of administrator—a SuccessFactors Platform administrator, an SAP Jam Support administrator, and an SAP Jam company administrator—in both SuccessFactors Platform and SAP Jam Collaboration as shown below:
Employee Central's Global Assignment configuration
NoteOnce these configuration steps are complete, an HR manager can set an employee as being on assignment in a foreign office location in Employee Central, and that employee will receive invitation to the groups indicated by the SAP Jam area or company administrator.
The procedures in the above diagram are documented in the following subsections of this section.
A SuccessFactors Platform administrator creates a business rule
The first procedure is to create a business rule in the SuccessFactors Platform's Admin Center Configure Business Rules page to raise an AddGlobalAssignment event.
SAP Jam Collaboration Administrator Guide 1805Integrations P U B L I C 257
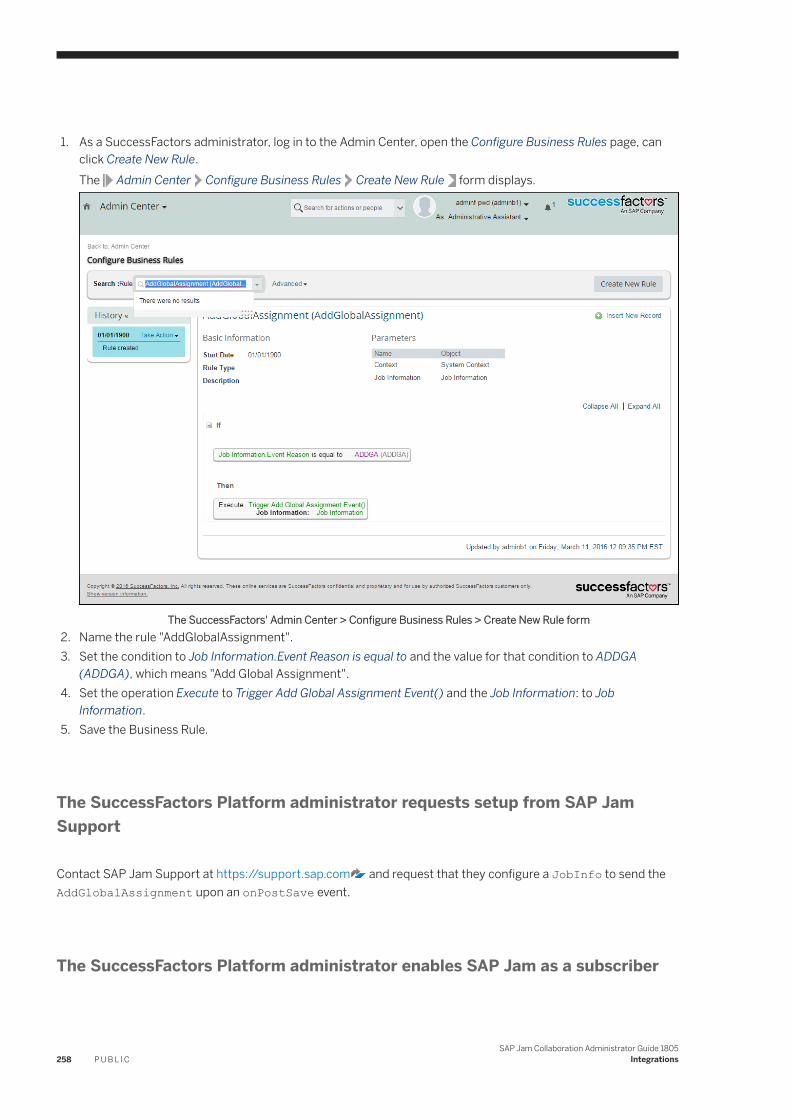
1. As a SuccessFactors administrator, log in to the Admin Center, open the Configure Business Rules page, can click Create New Rule.The Admin Center Configure Business Rules Create New Rule form displays.
The SuccessFactors' Admin Center > Configure Business Rules > Create New Rule form2. Name the rule "AddGlobalAssignment".3. Set the condition to Job Information.Event Reason is equal to and the value for that condition to ADDGA
(ADDGA), which means "Add Global Assignment".4. Set the operation Execute to Trigger Add Global Assignment Event() and the Job Information: to Job
Information.5. Save the Business Rule.
The SuccessFactors Platform administrator requests setup from SAP Jam Support
Contact SAP Jam Support at https://support.sap.com and request that they configure a JobInfo to send the AddGlobalAssignment upon an onPostSave event.
The SuccessFactors Platform administrator enables SAP Jam as a subscriber
258 P U B L I CSAP Jam Collaboration Administrator Guide 1805
Integrations
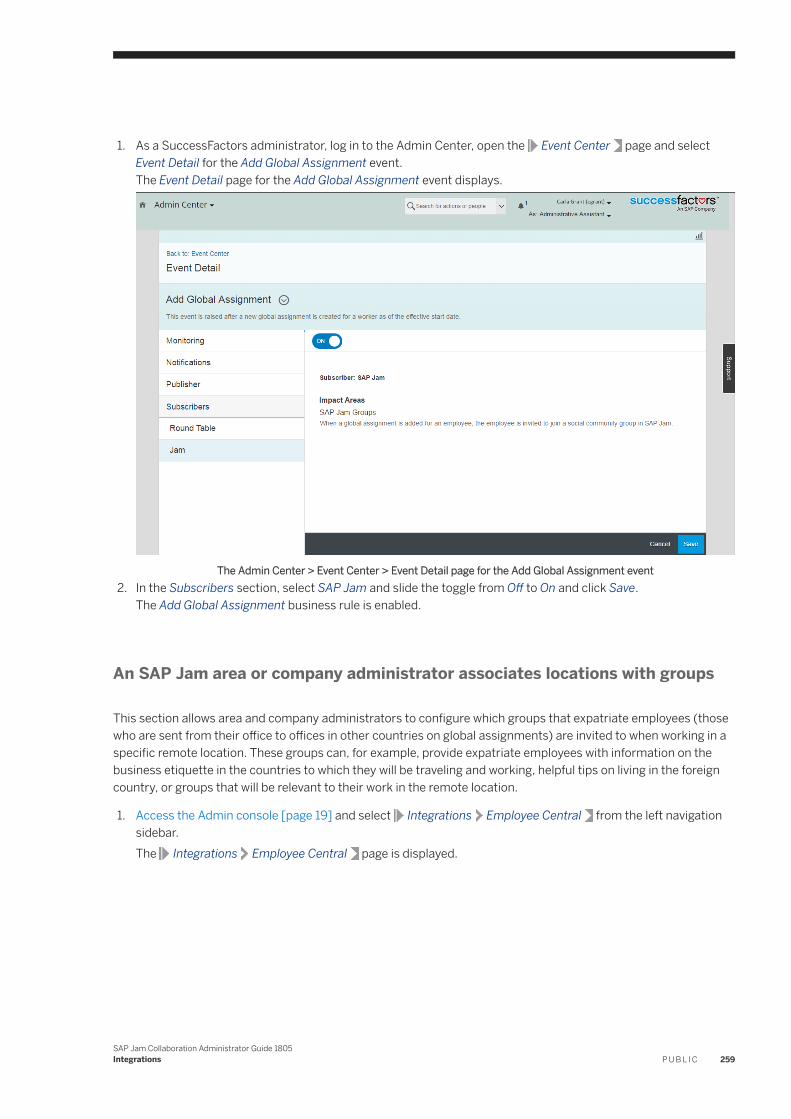
1. As a SuccessFactors administrator, log in to the Admin Center, open the Event Center page and select Event Detail for the Add Global Assignment event.The Event Detail page for the Add Global Assignment event displays.
The Admin Center > Event Center > Event Detail page for the Add Global Assignment event2. In the Subscribers section, select SAP Jam and slide the toggle from Off to On and click Save.
The Add Global Assignment business rule is enabled.
An SAP Jam area or company administrator associates locations with groups
This section allows area and company administrators to configure which groups that expatriate employees (those who are sent from their office to offices in other countries on global assignments) are invited to when working in a specific remote location. These groups can, for example, provide expatriate employees with information on the business etiquette in the countries to which they will be traveling and working, helpful tips on living in the foreign country, or groups that will be relevant to their work in the remote location.
1. Access the Admin console [page 19] and select Integrations Employee Central from the left navigation sidebar.The Integrations Employee Central page is displayed.
SAP Jam Collaboration Administrator Guide 1805Integrations P U B L I C 259

The Admin > Employee Central page, initial view2. Click the + Company button to add a Global Assignment record.
The Employee Central Assign Group To Company dialog box displays.
Employee Central > Assign Group To Company dialog box3. Click on the Company drop-down menu once the Select an existing company label displays.
260 P U B L I CSAP Jam Collaboration Administrator Guide 1805
Integrations
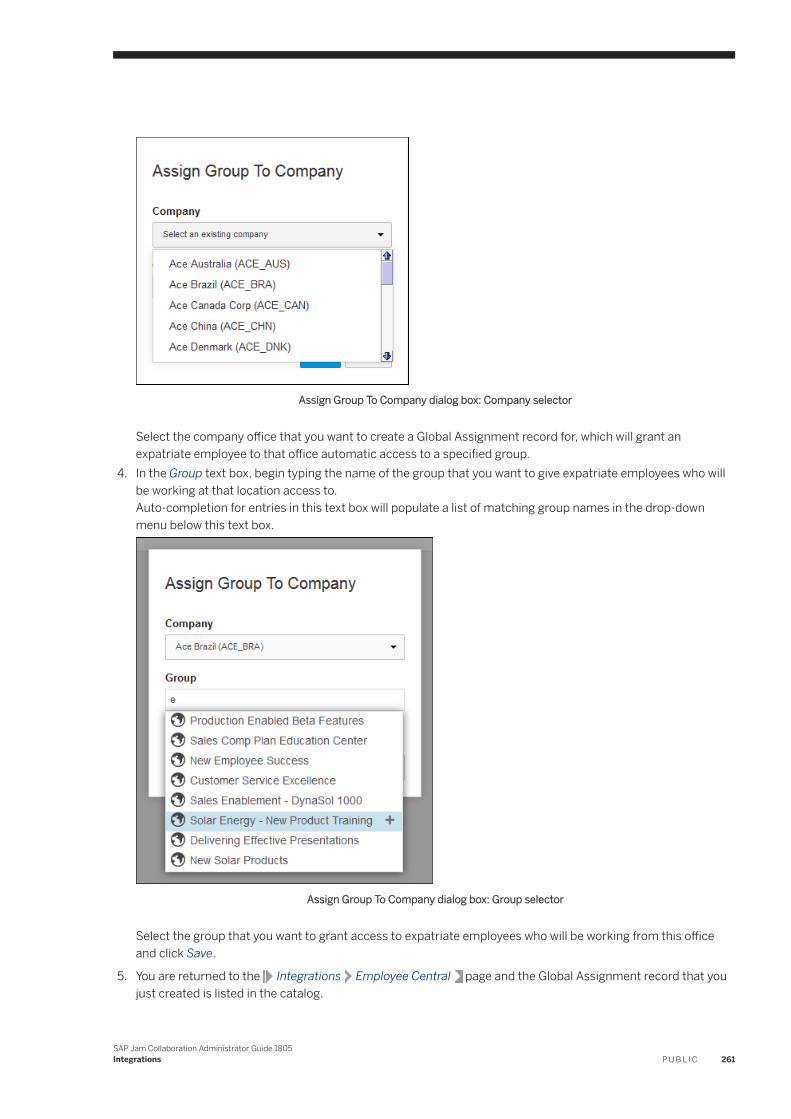
Assign Group To Company dialog box: Company selector
Select the company office that you want to create a Global Assignment record for, which will grant an expatriate employee to that office automatic access to a specified group.
4. In the Group text box, begin typing the name of the group that you want to give expatriate employees who will be working at that location access to.Auto-completion for entries in this text box will populate a list of matching group names in the drop-down menu below this text box.
Assign Group To Company dialog box: Group selector
Select the group that you want to grant access to expatriate employees who will be working from this office and click Save.
5. You are returned to the Integrations Employee Central page and the Global Assignment record that you just created is listed in the catalog.
SAP Jam Collaboration Administrator Guide 1805Integrations P U B L I C 261
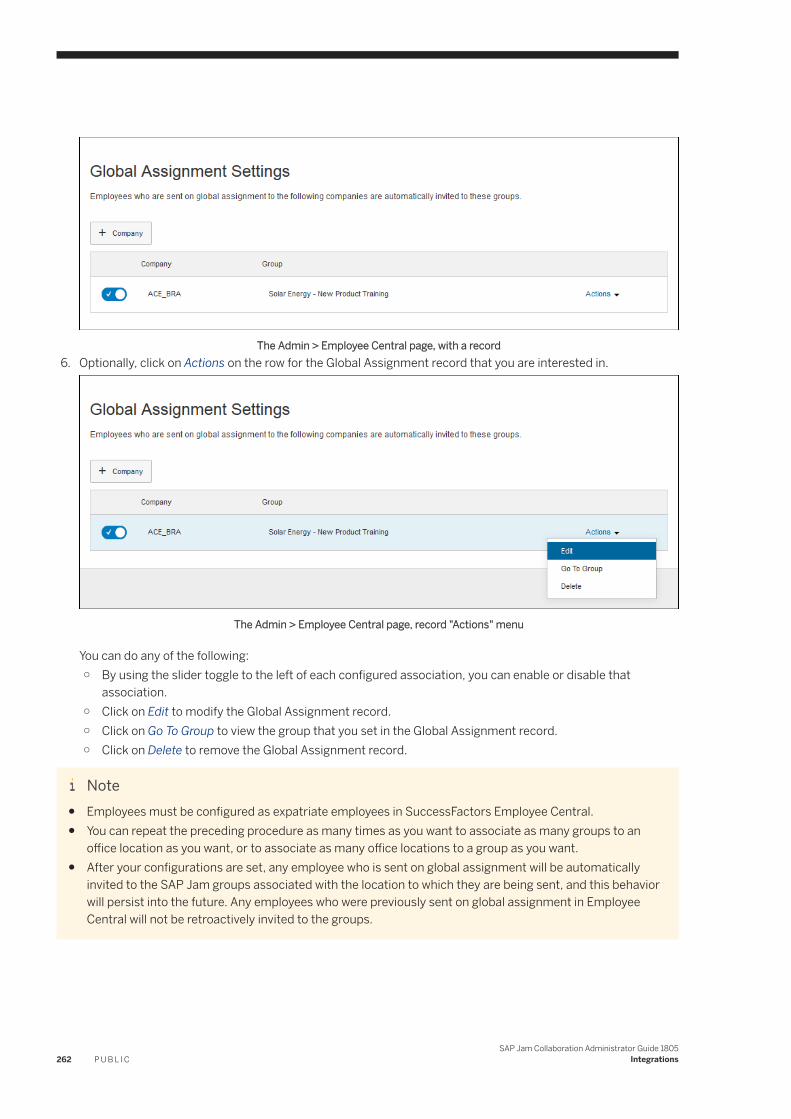
The Admin > Employee Central page, with a record6. Optionally, click on Actions on the row for the Global Assignment record that you are interested in.
The Admin > Employee Central page, record "Actions" menu
You can do any of the following:○ By using the slider toggle to the left of each configured association, you can enable or disable that
association.○ Click on Edit to modify the Global Assignment record.○ Click on Go To Group to view the group that you set in the Global Assignment record.○ Click on Delete to remove the Global Assignment record.
Note● Employees must be configured as expatriate employees in SuccessFactors Employee Central.● You can repeat the preceding procedure as many times as you want to associate as many groups to an
office location as you want, or to associate as many office locations to a group as you want.● After your configurations are set, any employee who is sent on global assignment will be automatically
invited to the SAP Jam groups associated with the location to which they are being sent, and this behavior will persist into the future. Any employees who were previously sent on global assignment in Employee Central will not be retroactively invited to the groups.
262 P U B L I CSAP Jam Collaboration Administrator Guide 1805
Integrations

Result of this configuration
Once these configuration procedures have been performed, an HR worker can set assign an employee to a long-term global assignment and the assignee will receive automated invitations to the groups specified by the SAP Jam administrator for the office location to which they have been assigned.
This is done as follows:
1. As an HR professional, log in to SuccessFactors Employee Central and navigate to the employee record for the person you are assigning to a long-term foreign location and select Update Employee Records.The Update Employee Records page displays.
The SuccessFactors Employee Central > Update Employee Records page2. Select the Add Global Assignment radio button.
The Manage Global Assignment form displays.3. For the Event Reason, select Global Assignment (ADDGA) from the drop-down menu.4. For the Assignment Type, select the type that you want from the drop-down menu.5. In the Assignment Start Date selector, select the date at which the employee's assignment will begin.6. In the Planned End Date selector, select the expected date at which the employee's assignment will end.7. In the New Assignment Company, select the company office to which they will report during the assignment.8. Once these settings are configured to your satisfaction, click Save.
The employee's long-term foreign assignment is set. The employee will receive invitations to the groups configured in SAP Jam as being relevant to assignment in the specified location.
SAP Jam Collaboration Administrator Guide 1805Integrations P U B L I C 263
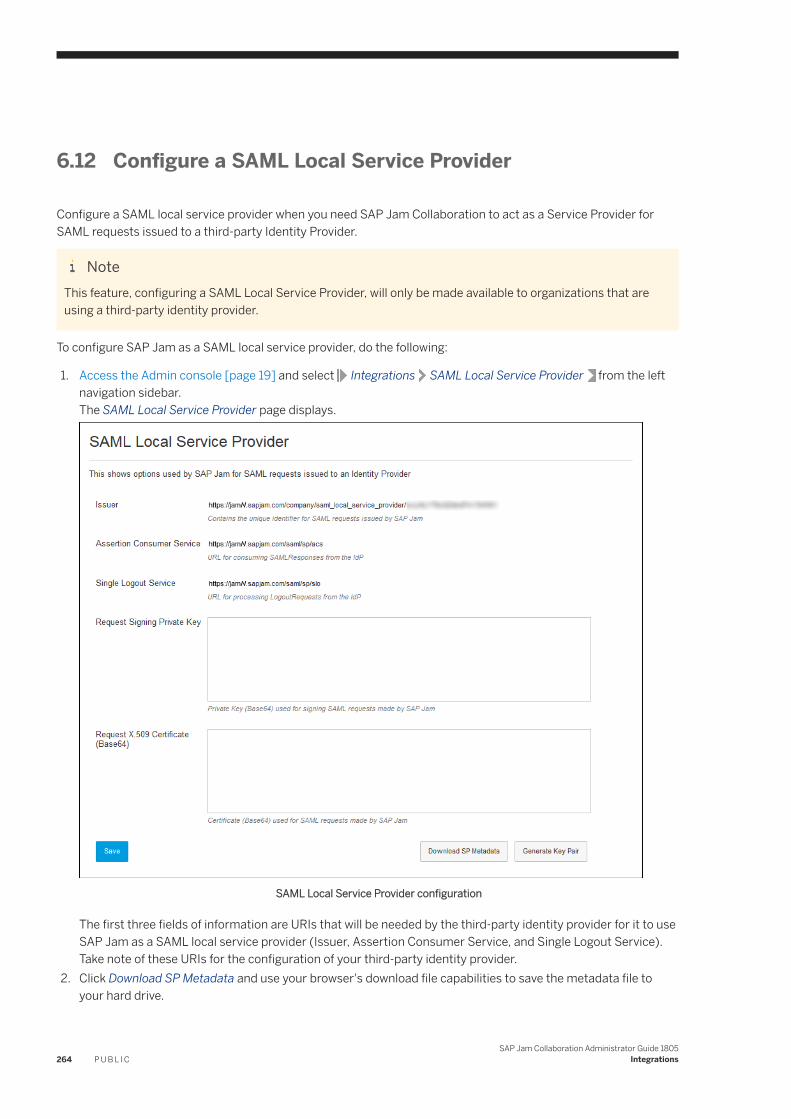
6.12 Configure a SAML Local Service Provider
Configure a SAML local service provider when you need SAP Jam Collaboration to act as a Service Provider for SAML requests issued to a third-party Identity Provider.
NoteThis feature, configuring a SAML Local Service Provider, will only be made available to organizations that are using a third-party identity provider.
To configure SAP Jam as a SAML local service provider, do the following:
1. Access the Admin console [page 19] and select Integrations SAML Local Service Provider from the left navigation sidebar.The SAML Local Service Provider page displays.
SAML Local Service Provider configuration
The first three fields of information are URIs that will be needed by the third-party identity provider for it to use SAP Jam as a SAML local service provider (Issuer, Assertion Consumer Service, and Single Logout Service). Take note of these URIs for the configuration of your third-party identity provider.
2. Click Download SP Metadata and use your browser's download file capabilities to save the metadata file to your hard drive.
264 P U B L I CSAP Jam Collaboration Administrator Guide 1805
Integrations
Save this file for the configuration of your third-party identity provider.3. Click Generate Key Pair to automatically fill the Request Signing Private Key and the Request X.509 Certificate
(Base64) text boxes with the required information.4. Once these steps are done, click Save to store the Request Signing Private Key and Request X.509 Certificate
(Base64) so that SAP Jam will work with your third-party identity provider, which you must now configure with the information you noted and downloaded.
6.13 Push notifications for webhooks
Webhooks provide a means of tracking specific events that occur in SAP Jam and then sending the event notification metadata to third party applications that use them. From the SAP Jam Admin console, company administrators can create and manage webhook subscriptions.
For more information on how to integrate with webhooks, please refer to the SAP Jam Collaboration Developer Guide.
6.14 Zapier to SAP Jam Integration
Explains how to integrate Zapier with SAP Jam using an Alias User.
Overview
Zapier can be integrated with SAP Jam using an Alias User to provide robust integration capabilities without requiring any coding. Simply configure everything through the Zapier and SAP Jam user interfaces and go.
Use Case 1: Integrate Gmail with SAP Jam
Moving data from your gmail account into a SAP Jam feed so your organization can have full visibility into important information. To demonstrate this we will move all new starred emails from a gmail account into a group as feed entries in SAP Jam. We will demonstrate how to set this up on a free SAP Cloud Platform trial account and a free Zapier account.
SAP Jam Collaboration Administrator Guide 1805Integrations P U B L I C 265
Setup your SAP Jam instance on SAP Cloud Platform
The following steps will demonstrate how to setup SAP Jam on SAP Cloud Platform:
1. Sign up for a trial account of SAP Cloud Platform2. Login to SAP Jam on your SAP Cloud Platform account
Setup your SAP Jam OAuth Client and Alias account
The following steps will demonstrate how to setup your SAP Jam OAuth Client and Alias account:
1. Setup your OAuth Client in SAP Jam [page 181]1. Make sure to add the following to your OAuth Client configuration:
○ Integration URL: https://developer.sapjam.com2. Setup an Alias Account [page 46]
1. Add all users you want to be associated with the Alias Account (Setup an Alias Account - Step 3).2. Add the OAuth client you just created to API Access for your Alias Account (Setup an Alias Account - Step
4).3. Copy the OAuth2 Access Token
Setup your Zapier Account
The following steps will show you how to setup your Zapier account:
1. Sign up for a free Zapier account at:○ https://zapier.com/sign-up
2. Login to your Zapier account at:○ https://zapier.com/app/login
3. Go to Zapier's SAP Jam Collaboration Integrations page at:○ https://zapier.com/zapbook/sap-jam/
Create a Zap Trigger with Gmail
The following steps will show you how to create a Zap Trigger with Gmail:
1. Click the MAKE A ZAP button. The Choose a Trigger App screen appears.2. Select the Choose a Trigger App input field and enter Gmail.3. Select Gmail from the drop-down list. The Select Gmail Trigger screen appears.4. Select the New Starred Email radio button.5. Click the Save + Continue button. The Select Gmail Account screen appears.6. Click the Connect a New Account button. A Request for Permission popup appears.7. Enter your Gmail account user credentials and click the Allow button. Your Gmail account is added.
266 P U B L I CSAP Jam Collaboration Administrator Guide 1805
Integrations

8. Click the Save + Continue button. The Test Gmail screen appears.9. Click the Fetch & Continue button. The Zap Trigger will be tested with your Gmail account.10. Test Successful appears if the Zap Trigger works. Click the Continue button.
Create a Zap Action with SAP Jam Collaboration
The following steps will show you how to create a Zap Action with SAP Jam Collaboration:
1. Select the Choose an Action App input field and enter SAP Jam Collaboration.2. Select SAP Jam Collaboration from the drop-down list. The Select SAP Jam Collaboration Action screen
appears3. Select the Create Group Feed radio button.4. Click the Save + Continue button. The Select SAP Jam Collaboration Account screen appears.5. Click the Connect a New Account button. A Connect an Account popup appears.6. Paste your OAuth2 Access Token in the OAuth2 Token input field.7. Select developer.sapjam.com from the Domain drop-down list.8. Click the Yes, continue button. Your SAP Jam Collaboration account is added.9. Click the Save + Continue button. The Set up SAP Jam Collaboration Group Feed screen appears.10. Follow the on-screen intructions to copy and paste your SAP Jam GroupID into the Group ID input field. Make
sure the your Alias User has access to that group.11. Follow the on-screen instructions to add text to the Text input field.12. Click the Continue button.13. Click the Create & Continue button. The Zap Action will be tested with your SAP Jam Collaboration account.14. Test Successful appears if the Zap Trigger works. Your new group feed entry is added to your SAP Jam group.15. Click the Finish button. The Ready to turn on your Zap? screen appears.16. Enter the name of your Zap in the Name your Zap... input field.17. Set the YOUR ZAP IS slider button to on to enable your Zap.18. Your Zap is enabled! Click the See it on your Dashboard button to see your collection of Zaps.
6.15 Microsoft® Skype for Business® integration
Microsoft® Skype for Business® can now be enabled on SAP Jam so that users can chat within Skype for Business and check to see if other users are online.
When the company administrator enables the Skype for Business integration, the user will be able to see the online status of another user when they place their cursor over their profile card in a feed item. As the user clicks on the Skype for Business status on the profile card, the application opens.
The Skype for Business integration with SAP Jam is only supported with the Microsoft Internet Explorer 11 browser. Microsoft Edge, Google Chrome, Mozilla Firefox and other browsers are not supported.
Please note the following Skype for Business version and browser compatibility matrix:
SAP Jam Collaboration Administrator Guide 1805Integrations P U B L I C 267
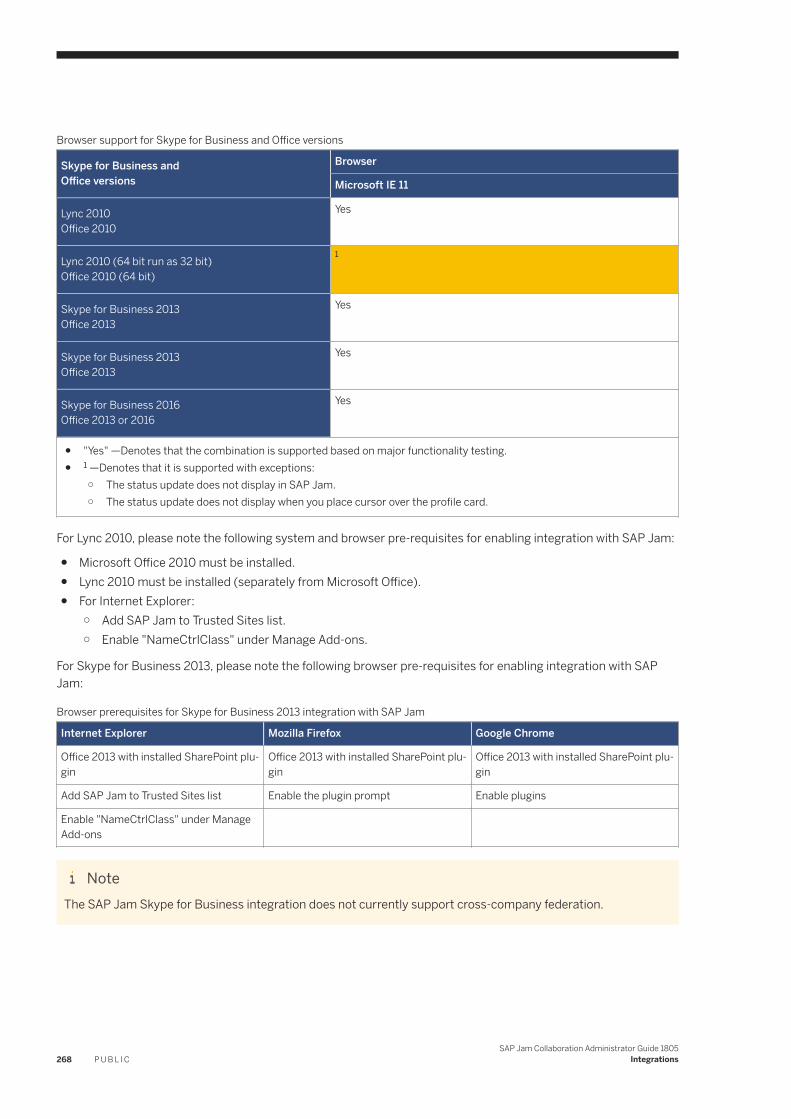
Browser support for Skype for Business and Office versions
Skype for Business andOffice versions
Browser
Microsoft IE 11
Lync 2010Office 2010
Yes
Lync 2010 (64 bit run as 32 bit)Office 2010 (64 bit)
1
Skype for Business 2013Office 2013
Yes
Skype for Business 2013Office 2013
Yes
Skype for Business 2016Office 2013 or 2016
Yes
● "Yes" —Denotes that the combination is supported based on major functionality testing.● 1 —Denotes that it is supported with exceptions:
○ The status update does not display in SAP Jam.○ The status update does not display when you place cursor over the profile card.
For Lync 2010, please note the following system and browser pre-requisites for enabling integration with SAP Jam:
● Microsoft Office 2010 must be installed.● Lync 2010 must be installed (separately from Microsoft Office).● For Internet Explorer:
○ Add SAP Jam to Trusted Sites list.○ Enable "NameCtrlClass" under Manage Add-ons.
For Skype for Business 2013, please note the following browser pre-requisites for enabling integration with SAP Jam:
Browser prerequisites for Skype for Business 2013 integration with SAP Jam
Internet Explorer Mozilla Firefox Google Chrome
Office 2013 with installed SharePoint plugin
Office 2013 with installed SharePoint plugin
Office 2013 with installed SharePoint plugin
Add SAP Jam to Trusted Sites list Enable the plugin prompt Enable plugins
Enable "NameCtrlClass" under Manage Add-ons
NoteThe SAP Jam Skype for Business integration does not currently support cross-company federation.
268 P U B L I CSAP Jam Collaboration Administrator Guide 1805
Integrations
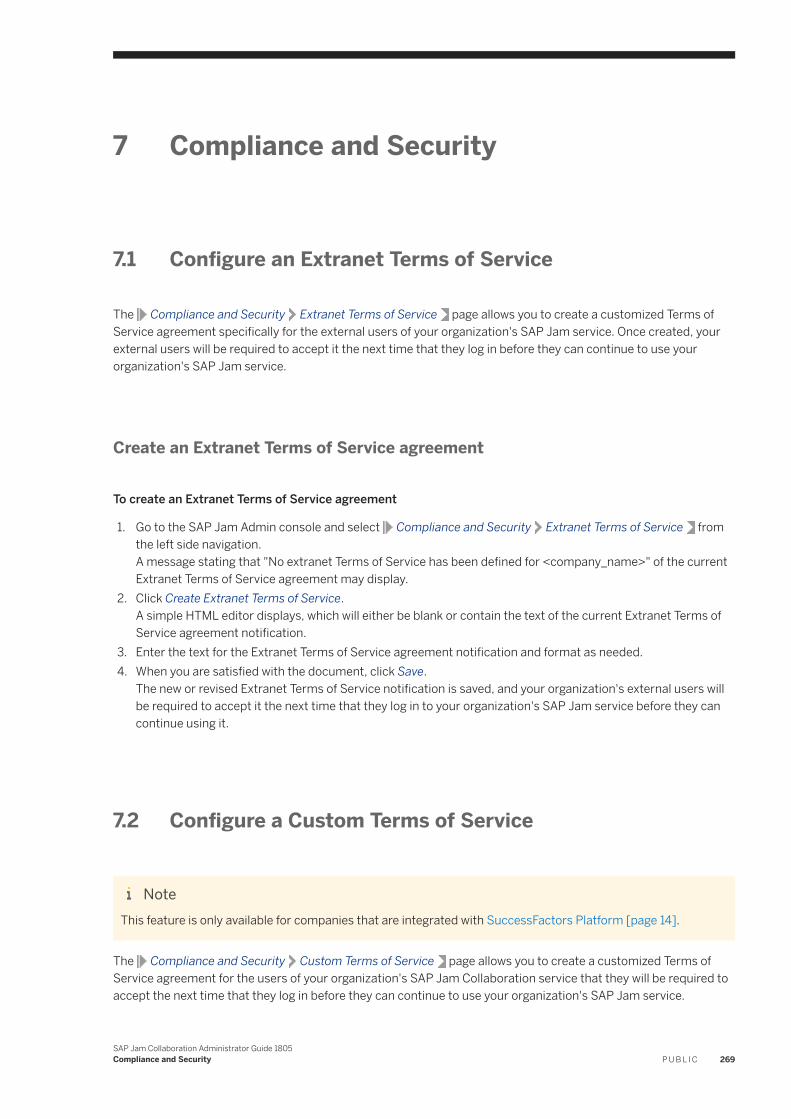
7 Compliance and Security
7.1 Configure an Extranet Terms of Service
The Compliance and Security Extranet Terms of Service page allows you to create a customized Terms of Service agreement specifically for the external users of your organization's SAP Jam service. Once created, your external users will be required to accept it the next time that they log in before they can continue to use your organization's SAP Jam service.
Create an Extranet Terms of Service agreement
To create an Extranet Terms of Service agreement
1. Go to the SAP Jam Admin console and select Compliance and Security Extranet Terms of Service from the left side navigation.A message stating that "No extranet Terms of Service has been defined for <company_name>" of the current Extranet Terms of Service agreement may display.
2. Click Create Extranet Terms of Service.A simple HTML editor displays, which will either be blank or contain the text of the current Extranet Terms of Service agreement notification.
3. Enter the text for the Extranet Terms of Service agreement notification and format as needed.4. When you are satisfied with the document, click Save.
The new or revised Extranet Terms of Service notification is saved, and your organization's external users will be required to accept it the next time that they log in to your organization's SAP Jam service before they can continue using it.
7.2 Configure a Custom Terms of Service
NoteThis feature is only available for companies that are integrated with SuccessFactors Platform [page 14].
The Compliance and Security Custom Terms of Service page allows you to create a customized Terms of Service agreement for the users of your organization's SAP Jam Collaboration service that they will be required to accept the next time that they log in before they can continue to use your organization's SAP Jam service.
SAP Jam Collaboration Administrator Guide 1805Compliance and Security P U B L I C 269
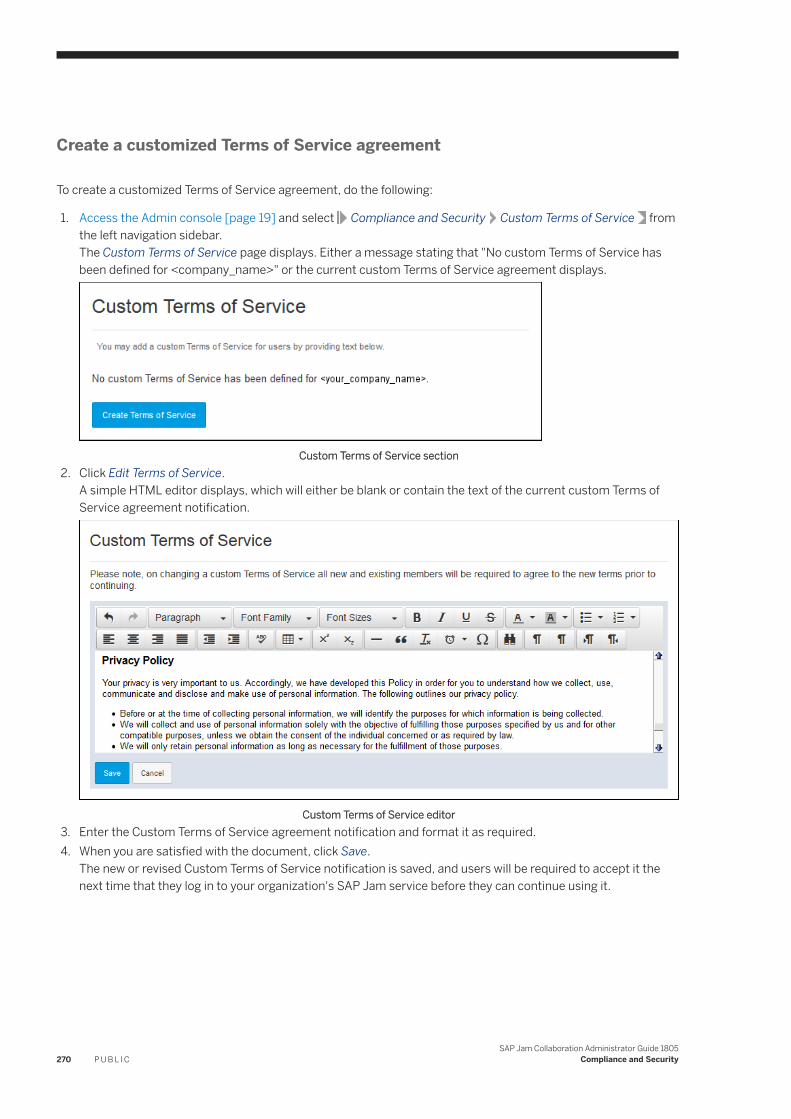
Create a customized Terms of Service agreement
To create a customized Terms of Service agreement, do the following:
1. Access the Admin console [page 19] and select Compliance and Security Custom Terms of Service from the left navigation sidebar.The Custom Terms of Service page displays. Either a message stating that "No custom Terms of Service has been defined for <company_name>" or the current custom Terms of Service agreement displays.
Custom Terms of Service section2. Click Edit Terms of Service.
A simple HTML editor displays, which will either be blank or contain the text of the current custom Terms of Service agreement notification.
Custom Terms of Service editor3. Enter the Custom Terms of Service agreement notification and format it as required.4. When you are satisfied with the document, click Save.
The new or revised Custom Terms of Service notification is saved, and users will be required to accept it the next time that they log in to your organization's SAP Jam service before they can continue using it.
270 P U B L I CSAP Jam Collaboration Administrator Guide 1805
Compliance and Security
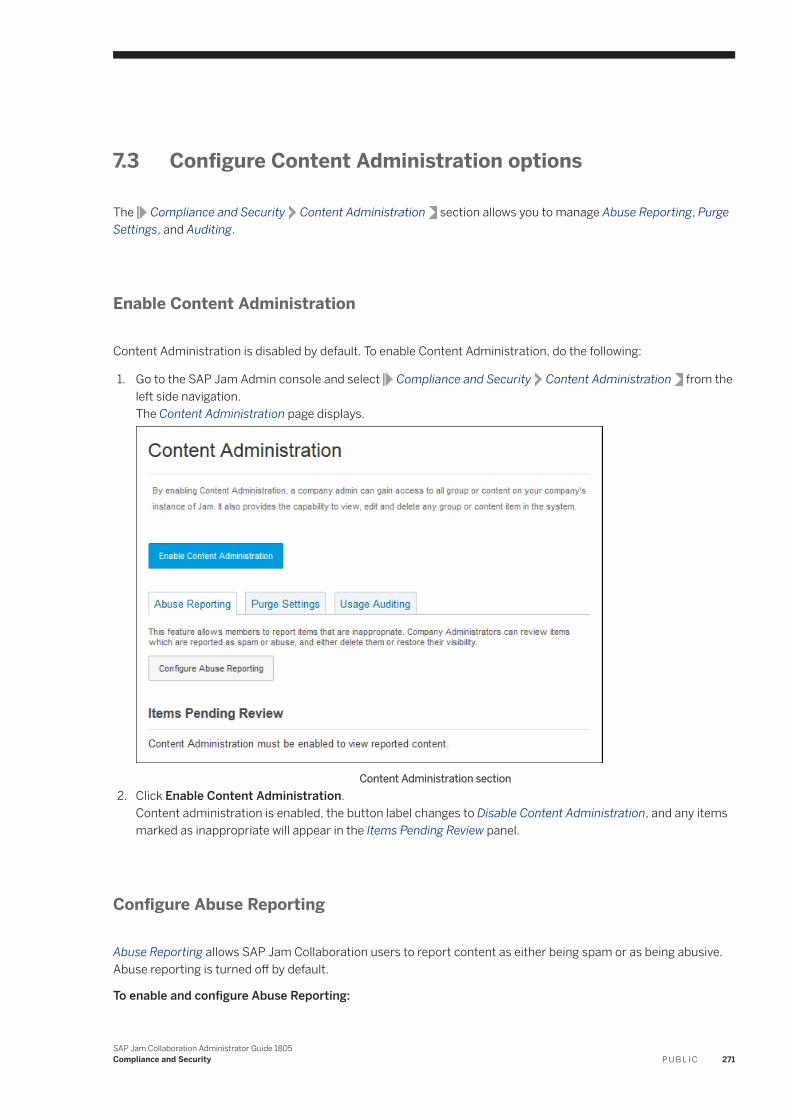
7.3 Configure Content Administration options
The Compliance and Security Content Administration section allows you to manage Abuse Reporting, Purge Settings, and Auditing.
Enable Content Administration
Content Administration is disabled by default. To enable Content Administration, do the following:
1. Go to the SAP Jam Admin console and select Compliance and Security Content Administration from the left side navigation.The Content Administration page displays.
Content Administration section2. Click Enable Content Administration.
Content administration is enabled, the button label changes to Disable Content Administration, and any items marked as inappropriate will appear in the Items Pending Review panel.
Configure Abuse Reporting
Abuse Reporting allows SAP Jam Collaboration users to report content as either being spam or as being abusive. Abuse reporting is turned off by default.
To enable and configure Abuse Reporting:
SAP Jam Collaboration Administrator Guide 1805Compliance and Security P U B L I C 271
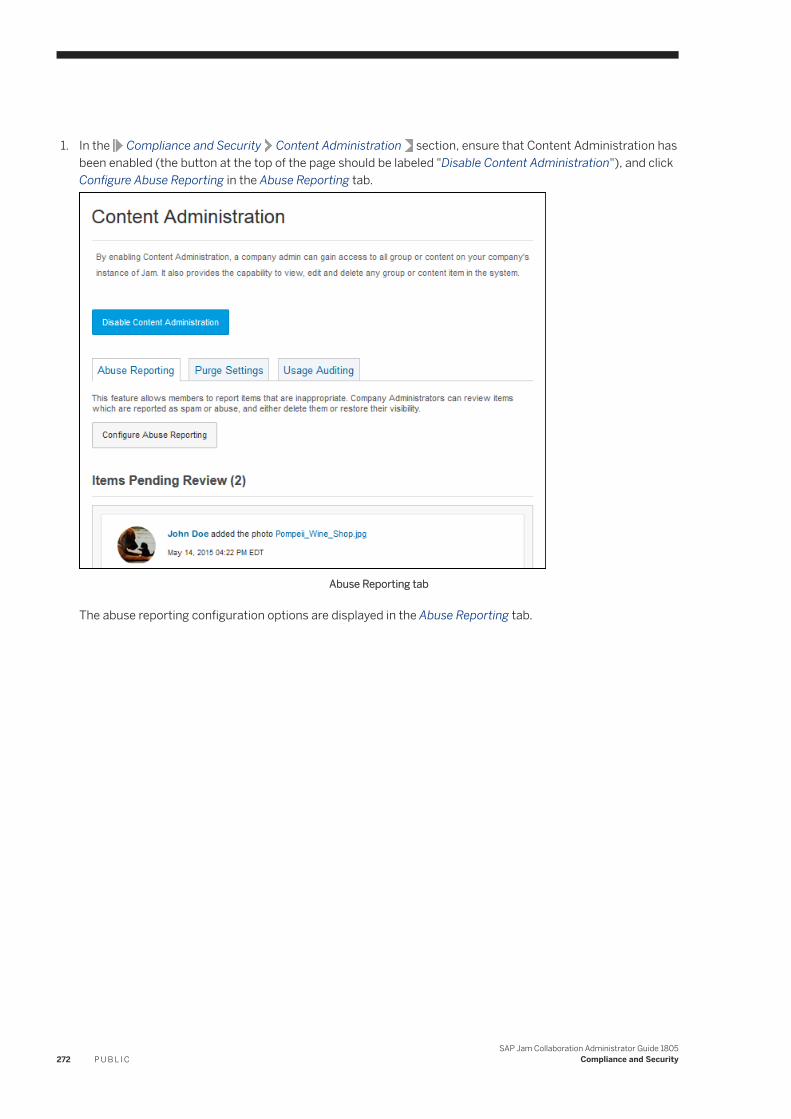
1. In the Compliance and Security Content Administration section, ensure that Content Administration has been enabled (the button at the top of the page should be labeled "Disable Content Administration"), and click Configure Abuse Reporting in the Abuse Reporting tab.
Abuse Reporting tab
The abuse reporting configuration options are displayed in the Abuse Reporting tab.
272 P U B L I CSAP Jam Collaboration Administrator Guide 1805
Compliance and Security
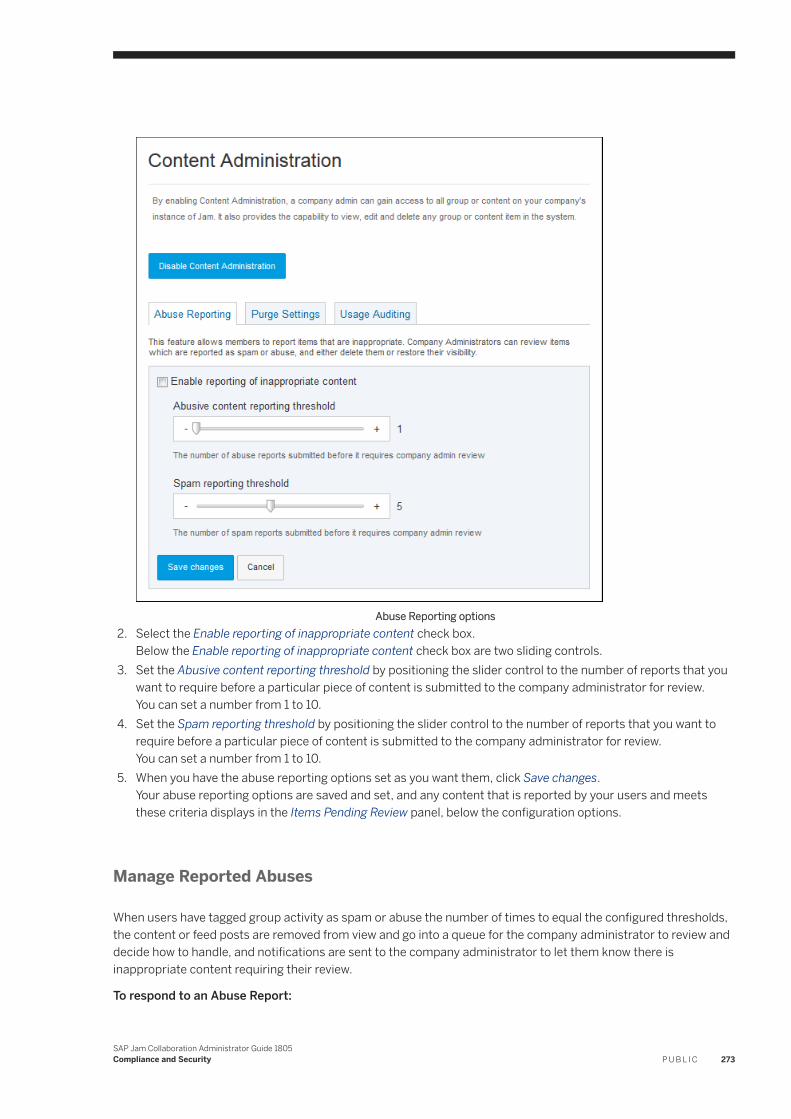
Abuse Reporting options2. Select the Enable reporting of inappropriate content check box.
Below the Enable reporting of inappropriate content check box are two sliding controls.3. Set the Abusive content reporting threshold by positioning the slider control to the number of reports that you
want to require before a particular piece of content is submitted to the company administrator for review.You can set a number from 1 to 10.
4. Set the Spam reporting threshold by positioning the slider control to the number of reports that you want to require before a particular piece of content is submitted to the company administrator for review.You can set a number from 1 to 10.
5. When you have the abuse reporting options set as you want them, click Save changes.Your abuse reporting options are saved and set, and any content that is reported by your users and meets these criteria displays in the Items Pending Review panel, below the configuration options.
Manage Reported Abuses
When users have tagged group activity as spam or abuse the number of times to equal the configured thresholds, the content or feed posts are removed from view and go into a queue for the company administrator to review and decide how to handle, and notifications are sent to the company administrator to let them know there is inappropriate content requiring their review.
To respond to an Abuse Report:
SAP Jam Collaboration Administrator Guide 1805Compliance and Security P U B L I C 273
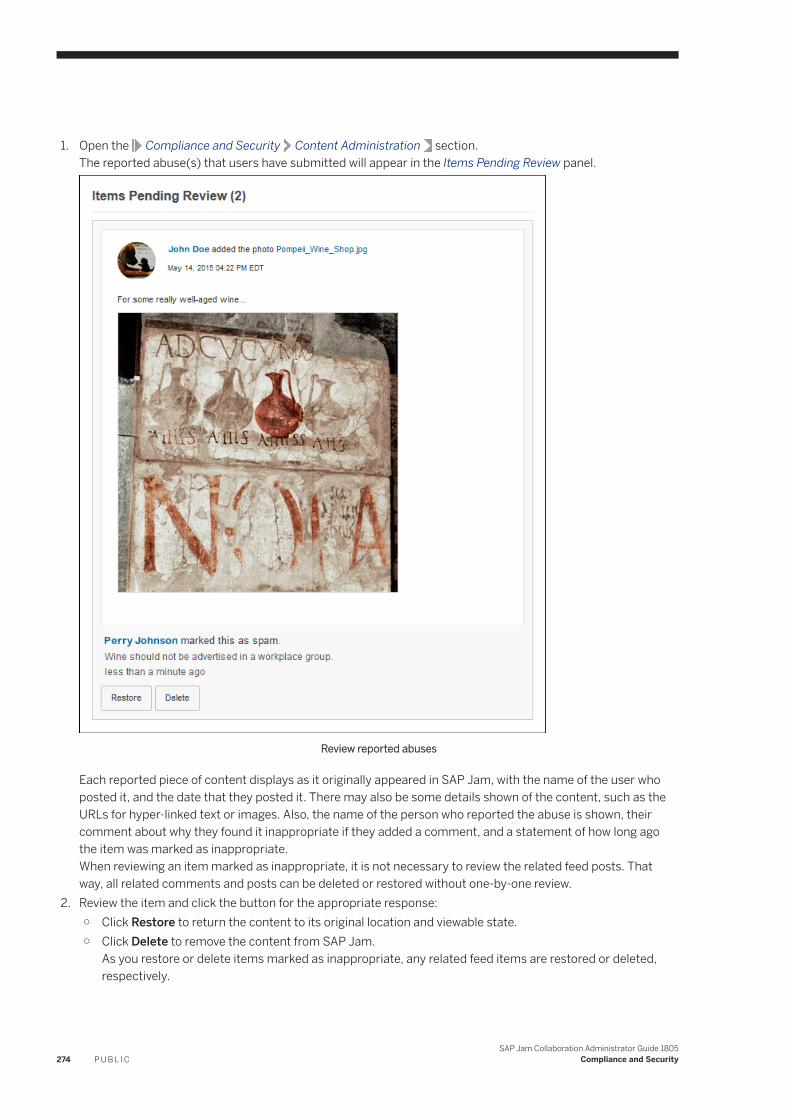
1. Open the Compliance and Security Content Administration section.The reported abuse(s) that users have submitted will appear in the Items Pending Review panel.
Review reported abuses
Each reported piece of content displays as it originally appeared in SAP Jam, with the name of the user who posted it, and the date that they posted it. There may also be some details shown of the content, such as the URLs for hyper-linked text or images. Also, the name of the person who reported the abuse is shown, their comment about why they found it inappropriate if they added a comment, and a statement of how long ago the item was marked as inappropriate.When reviewing an item marked as inappropriate, it is not necessary to review the related feed posts. That way, all related comments and posts can be deleted or restored without one-by-one review.
2. Review the item and click the button for the appropriate response:○ Click Restore to return the content to its original location and viewable state.○ Click Delete to remove the content from SAP Jam.
As you restore or delete items marked as inappropriate, any related feed items are restored or deleted, respectively.
274 P U B L I CSAP Jam Collaboration Administrator Guide 1805
Compliance and Security
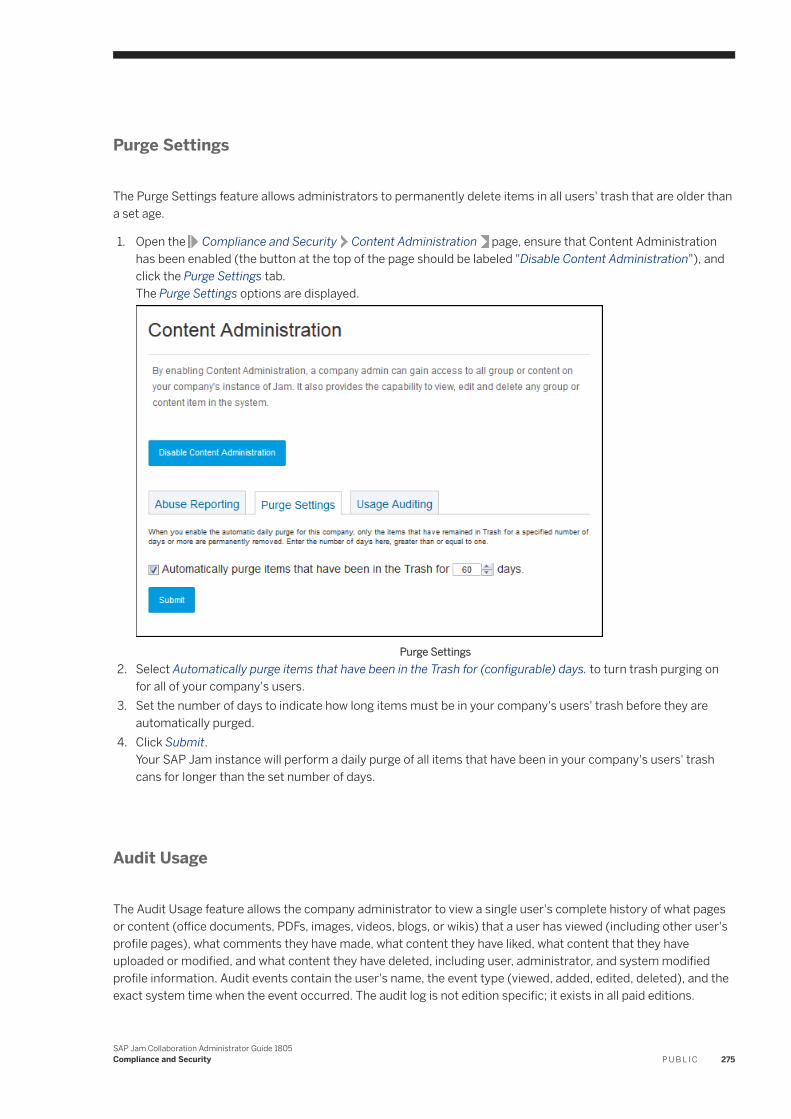
Purge Settings
The Purge Settings feature allows administrators to permanently delete items in all users' trash that are older than a set age.
1. Open the Compliance and Security Content Administration page, ensure that Content Administration has been enabled (the button at the top of the page should be labeled "Disable Content Administration"), and click the Purge Settings tab.The Purge Settings options are displayed.
Purge Settings2. Select Automatically purge items that have been in the Trash for (configurable) days. to turn trash purging on
for all of your company's users.3. Set the number of days to indicate how long items must be in your company's users' trash before they are
automatically purged.4. Click Submit.
Your SAP Jam instance will perform a daily purge of all items that have been in your company's users' trash cans for longer than the set number of days.
Audit Usage
The Audit Usage feature allows the company administrator to view a single user's complete history of what pages or content (office documents, PDFs, images, videos, blogs, or wikis) that a user has viewed (including other user's profile pages), what comments they have made, what content they have liked, what content that they have uploaded or modified, and what content they have deleted, including user, administrator, and system modified profile information. Audit events contain the user's name, the event type (viewed, added, edited, deleted), and the exact system time when the event occurred. The audit log is not edition specific; it exists in all paid editions.
SAP Jam Collaboration Administrator Guide 1805Compliance and Security P U B L I C 275
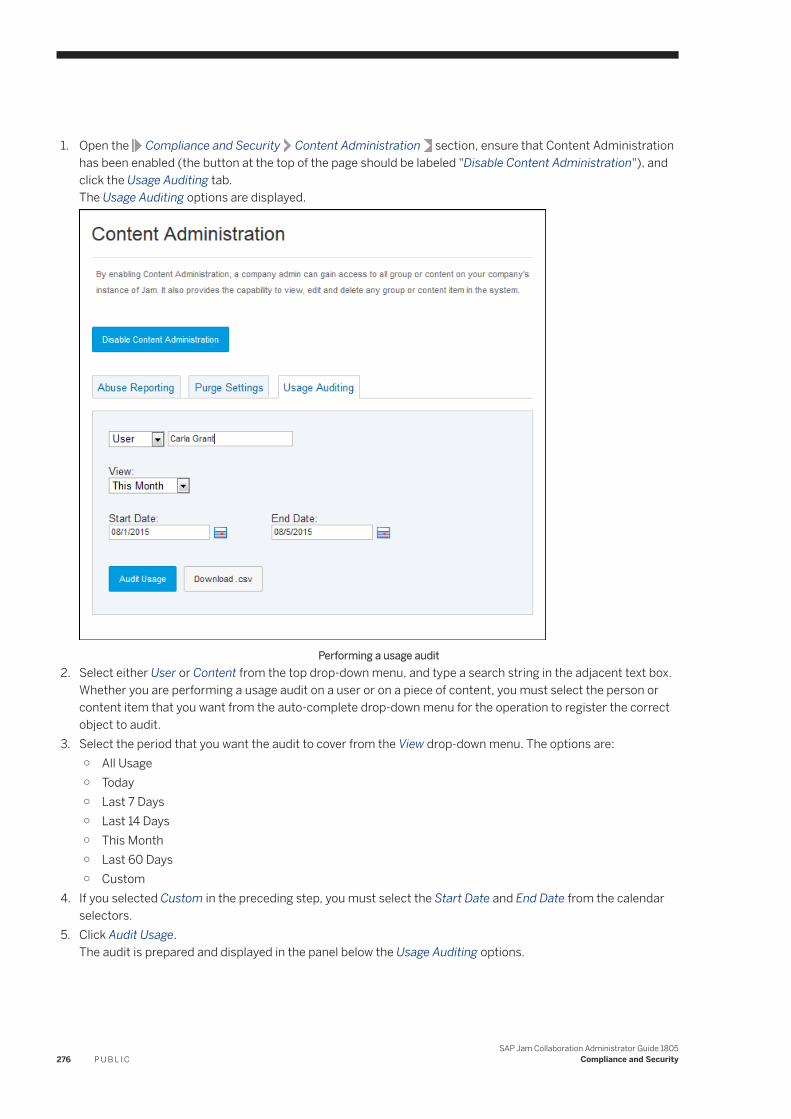
1. Open the Compliance and Security Content Administration section, ensure that Content Administration has been enabled (the button at the top of the page should be labeled "Disable Content Administration"), and click the Usage Auditing tab.The Usage Auditing options are displayed.
Performing a usage audit2. Select either User or Content from the top drop-down menu, and type a search string in the adjacent text box.
Whether you are performing a usage audit on a user or on a piece of content, you must select the person or content item that you want from the auto-complete drop-down menu for the operation to register the correct object to audit.
3. Select the period that you want the audit to cover from the View drop-down menu. The options are:○ All Usage○ Today○ Last 7 Days○ Last 14 Days○ This Month○ Last 60 Days○ Custom
4. If you selected Custom in the preceding step, you must select the Start Date and End Date from the calendar selectors.
5. Click Audit Usage.The audit is prepared and displayed in the panel below the Usage Auditing options.
276 P U B L I CSAP Jam Collaboration Administrator Guide 1805
Compliance and Security
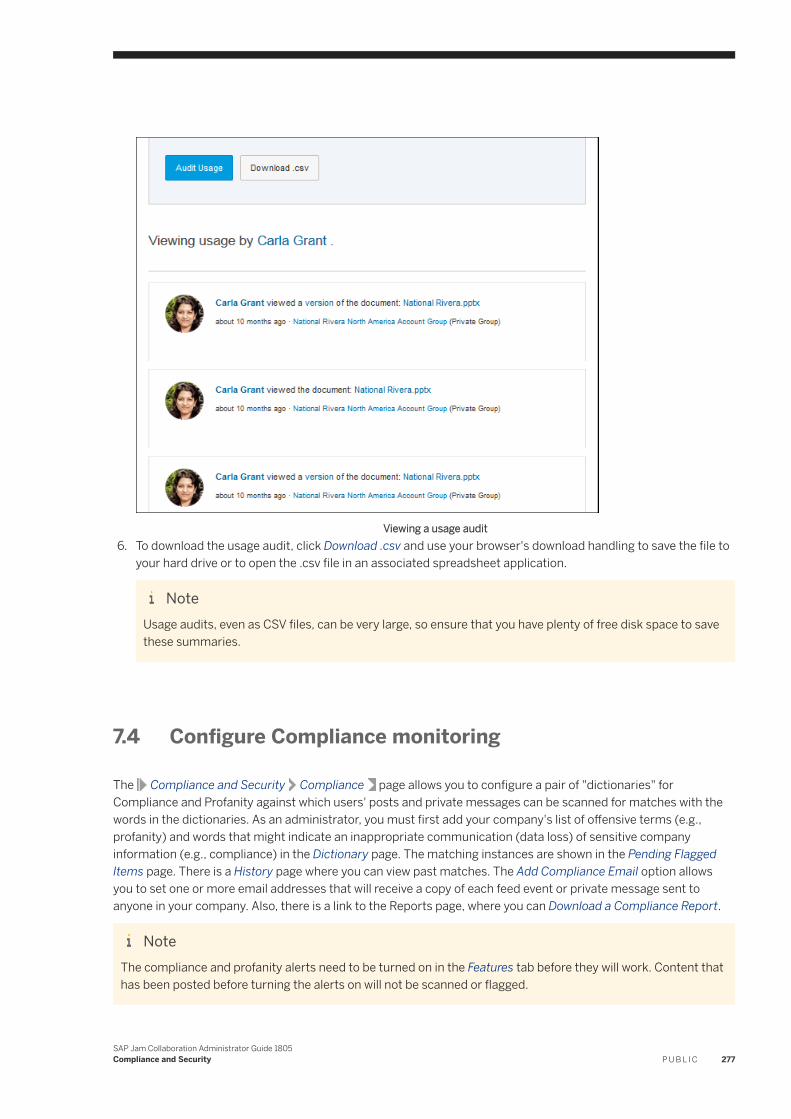
Viewing a usage audit6. To download the usage audit, click Download .csv and use your browser's download handling to save the file to
your hard drive or to open the .csv file in an associated spreadsheet application.
NoteUsage audits, even as CSV files, can be very large, so ensure that you have plenty of free disk space to save these summaries.
7.4 Configure Compliance monitoring
The Compliance and Security Compliance page allows you to configure a pair of "dictionaries" for Compliance and Profanity against which users' posts and private messages can be scanned for matches with the words in the dictionaries. As an administrator, you must first add your company's list of offensive terms (e.g., profanity) and words that might indicate an inappropriate communication (data loss) of sensitive company information (e.g., compliance) in the Dictionary page. The matching instances are shown in the Pending Flagged Items page. There is a History page where you can view past matches. The Add Compliance Email option allows you to set one or more email addresses that will receive a copy of each feed event or private message sent to anyone in your company. Also, there is a link to the Reports page, where you can Download a Compliance Report.
NoteThe compliance and profanity alerts need to be turned on in the Features tab before they will work. Content that has been posted before turning the alerts on will not be scanned or flagged.
SAP Jam Collaboration Administrator Guide 1805Compliance and Security P U B L I C 277
Configure the Compliance dictionaries
1. Go to the SAP Jam Admin console and select Compliance and Security Compliance from the left side navigation.
2. Click the Dictionary tab.3. On the Dictionary page, you can do the following:
○ Add one or more terms: Click Add Term at the top of the Dictionary tab. The add terms form displays.1. Select the radio button, Compliance or Profanity, for the dictionary that you want to add a term or
terms to.2. Enter the term or terms (as a comma-separated list; no spaces) that you want to add in the text box.3. Click Add, or click Cancel to return to the Dictionary tab's terms catalog view.
○ Browse through the terms: The dictionary catalog displays 20 terms per page. By default, these terms are displayed in alphabetical order, although you can change the sort order of the terms by clicking on the catalog table headings (Flag, Terms, and Action). Scroll to the bottom of the page and click Next Page to browser through the full list of terms.
○ Search for a specific term: Near the top of the Dictionary tab, type the term that you are looking for in the text box and click Search. If the term is currently in either dictionary, the dictionary catalog will display only that term. If it is not currently in either dictionary, the catalog will not display and the message Nothing to display will be shown instead.
○ Enable or disable terms: If the dictionary contains a term that you no longer want to be checked in scans, click Disable in the Action column for the row for that term. Click Enable to restore a term to use in scans of users' posts.
NoteThe compliance and profanity alerts do not prevent users from posting inappropriate terms, nor do they send email notifications if users do post inappropriate terms. They only flag instances of users' use of the terms listed and enabled in the compliance and profanity dictionaries.
Set Compliance email recipients
The Add Compliance Email option allows you to set one or more email addresses that will receive a copy of each feed event or private message sent to anyone in your company.
NoteSince routing all feed items can generate a massive amount of data, it is recommended that you specify a dedicated email address for use with this feature.
1. Go to the SAP Jam Admin console and select Compliance from the left side navigation.2. Click Add Compliance Email.3. Enter the email address or list of addresses (as a comma-separated list; no spaces) that will receive a copy of
each feed event sent to anyone in your company.4. Click Save to save the email address or list of addresses, or click Cancel to return to the Compliance page.
278 P U B L I CSAP Jam Collaboration Administrator Guide 1805
Compliance and Security
NoteTo remove all email addresses from the Compliance Email configuration, repeat steps 1 and 2, then click Clear and Save.
Respond to dictionary matches in the Pending Flagged Items page
The Compliance and Profanity alerts monitors the content posted to SAP Jam or sent in private messages and flags items that contain the profanity or compliance terms listed in the compliance dictionaries.
SAP Jam Administrators can view the list of flagged items and perform the following actions:
● Alert: if flagged content is in a group, the group admins are notified; if flagged content is in user's profile, user's manager is notified.
● Ignore: applies to flagged item.
All of these items will remove the alerts from the Pending Flagged Items catalog, but they will remain accessible from the Compliance History catalog.
1. Go to the SAP Jam Admin console and select Compliance and Security Compliance from the left side navigation.The Compliance page displays.
2. In the default view, which is the Pending Flagged Items tab, you can do the following:○ Optionally, you can filter the items shown in the Pending Flagged Items table by selecting an option from
the Show drop-down menus:○ From the first drop-down menu, the options are All Flags, Compliance, Profanity, or Unscannable.○ From the second drop-down menu, the options are Any Date, Today, Within a Week, Within a Month, or
> 1 Month ago.○ For more information on the user, click the hyper-linked term in the Term column.
A Flagged Item Details dialog box displays.Click Close to exit the dialog box.
○ To dismiss a flagged item that is not a problem, select the checkbox on the row for that item and click Ignore.The item is removed from the Pending Flagged Items table.
○ To send an alert message via email to group administrators (for flagged group content) or the user's manager (for flagged content outside of a group), as well as the user, select the check box on the row for that item and click Alert. The email will cite the flagged content and include a hyperlink to go review the post.The item is then removed from the Pending Flagged Items table.
View History
1. Go to the SAP Jam Admin console and select Compliance and Security Compliance from the left side navigation.
2. Click the History tab.
SAP Jam Collaboration Administrator Guide 1805Compliance and Security P U B L I C 279
A table, much like the Pending Flagged Items table, displays; however, this table shows all previously flagged items that have been responded to, and the Action column indicates whether they have been set as Ignored or Alerted.
Download a Compliance Report
1. Go to the SAP Jam Admin console and select Compliance and Security Compliance from the left side navigation.
2. Click Download Compliance Report.The Reports page displays, with the report request form set to produce a Compliance Report.
3. Click Request report.4. Navigate away from the page and return to it after a few minutes, and then click Compliance Report in the Title
column of the listed reports in the Reports page.Use your browser's download options to save the report to your hard drive, or to open the report in an associated application (such as a spreadsheet).
7.5 Configure Security options
Security options include email authentication requirements, password strength options, domain management, and IP restriction settings.
Set security options
To set SAP Jam security options
1. Go to the SAP Jam Admin console and select Compliance and Security Security from the left side navigation.
2. In the top section of the Security page, you can set the following options:○ Select Enable RSS to control whether SAP Jam accepts requests to the RSS URLs. SAP Jam Rich Site
Summary (RSS) URLs are secure, private to each member, and should not be shared. When disabled, SAP Jam will return an HTTP 403 status message, but no content.
○ Select Require email authentication for new browsers to decrease the possibility of someone gaining access to a user's SAP Jam account without access to their email account. If this setting is enabled, users will be sent an email validation each time they log in from a browser or computer that they haven't used before.
○ Enter a value in the Automatically end a session after a period of inactivity (seconds) field to set the duration of inactivity before SAP Jam sessions log a user out. For companies signing on through SuccessFactors Platform, this setting must be equal to or greater than the SuccessFactors Platform timeout setting; otherwise, users will be re-signed in automatically with a new session, thus effectively turning off automatic log offs.
○ Select Enable SuccessFactors shared session service to ensure that the SuccessFactors setting for maximum session length is used, even if it is shorter than the maximum session length set in SAP Jam.
280 P U B L I CSAP Jam Collaboration Administrator Guide 1805
Compliance and Security
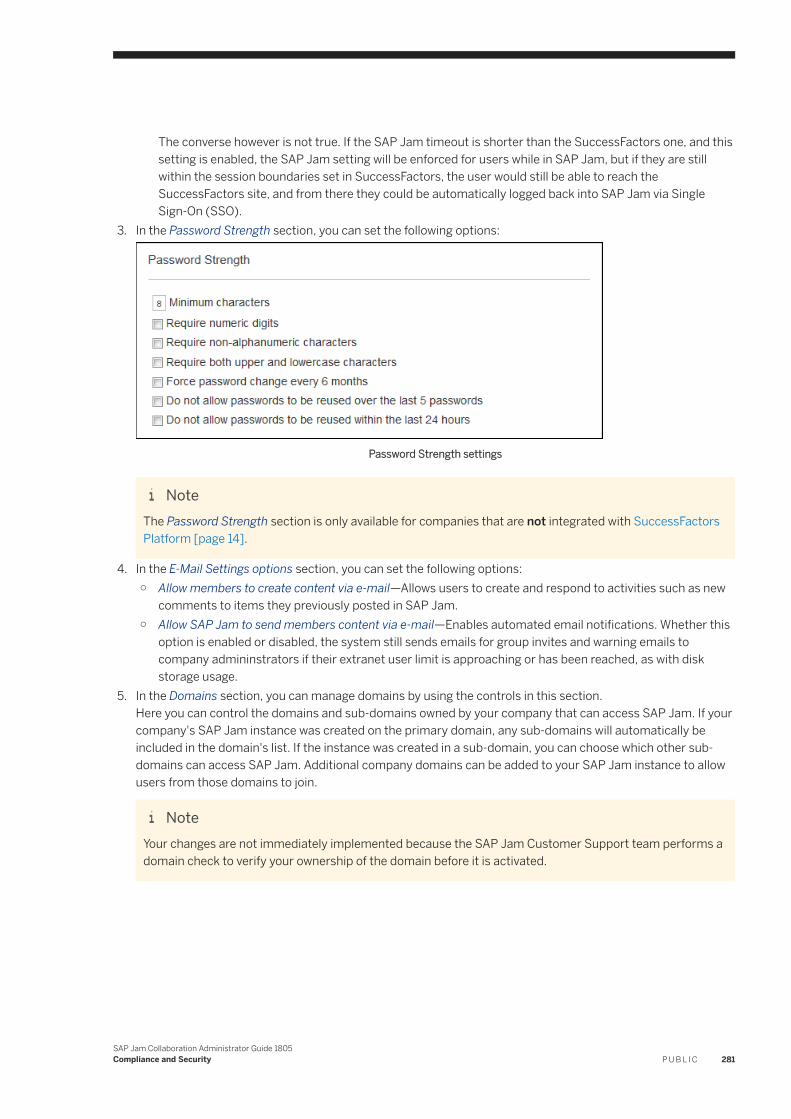
The converse however is not true. If the SAP Jam timeout is shorter than the SuccessFactors one, and this setting is enabled, the SAP Jam setting will be enforced for users while in SAP Jam, but if they are still within the session boundaries set in SuccessFactors, the user would still be able to reach the SuccessFactors site, and from there they could be automatically logged back into SAP Jam via Single Sign-On (SSO).
3. In the Password Strength section, you can set the following options:
Password Strength settings
NoteThe Password Strength section is only available for companies that are not integrated with SuccessFactors Platform [page 14].
4. In the E-Mail Settings options section, you can set the following options:○ Allow members to create content via e-mail—Allows users to create and respond to activities such as new
comments to items they previously posted in SAP Jam.○ Allow SAP Jam to send members content via e-mail—Enables automated email notifications. Whether this
option is enabled or disabled, the system still sends emails for group invites and warning emails to company admininstrators if their extranet user limit is approaching or has been reached, as with disk storage usage.
5. In the Domains section, you can manage domains by using the controls in this section.Here you can control the domains and sub-domains owned by your company that can access SAP Jam. If your company's SAP Jam instance was created on the primary domain, any sub-domains will automatically be included in the domain's list. If the instance was created in a sub-domain, you can choose which other sub-domains can access SAP Jam. Additional company domains can be added to your SAP Jam instance to allow users from those domains to join.
NoteYour changes are not immediately implemented because the SAP Jam Customer Support team performs a domain check to verify your ownership of the domain before it is activated.
SAP Jam Collaboration Administrator Guide 1805Compliance and Security P U B L I C 281
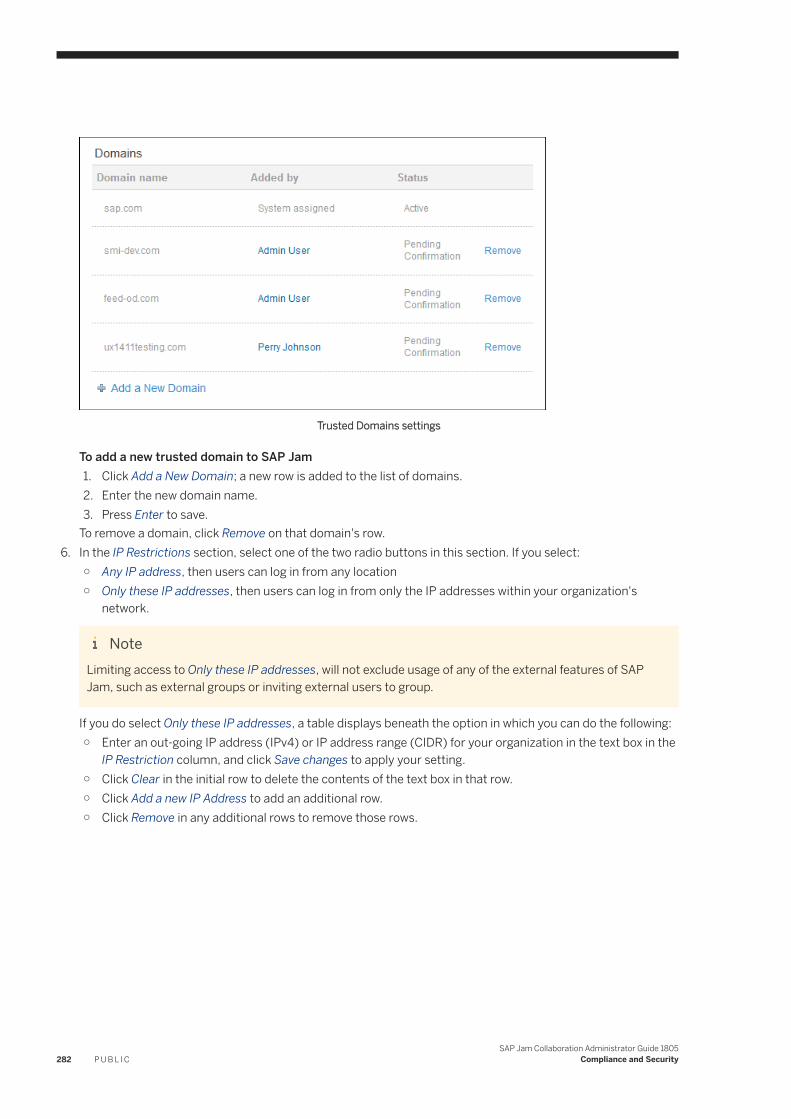
Trusted Domains settings
To add a new trusted domain to SAP Jam1. Click Add a New Domain; a new row is added to the list of domains.2. Enter the new domain name.3. Press Enter to save.
To remove a domain, click Remove on that domain's row.6. In the IP Restrictions section, select one of the two radio buttons in this section. If you select:
○ Any IP address, then users can log in from any location○ Only these IP addresses, then users can log in from only the IP addresses within your organization's
network.
NoteLimiting access to Only these IP addresses, will not exclude usage of any of the external features of SAP Jam, such as external groups or inviting external users to group.
If you do select Only these IP addresses, a table displays beneath the option in which you can do the following:○ Enter an out-going IP address (IPv4) or IP address range (CIDR) for your organization in the text box in the
IP Restriction column, and click Save changes to apply your setting.○ Click Clear in the initial row to delete the contents of the text box in that row.○ Click Add a new IP Address to add an additional row.○ Click Remove in any additional rows to remove those rows.
282 P U B L I CSAP Jam Collaboration Administrator Guide 1805
Compliance and Security
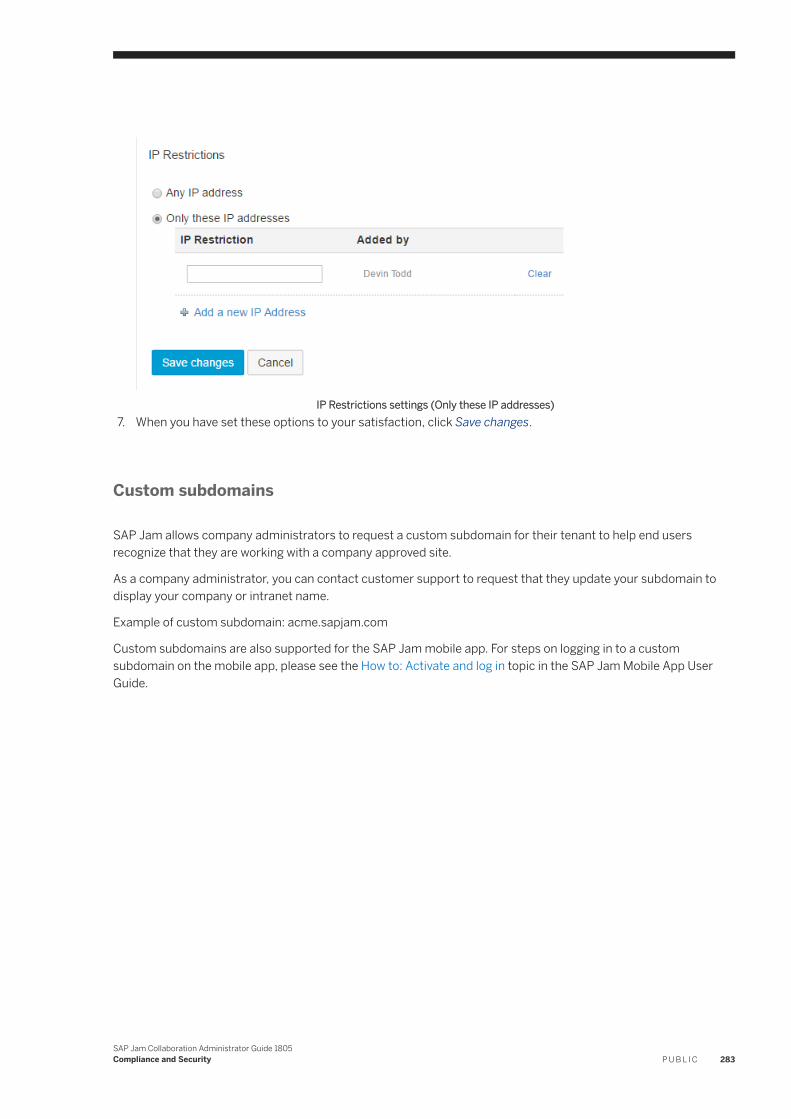
IP Restrictions settings (Only these IP addresses)7. When you have set these options to your satisfaction, click Save changes.
Custom subdomains
SAP Jam allows company administrators to request a custom subdomain for their tenant to help end users recognize that they are working with a company approved site.
As a company administrator, you can contact customer support to request that they update your subdomain to display your company or intranet name.
Example of custom subdomain: acme.sapjam.com
Custom subdomains are also supported for the SAP Jam mobile app. For steps on logging in to a custom subdomain on the mobile app, please see the How to: Activate and log in topic in the SAP Jam Mobile App User Guide.
SAP Jam Collaboration Administrator Guide 1805Compliance and Security P U B L I C 283
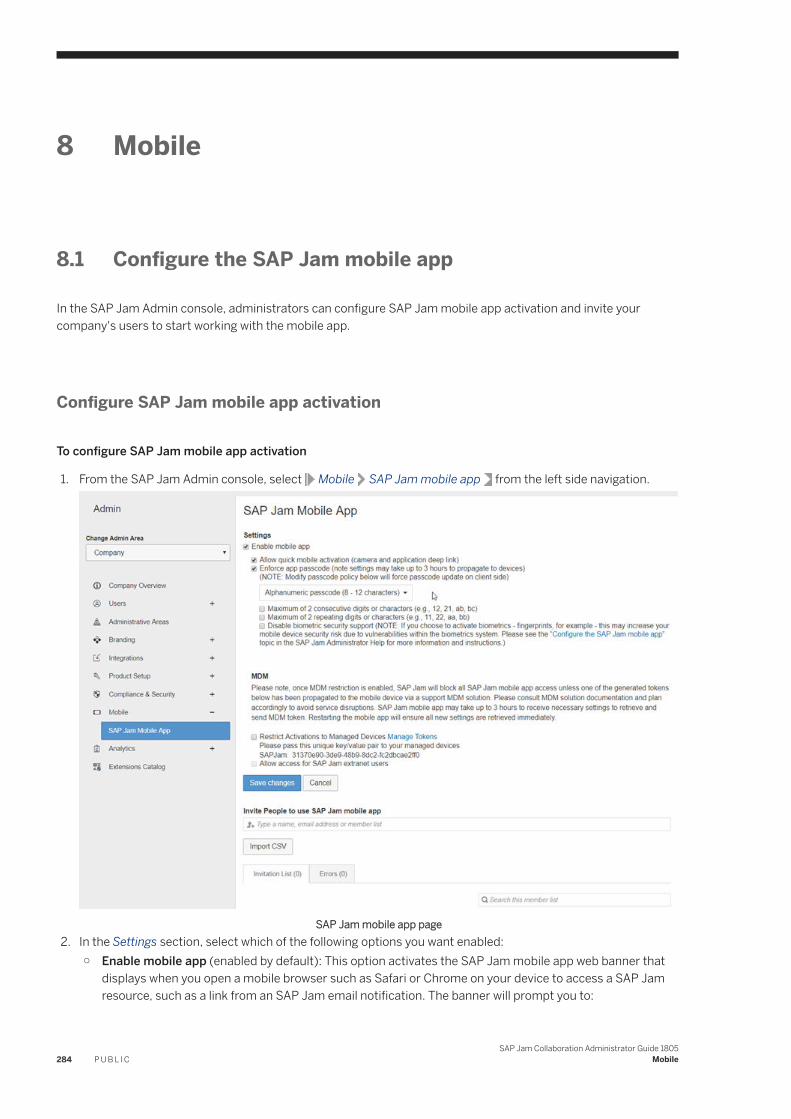
8 Mobile
8.1 Configure the SAP Jam mobile app
In the SAP Jam Admin console, administrators can configure SAP Jam mobile app activation and invite your company's users to start working with the mobile app.
Configure SAP Jam mobile app activation
To configure SAP Jam mobile app activation
1. From the SAP Jam Admin console, select Mobile SAP Jam mobile app from the left side navigation.
SAP Jam mobile app page2. In the Settings section, select which of the following options you want enabled:
○ Enable mobile app (enabled by default): This option activates the SAP Jam mobile app web banner that displays when you open a mobile browser such as Safari or Chrome on your device to access a SAP Jam resource, such as a link from an SAP Jam email notification. The banner will prompt you to:
284 P U B L I CSAP Jam Collaboration Administrator Guide 1805
Mobile
○ Install the SAP Jam mobile app if it is not yet installed○ View content in the SAP Jam mobile app if it is installed and activated
○ Allow quick mobile activation (enabled by default): This option allows users to leverage the new one-time-use, QR code-based mobile app activation or the SAP Jam mobile app web banner activation.
NoteBoth the QR Code and banner activation methods transfer the authenticated user's identity to the mobile app, thus enabling the user's access to the SAP Jam mobile app. This can be used to allow companies' with "behind the firewall" IDP proxies to activate the mobile app.
The SAP Jam mobile app activation will pass your users' SAP Jam identity information to the device, simplifying their configuration.If not selected, the web page for QR code-based activation and web banner activation will be disabled, also—for QR code-based activations—a message informing the user that this feature has been disabled by the SAP Jam administrator will be displayed.
○ Enforce app passcode (disabled by default): This option requires all mobile users to enter an app passcode and to enter it to access the SAP Jam app on their mobile device every time that they try to access it.You can also select which app passcode security options you want to require:○ Maximum of 2 consecutive numbers: Allows a maximum of two ascending or descending digits (for
example, 126589 is acceptable, 123987 is not).○ Maximum of 2 repeating numbers: Allows a maximum of two repeating digits (for example, 114595 is
acceptable, 111459 is not).
NoteThe above listed app passcode security options block the indicated simple passcodes, but they also reduce the total number of available PIN options, which slightly increases vulnerability to brute force passcode hacks. However, this vulnerability is almost completely eliminated by the default behavior of account deactivation after three failed tries of the passcode, although it will not prevent code level brute force attacks on the encrypted store. If account deactivation occurs, the user's data will be deleted and they will be returned to the SAP Jam mobile app initial connection and configuration screen, where they will need to authenticate again using either the QR code or their user name and password.
○ Disable biometric security support: If selected, users will be unable to use biometric identifier devices, such as the Touch ID® and FaceID® on iOS devices, and Fingerprint Authentication on Android.
NoteEnabling this option requires iOS 8 or later, or Android 6.x or later, and a device that supports biometric access. Also, be aware that enabling biometric security support represents a potentially greater security risk than if it is not used. Use of iOS Touch ID involves storing the app passcode in the platform-provided iOS Secure Key Chain storage, Secure Enclave, which is accessed using the iOS KeychainServices API. For more information on the security implications of this option, please see https://www.apple.com/business/docs/iOS_Security_Guide.pdf .
SAP Jam Collaboration Administrator Guide 1805Mobile P U B L I C 285
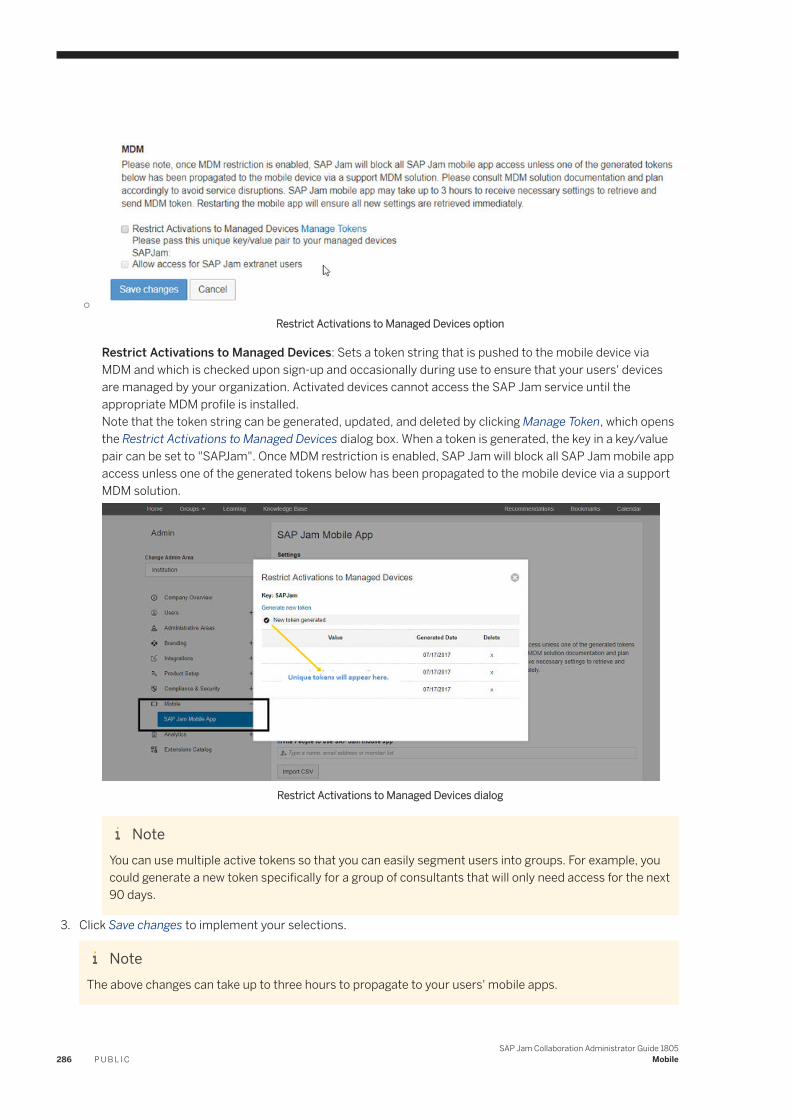
○Restrict Activations to Managed Devices option
Restrict Activations to Managed Devices: Sets a token string that is pushed to the mobile device via MDM and which is checked upon sign-up and occasionally during use to ensure that your users' devices are managed by your organization. Activated devices cannot access the SAP Jam service until the appropriate MDM profile is installed.Note that the token string can be generated, updated, and deleted by clicking Manage Token, which opens the Restrict Activations to Managed Devices dialog box. When a token is generated, the key in a key/value pair can be set to "SAPJam". Once MDM restriction is enabled, SAP Jam will block all SAP Jam mobile app access unless one of the generated tokens below has been propagated to the mobile device via a support MDM solution.
Restrict Activations to Managed Devices dialog
NoteYou can use multiple active tokens so that you can easily segment users into groups. For example, you could generate a new token specifically for a group of consultants that will only need access for the next 90 days.
3. Click Save changes to implement your selections.
NoteThe above changes can take up to three hours to propagate to your users' mobile apps.
286 P U B L I CSAP Jam Collaboration Administrator Guide 1805
Mobile
Supported MDM vendors and products
Supported MDM vendors and products include:
● SAP Mobile Secure, cloud edition● MobileIron EMM, including MobileIron app wrapping● VMWare AirWatch
MDM access control and requirements
For iOS 7.x or later, please see the www.appconfig.org website for AppConfig.
For Android 5.x or later, please see Android for Work .
Send invitations
To invite users in your company to use the SAP Jam mobile app
1. In the Invite People to use SAP Jam mobile app text box, begin typing a user's name, their email address, or the name of a member list, and when the person or members list that you are looking for appears in the drop-down auto-completion options list, click on the name of that person or member list.The user or member list that you clicked on will appear in the Invitation List table.
2. Alternatively, import a list of members in the form of a comma-separated list of email addresses by clicking Import CSV and using your browser's upload feature to find and select the file on your hard drive.
3. Once you have the list of users that you want to invite to use the SAP Jam mobile app showing in the Invitation List, click Send.The users shown in the Invitation List will be sent an email invitation to use the SAP Jam mobile app, with instructions on how to set it up for use on their mobile devices.
SAP Jam Collaboration Administrator Guide 1805Mobile P U B L I C 287
9 Analytics
9.1 Administrator reports
SAP Jam Collaboration administrator reports display information on many aspects of SAP Jam usage, including adoption metrics—such as user information, user contribution, and consumption activity—and disk usage statistics. SAP Jam Reports can be downloaded as CSV files. Many reports are available to Group Administrators for group-specific data.
NoteReport time frames span a maximum of three months at a time. For example, if you wish to view results for a particular report from January 1, 2016 to May 31, 2016, you would have to generate two reports. The first report would have a date range of January 1, 2016 to March 31, 2016, and the second report would span April 1, 2016 to May 31, 2016.
To run a report
1. From the SAP Jam Admin console, select Analytics Reports from the left side navigation.2. Select the options for the report that you want to run:
○ Select Report: Select the type of report that you want to run from the top drop-down menu.The report types, and in some cases the report parameters, that are available are described below.
○ Specify Date Range: Click the Start Date and End Date fields or calendar icons to select the beginning and ending dates, respectively, for the period to be covered by your report from the pop-up calendar selector widgets. As per the note at the start of this topic, the maximum date range spans no more than three months.
○ Show Report Header: Select this option to include report headings indicating the report name and the settings used for the report (such as the time frame and the group or groups covered).
○ Select Group: Select either All Company or any of the groups that have been created in your company.3. Once you have set the parameters for the report that you want to run, click Request report.
The report is queued to be run. Your report will be run almost immediately, unless there are multiple reports scheduled (queued). Some reports with large amounts of data to process, such as the Group Activity Report, can take up to about an hour to run.Queued and completed reports will be listed in the table below the report options section of the page. These queued and completed reports are visible to all administrators.
4. To download your report, click the name of your report in the table below the report options section of the page, which will open your browser's download options dialog box.It may be necessary to reload the page in your browser to see the results of a recently run report.
288 P U B L I CSAP Jam Collaboration Administrator Guide 1805
Analytics
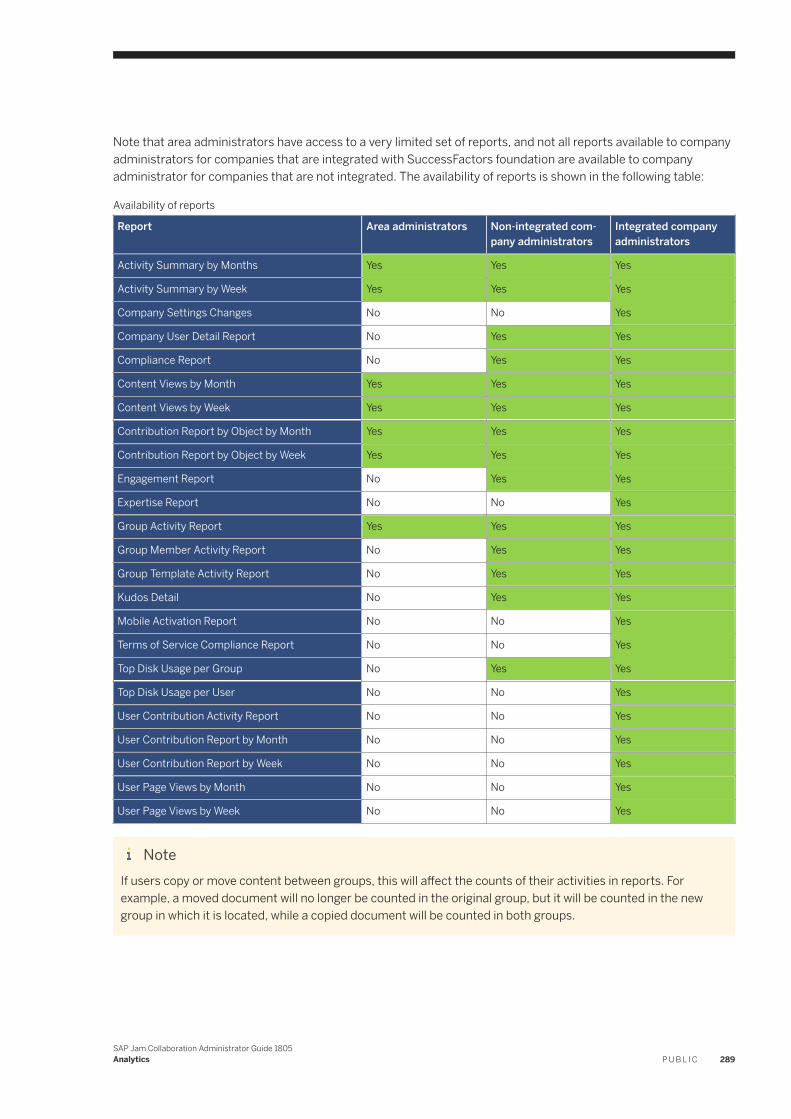
Note that area administrators have access to a very limited set of reports, and not all reports available to company administrators for companies that are integrated with SuccessFactors foundation are available to company administrator for companies that are not integrated. The availability of reports is shown in the following table:
Availability of reports
Report Area administrators Non-integrated company administrators
Integrated company administrators
Activity Summary by Months Yes Yes Yes
Activity Summary by Week Yes Yes Yes
Company Settings Changes No No Yes
Company User Detail Report No Yes Yes
Compliance Report No Yes Yes
Content Views by Month Yes Yes Yes
Content Views by Week Yes Yes Yes
Contribution Report by Object by Month Yes Yes Yes
Contribution Report by Object by Week Yes Yes Yes
Engagement Report No Yes Yes
Expertise Report No No Yes
Group Activity Report Yes Yes Yes
Group Member Activity Report No Yes Yes
Group Template Activity Report No Yes Yes
Kudos Detail No Yes Yes
Mobile Activation Report No No Yes
Terms of Service Compliance Report No No Yes
Top Disk Usage per Group No Yes Yes
Top Disk Usage per User No No Yes
User Contribution Activity Report No No Yes
User Contribution Report by Month No No Yes
User Contribution Report by Week No No Yes
User Page Views by Month No No Yes
User Page Views by Week No No Yes
NoteIf users copy or move content between groups, this will affect the counts of their activities in reports. For example, a moved document will no longer be counted in the original group, but it will be counted in the new group in which it is located, while a copied document will be counted in both groups.
SAP Jam Collaboration Administrator Guide 1805Analytics P U B L I C 289
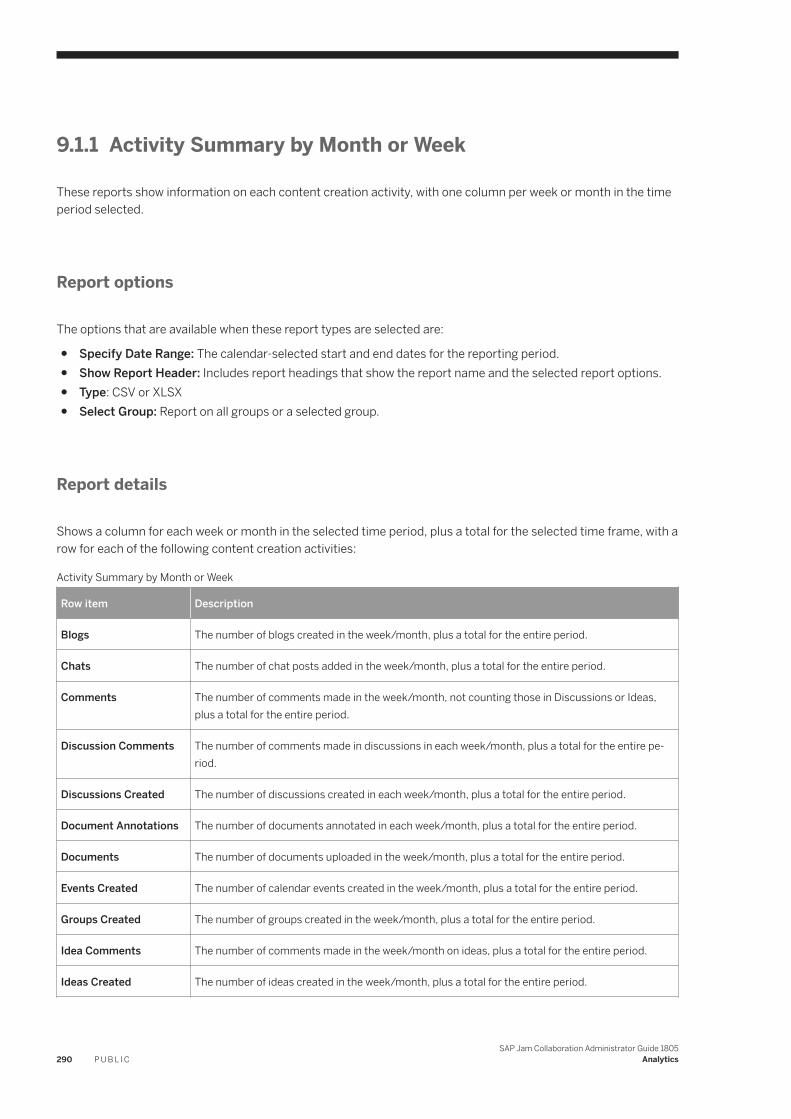
9.1.1 Activity Summary by Month or Week
These reports show information on each content creation activity, with one column per week or month in the time period selected.
Report options
The options that are available when these report types are selected are:
● Specify Date Range: The calendar-selected start and end dates for the reporting period.● Show Report Header: Includes report headings that show the report name and the selected report options.● Type: CSV or XLSX● Select Group: Report on all groups or a selected group.
Report details
Shows a column for each week or month in the selected time period, plus a total for the selected time frame, with a row for each of the following content creation activities:
Activity Summary by Month or Week
Row item Description
Blogs The number of blogs created in the week/month, plus a total for the entire period.
Chats The number of chat posts added in the week/month, plus a total for the entire period.
Comments The number of comments made in the week/month, not counting those in Discussions or Ideas, plus a total for the entire period.
Discussion Comments The number of comments made in discussions in each week/month, plus a total for the entire period.
Discussions Created The number of discussions created in each week/month, plus a total for the entire period.
Document Annotations The number of documents annotated in each week/month, plus a total for the entire period.
Documents The number of documents uploaded in the week/month, plus a total for the entire period.
Events Created The number of calendar events created in the week/month, plus a total for the entire period.
Groups Created The number of groups created in the week/month, plus a total for the entire period.
Idea Comments The number of comments made in the week/month on ideas, plus a total for the entire period.
Ideas Created The number of ideas created in the week/month, plus a total for the entire period.
290 P U B L I CSAP Jam Collaboration Administrator Guide 1805
Analytics
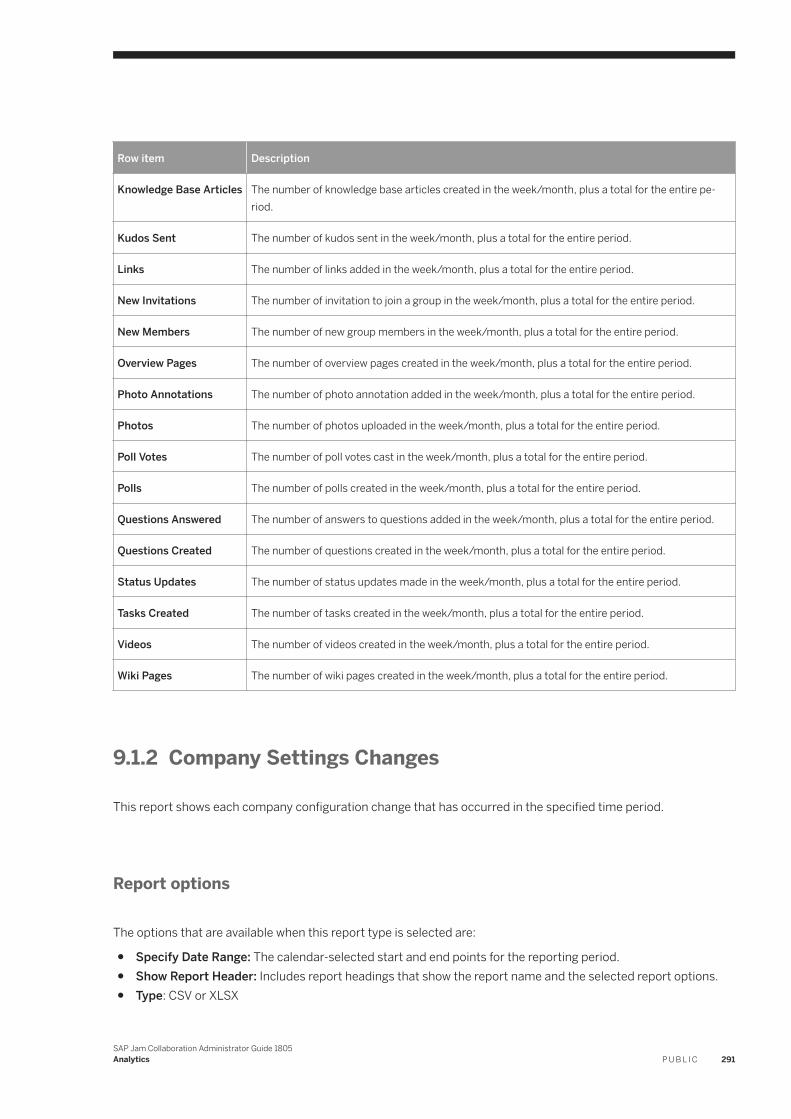
Row item Description
Knowledge Base Articles The number of knowledge base articles created in the week/month, plus a total for the entire period.
Kudos Sent The number of kudos sent in the week/month, plus a total for the entire period.
Links The number of links added in the week/month, plus a total for the entire period.
New Invitations The number of invitation to join a group in the week/month, plus a total for the entire period.
New Members The number of new group members in the week/month, plus a total for the entire period.
Overview Pages The number of overview pages created in the week/month, plus a total for the entire period.
Photo Annotations The number of photo annotation added in the week/month, plus a total for the entire period.
Photos The number of photos uploaded in the week/month, plus a total for the entire period.
Poll Votes The number of poll votes cast in the week/month, plus a total for the entire period.
Polls The number of polls created in the week/month, plus a total for the entire period.
Questions Answered The number of answers to questions added in the week/month, plus a total for the entire period.
Questions Created The number of questions created in the week/month, plus a total for the entire period.
Status Updates The number of status updates made in the week/month, plus a total for the entire period.
Tasks Created The number of tasks created in the week/month, plus a total for the entire period.
Videos The number of videos created in the week/month, plus a total for the entire period.
Wiki Pages The number of wiki pages created in the week/month, plus a total for the entire period.
9.1.2 Company Settings Changes
This report shows each company configuration change that has occurred in the specified time period.
Report options
The options that are available when this report type is selected are:
● Specify Date Range: The calendar-selected start and end points for the reporting period.● Show Report Header: Includes report headings that show the report name and the selected report options.● Type: CSV or XLSX
SAP Jam Collaboration Administrator Guide 1805Analytics P U B L I C 291
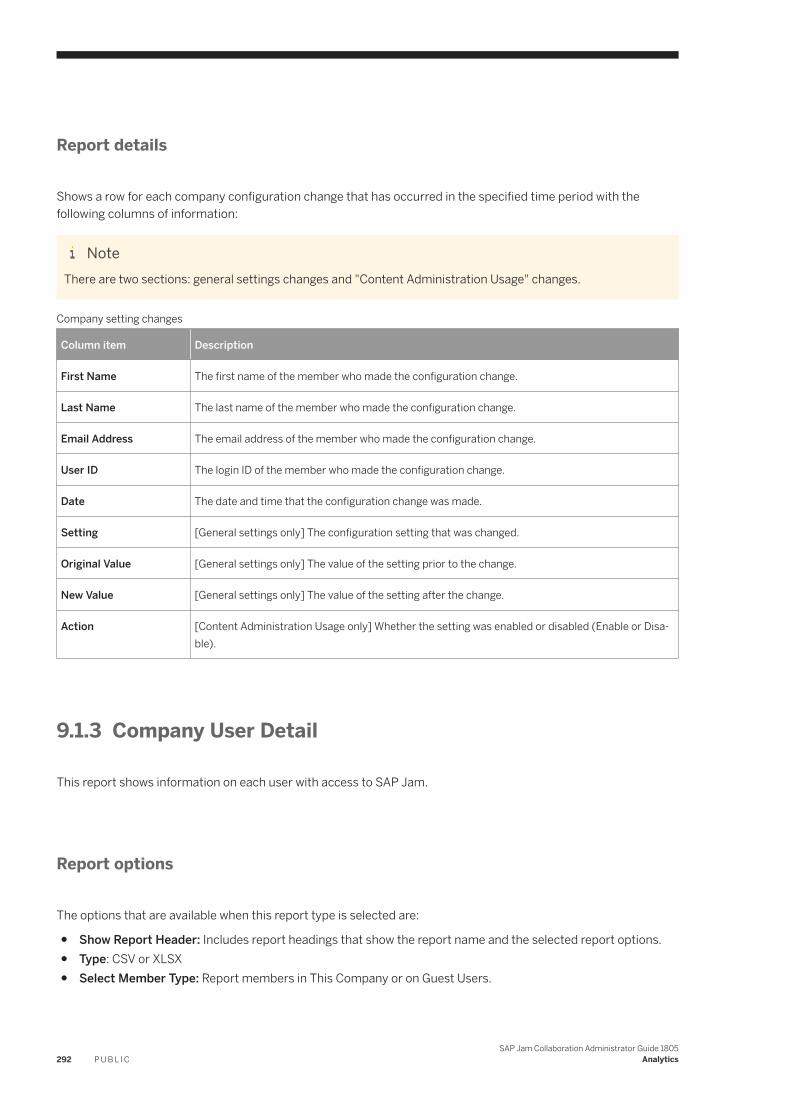
Report details
Shows a row for each company configuration change that has occurred in the specified time period with the following columns of information:
NoteThere are two sections: general settings changes and "Content Administration Usage" changes.
Company setting changes
Column item Description
First Name The first name of the member who made the configuration change.
Last Name The last name of the member who made the configuration change.
Email Address The email address of the member who made the configuration change.
User ID The login ID of the member who made the configuration change.
Date The date and time that the configuration change was made.
Setting [General settings only] The configuration setting that was changed.
Original Value [General settings only] The value of the setting prior to the change.
New Value [General settings only] The value of the setting after the change.
Action [Content Administration Usage only] Whether the setting was enabled or disabled (Enable or Disable).
9.1.3 Company User Detail
This report shows information on each user with access to SAP Jam.
Report options
The options that are available when this report type is selected are:
● Show Report Header: Includes report headings that show the report name and the selected report options.● Type: CSV or XLSX● Select Member Type: Report members in This Company or on Guest Users.
292 P U B L I CSAP Jam Collaboration Administrator Guide 1805
Analytics
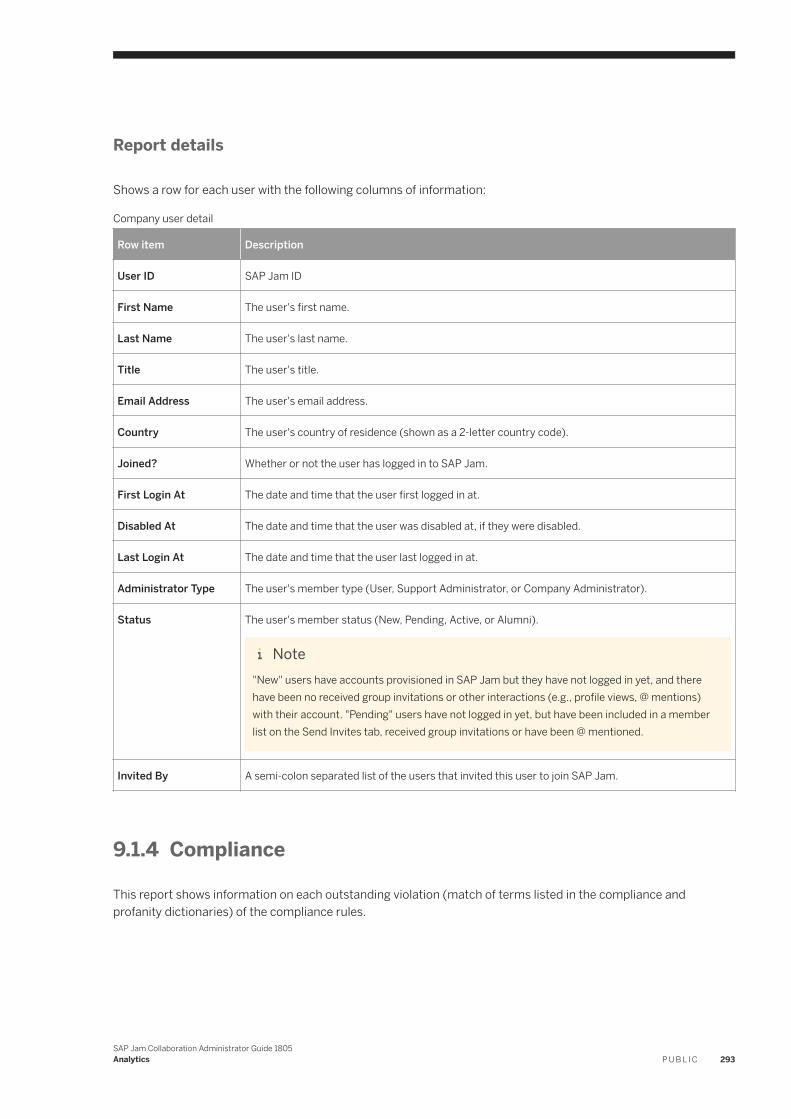
Report details
Shows a row for each user with the following columns of information:
Company user detail
Row item Description
User ID SAP Jam ID
First Name The user's first name.
Last Name The user's last name.
Title The user's title.
Email Address The user's email address.
Country The user's country of residence (shown as a 2-letter country code).
Joined? Whether or not the user has logged in to SAP Jam.
First Login At The date and time that the user first logged in at.
Disabled At The date and time that the user was disabled at, if they were disabled.
Last Login At The date and time that the user last logged in at.
Administrator Type The user's member type (User, Support Administrator, or Company Administrator).
Status The user's member status (New, Pending, Active, or Alumni).
Note"New" users have accounts provisioned in SAP Jam but they have not logged in yet, and there have been no received group invitations or other interactions (e.g., profile views, @ mentions) with their account. "Pending" users have not logged in yet, but have been included in a member list on the Send Invites tab, received group invitations or have been @ mentioned.
Invited By A semi-colon separated list of the users that invited this user to join SAP Jam.
9.1.4 Compliance
This report shows information on each outstanding violation (match of terms listed in the compliance and profanity dictionaries) of the compliance rules.
SAP Jam Collaboration Administrator Guide 1805Analytics P U B L I C 293
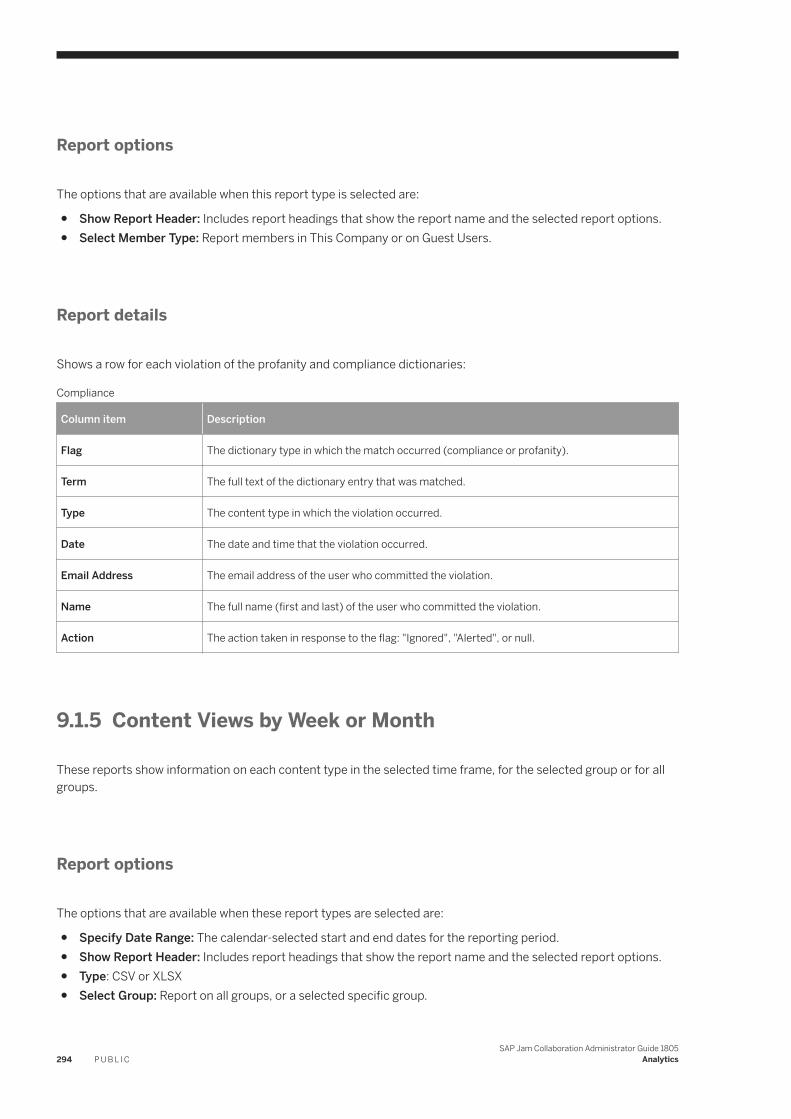
Report options
The options that are available when this report type is selected are:
● Show Report Header: Includes report headings that show the report name and the selected report options.● Select Member Type: Report members in This Company or on Guest Users.
Report details
Shows a row for each violation of the profanity and compliance dictionaries:
Compliance
Column item Description
Flag The dictionary type in which the match occurred (compliance or profanity).
Term The full text of the dictionary entry that was matched.
Type The content type in which the violation occurred.
Date The date and time that the violation occurred.
Email Address The email address of the user who committed the violation.
Name The full name (first and last) of the user who committed the violation.
Action The action taken in response to the flag: "Ignored", "Alerted", or null.
9.1.5 Content Views by Week or Month
These reports show information on each content type in the selected time frame, for the selected group or for all groups.
Report options
The options that are available when these report types are selected are:
● Specify Date Range: The calendar-selected start and end dates for the reporting period.● Show Report Header: Includes report headings that show the report name and the selected report options.● Type: CSV or XLSX● Select Group: Report on all groups, or a selected specific group.
294 P U B L I CSAP Jam Collaboration Administrator Guide 1805
Analytics
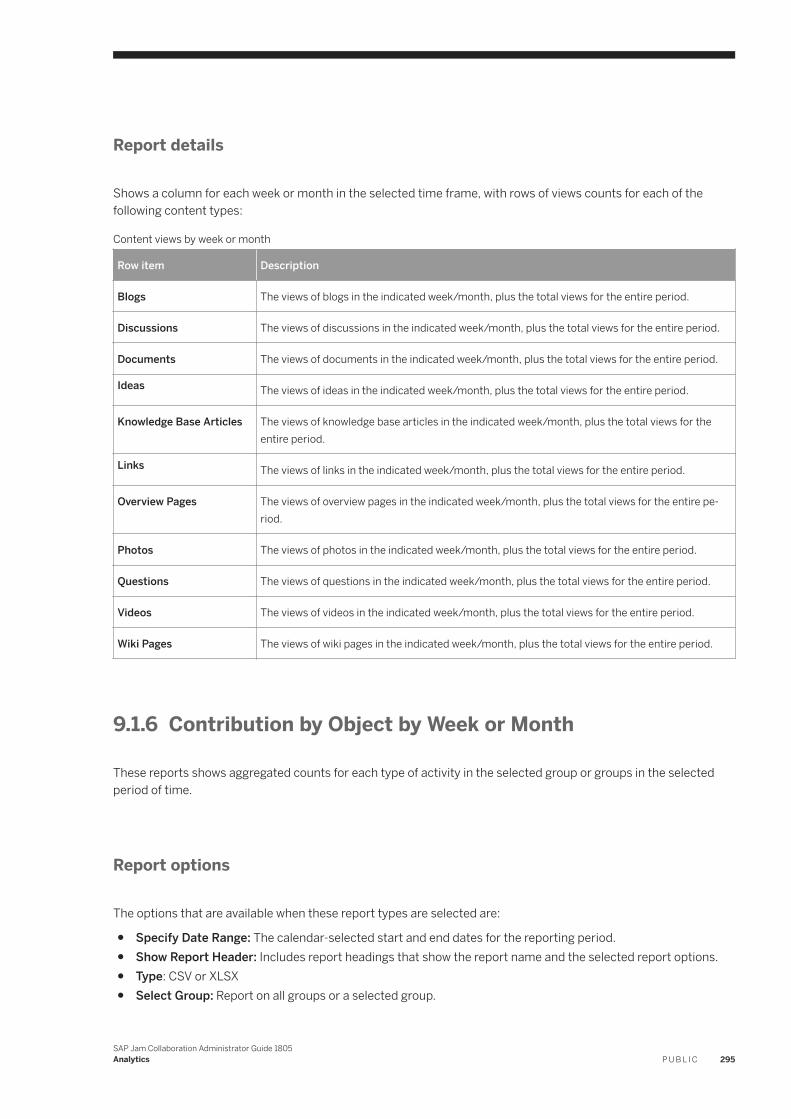
Report details
Shows a column for each week or month in the selected time frame, with rows of views counts for each of the following content types:
Content views by week or month
Row item Description
Blogs The views of blogs in the indicated week/month, plus the total views for the entire period.
Discussions The views of discussions in the indicated week/month, plus the total views for the entire period.
Documents The views of documents in the indicated week/month, plus the total views for the entire period.
Ideas The views of ideas in the indicated week/month, plus the total views for the entire period.
Knowledge Base Articles The views of knowledge base articles in the indicated week/month, plus the total views for the entire period.
Links The views of links in the indicated week/month, plus the total views for the entire period.
Overview Pages The views of overview pages in the indicated week/month, plus the total views for the entire period.
Photos The views of photos in the indicated week/month, plus the total views for the entire period.
Questions The views of questions in the indicated week/month, plus the total views for the entire period.
Videos The views of videos in the indicated week/month, plus the total views for the entire period.
Wiki Pages The views of wiki pages in the indicated week/month, plus the total views for the entire period.
9.1.6 Contribution by Object by Week or Month
These reports shows aggregated counts for each type of activity in the selected group or groups in the selected period of time.
Report options
The options that are available when these report types are selected are:
● Specify Date Range: The calendar-selected start and end dates for the reporting period.● Show Report Header: Includes report headings that show the report name and the selected report options.● Type: CSV or XLSX● Select Group: Report on all groups or a selected group.
SAP Jam Collaboration Administrator Guide 1805Analytics P U B L I C 295
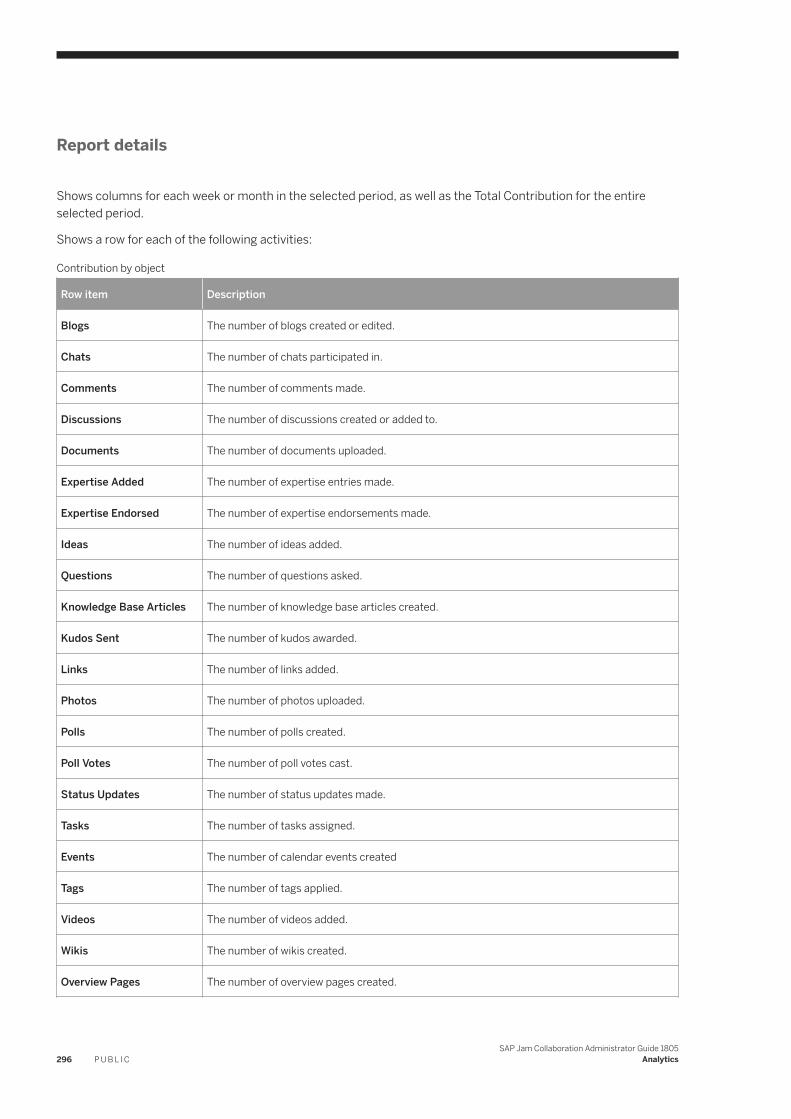
Report details
Shows columns for each week or month in the selected period, as well as the Total Contribution for the entire selected period.
Shows a row for each of the following activities:
Contribution by object
Row item Description
Blogs The number of blogs created or edited.
Chats The number of chats participated in.
Comments The number of comments made.
Discussions The number of discussions created or added to.
Documents The number of documents uploaded.
Expertise Added The number of expertise entries made.
Expertise Endorsed The number of expertise endorsements made.
Ideas The number of ideas added.
Questions The number of questions asked.
Knowledge Base Articles The number of knowledge base articles created.
Kudos Sent The number of kudos awarded.
Links The number of links added.
Photos The number of photos uploaded.
Polls The number of polls created.
Poll Votes The number of poll votes cast.
Status Updates The number of status updates made.
Tasks The number of tasks assigned.
Events The number of calendar events created
Tags The number of tags applied.
Videos The number of videos added.
Wikis The number of wikis created.
Overview Pages The number of overview pages created.
296 P U B L I CSAP Jam Collaboration Administrator Guide 1805
Analytics
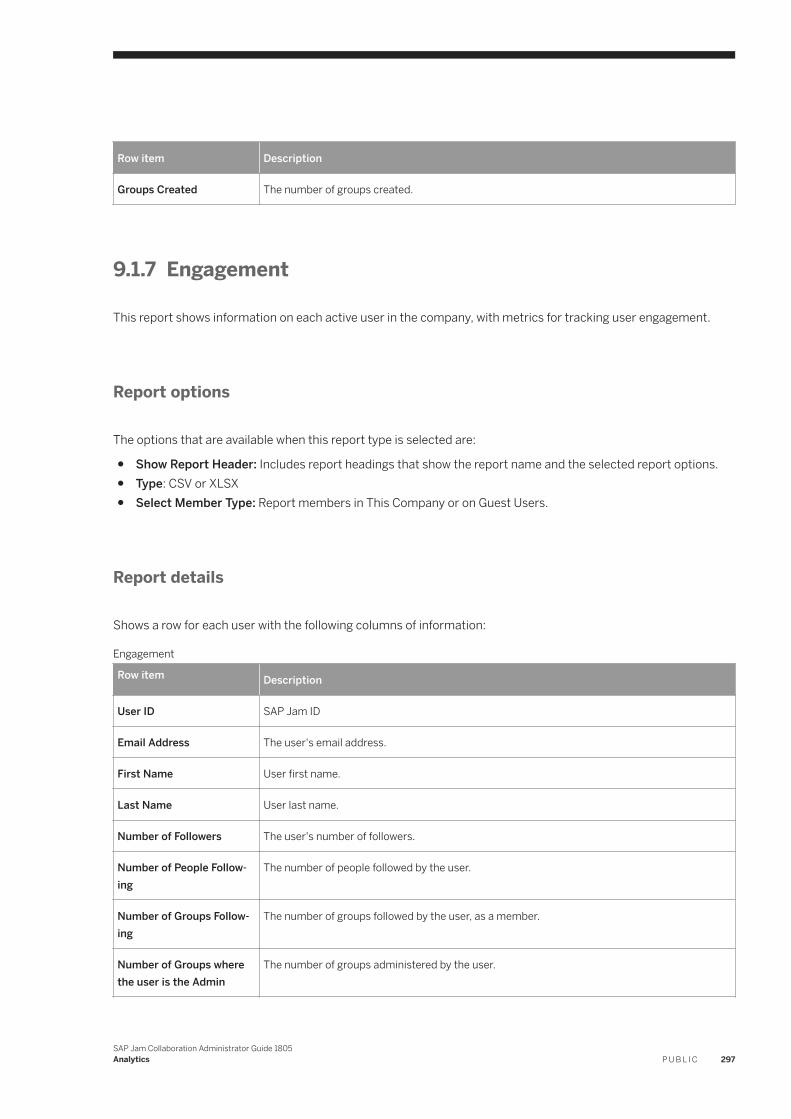
Row item Description
Groups Created The number of groups created.
9.1.7 Engagement
This report shows information on each active user in the company, with metrics for tracking user engagement.
Report options
The options that are available when this report type is selected are:
● Show Report Header: Includes report headings that show the report name and the selected report options.● Type: CSV or XLSX● Select Member Type: Report members in This Company or on Guest Users.
Report details
Shows a row for each user with the following columns of information:
Engagement
Row item Description
User ID SAP Jam ID
Email Address The user's email address.
First Name User first name.
Last Name User last name.
Number of Followers The user's number of followers.
Number of People Following
The number of people followed by the user.
Number of Groups Following
The number of groups followed by the user, as a member.
Number of Groups where the user is the Admin
The number of groups administered by the user.
SAP Jam Collaboration Administrator Guide 1805Analytics P U B L I C 297
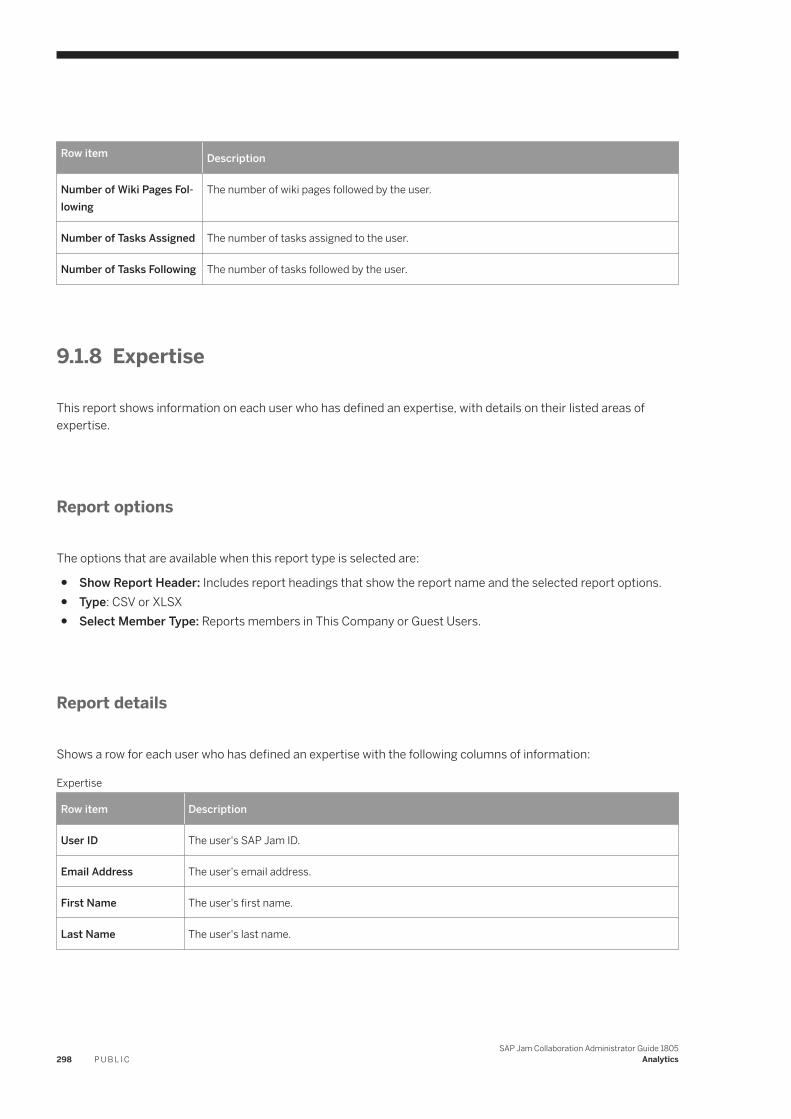
Row item Description
Number of Wiki Pages Following
The number of wiki pages followed by the user.
Number of Tasks Assigned The number of tasks assigned to the user.
Number of Tasks Following The number of tasks followed by the user.
9.1.8 Expertise
This report shows information on each user who has defined an expertise, with details on their listed areas of expertise.
Report options
The options that are available when this report type is selected are:
● Show Report Header: Includes report headings that show the report name and the selected report options.● Type: CSV or XLSX● Select Member Type: Reports members in This Company or Guest Users.
Report details
Shows a row for each user who has defined an expertise with the following columns of information:
Expertise
Row item Description
User ID The user's SAP Jam ID.
Email Address The user's email address.
First Name The user's first name.
Last Name The user's last name.
298 P U B L I CSAP Jam Collaboration Administrator Guide 1805
Analytics
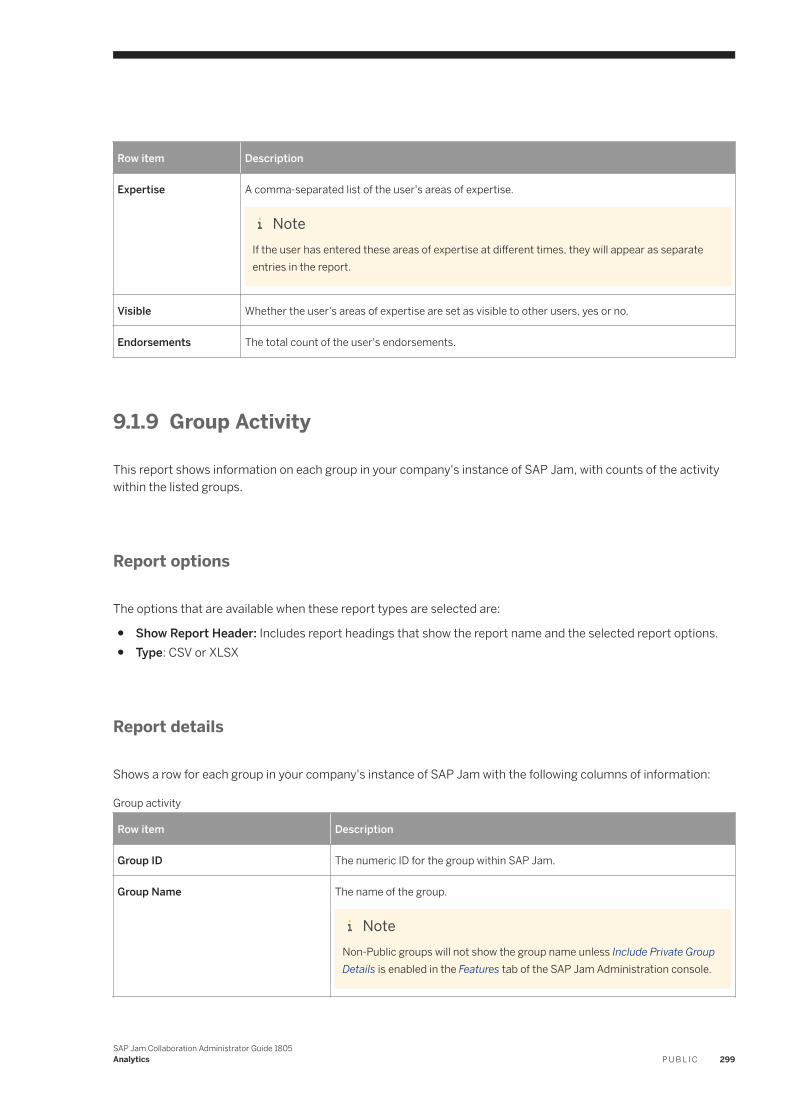
Row item Description
Expertise A comma-separated list of the user's areas of expertise.
NoteIf the user has entered these areas of expertise at different times, they will appear as separate entries in the report.
Visible Whether the user's areas of expertise are set as visible to other users, yes or no.
Endorsements The total count of the user's endorsements.
9.1.9 Group Activity
This report shows information on each group in your company's instance of SAP Jam, with counts of the activity within the listed groups.
Report options
The options that are available when these report types are selected are:
● Show Report Header: Includes report headings that show the report name and the selected report options.● Type: CSV or XLSX
Report details
Shows a row for each group in your company's instance of SAP Jam with the following columns of information:
Group activity
Row item Description
Group ID The numeric ID for the group within SAP Jam.
Group Name The name of the group.
NoteNon-Public groups will not show the group name unless Include Private Group Details is enabled in the Features tab of the SAP Jam Administration console.
SAP Jam Collaboration Administrator Guide 1805Analytics P U B L I C 299
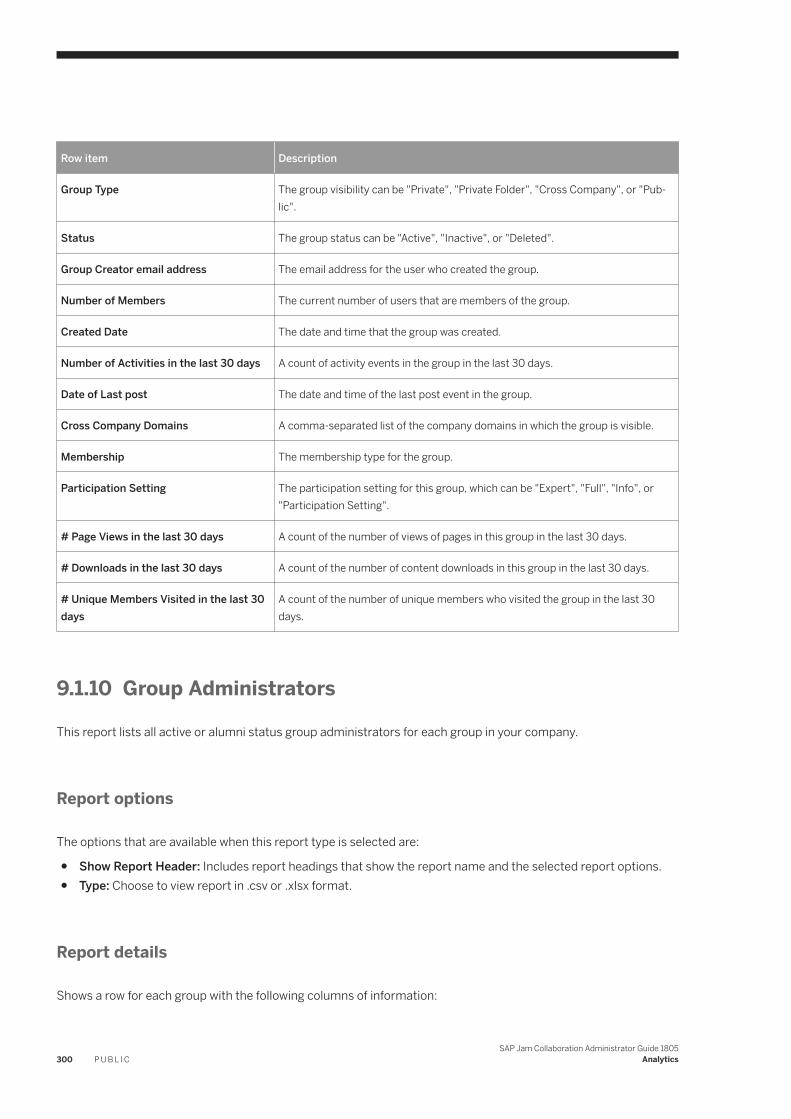
Row item Description
Group Type The group visibility can be "Private", "Private Folder", "Cross Company", or "Public".
Status The group status can be "Active", "Inactive", or "Deleted".
Group Creator email address The email address for the user who created the group.
Number of Members The current number of users that are members of the group.
Created Date The date and time that the group was created.
Number of Activities in the last 30 days A count of activity events in the group in the last 30 days.
Date of Last post The date and time of the last post event in the group.
Cross Company Domains A comma-separated list of the company domains in which the group is visible.
Membership The membership type for the group.
Participation Setting The participation setting for this group, which can be "Expert", "Full", "Info", or "Participation Setting".
# Page Views in the last 30 days A count of the number of views of pages in this group in the last 30 days.
# Downloads in the last 30 days A count of the number of content downloads in this group in the last 30 days.
# Unique Members Visited in the last 30 days
A count of the number of unique members who visited the group in the last 30 days.
9.1.10 Group Administrators
This report lists all active or alumni status group administrators for each group in your company.
Report options
The options that are available when this report type is selected are:
● Show Report Header: Includes report headings that show the report name and the selected report options.● Type: Choose to view report in .csv or .xlsx format.
Report details
Shows a row for each group with the following columns of information:
300 P U B L I CSAP Jam Collaboration Administrator Guide 1805
Analytics
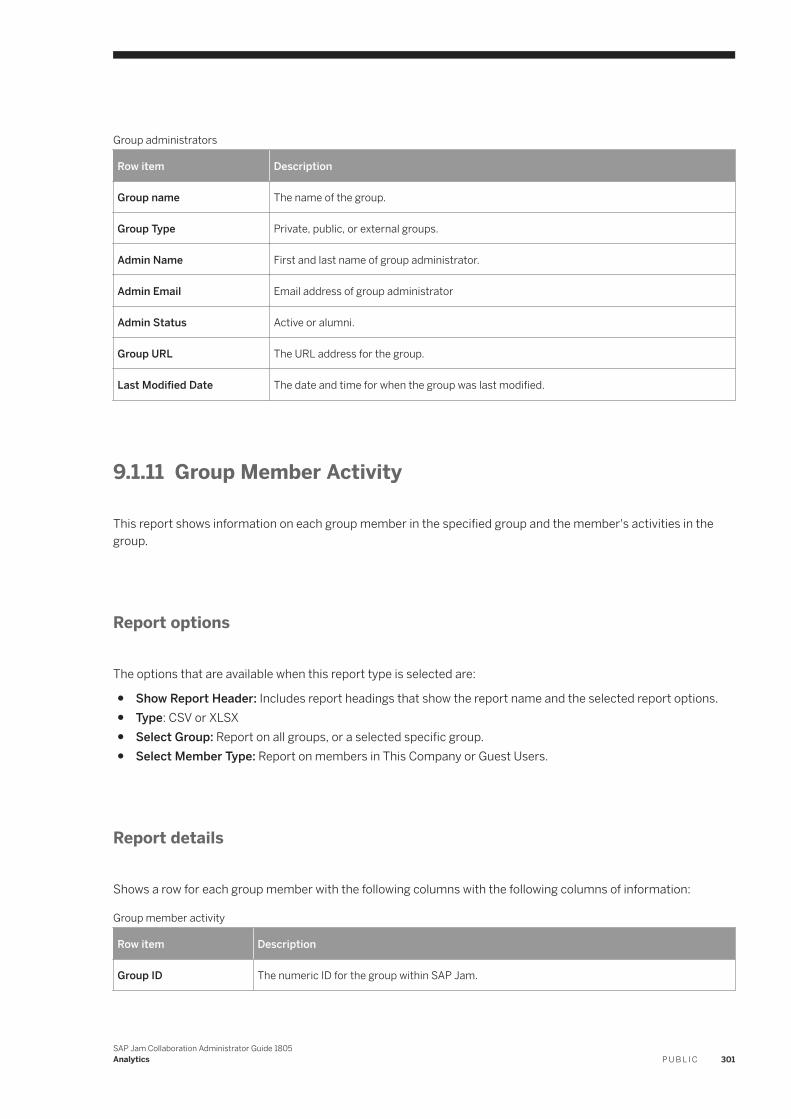
Group administrators
Row item Description
Group name The name of the group.
Group Type Private, public, or external groups.
Admin Name First and last name of group administrator.
Admin Email Email address of group administrator
Admin Status Active or alumni.
Group URL The URL address for the group.
Last Modified Date The date and time for when the group was last modified.
9.1.11 Group Member Activity
This report shows information on each group member in the specified group and the member's activities in the group.
Report options
The options that are available when this report type is selected are:
● Show Report Header: Includes report headings that show the report name and the selected report options.● Type: CSV or XLSX● Select Group: Report on all groups, or a selected specific group.● Select Member Type: Report on members in This Company or Guest Users.
Report details
Shows a row for each group member with the following columns with the following columns of information:
Group member activity
Row item Description
Group ID The numeric ID for the group within SAP Jam.
SAP Jam Collaboration Administrator Guide 1805Analytics P U B L I C 301

Row item Description
Group Name The name of the group.
NoteNon-Public groups will not show the group name unless Include Private Group Details is enabled in the Features tab of the SAP Jam Administration console.
Group Type The group visibility can be "Private", "Private Folder", "Cross Company", or "Public".
Status The group status can be "Active", "Inactive", or "Deleted".
User ID The user's username.
Email Address The user's email address.
First Name The user's first name.
Last Name The user's last name.
User Status Whether the user is "Active" or an "Alumni".
Number of Activities in the last 30 days
A count of the user's activities in the last 30 days in the specified group.
Date of Last post The date and time of the user's last activity.
Total number of Activities A count of the user's activities in the specified group since it's creation.
Group Admin Whether the user is the group's administrator, Yes or No.
9.1.12 Group Template Activity
This report shows information on each template listed, with one row for each template used in the specified time period.
Report options
The options that are available when this report type is selected are:
● Specify Date Range: The calendar-selected start and end dates for the reporting period.● Show Report Header: Includes report headings that show the report name and the selected report options.● Type: CSV or XLSX
302 P U B L I CSAP Jam Collaboration Administrator Guide 1805
Analytics
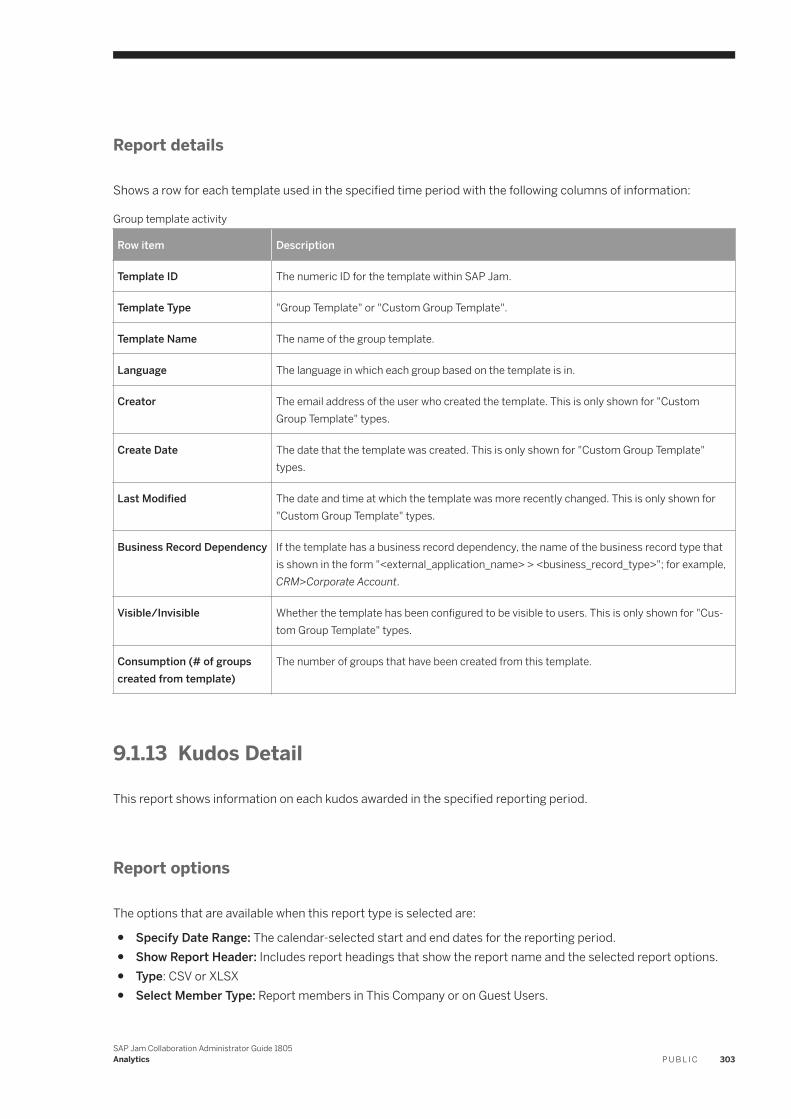
Report details
Shows a row for each template used in the specified time period with the following columns of information:
Group template activity
Row item Description
Template ID The numeric ID for the template within SAP Jam.
Template Type "Group Template" or "Custom Group Template".
Template Name The name of the group template.
Language The language in which each group based on the template is in.
Creator The email address of the user who created the template. This is only shown for "Custom Group Template" types.
Create Date The date that the template was created. This is only shown for "Custom Group Template" types.
Last Modified The date and time at which the template was more recently changed. This is only shown for "Custom Group Template" types.
Business Record Dependency If the template has a business record dependency, the name of the business record type that is shown in the form "<external_application_name> > <business_record_type>"; for example, CRM>Corporate Account.
Visible/Invisible Whether the template has been configured to be visible to users. This is only shown for "Custom Group Template" types.
Consumption (# of groups created from template)
The number of groups that have been created from this template.
9.1.13 Kudos Detail
This report shows information on each kudos awarded in the specified reporting period.
Report options
The options that are available when this report type is selected are:
● Specify Date Range: The calendar-selected start and end dates for the reporting period.● Show Report Header: Includes report headings that show the report name and the selected report options.● Type: CSV or XLSX● Select Member Type: Report members in This Company or on Guest Users.
SAP Jam Collaboration Administrator Guide 1805Analytics P U B L I C 303
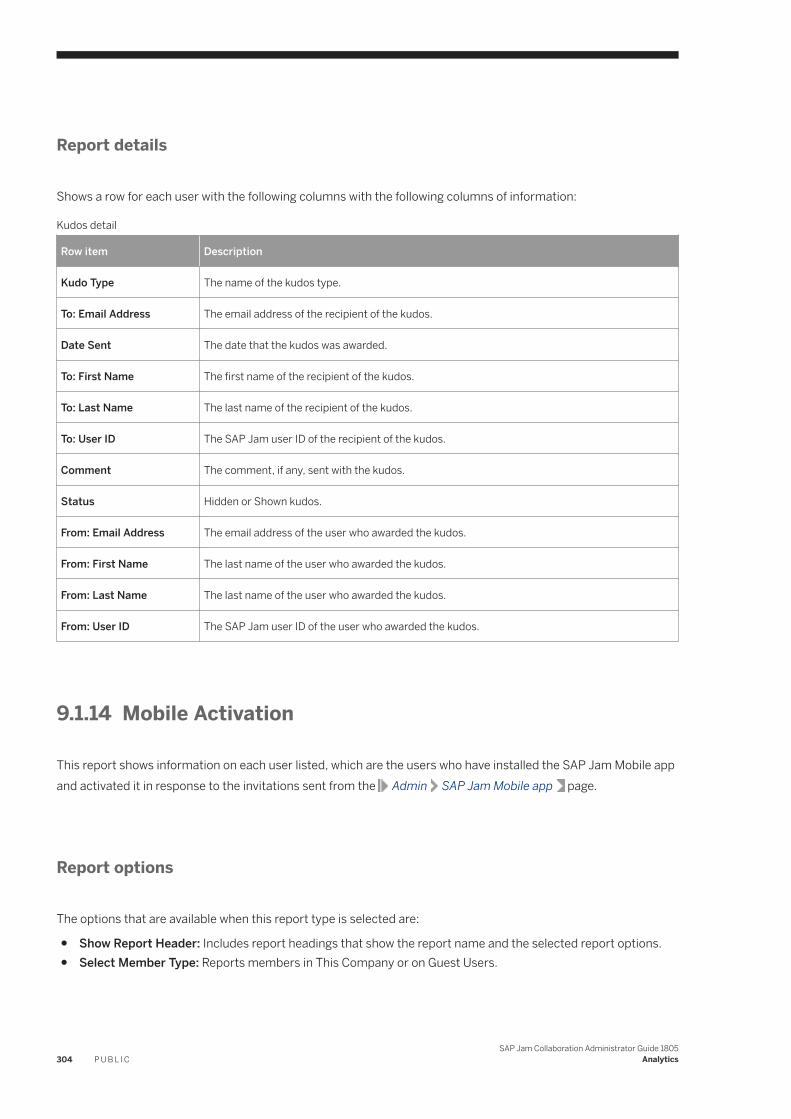
Report details
Shows a row for each user with the following columns with the following columns of information:
Kudos detail
Row item Description
Kudo Type The name of the kudos type.
To: Email Address The email address of the recipient of the kudos.
Date Sent The date that the kudos was awarded.
To: First Name The first name of the recipient of the kudos.
To: Last Name The last name of the recipient of the kudos.
To: User ID The SAP Jam user ID of the recipient of the kudos.
Comment The comment, if any, sent with the kudos.
Status Hidden or Shown kudos.
From: Email Address The email address of the user who awarded the kudos.
From: First Name The last name of the user who awarded the kudos.
From: Last Name The last name of the user who awarded the kudos.
From: User ID The SAP Jam user ID of the user who awarded the kudos.
9.1.14 Mobile Activation
This report shows information on each user listed, which are the users who have installed the SAP Jam Mobile app and activated it in response to the invitations sent from the Admin SAP Jam Mobile app page.
Report options
The options that are available when this report type is selected are:
● Show Report Header: Includes report headings that show the report name and the selected report options.● Select Member Type: Reports members in This Company or on Guest Users.
304 P U B L I CSAP Jam Collaboration Administrator Guide 1805
Analytics
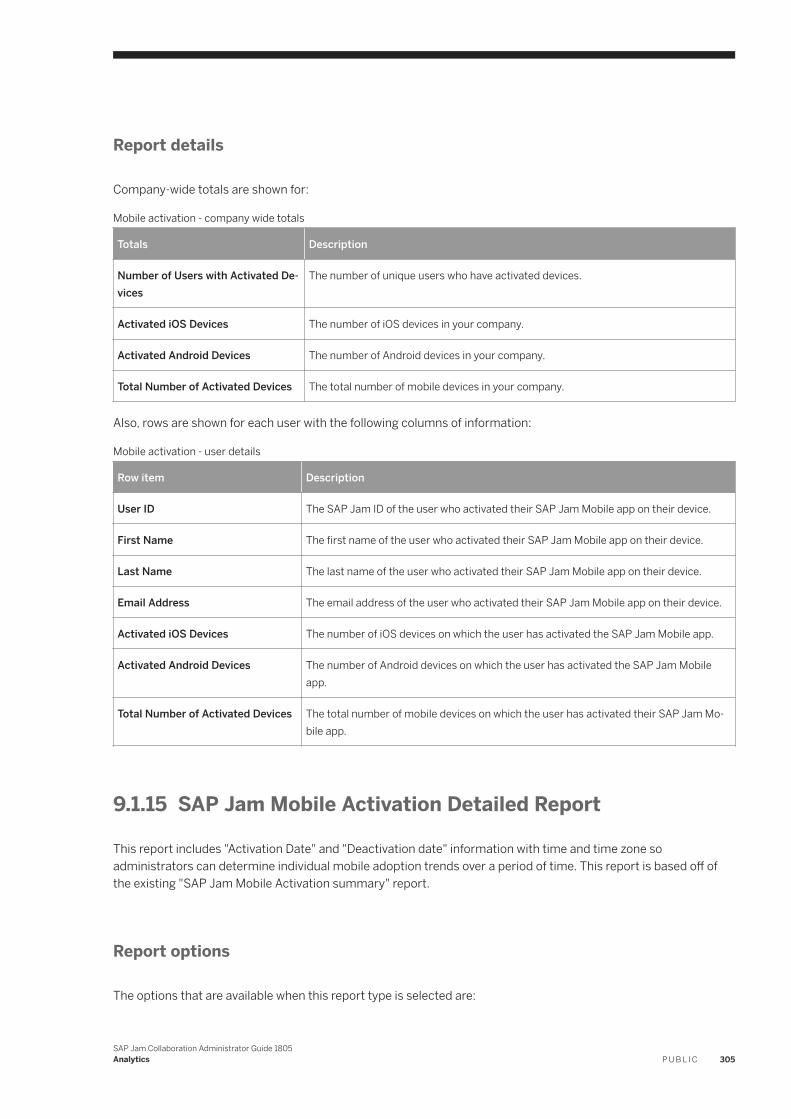
Report details
Company-wide totals are shown for:
Mobile activation - company wide totals
Totals Description
Number of Users with Activated Devices
The number of unique users who have activated devices.
Activated iOS Devices The number of iOS devices in your company.
Activated Android Devices The number of Android devices in your company.
Total Number of Activated Devices The total number of mobile devices in your company.
Also, rows are shown for each user with the following columns of information:
Mobile activation - user details
Row item Description
User ID The SAP Jam ID of the user who activated their SAP Jam Mobile app on their device.
First Name The first name of the user who activated their SAP Jam Mobile app on their device.
Last Name The last name of the user who activated their SAP Jam Mobile app on their device.
Email Address The email address of the user who activated their SAP Jam Mobile app on their device.
Activated iOS Devices The number of iOS devices on which the user has activated the SAP Jam Mobile app.
Activated Android Devices The number of Android devices on which the user has activated the SAP Jam Mobile app.
Total Number of Activated Devices The total number of mobile devices on which the user has activated their SAP Jam Mobile app.
9.1.15 SAP Jam Mobile Activation Detailed Report
This report includes "Activation Date" and "Deactivation date" information with time and time zone so administrators can determine individual mobile adoption trends over a period of time. This report is based off of the existing "SAP Jam Mobile Activation summary" report.
Report options
The options that are available when this report type is selected are:
SAP Jam Collaboration Administrator Guide 1805Analytics P U B L I C 305
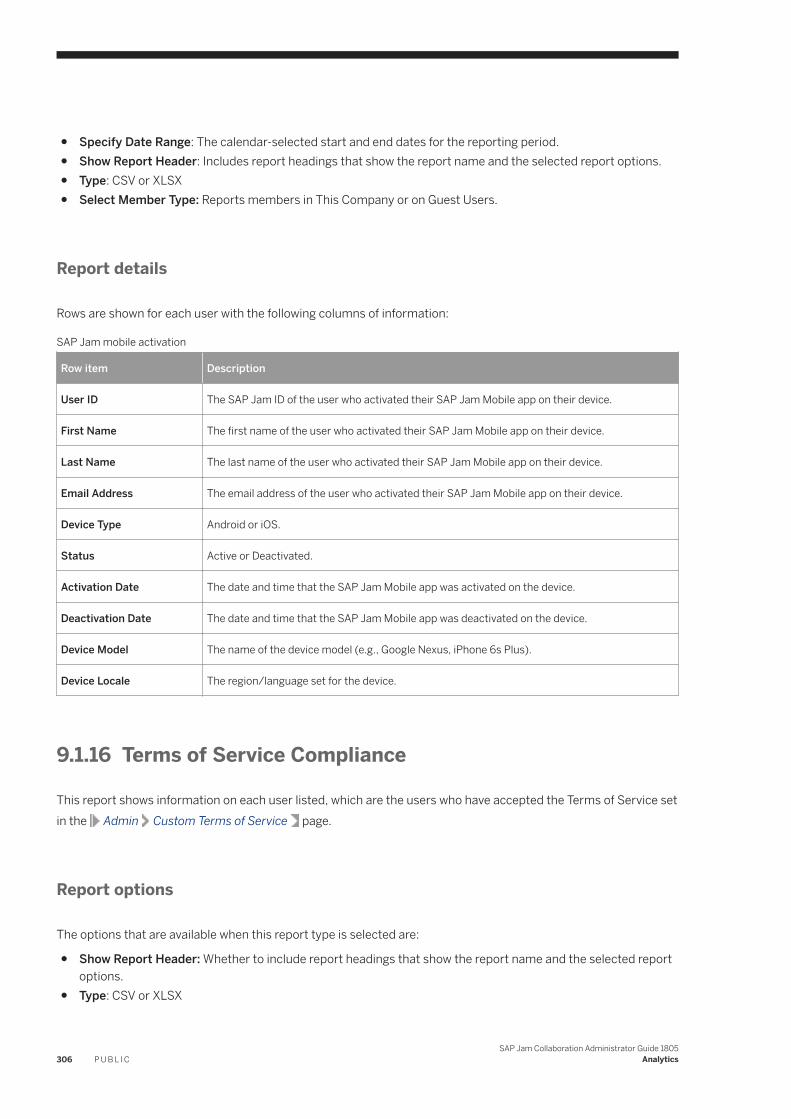
● Specify Date Range: The calendar-selected start and end dates for the reporting period.● Show Report Header: Includes report headings that show the report name and the selected report options.● Type: CSV or XLSX● Select Member Type: Reports members in This Company or on Guest Users.
Report details
Rows are shown for each user with the following columns of information:
SAP Jam mobile activation
Row item Description
User ID The SAP Jam ID of the user who activated their SAP Jam Mobile app on their device.
First Name The first name of the user who activated their SAP Jam Mobile app on their device.
Last Name The last name of the user who activated their SAP Jam Mobile app on their device.
Email Address The email address of the user who activated their SAP Jam Mobile app on their device.
Device Type Android or iOS.
Status Active or Deactivated.
Activation Date The date and time that the SAP Jam Mobile app was activated on the device.
Deactivation Date The date and time that the SAP Jam Mobile app was deactivated on the device.
Device Model The name of the device model (e.g., Google Nexus, iPhone 6s Plus).
Device Locale The region/language set for the device.
9.1.16 Terms of Service Compliance
This report shows information on each user listed, which are the users who have accepted the Terms of Service set in the Admin Custom Terms of Service page.
Report options
The options that are available when this report type is selected are:
● Show Report Header: Whether to include report headings that show the report name and the selected report options.
● Type: CSV or XLSX
306 P U B L I CSAP Jam Collaboration Administrator Guide 1805
Analytics
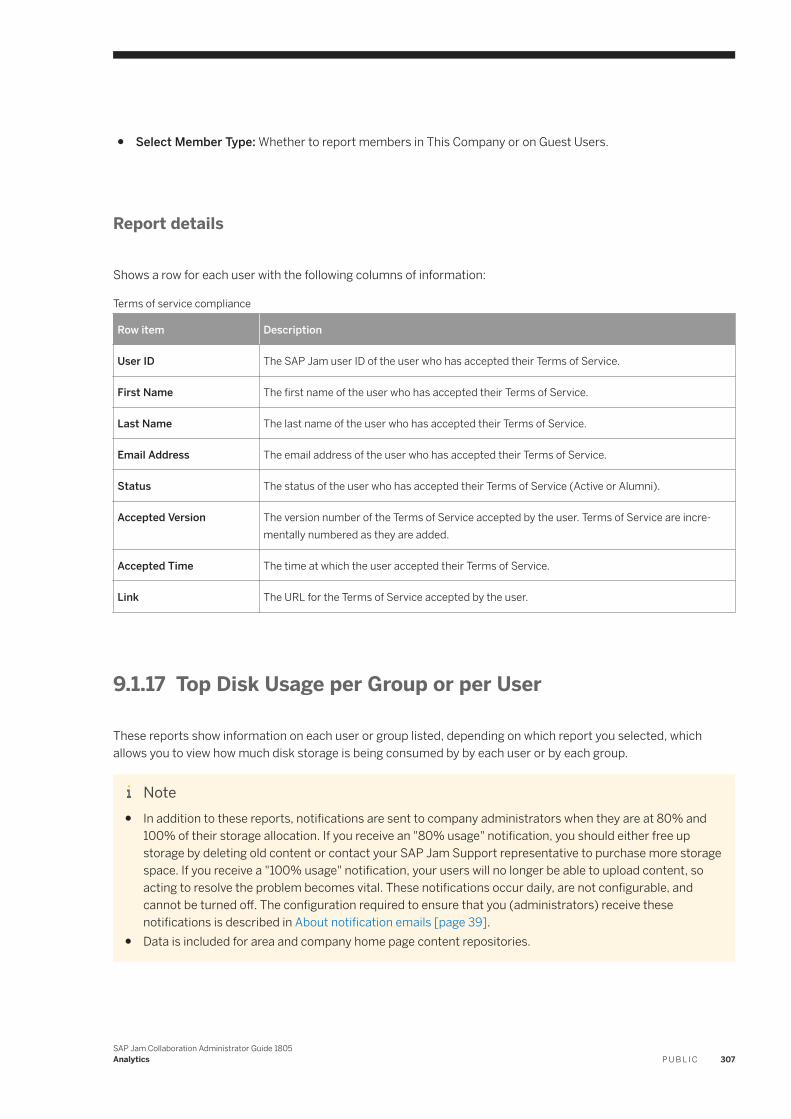
● Select Member Type: Whether to report members in This Company or on Guest Users.
Report details
Shows a row for each user with the following columns of information:
Terms of service compliance
Row item Description
User ID The SAP Jam user ID of the user who has accepted their Terms of Service.
First Name The first name of the user who has accepted their Terms of Service.
Last Name The last name of the user who has accepted their Terms of Service.
Email Address The email address of the user who has accepted their Terms of Service.
Status The status of the user who has accepted their Terms of Service (Active or Alumni).
Accepted Version The version number of the Terms of Service accepted by the user. Terms of Service are incrementally numbered as they are added.
Accepted Time The time at which the user accepted their Terms of Service.
Link The URL for the Terms of Service accepted by the user.
9.1.17 Top Disk Usage per Group or per User
These reports show information on each user or group listed, depending on which report you selected, which allows you to view how much disk storage is being consumed by by each user or by each group.
Note● In addition to these reports, notifications are sent to company administrators when they are at 80% and
100% of their storage allocation. If you receive an "80% usage" notification, you should either free up storage by deleting old content or contact your SAP Jam Support representative to purchase more storage space. If you receive a "100% usage" notification, your users will no longer be able to upload content, so acting to resolve the problem becomes vital. These notifications occur daily, are not configurable, and cannot be turned off. The configuration required to ensure that you (administrators) receive these notifications is described in About notification emails [page 39].
● Data is included for area and company home page content repositories.
SAP Jam Collaboration Administrator Guide 1805Analytics P U B L I C 307
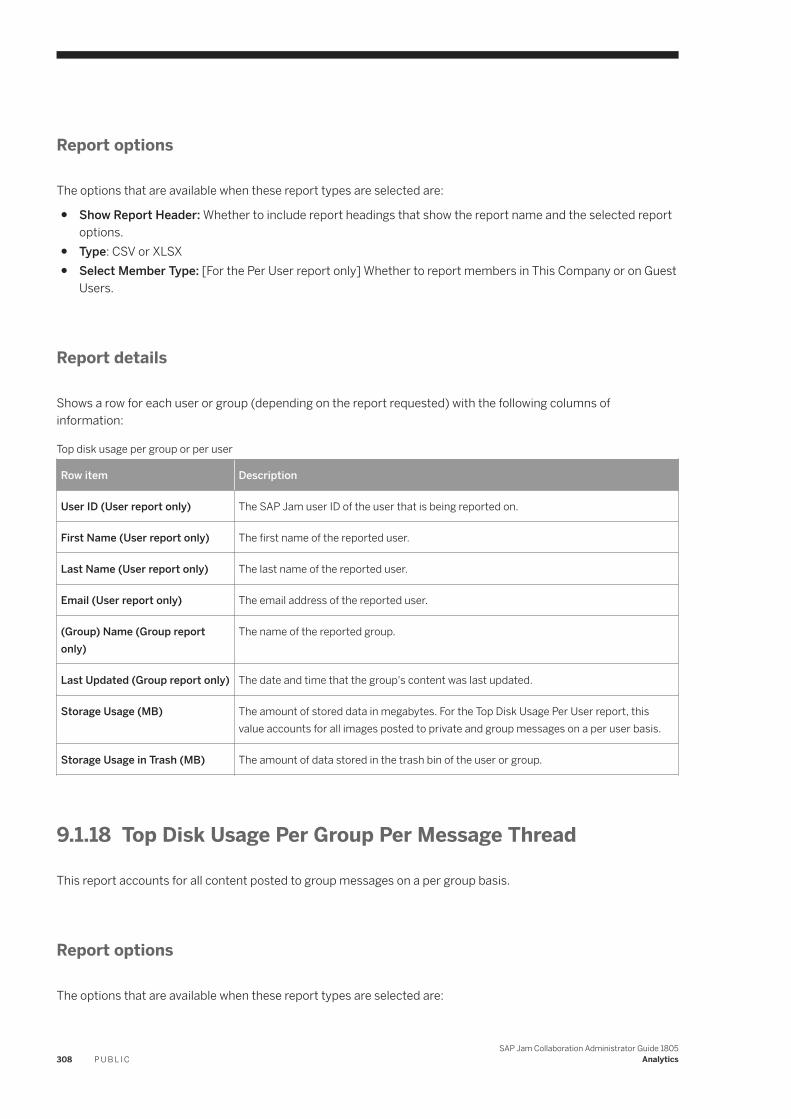
Report options
The options that are available when these report types are selected are:
● Show Report Header: Whether to include report headings that show the report name and the selected report options.
● Type: CSV or XLSX● Select Member Type: [For the Per User report only] Whether to report members in This Company or on Guest
Users.
Report details
Shows a row for each user or group (depending on the report requested) with the following columns of information:
Top disk usage per group or per user
Row item Description
User ID (User report only) The SAP Jam user ID of the user that is being reported on.
First Name (User report only) The first name of the reported user.
Last Name (User report only) The last name of the reported user.
Email (User report only) The email address of the reported user.
(Group) Name (Group report only)
The name of the reported group.
Last Updated (Group report only) The date and time that the group's content was last updated.
Storage Usage (MB) The amount of stored data in megabytes. For the Top Disk Usage Per User report, this value accounts for all images posted to private and group messages on a per user basis.
Storage Usage in Trash (MB) The amount of data stored in the trash bin of the user or group.
9.1.18 Top Disk Usage Per Group Per Message Thread
This report accounts for all content posted to group messages on a per group basis.
Report options
The options that are available when these report types are selected are:
308 P U B L I CSAP Jam Collaboration Administrator Guide 1805
Analytics
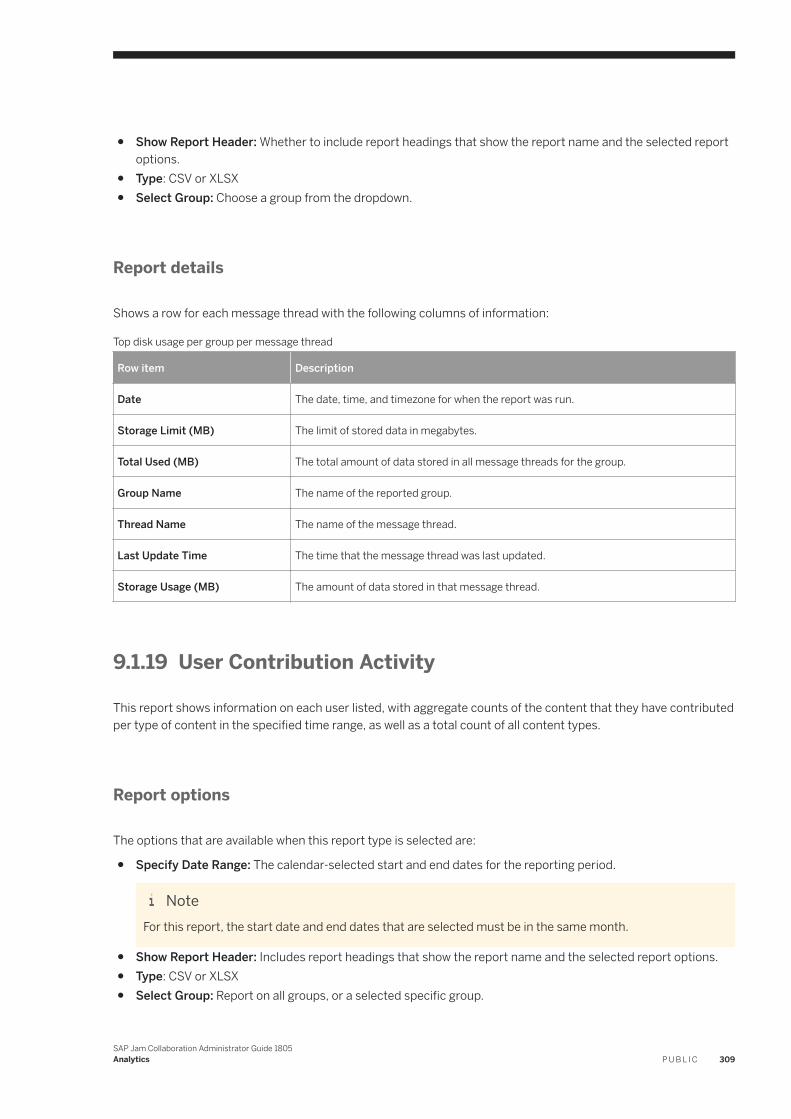
● Show Report Header: Whether to include report headings that show the report name and the selected report options.
● Type: CSV or XLSX● Select Group: Choose a group from the dropdown.
Report details
Shows a row for each message thread with the following columns of information:
Top disk usage per group per message thread
Row item Description
Date The date, time, and timezone for when the report was run.
Storage Limit (MB) The limit of stored data in megabytes.
Total Used (MB) The total amount of data stored in all message threads for the group.
Group Name The name of the reported group.
Thread Name The name of the message thread.
Last Update Time The time that the message thread was last updated.
Storage Usage (MB) The amount of data stored in that message thread.
9.1.19 User Contribution Activity
This report shows information on each user listed, with aggregate counts of the content that they have contributed per type of content in the specified time range, as well as a total count of all content types.
Report options
The options that are available when this report type is selected are:
● Specify Date Range: The calendar-selected start and end dates for the reporting period.
NoteFor this report, the start date and end dates that are selected must be in the same month.
● Show Report Header: Includes report headings that show the report name and the selected report options.● Type: CSV or XLSX● Select Group: Report on all groups, or a selected specific group.
SAP Jam Collaboration Administrator Guide 1805Analytics P U B L I C 309
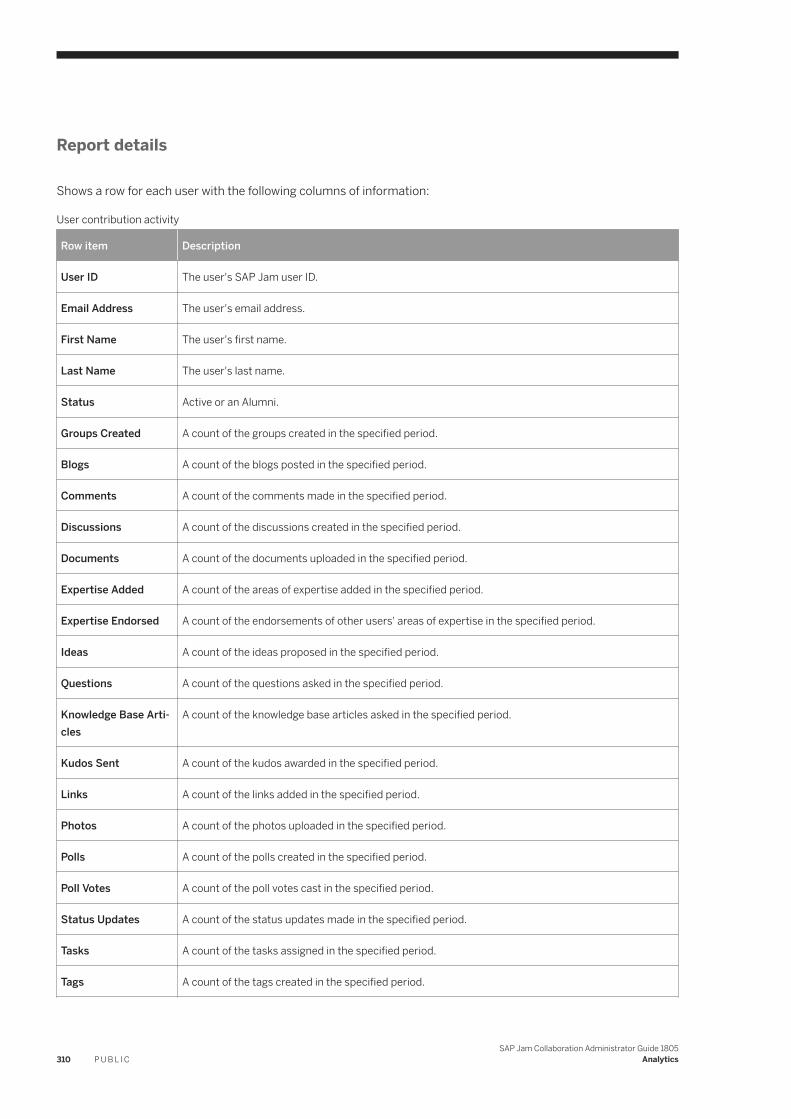
Report details
Shows a row for each user with the following columns of information:
User contribution activity
Row item Description
User ID The user's SAP Jam user ID.
Email Address The user's email address.
First Name The user's first name.
Last Name The user's last name.
Status Active or an Alumni.
Groups Created A count of the groups created in the specified period.
Blogs A count of the blogs posted in the specified period.
Comments A count of the comments made in the specified period.
Discussions A count of the discussions created in the specified period.
Documents A count of the documents uploaded in the specified period.
Expertise Added A count of the areas of expertise added in the specified period.
Expertise Endorsed A count of the endorsements of other users' areas of expertise in the specified period.
Ideas A count of the ideas proposed in the specified period.
Questions A count of the questions asked in the specified period.
Knowledge Base Articles
A count of the knowledge base articles asked in the specified period.
Kudos Sent A count of the kudos awarded in the specified period.
Links A count of the links added in the specified period.
Photos A count of the photos uploaded in the specified period.
Polls A count of the polls created in the specified period.
Poll Votes A count of the poll votes cast in the specified period.
Status Updates A count of the status updates made in the specified period.
Tasks A count of the tasks assigned in the specified period.
Tags A count of the tags created in the specified period.
310 P U B L I CSAP Jam Collaboration Administrator Guide 1805
Analytics
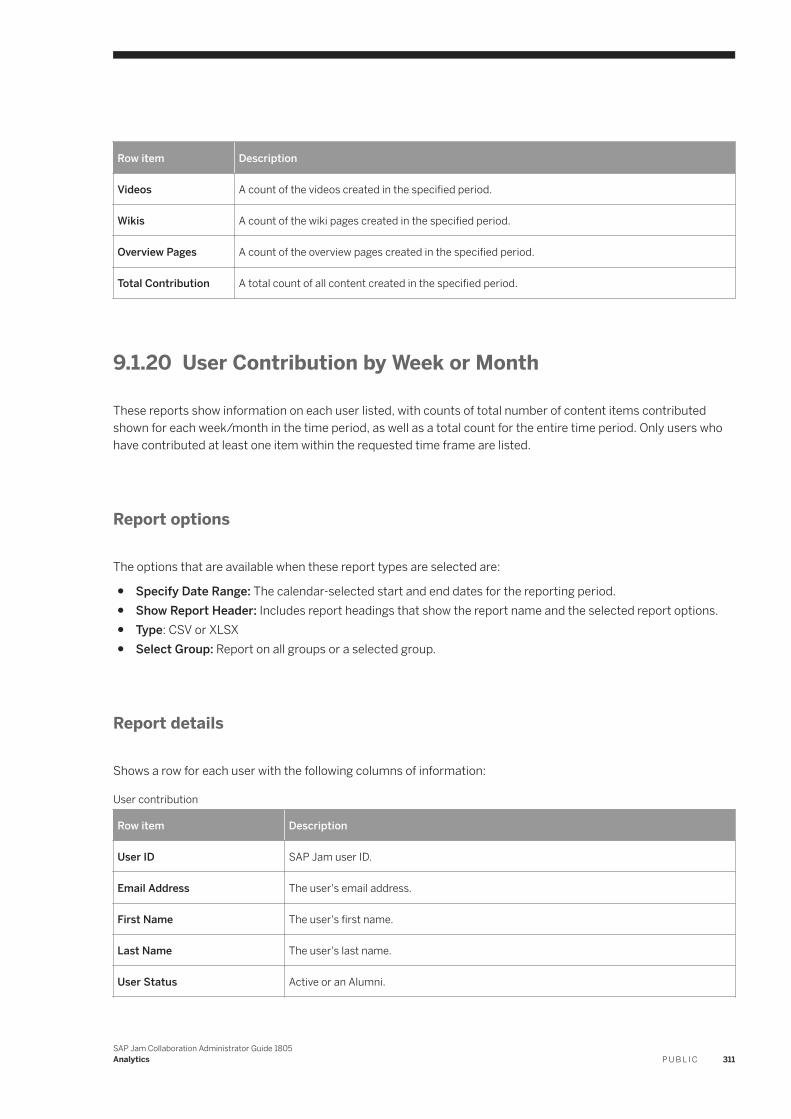
Row item Description
Videos A count of the videos created in the specified period.
Wikis A count of the wiki pages created in the specified period.
Overview Pages A count of the overview pages created in the specified period.
Total Contribution A total count of all content created in the specified period.
9.1.20 User Contribution by Week or Month
These reports show information on each user listed, with counts of total number of content items contributed shown for each week/month in the time period, as well as a total count for the entire time period. Only users who have contributed at least one item within the requested time frame are listed.
Report options
The options that are available when these report types are selected are:
● Specify Date Range: The calendar-selected start and end dates for the reporting period.● Show Report Header: Includes report headings that show the report name and the selected report options.● Type: CSV or XLSX● Select Group: Report on all groups or a selected group.
Report details
Shows a row for each user with the following columns of information:
User contribution
Row item Description
User ID SAP Jam user ID.
Email Address The user's email address.
First Name The user's first name.
Last Name The user's last name.
User Status Active or an Alumni.
SAP Jam Collaboration Administrator Guide 1805Analytics P U B L I C 311
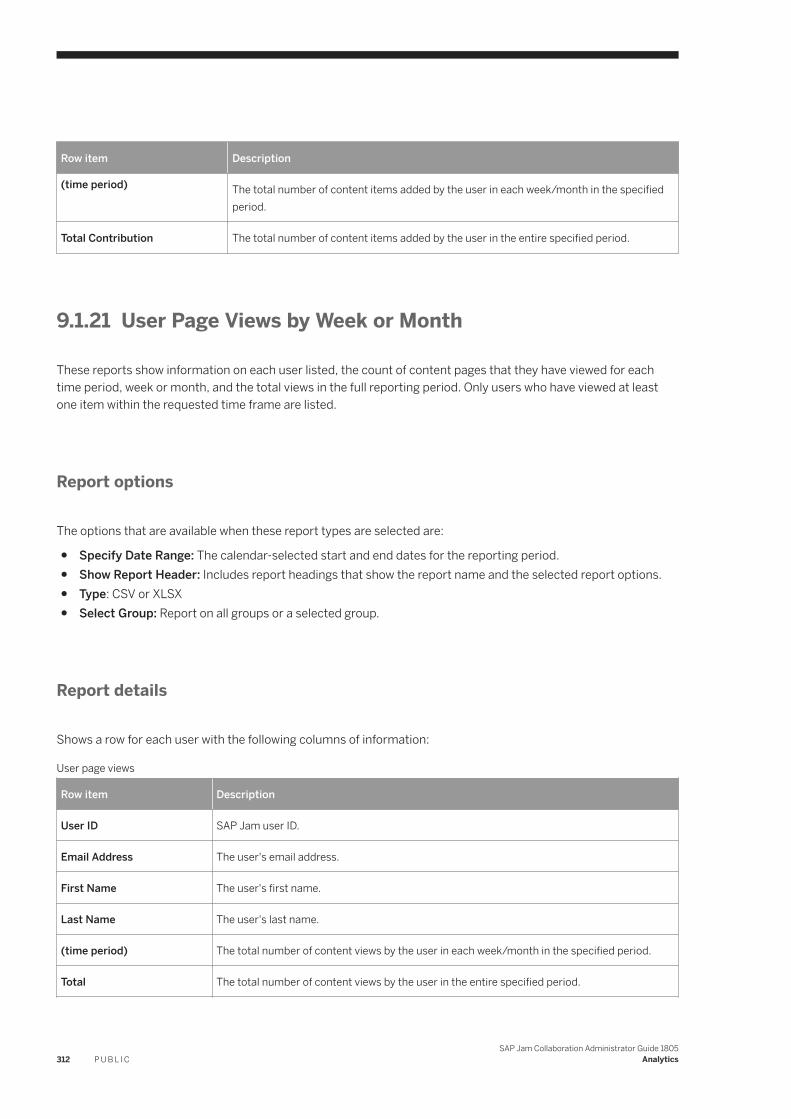
Row item Description
(time period) The total number of content items added by the user in each week/month in the specified period.
Total Contribution The total number of content items added by the user in the entire specified period.
9.1.21 User Page Views by Week or Month
These reports show information on each user listed, the count of content pages that they have viewed for each time period, week or month, and the total views in the full reporting period. Only users who have viewed at least one item within the requested time frame are listed.
Report options
The options that are available when these report types are selected are:
● Specify Date Range: The calendar-selected start and end dates for the reporting period.● Show Report Header: Includes report headings that show the report name and the selected report options.● Type: CSV or XLSX● Select Group: Report on all groups or a selected group.
Report details
Shows a row for each user with the following columns of information:
User page views
Row item Description
User ID SAP Jam user ID.
Email Address The user's email address.
First Name The user's first name.
Last Name The user's last name.
(time period) The total number of content views by the user in each week/month in the specified period.
Total The total number of content views by the user in the entire specified period.
312 P U B L I CSAP Jam Collaboration Administrator Guide 1805
Analytics
9.2 Dashboard
The Analytics Dashboard presents summarized information on SAP Jam activity. Dashboard information is presented in three sections: a top panel, a set of five summary panels that show Login Activity, Groups, Most Viewed Groups, Most Engaging Items, and Most Engaged Members, and a set of five details panels that expand on the summary panels information.
NoteThe data shown in the Analytics Dashboard is updated, at most, every 7 days.
Company and area level dashboards
As a company or area administrator, from the SAP Jam Admin console, select the admin area from the Change Admin Area dropdown, and then go to Analytics Dashboard .
The top panel
The information and actions available in the top panel are:
● A dropdown selection for the dashboard timeframe (last 4 weeks, last 3, 6, or 12 months). When you make a selection here, it applies to all other tiles.
NoteYou can change the timeframe selection for individual tiles; those selections will not change the timeframes of other tiles.
● A statement indicating the time interval of the default data sets.● A statement indicating the date that the data was generated. Dashboard data is updated weekly.● A statement indicating if more recent data is available, and a link to update the display with the newer data.● A Print button that displays a print-friendly page and opens a printer selection dialog box.● A Download button to download the following leaderboard metadata to a spreadsheet:
○ Most Engaged Users (top 200 list): profile URL, email address, user ID, name, number of views, number of likes, number of comments, items, and total number of activities.
○ Most Engaging Items (top 200 list): item URL, item name, content type, contributor, last modified, number of views, number of likes, number of comments, number of versions, and total number of activities.
○ Exported data also indicates whether leaderboard values are from the company or area home page, the export timestamp, and whether administrators are excluded or included.
SAP Jam Collaboration Administrator Guide 1805Analytics P U B L I C 313
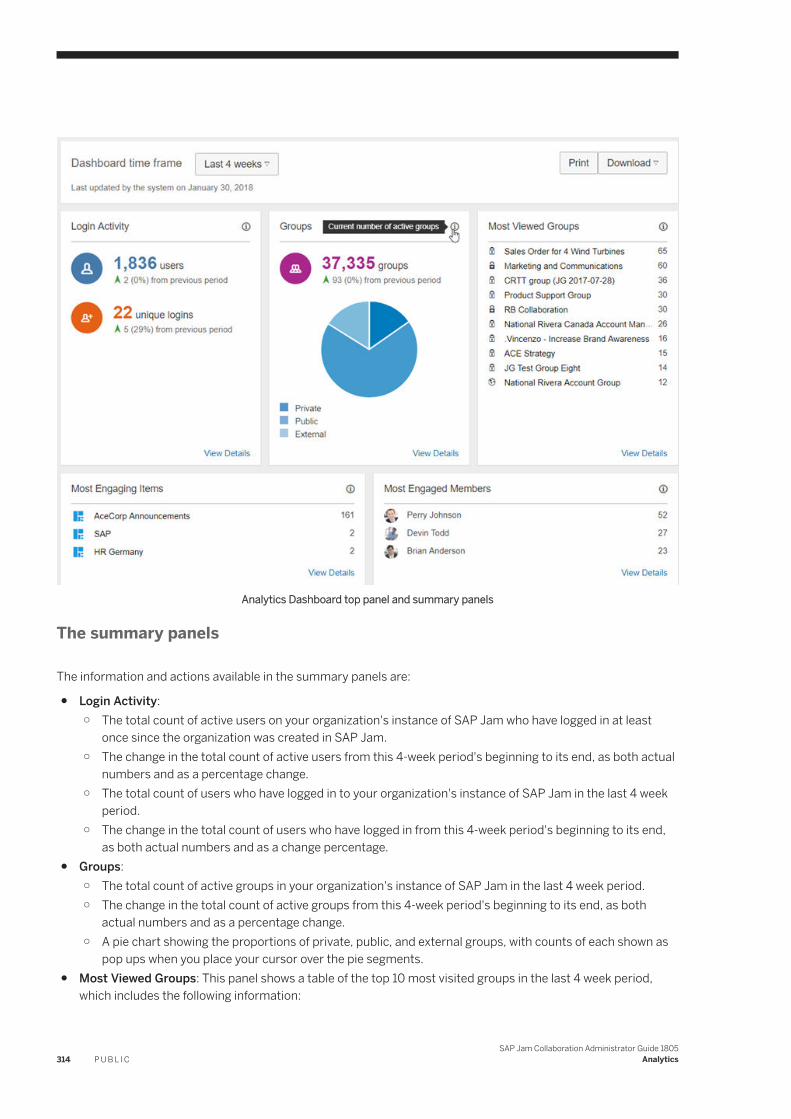
Analytics Dashboard top panel and summary panels
The summary panels
The information and actions available in the summary panels are:
● Login Activity:○ The total count of active users on your organization's instance of SAP Jam who have logged in at least
once since the organization was created in SAP Jam.○ The change in the total count of active users from this 4-week period's beginning to its end, as both actual
numbers and as a percentage change.○ The total count of users who have logged in to your organization's instance of SAP Jam in the last 4 week
period.○ The change in the total count of users who have logged in from this 4-week period's beginning to its end,
as both actual numbers and as a change percentage.● Groups:
○ The total count of active groups in your organization's instance of SAP Jam in the last 4 week period.○ The change in the total count of active groups from this 4-week period's beginning to its end, as both
actual numbers and as a percentage change.○ A pie chart showing the proportions of private, public, and external groups, with counts of each shown as
pop ups when you place your cursor over the pie segments.● Most Viewed Groups: This panel shows a table of the top 10 most visited groups in the last 4 week period,
which includes the following information:
314 P U B L I CSAP Jam Collaboration Administrator Guide 1805
Analytics
○ An icon indicating the type of group (public, private, or external).○ The name of the group (if you have access to that group), which is hyperlinked to the home page of that
group).○ A count of the number of views that each group has received.
NoteYou can filter the group names of the groups that you can access in the type ahead search bar above the chart.
● Most Engaging Items (home page content only):○ An option to filter by content type. The content type that appears depends on what home page content
was uploaded, viewed, liked, and commented on within the selected time frame.○ An option to exclude administrators so that the calculation of the top 10 most engaging items on the home
page for the selected time frame removes all company or area administrators' contributions.○ Metadata such as content type, item name, contributor, last modified date, number of views, number of
likes, number of comments, uploads, and total number of views, likes, comments, and uploads for home page content.
○ Items are sorted in descending order by total number of activities.
Note○ Custom home page tabs themselves are excluded from company and area leaderboards.○ Items that are saved to public groups and displayed on the company or area home page are
excluded from company and area leaderboards. Those items display on the group leaderboards instead.
● Most Engaged Members (home page content only):○ An option to exclude administrators so that the calculation of the top 10 most engaged users for the
selected time frame removes their names from the list.○ Metadata such as the user's full name, number of views, number of likes, number of comments, uploads,
and total number views, likes, comments, and uploads.○ Users can be sorted in descending order by total number of activities.○ If the "Allow user level reporting" option is not selected, then the most engaging users leaderboard does
not display● Summary panels include:
○ An information icon in the upper-right corner of each panel that displays a pop up explanation of the data displayed in that panel.
○ [Groups panel only] Pop up numbers of each type of group when you place your cursor over each slice of the pie chart.
○ [Most Viewed Groups panel only] Links to the home page of each of the listed groups.○ A View Details link to the detail panel corresponding to each summary panel.
The details panels
These panels show extended information on the same themes as the summary panels.
SAP Jam Collaboration Administrator Guide 1805Analytics P U B L I C 315
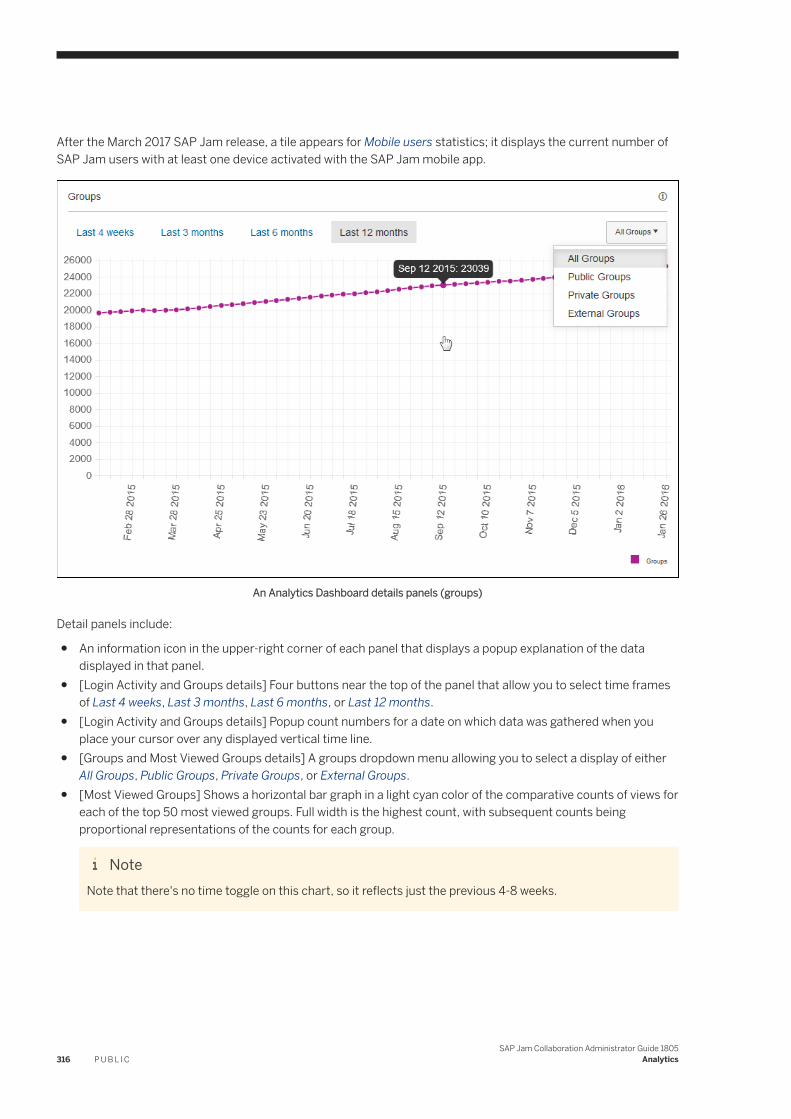
After the March 2017 SAP Jam release, a tile appears for Mobile users statistics; it displays the current number of SAP Jam users with at least one device activated with the SAP Jam mobile app.
An Analytics Dashboard details panels (groups)
Detail panels include:
● An information icon in the upper-right corner of each panel that displays a popup explanation of the data displayed in that panel.
● [Login Activity and Groups details] Four buttons near the top of the panel that allow you to select time frames of Last 4 weeks, Last 3 months, Last 6 months, or Last 12 months.
● [Login Activity and Groups details] Popup count numbers for a date on which data was gathered when you place your cursor over any displayed vertical time line.
● [Groups and Most Viewed Groups details] A groups dropdown menu allowing you to select a display of either All Groups, Public Groups, Private Groups, or External Groups.
● [Most Viewed Groups] Shows a horizontal bar graph in a light cyan color of the comparative counts of views for each of the top 50 most viewed groups. Full width is the highest count, with subsequent counts being proportional representations of the counts for each group.
NoteNote that there's no time toggle on this chart, so it reflects just the previous 4-8 weeks.
316 P U B L I CSAP Jam Collaboration Administrator Guide 1805
Analytics
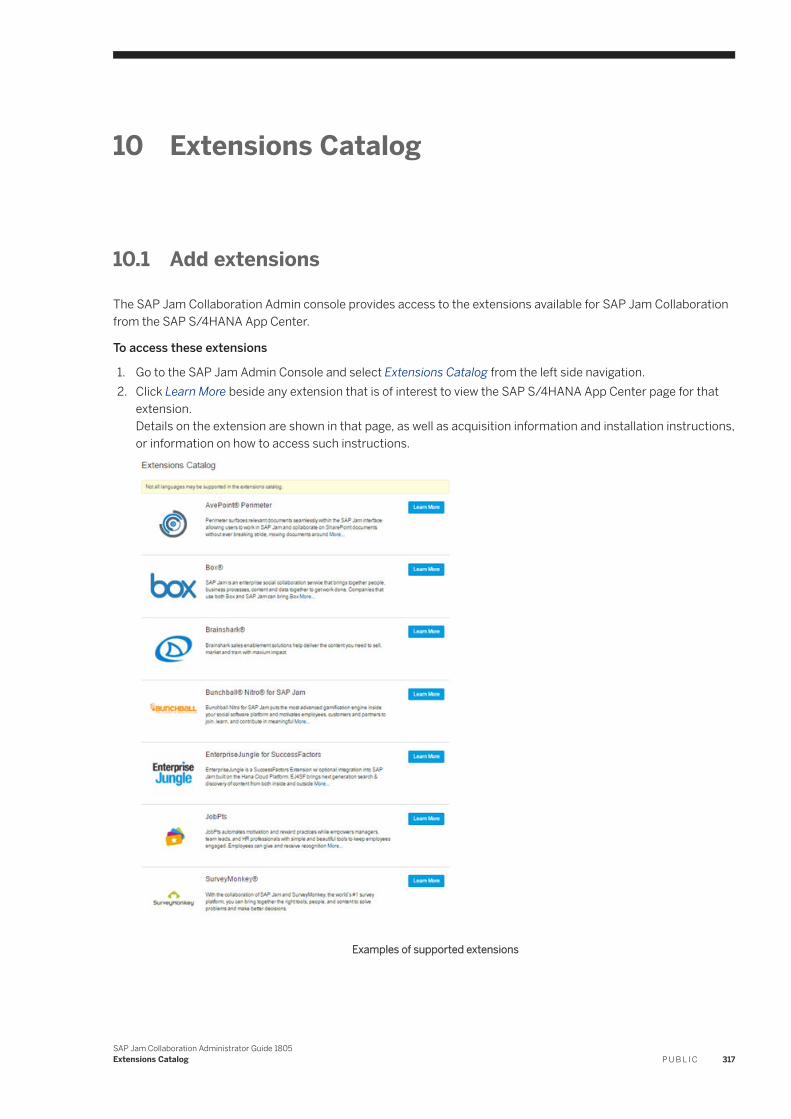
10 Extensions Catalog
10.1 Add extensions
The SAP Jam Collaboration Admin console provides access to the extensions available for SAP Jam Collaboration from the SAP S/4HANA App Center.
To access these extensions
1. Go to the SAP Jam Admin Console and select Extensions Catalog from the left side navigation.2. Click Learn More beside any extension that is of interest to view the SAP S/4HANA App Center page for that
extension.Details on the extension are shown in that page, as well as acquisition information and installation instructions, or information on how to access such instructions.
Examples of supported extensions
SAP Jam Collaboration Administrator Guide 1805Extensions Catalog P U B L I C 317
NoteExtensions from the SAP S/4HANA App Center are not currently available in translation. Please ensure that you and your users are prepared to use the extension in its available language, or languages, before acquiring and installing one.
318 P U B L I CSAP Jam Collaboration Administrator Guide 1805
Extensions Catalog
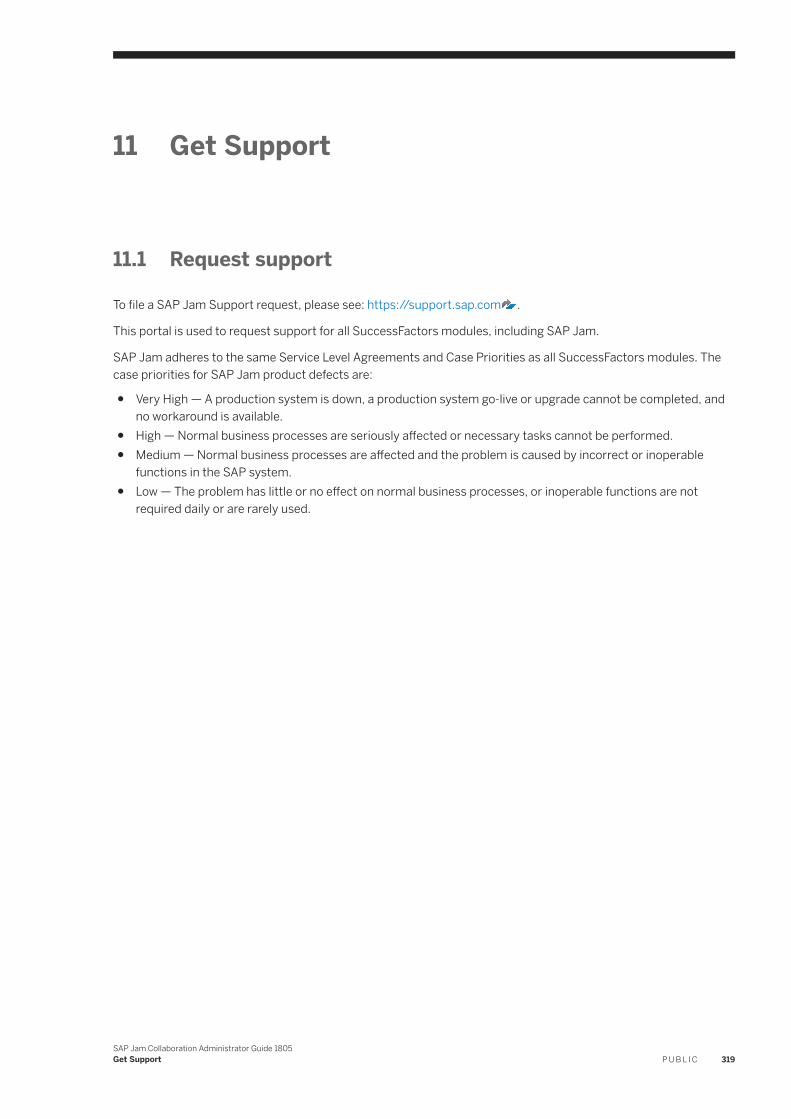
11 Get Support
11.1 Request support
To file a SAP Jam Support request, please see: https://support.sap.com .
This portal is used to request support for all SuccessFactors modules, including SAP Jam.
SAP Jam adheres to the same Service Level Agreements and Case Priorities as all SuccessFactors modules. The case priorities for SAP Jam product defects are:
● Very High — A production system is down, a production system go-live or upgrade cannot be completed, and no workaround is available.
● High — Normal business processes are seriously affected or necessary tasks cannot be performed.● Medium — Normal business processes are affected and the problem is caused by incorrect or inoperable
functions in the SAP system.● Low — The problem has little or no effect on normal business processes, or inoperable functions are not
required daily or are rarely used.
SAP Jam Collaboration Administrator Guide 1805Get Support P U B L I C 319
Important Disclaimers and Legal Information
HyperlinksSome links are classified by an icon and/or a mouseover text. These links provide additional information.About the icons:
● Links with the icon : You are entering a Web site that is not hosted by SAP. By using such links, you agree (unless expressly stated otherwise in your agreements with SAP) to this:
● The content of the linked-to site is not SAP documentation. You may not infer any product claims against SAP based on this information.● SAP does not agree or disagree with the content on the linked-to site, nor does SAP warrant the availability and correctness. SAP shall not be liable for any
damages caused by the use of such content unless damages have been caused by SAP's gross negligence or willful misconduct.
● Links with the icon : You are leaving the documentation for that particular SAP product or service and are entering a SAP-hosted Web site. By using such links, you agree that (unless expressly stated otherwise in your agreements with SAP) you may not infer any product claims against SAP based on this information.
Beta and Other Experimental FeaturesExperimental features are not part of the officially delivered scope that SAP guarantees for future releases. This means that experimental features may be changed by SAP at any time for any reason without notice. Experimental features are not for productive use. You may not demonstrate, test, examine, evaluate or otherwise use the experimental features in a live operating environment or with data that has not been sufficiently backed up.The purpose of experimental features is to get feedback early on, allowing customers and partners to influence the future product accordingly. By providing your feedback (e.g. in the SAP Community), you accept that intellectual property rights of the contributions or derivative works shall remain the exclusive property of SAP.
Example CodeAny software coding and/or code snippets are examples. They are not for productive use. The example code is only intended to better explain and visualize the syntax and phrasing rules. SAP does not warrant the correctness and completeness of the example code. SAP shall not be liable for errors or damages caused by the use of example code unless damages have been caused by SAP's gross negligence or willful misconduct.
Gender-Related LanguageWe try not to use gender-specific word forms and formulations. As appropriate for context and readability, SAP may use masculine word forms to refer to all genders.
320 P U B L I CSAP Jam Collaboration Administrator Guide 1805Important Disclaimers and Legal Information

SAP Jam Collaboration Administrator Guide 1805Important Disclaimers and Legal Information P U B L I C 321
go.sap.com/registration/contact.html
© 2018 SAP SE or an SAP affiliate company. All rights reserved.No part of this publication may be reproduced or transmitted in any form or for any purpose without the express permission of SAP SE or an SAP affiliate company. The information contained herein may be changed without prior notice.Some software products marketed by SAP SE and its distributors contain proprietary software components of other software vendors. National product specifications may vary.These materials are provided by SAP SE or an SAP affiliate company for informational purposes only, without representation or warranty of any kind, and SAP or its affiliated companies shall not be liable for errors or omissions with respect to the materials. The only warranties for SAP or SAP affiliate company products and services are those that are set forth in the express warranty statements accompanying such products and services, if any. Nothing herein should be construed as constituting an additional warranty.SAP and other SAP products and services mentioned herein as well as their respective logos are trademarks or registered trademarks of SAP SE (or an SAP affiliate company) in Germany and other countries. All other product and service names mentioned are the trademarks of their respective companies.Please see https://www.sap.com/about/legal/trademark.html for additional trademark information and notices.