Embed Size (px)
Citation preview
SAP System Landscape Directory
Release 640
HE
LP
.BC
JA
VA
_A
DM
_S
LD

SAP Online Help 18.02.2004
SAP System Landscape Directory 640 2
Copyright © Copyright 2004 SAP AG. All rights reserved. No part of this publication may be reproduced or transmitted in any form or for any purpose without the express permission of SAP AG. The information contained herein may be changed without prior notice. Some software products marketed by SAP AG and its distributors contain proprietary software components of other software vendors. Microsoft®, WINDOWS®, NT®, EXCEL®, Word®, PowerPoint® and SQL Server® are registered trademarks of Microsoft Corporation. IBM®, DB2®, DB2 Universal Database, OS/2®, Parallel Sysplex®, MVS/ESA, AIX®, S/390®, AS/400®, OS/390®, OS/400®, iSeries, pSeries, xSeries, zSeries, z/OS, AFP, Intelligent Miner, WebSphere®, Netfinity®, Tivoli®, Informix and Informix® Dynamic ServerTM are trademarks of IBM Corporation in USA and/or other countries. ORACLE® is a registered trademark of ORACLE Corporation. UNIX®, X/Open®, OSF/1®, and Motif® are registered trademarks of the Open Group. Citrix®, the Citrix logo, ICA®, Program Neighborhood®, MetaFrame®, WinFrame®, VideoFrame®, MultiWin® and other Citrix product names referenced herein are trademarks of Citrix Systems, Inc. HTML, DHTML, XML, XHTML are trademarks or registered trademarks of W3C®, World Wide Web Consortium, Massachusetts Institute of Technology. JAVA® is a registered trademark of Sun Microsystems, Inc. JAVASCRIPT® is a registered trademark of Sun Microsystems, Inc., used under license for technology invented and implemented by Netscape. MarketSet and Enterprise Buyer are jointly owned trademarks of SAP AG and Commerce One. SAP, SAP Logo, R/2, R/3, mySAP, mySAP.com and other SAP products and services mentioned herein as well as their respective logos are trademarks or registered trademarks of SAP AG in Germany and in several other countries all over the world. All other product and service names mentioned are trademarks of their respective companies.
SAP Online Help 18.02.2004
SAP System Landscape Directory 640 3
Icons in Body Text
Icon Meaning
Caution
Example
Note
Recommendation
Syntax
Additional icons are used in SAP Library documentation to help you identify different types of information at a glance. For more information, see Help on Help → General Information Classes and Information Classes for Business Information Warehouse on the first page of any version of SAP Library.
Typographic Conventions
Type Style Description
Example text Words or characters quoted from the screen. These include field names, screen titles, pushbuttons labels, menu names, menu paths, and menu options.
Cross-references to other documentation. Example text Emphasized words or phrases in body text, graphic titles, and table
titles.
EXAMPLE TEXT Technical names of system objects. These include report names, program names, transaction codes, table names, and key concepts of a programming language when they are surrounded by body text, for example, SELECT and INCLUDE.
Example text Output on the screen. This includes file and directory names and their paths, messages, names of variables and parameters, source text, and names of installation, upgrade and database tools.
Example text Exact user entry. These are words or characters that you enter in the system exactly as they appear in the documentation.
<Example text> Variable user entry. Angle brackets indicate that you replace these words and characters with appropriate entries to make entries in the system.
EXAMPLE TEXT Keys on the keyboard, for example, F2 or ENTER.
SAP Online Help 18.02.2004
SAP System Landscape Directory 640 4
SAP System Landscape Directory ............................................................................................ 7 CIM Concept .......................................................................................................................... 9 Component Information ....................................................................................................... 11 System Landscape Description ........................................................................................... 12 Security Roles...................................................................................................................... 13 Administrative Activities ....................................................................................................... 15
Logging On as Administrator............................................................................................ 16
Starting and Stopping the SLD Service............................................................................ 17
Displaying System Information......................................................................................... 18
Configuring the SAP System Landscape Directory ......................................................... 19
Making Server Settings .................................................................................................... 21
Creating a System Message ............................................................................................ 23
System Monitoring............................................................................................................ 24
Making Settings for the Data Supplier Bridge (on the SLD Server) ................................. 26
Maintaining Data .............................................................................................................. 27
Maintaining Data in the SLD Reported by the Data Suppliers ..................................... 30
Navigating in the Structure View ...................................................................................... 31
Importing CIM Instances .................................................................................................. 32
Creating Exports and Backups of CIM Instances............................................................. 33
Exporting CIM Instances............................................................................................... 34
Component Repository Exports: Scenarios.................................................................. 35
Backing Up CIM Instances ........................................................................................... 37
Tracing Instance Modifications......................................................................................... 38
Administering Namespaces.............................................................................................. 39
Technical System Landscape.............................................................................................. 41 Displaying Technical Systems.......................................................................................... 42
Maintaining Data About Registered Systems (Web AS ABAP) ....................................... 43
Registering Standalone Java Systems ............................................................................ 45
Registering Third-Party Systems...................................................................................... 46
Maintaining Additional Data About Web AS Java Systems ............................................. 47
Configuration for the SAP Exchange Infrastructure............................................................. 48 Configuration of SAP and Third-Party Systems............................................................... 49
Manually Registering SAP Web AS ABAP Systems........................................................ 50
Manually Registering a Product for an Add-On............................................................ 51
Configuring an SAP Business System ............................................................................. 52
Registration of Third-Party Systems ................................................................................ 53
Defining Third-Party Software....................................................................................... 54
Defining a Third-Party Software Component................................................................ 55
Configuring a Third-Party System ................................................................................ 56
SAP Online Help 18.02.2004
SAP System Landscape Directory 640 5
Configuring a Third-Party Business System................................................................. 57
Software Catalog ................................................................................................................. 58 Software Components and Software Products ................................................................ 59
Displaying the Software Catalog ...................................................................................... 61
Maintaining Third-Party Products ..................................................................................... 62
Software Dependencies ................................................................................................... 64
Displaying Dependencies Between Software Component Versions............................ 65
Defining Additional Software Dependencies ................................................................ 66
Deleting Software Dependencies ................................................................................. 67
Name Reservation ............................................................................................................... 68 Set-Up of the Name Reservation Service ........................................................................ 69
Creating a Record for a Name Server .......................................................................... 70
Defining a Namespace Prefix........................................................................................... 71
Object Name Categories .............................................................................................. 72
Displaying and Copying Namespace Prefixes ................................................................. 75
Reserving a Single Name................................................................................................. 76
Maintaining Reserved Names .......................................................................................... 77
Implementing an SLD Client ................................................................................................ 78 Java Client for the SLD Service ....................................................................................... 79
Generating a CIM Client ............................................................................................... 80
Processing CIM Objects ............................................................................................... 81
List CIM Objects ........................................................................................................... 84
Executing a Batch Request .......................................................................................... 85
Handle Exceptions........................................................................................................ 86
Controlling the Logging Process................................................................................... 87
Namespace................................................................................................................... 88
SAP Proxy Layer .......................................................................................................... 89
ABAP Client for the SLD Service ..................................................................................... 91
Basis for Server Access................................................................................................ 92
Read Access................................................................................................................. 94
Write Access................................................................................................................. 96
Exception Handling....................................................................................................... 98
Data Suppliers for the SAP System Landscape Directory................................................... 99 Architecture Overview of the SLD Data Suppliers ......................................................... 100
SLD Data Supplier for ABAP-Based Systems............................................................ 102
Configuring the SLD Data Supplier: Default Settings ............................................. 103
Global Settings........................................................................................................ 104
Making Settings for Using RFC to Send Data to the SLD Bridge ....................... 105
Making Settings for Using a CCMS Agent .......................................................... 106
Making Settings for the Data Supplier Bridge (in an ABAP System) .................. 107
SAP Online Help 18.02.2004
SAP System Landscape Directory 640 6
Setting the Time Interval for Collecting Data....................................................... 108
Data Collection Programs ....................................................................................... 109
Data Collection Programs: Overview .................................................................. 110
Adding and Removing Data Collection Programs............................................... 111
Activating and Deactivating Data Collection Programs....................................... 112
Testing Data Collection Programs....................................................................... 113
Starting and Stopping the Data Collection Programs.......................................... 114
SLD Data Supplier for J2EE-Based Systems............................................................. 115
Setting Up the SLD Data Supplier (J2EE) .............................................................. 116
Overview of Parameters for the SLD Service...................................................... 118
Information About the SLD Service in the Visual Administrator.............................. 119
Configuring the Interface for CIM Client Generation............................................... 121
Additional Functions of the SLD Service................................................................. 122
SAP Online Help 18.02.2004
SAP System Landscape Directory 640 7
SAP System Landscape Directory
Purpose A modern computing environment consists of a number of hardware and software components that depend on each other with regard to installation, software updates, and demands on interfaces. The SAP System Landscape Directory (SLD) simplifies the administration of your system landscape.
The SLD is a server application that communicates with a client application by using the Hypertext Transfer Protocol (HTTP). The SLD server contains component information [page 11], a landscape description [page 12], and a name reservation [page 68], which are based on the standard Common Information Model (CIM) [page 9]. The CIM standard is a general schema for describing the elements in a system landscape. This standard is independent of any implementation.
Features The component description provides information about all available SAP software modules. This includes version numbers, current patch level, and dependencies between landscape components. SAP makes this information available to its customers. You can download the current component description from SAP Service Marketplace, which then updates your local component description (see SAP Note 669669). It is also possible to add instances for third-party components to the component description.
The system landscape description represents the exact model of an actual system landscape. Together with the current component description, the system description provides information for various processes (the system administration and implementation, for example).
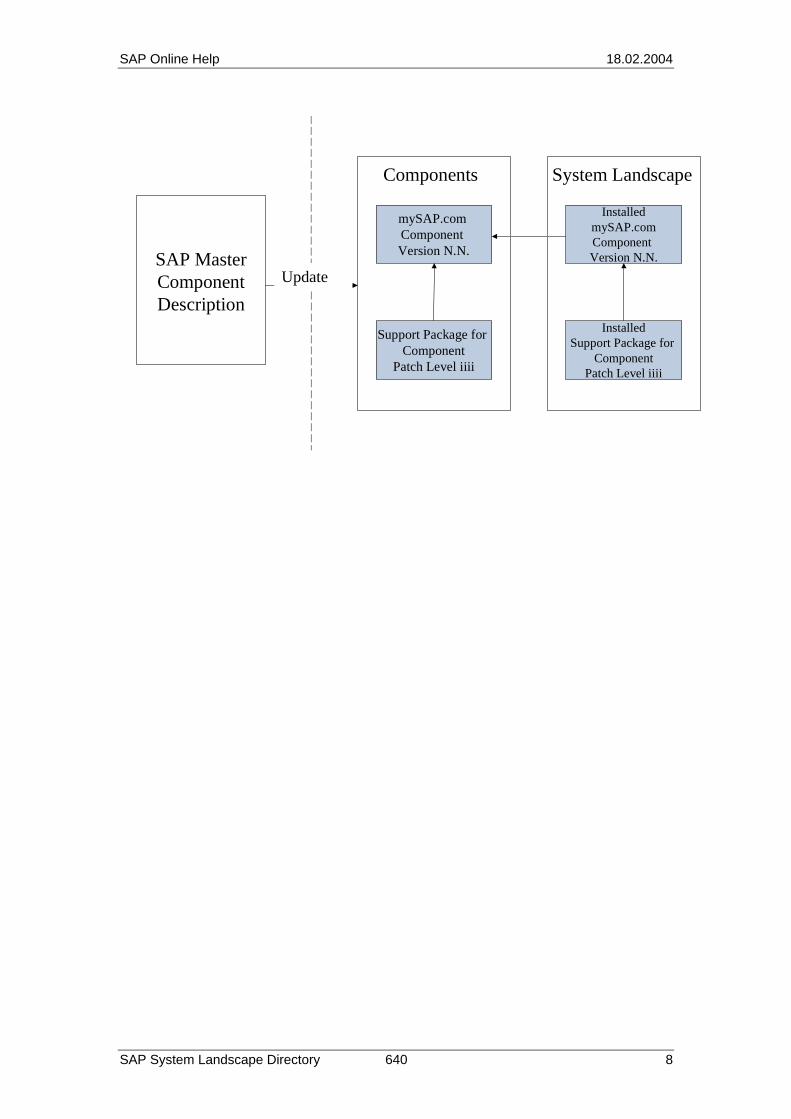
The example below shows a possible scenario that illustrates how the component and system landscape description functions.
Example On the left-hand side of the following graphic is the master description for all existing SAP software modules. SAP maintains this information. The local component description on the right-hand side (client side) can be updated in accordance with the master description.
An installed mySAP.com component is registered in the System Landscape Directory. The component description contains information about the installed components. If, for example, a new Support Package is available for this component, SAP publishes this information using the master description. In this way, the customers receive all the latest information relevant for their system landscape promptly.
SAP Online Help 18.02.2004
SAP System Landscape Directory 640 8
InstalledSupport Package for
ComponentPatch Level iiii
mySAP.com Component Version N.N.
Support Package for Component
Patch Level iiii
InstalledmySAP.comComponent Version N.N.
Components System Landscape
SAP MasterComponentDescription
Update

SAP Online Help 18.02.2004
SAP System Landscape Directory 640 9
CIM Concept The Common Information Model (CIM) is a standard of the Distributed Management Task Force (DMTF) and is based on the object-oriented modeling approach. This standard provides a neutral implementation schema to describe management information within a computing environment. For more information about CIM and DMTF, see www.dmtf.org.
Object-oriented modeling is a means of representing the real world. CIM is designed to model hardware and software elements. The following are basic terms associated with this concept:
• Class and inheritance
• Instance
• Association and reference
• Schema
Class and Inheritance A class is a collection of objects that have similar properties. It is a template for a type of object. CIM supports the inheritance concept so that classes in the context of CIM are organized hierarchically.
Inheritance is an object-oriented concept. A class automatically has all the properties of the class from which it is derived. The class that passes on properties is called the superior class. The class that inherits properties from a superior class is called the subclass. A subclass represents a specialization of the superior class by enhancing it with additional properties.
There are also abstract classes. These are classes that do not have a particular form, but which represent the superior class for one or more subclasses.
Example The CIM class SAP_Product defines the number of SAP products that have joint properties such as the same product name, version, and so on.
Instance An instance is a form of a class, or an object of the class. All properties defined in the class have fixed values in an instance.
Example The CIM class SAP_Product can have instances such as mySAP CRM and R/3 Enterprise.
Property and Key Property An instance has certain properties. A class declares some of these properties as key properties. The CIM concept uses key properties to clearly identify instances of a class. This identification is also known as the name of an instance. This means that there are no two instances of one class whose key properties are completely identical. Key properties are mandatory for any given instance.
Example The CIM class SAP_ProductLine declares Vendor and Name as key properties. In addition, this class also has properties such as Caption and Description. The product CRM IPC differs completely from other products with the name sap_productline.name="CRM IPC",vendor="sap.com".
SAP Online Help 18.02.2004
SAP System Landscape Directory 640 10
Qualifier Qualifiers contain metainformation that describes classes, instances, and properties in more detail.
Example Many CIM classes or their instances have a Caption property. This property is a short description and has, among other things, a maxlen qualifier, which restricts the length of the description to 64 characters.
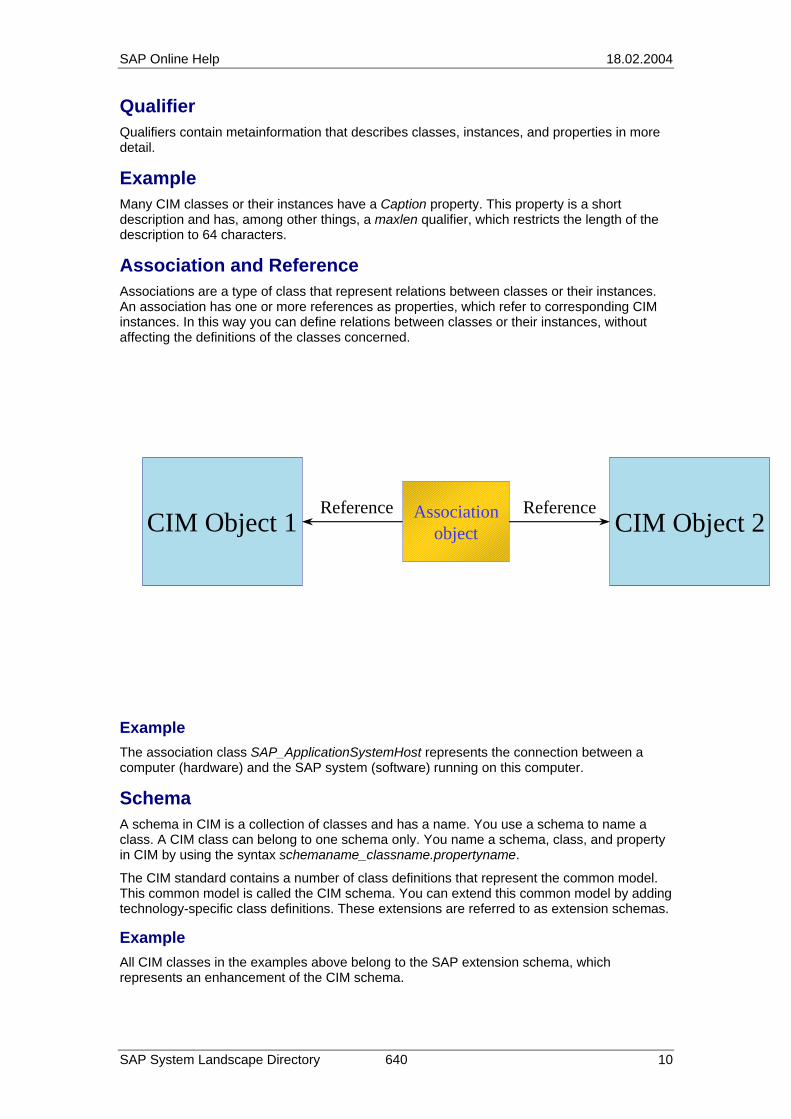
Association and Reference Associations are a type of class that represent relations between classes or their instances. An association has one or more references as properties, which refer to corresponding CIM instances. In this way you can define relations between classes or their instances, without affecting the definitions of the classes concerned.
CIM Object 1 CIM Object 2Associationobject
Reference Reference
Example The association class SAP_ApplicationSystemHost represents the connection between a computer (hardware) and the SAP system (software) running on this computer.
Schema A schema in CIM is a collection of classes and has a name. You use a schema to name a class. A CIM class can belong to one schema only. You name a schema, class, and property in CIM by using the syntax schemaname_classname.propertyname.
The CIM standard contains a number of class definitions that represent the common model. This common model is called the CIM schema. You can extend this common model by adding technology-specific class definitions. These extensions are referred to as extension schemas.
Example All CIM classes in the examples above belong to the SAP extension schema, which represents an enhancement of the CIM schema.
SAP Online Help 18.02.2004
SAP System Landscape Directory 640 11
Component Information Purpose The SLD server contains component information about all existing software modules, as well as their combination options and dependencies. This information represents the basis for the description of the system landscape [page 12].
SAP provides component information about all SAP software modules. You can get the current model data from the master component information provided on SAP Service Marketplace (see SAP Note 669669).
Features The component description provides you with the following information:
• Software product and software component attributes
mySAP.com components
Software components
Releases and Support Packages
• Dependencies:
Supported platforms, versions of operation systems, databases, and so on
Combination options and integration matrix
Example SAP Basis 6.20 is a software component. It is registered in the component information as a CIM instance of the class SAP_SoftwareComponent. The entry contains important information about this component (date of implementation and end of support, for example). In addition, all existing Support Packages for the component are registered and associated with the software component.
SAP Online Help 18.02.2004
SAP System Landscape Directory 640 12
System Landscape Description Purpose The system landscape description is an exact model of the installed system landscape.
The classes in the system landscape description are linked to those classes in the component information by using associations. In this way, an installed component that is entered in the system landscape description can quickly find current, relevant information by using its corresponding instances in the component information.
Features The system landscape description provides information about the following:
• Systems and system topology (network addresses and links, for example)
• Component structures
• Component information of the installed software
• ...
Example A system in the system landscape has the component SAP Web Application Server 6.20 installed. This installed software component has an entry in the system landscape description as an instance of the CIM class SAP_InstalledSoftwareComponent. Using the association SAP_SoftwareComponentType, this instance establishes a connection with its counterpart in the component description, namely the instance of the CIM class SAP_SoftwareComponent. In this way, this instance gets all the relevant information from the component information.
SAP Online Help 18.02.2004
SAP System Landscape Directory 640 13
Security Roles To protect the functions in the SAP System Landscape Directory (SLD) from unauthorized access, there are seven SLD security roles. These roles are delivered with the SLD.
SLD Security Roles and Permissions
Security Role Permissions
LcrUser Read access to SLD data
LcrClassWriter Create, modify, and delete CIM classes (includes the role LcrUser)
LcrInstanceWriterLD Create, modify, and delete CIM instances of the subset Landscape Description (includes the role LcrUser)
LcrInstanceWriterCR Create, modify, and delete CIM instances of the subset Component Information (includes the role LcrUser)
LcrInstanceWriterNR Create, modify, and delete CIM instances of the subset Name Reservation (includes the role LcrUser)
LcrInstanceWriterAll Create, modify, and delete all types of CIM instances (includes the roles LcrUser, LcrInstanceWriterCR, LcrInstanceWriterLD, and LcrInstanceWriterNR)
LcrAdministrator Administrative tasks for both system and application (includes all other roles)
Before you can use the SLD, these security roles have to be assigned to users or user groups. We recommend that you create the user groups that are in the table below.
SLD User Groups and Permissions
User Group Permissions
SAP_SLD_GUEST Read permission for the whole content
SAP_SLD_DEVELOPER Additionally, write permission for development object names (name reservation)
SAP_SLD_CONFIGURATOR Additionally, write permission for system landscape elements (systems, for example)
SAP_SLD_ORGANIZER Additionally, writer permission for component information (software components)
SAP_SLD_ADMINISTRATOR Additionally, administration permission
If these user groups already exist when the SLD is deployed, the security roles are automatically mapped to the relevant user groups (see table below). However, if you create the user groups after the SLD has been deployed, you have to map the roles manually in the SAP J2EE Visual Administrator (see Additional Functions of the SLD Service [page 122]).
SAP Online Help 18.02.2004
SAP System Landscape Directory 640 14
SLD Security Roles and Mappings
Security Role Mapped to
LcrUser SAP_SLD_GUEST
LcrInstanceWriterNR SAP_SLD_DEVELOPER and SAP_SLD_CONFIGURATOR
LcrInstanceWriterLD SAP_SLD_CONFIGURATOR
LcrInstanceWriterAll SAP_SLD_ORGANIZER
LcrAdministrator SAP_SLD_ADMINISTRATOR
See also:
Security Guide for the SAP System Landscape Directory [Extern]
SAP Online Help 18.02.2004
SAP System Landscape Directory 640 15
Administrative Activities Purpose You must perform the following administrative tasks to ensure that the SLD service functions correctly.
• Server administration:
Start and stop the SLD service [page 17]
Display system information [page 18]
Configure the SLD server [page 19]
Configure data persistence [page 21]
Monitor the system [page 24]
Make settings for the SLD bridge [page 26]
• Data Management:
Maintain data [page 27]
Navigate in the structure view [page 31]
Import [page 32] and export [page 34] data instances
Trace instance modifications [page 38]
Administer namespaces [page 39]
There are certain security aspects that you need to consider. For more information, see Security Guide for the SAP System Landscape Directory [Extern].
Prerequisites To administer the SLD, you require the authorizations contained in the user role LcrAdministrator.
If you do not have the authorizations required, contact your system administrator.
See also:
Security Roles [page 13]
SAP Online Help 18.02.2004
SAP System Landscape Directory 640 16
Logging On as Administrator Prerequisites To access the administration area, you require a user ID with the security role LcrAdministrator. The standard role mapping provides this security role for the J2EE administrator. If you do not have a user ID with this authorization, contact your system administrator.
Procedure ...
1. In your Internet browser, enter the following URL: http://<host>:<port>/sld.
When you call a server function for the first time, the system prompts you to log on so that it can check your authorizations. If you do not have the necessary authorizations for the function that you want to call, the system prompts you to log on again.
2. Enter your user name and password, and then choose OK.
Result The system checks your user name and password. If both are valid, the browser displays the administration area.
SAP Online Help 18.02.2004
SAP System Landscape Directory 640 17
Starting and Stopping the SLD Service Use To use the SLD service, you must start the SLD server once. You can exit the service regardless of the application server it runs on.
The browser displays a status bar that indicates the current status of the service. When the service is running, the status bar displays Running. If the service is not active, the status bar displays Stopped.
Prerequisites You have navigated to the Administration screen.
Starting the SLD Service Choose Start Server.
The system starts the SLD service. The nominal state of the SLD service is now "started" and the service will automatically start when you start the SAP J2EE Engine.
Stopping the SLD Service Choose Stop Server.
The system stops the SLD service. The nominal state of the SLD service is now "stopped" and the service will therefore not automatically start when you start the SAP J2EE Engine.
Result When the service has been started or stopped successfully, the status bar indicates the corresponding status. If this is not the case, check the system log [page 24] to find out the cause of the error.
SAP Online Help 18.02.2004
SAP System Landscape Directory 640 18
Displaying System Information Use To perform administrative activities for the SLD service, you need an overview of the J2EE application that is running. You can use the function described here to display information about the following:
• Server
• Data
• Persistence
• Object Manager
• Browser
Prerequisites You have navigated to the Administration screen.
Procedure ... ... ...
1. Choose Server → Details.
The browser displays the Details screen.
2. Select the relevant tab page.
SAP Online Help 18.02.2004
SAP System Landscape Directory 640 19
Configuring the SAP System Landscape Directory Use You can configure the SLD service by using parameter settings to influence how the server acts, and to influence its performance. This configuration is called a system profile.
For more information about configuration, see the Installation and Configuration Guides.
Prerequisites To modify configuration data, you require the user role LcrAdministrator.
Uploading a Profile
When you start the SLD server for the first time, the system profile is automatically uploaded. This profile contains default settings.
We recommend that you use the default settings when you use the SLD server for the first time with one exception: On an SAP J2EE Engine cluster with more than one node, you must set the parameter BufferInstances to "false".
To modify a system profile offline, you have to download and upload it to a file. Proceed as follows:
1. On the Administration screen, choose Server → Profile.
2. On the Profile screen, choose Download.
3. Choose Save This File to Disk, and then enter the file name and the directory where you want to save the file.
The configuration file is now available for processing in the specified directory. After you have processed the configuration file as described in the previous section, you have to transfer this file back to the server. You must also do this after the SLD server has been installed.
4. On the Profile screen, choose Upload.
The browser displays the Profile Upload screen.
5. Enter the file name (or choose Browse to navigate to the file), and then choose Upload.
The browser transfers the file to the server.
The default profile is located in the file sldprofile.xml in the following directory (on MS Windows): \\<server>\usr\sap\<SAPSID>\SYS\global\sld. You can transfer the configuration file to the server directly as an XML or zip file.
The changes to the configuration take effect only when you restart the SLD service [page 17].
SAP Online Help 18.02.2004
SAP System Landscape Directory 640 20
Setting Parameters To modify a system profile online, proceed as follows: ...
1. On the Administration screen, choose Server → Profile.
The browser displays the Profile screen.
2. Make the modifications and then choose Save.
The modifications are saved.
If you want to discard modifications that you made, choose Reset to Defaults. All parameter values recommended by SAP take effect again.
SAP Online Help 18.02.2004
SAP System Landscape Directory 640 21
Making Server Settings Use The SLD service supports three ways of saving data:
• Database persistence
• ABAP persistence
• File system persistence
We recommend that you use database persistence. ABAP persistence is provided for downward compatibility only, and file system persistence is useful for (local) test purposes only.
For all three types of data persistence, you have to make certain server settings.
Prerequisites You have navigated to the Administration screen.
You have stopped the SLD service [page 17].
Procedure Server Parameters
1. On the Administration screen, choose Server → Server Settings.
2. Under Server Parameters, enter the name of the object server and the working directory.
Make sure that the object server name is unique at least within your system landscape, if not globally. Use an ABAP prefix that has been reserved at SAP, without the slashes. If you cannot reserve an ABAP prefix, use the name of the host where your SLD is running. The working directory is /usr/sap/<SAPSID>/SYS/global/sld (UNIX) or \\<server>\usr\sap\<SAPSID>\SYS\global\sld (MS Windows). You have to set the server parameters for each type of persistence.
Database persistence ...
Under Persistence, choose Database → Set.
ABAP persistence ...
1. Under Persistence, choose ABAP Connection Parameters.
2. Make an entry in every field.
3. Choose Set.
SAP Online Help 18.02.2004
SAP System Landscape Directory 640 22
For security reasons, the browser displays the password with a placeholder (*).
File system persistence ...
Under Persistence, choose File System → Set.
Result The SLD server sets the relevant persistence method.
SAP Online Help 18.02.2004
SAP System Landscape Directory 640 23
Creating a System Message Use For information purposes, you can create a system message that is seen by every user who logs on to the SAP System Landscape Directory (SLD).
Prerequisites You are logged on to the SLD as an administrator and have navigated to the Administration screen.
Procedure ...
1. Choose Server → System Message.
2. Enter the text for the system message in the Message field.
3. You can optionally set an expiry date and time. To do so, make the relevant entries in the Date and Time fields.
4. Save your entries by choosing Set.
SAP Online Help 18.02.2004
SAP System Landscape Directory 640 24
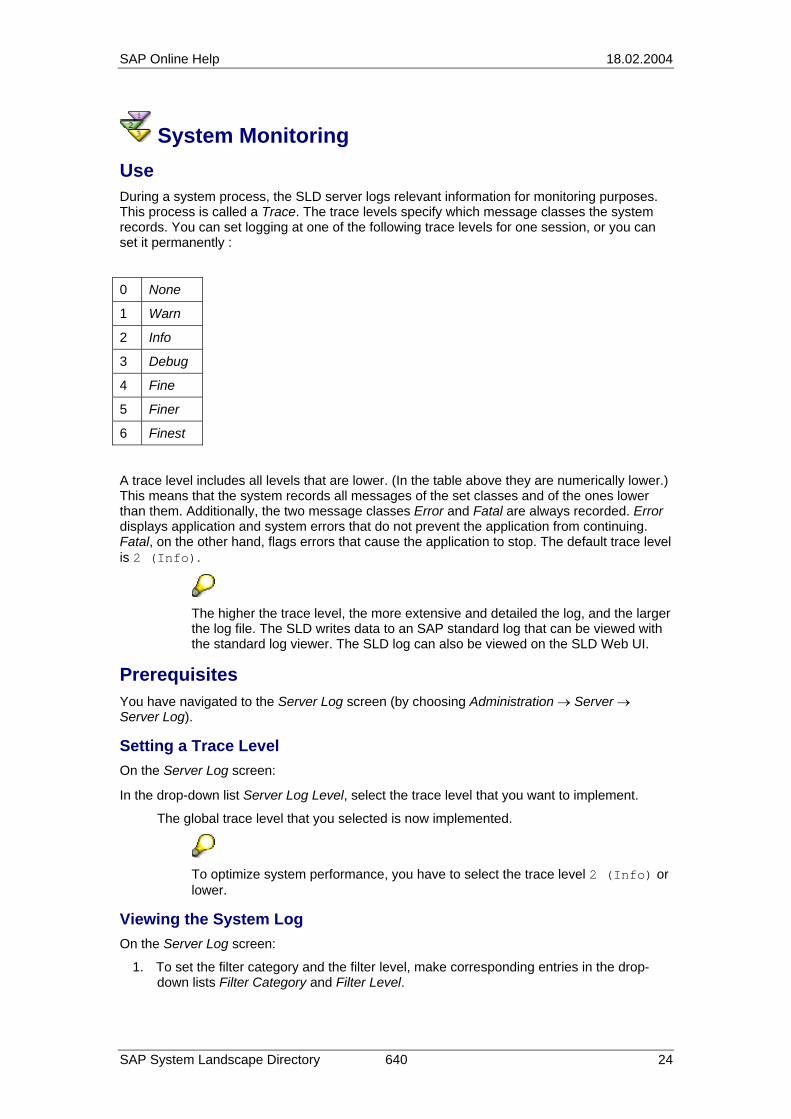
System Monitoring Use During a system process, the SLD server logs relevant information for monitoring purposes. This process is called a Trace. The trace levels specify which message classes the system records. You can set logging at one of the following trace levels for one session, or you can set it permanently :
0 None
1 Warn
2 Info
3 Debug
4 Fine
5 Finer
6 Finest
A trace level includes all levels that are lower. (In the table above they are numerically lower.) This means that the system records all messages of the set classes and of the ones lower than them. Additionally, the two message classes Error and Fatal are always recorded. Error displays application and system errors that do not prevent the application from continuing. Fatal, on the other hand, flags errors that cause the application to stop. The default trace level is 2 (Info).
The higher the trace level, the more extensive and detailed the log, and the larger the log file. The SLD writes data to an SAP standard log that can be viewed with the standard log viewer. The SLD log can also be viewed on the SLD Web UI.
Prerequisites You have navigated to the Server Log screen (by choosing Administration → Server → Server Log).
Setting a Trace Level On the Server Log screen: ...
In the drop-down list Server Log Level, select the trace level that you want to implement.
The global trace level that you selected is now implemented.
To optimize system performance, you have to select the trace level 2 (Info) or lower.
Viewing the System Log On the Server Log screen:
1. To set the filter category and the filter level, make corresponding entries in the drop-down lists Filter Category and Filter Level.

SAP Online Help 18.02.2004
SAP System Landscape Directory 640 25
The filter category specifies in the Java package hierarchy the package whose log data you want to view (including the log data for the subpackages).
The filter levels correspond to the trace levels at the start of this section.
2. Choose Refresh.
The browser displays the log data you selected in reverse sequence (the newest message appears first).
To update the display automatically, select the Auto-Refresh option.
Deleting the System Log On the Server Log screen, choose Clear.
The log data is deleted permanently.
Downloading the System Log from the Server You can download the system log from the server to view it locally or archive it. On the Server Log screen: ...
1. Choose Download Log.
2. Choose Save This File to Disk, and then enter the file name and the directory where you want to save the file.
The system log is now located in the specified directory.
Downloading the Configuration File for Logging from the Server You can also download the configuration for logging in the form of a file from the server to process the file locally. On the Server Log screen: ...
1. Choose Download Settings.
2. Choose Save This File to Disk, and then enter the file name and the directory where you want to save the file.
The configuration file is now available for processing locally.
Transferring the Configuration File for Logging to the Server After you have modified the configuration file, you have to transfer it back to the server. On the Server Log screen: ...
1. Choose Upload Settings.
2. Enter the file name and then choose Upload.
The file is transferred to the server.
The changes to the configuration take effect only when you restart the SLD service [page 17].
SAP Online Help 18.02.2004
SAP System Landscape Directory 640 26
Making Settings for the Data Supplier Bridge (on the SLD Server) Use When you make settings for the data supplier programs [page 100], you also have to specify information about the data supplier bridge. Since the data supplier bridge is registered on an SAP gateway, you have to enter information about this gateway.
You have to maintain the settings for the data supplier bridge both on the SLD server and in the ABAP-based system where the data supplier programs are running. For more information about making settings for the data supplier bridge in an ABAP-based system, see Making Settings for the Data Supplier Bridge (in an ABAP System) [page 107].
Procedure ...
1. On the initial screen of the SAP System Landscape Directory, choose Administration.
2. Choose Data Supplier Bridge.
3. In the Server field, enter the name of the gateway server (host).
4. In the Service field, enter the name of the gateway service.
You must make sure that the entries for the gateway host and the gateway service on the SLD server are exactly the same as in the ABAP system.
5. Choose Set.
If you want multiple SLD servers (hosts) to receive data from the same data supplier bridge (see Architecture Overview of the SLD Data Suppliers [page 100]), you have to activate a separate host connection to each server as follows:
6. Choose New Target.
7. Enter the URL, the user name, the password, and (optionally) the namespace.
If you use an HTTP connection, enter the URL as http://<server>:5xx00/. If you use SSL, enter the URL as https://<server>:5xx01/.
8. Choose Save.
Your settings will take effect when the data supplier bridge is restarted.
SAP Online Help 18.02.2004
SAP System Landscape Directory 640 27
Maintaining Data Use You can use the generic data maintenance editor to view and manipulate the content of the SLD directly at model level. This is useful for objects that have no specific maintenance interface.
Maintenance interfaces exist for most SAP applications, in particular for the SAP Exchange Infrastructure. Use these specific interfaces for maintaining data so that the applications run smoothly.
If you use the generic maintenance editor, it could destroy the data integrity, which means that a smooth operation of the applications is no longer guaranteed. Use the generic editor only if you are familiar with the CIM concept and the data models of the specific applications.
Prerequisites You have the user role LcrAdministrator and have navigated to the Administration screen.
Procedure Choose Content → Content Maintenance.
There are two drop-down lists on the Content Maintenance screen:
• Subset: Determines the subset of the data that you want to display. You can choose Component Information, Landscape Description, or Name Reservation.
• Class: Determines the class whose instances you want to view and process. The number in parentheses after the class name indicates the number of instances.
To display a particular CIM class or CIM instance, choose the corresponding list.
The browser displays an overview screen with all the instances of the selected CIM class.
On the overview screen there is a Display Filter input field to the right of the selection lists. You can enter strings in this field that you want the return values to contain.
If you want to display all products, choose Component Information in the Subset selection list, or Product in the Class selection list.
The browser then displays all registered products.
Example: If you enter the string CRM in the Display Filter field, and confirm this with Enter, the browser displays only the rows that contain this string.
You can use the links in the Assoc’s column to display all associations of the relevant instances.
If you select an instance on the overview screen, the browser displays the detailed view of this instance.
Activities on the Overview Screen This section describes activities that you can perform on the overview screen.
SAP Online Help 18.02.2004
SAP System Landscape Directory 640 28
Create an instance of the selected CIM class ...
1. Choose New <Class Name>. (<Class Name> stands for the selected class.)
The browser displays the detail screen for the new instance.
2. Enter the instance data and then choose Create.
The system creates the new instance.
The entries for key properties are mandatory. The browser displays key properties on the detail screen in bold font. If the key properties are missing, the system triggers an exception.
Delete multiple instances simultaneously ...
1. Select all the instances that you want to delete.
2. Choose Remove Selected.
The system deletes all selected instances.
View an instance in more detail or process it ...
Select the instance directly by clicking the instance name.
The browser displays the detail screen for the selected instance.
Activities on the Detail Screen This section describes activities that you can perform on the detail screen.
To display the detail screen, select the relevant instance on the overview screen.
Change an instance ...
1. Make modifications on the detail screen.
2. To save the changes, choose Update.
The system saves the changes.
Create a copy of an instance ...
1. On the detail screen of the instance that you want to copy, choose Copy.
The browser displays the detail screen for a new instance. All fields on this screen are identical to the original instance.
2. Make modifications to the key properties.
3. To save the copy, choose Create.
The system saves the copy.
The CIM concept does not permit completely identical instances. At least one of the key properties must be different. In this case, copying means only that the data of the original instance is copied as a template for the new instance. The new instance must have at least one key property that is different from the original instance.
SAP Online Help 18.02.2004
SAP System Landscape Directory 640 29
Rename an instance ...
1. On the detail screen of the relevant instance, choose Move.
2. Change the key properties of the instance.
You can also change other property values here.
3. Save the instance by choosing Create.
The system saves the renamed instance. This instance replaces the original instance.
Delete an instance
Choose Remove.
View the associations of an instance ...
Choose <num> Associated Instances. (<num> is the number of existing associations.)
The browser displays the Association screen.
Activities on the Association Screen The association screen of an instance displays all associations of a specified CIM instance and its associated CIM instances. This section describes the activities on the association screen.
Delete an association ...
1. Select the relevant row(s).
2. Choose Remove Selected.
The system deletes the selected association instance(s). The instances that are connected with the original instance by these associations remain.
Create an association that starts with the specified instance ...
1. Choose New Association.
The browser displays a dialog box with the drop-down list Association Type.
2. In this selection list, select the relevant association type.
The browser then displays all the relevant instances.
3. Select the instances that you want to link to the specified instance by using the selected association type.
4. Choose Associate Selected.
The system creates the new association(s).
SAP Online Help 18.02.2004
SAP System Landscape Directory 640 30
Maintaining Data in the SLD Reported by the Data Suppliers Use The data supplier programs report data about the systems in your landscape to the SLD. If a system no longer exists in your landscape, you must maintain this information manually in the SLD.
Procedure ...
1. On the initial screen of the SAP System Landscape Directory, choose Administration.
2. Choose Auto-Synchronized Data.
3. Enter a date (and, optionally, a time) before which you want to display the systems that reported data to the SLD.
4. Choose Display.
The browser displays a list of systems and the date when they last reported data to the SLD.
If a particular date is too far in the past (see Setting the Time Interval for Collecting Data [page 108]), this is a good indication that the system no longer exists in the system landscape. The SLD has no way of knowing this so you must manually remove the system from the SLD.
5. Select the system(s) that you want to remove from the SLD.
Before you actually remove a system, you must be aware that you remove not only the system itself but all its associations to other systems (business systems, for example) as well.
6. If you want to remove the selected system(s) and all their instances, choose Remove Selected.
Result The system(s) that you selected have been removed from the SLD.
SAP Online Help 18.02.2004
SAP System Landscape Directory 640 31
Navigating in the Structure View Use CIM is based on the object-oriented concept. Classes and instances are ordered hierarchically. SLD provides a structure view for the component information and system landscape description, which reflects this hierarchical order. You can navigate in this hierarchy to access particular class and instance definitions.
Procedure To display the structure view, go to the Administration screen and choose Class Browser.
The Web browser displays the structure overview.
On the left-hand side of the structure view there is a tree structure. On the right-hand side there is a detailed view for individually selected objects. The tree view has three tab pages: system landscape description (LD), component information (CR), and all models (All). To switch between the three structure overviews, select the corresponding tab page.
To open the entire structure view, choose Expand All.
To update the structure view, choose Refresh.
When you select an object in the tree view, the right-hand side of the screen displays detailed information about the object. In the detailed view, you can also display the XML definition for each object.
SAP Online Help 18.02.2004
SAP System Landscape Directory 640 32
Importing CIM Instances Use The component description and the system landscape description are based on the standard Common Information Model (CIM) [page 9]. To insert these descriptions into a system, or to update a description that already exists in a system, you have to import the corresponding instances from a master file.
Prerequisites • You have navigated to the Administration screen.
• The instance descriptions must be either XML files or compressed XML files in ZIP format.
• You have set the heap size for all nodes to 512 MB in the SAP J2EE Configuration Tool [Extern].
Procedure ...
1. Choose Content → Import.
The browser displays the Import Selection screen.
2. Next to the Import File field, choose Browse.
3. To import the component information data, navigate to the following file: \\<server>\usr\sap\<SAPSID>\SYS\global\sld\model\cr_content.zip (MS Windows) and then choose Open.
Objects that already exist in the system are automatically overwritten.
4. If you do not want to import the instances into the current namespace, you can change the namespace [page 39].
5. Choose Import.
The CIM standard is based on the object-oriented approach. When you import instances from multiple files, make sure that you import them in the correct sequence since this has an effect on the inheritance hierarchy.
Result After you have triggered the import, the browser returns to the Administration screen. The status bar on this screen indicates the status of the import procedure.
SAP Online Help 18.02.2004
SAP System Landscape Directory 640 33
Creating Exports and Backups of CIM Instances
Use Before you maintain your system, we recommend that you create a backup copy of the CIM instances in the component and system landscape descriptions. The system creates an XML file when exporting instances. This file contains all relevant data regarding the instances.
We also recommend that you transfer instances from one system to another system. The simplest method is to export the instances from the source system and then to import [page 32] them into the target system.
There are two ways of creating backups of CIM instances:
• With versioning (see Exporting CIM Instances [page 34])
• Without versioning (see Backing Up CIM Instances [page 37])
SAP Online Help 18.02.2004
SAP System Landscape Directory 640 34
Exporting CIM Instances Use If you want to export your CIM instances with versioning, you have to use the administrative function Export.
Prerequisites You are logged on with the user role LcrAdministrator, and have navigated to the Administration screen.
Procedure ...
1. Choose Content → Export.
The browser displays the Export screen. The namespace to be exported is displayed in a status bar.
2. In the dropdown list Export Line, select ALL (to export all CIM instances), LD (to export the landscape description), or CR (to export component repository data). For more information about CR exports, see Component Repository Exports: Scenarios [page 35].
If this is the first export for this export line, you have to perform a full export. For the next export you can then decide whether to perform a full or an incremental export.
3. Choose Export.
Result The system exports the data of the selected export line. This export is also saved to the database for later reuse. You can then import [page 32] the data as required (into other systems in your system landscape, for example). You can manage your exports by clicking Export Administration. The browser displays a list of your previous exports. Here you can group exports together and import them as an aggregated backup.
Exports with versioning have to be imported in the same sequence into the target system.
If you want to create a backup of a particular export line without versioning, on the Export Administration screen choose Backup.
SAP Online Help 18.02.2004
SAP System Landscape Directory 640 35
Component Repository Exports: Scenarios
The content of the Component Repository (CR) in the System Landscape Directory (SLD) is derived from the following:
• CR data provided by SAP (on SAP Service Marketplace; see SAP Note 669669)
• CR data created by SLD users
You can import CR data provided by SAP into any SLD system if you fulfill all of the following prerequisites:
• You only use the CR data provided by SAP
• You do not define your own software components
If you use multiple SLD systems and you define your own software components (which means that you do not use exclusively the CR data provided by SAP), we recommend that you import the CR data provided by SAP into one system only, and distribute it from there. To distribute CR data in your system landscape, use the exports of the export line CR (see Exporting CIM Instances [page 34]). These exports contain all CR data of the export system, regardless of whether the data was created by the user or by SAP.
The following rule applies when distributing CR data: A successor system can receive data from one predecessor system only, while a predecessor system can export data into any number of successor systems.
The following scenarios are examples of how you can distribute your own CR data:
• You use one SLD where all your own software components are defined.
Import the SAP CR data only into the master system where your SLD is running, and maintain your own components there. Use the CR export line to distribute changes from the master system to other SLD systems. Import either only the SAP data or only the CR exports from the master system into the other SLD systems. This results in a stellar distribution of the CR data as shown in the figure below.
We recommend that you use this scenario.
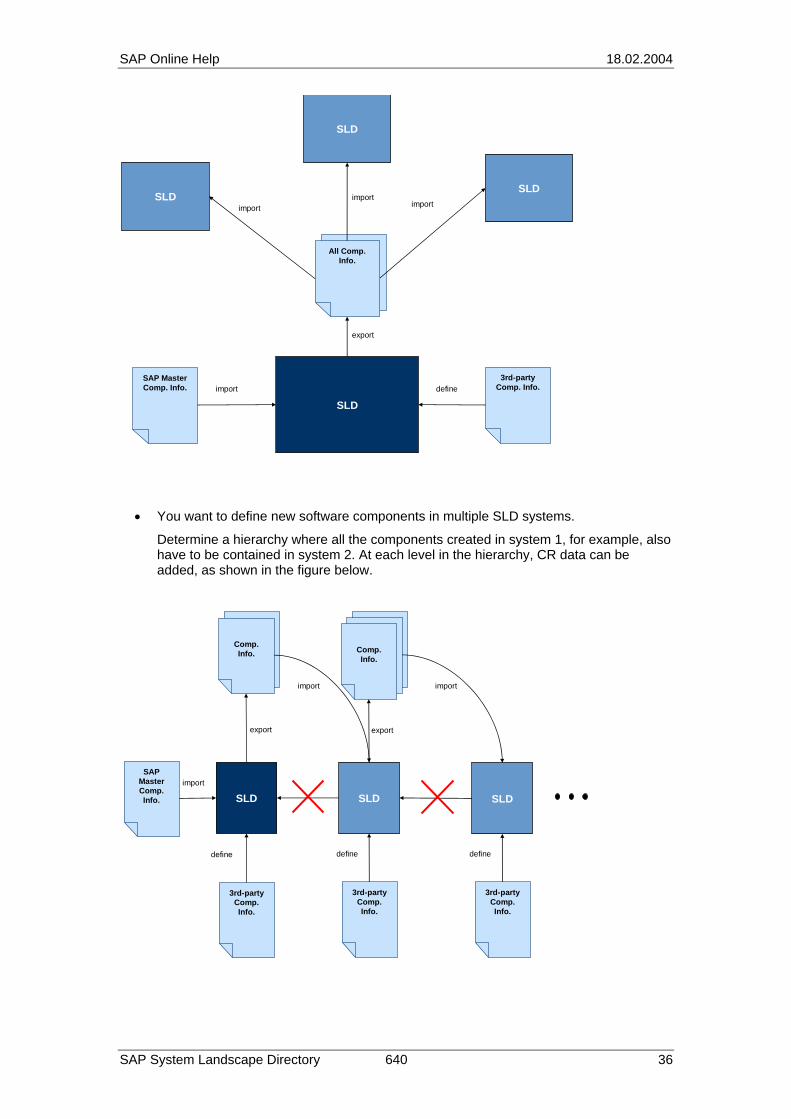
SAP Online Help 18.02.2004
SAP System Landscape Directory 640 36
SAP Master Comp. Info.
SLD
3rd-party Comp. Info.import define
export
SLD
SLD
SLD
All Comp. Info.
importimport
import
• You want to define new software components in multiple SLD systems.
Determine a hierarchy where all the components created in system 1, for example, also have to be contained in system 2. At each level in the hierarchy, CR data can be added, as shown in the figure below.
SAP Master Comp. Info. SLD
3rd-party Comp. Info.
import
define
export
Comp. Info.
SLD
3rd-party Comp. Info.
define
export
Comp. Info.
import
SLD
import
3rd-party Comp. Info.
define

SAP Online Help 18.02.2004
SAP System Landscape Directory 640 37
Backing Up CIM Instances Use If you want to create a backup [page 33] of your CIM instances without versioning, you have to use the administrative function Backup. This function has three backup options:
• All CIM instances
• Instances of selected classes
• CIM model (classes and qualifiers but no instances)
Prerequisites You have logged on as an administrator and navigated to the Administration screen.
Procedure ...
Backing Up All CIM Instances
1. Choose Content → Backup.
2. Choose All Instances.
The browser returns to the Administration screen and displays the status of the backup at the top of the screen. When the backup is complete, the browser displays the Download screen.
3. On the Download screen, choose Download backup file.
4. Save the file in a directory of your choice.
Backing Up Instances of Selected Classes
1. Choose Content → Backup.
2. Choose Instances By Class.
3. Under Available Classes, select the relevant classes, and choose Add.
4. Choose Backup.
Backing Up a Complete CIM Model
1. Choose Content → Backup.
2. Choose Model.
3. Choose Download model file.
4. Save the file in a directory of your choice.
SAP Online Help 18.02.2004
SAP System Landscape Directory 640 38
Tracing Instance Modifications Use The system logs every change to instances. This includes generating, modifying, and deleting instances. You can display the log data according to particular criteria.
Prerequisites You have navigated to the Administration screen.
You can perform this action only if database persistence is activated.
Procedure ...
1. Choose Change Log.
The browser displays the Change Log screen.
2. To restrict the search, enter search criteria here.
You have the following choice of search criteria:
User Name: User who made the changes.
Class or Qualifier Name: Name of a CIM class or a CIM qualifier. If it is a class name, the system returns modifications to the declaration of the class and modifications of its instances. If it is a qualifier name, the system returns the modifications to the qualifier declaration.
Time Interval: Time range in which the changes were made.
Object Types: Types of changed objects (classes, instances, and associations).
Event Types: Type of change (generation, change, and deletion).
3. Choose Search.
The browser displays the results screen.
Result The browser shows all changes in the current namespace that meet the search criteria. In the case of a modification, the browser also shows the old object.
SAP Online Help 18.02.2004
SAP System Landscape Directory 640 39
Administering Namespaces Use The component and system landscape description contains current information about your system landscape. Using SLD simulations, you can also plan the future system landscape. We recommend that you test simulations in a different area to the current system landscape.
The SLD takes this consideration into account with the namespace concept. This means that you can create various namespaces as logical areas. The namespace sld/active mirrors the real system landscape. You can copy data from the standard namespace to other namespaces, and then modify and test the data there.
You have the option of switching between different namespaces.
Creating Namespaces To create a namespace, proceed as follows: ...
1. On the Administration screen, choose Content → Namespaces.
The browser displays the Namespaces screen.
2. Choose Add.
The browser displays a dialog box for entering the new namespace.
3. Enter the name of the new namespace in the input field and choose OK.
The system creates a new namespace.
Switching Between Namespaces To switch between namespaces, proceed as follows: ...
1. On the Administration screen, choose Content → Namespaces.
The browser displays the Namespaces screen.
2. In the field Database Namespaces, select the namespace to which you want to switch.
The system switches to the namespace you selected.
You can switch between namespaces on all the screens where a namespace switch is relevant. On these screens, the current namespace is displayed at the bottom of each screen. To switch the namespace from there, proceed as follows: ...
1. Double-click the current namespace.
The browser displays the Change Namespace screen.
2. Select the new namespace from the list, and then choose Set Current.
The browser switches to the selected namespace and displays the previous screen.
The namespace is a parameter of your HTTP session. For this reason, the namespace value is automatically reset to sld/active after a certain period of inactivity in the HTTP session.
Importing Instance Data When you create a new namespace, it is initially empty. To create a duplicate of another namespace for test purposes, import the instance data from the namespace concerned to the current namespace.
SAP Online Help 18.02.2004
SAP System Landscape Directory 640 40
Go to the Administration screen and proceed as follows: ...
1. Choose Content → Namespaces.
The browser displays the Namespaces screen.
2. Under Namespace Import, select the source namespace in the drop-down list (From Namespace). The data is automatically imported in the current namespace.
Deleting Namespaces To delete a namespace entirely, proceed as follows: ...
1. On the Administration screen, choose Content → Namespaces.
The browser displays the Namespaces screen. The name of the current namespace is highlighted under Database Namespaces.
If the browser does not display the namespace you want to delete, first switch to the correct namespace.
2. Choose Remove <namespace>. (<Namespace> is the current namespace.)
This procedure deletes the namespace, including all its data.
Deleting Namespace Instances
The system deletes these instances permanently. Make a backup copy of the instances using the export function [page 34], before you delete any instances permanently.
To delete all instances in a namespace, proceed as follows: ...
1. On the Administration screen, choose Content → Namespaces.
The browser displays the Namespaces screen. The name of the current namespace is highlighted under Database Namespaces.
2. Select the namespace that contains the instances that you want to delete.
3. Choose Remove Instances.
SAP Online Help 18.02.2004
SAP System Landscape Directory 640 41
Technical System Landscape Purpose Technical systems are application systems that are installed in your system landscape (a CRM server, for example). You can manage data about these application systems by using the landscape description of the SLD. Most systems (Web AS ABAP and Web AS Java systems) automatically report information to the SLD about the elements that they contain by using the SLD data supplier programs. You need to manually register the following types of system only:
• Standalone Java systems
• Third-party systems
To manually register these systems – and if you want to maintain additional data about automatically registered systems – you use the technical system browser.
Features You can use the technical system browser to perform the following tasks:
• Display lists of registered technical systems [page 42] (Web AS ABAP, Web AS Java, Exchange Infrastructure, standalone Java, and third-party systems)
• Register standalone Java systems [page 45]
• Register third-party systems [page 46]
• Maintain additional data about Web AS ABAP systems [page 43]
• Maintain additional data about Web AS Java systems [page 47]
SAP Online Help 18.02.2004
SAP System Landscape Directory 640 42
Displaying Technical Systems Use You can use the technical system browser to display all registered application systems. From there you can start additional activities for technical systems.
Procedure
1. Call the technical system browser from the initial screen of the SLD by choosing System Landscape → Technical Landscape.
The browser displays the screen Technical System Browser.
2. From the drop-down list Technical System Type, choose which type of technical system you want to display. The following types exist:
• Web AS ABAP
• Web AS Java
• Exchange Infrastructure
• Standalone Java
• Third-Party
The technical system browser displays all the application systems of the relevant type. The information displayed includes the system name, number, host, and the time when the data supplier [page 109] programs last reported data to the SLD server.
Additional Features
If you want to Perform this action
Sort the list in ascending or descending order according to a particular criteria (host, for example)
Click the relevant column heading
Limit the number of systems displayed Enter a string in the Filter field
View detailed information about a particular system
Select the system directly in the list by clicking the system in the Name column
Make changes to the data for a particular system
See Maintaining data about registered systems (Web AS ABAP) [page 43]
Remove a system from the SLD On the detail screen, choose Remove
Remove multiple systems from the SLD On the detail screen, select the systems in the overview list, and then choose Remove Selected
SAP Online Help 18.02.2004
SAP System Landscape Directory 640 43
Maintaining Data About Registered Systems (Web AS ABAP) Use If you add application servers, clients, or products to a Web AS ABAP system that you have already registered in the SLD, you also need to register them in the SLD.
Prerequisites You have navigated to the Technical System Browser (by choosing Technical Landscape on the initial screen of the SLD), and selected the technical system type Web AS ABAP.
Procedure Maintaining Application Servers
1. Select the system to which you want to add application servers by clicking the system in the Name column.
The browser displays the detail screen for the selected system.
2. Under Secondary Application Servers, choose Add.
The browser displays the screen for registering a new application server.
3. Enter the host name and the software instance of the new application server.
Optionally, you can fill the fields Description and Administrative Contact.
4. To register the new application server, choose Save.
The SLD server registers the new application server for the selected SAP system.
Removing Application Servers
1. Select the system whose application server you want to remove by clicking the system in the Name column.
The browser displays the detail screen for the selected system.
2. Under Secondary Application Servers, select the application server that you want to remove by clicking its name.
The browser displays the detail screen for the selected application server.
3. Choose Remove.
The browser displays a dialog box with a warning that this operation cannot be undone.
4. If you really want to proceed, choose OK.
Maintaining Clients
1. Select the system to which you want to add a new client by clicking the system in the Name column.
The browser displays the detail screen for the selected system.
2. Under Clients, choose Add.
SAP Online Help 18.02.2004
SAP System Landscape Directory 640 44
The browser displays the screen for registering a new client.
3. Specify the client number.
4. To register the new client, choose Save.
The SLD server registers the client for the selected SAP system.
Removing Clients
1. Select the system whose client you want to remove by clicking the system in the Name column.
The browser displays the detail screen for the selected system.
2. Under Clients, select the client that you want to remove by clicking its number.
The browser displays the detail screen for the selected client.
3. Choose Remove.
The browser displays a dialog box with a warning that this operation cannot be undone.
4. If you really want to proceed, choose OK.
Maintaining Products/Software Components
1. Select the system to which you want to add a new product by clicking the system in the Name column.
The browser displays the detail screen for the selected system.
2. Under Installed Products, choose Add.
The browser displays the screen for registering a new product.
3. Select the product and the relevant software component that you want to add.
4. Save your entries.
The SLD server registers the new product and its software components for the selected SAP system.
Removing Products
1. Select the system whose product you want to remove by clicking the system in the Name column.
The browser displays the detail screen for the selected system.
2. Under Installed Products, select the product that you want to remove by clicking it.
The browser displays the detail screen for the selected product.
3. Choose Remove.
The browser displays a dialog box with a warning that this operation cannot be undone.
4. If you really want to proceed, choose OK.
The SLD server removes the selected product and all its software components.

SAP Online Help 18.02.2004
SAP System Landscape Directory 640 45
Registering Standalone Java Systems Use Whereas SAP systems handle business processes by using a highly developed client system, most applications run as separate systems. These systems are called standalone systems.
This section describes how to define an SAP standalone Java system.
Prerequisites • You have the user role LcrInstanceWriterLD.
• You have navigated to the Technical System Browser.
Procedure ...
1. Choose New Technical System... .
The browser displays the screen Technical System Wizard in a separate window.
2. Select Standalone Java, and then choose Next.
The browser displays the screen for registering an SAP standalone Java system.
3. Enter the technical system identification and the system host name.
The technical system identification is a unique system ID.
The system host name specifies the host where the application runs.
4. Choose Finish.
The SLD server has now registered the standalone Java system.
SAP Online Help 18.02.2004
SAP System Landscape Directory 640 46
Registering Third-Party Systems Use Unlike SAP products, third-party products are not necessarily included in the SLD component description. Therefore, you must first register the third-party product [page 62] before you can register an installed system of this third-party product in the SLD. This section describes how to register an installed third-party system.
Prerequisites • You have the user role LcrInstanceWriterLD.
• You have navigated to the Technical System Browser.
Procedure
1. Choose New Technical System.
The browser displays the screen Technical System Wizard in a separate window.
2. Select Third-Party, and then choose Next.
3. Enter the system name and the host name of the system, and then choose Next.
The browser displays all the registered SAP product versions in the list Available Products.
4. Select the SAP products that are installed in the third-party system, and then choose Add.
On the lower part of the screen, the browser displays a list of all the software components that are contained in the selected products.
Repeat this step as many times as necessary until you have added all products.
To remove a product, select it in the list, and then choose Remove.
You can add more products to this system at a later stage.
5. Select the software components that are actually installed in the system.
6. Choose Finish.
The SLD server has now registered the new third-party system.
SAP Online Help 18.02.2004
SAP System Landscape Directory 640 47
Maintaining Additional Data About Web AS Java Systems Use Web AS Java systems that are installed in your system landscape automatically report information about the elements that they contain by using the SLD data supplier programs. However, some data is not automatically reported; you have to maintain this data manually. Examples of this data are the administrative contact (e-mail address) and the JCo destinations. This procedure explains how to add a JCo destination.
Prerequisites You have navigated to the Technical System Browser (by choosing Technical Landscape on the initial screen of the SLD).
Procedure
1. In the drop-down list Technical System Type, select Web AS Java.
The browser displays a list of all the Web AS Java systems that have been registered in the SLD.
2. Select the system to which you want to add JCo destinations by clicking the system in the Name column.
The browser displays the detail view of the relevant system.
3. Under JCo Destinations, choose Add.
4. Enter the relevant data in the fields and choose Save.
On the detail screen, you can also enter a description of the Web AS Java system and the name of the system administrator.
SAP Online Help 18.02.2004
SAP System Landscape Directory 640 48
Configuration for the SAP Exchange Infrastructure Naming Conventions The following terms are used in this documentation:
• Business Systems
Logical systems that function as senders or receivers within the SAP Exchange Infrastructure. Business systems can be SAP systems or third-party systems. You can configure business systems in the SLD.
• Technical Systems
Physical systems that can be installed and administered (a CRM server, for example).
• Products
When you define products, this includes creating both products and links to the installed systems. SAP products are predefined in the SLD, but you can also define third-party products.
When you enter values in the fields of the SLD, pay attention to uppercase and lowercase spelling, as described in this documentation.
Configuration Steps The configuration steps that you need to perform depend on the type of system. The following system types are relevant for the SAP System Landscape Directory (SLD):
• SAP technical systems
The following SAP systems do not need to be configured manually since they automatically register themselves in the SLD:
SAP Basis systems as of Release 4.0B
All SAP Web AS ABAP systems
SAP Web AS Java systems as of Release 6.40
You do not need to maintain data about SAP software components and products that a system contains since their data already exists in the component repository, which is delivered with the SLD. SAP technical systems automatically register themselves and report data about their installed products to the SLD by means of data supplier [page 99] programs. However, if you cannot use the data supplier programs (if your Support Package level is too low, for example), you have to define SAP technical systems manually. For more information, see Manually Registering SAP Web AS ABAP Systems [page 50].
• Other SAP systems (business systems [page 52],for example), which have to be registered manually.
• Third-party systems
If you have installed third-party (technical or business) systems [page 53] in your system landscape, you have to register them manually in the SLD. This includes maintaining data about the software components and software products that they contain.
SAP Online Help 18.02.2004
SAP System Landscape Directory 640 49
Configuration of SAP and Third-Party Systems
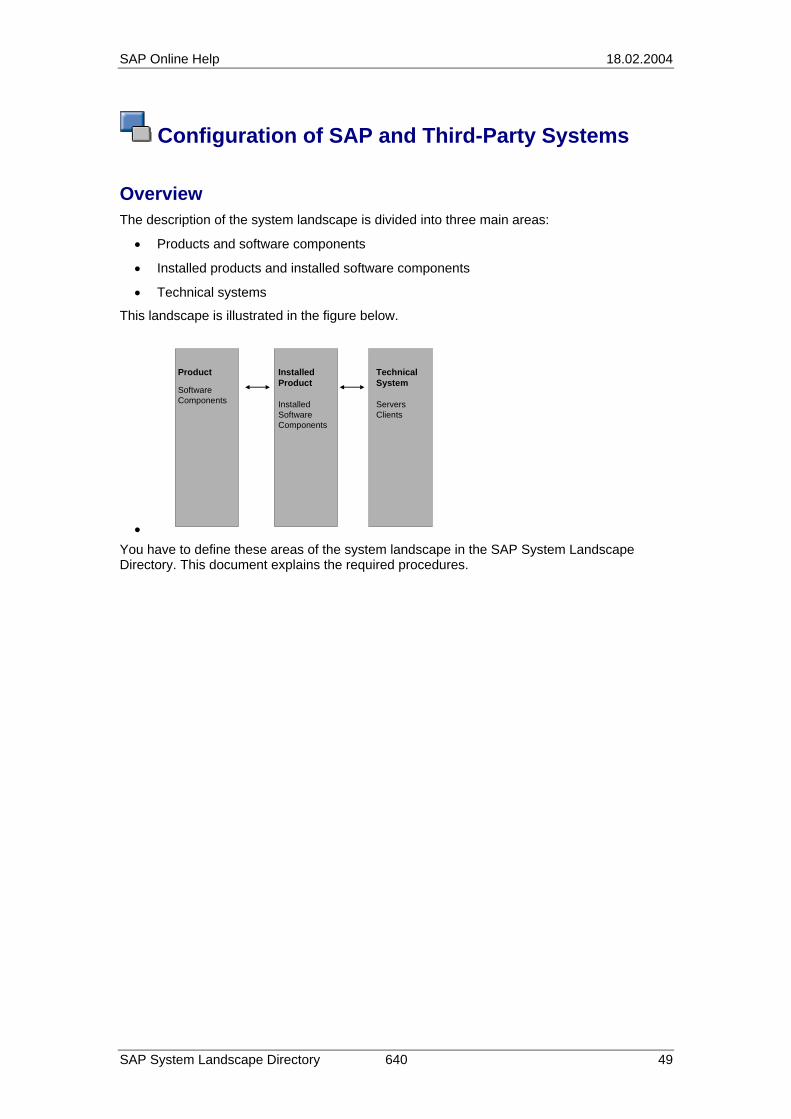
Overview The description of the system landscape is divided into three main areas:
• Products and software components
• Installed products and installed software components
• Technical systems
This landscape is illustrated in the figure below.
•
Product
Software Components
Installed Product
Installed Software Components
Technical System
ServersClients
You have to define these areas of the system landscape in the SAP System Landscape Directory. This document explains the required procedures.
SAP Online Help 18.02.2004
SAP System Landscape Directory 640 50
Manually Registering SAP Web AS ABAP Systems Procedure ...
1. On the initial screen of the SAP System Landscape Directory, choose System Landscape → Technical Landscape.
The system displays the Technical System Browser screen.
2. Choose New Technical System.
The system displays the Technical System Wizard in a separate window.
3. Select Web AS ABAP, and then choose Next.
4. Under Available Products, select an SAP product that is installed in the system, and then choose Add.
The system adds the product to the Selected Products list, and displays a list of the components that are installed for this product.
5. Choose Next.
6. Enter the required information about the Web AS ABAP system.
The field Database Host Name may contain lowercase characters, digits, hyphens, and periods only.
If the field Installation Number contains the value initial, enter the license number of your installation; the value initial is not valid.
7. Choose Next.
The system displays the Message Server and Central Application Server screen.
The Host Name and Message Port fields contain a default value, which you can change if necessary. If you change a value, enter it in lowercase and without a network domain.
8. Enter the instance number, and then choose Next.
9. If you want to enter additional servers (optional), do so on the subsequent screen, and choose Next.
10. Enter at least one client, optionally add a logical system (indicates the ALE destination), and then choose Add.
11. Choose Finish.
You have now manually registered an SAP Web AS system, and can view details about it in the Technical System Browser.
If any of the products that you selected for this system is an ABAP add-on, the underlying product is not automatically entered for this system. See Manually Registering a Product for an Add-On [page 51].
SAP Online Help 18.02.2004
SAP System Landscape Directory 640 51
Manually Registering a Product for an Add-On Use If any products that you selected when you registered an SAP Web AS ABAP system [page 50] is an ABAP add-on, the underlying product (a particular version of SAP R/3) is not automatically registered. Therefore, you have to register it manually.
To find out whether the product is an add-on, see the list of Installed Software Components on the system details screen. If the software component SAP_BASIS does not appear in this list, this is a good indication that the installed product is an ABAP add-on.
Procedure ...
1. In the Technical System Browser, display the details about the system that you defined by clicking it in the Name column.
2. Under Installed Products, choose Add.
3. Select the SAP R/3 product version.
The browser displays a list of the installed software components.
4. Select the necessary software component(s) and then choose Save.
Result On the system details screen you can now see that the SAP R/3 product version has been added to the list of installed products for the system that you registered.

SAP Online Help 18.02.2004
SAP System Landscape Directory 640 52
Configuring an SAP Business System Use Business systems are logical systems that function as senders or receivers within the SAP Exchange Infrastructure. You configure business systems in the SAP System Landscape Directory (SLD). A business system is always associated with a technical system (here: SAP Web AS ABAP system).
Procedure ...
1. On the initial screen of the SAP System Landscape Directory, choose System Landscape → Business Landscape.
2. Choose New Business System.
The system displays the screen Business System Wizard in a separate window.
3. Select SAP Business System, and then choose Next.
4. Select the technical system for the business system that you want to define.
The system displays a list of the clients that have been defined for this technical system.
5. Select one of the clients, and then choose Next.
6. Select the products that are installed in this business system, and then choose Next.
7. Enter a name for the business system.
We recommend that you implement the internal naming convention <namespace>_<name> for business systems. For <namespace>, insert a URL or a namespace of the Integration Repository. Only alphanumeric characters are permitted. Use the underscore as a replacement for non-alphanumeric characters. For <name>, insert the role of the system. Example: SAP_COM_SRM_DEVELOPMENT.
8. Choose Next.
9. Select the role of the business system (integration server or application system).
If the system is an application system, also specify an integration server.
10. Choose Finish.
SAP Online Help 18.02.2004
SAP System Landscape Directory 640 53
Registration of Third-Party Systems Purpose Third-party systems are not automatically registered in the SAP System Landscape Directory. Therefore, you have to use this process to manually register them by defining their products and software components.
The definition of new products and software components is not only required for third-party systems in the SAP Exchange Infrastructure but also in the new SAP Java Development Infrastructure.
Process Flow ...
1. You maintain data about the software products [page 54] that are installed in the third-party system.
2. You maintain data about the installed software components [page 55].
3. You configure a third-party technical system [page 56].
4. You configure a third-party business system [page 57].
SAP Online Help 18.02.2004
SAP System Landscape Directory 640 54
Defining Third-Party Software Procedure ...
1. On the initial screen of the SAP System Landscape Directory, choose Software → Software Catalog.
2. Under Software Type, select Products.
3. Choose New Product.
4. Enter the required information about the third-party product.
Enter the vendor as a URL.
5. Choose Create.
6. Repeat steps 1 through 4 to define more products, or proceed to define software components for this product on the same screen.
SAP Online Help 18.02.2004
SAP System Landscape Directory 640 55
Defining a Third-Party Software Component Procedure ...
1. On the initial screen of the SAP System Landscape Directory, choose Software → Software Catalog.
2. Under Software Type, select Software Components.
3. Choose New Component.
4. Select the product for which you want to define a third-party software component.
5. Enter the vendor, name, and version of the software component.
6. Choose Create.
You have now defined a software component and linked it to the product you defined previously (see Defining Third-Party Software [page 54]).
SAP Online Help 18.02.2004
SAP System Landscape Directory 640 56
Configuring a Third-Party System Procedure ...
1. On the initial screen of the SAP System Landscape Directory, choose System Landscape → Technical Landscape.
The system displays the Technical System Browser screen.
2. Choose New Technical System.
The browser displays the Technical System Wizard in a separate window.
3. Select Third-Party System, and choose Next.
4. Select at least one third-party product, and choose Add.
The system displays the product(s) in the Selected Products field, and a list of the software components that are installed for this product.
5. Choose Next.
6. Enter the required information.
7. Choose Finish.
Result You have now configured a third-party system in which the specified product and software component(s) are installed.
SAP Online Help 18.02.2004
SAP System Landscape Directory 640 57
Configuring a Third-Party Business System Procedure ...
1. On the initial screen of the SAP Landscape Directory, choose System Landscape → Business Landscape.
2. In the System Type field, select Third-Party Systems.
3. Choose New Business System.
The system displays the Business System Wizard in a separate window.
4. Select Third-Party Business System, and then choose Next.
5. Optionally, enter an ALE name and choose Next.
6. From the drop-down list, select the technical system for the third-party system that you want to define, and then choose Next.
7. Select the products that are installed in this third-party business system, and then choose Next.
8. Enter the name of the third-party business system.
We recommend that you implement the internal naming convention <namespace>_<name> for business systems. For <namespace>, insert a URL or a namespace of the Integration Repository. Only alphanumeric characters are permitted. Use the underscore as a replacement for non-alphanumeric characters. For <name>, insert the role of the system. Example: SAP_COM_SRM_DEVELOPMENT.
9. Choose Next.
10. In the Related Integration Server list, you can optionally select an integration server.
11. Choose Finish.
If you need to change or delete the configuration of any element in your system landscape (systems, servers, clients, software components, and so on), you can do so at any stage in the technical system browser or the business system browser.
SAP Online Help 18.02.2004
SAP System Landscape Directory 640 58
Software Catalog Purpose The SAP System Landscape Directory contains component information about all the available software modules, including their combination options and dependencies. This information represents the basis for the description of the system landscape. You can get the current model data from the master component information provided by SAP.
You can also enter information about third-party products in the SLD for managing your system landscape.
The software catalog displays this information and enables you to maintain data for third-party products. This section contains information about the following:
• Modeling logic of software components and software products [page 59] [page 59]
• Displaying the software catalog [page 61] [page 61]
• Maintaining data for third-party products [page 62] [page 62]
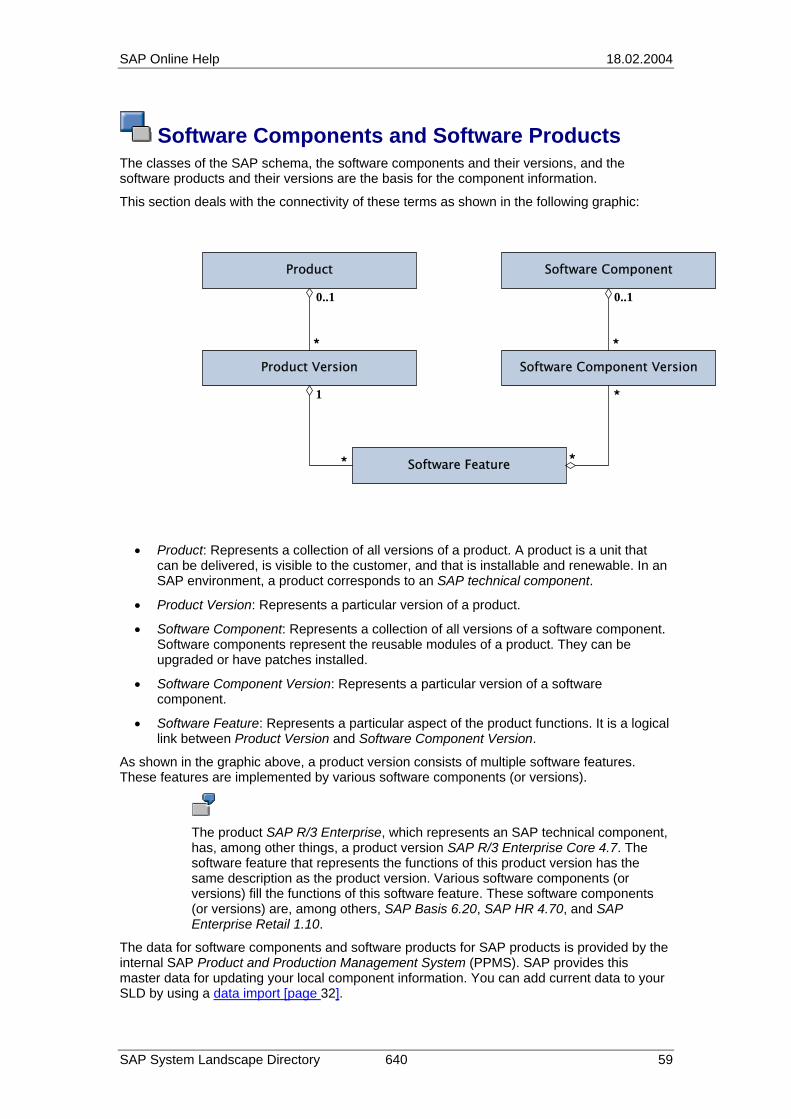
SAP Online Help 18.02.2004
SAP System Landscape Directory 640 59
Software Components and Software Products The classes of the SAP schema, the software components and their versions, and the software products and their versions are the basis for the component information.
This section deals with the connectivity of these terms as shown in the following graphic:
Software ComponentProduct
Product Version Software Component Version
Software Feature
1
* *
*
* *
0..1 0..1
• Product: Represents a collection of all versions of a product. A product is a unit that can be delivered, is visible to the customer, and that is installable and renewable. In an SAP environment, a product corresponds to an SAP technical component.
• Product Version: Represents a particular version of a product.
• Software Component: Represents a collection of all versions of a software component. Software components represent the reusable modules of a product. They can be upgraded or have patches installed.
• Software Component Version: Represents a particular version of a software component.
• Software Feature: Represents a particular aspect of the product functions. It is a logical link between Product Version and Software Component Version.
As shown in the graphic above, a product version consists of multiple software features. These features are implemented by various software components (or versions).
The product SAP R/3 Enterprise, which represents an SAP technical component, has, among other things, a product version SAP R/3 Enterprise Core 4.7. The software feature that represents the functions of this product version has the same description as the product version. Various software components (or versions) fill the functions of this software feature. These software components (or versions) are, among others, SAP Basis 6.20, SAP HR 4.70, and SAP Enterprise Retail 1.10.
The data for software components and software products for SAP products is provided by the internal SAP Product and Production Management System (PPMS). SAP provides this master data for updating your local component information. You can add current data to your SLD by using a data import [page 32].
SAP Online Help 18.02.2004
SAP System Landscape Directory 640 60
Also, you can enter third-party products in the SLD by using the function third-party product maintenance [page 62].
SAP Online Help 18.02.2004
SAP System Landscape Directory 640 61
Displaying the Software Catalog Use You can use the software catalog to display all registered software products and their versions, as well as all registered software components and their versions.
The component information is provided by SAP. You cannot change this information. Third-party products that you enter on the screen Maintaining Third-Party Products [page 62] are also in the software catalog.
Prerequisites You have navigated to the initial screen of the SAP System Landscape Directory.
Procedure ...
1. To open the software catalog, choose Software → Software Catalog.
The browser displays the Software Catalog screen.
2. In the drop-down list Software Type, choose whether you want to display products or software components.
Depending on your selection, the browser displays a list of all available products or software components and their versions.
3. To restrict the display, you can enter a corresponding string in the field Display Filter.
The browser then displays only the rows that contain this string.
SAP Online Help 18.02.2004
SAP System Landscape Directory 640 62
Maintaining Third-Party Products Use The SAP System Landscape Directory (SLD) is the central information point for your system landscape. Management and business applications access the information stored there to perform tasks in a collaborative computing environment.
Third-party products are often implemented in a system landscape. These third-party products can be standalone applications or additional modules for SAP applications.
To register third-party products in the SLD, you have to enter the product information manually.
Prerequisites You have the user role LcrAdministrator and have navigated to the initial screen of the SLD.
Entering a Product (Version) ...
1. Choose Software → Software Catalog.
The browser displays the screen Software Catalog.
2. Choose New Product.
The browser displays the screen Define Product.
3. Enter the vendor name, product name, and the product version.
4. Choose Create.
The browser displays the screen Define Software Component. The SLD server creates instances for the classes Product, Product Version, and Software Feature as well as the association instances.
If you do not want to create the software components for the third-party product immediately, you can stop the process by choosing Cancel. The system then creates only the product.
You can create various versions for a registered third-party product by specifying exactly the same vendor and product name. Assign the version numbers accordingly.
Entering a Software Component (Version) ...
1. Choose Software → Software Catalog.
The browser displays the screen Software Catalog.
2. In the drop-down menu Software Type, select Software Components.
The browser displays all the software components that are already registered in the SLD.
3. Choose New Component.
The browser displays the screen Define Software Component.
4. In the Product drop-down list, select the product that the software component belongs to.
5. Enter the vendor name, component name, and the component version.
SAP Online Help 18.02.2004
SAP System Landscape Directory 640 63
6. Choose Create.
The SLD server creates instances for the CIM classes Software Component and Software Component Version, as well as the association instances.
You can create various versions for a registered third-party product by choosing exactly the same product, and specifying exactly the same vendor and component name. Assign the version numbers accordingly.

SAP Online Help 18.02.2004
SAP System Landscape Directory 640 64
Software Dependencies
In the SLD software catalog, you can see which usage dependencies exist between software component versions in different contexts (at installation or build time, for example). For SAP software components, this information is maintained by the PPMS at SAP.
The usage dependency is a two-way dependency: You can see which software components (including the version) are used by a particular software component (version) and the other way around.
To add to the information provided by the PPMS, you can define additional software dependencies (in the build time context, for example). You have to define these dependencies manually in the software catalog.
This section contains information on how to:
• Display [page 65] dependencies at installation time and build time
• Define [page 66] additional dependencies
• Delete [page 67] dependencies
SAP Online Help 18.02.2004
SAP System Landscape Directory 640 65
Displaying Dependencies Between Software Component Versions Procedure ...
1. On the initial screen of the SLD, choose Software → Software Catalog.
2. In the drop-down menu Software Type, select Software Components.
The browser displays a list of all the SAP software components and their versions.
You can restrict this display by entering a value in the field Display Filter.
3. Select the version of a software component for which you want to display the usage dependencies.
4. Choose Usage Dependencies.
The browser displays all the dependencies that exist. You can display the dependencies for a certain context by selecting the context in the drop-down menu Dependency Context. If the list of dependencies is too long, you can restrict the display by entering a relevant value in the field Display Filter.
SAP Online Help 18.02.2004
SAP System Landscape Directory 640 66
Defining Additional Software Dependencies Use The SLD software catalog automatically contains information about software dependencies at installation time. Software dependencies in other contexts or for third-party components, however, have to be maintained manually.
Procedure ...
1. On the initial screen of the SLD, choose Software → Software Catalog.
2. In the drop-down menu Software Type, select Software Components.
3. Select the version of the software component for which you want to define a dependency.
4. Choose Usage Dependencies.
The browser displays the dependencies that currently exist for this version in all contexts.
5. Choose Define Dependencies.
The browser displays a list of all SAP software component versions.
6. In the drop-down menu, select the context for which you want to define dependencies.
7. Select the software component versions that are prerequisites in the selected context for the software component version that you selected in point 3.
If dependencies exist at installation time (see Displaying Dependencies Between Software Component Versions [page 65]), you can select the same dependencies at build time simply by choosing Collect from Installation Time.
If any dependencies already exist in the selected context, these are indicated by a gray activated checkbox next to the software component version.
8. Choose Create.
The browser goes back to the screen that displays the software dependencies that exist for the selected context.
If you want to delete the dependency that you have just defined, select it and choose Remove Selected Dependencies.
If you want to delete other software dependencies, see Deleting Software Dependencies [page 67].
SAP Online Help 18.02.2004
SAP System Landscape Directory 640 67
Deleting Software Dependencies Procedure ...
1. On the initial screen of the SLD, choose Software → Software Catalog.
2. In the drop-down menu Software Type, select Software Components.
3. Select the version of the software component for which you want to delete dependencies.
4. Choose Usage Dependencies.
5. In the drop-down menu Dependency Context, select the context in which you want to delete the dependency.
The browser displays the dependencies that currently exist in the selected context.
6. Select at least one dependency that you want to delete.
7. Choose Remove Selected Dependencies.
SAP Online Help 18.02.2004
SAP System Landscape Directory 640 68
Name Reservation
Software development that is globally distributed requires a conflict-free method of creating names for software objects. Without such a method, different development teams could accidentally use the same name for software objects that have different purposes. If the software objects are then merged in the same runtime environment, this could even disable applications due to a “simple” naming conflict.
To avoid naming conflicts, the SAP System Landscape Directory (SLD) provides a name reservation service (also known as the name server) that enables you to “reserve” names that are globally unique. The underlying principle is the namespace concept. (For more information about the namespace concept, see SAP Service Marketplace at service.sap.com/namespaces). A namespace is defined by a namespace prefix, which is the leading part of a development object name. For certain object name categories [page 72], a namespace can contain a number of sub-namespaces.
A complete name for a development component consists of the vendor ID followed by a project-specific path and the name of the development component itself. The vendor ID can be the Internet domain of the vendor (sap.com, for example). The complete name would be: <vendor ID>/<project>/[<sub-project>/]<component name>. Example: The vendor Petshop has a Web store project that contains the development components Catalog and Order. The complete names of these development components are: petshop.com/webstore/catalog and petshop.com/webstore/order, which both belong to the namespace petshop.com/webstore/.
Object names must adhere to the following rules:
• The name corresponds to the syntax of the object name category.
• The leading parts of a name are exactly the same as the namespace definition (namespace prefix).
• The closing asterisk in the namespace prefix represents all names that belong to this namespace (testcomp belongs to test*, for example).
If you define new development objects within the SAP Java Development Infrastructure (JDI), the SAP NetWeaver Developer Studio provides you with all the namespaces that have already been defined for the relevant object name category. You can then choose an appropriate namespace prefix and complete the naming of your objects. Subsequently, the JDI reserves this name for you on the name server.
The following functions are included on the name reservation interface in the SLD:
• Define [page 71] a new namespace prefix
• Display and copy [page 75] namespace prefixes for each object name category
• Reserve [page 76] single names
• Maintain [page 77] namespace prefixes (administration)
These functions are described in the following sections.

SAP Online Help 18.02.2004
SAP System Landscape Directory 640 69
Set-Up of the Name Reservation Service Purpose
You do not have to run the name reservation service (name server) on the same SLD server that you use for system landscape data. Depending on your performance requirements, you can choose to use a different SLD server.
This section describes the steps involved in setting up the name reservation service.
Process Flow
1. You set up the name server as described in Making Server Settings [page 21].
For the name of the object server, you must use a unique name. The name must be an ABAP prefix that has been reserved at SAP (without the slashes). The SAP Java Development Infrastructure (JDI) allows the use of multiple name servers. Therefore, you must use a unique name for each name server. By reserving the name on SAP Service Marketplace, you ensure that the name is unique.
2. You create a record [page 70] for this name server on the SLD server that you use for system landscape data.
3. To enable the JDI to connect to the name server, you specify the logon data for the JDI. For more information, see SAP Service Marketplace at service.sap.com/jdi.

SAP Online Help 18.02.2004
SAP System Landscape Directory 640 70
Creating a Record for a Name Server Use When you set up a name server for the name reservation service, you have to create a record for this name server on the SLD server where you manage your system landscape data.
Prerequisites You have navigated to the initial page of the SLD server that you use for system landscape data.
Procedure
1. Choose Technical Landscape.
2. In the dropdown list Technical System Type , select System Landscape Directory.
3. Choose New Technical System.
4. Choose Next.
5. Select the Web AS Java of the name server.
6. Select Name Server.
7. Enter the URL, the object server, a description, and an administrative contact.
8. Choose Finish.
SAP Online Help 18.02.2004
SAP System Landscape Directory 640 71
Defining a Namespace Prefix Procedure
1. On the initial screen of the SLD, choose Name Reservation.
2. Choose Define Namespace Prefix.
3. In the drop-down list Name Category, select a relevant category (see Object Name Categories [page 72]).
The category By convention creates namespace prefixes for multiple name categories that are derived from an ABAP prefix (without the slashes).
4. In the Namespace Prefix field, enter a prefix that corresponds to the syntax rules (see Object Name Categories [page 72]).
5. Enter the relevant purpose.
The default setting for the Purpose field is Used by Developer. However, certain exceptions are required for prototyping and for generated object names. These are as follows:
Used in Generator: This namespace prefix is reserved for generator programs. It is locked for development and no name servers allow name allocation in this namespace.
Used Everywhere: Local prefixes for prototyping. All name servers allow name allocation in this namespace.
Used by Other Name Server: Prefixes for Business One development, for example. No names are reserved on this name server; only prefixes have been created.
Used Nowhere: Locked prefixes reserved for future use.
6. Enter the contact/owner of the namespace (as an e-mail address) and a description of the namespace.
SAP Online Help 18.02.2004
SAP System Landscape Directory 640 72
Object Name Categories
The object name categories for the namespace prefixes are implemented as CIM classes [page 9]. The global uniqueness of prefixes is guaranteed by using Internet domains or by using an ABAP prefix that has been reserved at SAP.
You reserve a prefix globally on SAP Service Marketplace at service.sap.com/namespaces (see SAP Note 105132). Example: Prefix <X> has been reserved. For ABAP purposes, you use the prefix </X/> whereas for non-ABAP purposes, you use different naming conventions. This section lists all available object name categories and their syntax rules. The syntax rules are important when you define a new namespace prefix [page 71].
Object Name Categories and Syntax Rules for Non-ABAP Objects
Object Name Category
Where Used Prefix Naming Convention
Syntax Rules
Application Context Root
Names of J2EE applications. Defines the first path component in the URLs of the application.
x Hierarchical name in lowercase as a first name component separated by a slash. Example: <x/...>
DB Field Name Field names of any database tables. Developers of different database tables can reuse field names. Namespace prefixes can be separated according to vendor in this category.
X_* Prefix must have a trailing asterisk to allow more than one single name. In front of the asterisk, you have to insert the underscore character to separate the namespace prefixes. Any string of uppercase letters and digits may be inserted in front of <_*>. The minimum length is 1. Example: <X_*>. Do NOT enter the underscore character inside the prefix string as this would be ambiguous.
DB Object Name Names of database tables and database indexes
X_* Prefix must have a trailing asterisk to allow more than one single name. In front of the asterisk, you have to insert the underscore character to separate the namespace prefixes. Any string of uppercase letters and
SAP Online Help 18.02.2004
SAP System Landscape Directory 640 73
digits may be inserted in front of <_*>. The minimum length is 1. Example: <X_*>. Do NOT enter the underscore character inside the prefix string as this would be ambiguous.
DB Pool Name Names of DB pool aliases. These aliases are used by J2EE applications to refer to a DB connection, including the physical database, the database schema, and access rights.
X/P_* Prefix must have a trailing asterisk to allow more than one single name. In front of the asterisk, you have to insert the underscore character to separate the namespace prefixes. Any string of uppercase letters, digits, and the slash character may be inserted in front of <_*>. The minimum length is 1. Example: <X/P_*>. Do NOT enter the underscore character inside the prefix string as this would be ambiguous.
Design Time Package Names of Java packages.
<rid> Reverse Internet domain. Example: <sap.com> is the normal Internet domain so the reverse is <com.sap>
Development Component Name
Names of the smallest reusable software bundles (development components)
<id> Hierarchical name separated by a slash. The file path in the DTR is preceded by a vendor path that belongs to the development component name. The vendor path at SAP is sap.com. Example: <sap.com/*>
Installation Unit Name Names that identify any type of installation unit (executable, dynamically linked library, archive, VB module, and so on). The type is designed mainly for file system elements but not necessarily restricted to them. To avoid
X_* Prefix must have a trailing asterisk to allow more than one single name. In front of the asterisk, you have to insert the underscore character to separate the namespace prefixes. Any string of uppercase letters and
SAP Online Help 18.02.2004
SAP System Landscape Directory 640 74
name reservation conflicts, do not assign the same name to elements of different types.
digits may be inserted in front of <_*>. The minimum length is 1. Example: <X_*>. Do NOT enter the underscore character inside the prefix string as this would be ambiguous.
Software Component Name
Names of the smallest shipped software bundles. These bundles contain many development components.
<id> Software components that have sources in the DTR have to follow the same naming rules as for development components. Example: <sap.com/*>
SAP Online Help 18.02.2004
SAP System Landscape Directory 640 75
Displaying and Copying Namespace Prefixes Procedure ...
1. On the initial screen of the SLD, choose Name Reservation.
2. Choose List Namespace Prefixes.
3. Select the relevant object name category.
The browser displays a list of all the namespace prefixes that have already been allocated to this category.
If the list of prefixes is too long, you can limit the output by entering a relevant string in the Display Filter field.
4. If you want to use a particular namespace prefix as a template for a new prefix, select the prefix and choose Create Copy.
SAP Online Help 18.02.2004
SAP System Landscape Directory 640 76
Reserving a Single Name
This function is for use by system administrators only.
Use You can use this function if you want to reserve a single name on a particular name server. If an IDE is available, this task is performed by the IDE. However, for developments without an IDE, you can use the Reserve Name function provided by the SLD.
Procedure
You can reserve a name once only.
1. On the initial screen of the SLD, choose Name Reservation.
2. Choose Reserve Name.
3. In the drop-down list Name Category, select the object name category [page 72] for which you want to reserve a name.
4. Enter the name that you want to reserve. (For the syntax rules, see Object Name Categories [page 72].)
5. Enter a caption and a description of the name.
6. Choose Create.
SAP Online Help 18.02.2004
SAP System Landscape Directory 640 77
Maintaining Reserved Names
This function is for use by system administrators only.
Use You can use this function if you want to make changes to a particular reserved name (if it contains spelling errors, for example), or if you want to delete it.
Procedure
1. On the initial screen of the SLD, choose Software → Name Reservation.
2. Choose Administration.
3. In the Subset drop-down list, select Name Reservation.
4. In the Class drop-down list, select the relevant object name category.
The browser displays a list of names that have been reserved for this category.
5. Select the name by marking the relevant checkbox next to it.
6. If you want to delete the name, choose Remove Selected.
7. If you want to change the name, click it, and then make the relevant changes on the next screen.

SAP Online Help 18.02.2004
SAP System Landscape Directory 640 78
Implementing an SLD Client Purpose The SAP System Landscape Directory provides information about the available software products and the system landscape. Applications can access this information on the SLD server. These applications represent clients of the SLD server.
SLD provides programming interfaces (APIs) for Java and ABAP that implement the specification for CIM operations over HTTP of the Distributed Management Task Force (DMTF) (For more information, see www.dmtf.org.) This specification enables the SLD server to communicate with other systems using an HTTP connection. To guarantee that a software system is able to work with other systems, the XML format is used to represent data, and HTTP is used for data transport.
SLD server
CIM data
Instrumentedapplications
Managementapplications
HTTP connection
XML messagesJava/
ABAPAPI
Applications can use these Java or ABAP APIs to send queries to and receive replies from the server. These applications can be management applications or instrumented business applications. Instrumented applications are applications that have an API.
In addition, SAP has implemented a CIM proxy layer for easy access to the classes of the CIM Core Schema and the SAP Extension Schema.
The following provides you with the basics for implementing:
• A Java client
• An ABAP client

SAP Online Help 18.02.2004
SAP System Landscape Directory 640 79
Java Client for the SLD Service Concept To execute a particular CIM operation, a Java client calls the corresponding Java methods of the API. The API packs the operation and its parameters in an XML message. The API then sends the request to the SLD server by using HTTP. The SLD server executes the operation and sends the result, or the error message, in an XML message as an HTTP response to the API on the client side. The API forwards the results as the return value of the method call to the application.
Prerequisites To implement an SLD client you require the following Java archives:
• lcrclient.jar: Implementing the specification for CIM operations over HTTP
• logging.jar: Logging
• httpclient.jar: HTTP library
• tc_sec_https.jar: HTTPS library
• sapxmltoolkit.jar: XML/XSLT processors (optional for JDK 1.4.x)
All the JAR files named above are included in the SAP Web Application Server.
The next sections show you how to:
• Generate a CIM client [page 80]
• Process CIM objects [page 81]
• List CIM objects [page 84]
• Handle exceptions [page 86]
• Control logging [page 87]
• Use namespaces [page 88]
• Use the SAP proxy layer [page 89]
For more information, see the JavaDoc package.
SAP Online Help 18.02.2004
SAP System Landscape Directory 640 80
Generating a CIM Client To generate a CIM client, you have to:
1. Generate an instance of the class ClientFactory (also possible for HTTPS)
2. Generate an instance of the class CIMOMClient
You have to specify the connection data when creating an instance of CIMOMClient. On the server side, a servlet – the CIM Object Manager – edits the requests of the clients. The URL of the CIM Object Manager is as follows: http://<HOST>:<PORT>/sld/cimom; you must specify the host and the port individually. /sld is the preset name where the SLD server is installed as J2EE components on the application server.
Generating an Instance of the Class ClientFactory • To create an instance for HTTP connections, use the following:
...
ClientFactory factory = ClientFactory newInstance() ...
• To create an instance for HTTPS connections (servers only; no standalone clients are supported by this method), use the following: factory.configureEngineKeyStores (trustStore, null)
The trust store parameter is the name of the view in the key storage service of the SAP J2EE Engine where your trusted root certificates are located.
Generating an Instance of the Class CIMOMClient To generate a CIM client, you have to create an instance of the class CIMOMClient (this replaces the old CIMClient). To do this, use:
CIMOMClient client = factory.createClient (URL, user, password)
If you want to use this method with an HTTPS URL, first you have to configure the key stores of factory.
The CIMOMClient has the following advantages over the CIMClient:
1. CIMOMClient is a compact implementation of the specification. By limiting the number of overloaded methods, you can simplify the class handling.
2. The read methods of CIMOMClient return lists instead of simple arrays. The implementation of these lists is similar to the style of the Java Collection API. This simplifies the processing of the return values.
3. The methods of CIMOMClient use CIM types only. String representations are not valid.
To generate CIM types, you can use the help class com.sap.lcr.api.cim.CIMFactory or the interface com.sap.lcr.api.cimclient.CIMNames. For detailed information, see the JavaDoc package that you received.
You can now call methods of the CIM client.
SAP Online Help 18.02.2004
SAP System Landscape Directory 640 81
Processing CIM Objects CIM objects are units of data that are managed by the SLD server. They are CIM classes and CIM instances. The following sections give you an overview of how to create and process a CIM object.
For more information, see the JavaDoc package.
Creating a New CIM Object ...
1. Create a local CIM object.
2. Process the new CIM object locally.
3. Transfer the new CIM object to the SLD server.
These steps are described below.
Creating a Local CIM Object SLD is a client-server application. For this reason, the client cannot create any new server objects directly by calling the constructors. Using the class methods of the class com.sap.lcr.api.cim.CIMFactory, you can create new CIM objects locally on the client side. You can process these local CIM objects and then transfer them to the server.
To create a new object of a CIM class, call up the class method cimclass(String aClassname, String aSuperclassname) of CIMFactory. The first parameter specifies the name of the new CIM class, whereas the second parameter represents the name of the superclass. Leave out the second parameter if the new class has no superclass.
To create a new instance of a CIM class, call up the class method instance(String aClassname) of CIMFactory. The parameter specifies the CIM class for which you are creating an instance.
For the class methods of CIMFactory, you can create local objects only. To transfer them to the SLD server, call up the corresponding instance methods of com.sap.lcr.api.cimclient.CIMOMClient.
Processing CIM Objects Locally After you have created a new CIM object locally, you can set values for properties and qualifiers. Properties are attributes of a CIM object. The key properties are important for the identity of the CIM instances. You cannot change key properties after the CIM object has been saved on the server. Qualifiers are metainformation that characterizes CIM classes and properties.
An instance of SAP_Product has a number of properties such as Name, Version, and WarrantyDuration. The warranty duration has the qualifier Units, which specifies the unit of time. In this case, the unit is Day. This means that the warranty duration is specified in days.
Using the class methods property() and qualifier() of CIMFactory, you can create Java objects of the metaclasses CIMProperty and CIMQualifier. Like CIMFactory, these classes also come from the package com.sap.lcr.api.cim. You can set values for these metaobjects by using the extensive instance methods of both classes.
SAP Online Help 18.02.2004
SAP System Landscape Directory 640 82
To add these properties and qualifiers to the CIM object mentioned above, call up the instance methods addProperty() and addQualifier() of the classes CIMClass or CIMInstance. If the values of the properties or qualifiers have already been set in the relevant CIM object, the method call overwrites the old values.
Transferring the CIM Object to the Server To transfer the CIM object to the SLD server, call up the instance methods createClass() or createInstance() of the class CIMOMClient. By doing this, you save the CIM object on the server permanently.
The following program section creates a new CIM class called SAP_SWProduct. The superclass is called SAP_Product. The qualifier DISPLAYNAME of the new class also has the value Software Product.
private CIMOMClient client;...try {
CIMClass cc = CIMFactory.cimclass(“SAP_SWProduct”, “SAP_Product”);CIMQualifier cq =
CIMFactory.qualifier(“DISPLAYNAME”, “string”, “Software Product”);cc.addQualifier(cq);client.createClass(cc);
}catch (Exception ex) {...}finally {...}...
Modifying an Existing CIM Object To modify an existing CIM object, you have to: ...
1. Get a local copy of the CIM object from the SLD server.
2. Make the modifications locally.
3. Transfer the modified CIM object to the SLD server.
These steps are described below.
Getting a Local Copy of a CIM Object SLD is a server-client application. To process an existing CIM object, you have to get a local copy of this object. The Java class CIMOMClient provides two instance methods that you can use to make copies of existing CIM classes or CIM instances from the SLD server. These instance methods are getCIMClass() and getInstance(). The first parameter of these two methods specifies the name of the CIM object. The return value is of the type CIMClass or CIMInstance.
According to the Specification for CIM Operations over HTTP (version 1.0), the second parameter of the boolean type specifies whether the properties and qualifiers that were transferred by the relevant superclasses are included. Usually they are not included. To make sure, set the value to false. However, doing this increases the amount of data on the communication channel. Read the JavaDoc, which contains detailed information.
Modifying CIM Objects Locally The Java classes CIMClass and CIMInstance provide a large number of instance methods (getPropertyByName() and getQualifierByName(), for example) that return properties or qualifiers of the CIM objects. You can change the values of the properties or qualifiers.
SAP Online Help 18.02.2004
SAP System Landscape Directory 640 83
Transferring the Modified CIM Object to the Server To save the changes permanently, transfer the modified CIM object with the instance method modifyInstance() of the class CIMClient back to the server. The modification then takes effect.
The following program section shows the steps for modifying an existing CIM instance.
try {CIMInstancename (cin, ci);...// Get a local copy of instanceCIMInstance ci =
client.getInstance(cin, false, true, false, null);
// Get propertyCIMProperty prop = ci.getPropertyByName(“Description”);
// Modify propertyprop.setValue(
“Changed on ”+ DateFormat.getInstance().format(new Date()));
// Upload modified instance to serverclient.modifyInstance(CIMFactory.valueNamedInstance (cin, ci));
}catch (Exception ex) {...}finally {...}
The instance method setProperty() of the class CIMClient changes a property of an existing CIM instance directly. This means that no local copy of the CIM instance is required.
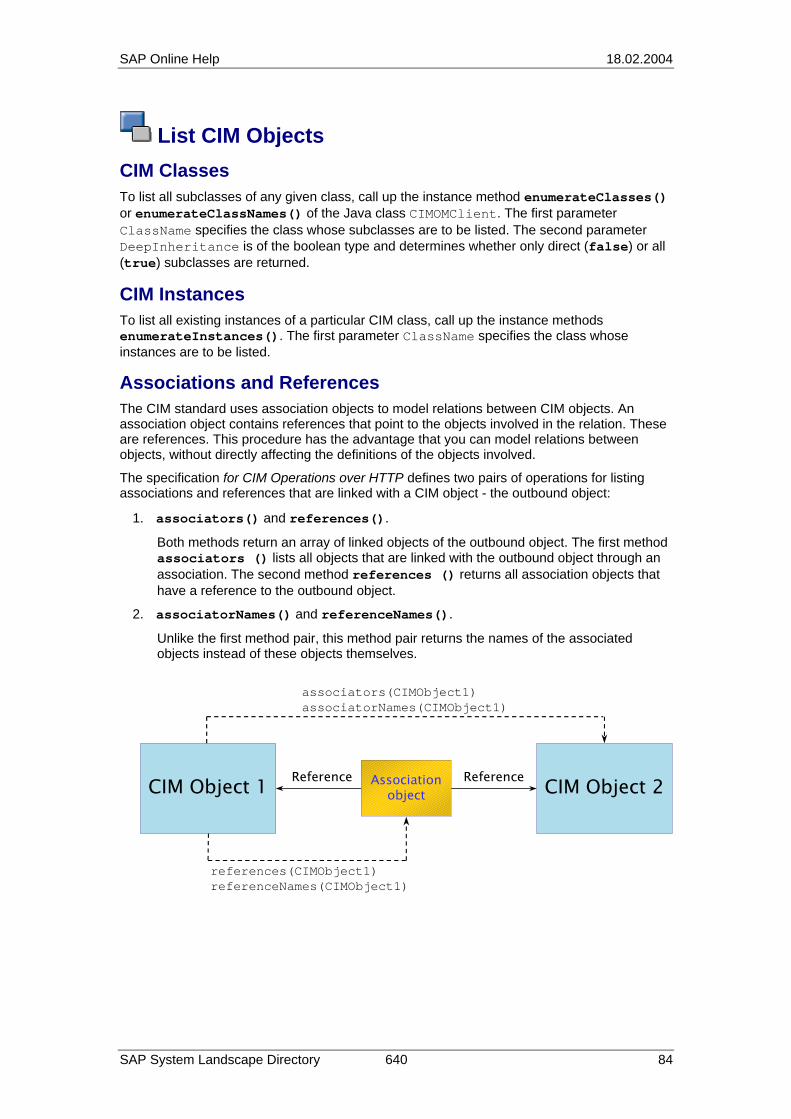
SAP Online Help 18.02.2004
SAP System Landscape Directory 640 84
List CIM Objects CIM Classes To list all subclasses of any given class, call up the instance method enumerateClasses() or enumerateClassNames() of the Java class CIMOMClient. The first parameter ClassName specifies the class whose subclasses are to be listed. The second parameter DeepInheritance is of the boolean type and determines whether only direct (false) or all (true) subclasses are returned.
CIM Instances To list all existing instances of a particular CIM class, call up the instance methods enumerateInstances(). The first parameter ClassName specifies the class whose instances are to be listed.
Associations and References The CIM standard uses association objects to model relations between CIM objects. An association object contains references that point to the objects involved in the relation. These are references. This procedure has the advantage that you can model relations between objects, without directly affecting the definitions of the objects involved.
The specification for CIM Operations over HTTP defines two pairs of operations for listing associations and references that are linked with a CIM object - the outbound object: ...
1. associators() and references().
Both methods return an array of linked objects of the outbound object. The first method associators () lists all objects that are linked with the outbound object through an association. The second method references () returns all association objects that have a reference to the outbound object.
2. associatorNames() and referenceNames().
Unlike the first method pair, this method pair returns the names of the associated objects instead of these objects themselves.
CIM Object 1 CIM Object 2Associationobject
Reference Reference
associators(CIMObject1)associatorNames(CIMObject1)
references(CIMObject1)referenceNames(CIMObject1)
SAP Online Help 18.02.2004
SAP System Landscape Directory 640 85
Executing a Batch Request Use As of SAP Web Application Server 6.30, the SLD server is able to execute batch requests. You can group multiple operations together in one packet (batch request) and transfer the packet to the server. These operations are processed by the server in sequence. You then receive a packet back from the server with results of the executed operations. This implementation corresponds with the definition of the Multiple Operation Request in the specification CIM Operations over HTTP.
Procedure
1. Generate a CIM client and a batch client.
For information on generating a CIM client, see Generating a CIM Client [page 80].
To get a batch client, generate an instance of the class CIMBatchClient. This class implements the abstract class CIMBatchHandle, which declares all CIM operations. No parameters are required by the constructor of CIMBatchClient.
2. Insert operations into the batch packet.
Insert operations by calling corresponding methods of the batch client in the sequence of the execution.
The called methods are not executed immediately. As a return, you receive a number of the type Integer, which specifies the index of the operations in the batch queue.
3. Send the batch request to the server.
Call the method performBatchOperation of the class CIMOMClient or CIMClient. This method expects the batch client with a filled batch queue as a parameter.
The CIM client transfers the batch request to the server.
4. Evaluate the result.
After the batch request has been executed, you receive an instance of the class CIMBatchResult from the server. You can find out the indexes of the successful and failed operations by using the methods getSucceeded and getFailed.
To see the results of the operations and the corresponding indexes, use the method getResult.
The return value of getResult is of the type java.lang.Object. You have to cast the necessary types yourself.
All the Java classes mentioned here belong to the package com.sap.lcr.api.cimclient.
SAP Online Help 18.02.2004
SAP System Landscape Directory 640 86
Handle Exceptions The CIM operations trigger two runtime exceptions if an error occurs: ...
1. com.sap.lcr.api.cimclient.CIMClientException: Displays errors on the client side (failed connections, for example).
2. com.sap.lcr.api.cimclient.LcrException: Displays processing errors from the SLD server, for example, invalid parameters. The Specification for CIM Operations over HTTP defines 17 status codes that indicate different error types.
3. You can identify the numerical value and the symbolic names of the error by using the instance methods of LcrException getStatusCode() and getStatusName().
When class methods of CIMFactory are executed, the exception of the type com.sap.lcr.api.cim.ItemConstructionExcp is triggered, which displays the errors that occurred when the CIM objects were generated.
SAP Online Help 18.02.2004
SAP System Landscape Directory 640 87
Controlling the Logging Process The API logs the process flow of client-server communication. To specify the level of logging, simply set the static variable traceLevel of the class CIMTraceUtil to the level of your choice. There are seven logging levels, which are defined in the Java interface com.sap.lcr.api.cimclient.CIMConst:
Logging Levels
Level Value CIMConst.NONE 0
CIMConst.WARN 1
CIMConst.INFO 2
CIMConst.DEBUG 3
CIMConst.FINE 4
CIMConst.FINER 5
CIMConst.FINEST 6
SAP Online Help 18.02.2004
SAP System Landscape Directory 640 88
Namespace SLD supports the namespace concept that implements namespaces as logical areas for different purposes. The default namespace for SLD is sld/active. You can determine the namespace that you want to use in the following ways:
• Specify the namespace when you create the CIM client.
• Change the namespace at any time after you have created the CIM client by using the instance method setLocalNamespacePath().
To identify the current namespace, call the instance method getLocalNamespacePath() of the CIM client.
SAP Online Help 18.02.2004
SAP System Landscape Directory 640 89
SAP Proxy Layer To simplify the programming and the handling of CIM objects, SAP introduced an SAP proxy layer. Using this approach, each CIM class of the CIM schema and the SAP extension schema generates a representation class, an access class, and a filter class in Java.
All generated Java classes are grouped in the package com.sap.lcr.api.sapmodel.
Representation Class A representation class represents the corresponding CIM class on the client side. It provides access methods (Getter/Setter) for all attributes of the CIM class concerned. Using the corresponding access class, you can transfer instances from the server to the client side, and modify them. You can also create new CIM instances by adding them to the server.
Representation classes have the same names as the corresponding CIM classes.
The representation class of the CIM class SAP_SoftwareComponent has the same name.
Representation classes for abstract CIM classes are also abstract.
Access Class Access classes are used for client-server communication. The name of the access class consists of the name of the corresponding CIM class with the suffix Accessor.
The access class of the CIM class SAP_SoftwareComponent is called SAP_SoftwareComponentAccessor.
The constructor of the access class has a parameter that represents the CIM client.
You have created a CIM client aClient. For an instance of the class SAP_SoftwareComponentAccessor, call the constructor SAP_SoftwareComponentAccessor(aClient).
Using the listing methods of the access class, you can access all instances of the corresponding classes, as well as all objects (associations and references) that are linked to these instances. You can also delete instances from the server or add new instances to the server.
Abstract CIM classes do not have generated access classes.
Filter Class To select CIM instances from a large number of CIM instances that return the listing methods of the access classes, define selection criteria using the filter classes. You can specify the value range for numerical attributes and a search string for attributes of the string type. You can construct search strings with the following special characters:
SAP Online Help 18.02.2004
SAP System Landscape Directory 640 90
Special Character Meaning Example
^ Start of a string ^string
$ End of a string string$
. A single character str.ng
* Any sequence of characters St*
[...] One of the specified characters [abc]
\ Escape \*
Note: An escape character cancels out the special character meaning of the following character.
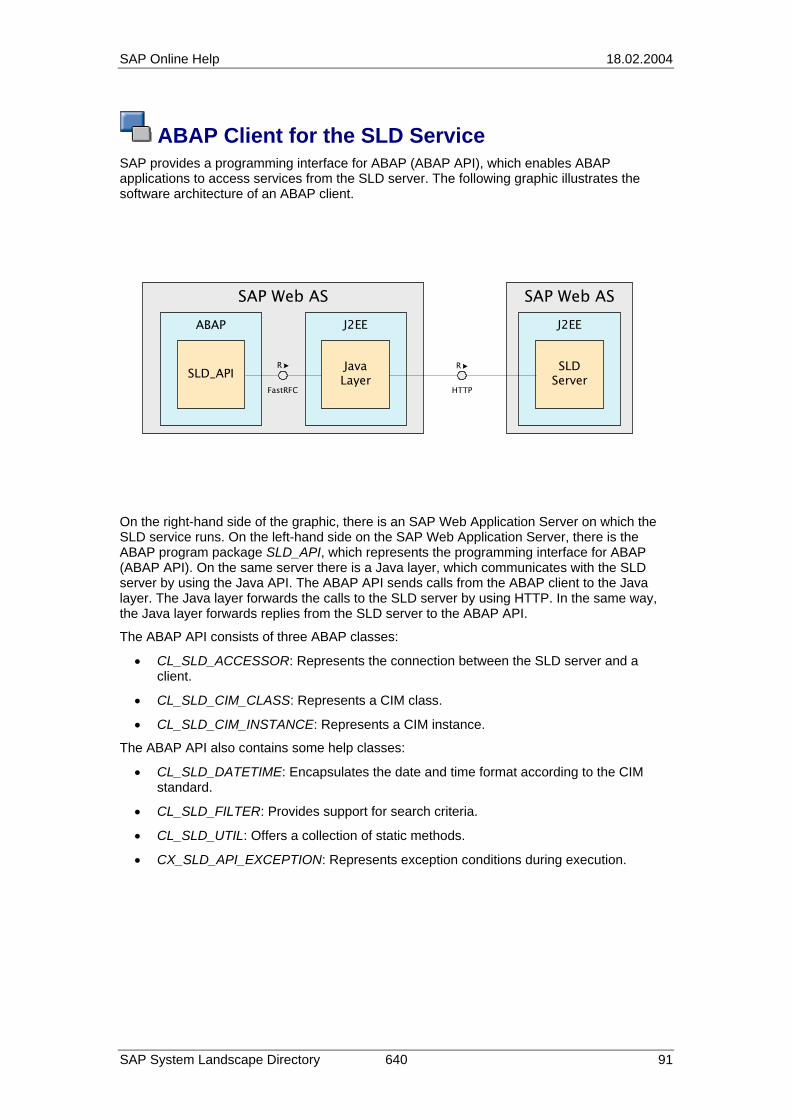
SAP Online Help 18.02.2004
SAP System Landscape Directory 640 91
ABAP Client for the SLD Service SAP provides a programming interface for ABAP (ABAP API), which enables ABAP applications to access services from the SLD server. The following graphic illustrates the software architecture of an ABAP client.
SAP Web AS
FastRFC
SAP Web ASJ2EE
JavaLayer
ABAP
SLD_API
J2EE
SLDServer
HTTP
RR
On the right-hand side of the graphic, there is an SAP Web Application Server on which the SLD service runs. On the left-hand side on the SAP Web Application Server, there is the ABAP program package SLD_API, which represents the programming interface for ABAP (ABAP API). On the same server there is a Java layer, which communicates with the SLD server by using the Java API. The ABAP API sends calls from the ABAP client to the Java layer. The Java layer forwards the calls to the SLD server by using HTTP. In the same way, the Java layer forwards replies from the SLD server to the ABAP API.
The ABAP API consists of three ABAP classes:
• CL_SLD_ACCESSOR: Represents the connection between the SLD server and a client.
• CL_SLD_CIM_CLASS: Represents a CIM class.
• CL_SLD_CIM_INSTANCE: Represents a CIM instance.
The ABAP API also contains some help classes:
• CL_SLD_DATETIME: Encapsulates the date and time format according to the CIM standard.
• CL_SLD_FILTER: Provides support for search criteria.
• CL_SLD_UTIL: Offers a collection of static methods.
• CX_SLD_API_EXCEPTION: Represents exception conditions during execution.
SAP Online Help 18.02.2004
SAP System Landscape Directory 640 92
Basis for Server Access Establishing a Connection The ABAP class CL_SLD_ACCESSOR manages the connection between the client and the SLD server. You can use this class to call server functions. To create a connection to the SLD server, you have to specify the parameters server and port of the SLD service, and user and password for the authentication. You can specify these parameters when the constructor is called. Alternatively, you can maintain a connection record with the transaction SLDAPICUST. In this case, you only need to specify the unique ALIAS identifier for this record. If the constructor of CL_SLD_ACCESSOR is called without parameters, the connection record that is flagged as primary in SLDAPICUST is used.
Setting a Trace Level You can use the instance method set_tracelevel of the class CL_SLD_ACCESSOR to set the trace level to control the logging. The parameter specifies the trace level. To find out the values of the trace levels, see System Monitoring [page 24].
We strongly recommend that you use a trace level higher than null only in a test environment.
Checking the Connection You can use the instance method ping of the class CL_SLD_ACCESSOR to test the state of a connection. The method runs, and, if an error occurs, triggers an exception called cx_sld_api_exception.
The following program section creates a connection to the specified SLD server, and sets the trace level to 1 (Warning). The program then tests whether the connection was successful.

SAP Online Help 18.02.2004
SAP System Landscape Directory 640 93
report sldapi_read_example.
data: my_sld_host type string, my_sld_port type i, my_namespace type string, my_user type string, my_password type string, accessor type ref to cl_sld_accessor, ex type ref to cx_sld_api_exception....
* Set SLD access parameters:my_sld_host = 'iwdf7059'.my_sld_port = 55800.my_namespace = 'sld/active'.my_user = 'STANLEY'.my_password = 'KUBRICK'.
* Create accessor object to SLD server:create object accessor exporting host = my_sld_host port = my_sld_port namespace = my_namespace user = my_user password = my_password .* set trace level for java logging.accessor->set_tracelevel( 1 ).
* Test the connection to the SLD server:try. accessor->ping( ). catch cx_sld_api_exception into ex. value = ex->get_text( ). write: / 'PING failed!' color 6, at / value. uline. return.endtry.
...
SAP Online Help 18.02.2004
SAP System Landscape Directory 640 94
Read Access General The ABAP API offers a number of methods that enable read access to the SLD server. To get information about existing CIM objects, call the following methods from the ABAP class cl_sld_accessor:
• get_class: Gets the definition of a CIM class.
• get_instance: Gets information about a CIM instance.
• get_property: Returns the property value of a CIM instance.
• get_property_array: Returns a list of property values of a CIM instance.
• enumerate_instances: Lists existing instances of a CIM class.
• enumerate_instnames: Lists the names of existing instances of a CIM class.
• associators: Returns all associated CIM objects that are connected with the outbound object by an association.
• associatornames: Returns the names of all associated CIM objects that are connected with the outbound object by an association.
• references: Returns all association objects that contain a reference to the outbound object.
• referencenames: Returns the names of all association objects that contain a reference to the outbound object.
Listing Search Criteria You can optionally use certain search criteria to call the methods enumerate_instances and enumerate_instnames. To do so, when you call the methods you have to transfer an object of the class cl_sld_filter as a parameter. You can use the filter class to determine the value areas or values for numeric property values, and search templates for property values of the type String in such a way that the list methods mentioned above return only the instances that meet these search criteria.
The class cl_sld_filter provides the following instance methods, which you can use to set the search criteria:
• add_min_dt and add_max_dt: Specify the lowest or the highest value of an attribute of the ABAP class cl_sld_datetime.
• add_min_i and add_max_i: Specify the lowest or the highest value of an attribute of the ABAP type l.
• add_min_f and add_max_f: Specify the lowest or the highest value of an attribute of the ABAP type F.
• add_value: Specifies the value of an attribute of the ABAP type String.
• add_value_c: Specifies the value of an attribute of the ABAP class sldi_char.
• add_value_dt: Specifies the value of an attribute of the ABAP class cl_sld_datetime.
• add_value_i: Specifies the value of an attribute of the ABAP type /.
• add_value_f: Specifies the value of an attribute of the ABAP type F.
• add_pattern: Specifies the search template of an attribute of the ABAP type String. All the search templates that are defined with the filter classes of the SAP proxy layer [page 89] are valid.
SAP Online Help 18.02.2004
SAP System Landscape Directory 640 95
The following program section returns a list of the CIM instances of the CIM class SAP_SoftwareFeature, whose property value for Name contains the string R/3.
report sldapi_read_example.
data: accessor type ref to cl_sld_accessor, ex type ref to cx_sld_api_exception, filter type ref to cl_sld_filter, t_irefs type sld_t_instref, instref type ref to cl_sld_cim_instance, ......
try. create object filter. filter->add_pattern( pname = 'Name' value = '*R/3*' ). t_irefs = accessor->enumerate_instances( cname = 'SAP_SoftwareFeature' filter = filter ). ... loop at t_irefs into instref. ... endloop. catch cx_sld_api_exception into ex. ...endtry.
SAP Online Help 18.02.2004
SAP System Landscape Directory 640 96
Write Access Creating a New CIM Instance To create a new CIM instance, you have to: ...
1. Create a local object of the ABAP class cl_sld_cim_instance.
2. Set property values of the local object.
3. Call the instance method create_instance of the ABAP class cl_sld_accessor to transfer the new CIM instance to the SLD server.
The SLD server adds the new CIM instance.
The following program creates a CIM instance of the CIM class SAP_BCSystem.
report sldapi_write_example.
data: accessor type ref to cl_sld_accessor, systref type ref to cl_sld_cim_instance, systhandle type string,...
try. create object systref exporting classname = 'SAP_BCSystem' accessor = accessor.
systref->set_property( pname = 'CreationClassName' value = 'SAP_BCSystem' ).... systhandle = accessor->create_instance( iref = systref ). catch cx_sld_api_exception into ex. ...
endtry.
Modifying an Existing CIM Instance There are two ways of modifying an existing CIM instance: ...
1. Process the CIM instance locally and then transfer it to the server.
2. Change the property values of the CIM instance directly.
Processing a CIM Instance Locally This method is suitable if you want to change multiple property values of a CIM instance. In this case, we recommend that you create a local copy from the server and then process it locally. You can then transfer it back to the SLD server. Proceed as follows: ...
1. Call the instance method get_instance of the ABAP class cl_sld_accessor to get a local copy of the CIM instance that you want to modify.
2. Call the instance method set_property or set_property_array of the ABAP class cl_sld_cim_instance to change the property values.
3. Call the instance method modify_instance of the ABAP class cl_sld_accessor to transfer the modified CIM instance to the server.
SAP Online Help 18.02.2004
SAP System Landscape Directory 640 97
The changes to the CIM instance take effect on the server side.
Setting Property Values Directly If you want to change only one or a few property values of a CIM instance, you can call the instance method set_property or set_property_array of the ABAP class cl_sld_accessor. These methods cause direct changes to the CIM instance on the server.
Removing a CIM Instance from the Server To remove CIM instances from the server, call the instance method delete_instance or delete_instances of the ABAP class cl_sld_accessor.
• delete_instance: Deletes a particular CIM instance.
• delete_instances: Deletes all CIM instances of a particular CIM class that fulfill the specified filter criteria.
SAP Online Help 18.02.2004
SAP System Landscape Directory 640 98
Exception Handling If an error occurs, the method calls of the ABAP API trigger the exception of the ABAP class cx_sld_api_exception. The attribute field textid of the exception can be one of the constants that are defined in the class itself. These constants display various error conditions. You can view values of the constants in the class builder (SE24).
The following program section illustrates the exception handling after the method get_property has been called.
...try.
value = accessor->get_property( ihandle = insthandle pname = 'Slartibartfast' ).
catch cx_sld_api_exception into ex. case ex->textid. when cx_sld_api_exception=>no_such_property. write: / 'Caught expected exception NO_SUCH_PROPERTY.'. when others. write: / 'Caught some unexpected exception!' color 6. endcase. value = ex->get_text( ). write: / value. uline.
endtry.
SAP Online Help 18.02.2004
SAP System Landscape Directory 640 99
Data Suppliers for the SAP System Landscape Directory Purpose The data suppliers for the SAP System Landscape Directory (SLD) collect data about the systems that are installed in your system landscape, and send this data to the SLD. There are two SLD data suppliers: one for ABAP-based systems and one for J2EE-based systems.
The ABAP-based SLD data supplier (transaction RZ70) is available for all SAP systems as of SAP Basis 4.0B. The J2EE-based SLD data supplier is available for all SAP J2EE servers as of SAP Web Application Server 6.40.
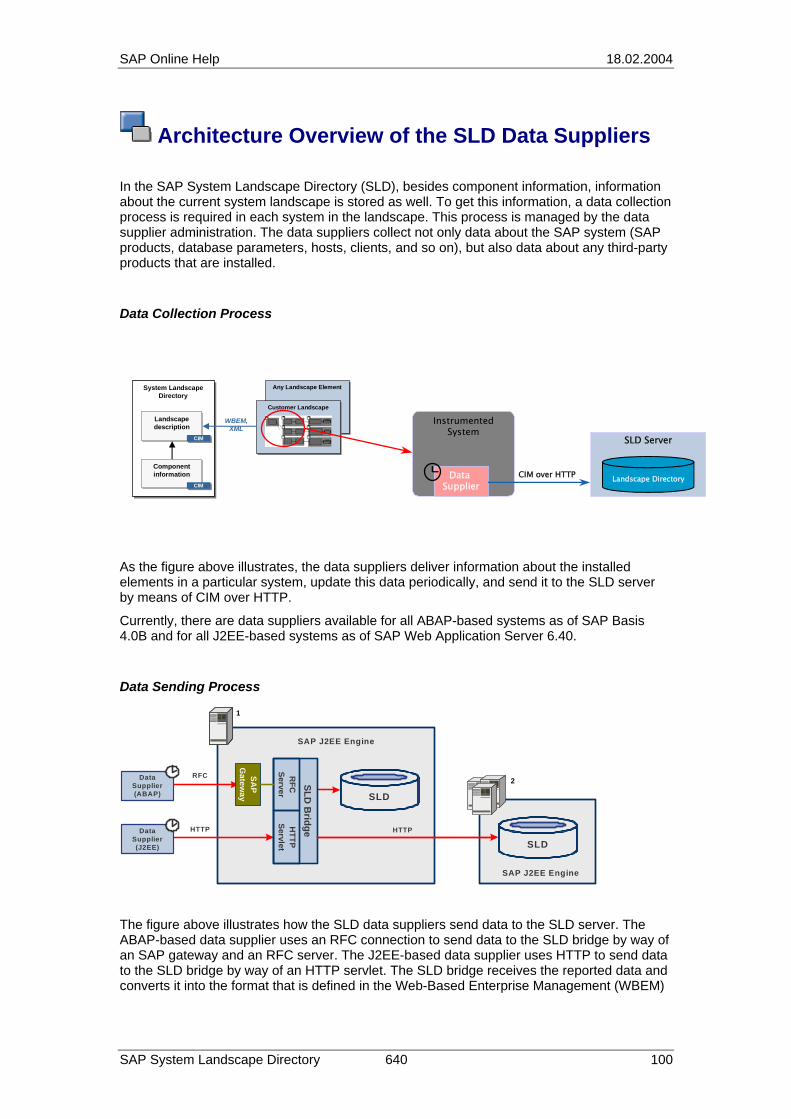
SAP Online Help 18.02.2004
SAP System Landscape Directory 640 100
Architecture Overview of the SLD Data Suppliers
In the SAP System Landscape Directory (SLD), besides component information, information about the current system landscape is stored as well. To get this information, a data collection process is required in each system in the landscape. This process is managed by the data supplier administration. The data suppliers collect not only data about the SAP system (SAP products, database parameters, hosts, clients, and so on), but also data about any third-party products that are installed.
Data Collection Process
Any Landscape ElementAny Landscape Element
Customer LandscapeCustomer Landscape
System Landscape Directory
System Landscape Directory
ComponentinformationComponentinformation
CIMCIM
LandscapedescriptionLandscapedescription
CIMCIM
WBEM,XML
SLD Server
Landscape Directory
InstrumentedSystem
Data Supplier
CIM over HTTP
As the figure above illustrates, the data suppliers deliver information about the installed elements in a particular system, update this data periodically, and send it to the SLD server by means of CIM over HTTP.
Currently, there are data suppliers available for all ABAP-based systems as of SAP Basis 4.0B and for all J2EE-based systems as of SAP Web Application Server 6.40.
Data Sending Process
HTTP
RFC SAP
Gatew
ay
SAP J2EE Engine
SLD B
ridgeR
FCServer
HTTP
Servlet
DataSupplier(ABAP)
DataSupplier(J2EE)
SAP J2EE Engine
HTTP
SLD
SLD
1
2
The figure above illustrates how the SLD data suppliers send data to the SLD server. The ABAP-based data supplier uses an RFC connection to send data to the SLD bridge by way of an SAP gateway and an RFC server. The J2EE-based data supplier uses HTTP to send data to the SLD bridge by way of an HTTP servlet. The SLD bridge receives the reported data and converts it into the format that is defined in the Web-Based Enterprise Management (WBEM)
SAP Online Help 18.02.2004
SAP System Landscape Directory 640 101
standard. (For more information, see www.dmtf.org/standards/wbem.) The SLD bridge then forwards the data to the SLD server.
If you have installed multiple SLD servers (for security purposes, for example), the SLD bridge can be configured to send data to each of these servers. In the figure above, one SLD server has been installed locally (indicated by 1 in the figure) and multiple SLD servers have been installed remotely (indicated by 2 in the figure).
SAP Online Help 18.02.2004
SAP System Landscape Directory 640 102
SLD Data Supplier for ABAP-Based Systems There are two ways of sending data from ABAP-based systems to the SLD, which are illustrated in the figure below:
RFC (1)
SAP J2EE Engine
SLD
ABAP Stack
Shared Memory
RFC (2)CCMS Agent
SLDPlug-In
SLDB
ri dg e
SAP
Gat ew
a y
DataSupplier(ABAP)
The data supplier periodically sends data directly to the SLD bridge by using an RFC connection (option 1 in the figure above). Alternatively, the data supplier can be configured to send information about the system to a shared memory. A CCMS agent then fetches this data periodically from the shared memory and sends it to the SLD bridge by using an RFC connection (option 2 in the figure above).
If your system is running on an SAP Web Application Server lower than Release 6.20, only option 1 is available. This option is of advantage if you already implement a CCMS agent.
SAP Online Help 18.02.2004
SAP System Landscape Directory 640 103
Configuring the SLD Data Supplier: Default Settings Use If your SAP system is running on an SAP Web AS lower than Release 6.30 and contains the data supplier function, you have to perform an initial configuration of the SLD data supplier.
Prerequisites The SLD and the SLD bridge (the receiving thread of the SLD, which runs on the SAP J2EE Engine) are running.
Procedure
1. Call transaction RZ70.
2. In the group box Transport Information, enter in the Host field the host name of the gateway where your SLD bridge is registered.
3. In the Service field, enter the service name of the gateway.
4. In the group box Data Collection Programs, choose with the quick info text Proposal.
If your system is running on SAP Basis 4.0B, choose with the quick info text Import.
The system displays a dialog box asking you whether you want to use the default installation settings.
5. Choose Yes.
6. Save these settings by choosing with the quick info text Activate Current Configuration.
7. Choose with the quick info text Start Data Collection.
The system displays a list of the executed programs on a separate screen. This screen also informs you whether the initial transfer of data by RFC was successful. For more information, see SAP Note 584654.
SAP Online Help 18.02.2004
SAP System Landscape Directory 640 104
Global Settings Purpose If you do not want to use the default settings [page 103], you can make your own settings. These settings include:
• Using an RFC connection [page 105] to send data directly to the SLD bridge
• Using a CCMS agent [page 106] for sending data to the SLD by means of a shared memory
• Configuring the SLD bridge [page 107]
• Scheduling [page 108] the data collection programs
SAP Online Help 18.02.2004
SAP System Landscape Directory 640 105
Making Settings for Using RFC to Send Data to the SLD Bridge Use If you want to use an RFC connection to send data directly to the SLD bridge, you have to make certain settings.
Prerequisites You have called transaction RZ70.
Procedure
1. In the group box Data Transport, choose Execute RFC.
2. In the group box Transport Information, choose either Automatic RFC Destination or Explicit RFC Destination.
We recommend that you select Automatic RFC Destination. The SLD then automatically generates an RFC destination. The option Explicit RFC Destination is intended for error handling and is therefore required in special cases only.
If you have to select Explicit RFC Destination, enter the destination in the corresponding field.
3. Enter the required information about the SLD bridge [page 107].
4. Set the time interval [page 108] (in minutes) for the data collection process.
5. Save your settings by choosing Activate Current Configuration.
Result You have set the data supplier to send data about the current system directly to the SLD by using an RFC connection.
SAP Online Help 18.02.2004
SAP System Landscape Directory 640 106
Making Settings for Using a CCMS Agent Use If you want the data supplier to write the SLD data to a shared memory, you have to use a CCMS agent.
Prerequisites • Your system is running on SAP Web Application Server 6.20 or higher.
• You have installed a CCMS agent with an SLD plug-in.
• You have called transaction RZ70.
Procedure
1. In the Data Transport group box, choose Write Data to Shared Memory.
2. In the Transport Information group box, enter the name of the SAP application server whose shared memory you want to send the data to in the field Central Shared Memory Server.
The CCMS agent with an SLD plug-in must be installed on this server, otherwise the data will not be transported to the SLD.
If you leave the field Central Shared Memory Server blank, the data collection programs use the local shared memory of the server where the data collection process is running.
3. Enter the required information about the SLD bridge [page 107].
4. Set the time interval [page 108] (in minutes) for the data collection process.
5. Save your settings by choosing Activate Current Configuration.
Result You have configured the data supplier to write data about the current system to a shared memory. The data is then transported to the SLD bridge periodically by using the SLD plug-in of a CCMS agent.
SAP Online Help 18.02.2004
SAP System Landscape Directory 640 107
Making Settings for the Data Supplier Bridge (in an ABAP System) Use When you make settings for the data supplier, you also have to specify information about the SLD bridge. Since the SLD bridge is registered on an SAP gateway, you have to enter this gateway.
You have to maintain the settings for the SLD bridge in the current system and on the SLD server. For more information on maintaining settings on the SLD server, see Making Settings for the Data Supplier Bridge (on the SLD Server) [page 26].
Procedure ...
1. Call transaction RZ70.
2. In the group box SLD Bridge: Gateway Information, enter the following data:
a. In the Host field, enter the name of the gateway host.
b. In the Service field, enter the name of the gateway service.
You must make sure that the entries for the gateway host and the gateway service on the SLD server are exactly the same as in the current system.
3. Save your entries by choosing Activate Current Configuration.
SAP Online Help 18.02.2004
SAP System Landscape Directory 640 108
Setting the Time Interval for Collecting Data Use When you make settings for the data supplier, you also have to set how often you want data about the current system to be collected.
Prerequisites You have called transaction RZ70.
Procedure
1. Make sure that the checkbox Schedule Batch Job is selected. (This is the default setting.)
2. Choose Activate Current Configuration.
3. In the Minutes field, enter how often you want data to be collected.
The default setting is 720 minutes (12 hours). You can change this setting if necessary.
4. Save your settings by choosing Activate Current Configuration.
SAP Online Help 18.02.2004
SAP System Landscape Directory 640 109
Data Collection Programs Purpose The SLD data supplier collects and sends data about the current system to the SLD. To collect this data, the data supplier uses data collection programs. You have to choose which programs are used, depending on what type of data you want to collect.
For a list of the data collection programs that are available, see Data Collection Programs: Overview [page 110].
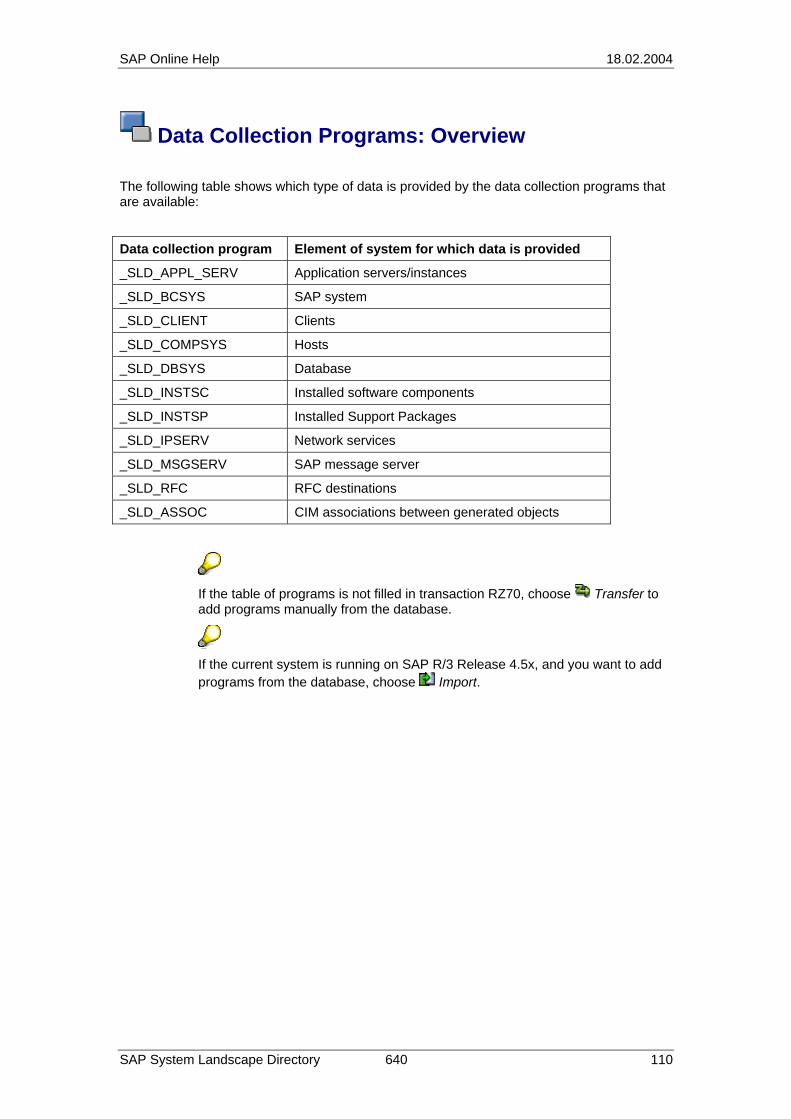
SAP Online Help 18.02.2004
SAP System Landscape Directory 640 110
Data Collection Programs: Overview
The following table shows which type of data is provided by the data collection programs that are available:
Data collection program Element of system for which data is provided
_SLD_APPL_SERV Application servers/instances
_SLD_BCSYS SAP system
_SLD_CLIENT Clients
_SLD_COMPSYS Hosts
_SLD_DBSYS Database
_SLD_INSTSC Installed software components
_SLD_INSTSP Installed Support Packages
_SLD_IPSERV Network services
_SLD_MSGSERV SAP message server
_SLD_RFC RFC destinations
_SLD_ASSOC CIM associations between generated objects
If the table of programs is not filled in transaction RZ70, choose Transfer to add programs manually from the database.
If the current system is running on SAP R/3 Release 4.5x, and you want to add programs from the database, choose Import.
SAP Online Help 18.02.2004
SAP System Landscape Directory 640 111
Adding and Removing Data Collection Programs Procedure To add a data collection program to the list in transaction RZ70, proceed as follows:
1. Choose Transfer.
If the current system is running on SAP R/3 Release 4.5x, you have to choose
Import.
The system displays a dialog box asking you whether you want to add data collection programs from the database.
2. Choose Yes.
The system adds all the missing data collection programs to the list.
Only programs with the prefix _SLD_ are data collection programs.
For a list of the data collection programs that are currently available, see Data Collection Programs: Overview [page 110].
To remove a data collection program from the list, proceed as follows: ...
1. Select one or more data collection programs.
2. Choose Delete line.
SAP Online Help 18.02.2004
SAP System Landscape Directory 640 112
Activating and Deactivating Data Collection Programs Procedure To activate a data collection program, proceed as follows:
1. Select the Active checkbox next to the relevant program name(s).
2. Save your settings by choosing Activate Current Configuration.
Every program in the system that has the prefix _SLD_ is implicitly activated – even if it does not appear in the list in transaction RZ70.
The system activates the program(s) that you selected.
The relevant data collection programs are activated but not yet started. For information on how to start the programs that you have activated, see Starting and Stopping the Data Collection Programs [page 114].
To deactivate a program, proceed as follows: ...
1. Make sure that the data collection program is in the list (see Adding and Removing Data Collection Programs [page 111]).
2. Deselect the Active checkbox next to the relevant program.
3. Save your settings by choosing Activate Current Configuration.

SAP Online Help 18.02.2004
SAP System Landscape Directory 640 113
Testing Data Collection Programs Use If you want to see a detailed list of the type of data that is collected by the data collection programs, you can test the programs before you start them.
Procedure
1. Select the data collection program(s) that you want to test by selecting the relevant line(s) in the table.
2. Choose Test.
The system displays a dialog box asking you whether you want to test the selected data collection program(s).
3. Choose Yes.
The system displays the results of the test on a separate screen.
Leave the last three columns in the table blank (Test, Display Results, and Test Counter) as they are intended for internal test purposes only.
SAP Online Help 18.02.2004
SAP System Landscape Directory 640 114
Starting and Stopping the Data Collection Programs Use After you have made all the required settings (see Global Settings [page 104]), you must explicitly start the data collection programs. You can also stop the programs.
Prerequisites You have made the required settings and activated your configuration (by choosing Activate Current Configuration).
Procedure • To start the data collection programs, choose Start Data Collection.
The system schedules the programs as batch jobs.
• To stop the data collection programs, choose Delete SLD Batch Jobs.
The system deschedules the batch jobs.
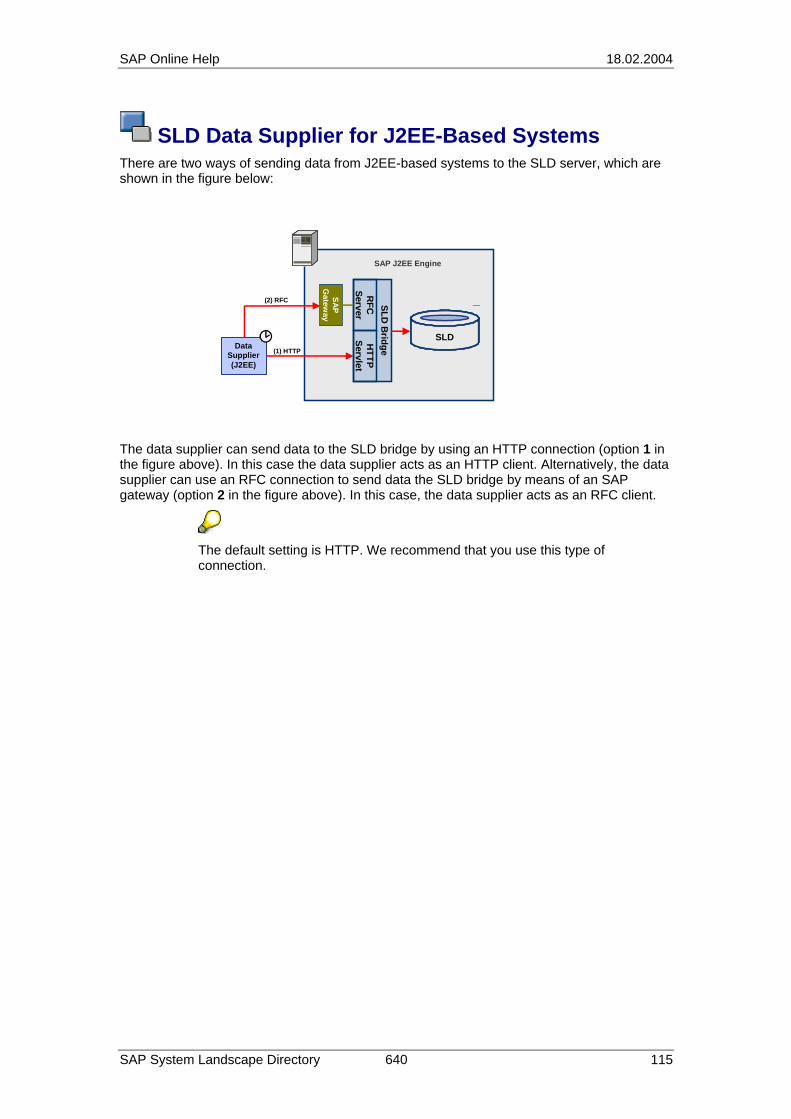
SAP Online Help 18.02.2004
SAP System Landscape Directory 640 115
SLD Data Supplier for J2EE-Based Systems There are two ways of sending data from J2EE-based systems to the SLD server, which are shown in the figure below:
(1) HTTP
SAP G
ateway
SLD B
ridge
SAP J2EE Engine
RFC
Server
HTTP
Servlet
Data Supplier (J2EE)
SLD
(2) RFC
The data supplier can send data to the SLD bridge by using an HTTP connection (option 1 in the figure above). In this case the data supplier acts as an HTTP client. Alternatively, the data supplier can use an RFC connection to send data the SLD bridge by means of an SAP gateway (option 2 in the figure above). In this case, the data supplier acts as an RFC client.
The default setting is HTTP. We recommend that you use this type of connection.
SAP Online Help 18.02.2004
SAP System Landscape Directory 640 116
Setting Up the SLD Data Supplier (J2EE) Use An initial configuration of the data supplier for J2EE-based systems is performed by the SAP installation tool SAPinst when you install the SAP J2EE Engine. However, if you want to change the default settings, or if you used a different method to install the SAP J2EE Engine, you can use the SAP J2EE administration tool (the Visual Administrator) to configure the data supplier manually.
Prerequisites ...
1. The SAP System Landscape Directory (SLD) and the SLD bridge are running.
2. You are logged on to the Visual Administrator [Extern] of the SAP J2EE Engine as an administrator.
3. The property SynchPermissionsWithDatabase under Services → Security Provider is set as "true".
Procedure
1. On the Cluster tab page, select any server, and expand the corresponding node.
2. Expand the Services node.
3. Select the service SLD Data Supplier.
4. On the Runtime tab page, select HTTP Settings.
5. Enter the data required for the HTTP connection from the SLD service to the SLD as follows:
a. In the Host field, enter the name of the host where the SLD bridge runs.
b. In the Port field, specify the HTTP standard access port of the SLD.
c. In the User field, specify an SAP J2EE user that already exists on the host where the SLD Bridge runs.
d. Enter the user password.
6. If you want to use HTTPS for the connection from the SLD service to the SLD, select Use HTTPS?.
The Trust Store field is now ready for input.
A trust store contains the root certificates of the trusted roots, and checks the authentication of a received server certificate. The default setting for the trust store is TrustedCAs. You can change this setting if necessary. For a list of the available trust stores, see the Key Storage service (Runtime → Views).
7. Save your entries.
If an error occurs, an error message appears. If your entries were saved successfully, the connection data is saved in encrypted form in the secure store in the database.
Alternatively, you can use an RFC connection to send data to the SLD (tab page RFC Settings). However, we recommend that you use this type of connection for test purposes only.
SAP Online Help 18.02.2004
SAP System Landscape Directory 640 117
8. If you want to test your settings by sending test data to the SLD, click with the quick info text Trigger data transfer to System Landscape Directory.
9. To apply the new configuration immediately, restart the SLD service as follows:
a. On the Cluster tab page, click SLD Data Supplier with the secondary mouse button.
b. Choose Stop.
c. When the service has been stopped, click SLD Data Supplier with the secondary mouse button again, and choose Start.
The service is restarted within a few seconds, and the first data transfer to the SLD takes place after two minutes.
If you do not restart the SLD service, the settings are refreshed automatically after a certain time interval, provided that the SAP J2EE Server is not restarted. For details about the time interval and the status of the last data transfer, see Information About the SLD Service in the Visual Administrator [page 119].
SAP Online Help 18.02.2004
SAP System Landscape Directory 640 118
Overview of Parameters for the SLD Service The following parameters are displayed on the Properties tab page of the SLD Data Supplier service in the Visual Administrator:
Parameter Function
RepeatTimeMinutes Specifies the time interval in minutes between two data transfers from the SLD service to the SLD. The default value is 720 minutes (0.5 days). You can change this parameter if necessary.
If you enter a value less than 5 minutes, this value is automatically adjusted to 5 minutes when the SLD service is started the next time.
TypeId Identifies the data supplier type. This information is required by the SLD bridge.
Do not change this parameter.
VersionId Identifies the data supplier version. This information is required by the SLD bridge.
Do not change this parameter.
SAP Online Help 18.02.2004
SAP System Landscape Directory 640 119
Information About the SLD Service in the Visual Administrator On the Runtime tab page of the SLD Data Supplier service in the Visual Administrator you can view information about the following:
• Status of the last data transfer
• Connection data
To make sure that you see the most current connection data you refresh the SLD Data Supplier service.
The following fields are displayed:
Latest Send Activity
Indicates the date and time of the last data transfer.
Used HTTP Parameters [http host:port user]
Connection data (except the SLD J2EE user password) of the last transfer.
The default setting for this field is the data for HTTP connections to the SLD. However, if you specified RFC data (gateway host and gateway service) instead, this data is displayed here as [gateway host][gateway service]. If you specified both HTTP and RFC connection data, the HTTP data overrides the RFC data.
Sending Node [nodeID][hostname]
Since an SAP J2EE Server consists of various server nodes, this field contains the node that last sent data to the SLD.
You can use this information, for example, to access the log file of this instance of the SLD service.
Send Result
Indicates for each send attempt whether the data was transferred to the SLD correctly (success) or not (failed).
Next Automatic Send Timestamp
Indicates when the next automatic transfer from a node of the SAP J2EE cluster will start.
Send Type
SAP Online Help 18.02.2004
SAP System Landscape Directory 640 120
Indicates whether the displayed transfer attempt was a manual attempt (Manual) or an automatic one (Automatic (Time Scheduled)).
Configuration Status
Indicates whether the specified configuration data is sufficient to transfer data to the SLD (automatically or manually). If so, this field contains the value valid. If the data is insufficient, the field contains the value invalid. In this case you must then complete the connection data (see Setting Up the SLD Data Supplier (J2EE) [page 116]).
In addition, there is a tab page for CIM Client Generation Settings. This tab page does not directly concern data transfer to the SLD. Here an administrator can give rights to other SAP J2EE applications on the SAP J2EE Engine. These applications can then, by means of an internal interface of the SLD service, generate a CIM client for accessing the SLD (code-based security).
Assign User Groups to Roles ( icon at the top of the SLD Data Supplier screen)
This function does not directly concern data transfer to the SLD. It is used for assigning standard application roles to user groups. For more information, see Additional Functions of the SLD Service [page 122].
SAP Online Help 18.02.2004
SAP System Landscape Directory 640 121
Configuring the Interface for CIM Client Generation Use The SLD service provides every SAP J2EE application with the option of generating a CIM client for accessing an SLD server. The generation process is subject to a security check that is not based on the user who started the application (user-based security), but on the Java software archive that was used for deploying the application on the SAP J2EE server (code-based security). This procedure explains how to configure this process.
Prerequisites • You are logged on to the Visual Administrator [Extern] of the SAP J2EE Engine as an
administrator.
• The property SynchPermissionsWithDatabase under Services → Security Provider is set as "true".
Procedure ...
1. On the Cluster tab page, select any server, and expand the corresponding node.
2. Expand the Services node.
3. Select the service SLD Data Supplier.
4. On the Runtime tab page, choose CIM Client Generation Settings.
A list of archives of all the SAP J2EE applications is displayed.
5. To allow a particular application to generate a CIM client by means of the SLD server, flag the relevant checkbox in the Grant column.
6. Enter the data required for generating the CIM client as follows:
a. In the Host field, enter the name of the host where the SLD runs.
b. In the Port field, specify the port of the SLD.
c. In the User field, specify an SAP J2EE user.
d. Enter the user password.
The generated CIM client can use both HTTP and HTTPS as a communication protocol. If you want to use HTTPS, flag the checkbox Use HTTPS?. In the Port field, you also have to specify the HTTPS port of your destination. The Trust Store field is now ready for input. A trust store contains the root certificates of the trusted roots, and checks the authentication of a received server certificate. The default setting for the trust store is TrustedCAs. You can change this setting if necessary. For a list of the available trust stores, see the Key Storage service (Runtime → Views).
7. Save your entries.
SAP Online Help 18.02.2004
SAP System Landscape Directory 640 122
Additional Functions of the SLD Service Assignment of Standard Roles in the SLD Service Standard roles are assigned automatically when you install the SAP J2EE Engine by using the installation tool SAPinst. These roles are particularly important if you run the SAP J2EE Engine together with an SAP Web Application Server (ABAP stack). In this case, certain SAP J2EE security roles have to be assigned to ABAP roles (which are implemented as SAP J2EE user groups). However, if you used a different installation method, you can manually assign roles to user groups. on.
Before you can assign roles to user groups, you must make sure that the user groups have been created. For more information, see Security Roles [page 13].
To manually assign security roles to user groups in the Visual Administrator, you go to the
SLD Service screen and click with the quick info text Assign User Groups to Roles. The user groups are then assigned to the relevant security roles (see table below).
User Groups and Security Roles
User Group Security Role
SAP_SLD_GUEST LcrUser
SAP_SLD_DEVELOPER LcrInstanceWriterNR
SAP_SLD_CONFIGURATOR LcrInstanceWriterNR and LcrInstanceWriteLD
SAP_SLD_ORGANIZER LcrInstanceWriterAll
SAP_SLD_ADMINISTRATOR LcrAdministrator