Embed Size (px)
Citation preview
E:\Soma\My Documents\XRAY\CY2006Facility\ScreenCapture.doc
Single, Multiple, & Portions of Screen Captures
Screen Capture 3
Procedure for capturing a single, multiple, and portions of a screen
Thayumanasamy Somasundaram X-Ray Crystallography Facility | 410-413 Kasha Laboratory
Institute of Molecular Biophysics Florida State University, Tallahassee, FL 32306-4380, USA
(850) 644-6448 (Off) | (850) 645-1333 (Lab) [email protected]
http://www.sb.fsu.edu/~xray | http://www.sb.fsu.edu/~soma
Thayumanasamy Somasundaram Page 2 1/25/2006
E:\Soma\My Documents\XRAY\CY2006Facility\ScreenCapture.doc 2
Table of contents
Introduction .................................................................................................................................................. 3
List of Programs ........................................................................................................................................... 3
Operating System Utilities ........................................................................................................................... 4 Linux’s native utility ‘xwd/xwud’ ................................................................................. 4 MS Window’s native utility ‘PrintScreen’................................................................. 4
Image Processing Programs (Linux/UNIX) ............................................................................................... 5 Ksnapshot (snapshot) ................................................................................................................ 5 gimp ...................................................................................................................................................... 6 Display (ImageMagick) .............................................................................................................. 7 Import (ImageMagick): Full Window ................................................................................. 8 Import (ImageMagick): Portions of Window............................................................... 10
Special Programs........................................................................................................................................ 11 Adxv .................................................................................................................................................... 11 XdisplayF ........................................................................................................................................ 12 Paint Shop Pro (version 5.0 or higher) ................................................................... 13
Conclusion................................................................................................................................................... 14 © 2004-2006 Thayumanasamy Somasundaram
414 Kasha Laboratory | Institute of Molecular Biophysics Florida State University
Tallahassee, FL 32306-4380 E-mail: [email protected] • URL: http://www.sb.fsu.edu/~soma
URL: http://www.sb.fsu.edu/~xray
Phone 850.644.6448 • Fax 850.644.7244 January 25, 2006
Thayumanasamy Somasundaram Page 3 1/25/2006
E:\Soma\My Documents\XRAY\CY2006Facility\ScreenCapture.doc 3
Screen Capture 3 Procedure for capturing a single, multiple, and portions of a screen
Document Version: 3.0 (January 23, 2006) 2.0 (03072005); 1.0 (09132004) Keywords: Single and multiple screen capture, Portions of screen, Screen Dump, Print Screen, X windows dump, xwd, xwud, gimp, Paint Shop Pro, Image Magick, import, Adxv, XdisplayF, snapshot, and ksnapshot.
Introduction
This note describes several procedures for capturing a single and/or multiple screen shots as well as portions of a computer screen (a procedure referred to as screen capture, or screen dump). Screen capture is a quick way to make pictures of your work that can be used for informal presentation or for research discussions. Please note that in general the quality of picture generated using this technique is NOT high enough for publications or for quantitative work. This note is intended for the users of IMB X-Ray Crystallography Facility. This Note is Version 3 in this series about Screen Capture and I have included a procedure for taking a snapshot of a portion of an image rather than the whole window (similar to crop).
List of Programs
The following is the list of programs that can be used to capture the screen:
1. Operating System Utilities
i. Linux Utility
ii. Windows Utility
2. Image Processing Programs
i. ksnapshot (snapshot)
ii. gimp
iii. display (ImageMagick)
iv. import (ImageMagick): whole window
v. import(ImageMagick): window portion
3. Special Programs
i. Adxv
ii. XdisplayF
iii. Paint Shop Pro 5.0 (Including Multiple captures)
Thayumanasamy Somasundaram Page 4 1/25/2006
E:\Soma\My Documents\XRAY\CY2006Facility\ScreenCapture.doc 4
Operating System Utilities
The operating system utilities are the simplest to use but may not produce the best images. Here we look at both the Linux/UNIX native utility ‘xwd/xwud’ and Window’s ‘PrintScreen’.
Linux’s native utility ‘xwd/xwud’ Most Linux and UNIX operating systems have native utilities called xwd (x-window dump) and xwud (x-window un-dump) that allow the user to capture either the whole screen or a specific window. In order for the user to capture specific window, issue the following command,
soma@raccoon> xwd >myimage.xwd and then click with the mouse inside the window of choice (if the whole screen needs to captured, simply click anywhere in the screen). The utility will write out an image in the special ‘.xwd’ format. The created image can be viewed either using the related utility ‘xwud’ or using any number of image processing software like, display, gimp, or xv. To view using ‘xwud’ issue the following command,
soma@raccoon> xwud -in myimage.xwd
The image can be converted to .jpg or .png using the convert utility.
soma@raccoon> convert myimage.xwd myimage.jpg
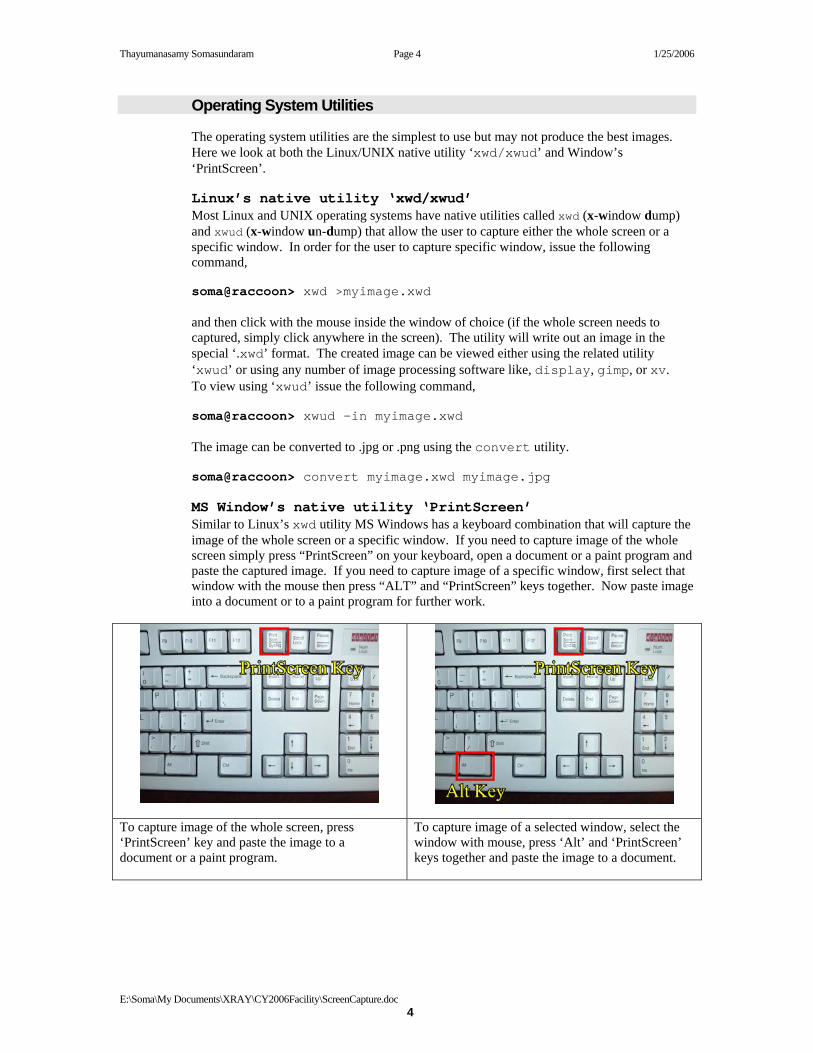
MS Window’s native utility ‘PrintScreen’ Similar to Linux’s xwd utility MS Windows has a keyboard combination that will capture the image of the whole screen or a specific window. If you need to capture image of the whole screen simply press “PrintScreen” on your keyboard, open a document or a paint program and paste the captured image. If you need to capture image of a specific window, first select that window with the mouse then press “ALT” and “PrintScreen” keys together. Now paste image into a document or to a paint program for further work.
To capture image of the whole screen, press ‘PrintScreen’ key and paste the image to a document or a paint program.
To capture image of a selected window, select the window with mouse, press ‘Alt’ and ‘PrintScreen’ keys together and paste the image to a document.
Thayumanasamy Somasundaram Page 5 1/25/2006
E:\Soma\My Documents\XRAY\CY2006Facility\ScreenCapture.doc 5
Image Processing Programs (Linux/UNIX)
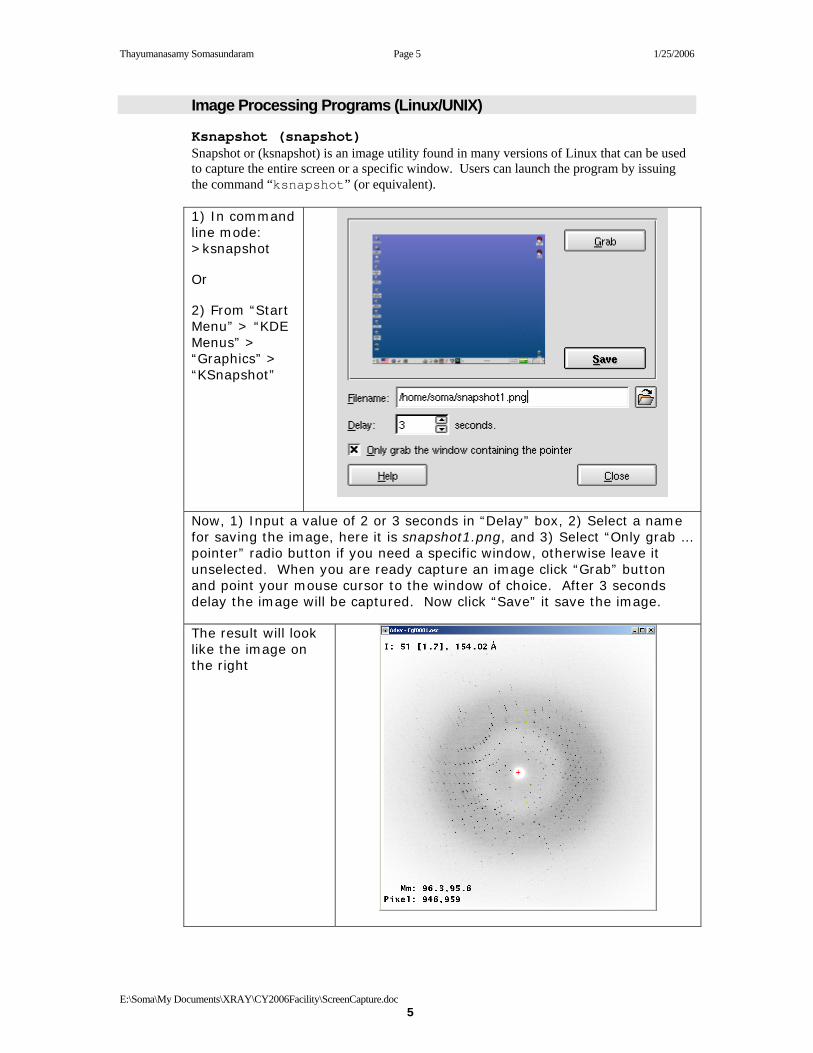
Ksnapshot (snapshot) Snapshot or (ksnapshot) is an image utility found in many versions of Linux that can be used to capture the entire screen or a specific window. Users can launch the program by issuing the command “ksnapshot” (or equivalent).
1) In command line mode: >ksnapshot
Or
2) From “Start Menu” > “KDE Menus” > “Graphics” > “KSnapshot”
Now, 1) Input a value of 2 or 3 seconds in “Delay” box, 2) Select a name for saving the image, here it is snapshot1.png, and 3) Select “Only grab … pointer” radio button if you need a specific window, otherwise leave it unselected. When you are ready capture an image click “Grab” button and point your mouse cursor to the window of choice. After 3 seconds delay the image will be captured. Now click “Save” it save the image.
The result will look like the image on the right
Thayumanasamy Somasundaram Page 6 1/25/2006
E:\Soma\My Documents\XRAY\CY2006Facility\ScreenCapture.doc 6
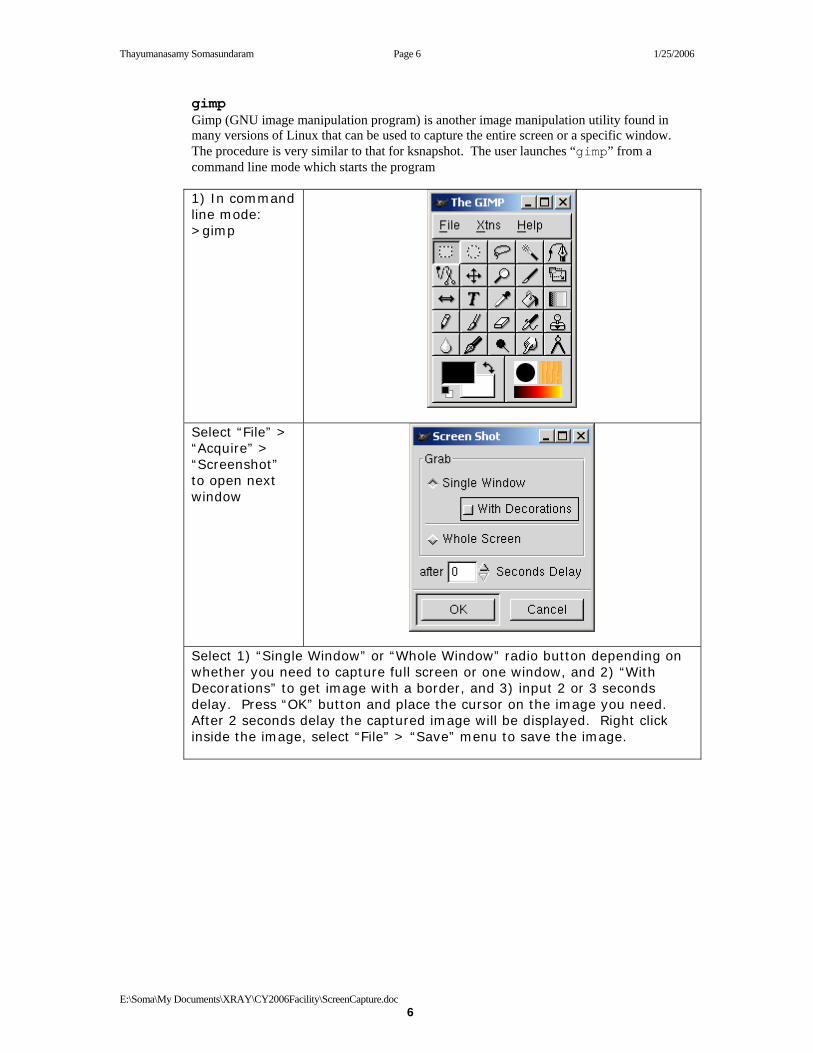
gimp Gimp (GNU image manipulation program) is another image manipulation utility found in many versions of Linux that can be used to capture the entire screen or a specific window. The procedure is very similar to that for ksnapshot. The user launches “gimp” from a command line mode which starts the program
1) In command line mode: >gimp
Select “File” > “Acquire” > “Screenshot” to open next window
Select 1) “Single Window” or “Whole Window” radio button depending on whether you need to capture full screen or one window, and 2) “With Decorations” to get image with a border, and 3) input 2 or 3 seconds delay. Press “OK” button and place the cursor on the image you need. After 2 seconds delay the captured image will be displayed. Right click inside the image, select “File” > “Save” menu to save the image.
Thayumanasamy Somasundaram Page 7 1/25/2006
E:\Soma\My Documents\XRAY\CY2006Facility\ScreenCapture.doc 7
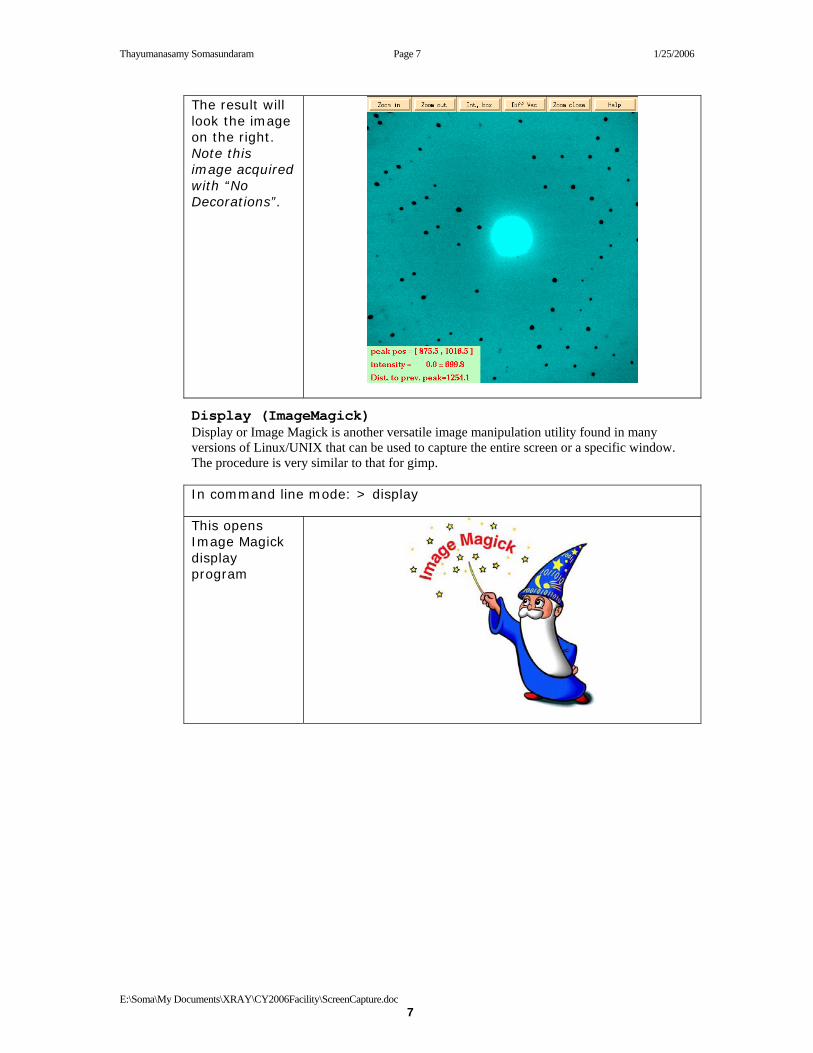
The result will look the image on the right. Note this image acquired with “No Decorations”.
Display (ImageMagick) Display or Image Magick is another versatile image manipulation utility found in many versions of Linux/UNIX that can be used to capture the entire screen or a specific window. The procedure is very similar to that for gimp.
In command line mode: > display
This opens Image Magick display program
Thayumanasamy Somasundaram Page 8 1/25/2006
E:\Soma\My Documents\XRAY\CY2006Facility\ScreenCapture.doc 8
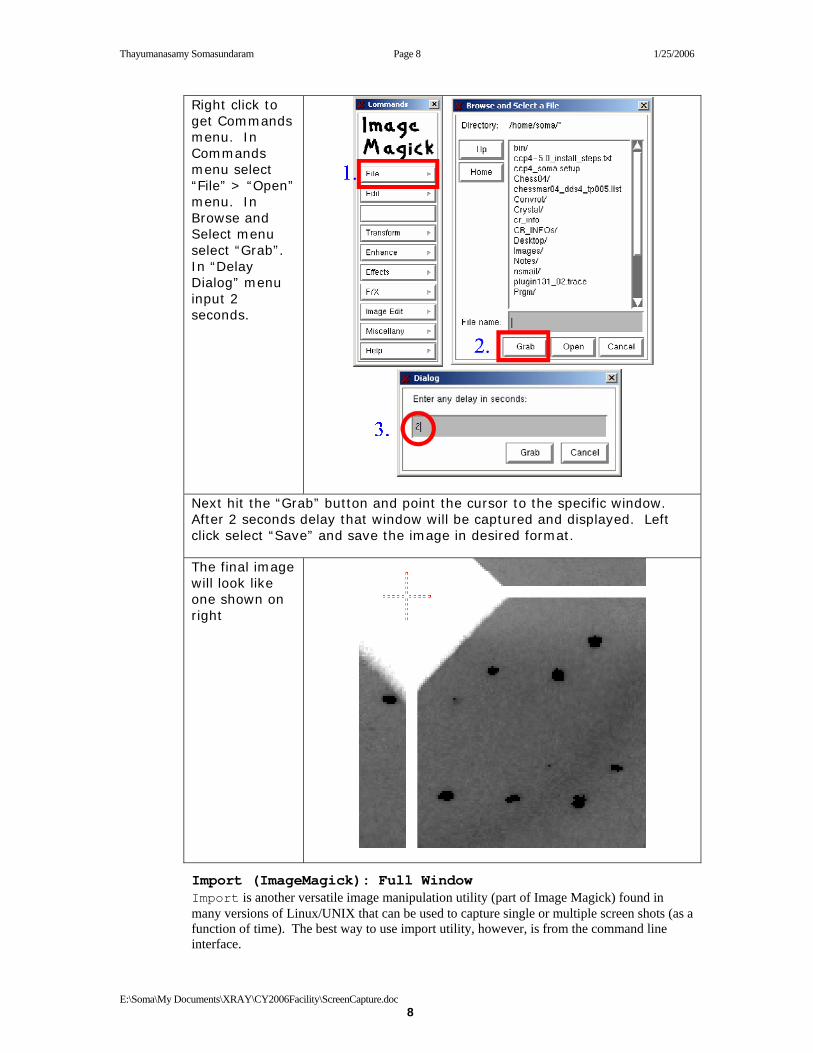
Right click to get Commands menu. In Commands menu select “File” > “Open” menu. In Browse and Select menu select “Grab”. In “Delay Dialog” menu input 2 seconds.
Next hit the “Grab” button and point the cursor to the specific window. After 2 seconds delay that window will be captured and displayed. Left click select “Save” and save the image in desired format.
The final image will look like one shown on right
Import (ImageMagick): Full Window Import is another versatile image manipulation utility (part of Image Magick) found in many versions of Linux/UNIX that can be used to capture single or multiple screen shots (as a function of time). The best way to use import utility, however, is from the command line interface.

Thayumanasamy Somasundaram Page 9 1/25/2006
E:\Soma\My Documents\XRAY\CY2006Facility\ScreenCapture.doc 9
Let us say you want to capture four (4) images of a window at five (5) second intervals spanning a total duration of twenty (20) seconds. Since we are capturing images as a function of time we can not and should not use mouse click or cursor point to capture the image as that is not practical and is prone to error. So first we need some basic information about the window (xwininfo) we are capturing and second we need to position that window on top of all other windows to avoid overlap. Once all the information is available we can issue the command “import” with specific arguments. First issue xwininfo command and click the mouse on the window you are planning to capture to get the following output.
soma@neptune[11:36am]~>xwininfo | User input xwininfo: Please select the window about which you would like information by clicking the mouse in that window. xwininfo: Window id: 0x40000a "xclock" Absolute upper-left X: 193 … … Corners: +193+461 -923+461 -923-370 +193-370 -geometry 164x164+189+438
Output from the computer
Now we know the window has an id (0x40000a or "xclock"), raise it to the top of all windows and ensure that no other window obscures it.
soma@neptune[10:43am]~>import -help | Check the version Version: @ (#)ImageMagick 5.4.3 03/05/02 Q:16 http://www.imagemagick.org | Copyright (C) 2002 ImageMagick Studio LLC Now issue the import command with the following arguments (explained below):
>import -window xclock -frame -pause 5 -snaps 4 clock.png After roughly twenty seconds after issuing the command you will see four (4) images with the following names: clock.png.0, clock.png.1, clock.png.2, and clock.png.3. They are images of the window captured at 5 second intervals.
import [arguments] file_name
• -window | Name or the id of the captured window
• -frame | With or without external frame for window
• -pause | Delay between snaps (seconds)
• -snaps | Number of snaps
• -help | Explains all the options
Thayumanasamy Somasundaram Page 10 1/25/2006
E:\Soma\My Documents\XRAY\CY2006Facility\ScreenCapture.doc 10
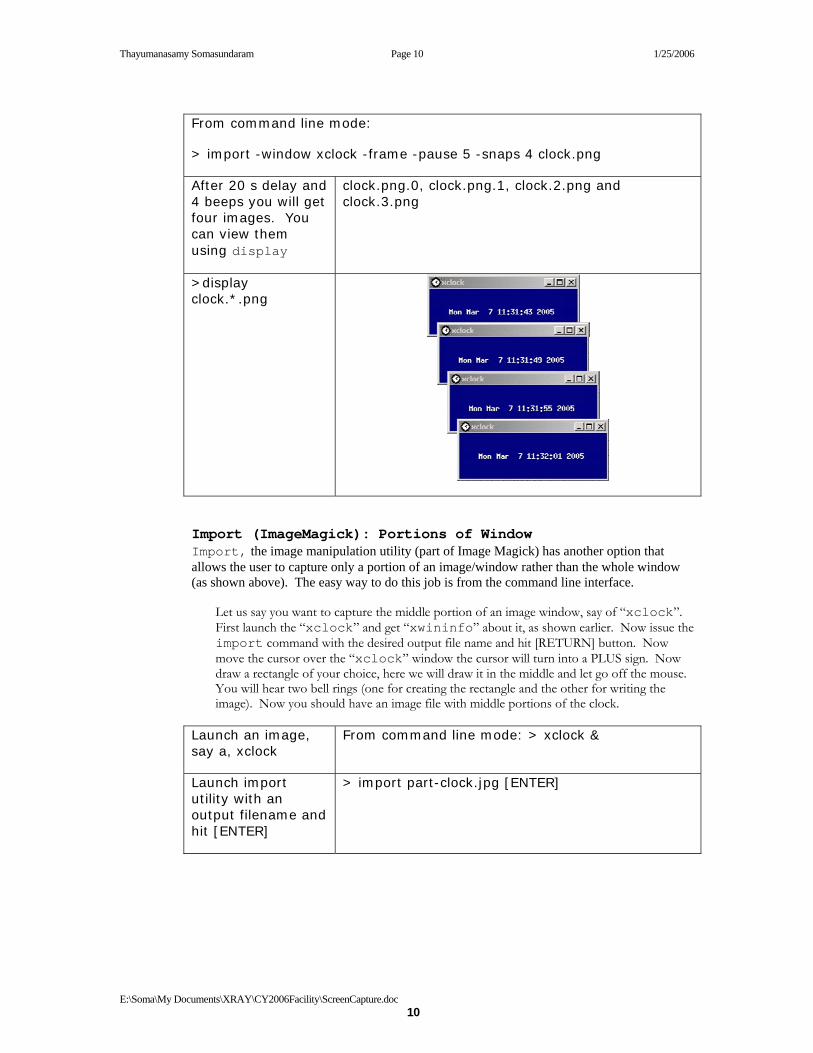
From command line mode:
> import -window xclock -frame -pause 5 -snaps 4 clock.png
After 20 s delay and 4 beeps you will get four images. You can view them using display
clock.png.0, clock.png.1, clock.2.png and clock.3.png
>display clock.*.png
Import (ImageMagick): Portions of Window Import, the image manipulation utility (part of Image Magick) has another option that allows the user to capture only a portion of an image/window rather than the whole window (as shown above). The easy way to do this job is from the command line interface.
Let us say you want to capture the middle portion of an image window, say of “xclock”. First launch the “xclock” and get “xwininfo” about it, as shown earlier. Now issue the import command with the desired output file name and hit [RETURN] button. Now move the cursor over the “xclock” window the cursor will turn into a PLUS sign. Now draw a rectangle of your choice, here we will draw it in the middle and let go off the mouse. You will hear two bell rings (one for creating the rectangle and the other for writing the image). Now you should have an image file with middle portions of the clock.
Launch an image, say a, xclock
From command line mode: > xclock &
Launch import utility with an output filename and hit [ENTER]
> import part-clock.jpg [ENTER]
Thayumanasamy Somasundaram Page 11 1/25/2006
E:\Soma\My Documents\XRAY\CY2006Facility\ScreenCapture.doc 11
Move the mouse on top of xclock and draw a rectangle where desired. Let go off the mouse.
After 2 beeps import utility will write an image file with only part selected by the mouse.
This way any rectangular portion of an image can be captured.
Special Programs
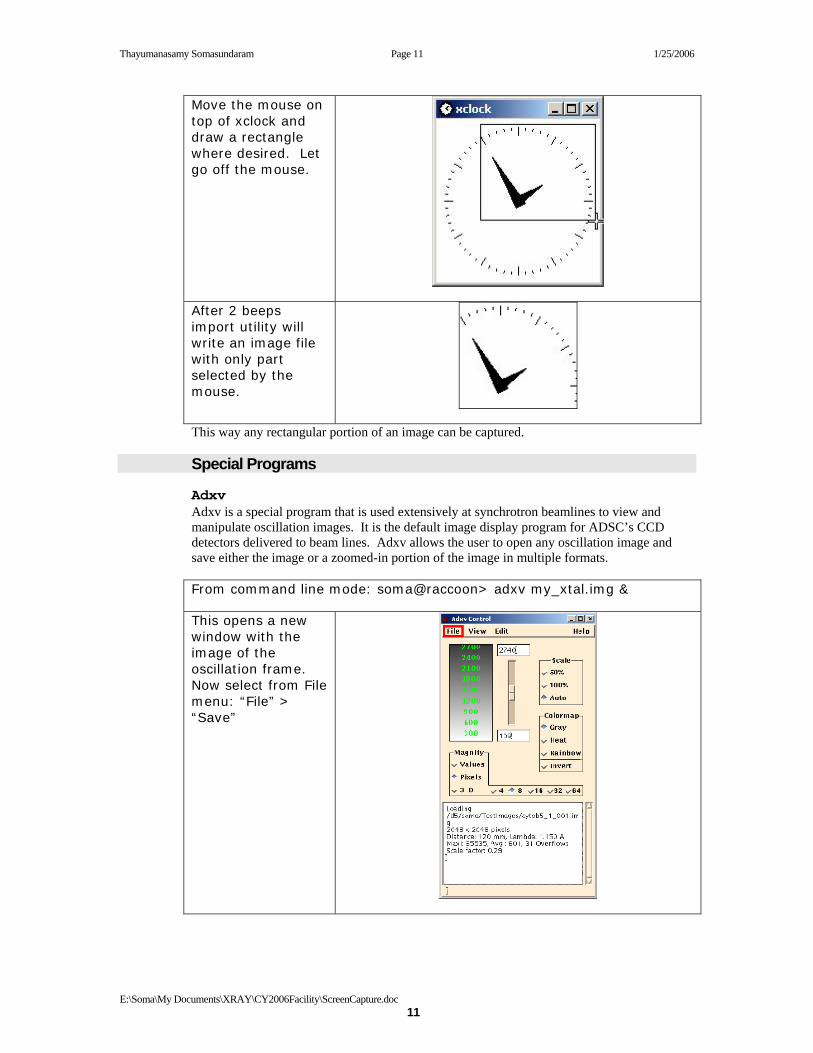
Adxv Adxv is a special program that is used extensively at synchrotron beamlines to view and manipulate oscillation images. It is the default image display program for ADSC’s CCD detectors delivered to beam lines. Adxv allows the user to open any oscillation image and save either the image or a zoomed-in portion of the image in multiple formats.
From command line mode: soma@raccoon> adxv my_xtal.img &
This opens a new window with the image of the oscillation frame. Now select from File menu: “File” > “Save”
Thayumanasamy Somasundaram Page 12 1/25/2006
E:\Soma\My Documents\XRAY\CY2006Facility\ScreenCapture.doc 12
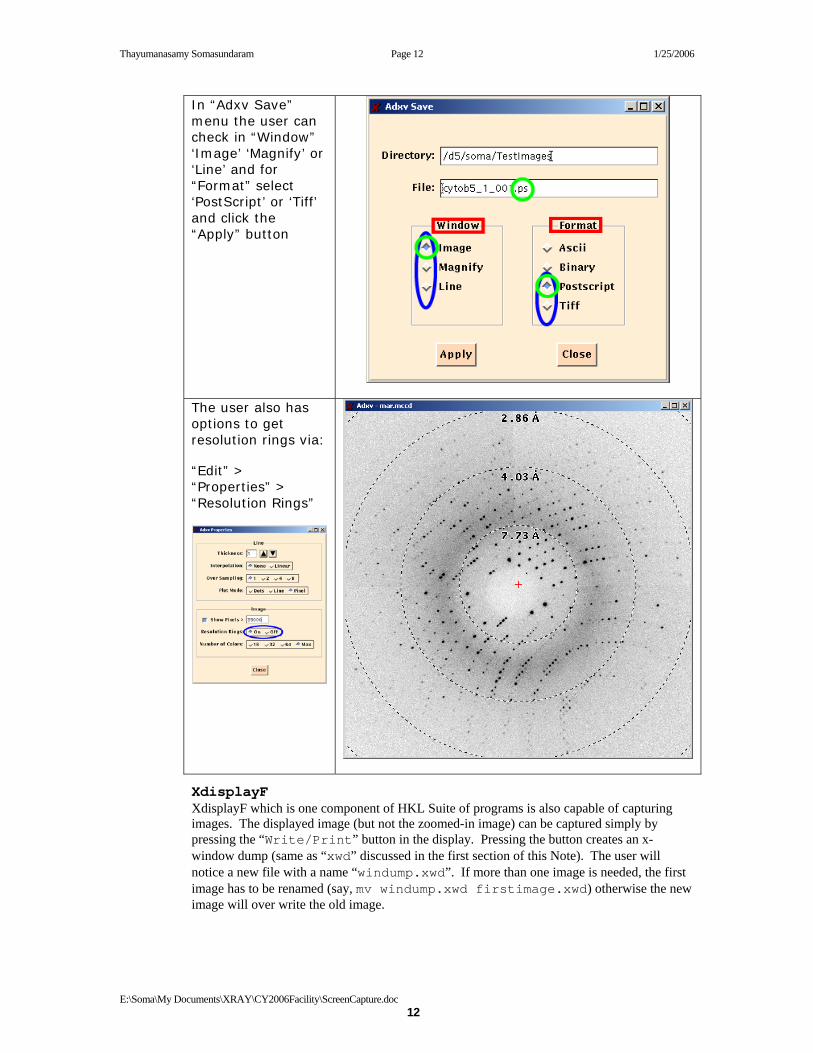
In “Adxv Save” menu the user can check in “Window” ‘Image’ ‘Magnify’ or ‘Line’ and for “Format” select ‘PostScript’ or ‘Tiff’ and click the “Apply” button
The user also has options to get resolution rings via:
“Edit” > “Properties” > “Resolution Rings”
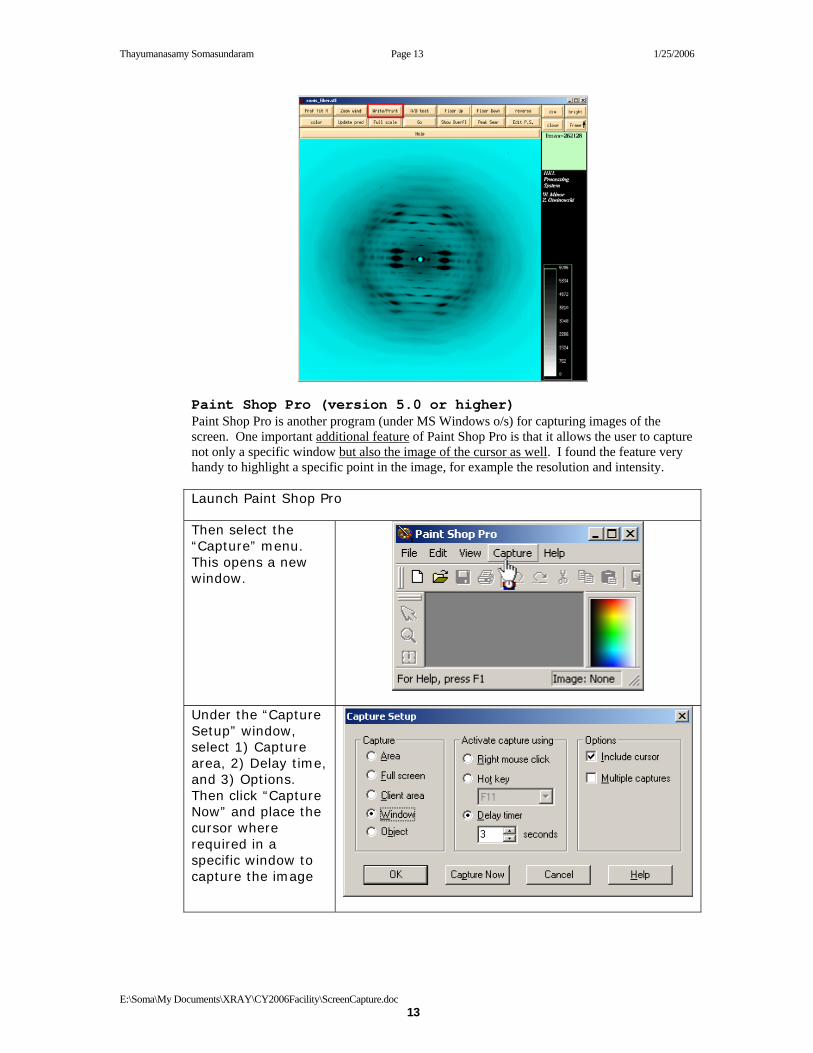
XdisplayF XdisplayF which is one component of HKL Suite of programs is also capable of capturing images. The displayed image (but not the zoomed-in image) can be captured simply by pressing the “Write/Print” button in the display. Pressing the button creates an x-window dump (same as “xwd” discussed in the first section of this Note). The user will notice a new file with a name “windump.xwd”. If more than one image is needed, the first image has to be renamed (say, mv windump.xwd firstimage.xwd) otherwise the new image will over write the old image.
Thayumanasamy Somasundaram Page 13 1/25/2006
E:\Soma\My Documents\XRAY\CY2006Facility\ScreenCapture.doc 13
Paint Shop Pro (version 5.0 or higher) Paint Shop Pro is another program (under MS Windows o/s) for capturing images of the screen. One important additional feature of Paint Shop Pro is that it allows the user to capture not only a specific window but also the image of the cursor as well. I found the feature very handy to highlight a specific point in the image, for example the resolution and intensity.
Launch Paint Shop Pro
Then select the “Capture” menu. This opens a new window.
Under the “Capture Setup” window, select 1) Capture area, 2) Delay time, and 3) Options. Then click “Capture Now” and place the cursor where required in a specific window to capture the image
Thayumanasamy Somasundaram Page 14 1/25/2006
E:\Soma\My Documents\XRAY\CY2006Facility\ScreenCapture.doc 14
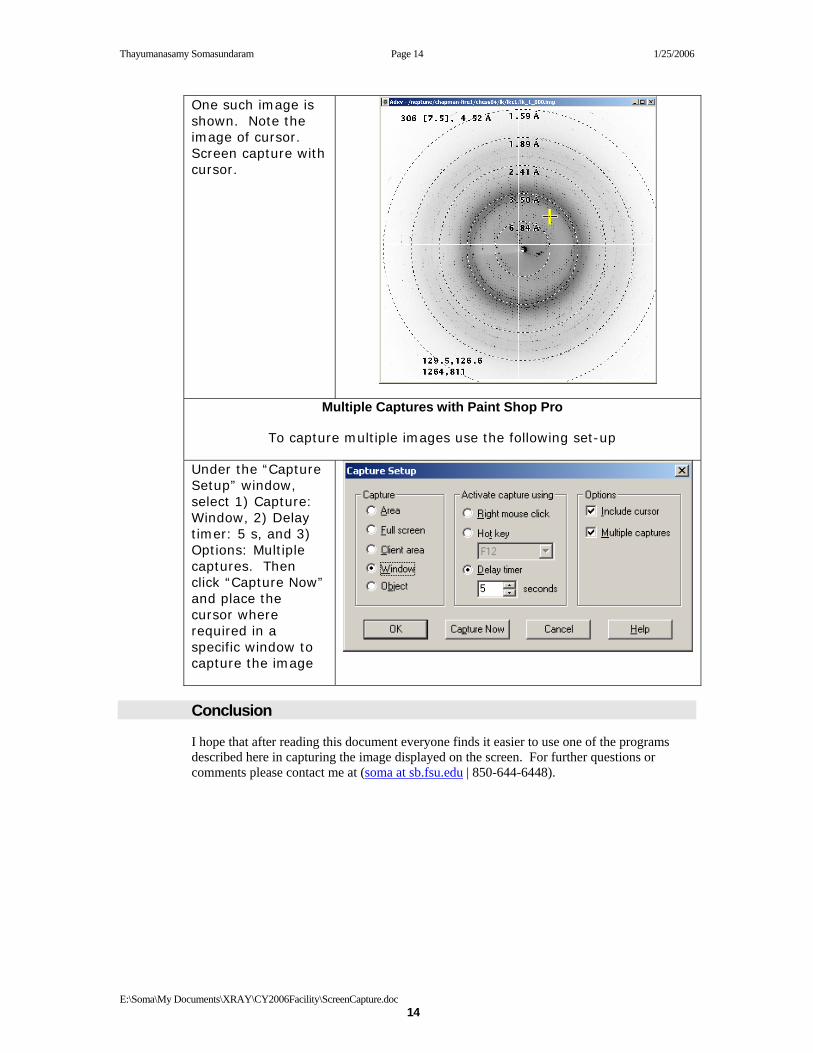
One such image is shown. Note the image of cursor. Screen capture with cursor.
Multiple Captures with Paint Shop Pro
To capture multiple images use the following set-up
Under the “Capture Setup” window, select 1) Capture: Window, 2) Delay timer: 5 s, and 3) Options: Multiple captures. Then click “Capture Now” and place the cursor where required in a specific window to capture the image
Conclusion
I hope that after reading this document everyone finds it easier to use one of the programs described here in capturing the image displayed on the screen. For further questions or comments please contact me at (soma at sb.fsu.edu | 850-644-6448).