Embed Size (px)
Citation preview

SCT HIGHER EDUCATION
SCT Banner Student Admissions Training Workbook
May 2005 Release 7.1
Confidential Business Information -------------------------------------------------------------------------------------------------------------------------------------------------------------------------------- This documentation is proprietary information of SunGard SCT and is not to be copied, reproduced, lent or disposed of, nor used for any purpose other than that for which it is specifically provided without the written permission of SunGard SCT. Prepared By: SunGard SCT
4 Country View Road Malvern, Pennsylvania 19355 United States of America
© SunGard 2005. All rights reserved. The unauthorized possession, use, reproduction, distribution, display or disclosure of this material or the information contained herein is prohibited. In preparing and providing this publication, SunGard SCT is not rendering legal, accounting, or other similar professional services. SunGard SCT makes no claims that an institution's use of this publication or the software for which it is provided will insure compliance with applicable federal or state laws, rules, or regulations. Each organization should seek legal, accounting and other similar professional services from competent providers of the organization’s own choosing. SunGard, the SunGard logo, SCT, and Banner, Campus Pipeline, Luminis, PowerCAMPUS, SCT fsaATLAS, SCT Matrix, SCT Plus, SCT OnSite and SCT PocketRecruiter are trademarks or registered trademarks of SunGard Data Systems Inc. or its subsidiaries in the U.S. and other countries. All other trade names are trademarks or registered trademarks of their respective holders.

Table of Contents
Section A: Introduction ..............................................................................................................5 Overview ..................................................................................................................................5 Process Introduction .................................................................................................................7 Terminology .............................................................................................................................9
Section B: Set Up.......................................................................................................................10 Overview ................................................................................................................................10 Review Required Values for Validation Forms .....................................................................12 Entering Data into Validation Forms .....................................................................................13 Address Type Code Validation ..............................................................................................16 Citizen Type Code Validation................................................................................................18 State/Province Code Validation .............................................................................................19 Ethnic Code Validation ..........................................................................................................21 Letter Code Validation ...........................................................................................................22 Paragraph Code Validation ....................................................................................................24 Admission Request Checklist Code Validation .....................................................................25 Admission Application Decision Code Validation ................................................................27 Admission Application Status Code Validation.....................................................................29 Cohort Code Validation..........................................................................................................30 Institutional Honors Code Validation.....................................................................................31 Initials Code Validation..........................................................................................................32 Level Code Validation............................................................................................................34 Relation Code Validation .......................................................................................................35 Residence Code Validation ....................................................................................................36 Site Code Validation ..............................................................................................................37 Student Status Code Validation..............................................................................................39 Student Type Code Validation ...............................................................................................40 Visa Type Code Validation ....................................................................................................42 Admissions Checklist Rules...................................................................................................43 Admissions Decision Rule .....................................................................................................45 Quick Entry Rules ..................................................................................................................49 Self Check ..............................................................................................................................51 Answer Key for Self Check....................................................................................................52
Section C: Day-to-Day Operations ..........................................................................................53 Overview ................................................................................................................................53 Running the Admissions Decision Criteria Report ................................................................55 Entering an Applicant.............................................................................................................57 Withdrawing an Applicant .....................................................................................................64 Assigning a Decision Code ....................................................................................................66 Running the Admissions Decision Calculation Report ..........................................................68 Rolling Prospect Information to Admissions .........................................................................71 Performing a Quick Admit .....................................................................................................73 Summary ................................................................................................................................77
Table of Contents (Continued)
Self Check ..............................................................................................................................78 Answer Key for Self Check....................................................................................................79
Section D: Reference.................................................................................................................80 Overview ................................................................................................................................80 Setup Forms and Where Used ................................................................................................81 Day-to-Day Forms and Setup Needed....................................................................................84 Forms Job Aid ........................................................................................................................85

© SunGard 2004-2005 Student Admissions Page 5
Section A: Introduction
Lesson: Overview
Workbook goal The goal of this workbook is to provide you with the knowledge and practice to create applicant records in SCT Banner Admissions module. This workbook is divided into four sections: • Introduction • Set-up • Day-to-day operations • Reference
Intended audience Admissions and recruiting office staff and administrators
Objectives At the end of this section, you will be able to • create the rules to process the data • set parameters used to process the data • admit a student • withdrawal a student • assign a decision code • perform a quick admit • roll prospect information to Admissions.
Prerequisites To complete this workbook, you should have • completed the SCT Education Practices computer-based training (CBT) tutorial “SCT
Banner 7.x Fundamentals,” or have equivalent experience navigating in the SCT Banner system
• completed the Curriculum, Advising, and Program Planning (CAPP) training workbook.
© SunGard 2004-2005 Student Admissions Page 6
Section A: Introduction
Lesson: Overview (Continued)
Section contents Overview ..................................................................................................................................5 Process Introduction .................................................................................................................7 Terminology .............................................................................................................................9
© SunGard 2004-2005 Student Admissions Page 7
Section A: Introduction
Lesson: Process Introduction
Introduction The Admissions office is responsible for developing the validation tables and control forms for applications, creating and maintaining application records, applying decisions, and maintaining checklist items.
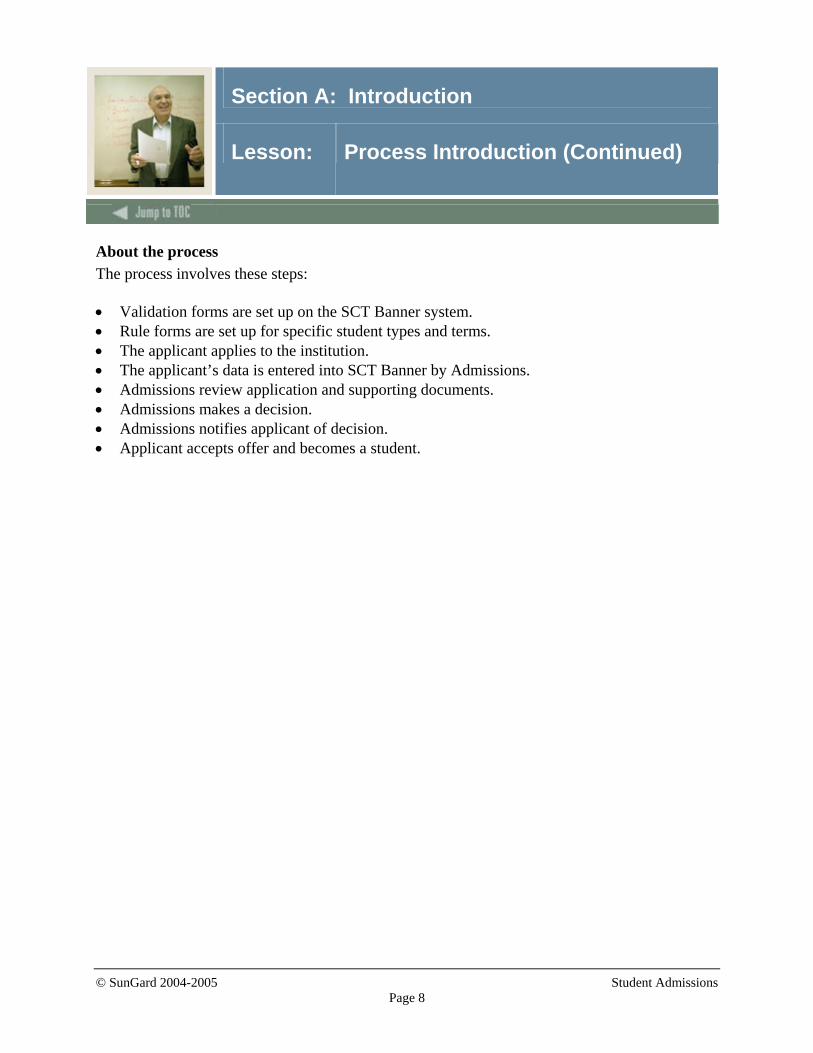
Flow diagram This diagram highlights where the admissions process occurs within the overall Student process.
© SunGard 2004-2005 Student Admissions Page 8
Section A: Introduction
Lesson: Process Introduction (Continued)
About the process The process involves these steps: • Validation forms are set up on the SCT Banner system. • Rule forms are set up for specific student types and terms. • The applicant applies to the institution. • The applicant’s data is entered into SCT Banner by Admissions. • Admissions review application and supporting documents. • Admissions makes a decision. • Admissions notifies applicant of decision. • Applicant accepts offer and becomes a student.
© SunGard 2004-2005 Student Admissions Page 9
Section A: Introduction
Lesson: Terminology
Cohort A member of a group of students who have similar characteristics such as starting a program at the same time.
Communication Plan A set of rules designed to implement an institution’s preferences regarding who should receive which materials and when those materials should be sent. Materials can be generated (letter or label) or published (department brochures). Example: All accepted high school students who apply for admissions into the Education program receive a letter acknowledging acceptance into both the university and the Education program. However, all accepted high school students who apply for admissions into the Nursing program receive a letter acknowledging acceptance into just the university and instructions for next steps on how to apply at a later time to the Nursing program. Prospective nursing students also receive a Nursing program brochure along with their acceptance letter into the university.
Prospect A prospective student such as an applicant or recruit
Quick Admit A process for adding a student to the SCT Banner system with the minimum amount of data
Student A person becomes a student when they accept the offer of admissions
© SunGard 2004-2005 Student Admissions Page 10
Section B: Set Up
Lesson: Overview
Introduction The purpose of this section is to outline the set-up process and detail the procedures to set-up your SCT Banner Student Admissions system.
Intended audience The staff of the Admissions office and the Recruitment office who maintain biographic, demographic, and applicant data for applicants
Objectives At the end of this section, you will be able to • create the rules • set parameters used to process the data.
Prerequisites To complete this workbook section, you should have • completed the SCT Education Practices computer-based training (CBT) tutorial “SCT
Banner 7.x Fundamentals,” or have equivalent experience navigating in the SCT Banner system
• completed the Curriculum, Advising, and Program Planning (CAPP) training workbook.
© SunGard 2004-2005 Student Admissions Page 11
Section B: Set Up
Lesson: Overview (Continued)
Section contents Overview ................................................................................................................................10 Review Required Values for Validation Forms .....................................................................12 Entering Data into Validation Forms .....................................................................................13 Address Type Code Validation ..............................................................................................16 Citizen Type Code Validation................................................................................................18 State/Province Code Validation .............................................................................................19 Ethnic Code Validation ..........................................................................................................21 Letter Code Validation ...........................................................................................................22 Paragraph Code Validation ....................................................................................................24 Admission Request Checklist Code Validation .....................................................................25 Admission Application Decision Code Validation ................................................................27 Admission Application Status Code Validation.....................................................................29 Cohort Code Validation..........................................................................................................30 Institutional Honors Code Validation.....................................................................................31 Initials Code Validation..........................................................................................................32 Level Code Validation............................................................................................................34 Relation Code Validation .......................................................................................................35 Residence Code Validation ....................................................................................................36 Site Code Validation ..............................................................................................................37 Student Status Code Validation..............................................................................................39 Student Type Code Validation ...............................................................................................40 Visa Type Code Validation ....................................................................................................42 Admissions Checklist Rules...................................................................................................43 Admissions Decision Rule .....................................................................................................45 Quick Entry Rules ..................................................................................................................49 Self Check ..............................................................................................................................51 Answer Key for Self Check....................................................................................................52
© SunGard 2004-2005 Student Admissions Page 12
Section B: Set Up
Lesson: Review Required Values for Validation Forms
Introduction The SCT Banner Student system works in conjunction with other SCT Banner systems. Certain processes in SCT Banner Student are associated with specific values in validation forms. If the forms do not contain these values, processes associated with these forms will not run correctly. You can tailor some of the forms by adding or deleting values, but certain forms must remain as delivered. Validation forms enable you to tailor the Student System to your needs by providing the system with lists of coded values that can be entered at specific prompts. Note: When tailoring these codes, be mindful of the impact on other modules, i.e. Human Resources or Alumni. Refer to your institution’s data standards policy and procedures as well to ensure compliance.
Shared validation forms Some of the validation forms that need to be set-up will be tables that are maintained by other areas of SCT Banner. Validation forms beginning with STV are shared with the SCT Banner Human Resources System. Those beginning with GTV are SCT Banner General System forms. Some of these forms can be viewed but not changed without proper security access.
© SunGard 2004-2005 Student Admissions Page 13
Section B: Set Up
Lesson: Entering Data into Validation Forms
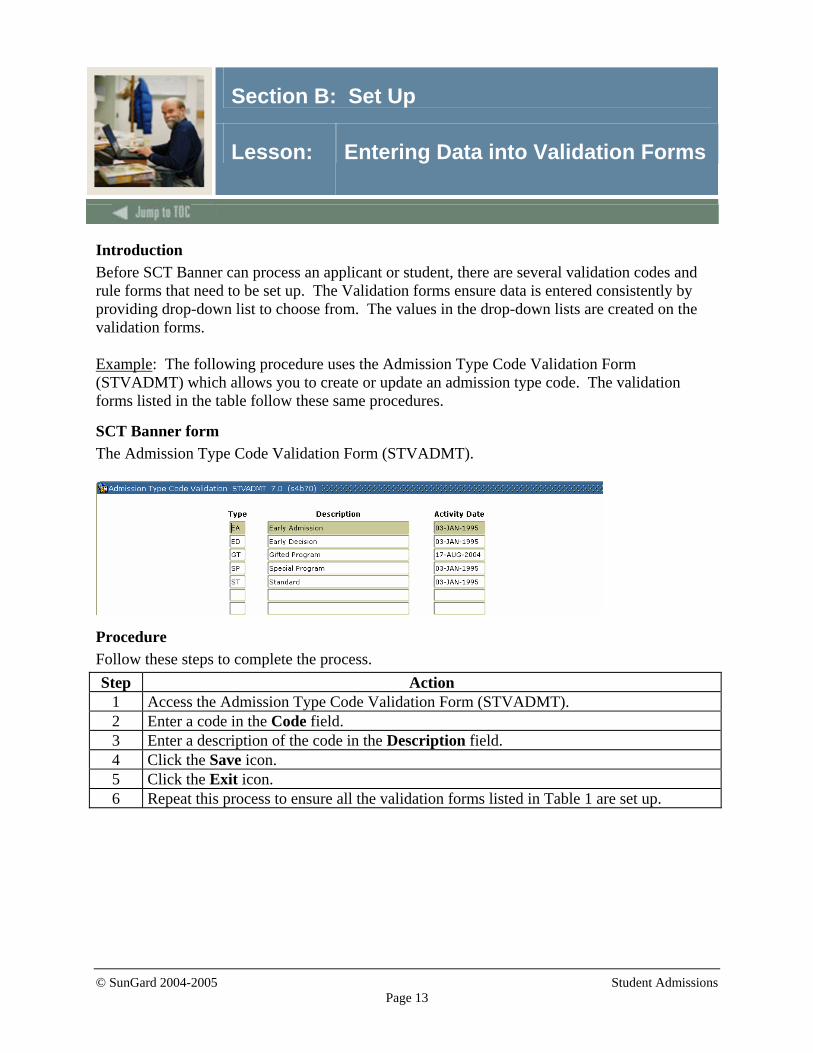
Introduction Before SCT Banner can process an applicant or student, there are several validation codes and rule forms that need to be set up. The Validation forms ensure data is entered consistently by providing drop-down list to choose from. The values in the drop-down lists are created on the validation forms. Example: The following procedure uses the Admission Type Code Validation Form (STVADMT) which allows you to create or update an admission type code. The validation forms listed in the table follow these same procedures.
SCT Banner form The Admission Type Code Validation Form (STVADMT).
Procedure Follow these steps to complete the process. Step Action
1 Access the Admission Type Code Validation Form (STVADMT). 2 Enter a code in the Code field. 3 Enter a description of the code in the Description field. 4 Click the Save icon. 5 Click the Exit icon. 6 Repeat this process to ensure all the validation forms listed in Table 1 are set up.
© SunGard 2004-2005 Student Admissions Page 14
Section B: Set Up
Lesson: Entering Data into Validation Forms (Continued)
Table 1 The forms listed in Table 1 follow the same format as the example. Follow the steps listed above to set the rules and parameters in SCT Banner for new or prospective students.
Form Description SCT Banner Name Admission Type Code Validation STVADMT Student Attribute Validation STVATTS Communication Group Code Validation STVCGRP County Code Validation STVCNTY Communication Plan Code Validation STVCPLN Contact Type Code Validation STVCTYP Diploma Type Validation STVDPLM Duplicate Material Code Validation STVDPMR Education Level Code Validation STVEDLV Education Goal Validation STVEGOL IPEDS Ethnic Code Validation STVETCT Outside Interest Code Validation STVINTS Interview Code Validation STVINTV Legacy Code Validation STVLGCY Material Code Validation STVMATL Student Fee Assessment Code Validation STVRATE Recruit Type Validation STVRTYP Source/Background Institution Code Validation
STVSBGI
High School Subject Validation STVSBJC Session Code Validation STVSESS Test Score Administration Type Code Validation
STVTADM
Test Accommodation Validation STVTEAC Test Form Validation STVTEFR Test Instrument Validation STVTEIN Telephone Type Validation STVTELE Test Purpose Validation STVTEPR Admission Test Score Source Code Validation STVTSRC
© SunGard 2004-2005 Student Admissions Page 15
Section B: Set Up
Lesson: Entering Data into Validation Forms (Continued)
Next Steps Once you have set up all the validation forms listed in Table 1, you will need to set up additional validation and rule forms. Since these forms have additional fields, the procedure for each is listed separately in the following pages. Note: If your institution is currently using the SCT Banner Human Resources systems, you do not need to set up Address Type Code, Citizen Type Code, State/Province Code, or Ethnic Code Validation Forms. You can skip these and go directly to Letter Code Validation on page B-10.
© SunGard 2004-2005 Student Admissions Page 16
Section B: Set Up
Lesson: Address Type Code Validation
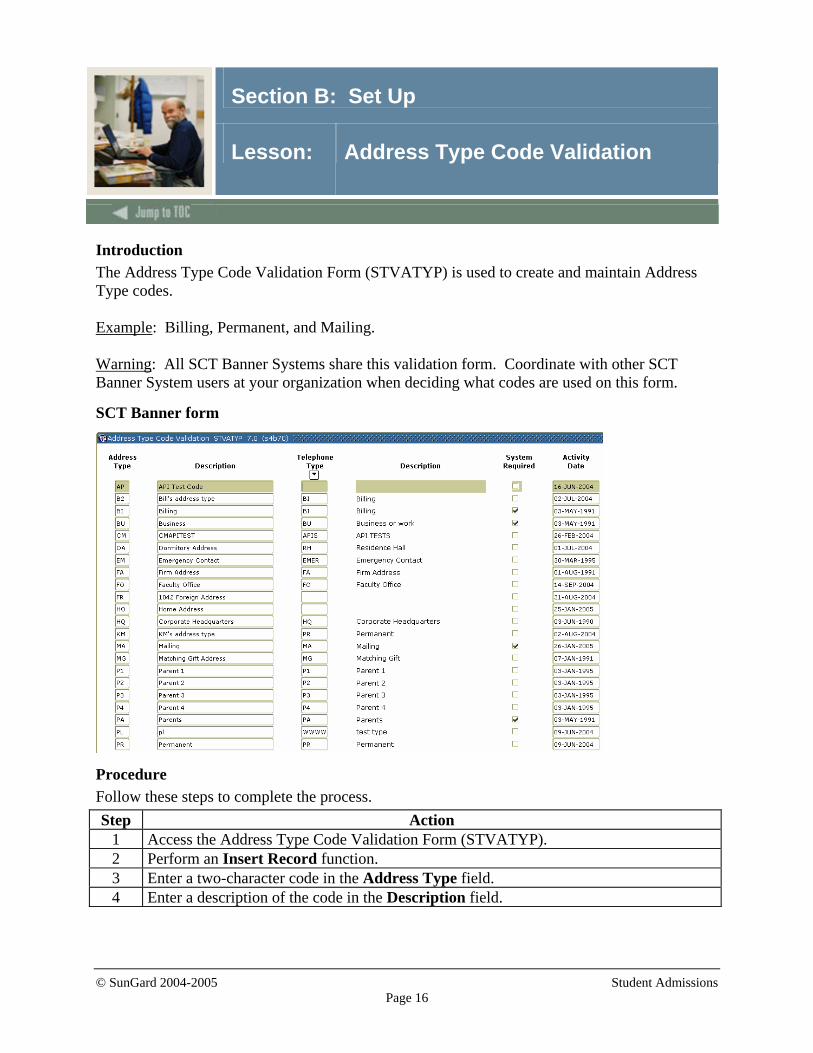
Introduction The Address Type Code Validation Form (STVATYP) is used to create and maintain Address Type codes. Example: Billing, Permanent, and Mailing. Warning: All SCT Banner Systems share this validation form. Coordinate with other SCT Banner System users at your organization when deciding what codes are used on this form.
SCT Banner form
Procedure Follow these steps to complete the process. Step Action
1 Access the Address Type Code Validation Form (STVATYP). 2 Perform an Insert Record function. 3 Enter a two-character code in the Address Type field. 4 Enter a description of the code in the Description field.

© SunGard 2004-2005 Student Admissions Page 17
Section B: Set Up
Lesson: Address Type Code Validation (Continued)
Procedure, continued
Step Action 5 Enter a default telephone type that corresponds to the address type in the Telephone
Type field if appropriate. 6 Click the System Required checkbox if this code is required by the system. 7 Click the Save icon. 8 Click the Exit icon.
© SunGard 2004-2005 Student Admissions Page 18
Section B: Set Up
Lesson: Citizen Type Code Validation
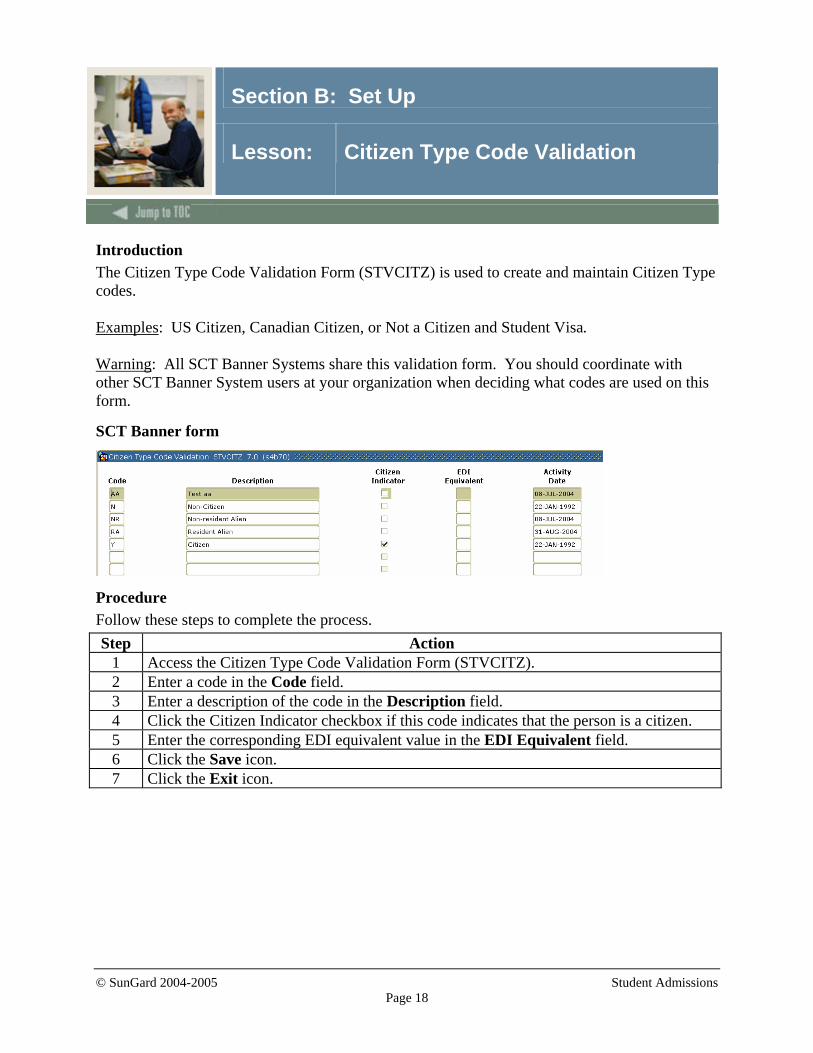
Introduction The Citizen Type Code Validation Form (STVCITZ) is used to create and maintain Citizen Type codes. Examples: US Citizen, Canadian Citizen, or Not a Citizen and Student Visa. Warning: All SCT Banner Systems share this validation form. You should coordinate with other SCT Banner System users at your organization when deciding what codes are used on this form.
SCT Banner form
Procedure Follow these steps to complete the process. Step Action
1 Access the Citizen Type Code Validation Form (STVCITZ). 2 Enter a code in the Code field. 3 Enter a description of the code in the Description field. 4 Click the Citizen Indicator checkbox if this code indicates that the person is a citizen. 5 Enter the corresponding EDI equivalent value in the EDI Equivalent field. 6 Click the Save icon. 7 Click the Exit icon.
© SunGard 2004-2005 Student Admissions Page 19
Section B: Set Up
Lesson: State/Province Code Validation
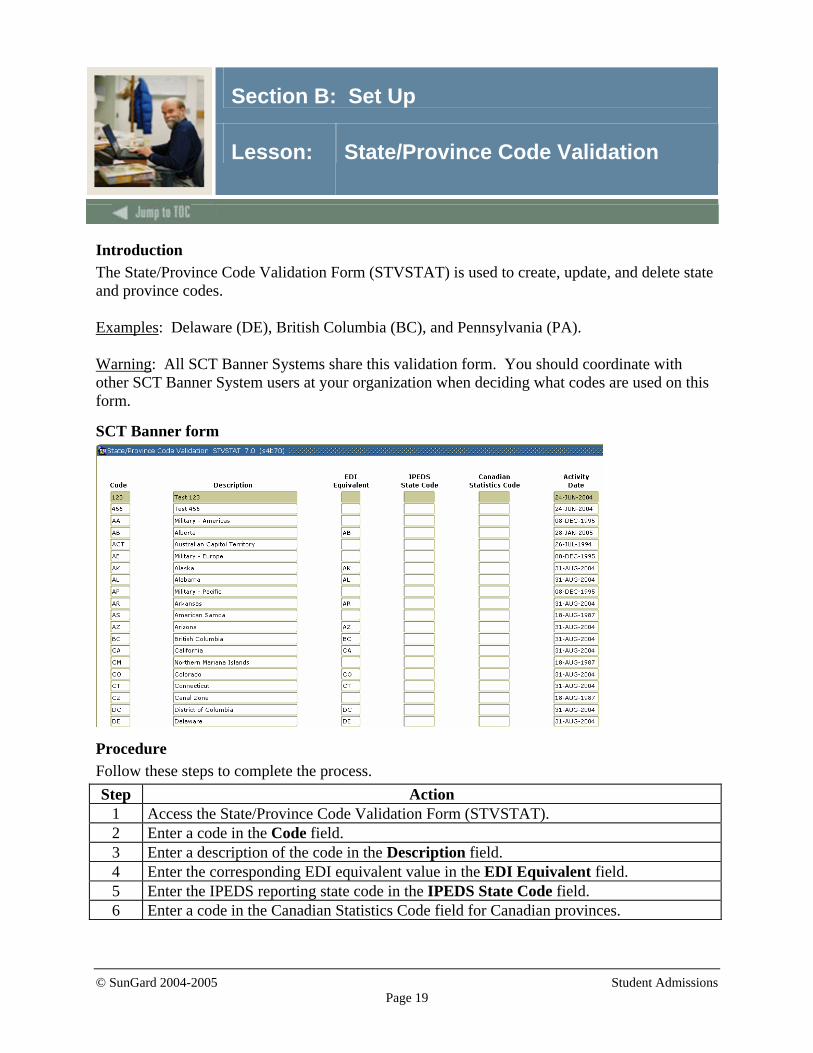
Introduction The State/Province Code Validation Form (STVSTAT) is used to create, update, and delete state and province codes. Examples: Delaware (DE), British Columbia (BC), and Pennsylvania (PA). Warning: All SCT Banner Systems share this validation form. You should coordinate with other SCT Banner System users at your organization when deciding what codes are used on this form.
SCT Banner form
Procedure Follow these steps to complete the process. Step Action
1 Access the State/Province Code Validation Form (STVSTAT). 2 Enter a code in the Code field. 3 Enter a description of the code in the Description field. 4 Enter the corresponding EDI equivalent value in the EDI Equivalent field. 5 Enter the IPEDS reporting state code in the IPEDS State Code field. 6 Enter a code in the Canadian Statistics Code field for Canadian provinces.
© SunGard 2004-2005 Student Admissions Page 20
Section B: Set Up
Lesson: State/Province Code Validation (Continued)
Procedure, continued
Step Action 7 Click the Save icon. 8 Click the Exit icon.
© SunGard 2004-2005 Student Admissions Page 21
Section B: Set Up
Lesson: Ethnic Code Validation
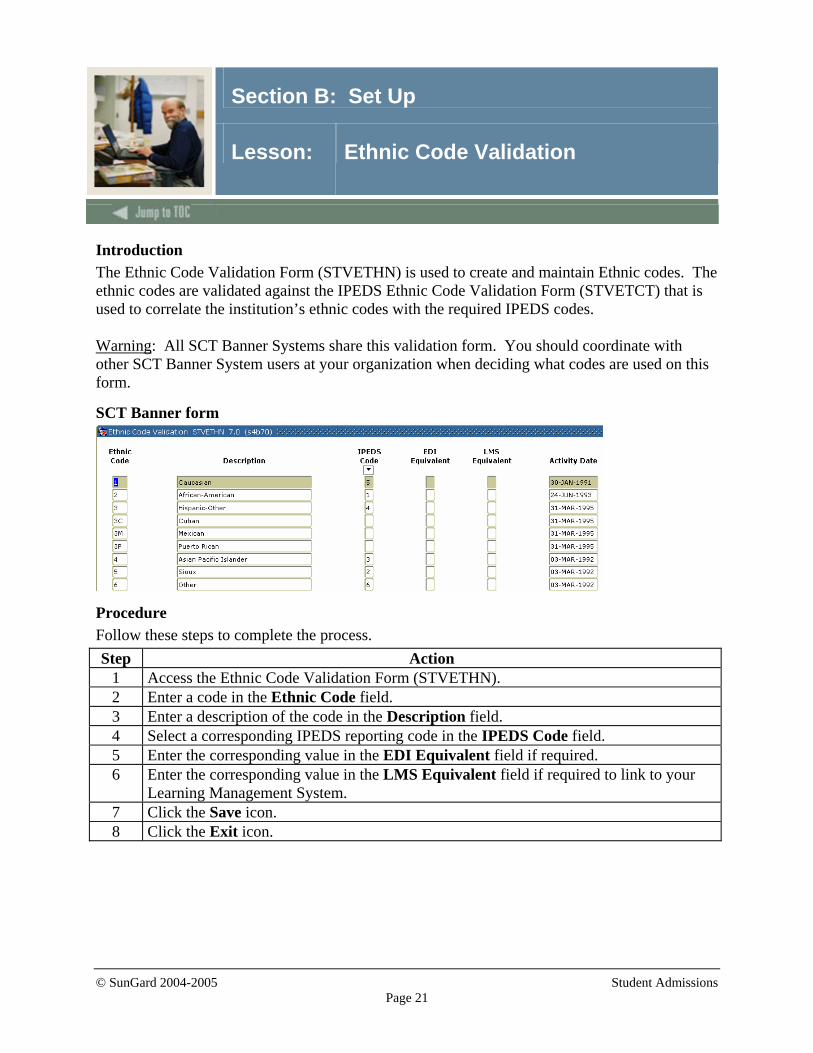
Introduction The Ethnic Code Validation Form (STVETHN) is used to create and maintain Ethnic codes. The ethnic codes are validated against the IPEDS Ethnic Code Validation Form (STVETCT) that is used to correlate the institution’s ethnic codes with the required IPEDS codes. Warning: All SCT Banner Systems share this validation form. You should coordinate with other SCT Banner System users at your organization when deciding what codes are used on this form.
SCT Banner form
Procedure Follow these steps to complete the process. Step Action
1 Access the Ethnic Code Validation Form (STVETHN). 2 Enter a code in the Ethnic Code field. 3 Enter a description of the code in the Description field. 4 Select a corresponding IPEDS reporting code in the IPEDS Code field. 5 Enter the corresponding value in the EDI Equivalent field if required. 6 Enter the corresponding value in the LMS Equivalent field if required to link to your
Learning Management System. 7 Click the Save icon. 8 Click the Exit icon.
© SunGard 2004-2005 Student Admissions Page 22
Section B: Set Up
Lesson: Letter Code Validation
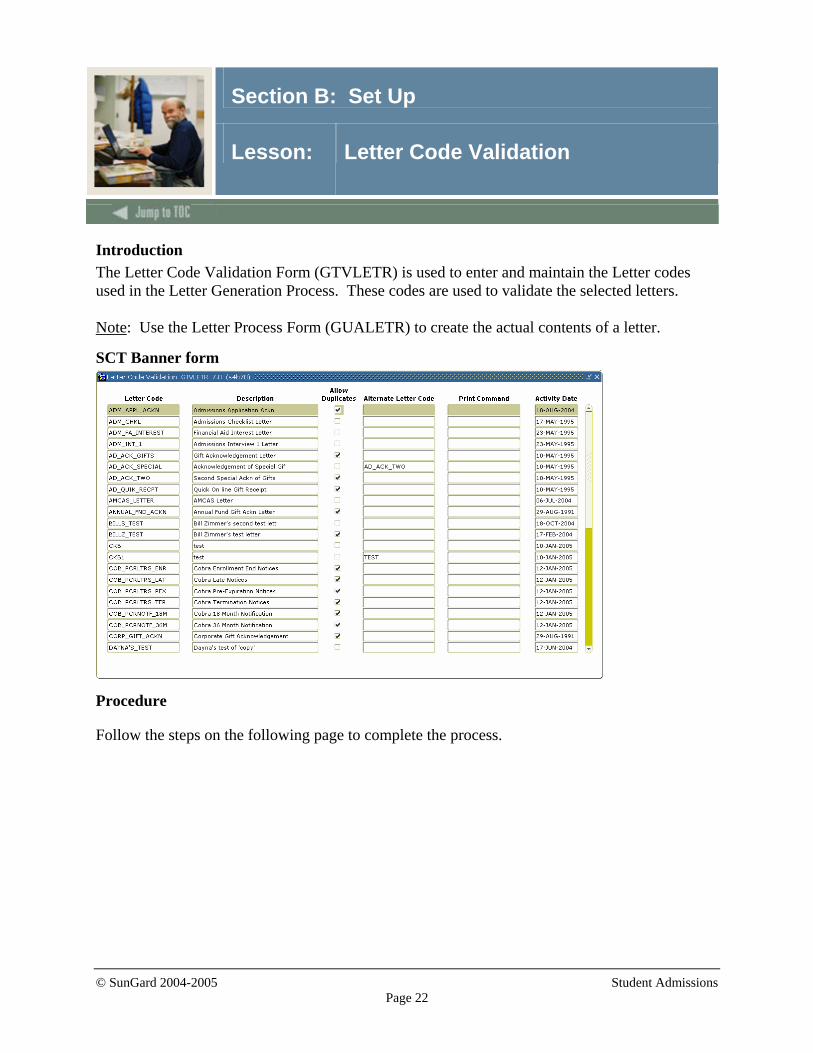
Introduction The Letter Code Validation Form (GTVLETR) is used to enter and maintain the Letter codes used in the Letter Generation Process. These codes are used to validate the selected letters. Note: Use the Letter Process Form (GUALETR) to create the actual contents of a letter.
SCT Banner form
Procedure
Follow the steps on the following page to complete the process.
© SunGard 2004-2005 Student Admissions Page 23
Section B: Set Up
Lesson: Letter Code Validation (Continued)
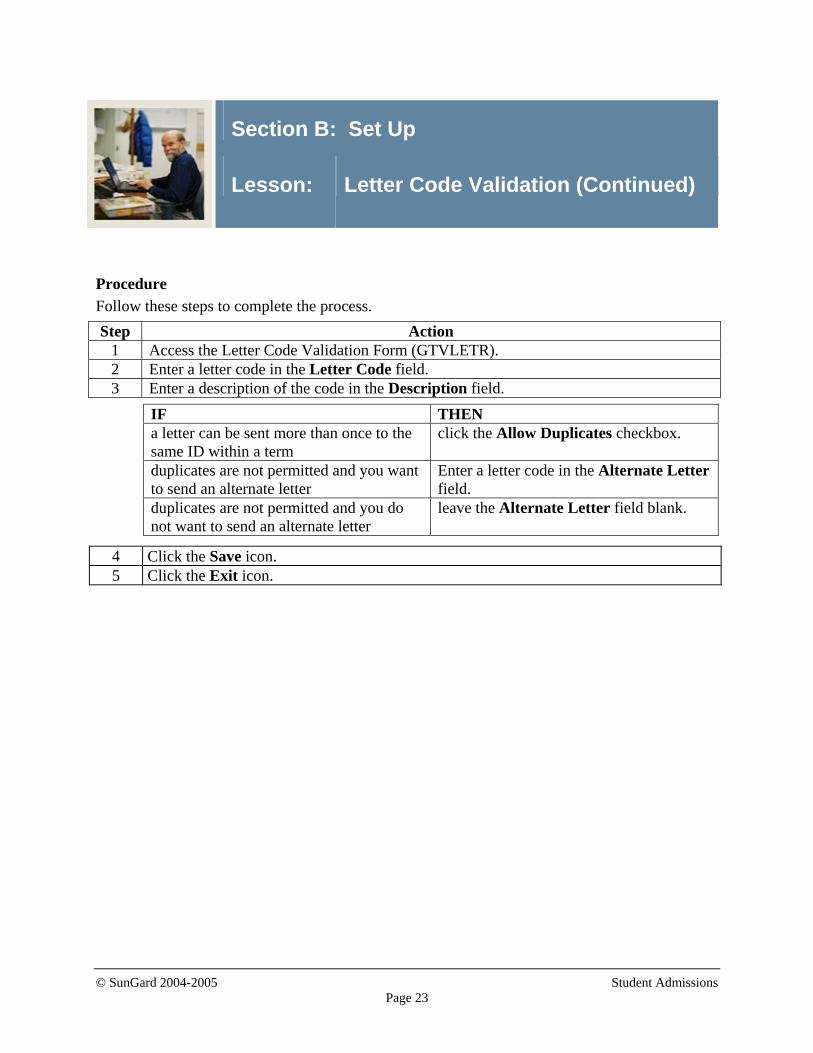
Procedure Follow these steps to complete the process.
Step Action 1 Access the Letter Code Validation Form (GTVLETR). 2 Enter a letter code in the Letter Code field. 3 Enter a description of the code in the Description field.
IF THEN a letter can be sent more than once to the same ID within a term
click the Allow Duplicates checkbox.
duplicates are not permitted and you want to send an alternate letter
Enter a letter code in the Alternate Letter field.
duplicates are not permitted and you do not want to send an alternate letter
leave the Alternate Letter field blank.
4 Click the Save icon. 5 Click the Exit icon.
© SunGard 2004-2005 Student Admissions Page 24
Section B: Set Up
Lesson: Paragraph Code Validation
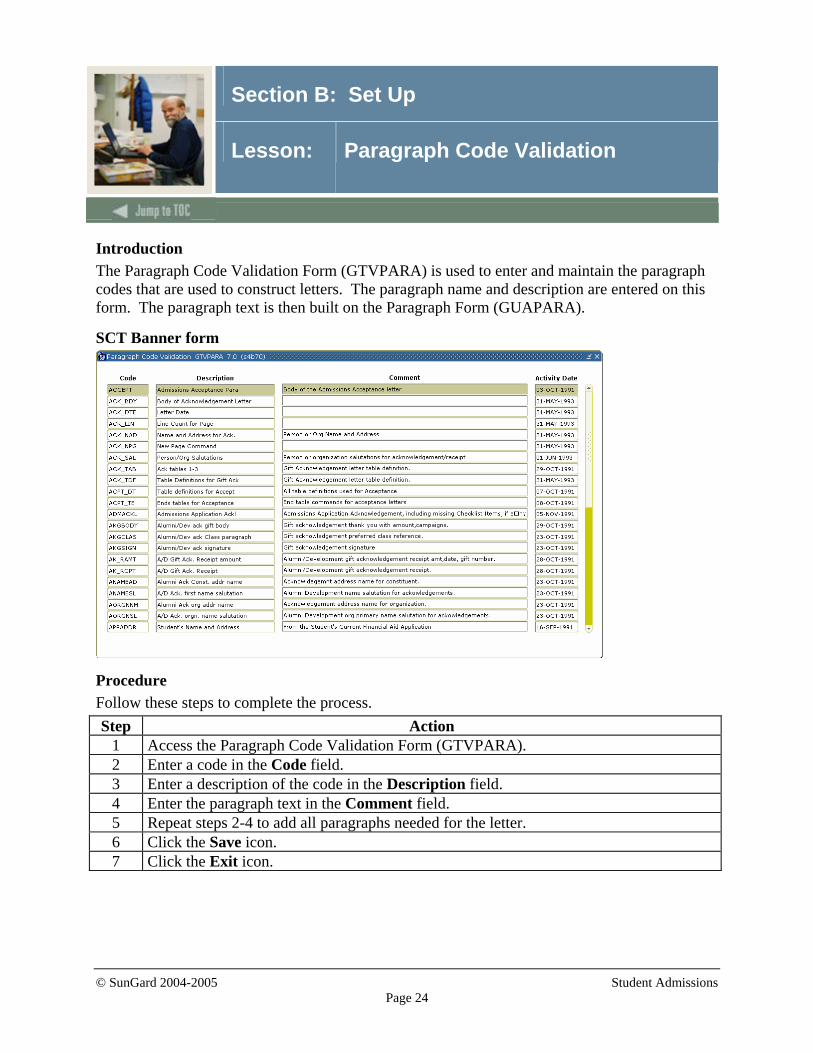
Introduction The Paragraph Code Validation Form (GTVPARA) is used to enter and maintain the paragraph codes that are used to construct letters. The paragraph name and description are entered on this form. The paragraph text is then built on the Paragraph Form (GUAPARA).
SCT Banner form
Procedure Follow these steps to complete the process. Step Action
1 Access the Paragraph Code Validation Form (GTVPARA). 2 Enter a code in the Code field. 3 Enter a description of the code in the Description field. 4 Enter the paragraph text in the Comment field. 5 Repeat steps 2-4 to add all paragraphs needed for the letter. 6 Click the Save icon. 7 Click the Exit icon.
© SunGard 2004-2005 Student Admissions Page 25
Section B: Set Up
Lesson: Admission Request Checklist Code Validation
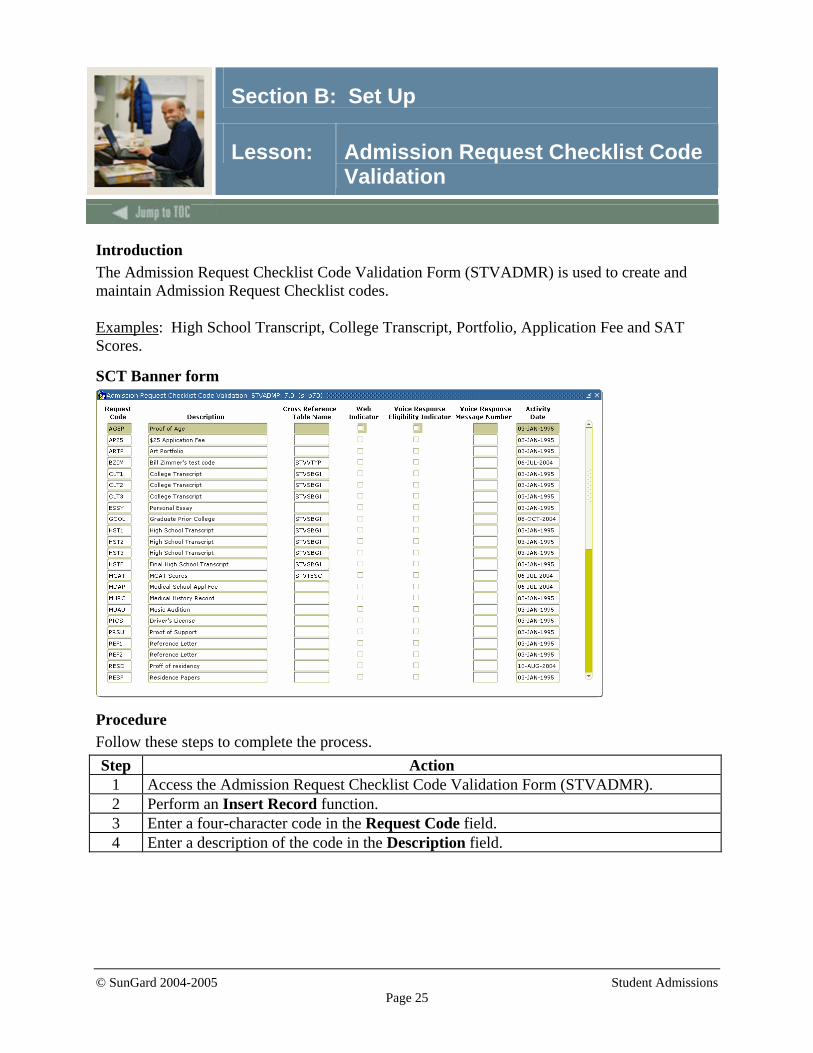
Introduction The Admission Request Checklist Code Validation Form (STVADMR) is used to create and maintain Admission Request Checklist codes. Examples: High School Transcript, College Transcript, Portfolio, Application Fee and SAT Scores.
SCT Banner form
Procedure Follow these steps to complete the process. Step Action
1 Access the Admission Request Checklist Code Validation Form (STVADMR). 2 Perform an Insert Record function. 3 Enter a four-character code in the Request Code field. 4 Enter a description of the code in the Description field.
© SunGard 2004-2005 Student Admissions Page 26
Section B: Set Up
Lesson: Admission Request Checklist Code Validation (Continued)
Procedure, continued
Step Action 5 Enter the name of the validation table to receive specific item codes and descriptions in
the Cross Reference Table Name field. Note: Other forms use this form to validate admission request checklist codes. Cross-referenced table names and descriptions can be entered on the following forms to provide further validation: • Residence Code Validation Form (STVRESD) • Source/Background Institution Code Validation Form (STVSBGI) • Test Code Validation Form (STVTESC) • Visa Type Code Validation Form (STVVTYP).
6 Click the Web Indicator checkbox to display the item in SCT Banner Web admissions application processing. Note: This option allows an institution to limit the checklist items which will be displayed to a subset of all valid items.
7 Click the Voice Response Eligibility Indicator checkbox to have a request code spoken to the student for telephone applications.
8 Enter a number in the Voice Response Message Number field to indicate the recorded message that describes the admission request code for telephone applications.
9 Click the Save icon. 10 Click the Exit icon.
© SunGard 2004-2005 Student Admissions Page 27
Section B: Set Up
Lesson: Admission Application Decision Code Validation
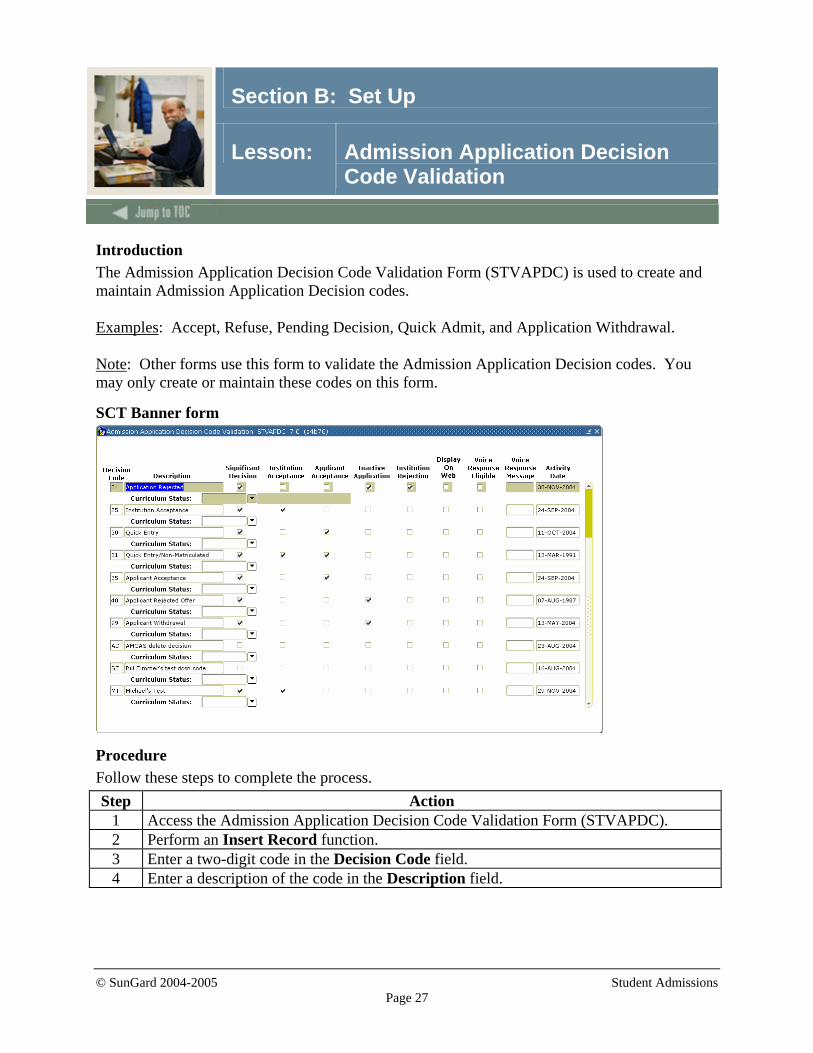
Introduction The Admission Application Decision Code Validation Form (STVAPDC) is used to create and maintain Admission Application Decision codes. Examples: Accept, Refuse, Pending Decision, Quick Admit, and Application Withdrawal. Note: Other forms use this form to validate the Admission Application Decision codes. You may only create or maintain these codes on this form.
SCT Banner form
Procedure Follow these steps to complete the process. Step Action
1 Access the Admission Application Decision Code Validation Form (STVAPDC). 2 Perform an Insert Record function. 3 Enter a two-digit code in the Decision Code field. 4 Enter a description of the code in the Description field.
© SunGard 2004-2005 Student Admissions Page 28
Section B: Set Up
Lesson: Admission Application Decision Code Validation (Continued)
Procedure, continued
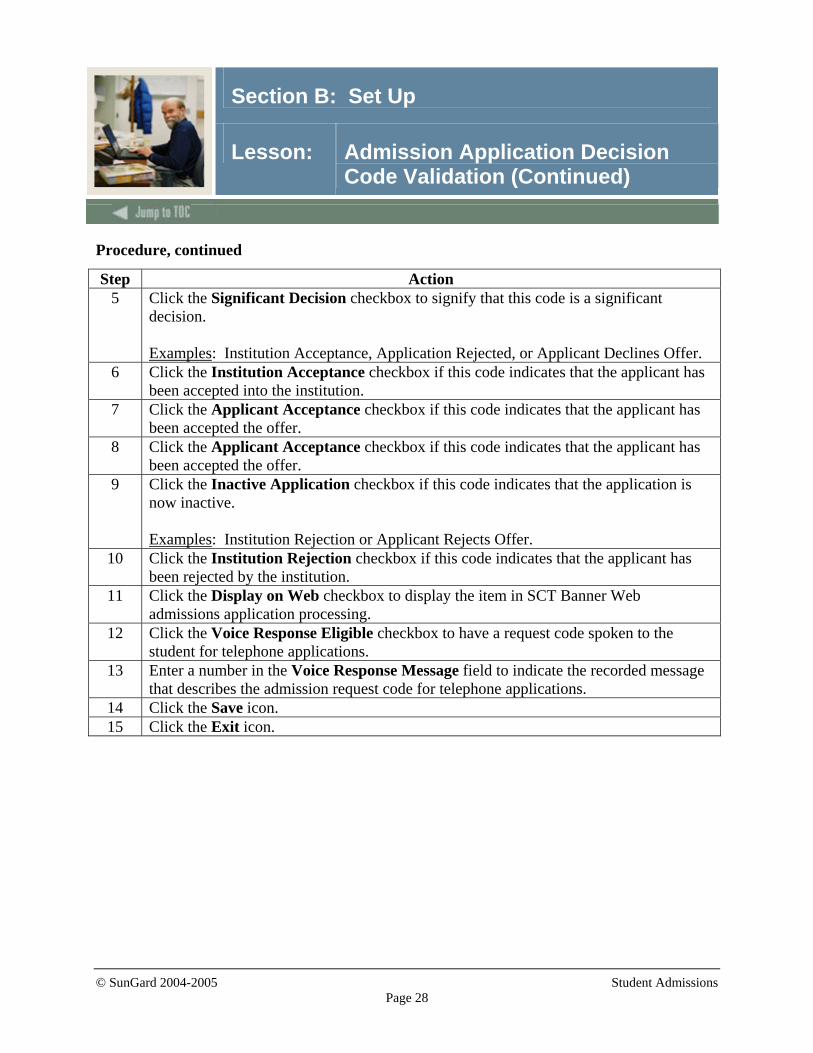
Step Action 5 Click the Significant Decision checkbox to signify that this code is a significant
decision. Examples: Institution Acceptance, Application Rejected, or Applicant Declines Offer.
6 Click the Institution Acceptance checkbox if this code indicates that the applicant has been accepted into the institution.
7 Click the Applicant Acceptance checkbox if this code indicates that the applicant has been accepted the offer.
8 Click the Applicant Acceptance checkbox if this code indicates that the applicant has been accepted the offer.
9 Click the Inactive Application checkbox if this code indicates that the application is now inactive. Examples: Institution Rejection or Applicant Rejects Offer.
10 Click the Institution Rejection checkbox if this code indicates that the applicant has been rejected by the institution.
11 Click the Display on Web checkbox to display the item in SCT Banner Web admissions application processing.
12 Click the Voice Response Eligible checkbox to have a request code spoken to the student for telephone applications.
13 Enter a number in the Voice Response Message field to indicate the recorded message that describes the admission request code for telephone applications.
14 Click the Save icon. 15 Click the Exit icon.
© SunGard 2004-2005 Student Admissions Page 29
Section B: Set Up
Lesson: Admission Application Status Code Validation
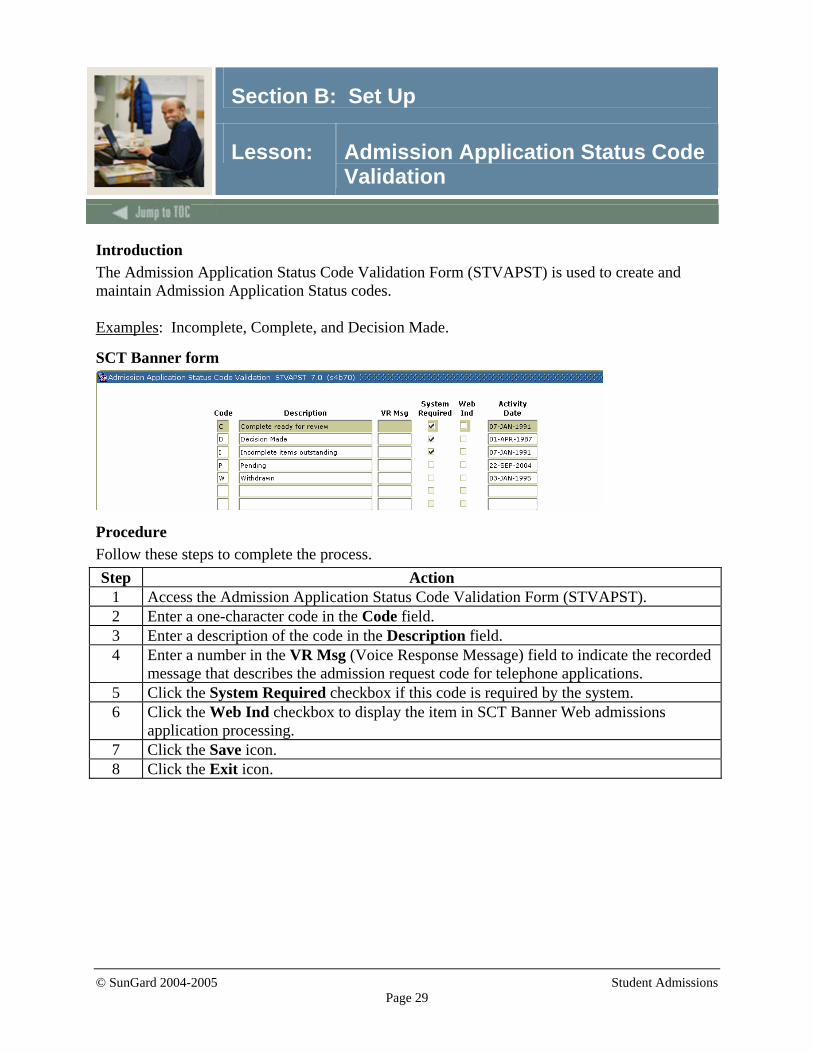
Introduction The Admission Application Status Code Validation Form (STVAPST) is used to create and maintain Admission Application Status codes. Examples: Incomplete, Complete, and Decision Made.
SCT Banner form
Procedure Follow these steps to complete the process. Step Action
1 Access the Admission Application Status Code Validation Form (STVAPST). 2 Enter a one-character code in the Code field. 3 Enter a description of the code in the Description field. 4 Enter a number in the VR Msg (Voice Response Message) field to indicate the recorded
message that describes the admission request code for telephone applications. 5 Click the System Required checkbox if this code is required by the system. 6 Click the Web Ind checkbox to display the item in SCT Banner Web admissions
application processing. 7 Click the Save icon. 8 Click the Exit icon.
© SunGard 2004-2005 Student Admissions Page 30
Section B: Set Up
Lesson: Cohort Code Validation
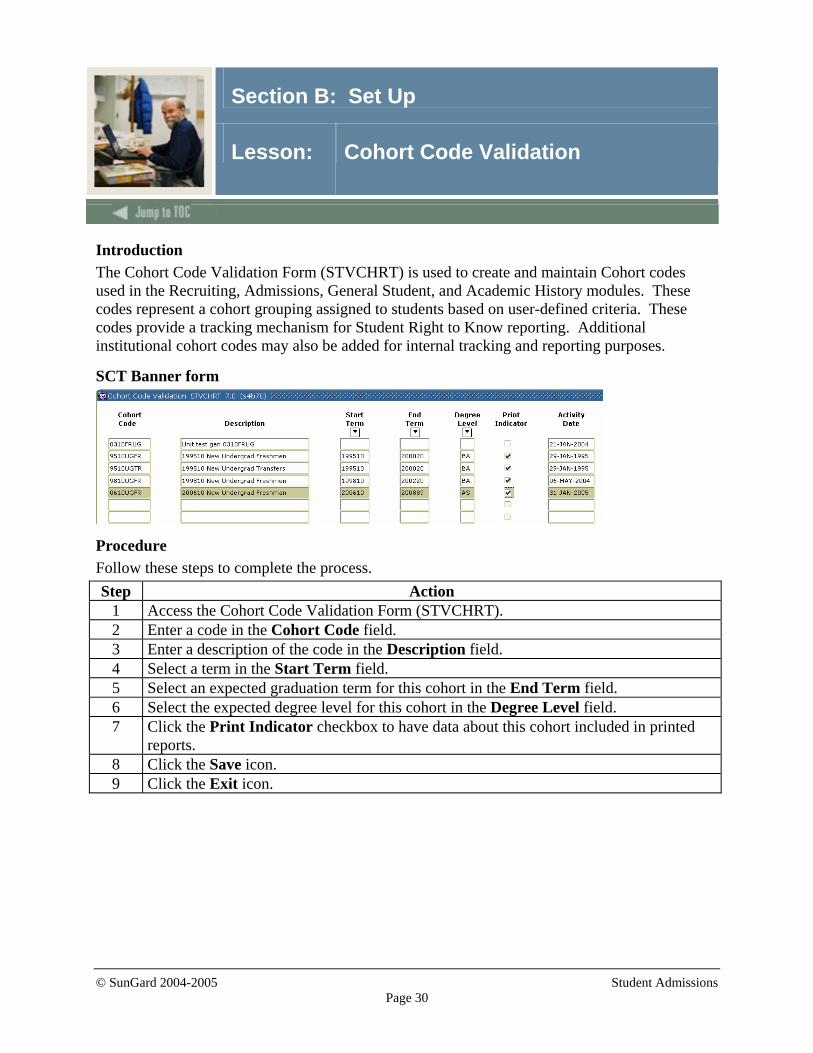
Introduction The Cohort Code Validation Form (STVCHRT) is used to create and maintain Cohort codes used in the Recruiting, Admissions, General Student, and Academic History modules. These codes represent a cohort grouping assigned to students based on user-defined criteria. These codes provide a tracking mechanism for Student Right to Know reporting. Additional institutional cohort codes may also be added for internal tracking and reporting purposes.
SCT Banner form
Procedure Follow these steps to complete the process. Step Action
1 Access the Cohort Code Validation Form (STVCHRT). 2 Enter a code in the Cohort Code field. 3 Enter a description of the code in the Description field. 4 Select a term in the Start Term field. 5 Select an expected graduation term for this cohort in the End Term field. 6 Select the expected degree level for this cohort in the Degree Level field. 7 Click the Print Indicator checkbox to have data about this cohort included in printed
reports. 8 Click the Save icon. 9 Click the Exit icon.
© SunGard 2004-2005 Student Admissions Page 31
Section B: Set Up
Lesson: Institutional Honors Code Validation
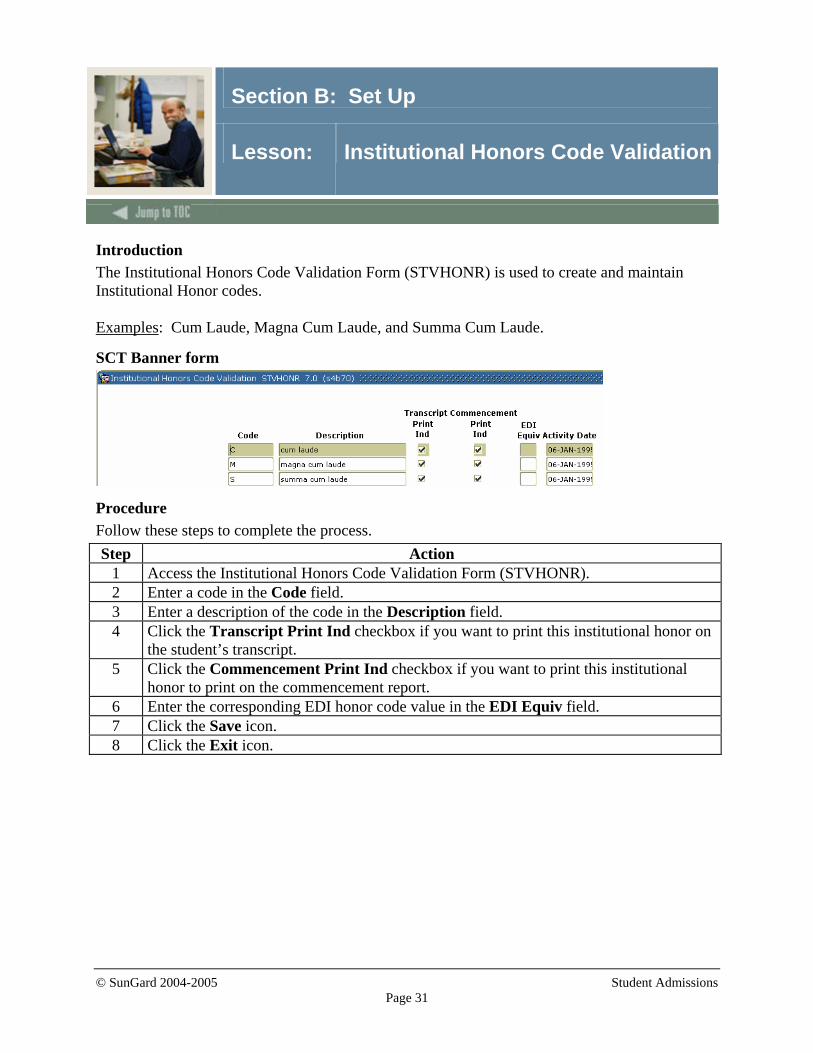
Introduction The Institutional Honors Code Validation Form (STVHONR) is used to create and maintain Institutional Honor codes. Examples: Cum Laude, Magna Cum Laude, and Summa Cum Laude.
SCT Banner form
Procedure Follow these steps to complete the process. Step Action
1 Access the Institutional Honors Code Validation Form (STVHONR). 2 Enter a code in the Code field. 3 Enter a description of the code in the Description field. 4 Click the Transcript Print Ind checkbox if you want to print this institutional honor on
the student’s transcript. 5 Click the Commencement Print Ind checkbox if you want to print this institutional
honor to print on the commencement report. 6 Enter the corresponding EDI honor code value in the EDI Equiv field. 7 Click the Save icon. 8 Click the Exit icon.
© SunGard 2004-2005 Student Admissions Page 32
Section B: Set Up
Lesson: Initials Code Validation
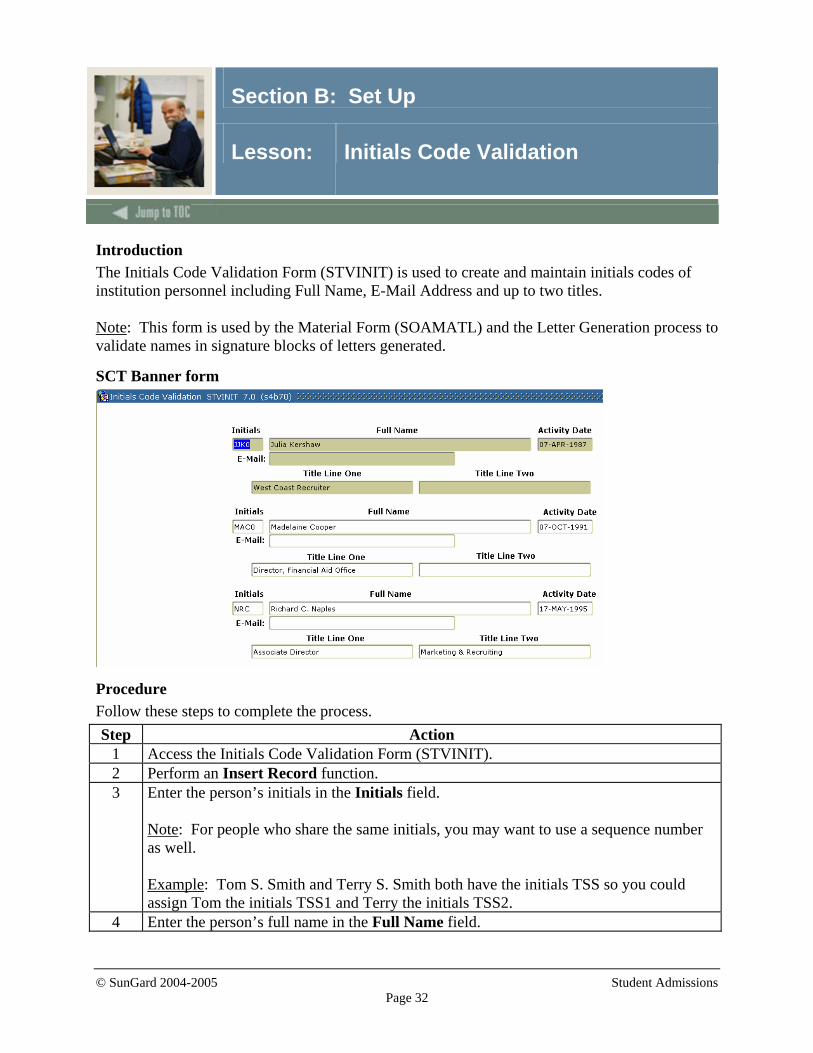
Introduction The Initials Code Validation Form (STVINIT) is used to create and maintain initials codes of institution personnel including Full Name, E-Mail Address and up to two titles. Note: This form is used by the Material Form (SOAMATL) and the Letter Generation process to validate names in signature blocks of letters generated.
SCT Banner form
Procedure Follow these steps to complete the process. Step Action
1 Access the Initials Code Validation Form (STVINIT). 2 Perform an Insert Record function. 3 Enter the person’s initials in the Initials field.
Note: For people who share the same initials, you may want to use a sequence number as well. Example: Tom S. Smith and Terry S. Smith both have the initials TSS so you could assign Tom the initials TSS1 and Terry the initials TSS2.
4 Enter the person’s full name in the Full Name field.
© SunGard 2004-2005 Student Admissions Page 33
Section B: Set Up
Lesson: Initials Code Validation (Continued)
Procedure, continued
Step Action 5 Enter the person’s title in the Title Line 1 field. 6 Enter the person’s other title in the Title Line 2 field if needed. 7 Enter the person’s e-mail address in the E-Mail field. 8 Click the Save icon. 9 Click the Exit icon.
© SunGard 2004-2005 Student Admissions Page 34
Section B: Set Up
Lesson: Level Code Validation
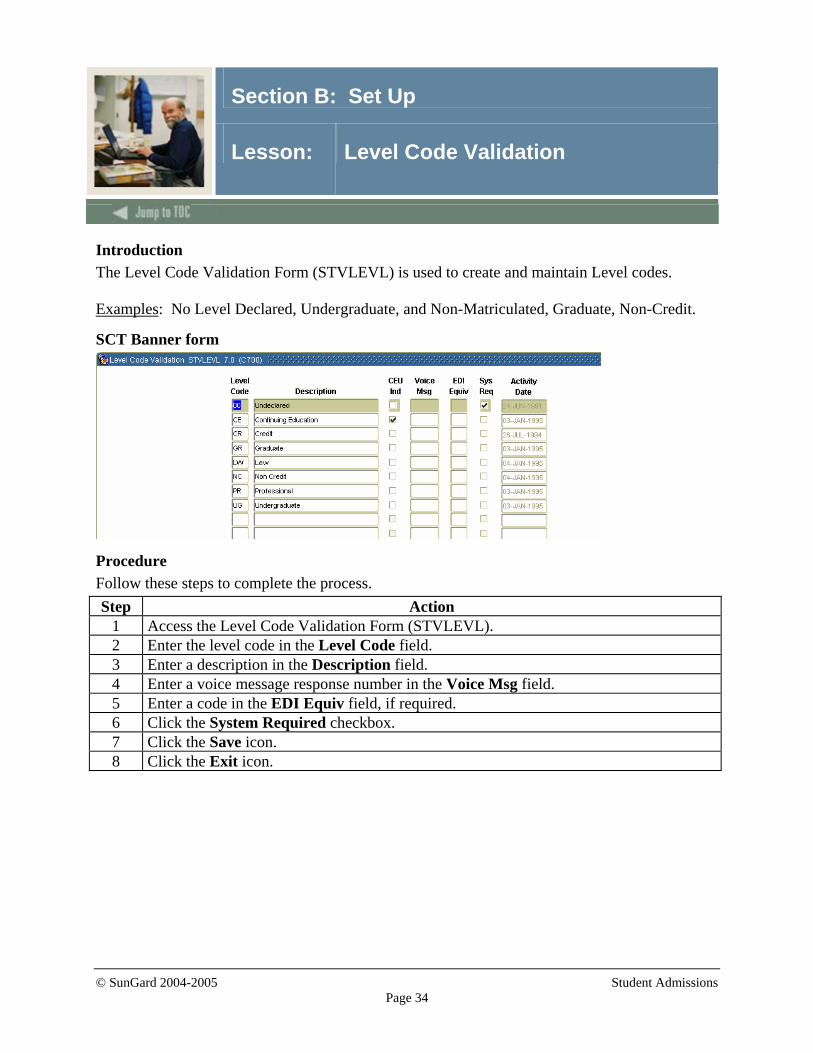
Introduction The Level Code Validation Form (STVLEVL) is used to create and maintain Level codes. Examples: No Level Declared, Undergraduate, and Non-Matriculated, Graduate, Non-Credit.
SCT Banner form
Procedure Follow these steps to complete the process. Step Action
1 Access the Level Code Validation Form (STVLEVL). 2 Enter the level code in the Level Code field. 3 Enter a description in the Description field. 4 Enter a voice message response number in the Voice Msg field. 5 Enter a code in the EDI Equiv field, if required. 6 Click the System Required checkbox. 7 Click the Save icon. 8 Click the Exit icon.
© SunGard 2004-2005 Student Admissions Page 35
Section B: Set Up
Lesson: Relation Code Validation
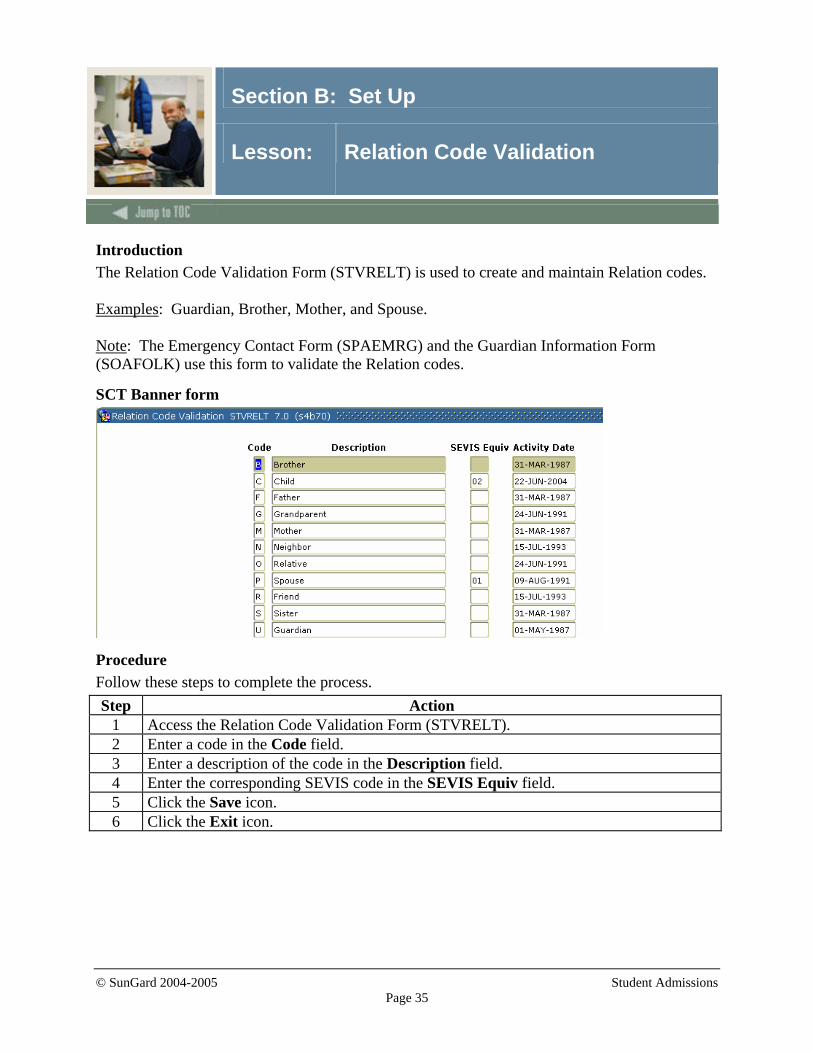
Introduction The Relation Code Validation Form (STVRELT) is used to create and maintain Relation codes. Examples: Guardian, Brother, Mother, and Spouse. Note: The Emergency Contact Form (SPAEMRG) and the Guardian Information Form (SOAFOLK) use this form to validate the Relation codes.
SCT Banner form
Procedure Follow these steps to complete the process. Step Action
1 Access the Relation Code Validation Form (STVRELT). 2 Enter a code in the Code field. 3 Enter a description of the code in the Description field. 4 Enter the corresponding SEVIS code in the SEVIS Equiv field. 5 Click the Save icon. 6 Click the Exit icon.
© SunGard 2004-2005 Student Admissions Page 36
Section B: Set Up
Lesson: Residence Code Validation
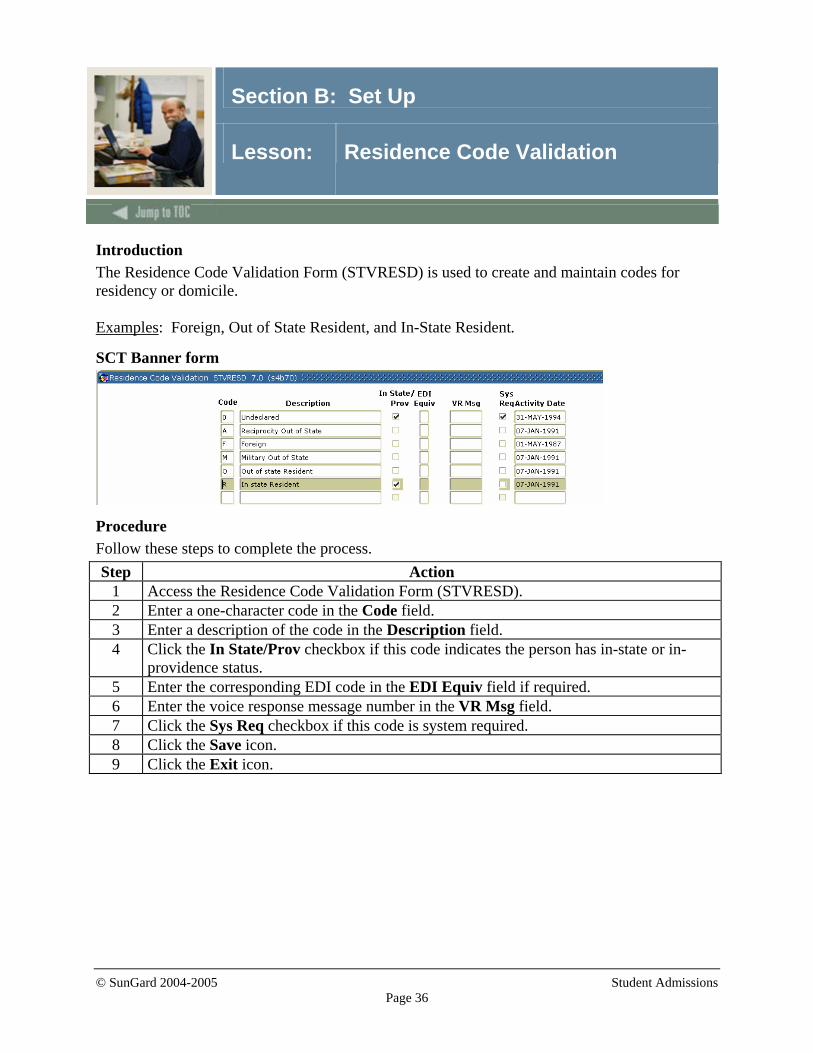
Introduction The Residence Code Validation Form (STVRESD) is used to create and maintain codes for residency or domicile. Examples: Foreign, Out of State Resident, and In-State Resident.
SCT Banner form
Procedure Follow these steps to complete the process. Step Action
1 Access the Residence Code Validation Form (STVRESD). 2 Enter a one-character code in the Code field. 3 Enter a description of the code in the Description field. 4 Click the In State/Prov checkbox if this code indicates the person has in-state or in-
providence status. 5 Enter the corresponding EDI code in the EDI Equiv field if required. 6 Enter the voice response message number in the VR Msg field. 7 Click the Sys Req checkbox if this code is system required. 8 Click the Save icon. 9 Click the Exit icon.
© SunGard 2004-2005 Student Admissions Page 37
Section B: Set Up
Lesson: Site Code Validation
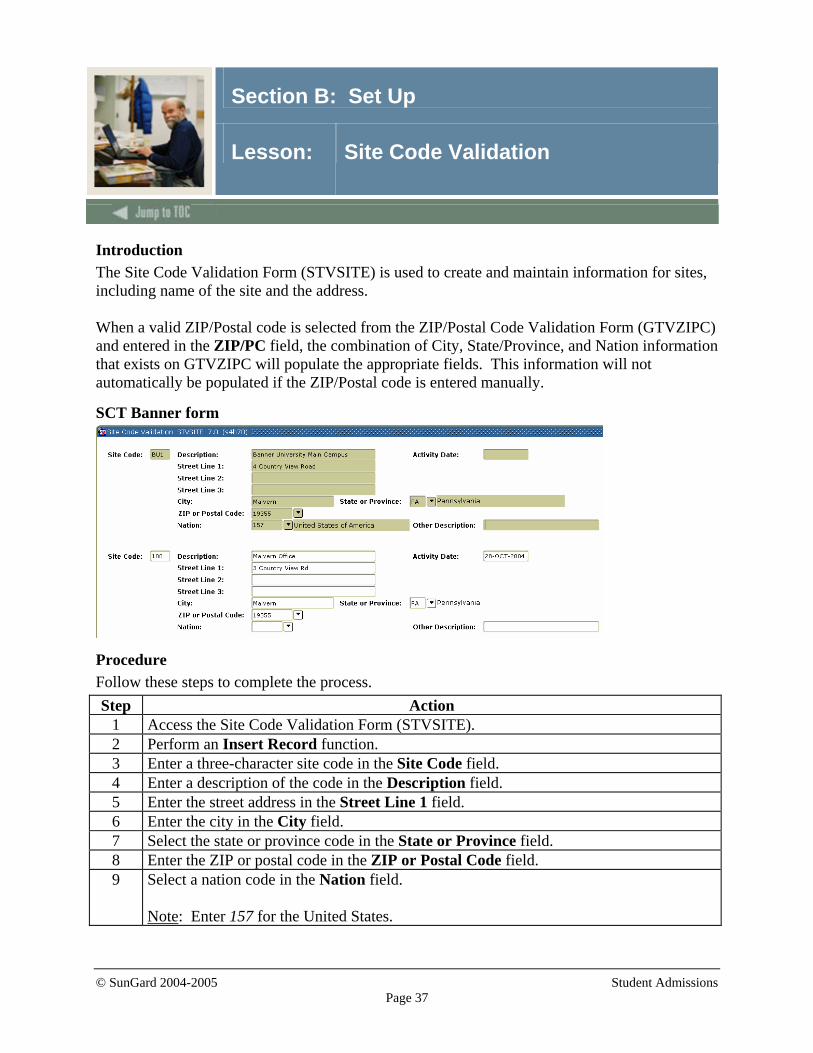
Introduction The Site Code Validation Form (STVSITE) is used to create and maintain information for sites, including name of the site and the address. When a valid ZIP/Postal code is selected from the ZIP/Postal Code Validation Form (GTVZIPC) and entered in the ZIP/PC field, the combination of City, State/Province, and Nation information that exists on GTVZIPC will populate the appropriate fields. This information will not automatically be populated if the ZIP/Postal code is entered manually.
SCT Banner form
Procedure Follow these steps to complete the process. Step Action
1 Access the Site Code Validation Form (STVSITE). 2 Perform an Insert Record function. 3 Enter a three-character site code in the Site Code field. 4 Enter a description of the code in the Description field. 5 Enter the street address in the Street Line 1 field. 6 Enter the city in the City field. 7 Select the state or province code in the State or Province field. 8 Enter the ZIP or postal code in the ZIP or Postal Code field. 9 Select a nation code in the Nation field.
Note: Enter 157 for the United States.
© SunGard 2004-2005 Student Admissions Page 38
Section B: Set Up
Lesson: Site Code Validation (Continued)
Procedure, continued
Step Action 10 Click the Save icon. 11 Click the Exit icon.
© SunGard 2004-2005 Student Admissions Page 39
Section B: Set Up
Lesson: Student Status Code Validation
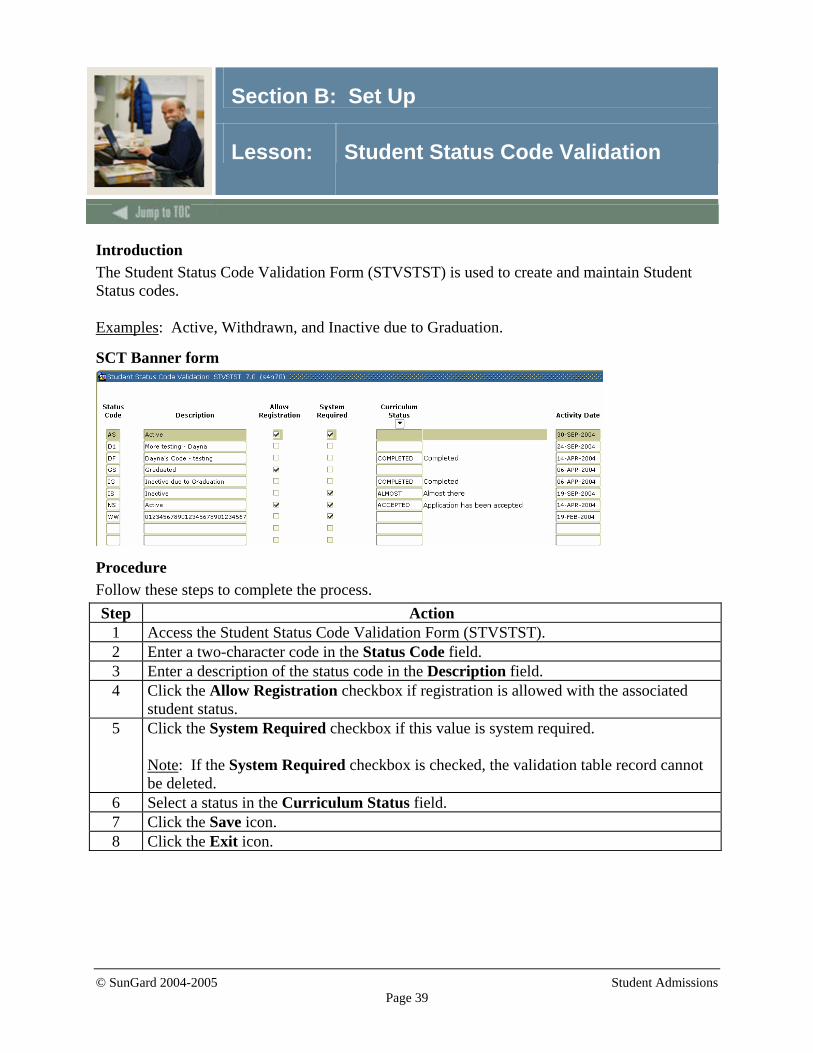
Introduction The Student Status Code Validation Form (STVSTST) is used to create and maintain Student Status codes. Examples: Active, Withdrawn, and Inactive due to Graduation.
SCT Banner form
Procedure Follow these steps to complete the process. Step Action
1 Access the Student Status Code Validation Form (STVSTST). 2 Enter a two-character code in the Status Code field. 3 Enter a description of the status code in the Description field. 4 Click the Allow Registration checkbox if registration is allowed with the associated
student status. 5 Click the System Required checkbox if this value is system required.
Note: If the System Required checkbox is checked, the validation table record cannot be deleted.
6 Select a status in the Curriculum Status field. 7 Click the Save icon. 8 Click the Exit icon.
© SunGard 2004-2005 Student Admissions Page 40
Section B: Set Up
Lesson: Student Type Code Validation
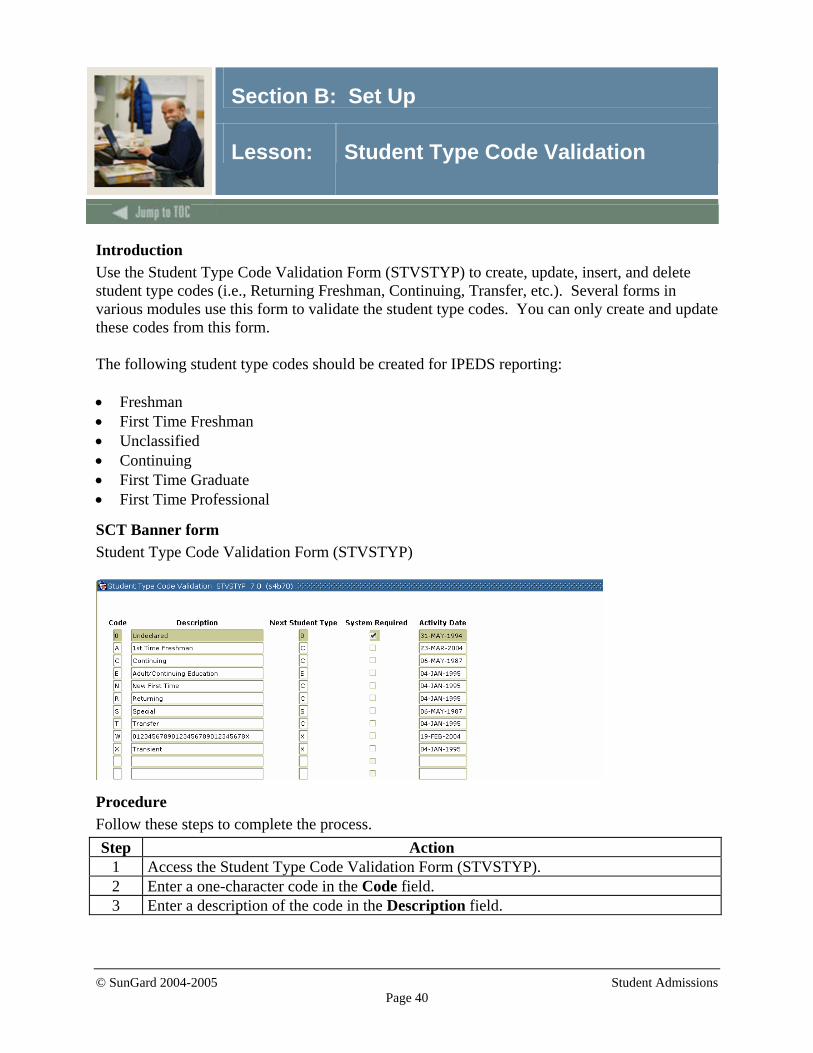
Introduction Use the Student Type Code Validation Form (STVSTYP) to create, update, insert, and delete student type codes (i.e., Returning Freshman, Continuing, Transfer, etc.). Several forms in various modules use this form to validate the student type codes. You can only create and update these codes from this form. The following student type codes should be created for IPEDS reporting: • Freshman • First Time Freshman • Unclassified • Continuing • First Time Graduate • First Time Professional
SCT Banner form Student Type Code Validation Form (STVSTYP)
Procedure Follow these steps to complete the process. Step Action
1 Access the Student Type Code Validation Form (STVSTYP). 2 Enter a one-character code in the Code field. 3 Enter a description of the code in the Description field.
© SunGard 2004-2005 Student Admissions Page 41
Section B: Set Up
Lesson: Student Type Code Validation (Continued)
Procedure, continued
Step Action 4 Enter a code in the Next Student Type field to identify the student type to be assigned
when the Student Type Update Report (SHRTYPE) is run. Example: The Next Student Type for A - First Time Freshman would be C - Continuing. The Next Student Type for an E - Adult Continuing Education Code would be E - Adult Continuing Education since the status for this type of student would not change from year to year.
5 Click the System Required checkbox if this validation table record is required. Examples: First Time Freshman, Continuing. Note: The System Required checkbox is used to set up a default when residency is not entered in the Recruiting module, and the prospect record is pulled to the Admissions module to build the application. If the System Required checkbox is checked, the validation table record cannot be deleted.
6 Repeat steps 2-5 until all codes are set up. 7 Click the Save icon. 8 Click the Exit icon.
© SunGard 2004-2005 Student Admissions Page 42
Section B: Set Up
Lesson: Visa Type Code Validation
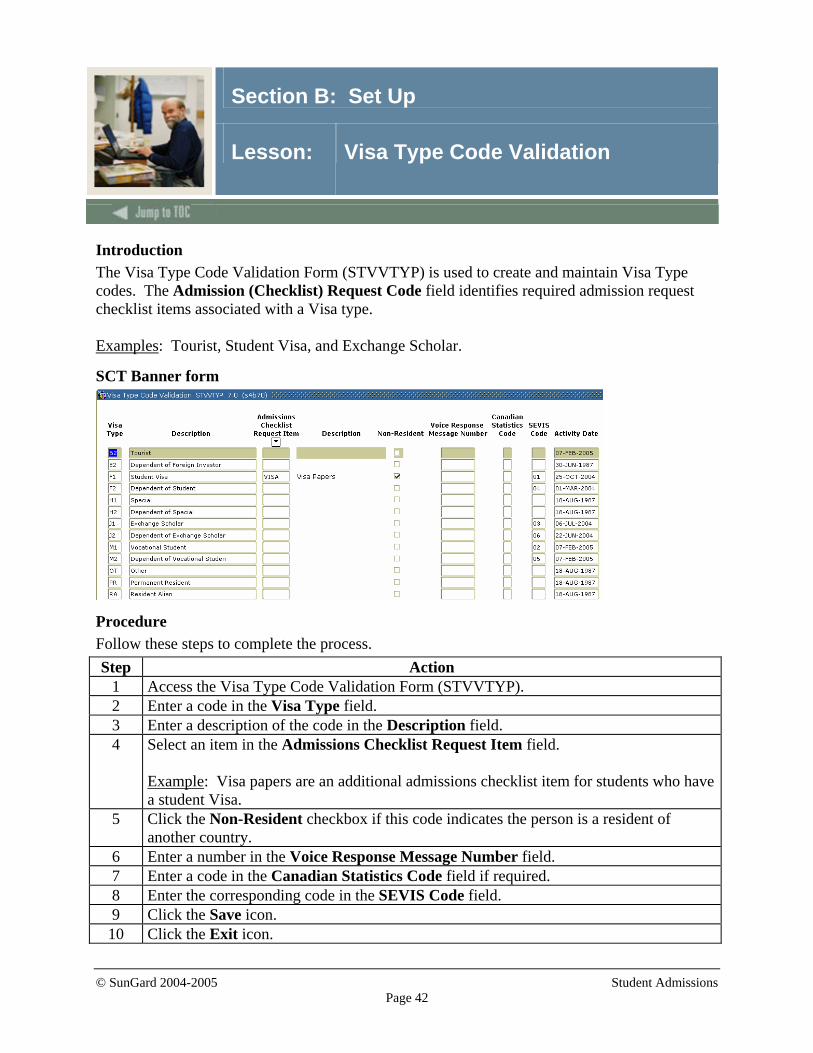
Introduction The Visa Type Code Validation Form (STVVTYP) is used to create and maintain Visa Type codes. The Admission (Checklist) Request Code field identifies required admission request checklist items associated with a Visa type. Examples: Tourist, Student Visa, and Exchange Scholar.
SCT Banner form
Procedure Follow these steps to complete the process. Step Action
1 Access the Visa Type Code Validation Form (STVVTYP). 2 Enter a code in the Visa Type field. 3 Enter a description of the code in the Description field. 4 Select an item in the Admissions Checklist Request Item field.
Example: Visa papers are an additional admissions checklist item for students who have a student Visa.
5 Click the Non-Resident checkbox if this code indicates the person is a resident of another country.
6 Enter a number in the Voice Response Message Number field. 7 Enter a code in the Canadian Statistics Code field if required. 8 Enter the corresponding code in the SEVIS Code field. 9 Click the Save icon. 10 Click the Exit icon.
© SunGard 2004-2005 Student Admissions Page 43
Section B: Set Up
Lesson: Admissions Checklist Rules
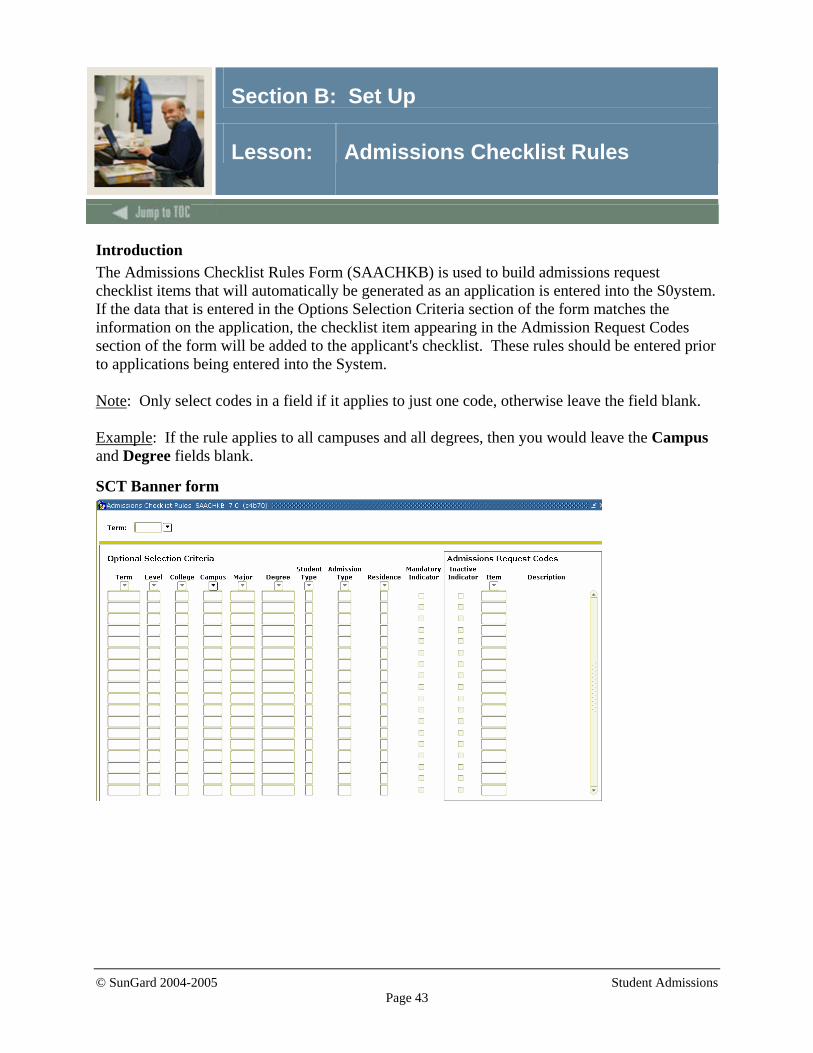
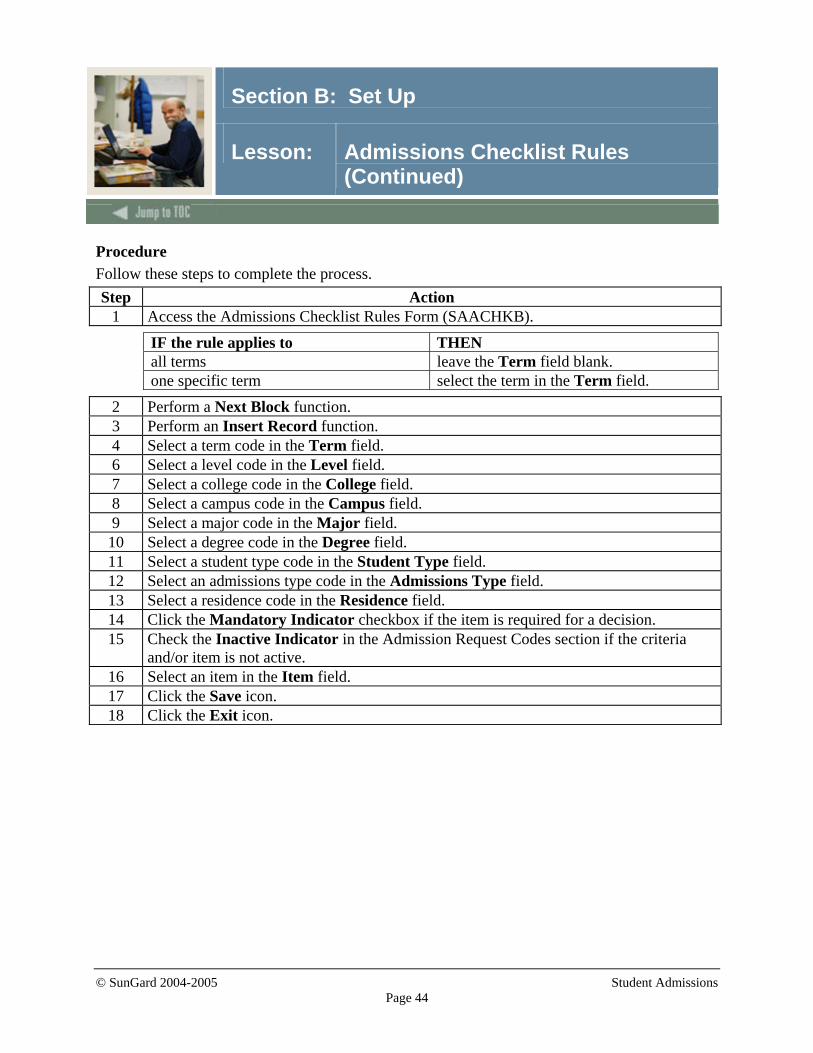
Introduction The Admissions Checklist Rules Form (SAACHKB) is used to build admissions request checklist items that will automatically be generated as an application is entered into the S0ystem. If the data that is entered in the Options Selection Criteria section of the form matches the information on the application, the checklist item appearing in the Admission Request Codes section of the form will be added to the applicant's checklist. These rules should be entered prior to applications being entered into the System. Note: Only select codes in a field if it applies to just one code, otherwise leave the field blank. Example: If the rule applies to all campuses and all degrees, then you would leave the Campus and Degree fields blank.
SCT Banner form
© SunGard 2004-2005 Student Admissions Page 44
Section B: Set Up
Lesson: Admissions Checklist Rules (Continued)
Procedure Follow these steps to complete the process. Step Action
1 Access the Admissions Checklist Rules Form (SAACHKB).
IF the rule applies to THEN all terms leave the Term field blank. one specific term select the term in the Term field.
2 Perform a Next Block function. 3 Perform an Insert Record function. 4 Select a term code in the Term field. 6 Select a level code in the Level field. 7 Select a college code in the College field. 8 Select a campus code in the Campus field. 9 Select a major code in the Major field. 10 Select a degree code in the Degree field. 11 Select a student type code in the Student Type field. 12 Select an admissions type code in the Admissions Type field. 13 Select a residence code in the Residence field. 14 Click the Mandatory Indicator checkbox if the item is required for a decision. 15 Check the Inactive Indicator in the Admission Request Codes section if the criteria
and/or item is not active. 16 Select an item in the Item field. 17 Click the Save icon. 18 Click the Exit icon.

© SunGard 2004-2005 Student Admissions Page 45
Section B: Set Up
Lesson: Admissions Decision Rule
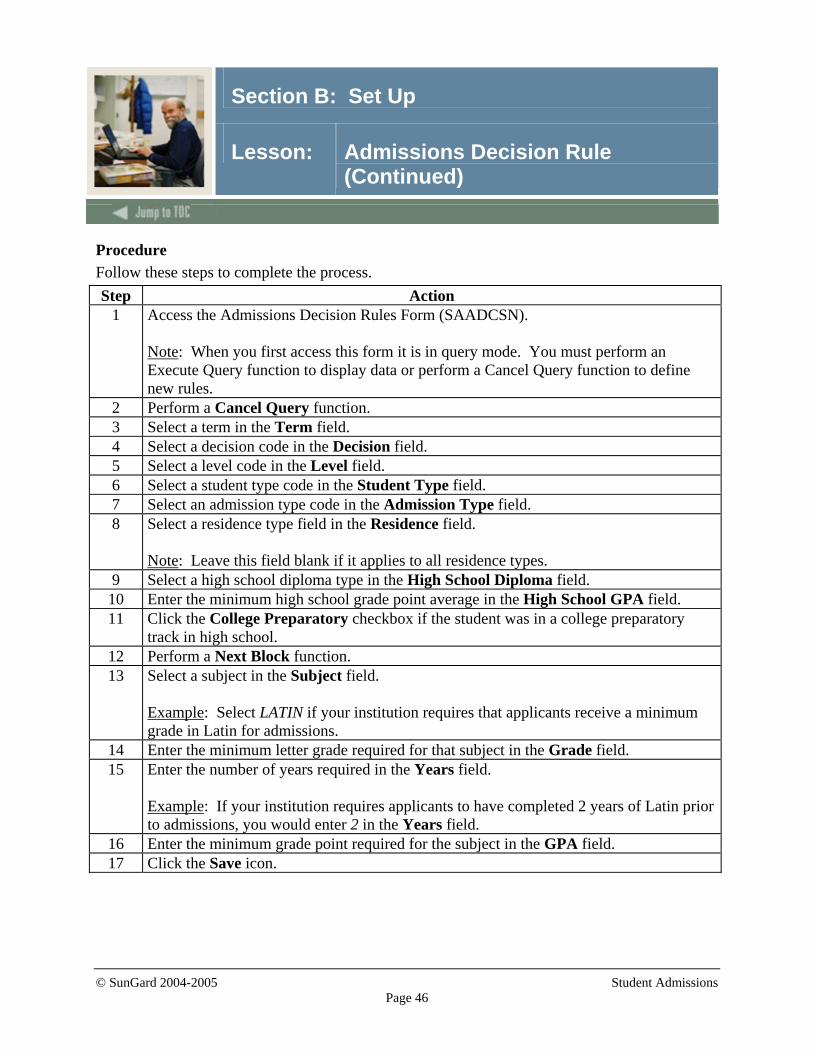
Introduction The Admissions Decision Rules Form (SAADCSN) is used to enter criteria for System-calculated decisions. All student information entered is compared to admission application data. Other areas of the form are used to enter, high school subject(s), test score information, and ratings to be compared to the applicant’s data. Rules should be entered on this form prior to calculating any admission decision. Note: You can create a separate record for each new set of rules for each decision. In other words, multiple records can exist with the same decision code but with a different set of rules. Example: You can create an acceptance rule for high school students and another acceptance rule for returning adults and a third for transfer students. Although the rules are different, the same decision code (acceptance) would be used.
SCT Banner form
© SunGard 2004-2005 Student Admissions Page 46
Section B: Set Up
Lesson: Admissions Decision Rule (Continued)
Procedure Follow these steps to complete the process. Step Action
1 Access the Admissions Decision Rules Form (SAADCSN). Note: When you first access this form it is in query mode. You must perform an Execute Query function to display data or perform a Cancel Query function to define new rules.
2 Perform a Cancel Query function. 3 Select a term in the Term field. 4 Select a decision code in the Decision field. 5 Select a level code in the Level field. 6 Select a student type code in the Student Type field. 7 Select an admission type code in the Admission Type field. 8 Select a residence type field in the Residence field.
Note: Leave this field blank if it applies to all residence types.
9 Select a high school diploma type in the High School Diploma field. 10 Enter the minimum high school grade point average in the High School GPA field. 11 Click the College Preparatory checkbox if the student was in a college preparatory
track in high school. 12 Perform a Next Block function. 13 Select a subject in the Subject field.
Example: Select LATIN if your institution requires that applicants receive a minimum grade in Latin for admissions.
14 Enter the minimum letter grade required for that subject in the Grade field. 15 Enter the number of years required in the Years field.
Example: If your institution requires applicants to have completed 2 years of Latin prior to admissions, you would enter 2 in the Years field.
16 Enter the minimum grade point required for the subject in the GPA field. 17 Click the Save icon.
© SunGard 2004-2005 Student Admissions Page 47
Section B: Set Up
Lesson: Admissions Decision Rule (Continued)
Procedure, continued
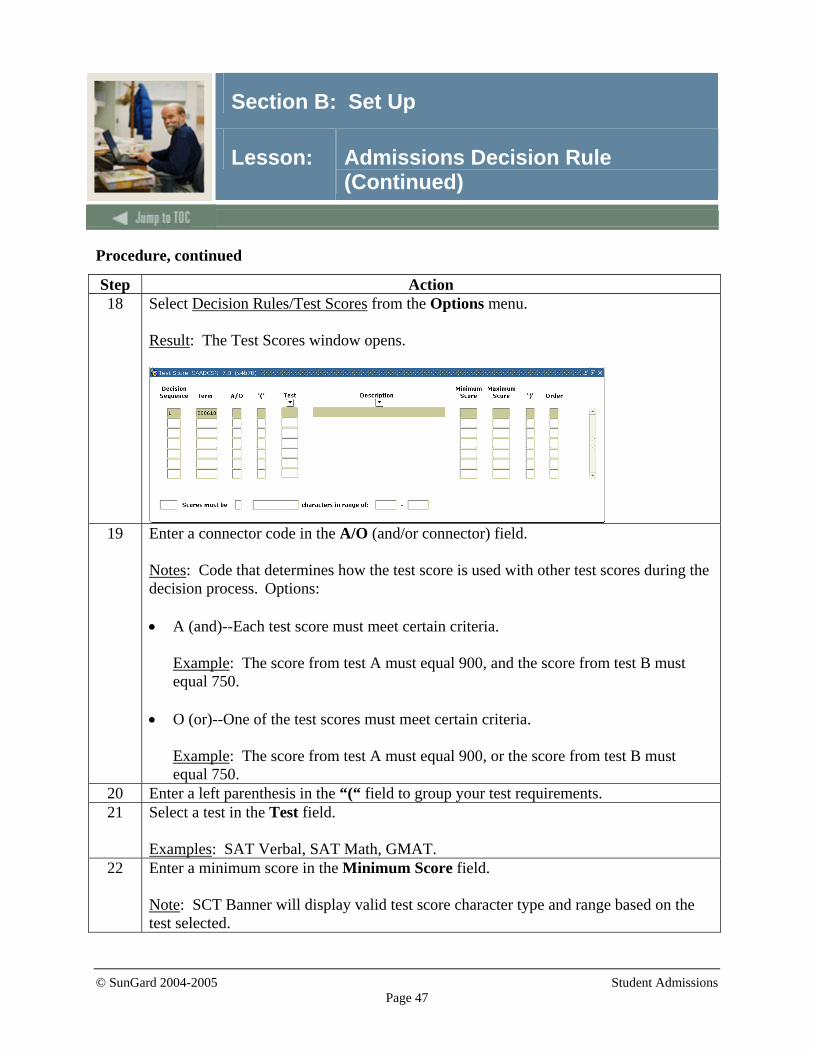
Step Action 18 Select Decision Rules/Test Scores from the Options menu.
Result: The Test Scores window opens.
19 Enter a connector code in the A/O (and/or connector) field.
Notes: Code that determines how the test score is used with other test scores during the decision process. Options: • A (and)--Each test score must meet certain criteria.
Example: The score from test A must equal 900, and the score from test B must equal 750.
• O (or)--One of the test scores must meet certain criteria.
Example: The score from test A must equal 900, or the score from test B must equal 750.
20 Enter a left parenthesis in the “(“ field to group your test requirements. 21 Select a test in the Test field.
Examples: SAT Verbal, SAT Math, GMAT.
22 Enter a minimum score in the Minimum Score field. Note: SCT Banner will display valid test score character type and range based on the test selected.
© SunGard 2004-2005 Student Admissions Page 48
Section B: Set Up
Lesson: Admissions Decision Rule (Continued)
Procedure, continued
Step Action 23 Enter a maximum score in the Maximum Score field. 24 Enter a right parenthesis in the “)“ field to group your test requirements. 25 Enter the order of conditions in the Order field starting with 1. 26 Repeat steps 19-25 for each additional test requirement. 27 Click the Save icon. 28 Click the Exit icon.
© SunGard 2004-2005 Student Admissions Page 49
Section B: Set Up
Lesson: Quick Entry Rules
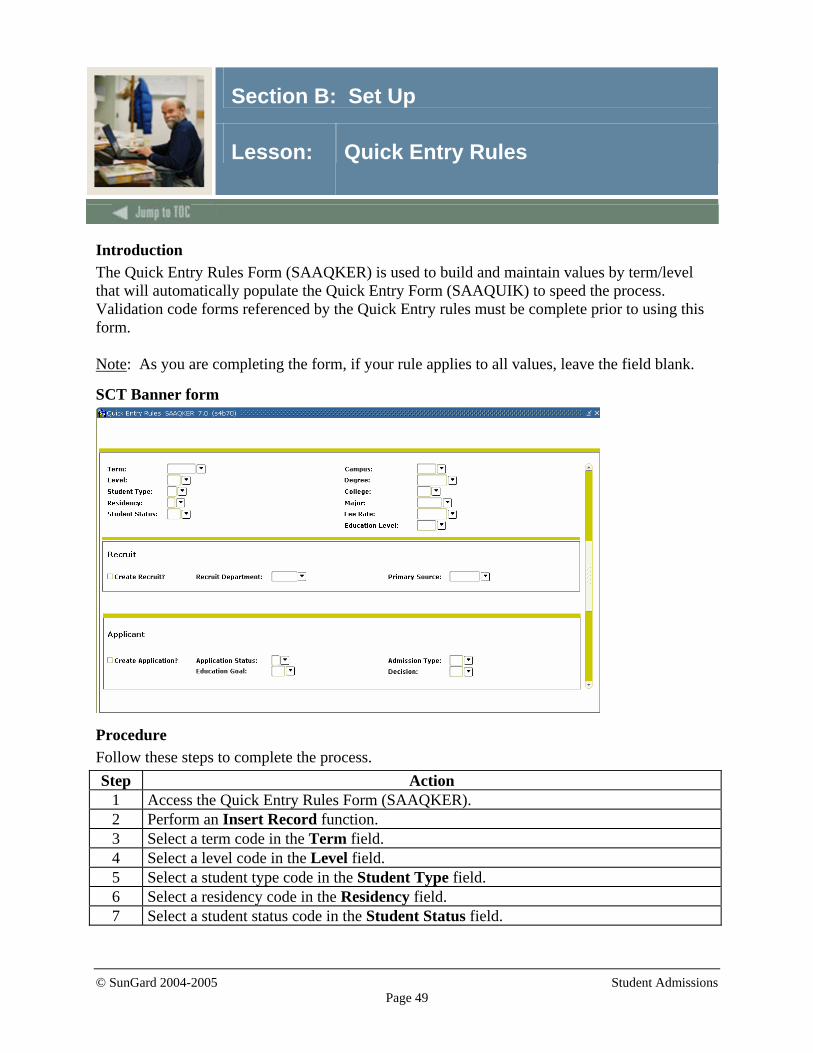
Introduction The Quick Entry Rules Form (SAAQKER) is used to build and maintain values by term/level that will automatically populate the Quick Entry Form (SAAQUIK) to speed the process. Validation code forms referenced by the Quick Entry rules must be complete prior to using this form. Note: As you are completing the form, if your rule applies to all values, leave the field blank.
SCT Banner form
Procedure Follow these steps to complete the process. Step Action
1 Access the Quick Entry Rules Form (SAAQKER). 2 Perform an Insert Record function. 3 Select a term code in the Term field. 4 Select a level code in the Level field. 5 Select a student type code in the Student Type field. 6 Select a residency code in the Residency field. 7 Select a student status code in the Student Status field.
© SunGard 2004-2005 Student Admissions Page 50
Section B: Set Up
Lesson: Quick Entry Rules (Continued)
Procedure, continued
Step Action 8 Select a campus code in the Campus field. 9 Select a college code in the College field. 10 Select a major code in the Major field. 11 Select a fee rate code in the Fee Rate field. 12 Select an education level code in the Education Level field. 13 Click the Create Recruit? checkbox if a recruiting record is to be created by the system
for the applicant associated with the quick entry rule. 14 Select the recruiting department in the Recruit Department field. 15 Click the Create Application? checkbox if an application record is to be created by the
system for the applicant associated with the quick entry rule. 16 Click the Save icon. 17 Click the Exit icon.
© SunGard 2004-2005 Student Admissions Page 51
Section B: Set Up
Lesson: Self Check
Directions Use the information you have learned in this workbook to complete this self-check activity.
Question 1 On which form would you indicate that a duplicate letter should not go to the same student in the same term?
Question 2 Name at least two student type codes that should be created on the Student Type Code Validation Form (STVSTYP) for IPEDS reporting.
Question 3 Where would you enter the institution’s admissions policies to be used by the System when calculating a decision on an applicant?
© SunGard 2004-2005 Student Admissions Page 52
Section B: Set Up
Lesson: Answer Key for Self Check
Question 1 On which form would you indicate that a duplicate letter should not go to the same student in the same term? The Letter Code Validation Form (GTVLETR).
Question 2 Name at least two student type codes that should be created on the Student Type Code Validation Form (STVSTYP) for IPEDS reporting. The following student type codes should be created for IPEDS reporting: Freshman First Time Freshman Unclassified Continuing First Time Graduate First Time Professional
Question 3 Where would you enter the institution’s admissions policies to be used by the System when calculating a decision on an applicant? The Admissions Decision Rules Form (SAADCSN) is used to enter the organization's admissions policies.
© SunGard 2004-2005 Student Admissions Page 53
Section C: Day-to-Day Operations
Lesson: Overview
Purpose The purpose of this section is to explain the regular process and detail the procedures to handle admissions procedures at your institution.
Intended audience The audience intended for this workbook is the staff of the Admissions office and the Recruitment office who maintain biographic, demographic and applicant data for prospects and applicants.
Objectives At the end of this section, you will be able to • run the Admissions Decision Criteria Report • admit a student • withdrawal a student • assign a decision code • run the Admissions Decision Calculation Report • perform a quick admit • roll prospect information to Admissions.
Prerequisites To complete this workbook section, you should have • completed the SCT Education Practices computer-based training (CBT) tutorial “SCT
Banner 7.x Fundamentals,” or have equivalent experience navigating in the SCT Banner system
• completed the Curriculum, Advising, and Program Planning (CAPP) training workbook.
Section contents Overview ................................................................................................................................53 Running the Admissions Decision Criteria Report ................................................................55 Entering an Applicant.............................................................................................................57 Withdrawing an Applicant .....................................................................................................64
© SunGard 2004-2005 Student Admissions Page 54
Section C: Day-to-Day Operations
Lesson: Overview (Continued)
Assigning a Decision Code ....................................................................................................66 Running the Admissions Decision Calculation Report ..........................................................68 Rolling Prospect Information to Admissions .........................................................................71 Performing a Quick Admit .....................................................................................................73 Summary ................................................................................................................................77 Self Check ..............................................................................................................................78 Answer Key for Self Check....................................................................................................79
© SunGard 2004-2005 Student Admissions Page 55
Section C: Day-to-Day Operations
Lesson: Running the Admissions Decision Criteria Report
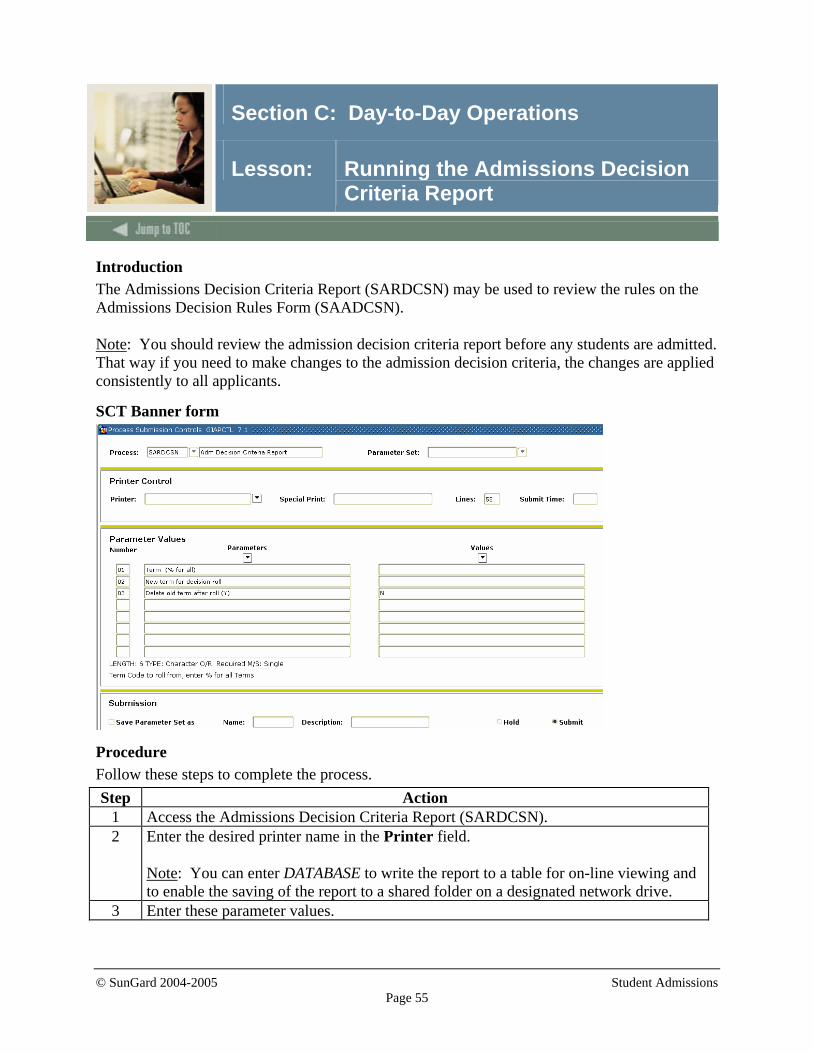
Introduction The Admissions Decision Criteria Report (SARDCSN) may be used to review the rules on the Admissions Decision Rules Form (SAADCSN). Note: You should review the admission decision criteria report before any students are admitted. That way if you need to make changes to the admission decision criteria, the changes are applied consistently to all applicants.
SCT Banner form
Procedure Follow these steps to complete the process. Step Action
1 Access the Admissions Decision Criteria Report (SARDCSN). 2 Enter the desired printer name in the Printer field.
Note: You can enter DATABASE to write the report to a table for on-line viewing and to enable the saving of the report to a shared folder on a designated network drive.
3 Enter these parameter values.
© SunGard 2004-2005 Student Admissions Page 56
Section C: Day-to-Day Operations
Lesson: Running the Admissions Decision Criteria Report (Continued)
Procedure, continued
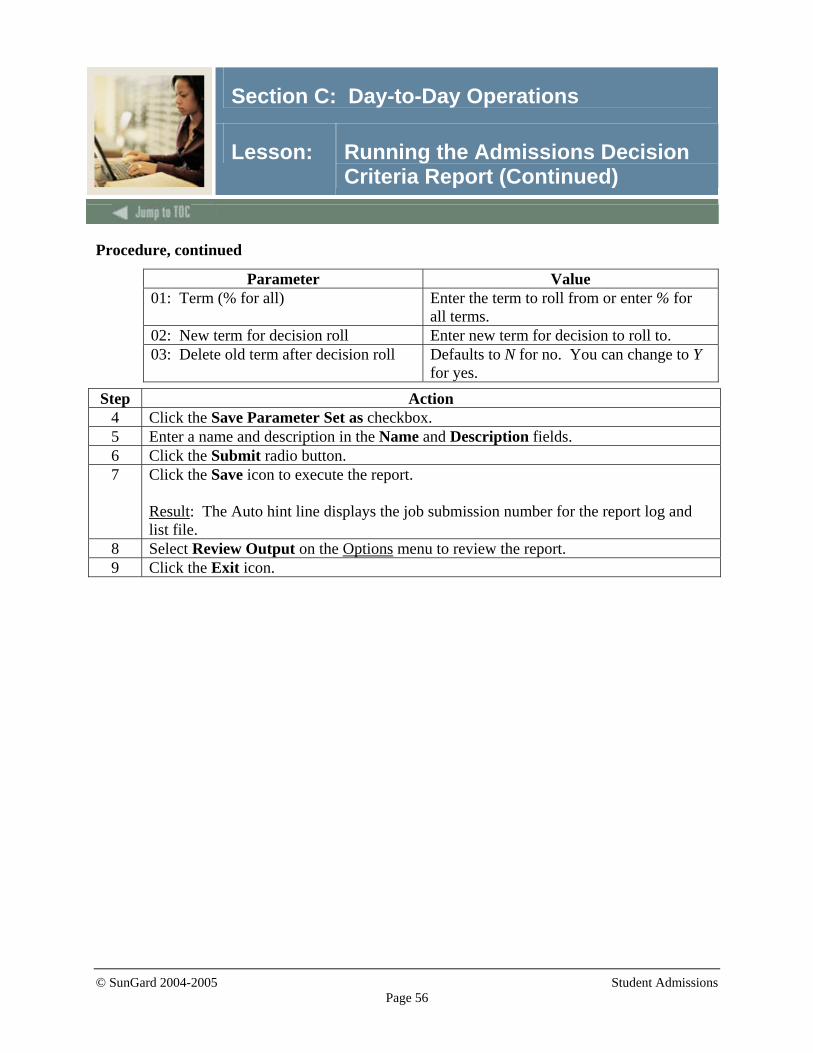
Parameter Value 01: Term (% for all) Enter the term to roll from or enter % for
all terms. 02: New term for decision roll Enter new term for decision to roll to. 03: Delete old term after decision roll Defaults to N for no. You can change to Y
for yes.
Step Action 4 Click the Save Parameter Set as checkbox. 5 Enter a name and description in the Name and Description fields. 6 Click the Submit radio button. 7 Click the Save icon to execute the report.
Result: The Auto hint line displays the job submission number for the report log and list file.
8 Select Review Output on the Options menu to review the report. 9 Click the Exit icon.
© SunGard 2004-2005 Student Admissions Page 57
Section C: Day-to-Day Operations
Lesson: Entering an Applicant
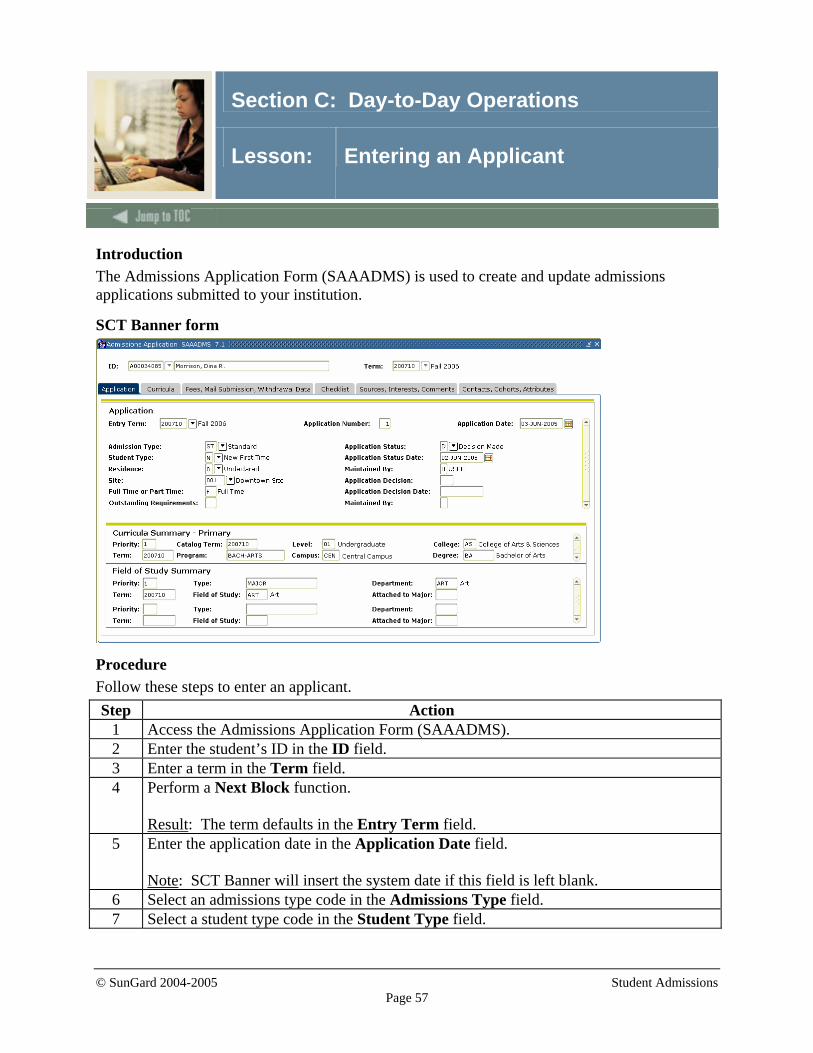
Introduction The Admissions Application Form (SAAADMS) is used to create and update admissions applications submitted to your institution.
SCT Banner form
Procedure Follow these steps to enter an applicant. Step Action
1 Access the Admissions Application Form (SAAADMS). 2 Enter the student’s ID in the ID field. 3 Enter a term in the Term field. 4 Perform a Next Block function.
Result: The term defaults in the Entry Term field.
5 Enter the application date in the Application Date field. Note: SCT Banner will insert the system date if this field is left blank.
6 Select an admissions type code in the Admissions Type field. 7 Select a student type code in the Student Type field.
© SunGard 2004-2005 Student Admissions Page 58
Section C: Day-to-Day Operations
Lesson: Entering an Applicant (Continued)
Procedure, continued
Step Action 8 Select a residence type code in the Residence field. 9 Select the site the student wants to attend in the Site field. 10 Enter F for Full Time or P for Part Time in the Full or Part Time field. 11 Enter the application status in the Application Status field.
Result: The Applicant Status Date and Maintained by fields will be filled in by SCT Banner.
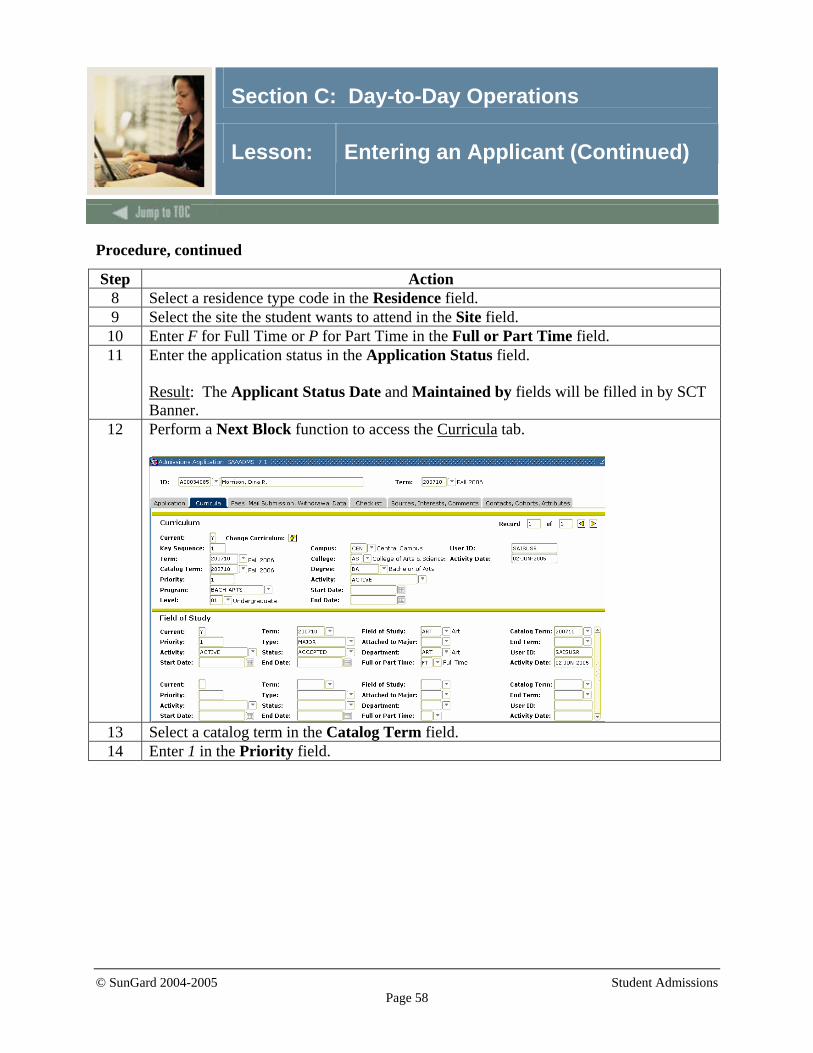
12 Perform a Next Block function to access the Curricula tab.
13 Select a catalog term in the Catalog Term field. 14 Enter 1 in the Priority field.
© SunGard 2004-2005 Student Admissions Page 59
Section C: Day-to-Day Operations
Lesson: Entering an Applicant (Continued)
Procedure, continued
Step Action 15 Select a program code in the Program field and select Base Curriculum Rules by
Program. Result: By double-clicking and choosing this option, the information that is built in the curriculum rules will default and fill in the SCT Banner fields. This saves on data entry and ensures that the appropriate data is entered by the Admissions staff. Note: If you select Base Curriculum Rules by Program, go to Step 24. Example: If you select BA-History in the Program field, all the data for a History Major is automatically entered.
16 Select a level code in the Level field. 17 Select a campus code in the Campus field. 18 Select a college code in the College field. 19 Select a degree code in the Degree field. 20 Enter a 1 in the Field of Study Priority field.
Note: To enter a minor, repeat steps 20-25 And enter 2 in the Field of Study Priority field.
21 Select Major in the Type field. Notes: You must enter at least one major. If you were entering a minor, you would select Minor in the Type field.
22 Select a field of study in the Field of Study field. 23 Select a department code in the Department field. 24 Click the Save icon. 25 Click the OK button. 26 Click the Save icon to accept the Communication Plan. 27 Click the Return button to close the Communication Plan Change window.
© SunGard 2004-2005 Student Admissions Page 60
Section C: Day-to-Day Operations
Lesson: Entering an Applicant (Continued)
Procedure, continued
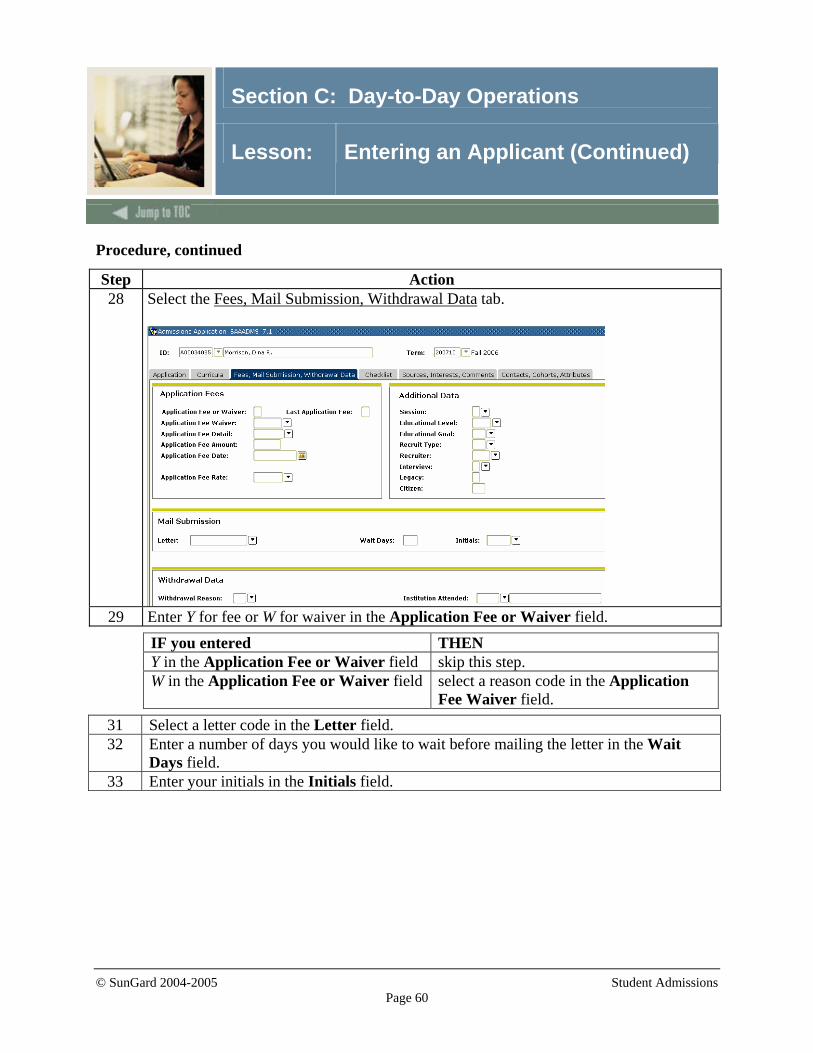
Step Action 28 Select the Fees, Mail Submission, Withdrawal Data tab.
29 Enter Y for fee or W for waiver in the Application Fee or Waiver field.
IF you entered THEN Y in the Application Fee or Waiver field skip this step. W in the Application Fee or Waiver field select a reason code in the Application
Fee Waiver field.
31 Select a letter code in the Letter field. 32 Enter a number of days you would like to wait before mailing the letter in the Wait
Days field. 33 Enter your initials in the Initials field.
© SunGard 2004-2005 Student Admissions Page 61
Section C: Day-to-Day Operations
Lesson: Entering an Applicant (Continued)
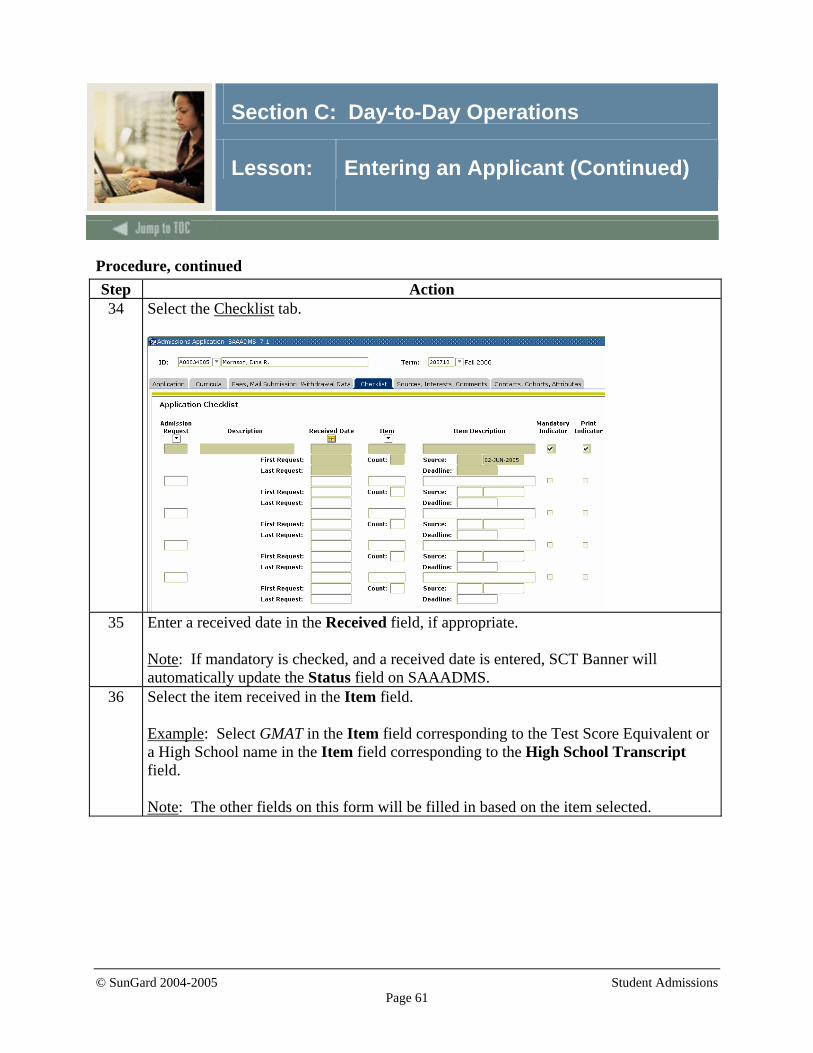
Procedure, continued Step Action 34 Select the Checklist tab.
35 Enter a received date in the Received field, if appropriate.
Note: If mandatory is checked, and a received date is entered, SCT Banner will automatically update the Status field on SAAADMS.
36 Select the item received in the Item field. Example: Select GMAT in the Item field corresponding to the Test Score Equivalent or a High School name in the Item field corresponding to the High School Transcript field. Note: The other fields on this form will be filled in based on the item selected.
© SunGard 2004-2005 Student Admissions Page 62
Section C: Day-to-Day Operations
Lesson: Entering an Applicant (Continued)
Procedure, continued
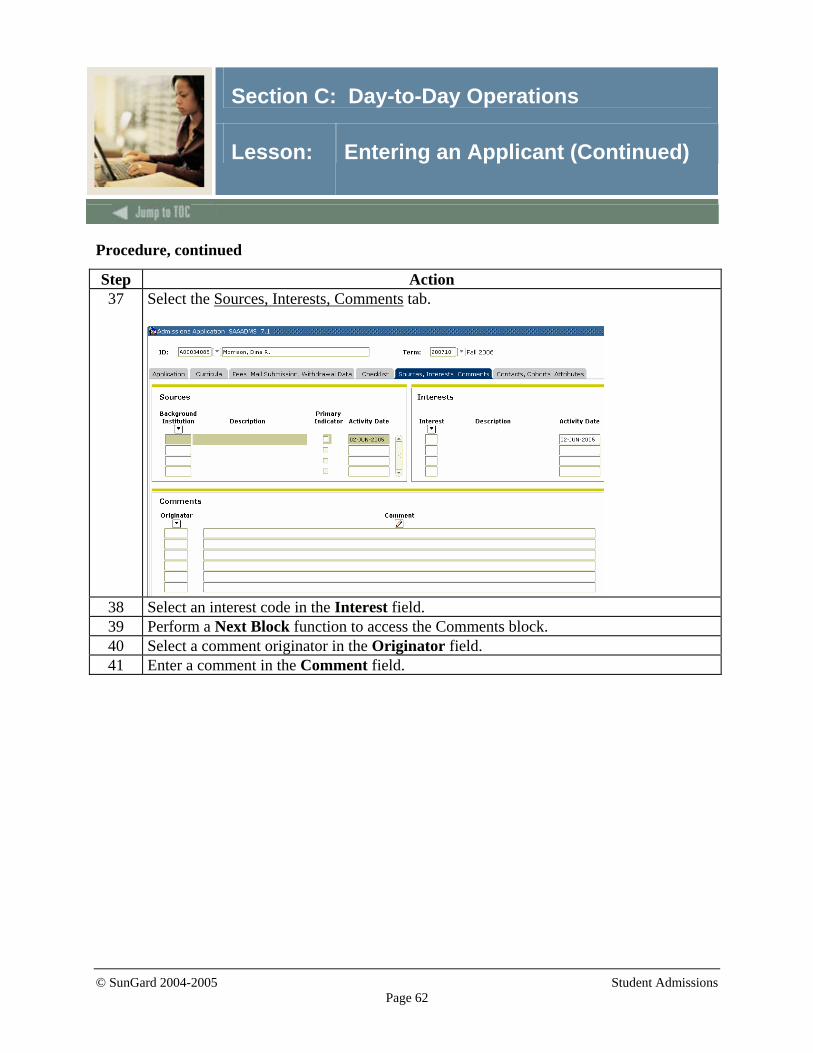
Step Action 37 Select the Sources, Interests, Comments tab.
38 Select an interest code in the Interest field. 39 Perform a Next Block function to access the Comments block. 40 Select a comment originator in the Originator field. 41 Enter a comment in the Comment field.
© SunGard 2004-2005 Student Admissions Page 63
Section C: Day-to-Day Operations
Lesson: Entering an Applicant (Continued)
Procedure, continued
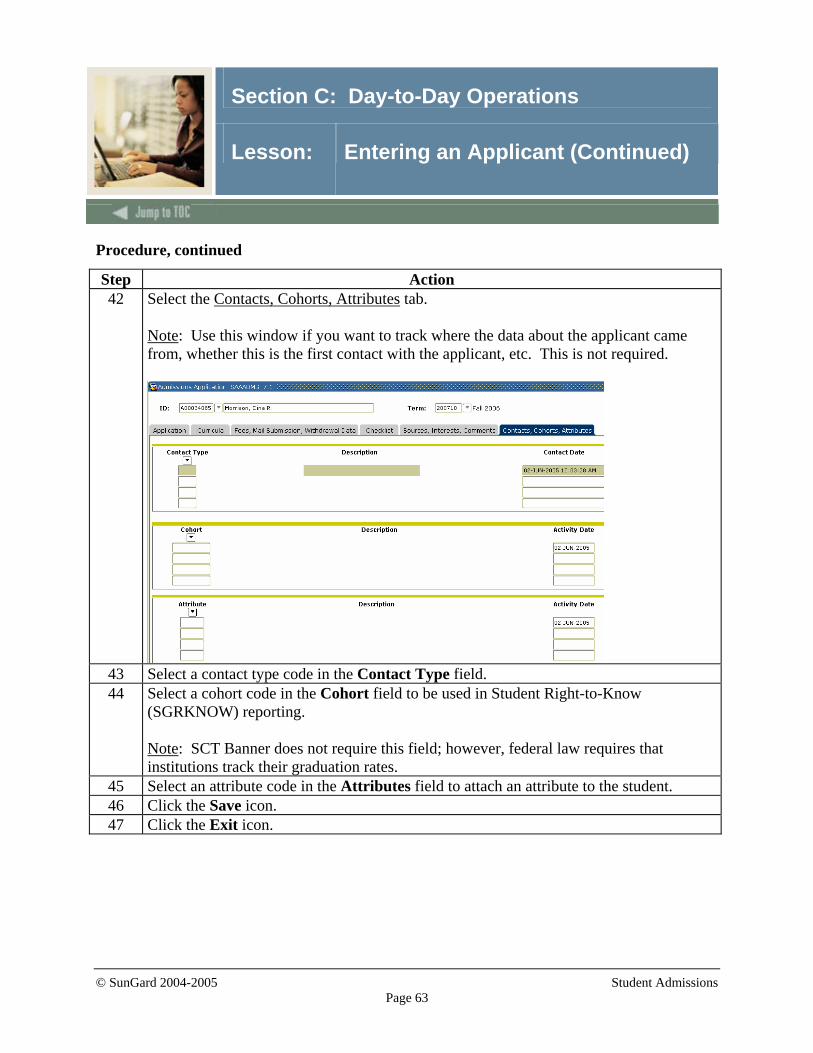
Step Action 42 Select the Contacts, Cohorts, Attributes tab.
Note: Use this window if you want to track where the data about the applicant came from, whether this is the first contact with the applicant, etc. This is not required.
43 Select a contact type code in the Contact Type field. 44 Select a cohort code in the Cohort field to be used in Student Right-to-Know
(SGRKNOW) reporting. Note: SCT Banner does not require this field; however, federal law requires that institutions track their graduation rates.
45 Select an attribute code in the Attributes field to attach an attribute to the student. 46 Click the Save icon. 47 Click the Exit icon.
© SunGard 2004-2005 Student Admissions Page 64
Section C: Day-to-Day Operations
Lesson: Withdrawing an Applicant
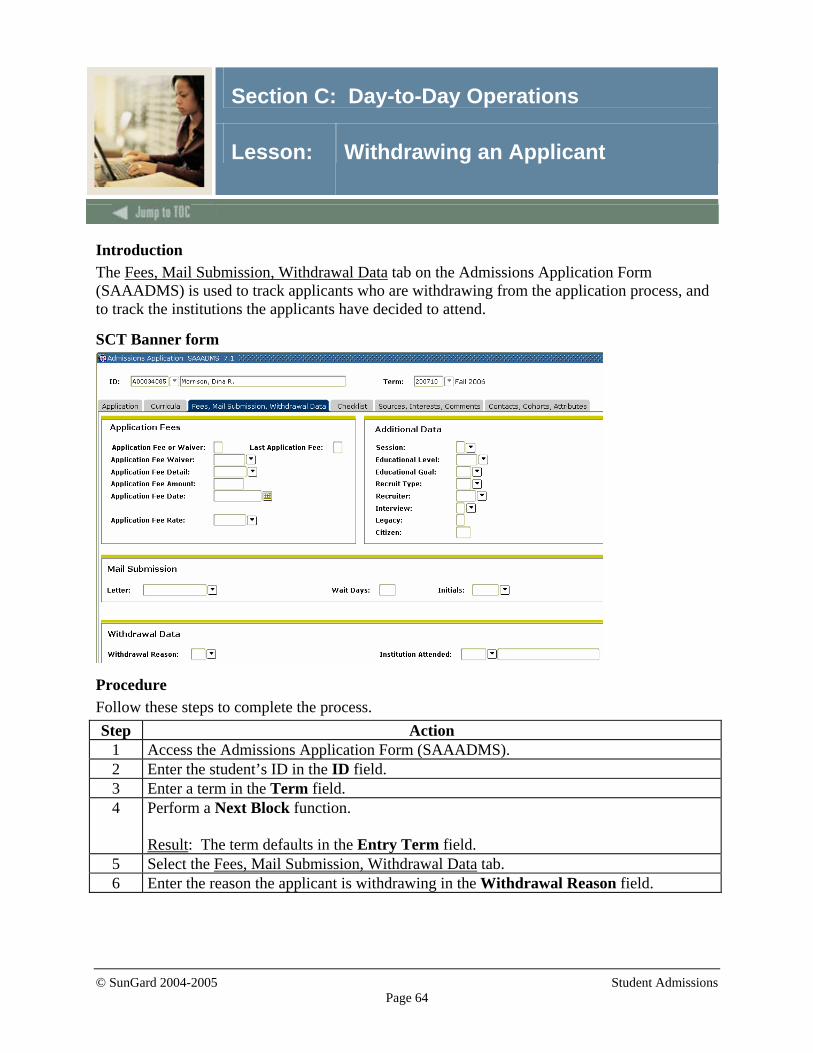
Introduction The Fees, Mail Submission, Withdrawal Data tab on the Admissions Application Form (SAAADMS) is used to track applicants who are withdrawing from the application process, and to track the institutions the applicants have decided to attend.
SCT Banner form
Procedure Follow these steps to complete the process. Step Action
1 Access the Admissions Application Form (SAAADMS). 2 Enter the student’s ID in the ID field. 3 Enter a term in the Term field. 4 Perform a Next Block function.
Result: The term defaults in the Entry Term field.
5 Select the Fees, Mail Submission, Withdrawal Data tab. 6 Enter the reason the applicant is withdrawing in the Withdrawal Reason field.
© SunGard 2004-2005 Student Admissions Page 65
Section C: Day-to-Day Operations
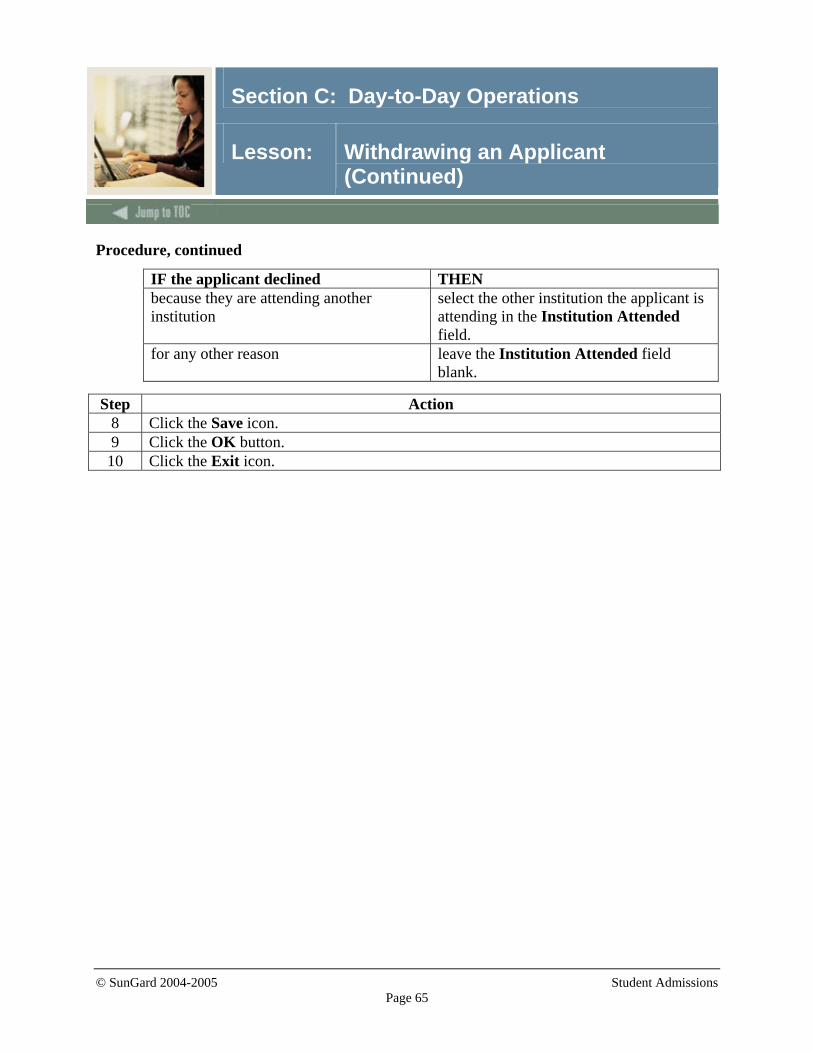
Lesson: Withdrawing an Applicant (Continued)
Procedure, continued
IF the applicant declined THEN because they are attending another institution
select the other institution the applicant is attending in the Institution Attended field.
for any other reason leave the Institution Attended field blank.
Step Action 8 Click the Save icon. 9 Click the OK button. 10 Click the Exit icon.
© SunGard 2004-2005 Student Admissions Page 66
Section C: Day-to-Day Operations
Lesson: Assigning a Decision Code
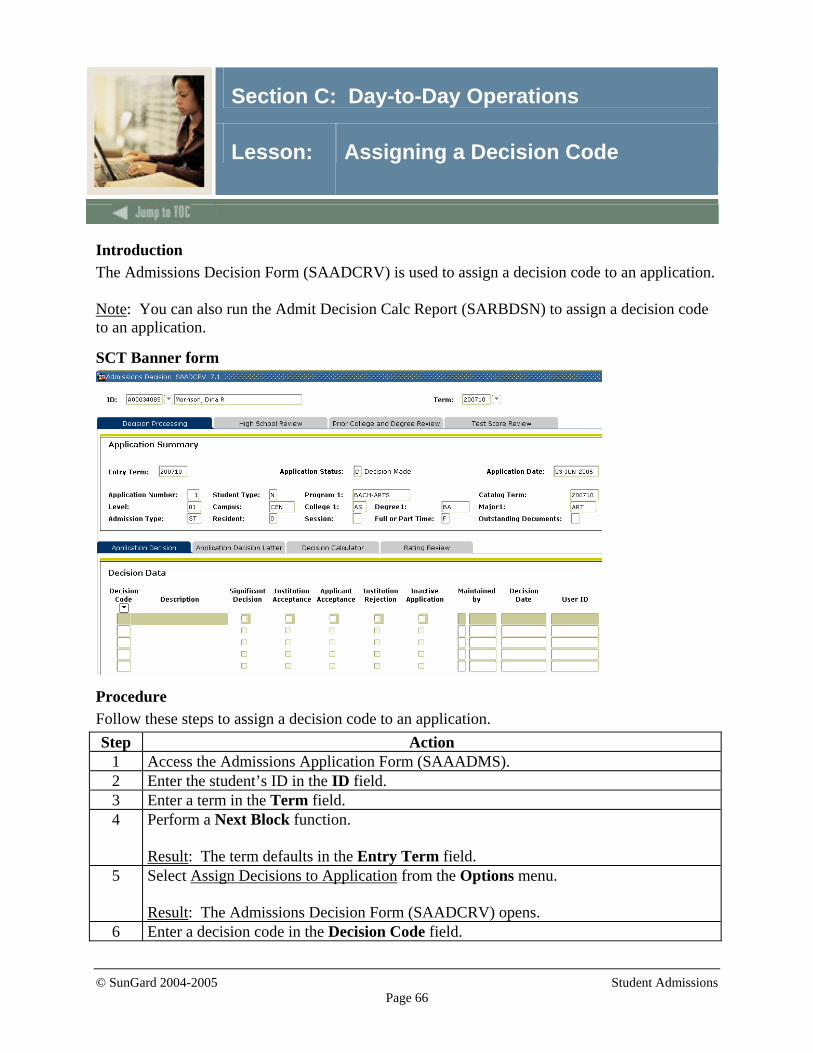
Introduction The Admissions Decision Form (SAADCRV) is used to assign a decision code to an application. Note: You can also run the Admit Decision Calc Report (SARBDSN) to assign a decision code to an application.
SCT Banner form
Procedure Follow these steps to assign a decision code to an application. Step Action
1 Access the Admissions Application Form (SAAADMS). 2 Enter the student’s ID in the ID field. 3 Enter a term in the Term field. 4 Perform a Next Block function.
Result: The term defaults in the Entry Term field.
5 Select Assign Decisions to Application from the Options menu. Result: The Admissions Decision Form (SAADCRV) opens.
6 Enter a decision code in the Decision Code field.
© SunGard 2004-2005 Student Admissions Page 67
Section C: Day-to-Day Operations
Lesson: Assigning a Decision Code (Continued)
Procedure, continued
Step Action 7 Click the Significant Decision checkbox if this is a significant decision.
Note: Once you enter a significant decision (e.g., Applicant Acceptance) and save, this will create a General Student Record. Warning: After the General student record is created, changes made in the Admissions module do not go forward to General Student record. Changes going forward need to be made on either the Registration Form (SFAREGS) or the General Student record itself.
8 Click the Save icon. 9 Click the Exit icon to return to the Admissions Application Form (SAAADMS). 10 Click the Exit icon.
© SunGard 2004-2005 Student Admissions Page 68
Section C: Day-to-Day Operations
Lesson: Running the Admissions Decision Calculation Report
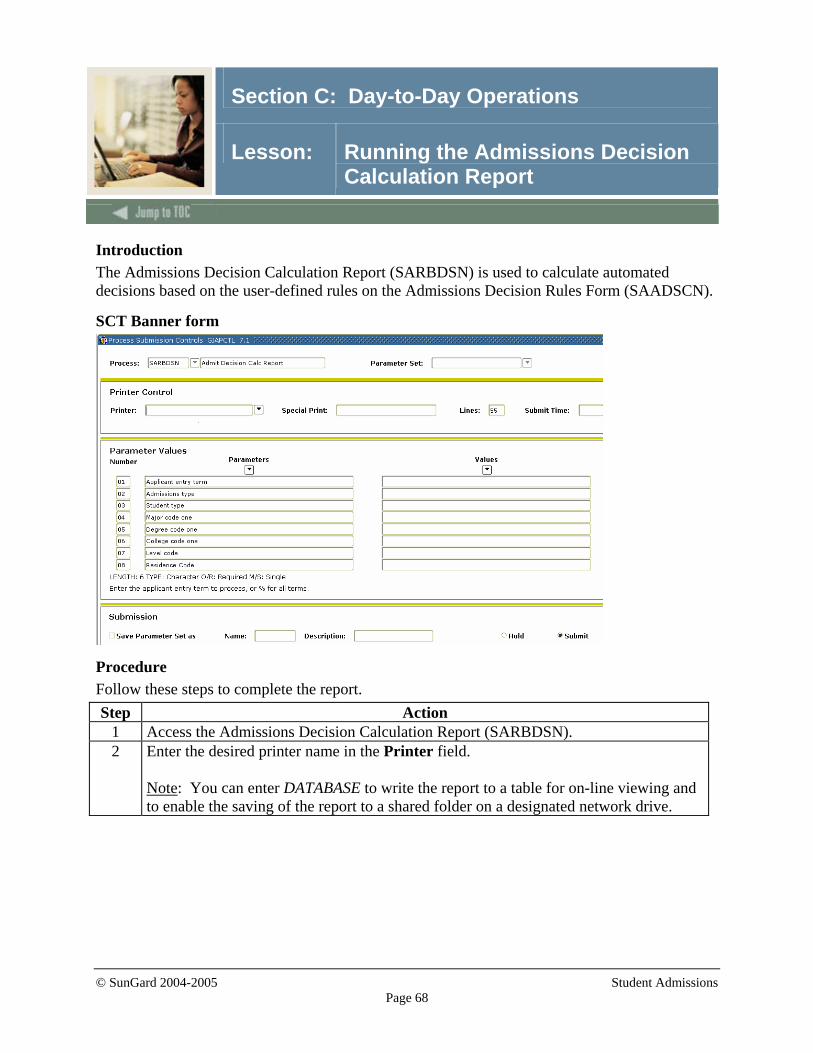
Introduction The Admissions Decision Calculation Report (SARBDSN) is used to calculate automated decisions based on the user-defined rules on the Admissions Decision Rules Form (SAADSCN).
SCT Banner form
Procedure Follow these steps to complete the report. Step Action
1 Access the Admissions Decision Calculation Report (SARBDSN). 2 Enter the desired printer name in the Printer field.
Note: You can enter DATABASE to write the report to a table for on-line viewing and to enable the saving of the report to a shared folder on a designated network drive.
© SunGard 2004-2005 Student Admissions Page 69
Section C: Day-to-Day Operations
Lesson: Running the Admissions Decision Calculation Report (Continued)
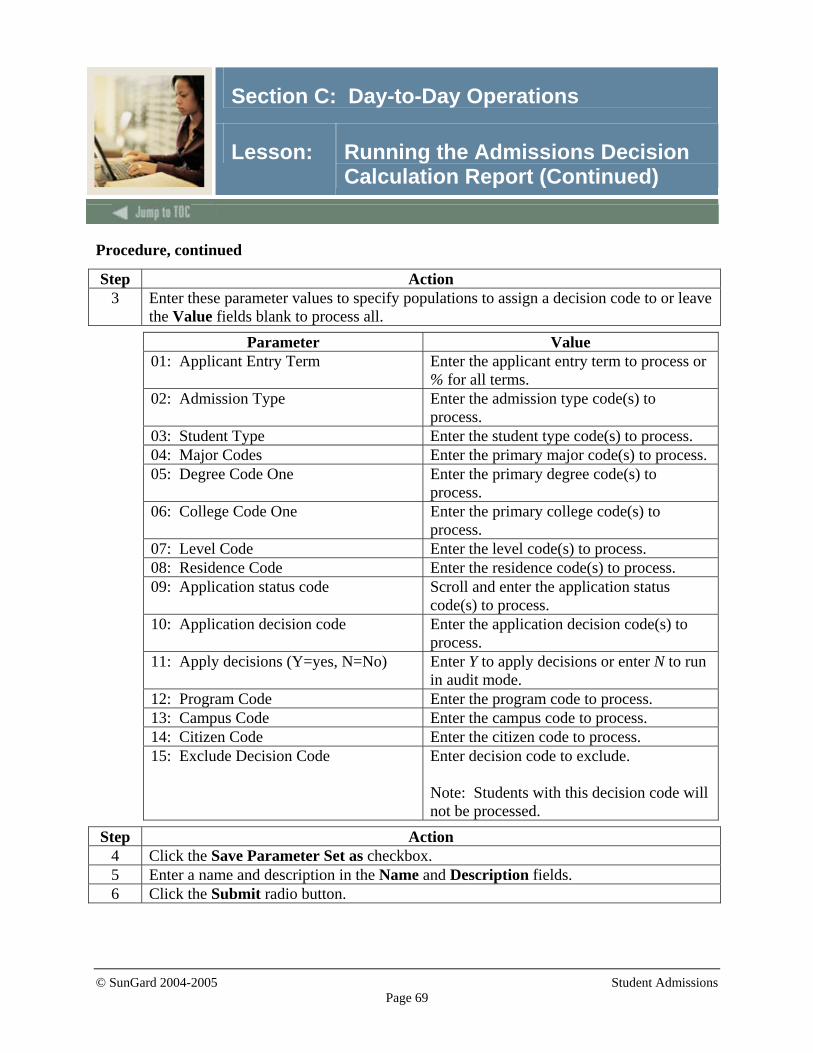
Procedure, continued
Step Action 3 Enter these parameter values to specify populations to assign a decision code to or leave
the Value fields blank to process all.
Parameter Value 01: Applicant Entry Term Enter the applicant entry term to process or
% for all terms. 02: Admission Type Enter the admission type code(s) to
process. 03: Student Type Enter the student type code(s) to process. 04: Major Codes Enter the primary major code(s) to process. 05: Degree Code One Enter the primary degree code(s) to
process. 06: College Code One Enter the primary college code(s) to
process. 07: Level Code Enter the level code(s) to process. 08: Residence Code Enter the residence code(s) to process. 09: Application status code Scroll and enter the application status
code(s) to process. 10: Application decision code Enter the application decision code(s) to
process. 11: Apply decisions (Y=yes, N=No) Enter Y to apply decisions or enter N to run
in audit mode. 12: Program Code Enter the program code to process. 13: Campus Code Enter the campus code to process. 14: Citizen Code Enter the citizen code to process. 15: Exclude Decision Code Enter decision code to exclude.
Note: Students with this decision code will not be processed.
Step Action 4 Click the Save Parameter Set as checkbox. 5 Enter a name and description in the Name and Description fields. 6 Click the Submit radio button.
© SunGard 2004-2005 Student Admissions Page 70
Section C: Day-to-Day Operations
Lesson: Running the Admissions Decision Calculation Report (Continued)
Procedure, continued
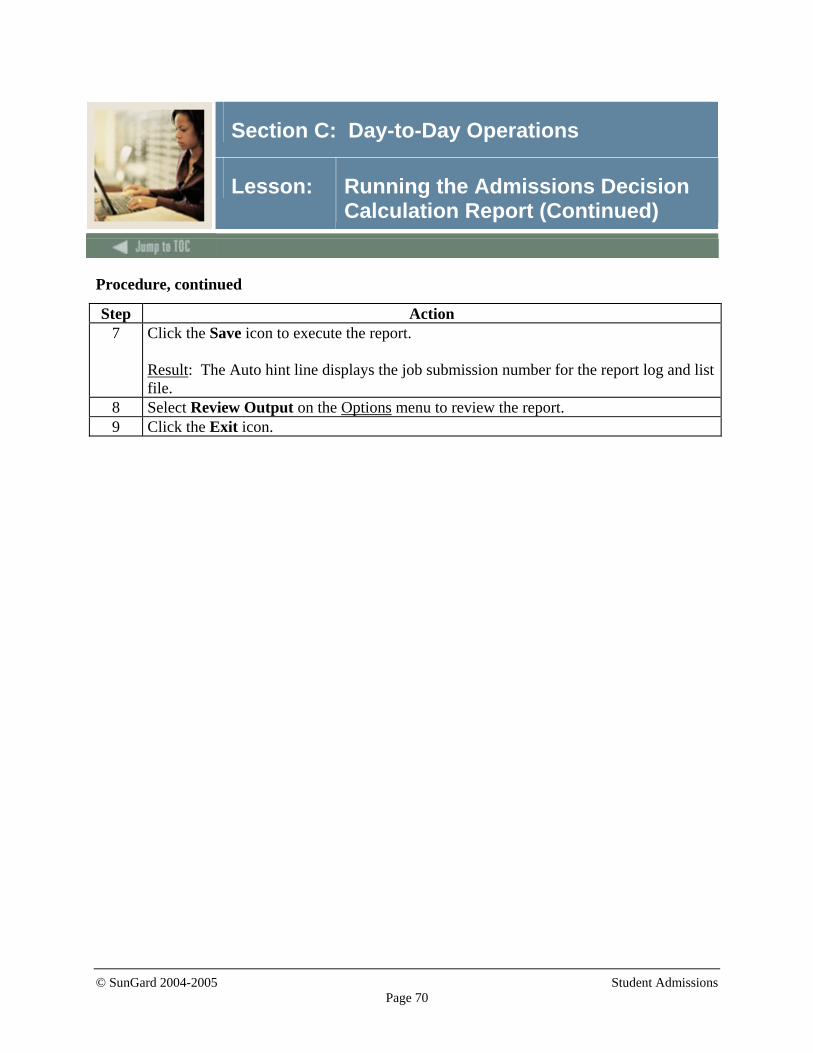
Step Action 7 Click the Save icon to execute the report.
Result: The Auto hint line displays the job submission number for the report log and list file.
8 Select Review Output on the Options menu to review the report. 9 Click the Exit icon.
© SunGard 2004-2005 Student Admissions Page 71
Section C: Day-to-Day Operations
Lesson: Rolling Prospect Information to Admissions
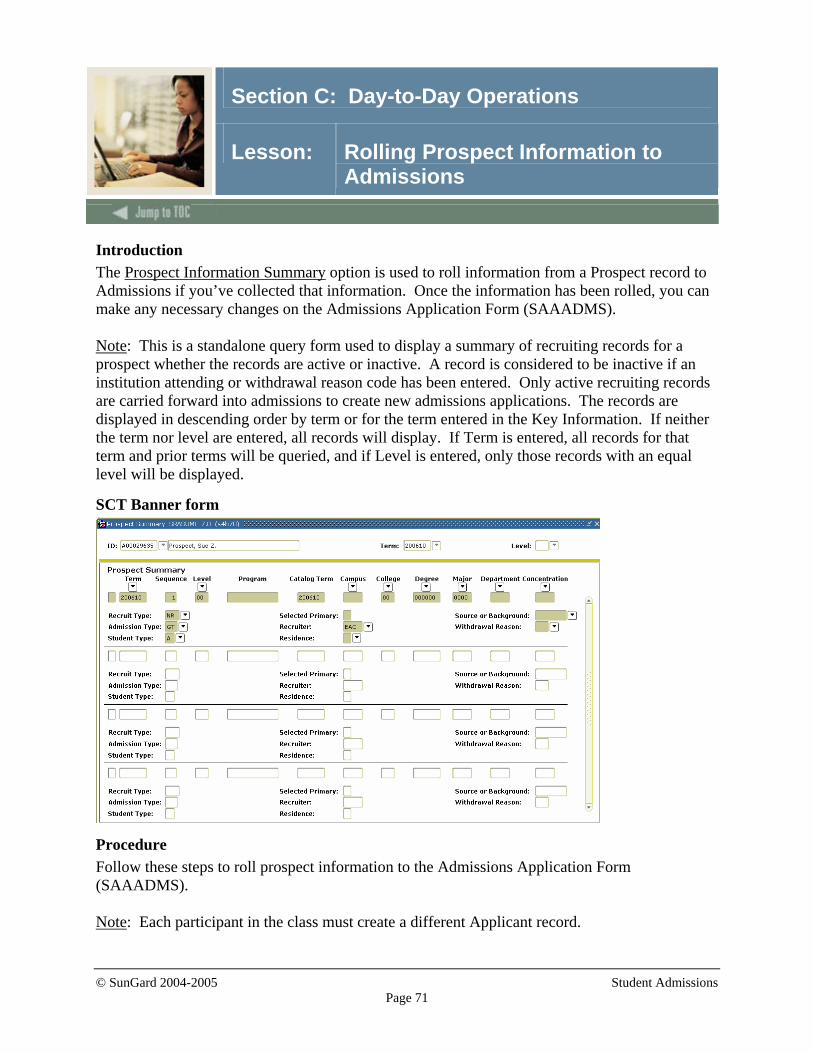
Introduction The Prospect Information Summary option is used to roll information from a Prospect record to Admissions if you’ve collected that information. Once the information has been rolled, you can make any necessary changes on the Admissions Application Form (SAAADMS). Note: This is a standalone query form used to display a summary of recruiting records for a prospect whether the records are active or inactive. A record is considered to be inactive if an institution attending or withdrawal reason code has been entered. Only active recruiting records are carried forward into admissions to create new admissions applications. The records are displayed in descending order by term or for the term entered in the Key Information. If neither the term nor level are entered, all records will display. If Term is entered, all records for that term and prior terms will be queried, and if Level is entered, only those records with an equal level will be displayed.
SCT Banner form
Procedure Follow these steps to roll prospect information to the Admissions Application Form (SAAADMS). Note: Each participant in the class must create a different Applicant record.
© SunGard 2004-2005 Student Admissions Page 72
Section C: Day-to-Day Operations
Lesson: Rolling Prospect Information to Admissions (Continued)
Procedure, continued
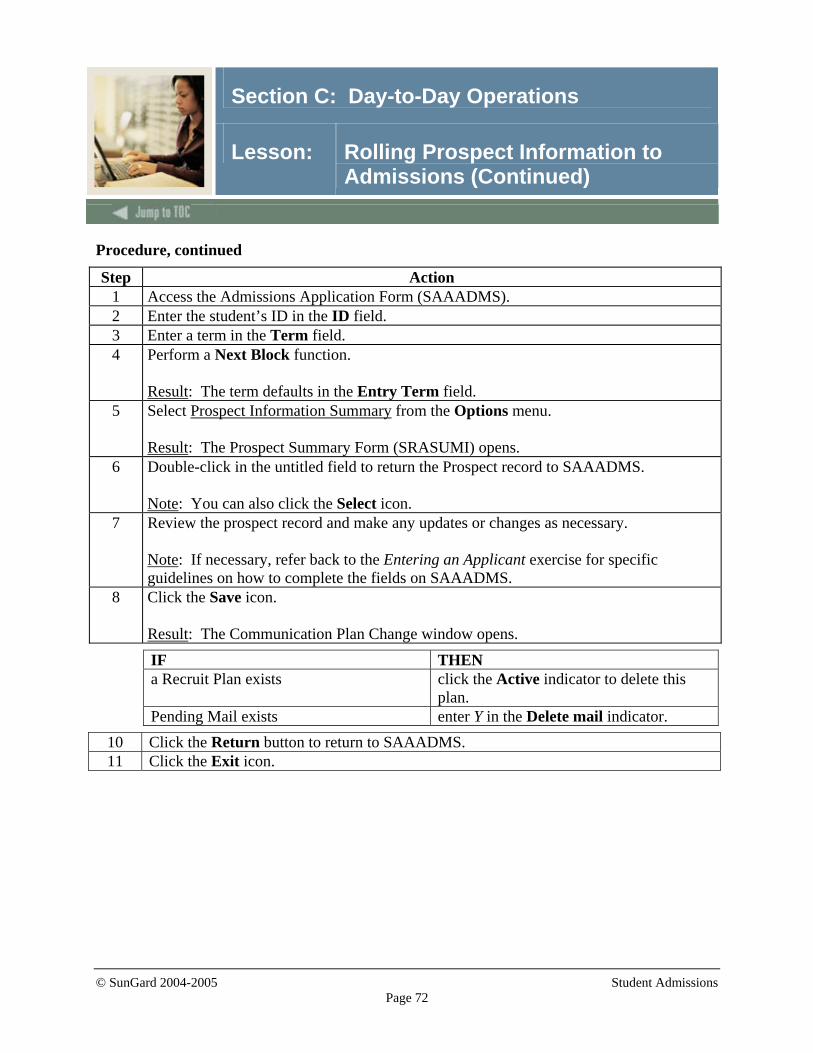
Step Action 1 Access the Admissions Application Form (SAAADMS). 2 Enter the student’s ID in the ID field. 3 Enter a term in the Term field. 4 Perform a Next Block function.
Result: The term defaults in the Entry Term field.
5 Select Prospect Information Summary from the Options menu. Result: The Prospect Summary Form (SRASUMI) opens.
6 Double-click in the untitled field to return the Prospect record to SAAADMS. Note: You can also click the Select icon.
7 Review the prospect record and make any updates or changes as necessary. Note: If necessary, refer back to the Entering an Applicant exercise for specific guidelines on how to complete the fields on SAAADMS.
8 Click the Save icon. Result: The Communication Plan Change window opens.
IF THEN a Recruit Plan exists click the Active indicator to delete this
plan. Pending Mail exists enter Y in the Delete mail indicator.
10 Click the Return button to return to SAAADMS. 11 Click the Exit icon.
© SunGard 2004-2005 Student Admissions Page 73
Section C: Day-to-Day Operations
Lesson: Performing a Quick Admit
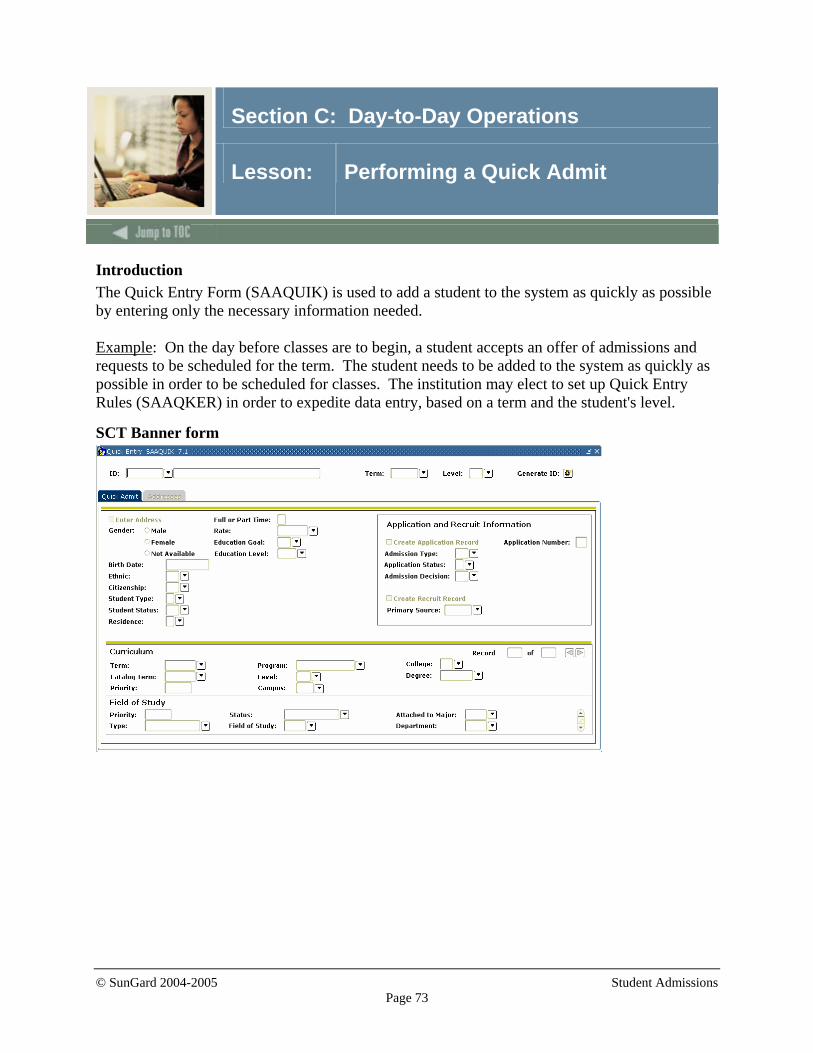
Introduction The Quick Entry Form (SAAQUIK) is used to add a student to the system as quickly as possible by entering only the necessary information needed. Example: On the day before classes are to begin, a student accepts an offer of admissions and requests to be scheduled for the term. The student needs to be added to the system as quickly as possible in order to be scheduled for classes. The institution may elect to set up Quick Entry Rules (SAAQKER) in order to expedite data entry, based on a term and the student's level.
SCT Banner form
© SunGard 2004-2005 Student Admissions Page 74
Section C: Day-to-Day Operations
Lesson: Performing a Quick Admit (Continued)
Procedure Follow these steps to complete the process. Step Action
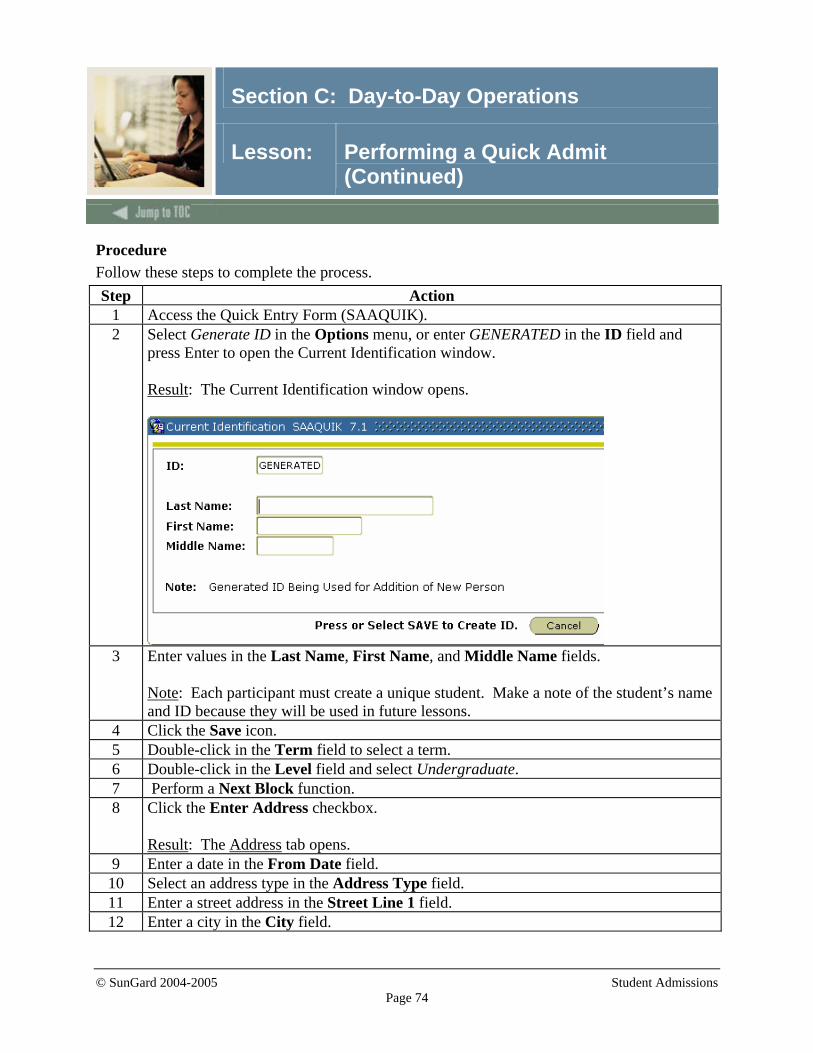
1 Access the Quick Entry Form (SAAQUIK). 2 Select Generate ID in the Options menu, or enter GENERATED in the ID field and
press Enter to open the Current Identification window. Result: The Current Identification window opens.
3 Enter values in the Last Name, First Name, and Middle Name fields.
Note: Each participant must create a unique student. Make a note of the student’s name and ID because they will be used in future lessons.
4 Click the Save icon. 5 Double-click in the Term field to select a term. 6 Double-click in the Level field and select Undergraduate. 7 Perform a Next Block function. 8 Click the Enter Address checkbox.
Result: The Address tab opens.
9 Enter a date in the From Date field. 10 Select an address type in the Address Type field. 11 Enter a street address in the Street Line 1 field. 12 Enter a city in the City field.
© SunGard 2004-2005 Student Admissions Page 75
Section C: Day-to-Day Operations
Lesson: Performing a Quick Admit (Continued)
Procedure, continued
Step Action 13 Enter a state or province code in the State or Province field. 14 Enter a zip or postal code in the Zip or Postal Code field. 15 Select a telephone type in the Telephone Type field. 16 Enter a telephone number in the Telephone Number field. 17 Click the Save icon. 18 Select the Quick Admit tab. 19 Click either the Male or Female Gender radio button. 20 Enter a date in DD-MM-YYYY format in the Date of Birth field. 21 Select an ethnicity code in the Ethnic field.
Note: Your institution may not request this information. If it does not, the field can be left blank.
17 Select a citizenship code in the Citizenship field. Note: Your institution may not request this information. If it does not, the field can be left blank.
18 Select a student type in the Student Type field. Example: New First Time
19 Select Active in the Student Status field. 20 Select a residency code in the Residence field. 21 Enter F if the student is full time or P if the student is part time in the Full or Part
Time field. 22 Select a rate code in the Rate field. 23 Select an education goal in the Education Goal field. 24 Select an education level in the Education Level field. 25 Click the Create Application Record checkbox. 26 Select the type of admissions in the Admissions Type field. 27 Select an application status code in the Application Status field. 28 Select an admissions decision in the Admissions Decision field. 29 Perform a Next Block function. 30 Select a catalog term in the Catalog Term field. 31 Enter a priority number that identifies curriculum rank in the Priority field.
© SunGard 2004-2005 Student Admissions Page 76
Section C: Day-to-Day Operations
Lesson: Performing a Quick Admit (Continued)
Procedure, continued
Step Action 32 Select a program from the All Programs option in the Program field.
Note: The College, Level, and Degree fields may be filled in for you based on the program selected. If not, select values for these fields.
33 Select a campus code in the Campus field. 34 Enter a field of study priority number in the Priority field. 35 Select Major in the Type field. 36 Select a major, minor, or concentration code in the Field of Study field. 37 Click the Save icon. 38 Click the OK button to acknowledge that the records have been saved.
Result: The Communication Plan window opens.
39 Click the Save icon to save the communication plan. 40 Click the Return button. 41 Click the Exit icon.
© SunGard 2004-2005 Student Admissions Page 77
Section C: Day-to-Day Operations
Lesson: Summary
Let’s review As a result of completing this workbook, you have • run the Admissions Decision Criteria Report • admitted an applicant • withdrawn a student • assigned a decision code • run the Admissions Decision Calculation Report • rolled prospect information to Admissions • performed a quick admit.
© SunGard 2004-2005 Student Admissions Page 78
Section C: Day-to-Day Operations
Lesson: Self Check
Directions Use the information you have learned in this workbook to complete this self-check activity.
Question 1 What form do you use to add a student to the system as quickly as possible in order to be scheduled for classes?
Question 2 How do you roll default prospect data to the Admissions module?
© SunGard 2004-2005 Student Admissions Page 79
Section C: Day-to-Day Operations
Lesson: Answer Key for Self Check
Question 1 What form do you use to add a student to the system as quickly as possible in order to be scheduled for classes? The Quick Entry Form (SAAQUIK).
Question 2 How do you roll default prospect data to the Admissions module? Prospect data is rolled to the Admission module on the Admissions Application Form (SAAADMS) using the Prospect Information Summary option.
© SunGard 2004-2005 Student Admissions Page 80
Section D: Reference
Lesson: Overview
Introduction The purpose of this section is to provide reference materials related to the workbook.
Section contents Overview ................................................................................................................................80 Setup Forms and Where Used ................................................................................................81 Day-to-Day Forms and Setup Needed....................................................................................84 Forms Job Aid ........................................................................................................................85
© SunGard 2004-2005 Student Admissions Page 81
Section D: Reference
Lesson: Setup Forms and Where Used
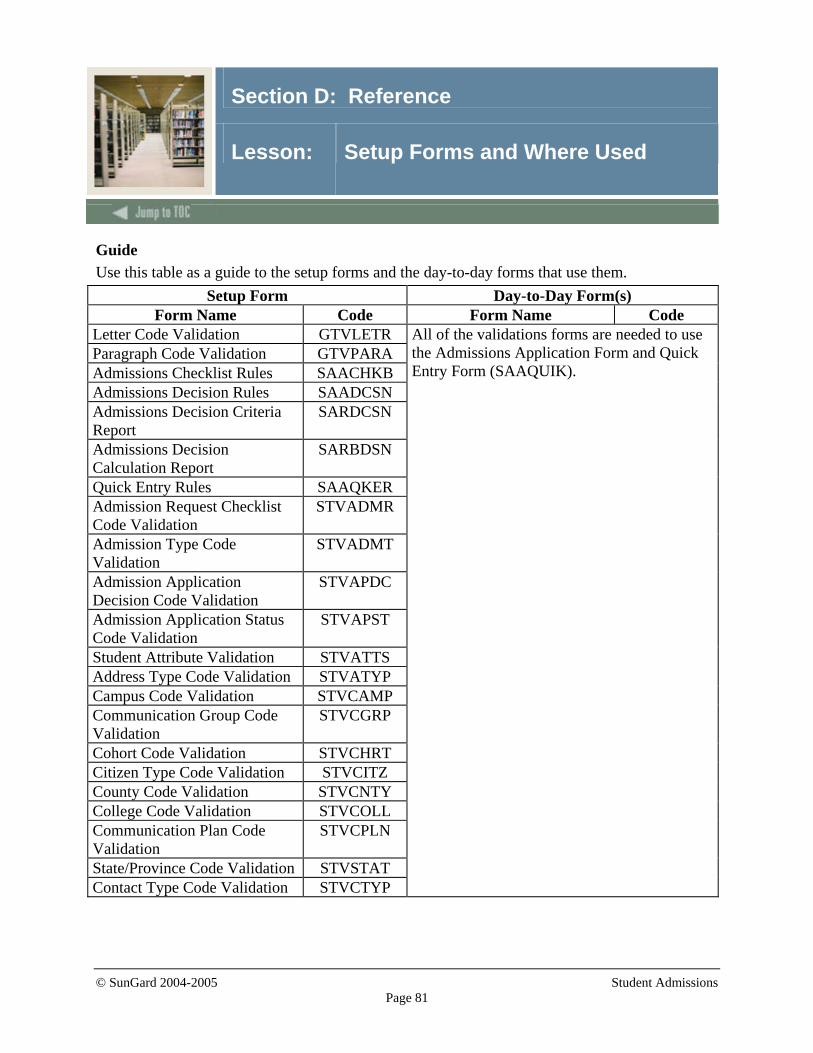
Guide Use this table as a guide to the setup forms and the day-to-day forms that use them.
Setup Form Day-to-Day Form(s) Form Name Code Form Name Code
Letter Code Validation GTVLETR Paragraph Code Validation GTVPARA Admissions Checklist Rules SAACHKB Admissions Decision Rules SAADCSN Admissions Decision Criteria Report
SARDCSN
Admissions Decision Calculation Report
SARBDSN
Quick Entry Rules SAAQKER Admission Request Checklist Code Validation
STVADMR
Admission Type Code Validation
STVADMT
Admission Application Decision Code Validation
STVAPDC
Admission Application Status Code Validation
STVAPST
Student Attribute Validation STVATTS Address Type Code Validation STVATYP Campus Code Validation STVCAMP Communication Group Code Validation
STVCGRP
Cohort Code Validation STVCHRT Citizen Type Code Validation STVCITZ County Code Validation STVCNTY College Code Validation STVCOLL Communication Plan Code Validation
STVCPLN
State/Province Code Validation STVSTAT Contact Type Code Validation STVCTYP
All of the validations forms are needed to use the Admissions Application Form and Quick Entry Form (SAAQUIK).
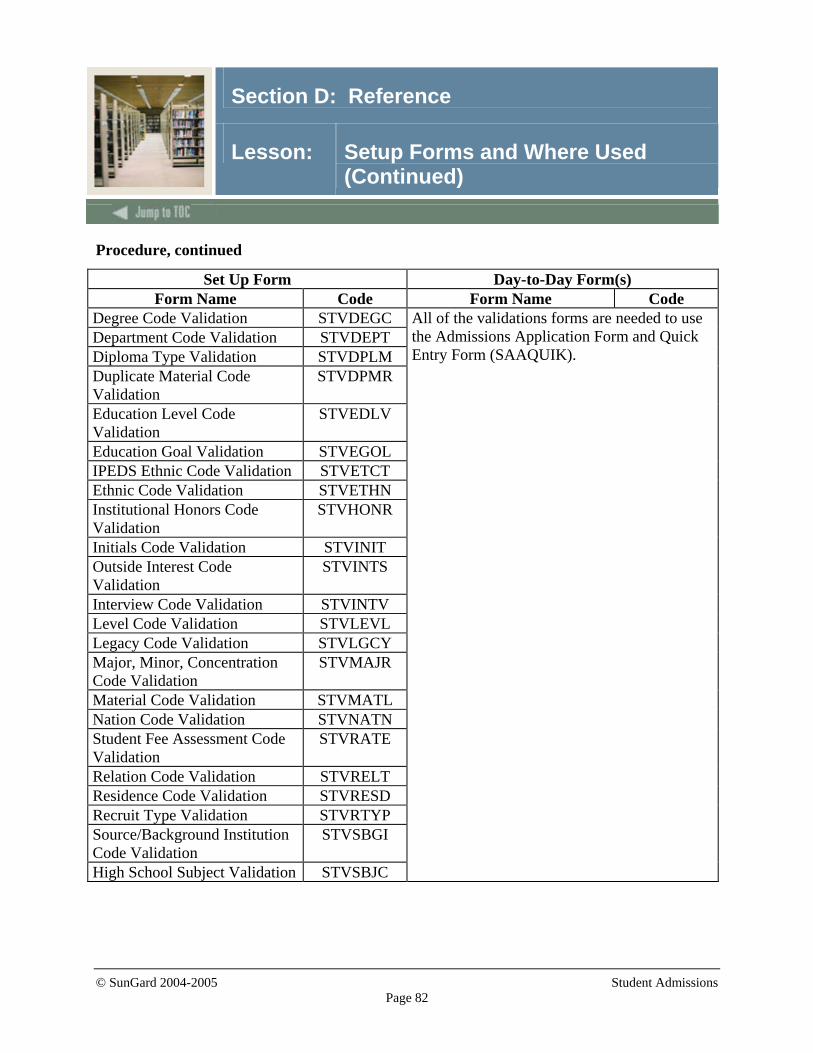
© SunGard 2004-2005 Student Admissions Page 82
Section D: Reference
Lesson: Setup Forms and Where Used (Continued)
Procedure, continued
Set Up Form Day-to-Day Form(s) Form Name Code Form Name Code
Degree Code Validation STVDEGC Department Code Validation STVDEPT Diploma Type Validation STVDPLM Duplicate Material Code Validation
STVDPMR
Education Level Code Validation
STVEDLV
Education Goal Validation STVEGOL IPEDS Ethnic Code Validation STVETCT Ethnic Code Validation STVETHN Institutional Honors Code Validation
STVHONR
Initials Code Validation STVINIT Outside Interest Code Validation
STVINTS
Interview Code Validation STVINTV Level Code Validation STVLEVL Legacy Code Validation STVLGCY Major, Minor, Concentration Code Validation
STVMAJR
Material Code Validation STVMATL Nation Code Validation STVNATN Student Fee Assessment Code Validation
STVRATE
Relation Code Validation STVRELT Residence Code Validation STVRESD Recruit Type Validation STVRTYP Source/Background Institution Code Validation
STVSBGI
High School Subject Validation STVSBJC
All of the validations forms are needed to use the Admissions Application Form and Quick Entry Form (SAAQUIK).
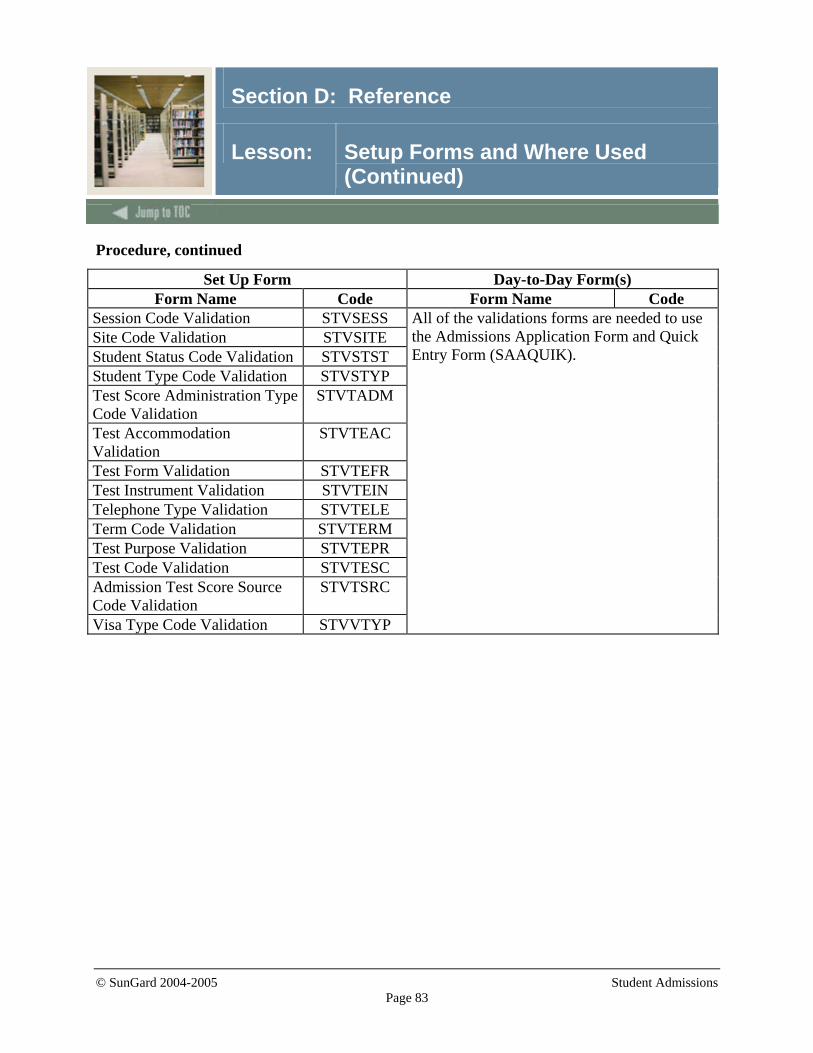
© SunGard 2004-2005 Student Admissions Page 83
Section D: Reference
Lesson: Setup Forms and Where Used (Continued)
Procedure, continued
Set Up Form Day-to-Day Form(s) Form Name Code Form Name Code
Session Code Validation STVSESS Site Code Validation STVSITE Student Status Code Validation STVSTST Student Type Code Validation STVSTYP Test Score Administration Type Code Validation
STVTADM
Test Accommodation Validation
STVTEAC
Test Form Validation STVTEFR Test Instrument Validation STVTEIN Telephone Type Validation STVTELE Term Code Validation STVTERM Test Purpose Validation STVTEPR Test Code Validation STVTESC Admission Test Score Source Code Validation
STVTSRC
Visa Type Code Validation STVVTYP
All of the validations forms are needed to use the Admissions Application Form and Quick Entry Form (SAAQUIK).
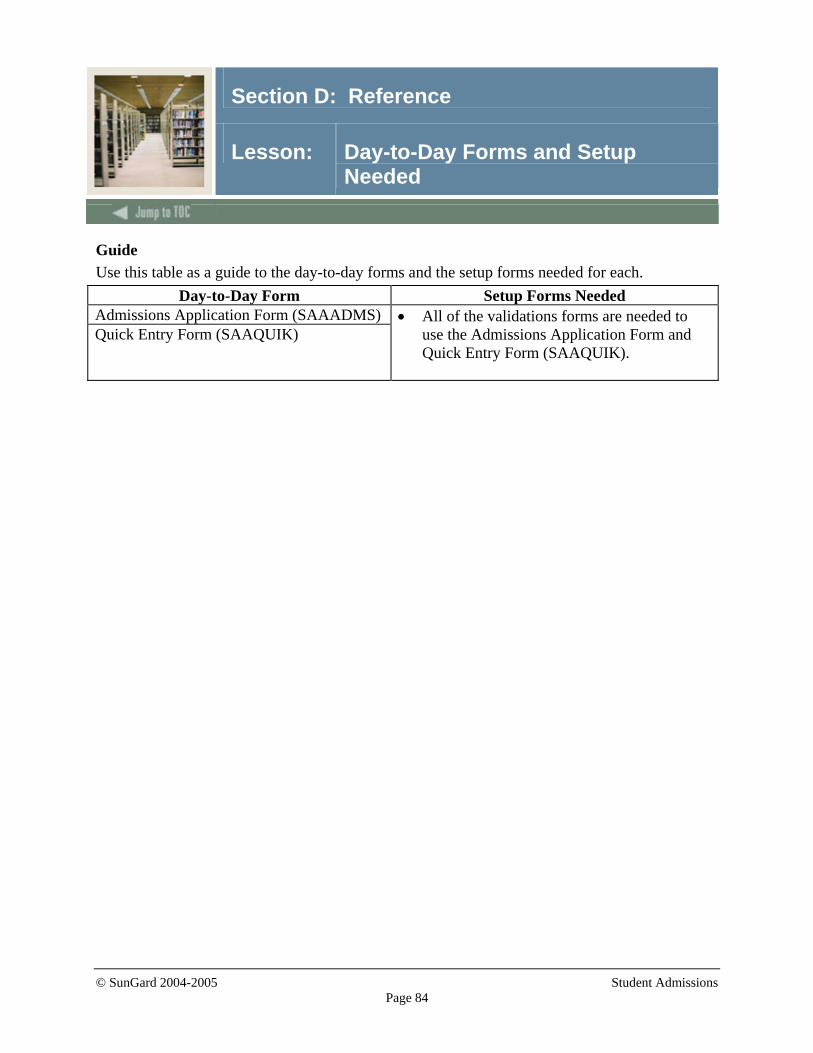
© SunGard 2004-2005 Student Admissions Page 84
Section D: Reference
Lesson: Day-to-Day Forms and Setup Needed
Guide Use this table as a guide to the day-to-day forms and the setup forms needed for each.
Day-to-Day Form Setup Forms Needed Admissions Application Form (SAAADMS) Quick Entry Form (SAAQUIK)
• All of the validations forms are needed to use the Admissions Application Form and Quick Entry Form (SAAQUIK).
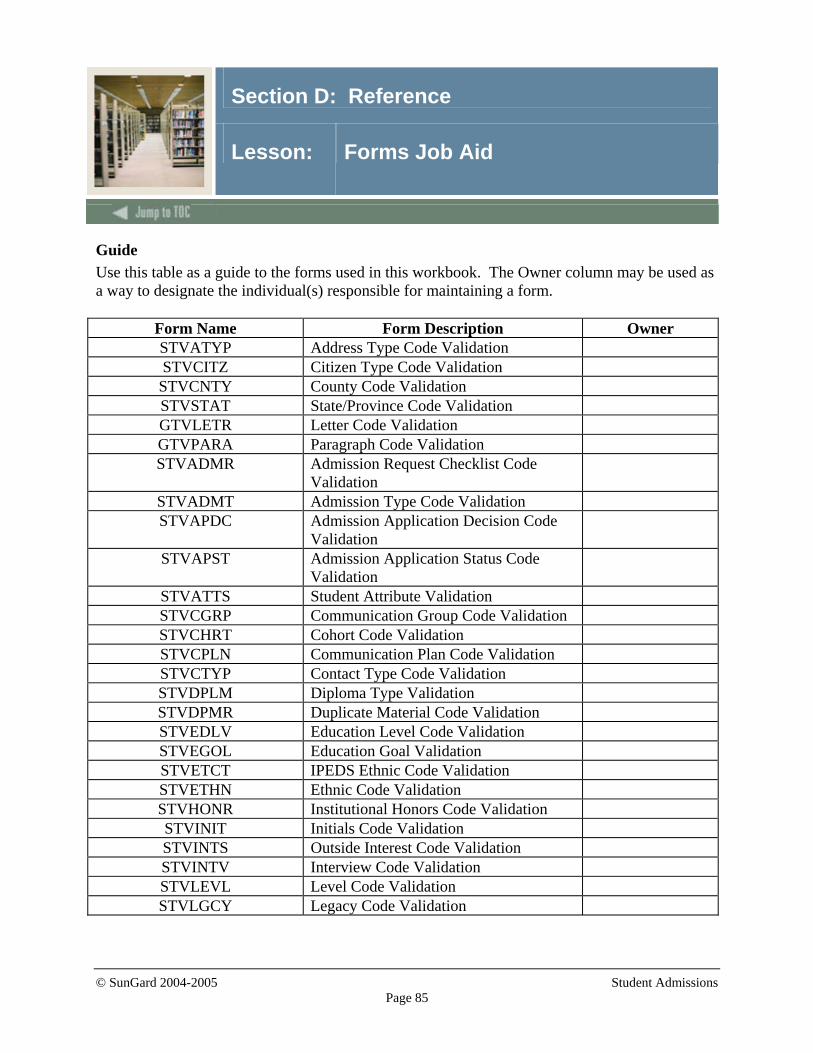
© SunGard 2004-2005 Student Admissions Page 85
Section D: Reference
Lesson: Forms Job Aid
Guide Use this table as a guide to the forms used in this workbook. The Owner column may be used as a way to designate the individual(s) responsible for maintaining a form.
Form Name Form Description Owner STVATYP Address Type Code Validation STVCITZ Citizen Type Code Validation STVCNTY County Code Validation STVSTAT State/Province Code Validation GTVLETR Letter Code Validation GTVPARA Paragraph Code Validation STVADMR Admission Request Checklist Code
Validation
STVADMT Admission Type Code Validation STVAPDC Admission Application Decision Code
Validation
STVAPST Admission Application Status Code Validation
STVATTS Student Attribute Validation STVCGRP Communication Group Code Validation STVCHRT Cohort Code Validation STVCPLN Communication Plan Code Validation STVCTYP Contact Type Code Validation STVDPLM Diploma Type Validation STVDPMR Duplicate Material Code Validation STVEDLV Education Level Code Validation STVEGOL Education Goal Validation STVETCT IPEDS Ethnic Code Validation STVETHN Ethnic Code Validation STVHONR Institutional Honors Code Validation STVINIT Initials Code Validation STVINTS Outside Interest Code Validation STVINTV Interview Code Validation STVLEVL Level Code Validation STVLGCY Legacy Code Validation
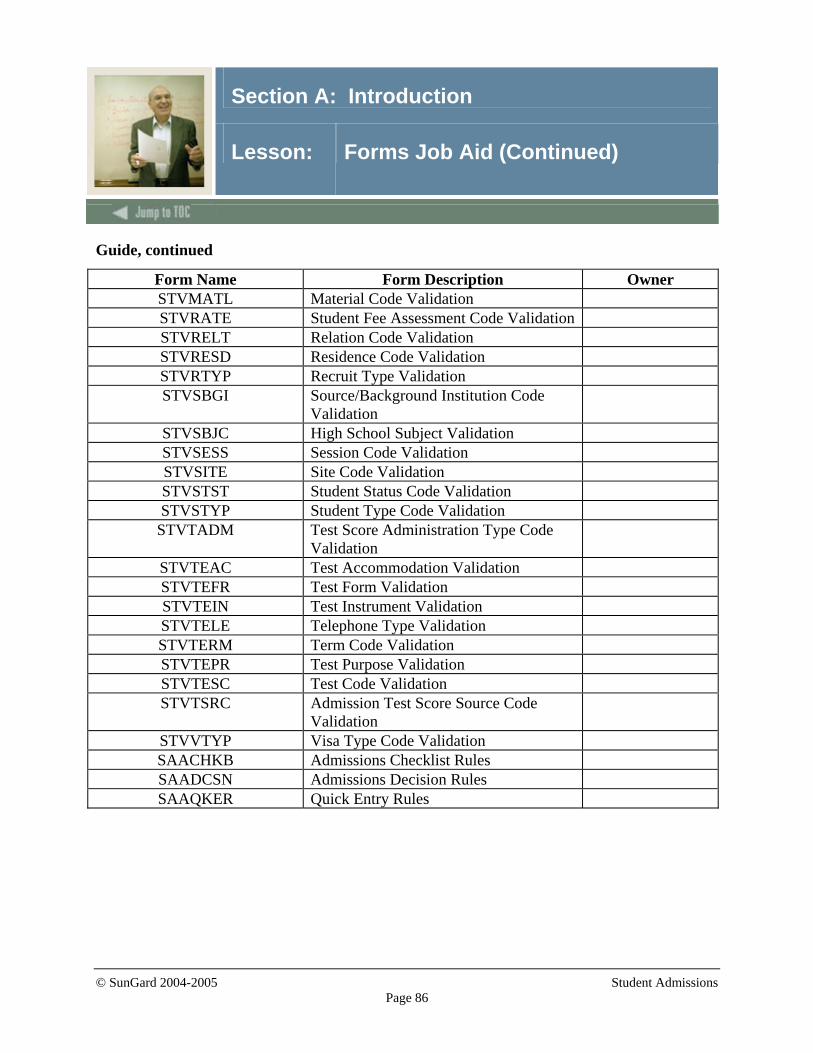
© SunGard 2004-2005 Student Admissions Page 86
Section A: Introduction
Lesson: Forms Job Aid (Continued)
Guide, continued
Form Name Form Description Owner STVMATL Material Code Validation STVRATE Student Fee Assessment Code Validation STVRELT Relation Code Validation STVRESD Residence Code Validation STVRTYP Recruit Type Validation STVSBGI Source/Background Institution Code
Validation
STVSBJC High School Subject Validation STVSESS Session Code Validation STVSITE Site Code Validation STVSTST Student Status Code Validation STVSTYP Student Type Code Validation
STVTADM Test Score Administration Type Code Validation
STVTEAC Test Accommodation Validation STVTEFR Test Form Validation STVTEIN Test Instrument Validation STVTELE Telephone Type Validation STVTERM Term Code Validation STVTEPR Test Purpose Validation STVTESC Test Code Validation STVTSRC Admission Test Score Source Code
Validation
STVVTYP Visa Type Code Validation SAACHKB Admissions Checklist Rules SAADCSN Admissions Decision Rules SAAQKER Quick Entry Rules
Release Date
This workbook was last updated on 08/11/2005.