Embed Size (px)
Citation preview
©Mustard Enterprises – unauthorised copying of this document by any means, or its contents in part or whole, is prohibited under International Law. Valid 25/08/2009. Seabase is a registered trademark. This document is provided as a guide without warranty.
SEABASE SURFBOARD KIT – INSTRUCTIONS
This is a brief summary of how to make a surfboard, with particular reference to the materials you will be using
from Seabase. The materials supplied are first quality, and are tested and checked before being sent out. They
are in every day use as surfboard construction materials, and the reliability and suitability of the materials supplied
are well proven. We are unable therefore to consider any claims for faults occurring before, during or after
production, since it would be impossible to determine the cause. The information provided is to be used as a
guide only, and should provide all of the basic information you require. A much more comprehensive tutorial is
available in the book “Surfboard” available from Seabase at £14.99 included postage and packaging.
We highly recommend this book. (Written in both English and Japanese, for complete assurance!)
Quantities of resin and catalyst will vary with board size and ambient (surrounding) working temperatures, and
again should be treated as a guide only. We are using a longboard to demo.
STANDS
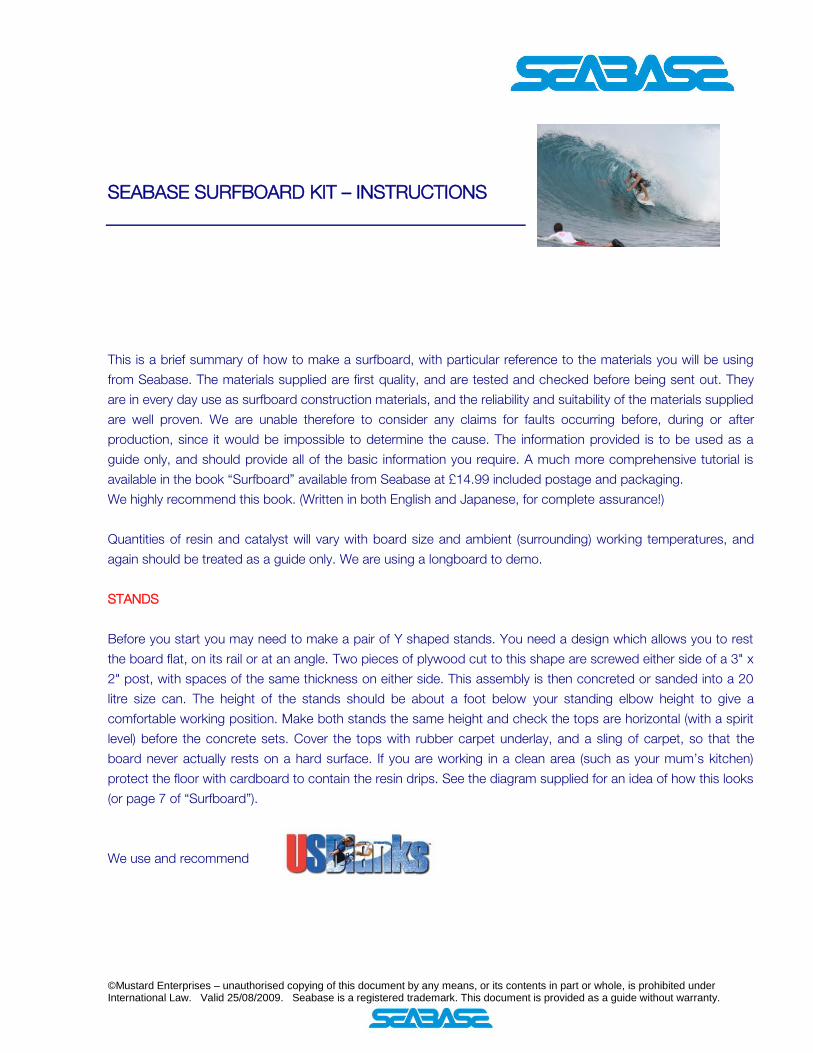
Before you start you may need to make a pair of Y shaped stands. You need a design which allows you to rest
the board flat, on its rail or at an angle. Two pieces of plywood cut to this shape are screwed either side of a 3" x
2" post, with spaces of the same thickness on either side. This assembly is then concreted or sanded into a 20
litre size can. The height of the stands should be about a foot below your standing elbow height to give a
comfortable working position. Make both stands the same height and check the tops are horizontal (with a spirit
level) before the concrete sets. Cover the tops with rubber carpet underlay, and a sling of carpet, so that the
board never actually rests on a hard surface. If you are working in a clean area (such as your mum’s kitchen)
protect the floor with cardboard to contain the resin drips. See the diagram supplied for an idea of how this looks
(or page 7 of “Surfboard”).
We use and recommend
©Mustard Enterprises – unauthorised copying of this document by any means, or its contents in part or whole, is prohibited under International Law. Valid 25/08/2009. Seabase is a registered trademark. This document is provided as a guide without warranty.
SHAPING
Here is a brief outline of the jobs you will need to do, and the order in which to do them. With a lot of elbow
grease, a blank can be shaped by hand, with blocks and coarse papers. But a power planer saves a lot of hard
work in the initial stages.
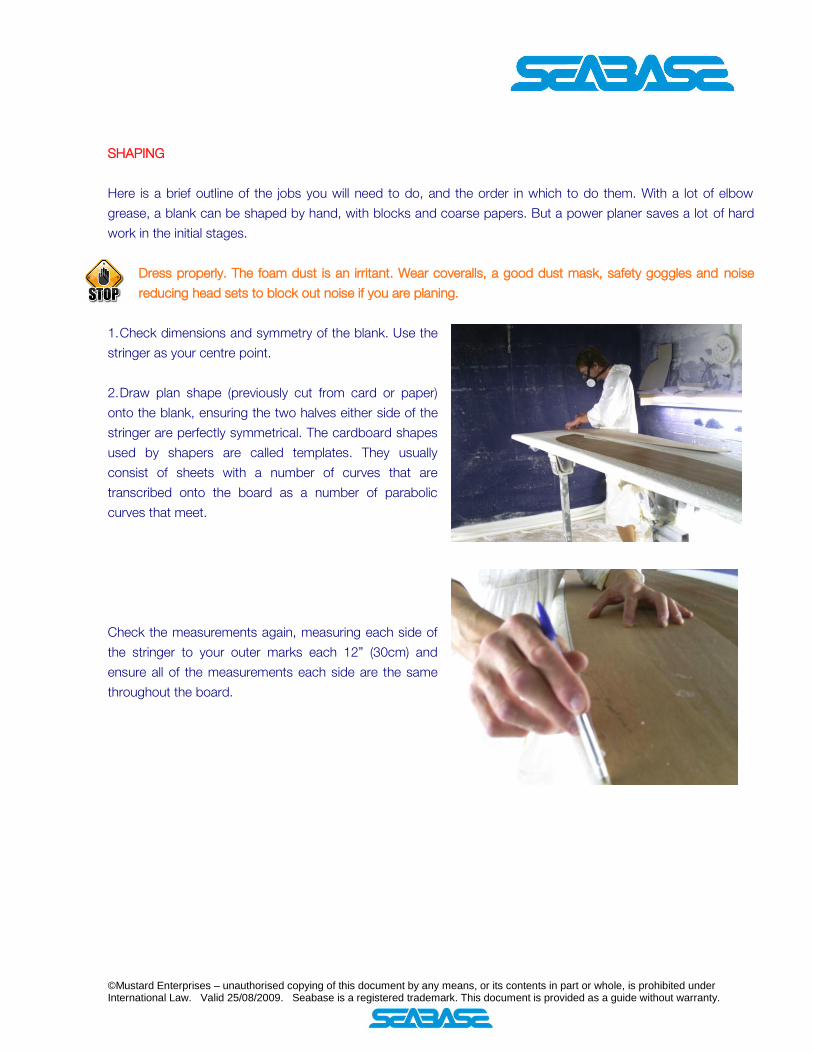
Dress properly. The foam dust is an irritant. Wear coveralls, a good dust mask, safety goggles and noise
reducing head sets to block out noise if you are planing.
1. Check dimensions and symmetry of the blank. Use the
stringer as your centre point.
2. Draw plan shape (previously cut from card or paper)
onto the blank, ensuring the two halves either side of the
stringer are perfectly symmetrical. The cardboard shapes
used by shapers are called templates. They usually
consist of sheets with a number of curves that are
transcribed onto the board as a number of parabolic
curves that meet.
Check the measurements again, measuring each side of
the stringer to your outer marks each 12” (30cm) and
ensure all of the measurements each side are the same
throughout the board.
©Mustard Enterprises – unauthorised copying of this document by any means, or its contents in part or whole, is prohibited under International Law. Valid 25/08/2009. Seabase is a registered trademark. This document is provided as a guide without warranty.
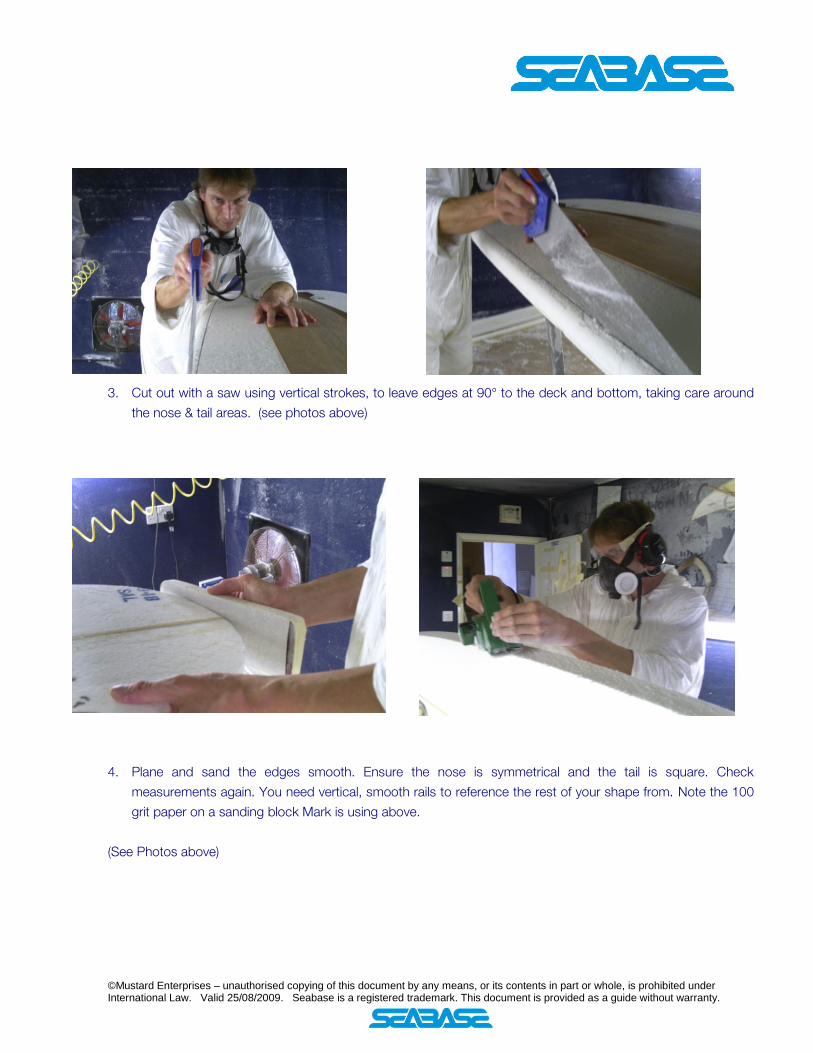
3. Cut out with a saw using vertical strokes, to leave edges at 90° to the deck and bottom, taking care around
the nose & tail areas. (see photos above)
4. Plane and sand the edges smooth. Ensure the nose is symmetrical and the tail is square. Check
measurements again. You need vertical, smooth rails to reference the rest of your shape from. Note the 100
grit paper on a sanding block Mark is using above.
(See Photos above)
©Mustard Enterprises – unauthorised copying of this document by any means, or its contents in part or whole, is prohibited under International Law. Valid 25/08/2009. Seabase is a registered trademark. This document is provided as a guide without warranty.
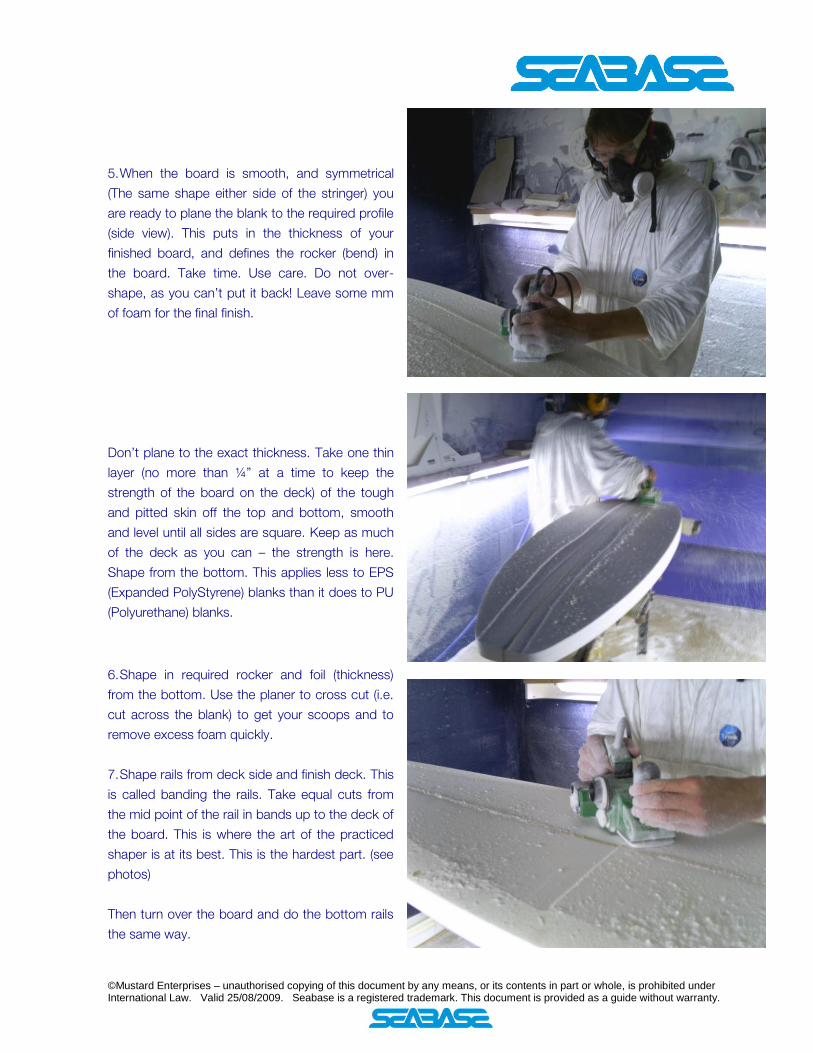
5. When the board is smooth, and symmetrical
(The same shape either side of the stringer) you
are ready to plane the blank to the required profile
(side view). This puts in the thickness of your
finished board, and defines the rocker (bend) in
the board. Take time. Use care. Do not over-
shape, as you can’t put it back! Leave some mm
of foam for the final finish.
Don’t plane to the exact thickness. Take one thin
layer (no more than ¼” at a time to keep the
strength of the board on the deck) of the tough
and pitted skin off the top and bottom, smooth
and level until all sides are square. Keep as much
of the deck as you can – the strength is here.
Shape from the bottom. This applies less to EPS
(Expanded PolyStyrene) blanks than it does to PU
(Polyurethane) blanks.
6. Shape in required rocker and foil (thickness)
from the bottom. Use the planer to cross cut (i.e.
cut across the blank) to get your scoops and to
remove excess foam quickly.
7. Shape rails from deck side and finish deck. This
is called banding the rails. Take equal cuts from
the mid point of the rail in bands up to the deck of
the board. This is where the art of the practiced
shaper is at its best. This is the hardest part. (see
photos)
Then turn over the board and do the bottom rails
the same way.
©Mustard Enterprises – unauthorised copying of this document by any means, or its contents in part or whole, is prohibited under International Law. Valid 25/08/2009. Seabase is a registered trademark. This document is provided as a guide without warranty.
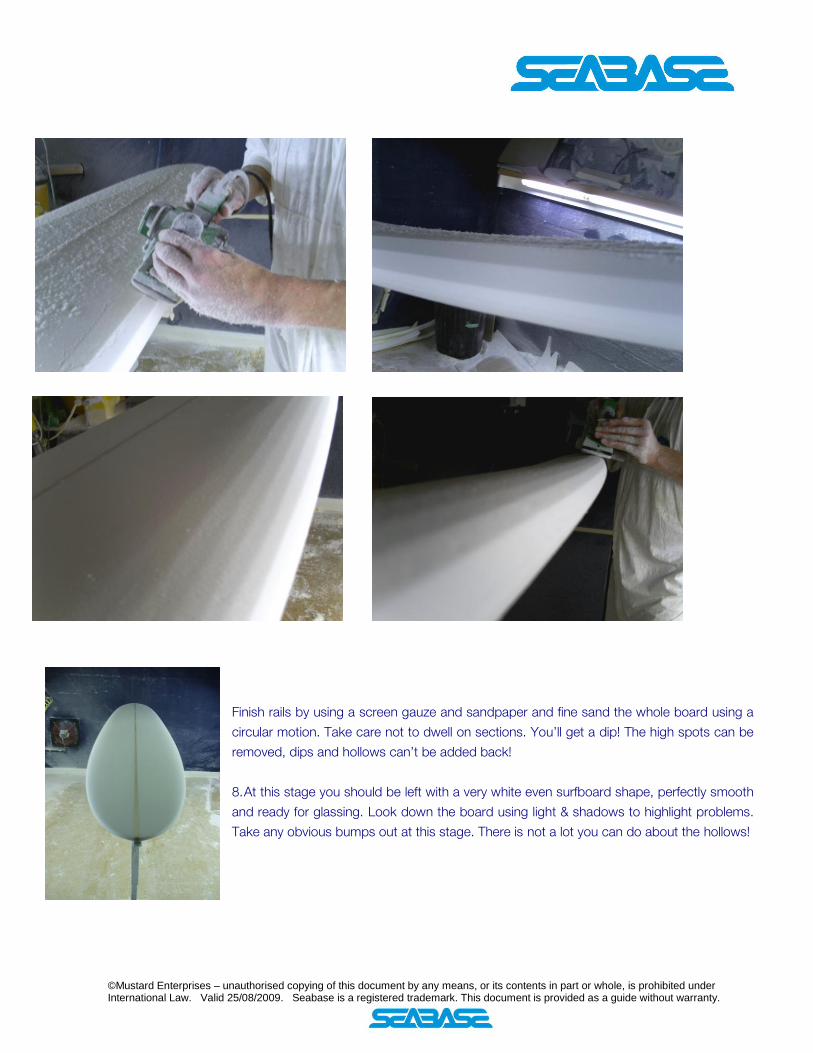
Finish rails by using a screen gauze and sandpaper and fine sand the whole board using a
circular motion. Take care not to dwell on sections. You’ll get a dip! The high spots can be
removed, dips and hollows can’t be added back!
8. At this stage you should be left with a very white even surfboard shape, perfectly smooth
and ready for glassing. Look down the board using light & shadows to highlight problems.
Take any obvious bumps out at this stage. There is not a lot you can do about the hollows!
©Mustard Enterprises – unauthorised copying of this document by any means, or its contents in part or whole, is prohibited under International Law. Valid 25/08/2009. Seabase is a registered trademark. This document is provided as a guide without warranty.
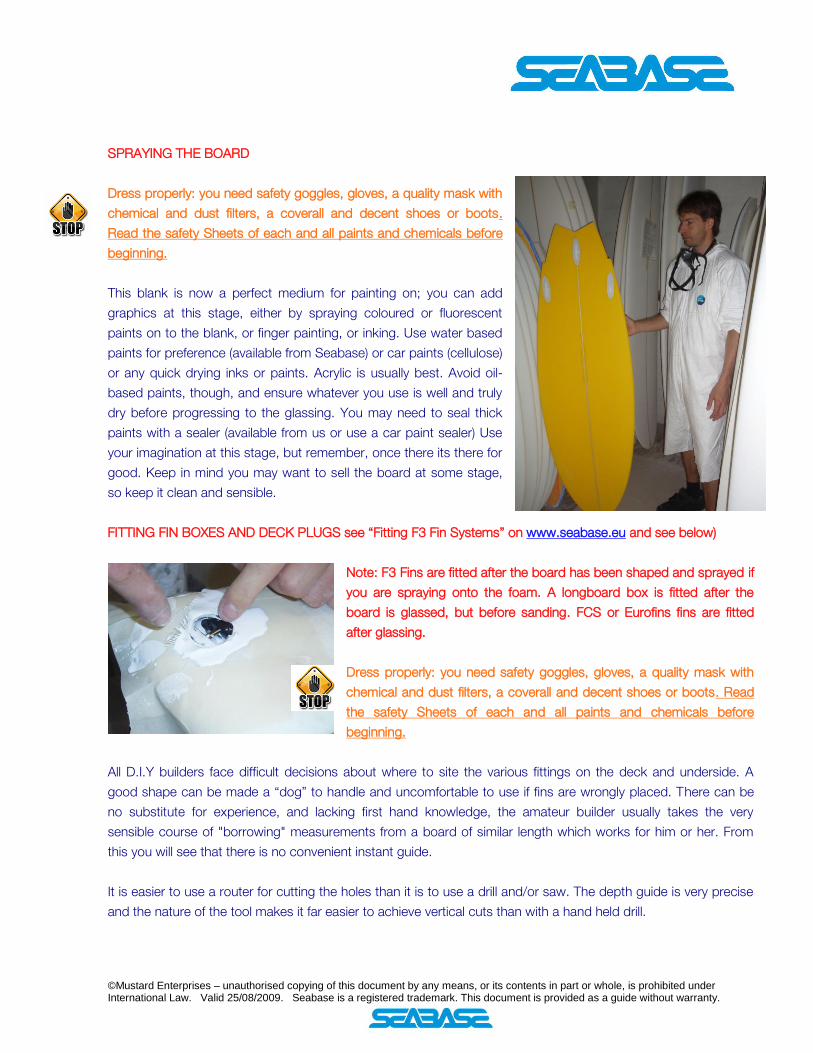
SPRAYING THE BOARD
Dress properly: you need safety goggles, gloves, a quality mask with
chemical and dust filters, a coverall and decent shoes or boots.
Read the safety Sheets of each and all paints and chemicals before
beginning.
This blank is now a perfect medium for painting on; you can add
graphics at this stage, either by spraying coloured or fluorescent
paints on to the blank, or finger painting, or inking. Use water based
paints for preference (available from Seabase) or car paints (cellulose)
or any quick drying inks or paints. Acrylic is usually best. Avoid oil-
based paints, though, and ensure whatever you use is well and truly
dry before progressing to the glassing. You may need to seal thick
paints with a sealer (available from us or use a car paint sealer) Use
your imagination at this stage, but remember, once there its there for
good. Keep in mind you may want to sell the board at some stage,
so keep it clean and sensible.
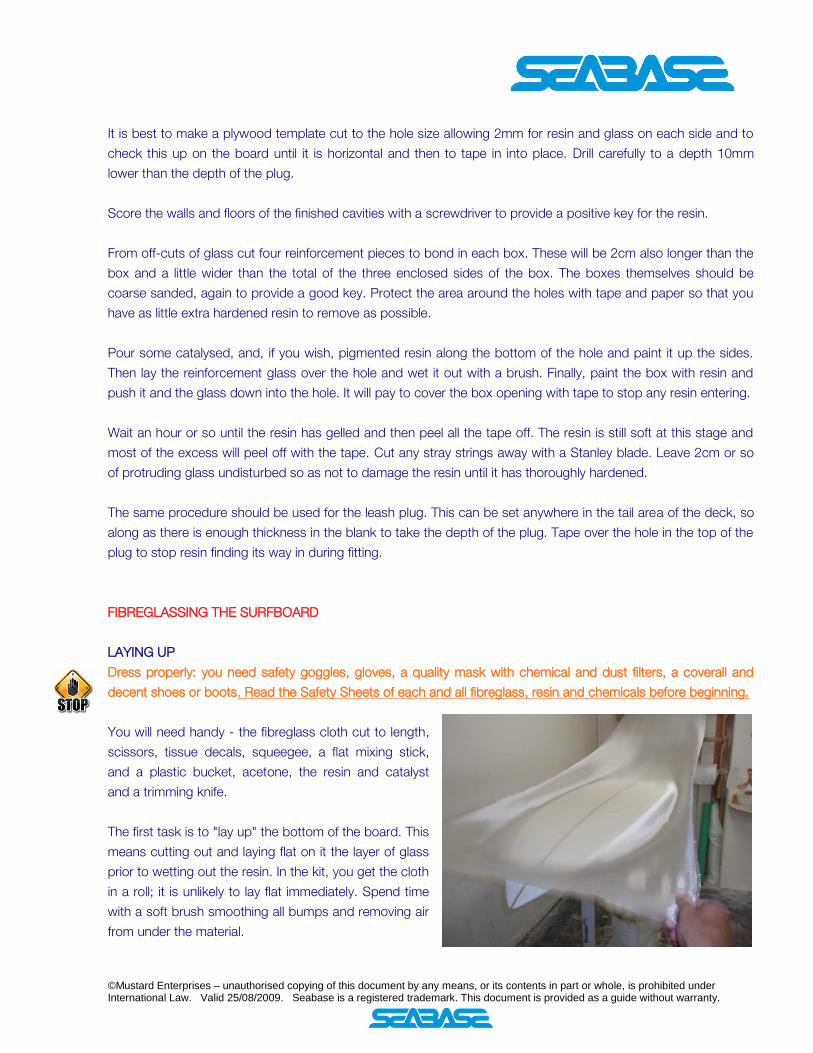
FITTING FIN BOXES AND DECK PLUGS see “Fitting F3 Fin Systems” on www.seabase.eu and see below)
Note: F3 Fins are fitted after the board has been shaped and sprayed if
you are spraying onto the foam. A longboard box is fitted after the
board is glassed, but before sanding. FCS or Eurofins fins are fitted
after glassing.
Dress properly: you need safety goggles, gloves, a quality mask with
chemical and dust filters, a coverall and decent shoes or boots. Read
the safety Sheets of each and all paints and chemicals before
beginning.
All D.I.Y builders face difficult decisions about where to site the various fittings on the deck and underside. A
good shape can be made a “dog” to handle and uncomfortable to use if fins are wrongly placed. There can be
no substitute for experience, and lacking first hand knowledge, the amateur builder usually takes the very
sensible course of "borrowing" measurements from a board of similar length which works for him or her. From
this you will see that there is no convenient instant guide.
It is easier to use a router for cutting the holes than it is to use a drill and/or saw. The depth guide is very precise
and the nature of the tool makes it far easier to achieve vertical cuts than with a hand held drill.
©Mustard Enterprises – unauthorised copying of this document by any means, or its contents in part or whole, is prohibited under International Law. Valid 25/08/2009. Seabase is a registered trademark. This document is provided as a guide without warranty.
It is best to make a plywood template cut to the hole size allowing 2mm for resin and glass on each side and to
check this up on the board until it is horizontal and then to tape in into place. Drill carefully to a depth 10mm
lower than the depth of the plug.
Score the walls and floors of the finished cavities with a screwdriver to provide a positive key for the resin.
From off-cuts of glass cut four reinforcement pieces to bond in each box. These will be 2cm also longer than the
box and a little wider than the total of the three enclosed sides of the box. The boxes themselves should be
coarse sanded, again to provide a good key. Protect the area around the holes with tape and paper so that you
have as little extra hardened resin to remove as possible.
Pour some catalysed, and, if you wish, pigmented resin along the bottom of the hole and paint it up the sides.
Then lay the reinforcement glass over the hole and wet it out with a brush. Finally, paint the box with resin and
push it and the glass down into the hole. It will pay to cover the box opening with tape to stop any resin entering.
Wait an hour or so until the resin has gelled and then peel all the tape off. The resin is still soft at this stage and
most of the excess will peel off with the tape. Cut any stray strings away with a Stanley blade. Leave 2cm or so
of protruding glass undisturbed so as not to damage the resin until it has thoroughly hardened.
The same procedure should be used for the leash plug. This can be set anywhere in the tail area of the deck, so
along as there is enough thickness in the blank to take the depth of the plug. Tape over the hole in the top of the
plug to stop resin finding its way in during fitting.
FIBREGLASSING THE SURFBOARD
LAYING UP
Dress properly: you need safety goggles, gloves, a quality mask with chemical and dust filters, a coverall and
decent shoes or boots. Read the Safety Sheets of each and all fibreglass, resin and chemicals before beginning.
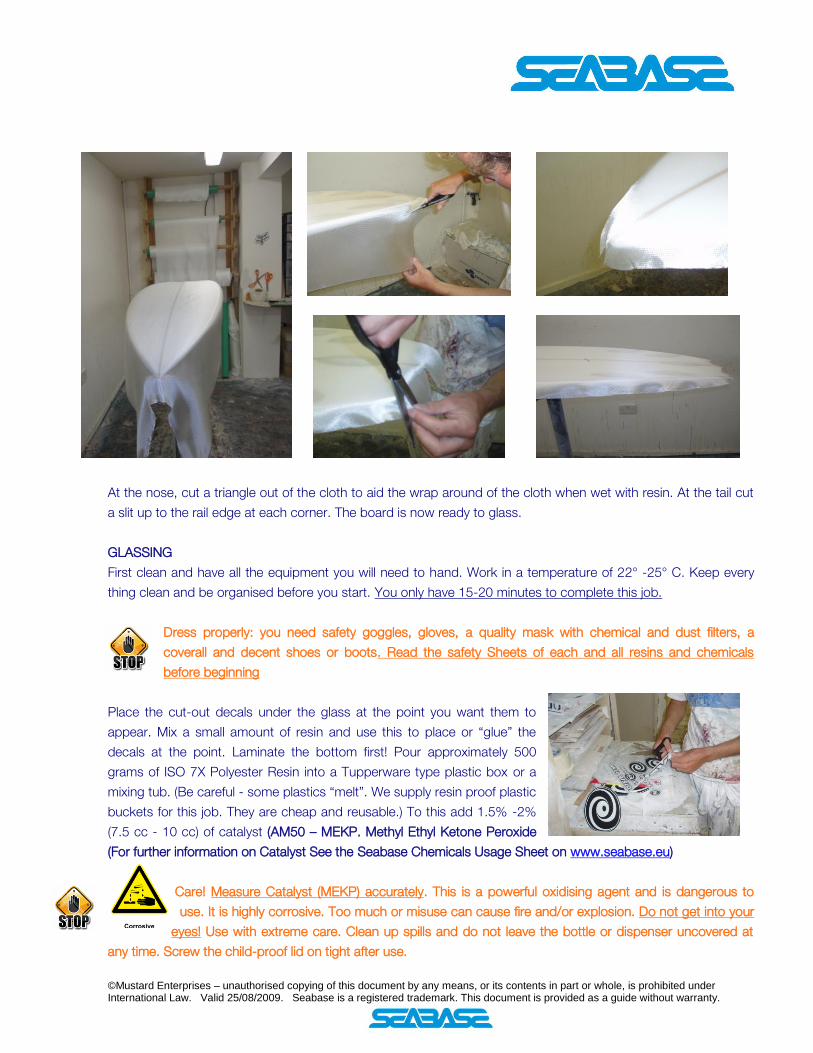
You will need handy - the fibreglass cloth cut to length,
scissors, tissue decals, squeegee, a flat mixing stick,
and a plastic bucket, acetone, the resin and catalyst
and a trimming knife.
The first task is to "lay up" the bottom of the board. This
means cutting out and laying flat on it the layer of glass
prior to wetting out the resin. In the kit, you get the cloth
in a roll; it is unlikely to lay flat immediately. Spend time
with a soft brush smoothing all bumps and removing air
from under the material.
©Mustard Enterprises – unauthorised copying of this document by any means, or its contents in part or whole, is prohibited under International Law. Valid 25/08/2009. Seabase is a registered trademark. This document is provided as a guide without warranty.
At the nose, cut a triangle out of the cloth to aid the wrap around of the cloth when wet with resin. At the tail cut
a slit up to the rail edge at each corner. The board is now ready to glass.
GLASSING
First clean and have all the equipment you will need to hand. Work in a temperature of 22° -25° C. Keep every
thing clean and be organised before you start. You only have 15-20 minutes to complete this job.
Dress properly: you need safety goggles, gloves, a quality mask with chemical and dust filters, a
coverall and decent shoes or boots. Read the safety Sheets of each and all resins and chemicals
before beginning
Place the cut-out decals under the glass at the point you want them to
appear. Mix a small amount of resin and use this to place or “glue” the
decals at the point. Laminate the bottom first! Pour approximately 500
grams of ISO 7X Polyester Resin into a Tupperware type plastic box or a
mixing tub. (Be careful - some plastics “melt”. We supply resin proof plastic
buckets for this job. They are cheap and reusable.) To this add 1.5% -2%
(7.5 cc - 10 cc) of catalyst (AM50 – MEKP. Methyl Ethyl Ketone Peroxide
(For further information on Catalyst See the Seabase Chemicals Usage Sheet on www.seabase.eu)
Care! Measure Catalyst (MEKP) accurately. This is a powerful oxidising agent and is dangerous to
use. It is highly corrosive. Too much or misuse can cause fire and/or explosion. Do not get into your
eyes! Use with extreme care. Clean up spills and do not leave the bottle or dispenser uncovered at
any time. Screw the child-proof lid on tight after use.
©Mustard Enterprises – unauthorised copying of this document by any means, or its contents in part or whole, is prohibited under International Law. Valid 25/08/2009. Seabase is a registered trademark. This document is provided as a guide without warranty.
DO NOT MIX CATALYST WITH ANY SOAP, OR ALLOW IT TO COME INTO CONTACT WITH RUST! Use only a
glass or plastic dispenser. Do not use metal spoons or jugs. TAKE PRECAUTIONS AGAINST SPILLAGE. Clean
up with dry clean rags, (not your mum’s Tea towels) place in a plastic bag, tie well and dispose of immediately .
Stir the catalyst into the resin (not the other way round) and mix well with a flat stick.(Do not use a round stick as
it simply causes eddies). Mix well but do not frappe. (i.e. stir air into the mixture). Scrape the container sides
often. Use a lesser amount of catalyst for a longer gel time (i.e. the time before the resin becomes unusable).
With experience you can add more catalyst to make the working time shorter.
Losing no time, pour all of the mix down the middle of the board. Immediately work this out longitudinally with the
squeegee, (you must use the correct type of pure rubber squeegee) taking off the excess at either and back into
the container. Hold the squeegee at an angle so that the resin is gradually worked out toward the rails, but still
used with end to end strokes. You need to apply a firm and steady pressure, but be careful not to ruck the cloth.
As soon as the painted design, if any, or the decal is clearly visible, and the blank looks white the cloth has been
wetted out and it is then important to remove the excess resin before it floats the cloth and too much soaks into
the blank.
Once the entire bottom has been wetted out, pour the remainder of the resin caught in the container, down the
centre line of the board again. Pull half of the line of resin out to the edge, hold out the overhang of cloth with
your free hand, and thoroughly wet it, gradually working from end to end.
This done, trim off with scissors, any long strands of glass which have pulled out and are hanging down. Then
work round the rails of the board smoothing the overhang down onto the deck, being very careful not to touch
any paint work on the deck with the squeegee. Continually smooth the overhang down as flat as possible,
removing all lumps.
Once the resin really begins to “go off” (gel) it has to be left alone. As soon as the edges are neatly plastered
down, clean all tools with acetone and yourself with Kleenall paste.Do not vclean youself with acetone – it is a
powerful degreaser and will leave your skin unprotected and cause dermatitis.
Leave the board overnight on the stands with no part of the laminate touching. It will cure with a tacky finish.
DECK LAY UP AND GLASSING
Dress properly: you need safety goggles, gloves, a quality mask with chemical and dust filters, a coverall
and decent shoes or boots. Read the safety Sheets of each and all paints and chemicals before
beginning.
The next stage is to go around the edges of the bottom with a sureform or a small angle grinder with an 80 or
100 grit disc to remove all the bubbles of hardened resin and sloping the edge down to the foam. Be very careful
not to catch the exposed foam on the deck during this process! (see photo )
©Mustard Enterprises – unauthorised copying of this document by any means, or its contents in part or whole, is prohibited under International Law. Valid 25/08/2009. Seabase is a registered trademark. This document is provided as a guide without warranty.
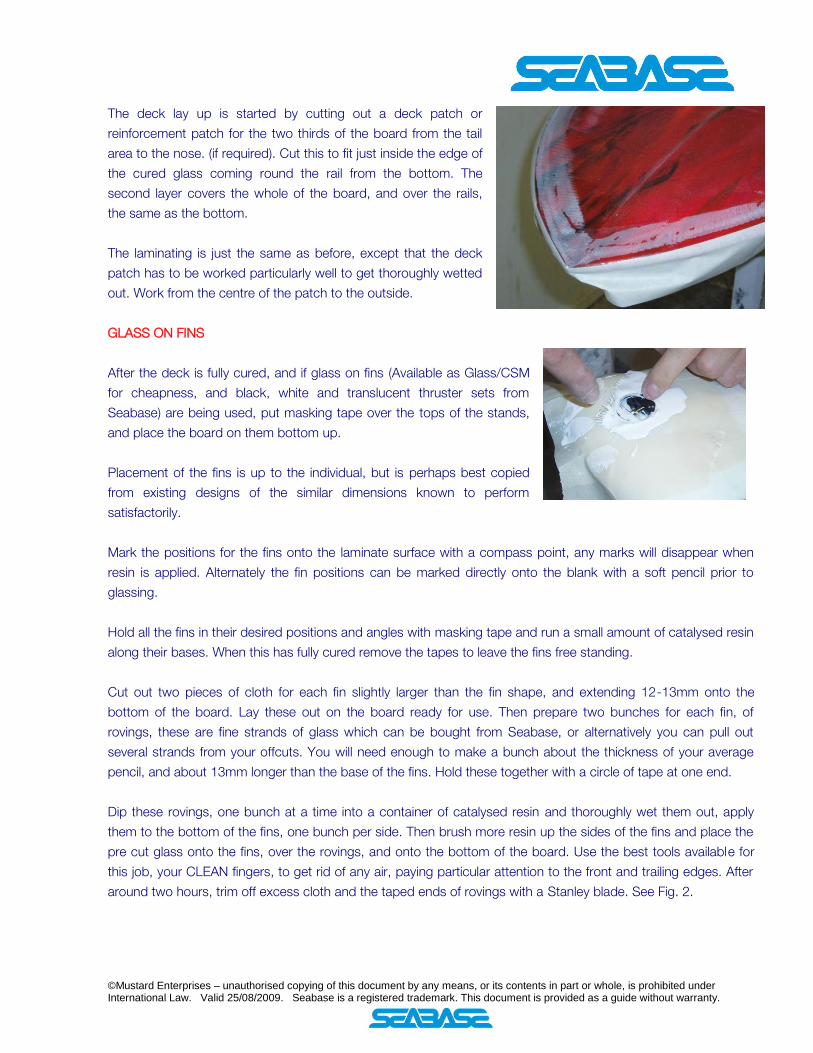
The deck lay up is started by cutting out a deck patch or
reinforcement patch for the two thirds of the board from the tail
area to the nose. (if required). Cut this to fit just inside the edge of
the cured glass coming round the rail from the bottom. The
second layer covers the whole of the board, and over the rails,
the same as the bottom.
The laminating is just the same as before, except that the deck
patch has to be worked particularly well to get thoroughly wetted
out. Work from the centre of the patch to the outside.
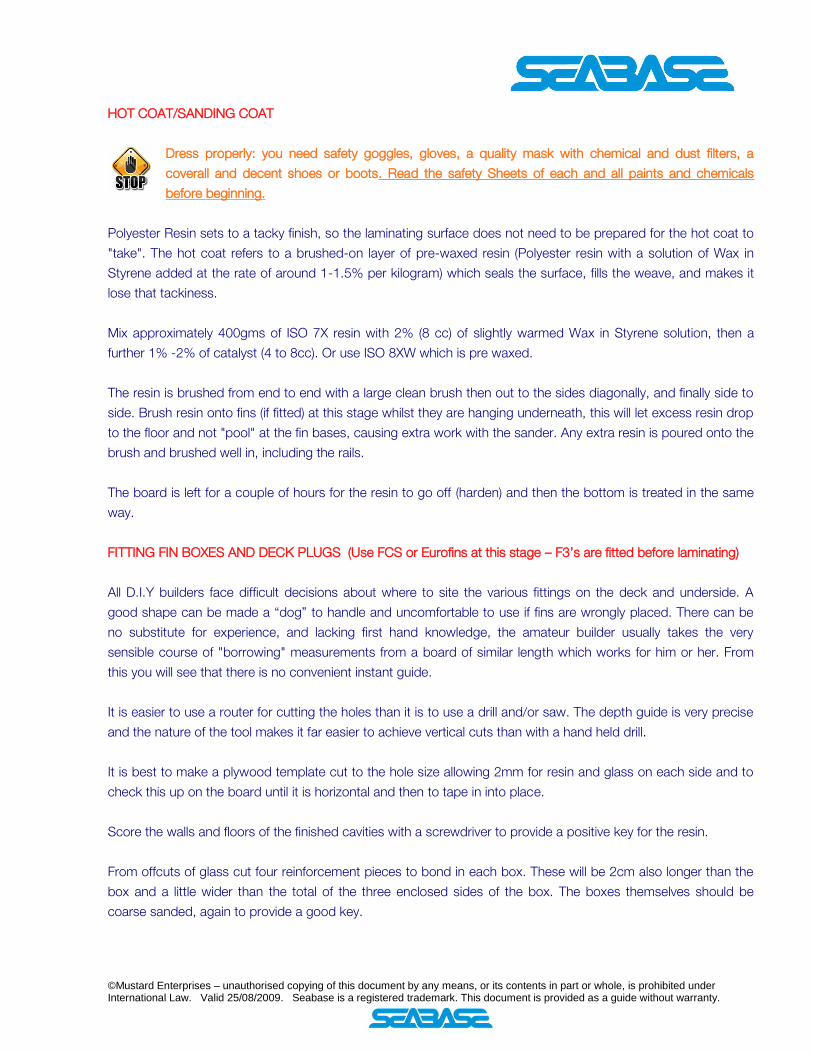
GLASS ON FINS
After the deck is fully cured, and if glass on fins (Available as Glass/CSM
for cheapness, and black, white and translucent thruster sets from
Seabase) are being used, put masking tape over the tops of the stands,
and place the board on them bottom up.
Placement of the fins is up to the individual, but is perhaps best copied
from existing designs of the similar dimensions known to perform
satisfactorily.
Mark the positions for the fins onto the laminate surface with a compass point, any marks will disappear when
resin is applied. Alternately the fin positions can be marked directly onto the blank with a soft pencil prior to
glassing.
Hold all the fins in their desired positions and angles with masking tape and run a small amount of catalysed resin
along their bases. When this has fully cured remove the tapes to leave the fins free standing.
Cut out two pieces of cloth for each fin slightly larger than the fin shape, and extending 12-13mm onto the
bottom of the board. Lay these out on the board ready for use. Then prepare two bunches for each fin, of
rovings, these are fine strands of glass which can be bought from Seabase, or alternatively you can pull out
several strands from your offcuts. You will need enough to make a bunch about the thickness of your average
pencil, and about 13mm longer than the base of the fins. Hold these together with a circle of tape at one end.
Dip these rovings, one bunch at a time into a container of catalysed resin and thoroughly wet them out, apply
them to the bottom of the fins, one bunch per side. Then brush more resin up the sides of the fins and place the
pre cut glass onto the fins, over the rovings, and onto the bottom of the board. Use the best tools available for
this job, your CLEAN fingers, to get rid of any air, paying particular attention to the front and trailing edges. After
around two hours, trim off excess cloth and the taped ends of rovings with a Stanley blade. See Fig. 2.
©Mustard Enterprises – unauthorised copying of this document by any means, or its contents in part or whole, is prohibited under International Law. Valid 25/08/2009. Seabase is a registered trademark. This document is provided as a guide without warranty.
HOT COAT/SANDING COAT
Dress properly: you need safety goggles, gloves, a quality mask with chemical and dust filters, a
coverall and decent shoes or boots. Read the safety Sheets of each and all paints and chemicals
before beginning.
Polyester Resin sets to a tacky finish, so the laminating surface does not need to be prepared for the hot coat to
"take". The hot coat refers to a brushed-on layer of pre-waxed resin (Polyester resin with a solution of Wax in
Styrene added at the rate of around 1-1.5% per kilogram) which seals the surface, fills the weave, and makes it
lose that tackiness.
Mix approximately 400gms of ISO 7X resin with 2% (8 cc) of slightly warmed Wax in Styrene solution, then a
further 1% -2% of catalyst (4 to 8cc). Or use ISO 8XW which is pre waxed.
The resin is brushed from end to end with a large clean brush then out to the sides diagonally, and finally side to
side. Brush resin onto fins (if fitted) at this stage whilst they are hanging underneath, this will let excess resin drop
to the floor and not "pool" at the fin bases, causing extra work with the sander. Any extra resin is poured onto the
brush and brushed well in, including the rails.
The board is left for a couple of hours for the resin to go off (harden) and then the bottom is treated in the same
way.
FITTING FIN BOXES AND DECK PLUGS (Use FCS or Eurofins at this stage – F3’s are fitted before laminating)
All D.I.Y builders face difficult decisions about where to site the various fittings on the deck and underside. A
good shape can be made a “dog” to handle and uncomfortable to use if fins are wrongly placed. There can be
no substitute for experience, and lacking first hand knowledge, the amateur builder usually takes the very
sensible course of "borrowing" measurements from a board of similar length which works for him or her. From
this you will see that there is no convenient instant guide.
It is easier to use a router for cutting the holes than it is to use a drill and/or saw. The depth guide is very precise
and the nature of the tool makes it far easier to achieve vertical cuts than with a hand held drill.
It is best to make a plywood template cut to the hole size allowing 2mm for resin and glass on each side and to
check this up on the board until it is horizontal and then to tape in into place.
Score the walls and floors of the finished cavities with a screwdriver to provide a positive key for the resin.
From offcuts of glass cut four reinforcement pieces to bond in each box. These will be 2cm also longer than the
box and a little wider than the total of the three enclosed sides of the box. The boxes themselves should be
coarse sanded, again to provide a good key.

©Mustard Enterprises – unauthorised copying of this document by any means, or its contents in part or whole, is prohibited under International Law. Valid 25/08/2009. Seabase is a registered trademark. This document is provided as a guide without warranty.
Protect the area around the holes with tape and paper so that you have as little extra hardened resin to remove
as possible.
Pour some catalysed, and, if you wish, pigmented resin along the bottom of the hole and paint it up the sides.
Then lay the reinforcement glass over the hole and wet it out with a brush. Finally, paint the box with resin and
push it and the glass down into the hole. It will pay to cover the box opening with tape to stop any resin entering.
Wait an hour or so until the resin has gelled and then peel all the tape off. The resin is still soft at this stage and
most of the excess will peel off with the tape. Cut any stray strings away with a Stanley blade. Leave 2cm or so
of protruding glass undisturbed so as not to damage the resin until it has thoroughly hardened.
The same procedure should be used for the leash plug. This can be set anywhere in the tail area of the deck, so
along as there is enough thickness in the blank to take the depth of the plug. Tape over the hole in the top of the
plug to stop resin finding its way in during fitting.
SANDING
Dress properly: you need safety goggles, gloves, a quality mask with top quality dust filters, a coverall
and decent shoes or boots. Use sound deadening headphones if using machinery.
After the hot coat, the board has a hard glossy coat all over, with a texture like goose pimples and a slightly waxy
surface. The hot coat surface is very shiny and as soon as you start to sand it the gloss disappears, giving you a
good guide as to when you have sanded down to the level of any hollows. If you do hit glass, it is white and
weave will show quite plainly. If your work with the squeegee has been effective there is virtually no resin under
the glass, so the sight of exposed mat should sound the warning bells and tell you that you are in danger of
sanding through.
Start sanding with about 80 grit paper, and finish with 100 grit paper. Thoroughly brush dust from the board and
wipe down with styrene (Care! Styrene is both an irritant and is thought to act on the nervous system) to remove
any greasy spots.
FINISHING
Dress properly: you need safety goggles, gloves, a quality mask with chemical and dust filters, a
coverall and decent shoes or boots. Read the safety Sheets of each and all paints, sprays and
chemicals before beginning.
Modern boards are finished in two ways - a gloss coat of resin or a mat coat of a very durable sealer / finish
spray. Use Taupo Gloss for a gloss and polished board, or CX9 Finish Spray or White Flash! for a bright satin
finish.
©Mustard Enterprises – unauthorised copying of this document by any means, or its contents in part or whole, is prohibited under International Law. Valid 25/08/2009. Seabase is a registered trademark. This document is provided as a guide without warranty.
GLOSS or FLOW COAT (for best results see “Perfect Glosses” on www.seabase.eu )
Flow coat, or gloss coat resin is a specially formulated pre waxed resin that is self levelling, highly glossy, and
durable. We blend our own called Taupo Gloss.
Flow coat the deck of the board first, use tape to cover the hole in the deck plug, or the boxes, both Futures and
longboard boxes, and position tape all around the rail line about half way down.
Leave this tape hanging away from the board to create an area for the excess resin to run off onto the floor, and
not creep around the rails and onto the bottom. If glass-on fins are fitted, gloss coat the fins while they are
pointing towards the floor, it is easier to fine sand the edges of the fins than to sand off thick pools of resin
around the fin bases. Have all necessary equipment clean and to hand.
Wait until any dust settles before applying resin.
Take 400gms of gloss resin and add 2% (8 cc) of catalyst to this. Pour the resin through a paper paint filter down
the centre line of the board and immediately brush from end to end with a very clean 4" brush until the whole
deck is covered. Work it from side to side and once again longways. Do not forget the fins. Do not over brush.
After an hour at about 18 degrees plus the coat will have cured enough for the board to be turned over. The tape
is removed and another put on hanging the other way, again scrooning the freshly resined surface of the deck.
Repeat the procedure for the bottom.
Leave the board for at least 24 hours to allow the resin to completely cure before final sanding and polishing.
MATT FINISH SPRAY
This type of finish is sprayed on a board using proper spray equipment. Dilute White Flash! with non-bloom
thinners (Care – both of these products are flammable and irritants. Use our water based speedcote for safer
results) until you get an even spray. Apply two or more thin coats of this in a dust free environment, when dry
(after about 10 minutes) sand lightly if necessary with 800 or 1000gt water paper. This finish cannot be
successfully applied by hand.
FINAL SANDING AND POLISHING (see “Perfect Polishes” and “perfect glosses” on www.seabase.eu )
400 grit wet and dry paper is used to remove dust particles, runs, ripples, and imperfections. Then the
progression is 600, 800, 1000, followed by cutting compound, hand applied, then fine polish and machine buff.
All are best used wet to avoid deep scratches and a little detergent added to the several changes of water used
during the sanding helps. The idea is to use each grade to remove the scratches of the one before and it is only
necessary to let the paper bite for itself rather than putting pressure on it.
The final glossy, glassy surface is worth the several hours work involved.
This completes your board. We hope it has been a great success and that you got as much satisfaction from
making it as you will do riding it. The second will be better still, the 30th board should be perfect!
Good surfing...