Embed Size (px)
Citation preview
Module NameSection XX:

Maintenance: Welcome!Section 03: The LeafLogix Manintenance and Setup Manual will help you navigate LeafLogix’s administrative and setup options. Use it both as a guide and as reference to backend setup. First, the document provides a high-level review of system concepts and organization. Next, it will review any special considerations that should be taken into account around system administration and setup. Finally, we’ll review specific administrative items and how to interact with them.Please note that some states require modifications to recommened workflows. if you have questions about how best to modify your SOPs, contact [email protected].
Maintenance and Setup Overview - 2-3
Users - 5
Permission Groups - 23-24
Product Categories - 6
Location Options - 25
Strains - 7
Form Validation - 26
Vendors - 8
Identifiers - 27-28
Brands - 9
Customers - 29
Sizes - 10
Taxes - 30
Dosages -11
Adjustment Reasons - 31
Product Master - 12-19
Cars and Drivers - 32
Coupons - 20
Inventory Status - 33
Reason Codes - 21
Rooms - 34Printer Setup - 35-36Tables - 37Loyalty - 38Receipts - 39Preorder Settings - 40
ORG/LSP Settings - 4
Location Settings - 22
Maintenance and Setup Overview
1
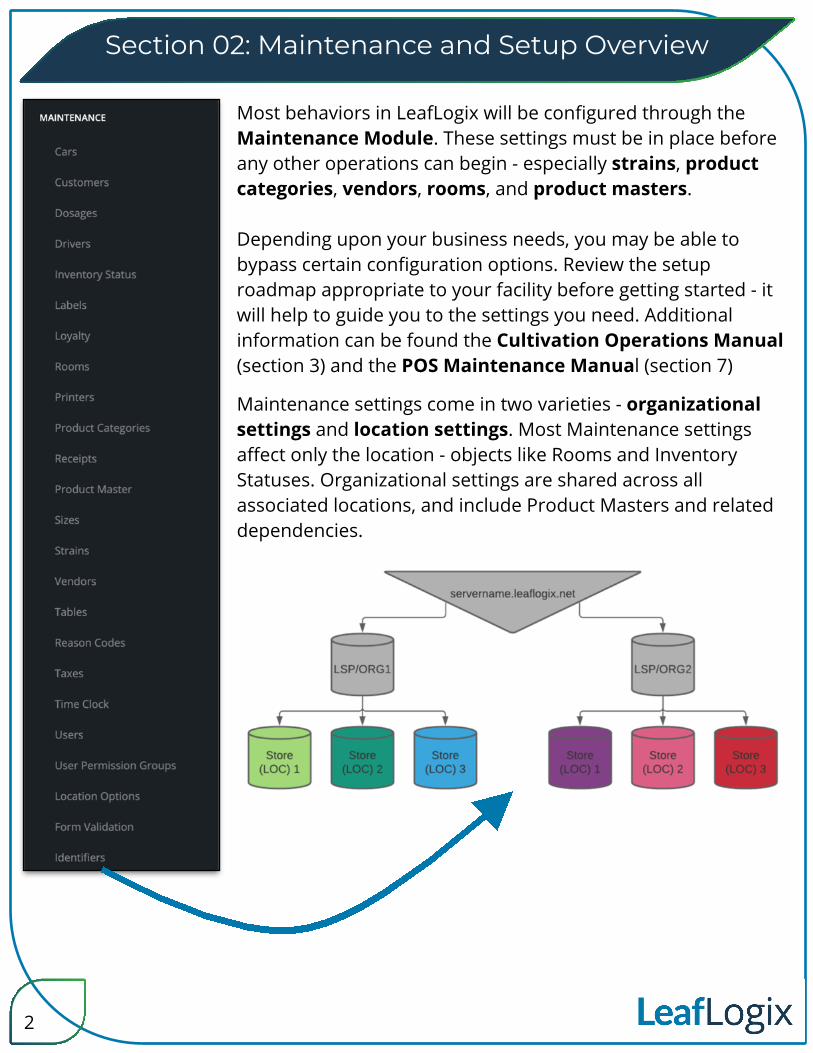
Maintenance settings come in two varieties - organizational settings and location settings. Most Maintenance settings affect only the location - objects like Rooms and Inventory Statuses. Organizational settings are shared across all associated locations, and include Product Masters and related dependencies.
Most behaviors in LeafLogix will be configured through the Maintenance Module. These settings must be in place before any other operations can begin - especially strains, product categories, vendors, rooms, and product masters.
Depending upon your business needs, you may be able to bypass certain configuration options. Review the setup roadmap appropriate to your facility before getting started - it will help to guide you to the settings you need. Additional information can be found the Cultivation Operations Manual (section 3) and the POS Maintenance Manual (section 7)
Section 02: Maintenance and Setup Overview
2
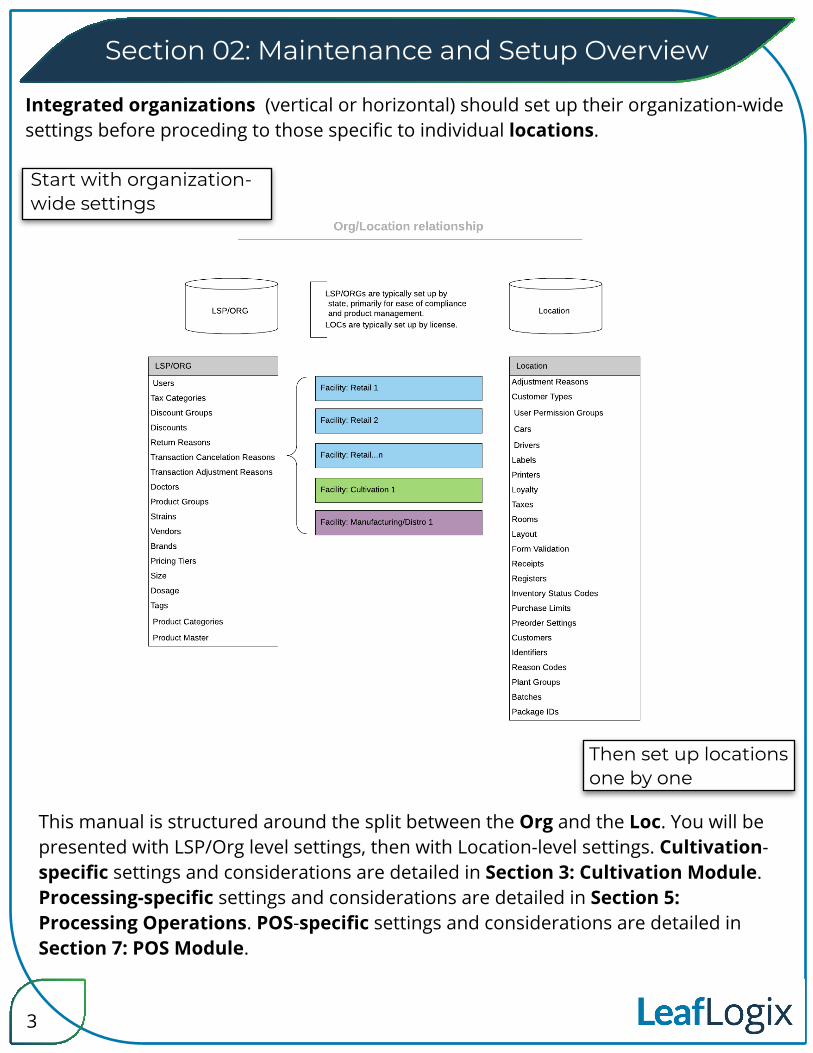
Integrated organizations (vertical or horizontal) should set up their organization-wide settings before proceding to those specific to individual locations.
This manual is structured around the split between the Org and the Loc. You will be presented with LSP/Org level settings, then with Location-level settings. Cultivation-specific settings and considerations are detailed in Section 3: Cultivation Module. Processing-specific settings and considerations are detailed in Section 5: Processing Operations. POS-specific settings and considerations are detailed in Section 7: POS Module.
Then set up locations one by one
Start with organization-wide settings
Section 02: Maintenance and Setup Overview
3
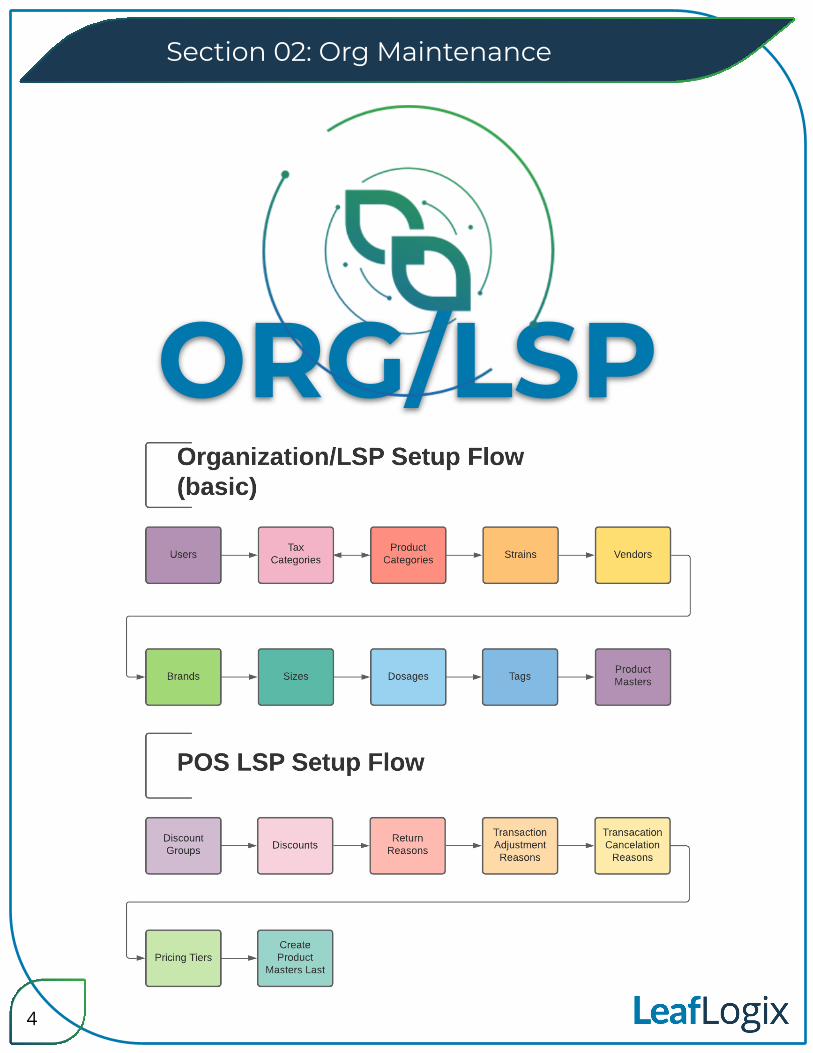
Section 02: Org Maintenance
ORG/LSP ORG/LSP
4
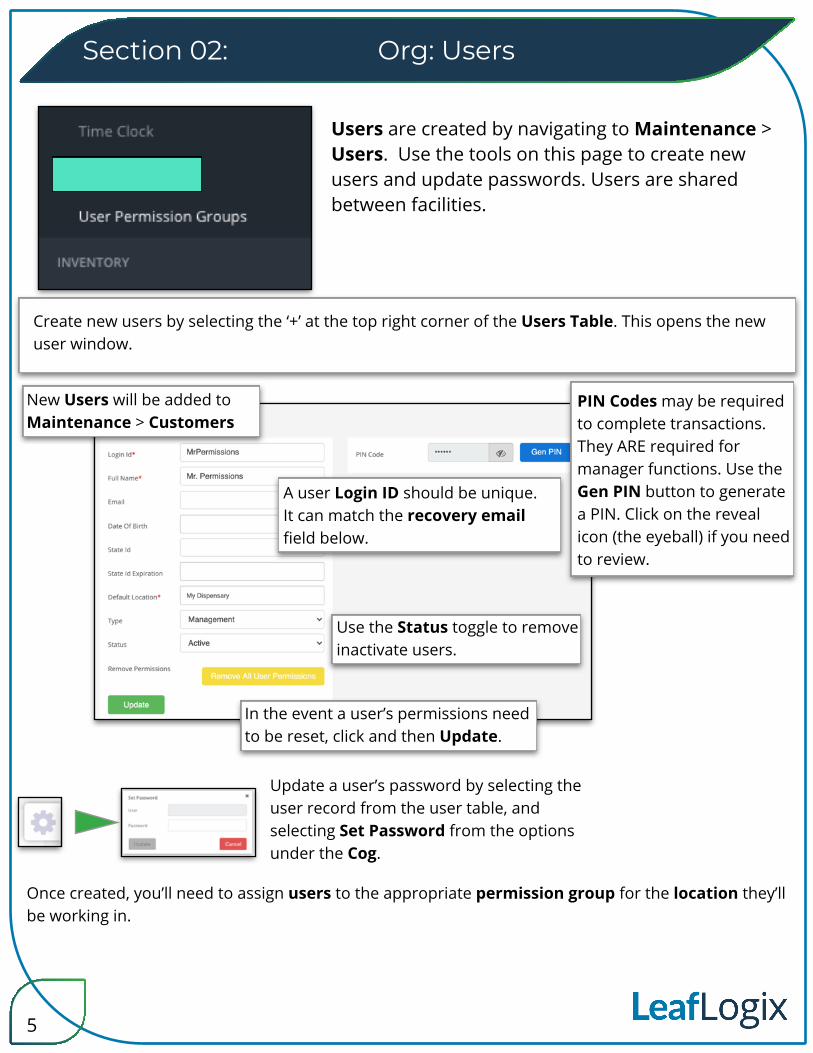
Update a user’s password by selecting the user record from the user table, and selecting Set Password from the options under the Cog.
Once created, you’ll need to assign users to the appropriate permission group for the location they’ll be working in.
Use the Status toggle to remove inactivate users.
In the event a user’s permissions need to be reset, click and then Update.
New Users will be added to Maintenance > Customers
Users are created by navigating to Maintenance > Users. Use the tools on this page to create new users and update passwords. Users are shared between facilities.
5
Org: UsersSection 02:
A user Login ID should be unique. It can match the recovery email field below.
Create new users by selecting the ‘+’ at the top right corner of the Users Table. This opens the new user window.
PIN Codes may be required to complete transactions. They ARE required for manager functions. Use the Gen PIN button to generate a PIN. Click on the reveal icon (the eyeball) if you need to review.
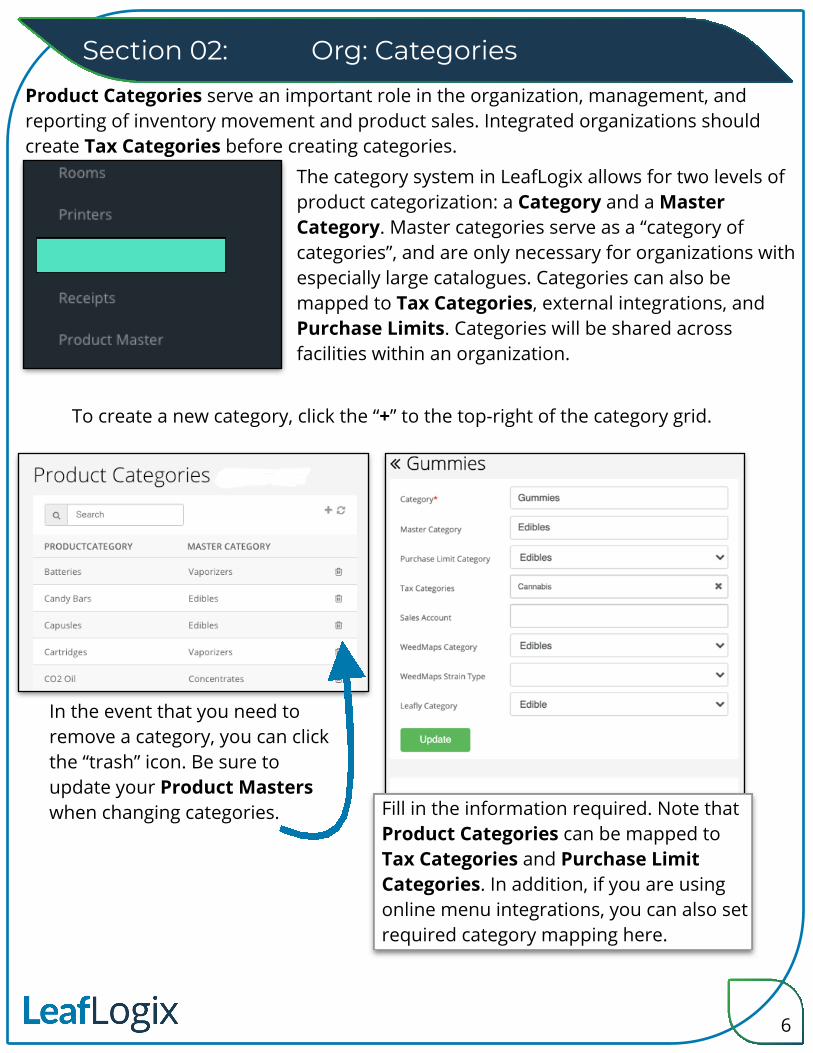
Product Categories serve an important role in the organization, management, and reporting of inventory movement and product sales. Integrated organizations should create Tax Categories before creating categories.
Org: CategoriesSection 02:
The category system in LeafLogix allows for two levels of product categorization: a Category and a Master Category. Master categories serve as a “category of categories”, and are only necessary for organizations with especially large catalogues. Categories can also be mapped to Tax Categories, external integrations, and Purchase Limits. Categories will be shared across facilities within an organization.
To create a new category, click the “+” to the top-right of the category grid.
In the event that you need to remove a category, you can click the “trash” icon. Be sure to update your Product Masters when changing categories. Fill in the information required. Note that
Product Categories can be mapped to Tax Categories and Purchase Limit Categories. In addition, if you are using online menu integrations, you can also set required category mapping here.
6
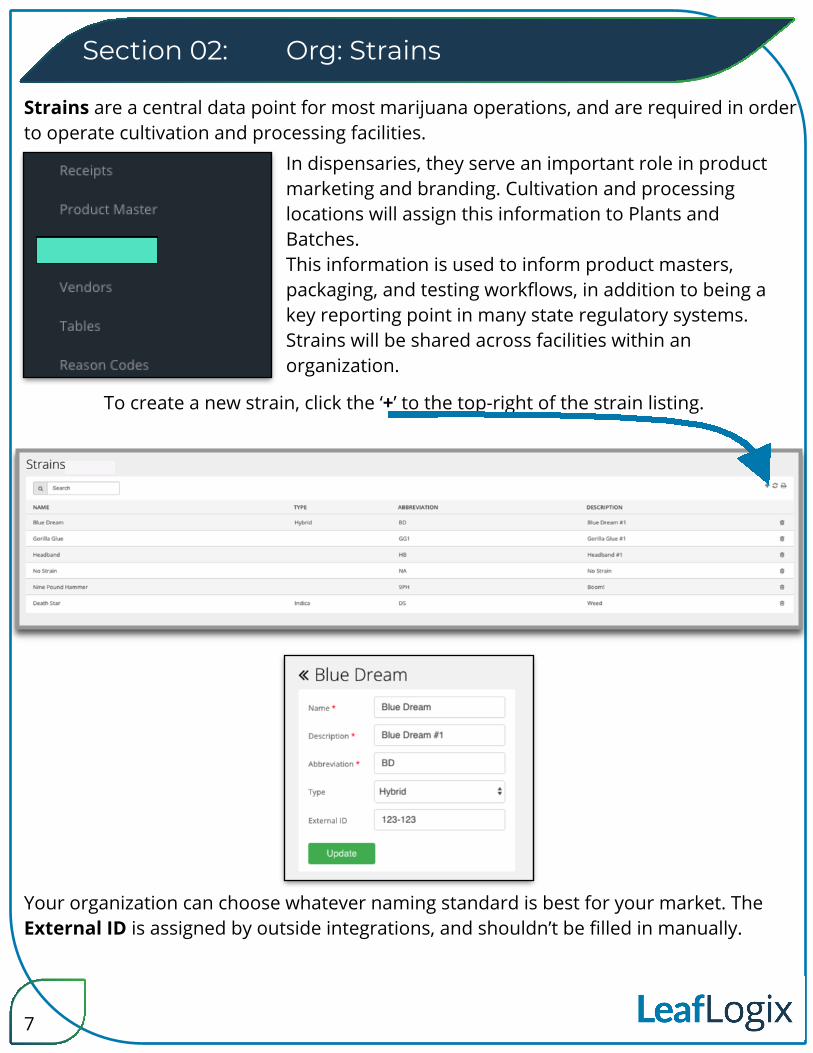
In dispensaries, they serve an important role in product marketing and branding. Cultivation and processing locations will assign this information to Plants and Batches.This information is used to inform product masters, packaging, and testing workflows, in addition to being a key reporting point in many state regulatory systems.Strains will be shared across facilities within an organization.
Section 02: Org: Strains
Strains are a central data point for most marijuana operations, and are required in order to operate cultivation and processing facilities.
To create a new strain, click the ‘+’ to the top-right of the strain listing.
Your organization can choose whatever naming standard is best for your market. The External ID is assigned by outside integrations, and shouldn’t be filled in manually.
7
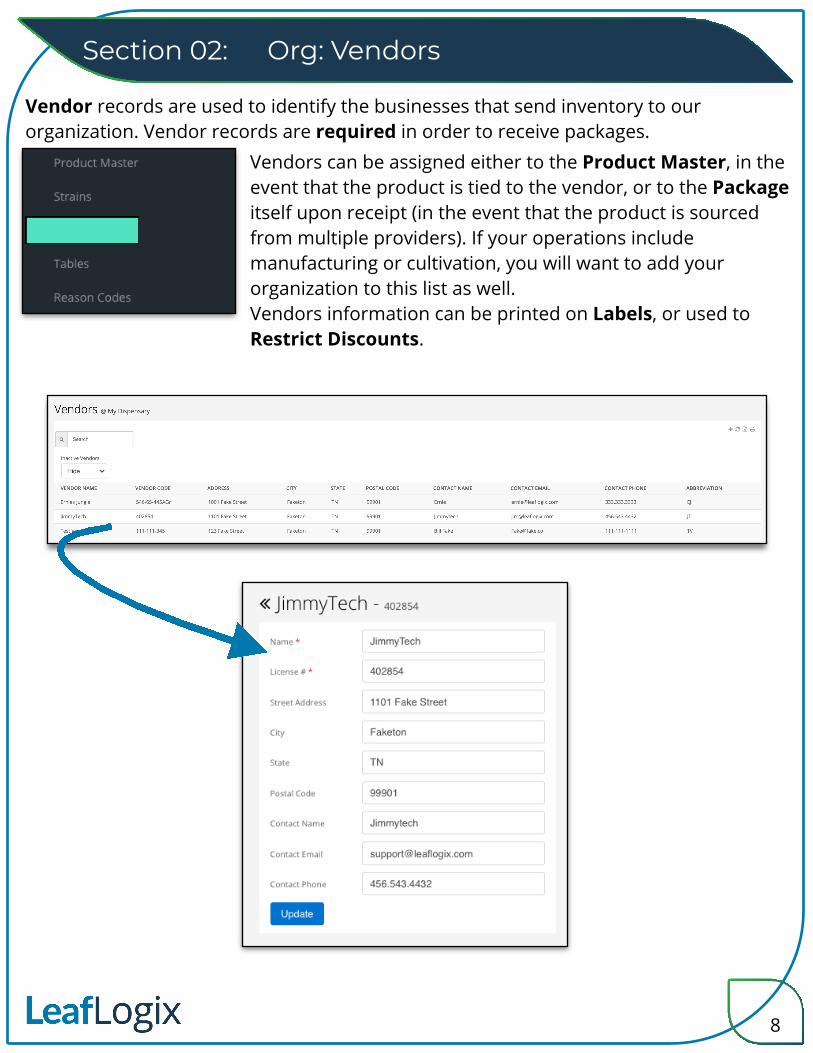
Vendors can be assigned either to the Product Master, in the event that the product is tied to the vendor, or to the Package itself upon receipt (in the event that the product is sourced from multiple providers). If your operations include manufacturing or cultivation, you will want to add your organization to this list as well. Vendors information can be printed on Labels, or used to Restrict Discounts.
Section 02: Org: Vendors
Vendor records are used to identify the businesses that send inventory to our organization. Vendor records are required in order to receive packages.
8
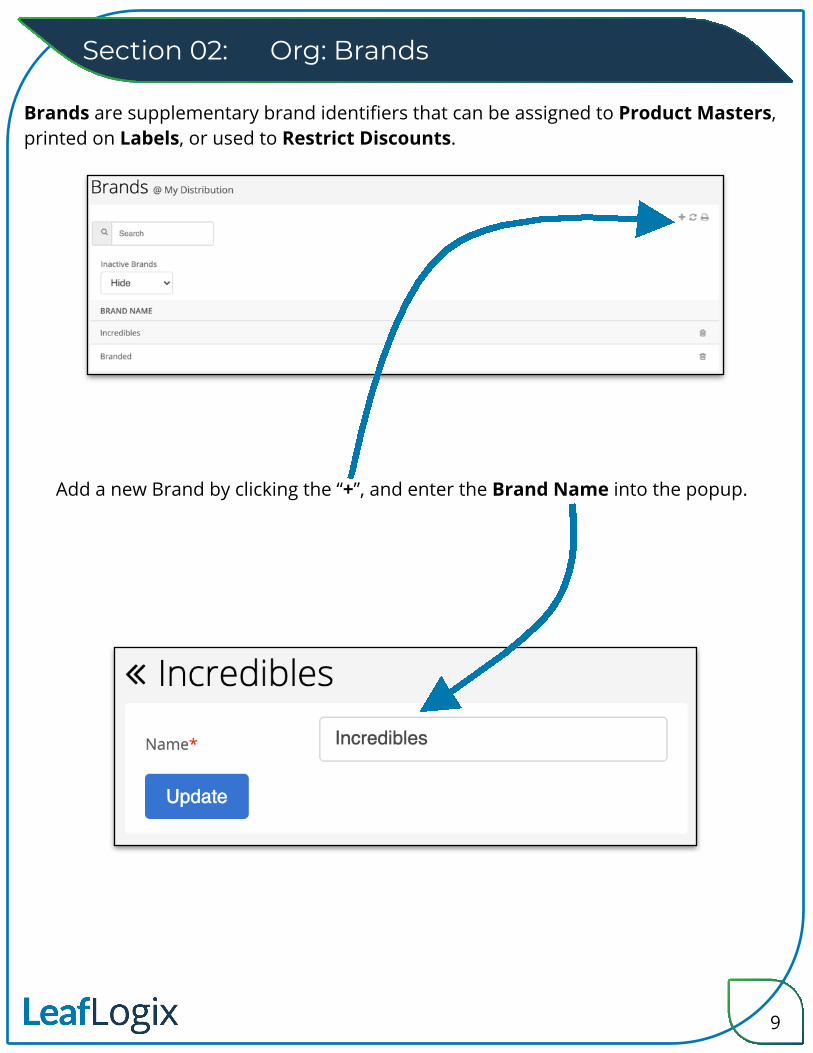
Section 02: Org: Brands
Brands are supplementary brand identifiers that can be assigned to Product Masters, printed on Labels, or used to Restrict Discounts.
Add a new Brand by clicking the “+”, and enter the Brand Name into the popup.
9
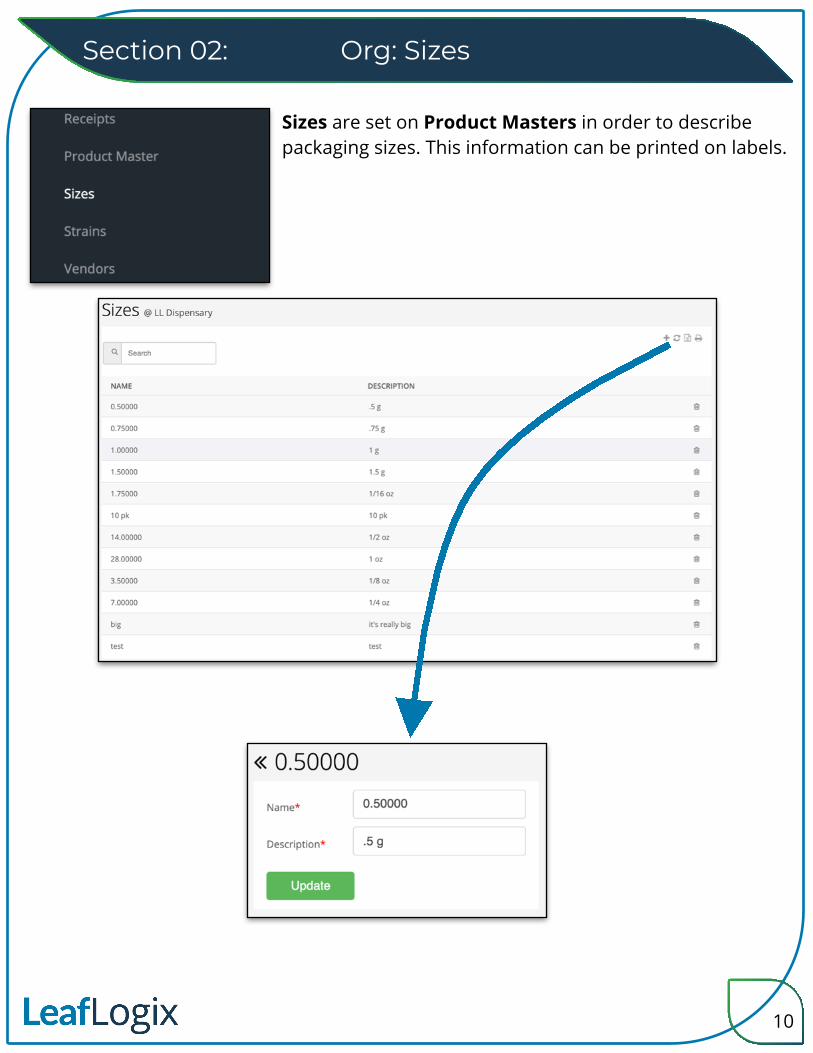
Section 02: Org: Sizes
Sizes are set on Product Masters in order to describe packaging sizes. This information can be printed on labels.
10
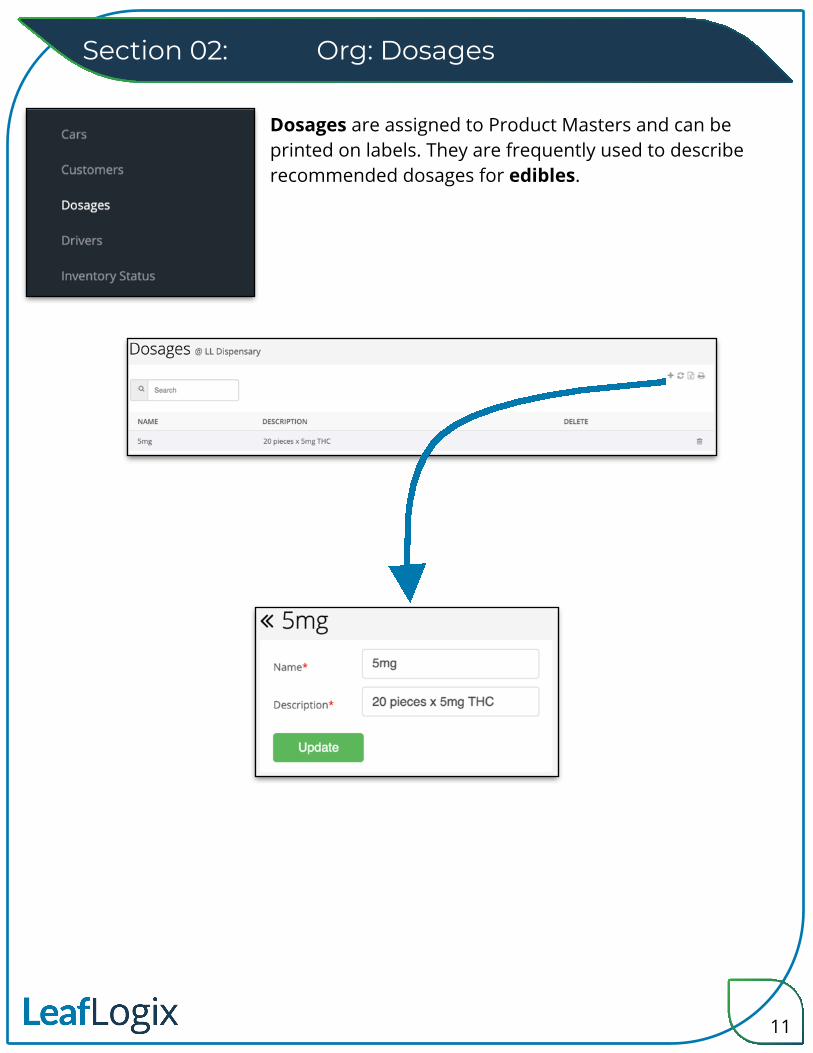
Section 02: Org: Dosages
Dosages are assigned to Product Masters and can be printed on labels. They are frequently used to describe recommended dosages for edibles.
11
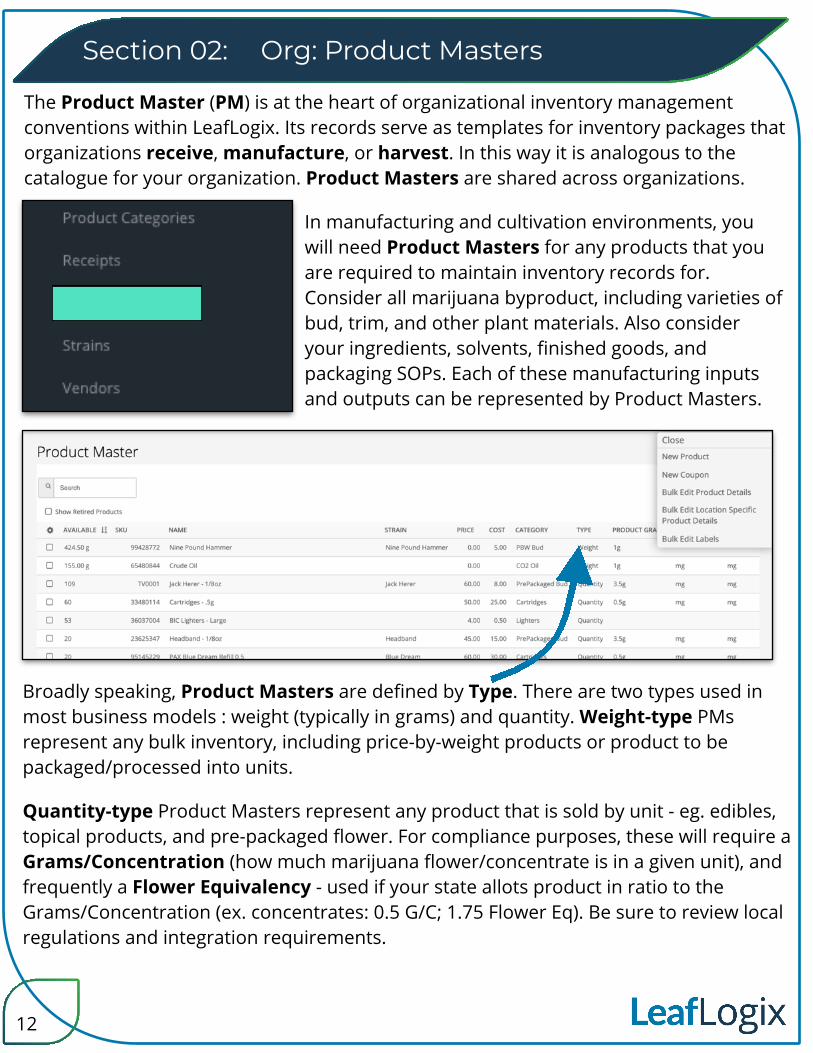
Quantity-type Product Masters represent any product that is sold by unit - eg. edibles, topical products, and pre-packaged flower. For compliance purposes, these will require a Grams/Concentration (how much marijuana flower/concentrate is in a given unit), and frequently a Flower Equivalency - used if your state allots product in ratio to the Grams/Concentration (ex. concentrates: 0.5 G/C; 1.75 Flower Eq). Be sure to review local regulations and integration requirements.
Org: Product MastersSection 02:
The Product Master (PM) is at the heart of organizational inventory management conventions within LeafLogix. Its records serve as templates for inventory packages that organizations receive, manufacture, or harvest. In this way it is analogous to the catalogue for your organization. Product Masters are shared across organizations.
In manufacturing and cultivation environments, you will need Product Masters for any products that you are required to maintain inventory records for. Consider all marijuana byproduct, including varieties of bud, trim, and other plant materials. Also consider your ingredients, solvents, finished goods, and packaging SOPs. Each of these manufacturing inputs and outputs can be represented by Product Masters.
Broadly speaking, Product Masters are defined by Type. There are two types used in most business models : weight (typically in grams) and quantity. Weight-type PMs represent any bulk inventory, including price-by-weight products or product to be packaged/processed into units.
12
Section 02: Org: Product Masters
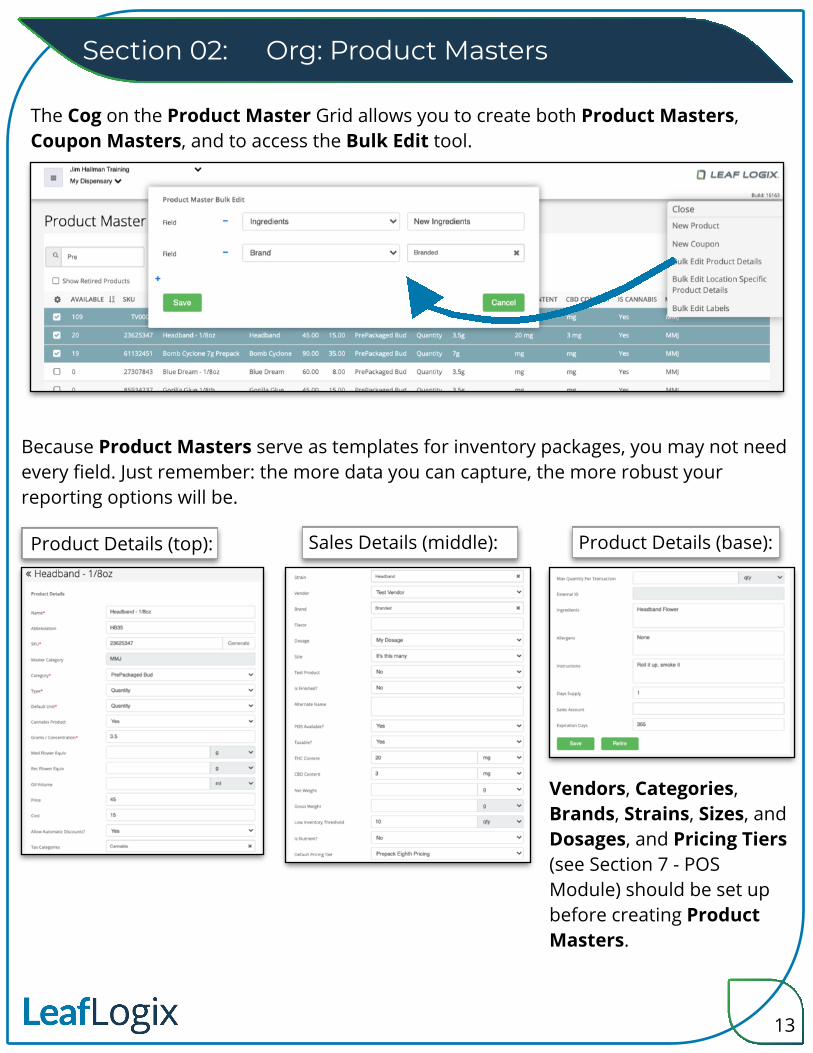
The Cog on the Product Master Grid allows you to create both Product Masters, Coupon Masters, and to access the Bulk Edit tool.
Because Product Masters serve as templates for inventory packages, you may not need every field. Just remember: the more data you can capture, the more robust your reporting options will be.
Product Details (top): Sales Details (middle): Product Details (base):
Vendors, Categories, Brands, Strains, Sizes, and Dosages, and Pricing Tiers (see Section 7 - POS Module) should be set up before creating Product Masters.
13

Section 02: Org: Product Masters
Drilling into a product master and selecting the cog will allow access to two important tools.
Once created, you can make bulk edits to PMs by filtering to and selecting the records you want to change, selecting the fields that you want to update, entering the new value, and clicking save.
In addition to acting as a catalogue of products, the Product Master also contains several important tools.
Copy will create a copy of the product master you have selected. Once copied, update the name, generate/enter a SKU and update any other information as required.Selecting Transactions will show you a listing of all POS/sales transactions run for inventory connected to this PM. This report will show sales for all packages and all locations.
16
Section 02: Org: Product Masters
4
3
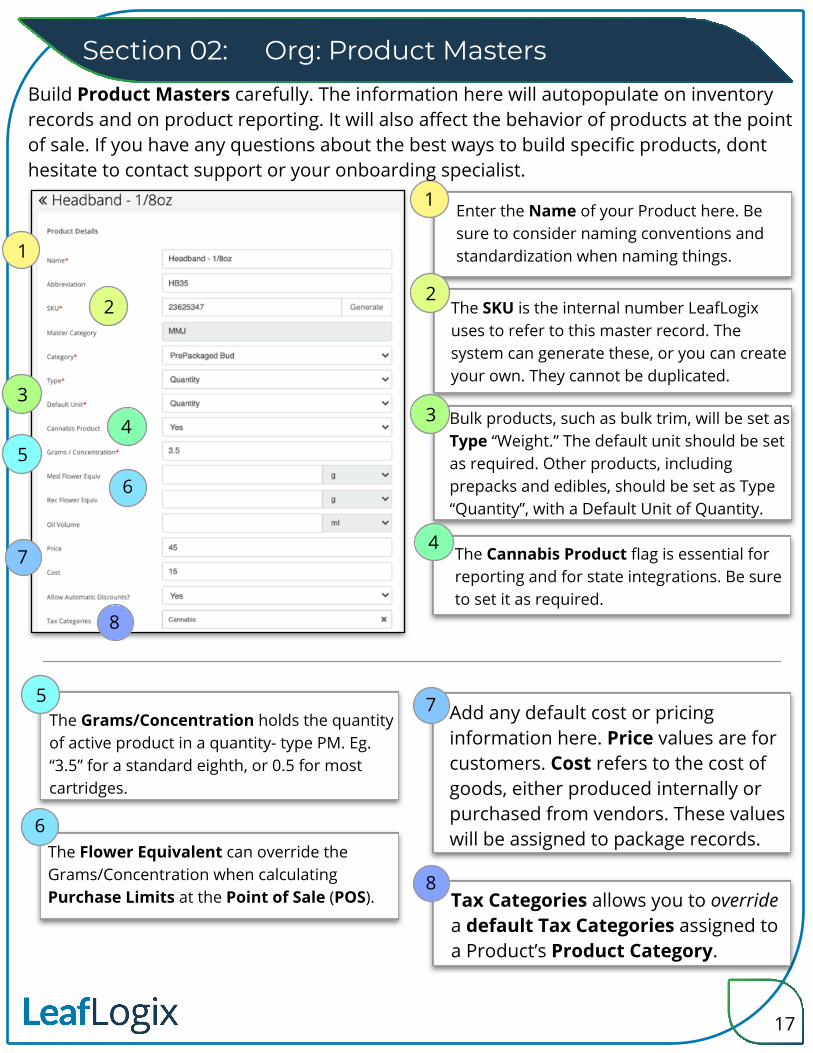
2The SKU is the internal number LeafLogix uses to refer to this master record. The system can generate these, or you can create your own. They cannot be duplicated.
Enter the Name of your Product here. Be sure to consider naming conventions and standardization when naming things.
1
Bulk products, such as bulk trim, will be set as Type “Weight.” The default unit should be set as required. Other products, including prepacks and edibles, should be set as Type “Quantity”, with a Default Unit of Quantity.
The Cannabis Product flag is essential for reporting and for state integrations. Be sure to set it as required.
4
The Grams/Concentration holds the quantity of active product in a quantity- type PM. Eg. “3.5” for a standard eighth, or 0.5 for most cartridges.
The Flower Equivalent can override the Grams/Concentration when calculating Purchase Limits at the Point of Sale (POS).
Build Product Masters carefully. The information here will autopopulate on inventory records and on product reporting. It will also affect the behavior of products at the point of sale. If you have any questions about the best ways to build specific products, dont hesitate to contact support or your onboarding specialist.
5
3
2
1
5Add any default cost or pricing information here. Price values are for customers. Cost refers to the cost of goods, either produced internally or purchased from vendors. These values will be assigned to package records.
6
6
Tax Categories allows you to override a default Tax Categories assigned to a Product’s Product Category.
7
7
8
8
17
Section 02: Org: Product Masters
6
6
5
4
3
2
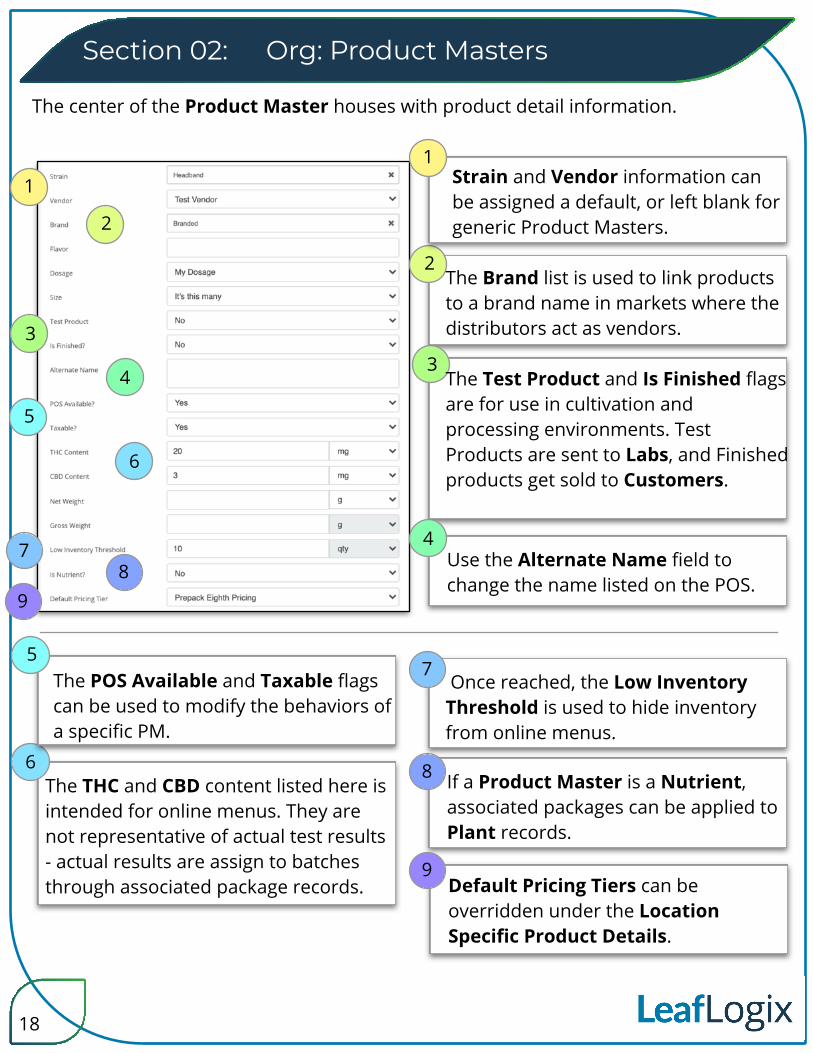
The THC and CBD content listed here is intended for online menus. They are not representative of actual test results - actual results are assign to batches through associated package records.
5
2
3
4
Strain and Vendor information can be assigned a default, or left blank for generic Product Masters.
The Brand list is used to link products to a brand name in markets where the distributors act as vendors.
Use the Alternate Name field to change the name listed on the POS.
The Test Product and Is Finished flags are for use in cultivation and processing environments. Test Products are sent to Labs, and Finished products get sold to Customers.
The POS Available and Taxable flags can be used to modify the behaviors of a specific PM.
Once reached, the Low Inventory Threshold is used to hide inventory from online menus.
If a Product Master is a Nutrient, associated packages can be applied to Plant records.
Default Pricing Tiers can be overridden under the Location Specific Product Details.
The center of the Product Master houses with product detail information.
11
7
7
8
8
9
9
18
Org: Product MastersSection 02:
5
4
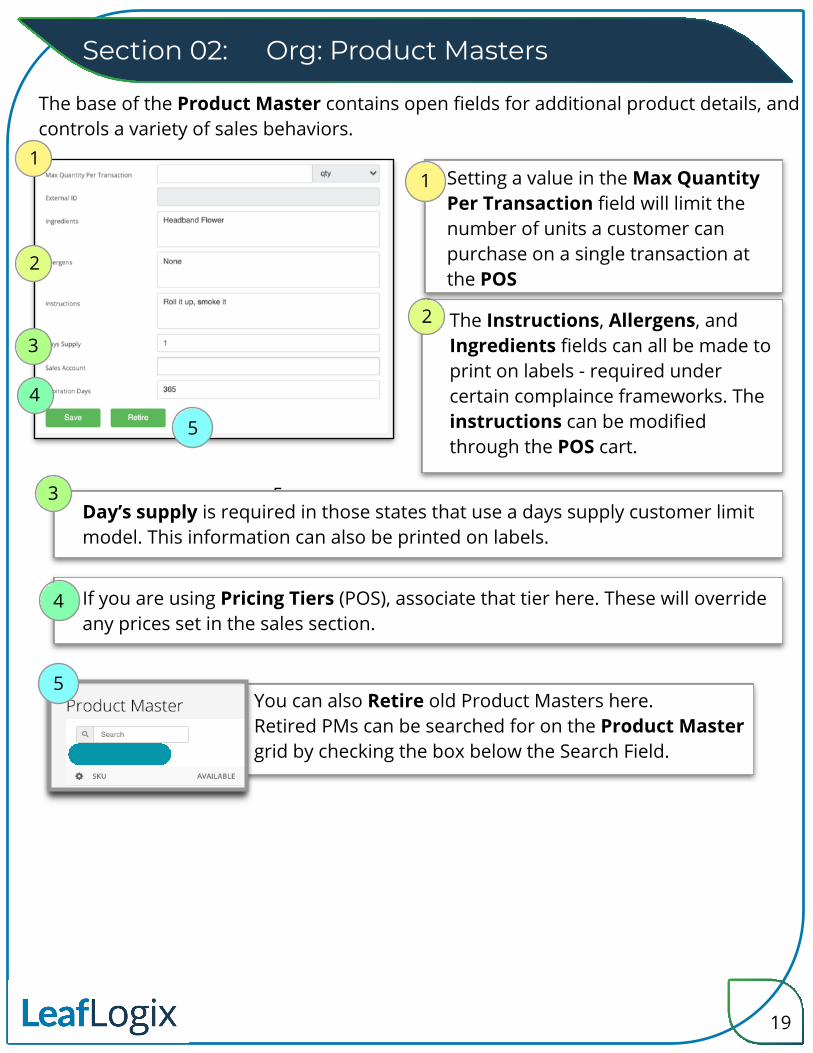
The Instructions, Allergens, and Ingredients fields can all be made to print on labels - required under certain complaince frameworks. The instructions can be modified through the POS cart.
3
2
2
1
You can also Retire old Product Masters here. Retired PMs can be searched for on the Product Master grid by checking the box below the Search Field.
1 Setting a value in the Max Quantity Per Transaction field will limit the number of units a customer can purchase on a single transaction at the POS
Day’s supply is required in those states that use a days supply customer limit model. This information can also be printed on labels.
4
3
If you are using Pricing Tiers (POS), associate that tier here. These will override any prices set in the sales section.
5
5
The base of the Product Master contains open fields for additional product details, and controls a variety of sales behaviors.
19
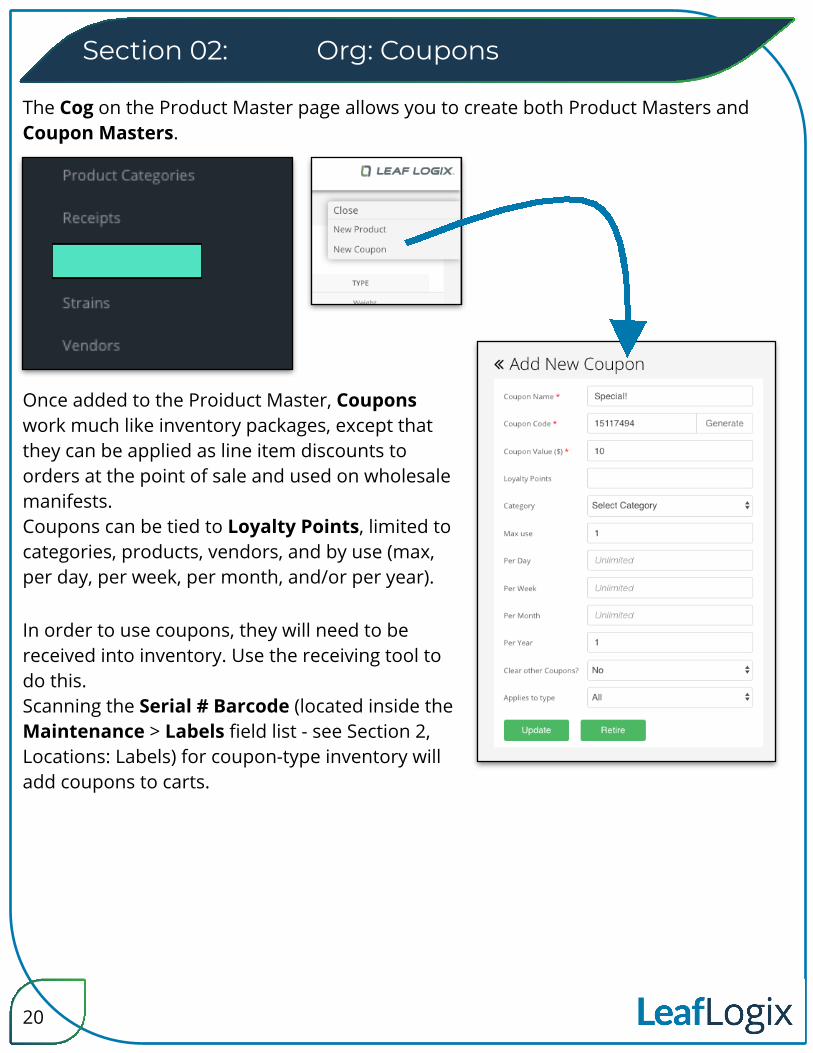
In order to use coupons, they will need to be received into inventory. Use the receiving tool to do this. Scanning the Serial # Barcode (located inside the Maintenance > Labels field list - see Section 2, Locations: Labels) for coupon-type inventory will add coupons to carts.
Coupons can be tied to Loyalty Points, limited to categories, products, vendors, and by use (max, per day, per week, per month, and/or per year).
The Cog on the Product Master page allows you to create both Product Masters and Coupon Masters.
Section 02:
Once added to the Proiduct Master, Coupons work much like inventory packages, except that they can be applied as line item discounts to orders at the point of sale and used on wholesale manifests.
Org: Coupons
20
Section 02: Org: Reason Codes (Cultivation)
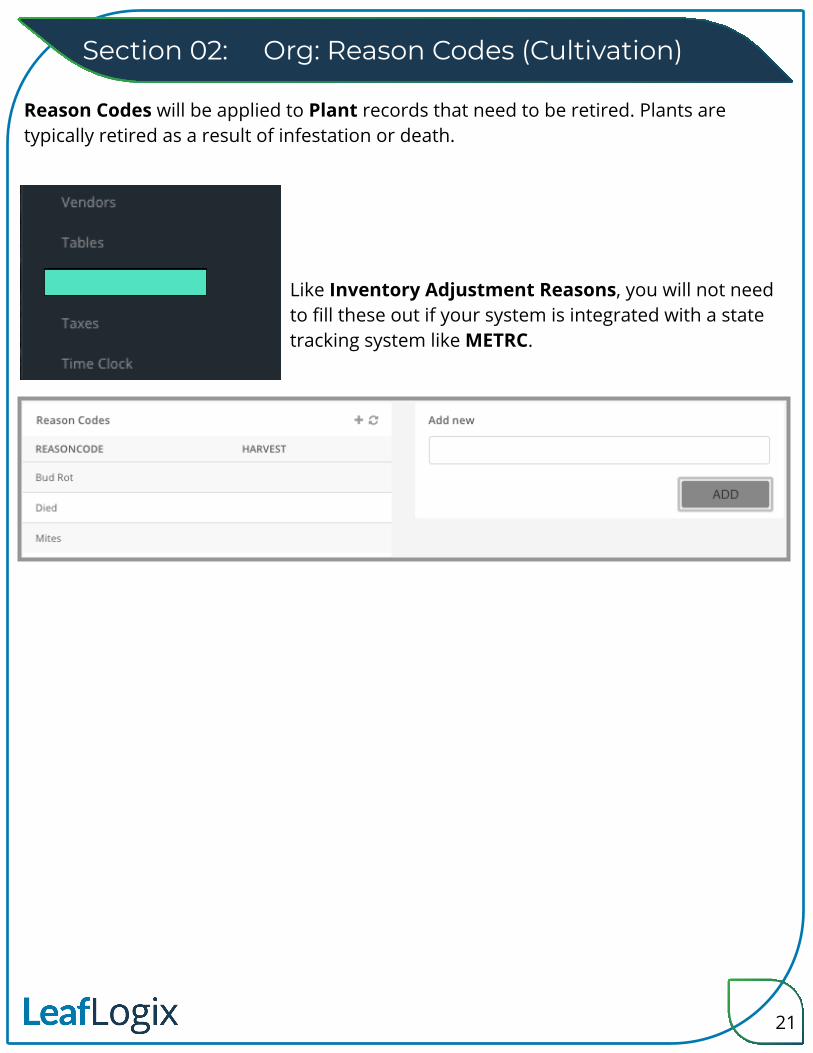
Reason Codes will be applied to Plant records that need to be retired. Plants are typically retired as a result of infestation or death.
Like Inventory Adjustment Reasons, you will not need to fill these out if your system is integrated with a state tracking system like METRC.
21
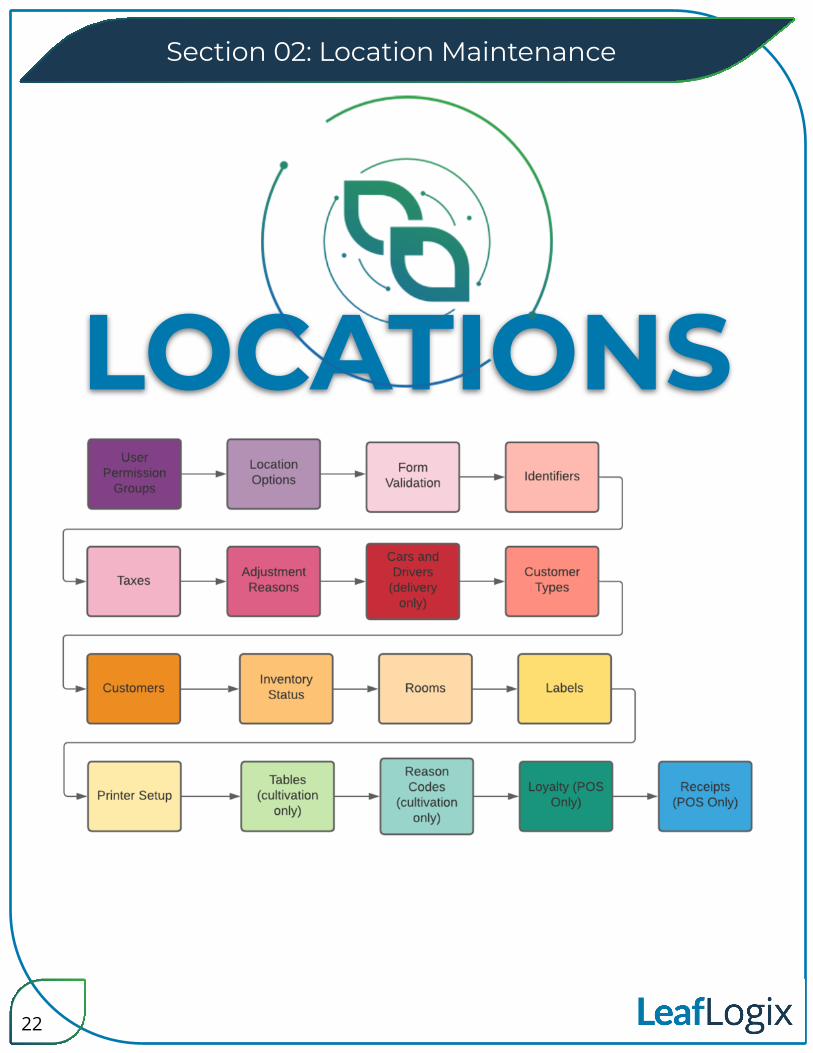
Section 02: Location Maintenance
LOCATIONS LOCATIONS
22
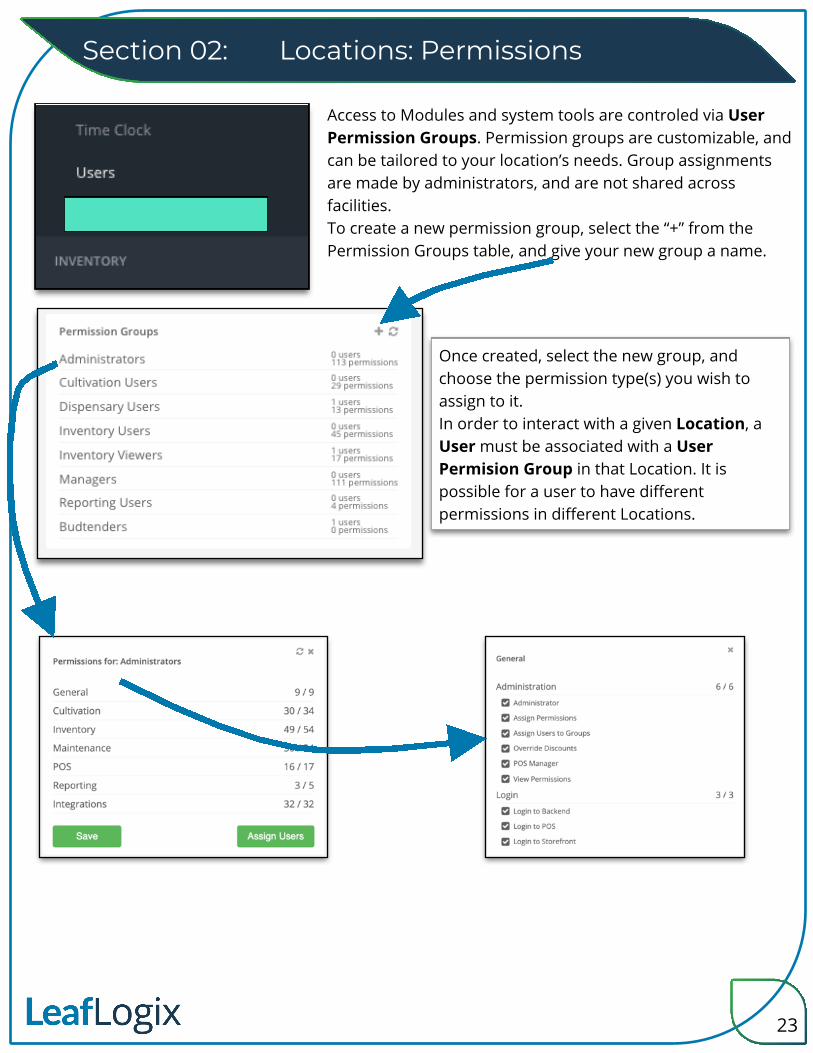
Once created, select the new group, and choose the permission type(s) you wish to assign to it.In order to interact with a given Location, a User must be associated with a User Permision Group in that Location. It is possible for a user to have different permissions in different Locations.
23
Locations: PermissionsSection 02:
Access to Modules and system tools are controled via User Permission Groups. Permission groups are customizable, and can be tailored to your location’s needs. Group assignments are made by administrators, and are not shared across facilities.To create a new permission group, select the “+” from the Permission Groups table, and give your new group a name.
24
Locations: Permissions
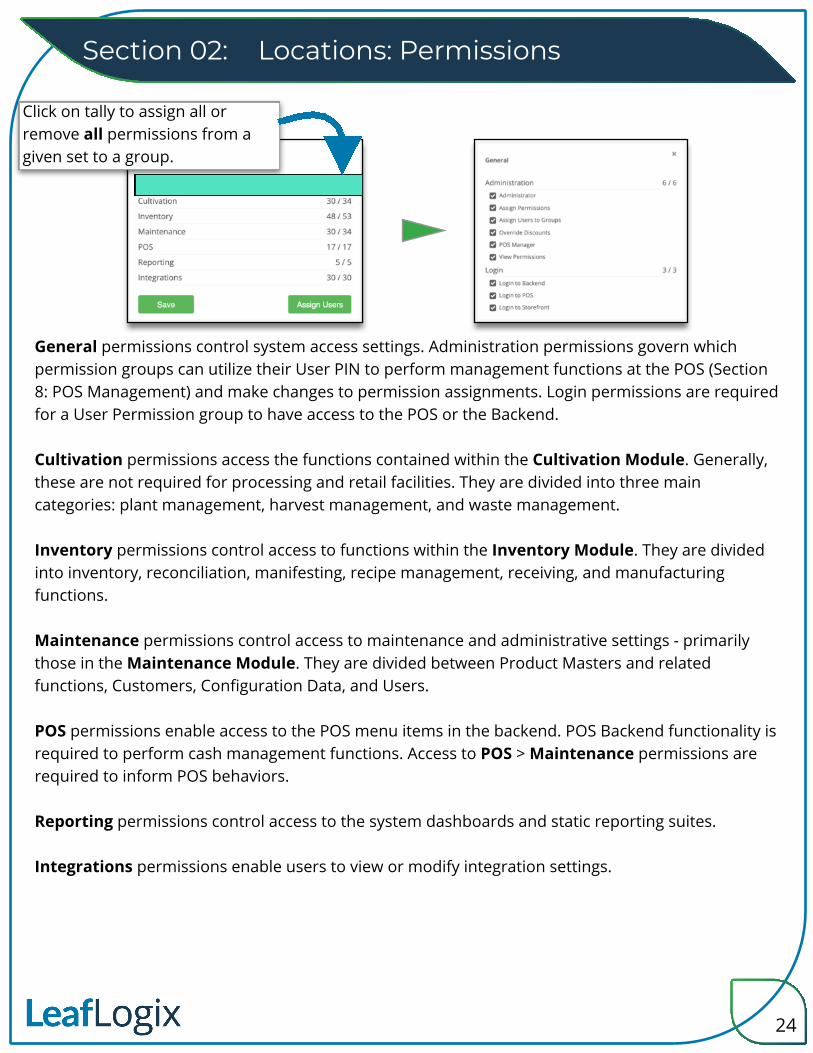
Click on tally to assign all or remove all permissions from a given set to a group.
Section 02:
General permissions control system access settings. Administration permissions govern which permission groups can utilize their User PIN to perform management functions at the POS (Section 8: POS Management) and make changes to permission assignments. Login permissions are required for a User Permission group to have access to the POS or the Backend.
Cultivation permissions access the functions contained within the Cultivation Module. Generally, these are not required for processing and retail facilities. They are divided into three main categories: plant management, harvest management, and waste management.
Inventory permissions control access to functions within the Inventory Module. They are divided into inventory, reconciliation, manifesting, recipe management, receiving, and manufacturing functions.
Maintenance permissions control access to maintenance and administrative settings - primarily those in the Maintenance Module. They are divided between Product Masters and related functions, Customers, Configuration Data, and Users.
POS permissions enable access to the POS menu items in the backend. POS Backend functionality is required to perform cash management functions. Access to POS > Maintenance permissions are required to inform POS behaviors.
Reporting permissions control access to the system dashboards and static reporting suites.
Integrations permissions enable users to view or modify integration settings.
Section 02: Locations: Location Options
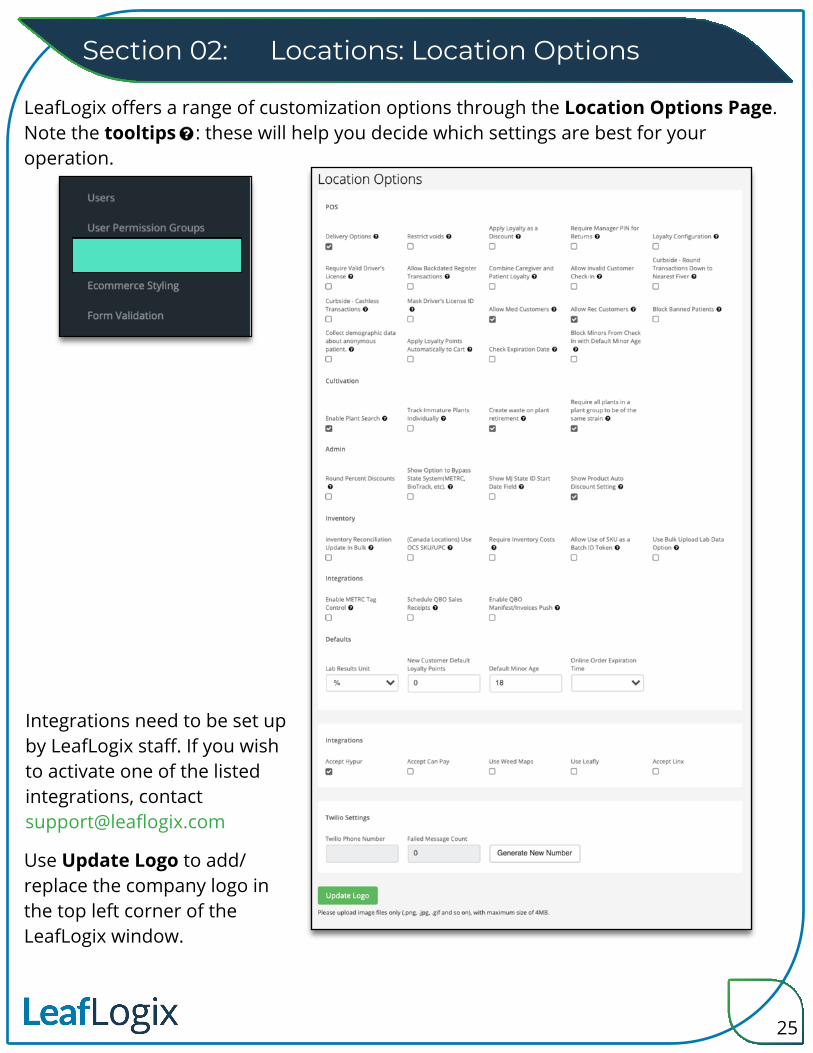
LeafLogix offers a range of customization options through the Location Options Page. Note the tooltips : these will help you decide which settings are best for your operation.
Integrations need to be set up by LeafLogix staff. If you wish to activate one of the listed integrations, contact [email protected]
Use Update Logo to add/replace the company logo in the top left corner of the LeafLogix window.
25
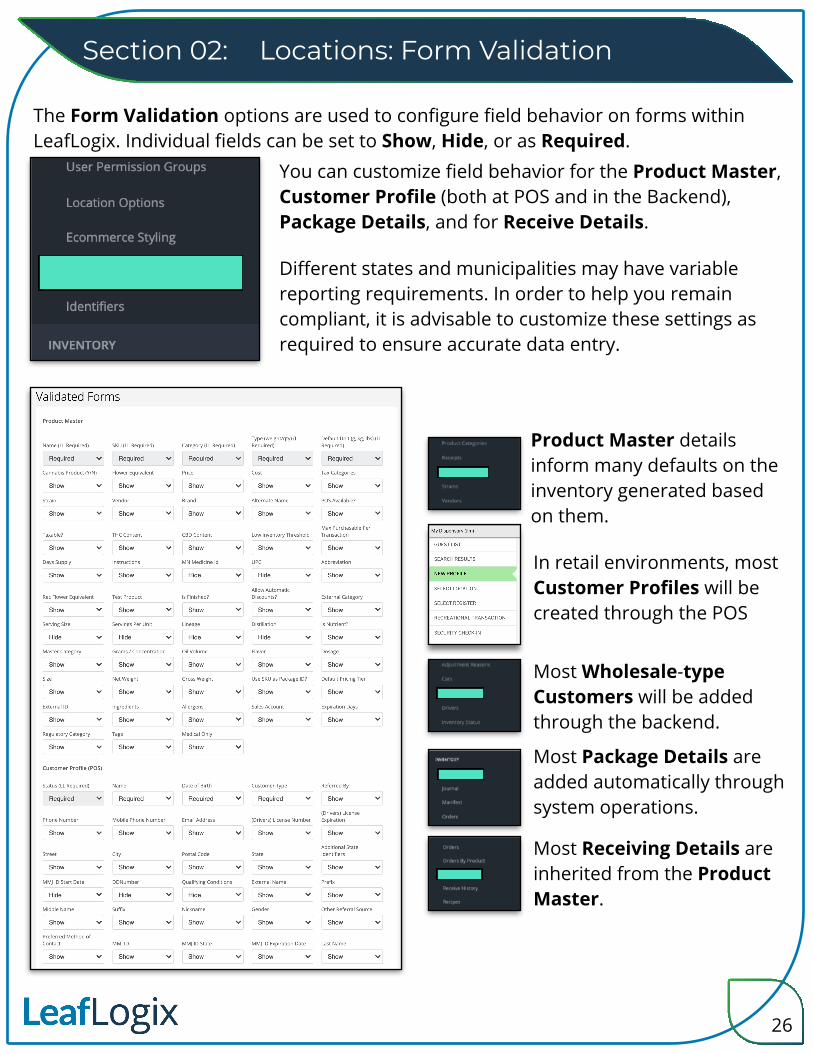
You can customize field behavior for the Product Master, Customer Profile (both at POS and in the Backend), Package Details, and for Receive Details.
In retail environments, most Customer Profiles will be created through the POS
Product Master details inform many defaults on the inventory generated based on them.
Most Wholesale-type Customers will be added through the backend.
Most Package Details are added automatically through system operations.
Most Receiving Details are inherited from the Product Master.
Different states and municipalities may have variable reporting requirements. In order to help you remain compliant, it is advisable to customize these settings as required to ensure accurate data entry.
Section 02: Locations: Form Validation
The Form Validation options are used to configure field behavior on forms within LeafLogix. Individual fields can be set to Show, Hide, or as Required.
26
Section 02: Locations: Identifiers
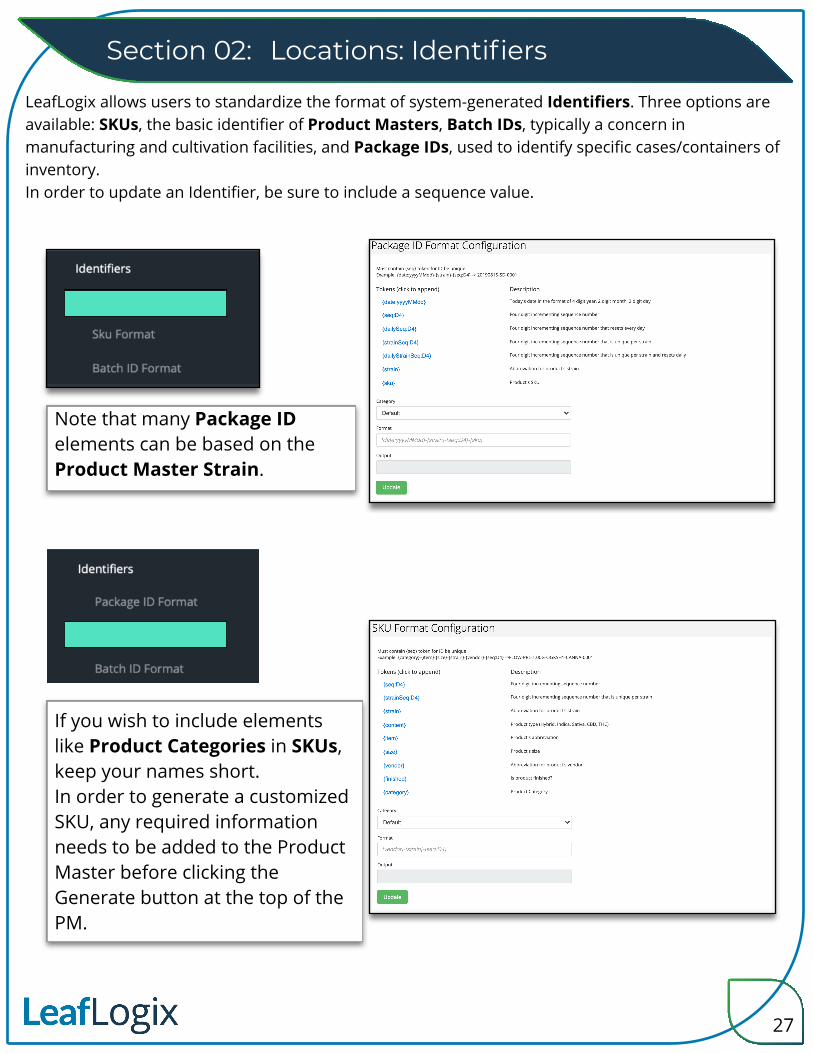
LeafLogix allows users to standardize the format of system-generated Identifiers. Three options are available: SKUs, the basic identifier of Product Masters, Batch IDs, typically a concern in manufacturing and cultivation facilities, and Package IDs, used to identify specific cases/containers of inventory. In order to update an Identifier, be sure to include a sequence value.
Note that many Package ID elements can be based on the Product Master Strain.
If you wish to include elements like Product Categories in SKUs, keep your names short.In order to generate a customized SKU, any required information needs to be added to the Product Master before clicking the Generate button at the top of the PM.
Section 02:
27
Section 02: Locations: Identifiers
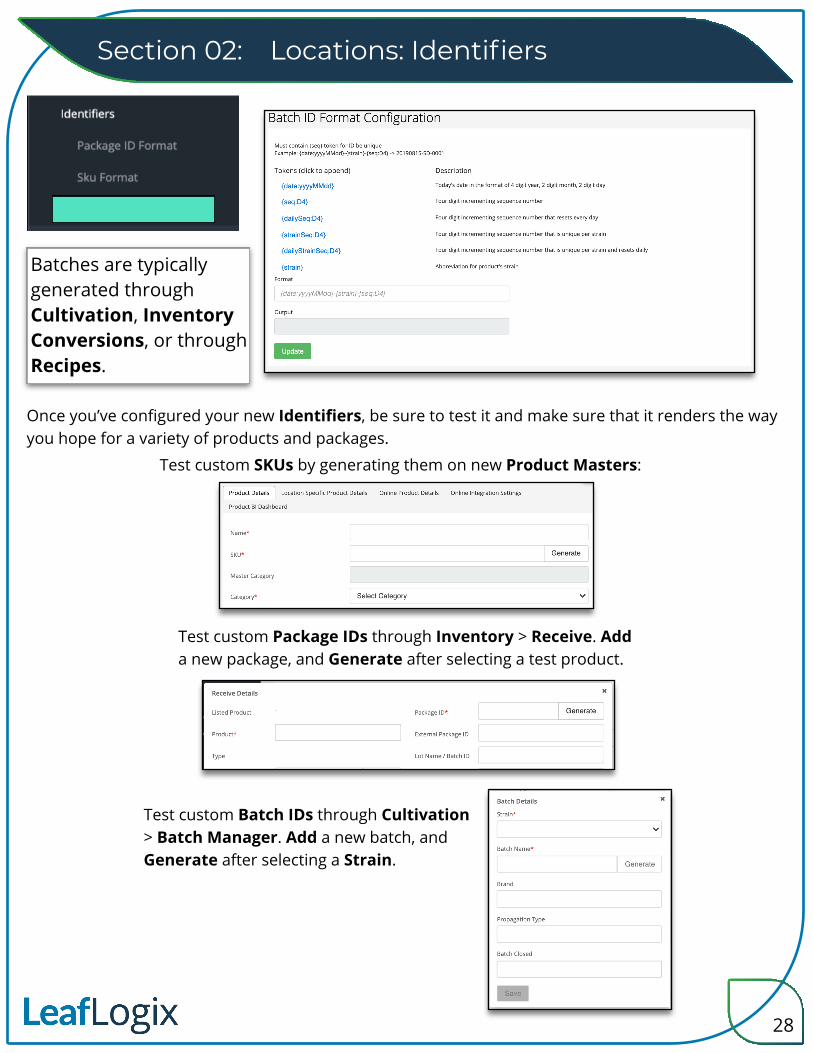
Batches are typically generated through Cultivation, Inventory Conversions, or through Recipes.
Once you’ve configured your new Identifiers, be sure to test it and make sure that it renders the way you hope for a variety of products and packages.
Test custom SKUs by generating them on new Product Masters:
Test custom Package IDs through Inventory > Receive. Add a new package, and Generate after selecting a test product.
Test custom Batch IDs through Cultivation > Batch Manager. Add a new batch, and Generate after selecting a Strain.
Section 02:
28
Locations: CustomersSection 02:
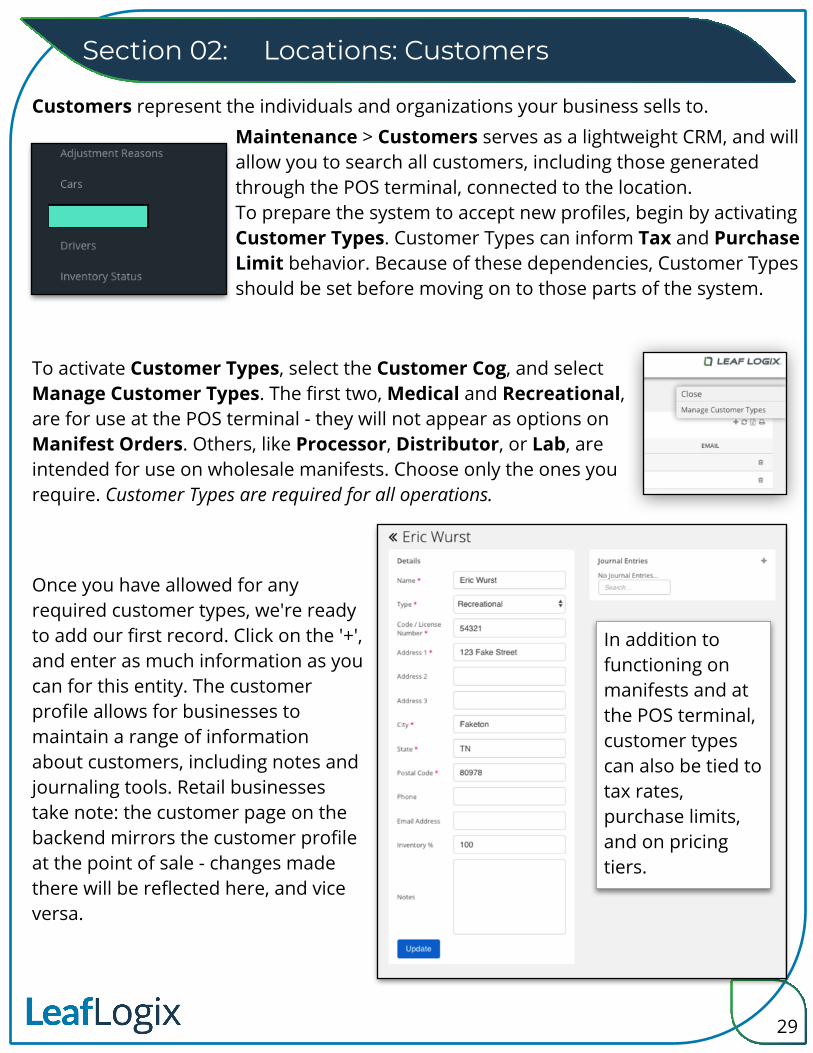
Customers represent the individuals and organizations your business sells to.
To activate Customer Types, select the Customer Cog, and select Manage Customer Types. The first two, Medical and Recreational, are for use at the POS terminal - they will not appear as options on Manifest Orders. Others, like Processor, Distributor, or Lab, are intended for use on wholesale manifests. Choose only the ones you require. Customer Types are required for all operations.
Once you have allowed for any required customer types, we're ready to add our first record. Click on the '+', and enter as much information as you can for this entity. The customer profile allows for businesses to maintain a range of information about customers, including notes and journaling tools. Retail businesses take note: the customer page on the backend mirrors the customer profile at the point of sale - changes made there will be reflected here, and vice versa.
In addition to functioning on manifests and at the POS terminal, customer types can also be tied to tax rates, purchase limits, and on pricing tiers.
Maintenance > Customers serves as a lightweight CRM, and will allow you to search all customers, including those generated through the POS terminal, connected to the location. To prepare the system to accept new profiles, begin by activating Customer Types. Customer Types can inform Tax and Purchase Limit behavior. Because of these dependencies, Customer Types should be set before moving on to those parts of the system.
29
Locations: TaxesSection 02:
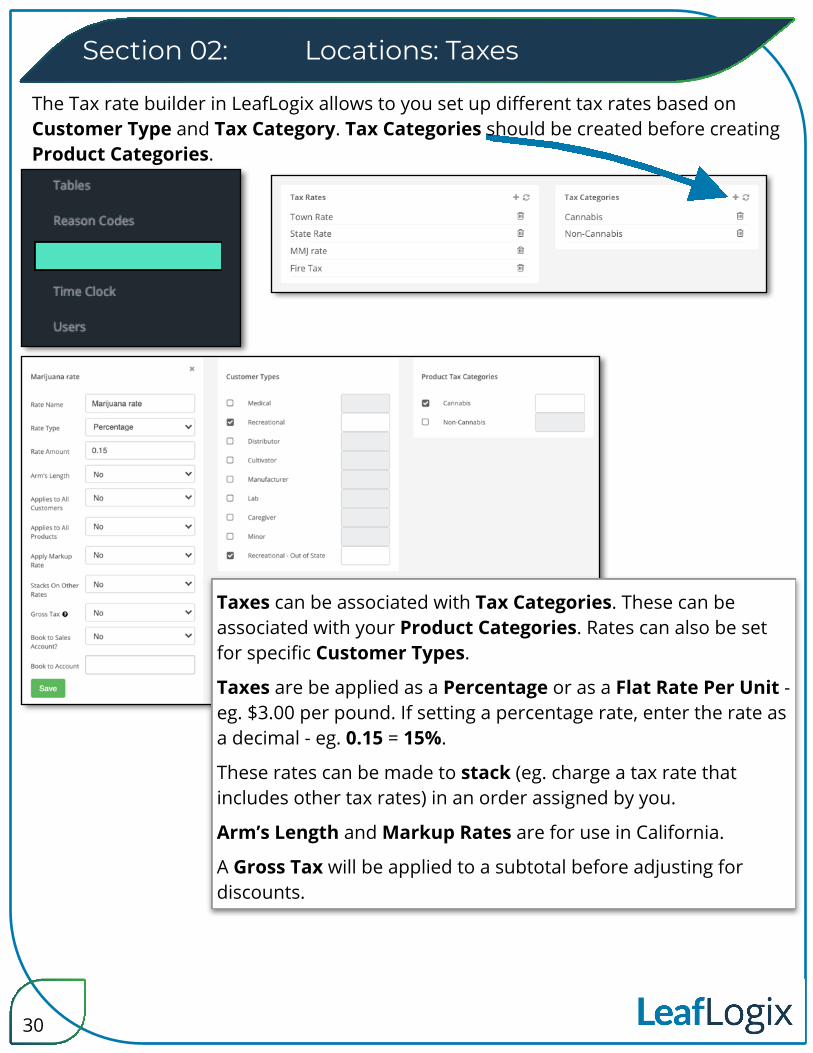
The Tax rate builder in LeafLogix allows to you set up different tax rates based on Customer Type and Tax Category. Tax Categories should be created before creating Product Categories.
Taxes are be applied as a Percentage or as a Flat Rate Per Unit - eg. $3.00 per pound. If setting a percentage rate, enter the rate as a decimal - eg. 0.15 = 15%.
Taxes can be associated with Tax Categories. These can be associated with your Product Categories. Rates can also be set for specific Customer Types.
These rates can be made to stack (eg. charge a tax rate that includes other tax rates) in an order assigned by you.
Arm’s Length and Markup Rates are for use in California.
A Gross Tax will be applied to a subtotal before adjusting for discounts.
30
Section 02: Locations: Adjustment Reasons
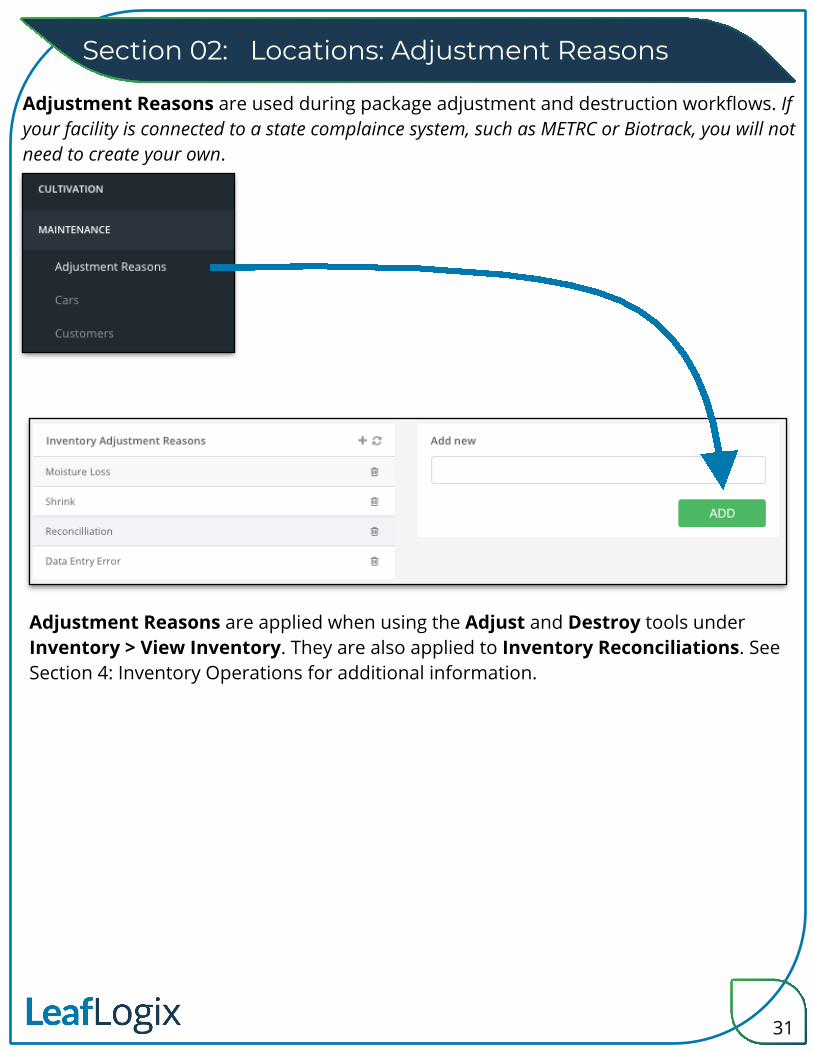
Adjustment Reasons are used during package adjustment and destruction workflows. If your facility is connected to a state complaince system, such as METRC or Biotrack, you will not need to create your own.
Adjustment Reasons are applied when using the Adjust and Destroy tools under Inventory > View Inventory. They are also applied to Inventory Reconciliations. See Section 4: Inventory Operations for additional information.
31

Section 02: Locations: Cars and Drivers
If you are required to provide vehicle information on transportation and delivery manifests, you can create these records under Maintenance > Cars and Maintenance > Drivers.
New Driver PageNew Car Page
You can add these details to Manifests by selecting a manifest, and selecting the the manifest cog. Click Edit Driver. The window this opens will also allow you to capture delivery times and direction information.
Note that driver records can contain image files, like driver’s licenses. Upload those here.
32

Locations: Inventory StatusSection 02:
Inventory Statuses are used to assist with inventory management workflows. They can be assigned to packages in order to assign statuses to packages (eg. what needs to be tested, quarantined, returned, or otherwise handled in some way specific to your operational SOPs). These statuses can be used under View Inventory to quickly filter to specific inventory packages.
To create a new inventory status, click the “+” to the top-right of the Inventory Status grid.
Once set, you can quickly locate the packages assigned a given status using the Status filter located under Inventory > View Inventory.
33

Room setup requires that you choose settings based on the room’s purpose within your facility. Most retail facilities will require a mixure of Inventory Rooms, a Sales Floor, and sometimes inventory locations Linked to specific Registers. Cultivations will require Plant Rooms, as well as Inventory Rooms. Production facilities typically only require Inventory Rooms.Room management can do a lot to dictate flow within your facility, so be sure and check with your onboarding consultant if you have questions. Rooms can have multiple settings assigned to them (eg. sharing and entry for a Sales floor and a Waiting Room.
Locations: RoomsSection 02:
LeafLogix organizes inventory records into Rooms: the areas within your facility where plants and inventory will be logged.
1
2
5
4
3
7
6
8
Create one quarantine room. Returned inventory packages will be assigned here.
1
Set one Waiting Room. One room with this setting is required for to check in customers 2
Inventory can only be sold from a room set as a Sales Floor. Retail facilities require one.3
Customers can be assigned to POS Rooms - useful for facilities with more than one customer service area.
4
Most non-cultivation rooms require that Is Inventory Room be set to Yes.
5
PreOrder rooms are used to store inbound E-Commerce orders (integration dependent).
6
Inventory in rooms marked with the Is E-Commerce Room set to yes will share that inventory with your menu integrations.
7
If a room is linked to a register, only that register will be able to sell its inventory.8
Rooms should be built around their purpose. When creating a new room, consider what it is used for:
34

Locations: LabelsSection 02:
Labels are fully customizable within LeafLogix. They can be printed for packages and for plants, and can contain a considerable variety of datapoints from within the system.Labels are not shared between facilities, but they can be copied. Your onboarding team will help you build your first labels.
To create a new label, simply click ‘+’ to the top right of the labels table. This will open the Add New Label page. Name your label, select the type, width, height, and orientation of your new label (note: LABEL ROTATION IS NOT RECOMMENDED - for best results, stay in Portrait). Save before proceeding.
Select the label you wish to design/modify. Search the field list for the data you wish to print on your label. To create text or text labels, select the Text Label, and type your text into the Value field below. You do not need to use the value field except when adding your own text.
Data is contained within virtual text boxes. The X-Position indicates the distance from the left. the Y-Position indicates the distance from the top.
The Width and Height of the text box is added here. Make sure that there’s enough space for your information. Click Update when finished.
35
X
Y(0,0)
(0,1) (2,1)
(2,0)
36
Locations: Printer SetupSection 02:
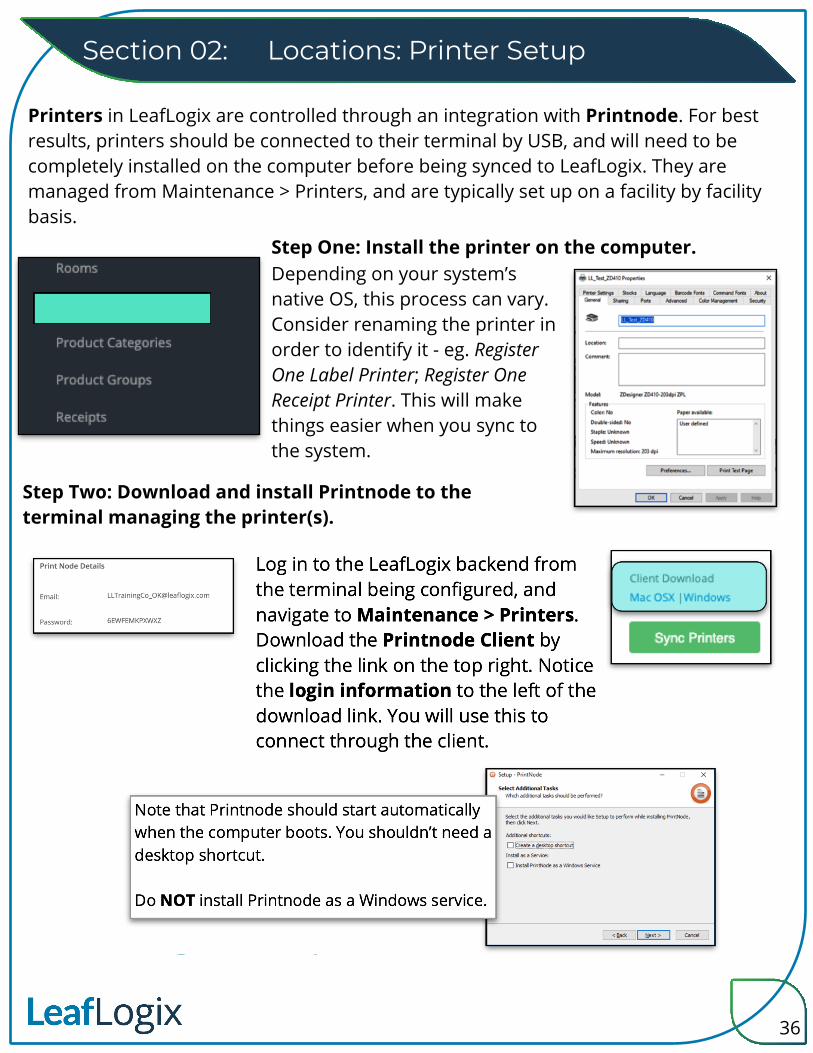
Printers in LeafLogix are controlled through an integration with Printnode. For best results, printers should be connected to their terminal by USB, and will need to be completely installed on the computer before being synced to LeafLogix. They are managed from Maintenance > Printers, and are typically set up on a facility by facility basis.
Depending on your system’s native OS, this process can vary. Consider renaming the printer in order to identify it - eg. Register One Label Printer; Register One Receipt Printer. This will make things easier when you sync to the system.
Step One: Install the printer on the computer.
Step Two: Download and install Printnode to the terminal managing the printer(s).
37
Section 02:
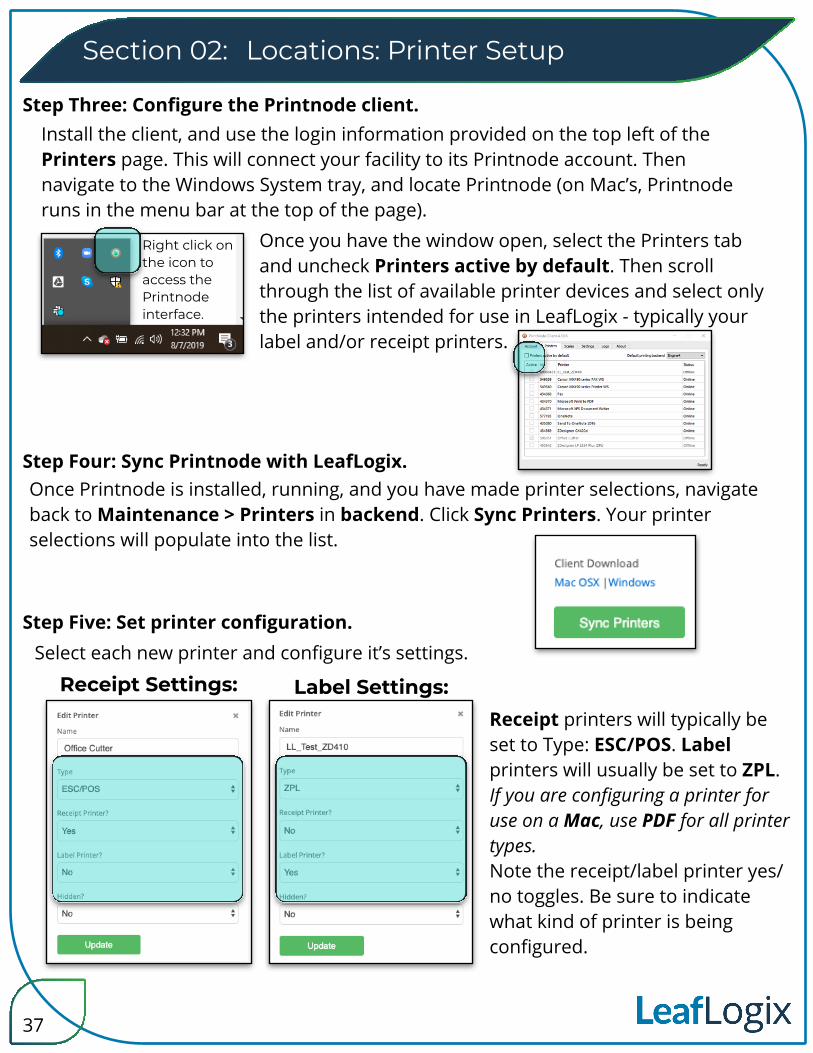
Once Printnode is installed, running, and you have made printer selections, navigate back to Maintenance > Printers in backend. Click Sync Printers. Your printer selections will populate into the list.
Step Four: Sync Printnode with LeafLogix.
Select each new printer and configure it’s settings.Step Five: Set printer configuration.
Label Settings:Receipt Settings:Receipt printers will typically be set to Type: ESC/POS. Label printers will usually be set to ZPL. If you are configuring a printer for use on a Mac, use PDF for all printer types.Note the receipt/label printer yes/no toggles. Be sure to indicate what kind of printer is being configured.
Locations: Printer Setup
Install the client, and use the login information provided on the top left of the Printers page. This will connect your facility to its Printnode account. Then navigate to the Windows System tray, and locate Printnode (on Mac’s, Printnode runs in the menu bar at the top of the page).
Step Three: Configure the Printnode client.
Right click on the icon to access the Printnode interface.
Once you have the window open, select the Printers tab and uncheck Printers active by default. Then scroll through the list of available printer devices and select only the printers intended for use in LeafLogix - typically your label and/or receipt printers.
Section 02: Locations: Tables
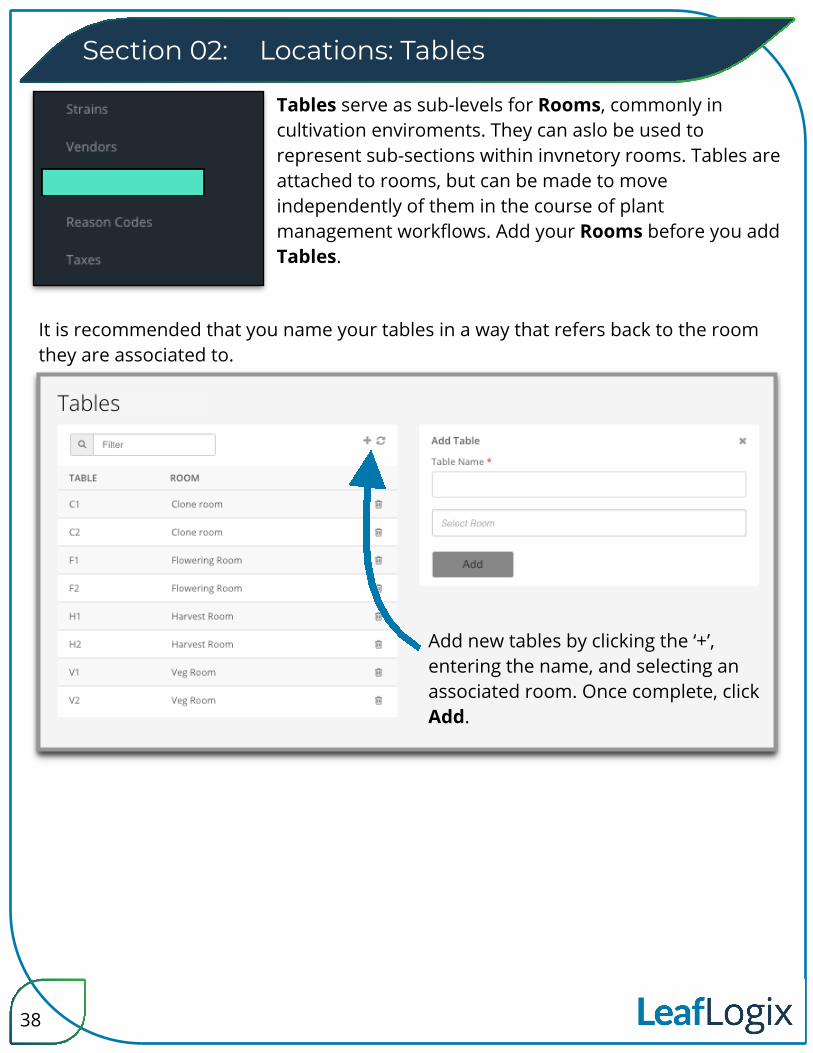
Tables serve as sub-levels for Rooms, commonly in cultivation enviroments. They can aslo be used to represent sub-sections within invnetory rooms. Tables are attached to rooms, but can be made to move independently of them in the course of plant management workflows. Add your Rooms before you add Tables.
It is recommended that you name your tables in a way that refers back to the room they are associated to.
Add new tables by clicking the ‘+’, entering the name, and selecting an associated room. Once complete, click Add.
38
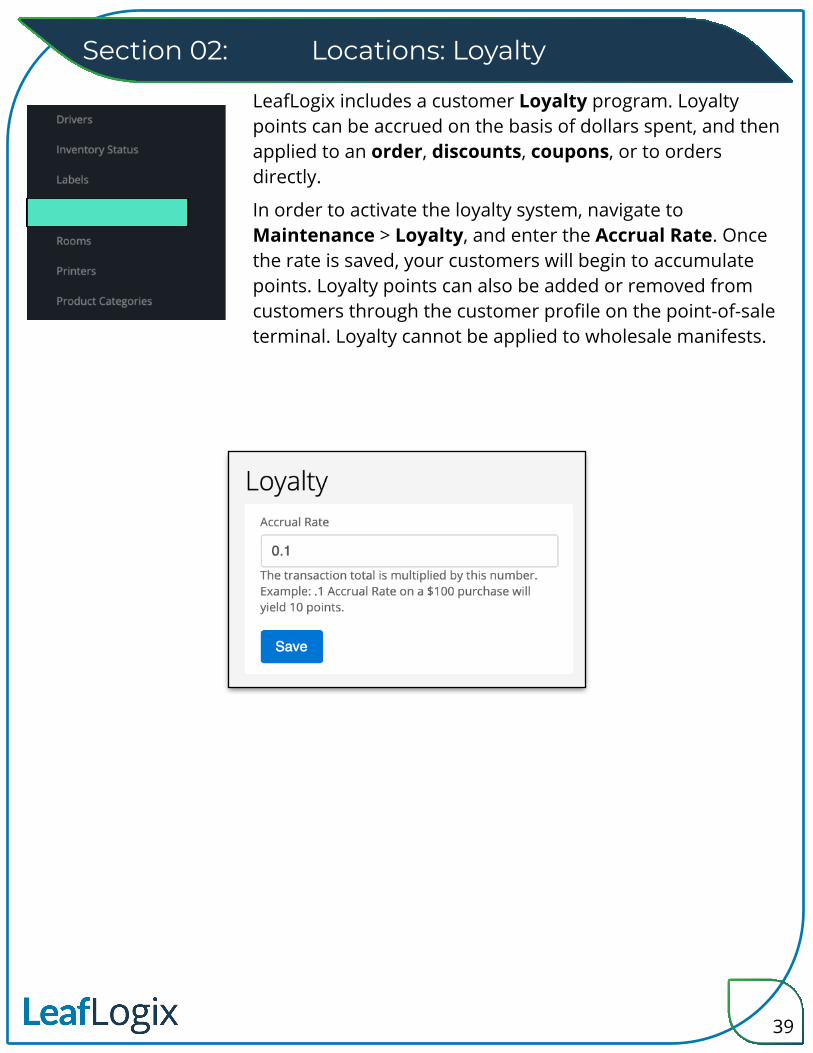
LeafLogix includes a customer Loyalty program. Loyalty points can be accrued on the basis of dollars spent, and then applied to an order, discounts, coupons, or to orders directly.
Locations: LoyaltySection 02:
In order to activate the loyalty system, navigate to Maintenance > Loyalty, and enter the Accrual Rate. Once the rate is saved, your customers will begin to accumulate points. Loyalty points can also be added or removed from customers through the customer profile on the point-of-sale terminal. Loyalty cannot be applied to wholesale manifests.
39
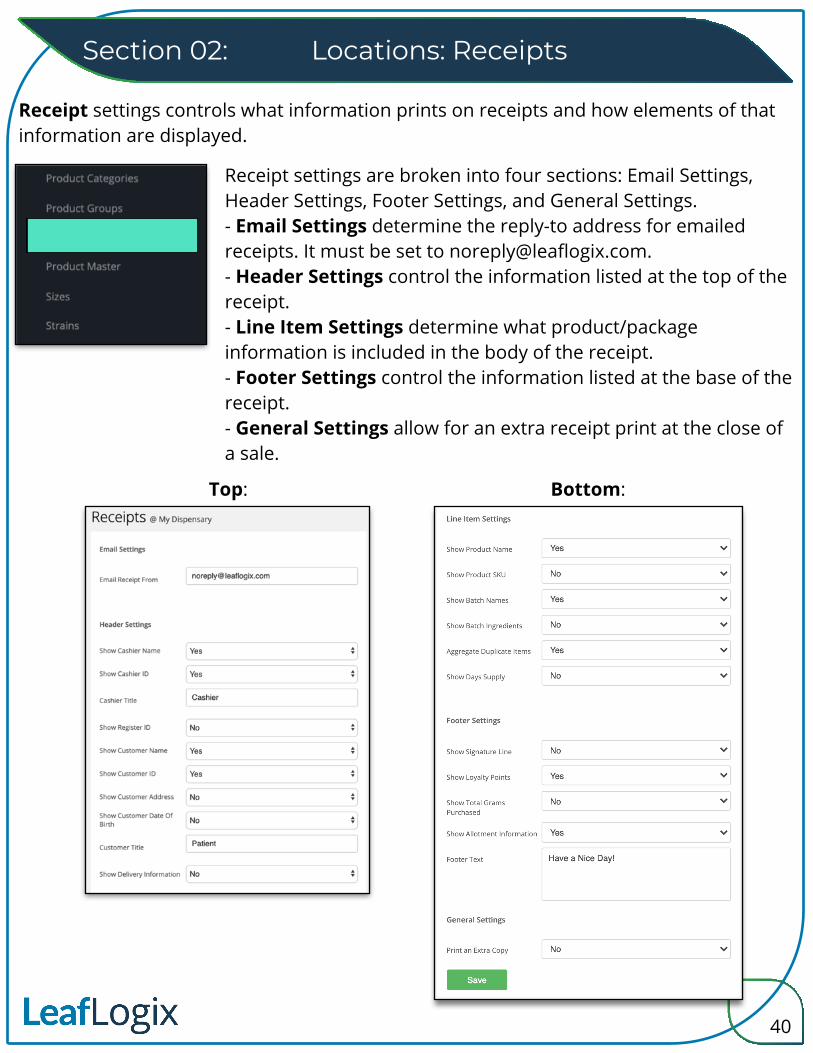
Receipt settings are broken into four sections: Email Settings, Header Settings, Footer Settings, and General Settings. - Email Settings determine the reply-to address for emailed receipts. It must be set to [email protected] Header Settings control the information listed at the top of the receipt.- Line Item Settings determine what product/package information is included in the body of the receipt.- Footer Settings control the information listed at the base of the receipt.- General Settings allow for an extra receipt print at the close of a sale.
Receipt settings controls what information prints on receipts and how elements of that information are displayed.
Locations: ReceiptsSection 02:
Top: Bottom:
40
Section 02: Locations: Preorder Settings
41
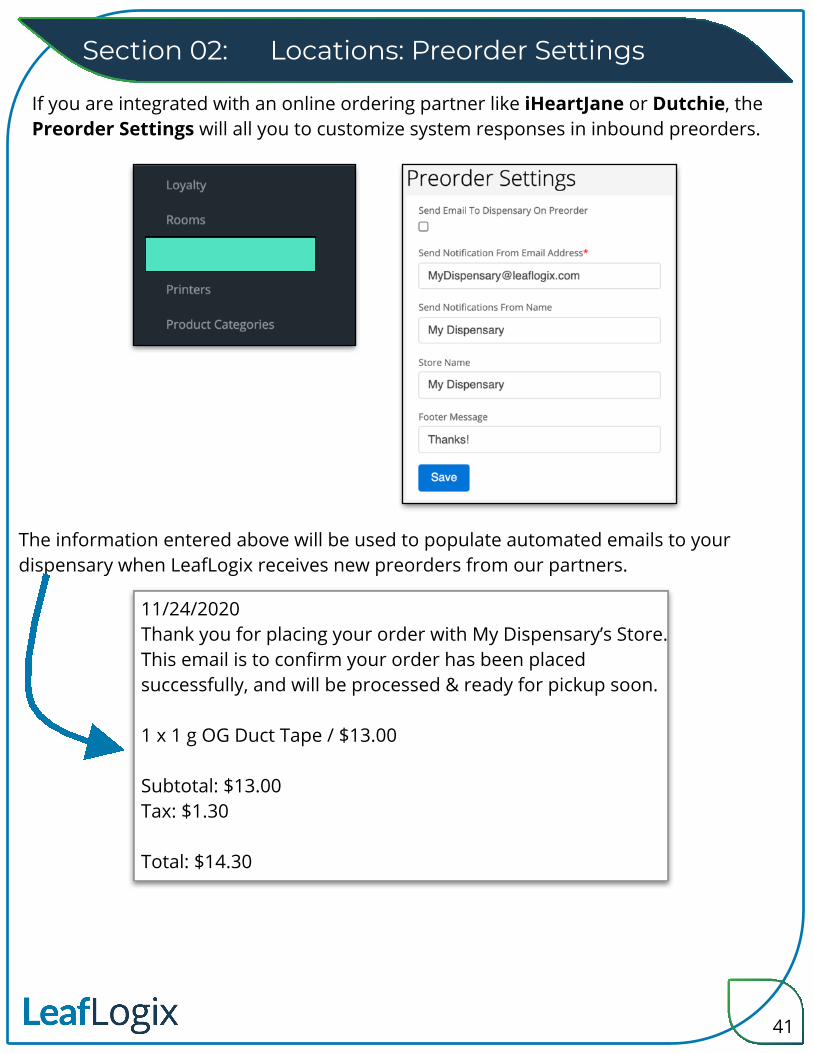
If you are integrated with an online ordering partner like iHeartJane or Dutchie, the Preorder Settings will all you to customize system responses in inbound preorders.
The information entered above will be used to populate automated emails to your dispensary when LeafLogix receives new preorders from our partners.
11/24/2020Thank you for placing your order with My Dispensary’s Store. This email is to confirm your order has been placed successfully, and will be processed & ready for pickup soon.
1 x 1 g OG Duct Tape / $13.00
Subtotal: $13.00Tax: $1.30
Total: $14.30


![January [XX], 2013 [Recipient Name] [Address Line 1 ... Letter_1.pdfJanuary [XX], 2013 [Recipient Name] [Address Line 1] ... According to RR Donnelley, ... On December 3, 2012,](https://img.pdfslide.net/doc/110x75/5ab0a35b7f8b9aea528b5d84/january-xx-2013-recipient-name-address-line-1-letter1pdfjanuary-xx.jpg)