Embed Size (px)
Citation preview
EU Certificates Campus Self Assessment and Learning Guide Version 2 - 22.12.2008
Page 1 of 38
SELF ASSESSMENT AND LEARNING GUIDE R. Messnarz ISCN, D. Ekert ISCN
The rework of the learning guide version 2 for EU Cert Campus has been funded by the EU Cert Campus LLP project (135691- LLP-1-2007-1-AT-KA3-KA3MP)
The Implemented Learning and Course Development System
Figure 1 : The Implemented Learning and Course Development System
The Implemented Learning Cycle (see Figure 1) - User level : Learner 1. Participants ( Learners ) log into the Capability Adviser, browse the skills tree, assess their
skills against performance criteria, upload evidences to prove their skills, and print a skills profile.
2. Participants ( Learners ) select the “Learning Steps” option the Capability Adviser, access recommended learning references, and can call “Sign In” to log into courses on the Moodle web based training server system.
3. Users ( Learners ) on the Moodle System attend the courses , perform exercises, upload results of their homework, and receive feedback from the trainer.
4. Users ( Learners ) switch to the Capability Adviser window (if you did all in one session) or log into Capability adviser as participant and upload their homework results as evidence into the system to prove their competence.
EU Certificates Campus Self Assessment and Learning Guide Version 2 - 22.12.2008
Page 2 of 38
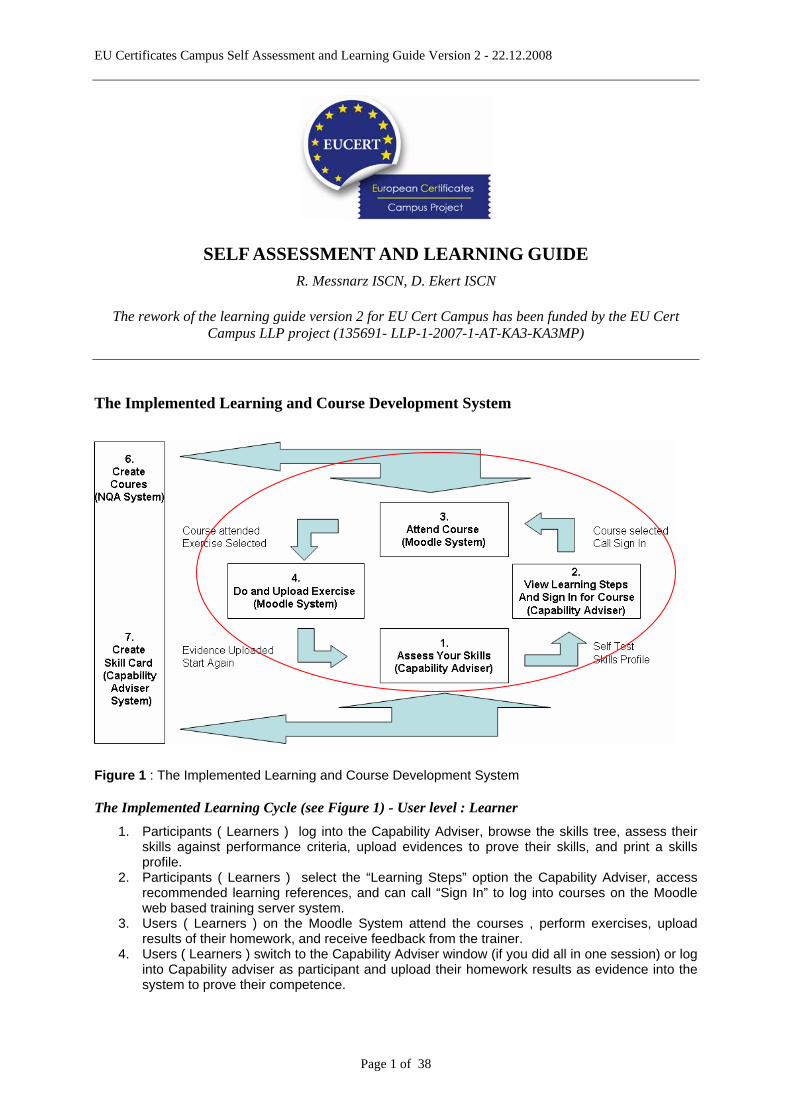
The Implemented Accreditation Process (see Figure 1) - User level : Assessor/ Accreditation Body
Figure 2 : The Accreditation Step
5. Users ( Learners ) inform Assessors. Formal Assessors log into the Capability Adviser, assess the evidences, assess the performance criteria, and produce a formal skills profile of the user. The results of the formal assessor display separately.
The Implemented Course and Skills Development System (see Figure 1) User level : Course and Skills Developer / Administrator Course Developers (Trainers, Accreditation Institutions, etc. ) log into an e-working space where course material development work can be shared in a team. The system offers team management, working scenarios, version control, and an interface to –
6. Export the training and reference materials in the Moodle based training system. 7. Enter and administer a skill card online, which forms the basis for step 1 in Figure 1.
Note: This manual describes the user / learner level.
The Main Window for the EU Cert Campus Learning Systems
There are different professions which use the same type of skills browsing, skills assessment, exam, and learning portals.
- Certified Configuration and Change Manager - Certified e-Business Manager - Certified e-Commerce Engineer - Certified e-Security Manager - Certified EU Internal Financial Control Assessor - Certified EU Project Manager - Certified Information and Communication Engineer - Certified Innovation Manager - Certified IT Consultant for SMEs - Certified IT-Security Manager - Certified SCOPE Manager - Certified SPI Manager - Certified SW Architect - Certified SW Project Manager - Certified Professional Competences - Certified EQ-Interpersonal Skills
EU Certificates Campus Self Assessment and Learning Guide Version 2 - 22.12.2008
Page 3 of 38
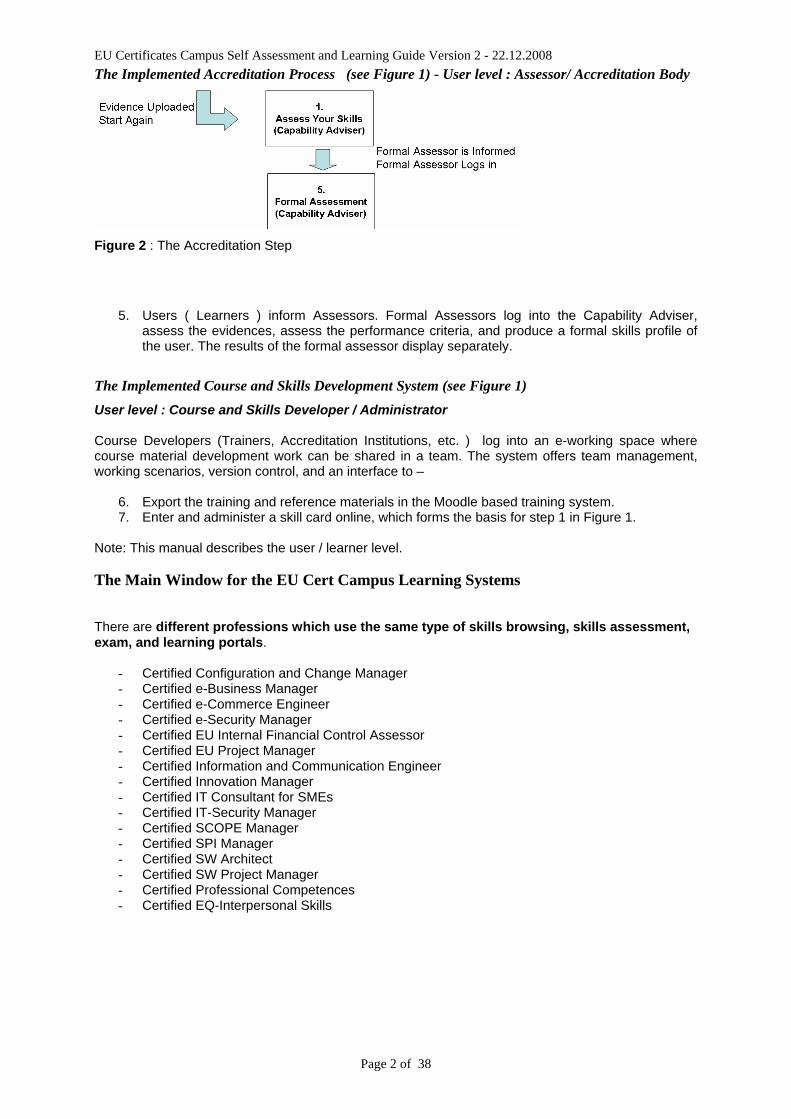
See www.eu-certificates.org , section Skills Portals and Learning Portals.
Figure 3: Main Page for Skills Portals
Note: In the following chapters of the guide we describe the functions based on the innovation manager example. It works the same way for the other professions.
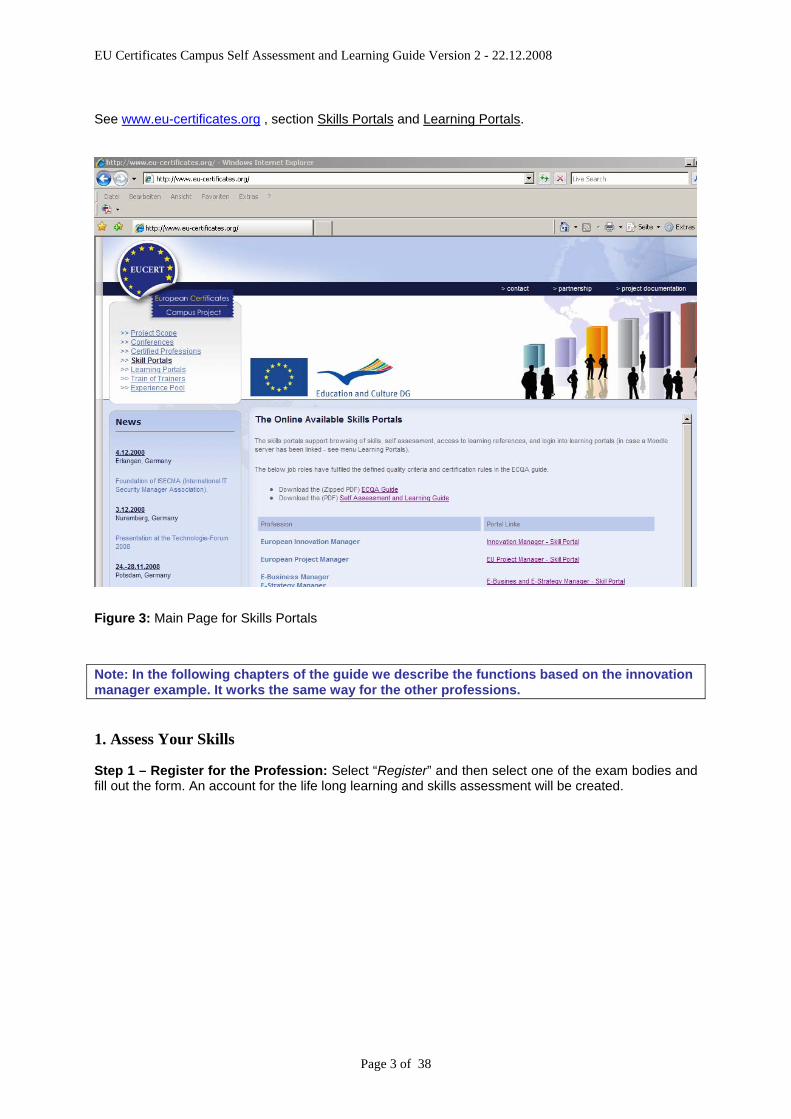
1. Assess Your Skills
Step 1 – Register for the Profession: Select “Register” and then select one of the exam bodies and fill out the form. An account for the life long learning and skills assessment will be created.

EU Certificates Campus Self Assessment and Learning Guide Version 2 - 22.12.2008
Page 4 of 38
Figure 4: Registration
Note: If you have registered before, just log in. You only need to register once.
Figure 5: Login
Step 2 – Login to the System: After the registration the Participant is automatically logged in. The participant can also login later by entering the username and password in the main window (Figure 5)
EU Certificates Campus Self Assessment and Learning Guide Version 2 - 22.12.2008
Page 5 of 38
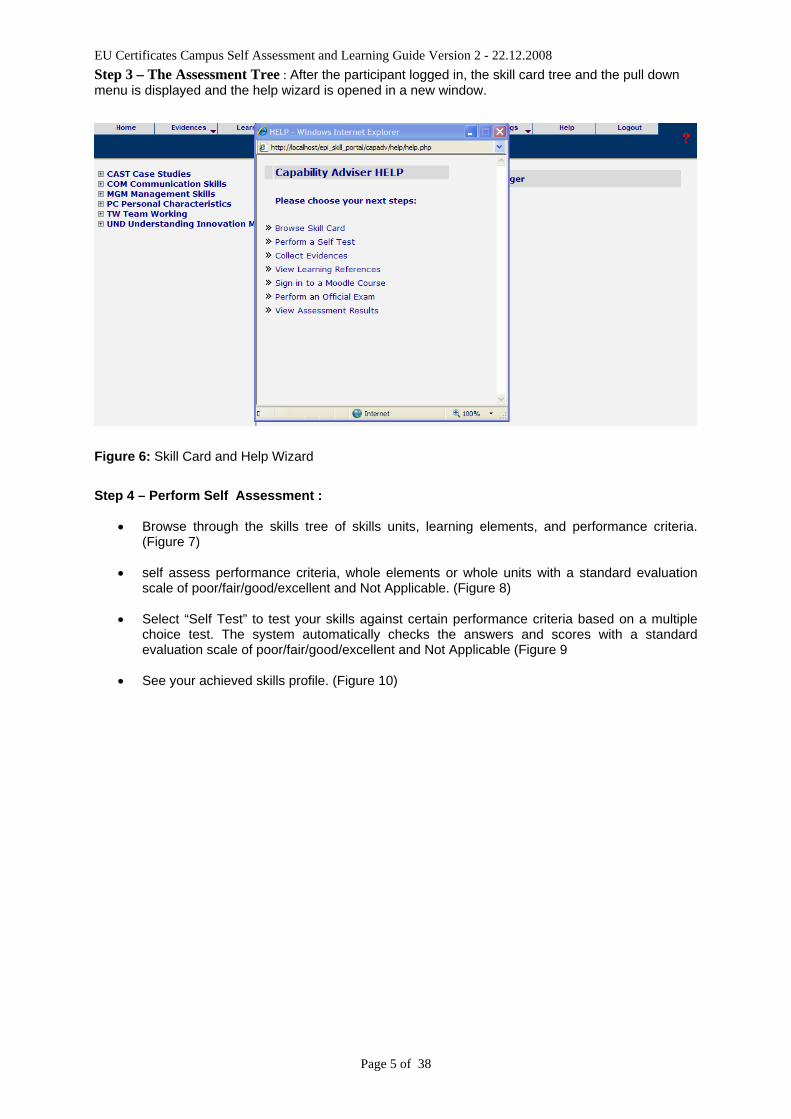
Step 3 – The Assessment Tree : After the participant logged in, the skill card tree and the pull down menu is displayed and the help wizard is opened in a new window.
Figure 6: Skill Card and Help Wizard
Step 4 – Perform Self Assessment :
• Browse through the skills tree of skills units, learning elements, and performance criteria. (Figure 7)
• self assess performance criteria, whole elements or whole units with a standard evaluation scale of poor/fair/good/excellent and Not Applicable. (Figure 8)
• Select “Self Test” to test your skills against certain performance criteria based on a multiple choice test. The system automatically checks the answers and scores with a standard evaluation scale of poor/fair/good/excellent and Not Applicable (Figure 9
• See your achieved skills profile. (Figure 10)
EU Certificates Campus Self Assessment and Learning Guide Version 2 - 22.12.2008
Page 6 of 38
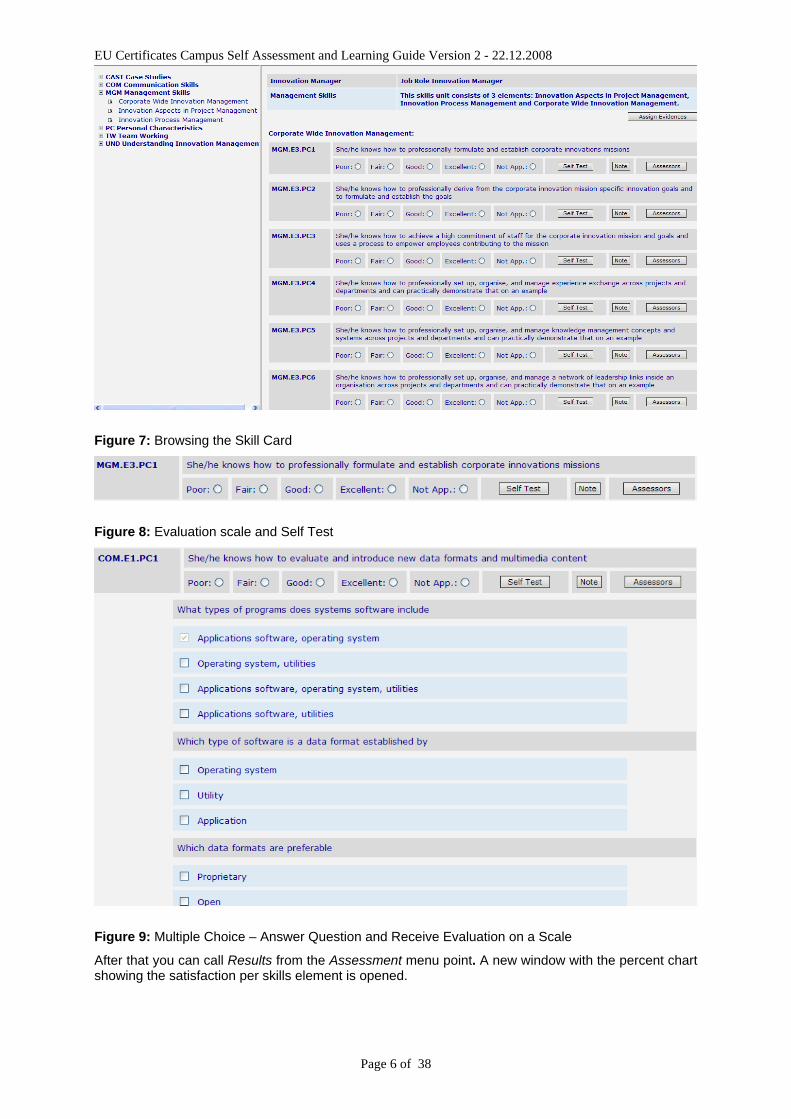
Figure 7: Browsing the Skill Card
Figure 8: Evaluation scale and Self Test
Figure 9: Multiple Choice – Answer Question and Receive Evaluation on a Scale
After that you can call Results from the Assessment menu point. A new window with the percent chart showing the satisfaction per skills element is opened.
EU Certificates Campus Self Assessment and Learning Guide Version 2 - 22.12.2008
Page 7 of 38
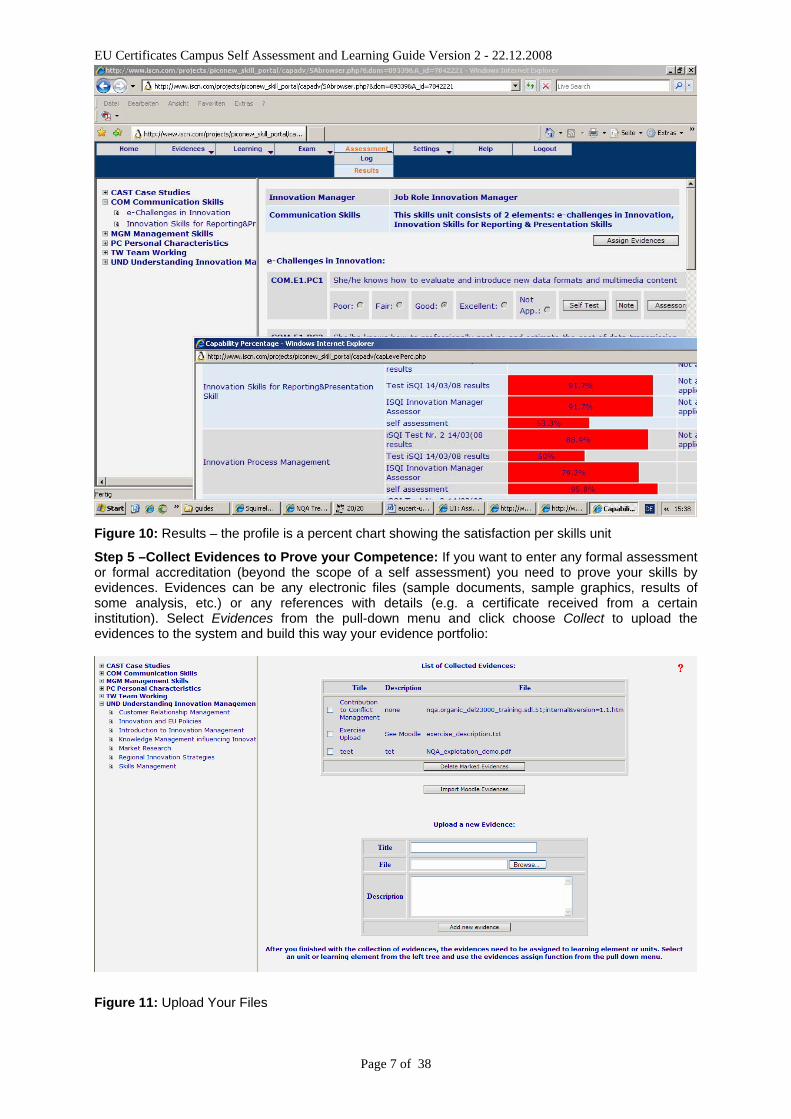
Figure 10: Results – the profile is a percent chart showing the satisfaction per skills unit
Step 5 –Collect Evidences to Prove your Competence: If you want to enter any formal assessment or formal accreditation (beyond the scope of a self assessment) you need to prove your skills by evidences. Evidences can be any electronic files (sample documents, sample graphics, results of some analysis, etc.) or any references with details (e.g. a certificate received from a certain institution). Select Evidences from the pull-down menu and click choose Collect to upload the evidences to the system and build this way your evidence portfolio:
Figure 11: Upload Your Files
EU Certificates Campus Self Assessment and Learning Guide Version 2 - 22.12.2008
Page 8 of 38
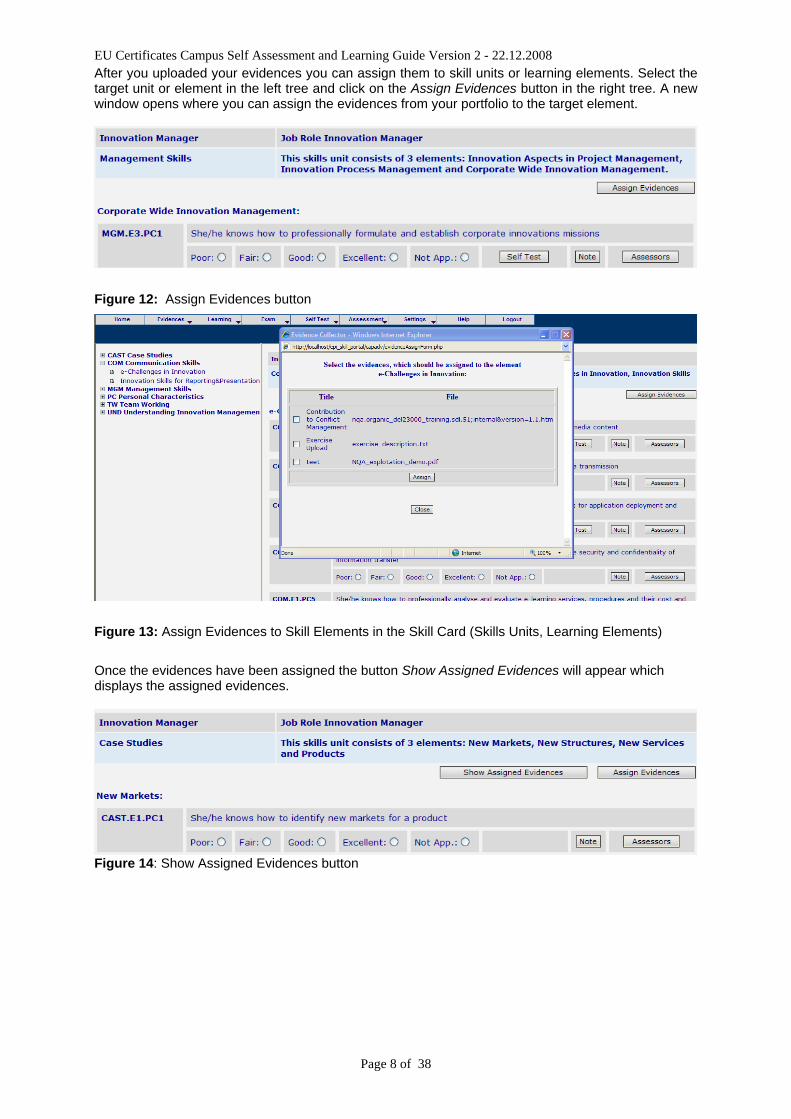
After you uploaded your evidences you can assign them to skill units or learning elements. Select the target unit or element in the left tree and click on the Assign Evidences button in the right tree. A new window opens where you can assign the evidences from your portfolio to the target element.
Figure 12: Assign Evidences button
Figure 13: Assign Evidences to Skill Elements in the Skill Card (Skills Units, Learning Elements)
Once the evidences have been assigned the button Show Assigned Evidences will appear which displays the assigned evidences.
Figure 14: Show Assigned Evidences button
EU Certificates Campus Self Assessment and Learning Guide Version 2 - 22.12.2008
Page 9 of 38
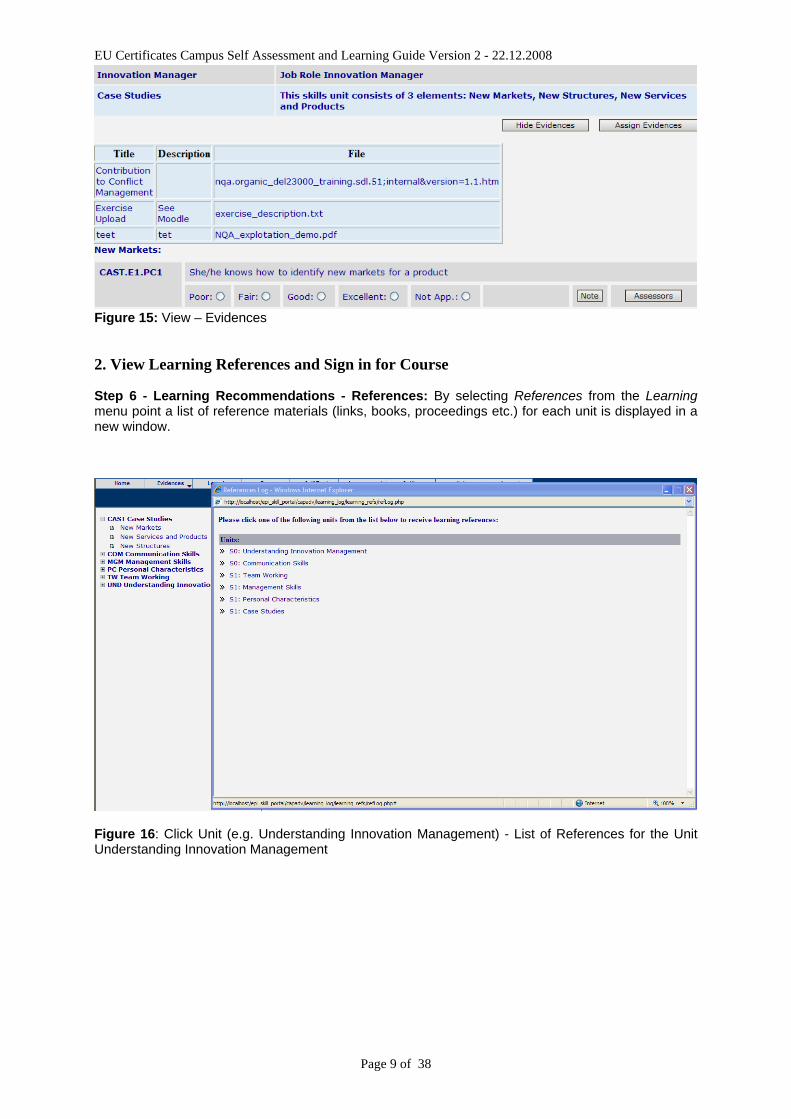
Figure 15: View – Evidences
2. View Learning References and Sign in for Course
Step 6 - Learning Recommendations - References: By selecting References from the Learning menu point a list of reference materials (links, books, proceedings etc.) for each unit is displayed in a new window.
Figure 16: Click Unit (e.g. Understanding Innovation Management) - List of References for the Unit Understanding Innovation Management
EU Certificates Campus Self Assessment and Learning Guide Version 2 - 22.12.2008
Page 10 of 38
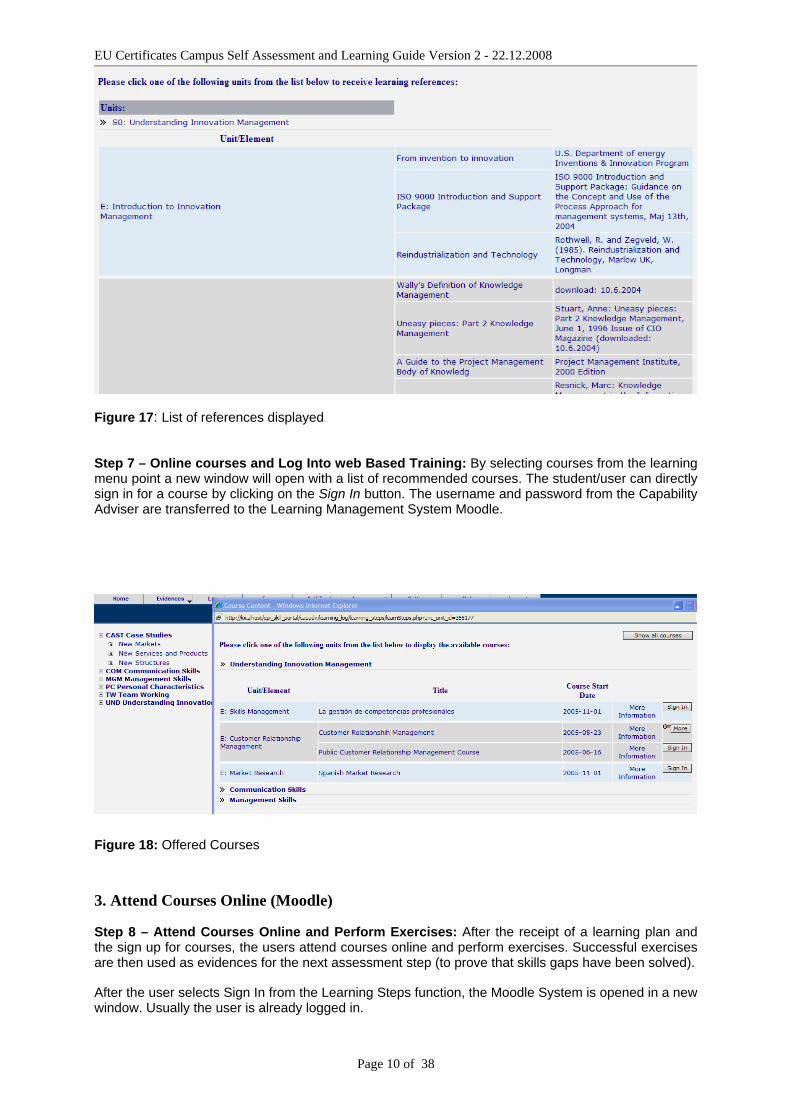
Figure 17: List of references displayed
Step 7 – Online courses and Log Into web Based Training: By selecting courses from the learning menu point a new window will open with a list of recommended courses. The student/user can directly sign in for a course by clicking on the Sign In button. The username and password from the Capability Adviser are transferred to the Learning Management System Moodle.
Figure 18: Offered Courses
3. Attend Courses Online (Moodle)
Step 8 – Attend Courses Online and Perform Exercises: After the receipt of a learning plan and the sign up for courses, the users attend courses online and perform exercises. Successful exercises are then used as evidences for the next assessment step (to prove that skills gaps have been solved).
After the user selects Sign In from the Learning Steps function, the Moodle System is opened in a new window. Usually the user is already logged in.
EU Certificates Campus Self Assessment and Learning Guide Version 2 - 22.12.2008
Page 11 of 38
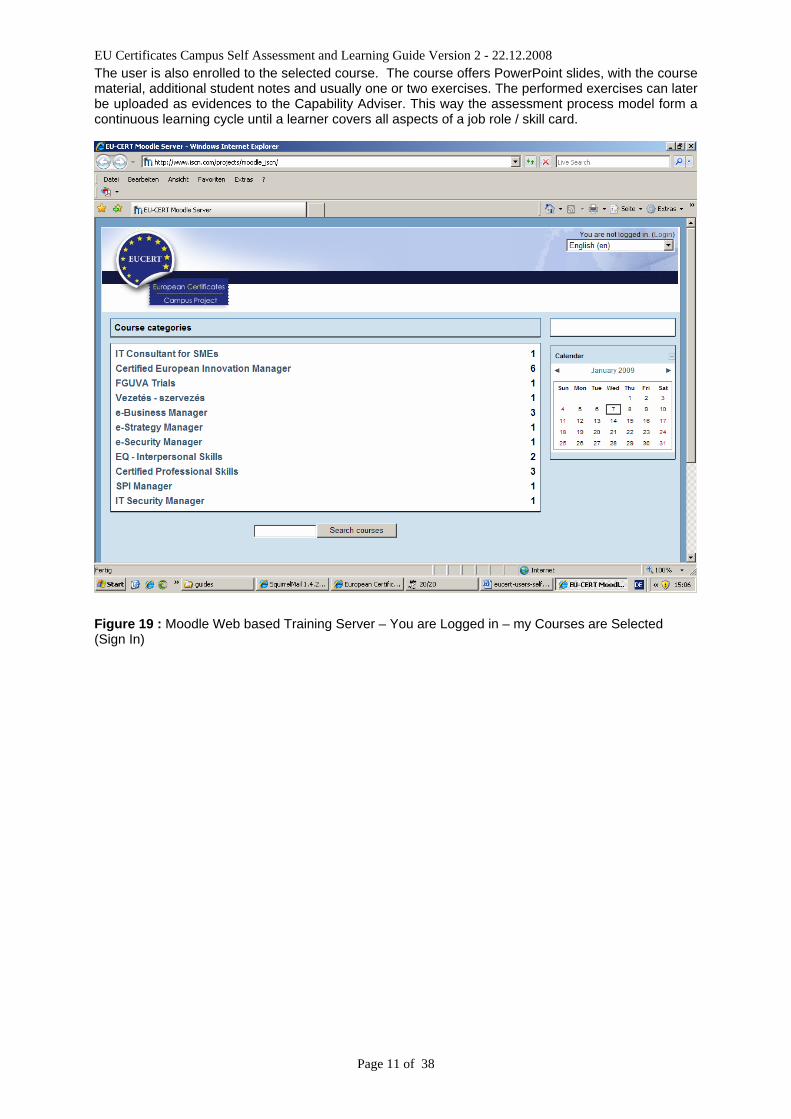
The user is also enrolled to the selected course. The course offers PowerPoint slides, with the course material, additional student notes and usually one or two exercises. The performed exercises can later be uploaded as evidences to the Capability Adviser. This way the assessment process model form a continuous learning cycle until a learner covers all aspects of a job role / skill card.
Figure 19 : Moodle Web based Training Server – You are Logged in – my Courses are Selected (Sign In)
EU Certificates Campus Self Assessment and Learning Guide Version 2 - 22.12.2008
Page 12 of 38
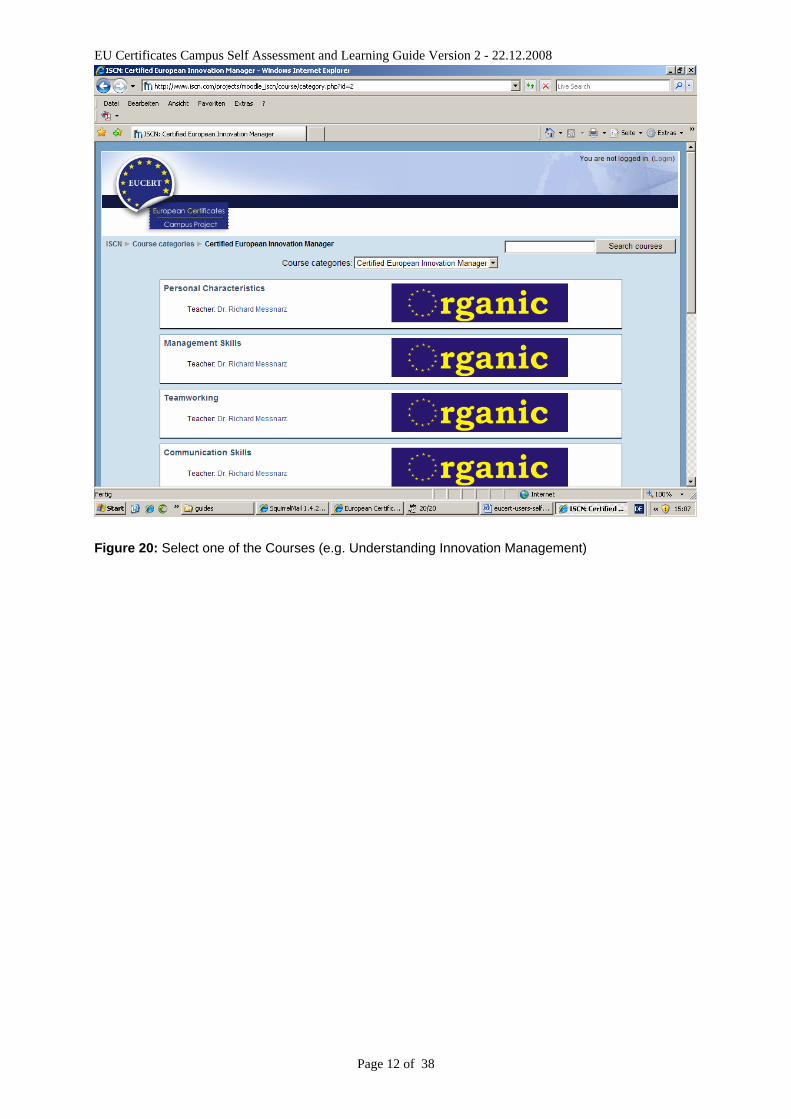
Figure 20: Select one of the Courses (e.g. Understanding Innovation Management)
EU Certificates Campus Self Assessment and Learning Guide Version 2 - 22.12.2008
Page 13 of 38
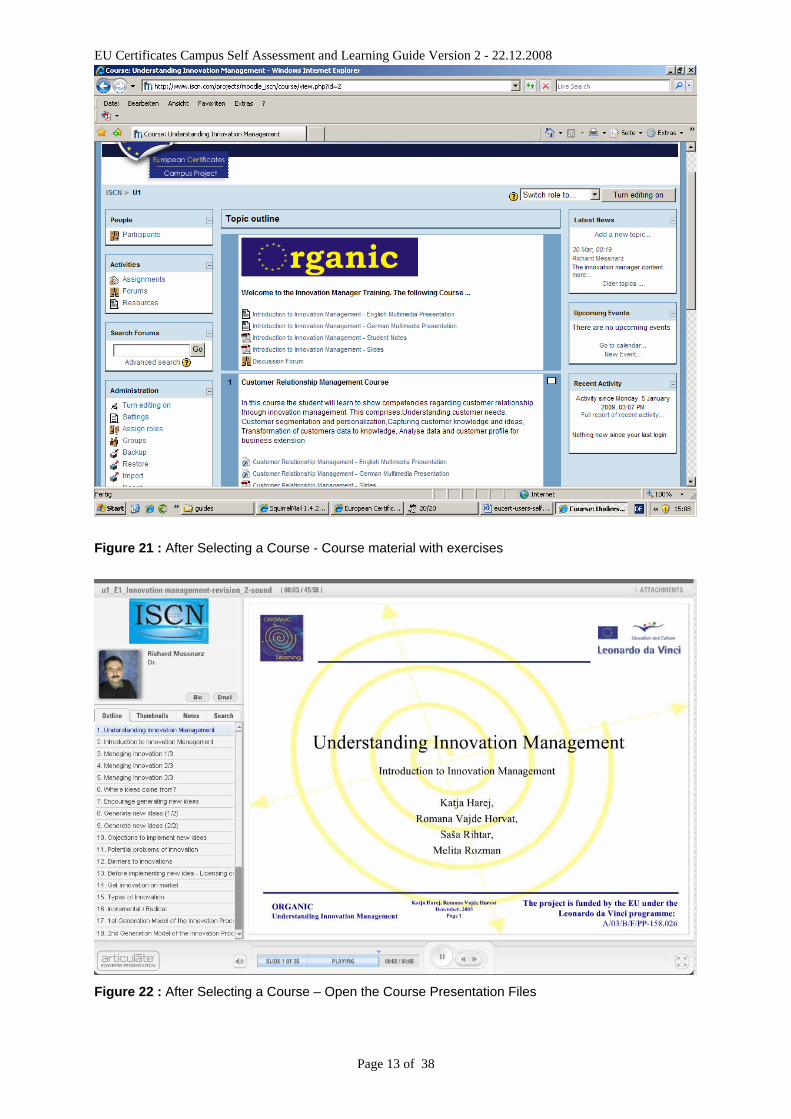
Figure 21 : After Selecting a Course - Course material with exercises
Figure 22 : After Selecting a Course – Open the Course Presentation Files
EU Certificates Campus Self Assessment and Learning Guide Version 2 - 22.12.2008
Page 14 of 38
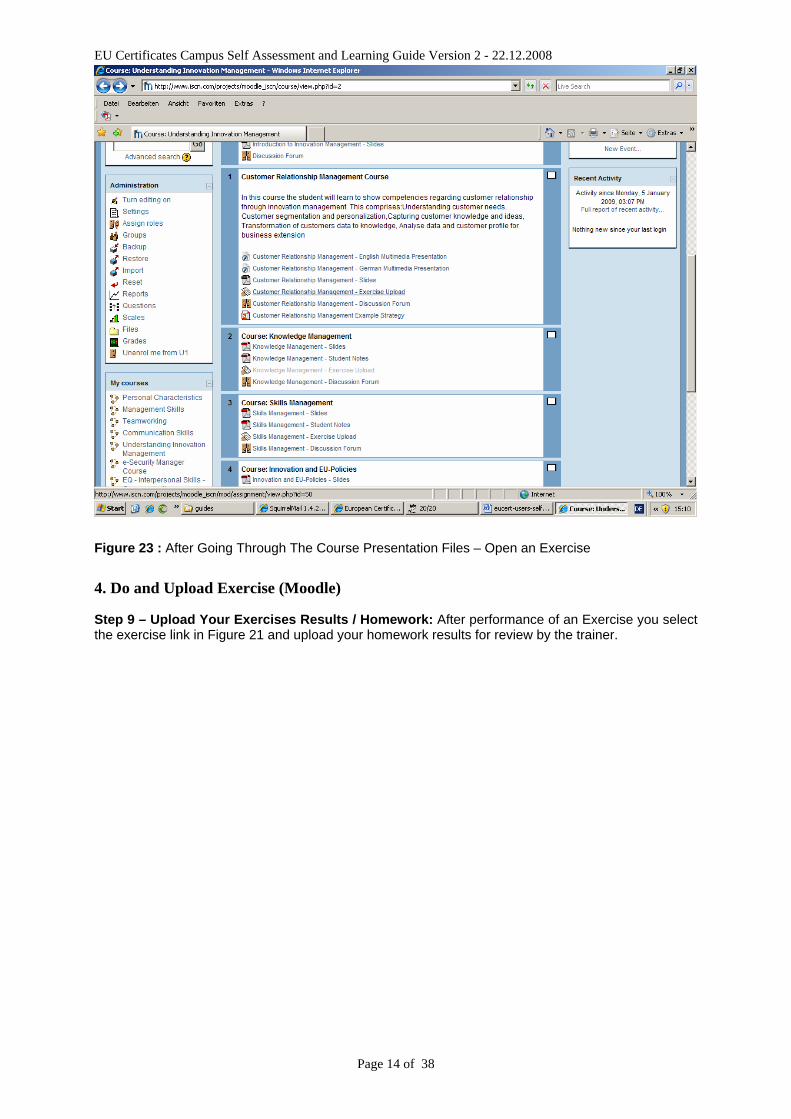
Figure 23 : After Going Through The Course Presentation Files – Open an Exercise
4. Do and Upload Exercise (Moodle)
Step 9 – Upload Your Exercises Results / Homework: After performance of an Exercise you select the exercise link in Figure 21 and upload your homework results for review by the trainer.
EU Certificates Campus Self Assessment and Learning Guide Version 2 - 22.12.2008
Page 15 of 38
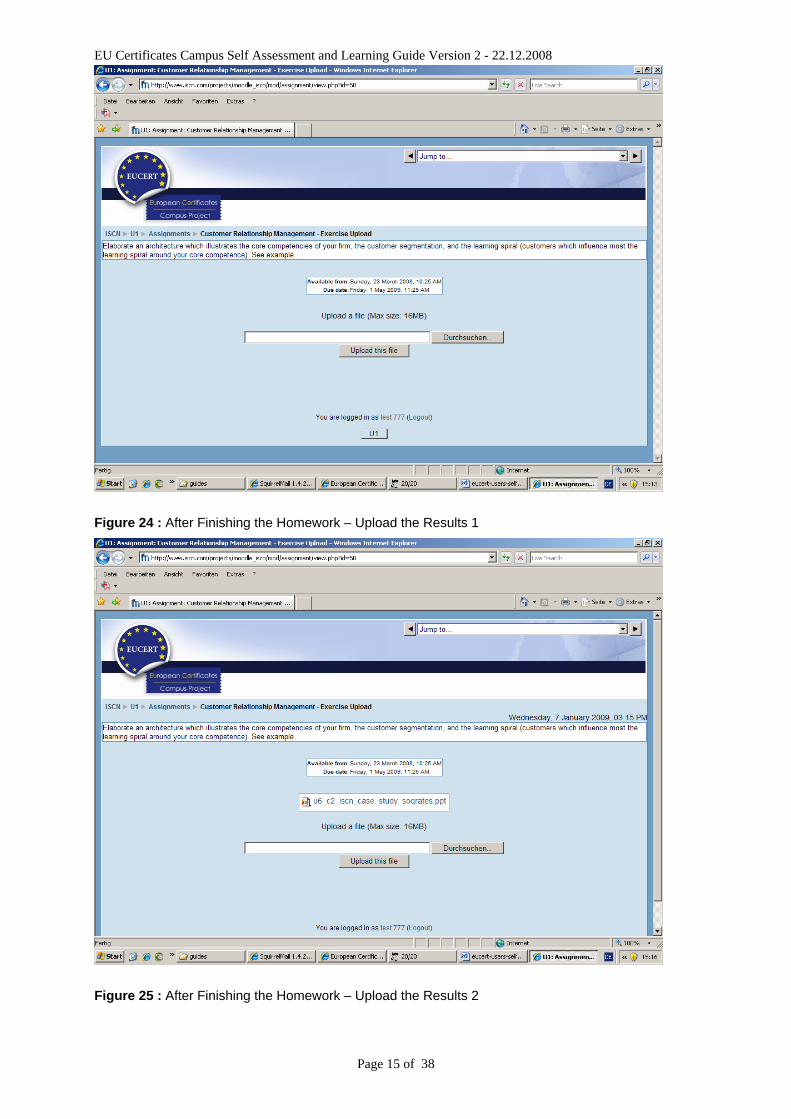
Figure 24 : After Finishing the Homework – Upload the Results 1
Figure 25 : After Finishing the Homework – Upload the Results 2
EU Certificates Campus Self Assessment and Learning Guide Version 2 - 22.12.2008
Page 16 of 38
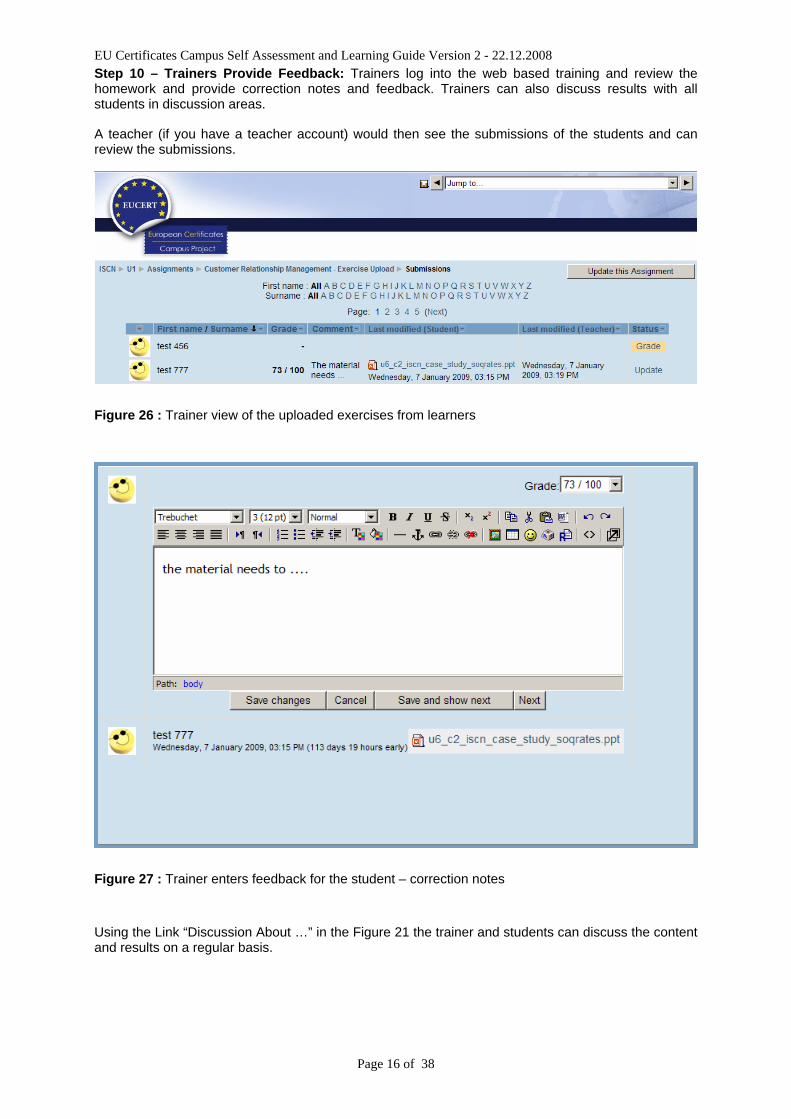
Step 10 – Trainers Provide Feedback: Trainers log into the web based training and review the homework and provide correction notes and feedback. Trainers can also discuss results with all students in discussion areas.
A teacher (if you have a teacher account) would then see the submissions of the students and can review the submissions.
Figure 26 : Trainer view of the uploaded exercises from learners
Figure 27 : Trainer enters feedback for the student – correction notes
Using the Link “Discussion About …” in the Figure 21 the trainer and students can discuss the content and results on a regular basis.
EU Certificates Campus Self Assessment and Learning Guide Version 2 - 22.12.2008
Page 17 of 38
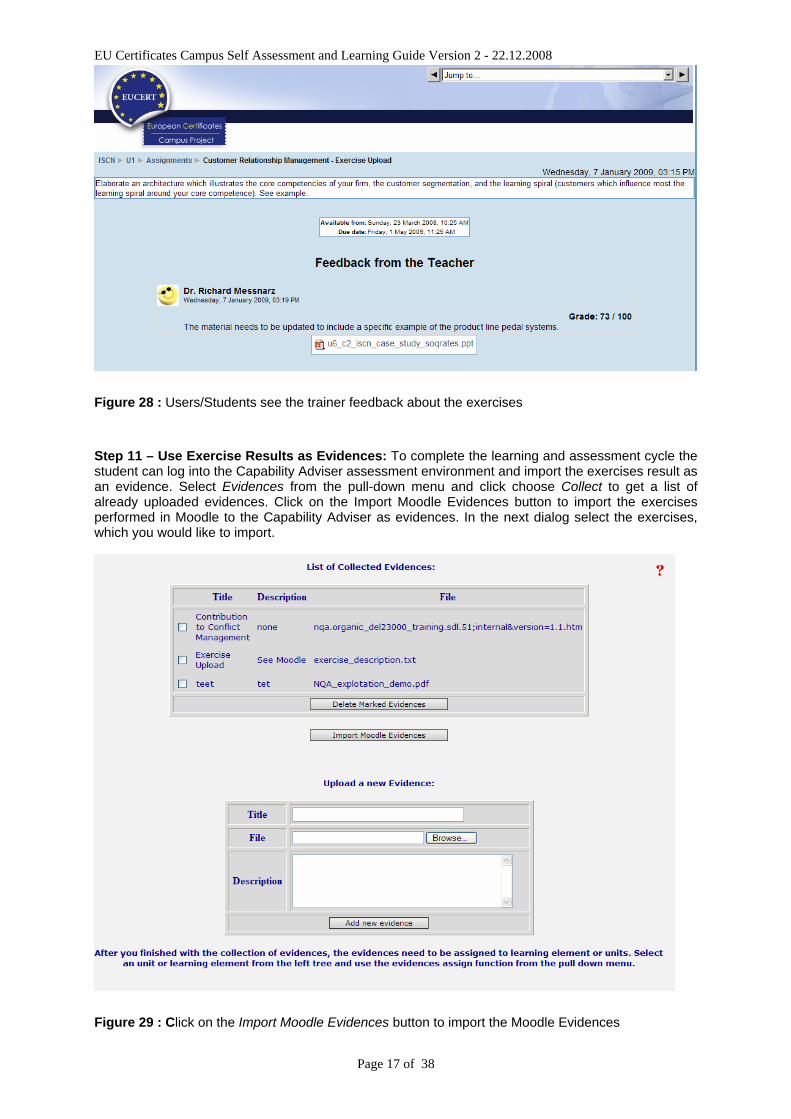
Figure 28 : Users/Students see the trainer feedback about the exercises
Step 11 – Use Exercise Results as Evidences: To complete the learning and assessment cycle the student can log into the Capability Adviser assessment environment and import the exercises result as an evidence. Select Evidences from the pull-down menu and click choose Collect to get a list of already uploaded evidences. Click on the Import Moodle Evidences button to import the exercises performed in Moodle to the Capability Adviser as evidences. In the next dialog select the exercises, which you would like to import.
Figure 29 : Click on the Import Moodle Evidences button to import the Moodle Evidences
EU Certificates Campus Self Assessment and Learning Guide Version 2 - 22.12.2008
Page 18 of 38
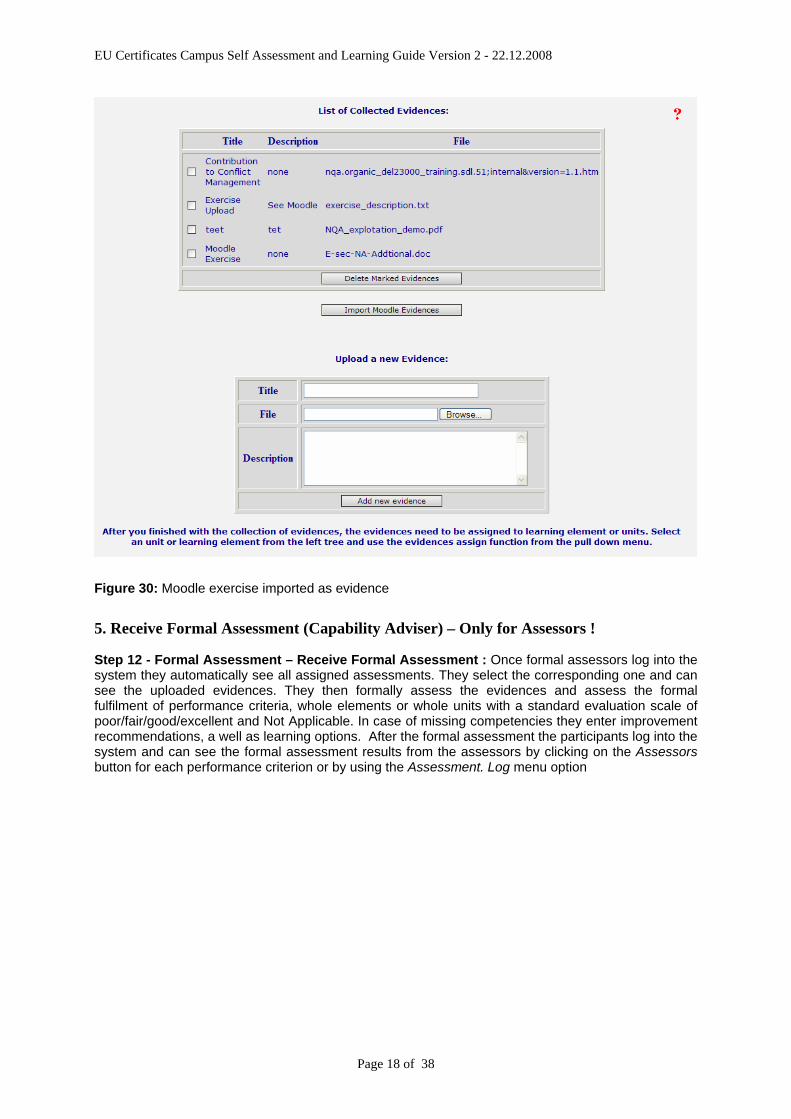
Figure 30: Moodle exercise imported as evidence
5. Receive Formal Assessment (Capability Adviser) – Only for Assessors !
Step 12 - Formal Assessment – Receive Formal Assessment : Once formal assessors log into the system they automatically see all assigned assessments. They select the corresponding one and can see the uploaded evidences. They then formally assess the evidences and assess the formal fulfilment of performance criteria, whole elements or whole units with a standard evaluation scale of poor/fair/good/excellent and Not Applicable. In case of missing competencies they enter improvement recommendations, a well as learning options. After the formal assessment the participants log into the system and can see the formal assessment results from the assessors by clicking on the Assessors button for each performance criterion or by using the Assessment. Log menu option
EU Certificates Campus Self Assessment and Learning Guide Version 2 - 22.12.2008
Page 19 of 38
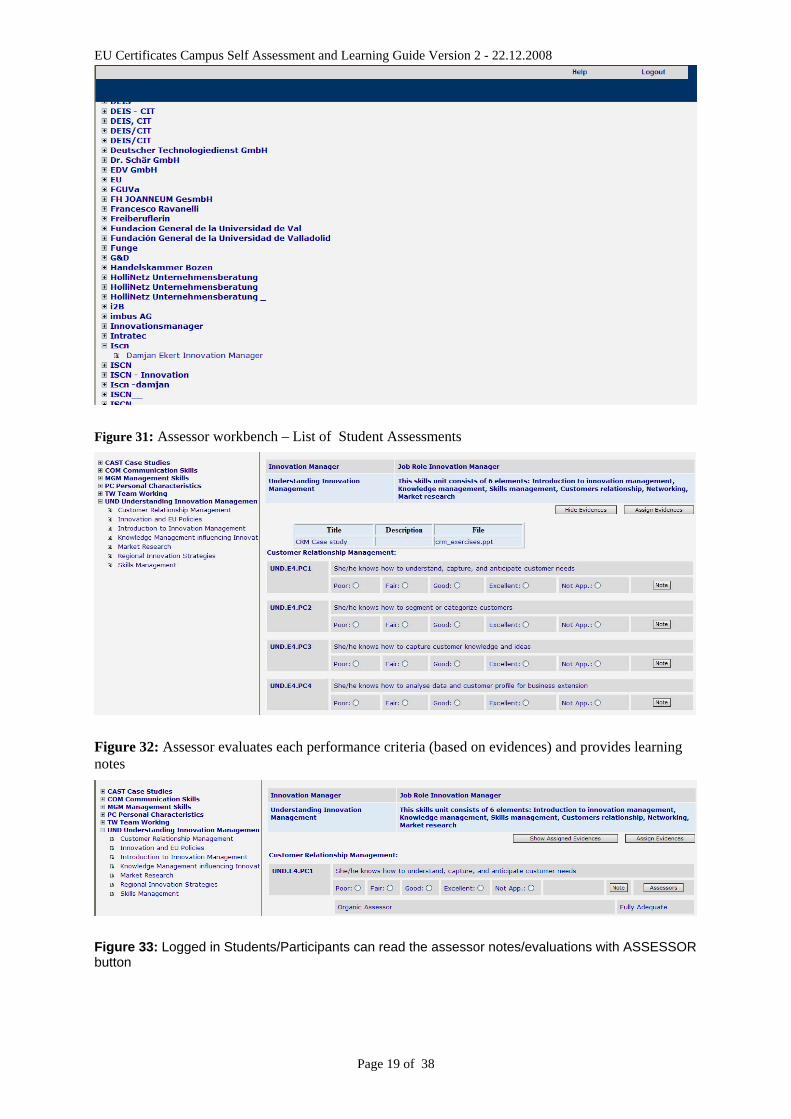
Figure 31: Assessor workbench – List of Student Assessments
Figure 32: Assessor evaluates each performance criteria (based on evidences) and provides learning notes
Figure 33: Logged in Students/Participants can read the assessor notes/evaluations with ASSESSOR button
EU Certificates Campus Self Assessment and Learning Guide Version 2 - 22.12.2008
Page 20 of 38
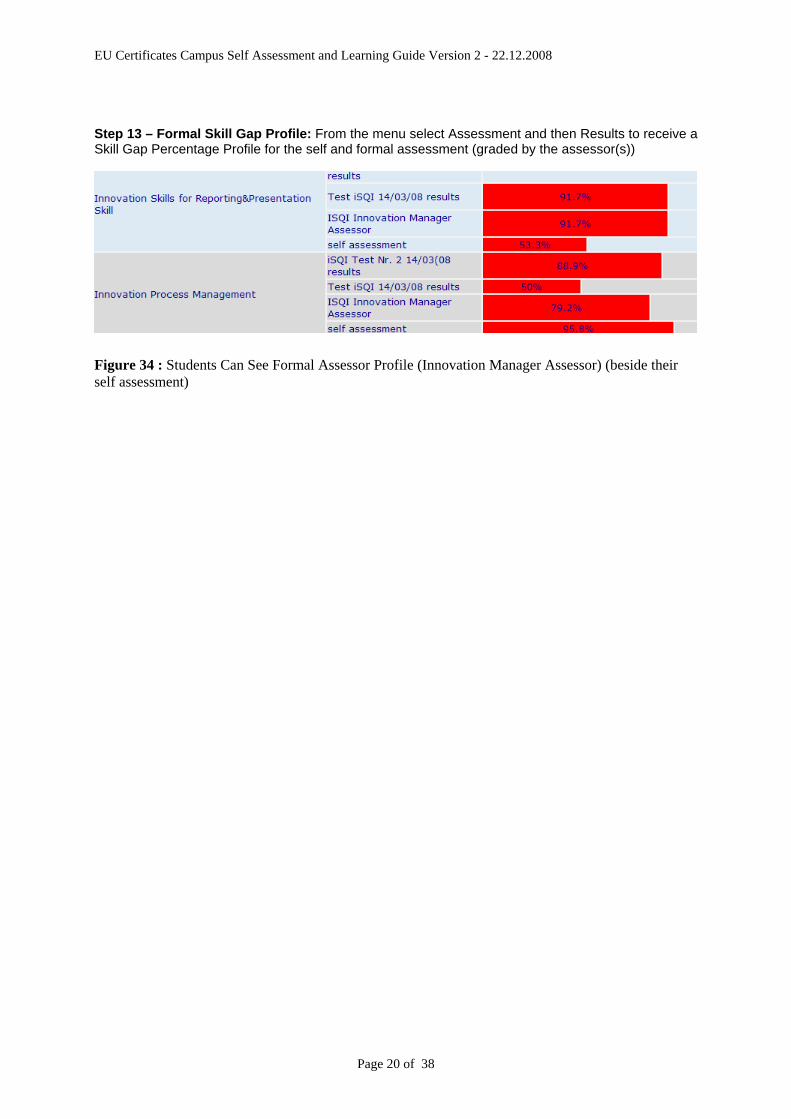
Step 13 – Formal Skill Gap Profile: From the menu select Assessment and then Results to receive a Skill Gap Percentage Profile for the self and formal assessment (graded by the assessor(s))
Figure 34 : Students Can See Formal Assessor Profile (Innovation Manager Assessor) (beside their self assessment)
EU Certificates Campus Self Assessment and Learning Guide Version 2 - 22.12.2008
Page 21 of 38
6. Create Courses in an E-Working Space – TEAMWORK System
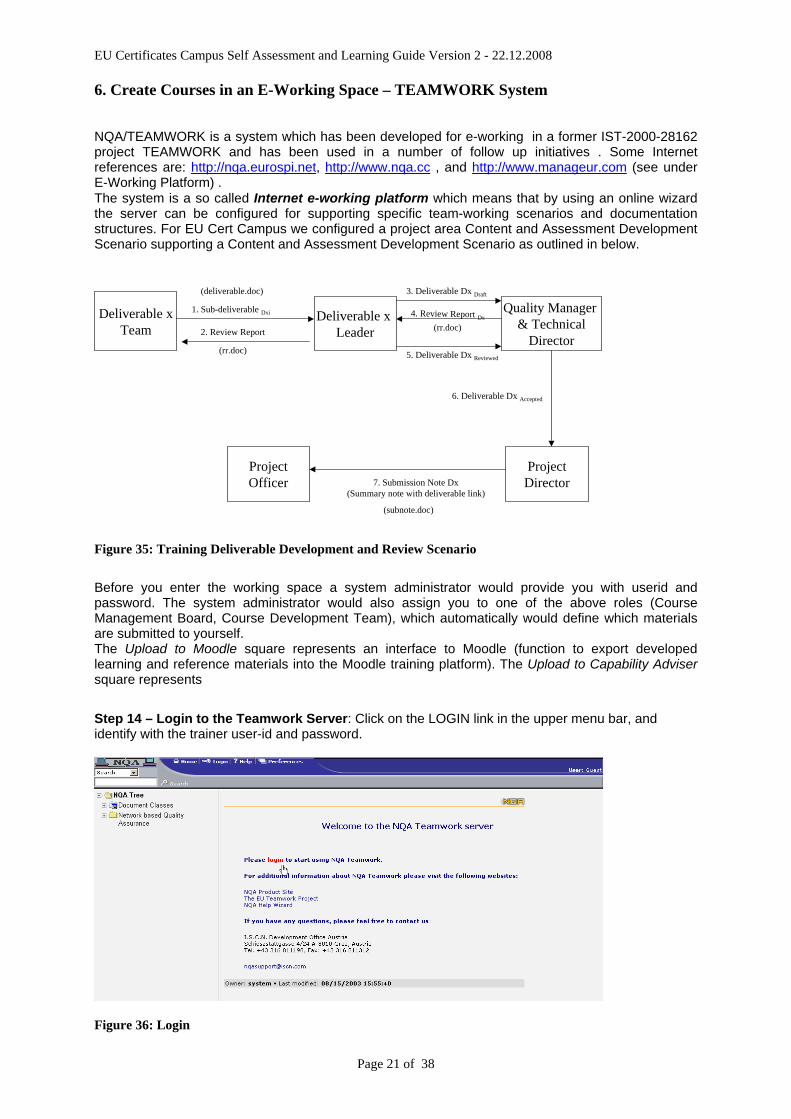
NQA/TEAMWORK is a system which has been developed for e-working in a former IST-2000-28162 project TEAMWORK and has been used in a number of follow up initiatives . Some Internet references are: http://nqa.eurospi.net, http://www.nqa.cc , and http://www.manageur.com (see under E-Working Platform) . The system is a so called Internet e-working platform which means that by using an online wizard the server can be configured for supporting specific team-working scenarios and documentation structures. For EU Cert Campus we configured a project area Content and Assessment Development Scenario supporting a Content and Assessment Development Scenario as outlined in below.
Quality Manager & Technical
Director
Deliverable x Leader2. Review Report
Deliverable xTeam
ProjectDirector
1. Sub-deliverable Dxi
ProjectOfficer
6. Deliverable Dx Accepted
7. Submission Note Dx(Summary note with deliverable link)
3. Deliverable Dx Draft
4. Review Report Dx
5. Deliverable Dx Reviewed(rr.doc)
(rr.doc)
(deliverable.doc)
(subnote.doc)
Figure 35: Training Deliverable Development and Review Scenario
Before you enter the working space a system administrator would provide you with userid and password. The system administrator would also assign you to one of the above roles (Course Management Board, Course Development Team), which automatically would define which materials are submitted to yourself. The Upload to Moodle square represents an interface to Moodle (function to export developed learning and reference materials into the Moodle training platform). The Upload to Capability Adviser square represents
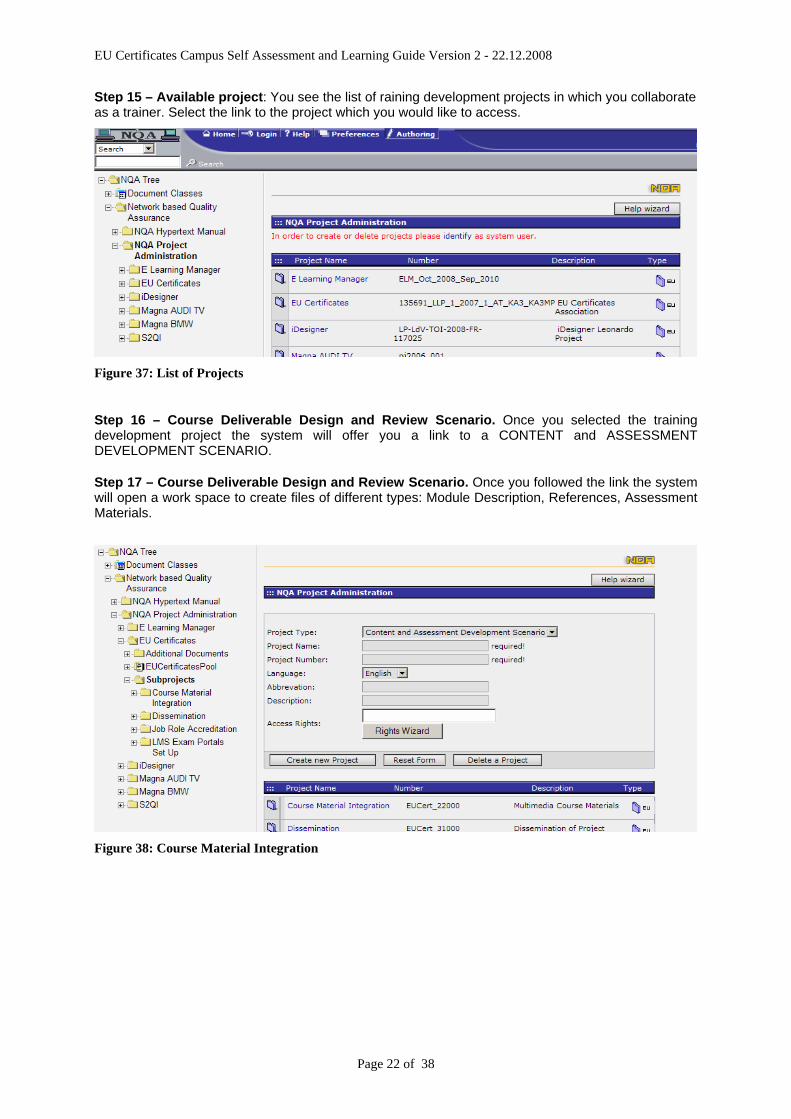
Step 14 – Login to the Teamwork Server: Click on the LOGIN link in the upper menu bar, and identify with the trainer user-id and password.
Figure 36: Login
EU Certificates Campus Self Assessment and Learning Guide Version 2 - 22.12.2008
Page 22 of 38
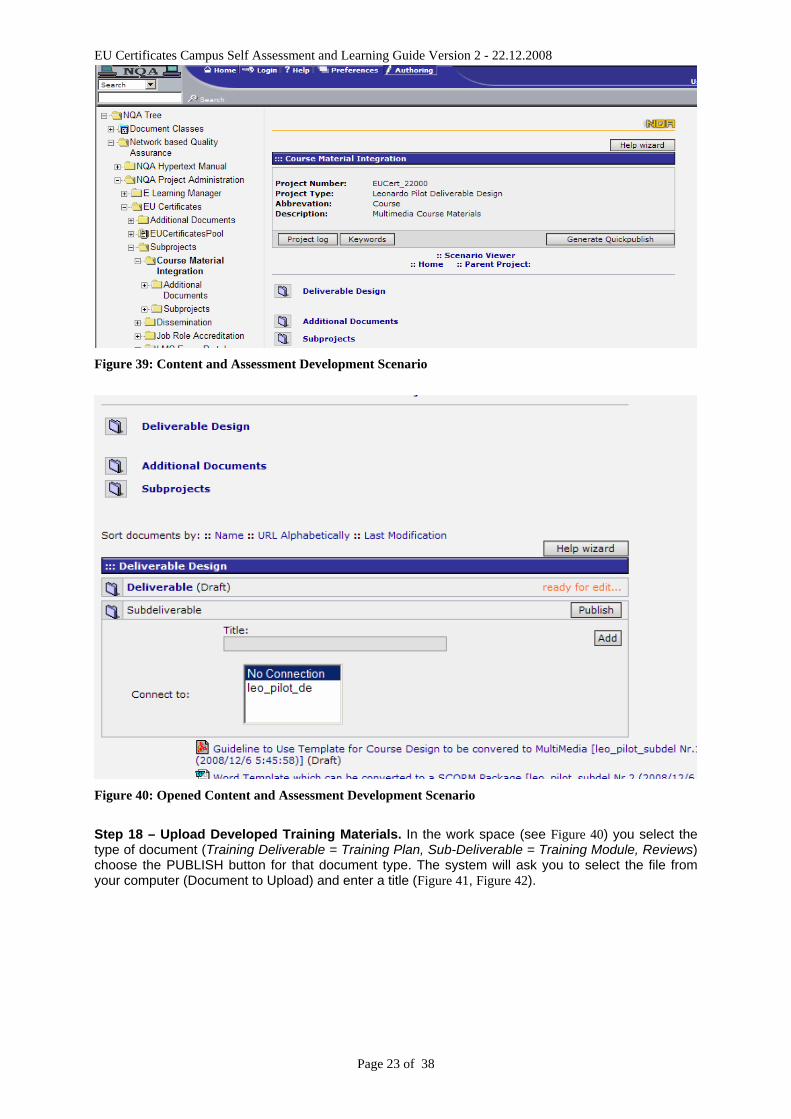
Step 15 – Available project: You see the list of raining development projects in which you collaborate as a trainer. Select the link to the project which you would like to access.
Figure 37: List of Projects
Step 16 – Course Deliverable Design and Review Scenario. Once you selected the training development project the system will offer you a link to a CONTENT and ASSESSMENT DEVELOPMENT SCENARIO.
Step 17 – Course Deliverable Design and Review Scenario. Once you followed the link the system will open a work space to create files of different types: Module Description, References, Assessment Materials.
Figure 38: Course Material Integration
EU Certificates Campus Self Assessment and Learning Guide Version 2 - 22.12.2008
Page 23 of 38
Figure 39: Content and Assessment Development Scenario
Figure 40: Opened Content and Assessment Development Scenario
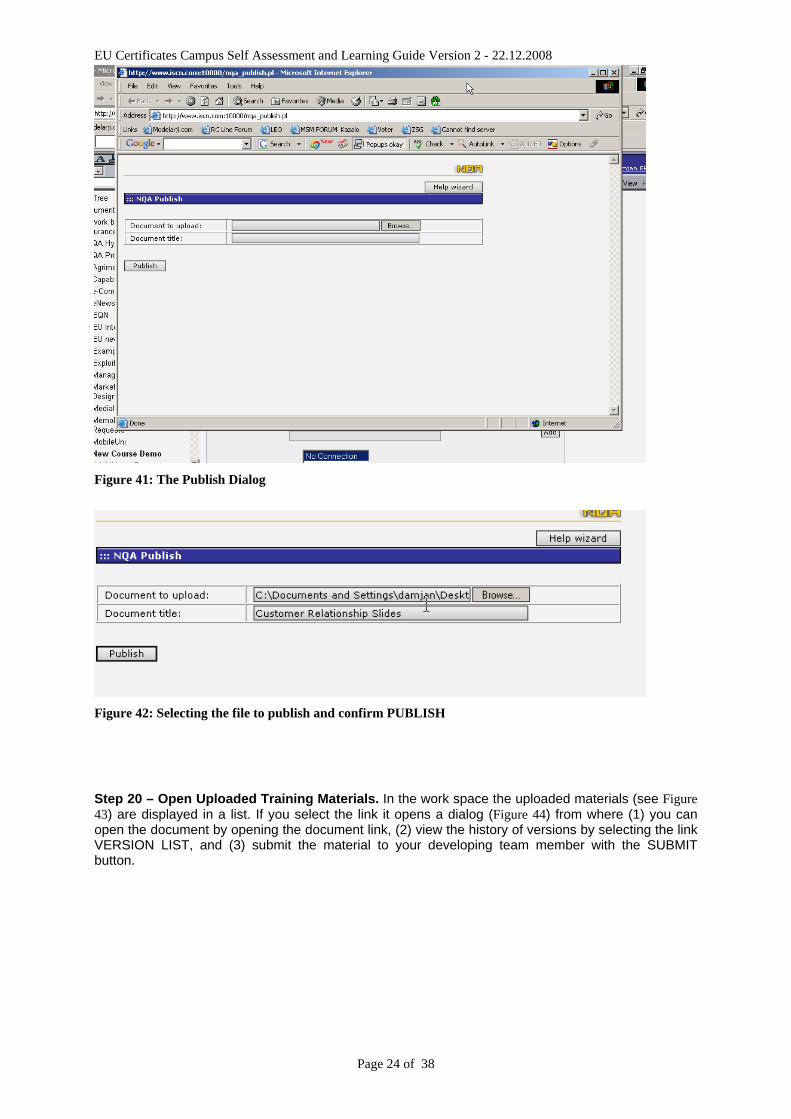
Step 18 – Upload Developed Training Materials. In the work space (see Figure 40) you select the type of document (Training Deliverable = Training Plan, Sub-Deliverable = Training Module, Reviews) choose the PUBLISH button for that document type. The system will ask you to select the file from your computer (Document to Upload) and enter a title (Figure 41, Figure 42).
EU Certificates Campus Self Assessment and Learning Guide Version 2 - 22.12.2008
Page 24 of 38
Figure 41: The Publish Dialog
Figure 42: Selecting the file to publish and confirm PUBLISH
Step 20 – Open Uploaded Training Materials. In the work space the uploaded materials (see Figure 43) are displayed in a list. If you select the link it opens a dialog (Figure 44) from where (1) you can open the document by opening the document link, (2) view the history of versions by selecting the link VERSION LIST, and (3) submit the material to your developing team member with the SUBMIT button.

EU Certificates Campus Self Assessment and Learning Guide Version 2 - 22.12.2008
Page 25 of 38
Figure 43: Published Files are displayed in a list
Figure 44: If you select a published file a submission dialog with version control opens
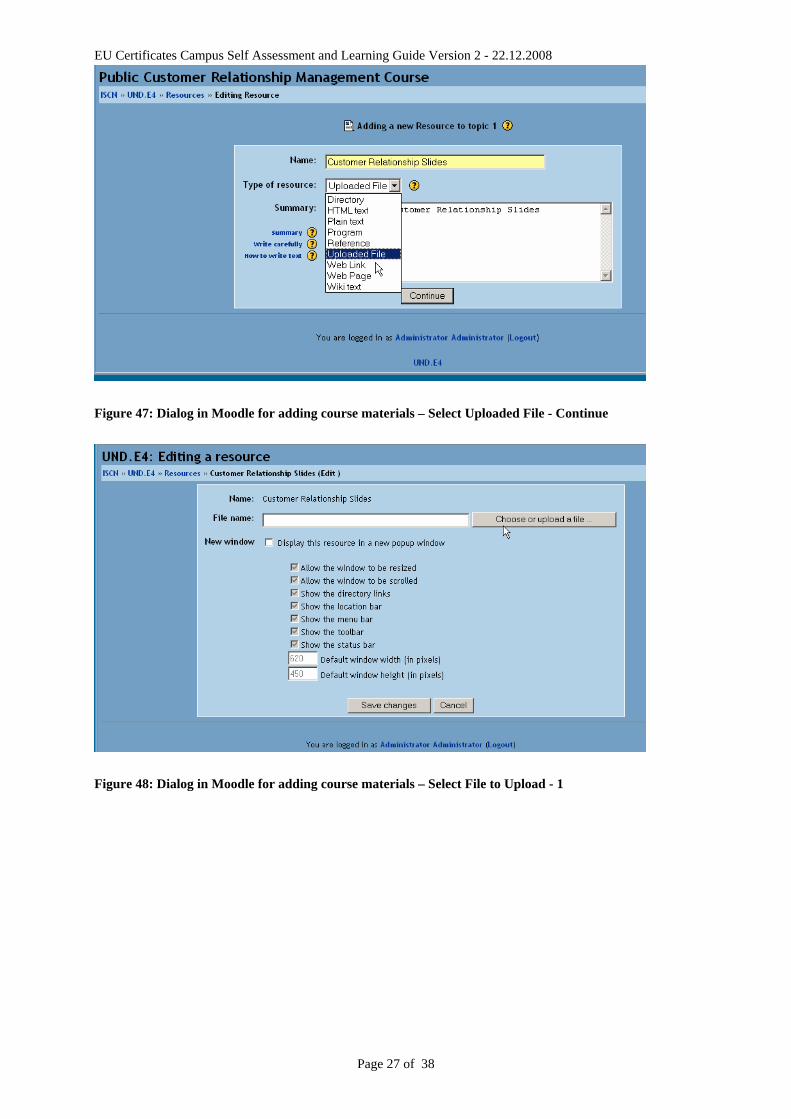
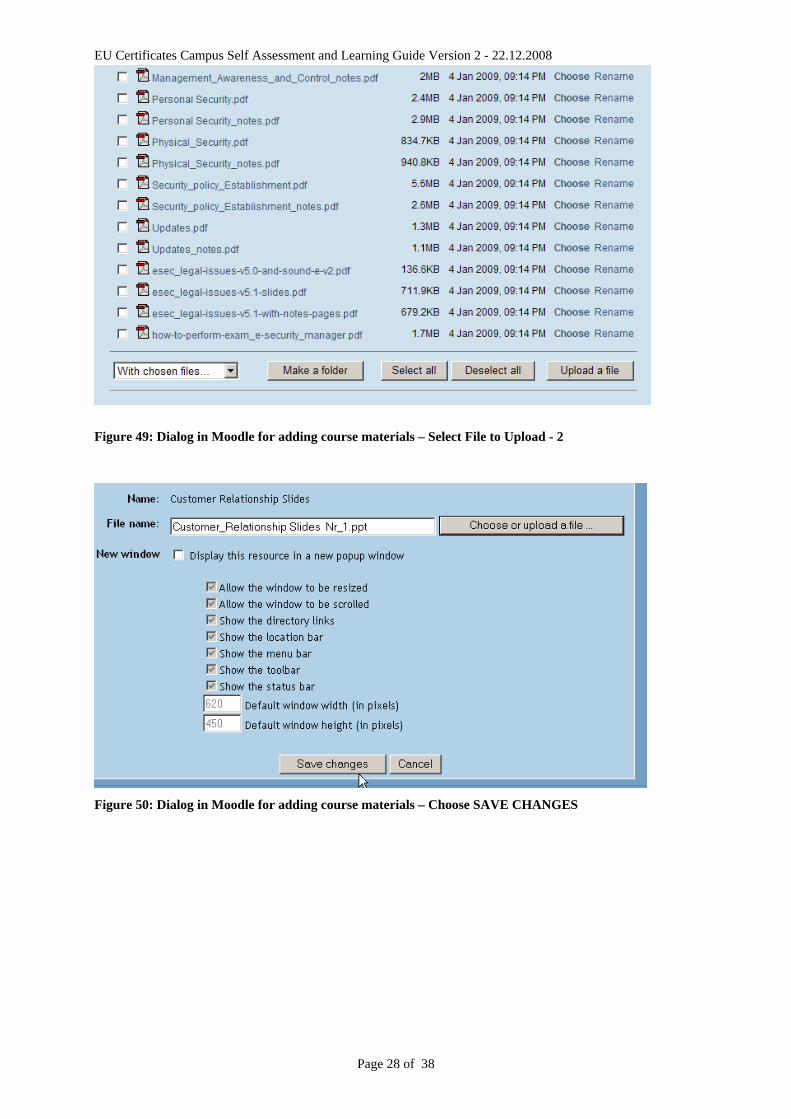
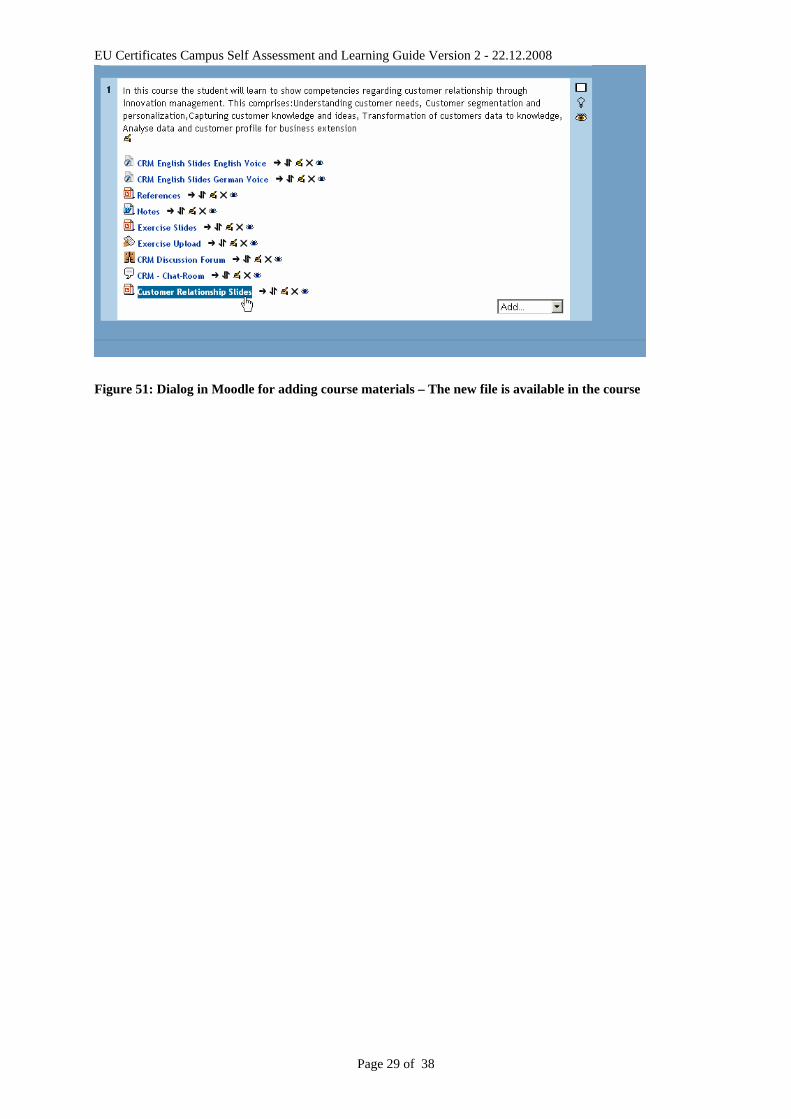
Step 21 – Export References and Content Materials to We Based Training Environment Moodle. In the work space (see Figure 40) the files can be downloaded and imported by a teacher in Moodle into the course administered on Moodle. Step 22 – Integration in the Moodle based online course. Login in Moodle, and add a new resource file (Figure 45 and Figure 46), the select the file to integrate (follow the steps in Figure 47, Figure 48, Figure 49, Figure 50). After that the new course files are available to the students (Figure 51).

EU Certificates Campus Self Assessment and Learning Guide Version 2 - 22.12.2008
Page 26 of 38
Figure 45: In Moodle Call ADD and then select RESOURCE
Figure 46: Dialog in Moodle for adding course materials
EU Certificates Campus Self Assessment and Learning Guide Version 2 - 22.12.2008
Page 27 of 38
Figure 47: Dialog in Moodle for adding course materials – Select Uploaded File - Continue
Figure 48: Dialog in Moodle for adding course materials – Select File to Upload - 1
EU Certificates Campus Self Assessment and Learning Guide Version 2 - 22.12.2008
Page 28 of 38
Figure 49: Dialog in Moodle for adding course materials – Select File to Upload - 2
Figure 50: Dialog in Moodle for adding course materials – Choose SAVE CHANGES
EU Certificates Campus Self Assessment and Learning Guide Version 2 - 22.12.2008
Page 29 of 38
Figure 51: Dialog in Moodle for adding course materials – The new file is available in the course
EU Certificates Campus Self Assessment and Learning Guide Version 2 - 22.12.2008
Page 30 of 38
7. Insert a Skill Card– Only for Content Providers!
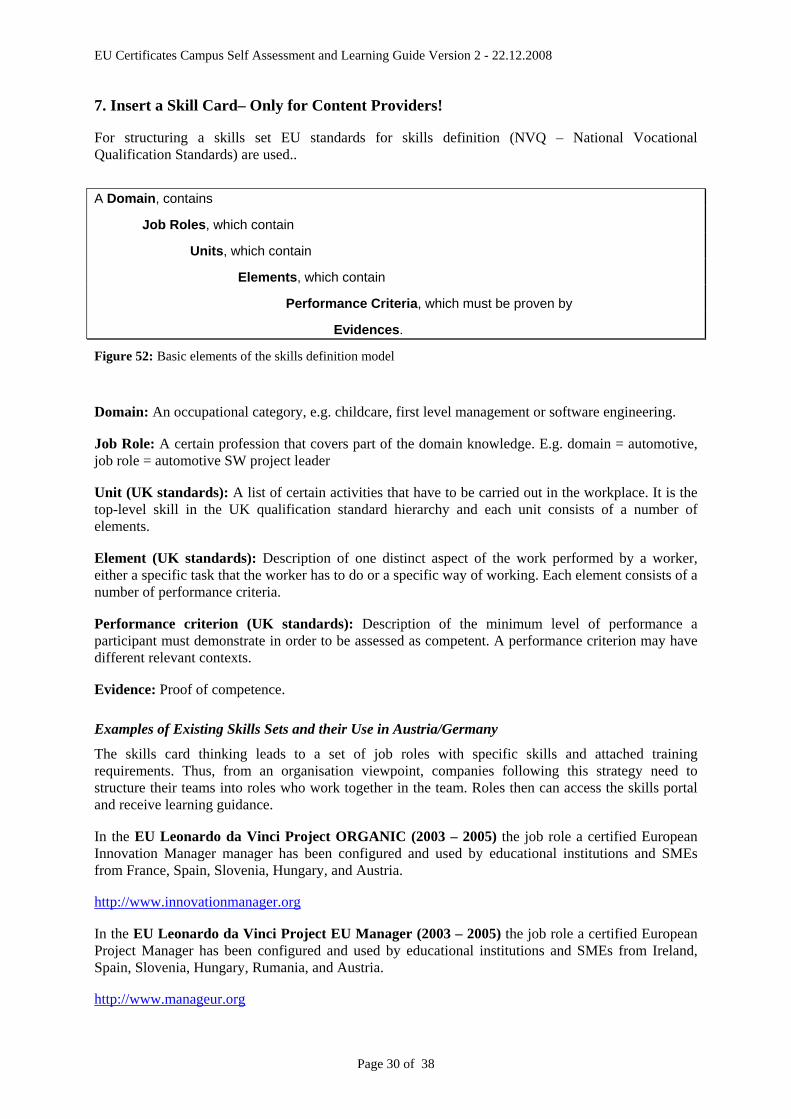
For structuring a skills set EU standards for skills definition (NVQ – National Vocational Qualification Standards) are used..
A Domain, contains
Job Roles, which contain
Units, which contain
Elements, which contain
Performance Criteria, which must be proven by
Evidences.
Figure 52: Basic elements of the skills definition model
Domain: An occupational category, e.g. childcare, first level management or software engineering.
Job Role: A certain profession that covers part of the domain knowledge. E.g. domain = automotive, job role = automotive SW project leader
Unit (UK standards): A list of certain activities that have to be carried out in the workplace. It is the top-level skill in the UK qualification standard hierarchy and each unit consists of a number of elements.
Element (UK standards): Description of one distinct aspect of the work performed by a worker, either a specific task that the worker has to do or a specific way of working. Each element consists of a number of performance criteria.
Performance criterion (UK standards): Description of the minimum level of performance a participant must demonstrate in order to be assessed as competent. A performance criterion may have different relevant contexts.
Evidence: Proof of competence.
Examples of Existing Skills Sets and their Use in Austria/Germany
The skills card thinking leads to a set of job roles with specific skills and attached training requirements. Thus, from an organisation viewpoint, companies following this strategy need to structure their teams into roles who work together in the team. Roles then can access the skills portal and receive learning guidance.
In the EU Leonardo da Vinci Project ORGANIC (2003 – 2005) the job role a certified European Innovation Manager manager has been configured and used by educational institutions and SMEs from France, Spain, Slovenia, Hungary, and Austria.
http://www.innovationmanager.org
In the EU Leonardo da Vinci Project EU Manager (2003 – 2005) the job role a certified European Project Manager has been configured and used by educational institutions and SMEs from Ireland, Spain, Slovenia, Hungary, Rumania, and Austria.
http://www.manageur.org
EU Certificates Campus Self Assessment and Learning Guide Version 2 - 22.12.2008
Page 31 of 38
Insert a Skill Card
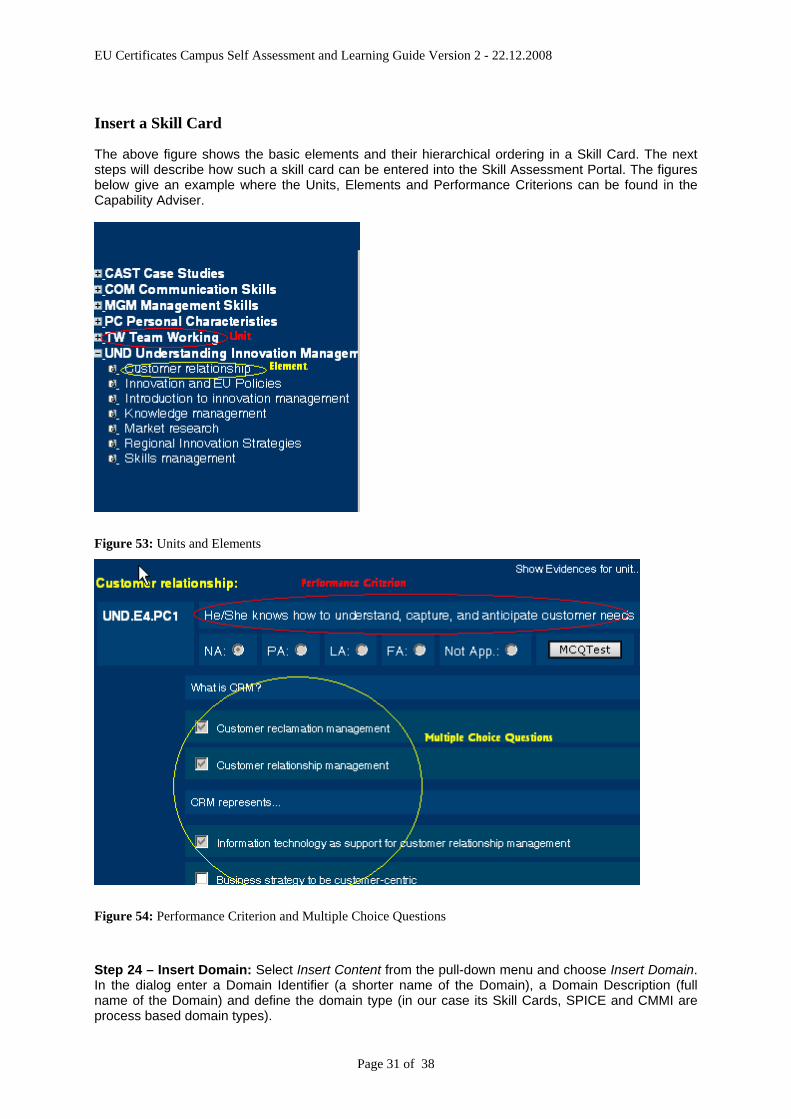
The above figure shows the basic elements and their hierarchical ordering in a Skill Card. The next steps will describe how such a skill card can be entered into the Skill Assessment Portal. The figures below give an example where the Units, Elements and Performance Criterions can be found in the Capability Adviser.
Figure 53: Units and Elements
Figure 54: Performance Criterion and Multiple Choice Questions
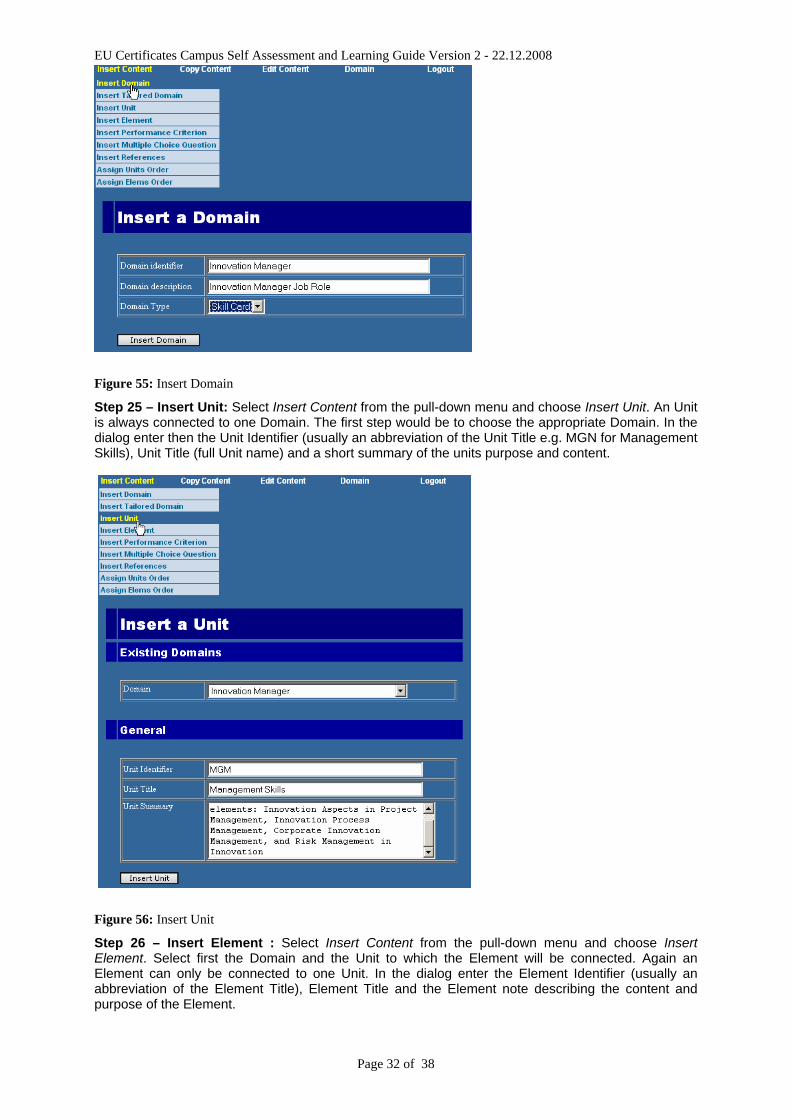
Step 24 – Insert Domain: Select Insert Content from the pull-down menu and choose Insert Domain. In the dialog enter a Domain Identifier (a shorter name of the Domain), a Domain Description (full name of the Domain) and define the domain type (in our case its Skill Cards, SPICE and CMMI are process based domain types).
EU Certificates Campus Self Assessment and Learning Guide Version 2 - 22.12.2008
Page 32 of 38
Figure 55: Insert Domain Step 25 – Insert Unit: Select Insert Content from the pull-down menu and choose Insert Unit. An Unit is always connected to one Domain. The first step would be to choose the appropriate Domain. In the dialog enter then the Unit Identifier (usually an abbreviation of the Unit Title e.g. MGN for Management Skills), Unit Title (full Unit name) and a short summary of the units purpose and content.
Figure 56: Insert Unit
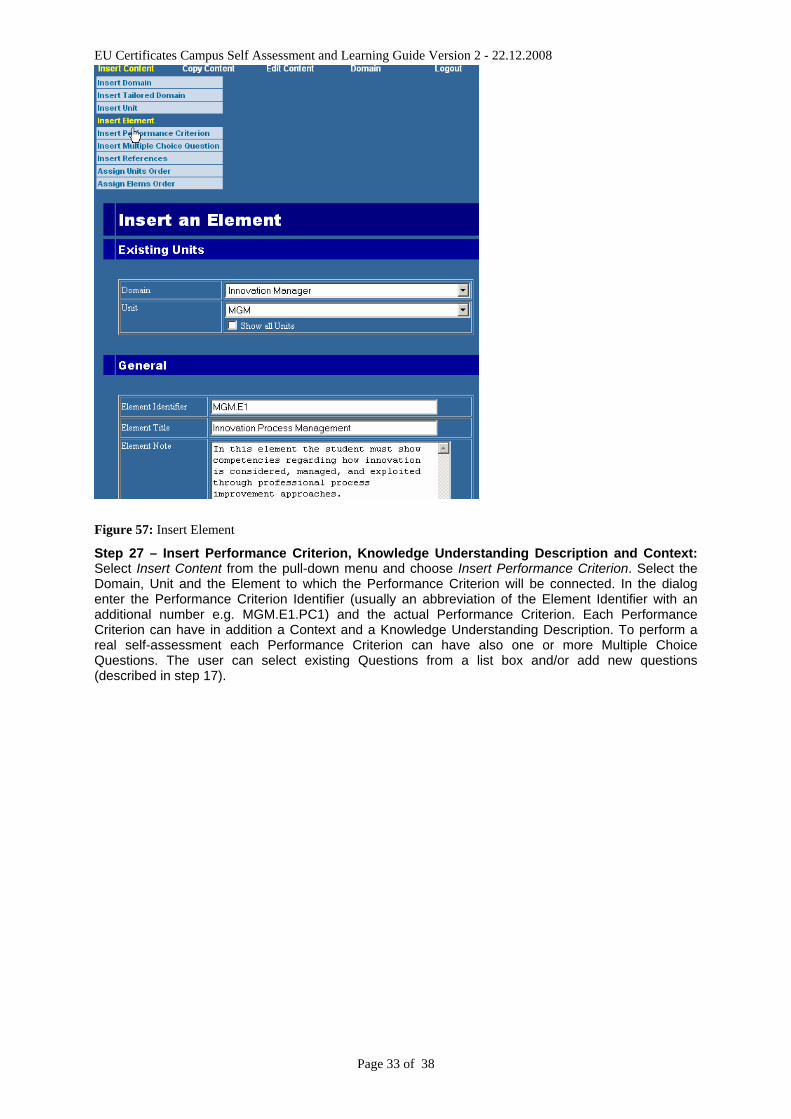
Step 26 – Insert Element : Select Insert Content from the pull-down menu and choose Insert Element. Select first the Domain and the Unit to which the Element will be connected. Again an Element can only be connected to one Unit. In the dialog enter the Element Identifier (usually an abbreviation of the Element Title), Element Title and the Element note describing the content and purpose of the Element.
EU Certificates Campus Self Assessment and Learning Guide Version 2 - 22.12.2008
Page 33 of 38
Figure 57: Insert Element
Step 27 – Insert Performance Criterion, Knowledge Understanding Description and Context: Select Insert Content from the pull-down menu and choose Insert Performance Criterion. Select the Domain, Unit and the Element to which the Performance Criterion will be connected. In the dialog enter the Performance Criterion Identifier (usually an abbreviation of the Element Identifier with an additional number e.g. MGM.E1.PC1) and the actual Performance Criterion. Each Performance Criterion can have in addition a Context and a Knowledge Understanding Description. To perform a real self-assessment each Performance Criterion can have also one or more Multiple Choice Questions. The user can select existing Questions from a list box and/or add new questions (described in step 17).
EU Certificates Campus Self Assessment and Learning Guide Version 2 - 22.12.2008
Page 34 of 38
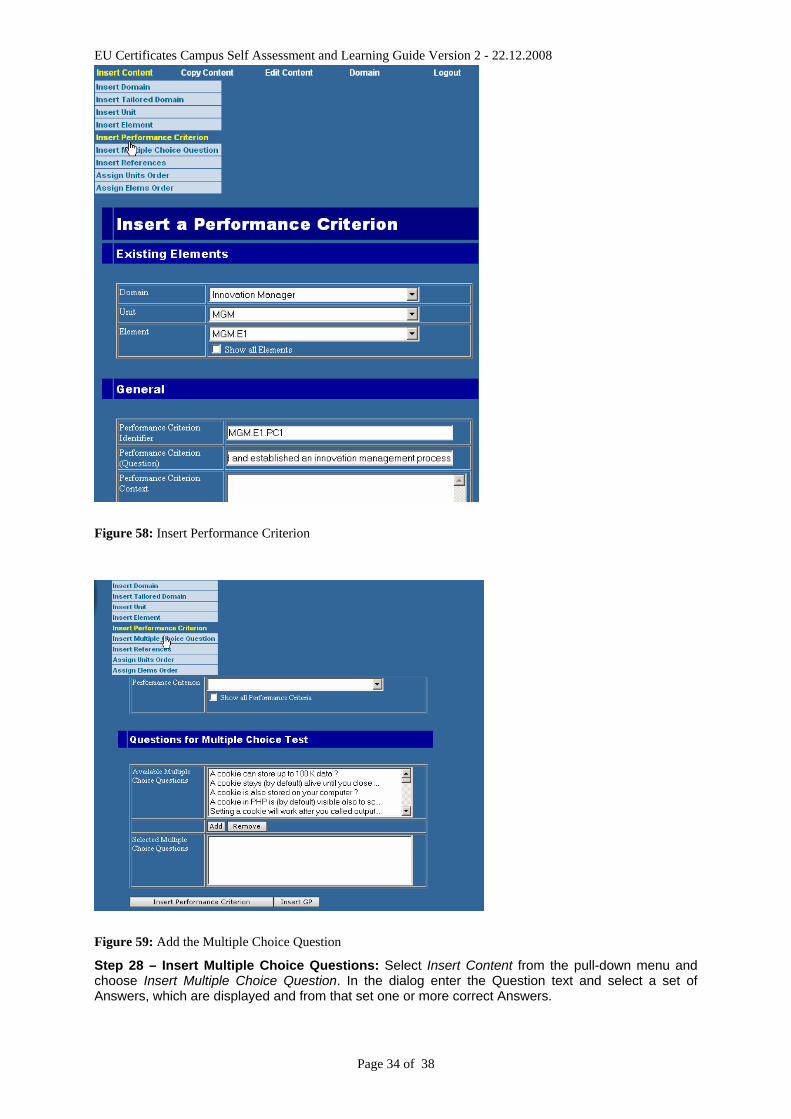
Figure 58: Insert Performance Criterion
Figure 59: Add the Multiple Choice Question
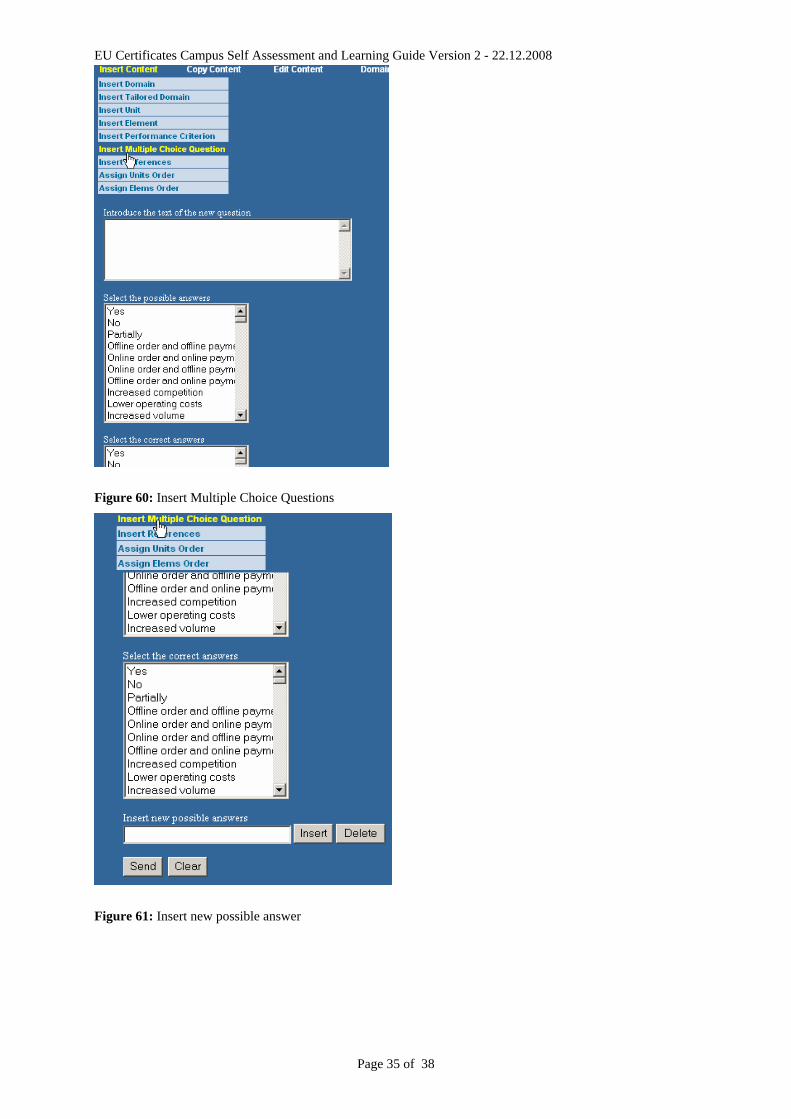
Step 28 – Insert Multiple Choice Questions: Select Insert Content from the pull-down menu and choose Insert Multiple Choice Question. In the dialog enter the Question text and select a set of Answers, which are displayed and from that set one or more correct Answers.
EU Certificates Campus Self Assessment and Learning Guide Version 2 - 22.12.2008
Page 35 of 38
Figure 60: Insert Multiple Choice Questions
Figure 61: Insert new possible answer
EU Certificates Campus Self Assessment and Learning Guide Version 2 - 22.12.2008
Page 36 of 38
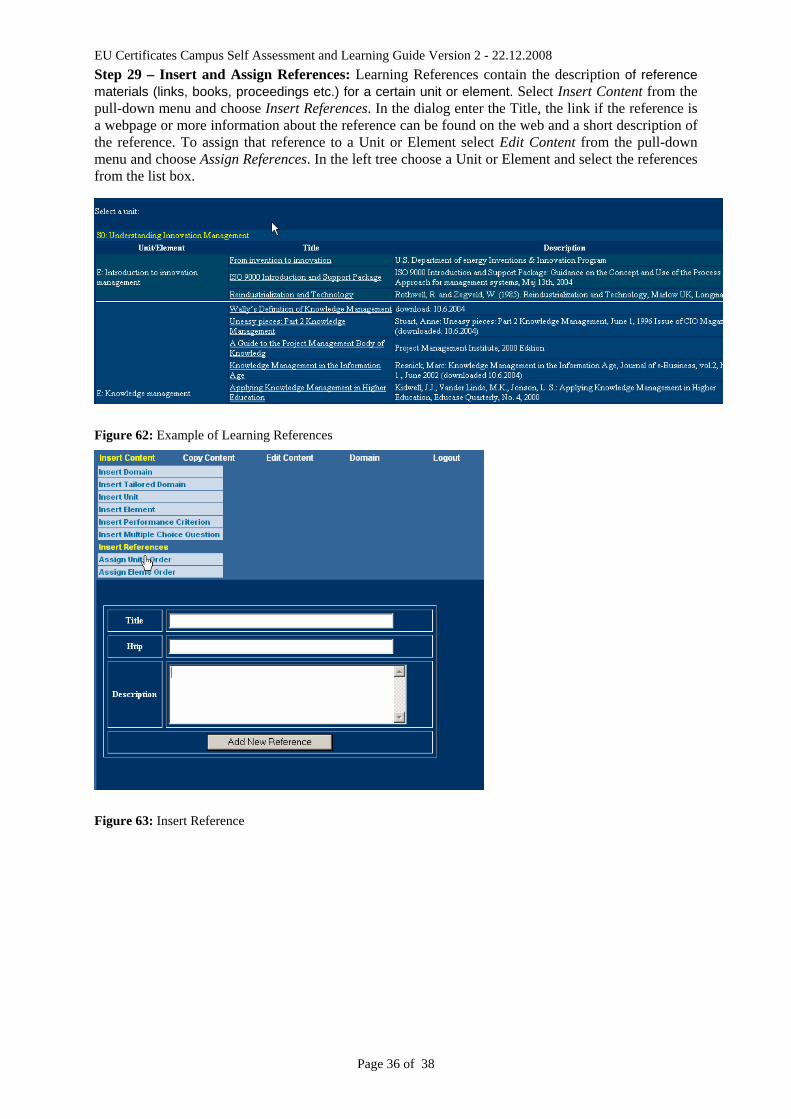
Step 29 – Insert and Assign References: Learning References contain the description of reference materials (links, books, proceedings etc.) for a certain unit or element. Select Insert Content from the pull-down menu and choose Insert References. In the dialog enter the Title, the link if the reference is a webpage or more information about the reference can be found on the web and a short description of the reference. To assign that reference to a Unit or Element select Edit Content from the pull-down menu and choose Assign References. In the left tree choose a Unit or Element and select the references from the list box.
Figure 62: Example of Learning References
Figure 63: Insert Reference
EU Certificates Campus Self Assessment and Learning Guide Version 2 - 22.12.2008
Page 37 of 38
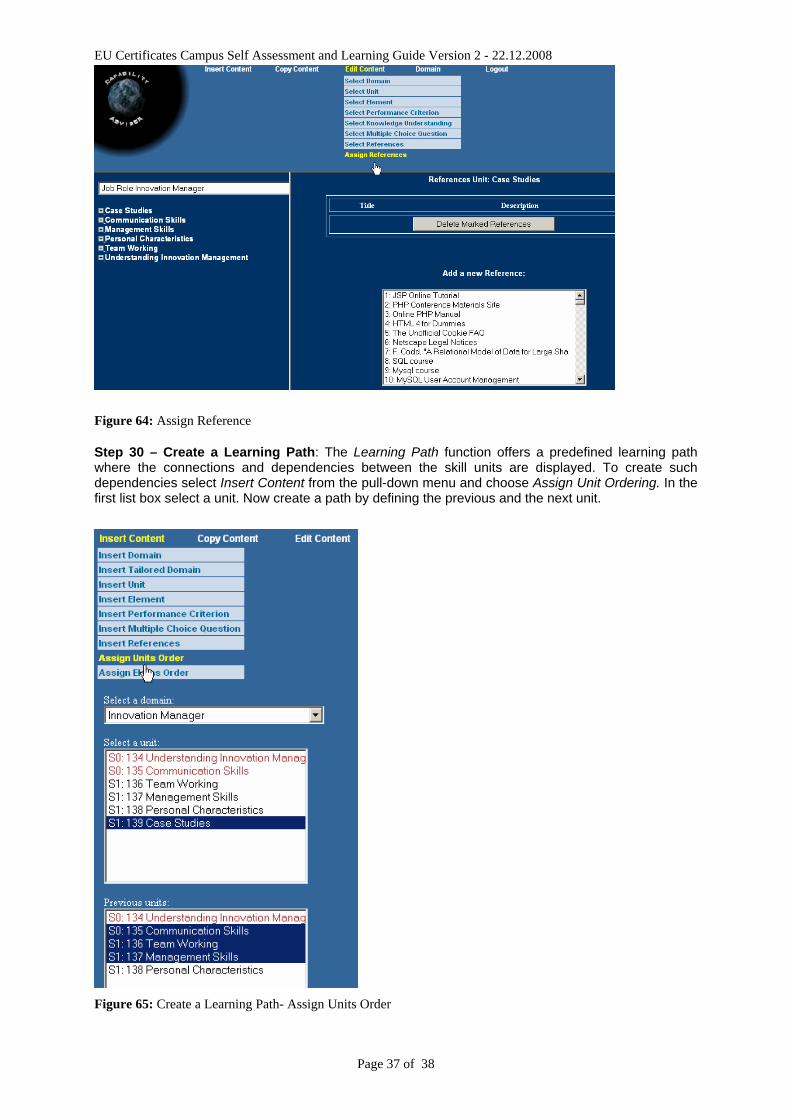
Figure 64: Assign Reference
Step 30 – Create a Learning Path: The Learning Path function offers a predefined learning path where the connections and dependencies between the skill units are displayed. To create such dependencies select Insert Content from the pull-down menu and choose Assign Unit Ordering. In the first list box select a unit. Now create a path by defining the previous and the next unit.
Figure 65: Create a Learning Path- Assign Units Order

EU Certificates Campus Self Assessment and Learning Guide Version 2 - 22.12.2008
Page 38 of 38
Step 31 – Edit Domain, Unit, Element, and Performance Criterion etc.: In the pull-down menu Edit Content various functions are available to edit the entered domains, units, elements etc. The edit functions will be not be described in detail, as the dialogs are the same as in the insert functions.