Embed Size (px)
Citation preview
OracleEngagement CloudImplementing Digital CustomerService
Release 13 (update 17D)

Oracle Engagement CloudImplementing Digital Customer Service
Release 13 (update 17D)Part Number E89297-01Copyright © 2011-2017, Oracle and/or its affiliates. All rights reserved.
Author: Andrew Mitchell
This software and related documentation are provided under a license agreement containing restrictions on use and disclosure and are protected byintellectual property laws. Except as expressly permitted in your license agreement or allowed by law, you may not use, copy, reproduce, translate, broadcast,modify, license, transmit, distribute, exhibit, perform, publish, or display any part, in any form, or by any means. Reverse engineering, disassembly, ordecompilation of this software, unless required by law for interoperability, is prohibited.
The information contained herein is subject to change without notice and is not warranted to be error-free. If you find any errors, please report them tous in writing.
If this is software or related documentation that is delivered to the U.S. Government or anyone licensing it on behalf of the U.S. Government, then thefollowing notice is applicable:
U.S. GOVERNMENT END USERS: Oracle programs, including any operating system, integrated software, any programs installed on the hardware, and/or documentation, delivered to U.S. Government end users are "commercial computer software" pursuant to the applicable Federal Acquisition Regulationand agency-specific supplemental regulations. As such, use, duplication, disclosure, modification, and adaptation of the programs, including any operatingsystem, integrated software, any programs installed on the hardware, and/or documentation, shall be subject to license terms and license restrictionsapplicable to the programs. No other rights are granted to the U.S. Government.
This software or hardware is developed for general use in a variety of information management applications. It is not developed or intended for use inany inherently dangerous applications, including applications that may create a risk of personal injury. If you use this software or hardware in dangerousapplications, then you shall be responsible to take all appropriate fail-safe, backup, redundancy, and other measures to ensure its safe use. OracleCorporation and its affiliates disclaim any liability for any damages caused by use of this software or hardware in dangerous applications.
Oracle and Java are registered trademarks of Oracle and/or its affiliates. Other names may be trademarks of their respective owners.
Intel and Intel Xeon are trademarks or registered trademarks of Intel Corporation. All SPARC trademarks are used under license and are trademarks orregistered trademarks of SPARC International, Inc. AMD, Opteron, the AMD logo, and the AMD Opteron logo are trademarks or registered trademarks ofAdvanced Micro Devices. UNIX is a registered trademark of The Open Group.
This software or hardware and documentation may provide access to or information about content, products, and services from third parties. OracleCorporation and its affiliates are not responsible for and expressly disclaim all warranties of any kind with respect to third-party content, products, andservices unless otherwise set forth in an applicable agreement between you and Oracle. Oracle Corporation and its affiliates will not be responsible for anyloss, costs, or damages incurred due to your access to or use of third-party content, products, or services, except as set forth in an applicable agreementbetween you and Oracle.
The business names used in this documentation are fictitious, and are not intended to identify any real companies currently or previously in existence.
Oracle customers that have purchased support have access to electronic support through My Oracle Support. For information, visit http://www.oracle.com/pls/topic/lookup?ctx=acc&id=info or visit http://www.oracle.com/pls/topic/lookup?ctx=acc&id=trs if you are hearing impaired.
Oracle Engagement CloudImplementing Digital Customer Service
Contents
Preface i
1 About this Guide 1Audience and Scope ................................................................................................................................................ 1
Related Guides ......................................................................................................................................................... 1
2 About Digital Customer Service 3Overview of Digital Customer Service: Explained ...................................................................................................... 3
About Digital Customer Service Terminology: Explained ............................................................................................ 3
About Digital Customer Service Roles: Explained ...................................................................................................... 4
About Technical Compatibility: Explained .................................................................................................................. 5
3 Getting Started with Digital Customer Service 7About Initial Digital Customer Service Setup: Explained ............................................................................................ 7
Enabling Digital Customer Service: Explained ........................................................................................................... 7
Configuring Profile Options: Explained ...................................................................................................................... 8
Performing Role Synchronization: Explained ............................................................................................................ 10
Setting Up Administrators and Developers: Explained ............................................................................................. 12
Setting Up Authentication for Your Application: Procedure ...................................................................................... 14
Setting Up Customer Accounts: Explained ............................................................................................................. 15
Creating a New Digital Customer Service Application: Explained ............................................................................. 16
Setting Up Products, Categories and Knowledge Articles for Digital Customer Service: Explained ........................... 17
4 Configuring Additional Features within Digital Customer Service 19Configuring Cobrowse: Explained ........................................................................................................................... 19
Associating Content Types with Images: Explained ................................................................................................. 20
Mapping Roles: Explained ....................................................................................................................................... 20
Creating a Digital Customer Service Icon in Oracle Engagement Cloud: Explained .................................................. 21
About Application Configuration Settings: Explained ............................................................................................... 23
Post-Configuration Verification Tasks: Explained ..................................................................................................... 25
Oracle Engagement CloudImplementing Digital Customer Service
5 Managing Digital Customer Service Components 29Overview of Digital Customer Service Components: Explained ................................................................................ 29
About the Service Request Creator Component: Explained .................................................................................... 34
Configuring the Product Picker Component: Explained ........................................................................................... 35
Setting Up User Administration Components: Procedure ........................................................................................ 37
6 Configuring Common Use Cases with Digital Customer Service 45Securing Digital Customer Service .......................................................................................................................... 45
Managing Registration Requests: Explained ............................................................................................................ 46
Managing Self-Service Users: Explained ................................................................................................................. 47
Creating Digital Customer Service User Accounts: Explained .................................................................................. 48
Localizing Digital Customer Service for Multilingual Support: Explained ................................................................... 49
7 Implementing Digital Customer Service Advanced Features 53Overview of Digital Customer Service Advanced Features: Explained ...................................................................... 53
Branding the Experience and Using Themes: Explained .......................................................................................... 53
Setting Up the Error Handler: Explained ................................................................................................................. 55
Using a Standard Business Object: A Working Example: Explained ........................................................................ 57
8 Lifecycle Management 61Determining Extension Versions: Explained ............................................................................................................. 61
About Updates: Explained ...................................................................................................................................... 61
Performing Updates: Explained ............................................................................................................................... 62
Oracle Engagement CloudImplementing Digital Customer Service
Preface
i
PrefaceThis preface introduces information sources that can help you use the application.
Oracle Applications HelpUse the help icon to access Oracle Applications Help in the application. If you don't see any help icons on your page,
click the Show Help icon in the global header. Not all pages have help icons. You can also access Oracle ApplicationsHelp at https://fusionhelp.oracle.com.
Using Applications Help
Watch: This video tutorial shows you how to find help and use help features.
Additional Resources• Community: Use Oracle Applications Customer Connect to get information from experts at Oracle, the
partner community, and other users.
• Guides and Videos: Go to the Oracle Help Center to find guides and videos.
• Training: Take courses on Oracle Cloud from Oracle University .
Documentation AccessibilityFor information about Oracle's commitment to accessibility, visit the Oracle Accessibility Program website at OracleAccessibility Program .
Access to Oracle SupportOracle customers that have purchased support have access to electronic support through My Oracle Support. Forinformation, visit http://www.oracle.com/pls/topic/lookup?ctx=acc&id=info or visit http://www.oracle.com/pls/topic/lookup?ctx=acc&id=trs if you are hearing impaired.
Comments and SuggestionsPlease give us feedback about Oracle Applications Help and guides! You can send e-mail to:[email protected].

Oracle Engagement CloudImplementing Digital Customer Service
Preface
ii
Oracle Engagement CloudImplementing Digital Customer Service
Chapter 1About this Guide
1
1 About this Guide
Audience and ScopeThis guide outlines the implementation and configuration steps required to develop, configure, manage, and administer DigitalCustomer Service in Oracle Engagement Cloud. To set up and work with the additional features of Oracle EngagementCloud, see Oracle Sales Cloud documentation on Oracle Help Center at https://docs.oracle.com.
This implementation guide is designed to be used as a starting point that shows how Digital Customer Service in OracleEngagement Cloud can be developed and implemented using the Oracle Visual Builder Cloud Service. An implementor canuse the documented development and configuration information in this guide to successfully deploy Digital Customer Service.
Each implementation of Oracle Engagement Cloud is unique, and leads to the development of application customizations thatsupport unique business requirements.
Related GuidesTo understand more about the information covered in this guide, refer to the list of guides in the following table.
Title Description
Oracle Engagement Cloud UsingService
Contains information to help service managers, service personnel, and other service end users toperform day-to-day business tasks using Oracle Cloud.
Using Knowledge in Engagement Cloud
Describes how administrators, agents, authors, and other knowledge base contributors canimplement and use Knowledge in Engagement Cloud.
Oracle Engagement Cloud ImplementingService
Describes how to set up Service Request Management for Oracle Engagement Cloud.
Oracle Sales Cloud Getting Started withYour Implementation
Describes your initial Oracle Sales Cloud service implementation procedures, based on a simplesales-force-automation use case.
Oracle Sales Cloud Implementing Sales
Contains conceptual information and procedures needed to implement components and features ofOracle Sales Cloud.
Oracle Sales Cloud Securing OracleSales Cloud
Contains information to help setup users and sales administrators configure access to Oracle SalesCloud functionality and data.
Oracle Sales Cloud Security Reference
Lists the predefined security data that is included in the Sales offering.
Oracle Cloud Using Oracle Visual BuilderCloud Service
Describes how to use a web-based visual development tool to create and publish custom web andmobile applications that can integrate business objects and Fusion Applications REST services toextend SaaS services.
Oracle Engagement CloudImplementing Digital Customer Service
Chapter 1About this Guide
2
Title Description
Oracle Cloud Administrator's Guide forOracle Visual Builder Cloud Service
Describes tasks for administrators of Oracle Visual Builder Cloud Service.
Related Topics
• Oracle Help Center
Oracle Engagement CloudImplementing Digital Customer Service
Chapter 2About Digital Customer Service
3
2 About Digital Customer Service
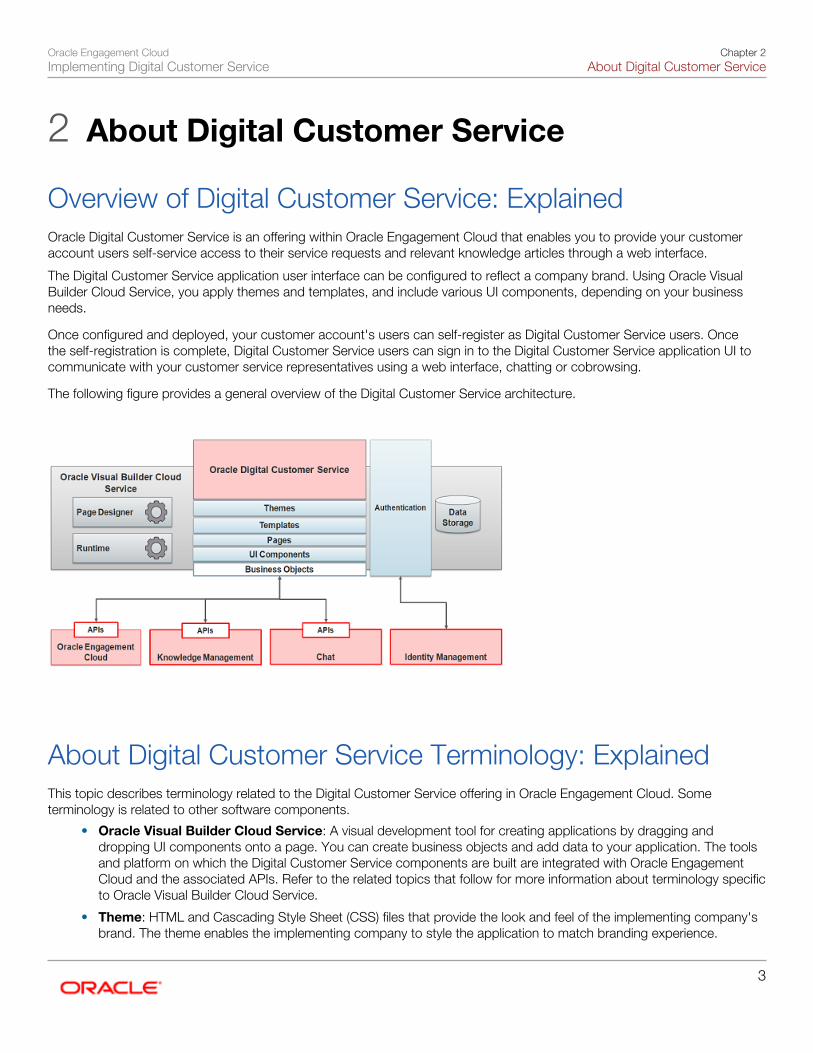
Overview of Digital Customer Service: ExplainedOracle Digital Customer Service is an offering within Oracle Engagement Cloud that enables you to provide your customeraccount users self-service access to their service requests and relevant knowledge articles through a web interface.
The Digital Customer Service application user interface can be configured to reflect a company brand. Using Oracle VisualBuilder Cloud Service, you apply themes and templates, and include various UI components, depending on your businessneeds.
Once configured and deployed, your customer account's users can self-register as Digital Customer Service users. Oncethe self-registration is complete, Digital Customer Service users can sign in to the Digital Customer Service application UI tocommunicate with your customer service representatives using a web interface, chatting or cobrowsing.
The following figure provides a general overview of the Digital Customer Service architecture.
About Digital Customer Service Terminology: ExplainedThis topic describes terminology related to the Digital Customer Service offering in Oracle Engagement Cloud. Someterminology is related to other software components.
• Oracle Visual Builder Cloud Service: A visual development tool for creating applications by dragging anddropping UI components onto a page. You can create business objects and add data to your application. The toolsand platform on which the Digital Customer Service components are built are integrated with Oracle EngagementCloud and the associated APIs. Refer to the related topics that follow for more information about terminology specificto Oracle Visual Builder Cloud Service.
• Theme: HTML and Cascading Style Sheet (CSS) files that provide the look and feel of the implementing company'sbrand. The theme enables the implementing company to style the application to match branding experience.
Oracle Engagement CloudImplementing Digital Customer Service
Chapter 2About Digital Customer Service
4
• UI Components: The items that you place onto a web page that provide key capabilities within a user experience,for example: knowledge search, and results.
• Business Objects: The definitions of data objects that enable UI components to interact with Oracle EngagementCloud APIs.
• Digital Customer Service Application: The application that you build using Oracle Visual Builder Cloud Servicewhich acts as the web interface for your users. The Digital Customer Service application is built using the DigitalCustomer Service Reference Implementation Template or the Digital Customer Service Stater template.
• Digital Customer Service Users: Your customer account users who have successfully self-registered to use theDigital Customer Service application. These users can have a variety of roles.
• Digital Customer Service Templates: Available templates you can select while creating your Digital CustomerService application. These application templates include component extensions, themes, and depending on thetemplate, predefined pages and actions.
• Digital Customer Service Reference Implementation: This template includes several pages and businesscomponents that enable basic support experience including: product browsing, knowledge search, service requestcreation and management, chat, and self-service user management capabilities for the account administrator. Theadministrator manages all of the users and roles.
• Digital Customer Service Starter: This template is an empty application that makes the Digital Customer Servicecomponents available in the component palette of Oracle Visual Builder Cloud Service.
Related Topics
• Getting Started with Oracle Visual Builder Cloud Service
About Digital Customer Service Roles: ExplainedDigital Customer Service users can be granted different roles. This topic describes the details of the privileges granted witheach role.
Note: By default, all users have access to knowledge search and article viewing. This can be configured to limitaccess to authenticated users through the security configuration within Oracle Visual Builder Cloud Service andthe specific application.
UserThe User role grants the privileges to view and edit service requests created by the user, and to create service requests.Removing this role causes the removal of all privileges. The only way to restore the privileges is to submit a new registrationrequest.
Account ManagerThe Account Manager role grants the privileges to view and edit all service requests for a specific customer account.Additionally, users with the Account Manager role can create service requests. The user can perform these tasks only onaccounts for which they are the Account Manager.

Oracle Engagement CloudImplementing Digital Customer Service
Chapter 2About Digital Customer Service
5
Account AdministratorThe Account Administrator role grants the privileges to view and approve registration requests in the customer accountfor which they are the Account Administrator. Additionally, the role permits the user to assign and remove the AccountAdministrator and Account Manager roles, and remove roles on accounts for which they are the Account Administrator.
Related Topics
• Managing Self-Service Users: Explained
• Oracle Cloud Administrator's Guide for Oracle Visual Builder Cloud Service
About Technical Compatibility: ExplainedThis topic describes the software versions that are compatible with this release of the Digital Customer Service offering.
Digital Customer Service Release 17.4 is available with Oracle Engagement Cloud Release 13. Use the following software andspecified versions with Digital Customer Service Release 17.4:
• Oracle Visual Builder Cloud Service 17.4
• Knowledge Management, Chat, Cobrowse, Service Request Management, and Digital Customer ServiceAdministration packaged with Oracle Engagement Cloud Release 13
• Oracle JavaScript Extension Toolkit (Oracle JET)
• Browsers supported by Oracle JET: see the Related Topics that follow.
Note: Digital Customer Service is not supported with Symantec Blue Coat Cloud Data Protection Gateway.
Related Topics
• What platforms are supported by Oracle JET?
• Oracle Software Web Browser Support Policy
• Oracle Visual Builder Cloud Service
Oracle Engagement CloudImplementing Digital Customer Service
Chapter 2About Digital Customer Service
6
Oracle Engagement CloudImplementing Digital Customer Service
Chapter 3Getting Started with Digital Customer Service
7
3 Getting Started with Digital CustomerService
About Initial Digital Customer Service Setup: ExplainedThis topic describes the various initial tasks that must be completed to set up Digital Customer Service.
The tasks outlined in this topic refer to documents later in this chapter. Follow these steps to get your Digital CustomerService application running:
1. Enabling Digital Customer Service.2. Configuring Profile Options.3. Performing Role Synchronization.4. Setting Up Administrators and Developers.5. Setting Up Authentication for Your Application6. Setting Up Customer Accounts.7. Creating a New Digital Customer Service Application.8. Setting Up Products, Categories and Knowledge Articles.
Enabling Digital Customer Service: ExplainedThis topic describes how to enable the Digital Customer Service application.
Note: This topic is one of many required for the initial setup of Digital Customer Service. For more informationabout initial setup tasks required to get started with your Digital Customer Service application, see the relatedtopics that follow.
You must enable Digital Customer Service in Oracle Engagement Cloud to have access to certain profile options and workareas. Once enabled, the following work areas are grouped with the Service icon in Oracle Engagement Cloud:
• Self-Service Users
• Registration Requests
The profile options in the following areas are available after enabling Digital Customer Service:
• Manage Digital Customer Service Account Setup Profile Options
• Manage Digital Customer Service Registration Profile Options
To enable the Digital Customer Service Application:
1. Sign in to Oracle Engagement Cloud as administrator or a setup user.2. Navigate to the Setup and Maintenance work area.3. From the Setup list, select Service.4. Click the Change Feature Opt In link.5. In the Service row, click the pencil icon in the Features column.

Oracle Engagement CloudImplementing Digital Customer Service
Chapter 3Getting Started with Digital Customer Service
8
6. In the Customer Self-Service row, select the Enable option.7. Click Done.8. In the Digital Customer Service row, select the Enable option.9. Click Done.
Configuring Profile Options: ExplainedThis topic describes Digital Customer Service profile options, including configuration instructions.
Note: This topic is one of many required for the initial setup of Digital Customer Service. For more informationabout initial setup tasks required to get started with your Digital Customer Service application, see the relatedtopics that follow.
The following task lists contain the profile options related to Digital Customer Service:
• Manage Digital Customer Service Registration Profile Options
• Manage Digital Customer Service Account Setup Profile Options
About Digital Customer Service Registration Profile OptionsThe following table lists the profile options for Digital Customer Service Registration profile options.
Lookup Code Default Value Possible Values Effect
SVC_ CSS_ SELF_REGISTRATION
New Or Existing
None New Or Existing Existing Only
Specifies which contactscan self-register. If Existing isspecified, only existing contactscan self-register.
SVC_ CSS_ SELF_ REG_AUTO_APPROVE
False
True False
Enables automatic approval forself-service user registration. If SVC_ CSS_ SELF_ REG_AUTO_APPROVE is set toFalse and SVC_ CSS_ ACCT_ADMIN_APPROVE is set toTrue, then the Digital CustomerService Account Administratorscan approve user registrationrequests in the Digital CustomerService Customer user interface.Also Digital Customer ServiceAdministrators can approveregistration requests in the DigitalCustomer Service Administrationuser interface.
SVC_ CSS_ ACCT_ADMIN_APPROVE
True
True False
Enables the approval of self-service user registrations byusers with Digital CustomerService Account Administratorroles.
Oracle Engagement CloudImplementing Digital Customer Service
Chapter 3Getting Started with Digital Customer Service
9
Lookup Code Default Value Possible Values Effect
If set to True, Digital CustomerService Account Administratorscan approve user registrationrequests in the Digital CustomerService customer user interfaceand Digital Customer ServiceAdministrators can approveregistration requests in the DigitalCustomer Service Administrationuser interface. If set to False, only DigitalCustomer Service Administratorscan approve registrationrequests in the Digital CustomerService Administration userinterface.
Note: This option appliesonly when the SVC_CSS_ SELF_ REG_AUTO_APPROVE option isset to False.
SVC_ CSS_ ACCT_ KEY_FIELD
OrganizationName
Any field in the Account object
Specifies a valid field name in theAccount object.
Note: You must create anattribute to be the accountkey, because the defaultaccount key of accountname is not secure.
SVC_ CSS_ REG_CONT_MAP
PersonFirstName:PersonFirstName PersonLastName:PersonLastName EmailAddress: EmailAddress
NULL Any defined value, with a colonseparating fields, and commasseparating the pairs. For example, reg_field1:contact_ field1 reg_ field2:contact field2
Specifies name and valuepairs that map fields of theRegistration View object to theContact View object. When setto NULL, the same name isexpected in both objects.
SVC_ CSS_ SIGN_IN_ATTR_NAME
EmailAddress
The value of the assignedattribute must be unique. Possible values include: EmailAddress UID
Specifies the sign-in attributethat users must specify in theSign In ID field in the RegistrationView object. This field is usedto determine if the user exists inthe Lightweight Directory AccessProtocol server.
SVC_ CSS_ REG_FLD_CONTACT
EmailAddress
Any field on the Contact object
Specifies the fields to use duringthe user registration process todetermine if the registering useris an existing contact.
Oracle Engagement CloudImplementing Digital Customer Service
Chapter 3Getting Started with Digital Customer Service
10
Lookup Code Default Value Possible Values Effect
SVC_ CSS_ SEND_WELCOME_EMAIL
True
True False
Enables sending a welcomeemail when a new user accountis created.
About Digital Customer Service Account Setup Profile OptionsThe following table lists the profile options for Digital Customer Service Account Setup profile options.
Lookup Code Default Value Possible Values Effect
SVC_ AC_ MQS_ ACCOUNT_ID
None
A sting that represents the valueof the identity domain assignedto your order.
Enables the account ID to usethe metering service. This represents the IdentityDomain shown in the MyAccountUI in Cloud Portal.
SVC_ AC_ MQS_DATA_CENTER
None
A sting that represents the valueof the Data Center assigned toyour order.
Enables the data center to usethe metering service. This represents the name ofthe Data Center shown in theMyAccount UI in Cloud Portal.
Setting Digital Customer Service Profile OptionsThis topic describes how to set profile options for Digital Customer Service. The profile options specific to Digital CustomerService are found in two task areas: Manage Digital Customer Service Registration Profile Options and Manage DigitalCustomer Service Account Setup Profile Options.
To find and set the Digital Customer Service profile options:
1. Sign in to Oracle Engagement Cloud as administrator or a setup user.2. Navigate to the Setup and Maintenance work area.3. From the Setup list, select Service.4. Click the Digital Customer Service functional area.5. In the Task list, click one of the two following tasks:
◦ Manage Digital Customer Service Registration Profile Options
◦ Manage Digital Customer Service Account Setup Profile Options
6. Click the profile option that you want to modify, then click the pencil icon.7. Set the profile option value as needed.
Oracle Engagement CloudImplementing Digital Customer Service
Chapter 3Getting Started with Digital Customer Service
11
Performing Role Synchronization: ExplainedThis topic describes how to configure a role synchronization.
Note: This topic is one of many required for the initial setup of Digital Customer Service. For more informationabout initial setup tasks required to get started with your Digital Customer Service application, see the relatedtopics that follow.
Perform all of the tasks in this topic in the following order to configure role synchronization for your Digital Customer Serviceapplication:
1. Register the SIM Endpoint.2. Configure Role Synchronization.3. Schedule a New Process for Role Synchronization.4. Configure an Automated Role Synchronization.
Register the SIM EndpointYou must begin by registering the SIM endpoint. For more information, refer to the Synchronizing Oracle Sales Cloud, OracleHCM Cloud, and Oracle ERP Cloud User Identities and Roles to SIM solution in the Oracle Cloud Developers Solutions page,in the Related Topics that follow.
Configure Role SynchronizationOnce the SIM endpoint is registered, you can configure your role synchronization. For more information, refer to theSynchronizing Oracle Sales Cloud, Oracle HCM Cloud, and Oracle ERP Cloud User Identities and Roles to SIM solution in theOracle Cloud Developers Solutions page, in the Related Topics that follow.
When configuring role synchronization, you must specify the following roles:
• Customer Self-Service User
• Customer Self-Service Administrator
Schedule a New Process for Role SynchronizationTo schedule a new process for role synchronization:
1. Sign in to Oracle Engagement Cloud as an administrator or a setup user.2. Navigate to the Tools work area, and click Scheduled Processes.3. Click Schedule New Process.
The Schedule New Process dialog box appears.4. Select the Job option.5. Click the Name list.6. Click the Search link.
The Search and Select Name dialog box appears.7. Enter the following string in the Name field:
User identity synchronization from this SaaS instance to the PaaS Identity store
Oracle Engagement CloudImplementing Digital Customer Service
Chapter 3Getting Started with Digital Customer Service
12
8. Click Search.9. Click the User identity synchronization from this SaaS instance to the PaaS Identity store row.
10. Click OK.11. Click OK in the Schedule New Process dialog box.
The Process Details dialog box appears.12. (Optional) Enter notes in the Submissions Notes field.13. Click Submit.
A Confirmation dialog is displayed.14. Click OK on the Confirmation dialog.15. Click Refresh.
The status of the new scheduled process changes to Succeeded.16. (Optional) To view the log and output of the scheduled process, click the Succeeded status link in the scheduled
process row.Details, including the Log and Output, appear after the Scheduled Processes list.
Configure an Automated Role SynchronizationYou can configure an automated role synchronization. For Digital Customer Service, Oracle recommends that you scheduleyour automated role synchronization to occur every three to four minutes. For more information, refer to the SynchronizingOracle Sales Cloud, Oracle HCM Cloud, and Oracle ERP Cloud User Identities and Roles to SIM solution in the Oracle CloudDevelopers Solutions page, in the Related Topics that follow.
Related Topics• Synchronizing Oracle Sales Cloud, Oracle HCM Cloud, and Oracle ERP Cloud User Identities and Roles to SIM
Setting Up Administrators and Developers: ExplainedThis topic describes how to set up administrators and developers for Digital Customer Service in Oracle Engagement Cloud.
Note: This topic is one of many required for the initial setup of Digital Customer Service. For more informationabout initial setup tasks required to get started with your Digital Customer Service application, see the relatedtopics that follow.
Creating a Developer User with the Appropriate RolesTo work with business objects relevant to Digital Customer Service, the developer must be granted the appropriate roles.Three roles are required to perform developer tasks:
• Sales Administrator. Required to enable the user to submit self-registration requests.
• Customer Self-Service User. Required to enable the developer to work with APIs.
• Customer Self-Service Account Administrator. Required to enable the developer to describe the self-service roles inthe REST API.
To create a developer user with the appropriate roles:
1. Sign in to Oracle Engagement Cloud.
Oracle Engagement CloudImplementing Digital Customer Service
Chapter 3Getting Started with Digital Customer Service
13
2. Navigate to the My Team work area and click Manage Users.3. Click + (Create).4. Enter the required information and any of the optional fields.5. Click Add Role.
The Add Role dialog box appears.a. In the Role Name enter one of the three roles listed in this topic.b. Click Search.c. Select the role name, and then click OK.
6. Repeat the previous step for all three roles listed in this topic.7. Click Save and Close.
Note: A role synchronization must occur before continuing to the next step. The time that it takesfor the synchronization to occur depends on the configured frequency of your automated rolesynchronization. For more information, refer to the Performing Role Synchronization topic in the RelatedTopics.
8. Use the Oracle Visual Builder Cloud Service My Services application to grant the developer user created in steps3-7 the Application Builder Developer role. For more information refer to the Getting Started topic in theAdministrator's Guide for Oracle Visual Builder Cloud Service listed in the Related Topics.
Creating the APPID User for Digital Customer ServiceAn administrator-defined job role with the required privileges for Digital Customer Service must be created and then grantedto a new APPID user. The APPID user is required when setting up the authentication for the Services API, the CRM Sales APIand the Knowledge API during application configuration. The APPID is used by the APIs when a user has not signed in, or forRest API calls during Sign Up.
This task ensures that the APPID user does not have more privileges than required. Follow both sets of steps in this topic tocreate the administrator-defined job role for the APPID, and then create the APPID user with the administrator-defined jobrole.
To create the administrator-defined job role for the APPID user:
1. Sign in to Oracle Engagement Cloud.2. Navigate to the Security Console work area and click the Roles tab.3. Click Create Role.4. In the Role Name field, enter the following text:
DCS APPID Users
5. In the Role Code field, enter the following text:DCS_APPID_USERS
6. From Role Category list, select Common - Job Roles.7. (Optional) In the Description field, enter a description.8. Click the Next button three times, until you reach the Role Hierarchy.9. Click Add Role.
The Add Role Membership dialog box appears.a. In the Search field, enter each of the following roles, then click Add Role Membership:
• Customer Self-Service Administrator
Oracle Engagement CloudImplementing Digital Customer Service
Chapter 3Getting Started with Digital Customer Service
14
• Opportunity Administration• Customer Self-Service Account Administrator• Customer Self-Service User• Service Request Channel User
Note: A Confirmation dialog appears each time your click Add Role Membership. Click OKafter adding each role.
b. Click Close to close the Add Role Membership dialog box.10. Click Next until you reach the Summary and Impact Report screen.11. Click Save and Close.
To create the APPID user and assign the administrator-defined job role:
1. Sign in to Oracle Engagement Cloud.2. Navigate to the Security Console work area and click the User Accounts tab.3. Click Add User Account.4. Fill out the obligatory fields.
Tip: In the User Name field, enter a meaningful user name, such as: DCS_SELF_REG_APPID.
5. Click Add Role.
The Add Role Membership dialog box appears.
a. In the Search field, enter DCS APPID Users.b. Click Search.c. Select the role name, and then click Add Role Membership.
A Confirmation dialog box appears.d. Click OK.e. Click Done.
6. Click Save and Close.
Related Topics• About Digital Customer Service Roles: Explained
• Administrator's Guide for Oracle Visual Builder Cloud Service
Setting Up Authentication for Your Application: ProcedureFor your application to run properly, you must first set up system-to-system authentication between your Digital CustomerService application and Oracle Engagement Cloud.
To complete the tasks in this topic, you must be signed in to the Oracle Visual Builder Cloud Service with a valid developeror administrator account. This account was created in the previous topic. For more information about the developer useraccount that you created, refer to "Setting Up Administrators and Developers" under Related Topics.
To set up authentication, perform the following tasks:
1. Open your Digital Customer Service application in the Oracle Visual Builder Cloud Service.
Oracle Engagement CloudImplementing Digital Customer Service
Chapter 3Getting Started with Digital Customer Service
15
2. Navigate to the Data Designer page.3. Click the Services tab, select Knowledge, and then click the Authentication tab.4. Configure the following fields under Service Authentication:
a. From the Authentication Mechanism list, select Basic.b. Enter a user name for the APPID user that you created when setting up administrators and developers. For
example DCSTest.Appid as the User Name . For more information, see "Setting Up Administrators andDevelopers" under Related Topics.
c. Enter the Password for the APPID user.d. Specify the authentication for a logged on user:
• For deployments with Digital Customer Service applications 17.4.1 and later connected to OracleEngagement Cloud earlier than 17.11, do not check the Use different authentication for a loggedin user check box.
• For deployments with Digital Customer Service applications 17.4.1 and later connected to OracleEngagement Cloud 17.11 or later, check the Use different authentication for a logged in usercheck box.
• If you selected to use a different authentication for a logged in user, select the authentication to use.From the Logged In Method list, select Oracle Cloud Account.
e. Click Save to save the settings.5. Set up authentication for Services API and CRM Sales API:
a. Select CRM Sales API, and then click the Authentication tab.
Note: The steps outlined in the following steps must be completed for both Services API andCRM Sales API.
b. Configure the following fields under Service Authentication:
i. From the Authentication Mechanism list, select Basic.ii. Enter a user name for the APPID user that you created when setting up administrators and
developers. For example DCSTest.Appid as the User Name . For more information, see "Setting UpAdministrators and Developers" under Related Topics.
iii. Enter the Password for the APPID user.iv. Select the Use different authentication for a logged in user check box.v. From the Logged In Method list, select Oracle Cloud Account.vi. Click Save.vii. Select Services API and repeat these steps.
Related Topics
• Overview of Digital Customer Service Components: Explained
Setting Up Customer Accounts: ExplainedThis topic describes how to set up end user customer accounts for Digital Customer Service. End user customers arerequired to have a known account key. This account key is required to enable the end user to self-register.
Oracle Engagement CloudImplementing Digital Customer Service
Chapter 3Getting Started with Digital Customer Service
16
Note: This topic is one of many required for the initial setup of Digital Customer Service. For more informationabout initial setup tasks required to get started with your Digital Customer Service application, see the relatedtopics that follow.
You must set up a customer account for testing your Digital Customer Service application. To set up a customer account,you are required to know the account key.
Configuring the Account Key
To set up customer accounts to use Digital Customer Service, you must create an account and associate it with an accountkey.
The account key is used to uniquely identify an account. The account key is determined by the value assigned to theSVC_CSS_ACCT_KEY_FIELD profile option. For more information about configuring profile options, refer to the ConfiguringProfile Options topic in the Related Links.
By default, the SVC_CSS_ACCT_KEY_FIELD profile option is mapped to the Organization Name field. You must create anattribute to be the account key, because the default account key is not secure.
Creating a Customer Account in Oracle Engagement CloudTo set up a customer account:
1. Sign in to Oracle Engagement Cloud.2. Navigate to the Service work area and click Accounts.3. Click Create Account.4. Enter the Name.5. Specify the account key in the appropriate field.
Note: The field in which you enter the account key differs depending on your deployment. Theaccount key should be specified in the attribute that you defined for the account key.
6. Click Save and Close.
About End User Self-Registration User Account CreationThe Oracle Digital Customer Service Reference Implementation has sample pages that provide the ability for an end user toself-identify and register within the application.
The end user needs the account key to register successfully.
Creating a New Digital Customer Service Application:ExplainedThis topic describes how to create a new Digital Customer Service application in Oracle Visual Builder Cloud Service.
Oracle Engagement CloudImplementing Digital Customer Service
Chapter 3Getting Started with Digital Customer Service
17
Note: This topic is one of many required for the initial setup of Digital Customer Service. For more informationabout initial setup tasks required to get started with your Digital Customer Service application, see the relatedtopics that follow.
To create a new Digital Customer Service application:
1. Sign in to the Oracle Visual Builder Cloud Service editor as a user with the Developer role.2. Click New Application.3. Click Web.4. Specify the Application Name.
Note: The application display name can be changed.
5. Specify the Application ID.
Note: The Application ID is automatically derived from the specified Application Name, but you canchange it, if desired. The Application ID cannot be modified once the application is created: it appearsin the application URL.
6. Click Next.7. Click the template you want to use.
Note: Oracle recommends using the Digital Customer Service Reference Implementation templatefor initial implementations and familiarization with Digital Customer Service capabilities. If you use theDigital Customer Service Starter template, advanced setup and additional configuration is required..
The following templates are provided for Digital Customer Service:
◦ Digital Customer Service Starter. This template is a blank application that includes no applicationpages other than a select few pages for error handling. This template makes the Digital Customer Servicecomponents available in the component palette.
◦ Digital Customer Service Reference Implementation. This template creates an application with basicservice functionality, including the ability to create and update SRs, search knowledge, browse products, andchat with an agent.
8. Click Next.9. (Optional) Remove any predefined pages, or add new pages.
10. Click Finish.
The Digital Customer Service application has been created. You are now ready to configure your Digital CustomerService application to meet your business needs.
Related Topics
• About Digital Customer Service Terminology: Explained
• Mapping Roles: Explained
• Setting Up User Administration Components: Procedure
Oracle Engagement CloudImplementing Digital Customer Service
Chapter 3Getting Started with Digital Customer Service
18
Setting Up Products, Categories and Knowledge Articlesfor Digital Customer Service: ExplainedThis topic describes how to create products and categories, and author knowledge articles, specific to Digital CustomerService. Product items and groups are used within the Digital Customer Service application to provide better support andknowledge article navigation. Additionally, product items and groups facilitate associating service requests for process flowswithin Oracle Engagement Cloud. Consider your creation and use of product items and groups as a mechanism to improvethe customer experience.
Note: This topic is one of many required for the initial setup of Digital Customer Service. For more informationabout initial setup tasks required to get started with your Digital Customer Service application, see the RelatedTopics.
To configure products and categories for service request management:
1. Sign in to Oracle Engagement Cloud as an administrator or a setup user.2. Configure the products that are available in service requests.
Note: When creating your products, the following options must be selected: Eligible to Sell, Eligiblefor Service and Enable Customer Self-Service .
For information about configuring products, refer to the Related Topics.3. Configure the available categories for service requests.
For information about configuring categories, refer to the Related Topics.4. Author Knowledge articles that you want users to have access to in their Digital Customer Service applications.
For information about creating and editing knowledge articles, refer to the Related Topics.
Related Topics
• Managing Service Request Categories: Explained
• Working with Sales Products: Procedures
• Knowledge Articles: Explained
Oracle Engagement CloudImplementing Digital Customer Service
Chapter 4Configuring Additional Features within Digital Customer
Service
19
4 Configuring Additional Features withinDigital Customer Service
Configuring Cobrowse: ExplainedThis topic describes how to configure Oracle Cobrowse for Digital Customer Service.
Setting Up CobrowseSetting up Oracle Cobrowse is a task that occurs in Oracle Service Cloud. This topic describes what is required from OracleService Cloud, before integrating the Oracle Cobrowse script tag in your Digital Customer Service application.
To set up Oracle Cobrowse:
1. Configure the Oracle Cobrowse offer widget using the Oracle Cobrowse administration UI. For more information,refer to the Configuring the Cobrowse UI in the Cobrowse Deployment and Use Guide.
2. Locate the script tag from the Oracle Cobrowse administration UI. For more information, refer to the ConfiguringYour Company Deployment in the Cobrowse Deployment and Use Guide.
Integrating the Cobrowse Script Tag in your Digital Customer ServiceApplicationBefore integrating Oracle Cobrowse with your Digital Customer Service application you must configure Cobrowse in OracleService Cloud and obtain the script tag.
To integrate the Oracle Cobrowse script tag in your Digital Customer Service application:
1. Open your Digital Customer Service application in the Oracle Visual Builder Cloud Service Page Designer.2. Click the Main Menu.3. Click Application Settings, and select Extensions.4. Click the Theme tab.5. Click the name of the theme that your application is using.
Information about your selected theme is displayed.6. Click the Sources tab.7. In the Resource Browser, navigate to the user/extensions/<theme_id>/theme folder.8. Click the layout.html file.
The contents of the file are displayed following the Resource Browser.9. Paste the Cobrowse <script> tag immediately before the last </div> tag in the layout.html file.
10. Click Save Changes.11. Verify that Oracle Cobrowse is available, by refreshing your browser.
The cobrowse launch point is displayed, as it has been configured.
Related Topics• Cobrowse Deployment and Use Guide
Oracle Engagement CloudImplementing Digital Customer Service
Chapter 4Configuring Additional Features within Digital Customer
Service
20
• Creating a New Digital Customer Service Application: Explained
Associating Content Types with Images: ExplainedThis topic describes how to add and associate an image with a content type.
When you configure your Digital Customer Service application, you might want to associate modified image icons with yourcontent types. By default, the following images are packaged with your Digital Customer Service application:
• FAQ.png
• SOLUTION.png
• KNOWLEDGE.png
The FAQ.png and SOLUTION.png files correspond to content types in Knowledge. The KNOWLEDGE.png file is the defaultimage that is displayed when list sample data is displayed in a list. You cannot add new content types. The content-typefile that is uploaded in this topic must be uploaded in a compressed .zip type file . For example, if you want to upload theFAQ.png, you would have to upload it within a FAQ.zip file.
Note: The optimal size for content type images is 32 x 32 pixels.
To associate an image with a content type:
1. Open your Digital Customer Service application in the Oracle Visual Builder Cloud Service Page Designer.2. Click the Main Menu icon at the top of the editor, and select Application Settings, then Resource Browser.3. In the Resource Browser, navigate to the user/resources/images folder, then contextually-click the content-type
folder, then select Import.
The Import file dialog box appears.4. Add an image, then click Done.
Note: The file must already exist in the folder. The image must be a PNG, and the file name must bethe same name as the capitalized Content Type name. For example, if the Content Type is "FAQ" thefile name must be FAQ.png.
Mapping Roles: ExplainedThis topic describes how to manage role mappings for Digital Customer Service.
If you did not use the Digital Customer Service Reference Implementation template for your deployment, you are required tomap roles to allow the Oracle Visual Builder Cloud Service role to match with the Oracle Engagement Cloud role. Doing thishelps manage roles of users within the Oracle Engagement Cloud and your Digital Customer Service application in a similarway.
When using the Digital Customer Service Reference Implementation template your Digital Customer Service application rolesare automatically mapped to Oracle Engagement Cloud roles that are provisioned in your environment. The process formapping roles described in this topic should be used if there are additional roles that you have defined.
Oracle Engagement CloudImplementing Digital Customer Service
Chapter 4Configuring Additional Features within Digital Customer
Service
21
Mapping a New RoleTo map a new role for Digital Customer Service:
1. Sign in to Oracle Visual Builder Cloud Service.2. Click your application.3. Click the Main menu icon and select Application Settings.4. Click Security.5. In the Roles section, click New Role.6. Enter the Application Role Name.7. In Maps to select the Oracle Engagement Cloud role to which to map.8. (Optional) Enter a description in the Description field.9. Click Create to complete the mapping.
Editing an Existing Role MappingTo edit an existing role mapping for Digital Customer Service:
1. Sign in to Oracle Visual Builder Cloud Service.2. Click your application.3. Click the Main menu icon and select Application Settings.4. Click Security.5. In the Roles section, click the Role mapping menu options menu on the mapping that you want to edit.6. Click Edit.
The Edit Role dialog box appears.7. Modify the Application Role Name.8. Modify the role in the Maps to menu.9. Modify the description in the Description field.
10. Click Save and Close.
Removing an Existing Role MappingTo remove an existing role mapping for Digital Customer Service:
1. Sign in to Oracle Visual Builder Cloud Service.2. Click your application.3. Click the Main menu icon and select Application Settings.4. Click Security.5. In the Roles section, click the Role mapping options icon next to the mapping you want to remove.6. Click Remove.
Creating a Digital Customer Service Icon in OracleEngagement Cloud: ExplainedWhen performing certain actions in the Digital Customer Service application, users are redirected to the Oracle EngagementCloud Dashboard. To facilitate an easier path for your users, Oracle recommends that you provide a Digital Customer Serviceicon within the dashboard.This topic describes how to create a Digital Customer Service icon in Oracle Engagement Cloud.
Oracle Engagement CloudImplementing Digital Customer Service
Chapter 4Configuring Additional Features within Digital Customer
Service
22
Note: If you use a third-party identity management solution with Oracle Engagement Cloud, you must addressthe redirect issues within your deployment.
Follow the procedures in this topic in the stated order to create a Digital Customer Service icon in Oracle Engagement Cloud:
1. Create a New Sandbox2. Create a New Card Icon for Accessing Digital Customer Service3. Validate the Card Icon4. Publish the Sandbox
Create a New SandboxTo create a new sandbox:
1. Sign in to Oracle Engagement Cloud.2. Click the User menu and select Manage Sandboxes.3. Click the + icon (New) to create the new sandbox.4. Select the sandbox created in Step 3.5. Click Set as Active.
Create a New Card Icon for Accessing Digital Customer ServiceTo create a new card icon for accessing Digital Customer Service:
1. Sign in to Oracle Engagement Cloud.
Note: Ensure that your sandbox is set as active.
2. Navigate to the Tools work area and click Structure.3. From the Create menu, select Create Page Entry.4. Enter information for the new card:
◦ Name. Specify DCS.
◦ Icon. Select an icon.
◦ Category. Select Service.
◦ Navigator. Select EL Expression, then select the Edit and paste the following expression:#{!securityContext.userInRole['ORA_PER_EMPLOYEE_ABSTRACT']}
◦ Springboard. Select EL Expression, then select the Edit and paste the following expression:#{!securityContext.userInRole['ORA_PER_EMPLOYEE_ABSTRACT']}
◦ Link Type. Select Static URL.
◦ Destination. Specify the URL for your Digital Customer Service web application.
5. Click Save and Close.
Validate the Card IconTo validate the card icon:
1. Sign in to Oracle Engagement Cloud.2. Click the User menu and select Manage Sandboxes.
Oracle Engagement CloudImplementing Digital Customer Service
Chapter 4Configuring Additional Features within Digital Customer
Service
23
3. Select the sandbox created in the Create a New Sandbox topic.4. Click Set as Active.5. Navigate to the Home page.
The DCS icon appears on the Home page and in the Navigator.
Publish the SandboxTo publish the sandbox:
1. Sign in to Oracle Engagement Cloud as a user with the Sales Administrator job role.2. Click the User menu and select Manage Sandboxes.3. Select the name of the sandbox created in the Create a New Sandbox topic.
The Sandbox Details dialog appears.4. Click Publish.
Related Topics• Using Sandboxes: Explained
About Application Configuration Settings: ExplainedThis topic describes Digital Customer Service application configuration settings.
Digital Customer Service application settings are configured in the config.json file within your Digital Customer Serviceapplication in Oracle Visual Builder Cloud service. This topic describes how to configure settings, followed by descriptions ofthe parameters.
Modifying the Configuration SettingsThis topic describes how to modify configuration settings for your Digital Customer Service application in the Oracle VisualCloud Builder Service. The parameters that are available for configuration are described in the topics that follow.
To modify parameters in the config.json file:
1. Navigate to the Oracle Visual Builder Cloud Service editor.2. Click the Main Menu icon at the top of the editor, and select Application Settings, then Resource Browser.3. In the Resource Browser, navigate to the user/resources folder, then click config.json.4. Configure your parameters.5. Click Save Changes.
About Service Request Linking ConfigurationThis topic describes the config.json parameters related to Service Request linking.
The following parameters are used by the Linked Text component to identify references to Service Requests. In the DigitalCustomer Service Reference Implementation application, the Linked Text component is used to render SR problemdescriptions and message content on the View Service Requests page.
• srIdentifierPrefix Specifies a case-insensitive prefix that identifies SRs in text rendered by the Linked Textcomponent. If not specified in the config.json file, the setting default for this parameter is SR.
Oracle Engagement CloudImplementing Digital Customer Service
Chapter 4Configuring Additional Features within Digital Customer
Service
24
• srIdentifierDigits Specifies the number of digits that must follow the srIdentifierPrefix prefix to define an SR number.Optionally, this number can be separated by any amount of white space. If present, the white space is maintained:no white space is added or removed from the link. If not specified in the config.json file, the setting default for thisparameter is 10.
For example:
{ ... "srIdentifierPrefix": "BUG", "srIdentifierDigits": 8, ...}
In this example, the config.json file has been configured to indicate that the case-insensitive string BUG, must be followed byexactly eight digits. With these settings, any one of the following strings in the data would reference a service request with theidentifier 12345678:
• bug 12345678
• Bug 12345678
• BUG 12345678
About Knowledge Management Article Linking ConfigurationThis topic describes the config.json parameter related to Knowledge Management article linking.
The following parameter is used by the Linked Text component to identify references to Knowledge Articles:
• kmArticlePrefixes Specifies a list of prefixes in JavaScript Object Notation syntax defining an array of strings thatrepresent knowledge article types. If not specified in the config.json file, this setting default is empty: no linking isperformed.
Note: The identifiers in the text must match the Knowledge Management articles IDs exactly. Also, theyare case-sensitive, and there can be no white space between the prefix and digits.
For example:
{ ... "kmArticlePrefixes": ["FAQ", "INFO"], ...}
In this example, the config.json file has been configured in such a way so that FAQ and INFO are defined as prefixes.Consider the following two sentences:
• For more information about this subject, see FAQ13.
• Refer to INFO33 for additional details in the sentence.
Given the values defined for kmArticlePrefixes parameter, in this example FAQ12 and INFO33 are converted into links toKnowledge Management articles with article IDs FAQ12 and INFO33 respectively.
Oracle Engagement CloudImplementing Digital Customer Service
Chapter 4Configuring Additional Features within Digital Customer
Service
25
Configuring Product and Category FilteringThis topic describes the config.json parameters related to configuring flags.
• onlyCSSCategories Specifies the categories to display in your Digital Customer Service application. When set totrue, categories with the CSSFlag set to false in the REST API will not be displayed in the Category Selector.
• onlyCSSProducts Specifies the products to display in your Digital Customer Service application. When set toTRUE, only products with Enable for Customer Self Service set to YES will be displayed in the Product Picker andProduct Selector. When set to FALSE, all products in the Oracle Engagement Cloud Service product catalog aredisplayed.
Configuring Language Defaults in Knowledge ManagementThis topic describes the config.json parameters related to language defaults in Knowledge Management.
This configuration is required when more than one region is supported for the same language, because the default from theconfiguration file is used. Also for the API that retrieves the Knowledge Management locales, a localeId must be provided inthe kmauthtoken, so that value is taken from the configuration file.
Oracle Knowledge Management supports a predetermined set of locales for knowledge searches. If the Accept-Languageheader element of the knowledge search REST request does not match one of the supported locales, an HTTP 400 error isreturned. To prevent this, the locale specified in the Accept-Language header is overridden. This logic that determines theoverride locale is as follows:
1. Query the Server for all the supported locales and cache it.2. Get the locale preference from the Oracle JET locale configuration using oj.Config.getLocale();
Note: Oracle JET determines the locale for locale-sensitive operations in the following order: localespecification in the RequireJS configuration, lang attribute of the HTML tag, navigator.languagebrowser property or navigator.userLanguage Internet Explorer property.
◦ If the locale preference is on the supported locale list, use it.
◦ If the locale preference is not a supported locale, extract the language from it.
3. Search the supported locale list by language. If only one match is found, use it.4. Search kmLanguageDefaults in config.json by language. If a match is found, use it.5. Pick the default locale for any language not on the list and use it.
The kmLanguageDefaults entry in config.json maintains a mapping of language to locale. If an asterisk (*) is specified forlanguage, then it will match any language not specified and map it to a locale.
For example:
"kmLanguageDefaults" : { "en" : "en_US", "zh" : "zh_CN", "*" : "en_US"}
Using this example, if the Oracle JET locale is set to zh_HK and is not on the locales supported by Knowledge Management,then the locale override will be set to zh_CN.

Oracle Engagement CloudImplementing Digital Customer Service
Chapter 4Configuring Additional Features within Digital Customer
Service
26
Post-Configuration Verification Tasks: ExplainedThis topic describes the post-configuration verification tasks recommended after configuring your Digital Customer Serviceapplication. The tasks outlined in this topic, apply only in the following cases
• You created your Digital Customer Service application using the Digital Customer Service Reference Implementationtemplate.
• You created your own Digital Customer Service application using the Starter template and used the componentslisted herein.
Verify the Knowledge Search ComponentTo verify the Knowledge Search component:
1. Sign in to your Digital Customer Service application as an anonymous user.2. Enter the search text for the Knowledge Management articles that have been created.3. Click the Search icon.4. Verify that the search results match the search text.5. Click the Category field to verify the list of categories are displayed.6. Click the Product field to verify the list of products are displayed.7. Sign out.8. Sign in to your Digital Customer Service application as a self-registered user.9. Enter the search text for the Knowledge Management articles that have been created.
10. Click the Search icon.11. Verify that the search results match the search text.12. Click the Category field to verify the list of categories are displayed.13. Click the Product field to verify the list of products are displayed.
Verify the Product Picker ComponentTo verify the Product Picker component is properly configured:
1. Sign in to your Digital Customer Service application as a self-registered user.2. Verify that the Product Picker contains products, as configured in the Oracle Visual Builder Cloud Service designer.3. Verify that the Product Picker displays the image of the product that has been uploaded.4. Click a product in the Product Picker to ensure that you are redirected to the expected Product Details page
Verify the Service Request Creator ComponentTo verify the Service Request Creator component:
1. Sign in to your Digital Customer Service application as a self-registered user.2. Click a product in the Product Picker.3. Click Create Service Request.4. Verify that the Product field contains the product that you selected in Step 2.5. Enter details in the following fields:
◦ Title
Oracle Engagement CloudImplementing Digital Customer Service
Chapter 4Configuring Additional Features within Digital Customer
Service
27
◦ Problem Description
◦ Category
6. Click Submit.7. Verify that a green confirmation message appears.8. Navigate to the Home page.9. Click Create Service Request.
10. Enter details in the following fields:
◦ Title
◦ Problem Description
◦ Product
◦ Category
11. Click Submit.12. Verify that a green confirmation message appears.
Verify the Service Request List ComponentTo verify the Service Request List component:
1. Sign in to your Digital Customer Service application as a self-registered user.2. Verify that the Service Requests list contains the service requests created in the Verify the Service Request Creator
Component task.3. Specify a Filter.4. Verify that the Service Request list returns only SRs that contain the filter in the title.5. Change the Sort By to Reference Number Ascending.6. Verify that the Service Request list is ordered by SR number, where the lowest SR number appears first in the list.
Verify the Edit Service Request Data ComponentTo verify the Edit Service Request Data component:
1. Sign in to your Digital Customer Service application as a self-registered user.2. View an existing SR by selecting it from the Service Requests list.3. Verify that the details of the SR that you selected are displayed as expected.4. Add a message:
a. Enter a message in the Comment field.b. Click Submit.c. Verify that the message you entered is displayed in the list of messages at the bottom of the page.
5. Add a file attachment:
a. Click the File Attachments tab.b. Click Add.c. Choose a file and enter a description.d. Click Upload.e. Verify that the file and its description are listed in the list of file attachments.f. Click the file name.g. Verify that the file is successfully downloaded.
Oracle Engagement CloudImplementing Digital Customer Service
Chapter 4Configuring Additional Features within Digital Customer
Service
28
6. Add a URL attachment:
a. Click the URL Attachments tab.b. Click Add.c. Enter a URL and a description.d. Click Upload.e. Verify that the URL and its description are listed in the list of URL attachments.
7. Escalate the SR:
a. Click Escalate.b. Enter a comment for the escalation.c. Click Save and Escalate.d. Verify that the SR displays an escalated indicator.e. Verify that the escalation comment appears in the list of messages on the Messages tab.
8. Close the SR:
a. Click Closeb. Enter a comment for the SR closure.c. Click Save and Closed. Check that the SR displays a closed status.e. Verify that the closure comment appears in the list of messages on the Messages tab.
Verify the Chat ComponentTo verify the Chat component:
1. Sign in to your Digital Customer Service application as a self-registered user.2. Click the Chat link.3. Fill in the Subject field.
Note: Some user details are prepopulated in form
4. Click Start Chat.5. Verify that the chat connects, and is placed in the queue.
Oracle Engagement CloudImplementing Digital Customer Service
Chapter 5Managing Digital Customer Service Components
29
5 Managing Digital Customer ServiceComponents
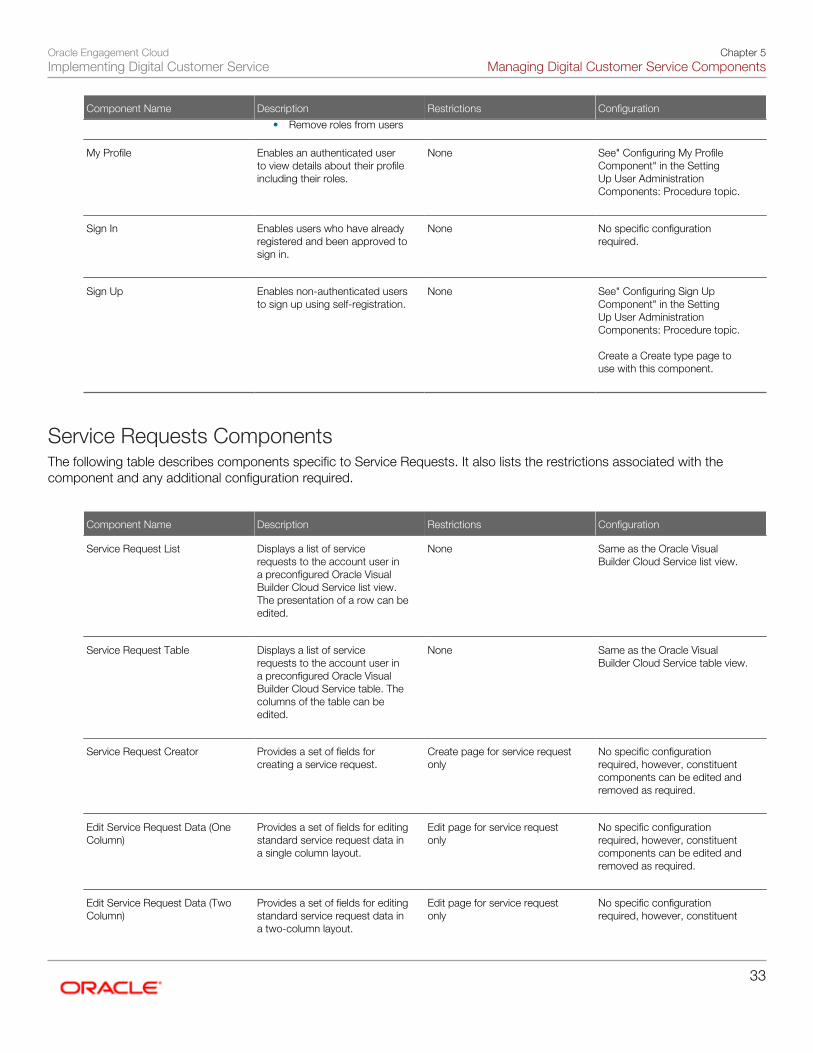
Overview of Digital Customer Service Components:ExplainedThis topic describes the Digital Customer Service components that are available when configuring your application in theOracle Visual Builder Cloud Service.
Product ComponentsThe following table describes components specific to products. It also lists the restrictions associated with the componentand any additional configuration required.
Component Name Description Restrictions Configuration
Product Picker
Enables the account user tonavigate to a product pagewhere they can view knowledgespecific to the product andfile service requests. Thiscomponent displays a selectionof products with associatedimages.
None
For more information, refer to theConfiguring the Product Pickertopic.
Contact Methods ComponentsThe following table describes components specific to contact methods. It also lists the restrictions associated with thecomponent and any additional configuration required.
Component Name Description Restrictions Configuration
Contact Us Displays a series of links that
enables users to communicatewith the business.
Display options include:
• Create ServiceRequest. Creates aservice request.
• Chat. Displays a statusmessage, estimated timeand the disabled state.
• Contact Us. Whenclicked, a new page
None The following properties can be
configured:
• Label• Label Position• Link Text• Link Target• Disabled

Oracle Engagement CloudImplementing Digital Customer Service
Chapter 5Managing Digital Customer Service Components
30
Component Name Description Restrictions Configuration
displays a paragraphthat the designer canconfigure to includephone numbers, emailaddresses, and otherinformation.
Chat
Enables users to initiate a chatrequest and exchange messageswith an agent.
None The following properties can be
configured:
• Link Label• Window Title• Start Chat Label• Send Message Label• Window Width (number +
Relative Absolute)• Window Height (number
+ Relative Absolute)
Knowledge Management ComponentsThe following table describes components specific to knowledge management. It also lists the restrictions associated with thecomponent and any additional configuration required.
Note:
For the Knowledge Management components to run properly, you must first set up authentication for the Knowledge service.For more information, see the "Setting up Authentication for Knowledge Service: Procedure" topic.
Component Name Description Restrictions Configuration
Knowledge Category Selector
Enables users to select acategory by which to filter thesearch results. This componentworks in conjunction with theKnowledge Search Box.
You can only drop theKnowledge Category Selectorcomponent inside of aKnowledge Search Boxcomponent.
None
Knowledge Product Selector
Enables users to select aproduct by which to filter thesearch results. This componentworks in conjunction with theKnowledge Search Box.
You can only drop theKnowledge Category Selectorcomponent inside of aKnowledge Search Boxcomponent.
None
Knowledge Article Icon
Displays an image next to aknowledge article in a searchresult list. Different images canbe associated with differentknowledge content types.
The Knowledge Article Iconcomponent can only be droppedinside a Knowledge Article Listcomponent or a KnowledgeSearch Result List component.
None
Knowledge Search Result List
Enables users to enter searchterms and view the resultinglist of knowledge articles.Users can optionally filter the
None
If you want the knowledge articletitles to be in bold, use thefollowing styling in the src/ri/
Oracle Engagement CloudImplementing Digital Customer Service
Chapter 5Managing Digital Customer Service Components
31
Component Name Description Restrictions Configuration
results by product or category.This component consistsof a search box, a categoryselector, a product selector anda knowledge article list.
public_ html/ repository/ user/resources/ applicationCSS file: /* Make the knowledge resultlist titles bold in the KnowledgeSearch page*/ div[data-view-id="list-71849101"] a. oj-label-inline{ font-weight: bold !important;
Knowledge Article List
Displays a list of knowledgearticles resulting from a search.
This component can be droppedon any page, however theintended use was to put it inthe Product page and to havethe query product be a functionexpression to the productdescription.
Configuration is required fordata to appear in the list. In theProperty Inspector under theData tab, you must edit theDefault Query to set one of thefollowing:
• Question• Category ID• Product ID
Note: When usingthe Default Queryon the KnowledgeArticle List, thecategory andproduct filters usethe category IDand product IDrespectively, and notthe category nameor product name.
For example, if you dropthe Knowledge Article Listcomponent on the Productpage:
1. In the Edit DefaultQuery dialog box, selectthe Expression functiontype.
2. In Available Fields,under the Local tab,select Item Description.
3. Click OK and then clickthe check mark to savethe query.
If you want the knowledgearticle titles to be in bold, usethe following styling in the src/ri/public_html/repository/user/resources/application.css file:
/* Make the knowledgeresult list titles boldin the Knowledge Search
Oracle Engagement CloudImplementing Digital Customer Service
Chapter 5Managing Digital Customer Service Components
32
Component Name Description Restrictions Configuration
page*/ div[data-view-id="list-71849101"]a.oj-label-inline{ font-weight: bold !important;
Knowledge Article Detail
Displays the details of a singleknowledge article.
The Knowledge Article Detailcomponent can only be droppedon the Answer page.
None
Knowledge Search Box Defines a simple text entry
search field which collaborateswith a search results componentto display a list of knowledgearticles associated with theentered text. This componentconsists of a text entry field, asearch button, a KnowledgeProduct Selector and aKnowledge CategorySelector.
When submitting a query, searchterms are required. When dropping the search boxcomponent, at least one pagemust contain a KnowledgeArticle List or Knowledge SearchResult List to display the resultswhen the query is submitted.
When dropping this component,a dialog box appears askingusers to select the page wherethey want to display the answersto the search query. Users mustselect a page with a KnowledgeArticle List or Knowledge SearchResult List. If the component is beingdropped on a page that hasa Knowledge Article List orKnowledge Search Result List,then the dialog box does notappear, because the results arebeing shown on that page.
User Administration ComponentsThe following table describes components specific to user administration. It also lists the restrictions associated with thecomponent and any additional configuration required.
Note:
You must set up User Administration components as specified in the "Setting Up User Administration Components:Procedure" topic.
Component Name Description Restrictions Configuration
Registration Requests Enables the Customer Self-
Service Administrator to:
• List registration requests.• Approve or reject a user
account self-registrationrequest.
When added to an application,only users with the CustomerSelf-Service AccountAdministrator role can see thiscomponent in the application.
See "Configuring RegistrationRequests Component" in theSetting Up User AdministrationComponents: Procedure topic. Create a Landing type page touse with this component.
Self-Service Users Enables the Customer Self-
Service Account Administratorto:
• Find one or more usersand their roles
• Assign roles to users
When added to an application,only users with the CustomerSelf-Service AccountAdministrator role can see thiscomponent in the application.
See" Configuring Self-ServiceUsers Component" in theSetting Up User AdministrationComponents: Procedure topic. Create a Landing type page touse with this component.
Oracle Engagement CloudImplementing Digital Customer Service
Chapter 5Managing Digital Customer Service Components
33
Component Name Description Restrictions Configuration
• Remove roles from users
My Profile
Enables an authenticated userto view details about their profileincluding their roles.
None
See" Configuring My ProfileComponent" in the SettingUp User AdministrationComponents: Procedure topic.
Sign In
Enables users who have alreadyregistered and been approved tosign in.
None
No specific configurationrequired.
Sign Up
Enables non-authenticated usersto sign up using self-registration.
None
See" Configuring Sign UpComponent" in the SettingUp User AdministrationComponents: Procedure topic. Create a Create type page touse with this component.
Service Requests ComponentsThe following table describes components specific to Service Requests. It also lists the restrictions associated with thecomponent and any additional configuration required.
Component Name Description Restrictions Configuration
Service Request List
Displays a list of servicerequests to the account user ina preconfigured Oracle VisualBuilder Cloud Service list view.The presentation of a row can beedited.
None
Same as the Oracle VisualBuilder Cloud Service list view.
Service Request Table
Displays a list of servicerequests to the account user ina preconfigured Oracle VisualBuilder Cloud Service table. Thecolumns of the table can beedited.
None
Same as the Oracle VisualBuilder Cloud Service table view.
Service Request Creator
Provides a set of fields forcreating a service request.
Create page for service requestonly
No specific configurationrequired, however, constituentcomponents can be edited andremoved as required.
Edit Service Request Data (OneColumn)
Provides a set of fields for editingstandard service request data ina single column layout.
Edit page for service requestonly
No specific configurationrequired, however, constituentcomponents can be edited andremoved as required.
Edit Service Request Data (TwoColumn)
Provides a set of fields for editingstandard service request data ina two-column layout.
Edit page for service requestonly
No specific configurationrequired, however, constituent
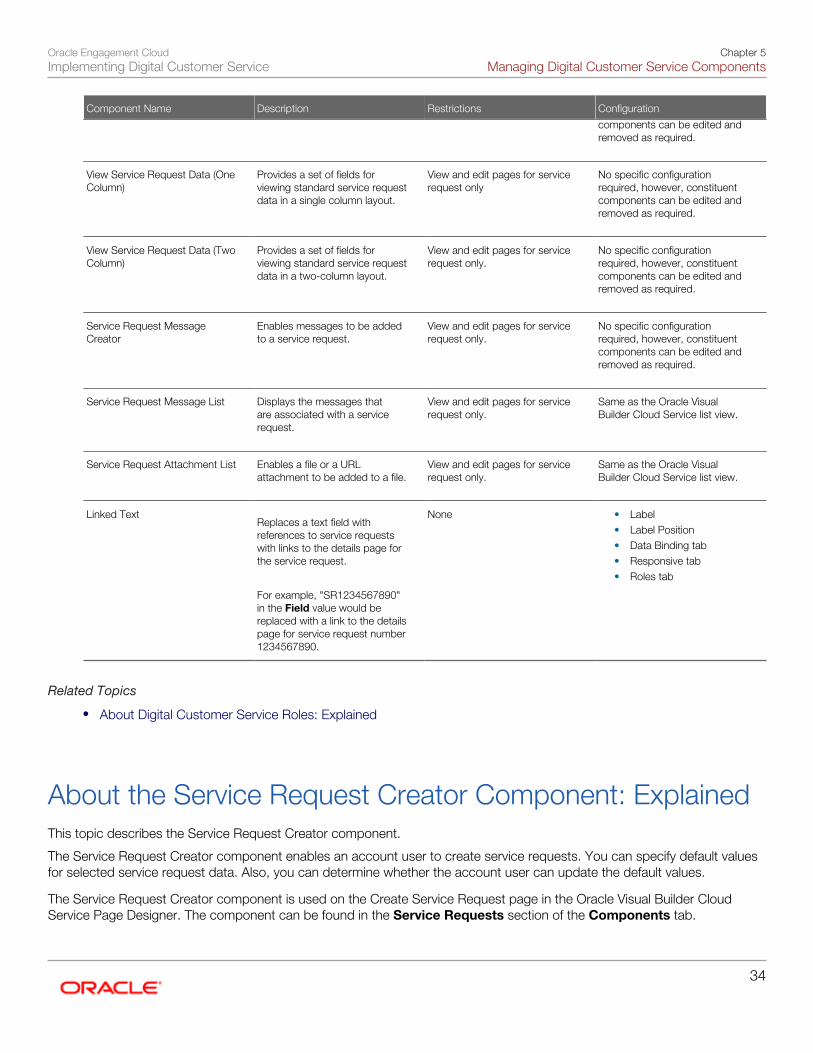
Oracle Engagement CloudImplementing Digital Customer Service
Chapter 5Managing Digital Customer Service Components
34
Component Name Description Restrictions Configuration
components can be edited andremoved as required.
View Service Request Data (OneColumn)
Provides a set of fields forviewing standard service requestdata in a single column layout.
View and edit pages for servicerequest only
No specific configurationrequired, however, constituentcomponents can be edited andremoved as required.
View Service Request Data (TwoColumn)
Provides a set of fields forviewing standard service requestdata in a two-column layout.
View and edit pages for servicerequest only.
No specific configurationrequired, however, constituentcomponents can be edited andremoved as required.
Service Request MessageCreator
Enables messages to be addedto a service request.
View and edit pages for servicerequest only.
No specific configurationrequired, however, constituentcomponents can be edited andremoved as required.
Service Request Message List
Displays the messages thatare associated with a servicerequest.
View and edit pages for servicerequest only.
Same as the Oracle VisualBuilder Cloud Service list view.
Service Request Attachment List
Enables a file or a URLattachment to be added to a file.
View and edit pages for servicerequest only.
Same as the Oracle VisualBuilder Cloud Service list view.
Linked Text Replaces a text field with
references to service requestswith links to the details page forthe service request.
For example, "SR1234567890"in the Field value would bereplaced with a link to the detailspage for service request number1234567890.
None
• Label• Label Position• Data Binding tab• Responsive tab• Roles tab
Related Topics
• About Digital Customer Service Roles: Explained
About the Service Request Creator Component: ExplainedThis topic describes the Service Request Creator component.
The Service Request Creator component enables an account user to create service requests. You can specify default valuesfor selected service request data. Also, you can determine whether the account user can update the default values.
The Service Request Creator component is used on the Create Service Request page in the Oracle Visual Builder CloudService Page Designer. The component can be found in the Service Requests section of the Components tab.
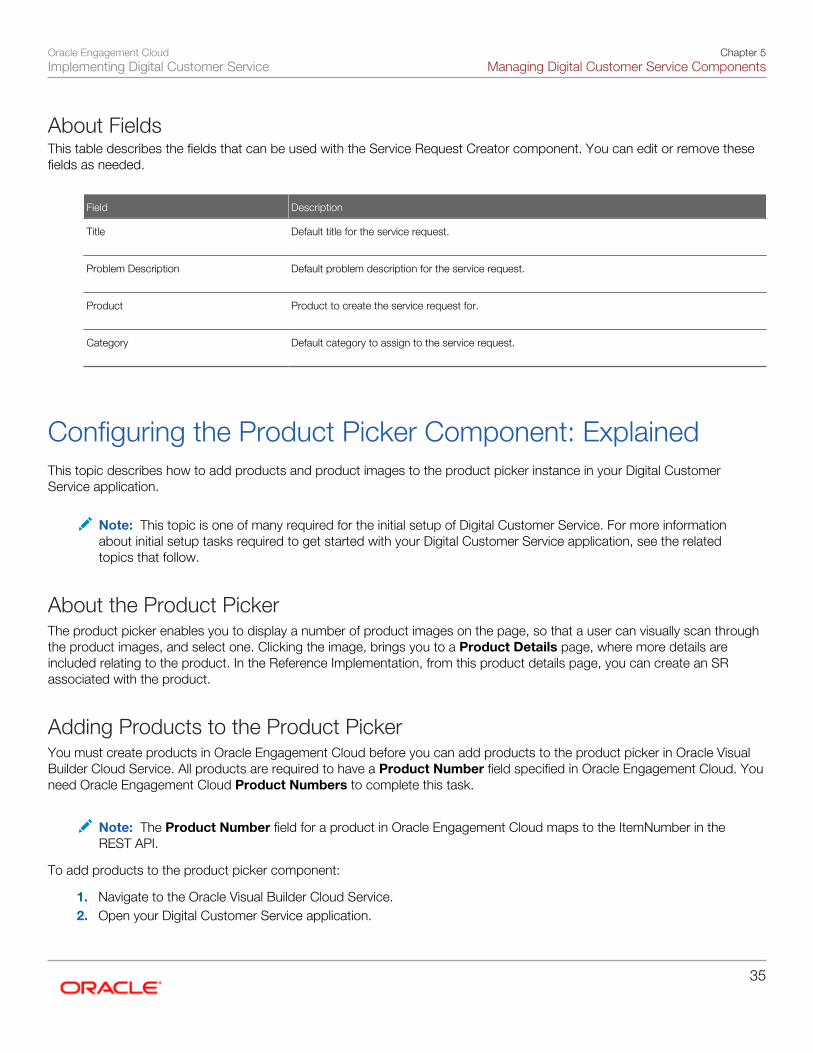
Oracle Engagement CloudImplementing Digital Customer Service
Chapter 5Managing Digital Customer Service Components
35
About FieldsThis table describes the fields that can be used with the Service Request Creator component. You can edit or remove thesefields as needed.
Field Description
Title
Default title for the service request.
Problem Description
Default problem description for the service request.
Product
Product to create the service request for.
Category
Default category to assign to the service request.
Configuring the Product Picker Component: ExplainedThis topic describes how to add products and product images to the product picker instance in your Digital CustomerService application.
Note: This topic is one of many required for the initial setup of Digital Customer Service. For more informationabout initial setup tasks required to get started with your Digital Customer Service application, see the relatedtopics that follow.
About the Product PickerThe product picker enables you to display a number of product images on the page, so that a user can visually scan throughthe product images, and select one. Clicking the image, brings you to a Product Details page, where more details areincluded relating to the product. In the Reference Implementation, from this product details page, you can create an SRassociated with the product.
Adding Products to the Product PickerYou must create products in Oracle Engagement Cloud before you can add products to the product picker in Oracle VisualBuilder Cloud Service. All products are required to have a Product Number field specified in Oracle Engagement Cloud. Youneed Oracle Engagement Cloud Product Numbers to complete this task.
Note: The Product Number field for a product in Oracle Engagement Cloud maps to the ItemNumber in theREST API.
To add products to the product picker component:
1. Navigate to the Oracle Visual Builder Cloud Service.2. Open your Digital Customer Service application.
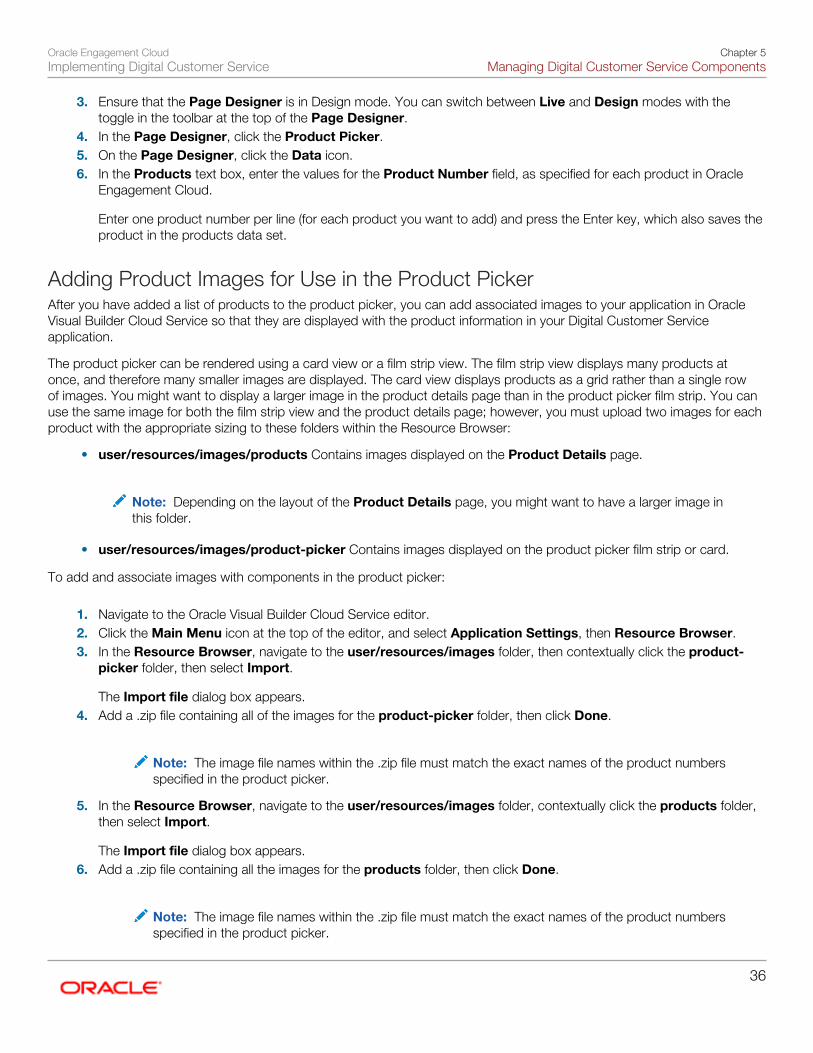
Oracle Engagement CloudImplementing Digital Customer Service
Chapter 5Managing Digital Customer Service Components
36
3. Ensure that the Page Designer is in Design mode. You can switch between Live and Design modes with thetoggle in the toolbar at the top of the Page Designer.
4. In the Page Designer, click the Product Picker.5. On the Page Designer, click the Data icon.6. In the Products text box, enter the values for the Product Number field, as specified for each product in Oracle
Engagement Cloud.
Enter one product number per line (for each product you want to add) and press the Enter key, which also saves theproduct in the products data set.
Adding Product Images for Use in the Product PickerAfter you have added a list of products to the product picker, you can add associated images to your application in OracleVisual Builder Cloud Service so that they are displayed with the product information in your Digital Customer Serviceapplication.
The product picker can be rendered using a card view or a film strip view. The film strip view displays many products atonce, and therefore many smaller images are displayed. The card view displays products as a grid rather than a single rowof images. You might want to display a larger image in the product details page than in the product picker film strip. You canuse the same image for both the film strip view and the product details page; however, you must upload two images for eachproduct with the appropriate sizing to these folders within the Resource Browser:
• user/resources/images/products Contains images displayed on the Product Details page.
Note: Depending on the layout of the Product Details page, you might want to have a larger image inthis folder.
• user/resources/images/product-picker Contains images displayed on the product picker film strip or card.
To add and associate images with components in the product picker:
1. Navigate to the Oracle Visual Builder Cloud Service editor.2. Click the Main Menu icon at the top of the editor, and select Application Settings, then Resource Browser.3. In the Resource Browser, navigate to the user/resources/images folder, then contextually click the product-
picker folder, then select Import.
The Import file dialog box appears.4. Add a .zip file containing all of the images for the product-picker folder, then click Done.
Note: The image file names within the .zip file must match the exact names of the product numbersspecified in the product picker.
5. In the Resource Browser, navigate to the user/resources/images folder, contextually click the products folder,then select Import.
The Import file dialog box appears.6. Add a .zip file containing all the images for the products folder, then click Done.
Note: The image file names within the .zip file must match the exact names of the product numbersspecified in the product picker.
Oracle Engagement CloudImplementing Digital Customer Service
Chapter 5Managing Digital Customer Service Components
37
Related Topics
• About Initial Digital Customer Service Setup: Explained
Setting Up User Administration Components: ProcedureTo set up User Administration Components, perform the tasks in this topic.
The tasks outlined in this topic apply only to deployments where your Digital Customer Service application has been createdusing the Starter template.
Configuring Self-Service Users ComponentYou must set up the Manage Users and Add Roles pages to use the Self-Service Users component. To configure thiscomponent, perform the following tasks:
1. Rename the Self-Service Role business object:
a. On the Data Designer page, select Business Objects.b. From the list of business objects, expand Self-Service User, select the child Self-Service Role business
object.c. Update the value of the Plural Label field to Self-Service Roles by User.d. Update the value of the Singular Label field to Self-Service Role by User.e. Click Save.f. Verify that the business object name is updated.
2. Navigate to the Page Designer.3. Click New Page to create a new page. The Create Page page is displayed.
a. In the Page Title field, enter Self-Service Users.b. From the Page Type list, select Landing.c. Click Create.
The Self-Service Users page is displayed.4. From the User Administration category in the Components palette, drag-and-drop the Self-Service Users
component onto the newly created Self-Service Users page.5. Select the Self-Service User page from the menu with list of available pages.6. Switch the application to the Design mode.7. Click the page header, then in the Property Inspector pane, update the value for the Page Header text box to the
following string:
Manage Self-Service User
8. From the Common category in the Components palette, drag-and-drop the Paragraph component at under theheader.
9. Click the Paragraph field,, then in the Property Inspector pane, enter the following in the Text field:
Removing the User role causes the removal of all privileges. The user will no longer be able to use Customer Self-Service and will need to reregister to access the application again. Remove all other roles before removing the User role.
Oracle Engagement CloudImplementing Digital Customer Service
Chapter 5Managing Digital Customer Service Components
38
10. From the Collection category in the Components palette, drag-and-drop the Table component under the userfields. The Table Creation pane is enabled.
a. On the Data tab of the Property Inspector pane, select Self-Service Role by User to bind the table to theself-service role.
b. On the Mapping tab, select the Account ID, Contact ID, and Relationship Type fields, and move them tothe Selected list.
c. Click the next arrow.d. On the Object Actions tab, disable Details by selecting Off.e. Click Finish.
11. Select the table after the table component is created.12. In the Property Inspector pane, click the Responsive icon, and then deselect Account ID and Contact ID.13. Repeat the previous step for each display mode from the Set Properties For list.14. Click the Create button, then in the Properties tab of the Property Inspector pane, rename it to the following
string:
Add Role
15. Click the Actions tab.16. Click Edit and perform the following tasks:
a. Click the Show JavaScript button, and save the generated code on the page.b. Click the Show Recipe button, and remove all default actions.c. In the tab area, expand Other Scripting.d. Drag-and-drop Custom JavaScript Code to the first line under the When the user pressed the Add Role
component.e. Click Edit Custom Code.f. Use the following code as a guideline for what must be added:
Note:
Ensure that you modify the page name, archetype name, and entity name, to reflect the code that you savedin the first step.
return Abcs.Pages().navigateToPage('createcom_oracle_abcs_fa_sr_selfServiceUsers_SelfServiceRolesPage', ContextualData.createStartWithBlankRecordContext({entityId: 'com.oracle.abcs.fa.sr.selfServiceUsers.SelfServiceRoles', data: new Record({ AccountPartyId : $selfServiceUsers.getValue('AccountPartyId'), ContactPartyId : $selfServiceUsers.getValue('ContactPartyId'), ref2selfServiceUsers: self.Observables.com_oracle_abcs_fa_sr_selfServiceUsersEntityDetailArchetype.item._breeze_system_id() })}))
g. Remove the following string from the code pasted in the previous step:
$selfServiceUsers.getValue('AccountPartyId')
h. Select the Account ID field under Self-Service User Fields.i. Remove the following string from the code pasted in the previous step:
$selfServiceUsers.getValue('ContactPartyId')
Oracle Engagement CloudImplementing Digital Customer Service
Chapter 5Managing Digital Customer Service Components
39
j. Select the Contact ID field under Self-Service User Fields.k. Click Save.l. Enter a Description, and then click Done.
17. Switch the application to the Live mode.18. Click Add Role.19. Switch the application to the Designer mode.20. Click the page title, then in the Property Inspector pane, update the value for the Text text box to the following
string:
Add Self-Service Role
21. Delete the Account ID and Contact ID fields.22. Click the Data tab on the palette.23. Drag-and-drop the Relationship Type field onto the page.24. Click the Relationship Type field, then in the Property Inspector pane, update the value for the Label text box to
the following string:
Role
25. Click Save and Close on the pages.26. In the Property Inspector pane, click the Actions tab.27. Click Edit and do the following:
a. Click the Show JavaScript button, and save the generated code on the page.b. Click the Show Recipe button, and remove all default actions.c. In the tab area, expand Other Scripting.d. Drag and drop Custom JavaScript Code to the first line under the When the user presses the Save and
Close component.e. Click Edit Custom Code.f. Use the following code as a guideline for what must be added:
Note:
Ensure that you modify the page name, archetype name, and entity name, to reflect the code that you savedin the first step.
self.Archetypes.com_oracle_abcs_fa_sr_selfServiceUsers_SelfServiceRolesEntityDetailArchetype.save(self.Archetypes.com_oracle_abcs_fa_sr_selfServiceUsers_SelfServiceRolesEntityDetailArchetype.getRecord()).then(function(saveOneRecordSuccessResult) { return Abcs.Pages().returnToPage(self.navigationContext.getPreviousPageId(), ContextualData.createRecordWasChangedContext({entityId: 'com.oracle.abcs.fa.sr.selfServiceUsers.SelfServiceRoles', data: saveOneRecordSuccessResult})).then(function() { return Promise.resolve(Abcs.UI().showNotification(Abcs.UI().Notification.create({ message: 'Role Created', level: Abcs.UI().Notification.Level.SUCCESS }))).then(function () {}); }); }).catch(function(errorResult) { var errmsg = errorResult.getMessage ? errorResult.getMessage() : errorResult.message; if (errmsg === undefined){ return Promise.resolve(Abcs.UI().showNotification(Abcs.UI().Notification.create({ message: "Error: " + (errorResult.getMessage ? errorResult.getMessage() : errorResult.message), level: Abcs.UI().Notification.Level.ERROR }))); } else {
Oracle Engagement CloudImplementing Digital Customer Service
Chapter 5Managing Digital Customer Service Components
40
var msg = errmsg; console.log("*****************************"); console.log(msg); console.log("*****************************"); Abcs.UI().showNotification(Abcs.UI().Notification.create({ message: AbcsLib.i18n('businesscode.errorWithoutCode', msg), level: Abcs.UI().Notification.Level.ERROR })) } }).then(resolve);
g. Click Save.h. Enter a Description, and then click Done.
Configuring Registration Requests ComponentTo configure this component, perform the following tasks:
1. On the Page Designer page, click New Page to create a new page. The Create Page page is displayed.2. In the Page Title field, enter the name of the page you are creating.3. From the Page Type list, select Landing.4. Click Create.5. From the User Administration category in the Components palette, drag-and-drop the Registration Requests
component.6. Select the Self-Service Registration page from the list of available pages menu.7. Rearrange the fields in the order you want.8. Rename Account Name to Account.9. Delete the Reason field, and replace it with a multiline field:
a. From the Component palette, select Text Area from the Field section, and drop it on the page.
A dialog box is displayed. Enter the following:b. Enter Reason in the Label field.
Note: You can change the single line text to a text area if more space is required for entering theReason.
c. Select Self-Service Registration under Business Object.d. Select Existing for the Business Object field.e. Select StatusMsg for the Field ID field.f. Click Save.g. In the Property Inspector pane, change the Number of rows field to the Number of rows you would like
displayed for the reason field.10. Switch the application to the Live mode.11. Select the Edit Self-Service User page from the list of available pages menu.12. Click a user, then click the Action menu associated with that user and click Edit13. Switch the application to the Design mode.14. On the Edit Self-Service Registration page, delete the Last Updated Date field.15. Rename Account Name to Account.16. In the Property Inspector pane, select the Read-only check box for the Name and Email fields.17. Rearrange the fields in the order you want.18. Delete the Reason field.19. From the Component palette, select Text Area from the Field section, and drop it on the page.
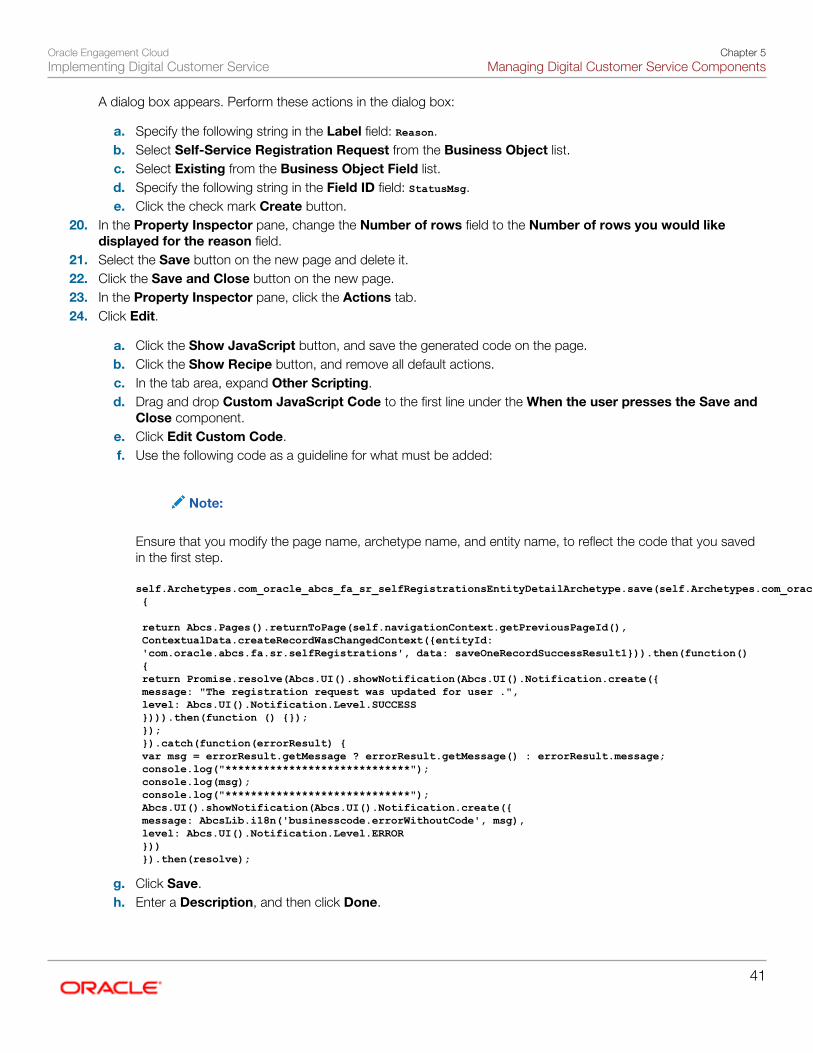
Oracle Engagement CloudImplementing Digital Customer Service
Chapter 5Managing Digital Customer Service Components
41
A dialog box appears. Perform these actions in the dialog box:
a. Specify the following string in the Label field: Reason.b. Select Self-Service Registration Request from the Business Object list.c. Select Existing from the Business Object Field list.d. Specify the following string in the Field ID field: StatusMsg.e. Click the check mark Create button.
20. In the Property Inspector pane, change the Number of rows field to the Number of rows you would likedisplayed for the reason field.
21. Select the Save button on the new page and delete it.22. Click the Save and Close button on the new page.23. In the Property Inspector pane, click the Actions tab.24. Click Edit.
a. Click the Show JavaScript button, and save the generated code on the page.b. Click the Show Recipe button, and remove all default actions.c. In the tab area, expand Other Scripting.d. Drag and drop Custom JavaScript Code to the first line under the When the user presses the Save and
Close component.e. Click Edit Custom Code.f. Use the following code as a guideline for what must be added:
Note:
Ensure that you modify the page name, archetype name, and entity name, to reflect the code that you savedin the first step.
self.Archetypes.com_oracle_abcs_fa_sr_selfRegistrationsEntityDetailArchetype.save(self.Archetypes.com_oracle_abcs_fa_sr_selfRegistrationsEntityDetailArchetype.getRecord()).then(function(saveOneRecordSuccessResult1) { return Abcs.Pages().returnToPage(self.navigationContext.getPreviousPageId(), ContextualData.createRecordWasChangedContext({entityId: 'com.oracle.abcs.fa.sr.selfRegistrations', data: saveOneRecordSuccessResult1})).then(function() { return Promise.resolve(Abcs.UI().showNotification(Abcs.UI().Notification.create({ message: "The registration request was updated for user .", level: Abcs.UI().Notification.Level.SUCCESS }))).then(function () {}); }); }).catch(function(errorResult) { var msg = errorResult.getMessage ? errorResult.getMessage() : errorResult.message; console.log("*****************************"); console.log(msg); console.log("*****************************"); Abcs.UI().showNotification(Abcs.UI().Notification.create({ message: AbcsLib.i18n('businesscode.errorWithoutCode', msg), level: Abcs.UI().Notification.Level.ERROR })) }).then(resolve);
g. Click Save.h. Enter a Description, and then click Done.
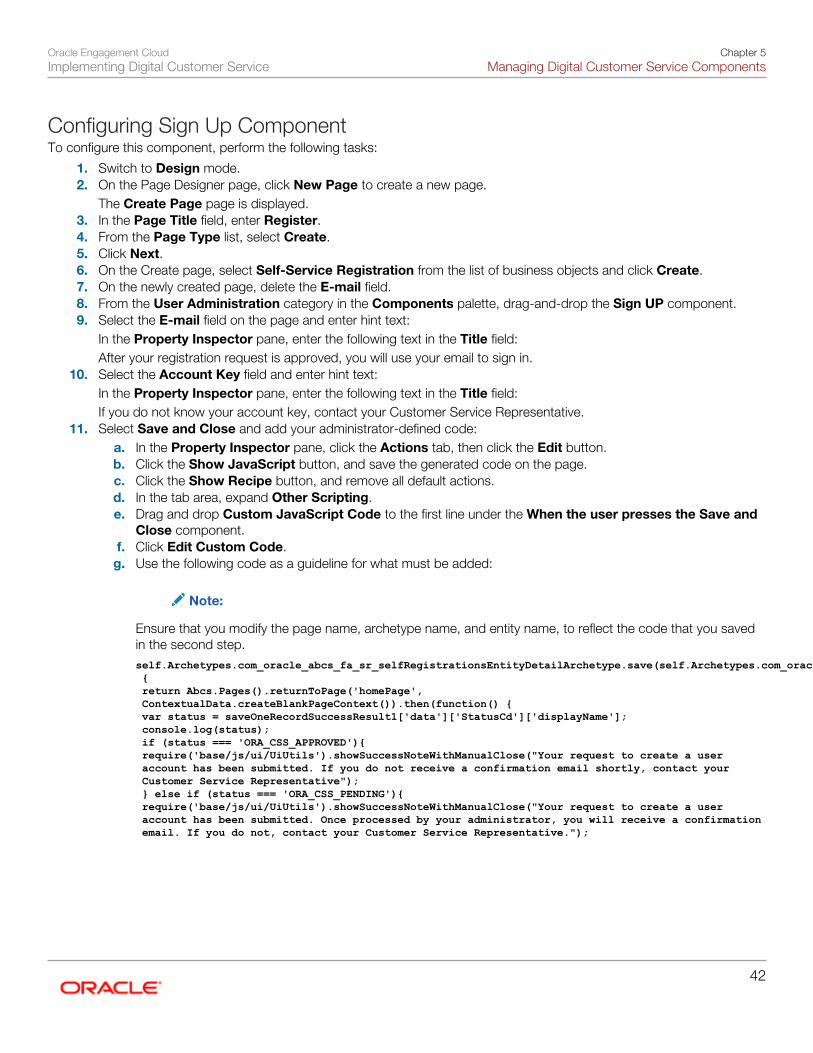
Oracle Engagement CloudImplementing Digital Customer Service
Chapter 5Managing Digital Customer Service Components
42
Configuring Sign Up ComponentTo configure this component, perform the following tasks:
1. Switch to Design mode.2. On the Page Designer page, click New Page to create a new page.
The Create Page page is displayed.3. In the Page Title field, enter Register.4. From the Page Type list, select Create.5. Click Next.6. On the Create page, select Self-Service Registration from the list of business objects and click Create.7. On the newly created page, delete the E-mail field.8. From the User Administration category in the Components palette, drag-and-drop the Sign UP component.9. Select the E-mail field on the page and enter hint text:
In the Property Inspector pane, enter the following text in the Title field:After your registration request is approved, you will use your email to sign in.
10. Select the Account Key field and enter hint text:In the Property Inspector pane, enter the following text in the Title field:If you do not know your account key, contact your Customer Service Representative.
11. Select Save and Close and add your administrator-defined code:a. In the Property Inspector pane, click the Actions tab, then click the Edit button.b. Click the Show JavaScript button, and save the generated code on the page.c. Click the Show Recipe button, and remove all default actions.d. In the tab area, expand Other Scripting.e. Drag and drop Custom JavaScript Code to the first line under the When the user presses the Save and
Close component.f. Click Edit Custom Code.g. Use the following code as a guideline for what must be added:
Note:
Ensure that you modify the page name, archetype name, and entity name, to reflect the code that you savedin the second step.self.Archetypes.com_oracle_abcs_fa_sr_selfRegistrationsEntityDetailArchetype.save(self.Archetypes.com_oracle_abcs_fa_sr_selfRegistrationsEntityDetailArchetype.getRecord()).then(function(saveOneRecordSuccessResult1) { return Abcs.Pages().returnToPage('homePage', ContextualData.createBlankPageContext()).then(function() { var status = saveOneRecordSuccessResult1['data']['StatusCd']['displayName']; console.log(status); if (status === 'ORA_CSS_APPROVED'){ require('base/js/ui/UiUtils').showSuccessNoteWithManualClose("Your request to create a user account has been submitted. If you do not receive a confirmation email shortly, contact your Customer Service Representative"); } else if (status === 'ORA_CSS_PENDING'){ require('base/js/ui/UiUtils').showSuccessNoteWithManualClose("Your request to create a user account has been submitted. Once processed by your administrator, you will receive a confirmation email. If you do not, contact your Customer Service Representative.");
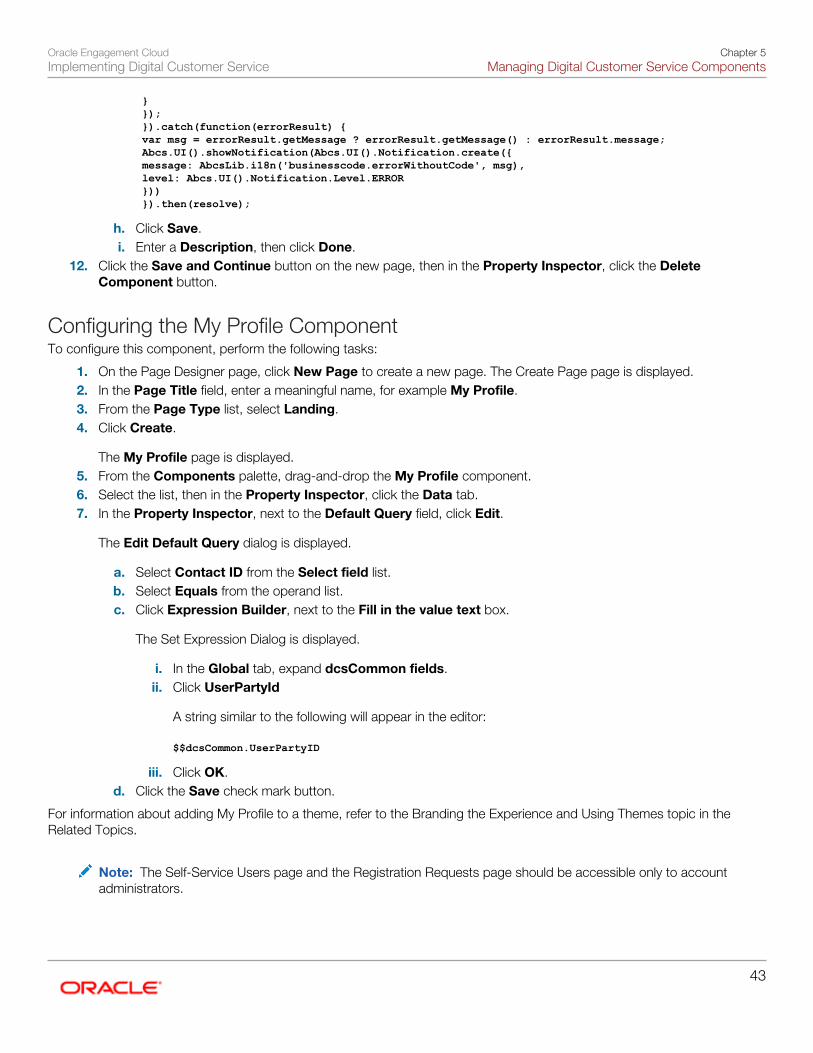
Oracle Engagement CloudImplementing Digital Customer Service
Chapter 5Managing Digital Customer Service Components
43
} }); }).catch(function(errorResult) { var msg = errorResult.getMessage ? errorResult.getMessage() : errorResult.message; Abcs.UI().showNotification(Abcs.UI().Notification.create({ message: AbcsLib.i18n('businesscode.errorWithoutCode', msg), level: Abcs.UI().Notification.Level.ERROR })) }).then(resolve);
h. Click Save.i. Enter a Description, then click Done.
12. Click the Save and Continue button on the new page, then in the Property Inspector, click the DeleteComponent button.
Configuring the My Profile ComponentTo configure this component, perform the following tasks:
1. On the Page Designer page, click New Page to create a new page. The Create Page page is displayed.2. In the Page Title field, enter a meaningful name, for example My Profile.3. From the Page Type list, select Landing.4. Click Create.
The My Profile page is displayed.5. From the Components palette, drag-and-drop the My Profile component.6. Select the list, then in the Property Inspector, click the Data tab.7. In the Property Inspector, next to the Default Query field, click Edit.
The Edit Default Query dialog is displayed.
a. Select Contact ID from the Select field list.b. Select Equals from the operand list.c. Click Expression Builder, next to the Fill in the value text box.
The Set Expression Dialog is displayed.
i. In the Global tab, expand dcsCommon fields.ii. Click UserPartyId
A string similar to the following will appear in the editor:
$$dcsCommon.UserPartyID
iii. Click OK.d. Click the Save check mark button.
For information about adding My Profile to a theme, refer to the Branding the Experience and Using Themes topic in theRelated Topics.
Note: The Self-Service Users page and the Registration Requests page should be accessible only to accountadministrators.
Oracle Engagement CloudImplementing Digital Customer Service
Chapter 5Managing Digital Customer Service Components
44
Mapping PagesTo map the pages:
1. Open your Digital Customer Service application in the Oracle Visual Builder Cloud Service.2. Click the Main menu icon, select Application Settings, and then select Security.3. Under Pages, determine which user can access each page.
a. For each page, determine if authentication is required.b. For any page for which authentication is required, select the role that is required to access the page.
• Select User if all authenticated users can access the page.• Select Account Administrator if only account administrators can access the page.
Related Topics
• Setting Up Administrators and Developers: Explained
• Branding the Experience and Using Themes: Explained

Oracle Engagement CloudImplementing Digital Customer Service
Chapter 6Configuring Common Use Cases with Digital Customer
Service
45
6 Configuring Common Use Cases with DigitalCustomer Service
Securing Digital Customer Service
Adding Oracle Visual Builder Cloud Service Links for Password Reset:ExplainedIn your Digital Customer Service application, the My Profile component contains a Change Password link. Because thevalue that is required in the field is dependent on your Oracle Engagement Cloud deployment, by default the link value isempty. For this link to work for users, you must obtain the URL from your deployment of Oracle Engagement Cloud, and thenspecify the URL in your Digital Customer Service application. This topic describes how to obtain the URL, and then add it toyour Digital Customer Service application in Oracle Visual Builder Cloud Service.
Note: The production Oracle Engagement Cloud URL and staged Oracle Engagement Cloud URL are different.Use the production Oracle Engagement Cloud URL for the tasks in this topic.
Obtaining the Change Password Link from Oracle Engagement Cloud
To obtain the Change Password link from Oracle Engagement Cloud:
1. Sign in to Oracle Engagement Cloud as a Digital Customer Service user.2. Click the User menu and select Set Preferences.3. Click the Password link.
The password reset view appears.4. In your browser, select the entire URL.5. Copy the URL.
Specify the Change Password Link in Your Digital Customer Service ApplicationTo specify the Change Password link in your Digital Customer Service:
1. Navigate to the Oracle Visual Builder Cloud Service.2. Open your Digital Customer Service application. Ensure that the Page Designer is in Design mode.
Note: You can switch between Live and Design modes with the toggle in the toolbar in the PageDesigner.
3. In the Page Designer, click the My Profile component.4. On the Page Designer, click the Password field.5. In the Properties tab, paste the Change Password URL that you copied in Oracle Engagement Cloud into the Link
Target field.6. Save your changes.
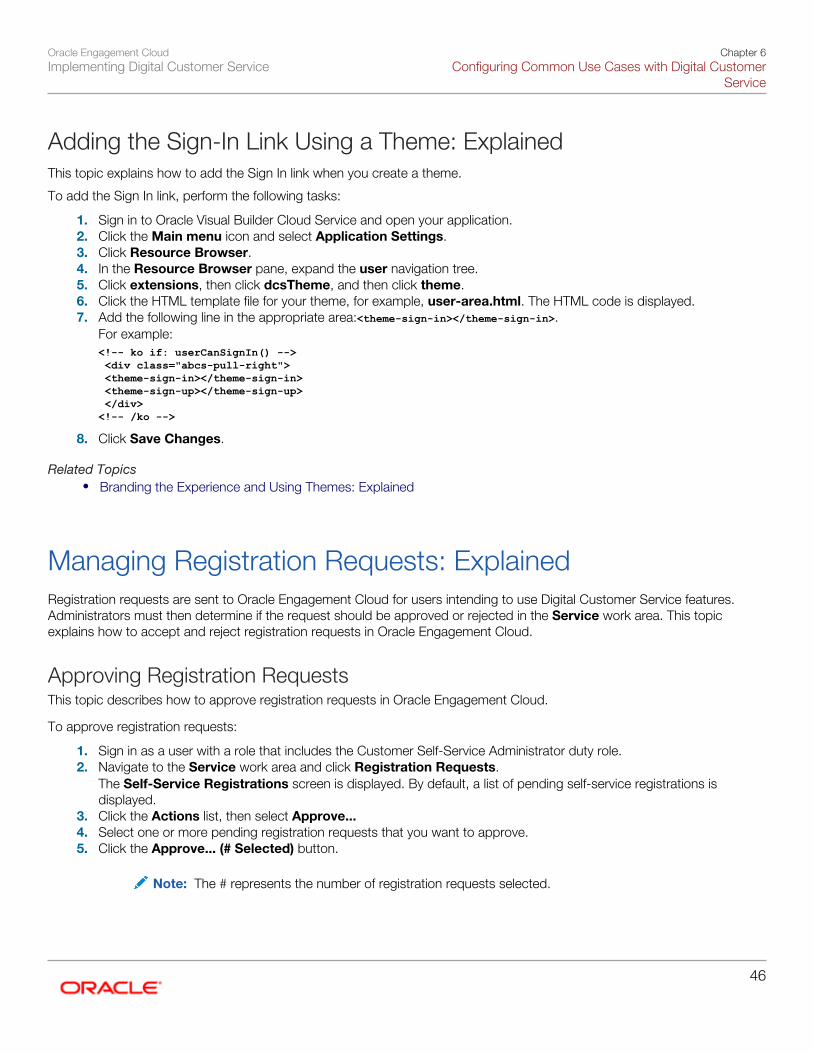
Oracle Engagement CloudImplementing Digital Customer Service
Chapter 6Configuring Common Use Cases with Digital Customer
Service
46
Adding the Sign-In Link Using a Theme: ExplainedThis topic explains how to add the Sign In link when you create a theme.
To add the Sign In link, perform the following tasks:
1. Sign in to Oracle Visual Builder Cloud Service and open your application.2. Click the Main menu icon and select Application Settings.3. Click Resource Browser.4. In the Resource Browser pane, expand the user navigation tree.5. Click extensions, then click dcsTheme, and then click theme.6. Click the HTML template file for your theme, for example, user-area.html. The HTML code is displayed.7. Add the following line in the appropriate area:<theme-sign-in></theme-sign-in>.
For example:<!-- ko if: userCanSignIn() --> <div class="abcs-pull-right"> <theme-sign-in></theme-sign-in> <theme-sign-up></theme-sign-up> </div><!-- /ko -->
8. Click Save Changes.
Related Topics• Branding the Experience and Using Themes: Explained
Managing Registration Requests: ExplainedRegistration requests are sent to Oracle Engagement Cloud for users intending to use Digital Customer Service features.Administrators must then determine if the request should be approved or rejected in the Service work area. This topicexplains how to accept and reject registration requests in Oracle Engagement Cloud.
Approving Registration RequestsThis topic describes how to approve registration requests in Oracle Engagement Cloud.
To approve registration requests:
1. Sign in as a user with a role that includes the Customer Self-Service Administrator duty role.2. Navigate to the Service work area and click Registration Requests.
The Self-Service Registrations screen is displayed. By default, a list of pending self-service registrations isdisplayed.
3. Click the Actions list, then select Approve...4. Select one or more pending registration requests that you want to approve.5. Click the Approve... (# Selected) button.
Note: The # represents the number of registration requests selected.
Oracle Engagement CloudImplementing Digital Customer Service
Chapter 6Configuring Common Use Cases with Digital Customer
Service
47
The Requests to Be Approved dialog box appears.6. (Optional) In the Reason for Approving text box, enter a reason.7. Click the Approve button.
A message appears, confirming the number of approved registration requests. The approved requests no longerappear in the pending list.
Rejecting Registration RequestsThis topic describes how to reject registration requests in Oracle Engagement Cloud.
To reject registration requests:
1. Sign in as a user with a role that includes the Customer Self-Service Administrator duty role.2. Navigate to the Service work area and click Registration Requests.
The Self-Service Registrations screen is displayed. By default, a list of pending self-service registrations isdisplayed.
3. Click the Actions list, then select Reject...4. Select one or more pending registration requests.5. Click the Reject... (# Selected) button.
Note: The # represents the number of registration requests that you have selected.
The Requests to Be Rejected dialog box appears.6. In the Reason for Rejecting text box, enter a reason.7. Click the Reject button.
A message appears, confirming the number of rejected registration requests. The rejected requests no longerappear in the pending list.
Managing Self-Service Users: ExplainedUsers can be granted different roles. By default, when a registration request is approved for a user, they are granted the Userrole. However, administrators can grant or remove roles, depending on the users intended responsibilities.
Note: The first user to be approved for a customer account is automatically granted the Account Administratorrole. There must always be one user with the Account Administrator role for an account.
This topic describes how to add and remove roles for users in Oracle Engagement Cloud. For more information about self-service roles, see About Digital Customer Service Roles.
To manage self-service roles for an account:
1. Sign in as a user with the Customer Self-Service Administrator role.2. Navigate to the Service work area and click Self-Service Users.3. From the Self-Service Users list, select the user you want to modify.
Oracle Engagement CloudImplementing Digital Customer Service
Chapter 6Configuring Common Use Cases with Digital Customer
Service
48
4. In the User Administration section at the bottom of the screen, select or deselect one or more of the followingroles:
◦ User
◦ Account Manager
◦ Account Administrator
Note: Removing the User role causes the removal of all privileges. The only way to restore theprivileges is to submit a new registration request. You cannot delete the User role for the last AccountAdministrator because each account must have at least one administrator.
5. Click Save.
A dialog appears, confirming the role modifications.
Related Topics
• About Digital Customer Service Roles: Explained
Creating Digital Customer Service User Accounts:ExplainedThis topic describes how to create users in the Digital Customer Service application.
Creating an Account AdministratorEach account must have at least one account administrator. You can assign the account administrator role to user accountsin your Digital Customer Service application.
To assign the account administrator role:
1. Sign in to your Digital Customer Service application as a user with the account administrator role.
Note: The first user created for an account is automatically assigned the role of account administrator.
2. Click the Self-Service Users icon.3. On the Self-Service Users page, search for the user.4. Click the Action menu associated with the user, then select Details.5. On the Manage Self-Service User page, click Add Role.6. On the Add Self-Service Role page, from the Role list, select Account Administrator.7. Click Save and Close.
A Role Created confirmation message is displayed on the Manage Self-Service User page.
Creating an Account ManagerEach account must have at least one account manager. You can assign the account manager role to user accounts in yourDigital Customer Service application.
Oracle Engagement CloudImplementing Digital Customer Service
Chapter 6Configuring Common Use Cases with Digital Customer
Service
49
To assign the account manager role:
1. Sign in to your Digital Customer Service application as a user with the account administrator role.
Note: The first user created for an account is automatically assigned the role of account administrator.
2. On the Self-Service Users page, search for the user.3. Click the Action menu associated with the user, then select Details.4. On the Manage Self-Service User page, click Add Role.5. On the Add Self-Service Role page, from the Role list, select Account Manager.6. Click Save and Close.
A Role Created confirmation message is displayed on the Manage Self-Service User page.
Localizing Digital Customer Service for Multilingual Support:ExplainedThis topic describes how to localize Digital Customer Service for multilingual support.
Creating Localized Digital Customer Service ApplicationsYou can create localized versions of your application by translating the UI text and messages in your application into otherlanguages. The localized strings are displayed in the application during runtime. When you run the staged or publishedapplication, a localized version is displayed based on the language settings of your browser.
Note: A Digital Customer Service application created using the Reference Implementation template includestranslations to the 22 languages supported by Oracle Engagement Cloud. While the Reference Implementationtemplate is delivered with these translation strings and files, any modifications that you apply to the strings inyour Digital Customer Service application requires additional translation.
If you must translate additional strings after modifying strings in your Digital Customer Service application generated from theReference Implementation template, the nls.json file contains all the new or modified strings in English. The localized resourcebundles, for example nls-fr-FR.json for French, contain only the original translated strings.
The resource bundles provide an initial set of translated strings for the majority of the application that you can use for yourown translation files. To populate the rest of the translation files for the languages you want to support, follow the instructionsfor generating files for new languages, and then use the existing translated files to obtain translations for use in your new file.
For more information about adding translated text to your application, refer to the Configuring Application Settings topic in theDeveloping Web Applications chapter in the Using Oracle Visual Builder Cloud Service Related Topic.
To introduce a new language beyond the ones delivered with a Digital Customer Service application that was created usingthe Reference Implementation, follow these steps:
1. Navigate to the Oracle Visual Builder Cloud Service editor.2. Click the Main Menu icon in the editor, and select Application Settings, then Translations.
The Translations page contains a Manage Language Bundles section and a Translations section.
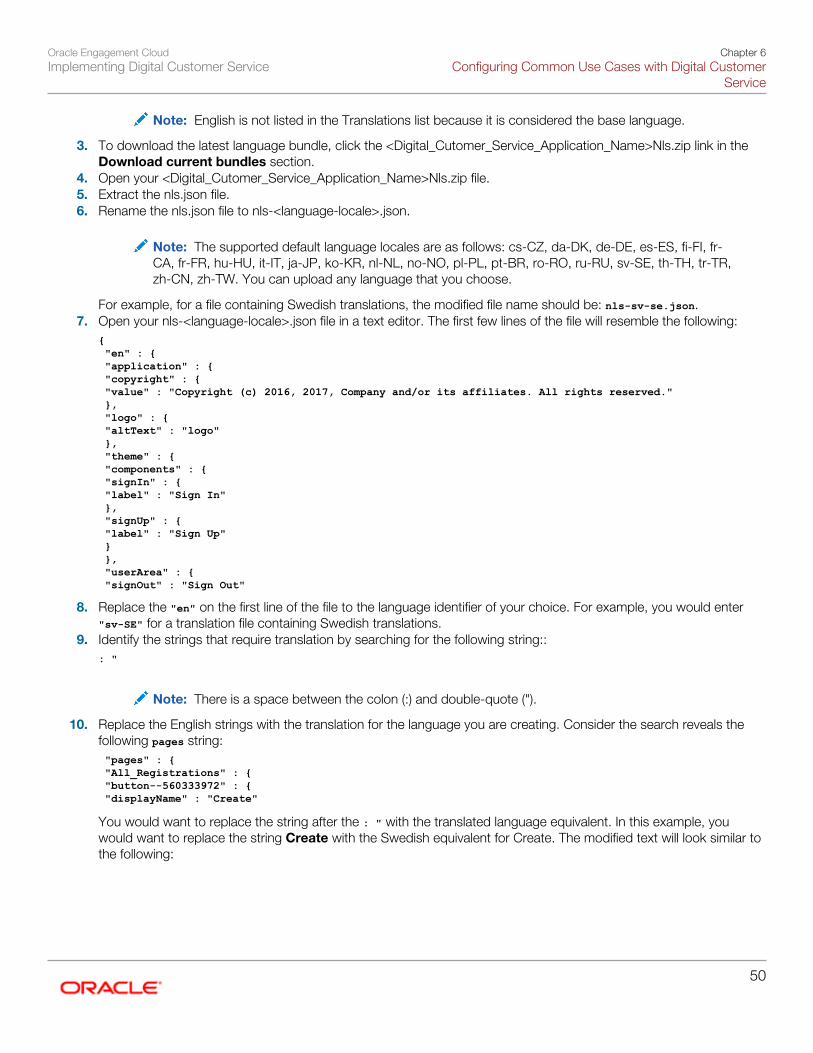
Oracle Engagement CloudImplementing Digital Customer Service
Chapter 6Configuring Common Use Cases with Digital Customer
Service
50
Note: English is not listed in the Translations list because it is considered the base language.
3. To download the latest language bundle, click the <Digital_Cutomer_Service_Application_Name>Nls.zip link in theDownload current bundles section.
4. Open your <Digital_Cutomer_Service_Application_Name>Nls.zip file.5. Extract the nls.json file.6. Rename the nls.json file to nls-<language-locale>.json.
Note: The supported default language locales are as follows: cs-CZ, da-DK, de-DE, es-ES, fi-FI, fr-CA, fr-FR, hu-HU, it-IT, ja-JP, ko-KR, nl-NL, no-NO, pl-PL, pt-BR, ro-RO, ru-RU, sv-SE, th-TH, tr-TR,zh-CN, zh-TW. You can upload any language that you choose.
For example, for a file containing Swedish translations, the modified file name should be: nls-sv-se.json.7. Open your nls-<language-locale>.json file in a text editor. The first few lines of the file will resemble the following:
{ "en" : { "application" : { "copyright" : { "value" : "Copyright (c) 2016, 2017, Company and/or its affiliates. All rights reserved." }, "logo" : { "altText" : "logo" }, "theme" : { "components" : { "signIn" : { "label" : "Sign In" }, "signUp" : { "label" : "Sign Up" } }, "userArea" : { "signOut" : "Sign Out"
8. Replace the "en" on the first line of the file to the language identifier of your choice. For example, you would enter"sv-SE" for a translation file containing Swedish translations.
9. Identify the strings that require translation by searching for the following string::: "
Note: There is a space between the colon (:) and double-quote (").
10. Replace the English strings with the translation for the language you are creating. Consider the search reveals thefollowing pages string: "pages" : { "All_Registrations" : { "button--560333972" : { "displayName" : "Create"
You would want to replace the string after the : " with the translated language equivalent. In this example, youwould want to replace the string Create with the Swedish equivalent for Create. The modified text will look similar tothe following:
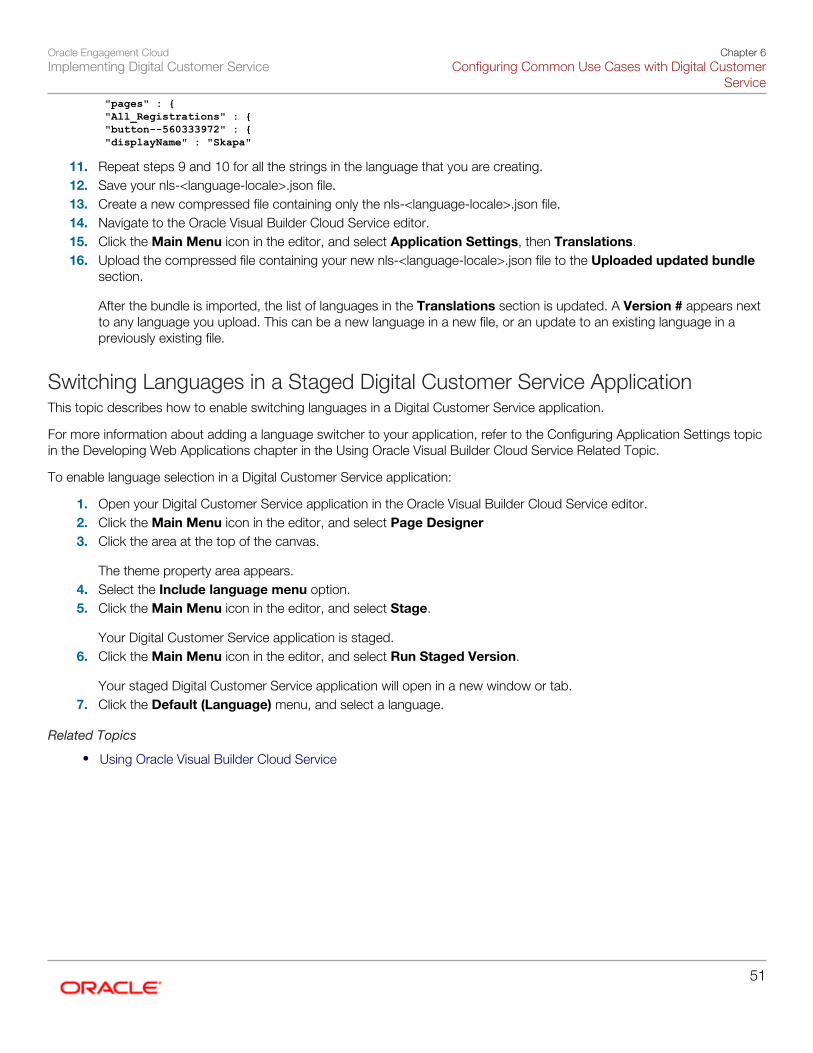
Oracle Engagement CloudImplementing Digital Customer Service
Chapter 6Configuring Common Use Cases with Digital Customer
Service
51
"pages" : { "All_Registrations" : { "button--560333972" : { "displayName" : "Skapa"
11. Repeat steps 9 and 10 for all the strings in the language that you are creating.12. Save your nls-<language-locale>.json file.13. Create a new compressed file containing only the nls-<language-locale>.json file.14. Navigate to the Oracle Visual Builder Cloud Service editor.15. Click the Main Menu icon in the editor, and select Application Settings, then Translations.16. Upload the compressed file containing your new nls-<language-locale>.json file to the Uploaded updated bundle
section.
After the bundle is imported, the list of languages in the Translations section is updated. A Version # appears nextto any language you upload. This can be a new language in a new file, or an update to an existing language in apreviously existing file.
Switching Languages in a Staged Digital Customer Service ApplicationThis topic describes how to enable switching languages in a Digital Customer Service application.
For more information about adding a language switcher to your application, refer to the Configuring Application Settings topicin the Developing Web Applications chapter in the Using Oracle Visual Builder Cloud Service Related Topic.
To enable language selection in a Digital Customer Service application:
1. Open your Digital Customer Service application in the Oracle Visual Builder Cloud Service editor.2. Click the Main Menu icon in the editor, and select Page Designer3. Click the area at the top of the canvas.
The theme property area appears.4. Select the Include language menu option.5. Click the Main Menu icon in the editor, and select Stage.
Your Digital Customer Service application is staged.6. Click the Main Menu icon in the editor, and select Run Staged Version.
Your staged Digital Customer Service application will open in a new window or tab.7. Click the Default (Language) menu, and select a language.
Related Topics
• Using Oracle Visual Builder Cloud Service
Oracle Engagement CloudImplementing Digital Customer Service
Chapter 6Configuring Common Use Cases with Digital Customer
Service
52
Oracle Engagement CloudImplementing Digital Customer Service
Chapter 7Implementing Digital Customer Service Advanced Features
53
7 Implementing Digital Customer ServiceAdvanced Features
Overview of Digital Customer Service Advanced Features:ExplainedThis topic provides a general overview of Digital Customer Service from a development perspective.
Digital Customer Service is an application built with the Oracle Visual Builder Cloud Service platform. It is preconfigured witha theme, pages and functionality supporting a self-service experience. The easy-to-use, drag-and-drop designer enablesdevelopers to quickly make changes and implement the look-and-feel of a brand.
As with any development framework, there can be restrictions when using ready-to-use components and capabilities.While Oracle Visual Builder Cloud Service is very flexible and code can be written to accommodate many use cases, werecommend leveraging the packaged components as a first fulfillment of your requirements. Then, if those components donot meet your requirements, look to extend the capabilities.
Note: If you have modified your Digital Customer Service deployment, you must devise a product life cyclestrategy to manage your own code migration and merges as well as uptake any environment changes.
Branding the Experience and Using Themes: ExplainedThis topic describes how to brand your own Digital Customer Service application by creating and using themes.
Branding your Digital Customer Service application requires you to develop HTML and CSS from your currently brandedcompany web pages that are then modified to work within Oracle Visual Builder Cloud Service. In most cases, it requireswork with a web developer to take existing HTML and CSS and implement it within a new template.
Note: Oracle recommends creating the theme from the Simple Template as documented in this topic whenyou are creating your first theme. Using the Simple Template provides you with the base files.
For Web Developers, we also recommend that they become familiar with Oracle JavaScript Extension Toolkit (JET) as thisJavaScript framework is implemented within the Oracle Visual Builder Cloud Service platform, themes and pages. Templatefiles can be accessed within Application Settings in Resource Browser or Extension areas. Editing can be done within theprovided text editor or you can export all files and use your own text editor. For file Lifecycle Management you should use afile management repository and merging strategy.
Creating and Activating a Theme1. Sign in to Oracle Visual Builder Cloud Service.2. Click your application.3. Click the Main menu icon and select Application Settings.4. Click Extensions.
Oracle Engagement CloudImplementing Digital Customer Service
Chapter 7Implementing Digital Customer Service Advanced Features
54
5. Click the Theme tab.6. Click New Theme.7. Click Create New.8. Specify your Display Name and Extension ID. The Extension ID must be at least two groups of letters or numbers
separated by period (.).
Note: The other field, AMD Package Name, will be populated with the value that you enter in theExtension ID field.
9. Click Template.10. Select Simple Theme.11. Click OK.12. Select the Extension Active switch, to activate the theme.
For more information about creating a theme, refer to the Working with Application Extensions topic in the Using Oracle VisualBuilder Cloud Service related link.
Editing a Theme to Include My ProfileDigital Customer Service applications that have been developed without the use of a Digital Customer Service template donot include the My Profile option for users. You can edit your theme to include the My Profile option for your users.
Before editing your theme you require the page ID for your My Profile page. For more information about creating the MyProfile page, refer to the Setting Up User Administration Components topic in the Related Topics.
To determine the page ID of your My Profile page:
1. Switch to Page Designer.2. Select the My Profiles from the page list.3. In the Properties Inspector, locate the Page ID field.4. Copy the value assigned to the Page ID field.
To add the My Profile option:
1. Sign in to Oracle Visual Builder Cloud Service and open your application.2. Click the Main menu icon and select Application Settings.3. Click Resource Browser.4. In the Resource Browser pane, expand the user navigation tree.5. Click extensions, then click dcsTheme, and then click theme.6. Click the HTML template file for your theme, for example, user-area.html. The HTML code is displayed.7. Add the following sample lines in the appropriate area. The argument assigned to the navigateToPage function
should reflect the value you copied in Step 4 of the previous task.<!-- ko if: currentUserEmail() --> <div id="abcs-tpl-app-user-area-menu-container"> <ul id="abcs-tpl-app-user-area-menu" data-bind="ojComponent: {component: 'ojMenu', select: navigateTo}" style="display:none"> <li><a data-bind="text: 'My Profile', attr: {'id': 'My_Profile'}, click: function () { Abcs.Pages().navigateToPage('My_Profile'); }, clickBubble: false"></a></li> <!-- ko foreach: getMenuItems() --> <!-- ko if: getType() === $data.constructor.Type.LOGOUT --> <li><a data-bind="text: getLabel(), attr: {'href': getLink(), 'id': 'user-area-' + getLabel()}"></a></li> <!-- /ko --> <!-- ko ifnot: getType() === $data.constructor.Type.LOGOUT --> <li><a data-bind="text: getLabel(), attr: {'id': 'user-area-' + getLabel()}, click: function () { window.open(getLink()); }, clickBubble: false;"></a></li>
Oracle Engagement CloudImplementing Digital Customer Service
Chapter 7Implementing Digital Customer Service Advanced Features
55
<!-- /ko --> <!-- /ko --> </ul> </div> <div class="abcs-pull-right"> <button id="abcs-tpl-app-user-area-button" data-bind="ojComponent: { component: 'ojButton', chroming: 'half', label: currentUserEmail, menu: '#abcs-tpl-app-user-area-menu'}"> </button> <button id="abcs-tpl-app-user-area-button-mobile" class="abcs-hidden" data-bind="ojComponent: { component: 'ojButton', chroming: 'half', icons: {start: 'oj-icon func-icon-16-user'}, menu: '#abcs-tpl-app-user-area-menu'}"> </button> </div><!-- /ko -->
8. Click Save Changes.
Related Topics• Using Oracle Visual Builder Cloud Service
• Setting Up User Administration Components: Procedure
Setting Up the Error Handler: ExplainedThis topic describes how to set up the error handler for Digital Customer Service.
About the Error Handler SettingsThe Digital Customer Service theme extends the error handling of Oracle Visual Builder Cloud Service. Actions takenby a Digital Customer Service application when an error occurs while accessing external services, such as KnowledgeManagement, can be configured on a per-service basis.
Error Handler configuration is defined as a set of rules in the error-config.json file. Each rule has the following parts:
• notes
• template
• errorPage/errorMessage
This is an example of one of the default rules in the Digital Customer Service theme:
{ "notes": "Error contacting KM after auth token previously obtained", "template": { "event": {}, "request": { "status": "regexp:/^5[0-9][0-9]$/" }, "settings": { "headers": { "kmauthtoken": "regexp:/.*/" } } }, "mode:RunTime:errorPage": "Knowledge_Error" }
Oracle Engagement CloudImplementing Digital Customer Service
Chapter 7Implementing Digital Customer Service Advanced Features
56
About the notes Part of the RuleThe notes part is used to define the purpose of the rule. For example:
"notes": "General Fusion Service errors"
About the template Part of the RuleThe template part is used to define a set of partial JavaScript Object Notation objects. These objects must match thearguments passed to the handler function that is used to call the jQuery.ajaxError(handler) function whenever an erroroccurs. For more information about the jQuery.ajaxError(handler) function, see the Related Topics. Any parts of thetemplate child objects that are omitted are ignored when matching a rule to an error. For example:
"template": { "request": { "status": "regexp:/^5[0-9][0-9]$/" }, "settings": { "url": "regexp:/\/uri\/associated\/SR\/serviceApi\/.*/" }}
The settings in this example would cause a rule to match if all of the following statements are true:
• The .ajaxError() function is run with a request.status value of between 500 and 599.
• The settings.url value that matches URLs with a path including /uri/associated/SR/serviceApi/
Note: Although templates can be defined to test any part of an AJAX error using this framework, in most cases,testing the status code, URL and request headers is sufficient for detecting most error conditions.
About the errorPage/errorMessage Part of the RuleThe errorPage/errorMessage part is used to define the ID of the errorPage to which to navigate. Also this part is used todefine the errorMessage that is displayed when a rule match occurs. For example:
"errorPage": "Fusion_Service_Error"
The settings in this example would navigate the user to a page with ID Fusion_Service_Error.
The following is another example:
"errorMessage": "An error occurred when trying to access the widget generator service"
The settings in this example would display the following message "An error occurred when trying to access the widgetgenerator service".
In addition, this field can be prefixed with mode:RunTime to indicate that the rule only applies at runtime or mode:DesignTime toindicate that the rule only applies at design-time. If the prefix is omitted, then the rule applies regardless of the environment inwhich the application is running.
Oracle Engagement CloudImplementing Digital Customer Service
Chapter 7Implementing Digital Customer Service Advanced Features
57
Configuring Error Handler SettingsThis topic describes how to configure error handler settings for your Digital Customer Service application in the Oracle VisualBuilder Cloud Service.
1. Navigate to the Oracle Visual Builder Cloud Service editor.2. Click the Main Menu icon at the top of the editor, and select Application Settings, then Resource Browser.3. In the Resource Browser, navigate to the user/extensions/dcsTheme/theme folder, then click error-config.json.4. Configure your parameters.5. Click Save Changes.
Note: Your Digital Customer Service application must be redeployed in order for the changes to be applied.Design-time specific changes can be applied by reloading the Oracle Visual Builder Cloud Service design-time inthe browser.
Using the Error Handler in a Custom ThemeIf your theme is based on the dcsTheme, where necessary you can reconfigure error handling for your Digital Customer Serviceapplication by modifying the error-config.json file as described in the previous topics. However, if you are working with anew custom theme that does not include the Digital Customer Service error handler code, you must perform the additionalconfiguration to make use of Digital Customer Service custom error handling.
To use the error handler in a custom theme:
1. Note path to the directory of your custom theme.2. Copy the user/extensions/dcsTheme/theme/error-config.json file, and paste it in the folder you noted in step 1.3. Copy the user/extensions/dcsTheme/js/ErrorChecker.js file, and paste it in the folder you noted in step 1.4. Copy the user/extensions/dcsTheme/js/ThemeProvider.js file, and paste it in the folder you noted in step 1.
Note: You must retain the definition of self._descriptor in the constructor function from your themein the ThemeProvider.
5. Open the user/extensions/dcsTheme/theme/manifest.json file in your custom theme, and add the following line tothe resources section:
js/ErrorChecker.js
6. Click Save Changes.
Related Topics
• jQuery Ajax Error Handler
Using a Standard Business Object: A Working Example:ExplainedThis topic is a working example of how to configure and use a standard Oracle Engagement Cloud business object forcustomer self-service product registration.
Oracle Engagement CloudImplementing Digital Customer Service
Chapter 7Implementing Digital Customer Service Advanced Features
58
Working Example OverviewThis working example provides an introduction to using business objects, APIs, data security, and mapping serviceswithin Oracle Visual Builder Cloud Service. This working example is not intended to be a complete implementation andconfiguration, but rather acts as a quick introduction with general guidance.
Note: This is only a working example. You must address more granular data security per user in a productionimplementation.
In this working example, the following tasks will be described:
• Configuring Security to Enable Access and Data Access to the Asset REST API
• Testing Access to the API
• Mapping Oracle Visual Builder Cloud Service to the API
• Creating an Oracle Visual Builder Cloud Service Launch Page
Configuring Security to Enable Access and Data Access to the Asset RESTAPIIn this working example, you will open the API.
Note: In a production implementation, additional configuration is required.
For more information about REST APIs refer to REST API for Oracle Sales Cloud R13, in the Related Topics.
You must access Oracle Engagement Cloud using an account with access to the Security Console. You will go into thesecurity console and perform the following:
1. Sign-in to Oracle Engagement Cloud.2. Navigate to the Security Console.3. Select the Users tab.4. Lookup and select a user with the administrator role.
This user will become the account that you will use for the for REST API authentication. You must configure orupdate an existing role and then assign a user to that role.
5. Click Edit.6. Click Add Role.7. Search for, and add following role memberships:
◦ View Asset - ZCM_VIEW_ASSETS_PRIV
◦ Create Asset - ZCM_CREATE_ASSET_PRIV
◦ Edit Asset - ZCM_EDIT_ASSET_PRIV
◦ Delete Asset - ZCM_DELETE_ASSET_PRIV
8. Click Save and Close.
Use this account for REST API authentication.
Oracle Engagement CloudImplementing Digital Customer Service
Chapter 7Implementing Digital Customer Service Advanced Features
59
Testing Access to the Asset REST APIIn this part of the working example you will use a third-party software tool to test access to the Access REST API that youconfigured in the previous topic. The example uses Postman, a free third-party software desktop tool. You can use an APItesting tool of your choice.
Before testing the Asset REST API, you should know
• Your API domain. If you are unsure of your API domain, contact your administrator. Your API domain will looksimilar to the following:
https://aaaaaaaaa123-fa-ext.us.company.com/
• The describe URL for your REST API endpoint. It will look similar to the following:
https:// aaaaaaaaa123-fa-ext.us.company.com/crmRestApi/resources/latest/assets/describe
To test access to your Asset REST API in Postman:
1. In the Get field, enter the full describe URL for your REST API endpoint.2. Select Basic Auth from the Type menu.3. In the User name field, enter the user you configured to access the Asset REST API.4. In the Password field, enter the password of the user you configured to access the Asset REST API.5. Click Send.
If you get an error or no data in the response, verify that you entered the proper describe URL, user, and password, thentry again. If the problem persists, contact your administrator. Your Access REST API must respond to this test with a 200response and a data return before continuing to the next task.
Mapping Oracle Visual Builder Cloud Service to the APIWithin the Oracle Visual Builder Cloud Service designer perform the following.
1. Navigate to your Oracle Visual Builder Cloud Service.2. Open your Digital Customer Service application.3. Click the Main Menu icon in the editor, and select Data Designer, then Services.4. Click Add Service.5. Click Service Specification, then click Next.
The page is displayed.6. On the Add Service screen, configure the service
a. In the Name field, enter a meaningful name for the service.b. Select ADFm Rest from the Service Type list.c. Select Web Address from the Service Specification option.d. In the Service Specification text box, enter in the full describe REST API URL.e. Select Basic from the Service Specification Authentication Method list.f. In the User name field, enter the user you configured to access the Asset REST API.g. In the Password field, enter the password of the user you configured to access the Asset REST API.
7. Click Next.8. Select the Asset business object.9. Map the following fields:
Oracle Engagement CloudImplementing Digital Customer Service
Chapter 7Implementing Digital Customer Service Advanced Features
60
Note: Oracle recommends that you select only the fields that will be used for this connection. Thishelps to facilitate faster response times.
◦ Item ID
◦ Item Description
◦ Serial Number
◦ Purchase Date
10. Enter authentication credentials.
For the purpose of this working example, you can open the authentication for any user. In a production environment,you must setup proper security for each user role.
11. Test the connection.
If you have completed all of the previous steps correctly, you will receive a data return. If not, before proceeding,revisit the previous steps and correct any errors until you receive a data return.
12. Click Finish.
Creating an Oracle Visual Builder Cloud Service Launch PageFollow these steps to create a simple and functioning launch page using the data that was mapped from the Asset REST APIin the previous tasks.
1. Navigate to your Oracle Visual Builder Cloud Service.2. Open your Digital Customer Service application.3. Click the Main Menu icon in the editor, and select Page Designer, then Services.4. Click Home.5. Click New Page.6. Enter a meaningful title in the Page Title text box.7. For the Page Type option, select the Landing option.8. Click Create.9. Open your new landing page, then drag-and-drop Table component from the Components palette onto your new
landing page.10. On the Table Creation palette, click the Asset business object.11. Define the mapping of the table:
a. Drag-and-drop Available fields to the Selected box.b. Click Next.
12. Define your object actions by toggling the switches in the Default Actions section.13. Click Next.14. Define your Options by modifying your Filter Options, Sort Options or entering a Table Summary.15. Click Finish.
A preview of your landing page is displayed.
Related Topics
• Using Oracle Visual Builder Cloud Service
• REST API for Oracle Sales Cloud R13
Oracle Engagement CloudImplementing Digital Customer Service
Chapter 8Lifecycle Management
61
8 Lifecycle Management
Determining Extension Versions: ExplainedDigital Customer Service provides reusable components to your application through extensions delivered in a ComponentApplication. These extensions may be updated periodically to provide bug fixes or additional features.
This topic describes how to determine your Digital Customer Service application extension version in Oracle Visual BuilderCloud Service.
To determine your Digital Customer Service application extension version:
1. Navigate to the Oracle Visual Builder Cloud Service editor.2. Click the Main Menu icon in the editor, and select Application Settings, then Extensions.3. Select an extension from the Extensions list.4. In the extension Overview tab, next to the Display Name, text similar to the following is displayed:
This Custom UI Component is owned and maintained in ApplicationDigital_Customer_Service_Components-1.1.0
The numbered suffix represents the version of your Digital Customer Service application extension. In this case, theversion is 1.1.0.
About Updates: ExplainedThis topic describes updates and the different options available for updating Digital Customer Service.
Overview of UpdatesWhen you build a Digital Customer Service application using either the Starter template or the Reference Implementationtemplate, it is associated with a specific version of the Digital Customer Service component application. The Digital CustomerService application you create will maintain a relationship link to that component application. Subsequently, as updatesare delivered, you might decide to update your reference to an updated component application that delivers additionalfunctionality or bug fixes.
The following are the two ways that updates can be applied to your Digital Customer Service application:
• Automatic Updates
• Elected Updates
About the Rules Governing Automatic and Elected UpdatesThe determining factor of whether an update is automatic or elected is the version number of the component application thatis delivered. A component application version number has three digits, separated by periods. For example:
1.1.0
• The first digit represents the Major version.
Oracle Engagement CloudImplementing Digital Customer Service
Chapter 8Lifecycle Management
62
• The second digit represents the Minor version.
• The third digit represents the Micro version.
The rules that determine whether an update is automatic or elected, are as follows:
• If the Major or Minor version number increments, an elected update is required.
• If only the Micro version number increments, the update is applied automatically when the first of the following twoevents occur:
◦ When you open your Digital Customer Service in Design mode in Oracle Visual Builder Cloud Service.
◦ When you stage your Digital Customer Service application in Oracle Visual Builder Cloud Service.
Related Topics
• About Digital Customer Service Terminology: Explained
Performing Updates: ExplainedThis topic describes how to update Digital Customer Service application extensions in Oracle Visual Builder Cloud Service.
About Automatic UpdatesAutomatic updates occur when a developer opens their Digital Customer Service application in the Oracle Visual BuilderCloud Service designer, after the platform has been updated with a new version of Oracle Visual Builder Cloud Service orOracle Developer Cloud Service. Typically, updates are delivered on a monthly cadence, however, occasionally an updatemight be skipped. Feature updates occur quarterly, while bug fixes can be delivered monthly.
Performing Elected Updates
If your Digital Customer Service component application is updated with new features that require explicit uptake, Oracle VisualBuilder Cloud Service alerts you that your application is referencing an outdated component application. You must perform anelected update.
To determine whether there is an updated Digital Customer Service component application with new features, and to performthe elected update to your application:
1. Navigate to the Oracle Visual Builder Cloud Service editor.2. Click the Main Menu icon in the editor, and select Application Settings, then Extensions.3. Select an extension from the Extensions list.4. In the extension Overview tab, next to the Display Name, text similar to the following is displayed, when updates
are available:
You have multiple extensions fromDigital_Customer_Service_Components-1.0.2 you can update.Update All from Digital_Customer_Service_Components-1.0.2
5. Click Update All.